No edit summary |
Skylord wars (talk | contribs) (Undo revision 1304996 by 73.42.205.69 (talk)) Tag: Undo |
||
| Line 6: | Line 6: | ||
{{TOC|right}} |
{{TOC|right}} |
||
| + | |||
| − | JUST OPTIMIZE YOUR WORLD! JUST CLICK THE WORLD IN MINECRAFT THEN CLICK EDIT THEN CLICK OPTIMIZE! PIECE OF CAKE! IT MAKES YOU NOT HAVE TO DO ANY OF THIS! |
||
This tutorial explains how to reset chunks in any pre-[[1.13]] world for them to regenerate in [[1.13]], so that you won't need to travel thousands of blocks into unexplored terrain to see the new terrains if you have a huge world.<ref>https://www.reddit.com/r/Minecraft/comments/8r0pz1/tutorial_how_to_get_113_oceans_into_your_existing/</ref> |
This tutorial explains how to reset chunks in any pre-[[1.13]] world for them to regenerate in [[1.13]], so that you won't need to travel thousands of blocks into unexplored terrain to see the new terrains if you have a huge world.<ref>https://www.reddit.com/r/Minecraft/comments/8r0pz1/tutorial_how_to_get_113_oceans_into_your_existing/</ref> |
||
Revision as of 11:25, 15 January 2019
This tutorial explains how to reset chunks in any pre-1.13 world for them to regenerate in 1.13, so that you won't need to travel thousands of blocks into unexplored terrain to see the new terrains if you have a huge world.[1]
This tutorials works for any world size even up to 2GB.
This approach should work for any worlds generated after 1.7.2 to 1.12.2. However, it will not work if you already opened your world in 1.13, or any pre-release or snapshot that was released after 1.12.2. If you already did that, you would need to open your backups folder and replace your world with your backup.
How it works
1.13 vastly changes the world generation of oceans, swamps and rivers by adding features like shipwrecks, coral reefs, and seagrass. However, the new terrain generation doesn't affect the biome type or terrain altitude (with a few exceptions, as u/bdm68 pointed out.[2])
Using an external tool, we can delete any oceans, rivers, and swamps in an existing world. When the world is then opened in 1.13, the game will regenerate the chunks we deleted previously. Since the biome types and altitude didn't change in 1.13, the regenerated chunks will seamlessly blend into the existing landscape, but they will generate with the new underwater features.
Using a plugin for MCEdit, it is possible to delete certain biomes from a world. You can specify exactly which biomes you want to delete. It is also possible to protect regions of your world, in case you need to preserve existing builds in those biomes.
The plugin inspects each chunk of your world, and decides for each chunk whether it can be deleted. In Minecraft, a single chunk can contain different biomes. For example, along the shore of an ocean, a lot of chunks will contain ocean biomes as well as beach biomes. Sometimes it is not obvious how these cases should be handled, so the plugin can be used in one of two modes:
- Aggressive mode deletes chunks that contain any of the selected biomes. For example, if you decide to delete all river biomes in aggressive mode, the plugin will delete a chunk as soon as it contains a single block of river biome, no matter which other biomes are present in that chunk.
- Cautious mode only deletes chunks that contain nothing but the selected biomes. For example, if you tell the plugin to delete ocean and beach biomes, then it will only delete chunks in which each block is part of an ocean biome or a beach biome. If there is a single block in that chunk that is neither in an ocean nor in a beach biome, then it won't delete that chunk.
Here is an example to illustrate the difference:
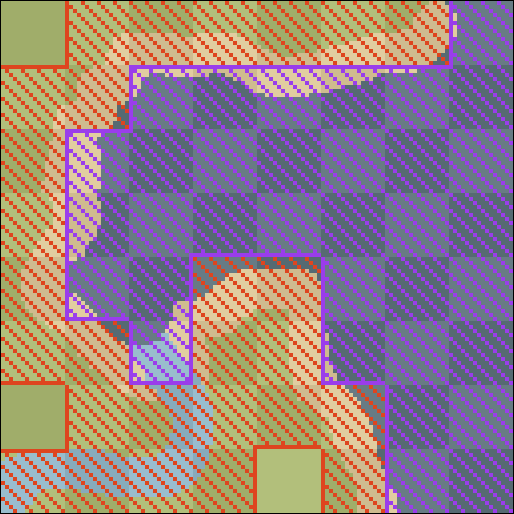
There are four biomes present here: plains (green), beaches (yellow), rivers (light blue), and oceans (dark blue). If you were to delete all rivers, beaches, and oceans with the plugin, then all purple striped chunks would be deleted no matter which mode you use. But in aggressive mode, also the red striped chunks would be deleted.
In general, aggressive mode will lead to better results, especially if you want to regenerate river biomes. However, you may need to protect more regions of your world.
To protect regions of your world, you will need to modify my plugin by writing some Python code. Guides are provided so don't be worried.
The whole process may take a couple of hours.
Preparation
- Make a backup of your world.
- Test your backup to make sure that it works.
- Be aware that your world's may be corrupted. With that in mind, make sure you actually did steps 1 and 2, and didn't just skip them.
- Download and install MCEdit. The recommended version is MCEdit 2.0.0 beta 12. The download link is for Windows and Mac.
- Download the biome deleter plugin here and extract it. You will find two files; a copy of this tutorial, as well as the plugin in a file called 'biome_deleter.py'.
- Decide which biomes you want to delete. The following biomes are largely affected by the new terrain generation:
- Ocean (ID 0)
- Swamp (ID 6)
- River (ID 7)
- Frozen Ocean (ID 10)
- Mushroom Fields (ID 15)
- Beach (ID 16)
- Deep Ocean (ID 24)
- Stone Shore (ID 25)
- Snowy Beach (ID 26)
Protecting regions of your world
Once you decided which biomes you want to delete, make a (mental) list of things you built in those biomes, or near the edges of those biomes. Depending on the mode you use, the plugin may delete chunks even if they contain biomes that you did not want to delete.
If you haven't built anything in those biomes that you want to keep, skip to the next section. Otherwise, this section will teach you how you can modify the plugin to protect those builds.
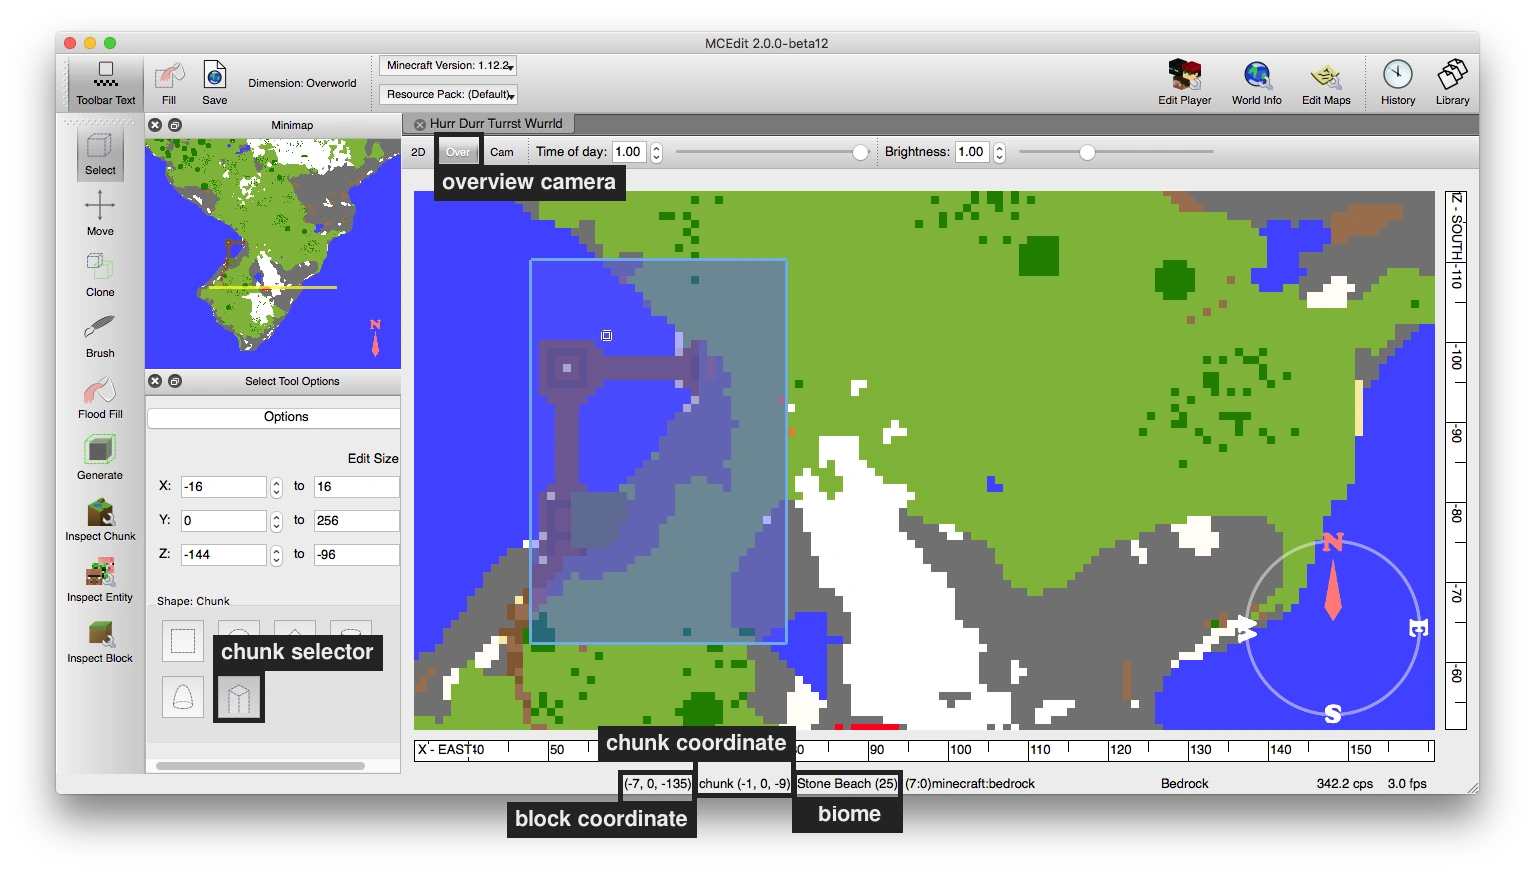

A screenshot explaining parts of the MCEdit user interface.
- Open your world in MCEdit. Here is a simple guide for MCEdit:
- MCEdit has three camera modes. A sideways camera that looks like Terraria, an overview camera that shows the world from the top, as well as a full 3-D camera. You can switch between them using the three buttons labeled 2D, Over, and 3D. For this tutorial, we'll be using the overview camera.
- Press and hold the right mouse button to move around.
- The toolbar is on the left-hand side of the window. For this tutorial, we'll only be using the Select tool.
- Using the chunk selector, you can select chunks by dragging a box with the left mouse button.
- The status bar at the bottom of the window shows a lot of useful information about whatever you're pointing at with your mouse cursor. In particular, it shows the block coordinates, chunk coordinates, and the biome. You will be using the chunk coordinates to define protected regions.
- Open the plugin ('biome_deleter.py') in a text editor (e.g. Notepad on Windows, or TextEdit on macOS). Scroll down until you found a big headline saying 'Protected Regions' (line 200).
- For each region that you want to protect, do the following:
- Using the overview camera, find the region that you want to protect.
- Using the chunk selection tool, select the region that you want to protect.
- Find the chunk coordinates of the upper left and lower right chunk of the selected region. The status bar in MCEdit shows, from left to right, the x, y, and z coordinate of the chunk. So, when you see 'chunk (1, 0, -9)', then 1 is the x coordinate, 0 is the y coordinate, and -9 is the z coordinate of that chunk.
- In your text editor, find the area dedicated to your protected regions, and add a new line there.
- Type 'chunk_region(x1, z1, x2, z2),' (note the comma at the end there), but replace x1 and z1 by the x and z coordinate of the upper left chunk, and replace x2 and z2 by the x and z coordinate of the lower right chunk.
- Add spaces at the beginning of that new line until the 'c' in 'chunk_region' is right underneath the '#' signs in the lines above.
- Save the modified plugin.
Example
There are two regions that you want to protect.
- The first one is your base. The box of chunks that encloses your base has chunk (-1, 0, 4) in its upper left corner, and chunk (3, 0, 12) in its lower right corner. So, we write 'chunk_region(-1, 4, 3, 12),' to define this region.
- The second one is a mob farm in the middle of the ocean. The entire farm fits into a single chunk, namely chunk (33, 0, 15). In this case, the upper left and lower right "corner" are the same chunk, so we write 'chunk_region(33, 15, 33, 15),'.
This is what the modified section of the plugin would look like:
# Protected Regions
# Any chunk region in this list will not be deleted.
protected_regions = [
   # Use spaces to indent your lines so far that the 'c' in
   # 'chunk_region' is right under the # characters.
   # ----------- Add your protected regions below this line -----------
   chunk_region(-1, 4, 3, 12),
   chunk_region(33, 15, 33, 15),
   # ----------- Add your protected regions above this line -----------
]
If you're having trouble with this section, feel free to message the creator on Reddit. Be sure to include the modified part of the plugin in your comment. If MCEdit shows an error message, include the content of the error message, too.
Running the plugin
- Copy the (modified) plugin into the MCEdit plugins folder.
- On Windows, you will find a folder next to the MCEdit 2 exe called 'MCEdit 2 Files'. The 'plugins' folder is inside that folder.
- On macOS, the plugins folder is '~/Documents/MCEdit 2 Files/plugins'. You might need to create that folder if it doesn't exist.
- Restart MCEdit and open your world again. The biome deleter plugin should now be listed in the Plugins menu.
- Open the biome deleter plugin. It is listed as Biome deleter in the Plugins menu.
- Pick either Aggressive or Cautious mode (see above for the differences).
- Decide whether you want to run the plugin on the entire dimension, or just on the currently selected chunks.
- Select the biomes that you want to delete.
- Click OK to start the plugin. This may take hours depending on the size of your world, and the computer you're using. MCEdit may appear unresponsive in the process, but you should see a message in MCEdit's console window every now and then that reports how many chunks have been marked for deletion. Once the plugin finishes, MCEdit will be responsive again. You should also see a message in the console window that reports how many chunks have been marked for deletion in total.
- Now save the modified world. Again this may take a very long time, depending on the number of changed chunks.
Wrapping up
At this point, your world is ready to be opened in 1.13. Take a few minutes to check your world to verify that everything went well.
Feel free to message the author on Reddit if you have any questions.
Known problems
- The terrain generation in 1.13 is occasionally different from previous versions, so there can be some cases where the newly generated terrain does not blend into the existing landscape. If that happens in your world, you could add a protected region around the affected area, or delete additional chunks until the landscape is continuous again. This might take some trial and error. See this post for more details.
- This method will probably not work in worlds that were created prior to version 1.7 (released in 2013), since the terrain generation changed significantly in the 1.7 update.
- Treetops near chunk borders may not regenerate properly.
- There may be problems related to regenerating structures (e.g. ocean monuments, villages).
Gallery

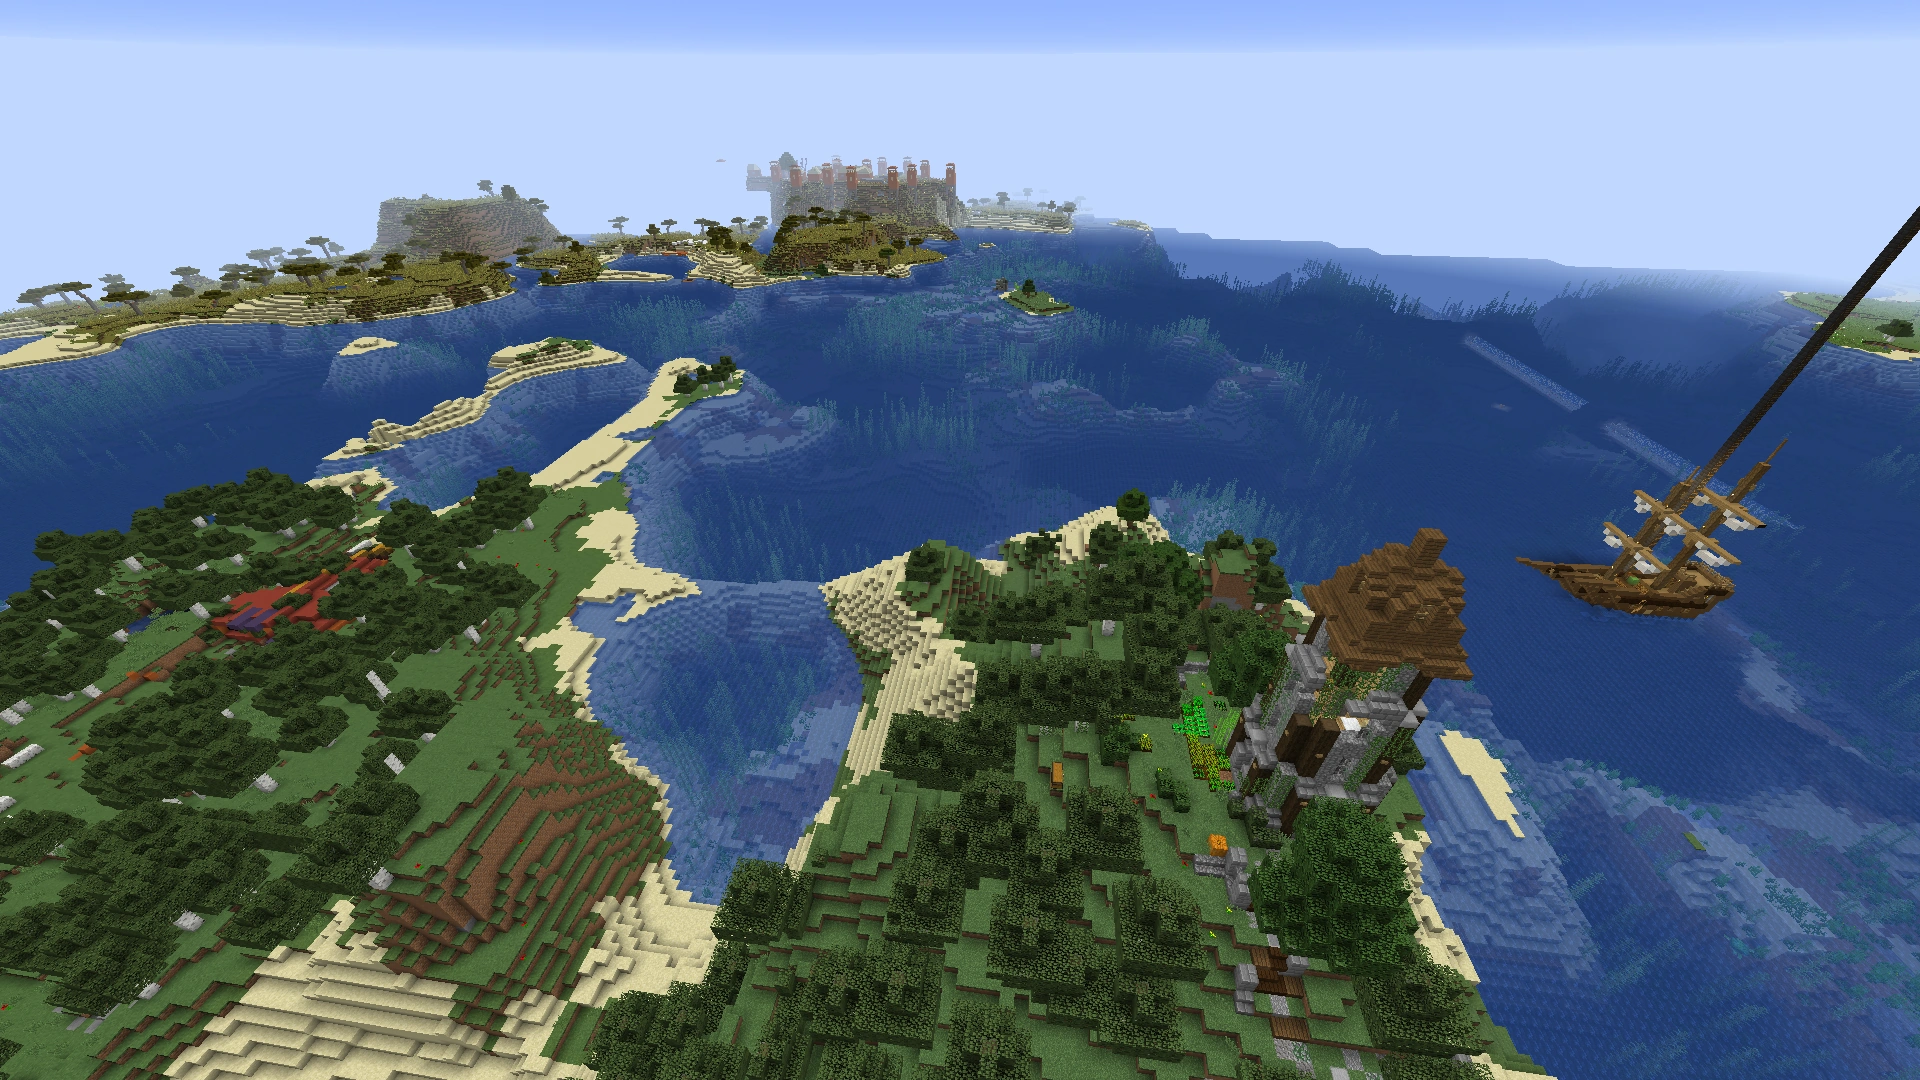
The ship on the right was built in pre-1.12, but now there's sea grass in 1.13 growing right next to it.