This tutorial is about tips to make redstone contraptions better, more reasonable, more function-able, and easier to build. It is designed for beginners, but it is useful for people who are more advanced in redstone too. This page is solely redstone tips and tricks, and it does not have a section about how to actually build any type of redstone circuit. If you're wanting to build a redstone circuit, contraption, or want to learn the mechanics of redstone, see the section "See also" for related pages.
When preparing and planning
First in Creative mode
If you want to make a complex redstone project in your Survival world, it's always best to do it in Creative mode first. When making complex projects, create a creative world, preferably a superflat, and set cheats on, then do "/gamemode doDaylightCycle false", then do "/time set 0". This makes it permanently day, so you never have to worry about mobs spawning at night. Creative mode is a great for building, because you have an infinite number of blocks, you can break blocks right away, and you can fly around to look all around your structures.
Once you have finished your redstone contraption, try to figure out where you can improve the contraption; maybe try to make it a little bit smaller. Then, all you have to do once in survival mode is gather the materials, and just copy what you did in creative mode. Optionally, you can count how many of each material you used when building in creative mode, so that you will know exactly how much of a certain material to gather when in survival.
Farming materials
When making very large redstone contraptions, it is recommended to make farms for renewable resources. Here are a list of materials you may need to farm:
- Redstone (The only renewable source of redstone is by killing witches, so make a witch farm)
- String (Make a spider farm if your contraption includes a lot of tripwires and/or dispensers)
- Iron ingots (Make an iron golem farm if you need a lot of hoppers or minecarts)
- Slimeballs (Most redstone contraptions are much easier to make if you have a slime farm, specifically ones that require a lot of sticky pistons and/or slime blocks)
Extra materials
When you're making a redstone contraption in survival mode, in addition to bringing all the materials needed to built that contraption, there are other things that you will need or are recommended. See this list for things to bring in addition to what you need to actually build the circuit.
- A bed, to sleep off the night
- A sword or axe, to defend yourself against mobs
- Food
- A stack of any type of block, preferably a cheap and easy-to-break block, such as dirt, but not a block that has follows physics, like sand. Use this as scaffolding when building up high.
- A map to find your way back to your house (optional)
- Basic tools
When constructing
Color coding
This is a simple yet very effective tip, especially if you create redstone contraptions that have many different parts to them, such as comparator clocks mixed with other redstone items. It is to use different colored wool, concrete, or terracotta for different parts of the circuit. If you place all of the redstone on top of the same block, for example, out of dirt, soon you may completely forget how your redstone works. Furthermore, this is important if you want to show off all redstone contraptions on YouTube, so people can copy your design in their Minecraft world or you want to be able to go back to your project and understand what parts of the circuit perform what function.
If you don't want to use wool, concrete, or terracotta, you can find other blocks that are different colors from each other. For example, you can use stone (for gray) and wood planks (for brown). However, try not to use blocks of similar color, such as a block of coal and black concrete on 2 different parts of a circuit.
The perfect redstone
When making redstone, its important to make it a reasonable size.
You shouldn't create too much redstone, such as 876 chunks for one contraption. If many complex redstone circuits are going on all at once, your computer could lag. However, you also shouldn't try to create a fully functional redstone circuit in a small amount of space. Complex redstone circuits will need plenty of space to function. For example, you cannot create a computer that can play Minecraft on it and has 478 frames a second in 1 chunk.
For the best redstone results, make your contraption as small as you can with it still functioning, but if you find you're having any troubles with that small of a size, make it bigger. Also, make sure to never underestimate how much time, space or materials you will need.
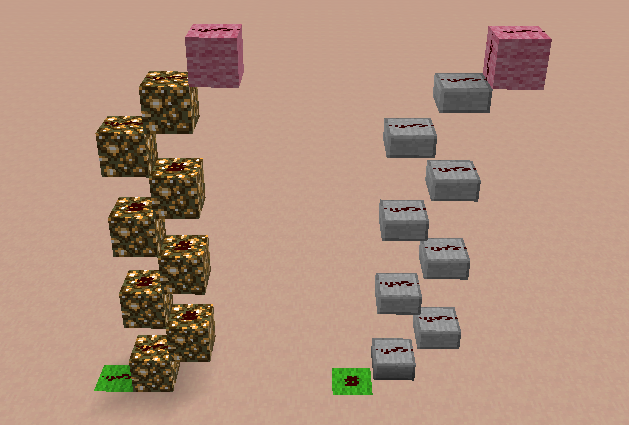
Two redstone ladders - one uses glowstone, and another uses slabs.
Redstone ladders
A very quick and easy way to get redstone up to a high height is to use a redstone ladder. This takes advantage of the fact that redstone can travel through transparent blocks, but can also be placed on top of transparent blocks. Basically, use a transparent block, such as glass, glowstone, or upside-down slabs, and alternate going up between blocks to the left and to the right. Then, place redstone on top of each block. This will help you greatly when making redstone circuits that need to go vertically upwards in a minimal amount of space.
See also
- Tutorials/Redstone machines
- Tutorials/Mechanisms
- Tutorials/Advanced redstone circuits
- Redstone
- Redstone circuits
- Clock circuits
- List of redstone components