In the world of Minecraft, mining is essential to a player's progress. However, mining can be dangerous and time-consuming if not done well. Below are some tips provided by the community for performing this underground work.
Mining layers
| Resource | Location |
|---|---|
| Gravel | Can be found below y=111. |
| Coal | Can be found below y=114, but is more common between y=5 and 66. |
| Iron | Can be found below y=63, but is more common below y=58. |
| Gold | Can be found below y=33, but is more common below y=29. In the badlands biome, it is also generated between y32 and 79. |
| Lapis | Can be found below y=31, but is more common between y=13 and 16. |
| Emeralds | Can be found between y=4 and 32, but are more common below y=29. Generates exclusively in the mountains biome. |
| Diamonds | Can be found below y=16, but are more common between y=5 and 13. |
| Lava | Excluding lava lakes, can be found below y=10, but is less common below y=4. |
| Bedrock | Can be found below y=5. |
Due to being the safest layers to mine where all ores exist in reasonable quantities (especially diamond), layer 10 to 15 are usually considered the best area in which to start mining. The single best layer for mining is highly debated and is not agreed on. Using the debug screen (F3) is the easiest way to find the player's altitude. The player can also look for lava pools, all air blocks between level 1 and 10 are turned to lava during world generation. (Mining at this layer ensures that the floor remains intact if they pour water). The player can even find and stand on the uppermost layer of bedrock, then climb up 6 blocks. Once they have located their desired layer, they can begin mining using one of the techniques listed below.
Preparing to mine
It is helpful to bring food, wood, coal, torches, swords and a water bucket. The player may want to bring a bed if they are spending several days underground so they do not have to go back to their house to sleep. Also, if the player has spare iron, it's recommended to bring iron pickaxes instead of stone pickaxes as they mine faster and have a higher durability. If the player is looking for obsidian, then they need to have a diamond pickaxe.
Getting lost in a cave without food may result in starvation. Without a sword, the player will be defenseless from large number of mobs that spawn in the darkness underground. A shield is also a good way to protect yourself in the dark.
If players are prone to losing the way back or simply want to be more safe, try marking their path with torches or another unique entity, such as signs, birch planks or colored wool. This also helps them to recover their items if they die. Carving out a safe room containing furnaces, a crafting table, a bed and a chest might be well worth their time. If they spend lots of time underground, they may want to bring resources for a more sophisticated base with.
Lava is highly dangerous and becomes quite common on lower levels, so remember to bring two water buckets when mining. Two buckets allow the player to create an infinite water source to replenish their water supply. Dig a 2×2 hole and place water in two opposing corners and now they have infinite water. This can also be done by placing water at both ends of a 3×1 hole. This can help the player get to ores above lava. Just place the water next to the lava source, and the water will convert the lava blocks on top of the pool to obsidian.
Armor is essential for reducing the damage taken by hostile mobs and lava.
There are three basic ways to start off the mine, though they can be combined:
- Find one of the many caves that opens to the surface, and start exploring that, generally working the way downwards. Even shallow caves offer plenty of coal and iron, and later gold and other ores. Caves offer the advantage that a great deal of stone has already been excavated for the player, exposing many ore veins. On the flip side, they often contain a large amount of hostile mobs, and both water and lava can be troublesome.
- If, rather than a proper cave entrance, having a shaft or ravine, players can start with that. Use a water bucket to create a waterfall that they can swim down (and back up), then continue as above with the caves that open off the ravine. Watch out for monsters falling off high ledges. The player may want to pillar jump to light those ledges and look for high tunnels.
- Alternatively, players can make their own entrance to the underworld: dig a vertical or diagonal mineshaft, wherever is convenient such as a back room in the base, and start digging horizontal shafts at suitable depths. This takes more tools (since the player are digging everything out themselves), but with proper lighting, they will hardly ever see monsters. Their mineshaft probably will also open into caves, which they can explore as above. There's a good deal of discussion about which methods are best for mining ores, but for the initial mineshaft, the safest method is probably a 1×3 shaft equipped with a ladder down the middle, and occasional ledges in case the player fall off the ladder. Regardless of how the player arrange things, they need to light the shafts properly to avoid monsters being spawned. The player can also turn to mineshafts when the cave is mined out. It is a good idea to mine everything out including coal as the player never know when they might be lost and need more torches.
Cave Mining
Also known as cave hunting, caving, or spelunking, cave mining is simply the practice of exploring caves and extracting the ores found on its walls, floors and ceilings. Exploring a large cave system almost always results in finding large quantities of ore, though players probably will find bigger veins of ore unexposed, because cave generation sometimes cuts off the vein generation. Cave mining has a high return on investment, yielding more ore per unit time and requiring fewer tools (less pickaxe and shovel durability is lost mining stone, dirt, and gravel) than other approaches.
On the other hand, cave mining is also quite dangerous. Unexplored caves are dark and tend to contain many hostile mobs. Swords, bows and armor are necessities. The player should carry a large supply of torches to light up the cave to prevent hostile mobs from spawning. Large cave systems can become confusing and dangerous. Special attention must be paid to navigation, lest one quickly gets lost. Moving through a cave too quickly makes it easy to miss unlit passages around the player where monsters can come out, and increases the chance of falling into a hole. This becomes extremely dangerous when the player is stuck in there and encounters mobs. Players can also fall into a lava pool which will result not only in death but in all of their items being destroyed in the lava. All air blocks are converted to lava during generation below layer 10. Because of these factors, players usually carefully explore and light a cave before extracting ores.
The cave article contains tips on dealing with large cave systems, while the Navigation tutorial has a section on caverns.
It is a good idea to carry a bucket of water. Caves often contain random lava flows, and cave areas below level 10 are filled with large lava pools. A bucket of water serves as both a fire extinguisher, if the player fall in; and as a way to form obsidian surfaces over lava pools (pour water onto a solid block adjacent to a lava pool; do not stand between that spot and the lava). If the monsters are too much trouble, the player can also go to options and change the difficulty to "peaceful" to prevent mobs from spawning. However, the player could still die from lava, so don't forget that water bucket.
Caves often contain dead-end passages and shafts, or masses of gravel and dirt blocking the way. Many of these dead ends are actually thin barriers that, if removed, reveal continuing passages, sometimes into entire adjacent cave systems. 'Drifting' is a term for simply searching for adjacent caves by digging beyond apparent dead ends. Drifting can be effective in finding dungeons if there are mob sounds audible at a dead end. Once players can make pistons, those can also help detect nearby caves, even through rock: Set one up facing against a wall, and power it with a lever, redstone torch. If there's an open space within 12 blocks ahead of the piston, it will push a hole into the wall.
Abandoned mineshafts
Abandoned mineshafts are often found intersecting caves, but the player's mineshafts may well accessed into one of these. Dealing with them is similar to ordinary cave mining, but resources are more plentiful, especially log and string obtained from shears and swords (from cobwebs). The string can also be crafted into wool for markers. The special hazards here are that it's easier to get lost in mineshaft tunnels: they look dangerously similar, and pre-placed torches make it harder to know which places they have already explored. As well, abandoned mineshafts contain cave spider spawners which are rather difficult to reach and destroy. Often, there can be more than one in a small area, so even if the player destroyed a spawner, be alert of the possibility of more spawners being in the area. There can be two, three or (very rarely) even four cave spider spawners side-by-side within 16 blocks (or less) of one another, but usually, there is only one spawner within 16 blocks of the player.
For upsides, due to pre-placed torches, the presence of hostile mobs is a little lower. Since supports of tunnels are largely made out of planks, the need to surface due to wood shortage is also lower. In addition, mineshafts contain broken sections of rails and minecart with chests with loot. These rails can be reassembled into complete tracks for transporting loot. One method to avoid getting lost is simply to remove everything (supports, rails etc.) from the tunnel, leaving only a plain 3×3 tunnel. This makes it much easier to recall where the player have been, although it takes quite a bit longer (and lots of axes). Signs and other markers are also very helpful here. Since fences are plentiful (those supports again), players can use them to block off unexplored or dangerous areas or cave spider spawners.
Caves under sand
If players are mining in an area with sand or gravel, like a desert biome, they can break the sand or gravel blocks and see if any others fall. If any does fall they know, there is something beneath. This can be rather dangerous if blocks fall beneath players, but they can place ladders or dig their way out. If done during the day, hostile mobs will mostly burn or go neutral in the sun, but as always, watch out for creepers. Also, the fallen sand or gravel can cover ores. Another event is that it is possible that there is lava under the sand. This is most common under mountains. There could also be a dungeon under the sand, so be prepared to fight or retreat.
Cave mining checklist
- A pickaxe. If it is the first mining trip, use a wooden pickaxe to mine some cobblestone and make a stone pickaxe. If they are further along in the game, and expect to mine for a while, bring two iron pickaxes and at least 12 stone pickaxes. If players have found diamonds, they can also use a diamond pickaxe. Once the player have reached diamonds, if they have an efficient style of mine at a depth where diamonds are found, they can use a diamond pickaxe, which lasts a long time and is capable of mining obsidian. Even a partial vein usually provides enough diamonds to replace the pickaxe when it does break, or repair it when it's about to. If they prefer to save valuable materials, take a few stone pickaxes for mining stone and one iron pickaxe only for mining ores.
- A shovel. Having at least one iron shovel can get through cumbersome patches of dirt and gravel quickly without using hands. Just one or two stone shovels also works if players want to use the iron for other things. Later, a diamond shovel is a nice convenience.
- Torches. Light is the key to survival. At least a full stack is recommended, and the more the player can carry, the better. Lighting the area around can help players know which areas they have explored and not get lost, keep monster spawns down to a minimum, and find hidden ores in the shadows. Torches can also be used to disable mob spawners, allowing them to convert them into drop farms later on.
- Log. If the player run out of tools or torches, the player can make a crafting table and sticks to replenish the supplies of pickaxes, shovels, and torches (players can get more coal for them from mining). The player can take the crafting table with them when they are done, or leave it and turn it into the core of a mini-base. As for torches, if players run out of coal as well, they can burn log to make charcoal as a substitute.
- A water bucket. This is useful in saving player's life and their items, should players run afoul of lava. Also, if players come across a lava lake or pool they want to cross, they can flood it to turn the lava into obsidian. Water can also be placed to create a waterfall, to descend any shafts or ravines the player come across. More experienced players may also substitute a water bucket for ladders.
- An empty bucket. A spare bucket is useful for collecting lava to use as fuel in a furnace, to block or slaughter monsters (the player will lose most of their drops), or just to get the lava out of the way. The player can also use it to pick up more water from a spring, perhaps after placing a waterfall. A second bucket of water also lets players to create a perpetual water pool, from which they can then refill either or both buckets whenever players want. The easiest way to make an infinite water source is to make a 2×2 pit one level deep, then empty two water buckets into opposite corners. This lets the player refill the bucket from any of the pool blocks.
- Food. Prolonged visits in mines wear away player's hunger bar. Bringing food allows the player to spend more time in the cave system, and keeping the hunger bar full is important for healing. If there are mushrooms present, they might carry or make a bowl to make mushroom stew.
- Weapons: A sword (stone or better), a bow, and plenty of arrows (except if their bow has the Infinity enchantment, in that case bring only one arrow.) These help players defend self against monsters. Upgrade to a diamond sword as soon as players can, as it makes fights noticeably shorter.
- Armor. It protects players from the monsters they may encounter, and even from lava. In general, players want at least iron armor — if necessary, players can smelt ore and craft their armor in the caves.
- Chests are invaluable when exploring lava caves since players can store their items in case they die; instead of losing a whole stack of iron and half a stack of gold along with all of their food and weapons, they can drop a chest and a crafting table nearby, and lose only their current tools and whatever they hadn't stashed yet. It's worth writing down the coordinates of the stashes, just in case.
- Ladders. For when players've fallen down, and can't get up. Also useful for reaching high tunnels and blocking off flooding water.
- Signs. These are useful to mark directions in a cavern. Leave messages or ASCII arrows for the player, such as "EXIT -->", "Base with Bed ^", "Zombie spawner this way", or "mind the holes!". Signs can be stacked, which makes carrying a supply much easier. Signs can also block water and lava.
- (Optional) Fences. Useful not only for blocking off unexplored passages, but for containing waterfalls and rivers when players can't bucket the source. As noted above, players can also harvest these in abandoned mine shafts.
- (Optional) Markers of various kinds. Aside from the above-mentioned signs, wool is available early, and redstone turns up when the player get deep enough. If players have pumpkins available, jack o'lanterns provide both light and direction.
- (Optional) Dirt, cobblestone, gravel. players'll certainly be picking some of these up along the way, but starting off with some cheap blocks lets players plug holes, make quick staircases, block off lava and bridge their way across pits and ravines if staircases are too expensive or time-consuming.
- (Optional) Wheat seeds and saplings. Players can create an underground tree farm to replenish the player's supply of log and a small wheat farm to continuously grow wheat for bread, allowing players to stay underground for an infinite period of time. These should both be built in a safe, well-lit area, to prevent spawning of hostile mobs and to encourage growth.
- (Optional) Doors. In conjunction with solid blocks, wooden doors can be used to temporarily block off unexplored caves and prevent hostile mobs entering a secured area. The crafting recipe for wooden doors creates three doors from six wood planks, hence each door uses two wood planks - the same as what would be required to block a 2 x 1 hole but with the ability to pass through with ease, and return in a hurry if there are a large number of mobs on the other side. Some zombies can break through wooden doors on hard, and consideration should be given to this when playing on this difficulty level. After an area is neutralized the doors may be mined and placed deeper in the cave system, or left as a marker/decoration as well as giving protection against a surprise creeper explosion making a section of cave unsafe again.
- (Optional) Bed. Having a bed around might be useful when players could be trapped in a cave or ravine if players are on the surface during night time. Having a bed can help them set up a base camp if they are far from home and the surrounding area is filled with hostile mobs or other dangers. With the bed, players can sleep and avoid the danger of the night and return home safely in one piece.
- (Optional) A shield. Can be used to block attacks.
Shaft Mining
Also known as Vertical Mining and Shafting, Shaft Mining consists of digging the player's own tunnels to expose hidden resources. The usual warning for digging applies: Watch out for uncorking lava or water or for digging into a deep drop or inhabited cavern. While doing this, make sure to be careful as the player might remove a block holding back lava or separating them from a drop or hostile mobs.
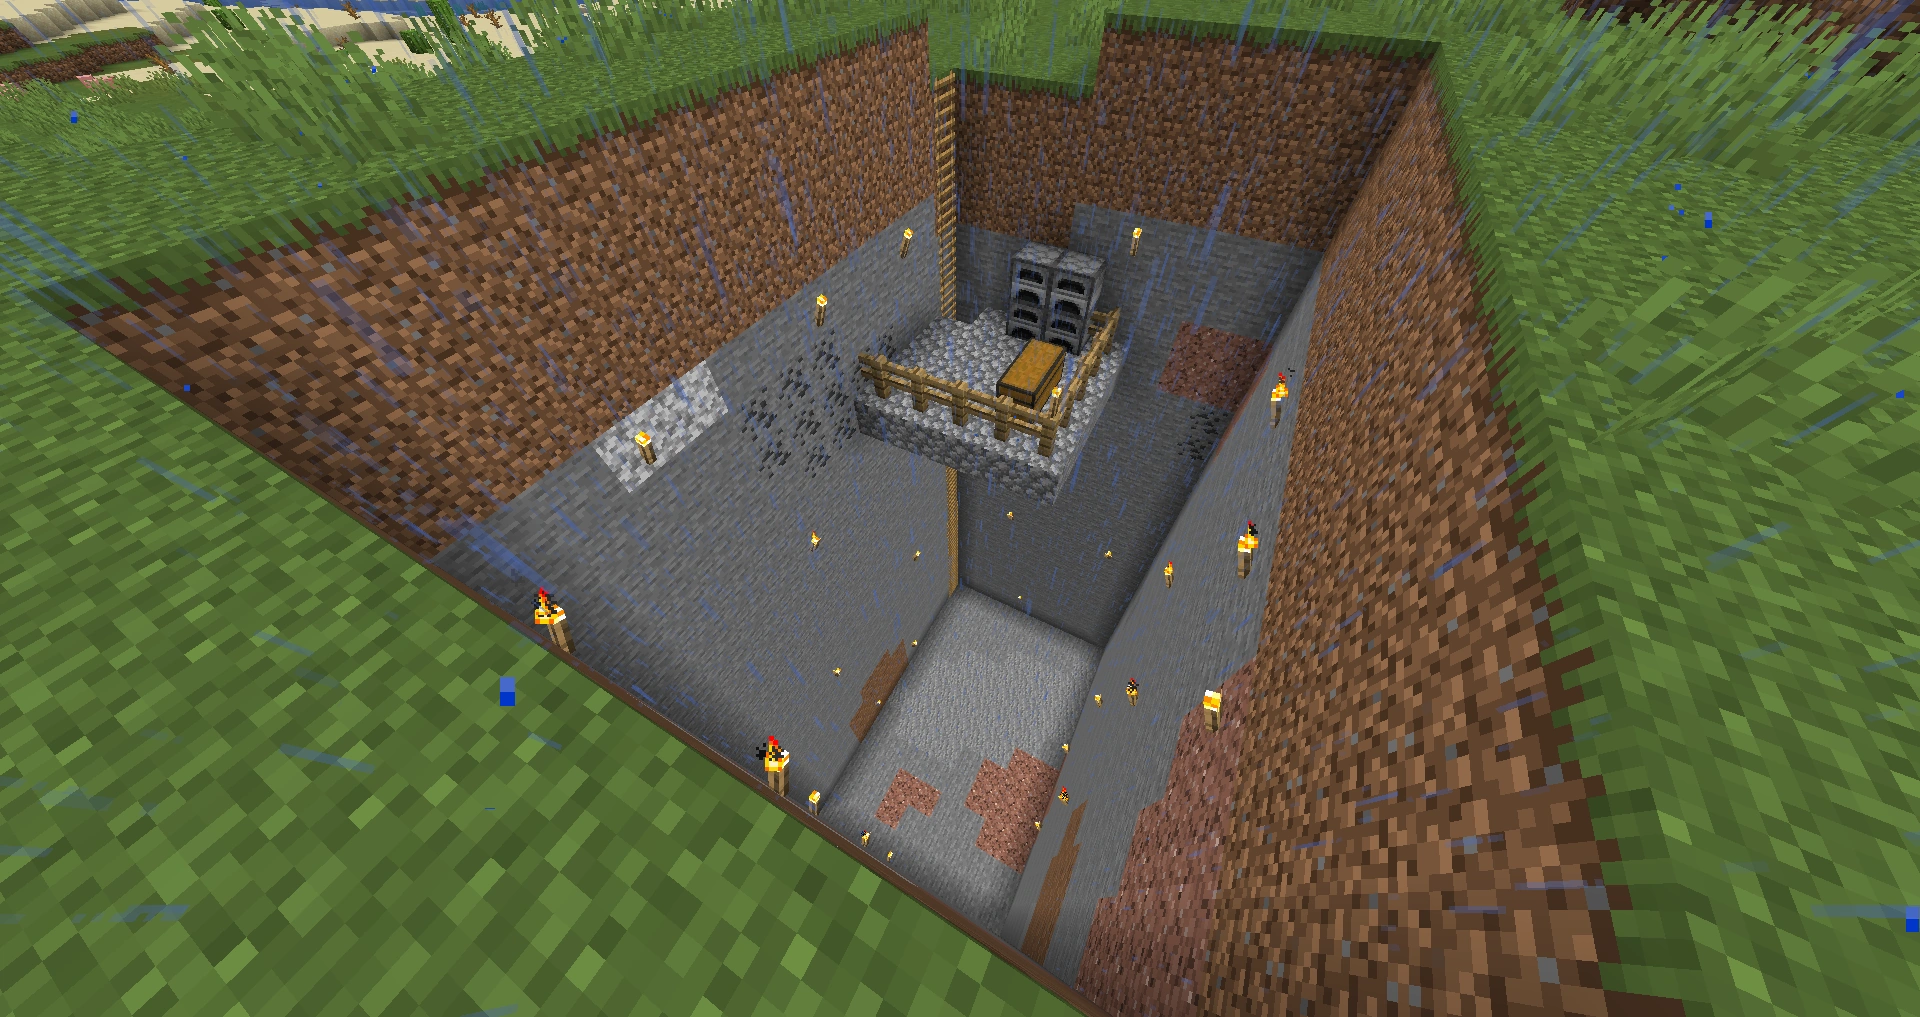
Simple Mine Shaft
A simple mineshaft is a 3-by-3 or 4-by-4 shaft that has a ladder on the side. The player can build several bases in the middle by making a glass floor and expanding the resulting room. The following diagrams show what one looks like:
Mineshaft room
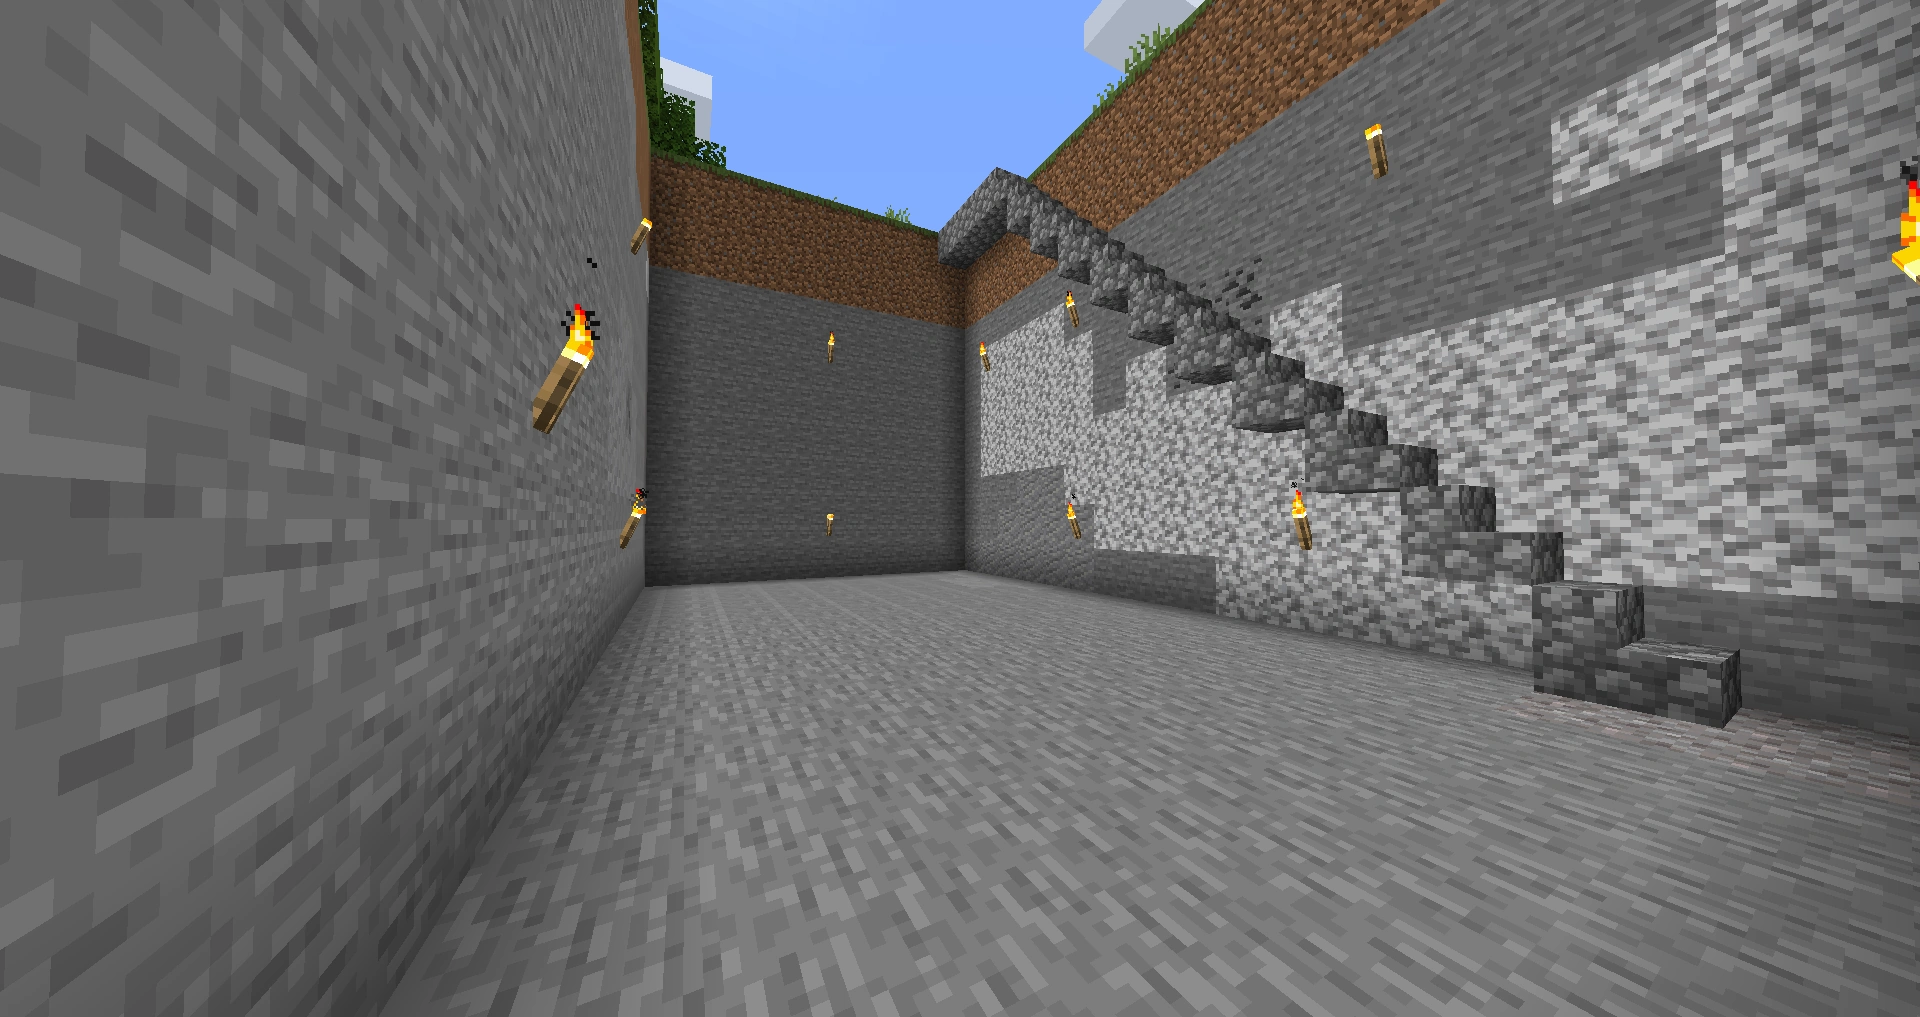
Staircases
A staircase mine.
The advantage of a staircase is that the player can always trivially climb back up, without need to place ladders. Crafting some of the harvested stone into stairs makes getting down and up even easier without jumping, though they need to carve out an extra block of headroom. Any such staircase drops at most 1 block for each 3 blocks excavated (without the headroom). There are several sorts possible:
Straight Staircases
A straight staircase heads down, but also over. This may or may not be useful — with a map, the player might learn about more of the surface they are going under, but if they need to dig their way back up a different way, they may come out in unknown territory. Also, a long staircase from their base may take them out of chunk-update range from their base, or at least far enough out that further exploration will take them out of range. Then their crops won't grow and so forth while they are mining. All of these can be 1, 2, or even 3 blocks wide.
The most basic strategy is to mine in a straight line at a 45° angle downwards, moving one block across for every block down. If the player dig out four blocks above each step instead of three, climbing back up is easier, since they won't "hit their head" with each jump up the steps. Placing a torch every fifth block helps the player keeping track of their elevation, and maintain a decent light level.
Alternatively, the player can dig diagonally. Face a corner, and imagine that the corner block is the missing block of a 2×2×2 cube. Now dig that cube. Repeat, adding torches at every step. This takes more effort for each level dropped, but exposes more blocks along the way.
They can also dig a shallower stair, two blocks ahead for each block down. This takes the player even farther away horizontally, but makes it much easier to run minecart trains up the stair.
Spiral
Spiral staircases are slightly more complicated since they have frequent turns, but have the advantage of leading straight down, thus staying in the same chunk. This gives the player a more targeted dig, and can often reach bedrock quicker and more safely than straight staircases.
2×2 Spiral Staircase
Starting from a flat floor, dig one block ahead of the player, then dig 2 blocks down to the right of that. Then move forward into the first place they have dug, turn right to face the second step, and to its right dig 3 blocks down from the floor. The fourth step puts them below their original floor — leave the floor block to become a ceiling, and dig the three blocks below it down to the new step. Continue with this pattern, note that each turn of the stair becomes the ceiling for the next turn. This design drops 4 layers per full turn, but if they run into gravel, players need to place dirt or cobblestone to replace it for the stairway. Turning right forms a clockwise spiral, they can of course go the other way for a counter-clockwise stair.
3×3 Spiral Staircase
One design is a 3×3 horizontal grid. By digging one block down at a time, and moving around the perimeter of the 3×3 area, they leave enough head room as they move down the staircase. They can also add stair blocks to this setup as well. They can optionally leave the central column for a barrier, or mine it out to place ladders for speedy transit. Instead of ladders, they could use a waterfall, but they had have to place that after "finishing" the stair (dig an extra pit beneath the bottom of the column to prevent flooding). Players will also have to dodge out of the water column occasionally to breathe. For a long stair, the player will need 2 or 3 blocks deep water. Alternatively, they can remove the central column of the staircase when players finish, and flood the bottom so they can jump to it and save time going down.
The basic design drops 8 layers per full turn. They could build this as a shallower stair (4 layers per turn) for minecarts, but minecarts have trouble with the corners anyway, because of the rock around them.
5×5 Spiral Staircase
This is similar to the 3×3, except that players dig out the edge of a 5 by 5 grid. The center column is cleared, acting as a supply of light on the way down. The middle acts as a safety barrier, and the outer ring has the staircase itself. The middle can also be hollowed (digging straight down should be safe so long as the player didn't find any caves or lava pools as they have made the staircase) out and a ladder or waterfall can be placed in it, with openings at different levels to allow for quick and easy access. Note that climbing ladders does not deplete hunger, unlike walking and jumping used to travel the outer ring. Swimming does deplete hunger, but since they have less distance to travel, they still come out ahead.
This design drops the player 16 layers each full turn, and provides an exploratory dig over a wider region. At the same time, it has a bigger chance to miss things in-between the spirals.
Additional Staircases
With a shaft of 4×4 or more, two staircases on opposite sides of the shaft going in the same clockwise direction can be added, allowing horizontal 'satellite shafts' to be added on each flight of stairs on opposite sides if the shaft, allowing for extremely efficient and exhaustive mining, and in shafts of 5×5 or more, a staircase can be added on every side of the shaft for an even more productive mine.
Room Spiral
This is variation of the spiral which consists of a spiral of 5×5 rooms leading down. Simply dig a straight staircase down for a short while, then dig out a 5×5 room and add a torch or two. Turn right or left, and dig another staircase for a short while, and dig out another 5×5 room, add a torch, and so on. Remember to always turn the same way. This method allows players to find a large number of ores and such. If they hit bedrock, don't worry, go back up to the first room and turn the opposite direction this time. It is very helpful if players want to avoid lava and such. It also has the tendency to open up underground caves, which are always well-stocked with ores and gems. Just remember to be careful of monsters, so always bring a sword when using this method.
Vertical shaft mining
Vertical shafts are mined vertical tunnels used to gain access to underground mining sites. They can be of any width starting from (if the player is crazy ) 1×1 blocks. Don't forget to keep a water bucket and a stack of blocks in their hotbar, to deal with lava quickly.
1×1
Also known as, "Digging straight down". Do not do it. While there is a 62% chance of reaching bedrock and a 27% of landing in a cave, the player has about a one in ten chance of falling into dangerous places like lava (8%) or ravines (3%) (100 tests). If they absolutely must be the crazy one, try this: Put a bed and a chest at the top. Sleep in the bed, and put everything from their inventory into the chest except for pickaxes, ladders, a stack each of gravel and cobblestone, and perhaps some torches. Dig down until the player dies or reaches their target depth, placing ladders above the player as they go. Every 5 levels or so, cut a 2-block high foothold opposite the ladder. If they fell into a cavern and survived, pillar jump back to the hole the player fell out of, and/or build a cobble pillar in front of players, and put ladders on that. If they fall into a cavern and die, the footholds might let them break the ladders below it so they can drop gravel for a pillar, and perhaps retrieve any ore they have found on the way down, but be watch out for the hostile mobs. If the player fell into lava, they can forget about the ore, but perhaps they can drop water to quench the lava.
It is possible to do this method safely, but it is very time consuming. It's the same as before, except hold ⇧ Shift to cling to the ladder while mining straight down. This way, if they mine into a pit or lava, they won't fall into it unless they unhold ⇧ Shift (⇧ Shift won't let the player move down the ladder, but makes the mining speed slower). If the player does find a cave, they can climb up a little bit, remove the last ladder the player put down, and put a bucket of water there instead. Now they can swim down, and if there was lava under the player, it will turn into obsidian, and will be harmless. They can also dig 1 deep and 2 wide alcoves in the side, giving them a place to put a torch, rest, and most importantly dig the hole deeper as far as they can reach without having to hold onto the ladder.
Note that mining upward in a 1×1 shaft can actually be safer, if the player are placing ladders as they go up. Lava will be blocked by the ladder, which can't burn (and even if it could, there's no place for a fire block to appear).
1×2
- Pick a place where the player wants the shaft
- Mine a first block adjacent to the block they are standing at.
- Step down.
- Mine a block the player were standing at and one below it.
- Place a ladder every block, skip this step if the player wants to place scaffolding.
- Go to step 2.
- Continue in above pattern until they reach their desired depth. From then on use a horizontal mining method of their choice. Put scaffolding if the player doesn't want to place ladders.
Simpler variant
- Pick a place where the player wants the shaft.
- Stand on the dividing line between two blocks.
- Mine the two blocks they are standing on, being ready to stop if need be.
- Place a ladder every block.
- Go to step 1.
- Continue in above pattern until the player reach desired depth. From then on use a horizontal mining method of their choice.
1×3
Similar to 1×2, but players have more room to place torches, ladders, or footholds in case they fall off the ladder. They will also get more warning of gravel masses, caverns, or lava, and an extra block of room to deal with them. This is relatively safe, and is a good way to start a mine from the base.
The more common version runs the ladders down the middle of the wide side, that is put blocks to break the fall on both sides every few levels, and at their mining levels, but another way to do it is to put ladders on one end, and put a waterfall on the other. They can then put a few blocks in the middle to prevent falls, but leave plenty of spaces to pop out of the waterfall for a breath.
2×2
The player want to excavate one level at a time, placing ladders down one corner of the block. This technique is relatively safe.
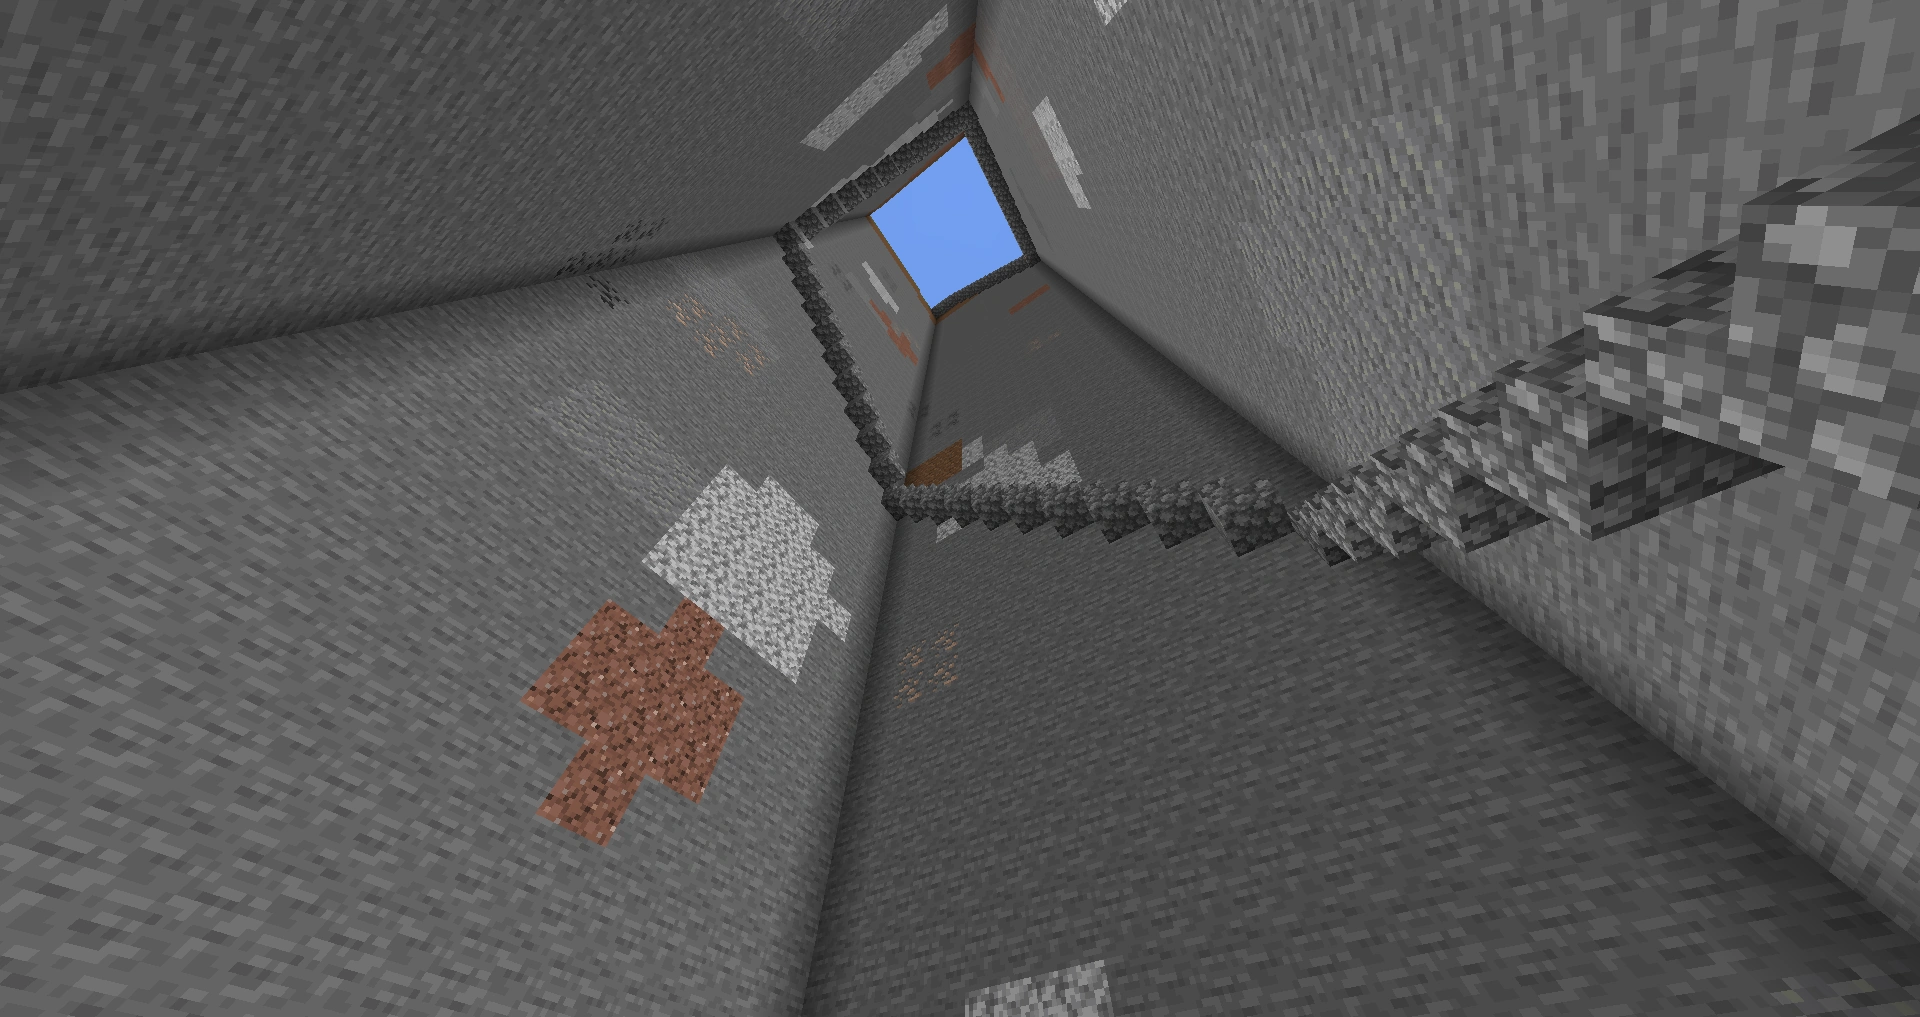
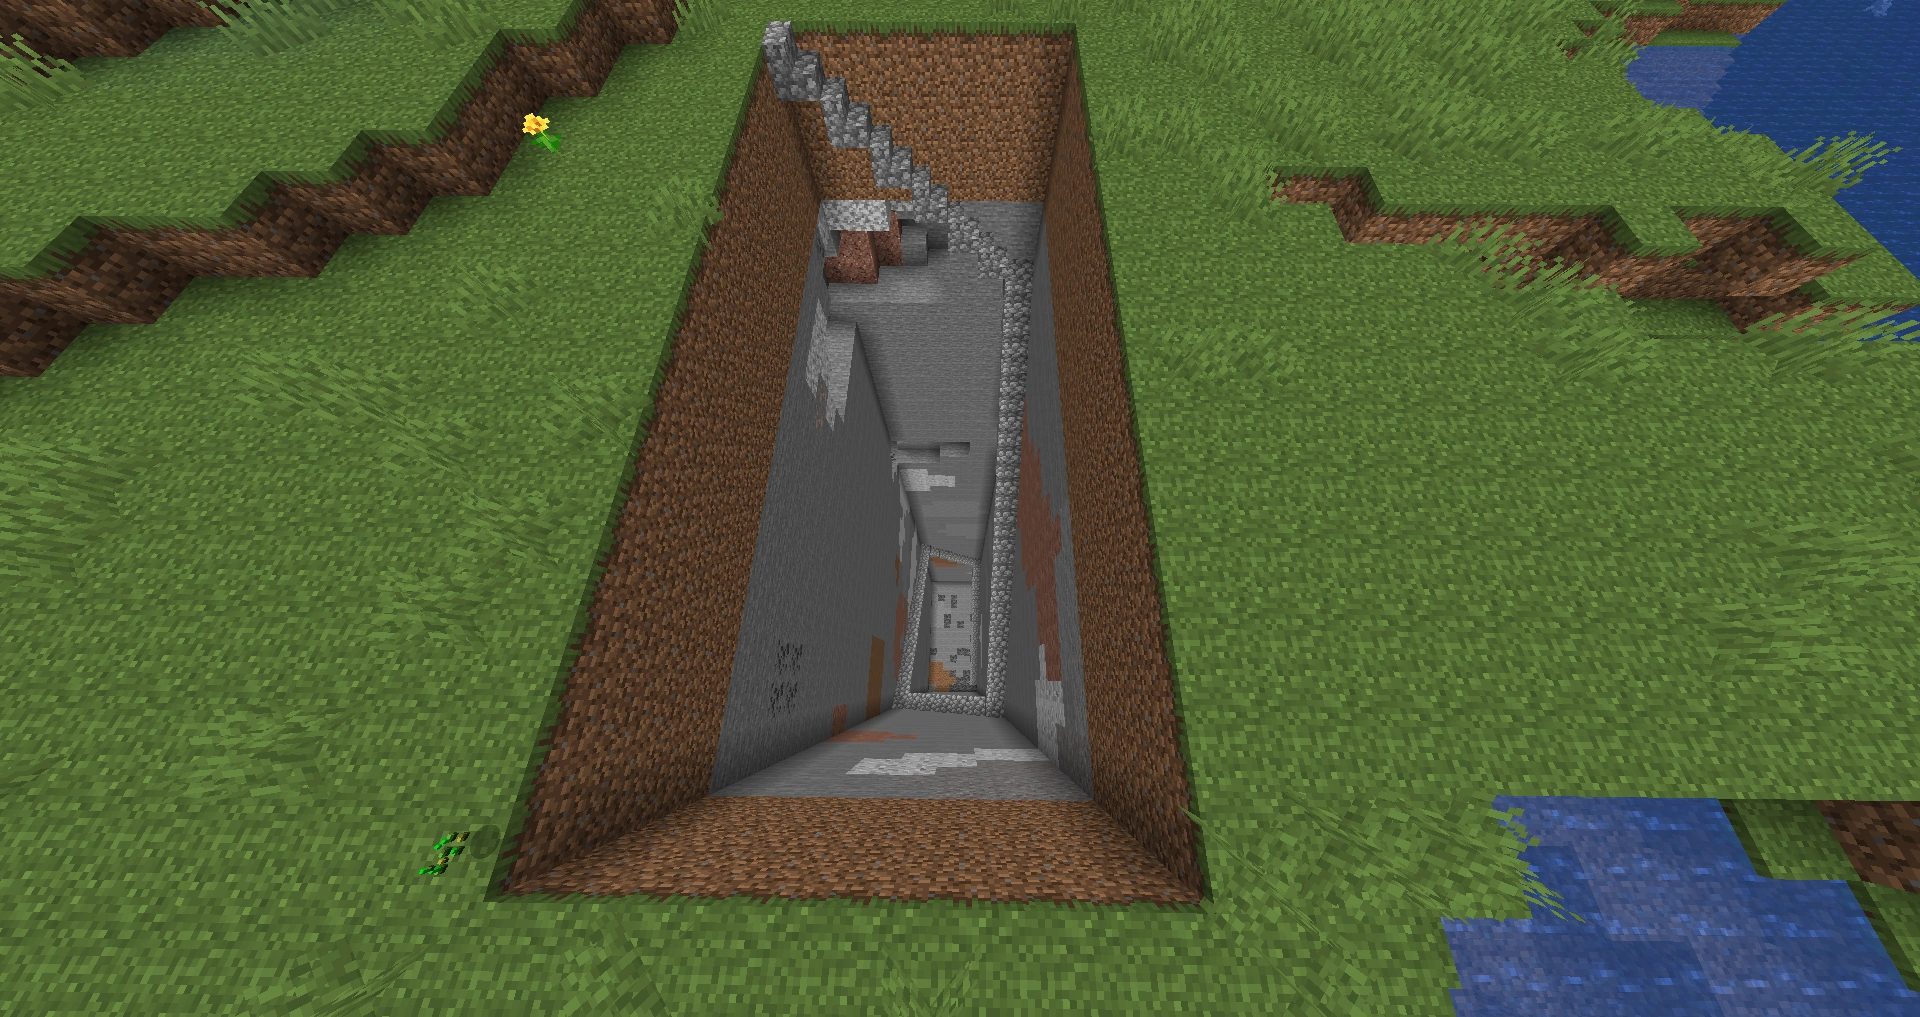
Vertical mineshaft with water drop

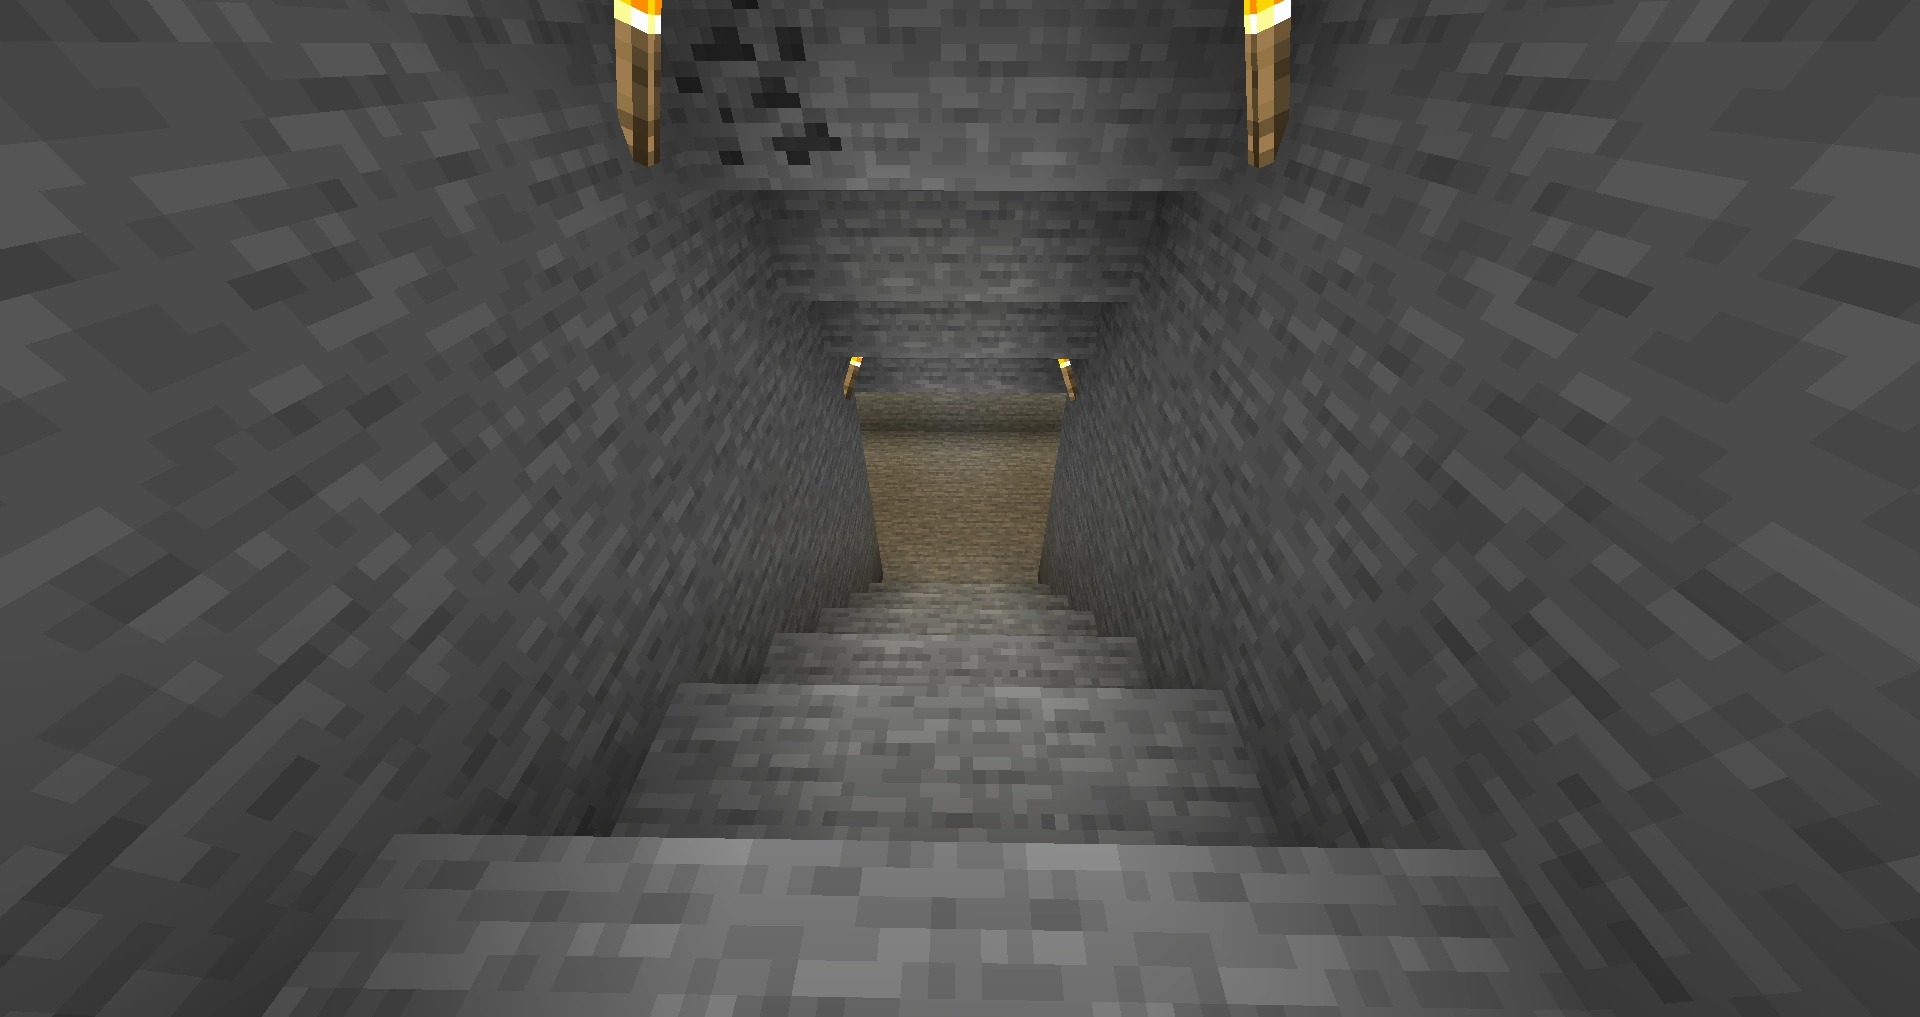
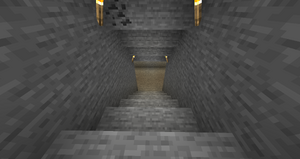
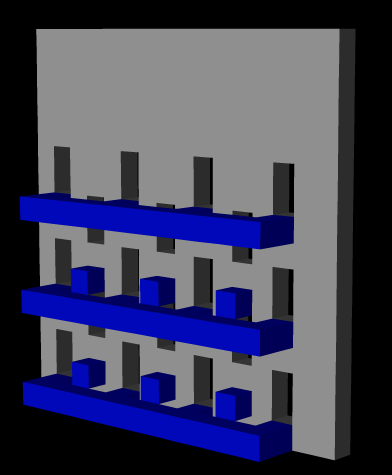
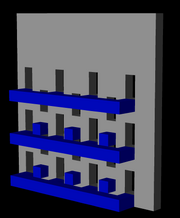
Cutaway of the top of the mineshaft. (1) Entrance passage (2) Ascent shaft (3) Descent shaft.
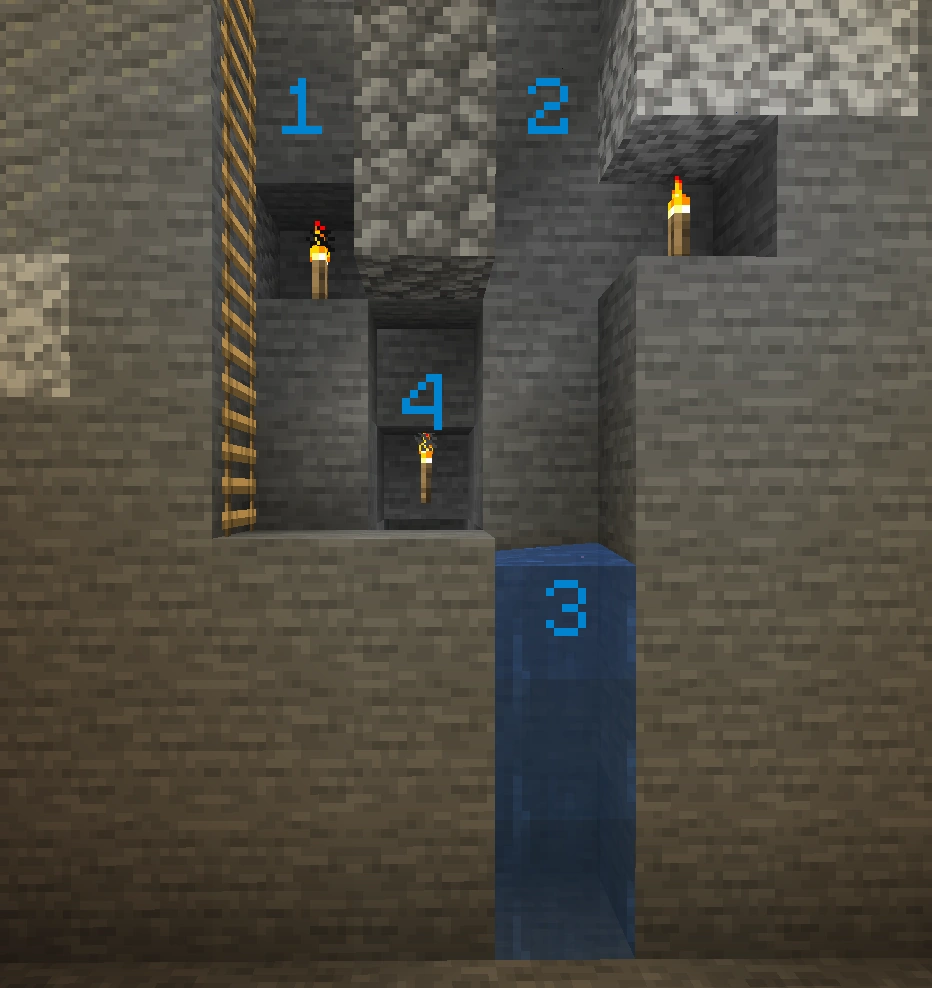
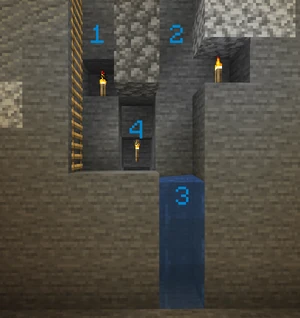
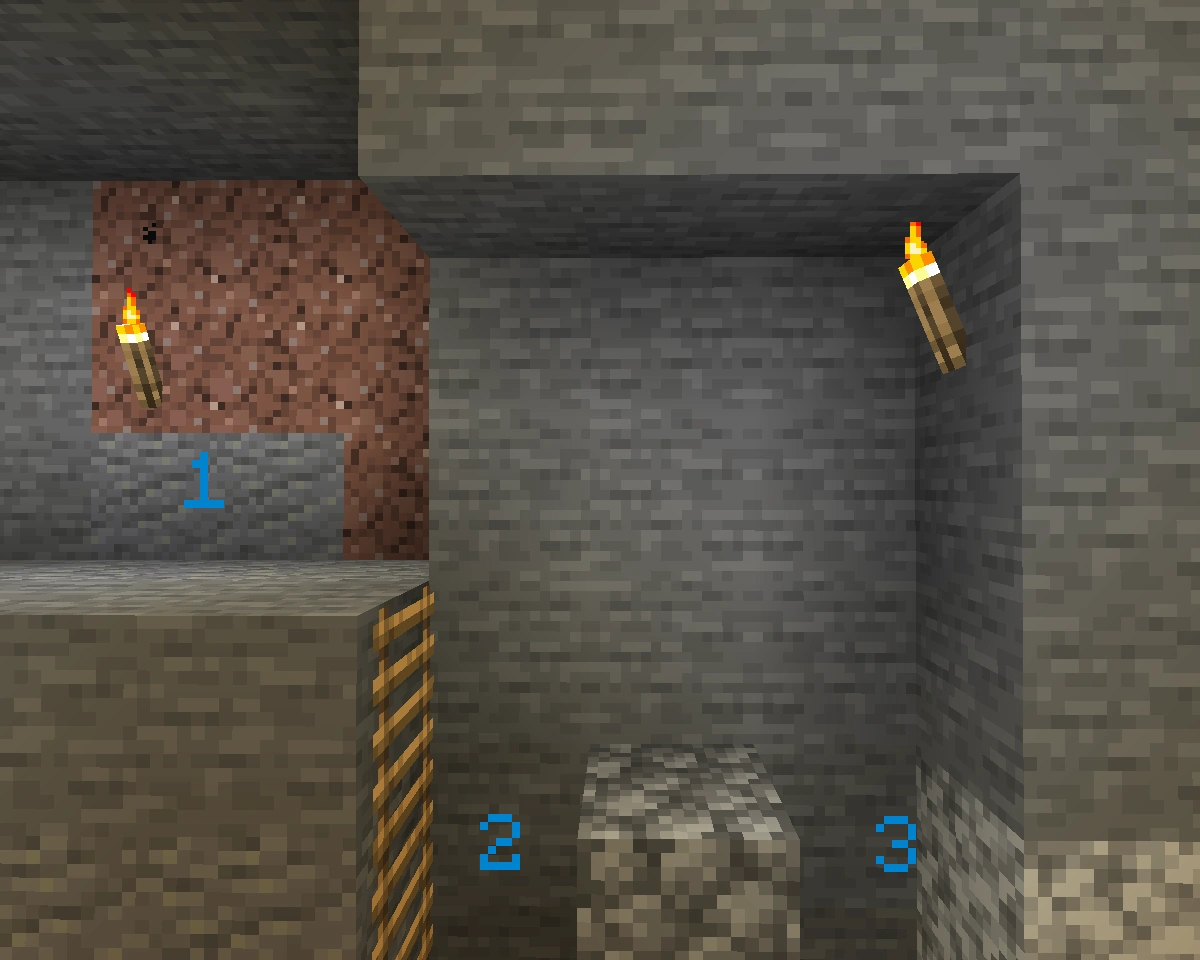
Cutaway of the bottom of the mineshaft. Note the placement of torches in the ascent and descent shafts. (1) Ascent shaft (2) Descent shaft (3) Water pit (4) Side passage to utility room/mining area.
A vertical mine shaft can be built quickly and allows safe, fast access to the deepest regions of the map. To descend to the bottom, simply walk into the shaft. The player will pass over the ascent shaft, fall into the descent shaft, and land in the water pit. To ascend, climb the ladder and hop out.
This guide describes the construction of a vertical mine shaft with the following properties:
- Provides quick access to the lowest mining levels
- Fast construction
- Requires a decent amount of wood
Drawbacks:
- Unsuitable for minecarts
Materials:
- 64 ladders
- 2 water buckets
- 20 torches
- pickaxes and shovels
The log requirements amount to approximately 60 blocks of log.
Construction
Overview
- Gather all materials
- Dig 3-wide pit to bedrock
- Dig utility room
- Dig and fill water pit
- Place ladders in ascent shaft
- Fill in center of shaft
Details
First, gather and manufacture the materials. Be sure to fill the buckets with water. The shaft will be constructed to the side of an existing room. Start by excavating a 3-block deep alcove. If the top of the shaft is above ground, it should be surrounded by fences or walls with only one entrance on a narrow side. Place one torch in the end of the alcove as illustrated.
Next, a 3-block wide pit will be dug all the way down to the bedrock. Do not dig out the block the player are standing on. Dig out a 3-high by 2-wide section, then hop down into it and dig out the 3-high column that the player were standing on. Place torches on both sides (ascent and descent) at regular intervals, excavating 1 block to place them in. In the ascent shaft, torches should be placed in the wide sides so they don't interfere with the ladder. In the descent shaft, torches should be place in the narrow side, primarily so that the player can keep track of which side is ascent and which is descent.
Be careful when digging out any blocks beside the player. Lateral breaches into lava pools or monster caves can be hazardous. Be ready to plug the hole, or hop up and throw blocks down so the player can escape upwards. Also, be sure that the 3×2 section hasn't opened into a cavern before players hop down. Keep the pit well-lit. When players reach the bedrock level, make a 3-deep pit on the descent side. Fill in the middle and ascent sides as needed, as in the screenshot.
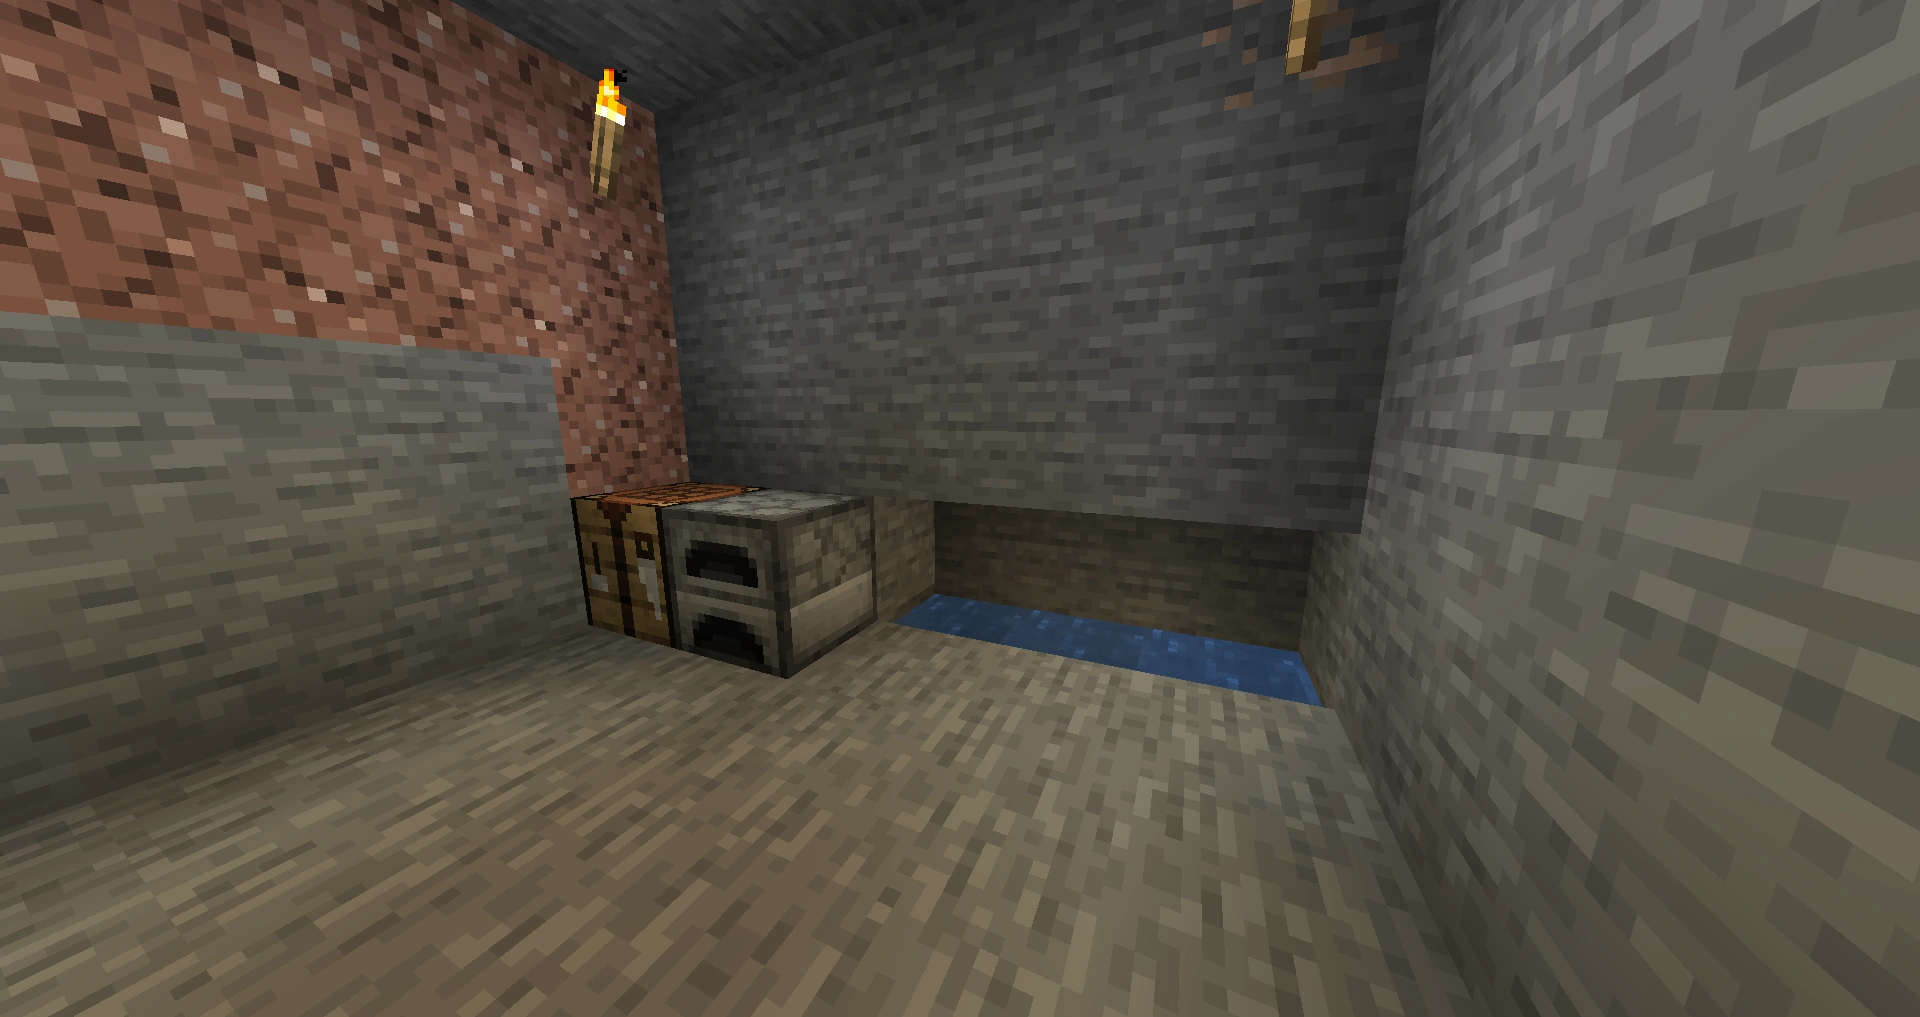

The water trough in the utility room.
In the middle of the shaft, cut a side shaft. Due to the fact that the landing pit must be 3 deep, they may want to stairstep downward a few blocks in this shaft. Next, dig out a utility room. Cut a 3×1 horizontal trough in this room for water. Empty each bucket into the end of this trough. The water should fill it in and become still.
Fill the buckets again from the center of the water trough. Use the water to fill the pit at the bottom of the descent shaft. Be sure that the pit is 3 deep, and each block is filled with water.
Now it's time to place the ladders and to fill in the center of the shaft. Stand in the ascent shaft and face away from the descent shaft. Place ladders on the wall in front of the player and climb. Build the ladder all the way to the top.
Descend to the bottom again using the ladder. Be careful, because the center of the shaft is not filled in yet, and it's possible to fall to their death. Once at the bottom, stand in the middle of the shaft and fill it with blocks. Hop upward and place blocks beneath themselves. When they reach the top, leave the central pillar 1 block below the surface (see screenshot). Leaving it 1 block lower allows players to enter the descent shaft simply by walking in.
Alternate landing
Instead of a 3-block deep water landing pit, if players place two blocks of water at the bottom of the shaft in the ceiling of their utility room at the bottom and "hold it in place" with a sign on the wall below the shaft, it will break their fall as they fall through it and they will land without damage on the bottom of their utility room area.
Horizontal Mining (or Resource Mining/Stratifying)
Safety
Horizontal mining is not as dangerous as vertical. But there are some similar suggestions. Carry a water bucket and some blocks of some disposable, non flammable material (e.g. sand, gravel, cobblestone) somewhere on the player's hotbar. A block can be used to quickly plug the leakage in cases of lava, and water can be poured over source lava to turn it into obsidian, as well as to put out fires. (Flowing lava will usually turn to cobblestone, occasionally smooth stone, if the water is a source block.)
Terms and Definitions
Main shaft/access shaft: a 1×2 or 2×2 tunnel use accessing other tunnels.
Efficiency: how many ores the player get for the amount of effort they put into the mine, or how many ores and cobblestone they get they dig to find them.
Thoroughness: how many of the ores the player extract per chunk.
The tradeoff: a mine can be made more thorough at the price of efficiency, or vice versa.
Layout: the top-down view of the mine.
Branch: the tunnels dug purely to gather ores.
Branch-length: how many blocks the player dig their branches out. One recommendation is to measure a length with the durability of a stone pickaxe.
Spacing: how far apart the branches are.
Completely Thorough: a mine that reveals 4 new blocks dug, and reveals every block within a chunk, is completely thorough.
Tiering: "stacking" one branch mine on top of another, in order to obtain a much greater degree of thoroughness without sacrificing too much efficiency.
Efficiency vs Thoroughness
Efficiency in Minecraft mining is defined as how many ore blocks the player mines, relative to the time spent reaching them. Thoroughness is the percentage of the ores a player has extracted from a given chunk. Efficiency is approximated by blocks revealed per blocks mined, while thoroughness is approximated by blocks revealed per blocks in a chunk. Since both include "blocks revealed", they are often confused.
If we assume that all ores spawn in 2×2×2 cubes or larger, then there is no need to reveal every block. Mining three spaces wide, with four blocks between each shaft will be completely thorough. If we assume that 90% of ores are 2×2×2, but 10% are 1×1×1; while obtaining 100% unitary thoroughness then requires a spacing of 3 and a tiering distance of 2, the original mine (the 3-space 4-tiering) maintains a thoroughness of 98%. The 100% thorough mine requires mining twice as much stone while only increasing the total yield by 2%, resulting in half the efficiency.
In order to give an actual number for efficiency, we can use efficiency=100×(number of ores collected / number of blocks mined)-or, equivalently, %efficiency = (number of ores collected/number of blocks mined)
Several assumptions must be made:
- Ore is distributed randomly
- Ore is orientated randomly
- Ore occupies a certain width, whereby two tunnels running too close to each other would intersect the same orebody twice.
In Minecraft these assumptions are essentially true, though there is some distortion since diamonds only spawn once per chunk.
So we reach the crux of the argument; tunnel spacing. In the traditional "efficient" mining methods, tunnels are spaced close together in order to "observe" the maximum number of blocks possible, therefore removing all of the ore from an area. So, let's consider a spacing of 1; that is one tunnel separated by one block from another tunnel. During the digging of the first tunnel, several ore bodies are encountered. This tunnel has a high efficiency (in fact, the maximum efficiency possible, as we shall see later). The second tunnel has a very low efficiency because almost all of the ore bodies it encounters have already been removed by the first tunnel. This causes the efficiency of the mining operation to plummet. A spacing of 1 is incredibly inefficient. Now we move to a spacing of 2. This is a spacing that a lot of people use because it leads to 100% observed blocks in a single layer. However, with a spacing of 2, the second tunnel still encounters several ore bodies that have already been removed, so it is also quite inefficient. We can go on like this; as long as the second tunnel has a chance of encountering ore bodies which have already been removed by the adjacent tunnel, it will have a less than maximum efficiency. It follows that the most efficient way to mine is to place the second tunnel far enough away from the adjacent tunnel that there is no chance of encountering ores that have already been removed.
The problem has been modeled in MATLAB using a 2D slice of a real Minecraft level and a virtual mining procedure. The model mines a 1 block wide tunnel through the 2D layer and removes all diamonds it encounters, just like a real player would do. The model is limited to diamonds but the principle applies to all ores. It repeats the mining for different tunnel spacings, from 1 to 10. The model then records how many diamonds were mined for each case, how many blocks were removed, and calculates the efficiency of each spacing. A simple graph is produced:
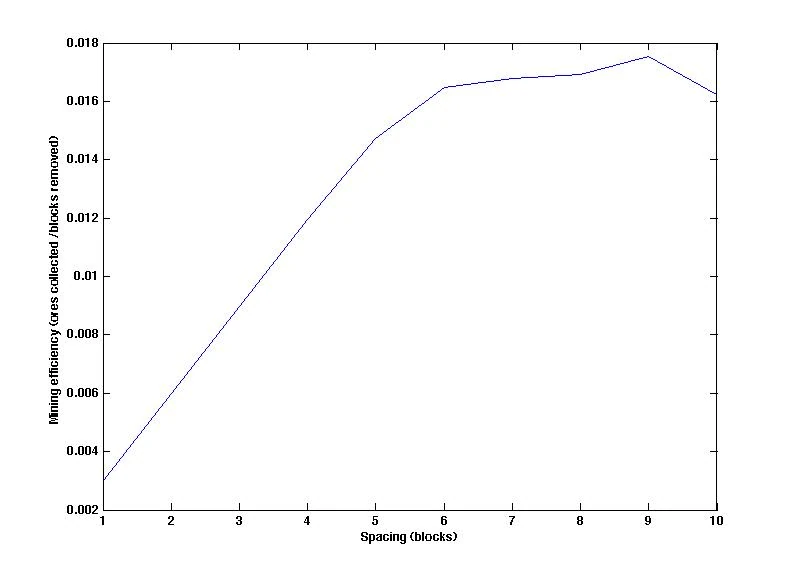
The results indicate what is expected — that when tunnels are close together they are not efficient because the miner will encounter diamonds which were already removed by the adjacent tunnel(s). A maximum efficiency is reached at a spacing of around 6 blocks (that is, 6 solid blocks left in-between the tunnels). At this spacing, efficiency is about 0.017, corresponding to 1.7% of blocks removed being a diamond. At this spacing, the tunnels effectively become independent of each other and so, statistically speaking, the chance of encountering an ore are maximized because there is no chance the ore has been removed by an adjacent tunnel. Above a spacing of 6, efficiency does not increase greatly because ore collection rate is simply a function of the distribution of ores within the level. Note: in the above graph, efficiency appears to drop-off at a spacing of 10. This is simply a limitation of the size of the level used to model the process, resulting in a large error at high spacings. If a larger level were used, the line would smoothly come to a maximum efficiency and stay there.
In summary:
- The term "efficiency" is often applied to the practice of making every block observable, however this is not usually the objective of a miner.
- A more practical definition of "efficiency" describes the percentage of blocks removed that are ores, in other words efficiency = (ores removed / blocks removed).
- Maximum efficiency is reached when adjacent tunnels become independent of each other, since there is no chance that an adjacent tunnel has already removed an ore.
- This maximum efficiency, for diamonds, is reached at a spacing of 6. Since other ores are usually collected in copious amounts compared to diamonds, this spacing is recommended for every-day mining operations.
Branch Mining
Branch mining consists of mining out side tunnels from an access shaft to expose as many blocks as possible with a minimum of blocks removed.
Creating a Branch Mine is simple. First, dig deep underground until 0-16 blocks above the bottom level. To keep track of this, press F3, and the Y-coordinate tells the vertical level the player character is currently at (It is best to mine at level 11 because it is easier to deal with lava lakes on that height). Upon reaching the desired level, begin to dig at least 20 blocks into a wall to create a shaft. Come out of the shaft, move at least 3 blocks to the left or right, and do the same again, digging 20 blocks into the wall. Each shaft made will almost always contain a resource block ranging from coal, iron, redstone to even gold and diamond.
There is a tradeoff between the distance chosen for each branch of the mine. A distance of 2 blocks per branch means that players will end up exposing almost every block, but at the cost of a lot of work. A distance of 5 blocks per branch will give them a wider distance covered but there is the possibility of missing some ore veins, especially diamond or lapis lazuli which can appear in veins of less than 4 blocks. Using the diagram titled Better 3 Space leaves no ores hidden, however requires them mine more stone. It is recommended to use this method if they don't mind mining a bit extra and really need the gold, redstone, diamond, iron, and coal.
Layout 1
The trade-off for distance can be minimized by making a branch mine a level above and below the branch mine that is offset. (This is a side view) For example:
Offsetting mine levels
Layout 2
Another option is the per-chunk branch mine. This is a 2 space branch mine, but is constructed over the space of a single chunk, and is capable of ensuring that every ore deposit is found, while still only mining around 45% of the chunk's stone. For the initial shaft to bedrock for this mine, a 1×2 shaft will fit lengthwise in the central corridor. Also, considering in most cases each chunk have one diamond ore vein, if their only priority is diamonds, they can place the top most branches at level 14 & 15 and dig branches from top to bottom until they strike a diamond vein and then skip the rest of the chunk.
Per-chunk Branch Mine
Layout 3
Antennae layout
An effective technique if players want to find rare resources with minimal effort. It is basically mining down to any level, usually to bedrock, and then mining outwards to the sides, much like a tree with a trunk and branches.
- Use the staircase method to dig down to bedrock.
- Go up 2 blocks and fill any space below they have mined out.
- Dig a 3×3 room.
- Dig a straight 2×1 tunnel in a straight line then dig out 32 blocks every 4th block.
- (Optional) If the player don't want to count to 32 every branch, dig out a "Marker" 1×1 tunnel 4 blocks in and stop by it in the next branch.
- To further increase efficiency, the player can end the 20-block tunnel by digging 4 blocks of an 1×1 tunnels as each of the mined block reveals more than a 2×1 tunnel.
This method is based on the relatively low probability of desirable blocks being created without any neighbors, so it will occasionally miss small or narrow ore deposits that fall entirely between the branches, but it covers ground faster, so players will usually get more ore for their time. If the player would rather be sure of 100% coverage, simply place the tunnels closer together. It is also meant to be done quickly.
Diagram:
                           X = Tunnel "Trunk"
                           B = Branch
                           S = Staircase
                           Y = Outpost (for supplies, etc.)
                           - = (Optional) 1×1 block tunnel

          B-------B                 B-------B
          B       B                 B       B
          B       B                 B       B
          B       B                 B       B
          B       B                 B       B
          B       B                 B       B
          B       B       YYY       B       B
X X X X X X X X X X X X X YYY X X X X X X X X X X X X
          B       B       YYY       B       B
          B       B        S        B       B
          B       B        S        B       B
          B       B        S        B       B
          B       B        S        B       B
          B-------B        S        B-------B
Each branch can be any length, but about 32 blocks long is a good length to begin with, as it can be measured with the durability of a stone pickaxe.
Layout 4
a pinwheel mine with a spacing of 2
Pinwheel Mining System.
The Pinwheel Mining layout:
The Pinwheel Mining layout is designed to cover large squares of land, over long periods of time.
- Get to the diamond layer by the player's preferred method,
- Dig out a room-as large as 10×10×8 if the player want to set it up as a self-sufficient base, or as small as 4×4×2 if the player just want to get mining, and use even numbers if they like 2×2 access shafts or odd numbers if they prefer 1×2 access shafts.
- Mark the access shafts into the middle of the walls; the picture shows 2×2 tunnels. If players do not use the wide tunnels, mark the main shafts with signposts.
- Dig a given access shaft out until their inventory is full. They'll have plenty of chances to get the ores out of the access shafts.
- Note: If they use a simple straight staircase to get down, they may need to leave off the south tunnel for a while.
- Mark the branches at the desired interval. The picture shows a spacing of 2, which is 100% thorough but inefficient.
- Dig out each branch until their inventory is 3 spaces away from full, then turn around.
- On the way back, place torches in any dark spots, and collect any missed ores — collecting all the coal is advised, but not required.
As always, the player can use any spacing; a spacing of three provides both reasonable efficiency and reasonable thoroughness.
This layout can compete with the phoenix mine in terms of efficiency, and is easier to modify if necessary, but it does require a lot of time for each trip.
Layout 5
Room and fork layout
- Dig a room that is 7 blocks long, 10 blocks wide and 3 blocks high. Have their stairway or ladder in the middle of one of the 10 block walls, preferably 2 spaces wide.
- Starting in one of the corners, dig parallel to one of the walls of the room the player just dug for 20 spaces, and place a torch every 5 blocks.
- Then, dig another 20 block tunnel that has two blocks between it and the previous tunnel.
- Continue until the player reaches the other side of the room.
Diagram (dirt: tunnels, stair blocks: a staircase):
By utilizing this variant properly, players can uncover all the blocks in quite a large area, and the mineral yields are quite high. Having the stairs 2 blocks wide allows for thorough strip mining as they can be strip mined around. Also, a good length for each tunnel is 20 blocks long.
Layout 6


A branch mine with pokeholes (top view)

The spacing between the branches (11 blocks)
Branch mining with "pokeholes".
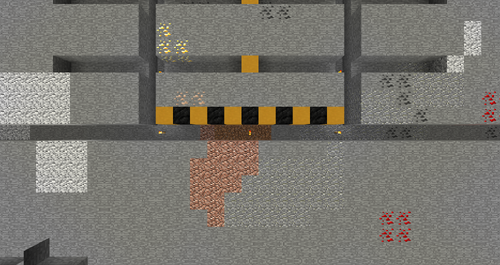
A branch mine with pokeholes is a variation on a traditional branch mine, but designed to have a better blocks-revealed to blocks-mined ratio. Like a traditional branch mine, branch mines with pokeholes have several parallel 2×1 shafts that branch out of a main trunk shaft. However, they are much further apart than in a branch mine (11 blocks as opposed to 3). The reason for this is that as player dig the 2×1 shafts, every 4th block forward they have go, they dig a 1×1 hole to the left and the right, revealing many previously hidden blocks. This technique used to be called "feather mining", but after xisumavoid's video covering this method, it's more commonly known as "branch mining with poke holes", or simply "pokehole mining". The mine got its old name from its feather-like shape when viewed in a cave map or with an x-ray resource pack.
Tiered Branch Mining

Advanced branch mining is one of the most efficient way to mine 100% of the ores on multiple levels.
This setup allows for linear navigation along tunnels by first selecting depth, then choosing an appropriate tunnel at that depth.
Tiered branch mining is the art of stacking shaft mines on top of one another.
If the player decide to stack their mineshafts, however, they should use an odd-spacing, or they will get inefficiency and blind spots.
For instance, the following tiering has the advantage of being very thorough, while finding any 2×2×2 cube of valuable ore. It has the disadvantage of missing some of the smaller veins, though it doesn't miss as many as players might expect it yields somewhere between 80 and 90% of the ores in a region.
(mine at y=12, y=16, and y=8)
oxoooxoooxooo
oxoooxoooxooo
ooooooooooooo
ooooooooooooo
oooxoooxoooxo
oooxoooxoooxo
ooooooooooooo
ooooooooooooo
oxoooxoooxooo
oxoooxoooxooo
ooooooooooooo
ooooooooooooo
(bedrock begins.)
(x=branch, o=stone)
This is a good mine for single player if the player can't stand the mere possibility of leaving 2×2×2 cube of diamonds just below or above their initial mineshaft and this will find them.
The next one has a tiering distance of 3, and is noticeably less thorough, but it finds at least 90% of the diamonds in a chunk:
oooxoooxoooxo
oooxoooxoooxo
ooooooooooooo
oxoooxoooxooo
oxoooxoooxooo
ooooooooooooo
oooxoooxoooxo
oooxoooxoooxo
ooooooooooooo
oxoooxoooxooo
oxoooxoooxooo
(bedrock begins)
This is a good mine for somewhat crowded multiplayer, where thoroughness is actually worth something.
Should the player be willing to sacrifice efficiency in exchange for revealing every last block, players can use a tiering distance of 2:
oooxoooxoooxo
oooxoooxoooxo
oxoooxoooxooo
oxoooxoooxooo
oooxoooxoooxo
oooxoooxoooxo
oxoooxoooxooo
oxoooxoooxooo
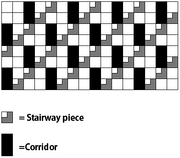
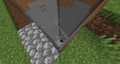
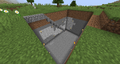
This particular tiering, however, is not only inefficient, but requires one of the access methods shown in the pictures-either an 8 tall, 2-3 wide tunnel with staircases as shown in the gray picture, or with one access shaft for 2 sets of layers. This should be used only in ridiculously crowded multiplayer servers, when what matters is finding that one redstone vein that got missed by all the random-miners.
However, nearly any spacing and layout can be used with a given tiering distance, as it is fairly thorough, only slightly less efficient than a straight shaft, and it can be transformed into nearly any level of thoroughness without wasting effort.
Nearly any layout, spacing, and branch-length can be combined with any tiering distance, though doing it with a phoenix mine on the compact spacing is not recommend for anyone who gets headaches easily.
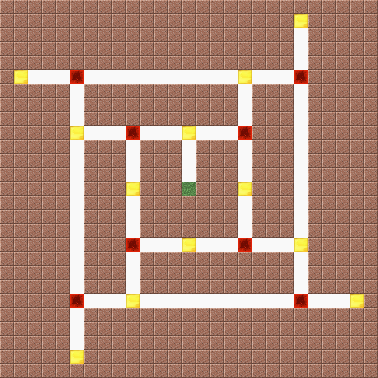
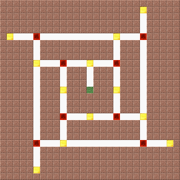
Windmill mining
Note: The player will need a basic understanding of Japanese to watch the video, or translation captions will be needed.
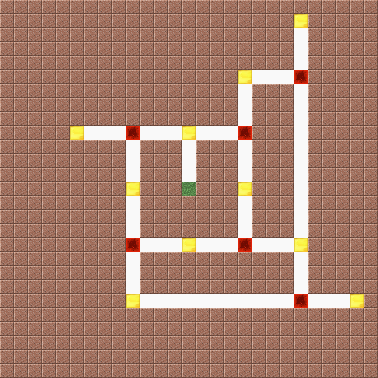
Windmill mining is an efficient mining technique invented by a Japanese Minecrafter てりぃ (pronounced like Terry).
Pros:
- Players don't need to count a large number of blocks.
- Players player won't get lost in their own labyrinth.
- Players can easily predict biomes that they are going to mine. If they want to mine emeralds, just choose the center of mountains for their start point.
- It is relatively easy to suspend and resume mining.
- It has the same efficiency as 3 space branch mining.
Preparation
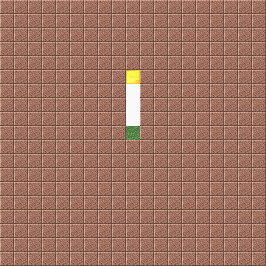
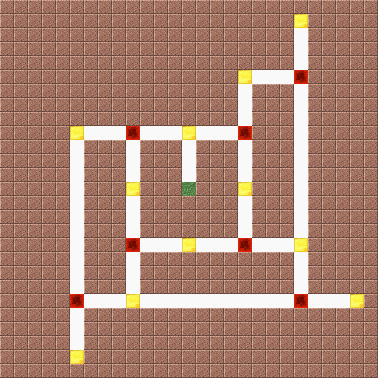
Descend to Y=11, which is 6 blocks above the highest bedrock layer. This is the start point denoted by the grass block.
Dig a 1×2 tunnel of 4 blocks long from the start point, then put a mark there denoted by the gold block.
Don't make it 1×3. That will only reduce the efficiency.
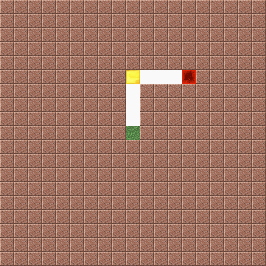
Turn right, dig 4 blocks, then put another mark denoted by the redstone block.
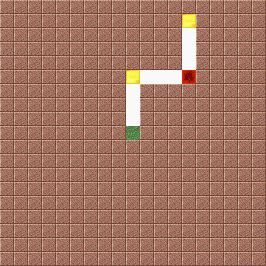
Turn left, dig 4 blocks, then put a mark.
Turn back, return to the previous mark, dig 4 blocks, then put a mark.
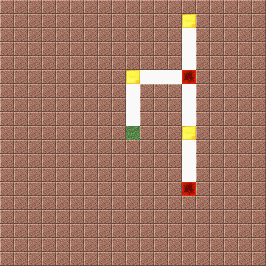
Dig 4 blocks and put another mark.
Turn left, dig 4 blocks, then put a mark.
Turn back, return to the previous mark, dig 4 blocks, then put a mark.
Dig 4 blocks and put another mark.
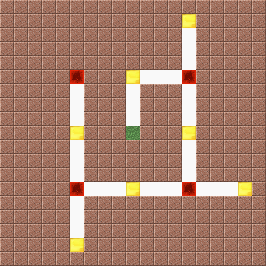
Repeat the previous step.
Repeat the previous step but while the player are doing so, they will reach the mark they have put before. Now the player have completed the first lap.
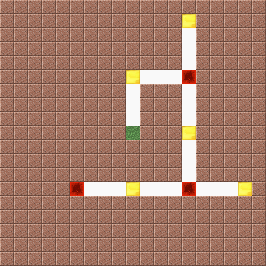
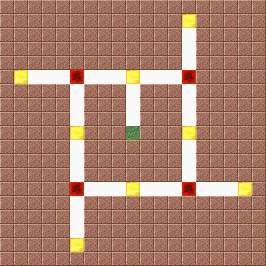
After the first lap
Choose one of four corners and go there. Go to the "gold" mark they have previously put.
Turn right, dig 4 blocks, then put a mark.
Turn left, dig 4 blocks, then put another mark.
Turn back, return to the previous mark, then dig a tunnel until they reach the "gold" mark they have previously put.
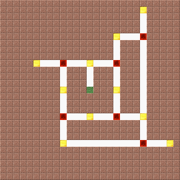
Dig 4 blocks, then put a mark.
Turn left, dig 4 blocks, then put another mark.
Turn back, return to the previous mark, then dig a tunnel until they reach the "gold" mark they have previously put.
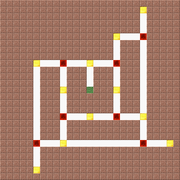
Repeat the previous step.
Repeat the previous step. Now they have completed their second lap. Repeat the entire steps until they are satisfied.
Speed Mining
Speed mining is a technique of mining in which a player randomly mines out a 50 block radius around them. Using an Efficiency V diamond pickaxe, along with beacons for Speed I/II and Haste II, minerals can be acquired rather quickly. It is at first expensive, but pays off quickly. It is suggested that the player to do this at diamond level.
Best results are obtained by using a diamond pickaxe enchanted with Efficiency V and Silk Touch to mine and collect ores, then smelting the gold and iron and using a Fortune III pick to mine the other ores.
Simple Strip Mining
This technique is to take off the top 6 layers of a mountain completely. Continue until the mountain is entirely flat. TNT is useful for the first 5 layers, since the explosion will destroy grass and dirt for the most part.
Diagram:
Key: A = Air
     B = Block
     L = Ground Level
Step 1:
         A A A A A A A A A A
         A A A A A A A A A A A A
       A A A A A A A A A A A A A A
       A A A A A A A A A A A A A A A
       A A A A A A A A A A A A A A A
     B B B B B B B B B B B B B B B B
First 5 layers are gone when the player started mining.
Next couple steps are as shown:
         A A A A A A A A A A
         A A A A A A A A A A A A
       A A A A A A A A A A A A A A
       A A A A A A A A A A A A A A A
       A A A A A A A A A A A A A A A
     A A A A A A A A A A A A A A A A
   B B B B B B B B B B B B B B B B B B
         A A A A A A A A A A
         A A A A A A A A A A A A
       A A A A A A A A A A A A A A
       A A A A A A A A A A A A A A A
       A A A A A A A A A A A A A A A
     A A A A A A A A A A A A A A A A
   A A A A A A A A A A A A A A A A A A
 B B B B B B B B B B B B B B B B B B B B B
This time consuming method is a useful tool for when they need minerals or a flat area.
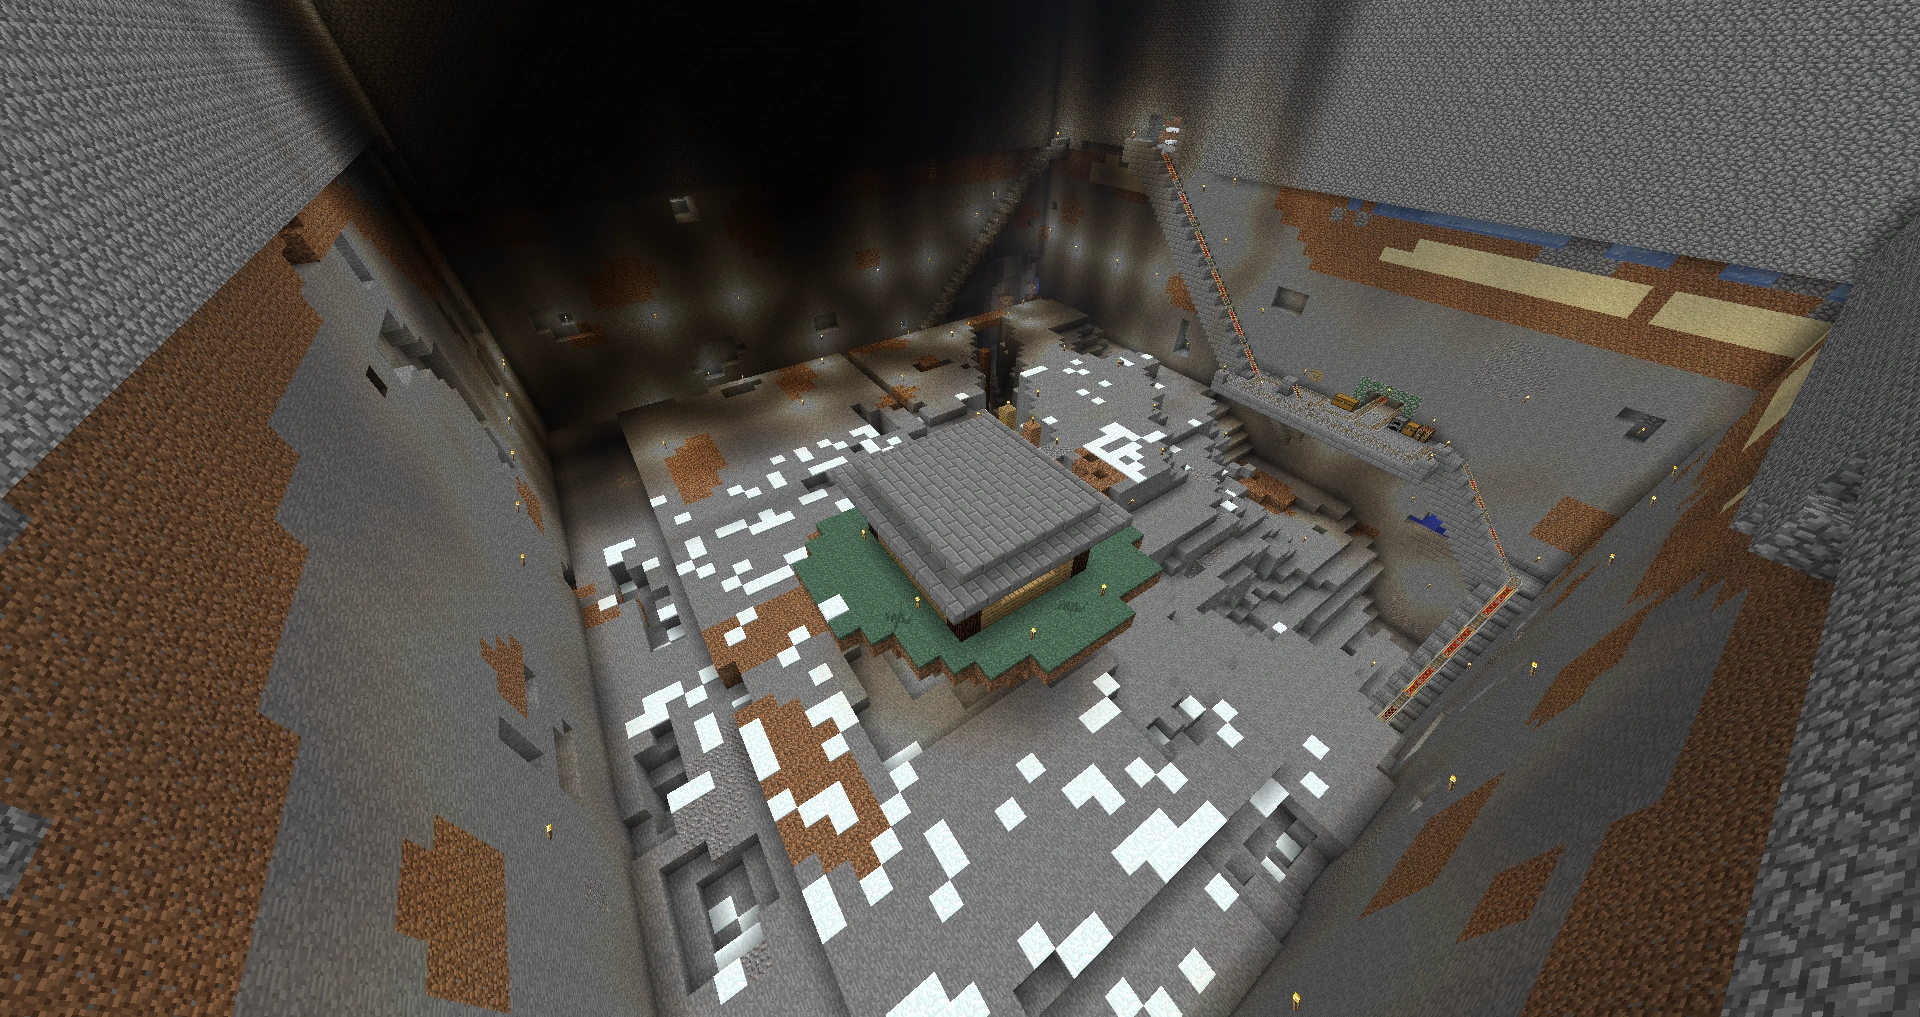
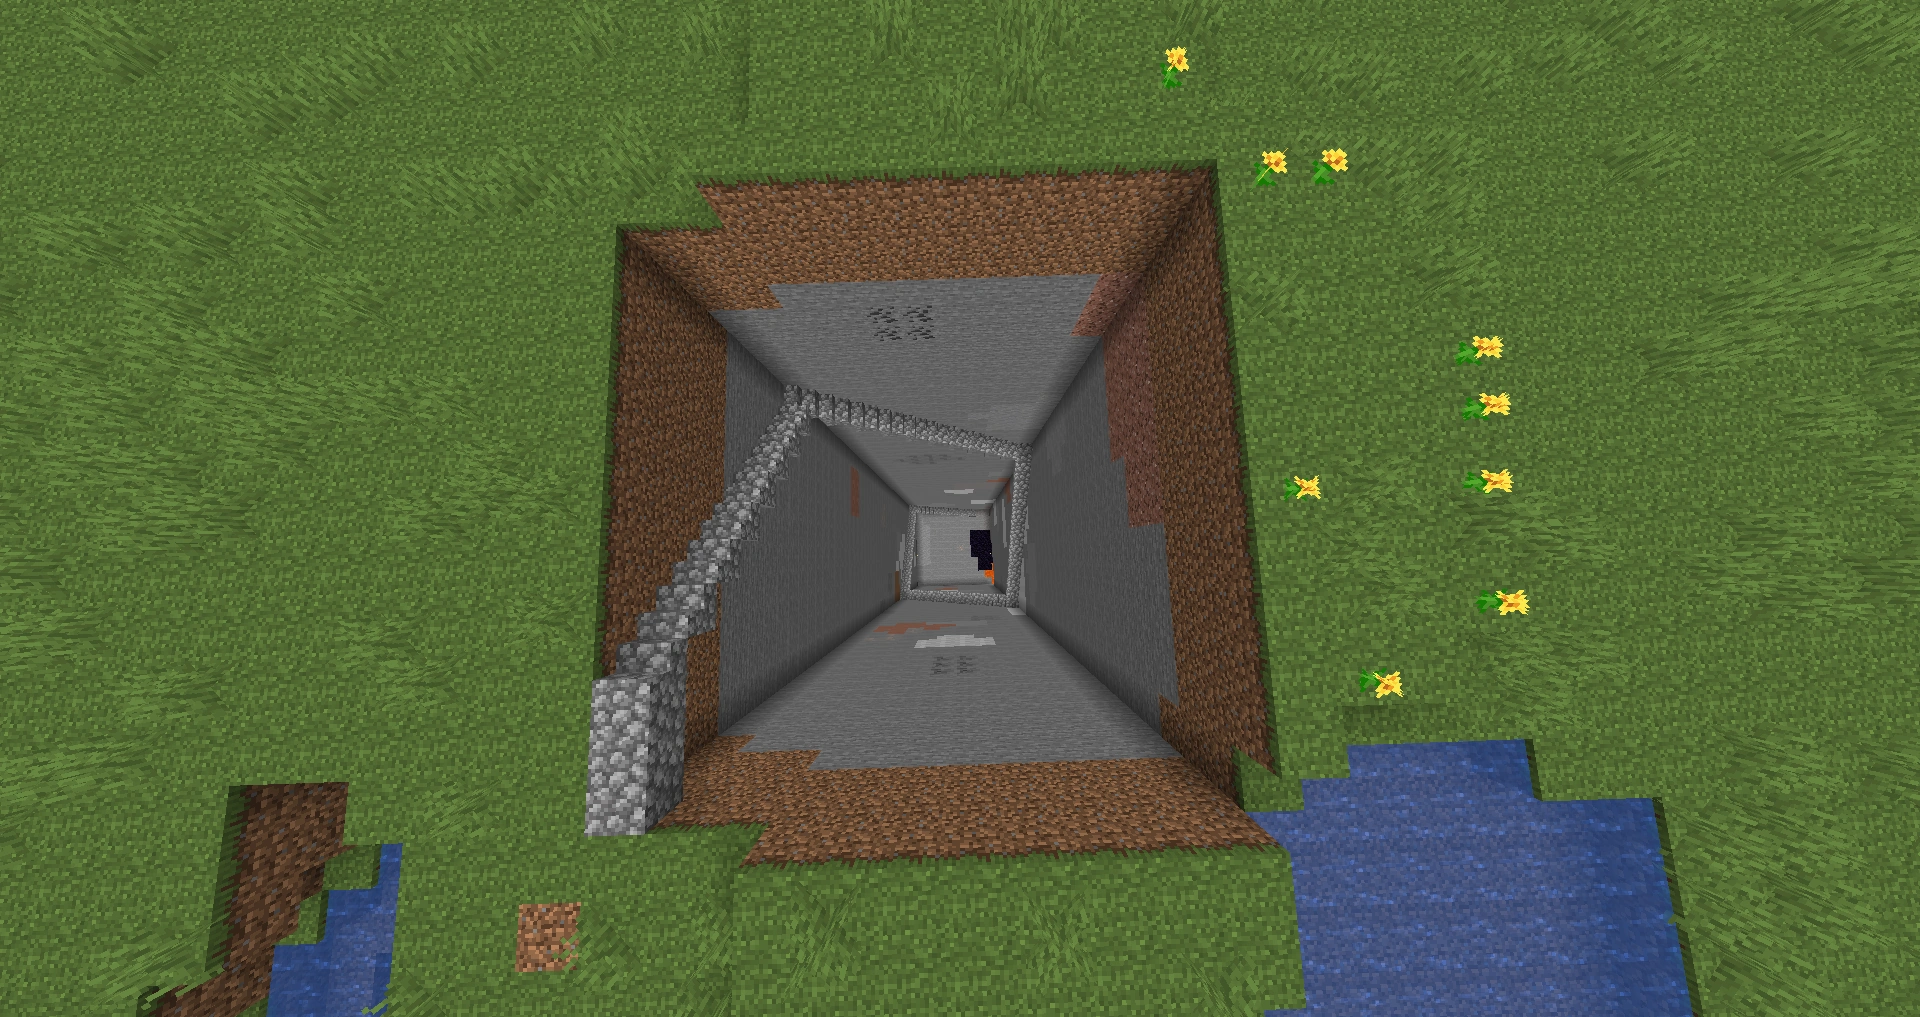
Quarry Mining
Quarry Mining is very similar to strip mining, sharing the prospect of taking all resources within an area. These mining methods are used very commonly in Minecraft. The difference between quarrying and strip mining is that the process of quarrying involves a large rectangular or square strip, continually mined downwards with a staircase running along the side. This method got its name by its similarity to real world quarry sites. Quarries are typically ceased when a large cave is discovered (This does not directly stop the excavation, it just makes it difficult to continue), the miner abandons the quarry for another project, or bedrock is reached. A way to deal with large caves is to block the cave with Creeper-resistant materials, like obsidian. One can place a (powered) rail in a spiral, to allow ease of access.
A finished quarry with obsidian and lava at the bottom.
A quarry in construction.

A recently begun quarry. There is a convenient, easily accessible ledge with chests, furnaces and a crafting table.

The inside of a quarry.
An elaborate 64 by 64 blocks quarry in the making.
A 16×16 quarry being looked at from the top.
Looking up from the bottom of a quarry mine.
An unfinished 20×20 quarry.
A 25×25 quarry to bedrock.


The construction of a quarry is as follows:
- Determine the size of the project. There is no standard, so simply choose how big players want it to be. However it is advised that they make the area large, to maximize resources within a single quarry. (A typical quarry can be 20×20 or 20×30, for example)
- Once the player have found a large enough space, dig down one space at the corner of their site. Next, mine the block adjacent to it. Continue this around the perimeter of their site until they have a 1-block-deep trench around the perimeter of the site.
- Now that the player have set their perimeter, mine all of the surface blocks within their site. When this is finished, they should have a large, square, 1-block-deep hole in the ground.
- Next, head back to the first corner that the player have dug in, and dig down one more block. Repeat what the player have did in step 1, but now they will be one level lower. Upon completing this level, they can begin placing their staircase/ladder/vines as well.
- Continue the process of mining a layer, and then another, until they hit the bedrock level. This may take a few days of vigorous playing to accomplish, but their earnings will make it well worth it. For reference, 20×20 quarries (down to bedrock) typically yield 3 - 10 stacks of coal, 1 - 7 stacks of iron ore, up to half a stack of gold ore, perhaps 50 redstone dust(lower down), and a few lapis lazuli and diamond, though these results vary with the width, depth and location of their quarry.
- Various game mods may also provide tools for quarrying or similar rapid-mining techniques.
Really reckless miners have been known to make huge quarries, some giant ones are 50×50, 64×64 and 80×80, yielding a staggering 2200 stacks of cobblestone/stone. To put that in perspective, that many cobblestone blocks in a tower would be a whopping 140,800 meters tall, or an unrealistic 170 times the height of the Burj Khalifa, which is the tallest building on earth. These will take a couple weeks of 24/7 gameplay, given their size, but the stone payoff is gigantic.
Example:
Key: - = Air
     B = Stone block
     S = Staircase
Top of mine:
         BBBBBBBBBBBBBBBBBBBBBBBBBBBBBBB
         BS----------------------------B
         B-----------------------------B
         B-----------------------------B
         B-----------------------------B
         B-----------------------------B
         B-----------------------------B
         B-----------------------------B
         B-----------------------------B
         B-----------------------------B
         B-----------------------------B
         B-----------------------------B
         BBBBBBBBBBBBBBBBBBBBBBBBBBBBBBB
Next few levels down:
         BBBBBBBBBBBBBBBBBBBBBBBBBBBBBBB          BBBBBBBBBBBBBBBBBBBBBBBBBBBBBBB
         B-----------------------------B          B-----------------------------B
         BS----------------------------B          B-----------------------------B
         B-----------------------------B          BS----------------------------B
         B-----------------------------B          B-----------------------------B
         B-----------------------------B          B-----------------------------B
         B-----------------------------B          B-----------------------------B
         B-----------------------------B          B-----------------------------B
         B-----------------------------B          B-----------------------------B
         B-----------------------------B          B-----------------------------B
         B-----------------------------B          B-----------------------------B
         B-----------------------------B          B-----------------------------B
         BBBBBBBBBBBBBBBBBBBBBBBBBBBBBBB          BBBBBBBBBBBBBBBBBBBBBBBBBBBBBBB
Although the yielded amount of cobblestone, dirt, sand, coal, iron, and to some extent gold, will be enormous, and the possibility of lava is very high, this is not the best method for mining diamond and lapis lazuli, because they're found only at the bottom of the map. (Note: Diamonds and lapis lazuli can be mined using this method, but due to their rarity, the placement of the quarry along with its size will determine the amount.) This type of mining is suggested for getting large amounts of cobblestone, iron and coal, besides the ability to gain large amounts of resources, this type of mining exposes many caves for further exploration and mining.
Besides mining, quarries also offer some non-resource related benefits, such as keeping the area clean and fresh (not ruining the nature), as well as serving as a handy trap.
Warning: Be extremely careful around this mine, as a fall will surely be fatal, unless they have covered the 2 bottom levels of it with water. Make sure the shaft is either covered up by a layer of blocks or a fenced perimeter. The shaft should also be well-lit to avoid being a mob pit.
Once a quarry is finished, they will have a large, deep hole. There are many ways to utilize a spent quarry, but some choices are as follows:
- Underground Base
Due to the open nature of a quarry, many players choose to build an intricate base floating in the quarry, and then fill in the unused space with dirt, gravel, sand and stone. If done correctly, an underground base will be undetectable from the surface, especially when grass grows on the surface above it. For extra stealth, consider planting trees in the open area. They can deter miners by placing a large lava lake over the base. This will also decrease hostile mob spawns around the base.
- Structure space
When their quarry is complete, they can fill the area with a structure such as a skyscraper or a tall building. This is more effective than building at sea level as some buildings can be taller than 256 blocks, so they can build from bedrock level and make larger structures.
- Underwater Base
These are made by the same method as an underground base, except the open area is filled with water from artificial springs, lakes, rivers, etc. For additional effect, a lot of players build underwater bases from glass blocks, and build airlocks for extra stealth. Most quarries are square or rectangular, so it is hard to disguise an underwater base as a natural lake or pond, but with a little bit of work, they can make it look like a natural body of water.
- Multi-level Grinder
After finishing their quarry, the large area mined out can make a perfect space for creating a large multi-level grinder.
Tunnel-mining
This involves digging a long tunnel. The player will need a lot of planks (for sticks), and optimally, crafting tables, chests, and furnaces. The simplest tunnel is 2 high by 1 wide, but the wider and higher the tunnel, the more cobblestone they get per chunk, the more they have explored (they will not gather cobblestone any faster, also they will get less ores). Dig at about level 50 if under land; 40 if underwater; or 12 if for precious ores. The player may want to use the cobblestone to seal off caves already explored. This is like a quarry — but more useful since less resources are spent going through the dirt/sand layer, and it can also be used in conjunction with minecart tracks to go from one base to another. A 4×3 tunnel that is 1800 blocks long will yield as much as an 18×18 quarry to bedrock, though arguably safer as they won't hit the lava layer, and it will yield more diamond/redstone if at layer 12, as well as the fact that falling in is completely non-lethal.
A 2×1 shaft is probably the highest-yielding way of mining for ores that is. Mathematically, a 2×1 shaft reveals 8 blocks for every 2 blocks mined forward, so the basic premise of this system is that digging little 10-block deep side shafts off of their main tunnel, as in branch mining, does not yield any more ores than digging straight as their yield will be highest if they simply keep moving forward and mine endlessly instead of stopping a 2×1 shaft will also lead them into plenty of caves, which could be good or bad depending on how they have feel about those. A good strategy for cave run-ins is to make a quick run-down and nab any visible ores, then find their shaft and keep moving. If they don't want to walk all the way back home after digging this, just dig in a "U" shape until a little less than half of their pick is used up, move 8 blocks to the side, and go back. The 2 biggest problems with this kind of mining are: A. It takes a lot of torches, though their coal yield is way higher than the amount they have spend on torches, and B. They have covered a lot of distance, therefore their chances of having lava run-ins are pretty high.
A variation on this kind of tunnel-mining is to drill a finger tunnel into the stone for 20 blocks, placing torches as they go; retrieve any ore found; then recover the torches as players exit, plunging the tunnel back into darkness; then block up the entrance to the finger tunnel with just two blocks of surplus cobble. By leaving the finger tunnel unlit, and unfilled in, it's true that monsters may spawn later, but they are trapped in the walled-off tunnel. Be careful not to mine back into the same area later and also, there is a low chance that monstrous noise might become disconcerting later.
Multi-mining
The name fits any combined mine such as the following:
Quarry-Branch Mine
This involves digging a quarry and adding ledges every few blocks down around the outside while digging. The sides of the quarry have to be a certain length, for example with a two-space branch mine, the player need each side to be 3n+1 blocks long. The result will vaguely resemble a shopping mall atrium with one massive open space and then a bunch of "shelves". Then, dig the shafts to at least 20 blocks for a ton of ores, including quite a few diamonds (about 3 veins) down on the lower levels. For a 10×10 quarry, they will get about 150 stacks of cobblestone, while for larger mines (e.g., 40×40), they will get around 2000 stacks, handy for massive building projects.
Quarry-Cave Mining
Dig a quarry down to under Y-level 25, and attempt to unearth a cave. If they did, they can explore that cave. Many of the deeper caves have no surface entrance, and being able to expose a cave that is otherwise sealed to the outside world through a quarry can garner them both large amounts of cobblestone, dirt, and gravel, as well as the rewards of mining out a deep cave. If they don't want to hold on to the stone that is excavated, they can use it to fill in dead ends, allowing them to navigate the remainder of the cave more easily.
Quarry-Drop Shaft Mining
This involves basic quarry technique but in small squares. First, the player decide how large they want the mine to be. For example a make a 3 by 3 hole then go over 1 block and repeat for a 2 by 2 square quarry. Also this allows for maximum ore exposure. But they would need at least a 3 by 3 squares, going all the way to the bedrock layer.
Warning: This can be very dangerous, as they can run into hidden caves, dungeons, lava pools, and abandoned mines.
Mass Mining
For those who favor mining in a straight path but try to not make it very long. Once they have reach the bedrock level, go up a few blocks and start mining and make it a large corridor. If the player reach a cave, continue to make the large corridor and secure the cave. This will give the player large stores of cobblestone and more of a chance of finding lava. Find ores that are nearby that would be hidden if the player did another technique and did not get lost in their mine. This a very basic technique yet a tiring way of mining. It is suggested to use a diamond pickaxe with max efficiency enchantment and unbreaking enchantment so that the pickaxe doesn't break during the process and also consumes less time compared to using a non-enchanted stone pickaxe.
Special techniques
TNT mining
TNT mining is dangerous. If they must do it, they can use the 3-in method: First find a solid stone wall, mine 3 blocks inward, then the player place 1 block of TNT on the third hollowed out space. Once placed with flint and steel in hand, they right-click it with the flint and steel and back up a few steps and quickly block off the front of the hole with one block of stone. The explosion should create a perfect 4×3×3 hole. Repeat as desired.
A much faster but risky technique is mining in a small alcove, filling it with multiple units of TNT, and igniting it, creating a fairly large cavern. While this variation uncovers a large number of blocks at once, the explosion can let a large amount of lava leak in, making the cave hard to access and burning any drops created by the explosion.
TNT is expensive to manufacture (requiring 4 sand and 5 gunpowder to make 1 TNT), thus another mining technique to maximize the use of each TNT is to dig a 2×1 tunnel 4-5 blocks into the wall, then at head height mine 2-4 blocks (depending on desired size of hole) to their front, right, left, up and down. Place 1 block of dirt to act as a stand for the TNT to explode in the middle. The explosion should create a roughly spherical shaped hole averaging 8 blocks in diameter. This method destroys more blocks per TNT but requires more use from the pickaxe in order to carve the space around the TNT. Since this only creates a single explosion unlike the previous technique, the items dropped from the broken blocks will survive.
Silverfish Mining
The player can use silverfish to clear a lot of stone away to reveal the valuable stuff. To do this, get a bunch of silverfish in a hole, and position themselves above the hole. Most of the silverfish will go into the stone, but make sure there are at least some left visible. While standing above the leftover silverfish, throw a splash potion of poison, then a splash potion of regeneration immediately after. Every time the poison hurts the silverfish, it will call any nearby silverfish out of the stone, then it will get healed by the regeneration potion, so it can keep getting hurt instead of being pinned at 1 health. Soon, all of the silverfish will come out of the stone, and they can kill them at this point, then mine all of the minerals left behind.
The easiest way to transfer silverfish to different places is by leading them through the Nether. The player can do this by putting a nether portal by a silverfish spawner, however they will need a path of blocks they can't enter, and another portal for players, farther away with a different exit. After luring a batch of silverfish through their portal, they go through theirs. The player will have made walls and a trail in advance. The walls and trail contain the silverfish, but lets the player see and follow them without being able to reach them. Two levels with a glass walkway for them above their path can do this, just make sure they can't reach the player's level (and none of the blocks are stone they can enter). Also, they may need to see the player once without glass, so they know where they are. Then lead them to a third portal leading to their mine, and voila, the player have transported them to where they want to mine at.
| Silverfish Mining in action (go to the 18 minute mark) (view on YouTube) |
|---|
Wither Mining
Another way to get many resources acquired from mining very quickly without having to use up tools or TNT, is to use the wither. The wither, unlike most other mobs, has the ability to break any block that can be mined by the player. In addition, if a block is destroyed by the black or blue skulls of the wither, it will drop itself (see Explosion for more details). However, be very careful when attempting to mine by using the wither when in Survival mode, as the wither has many defenses, and is able to deal a great amount of damage to the player. So, make sure to either have high quality weapons and armor, or make the wither mine so that it is impossible for the wither to attack the player.
Piston Mining
Piston mining is a technique for safely extracting small amounts of valuable ores, usually diamonds, and for inserting 'windows' into potentially dangerous spots.
- Start by digging a 1×2 hole in a safe spot a few blocks to one side of the target area. If no truly safe spot is available, pick a location where the risk is least.
- Place a block and a piston in the hole. Any block moveable by a piston will do. Glass would allow the player to see hazards without triggering them. An efficient method is to place one block of glass, then use 'filler' material for the subsequent blocks.
- Dig another hole a few blocks to the other side of the target area, ideally in another safe spot. When doing this, don't forget that the maximum distance a piston can push is twelve blocks in a straight line.
- Activate the piston using a redstone torch, lever, button or pressure plate as the player prefers.
- Insert another block, re-open the 'receiving hole' if necessary and reactivate the piston.
- Repeat until the ore can safely be collected, or the glass block has revealed a hazard or confirmed all is safe. Note that they may need to check several rows before they can be entirely sure there is no danger.
- Retrieve the piston for reuse.
This mining method is only practical for collecting very small amounts of ore, but it can be useful for collecting diamonds from dangerous spots or when players suspect a natural hazard is nearby and they want to locate it precisely.
Aesthetic Mines
This section is for mines that focus more on aesthetics rather than efficiency.
Vertical design
Design
This design consists of a Hub and a Push leading into another Hub.
Key:
   B - Block
   _ - Air
Hub: Top view:
         BBBBBBB
         BB___BB
         B_____B
         B_____B
         B_____B
         BB___BB
         BBBBBBB
Side view:
         BBBBBBB
         BB___BB
         BB___BB
         B_____B
         B_____B
         B_____B
         BBBBBBB
Each push is basically the design behind it (The side view) dropped a square repeated several times, the amount is dependent on the miner but an even number is preferred due to torch placement. (Discussed later)
The central hub (The first hub made in the mine) will have 4 pushes in each of the cardinal directions, eventually, if players are in need of ores they may choose to go down in one direction until the player have what they need. It is recommended to check the Y-coordinate about now, they may want a push length that will allow them to get to their Y-coordinate value as close as they can to 12. (Lava spawns in caves at 10, and their Y-coordinate is up 2 for the positioning of their head) After the player's decided on the length and finished a push, make another Hub in the same size as above. Continue until they reach the last of their hubs, and they should end it before they hit the bedrock layer, otherwise it won't be very nice looking.
Torch Placement
Torch placement is simple in this design. The player will have 8 torches in each hub, on both sides of the bottom of the corners. If the player want, they may add a torch to the center floor to add more light, but it is enough to prevent mobs spawning as it is now.
For every push, put two torches on every other left and right hangs.
Connections
After players finished all of the cardinal pushes, they will be wondering what next to do, considering the amount they have mined, they may want a place to store away items, connections are great for this.
Each connection is a hub formed by two of the cardinal branches intersecting, meaning if players went to the first north hub down, they would have to mine one push or hub to the left and connect to it from the first west hub down by pushing right. It's the same as the hub but it leaves two walls with nothing to do, if the player try to continue with them, they will get intersections that are hard to make aesthetic unless the player are looking for a large open mine, or a maze mine. Instead, the player can use it for chests, and it works well for its purpose. Very hard to describe with letters, so here's a picture instead: Picture
Continuations
After the cardinal directions are done, players have their as many connections as they care for, continue adding onto their bottom hubs, only with straight pushes. The bottom hubs will branch in all directions except backwards, unless the player are going with an open or mine variation, and each of those hubs may spread in the same direction so long as it's not backwards for the original hub. If they positioned well in the first central hub and push size, they will be scraping a long in a fairly wide tunnel along the same height the player find diamonds. It's easy sailing from here on.
Variations
- Central Drop shaft
Central hub is under an area of flat ground, dig three deep holes where torches will go, ladders go on the bottom and top, torches in the middle, players go above the hub as normal only there will be a 2 high gap under the hangs on this first hub to allow for the ladders as a way up. The player will need the ladders to go all the way down, and such won't have a place for a torch. They can circumvent this by putting them on the middle of part left over at the top of the next section, the lighting is the same and players won't need an extra torch to prevent mobs spawning. This also works particularly well if they want to replace the top with glass.
- Open Mine Connections
Same as original, only every connection made splits off in all four directions. It goes up with a 1 wide path in the center in all four directions and the both of the two wide paths go down until they merge, which is when it can do so without getting rid of the upward patch.
There are two variations, one where players will go up when they make a connection, so they will have a stack of hubs in all directions, another where they only dig down in the connections, where they intersect their build the 1 central path down to the hub. The latter is more efficient as all of it will eventually lead to the bottom and therefore be mining ore.
- Maze Mine Connections
This is the same as an Open Mine except player's down path is one wide, not their up path. Same two variations, same correlation in efficiency.
- Lava lights
Players can replace the torches in the center of the hubs with a piece of glass and lava under it and it gives only one light less, providing that they placed them at all. They can change it for a 3×3 if they feel so inclined and have enough lava.
- Drop Shafts
This combines the Central Drop Shaft and optionally the Open and Maze Mine Connections. It requires close tallies if they don't want to combine them though.
At the hub, mine down the same as if they were going to make a Central drop Shaft, but continue until they are on the same level as their next hub, depends on the size of their push, like a 8 push would be 8 blocks down. After they reach the bottom, make another hub in the same style as a Central Drop Shaft. This will require more ladders, so it's not a very good idea if players are short on log, but it allows a certain maze quality.
There are two places where they can put the ladders, but the two per corner type of the Central Drop Shaft style is preferred, however the other style uses less ladders.
The player mine their shafts in the blocks directly north/south/east/west of the center so that they have 4 shafts all the way to the next hub, this require 5 blocks to hang down from the hub, some like it, others don't.
Two variations on top of that, they may use the drop shaft for all hubs, thus any hub with a hub above will be able to ascend, or they can only use the shafts for the central hub, adding 'terraces' to their mine.
After players get down to the bottom level, they may continue to stretch out and connect with the original push/hubs. Once they connectted, they may use the open style, leaving 1 wide path up or the maze, leaving 2×2 wide up.
Other Aesthetic Mine Ideas
Central Mine
The player should change the rail-torch-rail combination to powered rail-redstone torch-powered rail combination every 34 blocks.
Players will have a central rail system with smaller hallways for pedestrian traffic. On interesting locations, players should add some kind of rail station with access to the rail.
Side Mines
Connections
(From the top)
Random Mining
Mining randomly is very simple: dig, dig, dig wherever and however the player just happen to feel like digging at the moment.
Very simple, and potentially the most rewarding type of mining around: the player can find dungeons, massive cave networks, and maybe the hostile mob base. However, it is also potentially the least rewarding; it's possible to miss all the ores, as this method offers little consistency.
Random mining can very well be the most dangerous method. The player can get lost, mine their way into lava and thus lose their items, into a ravine, into a skeleton spawner with 5 skeletons, or even into their own 40 block drop. Alternatively, they could embarrass themselves by mining straight up into a patch of gravel or sand, or flood their mine by digging into the ocean.
That being said, there is one major benefit to random mining; it will confuse potential griefers. Surrounding a main base with all kinds of twisty passages is a viable option, though it won't ultimately stop a determined griefer from finding the player or their base. This was the most used technique in Pocket Edition, before the cave generation update.
Space/Portion Mining
Not to be confused with Strip Mining; however, this does involve a similar method.
Room Mining
This form of mining involves someone to make a hall way and then make a small opening in the wall. From there, one must simply dig out a portion of the block to create a space. This method is repeated many times down the hall on either side to create rooms for various purposes, while finding several ores and valued materials in the process. This method is useful for the creation of houses, barns, indoor-gardens, storages, and in the creation of hard-to-find/secret places as it offers a variety of places one may go to in order to find something, but they may likely give up in the process unless they are determined.
Tunnel Mining
This is highly similar to Room Mining, except that instead of building rooms, the player build tunnels. However, this takes much longer to do and tunnels are usually much larger than rooms. Because of this, Tunnel Mining is lesser to be used as the tunnels take up many tools in the process of making them as well as the mining process may dig into a body of water and flood the tunnel. However, if the player wants to make an artificial river for boats, this may not be a problem. Despite the fact that they may yield many resources, players may use up several pickaxes or shovels in the process of making them as well as torches to light up the tunnel. Players may get bored of doing this and may abandon the tunnels while still in the process of making them. Some may not consider beginning construction on future tunnels due to lost supplies and the tunnel not being rewarding enough to continue. This method is useful for making minecart subways, large indoor-gardens, art galleries, tree farms, boat rivers, large barn(s), mazes, doing construction on vertical and horizontal structures, constructing strip mines, and secret/hard-to-find areas by making tunnels that seem to go nowhere.
Clear Mining/Safe Mining
The general purpose of Clear Mining (or Safe Mining, whichever one may prefer to call it) is a variation of Box Mining and other simple techniques. A player first finds a suitable area, preferably one block above the bedrock layer so that the player can easily obtain diamonds and other rare minerals. The player must also have at least 5 to 6 stone picks, one iron pick for rare minerals such as gold, and 3-4 shovels for gravel. A sword is optional depending on the players preferred difficulty settings. Once the player has found a suitable and deep area that they are confident in they may either begin or set up a small chamber near the area to store minerals and construct tools to further their mining. To begin, make a simple 1 block wide and 2 blocks high that spans roughly 8-10 blocks in length. Once this has begun, the player then uses their stone picks to mine directly in front of them where their tunnel ends, but, there is a catch. The player does not move once they make their initial 8-10 block tunnel, and mines only the above block of the two block height making a small box, 4 blocks long. Once the player makes a half tunnel 4 blocks long, the turn to their left or right and do the same; not breaking any of the blocks below the first block. (When it is done the concept is much more simple) After the player makes a reversed "T" shape, then the player can start to mine out the remaining areas around the tunnels, only using their reach length to clear away stone and any materials. Once the player has maxed out their reach length, they will be in small "box" that reduces risks of being suffocated by gravel or possibly lava. The player then should have a clear area, and then mines out the remaining second blocks, still avoiding the "edges" of the safety box. Once all materials are mined, the player can then break the box and gather the resources in one quick run. Once the player is done in this, there will of course be small "edges" that they not reach, and these should be mined out making a clear box. To further the effectiveness of this strategy, one may then place torches in the "frontal" corners of the area and repeat the process on each side, however this time, rotating their view to clear away all areas of their reach, so long as they are away from their initial entrance tunnel. The end result should be a very fast, resourceful, and safer approach to mining at bedrock. However, mobs may spawn in areas of the mine that are poorly lit, and lava is a factor, along with tediousness, so the player must make a commitment to a clear mine, leaving when satisfied with their bounty of materials. Like parenthesized above, this strategy is best played out rather than explained.
Amphitheater Mining
Start with a basic U-shaped mine, and make an "amphitheater" down the levels until the player have a one-block space. Then, make a doorway ahead to make another amphitheater mine. This is very useful, and the player can even make it decorative by adding staircases as stairs or chairs.
Wanderer mining
This is a simple mining technique, but isn't used much because of the risk of getting lost. Start by making a staircase down until the player reach the level where the desired ore is most commonly found, and begin mining. Occasionally change directions and make multiple branches. If there is a rise, plow through it. If there is a fall, bridge it with cobblestone. The point is to cover as much area without changing their Y-coordinate.
OCD Mining
This form of mining is relatively simple. Find or make a cave. When the player found ores, dig it out. Then, measure the longest side of the ore. Turn the small hole into a perfect cube and they will probably find more ores.
Shovel Mining
Simply create staircase to desired depth and make tunnel to find pocket of dirt or gravel. With their shovel mine all dirt/gravel and look at sides of created cave. It is very similar to caving, except they are making their own cave. This technique is very useful on older server where all caves had been explored. The advantage is that players don't need to spend too many resources on tools, because they mainly use shovels, a cheap and reasonably fast tool most of the time. On the other hand yields are smaller than from caving or strip mining.
Worst Case Scenarios
If the player falls into lava, do not panic; swim upward to get out, then try to get far away from the lava and to water if they can. This way even if they die, their items won't be destroyed by the lava. If they need to heal, eat golden apples or drink some Potions of Healing or Regeneration and hide in a corner/away from mobs, and make sure they use a water bucket if they have one. If the player know they are going to die anyway, press F3 and F2 (and also press fn together if the F2 or F3 button has other functions) to take a screenshot of their coordinates. If they are burning to death, trapped, close to the lava, stand in a corner and encase themselves in a dirt or other hand breakable shell. Once they die, their items will be contained safely in the shell.
If they are trapped in blocks and are suffocating, try to dig looking downwards. This could assist them in getting out of the trapped pit.
If they are fighting and are going to die, press F3 then F2.
Whatever happens, they should look back upon what they did, and analyze how they died, and what they could do to improve.
If their pickaxe breaks and they have stumbled into a cave and they have lost their way, the only option is to punch their way out and this could take a while. If there are any nearby abandoned mine shafts, check them out, they can use planks to make a crafting table and tools or there might be a spare iron pickaxe floating around.
If they can, get an ender chest and start to put in their stuff from the most expensive/important to the cheapest/least valuable. When they spawn back to their house, put another ender chest and take out their stuff.
Best Case Scenario
Should the player happen to accumulate a large amount of resources, such as, perhaps, 2 stacks of iron ore and 10 diamonds, they may be tempted to delve further into the cavern. Resist this urge and return to their base to empty their loot. Dumping off their goodies instead of trying to explore longer may help in the long run, and will reduce the chance of losing their loot. Having a bed at the base of their mine is also helpful; if the player dies, they will spawn at the base of their mine, hopefully surrounded by their chests full of goodies.
If possible, carry an ender chest with the player to store their valuable resources, or put down a chest where they are at, put their loot in it, and write down the coordinates of the chest. They can come back to the chest later. Find the current coordinates by F3.
Safety
When going for a mining trip, make sure that the player take proper precautions to not die because of sand or gravel. Use their best judgement and be careful when digging. When going mining, after they are finished and they make their way back, try to go out the way they came. That way, players know they are safe and there is no risk of lava, water, gravel, or sand falling on them and killing them. Digging a new shaft to escape the underground could result in sand falling on them when it turns out they dug their exit below a desert biome, or they could be drowned when the entire ocean floods their exit shaft. If players do get lost, they can dig up in a stairs pattern so that sand and gravel won't kill players and they won't be drowned if water comes through. If gravel does happen to fall on them, do not panic and immediately hold down the left mouse button to dig the gravel out. This will save themselves from suffocating.
Stairs pattern: A=Airspace B=Block
    A
   AB
  AB
 AB
AB
Never take valuable items when going mining. The player don't want to delve into dangerous caves while carrying tons of iron and diamonds, for if they lose them while mining, they will be sorry. Carry more supplies for longer trips, but don't carry more than they can afford to lose to lava. Normally, they will want to use stone pickaxe for economy, but carry at least one iron pick for advanced ores (gold, redstone, and of course diamond). If they have tons of iron and are impatient, they might use iron pickaxe in general, but while those are faster, they only last twice as long (block-wise) as stone tools, and they will be going through a lot of pickaxe regardless. Take a diamond pickaxe if they want to be fast and efficient for its durability, or to collect some obsidian. Make sure to bring a sword, or at the very least, a bow and some arrows.
Supplies to bring while mining: Crafting table, furnace, sticks, cobblestone, water bucket, picks, swords, food, armor and fishing rod.
ABBA Rules
ABBA Rules is a style of caving introduced by VintageBeef where two or more members go caving for a set period of time, collecting ores with Silk touch. Each ore is assigned a certain number of points. At the end the participants tally their points and the winner takes all the loot gathered by all parties. This competitive style of caving was inspired by a song called "The Winner Takes It All" by the Swedish band ABBA, hence the name.
PvP is not allowed and participants typically make use of potions or Ender Pearls if they so choose.
Point System
| Ore/Item | Points |
|---|---|
| Emeralds | 7 |
| Diamonds | 5 |
| Gold | 3 |
| Lapis Lazuli & Redstone | 1 |
| Name tags | 7-10 |
| Horse Armor | 7-10 |
| Golden Apple? | 10 |
Iron and coal ore are not worth any points. Gold ingots found in chests may or may not count for points. Name tags, Horse Armor and other loot chest items may or may not count for points - they are usually worth between 7-10 points. Guude found a golden apple in a chest once which counted for 10 points?.
Mine Defense
One method for defending a mine is a tunnel collapse system. This essentially has the miner press a button to retract sticky pistons in the walls, pulling torches off the walls. These torches are supporting sand or gravel in the roof, preventing it from falling. When the sticky pistons retract, the torches are no longer attached to the walls, and so they disappear. This allows the sand or gravel to fall, blocking off the tunnel. This can be used in a network style mine to block off the assaulted tunnels while still allowing movement past the blockages. It can also be used to trap assaulting mobs in a "Quarantine Area" and prevent them getting loose in the mine.