Summary
Time Required
This tutorial should take around 1 to 1.5 hours to complete.
Getting Started
We are going to start off small and teach you how to make a resource pack. Resource packs can modify textures, models, animations, music sounds, user interfaces, and languages.
Don'ts in creating resource packs
Before creating resource pack, you should first know what not to do. Here is a list of the things you should not do:
- Do anything that violates Mojang's terms of use for Minecraft.
- Release Minecraft versions or modifications that allow you to play without having bought Minecraft from Mojang.
- Release the decompiled source code of Minecraft in any way.
Creating a resource pack
Start off by navigating to our resourcepacks folder. To find the folder, you must first locate the Minecraft folder. Once you are in the resource pack folder, create a new folder and name it: “Tutorial_Resource_Pack”. Then, open that folder.
The first thing we need to do is create a pack.mcmeta file. This lets Minecraft know that the folder is a resource pack and it also allows you to customize the description that appears when you're selecting which resource pack to use in the game.
Creating an MCMETA file
To create an MCMETA file, right click in the 'Tutorial_Resource_Pack' folder and create a new text document. Name this file “pack.mcmeta”.
Requirement
- Any text editor should work but the suggested is a text editor using some sort of programming IDE. Notepad++ is an excellent, and FREE, text editor with syntax highlighting for lots of programming languages. You can download Notepad++ from here: [1]
- Note
Make sure the file extension is .mcmeta and not .txt when you rename it. You may be warned that changing a file name extension could make the file unusable. This is okay!
If you can’t see file extensions, you can turn them on by going to the View menu of the file explorer and checking the check box for file name extensions.

pack.mcmeta
Open pack.mcmeta in a text editor of your choice and copy or type the following for 1.11 and 1.12:
- pack.mcmeta
{
   "pack": {
      "pack_format": 3,
      "description": "Tutorial Resource Pack"
   }
}
"pack_format" requires 1 in versions before 1.9, and 2 as of 1.9 and 1.10.
You can leave the description or you can change it to something more exciting. If you decide you need something with fancy characters, you can look up the code for it here. Say you want to use the letter thorn: Þ. You'd put that in as \u00DE. Just make sure you use a backslash and not a forward slash.
- Note
This file is written in JSON! We won’t go into specifics about the format now, but be aware about how things are laid out. Be very careful not to forget quotation marks, colons, and curly or square brackets. Missing one of these can lead to your resource pack not working correctly!
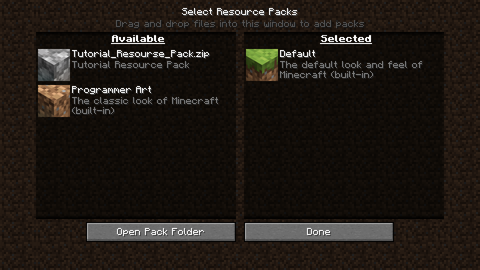
Testing our Pack
Now we are ready to test it out in game! Launch Minecraft and open the options, then click on Resource Packs. Your game should look something like this if you used the above code:
Troubleshooting
If you don’t see your pack in game, make sure your pack.mcmeta is correct. If it isn't, look for any missing curly braces { }, commas, colons :, quotation marks “”, or square brackets [ ]. Remember for each open brace, quotation, or square bracket, you must have a closing brace, quotation, or square bracket.
Creating an Icon
As you may have noticed, our pack does not have an icon! If you do not specify an icon, a grayscale icon will show up next to your pack.
Requirement
- MS Paint will work for modifying most textures, but will not work for saving out textures that have transparency (like the chicken’s). GIMP (GNU Image Manipulation Program) is a free image editing program that will allow you to save out transparent images. You can download GIMP from here: [2]
In the image editor of your choice, create a new image with a size of 128 by 128 pixels.
To do this with MS Paint:
- Click resize
- Change from percentage to pixels in the resize dialog that pops up
- Uncheck maintain aspect ratio
- Type in 128 in both horizontal and vertical text entry boxes
- Click OK
Once you have the correct canvas size, draw whatever you want your icon to be. For this tutorial, we’ve created a crudely drawn smiley face:

Save your icon with the name “pack” and make sure that it is saved as a .png. Save it into the same folder that we put our pack.mcmeta file. For reference, our folder should look like this now:
Now if we launch the game and go to the resource packs list it should look something like this:
Apply the tutorial resource pack!
Modifying an Entity’s texture
Now that we have our resource pack set up, let’s modify the creeper’s texture!
However, before we can do some painting, we need to set up the folder structure that Minecraft expects resource packs to be in. To do this, do the following:
- Create a folder named “assets” in our Tutorial_resource_pack folder
- Inside “assets”, create a folder called “minecraft”
- Inside “minecraft”, create a folder called “textures”
- Inside “textures”, create a folder called “entity”
- Inside “entity”, create a folder called “creeper”
- Copy the creeper texture from the Vanilla Minecraft resource pack into our newly created creeper folder.
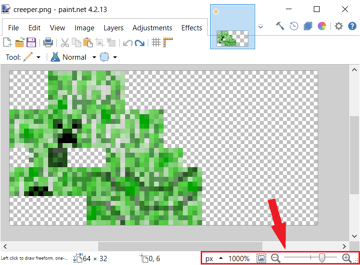
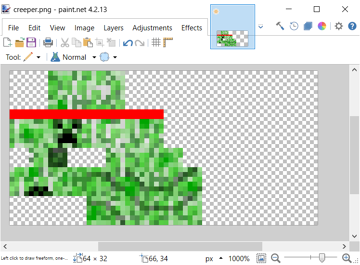
Now that we have the normal creeper texture, open it up in the image editor of your choice. It should look something like this:
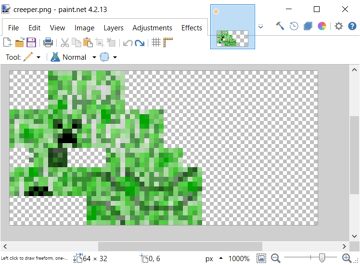
You might notice your texture looking small, make sure to zoom in on the texture. In MS Paint you can control magnification in the bottom right hand corner of the window with the slider.
- A quick note on textures
If you’ve never seen a texture before, the above image might surprise you. The best way to think about it is like wrapping a gift with wrapping paper, but instead our wrapping paper is our texture. Here is how the creeper’s texture is laid out:
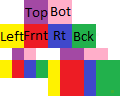
| Image Key | |
|---|---|
| Top | Top of cube |
| Bot | Bottom of cube |
| Left | Left side |
| Frnt | Front side |
| Rt | Right side |
| Bck | Back side |
Areas with matching colors face the same direction (i.e. Red areas are always the front of a cube).
How this looks in game:
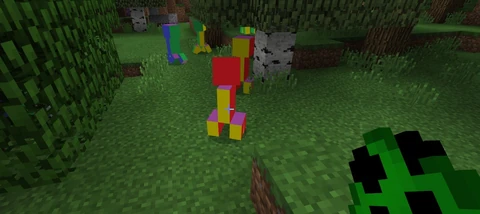
Now it’s time to be creative! Edit the creeper however you want. I’m just going to add a headband for sake of simplicity.
Once you are happy with your texture, save out the file as a .png and make sure that the file name is “creeper”. The game will only look for files with the correct name.
Modelling Blocks/Items
Sometimes you may want to change one of the Minecraft models. Here is a quick and easy way on how to do it.
Requirement
- A 3D Modelling Editor like opl's Model Creator. You can use other modelling editors but it is recommended to use this because it is easier to use and can export to
.jsonformat. - A ZIP viewer like WinRAR for Windows. Other ZIP viewers can be used but this can view JAR files as well.
Replacing a Block
Because the default ladder in Minecraft isn't 3D, you can replace it with your own model. First, get all the ladder's files into this resource pack:
- Open the Minecraft JAR file using a ZIP viewer of your choice.
- Navigate into the
assets/minecraft/blockstatesfolder, then extractladder.jsontoTutorial_Resource_Pack/assets/minecraft/blockstates - Navigate into the
assets/minecraft/models/blockfolder, then extractladder.jsontoTutorial_Resource_Pack/assets/minecraft/models/block - Navigate into the
assets/minecraft/models/itemfolder, then extractladder.jsontoTutorial_Resource_Pack/assets/minecraft/models/item - Lastly, navigate into the
assets/minecraft/textures/blockfolder, then extractladder.pngtoTutorial_Resource_Pack/assets/minecraft/textures/block.
Now you can either edit the ladder.png using your preferred image editor, or you can edit it in your preferred modelling editor.
Modelling the Ladder
In modelling the ladder, we will use the recommended opl's Model Creator. To open it, simply double-click it. After it has opened, press Ctrl+O to open the ladder model. After the open dialog has appeared, paste in resourcepacks/Tutorial_Resource_Pack/assets/minecraft/models/block/ladder.json in the "File Name" box.
You then should be facing a ladder which is on the south side of the box.
- Press
R to create a new block.
- Resize the model to as small as one of the rungs of the ladder. Then, on the menu bar, go to "View -> Dialog -> Texture Manager"
- Type in the first box to "texture" and the second to "blocks/ladder" and the last, double-click the "C" button and paste in the box,
resourcepacks/Tutorial_Resource_Pack/assets/minecraft/textures/blocks/ladder.png
- In the next row, type in the first box "particle", then follow the third step above.
Now we have created the particle texture of the block when broken and the main texture.
To assign a texture to a block, select all its faces and press T to toggle face visibility, then go to "View -> Dialog -> UV Editor". Put on the texture. This part is a little bit hard to document, so try to do it yourself.
Finishing off
When you have completed the 3D model of the ladder and saved it, launch Minecraft, and test it out. Place a ladder on a wall, and you should see it's replaced model.
Adding Languages
Main article: Resource pack § LanguageYou can add new languages to Minecraft using a resource pack. Assume your language code is 'LANG'[1] and country/region code is 'COUNTRY'[2], pack.mcmeta will look like:
- pack.mcmeta
{
   "pack": {
      "pack_format": 3,
      "description": "Tutorial Resource Pack"
   },
   "language": {
      "LANG_COUNTRY": {
         "name": "Tutorial Language",
         "region": "Country/region name",
         "bidirectional": false
      }
   }
}
If you want your language to be right-to-left, set "bidirectional" to true.
Then, put LANG_COUNTRY.lang in assets/minecraft/lang inside your resource pack. When you launch the game, choose your resource pack, open the Language selection screen, and your new language will be there.
- Notes
The pack.mcmeta goes in the root folder of your resource pack, not in the assets/minecraft/lang folder. Also note that the above pack.mcmeta is the same file as the pack.mcmeta file that you have created a while ago. As of 1.7, you can choose multiple resource packs at once. If you want to use your new language and resource pack for before 1.7, you need to combine them manually because multiple resource packs could not be selected before the version.
Animation Properties
Main article: Resource pack § AnimationAn example of an animation file is this:
- stone.png.mcmeta
{
   "animation": {
      "interpolate": true,
      "width": 1,
      "height": 7,
      "frametime": 1,
      "frames": [
         {
            "index": 0,
            "time": 0
         },
         1, 2, 3, 4, 5, 6, 4, 2
      ]
   }
}
- Note
All you really need to make a texture animated is the following code, though it will make each frame last only one frame:
- stone.png.mcmeta
{
  "animation": {}
}
Save the file as the same name as the texture you want animated with an .mcmeta in the same folder as your texture.
Texture Properties
Main article: Resource pack § PropertiesAn example of a texture property is this:
- shadow.png.mcmeta
{
   "texture": {
      "blur": false,
      "clamp": true
   }
}
Fonts
Main article: Resource pack § FontsCharacter sizes in fonts are determined by the last line of pixels that contains pixels which contain a non-zero alpha. This allows additional padding to be added around characters by adding a color with an alpha level of 1, which Minecraft will consider as part of the character.
Testing your Resource Pack
- Launch the game
- Click on Options
- Click on Resource Packs
- Find “Tutorial Resource Pack” in the list on the left and click the arrow next to it
- Click Done
If you decide you want to make some changes to your resource pack, just close the game, edit your resource pack, relaunch the game, and follow the steps above to test your resource pack again.
Packaging Resource Packs with Worlds
For using in singleplayer worlds, you can package your resource pack as a ZIP file named resources.zip inside the world directory. This will then be automatically used when playing the singleplayer world.
Server Resource Packs
If you are the owner of a server, you may set it as the resource pack of your server.
References