For players who do not know how to begin their Minecraft journey, the Beginner's Guide is a tutorial made to provide a list full of good ways to start. Here, you can learn how to survive the first night in two different formats: in an overview with goals or in a step-by-step instruction. You can choose which one you want to use, but both will help you accomplish the same goal.
In Java Edition, when you starts the game for the first time, there will be a short in-game tutorial which explains the very basics on how to move and look around. The Controls page will give you a complete overview of all the controls.
Before reading this page, it's expected for players to have already bought and downloaded the game. You will need to create a new world before starting the tutorial. For Java Edition, Tutorials/Menu screen can help with that.
Overview
First day
Controls from the Java Edition are listed below.
As the first day begins, you will need to collect logs. First, you should look around for trees, and go towards any you find. You need to collect at least 5-8 blocks of logs from trees by holding down the ![]() left mouse button while the cursor is on the block. This is enough to craft the basic tools and items you need immediately, though you'll certainly want more a little later.
left mouse button while the cursor is on the block. This is enough to craft the basic tools and items you need immediately, though you'll certainly want more a little later.
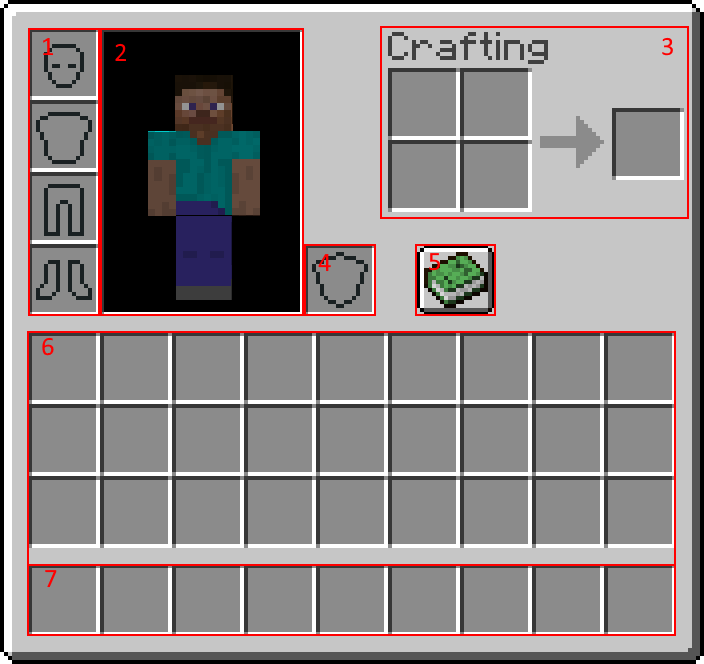
1. Player's armor. 2. Character. 3. Personal crafting area. 4. Offhand slot. 5. Recipe book. 6. Inventory. 7. Hotbar (part of inventory)
When the player opens up their inventory (E by default), they will see the inventory window, depicted to the right.
The player's avatar takes up most of the upper portion of the GUI, and the inventory below is the space for the player's items. The bottom 9 slots are the usable slots, which is the hotbar (7). Four armor slots are to the left of the player's avatar (ignore those for now, they don't become useful until much later on), and a 2×2 square to the right of the character as the player's personal crafting grid (3), which can be used to craft a few basic items. By clicking the recipe book (5), the player can easily craft items in this grid. Place the logs into any space in the crafting grid, and planks will appear to the right of your logs. ![]() Left-clicking the planks will cause the logs to disappear and planks to appear as a newly crafted item. Once you have the planks, it is possible to drag them into the inventory and place them.
Left-clicking the planks will cause the logs to disappear and planks to appear as a newly crafted item. Once you have the planks, it is possible to drag them into the inventory and place them.
Four planks can in turn make a crafting table (Place 4 planks in a 2×2 square. To fill each individual slot, ![]() right click.) and place the crafting table to use it. Right click the crafting table to access it, this crafting grid is a 3×3 square, big enough for all of the craftable items in Minecraft. The first tool you should craft is a wooden pickaxe (3 planks on the top 3 slots and 2 sticks down from the middle plank). If any stone blocks are exposed close by, you can mine them with a wooden pickaxe for 19 blocks of cobblestone. This is the amount you need to create every basic tool needed for this tutorial: a stone sword, a pickaxe (you'll need the upgraded stone pickaxe to mine iron ore and other blocks), an axe, a shovel, a hoe (not necessary), and a furnace. You'll need the furnace to cook meat for food and smelt any ore you mine with your pickaxe. Once you have a stone axe, you should try to get more logs as time allows; extra logs are useful in many ways, such as building, crafting, securing your base and much more.
right click.) and place the crafting table to use it. Right click the crafting table to access it, this crafting grid is a 3×3 square, big enough for all of the craftable items in Minecraft. The first tool you should craft is a wooden pickaxe (3 planks on the top 3 slots and 2 sticks down from the middle plank). If any stone blocks are exposed close by, you can mine them with a wooden pickaxe for 19 blocks of cobblestone. This is the amount you need to create every basic tool needed for this tutorial: a stone sword, a pickaxe (you'll need the upgraded stone pickaxe to mine iron ore and other blocks), an axe, a shovel, a hoe (not necessary), and a furnace. You'll need the furnace to cook meat for food and smelt any ore you mine with your pickaxe. Once you have a stone axe, you should try to get more logs as time allows; extra logs are useful in many ways, such as building, crafting, securing your base and much more.
If all goes well, you can obtain coal quickly. With the sticks crafted from planks and some coal, you will be able to make torches (coal above a stick on the crafting grid). With torches in hand, you can make for the nearest cave, because iron ore is your next goal. Underground will actually be safer than the surface when night falls, so mining the first night away is not a bad idea at all. On the other hand, if night is falling and you haven't found coal, use a furnace to smelt more logs to create charcoal, a substitute. Additionally, you can gather 3 blocks of wool from sheep and combine it with three planks to make a bed. With this you can sleep through the night without the worry of monsters killing you. The downside of this is wasting sunlight the next day mining, or working indoors. Another thing to worry about is the phantom, you have 3 in game days before they spawn at night, they can kill you if you don't make a shelter as soon as possible or sleep in bed, the longer you don't sleep in bed, the more phantoms will spawn.
Night time
At night time, the primary danger will be hostile mobs (monsters) that only spawn in the dark. These include zombies, skeletons, spiders, creepers, and more. It is a good idea to stay in a well-lit shelter (see below).
If you are really seeking adventure, you could always arm yourself with a sword and fight some mobs; you might be able to get some materials for further crafting and early experience levels, which will come in handy later on. However, the monsters you can fight at this point will either burn (zombies and skeletons) or become less dangerous (spiders) when morning comes, and it will be much easier to fight them later when you have better equipment. If you must fight monsters this early, be especially wary of skeletons; in the open their arrows can easily get your ![]() health quite low, or even kill you at a distance, and if they're in the water or on higher ground, it's unlikely you'll be able to reach them before being killed at this stage. If you happen to see any of the more powerful monsters, keep well away from them: At this point an enderman, witch, or even a creeper can kill you easily.
health quite low, or even kill you at a distance, and if they're in the water or on higher ground, it's unlikely you'll be able to reach them before being killed at this stage. If you happen to see any of the more powerful monsters, keep well away from them: At this point an enderman, witch, or even a creeper can kill you easily.
If you are repeatedly being killed (too ambitious, a monster got into the shelter, or didn't manage to make a shelter), you can always dig a three block hole, cover it up and hide there. However, consider that because this is the first day, you won't actually lose much when you die (except for what has already been gathered that day), so if you do end up being killed you can just tough it out until dawn and start again. Keep on practicing killing mobs until you get the hang of it. If you're completely desperate, you can consider switching to "peaceful difficulty" (see "changing the rules" below), which will make all the monsters disappear until you switch back.
Shelter
As noted above, you should really want to find or make some kind of shelter before your first night, to avoid being killed. The "Shelters" article linked above gives a lot of suggestions for emergency shelters and more advanced ideas, but it only takes a little thinking ahead to manage a decent shelter for the first night. As you move around collecting logs and so on, look at the landscape for potential homes. Easiest (if you can find it) is a small cave with a single entrance that you can wall or fence off. If it's not quite ideal, consider if you can fix it quickly – say, fencing off a back door to deeper caves. If you don't have a cave, you may be able to make one, by simply digging into a mountainside or even roofing over a small valley. If instead you have wide, flat space, then go ahead and build a small house. In all cases:
- Don't be too ambitious the first night, because you will want it to be safe before dark, and you will also want to light up the space you claim (see "Light" below). You can always expand and decorate your home later, or even rearrange the landscape around it.
- When picking your location, it's good to have a view of the landscape so you can see if any monsters are waiting for you in the morning.
- Learn about the awesome powers of planks: fences can be used not only in the obvious way, but as windows or transparent walls, with fence gates to get in and out. Doors provide a full-height exit for solid walls: logs, planks, stone, even dirt, but not fences! A few properly-placed ladders can make it a lot easier to get up to your roof or up a hill. A chest will also be useful – stash anything you're not going to use soon, so you don't have to worry about it if you happen to get killed. You will save some of your precious 36 inventory slots by making planks and sticks only as you need them.
- If you can manage to make a bed early on, place that in your shelter and use it the first night you have it. Getting killed is much less painful after that, because sleeping in a bed sets the spawn point next to it. After the first night, you may well want to spend the nights crafting and mining.
Light
Monsters can't spawn within 24 blocks of you, but huddling in the dark is no fun – and when you do leave your home, you don't want to come back to find a monster has spawned or moved in. So, you need to light up your space, and at this point, the light you have is torches. A single torch gives enough light to prevent monster spawns completely within a 7 block range (barring obstructions), and reduce them for about the same distance past that. That includes horizontal and vertical steps, so the safe zone only runs 3 spaces or so diagonally. Even outside the safe zone, having some light will sharply reduce the chance of monsters spawning (depending on how much light), but it's better to use enough torches to keep your whole home well-lit. If you have extra torches after that, try to light some space outside your home (or at least the entrance) too, to push back the area where monsters are likely to spawn.
Food and hunger
Once you have tools and shelter, your next priority will be food. ![]() Hunger will take a while to hit, so it shouldn't be a problem on your first day, but you should try to pick up some food for when it does, as after you have been moving around for a while, the hunger bar will begin rippling and start to decrease. If the hunger bar drops below 90% (
Hunger will take a while to hit, so it shouldn't be a problem on your first day, but you should try to pick up some food for when it does, as after you have been moving around for a while, the hunger bar will begin rippling and start to decrease. If the hunger bar drops below 90% (![]() × 9), you will not regenerate health, and if it gets to 30% (
× 9), you will not regenerate health, and if it gets to 30% (![]()
![]()
![]() ), you can't sprint. If the hunger bar goes down to empty, you will begin losing
), you can't sprint. If the hunger bar goes down to empty, you will begin losing ![]() health. Unless you are in Hard mode (and a beginning player shouldn't be), you can't actually starve to death, but you will go down to 1 health point (
health. Unless you are in Hard mode (and a beginning player shouldn't be), you can't actually starve to death, but you will go down to 1 health point (![]() ) in Normal mode or half health (
) in Normal mode or half health (![]()
![]()
![]()
![]()
![]() ) in Easy mode, which leaves you quite vulnerable. You will not lose hunger at all if you are playing in Peaceful mode.
) in Easy mode, which leaves you quite vulnerable. You will not lose hunger at all if you are playing in Peaceful mode.
The primary drain on hunger is from healing damage. Note that you will have a little grace period (see "saturation") when starting the game and after eating, but when that's exhausted, healing a single point of damage (![]() ) costs the equivalent of 1.5 hunger points (that's 3/4 of a visible "shank"). Avoid taking falls of more than 3 blocks, drowning or burning yourself, or otherwise taking damage that you will need to heal.
) costs the equivalent of 1.5 hunger points (that's 3/4 of a visible "shank"). Avoid taking falls of more than 3 blocks, drowning or burning yourself, or otherwise taking damage that you will need to heal.
A few other activities also cause hunger, though at a slower rate:
- Fighting: Both attacking mobs and receiving damage costs hunger, even before you start trying to heal damage. (60 blows either way, matches healing
 .) You will need to slaughter a few animals but pick your fights carefully. Taking damage in other ways counts for this too, but each time you take damage it counts as one "blow" no matter how much damage you took.
 - Sprinting: If the player double-taps the forward movement key (W by default), or presses the sprint key (Left Ctrl by default), they will sprint. Doing this will move you somewhat faster, but it also uses up food. (60 meters matches healing .)
- Jumping: Obviously, you'll need to jump some just to get around, but don't bounce around randomly or unnecessarily. (120 jumps matches healing .) Sprinting jumps are especially costly, 4 times as much as a regular jump, although they are the fastest mode of transportation early in the game.
- Swimming and mining blocks cost a little hunger, but those are minimal compared to the items above.
Note that if you are staying at full health, and not fighting, sprinting and/or jumping, or mining blocks, then you will use almost no food. Thus, if your character has a secure place to stay, you can just stay put to conserve food while waiting out the night, a storm, or crop/animal growth.
Consider making a basic crop farm immediately after you have settled in a place. Wheat is where you'll begin obtaining food:
- You can use harvested wheat to make bread.
- When harvesting wheat, you can use the wheat/seeds to breed cows and chickens, thus having a better food source.
In order to make a wheat farm, you must obtain wheat seeds, which can be collected by breaking grass
Play-by-play
Starting the game
When the player begins the game, they will be standing in a landscape somewhere. The general area the player first starts is where they will reappear (also known as respawn) if they die in the game. This is the start of a new Minecraft world. This tutorial is designed to allow you to learn the skills needed to survive in this world and eventually be able to do just about anything you desire. You can do the different sections below in any order you desire, but many sections require you to first complete other tasks first. The tasks listed on this page should all be completed before moving on to the second day tutorial, even if it takes you multiple days to complete all of the tutorial. No matter what, your goal for the first day should be creating a bed or shelter so you can survive the night. The other tasks are also very important and can all be completed along with the main objectives while leaving you with extra time.
Movement
To properly play the game, you will need to be able to move. The controls page is best at describing controls between different systems and can be left open on a computer while first playing the game to check controls. To start, you need to be able to look and move around. After this, you can also test out jumping (which will be done automatically by the game on most versions).
There are three more important actions for the beginning player, and they are all closely related: attacking, mining, and using. Each requires targeting a spot on the screen. Many versions of the game will have a cursor in the center of the screen used for targeting, but touchscreens will allow the player to click on the screen to act as the targeting spot. Only blocks near you can be targeted, and you can tell a block is targeted by it having a box around it (or in the case of touchscreens, being brighter). This selected area or block affects the way you use these actions. For example, using is based on what you are looking at and what is in your hand. Less obviously, the player's actions of attacking and mining also use this cursor or selector method. The buttons for both attacking and mining are always the same, but attacking is only a tap of the control while mining requires holding down the control. These actions may use up blocks and change tools that you are holding and also change depending on your held item. Any time this tutorial mentions verbs describing in-game actions, you may want to test out that action using the controls page as a reference.
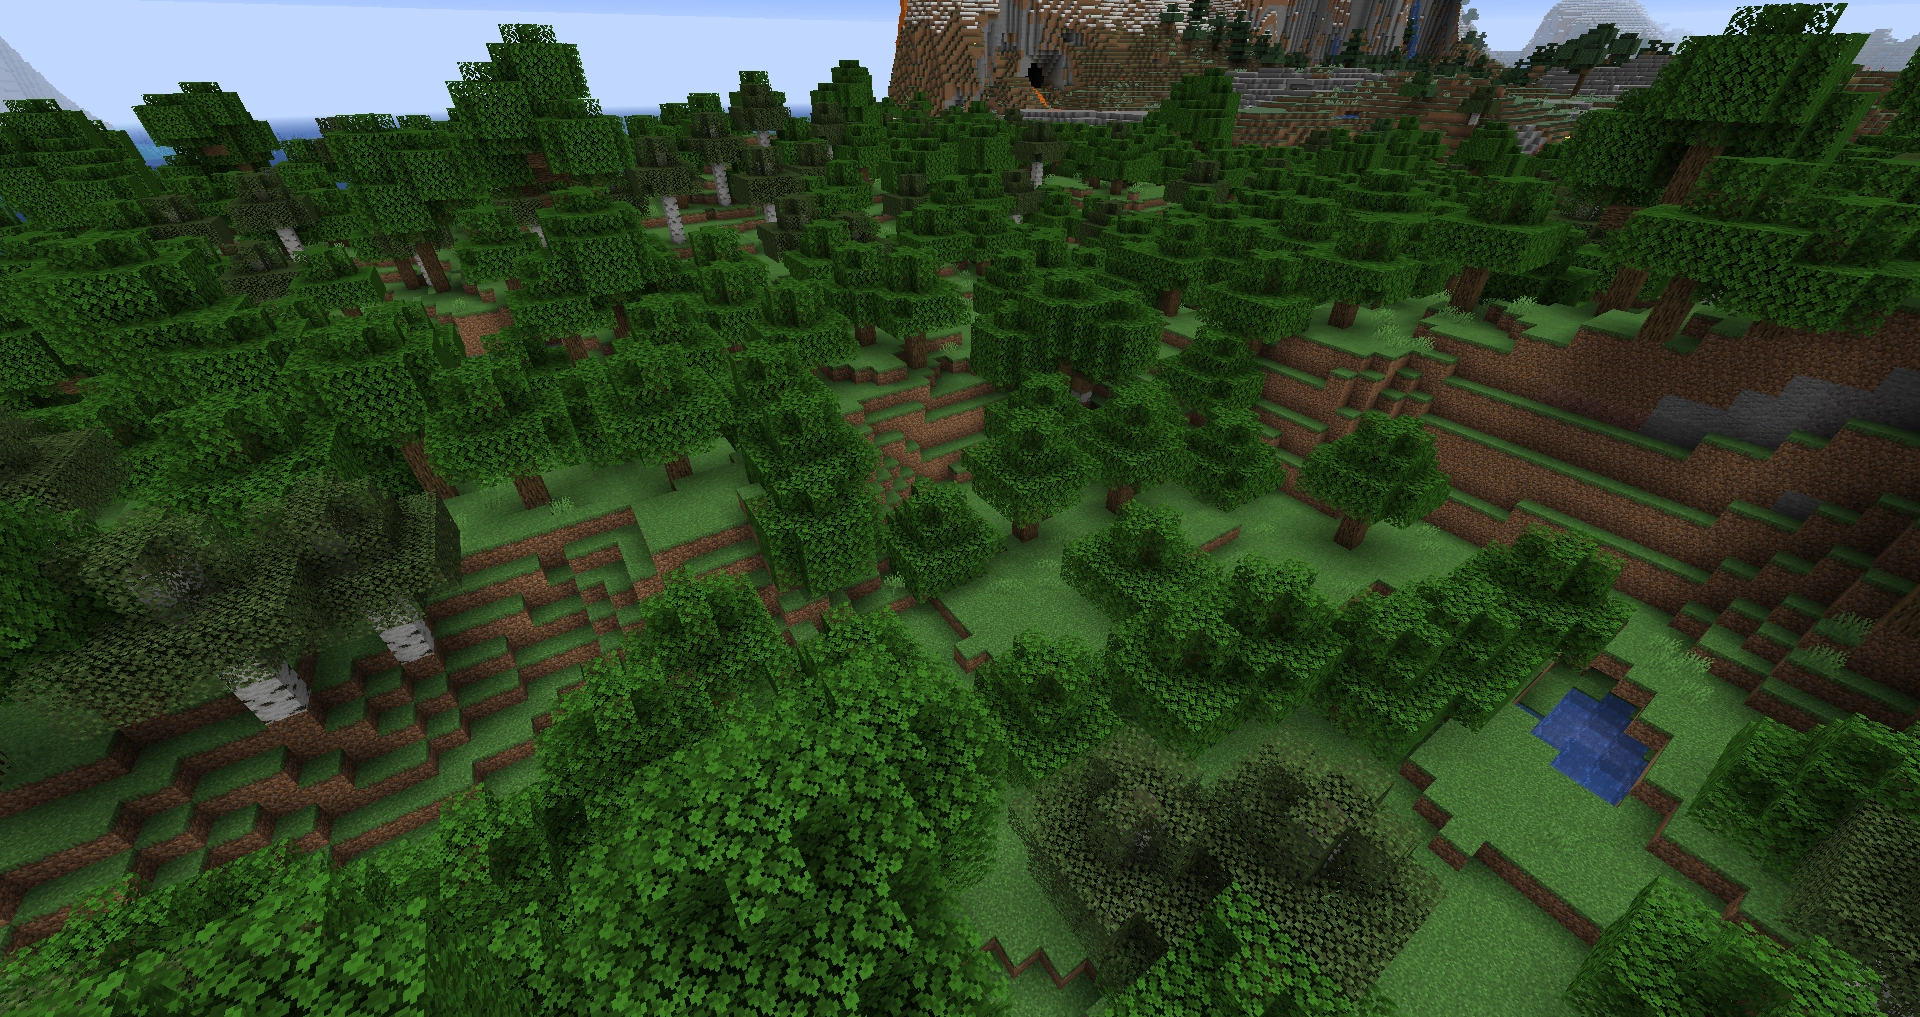
Biomes
The Minecraft world is divided into different areas called "biomes". Different biomes will contain different blocks and plants and change how the land is shaped. There is an advancement that includes finding all the biomes; this is better explained on the advancements page. Biomes will affect you, especially at the beginning of the game, but you have little need to worry about specific biomes until you have learned how to play the game. If you are curious, you may want to read more about biomes on the biomes page.
Log
- Prerequisites: Movement
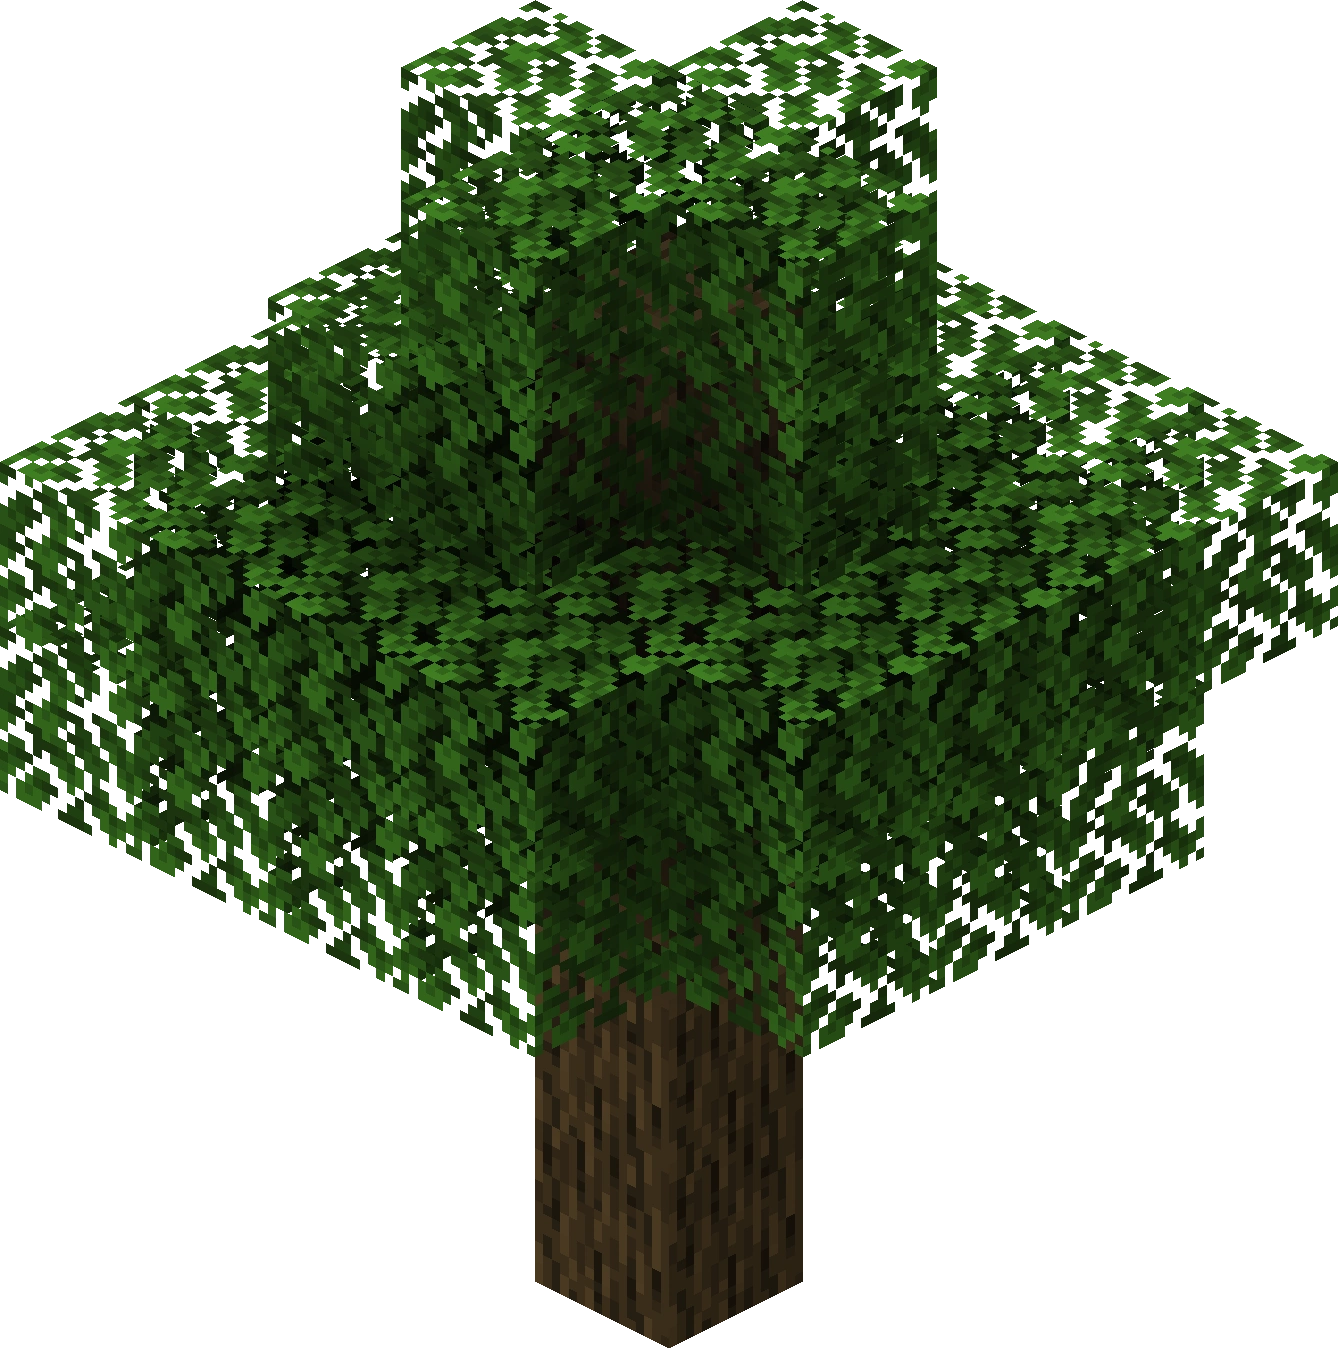
An oak tree.
To progress in Minecraft, it is important for the player to collect logs. The most plentiful log source are trees which are available in most biomes. Logs are one of many items the player can collect without the use of a tool. All the player has to do is mine any log of the tree with their hand or any item. Each block will drop as an item which the player can pick up by approaching it. Items automatically enter into the player's inventory. The player may want to collect a couple blocks of log for later use. There are many different types of trees in Minecraft with each having its own individual name and look. All log works for any recipe requiring logs, but some recipes require that all the logs be the same type.
Inventory

1. Player's armor. 2. Character. 3. Personal crafting area. 4. Offhand slot. 5. Recipe book. 6. Inventory. 7. Hotbar (part of inventory)
To manage all the items they may gather, the player needs to understand their inventory screen (follow that link for a fuller account). Parts of the inventory are always accessible, while most of it requires that the player open the inventory GUI. The inventory screen seen here can most easily be understood from the bottom up:
The many small grey boxes are "slots" which hold items. Each slot can hold up to a "stack" of items, but how many items are in a stack depends on the item involved: Most items stack up to 64, but some (e.g. eggs, snowballs) only stack to 16. Some items are completely "unstackable", only a single item of those types will fit in a slot. Any item that can take damage (tools, weapons, armor) is automatically unstackable, as are a few other items such as saddles or potions.
The 9 slots at the bottom of the inventory screen are the hotbar. These are always visible, and at any given time one of these slots (the player's choice) will be "active". The item in the active hotbar slot is the player's "item in hand", which they can directly use as a tool or weapon.
Above the hotbar are another three rows (27 slots) for the player's main inventory. These are hidden while moving around, but are visible in most GUI's -- not just the inventory screen, but also when using a crafting table, chest, or any similar block. Items can be freely moved around among all the hotbar slots, the main inventory, and any other slots that may be visible at the moment.
The hotbar and main inventory adds up to 36 slots for general storage, which is the limit for how much the player can carry around and transport on their person. There is no sense of "weight" or encumbrance for items, the player moves at normal speed regardless of how full their inventory is.
The inventory screen offers a few extra features above the inventory itself. At the upper-left are the armor slots (with pictures inside) and an image of the player's avatar. The armor slots are restricted; they can only hold armor of the proper type, any items here are considered to be worn. The avatar image will visually show their armor and the items in both hands. (Along with a few other details; for example, after being attacked by skeletons you can often see arrows sticking out of the avatar.)
On the other side of the avatar image is the "off-hand" slot, with a shield outline. This acts much like a tenth hotbar slot; unlike the other armor slots any item can go here, and any item here is held in the player's off-hand. This can be a shield, or some other item such as a hoe or stack of torches. Any time the player presses "use" with no use-able item in their main hand, the item in the off-hand will be used instead, if it has a "use" function: a shield will be raised to protect the player, a hoe or other tool will be used on a block, while torches or other blocks can be placed. Note that swords, pickaxes, and shovels, have no "use" function, so they always defer to the offhand item.
At the top-right, there is the personal crafting grid. Players can place items in the crafting area, but cannot store items there -- any items left there when leaving the GUI will fall back into inventory, or to the ground. The small crafting grid lets the player craft some basic items any time their inventory is open, but is limited to a 2x2 grid. Below the crafting grid is the Recipe Book, which helps a player learn and remember crafting recipes. The recipe book here will only show recipes that fit on the 2x2 grid.
Crafting
- Prerequisites: Log, Inventory
As the game's name suggests, crafting is core to Minecraft. While there are a small number of items that can be crafted directly from the inventory, a crafting table is required to craft tools and most other items in the game. The crafting table will be the player's main asset throughout the game, giving access to the full 3x3 crafting grid (and a Recipe Book to match).
To make a crafting table, the player needs to open their inventory and pick up the logs they collected. Placing one log into the crafting area allows the player to obtain 4 planks.
Template:Grid/Inventory Table
The planks will be different types matching the log types. The different types of logs and planks can be used interchangeably, but some recipes require the logs (or planks, or wool) to match (all the same type or color).
As the player converts their first logs to planks, they may want to consider saving some logs for later. Logs cannot be crafted from planks and have their own special uses.
With planks, the player can finally create a crafting table. After placing and using a crafting table, the player is opened to a three-by-three crafting grid which allows for more items to be crafted. Players will need to use this item a lot for crafting, so it is best for the player to keep one handy.
A crafting table is made of four planks in this pattern:
Template:Grid/Inventory Table
- Tip: Anything that can be crafted in the inventory's crafting space can also be crafted in the crafting table.
Tools
- Prerequisites: Crafting
In order to obtain better materials at faster speeds, the player needs tools. Tools are items which allow the player to complete tasks other than placing blocks at faster speeds than normal. Most tools can be made out of different materials each better than the last. Using a tool to mine the blocks it is intended to will mine the blocks quicker than normal. Tools lose durability upon each use, even if the use was to hit an entity. Enough damage to a tool will eventually cause the tool to break. Different tools have different properties.
First, to craft any basic tool, the player needs to know how to craft sticks.
The basic tools the player can acquire come in multiple tiers and are such:
| Name | Ingredients | Crafting recipe | Description |
|---|---|---|---|
| Axe | Sticks + Planks or Cobblestone or Iron Ingots or Gold Ingots or Diamonds |
Mines log type blocks faster and is a decent melee weapon, but loses 2 durability when hitting a mob instead of 1, and has slower recharging speed | |
| Hoe | Sticks + Planks or Cobblestone or Iron Ingots or Gold Ingots or Diamonds |
Changes dirt to farmland | |
| Pickaxe | Sticks + Planks or Cobblestone or Iron Ingots or Gold Ingots or Diamonds |
Mines stone type blocks faster | |
| Shovel | Sticks + Planks or Cobblestone or Iron Ingots or Gold Ingots or Diamonds |
Mines soil type blocks faster | |
| Sword | Sticks + Planks or Cobblestone or Iron Ingots or Gold Ingots or Diamonds |
Quick weapon with decent damage |
The planks required for a wooden tool can be any combination of planks, as shown here:
Template:Grid/Crafting Table
The simplest way to gather materials for any basic tool better than wooden tools requires the use of a pickaxe. Most players don't craft any tool other than a pickaxe out of wood as the wooden pickaxe is the only tool the player needs to craft before they can build better versions of all the basic tools. To craft a pickaxe, the player must first craft sticks. This is done with the following recipe.
The 4 basic tools are the pickaxe, which is used to destroy and gather stone and stone-related materials, the shovel, which is used to gather dirt, sand, gravel, clay, and their variants, the axe is used to collect wooden materials more efficiently, and lastly, the hoe, which is used to turn dirt or grass block into farmland. The player may have noticed that in order to craft a basic tool, they more or less draw it with its components in the crafting grid. Other items are crafted in a similar fashion.
Stone
- Prerequisites: Tools
Once the player has crafted a pickaxe, they can successfully acquire cobblestone to make better tools. Cobblestone is collected by finding stone then mining it with any pickaxe. Any stone mined with any pickaxe will drop as a cobblestone item.
If no stone appears above ground near the player, stone can also be found within 5 blocks under dirt and grass block or within 8 blocks under sand and sandstone. The player should remember to never mine out the block they are standing on unless they know that there is not a drop below that block.
Most players will want to gather about 18 cobblestone in total, which is enough to upgrade all the basic stone tools except for the hoe and to create a furnace. The hoe is usually skipped at this stage as it's usually unused in the first day.
Combat
- Prerequisites: Tools
Surviving in Minecraft often requires a knowledge of the game's combat mechanics. There are two combat systems which exist in Minecraft – the system in the Java Edition and the system in all other versions.
The more common combat mechanics are simple. While three blocks away or closer to an animal, monster, or other player, the player can attack that entity by clicking the attack button while their cursor is over the entity. Clicking speed does not affect the combat, instead, a player's skill in combat is based more off of their hit accuracy. Without a tool in the player's hand, any attack will deal 1 health point (![]() ) of damage. The basic tools from above each deal multiple hearts of damage when the player attacks an entity while holding that tool. Swords deal the most damage, axes second, pickaxes third, and shovels the least. Each tool deals one more damage than the one below it and each tier of tool adds an extra damage. Using a tool other than a sword as a weapon depletes the durability of that tool twice as fast as usual.
) of damage. The basic tools from above each deal multiple hearts of damage when the player attacks an entity while holding that tool. Swords deal the most damage, axes second, pickaxes third, and shovels the least. Each tool deals one more damage than the one below it and each tier of tool adds an extra damage. Using a tool other than a sword as a weapon depletes the durability of that tool twice as fast as usual.
In the Java Edition a different combat system is used. To attack any animal, monster, or other player, the player must have their cursor hovering over the entity and be within three blocks of the entity when they press the attack button. Any basic tool will deal more damage than any other item the player may use, including when the player is not holding an item. Different basic tools have different cooldowns between hits, shown by an animation of the player's hand which holds the weapon and the dropper icon below the cursor or next to the hotbar. Tools also have different damage amounts. Generally, a tool deals more damage per second the rarer the substance it's made out of. Axes and swords deal the most damage and work well as weapons while the other tools do not work very well as weapons. If the player attacks while still in a cooldown their attack deals less damage, creating an importance in the player's ability to aim before attempting to attack an enemy.
In addition to attacking, the player can also block attacks with the shield, a shield completely negates any damage when it is raised with the ![]() right mouse button. Be aware that a shield can be disabled if attacked with an axe.
right mouse button. Be aware that a shield can be disabled if attacked with an axe.
More resources
Now, with your stone axe, you should cut down some more trees for logs. Although some trees may look different than others, all logs function the same. However, different kinds of logs don't stack together. While you cut down trees, try to gather the saplings that fall. If you are cutting down oak trees, apples will also drop (see "Tree" for more info.)
If the sun is still in the sky, explore the immediate area (making sure you don't get lost), to try and find some coal ore. Coal has all the same properties as charcoal (and can also be crafted into coal blocks).
If you happen across a coal-like ore with tan specks in place of the black, you have found some iron ore. Iron will be extremely useful for most of your Minecraft career, and if it's within easy reach, go ahead and gather it (you will need to mine it with a stone pickaxe). However, If it's in a difficult-to-reach place, just note its location and save it for later.
Animals
- Prerequisites: Tools, Combat
Some creatures in Minecraft are not immediately hostile to the player. These are known as passive and neutral mobs. Many passive mobs can act as important food sources.
Passive mobs will never attempt to harm the player. The majority of passive mobs are traditional domesticated farm animals which will usually ignore the player. If harmed, they will quickly run around in circles for a short time. Some animals will run straight away from players who get too near. If a passive animal is killed, it may drop animal specific resources such as raw meat. Most passive mobs drop experience orbs if killed by the player.
Neutral mobs act similarly to passive mobs except that they will harm the player if provoked. Wolves, polar bears, iron golems, llamas, dolphins, pandas will attack the player if the player harms them. These creatures will also attack other creatures that hurt them. Polar bears will turn hostile to the player if it has a polar bear cub with it.
Animals can be bred by the player. If the player holds certain food items (wheat for cows, sheep, red mooshrooms and brown mooshroom; any seeds for chickens and parrots; dandelion and carrots for rabbits; carrots, potatoes, and beetroots for pigs); sweet berries for foxes; raw cod, raw salmon, tropical fish, and pufferfish for ocelots; raw cod and raw salmon for cats; golden apple and golden carrot for horse and Donkey, then specific animals will start following the player. Right-clicking an animal with their specific food item will create heart particles around the animal and enter it into love mode. When two animals of the same species are near each other and are both in love mode, they will run to each other, creating a baby animal at their location and dropping a few experience orbs. Animals do not have genders, so any two animals of the same species can be used in breeding. There is also a 5 minute wait an animal goes through before it can enter love mode after having been in love mode. Because of this mechanic, it is advised to keep alive at least two of any animal the player wants available at their home.
Bed
- Prerequisites: Animals
To make it through the first night, the player has two good options: craft and use a bed or build a shelter. An experienced player may be able to accomplish both on the first day, but it takes a fair bit of knowledge and efficiency to do so. The best option for making it through the first night is to build a bed as it is faster and safer than a shelter. What a bed allows the player to do is set their spawn point – the location they respawn in if they die – and skip through night entirely. After crafting a bed, the player can place the bed to use it, just like a crafting table. Beds are a special block that require two blocks of space for placement. Beds are about half a block tall, a shape most likely unusual for what the player has thus far seen.
To use a placed bed, night must have started. If it isn't nighttime, the player will receive a written warning from the game that beds can only be used during night or thunderstorms. The player must also be close to the bed and no monsters (other than the smallest size of slimes or neutral zombie pigman[JE & LCE only]) may be near the bed for them to use it. When the player attempts to use a bed during nighttime, they will be moved a lying position on the bed without the ability to move – not even the camera. The game immediately sets the player's spawn point as soon as the player is in bed. If the player is in a multiplayer game, all other players must also use a bed before night is skipped. It takes a few seconds after getting into bed before the game skips the night. If the player wants to leave the bed, they should follow the onscreen instructions when they are using a bed.
To craft a bed, the player will need 3 wool of the same color. Wool is obtained from sheep by shearing them (an option unavailable to the player at this time) or by killing them. Sometimes the player may find wool on the ground; this wool comes from sheep that were killed by other players (if the player is in a multiplayer world) or by wolves.
Here is the crafting recipe for a bed. The color of the bed will match the three wool used. The three wool must be the same color. Template:Grid/Crafting Table With a bed, night is easy to survive. All the player has to do is sleep in their bed whenever night falls.
The player should know that a bed only keeps acts as a spawn point for the player as long as the bed is not broken or used by another player since the player last used it. If the bed has no blocks immediately next to it open for the player to spawn in, then the player will not respawn there but their spawn point will still default to the bed.
Taming animals
- Prerequisites: Movement
Some animals can be tamed as pets. By feeding a specific animal its taming item (by right-clicking on the animal with the item in hand), the animal has a chance with each item to become the player's pet. This works with cats when using raw cod or raw salmon, parrots when using seeds, and wolves when using bones. Some animals change their look when they become a pet. Pets will follow a player unless the player has them sit, an action which is caused by the pet's owner clicking on the pet. If a pet which isn't sitting gets too far from its owner, it will teleport to the owner's location.
Horses, donkeys, mules, and llamas are tamed by the player right-clicking on them with an empty hand to ride that animal. The animal may kick the player off a few times. After enough attempts at riding the animal, the animal will become tamed and stop kicking the player off of them.
Skeleton horses are tamed after skeleton rider killed.
Trader llamas are tamed after detached from wandering trader.
Smelting
- Prerequisites: Stone
To progress in the game and even to stay alive, the player needs to know how to use a furnace. A furnace is used to cook food, smelt ores, and create other specific items such as charcoal. To use a furnace, the player must first have one. This is the crafting recipe: Template:Grid/Crafting Table
Just like the crafting table, the player usually uses the furnace by first placing it down in the world then clicking on it with the use button. The furnace acts like stone, meaning it needs to be broken by the player with a pickaxe, else the item will not drop. The furnace will light up, display fire particles, and create popping sounds while cooking items.
The furnace GUI has only three slots and includes two icons to indicate time. The top left slot is where items to smelt are placed. The items are moved from this slot one by one as they are cooked and the products are placed in the right slot. To cook items, the furnace requires fuel which is placed in the bottom left slot.
It's simple to tell how long is left for an item to smelt – just see how much of the arrow icon has turned white. When a valid item is placed in the top left slot and the furnace is either lit or has fuel to use in the bottom left slot, the arrow icon begins filling. It takes ten seconds for one item to be smelted. Luckily for the player, the furnace will continue cooking items even when they do not have the furnace GUI open. To also ease the use of furnaces, a furnace will automatically use fuel from the bottom left as needed to keep the furnace lit until all the items in the top left are smelted. The furnace stays lit by using up flammable items from the bottom left slot of the furnace GUI. Different items burn for different amounts of time, but generally, most items made from wood can be used as fuel. After the furnace uses an item to light itself, the flame icon will show a full flame which has the color's size diminish over time.
While lit, the furnace changes its texture to show flames near its bottom, displays fire particle effects near the bottom, and creates popping sounds. The furnace will also create light around it while in a lit state, allowing the player to use a furnace as a temporary light source.
For the first day, the most efficient use of a furnace would be to smelt some logs into charcoal using any wood tools the player has replaced with stone tools, planks, and charcoal itself. Charcoal is a much more efficient fuel source than logs or planks because it keeps the furnace lit for much longer than the amount of logs or planks it would require to create a charcoal. One charcoal burns for 80 seconds, allowing a furnace lit with a piece of charcoal to smelt 8 items.
Here is the recipe for charcoal:
Once a furnace uses a piece of fuel, the time the fire stays lit will not stop if the player exits the GUI or the furnace runs out of items to smelt. For this reason, players who do not want to waste a lot of fuel ought to only place the exact number of or less than the exact number of items their fuel will smelt in the furnace at any time. Also, if the furnace is unlit while in the process of smelting an item, the progress of smelting that item is immediately lost.
Light
- Prerequisites: Smelting
Players are greatly affected by light in Minecraft. First off, any underground space is very dark and half of the time the game is in night. The first aid the player can give themselves to see in the dark is to increase their brightness in the options or even in their PC settings. More important, though, is to craft light sources. The absence of light doesn't just affect the visibility of the world but allows monsters to spawn. Any space further than 24 blocks from a player that isn't lit up well enough (about 7 blocks in taxicab distance from a light source) is free spawning ground for monsters. On the first day, a player can create the light source of torches. They give off light when placed. Torches work just about as well as any other light source except that they require a block to be set on. Unlike in real life, a torch will forever be lit allowing the player to always use torches as a cheap light source. Also, a single pair of one stick and one coal or charcoal crafts into 4 torches.
Template:Grid/Inventory Table
The most important places to light up are a player's home or base, caves they explore, the outside around the player's home, and anywhere the player will often be in or near that is dark.
Shelter
- Prerequisites: Light (suggested if night or almost night but not necessary)
The best way to avoid the darkness and accompanying mobs of night time is to craft and use a bed, but this isn't an option easily available to all players as they start their first day. Building a shelter is an important skill for players to learn and important if the player cannot craft a bed. The point of a quick shelter is to keep all monsters far enough from the player that they cannot harm them. Monsters will not even move towards a player who is in a correctly built shelter.
To protect a player, a shelter should be made out of a blocks that cannot be just passed through by monsters or the player themself. Holes of any kind in the walls or ceiling are a safety hazard as baby zombies can fit through a one block gap, skeletons can shoot through open gaps created by slabs or stairs, and spiders can climb over most walls.
The walls and ceiling of a shelter can be made entirely out of blocks the player has gathered but it is usually much faster to dig out a shelter out of a hill not made of blocks affected by gravity, such as sand, gravel, or concrete powder. A player may already have a hole dug out from gathering cobblestone earlier in the day which can be quickly reused as part of a shelter. Sometimes there may be a naturally generated structure nearby that would serve as a shelter. Similarly, there may be a cave which is visible from the surface which can have its ends blocked off to create a shelter, being careful that no monsters are already in the cave.
If a village happens to be nearby, that is an ideal place to seek shelter, as well as to establish a home base by occupying one of the larger buildings and eventually setting up shop with a furnace, chests, crafting table, and bed.
In an emergency, the player may not have time to make an adequate shelter. While digging straight down is ill-advised, an emergency may warrant mining straight down three blocks and quickly blocking off the top. The player could swim out into some water or ride a boat out to have some temporary safety, though players should avoid moving towards parts of the ocean lit up beneath, and trident-wielding drowned mobs swimming underwater may harm the player. If the player decides to swim and stay float on the water, the hunger bar will deplete more quickly (hunger does not deplete in a boat). If the player does not want to deal with monsters, they can change the difficulty to peaceful temporarily to remove monsters or use /time set day to skip night entirely if cheats are enabled, but cheats will prevent the player from earning advancements.
If the player is successful in creating a shelter then they will most likely find themself in almost complete darkness. Lighting up a shelter and the surrounding area with some light sources such as torches not only allows the player to see but the light created by light sources can also prevent monsters from spawning. A furnace can also be used as a temporary light source. Having light before building a shelter is usually best as it is easier for players to set up light sources when they can still see.
To get in and out of a shelter, the player needs some type of entrance/exit. If necessary, the shelter's exit can simply be some easily broken blocks. A much better way to set up a shelter's entrance is by crafting and placing a door. A door is relatively cheap and can be placed on any solid, opaque block. The door will take up a vertical space of two blocks, similar to how a bed takes up a horizontal space of 2 blocks. By placing from the outside, the door will be flush with the outside wall. Doors can be quickly opened and closed and many while closed allow the player to see outside without monsters being able to see or attack the player inside. If the player is playing in hard difficulty, there is a chance a zombie may come that can break down the door. If a zombie begins breaking down the player's door, they ought to quickly cover up the door from the inside with a couple blocks. Template:Grid/Crafting Table
Finally, it is useful for the player to be able to see when the time switches to day. Periodically breaking a block in the shelter can provide this information but leaves the player in mild temporary danger. Instead, it is better to use a block the player can see through but mobs cannot. Doors are perfect for this functionality along with trapdoors. With some extra work the player can craft glass by smelting sand in a furnace. fences and cobblestone walls can give the player some limited visibility but must be placed so they connect correctly with blocks to form a solid wall or ceiling. If the player doesn't have a way to check for day, they can listen for burning monsters or time the 10 minutes night lasts.
| Name | Ingredients | Crafting recipe |
|---|---|---|
| Wooden Trapdoor | Matching Planks | |
| Cobblestone Wall | Cobblestone | |
| Wooden Fence | Matching Planks + Stick |
A shelter is a great place for the player to continue to mine, craft, and smelt items while they wait for daybreak.
However, if the player is not able to sleep, then after just 3 days, phantoms will have a chance to spawn at night when the player is outside, harming the player. If this happens, the player can just stay indoors at night, and make tunnels to get to places.
Read more: Guide to shelters
Food
- Prerequisites: Smelting
If the player is not playing in a peaceful difficulty, every movement will slowly drain away at the player's hunger bar. Similar to the player's health bar, the hunger bar has 20 points which are displayed by 10 icons that each display as either full, half full, or empty. Keeping at least 18 points allows the player to regenerate health and keeping above 6 points allows the player to sprint.
Different types of movements drain the player's hunger bar at different rates and standing still will allow the player to lose no hunger whatsoever. Quicker movements are usually less efficient – using up more of the player's hunger bar for the same distance traveled. For example, walking is more efficient than sprinting, and sneaking is more so but jumping while running is the least efficient action the player can perform.
To replenish the hunger bar, the player needs to eat food. Food has two values: food points and saturation. Food points immediately replenish the player's hunger bar. Saturation is an invisible number to the player which is used up before the player's hunger bar becomes depleted. As general rules, bigger food and harder to cook food items fill up more hunger points while foods which are more filling increase the player's saturation. After killing a few animals, the player will have a couple pieces of raw meat in different varieties. A food item easy to make early on is any type of cooked food, made by placing raw meat of any type in a furnace, smoker, or campfire and cooking it.
Certain foods should not be eaten by the player under most circumstances. For example, pufferfish, poisonous Potatoes, and spider eyes all poison the player. Another set of foods to avoid are those which give players the hunger effect which include raw chicken and rotten flesh.
Cooking meat to greatly improve its efficiency:
Template:Grid/Furnace Template:Grid/Furnace
Chest
- Prerequisites: Crafting
If you have a couple of logs (or 8 planks) left over after making torches and a bed, you can also make a chest to stash items you don't want to carry around. If you get killed, anything in the chest will be waiting for you rather than scattered around your death site. Template:Grid/Crafting Table
A chest isn't really necessary for your first night, but it will become very helpful over the next day or few.
Dawn
Wait for full light, wield your sword, and carefully leave your shelter. Hopefully, it will be sunny, but even so, watch out for any remaining monsters — this may well be your first fight. If you see spiders, don't panic, they will hopefully have become peaceful in the sun (you can try to kill them for their strings). If you see a creeper, your best bet at this point is to run at least 16 blocks away from it, and wait for it to go away (or explode, if it got too close before you got away). If you see any skeletons or zombies (hiding under trees or in water), stay away from them — skeletons can still shoot at you if you are too close (16 blocks or so), and either skeletons or zombies may come out from shade to attack you even as they burn. If a burning zombie attacks you and the difficulty is normal or hard, you have a chance to be set on fire! If this happens, flee and jump into any nearby (monster-free) water. Once you're out and clear of monsters, look around for and collect bones, arrows, or rotten flesh which may have been dropped by dead skeletons and zombies.
If it is not sunny, you may have worse problems: You may need to kill zombies or even skeletons (or just retreat back in your shelter until the sun comes out). Zombies can be easy to kill by themselves, but if in a pack they can overrun you. However, if a zombie is attacked, it alerts all nearby zombies that you are there, and also some more zombies spawn out of sight to attack you. So even if there's only one zombie, you'll soon find yourself facing a horde.
Skeletons would be easy, but they are pretty accurate with the bow. It can be difficult to dodge their arrows. Also, the closer you get, the more likely the skeleton will hit you. If you get too close, it would only take a couple of shots to kill you. It's best to have a bow (or at least a shield) of your own before facing these undead creatures. If you don't have a bow or shield and they see you, try to run up to them and get in a few hits with your sword before you get shot too many times (at a distance, you can dodge the arrows).
Assuming you made it out of the shelter, congratulations! You've survived your first night in Minecraft! Within the next day or two, you should have acquired some iron armor and better weapons, which will take a lot of the terror out of nighttime. You can also make a more secure shelter, and hopefully a bed.
After the first day
A tutorial for the next day is available here: Tutorials/The Second Day.
Following are some general tips:
Home safety
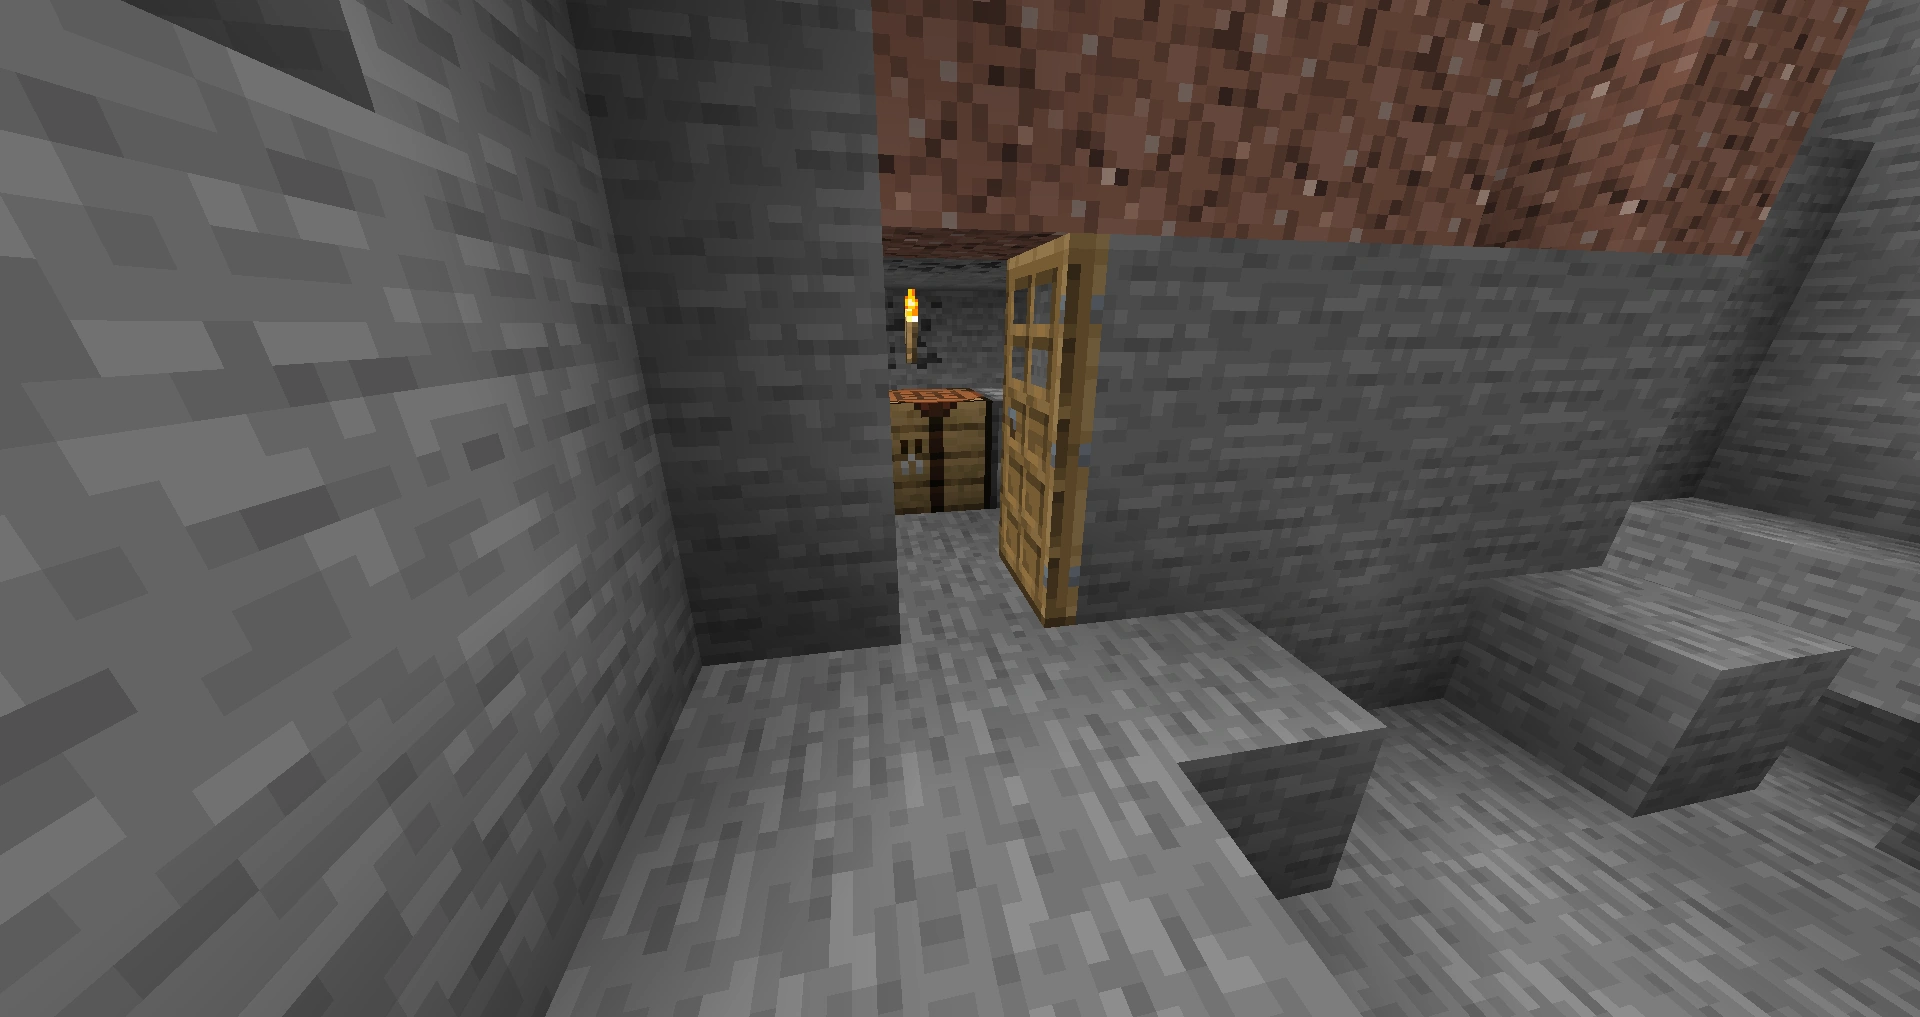
A 3×3×2 chamber in stone, filled with 1 bed, 1 furnace, 1 crafting table, and 1 torch. Sealed with door and defended by dry moat.
By the end of the first day, the shelter will likely be primitive and small. In the days afterwards, you will be able to build a better home, in any of various forms. Some natural extensions include a back door, windows, a surrounding fence, and even traps for monsters. Remember that any time you pick up your bed, your spawn point will revert to the default (that is, random within 20 blocks of the world spawn point), until you not only place, but sleep in a bed again. For this reason, if your home is not very near the world spawn point, you should eventually use a compass to locate the exact point, and build a shelter there, or keep enough wool and planks to build new beds in new locations to keep your respawn point nearby as you explore the world.
Mining
Eventually, you will need to venture below ground to gather iron and other resources. While there are much more advanced mining techniques, the most basic way to find ores is by entering a cave and exploring. Remember, if mining, never ever dig straight down as you might fall in lava or in a group of monsters. You can, however, dig straight down in a 2×1 pattern, standing in the middle of the 2 blocks. This will allow you to have a "safe block" in case there is lava beneath you.
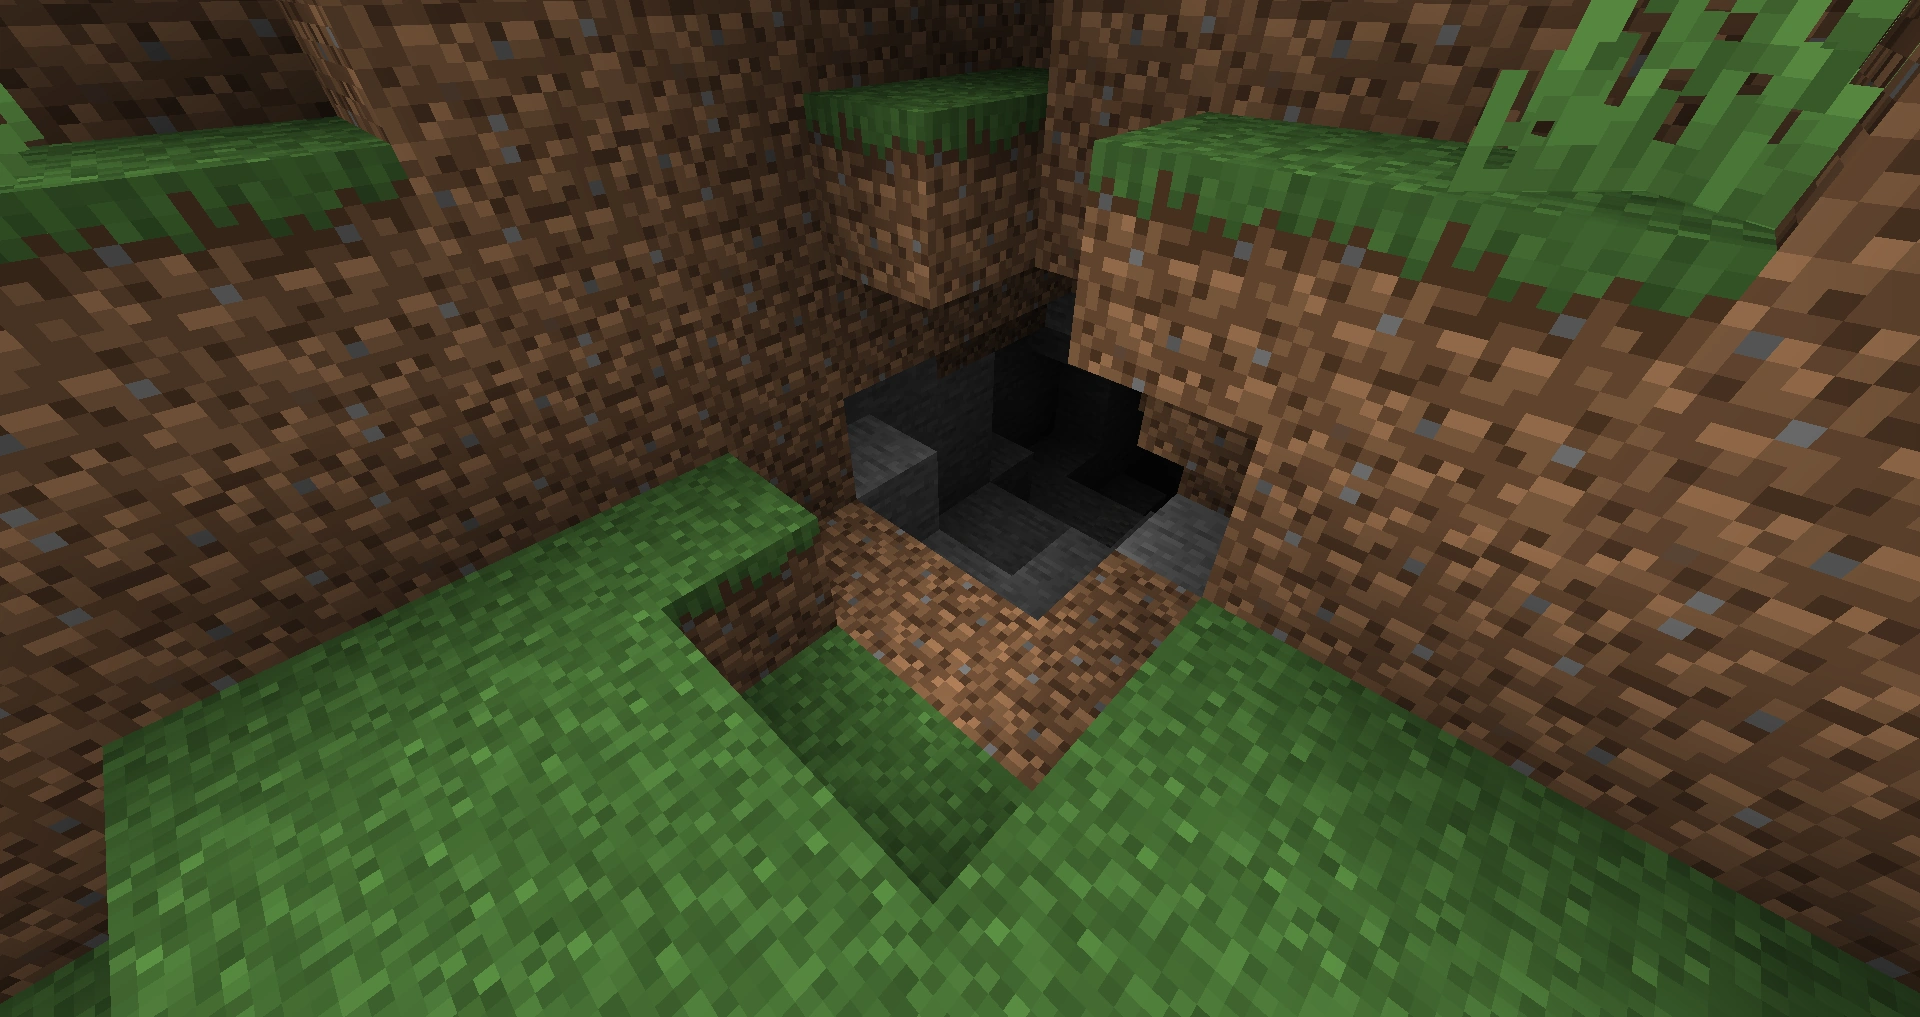
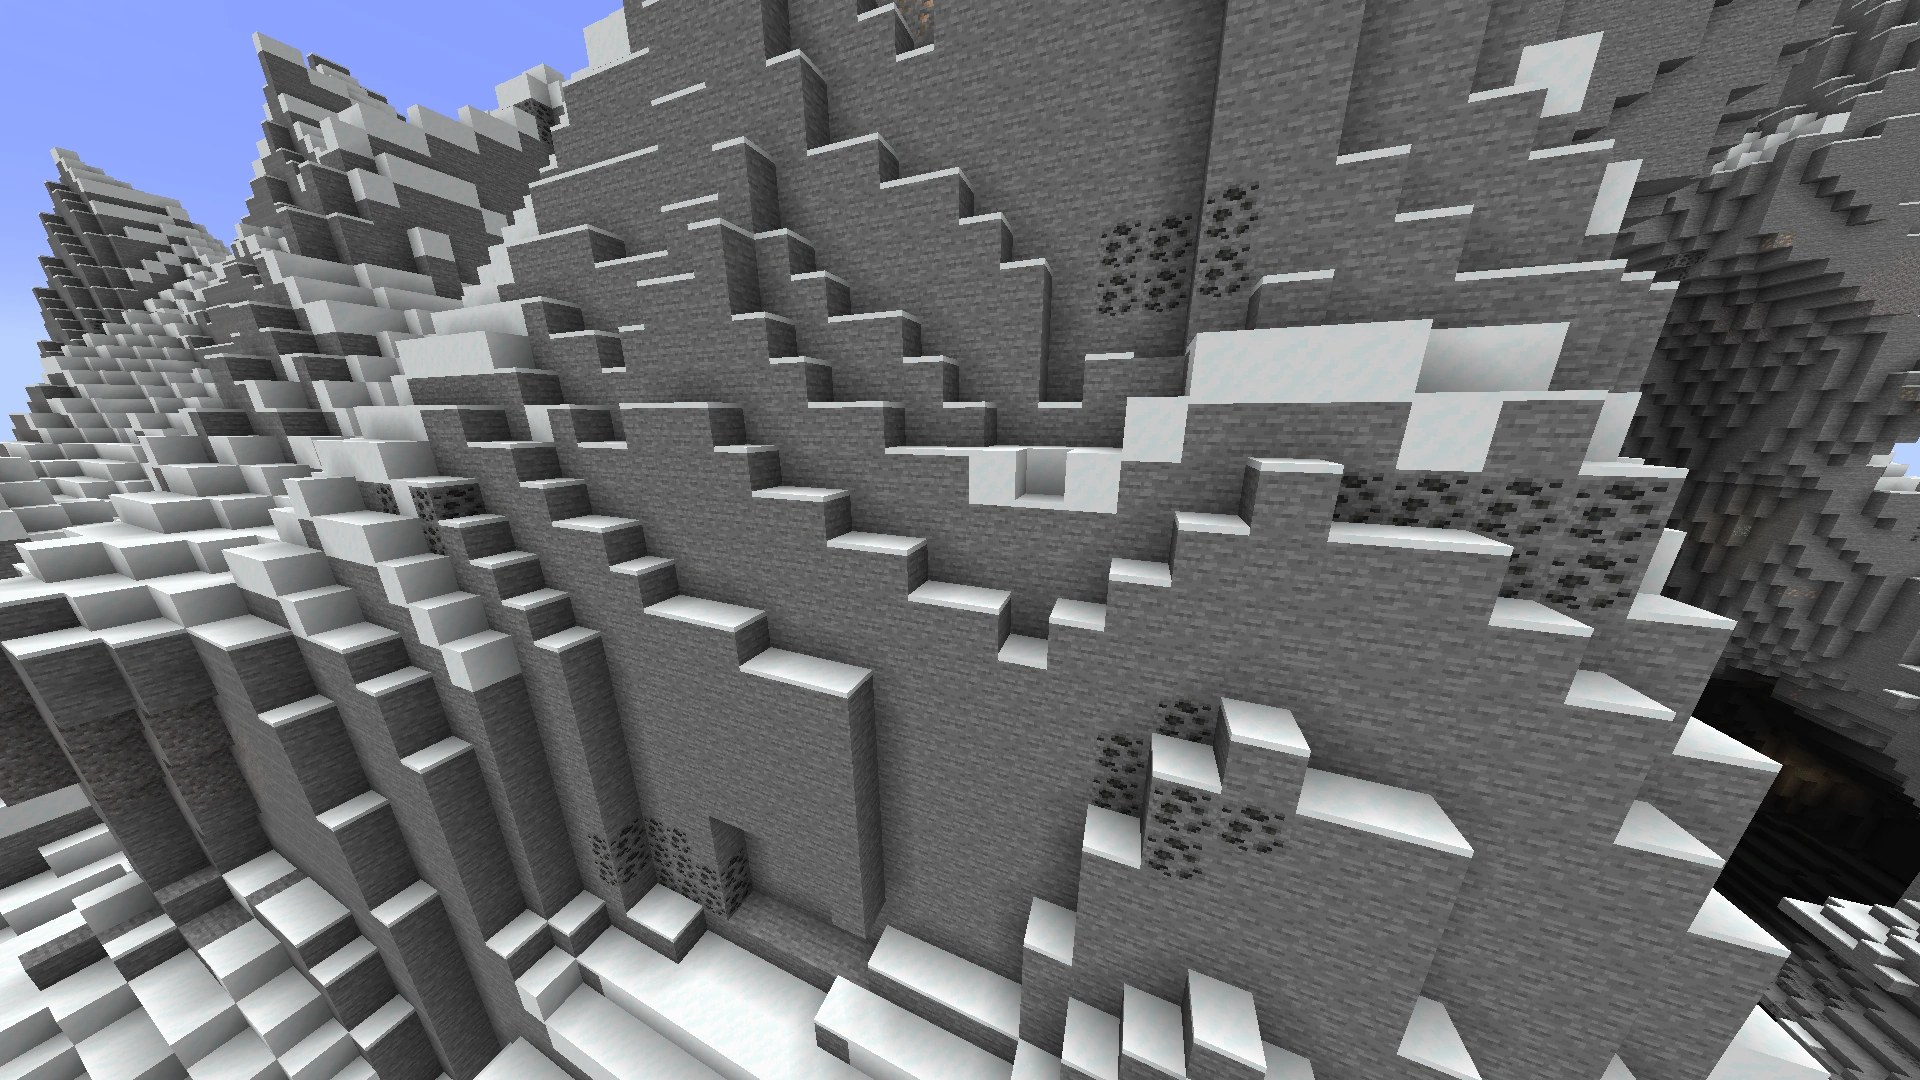
Finding a cave
You have no problems if you have just spent your night in a cave. If you haven't, the easiest way to do so is to roam the Overworld a little and look out for exposed cave entrances. Mountains biomes will have caves inside mountains, but these are generally not what you want, because only coal ore will appear above sea level. For iron and better ores, you'll want to find a cave opening into the ground (these are quite common) and head downwards. Sometimes such caves end immediately, but often they continue into big cave systems. If they seem to end right away sometimes there will be a continuation about 2-8 blocks farther back and below the cave's end; mining in these directions (8 blocks back and down, exploring somewhat to the sides) will reveal this if it is the case. Digging away gravel or dirt can also expose cave extensions, but you may go through a few shovels that way. If you can't find any all day, just sleep away the night, replenishing your resources like wood and food as you use them. If you hear suspicious, hostile noises, just try to listen and follow them.
Cave exploration
Cave exploration is pretty straight forward: you light up your way with torches, mine up ores as you see them (check ores and minerals) and kill enemies as you encounter them (see Tutorials/Combat for details). There are also some important techniques that might not be obvious to a new player, such as using waterfalls to descend into shafts, and/or swim back up from them. There are also many options for marking your trail and not getting lost. Also, note that sneaking (on PCs, the ⇧ Left Shift key by default) prevents you from falling over the edge of a block and as such it is useful if you are caving near a long drop, especially a drop into lava. There are mines called ravines. In some of your worlds, they will be in a forest and open space.
Tutorial videos
- Note: The right video is outdated, as the fence crafting recipe is now 2 sticks and 4 planks. Also, the charcoal texture is a former texture, which was changed in Java Edition 1.6.1.
History
| classic | |||||
|---|---|---|---|---|---|
| May 16, 2009 | Notch discussed Survival among the various game modes he envisioned for the game. | ||||
| June 14, 2009 | Notch discussed his vision of how Survival mode would work. | ||||
| August 4, 2009 | Survival mode testing starts. At this time, there was no health bar, and resource management was being tested. | ||||
| August 18, 2009 | Hearts are shown, mobs takes damage when hit. | ||||
0.24 SURVIVAL TEST{{Extension DPL}}<ul><li>[[Cyan Dye|Cyan Dye]]<br/>{{Item
| image = Cyan Dye.png
| renewable = Yes
| stackable = Yes (64)
}}
'''Cyan dye''' is a [[Dyeing#Secondary|secondary dye color]].
== Obtaining ==
=== Crafting ===
{{Crafting
|head=1
|showdescription=1
|showname=0
|Blue Dye
|Green Dye
|Output=Cyan Dye,2
|type=Material
}}
{{Crafting
|Lapis Lazuli
|Green Dye
|Output=Cyan Dye,2
|description={{only|bedrock|education}}
|type=Material
}}
{{Crafting
|Pitcher Plant
|Output=Cyan Dye,2
|description=
|type=Material
|foot=1
}}
=== Trading ===
[[Wandering trader]]s sell 3 cyan dye for an [[emerald]].
== Usage ==
{{dye usage}}
=== Crafting ingredient ===
{{crafting usage|ignore=Banner|continue=1}}
{{banner crafting usage}}
=== Loom ingredient ===
{{Banner loom usage|Cyan Dye}}
=== Trading ===
{{IN|bedrock}}, journeyman-level shepherd villagers have 20% chance to buy 12 cyan dye for an emerald.
{{More info|java=1|Java UI does not use a specific trade slot, which results in a different chance to offer this trade.}}
== Data values ==
=== ID ===
{{edition|java}}:
{{ID table
|edition=java
|showforms=y
|generatetranslationkeys=y
|displayname=Cyan Dye
|spritetype=item
|nameid=cyan_dye
|form=item
|foot=1}}
{{edition|bedrock}}:
{{ID table
|edition=bedrock
|showaliasids=y
|shownumericids=y
|showforms=y
|notshowbeitemforms=y
|generatetranslationkeys=y
|displayname=Cyan Dye
|spritetype=item
|nameid=cyan_dye
|aliasid=dye / 6
|id=401
|form=item
|translationkey=item.dye.cyan.name
|foot=1}}
== History ==
{{History|java beta}}
{{History||1.2|[[File:Cyan Dye JE1 BE1.png|32px]] Added cyan dye.}}
{{History|java}}
{{History||1.4.2|snap=12w34a|Added the ability to [[Armor#Dyeing|dye]] leather [[armor]] and [[wolf]] collars.}}
{{History||1.4.6|snap=12w49a|Cyan dye can now be [[crafting|crafted]] with [[gunpowder]] to create a [[firework star]].}}
{{History||1.6.1|snap=13w19a|[[Stained clay]] can now be crafted.}}
{{history||1.7.2|snap=13w36a|With the addition of new [[flower]]s, many secondary and tertiary dyes are now primary [[dye]]s.}}
{{History|||snap=13w41a|[[Stained glass]] can now be crafted.}}
{{History||1.8|snap=14w02a|Due to [[lapis lazuli]] being [[renewable resource|renewable]], cyan dye is also renewable.}}
{{History|||snap=14w30a|Added [[banner]]s, which can be dyed.}}
{{History||1.13|snap=17w47a|The different data values for the <code>dye</code> ID have now been split up into their own IDs.
|Prior to [[1.13/Flattening|''The Flattening'']], this [[item]]'s numeral ID was 351.}}
{{History||1.14|snap=18w43a|Cyan dye is now [[crafting|crafted]] using [[blue dye]], instead of [[lapis lazuli]].
|[[File:Cyan Dye.png|32px]] The texture of cyan dye has now been changed.}}
{{History|||snap=18w44a|Cyan dye can now change the text color on [[sign]]s to cyan.}}
{{History|||snap=19w05a|Added the [[wandering trader]], which sell cyan dyes.}}
{{History|||snap=19w11a|Cyan dye can now be [[trading|bought]] by shepherd villagers.}}
{{History||1.17|snap=20w45a|Cyan dye can now be used to craft [[cyan candle]]s.}}
{{History|||snap=21w19a|Cyan dye can no longer be used to craft cyan candles.}}
{{History|||snap=Pre-release 1|Cyan dye can once again be used to craft cyan candles.}}
{{History||1.20<br>(Experimental)|link=1.19.3|snap=22w42a|Cyan dye can now change the text color on [[hanging sign]]s to cyan.}}
{{History||1.20|snap=23w12a|Added [[pitcher plant]]s, which can be crafted into cyan dye.}}
{{History|||snap=23w14a|[[Pitcher plant]]s now craft into 2 cyan dye instead of 1.}}
{{History|pocket alpha}}
{{History||v0.3.0|[[File:Cyan Dye JE1 BE1.png|32px]] Added cyan dye. It is currently unobtainable and serves no purpose.}}
{{History||v0.4.0|Cyan dye is now craftable with [[lapis lazuli]] and [[cactus green]].
|Cyan dye can now be used to craft cyan wool.}}
{{History||v0.6.0|Cyan dye can now be used to dye [[sheep]].}}
{{History||v0.9.0|snap=build 11|Cyan dye can now be used to craft colored [[terracotta]].}}
{{History||v0.11.0|snap=build 1|Cyan dye can now be used to dye tamed [[wolf]] collars.}}
{{History||v0.14.0|snap=build 1|Cyan dye can now be used to dye water in [[cauldron]]s.}}
{{History|pocket}}
{{History||1.0.0|snap=alpha 0.17.0.1|Cyan dye can now be used to dye [[shulker]]s.}}
{{History||1.1.0|snap=alpha 1.1.0.0|Cyan dye can now be used to craft [[concrete powder]], colored [[bed]]s and dyed [[shulker box]]es.}}
{{History|bedrock}}
{{History||1.2.0|snap=beta 1.2.0.2|Cyan dye can now be used to craft [[firework star]]s, [[stained glass]] and patterns on [[banner]]s.}}
{{History||1.4.0|snap=beta 1.2.20.1|Cyan dye can now be used to craft [[balloon|ballons]] and [[glow stick|glow sticks]].}}
{{History||1.8.0|snap=beta 1.8.0.8|Cyan dye can now be used to dye tamed [[cat]] collars.}}
{{History||1.10.0|snap=beta 1.10.0.3|Cyan dye are now [[trading|sold]] by [[wandering trader]]s.
|Cyan dye can now be used to dye white [[carpet|carpets]] and undyed [[glass pane]]s.
|[[File:Cyan Dye.png|32px]] The texture of cyan dye has now been changed.}}
{{History||1.11.0|snap=beta 1.11.0.4|Cyan dye can be [[trading|sold]] to shepherd [[villager]]s.}}
{{History||1.16.100|snap=beta 1.16.100.56|The ID of cyan dye has been changed from <code>dye/6</code> to <code>cyan_dye</code>.}}
{{History|console}}
{{History||xbox=TU1|xbone=CU1|ps=1.00|switch=1.0.1|wiiu=Patch 1|[[File:Cyan Dye JE1 BE1.png|32px]] Added cyan dye.}}
{{History|PS4}}
{{History||1.90|[[File:Cyan Dye.png|32px]] The texture of cyan dye has now been changed.}}
{{History|new 3ds}}
{{History||0.1.0|[[File:Cyan Dye JE1 BE1.png|32px]] Added cyan dye.}}
{{History|foot}}
== Issues ==
{{issue list}}
{{Items}}
[[Category:Items]]
[[Category:Dyes]]
[[Category:Renewable resources]]
[[cs:Azurové barvivo]]
[[de:Türkiser Farbstoff]]
[[es:Tinte cian]]
[[fr:Teinture cyan]]
[[hu:Ciánkék festék]]
[[ja:青緑色の染料]]
[[ko:청록색 염료]]
[[nl:Turquoise kleurstof]]
[[pl:Błękitny barwnik]]
[[pt:Corante ciano]]
[[ru:Бирюзовый краситель]]
[[zh:青色染料]]</li><li>[[Popped Chorus Fruit|Popped Chorus Fruit]]<br/>{{Item
| image = Popped Chorus Fruit.png
| renewable = Yes
| stackable = Yes (64)
}}
'''Popped chorus fruit''' is an [[item]] obtained by [[smelting]] [[chorus fruit]], and used to craft [[End Rod|end rods]] and [[purpur blocks]]. Unlike raw chorus fruit, the popped fruit is inedible.
== Obtaining ==
=== Smelting ===
{{Smelting
|Chorus Fruit
|Popped Chorus Fruit
|0,1
}}
== Usage ==
=== Crafting ingredient ===
{{crafting usage}}
== Data values ==
=== ID ===
{{edition|java}}:
{{ID table
|edition=java
|showforms=y
|generatetranslationkeys=y
|displayname=Popped Chorus Fruit
|spritetype=item
|nameid=popped_chorus_fruit
|form=item
|foot=1}}
{{edition|bedrock}}:
{{ID table
|edition=bedrock
|showaliasids=y
|shownumericids=y
|showforms=y
|notshowbeitemforms=y
|generatetranslationkeys=y
|displayname=Popped Chorus Fruit
|spritetype=item
|nameid=popped_chorus_fruit
|aliasid=chorus_fruit_popped
|id=559
|form=item
|translationkey=item.chorus_fruit_popped.name
|foot=1}}
== History ==
{{History|java}}
{{History||1.9|snap=15w31a|[[File:Popped Chorus Fruit JE1 BE1.png|32px]] Added popped chorus fruit.
|Popped chorus fruit are used to craft [[purpur block]]s.}}
{{History|||snap=15w44b|Popped chorus fruit are now used to craft [[end rod]]s.}}
{{History||1.13|snap=17w47a|Prior to [[1.13/Flattening|''The Flattening'']], this [[item]]'s numeral ID was 433.}}
{{History|||snap=pre5|The ID of popped chorus fruit has now been changed to <code>popped_chorus_fruit</code>.}}
{{History||1.14|snap=18w43a|[[File:Popped Chorus Fruit JE2 BE2.png|32px]] The texture of popped chorus fruit has now been changed.}}
{{History|pocket}}
{{History||1.0.0|snap=alpha 0.17.0.1|[[File:Popped Chorus Fruit JE1 BE1.png|32px]] Added popped chorus fruit.}}
{{History|bedrock}}
{{History||1.10.0|snap=beta 1.10.0.3|[[File:Popped Chorus Fruit JE2 BE2.png|32px]] The texture of popped chorus fruit has now been changed.}}
{{History||1.16.100|snap=beta 1.16.100.56|The ID of popped chorus fruit has been changed from <code>chorus_fruit_popped</code> to <code>popped_chorus_fruit</code>.}}
{{History|console}}
{{History||xbox=TU46|xbone=CU36|ps=1.38|wiiu=Patch 15|[[File:Popped Chorus Fruit JE1 BE1.png|32px]] Added popped chorus fruit.}}
{{History||xbox=none|xbone=none|ps=1.90|wiiu=none|switch=none|[[File:Popped Chorus Fruit JE2 BE2.png|32px]] The texture of popped chorus fruit has now been changed.}}
{{History|new 3ds}}
{{History||1.7.10|[[File:Popped Chorus Fruit JE1 BE1.png|32px]] Added popped chorus fruit.}}
{{History|foot}}
== Issues ==
{{issue list}}
{{Items}}
[[cs:Vypukaný květ chorusu]]
[[de:Geplatzte Chorusfrucht]]
[[fr:Chorus éclaté]]
[[it:Frutto di chorus scoppiato]]
[[ja:焼いたコーラスフルーツ]]
[[ko:튀긴 후렴과]]
[[nl:Gepoft Chorusfruit]]
[[pl:Prażony owoc refrenusu]]
[[pt:Fruta do coro cozida]]
[[ru:Приготовленный плод коруса]]
[[zh:爆裂紫颂果]]
[[Category:Renewable resources]]</li></ul> | Added survival mode in Survival Test. During this time, death was permanent, meaning players could not respawn and the level needed to be restarted unless a save file had been created. | ||||
| Until mid-Alpha, survival single-player was the only available mode besides Classic creative mode. | |||||
| indev | |||||
0.31{{Extension DPL}}<ul><li>[[Torchflower Seeds|Torchflower Seeds]]<br/>{{wip}}
{{Block
| image = <gallery>
Torchflower Age 0.png| Age 0
Torchflower Age 1.png| Age 1
Torchflower Age 2.png| Age 2
</gallery>
| image2 = Torchflower Seeds JE1.png
| transparent = Yes
| light = No
| tool = N/A
| renewable = Yes
| stackable = Yes (64)
| rarity = Common
|flammable=No
|lavasusceptible=No
}}
'''Torchflower seeds''' are seeds that have a chance to be dropped by [[Sniffer|sniffers]] when they finish digging.
== Obtaining ==
[[Sniffer]]s will occasionally bury their nose in the ground and start digging. Once the sniffer has finished digging, one torchflower seed will have a chance to be dropped on the floor as an item.
Sniffers can only dig for torchflower seeds in the following blocks:
*{{BlockLink|Dirt}}
*{{BlockLink|Grass Block}}
*{{BlockLink|Podzol}}
*{{BlockLink|Coarse Dirt}}
*{{BlockLink|Rooted Dirt}}
*{{BlockLink|Moss Block}}
*{{BlockLink|Mud}}
*{{BlockLink|Muddy Mangrove Roots}}
They cannot dig for torchflower seeds on [[mycelium]], which is intended.<ref>{{bug|MC-260259||Sniffers cannot dig nor find seeds on mycelium|WAI}}</ref>
== Usage ==
=== Crop ===
{{main|Tutorials/Crop farming|title1=Crop farming}}
Torchflower seeds can be {{control|placed}} on [[farmland]], where they grow through three stages. Breaking the torchflower crop before it matures drops the seed, while breaking the final stage produces one [[torchflower]] and does not yield the seed.
Crops break if pushed by a [[piston]] or if their supporting farmland breaks or turns to dirt (i.e. by being trampled), dropping their usual drops.
Farmer [[villager]]s can plant torchflower seeds, but cannot harvest them after they have fully grown.<ref>{{bug|MC-263382|||WAI}}</ref>
=== Feeding ===
Torchflower seeds can be used to breed [[sniffer]]s and [[chicken]]s and reduce the remaining growth duration of snifflets and chicks by 10%. Also, if some torchflower seeds were fed to an injured sniffer, it will heal it by {{hp|2}} health points.
=== Taming ===
Torchflower seeds can be used to tame [[parrot]]s.
=== Composting ===
Placing torchflower seeds into a [[composter]] has a 30% chance of raising the compost level by 1.
== Sounds ==
{{Sound table/Block/Crop}}
== Data values ==
=== ID ===
{{edition|java}}:
{{ID table
|edition=java
|showblocktags=y
|showitemtags=y
|showforms=y
|generatetranslationkeys=y
|displayname=Torchflower Crop
|spritetype=block
|nameid=torchflower_crop
|form=block
|blocktags=bee_growables, crops}}
{{ID table
|displayname=Torchflower Seeds
|spritetype=item
|nameid=torchflower_seeds
|form=item
|itemtags=villager_plantable_seeds
|foot=1}}
{{edition|bedrock}}:
{{ID table
|edition=bedrock
|shownumericids=y
|showforms=y
|generatetranslationkeys=y
|displayname=Torchflower Crop
|spritetype=block
|nameid=torchflower_crop
|id=-567
|form=block
|translationkey=-}}
{{ID table
|displayname=Torchflower Seeds
|spritetype=item
|nameid=torchflower_seeds
|id=296
|form=item
|foot=1}}
=== Block states ===
{{see also|Block states}}
{{/BS}}
== Achievements ==
{{Load achievements|Planting The Past}}
== Advancements ==
{{load advancements|A Seedy Place;Planting The Past;Little Sniffs}}
== History ==
{{History|java}}
{{History||1.20<br>(Experimental)|link=1.19.4|snap=23w07a|[[File:Torchflower Seeds JE1.png|32px]] Added torchflower seeds behind the [[Java Edition 1.20|Update 1.20 experimental datapack]].}}
{{History|||snap=1.19.4 Pre-release 1|Torchflower seeds can now be used to breed [[chicken]]s and tame [[parrot]]s.<ref>{{bug|MC-260035|||Fixed}}</ref>|Torchflower seeds are now next to other seeds in the [[Creative inventory]].|Placing torchflower seeds in farmland now gives the player the "A Seedy Place" [[advancement]].}}
{{History||1.20|snap=23w12a|[[Sniffer]]s can now be obtained in Survival, making torchflower seeds [[renewable]].|Torchflower seeds are now available without using the "Update 1.20" experimental datapack.}}
{{History|||snap=23w14a|Torchflower seeds can now be picked up by farmer [[villager]]s.|[[Sniffer]]s can now be tempted with torchflower seeds.}}
{{History|||snap=23w16a|[[Villager]]s can now plant torchflower seeds.}}
{{History|||snap=23w17a|The player now get the [[advancement]] "Little sniffs" when they feed a [[snifflet]] using torchflower seeds, "Planting the past" when they plant torchflower seeds on [[farmland]].}}
{{History|bedrock}}
{{History||Sniffer<br>(Experimental)|link=Bedrock Edition 1.19.70|snap=beta 1.19.70.23|[[File:Torchflower Seeds JE1.png|32px]] Added torchflower seeds behind the "[[Bedrock Edition 1.20.0|Sniffer]]" [[experimental]] toggle.}}
{{History||1.20.0|snap=beta 1.20.0.20|Torchflower seeds are now available without using the "Sniffer" experimental toggle.}}
{{History|foot}}
== Issues ==
{{issue list}}
== Trivia ==
* The final growth stage of the torchflower crop uses the same ID as the actual torchflower. This causes some side effects, such as the plant becoming offset and randomly jumping to the side.<ref>{{bug|MC-260472|resolution=wai}}</ref>
== Gallery ==
<gallery>
Torchflower Seeds stages.png|All the growth stages of torchflower seeds.
</gallery>
== Notes ==
{{notelist}}
== References ==
{{reflist}}
{{Blocks|upcoming}}
{{Items}}
[[Category:Plants]]
[[Category:Non-solid blocks]]
[[de:Fackelliliensamen]]
[[es:Semillas de plantorcha]]
[[ja:トーチフラワーの種]]
[[pt:Sementes de plantocha]]
[[zh:火把莲种子]]</li><li>[[Dupe Hack|Dupe Hack]]<br/>{{for|the method to duplicate items and blocks|Tutorials/Block and item duplication}}
{{stub}}
{{Joke feature}}
{{exclusive|java}}{{item
| image = Missing Texture.png
| rarity=Common
| stackable=No
|title=minecraft:dupe_hack|renewable=Yes}}
'''minecraft:dupe_hack''' is a joke item from [[Java Edition 23w13a_or_b]].
==Obtaining==
Once the <code>dupe_hack_occurrence_chance</code> vote is approved the '''dupe hack''' item has a random chance of dropping whenever an entity with chests is killed by a player, e.g. when destroying a [[Minecart with Chest|minecart with chest]] with a [[sword]].
It doesn't appear in the [[creative]] menu, not even when the [[Options#Controls|option]] "Operator Items Tab" is enabled, but can be given to the player with [[Commands/give|<code>/give</code>]] and other commands.
==Usage==
The dupe hack item can be used to create a limited amount of duplicate items by placing it on a [[crafting table]] with any other item. It has a random chance of breaking, controlled by the <code>dupe_hack_break_chance</code> vote. This limitation can be mostly bypassed by putting the items in an [[Ender Chest|ender chest]] first and duplicating the chest.
When using the Dupe Hack, it has a random chance of breaking, which is often decided by votes.
===Crafting ingredient===
{{Crafting
|Any Item
|Dupe Hack
|Output=Any Item, 2
|showdescription=1
|description=The dupe hack item remains in the crafting grid after duplicating an item.
|foot=1
}}
==Data values==
===ID===
{{edition|java}}:{{ID table
|edition=java
|showforms=y
|generatetranslationkeys=y
|displayname=minecraft:dupe_hack
|spritetype=item
|nameid=dupe_hack
|form=item|foot=1|spritename=missingno}}
==History==
{{History|java}}
{{History||23w13a_or_b|[[File:Missing Texture JE4.png|32px]] Added minecraft:dupe_hack.}}
{{History|foot}}
{{items}}
{{Jokes}}
<references />
[[Category:Joke items]]
[[ja:Dupe Hack]]
[[pt:Dupe Hack]]</li></ul> | 20100129 | Crafting is introduced. | |||
| infdev | |||||
20100227{{Extension DPL}}<ul><li>[[Amethyst Shard|Amethyst Shard]]<br/>{{Item
| title = Amethyst Shard
| image = Amethyst Shard.png
| renewable = Yes
| stackable = Yes (64)
}}
An '''amethyst shard''' is a crystal ore obtained from mining a fully grown [[amethyst cluster]] or can be obtained from chests in [[Ancient City|ancient cities]].
== Obtaining ==
=== Mining ===
An [[amethyst cluster]] mined using a non-[[Silk Touch]], non-[[Fortune]] [[pickaxe]] drops 4 amethyst shards. When mined using any other tool, [[item]] or mechanism (such as [[explosion]]s or [[piston]]s) it drops 2 shards. The maximum amount of amethyst shards dropped can be increased with Fortune. Fortune I gives a {{frac|1|3}} chance for eight shards, averaging 5.33 shards; Fortune II gives a 25% chance (each) to give eight or 12 shards, averaging 7 shards, and Fortune III gives a 20% chance (each) to give 8, 12, or 16 shards, averaging 8.8 shards.
If the amethyst cluster in any of its growth stages is mined using a pickaxe enchanted with [[Silk Touch]], it drops itself rather than amethyst shards.
=== Chest loot ===
{{LootChestItem|amethyst-shard}}
== Usage ==
=== Crafting ingredient ===
{{Crafting usage}}
=== Smithing ingredient ===
{{Smithing
|head=1
|ingredients=Any Armor Trim +<br/>Any Armor Piece + <br/>Amethyst Shard
|Any Armor Trim Smithing Template
|Netherite Chestplate
|Amethyst Shard
|Amethyst Trim Netherite Chestplate
|showdescription=1
|description = All armor types can be used in this recipe;<br/>a netherite chestplate is shown as an example.<br/>
|tail=1
}}
;Trim color palette
The following color palette is shown on the designs on trimmed armor:
*{{TrimPalette|amethyst shard}}
=== Allay duplication ===
If an amethyst shard is given to an [[allay]] that is currently dancing to an active [[jukebox]], the allay emits heart particles, consumes the amethyst shard and duplicates into another allay. After this, there is a 5 minute cool down until both allays can be duplicated like this again.
== Sounds ==
{{Edition|Java}}:
{{Sound table
|sound=Amethyst shimmer.ogg
|subtitle=Amethyst chimes
|source=neutral
|description=When an amethyst shard duplicates an allay
|id=block.amethyst_block.chime
|translationkey=subtitles.block.amethyst_block.chime
|volume=0.4
|pitch=1.0
|distance=16
|foot=1}}
{{Edition|Bedrock}}:
{{Sound table
|type=bedrock
|sound=Amethyst shimmer.ogg
|source=block
|description=When an amethyst shard duplicates an allay
|id=chime.amethyst_block
|volume=1.0
|pitch=0.5-1.7
|foot=1}}
== Data values ==
=== ID ===
{{edition|java}}:
{{ID table
|edition=java
|showforms=y
|generatetranslationkeys=y
|displayname=Amethyst Shard
|spritetype=item
|nameid=amethyst_shard
|form=item
|foot=1}}
{{edition|bedrock}}:
{{ID table
|edition=bedrock
|shownumericids=y
|showforms=y
|notshowbeitemforms=y
|generatetranslationkeys=y
|displayname=Amethyst Shard
|spritetype=item
|nameid=amethyst_shard
|form=item
|id=625
|foot=1}}
==History==
{{History||October 3, 2020|link={{ytl|DBvZ2Iqmm3M|t=23m14s}}|Amethyst shards are mentioned, but not shown at [[Minecraft Live 2020]].}}
{{History|java}}
{{History||1.17|snap=20w45a|[[File:Amethyst Shard JE1.png|32px]] Added amethyst shards.}}
{{History|||snap=20w46a|[[File:Amethyst Shard JE2 BE1.png|32px]] The texture for amethyst shards has changed.}}
{{History||1.19|snap=22w13a|Amethyst shards can now be found in [[ancient city]] [[chest]]s.}}
{{History||1.19.1|snap=22w24a|Amethyst shards can now be used to duplicate [[allay]]s.}}
{{History||1.20<br>(Experimental)|link=1.19.4|snap=23w04a|Amethyst shards can now be used as an armor trim material.}}
{{History||1.20|snap=23w12a|Amethyst shards can now be used to craft [[calibrated sculk sensor]]s.}}
{{History|bedrock}}
{{History||1.17.0|snap=beta 1.17.0.50|[[File:Amethyst Shard JE2 BE1.png|32px]] Added amethyst shards.}}
{{History|||snap=beta 1.17.0.52|Amethyst shards are now available without enabling [[Experimental Gameplay]].}}
{{History||1.19.0|snap=beta 1.19.0.26|Amethyst shards can now be found in [[ancient city]] [[chest]]s.}}
{{History||1.19.10|snap=beta 1.19.10.22|Amethyst shards can now be used to duplicate allays.}}
{{History||1.20.0<br>(Experimental)|link=Bedrock Edition 1.19.80|snap=beta 1.19.80.21|Amethyst shards can now be used as an armor trim material.}}
{{History|||snap=beta 1.19.80.22|Amethyst shards can now be used to craft calibrated sculk sensors.}}
{{History|foot}}
==Issues==
{{issue list}}
==Trivia==
* Although in real life {{w|amethyst}} is a variety of {{w|quartz}} like [[Nether Quartz|nether quartz]], the two resources are not interchangeable.
* besides netherite, amethyst is the only or to be attempted not from an ore in caves
== External Links ==
*[https://www.minecraft.net/en-us/article/taking-inventory--amethyst-shard Taking Inventory: Amethyst Shard] – Minecraft.net on May 20, 2021
{{Items}}
[[Category:Renewable resources]]
[[de:Amethystscherbe]]
[[es:Fragmento de amatista]]
[[fr:Éclat d'améthyste]]
[[it:Scheggia di ametista]]
[[ja:アメジストの欠片]]
[[lzh:紫水玉片]]
[[pl:Odłamek ametystu]]
[[pt:Fragmento de ametista]]
[[ru:Осколок аметиста]]
[[uk:Уламок аметисту]]
[[zh:紫水晶碎片]]
[[Category:Ore]]</li><li>[[Egg|Egg]]<br/>{{About|chicken eggs|the similar item that spawns mobs|Spawn egg|other uses}}
{{ItemEntity
|image=Egg.png
|renewable=Yes
|stackable=Yes (16)
|size=Height: 0.25 Blocks<br>Width: 0.25 Blocks
}}
An '''egg''' is an [[item]] that can be used to craft [[food]] items, or thrown for a chance to spawn [[chick]]s on impact.
== Obtaining ==
=== Mob loot ===
{{see also|Tutorials/Egg farming}}
A [[chicken]] drops an egg item every 5–10 minutes. The theoretical average would be expected at 1 egg every 7.5 minutes, or 0.1333 eggs per minute.
A [[fox]] sometimes spawns holding an egg, which it always drops upon death. Alternatively, a player dropping a food item causes the fox to drop the egg.
=== Chest loot ===
{{LootChestItem|egg}}
== Usage ==
=== Crafting ingredient ===
{{crafting usage}}
=== Combat ===
Players are able to throw eggs and deal knockback to [[mob]]s (but not other players{{only|JE|short=1}}<ref>{{bug|MC-3179|||WAI}}</ref>{{until|JE Combat Tests}}), but no damage is dealt, similar to a [[snowball]]. Likewise, throwing eggs at [[neutral mobs]] provokes them. Eggs can also be fired from [[dispenser]]s and are affected by gravity.
=== Spawning chickens ===
When thrown by a dispenser or by pressing the {{control|use}} button, an egg has a {{fraction|1|8}} (12.5%) chance of spawning a [[chick]]. If this occurs, there is a {{fraction|1|32}} (3.125%) chance of spawning three additional chicks (on average, 1 out of every 256 eggs spawns 4 chicks). In other words, whenever an egg is thrown, there is a {{fraction|31|256}} chance of spawning 1 chick and a {{fraction|1|256}} chance of spawning four chicks.
The expected value of the number of chicks an egg produces is {{fraction|35|256}} or 13.7%. This means that on average, a chick is spawned every 7.3 eggs, a stack of 16 eggs spawns 2.188 chicks, and a full inventory including the hotbar and off-hand (<code>37 * 16 = 592</code> eggs) is expected to spawn approximately 81 chicks.
== Sounds ==
{{Edition|Java}}:<br>
Thrown eggs use the Friendly Creatures sound category for entity-dependent sound events.
{{Sound table
|rowspan=2
|sound=Bow shoot.ogg
|subtitle=Egg flies
|source=player
|description=When an egg is thrown
|id=entity.egg.throw
|translationkey=subtitles.entity.egg.throw
|volume=0.5
|pitch={{frac|1|3}}-0.5
|distance=16}}
{{Sound table
|subtitle=Dispensed item
|source=block
|description=When a dispenser shoots an egg
|id=block.dispenser.launch
|translationkey=subtitles.block.dispenser.dispense
|volume=1.0
|pitch=1.2
|distance=16}}
{{Sound table
|sound=Chicken plop.ogg
|subtitle=Chicken plops
|source=Friendly Creatures
|description=When an egg is laid by a chicken
|id=entity.chicken.egg
|translationkey=subtitles.entity.chicken.egg
|volume=1.0
|pitch=0.8-1.2
|distance=16
|foot=1}}
{{Edition|Bedrock}}:
{{Sound table
|type=bedrock
|rowspan=2
|sound=Bow shoot.ogg
|source=player
|description=When an egg is thrown
|id=random.bow
|volume=0.5
|pitch=0.33-0.5}}
{{Sound table
|source=player
|description=When a dispenser shoots an egg
|id=random.bow
|volume=1.0
|pitch=0.83-1.25}}
{{Sound table
|sound=Chicken plop.ogg
|source=neutral
|description=When an egg is laid by a chicken
|id=mob.chicken.plop
|volume=1.0
|pitch=0.8-1.2
|foot=1}}
== Data values ==
=== ID ===
{{edition|java}}:
{{ID table
|edition=java
|showforms=y
|generatetranslationkeys=y
|displayname=Egg
|spritetype=item
|nameid=egg
|form=item
|foot=1}}
{{ID table
|edition=java
|showentitytags=y
|generatetranslationkeys=y
|displayname=Thrown Egg
|spritetype=entity
|spritename=Egg
|nameid=egg
|entitytags=impact_projectiles
|foot=1}}
{{edition|bedrock}}:
{{ID table
|edition=bedrock
|shownumericids=y
|showforms=y
|notshowbeitemforms=y
|generatetranslationkeys=y
|displayname=Egg
|spritetype=item
|nameid=egg
|id=390
|form=item
|foot=1}}
{{ID table
|edition=bedrock
|shownumericids=y
|generatetranslationkeys=y
|displayname=Egg
|spritetype=entity
|nameid=egg
|id=82
|foot=1}}
=== Entity Data ===
Thrown eggs have entity data that define various properties of the entity.
{{el|java}}:
{{main|Entity format}}
{{/ED}}
{{el|bedrock}}:
: See [[Bedrock Edition level format/Entity format]].
== Achievements ==
{{load achievements|The Lie}}
==Advancements==
{{Load advancements|Bullseye}}
== Video ==
<div style="text-align:center">{{yt|8rDbF8UYuTc}}</div>
== History ==
{{History|java alpha}}
{{History||v1.0.14|[[File:Egg JE1 BE1.png|32px]] Added eggs.
|Eggs currently have no purpose.}}
{{History|java beta}}
{{History||1.0|Eggs are now throwable at the request of a fan as the result of a [[wikipedia:Twitter|Twitter]] conversation about a man eating his [[wikipedia:USB|USB]], if [[Notch]] added egg throwing.<ref>{{tweet|notch|11773078791000065}}</ref>}}
{{History||1.2|Eggs are now used to craft [[cake]]s.
|Eggs can now be thrown by [[dispenser]]s.}}
{{History|java}}
{{History||1.0.0|snap=Beta 1.9 Prerelease 2|[[Breeding]] has been added, making eggs easier to obtain.}}
{{History|||snap=RC1|Thrown eggs now hatch chicks instead of adult chickens.
|The egg's throw [[sound]] has been changed.}}
{{History||1.4.2|snap=12w37a|Eggs are now used to craft [[pumpkin pie]]s.}}
{{History||1.9|snap=15w32a|Eggs no longer [[damage]] the [[ender dragon]].}}
{{History|||snap=15w36b|Eggs now produce particles when thrown at an entity.}}
{{History|||snap=15w49a|Eggs, like all throwable projectiles, now take the thrower's motion into account when fired.}}
{{History||1.11|snap=16w32a|The [[entity]] ID has now been changed from <code>ThrownEgg</code> to <code>egg</code>.}}
{{History||1.13|snap=17w47a|Prior to [[1.13/Flattening|''The Flattening'']], this [[item]]'s numeral ID was 344.}}
{{History||1.14|snap=18w43a|[[File:Egg JE2 BE2.png|32px]] The texture of eggs has been changed.}}
{{History|||snap=18w50a|Eggs can now be found in [[chest]]s in [[village]] fletcher houses.
|Therefore, chickens are no longer the only source of eggs.}}
{{History|||snap=19w07a|Added [[fox]]es, which sometimes spawn with eggs in their mouths.}}
{{History||1.16.2|snap=Pre-Release 1|Eggs are now affected by [[bubble column]]s.}}
{{History|pocket alpha}}
{{History||v0.4.0|[[File:Egg JE1 BE1.png|32px]] Added eggs. They are currently unobtainable.
|Eggs are throwable, but are unable to spawn chickens.}}
{{History||v0.7.0|[[Chicken]]s now occasionally lay eggs.
|Eggs can be used to craft [[cake]].
|Thrown eggs now have a chance of spawning adult chickens.}}
{{History||v0.8.0|snap=build 1|Eggs are now used to craft [[pumpkin pie]]s.}}
{{History|||snap=build 3|Thrown eggs now have a chance of spawning chicks instead of adult chickens.}}
{{History|pocket}}
{{History||1.1.0|snap=alpha 1.1.0.0|The [[entity]] ID has now been changed from <code>thrownegg</code> to <code>egg</code>.}}
{{History|bedrock}}
{{History||1.2.0|Eggs now deal knockback to [[player]]s.}}
{{History||1.10.0|snap=beta 1.10.0.3|[[File:Egg.png|32px]] The texture of eggs has been changed.}}
{{History||1.11.0|snap=beta 1.11.0.1|Eggs can now be found in [[village]] fletcher [[chest]]s.}}
{{History|||snap=beta 1.11.0.4|Eggs can now be [[trading|sold]] to farmer [[villager]]s.}}
{{History||1.13.0|snap=beta 1.13.0.1|Added [[fox]]es, which can [[drops|drop]] eggs.}}
{{History||1.16.0|snap=beta 1.16.0.57|[[Trading]] has now been changed, eggs can no longer be [[trading|sold]] to farmer [[villager]]s.}}
{{History|console}}
{{History||xbox=TU1|xbone=CU1|ps=1.0|wiiu=Patch 1|[[File:Egg JE1 BE1.png|32px]] Added eggs.}}
{{History|PS4}}
{{History||1.90|[[File:Egg JE2 BE2.png|32px]] The texture of eggs has been changed.}}
{{History|New 3DS}}
{{History||0.1.0|[[File:Egg JE1 BE1.png|32px]] Added eggs.}}
{{History|foot}}
== Issues ==
{{issue list}}
== Trivia ==
* Eggs break mid-fall if hit by another projectile; the chance of spawning a chick is not affected.
* Throwing an egg at a [[nether portal]] breaks the egg when it hits the portal.
* A thrown egg faces toward the [[player]] in first-person view, while it appears rotated horizontally in third-person view. This is the case for all throwable [[item]]s ([[ender pearl]]s, eggs, [[snowball]]s, and all throwable [[potion]]s).
== References ==
{{Reflist}}
{{Items}}
{{entities}}
[[Category:Combat]]
[[Category:Egg]]
[[cs:Vajíčko]]
[[de:Ei]]
[[es:Huevo]]
[[fr:Œuf]]
[[hu:Tojás]]
[[it:Uovo]]
[[ja:卵]]
[[ko:달걀]]
[[nl:Ei]]
[[pl:Jajko]]
[[pt:Ovo]]
[[ru:Яйцо]]
[[th:ไข่ไก่]]
[[uk:Яйце]]
[[zh:鸡蛋]]
<br /></li></ul> | Death is no longer permanent; the player is now able to respawn. | ||||
| alpha | |||||
v1.0.15{{Extension DPL}}<ul><li>[[:Category:Fungi|Category:Fungi]]<br/>All pages covering blocks that are fungi.
[[Category:Blocks]]
[[Category:Items]]
[[ja:カテゴリ:菌類]]</li><li>[[Enchanted Golden Apple|Enchanted Golden Apple]]<br/>{{Item
| image = Enchanted Golden Apple.png
| rarity = Epic
| heals = {{hunger|4}}
| effects =
* {{EffectLink|Absorption}} IV (2:00)
* {{EffectLink|Regeneration}} II (0:20){{only|java|short=yes}}/V (0:30){{only|bedrock|short=yes}}
* {{EffectLink|Fire Resistance}} (5:00)
* {{EffectLink|Resistance}} (5:00)
| renewable = No
| stackable = Yes (64)
}}
An '''enchanted golden apple''' ({{in|je}}), notch apple, or '''enchanted apple''' ({{in|be}}), is a rare, uncraftable variant of the [[golden apple]] that grants much more powerful effects when consumed.
== Obtaining ==
=== Chest loot ===
{{LootChestItem|enchanted-golden-apple}}
== Usage ==
{{see also|Tutorials/Hunger management|title1=Hunger management}}
To eat an enchanted golden apple, press and hold {{control|use}} while it is selected in the hotbar. It restores {{hunger|4}} points of hunger and 9.6 [[Hunger#Mechanics|saturation]].
The enchanted golden apple provides:
* [[Absorption]] IV for 2 minutes (providing {{hp|16|absorption=1}} points of absorption health)
* [[Regeneration]] level II {{in|java}} or V {{in|bedrock}} for 30 seconds ({{in|java}}, {{hp|1}} is restored every 25 ticks, {{hp|2|notag=1}} × 0.4 per second) for 20 seconds (long enough to heal {{hp|16}} points of damage; {{in|bedrock}}, {{hp|1}} is restored every 6 ticks, {{hp|2|notag=1}} × 1.66 per second for 30 seconds, which is long enough to heal up to {{hp|100}} points of damage.
* [[Fire Resistance]] I for 5 minutes
* [[Resistance]] I (20% reduced damage from all sources except the [[void]]) for 5 minutes
=== Horses ===
Enchanted golden apples can be used for improving the chances of taming a [[horse]] by 10%, for [[breeding]] and leading horses, and for speeding up the growth of [[baby]] horses by 4 minutes.
=== Crafting ingredient ===
{{crafting usage|Enchanted Golden Apple|match=start}}
===Piglins===
{{EntityLink|Piglin|Piglins}} are attracted to enchanted golden apples and run toward any enchanted golden apples on the ground, and inspect it for 6 to 8 seconds before putting it in their inventory. However, piglins do not eat enchanted golden apples (or any [[food]]).
== Sounds ==
{{Sound table/Entity/Food}}
== Data values ==
=== ID ===
{{edition|java}}:
{{ID table
|edition=java
|showforms=y
|generatetranslationkeys=y
|displayname=Enchanted Golden Apple
|spritetype=item
|nameid=enchanted_golden_apple
|form=item
|foot=1}}
{{edition|bedrock}}:
{{ID table
|edition=bedrock
|showaliasids=y
|shownumericids=y
|showforms=y
|notshowbeitemforms=y
|generatetranslationkeys=y
|displayname=Enchanted Golden Apple
|spritetype=item
|nameid=enchanted_golden_apple
|aliasid=appleenchanted
|id=259
|form=item
|translationkey=item.appleEnchanted.name
|foot=1}}
== Achievements ==
{{load achievements|Overpowered;Fruit on the Loom;Oooh, shiny!}}
== Advancements ==
{{load advancements|Oh Shiny;A Furious Cocktail;How Did We Get Here;Husbandry;A Balanced Diet}}
== History ==
{{History|java}}
{{History||1.3.1|snap=12w21a|[[File:Enchanted Golden Apple JE1 BE1.gif|32px]] Added enchanted golden apples.
|Enchanted golden apples highly resemble the golden apple prior to [[Java Edition 1.1|1.1]].
|Enchanted golden apples have [[Regeneration]] IV (30 seconds), [[Resistance]] (5 minutes) and [[Fire Resistance]] (5 minutes).
|Enchanted golden apples can be [[crafted]] with 8 [[blocks of gold]] and one apple, making them [[renewable]].
|Enchanted golden apples shine like an [[enchanting|enchanted]] [[item]] and have a purple tooltip while the standard golden apple's tooltip changed to blue. However, the standard golden apple's effects remain unchanged.}}
{{History|||snap=12w21b|Added Enchanted Golden Apples to the Creative inventory.}}
{{History||1.6.1|snap=13w24b|Enchanted golden apples now give the player Absorption as well, and Regeneration IV has been increased to Regeneration V.}}
{{History|||snap=?|Enchanted golden apples can now be used to tame, breed and heal horses and donkeys.}}
{{History||1.8|snap=14w06a|[[Crafting]] an enchanted golden apple now gives the [[player]] the [[Achievements/Java_Edition|''achievement'']] "Overpowered."}}
{{History||1.9|snap=15w37a|Enchanted golden apples now give Regeneration II (down from V) and [[Absorption]] IV (up from I), in addition to the unchanged [[Resistance]] and [[Fire Resistance]] effects. The duration of the Regeneration effect has now also been decreased to 20 seconds.}}
{{History|||snap=15w44a|Enchanted golden apples are now uncraftable, making them no longer renewable.
|Enchanted golden apples have been added to [[dungeon]], [[desert temple]] and [[mineshaft]] chests.}}
{{History||1.11|snap=16w39a|Enchanted golden apples are now found in the new [[woodland mansion]] chests.}}
{{History||1.13|snap=17w47a|The names and IDs have been split into golden apple and enchanted golden apple.
|Prior to [[1.13/Flattening|''The Flattening'']], this [[item]]'s numeral ID was 322.}}
{{History||1.14|snap=18w43a|[[File:Enchanted Golden Apple JE2 BE2.gif|32px]] The texture for enchanted golden apples has been changed.}}
{{History||1.16|snap=20w16a|Enchanted golden apples can now be found inside [[ruined portal]] chests.}}
{{History||1.16.2|snap=20w30a|Enchanted golden apples can now be found inside [[bastion remnant]] chests.}}
{{History||1.18|snap=experimental snapshot 6|Horses, donkeys and mules now follow players holding enchanted golden apples.}}
{{History||1.19|snap=22w13a|Enchanted golden apples may now be found in [[ancient city]] [[chest]]s.}}
{{History|pocket alpha}}
{{History||v0.12.1|snap=build 1|[[File:Enchanted Golden Apple JE1 BE1.gif|32px]] Added enchanted golden apples.}}
{{History|||snap=build 4|A crafting recipe has been added for enchanted golden apples.}}
{{History|pocket}}
{{History||1.1.0|snap=alpha 1.1.0.0|Enchanted golden apples are now known as "Enchanted Apple."}}
{{History|bedrock}}
{{History||1.2.0|snap=?|Enchanted apples now give [[Absorption]] IV rather than Absorption I.}}
{{History||1.2.13|snap=?|Enchanted golden apples are now uncraftable, making them no longer [[renewable resource|renewable]].}}
{{History||?|Enchanted apples now give [[Regeneration]] V rather than IV.}}
{{History||1.10.0|snap=beta 1.10.0.3|Enchanted apples are no longer used to [[crafting|craft]] patterns on [[banner]]s directly, but are now used to craft Thing [[banner pattern]]s.
|[[File:Enchanted Golden Apple JE2 BE2.gif|32px]] The texture for the enchanted golden apple has been changed.}}
{{History||1.16.0|snap=beta 1.16.0.57|Enchanted golden apples can now be found inside [[ruined portal]] chests.}}
{{History||1.16.100|snap=beta 1.16.100.56|The ID of enchanted apples has been changed from <code>appleenchanted</code> to <code>enchanted_golden_apple</code>.}}
{{History|console}}
{{History||xbox=TU14|xbone=CU1|ps=1.04|wiiu=Patch 1|switch=1.0.1|[[File:Enchanted Golden Apple JE1 BE1.gif|32px]] Added enchanted golden apples.}}
{{History||xbox=none|xbone=none|ps=1.90|wiiu=none|switch=none|[[File:Enchanted Golden Apple JE2 BE2.gif|32px]] The texture for the enchanted golden apple has been changed.}}
{{History|New 3DS}}
{{History||0.1.0|[[File:Enchanted Golden Apple JE1 BE1.gif|32px]] Added enchanted golden apples.}}
{{History|foot}}
== Issues ==
{{issue list}}
== Trivia ==
* The damage tag of an enchanted apple obtained {{in|be}} is 1, although setting it to 0 makes no difference.
== Gallery ==
<gallery>
GoldenAppleComparison.png|A comparison of the two golden apple variations.
EnchantedGoldenAppleEffects.png|The effects of consuming an enchanted golden apple.
Notch Apple In Mansion Chest.png|An extremely rare occasion where a regular golden apple and an enchanted apple being found in the same woodland mansion chest {{in|ee}}.
GoldenAppleDungeonChest.png|Golden apple in a [[dungeon]] chest, prior to 1.3.1. It resembles the enchanted golden apple.
GodPortal.png|An enchanted golden apple found in a ruined portal chest.
GodSpawner.png|An enchanted golden apple found in a monster room chest.
</gallery>
{{Items}}
[[Category:Non-renewable resources]]
[[Category:Food]]
[[de:Verzauberter goldener Apfel]]
[[es:Manzana dorada encantada]]
[[fr:pomme dorée enchantée]]
[[ja:エンチャントされた金のリンゴ]]
[[pt:Maçã dourada encantada]]
[[th:แอปเปิ้ลทองร่ายมนตร์]]
[[zh:附魔金苹果]]</li></ul> | Added multiplayer. Originally, Notch had only allowed a limited number of people from the Minecraft IRC channel to participate in the first tests of multiplayer. These invitees could invite other people to test out this mode; however, the password was leaked and the server was quickly filled up. Notch released the first version of the multiplayer server software on the 4th of August, 2010. The client was updated so that players could enter the IP of a server to join it. | ||||
| Pocket Edition Alpha | |||||
0.2.0{{Extension DPL}}<ul><li>[[Lapis Lazuli|Lapis Lazuli]]<br/>{{Item
| image = Lapis Lazuli.png
|type=
| renewable = Yes
| stackable = Yes (64)
}}
{{About|the item|the ore|Lapis Lazuli Ore|the mineral block|Lapis Lazuli Block}}
'''Lapis lazuli''' is a mineral required to [[Enchanting|enchant]] items in an [[Enchanting Table|enchanting table]].
== Obtaining ==
=== Mining ===
When mined with a stone [[pickaxe]] or better, [[lapis lazuli ore]] drops 4–9 lapis lazuli. With the [[Fortune]] III enchantment, a single block has a chance of dropping up to 36 items.
=== Crafting ===
{{Crafting
|Block of Lapis Lazuli
|Output=Lapis Lazuli,9
|type=Material
}}
=== Smelting ===
{{Smelting
|showname=1
|Lapis Lazuli Ore; Deepslate Lapis Lazuli Ore
|Lapis Lazuli
|0.2
}}
=== Villager gifts ===
{{IN|java}}, cleric [[villager]]s give [[player]]s lapis lazuli if they have the [[Hero of the Village]] effect.
=== Trading ===
Apprentice-level cleric villagers sell one lapis lazuli for an [[emerald]] as part of their trades.
{{IN|bedrock}}, [[wandering trader]]s may sell 3 lapis lazuli for an emerald.
=== Chest loot ===
{{see also|Lapis Lazuli Ore#Natural generation}}
{{LootChestItem|lapis-lazuli}}
== Usage ==
=== Enchanting ===
1–3 pieces of lapis lazuli are required to use an [[Enchanting Table|enchanting table]] to enchant an [[items|item]]. More specifically, the enchanting table UI shows 3 options (see [[Enchanting mechanics]] for details): the first, second, and third options cost 1, 2, and 3 lapis lazuli, respectively.
=== Crafting ingredient ===
Lapis lazuli can be used to make [[blocks of lapis lazuli]] and [[blue dye]]. {{IN|bedrock}}, it can also be used directly as a substitute for blue dye.
{{crafting usage}}
{{IN|bedrock}}, lapis lazuli can be also used in banner patterns:
{{banner crafting usage}}
=== Loom ingredient ===
{{Banner loom usage|Lapis Lazuli}}
=== Dye ===
{{Dye usage}}
=== Smithing ingredient ===
{{Smithing
|head=1
|ingredients=Any Armor Trim +<br/>Any Armor Piece + <br/>Lapis Lazuli
|Any Armor Trim Smithing Template
|Netherite Chestplate
|Lapis Lazuli
|Lapis Trim Netherite Chestplate
|showdescription=1
|description = All armor types can be used in this recipe,<br/>a netherite chestplate is shown as an example.<br/>
|tail=1
}}
;Trim color palette
The following color palette is shown on the designs on trimmed armor:
*{{TrimPalette|lapis lazuli}}
== Data values ==
=== ID ===
{{edition|java}}:
{{ID table
|edition=java
|showforms=y
|generatetranslationkeys=y
|displayname=Lapis Lazuli
|spritetype=item
|nameid=lapis_lazuli
|form=item
|foot=1}}
{{edition|bedrock}}:
{{ID table
|edition=bedrock
|showaliasids=y
|shownumericids=y
|showforms=y
|notshowbeitemforms=y
|generatetranslationkeys=y
|displayname=Lapis Lazuli
|spritetype=item
|nameid=lapis_lazuli
|aliasid=dye / 4
|id=414
|form=item
|translationkey=item.dye.blue.name
|foot=1}}
== Advancements ==
{{load advancements|Enchanter}}
== History ==
{{History|java beta}}
{{History||1.2|[[File:Lapis Lazuli JE1 BE1.png|32px]] Added lapis lazuli.}}
{{History||1.2_02|[[Lapis lazuli ore]] can now be found at [[bedrock]] level and now drops 4–8 lapis lazuli per block mined (increased from 1) on [[singleplayer]] only. However, servers have not been affected yet.}}
{{History||1.8|snap=Pre-release|Lapis lazuli can now be found in [[mineshaft]] [[chest]]s.}}
{{History|java}}
{{History||1.4.2|snap=12w34a|Lapis lazuli can now be used to [[Armor#Dyeing|dye]] leather [[armor]] and [[wolf]] collars.}}
{{History||1.4.6|snap=12w49a|Lapis lazuli can now be [[crafting|crafted]] with [[gunpowder]] to create a [[firework star]].}}
{{History||1.6.1|snap=13w19a|Lapis lazuli can now be used to craft blue [[stained clay]].}}
{{History||1.7.2|snap=13w41a|Lapis lazuli can now be used to craft blue [[stained glass]].}}
{{History||1.8|snap=14w02a|[[Enchanting]] now requires lapis lazuli. Different enchantments require different amounts of levels and different amounts of levels now require different amounts of lapis lazuli (between 1-3).
|Cleric [[villager]]s now [[trading|sell]] 1–2 lapis lazuli for 1 [[emerald]], making it a [[renewable resource]].}}
{{History|||snap=14w30a|Lapis lazuli can now be used to dye [[banner]]s.}}
{{History||1.9|snap=15w44a|The average yield of lapis lazuli in [[mineshaft]] [[chest]]s has been decreased.}}{{History||1.11|snap=16w39a|Added the ability to dye [[shulker box]]es.}}
{{History||1.12|snap=17w06a|Can now be used to craft blue [[concrete powder]].}}
{{History|||snap=17w15a|Added the ability to dye [[bed]]s.}}
{{History||1.13|snap=17w47a|The different data values for the <code>dye</code> ID have been split up into their own IDs.
|Prior to [[1.13/Flattening|''The Flattening'']], this [[item]]'s numeral ID was 351.}}
{{History|||snap=18w11a|Lapis lazuli now generates in [[shipwreck]] [[chest]]s.}}
{{History||1.14|snap=18w43a|Lapis lazuli can now be used to craft [[blue dye]].
|Lapis lazuli can no longer be used as a [[dye]].
|All of the dye-related functions and crafting recipes of lapis lazuli (except lapis lazuli blocks) have been transferred to blue dye.
|[[File:Lapis Lazuli JE2 BE2.png|32px]] The texture of lapis lazuli has been changed.}}
{{History|||snap=18w50a|Lapis lazuli can now be found in chests in [[village]] temples.}}
{{History|||snap=19w13a|Cleric villagers now give lapis lazuli to players under the [[Hero of the Village]] effect.}}
{{History||1.17|snap=21w08a|Lapis lazuli can now drop and be smelted from [[deepslate lapis lazuli ore]].}}
{{History||1.20<br>(Experimental)|link=1.19.4|snap=23w04a|Lapis lazuli can now be used as an armor trim material.}}
{{History|pocket alpha}}
{{History||v0.3.0|[[File:Lapis Lazuli JE1 BE1.png|32px]] Added lapis lazuli.}}
{{History||v0.3.2|Lapis lazuli can now be crafted into lapis lazuli blocks, and vice versa.}}
{{History||v0.12.1|snap=build 1|Lapis lazuli is now required for [[enchanting]].}}
{{History||v0.14.0|snap=build 1|Lapis lazuli can now be found inside [[minecart with chest]]s in [[mineshaft]]s.
|Lapis lazuli can now be used to dye [[water]] in [[cauldron]]s.}}
{{History|pocket}}
{{History||1.0.4|snap=alpha 1.0.4.0|Cleric [[villager]]s now [[trading|sell]] 1–2 lapis lazuli for 1 [[emerald]].
|Lapis lazuli can now be used to [[dyeing|dye]] [[shulker shell]]s.}}
{{History||1.1.0|snap=alpha 1.1.0.0|Lapis lazuli can now be used to dye [[shulker box]]es and [[bed]]s.
|Lapis lazuli can now be used to [[crafting|craft]] blue [[concrete powder]].}}
{{History|bedrock}}
{{History||1.2.0|snap=beta 1.2.0.2|Lapis lazuli can now be used to dye [[banner]]s, [[firework star]]s and [[glass]].}}
{{History||1.4.0|snap=beta 1.2.14.2|Lapis lazuli can now be found in [[shipwreck]] treasure chests.}}
{{History|||snap=beta 1.2.20.1|Lapis lazuli can now be used to craft [[balloon]]s and [[glow stick]]s.}}
{{History||1.8.0|snap=beta 1.8.0.10|Lapis lazuli can now be used to craft [[blue dye]]s.}}
{{History||1.10.0|snap=beta 1.10.0.3|Lapis lazuli are now [[trading|sold]] by [[wandering trader]]s.
|[[File:Lapis Lazuli JE2 BE2.png|32px]] The texture of lapis lazuli has been changed.}}
{{History||1.11.0|snap=beta 1.11.0.1|Lapis lazuli can now be found in [[desert]] [[village]] temple [[chest]]s.}}
{{History|||snap=beta 1.11.0.4|Cleric [[villager]]s now [[trading|sell]] one lapis lazuli for one [[emerald]].}}
{{History||1.16.100|snap=beta 1.16.100.56|The ID of lapis lazuli has been changed from <code>dye/4</code> to <code>lapis_lazuli</code>.}}
{{History||1.17.0|snap=beta 1.16.230.52|Lapis lazuli can now drop and be smelted from [[deepslate lapis lazuli ore]].}}
{{History||1.19.80|snap=beta 1.19.80.21|Lapis lazuli can now be used as an armor trim material.}}
{{History|console}}
{{History||xbox=TU1|xbone=CU1|ps=1.0|wiiu=Patch 1|switch=1.0.1|[[File:Lapis Lazuli JE1 BE1.png|32px]] Added lapis lazuli.}}
{{History||xbox=TU31|xbone=CU19|ps=1.22|wiiu=Patch 3|switch=1.0.1|Lapis lazuli can now be used in [[enchanting]].}}
{{History|Ps4}}
{{History||1.90|[[File:Lapis Lazuli JE2 BE2.png|32px]] The texture of lapis lazuli has been changed.}}
{{History|foot}}
== Issues ==
{{issue list}}
== Trivia ==
* In real life, lapis lazuli is a blue gem that can be ground and processed into ultramarine pigment. Lapis lazuli pigment has been famously used in the production of illuminated manuscripts, stained glass, and cave paintings. [[Wikipedia:Lapis lazuli|See the Wikipedia article for more information]].
* Lapis lazuli is the only [[ore]] that can be used as a [[dye]]{{only|BE|short=1}} or making a dye.
* It is the only item that can be put in the second slot of an [[enchantment table]].
== References ==
{{reflist}}
{{Items}}
[[Category:Dyes]]
[[cs:Lazurit]]
[[de:Lapislazuli]]
[[es:Lapislázuli]]
[[fr:Lapis-lazuli]]
[[hu:Lazurit]]
[[ja:ラピスラズリ]]
[[ko:청금석]]
[[nl:Lapis lazuli]]
[[pl:Lazuryt]]
[[pt:Lápis-lazúli]]
[[ru:Лазурит]]
[[th:แร่แลพิสแลซูลี]]
[[uk:Лазурит]]
[[zh:青金石]]
[[Category:Renewable resources]]</li><li>[[Nether Wart|Nether Wart]]<br/><!--Please do not change "nether wart" to "Nether wart". According to style guide, block names should not be capitalized.-->
{{about|the fungus used for potions|the block found in crimson forests|Nether Wart Block}}{{Block
| group = Age 0
| 1-1 = Nether Wart Age 0.png
| 1-2 = Nether Wart Age 0 BE.png
| group2 = Age 1-2
| 2-1 = Nether Wart Age 1-2.png
| 2-2 = Nether Wart Age 1-2 BE.png
| group3 = Age 3
| 3-1 = Nether Wart Age 3.png
| 3-2 = Nether Wart Age 3 BE.png
|image= Nether Wart (item).png
|transparent=Yes
|light=No
|tool=any
|renewable=Yes
|stackable=Yes (64)
|flammable=No
|lavasusceptible=No
}}
'''Nether wart''' is a fungus harvested from nether wart crops and is used to plant them, as well as being vital in the creation of [[potions]].
'''Nether wart crops''' are found in [[Nether Fortress/Structure|nether fortresses]] and [[Bastion Remnant|bastions]] and is used to grow nether wart in [[Soul Sand|soul sand]].
== Obtaining ==
=== Breaking ===
Nether wart can be mined instantly with any tool. A fully mature nether wart crop yields 2–4 nether wart. This is increased by one for each level of [[Fortune]], this allows for a maximum of 7 nether warts dropping from one crop. Less mature stages drop one nether wart, even with the Fortune enchantment.
=== Natural generation ===
Nether wart can generate in [[nether fortress]]es in [[soul sand]] gardens around stairwells. Nether wart can also generate in the courtyards of housing unit [[bastion remnant]]s. Due to only spawning in these specific structures, it's entirely possible for a nether fortress or bastion remnant to generate without nether wart (though they may still appear in the chests that generate in the fortress).
{| class="wikitable"
|+
!Location
!Description
!Image
|-
|{{anchor|Nether Fortress}}'''Nether Fortress'''
|Nether wart can be found growing near stairwells in small soul sand gardens.
|[[File:Nether wart garden.png|thumb|Nether wart growing in a nether fortress.]]
|-
|{{anchor|Bastion Remnant}}'''Bastion Remnant'''
|Nether wart can be found growing in the central courtyard of each of the sections of piglin housing unit bastions.
|[[File:Bastion Courtyard.png|thumb|Nether wart growing in a bastion remnant.]]
|}
<br>
=== Chest loot ===
{{LootChestItem|nether-wart}}
== Usage ==
=== Brewing ingredient ===
Nether wart's primary purpose is to [[brew]] the [[Potion|awkward potion]], the base for all potions, but optional for Weakness.
{{brewing
|showname=1
|Nether Wart
|Awkward Potion
|base=Water Bottle
}}
=== Crafting ingredient ===
{{crafting usage}}
=== Trading ===
Master-level cleric [[villager]]s buy 22 nether warts for an [[emerald]] as part of their trades.
=== Farming ===
{{main|Tutorials/Nether Wart farming}}
When planted on [[soul sand]], nether wart grows through four stages, though the middle two stages use the same texture (the hitbox of stage 3 is three pixels taller). {{IN|java}}, the exact age can be seen using the [[debug screen]], and the ages range from 0 to 3. Each random tick, nether wart has a 10% chance of growing one stage. At default random tick speed, each nether wart grows one age step approximately every {{convert|13653|ticks|minutes}} on average, and fully grows from planting to harvest every {{convert|40960|ticks|minutes}} on average. The growth rate is not affected by light or any other environmental factors. [[Bone meal]] cannot be used on the nether wart.
Nether wart can only be planted on [[soul sand]]. It cannot be planted on [[soul soil]]. It can grow in any [[dimension]].
Nether wart is ready to harvest when it reaches its fourth stage (age:3). Breaking a fully grown nether wart drops 2 to 4 nether wart, while an immature one drops a single nether wart. Using a tool enchanted with fortune increases the maximum number of nether wart dropped by 1 per level, for a maximum of 7 for a tool enchanted with [[Fortune|Fortune III]].
=== Composting ===
Placing a nether wart into a [[composter]] has a 30% chance of raising the compost level by 1.
== Sounds ==
{{Sound table/Block/Nether wart}}
== Data values ==
=== ID ===
{{edition|java}}:
{{ID table
|edition=java
|showforms=y
|generatetranslationkeys=y
|displayname=Nether Wart
|spritetype=block
|nameid=nether_wart
|translationkey=block.minecraft.nether_wart,item.minecraft.nether_wart
|foot=1}}
{{edition|bedrock}}:
{{ID table
|edition=bedrock
|firstcolumnname=Nether Wart
|shownumericids=y
|showforms=y
|generatetranslationkeys=y
|displayname=Block
|spritename=nether-wart
|spritetype=block
|nameid=nether_wart
|id=115
|form=block
|itemform=item.nether_wart}}
{{ID table
|displayname=Item
|spritename=nether-wart
|spritetype=item
|nameid=nether_wart
|id=294
|form=item
|foot=1}}
=== Block states ===
{{see also|Block states}}
{{/BS}}
== Advancements ==
{{load advancements|A Seedy Place}}
== History ==
{{History|java}}
{{History||1.0.0|snap=Beta 1.9 Prerelease|[[File:Nether Wart Age 0 JE1.png|32px]] [[File:Nether Wart Age 1-2 JE1.png|32px]] [[File:Nether Wart Age 3 JE1.png|32px]] [[File:Nether Wart (item) JE1.png|32px]] Added nether wart.}}
{{History|||snap=Beta 1.9 Prerelease 3|Nether wart can now be brewed in a [[water bottle]] to create an [[awkward potion]].}}
{{History||1.3.1|snap=12w27a|Nether wart can now grow outside of [[the Nether]].}}
{{History|||snap=1.3|[[File:Nether Wart (item) JE2 BE1.png|32px]] The item texture has been changed.}}
{{History||1.4.2|snap=12w36a|Nether wart can now be used to breed [[chicken]]s.}}
{{History||1.6.1|snap=13w18a|Nether wart is now found in the new [[chest]]s in [[nether fortress]]es.}}
{{History||1.8|snap=14w06a|[[File:Nether Wart Age 0 JE2.png|32px]] [[File:Nether Wart Age 1-2 JE2.png|32px]] [[File:Nether Wart Age 3 JE2.png|32px]] Nether wart crops are now a pixel higher, likely as an accidental result of model conversion. Previously they were offset one pixel downwards like the other crops (wheat, carrots potatoes) to match farmland, although in nether wart's case such a downwards offset hides some pixels of the texture inside of the soul sand.<ref>{{bug|MC-250679}}</ref>}}
{{History|||snap=14w10a|[[File:Missing Model JE2.png|32px]] [[File:Missing Model JE2.png|32px]] [[File:Missing Model JE2.png|32px]]<br>[[File:Missing Model (anisotropic filtering) JE2.png|32px]] [[File:Missing Model (anisotropic filtering) JE2.png|32px]] [[File:Missing Model (anisotropic filtering) JE2.png|32px]] Nether wart crops of all ages [[Missing model|no longer have a model]].}}
{{History|||snap=14w10b|[[File:Nether Wart Age 0 JE4.png|32px]] [[File:Nether Wart Age 1-2 JE4.png|32px]] [[File:Nether Wart Age 3 JE4.png|32px]] Nether wart crops now have models again.<ref>{{bug|MC-50276}}</ref> In addition, they are now offset downwards by one pixel once more, hiding the bottom row of pixels again.}}
{{History|||snap=14w25a|[[File:Nether Wart Age 0 JE5.png|32px]] [[File:Nether Wart Age 1-2 JE5.png|32px]] [[File:Nether Wart Age 3 JE5.png|32px]] Nether wart crops are now darker and subject to directional shading.}}
{{History|||snap=14w27a|[[File:Nether Wart Age 0 JE6.png|32px]] [[File:Nether Wart Age 1-2 JE6.png|32px]] [[File:Nether Wart Age 3 JE6.png|32px]] Nether wart crops are no longer subject to directional shading.}}
{{History|||snap=14w34d|Nether wart can no longer be used to breed [[chicken]]s.}}
{{History||1.9|snap=15w43a|The average yield of nether wart from [[nether fortress]] chests has now been slightly decreased.}}
{{History||1.10|snap=16w20a|Nether wart can now be used to [[crafting|craft]] the new [[red nether brick]] blocks and [[nether wart block]]s.}}
{{History||1.12|snap=17w18b|Placing a nether wart in soul sand now gives the player the "A Seedy Place" [[advancement]].{{verify}}}}
{{History||1.13|snap=17w47a|Prior to [[1.13/Flattening|''The Flattening'']], this block's numeral ID was 115, and the item's 372.}}
{{History||1.14|snap=18w43a|[[File:Nether Wart Age 0 JE7.png|32px]] [[File:Nether Wart Age 1-2 JE7.png|32px]] [[File:Nether Wart Age 3 JE7.png|32px]] The textures of nether wart crops have changed.}}
{{History|||snap=19w03a|Placement and breaking [[sound]]s have now been added to nether wart. Before this version, nether wart made stone sounds.}}
{{History|||snap=19w11a|Cleric [[villager]]s now [[trading|buy]] nether wart.
|Nether wart can now be planted by aiming against the sides and underside of blocks, rather than just the top surface of the soul sand.}}
{{History||1.16|snap=20w15a|Nether wart can now be [[composter|composted]].}}
{{History|||snap=20w16a|Nether wart now generates as part of [[bastion remnant]]s.}}
{{History||1.17|snap=21w13a|[[File:Nether Wart Age 0 JE8.png|32px]] [[File:Nether Wart Age 1-2 JE8.png|32px]] [[File:Nether Wart Age 3 JE8.png|32px]] The "crop" template model has changed such that pixels appear in the same physical positions on opposite sides of texture planes, changing the nether wart crop's appearance in the process.<ref>{{bug|MC-199242}}</ref>}}
{{History|pocket alpha}}
{{History||v0.12.1|snap=build 1|[[File:Nether Wart Age 0 BE1.png|32px]] [[File:Nether Wart Age 1-2 BE1.png|32px]] [[File:Nether Wart Age 3 BE1.png|32px]] [[File:Nether Wart (item) JE2 BE1.png|32px]] Added nether wart.
|Nether wart uses a cross model instead of the "hash" shape associated with crops.}}
{{History||?|[[File:Nether Wart Age 0 JE6 BE2.png|32px]] [[File:Nether Wart Age 1-2 JE6 BE2.png|32px]] [[File:Nether Wart Age 3 JE6 BE2.png|32px]]{{verify|Correct models? check UV, etc.}} Nether wart now uses a more conventional crop model.}}
{{History|pocket}}
{{History||1.1.3|snap=alpha 1.1.3.0|Nether wart can now be used to [[crafting|craft]] [[red nether bricks]] and [[nether wart block]]s.}}
{{History|bedrock}}
{{History||1.10.0|snap=beta 1.10.0.3|[[File:Nether Wart Age 0 BE.png|32px]] [[File:Nether Wart Age 1-2 BE.png|32px]] [[File:Nether Wart Age 3 BE.png|32px]] The textures of nether wart crops have changed.
|Placement and breaking [[sound]]s have now been added to nether wart.}}
{{History||1.11.0|snap=beta 1.11.0.4|Nether wart can now be [[trading|sold]] to cleric [[villager]]s.}}
{{History||1.16.0|snap=beta 1.16.0.57|Nether wart now generates as part of [[bastion remnant]]s.
|The placement and breaking [[sound]]s for nether wart have been changed to match {{el|je}}.
|Nether wart can now be [[composter|composted]].}}
{{History|console}}
{{History||xbox=TU7|xbone=CU1|ps=1.0|wiiu=Patch 1|switch=1.0.1|[[File:Nether Wart Age 0 JE6 BE2.png|32px]] [[File:Nether Wart Age 1-2 JE6 BE2.png|32px]] [[File:Nether Wart Age 3 JE6 BE2.png|32px]]{{verify|Correct models? check UV, etc.}} [[File:Nether Wart (item) JE2 BE1.png|32px]] Added nether wart.}}
{{History||xbox=TU9|Nether wart now spawns randomly wherever [[soul sand]] is generated in [[the Nether]].
|[[Nether fortress]]es have now been changed to make nether wart rooms more likely.
|Nether wart can now grow outside of [[the Nether]].}}
{{History||xbox=none|xbone=none|ps=1.90|wiiu=none|switch=none|[[File:Nether Wart Age 0 JE7.png|32px]] [[File:Nether Wart Age 1-2 JE7.png|32px]] [[File:Nether Wart Age 3 JE7.png|32px]]{{verify|Correct models?}} The textures of nether wart crops have now been changed.}}
{{History|New 3DS}}
{{History||0.1.0|[[File:Nether Wart Age 0 JE6 BE2.png|32px]] [[File:Nether Wart Age 1-2 JE6 BE2.png|32px]] [[File:Nether Wart Age 3 JE6 BE2.png|32px]]{{verify|Correct models? check UV, etc.}} [[File:Nether Wart (item) JE2 BE1.png|32px]] Added nether wart.}}
{{History|foot}}
=== Nether wart "item" ===
{{:Technical blocks/Nether Wart}}
==Issues==
{{issue list}}
== Trivia ==
* Nether wart's stage changes cannot be detected by a [[block update detector]], but can by an [[observer]] block.
* Unlike other crimson "plants", nether wart doesn't have a warped equivalent. This is also the case with [[nether sprouts]], which lack a crimson equivalent.
== Gallery ==
<gallery>
Nether Brick And Wart.png|Nether wart found in a nether fortress.
Nether Wart Closeup.png| Another example of nether wart found in a nether fortress.
Nether wart three sizes.png|The three different sizes of the nether wart as viewed from the side.
Nether Fortress Large Stairs Room.png
</gallery>
== References ==
{{reflist}}
{{Blocks|vegetation}}
{{Items}}
[[Category:Nether blocks]]
[[Category:Fungi]]
[[Category:Non-solid blocks]]
[[Category:Generated structure blocks]]
[[de:Netherwarze]]
[[es:Verruga del Nether]]
[[fr:Verrues du Nether]]
[[hu:Bibircsók]]
[[it:Verruca del Nether]]
[[ja:ネザーウォート]]
[[ko:네더 사마귀]]
[[nl:Netherkruid]]
[[pl:Netherowa brodawka]]
[[pt:Fungo do Nether]]
[[ru:Адский нарост]]
[[th:หูดเนเธอร์]]
[[uk:Пекельний наріст]]
[[zh:下界疣]]
[[Category:Brewing recipe]]</li></ul> | Added Survival mode. | ||||
0.3.0{{Extension DPL}}<ul><li>[[Powder Snow Bucket|Powder Snow Bucket]]<br/>{{Item
| title = Powder Snow Bucket
| image = Powder Snow Bucket.png
| renewable = Yes
| stackable = No
}}
A '''powder snow bucket''' is a [[bucket]] with [[powder snow]] inside.
== Obtaining ==
A powder snow bucket can be obtained by {{ctrl|using}} an [[empty bucket]] on a [[powder snow block]] or [[powder snow cauldron]].
== Usage ==
Pressing {{control|use}} while holding a powder snow bucket places a [[powder snow]] block. {{IN|Java}}, powder snow may also be placed inside empty [[cauldron]]s, creating powder snow cauldrons.
[[Dispenser]]s can also create and place powder snow buckets. However, they cannot do so with [[cauldron]]s. You can also use it to cushion falls in the [[nether]] by placing it below you when falling.
== Sounds ==
{{el|je}}:
{{Sound table
|sound=Empty powder snow bucket1.ogg
|sound2=Empty powder snow bucket2.ogg
|subtitle=Bucket empties
|source=block
|description=When a powder snow bucket is placed
|id=item.bucket.empty_powder_snow
|translationkey=subtitles.item.bucket.empty
|volume=1.0
|pitch=''varies'' <ref group=sound>Each sound event can be 1.0, 0.95, or 1.1</ref>
|distance=16}}
{{Sound table
|sound=Fill powder snow bucket1.ogg
|sound2=Fill powder snow bucket2.ogg
|subtitle=Bucket fills
|source=player
|description=When a bucket is filled with powder snow
|id=item.bucket.fill_powder_snow
|translationkey=subtitles.item.bucket.fill
|volume=1.0
|pitch=''varies'' <ref group=sound>Each sound event can be 1.0, 0.9, or 1.1</ref>
|distance=16}}
{{Sound table
|sound=Powder Snow break1.ogg
|sound2=Powder Snow break2.ogg
|sound3=Powder Snow break3.ogg
|sound4=Powder Snow break4.ogg
|sound5=Powder Snow break5.ogg
|sound6=Powder Snow break6.ogg
|sound7=Powder Snow break7.ogg
|subtitle=Block broken
|source=block
|description=When a bucket is filled with powder snow
|id=block.powder_snow.break
|translationkey=subtitles.block.generic.break
|volume=1.0
|pitch=0.8
|distance=16
|foot=1}}
{{el|be}}:
{{Sound table
|type=bedrock
|sound=Fill powder snow bucket1.ogg
|sound2=Fill powder snow bucket2.ogg
|source=player
|description=When a bucket is filled with powder snow
|id=bucket.fill_powder_snow
|volume=1.0
|pitch=1.0}}
{{Sound table
|sound=Empty powder snow bucket1.ogg
|sound2=Empty powder snow bucket2.ogg
|source=block
|description=When a powder snow bucket is placed
|id=bucket.empty_powder_snow
|volume=1.0
|pitch=1.0
|foot=1}}
== Data values ==
=== ID ===
{{edition|java}}:
{{ID table
|edition=java
|showforms=y
|generatetranslationkeys=y
|displayname=Powder Snow Bucket
|spritetype=item
|nameid=powder_snow_bucket
|form=item
|foot=1}}
{{edition|bedrock}}:
{{ID table
|edition=bedrock
|shownumericids=y
|showforms=y
|showaliasids=y
|notshowbeitemforms=y
|generatetranslationkeys=y
|displayname=Powder Snow Bucket
|spritetype=item
|nameid=powder_snow_bucket
|aliasid=bucket / 11
|form=item
|id=368
|foot=1}}
== History ==
{{History|java}}
{{History||1.17|snap=20w46a|[[File:Powder Snow Bucket JE1 BE1.png|32px]] Added powder snow buckets.}}
{{History|bedrock}}
{{History||Caves & Cliffs<br>(experimental)|link=Bedrock Edition 1.17.0|snap=beta 1.16.210.53|[[File:Powder Snow Bucket JE1 BE1.png|32px]] Added powder snow buckets.
|The powder snow bucket replaced the powder snow block in the creative inventory.}}
{{History||1.17.0|snap=beta 1.17.0.50|Powder snow bucket are now available without enabling [[Experimental Gameplay]].}}
{{h|foot}}
== Issues ==
{{Issue list}}
==Gallery==
<gallery>
Cozy Cabin Powder Snow Bucket 1.jpg|Teaser image with a barely visible powder snow bucket.
Cozy Cabin Powder Snow Bucket 2.jpg|Teaser image with a barely visible powder snow bucket.
Cozy Cabin Powder Snow Bucket 3.jpg|Teaser image with a barely visible powder snow bucket.
</gallery>
{{Items}}
[[Category:Renewable resources]]
[[Category:Tools]]
[[de:Pulverschneeeimer]]
[[es:Cubo con nieve polvo]]
[[fr:Seau de neige poudreuse]]
[[it:Secchio di neve polverosa]]
[[ja:粉雪入りバケツ]]
[[pl:Wiadro sypkiego śniegu]]
[[pt:Balde de neve fofa]]
[[ru:Ведро с рыхлым снегом]]
[[zh:细雪桶]]</li><li>[[Item|Item]]<br/>{{Many images}}
{{Redirect|Items|the old image file used to load item textures|items.png}}
{{About|inventory items|the entity|Item (entity)|the items that mobs and some entities leave behind on death|Drops|the command|Commands/item|other uses}} ''This article does not include block items, which you can find a list of [[:en:Block#List_of_blocks|here.]]''[[File:Minecraft Creative.png|thumb|300px|The Creative inventory is filled with a wide variety of items.]]
An '''item''' is an object that exists only within the [[player]]'s [[inventory]] and hands, or displayed in [[item frame]]s, [[glow item frame]]s, or [[armor stand]]s. As of 1.20, there are a total of '''1,643''' items in the game.
== Behavior ==
Some items, when {{control|used|use}}, place a [[block]] (ItemBlock) or [[entity]] (minecart, spawn eggs, etc.) version of themselves into the game world. Put simply, they are an item when in the [[inventory]], and a block when placed. For example, [[boat]]s turn into an entity when placed, and [[bed]]s turn into a group of blocks when placed. When selected in the [[hotbar]], items briefly display their names above the [[HUD]].
The only method by which an item can be properly displayed within the game environment is to place it into an [[item frame]].
If an item that does not become a block is dropped, it becomes an [[Item (entity)|entity]] represented by a sprite that floats above the ground for 5 minutes in a loaded [[chunk]] before despawning, unless the player walks over it to pick it up before it despawns, it is picked up by a mob, [[hopper]] or [[minecart with hopper]], or it is destroyed by [[fire]], [[lava]], [[cactus]], or [[explosion]]s.
A submerged object ascends towards the water’s edge. When the surface current is in motion, the object is propelled along with it.
Hoppers draw in any items that are placed above them.
Most items [[stack]] to 64, but some only stack to 16, and others not at all. ''However,'' all types of items can be stacked up to 127 through inventory editing.
== List of items ==
<!--potentially missing bedrock edition items-->
=== Items that create blocks, fluids or entities ===
{{columns-list|colwidth=16em|
* {{ItemLink|Acacia Boat}}
* {{ItemLink|Acacia Boat with Chest}}
* {{ItemLink|Armor Stand}}
* {{ItemLink|Bamboo Raft}}
* {{ItemLink|Bamboo Raft with Chest}}
* {{ItemLink|Beetroot Seeds}}
* {{ItemLink|Birch Boat}}
* {{ItemLink|Birch Boat with Chest}}
* {{ItemLink|Bottle o' Enchanting}}
* {{ItemLink|Bow}}
* {{ItemLink|Bucket}}
* {{ItemLink|Bucket of Axolotl}}
* {{ItemLink|Bucket of Cod}}
* {{ItemLink|Bucket of Pufferfish}}
* {{ItemLink|Bucket of Salmon}}
* {{ItemLink|Bucket of Tadpole}}
* {{ItemLink|Bucket of Tropical Fish}}
* {{ItemLink|Carrot}}
* {{ItemLink|Cherry Boat}}
* {{ItemLink|Cherry Boat with Chest}}
* {{ItemLink|Cocoa Beans}}
* {{ItemLink|Crossbow}}
* {{ItemLink|Dark Oak Boat}}
* {{ItemLink|Dark Oak Boat with Chest}}
* {{ItemLink|Egg}}
* {{ItemLink|End Crystal}}
* {{ItemLink|Ender Pearl}}
* {{ItemLink|Eye of Ender}}
* {{ItemLink|Fire Charge}}
* {{ItemLink|Firework Rocket}}
* {{ItemLink|Fishing Rod}}
* {{ItemLink|Flint and Steel}}
* {{ItemLink|Glow Berries}}
* {{ItemLink|Glow Item Frame}}
* {{ItemLink|Item Frame}}
* {{ItemLink|Jungle Boat}}
* {{ItemLink|Jungle Boat with Chest}}
* {{ItemLink|Kelp}}
* {{ItemLink|Lava Bucket}}
* {{ItemLink|Lead}}
* {{ItemLink|Lingering Potion}}
* {{ItemLink|Mangrove Boat}}
* {{ItemLink|Mangrove Boat with Chest}}
* {{ItemLink|Melon Seeds}}
* {{ItemLink|Minecart}}
* {{ItemLink|Minecart with Chest}}
* {{ItemLink|Minecart with Command Block}}
* {{ItemLink|Minecart with Furnace}}{{only|java|short=1}}
* {{ItemLink|Minecart with Hopper}}
* {{ItemLink|Minecart with TNT}}
* {{ItemLink|Nether Wart}}
* {{ItemLink|Oak Boat}}
* {{ItemLink|Oak Boat with Chest}}
* {{ItemLink|Painting}}
* {{ItemLink|Pitcher Pod}}
* {{ItemLink|Potato}}
* {{ItemLink|Powder Snow Bucket}}
* {{ItemLink|Pumpkin Seeds}}
* {{ItemLink|Redstone Dust}}
* {{ItemLink|Snowball}}
* {{ItemLink|Splash Potion}}
* {{ItemLink|Spruce Boat}}
* {{ItemLink|Spruce Boat with Chest}}
* {{ItemLink|String}}
* {{ItemLink|Sweet Berries}}
* {{ItemLink|Torchflower Seeds}}
* {{ItemLink|Trident}}
* {{ItemLink|Water Bucket}}
* {{ItemLink|Wheat Seeds}}
}}
=== Items with use in the world ===
These items, when highlighted in a player's hotbar (a.k.a "held"), held in the off hand, or equipped in an armor slot, can be used by either {{control|attack}} or {{control|use}}, or can serve a specific purpose (for example, offer the player advantage or disadvantage). Some can be used whenever, others only when aiming at specific blocks or entities.
{{columns-list|colwidth=16em|
* {{ItemLink|id=amethyst-shard|link=Amethyst Shard#Allay duplication|text=Amethyst Shard}} (to duplicate allays)
* {{ItemLink|Apple}}
* {{ItemLink|Arrow}}
* {{ItemLink|Baked Potato}}
* {{ItemLink|Beetroot}}
* {{ItemLink|Beetroot Soup}}
* {{ItemLink|Black Dye}}
* {{ItemLink|Blue Dye}}
* {{ItemLink|Bone}}
* {{ItemLink|Bone Meal}}
* {{ItemLink|Book}} (to interact with chiseled bookshelves)
* {{ItemLink|Book and Quill}}
* {{ItemLink|Bowl}}
* {{ItemLink|Bread}}
* {{ItemLink|Brown Dye}}
* {{ItemLink|Brush}}
* {{ItemLink|Bundle}}
* {{ItemLink|Carrot on a Stick}}
* {{ItemLink|Chainmail Boots}}
* {{ItemLink|Chainmail Chestplate}}
* {{ItemLink|Chainmail Helmet}}
* {{ItemLink|Chainmail Leggings}}
* {{ItemLink|Chorus Fruit}}
* {{ItemLink|Compass}}
* {{ItemLink|Cooked Chicken}}
* {{ItemLink|Cooked Cod}}
* {{ItemLink|Cooked Mutton}}
* {{ItemLink|Cooked Porkchop}}
* {{ItemLink|Cooked Rabbit}}
* {{ItemLink|Cooked Salmon}}
* {{ItemLink|Cookie}}
* {{ItemLink|Cyan Dye}}
* {{ItemLink|Debug Stick}}{{only|java|short=1}}
* {{ItemLink|Diamond Axe}}
* {{ItemLink|Diamond Boots}}
* {{ItemLink|Diamond Chestplate}}
* {{ItemLink|Diamond Helmet}}
* {{ItemLink|Diamond Hoe}}
* {{ItemLink|Diamond Horse Armor}}
* {{ItemLink|Diamond Leggings}}
* {{ItemLink|Diamond Pickaxe}}
* {{ItemLink|Diamond Shovel}}
* {{ItemLink|Diamond Sword}}
* {{ItemLink|Dried Kelp}}
* {{ItemLink|Elytra}}
* {{ItemLink|Empty Map}}
* {{ItemLink|Enchanted Book}} (to interact with chiseled bookshelves)
* {{ItemLink|Enchanted Golden Apple}}
* {{ItemLink|Goat Horn}}
* {{ItemLink|Glass Bottle}}
* {{ItemLink|Glow Ink Sac}}
* {{ItemLink|Gold Ingot}}
* {{ItemLink|Golden Apple}}
* {{ItemLink|Golden Axe}}
* {{ItemLink|Golden Boots}}
* {{ItemLink|Golden Carrot}}
* {{ItemLink|Golden Chestplate}}
* {{ItemLink|Golden Helmet}}
* {{ItemLink|Golden Hoe}}
* {{ItemLink|Golden Horse Armor}}
* {{ItemLink|Golden Leggings}}
* {{ItemLink|Golden Pickaxe}}
* {{ItemLink|Golden Shovel}}
* {{ItemLink|Golden Sword}}
* {{ItemLink|Gray Dye}}
* {{ItemLink|Green Dye}}
* {{ItemLink|Honeycomb}}
* {{ItemLink|Honey Bottle}}
* {{ItemLink|Ink Sac}}
* {{ItemLink|Iron Axe}}
* {{ItemLink|Iron Boots}}
* {{ItemLink|Iron Chestplate}}
* {{ItemLink|Iron Helmet}}
* {{ItemLink|Iron Hoe}}
* {{ItemLink|Iron Horse Armor}}
* {{ItemLink|id=iron-ingot|link=Iron Ingot#Healing iron golems|text=Iron Ingot}} (to heal iron golems)
* {{ItemLink|Iron Leggings}}
* {{ItemLink|Iron Pickaxe}}
* {{ItemLink|Iron Shovel}}
* {{ItemLink|Iron Sword}}
* {{ItemLink|Knowledge Book}}{{only|java|short=1}}
* {{ItemLink|Lapis Lazuli}} (as a dye){{only|bedrock|short=1}}
* {{ItemLink|Leather Boots}}
* {{ItemLink|Leather Cap}}
* {{ItemLink|Leather Horse Armor}}
* {{ItemLink|Leather Pants}}
* {{ItemLink|Leather Tunic}}
* {{ItemLink|Light Blue Dye}}
* {{ItemLink|Light Gray Dye}}
* {{ItemLink|Lime Dye}}
* {{ItemLink|Magenta Dye}}
* {{ItemLink|Map}} or [[Explorer Map]]
* {{ItemLink|Melon Slice}}
* {{ItemLink|Milk Bucket}}
* {{ItemLink|Mushroom Stew}}
* {{ItemLink|id=music-disc-5|Music Disc}} (5)
* {{ItemLink|id=music-disc-11|Music Disc}} (11)
* {{ItemLink|id=music-disc-13|Music Disc}} (13)
* {{ItemLink|id=music-disc-blocks|Music Disc}} (Blocks)
* {{ItemLink|id=music-disc-cat|Music Disc}} (Cat)
* {{ItemLink|id=music-disc-chirp|Music Disc}} (Chirp)
* {{ItemLink|id=music-disc-far|Music Disc}} (Far)
* {{ItemLink|id=music-disc-mall|Music Disc}} (Mall)
* {{ItemLink|id=music-disc-mellohi|Music Disc}} (Mellohi)
* {{ItemLink|id=music-disc-otherside|Music Disc}} (Otherside)
* {{ItemLink|id=music-disc-pigstep|Music Disc}} (Pigstep)
* {{ItemLink|id=music-disc-relic|Music Disc}} (Relic)
* {{ItemLink|id=music-disc-stal|Music Disc}} (Stal)
* {{ItemLink|id=music-disc-strad|Music Disc}} (Strad)
* {{ItemLink|id=music-disc-wait|Music Disc}} (Wait)
* {{ItemLink|id=music-disc-ward|Music Disc}} (Ward)
* {{ItemLink|Name Tag}}
* {{ItemLink|Netherite Axe}}
* {{ItemLink|Netherite Boots}}
* {{ItemLink|Netherite Chestplate}}
* {{ItemLink|Netherite Helmet}}
* {{ItemLink|Netherite Hoe}}
* {{ItemLink|Netherite Leggings}}
* {{ItemLink|Netherite Pickaxe}}
* {{ItemLink|Netherite Shovel}}
* {{ItemLink|Netherite Sword}}
* {{ItemLink|Orange Dye}}
* {{ItemLink|Pink Dye}}
* {{ItemLink|Poisonous Potato}}
* {{ItemLink|Potion|Potions}}
* {{ItemLink|Pufferfish|link=Pufferfish (item)}}
* {{ItemLink|Pumpkin Pie}}
* {{ItemLink|Purple Dye}}
* {{ItemLink|Rabbit Stew}}
* {{ItemLink|Raw Beef}}
* {{ItemLink|Raw Chicken}}
* {{ItemLink|Raw Cod}}
* {{ItemLink|Raw Mutton}}
* {{ItemLink|Raw Porkchop}}
* {{ItemLink|Raw Rabbit}}
* {{ItemLink|Raw Salmon}}
* {{ItemLink|Red Dye}}
* {{ItemLink|Rotten Flesh}}
* {{ItemLink|Saddle}}
* {{ItemLink|Shears}}
* {{ItemLink|Shield}}
* {{ItemLink|Spectral Arrow}}{{only|java|short=1}}
* {{ItemLink|Spider Eye}}
* {{ItemLink|Spyglass}}
* {{ItemLink|Steak}}
* {{ItemLink|Stone Axe}}
* {{ItemLink|Stone Hoe}}
* {{ItemLink|Stone Pickaxe}}
* {{ItemLink|Stone Shovel}}
* {{ItemLink|Stone Sword}}
* {{ItemLink|Sugar}}
* {{ItemLink|Suspicious Stew}}
* {{ItemLink|Tipped Arrow}}
* {{ItemLink|Totem of Undying}}
* {{ItemLink|Tropical Fish}}
* {{ItemLink|Turtle Shell}}
* {{ItemLink|Warped Fungus on a Stick}}
* {{ItemLink|Wheat}}
* {{ItemLink|White Dye}}
* {{ItemLink|Wooden Axe}}
* {{ItemLink|Wooden Hoe}}
* {{ItemLink|Wooden Pickaxe}}
* {{ItemLink|Wooden Shovel}}
* {{ItemLink|Wooden Sword}}
* {{ItemLink|Written Book}}
* {{ItemLink|Yellow Dye}}
}}
=== Items with indirect use in the world ===
The player cannot interact with or directly use these items; however, they are used for [[trading]], [[brewing]], [[enchanting]], or [[crafting]] ingredients for other items that do have direct uses. The exception is clocks, which are not used in any recipes but serve an informative function.
{{columns-list|colwidth=16em|
* {{ItemLink|Angler Pottery Sherd}}
* {{ItemLink|Archer Pottery Sherd}}
* {{ItemLink|Arms Up Pottery Sherd}}
* {{ItemLink|Banner Pattern}} (Bordure Indented){{only|BE|short=1}}
* {{ItemLink|Banner Pattern}} (Creeper Charge)
* {{ItemLink|Banner Pattern}} (Field Masoned){{only|BE|short=1}}
* {{ItemLink|Banner Pattern}} (Flower Charge)
* {{ItemLink|Banner Pattern}} (Globe)
* {{ItemLink|Banner Pattern}} (Skull Charge)
* {{ItemLink|Banner Pattern}} (Snout)
* {{ItemLink|Banner Pattern}} (Thing)
* {{ItemLink|Blade Pottery Sherd}}
* {{ItemLink|Blaze Powder}}
* {{ItemLink|Blaze Rod}}
* {{ItemLink|Brewer Pottery Sherd}}
* {{ItemLink|Brick}}
* {{ItemLink|Burn Pottery Sherd}}
* {{ItemLink|Charcoal}}
* {{ItemLink|Clay Ball}}
* {{ItemLink|Clock}}
* {{ItemLink|Coal}}
* {{ItemLink|Coast Armor Trim}}
* {{ItemLink|Copper Ingot}}
* {{ItemLink|Danger Pottery Sherd}}
* {{ItemLink|Diamond}}
* {{ItemLink|Disc Fragment}}
* {{ItemLink|Dragon's Breath}}
* {{ItemLink|Dune Armor Trim}}
* {{ItemLink|Echo Shard}}
* {{ItemLink|Emerald}}
* {{ItemLink|Explorer Pottery Sherd}}
* {{ItemLink|Eye Armor Trim}}
* {{ItemLink|Feather}}
* {{ItemLink|Fermented Spider Eye}}
* {{ItemLink|Firework Star}}
* {{ItemLink|Flint}}
* {{ItemLink|Friend Pottery Sherd}}
* {{ItemLink|Ghast Tear}}
* {{ItemLink|Glistering Melon Slice}}
* {{ItemLink|Glowstone Dust}}
* {{ItemLink|Gold Nugget}}
* {{ItemLink|Gunpowder}}
* {{ItemLink|Heart of the Sea}}
* {{ItemLink|Heart Pottery Sherd}}
* {{ItemLink|Heartbreak Pottery Sherd}}
* {{ItemLink|Host Armor Trim}}
* {{ItemLink|Howl Pottery Sherd}}
* {{ItemLink|Ink Sac}}
* {{ItemLink|Iron Ingot}}
* {{ItemLink|Iron Nugget}}
* {{ItemLink|Lapis Lazuli}}
* {{ItemLink|Leather}}
* {{ItemLink|Magma Cream}}
* {{ItemLink|Miner Pottery Sherd}}
* {{ItemLink|Mourner Pottery Sherd}}
* {{ItemLink|Nautilus Shell}}
* {{ItemLink|Nether Brick}}
* {{ItemLink|Nether Quartz}}
* {{ItemLink|Nether Star}}
* {{ItemLink|Netherite Ingot}}
* {{ItemLink|Netherite Scrap}}
* {{ItemLink|Netherite Upgrade}}
* {{ItemLink|Paper}}
* {{ItemLink|Phantom Membrane}}
* {{ItemLink|Plenty Pottery Sherd}}
* {{ItemLink|Popped Chorus Fruit}}
* {{ItemLink|Prismarine Crystals}}
* {{ItemLink|Prismarine Shard}}
* {{ItemLink|Prize Pottery Sherd}}
* {{ItemLink|Rabbit Hide}}
* {{ItemLink|Rabbit's Foot}}
* {{ItemLink|Raiser Armor Trim}}
* {{ItemLink|Raw Copper}}
* {{ItemLink|Raw Gold}}
* {{ItemLink|Raw Iron}}
* {{ItemLink|Recovery Compass}}
* {{ItemLink|Rib Armor Trim}}
* {{ItemLink|Scute}}
* {{ItemLink|Sentry Armor Trim}}
* {{ItemLink|Shaper Armor Trim}}
* {{ItemLink|Sheaf Pottery Sherd}}
* {{ItemLink|Shelter Pottery Sherd}}
* {{ItemLink|Shulker Shell}}
* {{ItemLink|Silence Armor Trim}}
* {{ItemLink|Skull Pottery Sherd}}
* {{ItemLink|Slimeball}}
* {{ItemLink|Snort Pottery Sherd}}
* {{ItemLink|Spire Armor Trim}}
* {{ItemLink|Stick}}
* {{ItemLink|Tide Armor Trim}}
* {{ItemLink|Vex Armor Trim}}
* {{ItemLink|Ward Armor Trim}}
* {{ItemLink|Wayfinder Armor Trim}}
* {{ItemLink|Wild Armor Trim}}
}}
=== Spawn eggs ===
Spawn eggs spawn the entity inside them. They cannot be obtained in Survival mode.{{columns-list|colwidth=16em|
* {{ItemLink|Allay Spawn Egg}}
* {{ItemLink|Axolotl Spawn Egg}}
* {{ItemLink|Bat Spawn Egg}}
* {{ItemLink|Bee Spawn Egg}}
* {{ItemLink|Blaze Spawn Egg}}
* {{ItemLink|Camel Spawn Egg}}
* {{ItemLink|Cat Spawn Egg}}
* {{ItemLink|Cave Spider Spawn Egg}}
* {{ItemLink|Chicken Spawn Egg}}
* {{ItemLink|Cod Spawn Egg}}
* {{ItemLink|Cow Spawn Egg}}
* {{ItemLink|Creeper Spawn Egg}}
* {{ItemLink|Dolphin Spawn Egg}}
* {{ItemLink|Donkey Spawn Egg}}
* {{ItemLink|Drowned Spawn Egg}}
* {{ItemLink|Elder Guardian Spawn Egg}}
* {{ItemLink|Ender Dragon Spawn Egg}}
* {{ItemLink|Enderman Spawn Egg}}
* {{ItemLink|Endermite Spawn Egg}}
* {{ItemLink|Evoker Spawn Egg}}
* {{ItemLink|Fox Spawn Egg}}
* {{ItemLink|Frog Spawn Egg}}
* {{ItemLink|Ghast Spawn Egg}}
* {{ItemLink|Glow Squid Spawn Egg}}
* {{ItemLink|Goat Spawn Egg}}
* {{ItemLink|Guardian Spawn Egg}}
* {{ItemLink|Hoglin Spawn Egg}}
* {{ItemLink|Horse Spawn Egg}}
* {{ItemLink|Husk Spawn Egg}}
* {{ItemLink|Iron Golem Spawn Egg}}
* {{ItemLink|Llama Spawn Egg}}
* {{ItemLink|Magma Cube Spawn Egg}}
* {{ItemLink|Mooshroom Spawn Egg}}
* {{ItemLink|Mule Spawn Egg}}
* {{ItemLink|Spawn NPC}}{{only|bedrock}}
* {{ItemLink|Ocelot Spawn Egg}}
* {{ItemLink|Panda Spawn Egg}}
* {{ItemLink|Parrot Spawn Egg}}
* {{ItemLink|Phantom Spawn Egg}}
* {{ItemLink|Pig Spawn Egg}}
* {{ItemLink|Piglin Spawn Egg}}
* {{ItemLink|Piglin Brute Spawn Egg}}
* {{ItemLink|Pillager Spawn Egg}}
* {{ItemLink|Polar Bear Spawn Egg}}
* {{ItemLink|Pufferfish Spawn Egg}}
* {{ItemLink|Rabbit Spawn Egg}}
* {{ItemLink|Ravager Spawn Egg}}
* {{ItemLink|Salmon Spawn Egg}}
* {{ItemLink|Sheep Spawn Egg}}
* {{ItemLink|Shulker Spawn Egg}}
* {{ItemLink|Silverfish Spawn Egg}}
* {{ItemLink|Skeleton Horse Spawn Egg}}
* {{ItemLink|Skeleton Spawn Egg}}
* {{ItemLink|Slime Spawn Egg}}
* {{ItemLink|Sniffer Spawn Egg}}
* {{ItemLink|Snow Golem Spawn Egg}}
* {{ItemLink|Spider Spawn Egg}}
* {{ItemLink|Squid Spawn Egg}}
* {{ItemLink|Stray Spawn Egg}}
* {{ItemLink|Strider Spawn Egg}}
* {{ItemLink|Tadpole Spawn Egg}}
* {{ItemLink|Trader Llama Spawn Egg}}
* {{ItemLink|Tropical Fish Spawn Egg}}
* {{ItemLink|Turtle Spawn Egg}}
* {{ItemLink|Vex Spawn Egg}}
* {{ItemLink|Villager Spawn Egg}}
* {{ItemLink|Vindicator Spawn Egg}}
* {{ItemLink|Wandering Trader Spawn Egg}}
* {{ItemLink|Warden Spawn Egg}}
* {{ItemLink|Witch Spawn Egg}}
* {{ItemLink|Wither Skeleton Spawn Egg}}
* {{ItemLink|Wither Spawn Egg}}
* {{ItemLink|Wolf Spawn Egg}}
* {{ItemLink|Zoglin Spawn Egg}}
* {{ItemLink|Zombie Horse Spawn Egg}}
* {{ItemLink|Zombie Spawn Egg}}
* {{ItemLink|Zombie Villager Spawn Egg}}
* {{ItemLink|Zombified Piglin Spawn Egg}}
}}
=== Education Edition only===
These items can be accessed only {{in|ee}}. The [[spawn egg|spawn agent]], [[portfolio]], and [[camera]] are obtainable through [[Creative]] mode and the {{cmd|give}} [[command]]. The [[Garbage]] item is only obtainable through unknown Lab Table recipes or via inventory editing.
{{columns-list|colwidth=16em|
* {{ItemLink|Agent Spawn Egg}}
* {{ItemLink|Antidote}}
* {{ItemLink|Black Balloon}}
* {{ItemLink|Bleach}}
* {{ItemLink|Blue Balloon}}
* {{ItemLink|Blue Glow Stick}}
* {{ItemLink|Blue Sparkler}}
* {{ItemLink|Board}}
* {{ItemLink|Brown Balloon}}
* {{ItemLink|Brown Glow Stick}}
* {{EntityLink|Camera}}
* {{ItemLink|Compound}}s
* {{ItemLink|Cyan Balloon}}
* {{ItemLink|Cyan Glow Stick}}
* {{ItemLink|Elixir}}
* {{ItemLink|Eye Drops}}
* {{ItemLink|Gray Balloon}}
* {{ItemLink|Gray Glow Stick}}
* {{ItemLink|Green Balloon}}
* {{ItemLink|Green Glow Stick}}
* {{ItemLink|Green Sparkler}}
* {{ItemLink|Ice Bomb}}
* {{ItemLink|Light Blue Balloon}}
* {{ItemLink|Light Blue Glow Stick}}
* {{ItemLink|Lime Balloon}}
* {{ItemLink|Lime Glow Stick}}
* {{ItemLink|Magenta Balloon}}
* {{ItemLink|Magenta Glow Stick}}
* {{ItemLink|Orange Balloon}}
* {{ItemLink|Orange Glow Stick}}
* {{ItemLink|Orange Sparkler}}
* {{ItemLink|Photo}}
* {{ItemLink|Pink Balloon}}
* {{ItemLink|Pink Glow Stick}}
* {{ItemLink|Portfolio}}
* {{ItemLink|Poster}}
* {{ItemLink|Purple Balloon}}
* {{ItemLink|Purple Glow Stick}}
* {{ItemLink|Purple Sparkler}}
* {{ItemLink|Red Balloon}}
* {{ItemLink|Red Glow Stick}}
* {{ItemLink|Red Sparkler}}
* {{ItemLink|Silver Balloon}}
* {{ItemLink|Slate}}
* {{ItemLink|Spawn NPC}}
* {{ItemLink|Super Fertilizer}}
* {{ItemLink|Tonic}}
* {{ItemLink|White Balloon}}
* {{ItemLink|White Glow Stick}}
* {{ItemLink|Yellow Balloon}}
* {{ItemLink|Yellow Glow Stick}}
}}
==Unimplemented items ==
Some items are unimplemented, or have been mentioned to be implemented in the future.
*{{ItemLink|Ruby}}
==Removed items ==
Removed items no longer exist in current versions of the game.
*{{ItemLink|Copper Horn}}
*{{ItemLink|Horse Saddle}}
*{{ItemLink|Studded Helmet}}
*{{ItemLink|Studded Chestplate}}
*{{ItemLink|Studded Leggings}}
*{{ItemLink|Studded Boots}}
*{{ItemLink|Quiver}}
==Joke items==
Joke items are only present in [[April Fools]] versions of the game.
{{columns-list|colwidth=16em|
*{{ItemLink|3D}}
*{{ItemLink|A Very Fine Item}}
*{{ItemLink|Ankle Monitor}}
*{{ItemLink|Arrow of Big}}
*{{ItemLink|Arrow of Small}}
*{{ItemLink|Banner Pattern (New Thing)}}
*{{ItemLink|Blue Key}}
*{{ItemLink|Bit}}
*{{ItemLink|Bottle of Entity}}
*{{ItemLink|Bottle of Void}}
*{{ItemLink|Tag (item)|Byte Tag}}
*{{ItemLink|Tag (item)|Compound Tag}}
*{{ItemLink|Tag (item)|Double Tag}}
*{{ItemLink|Tag (item)|Float Tag}}
*{{ItemLink|Footprint}}
*{{ItemLink|Tag (item)|Int Tag}}
*{{ItemLink|La Baguette}}
*{{ItemLink|Le Tricolore}}
*{{ItemLink|Tag (item)|Left Curly}}
*{{ItemLink|Tag (item)|Left Square}}
*{{ItemLink|Lingering Potion of Big}}
*{{ItemLink|Lingering Potion of Small}}
*{{ItemLink|Tag (item)|List Tag}}
*{{ItemLink|Tag (item)|Long Tag}}
*{{ItemLink|Longer String}}
*{{ItemLink|Dupe Hack|text=minecraft:dupe_hack}}
*{{ItemLink|Moon Cow Spawn Egg}}
*{{ItemLink|Tag (item)|Name}}
*{{ItemLink|Obsidian Boat}}
*{{ItemLink|Potion of Big}}
*{{ItemLink|Potion of Small}}
*{{ItemLink|Reality Vision}}
*{{ItemLink|Red Key}}
*{{ItemLink|Tag (item)|Right Curly}}
*{{ItemLink|Tag (item)|Right Square}}
*{{ItemLink|Tag (item)|Short Tag}}
*{{ItemLink|Smarter Watch}}
*{{ItemLink|Splash Bottle of Entity}}
*{{ItemLink|Splash Potion of Big}}
*{{ItemLink|Splash Potion of Small}}
*{{ItemLink|Tag (item)|Sssyntax Error}}
*{{ItemLink|Tag (item)|String Tag}}
*{{ItemLink|Tag (item)|Tag}}
*{{ItemLink|Yellow Key}}
}}
==Video==
{{yt|5khbViFTwz4}}
{{yt|YUM7XiEX1DI}}
==History==
===Item additions and removals===
{{Wip|section=1}}
{{History|Java Edition Classic}}
{{History||0.24_SURVIVAL_TEST|Added [[arrow]]s.
|Total items: 1 (+1, -0)}}
{{History|Java Edition Indev}}
{{History||0.31|snap=20091231-2|Added leather, studded, chainmail, and iron [[armor]], [[quiver]], [[apple]], [[shovel]], and [[sword]].
|Total items: 21 (+20, -0)}}
{{History|||snap=20100110|Added [[flint and steel]], [[axe]]s, [[pickaxe]]s, and [[bow]]s.
|Total items: 25 (+4, -0)}}
{{History|||snap=20100128|Added [[coal]], [[diamond]], [[gold ingot]], [[iron ingot]], and new wooden, stone and diamond swords, axes, pickaxes and shovels variants.
|Total items: 41 (+16, -0)}}
{{History|||snap=20100129|Added [[stick]].
|Total items: 42 (+1, -0)}}
{{History|||snap=20100130|Added golden swords, axes, pickaxes, and shovels; [[bowl]], [[mushroom stew]], [[gunpowder]], [[string]], and [[feather]].
|Total items: 51 (+9, -0)}}
{{History||20100206|Added [[bread]], [[hoes]], [[wheat seeds|seeds]], and [[wheat]].
|Total items: 55 (+4, -0)}}
{{History||20100212-1|Added gold and diamond armor.
|[[Studded Armor]] was removed between [[Indev 0.31 20100204-1]] and [[Indev 20100206]].
|Total items: 56 (+2, -1)}}
{{History||20100219|Added [[flint]], [[raw porkchop]], and [[cooked porkchop]].
|Total items: 59 (+3, -0)}}
{{History|Java Edition Infdev}}
{{History||20100227-1|Added [[golden apples]].
|Total items: 60 (+1, -0)}}
{{History||20100615|Added [[bucket]], [[water bucket]], and [[lava bucket]].
|Total items: 63 (+3, -0)}}
{{History||20100625-2|Added [[saddles]].
|Total items: 64 (+1, -0)}}
{{History|java Alpha}}
{{History||v1.0.5|Added [[snowballs]].
|Total items: 65 (+1, -0)}}
{{History||v1.0.8|Added [[leather]] and [[milk bucket]].
|Total items: 67 (+2 ,-0)}}
{{History||v1.0.11|Added [[paper]], [[book]], [[clay ball]], [[brick]], and [[slimeball]].
|Total items: 72 (+5, -0)}}
{{History||v1.0.14|Added [[eggs]], 2 new [[music discs]], [[minecart with furnace]], and [[minecart with chest]].
|Total items: 77 (+5, -0)}}
{{History||v1.1.0|Added [[compass]].
|Total items: 78 (+1, -0)}}
{{History||v1.1.1|Added [[fishing rod]].
|Total items: 79 (+1, -0)}}
{{History||v1.2.0|Added [[clock]], [[glowstone dust]], [[cooked cod]], and [[raw cod]].
|Total items: 83 (+4, -0)}}
{{History|java Beta}}
{{History||1.2|Added [[bone]], [[bone meal]], [[lapis lazuli]], [[cocoa beans]], [[ink sac]], [[charcoal]], [[dyes]], and [[sugar]].
|Total items: 91 (+8, -0)}}
{{History||1.4|Added [[cookie]].
|Total items: 92 (+1, -0)}}
{{History||1.6|Added [[maps]].
|Total items: 93 (+1, -0)}}
{{History||1.7|Added [[shears]].
|Total items: 94 (+1, -0)}}
{{History||1.8|snap=Pre-release|Added [[raw chicken]], [[cooked chicken]], [[raw beef]], [[steak]], [[ender pearls]], [[melon seeds]], [[melon slice]], [[pumpkin seeds]], and [[rotten flesh]].
|Total items: 103 (+9, -0)}}
{{History|Java}}
{{History||1.0.0|snap=Beta 1.9 Prerelease|Added [[blaze rod]], [[ghast tear]], [[gold nugget]], and [[nether wart]].
|Total items: 107 (+4, -0)}}
{{History|||snap=Beta 1.9 Prerelease 2|Added [[blaze powder]], [[fermented spider eye]], [[glass bottle]], [[magma cream]], 9 new [[music disc]], and [[spider eye]].
|Total items: 121 (+14, -0)}}
{{History|||snap=Beta 1.9 Prerelease 3|Added [[eye of ender]].
|Total items: 122 (+1, -0)}}
{{History|||snap=Beta 1.9 Prerelease 4|Added [[glistering melon slice]], [[ghast tear]], [[potions]], and [[splash potions]].
|Total items: 126 (+4, -0)}}
{{History||1.1|snap=11w49a|Added 20 types of [[spawn eggs]].
|Total items: 146 (+20, -0)}}
{{History||1.2.1|snap=12w04a|Added [[bottle o' enchanting]], [[fire charge]], and [[ocelot]] spawn egg.
|Total items: 149 (+3, -0)}}
{{History||1.3.1|snap=12w17a|Added [[book and quill]] and [[written book]].
|Total items: 151 (+2, -0)}}
{{History|||snap=12w21a|Added [[emerald]] and [[enchanted golden apple]].
|Total items: 153 (+2, -0)}}
{{History|||snap=12w22a|Added 8 types of [[potion]].}}
{{History||1.4.2|snap=12w32a|Added potion and splash potion of [[night vision]].
|Total items: 156 (+2, -0)}}
{{History|||snap=12w34a|Added [[carrot]], [[golden carrot]], [[potato]], [[baked potato]], [[poisonous potato]], [[item frame]] and [[potion]] and [[splash potion]] of [[invisibility]].
|Total items: 162 (+7, -0)}}
{{History|||snap=12w36a|Added [[carrot on a stick]] and [[nether star]].
|Total items: 164 (+2, -0)}}
{{History|||snap=12w37a|Added [[pumpkin pie]].
|Total items: 165 (+1, -0)}}
{{History||1.4.4|snap=1.4.3|Added the [[music disc]] "wait".
|Total items: 166 (+1, -0)}}
{{History||1.4.6|snap=12w49a|Added [[enchanted book]], [[firework rocket]], and [[firework star]].
|Total items: 169 (+3, -0)}}
{{History||1.5|snap=13w01a|Added [[nether brick]] and [[nether quartz]].
|Total items: 171 (+2, -0)}}
{{History||1.6.1|snap=13w16a|Added diamond, gold, and iron [[horse armor]], [[leads]], [[horse]] spawn egg, and [[horse saddle]].
|Total items: 177 (+6, -0)}}
{{History|||snap=13w16b|Added [[name tag]].
|Total items: 178 (+1, -0)}}
{{History|||snap=13w18a|Removed [[horse saddle]].
|Total items: 177 (+0, -1)}}
{{History||1.7.2|snap=13w36a|Added [[clownfish]], [[raw salmon]], [[cooked salmon]], [[pufferfish]], and potion and splash potion of [[water breathing]].
|Total items: 182 (+5, -0)}}
{{History||1.8|snap=14w11a|Added [[endermite]] spawn egg.
|Total items: 183 (+1, -0)}}
{{History|||snap=14w25a|Added [[prismarine crystals]], [[prismarine shard]], and [[guardian]] spawn egg.
|Total items: 186 (+3, -0)}}
{{History|||snap=14w27a|Added [[raw mutton]], [[cooked mutton]], [[raw rabbit]], [[cooked rabbit]], potion and splash potion of [[leaping]], [[rabbit's foot]], [[rabbit hide]], [[rabbit]] spawn egg, and [[rabbit stew]].
|Total items: 196 (+10, -0)}}
{{History||1.9|snap=15w31a|Added [[spectral arrow]], 14 new tipped [[arrows]], [[beetroot]], [[beetroot seeds]], [[beetroot soup]], [[chorus fruit]], [[popped chorus fruit]], [[shulker]] spawn egg, splash water bottles, mundane, thick, and awkward splash potions.
|Total items: 220 (+24, -0)}}
{{History|||snap=15w33a|Added [[dragon's breath]] and [[lingering potion]]s.
|Total items: 238 (+18, -0)}}
{{History|||snap=15w33c|Added [[shield]].
|Total items: 239 (+1, -0)}}
{{History|||snap=15w41a|Added [[elytra]].
|Total items: 240 (+1, -0)}}
{{History|||snap=15w44a|Added [[end crystal]].
|Total items: 241 (+1, -0)}}
{{History|||snap=15w44b|Added potion of [[luck]] and uncraftable potion.
|Total items: 243 (+2, -0)}}
{{History||1.10|snap=16w20a|Added 10 new types of spawn eggs.
|Total items: 253 (+10, -0)}}
{{History||1.11|snap=16w32a|Added [[zombie villager]] spawn eggs.
|Total items: 254 (+1, -0)}}
{{History|||snap=16w39a|Added [[llama]], [[evoker]], [[vex]], and [[vindicator]] spawn eggs, [[shulker shell]], [[totem of undying]], and [[explorer map]].
|Total items: 261 (+7, -0)}}
{{History||1.11.1|snap=16w50a|Added [[iron nugget]].
|Total items: 262 (+1, -0)}}
{{History||1.12|snap=17w13a|Added [[knowledge book]] and [[parrot]] spawn egg.
|Total items: 264 (+2, -0)}}
{{History||1.13|snap=17w47a|Added [[bark]], [[mushroom blocks]], [[mushroom stem]], [[petrified oak slab]], [[smooth quartz]], [[smooth red sandstone]], [[smooth sandstone]], [[smooth stone]], and [[debug stick]].
|Total items: 273 (+9, -0)}}
{{History|||snap=18w07a|Added [[trident]] weapon, [[kelp]], [[dried kelp]], [[scute]], [[turtle shell]], [[potion of the turtle master]], [[Arrow#Tipped arrows|arrow of the turtle master]], [[turtle]] and [[phantom]] spawn eggs.
|Total items: 282 (+9, -0)}}
{{History|||snap=18w08b|Added 3 [[fish bucket]]s and spawn eggs for [[cod]], [[salmon]], and [[pufferfish]].
|Total items: 288 (+6, -0)}}
{{History|||snap=18w10a|Added spawn egg and bucket of [[tropical fish]], and buried treasure [[exploration map]].
|Total items: 291 (+3, -0)}}
{{History|||snap=18w11a|Added [[drowned]] spawn egg.
|Total items: 292 (+1, -0)}}
{{History|||snap=18w14a|Added [[phantom membrane]], potion and arrow of [[slow falling]].
|Total items: 295 (+3, -0)}}
{{History|||snap=18w15a|Added [[heart of the sea]] and [[nautilus shell]].
|Total items: 297 (+2, -0)}}
{{History||1.14|snap=18w43a|Added 4 [[banner pattern]]s, [[crossbow]], 4 new [[dyes]], [[illager beast]], [[panda]], and [[pillager]] spawn eggs, and [[suspicious stew]].
|Total items: 310 (+13, -0)}}
{{History|||snap=18w49a|Added [[sweet berries]].
|Total items: 311 (+1, -0)}}
{{History|||snap=19w05a|Added [[wandering trader]] and [[trader llama]] spawn eggs.
|Total items: 313 (+2, -0)}}
{{History|||snap=19w07a|Added [[fox]] spawn egg.
|Total items: 314 (+1 ,-0)}}
{{History|||snap=19w08a|Added leather [[horse armor]].
|Total items: 315 (+1, -0)}}
{{History|||snap=19w11a|Added a new "globe" banner pattern.
|Total items: 316 (+1, -0)}}
{{History||1.15|snap=19w34a|Added [[honey bottle]], [[honeycomb]], and [[bee]] spawn egg.
|Total items: 317 (+1, -0)}}
{{History||1.16|snap=20w06a|Added [[netherite]] armor, [[axe]], [[shovel]], [[pickaxe]], and [[sword]], [[netherite ingot]], [[netherite scrap]], and [[hoglin]] spawn egg.
|Total items: 328 (+11, -0)}}
{{History|||snap=20w07a|Added [[piglin]] spawn egg.
|Total items: 329 (+1, -0)}}
{{History|||snap=20w13a|Added [[warped fungus on a stick]], and [[strider]] spawn egg.
|Total items: 331 (+2, -0)}}
{{History|||snap=20w14a|Added [[zoglin]] spawn egg.
|Total items: 332 (+1, -0)}}
{{History|||snap=20w15a|Added [[piglin banner pattern]].
|Total items: 333 (+1, -0)}}
{{History|||snap=20w16a|Added [[pigstep]] music disc.
|Total items: 334 (+1, -0)}}
{{History||1.16.2|snap=20w27a|Added [[piglin brute]] spawn egg.
|Total items: 335 (+1, -0)}}
{{History||1.17|snap=20w45a|Added [[amethyst shard]], [[bundle]], [[copper ingot]], and [[spyglass]].
|Total items: 339 (+4, -0)}}
{{History|||snap=20w46a|Added [[powder snow bucket]].
|Total items: 340 (+1, -0)}}
{{History|||snap=20w51a|Added [[axolotl]] spawn egg and bucket of [[axolotl]].
|Total items: 342 (+2, -0)}}
{{History|||snap=21w03a|Added [[glow item frame]], [[glow ink sac]] and [[glow squid]] spawn egg.
|Total items: 344 (+2, -0)}}
{{History|||snap=21w05a|Added [[glow berries]].
|Total items: 346 (+1, -0)}}
{{History|||snap=21w14a|Added [[raw copper]], [[raw iron]], and [[raw gold]].
|Total items: 348 (+3, -0)}}
{{History||1.18|snap=21w42a|Added the [[music disc]] "Otherside".
|Total items: 349 (+1, -0)}}
{{History||1.19|snap=Deep Dark Experimental Snapshot 1|Added [[warden]] spawn egg.
|Total items: 350 (+1, -0)}}
{{History|||snap=22w11a|Added [[frog]] and [[tadpole]] spawn egg, [[bucket of tadpole]] and [[Boat|mangrove boat]].
|Removed [[warden]] spawn egg.
|Total items: 352 (+3, -1)}}
{{History|||snap=22w12a|Re-added [[warden]] spawn egg
|Added 7 types of [[boat with chest]].
|Total items: 360 (+8, -0)}}
{{History|||snap=22w13a|Added [[allay]] spawn egg.
|Total items: 361 (+1, -0)}}
{{History|||snap=22w14a|Added [[echo shard]] and [[recovery compass]].
|Total items: 363 (+2, -0)}}
{{History|||snap=22w16a|Added [[music disc 5]] and [[disc fragment]].
|Total items: 365 (+2, -0)}}
{{History|||snap=22w17a|Added the [[goat horn]].
|Total items: 366 (+1, -0)}}
{{History||1.20<br>(Experimental)|link=1.19.3|snap=22w42a|Added [[Boat|bamboo raft]], [[Boat with Chest|bamboo raft with chest]], and [[camel]] spawn egg.
|Total items: 369 (+3, -0)}}
{{History||1.19.3|snap=22w44a|Added [[iron golem]], [[snow golem]], [[ender dragon]], and [[wither]] spawn egg.
|Total items: 373 (+4, -0)}}
{{History||1.20<br>(Experimental)|link=1.19.4|snap=23w04a|Added 12 [[smithing template]]s.
|Total items: 385 (+12, -0)}}
{{History|||snap=23w07a|Added cherry [[boat]] and [[boat with chest]]; 4 types of [[pottery shard]], [[sniffer spawn egg]], [[torchflower seeds]] and [[brush]].
|Total items: 394 (+9, -0)}}
{{History||1.20|snap=23w12a|Added [[pitcher pod]], 16 [[pottery shard]]s, and 5 [[smithing template]]s.
|Total items: 418 (+24, -0)}}
{{History|||snap=23w17a|Added Relic [[music disc]].
|Total items: 419 (+1, -0)}}
{{History|Pocket Alpha}}
{{History||v0.2.0|Added [[shears]]; stone [[shovel]], [[pickaxe]], [[axe]], and [[sword]].
|Total items: 5 (+5, -0)}}
{{History||v0.3.0|Added [[snowball]]s, [[stick]]s, [[yellow dye|dandelion yellow]], [[bowl]]s, [[sugar]]s, [[book]]s, [[paper]]s, [[coal]]s; wooden axe, shovel, pickaxe, and sword.
|Total items: 17 (+12, -0)}}
{{History||v0.3.2|Added [[charcoal]], [[gold ingot]], [[iron ingot]], [[diamond]]; diamond, gold, and iron pickaxe, axe, shovel, and sword.
|Total items: 33 (+16, -0)}}
{{History||v0.3.3|Added [[bow]], [[arrow]], [[bone]]s, [[bone meal]], [[flint]], and [[feather]].
|Total items: 39 (+6, -0)}}
{{History||v0.4.0|Added [[gunpowder]], [[flint and steel]], [[apple]]s, [[bread]], [[mushroom stew]], [[raw beef]], [[steak]], [[raw chicken]], [[cooked chicken]], [[raw porkchop]], [[cooked porkchop]], [[wheat]], [[wheat seeds|seeds]], [[lapis lazuli]]; and 10 colors of [[dye]]s.
|Total items: 63 (+24, -0)}}
{{History||v0.5.0|Added [[melon seeds]].
|Total items: 64 (+1, -0)}}
{{History||v0.6.0|Added 5 variants of armor, [[nether brick]], and [[nether quartz]].
|Total items: 86 (+22, -0)}}
{{History||v0.7.0|Added [[bucket]] and its 3 other variants; 4 [[spawn egg]]s; and [[egg]]s.
|Total items: 95 (+9, -0)}}
{{History||v0.8.0|snap=build 1|Added [[pumpkin pie]], [[potato]], [[baked potato]], [[carrot]], [[clock]], [[compass]], and [[redstone]].
|Total items: 102 (+7, -0)}}
{{History|||snap=build 2|Added [[beetroot seeds]], [[beetroot]], [[beetroot soup]], and [[minecart]].
|Total items: 106 (+4, -0)}}
{{History||v0.9.0|snap=build 1|Added 6 spawn eggs, [[emerald]], and [[slimeball]].
|Total items: 114 (+8, -0)}}
{{History||v0.11.0|snap=build 1|Added [[rotten flesh]], [[fishing rod]], [[raw fish]], [[cooked fish]], [[raw salmon]], [[cooked salmon]], [[pufferfish]], [[clownfish]], [[magma cream]]; [[squid]], [[bat]], [[cave spider]], [[magma cube]] and [[ghast]] spawn eggs.
|Total items: 128 (+14, -0)}}
{{History||v0.12.1|snap=build 1|Added [[glass bottle]]s; 12 [[potion]]s, 11 [[splash potion]]s; [[gold nugget]], [[golden carrot]], [[nether wart]], [[glistering melon slice]], [[golden apple]], [[enchanted golden apple]], [[rabbit's foot]], [[blaze rod]], [[blaze powder]], [[ghast tear]], [[spider eye]], [[fermented spider eye]], [[bottle o' enchanting]], [[poisonous potato]], [[enchanted book]]; [[zombie villager]], [[ocelot]] and [[blaze]] spawn eggs.
|Total items: 170 (+42, -0)}}
{{History||v0.13.0|snap=build 1|Added [[rabbit]] spawn egg, [[raw rabbit]], [[cooked rabbit]], [[rabbit stew]], and [[rabbit hide]].
|Total items: 175 (+5, -0)}}
{{History||v0.14.0|snap=build 1|Added [[map]]s, [[ender pearl]]s, and [[witch]] spawn egg.
|Total items: 178 (+3, -0)}}
{{History||v0.15.0|snap=build 1|Added [[raw mutton]], [[cooked mutton]], [[fire charge]]s; spawn eggs for [[horse]]s, [[zombie horse]], [[skeleton horse]], [[mule]], [[donkey]], [[stray]], [[husk]], and [[wither skeleton]]; [[name tag]]s, [[lead]]s, [[carrot on a stick]], [[tipped arrow]]s, and leather [[horse armor]].
|Total items: 194 (+16, -0)}}
{{History||v0.16.0|snap=build 1|Added [[prismarine crystals]], [[prismarine shard]]s; spawn eggs for [[guardian]], [[elder guardian]] (unavailable in the [[creative]] [[inventory]]), and [[NPC]] {{only|be|ee}}; and {{only|be|ee}} portfolio.
|Total items: 200 (+6, -0)}}
{{History|||snap=build 4|Added [[nether star]], potion of [[wither (effect)|decay]] {{only|be}} with its splash and arrow variant.
|Removed the NPC spawn egg.
|Total items: 203 (+4, -1)}}
{{History|Pocket}}
{{History||1.0.0|snap=alpha 0.17.0.1|Added [[dragon's breath]], [[elytra]], [[end crystal]], [[chorus fruit]], [[ender pearl]], [[eye of ender]], [[popped chorus fruit]]; [[spawn eggs]] for [[shulker]]s, [[endermite]]s, and [[polar bear]]s; and 12 [[lingering potion]]s.
|Total items: 223 (+20, -0)}}
{{History|||snap=alpha 1.0.0.1|Added [[shulker shell]]s.
|Total items: 224 (+1, -0)}}
{{History||1.1.0|snap=alpha 1.1.0.0|Added [[totem of undying]], [[explorer map]], [[iron nugget]]; spawn eggs for [[llama]]s, [[vindicator]]s, [[evoker]]s, and [[vex]]es.
|Total items: 231 (+7, -0)}}
{{History|Bedrock}}
{{History||1.2.0|snap=beta 1.2.0.2|Added [[armor stand]]s, [[book and quill]], [[firework star]], [[firework rocket]], 12 [[music disc]]s, and spawn eggs for [[parrot]]s and [[zombie villager]]s.
|Total items: 249 (+18, -0)}}
{{History||1.4.0|snap=beta 1.2.13.8|Added [[trident]] and [[drowned]] spawn egg.
|Total items: 251 (+2, -0)}}
{{History|||snap=beta 1.2.14.2|Added 4 variants of [[bucket of fish]], [[dried kelp]]; and spawn eggs for [[cod]], [[pufferfish]], [[salmon]], and [[tropical fish]].
|Total items: 260 (+9, -0)}}
{{History|||snap=beta 1.2.20.1|Added [[heart of the sea]], [[nautilus shell]]s, and [[dolphin]] spawn egg.
|Total items: 263 (+3, -0)}}
{{History||1.5.0|snap=beta 1.5.0.4|Added [[scute]]s, [[turtle shell]]s; [[potion]] of the turtle master with it's [[splash potion]], [[lingering potion]]s, and [[arrow#tipped arrows|tipped arrow]] variants; and [[turtle]]s spawn egg.
|Total items: 270 (+7, -0)}}
{{History||1.6.0|snap=beta 1.6.0.1|Added [[phantom]] spawn egg.
|Total items: 271 (+1, -0)}}
{{History|||snap=beta 1.6.0.5|Added [[phantom membrane]]; potion of [[slow falling]] with it's splash, lingering, and tipped arrow variants.
|Total items: 276 (+5, -0)}}
{{History||1.8.0|snap=beta 1.8.0.8|Added spawn eggs for [[cat]]s and [[panda]]s.
|Total items: 278 (+2, -0)}}
{{History|||snap=beta 1.8.0.10|Added [[crossbow]] and 4 colors of [[dye]]s.
|Total items: 283 (+5, -0)}}
{{History||1.9.0|snap=beta 1.9.0.0|Added [[pillager]] spawn egg.
|Total items: 284 (+1, -0)}}
{{History||1.10.0|snap=beta 1.10.0.3|Added 6 [[banner pattern]]s, [[sweet berries]], [[shield]]; spawn eggs for [[wandering trader]] and [[ravager|illager beast]].
|Total items: 294 (+10, -0)}}
{{History||1.13.0|snap=beta 1.13.0.1|Added [[fox]]es spawn egg.
|Total items: 295 (+1, -0)}}
{{History|||snap=beta 1.13.0.9|Added [[suspicious stew]].
|Total items: 296 (+1, -0)}}
{{History||1.14.0|snap=beta 1.14.0.1|Added [[honey bottle]], [[honeycomb]], and [[bee]] spawn egg.
|Total items: 299 (+3, -0)}}
{{History||1.16.0|snap=beta 1.15.0.51|Added potion of [[slowness]] '''iv''' with it's splash, lingering, and tipped arrow variants.
|Total items: 303 (+4, -0)}}
{{History|||snap=beta 1.16.0.51|Added [[netherite]] armor, [[netherite ingot]], [[netherite scrap]]; [[hoglin]] and [[piglin]] spawn eggs; and netherite [[hoe]], [[axe]], [[pickaxe]], [[shovel]], and [[sword]].
|Total items: 316 (+13, -0)}}
{{History|||snap=beta 1.16.0.57|Added piglin [[banner pattern]], pigstep [[music disc]], [[warped fungus on a stick]]; [[strider]] and [[zoglin]] spawn egg.
|Total items: 321 (+5, -0)}}
{{History||1.16.20|snap=beta 1.16.20.50|Added [[piglin brute]] spawn egg.
|Total items: 322 (+1, -0)}}
{{History||1.16.200|snap=beta 1.16.200.52|Added [[goat]] spawn egg and [[goat horn]]s.
|Total items: 324 (+2, -0)}}
{{History||1.16.210|snap=beta 1.16.210.53|Added [[powder snow bucket]].
|Total items: 325 (+1, -0)}}
{{History|||snap=beta 1.16.210.57|Added [[copper ingot]].
|Total items: 326 (+1, -0)}}
{{History|||snap=beta 1.16.210.59|Added [[glow squid]] spawn egg and [[glow ink sac]].
|Total items: 328 (+2, -0)}}
{{History|||snap=beta 1.16.210.60|Removed [[glow squid]] spawn egg and [[glow ink sac]].
|Total items: 326 (+0, -2)}}
{{History||1.16.220|snap=beta 1.16.220.50|Re-added [[glow squid]] spawn egg and [[glow ink sac]].
|Total items: 328 (+2, -0)}}
{{History|||snap=beta 1.16.220.52|Added [[glow berries]].
|Total items: 329 (+1, -0)}}
{{History||1.17.0|snap=beta 1.16.230.52|Added [[axolotl]] spawn egg and bucket of [[axolotl]].
|Total items: 331 (+2, -0)}}
{{History|||snap=beta 1.17.0.50|Added [[amethyst shard]], [[raw metal]]s, and [[spyglass]].
|Total items: 336 (+5, -0)}}
{{History||1.18.0|snap=beta 1.18.0.22|Added otherside [[music disc]].
|Total items: 337 (+1, -0)}}
{{History||1.18.10|snap=beta 1.18.10.24|Added [[frog]] spawn egg, [[tadpole]] spawn egg, and [[Bucket of aquatic mob|bucket of tadpole]].
|Total items: 340 (+3, -0)}}
{{History||1.18.30|snap=beta 1.18.30.22|Added [[allay]] spawn egg.
|Total items: 341 (+1, -0)}}
{{History|||snap=beta 1.18.30.26|Added [[copper horn]].
|Total items: 342 (+1, -0)}}
{{History|||snap=beta 1.18.30.28|Added six [[Boat with Chest|boats with chests]].
|Total items: 348 (+6, -0)}}
{{History|||snap=beta 1.18.30.32|Added [[warden]] spawn egg.
|Total items: 349 (+1, -0)}}
{{History||1.19.0|snap=beta 1.19.0.20|Added [[Boat|mangrove boat]]s, and [[Boat with Chest|mangrove boat with chest]]s.
|Total items: 351 (+2, -0)}}
{{History|||snap=beta 1.19.0.24|Added [[Echo Shard|echo shards]], and [[recovery compass]]es.
|Removed [[copper horn]].
|Total items: 352 (+2, -1)}}
{{History|||snap=beta 1.19.0.28|Added [[Disc Fragment|disc fragments]], and [[music disc]] 5.
|Total items: 354 (+2, -0)}}
{{History||1.19.10|snap=beta 1.19.10.20|Added the trader [[llama]] spawn egg.
|Total items: 355 (+1, -0)}}
{{History||1.20.0<br>(Experimental)|link=Bedrock Edition 1.20.0|snap=beta 1.19.50.21|Added [[Boat|bamboo raft]], [[Boat with Chest|bamboo raft with chest]], and [[camel]] spawn egg.
|Total items: 358 (+3, -0)}}
{{History||1.19.60|snap=beta 1.19.60.20|Added [[iron golem]], [[snow golem]], [[ender dragon]], and [[wither]] spawn egg.
|Total items: 362 (+4, -0)}}
{{History||1.20.0<br>(Experimental)|link=Bedrock Edition 1.20.0|snap=beta 1.19.70.23|Added 4 types of [[pottery shard]], [[sniffer spawn egg]], [[torchflower seeds]] and [[brush]].
|Total items: 369 (+7, -0)}}
{{History|||snap=beta 1.19.80.20|Added cherry [[boat]] and [[boat with chest]];
|Total items: 371 (+2, -0)}}
{{History|||snap=beta 1.19.80.21|Added 12 [[smithing template]]s.
|Total items: 383 (+12, -0)}}
{{History|||snap=beta 1.19.80.22|Added 16 [[pottery shard]]s and 5 [[smithing template]]s.
|Total items: 404 (+21, -0)}}
{{History||1.20.0|snap=beta 1.20.0.20|Added [[pitcher pod]],
|Total items: 405 (+1, -0)}}
{{History|||snap=beta 1.20.0.22|Added Relic [[music disc]].
|Total items: 406 (+1, -0)}}
{{History|console}}
{{History||xbox=TU1|xbone=CU1|ps=1.0|wiiu=Patch 1|switch=1.0.1|Added all items from and prior to [[Java Edition Beta 1.6]].
|Total items: 93 (+93, -0)}}
{{History||xbox=TU3|Added [[shear]]s.
|Total items: 94 (+1, -0)}}
{{History||xbox=TU5|Added [[melon]], melon [[seeds]], pumpkin [[seeds]], raw [[steak|beef]], [[steak]], [[raw chicken]], [[cooked chicken]], [[rotten flesh]], [[ender pearl]]s, 10 [[music disc]]s and chain [[armor]].
|Total items: 117 (+23, -0)}}
{{History||xbox=TU7|Added [[blaze rod]], [[ghast tear]], [[gold nugget]], [[glass bottle]], [[water bottle]], [[spider eye]], [[fermented spider eye]], [[eye of ender]], [[glistering melon]], [[nether wart]], [[blaze powder]], [[bottle o' enchanting]], [[magma cream]].
|Total items: 130 (+13, -0)}}
{{History||xbox=TU9|Added 20 types of [[spawn egg]]s, [[fire charge]]s and [[nether brick]].
|Total items: 152 (+22, -0)}}
{{History||xbox=TU12|Added [[ocelot]] spawn egg.
|Total items: 153 (+1, -0)}}
{{History||xbox=TU14|ps=1.04|Added [[emerald]], [[nether quartz]], [[enchanted book]], [[enchanted golden apple]], [[potato]], [[baked potato]], [[poisonous potato]], [[carrot]], [[golden carrot]], [[carrot on a stick]], [[pumpkin pie]], [[potion of night vision]] and [[potion of invisibility]].
|Total items: 166 (+13, -0)}}
{{History||xbox=TU19|xbone=CU7|ps=1.12|Added [[firework rocket]]s, [[firework star]], [[nether star]], [[lead]], iron, gold and diamond [[horse armor]], [[name tag]], [[horse]], [[donkey]] and [[mule]] spawn eggs.
|Total items: 177 (+11, -0)}}
{{History||xbox=TU25|xbone=CU14|ps=1.17|Added [[book and quill]].
|Total items: 178 (+1, -0)}}
{{History||xbox=TU31|xbone=CU19|ps=1.22|wiiu=Patch 3|Added [[raw rabbit]], [[cooked rabbit]], [[rabbit stew]], [[raw mutton]], [[cooked mutton]], [[rabbit's foot]], [[rabbit hide]], [[potion]] of leaping, [[potion]] of water breathing, [[raw salmon]], [[cooked salmon]], [[clownfish]], [[pufferfish]], [[blue orchid]], [[allium]],[[azure bluet]], [[tulips]], [[oxeye daisy]], [[sunflower]], [[lilac]], [[poppy]] (replaces rose), [[rose bush]], [[peony]], [[prismarine crystals]], [[prismarine shard]] and spawn eggs for [[rabbit]]s, [[endermite]]s and [[guardian]]s.
|Total items: 205 (+28, -1)}}
{{History||xbox=TU43|xbone=CU33|ps=1.36|wiiu=Patch 13|Added [[beetroot]], [[beetroot seeds]] and [[beetroot soup]].
|Total items: 208 (+3, -0)}}
{{History||xbox=TU46|xbone=CU36|ps=1.38|wiiu=Patch 15|Added [[chorus fruit]], [[popped chorus fruit]], [[dragon's breath]], [[elytra]], [[lingering potions]], water [[splash potion]], [[potion]] of luck, tipped [[arrow]]s and [[boat]]s made from '''spruce, birch, jungle, acacia and dark oak wood'''.
|Total items: 247 (+39, -0)}}
{{History||xbox=TU53|xbone=CU43|ps=1.49|wiiu=Patch 23|switch=1.0.3|Added [[shulker shell]]s and iron [[nugget]].
|Total items: 249 (+2, -0)}}
{{History||xbox=TU54|xbone=CU44|ps=1.52|wiiu=Patch 24|switch=1.0.4|Added [[explorer map]]s, [[Totem of Undying|totems of undying]] and spawn eggs for [[skeleton horse]]s, [[zombie horse]]s, [[elder guardian]]s, [[stray]]s, [[wither skeleton]]s, [[husk]]s and [[zombie villager]]s.
|Total items: 258 (+9, -0)}}
{{History||xbox=TU60|xbone=CU51|ps=1.64|wiiu=Patch 30|switch=1.0.11|Added leather [[horse armor]].
|Total items: 259 (+1, -0)}}
{{History||xbox=TU69|xbone=none|ps=1.76|wiiu=Patch 38|switch=none|Added [[trident]]s, [[dried kelp]], [[fish]] buckets, [[turtle shell]]s, [[heart of the sea]]s, [[nautilus shell]]s, [[scute]], [[phantom membrane]]s, slow falling [[potion]]s and tipped [[arrow]]s and [[explorer map|buried treasure explorer maps]].
|Total items: 275 (+16, -0)}}
{{History||xbox=none|ps=1.83|wiiu=none|Added white, blue, brown and black [[dye]]s and spawn eggs for [[panda]]s and [[cat]]s.
|Total items: 281 (+6, -0)}}
{{History||ps=1.90|Added [[crossbow]], [[banner pattern]]s and [[shield]]s.
|Total items: 284 (+3, -0)}}
{{History||ps=1.91|Added [[sweet berries]].
|Total items: 285 (+1, -0)}}
{{History|3DS}}
{{History||0.1.0|Added all items from and prior to [[Pocket Edition Alpha 0.15.0]].}}
{{History||1.3.12|Added [[prismarine shard]]s, [[prismarine crystals]], [[nether star]]s, [[potion]] of decay and their [[Splash Potion|splash]], [[Lingering Potion|lingering]] and tipped [[arrow]] variants, [[guardian]] and elder guardian spawn eggs.}}
{{History||1.7.10|Added [[ender pearl]], [[dragon egg]], [[chorus flower]], [[chorus fruit]], [[popped chorus fruit]], [[shulker shell]] and spawn eggs of [[endermite]], [[polar Bear]] and [[shulker]].}}
{{History||1.9.19|Added [[explorer map]], [[totem of undying]], iron and gold [[nugget]]s and spawn eggs for [[llama]]s, [[evoker]]s, [[vindicator]]s and [[vex]]es.}}
{{History|MinecraftEdu}}
{{History||0.1|Added all items from and prior to [[Java Edition Beta 1.6]].}}
{{History||0.9652|Added [[shears]], [[melon]], melon [[seeds]], pumpkin [[seeds]], raw [[steak|beef]], [[steak]], [[raw chicken]], [[cooked chicken]], [[rotten flesh]], [[ender pearl]]s, 10 [[music disc]]s and chain [[armor]].}}
{{History||0.97|Added [[blaze rod]], [[ghast tear]], [[gold nugget]], [[glass bottle]], [[water bottle]], [[spider eye]], [[fermented spider eye]], [[eye of ender]], [[glistering melon]], [[nether wart]], [[blaze powder]], [[bottle o' enchanting]], [[magma cream]], and [[fire charge]].}}
{{History||0.98|Added 20 types of [[spawn egg]]s.}}
{{History||0.982|Added [[ocelot]] spawn egg.}}
{{History||0.985|Added [[emerald]], [[enchanted golden apple]], [[book and quill]], [[written book]], and 8 types of [[potion]]s.}}
{{History||0.9847|Added [[carrot]], [[golden carrot]], [[carrot on a stick]], [[nether star]], [[potato]], [[baked potato]], [[poisonous potato]], [[pumpkin pie]], [[music disc]] “wait”, [[enchanted book]], [[firework rocket]], [[firework star]], and [[potion]] and [[splash potion]] of [[invisibility]] and [[night vision]].}}
{{History||1.5.1|snap=Build 1|Added [[block inspector]]{{only|MinecraftEdu}}, [[nether brick]], and [[nether quartz]].}}
{{History||1.6.4|snap=Build 1|Added diamond, gold, and iron [[horse armor]], [[leads]], [[horse]] spawn egg, and [[name tag]].}}
{{History||1.7.10|snap=Build 1|Added [[clownfish]], [[raw salmon]], [[cooked salmon]], [[pufferfish]], and potion and splash potion of [[water breathing]].}}
{{History||1.8.9|snap=Build 1|Added [[raw rabbit]], [[cooked rabbit]], [[rabbit stew]], [[raw mutton]], [[cooked mutton]], [[rabbit's foot]], [[rabbit hide]], [[potion]] of leaping, [[blue orchid]], [[allium]], [[azure bluet]], [[tulips]], [[oxeye daisy]], [[sunflower]], [[lilac]], [[poppy]], [[rose bush]], [[peony]], [[prismarine crystals]], [[prismarine shard]] and spawn eggs for [[rabbit]]s, [[endermite]]s and [[guardian]]s.}}
{{History|Education}}
{{History||1.0.0|snap=0.14.2|Added all items from and prior to [[Pocket Edition Alpha 0.16.0]].}}
{{History|||snap=release|Added [[ender pearl]], [[dragon egg]], [[chorus flower]], [[chorus fruit]], [[popped chorus fruit]], [[shulker shell]], [[portfolio]] and spawn eggs of [[endermite]], [[polar Bear]], [[shulker]], and [[NPC]].}}
{{History||1.0.1|Added [[explorer map]], [[totem of undying]], iron [[nugget]], and spawn eggs for [[llama]]s, [[evoker]]s, [[vindicator]]s and [[vex]]es.}}
{{History||1.0.21|Added [[armor stand]]s, [[book and quill]], [[firework star]], [[firework rocket]], 12 [[music disc]]s, and spawn eggs for [[parrot]]s and [[zombie villager]]s.}}
{{History||1.0.27|Added [[compound]]s, [[bleach]], [[ice bomb]]s, [[super fertilizer]], [[medicine]], [[sparkler]]s and [[glow stick]]s.}}
{{History||1.4|Added [[trident]], [[dried kelp]], 4 buckets of [[Bucket of aquatic mob|fish]], [[heart of the sea]]s, [[nautilus shell]]s and spawn eggs for [[drowned]], [[dolphin]] and 4 types of [[fish]].}}
{{History||1.7|Added [[turtle shell]]s, [[scute]]s, [[phantom membrane]]s, turtle master and slow falling [[potion]] and their [[Splash Potion|splash]], [[Lingering Potion|lingering]] and [[tipped arrow]] variants and spawn eggs for [[turtle]]s, [[phantom]]s and [[agent]]s.}}
{{History||1.9|snap=1.8.0|Added [[crossbow]]s, 4 colors of [[dye]] and spawn eggs for [[cat]]s and [[panda]]s.}}
{{History||1.12.0|Added 6 [[banner pattern]]s, [[sweet berries]], [[shield]]s and spawn eggs for [[pillager]]s, [[wandering trader]]s and [[ravager]]s.}}
{{History||1.14.31|snap=1.14.30|Added [[suspicious stew]], [[honeycomb]], [[honey bottle]]s and spawn eggs for [[fox]]es and [[bee]]s.}}
{{History||1.17.30|snap=1.17.30.2|Added netherite armor, tools, [[Netherite Ingot|ingot]] and [[Netherite Scrap|scrap]], piglin [[banner pattern]], pigstep [[music disc]], [[warped fungus on a stick]], [[powder snow bucket]], [[copper ingot]], [[glow ink sac]], [[glow berries]], [[bucket of axolotl]], [[amethyst shard]], [[raw metal]], [[spyglass]], slowness '''iv''' [[potion]]s and spawn eggs for [[hoglin]]s, [[piglin]]s, [[strider]]s, [[zoglin]]s, [[piglin brute]]s, [[goat]]s, [[glow squid]]s and [[axolotl]]s.}}
{{History||1.18.32|snap=1.18.10.04|Added [[music disc]] “Otherside”.}}
{{History|earth}}
{{History||Release|Added all items from and prior to [[Bedrock Edition 1.12.0]].
|Added spawn eggs for [[Minecraft Earth:Cluckshroom|cluckshroom]] and [[Minecraft Earth:Moobloom|moobloom]].}}
{{History||0.2.0|Added [[glowstone dust]], and [[melon seeds]].}}
{{History|dungeons}}
{{History||1.1.1.0|snap=Dungeons Beta|Added all items from and prior to [[Bedrock Edition 1.14.0]].}}
{{History||1.2.0.0|Added netherite armor, tools, [[Netherite Ingot|ingot]] and [[Netherite Scrap|scrap]], piglin [[banner pattern]], pigstep [[music disc]], [[warped fungus on a stick]], slowness '''iv''' potions, and spawn eggs for [[hoglin]]s, [[piglin]]s, [[strider]]s, and [[zoglin]]s.}}
{{History||1.3.2.0|Added [[MCD:Baby Crossbows|baby crossbow]]s, [[battlestaff]], [[Minecraft Dungeons:Battlestaff of Terror|battlestaff of terror]], [[MCD:Corrupted Seeds|corrupted seeds]], [[MCD:Dual Crossbows|dual crossbows]], [[MCD:Growing Staff|growing staff]], and [[MCD:Spellbound Crossbows|spellbound crossbows]].}}
{{History|foot}}
===Other changes===
{{History|java Classic}}
{{History||0.24_SURVIVAL_TEST|Arrows were added as an object and were fired by pressing {{Key|Tab}}.}}
{{History|java indev}}
{{History||December 31, 2009|link={{tumblr|notch|310183062}}|Added the [[inventory]], and with it, the first "non-tile" items.
|[[Notch]] was hard at work making items and the inventory fully functional.<ref>{{tumblr|notch|310275237}}</ref><ref>{{tumblr|notch|310374080}}</ref>}}
{{History||0.31|snap=20100111-1|Because the crafting system did not exist at this point, items were automatically added to the inventory after creating a new world.<ref>{{ytl|_EaKUlR2kU4}}</ref>
|Apples were added, but they currently serve no function.}}
{{History|||snap=20100122|Can now place blocks on resource items
|Dropped items now experience gravity.}}
{{History|||snap=20100124|Can now drop a whole stack of items instead of just one at a time.}}
{{History|||snap=20100128|Items are now 3D.}}
{{History|||snap=20100129|Added crafting.
|Right-clicking drops one of a stack.}}
{{History|||snap=20100130|Crafting improved; now has 36 recipes.}}
{{History|java}}
{{History||1.3.1|snap=12w15a|Stackable items now stack outside inventory when thrown to the ground individually.}}
{{History||1.8|snap=14w25a|All items are now [[model]]s, some are still generated from item icons.
|Resource packs can make models for all items.}}
{{History||1.13|snap=17w49a|Items can be "tagged" with an ID.}}
{{History||1.15|snap=19w39a|Lighting of blocks in the inventory has been swapped from being dark on the right to being dark on the left.}}
{{History|||snap=19w40a|Lighting of blocks in the inventory is once again darker on the right, as it was before 19w39a.}}
{{History|bedrock}}
{{History||1.16.0|snap=beta 1.15.0.51|Dropped items now turn into a 3D model and spin.}}
{{History|foot}}
===April Fools items===
{{History|Java}}
{{History||15w14a|Added the [[Obsidian Boat|obsidian boat]].}}
{{History||1.RV-Pre1|Added [[Ankle Monitor|ankle monitor]]s, [[Reality Vision|reality vision glasses]] and the [[Smarter Watch|smarter watch]].}}
{{History||3D Shareware v1.34|Added the [[3D|3D item]] and the blue, red, and yellow [[key]]s.}}
{{History||20w14∞|Added the [[A Very Fine Item|very fine item]] and the [[footprint]]s.}}
{{History||23w13a or b|Added the [[Bottle of Entity|Bottle of entity]] and their splash variations, [[Bottle of Void|bottle of void]], [[potion of Big]] and [[Potion|Small]] and their splash, lingering, and arrow variations, [[La Baguette|la baguette]], [[Le Tricolore|le tricolore]], 17 [[tag (item)|tag item]]s, new thing [[banner pattern]], [[Dupe Hack|dupe hack]], and [[longer string]].}}
{{History|foot}}
==Issues==
{{Issue list}}
==See also==
*[[Item repair]]
*[[Item durability]]
*[[Item (entity)]]
==References==
{{reflist}}
{{Items}}
{{Environment}}
[[Category:Items]]
[[cs:Předmět]]
[[de:Gegenstand]]
[[el:Αντικείμενο]]
[[es:Objeto]]
[[fr:Objets]]
[[hu:Tárgyak]]
[[it:Oggetto]]
[[ja:アイテム]]
[[ko:아이템]]
[[nl:Voorwerp]]
[[pl:Przedmioty]]
[[pt:Item]]
[[ru:Предметы]]
[[th:ไอเทม]]
[[tr:Eşyalar]]
[[uk:Предмет]]
[[zh:物品]]</li></ul> | Crafting was introduced. | ||||
| Legacy Console Edition | |||||
| TU1 | CU1 | 1.0 | Patch 1 | Added Survival mode. | |