Reason: Rabbits now spawn in deserts with new chunks and with the spawn cycle. A comprehensive check that this article is up-to-date to 1.9 is in order.
Spawning refers to players and mobs being created and placed in the game world.
Player spawning
World spawn

World spawning area. White represents the extent of singleplayer, blue represents multiplayer, and yellow represents the world spawn point.
New players will initially spawn within a small area surrounding the world spawn point when the server is not in adventure mode. This area is 20×20 blocks by default, but can be changed by the spawnRadius gamerule in both single and multiplayer. Upon death, the player will then respawn within this area unless they have had their individual spawn point changed.
When spawning, the player will be placed upon the highest block of the matching X and Z location that they have spawned at, even if this would set the player above the maximum build height. This area will not consider the existence of a block to spawn on, which can result in players spawning above the Void if there are no blocks at that X and Z location.
The world spawn point also determines the center of the permanently loaded spawn chunks.
The world spawn point itself can be changed using the /setworldspawn command.
Adventure mode
When the server's settings set the default game mode to adventure mode (using the server.properties), then the normal spawning mechanic is ignored and players are spawned directly on the world spawn. This includes the X, Y and Z coordinates, even if there is no block there and even if there are blocks above it.
If the Y coordinate is not a valid spawning area then the server looks up until it finds one, at most players can spawn at Y=256. If there is space to spawn but it is in the middle of the air, the player will spawn in the middle of the air, even falling into the void if there is a hole.
Individual spawn
The individual spawn point of the player can be changed by sleeping in a bed or using the /spawnpoint command. If the individual spawning area of the player is obstructed upon their death, they will be forced to respawn at the world spawn.
Sleeping in a bed will allow for leniency in obstruction, in that the player will attempt to respawn on other blocks near the bed if the original point becomes blocked. If the spawn point set via /spawnpoint becomes obstructed, the player will not be given this leniency in respawning.
Natural generation
Many mobs generate upon initial chunk creation. These spawns will only happen once per chunk. They are not affected by the /gamerule doMobSpawning command.
Animals

A cow that generated with the map inside a tree's leaves and could not escape, a common sight in forested hill areas.
Approximately one in ten newly generated chunks will contain mobs, usually in packs of up to four of the same species. They will always spawn on the highest available block in a column. For an animal to spawn on it, this block must be opaque and the two blocks above it must be transparent. The block does not need to be a grass block nor does it need to be illuminated as it does with mob spawning.
Animals do not spawn in desert, beach or ocean biomes, with the exception of rabbits and squid, and only mooshrooms will spawn in mushroom fields biomes. Rabbits can only spawn in desert, flower forest, snowy tundra, taiga, giant tree taiga, and snowy taiga biomes, and mooshrooms can only spawn in mushroom fields biomes.
Randomness for animal spawning is derived from the world seed, which means that worlds with the same seed will generate chunks with the same animals in the same places.
Other mobs
The mobs still spawn if the /gamerule doMobSpawning command is set to false.
- Villagers generate as part of the village generation.
- Zombie villagers can spawn as part of zombie village generation, where they will never despawn. They also occur as 5% of naturally-spawning zombies, or if a zombie kills a villager.
- A single witch will spawn within a witch hut upon generation.
- Three elder guardians generate as part of a single ocean monument.
- A single ender dragon is created in the End when the dimension is created. The ender dragon can also be respawned by placing end crystals on the exit portal.
- Shulkers generate as part of end cities.
- Vindicators and evokers generate as part of woodland mansion.
- A Villager and a Zombie villager will generate as a part of an igloo if it generates with a basement.
- Some of drowned generate as part of underwater ruins.
Spawn cycle
Java Edition and Legacy Console Edition
Mobs are broadly divided into four categories: hostile, friendly, water (e.g. squid) and ambient (e.g. bat). Hostile mobs have a spawning cycle once every game tick (1⁄20 of a second). Friendly and water mobs have only one spawning cycle every 400 ticks (20 seconds). Because of this, where conditions permit spawning, hostile mobs spawn frequently, but passive mobs (ie: animals) spawn very rarely. Most animals spawn within chunks when they are generated.
Mobs spawn naturally within a square group of chunks centered on the player, 15×15 chunks (240×240 blocks). When there are multiple players, mobs can spawn within the given distance of any of them. However, hostile mobs (and some others) that move farther than 128 blocks from the nearest player will instantly despawn, so the mob spawning area is more-or-less limited to spheres with a radius of 128 blocks, centered at each player. In multiplayer, mob caps are shared by all players, no matter where they are.
Mob cap
Mob caps are directly proportional to the total number of chunks eligible for spawning. To calculate the cap, the spawning area is expanded by one chunk in every direction (so the default gives 17×17 chunks), then the total number of chunks is plugged into the following formula:
mobCap = constant * chunks / 289
Each mob category has a separate cap and a different constant in the formula:
 Hostile = 70
 Passive = 10
 Ambient (Bats) = 15
 Water (Squids) = 5
In single player mode, there are always 289 chunks in range so the caps above are used. In multiplayer, chunks that are in range of multiple players are only counted once. So the more spread out the players are, the more chunks will be covered and the higher the caps will be.
The amount of mobs is checked once at the beginning of each spawning cycle against the cap. If the number of living mobs in a category is over its cap, the entire spawning cycle for that category is skipped. The area checked for mobs is the same as the area used for calculating the mob cap, which is the spawning area expanded by one chunk in every direction.
Pack spawning

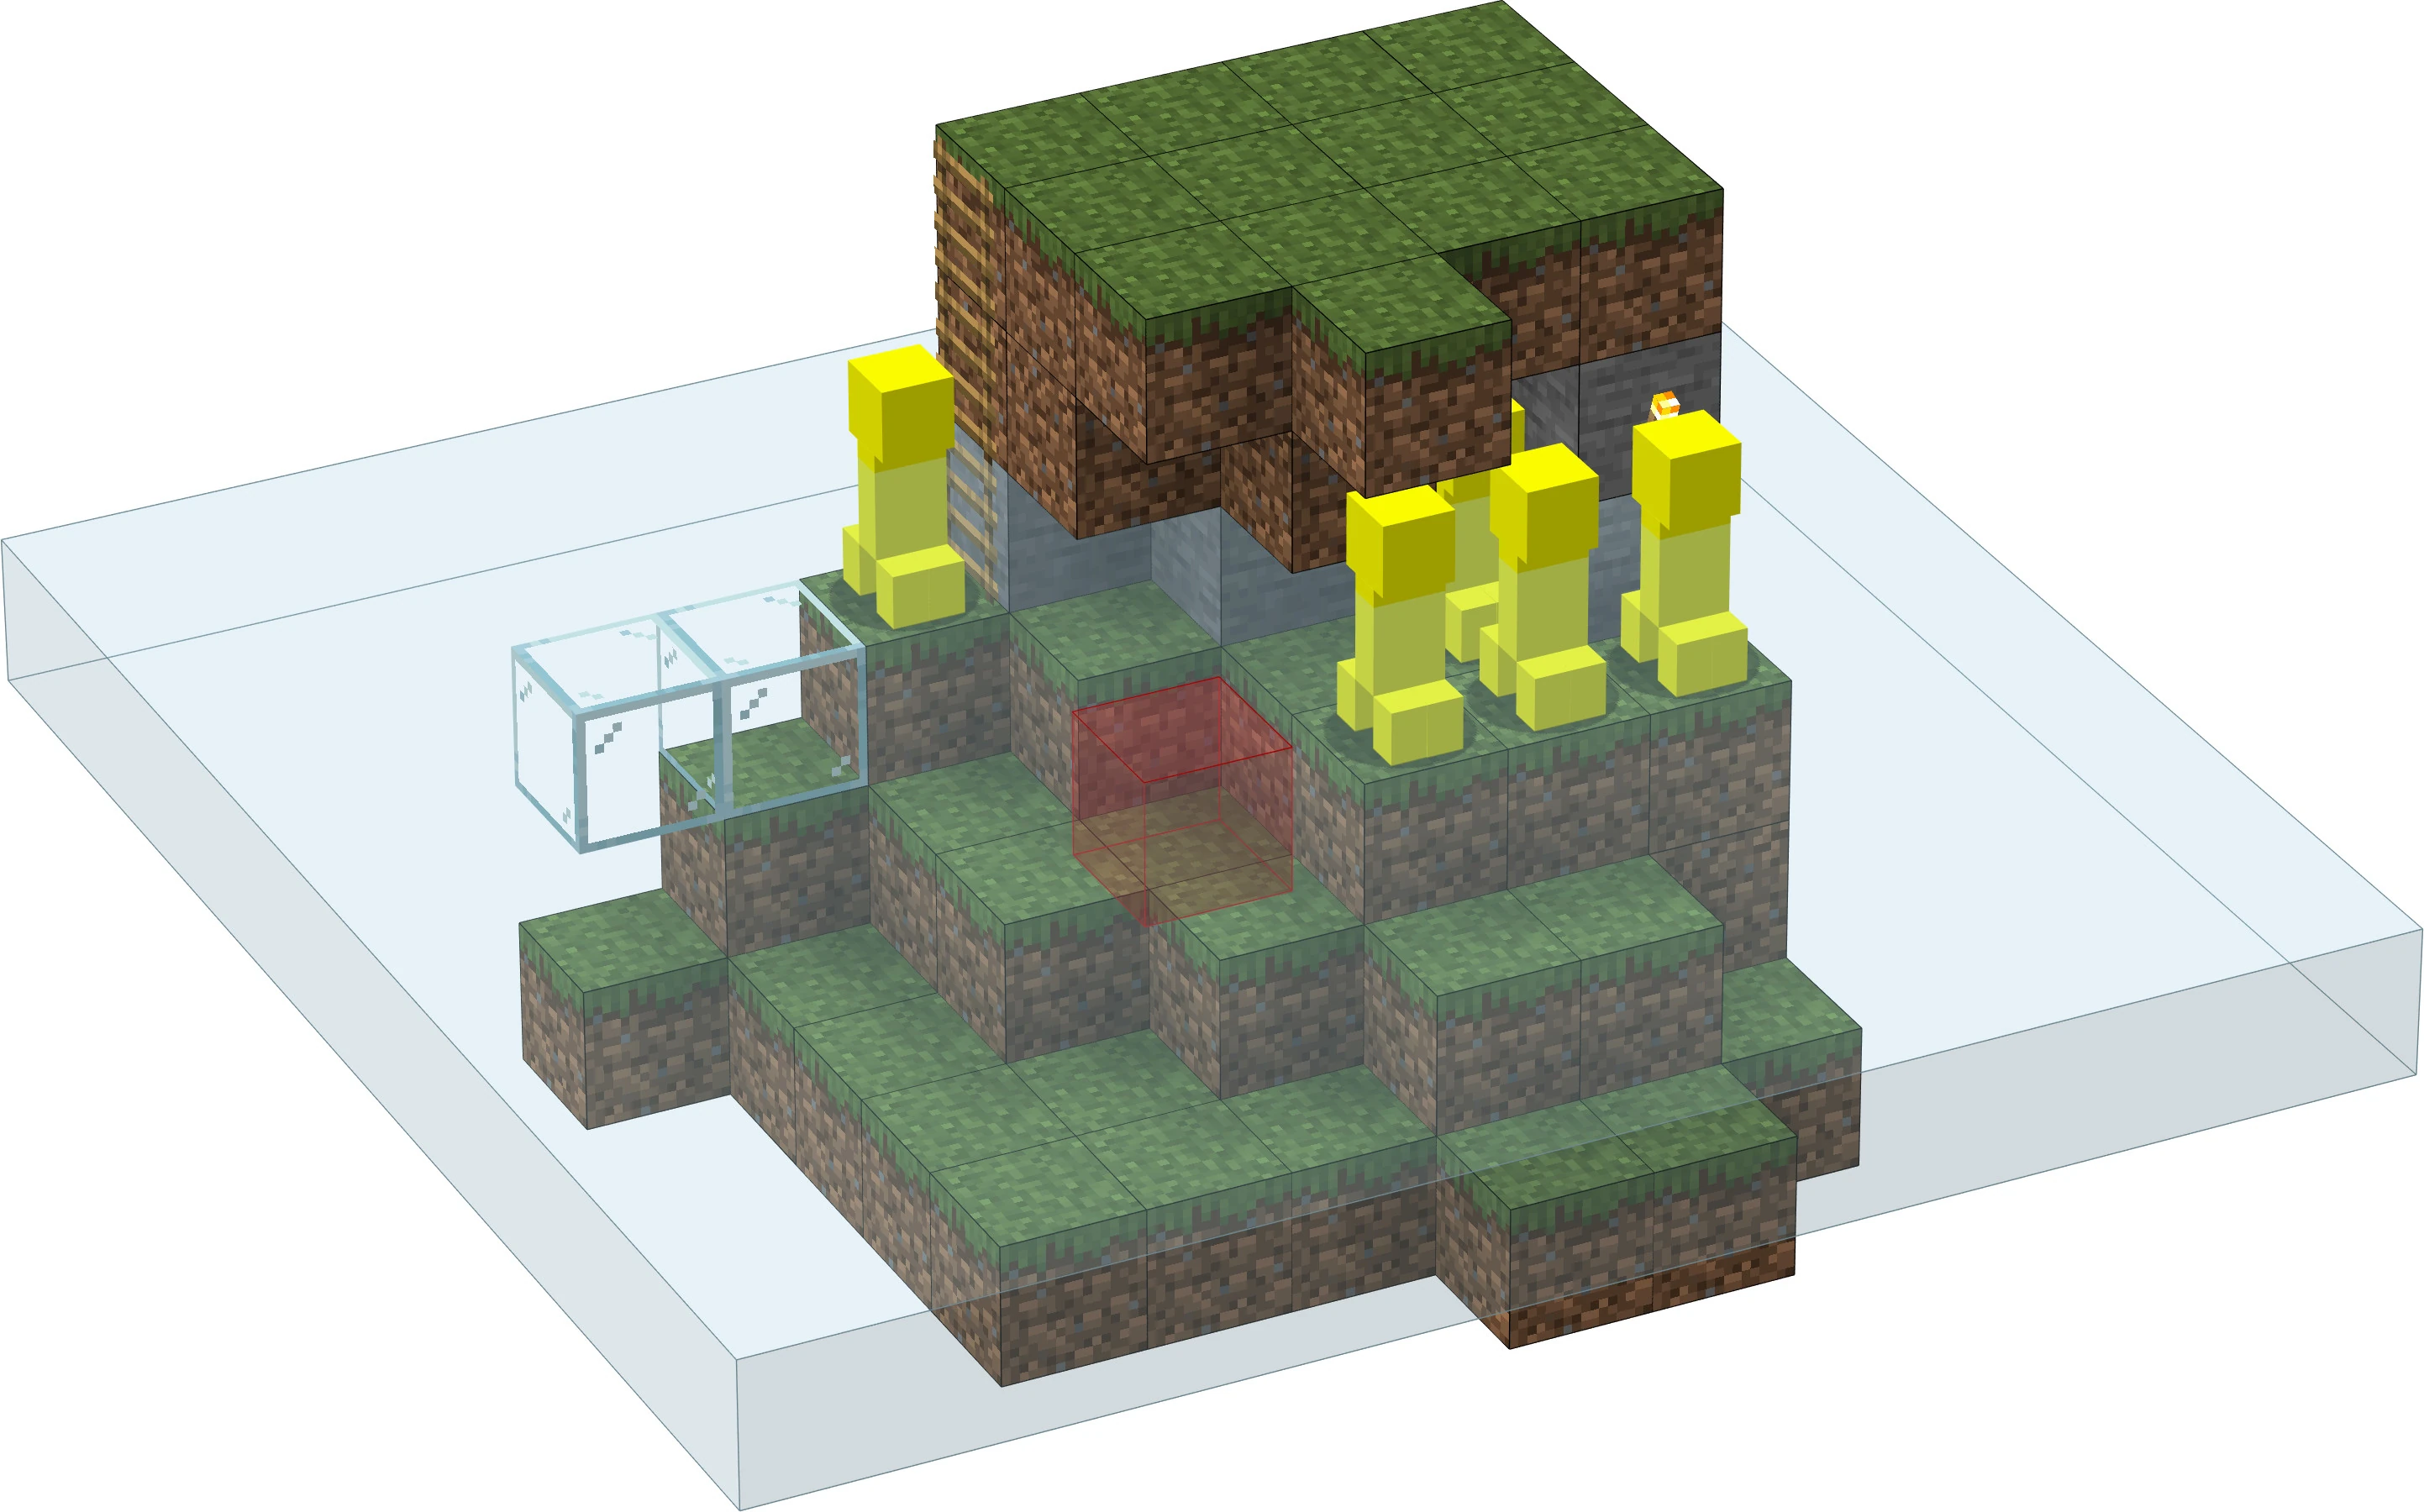
Example of a mob pack spawning. The 41×1×41 spawning area is shaded blue (not to scale). The yellow figures represent the actual positions that mobs could spawn in after checking the environment. Note that the mobs can spawn inside torch and ladder blocks. But they can't spawn on top of glass because it's not opaque. The red cube is the center of the pack.

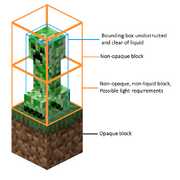
Requirements for the spawning location of individual mobs.
For each spawning cycle, one attempt is made to spawn a pack of mobs in each eligible chunk. A random location in the chunk is chosen to be the center point of the pack. For the pack to spawn at all, the center block must be non-opaque, or must not fill its entire cube, or must be powered.
If the pack location is suitable, up to 12 attempts are made to spawn up to a pack, which is 8 wolves, 1 ghast, 3 rabbits, or 4 of any other mob. The pack is spawned within a 41×1×41 (that's a 41×41 square that is one block high) area centered at the initial block. Mobs will spawn with the lowest part of their body inside this area. For each spawn attempt, a block location within the pack area is chosen at random. Though the pack area extends 21 blocks out from the center, the random location is heavily skewed toward the center of the pack. Approximately 85% of spawns will be within 5 blocks of the pack center, and 99% within 10 blocks of the center.
All mobs within a pack are the same species. The species for the entire pack is chosen randomly from those eligible to spawn at the location of the first spawn attempt in the pack:
- In the Overworld, this depends on the location:
- Forest, taiga, giant tree taiga, and snowy taiga biomes and their variants can also spawn wolves.
- Plains and savanna biomes can also spawn horses, though savannas spawn horses only 1⁄5 of the time as plains.
- Mountains and savanna biomes can also spawn llamas.
- Jungle biomes can also spawn ocelots, parrots and increase the chance to spawn chickens.
- Snowy tundra biomes do not spawn animals other than rabbits or polar bears.
- Desert biomes do not spawn animals other than rabbits.
- Badlands biomes only spawn hostile mobs.
- Beach biomes do not spawn animals other than turtles.
- River and frozen river biomes do not spawn animals other than salmon and squid. They also spawn drowned and the other land hostile mobs.
- Ocean biomes do not spawn animals other than fish, squid and dolphins. They also spawn drowned and the other hostile mobs.
- Frozen oceans spawn salmon.
- Cold oceans spawn salmon and cod.
- Regular oceans spawn cod.
- Lukewarm oceans spawn pufferfish, tropical fish and cod.
- Warm oceans spawn pufferfish and tropical fish.
- Mushroom fields biomes can spawn only mooshrooms.
- Witch huts can only spawn witches.
- Ocean monuments can only spawn guardians.
- The rest of the locations can spawn sheep, pigs, chickens, cows, rabbits, spiders, zombies, skeletons, creepers, endermen, slimes, witches and phantoms.
- Slimes will only spawn if they are in any eligible chunk under layer 40, or in a swamp biome at a low light level.
- In the Nether, the locations are less varied,
- Skeletons, wither skeletons, and blazes can spawn within Nether fortresses.
- Ghasts can spawn everywhere that does not belong to a nether fortress.
- Zombie pigmen, magma cubes, wither skeletons[Legacy Console Edition only] and endermen can spawn anywhere in the Nether.
- In the End, only endermen will spawn.
Spawn conditions
Each individual spawn attempt succeeds only if all of the following conditions are met:
- There must be no players and no player spawn points within a 24 block distance (spherical) of the spawning block
- There must be less loaded mobs of that type than the mob cap for that mob.
- If it's a squid, a guardian, a drowned, a fish or a dolphin then...
- the spawning block must contain liquid (water)
- If it's a squid, then...
- the spawning block must be between level 46 and 62, inclusive
- the spawning mob must not be obstructed by other mobs
- If it's a guardian, then...
- the difficulty must not be peaceful
- 95% chance of failure if the spawning block has sky exposure (details)
- If it's not a squid, guardian, a drowned, a fish or a dolphin, then...
- the block directly below it must have a solid top surface (opaque, upside down slabs / stairs and others)
- the block directly below it may not be bedrock or barrier
- the spawning block and the block above must be made of a material that does not block movement, must be non-liquid and not powered, and cannot be rails, powered rails, detector rails, or activator rails.
- the spawning mob hitbox must not be obstructed by solid blocks, other mobs or liquids
- If it's a bat, then...
- the spawning block must be at level 62 or below
- If the real-time day is between October 20 and November 3, then the light level must be 7 or darker. Otherwise the light level must be 4 or darker.
- If it's an animal (other than a mooshroom or ocelot), then...
- the light level of the spawning block must be 9 or brighter
- the block directly below the spawning block must be grass
- the light level of the spawning block must be 9 or brighter
- If it's a mooshroom, then...
- the light level of the spawning block must be 9 or brighter
- the block directly below the spawning block must be mycelium
- the light level of the spawning block must be 9 or brighter
- If it's an ocelot, then...
- If it's a hostile mob (except as noted below), then...
- the difficulty must not be peaceful
- the light level of the spawning block must be 7 or darker (with exception during thunderstorms), and more light increases the chance that the spawn will fail
- sunlight falling on the spawning block further increases the chance that the spawn will fail, by up to 50%
- If it's a slime, then...
- the light checks in the general hostile mob check don't apply
- one of the following must be true:
- option 1:
- the spawning block must be in a chunk eligible to spawn slimes (see the slime page for details)
- the spawning block must be below level 40
- 90% chance of failure
- option 2:
- the spawning block must be in a swamp biome
- the spawning block be on level 51 through 69 inclusive
- chance of failure based on the phase of the moon
- the light level of the spawning block must be 7 or darker, and more light increases the chance that the spawn will fail
- 50% chance of failure
- option 1:
- If it's a ghast, then...
- the light checks in the general hostile mob check don't apply
- there is a 95% chance the spawn will fail, thus ghasts only spawn 1⁄20 as often as other mobs
- If it's a magma cube or zombie pigman, then...
- the light checks in the general hostile mob check don't apply
- If it's a blaze, then...
- the light checks in the general hostile mob check don't apply
- the light level must be 11 or darker
- If it's a skeleton in the Nether, then...
- there is an 80% chance of spawning a wither skeleton instead
If all of these conditions are met then the mob is spawned. The pack is complete when 4 mobs have spawned (or 8 wolves, or 1 ghast, or 3 rabbits), or 12 attempts have been made, whichever comes first. The exception(s) to these rules is the ender dragon or the wither.
Notes
- Due to the general block checks, all mobs besides squids, drowned, fish, dolphins and guardians must spawn on top of an opaque block with at least two blocks of headroom, even ghasts, etc. However, short mobs can spawn in a one block high space if the block above is transparent, like a glass block or piston.
- Individual mobs and packs can spawn inside signs, and other blocks that have no collision boxes. However, they cannot spawn on any type of rails or on pressure plates.
- Similarly, buildings surrounded by air will spawn more mobs inside than underground rooms because packs that spawn outside of the building can spawn mobs inside it.
- The mob caps tend to be reached in seconds. Because of this, mobs can be funneled into a spawning room by preventing them from spawning outside of it.
- The caps also mean that the faster mobs are killed, the faster new mobs will spawn.
- Because the caps are only checked at the beginning of a spawn cycle, they can be dramatically exceeded when a large number of mobs spawn in a single cycle. This happens often with squid, which have a fairly low cap (5 in single player) but can spawn in the hundreds in a single cycle, in an area with lots of water.
- If the player's view distance or the server view distance in multiplayer is at 9 or below, mob spawning is severely reduced (or they despawn too quickly), and may result in the player encountering no mobs at all. Set the view distance to 10 or higher to ensure mobs spawn correctly.
Bedrock Edition
Natural spawning in Bedrock Edition shares only a few similarities to natural spawning in Java Edition. In Bedrock Edition, there are two main types of natural spawns: pack spawns and structure mob spawns. Structure mob spawns are mobs spawned as part of a structure, such as nether fortresses, witch huts, etc. Pack spawns account for all other types of natural spawns, including mobs that spawn individually (i.e. not in a pack of 2 or more). Both types of natural spawns follow the same rules for spawn conditions and the mob cap.
Mob spawning is evaluated for every chunk within a 6 chunk cylindrical radius of the player that is ticked; if the simulation distance is smaller than 6 chunks, then only chunks within the simulation distance will be able to spawn mobs. There is a 1 in 200 chance of the mob spawning algorithm attempting to run per chunk, per-tick.
Mob Cap
There are two main mob caps that affect spawning: a global mob cap and a mob density cap. The global mob cap for natural spawns is set at 200 regardless of difficulty. The global mob cap only affects natural mob spawning, and does not affect mobs spawned through breeding, spawn eggs, the /summon command, monster spawners or any other type of mob spawning. Only mobs that are within ticking areas (both those around players and those set manually using the /tickingarea command) count towards the global mob cap; mobs not ticked do not count towards the global mob cap. Mobs can also have their own individual cap listed below:
| Mob | Surface Cap | Cave Cap |
|---|---|---|
| Ghast | 0 | 2 |
| Creeper | 5 | Unlimited |
| Other | Unlimited | Unlimited |
Alongside the global mob cap is a mob density cap. The mob density cap limits how many mobs of each type and category can spawn within a 9x9 square region surrounding each chunk eligible for spawning. Mobs in chunks outside a ticking area count towards the mob density count. The density cap is split up into two distinct categories: a cap for surface mobs, and a cap for cave mobs. Cave mobs do not count towards the surface mob cap, and surface mobs do not count towards the cave mob cap.
There are four categories of mobs: ambient, animal, monster, and water. The mob density cap for each category and location of mob in each dimension is as follow:
| Category | Location | Overworld | Nether | The End |
|---|---|---|---|---|
| Ambient | Surface | 0 | 0 | 0 |
| Cave | 2 | 0 | 0 | |
| Animal | Surface | 4 | 0 | 0 |
| Cave | 0 | 0 | 0 | |
| Monster | Surface | 8 | 0 | 10 |
| Cave | 8 | 16 | 8 | |
| Water | Surface | 4 | 0 | 0 |
| Cave | 0 | 0 | 0 |
Spawn Conditions
The following rules apply to all mobs:
- Can only spawn 24 blocks spherical radius or further from the player.
- Cannot spawn if the block below them is air.
- Cannot spawn if that mob would collide with an existing mob.
- Cannot spawn on slabs or carpet.
Some additional rules apply to specific categories of mobs.
For water mobs:
- Cannot spawn outside of liquid.
For monsters:
- Cannot spawn if the light level is greater than 7.
For non-water mobs:
- Cannot spawn on bedrock or invisible bedrock.
- Cannot spawn touching any liquid.
Pack Spawning
Pack spawning happens in two stages: first attempt to spawn surface mobs, then attempt to spawn cave mobs. Before spawning, the mob density cap is calculated based on the 9x9 square area surrounding the current chunk. Spawning begins by picking a random X and Z location within the chunk currently being evaluated. The Y coordinate is determined by starting at the world height and searching downwards for the next solid block with a non-solid block above it. The first such block that is found is considered to be the surface, and the algorithm will attempt to spawn a surface mob pack. The algorithm then continues to search downwards for the next solid block with a non-solid block above it. When a block meeting the criteria is found, the algorithm attempts to spawn a cave mob pack at that block location. Cave spawn attempts continue until the Y coordinate reaches the world bottom, and do not stop even if a cave pack was spawned.
Surface and cave pack spawn attempts then go through the following steps to figure out what mob to spawn and how many:
- Picks a random mob.
- If the current spawn location is in a liquid, pick a random water mob.
- If the light level is greater than 7, there is no other blocks above the current location, and the current location is a grass block, pick a random animal mob.
- Otherwise, spawn a monster mob.
- Picks a random number of mobs to spawn in the pack. Each mob can have its own min and max pack size, and the pack size can depend on difficulty.
- Make sure the spawn location has suitable spawn conditions.
- Limit the number of mobs spawning based on the global mob cap. If the mob count is already at or exceeds the mob cap, no mobs will spawn.
- For each mob to spawn, check that spawning it would not exceed the mob density cap.
- If spawning the mob would not exceed the mob density cap, then the probability the mob will spawn can be calculated using the formula:
(mob density cap - current mob density count) / mob density cap
- If spawning the mob would not exceed the mob density cap, then the probability the mob will spawn can be calculated using the formula:
- Finally, attempt to spawn the mob in the world
- Spawning the mob can fail; for example, if spawning it would cause it to spawn inside of a block or part of a wall.
Other types of spawning
- Cows, chickens, pigs, sheep, mooshrooms, villagers, ocelots, wolves, horses, donkeys, and rabbits can breed. All of these require a player to breed them except for villagers.
- A thrown egg has a 1 in 8 chance of spawning a chicken, and an additional 1 in 32 chance of spawning 4 chickens from a single egg, so there is a total of 1 in 256 chance for a single thrown egg to spawn 4 chickens.
- A snow golem, iron golem, or wither can be made to spawn if a player builds the proper structure out of blocks. Iron golems can also spawn in sufficiently populous villages. See their respective pages for full details.
- A monster egg will spawn a silverfish if broken, or if a nearby silverfish is attacked.
- Zombies can spawn in large groups in villages at midnight ignoring most of the usual restrictions, forming a siege. It could even happen in mushroom biomes or if
/gamerule doMobSpawningisfalse. The game will make 10 attempts to spawn a zombie within a 17x7x17 area centered on a block within the village's cylindrical radius, at the same Y level as the village center. - Zombie pigmen can spawn from nether portals in the Overworld. Lighting and player proximity don't prevent this.
- Endermites can spawn randomly when a player uses an ender pearl.
- Killing medium and large slimes and magma cubes will spawn more of them, but in a smaller size.
- When a pig gets struck by lightning, it is replaced by a newly spawned zombie pigman.
- When a villager gets struck by lightning, it is replaced by a newly spawned witch.
- If a creeper gets struck by lightning, it becomes charged.
- A monster spawner causes mobs to spawn constantly in the area around it. Spawners may naturally generate spawning zombies, skeletons, spiders, cave spiders, silverfish, or blazes, but may be made to spawn other mobs using commands or spawn eggs. Mobs have the same spawning conditions they would have from a natural spawn, except hostile mobs may spawn without a block below them.
- In Creative, the player can use spawn eggs to spawn most mobs. When mobs are spawned this way, all normal spawning requirements, such as light level and block type, are ignored.
- Any entity can be spawned using the
/summoncommand.
Despawning
Java Edition


Various mob spawning ranges, illustrated.
Monsters (other than converting zombie villagers), bats, squid, ocelots (after having existed for over 2400 ticks), chickens from Chicken Jockeys, and hostile or untamed wolves[verify] can cease to exist, or "despawn", under certain conditions:
- A mob that has had no player within 32 blocks of it for more than 30 seconds has a 1 in 800 chance of despawning on each game tick (1/20th of a second), which is a 2.47% chance per second. Therefore, the half-life of monsters not within 32 blocks of a player is 27.73 seconds (after the initial 30 seconds have elapsed).
- A mob will immediately despawn if there is no player within 128 blocks of it.
- Note that this is a Euclidean sphere, not a cylinder from map top to bottom and not a taxicab sphere (which is more like an octahedron). Example: A mob at 0/y/0 will remain at least 30 seconds (as above) if the player moves to 65/y/65 (real distance 91.9), but despawns immediately if the player moves to 91/y/91 (real distance 128.7).
- The chunk the mob is in must still be loaded to the mob to despawn. Otherwise the mob will be frozen until the chunk is loaded again when the player approaches it, and possibly find the same mob again. Because the chunks loaded form a square around the player (if there is only one) while the distance needed for the despawning to happen is the euclidean one, moving in a diagonal direction compared to X/Z axes, and possibly taking some vertical distance, can help keeping the chunks loaded and make the monster despawn. Also, improving rendering distance helps, as this makes the game load more chunks.
- All hostile mobs (including those that are holding items) in a world will despawn if the difficulty is set to Peaceful, regardless as to where the player is positioned in the world.
- In multiplayer, despawning does not occur while there are no players in the game.
- A monster which has been named with a name tag will not despawn. However, one created from a renamed spawn egg will despawn as normal.
- If a monster is holding any items or wearing any armor that was given by a player or picked up from the ground, it will not despawn.
- Chickens that originally spawned as chicken jockeys follow zombie despawn rules, rather than chicken despawn rules. In other words, they will despawn.
Bedrock Edition
Entity despawning in Bedrock Edition is evaluated per-chunk, per-tick. There is a 1 in 50 chance for each chunk to attempt to despawn an entity per-tick. When despawning, a random entity in the chunk is chosen, and only despawned under the following conditions:
- The entity is more than 54 blocks circular radius away from a player.
- The light level is lower than 8.
- For monsters, light level must be greater than 8, and if it is a surface mob, it must be day time.
- The entity is too old.
- The entity does not have persistence.
Persistence
In Bedrock Edition, entities with persistence do not despawn naturally. Persistence is applied to entities in the following situations:
- Interacted with by a player.
- Was ridden by the player.
- Named with a name tag.
- Tempted with food.
- Breed or born as a result of breeding.
- Was tamed.
- Tried to attack a player.
- Was attacked by the player.
- Touched the player.
- Spawned via a monster spawner.
- Spawned via a spawn egg.
- A mob spawned using the
/summoncommand. - Zombie Villager which was cured.
- Skeleton or Skeleton Horse which spawned as part of a skeleton trap.
- Shulker which spawned as part of an End City.
- Witch which spawned as part of a Witch Hut.
- Villager or Zombie Villager spawned as part of an Igloo.
- Zombie Villager which spawned as part of a Zombie Village.
- Vindicator which spawned as part of a Woodland Mansion.
The following entities always have persistence:
- Ender Dragon
- Wither Boss
- Elder Guardian
- Guardian
- Iron Golem
- Snow Golem
- Villager
- Armor Stand
- Agent[Minecraft Education only]
History
| classic | |||||
|---|---|---|---|---|---|
0.24 (August 25, 2009){{Extension DPL}}<ul><li>[[Minecart with Furnace|Minecart with Furnace]]<br/>{{ItemEntity
|image=Minecart with Furnace.png
|renewable=Yes
|stackable=No
|size=Height: 0.7 Blocks<br>Width: 0.98 Blocks
|networkid=10
|drops= 1 {{ItemLink|Minecart with Furnace}}
|health={{Hp|6}}
}}
A '''minecart with furnace''' is a [[furnace]] inside a [[minecart]]. It can be powered with [[coal]] or [[charcoal]] to propel it across a [[rail]] line for a limited time, which can be used to move other minecarts.
==Obtaining==
Minecarts with furnace can be retrieved by attacking them, and by doing so it drops as an [[item]].
===Crafting===
{{Crafting
|Output= Minecart with Furnace
|type= Transportation
|Furnace|Minecart}}
==Usage==
Minecarts with furnaces are placed in the same way as other minecarts. It does not have a graphical user interface, unlike a [[furnace]].
Minecarts with furnaces can be powered, done by feeding fuel ([[coal]] or [[charcoal]]) into the furnace minecart with the {{Control|use}} button. The fuel is consumed immediately and it starts to move in the same direction the player clicked toward. Pressing {{Control|use}} always turns it to that direction, even when not holding coal.
Any piece of fuel, added at any time, increases the total range by an additional 3600 ticks (equal to 180 seconds or 3 minutes). The upper limit is 32767 ticks, approximately 27 minutes.
When powered, minecarts with furnaces cover 240m per minute (about 4 m/s, slightly slower than walking speed) or 720m per piece of coal. They do not accelerate beyond this speed when going downhill or on active [[powered rail]]s, and as long as they remain powered, they do not slow down when going uphill, on inactive powered rails, or when pushing or pulling other minecarts.
If a powered furnace minecart is derailed and then pushed back onto a rail, it starts moving again in the direction it came from, so they are not easily turned around in this state unless a player is nearby to redirect it with {{Control|use}}.
Minecarts with furnaces can climb up steep inclines while pushing other minecarts as long as they have fuel. If a minecart with furnace reaches a slope while pulling another minecart, the pulled minecart is switched to the forward position so that it can be pushed along the slope instead of pulled.
When a minecart with furnace bumps into another minecart or multiple minecarts, the other minecarts are pushed forward with great speed. The furnace minecart continues on with its own speed. Because of this speed difference, some of the minecarts may end up inside unloaded chunks on straight tracks.
===Train mechanics===
{{Schematic
|caption=weakly-shunted 1-cart train, one cart was used only to push the train together and is left behind
|AB|mc-$ew|mc-$ew|mc/Fu-$ew|-
|AB|ra-$wu|ra-$ew|ra-$ew|ra-$ew|ellipsis-ew
}}
{{Schematic
|caption=Creating a strongly-shunted 1-cart train. The sloped rail must be replaced with a horizontal rail before powering.
|AB|mc-$ew||mc/Fu-$ew|-
|AB|ra-$ew|ra-$ew|ra-$eu|ra-$ew|ra-$ew|ellipsis-ew
}}
[[File:FurnaceMinecartTrain.png|thumb|right|A Minecart train powered by furnace [[Minecart|minecarts.]]|alt=]]
A furnace minecart can be made to pull up to four other minecarts. All minecarts in this train move at the constant speed of the furnace minecart. Trains are formed when a minecart is pushed into the back of a powered furnace minecart or a short-enough train. These shunts are fragile at best and easily come undone, but some methods are stronger than others. For example, pushing a minecart into a furnace minecart and then powering the furnace gives a weaker shunt than pushing the furnace minecart into the other minecart against a wall, and then powering the furnace in the other direction.
A high-speed minecart running into the back of a furnace minecart going in the same direction automatically creates a weak shunt with it, pulling it along.
Pulling a minecart with TNT causes it to explode.
{| class="wikitable"
|+Pulled minecart/Shunt behavior
!Condition
!Result
|-
|Furnace loses power/speed||Shunt comes undone
|-
|Entity bumping besides those part of the train||Jettisoned forward
|-
|Upward sloped track||Jettisoned forward
|-
|Downward sloped track||Jettisoned forward (strong shunt) or shunt comes undone (weak shunt)
|-
|90° turn in track||Jettisoned backward
|-
|Turn toward north/south or east/west that is not the direction the train was shunted in||Train derails
|}
When a train comes to a turn, the shunt comes undone with the pulled minecart jettisoned backward. The correct way to make such a turn is having the shunt undone before a turn, and then make the two rejoin on a straight rail later by having the pulled cart catch up with the minecart with furnace.<ref name=mango/>
Since the train runs slower on a fully powered track than a normal minecart (~5 m/s compared to 8m/s), a train pulled by an unpowered furnace minecart is ideal for AFK farms involving breaking or placing blocks like [[nether wart]].<ref name=mango>{{YouTubeLink|1=pRLiAQfhTG8|2=Why The Furnace Minecart Isn't As Useless As You Think|3=ilmango}}</ref>
==Properties==
The coal is not stored as an item in the entity, but in the object data in the fuel property as a time in ticks. ''Fuel'' is a short value, i.e. a maximum of 32767 ticks, which is about 27 minutes. However, {{cmd|/summon furnace_minecart ~ ~ ~ {Fuel:32000} }} alone doesn't make it go since it doesn't have a direction. It can be right-clicked on a track to give it a direction, or it can be summoned with the properties ''PushX'' and ''PushZ'' set, which are responsible for the direction. The <code>Motion</code> property of every entity allows for movement of the minecart, but it does not direct the minecart to move on its own.
==Sounds==
{{Edition|Java}}:<br>
Minecarts with furnaces use the Friendly Creatures sound category for entity-dependent sound events.<ref group=sound name=rollsource>{{bug|MC-42132}}</ref>
{{Sound table
|sound=Minecart rolling.ogg
|subtitle=Minecart rolls
|source=Friendly Creatures <ref group=sound name=rollsource/>
|overridesource=1
|description=While a minecart with furnace is moving
|id=entity.minecart.riding
|translationkey=subtitles.entity.minecart.riding
|volume=0.0-0.35 <ref group=sound>Relates linearly with horizontal velocity (max 0.5)</ref>
|pitch=0.0-1.0 <ref group=sound>Will increase by 0.0025 per tick if the minecart's horizontal velocity is more than 0.01</ref>
|distance=16
|foot=1}}
{{Edition|Bedrock}}:
{{Sound table
|type=bedrock
|sound=Minecart rolling.ogg
|source=neutral
|description=While a minecart with furnace is moving
|id=minecart.base
|foot=1}}
==Data values==
===ID===
{{ID table
|edition=java
|firstcolumnname=Item
|showforms=y
|generatetranslationkeys=y
|displayname=Minecart with Furnace
|spritetype=item
|nameid=furnace_minecart
|form=item
|foot=1}}
{{ID table
|edition=java
|firstcolumnname=Entity
|generatetranslationkeys=y
|displayname=Minecart with Furnace
|spritetype=entity
|nameid=furnace_minecart
|foot=1}}
===Entity data===
Minecarts with furnace have entity data associated with them that contain various properties of the entity.
{{el|java}}:
{{main|Entity format}}
{{/ED}}
{{el|bedrock}}:
: See [[Bedrock Edition level format/Entity format]].
==History==
{{History|java alpha}}
{{History||v1.0.14|[[File:Minecart with Furnace JE1.png|32px]] [[File:Minecart with Furnace (item) JE1.png|32px]] Minecarts with furnace were added.
|Since no in-game name was indicated, they were referred to by names such as "powered minecart" or "furnace minecart".
|No matter how much fuel was added to the minecart, it would never move for more than 3 minutes after the last fuel.}}
{{History|java beta}}
{{History||1.0|When tooltips were added to items in inventory, this was named "Minecart with Furnace".}}
{{History||1.2|[[File:Minecart with Furnace JE2.png|32px]] The texture of the minecart with furnace has been changed.}}
{{History|java}}
{{History||1.0.0|snap=?|Each piece of [[coal]] now powers a [[minecart]] with furnace for {{convert|3|minutes|ticks}}, so that adding another piece of coal at any time increases the total range by another 3 minutes. A full stack of 64 coal now powers it for {{convert|192|minutes|ticks}}.
|Minecarts with furnace on a level track cover 204 meters per minute.}}
{{History||1.8|snap=14w11a|Minecarts with furnace now give a much greater boost to other minecarts.
|When powered, minecarts with furnace now move on non-powered rails without decelerating.}}
{{History|||snap=14w17a|Minecarts with furnace's behavior has been reverted, so that no change was released in [[Java Edition 1.8]].}}
{{History||1.11|snap=16w32a|The entity ID of the minecart with furnace has been changed from <code>MinecartFurnace</code> to <code>furnace_minecart</code>.}}
{{History||1.13|snap=17w47a|Prior to [[1.13/Flattening|''The Flattening'']], this [[item]]'s numeral ID was 343.}}
{{History||1.14|snap=18w43a|[[File:Minecart with Furnace JE3.png|32px]] [[File:Minecart with Furnace (item) JE2.png|32px]] The texture of the minecart with furnace has been changed.}}
{{History||1.15|snap=19w38a|[[File:Minecart with Furnace 19w38a.png|32px]] The furnace now appears dark, like suffocating mobs.}}
{{History|||snap=19w39a|The furnace texture is now colored correctly.}}
{{History||1.15.2|snap=Pre-Release 1|Furnace minecarts can now navigate around any corner.}}
{{History||1.19|snap=22w13a|The crafting recipe for a minecart with furnace is now shapeless.
|Breaking a minecart with furnace will now drop the item instead of the minecart and furnace separately.<ref>{{bug|MC-249493|||Fixed}}</ref>}}
{{History|console}}
{{History||xbox=TU1|xbone=CU1|ps=1.0|wiiu=Patch 1|switch=1.0.1|[[File:Minecart with Furnace JE2.png|32px]] [[File:Minecart with Furnace (item) JE1.png|32px]] Added minecart with furnace.}}
{{History|Ps4}}
{{History||1.90|[[File:Minecart with Furnace JE3.png|32px]] [[File:Minecart with Furnace (item) JE2.png|32px]] The texture of the minecart with furnace has been changed.}}
{{History|foot}}
==Issues==
{{issue list}}
==Trivia==
*The minecart with furnace is excluded from {{els|be|3ds}} on purpose. In a tweet, [[Jeb]] considered removing it from {{el|je}}.<ref>{{tweet|jeb|699241247391772672|I think we will phase out the furnace minecraft ''(sic)''|15 Feb 2016}}</ref>
**When converting a [[Legacy Console Edition]] world to a [[Bedrock Edition]] world, any present minecarts with furnaces are converted into a normal minecart.
**Despite the above-described poor standing of the minecart, it was most recently briefly featured in an animation in the [[Minecraft Live 2022]], where one was depicted as moving a train of about 20 minecarts at a higher than normal speed.
==Gallery==
<gallery>
Running Powered Minecart.png|A powered minecart in action.
</gallery>
==References==
{{reflist}}
{{Items}}
{{Entities}}
[[Category:Mechanics]]
[[cs:Parní vozík]]
[[de:Antriebslore]]
[[es:Vagoneta con horno]]
[[fr:Wagonnet motorisé]]
[[hu:Gőzmeghajtású csille]]
[[ja:かまど付きのトロッコ]]
[[ko:화로가 실린 광산 수레]]
[[nl:Mijnkar met oven]]
[[pl:Wagonik z piecem]]
[[ru:Вагонетка с печью]]
[[uk:Вагонетка з піччю]]
[[zh:动力矿车]]</li><li>[[Longer String|Longer String]]<br/>{{stub}}
{{Joke feature}}
{{exclusive|java}}
{{item
| image = Longer String.png
| rarity=Common
| renewable=Yes
| stackable=Yes (64)
}}
'''Longer string''' is a joke item from [[Java Edition 23w13a_or_b]].
==Obtaining==
===Crafting===
{{Crafting
|A1= String |B1= String
|Output= Longer String
|shapeless= 1
|ignoreusage=1
}}
==Data values==
===ID===
{{edition|java}}:{{ID table
|edition=java
|showforms=y
|generatetranslationkeys=y
|displayname=Longer String
|spritetype=item
|nameid=string2
|form=item|foot=1}}
==History==
{{History|java}}
{{History||23w13a_or_b|[[File:Longer String.png|32px]] Added longer string.}}
{{History|foot}}
{{items}}
{{Jokes}}
[[Category:Joke items]]
[[ja:Longer String]]
[[pt:Linha mais comprida]]</li></ul> | Mobs spawn in groups. | ||||
| ? | The spawning area used to be 17x17 chunks rather than 15x15. The area was reduced, but the old size is still used to calculate mob caps. | ||||
| It was not always possible to funnel mobs into a spawning room by preventing them from spawning elsewhere. Some older sources of information about spawning might make reference to this. | |||||
| Large amounts of empty space used to encourage spawning in the general area. This remains true on a smaller scale, and only horizontally, due to pack spawning. | |||||
| alpha | |||||
v1.2.0{{Extension DPL}}<ul><li>[[Black Dye|Black Dye]]<br/>{{Item
| image = Black Dye.png
| renewable = Yes
| stackable = Yes (64)
}}
'''Black dye''' is a [[Dye#Primary|primary color dye]] similar to an [[ink sac]].
== Obtaining ==
=== Trading ===
[[Wandering trader]]s have a chance to [[trading|trade]] 3 black dyes for 1 [[emerald]].{{only|java}}
=== Crafting ===
{{Crafting
|head=1
|showname=0
|Ink Sac
|Output=Black Dye
|type=Material
}}
{{Crafting
|Wither Rose
|Output=Black Dye
|type=Material
|foot=1
}}
== Usage ==
{{dye usage}}
=== Crafting ingredient ===
{{crafting usage|ignore=Banner|continue=1}}
{{banner crafting usage}}
=== Loom ingredient ===
{{Banner loom usage|Black Dye}}
=== Trading ===
Apprentice-level Shepherd villagers have a 20%{{only|bedrock}} or {{frac|2|7}}{{only|java}} chance to buy 12 black dye for an emerald.
== Data values ==
=== ID ===
{{edition|java}}:
{{ID table
|edition=java
|showforms=y
|generatetranslationkeys=y
|displayname=Black Dye
|spritetype=item
|nameid=black_dye
|form=item
|foot=1}}
{{edition|bedrock}}:
{{ID table
|edition=bedrock
|showaliasids=y
|shownumericids=y
|showforms=y
|notshowbeitemforms=y
|generatetranslationkeys=y
|displayname=Black Dye
|spritetype=item
|nameid=black_dye
|aliasid=dye / 16
|id=395
|form=item
|translationkey=item.dye.black_new.name
|foot=1}}
== History ==
{{History|java}}
{{History||1.14|snap=18w43a|[[File:Black Dye JE1 BE1.png|32px]] Added black dye.}}
{{History|||snap=18w44a|Black dyes now can changed the text color on the [[sign]]s to black.}}
{{History|||snap=19w05a|Added the [[wandering trader]], which sell black dyes.}}
{{History|||snap=19w11a|Black dyes can now be [[trading|bought]] by shepherd villagers.}}
{{History||1.15|snap=Pre-release 1|Black dye can now be used to craft [[prismarine|dark prismarine]], just like [[Bedrock Edition]].}}
{{History||1.17|snap=20w45a|Black dyes can now used to craft newly added [[black candle]]s.}}
{{History|||snap=21w19a|Black dyes can no longer used to craft black candles.}}
{{History|||snap=Pre-release 1|Black dyes can once again used to craft black candles.}}
{{History||1.20<br>(Experimental)|link=1.19.3|snap=22w42a|Black dyes now can change the text color on [[hanging sign]]s to black.}}
{{History|bedrock}}
{{History||1.8.0|snap=beta 1.8.0.10|[[File:Black Dye JE1 BE1.png|32px]] Added black dye.}}
{{History||1.11.0|snap=beta 1.11.0.4|Black dye can now be [[trading|sold]] to shepherd [[villager]]s.}}
{{history||1.13.0|snap=beta 1.13.0.9|Black dye can now be [[crafting|crafted]] from [[flower|wither roses]].}}
{{History||1.16.100|snap=beta 1.16.100.56|The ID of black dye has been changed from <code>dye/16</code> to <code>black_dye</code>.}}
{{History|ps4}}
{{History||1.83|[[File:Black Dye JE1 BE1.png|32px]] Added black dye.}}
{{History|foot}}
== Issues ==
{{issue list}}
{{Items}}
[[Category:Dyes]]
[[Category:Renewable resources]]
[[de:Schwarzer Farbstoff]]
[[es:Tinte negro]]
[[fr:Teinture noire]]
[[ja:黒色の染料]]
[[ko:검은색 염료]]
[[pl:Czarny barwnik]]
[[pt:Corante preto]]
[[th:สีย้อมสีดำ]]
[[zh:黑色染料]]</li><li>[[Compound|Compound]]<br/>{{About|a feature in the Education Edition|the NBT tag|NBT}}
{{education feature}}
{{exclusive|bedrock|education}}
{{Item
| image = Water (compound).png
| image2 = Garbage.png
| renewable = No
| stackable = Yes (64)
}}
'''Compounds''' are a type of [[item]] from [[Education Edition]] used in chemistry, which are created from combinations of various [[element]]s.
== Obtaining ==
Compounds cannot be obtained in the [[Creative inventory]]. They are only obtained from creating them in the [[compound creator]]. This is done by inserting a certain number of [[element]]s corresponding to the compound's chemical formula.
== List of compounds ==
{| class="wikitable" data-description="Compounds"
!Icon
!Compound Name
!Compound Recipe
!Description
!Uses
|-
|{{slot|Aluminum Oxide|link=none}}
|{{text anchor|Aluminium Oxide}}
|{{slot|Aluminum,2}}{{slot|Oxygen,3}}
|Is only brown when dug up from the Earth and contaminated; actually white when pure. Can be electrolyzed to make aluminum metal. Also the main chemical in rubies and sapphires.
|Used to craft [[hardened glass]].
|-
|{{slot|Ammonia|link=none}}
|{{text anchor|Ammonia}}
|{{slot|Nitrogen}}{{slot|Hydrogen,3}}
|
|Used to create [[super fertilizer]].
|-
|{{slot|Barium Sulfate|link=none}}
|{{text anchor|Barium Sulfate}}
|{{slot|Barium}}{{slot|Sulfur}}{{slot|Oxygen,4}}
|
|
|-
|{{slot|Benzene|link=none}}
|{{text anchor|Benzene}}
|{{slot|Carbon,6}}{{slot|Hydrogen,6}}
|
|
|-
|{{slot|Boron Trioxide|link=none}}
|{{text anchor|Boron Trioxide}}
|{{slot|Boron,2}}{{slot|Oxygen,3}}
|
|Used to craft [[hardened glass]].
|-
|{{slot|Calcium Bromide|link=none}}
|{{text anchor|Calcium Bromide}}
|{{slot|Calcium}}{{slot|Bromine,2}}
|
|
|-
|{{slot|Crude Oil|link=none}}
|{{text anchor|Crude Oil}}
|{{slot|Carbon,9}}{{slot|Hydrogen,20}}
|C<sub>9</sub>H<sub>20</sub> is the chemical formula for nonane.
|
|-
|{{slot|Glue|link=none}}
|{{text anchor|Glue}} (Cyanoacrylate)
|{{slot|Carbon,5}}{{slot|Hydrogen,5}}{{slot|Nitrogen}}{{slot|Oxygen,2}}
|C<sub>5</sub>H<sub>5</sub>NO<sub>2</sub> is the chemical formula for methyl cyanoacrylate, one of the cyanoacrylate glues ("superglue"); its condensed formula is CH<sub>2</sub>=C(CN)COOCH<sub>3</sub>.
|
|-
|{{slot|Hydrogen Peroxide|link=none}}
|{{text anchor|Hydrogen Peroxide}}
|{{slot|Hydrogen,2}}{{slot|Oxygen,2}}
|
|Used to craft [[glow stick]].
|-
|{{slot|Iron Sulfide|link=none}}
|{{text anchor|Iron Sulfide}}
|{{slot|Iron}}{{slot|Sulfur}}
|
|
|-
|{{slot|Latex|link=none}}
|{{text anchor|Latex}}
|{{slot|Carbon,5}}{{slot|Hydrogen,8}}
|C<sub>5</sub>H<sub>8</sub> is the chemical formula for isoprene, which polymers are the main components of natural rubber; its condensed formula is CH<sub>2</sub>=C(CH<sub>3</sub>)−CH=CH<sub>2</sub>.
|Used to craft [[balloon]]s.
|-
|{{slot|Lithium Hydride|link=none}}
|{{text anchor|Lithium Hydride}}
|{{slot|Lithium}}{{slot|Hydrogen}}
|
|
|-
|{{slot|Luminol|link=none}}
|{{text anchor|Luminol}}
| class="nowrap" |{{slot|Carbon,8}}{{slot|Hydrogen,7}}{{slot|Nitrogen,3}}{{slot|Oxygen,2}}
|Luminol is a chemical that glows blue when oxidized. It can detect blood.
|Used to craft [[glow stick]].
|-
|{{slot|Lye|link=none}}
|{{text anchor|Lye}}
|{{slot|Sodium}}{{slot|Oxygen}}{{slot|Hydrogen}}
|
|
|-
|{{slot|Magnesium Nitrate|link=none}}
|{{text anchor|Magnesium Nitrate}}
|{{slot|Magnesium}}{{slot|Nitrogen,2}}{{slot|Oxygen,6}}
|Condensed formula: Mg(NO<sub>3</sub>)<sub>2</sub>
|
|-
|{{slot|Magnesium Oxide|link=none}}
|{{text anchor|Magnesium Oxide}}
|{{slot|Magnesium}}{{slot|Oxygen}}
|
|
|-
|{{slot|Polyethylene|link=none}}
|{{text anchor|Polyethylene}}
|{{slot|Carbon,10}}{{slot|Hydrogen,20}}
|Polyethlene (PE), (CH<sub>2</sub>)<sub>''n''</sub>, is ''the'' most commonly produced plastic.
|Used to craft [[glow stick]].
|-
|{{slot|Potassium Iodide|link=none}}
|{{text anchor|Potassium Iodide}}
|{{slot|Potassium}}{{slot|Iodine}}
|Used for making iodized salt and other things.
|
|-
|{{slot|Soap|link=none}}
|{{text anchor|Soap}}
|{{slot|Carbon,18}}{{slot|Hydrogen,35}}{{slot|Sodium}}{{slot|Oxygen,2}}
|C<sub>18</sub>H<sub>35</sub>NaO<sub>2</sub> is the chemical formula of sodium stearate, the most common soap.
|
|-
|{{slot|Sodium Acetate|link=none}}
|{{text anchor|Sodium Acetate}}
|{{slot|Carbon,2}}{{slot|Hydrogen,3}}{{slot|Sodium}}{{slot|Oxygen,2}}
|Used to make hand warmers because it heats up when it "freezes".
|Used to create [[Ice Bomb]].
|-
|{{slot|Sodium Fluoride|link=none}}
|{{text anchor|Sodium Fluoride}}
|{{slot|Sodium}}{{slot|Fluorine}}
|Commonly used in toothpaste to prevent cavity, among other uses.
|
|-
|{{slot|Sodium Hydride|link=none}}
|{{text anchor|Sodium Hydride}}
|{{slot|Sodium}}{{slot|Hydrogen}}
|
|
|-
|{{slot|Sodium Hypochlorite|link=none}}
|{{text anchor|Sodium Hypochlorite}}
|{{slot|Sodium}}{{slot|Chlorine}}{{slot|Oxygen}}
|Main ingredient of real-life bleach.
|Used to create [[Bleach]].
|-
|{{slot|Sodium Oxide|link=none}}
|{{text anchor|Sodium Oxide}}
|{{slot|Sodium,2}}{{slot|Oxygen}}
|
|
|-
|{{slot|Sulfate|link=none}}
|{{text anchor|Sulfate}}
|{{slot|Sulfur}}{{slot|Oxygen,4}}
|Cannot actually exist on its own, as it should have a <sup>2-</sup> charge.
|
|}
=== Chlorides ===
{| class="wikitable" data-description="Chlorides"
!Icon
!Compound
!Recipe
!Uses
|-
|{{slot|Salt|link=none}}
|{{text anchor|Salt}}
|{{slot|Sodium}}{{slot|Chlorine}}
|Used to create [[heat block]].
|-
|{{slot|Calcium Chloride|link=none}}
|{{text anchor|Calcium Chloride}}
|{{slot|Calcium}}{{slot|Chlorine,2}}
|Used to craft [[sparkler|orange sparkler]].
|-
|{{slot|Cerium Chloride|link=none}}
|{{text anchor|Cerium Chloride}}
|{{slot|Cerium}}{{slot|Chlorine,3}}
|Used to craft [[colored torch|blue torch]] and [[sparkler|blue sparkler]].
|-
|{{slot|Mercuric Chloride|link=none}}
|{{text anchor|Mercuric Chloride}}
|{{slot|Mercury}}{{slot|Chlorine,2}}
|Used to craft [[colored torch|red torch]] and [[sparkler|red sparkler]].
|-
|{{slot|Potassium Chloride|link=none}}
|{{text anchor|Potassium Chloride}}
|{{slot|Potassium}}{{slot|Chlorine}}
|Used to craft [[colored torch|purple torch]] and [[sparkler|purple sparkler]].
|-
|{{slot|Tungsten Chloride|link=none}}
|{{text anchor|Tungsten Chloride}}
|{{slot|Tungsten}}{{slot|Chlorine,6}}
|Used to craft [[colored torch|green torch]] and [[sparkler|green sparkler]].
|}
=== Natural compounds ===
Natural compounds are compounds which can be obtained naturally in ''Minecraft''.
{| class="wikitable" data-description="Chlorides"
!Icon
!Compound
! class="nowrap" |Chemical formula
!Natural source
!Method
!Notes
|-
|{{slot|Charcoal}}
|[[Charcoal]]
|{{slot|Carbon,7}}{{slot|Hydrogen,4}}{{slot|Oxygen}}
|[[Log]] or [[Wood]]
|[[Smelting]]
|The chemical formula C<sub>7</sub>H<sub>4</sub>O is sometimes used to describe the approximate composition of charcoal.
|-
|{{slot|Glow Ink Sac}} {{slot|Ink Sac}}
|[[Glow Ink Sac]], [[Ink Sac]]
|{{slot|Iron}}{{slot|Sulfur}}{{slot|Oxygen,4}}
|[[Glow Squid]], [[Squid]]
|Killing Glow Squid, Squid
|FeSO<sub>4</sub> is the chemical formula of iron(II) sulfate or ferrous sulfate, normally found complexed with water as a salt with the formula FeSO<sub>4</sub>·''x''H<sub>2</sub>O, and has been used in the manufacture of iron gall ink and other inks for centuries. In contrast, squid ink (and other cephalopod inks) is composed mainly of melanin and mucus, with an assortment of other compounds in a variety of concentrations dependent on the species.
|-
|{{slot|Sugar}}
|[[Sugar]]
|{{slot|Carbon,6}}{{slot|Hydrogen,12}}{{slot|Oxygen,6}}
|[[Sugar Cane]]s or [[Honey Bottle]]s
|Harvesting and [[crafting]]
|C<sub>6</sub>H<sub>12</sub>O<sub>6</sub> is the chemical formula of glucose and fructose, as well as a number of other simple sugars (common table sugar is instead sucrose, a complex sugar made of glucose and fructose with the chemical formula C<sub>12</sub>H<sub>22</sub>O<sub>11</sub>).
|-
|{{slot|Water (compound)|link=water}}
|{{text anchor|Water}}
|{{slot|Hydrogen,2}}{{slot|Oxygen}}
|[[Water]]
|Picking up in a [[bucket]] or [[glass bottle]] from a [[Cauldron]] or a water source block
|One of the easiest to obtain.
|}
=== Garbage ===
Garbage is considered a "compound", but the only way to produce it is to activate the [[Lab Table]] when its inputs are an invalid recipe. It has no uses.
== Usage ==
Certain compounds are used as ingredients in [[crafting]] or [[lab table]] experiments. Natural compounds have uses outside of chemistry, detailed in their respective articles.
=== Crafting ingredient ===
{{Crafting usage|description=0|Latex, Polyethylene, Hydrogen Peroxide, Luminol, Boron Trioxide, Aluminum Oxide}}
==== Chloride coloring ====
{{Crafting usage|Chloride,Cerium Chloride|match=end}}
=== Lab table ingredient ===
{| class="wikitable"
!Result
!Materials needed
|-
! rowspan="2" |{{slot|Bleach}}<br>[[Bleach]]
|{{slot|Water (compound)|link=Compound}}{{slot|Water (compound)|link=Compound}}{{slot|Water (compound)|link=Compound}}{{slot|Sodium Hypochlorite|link=Compound}}{{slot|Sodium Hypochlorite|link=Compound}}{{slot|Sodium Hypochlorite|link=Compound}}
|-
|<center>Water ×3, Sodium Hypochlorite ×3</center>
|-
! rowspan="2" |{{slot|Heat Block.gif}}<br>[[Heat Block]]
|{{slot}}{{slot|Iron|link=Element#Iron}}{{slot|Water (compound)|link=Compound}}{{slot|Charcoal}}{{slot|Salt|link=Compound}}{{slot}}
|-
|<center>[[Iron (element)|Iron]], Water, [[Charcoal]], Salt</center>
|-
! rowspan="2" |{{slot|Ice Bomb}}<br>[[Ice Bomb]]
|{{slot}}{{slot|Sodium Acetate|link=Compound}}{{slot|Sodium Acetate|link=Compound}}{{slot|Sodium Acetate|link=Compound}}{{slot|Sodium Acetate|link=Compound}}{{slot}}
|-
|<center>Sodium Acetate ×4</center>
|-
! rowspan="2" |{{slot|Super Fertilizer}}<br>[[Super Fertilizer]]
|{{slot}}{{slot}}{{slot|Ammonia|link=Compound}}{{slot|Phosphorus|link=Element#Phosphorus}}{{slot}}{{slot}}
|-
|<center>Ammonia, [[Phosphorus]]</center>
|}
== Sounds ==
Sounds are produced when a [[lab table]] creates garbage.
{{Sound table
|type=bedrock
|sound=Fizz.ogg
|source=block
|description=When a lab table creates garbage{{verify}}
|id=random.fizz
|volume=1.0
|pitch=0.5/0.7}}
{{Sound table
|sound=Ghast fireball4.ogg
|source=hostile
|description=When a lab table creates garbage{{verify}}
|id=mob.blaze.shoot
|volume=1.0
|pitch=0.8/1.0}}
{{Sound table
|sound=Explosion1.ogg
|sound2=Explosion2.ogg
|sound3=Explosion3.ogg
|sound4=Explosion4.ogg
|source=block
|description=When a lab table creates garbage
|id=random.explode
|volume=1.0
|pitch=0.4/0.6}}
{{Sound table
|sound=Fire.ogg
|source=sound
|description=When a lab table creates garbage
|id=lt.reaction.fire
|volume=2.0
|pitch=0.4/0.6}}
{{Sound table
|sound=Explosion1.ogg
|sound2=Explosion2.ogg
|sound3=Explosion3.ogg
|sound4=Explosion4.ogg
|source=weather
|description=When a lab table creates garbage
|id=ambient.weather.lightning.impact
|volume=1.0
|pitch=0.6/0.8
|foot=1}}
== Data values ==
=== ID ===
{{ID table
|edition=bedrock
|shownumericids=y
|showforms=y
|notshowbeitemforms=y
|generatetranslationkeys=y
|displayname=Compound
|spritetype=item
|nameid=compound
|id=594
|form=item
|translationkey=item.compound.salt.name,item.compound.sodiumoxide.name,item.compound.sodiumhydroxide.name,item.compound.magnesiumnitrate.name,item.compound.ironsulfide.name,item.compound.lithiumhydride.name,item.compound.sodiumhydride.name,item.compound.calciumbromide.name,item.compound.magnesiumoxide.name,item.compound.sodiumacetate.name,item.compound.luminol.name,item.compound.charcoal.name,item.compound.sugar.name,item.compound.aluminumoxide.name,item.compound.borontrioxide.name,item.compound.soap.name,item.compound.polyethylene.name,item.compound.garbage.name,item.compound.magnesiumsalts.name,item.compound.sulfate.name,item.compound.bariumsulfate.name,item.compound.potassiumchloride.name,item.compound.mercuricchloride.name,item.compound.ceriumchloride.name,item.compound.tungstenchloride.name,item.compound.calciumchloride.name,item.compound.water.name,item.compound.glue.name,item.compound.hypochlorite.name,item.compound.crudeoil.name,item.compound.latex.name,item.compound.potassiumiodide.name,item.compound.sodiumfluoride.name,item.compound.benzene.name,item.compound.ink.name,item.compound.hydrogenperoxide.name,item.compound.ammonia.name,item.compound.sodiumhypochlorite.name
|foot=1}}
===Item data===
{{see also|Data values}}Compounds uses the following data values:{{/DV}}
== History ==
{{History|bedrock}}
{{History||1.4.0|snap=beta 1.2.20.1|[[File:Aluminum Oxide BE1.png|32px]] [[File:Ammonia BE1.png|32px]] [[File:Barium Sulfate BE1.png|32px]] [[File:Benzene BE1.png|32px]] [[File:Boron Trioxide BE1.png|32px]] [[File:Calcium Bromide BE1.png|32px]] [[File:Crude Oil BE1.png|32px]] [[File:Glue BE1.png|32px]] [[File:Hydrogen Peroxide BE1.png|32px]] [[File:Iron Sulfide BE1.png|32px]] [[File:Latex BE1.png|32px]] [[File:Lithium Hydride BE1.png|32px]] [[File:Luminol BE1.png|32px]] [[File:Lye BE1.png|32px]] [[File:Magnesium Nitrate BE1.png|32px]] [[File:Magnesium Oxide BE1.png|32px]] [[File:Polyethylene BE1.png|32px]] [[File:Potassium Iodide BE1.png|32px]] [[File:Salt BE1.png|32px]] [[File:Soap BE1.png|32px]] [[File:Sodium Acetate BE1.png|32px]] [[File:Sodium Fluoride.png|32px]] [[File:Sodium Hydride BE1.png|32px]] [[File:Sodium Hypochlorite BE1.png|32px]] [[File:Sodium Oxide BE1.png|32px]] [[File:Sulfate BE1.png|32px]] [[File:Calcium Chloride BE1.png|32px]] [[File:Cerium Chloride BE1.png|32px]] [[File:Mercuric Chloride BE1.png|32px]] [[File:Potassium Chloride BE1.png|32px]] [[File:Tungsten Chloride BE1.png|32px]] [[File:Charcoal JE3 BE3.png|32px]] [[File:Ink Sac JE1 BE1.png|32px]] [[File:Sugar JE1 BE1.png|32px]] [[File:Water (compound) BE1.png|32px]] [[File:Garbage BE1.png|32px]] Added compounds.}}
{{History||1.10.0|snap=beta 1.10.0.3|[[File:Charcoal JE4 BE4.png|32px]][[File:Ink Sac JE2 BE2.png|32px]][[File:Sugar JE2 BE2.png|32px]] The textures of Charcoal, Ink Sacs and Sugar have been changed.}}
{{History||1.16|All compounds have been made unobtainable. It is unknown whether it is a glitch or intended. {{bug|MCPE-113776}}}}
{{History| |1.17.0|All compounds are obtainable once again.}}{{History|education}}
{{History||1.0.27|[[File:Aluminum Oxide BE1.png|32px]] [[File:Ammonia BE1.png|32px]] [[File:Barium Sulfate BE1.png|32px]] [[File:Benzene BE1.png|32px]] [[File:Boron Trioxide BE1.png|32px]] [[File:Calcium Bromide BE1.png|32px]] [[File:Crude Oil BE1.png|32px]] [[File:Glue BE1.png|32px]] [[File:Hydrogen Peroxide BE1.png|32px]] [[File:Iron Sulfide BE1.png|32px]] [[File:Latex BE1.png|32px]] [[File:Lithium Hydride BE1.png|32px]] [[File:Luminol BE1.png|32px]] [[File:Lye BE1.png|32px]] [[File:Magnesium Nitrate BE1.png|32px]] [[File:Magnesium Oxide BE1.png|32px]] [[File:Polyethylene BE1.png|32px]] [[File:Potassium Iodide BE1.png|32px]] [[File:Salt BE1.png|32px]] [[File:Soap BE1.png|32px]] [[File:Sodium Acetate BE1.png|32px]] [[File:Sodium Fluoride BE1.png|32px]] [[File:Sodium Hydride BE1.png|32px]] [[File:Sodium Hypochlorite BE1.png|32px]] [[File:Sodium Oxide BE1.png|32px]] [[File:Sulfate BE1.png|32px]] [[File:Calcium Chloride BE1.png|32px]] [[File:Cerium Chloride BE1.png|32px]] [[File:Mercuric Chloride BE1.png|32px]] [[File:Potassium Chloride BE1.png|32px]] [[File:Tungsten Chloride BE1.png|32px]] [[File:Charcoal JE3 BE3.png|32px]] [[File:Ink Sac JE1 BE1.png|32px]] [[File:Sugar JE1 BE1.png|32px]] [[File:Water (compound) BE1.png|32px]] [[File:Garbage BE1.png|32px]] Added compounds.}}
{{History||1.12.0|[[File:Charcoal JE4 BE4.png|32px]][[File:Ink Sac JE2 BE2.png|32px]][[File:Sugar JE2 BE2.png|32px]] The textures of Charcoal, Ink Sacs and Sugar have been changed.}}
{{History|foot}}
== Unused compound textures ==
In the chemistry resource pack folder, there are numerous [[History of textures/Unused textures#Unused compounds|compound textures which are not used]] in the game. Note: a <code>compound</code> item with a data value of <code>38</code> will have the <code>Blue Flask</code> texture and will be called <code>item.compound..name</code>. If you use an NBT Editor to get a compound item with no assigned data value (by deleting the data tag) and then transfer that item to another world / realm using structure blocks (by exporting to a <code>.mcstructure</code> file, then importing it on another world or realm) then it will be renamed to <code>Ivory Tusk</code>.
<gallery widths="48" heights="48" perrow="30" class="center">
Flask EE1.png|Flask
Black Flask EE1.png|Black Flask
Blue Flask EE1.png|Blue Flask
Brown Beaker EE1.png|Brown Beaker
Brown Flask EE1.png|Brown Flask
Dark Gray Beaker EE1.png|Dark Gray Beaker
Dark Gray Flask EE1.png|Dark Gray Flask
Dark Gray Jar EE1.png|Dark Gray Jar
Green Beaker EE1.png|Green Beaker
Green Flask EE1.png|Green Flask
Green Jar EE1.png|Green Jar
Indigo Beaker EE1.png|Indigo Beaker
Indigo Flask EE1.png|Indigo Flask
Indigo Jar EE1.png|Indigo Jar
Light Gray Beaker EE1.png|Light Gray Beaker
Light Gray Flask EE1.png|Light Gray Flask
Orange Beaker EE1.png|Orange Beaker
Orange Flask EE1.png|Orange Flask
Orange Jar EE1.png|Orange Jar
Purple Beaker EE1.png|Purple Beaker
Purple Flask EE1.png|Purple Flask
Purple Jar EE1.png|Purple Jar
Red Beaker EE1.png|Red Beaker
Red Flask EE1.png|Red Flask
Red Jar EE1.png|Red Jar
White Flask EE1.png|White Flask
Yellow Flask EE1.png|Yellow Flask
Bleach (compound).png|Bleach
</gallery>
== Gallery ==
<gallery>
Screen Shot 2021-08-19 at 12.22.50 PM.png|A compound creator in using 5 carbon and 8 hydrogen to create latex.
</gallery>
== See also ==
*[[Compound Creator]]
*[[Crafting]]
*[[Element Constructor]]
*[[Lab Table]]
*[[Brewing Stand]]
*[[Brewing]]
*[[Crafting Table]]
== References ==
{{reflist}}
{{Items}}
{{Education Edition}}
[[Category:Non-renewable resources]]
[[Category:Education Edition items]]
[[de:Verbindung]]
[[it:Composto]]
[[ja:化合物]]
[[pl:Związki chemiczne]]
[[pt:Composto]]
[[ru:Соединение]]
[[th:สารประกอบ]]
[[uk:Сполуки]]
[[zh:化合物]]</li></ul> | ? | The chunk 0,0 (X 0-16 and Z 0-16) is no longer always the first chunk evaluated for mob spawning. If one built a dark room inside that chunk, all mobs would spawn inside that room and nowhere else. | |||
| beta | |||||
1.8{{Extension DPL}}<ul><li>[[Cooked Porkchop|Cooked Porkchop]]<br/>{{Item
| title = Cooked Porkchop
| image = Cooked Porkchop.png
| renewable = Yes
| heals = {{hunger|8}}
| stackable = Yes (64)
}}
'''Cooked porkchop''' is a [[food]] [[item]] that can be eaten by the [[player]].
== Obtaining ==
{{see also|Tutorials/Animal farming|title1=Animal farming}}
Cooked porkchops can be obtained by cooking [[raw porkchop]]s or by [[trading]] with butchers, and is a [[drops|drop]] from [[pig]]s and [[hoglin]]s that die while on [[fire]].
=== Mob loot ===
==== Pigs ====
Adult [[pig]]s drop 1–3 cooked porkchop if killed while on fire. The maximum amount is increased by 1 per level of [[Looting]], for a maximum of 1-6 with Looting III.
==== Hoglins ====
Adult [[hoglin]]s drop 2–4 cooked porkchop if killed while on fire. The maximum amount is increased by 1 per level of Looting, for a maximum of 7 with Looting III.
=== Cooking ===
[[Raw porkchop]] can be cooked in a [[furnace]], [[smoker]], or [[campfire]]. Each piece of cooked porkchop removed from a furnace output slot gives 0.35 [[experience]] (22.4 experience per stack).
{{Smelting
|Raw Porkchop
|Cooked Porkchop
|0,35
}}
=== Trading ===
{{IN|java}}, apprentice-level butcher [[villager]]s have a {{frac|2|3}} chance of selling 5 cooked porkchop for 1 [[emerald]].
Butcher villagers may give players with the [[Hero of the Village]] effect a cooked porkchop.{{only|java}}
{{IN|bedrock}}, apprentice-level butcher villagers have a 25% chance to sell 5 cooked porkchop for 1 emerald.
=== Chest loot ===
{{LootChestItem|cooked-porkchop}}
== Usage ==
=== Food ===
{{see also|Tutorials/Hunger management|title1=Hunger management}}
To eat cooked porkchop, press and hold {{control|use}} while it is selected in the hotbar. Eating one restores {{hunger|8}} [[hunger]] and 12.8 [[Hunger#Mechanics|saturation]].
=== Wolves ===
Cooked porkchops can be used to [[breeding|breed]] and heal tamed [[wolf|wolves]], lead them around, and make baby tamed wolves grow up faster by 10% of the remaining time.
=== Piglins ===
[[Piglin]]s pick up any cooked porkchops in their [[item (entity)|item]] form. However, they do not eat it.
==Sounds==
{{Sound table/Entity/Food}}
== Data values ==
=== ID ===
{{edition|java}}:
{{ID table
|edition=java
|showitemtags=y
|showforms=y
|generatetranslationkeys=y
|displayname=Cooked Porkchop
|spritetype=item
|nameid=cooked_porkchop
|itemtags=piglin_food
|form=item
|foot=1}}
{{edition|bedrock}}:
{{ID table
|edition=bedrock
|shownumericids=y
|showforms=y
|notshowbeitemforms=y
|generatetranslationkeys=y
|displayname=Cooked Porkchop
|spritetype=item
|nameid=cooked_porkchop
|id=263
|form=item
|foot=1}}
== Achievements ==
{{load achievements|Pork Chop}}
== Advancements ==
{{load advancements|Husbandry;A Balanced Diet}}
== History ==
{{History|java indev}}
{{History||20100219|[[File:Cooked Porkchop JE1.png|32px]] Added cooked porkchops.
|Cooked porkchops restore {{hp|8}} and do not stack in the [[inventory]].
|Created by cooking [[raw porkchops]] in the inventory.}}
{{History|java alpha}}
{{History||v1.2.0|snap=preview|[[Zombie pigmen]] now [[drops|drop]] 0-2 cooked porkchops upon [[death]].}}
{{History|java beta}}
{{History||1.5|[[Pig]]s now [[drops|drop]] cooked porkchops when killed with [[fire]].}}
{{History||1.8|snap=Pre-release|[[File:Cooked Porkchop JE2 BE1.png|32px]] The texture of cooked porkchops has been changed to avoid confusion with [[steak]].
|Cooked porkchops are now stackable to 64 and restore [[hunger]] instead of [[health]].
|Cooked porkchops now restore {{hunger|8}} to the food bar.
|Cooked porkchops are no longer dropped by [[zombie pigmen]] upon their [[death]].}}
{{History|java}}
{{History||1.2.1|snap=12w03a|Cooked porkchop can now be used to breed wolves.}}
{{History||1.3.1|snap=12w21a|Butcher [[villager]]s now [[trading|sell]] 6–7 cooked porkchops for 1 [[emerald]].}}
{{History||1.4.2|snap=12w37a|[[File:Cooked Porkchop JE3 BE2.png|32px]] The texture of cooked porkchops has been changed, so that it no longer has a dark outline.}}
{{History||1.8|snap=14w02a|Butcher [[villager]]s now [[trading|sell]] 5–7 cooked porkchops for 1 [[emerald]].}}
{{History||1.13|snap=17w47a|Prior to [[1.13/Flattening|''The Flattening'']], this [[item]]'s numeral ID was 320.}}
{{History||1.14|snap=18w43a|[[File:Cooked Porkchop JE4 BE3.png|32px]] The texture of cooked porkchops has been changed.}}
{{History|||snap=19w13a|Butcher villagers now give cooked porkchops to players under the [[Hero of the Village]] effect.}}
{{History||1.16|snap=20w07a|[[Hoglin]]s now drop cooked porkchops if killed while on fire.}}
{{History|||snap=20w16a|Cooked porkchops can now be found in hoglin stable chests in [[bastion remnant]]s.}}
{{History||1.16.2|snap=20w30a|Cooked porkchops can now be found in generic bastion remnant chests as well.}}
{{History|pocket alpha}}
{{History||v0.4.0|[[File:Cooked Porkchop JE2 BE1.png|32px]] Added cooked porkchops.}}
{{History||v0.5.0|Cooked porkchops now restore {{hp|8}} instead of {{hp|4}}.}}
{{History||v0.8.0|snap=build 1|[[File:Cooked Porkchop JE3 BE2.png|32px]] The texture of cooked porkchops has been changed, so that it no longer has a dark outline.}}
{{History||v0.12.1|snap=build 1|Cooked porkchops now restore [[hunger]] instead of [[health]].}}
{{History|pocket}}
{{History||1.0.4|snap=alpha 1.0.4.0|Butcher [[villager]]s now [[trading|sell]] 5–7 cooked porkchops for 1 [[emerald]].}}
{{History|bedrock}}
{{History||1.10.0|snap=beta 1.10.0.3|[[File:Cooked Porkchop JE4 BE3.png|32px]] The texture of cooked porkchops has been changed.}}
{{History||1.11.0|snap=beta 1.11.0.4|[[Trading]] has been changed, butcher [[villager]]s now have a 25% chance to [[trading|sell]] 4 cooked porkchops as part of their second-tier [[trading|trade]].}}
{{History||1.16.0|snap=beta 1.16.0.57|Trading has been changed, apprentice butcher [[villager]]s now have a 25% chance to [[trading|sell]] 5 cooked porkchops instead of 3.}}
{{History|console}}
{{History||xbox=TU1|xbone=CU1|ps=1.0|wiiu=Patch 1|[[File:Cooked Porkchop JE1.png|32px]] Added cooked porkchops.}}
{{History||xbox=TU3|[[File:Cooked Porkchop JE2 BE1.png|32px]] The texture of cooked porkchops has been changed to be consistent with [[Java Edition]].}}
{{History||xbox=TU5|Cooked porkchops are now stackable to 64.
|Cooked porkchops now fill [[hunger]] instead of [[health]].}}
{{History||xbox=TU12|[[File:Cooked Porkchop JE3 BE2.png|32px]] The texture of cooked porkchops has been changed, so that it no longer has a dark outline.}}
{{History|PS4}}
{{History||1.90|[[File:Cooked Porkchop JE4 BE3.png|32px]] The texture of cooked porkchops has been changed.}}
{{History|new3DS}}
{{History||0.1.0|[[File:Cooked Porkchop JE3 BE2.png|32px]] Added cooked porkchops.}}
{{History|foot}}
== Issues ==
{{issue list}}
== External Links ==
*[https://www.minecraft.net/en-us/article/taking-inventory--porkchop Taking Inventory: Porkchop] – Minecraft.net on February 13, 2020
{{Items}}
[[Category:Food]]
[[Category:Renewable resources]]
[[cs:Pečená kotleta]]
[[de:Gebratenes Schweinefleisch]]
[[es:Chuleta de cerdo cocinada]]
[[fr:Côtelette de porc cuite]]
[[hu:Sült sertésszelet]]
[[ja:焼き豚]]
[[nl:Gebraden varkensvlees]]
[[pl:Pieczony schab]]
[[pt:Costeleta de porco assada]]
[[ru:Жареная свинина]]
[[uk:Смажена свинина]]
[[zh:熟猪排]]</li><li>[[Head|Head]]<br/>{{Block
| image =
<gallery>
Skeleton Skull.png | Skeleton
Wither Skeleton Skull.png | Wither Skeleton
Player Head.png | Player
Zombie Head.png| Zombie
Creeper Head.png | Creeper
Dragon Head.png | Dragon
Piglin Head.png | Piglin
</gallery>
| transparent = Yes
| light = No
| tool = any
| renewable =
* '''Skeleton, Wither Skeleton, Zombie, Creeper, Piglin:'''
* Yes
* '''Dragon, Player:'''
* No
| stackable = Yes (64)
| flammable = No
| lavasusceptible = No
| rarity = Uncommon
}}
A '''head''' or '''skull''' is a [[block]] modeled after the head of a specific [[entity]]. There are seven types of heads: [[player]] ([[Steve]]'s head by default), [[zombie]], [[skeleton]], [[wither skeleton]], [[creeper]], [[piglin]], and [[dragon]].
== Obtaining ==
=== Breaking ===
A mob head can be mined using any item,<ref>{{bug|MC-192905||Heads & Skulls have no assigned tool}}</ref> and drops itself when broken.
{{breaking row|horizontal=1|Mob Head|sprite=Heads}}
If a head is pushed by a [[piston]] or comes in contact with [[water]] or [[lava]], it breaks off as an [[item (entity)|item]].
When destroyed by an [[explosion]], the head ''always'' drops as an item.
===Natural generation===
Dragon heads generate on [[end ships]] found in [[End City|end cities]].
Skeleton skulls can generate in [[ancient cities]], which sometimes generate in the [[deep dark]].
=== Mob loot ===
A [[wither skeleton]] has a 2.5% chance of dropping a wither skeleton skull when killed by a player or a tamed [[wolf]]. The chance is increased by 1% per level of [[Looting]], for a maximum of 5.5% with Looting III. {{IN|bedrock}}, the chance is increased by 2% per level of [[Looting]], for a maximum of 8.5% with Looting III.
[[Skeleton]], [[wither skeleton]], [[zombie]], [[creeper]] and [[piglin]] heads are always dropped by the respective mob if it dies due to a [[charged creeper]]'s explosion. {{IN|bedrock}}, if multiple mobs are killed by the same charged creeper, all of them drop their heads, however {{in|java}} only one mob selected at random drops its head.<ref>{{bug|MC-63534|||WAI}}</ref> If an [[ender dragon]] or a [[player]] is killed by a charged creeper, it does not drop its head.<ref name=":0">{{bug|MC-132933|||WAI}}</ref>
==Usage ==
===Decoration===
Mob heads can be oriented in 16 different directions on top of a block, and 4 directions on the sides of blocks, similar to [[sign]]s. They can be placed on top of, or beside each other by shift clicking.
When placed and powered by redstone, the piglin and dragon heads plays an animation. The piglin head flaps its ears (2 times per second for the right ear and 2.5 times per second for the left ear) while the dragon head opens and closes its mouth repeatedly (2 times per second). The same animation occurs when worn by a (horizontally) moving player, zombie, skeleton, or [[armor stand]] (note: the animation does not play if the <code>NoGravity</code> tag is set to 1)
=== Wearing ===
{{See also|#Renders}}
The player can wear heads, similarly to [[pumpkin]]s or helmets. This overlays the second layer of the player's [[skin]].
====Disguise====
Wearing the corresponding mob head reduces the detection range for [[skeleton]]s (but not [[wither skeleton]]s), [[creeper]]s, [[zombie]]s, and [[piglin]]s to 50% of the normal range. This is similar to (and stacks with) the reductions in detection range from [[sneaking]] and from the [[Invisibility]] status effect.
{{IN|bedrock}}, wearing any mob head or carved pumpkin makes the player invisible to other players on a locator [[map]].
=== Withers===
{{FakeImage|{{BlockGrid|scale=2|w=Wither Skeleton Skull|s=Soul Sand|www|sss| s }}|Wither build configuration}}
[[Wither]]s can be spawned by placing soul sand or soul soil in a T shape, and putting 3 wither skeleton skulls on top of the T. The T can be horizontal or vertical. The last block placed must be one of the three wither skeleton skulls. A dispenser can also create a wither, by placing the final skull onto soul sand directly in front of and below it.
===Dispensers===
A [[dispenser]] can equip a mob head on a player, mob, or armor stand with an empty helmet slot, within the block the dispenser is facing.
[[Dispenser]]s can also complete the construction of a wither.
=== Crafting ingredient===
{{crafting usage|Wither Skeleton Skull,Creeper Head|continue=1}}
{{Crafting
|ignoreusage=1
|ingredients=Any '''Mob head''' +<br>[[Gunpowder]] +<br>Any [[Dye]]
|Gunpowder
|Wither Skeleton Skull;Skeleton Skull;Zombie Head;Head;Creeper Head;Dragon Head;Player Head
|Matching Dye
|Output= Matching Firework Star
|description=Forms Creeper shape
|foot=1
}}
===Enchantments===
Mob heads can receive the following enchantments, but only through an [[anvil]].
{| class="wikitable col-2-center col-3-right"
|+
!Name
!Max Level
![[Enchanting|Method]]
|-
|[[Curse of Binding]]
|I
|{{Inventory slot|Anvil}}
|-
|[[Curse of Vanishing]]
|I
|{{Inventory slot|Anvil}}
|-
|}
=== Note blocks ===
Placing a head above a [[note block]] causes the note block to play the corresponding mob's {{cd|ambient}} sound when activated. The only exception is the creeper head; as creepers don't make {{cd|ambient}} sounds, the note block plays the {{cd|primed}} (hissing) sound instead.
The block below the note block does not affect the mob sound it creates.
==Player skins==
{{exclusive|java|section=1}}
Human heads have an extra usage for map makers, they can be given [[Chunk format#Entity Format|NBT data]] so that they appear with the skin of any ''Minecraft'' account. This means if a player knows that a specific account has a head that is desired to display, the NBT data can be edited to make it appear.
The command to give the player a head with the skin of another player is {{cmd|give @s minecraft:player_head{SkullOwner:"<''PlayerName''>"} }}. Commonly, this kind of head is called a custom head.
Another command to give the player a head with another player's skin is {{cmd|give @s minecraft:player_head{SkullOwner:{Id:"<''PlayerUUID''>",Properties:{textures:[{Value:"<''SkinURL''>"}]} } } }}. ''SkinURL'' is a string encoded in [https://en.wikipedia.org/wiki/Base64 Base64] containing the URL of the player's skin.<ref>Example: {"textures":{"SKIN":{"url":"<nowiki>http://textures.minecraft.net/texture/292009a4925b58f02c77dadc3ecef07ea4c7472f64e0fdc32ce5522489362680"}}}</ref> A player head saves the skin of the player from the time it was created, meaning if the player changes their skin, the head still displays the original texture.<ref>{{tweet|Dinnerbone|464414369452142592|Skulls are a snapshot of the skin as it was made; just change your skin, make a skull, and change your skin back. That's intended behaviour.|May 8, 2014}}</ref>
Note that it is therefore necessary to be connected to the internet to load the texture of a skin, whatever the property used.
When they are loaded for the first time by the client, the skins textures are cached in {{code|[[.minecraft]]\assets\skins\(subfolders)\(files)}}.
If the client does not have access to the internet when it first loads, the player's head displays a regular head (Steve's skin) which is also cached.
Afterwards, even if the client reconnects to the internet, in order to display the skin correctly, it is necessary to clear the cache manually by deleting the recently created files in {{code|[[.minecraft]]\assets\skins\(subfolder)}}, then restarting the game.
When NBT-customized heads (with names and lores) are placed on the ground, they lose their names and given lores upon picking up. Therefore, using Ctrl + {{ctrl|pick block}} on a custom player head gives the player a head that still retains its textures, but with no lores and its name is reset to either {{code|[PlayerName]'s Head}} (heads obtained by MHF-Marc's Head Format or existing players in the world) or {{code|Player Head}} (heads obtained by using skin URLs).
=== Marc's Head Format===
[[File:Allmobheads.png|thumb|right|Most of the MHF mob heads provided.]]
{{exclusive|Java|section=1}}
[[Marc Watson]] created a number of accounts with specific skins so map makers could use common heads without the risk of someone changing their skins.<ref>{{reddit|1m0itx/twitter_marc_irl_mapmakers_would_it_be_useful|cc4m1cq|I'm here to make it so that people don't have to worry about having a consistent account whose skin might change.|Marc_IRL|September 9, 2013}}</ref> Nowadays, since heads do not update the skin if a player changes their skin, this is not something map-makers need to worry about, though these skins are still useful. These accounts have names in the format <code>MHF_<''Name''></code>, for example <code>MHF_PigZombie</code> is the name of a ''Minecraft'' user with a [[zombified piglin]] head. MHF stands for "Marc's Head Format".<ref>{{tweet|Marc_IRL|377453670410891264|head format. I needed to pick a prefix that was short and not already taken by other usernames.|September 10, 2013}}</ref> There are also a few blocks and "bonus" heads, for more variety. These player heads have not been updated in compliance with the [[Texture Update]], and are outdated.
Because these are names of player accounts, these heads are obtained or placed using the <code>SkullOwner</code> tag, for instance: {{cmd|/give @s minecraft:player_head{SkullOwner:"MHF_''<Name>''"}<nowiki />}}.
The following names/heads have been made available:<ref>{{tweet|Marc_IRL|542330244473311232|For those following the MHF list, I have presents for you. Full list of accounts I've made: http://pastebin.com/5mug6EBu|December 9, 2014}}</ref>
<!--
DO NOT add ANY skull to this list without a source that it is made by Mojang; unsourced additions will be reverted!
In particular:
* MHF_Apple, MHF_Wither and MHF_Tree are not made by Mojang, see {{tweet|Marc_IRL|542599419678707714}} and {{tweet|Marc_IRL|590522239616954369}}
* MHF_Guardian is unofficial, see http://redd.it/3439u0
-->
;Mobs
<div class="list-style-none" style="-moz-column-width:15em;-webkit-column-width:15em;column-width:15em">
*{{InvSprite|MHF Alex}} MHF_Alex
*{{InvSprite|MHF Blaze}} MHF_Blaze
*{{InvSprite|MHF CaveSpider}} MHF_CaveSpider
*{{InvSprite|MHF Chicken}} MHF_Chicken
*{{InvSprite|MHF Cow}} MHF_Cow
*{{InvSprite|MHF Creeper}} MHF_Creeper
*{{InvSprite|MHF Enderman}} MHF_Enderman
*{{InvSprite|MHF Ghast}} MHF_Ghast
*{{InvSprite|MHF Golem}} MHF_Golem
*{{InvSprite|MHF Herobrine}} MHF_Herobrine
*{{InvSprite|MHF LavaSlime}} MHF_LavaSlime
*{{InvSprite|MHF MushroomCow}} MHF_MushroomCow
*{{InvSprite|MHF Ocelot}} MHF_Ocelot
*{{InvSprite|MHF Pig}} MHF_Pig
*{{InvSprite|MHF PigZombie}} MHF_PigZombie
*{{InvSprite|MHF Sheep}} MHF_Sheep
*{{InvSprite|MHF Skeleton}} MHF_Skeleton
*{{InvSprite|MHF Slime}} MHF_Slime
*{{InvSprite|MHF Spider}} MHF_Spider
*{{InvSprite|MHF Squid}} MHF_Squid
*{{InvSprite|MHF Steve}} MHF_Steve
*{{InvSprite|MHF Villager}} MHF_Villager
*{{InvSprite|MHF WSkeleton}} MHF_WSkeleton
*{{InvSprite|MHF Zombie}} MHF_Zombie
</div>
;Blocks
<div class="list-style-none" style="-moz-column-width:15em;-webkit-column-width:15em;column-width:15em">
*{{InvSprite|MHF Cactus}} MHF_Cactus
*{{InvSprite|MHF Cake}} MHF_Cake
*{{InvSprite|MHF Chest}} MHF_Chest
*{{InvSprite|MHF CoconutB}} MHF_CoconutB
*{{InvSprite|MHF CoconutG}} MHF_CoconutG
*{{InvSprite|MHF Melon}} MHF_Melon
*{{InvSprite|MHF OakLog}} MHF_OakLog
*{{InvSprite|MHF Present1}} MHF_Present1
*{{InvSprite|MHF Present2}} MHF_Present2
*{{InvSprite|MHF Pumpkin}} MHF_Pumpkin
*{{InvSprite|MHF TNT}} MHF_TNT
*{{InvSprite|MHF TNT2}} MHF_TNT2
</div>
;Bonus
<div class="list-style-none" style="-moz-column-width:15em;-webkit-column-width:15em;column-width:15em">
*{{InvSprite|MHF ArrowUp}} MHF_ArrowUp
*{{InvSprite|MHF ArrowDown}} MHF_ArrowDown
*{{InvSprite|MHF ArrowLeft}} MHF_ArrowLeft
*{{InvSprite|MHF ArrowRight}} MHF_ArrowRight
*{{InvSprite|MHF Exclamation}} MHF_Exclamation
*{{InvSprite|MHF Question}} MHF_Question
</div>
==Sounds==
===Generic===
{{Sound table/Block/Stone}}
===Unique===
{{Edition|Java}}:
{{Sound table
|sound=Zombie idle1.ogg
|sound2=Zombie idle2.ogg
|sound3=Zombie idle3.ogg
|subtitle=Zombie groans
|source=record
|description=When a zombie head is played using a note block
|id=block.note_block.imitate.zombie
|translationkey=subtitles.entity.zombie.ambient
|volume=3.0
|pitch=1.0
|distance=16}}
{{Sound table
|sound=Skeleton idle1.ogg
|sound2=Skeleton idle2.ogg
|sound3=Skeleton idle3.ogg
|subtitle=Skeleton rattles
|source=record
|description=When a skeleton skull is played using a note block
|id=block.note_block.imitate.skeleton
|translationkey=subtitles.entity.skeleton.ambient
|volume=3.0
|pitch=1.0
|distance=16}}
{{Sound table
|sound=Creeper fuse.ogg
|subtitle=Creeper hisses
|source=record
|description=When a creeper head is played using a note block
|id=block.note_block.imitate.creeper
|translationkey=subtitles.entity.creeper.primed
|volume=3.0
|pitch=0.5
|distance=16}}
{{Sound table
|sound=Ender dragon idle1.ogg
|sound2=Ender dragon idle2.ogg
|sound3=Ender dragon idle3.ogg
|sound4=Ender dragon idle4.ogg
|subtitle=Dragon roars
|source=record
|description=When an ender dragon head is played using a note block
|id=block.note_block.imitate.ender_dragon
|translationkey=subtitles.entity.ender_dragon.ambient
|volume=3.0
|pitch=1.0
|distance=16}}
{{Sound table
|sound=Wither skeleton idle1.ogg
|sound2=Wither skeleton idle2.ogg
|sound3=Wither skeleton idle3.ogg
|subtitle=Wither Skeleton rattles
|source=record
|description=When a wither skeleton skull is played using a note block
|id=block.note_block.imitate.wither_skeleton
|translationkey=subtitles.entity.wither_skeleton.ambient
|volume=3.0
|pitch=1.0
|distance=16}}
{{Sound table
|sound=Piglin idle1.ogg
|sound2=Piglin idle2.ogg
|sound3=Piglin idle3.ogg
|sound4=Piglin idle4.ogg
|sound5=Piglin idle5.ogg
|subtitle=Piglin snorts
|source=record
|description=When a piglin head is played using a note block
|id=block.note_block.imitate.piglin
|translationkey=subtitles.entity.piglin.ambient
|volume=1.98
|pitch=1.0
|distance=16}}
{{Sound table
|sound=Equip generic1.ogg
|sound2=Equip generic2.ogg
|sound3=Equip generic3.ogg
|sound4=Equip generic4.ogg
|sound5=Equip generic5.ogg
|sound6=Equip generic6.ogg
|subtitle=Gear equips
|source=player
|description=When a carved pumpkin is equipped
|id=item.armor.equip_generic
|translationkey=subtitles.item.armor.equip
|volume=1.0
|pitch=1.0
|distance=16
|foot=1}}
<!--volumes and pitches seem to be approximately v=0.9 p=0.84, but those values are approximate and are not in the files. They are probably inside of the code.-->
{{Edition|Bedrock}}:
{{Sound table
|type=bedrock
|sound=Zombie idle1.ogg
|sound2=Zombie idle2.ogg
|sound3=Zombie idle3.ogg
|source=record
|description=When a zombie head is played using a note block
|id=note.zombie
|pitch=0.84 <ref group=sound name=pitch>Actually equal to <math>\frac{1}{\sqrt[4]{2}}</math>, which is about 0.8409</ref>}}
{{Sound table
|sound=Skeleton step1.ogg
|sound2=Skeleton step2.ogg
|sound3=Skeleton step3.ogg
|sound4=Skeleton step4.ogg
|source=record
|description=When a skeleton skull is played using a note block<wbr><ref group=sound name=skeletoncreeper>{{Bug|MCPE-164530}}</ref>
|id=note.skeleton
|pitch=0.84 <ref group=sound name=pitch/>}}
{{Sound table
|sound=Fuse.ogg
|source=record
|description=When a creeper head is played using a note block<wbr><ref group=sound name=skeletoncreeper/>
|id=note.creeper
|pitch=0.84 <ref group=sound name=pitch/>}}
{{Sound table
|sound=Ender dragon idle1.ogg
|sound2=Ender dragon idle2.ogg
|sound3=Ender dragon idle3.ogg
|sound4=Ender dragon idle4.ogg
|source=record
|description=When a dragon head is played using a note block
|id=note.enderdragon
|pitch=0.84 <ref group=sound name=pitch/>}}
{{Sound table
|sound=Skeleton step1.ogg
|sound2=Skeleton step2.ogg
|sound3=Skeleton step3.ogg
|sound4=Skeleton step4.ogg
|source=record
|description=When a wither skeleton skull is played using a note block<wbr>{{Until|BE 1.20.40}}<wbr><ref group=sound name=skeletoncreeper/>
|id=note.witherskeleton
|pitch=0.84 <ref group=sound name=pitch/>}}
{{Sound table
|sound=Wither skeleton step1.ogg
|sound2=Wither skeleton step2.ogg
|sound3=Wither skeleton step3.ogg
|sound4=Wither skeleton step4.ogg
|source=record
|description=When a wither skeleton skull is played using a note block<wbr>{{Upcoming|BE 1.20.40}}<wbr><ref group=sound name=skeletoncreeper/>
|id=note.witherskeleton
|pitch=0.84 <ref group=sound name=pitch/>}}
{{Sound table
|sound=Piglin angry1.ogg
|sound2=Piglin angry2.ogg
|sound3=Piglin angry3.ogg
|sound4=Piglin angry4.ogg
|source=record
|description=When a piglin head is played using a note block<wbr><ref group=sound>{{Bug|MCPE-164710}}</ref>
|id=note.piglin
|pitch=0.84 <ref group=sound name=pitch/>}}
{{Sound table
|sound=Equip generic1.ogg
|sound2=Equip generic2.ogg
|sound3=Equip generic3.ogg
|sound4=Equip generic4.ogg
|sound5=Equip generic5.ogg
|sound6=Equip generic6.ogg
|source=player
|description=When a carved pumpkin is equipped
|id=armor.equip_generic
|volume=1.0
|pitch=1.0
|foot=1}}
==Data values==
===ID===
{{edition|java}}:
{{ID table
|edition=java
|showforms=y
|generatetranslationkeys=y
|displayname=Skeleton Skull
|spritetype=block
|nameid=skeleton_skull}}
{{ID table
|displayname=Wither Skeleton Skull
|spritetype=block
|nameid=wither_skeleton_skull}}
{{ID table
|displayname=Zombie Head
|spritetype=block
|nameid=zombie_head}}
{{ID table
|displayname=Player Head
|spritetype=block
|nameid=player_head}}
{{ID table
|displayname=Creeper Head
|spritetype=block
|nameid=creeper_head}}
{{ID table
|displayname=Dragon Head
|spritetype=block
|nameid=dragon_head}}
{{ID table
|displayname=Piglin Head
|spritetype=block
|nameid=piglin_head}}
{{ID table
|displayname=Skeleton Wall Skull
|spritetype=block
|nameid=skeleton_wall_skull
|form=block}}
{{ID table
|displayname=Wither Skeleton Wall Skull
|spritetype=block
|nameid=wither_skeleton_wall_skull
|form=block}}
{{ID table
|displayname=Zombie Wall Head
|spritetype=block
|nameid=zombie_wall_head
|form=block}}
{{ID table
|displayname=Player Wall Head
|spritetype=block
|nameid=player_wall_head
|form=block}}
{{ID table
|displayname=Creeper Wall Head
|spritetype=block
|nameid=creeper_wall_head
|form=block}}
{{ID table
|displayname=Dragon Wall Head
|spritetype=block
|nameid=dragon_wall_head
|form=block}}
{{ID table
|displayname=Piglin Wall Head
|spritetype=block
|nameid=piglin_wall_head
|foot=1}}
{{ID table
|displayname=Block entity
|spritename=heads
|spritetype=block
|nameid=skull
|foot=1}}
{{edition|bedrock}}:
{{ID table
|edition=bedrock
|firstcolumnname=Head
|shownumericids=y
|showforms=y
|generatetranslationkeys=y
|displayname=Block
|spritename=skulls
|spritetype=block
|nameid=skull
|id=144
|form=block
|itemform=item.skull
|translationkey=-}}
{{ID table
|displayname=Item
|spritename=skulls
|spritetype=item
|nameid=skull
|id=516
|form=item
|translationkey=item.skull.skeleton.name, item.skull.wither.name, item.skull.zombie.name, item.skull.char.name, item.skull.creeper.name, item.skull.dragon.name, item.skull.piglin.name
|foot=1}}
{{ID table
|notnamespaced=y
|displayname=Block entity
|spritename=heads
|spritetype=block
|nameid=Skull
|foot=1}}
===Metadata===
{{see also|Data values}}
{{IN|bedrock}}, mob heads use the following data values:
{{/DV}}
===Item data===
{{el|java}}:
{{main|Player.dat format}}
Player heads use item NBT to save the owner.
<div class="treeview">
* {{nbt|compound|tag}}: The item's '''tag''' tag.
{{:Player.dat_format/Player Heads}}
</div>
{{el|bedrock}}:
:{{IN|bedrock}}, heads have no additional item tag.
:See [[Bedrock Edition level format/Item format]].
===Block states===
{{see also|Block states}}
{{/BS}}
===Block data===
A mob head has a block entity associated with it that holds additional data about the block.
{{el|java}}:
{{see also|Block entity format}}
{{/BE}}
{{el|bedrock}}:
:See [[Bedrock Edition level format/Block entity format]].
== Achievements==
{{load achievements|Camouflage;The Beginning?}}
==Advancements==
{{load advancements|Spooky Scary Skeleton;Withering Heights}}
==History==
''For a more in-depth breakdown of changes to textures and models, including a set of renders for each state combination, see [[/Asset history]]''
{{History|java}}
{{History||August 28, 2012|link={{tweet|jeb|240383066831462401}}|[[Jeb]] released images of the skeleton head, hinting of more types to come.}}
{{History||PAX 2012|link={{ytl|IqciEbjYd-I|t=03m21s}}|At [[wikipedia:PAX (event)|PAX]], [[Dinnerbone]] revealed that there would be rare [[drops]] of these [[mob]]s.<ref>http://www.twitch.tv/pax2/b/330745811 (at 3:59:00)</ref>}}
{{History||1.4.2|snap=12w36a|[[File:Skeleton Skull (item) JE1.png|32px]] [[File:Wither Skeleton Skull (item) JE1.png|32px]] [[File:Zombie Head (item) JE1.png|32px]] [[File:Player Head (item) JE1.png|32px]] [[File:Creeper Head (item) JE1.png|32px]] Added skeleton, wither skeleton, zombie, player, and creeper heads.
|Wither skeleton skulls are rarely [[drops|dropped]] by the [[wither skeleton]] upon [[death]] (2.5% chance), while the other four are obtainable only from the [[creative]] [[inventory]].}}
{{History|||snap=12w37a|[[File:Skeleton Skull (item) JE1 BE1.png|32px]] [[File:Wither Skeleton Skull (item) JE1 BE1.png|32px]] [[File:Zombie Head (item) JE1 BE1.png|32px]] [[File:Player Head (item) JE1 BE1.png|32px]] [[File:Creeper Head (item) JE1 BE1.png|32px]] Changed item textures.
|Added as a hidden and disabled feature, player heads can now have the [[skin]] of a specific [[player]]. A line in the language file implies that there either used to be, or in a future update, the possibility of obtaining a specific player's head.<ref name="en_US 12w21">Snapshot 12w37a {{cd|lang/en_US.lang}}: <code>item.skull.player.name=%s's Head</code></ref>
|Player heads do not [[drops|drop]] in vanilla, but mapmakers/modders/etc. can make them by adding an [[NBT format|NBT]] string tag <code>{"SkullOwner":"''player_name''"}</code> on the skull [[item]]s.<ref name="playerheads">{{reddit|zxn7u/its_apparently_my_cakeday_so_lets_cash_in_this}}</ref>}}
{{History||November 7, 2012|link=https://www.reddit.com/r/minecraftsuggestions/comments/12qtbz/killing_other_players_with_a_sword_should_drop/c6xqpym/?context=3|[[Jeb]] states that the official opinion is that "[dropping] player heads [on player kills] are a bit too gory for [[Minecraft]], so it's better suited for a plugin or mod."}}
{{History||1.4.6|snap=12w49a|Any kind of [[mob]] head can now be used to [[crafting|craft]] a [[firework star]] with [[creeper]]-face effect.}}
{{History||1.7.2|snap=13w36a|Custom heads can now be obtained without third party programs via {{cmd|give}}.}}
{{History||1.8|snap=14w03a|Player heads now show the [[skin]]'s hat layer (this also works when a [[mob]]/player wears the head).}}
{{History|||snap=14w29a|Heads now display a cracking animation.}}
{{History|||snap=14w30a|[[File:Skeleton Skull (item) JE2.png|32px]] [[File:Wither Skeleton Skull (item) JE2.png|32px]] [[File:Zombie Head (item) JE2.png|32px]] [[File:Player Head (item) JE2.png|32px]] [[File:Creeper Head (item) JE2.png|32px]] Player and mob heads in [[inventory|inventories]] and held by mobs/players now display as [[block]]s.
|Skulls worn by [[mob]]s and [[player]]s are now displayed on the armor layer. Previously, the skull replaced the mob/player's head texture; the hat layer appeared over the skull.
|Skeleton, zombie, and creeper heads are now available in [[survival]]. The player can obtain them by killing the appropriate mob with a charged [[creeper]].
|Creeper heads and wither skeleton skulls are now used in [[crafting]] specific [[banner]] patterns.}}
{{History|||snap=14w30b|A single charged creeper explosion no longer yields more than one [[mob]] head. The mob head that drops is chosen randomly.}}
{{History||1.8.4|snap=release|For security reasons, custom heads can now have textures only from [[mojang.com]] and [[minecraft.net]].}}
{{History||1.9|snap=15w31a|[[File:Dragon Head (8) JE2.png|32px]] Added dragon heads.
|Dragon heads are currently available only in [[creative]] mode.
|[[Mob]] heads now appear larger in the [[inventory]].}}
{{History|||snap=15w32a|Creeper, zombie, and skeleton heads can now be worn to reduce detection by the corresponding mobs by 50%.}}
{{History|||snap=15w32c|Dragon heads now generate on [[end ship]]s, meaning they are now obtainable in [[survival]].}}
{{History|||snap=15w33c|The disguise that is given by mob heads now reduces detection range to 37.5% of normal.}}
{{History|||snap=15w36a|The disguise that is given by mob heads now reduces detection range to 50% of normal again.}}
{{History|||snap=15w39a|[[Dispenser]]s can now equip mob heads onto [[player]]s, [[mob]]s and [[armor stand]]s.}}
{{History||1.13|snap=17w47a|The ID of heads have been split into 12; one of each available standard head, as well as a wall counterpart of each.
|<code>skeleton_skull</code>, <code>wither_skeleton_skull</code>, <code>player_head</code>, <code>zombie_head</code>, <code>creeper_head</code> and <code>dragon_head</code> are now available as [[item]]s and placed [[block]]s with a <code>rotation</code> block state of 0-15.
|<code>skeleton_wall_skull</code>, <code>wither_skeleton_wall_skull</code>, <code>player_wall_head</code>, <code>zombie_wall_head</code>, <code>creeper_wall_head</code> and <code>dragon_wall_head</code> are available only as placed blocks with a <code>facing</code> block state of north, south, east or west.
|Prior to [[1.13/Flattening|''The Flattening'']], this [[block]]'s numeral ID was 144, and the [[item]]'s 397.}}
{{History||1.19|snap=Deep Dark Experimental Snapshot 1|Skeleton skulls now generate as part of [[ancient cities]].}}
{{History||November 14, 2022|link=https://www.minecraft.net/en-us/article/playable-mob-sounds-coming-minecraft-1-20|Piglin heads are announced to be added in [[Java Edition 1.20]] on the Minecraft website.}}
{{History||1.19.3|snap=22w45a|[[File:Player Head (8) JE5.png|32px]] The texture of the player head has been changed.}}
{{History||1.20<br>(Experimental)|link=1.19.3|snap=22w46a|[[File:Piglin Head (8) JE1.png|32px]] Added piglin heads behind the [[Java Edition 1.20|Update 1.20 experimental datapack]].}}
{{History||1.20<br>(Experimental)|link=1.19.4|snap=23w03a|Heads can now be placed on top of note blocks without sneaking.}}
<!--
{{History||1.19.4|snap=23w05a|Heads can now be swapped by let [[helmet]]s {{ctrl|using}} in the hotbar.<ref>{{bug|MC-216270|||Fixed}}</ref>}}
{{History||?|Head can now be swapped in [[armor stand]]s by {{ctrl|using}} them/[[helmet]]s/[[carved pumpkin]]s in the armor stand's slot.}}
RE-ADD WHEN THE WORDING IS BETTER -->
{{History||1.20|snap=23w12a|Piglin heads are now available without using the "Update 1.20" experimental datapack.}}
{{History|pocket alpha}}
{{History||v0.12.1|snap=build 1|[[File:Skeleton Skull (item) JE1 BE1.png|32px]] [[File:Wither Skeleton Skull (item) JE1 BE1.png|32px]] [[File:Zombie Head (item) JE1 BE1.png|32px]] [[File:Player Head (item) JE1 BE1.png|32px]] [[File:Creeper Head (item) JE1 BE1.png|32px]] Added skeleton, wither skeleton, zombie, player, and creeper heads.
|The skeleton, wither skeleton, zombie, player and creeper heads use the [[Java Edition|Java]] textures prior to [[Java Edition 14w30a|14w30a]].}}
{{History||v0.14.0|snap=build 1|Mob heads can now be worn as armor.}}
{{History||v0.16.0|snap=build 4|Wither skeleton skulls can now be used to spawn the [[wither]].}}
{{History|pocket}}
{{History||1.0.0|snap=alpha 0.17.0.1|[[File:Dragon Head (item) BE1.png|32px]] Added dragon heads.
|Dragon heads use a two-dimensional sprite, unlike [[Java Edition|Java]] does.}}
{{History|bedrock}}
{{History||1.2.0|snap=beta 1.2.0.2|Mob heads can now be used to craft [[firework star]]s.
|Creeper heads and wither skeleton skulls are now used to [[crafting|craft]] specific patterns on [[banner]]s.}}
{{History|||snap=beta 1.2.0.11|[[File:Skeleton Skull (item) BE2.png|32px]] [[File:Wither Skeleton Skull (item) BE2.png|32px]] [[File:Zombie Head (item) BE2.png|32px]] [[File:Head (item) BE2.png|32px]] [[File:Creeper Head (item) BE2.png|32px]] [[File:Dragon Head (item) BE2.png|32px]] [[Player]] and [[mob]] heads in [[inventory|inventories]] and when held by mobs/players now display as [[block]]s.}}
{{History||1.10.0|snap=beta 1.10.0.3|Wither skeleton skulls and creeper heads can now be used to craft [[banner pattern]]s.}}
{{History||November 14, 2022|link=https://www.minecraft.net/en-us/article/playable-mob-sounds-coming-minecraft-1-20|Piglin heads are announced to be added in [[Bedrock Edition 1.20.0]] on the Minecraft website.}}
{{History||Next Major Update<br>(Experimental)|link=1.19.60|snap=beta 1.19.60.20|[[File:Piglin Head (item) BE1.png|32px]] Added piglin heads behind the "[[Bedrock Edition 1.20.0|Next Major Update]]" [[experimental]] toggle.}}
{{History|||snap=beta 1.19.60.25|Heads can now be placed on top of note blocks without sneaking.}}
{{History||1.20.0|snap=beta 1.20.0.21|Piglin heads are now available without using the "Next Major Update" experimental toggle.}}
{{History||1.20.40|snap=beta 1.20.40.20|Wither skeleton skulls now make their respective step sounds when played by a note block.}}
{{History|console}}
{{History||xbox=TU12|xbone=CU1|ps=1.0|wiiu=Patch 1|switch=1.0.1|[[File:Skeleton Skull (item) JE1 BE1.png|32px]] [[File:Wither Skeleton Skull (item) JE1 BE1.png|32px]] [[File:Zombie Head (item) JE1 BE1.png|32px]] [[File:Player Head (item) JE1 BE1.png|32px]] [[File:Creeper Head (item) JE1 BE1.png|32px]] Added skeleton, wither skeleton, zombie, player, and creeper heads to the [[creative inventory]].
|Wither skeleton skulls currently do not have a use.}}
{{History||xbox=TU19|xbone=CU7|ps=1.12|Wither skeleton skulls can now be obtained by killing [[wither skeleton]]s.
|Wither skeleton skulls can now be used to build the [[wither]].}}
{{History||xbox=TU31|xbone=CU19|ps=1.22|wiiu=Patch 3|Skeleton, zombie, and creeper heads are now available in [[survival]]. The [[player]] can obtain them by killing the appropriate [[mob]] with a charged [[creeper]].}}
{{History||xbox=TU46|xbone=CU36|ps=1.38|wiiu=Patch 15|[[File:Dragon Head (item) JE1.png|32px]] Added dragon heads.}}
{{History|new 3ds}}
{{History||0.1.0|[[File:Skeleton Skull (item) JE1 BE1.png|32px]] [[File:Wither Skeleton Skull (item) JE1 BE1.png|32px]] [[File:Zombie Head (item) JE1 BE1.png|32px]] [[File:Player Head (item) JE1 BE1.png|32px]] [[File:Creeper Head (item) JE1 BE1.png|32px]] Added skeleton, wither skeleton, zombie, player, and creeper heads.}}
{{History||1.7.10|[[File:Dragon Head (item) BE1.png|32px]] Added dragon heads.}}
{{History|foot}}
===Skull "item"===
{{:Technical blocks/Skull}}
==Issues==
{{issue list}}
== Trivia==
* Despite there being a default Steve head, heads for the other protagonist skins cannot be obtained without using custom names.
*{{IN|be}}, the skull variant for the item is stored under the {{cd|damage}} component, normally used for items with [[durability]].
*The head item's model when wore on a player is slightly larger than its placed block counterpart in the world, which in turn is also slightly larger than the actual player's head. Therefore, a player who wears their own head appears with a larger head.
==Gallery==
===Renders===
<gallery>
Steve wearing Skeleton Skull.png|
Steve wearing Wither Skeleton Skull.png|
Steve wearing Creeper Head.png|
Steve wearing Zombie Head.png|
Steve wearing Dragon Head.png|
Alex wearing Skeleton Skull.png|
Alex wearing Wither Skeleton Skull.png|
Alex wearing Creeper Head.png|
Alex wearing Zombie Head.png|
Alex wearing Dragon Head.png|
Dragon Head.gif|An animation of the dragon head when redstone power is supplied.
</gallery>
===Screenshots===
<gallery>
All The Heads.png|All of the heads.
Headsrotation.png|Heads oriented in different directions.
HeadsOnAFence.png|Heads are the same scale as [[cobblestone wall]] posts.
Playerheads.png|A picture of player heads, including some Mojang characters.
EndShipBow.png|A dragon head found at the bow of an end ship.
</gallery>
====Development====
<gallery>
1st image Mob Head.png|First screenshot released of heads.
Minecart with chest and head thing.png|Notch's head in a [[minecart with chest]].
PauseUnpause's Head 1.png|First image of held heads rendering as blocks.
PauseUnpause's Head 2.png|Second image of held heads rendering as blocks.
Pocket Edition Heads.jpg|First image of a head being worn in bedrock edition.
1.16 Dev failed head holding.jpg|First attempt to fix {{bug|MC-91869}} by [[Xilefian]].
1.16 Dev failed head holding 2.jpg|Second attempt.
</gallery>
===In other media===
<gallery>
Efe Looking at Makena Napping on a Note Block.jpg|[[Efe]] looking at [[Makena]] napping on a Note block
Efe Placing a Zombie Head on a Note Block.jpg|Efe placing a zombie head sneakily on the note block.
Makena Waking up Startled by the Zombie Noise.jpg|Makena waking up startled at the sound of zombies being played on the note block.
File:Piglin Head Animation.jpg|[[Sunny]] using a piglin head to make noise in a [[Crimson Forest]].<ref>https://www.instagram.com/p/Ct7CfOBplrG/</ref>
</gallery>
==References==
{{reflist}}
{{blocks|Utility}}
{{items}}
[[Category:Utility blocks]]
[[Category:Manufactured blocks]]
[[Category:Generated structure blocks]]
[[Category:Block entities]]
[[Category:Non-solid blocks]]
[[cs:Hlava]]
[[de:Kopf]]
[[es:Cabeza]]
[[fr:Tête]]
[[hu:Mob fejek]]
[[it:Testa di creatura]]
[[ja:Mobの頭]]
[[ko:몹 머리]]
[[nl:Wezenhoofd]]
[[pl:Głowa]]
[[pt:Cabeça de criatura]]
[[ru:Голова]]
[[uk:Голова]]
[[zh:生物头颅]]</li></ul></nowiki> | ? | The player's spawn point is now bound to a specific biome rather than to any sand block (when this was first the case is unknown). The player can spawn in forest, swamp and taiga biomes. | |||
| Java Edition | |||||
1.0{{Extension DPL}}<ul><li>[[Bookshelf|Bookshelf]]<br/>{{About|the bookshelf used with an enchanting table|the bookshelf that can hold books|Chiseled Bookshelf}}
{{Block
|image=Bookshelf.png
|transparent=No
|light=No
|tool=Axe
|renewable=Yes
|stackable=Yes (64)
|flammable=Yes (30)
|lavasusceptible=Yes
}}
'''Bookshelves''' are [[blocks]] that improve [[enchanting|enchantments]] applied with an [[enchanting table]] when placed around one, up to a maximum of fifteen bookshelves, at the expense of [[Enchanting/Levels|level]] requirement.
== Obtaining ==
=== Natural generation ===
Bookshelves can generate in village libraries and sometimes village houses.
[[Stronghold]]s may contain up to two libraries, each of which may be single-level or have an upper balcony. These feature some bookshelves arranged in pillars, and more bookshelves arranged in pillars in the walls. Single-level libraries contain 161 bookshelves, while libraries with balconies contain 233.
Bookshelves also naturally generate in certain [[woodland mansion]] rooms.
=== Breaking ===
Bookshelves can be broken fairly easily by hand, but can be broken faster by using an [[axe]]. In either case, they drop 3 books when broken, allowing the reconstruction of the bookshelf with the addition of six wood planks. When broken by an item that is [[enchanted]] with [[Silk Touch]], a bookshelf drops itself.
{{breaking row|horizontal=1|Bookshelf|Axe}}
=== Crafting ===
{{Crafting
|A1=Any Planks
|B1=Any Planks
|C1=Any Planks
|A2=Book
|B2=Book
|C2=Book
|A3=Any Planks
|B3=Any Planks
|C3=Any Planks
|Output=Bookshelf
|type=Building block
}}
=== Trading ===
Novice-level librarian [[Villager|villagers]] have a 50% chance to sell 1 bookshelf for 9 [[Emerald|emeralds]] as part of their trades.{{only|bedrock}}
Novice-level librarian villagers have a {{frac|2|3}} chance to sell 1 bookshelf for 9 emeralds.{{only|java}}
== Usage ==
=== Enchanting ===
{{main|Enchantment mechanics#Bookshelf placement}}
If an [[enchanting table]] is placed near a bookshelf, glyph [[particles]] fly from the bookshelf toward the enchanting table. Having bookshelves in the proper position near the table allows the table to apply higher-level enchantments.
=== Crafting ingredient ===
{{crafting usage}}
=== Fuel ===
Bookshelves can be used as a [[fuel]] in [[furnace]]s, smelting 1.5 items per block.
=== Villager ===
Librarian [[villager]]s can interact with bookshelves.
=== Note Blocks ===
Bookshelf can be placed under [[note block]]s to produce "bass" sounds.
== Sounds ==
{{Sound table/Block/Wood}}
== Data values ==
=== ID ===
{{edition|java}}:
{{ID table
|edition=java
|showforms=y
|generatetranslationkeys=y
|displayname=Bookshelf
|spritetype=block
|nameid=bookshelf
|showblocktags=y|blocktags=mineable/axe
|foot=1}}
{{edition|bedrock}}:
{{ID table
|edition=bedrock
|shownumericids=y
|showforms=y
|generatetranslationkeys=y
|displayname=Bookshelf
|spritetype=block
|nameid=bookshelf
|id=47
|foot=1}}
== Achievements ==
{{load achievements|Librarian}}
== History ==
{{History|java classic}}
{{History||October 24, 2009|link=https://notch.tumblr.com/post/221308991/the-new-block-types-and-new-graphics-for-the-gold|Bookshelves were teased by [[Notch]].}}
{{History||0.26 SURVIVAL TEST|[[File:Bookshelf JE1.png|32px]] Added bookshelves.
|Bookshelves are currently impossible to obtain without loading a pre-edited map.
|Bookshelves are currently destroyed in [[explosion]]s.
|When bookshelves are broken, they currently do not drop anything.}}
{{History||0.28|Bookshelves can now be freely placed.}}
{{History|java alpha}}
{{History||v1.0.11|Bookshelves can now be [[crafting|crafted]] from 3 [[book]]s and 6 [[planks]].}}
{{History|java beta}}
{{History||1.8|snap=Pre-release|Bookshelves can now be found generated in libraries in [[village]]s, and libraries in [[stronghold]]s.}}
{{History|java}}
{{History||1.0.0|snap=Beta 1.9 Prerelease 3|Bookshelves now drop 3 [[book]]s when broken by a non-[[Silk Touch]] [[item]].
|They are now necessary to [[enchanting|enchant]] with higher levels for better enchanted items.
|The number of bookshelves required to reach the maximum enchantment level is 30.}}
{{History|||snap=Beta 1.9 Prerelease 5|[[File:Bookshelf JE2 BE1.png|32px]] The top texture of bookshelves have now been updated as a result of the [[planks]] texture update.}}
{{History||1.2.4|snap=release|[[Spruce planks]], [[birch planks]], and [[jungle planks]] can now be used to craft bookshelves.}}
{{History||1.3.1|snap=12w21a|Librarian [[villager]]s now [[trading|sell]] 1 bookshelf for 3 [[emerald]]s.}}
{{History|||snap=12w22a|The number of bookshelves required to reach the maximum enchantment level has been now decreased to 15.}}
{{History||1.7.2|snap=1.7.1|[[Acacia planks]] and [[dark oak planks]] can now be used to craft bookshelves.}}
{{History||1.8|snap=14w02a|Librarian villagers now sell 1 bookshelf for 3–4 [[emerald]]s.}}
{{History||1.11|snap=16w39a|Bookshelves now generate in [[woodland mansion]]s.}}
{{History||1.13|snap=17w47a|Prior to [[1.13/Flattening|''The Flattening'']], this [[block]]'s numeral ID was 47.}}
{{History||1.14|snap=18w43a|[[File:Bookshelf JE3.png|32px]] The texture of bookshelves has now been changed.}}
{{History|||snap=18w47a|[[File:Bookshelf JE4 BE2.png|32px]] The texture of bookshelves has now been changed, once again.}}
{{History|||snap=19w02a|Bookshelves can now be used to craft [[lectern]]s.}}
{{History||1.16|snap=20w06a|[[Crimson planks]] and [[warped planks]] can now be used to craft bookshelves.}}
{{History||1.19|snap=22w11a|[[Mangrove planks]] can now be used to craft bookshelves.}}
{{History|pocket alpha}}
{{History||v0.2.1|[[File:Bookshelf JE2 BE1.png|32px]] Added bookshelves.|Bookshelves are currently obtainable only in [[Creative]] mode.}}
{{History||v0.3.0|Bookshelves are now obtainable in [[Survival]] mode.}}
{{History||v0.9.0|snap=build 1|Bookshelves now naturally spawn in [[stronghold]]s and [[village]]s.}}
{{History||v0.12.1|snap=build 1|Bookshelves can now be used to increase [[enchantment table]] levels.|Bookshelves can now be obtained by using a [[tool]] with the [[Silk Touch]] enchantment.}}
{{History|pocket}}
{{History||1.0.4|snap=alpha 1.0.4.0|Librarian [[villager]]s now [[trading|sell]] 1 bookshelf for 3-4 [[emerald]]s as their second tier trade.}}
{{History||1.1.0|snap=alpha 1.1.0.0|Bookshelves now generate in [[woodland mansion]]s.}}
{{History|bedrock}}
{{History||1.10.0|snap=beta 1.10.0.3|Bookshelves can now be used to craft [[lectern]]s.|Bookshelves now get inspected by librarian [[villager]]s.|[[File:Bookshelf JE4 BE2.png|32px]] The texture of bookshelves has been changed.}}
{{History||1.11.0|snap=beta 1.11.0.4|[[Trading]] has now been changed, librarian villagers now have a 50% chance to sell a bookshelf for 6 [[emerald]]s as part of their first trade.}}
{{History|console}}
{{History||xbox=TU1|xbone=CU1|ps=1.00|wiiu=Patch 1|switch=1.0.1|[[File:Bookshelf JE2 BE1.png|32px]] Added bookshelves. Whether they actually used this texture is unknown.}}
{{History||xbox=none|xbone=none|ps=1.90|wiiu=none|switch=none|[[File:Bookshelf JE4 BE2.png|32px]] The texture of bookshelves has been changed.}}
{{History|new 3ds}}
{{History||0.1.0|[[File:Bookshelf JE2 BE1.png|32px]] Added bookshelves.}}
{{History|foot}}
== Issues ==
{{Issue list}}
== Trivia ==
* Bookshelves' top and bottom textures by default use the same texture as [[oak planks]].
* It takes 90 planks, 45 [[leather]] and 135 [[paper]] to make 15 bookshelves in order to get a level 30 [[enchantment]].
* A bookshelf is the icon for [[Education Edition]].
== Gallery ==
<gallery>
File:Library in Village.png|Naturally occurring bookshelves in a [[village]]. (Before Village & Pillage).
File:Large Stronghold Library.png|Naturally occurring bookshelves in a [[stronghold]].
File:Achievement get! Trading emeralds for bookshelves.png|Bookshelves obtained by [[trading]] with a [[villager]].
File:Enchanting-Table.png|Bookshelves powering an [[enchanting table]].
</gallery>
== References ==
{{Reflist}}
== External Links ==
*[https://www.minecraft.net/en-us/article/block-week-bookshelf Block of the Week: Bookshelf] – Minecraft.net on December 16, 2016
{{Blocks|Building}}
[[Category:Manufactured blocks]]
[[Category:Natural blocks]]
[[Category:Generated structure blocks]]
[[Category:Utility blocks]]
[[Category:Bedrock Edition]]
[[Category:Java Edition]]
[[Category:Items]]
[[Category:Flammable blocks]]
[[cs:Knihovna]]
[[de:Bücherregal]]
[[es:Librería]]
[[fr:Bibliothèque]]
[[hu:Könyvespolc]]
[[it:Libreria]]
[[ja:本棚]]
[[ko:책장]]
[[nl:Boekenkast]]
[[pl:Biblioteczka]]
[[pt:Estante de livros]]
[[ru:Книжные полки]]
[[th:ชั้นหนังสือ]]
[[uk:Книжкова полиця]]
[[zh:书架]]</li><li>[[Banner|Banner]]<br/>{{for|the image|Banner (image)}}
{{Block
| image = <gallery>
White Banner.gif | Banner
White Wall Banner.png | Wall Banner
</gallery>
| rarity = Common
| transparent = Yes
| light = No
| tool = axe
| renewable = Yes
| stackable = Yes (16)
| flammable = No
| lavasusceptible = Yes
}}
'''Banners''' are tall decorative [[blocks]], featuring a field that is highly customizable using [[dye]]s and [[banner pattern]]s.
== Obtaining ==
=== Breaking ===
Banners can be broken with or without a [[tool]], but an [[axe]] is fastest.
{{breaking row|horizontal=1|Banners|Axe}}
A banner also breaks and drops itself as an [[Item (entity)|item]] if the block the banner is attached to is moved, removed, or destroyed.
=== Natural generation ===
{| class="wikitable collapsible"
! Name !! Location !! Appearance !! Design
|-
! Magenta Banner
| Outside of [[end cities]].
| style="text-align: center" | [[File:End City Banner.png|32px]]
| Magenta Banner
* Black Inverted Chevron
* Black Chevron
|-
! Gray Banner
| In banner room in [[woodland mansion]]s.
| style="text-align: center" | [[File:Gray Banner.png|32px]]
| Gray Banner
|-
! Light Gray Banner
| In master bedroom in [[woodland mansion]]s.
| style="text-align: center" | [[File:Master Bedroom Banner.png|32px]]
| Light Gray Banner
* White Flower Charge
|- id="Ominous Banner"
! Ominous Banner{{only|java|short=1}}
Illager Banner{{only|bedrock|education|short=1}}
| Carried by [[raid captain]]s.<br> Located in [[pillager outpost]]s.
{{IN|java}}, the ominous banner cannot be crafted or copied because the design uses 8 patterns.
{{IN|bedrock}}, the illager banner is a separate type that cannot be placed in a loom.
| style="text-align: center" | [[File:Ominous Banner.png|32px]]<br/>[[File:Ominous Banner BE.png|32px]]
| White Banner{{only|java|short=1}}
* Cyan Lozenge
* Light Gray Base
* Gray Pale
* Light Gray Bordure
* Black Fess
* Light Gray Per Fess
* Light Gray Roundel
* Black Bordure
Separate type entirely{{only|bedrock|short=1}}
|-
! Brown Banner
| Outside of some houses, meeting points, and pillar fountains in savanna [[village]]s.
| style="text-align: center" | [[File:Brown Banner.png|32px]]
| Brown Banner
|-
! Black Banner
| In altar room in [[woodland mansions]].
| style="text-align: center" | [[File:Black Banner.png|32px]]
| Black Banner
|}
=== Crafting ===
Banners can be crafted from six [[wool]] and a [[stick]] in a pattern resembling a [[sign]].
{{Crafting
|head=1
|showdescription=1
|A1=Matching Wool |B1=Matching Wool |C1=Matching Wool
|A2=Matching Wool |B2=Matching Wool |C2=Matching Wool
|B3=Stick
|Output=Matching Banner
|Olink=Banner
|type=Decoration block
|description=Once the banner is crafted, its base color cannot be changed.{{only|java}}
}}
{{Crafting
|showdescription=1
|Any Banner
|Bleach
|Output=White Banner
|type=Decoration block
|description=Bleach can be used to remove the color of a banner, resulting in a white banner. This includes removing patterns from a white banner.{{only|bedrock|education}}
|foot=1
}}
=== Trading ===
Expert-level cartographer [[villager]]s always offer to [[trading|sell]] 1 or 2 blank banners of a random color for 3 [[emeralds]]. Expert-level shepherd villagers have a {{frac|2|7}} chance of offering the same trade.{{only|java}}
{{IN|bedrock}}, expert-level cartographer and shepherd villagers both offer to sell one of 16 blank banners for 3 emeralds as part of their trades.
=== Mob loot ===
[[Illager]]s that spawn carrying an ominous banner{{only|java|short=1}} / illager banner{{only|bedrock|education|short=1}} always drop it upon death.
== Usage ==
[[File:Standing banner with block.png|thumb|upright|Overlapping block on a banner.]]
[[File:Wall banner with block.png|thumb|upright|Overlapping on a wall mounted banner.]]
There are 16 colored blank banners, and numerous patterns each available in each of the 16 colors. A banner can feature up to 6 different patterns. The top layer of a banner (or the last pattern added) can be washed off by {{control|using}} it on a [[cauldron]] containing water.
Banners, much like signs, can be placed both on the ground facing in any direction, or on a wall. They gently sway as if affected by a breeze, regardless of dimension or location.
Banners have no collision mask as they are completely non-solid, so [[entities]] can move through them.
Other blocks (including other banners) can be placed on any edge of a banner's hitbox, which is only one block high despite the banner appearing as two blocks tall. This makes it possible to overlap another solid block on the top half of a banner for floor banners, or the bottom half of wall banners.
When a banner is placed on the side of a block, its position is set by the top block, and it is possible to place it so it appears half buried.
Banners can also be placed in [[item frame]]s, where they simply appear as their item model.
[[Water]] and [[lava]] flow around banners. {{IN|bedrock}}, banners can be [[waterlogged]].
<gallery>
File:Wall banner with water below.png| Water can be placed below wall banners
File:Water flowing around banner.png| Water flows around a banner on the ground
</gallery>
Lava can create [[fire]] in air blocks next to banners as if the banners were flammable, but the banners do not burn (and cannot be burned by other methods). Banners also cannot be moved by [[piston]]s.
If a banner is renamed on an [[anvil]], it retains its name when a pattern is added, but not when a pattern is removed.
=== Helmet ===
{{exclusive|java|section=13}}
While a banner cannot be equipped in the [[Helmet|head slot]] in [[Survival]] mode, equipping it using commands causes it to appear on top of the player. This is how [[raid captain]]s wear banners{{only|java|short=1}}.
=== Chestplate ===
{{exclusive|bedrock|section=13}}
While a banner cannot be equipped in the [[chestplate]] slot in Survival mode, equipping it using NBT editors causes it to appear on top of the player. This is how [[raid captain]]s wear banners{{only|bedrock|education|short=1}}.
<gallery>
Steve wearing White Banner.png|
Alex wearing White Banner.png|
Pillager with Ominous Banner.png|
Vindicator with Ominous Banner.png|
Evoker with Ominous Banner.png|Illusioner with Ominous Banner.png|
</gallery>
=== Crafting ingredient ===
[[Shield]]s can have patterns applied to them using banners. The shield pattern has a smaller resolution than the banner pattern, causing them to look different or offset. Banners that have more than six patterns, such as Ominous Banners or banners obtained through inventory editors, will be reduced to six patterns on the shield.
{{Crafting
|showdescription=1
|Shield
|Matching Banner; Ominous Banner
|Output=Matching Shield; Ominous Shield
|B2link=Banner
|type=Combat
|description=Applies the banner pattern to the shield. The banner is consumed.<br>The shield must have no pre-existing patterns.<br>Does not change existing durability or enchantments on the shield.
}}
=== Copying ===
Banners can be copied with a blank banner to make multiple identical banners. Banners with more than 6 patterns applied using commands cannot be copied in this manner.
{{Crafting
|showdescription=1
|Matching Banner
|Matching Banner
|Output=Matching Banner
|A2link=Banner
|B2link=Banner
|Olink=Banner
|type=Decoration block
|ignoreusage=1
|description=Copies pattern; both banners must have the same base color, and the one having a pattern copied onto it must have no preexisting pattern.
}}
=== Map marker ===
[[File:Banner marked map.png|alt=All banners marked on a map, alongside a named banner.|thumb|right|How every banner appears {{IN|java}} on a map, including named banners.]]
{{exclusive|java|section=13}}
{{IN|java}}, {{control|using}} on a standing banner with a [[map]] selected places a marker of the banner's position on the selected map, and {{control|using}} on the banner again removes the marker. Note that wall banners cannot serve as map markers. The marker has the same color as the banner's base without decorations. The marker is removed if the banner is destroyed unless the map is locked using a [[cartography table]]. If the banner is renamed, the name appears below the marker.
=== Patterns ===
{{see also|Banner/Patterns|title1=List of patterned banners}}
[[File:Spawned-in Banner.png|thumb|100px|Example of a banner with more than 6 patterns, a result of using the {{cmd|give}} command.]]
A banner may have up to six layers of patterns, which are overlaid with the last-crafted on top. A banner can have up to 16 layers of patterns with the use of commands. The total number of unique banners is approximately 2.3x10^16 (or 23 quadrillion).
Any color banner can be used; the pattern overlays the color. {{IN|java}}, a [[loom]] is used to make patterns. However, {{in|bedrock}}, the patterns can be made in a [[loom]] or a [[crafting table]].
A banner can have more than six layers of patterns through the commands <code>/[[Commands/give|give]]</code>, <code>/[[Commands/setblock|setblock]]</code> or <code>/[[Commands/fill|fill]]</code>. This only works in ''Java Edition'', as Bedrock Edition doesn't have any NBT commands. Here is an example of a mining banner with seven different patterns. There is specific codes for the [[Banner#Item data:~:text=white-,Item,-In Java Edition|colors]] and [[Banner/Patterns|patterns]] that you have to input.
<code><nowiki>/give @p white_banner{display:{Name:"\"Mining Industries Banner\""},BlockEntityTag:{Patterns:[{Pattern:"cr",Color:15},{Pattern:"bs",Color:15},{Pattern:"sc",Color:12},{Pattern:"ms",Color:0},{Pattern:"hh",Color:15},{Pattern:"bo",Color:15},{Pattern:"tts",Color:8}]}} 1</code>
{{LoadPage|Template:Banner pattern loom recipes|Loom recipes|h4}}
{{LoadPage|Banner/Banner pattern crafting recipes|Crafting recipes|h4|transcluded=1}}
=== Renaming ===
{{IN|java}}, a banner can be given a custom name that remains as the banner is placed and retrieved. The player can use an [[anvil]] to rename the banner item, or may change the <code>CustomName</code> tag using the {{cmd|data}} command on the banner block.
=== Fuel ===
Banners can be used as a fuel in [[furnace]]s, smelting 1.5 items per banner.
=== Note Blocks ===
Banners can be placed under [[note block]]s to produce "bass" sounds.
== Sounds ==
=== Generic ===
{{Sound table/Block/Wood}}
=== Unique ===
{{edition|java}}: ''None''
{{edition|bedrock}}:
{{Sound table
|type=bedrock
|sound=Water Splash Old.ogg
|source=block
|description=When all patterns are removed from a banner using a cauldron
|id=cauldron.cleanbanner
|volume=0.1
|pitch=1.0
|foot=1}}
== Data values ==
=== ID ===
{{edition|java}}:
{{ID table
|edition=java
|showblocktags=y
|showitemtags=y
|showforms=y
|generatetranslationkeys=y
|displayname=White Banner
|spritetype=block
|nameid=white_banner
|blocktags=banners, wall_post_override
|itemtags=banners
|translationkey=block.minecraft.white_banner,block.minecraft.ominous_banner
}}
{{ID table
|displayname=Orange Banner
|spritetype=block
|nameid=orange_banner
|blocktags=banners, wall_post_override
|itemtags=banners}}
{{ID table
|displayname=Magenta Banner
|spritetype=block
|nameid=magenta_banner
|blocktags=banners, wall_post_override
|itemtags=banners}}
{{ID table
|displayname=Light Blue Banner
|spritetype=block
|nameid=light_blue_banner
|blocktags=banners, wall_post_override
|itemtags=banners}}
{{ID table
|displayname=Yellow Banner
|spritetype=block
|nameid=yellow_banner
|blocktags=banners, wall_post_override
|itemtags=banners}}
{{ID table
|displayname=Lime Banner
|spritetype=block
|nameid=lime_banner
|blocktags=banners, wall_post_override
|itemtags=banners}}
{{ID table
|displayname=Pink Banner
|spritetype=block
|nameid=pink_banner
|blocktags=banners, wall_post_override
|itemtags=banners}}
{{ID table
|displayname=Gray Banner
|spritetype=block
|nameid=gray_banner
|blocktags=banners, wall_post_override
|itemtags=banners}}
{{ID table
|displayname=Light Gray Banner
|spritetype=block
|nameid=light_gray_banner
|blocktags=banners, wall_post_override
|itemtags=banners}}
{{ID table
|displayname=Cyan Banner
|spritetype=block
|nameid=cyan_banner
|blocktags=banners, wall_post_override
|itemtags=banners}}
{{ID table
|displayname=Purple Banner
|spritetype=block
|nameid=purple_banner
|blocktags=banners, wall_post_override
|itemtags=banners}}
{{ID table
|displayname=Blue Banner
|spritetype=block
|nameid=blue_banner
|blocktags=banners, wall_post_override
|itemtags=banners}}
{{ID table
|displayname=Brown Banner
|spritetype=block
|nameid=brown_banner
|blocktags=banners, wall_post_override
|itemtags=banners}}
{{ID table
|displayname=Green Banner
|spritetype=block
|nameid=green_banner
|blocktags=banners, wall_post_override
|itemtags=banners}}
{{ID table
|displayname=Red Banner
|spritetype=block
|nameid=red_banner
|blocktags=banners, wall_post_override
|itemtags=banners}}
{{ID table
|displayname=Black Banner
|spritetype=block
|nameid=black_banner
|blocktags=banners, wall_post_override
|itemtags=banners}}
{{ID table
|displayname=White Wall Banner
|spritetype=block
|nameid=white_wall_banner
|blocktags=banners, wall_post_override
|form=block
|translationkey=block.minecraft.white_banner,block.minecraft.ominous_banner}}
{{ID table
|displayname=Orange Wall Banner
|spritetype=block
|nameid=orange_wall_banner
|blocktags=banners, wall_post_override
|form=block
|translationkey=block.minecraft.orange_banner}}
{{ID table
|displayname=Magenta Wall Banner
|spritetype=block
|nameid=magenta_wall_banner
|blocktags=banners, wall_post_override
|form=block
|translationkey=block.minecraft.magenta_banner}}
{{ID table
|displayname=Light Blue Wall Banner
|spritetype=block
|nameid=light_blue_wall_banner
|blocktags=banners, wall_post_override
|form=block
|translationkey=block.minecraft.light_blue_banner}}
{{ID table
|displayname=Yellow Wall Banner
|spritetype=block
|nameid=yellow_wall_banner
|blocktags=banners, wall_post_override
|form=block
|translationkey=block.minecraft.yellow_banner}}
{{ID table
|displayname=Lime Wall Banner
|spritetype=block
|nameid=lime_wall_banner
|blocktags=banners, wall_post_override
|form=block
|translationkey=block.minecraft.lime_banner}}
{{ID table
|displayname=Pink Wall Banner
|spritetype=block
|nameid=pink_wall_banner
|blocktags=banners, wall_post_override
|form=block
|translationkey=block.minecraft.pink_banner}}
{{ID table
|displayname=Gray Wall Banner
|spritetype=block
|nameid=gray_wall_banner
|blocktags=banners, wall_post_override
|form=block
|translationkey=block.minecraft.gray_banner}}
{{ID table
|displayname=Light Gray Wall Banner
|spritetype=block
|nameid=light_gray_wall_banner
|blocktags=banners, wall_post_override
|form=block
|translationkey=block.minecraft.light_gray_banner}}
{{ID table
|displayname=Cyan Wall Banner
|spritetype=block
|nameid=cyan_wall_banner
|blocktags=banners, wall_post_override
|form=block
|translationkey=block.minecraft.cyan_banner}}
{{ID table
|displayname=Purple Wall Banner
|spritetype=block
|nameid=purple_wall_banner
|blocktags=banners, wall_post_override
|form=block
|translationkey=block.minecraft.purple_banner}}
{{ID table
|displayname=Blue Wall Banner
|spritetype=block
|nameid=blue_wall_banner
|blocktags=banners, wall_post_override
|form=block
|translationkey=block.minecraft.blue_banner}}
{{ID table
|displayname=Brown Wall Banner
|spritetype=block
|nameid=brown_wall_banner
|blocktags=banners, wall_post_override
|form=block
|translationkey=block.minecraft.brown_banner}}
{{ID table
|displayname=Green Wall Banner
|spritetype=block
|nameid=green_wall_banner
|blocktags=banners, wall_post_override
|form=block
|translationkey=block.minecraft.green_banner}}
{{ID table
|displayname=Red Wall Banner
|spritetype=block
|nameid=red_wall_banner
|blocktags=banners, wall_post_override
|form=block
|translationkey=block.minecraft.red_banner}}
{{ID table
|displayname=Black Wall Banner
|spritetype=block
|nameid=black_wall_banner
|blocktags=banners, wall_post_override
|form=block
|translationkey=block.minecraft.black_banner
|foot=1}}
{{ID table
|displayname=Block entity
|spritename=Banners
|spritetype=block
|nameid=banner
|foot=1}}
{{edition|bedrock}}:
{{ID table
|edition=bedrock
|firstcolumnname=Banner
|shownumericids=y
|showforms=y
|generatetranslationkeys=y
|displayname=Standing
|spritename=Banners
|spritetype=block
|nameid=standing_banner
|translationkey=tile.standing_banner.black.name, tile.standing_banner.red.name, tile.standing_banner.green.name, tile.standing_banner.brown.name, tile.standing_banner.blue.name, tile.standing_banner.purple.name, tile.standing_banner.cyan.name, tile.standing_banner.silver.name, tile.standing_banner.gray.name, tile.standing_banner.pink.name, tile.standing_banner.lime.name, tile.standing_banner.yellow.name, tile.standing_banner.lightBlue.name, tile.standing_banner.magenta.name, tile.standing_banner.orange.name, tile.standing_banner.white.name
|id=176
|form=block}}
{{ID table
|displayname=Wall
|spritename=Banners
|spritetype=block
|nameid=wall_banner
|id=177
|form=block
|translationkey=-}}
{{ID table
|displayname=Item
|spritename=Banners
|spritetype=item
|nameid=banner
|translationkey=item.banner.black.name, item.banner.red.name, item.banner.green.name, item.banner.brown.name, item.banner.blue.name, item.banner.purple.name, item.banner.cyan.name, item.banner.silver.name, item.banner.gray.name, item.banner.pink.name, item.banner.lime.name, item.banner.yellow.name, item.banner.lightBlue.name, item.banner.magenta.name, item.banner.orange.name, item.banner.white.name
|id=567
|form=item
|foot=1}}
{{ID table
|notnamespaced=y
|displayname=Block entity
|spritename=Banners
|spritetype=block
|nameid=Banner
|foot=1}}
=== Metadata ===
==== Item ====
{{IN|Bedrock}}, banner items use the following data values:
{| class="wikitable"
! DV !! Banner color
|-
|| 0 || black
|-
|| 1 || red
|-
|| 2 || green
|-
|| 3 || brown
|-
|| 4 || blue
|-
|| 5 || purple
|-
|| 6 || cyan
|-
|| 7 || light gray
|-
|| 8 || gray
|-
|| 9 || pink
|-
|| 10 || lime
|-
|| 11 || yellow
|-
|| 12 || light blue
|-
|| 13 || magenta
|-
|| 14 || orange
|-
|| 15 || white
|}
=== Item ===
{{IN|Java}}, banner items use the following data values:
{| class="wikitable"
! DV !! Banner color
|-
|| 15 || black
|-
|| 14 || red
|-
|| 13 || green
|-
|| 12 || brown
|-
|| 11 || blue
|-
|| 10 || purple
|-
|| 9 || cyan
|-
|| 8 || light gray
|-
|| 7 || gray
|-
|| 6 || pink
|-
|| 5 || lime
|-
|| 4 || yellow
|-
|| 3 || light blue
|-
|| 2 || magenta
|-
|| 1 || orange
|-
|| 0 || white
|}
=== Block states ===
{{see also|Block states}}
{{/BS}}
=== Block data ===
A banner has a block entity associated with it that holds additional data about the block.
{{el|bedrock}}:
: See [[Bedrock Edition level format/Block entity format]].
{{el|java}}:
{{see also|Block entity format}}
{{/BE}}
=== Item data ===
{{el|java}}:
{{main|Player.dat format}}
Banners, as items, use an NBT tag <code>BlockEntityTag</code> to indicate the patterns and details when it is placed.
<div class="treeview" style="margin-top: 0;">
* {{nbt|compound|Item}}: The item
** {{nbt|compound|tag}}: Additional information about the item. This tag is optional for most items.
*** {{nbt|compound|BlockEntityTag}}: The details of the shulker box.
**** All block data, except tags common to all block entities.
</div>
{{el|bedrock}}:
: See [[Bedrock Edition level format/Item format]].
== Achievements ==
{{load achievements|Fruit on the Loom}}
== Advancements ==
{{load advancements|Voluntary Exile}}
== History ==
{{info needed section|The Nether Update}}
{{History|java}}
{{History||1.8|snap=July 21, 2014|slink=https://twitter.com/jeb_/status/491238882789572608|[[Jeb]] posted a picture of banners, and stated that he is working on them.}}
{{History|||snap=14w30a|[[File:White Banner Revision 1.png|22px]][[File:Light Gray Banner Revision 1.png|22px]][[File:Gray Banner Revision 1.png|22px]][[File:Black Banner Revision 1.png|22px]][[File:Brown Banner Revision 1.png|22px]][[File:Red Banner Revision 1.png|22px]][[File:Orange Banner Revision 1.png|22px]][[File:Yellow Banner Revision 1.png|22px]][[File:Lime Banner Revision 1.png|22px]][[File:Green Banner Revision 1.png|22px]][[File:Cyan Banner Revision 1.png|22px]][[File:Light Blue Banner Revision 1.png|22px]][[File:Blue Banner Revision 1.png|22px]][[File:Purple Banner Revision 1.png|22px]][[File:Magenta Banner Revision 1.png|22px]][[File:Pink Banner Revision 1.png|22px]] Added banners.}}
{{History|||snap=14w30c|Added four additional patterns: Cross (+), Border, Curly Border and Thing (Mojang logo).}}
{{History|||snap=14w31a|Added two additional patterns: Inverted Halves and Base Gradient.
|The banner pattern terminology has been changed based on vexillology advice [[Jeb]] received from [http://www.reddit.com/r/Minecraft/comments/2bkxej/i_made_a_huge_mistake_banners/ his Reddit post].
|Banners can now be used as a [[fuel]] in [[furnace]]s.}}
{{History||1.8.8|snap=pre|The number of layers attainable by using [[commands]] is now limited to 16 per banner.}}
{{History||1.9|snap=15w31a|[[File:End City Banner.png|17px]] Magenta banners with a black chevron and inverted chevron are now naturally generated on the outside walls of [[end city|end cities]].}}
{{History|||snap=15w33c|Banners can be used to apply patterns to [[shield]]s.}}
{{History||1.11|snap=16w33a|Banners now require a [[dye]] when applying a pattern that uses a non-dye [[item]], such as a [[mob head|creeper head]] or [[golden apple|enchanted golden apple]]. Previously, the lack of a dye would have applied the black variant of the pattern.}}
{{History|||snap=16w39a|Black and gray banners, and light gray banners with a white flower charge are now naturally generated in rooms of [[woodland mansion]]s.}}
{{History||1.12|snap=January 24, 2017|slink={{tweet|jeb_|823817090511601664}}|[[Jeb]] tweets a screenshot of the changes to the banner color palette.}}
{{History|||snap=17w06a|[[File:White Banner.png|17px]] [[File:Light Gray Banner.png|17px]] [[File:Gray Banner.png|17px]] [[File:Black Banner.png|17px]] [[File:Brown Banner.png|17px]] [[File:Red Banner.png|17px]] [[File:Orange Banner.png|17px]] [[File:Yellow Banner.png|17px]] [[File:Lime Banner.png|17px]] [[File:Green Banner.png|17px]] [[File:Cyan Banner.png|17px]] [[File:Light Blue Banner.png|17px]] [[File:Blue Banner.png|17px]] [[File:Purple Banner.png|17px]] [[File:Magenta Banner.png|17px]] [[File:Pink Banner.png|17px]] Changed banners' [[tint]]s.}}
{{History|||snap=pre6|"Chief fess" and "base fess" banners are now just "chief" and "base" banners.}}
{{History||1.13|snap=17w47a|The colors for the <code>banner</code>, <code>wall_banner</code> and <code>standing_banner</code> ID have been split up into their own IDs.
|Prior to [[1.13/Flattening|''The Flattening'']], these [[block]]s' numeral IDs were 176 and 177, and the [[item]]'s 425.}}
{{History|||snap=18w10a|{{control|Using}} a [[map]] on a banner now mark the spot of the banner on the map.}}
{{History||1.14|snap=18w43a|[[Loom]]s have been added to help the [[player]] edit banners more easily.
|All recipes for banner patterns have been removed.}}
{{History|||snap=18w45a|[[File:Ominous Banner Revision 1.png|17px]] Added [[illager patrol]]s, where the leader of an illager patrol carries an [[illager]] banner.}}
{{History|||snap=18w46a|[[File:Ominous Banner.png|17px]] The pattern of [[illager]] banner now has a black border.}}
{{History|||snap=19w11a|Cartographer and shepherd [[villager]]s now [[trading|sell]] banners.}}
{{History|||snap=Pre-Release 2|"Illager Banners" have been renamed to "Ominous Banners".}}
{{History||1.17|snap=20w46a|The unused "base" pattern has been renamed to the "field" pattern and given proper translation strings (its ID is still "base").}}
{{History||1.19.3|snap=22w43a|The ominous banner is now available in the Creative inventory.}}
{{History|bedrock}}
{{History||1.2.0|snap=beta 1.2.0.2|[[File:White Banner.png|17px]] [[File:Light Gray Banner.png|17px]] [[File:Gray Banner.png|17px]] [[File:Black Banner.png|17px]] [[File:Brown Banner.png|17px]] [[File:Red Banner.png|17px]] [[File:Orange Banner.png|17px]] [[File:Yellow Banner.png|17px]] [[File:Lime Banner.png|17px]] [[File:Green Banner.png|17px]] [[File:Cyan Banner.png|17px]] [[File:Light Blue Banner.png|17px]] [[File:Blue Banner.png|17px]] [[File:Purple Banner.png|17px]] [[File:Magenta Banner.png|17px]] [[File:Pink Banner.png|17px]] Added banners.
|[[File:End City Banner.png|17px]] Magenta banners with a black chevron and inverted chevron are now naturally generated on the outside walls of [[end city|end cities]].
|Black and gray banners, and light gray banners with a white flower charge are now naturally generated in rooms of [[woodland mansion]]s.}}
{{History||1.4.0|snap=beta 1.2.20.1|The white banner can now be crafted from a colored banner and [[bleach]], which also removes all patterns, if used on a white banner.}}
{{History||1.10.0|snap=beta 1.10.0.3|[[Loom]]s have been added to help the [[player]] edit banners more easily.
|Brown banners now generate in new [[savanna]] [[village]]s.
|Black banners now generate in [[pillager outpost]] watchtowers.}}
{{History||1.11.0|snap=beta 1.11.0.1|Gray banners now generate in pillager outpost watchtowers, instead of black banners.
|[[File:Ominous Banner BE.png|17px]] Added [[illager captain]]s, which drop an [[illager]] banner upon [[death]].}}
{{History|||snap=beta 1.11.0.3|Illager banners now generate in [[pillager outpost]] watchtowers, instead of gray banners.}}
{{History|||snap=beta 1.11.0.4|Banners can now be [[trading|bought]] from cartographer and shepherd [[villager]]s.}}
{{History||1.20.0|snap=beta 1.20.0.20|Banners can now be used to customise [[shield]]s.}}
{{History|console}}
{{History||xbox=TU43|xbone=CU33|ps=1.36|wiiu=Patch 13|switch=1.0.1|[[File:White Banner Revision 1.png|22px]][[File:Light Gray Banner Revision 1.png|22px]][[File:Gray Banner Revision 1.png|22px]][[File:Black Banner Revision 1.png|22px]][[File:Brown Banner Revision 1.png|22px]][[File:Red Banner Revision 1.png|22px]][[File:Orange Banner Revision 1.png|22px]][[File:Yellow Banner Revision 1.png|22px]][[File:Lime Banner Revision 1.png|22px]][[File:Green Banner Revision 1.png|22px]][[File:Cyan Banner Revision 1.png|22px]][[File:Light Blue Banner Revision 1.png|22px]][[File:Blue Banner Revision 1.png|22px]][[File:Purple Banner Revision 1.png|22px]][[File:Magenta Banner Revision 1.png|22px]][[File:Pink Banner Revision 1.png|22px]] Added banners.}}
{{History||xbox=TU46|xbone=CU36|ps=1.38|wiiu=Patch 15|switch=1.0.1|[[File:End City Banner.png|17px]] Magenta banners with a black chevron and inverted chevron are now naturally generated on the outside walls of [[end city|end cities]].}}
{{History||xbox=TU53|xbone=CU43|ps=1.49|wiiu=Patch 23|switch=1.0.3|[[File:White Banner.png|17px]] [[File:Light Gray Banner.png|17px]] [[File:Gray Banner.png|17px]] [[File:Black Banner.png|17px]] [[File:Brown Banner.png|17px]] [[File:Red Banner.png|17px]] [[File:Orange Banner.png|17px]] [[File:Yellow Banner.png|17px]] [[File:Lime Banner.png|17px]] [[File:Green Banner.png|17px]] [[File:Cyan Banner.png|17px]] [[File:Light Blue Banner.png|17px]] [[File:Blue Banner.png|17px]] [[File:Purple Banner.png|17px]] [[File:Magenta Banner.png|17px]] [[File:Pink Banner.png|17px]] Changed banners' [[tint]]s.}}
{{History||xbox=none|xbone=none|ps=1.90|wiiu=none|switch=none|[[Loom]]s have been added to help the [[player]] edit banners more easily.}}
{{History||ps=1.91|[[File:Ominous Banner BE.png|17px]] Added [[illager]] banners, which generate with [[pillager outpost]]s and are [[drops|dropped]] by [[illager captain]]s upon [[death]].}}
{{History|foot}}
== Issues ==
{{issue list}}
== Trivia ==
* With 16 blank banners, 38 patterns of 16 colors each (608 uniquely-colored patterns), and 0 to 6 patterns per banner, the number of uniquely crafted banners is 16 × (608<sup>0</sup> + 608<sup>1</sup> + 608<sup>2</sup> + 608<sup>3</sup> + 608<sup>4</sup> + 608<sup>5</sup> + 608<sup>6</sup>) ≈ 809 quadrillion - 809 with 15 zeros (809,573,616,779,945,488). The number of visually distinct banners is smaller, because one or more patterns may completely cover other patterns, or the entire banner, or be duplicated due to the symmetric set of patterns (e.g. field or (yellow) + per pale azure (blue) = field azure + per pale or inverted).
** Not 38 patterns are available on BE, but 40 patterns of 16 colors each (640 uniquely-colored patterns), so the number is even greater. 16 × (640<sup>0</sup> + 640<sup>1</sup> + 640<sup>2</sup> + 640<sup>3</sup> + 640<sup>4</sup> + 640<sup>5</sup> + 640<sup>6</sup>) ≈ 1 quintillion - 1 with 18 zeros (1,101,232,303,249,827,856). This increases the number by almost 1.4 times, or almost 292 quadrillion, despite the addition of only 2 patterns.
* If a banner has over 6 patterns, only the six bottom-most patterns are displayed when hovered over in the [[inventory]].
* The Mojang logo is called "Thing" in-game, which could be considered an alternate translation for [[wiktionary:mojäng|mojäng]]. If [[wikipedia:Google Translate|Google Translate]] is used, it translates to "thingys" or "contraption".
** In the Swedish translation of the game, this pattern is, in fact, called ''mojäng''.
* [[List of block textures#Banner Textures|Banner textures]] are located in \assets\minecraft\textures\entity\banner.
** There are 40 monochrome textures, each containing all 6 sides of the banner.
** The texture of the back side is the mirrored texture of the front side.
** Compared to the texture files, textures' colors are inverted in-game due to them acting as masks for the re-colored base texture, base.png. That means white is visible, while black is transparent.
* Banners that have the purple NBT+ line in the bottom (obtained by holding Ctrl and middle-clicking the banner, which also copies the NBT [[tag]] of anything that the player points their crosshair to) actually have no difference with the base banner obtained by middle click.
*The Illager Banner in Bedrock Edition is available as a separate item but is just a second variant of the white banner.
**Standard variant of white banner is set to type 0.
**Illager variant is set to type 1.
== Gallery ==
<gallery>
Banners Jeb.png|The first image of banners, as tweeted by Jens Bergensten.
Iceland and Norway Flags.png|Another banner image from Jeb.
Searge Banners.png|Several banners made by Searge.
The Bountiful Update.png|Banners in the official 1.8 poster.
BannersBeforeAndAfter.png|An image, tweeted by Jeb, showcasing the changes he made to the banner color palette in the 1.12 update.
Gradients Overlay.png|The result of using gradient different numbers of times, each time increasing the level of gradient by 1.
All positions and rotations of a banner.png|All positions and rotations of a banner
Item Frame with Banner.png|A banner with the [[Mojang]] logo in an [[item frame]].
EndCityBanners.png|Banners floating outside of an [[End city]] tower.
Woodland mansion 1x2 d1.png|Banners hanging above the doorway of a [[woodland mansion]] master bedroom.
Replaceitembanner.png|Banner put in the helmet slot by using the command {{cmd|replaceitem}}{{Only|BE}} or {{cmd|item replace}}{{Only|JE}}.
Better Together Banners.jpg|Banners in ''Bedrock Edition''.
Better Together Banner Crafting 1.jpg|A banner in the hand.
Better Together Banner Crafting 2.jpg|A banner in the inventory.
Better Together Banner Crafting 3.jpg|A banner in the crafting grid.
Better Together Banner Crafting 4.jpg|A banner being given a pattern.
</gallery>
=== Renders ===
<gallery>
Ominous Banner.gif
White Banner.gif
Light Gray Banner.gif
Gray Banner.gif
Black Banner.gif
Brown Banner.gif
Red Banner.gif
Orange Banner.gif
Yellow Banner.gif
Lime Banner.gif
Green Banner.gif
Cyan Banner.gif
Light Blue Banner.gif
Blue Banner.gif
Purple Banner.gif
Magenta Banner.gif
Pink Banner.gif
Ominous Wall Banner.png|
White Wall Banner.png|
Light Gray Wall Banner.png|
Gray Wall Banner.png|
Black Wall Banner.png|
Brown Wall Banner.png|
Red Wall Banner.png|
Orange Wall Banner.png|
Yellow Wall Banner.png|
Lime Wall Banner.png|
Green Wall Banner.png|
Cyan Wall Banner.png|
Light Blue Wall Banner.png|
Blue Wall Banner.png|
Purple Wall Banner.png|
Magenta Wall Banner.png|
Pink Wall Banner.png
</gallery>
<gallery>
File:Ominous Banner.gif|Ominous banner pattern in Java Edition.
File:Ominous Banner BE.gif|Illager banner pattern in Bedrock Edition.
File:Ominous Banner Revision 1.gif|Old Ominous banner pattern.
File:Ominous Banner washing.gif|Washing with cauldron shows how to apply the ominous banner pattern.
</gallery>
=== [[Lego Minecraft]] Banners ===
<gallery>
File:Lego Red Creeper Banner Collage.jpg|Lego banners from 21127 and 21131
File:Lego Melon Banner.png|Lego banner from 21138
File:Lego Fish Banner.png|Lego banner from 21142
File:Lego Beetroot Banner.png|Lego banner from 21144
File:Lego Wheat Banner.png|Another lego banner from 21144
File:Lego Carrot Banner.png|A third lego banner from 21144
File:Lego Crossbones Banner.png|Lego banner from 21152
File:Lego Green Creeper Banner Collage.jpg|Lego banners from 21155
File:Lego Ominous Banner.png|Lego ominous banner from 21160
</gallery>
== References ==
{{reflist}}
{{Blocks|Utility}}
{{Items}}
[[Category:Generated structure blocks]]
[[Category:Manufactured blocks]]
[[Category:Block entities]]
[[Category:Non-solid blocks]]
[[cs:Prapor]]
[[de:Banner]]
[[es:Estandarte]]
[[fr:Bannière]]
[[ja:旗]]
[[ko:현수막]]
[[nl:Banier]]
[[pl:Sztandar]]
[[pt:Estandarte]]
[[ru:Флаг]]
[[uk:Стяг]]
[[zh:旗帜]]</li></ul></nowiki> | ? | Previously, spawn was determined by light level rather than the current chunk properties. This was no longer the case in 1.0.0. In a Beta world, hostile mobs would spawn in light level 7 or lower while friendly mobs would spawn in light levels 9 or higher. Because of this, hostile mobs had a slight chance of spawning even though it was light due to them spawning in the air where there was little light. If you had a lot of torches down, go down to your mine, then return, you would have a tendency to find your house having some cows, pigs, chickens or sheep running about. | |||
1.1{{Extension DPL}}<ul><li>[[Ankle Monitor|Ankle Monitor]]<br/>{{Joke feature}}
{{Item
| title = Ankle Monitor
| image = Ankle Monitor.png
| renewable = No
| stackable = Yes (64)
}}
The '''Ankle monitor''' was a joke foot item.
== Usage ==
Ankle monitors were equipped in the boots slot. In survival mode, when equipped, it could not be taken off. However, players in Creative mode are unaffected.
When equipped, the player would be afflicted with {{EffectLink|Slowness}} I.
During the night, being a certain number of blocks from the world spawn, above a certain minimum,{{checkthecode|how much?}} would prompt the following message in chat: "CURFEW WARNING! You are violating your house arrest! Get back by [distance] meters!"
If in [[the Nether]] or [[the End]], a different set of messages would be cycled through which can be seen in the section below.
=== Nether and End messages ===
* CURFEW WARNING! You are violating your house arrest! Uuuh... where are you anyway?
* CURFEW WARNING! Hello, are you there?
* CURFEW WARNING! I'm sure you have important things to do, but you need to go back!
* CURFEW WARNING! We're lonely back home!
* CURFEW WARNING! By "we" I mean I. I'm lonely.
* CURFEW WARNING! Ok enough games... GET BACK RIGHT NOW!
* CURFEW WARNING! LAST WARNING!
* CURFEW WARNING! LASTEST WARNING (really now)
* CURFEW WARNING! ...
* CURFEW WARNING! So... Where are you?
* CURFEW WARNING! Having a good day?
* CURFEW WARNING! Did you see that monster over there?
* CURFEW WARNING! Give it a whack, if you would be so kind.
* CURFEW WARNING! Teheee...
* CURFEW WARNING! Ok, enough of this!
* CURFEW WARNING! Last straw!
* CURFEW WARNING! Now you die.
* CURFEW WARNING! Boom!
* CURFEW WARNING! Hehe, fun right?
* CURFEW WARNING! Ok, you will not hear anything more from me now!
* CURFEW WARNING! You'll be as lonely as I am.
* CURFEW WARNING! How does that feel?
* CURFEW WARNING! Stop. Please. Stupid.
* CURFEW WARNING! I know, I'll wipe my memory. That way, I can start over!
* CURFEW WARNING! *bzzzzttt*
== Sounds ==
{{Sound table
|sound=Robot1arm1.ogg
|sound2=Robot1arm2.ogg
|sound3=Robot1arm3.ogg
|sound4=Robot1arm4.ogg
|source=dependent
|subtitle=''None''
|description=When a notification is displayed
|id=item.ankle_monitor.warning
|translationkey=''None''
|volume=1.0
|pitch=1.0
|distance=16
|foot=1}}
== Data values ==
=== ID ===
{{ID table
|shownumericids=y
|showforms=y
|generatetranslationkeys=java
|displayname=Ankle Monitor
|spritetype=item
|nameid=ankle_monitor
|id=501
|form=item
|translationkey=item.ankleMonitor.name
|foot=1}}
== History ==
{{History|java}}
{{History||1.RV-Pre1|[[File:Ankle_Monitor_(item).png|32px]] [[File:Ankle Monitor.png|32px]] Added ankle monitors.}}
{{History||1.11|snap=16w39a|The inability to remove ankle monitors was somewhat implemented into the canonical game through the addition of [[Curse of Binding]].<ref>{{ytl|Vm6oplvyyh0|t=3m31s}}</ref>}}
{{History|foot}}
== Issues ==
Ankle monitors are an unsupported [[item]] due to being an [[Wikipedia:April Fools' Day|April Fools']] joke, and therefore such issues relating to them will not be fixed.
== Gallery ==
<gallery>
TechGear.png|A [[player]] wearing the gear featured in this [[wikipedia:April Fools' Day|April Fools']] joke version.
</gallery>
==References==
{{Reflist}}
{{Items}}
{{Jokes}}
[[Category:Non-renewable resources]]
[[Category:Joke items]]
[[es:Ankle monitor]]</li><li>[[Slimeball|Slimeball]]<br/>{{about|the item|the mob|Slime|the block constructed with slimeballs|Slime Block|other uses|Slime (disambiguation)}}
{{Item
| image = Slimeball.png
| renewable = Yes
| stackable = Yes (64)
}}
A '''slimeball''' is a [[crafting]] ingredient commonly dropped by [[slime]]s, and can be sneezed out by [[panda]]s.
== Obtaining ==
=== Mob loot ===
==== Slimes ====
{{see also|Tutorials/Slime farming}}
If a [[slime]]'s size is 1, it drops 0–2 slimeballs when killed. The maximum number of slimeballs is increased by 1 per level of [[Looting]], for a maximum of 5 slimeballs with Looting III.
==== Pandas ====
Baby [[panda]]s have a {{frac|1|700}} chance of [[drop]]ping one slimeball when sneezing.
=== Crafting ===
{{Crafting
|Slime Block
|Output= Slimeball,9
|type= Miscellaneous
}}
=== Trading ===
[[Wandering trader]]s sometimes offer to sell a slimeball for 4 [[emerald]]s.
== Usage ==
=== Crafting ingredient ===
{{crafting usage}}
=== Breeding ===
Slimeballs can be used to breed [[frog]]s and reduce the remaining growth duration of [[tadpole]]s by 10%. Both also follow a player holding a slimeball.
==Video==
{{Video note|This video is outdated, as slimeballs can now also be used to craft [[lead]]s and [[slime block]]s, breed [[frog]]s, and can now be obtained from baby [[panda]]s and [[wandering trader]]s.}}
{{yt|J6oR3fdbbjY}}
== Data values ==
===ID===
{{edition|java}}:
{{ID table
|edition=java
|showforms=y
|generatetranslationkeys=y
|displayname=Slimeball
|spritetype=item
|nameid=slime_ball
|form=item
|foot=1}}
{{edition|bedrock}}:
{{ID table
|edition=bedrock
|shownumericids=y
|showforms=y
|notshowbeitemforms=y
|generatetranslationkeys=y
|displayname=Slimeball
|spritetype=item
|nameid=slime_ball
|id=388
|form=item
|foot=1}}
==History==
{{History|java alpha}}
{{History||v1.0.11|[[File:Slimeball JE1 BE1.png|32px]] Added slimeballs, which are dropped from [[slime]]s. At the moment, they serve no purpose.}}
{{History|java beta}}
{{History||1.7|Slimeballs are now used to craft [[sticky piston]]s.}}
{{History|java}}
{{History||1.0.0|snap=Beta 1.9 Prerelease 2|Slimeballs are used to craft [[magma cream]].}}
{{History||1.6.1|snap=13w18a|[[Lead]]s, which were originally implemented in the [[13w16a]] snapshot, now have a [[crafting]] recipe that includes slimeballs.}}
{{History||1.8|snap=14w02a|Nine slimeballs are now used to [[crafting|craft]] a [[slime block]]. Slime blocks also act as storage [[block]]s, being able to craft back into 9 slimeballs.}}
{{History||1.13|snap=17w47a|Prior to [[1.13/Flattening|''The Flattening'']], this [[item]]'s numeral ID was 341.}}
{{History||1.14|snap=18w43a|[[File:Slimeball JE2 BE2.png|32px]] The texture of slimeballs has been changed.
|Slimeballs can now be obtained when a [[panda|baby panda]] sneezes.}}
{{History|||snap=19w05a|Slimeballs can now be bought from [[wandering trader]]s.}}
{{History||1.19|snap=22w11a|Slimeballs can now be used to breed [[frog]]s.}}
{{History|pocket alpha}}
{{History||v0.9.0|snap=build 1|[[File:Slimeball JE1 BE1.png|32px]] Added slimeballs. They are currently unobtainable and serve no purpose.}}
{{History||v0.12.1|snap=build 1|Added slimeballs to the [[creative]] [[inventory]].
|Slimeballs can now be obtained by killing [[slime]]s.
|Slimeballs are now used to craft [[magma cream]].}}
{{History||v0.14.0|snap=build 1|Slimeballs are now used to craft [[slime block]]s.}}
{{History||v0.15.0|snap=build 1|Slimeballs are now used to craft [[sticky piston]]s and [[lead]]s.}}
{{History|bedrock}}
{{History||1.8.0|snap=beta 1.8.0.8|Slimeballs can now be obtained when a [[panda|baby panda]] sneezes.}}
{{History||1.10.0|snap=beta 1.10.0.3|[[File:Slimeball JE2 BE2.png|32px]] The texture of slimeballs has been changed.
|Slimeballs can now be obtained via [[trading]] with [[wandering trader]]s.}}
{{History|console}}
{{History||xbox=TU1|xbone=CU1|ps=1.0|wiiu=Patch 1|switch=1.0.1|[[File:Slimeball JE1 BE1.png|32px]] Added slimeballs.}}
{{History||xbox=TU3|Slimeballs are now used to craft [[sticky piston]]s.}}
{{History||xbox=TU5|Slimeballs are found in the Miscellaneous tab in the [[Creative inventory]].}}
{{History||xbox=TU9|Moved slimeballs to the Materials tab in the Creative inventory.}}
{{History||xbox=none|xbone=none|ps=1.83|wiiu=none|switch=none|Slimeballs can now be obtained when a [[panda|baby panda]] sneezes.}}
{{History||xbox=none|xbone=none|ps=1.90|wiiu=none|switch=none|[[File:Slimeball JE2 BE2.png|32px]] The texture of slimeballs has been changed.}}
{{History|New 3DS}}
{{History||0.1.0|[[File:Slimeball JE1 BE1.png|32px]] Added slimeballs.}}
{{History|foot}}
==Issues ==
{{issue list}}
== External Links ==
*[https://www.minecraft.net/en-us/article/taking-inventory--slimeball Taking Inventory: Slimeball] – Minecraft.net on June 24, 2021
{{Items}}
[[Category:Renewable resources]]
[[cs:Sliz]]
[[de:Schleimball]]
[[es:Bola de slime]]
[[fr:Boule de Slime]]
[[hu:Nyálkagolyó]]
[[it:Palla di slime]]
[[ja:スライムボール]]
[[ko:슬라임볼]]
[[nl:Slijmbal]]
[[pl:Kula szlamu]]
[[pt:Bola de slime]]
[[ru:Слизь]]
[[th:ลูกเมือก]]
[[uk:Слизова кулька]]
[[zh:黏液球]]</li></ul> | 12w01a | The biomes valid for the player's spawn location were adjusted. Players can now spawn in forest, plains, taiga, forest hills and taiga hills biomes. | |||
1.2{{Extension DPL}}<ul><li>[[Raw Iron|Raw Iron]]<br/>{{Item
| image = Raw Iron.png
| renewable = No
| stackable = Yes (64)
}}
'''Raw iron''' is a raw metal resource obtained from mining [[iron ore]].
== Obtaining ==
=== Mining ===
[[Iron ore]] and [[deepslate iron ore]] mined with a [[stone pickaxe]] or higher drops 1 unit of raw iron. If the pickaxe is enchanted with [[Fortune]], it can drop an extra unit per level of Fortune, allowing for a maximum of 4 with Fortune III. If the ore is mined using a pickaxe enchanted with [[Silk Touch]], it drops the ore block instead.
=== Crafting ===
{{Crafting
|showname=1
|Block of Raw Iron
|Output=Raw Iron,9
|type=Material
|foot=1
}}
== Usage ==
The primary usage of raw iron is smelting it into [[iron ingot]]s.
=== Crafting ===
{{crafting usage}}
=== Smelting ingredient ===
{{Smelting
|showname=2
|Raw Iron
|Iron Ingot
|0.7
}}
== Data values ==
=== ID ===
{{edition|java}}:
{{ID table
|edition=java
|showitemtags=y
|showforms=y
|generatetranslationkeys=y
|displayname=Raw Iron
|spritetype=item
|nameid=raw_iron
|form=item
|foot=1}}
{{edition|bedrock}}:
{{ID table
|edition=bedrock
|shownumericids=y
|showforms=y
|notshowbeitemforms=y
|generatetranslationkeys=y
|displayname=Raw Iron
|spritetype=item
|nameid=raw_iron
|form=item
|id=505
|foot=1}}
== History ==
{{History|java}}
{{History||1.17|snap=21w14a|[[File:Raw Iron JE1.png|32px]] Added raw iron.}}
{{History|||snap=April 13, 2021|slink={{Tweet|JasperBoerstra|1381991999952277513}}|[[File:Raw Iron JE2.png|32px]] [[JAPPA]] shows a new raw iron texture.}}
{{History|||snap=21w15a|[[File:Raw Iron JE2.png|32px]] The texture of raw iron has been changed.
|Raw iron can now be used to craft [[block of raw iron]].}}
{{History|||snap=April 16, 2021|slink={{Tweet|JasperBoerstra|1383047666037325829}}|[[File:Raw Iron (pre-release).png|32px]] [[JAPPA]] shows a new raw iron texture again.}}
{{History|||snap=21w16a|[[File:Raw Iron JE3.png|32px]] The texture of raw iron has been changed.}}
{{History|Bedrock}}
{{History||1.17.0|snap=beta 1.17.0.50|[[File:Raw Iron JE2.png|32px]] Added raw iron.}}
{{History|||snap=beta 1.17.0.52|Raw iron are now available without enabling [[experimental gameplay]].}}
{{History|||snap=beta 1.17.0.54|[[File:Raw Iron JE3.png|32px]] The texture of raw iron has been changed.}}
{{History|foot}}
== Issues ==
{{Issue list}}
==Gallery==
<gallery>
JE 1.17 Dev Raw Metals.jpg|Jappa shows raw ore textures.
Jappa Raw Ores 1.jpg|Jappa shows raw ore textures.
Jappa Raw Ores 2.png|Jappa shows raw ore textures.
Jappa Raw Ores 3.jpg|Jappa shows raw ore textures.
Jappa Raw Ores 4.jpg|Jappa shows raw ore textures.
Jappa Raw Ores 5.jpg|Jappa shows raw ore textures.
</gallery>
{{Items}}
[[Category:Non-renewable resources]]
[[de:Roheisen]]
[[es:Hierro en bruto]]
[[fr:Fer brut]]
[[it:Ferro grezzo]]
[[ja:鉄の原石]]
[[lzh:砂鐵]]
[[pl:Surowe żelazo]]
[[pt:Ferro bruto]]
[[ru:Необработанное железо]]
[[uk:Необроблене залізо]]
[[zh:粗铁]]</li><li>[[:Category:Invalid data value items|Category:Invalid data value items]]<br/>[[Category:Items]]</li></ul> | 12w03a | The player's spawn point can now also be located in jungle and jungle hills biomes. | |||
1.8{{Extension DPL}}<ul><li>[[Copper Ingot|Copper Ingot]]<br/>{{About|the ingot|the ore|Copper Ore|the mineral block|Block of Copper}}
{{Item
| image = Copper Ingot.png
| renewable = Yes
| stackable = Yes (64)
}}
'''Copper ingots''' are [[metal]] ingots obtained from smelting [[raw copper]] or killing [[drowned]].
== Obtaining ==
=== Crafting ===
{{Crafting
|Block of Copper;Waxed Block of Copper|Output=Copper Ingot,9
|type=Miscellaneous
}}
=== Smelting ===
Copper ingots can be obtained by smelting [[raw copper]] in a [[furnace]] or [[blast furnace]], as well as the ore itself if mined using [[Silk Touch]].
{{Smelting
|head=1
|Raw Copper
|Copper Ingot
|0.7
}}
{{Smelting
|foot=1
|Copper Ore; Deepslate Copper Ore
|Copper Ingot
|0.7
}}
=== Mob loot ===
==== Drowned ====
When killed by a [[player]] or a tamed [[wolf]], a [[drowned]] has a 11% ({{frac|11|100}}) chance of dropping a copper ingot. With the [[Looting]] enchantment, the chance can be increased to 13% ({{frac|13|100}}) with Looting I, 15% ({{frac|3|20}}) with Looting II, and 17% ({{frac|17|100}}) with Looting III.
== Usage ==
=== Crafting ingredient ===
{{crafting usage}}
=== Smithing ingredient ===
{{Smithing
|head=1
|ingredients=Any Armor Trim +<br/>Any Armor Piece + <br/>Copper Ingot
|Any Armor Trim Smithing Template
|Netherite Chestplate
|Copper Ingot
|Copper Trim Netherite Chestplate
|showdescription=1
|description = All armor types can be used in this recipe,<br/>a netherite chestplate is shown as an example.<br/>
|tail=1
}}
;Trim color palette
The following color palette is shown on the designs on trimmed armor:
*{{TrimPalette|copper ingot}}
== Data values ==
=== ID ===
{{edition|java}}:
{{ID table
|edition=java
|showforms=y
|generatetranslationkeys=y
|displayname=Copper Ingot
|spritetype=item
|nameid=copper_ingot
|form=item
|foot=1}}
{{edition|bedrock}}:
{{ID table
|edition=bedrock
|shownumericids=y
|showforms=y
|notshowbeitemforms=y
|generatetranslationkeys=y
|displayname=Copper Ingot
|spritetype=item
|nameid=copper_ingot
|form=item
|id=504
|foot=1}}
== History ==
{{History|java}}
{{History||1.17|snap=20w45a|[[File:Copper Ingot JE1.png|32px]] Added copper ingots.}}
{{History|||snap=20w46a|[[File:Copper Ingot JE2 BE1.png|32px]] The texture of copper ingots has been changed.|Crafting copper ingots from and into copper blocks now outputs/requires only 4 ingots.}}
{{History|||snap=21w05a|[[Drowned]] can now drop copper ingots when killed instead of [[gold ingots]], making copper ingots renewable.}}
{{History|||snap=21w10a|Copper ingots can now be smelted from [[deepslate copper ore]].}}
{{History|||snap=21w14a|Copper ingots can now be smelted from [[raw copper]].}}
{{History|||snap=21w17a|The amount of copper ingots required to make a [[block of copper]] has been changed back to 9.}}
{{History||1.17.1|snap=Pre-release 1|Increased the chance of [[drowned]] dropping a copper ingot from 5% to 11% and the increase of this chance for each level of [[Looting]] enchantment from 1% to 2% to match {{el|be}}.}}
{{History||1.20<br>(Experimental)|link=1.19.4|snap=23w04a|Copper ingots can now be used as an armor trim material.}}
{{History|||snap=1.19.4 Pre-release 1|Copper ingots can now be used to craft [[brush]]es.}}
{{History|bedrock}}
{{History||Caves & Cliffs (experimental)|link=Bedrock Edition 1.17.0|snap=beta 1.16.210.57|[[File:Copper Ingot JE2 BE1.png|32px]] Added copper ingots.}}
{{History||1.17.0|snap=beta 1.17.0.50|Copper ingots can now be used to craft [[spyglass|spyglasses]].}}
{{History|||snap=beta 1.17.0.52|Copper ingots are now available without enabling [[experimental gameplay]].}}
{{History|||snap=beta 1.17.0.54|The amount of copper ingots required to make a [[block of copper]] has been changed to 9.}}
{{History||Vanilla Experiments (experimental)|link=1.18.30|snap=beta 1.18.30.26|Copper ingots can now be used to craft copper horns.}}
{{History||1.19.0|snap=beta 1.19.0.24|Copper ingots can no longer be used to craft copper horns, as copper horns have been removed.}}
{{History||1.20.0<br>(Experimental)|link=Bedrock Edition 1.19.80|snap=beta 1.19.80.20|Copper ingots can now be used to craft [[brush]]es.}}
{{History|||snap=beta 1.19.80.21|Copper ingots can now be used as an armor trim material.}}
{{History|foot}}
== Issues ==
{{Issue list}}
== External Links ==
*[https://www.minecraft.net/en-us/article/taking-inventory--copper-ingot Taking Inventory:Copper Ingot] – Minecraft.net on December 22, 2022
{{Items}}
[[Category:Renewable resources]]
[[de:Kupferbarren]]
[[es:Lingote de cobre]]
[[fr:Lingot de cuivre]]
[[it:Lingotto di rame]]
[[ja:Copper Ingot]]
[[ko:구리괴]]
[[pl:Sztabka miedzi]]
[[pt:Barra de cobre]]
[[ru:Медный слиток]]
[[uk:Мідний злиток]]
[[zh:铜锭]]</li><li>[[Light Blue Dye|Light Blue Dye]]<br/>{{Item
| image = Light_Blue_Dye_JE2_BE2.png
| renewable = Yes
| stackable = Yes (64)
}}
'''Light blue dye''' is a [[Dyeing#Quasi-Primary|quasi-primary dye]].
== Obtaining ==
=== Crafting ===
{{Crafting
|showname=0
|showdescription=1
|Blue Orchid
|Output=Light Blue Dye
|type=Material
|head=1
}}
{{Crafting
|Blue Dye
|White Dye
|Output=Light Blue Dye,2
|type=Material
}}
{{Crafting
|Lapis Lazuli;Blue Dye;Lapis Lazuli
|Bone Meal;Bone Meal;White Dye
|Output=Light Blue Dye,2
|type=Material
|description={{only|bedrock|education}}
|foot=1
}}
=== Loot chest ===
{{#invoke:LootChest|base3|light-blue-dye}}
=== Trading ===
[[Wandering trader]]s sell 3 light blue dye for an [[emerald]].
== Usage ==
{{dye usage}}
=== Crafting ingredient ===
{{crafting usage|ignore=Banner|continue=1}}
{{banner crafting usage}}
=== Loom ingredient ===
{{Banner loom usage|Light Blue Dye}}
=== Trading ===
Apprentice-level shepherd villagers have a 20%{{only|bedrock}} or {{frac|2|7}}{{only|java}} chance to buy 12 light blue dye for an emerald as part of their trades.
== Data values ==
=== ID ===
{{edition|java}}:
{{ID table
|edition=java
|showforms=y
|generatetranslationkeys=y
|displayname=Light Blue Dye
|spritetype=item
|nameid=light_blue_dye
|form=item
|foot=1}}
{{edition|bedrock}}:
{{ID table
|edition=bedrock
|showaliasids=y
|shownumericids=y
|showforms=y
|notshowbeitemforms=y
|generatetranslationkeys=y
|displayname=Light Blue Dye
|spritetype=item
|nameid=light_blue_dye
|aliasid=dye / 12
|id=407
|form=item
|translationkey=item.dye.lightBlue.name
|foot=1}}
== Video ==
{{yt|IPQzg-zPJgk}}
== History ==
{{History|java beta}}
{{History||1.2|[[File:Light Blue Dye JE1 BE1.png|32px]] Added light blue dye.}}
{{History|java}}
{{History||1.4.2|snap=12w34a|Added the ability to [[Armor#Dyeing|dye]] leather [[armor]] and [[wolf]] collars.}}
{{History||1.4.6|snap=12w49a|Light blue dye can be [[crafting|crafted]] with gunpowder to create a [[firework star]].}}
{{History||1.6.1|snap=13w19a|[[Stained clay]] can now be crafted.}}
{{history||1.7.2|snap=13w36a|With the addition of new [[flower]]s, many secondary and tertiary dyes are now primary [[dye]]s.}}
{{History|||snap=13w41a|[[Stained glass]] can now be crafted.}}
{{History||1.8|snap=14w30a|Added [[banner]]s, which can be dyed.}}
{{History||1.13|snap=17w47a|The different data values for the <code>dye</code> ID have now been split up into their own IDs.
|Prior to [[1.13/Flattening|''The Flattening'']], this [[item]]'s numeral ID was 351.}}
{{History||1.14|snap=18w43a|Light blue dye is now crafted using [[white dye|white]] and [[blue dye]]s, instead of [[bone meal]] and [[lapis lazuli]].
|[[File:Light_Blue_Dye_JE2_BE2.png|32px]] The texture of light blue dye has now been changed.}}
{{History|||snap=18w44a|Light blue dye can now change the text color on [[sign]]s to light blue.}}
{{History|||snap=19w05a|Added the [[wandering trader]], which sells light blue dye.}}
{{History|||snap=19w11a|Light blue dye can now be [[trading|bought]] by shepherd villagers.}}
{{History||1.17|snap=20w45a|Light blue dye can now be used to craft [[light blue candle]]s.}}
{{History|||snap=21w19a|Light blue dye can no longer be used to craft light blue candles.}}
{{History|||snap=Pre-release 1|Light blue dye can now once again be used to craft light blue candles.}}
{{History||1.20<br>(Experimental)|link=1.19.3|snap=22w42a|Light blue dye can now change the text color on [[hanging sign]]s to light blue.}}
{{History||1.20|snap=23w12a|Light blue dye can now be found in [[suspicious gravel]] and [[suspicious sand]] in [[trail ruins]].}}
{{History|||snap=23w16a|Light blue dye no longer generates in [[suspicious sand]] in [[trail ruins]].|Due to the split of the archaeological loot tables for the suspicious gravel within the [[trail ruins]]; light blue dye now is in the common loot.}}
{{History|pocket alpha}}
{{History||v0.3.0|[[File:Light Blue Dye JE1 BE1.png|32px]] Added light blue dye. It is currently unobtainable and serves no purpose.}}
{{History||v0.4.0|Light blue dye is now craftable with [[lapis lazuli]] and [[bone meal]].
|Light blue dye can now be used to craft light blue wool.}}
{{History||v0.14.0|snap=build 1|Light blue dye can now be used to dye [[water]] in [[cauldron]]s.}}
{{History|pocket}}
{{History||1.0.0|snap=alpha 0.17.0.1|Light blue dye can now be used to dye [[shulker]]s.}}
{{History||1.1.0|snap=alpha 1.1.0.0|Light dye can now be used to craft [[concrete powder]] and dye [[shulker box]]es and [[bed]]s.}}
{{History|bedrock}}
{{History||1.2.0|snap=beta 1.2.0.2|Light blue dye can now be used to craft [[firework star]]s, [[stained glass]], and patterns on [[banner]]s.}}
{{History||1.4.0|snap=beta 1.2.20.1|Light blue dye can now be used to craft [[balloon]]s and [[glow stick]]s.}}
{{History||1.8.0|snap=beta 1.8.0.8|Light blue dye can now be used to dye [[cat]] collars.}}
{{History||1.10.0|snap=beta 1.10.0.3|Light blue dye is now [[trading|sold]] by [[wandering trader]]s.
|Light blue dye can now be used to dye white [[carpet]]s.
|[[File:Light_Blue_Dye_JE2_BE2.png|32px]] The texture of light blue dye has now been changed.}}
{{History||1.11.0|snap=beta 1.11.0.4|Light blue dye can now be [[trading|sold]] to shepherd [[villager]]s.}}
{{History||1.16.100|snap=beta 1.16.100.56|The ID of light blue dye has been changed from <code>dye/12</code> to <code>light_blue_dye</code>.}}
{{History|console}}
{{History||xbox=TU1|xbone=CU1|ps=1.00|switch=1.0.1|wiiu=Patch 1|[[File:Light Blue Dye JE1 BE1.png|32px]] Added light blue dye.}}
{{History|PS4}}
{{History||1.90|[[File:Light_Blue_Dye_JE2_BE2.png|32px]] The texture of light blue dye has now been changed.}}
{{History|new 3ds}}
{{History||0.1.0|[[File:Light Blue Dye JE1 BE1.png|32px]] Added light blue dye.}}
{{History|foot}}
== Issues ==
{{issue list}}
{{Items}}
[[Category:Dyes]]
[[cs:Světle modré barvivo]]
[[de:Hellblauer Farbstoff]]
[[es:Tinte azul claro]]
[[fr:Teinture bleu clair]]
[[hu:Világoskék festék]]
[[ja:空色の染料]]
[[ko:하늘색 염료]]
[[nl:Lichtblauwe kleurstof]]
[[pl:Jasnoniebieski barwnik]]
[[pt:Corante azul-claro]]
[[ru:Светло-синий краситель]]
[[zh:淡蓝色染料]]
[[Category:Renewable resources]]</li></ul> | 14w25a | Most restrictions on the pack location are removed. Formerly it had to be an air block, now any non-opaque block will do. | |||
1.9{{Extension DPL}}<ul><li>[[Rabbit's Foot|Rabbit's Foot]]<br/>{{Item
| image = Rabbit's Foot.png
|type=
| renewable = Yes
| stackable = Yes (64)
}}
A '''rabbit's foot''' is a [[brewing]] item obtained from [[rabbit]]s.
== Obtaining ==
=== Mob loot ===
Each [[rabbit]] has a 10% chance to drop a rabbit's foot when killed by the [[player]]. This chance can be increased by 3% per level using a sword enchanted with [[Looting]].
A [[fox]] sometimes spawns with a rabbit's foot in its mouth, which always drops upon death. Alternatively, the player can drop a [[food]] item, which causes the fox to drop the rabbit's foot.
=== Cat gifts ===
{{main|Cat#Gifts}}
A tamed [[cat]] has a 70% chance of giving the player a gift when the player wakes up from a [[bed]], and the gift has a 16.13% chance to be a rabbit's foot.
== Usage ==
=== Brewing ingredient ===
{{Brewing
|head=1
|Rabbit's Foot
|Mundane Potion
|base=Water Bottle
}}
{{brewing
|foot=1
|showname=1
|Rabbit's Foot
|Potion of Leaping
}}
=== Trading ===
Journeyman-level cleric [[villager]]s buy rabbit's feet for an [[emerald]] as part of their trade: {{in|java}} they buy 2, and {{in|bedrock}} they buy 4.
== Video ==
<div style="text-align:center">{{yt|Ba3QN3uCniU}}</div>
== Data values ==
=== ID ===
{{edition|java}}:
{{ID table
|edition=java
|showforms=y
|generatetranslationkeys=y
|displayname=Rabbit's Foot
|spritetype=item
|nameid=rabbit_foot
|form=item
|foot=1}}
{{edition|bedrock}}:
{{ID table
|edition=bedrock
|shownumericids=y
|showforms=y
|notshowbeitemforms=y
|generatetranslationkeys=y
|displayname=Rabbit's Foot
|spritetype=item
|nameid=rabbit_foot
|id=528
|form=item
|foot=1}}
== History ==
{{History|java}}
{{History||1.8|snap=June 30, 2014|slink=https://twitter.com/TheMogMiner/status/483636993780232192|[[Ryan Holtz]] tweeted images of a rabbit's foot with some other new [[item]]s.}}
{{History|||snap=14w27a|[[File:Rabbit's Foot JE1.png|32px]] Added rabbit's foot.
|Added the [[potion of Leaping]]; it is [[brewing|brewed]] by adding a rabbit's foot to an [[awkward potion]]. The rabbit's foot also creates the [[mundane potion]] when brewed into a [[water bottle]].}}
{{History|||snap=14w33b|[[File:Rabbit's Foot JE2 BE1.png|32px]] The texture of the rabbit's foot has been changed. The new texture was created by [[wikipedia:Reddit|Reddit]] user [http://www.reddit.com/u/zeldahuman zeldahuman].<ref>{{reddit|2bjzes/a_reminder_of_the_blocks_and_items_added_in_18_so|cj69zie|context=3}}</ref><ref>{{reddit|2c5f35/minecraft_snapshot_14w31a_has_been_released|cjct7gb}}</ref>}}
{{History||1.8.1|snap=pre1|Potions of Leaping, which use rabbit's foot, can now be extended using [[redstone]].}}
{{History||1.9|snap=15w46a|The drop rate of rabbit's foot has been quadrupled.{{more info|Before/After rates}}}}
{{History||1.13|snap=17w47a|Prior to [[1.13/Flattening|''The Flattening'']], this [[item]]'s numeral ID was 414.}}
{{History||1.14|snap=18w43a|[[File:Rabbit's Foot JE3 BE2.png|32px]] The texture of rabbit's foot has been changed.}}
{{History|||snap=18w44a|[[Cat]]s now offer rabbit's feet as [[Cat#Gifts|gifts]].}}
{{History|||snap=19w07a|Added [[fox]]es, which sometimes spawn with rabbit's feet in their mouths.}}
{{History|||snap=19w11a|Cleric [[villager]]s now [[trading|buy]] rabbit's feet.}}
{{History|pocket alpha}}
{{History||v0.12.1|snap=build 1|[[File:Rabbit's Foot JE2 BE1.png|32px]] Added rabbit's foot to the [[Creative]] mode [[inventory]].}}
{{History||v0.13.0|snap=build 1|Rabbit's foot can now be obtained as a rare [[drops|drop]] upon killing [[rabbit]]s.
|Rabbit's foot can now be [[brewing|brewed]] to make [[potions of Leaping]].}}
{{History|bedrock}}
{{History||1.8.0|snap=beta 1.8.0.8|Tamed [[cat]]s can now give the [[player]] rabbit's foot as a gift.}}
{{History||1.10.0|snap=beta 1.10.0.3|[[File:Rabbit's Foot JE3 BE2.png|32px]] The texture of rabbit's foot has been changed.}}
{{History||1.11.0|snap=beta 1.11.0.4|Rabbit's foot can now be [[trading|sold]] to cleric [[villager]]s.}}
{{History||1.13.0|snap=beta 1.13.0.1|Added [[fox]]es, which can [[drops|drop]] rabbit's foot.}}
{{History|console}}
{{History||xbox=TU31|xbone=CU19|ps=1.22|wiiu=Patch 3|switch=1.0.1|[[File:Rabbit's Foot JE2 BE1.png|32px]] Added rabbit's foot.}}
{{History||xbox=none|xbone=none|ps=1.90|wiiu=none|switch=none|[[File:Rabbit's Foot JE3 BE2.png|32px]] The texture of rabbit's foot has been changed.}}
{{History|New 3DS}}
{{History||0.1.0|[[File:Rabbit's Foot JE2 BE1.png|32px]] Added rabbit's foot.}}
{{History|foot}}
== Issues ==
{{issue list}}
== Trivia ==
* The superstition that [[wikipedia:Rabbit's_foot|a rabbit's foot is a lucky charm]] applies equally to Minecraft as it does in the real world: it does not actually increase luck.
== Gallery ==
<gallery>
Rabbit Items 4 Ryan Holtz.png|First image of the item by [[Ryan Holtz]].
Rabbit Items 5 Ryan Holtz.png|Ryan Holtz brewing the item into a potion.
Rabbit Items 6 Ryan Holtz.png|Ryan Holtz enhancing the potion.
</gallery>
== References ==
{{reflist}}
== External Links ==
*[https://www.minecraft.net/en-us/article/taking-inventory--rabbit-s-foot Taking Inventory: Rabbit's Foot] – Minecraft.net on May 3, 2019
{{items}}
[[de:Hasenpfote]]
[[es:Pata de conejo]]
[[fr:Patte de lapin]]
[[it:Zampa di coniglio]]
[[ja:ウサギの足]]
[[ko:토끼발]]
[[nl:Konijnenpootje]]
[[pl:Królicza łapka]]
[[pt:Pé de coelho]]
[[ru:Кроличья лапка]]
[[uk:Кроляча лапка]]
[[zh:兔子脚]]
[[Category:Renewable resources]]
[[Category:Brewing recipe]]</li><li>[[Shears|Shears]]<br/>{{Item
| image = Shears.png
| rarity = Common
| renewable = Yes
| durability = 238
| stackable = No
}}
'''Shears''' are tools required to obtain some organic blocks or otherwise mine them faster as well as to shear certain entities and blocks.
==Obtaining==
===Crafting===
{{Crafting
|head=1
|showdescription=1
|B2= Iron Ingot
|A3= Iron Ingot
|Output= Shears
|type= Tool
}}
{{crafting
|foot=1
|ignoreusage=1
|Damaged Shears
|Damaged Shears
|Output= Shears
|description= The durability of the two shears is added together, plus an extra 5% durability.
|type= Tool
}}
Despite using [[Iron Ingot|iron]] in its crafting recipe, shears cannot be smelted into [[iron nugget]]s.<ref>{{bug|MC-111738}}</ref>
===Trading===
Novice-level Shepherd [[villager]]s have a 40% chance to sell shears for 2 [[emerald]]s in Java Edition. This trade is always offered in Bedrock Edition.
===Chest loot===
{{LootChestItem|shears}}
==Usage==
===Shearing===
Shears lose 1 [[durability]] when used to shear something.
Shears can be {{Control|use|text=used}} on a [[sheep]] to remove its coat and drop 1–3 [[wool]] of the corresponding color. The same sheep can be sheared again after it eats from a [[grass block]] to regenerate its coat.
Shearing a [[mooshroom]] drops 5 [[mushroom]]s of the corresponding color and irreversibly turns it into a normal [[cow]].
Shearing a [[snow golem]] irreversibly removes its pumpkin, dropping it and revealing its face.
Shearing either a [[beehive]] or [[bee nest]] that is full of honey makes it drop 3 [[honeycomb]]s and resets it to honey level 0. The same beehive or bee nest can be sheared again if it is able to reach full honey again. If sheared by hand without a [[campfire]] below the hive or nest all bees within will exit and all nearby bees will attack the offending player.
[[Dispenser]]s can use shears in any of the above listed ways, interacting with any valid block or entity in front of the dispenser's face. This decreases the shears' [[durability]]. A dispenser shearing a beehive or bee nest will not anger bees or cause them to leave even if there is not a campfire below it.
Shearing a [[pumpkin]] turns it into a [[carved pumpkin]], dropping 4 [[pumpkin seeds]].
{{IN|java}}, shearing the tip of [[cave vines]], [[kelp]], [[weeping vines]], or [[twisting vines]] sets its age value to 25 and stops further growth.
===Breaking blocks===
Shears use 1 [[durability]] when is used to break any block, even if it [[instant mining|breaks instantly]] by hand.
Shears can be used to harvest [[cobweb|cobwebs]], [[leaves]], [[grass|grass, tall grass]], [[seagrass|seagrass, tall seagrass]], [[fern|ferns, large fern]]s, [[dead bush]]es, [[nether sprouts]], [[vines]], [[glow lichen]] or [[hanging roots]] and obtain them in item form. They can also be used to break [[tripwire]] connected to a [[tripwire hook]] without activating it.
When shears are used to break [[Weeping Vines|weeping vines]] or [[Twisting Vines|twisting vines]] they are guaranteed to drop in item form instead of the usual 33% chance. This only applies to vines directly broken by shears and not vines that are broken due to the destruction of their supporting vines.
The following table shows information about blocks that can be broken with shears. Colors indicate what gets dropped when the block is broken:
*White: The original block.
*Blue: The block's normal drop (i.e. string, sticks, seeds, saplings, apples).
*Red: Nothing.
{| class="wikitable" style="text-align:center" data-description="Blocks broken with shears"
!
!No shears breaking time
!Shears breaking time
|-
! style="text-align:left" |{{BlockLink|Cobweb}}
| {{tc|no|20 s}}<ref group="note">Breaking cobwebs with a sword is as fast as breaking with shears, and yields string. This costs double durability.</ref>
|0.4 s
|-
! style="text-align:left" |{{BlockLink|Dead Bush}}
| {{tc|planned|0 s}}
|0 s
|-
! style="text-align:left" |{{BlockLink|id=fern|Grass|Fern}}
| {{tc|planned|0 s}}
|0 s
|-
! style="text-align:left" |{{BlockLink|Grass}}
| {{tc|planned|0 s}}
| 0 s
|-
! style="text-align:left" |{{BlockLink|Nether Sprouts}}
| {{tc|no|0 s}}<ref group="note">{{IN|bedrock}}, the item drops when breaking it with fists.</ref>
|0 s
|-
! style="text-align:left" |{{BlockLink|Leaves}}
| {{tc|planned|0.35 s}}
|0.05 s
|-
! style="text-align:left" |{{BlockLink|id=tripwire|String#Tripwire|Tripwire}}
|0 s
|0 s<ref group="note">Using shears does not trigger a redstone pulse.</ref>
|-
! style="text-align:left" |{{BlockLink|Vines}}
| {{tc|no|0.35 s}}
|0.35 s
|-
! style="text-align:left" |{{BlockLink|Wool}}
|1.25 s
|0.25 s
|-
! style="text-align:left" |{{BlockLink|Seagrass}}
| {{tc|no|0 s}}
|0 s
|-
! style="text-align:left" | {{BlockLink|Glow Lichen}}
| {{tc|no|0.3 s}}
|0.3 s
|-
! style="text-align:left" |{{BlockLink|Hanging Roots}}
| {{tc|no|0 s}}
|0 s
|-
! style="text-align:left" |{{BlockSprite|Twisting Vines Plant}}{{BlockLink|Twisting Vines}}<br> {{BlockSprite|Weeping Vines Plant}}{{BlockLink|Weeping Vines}}
|0 s
|0 s<ref group="note">Using shears will increase the chance of dropping from 33% to 100%.</ref>
|}
{{notelist}}
===Enchantments===
Shears can receive the following [[Enchanting|enchantments]]:
{| class="wikitable col-2-center col-3-right"
|+
!Name
! Max Level
![[Enchanting|Method]]
|-
|[[Efficiency]]
|V
|{{Inventory slot|Anvil}}
|-
|[[Unbreaking]]
| III
|{{Inventory slot|Anvil}}
|-
|[[Mending]]
|I
|{{Inventory slot|Anvil}}
|-
|[[Curse of Vanishing]]
|I
|{{Inventory slot|Anvil}}
|-
|[[Silk Touch]]{{only|be|short=1}}
|I
|{{Inventory slot|Anvil}}
|}
{{notelist}}
== Sounds ==
{{edition|java}}:
{{Sound table
|rowspan=4
|sound=Shear.ogg
|subtitle=Shears click
|source=player
|description=When a mooshroom is sheared
|id=entity.mooshroom.shear
|translationkey=subtitles.item.shears.shear
|volume=1.0
|pitch=1.0
|distance=16}}
{{Sound table
|subtitle=Shears click
|source=player
|description=When a sheep is sheared
|id=entity.sheep.shear
|translationkey=subtitles.item.shears.shear
|volume=1.0
|pitch=1.0
|distance=16}}
{{Sound table
|subtitle=Shears click
|source=player
|description=When a snow golem is sheared
|id=entity.snow_golem.shear
|translationkey=subtitles.item.shears.shear
|volume=1.0
|pitch=1.0
|distance=16}}
{{Sound table
|subtitle=Plant cropped
|source=block
|description=When a growing plant is cropped
|id=block.growing_plant.crop
|translationkey=subtitles.block.growing_plant.crop
|volume=1.0
|pitch=1.0
|distance=16}}
{{Sound table
|sound=Beehive shear.ogg
|source=block
|subtitle=Shears scrape
|description=When honeycombs are harvested from a beehive
|id=block.beehive.shear
|translationkey=subtitles.block.beehive.shear
|volume=0.8
|pitch=1.0/0.8/0.9
|distance=16}}
{{Sound table
|sound=Pumpkin carve1.ogg
|sound2=Pumpkin carve2.ogg
|source=block
|subtitle=Shears carve
|description=When a pumpkin is carved
|id=block.pumpkin.carve
|translationkey=subtitles.block.pumpkin.carve
|volume=1.0
|pitch=1.0
|distance=16}}
{{Sound table
|sound=Random break.ogg
|subtitle=Item breaks
|source=player
|description=When a pair of shears' durability is exhausted
|id=entity.item.break
|translationkey=subtitles.entity.item.break
|volume=0.8
|pitch=0.8-1.2
|distance=16
|foot=1}}
{{edition|bedrock}}:<br>
Pumpkins do not have carve sounds.
{{Sound table
|type=bedrock
|sound=Shear.ogg
|source=player
|description=When something is sheared
|id=mob.sheep.shear
|volume=1.0
|pitch=1.0}}
{{Sound table
|sound=Beehive shear.ogg
|source=block
|description=When honeycombs are harvested from a beehive
|id=block.beehive.shear
|volume=0.8
|pitch=0.8-1.0}}
{{Sound table
|sound=Random break.ogg
|source=player
|description=When a pair of shears' durability is exhausted
|id=random.break
|volume=1.0
|pitch=0.9
|foot=1}}
==Data values==
===ID===
{{edition|java}}:
{{ID table
|edition=java
|showforms=y
|generatetranslationkeys=y
|displayname=Shears
|spritetype=item
|nameid=shears
|form=item
|foot=1}}
{{edition|bedrock}}:
{{ID table
|edition=bedrock
|shownumericids=y
|showforms=y
|notshowbeitemforms=y
|generatetranslationkeys=y
|displayname=Shears
|spritetype=item
|nameid=shears
|id=421
|form=item
|foot=1}}
==Achievements==
{{load achievements|Have a Shearful Day}}<div style="text-align:center"></div>
==History==
{{History||June 3, 2011|link=https://twitter.com/jeb_/status/76570646074765312|Shears were first mentioned by [[Jeb]] on [[wikipedia:Twitter|Twitter]]. The tweet revealing Jeb's work on shears was written in Swedish (''Jag jobbar på shears nu''), which translates to "I'm working on shears now".}}
{{History||June 7, 2011|link=https://twitter.com/jeb_/status/78154891637436416|Jeb tweets about how shears were originally planned as a way to defuse [[TNT]], but he dropped this shortly after deciding TNT would detonate only with [[redstone]] or [[fire]].}}
{{History|java beta}}
{{History||1.7|[[File:Shears JE1 BE1.png|32px]] Added shears.
|Before [[Beta 1.7]], [[sheep]] would drop 1-3 [[wool]] blocks at most when hit, but shears can harvest up to 4 wool blocks per sheep.}}
{{History||1.8|snap=Pre-release|Shears can now be used to harvest a [[fern]], [[vines]] and [[grass]].}}
{{History|java}}
{{History||1.0.0|snap=Beta 1.9 Prerelease|Shears now harvest [[red mushroom]]s from a [[mooshroom]] and turn it back into a normal [[cow]].}}
{{History||1.1|snap=11w49a|[[Sheep]] now drop only 1-3 wool blocks when sheared, but they can also regrow their wool by eating [[grass block|grass]], which is part of a plan to have [[animal]]s stay in the game longer.<ref>{{Tweet|jeb|76647002317930496}}</ref>}}
{{History||1.2.1|snap=12w05a|Shears can now be used to harvest [[dead bush]]es.}}
{{History|||snap=12w06a|Shears are now [[renewable]], due to [[zombie]]s occassionally dropping iron ingots.}}
{{History||1.3.1|snap=12w21a|Shears can now be [[trading|bought]] from farmer [[villager]]s for 3 [[emerald]]s each.}}
{{History|||snap=12w22a|Shears can now be used to break [[tripwire]] string and not set it off.}}
{{History||1.4.2|snap=12w38a|Added a [[sound]] when using shears on [[sheep]].}}
{{History||1.4.6|snap=12w50a|Shears can now be [[enchanting|enchanted]].}}
{{History||1.8|snap=14w02a|[[Trading]] has been changed: Shepherd [[villager]]s now [[trading|sell]] shears for 3–4 [[emerald]]s each.
|Farmers no longer trade shears.}}
{{History|||snap=pre1|Shears now lose [[item durability|durability]] when breaking [[wool]] blocks. In previous versions, shears would take [[item durability|durability]] [[damage]] only when destroyed or when breaking [[tall grass]] or [[leaves]], the damage remaining the same for all other [[block]]s.<ref>{{bug|MC-5313}}</ref>}}
{{History||1.9|snap=15w34a|Shears may now be used in a crafting grid to zoom in [[map]]s.}}
{{History|||snap=15w45a|Shears no longer zoom in maps.}}
{{History|||snap=15w47b|Shears can no longer be enchanted with [[Silk Touch]].
|Shears now lose durability when used to break any block (formerly lost durability only from [[leaves]], [[web]], [[grass]], [[vines]], [[tripwire]] and [[wool]]).}}
{{History|||snap=15w47c|Shears now harvest [[cobweb]] without requiring [[Silk Touch]].}}
{{History|||snap=15w49a|[[Snow golem]]'s [[pumpkin]] can now be removed with shears.}}
{{History||1.13|snap=17w47a|When shears are {{control|used}} on an un-carved [[pumpkin]], it now turns into a carved pumpkin and drops 4 [[pumpkin seeds]].
|Prior to [[1.13/Flattening|''The Flattening'']], this [[item]]'s numeral ID was 359.}}
{{History||1.14|snap=18w43a|Shears placed in a [[dispenser]] can now shear [[sheep]].
|[[File:Shears JE2 BE2.png|32px]] The texture of shears has been changed.}}
{{History|||snap=18w49a|Shears can now be found in [[chest]]s in [[village]] shepherd houses.}}
{{History||1.15|snap=19w34a|Shears can now be used on [[bee nest]]s and [[beehive]]s to harvest [[honeycomb]].}}
{{History||1.16|snap=20w15a|Shears placed in a dispenser can now shear [[mooshrooms]] and [[snow golem]]s.}}
{{History||1.16.2|snap=pre1|Shears are now required in order to pick up [[roots]].}}
{{History||1.16.2|snap=pre2|Shears are no longer required to pick up [[roots]].}}
{{History||1.17|snap=?|Shears are now required in order to pick up [[hanging roots]].}}
{{History||1.18|snap=21w37a|Shears can now stop [[cave vines]], [[kelp]], [[weeping vines]], and [[twisting vines]] from aging.}}
{{History||1.19|snap=22w11a|Shears are now required in order to pick up [[mangrove leaves]].}}
{{History|pocket alpha}}
{{History||v0.2.0|[[File:Shears JE1 BE1.png|32px]] Added shears.}}
{{History||v0.3.2|Survival [[player]]s no longer start out with infinite durability shears in the [[inventory]].}}
{{History||v0.4.0|Removed shears from the creative inventory.}}
{{History||v0.8.0|snap=build 3|Re-added shears to [[creative]] mode.}}
{{History||v0.9.0|snap=build 1|Shears can now be used to transform [[mooshroom]]s into [[cow]]s.}}
{{History||v0.12.1|snap=build 3|Shearing a [[snow golem]] now removes its [[pumpkin]].
|Shears can now be [[enchanting|enchanted]] in an [[anvil]].}}
{{History||v0.13.0|snap=build 1|Shears can now be used to break [[tripwire]] string without triggering it.}}
{{History||v0.15.0|snap=build 1|Shears now lose durability when used to break any [[block]].}}
{{History|pocket}}
{{History||1.0.4|snap=alpha 1.0.4.0|Shears can now be [[trading|bought]] from shepherd [[villager]]s.}}
{{History||1.1.0|snap=alpha 1.1.0.0|Breaking a [[melon|melon block]] with shears now always drop 9 [[melon slice|melons]].}}
{{History|bedrock}}
{{History||1.4.0|snap=beta 1.2.13.8|Shears can now be used to turn un-carved [[pumpkin]]s into [[carved pumpkin]] and spit out 4 [[pumpkin seeds]].}}
{{History||?|Shears now harvest [[cobweb]] without requiring [[Silk Touch]].}}
{{History||1.10.0|snap=beta 1.10.0.3|Shears placed in a [[dispenser]] can now shear [[sheep]].
|[[File:Shears JE2 BE2.png|32px]] The texture of shears has been changed.}}
{{History||1.11.0|snap=beta 1.11.0.1|Shears can now be found in [[village]] shepherd houses.}}
{{History|||snap=beta 1.11.0.4|Shears [[trading|sold]] by shepherd [[villager]]s now cost only 2 [[emerald]]s.}}
{{History||1.14.0|snap=beta 1.14.0.1|Shears can now be used on [[bee nest]]s and [[beehive]]s to harvest [[honeycomb]].}}
{{History|console}}
{{History||xbox=TU3|xbone=CU1|ps=1.0|wiiu=Patch 1|switch=1.0.1|[[File:Shears JE1 BE1.png|32px]] Added shears.}}
{{History||xbox=TU69|xbone=none|ps=1.76|wiiu=Patch 38|switch=none|Shears can now be used to turn regular [[pumpkin]]s into [[carved pumpkin]]s.}}
{{History||xbox=none|xbone=none|ps=1.90|wiiu=none|switch=none|[[File:Shears JE2 BE2.png|32px]] The texture of shears has been changed.
|Shears placed in a [[dispenser]] can now shear [[sheep]].}}
{{History|New 3DS}}
{{History||0.1.0|[[File:Shears JE1 BE1.png|32px]] Added shears.}}
{{History|foot}}
==Issues==
{{issue list}}
==Gallery==
<gallery>
File:Enchanted Shears.gif|An enchanted pair of shears.
</gallery>
==References==
{{reflist}}
==External links==
*[https://www.minecraft.net/en-us/article/taking-inventory--shears Taking Inventory: Shears] – Minecraft.net on November 20, 2019
{{Items}}
[[cs:Nůžky]]
[[de:Schere]]
[[es:Tijeras]]
[[fr:Cisailles]]
[[hu:Metszőolló]]
[[it:Cesoie]]
[[ja:ハサミ]]
[[ko:가위]]
[[nl:Schaar]]
[[pl:Nożyce]]
[[pt:Tesoura]]
[[ru:Ножницы]]
[[zh:剪刀]]
[[Category:Renewable resources]]</li></ul> | 15w46a | When spawning mobs, the spawning block cannot block movement (formerly just had to be non-opaque) and cannot be any type of rail. Also the block above can no longer be liquid. | |||
| 15w51a | Added spawnRadius gamerule to control the size of the world spawn area. | ||||
| pre2 | Pack spawning mechanics adjusted, "12 attempts" is now "up to 12 attempts" and is even more heavily weighted towards the center. | ||||
Issues
Issues relating to "Spawn" are maintained on the bug tracker. Report issues there.
Trivia
- In older versions, it is possible for the spawn point of a world to be in a lava lake, in which case starting a game in Survival is nearly impossible unless there is water nearby. This was fixed in 1.9, so that lava lakes fail to generate in the world spawn area.
- The world spawn (the point where players spawn if they have no valid bed spawn) is usually a random (seed determined) point between -500 and +500 on the X and Z axis. If the chosen point is in water (due to nothing, but ocean biomes in the -500 to +500 range), a second attempt will be made between -1500 to +1500. If this fails due to ocean, the game gives up and puts the world spawn in the middle of the ocean (still at the surface) (attempting to play the flat lands preset Water World does, this for example). Normally, however, if a player spawns in the water, it will be next to the shore because the world spawn itself picked a spot on dry land.
- Players spawn within a 10 block radius of the block space of the world spawn (so the possible area is a 21x21 box). Checks for valid spawn locations within this 21x21 area treat liquids as air (before 1.13's liquid changes). Thus, if you get a lava spawn, it's possible to keep trying your luck, as usually not every space within the 21x21 box will be within the lava lake.
External links
- Forum thread by Marglyph about the spawning algorithm in Beta 1.2
- Forum thread by fr0stbyte124 on mob spawning in Alpha v1.1.2_01 from before the Halloween Update changes