The nether portal block is the translucent part of the nether portal which teleports the player to and from the Nether.
Obtaining
The nether portal block cannot be obtained as an item.[Java and Legacy Console editions only] It can be placed using the /setblock command, and is generated when lighting a nether portal.
In the Bedrock Edition, it may be obtained as an item via inventory editing.[Bedrock Edition only]
Usage
Portal blocks can only exist within a nether portal structure. When the block is updated and detects it is not part of such a structure, it will remove itself.
The Nether portal animation.
Nether portal blocks can be used to teleport into and out of the Nether. When a player in the Overworld or the Nether stands in a nether portal block for 4 seconds, the player is taken to the other dimension. The player can step out of a portal before it completes its animation to abort the teleport. However, in Creative there is no wait time—the player will immediately transfer between dimensions. If there is already an active portal within range (about 128 blocks) in the other world, the player will appear in that portal. Otherwise, a portal will be created at or near the corresponding coordinates. If a single portal block is placed using commands, it can still be used to travel to the Nether.
Nether portal blocks make distinctive sounds of whimpering and cries, and emit purple particles resembling snowflakes (the same purple particles are produced by endermen, endermites, ender pearls, and the ender chest). Portal blocks emit light of level 11, rather dimmer than a torch and not quite sufficient to prevent mob spawning on top of a freestanding portal.
Much like water or lava, portal blocks cannot be broken by tools except in Creative. However, portal blocks can be destroyed by explosions (even weak ones) and can be replaced by placing water. If any portal block is destroyed, the whole portal is deactivated as adjacent portal blocks are updated and detect that the portal structure is no longer complete.
Portal blocks cannot be moved by pistons, nor can a piston push a block into a portal.
A portal block set in the End will behave exactly like in the Overworld, calculating coordinates in the Nether with the same 1:8 ratio (1:3 in Legacy Console Edition).
Data values
ID
Nether Portal (block)/ID
Block states
| Name | Default value | Allowed values | Description |
|---|---|---|---|
| axis | x
| x | The portal's long edge runs east–west. |
z | The portal's long edge runs north–south. |
| Name | Metadata Bits | Default value | Allowed values | Values for Metadata Bits |
Description |
|---|---|---|---|---|---|
| portal_axis | 0x10x2 | unknown
| unknown | 0 | If placed with this state, the portal's long edge runs north–south. If set to it, its direction will be tied to that of adjacent portals. |
x | 1 | The portal's long edge runs east–west. | |||
z | 2 | The portal's long edge runs north–south. |
History
A nether portal is a manufactured structure that acts as a gateway between the Overworld and the Nether dimensions.
Creation
|
|
| ||||||||||||||||||||||||||||||||||||||||
| Full version | Minimal version |
|---|
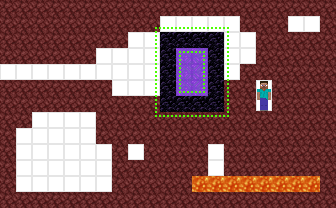
A nether portal is built as a vertical, rectangular frame of obsidian (4×5 minimum, 23×23 maximum). The four corners of the frame are not required, but portals created by the game always include them, resulting in 4 free/extra obsidian. The obsidian can be placed in any manner, e.g. by placing mined obsidian, by completing a ruined portal, or by casting it in place using lava and water. Adjacent portals can share obsidian blocks. A nether portal cannot be built horizontally like an end portal.
Once a frame is constructed, it is activated by fire placed inside the frame. This creates portal blocks inside the frame, resembling a vortex. The fire can be placed in any manner, including use of flint and steel or a fire charge, the impact of a fireball or small fireball, a lightning strike, or natural spread of fire to flammable material adjacent to the portal. Nether portals can be activated only in the Overworld or the Nether; they cannot be activated in the End and customized dimensions.
The fire must be the last placed block in the structure—a fire on an incomplete frame does not result in the portal activating upon the placement of the last obsidian block.
When a portal is used by a player, if no corresponding portal within range exists in the other dimension, one is created there; see § Portal search and § Portal creation. There is an infinitesimal chance of failure for the corresponding portal to generate in the Nether, leaving the player trapped until death or until another portal can be constructed, either in the Nether or by another player in the Overworld.
Behavior
When a player in the Overworld or the Nether stands in a nether portal block for 4 seconds, the player is taken to the other dimension. The player can step out of a portal before it completes its animation to abort the teleport. However, in Creative, the wait time is one game tick (1⁄20 second) for the player to transfer between dimensions. If there is already an active portal within range (about 128 blocks) in the other dimension, the player appears in that portal. Otherwise, a portal is created at or near the corresponding coordinates. If a portal is deactivated, and the matching portal in the other dimension is used before it is re-activated, a new portal may be created (unless there is another active portal within range). The usual cause for this is when the player's Nether-side portal is deactivated by a ghast, and then the player dies in the Nether, spawns, and then re-enters the Nether through the Overworld-side portal. However, multiple portals can be exploited to farm obsidian.
Most entities can travel through portals, including mobs (except the wither and ender dragon), thrown items, and transportation without passengers (neither mobs nor player)[1], including boats, minecarts and horses. Unlike players, other entities travel through portals instantly, and once they reach the other side, there is a cool-down time for 300 game ticks (15 seconds), in which they cannot go through any nether portals. Therefore, an entity can only travel though nether portals again, once it is not touching any nether portal for 15 seconds. In Bedrock Edition, a parrot on the player's shoulder prevents the player from going through the portal.[2]
Zombified piglins have a chance to spawn on the bottom frame of the portal in the Overworld in Java Edition if any nether portal block above receives a block tick. In Bedrock Edition they spawn in certain squares adjacent to the portals in the Overworld, not inside them. Zombified piglins spawned in this way have a full 15-second portal cooldown, meaning they can't go through the portal they are spawned in unless they leave the portal for a while. They spawn twice as often on Normal difficulty as on Easy, and three times as often on Hard difficulty as on Easy. No other mobs can be spawned by nether portals in this way, in any dimension.
Active portals also repel hoglins.
Chunk loading
Whenever an entity is teleported through a nether portal, the chunk at the linked portal gets load ticket with load level of 30, meaning that it is fully loaded and can process entities. This load level also spreads to adjacent chunks but they get lower for each chunk. This results in 8 more fully loaded "entity ticking" chunks with gradually fewer loaded chunks further out.
These chunks remain loaded for 15 seconds but this timer gets refreshed each time the entity passes through the portal (including mobs wandering through it from either direction). This can be used to permanently load chunks, creating a "chunk loader". Permanently-loaded chunks created using chunk loaders create a considerable amount of lag.
Portal linkage between Overworld and Nether


The closest portal to the corresponding location receives the player.

A new portal is generated in the closest empty area if no portal is found in range.
Coordinate conversion
Horizontal coordinates and distances in the Nether are proportional to the Overworld in a 1:8 ratio. That is, by moving 1 block horizontally in the Nether, players have moved the equivalent of 8 blocks on the Overworld. This does not apply to the Y-axis. Thus, for a given location (X, Y, Z) in the Overworld, the corresponding coordinates in the Nether are (floor(X ÷ 8), Y, floor(Z ÷ 8)), and conversely, for a location (X, Y, Z) in the Nether, the matching Overworld coordinates are (X × 8, Y, Z × 8).
The Java floor() method used in these conversions rounds down to the largest integer less than or equal to the argument (toward smaller positive values and toward larger negative values), so a coordinate of 29.9 rounds to 29, and one of −29.9 to −30.
Both the X and Z coordinates in this conversion are constrained to be between −29,999,872 and 29,999,872 (inclusive); this affects travel to the Overworld from the Nether at X or Z beyond ±3,749,984.
Portal search
When an entity starts colliding with a nether portal block, the game records the coordinates of the entity.
The game then converts those coordinates into destination coordinates as above: The entry X- and Z-coordinates are multiplied by 8 if the entity is in the Nether or divided by 8 if the entity is in the overworld, while the Y-coordinate is not changed.
Starting at these destination coordinates, the game looks for all nearby portal points of interest (POI). The point of interest can be within 257×257 blocks in the Overworld and 33×33 blocks in the Nether[3] centered on the converted coordinate and the full map height.
If any candidate portal POI is found, then the game selects the closest one as determined by its distance in the new coordinate system (including the Y coordinate, which can cause seemingly more distant portals to be selected), and teleports the entity to the location in the new portal calculated by a special algorithm. Note that the calculated distance is Euclidean distance, not taxicab distance. The distance computation between portals in the range is a straight-line distance calculation, and the shortest path is chosen, counting the Y difference.
The algorithm used for determining the position of the entity inside the destination portal to teleport to is as follows:
- Portal rectangle dimensions are determined for both source and destination portals. (Not counting the obsidian)
- Entity hitbox dimensions are subtracted from those rectangles' width and height, meaning that the entity can now be considered as a point, to avoid problems with preserving the hitbox dimensions in a goemetrical transformation.
- Distance between the bottom of the source portal and the bottom of the entity hitbox is measured, similar is done for distance to one of the sides of the portal.
- Those offsets are then multiplied by the ratio of the reduced sizes of the portals and used to get the position in the destination portal.
- If one of the dimensions of entity hitbox is larger than the portal, the corresponing dimension falls back to bottom-middle of the destination portal, the other dimension is still calculated using the algorithm.
- If the destination portal is at 90° to the source portal, entity yaw and velocity are rotated 90° clockwise, interestingly regardless of the direction of travel, meaning that if player travels there and back without touching their mouse, they will be rotated 180°, but the coordinates will still be the same, making it appear like the player exited through the wrong side of the portal.
This way, if source and destination portals are of the same shape, have the same orientation, and no other portals are interfering with the linking, one can safely assume that entities will travel through them as if the portal frames were physically placed behind each other.
Portal creation
For players, if no portals exist in the search region, the game creates one, by looking for the closest suitable location to place a portal, within 16 blocks horizontally (but any distance vertically) of the player's destination coordinates. A valid location is 3×4 buildable blocks with air 4 high above all 12 blocks, with the long axis matching the long axis of the source portal. The closest valid position in the 3D distance is always picked.
If the first check for valid locations fails entirely, the check is redone looking for a 1×4 expanse of buildable blocks with air 4 high above each.
If that fails, too, a portal is forced at the target coordinates, but with Y constrained to be between 70 and 10 less than the world height (i.e. 118 for the Nether or 246 for the Overworld). When a portal is forced in this way, a 2×3 platform of obsidian with air 3 high above is created at the target location, overwriting whatever might be there. This provides air space underground or a small platform if high in the air. In Bedrock Edition, these obsidian blocks are flanked by 4 more blocks of netherrack on each side, resulting in 12 blocks of platform.
Once coordinates are chosen, a portal (always 4×5 and including the corners) including portal blocks is constructed at the target coordinates, replacing anything in the way.
If a portal is forced into water or lava, the liquid immediately flows into the generated air blocks, leaving the player with no airspace. However, a glitch can prevent this water from flowing into the portal: if the liquid would flow both vertically and horizontally into the air pocket, it instead flows only vertically, so the blocks on the platform's outer corners never become water source blocks.
Sounds
| Sound | Subtitles | Source | Description | Resource location | Translation key | Volume | Pitch | Attenuation distance |
|---|---|---|---|---|---|---|---|---|
| Portal whooshes [sound 1] | Blocks | Randomly | block[sound 2] | subtitles[sound 2] | 0.5 | 0.8-1.2 | 10 | |
| None[sound 3] | Ambient/Environment | After the player is teleported through a nether portal | block[sound 2] | None[sound 3] | 0.25 | 0.8-1.2 | 16 | |
| Portal noise intensifies [sound 1] | Ambient/Environment | When the player enters a nether portal | block[sound 2] | subtitles[sound 2] | 0.25 | 0.8-1.2 | 16 |
| Sound | Source | Description | Resource location | Volume | Pitch |
|---|---|---|---|---|---|
| Blocks | Randomly | portal | 0.25 | 0.8-1.2 | |
| Ambient/Environment | After the player is teleported through a nether portal | portal | 1.0 | 1.0 | |
| Ambient/Environment | When the player enters a nether portal | portal | 1.0 | 1.0 |
Achievements
| Icon | Achievement | In-game description | Actual requirements (if different) | Gamerscore earned | Trophy type (PS4) | |
|---|---|---|---|---|---|---|
| PS4 | Other | |||||
| Into The Nether | Construct a Nether Portal. | Light a nether portal. | 30G | Bronze | ||
Advancements
| Icon | Advancement | In-game description | Parent | Actual requirements (if different) | Resource location |
|---|---|---|---|---|---|
 | We Need to Go Deeper | Build, light and enter a Nether Portal | Ice Bucket Challenge | Enter the Nether dimension. | story/enter_the_nether
|
| Nether | Bring summer clothes | — | Enter the Nether dimension. | nether/root
|
 | Subspace Bubble | Use the Nether to travel 7 km in the Overworld | Nether | Use the Nether to travel between 2 points in the Overworld with a minimum horizontal euclidean distance of 7000 blocks between each other, which is 875 blocks in the Nether. | nether/fast_travel
|
| Uneasy Alliance | Rescue a Ghast from the Nether, bring it safely home to the Overworld... and then kill it | Return to Sender | Kill a ghast while the player is in the Overworld. | nether/uneasy_alliance
|
Video
Note: These videos do not mention that nether portals on the Nether ceiling now link up with Overworld portals.
History
History of the structure itself
The specific instructions are: Nether portals during a1.2.0-preview, Beta 1.9 Prerelease 4 nether portals, and Texture Update nether portals (and nether portal block).
| Java Edition Alpha | |||||
|---|---|---|---|---|---|
v1.2.0{{Extension DPL}}<ul><li>[[Brown Dye|Brown Dye]]<br/>{{Item
| image = Brown Dye.png
| renewable = Yes
| stackable = Yes (64)
}}
'''Brown dye''' is a [[Dye#Primary|primary color dye]] derived from [[cocoa beans]].
== Obtaining ==
=== Crafting ===
{{Crafting
|Cocoa Beans
|Output=Brown Dye
|type=Material
|head=
}}
== Usage ==
{{dye usage}}
=== Crafting ingredient ===
{{crafting usage|ignore=Banner|continue=1}}
{{banner crafting usage}}
=== Loom ingredient ===
{{Banner loom usage|Brown Dye}}
=== Trading ===
Apprentice-level Shepherd villagers have a 20% chance to buy 12 brown dye for an emerald.{{only|bedrock}}
Expert-level Shepherd villagers have a {{frac|2|7}} chance to buy 12 brown dye for an emerald.{{only|java}}
== Data values ==
=== ID ===
{{edition|java}}:
{{ID table
|edition=java
|showforms=y
|generatetranslationkeys=y
|displayname=Brown Dye
|spritetype=item
|nameid=brown_dye
|form=item
|foot=1}}
{{edition|bedrock}}:
{{ID table
|edition=bedrock
|showaliasids=y
|shownumericids=y
|showforms=y
|notshowbeitemforms=y
|generatetranslationkeys=y
|displayname=Brown Dye
|spritetype=item
|nameid=brown_dye
|aliasid=dye / 17
|id=398
|form=item
|translationkey=item.dye.brown_new.name
|foot=1}}
== History ==
{{expand section|Item textures and more from a development video on twitter by bartek.}}
{{History|java}}
{{History||1.14|snap=18w43a|[[File:Brown Dye JE1 BE1.png|32px]] Added brown dye.}}
{{History|||snap=18w44a|Brown dye now can change the text color on [[sign]]s to brown.}}
{{History|||snap=19w05a|Added the [[wandering trader]], which sell brown dyes.}}
{{History|||snap=19w11a|Brown dye can now be [[trading|bought]] by shepherd villagers.}}
{{History||1.17|snap=20w45a|Brown dye can now used to craft newly added [[brown candle]]s.}}
{{History|||snap=21w19a|Brown dye can no longer used to craft brown candles.}}
{{History|||snap=Pre-release 1|Brown dye can once again used to craft brown candles.}}
{{History||1.20<br>(Experimental)|link=1.19.3|snap=22w42a|Brown dye now can change the text color on [[hanging sign]]s to brown.}}
{{History|bedrock}}
{{History||1.8.0|snap=beta 1.8.0.10|[[File:Brown Dye JE1 BE1.png|32px]] Added brown dye.}}
{{History||1.11.0|snap=beta 1.11.0.4|Brown dye can now be [[trading|sold]] to shepherd [[villager]]s.}}
{{History||1.16.100|snap=beta 1.16.100.56|The ID of brown dye has been changed from <code>dye/17</code> to <code>brown_dye</code>.}}
{{History|ps4}}
{{History||1.83|[[File:Brown Dye JE1 BE1.png|32px]] Added brown dye.}}
{{History|foot}}
== Issues ==
{{issue list}}
{{Items}}
[[Category:Dyes]]
[[Category:Renewable resources]]
[[de:Brauner Farbstoff]]
[[es:Tinte marrón]]
[[fr:Teinture marron]]
[[ja:茶色の染料]]
[[ko:갈색 염료]]
[[pl:Brązowy barwnik]]
[[pt:Corante marrom]]
[[th:สีย้อมสีน้ำตาล]]
[[zh:棕色染料]]</li><li>[[Cocoa Beans|Cocoa Beans]]<br/>{{Block
|image=<gallery>
Cocoa Age 0.png|Age 0 JE
Cocoa Age 1.png|Age 1 JE
Cocoa Age 2.png|Age 2 JE
</gallery>
|image2=<gallery>
Cocoa Age 0 BE.png|Age 0 BE
Cocoa Age 1 BE.png|Age 1 BE
Cocoa Age 2 BE.png|Age 2 BE
</gallery>
|transparent=Yes
|light=No
|tool=axe
|renewable=Yes
|stackable=Yes (64)
|flammable=No
|lavasusceptible=No
}} '''Cocoa beans''' are items obtained from cocoa pods and are used to plant them, as well as to craft [[dye|brown dye]] and [[cookie|cookies]].
'''Cocoa pods''' are [[Bone Meal|bonemealable]] [[plant]]s placed on [[Log|jungle log]] sides that grow cocoa beans, and can be found naturally in [[Jungle|jungles]].
==Obtaining==
In ''Java Edition'', cocoa beans are only obtained through the natural generation of cocoa pods, while in ''Bedrock Edition'', they can also be gotten in bonus chests, from [[fishing]] inside the jungle, bamboo jungle and sparse jungle biomes and during a [[trading]] with a wandering trader.
Cocoa beans come from cocoa pods, which are found on the trunks of normal-sized naturally-generated [[jungle tree]]s in [[jungle]], [[bamboo jungle]]s and [[sparse jungle]] temperate [[biome]]s.
Cocoa pods can be mined with any item, but [[axe]]s are the quickest. Fully grown cocoa pods drop 3 cocoa beans. Using a tool enchanted with Fortune does not increase the amount of cocoa beans dropped.
{{breaking row|horizontal=1|Cocoa|Axe|sword=1|link=none}}
The block itself can be obtained by inventory editing or [[add-on]]s {{in|bedrock}}.
From one to two cocoa beans can be found in 40% of bonus [[chest]]s {{in|bedrock}}.
{{LootChestItem|cocoa-beans}}
Cocoa beans can be obtained from [[fishing]] in a jungle {{in|bedrock}}.
[[Wandering trader]]s may sell 3 cocoa beans for an [[emerald]] during a [[trading]] {{in|bedrock}}.
==Usage==
===Farming===
{{main|Tutorials/Cocoa bean farming}}
Placing cocoa beans on the side of a jungle [[log]] plants a new cocoa pod. The log does not need to be attached to a tree. A cocoa pod can be placed on jungle logs, jungle [[wood]], stripped jungle logs and stripped jungle wood.
[[File:Cocoaplant farm.png|thumb|left|A somewhat efficient cocoa pod farm, minimizing space and wood use.]]
Cocoa has three stages of growth. During its first stage, the pod is small and green. In the second stage, the plant is bigger and colored tan. In its last stage, the pod is even larger and orange. The cocoa block has a 20% chance to grow a stage when receiving a [[Tick#Random tick|random tick]], giving it an average time of 5 minutes and 41 seconds per stage. When destroyed in the first two stages, the pod yields only one cocoa bean. When destroyed in the third stage, it gives 3 cocoa beans. [[Bone meal]] can be used to force the cocoa pod forward by one growth stage. Cocoa pods burst and drop their beans when struck by flowing water, pushed by a piston or if their [[log]] or wood are removed by any means.
===Composting===
Placing cocoa beans into a [[composter]] has a 65% chance of raising the compost level by 1. {{IN|bedrock}}, cocoa beans are accepted as a direct substitute of brown dye in many recipes.
===Crafting ingredient===
{{crafting usage}}
{{Dye usage}}
{{IN|bedrock}}, cocoa beans can be also used in banner patterns:
{{banner crafting usage}}
{{Banner loom usage|Cocoa Beans}}
==Sounds==
{{Sound table/Block/Wood}}
==Data values==
===ID===
{{edition|java}}:
{{ID table
|edition=java
|showforms=y
|generatetranslationkeys=y
|displayname=Cocoa
|spritetype=block
|nameid=cocoa
|form=block}}
{{ID table
|displayname=Cocoa Beans
|spritetype=item
|nameid=cocoa_beans
|form=item
|foot=1}}
{{edition|bedrock}}:
{{ID table
|edition=bedrock
|showforms=y
|showaliasids=y
|shownumericids=y
|generatetranslationkeys=y
|displayname=Cocoa
|spritetype=block
|nameid=cocoa
|id=127
|form=block}}
{{ID table
|displayname=Cocoa Beans
|spritetype=item
|nameid=cocoa_beans
|aliasid=dye / 3
|id=412
|form=item
|translationkey=item.dye.brown.name
|foot=1}}
===Block states===
{{see also|Block states}}
{{/BS}}
==History==
''For a more in-depth breakdown of changes to textures and models, including a set of renders for each state combination, see [[/Asset history]]''
{{History|java beta}}
{{History||1.2|[[File:Cocoa Beans JE1 BE1.png|32px]] Added cocoa beans.
|Cocoa beans are currently obtainable only through an inventory editor.}}
{{History||1.2_02|Prior to this, Cocoa Beans were misspelled as 'Coco Beans'.}}
{{History||1.4|Cocoa beans have been formally brought into the game as a reward found in [[dungeon]] chests.<ref>{{tweet|notch|53161729990987776}}</ref> (53% chance) Also, brown [[sheep]] now naturally spawn, making brown [[wool]] obtainable without hacking the game.
|Cocoa beans can now be used to craft [[cookie]]s.}}
{{History|java}}
{{History||May 8, 2012|link={{tweet|jeb|199867730927697920}}|[[Jeb]] revealed cocoa with a screenshot.}}
{{History||1.3.1|snap=12w18a|For only this snapshot, cocoa beans have been given a small (0.5%) chance of dropping from destroyed [[jungle tree]] [[leaves]] in a similar fashion to [[apple]]s from oak leaves, which makes cocoa beans [[renewable resource|renewable]] for the first time.}}
{{History|||snap=12w19a|[[File:Cocoa Age 0 (S) JE1.png|32px]] [[File:Cocoa Age 1 (S) JE1.png|32px]] [[File:Cocoa Age 2 (S) JE1.png|32px]] Added cocoa. The top textures of cocoa always keep a completely constant rotation, regardless of what direction they face. They also not shaded.
|[[File:Cocoa Beans JE2.png|32px]] The texture of cocoa beans has been changed.
|Cocoa has replaced jungle [[leaves]] as the main method of finding cocoa beans.
|[[File:Cocoa Age 3 (S) JE1.png|32px]] Cocoa with values 12–15 is inaccessible normally, and use the texture of the [[dragon egg]]. This is due to the dragon egg texture being to the left of the ripe cocoa texture in <samp>[[terrain.png]]</samp>, as cocoa textures are arranged with the oldest on the left and the youngest on the right, resulting in the unusually ripe cocoa reading the dragon egg texture.}}
{{History|||snap=1.3|[[File:Cocoa Beans JE3 BE2.png|32px]] The texture of cocoa beans has been changed.}}
{{History||1.4.2|snap=12w34a|Cocoa beans have been given the ability to [[Armor#Dyeing|dye]] leather [[armor]] and [[wolf]] collars.}}
{{History||1.4.6|snap=12w49a|Cocoa beans can now be [[crafting|crafted]] with [[gunpowder]] to create a [[firework star]].}}
{{History||1.5|snap=13w02a|Due to textures being stored in individual files, cocoa beans with data 12–15 no longer have a texture to use, and now crash the game if a [[chunk]] containing one is loaded.}}
{{History|||snap=13w03a|Cocoa with data values 12–15 now only crash the game if one is directly in the field of view.}}
{{History|||snap=13w04a|[[Bone meal]] now grows cocoa by only one stage.}}
{{History|||snap=13w10a|[[File:Cocoa Age 3 (S) JE2.png|32px]] Cocoa with data 12–15 now use the age 2 texture, resulting in a broken appearance, preventing previously mentioned crashes.}}
{{History||1.6.1|snap=13w18a|Cocoa beans have been removed from [[dungeon]] [[chest]]s.}}
{{History|||snap=13w19a|Brown [[Terracotta|stained clay]] can now be [[crafting|crafted]] using cocoa beans.}}
{{History||1.7.2|snap=13w41a|Brown [[stained glass]] can now be crafted using cocoa beans.}}
{{History||1.8|snap=14w07a|[[File:Cocoa Age 0 (S) JE2.png|32px]] [[File:Cocoa Age 1 (S) JE2.png|32px]] [[File:Cocoa Age 2 (S) JE2.png|32px]] [[File:Missing Model JE1.png|32px]] The top textures of cocoa now rotate with the blocks themselves (cocoa facing north remaining visually unaffected), and cocoa of age 3 has [[Missing model|no model]].}}
{{History|||snap=14w10a|[[File:Cocoa Age 0 (S) JE3.png|32px]] [[File:Cocoa Age 1 (S) JE3.png|32px]] [[File:Cocoa Age 2 (S) JE3.png|32px]] [[File:Missing Model JE2.png|32px]] The large section of cocoa is shaded, and the missing model (which age 3 cocoa uses) has changed.}}
{{History|||snap=14w25a|[[File:Cocoa Age 0 (S) JE4.png|32px]] [[File:Cocoa Age 1 (S) JE4.png|32px]] [[File:Cocoa Age 2 (S) JE4.png|32px]] The connecting region of cocoa is now shaded.}}
{{History|||snap=14w26a|Cocoa with data 12–15 has been effectively removed from the game, as such blocks now convert to a proper value with {{cmd|setblock}}. Loading worlds with existing out of range cocoa crash the game.}}
{{History|||snap=14w30a|Cocoa beans can now be used to dye [[banner]]s.}}
{{History||1.13|snap=17w47a|The different data values for the <code>dye</code> ID have been split up into their own IDs.
|Prior to [[1.13/Flattening|''The Flattening'']], this block's and item's numeral ID were respectively 127 and 351.}}
{{History||1.14|snap=18w43a|Cocoa beans can now be used to craft [[brown dye]].
|Cocoa beans can no longer be used as a [[dye]].
|All of the dye-related functions and crafting recipes of cocoa beans (except cookies) have been transferred to brown dye.
|"Cocoa Beans" item has been renamed to "Cocoa".
|[[File:Cocoa Beans JE4 BE3.png|32px]] The texture of cocoa has been changed.
|[[File:Cocoa Age 0 (S) JE5.png|32px]] [[File:Cocoa Age 1 (S) JE5.png|32px]] [[File:Cocoa Age 2 (S) JE5.png|32px]] The textures of cocoa have been changed.
|[[File:Cocoa Age 0 (texture) JE2 BE2.png|32px]] [[File:Cocoa Age 1 (texture) JE2 BE2.png|32px]] Textures for cocoa age 0 and 1 has palette left, visible only on particles.
|Cocoa now has a placement [[sound]].}}
{{History|||snap=19w03a|Placing cocoa into the new [[composter]] has a 50% chance of raising the compost level by 1.}}
{{History|||snap=19w05a|Cocoa now has a 65% chance of increasing the compost level in a composter by 1.}}
{{History|||snap=19w11b|"Cocoa" item has been renamed back to "Cocoa Beans".{{verify|was this not just one bug that affected other crops as well? if so cite the ticket and add to all other affected pages}}}}
{{History||1.18|snap=Pre-release 5|[[File:Cocoa Age 0 (texture) JE3 BE3.png|32px]] [[File:Cocoa Age 1 (texture) JE3 BE3.png|32px]] Textures for cocoa age 0 and 1 were changed. This visually changes only particles.}}
{{History||1.19|snap=22w11a|[[File:Cocoa Age 2 (S) JE6.png|32px]] The texture and model of cocoa age 2 have been changed.}}
{{History|pocket alpha}}
{{History||v0.3.0|[[File:Cocoa Beans JE1 BE1.png|32px]] Added cocoa beans. They are currently unobtainable and serve no purpose.}}
{{History||v0.8.0|snap=build 1|[[File:Cocoa Beans JE3 BE2.png|32px]] The texture of cocoa beans has been changed.
|Cocoa beans can be [[crafted]] from an [[orange dye]] and an [[ink sac]], or from [[dandelion yellow]], [[rose red]], and an ink sac, despite there being no way of obtaining ink sacs at the time.}}
{{History|||snap=build 3|Cocoa beans are now available in [[creative]].}}
{{History||v0.9.0|snap=build 1|[[File:Cocoa Age 0 (S) JE1.png|32px]] [[File:Cocoa Age 1 (S) JE1.png|32px]] [[File:Cocoa Age 2 (S) JE1.png|32px]] {{info needed|How did 12-16 appear?}} Added cocoa.
|Cocoa provides an additional way of obtaining cocoa beans.
|Cocoa beans are now used to craft [[cookie]]s.}}
{{History||v0.11.0|snap=build 14|Cocoa now grows over time.<ref>{{bug|MCPE-7887}}</ref>}}
{{History||?|[[File:Cocoa Age 0 (S) BE4.png|32px]] [[File:Cocoa Age 1 (S) BE4.png|32px]] [[File:Cocoa Age 2 (S) BE2.png|32px]] Cocoa no longer has a stem connecting it to the log.}}
{{History||v0.15.0|snap=Realms build 4|[[File:Cocoa Age 0 (S) JE1.png|32px]] [[File:Cocoa Age 1 (S) JE1.png|32px]] [[File:Cocoa Age 2 (S) JE1.png|32px]] Cocoa stems now render again.<ref>{{bug|MCPE-13579}}</ref>}}
{{History||v0.16.0|snap=build 1|Cocoa beans can no longer be crafted from [[orange dye]] and an ink sac.
|Cocoa beans can no longer be crafted from rose red, dandelion yellow and ink sacs.}}
{{History|pocket}}
{{History||1.0.0|snap=alpha 0.17.0.1|Cocoa beans can now be used to dye [[shulker]]s.}}
{{History||1.1.0|snap=alpha 1.1.0.0|Cocoa beans can now be used to dye [[shulker box]]es and [[bed]]s.
|Cocoa beans can now be used to craft [[concrete powder]].}}
{{History|bedrock}}
{{History||1.2.0|snap=beta 1.2.0.2|Cocoa beans can now be used to dye [[banner]]s, [[firework star]]s, and [[glass]].
|Cocoa beans can now be found in [[bonus chest]]s.}}
{{History||1.4.0|snap=beta 1.2.20.1|Cocoa beans can now be used to craft brown [[balloon]]s and [[glow stick]]s.}}
{{History||1.8.0|snap=beta 1.8.0.10|Cocoa beans can now be used to craft [[brown dye]].}}
{{History||1.10.0|snap=beta 1.10.0.3|Cocoa beans are now [[trading|sold]] by [[wandering trader]]s.
|[[File:Cocoa Beans JE4 BE3.png|32px]] The texture of cocoa beans has been changed.
|[[File:Cocoa Age 0 (S) BE4.png|32px]] [[File:Cocoa Age 1 (S) BE4.png|32px]] [[File:Cocoa Age 2 (S) BE4.png|32px]] The textures of cocoa have been changed.}}
{{History||1.11.0|snap=beta 1.11.0.1|Cocoa beans can now be used to fill up [[composter]]s.}}
{{History||1.16.100|snap=beta 1.16.100.56|The ID of cocoa beans has been changed from <code>dye/3</code> to <code>cocoa_beans</code>.}}
{{History||1.18.10|snap=beta 1.18.10.22|[[File:Cocoa Age 0 (texture) JE3 BE3.png|32px]] [[File:Cocoa Age 1 (texture) JE3 BE3.png|32px]] Textures for cocoa age 0 and 1 were changed. This visually changes only particles.}}
{{History|console}}
{{History||xbox=TU1|xbone=CU1|ps=1.0|wiiu=Patch 1|switch=1.0.1|[[File:Cocoa Beans JE1 BE1.png|32px]] Added cocoa beans.}}
{{History||xbox=TU9|[[File:Cocoa Beans JE3 BE2.png|32px]] The texture of cocoa beans has been changed.}}
{{History||xbox=TU12|[[File:Cocoa Age 0 (S) JE3.png|32px]] [[File:Cocoa Age 1 (S) JE3.png|32px]] [[File:Cocoa Age 2 (S) JE3.png|32px]]{{verify|Were these the models used?}} Added cocoa.}}
{{History||xbox=none|xbone=none|ps=1.90|wiiu=none|switch=none|[[File:Cocoa Beans JE4 BE3.png|32px]] The texture of cocoa beans has been changed once again.
|[[File:Cocoa Age 0 (S) JE5.png|32px]] [[File:Cocoa Age 1 (S) JE5.png|32px]] [[File:Cocoa Age 2 (S) JE5.png|32px]]{{verify|Were these the models used?}} The textures of cocoa have been changed.}}
{{History|new 3ds}}
{{History||0.1.0|[[File:Cocoa Beans JE3 BE2.png|32px]] Added cocoa beans.
|[[File:Cocoa Age 0 (S) JE3.png|32px]] [[File:Cocoa Age 1 (S) JE3.png|32px]] [[File:Cocoa Age 2 (S) JE3.png|32px]]{{verify|Were these the models used?}} Added cocoa.}}
{{History|foot}}
=== Cocoa "item" ===
{{:Technical blocks/Cocoa}}
== Issues ==
{{issue list|Cocoa Beans|Cocoa Pod}}
== Trivia ==
*Cocoa pods have a different hitbox for each size; however, the top is always 0.25 blocks below the top of the [[log]] it is on.
*If a cocoa pod grows while the player is standing next to it, the player is forced into the appropriate form of [[suffocation prevention]] depending on available space.
*{{IN|be}}, the pixels on top of the fully grown pod are 8/7 the size of those on the side.<ref>{{bug|MC-109055||Fixed}}</ref><ref>{{bug|MCPE-152862}}</ref>
== Gallery ==
<gallery>
CocoaReveal.png|The first screenshot of cocoa pods tweeted by [[Jens Bergensten]], which revealed the plants.
CocoaPlant.png|A screenshot tweeted by Jens Bergensten, showing the pod.
Cocoa Plants in a Jungle Biome (12w19a).png|Naturally generated cocoa pods.
CPlantsJWood.png|A cocoa pod farm.
Cocoa2.jpg|A cocoa farm.
Cocoa beans phases.png|Three growing phases of the cocoa pod.
AreaOptimizedBeanPods.gif|A log and pod layout for optimizing an example area of 14×14 (including walls).
File:CocoaBean15.png|Cocoa beans with values greater than 12 appeared this way
</gallery>
==Literature==
===References===
{{reflist}}
===External Links===
*[https://www.minecraft.net/en-us/article/taking-inventory--cocoa-beans Taking Inventory: Cocoa Beans] – Minecraft.net on December 5, 2019
{{Items}}
{{Blocks|vegetation}}
[[Category:Dyes]]
[[Category:Food]]
[[Category:Plants]]
[[Category:Renewable resources]]
[[Category:Non-solid blocks]]
[[Category:Natural blocks]]
[[cs:Kakaové boby]]
[[de:Kakaobohnen]]
[[es:Semillas de cacao]]
[[fr:Fèves de cacao]]
[[hu:Kakaóbab]]
[[ja:カカオ豆]]
[[ko:코코아 콩]]
[[nl:Cacaobonen]]
[[pl:Ziarna kakaowe]]
[[pt:Sementes de cacau]]
[[ru:Какао-бобы]]
[[uk:Какао-боби]]
[[zh:可可豆]]</li></ul> | preview | Added nether portals. | |||
v1.2.2a{{Extension DPL}}<ul><li>[[Fish|Fish]]<br/>{{About|the type of mob|the action|Fishing}}
'''Fish''' are aquatic creatures that are found in [[river]] and [[ocean]] biomes.
== Mobs ==
There are four categories of fish mobs in ''Minecraft'':
*{{EntityLink|Cod}}
*{{EntityLink|Salmon}}
*{{EntityLink|Pufferfish}}
*{{EntityLink|Tropical Fish}} - many color and pattern varieties
In addition, there are other fish-like mobs that have different characteristics from fish: {{EntityLink|Axolotl}}, {{EntityLink|Guardian}}, and {{EntityLink|Elder Guardian}}.
==Obtaining and transporting==
A live fish can be captured by using a [[water bucket]] on a fish, to obtain a [[bucket of fish]], which is the only way to obtain the live mob in item form. Using the bucket of fish on a water source block transfers the fish from the bucket to the body of water. A water bucket may also be used on [[axolotl]]s in this manner.
==Items==
Fish exist in several different item forms. Upon death, fish drop their item form equivalent (cooked if on fire), with a chance to drop a [[bone]]{{only|bedrock}} or [[bone meal]].{{only|java}}
;Non-living
*{{ItemLink|Raw Cod}}
*{{ItemLink|Cooked Cod}}
*{{ItemLink|Raw Salmon}}
*{{ItemLink|Cooked Salmon}}
*{{ItemLink|Pufferfish|link=Pufferfish (item)}}
*{{ItemLink|Tropical Fish|link=Tropical Fish (item)}}
;Living
*{{ItemLink|Bucket of Cod}}
*{{ItemLink|Bucket of Salmon}}
*{{ItemLink|Bucket of Pufferfish}}
*{{ItemLink|Bucket of Tropical Fish}}
== Spawning ==
Various fish can be found in different [[ocean]] [[biomes]], but only [[salmon]] appear in rivers. Fish can also spawn in player-created bodies of water, as long as they are within a river or ocean biome.
{| class="wikitable sortable" style="text-align:left" data-description="Fish biomes"
!'''Fish'''
! style="text-align:left" |{{BiomeLink|Warm Ocean}}
! style="text-align:left" |{{BiomeLink|Lukewarm Ocean}}<br>{{BiomeLink|Deep Lukewarm Ocean}}
! style="text-align:left" |{{BiomeLink|Ocean}}<br>{{BiomeLink|Deep Ocean}}
! style="text-align:left" |{{BiomeLink|Cold Ocean}}<br>{{BiomeLink|Deep Cold Ocean}}
! style="text-align:left" |{{BiomeLink|Frozen Ocean}}<br>{{BiomeLink|Deep Frozen Ocean}}
! style="text-align:left" |{{BiomeLink|River}}<br>{{BiomeLink|Frozen River}}
|-
! rowspan=2 style="text-align:left" |{{EntityLink|Cod}}
| rowspan=2 {{tc|no}}
| rowspan=2 {{tc|yes}}
| rowspan=2 {{tc|yes}}
| rowspan=2 {{tc|yes}}
| {{tc|no|No{{only|je|short=1}}}}
| rowspan=2 {{tc|no}}
|-
| {{tc|yes|Yes{{only|be|short=1}}}}
|-
! rowspan=2 style="text-align:left" |{{EntityLink|Salmon}}
| rowspan=2 {{tc|no}}
| {{tc|no|No{{only|je|short=1}}}}
| {{tc|no|No{{only|je|short=1}}}}
| rowspan=2 {{tc|yes}}
| rowspan=2 {{tc|yes}}
| rowspan=2 {{tc|yes}}
|-
| {{tc|yes|Yes{{only|be|short=1}}}}
| {{tc|yes|Yes{{only|be|short=1}}}}
|-
! rowspan=2 style="text-align:left" |{{EntityLink|Pufferfish}}
| rowspan=2 {{tc|yes}}
| {{tc|yes|Yes{{only|je|short=1}}}}
| rowspan=2 {{tc|no}}
| rowspan=2 {{tc|no}}
| rowspan=2 {{tc|no}}
| rowspan=2 {{tc|no}}
|-
| {{tc|no|No{{only|be|short=1}}}}
|-
! style="text-align:left" |{{EntityLink|Tropical Fish}}<ref group="note">Also spawns in {{BiomeLink|Lush Caves}} at any Y-level.</ref>
| {{tc|yes}}
| {{tc|yes}}
| {{tc|no}}
| {{tc|no}}
| {{tc|no}}
| {{tc|no}}
|-
! style="text-align:left" |{{EntityLink|Squid}}
| {{tc|yes}}
| {{tc|yes}}
| {{tc|yes}}
| {{tc|yes}}
| {{tc|yes}}
| {{tc|yes}}
|-
! rowspan=2 style="text-align:left" |{{EntityLink|Dolphin}}
| rowspan=2 {{tc|yes}}
| rowspan=2 {{tc|yes}}
| rowspan=2 {{tc|yes}}
| {{tc|no|No{{only|je|short=1}}}}
| rowspan=2 {{tc|no}}
| rowspan=2 {{tc|no}}
|-
| {{tc|yes|Yes{{only|be|short=1}}}}
|}
{{notelist}}
In ''Java Edition'', fish can spawn inside a water block at Y-level 50 to 63 (from 13 blocks below sea level up to inside the block one above it), that also has water above and below it. The spawn block and the block below can be any kind of water, such as a source block, falling water, bubble column, kelp, or even a waterlogged block (as long as the fish can be placed at the bottom center of the spawn block without colliding with anything solid). The block above must be pure water, such as a source block, falling water, or flowing water of any depth. Particularly, the block above cannot also be a bubble column, so fish no longer spawn inside bubble elevators.<ref>{{cite bug|MC|244683|Tropical fish spawn in bubble columns (fixed in 22w07a)}}</ref>
''Bedrock Edition'' does permit fish to spawn in bubble columns.<ref>{{cite bug|MCPE|73967|Squids, Dolphins, and fish not spawning in bubble columns (fixed in 1.16.20)}}</ref>
Fish can spawn between 24 and 64 block spherical range away from the player.{{only|java}}
=== Despawning ===
As of [[1.16]], fish can despawn at range of 40 blocks or more from the player, and will instantly despawn more than 64 blocks away, except when spawned using a [[bucket of fish]].
{{Items}}
{{Entities}}
[[cs:Ryba]]
[[de:Fisch (Begriffsklärung)]]
[[es:Pez]]
[[fr:Poisson]]
[[it:Pesce]]
[[ja:魚]]
[[ko:물고기]]
[[nl:Vis]]
[[pl:Ryba (ujednoznacznienie)]]
[[pt:Peixe]]
[[ru:Рыба]]
[[th:ปลา (แก้ความกำกวม)]]
[[uk:Риба]]
[[zh:鱼]]</li><li>[[Minecart with Furnace|Minecart with Furnace]]<br/>{{ItemEntity
|image=Minecart with Furnace.png
|renewable=Yes
|stackable=No
|size=Height: 0.7 Blocks<br>Width: 0.98 Blocks
|networkid=10
|drops= 1 {{ItemLink|Minecart with Furnace}}
|health={{Hp|6}}
}}
A '''minecart with furnace''' is a [[furnace]] inside a [[minecart]]. It can be powered with [[coal]] or [[charcoal]] to propel it across a [[rail]] line for a limited time, which can be used to move other minecarts.
==Obtaining==
Minecarts with furnace can be retrieved by attacking them, and by doing so it drops as an [[item]].
===Crafting===
{{Crafting
|Output= Minecart with Furnace
|type= Transportation
|Furnace|Minecart}}
==Usage==
Minecarts with furnaces are placed in the same way as other minecarts. It does not have a graphical user interface, unlike a [[furnace]].
Minecarts with furnaces can be powered, done by feeding fuel ([[coal]] or [[charcoal]]) into the furnace minecart with the {{Control|use}} button. The fuel is consumed immediately and it starts to move in the same direction the player clicked toward. Pressing {{Control|use}} always turns it to that direction, even when not holding coal.
Any piece of fuel, added at any time, increases the total range by an additional 3600 ticks (equal to 180 seconds or 3 minutes). The upper limit is 32767 ticks, approximately 27 minutes.
When powered, minecarts with furnaces cover 240m per minute (about 4 m/s, slightly slower than walking speed) or 720m per piece of coal. They do not accelerate beyond this speed when going downhill or on active [[powered rail]]s, and as long as they remain powered, they do not slow down when going uphill, on inactive powered rails, or when pushing or pulling other minecarts.
If a powered furnace minecart is derailed and then pushed back onto a rail, it starts moving again in the direction it came from, so they are not easily turned around in this state unless a player is nearby to redirect it with {{Control|use}}.
Minecarts with furnaces can climb up steep inclines while pushing other minecarts as long as they have fuel. If a minecart with furnace reaches a slope while pulling another minecart, the pulled minecart is switched to the forward position so that it can be pushed along the slope instead of pulled.
When a minecart with furnace bumps into another minecart or multiple minecarts, the other minecarts are pushed forward with great speed. The furnace minecart continues on with its own speed. Because of this speed difference, some of the minecarts may end up inside unloaded chunks on straight tracks.
===Train mechanics===
{{Schematic
|caption=weakly-shunted 1-cart train, one cart was used only to push the train together and is left behind
|AB|mc-$ew|mc-$ew|mc/Fu-$ew|-
|AB|ra-$wu|ra-$ew|ra-$ew|ra-$ew|ellipsis-ew
}}
{{Schematic
|caption=Creating a strongly-shunted 1-cart train. The sloped rail must be replaced with a horizontal rail before powering.
|AB|mc-$ew||mc/Fu-$ew|-
|AB|ra-$ew|ra-$ew|ra-$eu|ra-$ew|ra-$ew|ellipsis-ew
}}
[[File:FurnaceMinecartTrain.png|thumb|right|A Minecart train powered by furnace [[Minecart|minecarts.]]|alt=]]
A furnace minecart can be made to pull up to four other minecarts. All minecarts in this train move at the constant speed of the furnace minecart. Trains are formed when a minecart is pushed into the back of a powered furnace minecart or a short-enough train. These shunts are fragile at best and easily come undone, but some methods are stronger than others. For example, pushing a minecart into a furnace minecart and then powering the furnace gives a weaker shunt than pushing the furnace minecart into the other minecart against a wall, and then powering the furnace in the other direction.
A high-speed minecart running into the back of a furnace minecart going in the same direction automatically creates a weak shunt with it, pulling it along.
Pulling a minecart with TNT causes it to explode.
{| class="wikitable"
|+Pulled minecart/Shunt behavior
!Condition
!Result
|-
|Furnace loses power/speed||Shunt comes undone
|-
|Entity bumping besides those part of the train||Jettisoned forward
|-
|Upward sloped track||Jettisoned forward
|-
|Downward sloped track||Jettisoned forward (strong shunt) or shunt comes undone (weak shunt)
|-
|90° turn in track||Jettisoned backward
|-
|Turn toward north/south or east/west that is not the direction the train was shunted in||Train derails
|}
When a train comes to a turn, the shunt comes undone with the pulled minecart jettisoned backward. The correct way to make such a turn is having the shunt undone before a turn, and then make the two rejoin on a straight rail later by having the pulled cart catch up with the minecart with furnace.<ref name=mango/>
Since the train runs slower on a fully powered track than a normal minecart (~5 m/s compared to 8m/s), a train pulled by an unpowered furnace minecart is ideal for AFK farms involving breaking or placing blocks like [[nether wart]].<ref name=mango>{{YouTubeLink|1=pRLiAQfhTG8|2=Why The Furnace Minecart Isn't As Useless As You Think|3=ilmango}}</ref>
==Properties==
The coal is not stored as an item in the entity, but in the object data in the fuel property as a time in ticks. ''Fuel'' is a short value, i.e. a maximum of 32767 ticks, which is about 27 minutes. However, {{cmd|/summon furnace_minecart ~ ~ ~ {Fuel:32000} }} alone doesn't make it go since it doesn't have a direction. It can be right-clicked on a track to give it a direction, or it can be summoned with the properties ''PushX'' and ''PushZ'' set, which are responsible for the direction. The <code>Motion</code> property of every entity allows for movement of the minecart, but it does not direct the minecart to move on its own.
==Sounds==
{{Edition|Java}}:<br>
Minecarts with furnaces use the Friendly Creatures sound category for entity-dependent sound events.<ref group=sound name=rollsource>{{bug|MC-42132}}</ref>
{{Sound table
|sound=Minecart rolling.ogg
|subtitle=Minecart rolls
|source=Friendly Creatures <ref group=sound name=rollsource/>
|overridesource=1
|description=While a minecart with furnace is moving
|id=entity.minecart.riding
|translationkey=subtitles.entity.minecart.riding
|volume=0.0-0.35 <ref group=sound>Relates linearly with horizontal velocity (max 0.5)</ref>
|pitch=0.0-1.0 <ref group=sound>Will increase by 0.0025 per tick if the minecart's horizontal velocity is more than 0.01</ref>
|distance=16
|foot=1}}
{{Edition|Bedrock}}:
{{Sound table
|type=bedrock
|sound=Minecart rolling.ogg
|source=neutral
|description=While a minecart with furnace is moving
|id=minecart.base
|foot=1}}
==Data values==
===ID===
{{ID table
|edition=java
|firstcolumnname=Item
|showforms=y
|generatetranslationkeys=y
|displayname=Minecart with Furnace
|spritetype=item
|nameid=furnace_minecart
|form=item
|foot=1}}
{{ID table
|edition=java
|firstcolumnname=Entity
|generatetranslationkeys=y
|displayname=Minecart with Furnace
|spritetype=entity
|nameid=furnace_minecart
|foot=1}}
===Entity data===
Minecarts with furnace have entity data associated with them that contain various properties of the entity.
{{el|java}}:
{{main|Entity format}}
{{/ED}}
{{el|bedrock}}:
: See [[Bedrock Edition level format/Entity format]].
==History==
{{History|java alpha}}
{{History||v1.0.14|[[File:Minecart with Furnace JE1.png|32px]] [[File:Minecart with Furnace (item) JE1.png|32px]] Minecarts with furnace were added.
|Since no in-game name was indicated, they were referred to by names such as "powered minecart" or "furnace minecart".
|No matter how much fuel was added to the minecart, it would never move for more than 3 minutes after the last fuel.}}
{{History|java beta}}
{{History||1.0|When tooltips were added to items in inventory, this was named "Minecart with Furnace".}}
{{History||1.2|[[File:Minecart with Furnace JE2.png|32px]] The texture of the minecart with furnace has been changed.}}
{{History|java}}
{{History||1.0.0|snap=?|Each piece of [[coal]] now powers a [[minecart]] with furnace for {{convert|3|minutes|ticks}}, so that adding another piece of coal at any time increases the total range by another 3 minutes. A full stack of 64 coal now powers it for {{convert|192|minutes|ticks}}.
|Minecarts with furnace on a level track cover 204 meters per minute.}}
{{History||1.8|snap=14w11a|Minecarts with furnace now give a much greater boost to other minecarts.
|When powered, minecarts with furnace now move on non-powered rails without decelerating.}}
{{History|||snap=14w17a|Minecarts with furnace's behavior has been reverted, so that no change was released in [[Java Edition 1.8]].}}
{{History||1.11|snap=16w32a|The entity ID of the minecart with furnace has been changed from <code>MinecartFurnace</code> to <code>furnace_minecart</code>.}}
{{History||1.13|snap=17w47a|Prior to [[1.13/Flattening|''The Flattening'']], this [[item]]'s numeral ID was 343.}}
{{History||1.14|snap=18w43a|[[File:Minecart with Furnace JE3.png|32px]] [[File:Minecart with Furnace (item) JE2.png|32px]] The texture of the minecart with furnace has been changed.}}
{{History||1.15|snap=19w38a|[[File:Minecart with Furnace 19w38a.png|32px]] The furnace now appears dark, like suffocating mobs.}}
{{History|||snap=19w39a|The furnace texture is now colored correctly.}}
{{History||1.15.2|snap=Pre-Release 1|Furnace minecarts can now navigate around any corner.}}
{{History||1.19|snap=22w13a|The crafting recipe for a minecart with furnace is now shapeless.
|Breaking a minecart with furnace will now drop the item instead of the minecart and furnace separately.<ref>{{bug|MC-249493|||Fixed}}</ref>}}
{{History|console}}
{{History||xbox=TU1|xbone=CU1|ps=1.0|wiiu=Patch 1|switch=1.0.1|[[File:Minecart with Furnace JE2.png|32px]] [[File:Minecart with Furnace (item) JE1.png|32px]] Added minecart with furnace.}}
{{History|Ps4}}
{{History||1.90|[[File:Minecart with Furnace JE3.png|32px]] [[File:Minecart with Furnace (item) JE2.png|32px]] The texture of the minecart with furnace has been changed.}}
{{History|foot}}
==Issues==
{{issue list}}
==Trivia==
*The minecart with furnace is excluded from {{els|be|3ds}} on purpose. In a tweet, [[Jeb]] considered removing it from {{el|je}}.<ref>{{tweet|jeb|699241247391772672|I think we will phase out the furnace minecraft ''(sic)''|15 Feb 2016}}</ref>
**When converting a [[Legacy Console Edition]] world to a [[Bedrock Edition]] world, any present minecarts with furnaces are converted into a normal minecart.
**Despite the above-described poor standing of the minecart, it was most recently briefly featured in an animation in the [[Minecraft Live 2022]], where one was depicted as moving a train of about 20 minecarts at a higher than normal speed.
==Gallery==
<gallery>
Running Powered Minecart.png|A powered minecart in action.
</gallery>
==References==
{{reflist}}
{{Items}}
{{Entities}}
[[Category:Mechanics]]
[[cs:Parní vozík]]
[[de:Antriebslore]]
[[es:Vagoneta con horno]]
[[fr:Wagonnet motorisé]]
[[hu:Gőzmeghajtású csille]]
[[ja:かまど付きのトロッコ]]
[[ko:화로가 실린 광산 수레]]
[[nl:Mijnkar met oven]]
[[pl:Wagonik z piecem]]
[[ru:Вагонетка с печью]]
[[uk:Вагонетка з піччю]]
[[zh:动力矿车]]</li></ul> | The player can now create a nether portal by pressing F4 (presumably a developer testing function). | ||||
v1.2.2b{{Extension DPL}}<ul><li>[[Food|Food]]<br/>{{For|food in ''Minecraft Dungeons''|MCD:Food}}
[[File:Eating Steve.png|thumb|right|150px]]
[[File:Eating Alex.png|thumb|right|150px]]
'''Food''' refers to any consumable [[item]]s that, when eaten, restore [[hunger]] points and hunger saturation points, and sometimes cause [[status effect]]s. They are essential to survival, as going without them eventually causes the player to starve, causing damage until reaching {{hp|10}} in Easy [[difficulty]], and {{hp|1}} on Normal. [[Hunger#Effects of hunger|Starvation]] damage kills the player in Hard and [[Hardcore]] Mode.
Food is eaten by holding {{control|use}} while having the food item selected in the hot bar or in the off-hand.
[[Cake]] cannot be eaten this way, and must instead be placed on a surface before being eaten.
With the exception of [[chorus fruit]], [[golden apple]]s, [[honey bottle]]s, [[milk]], and [[suspicious stew]]{{only|Java}}, food cannot be eaten when the hunger bar is completely full. In [[Creative]] Mode, any food can be consumed at any time.
All food items and ingredients can be stacked in the inventory slots, except for [[milk]], [[rabbit stew]], [[mushroom stew]], [[beetroot soup]], [[suspicious stew]], and [[cake]].{{only|Java}}
This page covers food items for players; blocks and items that can be eaten by other [[mob]]s are not included here.
== Hunger and saturation ==
{{main|Hunger#Mechanics}}
{{seealso|Tutorials/Hunger_management}}
[[File:Raw_and_Cooked_Chicken_Comparison.png|thumb|Raw (left) and cooked (right) [[chicken]]. Eating raw chicken can give the [[player]] [[food poisoning]].]]
[[Player]]s have two different food statistics, one of which is visible: The hunger level is visible, and the saturation level is not.
[[Saturation]] is the first statistic to decrease when a player performs energy-intensive actions, and it must be completely depleted before the visible hunger meter begins decreasing. Although the current saturation level is generally hidden, the player can tell that their saturation level is completely depleted if the visible hunger meter begins displaying a jittering effect.
Eating a food item replenishes a fixed number of hunger points and saturation points, based on the item. Some foods have a better ratio of saturation to hunger points replenished than others. Overeating the hunger bar does not overflow to saturation.
A player's current saturation level can never exceed their current hunger level. A player at a hunger level of 5, for example, can be at a maximum of 5 saturation. Food always restores hunger (raising the saturation limit) ''before'' supplying saturation. The most efficient use of food is to eat low-saturation food to fill the hunger bar, followed by high-saturation food to fill saturation. While a few hunger points may be wasted when eating nourishing food when nearly full, eating nourishing foods on a low hunger bar wastes even more points of saturation. Maximizing saturation increases the length of time (and/or the amount of damage healed) before the player needs to eat again.
=== Usage ===
Most foods can be eaten by holding down the right-click button with a food item in hand. It takes 1.61 seconds to eat most foods; dried kelp takes 0.865 seconds to eat. Additionally, a player can hold food in their [[offhand]] {{in|Java}}.
While eating, food [[particles]] form from the player's mouth correlated with their respective food item, and produces a munching noise. Eating also slows the user significantly.
Unlike other foods, [[cake]] has to be eaten by placing it, then right-clicking on its block form. Eating cake is instant and it has 7 edible slices, each giving {{hunger|2}} hunger and 0.4 hunger [[saturation]].
=== Nourishment value ===
Nourishment is defined as the ratio of saturation to hunger points restored. Foods with higher nourishment values should be eaten when the hunger bar is more full.
The "nourishment" table below can help by categorizing foods by their saturation-to-hunger restoration ratios. See the more detailed [[#Foods|Foods]] table for the exact hunger and saturation statistics of each food.
<!-- do not change the locations of the food in this table without providing an explanation in the edit summary -->
{| class="wikitable" data-description="Nourishment value"
|-
!Nourishment
! Value
!Food
|- style="text-align: left;"
!Great
| 2.4
| {{Slot|Enchanted Golden Apple}}{{Slot|Golden Apple}}{{Slot|Golden Carrot}}
|- style="text-align: left;"
!Good
| 1.6
| {{Slot|Cooked Mutton}}{{Slot|Cooked Porkchop}}{{Slot|Cooked Salmon}}{{Slot|Steak}}
|- style="text-align: left;"
!Normal
| 1.2
| {{Slot|Baked Potato}}{{Slot|Beetroot}}{{Slot|Beetroot Soup}}{{Slot|Bread}}{{Slot|Carrot}}{{Slot|Cooked Chicken}}{{Slot|Cooked Cod}}{{Slot|Cooked Rabbit}}{{Slot|Mushroom Stew}}{{Slot|Rabbit Stew}}{{Slot|Suspicious Stew}}
|- style="text-align: left;"
! Low
| 0.6
| {{Slot|Apple}}{{Slot|Chorus Fruit}}{{Slot|Dried Kelp}}<ref group="note" name="Java">{{only|java}}</ref>{{Slot|Melon Slice}}{{Slot|Poisonous Potato}}{{Slot|Potato}}{{Slot|Pumpkin Pie}}{{Slot|Raw Beef}}{{Slot|Raw Chicken}}{{Slot|Raw Mutton}}{{Slot|Raw Porkchop}}{{Slot|Raw Rabbit}}{{Slot|Sweet Berries}}<ref group="note" name="Bedrock">{{only|bedrock}}</ref>
|- style="text-align: left;"
!Poor
| 0.2
| {{Slot|Cake}}{{Slot|Cookie}}{{Slot|Dried Kelp}}<ref group="note" name="Bedrock"/>{{Slot|Glow Berries}}{{Slot|Honey Bottle}}{{Slot|Pufferfish|link=Pufferfish (item)}}{{Slot|Raw Cod}}{{Slot|Raw Salmon}}{{Slot|Rotten Flesh}}{{Slot|Spider Eye}}{{Slot|Sweet Berries}}<ref group="note" name="Java"/>{{Slot|Tropical Fish|link=Tropical Fish (item)}}
|}
== Foods ==
{{/table}}
=== Ingredients ===
The following items cannot be eaten on their own. Instead, they are used to craft consumable food items.
<!--
Please leave spaces between each row in the table - this has no effect on the appearance of the table, but it makes it a lot easier on future wiki editors!
-->
{| class="sortable wikitable list-style-none" data-description="Ingredients"
|-
! Name
! Icon
! Used to make
! Source(s)
! Notes
|- id="Bowl"
! scope="row" | [[Bowl]]
| {{Slot|Bowl}}
| {{itemLink|Mushroom Stew}}
* {{itemLink|Beetroot Soup}}
* {{itemLink|Rabbit Stew}}
* {{itemLink|Suspicious Stew}}
|
* [[Crafting]] from [[planks]]
* [[Fishing Rod#Usage|Fishing]]
* [[Turtle]] killed by [[lightning]]
* Eating food made with them
|
|- id="Cocoa Bean"
! scope="row" | [[Cocoa Beans]]
| {{Slot|Cocoa Beans}}
| {{itemLink|Cookie}}s
|
* Breaking [[cocoa plant]]s
* Bought from [[wandering trader]]
|
|- id="Egg"
! scope="row" | [[Egg]]
| {{Slot|Egg}}
|
* {{itemLink|Cake}}
* {{itemLink|Pumpkin Pie}}
|
* Laid by [[chicken]]s
* Found in village fletcher chests
|
|- id="Milk"
! scope="row" | [[Milk Bucket]]
| {{Slot|Milk Bucket}}
| {{itemLink|Cake}}
|
* Milking a [[cow]], [[mooshroom]]s, or [[goat]]s
* Killing a [[Wandering trader]] drinking it
| Can also be consumed to clear [[status effect]]s
|- id="Mushroom"
! scope="row" | [[Brown Mushroom]] and [[Red Mushroom]]
| {{Slot|Brown Mushroom;Red Mushroom}}
| {{itemLink|Mushroom Stew}}
* {{itemLink|Rabbit Stew}}
* {{itemLink|Suspicious Stew}}
| {{anchor|Brown Mushroom|Red Mushroom}}
* Dark/shady areas
* Swamp [[biome]]s
* [[Mushroom fields]]
* Breaking [[Huge Mushroom|huge brown or red mushrooms]]
* [[The Nether]]
* Using [[shears]] on a [[mooshroom|brown mooshroom or red mushroom]]
* Bought from [[wandering trader]]
|
|- id="Flower"
! scope="row" | [[Flower]]
| {{Slot|Any Flower}}
|{{itemLink|Suspicious Stew}}
|
* Breaking [[Flower]]
* Using [[Bone Meal]] on a [[Grass Block]]
* Bought from [[wandering trader]]
* Killing [[Iron Golem]] (poppy)
|
|- id="Pumpkin"
! scope="row" | [[Pumpkin]]
| {{Slot|Pumpkin}}
| {{itemLink|Pumpkin Pie}}
|
* Harvesting mature [[pumpkin]]s grown from [[pumpkin seeds]]
* Naturally occurring [[pumpkin]]s
* Taiga and Snowy Taiga [[Village]]s
* Bought from [[wandering trader]]
|
|- id="Sugar"
! scope="row" | [[Sugar]]
| {{Slot|Sugar}}
|
* {{itemLink|Cake}}
* {{itemLink|Pumpkin Pie}}
|
* Crafting [[sugar cane]]
* Dropped by [[witch]]es
* Creating from its base [[element]]s {{only|bedrock|education}}
* Redeemed from [[honey bottle]] on a crafting table
|
|- id="Wheat"
! scope="row" | [[Wheat]]
| {{Slot|Wheat}}
|
* {{itemLink|Bread}}
* {{itemLink|Cake}}
* {{itemLink|Cookie}}s
|
* Harvesting mature [[wheat]]
* Found in [[Dungeon#Loot|dungeon]], [[Woodland Mansion#Loot|woodland mansion]], [[Shipwreck#Loot|shipwreck]], [[Igloo#Loot|igloo]], [[Village#Loot|village]], [[Ocean Ruins#Loot|ocean ruins]], and [[Pillager Outpost#Loot|pillager outpost]] chest
* Crafting [[hay bale]]s
|
|- id="Gold Nugget"
! scope="row" | [[Gold Nugget]]
| {{Slot|Gold Nugget}}
| {{itemLink|Golden Carrot}}
|
* Crafting [[gold ingot]]s
* Dropped by [[zombified piglin]]s
* Found in [[Shipwreck#Loot|shipwreck]], [[Igloo#Loot|igloo]], [[Village#Loot|village]], and [[Ocean Ruins#Loot|ocean ruins]] chest
* Smelting golden armor or tools
* Mining [[nether gold ore]] without [[Silk Touch]]
|
|- id="Gold Ingot"
! scope="row" | [[Gold Ingot]]
| {{Slot|Gold Ingot}}
| {{itemLink|Golden Apple}}
|
* Crafting [[gold block]]s or [[gold nugget]]s
* Rarely dropped by [[zombified piglin]]s and by [[Drowned]]
* Smelting [[gold ore]] or [[nether gold ore]]
* Found in [[Shipwreck#Loot|shipwreck]], [[Jungle Pyramid#Structure:Loot|jungle pyramid]], [[Dungeon#Loot|dungeon]], [[Woodland Mansion#Loot|woodland mansion]], [[Nether Fortress#Loot|nether fortress]], [[End city#Loot|end city]], [[Mineshaft#Loot|mineshaft]], [[Village#Structure:Loot|village]], [[Stronghold#Loot|stronghold]], [[Buried Treasure#Loot|buried treasure]] and [[Desert pyramid#Structure:Loot|desert pyramid]] chest
|
|- id="Honey Block"
! scope="row" | [[Honey Block]]
| {{Slot|Honey Block}}
| {{itemLink|Honey Bottle}}
|
* Crafting [[honey bottle]]s
|
|}
== Sounds ==
{{Sound table/Entity/Food}}
== Achievements ==
{{load achievements|Pork Chop;Iron Belly;Rabbit Season;Overpowered;Castaway;Delicious Fish;The Lie;Bake Bread;Time For Stew}}
== Advancements ==
{{load advancements|Husbandry;A Balanced Diet;A Furious Cocktail;How Did We Get Here;Fishy Business}}
== History ==
{{History|java classic}}
{{History||June 14, 2009|link=https://notch.tumblr.com/post/123343045/my-vision-for-survival|[[Notch]] discussed how food would work in [[survival]] mode: "Monsters will hurt you and take away from your health. The only way to regain health is to eat food. You get food from either hunting or from farming."}}
{{History||0.24_SURVIVAL_TEST|[[Mushroom]]s are now edible, making them the first food to be added in the game. At this point, food restores [[health]] instead of [[hunger]], and are eaten instantly without sound or animation. Pigs drop them upon death.}}
{{History|java indev}}
{{History||0.31|snap=20091231-2|Added [[apple]]s, which are currently non-functional.}}
{{History|||snap=20100110|Apples are now edible, and restore {{hp|4}} each.}}
{{History|||snap=?|Mushrooms are no longer edible.}}
{{History|||snap=20100130|Added [[mushroom stew]], which restores {{hp|8}} health.}}
{{History||20100206|Added [[wheat]] and [[bread]].
|Mushroom stew now restores {{hp|10}} health.}}
{{History||20100219|[[Pig]]s now drop [[raw porkchop]]s, which can be [[smelt]]ed to become [[cooked porkchop]]s.}}
{{History|java infdev}}
{{History||20100227-1|Added [[golden apple]]s. At this point, they were crafted with [[block of gold]], and restored {{hp|20}}.}}
{{History|java alpha}}
{{History||v1.0.8|Added [[milk]], which was at this point unobtainable and the player could not use it in any way.}}
{{History||v1.0.11|Milk can now be obtained in the game, by milking a [[cow]] with an empty [[bucket]].}}
{{History||v1.0.14|With the addition of [[chicken]]s, [[egg]]s are now in the game, but have no use. Chickens do not drop raw chicken at this point in time.}}
{{History||v1.2.0|snap=<nowiki>?|slink=:Category:Information needed requiring unarchived version|Added [[pumpkin]]s, but not pumpkin seeds.
|Added [[raw fish]] and [[cooked fish]], obtainable through [[fishing]].}}
{{History||v1.2.3|Eating food now functions correctly in multiplayer.}}
{{History|java beta}}
{{History||1.2|Added [[sugar]] and [[cake]].}}
{{History||1.4|[[Cocoa beans]] now appear naturally in the game; since Beta 1.2, they were available only through inventory editors.
|Added [[cookie]]s.}}
{{History||1.5|Pigs now drop cooked porkchops if killed while on fire.}}
{{History||1.8|snap=Pre-release|Added [[melon]]s, [[melon seeds]], and [[pumpkin seeds]].
|Added [[raw chicken]] as a drop from chickens, which can be smelted into [[cooked chicken]].
|Added [[raw beef]] as a drop from cows, which can be smelted into [[steak]].
|Added [[rotten flesh]] as a new drop from [[zombie]]s.
|Added an eating animation, instead of food simply disappearing from the player's hand as if a block had been placed.
|Added [[hunger bar]]; now food restores hunger instead of health.
|Food now stacks in the inventory, with the exception of cake, mushroom stew, and milk.
|[[Huge mushroom]]s were added as a new source for [[mushroom]]s.
|With the addition of the hunger bar, golden apples now restore {{Hunger|10}} and give 30 seconds of [[regeneration]], but do not heal health directly anymore.}}
{{History|java}}
{{History||1.0.0|snap=Beta 1.9 Prerelease 2|Mushrooms can now be obtained from the mushroom island [[biome]], via the huge mushrooms, random scattered mushrooms, or the new [[mooshroom]]s.
|[[Milk]] can be used to nullify the effects of [[potion]]s.
|[[Spider]]s now drop [[Spider Eye|eyes]].}}
{{History||1.1|snap=release|Golden apples are now made with [[gold nugget]]s instead of blocks of gold, restore {{Hunger|4}} and give 4 seconds of regeneration.}}
{{History||1.3.1|snap=12w21a|Added enchanted golden apples, which functioned like golden apples prior to 1.1 and had the same crafting recipe, but also gave resistance and fire resistance for 5 minutes each.
|[[Cocoa Beans]] are now a crop, making all food items a renewable resource.}}
{{History||1.4.2|snap=12w34a|[[Potato]]es and [[carrot]]s can be obtainable from zombies (rare drop) or harvested.
|Potatoes can be cooked to make [[baked potato]]es
|Harvesting potatoes may give 0–2 [[poisonous potato]]es.
|Carrots can be crafted into [[golden carrot]]s.
|Added [[pumpkin pie]], making [[pumpkin]]s a food ingredient.}}
{{History||1.7.2|snap=13w36a|Added [[tropical fish (item)|clownfish]], [[Raw Salmon|raw]] and [[cooked salmon]], and [[pufferfish (item)|pufferfish]].}}
{{History||1.8|snap=14w02a|Baked potatoes now restore {{Hunger|5}} hunger points instead of 6, with a corresponding reduction in saturation restored.
|Carrots now restore {{Hunger|3}} hunger points instead of 4, with a corresponding reduction in saturation restored.}}
{{History|||snap=14w27a|Added [[Raw Mutton|raw]] and [[cooked mutton]], [[Raw Rabbit|raw]] and [[cooked rabbit]], and [[rabbit stew]].}}
{{History||1.9|snap=15w31a|Added [[chorus fruit]], [[beetroot]] and [[beetroot soup]].
|Enchanted golden apples are no longer craftable, making them no longer renewable.}}
{{History||1.13|snap=18w07a|Added [[dried kelp]], which is edible.}}
{{History||1.14|snap=18w43a|Added [[suspicious stew]].}}
{{History|||snap=18w49a|Added [[sweet berries]].}}
{{History||1.15|snap=19w34a|Added [[honey bottle]]s.}}
{{History|||snap=19w35a|[[Honey bottle]]s now remove [[poison]] effects when consumed.}}
{{History|||snap=19w46a|All foods can now be consumed in Creative mode, including cake.}}
{{History||1.17|snap=21w05a|Added [[glow berries]].}}
{{History|pocket alpha}}
{{History||v0.4.0|Added the first food items: [[apple]]s, [[bread]], [[mushroom stew]], [[raw beef]], [[steak]], [[raw chicken]], [[cooked chicken]], [[raw porkchop]]s, and [[cooked porkchop]].}}
{{History||v0.5.0|Added [[melon]]s, [[melon slice]]s, and [[melon seeds]].}}
{{History||v0.7.0|Added [[milk]] and [[cake]].}}
{{History||v0.8.0|snap=build 1|Added [[pumpkin pie]], [[carrot]]s, [[potato]]es, and [[baked potato]]es.}}
{{History|||snap=build 2|Added [[beetroot]]s and [[beetroot soup]].}}
{{History||v0.9.0|snap=build 1|[[Potato]]es and [[carrot]]s can be obtainable from zombies (rare drop) or harvested.
|Added [[cookie]]s.}}
{{History||v0.11.0|snap=build 1|Added [[rotten flesh]] as a new drop from [[zombie]]s, at this time, it inflicts poison.
|Added [[Raw Fish|raw]] and [[cooked fish]], [[clownfish]], [[Raw Salmon|raw]] and [[cooked salmon]], and [[pufferfish]].}}
{{History|||snap=build 4|[[Milk]] can be used to nullify the effects of [[potion]]s.}}
{{History||v0.12.1|snap=build 1|Eating food now restores hunger.
|[[Spider]]s now drop [[Spider Eye|eyes]].
|Added poisonous potatoes, golden apples, enchanted golden apples and golden carrots.}}
{{History||v0.13.0|snap=build 1|Hunger restored by food now matches Minecraft PC.
|Added raw rabbit, cooked rabbit, and [[rabbit stew]].}}
{{History||v0.15.0|snap=build 1|Added raw mutton and cooked mutton.}}
{{History|pocket}}
{{History||1.0.0|snap=alpha 0.17.0.1|Added chorus fruit.}}
{{History|bedrock}}
{{History||1.4.0|snap=beta 1.2.14.2|Added [[dried kelp]], which is edible.}}
{{History||1.7.0|snap=beta 1.7.0.2|Food can now be eaten in creative mode and on peaceful difficulty.}}
{{History||1.10.0|snap=beta 1.10.0.3|Added [[sweet berries]].}}
{{History||1.13.0|snap=beta 1.13.0.9|Added [[suspicious stew]].}}
{{History||1.14.0|snap=beta 1.14.0.1|Added [[honey bottle]].}}
{{History||1.17.0|snap=beta 1.16.220.52|Added [[glow berries]].}}
{{History|foot}}
{{items}}
[[Category:Food]]
[[cs:Potraviny]]
[[de:Hunger]]
[[es:Comida]]
[[fr:Nourriture]]
[[hu:Étel]]
[[it:Cibo]]
[[ja:食料]]
[[ko:식료품]]
[[nl:Voedsel]]
[[pl:Jedzenie]]
[[pt:Alimento]]
[[ru:Еда]]
[[th:อาหาร]]
[[uk:Їжа]]
[[zh:食物]]</li><li>[[Smithing Template|Smithing Template]]<br/>{{for|the block|Smithing Table}}
{{Item
| title = Smithing Template
| image = <gallery>
Netherite Upgrade Smithing Template.png | Netherite Upgrade
Sentry Armor Trim Smithing Template.png | Armor Trim
</gallery>
| rarity = Rare
| renewable = No<!--Smithing templates are not renewable because diamonds, their only other method of creation, are not renewable.-->
| stackable = Yes (64)
}}
'''Smithing templates''' are items used in [[Smithing Table|smithing tables]] to alter [[Tool|tools]] and [[armor]]. They are consumed when used, but can be [[Crafting|duplicated]] using an existing template, its material and [[Diamond|diamonds]].
The sixteen '''armor trim smithing templates''' are found in a variety of [[Generated structures|structures]], and are used to apply various decorative trims (dependent on the variant) to armor using certain minerals for different colors.
'''Netherite upgrade smithing templates''' are required to upgrade diamond equipment with a [[Netherite Ingot|netherite ingot]]. They are only found in [[Bastion Remnant|bastion remnants]], but are guaranteed only in [[:en:Bastion_Remnant#Treasure_room|treasure rooms]].
== Obtaining ==
Smithing templates can be found in various [[Generated structures|structures]] and can be duplicated by using seven diamonds and a block based on what the template is.
=== Crafting ===
{{Crafting
|A1=Diamond |B1=Matching Smithing Template |C1=Diamond
|A2=Diamond |B2=Netherrack;Cobblestone;Sandstone;End Stone;Terracotta;Terracotta;Netherrack;Cobblestone;Terracotta;Cobbled Deepslate;Blackstone;Purpur Block;Prismarine;Cobblestone;Cobbled Deepslate;Terracotta;Mossy Cobblestone |C2=Diamond
|A3=Diamond |B3=Diamond |C3=Diamond
|Output=Matching Smithing Template,2
}}
{| class="article-table"
|+ Duplication
! Item !! Material
|-
| {{ItemSprite|netherite-upgrade|text=Netherite Upgrade}} || {{BlockSprite|Netherrack|text=Netherrack}}
|-
| {{ItemSprite|sentry-armor-trim|text=Sentry Armor Trim}} || {{BlockSprite|Cobblestone|text=Cobblestone}}
|-
| {{ItemSprite|vex-armor-trim|text=Vex Armor Trim}} || {{BlockSprite|Cobblestone|text=Cobblestone}}
|-
| {{ItemSprite|wild-armor-trim|text=Wild Armor Trim}} || {{BlockSprite|Mossy Cobblestone|text=Mossy Cobblestone}}
|-
| {{ItemSprite|coast-armor-trim|text=Coast Armor Trim}} || {{BlockSprite|Cobblestone|text=Cobblestone}}
|-
| {{ItemSprite|dune-armor-trim|text=Dune Armor Trim}} || {{BlockSprite|Sandstone|text=Sandstone}}
|-
| {{ItemSprite|wayfinder-armor-trim|text=Wayfinder Armor Trim}} || {{BlockSprite|Terracotta|text=Terracotta}}
|-
| {{ItemSprite|raiser-armor-trim|text=Raiser Armor Trim}} || {{BlockSprite|Terracotta|text=Terracotta}}
|-
| {{ItemSprite|shaper-armor-trim|text=Shaper Armor Trim}} || {{BlockSprite|Terracotta|text=Terracotta}}
|-
| {{ItemSprite|host-armor-trim|text=Host Armor Trim}} || {{BlockSprite|Terracotta|text=Terracotta}}
|-
| {{ItemSprite|ward-armor-trim|text=Ward Armor Trim}} || {{BlockSprite|Cobbled Deepslate|text=Cobbled Deepslate}}
|-
| {{ItemSprite|silence-armor-trim|text=Silence Armor Trim}} || {{BlockSprite|Cobbled Deepslate|text=Cobbled Deepslate}}
|-
| {{ItemSprite|tide-armor-trim|text=Tide Armor Trim}} || {{BlockSprite|Prismarine|text=Prismarine}}
|-
| {{ItemSprite|snout-armor-trim|text=Snout Armor Trim}} || {{BlockSprite|Blackstone|text=Blackstone}}
|-
| {{ItemSprite|rib-armor-trim|text=Rib Armor Trim}} || {{BlockSprite|Netherrack|text=Netherrack}}
|-
| {{ItemSprite|eye-armor-trim|text=Eye Armor Trim}} || {{BlockSprite|End Stone|text=End Stone}}
|-
| {{ItemSprite|spire-armor-trim|text=Spire Armor Trim}} || {{BlockSprite|Purpur Block|text=Purpur Block}}
|}
{{IN|bedrock}}, spire, tide, and dune armor trims can be duplicated with more blocks than {{in|java}}. In addition to the normal blocks, Tide armor trims can be duplicated using Prismarine Bricks or Dark Prismarine, dune armor trims can be duplicated with smooth sandstone, cut sandstone, or chiseled sandstone, and spire armor trims can be duplicated with purpur pillars.<ref>{{bug|MCPE-172711||Tide, Spire, and Dune Armor Trims can be crafted from more blocks than in Java Edition}}</ref>
=== Mob loot ===
[[Elder guardian]]s have a 20% chance to drop 1 tide armor trim upon death. [[Looting]] doesn't affect this percentage, and the elder guardian doesn't need to be killed by a player in order for the trim to drop and can be duplicated with [[prismarine]].
=== Chest loot ===
{{#invoke:LootChest|base3|netherite-upgrade-smithing-template,sentry-armor-trim-smithing-template,vex-armor-trim-smithing-template,wild-armor-trim-smithing-template,coast-armor-trim-smithing-template,dune-armor-trim-smithing-template,ward-armor-trim-smithing-template,silence-armor-trim-smithing-template,snout-armor-trim-smithing-template,rib-armor-trim-smithing-template,eye-armor-trim-smithing-template,spire-armor-trim-smithing-template}}
Note: In Woodland Mansions, only chests with random loot have the chance to contain the Vex Smithing Template, chests in the "Allium room", "Sapling farm", "Tree-chopping room" and "Fake End portal room" always generate with the same, room specific, loot.
=== Suspicious block loot ===
Items can only be extracted from [[Suspicious Block|suspicious blocks]] using a [[brush]].{{#invoke:LootChest|base3|wayfinder-armor-trim-smithing-template,raiser-armor-trim-smithing-template,shaper-armor-trim-smithing-template,host-armor-trim-smithing-template}}
== Usage ==
=== Crafting ingredient ===
{{Crafting
|A1=Diamond |B1=Matching Smithing Template |C1=Diamond
|A2=Diamond |B2=Netherrack;Cobblestone;Sandstone;End Stone;Terracotta;Terracotta;Netherrack;Cobblestone;Terracotta;Cobbled Deepslate;Blackstone;Purpur Block;Prismarine;Cobblestone;Cobbled Deepslate;Terracotta;Mossy Cobblestone |C2=Diamond
|A3=Diamond |B3=Diamond |C3=Diamond
|Output=Matching Smithing Template,2
}}
=== Smithing ingredient ===
Smithing templates are used at a [[smithing table]]. Netherite upgrade smithing templates are used to upgrade diamond gear into netherite gear by using a netherite upgrade, a piece of diamond gear, and a [[netherite ingot]].
{{Smithing
|head=1
|ingredients=Netherite Upgrade +<br>Any Diamond Gear +<br>[[Netherite Ingot]]
|Netherite Upgrade
|Diamond Helmet; Diamond Chestplate; Diamond Leggings; Diamond Boots; Diamond Sword; Diamond Pickaxe; Diamond Axe; Diamond Shovel
|Netherite Ingot
|Netherite Helmet; Netherite Chestplate; Netherite Leggings; Netherite Boots; Netherite Sword; Netherite Pickaxe; Netherite Axe; Netherite Shovel
|tail=1
}}
{{FakeImage|{{Animate|Iron_Armor_with_Iron_Shaper_Trim.png; Golden_Armor_with_Golden_Shaper_Trim.png; Diamond_Armor_with_Diamond_Shaper_Trim.png; Netherite_Armor_with_Netherite_Shaper_Trim.png|180px}}|If the armor material and the trimming material are the same, the color palette used for the armor trim is darker.}}
Armor trim smithing templates are used to customize an armor piece's appearance by using a smithing template, an armor piece, and an ingot or crystal ([[emerald]], [[redstone dust]], [[lapis lazuli]], [[amethyst shard]], [[nether quartz]], [[netherite ingot]], [[diamond]], [[gold ingot]], [[iron ingot]], or [[copper ingot]]). Including all dyed leather armor colors and regular armor, there are ≈3.679x10<sup>9</sup> different possible armor pieces<!--5713438 leather colors, plus the 4 other armor materials = 5713442. 5713442 * 161 (the 160 trim combos (16 trims, 10 materials) + untrimmed) = 919864162. 919864162 * 4 (helmet, chestplate, leggings, boots) = 3679456648 ≈ 3.679x10^9-->, and 7.16x10<sup>35</sup> <!--919864162 + 1 (no armor in that slot) = 919864163. 919864163^4 = 715969952015045562662444917041515536 ≈ 7.16x10^35 total possible armor combinations-->total possible armor combinations excluding enchantments and the player not wearing armor.
Already trimmed armor can be trimmed again by applying another template on it; the old trim pattern is overwritten in the process.<ref>{{bug|MC-262538||When combining armor trims the new trim deletes the old one|WAI}}</ref> Therefore, one piece of armor cannot possess multiple trims at the same time.
Most armor trims cover a small portion of the armor piece's surface with the trim material, except for the silence armor trim, which allows the trim material to cover a majority of the armor piece's surface.
All of the trims are purely decorative, and don't impact gameplay or strength(without the use of mods or plugins) of the armor they are applied to in any way. [[Piglin]]s do not pick up any gold-trimmed armor pieces, and they are not pacified by players wearing even a full set of gold-trimmed armor (unless, of course, the armor pieces in question are themselves golden), and netherite-trimmed armor pieces can still be burned by [[fire]].
{{Smithing
|head=1
|ingredients=Any Armor Trim +<br>Any Armor Piece +<br>Any Ingot/Crystal
|Any Armor Trim Smithing Template
|Iron Helmet; Netherite Chestplate;Golden Leggings;Diamond Boots
|Amethyst Shard; Copper Ingot; Diamond; Emerald; Gold Ingot; Iron Ingot; Lapis Lazuli; Nether Quartz; Netherite Ingot; Redstone Dust; Diamond; Emerald
|Amethyst Trim Iron Helmet; Copper Trim Netherite Chestplate; Diamond Trim Golden Leggings; Emerald Trim Diamond Boots; Gold Trim Iron Helmet; Iron Trim Netherite Chestplate; Lapis Trim Golden Leggings; Quartz Trim Diamond Boots; Netherite Trim Iron Helmet; Redstone Trim Netherite Chestplate; Diamond Trim Golden Leggings; Emerald Trim Diamond Boots
|tail=1
}}
;List of color palettes for all materials
*{{ItemSprite|emerald }} - {{TrimPalette| emerald }}
*{{ItemSprite|redstone dust }} - {{TrimPalette| redstone dust }}
*{{ItemSprite|lapis lazuli }} - {{TrimPalette| lapis lazuli }}
*{{ItemSprite|amethyst shard }} - {{TrimPalette| amethyst shard }}
*{{ItemSprite|nether quartz }} - {{TrimPalette| nether quartz }}
*{{ItemSprite|netherite ingot }} - {{TrimPalette| netherite ingot }} (Darker: {{TrimPalette| netherite ingot |darker=1}})
*{{ItemSprite|diamond }} - {{TrimPalette| diamond }} (Darker: {{TrimPalette| diamond |darker=1}})
*{{ItemSprite|gold ingot }} - {{TrimPalette| gold ingot }} (Darker: {{TrimPalette| gold ingot |darker=1}})
*{{ItemSprite|iron ingot }} - {{TrimPalette| iron ingot }} (Darker: {{TrimPalette| iron ingot |darker=1}})
*{{ItemSprite|copper ingot }} - {{TrimPalette| copper ingot }}
== Data values ==
=== ID ===
{{edition|java}}:
{{ID table
|edition=java
|firstcolumnname=Smithing Template
|showforms=y
|generatetranslationkeys=y
|displayname=Netherite Upgrade
|spritename=netherite-upgrade-smithing-template
|spritetype=item
|nameid=netherite_upgrade_smithing_template
|form=item}}
{{ID table
|displayname=Sentry Armor Trim
|spritename=sentry-armor-trim-smithing-template
|spritetype=item
|nameid=sentry_armor_trim_smithing_template
|form=item}}
{{ID table
|displayname=Vex Armor Trim
|spritename=vex-armor-trim-smithing-template
|spritetype=item
|nameid=vex_armor_trim_smithing_template
|form=item}}
{{ID table
|displayname=Wild Armor Trim
|spritename=wild-armor-trim-smithing-template
|spritetype=item
|nameid=wild_armor_trim_smithing_template
|form=item}}
{{ID table
|displayname=Coast Armor Trim
|spritename=coast-armor-trim-smithing-template
|spritetype=item
|nameid=coast_armor_trim_smithing_template
|form=item}}
{{ID table
|displayname=Dune Armor Trim
|spritename=dune-armor-trim-smithing-template
|spritetype=item
|nameid=dune_armor_trim_smithing_template
|form=item}}
{{ID table
|displayname=Wayfinder Armor Trim
|spritename=wayfinder-armor-trim-smithing-template
|spritetype=item
|nameid=wayfinder_armor_trim_smithing_template
|form=item}}
{{ID table
|displayname=Raiser Armor Trim
|spritename=raiser-armor-trim-smithing-template
|spritetype=item
|nameid=raiser_armor_trim_smithing_template
|form=item}}
{{ID table
|displayname=Shaper Armor Trim
|spritename=shaper-armor-trim-smithing-template
|spritetype=item
|nameid=shaper_armor_trim_smithing_template
|form=item}}
{{ID table
|displayname=Host Armor Trim
|spritename=host-armor-trim-smithing-template
|spritetype=item
|nameid=host_armor_trim_smithing_template
|form=item}}
{{ID table
|displayname=Ward Armor Trim
|spritename=ward-armor-trim-smithing-template
|spritetype=item
|nameid=ward_armor_trim_smithing_template
|form=item}}
{{ID table
|displayname=Silence Armor Trim
|spritename=silence-armor-trim-smithing-template
|spritetype=item
|nameid=silence_armor_trim_smithing_template
|form=item}}
{{ID table
|displayname=Tide Armor Trim
|spritename=tide-armor-trim-smithing-template
|spritetype=item
|nameid=tide_armor_trim_smithing_template
|form=item}}
{{ID table
|displayname=Snout Armor Trim
|spritename=snout-armor-trim-smithing-template
|spritetype=item
|nameid=snout_armor_trim_smithing_template
|form=item}}
{{ID table
|displayname=Rib Armor Trim
|spritename=rib-armor-trim-smithing-template
|spritetype=item
|nameid=rib_armor_trim_smithing_template
|form=item}}
{{ID table
|displayname=Eye Armor Trim
|spritename=eye-armor-trim-smithing-template
|spritetype=item
|nameid=eye_armor_trim_smithing_template
|form=item}}
{{ID table
|displayname=Spire Armor Trim
|spritename=spire-armor-trim-smithing-template
|spritetype=item
|nameid=spire_armor_trim_smithing_template
|form=item
|foot=1}}
{{edition|bedrock}}:
{{ID table
|edition=bedrock
|firstcolumnname=Smithing Template
|shownumericids=y
|showforms=y
|notshowbeitemforms=y
|generatetranslationkeys=y
|displayname=Netherite Upgrade
|spritename=netherite-upgrade-smithing-template
|spritetype=item
|nameid=netherite_upgrade_smithing_template
|id=685
|form=item
|translationkey=item.smithing_template.name, upgrade.netherite_upgrade.name}}
{{ID table
|displayname=Sentry Armor Trim
|spritename=sentry-armor-trim-smithing-template
|spritetype=item
|nameid=sentry_armor_trim_smithing_template
|id=686
|form=item
|translationkey=item.smithing_template.name, trim_pattern.sentry.name}}
{{ID table
|displayname=Vex Armor Trim
|spritename=vex-armor-trim-smithing-template
|spritetype=item
|nameid=vex_armor_trim_smithing_template
|id=692
|form=item
|translationkey=item.smithing_template.name, trim_pattern.vex.name}}
{{ID table
|displayname=Wild Armor Trim
|spritename=wild-armor-trim-smithing-template
|spritetype=item
|nameid=wild_armor_trim_smithing_template
|id=689
|form=item
|translationkey=item.smithing_template.name, trim_pattern.wild.name}}
{{ID table
|displayname=Coast Armor Trim
|spritename=coast-armor-trim-smithing-template
|spritetype=item
|nameid=coast_armor_trim_smithing_template
|id=688
|form=item
|translationkey=item.smithing_template.name, trim_pattern.coast.name}}
{{ID table
|displayname=Dune Armor Trim
|spritename=dune-armor-trim-smithing-template
|spritetype=item
|nameid=dune_armor_trim_smithing_template
|id=687
|form=item
|translationkey=item.smithing_template.name, trim_pattern.dune.name}}
{{ID table
|displayname=Wayfinder Armor Trim
|spritename=wayfinder-armor-trim-smithing-template
|spritetype=item
|nameid=wayfinder_armor_trim_smithing_template
|id=698
|form=item
|translationkey=item.smithing_template.name, trim_pattern.wayfinder.name}}
{{ID table
|displayname=Raiser Armor Trim
|spritename=raiser-armor-trim-smithing-template
|spritetype=item
|nameid=raiser_armor_trim_smithing_template
|id=699
|form=item
|translationkey=item.smithing_template.name, trim_pattern.raiser.name}}
{{ID table
|displayname=Shaper Armor Trim
|spritename=shaper-armor-trim-smithing-template
|spritetype=item
|nameid=shaper_armor_trim_smithing_template
|id=700
|form=item
|translationkey=item.smithing_template.name, trim_pattern.shaper.name}}
{{ID table
|displayname=Host Armor Trim
|spritename=host-armor-trim-smithing-template
|spritetype=item
|nameid=host_armor_trim_smithing_template
|id=701
|form=item
|translationkey=item.smithing_template.name, trim_pattern.host.name}}
{{ID table
|displayname=Ward Armor Trim
|spritename=ward-armor-trim-smithing-template
|spritetype=item
|nameid=ward_armor_trim_smithing_template
|id=690
|form=item
|translationkey=item.smithing_template.name, trim_pattern.ward.name}}
{{ID table
|displayname=Silence Armor Trim
|spritename=silence-armor-trim-smithing-template
|spritetype=item
|nameid=silence_armor_trim_smithing_template
|id=697
|form=item
|translationkey=item.smithing_template.name, trim_pattern.silence.name}}
{{ID table
|displayname=Tide Armor Trim
|spritename=tide-armor-trim-smithing-template
|spritetype=item
|nameid=tide_armor_trim_smithing_template
|id=693
|form=item
|translationkey=item.smithing_template.name, trim_pattern.tide.name}}
{{ID table
|displayname=Snout Armor Trim
|spritename=snout-armor-trim-smithing-template
|spritetype=item
|nameid=snout_armor_trim_smithing_template
|id=694
|form=item
|translationkey=item.smithing_template.name, trim_pattern.snout.name}}
{{ID table
|displayname=Rib Armor Trim
|spritename=rib-armor-trim-smithing-template
|spritetype=item
|nameid=rib_armor_trim_smithing_template
|id=695
|form=item
|translationkey=item.smithing_template.name, trim_pattern.rib.name}}
{{ID table
|displayname=Eye Armor Trim
|spritename=eye-armor-trim-smithing-template
|spritetype=item
|nameid=eye_armor_trim_smithing_template
|id=691
|form=item
|translationkey=item.smithing_template.name, trim_pattern.eye.name}}
{{ID table
|displayname=Spire Armor Trim
|spritename=spire-armor-trim-smithing-template
|spritetype=item
|nameid=spire_armor_trim_smithing_template
|id=696
|form=item
|translationkey=item.smithing_template.name, trim_pattern.spire.name
|foot=1}}
== Achievements ==
{{load achievements|Smithing with style}}
== Advancements ==
{{load advancements|Crafting a New Look;Smithing with Style}}
== Video ==
{{yt|klP9SrJFDU8}}
== History ==
{{History|java}}
{{History||1.20<br>(Experimental)|link=1.19.4|snap=23w04a|[[File:Netherite Upgrade Smithing Template JE1 BE1.png|32px]] [[File:Sentry Armor Trim Smithing Template JE1 BE1.png|32px]] [[File:Vex Armor Trim Smithing Template JE1 BE1.png|32px]] [[File:Wild Armor Trim Smithing Template JE1 BE1.png|32px]] [[File:Coast Armor Trim Smithing Template JE1 BE1.png|32px]] [[File:Dune Armor Trim Smithing Template JE1 BE1.png|32px]] [[File:Ward Armor Trim Smithing Template JE1 BE1.png|32px]] [[File:Tide Armor Trim Smithing Template JE1 BE1.png|32px]] [[File:Snout Armor Trim Smithing Template JE1 BE1.png|32px]] [[File:Rib Armor Trim Smithing Template JE1 BE1.png|32px]] [[File:Eye Armor Trim Smithing Template JE1 BE1.png|32px]] [[File:Spire Armor Trim Smithing Template JE1 BE1.png|32px]] Added smithing templates behind the "Update 1.20" experimental datapack.}}
{{History|||snap=23w05a|Smithing templates can be used to trim leather armor.
|Gold, iron, diamond, and netherite armor can be trimmed with their respective material.
|The dune, coast, wild, and sentry armor trims now always generate two templates in a chest when found.
|Increased the chances for all smithing templates that generate in chest loot to spawn:
*Netherite upgrade chance to find increased from 3.2% to 10%.
*Coast chance to find increased from 11.1% to 16.7%.
*Dune chance to find increased from 11.1% to 14.3%.
*Eye chance to find increased from 4.7% to 10% in alter chests, and to 100% in library chests.
*Rib chance to find increased from 4.7% to 6.7%.
*Sentry chance to find increased from 20% to 25%.
*Snout chance to find increased from 4.7% to 8.3%.
*Spire chance to find increased from 4.7% to 6.7%.
*Vex chance to find increased from 4.7% to 50%.
*Ward chance to find increased from 4.7% to 5%.
*Wild chance to find increased from 20% to 33%.}}
{{History||1.20|snap=23w12a|Smithing templates are now available without using the "Update 1.20" experimental datapack.|[[File:Wayfinder Armor Trim Smithing Template JE1 BE1.png|32px]] [[File:Raiser Armor Trim Smithing Template JE1 BE1.png|32px]] [[File:Shaper Armor Trim Smithing Template JE1 BE1.png|32px]] [[File:Host Armor Trim Smithing Template JE1 BE1.png|32px]] [[File:Silence Armor Trim Smithing Template JE1 BE1.png|32px]] Added wayfinder, raiser, shaper, host, and silence armor trim smithing templates.
|[[File:Sentry Armor Trim Smithing Template JE2 BE2.png|32px]] [[File:Dune Armor Trim Smithing Template JE2 BE2.png|32px]] Changed the textures of the sentry and dune armor trim smithing templates.
|The pattern textures of dune and sentry armor trims are changed from [[File:Armor Trim Dune (sample model) JE1 BE1.png|24px]] [[File:Armor Trim Sentry (sample model) JE1 BE1.png|24px]] to [[File:Armor Trim Dune (sample model) JE2 BE2.png|24px]] [[File:Armor Trim Sentry (sample model) JE2 BE2.png|24px]].<br>
Those previous patterns were left with different names: dune was renamed sentry and sentry was renamed shaper.}}
{{History|||snap=23w16a|Wayfinder, raiser, shaper, and host armor trim no longer generates in [[suspicious sand]] in [[trail ruins]].|Due to the split of the archaeological loot tables for the suspicious gravel within the [[trail ruins]]; wayfinder, raiser, shaper, and host armor trim now are in the rare loot.}}
{{History|||snap=23w17a|The probability of the wayfinder, raiser, shaper, and host armor trim to generate in [[suspicious gravel]] in [[trail ruins]] has been changed from 1/11 to 1/12.|The player now get the [[advancement]] "Crafting a new look" when they craft a trimmed armor at a [[smithing table]] using a smithing template, "Smithing with style" when they apply these smithing templates at least once on their armor: Spire, Snout, Rib, Ward, Silence, Vex, Tide, and Wayfinder.}}
{{History|bedrock}}
{{History||Next Major Update<br>(Experimental)|link=Bedrock Edition 1.19.80|snap=beta 1.19.80.21|[[File:Netherite Upgrade Smithing Template JE1 BE1.png|32px]] [[File:Sentry Armor Trim Smithing Template JE1 BE1.png|32px]] [[File:Vex Armor Trim Smithing Template JE1 BE1.png|32px]] [[File:Wild Armor Trim Smithing Template JE1 BE1.png|32px]] [[File:Coast Armor Trim Smithing Template JE1 BE1.png|32px]] [[File:Dune Armor Trim Smithing Template JE1 BE1.png|32px]] [[File:Ward Armor Trim Smithing Template JE1 BE1.png|32px]] [[File:Tide Armor Trim Smithing Template JE1 BE1.png|32px]] [[File:Snout Armor Trim Smithing Template JE1 BE1.png|32px]] [[File:Rib Armor Trim Smithing Template JE1 BE1.png|32px]] [[File:Eye Armor Trim Smithing Template JE1 BE1.png|32px]] [[File:Spire Armor Trim Smithing Template JE1 BE1.png|32px]] Added smithing templates behind the "[[Bedrock Edition 1.20.0|Next Major Update]]" [[experimental]] toggle.}}
{{History|||snap=beta 1.19.80.22|[[File:Wayfinder Armor Trim Smithing Template JE1 BE1.png|32px]] [[File:Raiser Armor Trim Smithing Template JE1 BE1.png|32px]] [[File:Shaper Armor Trim Smithing Template JE1 BE1.png|32px]] [[File:Host Armor Trim Smithing Template JE1 BE1.png|32px]] [[File:Silence Armor Trim Smithing Template JE1 BE1.png|32px]] Added wayfinder, raiser, shaper, host, and silence armor trim smithing templates.
|[[File:Sentry Armor Trim Smithing Template JE2 BE2.png|32px]] [[File:Dune Armor Trim Smithing Template JE2 BE2.png|32px]] Changed the textures of the sentry and dune armor trim smithing templates.
|The pattern textures of dune and sentry armor trims are changed from [[File:Armor Trim Dune (sample model) JE1 BE1.png|24px]] [[File:Armor Trim Sentry (sample model) JE1 BE1.png|24px]] to [[File:Armor Trim Dune (sample model) JE2 BE2.png|24px]] [[File:Armor Trim Sentry (sample model) JE2 BE2.png|24px]].<br>
Those previous patterns were left with different names: dune was renamed sentry and sentry was renamed shaper.}}
{{History||1.20.0|snap=beta 1.20.0.21|Smithing templates are now available without using the "Next Major Update" experimental toggle.}}
{{History|foot}}
== Issues ==
{{Issue list}}
== Trivia ==
* Smithing templates were named "Smithing Blueprints" in the prototype but was changed because the word "blueprint" sounded modern and technical.<ref>{{ytl|klP9SrJFDU8|Minecraft 1.20: Armor Trims - What Do They Mean?|Minecraft|May 4, 2023|t=98}}</ref>
* When Mojang developer Gnembon was working on armor trims, he accidentally messed up their rendering, making them jet through the player's body in a weird fashion, similar to what appears in {{w|Salvador Dalí}}'s paintings where a hand might poke through a forehead.<ref>{{ytl|ghQODkq4ITI|Mojang Dev Comes To Hermitcraft! (Mojang Developer Gnembom Interview)|GoodVodsWithScar|June 23, 2023|t=1980}}</ref>
* Some of the armor trims feature patterns based on a [[mob]] or [[block]] that is found in the same [[Generated structures|structure]] as the corresponding smithing template.<ref name=":0">"Some of the armor trims reflect the place where you found the template, for example bastions contain a piglin-inspired trim."-[[Sofia Dankis]]-{{Mcnet|armor-trims-coming-minecraft-1-20|Armor Trims Coming to Minecraft 1.20|January 24, 2023}}</ref>
** The spire armor trim resembles a [[shulker]].
** The vex armor trim resembles an [[evoker]]. As an item in the [[inventory]], it resembles the wing or the vein texture of a [[vex]].
** The wild armor trim has moss growing on 3 of its corners.
** The coast armor trim appears to have barnacles attached to it.
** The ward armor trim, as an item in the inventory, resembles the faces inside a [[warden]]'s chest.
** The silence armor trim appears to have sculk creeping onto / infecting it.
** The tide armor trim resembles [[Prismarine|prismarine bricks]].
** The snout armor trim resembles a [[piglin]]<ref name=":0" />.
** The rib armor trim resembles a [[wither skeleton]].
** The eye armor trim resembles an [[eye of ender]]. There are also two eyes on the head part of the armor trim that resemble those of an [[enderman]].
* ''Netherite upgrade smithing template'' (35 characters with "_" and 32 characters without "_") and ''sentry armor trim smithing template'' (35 characters with "_" and 31 characters without "_") are the current longest name for item ID, while ''[[polished blackstone pressure plate]]'' and ''[[cracked polished blackstone bricks]]'' have 34 characters with "_" and 31 characters without "_".
* The silence armor trim is the rarest trim, due to being found in ancient cities in the deep dark, and having only a 1.2% chance to be per chest.
* When [[lapis lazuli]] is used as trim material, it is called "Lapis" instead of its full name "Lapis Lazuli"; this is the only instance of the abbreviation "Lapis" being used in-game.<ref>{{bug|MC-262486|||WAI}}</ref>
== Gallery ==
=== Sprites ===
<gallery>
Netherite Upgrade Smithing Template.png|Netherite Upgrade
Sentry Armor Trim Smithing Template.png|Sentry Armor Trim
Vex Armor Trim Smithing Template.png|Vex Armor Trim
Wild Armor Trim Smithing Template.png|Wild Armor Trim
Coast Armor Trim Smithing Template.png|Coast Armor Trim
Dune Armor Trim Smithing Template.png|Dune Armor Trim
Wayfinder Armor Trim Smithing Template.png|Wayfinder Armor Trim
Raiser Armor Trim Smithing Template.png|Raiser Armor Trim
Shaper Armor Trim Smithing Template.png|Shaper Armor Trim
Host Armor Trim Smithing Template.png|Host Armor Trim
Ward Armor Trim Smithing Template.png|Ward Armor Trim
Silence Armor Trim Smithing Template.png|Silence Armor Trim
Tide Armor Trim Smithing Template.png|Tide Armor Trim
Snout Armor Trim Smithing Template.png|Snout Armor Trim
Rib Armor Trim Smithing Template.png|Rib Armor Trim
Eye Armor Trim Smithing Template.png|Eye Armor Trim
Spire Armor Trim Smithing Template.png|Spire Armor Trim
</gallery>
=== Armor trim patterns ===
<gallery>
Armor Trim Sentry (sample model).png|Sentry Armor Trim
Armor Trim Vex (sample model).png|Vex Armor Trim
Armor Trim Wild (sample model).png|Wild Armor Trim
Armor Trim Coast (sample model).png|Coast Armor Trim
Armor Trim Dune (sample model).png|Dune Armor Trim
Armor Trim Wayfinder (sample model).png|Wayfinder Armor Trim
Armor Trim Raiser (sample model).png|Raiser Armor Trim
Armor Trim Shaper (sample model).png|Shaper Armor Trim
Armor Trim Host (sample model).png|Host Armor Trim
Armor Trim Ward (sample model).png|Ward Armor Trim
Armor Trim Silence (sample model).png|Silence Armor Trim
Armor Trim Tide (sample model).png|Tide Armor Trim
Armor Trim Snout (sample model).png|Snout Armor Trim
Armor Trim Rib (sample model).png|Rib Armor Trim
Armor Trim Eye (sample model).png|Eye Armor Trim
Armor Trim Spire (sample model).png|Spire Armor Trim
</gallery>
=== Official Artwork ===
<gallery>
T&T Thumbnail.jpg|[[Sunny]] wearing amethyst armor trims.
Warden Chasing Alex with Silence Trim Pixel Art.png|A [[warden]] chasing Alex holding the silence armor trim.
Alex Trimming Armor in Smithing Table Pixel Art.png|Alex adding the silence armor trim and amethyst on iron armor.
Alex Wearing Iron Armor with Amethyst Pixel Art.jpg|Alex wearing the trimmed iron armor.
File:Live2023-01.jpeg|Noor working on trimmed iron armor.
</gallery>
=== Screenshots ===
<gallery>
Kingbdogz Armor Trim 1.jpg|Redstone trims on diamond armor.
Kingbdogz Armor Trim 2.jpg|Gold trims on netherite armor.
Too Many Trims.jpg|A large amount of armor trims.
Kingbdogz Armor Trim 3.jpg|Gold on netherite.
Kingbdogz Armor Trim 4.jpg|Diamond on diamond.
New Armor Trims in 23W12A.jpg|<ref>{{Tweet|kingbdogz|1638580472962850831|new trims got the drip The new "Silence" armor trim to the left is now the hardest trim to get, with only a 1% chance per chest to spawn in Ancient Cities. Definitely gonna be a challenge to get!|March 22, 2023}}</ref>
Emerald Armor.png|Emerald on gold.
Xilefian Armor Trims 1.png|[[Xilefian]] showing how armor trims work.
Xilefian Armor Trims 2.png|[[Xilefian]] showing how armor trims work.
Xilefian Armor Trims 3.png|[[Xilefian]] showing how armor trims work.
Armor Trims On Netherite Armors.png|A display of all eleven (before [[Java Edition 23w12a]]) armor trims and ten colors on netherite armors.
Armor Trim Showcase.png|A display of all eleven (before [[Java Edition 23w12a]]) armor trims, on netherite armor using emerald as the trim material.
Armor Trim Colors.png|A display of all ten armor trim colors, using the ward trim on a netherite helmet.
Silence Armor Trim on All Armors.png|A display of all ten colors of the silence armor trim on all armors.
Image 2023-06-07 154100087.png|A screenshot of every armor trim in every color(besides quartz) on leather armor.
Armor Trim Friends.jpg|Official screenshot of [[Alex]] and [[Zuri]] wearing armor trims.
LadyAgnes Armor Trims.jpg|Copper trims on netherite armor.
Trim Lineup.jpg
Fancy Delta.jpg|[[Kai]] wearing trimmed armor in a [[Basalt Delta]].
Trims & Pots.jpg
Noor Gold Armor Trim .jpeg
Noor Diamond Armor Trim.jpeg
Noor Netherite Armor Trim.jpeg
Noor Iron Armor Trim.jpeg
</gallery>
== References ==
{{Reflist}}
{{Items}}
[[Category:Bedrock Edition]]
[[Category:Non-renewable resources]]
[[de:Schmiedevorlage]]
[[es:Molde de herrería]]
[[fr:Modèle de forge]]
[[ja:鍛冶型]]
[[pl:Szablon kowalski]]
[[pt:Molde de ferraria]]
[[ru:Кузнечный шаблон]]
[[uk:Ковальський шаблон]]
[[zh:锻造模板]]</li></ul></nowiki> | The F4 cheat has been removed from nether portals. | ||||
| Java Edition | |||||
1.7.2{{Extension DPL}}<ul><li>[[Boots|Boots]]<br/>{{Item
| image = <gallery>
Leather Boots.png | Leather
Chainmail Boots.png | Chainmail
Iron Boots.png | Iron
Diamond Boots.png | Diamond
Golden Boots.png | Golden
Netherite Boots.png | Netherite
</gallery>
| durability =
* Leather: 65
* Chainmail: 195
* Iron: 195
* Golden: 91
* Diamond: 429
* Netherite: 481
| renewable =
* '''Netherite''': No
* '''All others''': Yes
| stackable = No
}}
'''Boots''' are a type of [[armor]] that covers the feet of the player. There are six types of boots: '''leather boots''', '''chainmail boots''', '''iron boots''', '''diamond boots''', '''gold boots''', and '''netherite boots'''.
== Obtaining ==
=== Crafting ===
{{crafting
|head=1
|showname=0
|showdescription=1
|name=[[Boots]]
|A2= Leather;Gold Ingot;Iron Ingot;Diamond
|C2= Leather;Gold Ingot;Iron Ingot;Diamond
|A3= Leather;Gold Ingot;Iron Ingot;Diamond
|C3= Leather;Gold Ingot;Iron Ingot;Diamond
|Output= Leather Boots;Golden Boots;Iron Boots;Diamond Boots
|type= Combat
}}
{{crafting
|foot=1
|ignoreusage=1
|name=[[Boots]]
|ingredients=Damaged Matching [[Boots]]
|Damaged Leather Boots; Damaged Golden Boots; Damaged Chainmail Boots; Damaged Iron Boots; Damaged Diamond Boots; Damaged Netherite Boots
|Damaged Leather Boots; Damaged Golden Boots; Damaged Chainmail Boots; Damaged Iron Boots; Damaged Diamond Boots; Damaged Netherite Boots
|Output= Leather Boots; Golden Boots; Chainmail Boots; Iron Boots; Diamond Boots; Netherite Boots
|description= The durability of the two boots is added together, plus an extra 5% durability.
|type= Combat
}}
=== Upgrading ===
{{Smithing
|head=1
|Netherite Upgrade
|Diamond Boots
|Netherite Ingot
|Netherite Boots
|description=
|tail=1
}}
=== Repairing ===
==== Grinding ====
{{Grinding
|showdescription=1
|ingredients=2x Damaged [[Leather Boots]] or<br>2x Damaged [[Chainmail Boots]] or<br>2x Damaged [[Iron Boots]] or<br>2x Damaged [[Golden Boots]] or<br>2x Damaged [[Diamond Boots]] or<br>2x Damaged [[Netherite Boots]]
|Damaged Leather Boots; Damaged Chainmail Boots; Damaged Iron Boots; Damaged Golden Boots; Damaged Diamond Boots; Damaged Netherite Boots
|Damaged Leather Boots; Damaged Chainmail Boots; Damaged Iron Boots; Damaged Golden Boots; Damaged Diamond Boots; Damaged Netherite Boots
|Leather Boots; Chainmail Boots; Iron Boots; Golden Boots; Diamond Boots; Netherite Boots
|description=The durability of the two boots are added together, plus an extra 5% durability.
}}
==== Anvil ====
Boots can be repaired in an [[Anvil mechanics#Unit repair|anvil]] by adding units of the [[armor material]]'s repair material, with each repair material restoring 25% of the boots' maximum durability, rounded down. Chainmail boots may also be repaired in this way using iron ingots.
They can also be [[Anvil mechanics#Combining items|combined]] with other boots. When doing this, the item's enchantments are not lost, and can even be raised.
==== Crafting ====
You can craft two sets of boots together using a crafting table, but enchantments are removed.
=== Mob loot ===
If a [[zombie]], [[husk]], [[stray]], [[piglin]], or [[skeleton]] is wearing armor, there is a 8.5% chance (9.5% with Looting I, 10.5% with Looting II and 11.5% with Looting III) for the mob to drop boots upon death. The boots are usually badly damaged, and may be enchanted.
[[File:Zombie With Boots.png|alt=Zombie is shown wearing boots|thumb|Zombie is shown wearing full iron armor set, including boots.]]
{{IN|bedrock}}, [[vindicator]]s and [[pillager]]s that spawn in [[raid]]s have a chance to drop iron boots, which are usually badly damaged and have a 50% chance to be enchanted.
=== Chest loot ===
{{LootChestItem|leather-boots,random-enchanted-leather-boots,chainmail-boots,iron-boots,level-enchanted-iron-boots,golden-boots,random-enchanted-golden-boots,soul-speed-enchanted-golden-boots,diamond-boots,damaged-diamond-boots,damaged-random-enchanted-diamond-boots,damaged-random-enchanted-diamond-boots-2,level-enchanted-diamond-boots}}
=== Trading ===
{{IN|java}}, novice-level armorer [[villager]]s have 40% chance to sell iron boots for 4 [[emerald]]s. Apprentice-level armorers have a 50% chance to sell chainmail boots for an [[emerald]]. Expert-level armorers always sell enchanted<ref group="note" name="enchantment" /> diamond boots for 11–27 [[emerald]]s. Apprentice-level leatherworker [[villager]]s have {{frac|2|3}} chance to sell leather boots for 4 [[emerald]]s.
Armorer [[villager]]s may give the players with the [[Hero of the Village]] effect chainmail boots.{{only|java}}
{{IN|bedrock}}, novice-level armorer villagers have a 25% chance to sell iron boots for 4 emeralds. Apprentice-level armorers have a {{frac|1|3}} chance to sell chainmail boots for an emerald. Expert-level armorers have a 50% chance to sell enchanted<ref group="note" name="enchantment">When creating an enchantment offer, the game uses a random enchantment level from 5 – 19. The enchantments are never treasure enchantments.</ref> diamond boots for 8 emeralds. Apprentice-level leatherworker villagers have a 50% chance to sell leather boots for 4 emeralds.
{{notelist}}
=== Bartering ===
[[Piglin]]s may [[bartering|barter]] iron boots with [[Soul Speed]] when given a [[gold ingot]].
=== Fishing ===
Leather boots can be caught as a "junk" item when [[fishing]].
== Usage ==
Boots can be placed in the fourth armor slot of a player's [[inventory]] for activation.
=== Defense points ===
Defense points are each signified by half of a chestplate in the armor bar above the health bar. Each defense point reduces any damage dealt to the player that is absorbed by armor by 4%, increasing additively with the number of defense points. Different materials and combinations of armor provide different levels of defense.
The following table shows the amount of defense points added by boots.
{| class="wikitable" data-description="Boots defense points"
|-
!scope="col" | Material
!scope="col" | Defense points
|-
!scope="row" | Leather
| rowspan="3" | {{armor|1}}
|-
!scope="row" | Golden
|-
!scope="row" | Chainmail
|-
!scope="row" | Iron
| {{armor|2}}
|-
!scope="row" | Diamond
| rowspan="2" | {{armor|3}}
|-
!scope="row" | Netherite
|}
=== Knockback resistance ===
Netherite boots provide 10% knockback resistance.
=== Durability ===
The following table shows the amount of damage each piece of armor can absorb before being destroyed.
Any "hit" from a damage source that can be blocked by armor removes one point of durability from each piece of armor worn for every {{hp|4}} of incoming damage (rounded down, but never below 1). Damage taken that armor doesn't protect (such as [[Damage#Fall damage|falling]] or [[Damage#Drowning|drowning]]) does not damage the armor, even if it is enchanted to protect against that type of damage. The following chart displays how many hits boots can endure.
Netherite armor is not damaged by [[lava]] or [[fire]] when worn.
{| class="wikitable" data-description="Boots durability"
|-
! Material
!Durability
|-
!scope="row" | Leather
| 65
|-
!scope="row" | Golden
| 91
|-
!scope="row" | Chainmail/Iron
| 195
|-
!scope="row" | Diamond
| 429
|-
!scope="row" | Netherite
| 481
|}
=== Enchantments ===
Boots can receive the following [[enchantment]]s:
{| class="wikitable"
|-
! Enchantment !! Max Level !! Notes
|-
| [[Fire Protection]] || IV || <ref group=note name=exclusive>Fire Protection, Blast Protection, Projectile Protection and Protection are mutually exclusive.</ref>
|-
| [[Projectile Protection]] || IV || <ref group=note name="exclusive"/>
|-
| [[Blast Protection]] || IV || <ref group=note name="exclusive"/>
|-
| [[Protection]] || IV || <ref group=note name="exclusive"/>
|-
| [[Feather Falling]] || IV ||
|-
| [[Unbreaking]] || III ||
|-
| [[Thorns]] || III || <ref group="note" name="anvil">Only from using an [[anvil]] and [[enchanted book]]s.</ref>
|-
| [[Depth Strider]] || III || <ref group=note name=exclusive2>Frost Walker and Depth Strider are mutually exclusive.</ref>
|-
| [[Soul Speed]] || III || <ref group=note name="anvil">Only from using an [[anvil]] and [[enchanted book]]s.</ref>
|-
| [[Frost Walker]] || II || <ref group=note name=exclusive2 /><ref group="note" name="anvil2">Only from using an [[anvil]] and [[enchanted book]]s, or by finding enchanted boots in an [[End city]] chest.</ref>
|-
| [[Mending]] || I || <ref group=note name="anvil2" />
|-
| [[Curse of Binding]] || I || <ref group="note" name="anvil2"/>
|-
| [[Curse of Vanishing]] || I || <ref group="note" name="anvil2"/>
|}
{{notelist}}
=== Smelting usage ===
{{Smelting|showname=1|Iron Boots;Chainmail Boots;Golden Boots|Iron Nugget;Iron Nugget;Gold Nugget|0,1}}
=== Piglins ===
{{EntityLink|Piglin|Piglins}} are attracted to ''golden'' boots and pick them up, examining them for 6 to 8 seconds. Other boots do not attract piglins but can be worn by them. They prefer stronger boots over weaker boots, with one major exception: They always prefer golden boots over all other boots, throwing out stronger boots to equip them. Enchanted boots are preferred over unenchanted boots.
=== Powder snow===
Leather boots can be used to safely cross [[powder snow]] without sinking in it. The block behaves similar to [[scaffolding]], allowing the player to sink in by pressing {{control|crouch}} and move up by pressing {{control|jump}}. The boots also prevent the wearer from taking freezing damage.
===Decoration===
It is possible to upgrade armor with trims. This requires a [[Smithing Template#Gallery|Smithing Template]], an armor piece, and an ingot or crystal ({{ItemSprite|iron-ingot}}iron ingot/{{ItemSprite|copper-ingot}}copper ingot/{{ItemSprite|gold-ingot}}gold ingot/{{ItemSprite|netherite-ingot}}netherite ingot/{{ItemSprite|emerald}}emerald/{{ItemSprite|redstone-dust}}redstone dust/{{ItemSprite|lapis-lazuli}}lapis lazuli/{{ItemSprite|amethyst-shard}}amethyst shard/{{ItemSprite|nether-quartz}}nether quartz/{{ItemSprite|diamond}}diamond).
These trims have no effect on the gameplay or strength of the armor.
{{Smithing|Any Armor Trim Smithing Template|Netherite Boots|Amethyst Shard; Copper Ingot; Diamond; Emerald; Gold Ingot; Iron Ingot; Lapis Lazuli; Netherite Ingot; Nether Quartz; Redstone Dust|Amethyst Trim Netherite Boots; Copper Trim Netherite Boots; Diamond Trim Netherite Boots; Emerald Trim Netherite Boots; Gold Trim Netherite Boots; Iron Trim Netherite Boots; Lapis Trim Netherite Boots; Netherite Trim Netherite Boots; Quartz Trim Netherite Boots; Redstone Trim Netherite Boots|head=1|tail=1|ingredients=Any Armor Trim +<br>Any Armor Piece +<br>Any Ingot/Crystal|showdescription=1|description=}}
==Sounds==
{{el|je}}:
{{Sound table
|sound=Equip leather1.ogg
|sound2=Equip leather2.ogg
|sound3=Equip leather3.ogg
|sound4=Equip leather4.ogg
|sound5=Equip leather5.ogg
|sound6=Equip leather6.ogg
|subtitle=Leather armor rustles
|source=player
|description=When leather boots are equipped
|id=item.armor.equip_leather
|translationkey=subtitles.item.armor.equip_leather
|volume=1.0
|pitch=1.0
|distance=16}}
{{Sound table
|sound=Equip chain1.ogg
|sound2=Equip chain2.ogg
|sound3=Equip chain3.ogg
|sound4=Equip chain4.ogg
|sound5=Equip chain5.ogg
|sound6=Equip chain6.ogg
|subtitle=Chain armor jingles
|source=player
|description=When chainmail boots are equipped
|id=item.armor.equip_chain
|translationkey=subtitles.item.armor.equip_chain
|volume=1.0
|pitch=1.0
|distance=16}}
{{Sound table
|sound=Equip iron1.ogg
|sound2=Equip iron2.ogg
|sound3=Equip iron3.ogg
|sound4=Equip iron4.ogg
|sound5=Equip iron5.ogg
|sound6=Equip iron6.ogg
|subtitle=Iron armor clanks
|source=player
|description=When iron boots are equipped
|id=item.armor.equip_iron
|translationkey=subtitles.item.armor.equip_iron
|volume=1.0
|pitch=1.0
|distance=16}}
{{Sound table
|sound=Equip gold1.ogg
|sound2=Equip gold2.ogg
|sound3=Equip gold3.ogg
|sound4=Equip gold4.ogg
|sound5=Equip gold5.ogg
|sound6=Equip gold6.ogg
|subtitle=Gold armor clinks
|source=player
|description=When gold boots are equipped
|id=item.armor.equip_gold
|translationkey=subtitles.item.armor.equip_gold
|volume=1.0
|pitch=1.0
|distance=16}}
{{Sound table
|sound=Equip diamond1.ogg
|sound2=Equip diamond2.ogg
|sound3=Equip diamond3.ogg
|sound4=Equip diamond4.ogg
|sound5=Equip diamond5.ogg
|sound6=Equip diamond6.ogg
|subtitle=Diamond armor clangs
|source=player
|description=When diamond boots are equipped
|id=item.armor.equip_diamond
|translationkey=subtitles.item.armor.equip_diamond
|volume=1.0
|pitch=1.0
|distance=16}}
{{Sound table
|sound=Equip netherite1.ogg
|sound2=Equip netherite2.ogg
|sound3=Equip netherite3.ogg
|sound4=Equip netherite4.ogg
|subtitle=Netherite armor clanks
|source=player
|description=When netherite boots are equipped
|id=item.armor.equip_netherite
|translationkey=subtitles.item.armor.equip_netherite
|volume=0.8
|pitch=1.0/0.9
|distance=16}}
{{Sound table
|sound=Random break.ogg
|subtitle=Item breaks
|source=dependent
|description=When a pair of boots' durability is exhausted
|id=entity.item.break
|translationkey=subtitles.entity.item.break
|volume=0.8
|pitch=0.8-1.2
|distance=16
|foot=1}}
{{el|be}}:
{{Sound table
|type=bedrock
|sound=Equip leather1.ogg
|sound2=Equip leather2.ogg
|sound3=Equip leather3.ogg
|sound4=Equip leather4.ogg
|sound5=Equip leather5.ogg
|sound6=Equip leather6.ogg
|source=player
|description=When leather boots are equipped
|id=armor.equip_leather
|volume=1.0
|pitch=1.0}}
{{Sound table
|sound=Equip chain1.ogg
|sound2=Equip chain2.ogg
|sound3=Equip chain3.ogg
|sound4=Equip chain4.ogg
|sound5=Equip chain5.ogg
|sound6=Equip chain6.ogg
|source=player
|description=When chain boots are equipped
|id=armor.equip_chain
|volume=1.0
|pitch=1.0}}
{{Sound table
|sound=Equip iron1.ogg
|sound2=Equip iron2.ogg
|sound3=Equip iron3.ogg
|sound4=Equip iron4.ogg
|sound5=Equip iron5.ogg
|sound6=Equip iron6.ogg
|source=player
|description=When iron boots are equipped
|id=armor.equip_iron
|volume=1.0
|pitch=1.0}}
{{Sound table
|sound=Equip gold1.ogg
|sound2=Equip gold2.ogg
|sound3=Equip gold3.ogg
|sound4=Equip gold4.ogg
|sound5=Equip gold5.ogg
|sound6=Equip gold6.ogg
|source=player
|description=When gold boots are equipped
|id=armor.equip_gold
|volume=1.0
|pitch=1.0}}
{{Sound table
|sound=Equip diamond1.ogg
|sound2=Equip diamond2.ogg
|sound3=Equip diamond3.ogg
|sound4=Equip diamond4.ogg
|sound5=Equip diamond5.ogg
|sound6=Equip diamond6.ogg
|source=player
|description=When diamond boots are equipped
|id=armor.equip_diamond
|volume=1.0
|pitch=1.0}}
{{Sound table
|sound=Equip netherite1.ogg
|sound2=Equip netherite2.ogg
|sound3=Equip netherite3.ogg
|sound4=Equip netherite4.ogg
|source=player
|description=When netherite boots are equipped.
|id=armor.equip_netherite
|volume=1.0
|pitch=1.0}}
{{Sound table
|rowspan=2
|sound=Water Splash Old.ogg
|source=block
|description=When leather boots are dyed using a cauldron
|id=cauldron.dyearmor
|volume=0.1
|pitch=1.0}}
{{Sound table
|source=block
|description=When leather boots' dye is removed using a cauldron
|id=cauldron.cleanarmor
|volume=0.1
|pitch=1.0}}
{{Sound table
|sound=Random break.ogg
|source=player
|description=When a pair of boots' durability is exhausted
|id=random.break
|volume=1.0
|pitch=0.9
|foot=1}}
==Data values==
===ID===
{{edition|java}}:
{{ID table
|edition=java
|showitemtags=y
|showforms=y
|generatetranslationkeys=y
|displayname=Leather Boots
|spritetype=item
|nameid=leather_boots
|itemtags=freeze_immune_wearables
|form=item}}
{{ID table
|displayname=Chainmail Boots
|spritetype=item
|nameid=chainmail_boots
|form=item}}
{{ID table
|displayname=Iron Boots
|spritetype=item
|nameid=iron_boots
|form=item}}
{{ID table
|displayname=Diamond Boots
|spritetype=item
|nameid=diamond_boots
|form=item}}
{{ID table
|displayname=Golden Boots
|spritetype=item
|nameid=golden_boots
|form=item}}
{{ID table
|displayname=Netherite Boots
|spritetype=item
|nameid=netherite_boots
|form=item
|foot=1}}
{{edition|bedrock}}:
{{ID table
|edition=bedrock
|shownumericids=y
|showforms=y
|notshowbeitemforms=y
|generatetranslationkeys=y
|displayname=Leather Boots
|spritetype=item
|nameid=leather_boots
|id=338
|form=item}}
{{ID table
|displayname=Chainmail Boots
|spritetype=item
|nameid=chainmail_boots
|id=342
|form=item}}
{{ID table
|displayname=Iron Boots
|spritetype=item
|nameid=iron_boots
|id=346
|form=item}}
{{ID table
|displayname=Diamond Boots
|spritetype=item
|nameid=diamond_boots
|id=350
|form=item}}
{{ID table
|displayname=Golden Boots
|spritetype=item
|nameid=golden_boots
|id=354
|form=item}}
{{ID table
|displayname=Netherite Boots
|spritetype=item
|nameid=netherite_boots
|id=612
|form=item
|foot=1}}
=== Item data===
When leather boots are dyed, it has the following NBT:
<div class="treeview">
*{{nbt|compound|tag}}: Parent tag.
**{{nbt|compound|display}}: Display properties.
***{{nbt|int|color}}: The color of the leather armor. The tooltip displays "Dyed" if advanced tooltips are disabled, otherwise it displays the hexadecimal color value. Color codes are calculated from the Red, Green and Blue components using this formula:<br>'''<span style="color:red">Red</span>[[wikipedia:Logical shift|<<]]16 + <span style="color:green">Green</span><<8 + <span style="color:blue">Blue</span>'''<ref>For positive values larger than 0x00FFFFFF, the top byte is ignored. All negative values produce white.</ref>
</div>
==Achievements==
{{load achievements|Iron Man;Tie Dye Outfit;Let It Go!;Cover me in debris;Oooh, shiny!}}
==Advancements==
{{load advancements|Suit Up;Cover me With Diamonds;Oh Shiny;Cover Me in Debris;Light as a Rabbit}}
==History==
{{History|java indev}}
{{History||0.31|snap=20091231-2|[[File:Studded Boots (item) JE1.png|32px]] [[History of textures/Unused textures#Studded armor|Studded boots]] are now capable of being seen in the [[inventory]]. This was taken directly from one of [[Notch|Notch's]] game's ''[[Legend of the Chambered 2]]''.{{more info|When were they removed?}}}}
{{History||February 9, 2010|link=wordofnotch:380486636|[[File:Notch revealed armor.png|32px]] [[Notch]] revealed new models for armor, which included boots.}}
{{History||20100218|[[File:Leather Boots JE1.png|32px]] [[File:Chainmail Boots JE1 BE1.png|32px]] [[File:Iron Boots JE1 BE1.png|32px]] [[File:Golden Boots JE1 BE1.png|32px]] [[File:Diamond Boots JE1 BE1.png|32px]]<br>[[File:Leather Boots (item) JE1 BE1.png|32px]] [[File:Chainmail Boots (item) JE1 BE1.png|32px]] [[File:Iron Boots (item) JE1 BE1.png|32px]] [[File:Golden Boots (item) JE1 BE1.png|32px]] [[File:Diamond Boots (item) JE1 BE1.png|32px]] Added cloth, chain, iron, gold, and diamond boots{{verify|edition=java|type=change|Below, it says "wool armor" was renamed to leather, which name is incorrect, wool or cloth? Also, was it "gold" or "golden"?}}
|Boots can now be [[crafting|crafted]] and worn.
|Boots now function, giving {{Armor|3}}. Boots have limited [[item durability|durability]], with lower tier boots less durable than higher tier boots.}}
{{History|java alpha}}
{{History||v1.0.8|"Wool boots" have been renamed to "leather boots", despite item names not existing at this time.
|Leather boots are now [[crafting|crafted]] with [[leather]] instead of [[wool]].}}
{{History|java}}
{{History||1.0.0|snap=Beta 1.9 Prerelease|The armor protection behavior has been changed. Previous to this update, the total armor protection is based in this equation: (((''total equipped armor damage reduction'' − 1) × (''all equipped armor max damage'' − ''total equipped armor damage'')) ÷ (''total equipped armor max damage'' + 1)).}}
{{History|||snap=October 3, 2011|slink={{tweet|notch|120859830339637249}}|The first images of a [[player]] wearing enchanted armor, including boots, are revealed.}}
{{History|||snap=Beta 1.9 Prerelease 3|Iron boots can now be found in the new [[stronghold]] altar [[chest]]s.}}
{{History|||snap=Beta 1.9 Prerelease 4|Boots can now be [[enchanting|enchanted]].}}
{{History||1.1|snap=12w01a|Iron boots can now be found in the new blacksmith [[chest]]s in [[village]]s.}}
{{History||1.2.1|snap=1.2|Changed "Golden boots" to "Golden Boots".}}
{{History||1.3.1|snap=12w15a|{{key|Shift}}+clicking can now be used to equip boots.}}
{{History|||snap=12w21a|Chain boots can now be obtained legitimately in [[survival]] mode through [[trading]].
|Blacksmith [[villager]]s now [[trading|sell]] chain boots for 5–6 [[emerald]]s.
|Blacksmith villagers now sell diamond boots for 7 emeralds.
|Blacksmith villagers now sell iron boots for 4–5 emeralds.
|Butcher villagers now sell leather boots for 2-3 emeralds.}}
{{History||1.4.2|snap=12w32a|[[Mob]] armor has been reintroduced. A partial or full set of any armor is now sometimes worn by [[zombie]]s, [[skeleton]]s and [[zombie pigman|zombie pigmen]], with the likelihood increasing with difficulty.}}
{{History|||snap=August 17, 2012|slink={{tweet|Dinnerbone|236445090929844225}}|[[Jeb]] and [[Dinnerbone]] tweeted pictures of [[dye]]able leather armor, including boots.{{citation needed|Link to Jeb's tweet?}}}}
{{History|||snap=12w34a|Leather boots can now be dyed by [[crafting]] leather boots with [[dye]]s. Dyes can be removed by {{control|use|text=using}} dyed leather boots on a [[cauldron]] with [[water]].
|[[File:Leather Boots JE2 BE1.png|32px]] [[File:Leather Boots (item) JE2.png|32px]] Default leather boots are now slightly darker.}}
{{History|||snap=12w36a|[[Dye]]d leather boots are now more saturated and have a slight tint of tan in respect to the default armor color.
|[[Wither skeleton]]s can now spawn wearing boots.}}
{{History|||snap=12w37a|[[File:Leather Boots (item) JE3 BE2.png|32px]] Leather boots now have non-dyed parts. This has been implemented so that [[player]]s can distinguish between other types of armor and similarly colored leather armor.}}
{{History||1.5|snap=13w04a|Boots in the [[player]]'s hand can now be equipped by right-clicking.
|[[Dispenser]]s can now equip nearby players with boots.}}
{{History||1.7.2|snap=13w36a|Leather boots can now be obtained as one of the "junk" items through [[fishing]].}}
{{History||1.8|snap=14w02a|Armorer [[villager]]s now [[trading|sell]] chain boots for 5–7 [[emerald]]s.
|Armorer villagers no longer sell diamond boots.
|Armorer villagers no longer sell iron boots.
|Leatherworker villagers no longer sell leather boots.}}
{{History|||snap=14w05a|Boots no longer turn red when [[mob]]s and [[player]]s are hurt.}}
{{History|||snap=14w06a|Boots are now visible on [[giant]]s.}}
{{History|||snap=14w25a|Chain boots [[Java Edition removed features#Chain armor|can no longer be crafted anymore]] due to the [[item]] form of [[fire]] being [[Java Edition removed features#Obtainable until 1.8|removed]].}}
{{History||1.9|snap=15w31a|Enchanted iron and diamond boots can now be found in [[end city]] ship [[chest]]s.
|[[Mob]]s now wear armor from the bottom to the top, rather than from the top to the bottom. This means that a mob with three armor pieces, for example, spawn with all armor except a helmet.}}
{{History|||snap=15w34b|Boots' [[item durability|durability]] now affects armor value.}}
{{History|||snap=15w36a|Armor value and[[enchanting|enchantment]] calculations have been changed. For the original values, see [[Armor/Before 1.9|here]].}}
{{History|||snap=15w36d|Boots' durability affecting value has been removed.
|Boots now have an attribute controlling the defense points.}}
{{History|||snap=15w50a|Added {{cd|equip}} [[sound]]s for boots.}}
{{History|||snap=16w02a|Armor value and enchantment calculations have been changed again.}}
{{History|||snap=16w05a|Armor value calculations have been changed, once again.}}
{{History||1.11.1|snap=16w50a|Golden, chain and iron boots can now be [[smelting|smelted]] down into one of their respective [[nugget]]s. Chain boots smelt into iron nuggets.}}
{{History||1.13|snap=17w47a|Prior to [[1.13/Flattening|''The Flattening'']], these [[item]]s' numeral IDs were 298 through 317.{{more info|Specific values for boots}}}}
{{History|||snap=18w11a|Enchanted leather boots can now generate in the chests of [[shipwreck]]s.}}
{{History|||snap=18w20a|Chain armor boots have been renamed to "chainmail".}}
{{History||1.14|snap=18w43a|[[File:Leather Boots JE3 BE2.png|32px]] [[File:Chainmail Boots JE2 BE2.png|32px]] [[File:Iron Boots JE2 BE2.png|32px]] [[File:Golden Boots JE2 BE2.png|32px]] [[File:Diamond Boots JE2 BE2.png|32px]]<br>[[File:Leather Boots (item) JE4 BE3.png|32px]] [[File:Chainmail Boots (item) JE2 BE2.png|32px]] [[File:Iron Boots (item) JE2 BE2.png|32px]] [[File:Golden Boots (item) JE2 BE2.png|32px]] [[File:Diamond Boots (item) JE2 BE2.png|32px]] The textures of leather, chainmail, iron, golden, and diamond boots have been changed.}}
{{History|||snap=18w48a|Leather boots can now be found in [[chest]]s in [[village]] tanneries.}}
{{History|||snap=19w08a|[[File:Golden Boots (item) JE3 BE3.png|32px]] The textures of gold boots [[item]]s have been changed.}}
{{History|||snap=19w11a|Armorer villagers now sell iron and enchanted diamond boots, making diamond boots effectively [[renewable resource|renewable]] again.
|Leatherworker villagers now sell randomly [[dye]]d leather boots.}}
{{History|||snap=19w13a|Armorer villagers now give chainmail boots to players under the [[Hero of the Village]] effect.}}
{{History||1.16|snap=20w06a|[[File:Netherite Boots JE1.png|32px]] [[File:Netherite Boots (item) JE1.png|32px]] Added netherite boots.
|Netherite boots are obtained by combining diamond boots and one netherite ingot in a crafting table.}}
{{History|||snap=20w09a|[[File:Diamond Boots (item) JE3 BE3.png|32px]] The texture of diamond boots [[item]]s has been changed.}}
{{History|||snap=20w10a|[[File:Netherite Boots JE2 BE1.png|32px]] [[File:Netherite Boots (item) JE2.png|32px]] The texture of netherite boots has been changed.
|Netherite boots can no longer be crafted.
|Netherite boots are now obtained by combining diamond boots and one netherite ingot in a smithing table.}}
{{History|||snap=20w16a|Netherite boots now generate randomly enchanted in [[bastion remnants]] chests.
|Golden boots now generate randomly enchanted in [[ruined portal]] chests.}}
{{History|||snap=20w17a|Diamonds boots now generate in place of netherite boots in bastion remnant chests.}}
{{History||1.17|snap=20w46a|Leather boots can now be used to safely walk on [[powder snow]].|Leather armor now protects against [[powder snow]]'s freezing.}}
{{History|||snap=21w13a|Leather Boots now prevent fall damage when landing on [[powder snow]].}}
{{History||1.18.2|snap=22w03a|Netherite boots knockback resistance is no longer random.}}
{{History||1.19|snap=Deep Dark Experimental Snapshot 1|Added the [[Swift Sneak]] enchantment, which can only be applied to boots.}}
{{History|||snap=22w12a|The [[Swift Sneak]] enchantment can no longer applied to boots.}}
{{History||1.20<br>(Experimental)|link=1.19.4|snap=23w04a|Non-leather boots can now be trimmed using a [[smithing table]].
|There are 10 types of material that determine the color of the trim:
*Iron
*Copper
*Gold
*Lapis
*Emerald
*Diamond
*Netherite
*Redstone
*Amethyst
*Quartz
|Upgrading diamond boots to netherite boots now requires the netherite upgrade [[smithing template]].}}
{{History|||snap=23w05a|Leather boots can now be trimmed using a smithing table.|Boots can now have trims of the same material it is made out of.}}
{{History|||snap=23w06a|Swapped {{cd|iron}} and {{cd|iron_darker}} palette, then made {{cd|iron_darker}} darker overall.}}
{{History||1.19.4|snap=23w05a|Boots can now be swapped by {{ctrl|using}} them in the hotbar.<ref>{{bug|MC-216270|||Fixed}}</ref>}}
{{History||?|Boots can now be swapped in [[armor stand]]s by {{ctrl|using}} them in the armor stand's slot.}}
{{History||1.20|snap=23w12a|The pattern textures of dune and sentry armor trims are changed.|
Those previous patterns were left with different names: dune was renamed sentry and sentry was renamed shaper.}}
{{History|pocket alpha}}
{{History||v0.6.0|[[File:Leather Boots JE1 BE1.png|32px]] [[File:Chainmail Boots JE1 BE1.png|32px]] [[File:Iron Boots JE1 BE1.png|32px]] [[File:Golden Boots JE1 BE1.png|32px]] [[File:Diamond Boots JE1 BE1.png|32px]]<br> [[File:Leather Boots (item) JE1 BE1.png|32px]] [[File:Chainmail Boots (item) JE1 BE1.png|32px]] [[File:Iron Boots (item) JE1 BE1.png|32px]] [[File:Golden Boots (item) JE1 BE1.png|32px]] [[File:Diamond Boots (item) JE1 BE1.png|32px]] Added boots.}}
{{History||v0.8.0|snap=build 2|{{InvSprite|Leather Boots}} The leather boots sprites have been changed to that of the [[Java Edition|PC]] version, but its armor [[model]] remains that of older versions.}}
{{History||v0.9.0|snap=build 1|Iron boots now naturally generates in [[village]] [[chest]]s and a [[stronghold]] altar chest.}}
{{History||v0.12.1|snap=build 1|Chainmail boots can now be obtained in [[survival]] mode from a mob wearing it.
|Leather boots can now be obtained from [[fishing]] as a "junk" [[item]].}}
{{History||v0.14.0|snap=build 1|[[File:Leather Boots JE2 BE2.png|32px]] Leather boots can now be dyed and the model has been updated.}}
{{History|pocket}}
{{History||1.0.0|snap=alpha 0.17.0.1|[[Enchanting|Enchanted]] iron boots and enchanted diamond boots can now be found inside [[chest]]s within [[end city]].}}
{{History||1.0.4|snap=alpha 1.0.4.0|Chainmail boots are now [[trading|sold]] by armorer smith [[villager]]s via [[trading]].}}
{{History||1.1.0|snap=alpha 1.1.0.0|Golden, chain and iron boots can now be [[smelting|smelted]] down into one of their respective [[nugget]]s.}}
{{History|bedrock}}
{{History||1.4.0|snap=beta 1.2.14.2|Chainmail boots now generate in [[buried treasure]] chests.
|Enchanted leather boots can now be found inside [[shipwreck]] supply room [[chest]]s.}}
{{History||1.10.0|snap=beta 1.10.0.3|Iron boots now can be found in plains [[village]] weaponsmith [[chest]]s.
|Leather boots can now be found inside plains village tannery chests.
|[[File:Leather Boots JE3 BE2.png|32px]] [[File:Iron Boots JE2 BE2.png|32px]] [[File:Golden Boots JE2 BE2.png|32px]] [[File:Diamond Boots JE2 BE2.png|32px]]<br> [[File:Leather Boots (item) JE4 BE3.png|32px]] [[File:Iron Boots (item) JE2 BE2.png|32px]] [[File:Golden Boots (item) JE2 BE2.png|32px]] [[File:Diamond Boots (item) JE2 BE2.png|32px]] The textures of boots have been changed.{{more info|Did chain boots not change?}}}}
{{History||1.11.0|snap=beta 1.11.0.1|Iron boots now can be found in [[savanna]], [[taiga]], [[desert]], [[snowy taiga]] and [[snowy tundra]] [[village]] weaponsmith [[chest]]s.
|Leather boots can now be found inside savanna, taiga, desert, snowy taiga and snowy tundra village tannery chests.}}
{{History|||snap=beta 1.11.0.4|[[Pillager]]s and [[vindicator]]s that spawn in [[raid]]s can now drop iron boots.
|Iron and diamond boots are now sold by armorer villagers.}}
{{History||1.11.0|snap=beta 1.11.0.5|[[File:Golden Boots (item) JE3 BE3.png|32px]] The textures of golden boots [[item]]s have been changed.}}
{{History||1.12.0|snap=beta 1.12.0.2|[[File:Armor Stand with Leather Armor MCPE-44669.png|32px]] Leather boots no longer show as being [[dye]]d properly when worn by [[armor stand]]s.}}
{{History||1.13.0|snap=beta 1.13.0.1|Leather boots now appear dyed properly when worn by armor stands.}}
{{History||1.16.0|snap=beta 1.16.0.51|[[File:Netherite Boots JE2 BE1.png|32px]] [[File:Netherite Boots (item) BE1.png|32px]] Added netherite boots.|Netherite boots are obtained by combining diamond boots and one netherite ingot in a crafting table.
|[[File:Diamond Boots (item) JE3 BE3.png|32px]] The texture of diamond boots [[item]]s have been changed.}}
{{History|||snap=beta 1.16.0.57|Iron boots with soul speed enchantment can be obtained from bartering with piglin.
|Netherite boots can no longer be crafted.
|Netherite boots are now obtained by combining diamond boots and one netherite ingot in a smithing table.
|Golden boots can now be found in [[ruined portal]] chest.
|Golden and netherite boots can be found in [[bastion remnant]] chest.}}
{{History|||snap=beta 1.16.0.63|Diamonds boots now generate in place of netherite boots in bastion remnant chests.}}
{{History||1.16.200|snap=beta 1.16.200.52|Leather boots can now be used to safely walk on [[powder snow]].}}
{{History||1.17.10|snap=beta 1.17.10.20|[[File:Netherite Boots (item) JE2.png|32px]] The texture of netherite boots item has been changed to match ''Java Edition''.}}
{{History|console}}
{{History||xbox=TU1|xbone=CU1|ps=1.0|wiiu=Patch 1|switch=1.0.1|[[File:Leather Boots JE2 BE1.png|32px]] [[File:Leather Boots (item) JE1 BE1.png|32px]] Added leather boots.
|[[File:Iron Boots JE1 BE1.png|32px]] [[File:Iron Boots (item) JE1 BE1.png|32px]] Added iron boots.
|[[File:Golden Boots JE1 BE1.png|32px]] [[File:Golden Boots (item) JE1 BE1.png|32px]] Added golden boots.
|[[File:Diamond Boots JE1 BE1.png|32px]] [[File:Diamond Boots (item) JE1 BE1.png|32px]] Added diamond boots.}}
{{History||xbox=TU5|[[File:Chainmail Boots JE1 BE1.png|32px]] [[File:Chainmail Boots (item) JE1 BE1.png|32px]] Added chain boots.
|Added a quick equip for boots to the [[inventory]] interface.}}
{{History||xbox=TU12|ps=1.03|[[File:Leather Boots (item) JE3 BE2.png|32px]] The textures for leather boots [[item]]s have been changed.}}
{{History||xbox=TU14|ps=1.05|Leather boots can now be [[dye]]d.
|[[Item repair]] can now repair boots.}}
{{History||xbox=TU25|xbone=CU13|ps=1.16|Boots now have the quick equip functionality.}}
{{History||xbox=TU53|xbone=CU43|ps=1.49|wiiu=Patch 23|switch=1.0.3|Golden, chain and iron boots can now be [[smelting|smelted]] down into one of their respective [[nugget]]s. Chain boots smelt into iron nuggets.}}
{{History|PS4}}
{{History||1.90|[[File:Leather Boots JE3 BE2.png|32px]] [[File:Leather Boots (item) JE4 BE3.png|32px]] The textures of leather boots have been changed.
|[[File:Chainmail Boots JE2 BE2.png|32px]] [[File:Chainmail Boots (item) JE2 BE2.png|32px]] The textures of chainmail boots have been changed.
|[[File:Iron Boots JE2 BE2.png|32px]] [[File:Iron Boots (item) JE2 BE2.png|32px]] The textures of iron boots have been changed.
|[[File:Golden Boots JE2 BE2.png|32px]] [[File:Golden Boots (item) JE3 BE3.png|32px]] The textures of gold boots have been changed.
|[[File:Diamond Boots JE2 BE2.png|32px]] [[File:Diamond Boots (item) JE2 BE2.png|32px]] The textures of diamond boots have been changed.}}
{{History|new 3ds}}
{{History||0.1.0|[[File:Leather Boots JE2 BE1.png|32px]] [[File:Leather Boots (item) JE3 BE2.png|32px]] Added leather boots.
|[[File:Chainmail Boots JE1 BE1.png|32px]] [[File:Chainmail Boots (item) JE1 BE1.png|32px]] Added chain boots.
|[[File:Iron Boots JE1 BE1.png|32px]] [[File:Iron Boots (item) JE1 BE1.png|32px]] Added iron boots.
|[[File:Golden Boots JE1 BE1.png|32px]] [[File:Golden Boots (item) JE1 BE1.png|32px]] Added golden boots.
|[[File:Diamond Boots JE1 BE1.png|32px]] [[File:Diamond Boots (item) JE1 BE1.png|32px]] Added diamond boots.}}
{{History|foot}}
==Issues ==
{{issue list}}
==Trivia==
*Netherite boots are shorter in their item texture but are longer in their texture when being worn
*Leather armor originally used textures from one of [[Notch]]'s previous games, ''[[Legend of the Chambered]]''.
*Leather boots are the only piece of leather armor that has the same name as other armor materials.
*The netherite boots are the only type of boots to have a differently shaped item sprite when compared to the other boot types.
*Chainmail boots are the only boots that have transparent pixels in their texture currently
==Gallery==
===Enchanted Boots===
<gallery>
File:Enchanted Leather Boots (item).gif
File:Enchanted Chainmail Boots (item).gif
File:Enchanted Iron Boots (item).gif
File:Enchanted Golden Boots (item).gif
File:Enchanted Diamond Boots (item).gif
File:Enchanted Netherite Boots (item).gif
</gallery>
<gallery>
File:Enchanted Leather Boots.gif
File:Enchanted Chainmail Boots.gif
File:Enchanted Iron Boots.gif
File:Enchanted Golden Boots.gif
File:Enchanted Diamond Boots.gif
File:Enchanted Netherite Boots.gif
</gallery>
==References==
{{reflist}}
==External Links==
*[https://www.minecraft.net/en-us/article/taking-inventory--boots Taking Inventory: Boots] – Minecraft.net on November 24, 2019
{{Items}}
[[Category:Armor]]
[[ja:ブーツ]]
[[ko:부츠]]
[[pl:Buty]]
[[pt:Botas]]
[[th:รองเท้า]]
[[zh:靴子]]</li><li>[[Charcoal|Charcoal]]<br/>{{Item
| image = Charcoal.png
|type=
| renewable = Yes
| stackable = Yes (64)
}}
'''Charcoal''' is an [[item]] obtained by smelting [[log]]s or [[wood]]. It is used as fuel, or for crafting [[torch]]es and [[campfire]]s. Unlike [[coal]], charcoal cannot be traded with [[villager]]s, nor can it be crafted into a [[block of coal]]. Coal and charcoal cannot stack together either. It can be used as a substitute for coal, as both charcoal and coal have an equivalent duration when smelted.
== Obtaining ==
=== Breaking ===
A [[campfire]] broken without the [[Silk Touch]] enchantment drops 2 charcoal.
=== Smelting ===
{{Smelting
|Any Log; Any Stripped Log; Any Wood; Any Stripped Wood
|Charcoal
|foot=1
|0,15
}}
=== Compound creation ===
Charcoal can be created from its base [[element]]s, using the [[compound creator]].{{only|bedrock|education}}
{| class="wikitable"
!Name
!Elements
!Example recipe
|- <!-- Temporarily using crafting grid as substitute for compound creator (template not yet available), since the layout is the same, even if the appearance is different -->
!Charcoal
|7 Carbon<br>4 Hydrogen<br>1 Oxygen
|{{Crafting Table
|shapeless= 1
|A2=Carbon,7 |B2=Hydrogen,4 |C2=Oxygen
|Output=Charcoal}}
|}
== Usage ==
=== Crafting ingredient ===
{{crafting usage|Charcoal}}
{{Crafting
|B1= Stick
|A2= Stick
|B2= Coal; Charcoal
|C2= Stick
|A3= Any Log or Stem; Any Stripped Log or Stem; Any Wood or Hyphae; Any Stripped Wood or Hyphae
|B3= Any Log or Stem; Any Stripped Log or Stem; Any Wood or Hyphae; Any Stripped Wood or Hyphae
|C3= Any Log or Stem; Any Stripped Log or Stem; Any Wood or Hyphae; Any Stripped Wood or Hyphae
|Output= Campfire
}}
=== Lab table ingredient ===
Charcoal is one of the [[lab table]] ingredients needed to produce the [[heat block]].{{only|education}}
{| class="wikitable"
! Result
! Materials Needed
|-
!rowspan=2|{{slot|Heat Block.gif}}<br>[[Heat Block]]
|{{slot}}{{slot|Iron|link=Element}}{{slot|Water (compound)|link=Compound}}{{slot|Charcoal}}{{slot|Salt|link=Compound}}{{slot}}
|-
|<center>[[Element|Iron]], [[Water (compound)|Water]], Charcoal, [[Compound|Salt]]</center>
|}
=== Fuel ===
When used in a [[furnace]] as a fuel, a piece of charcoal lasts 80 seconds (smelting up to 8 items), the same as coal. Charcoal used as fuel lasts more than 5 times longer than [[wood planks]] or [[wood]] logs used as fuel, being more efficient than any other use of wood for smelting in ''[[Java Edition]]'', but outstripped by [[wooden slabs]] in Bedrock.
Coal and charcoal are also the only fuels accepted by [[Minecart with Furnace|furnace minecarts]]. They provide approximately four minutes of transit each.
== Data values ==
=== ID ===
{{edition|java}}:
{{ID table
|edition=java
|showforms=y
|generatetranslationkeys=y
|displayname=Charcoal
|spritetype=item
|nameid=charcoal
|itemtags=coals
|form=item
|foot=1}}
{{edition|bedrock}}:
{{ID table
|edition=bedrock
|showitemtags=y
|showaliasids=y
|shownumericids=y
|showforms=y
|notshowbeitemforms=y
|generatetranslationkeys=y
|displayname=Charcoal
|spritetype=item
|nameid=charcoal
|aliasid=coal / 1
|id=303
|itemtags=minecraft:coals
|form=item
|foot=1}}
== Achievements ==
{{load achievements|Renewable Energy}}
== History ==
{{History|java beta}}
{{History||December 25, 2010|link=http://www.minecraftforum.net/topic/131047-lantern-update-incoming/page__st__20#entry1986964| In 0.3.2, charcoal was suggested to [[Markus Persson|Notch]] by [https://twitter.com/Moleculor @Moleculor] on [[wikipedia:Twitter|Twitter]] as a writing implement.}}
{{History||1.2|[[File:Charcoal JE1 BE1.png|32px]] Added charcoal, with the same texture as coal.
|Charcoal is not used as a writing implement.}}
{{History|java}}
{{History||1.2.1|snap=12w04a|Charcoal can now be used to craft [[fire charge]]s.}}
{{History||1.3.1|snap=?|Charcoal is now directly available in the creative inventory.}}
{{History|||snap=1.3|[[File:Charcoal JE2 BE2.png|32px]] The texture of charcoal has been changed.}}
{{History||1.6.1|snap=13w19a|[[File:Charcoal JE3 BE3.png|32px]] The texture of charcoal has been changed.}}
{{History||1.8|snap=14w02a|Charcoal can no longer be [[trading|traded]] from [[villager]]s.}}
{{History||1.13|snap=17w47a|The different data values for the {{code|coal}} ID have been split up into their own IDs.
|Prior to [[1.13/Flattening|''The Flattening'']], this [[item]]'s numeral ID was 263.}}
{{History||1.14|snap=18w43a|[[File:Charcoal JE4 BE4.png|32px]] The texture of charcoal has been changed.}}
{{History|||snap=19w02a|Charcoal can now be used to craft [[campfire]]s. Destroying a campfire returns 2 charcoal.}}
{{History|pocket alpha}}
{{History||v0.3.0|[[File:Charcoal JE1 BE1.png|32px]] Added charcoal, with the same texture as coal. It is not yet obtainable.}}
{{History||v0.3.2|Charcoal is now obtainable by smelting [[log|wood]] in a furnace.}}
{{History||v0.8.0|snap=build 1|[[File:Charcoal JE2 BE2.png|32px]] The texture of charcoal has been changed.}}
{{History||v0.8.1|[[File:Charcoal JE3 BE3.png|32px]] The texture of charcoal has been changed.}}
{{History|bedrock}}
{{History||1.4.0|snap=beta 1.2.13.8|Added [[stripped log]] variants, which can be [[smelting|smelted]] to obtain charcoal.}}
{{History|||snap=beta 1.2.20.1|Charcoal now can be crafted using 7 Carbon, 4 Hydrogen, and an Oxygen in a [[compound creator]].
|Charcoal can now be used in the [[lab table]] to create a [[heat block]].}}
{{History||1.10.0|snap=beta 1.10.0.3|Charcoal can now be used to craft [[campfire]]s. Destroying a campfire returns 2 charcoal.
|[[File:Charcoal JE4 BE4.png|32px]] The textures of charcoal has been changed.}}
{{History||1.16.0|snap=beta 1.16.0.51|Charcoal are now used to craft [[soul fire torch]]es.}}
{{History||1.16.100|snap=beta 1.16.100.56|The ID of charcoal has been changed from {{code|coal/1}} to {{code|charcoal}}.}}
{{History|console}}
{{History||xbox=TU1|xbone=CU1|ps=1.0|wiiu=Patch 1|switch=1.0.1|[[File:Charcoal JE1 BE1.png|32px]] Added charcoal.}}
{{History||?|[[File:Charcoal JE3 BE3.png|32px]] The texture of charcoal has been changed.}}
{{History||xbox=none|xbone=none|ps=1.90|wiiu=none|switch=none|[[File:Charcoal JE4 BE4.png|32px]] The texture of charcoal has been changed.}}
{{History|New 3DS}}
{{History||0.1.0|[[File:Charcoal JE3 BE3.png|32px]] Added charcoal.}}
{{History|foot}}
== Issues ==
{{issue list|Charcoal}}
== How it's renewable ==
Charcoal comes from smelting log. Logs are renewable and charcoal can be used as fuel to smelt logs{{Items}}
[[Category:Renewable resources]]
[[de:Holzkohle]]
[[fr:Charbon (objet)#Charbon de bois]]
[[hu:Faszén]]
[[it:Carbonella]]
[[ko:목탄]]
[[pt:Carvão#Carvão vegetal]]
[[nl:Steenkool#Houtskool]]
[[ru:Уголь#Древесный уголь]]
[[zh:木炭]]</li></ul> | September 11, 2013 | Dinnerbone releases images of larger and different shaped nether portals, also mentions the ability to light a portal from any block, not just the bottom row.[4] Both the sign and circular nature of the portal in the second image are references to Stargate, Col. Jack O'Neill was often heard mentioning his hatred for cliches. | |||
| 13w37a | Portals can now be activated from any block within the portal, not just the bottom (when any fire block appears inside the frame). | ||||
| There are now new nether portal building rules: portals can now be built at a minimum of 4×5, and a maximum of 23×23. | |||||
| Nether portals now use block data values (later changed to block state) to determine their orientation. Old portals created in 1.6.4 and earlier have a tendency to close when upgrading. | |||||
1.16{{Extension DPL}}<ul><li>[[Orange Dye|Orange Dye]]<br/>{{Item
|image = Orange_Dye_JE2_BE2.png
|renewable = Yes
|stackable = Yes (64)
}}
'''Orange dye''' is a [[Dye#Quasi-Primary|quasi-primary dye]] crafted from [[Flower|orange tulips]], or by combining one [[red dye]] with one [[yellow dye]].
== Obtaining ==
=== Crafting ===
{{Crafting
|head = 1
|showname = 0
|Orange Tulip; Torchflower
|Output=Orange Dye
|type=Material
}}
{{Crafting
|Red Dye
|Yellow Dye
|Output = Orange Dye,2
|type = Material
|foot = 1
}}
=== Loot chest ===
{{#invoke:LootChest|base3|orange-dye}}
=== Trading ===
[[Wandering trader|Wandering traders]] sell 3 orange dye for an [[emerald]].
== Usage ==
{{dye usage}}
=== Crafting ingredient ===
{{crafting usage|ignore=Banner|continue=1}}
{{banner crafting usage}}
=== Loom ingredient ===
{{Banner loom usage|Orange Dye}}
=== Trading ===
Apprentice-level shepherd [[villager]]s have a 20% chance to buy 12 orange dye for an [[emerald]] as part of their trades.{{only|bedrock}}
Journeyman-level shepherd [[villager]]s have a {{frac|1|3}} chance to buy 12 orange dye for an [[emerald]].{{only|java}}
== Data values ==
=== ID ===
{{edition|java}}:
{{ID table
|edition=java
|showforms=y
|generatetranslationkeys=y
|displayname=Orange Dye
|spritetype=item
|nameid=orange_dye
|form=item
|foot=1}}
{{edition|bedrock}}:
{{ID table
|edition=bedrock
|showaliasids=y
|shownumericids=y
|showforms=y
|notshowbeitemforms=y
|generatetranslationkeys=y
|displayname=Orange Dye
|spritetype=item
|nameid=orange_dye
|aliasid=dye / 14
|id=409
|form=item
|translationkey=item.dye.orange.name
|foot=1}}
== Video ==
<div style="text-align:center">{{yt|25t7uNMOFS8}}</div>
== History ==
{{History|java beta}}
{{History||1.2|[[File:Orange Dye JE1 BE1.png|32px]] Added orange dye.}}
{{History|java}}
{{History||1.4.2|snap=12w34a|Added the ability to [[Armor#Dyeing|dye]] leather [[armor]] and [[wolf]] collars.}}
{{History||1.4.6|snap=12w49a|Orange dye can now be crafted with [[gunpowder]] to create a [[firework star]].}}
{{History||1.6.1|snap=13w19a|[[Stained clay]] can now be [[crafting|crafted]].}}
{{History||1.7.2|snap=13w36a|With the addition of the new [[flower]]s, many secondary and tertiary [[dye]]s are now primary dyes.}}
{{History|||snap=13w41a|[[Stained glass]] can now be crafted.}}
{{History||1.8|snap=14w30a|Added [[banner]]s, which can be dyed.}}
{{History||1.11|snap=16w39a|Added the ability to dye [[shulker box]]es.}}
{{History||1.12|snap=17w15a|Added the ability to dye [[bed]]s.}}
{{History||1.13|snap=17w47a|The different data values for the <code>dye</code> ID has now been split up into their own IDs.
|Prior to [[1.13/Flattening|''The Flattening'']], this [[item]]'s numeral ID was 351.}}
{{History||1.14|snap=18w43a|[[File:Orange_Dye_JE2_BE2.png|32px]] The texture of orange dye has now been changed.}}
{{History|||snap=18w44a|Orange dye can now change the text color on [[sign]]s to orange.}}
{{History|||snap=19w05a|Added the [[wandering trader]], which sells orange dye.}}
{{History|||snap=19w11a|Orange dye can now be [[trading|bought]] by shepherd villagers.}}
{{History||1.17|snap=20w45a|Orange dye can now be used to craft [[orange candle]]s.}}
{{History|||snap=21w19a|Orange dye can no longer be used to craft orange candles.}}
{{History|||snap=Pre-release 1|Orange dye can now once again be used to craft orange candles.}}
{{History||1.20 (Experimental)|link=1.19.3|snap=22w42a|Orange dye can now change the text color on [[hanging sign]]s to orange.}}
{{History||1.20<br>(Experimental)|link=1.19.4|snap=23w07a|[[Torchflower]]s can now be crafted into orange dye.}}
{{History||1.20|snap=23w12a|Orange dye can now be found in [[suspicious gravel]] and [[suspicious sand]] in [[trail ruins]].}}
{{History|||snap=23w16a|Orange dye no longer generates in [[suspicious sand]] in [[trail ruins]].|Due to the split of the archaeological loot tables for suspicious gravel within [[trail ruins]], orange dye is now common loot.}}
{{History|pocket alpha}}
{{History||v0.3.0|[[File:Orange Dye JE1 BE1.png|32px]] Added orange dye. It is currently unobtainable and serves no purpose.}}
{{History||v0.4.0|Orange dye is now [[craft]]able with rose red and dandelion yellow.
|Orange dye can now be used to craft orange [[wool]].}}
{{History||v0.8.0|snap=build 1|Orange dye is now used to craft [[cocoa bean]]s (version exclusive).}}
{{History||v0.14.0|snap=build 1|Orange dye can now be used to dye [[water]] in [[cauldron]]s.}}
{{History||unknown|The above recipe for orange dye has now been removed.}}
{{History|pocket}}
{{History||1.0.0|snap=alpha 0.17.0.1|Orange dye can now be used to dye [[shulker]]s.}}
{{History||1.1.0|snap=alpha 1.1.0.0|Orange dye can now be used to craft [[concrete powder]] and colored [[bed]]s.}}
{{History|bedrock}}
{{History||1.2.0|snap=beta 1.2.0.2|Orange dye can now be used to craft [[firework star]]s, [[stained glass]], and patterns on [[banner]]s.}}
{{History||1.4.0|snap=beta 1.2.20.1|Orange dye can now be used to craft [[balloon]]s and [[glow stick]]s.}}
{{History||1.8.0|snap=beta 1.8.0.8|Orange dye can now be used to dye [[cat]] collars.}}
{{History||1.10.0|snap=beta 1.10.0.3|Orange dye is now [[trading|sold]] by [[wandering trader]]s.
|Orange dye can now be used to dye white [[carpet]]s.
|[[File:Orange_Dye_JE2_BE2.png|32px]] The texture of orange dye has now been changed.}}
{{History||1.11.0|snap=beta 1.11.0.4|Orange dye can now be [[trading|sold]] to shepherd [[villager]]s.}}
{{History||1.16.100|snap=beta 1.16.100.56|The ID of orange dye has been changed from <code>dye/14</code> to <code>orange_dye</code>.}}
{{History|console}}
{{History||xbox=TU1|xbone=CU1|ps=1.00|switch=1.0.1|wiiu=Patch 1|[[File:Orange Dye JE1 BE1.png|32px]] Added orange dye.}}
{{History|ps4}}
{{History||1.90|[[File:Orange_Dye_JE2_BE2.png|32px]] The texture of orange dye has now been changed.}}
{{History|new 3ds}}
{{History||0.1.0|[[File:Orange_Dye_JE2_BE2.png|32px]] Added orange dye.}}
{{History|foot}}
== Issues ==
{{issue list}}
== References ==
{{Reflist}}
{{Items}}
[[cs:Oranžové barvivo]]
[[de:Oranger Farbstoff]]
[[es:Tinte naranja]]
[[fr:Teinture orange]]
[[hu:Narancssárga festék]]
[[ja:橙色の染料]]
[[ko:주황색 염료]]
[[nl:Oranje kleurstof]]
[[pl:Pomarańczowy barwnik]]
[[pt:Corante laranja]]
[[ru:Оранжевый краситель]]
[[zh:橙色染料]]
[[Category:Items]]
[[Category:Dyes]]
[[Category:Renewable resources]]</li><li>[[Poisonous Potato|Poisonous Potato]]<br/>{{Item
| title = Poisonous Potato
| image = Poisonous Potato.png
| heals = {{hunger|2}}
|effects={{EffectLink|Poison}} (0:05) (60% chance)
| stackable = Yes (64)
| renewable = Yes
}}
A '''poisonous potato''' is a type of [[potato]] that can [[poison]] the [[player]].
== Obtaining ==
The poisonous potato is a rare [[drop]] when harvesting (destroying) [[potato|potato crops]]; a fully grown plant has a 2% chance of dropping one in addition to the 2-5 regular potatoes.
=== Chest loot ===
{{LootChestItem|poisonous-potato}}
== Usage ==
Poisonous potatoes cannot be planted on [[farmland]] or [[Baked Potato|baked]]. They also have no use with the [[composter]].<ref>{{bug|MC-142373|resolution=WAI}}</ref>
=== Food ===
{{see also|Tutorials/Hunger management|title1=Hunger management}}
To eat a poisonous potato, press and hold {{control|use}} while it is selected in the hotbar. Eating one restores {{hunger|2}} [[hunger]] and 1.2 hunger [[Hunger#Mechanics|saturation]] and has a 60% chance of applying 5 seconds of [[Poison]] II, draining {{hp|4|poisoned=1}} points of [[health]].
Interestingly, a poisonous potato actually restores double the hunger and saturation than a normal, unpoisoned potato. (A normal potato gives {{hunger|1}} hunger and 0.6 saturation points.)
==Sounds==
{{Sound table/Entity/Food}}
== Advancements ==
{{load advancements|Husbandry;A Balanced Diet}}
== Data values ==
=== ID ===
{{edition|java}}:
{{ID table
|edition=java
|showforms=y
|generatetranslationkeys=y
|displayname=Poisonous Potato
|spritetype=item
|nameid=poisonous_potato
|form=item
|foot=1}}
{{edition|bedrock}}:
{{ID table
|edition=bedrock
|shownumericids=y
|showforms=y
|notshowbeitemforms=y
|generatetranslationkeys=y
|displayname=Poisonous Potato
|spritetype=item
|nameid=poisonous_potato
|id=282
|form=item
|foot=1}}
== History ==
{{History|java}}
{{History||1.4.2|snap=12w34a|[[File:Poisonous Potato JE1 BE1.png|32px]] Added poisonous potatoes.}}
{{History||1.13|snap=17w47a|Prior to [[Java_Edition_1.13/Flattening|''The Flattening'']], this [[item]]'s numeral ID was 394.}}
{{History|||snap=18w11a|Poisonous potatoes now generate in the [[chest]]s of [[shipwreck]]s.}}
{{History||1.14|snap=18w43a|[[File:Poisonous Potato JE2.png|32px]] The texture of poisonous potatoes has been changed.}}
{{History|||snap=18w50a|[[File:Poisonous Potato JE3 BE2.png|32px]] The texture of poisonous potatoes has been changed, once again.}}
{{History|pocket alpha}}
{{History||v0.12.1|snap=build 1|[[File:Poisonous Potato JE1 BE1.png|32px]] Added poisonous potatoes.}}
{{History|bedrock}}
{{History||1.4.0|snap=beta 1.2.14.2|Poisonous potatoes can now be found inside of [[shipwreck]] [[chest]]s.}}
{{History||1.10.0|snap=beta 1.10.0.3|[[File:Poisonous Potato JE3 BE2.png|32px]] The texture of poisonous potatoes has been changed.}}
{{History|console}}
{{History||xbox=TU14|xbone=CU1|ps=1.04|wiiu=Patch 1|switch=1.0.1|[[File:Poisonous Potato JE1 BE1.png|32px]] Added poisonous potatoes.}}
{{History||xbox=none|xbone=none|ps=1.90|wiiu=none|switch=none|[[File:Poisonous Potato JE3 BE2.png|32px]] The texture of poisonous potatoes has been changed.}}
{{History|New 3DS}}
{{History||0.1.0|[[File:Poisonous Potato JE1 BE1.png|32px]] Added poisonous potatoes.}}
{{History|foot}}
== Issues ==
{{issue list}}
== References ==
{{reflist}}
{{Items}}
[[Category:Plants]]
[[cs:Jedovatá brambora]]
[[de:Giftige Kartoffel]]
[[es:Patata envenenada]]
[[fr:Pomme de terre empoisonnée]]
[[hu:Mérgező burgonya]]
[[it:Patata velenosa]]
[[ja:青くなったジャガイモ]]
[[ko:독이 있는 감자]]
[[nl:Giftige aardappel]]
[[pl:Trujący ziemniak]]
[[pt:Batata venenosa]]
[[ru:Ядовитый картофель]]
[[th:มันฝรั่งพิษ]]
[[uk:Отруйна картопля]]
[[zh:毒马铃薯]]
[[Category:Food]]
[[Category:Renewable resources]]</li></ul> | 20w16a | Added ruined portals. | |||
| Pocket Edition Alpha | |||||
v0.12.1{{Extension DPL}}<ul><li>[[Water Bucket|Water Bucket]]<br/>{{Item
| title = Water Bucket
| renewable = Yes
| image = Water Bucket.png
| stackable = No
}}
A '''water bucket''' is a [[bucket]] filled with [[water]].
== Obtaining ==
=== Interacting ===
To fill an empty [[bucket]] with water, {{control|use}} it on a [[water]] source block. The water is consumed in the process. Flowing water does not fill a bucket.
{{control|Using}} an empty bucket on a [[cauldron]] filled with water (water level 3) empties the cauldron and fills the bucket.
Water buckets can also be filled by placing an empty one in the fuel slot of a [[furnace]], and a wet [[sponge]] into the oven slot. The bucket is filled when the [[smelting]] process completes, which also leaves the sponge dry and ready to be reused.
=== Chest Loot ===
{{LootChestItem|water-bucket}}
== Usage ==
{{Control|Using}} a water bucket on a solid block places a water source block against that block, emptying the bucket; using a water bucket on a [[waterlogging|waterloggable]] block waterlogs the block. In [[the Nether]], however, the water evaporates, making a fire extinguishing sound and displays smoke particles while nothing gets placed.
=== Dispensers ===
A [[dispenser]] can be loaded with a water bucket, and when activated it places a water block directly before it, emptying the bucket. A dispenser loaded with an empty bucket and a water source right in front of it draws the source into the bucket when activated.
=== Cauldrons ===
A single water bucket can fill a [[cauldron]], and using an empty bucket on a water-filled cauldron fills the bucket. Empty buckets cannot be filled from partly-filled cauldrons.
=== Filling bucket with mobs ===
Water buckets can be used on a [[fish]], [[axolotl]] or [[tadpole]] to create a [[bucket of aquatic mob]].
=== Transportation ===
{{main|Tutorials/Elevators#Water elevators}}
Water buckets can be used as a means of quickly descending great heights in the [[Overworld]] and [[the End]], either by creating a waterfall or using the water bucket while falling to create a safe water landing.
Water buckets can also be used to climb vertical surfaces anywhere but [[the Nether]] by repeatedly creating higher waterfalls from the bottom and swimming up them.
== Sounds ==
{{el|je}}:
{{Sound table
|sound=Fill water bucket1.ogg
|sound2=Fill water bucket2.ogg
|sound3=Fill water bucket3.ogg
|subtitle=Bucket fills
|source=player
|description=When a bucket is filled with water
|id=item.bucket.fill
|translationkey=subtitles.item.bucket.fill
|volume=1.0
|pitch=1.0
|distance=16}}
{{Sound table
|sound=Empty water bucket1.ogg
|sound2=Empty water bucket2.ogg
|sound3=Empty water bucket3.ogg
|subtitle=Bucket empties
|source=block
|description=When the bucket is placed
|id=item.bucket.empty
|translationkey=subtitles.item.bucket.empty
|volume=1.0 <ref group=sound>Except for the second copy of {{cd|empty1}}, which is 0.9</ref>
|pitch=1.0
|distance=16
|foot=1}}
{{el|je}}:
{{Sound table
|type=bedrock
|sound=Fill water bucket1.ogg
|sound2=Fill water bucket2.ogg
|sound3=Fill water bucket3.ogg
|source=block
|description=When a bucket is filled with water
|id=bucket.fill_water
|volume=1.0
|pitch=1.0}}
{{Sound table
|sound=Empty water bucket1.ogg
|sound2=Empty water bucket2.ogg
|sound3=Empty water bucket3.ogg
|source=block
|description=When a water bucket is emptied
|id=bucket.empty_water
|volume=1.0
|pitch=1.0}}
{{Sound table
|rowspan=2
|sound=Water Splash Old.ogg
|source=block
|description=When a water bucket is placed in a cauldron<wbr><ref group=sound name=bucketsplash>{{Bug|MCPE-135919}}</ref>
|id=cauldron.fillwater
|volume=0.1
|pitch=1.0}}
{{Sound table
|source=block
|description=When a water bucket is removed from a cauldron<wbr><ref group=sound name=bucketsplash/>
|id=cauldron.takewater
|volume=0.1
|pitch=1.0
|foot=1}}
==Data values==
=== ID ===
{{edition|java}}:
{{ID table
|edition=java
|showforms=y
|generatetranslationkeys=y
|displayname=Water Bucket
|spritetype=item
|nameid=water_bucket
|form=item
|foot=1}}
{{edition|bedrock}}:
{{ID table
|edition=bedrock
|showaliasids=y
|shownumericids=y
|showforms=y
|notshowbeitemforms=y
|generatetranslationkeys=y
|displayname=Water Bucket
|spritetype=item
|nameid=water_bucket
|aliasid=bucket / 8
|id=362
|form=item
|translationkey=item.bucketWater.name
|foot=1}}
== Advancements ==
{{load advancements|Tactical fishing;The Cutest Predator;Bukkit bukkit}}
==History==
{{History|java infdev}}
{{History||20100615|[[File:Water Bucket JE1 BE1.png|32px]] Added water buckets.}}
{{History|java alpha}}
{{History||v1.2.6|{{control|use|text=Using}} a water bucket on [[block]]s with GUIs ([[chest]]s, [[furnace]]s, etc.) no longer places the water.}}
{{History|java}}
{{History||1.0.0|snap=Beta 1.9 Prerelease 2|Water buckets can now be used to fill [[cauldron]]s.}}
{{History||1.3.1|snap=12w15a|[[Dispenser]]s have now been given the ability to dispense water buckets. They can also collect if activated again.}}
{{History||1.8|snap=14w25a|A water bucket is now shown as the icon when [[water]] is used as a layer in [[Superflat]].}}
{{History|||snap=14w25b|[[Smelting]] a wet [[sponge]] while an empty bucket is in the fuel slot fills the bucket with water.}}
{{History||1.9|snap=15w44a|A full [[cauldron]] can now be emptied with a bucket, yielding a water bucket.}}
{{History|||snap=15w50a|Added sounds for collecting and pouring water using a bucket.}}
{{History||1.13|snap=17w47a|Prior to the ''[[Flattening]]'' this item's numerical ID was 326.}}
{{History|||snap=18w08b|Water buckets can now be used to pick up [[fish]] mobs.}}
{{History||1.14|snap=18w43a|[[File:Water Bucket JE2 BE2.png|32px]] The texture of water buckets has now been changed.
|Water buckets can now suck up liquids directly adjacent to the side they are facing. How this works is unknown, given the water bucket clearly already contains a liquid.}}
{{History|||snap=18w48a|Water buckets can now be found in [[chest]]s in [[village]] fishing cottages.}}
{{History|||snap=19w02a|Water buckets can now be used to put out [[campfire]]s.}}
{{History||1.17|snap=20w51a|Water buckets can now be used to collect [[axolotl]]s.}}
{{History||1.19|snap=22w11a|Water buckets can now be used to collect [[tadpole]]s.}}
{{History||1.19.3|snap=22w45a|Water buckets can now be emptied into [[waterlogging|waterlogged]] blocks, instead of placing water against them.<ref>{{bug|MC-127110|||Fixed}}</ref>}}
{{History|upcoming java}}
{{History||Villager Trade Rebalance<br>(Experimental)|link=Java Edition 1.20.2|snap=23w31a|[[Wandering trader]]s now have a chance to [[trading|buy]] a water bucket from the player.}}
{{History|pocket alpha}}
{{History||v0.7.0|[[File:Water Bucket JE1 BE1.png|32px]] Added water buckets.
|Water buckets were simply called "Bucket".}}
{{History||v0.7.4|Water buckets no longer stack to 64.}}
{{History||v0.14.0|snap=build 1|Dispensers can now shoot out water from water buckets.}}
{{History|bedrock}}
{{History||1.4.0|snap=beta 1.2.14.2|Water buckets can now be used to pick up [[fish mob]]s.
|Moved all bucket items, including water buckets, from the Equipment tab to the Items tab in the [[Creative inventory]].{{verify|type=update}}{{info needed}}<!---please check snapshots, only 1 major release version was checked each--->}}
{{History||1.10.0|snap=beta 1.10.0.3|[[File:Water Bucket JE2 BE2.png|32px]] The texture of water buckets has now been changed.}}
{{History||1.16.100|snap=beta 1.16.100.56|The ID of water buckets has been changed from <code>bucket/8</code> to <code>water_bucket</code>.}}
{{History||1.17.0|snap=beta 1.16.230.52|Water buckets can now be used to collect [[axolotl]]s.}}
{{History||1.18.10|snap=beta 1.18.10.24|Water buckets can now be used to collect [[tadpole]]s behind the "Wild Update" experimental toggle.}}
{{History|console}}
{{History||xbox=TU1|xbone=CU1|ps=1.0|wiiu=Patch 1|switch=1.0.1|[[File:Water Bucket JE1 BE1.png|32px]] Added water buckets.}}
{{History||xbox=TU9|[[Dispenser]]s have now been given the ability to shoot out the [[liquids]] inside water buckets. They can also suck up the liquids if activated again, but a bug prevents the empty [[bucket]] from being filled. Whether this was ever fixed is unknown.}}
{{History||xbox=none|xbone=none|ps=1.90|wiiu=none|switch=none|[[File:Water Bucket JE2 BE2.png|32px]] The texture of water buckets has now been changed.}}
{{History|New Nintendo 3DS Edition}}
{{History||0.1.0|[[File:Water Bucket JE1 BE1.png|32px]] Added water buckets.}}
{{History|foot}}
==Issues==
{{issue list}}
==Gallery==
<gallery>
Water Bucket SDGP.png|Water bucket in the [[Super Duper Graphics Pack]].
</gallery>
==References==
{{Reflist}}
{{Items}}
[[Category:Renewable resources]]
[[Category:Tools]]
[[de:Wassereimer]]
[[ja:水入りバケツ]]
[[pt:Balde de água]]
[[th:ถังน้ำ]]
[[uk:Відро води]]
[[zh:水桶]]</li><li>[[:Category:Joke items|Category:Joke items]]<br/>[[Category:Joke features|Items]]
[[Category:Items]]</li></ul> | build 1 | Added nether portals. | |||
| Nether portals can be built at a minimum of 4×5, and a maximum of 23×23. | |||||
| Legacy Console Edition | |||||
| TU1 | CU1 | 1.0 | Patch 1 | 1.0.1 | Added nether portals. |
| TU31 | CU19 | 1.22 | Patch 3 | There are now new nether portal building rules: Any rectangular shape from 4×5 to 23×23. | |
| If the nether portal in the Nether is big enough, ghasts can now travel through. | |||||
| Nether portals can now be activated by any fire block within the frame. | |||||
Other historical info
| Java Edition Alpha | |||||
|---|---|---|---|---|---|
v1.2.0{{Extension DPL}}<ul><li>[[Melon Slice|Melon Slice]]<br/>{{Dungeons hatnote|type=consumable|Melon}}
{{Item
| title = Melon Slice
|typeimage=Melon Slice.png
| renewable = Yes
| heals = {{hunger|2}}
| stackable = Yes (64)
}}
A '''melon slice'''{{efn|Known as '''Melon Slice''' {{in|java}} and '''Melon''' {{in|bedrock}}.}} is a [[food]] item that can be eaten by the [[player]].
== Obtaining ==
=== Block loot ===
{{see also|Tutorials/Pumpkin and melon farming|title1 = Pumpkin and melon farming}}
Melon slices can be obtained by breaking (harvesting) [[melon]]s using any [[tool]] or by hand. [[Axe]]s, followed by [[sword]]s, are the fastest tools for harvesting melons. A melon drops 3–7 melon slices, when broken; by hand, using a [[tool]], or after being broken by the movement of a [[piston]], with an average of 4.64 slices per melon.
Breaking a melon with a tool enchanted with [[Fortune]] increases the potential number of drops by 1 slice per level, up to a maximum of 9 slices.
== Usage ==
=== Food ===
{{see also|Tutorials/Hunger management|title1=Hunger management}}
To eat a melon slice, press and hold {{control|use}} while it is selected in the hotbar. Eating one restores {{hunger|2}} [[hunger]] and 1.2 hunger
[[Hunger#Mechanics|saturation]].
=== Crafting ingredient ===
{{crafting usage}}
=== Composting ===
Placing a melon slice into a [[composter]] has a 50% chance of raising the compost level by 1.
==Sounds==
{{Sound table/Entity/Food}}
== Data values ==
=== ID ===
{{edition|java}}:
{{ID table
|edition=java
|showforms=y
|generatetranslationkeys=y
|displayname=Melon Slice
|spritetype=item
|nameid=melon_slice
|form=item
|foot=1}}
{{edition|bedrock}}:
{{ID table
|edition=bedrock
|showaliasids=y
|shownumericids=y
|showforms=y
|notshowbeitemforms=y
|generatetranslationkeys=y
|spritename=melon-slice
|displayname=Melon
|spritetype=item
|nameid=melon_slice
|aliasid=melon
|id=272
|form=item
|translationkey=item.melon.name
|foot=1}}
== Advancements ==
{{load advancements|Husbandry;A Balanced Diet}}
== History ==
{{History|java beta}}
{{History||1.8|snap=Pre-release|[[File:Melon Slice JE1 BE1.png|32px]] Added melons.}}
{{History|java}}
{{History||1.0.0|snap=Beta 1.9 Prerelease 4|Melons are now used in the [[crafting]] recipe of [[glistering melon]]s.}}
{{History|||snap=Beta 1.9 Prerelease 5|Melons once again drop the correct number of slices.}}
{{History||1.3.1|snap=12w21a|Melons can now be [[trading|bought]] from farmer [[villager]]s, at 5–8 melon slices for 1 [[emerald]].}}
{{History||1.7.2|snap=13w37a|Block ID 105, [[melon stem]], has been removed from the {{cmd|give}} [[commands|command]].}}
{{History||1.8|snap=14w02a|[[Villager]]s no longer [[trading|sell]] melons. They now buy [[melon]]s instead.}}
{{History||1.13|snap=17w47a|Prior to [[1.13/Flattening|''The Flattening'']], this [[item]]'s numeral ID was 360.}}
{{History|||snap=18w20b|"Melon" has been renamed to "Melon Slice."
|The ID of melon slices has been changed from <code>melon</code> to <code>melon_slice</code>.}}
{{History||1.14|snap=18w43a|[[File:Melon Slice JE2 BE2.png|32px]] The texture of melon slices has been changed.}}
{{History|||snap=19w03a|Placing a melon slice into the new [[composter]] has a 20% chance of raising the compost level by 1.}}
{{History|||snap=19w05a|Melon slices now have a 50% chance of increasing the compost level in a composter by 1.}}
{{History|pocket alpha}}
{{History||v0.5.0|[[File:Melon Slice JE1 BE1.png|32px]] Added melons.
|Melons restore {{health|2}} each, rather than {{hunger|2}}.}}
{{History||v0.12.1|snap=?|Added Melon slice to the Creative inventory.}}
{{History|||snap=build 1|Melons now restores [[hunger]] instead of [[health]].
|Melons can no longer be obtained from [[nether reactor]]s.}}
{{History|pocket}}
{{History||1.1.0|snap=alpha 1.1.0.3|[[Breaking]] a [[melon]] with [[shears]] now always yields 9 melons.}}
{{History|bedrock}}
{{History||1.10.0|snap=beta 1.10.0.3|[[File:Melon Slice JE2 BE2.png|32px]] The texture of melons has been changed.}}
{{History||1.11.0|snap=beta 1.11.0.1|Melons can now be used to fill up [[composter]]s.}}
{{History|||snap=beta 1.11.0.4|Melons can now be [[trading|sold]] to farmer [[villager]]s.}}
{{History||1.16.0|snap=beta 1.16.0.57|[[Trading]] has been changed, melon slices can no longer be sold to farmer villagers.}}
{{History||1.16.100|snap=beta 1.16.100.56|The ID of melon slices has been changed from <code>melon</code> to <code>melon_slice</code>.}}
{{History|console}}
{{History||xbox=TU5|xbone=CU1|ps=1.0|wiiu=Patch 1|[[File:Melon Slice JE1 BE1.png|32px]] Added melons.}}
{{History||xbox=none|xbone=none|ps=1.90|wiiu=none|switch=none|[[File:Melon Slice JE2 BE2.png|32px]] The texture of melons has been changed.}}
{{History|new 3ds}}
{{History||0.1.0|[[File:Melon Slice JE1 BE1.png|32px]] Added melons.}}
{{History|foot}}
== Issues ==
{{issue list}}
== See also ==
* [[Pumpkin]]
* [[Glistering Melon Slice]]
== Notes ==
{{fnlist}}
{{Items}}
[[Category:Plants]]
[[cs:Meloun]]
[[de:Melone]]
[[es:Rodaja de sandía]]
[[fr:Tranche de pastèque]]
[[hu:Dinnye Szelet]]
[[ko:수박]]
[[nl:Meloenschijf]]
[[pl:Arbuz]]
[[pt:Fatia de melancia]]
[[ru:Ломтик арбуза]]
[[zh:西瓜片]]
[[Category:Food]]
[[Category:Renewable resources]]</li><li>[[Spyglass|Spyglass]]<br/>{{Item
| title = Spyglass
| image = Spyglass.png
| durability =
| rarity = Common
| renewable = Yes
| stackable = No
}}
A '''spyglass''' is a [[tool]] used to zoom in on distant objects.
== Obtaining ==
=== Crafting ===
{{Crafting
|B1=Amethyst Shard
|B2=Copper Ingot
|B3=Copper Ingot
|Output=Spyglass
|type=Tool
}}
== Usage ==
[[File:Steve scoping Spyglass.png|right|100px]] [[File:Alex scoping Spyglass.png|right|100px]]
To use a spyglass, the player selects it from the hotbar and clicks {{control|use}} while looking in the desired direction.
Spyglasses are used to zoom in on a specific location in the player's field of view (FOV). The spyglass changes the FOV to {{frac|1|10}} of the FOV set in [[options]]. By default, the FOV is set to 70° in ''Java Edition'' and 60° in Bedrock Edition, resulting in an FOV of 7° in ''Java Edition'' and 6° in Bedrock Edition through the spyglass. The player's FOV can be set from 30° to 110°, so the spyglass FOV can range from 3° to 11°. Regardless of the situation, or status effects the player has, using the Spyglass always shows a FOV {{frac|1|10}} of the FOV set in [[options]].
A square vignette is applied when in use, similar to the effect when wearing a [[carved pumpkin]]. Pressing {{key|F1}} removes the vignette,{{only|java}}<ref>{{bug|MC-203575||The spyglass overlay goes away when pressing F1|WAI}}</ref><ref>{{bug|MCPE-125869||Spyglass's overlay don't go away even if the player toggles Hide GUI on/ Pressing F1|}}</ref> similar to a carved pumpkin.
Hazy distant objects remain hazy when viewed in the spyglass. Mobs too distant to render also do not render in the spyglass. The spyglass shows a magnified view of what the player already sees.
The player is slowed down while watching through the spyglass. When the player uses the spyglass continuously for {{convert|1|minute|game tick}}, the interface is automatically closed.
If the player has a certain effect on their screen like [[fire]], the spyglass does not remove that effect on the player's screen.
[[File:Spyglass Zooming.gif|thumb|center|A spyglass being used to zoom in on a [[block of gold]] starting from normal FOV (70°).]]
== Sounds ==
{{edition|java}}:
{{Sound table
|sound=Spyglass use.ogg
|subtitle=Spyglass expands
|source=player
|description=When a player uses a spyglass
|id=item.spyglass.use
|translationkey=subtitles.item.spyglass.use
|volume=0.5
|pitch=''varies'' <ref group=sound>Can be 1.15, 1.33, 1.4, or 1.55</ref>
|distance=16}}
{{Sound table
|sound=Spyglass stop.ogg
|subtitle=Spyglass retracts
|source=player
|description=When a player stops using a spyglass
|id=item.spyglass.stop_using
|translationkey=subtitles.item.spyglass.stop_using
|volume=0.5
|pitch=''varies'' <ref group=sound>Can be 1.0, 0.8, or 0.9</ref>
|distance=16
|foot=1}}
{{edition|bedrock}}:
{{Sound table
|type=bedrock
|sound=Spyglass use.ogg
|source=player
|description=When a player uses a spyglass
|id=item.spyglass.use
|volume=0.5
|pitch=1.15-1.55}}
{{Sound table
|sound=Spyglass stop.ogg
|source=player
|description=When a player stops using a spyglass
|id=item.spyglass.stop_using
|volume=0.5
|pitch=0.8-1.0
|foot=1}}
== Data values ==
=== ID ===
{{edition|java}}:
{{ID table
|edition=java
|showforms=y
|generatetranslationkeys=y
|displayname=Spyglass
|spritetype=item
|nameid=spyglass
|form=item
|foot=1}}
{{edition|bedrock}}:
{{ID table
|edition=bedrock
|shownumericids=y
|showforms=y
|notshowbeitemforms=y
|generatetranslationkeys=y
|displayname=Spyglass
|spritetype=item
|nameid=spyglass
|form=item
|foot=1|id=626}}
== Advancements ==
{{load advancements|Is it a Bird?;Is it a Balloon?;Is it a Plane?}}
== History ==
{{History||October 3, 2020|link={{ytl|DBvZ2Iqmm3M|t=25m21s}}|[[File:Spyglass JE1.png|32px]]<!-- [[File:Spyglass scope (pre-release).png|32px]]--> Spyglasses are revealed at [[Minecraft Live 2020]]. They were originally named "telescopes" and had an oval vignette.}}
{{History|java}}
{{History||1.17|snap=20w45a|[[File:Spyglass JE1.png|32px]] Added spyglasses.
|[[File:Spyglass scope JE1.png|32px]] The scope texture is currently a circle with glare spots.}}
{{History|||snap=20w46a|[[File:Spyglass scope JE2.png|32px]] The scope texture is now a [[glass]] square with a [[copper]] border.}}
{{History|||snap=20w48a|[[File:Spyglass JE2 BE1.png|32px]] The spyglass is now a 3D model instead of a flat sprite.
|[[File:Spyglass (texture) JE2.png|32px]] The texture of the spyglass has changed.
|A spyglass in use is anchored better to the player's "eye" when viewed in 3rd person.}}
{{History|||snap=21w05a|Copper ingots are now renewable via [[drowned]], making spyglasses renewable.}}
{{History|||snap=21w10a|[[File:Spyglass (item) JE3 BE1.png|32px]] Spyglasses have a new texture in the inventory. The 3D model is still used in the hand, similar to [[tridents]].}}
{{History||1.17.1|snap=Pre-release 1|[[File:Spyglass (texture) JE3.png|32px]] The texture of the spyglass model has changed.}}
{{History|bedrock}}
{{History||1.17.0|snap=beta 1.17.0.50|[[File:Spyglass JE2 BE1.png|32px]] [[File:Spyglass (item) JE3 BE1.png|32px]] Added spyglasses.}}
{{History|||snap=beta 1.17.0.52|Spyglasses are now available without enabling [[experimental gameplay]].}}
{{History|foot}}
== Issues ==
{{Issue list}}
== Trivia ==
*If {{command|item replace}} is used to place a spyglass on a player's head, the item appears stuck to the center of the player's face.
== Gallery ==
<gallery>
Villager Spyglass.png|Spying on [[villager]]s through a spyglass.
After using the spyglass at FOV 30 F1.png|Hiding the HUD removes the spyglass overlay.
Panda eating a spyglass.png|When eaten by a [[panda]], spyglasses cause [[missing texture]] particles to be produced.<ref>{{bug|MC-206684}}</ref>
JE 1.17 Development Telescope.jpg|The spyglass was originally called the telescope.
JE 1.17 Development Telescope 2.jpg|The telescope's overlay was originally round instead of square.
File:Ari Spyglass.jpg|How the spyglass looks in the third person.
Steve scoping Spyglass JE1.png|Steve using a spyglass before its 3D model was added.
Alex scoping Spyglass JE1.png|Alex using a spyglass before its 3D model was added.
File:Mangrove Portal.jpg|An [[allay]] peeking into view of [[Noor]]’s spyglass.
</gallery>
== References ==
{{Reflist}}
== External Links ==
*[https://www.minecraft.net/en-us/article/taking-inventory--spyglass Taking Inventory: Spyglass] – Minecraft.net on February 17, 2022
{{Items}}
[[Category:Renewable resources]]
[[de:Fernrohr]]
[[es:Catalejo]]
[[fr:Longue-vue]]
[[it:Cannocchiale]]
[[ja:望遠鏡]]
[[pl:Luneta]]
[[pt:Luneta]]
[[ru:Подзорная труба]]
[[zh:望远镜]]</li></ul> | October 4, 2010 | A poster on Notch's blog announced a new "hell world," and hinted that it would utilize portals for fast travels. | |||
| October 22, 2010 | Originally, ghasts were intended to spawn from nether portals (referred to as "gates") in the Overworld. However, this ability has not yet been implemented.[5] | ||||
| October 29, 2010 | Notch sent a preview of the Halloween Update to two gaming companies; their articles[6][7] detailed the usage of nether portals, used for entering what was then known as "the Slip". | ||||
| Java Edition Beta | |||||
1.6{{Extension DPL}}<ul><li>[[Ender Pearl|Ender Pearl]]<br/>
{{ItemEntity
|image=Ender Pearl.png
|renewable=Yes
|stackable=Yes (16)
|size=Height: 0.25 Blocks<br>Width: 0.25 Blocks
}}
An '''ender pearl''' is an [[item]] that can be thrown and [[teleport|teleports]] the thrower to where it lands, and used to craft [[eye of ender|eyes of ender]] which are required to access [[the End]].
== Obtaining ==
=== Mob loot ===
An [[enderman]] has a 50% chance to drop 1 ender pearl when killed. The drop is increased by 1 per level of [[Looting]], with a maximum of 4 with Looting III.
=== Chest loot ===
{{LootChestItem|ender-pearl}}
A [[trapped chest]] always containing 2 ender pearls can be found in the "fake end portal" room of [[woodland mansion]]s.
=== Trading ===
{{IN|java}}, expert-level [[Trading#Cleric|cleric villagers]] have a {{frac|2|3}} chance to sell an ender pearl for 5 [[emerald]]s.
{{IN|bedrock}}, expert-level cleric villagers sell one ender pearl for 5 emeralds.
=== Bartering ===
[[Piglin]]s have a {{frac|10|459}} (4.27) chance to [[barter]] 3-4 ender pearls when given a [[gold ingot]].
== Usage ==
Ender pearls can be thrown by pressing {{control|use}}. After it is thrown, the ender pearl is consumed, and the player teleports to where it lands, taking {{hp|5}} [[fall damage]]. Wearing armor enchanted with [[Protection]] and/or [[Feather Falling]] reduces the damage taken from the ender pearl.
Ender pearls have a small cone of travel; they do not all follow the same path when thrown in the same direction. The direction and velocity of ender pearl throws is slightly randomized. They can travel about 30 blocks when thrown straight up, and up to 54 blocks forward when thrown at an optimum launch angle of ~35° (on even ground).
The thrower's vertical velocity influences the throw. Hence timing a throw with a jump can increase the throwing range to 42 blocks when thrown straight up and 64 blocks forward at a 35° angle. Throwing while falling significantly decreases the range. Ender pearls collide with all [[minecart]] types, [[boat]]s, [[end crystal]]s and [[nether portal]]s, and travel through [[end portal]]s. Ender pearls that fall into the [[void]] disappear, and do not trigger the player to teleport. However, ender pearl entities (instead of dropped items) are ''not'' destroyed by lava and will teleport the player to the bottom of lava pools/lava oceans.
Ender pearls have a cooldown of one second before they can be used again. The cooldown is shown in the hotbar by a white overlay on the ender pearl that shrinks and must disappear before the player can use it again. If there are other inventory or hotbar slots containing ender pearls, they are covered with the white overlay as well.<ref>{{bug|MC-88236|||WAI}}</ref>
Ender pearls can be thrown into [[end gateway]]s to reach the outer islands of the End. They can also be thrown into the [[exit portal]] to reach the player's spawn point.
Ender pearl teleportation makes no sound ''itself''{{only|java}}, but does emit a "small fall" sound at the destination when applying teleportation damage to the player.
=== Stasis chamber ===
Ender pearls are affected by [[bubble column]]s. An ender pearl can remain afloat on top of an upward bubble column, allowing it to be stored indefinitely. A mechanism can then be triggered to make the ender pearl hit a solid surface (e.g. by closing a [[trapdoor]]), teleporting the thrower back to the setup wherever they are.
=== Spawning endermites ===
An ender pearl has a 10% chance to spawn an [[endermite]] when it lands. This is the only way through which endermites can spawn, without using cheats. The endermite spawns at ''the player's position'' when the pearl lands{{only|je}}, or at the pearl's landing site{{only|be}}.
=== Crafting ingredient ===
{{crafting usage}}
== Sounds ==
{{edition|java}}:<br>
Thrown ender pearls use the Friendly Creatures sound category for entity-dependent sound events.
{{Sound table
|sound=Bow shoot.ogg
|subtitle=Ender Pearl flies
|source=neutral
|description=When an ender pearl is thrown
|id=entity.ender_pearl.throw
|translationkey=subtitles.entity.ender_pearl.throw
|volume=0.5
|pitch={{frac|1|3}}-0.5
|distance=16
|foot=1}}
{{Edition|Bedrock}}:
{{Sound table
|type=bedrock
|sound=Bow shoot.ogg
|source=player
|description=When an ender pearl is thrown
|id=random.bow
|volume=0.5
|pitch=0.33-0.5
|foot=1}}
== Data values ==
=== ID ===
{{edition|java}}:
{{ID table
|edition=java
|firstcolumnname=Item
|showforms=y
|generatetranslationkeys=y
|displayname=Ender Pearl
|spritetype=item
|nameid=ender_pearl
|form=item
|foot=1}}
{{ID table
|edition=java
|firstcolumnname=Entity
|generatetranslationkeys=y
|displayname=Thrown Ender Pearl
|spritetype=entity
|spritename=Ender Pearl
|nameid=ender_pearl
|foot=1}}
{{edition|bedrock}}:
{{ID table
|edition=bedrock
|firstcolumnname=Item
|shownumericids=y
|showforms=y
|notshowbeitemforms=y
|generatetranslationkeys=y
|displayname=Ender Pearl
|spritetype=item
|nameid=ender_pearl
|id=422
|foot=1}}
{{ID table
|edition=bedrock
|firstcolumnname=Entity
|shownumericids=y
|generatetranslationkeys=y
|displayname=Ender Pearl
|spritetype=entity
|nameid=ender_pearl
|id=87
|foot=1}}
===Entity Data===
Thrown ender pearls have entity data that define various properties of the entity.
{{el|java}}:
{{main|Entity format}}
{{/ED}}
{{el|bedrock}}:
: See [[Bedrock Edition level format/Entity format]].
== Achievements ==
{{Load achievements|Beam Me Up}}
== Advancements ==
{{load advancements|Remote Getaway;Bullseye}}
== History ==
{{History|java beta}}
{{History||1.8|snap=Pre-release|[[File:Ender Pearl JE1.png|32px]] Added ender pearls along with [[endermen]].
|Ender pearls have no use, but can stack up to 64.}}
{{History|java}}
{{History||1.0.0|snap=Beta 1.9 Prerelease|Ender pearls are now less commonly found near bodies of [[water]] since [[endermen]] now teleport away when in contact with water. Before this version, endermen didn't attempt to teleport and were [[damage]]d/killed from water much more frequently, causing numerous ender pearls to occur around bodies of water.
|Later, on a suggestion from [[wikipedia:Reddit|Reddit]] user isJesus, [[Notch]] implemented the teleporting feature for ender pearls.<ref>http://www.reddit.com/r/Minecraft/comments/kpsay/eggsnowballender_pearl_suggestiongif/c2mabfj</ref><ref>{{Tweet|notch|118614580539826176}}</ref><ref>http://www.reddit.com/r/Minecraft/comments/kss7n/twitter_ender_pearls_have_a_unique_ability_now/c2mwldd</ref>}}
{{History|||snap=Beta 1.9 Prerelease 2|Added teleporting feature to ender pearls.
|Using an ender pearl to teleport resulted in being kicked from servers for "hacking". This is due to a check triggering that was supposed to prevent modified clients from moving too quickly.
|Ender pearls now only stack up to 16.}}
{{History|||snap=Beta 1.9 Prerelease 3|Ender pearls are now used to craft [[eyes of ender]].
|Ender pearls can now be found in the new [[stronghold]] altar [[chest]]s.}}
{{History||1.3.1|snap=12w24a|[[File:Ender Pearl JE2 BE1.png|32px]] The texture of ender pearls has been changed.}}
{{History||1.8|snap=14w02a|As part of the revamp of the trading system, cleric [[villager]]s now [[trading|buy]] ender pearls.}}
{{History|||snap=14w03a|Villager clerics no longer buy ender pearls.}}
{{History|||snap=14w11b|Ender pearls have a 5% chance to spawn [[endermite]]s when used.}}
{{History||1.9|snap=15w31a|Ender pearls can now be thrown in [[Creative]] mode.}}
{{History|||snap=15w34c|Ender pearls now have a cooldown after using them.}}
{{History|||snap=15w41a|[[Villager]] clerics now [[trading|sell]] ender pearls for 4–7 [[emerald]]s, as one of their tier III trades.}}
{{History|||snap=15w49a|Thrown ender pearls now take the user's motion into account. For example, an ender pearl thrown forward will land closer if the player is falling, and land farther if the player is ascending.}}
{{History||1.10|snap=16w21a|Ender pearls can now teleport riders off their mounts.}}
{{History||1.11|snap=16w32a|The entity ID of ender pearls has been changed from <code>ThrownEnderpearl</code> to <code>ender_pearl</code>.}}
{{History|||snap=16w39a|Ender pearls can now be found in [[woodland mansion]]s' fake portal room [[chest]]s.}}
{{History||1.13|snap=17w47a|Prior to [[1.13/Flattening|''The Flattening'']], this [[item]]'s numeral ID was 368.}}
{{History||1.14|snap=18w43a|[[File:Ender Pearl JE3 BE2.png|32px]] The texture of ender pearls has been changed.}}
{{History||1.16|snap=20w07a|Ender pearls have a {{frac|2|109}} (~1.83%) chance of being offered by [[piglin]]s when [[bartering]], in a stack size of 2–4.}}
{{History|||snap=20w09a|Ender pearls now have a {{frac|10|226}} (~4.42%) chance of being offered by piglins when bartering, in a stack size of 1–5.}}
{{History|||snap=20w10a|Ender pearls now have a {{frac|20|411}} (~4.87%) chance of being offered by piglins when bartering, in a stack size of 4–8.}}
{{History|||snap=20w20a|Ender pearls now have a {{frac|20|423}} (~4.73%) chance of being offered by piglins when bartering, in a stack size of 4–8.}}
{{History||1.16.2|snap=20w28a|Ender pearls now have a {{frac|10|459}} (~2.18%) chance of being offered by piglins when bartering, in a stack size of 2–4.}}
{{History|||snap=Pre-Release 1|Ender pearls are now affected by [[bubble column]]s.<ref>{{bug|MC-125758|||Fixed}}</ref>
|Ender pearls no longer get destroyed at contact with non-solid blocks.<ref>{{bug|MC-73884|||Fixed}}</ref>}}
{{History|pocket alpha}}
{{History||v0.14.0|snap=build 1|[[File:Ender Pearl JE2 BE1.png|32px]] Added ender pearls.
|While fully implemented, ender pearls currently have no assigned ID and are currently unobtainable in-game.}}
{{History|pocket}}
{{History||1.0.0|snap=alpha 0.17.0.1|Ender pearls are now obtainable in-game.
|Ender pearls can now be used to craft [[eyes of ender]].}}
{{History|||snap=alpha 1.0.0.0|Ender pearls now require a 1-second cooldown.}}
{{History|||snap=alpha 1.0.0.1|Ender pearl cooldown now has an animation.}}
{{History||1.0.4|snap=alpha 1.0.4.0|Ender pearls can now be [[trading|bought]] from cleric [[villager]]s for 4-7 [[emerald]]s.}}
{{History||1.1.0|snap=alpha 1.1.0.0|Ender pearls can now be found in [[woodland mansion]]s' [[chest]]s.}}
{{History|bedrock}}
{{History||1.10.0|snap=beta 1.10.0.3|[[File:Ender Pearl JE3 BE2.png|32px]] The texture of ender pearls has been changed.}}
{{History||1.11.0|snap=beta 1.11.0.4|[[Trading]] has been changed, expert-level cleric [[villager]]s now [[trading|sell]] an ender pearl for 5 [[emerald]]s as part of their trade.}}
{{History||1.16.0|snap=beta 1.16.0.57|Ender pearls can now be obtained from [[bartering]] with [[piglin]]s.}}
{{History||1.16.100|snap=beta 1.16.100.54|Ender pearls now have a {{frac|10|459}} (~2.18%) chance of being offered by piglins when bartering, in a stack size of 2–4.}}
{{History|console}}
{{History||xbox=TU5|xbone=CU1|ps=1.0|wiiu=Patch 1|switch=1.0.1|[[File:Ender Pearl JE2 BE1.png|32px]] Added ender pearls.}}
{{History||xbox=TU7|A teleporting feature has been added to ender pearls.}}
{{History||xbox=none|xbone=none|ps=1.90|wiiu=none|switch=none|[[File:Ender Pearl JE3 BE2.png|32px]] The texture of ender pearls has been changed.}}
{{History|new 3ds}}
{{History||1.7.10|[[File:Ender Pearl JE2 BE1.png|32px]] Added ender pearls.}}
{{History|foot}}
== Issues ==
{{issue list}}
== Trivia ==
*Ender pearls can be used to teleport/move through non-[[solid block]]s without suffocation and solid blocks by pressing against the blocks and using the ender pearl at the player's feet until the player goes through.<ref>{{bug|MC-2164}}</ref><ref>{{ytl|KA1UmxraeUg}}</ref>
*In ''Java Edition'', it is possible to spawn a thrown ender pearl using commands, but it does not teleport, unless it is assigned an owner.
*If the player throws an ender pearl and then dies before impact while the pearl is in a loaded chunk, the pearl disappears and the player is not teleported. Pearls in unloaded chunks do not disappear if their owner dies.
*If the player throws an ender pearl in Survival mode and changes to Creative mode before the pearl lands, the player is still teleported.
*The player is still teleported by throwing an ender pearl and entering [[the Nether]] before it lands. The pearl is not lost if an ender pearl is thrown into a [[nether portal]] and the player travels through the portal; the pearl lands and teleports the player as usual.
*If multiple ender pearls are thrown in succession, the player can be hurt only once from fall damage within about a one-second span.
*If a [[player]] dies from ender pearl teleportation, the [[death message]] says: "<player> hit the ground too hard".
*A thrown ender pearl faces toward the player in first-person view, while it appears rotated horizontal in [[third-person view]]. This is the case for all throwable items (ender pearl, [[egg]], [[snowball]], and all throwable [[potion]]s).
*Ender pearls and [[snowball]]s have the exact same range when fired. Therefore, snowballs can be used to predict the trajectory of ender pearls, or simply for practicing ender pearl throwing. This can be very helpful when the player has to throw ender pearls in dangerous environments, such as the Nether or the End.
*Despite the fact that ender pearls deal no damage to anything they're thrown at, provokable mobs (such as iron golems and piglins) will be provoked by the player if one is thrown at them.
== Gallery ==
<gallery>
Ender Pearl Suggestion.gif|The original suggestion image for teleporting with ender pearls.
Enderlake.png|Ender pearls were formerly found in [[water]], however endermen now teleport out to prevent damage.
</gallery>
== References ==
{{reflist}}
== See also ==
*[[End Dimension]]
*[[Ender Dragon]]
*[[Ender Portal]]
*[[Enderman]]
{{Items}}
{{entities}}
[[cs:Endová perla]]
[[de:Enderperle]]
[[es:Perla de ender]]
[[fr:Perle de l'Ender]]
[[hu:Véggyöngy]]
[[ja:エンダーパール]]
[[ko:엔더 진주]]
[[nl:Enderparel]]
[[pl:Enderperła]]
[[pt:Pérola de ender]]
[[ru:Жемчуг Края]]
[[th:ไข่มุกเอนเดอร์]]
[[tr:Ender İncisi]]
[[uk:Перлина Краю]]
[[zh:末影珍珠]]</li><li>[[Trident|Trident]]<br/>{{For|the Hidden Depths DLC weapon in ''Minecraft Dungeons''|MCD:Trident}}
{{ItemEntity
|durability= 250
|renewable= Yes
|stackable= No
|size=Height: 0.25 Blocks<br>Width: 0.25 Blocks
|title=Trident|image= <gallery>
Trident (item).png | Item
Trident.png | Entity
</gallery>}}
A '''trident''' is a [[weapon]] used in both melee and ranged combat and is a rare drop from [[drowned]].
==Obtaining==
Tridents are not craftable. A trident can be obtained only when dropped by a [[drowned]], Converted drowned are never equipped with tridents.
===Mob loot===
==== '''''Java Edition''''' ====
6.25% (or 1 in 16) of [[Drowned]] in Java Edition spawn with a trident of random durability as their natural weapon. They have an 8.5% chance to drop their trident when killed by a player. The chance is increased by 1% for each level of [[Looting]] up to a max of 11.5% with Looting III. This means the overall chance of obtaining a trident from any given drowned is 0.53125% (about 1 in 188) or 0.71875% (about 1 in 140) with looting III.
{{IN|Java}}, a trident held by a drowned has a chance to be enchanted, but the trident's enchantments have no effects for drowned.<ref>{{bug|MC-127321}}</ref>
==== '''''Bedrock Edition''''' ====
Only 15% (or 3 in 20) of [[Drowned]] in Bedrock Edition spawn with tridents. Of these, they have a 25% chance to drop their trident when killed by a player. This chance is increased by 4% for each level of looting up to a max of 37% with looting III. This means the overall chance of obtaining a trident from any given drowned is 3.75% (or 3 in 80) or 5.55% with looting III.
===Thrown tridents===
Tridents thrown onto the ground by a player can be picked up; however, tridents thrown by [[drowned]] cannot be picked up, similar to arrows shot by [[skeleton]]s, [[stray]]s, and [[pillager]]s. Only the owner of a trident thrown in Creative mode or enchanted with Loyalty can pick it up; other players in Creative and players in Survival mode including its own owner can't pick up the trident thrown in Creative.
===Trading===
Drowned who are holding tridents will sometimes drop their trident at full durability if given a nautilus shell when they aren't attacking anything.{{only|BE}}
==Usage==
===Drowned===
{{main|Drowned}}
15% of drowned {{in|bedrock}}, and 6.25% {{in|java}}, spawn with a trident as its natural weapon. It throws the trident at its opponent every 1.5 seconds, dealing {{hp|9}} [[damage]] in normal difficulty. A drowned can throw unlimited tridents, and these tridents cannot be picked up by the [[player]].
A [[villager]] can be turned into a [[zombie villager]] if it is killed by a trident thrown by a drowned: the chance of conversion is 0% on Easy [[difficulty]], 50% on Normal, and 100% on Hard and [[Hardcore]].
{{IN|bedrock}}, a drowned can use the trident's melee attack if its target is within three blocks. The melee attack deals {{hp|9}} damage.
===Melee attack===
Pressing {{control|attack}} while holding a trident deals damage to both [[mob]]s and players. Tridents deal {{hp|9}} melee damage. A successful hit consumes durability of the trident.
===Ranged attack===
[[File:Steve aiming with Trident.png|150px]] [[File:Alex aiming with Trident.png|150px]]
Pressing and holding {{control|use}} while holding a trident charges it. When released at half charge or more, the trident is thrown and deals damage to any [[entity]] it hits. Note that it doesn't have to be full charge for the complete damage and length. It flies on a ballistic trajectory similar to that of an [[arrow]], but at 80% strength. If the trident hits a block, it sticks to the block. If it hits an entity, it bounces off the entity and lands nearby. It is also blocked by [[shield]]s and can be retrieved once it lands in the ground. Thrown tridents can trigger wooden [[button]]s, wooden [[pressure plate]]s, and [[target]] blocks. A trident can be thrown at a [[chorus flower]] or [[pointed dripstone]] to break it, which causes the block to be dropped as its respective item.
{{IN|bedrock}} and [[Java Edition Combat Test 4]], tridents can be shot by [[dispenser]]s regardless of enchantment.
Tridents [[Enchanting#Summary_of_enchantments_by_item|enchanted]] with [[Loyalty]] return to the thrower after hitting an entity{{only|java}}/hitting and bouncing off an entity then hitting a block{{only|bedrock}}<ref>{{bug|MCPE-51726}}</ref> or just a block. A Loyalty-enchanted trident fired from a [[dispenser]] just sticks to the block it strikes. Higher levels of enchantment result in shorter recovery times. {{IN|java}}, throwing a trident enchanted with Loyalty into the [[void]] destroys it,<ref>{{bug|MC-125755|||WAI}}</ref> while {{in|bedrock}} it automatically returns to the player. Tridents (if enchanted with Loyalty), can take [[fire]] damage but still return to the player if thrown in [[lava]]. This is especially helpful in [[the Nether]] should the [[player]] be using a trident instead of a [[bow]]. If a trident enchanted with Loyalty attempts to return to a player with no available inventory space, the trident floats near the player until inventory space becomes available.
Thrown tridents take 1 durability damage, regardless of whether it hit an entity or not. Tridents with 1 durability remaining cannot be thrown.
Tridents enchanted with [[Riptide]] launch the player a certain distance when thrown, with the distance increasing for higher enchantment levels. They can be thrown only if the player is standing in [[water]], or if it is raining on the block they are standing on. If the player charges it but walks into a nearby dry area, the charge is canceled. If the player throws a Riptide trident and collides with a mob, the mob takes melee damage (including critical damage if the player is falling). {{IN|java}} tridents enchanted with Riptide take one durability damage upon throwing, and lose an additional 1 durability if it collides with an entity on both editions. Each level of Riptide increases the distance traveled by six blocks. The enchantment at level one launches the player nine blocks, fifteen blocks at level two, and twenty-one blocks at level three.
Tridents enchanted with [[Channeling]] summon a lightning bolt if there is a thunderstorm, although only upon hitting a mob or player standing in the rain as well as a [[Lightning Rod|lightning rod]] placed in the rain.
Unlike other projectiles, the trident does not slow down when thrown through water or lava.
{{IN|java}}, the [[Impaling]] enchantment affects ''all water mobs''. {{IN|bedrock}}, it deals extra damage to [[player]]s and mobs in water or rain.
Unlike arrows, thrown tridents do not despawn.{{only|bedrock}} Tridents despawn after 60 seconds if they are not picked up.{{only|java}}<ref>{{bug|MC-125817}}</ref>
;Magical damage
Using [[Riptide]], nearby players or mobs are dealt [[Harming|splash damage]] within an 8.25×8.25×4.25 cubical area. It stacks with the [[Impaling]] enchantment and [[Strength]] effect. Critical hits do not increase splash damage, but affect the target.
{{IN|bedrock}}, thrown tridents can damage the [[ender dragon]] while resting on the bedrock fountain. {{IN|java}}, they act just like arrows — deflected, but burn as if they had [[Flame]].
=== Damage===
Thrown tridents and splashes deal {{hp|8}} damage. The damage remains the same regardless of the trident's speed. It has a faster charging speed than a [[bow]] or [[crossbow]] (barring the [[Quick Charge]] enchantment.)
====Java Edition====
{{IN|java}}, tridents have an attack speed of 1.1 and take ~0.91 seconds to [[Damage#Attack cooldown|recover]].
{| class="wikitable" style="text-align:center" data-description="Sword attack damage by type"
!Attack
!{{ItemSprite|Trident|text=Melee}}
!{{ItemSprite|Trident|text=Melee (critical)}}
!{{ItemSprite|Trident|text=Range}}
|-
!Attack damage
|{{hp|9}}
|{{hp|13.5}}
|{{hp|8}}
|-
!Damage/Second (DPS)<ref group="note">This does not take travel time into account</ref>
|9.9
|14.3
| ?
|-
!Lifetime damage inflicted<ref group="note">The formula to find the total lifetime damage is ''Durability × Damage per hit = Lifetime damage minimum'' (e.g., 250 × 9 = 2250). It ignores enchantments and critical hits, and assumes the trident is at maximum charge</ref>
|{{hp|2250}}
|{{hp|3375}}
|{{hp|2000}}
|-
!Durability
| colspan="3" |250
|}
{{notelist}}
====Bedrock Edition====
{{IN|bedrock}}, tridents have no attack cooldown and do the following damage:
{| class="wikitable" style="text-align:center" data-description="Sword attack damage by type"
!Attack
!{{ItemSprite|Trident|text=Melee}}
!{{ItemSprite|Trident|text=Range}}
|-
!Attack damage
|{{hp|9}}
|{{hp|8}}
|-
! ''Lifetime damage inflicted''<ref group="note">The formula to find the total lifetime damage is ''Durability × Damage per hit = Lifetime damage minimum''. It excludes enchantments and critical hits.</ref>
|{{hp|2259}}
|{{hp|2008}}
|-
!Durability
| colspan="2" |251
|}
{{notelist}}
===Elytra===
A trident with the [[Riptide]] enchantment can be used to propel a player with a pair of [[elytra]], but only in [[rain]]y weather, during snowy weather in certain biomes<ref>{{bug|MC-128169}}</ref> or while the [[player]] is in a body of water. A Riptide trident can boost the player to speeds as high as 125 blocks per second,<ref>{{bug|MC-147173||Using riptide tridents while elytra flying can boost the player to excessive speeds}}</ref> much faster than the 33.5 blocks-per-second speed achievable using [[firework rocket]]s.
===Impaling damage ===
{{IN|java}}, the [[Impaling]] enchantment deals extra damage to all water mobs. {{IN|bedrock}} and in [[Java Edition Combat Test 3]], it deals extra damage to all players and mobs in water or rain.
{| class="wikitable" style="text-align:center" data-description="Trident Damage by Impaling Level" |
|+ Trident Damage by Impaling level
|-
!Level
!Increase
!Melee
!Ranged
|-
|I
| adds {{hp|2.5}}
|{{hp|11.5}}
|{{hp|10.5}}
|-
|II
|adds {{hp|5}}
|{{hp|14}}
|{{hp|13}}
|-
|III
| adds {{hp|7.5}}
|{{hp|16.5}}
|{{hp|15.5}}
|-
|IV
|adds {{hp|10}}
|{{hp|19}}
|{{hp|18}}
|-
|V
|adds {{hp|12.5}}
|{{hp|21.5}}
|{{hp|20.5}}
|}
{{-}}
===Enchantments===
Tridents have a base enchantability of 1 and can receive the following [[enchantment]]s:
{| class="wikitable col-2-center col-3-right"
|+
!Name
!Max Level
![[Enchanting|Method]]
|-
|[[Loyalty]]<ref group="note" name="note1">Loyalty and Channeling are mutually exclusive from Riptide, but not from each other.</ref>
|III
|{{Inventory slot|Enchanting Table}}{{Inventory slot|Anvil}}
|-
|[[Channeling]]<ref group="note" name="note1" />
|I
|{{Inventory slot|Enchanting Table}}{{Inventory slot|Anvil}}
|-
|[[Riptide]]<ref group="note" name="note1" />
|III
|{{Inventory slot|Enchanting Table}}{{Inventory slot|Anvil}}
|-
|[[Impaling]]
|V
|{{Inventory slot|Enchanting Table}}{{Inventory slot|Anvil}}
|-
|[[Unbreaking]]
|III
|{{Inventory slot|Enchanting Table}}{{Inventory slot|Anvil}}
|-
|[[Mending]]
|I
|{{Inventory slot|Anvil}}
|-
|[[Curse of Vanishing]]
|I
|{{Inventory slot|Anvil}}
|}
; Notes
<references group="note" />
===Repairing ===
Tridents have the same [[durability]] as an [[sword|iron sword]]. Whenever a trident deals damage, its durability decreases by 1.
Tridents can be repaired by:
*combining two damaged tridents in a [[grindstone]], or on a [[crafting table]] or the 2×2 inventory grid, which removes any enchantments except for [[Curse of Vanishing]] and [[Curse of Binding]]
*combining a damaged trident with another trident on an [[anvil]], which preserves enchantments.
*applying the [[Mending]] enchantment.
==Sounds==
{{Edition|Java}}:<br>
Thrown tridents use the Friendly Creatures sound category for entity-dependent sound events.
{{Sound table
|sound=Trident pierce1.ogg
|sound2=Trident pierce2.ogg
|sound3=Trident pierce3.ogg
|subtitle=Trident stabs
|source=neutral
|description=When a trident hits a mob
|id=item.trident.hit
|translationkey=subtitles.item.trident.hit
|volume=1.0
|pitch=1.0
|distance=16}}
{{Sound table
|sound=Trident ground impact1.ogg
|sound2=Trident ground impact2.ogg
|sound3=Trident ground impact3.ogg
|sound4=Trident ground impact4.ogg
|subtitle=Trident vibrates
|source=neutral
|description=When a trident hits the ground
|id=item.trident.hit_ground
|translationkey=subtitles.item.trident.hit_ground
|volume=0.9
|pitch={{frac|12|11}}-{{frac|4|3}}
|distance=16}}
{{Sound table
|sound=Trident throw1.ogg
|sound2=Trident throw2.ogg
|subtitle=Trident clangs
|source=player
|description=When a player throws a trident
|id=item.trident.throw
|translationkey=subtitles.item.trident.throw
|volume=1.0
|pitch=1.0
|distance=16}}
{{Sound table
|rowspan=2
|sound=Trident thunder1.ogg
|sound2=Trident thunder2.ogg
|subtitle=Trident thunder cracks
|source=neutral
|description=When a Channeling trident hits a mob
|id=item.trident.thunder
|translationkey=subtitles.item.trident.thunder
|volume=5.0
|pitch=1.0
|distance=16}}
{{Sound table
|subtitle=Trident thunder cracks
|source=weather
|description=When a trident with Channeling strikes a lightning rod
|id=item.trident.thunder
|translationkey=subtitles.item.trident.thunder
|volume=5.0
|pitch=1.0
|distance=16}}
{{Sound table
|sound=Riptide I.ogg
|subtitle=Trident zooms
|source=player
|description=When a Riptide I trident is used
|id=item.trident.riptide_1
|translationkey=subtitles.item.trident.riptide
|volume=1.0
|pitch=1.0
|distance=16}}
{{Sound table
|sound=Riptide II.ogg
|subtitle=Trident zooms
|source=player
|description=When a Riptide II trident is used
|id=item.trident.riptide_2
|translationkey=subtitles.item.trident.riptide
|volume=1.0
|pitch=1.0
|distance=16}}
{{Sound table
|sound=Riptide III.ogg
|subtitle=Trident zooms
|source=player
|description=When a Riptide III or higher trident is used
|id=item.trident.riptide_3
|translationkey=subtitles.item.trident.riptide
|volume=1.0
|pitch=1.0
|distance=16}}
{{Sound table
|sound=Trident return1.ogg
|sound2=Trident return2.ogg
|sound3=Trident return3.ogg
|subtitle=Trident returns
|source=neutral
|description=When a trident starts returning <ref group=sound>The first sound is only played {{frac|1|9}} of the time, while the others are played {{frac|4|9}} of the time</ref>
|id=item.trident.return
|translationkey=subtitles.item.trident.return
|volume=8.0
|pitch=''varies'' <ref group=sound>1.0 for <code>return1</code>, 1.0/0.8/1.2/1.2 for <code>return2</code>, and 1.0/0.8/0.8/1.2 for <code>return3</code></ref>
|distance=16}}
{{Sound table
|sound=Trident throw1.ogg
|sound2=Trident throw2.ogg
|subtitle=Drowned throws Trident
|source=hostile
|description=When a drowned shoots a trident
|id=entity.drowned.shoot
|translationkey=subtitles.entity.drowned.shoot
|volume=1.0
|pitch={{frac|5|6}}-1.25
|distance=16}}
{{Sound table
|sound=Random break.ogg
|subtitle=Item breaks
|source=player
|description=When a trident's durability is exhausted
|id=entity.item.break
|translationkey=subtitles.entity.item.break
|volume=0.8
|pitch=0.8-1.2
|distance=16
|foot=1}}
{{Edition|Bedrock}}:
{{Sound table
|type=bedrock
|sound=Trident pierce1.ogg
|sound2=Trident pierce2.ogg
|sound3=Trident pierce3.ogg
|source=player
|description=When a trident hits a mob
|id=item.trident.hit
|volume=1.0
|pitch=1.0}}
{{Sound table
|sound=Trident ground impact1.ogg
|sound2=Trident ground impact2.ogg
|sound3=Trident ground impact3.ogg
|sound4=Trident ground impact4.ogg
|source=player
|description=When a trident hits the ground
|id=item.trident.hit_ground
|volume=0.9
|pitch=1.0}}
{{Sound table
|sound=Trident throw1.ogg
|sound2=Trident throw2.ogg
|source=player
|description=When a player throws a trident
|id=item.trident.throw
|volume=1.0
|pitch=1.0}}
{{Sound table
|sound=Trident thunder1.ogg
|sound2=Trident thunder2.ogg
|source=player
|description=When a trident with Channeling strikes a mob<ref group="sound">{{Bug|MCPE-43402}}</ref><wbr><ref group=sound>{{bug|MCPE-173931||Tridents don't make channeling sounds when striking a lightning rod}}</ref><wbr>{{Upcoming|BE 1.20.30}}
|id=item.trident.thunder
|volume=1.0<wbr>{{Until|BE 1.20.30}}<br>1000.0<wbr>{{Upcoming|BE 1.20.30}}
|pitch=1.0}}
{{Sound table
|sound=Riptide I.ogg
|source=player
|description=When a Riptide I trident is used
|id=item.trident.riptide_1
|volume=1.0
|pitch=1.0}}
{{Sound table
|sound=Riptide II.ogg
|source=player
|description=When a Riptide II trident is used
|id=item.trident.riptide_2
|volume=1.0
|pitch=1.0}}
{{Sound table
|sound=Riptide III.ogg
|source=player
|description=When a Riptide III trident is used
|id=item.trident.riptide_3
|volume=1.0
|pitch=1.0}}
{{Sound table
|sound=Trident return1.ogg
|sound2=Trident return2.ogg
|sound3=Trident return3.ogg
|source=player
|description=When a trident starts returning <ref group=sound>The first sound is only played {{frac|1|9}} of the time, while the others are played {{frac|4|9}} of the time</ref>
|id=item.trident.return
|volume=8.0
|pitch=''varies'' <ref group=sound>1.0 for <code>return1</code>, 1.0/0.8/1.2/1.2 for <code>return2</code>, and 1.0/0.8/0.8/1.2 for <code>return3</code></ref>}}
{{Sound table
|sound=Trident throw1.ogg
|sound2=Trident throw2.ogg
|source=hostile
|description=When a drowned shoots a trident<ref group="sound">{{Bug|MCPE-53297}}</ref><wbr>{{Upcoming|BE 1.20.30}}
|id=mob.drowned.shoot
|volume=1.0
|pitch=0.8-1.2
|foot=1}}
==Data values==
===ID===
{{edition|java}}:
{{ID table
|edition=java
|showforms=y
|generatetranslationkeys=y
|displayname=Trident
|spritetype=item
|nameid=trident
|form=item
|foot=1}}
{{ID table
|edition=java
|showentitytags=y
|generatetranslationkeys=y
|displayname=Trident
|spritetype=entity
|nameid=trident
|entitytags=impact_projectiles
|foot=1}}
{{edition|bedrock}}:
{{ID table
|edition=bedrock
|shownumericids=y
|showforms=y
|notshowbeitemforms=y
|generatetranslationkeys=y
|displayname=Trident
|spritetype=item
|nameid=trident
|id=546
|form=item
|foot=1}}
{{ID table
|edition=bedrock
|shownumericids=y
|generatetranslationkeys=y
|displayname=Trident
|spritetype=entity
|nameid=thrown_trident
|id=73
|foot=1}}
===Entity data ===
Tridents have entity data associated with them that contain various properties of the entity.
{{el|java}}:
{{main|Entity format}}
{{/ED}}
{{el|bedrock}}:
:See [[Bedrock Edition level format/Entity format]].
==Achievements==
{{load achievements|Do a Barrel Roll!;Bullseye}}
==Advancements==
{{load advancements|A Throwaway Joke;Very Very Frightening;Not Today;Sniper Duel;Bullseye}}
==History==
{{History|java}}
{{History||November 18, 2017|link={{YouTubeLink|mAapz_nIC_Y}}|A trident was shown killing a [[zombie]] in a clip presented at [[MineCon Earth]].}}
{{History||1.13|snap=18w07a|[[File:Trident.png|60px]] {{InvSprite|Trident Revision 1}} Added tridents, which are currently unobtainable in [[Survival]].}}
{{History|||snap=18w10a|[[File:Trident (item).png|32px]] Tridents now have a new texture in the [[inventory]].}}
{{History|||snap=18w11a|Added [[drowned]] mobs, which can spawn with a trident, allowing tridents to now become obtainable in [[Survival]].}}
{{History|||snap=18w14a|If the [[player]] is not in [[water]] and it is not [[rain]]ing, the player can no longer throw tridents [[enchantment|enchanted]] with [[Riptide]], but they can still deal melee [[damage]].}}
{{History|||snap=18w20a|Like with swords, tridents no longer can break blocks when held in [[Creative]] mode.<ref>{{bug|MC-126300}}</ref>}}
{{History||1.14|snap=18w43a|Thrown tridents can now break [[chorus flower]]s.}}
{{History||1.15|snap=19w39a|[[File:Enchanted Trident.png|60px]] [[File:Enchanted Trident (item).gif|32px]] Tridents that are [[enchanting|enchanted]] now have a glint.
|Trident items use a 3D model again. When dropped, it rotates off center<ref>{{bug|MC-161886}}</ref> (like with beds at the time and shields currently).}}
{{History|||snap=19w42a|Trident items now use the 2D sprite again.<ref>{{bug|MC-161872}}</ref>}}
{{History||1.17|snap=20w48a|Thrown tridents can now break [[pointed dripstone]].}}
{{History|upcoming java}}
{{History||Villager Trade Rebalance<br>(Experimental)|link=Java Edition 1.20.2|snap=23w31a|Trident-exclusive enchantments are no longer obtainable from villager [[trading]].}}
{{History||Combat Tests|snap=1.14.3 - Combat Test|The attack speed of tridents has been increased to 2.
|The base [[damage]] of tridents has been decreased from {{hp|9}} to {{hp|7}}.
|The attack reach of tridents has been increased to 4 [[block]]s.}}
{{History|||snap=Combat Test 2|The damage of tridents has been increased to {{hp|8}}.}}
{{History|||snap=Combat Test 4|Tridents can now be shot from [[dispenser]]s.
|Tridents with [[Loyalty]] that fall into the [[void]] now return to their owner upon breaking in the void.
|Tridents with [[Impaling]] now deal [[enchanting|enchantment]] damage to all [[mob]]s that are in [[water]] or [[rain]].}}
{{History|||snap=Combat Test 5|The damage of tridents has been decreased to {{hp|7}} again.}}
{{History|bedrock}}
{{History||1.4.0|snap=beta 1.2.13.8|[[File:Trident.png|60px]] [[File:Trident (item).png|32px]] Added tridents.
|Tridents are currently a part of [[Experimental Gameplay]].}}
{{History|||snap=beta 1.2.14.2|Tridents have been fully implemented.}}
{{History|||snap=beta 1.2.20.1|A new animation has been added for tridents with [[Riptide]] when they are thrown.}}
{{History||1.5.0|snap=beta 1.5.0.0|Tridents can now be [[enchantment|enchanted]] with [[Mending]] and [[Unbreaking]].}}
{{History|||snap=beta 1.5.0.7|Tridents no longer break [[block]]s in [[Creative]] mode.}}
{{History||1.10.0|snap=beta 1.10.0.3|Thrown tridents can now break [[chorus flower]]s.}}
{{History||1.16.0|snap=beta 1.15.0.51|Drowned can no longer have a trident when converted.|Drowned that are not holding a trident are no longer able to drop one.}}
{{History||1.16.220|snap=beta 1.16.220.50|Tridents are now able to break pointed dripstone.}}
{{History|||snap=beta 1.16.220.51|Drowned now hold their tridents correctly when targeting a player.}}
{{History|console}}
{{History||xbox=TU69|ps=1.76|wiiu=Patch 38|[[File:Trident.png|60px]] [[File:Trident (item).png|32px]] Added tridents.}}
{{History|education}}
{{History||1.4.0|[[File:Trident.png|60px]] [[File:Trident (item).png|32px]] Added tridents.}}
{{History|foot}}
==Issues==
{{issue list}}
==Trivia==
* If a player throws a Loyalty-enchanted trident and the player's inventory subsequently fills, the trident hovers around or through the player's skin until an inventory slot opens, which it fills immediately. Multiple tridents can be 'queued' to re-enter the player's inventory in this manner.
*{{IN|java}} in Creative mode, sword enchantments can be applied to tridents. This includes Sharpness, Fire Aspect, and Looting. Sharpness, Smite, and Bane of Arthropods increases their damage against their specific mobs, as well.{{more info needed|Does the damage also increase when the trident is thrown?}}
*Thrown tridents pass through [[Nether Portal (block)|nether portal block]]s without being transported to [[the Nether]] or the [[Overworld]].
*Using a trident enchanted with Riptide while riding an entity cancels the charge and does nothing.
==Gallery==
<gallery>
TridentMineconEarth.jpg|Tridents are shown in a clip of Minecon Earth 2017.
Returning trident.jpg|A trident [[enchantment|enchanted]] with [[Loyalty]] returning to the [[player]].
Riptide Trident.png|A player "flying" high in the [[air]] after throwing a trident enchanted with [[Riptide]] III vertically upward.
Trident in ground.png|A trident stuck in [[sand]].
Two-hand drowned.png|A drowned holding a trident and a [[nautilus shell]].
Enchanted Trident (item).gif|An enchanted trident.
Alex with Trident.png|An official T-Shirt design of [[Alex]] with a trident.
Acid Drowned.png|"Acid Drowned," an officially licensed T-Shirt featuring a [[drowned]] with a trident.
ArgoMajor Trident.jpg|First image of a trident in ''Bedrock Edition''.
</gallery>
==References==
{{reflist}}
==External Links==
*[https://www.minecraft.net/en-us/article/taking-inventory--trident Taking Inventory: Trident] – Minecraft.net on January 30, 2020
{{Items}}
{{Entities}}
[[Category:Combat]]
[[de:Dreizack]]
[[es:Tridente]]
[[fr:Trident]]
[[ja:トライデント]]
[[ko:삼지창]]
[[pl:Trójząb]]
[[pt:Tridente]]
[[ru:Трезубец]]
[[th:ตรีศูล]]
[[zh:三叉戟]]</li></ul> | Test Build 3 | Nether portals now work in multiplayer. Before this update, nether portals could be created on multiplayer servers, but could not teleport players to the Nether, thus multiplayer servers required modding to access the Nether. | |||
The travel.ogg sound and the screen animation used after traveling through a nether portal do not work in multiplayer. | |||||
| Standing in a nether portal now forces all GUIs to close, including the pause menu and chat. | |||||
| The nausea screen animation shown while entering a nether portal is now slower. | |||||
| Java Edition | |||||
1.2.1{{Extension DPL}}<ul><li>[[Head|Head]]<br/>{{Block
| image =
<gallery>
Skeleton Skull.png | Skeleton
Wither Skeleton Skull.png | Wither Skeleton
Player Head.png | Player
Zombie Head.png| Zombie
Creeper Head.png | Creeper
Dragon Head.png | Dragon
Piglin Head.png | Piglin
</gallery>
| transparent = Yes
| light = No
| tool = any
| renewable =
* '''Skeleton, Wither Skeleton, Zombie, Creeper, Piglin:'''
* Yes
* '''Dragon, Player:'''
* No
| stackable = Yes (64)
| flammable = No
| lavasusceptible = No
| rarity = Uncommon
}}
A '''head''' or '''skull''' is a [[block]] modeled after the head of a specific [[entity]]. There are seven types of heads: [[player]] ([[Steve]]'s head by default), [[zombie]], [[skeleton]], [[wither skeleton]], [[creeper]], [[piglin]], and [[dragon]].
== Obtaining ==
=== Breaking ===
A mob head can be mined using any item,<ref>{{bug|MC-192905||Heads & Skulls have no assigned tool}}</ref> and drops itself when broken.
{{breaking row|horizontal=1|Mob Head|sprite=Heads}}
If a head is pushed by a [[piston]] or comes in contact with [[water]] or [[lava]], it breaks off as an [[item (entity)|item]].
When destroyed by an [[explosion]], the head ''always'' drops as an item.
===Natural generation===
Dragon heads generate on [[end ships]] found in [[End City|end cities]].
Skeleton skulls can generate in [[ancient cities]], which sometimes generate in the [[deep dark]].
=== Mob loot ===
A [[wither skeleton]] has a 2.5% chance of dropping a wither skeleton skull when killed by a player or a tamed [[wolf]]. The chance is increased by 1% per level of [[Looting]], for a maximum of 5.5% with Looting III. {{IN|bedrock}}, the chance is increased by 2% per level of [[Looting]], for a maximum of 8.5% with Looting III.
[[Skeleton]], [[wither skeleton]], [[zombie]], [[creeper]] and [[piglin]] heads are always dropped by the respective mob if it dies due to a [[charged creeper]]'s explosion. {{IN|bedrock}}, if multiple mobs are killed by the same charged creeper, all of them drop their heads, however {{in|java}} only one mob selected at random drops its head.<ref>{{bug|MC-63534|||WAI}}</ref> If an [[ender dragon]] or a [[player]] is killed by a charged creeper, it does not drop its head.<ref name=":0">{{bug|MC-132933|||WAI}}</ref>
==Usage ==
===Decoration===
Mob heads can be oriented in 16 different directions on top of a block, and 4 directions on the sides of blocks, similar to [[sign]]s. They can be placed on top of, or beside each other by shift clicking.
When placed and powered by redstone, the piglin and dragon heads plays an animation. The piglin head flaps its ears (2 times per second for the right ear and 2.5 times per second for the left ear) while the dragon head opens and closes its mouth repeatedly (2 times per second). The same animation occurs when worn by a (horizontally) moving player, zombie, skeleton, or [[armor stand]] (note: the animation does not play if the <code>NoGravity</code> tag is set to 1)
=== Wearing ===
{{See also|#Renders}}
The player can wear heads, similarly to [[pumpkin]]s or helmets. This overlays the second layer of the player's [[skin]].
====Disguise====
Wearing the corresponding mob head reduces the detection range for [[skeleton]]s (but not [[wither skeleton]]s), [[creeper]]s, [[zombie]]s, and [[piglin]]s to 50% of the normal range. This is similar to (and stacks with) the reductions in detection range from [[sneaking]] and from the [[Invisibility]] status effect.
{{IN|bedrock}}, wearing any mob head or carved pumpkin makes the player invisible to other players on a locator [[map]].
=== Withers===
{{FakeImage|{{BlockGrid|scale=2|w=Wither Skeleton Skull|s=Soul Sand|www|sss| s }}|Wither build configuration}}
[[Wither]]s can be spawned by placing soul sand or soul soil in a T shape, and putting 3 wither skeleton skulls on top of the T. The T can be horizontal or vertical. The last block placed must be one of the three wither skeleton skulls. A dispenser can also create a wither, by placing the final skull onto soul sand directly in front of and below it.
===Dispensers===
A [[dispenser]] can equip a mob head on a player, mob, or armor stand with an empty helmet slot, within the block the dispenser is facing.
[[Dispenser]]s can also complete the construction of a wither.
=== Crafting ingredient===
{{crafting usage|Wither Skeleton Skull,Creeper Head|continue=1}}
{{Crafting
|ignoreusage=1
|ingredients=Any '''Mob head''' +<br>[[Gunpowder]] +<br>Any [[Dye]]
|Gunpowder
|Wither Skeleton Skull;Skeleton Skull;Zombie Head;Head;Creeper Head;Dragon Head;Player Head
|Matching Dye
|Output= Matching Firework Star
|description=Forms Creeper shape
|foot=1
}}
===Enchantments===
Mob heads can receive the following enchantments, but only through an [[anvil]].
{| class="wikitable col-2-center col-3-right"
|+
!Name
!Max Level
![[Enchanting|Method]]
|-
|[[Curse of Binding]]
|I
|{{Inventory slot|Anvil}}
|-
|[[Curse of Vanishing]]
|I
|{{Inventory slot|Anvil}}
|-
|}
=== Note blocks ===
Placing a head above a [[note block]] causes the note block to play the corresponding mob's {{cd|ambient}} sound when activated. The only exception is the creeper head; as creepers don't make {{cd|ambient}} sounds, the note block plays the {{cd|primed}} (hissing) sound instead.
The block below the note block does not affect the mob sound it creates.
==Player skins==
{{exclusive|java|section=1}}
Human heads have an extra usage for map makers, they can be given [[Chunk format#Entity Format|NBT data]] so that they appear with the skin of any ''Minecraft'' account. This means if a player knows that a specific account has a head that is desired to display, the NBT data can be edited to make it appear.
The command to give the player a head with the skin of another player is {{cmd|give @s minecraft:player_head{SkullOwner:"<''PlayerName''>"} }}. Commonly, this kind of head is called a custom head.
Another command to give the player a head with another player's skin is {{cmd|give @s minecraft:player_head{SkullOwner:{Id:"<''PlayerUUID''>",Properties:{textures:[{Value:"<''SkinURL''>"}]} } } }}. ''SkinURL'' is a string encoded in [https://en.wikipedia.org/wiki/Base64 Base64] containing the URL of the player's skin.<ref>Example: {"textures":{"SKIN":{"url":"<nowiki>http://textures.minecraft.net/texture/292009a4925b58f02c77dadc3ecef07ea4c7472f64e0fdc32ce5522489362680"}}}</ref> A player head saves the skin of the player from the time it was created, meaning if the player changes their skin, the head still displays the original texture.<ref>{{tweet|Dinnerbone|464414369452142592|Skulls are a snapshot of the skin as it was made; just change your skin, make a skull, and change your skin back. That's intended behaviour.|May 8, 2014}}</ref>
Note that it is therefore necessary to be connected to the internet to load the texture of a skin, whatever the property used.
When they are loaded for the first time by the client, the skins textures are cached in {{code|[[.minecraft]]\assets\skins\(subfolders)\(files)}}.
If the client does not have access to the internet when it first loads, the player's head displays a regular head (Steve's skin) which is also cached.
Afterwards, even if the client reconnects to the internet, in order to display the skin correctly, it is necessary to clear the cache manually by deleting the recently created files in {{code|[[.minecraft]]\assets\skins\(subfolder)}}, then restarting the game.
When NBT-customized heads (with names and lores) are placed on the ground, they lose their names and given lores upon picking up. Therefore, using Ctrl + {{ctrl|pick block}} on a custom player head gives the player a head that still retains its textures, but with no lores and its name is reset to either {{code|[PlayerName]'s Head}} (heads obtained by MHF-Marc's Head Format or existing players in the world) or {{code|Player Head}} (heads obtained by using skin URLs).
=== Marc's Head Format===
[[File:Allmobheads.png|thumb|right|Most of the MHF mob heads provided.]]
{{exclusive|Java|section=1}}
[[Marc Watson]] created a number of accounts with specific skins so map makers could use common heads without the risk of someone changing their skins.<ref>{{reddit|1m0itx/twitter_marc_irl_mapmakers_would_it_be_useful|cc4m1cq|I'm here to make it so that people don't have to worry about having a consistent account whose skin might change.|Marc_IRL|September 9, 2013}}</ref> Nowadays, since heads do not update the skin if a player changes their skin, this is not something map-makers need to worry about, though these skins are still useful. These accounts have names in the format <code>MHF_<''Name''></code>, for example <code>MHF_PigZombie</code> is the name of a ''Minecraft'' user with a [[zombified piglin]] head. MHF stands for "Marc's Head Format".<ref>{{tweet|Marc_IRL|377453670410891264|head format. I needed to pick a prefix that was short and not already taken by other usernames.|September 10, 2013}}</ref> There are also a few blocks and "bonus" heads, for more variety. These player heads have not been updated in compliance with the [[Texture Update]], and are outdated.
Because these are names of player accounts, these heads are obtained or placed using the <code>SkullOwner</code> tag, for instance: {{cmd|/give @s minecraft:player_head{SkullOwner:"MHF_''<Name>''"}<nowiki />}}.
The following names/heads have been made available:<ref>{{tweet|Marc_IRL|542330244473311232|For those following the MHF list, I have presents for you. Full list of accounts I've made: http://pastebin.com/5mug6EBu|December 9, 2014}}</ref>
<!--
DO NOT add ANY skull to this list without a source that it is made by Mojang; unsourced additions will be reverted!
In particular:
* MHF_Apple, MHF_Wither and MHF_Tree are not made by Mojang, see {{tweet|Marc_IRL|542599419678707714}} and {{tweet|Marc_IRL|590522239616954369}}
* MHF_Guardian is unofficial, see http://redd.it/3439u0
-->
;Mobs
<div class="list-style-none" style="-moz-column-width:15em;-webkit-column-width:15em;column-width:15em">
*{{InvSprite|MHF Alex}} MHF_Alex
*{{InvSprite|MHF Blaze}} MHF_Blaze
*{{InvSprite|MHF CaveSpider}} MHF_CaveSpider
*{{InvSprite|MHF Chicken}} MHF_Chicken
*{{InvSprite|MHF Cow}} MHF_Cow
*{{InvSprite|MHF Creeper}} MHF_Creeper
*{{InvSprite|MHF Enderman}} MHF_Enderman
*{{InvSprite|MHF Ghast}} MHF_Ghast
*{{InvSprite|MHF Golem}} MHF_Golem
*{{InvSprite|MHF Herobrine}} MHF_Herobrine
*{{InvSprite|MHF LavaSlime}} MHF_LavaSlime
*{{InvSprite|MHF MushroomCow}} MHF_MushroomCow
*{{InvSprite|MHF Ocelot}} MHF_Ocelot
*{{InvSprite|MHF Pig}} MHF_Pig
*{{InvSprite|MHF PigZombie}} MHF_PigZombie
*{{InvSprite|MHF Sheep}} MHF_Sheep
*{{InvSprite|MHF Skeleton}} MHF_Skeleton
*{{InvSprite|MHF Slime}} MHF_Slime
*{{InvSprite|MHF Spider}} MHF_Spider
*{{InvSprite|MHF Squid}} MHF_Squid
*{{InvSprite|MHF Steve}} MHF_Steve
*{{InvSprite|MHF Villager}} MHF_Villager
*{{InvSprite|MHF WSkeleton}} MHF_WSkeleton
*{{InvSprite|MHF Zombie}} MHF_Zombie
</div>
;Blocks
<div class="list-style-none" style="-moz-column-width:15em;-webkit-column-width:15em;column-width:15em">
*{{InvSprite|MHF Cactus}} MHF_Cactus
*{{InvSprite|MHF Cake}} MHF_Cake
*{{InvSprite|MHF Chest}} MHF_Chest
*{{InvSprite|MHF CoconutB}} MHF_CoconutB
*{{InvSprite|MHF CoconutG}} MHF_CoconutG
*{{InvSprite|MHF Melon}} MHF_Melon
*{{InvSprite|MHF OakLog}} MHF_OakLog
*{{InvSprite|MHF Present1}} MHF_Present1
*{{InvSprite|MHF Present2}} MHF_Present2
*{{InvSprite|MHF Pumpkin}} MHF_Pumpkin
*{{InvSprite|MHF TNT}} MHF_TNT
*{{InvSprite|MHF TNT2}} MHF_TNT2
</div>
;Bonus
<div class="list-style-none" style="-moz-column-width:15em;-webkit-column-width:15em;column-width:15em">
*{{InvSprite|MHF ArrowUp}} MHF_ArrowUp
*{{InvSprite|MHF ArrowDown}} MHF_ArrowDown
*{{InvSprite|MHF ArrowLeft}} MHF_ArrowLeft
*{{InvSprite|MHF ArrowRight}} MHF_ArrowRight
*{{InvSprite|MHF Exclamation}} MHF_Exclamation
*{{InvSprite|MHF Question}} MHF_Question
</div>
==Sounds==
===Generic===
{{Sound table/Block/Stone}}
===Unique===
{{Edition|Java}}:
{{Sound table
|sound=Zombie idle1.ogg
|sound2=Zombie idle2.ogg
|sound3=Zombie idle3.ogg
|subtitle=Zombie groans
|source=record
|description=When a zombie head is played using a note block
|id=block.note_block.imitate.zombie
|translationkey=subtitles.entity.zombie.ambient
|volume=3.0
|pitch=1.0
|distance=16}}
{{Sound table
|sound=Skeleton idle1.ogg
|sound2=Skeleton idle2.ogg
|sound3=Skeleton idle3.ogg
|subtitle=Skeleton rattles
|source=record
|description=When a skeleton skull is played using a note block
|id=block.note_block.imitate.skeleton
|translationkey=subtitles.entity.skeleton.ambient
|volume=3.0
|pitch=1.0
|distance=16}}
{{Sound table
|sound=Creeper fuse.ogg
|subtitle=Creeper hisses
|source=record
|description=When a creeper head is played using a note block
|id=block.note_block.imitate.creeper
|translationkey=subtitles.entity.creeper.primed
|volume=3.0
|pitch=0.5
|distance=16}}
{{Sound table
|sound=Ender dragon idle1.ogg
|sound2=Ender dragon idle2.ogg
|sound3=Ender dragon idle3.ogg
|sound4=Ender dragon idle4.ogg
|subtitle=Dragon roars
|source=record
|description=When an ender dragon head is played using a note block
|id=block.note_block.imitate.ender_dragon
|translationkey=subtitles.entity.ender_dragon.ambient
|volume=3.0
|pitch=1.0
|distance=16}}
{{Sound table
|sound=Wither skeleton idle1.ogg
|sound2=Wither skeleton idle2.ogg
|sound3=Wither skeleton idle3.ogg
|subtitle=Wither Skeleton rattles
|source=record
|description=When a wither skeleton skull is played using a note block
|id=block.note_block.imitate.wither_skeleton
|translationkey=subtitles.entity.wither_skeleton.ambient
|volume=3.0
|pitch=1.0
|distance=16}}
{{Sound table
|sound=Piglin idle1.ogg
|sound2=Piglin idle2.ogg
|sound3=Piglin idle3.ogg
|sound4=Piglin idle4.ogg
|sound5=Piglin idle5.ogg
|subtitle=Piglin snorts
|source=record
|description=When a piglin head is played using a note block
|id=block.note_block.imitate.piglin
|translationkey=subtitles.entity.piglin.ambient
|volume=1.98
|pitch=1.0
|distance=16}}
{{Sound table
|sound=Equip generic1.ogg
|sound2=Equip generic2.ogg
|sound3=Equip generic3.ogg
|sound4=Equip generic4.ogg
|sound5=Equip generic5.ogg
|sound6=Equip generic6.ogg
|subtitle=Gear equips
|source=player
|description=When a carved pumpkin is equipped
|id=item.armor.equip_generic
|translationkey=subtitles.item.armor.equip
|volume=1.0
|pitch=1.0
|distance=16
|foot=1}}
<!--volumes and pitches seem to be approximately v=0.9 p=0.84, but those values are approximate and are not in the files. They are probably inside of the code.-->
{{Edition|Bedrock}}:
{{Sound table
|type=bedrock
|sound=Zombie idle1.ogg
|sound2=Zombie idle2.ogg
|sound3=Zombie idle3.ogg
|source=record
|description=When a zombie head is played using a note block
|id=note.zombie
|pitch=0.84 <ref group=sound name=pitch>Actually equal to <math>\frac{1}{\sqrt[4]{2}}</math>, which is about 0.8409</ref>}}
{{Sound table
|sound=Skeleton step1.ogg
|sound2=Skeleton step2.ogg
|sound3=Skeleton step3.ogg
|sound4=Skeleton step4.ogg
|source=record
|description=When a skeleton skull is played using a note block<wbr><ref group=sound name=skeletoncreeper>{{Bug|MCPE-164530}}</ref>
|id=note.skeleton
|pitch=0.84 <ref group=sound name=pitch/>}}
{{Sound table
|sound=Fuse.ogg
|source=record
|description=When a creeper head is played using a note block<wbr><ref group=sound name=skeletoncreeper/>
|id=note.creeper
|pitch=0.84 <ref group=sound name=pitch/>}}
{{Sound table
|sound=Ender dragon idle1.ogg
|sound2=Ender dragon idle2.ogg
|sound3=Ender dragon idle3.ogg
|sound4=Ender dragon idle4.ogg
|source=record
|description=When a dragon head is played using a note block
|id=note.enderdragon
|pitch=0.84 <ref group=sound name=pitch/>}}
{{Sound table
|sound=Skeleton step1.ogg
|sound2=Skeleton step2.ogg
|sound3=Skeleton step3.ogg
|sound4=Skeleton step4.ogg
|source=record
|description=When a wither skeleton skull is played using a note block<wbr>{{Until|BE 1.20.40}}<wbr><ref group=sound name=skeletoncreeper/>
|id=note.witherskeleton
|pitch=0.84 <ref group=sound name=pitch/>}}
{{Sound table
|sound=Wither skeleton step1.ogg
|sound2=Wither skeleton step2.ogg
|sound3=Wither skeleton step3.ogg
|sound4=Wither skeleton step4.ogg
|source=record
|description=When a wither skeleton skull is played using a note block<wbr>{{Upcoming|BE 1.20.40}}<wbr><ref group=sound name=skeletoncreeper/>
|id=note.witherskeleton
|pitch=0.84 <ref group=sound name=pitch/>}}
{{Sound table
|sound=Piglin angry1.ogg
|sound2=Piglin angry2.ogg
|sound3=Piglin angry3.ogg
|sound4=Piglin angry4.ogg
|source=record
|description=When a piglin head is played using a note block<wbr><ref group=sound>{{Bug|MCPE-164710}}</ref>
|id=note.piglin
|pitch=0.84 <ref group=sound name=pitch/>}}
{{Sound table
|sound=Equip generic1.ogg
|sound2=Equip generic2.ogg
|sound3=Equip generic3.ogg
|sound4=Equip generic4.ogg
|sound5=Equip generic5.ogg
|sound6=Equip generic6.ogg
|source=player
|description=When a carved pumpkin is equipped
|id=armor.equip_generic
|volume=1.0
|pitch=1.0
|foot=1}}
==Data values==
===ID===
{{edition|java}}:
{{ID table
|edition=java
|showforms=y
|generatetranslationkeys=y
|displayname=Skeleton Skull
|spritetype=block
|nameid=skeleton_skull}}
{{ID table
|displayname=Wither Skeleton Skull
|spritetype=block
|nameid=wither_skeleton_skull}}
{{ID table
|displayname=Zombie Head
|spritetype=block
|nameid=zombie_head}}
{{ID table
|displayname=Player Head
|spritetype=block
|nameid=player_head}}
{{ID table
|displayname=Creeper Head
|spritetype=block
|nameid=creeper_head}}
{{ID table
|displayname=Dragon Head
|spritetype=block
|nameid=dragon_head}}
{{ID table
|displayname=Piglin Head
|spritetype=block
|nameid=piglin_head}}
{{ID table
|displayname=Skeleton Wall Skull
|spritetype=block
|nameid=skeleton_wall_skull
|form=block}}
{{ID table
|displayname=Wither Skeleton Wall Skull
|spritetype=block
|nameid=wither_skeleton_wall_skull
|form=block}}
{{ID table
|displayname=Zombie Wall Head
|spritetype=block
|nameid=zombie_wall_head
|form=block}}
{{ID table
|displayname=Player Wall Head
|spritetype=block
|nameid=player_wall_head
|form=block}}
{{ID table
|displayname=Creeper Wall Head
|spritetype=block
|nameid=creeper_wall_head
|form=block}}
{{ID table
|displayname=Dragon Wall Head
|spritetype=block
|nameid=dragon_wall_head
|form=block}}
{{ID table
|displayname=Piglin Wall Head
|spritetype=block
|nameid=piglin_wall_head
|foot=1}}
{{ID table
|displayname=Block entity
|spritename=heads
|spritetype=block
|nameid=skull
|foot=1}}
{{edition|bedrock}}:
{{ID table
|edition=bedrock
|firstcolumnname=Head
|shownumericids=y
|showforms=y
|generatetranslationkeys=y
|displayname=Block
|spritename=skulls
|spritetype=block
|nameid=skull
|id=144
|form=block
|itemform=item.skull
|translationkey=-}}
{{ID table
|displayname=Item
|spritename=skulls
|spritetype=item
|nameid=skull
|id=516
|form=item
|translationkey=item.skull.skeleton.name, item.skull.wither.name, item.skull.zombie.name, item.skull.char.name, item.skull.creeper.name, item.skull.dragon.name, item.skull.piglin.name
|foot=1}}
{{ID table
|notnamespaced=y
|displayname=Block entity
|spritename=heads
|spritetype=block
|nameid=Skull
|foot=1}}
===Metadata===
{{see also|Data values}}
{{IN|bedrock}}, mob heads use the following data values:
{{/DV}}
===Item data===
{{el|java}}:
{{main|Player.dat format}}
Player heads use item NBT to save the owner.
<div class="treeview">
* {{nbt|compound|tag}}: The item's '''tag''' tag.
{{:Player.dat_format/Player Heads}}
</div>
{{el|bedrock}}:
:{{IN|bedrock}}, heads have no additional item tag.
:See [[Bedrock Edition level format/Item format]].
===Block states===
{{see also|Block states}}
{{/BS}}
===Block data===
A mob head has a block entity associated with it that holds additional data about the block.
{{el|java}}:
{{see also|Block entity format}}
{{/BE}}
{{el|bedrock}}:
:See [[Bedrock Edition level format/Block entity format]].
== Achievements==
{{load achievements|Camouflage;The Beginning?}}
==Advancements==
{{load advancements|Spooky Scary Skeleton;Withering Heights}}
==History==
''For a more in-depth breakdown of changes to textures and models, including a set of renders for each state combination, see [[/Asset history]]''
{{History|java}}
{{History||August 28, 2012|link={{tweet|jeb|240383066831462401}}|[[Jeb]] released images of the skeleton head, hinting of more types to come.}}
{{History||PAX 2012|link={{ytl|IqciEbjYd-I|t=03m21s}}|At [[wikipedia:PAX (event)|PAX]], [[Dinnerbone]] revealed that there would be rare [[drops]] of these [[mob]]s.<ref>http://www.twitch.tv/pax2/b/330745811 (at 3:59:00)</ref>}}
{{History||1.4.2|snap=12w36a|[[File:Skeleton Skull (item) JE1.png|32px]] [[File:Wither Skeleton Skull (item) JE1.png|32px]] [[File:Zombie Head (item) JE1.png|32px]] [[File:Player Head (item) JE1.png|32px]] [[File:Creeper Head (item) JE1.png|32px]] Added skeleton, wither skeleton, zombie, player, and creeper heads.
|Wither skeleton skulls are rarely [[drops|dropped]] by the [[wither skeleton]] upon [[death]] (2.5% chance), while the other four are obtainable only from the [[creative]] [[inventory]].}}
{{History|||snap=12w37a|[[File:Skeleton Skull (item) JE1 BE1.png|32px]] [[File:Wither Skeleton Skull (item) JE1 BE1.png|32px]] [[File:Zombie Head (item) JE1 BE1.png|32px]] [[File:Player Head (item) JE1 BE1.png|32px]] [[File:Creeper Head (item) JE1 BE1.png|32px]] Changed item textures.
|Added as a hidden and disabled feature, player heads can now have the [[skin]] of a specific [[player]]. A line in the language file implies that there either used to be, or in a future update, the possibility of obtaining a specific player's head.<ref name="en_US 12w21">Snapshot 12w37a {{cd|lang/en_US.lang}}: <code>item.skull.player.name=%s's Head</code></ref>
|Player heads do not [[drops|drop]] in vanilla, but mapmakers/modders/etc. can make them by adding an [[NBT format|NBT]] string tag <code>{"SkullOwner":"''player_name''"}</code> on the skull [[item]]s.<ref name="playerheads">{{reddit|zxn7u/its_apparently_my_cakeday_so_lets_cash_in_this}}</ref>}}
{{History||November 7, 2012|link=https://www.reddit.com/r/minecraftsuggestions/comments/12qtbz/killing_other_players_with_a_sword_should_drop/c6xqpym/?context=3|[[Jeb]] states that the official opinion is that "[dropping] player heads [on player kills] are a bit too gory for [[Minecraft]], so it's better suited for a plugin or mod."}}
{{History||1.4.6|snap=12w49a|Any kind of [[mob]] head can now be used to [[crafting|craft]] a [[firework star]] with [[creeper]]-face effect.}}
{{History||1.7.2|snap=13w36a|Custom heads can now be obtained without third party programs via {{cmd|give}}.}}
{{History||1.8|snap=14w03a|Player heads now show the [[skin]]'s hat layer (this also works when a [[mob]]/player wears the head).}}
{{History|||snap=14w29a|Heads now display a cracking animation.}}
{{History|||snap=14w30a|[[File:Skeleton Skull (item) JE2.png|32px]] [[File:Wither Skeleton Skull (item) JE2.png|32px]] [[File:Zombie Head (item) JE2.png|32px]] [[File:Player Head (item) JE2.png|32px]] [[File:Creeper Head (item) JE2.png|32px]] Player and mob heads in [[inventory|inventories]] and held by mobs/players now display as [[block]]s.
|Skulls worn by [[mob]]s and [[player]]s are now displayed on the armor layer. Previously, the skull replaced the mob/player's head texture; the hat layer appeared over the skull.
|Skeleton, zombie, and creeper heads are now available in [[survival]]. The player can obtain them by killing the appropriate mob with a charged [[creeper]].
|Creeper heads and wither skeleton skulls are now used in [[crafting]] specific [[banner]] patterns.}}
{{History|||snap=14w30b|A single charged creeper explosion no longer yields more than one [[mob]] head. The mob head that drops is chosen randomly.}}
{{History||1.8.4|snap=release|For security reasons, custom heads can now have textures only from [[mojang.com]] and [[minecraft.net]].}}
{{History||1.9|snap=15w31a|[[File:Dragon Head (8) JE2.png|32px]] Added dragon heads.
|Dragon heads are currently available only in [[creative]] mode.
|[[Mob]] heads now appear larger in the [[inventory]].}}
{{History|||snap=15w32a|Creeper, zombie, and skeleton heads can now be worn to reduce detection by the corresponding mobs by 50%.}}
{{History|||snap=15w32c|Dragon heads now generate on [[end ship]]s, meaning they are now obtainable in [[survival]].}}
{{History|||snap=15w33c|The disguise that is given by mob heads now reduces detection range to 37.5% of normal.}}
{{History|||snap=15w36a|The disguise that is given by mob heads now reduces detection range to 50% of normal again.}}
{{History|||snap=15w39a|[[Dispenser]]s can now equip mob heads onto [[player]]s, [[mob]]s and [[armor stand]]s.}}
{{History||1.13|snap=17w47a|The ID of heads have been split into 12; one of each available standard head, as well as a wall counterpart of each.
|<code>skeleton_skull</code>, <code>wither_skeleton_skull</code>, <code>player_head</code>, <code>zombie_head</code>, <code>creeper_head</code> and <code>dragon_head</code> are now available as [[item]]s and placed [[block]]s with a <code>rotation</code> block state of 0-15.
|<code>skeleton_wall_skull</code>, <code>wither_skeleton_wall_skull</code>, <code>player_wall_head</code>, <code>zombie_wall_head</code>, <code>creeper_wall_head</code> and <code>dragon_wall_head</code> are available only as placed blocks with a <code>facing</code> block state of north, south, east or west.
|Prior to [[1.13/Flattening|''The Flattening'']], this [[block]]'s numeral ID was 144, and the [[item]]'s 397.}}
{{History||1.19|snap=Deep Dark Experimental Snapshot 1|Skeleton skulls now generate as part of [[ancient cities]].}}
{{History||November 14, 2022|link=https://www.minecraft.net/en-us/article/playable-mob-sounds-coming-minecraft-1-20|Piglin heads are announced to be added in [[Java Edition 1.20]] on the Minecraft website.}}
{{History||1.19.3|snap=22w45a|[[File:Player Head (8) JE5.png|32px]] The texture of the player head has been changed.}}
{{History||1.20<br>(Experimental)|link=1.19.3|snap=22w46a|[[File:Piglin Head (8) JE1.png|32px]] Added piglin heads behind the [[Java Edition 1.20|Update 1.20 experimental datapack]].}}
{{History||1.20<br>(Experimental)|link=1.19.4|snap=23w03a|Heads can now be placed on top of note blocks without sneaking.}}
<!--
{{History||1.19.4|snap=23w05a|Heads can now be swapped by let [[helmet]]s {{ctrl|using}} in the hotbar.<ref>{{bug|MC-216270|||Fixed}}</ref>}}
{{History||?|Head can now be swapped in [[armor stand]]s by {{ctrl|using}} them/[[helmet]]s/[[carved pumpkin]]s in the armor stand's slot.}}
RE-ADD WHEN THE WORDING IS BETTER -->
{{History||1.20|snap=23w12a|Piglin heads are now available without using the "Update 1.20" experimental datapack.}}
{{History|pocket alpha}}
{{History||v0.12.1|snap=build 1|[[File:Skeleton Skull (item) JE1 BE1.png|32px]] [[File:Wither Skeleton Skull (item) JE1 BE1.png|32px]] [[File:Zombie Head (item) JE1 BE1.png|32px]] [[File:Player Head (item) JE1 BE1.png|32px]] [[File:Creeper Head (item) JE1 BE1.png|32px]] Added skeleton, wither skeleton, zombie, player, and creeper heads.
|The skeleton, wither skeleton, zombie, player and creeper heads use the [[Java Edition|Java]] textures prior to [[Java Edition 14w30a|14w30a]].}}
{{History||v0.14.0|snap=build 1|Mob heads can now be worn as armor.}}
{{History||v0.16.0|snap=build 4|Wither skeleton skulls can now be used to spawn the [[wither]].}}
{{History|pocket}}
{{History||1.0.0|snap=alpha 0.17.0.1|[[File:Dragon Head (item) BE1.png|32px]] Added dragon heads.
|Dragon heads use a two-dimensional sprite, unlike [[Java Edition|Java]] does.}}
{{History|bedrock}}
{{History||1.2.0|snap=beta 1.2.0.2|Mob heads can now be used to craft [[firework star]]s.
|Creeper heads and wither skeleton skulls are now used to [[crafting|craft]] specific patterns on [[banner]]s.}}
{{History|||snap=beta 1.2.0.11|[[File:Skeleton Skull (item) BE2.png|32px]] [[File:Wither Skeleton Skull (item) BE2.png|32px]] [[File:Zombie Head (item) BE2.png|32px]] [[File:Head (item) BE2.png|32px]] [[File:Creeper Head (item) BE2.png|32px]] [[File:Dragon Head (item) BE2.png|32px]] [[Player]] and [[mob]] heads in [[inventory|inventories]] and when held by mobs/players now display as [[block]]s.}}
{{History||1.10.0|snap=beta 1.10.0.3|Wither skeleton skulls and creeper heads can now be used to craft [[banner pattern]]s.}}
{{History||November 14, 2022|link=https://www.minecraft.net/en-us/article/playable-mob-sounds-coming-minecraft-1-20|Piglin heads are announced to be added in [[Bedrock Edition 1.20.0]] on the Minecraft website.}}
{{History||Next Major Update<br>(Experimental)|link=1.19.60|snap=beta 1.19.60.20|[[File:Piglin Head (item) BE1.png|32px]] Added piglin heads behind the "[[Bedrock Edition 1.20.0|Next Major Update]]" [[experimental]] toggle.}}
{{History|||snap=beta 1.19.60.25|Heads can now be placed on top of note blocks without sneaking.}}
{{History||1.20.0|snap=beta 1.20.0.21|Piglin heads are now available without using the "Next Major Update" experimental toggle.}}
{{History||1.20.40|snap=beta 1.20.40.20|Wither skeleton skulls now make their respective step sounds when played by a note block.}}
{{History|console}}
{{History||xbox=TU12|xbone=CU1|ps=1.0|wiiu=Patch 1|switch=1.0.1|[[File:Skeleton Skull (item) JE1 BE1.png|32px]] [[File:Wither Skeleton Skull (item) JE1 BE1.png|32px]] [[File:Zombie Head (item) JE1 BE1.png|32px]] [[File:Player Head (item) JE1 BE1.png|32px]] [[File:Creeper Head (item) JE1 BE1.png|32px]] Added skeleton, wither skeleton, zombie, player, and creeper heads to the [[creative inventory]].
|Wither skeleton skulls currently do not have a use.}}
{{History||xbox=TU19|xbone=CU7|ps=1.12|Wither skeleton skulls can now be obtained by killing [[wither skeleton]]s.
|Wither skeleton skulls can now be used to build the [[wither]].}}
{{History||xbox=TU31|xbone=CU19|ps=1.22|wiiu=Patch 3|Skeleton, zombie, and creeper heads are now available in [[survival]]. The [[player]] can obtain them by killing the appropriate [[mob]] with a charged [[creeper]].}}
{{History||xbox=TU46|xbone=CU36|ps=1.38|wiiu=Patch 15|[[File:Dragon Head (item) JE1.png|32px]] Added dragon heads.}}
{{History|new 3ds}}
{{History||0.1.0|[[File:Skeleton Skull (item) JE1 BE1.png|32px]] [[File:Wither Skeleton Skull (item) JE1 BE1.png|32px]] [[File:Zombie Head (item) JE1 BE1.png|32px]] [[File:Player Head (item) JE1 BE1.png|32px]] [[File:Creeper Head (item) JE1 BE1.png|32px]] Added skeleton, wither skeleton, zombie, player, and creeper heads.}}
{{History||1.7.10|[[File:Dragon Head (item) BE1.png|32px]] Added dragon heads.}}
{{History|foot}}
===Skull "item"===
{{:Technical blocks/Skull}}
==Issues==
{{issue list}}
== Trivia==
* Despite there being a default Steve head, heads for the other protagonist skins cannot be obtained without using custom names.
*{{IN|be}}, the skull variant for the item is stored under the {{cd|damage}} component, normally used for items with [[durability]].
*The head item's model when wore on a player is slightly larger than its placed block counterpart in the world, which in turn is also slightly larger than the actual player's head. Therefore, a player who wears their own head appears with a larger head.
==Gallery==
===Renders===
<gallery>
Steve wearing Skeleton Skull.png|
Steve wearing Wither Skeleton Skull.png|
Steve wearing Creeper Head.png|
Steve wearing Zombie Head.png|
Steve wearing Dragon Head.png|
Alex wearing Skeleton Skull.png|
Alex wearing Wither Skeleton Skull.png|
Alex wearing Creeper Head.png|
Alex wearing Zombie Head.png|
Alex wearing Dragon Head.png|
Dragon Head.gif|An animation of the dragon head when redstone power is supplied.
</gallery>
===Screenshots===
<gallery>
All The Heads.png|All of the heads.
Headsrotation.png|Heads oriented in different directions.
HeadsOnAFence.png|Heads are the same scale as [[cobblestone wall]] posts.
Playerheads.png|A picture of player heads, including some Mojang characters.
EndShipBow.png|A dragon head found at the bow of an end ship.
</gallery>
====Development====
<gallery>
1st image Mob Head.png|First screenshot released of heads.
Minecart with chest and head thing.png|Notch's head in a [[minecart with chest]].
PauseUnpause's Head 1.png|First image of held heads rendering as blocks.
PauseUnpause's Head 2.png|Second image of held heads rendering as blocks.
Pocket Edition Heads.jpg|First image of a head being worn in bedrock edition.
1.16 Dev failed head holding.jpg|First attempt to fix {{bug|MC-91869}} by [[Xilefian]].
1.16 Dev failed head holding 2.jpg|Second attempt.
</gallery>
===In other media===
<gallery>
Efe Looking at Makena Napping on a Note Block.jpg|[[Efe]] looking at [[Makena]] napping on a Note block
Efe Placing a Zombie Head on a Note Block.jpg|Efe placing a zombie head sneakily on the note block.
Makena Waking up Startled by the Zombie Noise.jpg|Makena waking up startled at the sound of zombies being played on the note block.
File:Piglin Head Animation.jpg|[[Sunny]] using a piglin head to make noise in a [[Crimson Forest]].<ref>https://www.instagram.com/p/Ct7CfOBplrG/</ref>
</gallery>
==References==
{{reflist}}
{{blocks|Utility}}
{{items}}
[[Category:Utility blocks]]
[[Category:Manufactured blocks]]
[[Category:Generated structure blocks]]
[[Category:Block entities]]
[[Category:Non-solid blocks]]
[[cs:Hlava]]
[[de:Kopf]]
[[es:Cabeza]]
[[fr:Tête]]
[[hu:Mob fejek]]
[[it:Testa di creatura]]
[[ja:Mobの頭]]
[[ko:몹 머리]]
[[nl:Wezenhoofd]]
[[pl:Głowa]]
[[pt:Cabeça de criatura]]
[[ru:Голова]]
[[uk:Голова]]
[[zh:生物头颅]]</li><li>[[Iron Ingot|Iron Ingot]]<br/>{{About|the ingot|the ore|Iron Ore|the mineral block|Block of Iron|the nugget|Iron Nugget|the raw mineral|Raw Iron}}
{{Item
| image = Iron Ingot.png
|type=
| renewable = Yes
| stackable = Yes (64)
}}
'''Iron ingots''' are versatile [[metal]] ingots used extensively in [[crafting]].
== Obtaining ==
=== Chest loot ===
{{LootChestItem|iron-ingot}}
=== Crafting ===
{{Crafting
|head=1
|showname=0
|Block of Iron
|Output=Iron Ingot,9
|type=Material
}}
{{Crafting
|A1= Iron Nugget
|B1= Iron Nugget
|C1= Iron Nugget
|A2= Iron Nugget
|B2= Iron Nugget
|C2= Iron Nugget
|A3= Iron Nugget
|B3= Iron Nugget
|C3= Iron Nugget
|Output=Iron Ingot
|type= Material
|foot=1
}}
=== Smelting ===
{{see also|Iron Ore#Natural generation}}[[Smelting]] raw iron in a [[furnace]] or [[blast furnace]] is the most common way to obtain iron ingots.
{{Smelting
|head=1
|Iron Ore;Deepslate Iron Ore
|Iron Ingot
|0,7
}}
{{Smelting
|foot=1
|Raw Iron
|Iron Ingot
|0,7
}}
=== Compound creation ===
Iron Ingot can be created from its base [[element]]s, using the [[compound creator]].{{only|bedrock|education}}
{| class="wikitable"
!Name
!Elements
!Example recipe
|- <!-- Temporarily using crafting grid as a substitute for the compound creator (template not yet available), since the layout is the same, even if the appearance is different -->
!Iron Ingot
|Iron <br>
|{{Crafting Table
|shapeless= 1
|A2=Iron
|Output=Iron Ingot}}
|}
=== Mob loot ===
{{see also|Tutorials/Iron golem farming}}
[[Iron golem]]s drop 3-5 iron ingots upon death, regardless of the way they die. The looting enchantment does not increase the amount of iron ingots dropped.
[[Zombie]]s, [[husk]]s, and [[zombie villager]]s have a 2.5% ({{frac|1|40}}) chance of dropping either an iron ingot, [[carrot]], or [[potato]] when killed by a player or tamed wolf. This is increased by 1% ({{frac|1|100}}) per level of looting. This gives iron ingots the following chances of dropping:
* {{frac|1|120}} (about 0.83%)
* {{frac|7|600}} (about 1.17%) with Looting I
* {{frac|9|600}} (1.50%) with Looting II
* {{frac|11|600}} (about 1.83%) with Looting III
== Usage ==
=== Crafting ingredient ===
{{crafting usage}}
=== Trading ===
Apprentice-level Armorer, Toolsmith, and Weaponsmith [[Villager|villagers]] buy 3 iron ingots for an [[emerald]] as their third trade.{{only|bedrock}}
Apprentice-level Armorer villagers have a 50% chance to buy 4 iron ingots for one emerald, and apprentice-level Toolsmith and Weaponsmith villagers always offer to buy 4 iron ingots for one emerald.{{only|java}}
=== Repairing ===
Iron ingots are the repair items for the iron [[tier]] and chainmail and iron [[armor material]]s, and thus can be used to [[item repair|repair]] the following items in an [[anvil]]:
* {{ItemLink|Chainmail Helmet}}
* {{ItemLink|Chainmail Chestplate}}
* {{ItemLink|Chainmail Leggings}}
* {{ItemLink|Chainmail Boots}}
* {{ItemLink|Iron Helmet}}
* {{ItemLink|Iron Chestplate}}
* {{ItemLink|Iron Leggings}}
* {{ItemLink|Iron Boots}}
* {{ItemLink|Iron Sword}}
* {{ItemLink|Iron Axe}}
* {{ItemLink|Iron Pickaxe}}
* {{ItemLink|Iron Shovel}}
* {{ItemLink|Iron Hoe}}
=== Healing iron golems ===
{{control|Using}} an iron ingot on an [[iron golem]] restores its health by {{hp|25}}.
=== Beacons ===
Iron ingots can be used to select powers from a [[beacon]]. The player must select one of the available powers, and then insert an iron ingot in the item slot.
An iron ingot can be substituted for an [[emerald]], a [[gold ingot]], a [[diamond]], or a [[netherite ingot]].
=== Smithing ingredient ===
{{Smithing
|head=1
|ingredients=Any Armor Trim +<br/>Any Armor Piece + <br/>Iron Ingot
|Any Armor Trim Smithing Template
|Netherite Chestplate
|Iron Ingot
|Iron Trim Netherite Chestplate
|showdescription=1
|description = All armor types can be used in this recipe,<br/>a netherite chestplate is shown as an example.<br/>
|tail=1
}}
;Trim color palette
The following color palettes are shown on the designs on trimmed armor:
*{{TrimPalette|iron ingot}}
*{{TrimPalette|iron ingot|darker=1}} (a darker color palette is used when an iron armor piece is trimmed using an iron ingot).
== Achievements ==
{{load achievements|Acquire Hardware}}
== Advancements ==
{{load advancements|Acquire Hardware}}
== Data values ==
=== ID ===
{{edition|java}}:
{{ID table
|edition=java
|showitemtags=y
|showforms=y
|generatetranslationkeys=y
|displayname=Iron Ingot
|spritetype=item
|nameid=iron_ingot
|itemtags=beacon_payment_items
|form=item
|foot=1}}
{{edition|bedrock}}:
{{ID table
|edition=bedrock
|shownumericids=y
|showforms=y
|notshowbeitemforms=y
|generatetranslationkeys=y
|displayname=Iron Ingot
|spritetype=item
|nameid=iron_ingot
|id=305
|form=item
|foot=1}}
== History ==
{{History|java indev}}
{{History||0.31|snap=20100128|[[File:Iron Ingot JE1.png|32px]] Added iron ingots.}}
{{History|||snap=20100129|[[File:Iron Ingot JE2 BE1.png|32px]] The texture of iron ingots has been changed.
|Iron ingots can be [[smelting|smelted]] from [[iron ore]] and [[drops|drop]] 3–5 iron ingots.
|Iron ingots can be used to craft [[iron block]]s, [[flint and steel]] and iron [[sword]]s, [[shovel]]s, [[pickaxe]]s and [[axe]]s.}}
{{History|||snap=20100130|Iron ingots are now used to craft [[arrow]]s.|[[Iron block]]s now require 9 iron ingots (3×3) instead 4 (2×2) to be [[crafting|crafted]], making them much more expensive.}}
{{History||20100206|Iron ingots can now be used to [[crafting|craft]] iron [[hoe]]s.}}
{{History||?|[[Smelting]] now [[drops]] only 1 iron ingot (down from 3–5).}}
{{History||20100218|Iron ingots are now used to craft iron [[helmet]]s, [[chestplate]]s, [[leggings]] and [[boots]].}}
{{History|java infdev}}
{{History||20100615|Iron ingots are now used to craft [[bucket]]s.}}
{{History||20100618|Iron ingots are now used to craft [[rail]]s and [[minecart]]s.}}
{{History||20100625-2|Iron ingots can be found in [[dungeon]] [[chest]]s.}}
{{History|java alpha}}
{{History||v1.0.1|Iron ingots are now used to [[crafting|craft]] iron [[door]]s.}}
{{History||v1.0.14|Iron ingots are no longer used to craft [[arrow]]s.}}
{{History||v1.1.0|Iron ingots are now used to craft [[compass]]es.}}
{{History|java beta}}
{{History||1.5|Iron ingots are now used to craft [[detector rail]]s.}}
{{History||1.7|Iron ingots are now used to craft [[piston]]s and [[shears]].}}
{{History||1.8|snap=Pre-release|Iron ingots are found in the new [[stronghold]] storeroom and [[mineshaft]] [[chest]]s.
|Iron ingots are now used to craft [[iron bars]].}}
{{History|java}}
{{History||1.0.0|snap=Beta 1.9 Prerelease 2|Iron ingots are now used to craft [[cauldron]]s.}}
{{History|||snap=Beta 1.9 Prerelease 3|Iron ingots are now found in the new stronghold altar [[chest]]s.}}
{{History||1.1|snap=12w01a|Iron ingots are now found in [[village]] blacksmith chests.}}
{{History||1.2.1|snap=12w06a|[[Zombie]]s now rarely [[drops|drop]] iron ingots, making it a [[renewable resource]].}}
{{History|||snap=12w08a|[[Iron golem]]s now drop 3–5 iron ingots.}}
{{History||1.3.1|snap=12w21a|Added [[desert temple]]s, with a hidden [[chest]] room and loot containing iron ingots.
|Blacksmith [[villager]]s now [[trading|buy]] 8–9 iron ingots for 1 [[emerald]].}}
{{History|||snap=12w22a|Added [[jungle temple]]s, which contain loot [[chest]]s with iron ingots.
|Iron ingots are now used to craft [[tripwire hook]]s.}}
{{History||1.4.2|snap=12w32a|Iron ingots can be used to activate [[beacon]]s.}}
{{History|||snap=12w41a|Iron ingots are now used to craft [[anvil]]s.}}
{{History|||snap=12w42a|Anvils now need 4 iron ingots to [[craft]] instead of 1.}}
{{History||1.5|snap=13w01a|Iron ingots are now used to [[crafting|craft]] heavy [[weighted pressure plate]]s.}}
{{History|||snap=13w02a|Iron ingots are now used to craft [[hopper]]s and [[activator rail]]s.}}
{{History||1.6.1|snap=13w16a|Iron ingot is now used to craft iron [[horse armor]] and [[horse saddle]].}}
{{History|||snap=13w18a|Iron ingot is no longer used to craft iron [[horse armor]] and [[horse saddle]].|Iron ingots are now found in [[nether fortress]] [[chest]]s.}}
{{History||1.8|snap=14w02a|[[Trading]] for iron ingots has been changed: armorer, weapon smith and tool smith [[villager]]s now [[trading|buy]] 7–9 iron ingots for 1 [[emerald]].}}
{{History|||snap=14w07a|Iron ingots are now used to craft [[iron trapdoor]]s.}}
{{History||1.9|snap=15w31a|Iron ingots are now found in [[end city]] ship [[chest]]s.}}
{{History|||snap=15w33c|Iron ingots are now used to craft [[shield]]s.}}
{{History|||snap=15w44a|The average yield from [[dungeon]] and [[desert temple]] chests has been substantially decreased.
|The average yield from [[mineshaft]] and [[nether fortress]] chests has been slightly decreased.}}
{{History||1.11|snap=16w39a|Iron ingots are now found in the new [[woodland mansion]] chests.}}
{{History||1.11.1|snap=16w50a|Iron ingots are now used to craft [[iron nugget]]s.}}
{{History||1.13|snap=17w47a|Prior to [[1.13/Flattening|''The Flattening'']], this [[item]]'s numeral ID was 265.}}
{{History|||snap=18w10a|Iron ingots now generate in [[buried treasure]] [[chest]]s.}}
{{History|||snap=18w11a|Iron ingots can now be found in the chests of [[shipwreck]]s.}}
{{History||1.14|snap=18w43a|Iron ingots can now be used to craft [[crossbow]]s.
|[[File:Iron Ingot JE3 BE2.png|32px]] The texture of iron ingots has been changed.}}
{{History|||snap=18w47a|Iron ingots can now be found inside of loot [[chest]]s on top of [[pillager outpost]]s.}}
{{History|||snap=18w50a|Iron ingots can now be found in chests in [[village]] toolsmith houses.
|Iron ingots can now be used to craft a [[blast furnace]].}}
{{History|||snap=19w04a|Iron ingots can now be used to craft [[stonecutter]]s.}}
{{History||1.15|snap=19w41a|Iron ingots can now be used to heal [[iron golem]]s.}}
{{History||1.16|snap=20w16a|Iron ingots now generate in [[bastion remnants]] chests.
|Iron ingots are now used to craft [[chain]]s.}}
{{History||1.16.2|snap=20w30a|The average yield of iron ingots from bastion remnant chests has been slightly increased.}}
{{History||1.17|snap=21w08a|Iron ingots can now be smelted from [[deepslate iron ore]].}}
{{History|||snap=21w14a|Iron ingots can now be smelted from [[raw iron]].}}
{{History||1.20<br>(Experimental)|link=1.19.4|snap=23w04a|Iron ingots can now be used as an armor trim material.}}
{{History|||snap=23w05a|Iron ingots can now be trimmed with iron [[armor]].}}
{{History|pocket alpha}}
{{History||v0.2.0|[[File:Iron Ingot JE2 BE1.png|32px]] Added iron ingots. They are currently unobtainable and serve no purpose.}}
{{History||v0.3.2|Iron ingots are now obtainable by [[smelting]] iron ore in a [[furnace]].
|Iron ingots can be used to craft [[shears]], [[blocks of iron]] and iron [[pickaxe]]s, [[axe]]s, [[sword]]s and [[shovel]]s.}}
{{History||v0.4.0|Iron ingots are now used to craft [[flint and steel]] and iron [[hoe]]s.}}
{{History||v0.5.0|Iron ingots are now used to craft [[nether reactor core]]s.}}
{{History||v0.6.0|Iron ingots are now used to craft iron [[armor]].}}
{{History||v0.7.0|Iron ingots are now used to craft [[bucket]]s.}}
{{History||v0.8.0|snap=build 1|Iron ingots are now used to craft [[compass]]es and [[iron bars]].}}
{{History|||snap=build 2|Iron ingots are now used to craft [[minecart]]s and [[rail]]s.}}
{{History||v0.9.0|snap=build 1|Iron ingots can now be found in [[village]] blacksmith [[chest]]s, [[stronghold]] altar chests and [[dungeon]] chests.
|[[Zombie]]s now rarely drop iron ingots.}}
{{History||v0.12.1|snap=build 1|Iron ingots are no longer used to craft [[nether reactor core]]s and are instead dropped by it.
|Iron ingots are now used to craft [[anvil]]s.
|Iron ingots are now found in [[nether fortress]] chests.
|Added [[iron golem]]s, which [[drops|drop]] iron ingots.
|Iron ingots can now be used to repair iron [[tool]]s, [[armor]] and [[weapon]]s in [[anvil]]s.
|Added [[zombie villager]]s, which rarely drop iron ingots.}}
{{History||v0.13.0|snap=build 1|Iron ingots are now used to craft [[tripwire hook]]s, [[detector rail]]s, [[iron trapdoor]]s and heavy [[weighted pressure plate]]s.
|Added [[desert temple]]s, which have hidden [[chest]] rooms and loot containing iron ingots.}}
{{History||v0.14.0|snap=build 1|Iron ingots are now used to craft [[hoppers]] and [[cauldron]]s.
|Iron ingots can now be found in [[minecart with chest|minecart chests]] generated in [[mineshaft]]s.}}
{{History||v0.15.0|snap=build 1|Iron ingots are now used to craft [[piston]]s.
|Added [[jungle temple]]s, which have hidden [[chest]] rooms and main treasure rooms that have loot containing iron ingots.
|Added [[husk]]s, which rarely [[drops|drop]] iron ingots.}}
{{History||v0.16.0|snap=build 4|Iron ingots can now be used to activate [[beacon]]s.}}
{{History|pocket}}
{{History||1.0.0|snap=alpha 0.17.0.1|Iron ingots can now be found in [[end city]] ship [[chest]]s.
|Iron ingots can now be found in [[stronghold]] storeroom chests.}}
{{History||1.0.4|snap=alpha 1.0.4.0|Added [[trading]]—armorer, weaponsmith and toolsmith [[villager]]s now [[trading|buy]] 7–9 iron ingots for 1 [[emerald]].}}
{{History||1.1.0|snap=alpha 1.1.0.0|Iron ingots can now be [[crafting|crafted]] using [[iron nugget]]s.
|Iron ingots can now be used to [[crafting|craft]] iron nuggets.
|Iron ingots can now be found in [[woodland mansion]] [[chest]]s.}}
{{History|bedrock}}
{{History||1.4.0|snap=beta 1.2.14.2|Iron ingots now generate in [[buried treasure]] [[chest]]s.
|Iron ingots can now be found in [[shipwreck]] treasure chests.}}
{{History||1.8.0|snap=beta 1.8.0.10|Iron ingots can now be used to craft [[crossbow]]s.}}
{{History||1.10.0|snap=beta 1.10.0.3|Iron ingots can now be found inside [[pillager outpost]]s and plains [[village]]s' weaponsmith chests.
|Iron ingots can now be used to craft [[blast furnace]]s, [[stonecutter]]s and [[shield]]s.
|[[File:Iron Ingot JE3 BE2.png|32px]] The texture of iron ingots has been changed.}}
{{History||1.11.0|snap=beta 1.11.0.1|Iron ingots can now be found in [[village]] armorer and toolsmith [[chest]]s.
|Iron ingots can now be found in [[savanna]], [[taiga]], [[desert]] and [[snowy taiga]] village weaponsmiths.}}
{{History|||snap=beta 1.11.0.4|Armorer, toolsmith, and weaponsmith [[villager]]s now [[trading|buy]] 4 iron ingots for an [[emerald]].}}
{{History||1.16.0|snap=beta 1.16.0.57|Iron ingots now generate in bastion remnants chests.}}
{{History||1.17.0|snap=beta 1.16.230.52|Iron ingots can now be smelted from [[deepslate iron ore]].}}
{{History|||snap=beta 1.17.0.50|Iron ingots can now be smelted from [[raw iron]].}}
{{History||1.18.10|snap=beta 1.18.10.26|Iron ingots can now be used to heal iron golems.}}
{{History||1.19.80|snap=beta 1.19.80.21|Iron ingots can now be used as an armor trim material.}}
{{History|console}}
{{History||xbox=TU1|xbone=CU1|ps=1.0|wiiu=Patch 1|switch=1.0.1|[[File:Iron Ingot JE2 BE1.png|32px]] Added iron ingots.}}
{{History||xbox=none|xbone=none|ps=1.90|wiiu=none|switch=none|[[File:Iron Ingot JE3 BE2.png|32px]] The texture of iron ingots has been changed.}}
{{History|new3DS}}
{{History||0.1.0|[[File:Iron Ingot JE2 BE1.png|32px]] Added iron ingots.}}
{{History|foot}}
== Issues ==
{{issue list}}
== Trivia ==
* To craft each recipe once, a player would need 152 iron ingots, including 27 for the iron blocks in an [[anvil]], while using the extra tripwire hook for the [[crossbow]] and the [[iron nuggets]] for the [[chain]].
== See also ==
* {{BlockLink|Block of Iron}}
* {{ItemSprite|Iron Chestplate}} [[Iron armor]]
* {{ItemLink|Iron Nugget}}
* {{BlockLink|Iron Ore}}
* [[Ores]]
== External links ==
* {{Mcnet|taking-inventory--iron-ignot|Taking Inventory: Iron Ingot}}
{{Items}}
[[cs:Železný ingot]]
[[de:Eisenbarren]]
[[es:Lingote de hierro]]
[[fr:Lingot de fer]]
[[hu:Vasrúd]]
[[it:Lingotto di ferro]]
[[ja:鉄インゴット]]
[[ko:철괴]]
[[nl:IJzerstaaf]]
[[pl:Sztabka żelaza]]
[[pt:Barra de ferro]]
[[ru:Железный слиток]]
[[uk:Залізний зливок]]
[[zh:铁锭]]
[[Category:Renewable resources]]</li></ul></nowiki> | 12w07a | The Overworld's height limit has been raised to 256, but portals from the Nether cannot find portals above Y=128. | |||
1.3.1{{Extension DPL}}<ul><li>[[Crossbow|Crossbow]]<br/>{{For}}
{{Item
| title = Crossbow
| image = <gallery>
Crossbow.png | Crossbow
Crossbow Pull 0.png | Pull (state 0)
Crossbow Pull 1.png | Pull (state 1)
Crossbow Pull 2.png | Pull (state 2)
Arrow Loaded Crossbow.png | Arrow loaded
Firework Loaded Crossbow.png | Firework loaded
</gallery>
| rarity = Common
| renewable = Yes
| durability = 465{{only|JE|short=yes}}<br>464{{only|BE|short=1}}
| stackable = No
}}
A '''crossbow''' is a ranged [[weapon]] similar to a [[bow]] that uses [[arrow]]s or [[firework rocket|fireworks]] as ammunition.
== Obtaining ==
=== Crafting ===
{{Crafting
|A1=Stick|B1=Iron Ingot |C1=Stick
|A2=String|B2= Tripwire Hook|C2=String
|B3= Stick
|Output= Crossbow
|type= Combat
}}
=== Repairing ===
{{Grinding
|showdescription=1
|ingredients=2× Damaged [[Crossbow]] or<br>2× Damaged [[Arrow Loaded Crossbow]] or<br>2× Damaged [[Firework Loaded Crossbow]]
|Damaged Crossbow; Damaged Arrow Loaded Crossbow; Damaged Firework Loaded Crossbow
|Damaged Crossbow; Damaged Arrow Loaded Crossbow; Damaged Firework Loaded Crossbow
|Crossbow; Arrow Loaded Crossbow; Firework Loaded Crossbow
|description=The [[item durability|durability]] of the two crossbows is added together, plus an extra 5% durability.
}}
{{Crafting
|Damaged Crossbow;Damaged Arrow Loaded Crossbow;Damaged Firework Loaded Crossbow
|Damaged Crossbow;Damaged Arrow Loaded Crossbow;Damaged Firework Loaded Crossbow
|Output=Crossbow
|type=Combat
|ignoreusage=1
|showdescription=1
|description=The durability of the two crossbows is added together, plus an extra 5% durability. Any loaded ammunition is lost.
}}
=== Mob loot ===
==== Pillagers ====
When killed, a [[pillager]] has a small chance (8.5%) of dropping a loaded or unloaded crossbow with random [[durability]]; the [[drop]] rate increases by 1% per [[level]] of [[Looting]]: 9.5% with Looting I, 10.5% with Looting II and 11.5% with Looting III. The [[drop]]ped crossbow can rarely (10% chance) be [[enchanted]] at level 5–19 regardless of being [[enchanted]] when it [[spawn]]ed.
Crossbows dropped by pillagers may have multiple enchantments, including duplicate enchantments on the same weapon.
==== Piglins ====
[[Piglin]]s have a chance of wielding a crossbow upon spawning, and they also have a small chance (8.5%) of dropping a loaded or unloaded crossbow of random durability when killed; this rate increases by 1% per level of [[Looting]]: 9.5% with Looting I, 10.5% with Looting II and 11.5% with Looting III. It can rarely (10% chance) be enchanted at level 5–19 regardless of being enchanted when spawned.
=== Chest loot ===
{{LootChestItem|crossbow,damaged-level-enchanted-crossbow,damaged-random-enchanted-crossbow,damaged-random-enchanted-crossbow-2}}
=== Trading ===
Journeyman-level Fletcher [[villager]]s offer to [[trading|sell]] an unenchanted crossbow for 3 [[emerald]]s.
Master-level Fletcher villagers have a {{frac|1|16}} (6.25%) chance of selling an [[enchanting|enchanted]] crossbow for 8 emeralds.{{only|bedrock}}
Master-level Fletcher villagers have {{frac|2|3}} chance of selling an enchanted crossbow for 7-22 emeralds.{{only|java}}
== Usage ==
<gallery>
Steve aiming with Crossbow.png|
Alex aiming with Crossbow.png|
Pillager Aiming with Crossbow BE.png|
Piglin with Crossbow targeting JE.png|
</gallery>
Despite using [[iron ingot]]s in their crafting recipe, crossbows cannot be smelted into [[iron nugget]]s.<ref>{{bug|MC-111738}}</ref>
=== Weapon ===
[[File:Crossbowcooldown.gif|thumb|right|Charging and shooting the crossbow {{in|bedrock}}.]]
Crossbows are similar to [[bow]]s, but take longer to load and are slightly more powerful, shooting farther with slightly higher accuracy. Alternatively, they can be loaded with a firework rocket, which flies in a straight line.
Load them by {{control|using}} them, which makes the player move at sneak speed. Unlike bows, the [[arrow]] or [[firework rocket]] can be fired only if the player releases the use button after the crossbow is loaded{{Only|je}} or if the crossbow finishes its loading animation {{Only|be}}. At this point, it ''must be used a second time'' to fire its bolt.
Once it has reached full charge, the [[player]]'s speed returns to normal. After that, shooting a charged crossbow does not delay any of the [[player]]'s current action like [[sprinting]] or [[swimming]].
The crossbow can even be placed in another [[inventory]] slot or into an [[item frame]] without the [[arrow]] or [[firework rocket]] being unloaded or fired. A charged crossbow also remains charged after enchanting it with an enchantment table or with an anvil.
In order to use the crossbow, at least one arrow or firework rocket must be present in the inventory. The player can choose the type of arrow to fire based on its location in their [[inventory]]:
* [[File:Java Crossbow 1stP Loading.mp4|thumb|177x177px|Java Edition first-person loading animation for crossbows.]]Arrows in the off-hand, or the selected [[hotbar]] slot if the crossbow is in the off-hand, are prioritized first.
* If there are no arrows in the off-hand or selected hotbar slot, the arrow closest to slot 0 is selected.
Crossbows take 1.25 seconds (25 ticks) to load.
The player can load either an arrow, spectral arrow, tipped arrow (of any effect) or a firework (of any color/type).
[[File:Bedrock Crossbow 1stP Loading.mp4|thumb|177x177px|Bedrock Edition first-person loading animation for crossbows.]]
[[Endermen]] teleport away from projectile paths, so they cannot be hit with crossbow [[arrow]]s. However, they can still get harmed by [[firework rocket]] explosions, if they can't detect the firework rocket.
;Attack strength
''Java Edition'':
{| class="wikitable" style="text-align:center" data-description="Crossbow Damage Statistic"
|-
! Damage || Arrow || Max firework
|-
| {{ItemSprite|Crossbow|text= '''Minimum'''}}
| {{hp|7}}
| {{hp|11}}
|-
| {{ItemSprite|Crossbow|text= '''Average'''}}
| {{hp|9}}
| {{hp|14.5}}
|-
| {{ItemSprite|Crossbow|text= '''Maximum'''}}
| {{hp|11}}
| {{hp|18}}
|}
''Bedrock Edition''
* Always {{hp|9}}
=== Fireworks ===
[[Firework rocket]]s can be fired by loading the crossbow only while holding the rockets in the off-hand. They fly at 32 m/s. Firework rockets with higher flight duration have a longer time before they explode and therefore travel farther. Firing a firework rocket uses 3 [[durability]] points per shot.
{| class="wikitable" style="text-align:center"
! colspan="4" |Firework rocket range
|-
|Minimum
|Average
|Maximum
|Gunpowder
|-
|32m (20 ticks)
|40.8m (25.5 ticks)
|49.6m (31 ticks)
|1 ([[File:Gunpowder JE2 BE2.png|12x12px]])
|-
|48m (30 ticks)
|56.8m (35.5 ticks)
|65.6m (41 ticks)
| 2 ([[File:Gunpowder JE2 BE2.png|12x12px]][[File:Gunpowder JE2 BE2.png|12x12px]])
|-
|64m (40 ticks)
|72.8m (45.5 ticks)
|81.6m (51 ticks)
|3 ([[File:Gunpowder JE2 BE2.png|12x12px]][[File:Gunpowder JE2 BE2.png|12x12px]][[File:Gunpowder JE2 BE2.png|12x12px]])
|}
Firework rockets also work with the [[Multishot]] enchantment, enabling the [[player]] to shoot 3 firework rockets at a time. The increased durability usage stacks, resulting in 9 durability being consumed with each shot.
A shot firework rocket explodes instantly when it hits a [[mob]] or [[block]].{{only|java}} If the firework rocket has no explosion effect, it deals no [[damage]]. The explosion of a firework rocket deals {{hp|5}} to {{hp|6}} points of damage, with one [[firework star]]. The explosion has a radius of roughly 4 blocks, which is unaffected by the firework star's [[Firework Star#Effects|effect]]. Each additional firework star on the rocket deals an additional {{hp|1}} to {{hp|2}} points of damage, for a maximum of {{hp|11}} to {{hp|18}} with 7 firework stars. The flight duration of the firework increases the maximum range the firework can travel before exploding, but does not affect the damage output. Likewise, the damage remains the same regardless of any dyes used. The [[Piercing]] enchantment causes the firework rocket to pierce a number of entities based on its respective level before exploding.{{only|java}} Unlike an arrow shot from a bow, the firework does not slow down under water.
=== Repair ===
Crossbows can be repaired in an [[anvil]] or [[grindstone]] by combining two crossbows. Any loaded ammunition is retained from the crossbow in the first slot but sacrificed from the crossbow in the second slot.
===Enchantments===
{| class="wikitable"
|+
!Name
!Description
!Max Level
|-
|[[Quick Charge]]
|Decreases the reloading time of the crossbow by {{code|level * 0.25}} seconds. Crossbows with [[Quick Charge]] III fire slightly faster than [[bow]]s. If [[commands]] are used to enchant a crossbow with Quick Charge V, the crossbow charges instantaneously. A crossbow enchanted with Quick Charge VI is effectively impossible to charge, which renders it useless. This can be done only {{in|je}}.
|III
|-
|[[Multishot]]
| Makes the crossbow fire a spread of 3 projectiles at once instead of a single projectile, which is useful for targeting mobs spread out in a small area. This works for both [[arrow]]s and [[firework rocket]]s. Firing with this enchantment still uses only one projectile, and because of that, it is possible to recover only one of the three arrows shot from a Multishot crossbow. Multishot crossbows use 3 [[item durability|durability]] points per shot, unless using fireworks for ammunition, in which case 9 durability is consumed. Mutually exclusive with Piercing.
|I
|-
|[[Piercing]]
|Makes [[arrow]]s shot from the crossbow pierce [[entity|entities]] they hit and continue their flight, which allows each arrow to hit up to {{code|level + 1}} entities. This is useful for targeting [[mob]]s closely packed together, and for conserving arrows, as they can be picked up after piercing entities. Arrows fired in this manner also ignore [[Shield|shields]]. Mutually exclusive with Multishot.
|IV
|-
|[[Unbreaking]]
|Causes a <code>(Level /(Level+1)) * 100%</code> chance a shot fired does not reduce the [[item durability|durability]] of the crossbow.
|III
|-
|[[Mending]]
|Allows a certain proportion of [[experience]] orbs collected to contribute toward repairing the crossbow, rather than raising the [[player]]'s experience.
|I
|-
|[[Curse of Vanishing]]
| Causes the crossbow to disappear instead of dropping on the ground when the player dies. The {{cmd|gamerule keepInventory}} overrides this.
|I
|}
[[Multishot]] and [[Piercing]] are mutually exclusive. Normal methods of [[enchanting]] allow only one of them to be applied to a crossbow.
Crossbows can receive 3 unique [[enchanting|enchantment]]s, and have a base enchantability of 1. Enchantments specific to crossbows include [[Quick Charge]], Multishot and Piercing.
===Fuel===
Crossbows can be used as [[fuel]] in [[furnace]]s, [[smelting]] 1.5 [[item]]s per crossbow.
== Sounds ==
{{el|je}}:
{{Sound table
|sound=Crossbow loading start.ogg
|subtitle=Crossbow charges up
|source=player
|description=When a crossbow starts to load
|id=item.crossbow.loading_start
|translationkey=subtitles.item.crossbow.charge
|volume=0.15
|pitch=1.0
|distance=16}}
{{Sound table
|sound=Crossbow quick charge one1.ogg
|sound2=Crossbow quick charge one2.ogg
|sound3=Crossbow quick charge one3.ogg
|subtitle=Crossbow charges up
|source=player
|description=When a Quick Charge I crossbow starts to load <ref group=sound><code>quick1_3</code> occurs at half the frequency as the other sounds</ref>
|id=item.crossbow.quick_charge_1
|translationkey=subtitles.item.crossbow.charge
|volume=''varies'' <ref group=sound>0.325 for all except <code>quick1_1</code> (pitch=0.9), which is 0.25</ref>
|pitch=''varies'' <ref group=sound><code>quick1_1</code> can be 1.0 or 0.9; <code>quick1_2</code> can be 1.0 or 0.95; <code>quick1_3</code> can be 1.0</ref>
|distance=16}}
{{Sound table
|sound=Crossbow quick charge two1.ogg
|sound2=Crossbow quick charge two2.ogg
|sound3=Crossbow quick charge two3.ogg
|subtitle=Crossbow charges up
|source=player
|description=When a Quick Charge II crossbow starts to load <ref group=sound name=quickchargefrequency><code>_1</code> occurs at {{frac|2|3}} the frequency as the other sounds</ref>
|id=item.crossbow.quick_charge_2
|translationkey=subtitles.item.crossbow.charge
|pitch=''varies'' <ref group=sound name=quickchargevolume />
|volume=''varies'' <ref group=sound name=quickchargepitch />
|distance=16}}
{{Sound table
|sound=Crossbow quick charge three1.ogg
|sound2=Crossbow quick charge three2.ogg
|sound3=Crossbow quick charge three3.ogg
|subtitle=Crossbow charges up
|source=player
|description=When a Quick Charge III crossbow starts to load <ref group=sound name=quickchargefrequency />
|id=item.crossbow.quick_charge_3
|translationkey=subtitles.item.crossbow.charge
|volume=''varies'' <ref group=sound name=quickchargevolume>0.325 for all except <code>_1</code> (pitch=0.95), which is 0.25</ref>
|pitch=''varies'' <ref group=sound name=quickchargepitch><code>_1</code> can be 1.0 or 0.95; <code>_2</code> can be 1.0, 0.95, or 1.05; <code>_3</code> can be 1.0, 0.9, or 1.05</ref>
|distance=16}}
{{Sound table
|sound=Crossbow loading middle1.ogg
|sound2=Crossbow loading middle2.ogg
|sound3=Crossbow loading middle3.ogg
|sound4=Crossbow loading middle4.ogg
|subtitle=MC-203146
|source=player
|description=While a crossbow is loading <ref group=sound><code>loading_middle4</code> occurs at {{frac|1|4}} the frequency as the other sounds</ref>
|id=item.crossbow.loading_middle
|translationkey=-
|volume=0.325
|pitch=''varies'' <ref group=sound><code>loading_middle1</code> can be 1.0, 0.95, or 1.2; <code>loading_middle2</code> and <code>loading_middle3</code> can be 1.0, 0.9, or 1.05; <code>loading_middle4</code> can be 1.0</ref>
|distance=16}}
{{Sound table
|sound=Crossbow loading end.ogg
|subtitle=Crossbow loads
|source=dependent
|description=When a crossbow stops loading
|id=item.crossbow.loading_end
|translationkey=subtitles.item.crossbow.load
|volume=1.0
|pitch={{frac|13|15}}-1.2
|distance=16}}
{{Sound table
|sound=Crossbow shoot1.ogg
|sound2=Crossbow shoot2.ogg
|sound3=Crossbow shoot3.ogg
|subtitle=Crossbow fires
|source=dependent
|description=When a crossbow fires
|id=item.crossbow.shoot
|translationkey=subtitles.item.crossbow.shoot
|volume=0.8/0.9/0.9
|pitch=1.0/1.0/0.9 <ref group=sound>Multiplied by the loading percentage of the crossbow</ref>
|distance=16}}
{{Sound table
|sound=Arrow hit1.ogg
|sound2=Arrow hit2.ogg
|sound3=Arrow hit3.ogg
|sound4=Arrow hit4.ogg
|subtitle=Arrow hits
|source=neutral
|description=When an arrow hits a block or entity
|id=item.crossbow.hit
|translationkey=subtitles.item.crossbow.hit
|volume=1.0
|pitch={{frac|12|11}}-{{frac|4|3}}
|distance=16}}
{{Sound table
|sound=Succesfull Hit.ogg
|subtitle=Player hit
|source=player
|description=When an arrow shot by a player hits another player
|id=entity.arrow.hit_player
|translationkey=subtitles.entity.arrow.hit_player
|volume=0.18
|pitch=0.45
|distance=16}}
{{Sound table
|sound=Firework launch.ogg
|subtitle=Firework launches
|source=ambient
|description=When a crossbow fires a firework rocket
|id=entity.firework_rocket.launch
|translationkey=subtitles.entity.firework_rocket.launch
|volume=3.0
|pitch=1.0
|distance=16}}
{{Sound table
|sound=Random break.ogg
|subtitle=Item breaks
|source=dependent
|description=When a crossbow's durability is exhausted
|id=entity.item.break
|translationkey=subtitles.entity.item.break
|volume=0.8
|pitch=0.8-1.2
|distance=16
|foot=1}}
{{el|be}}:
{{Sound table
|type=bedrock
|sound=Crossbow loading start.ogg
|source=player
|description=When a crossbow starts to load
|id=crossbow.loading.start
|volume=1.0
|pitch=1.0}}
{{Sound table
|sound=Crossbow loading middle1.ogg
|sound2=Crossbow loading middle2.ogg
|sound3=Crossbow loading middle3.ogg
|sound4=Crossbow loading middle4.ogg
|source=player
|description=While a crossbow is loading and when a crossbow stops loading
|id=crossbow.loading.middle
|volume=1.0
|pitch=1.0}}
{{Sound table
|sound=Crossbow loading end.ogg
|source=player
|description=''Unused sound event''
|id=crossbow.loading.end
|volume=1.0
|pitch=1.0}}
{{Sound table
|sound=Crossbow quick charge one1.ogg
|sound2=Crossbow quick charge two1.ogg
|sound3=Crossbow quick charge three1.ogg
|source=player
|description=When a crossbow with Quick Charge starts to load
|id=crossbow.quick_charge.start
|volume=1.0
|pitch=1.0}}
{{Sound table
|sound=Crossbow quick charge one2.ogg
|sound2=Crossbow quick charge two2.ogg
|sound3=Crossbow quick charge three2.ogg
|source=player
|description=While a crossbow with Quick Charge is loading
|id=crossbow.quick_charge.middle
|volume=1.0
|pitch=1.0}}
{{Sound table
|sound=Crossbow quick charge one3.ogg
|sound2=Crossbow quick charge two3.ogg
|sound3=Crossbow quick charge three3.ogg
|source=player
|description=When a crossbow with Quick Charge stops loading
|id=crossbow.quick_charge.end
|volume=1.0
|pitch=1.0}}
{{Sound table
|sound=Crossbow shoot1.ogg
|sound2=Crossbow shoot2.ogg
|sound3=Crossbow shoot3.ogg
|source=player
|description=When a crossbow fires
|id=crossbow.shoot
|volume=1.0
|pitch=1.0}}
{{Sound table
|sound=Arrow hit1.ogg
|sound2=Arrow hit2.ogg
|sound3=Arrow hit3.ogg
|sound4=Arrow hit4.ogg
|source=player
|description=When an arrow hits a block or entity
|id=random.bowhit
|volume=1.0
|pitch=1.09-1.3}}
{{Sound table
|sound=Firework launch.ogg
|source=ambient
|description=When a crossbow fires a firework rocket
|id=firework.launch
|volume=1.0
|pitch=1.0}}
{{Sound table
|sound=Random break.ogg
|source=player
|description=When a crossbow's durability is exhausted
|id=random.break
|volume=1.0
|pitch=0.9
|foot=1}}
==Data values==
=== ID===
{{edition|java}}:
{{ID table
|edition=java
|showforms=y
|generatetranslationkeys=y
|displayname=Crossbow
|spritetype=item
|nameid=crossbow
|form=item
|foot=1}}
{{edition|bedrock}}:
{{ID table
|edition=bedrock
|shownumericids=y
|showforms=y
|notshowbeitemforms=y
|generatetranslationkeys=y
|displayname=Crossbow
|spritetype=item
|nameid=crossbow
|id=575
|form=item
|foot=1}}
===Item data===
{{el|java}}:
{{main|Player.dat format}}
<div class="treeview" style="margin-top: 0;">
*{{nbt|compound|tag}}: The '''tag''' tag.
{{:Player.dat_format/Crossbow}}
</div>
{{el|bedrock}}:
: See [[Bedrock Edition level format/Item format]].
==Achievements==
{{load achievements|Sniper Duel;Archer;Bullseye}}
==Advancements==
{{load advancements|Take Aim;Bullseye;Sniper Duel;Ol' Betsy;Who's the Pillager Now;Two Birds;Arbalistic}}
==History==
{{History||September 29, 2018|link={{tweet|Minecraft|1046094916902965249}}|Crossbows are announced at [[MINECON Earth 2018]].}}
{{History|java}}
{{History||1.14|snap=18w43a|[[File:Crossbow.png|32px]] [[File:Crossbow Pull 0.png|32px]] [[File:Crossbow Pull 1.png|32px]] [[File:Crossbow Pull 2.png|32px]] [[File:Arrow Loaded Crossbow.png|32px]] [[File:Crossbow.png|32px]] [[File:Crossbow Pull 0.png|32px]] [[File:Crossbow Pull 1.png|32px]] [[File:Crossbow Pull 2.png|32px]] [[File:Firework Loaded Crossbow.png|32px]] [[File:Crossbow.png|32px]] Added crossbows.
|Crossbows can be enchanted with either the [[Quick Charge]] (Highest Level III), [[Piercing]] (Highest Level IV) or [[Multishot]] (Highest Level I).}}
{{History|||snap=18w47a|Crossbows can now be found inside loot [[chest]]s at the top of [[pillager outpost]]s.}}
{{History|||snap=19w11a|Fletcher [[villager]]s now [[trading|sell]] crossbows and enchanted crossbows.}}
{{History||1.16|snap=20w07a|[[File:Piglin with Crossbow.png|32px]] [[File:Piglin left handed with Crossbow.png|35px]] [[File:Piglin using one hand to hold a loaded crossbow JE1.png|35px]] Added [[piglin]]s, which can spawn with and [[drops|drop]] crossbows.}}
{{History|||snap=20w16a|Crossbows now generate randomly enchanted in [[bastion remnants]] chests.}}
{{History||1.18|snap=21w37a|Crossbow durability is increased to 465 to match {{edition|BE}}.}}
{{History||1.19.4|snap=23w07a|The crossbow recipes are no longer unlocked by [[stick]]s.}}
{{History|upcoming java}}
{{History||Villager Trade Rebalance<br>(Experimental)|link=Java Edition 1.20.2|snap=23w31a|Enchantments exclusive to crossbows are no longer obtainable from villager [[trading]].}}
{{History|bedrock}}
{{History||1.8.0|snap=beta 1.8.0.10|[[File:Crossbow.png|32px]] [[File: Crossbow Pull 0.png|32px]] [[File: Crossbow Pull 1.png|32px]] [[File: Crossbow Pull 2.png|32px]] [[File:Arrow Loaded Crossbow.png|32px]] [[File:Crossbow.png|32px]] [[File:Crossbow Pull 0.png|32px]] [[File:Crossbow Pull 1.png|32px]] [[File:Crossbow Pull 2.png|32px]] [[File:Firework Loaded Crossbow.png|32px]] [[File:Crossbow.png|32px]] Added crossbows.
|Crossbows are currently apart of [[Experimental Gameplay]].}}
{{History||1.9.0|snap=beta 1.9.0.0|Added [[pillager]]s, which use and [[drops|drop]] crossbows.}}
{{History|||snap=beta 1.9.0.3|Crossbows now appear bigger in a pillager's hand.}}
{{History||1.10.0|snap=beta 1.10.0.3|Crossbows are now fully implemented and separate from [[Experimental Gameplay]].
|Crossbows can now be found in [[pillager outpost]] [[chest]]s.}}
{{History||1.11.0|snap=beta 1.11.0.4|Unenchanted and [[enchanting|enchanted]] crossbows can now be [[trading|bought]] from fletcher [[villager]]s.}}
{{History||1.12.0|snap=beta 1.12.0.3|Journeyman-level fletcher villagers now have 100% chance to [[trading|sell]] unenchanted crossbow, rather than 50% chance.}}
{{History||1.16.0|snap=beta 1.16.0.51|[[File:Piglin with Crossbow BE.png|32px]] Added [[piglin]]s, which can spawn with and [[drops|drop]] crossbows.}}
{{History|||snap=beta 1.16.0.57|Crossbows now generate randomly enchanted in [[bastion remnants]] chests.}}
{{History|PS4}}
{{History||1.90|[[File:Crossbow.png|32px]] [[File: Crossbow Pull 0.png|32px]] [[File: Crossbow Pull 1.png|32px]] [[File: Crossbow Pull 2.png|32px]] [[File:Arrow Loaded Crossbow.png|32px]] [[File:Crossbow.png|32px]] [[File:Crossbow Pull 0.png|32px]] [[File:Crossbow Pull 1.png|32px]] [[File:Crossbow Pull 2.png|32px]] [[File:Firework Loaded Crossbow.png|32px]] [[File:Crossbow.png|32px]] Added crossbows.}}
{{History|foot}}
==Issues==
{{issue list}}
==Trivia==
*Alongside [[pillager]]s, crossbows were inspired by ''[[Minecraft Dungeons]]'', even though they were added in the base game first.<ref>{{cite|url=https://discord.com/channels/579770991056519194/818903542139453480/819631528593588244| title = March 2021 developper Q&A|website=discord.com|date=March 11, 2021}}</ref>
*Crossbows [[enchanting|enchanted]] with [[Quick Charge]] VI and above get stuck on the first frame on the recharging animation because the resulting charge time is negative, and the game never reaches the time markers that tell it to advance the animation or the reloading procedure itself. It is technically possible to charge such crossbows, but this would require overflowing the value that determines how long the crossbow has been charged. This takes such an amount of time that this is practically impossible: for example, charging a crossbow with Quick Charge VI would take 69.4 years to complete.
*Although Piercing allows arrows to bypass [[shield]]s, they can't get through the wither armor.
*The crossbow's first-person loading animation in [[Bedrock Edition]] is different from [[Java Edition]].
*Even if a crossbow is already wound with a projectile, when it drops on the ground, it always looks uncharged.<ref>{{bug|MC-137552}}</ref>
*In real life, crossbows don't shoot the same arrows as bows, rather they shoot shorter, thicker, and oftentimes fletchless arrows (usually called "bolts") made to withstand the crossbow's increased power, which can shatter conventional arrows.
==Gallery==
<gallery>
File:CrossbowMinecon.png|A crossbow shown at [[MINECON Earth 2018]].
File:PillagerMinecon.png|A [[pillager]] armed with a crossbow, shown at MINECON Earth 2018.
File:EquippingCrossbow.png|How the crossbow is equipped.
File:Enchanted_Crossbow.gif|An enchanted crossbow.
File:Steve_Charging_Crossbow.gif|Steve charging crossbow {{in|java}}.
File:Alex_Charging_Crossbow.gif|Alex charging crossbow {{in|java}}.
File:Pillager_Charging_Crossbow.gif|Pillager charging crossbow.
File:Piglin_Charging_Crossbow.gif|Piglin charging crossbow.
File:Crossbow_(MCD).png|The ''Minecraft Dungeons'' variant of the crossbow
</gallery>
== References ==
{{reflist}}
== External Links ==
*[https://www.minecraft.net/en-us/article/taking-inventory--crossbow Taking Inventory: Crossbow] – Minecraft.net on October 20, 2022
{{Items}}
[[Category:Combat]]
[[Category:Renewable resources]]
[[de:Armbrust]]
[[es:Ballesta]]
[[fr:Arbalète]]
[[it:Balestra]]
[[ja:クロスボウ]]
[[ko:쇠뇌]]
[[pl:Kusza]]
[[pt:Besta]]
[[ru:Арбалет]]
[[th:หน้าไม้]]
[[zh:弩]]</li><li>[[Trial Key|Trial Key]]<br/>{{Item|
|image=Trial Key .webp
|renewable=Yes
|stackable=Yes (64)
}}
{{Stub}}
{{in dev|java|bedrock|1.21|1.21.0}}
A '''Trial Key''' is an item found in [[Trial Chambers]].
Its functionality remained a mystery for a pretty good time, but on the Minecraft Monthly of January 2024, it has been revealed to open vaults, which once opened will drop an item. It's still unknown what will the loot be, but was seen dispensing the following:
Enchanted iron helmet, enchanted iron leggings, enchanted crossbow, enchanted diamond chestplate, iron, gold and diamond horse armour, enchanted golden apple, saddle, enchanted diamond axe, enchanted iron pickaxe and enchanted iron Shovel.
The trial key can currently be obtained from trial spawners (50%), or from pots and chests (8%).
[[Category:Items]]
[[ja:Trial Key]]
[[lzh:煉管]]</li></ul> | 12w18a | As a result of singleplayer being changed to an internal server, travel.ogg no longer plays when using a nether portal, and the screen animation after traveling through a portal no longer plays. | |||
| 12w22a | Zombie pigmen now rarely spawn from nether portals in the Overworld. | ||||
| ? | Portals from the Nether now search the entire height of the Overworld. | ||||
1.4.2{{Extension DPL}}<ul><li>[[Disc Fragment|Disc Fragment]]<br/>{{Item
| image = Disc Fragment.png
| renewable = No
| stackable = Yes (64)
}}
A '''disc fragment''' is a [[music disc]] fragment obtained from [[ancient city]] loot chests. Nine fragments can be combined in a [[Crafting Table|crafting table]] to make a music disc named "5".
== Obtaining ==
=== Chest loot ===
{{LootChestItem|disc-fragment-5}}
== Usage ==
=== Crafting ingredient ===
{{crafting usage|Disc Fragment 5}}
== Data values ==
=== ID ===
{{ID table
|edition=java<!--
|showitemtags=y-->
|showforms=y
|firstcolumnname=Track
|generatetranslationkeys=y
|displayname=Samuel Åberg - 5
|spritename=disc-fragment-5
|spritetype=item
|nameid=disc_fragment_5<!--
|itemtags=-->
|form=item
|foot=y}}
== History ==
{{History|java}}
{{History||1.19|snap=22w16a|[[File:Disc Fragment.png|32px]] Added disc fragments.}}
{{History|bedrock}}
{{History||1.19.0|snap=beta 1.19.0.28|[[File:Disc Fragment.png|32px]] Added disc fragments.}}
{{History|foot}}
== Issues ==
{{Issue list}}
==Gallery==
<gallery>
9 to 5.jpg|9 fragments of the 5 music disc.
</gallery>
==See also==
* {{EnvLink|Music}}
* {{ItemLink|Music Disc}}
{{Items}}
[[de:Plattenbruchstück]]
[[es:Fragmento de disco]]
[[fr:Fragment de disque]]
[[ja:レコードの破片]]
[[pl:Fragment płyty]]
[[pt:Fragmento de disco]]
[[ru:Фрагмент пластинки 5]]
[[uk:Фрагмент платівки]]
[[zh:唱片残片]]
[[Category:Non-renewable resources]]</li><li>[[Raw Chicken|Raw Chicken]]<br/>{{about|a food item|the mob "chicken"|Chicken}}{{About|a food item|the cooked version|Cooked Chicken}}{{Item
| title = Raw Chicken
| image = Raw Chicken.png
| heals = {{hunger|2}}
| effects = {{EffectLink|Hunger}} (0:30) (30% chance)
| renewable = Yes
| stackable = Yes (64)
}}
'''Raw chicken''' is a [[food]] item that can be eaten by the [[player]]. It can be cooked in a [[furnace]], [[smoker]], or a [[campfire]] to make [[cooked chicken]].
==Obtaining==
===Mob loot ===
Upon death, an adult [[chicken]] drops 1 raw chicken. The maximum is increased by 1 per level of [[Looting]], for a maximum of 1-4 with Looting III. Chickens that die while on [[fire]] drop [[cooked chicken]] instead.
===Cat gifts===
{{main|Cat#Gifts}}
Tamed [[cat]]s have a 70% chance to give the [[player]] a gift as they wake up from a [[bed]], and the gift has a 16.13% chance to be raw chicken.
==Usage==
=== Food===
To eat raw chicken, press and hold {{control|use}} while it is selected in the hotbar. Eating one restores {{hunger|2}} hunger and 1.2 hunger [[Hunger#Mechanics|saturation]], but has a 30% chance of inflicting food poisoning (the {{EffectLink|link=Hunger (status effect)|Hunger}} effect for 30 seconds).
<nowiki>*This has a similar effect as [[Rotten Flesh]].
===Smelting ingredient===
{{Smelting
|showname=1
|Raw Chicken
|Cooked Chicken
|0.35
}}
===Wolves===
Raw chicken can be used to [[breed]] and heal tamed [[wolves]], lead them around, and make baby tamed wolves grow up faster by 10% of the remaining time.
Wolves are at no risk of food poisoning.
===Trading===
Novice-level Butcher villagers have a {{frac|1|3}} chance to buy 14 raw chicken for an emerald.{{only|bedrock}}
Novice-level Butcher villagers have a 50% chance of offering to buy 14 raw chicken for an emerald.{{only|java}}
==Sounds==
{{Sound table/Entity/Food}}
==Data values==
===ID ===
{{edition|java}}:
{{ID table
|edition=java
|showforms=y
|generatetranslationkeys=y
|displayname=Raw Chicken
|spritetype=item
|nameid=chicken
|form=item
|foot=1}}
{{edition|bedrock}}:
{{ID table
|edition=bedrock
|shownumericids=y
|showforms=y
|notshowbeitemforms=y
|generatetranslationkeys=y
|displayname=Raw Chicken
|spritetype=item
|nameid=chicken
|id=275
|form=item
|foot=1}}
==Advancements ==
{{load advancements|Husbandry;A Balanced Diet}}
==Video==
<div style="text-align:center">{{yt|ux362Ae8Llc}}</div>
==History==
{{History|java beta}}
{{History||July 19, 2011|link=https://twitter.com/jeb_/status/93330811608240128|A teaser image for [[cooked chicken]] is revealed by [[Jeb]].}}
{{History||July 19, 2011|link=https://twitter.com/jeb_/status/93946593748852736|[[File:Raw Chicken (pre-release).png|32px]] Jens reveals raw chicken with changed texture based on feedback, saying "the chicken may be too smooth compared to other MC [[item]]s."<ref>https://twitter.com/jeb_/status/93335976298033152</ref>}}
{{History||1.8|snap=Pre-release|[[File:Raw Chicken JE1 BE1.png|32px]] Added raw chicken.
|Raw chicken is a new [[drops|drop]], obtained by killing a [[chicken]], usually along with a [[feather]].}}
{{History|java}}
{{History||1.2.1|snap=12w03a|Raw chicken can now be used to [[breeding|breed]] wolves.}}
{{History||1.3.1|snap=12w21a|Raw chicken can now be [[trading|sold]] to farmer [[villager]]s, at 14–17 raw chicken for 1 [[emerald]].}}
{{History||1.4.2|snap=12w37a|[[File:Raw Chicken JE2 BE2.png|32px]] The texture of raw chicken has been changed, so that it no longer has a dark outline.}}
{{History||1.8|snap=14w02a|Trading has been changed: butcher [[villager]]s now [[trading|buy]] 14–18 raw chicken for 1 [[emerald]].
|Farmer villagers no longer [[trading|trade]] raw chicken.}}
{{History||1.9|snap=15w43a|[[Chicken]]s can now [[drops|drop]] several raw chickens, if killed with a [[Looting]]-[[enchanting|enchanted]] [[weapon]].}}
{{History||1.13|snap=17w47a|Prior to [[1.13/Flattening|''The Flattening'']], this [[item]]'s numeral ID was 365.}}
{{History||1.14|snap=18w43a|[[File:Raw Chicken JE3 BE3.png|32px]] The texture of raw chicken has been changed.}}
{{History|||snap=18w44a|[[Cat]]s now offer raw chicken as [[Cat#Gifts|gift]]s.}}
{{History|pocket alpha}}
{{History||v0.4.0|[[File:Raw Chicken JE1 BE1.png|32px]] Added raw chicken.}}
{{History||v0.5.0|Raw chicken now restores {{hp|2}} instead of {{hp|1}}.}}
{{History||v0.8.0|snap=build 1|[[File:Raw Chicken JE2 BE2.png|32px]] The texture of raw chicken has been changed, so that it no longer has a dark outline.}}
{{History||v0.11.0|snap=build 1|Raw chicken now sometimes inflicts the [[hunger]] effect, despite the hunger bar not existing yet.}}
{{History||v0.12.1|snap=build 1|Raw chicken now restores [[hunger]] instead of [[health]].}}
{{History|pocket}}
{{History||1.0.4|snap=alpha 1.0.4.0|Butcher [[villager]]s now [[trading|buy]] 14-18 raw chicken for one [[emerald]].}}
{{History|bedrock}}
{{History||?|[[Chicken]]s can now [[drops|drop]] several raw chicken, if killed with a [[Looting]]-[[enchanting|enchanted]] [[weapon]].}}
{{History||1.8.0|snap=beta 1.8.0.8|Tamed [[cat]]s can now give the [[player]] raw chicken as a gift.}}
{{History||1.10.0|snap=beta 1.10.0.3|[[File:Raw Chicken JE3 BE3.png|32px]] The texture of raw chicken has been changed.}}
{{History||1.11.0|snap=beta 1.11.0.4|Butcher [[villager]]s now have {{frac|1|3}} of a chance to [[trading|buy]] 14 raw chicken.}}
{{History|console}}
{{History||xbox=TU5|xbone=CU1|ps=1.0|wiiu=Patch 1|[[File:Raw Chicken JE1 BE1.png|32px]] Added raw chicken.}}
{{History||xbox=TU12|[[File:Raw Chicken JE2 BE2.png|32px]] The texture of raw chicken has been changed, so that it no longer has a dark outline.}}
{{History|PS4}}
{{History||1.90|[[File:Raw Chicken JE3 BE3.png|32px]] The texture of raw chicken has been changed.}}
{{History|new3DS}}
{{History||0.1.0|[[File:Raw Chicken JE2 BE2.png|32px]] Added raw chicken.}}
{{History|foot}}
==Issues==
{{issue list}}
==Gallery ==
<gallery>
Beta 1.8 Dev Chicken 2.png|First image of raw chicken.
</gallery>
==References==
{{reflist}}
{{Items}}
[[de:Rohes Hühnchen]]
[[es:Pollo crudo]]
[[fr:Poulet cru]]
[[hu:Nyers csirkehús]]
[[ja:生の鶏肉]]
[[ko:익히지 않은 닭고기]]
[[nl:Rauwe kip]]
[[pl:Surowy kurczak]]
[[pt:Frango cru]]
[[ru:Сырая курятина]]
[[th:ไก่ดิบ]]
[[zh:生鸡肉]]
[[Category:Food]]
[[Category:Renewable resources]]</li></ul></nowiki> | 12w34a | Entities can now travel through portals. | |||
| The screen animation used when entering a portal is now replayed after traveling through, rather than having no animation (as before this snapshot) or a unique animation (as before 12w18a). | |||||
| 12w38a | The Nether now loads faster when traveling through a nether portal in Survival mode and loads immediately when in Creative mode. | ||||
1.7.2{{Extension DPL}}<ul><li>[[Brewing Stand|Brewing Stand]]<br/>{{Block
| image = <gallery>
Brewing Stand (empty) JE10.png | Empty
Brewing Stand (right) JE10.png | Right
Brewing Stand (left) JE10.png | Left
Brewing Stand (full) JE10.png | Full
</gallery>
| transparent = Yes
| light = Yes (1)
| tool = Wooden Pickaxe
| renewable = Yes
| stackable = Yes (64)
| flammable = No
| lavasusceptible = No
}}
A '''brewing stand''' is a [[block]] used for [[brewing]] [[potion]]s using [[Glass Bottle|bottles]] and suitable ingredients. It also serves as a [[cleric]]'s [[job site block]].
== Obtaining ==
=== Breaking ===
A brewing stand can be obtained using any [[pickaxe]]. If mined without a pickaxe, it drops nothing {{in|JE}}, while it drops itself {{in|BE}}.
{{breaking row|horizontal=1|Brewing Stand|Pickaxe|Wood|foot=1}}
=== Natural generation ===
Brewing stands generate in [[end ship]]s. They have two [[potion of Healing|Instant Health II potions]] in their holders.
A brewing stand also generates in the basement of [[igloo]]s with a [[splash potion of Weakness]] in it.
Brewing stands can generate without potions in [[village]] churches.
=== Crafting ===
{{Crafting
|head=1
|showdescription=1
|B1= Blaze Rod
|A2= Any stone-tier block |B2= Any stone-tier block |C2= Any stone-tier block
|Output= Brewing Stand
|type= Brewing
|description=Can use cobblestone and its other variants interchangeably.
|foot=1
}}
== Usage ==
[[File:Brewing Stand GUI.png|thumb|right|176px|Brewing stand GUI {{in|java}}]]
By default, the interface of a brewing stand is labeled "Brewing Stand", but this name can be customized by naming it in an [[anvil]] before placing it.
Brewing stands cannot be pushed by [[piston]]s {{in|java}}.
=== Brewing ===
{{main|Brewing}}
The main purpose of brewing stands is to allow for the [[brewing]] of [[potion]]s. Its interface can be opened by pressing {{control|use}} on them.
Brewing stands need [[blaze powder]] as fuel. Each piece brews 20 batches of potions, with each stage of brewing counting separately. Unlike [[furnace]]s, there is no time limit; fuel is consumed only when there are [[Glass Bottle|bottles]] and an ingredient to brew into it.
Brewing stands interact with [[hopper]]s as follows:
* They accept brewing ingredients from hoppers pointing down into the top.
* Any valid potion recipe can be preloaded for "hands-free" brewing of a complex recipe, with the [[Nether Wart|nether wart]] falling through into the stand for the first step.
* Bottles and fuel are accepted from hoppers pointing into the side.
* Finished products can be pulled out by hoppers below, but each stage of brewing counts as a batch of "finished" potions.
{{IN|education}}, elements can be combined in the brewing stand to make the [[medicine]] potions: antidote, elixir, eye drops, and tonic.
=== Changing profession ===
If a village has a brewing stand that has not been claimed by a villager, any villager who hasn't already picked a [[job site]] block in the village has a chance to change their profession into cleric.
=== Light source ===
Brewing stands emit a light level of 1.
== Sounds ==
=== Generic ===
{{Sound table/Block/Stone}}
=== Unique ===
{{edition|java}}:
{{Sound table
|rowspan=2
|sound=Brewing Stand brew1.ogg
|sound2=Brewing Stand brew2.ogg
|subtitle=Brewing Stand bubbles
|source=block
|description=When a potion finishes brewing
|id=block.brewing_stand.brew
|translationkey=subtitles.block.brewing_stand.brew
|volume=1.0
|pitch=1.0
|distance=16}}
{{Sound table
|subtitle=Cleric works
|source=neutral
|description=Randomly while a cleric is working
|id=entity.villager.work_cleric
|translationkey=subtitles.entity.villager.work_cleric
|volume=1.0
|pitch=0.8-1.2
|distance=16}}
{{Sound table
|sound=Door close.ogg
|sound2=Door open.ogg
|subtitle=Chest locked<ref group=sound name=lock>{{Bug|MC-98316||Wrong subtitles caused by missing distinction}}</ref>
|source=block
|description=When a player attempts to open a brewing stand locked using the {{nbt|string|Lock}} tag
|id=block.chest.locked|idnote=<ref group=sound name=lock/>
|translationkey=subtitles.block.chest.locked|translationkeynote=<ref group=sound name=lock/>
|volume=1.0
|pitch=1.0
|distance=16
|foot=1}}
{{Edition|Bedrock}}:
{{Sound table
|type=bedrock
|rowspan=2
|sound=Brewing Stand brew1.ogg
|sound2=Brewing Stand brew2.ogg
|source=block
|description=When a potion finishes brewing
|id=random.potion.brewed
|volume=1.0
|pitch=1.0}}
{{Sound table
|source=block
|description=Randomly while a cleric is working
|id=random.potion.brewed
|volume=1.0
|pitch=1.0
|foot=1}}
== Data values ==
=== ID ===
{{edition|java}}:
{{ID table
|edition=java
|showforms=y
|generatetranslationkeys=y
|displayname=Brewing Stand
|spritetype=block
|nameid=brewing_stand
|translationkey=block.minecraft.brewing_stand, item.minecraft.brewing_stand
|foot=1}}
{{ID table
|displayname=Block entity
|spritename=brewing-stand
|spritetype=block
|nameid=brewing_stand
|foot=1}}
{{edition|bedrock}}:
{{ID table
|edition=bedrock
|firstcolumnname=Brewing Stand
|shownumericids=y
|showforms=y
|generatetranslationkeys=y
|displayname=Block
|spritename=brewing-stand
|spritetype=block
|nameid=brewing_stand
|id=117
|form=block
|itemform=item.brewing_stand
|translationkey=-}}
{{ID table
|displayname=Item
|spritename=brewing-stand
|spritetype=item
|nameid=brewing_stand
|id=431
|form=item
|foot=1}}
{{ID table
|notnamespaced=y
|displayname=Block entity
|spritename=brewing-stand
|spritetype=block
|nameid=BrewingStand
|foot=1}}
=== Block states ===
{{see also|Block states}}
{{/BS}}
=== Block data ===
A brewing stand has a block entity associated with it that holds additional data about the block.
{{el|java}}:
{{see also|Block entity format}}
{{/BE}}
{{el|bedrock}}:
: See [[Bedrock Edition level format/Block entity format]].
== Achievements ==
{{load achievements|Local Brewery}}
== Advancements ==
{{Load advancements|Local Brewery}}
== History ==
{{History|java}}
{{History||1.0.0|snap=Beta 1.9 Prerelease 2|[[Cauldron]]s are implemented to be used to brew [[potion]]s, but are not available in-game yet.}}
{{History|||snap=September 30, 2011|slink={{tweet|jeb|119762786619359232}}|[[File:Brewing Stand (pre-release).png|32px]] [[Jens Bergensten|Jeb]] reveals that brewing is done through a brewing stand instead of a [[cauldron]].}}
{{History|||snap=Beta 1.9 Prerelease 3|[[File:Brewing Stand (empty) JE1 BE1.png|32px]] [[File:Brewing Stand (right) JE1.png|32px]] [[File:Brewing Stand (left) JE1.png|32px]] [[File:Brewing Stand (full) JE1.png|32px]] [[File:Brewing Stand (item) JE1 BE1.png|32px]] Added brewing stands.
|Brewing [[potion]]s with brewing stands currently take 30 seconds.
|When the first brewing stand was shown by Jeb, it had an additional 2D sub-stand for [[Glass Bottle|bottles]], but the stands for bottles are now designed in 3D.<ref>{{tweet|jeb|119763532312096769|I'm fully aware the potions are very thin (diet?), but it looks cute. (Always work in progress, of course)|September 30, 2011}}</ref>}}
{{History||1.1|snap=12w01a|Brewing time for brewing stands has been reduced to 20 seconds.}}
{{History||1.3.1|snap=12w15a|{{key|Shift}} + clicking can now be used to put items in brewing stands.}}
{{History||1.8|snap=14w11a|[[File:Brewing Stand (empty) JE2.png|32px]] [[File:Brewing Stand (right) JE2.png|32px]] [[File:Brewing Stand (left) JE2.png|32px]] [[File:Brewing Stand (full) JE2.png|32px]] The [[model]] of brewing stands has been changed. Stands with no bottles appear glitched from some angles, the left and right slots appear identical when filled in (although both distinct appearences still exist as metadata), and the arm angles have changed due to the 22.5º rotation limit.
|Brewing stands' targeting [[hitbox]] is now a full cube - previously it was a cuboid around the base plates.}}
{{History|||snap=14w11b|[[File:Brewing Stand (empty) JE3.png|32px]] [[File:Brewing Stand (right) JE3.png|32px]] [[File:Brewing Stand (left) JE3.png|32px]] [[File:Brewing Stand (full) JE3.png|32px]] Empty brewing stands' model have been fixed, although the other changes still remain.}}
{{History|||snap=14w25a|[[File:Brewing Stand (empty) JE4.png|32px]] [[File:Brewing Stand (right) JE4.png|32px]] [[File:Brewing Stand (left) JE4.png|32px]] [[File:Brewing Stand (full) JE4.png|32px]] Brewing stand models have changed such that bottles in the left and right slots now indeed appear different. However, the leftmost one appears stretched. Arms are also now affected by directional shading.<ref>{{bug|MC-68302|||WAI}}</ref>}}
{{History||1.9|snap=15w31a|Brewing stands now generate in [[End City|end cities]].}}
{{History|||snap=15w33a|Brewing stands can now brew [[Lingering Potion|lingering potion]]s.}}
{{History|||snap=15w33c|A bug where the [[player]] couldn't put in a [[splash potion]] to make a lingering potion has been fixed.}}
{{History|||snap=15w42a|Brewing stands now require [[Blaze Powder|blaze powder]] to operate.}}
{{History|||snap=15w43a|Brewing stands now generate in the basement of [[igloo]]s.
|Each blaze powder now fuels 20 brewing stand operations rather than 30.}}
{{History|||snap=15w44a|[[File:Brewing Stand (empty) JE5.png|32px]] [[File:Brewing Stand (right) JE5.png|32px]] [[File:Brewing Stand (left) JE5.png|32px]] [[File:Brewing Stand (full) JE5.png|32px]] Brewing stand models no longer have a stretched bottle.}}
{{History|||snap=15w47b|[[Sound]]s have been added for brewing stands.}}
{{History||1.11|snap=16w32a|The block entity ID has been changed from <code>Cauldron</code> to <code>brewing_stand</code>.}}
{{History||1.13|snap=17w47a|Prior to [[Java Edition 1.13/Flattening|''The Flattening'']], this [[block]]'s numeral ID was 117, and the [[item]]'s 379.}}
{{History||1.14|snap=18w43a|[[File:Brewing Stand (empty) JE6 BE2.png|32px]] <!-- [[File:Brewing Stand (left) JE6 BE2.png|32px]] [[File:Brewing Stand (right) JE6 BE2.png|32px]] -->[[File:Brewing Stand (Full) JE6 BE2.png|32px]] [[File:Brewing Stand (item) JE2.png|32px]] The textures of brewing stands have been changed.}}
{{History|||snap=18w44a|[[File:Brewing Stand (item) JE3 BE2.png|32px]] The texture of the brewing stand [[item]] has been changed.}}
{{History|||snap=18w48a|Brewing stands now generate in the updated [[plains]] [[village]]s.}}
{{History|||snap=18w49a|Brewing stands now generate in the updated [[savanna]] villages and the new [[Snowy Tundra|snowy]] villages.}}
{{History|||snap=18w50a|Brewing stands now generate in the updated [[desert]] and [[taiga]] villages.}}
{{History|||snap=19w03c|The three plates, but not the rod, of a brewing stand now use correct cullface arguments.}}
{{History|||snap=19w11a|Brewing stands now serve as cleric [[villager]]s' job site block.}}
{{History||1.16.2|snap=20w28a|Brewing stands can now be [[crafting|crafted]] with [[blackstone]].}}
{{History||1.17|snap=21w07a|Brewing stands can now be crafted with [[deepslate|grimstone]] (now deepslate).}}
{{History||1.17|snap=21w08a|Brewing stands can no longer be crafted with deepslate.
|Brewing stands can now be crafted with [[Cobbled Deepslate|cobbled deepslate]].}}
{{History|||snap=21w11a|<!--[[File:Brewing Stand (empty) JE7.png|32px]] [[File:Brewing Stand (right) JE7.png|32px]] [[File:Brewing Stand (left) JE7.png|32px]] [[File:Brewing Stand (Full) JE7.png|32px]] Changed [[lighting]].-->Tweaked the brewing stand GUI texture.}}
{{History||1.18|snap=21w39a|[[File:Brewing Stand (empty) JE8.png|32px]] [[File:Brewing Stand (right) JE8.png|32px]] [[File:Brewing Stand (left) JE8.png|32px]] [[File:Brewing Stand (full) JE8.png|32px]] The default [[brightness]] has been changed from "Moody" to 50.}}
{{History||1.19|snap=22w11a|[[File:Brewing Stand (empty) JE9.png|32px]] [[File:Brewing Stand (right) JE9.png|32px]] [[File:Brewing Stand (left) JE9.png|32px]] [[File:Brewing Stand (full) JE9.png|32px]] Changed texture and model.}}
{{History|||snap=22w17a|[[File:Brewing Stand (empty) JE10.png|32px]] [[File:Brewing Stand (right) JE10.png|32px]] [[File:Brewing Stand (left) JE10.png|32px]] [[File:Brewing Stand (full) JE10.png|32px]] Changed base texture and model.}}
{{History|pocket alpha}}
{{History||v0.12.1|snap=build 1|[[File:Brewing Stand (empty) JE1 BE1.png|32px]] [[File:Brewing Stand (item) JE1 BE1.png|32px]] Added brewing stands.}}
{{History|pocket}}
{{History||1.0.0|snap=alpha 0.17.0.1|Brewing stands now generate in [[igloo]] basements.
|Brewing stands now generate in [[end ship]]s.}}
{{History|bedrock}}
{{History||1.2.0|snap=beta 1.2.0.2|Brewing stands now require [[blaze powder]] to operate.}}
{{History||1.10.0|snap=beta 1.10.0.3|[[File:Brewing Stand (empty) JE6 BE2.png|32px]] [[File:Brewing Stand (item) JE3 BE2.png|32px]] The textures of brewing stands have been changed.|A brewing stand can now generate in [[village]] temples.}}
{{History||1.16.100|snap=beta 1.16.100.52|Brewing stands can now be [[craft]]ed with [[blackstone]].}}
{{History||1.17.0|snap=beta 1.17.0.50|Brewing stands can now be [[craft]]ed with [[cobbled deepslate]].}}
{{History||1.19.0|snap=beta 1.19.0.20|[[File:Brewing Stand (empty) JE10.png|32px]] [[File:Brewing Stand (right) JE10.png|32px]] [[File:Brewing Stand (left) JE10.png|32px]] [[File:Brewing Stand (full) JE10.png|32px]] Slightly changed its texture, to make their arms connect to their bases.}}
{{History|console}}
{{History||xbox=TU7|xbone=CU1|ps=1.0|wiiu=Patch 1|switch=1.0.1|[[File:Brewing Stand (empty) JE1 BE1.png|32px]] [[File:Brewing Stand (item) JE1 BE1.png|32px]] Added brewing stands.}}
{{History||xbox=TU43|xbone=CU33|ps=1.36|wiiu=Patch 13|Brewing stands now appear in [[igloo]]s. The lack of a fuel requirement means that potions can now be made without going to the Nether.}}
{{History||xbox=TU46|xbone=CU36|ps=1.38|wiiu=Patch 15|Brewing stands now require [[blaze powder]] to operate.}}
{{History||xbox=none|xbone=none|ps=1.90|wiiu=none|switch=none|[[File:Brewing Stand.png|32px]] [[File:Brewing Stand (item) JE3 BE2.png|32px]] The textures of brewing stands have been changed.}}
{{History|new 3ds}}
{{History||0.1.0|[[File:Brewing Stand (empty) JE1 BE1.png|32px]] [[File:Brewing Stand (item) JE1 BE1.png|32px]] Added brewing stands.}}
{{History|foot}}
<gallery>
File:Brewingstand Potion.png|The first picture of a brewing stand. A [[giant mushroom]] is also seen in this picture.
</gallery>
=== Brewing stand "item" ===
{{:Technical blocks/Brewing Stand}}
== Issues ==
{{issue list}}
== Trivia ==
* Even when the brewing stand is not in use, there is still smoke coming out of the top of it.
* In ''[[Java Edition]]'', when a brewing stand is broken, particles from a bottle appear, even if no bottle is in the stand.
* No matter what potion (including water bottles) is in the stand it always looks like a full red bottle.
* Brewing stands always face east, no matter what direction they are placed.
* According to [[Michael Stoyke|Searge]], for thematic reasons, a brewing stand was added to the basement of the [[igloo]]. Because of this, blaze powder was required for fuel to preserve game progression. In this way, the player is prevented from using it before going to the Nether.<ref>https://minecraft.net/en-us/article/meet-blaze</ref>
== Gallery ==
<gallery>
File:Brewing stand in action.png|A brewing stand in action.
File:Igloobasement.png|A brewing stand in an igloo basement.
File:1.8 and below brewing stand.png|The GUI of the brewing stand in 1.8.x and below.
</gallery>
== See also ==
*[[Glass Bottle]]
*[[Splash Potion]]
== References ==
{{reflist}}
== External links ==
*[https://www.minecraft.net/en-us/article/taking-inventory--brewing-stand Taking Inventory: Brewing Stand] – Minecraft.net on October 11, 2019
{{Blocks|Utility}}
{{items}}
[[Category:Job blocks]]
[[Category:Utility blocks]]
[[Category:Manufactured blocks]]
[[Category:Generated structure blocks]]
[[Category:Storage]]
[[Category:Block entities]]
[[Category:Light sources]]
[[de:Braustand]]
[[es:Soporte para pociones]]
[[fr:Alambic]]
[[hu:Főzőállvány]]
[[it:Alambicco]]
[[ja:醸造台]]
[[nl:Brouwstandaard]]
[[pl:Statyw alchemiczny]]
[[pt:Suporte de poções]]
[[ru:Варочная стойка]]
[[uk:Варильна стійка]]
[[zh:酿造台]]</li><li>[[Nautilus Shell|Nautilus Shell]]<br/>{{Item
| type =
| stackable = Yes (64)
| renewable = Yes
}}
A '''nautilus shell''' is an item that is used for crafting [[conduit]]s.
==Obtaining==
===Fishing===
{{main|Fishing#Junk and treasure}}
Nautilus shells can be rarely obtained as a treasure item from fishing. The drop chances of nautilus shells slightly increase with each level of [[Luck of the Sea]] on the [[player]]'s [[fishing rod]].
===Mob loot===
[[Drowned]] have a 3%{{only|java|short=1}} or 8%{{only|bedrock|short=1}} chance to spawn with a nautilus shell in their off-hand, and this nautilus shell always drops upon [[death]].
===Trading===
[[Wandering trader]]s may [[trading|sell]] a nautilus shell for 5 [[emerald]]s each, but they only sell 5 of them at a time.
==Usage==
{{IN|bedrock}}, a nautilus shell is one of the few items that can be held in the off-hand.
===Crafting ingredient===
{{crafting usage}}
=== Trading ===
Nautilus shells can be given to trident-wielding drowned with a chance for the drowned to pick up the shell and drop the trident.<sup>[''[[Bedrock Edition]] only'']</sup>
==Data values==
===ID===
{{edition|java}}:
{{ID table
|edition=java
|showforms=y
|generatetranslationkeys=y
|displayname=Nautilus Shell
|spritetype=item
|nameid=nautilus_shell
|form=item
|foot=1}}
{{edition|bedrock}}:
{{ID table
|edition=bedrock
|shownumericids=y
|showforms=y
|notshowbeitemforms=y
|generatetranslationkeys=y
|displayname=Nautilus Shell
|spritetype=item
|nameid=nautilus_shell
|id=570
|form=item
|foot=1}}
==History==
{{History|java}}
{{History||1.13|snap=18w15a|[[File:Nautilus Shell JE1 BE2.png|32px]] Added nautilus shells.}}
{{History||1.14|snap=19w05a|Added [[Wandering Trader|wandering trader]]s, which sell nautilus shells.}}
{{History|bedrock}}
{{History||1.4.0|snap=beta 1.2.20.1|[[File:Nautilus Shell BE1.png|32px]] Added nautilus shells.}}
{{History|||snap=beta 1.2.20.2|[[File:Nautilus Shell JE1 BE2.png|32px]] The texture of nautilus shells has now been changed.}}
{{History||1.5.0|snap=beta 1.5.0.0|[[Drowned]] now sometimes spawn holding a nautilus shell.
|Nautilus shells are no longer behind [[Experimental Gameplay]].}}
{{History|||snap=beta 1.5.0.1|Nautilus shells can now be used to craft [[conduit]]s.}}
{{History||1.10.0|snap=beta 1.10.0.3|Nautilus shells can now be obtained from [[trading]] with [[wandering trader]]s.}}
{{History|console}}
{{History||xbox=TU69|ps=1.76|wiiu=Patch 38|[[File:Nautilus Shell JE1 BE2.png|32px]] Added nautilus shells.}}
{{History||xbox=none|ps=1.91|wiiu=none|Nautilus shells can now be obtained from [[trading]] with [[wandering trader]]s.}}
{{History|foot}}
==Issues==
{{issue list}}
==Trivia==
*[[wikipedia:Nautilus|Nautilus]]es are animals that occupy deep oceans in the real world. However, they are absent in Minecraft and there are currently no plans to add nautilus [[mob]]s into the game.
*Because {{el|bedrock}} allows for Nautilus shells to be held in the off-hand (since drowned hold them), they are the only item in that version that can be put in the off-hand slot without having a specific function.
{{items}}
[[de:Nautilusschale]]
[[es:Caparazón de nautilo]]
[[fr:Coquille de nautile]]
[[it:Conchiglia di nautilus]]
[[ja:オウムガイの殻]]
[[ko:앵무조개 껍데기]]
[[nl:Nautilusschelp]]
[[pl:Muszla łodzika]]
[[pt:Concha de náutilo]]
[[ru:Раковина наутилуса]]
[[th:เปลือกหอยงวงช้าง]]
[[uk:Мушля наутилуса]]
[[zh:鹦鹉螺壳]]
[[Category:Renewable resources]]</li></ul> | 13w41a | Nether portals, water and ice are now visible through each other. | |||
1.8{{Extension DPL}}<ul><li>[[Prismarine Shard|Prismarine Shard]]<br/>{{Item
| renewable = Yes
| stackable = Yes (64)
| type =
}}
A '''prismarine shard''' is an item obtained by defeating [[guardian]]s or [[elder guardian]]s. It can be used to craft various [[prismarine]] blocks as well as [[sea lantern]]s.
== Obtaining ==
Prismarine shards are dropped upon the death of [[guardian]]s and [[elder guardian]]s. From these mobs, 0–2 shards are dropped each time. This can be increased to a maximum of 5 with the [[Looting]] enchantment.
== Usage ==
=== Crafting ingredient ===
{{crafting usage}}
== Data values ==
=== ID ===
{{edition|java}}:
{{ID table
|edition=java
|showforms=y
|generatetranslationkeys=y
|displayname=Prismarine Shard
|spritetype=item
|nameid=prismarine_shard
|form=item
|foot=1}}
{{edition|bedrock}}:
{{ID table
|edition=bedrock
|showaliasids=y
|shownumericids=y
|showforms=y
|notshowbeitemforms=y
|generatetranslationkeys=y
|displayname=Prismarine Shard
|spritetype=item
|nameid=prismarine_shard
|aliasid=prismarineshard
|id=565
|form=item
|foot=1}}
== History ==
{{History|java}}
{{history||1.8|snap=14w25a|[[File:Prismarine Shard JE1 BE1.png|32px]] Added prismarine shards.}}
{{History||1.13|snap=17w47a|Prior to [[1.13/Flattening|''The Flattening'']], this [[item]]'s numeral ID was 409.}}
{{History||1.14|snap=18w43a|[[File:Prismarine Shard JE2 BE2.png|32px]] The texture of prismarine shards has now been changed.}}
{{History|pocket alpha}}
{{History||v0.16.0|snap=build 1|[[File:Prismarine Shard JE1 BE1.png|32px]] Added prismarine shards.}}
{{History|bedrock}}
{{History||1.10.0|snap=beta 1.10.0.3|[[File:Prismarine Shard JE2 BE2.png|32px]] The texture of prismarine shards has now been changed.}}
{{History|console}}
{{History||xbox=TU31|xbone=CU19|ps=1.22|wiiu=Patch 3|[[File:Prismarine Shard JE1 BE1.png|32px]] Added prismarine shards.}}
{{History||xbox=none|xbone=none|ps=1.90|wiiu=none|switch=none|[[File:Prismarine Shard JE2 BE2.png|32px]] The texture of prismarine shards has now been changed.}}
{{History|New 3DS}}
{{History||1.3.12|[[File:Prismarine Shard JE1 BE1.png|32px]] Added prismarine shards.}}
{{History|foot}}
== Issues ==
{{issue list}}
{{items}}
[[de:Prismarinscherbe]]
[[es:Fragmento de prismarina]]
[[fr:Éclat de prismarine]]
[[ja:プリズマリンの欠片]]
[[ko:프리즈머린 조각]]
[[nl:Prismarienscherf]]
[[pl:Odłamek pryzmarynu]]
[[pt:Pedaço de prismarinho]]
[[ru:Призмариновый осколок]]
[[uk:Призмариновий уламок]]
[[zh:海晶碎片]]
[[Category:Renewable resources]]</li><li>[[Steak|Steak]]<br/>{{Item
| title = Steak
| image = Steak.png
| renewable = Yes
| heals = {{hunger|8}}
| stackable = Yes (64)
}}
'''Steak''' ({{in|java}}) or '''cooked beef''' ({{in|bedrock}}) is a [[food]] [[item]] obtained from [[cow]]s, [[mooshroom]]s, or from cooking [[raw beef]].
== Obtaining ==
=== Mob loot ===
==== Cows ====
When a [[cow]] or [[mooshroom]] is killed, it drops [[raw beef]]. If a cow dies while on fire, it drops steak instead. If the cow is killed using a weapon with the [[Looting]] enchantment, the maximum number of steak drops increases by 1 per level.
=== Cooking ===
Raw beef can be cooked in a [[furnace]], [[smoker]], or [[campfire]]. Each steak removed from a furnace output slot gives 0.35 [[experience]] (22.4 experience per stack).
{{Smelting
|Raw Beef
|Steak
|0,35
}}
=== Villager gifts ===
{{IN|java}}, butcher [[Villager|villagers]] may give players steak if they have the [[Hero of the Village]] status effect.
== Usage ==
=== Food ===
To eat steak, press and hold {{control|use}} while it is selected in the hotbar. Eating one restores {{hunger|8}} [[hunger]] and 12.8 hunger
[[saturation]].
=== Wolves ===
Steak can be used to [[breed]] and heal tamed [[wolves]], lead them around, and make baby tamed wolves grow up faster by 10% of the remaining time.
==Sounds==
{{Sound table/Entity/Food}}
== Data values ==
=== ID ===
{{edition|java}}:
{{ID table
|edition=java
|showforms=y
|generatetranslationkeys=y
|displayname=Steak
|spritetype=item
|nameid=cooked_beef
|form=item
|foot=1}}
{{edition|bedrock}}:
{{ID table
|edition=bedrock
|shownumericids=y
|showforms=y
|notshowbeitemforms=y
|generatetranslationkeys=y
|displayname=Cooked Beef
|spritetype=item
|nameid=cooked_beef
|id=274
|form=item
|foot=1}}
== Advancements ==
{{load advancements|Husbandry;A Balanced Diet}}
== History ==
{{History|java beta}}
{{History||1.8|snap=Pre-release|[[File:Steak JE1 BE1.png|32px]] Added steak.
|Steak has been introduced as the cooked result of [[raw beef]].
|Steak is a new [[food]] [[item]] dropped by [[cow]]s in addition to their [[leather]].
|The icon for steak is used as the image for the [[cooked porkchop]] before [[Java Edition Beta 1.8|Beta 1.8]], as the cooked porkchop's icon was updated to a lighter colored piece of meat.}}
{{History|java}}
{{History||1.2.1|snap=12w03a|Steak can now be used to [[breed]] [[wolves]].}}
{{History||1.3.1|snap=12w21a|Steak can now be [[trading|bought]] from butcher [[villager]]s, at 6–7 steak for 1 [[emerald]].}}
{{History|||snap=1.3|[[File:Steak JE2.png|32px]] The texture of steak has been changed.}}
{{History||1.4.2|snap=12w37a|[[File:Steak JE3 BE2.png|32px]] The texture of steak has been changed, so that it no longer has a dark outline.}}
{{History||1.8|snap=14w02a|[[Villager]]s no longer [[trade]] steak.}}
{{History||1.13|snap=17w47a|Prior to [[1.13/Flattening|''The Flattening'']], this [[item]]'s numeral ID was 364.}}
{{History||1.14|snap=18w43a|[[File:Steak JE4 BE3.png|32px]] The texture of steak has been changed.}}
{{History|||snap=19w13a|Butcher villagers now give steak to players under the [[Hero of the Village]] effect.}}
{{History|pocket alpha}}
{{History||v0.4.0|[[File:Steak JE1 BE1.png|32px]] Added steak.}}
{{History||v0.5.0|Steak now restores {{hp|8}} instead of {{hp|4}}.}}
{{History||v0.8.0|snap=build 1|[[File:Steak JE3 BE2.png|32px]] The texture of steak has been changed, so that it no longer has a dark outline.}}
{{History||v0.12.1|snap=build 1|Steak now restores [[hunger]] instead of [[health]].}}
{{History||v0.16.0|snap=build 4|"Steak" has been renamed to "Cooked Beef."}}
{{History|bedrock}}
{{History||1.10.0|snap=beta 1.10.0.3|[[File:Steak JE4 BE3.png|32px]] The texture of cooked beef has been changed.}}
{{History||1.11.0|snap=beta 1.11.0.4|Cooked beef can now be [[trading|bought]] from butcher [[villager]]s.}}
{{History|console}}
{{History||xbox=TU5|xbone=CU1|ps=1.0|wiiu=Patch 1|switch=1.0.1|[[File:Steak JE1 BE1.png|32px]] Added steak.}}
{{History||xbox=TU12|[[File:Steak JE3 BE2.png|32px]] The steak's texture has been changed, so that it no longer has a dark outline.}}
{{History||xbox=none|xbone=none|ps=1.90|wiiu=none|switch=none|[[File:Steak JE4 BE3.png|32px]] The texture of steak has been changed.}}
{{History|new3DS}}
{{History||0.1.0|[[File:Steak JE3 BE2.png|32px]] Added steak.}}
{{History|foot}}
== Issues ==
{{issue list}}
== Gallery ==
<gallery>
Jeb steak.png|Raw beef and steak shown in the [[inventory]] from a preview screenshot.
Eating Steak.png|A still frame of the player eating a steak.
Steak SDGP.png|Steak in the [[Super Duper Graphics Pack]].
</gallery>
== Notes ==
{{fnlist}}
{{Items}}
[[cs:Propečený steak]]
[[de:Steak]]
[[es:Filete asado]]
[[fr:Steak]]
[[hu:Steak]]
[[it:Bistecca]]
[[ja:ステーキ]]
[[ko:스테이크]]
[[nl:Biefstuk]]
[[pl:Befsztyk]]
[[pt:Filé]]
[[ru:Жареная говядина]]
[[tr:Biftek]]
[[uk:Стейк]]
[[zh:牛排]]
[[Category:Food]]
[[Category:Renewable resources]]</li></ul> | 14w31a | The pause menu can once again be opened while standing in a nether portal. | |||
1.9{{Extension DPL}}<ul><li>[[Food|Food]]<br/>{{For|food in ''Minecraft Dungeons''|MCD:Food}}
[[File:Eating Steve.png|thumb|right|150px]]
[[File:Eating Alex.png|thumb|right|150px]]
'''Food''' refers to any consumable [[item]]s that, when eaten, restore [[hunger]] points and hunger saturation points, and sometimes cause [[status effect]]s. They are essential to survival, as going without them eventually causes the player to starve, causing damage until reaching {{hp|10}} in Easy [[difficulty]], and {{hp|1}} on Normal. [[Hunger#Effects of hunger|Starvation]] damage kills the player in Hard and [[Hardcore]] Mode.
Food is eaten by holding {{control|use}} while having the food item selected in the hot bar or in the off-hand.
[[Cake]] cannot be eaten this way, and must instead be placed on a surface before being eaten.
With the exception of [[chorus fruit]], [[golden apple]]s, [[honey bottle]]s, [[milk]], and [[suspicious stew]]{{only|Java}}, food cannot be eaten when the hunger bar is completely full. In [[Creative]] Mode, any food can be consumed at any time.
All food items and ingredients can be stacked in the inventory slots, except for [[milk]], [[rabbit stew]], [[mushroom stew]], [[beetroot soup]], [[suspicious stew]], and [[cake]].{{only|Java}}
This page covers food items for players; blocks and items that can be eaten by other [[mob]]s are not included here.
== Hunger and saturation ==
{{main|Hunger#Mechanics}}
{{seealso|Tutorials/Hunger_management}}
[[File:Raw_and_Cooked_Chicken_Comparison.png|thumb|Raw (left) and cooked (right) [[chicken]]. Eating raw chicken can give the [[player]] [[food poisoning]].]]
[[Player]]s have two different food statistics, one of which is visible: The hunger level is visible, and the saturation level is not.
[[Saturation]] is the first statistic to decrease when a player performs energy-intensive actions, and it must be completely depleted before the visible hunger meter begins decreasing. Although the current saturation level is generally hidden, the player can tell that their saturation level is completely depleted if the visible hunger meter begins displaying a jittering effect.
Eating a food item replenishes a fixed number of hunger points and saturation points, based on the item. Some foods have a better ratio of saturation to hunger points replenished than others. Overeating the hunger bar does not overflow to saturation.
A player's current saturation level can never exceed their current hunger level. A player at a hunger level of 5, for example, can be at a maximum of 5 saturation. Food always restores hunger (raising the saturation limit) ''before'' supplying saturation. The most efficient use of food is to eat low-saturation food to fill the hunger bar, followed by high-saturation food to fill saturation. While a few hunger points may be wasted when eating nourishing food when nearly full, eating nourishing foods on a low hunger bar wastes even more points of saturation. Maximizing saturation increases the length of time (and/or the amount of damage healed) before the player needs to eat again.
=== Usage ===
Most foods can be eaten by holding down the right-click button with a food item in hand. It takes 1.61 seconds to eat most foods; dried kelp takes 0.865 seconds to eat. Additionally, a player can hold food in their [[offhand]] {{in|Java}}.
While eating, food [[particles]] form from the player's mouth correlated with their respective food item, and produces a munching noise. Eating also slows the user significantly.
Unlike other foods, [[cake]] has to be eaten by placing it, then right-clicking on its block form. Eating cake is instant and it has 7 edible slices, each giving {{hunger|2}} hunger and 0.4 hunger [[saturation]].
=== Nourishment value ===
Nourishment is defined as the ratio of saturation to hunger points restored. Foods with higher nourishment values should be eaten when the hunger bar is more full.
The "nourishment" table below can help by categorizing foods by their saturation-to-hunger restoration ratios. See the more detailed [[#Foods|Foods]] table for the exact hunger and saturation statistics of each food.
<!-- do not change the locations of the food in this table without providing an explanation in the edit summary -->
{| class="wikitable" data-description="Nourishment value"
|-
!Nourishment
! Value
!Food
|- style="text-align: left;"
!Great
| 2.4
| {{Slot|Enchanted Golden Apple}}{{Slot|Golden Apple}}{{Slot|Golden Carrot}}
|- style="text-align: left;"
!Good
| 1.6
| {{Slot|Cooked Mutton}}{{Slot|Cooked Porkchop}}{{Slot|Cooked Salmon}}{{Slot|Steak}}
|- style="text-align: left;"
!Normal
| 1.2
| {{Slot|Baked Potato}}{{Slot|Beetroot}}{{Slot|Beetroot Soup}}{{Slot|Bread}}{{Slot|Carrot}}{{Slot|Cooked Chicken}}{{Slot|Cooked Cod}}{{Slot|Cooked Rabbit}}{{Slot|Mushroom Stew}}{{Slot|Rabbit Stew}}{{Slot|Suspicious Stew}}
|- style="text-align: left;"
! Low
| 0.6
| {{Slot|Apple}}{{Slot|Chorus Fruit}}{{Slot|Dried Kelp}}<ref group="note" name="Java">{{only|java}}</ref>{{Slot|Melon Slice}}{{Slot|Poisonous Potato}}{{Slot|Potato}}{{Slot|Pumpkin Pie}}{{Slot|Raw Beef}}{{Slot|Raw Chicken}}{{Slot|Raw Mutton}}{{Slot|Raw Porkchop}}{{Slot|Raw Rabbit}}{{Slot|Sweet Berries}}<ref group="note" name="Bedrock">{{only|bedrock}}</ref>
|- style="text-align: left;"
!Poor
| 0.2
| {{Slot|Cake}}{{Slot|Cookie}}{{Slot|Dried Kelp}}<ref group="note" name="Bedrock"/>{{Slot|Glow Berries}}{{Slot|Honey Bottle}}{{Slot|Pufferfish|link=Pufferfish (item)}}{{Slot|Raw Cod}}{{Slot|Raw Salmon}}{{Slot|Rotten Flesh}}{{Slot|Spider Eye}}{{Slot|Sweet Berries}}<ref group="note" name="Java"/>{{Slot|Tropical Fish|link=Tropical Fish (item)}}
|}
== Foods ==
{{/table}}
=== Ingredients ===
The following items cannot be eaten on their own. Instead, they are used to craft consumable food items.
<!--
Please leave spaces between each row in the table - this has no effect on the appearance of the table, but it makes it a lot easier on future wiki editors!
-->
{| class="sortable wikitable list-style-none" data-description="Ingredients"
|-
! Name
! Icon
! Used to make
! Source(s)
! Notes
|- id="Bowl"
! scope="row" | [[Bowl]]
| {{Slot|Bowl}}
| {{itemLink|Mushroom Stew}}
* {{itemLink|Beetroot Soup}}
* {{itemLink|Rabbit Stew}}
* {{itemLink|Suspicious Stew}}
|
* [[Crafting]] from [[planks]]
* [[Fishing Rod#Usage|Fishing]]
* [[Turtle]] killed by [[lightning]]
* Eating food made with them
|
|- id="Cocoa Bean"
! scope="row" | [[Cocoa Beans]]
| {{Slot|Cocoa Beans}}
| {{itemLink|Cookie}}s
|
* Breaking [[cocoa plant]]s
* Bought from [[wandering trader]]
|
|- id="Egg"
! scope="row" | [[Egg]]
| {{Slot|Egg}}
|
* {{itemLink|Cake}}
* {{itemLink|Pumpkin Pie}}
|
* Laid by [[chicken]]s
* Found in village fletcher chests
|
|- id="Milk"
! scope="row" | [[Milk Bucket]]
| {{Slot|Milk Bucket}}
| {{itemLink|Cake}}
|
* Milking a [[cow]], [[mooshroom]]s, or [[goat]]s
* Killing a [[Wandering trader]] drinking it
| Can also be consumed to clear [[status effect]]s
|- id="Mushroom"
! scope="row" | [[Brown Mushroom]] and [[Red Mushroom]]
| {{Slot|Brown Mushroom;Red Mushroom}}
| {{itemLink|Mushroom Stew}}
* {{itemLink|Rabbit Stew}}
* {{itemLink|Suspicious Stew}}
| {{anchor|Brown Mushroom|Red Mushroom}}
* Dark/shady areas
* Swamp [[biome]]s
* [[Mushroom fields]]
* Breaking [[Huge Mushroom|huge brown or red mushrooms]]
* [[The Nether]]
* Using [[shears]] on a [[mooshroom|brown mooshroom or red mushroom]]
* Bought from [[wandering trader]]
|
|- id="Flower"
! scope="row" | [[Flower]]
| {{Slot|Any Flower}}
|{{itemLink|Suspicious Stew}}
|
* Breaking [[Flower]]
* Using [[Bone Meal]] on a [[Grass Block]]
* Bought from [[wandering trader]]
* Killing [[Iron Golem]] (poppy)
|
|- id="Pumpkin"
! scope="row" | [[Pumpkin]]
| {{Slot|Pumpkin}}
| {{itemLink|Pumpkin Pie}}
|
* Harvesting mature [[pumpkin]]s grown from [[pumpkin seeds]]
* Naturally occurring [[pumpkin]]s
* Taiga and Snowy Taiga [[Village]]s
* Bought from [[wandering trader]]
|
|- id="Sugar"
! scope="row" | [[Sugar]]
| {{Slot|Sugar}}
|
* {{itemLink|Cake}}
* {{itemLink|Pumpkin Pie}}
|
* Crafting [[sugar cane]]
* Dropped by [[witch]]es
* Creating from its base [[element]]s {{only|bedrock|education}}
* Redeemed from [[honey bottle]] on a crafting table
|
|- id="Wheat"
! scope="row" | [[Wheat]]
| {{Slot|Wheat}}
|
* {{itemLink|Bread}}
* {{itemLink|Cake}}
* {{itemLink|Cookie}}s
|
* Harvesting mature [[wheat]]
* Found in [[Dungeon#Loot|dungeon]], [[Woodland Mansion#Loot|woodland mansion]], [[Shipwreck#Loot|shipwreck]], [[Igloo#Loot|igloo]], [[Village#Loot|village]], [[Ocean Ruins#Loot|ocean ruins]], and [[Pillager Outpost#Loot|pillager outpost]] chest
* Crafting [[hay bale]]s
|
|- id="Gold Nugget"
! scope="row" | [[Gold Nugget]]
| {{Slot|Gold Nugget}}
| {{itemLink|Golden Carrot}}
|
* Crafting [[gold ingot]]s
* Dropped by [[zombified piglin]]s
* Found in [[Shipwreck#Loot|shipwreck]], [[Igloo#Loot|igloo]], [[Village#Loot|village]], and [[Ocean Ruins#Loot|ocean ruins]] chest
* Smelting golden armor or tools
* Mining [[nether gold ore]] without [[Silk Touch]]
|
|- id="Gold Ingot"
! scope="row" | [[Gold Ingot]]
| {{Slot|Gold Ingot}}
| {{itemLink|Golden Apple}}
|
* Crafting [[gold block]]s or [[gold nugget]]s
* Rarely dropped by [[zombified piglin]]s and by [[Drowned]]
* Smelting [[gold ore]] or [[nether gold ore]]
* Found in [[Shipwreck#Loot|shipwreck]], [[Jungle Pyramid#Structure:Loot|jungle pyramid]], [[Dungeon#Loot|dungeon]], [[Woodland Mansion#Loot|woodland mansion]], [[Nether Fortress#Loot|nether fortress]], [[End city#Loot|end city]], [[Mineshaft#Loot|mineshaft]], [[Village#Structure:Loot|village]], [[Stronghold#Loot|stronghold]], [[Buried Treasure#Loot|buried treasure]] and [[Desert pyramid#Structure:Loot|desert pyramid]] chest
|
|- id="Honey Block"
! scope="row" | [[Honey Block]]
| {{Slot|Honey Block}}
| {{itemLink|Honey Bottle}}
|
* Crafting [[honey bottle]]s
|
|}
== Sounds ==
{{Sound table/Entity/Food}}
== Achievements ==
{{load achievements|Pork Chop;Iron Belly;Rabbit Season;Overpowered;Castaway;Delicious Fish;The Lie;Bake Bread;Time For Stew}}
== Advancements ==
{{load advancements|Husbandry;A Balanced Diet;A Furious Cocktail;How Did We Get Here;Fishy Business}}
== History ==
{{History|java classic}}
{{History||June 14, 2009|link=https://notch.tumblr.com/post/123343045/my-vision-for-survival|[[Notch]] discussed how food would work in [[survival]] mode: "Monsters will hurt you and take away from your health. The only way to regain health is to eat food. You get food from either hunting or from farming."}}
{{History||0.24_SURVIVAL_TEST|[[Mushroom]]s are now edible, making them the first food to be added in the game. At this point, food restores [[health]] instead of [[hunger]], and are eaten instantly without sound or animation. Pigs drop them upon death.}}
{{History|java indev}}
{{History||0.31|snap=20091231-2|Added [[apple]]s, which are currently non-functional.}}
{{History|||snap=20100110|Apples are now edible, and restore {{hp|4}} each.}}
{{History|||snap=?|Mushrooms are no longer edible.}}
{{History|||snap=20100130|Added [[mushroom stew]], which restores {{hp|8}} health.}}
{{History||20100206|Added [[wheat]] and [[bread]].
|Mushroom stew now restores {{hp|10}} health.}}
{{History||20100219|[[Pig]]s now drop [[raw porkchop]]s, which can be [[smelt]]ed to become [[cooked porkchop]]s.}}
{{History|java infdev}}
{{History||20100227-1|Added [[golden apple]]s. At this point, they were crafted with [[block of gold]], and restored {{hp|20}}.}}
{{History|java alpha}}
{{History||v1.0.8|Added [[milk]], which was at this point unobtainable and the player could not use it in any way.}}
{{History||v1.0.11|Milk can now be obtained in the game, by milking a [[cow]] with an empty [[bucket]].}}
{{History||v1.0.14|With the addition of [[chicken]]s, [[egg]]s are now in the game, but have no use. Chickens do not drop raw chicken at this point in time.}}
{{History||v1.2.0|snap=<nowiki>?|slink=:Category:Information needed requiring unarchived version|Added [[pumpkin]]s, but not pumpkin seeds.
|Added [[raw fish]] and [[cooked fish]], obtainable through [[fishing]].}}
{{History||v1.2.3|Eating food now functions correctly in multiplayer.}}
{{History|java beta}}
{{History||1.2|Added [[sugar]] and [[cake]].}}
{{History||1.4|[[Cocoa beans]] now appear naturally in the game; since Beta 1.2, they were available only through inventory editors.
|Added [[cookie]]s.}}
{{History||1.5|Pigs now drop cooked porkchops if killed while on fire.}}
{{History||1.8|snap=Pre-release|Added [[melon]]s, [[melon seeds]], and [[pumpkin seeds]].
|Added [[raw chicken]] as a drop from chickens, which can be smelted into [[cooked chicken]].
|Added [[raw beef]] as a drop from cows, which can be smelted into [[steak]].
|Added [[rotten flesh]] as a new drop from [[zombie]]s.
|Added an eating animation, instead of food simply disappearing from the player's hand as if a block had been placed.
|Added [[hunger bar]]; now food restores hunger instead of health.
|Food now stacks in the inventory, with the exception of cake, mushroom stew, and milk.
|[[Huge mushroom]]s were added as a new source for [[mushroom]]s.
|With the addition of the hunger bar, golden apples now restore {{Hunger|10}} and give 30 seconds of [[regeneration]], but do not heal health directly anymore.}}
{{History|java}}
{{History||1.0.0|snap=Beta 1.9 Prerelease 2|Mushrooms can now be obtained from the mushroom island [[biome]], via the huge mushrooms, random scattered mushrooms, or the new [[mooshroom]]s.
|[[Milk]] can be used to nullify the effects of [[potion]]s.
|[[Spider]]s now drop [[Spider Eye|eyes]].}}
{{History||1.1|snap=release|Golden apples are now made with [[gold nugget]]s instead of blocks of gold, restore {{Hunger|4}} and give 4 seconds of regeneration.}}
{{History||1.3.1|snap=12w21a|Added enchanted golden apples, which functioned like golden apples prior to 1.1 and had the same crafting recipe, but also gave resistance and fire resistance for 5 minutes each.
|[[Cocoa Beans]] are now a crop, making all food items a renewable resource.}}
{{History||1.4.2|snap=12w34a|[[Potato]]es and [[carrot]]s can be obtainable from zombies (rare drop) or harvested.
|Potatoes can be cooked to make [[baked potato]]es
|Harvesting potatoes may give 0–2 [[poisonous potato]]es.
|Carrots can be crafted into [[golden carrot]]s.
|Added [[pumpkin pie]], making [[pumpkin]]s a food ingredient.}}
{{History||1.7.2|snap=13w36a|Added [[tropical fish (item)|clownfish]], [[Raw Salmon|raw]] and [[cooked salmon]], and [[pufferfish (item)|pufferfish]].}}
{{History||1.8|snap=14w02a|Baked potatoes now restore {{Hunger|5}} hunger points instead of 6, with a corresponding reduction in saturation restored.
|Carrots now restore {{Hunger|3}} hunger points instead of 4, with a corresponding reduction in saturation restored.}}
{{History|||snap=14w27a|Added [[Raw Mutton|raw]] and [[cooked mutton]], [[Raw Rabbit|raw]] and [[cooked rabbit]], and [[rabbit stew]].}}
{{History||1.9|snap=15w31a|Added [[chorus fruit]], [[beetroot]] and [[beetroot soup]].
|Enchanted golden apples are no longer craftable, making them no longer renewable.}}
{{History||1.13|snap=18w07a|Added [[dried kelp]], which is edible.}}
{{History||1.14|snap=18w43a|Added [[suspicious stew]].}}
{{History|||snap=18w49a|Added [[sweet berries]].}}
{{History||1.15|snap=19w34a|Added [[honey bottle]]s.}}
{{History|||snap=19w35a|[[Honey bottle]]s now remove [[poison]] effects when consumed.}}
{{History|||snap=19w46a|All foods can now be consumed in Creative mode, including cake.}}
{{History||1.17|snap=21w05a|Added [[glow berries]].}}
{{History|pocket alpha}}
{{History||v0.4.0|Added the first food items: [[apple]]s, [[bread]], [[mushroom stew]], [[raw beef]], [[steak]], [[raw chicken]], [[cooked chicken]], [[raw porkchop]]s, and [[cooked porkchop]].}}
{{History||v0.5.0|Added [[melon]]s, [[melon slice]]s, and [[melon seeds]].}}
{{History||v0.7.0|Added [[milk]] and [[cake]].}}
{{History||v0.8.0|snap=build 1|Added [[pumpkin pie]], [[carrot]]s, [[potato]]es, and [[baked potato]]es.}}
{{History|||snap=build 2|Added [[beetroot]]s and [[beetroot soup]].}}
{{History||v0.9.0|snap=build 1|[[Potato]]es and [[carrot]]s can be obtainable from zombies (rare drop) or harvested.
|Added [[cookie]]s.}}
{{History||v0.11.0|snap=build 1|Added [[rotten flesh]] as a new drop from [[zombie]]s, at this time, it inflicts poison.
|Added [[Raw Fish|raw]] and [[cooked fish]], [[clownfish]], [[Raw Salmon|raw]] and [[cooked salmon]], and [[pufferfish]].}}
{{History|||snap=build 4|[[Milk]] can be used to nullify the effects of [[potion]]s.}}
{{History||v0.12.1|snap=build 1|Eating food now restores hunger.
|[[Spider]]s now drop [[Spider Eye|eyes]].
|Added poisonous potatoes, golden apples, enchanted golden apples and golden carrots.}}
{{History||v0.13.0|snap=build 1|Hunger restored by food now matches Minecraft PC.
|Added raw rabbit, cooked rabbit, and [[rabbit stew]].}}
{{History||v0.15.0|snap=build 1|Added raw mutton and cooked mutton.}}
{{History|pocket}}
{{History||1.0.0|snap=alpha 0.17.0.1|Added chorus fruit.}}
{{History|bedrock}}
{{History||1.4.0|snap=beta 1.2.14.2|Added [[dried kelp]], which is edible.}}
{{History||1.7.0|snap=beta 1.7.0.2|Food can now be eaten in creative mode and on peaceful difficulty.}}
{{History||1.10.0|snap=beta 1.10.0.3|Added [[sweet berries]].}}
{{History||1.13.0|snap=beta 1.13.0.9|Added [[suspicious stew]].}}
{{History||1.14.0|snap=beta 1.14.0.1|Added [[honey bottle]].}}
{{History||1.17.0|snap=beta 1.16.220.52|Added [[glow berries]].}}
{{History|foot}}
{{items}}
[[Category:Food]]
[[cs:Potraviny]]
[[de:Hunger]]
[[es:Comida]]
[[fr:Nourriture]]
[[hu:Étel]]
[[it:Cibo]]
[[ja:食料]]
[[ko:식료품]]
[[nl:Voedsel]]
[[pl:Jedzenie]]
[[pt:Alimento]]
[[ru:Еда]]
[[th:อาหาร]]
[[uk:Їжа]]
[[zh:食物]]</li><li>[[Le Tricolore|Le Tricolore]]<br/>{{Exclusive|Java}}
{{Joke feature}}
{{Item
| image =
| renewable = Yes
| stackable = Yes (64)
}}
'''Le Tricolore''' (French for ''The Tricolour'') is a joke item from [[Java Edition 23w13a_or_b]].
== Obtaining ==
One le tricolore and one [[la baguette]] is given to all players when [[French mode]] gets activated. Deactivating the mode will remove le tricolore from the player's inventory (but not la baguette; [[container]]s such as [[chest]]s are not affected).
Le Tricolore is not available in the creative inventory, but can be obtained by using the {{cmd|give}} command.
== Data values ==
=== ID ===
{{ID table
|showforms=y
|generatetranslationkeys=java
|displayname=Le Tricolore
|spritetype=item
|nameid=le_tricolore
|form=item
|foot=1}}
== History ==
{{History|java}}
{{History||23w13a or b|[[File:Le Tricolore.png|32px]] Added Le Tricolore.}}
{{History|foot}}
{{Items}}
{{Jokes}}
[[Category:Joke items]]
[[ja:Le Tricolore]]
[[pt:Le Tricolore]]</li></ul></nowiki> | 16w02a | Nether portals now play travel.ogg again. | |||
1.15{{Extension DPL}}<ul><li>[[Emerald|Emerald]]<br/>{{About|the item|the currency in ''Minecraft Dungeons''|MCD:Emerald|the skin|MCD:Emerald (skin)|the ore|Emerald Ore|the mineral block|Block of Emerald}}
{{Item
| image = Emerald.png
| renewable = Yes
| stackable = Yes (64)
| rarity = Common}}
'''Emeralds''' are rare minerals that are used primarily as the currency for [[trading]] with [[villager]]s and [[wandering trader]]s. Naturally-occurring emeralds are rarer than [[diamond]]s.
== Obtaining ==
=== Trading (how emerald is renewable) ===
{{main|Trading}}
Emeralds can be obtained by trading with [[villager]]s, since they are the currency that villagers use for trading. Villagers either buy or sell specific goods for emeralds. Some villagers trade stuff that is renewable with emerald.
=== Mining ===
[[Emerald ore]] drops one emerald when mined using an iron or better [[pickaxe]]. If the pickaxe is enchanted with [[Fortune]], it may drop an extra emerald per level of Fortune, up to a maximum of 4 emeralds with Fortune III. If the ore is mined using a pickaxe enchanted with [[Silk Touch]], it drops itself in ore form instead of an emerald.
=== Crafting ===
{{Crafting
|Block of Emerald
|Output= Emerald,9
|type= Material
}}
=== Smelting ===
{{Smelting
|Emerald Ore; Deepslate Emerald Ore
|Emerald
|1
}}
=== Natural generation ===
{{see also|Emerald Ore#Natural generation}}
Emeralds can generate in [[chest]]s in some [[village]] houses or other generated [[Generated structures|structures]].
{{needs update|inaccurate=1|section=1}}
{{LootChestItem|emerald}}
=== Drops ===
[[Vindicator]]s and [[evoker]]s drop 0–1 emeralds upon death. [[Looting]] increases the maximum emerald drop by one per level, for a maximum of 4 emeralds with Looting III.
[[Fox]]es that are holding emeralds also have a chance of 100% to drop the emerald they are holding upon death. Alternatively, the player can drop a food item to entice the fox to drop the emerald without killing it.
{{IN|bedrock}}, vindicators and [[pillager]]s spawned from [[raids]] can drop 0–1 emeralds. Depending on difficulty, vindicators and pillagers spawned from raids also have a chance of dropping additional emeralds. There is a 65% chance of dropping on easy and normal, and an 80% chance of dropping on hard. If this additional drop condition is met, different emerald counts can drop with different chances. There is a {{frac|10|39}} chance to drop an additional 0–1 emeralds, a {{frac|5|39}} chance to drop an additional 2–3, and a {{frac|2|39}} chance to drop an additional 4–5.
{{IN|bedrock}}, with Looting III, it is possible for a vindicator in a raid to drop up to 16 emeralds upon death (vindicator drops + raid drops + an additional drop<!-- emerald from 2/39 chance-->).
== Usage ==
=== Trading ===
{{main|Trading}}
Emeralds are primarily used as currency for [[trading]] with villagers and wandering traders. Trading is typically a faster way to obtain emeralds than by mining, as an emerald ore is rarer than a diamond ore.
=== Crafting ingredient ===
{{crafting usage}}
===Beacons===
Emeralds can be used to select powers from a [[beacon]]. The player must select one of the available powers and then insert an emerald into the item slot.
An emerald can be substituted for an [[iron ingot]], a [[gold ingot]], a [[diamond]] or a [[netherite ingot]] in a beacon.
=== Smithing ingredient ===
{{Smithing
|head=1
|ingredients=Any Armor Trim +<br/>Any Armor Piece + <br/>Emerald
|Any Armor Trim Smithing Template
|Netherite Chestplate
|Emerald
|Emerald Trim Netherite Chestplate
|showdescription=1
|description = All armor types can be used in this recipe,<br/>a netherite chestplate is shown as an example.
|tail=1
}}
;Trim color palette
The following color palette is shown on the designs on trimmed armor:
*{{TrimPalette|emerald}}
== Achievements ==
{{load achievements|The Haggler;Buy Low;Master Trader}}
== Advancements ==
{{load advancements|What a Deal!}}
== Data values ==
=== ID ===
{{edition|java}}:
{{ID table
|edition=java
|showitemtags=y
|showforms=y
|generatetranslationkeys=y
|displayname=Emerald
|spritetype=item
|nameid=emerald
|itemtags=beacon_payment_items
|form=item
|foot=1}}
{{edition|bedrock}}:
{{ID table
|edition=bedrock
|shownumericids=y
|showforms=y
|notshowbeitemforms=y
|generatetranslationkeys=y
|displayname=Emerald
|spritetype=item
|nameid=emerald
|id=512
|form=item
|foot=1}}
== History ==
{{History|java indev}}
{{History||0.31|snap=20100129|Added [[diamond]]s, referred to as emeralds in the code.}}
{{History|java}}
{{History||May 21, 2012|link={{tweet|jeb_|204619936616808451}}|[[File:Ruby pJE20120521.png|32px]] [[Jens Bergensten|Jeb]] released a screenshot of himself testing the [[trading]] system. At this time, what would become emeralds were [[History_of_textures/Unused_textures#Ruby|rubies]].<ref>http://www.minecraftforum.net/topic/1621716-15-new-blocksitems/#entry19977082</ref>}}
{{History||1.3.1|snap=12w21a|[[File:Emerald JE1 BE1.png|32px]] Added emeralds and [[emerald ore]].
|Emeralds can be [[trading|traded]] with [[villager]]s in exchange for different [[item]]s.
|Added [[desert temple]]s, with a hidden [[chest]] room and loot containing emeralds.
|[[File:Ruby JE1 BE1.png|32px]] The texture of [[History_of_textures/Unused_textures#Ruby|rubies]] can be found in the (at this time unused) file {{cd|items.png}}.<ref name="en_US 12w21">Snapshot 12w21a/b ''lang/en_US.lang'': '''item.ruby.name=Ruby'''</ref>}}
{{History|||snap=12w22a|[[Block of emerald]] has now been added, which is [[crafting|crafted]] from nine emeralds and can be placed as a decorative [[block]].
|Added [[jungle temple]]s, which contain loot [[chest]]s with emeralds.}}
{{History||1.4.2|snap=12w32a|As [[zombie villager]]s can now spawn and be cured, emeralds can now still be obtained in [[trading|trades]] even if [[generated structures]] are disabled.}}
{{history||1.9|snap=15w31a|Emeralds now generate in [[end city]] ship [[chest]]s.}}
{{history|||snap=15w43a|Emeralds now generate in [[igloo]] basement chests.}}
{{history|||snap=15w44a|The average yield of emeralds in [[desert temple]] chests has now been increased.}}
{{History||1.11|snap=16w39a|Added [[vindicator]]s and [[evoker]]s, which drop emeralds if killed by a player.}}
{{History||1.13|snap=17w47a|Prior to [[1.13/Flattening|''The Flattening'']], this [[item]]'s numeral ID was 388.}}
{{History|||snap=18w09a|Emeralds can now generate in the loot [[chest]]s of [[underwater ruins]].}}
{{History|||snap=18w10a|Emeralds can now generate in [[buried treasure]] chests.}}
{{History|||snap=18w11a|Emeralds can now generate in the chests of [[shipwreck]]s.}}
{{History||1.14|snap=18w43a|[[File:Emerald JE2 BE2.png|32px]] The texture of emeralds has now been changed.
|Added [[pillager]]s, which can [[drops|drop]] emeralds.}}
{{History|||snap=18w46a|Pillagers no longer drop emeralds.}}
{{History|||snap=18w48a|Emeralds now generate in chests in [[village]] tanneries, fisher cottages and plains village houses.}}
{{History|||snap=18w49a|Emeralds now generate in chests in [[village]] shepherd houses, mason houses, butcher shops, and savanna and snowy village houses.}}
{{History|||snap=18w50a|Emeralds now generate in chests in [[village]] fletcher houses, temples, and desert and taiga village houses.}}
{{History|||snap=19w07a|Added [[fox]]es, which sometimes spawn with emeralds in their mouths.}}
{{History|||snap=19w08a|[[File:Emerald JE3 BE3.png|32px]] The texture of emeralds has now been changed, once again and it looks smaller.}}
{{History||1.17|snap=21w13a|The unused [[History_of_textures/Unused_textures#Ruby|rubies]] texture was removed.}}
{{History||1.20<br>(Experimental)|link=1.19.4|snap=23w04a|Emeralds can now be used as an armor trim material.}}
{{History|||snap=23w07a|Emeralds now drop when brushing [[suspicious sand]] in [[desert pyramid]]s or [[desert well]]s.}}
{{History||1.20|snap=23w12a|The probability for the emerald to generate in the [[suspicious sand]] in [[desert temple]] and in [[desert well]] has been changed from 1/7 to 1/8.|Emerald can now be found in [[suspicious gravel]] and [[suspicious sand]] in cold and warm [[ocean ruins]] and in [[trail ruins]].}}
{{History|||snap=23w16a|Emerald no longer generates in [[suspicious sand]] in [[trail ruins]].|Due to the split of the archaeological loot tables for the suspicious gravel within the [[trail ruins]]; emerald now is in the common loot.}}
{{History|pocket alpha}}
{{History||v0.9.0|snap=build 1|[[File:Emerald JE1 BE1.png|32px]] Added emeralds.}}
{{History|||snap=build 5|Emeralds can now be used to craft [[blocks of emerald]].}}
{{History||v0.13.0|snap=build 1|Emeralds can now be found inside [[desert temple]] [[chest]]s.}}
{{History||v0.15.0|snap=build 1|Added [[jungle temple]]s, which contain loot chests with emeralds.}}
{{History||v0.16.0|snap=build 1|Emeralds can now be used to power [[beacon]]s.}}
{{History|pocket}}
{{History||1.0.0|snap=alpha 0.17.0.1|Emeralds can now be found in [[end city]] ship [[chest]]s.
|Emeralds can now be found in [[igloo]] basement chests.}}
{{History||1.0.4|snap=alpha 1.0.4.0|Emeralds are now used as "currency" for [[villager]] [[trading]].}}
{{History||1.1.0|snap=alpha 1.1.0.0|Added [[evoker]]s and [[vindicator]]s, which [[drops|drop]] emeralds when killed.}}
{{History|bedrock}}
{{History||1.4.0|snap=beta 1.2.14.2|Emeralds can now be found in some [[shipwreck]] [[chest]]s.}}
{{History|||snap=beta 1.2.20.1|Emeralds can now be found inside [[underwater ruins]] chests.}}
{{History||1.10.0|snap=beta 1.10.0.3|Emeralds can now be used to [[trading|buy]] items from [[wandering trader]]s.
|Emeralds can now be found in [[plains]] [[village]] house and tannery [[chest]]s.
|[[File:Emerald JE2 BE2.png|32px]] The texture of emeralds has now been changed.}}
{{History||1.11.0|snap=beta 1.11.0.1|Emeralds can now be found in [[village]] [[chest]]s other than [[plains]].}}
{{History|||snap=beta 1.11.0.4|[[Vindicator]]s and [[pillager]]s that spawn from [[raid]]s can now [[drops|drop]] bonus emeralds.}}
{{History|||snap=beta 1.11.0.5|[[File:Emerald JE3 BE3.png|32px]] The texture of emeralds has now been changed, once again.}}
{{History||1.13.0|snap=beta 1.13.0.1|Added [[fox]]es, which can [[drops|drop]] emeralds.}}
{{History||Next Major Update<br>(Experimental)|link=Bedrock Edition 1.19.70|snap=beta 1.19.70.23|Emeralds now drop when brushing [[suspicious sand]] in [[desert pyramid]]s or [[desert well]]s.}}
{{History|||snap=beta 1.19.80.21|Emeralds can now be used as an armor trim material.}}
{{History|console}}
{{History||xbox=TU14|xbone=CU1|ps=1.04|wiiu=Patch 1|switch=1.0.1|[[File:Emerald JE1 BE1.png|32px]] Added emeralds.}}
{{History|Ps4}}
{{History||1.90|[[File:Emerald JE2 BE2.png|32px]] The texture of emeralds has now been changed.}}
{{History|new3DS}}
{{History||0.1.0|[[File:Emerald JE1 BE1.png|32px]] Added emeralds.}}
{{History|foot}}
== Issues ==
{{issue list}}
== Gallery ==
<gallery>
Villager trading preview.png|The first image of the trading system released by [[Jeb]]. What would become emeralds can be seen in the [[inventory]] space.
Emerald Ore 12w21a.png|A wall of [[emerald ore]] utilizing a previous texture in snapshot [[12w21a]].
Room of Emeralds.png|All forms of emeralds in one photo: emerald (in the form of [[emerald block|block]], [[emerald ore|ore]] and the emerald itself).
</gallery>
==Trivia==
*The [[History_of_textures/Unused_textures#Ruby|ruby]] was going to be the [[villager]] currency but was changed to emeralds before the update's release.
== References ==
{{Reflist}}
{{Items}}
[[Category:Renewable resources]]
[[cs:Smaragd]]
[[de:Smaragd]]
[[es:Esmeralda]]
[[fr:Émeraude]]
[[hu:Smaragd]]
[[it:Smeraldo]]
[[ja:エメラルド]]
[[ko:에메랄드]]
[[nl:Smaragd]]
[[pl:Szmaragd]]
[[pt:Esmeralda]]
[[ru:Изумруд]]
[[th:มรกต]]
[[tr:Zümrüt]]
[[uk:Смарагд]]
[[zh:绿宝石]]</li><li>[[Pumpkin Seeds|Pumpkin Seeds]]<br/>{{Block
| image = <gallery>
Pumpkin Stem Age 0.png | Age 0
Pumpkin Stem Age 1.png | Age 1
Pumpkin Stem Age 2.png | Age 2
Pumpkin Stem Age 3.png | Age 3
Pumpkin Stem Age 4.png | Age 4
Pumpkin Stem Age 5.png | Age 5
Pumpkin Stem Age 6.png | Age 6
Pumpkin Stem Age 7.png | Age 7
</gallery>
|image2 = <gallery>
Attached Pumpkin Stem (N).png | North
Attached Pumpkin Stem (E).png | East
Attached Pumpkin Stem (S).png | South
Attached Pumpkin Stem (W).png | West
</gallery>
| transparent = Yes
| light = No
| tool = none
| renewable = Yes
| stackable = Yes (64)
| flammable = No
| lavasusceptible = No
}}
'''Pumpkin seeds''' are items obtained from pumpkins that can be used to grow pumpkin stems.
'''Pumpkin stems''' are plants grown on [[farmland]] that, over time, grow [[pumpkin]]s on dirt, mud and moss blocks adjacent to them.
== Obtaining ==
=== Breaking ===
When broken, a pumpkin stem drops 0–3 pumpkin seeds. The chance for pumpkin seeds to drop increases with the stem's age.
{| class="wikitable"
! rowspan="3" |[[Resource location]]
! rowspan="3" | Source
! colspan="4" | Default
|-
| colspan="1" rowspan="2" style="text-align:center" | Nothing || colspan="3" style="text-align:center" |{{ItemLink|Pumpkin Seeds|Pumpkin seeds}}
|-
| style="text-align:center" | 1 || style="text-align:center" | 2 || style="text-align:center" | 3
|-
| rowspan="8" |<code>blocks/pumpkin_stem</code>
|{{BlockLink|Pumpkin Stem|Pumpkin stem}} <code>age = 0</code>
| style="text-align:center" |81.3%|| style="text-align:center" |17.42%|| style="text-align:center" |1.24%|| style="text-align:center" |0.03%
|-
|{{BlockLink|Pumpkin Stem|Pumpkin stem}} <code>age = 1</code>
| style="text-align:center" |65.1%|| style="text-align:center" |30.04%|| style="text-align:center" |4.62%|| style="text-align:center" |0.24%
|-
|{{BlockLink|Pumpkin Stem|Pumpkin stem}} <code>age = 2</code>
| style="text-align:center" |51.2%|| style="text-align:center" |38.4%|| style="text-align:center" |9.6%|| style="text-align:center" |0.8%
|-
|{{BlockLink|Pumpkin Stem|Pumpkin stem}} <code>age = 3</code>
| style="text-align:center" |39.44%|| style="text-align:center" |43.02%|| style="text-align:center" |15.64%|| style="text-align:center" |1.9%
|-
|{{BlockLink|Pumpkin Stem|Pumpkin stem}} <code>age = 4</code>
| style="text-align:center" |29.13%|| style="text-align:center" |44.44%|| style="text-align:center" |22.22%|| style="text-align:center" |3.7%
|-
|{{BlockLink|Pumpkin Stem|Pumpkin stem}} <code>age = 5</code>
| style="text-align:center" |21.6%|| style="text-align:center" |43.2%|| style="text-align:center" |28.8%|| style="text-align:center" |6.4%
|-
|{{BlockLink|Pumpkin Stem|Pumpkin stem}} <code>age = 6</code>
| style="text-align:center" |15.17%|| style="text-align:center" |39.82%|| style="text-align:center" |34.84%|| style="text-align:center" |10.16%
|-
|{{BlockLink|Pumpkin Stem|Pumpkin stem}} <code>age = 7</code>
| style="text-align:center" |10.16%|| style="text-align:center" |34.84%|| style="text-align:center" |39.82%|| style="text-align:center" |15.17%
|-
| rowspan="1" |<code>blocks/attached_pumpkin_stem</code>
|{{BlockLink|Attached Pumpkin Stem|Attached Pumpkin stem}}
| style="text-align:center" |10.16%|| style="text-align:center" |34.84%|| style="text-align:center" |39.82%|| style="text-align:center" |15.17%
|}
=== Natural generation ===
Pumpkin stems generate naturally in stem farm rooms in [[woodland mansion]]s.
Pumpkin stems generate in [[taiga]] and [[snowy taiga]]{{only|be|short=1}} [[village]] farms.
=== Chest loot ===
{{LootChestItem|pumpkin-seeds}}
=== Crafting ===
{{Crafting
|Pumpkin
|Output= Pumpkin Seeds,4
|type= Material
}}
=== Trading ===
[[Wandering trader]]s sell pumpkin seeds for 1 [[emerald]].
=== Post-generation ===
Shearing an uncarved pumpkin yields 4 pumpkin seeds.
== Usage ==
=== Farming ===
{{see also|Tutorials/Pumpkin and melon farming}}
Pumpkin seeds can be planted only on [[farmland]], as stems. Over time, a stem grows through several stages{{Needs testing}} and, at its final growth stage, will produce [[pumpkin]]s on any adjacent [[dirt]], [[Coarse Dirt|coarse dirt]], [[Rooted Dirt|rooted dirt]], [[Grass Block|grass block]], [[farmland]], [[podzol]], [[mycelium]], [[Moss Block|moss block]], [[mud]] or [[Muddy Mangrove Roots|muddy mangrove roots]]. If a pumpkin is already occupying a spot adjacent to a stem it does not grow more pumpkins until the pumpkin is removed. A single stem can grow an unlimited number of pumpkins. Pumpkin stems need a minimum light level of 10 in the block above the stem to grow and give pumpkins. Pumpkin seeds are affected by [[bone meal]] only with respect to stem growth; bone meal does not help produce the actual pumpkins.
=== Breeding ===
Like other seeds, pumpkin seeds can be used to [[breed]] [[chicken]]s, lead chickens around, and make baby chickens grow up faster by 10% of the remaining time.
=== Taming ===
Like other seeds, pumpkin seeds can be used to tame [[parrot]]s.
=== Composting ===
Placing pumpkin seeds into a [[composter]] has a 30% chance of raising the compost level by 1.
== Pumpkin stem ==
A '''pumpkin stem''' is the block that is planted on [[farmland]] when pumpkin seeds are used on it. It starts underground, and rises up as the plant grows. The stem is colored green when young, and then yellow once fully grown.
The stem curves once a pumpkin has grown from it. A fully-grown single stem connects to any [[pumpkin]] in an adjacent square, thus there are 5 possible appearances to a stem. If there are multiple pumpkins it can connect to, it favors the east, then west, north, and south. When the pumpkin is removed, the stem returns to its straight shape.
== Sounds ==
{{Sound table/Block/Hard crop}}
== Data values ==
=== ID ===
{{edition|java}}:
{{ID table
|edition=java
|showblocktags=y
|showforms=y
|generatetranslationkeys=y
|displayname=Pumpkin Stem
|spritetype=block
|nameid=pumpkin_stem
|blocktags=bee_growables, crops
|form=block}}
{{ID table
|displayname=Attached Pumpkin Stem
|spritetype=block
|nameid=attached_pumpkin_stem
|form=block}}
{{ID table
|displayname=Pumpkin Seeds
|spritetype=item
|nameid=pumpkin_seeds
|form=item
|foot=1}}
{{edition|bedrock}}:
{{ID table
|edition=bedrock
|shownumericids=y
|showforms=y
|generatetranslationkeys=y
|displayname=Pumpkin Stem
|spritetype=block
|nameid=pumpkin_stem
|id=104
|form=block}}
{{ID table
|displayname=Pumpkin Seeds
|spritetype=item
|nameid=pumpkin_seeds
|id=292
|form=item
|foot=1}}
=== Block states ===
{{see also|Block states}}
{{/BS}}
== Advancements ==
{{load advancements|A Seedy Place}}
== History ==
{{info needed section|check if stems floated above farmland upon initial implementation}}
{{History|java beta}}
{{History||1.8|snap=Pre-release|[[File:Pumpkin Seeds JE1 BE1.png|32px]] Added pumpkin seeds.
|[[File:Pumpkin Stem Age 0 JE1.png|32px]] [[File:Pumpkin Stem Age 1 JE1.png|32px]] [[File:Pumpkin Stem Age 2 JE1.png|32px]] [[File:Pumpkin Stem Age 3 JE1.png|32px]] [[File:Pumpkin Stem Age 4 JE1.png|32px]] [[File:Pumpkin Stem Age 5 JE1.png|32px]] [[File:Pumpkin Stem Age 6 JE1.png|32px]] [[File:Pumpkin Stem Age 7 JE1.png|32px]] Added the pumpkin stem, with seven stages of growth.
|Pumpkin seeds can be found in the new [[mineshaft]] [[chest]]s.
|[[File:Attached Pumpkin Stem (N) JE1.png|32px]] [[File:Attached Pumpkin Stem (E) JE1.png|32px]] [[File:Attached Pumpkin Stem (S) JE1.png|32px]] [[File:Attached Pumpkin Stem (W) JE1.png|32px]] The pumpkin stem has four slightly visually distinct appearances for each facing direction - the bent part of the stem rotates, but the other two planes do not.
|[[File:Pumpkin Stem Age 8 JE1.png|32px]] [[File:Pumpkin Stem Age 9 JE1.png|32px]] [[File:Pumpkin Stem Age 10 JE1.png|32px]] [[File:Pumpkin Stem Age 11 JE1.png|32px]] [[File:Pumpkin Stem Age 12 JE1.png|32px]] [[File:Pumpkin Stem Age 13 JE1.png|32px]] [[File:Pumpkin Stem Age 14 JE1.png|32px]] [[File:Pumpkin Stem Age 15 JE1.png|32px]] Pumpkin stem data values from 8 through 15 now show a glitched formation, with a floating stem with an attached stem cross eventually emerging below.
|[[File:Attached Stem Age 8 JE1.png|32px]] [[File:Attached Stem Age 9 JE1.png|32px]] [[File:Attached Stem Age 10 JE1.png|32px]] [[File:Attached Stem Age 11 JE1.png|32px]] [[File:Attached Stem Age 12 JE1.png|32px]] [[File:Attached Stem Age 13 JE1.png|32px]] [[File:Attached Stem Age 14 JE1.png|32px]] [[File:Attached Stem Age 15 JE1.png|32px]] Pumpkin stem blocks with data values higher than 7 can attach to adjacent fruits, which results in buggy stem textures with [[vines]] in the mix due to vines being below attached stems in [[terrain.png]].}}
{{History|||snap=Pre-release 2 ;)|Pumpkin stems can now be grown faster using [[bone meal]].}}
{{History|java}}
{{History||1.0.0|snap=Beta 1.9 Prerelease 2|Pumpkins can now be [[crafting|crafted]] into [[pumpkin seeds]].}}
{{History||1.3.1|snap=1.3|The texture of pumpkin stems has been moved one pixel to the left in [[terrain.png]].
|[[File:Pumpkin Stem Age 0 JE2.png|32px]] [[File:Pumpkin Stem Age 1 JE2.png|32px]] [[File:Pumpkin Stem Age 2 JE2.png|32px]] [[File:Pumpkin Stem Age 3 JE2.png|32px]] [[File:Pumpkin Stem Age 4 JE2.png|32px]] [[File:Pumpkin Stem Age 5 JE2.png|32px]] [[File:Pumpkin Stem Age 6 JE2.png|32px]] [[File:Pumpkin Stem Age 7 JE2.png|32px]] Stems now appear slightly different.
|[[File:Pumpkin Stem Age 8 JE2.png|32px]] [[File:Pumpkin Stem Age 9 JE2.png|32px]] [[File:Pumpkin Stem Age 10 JE2.png|32px]] [[File:Pumpkin Stem Age 11 JE2.png|32px]] [[File:Pumpkin Stem Age 12 JE2.png|32px]] [[File:Pumpkin Stem Age 13 JE2.png|32px]] [[File:Pumpkin Stem Age 14 JE2.png|32px]] [[File:Pumpkin Stem Age 15 JE2.png|32px]] Overgrown attached pumpkin stems now appear slightly different.
|[[File:Attached Pumpkin Stem (N) JE2.png|32px]] [[File:Attached Pumpkin Stem (E) JE2.png|32px]] [[File:Attached Pumpkin Stem (S) JE2.png|32px]] [[File:Attached Pumpkin Stem (W) JE2.png|32px]] Attached pumpkin stems now appear slightly different.
|[[File:Attached Stem Age 8 JE2.png|32px]] [[File:Attached Stem Age 9 JE2.png|32px]] [[File:Attached Stem Age 10 JE2.png|32px]] [[File:Attached Stem Age 11 JE2.png|32px]] [[File:Attached Stem Age 12 JE2.png|32px]] [[File:Attached Stem Age 13 JE2.png|32px]] [[File:Attached Stem Age 14 JE2.png|32px]] [[File:Attached Stem Age 15 JE2.png|32px]] Overgrown attached pumpkin stems now appear slightly different.}}
{{History||1.4.2|snap=12w36a|[[Chicken]]s now use [[wheat seeds]], [[melon seeds]] and pumpkin seeds, instead of [[wheat]] to [[breeding|breed]].}}
{{History||1.5|snap=13w02a|[[File:Pumpkin Stem Age 0 JE3.png|32px]] [[File:Pumpkin Stem Age 1 JE3.png|32px]] [[File:Pumpkin Stem Age 2 JE3.png|32px]] [[File:Pumpkin Stem Age 3 JE3.png|32px]] [[File:Pumpkin Stem Age 4 JE3.png|32px]] [[File:Pumpkin Stem Age 5 JE3.png|32px]] [[File:Pumpkin Stem Age 6 JE3.png|32px]] Pumpkin stems now use a squished version of their texture for immature stems, depending on age.
|[[File:Pumpkin Stem Age 8 JE3.png|32px]] [[File:Pumpkin Stem Age 9 JE3.png|32px]] [[File:Pumpkin Stem Age 10 JE3.png|32px]] [[File:Pumpkin Stem Age 11 JE3.png|32px]] [[File:Pumpkin Stem Age 12 JE3.png|32px]] [[File:Pumpkin Stem Age 13 JE3.png|32px]] [[File:Pumpkin Stem Age 14 JE3.png|32px]] [[File:Pumpkin Stem Age 15 JE3.png|32px]] This also affects pumpkin stems of ages 8-15, which are likewise stretched to accommodate its predicted size.
|[[File:Attached Stem Age 8 JE3.png|32px]] [[File:Attached Stem Age 9 JE3.png|32px]] [[File:Attached Stem Age 10 JE3.png|32px]] [[File:Attached Stem Age 11 JE3.png|32px]] [[File:Attached Stem Age 12 JE3.png|32px]] [[File:Attached Stem Age 13 JE3.png|32px]] [[File:Attached Stem Age 14 JE3.png|32px]] [[File:Attached Stem Age 15 JE3.png|32px]] Pumpkin stems of extreme ages, which are attached to adjacent fruits, now show a stretched and tinted stem appearance.}}
{{History|||snap=13w03a|[[File:Pumpkin Stem Age 0 JE4.png|32px]] [[File:Pumpkin Stem Age 1 JE4.png|32px]] [[File:Pumpkin Stem Age 2 JE4.png|32px]] [[File:Pumpkin Stem Age 3 JE4.png|32px]] [[File:Pumpkin Stem Age 4 JE4.png|32px]] [[File:Pumpkin Stem Age 5 JE4.png|32px]] [[File:Pumpkin Stem Age 6 JE4.png|32px]] [[File:Pumpkin Stem Age 7 JE4.png|32px]] Pumpkin stems are no longer squished or stretched to account for age.<ref>{{bug|MC-7111}}</ref>
|[[File:Pumpkin Stem Age 8 JE4.png|32px]] [[File:Pumpkin Stem Age 9 JE4.png|32px]] [[File:Pumpkin Stem Age 10 JE4.png|32px]] [[File:Pumpkin Stem Age 11 JE4.png|32px]] [[File:Pumpkin Stem Age 12 JE4.png|32px]] [[File:Pumpkin Stem Age 13 JE4.png|32px]] [[File:Pumpkin Stem Age 14 JE4.png|32px]] [[File:Pumpkin Stem Age 15 JE4.png|32px]] Pumpkin stems with age values 8 through 15 now show a tinted [[trapdoor]] texture.
|From this version up until 14w08a, overgrown pumpkin stems start to draw from the texture below them on the [[texture atlas]], in much the same way they previously did with terrain.png. However, as texture atlases are unstable and textures tend to change positions as new blocks and textures are added, overgrown stems change the texture they draw from every time new textures are added, which includes when textures added by [[mods]].}}
{{History|||snap=13w09a|[[File:Pumpkin Stem Age 8 JE5.png|32px]] [[File:Pumpkin Stem Age 9 JE5.png|32px]] [[File:Pumpkin Stem Age 10 JE5.png|32px]] [[File:Pumpkin Stem Age 11 JE5.png|32px]] [[File:Pumpkin Stem Age 12 JE5.png|32px]] [[File:Pumpkin Stem Age 13 JE5.png|32px]] [[File:Pumpkin Stem Age 14 JE5.png|32px]] [[File:Pumpkin Stem Age 15 JE5.png|32px]] Pumpkin stems with age values 8 through 15 now show a tinted [[birch wood]] texture.}}
{{History||1.6.1|snap=13w24a|Melon and pumpkin stems have now been assigned separate textures.
|[[File:Pumpkin Stem Age 8 JE6.png|32px]] [[File:Pumpkin Stem Age 9 JE6.png|32px]] [[File:Pumpkin Stem Age 10 JE6.png|32px]] [[File:Pumpkin Stem Age 11 JE6.png|32px]] [[File:Pumpkin Stem Age 12 JE6.png|32px]] [[File:Pumpkin Stem Age 13 JE6.png|32px]] [[File:Pumpkin Stem Age 14 JE6.png|32px]] [[File:Pumpkin Stem Age 15 JE6.png|32px]] Pumpkin stems with age values 8 through 15 now show a tinted curving [[rail]] texture.}}
{{History||1.7.2|snap=13w37a|Added the {{cmd|setblock}} command, allowing for invalid pumpkin stem ages to be placed in the world without using external editors. This also allows them to be obtained in earlier versions via backdating.}}
{{History|||snap=13w41a|[[File:Pumpkin Stem Age 8 JE7.png|32px]] [[File:Pumpkin Stem Age 9 JE7.png|32px]] [[File:Pumpkin Stem Age 10 JE7.png|32px]] [[File:Pumpkin Stem Age 11 JE7.png|32px]] [[File:Pumpkin Stem Age 12 JE7.png|32px]] [[File:Pumpkin Stem Age 13 JE7.png|32px]] [[File:Pumpkin Stem Age 14 JE7.png|32px]] [[File:Pumpkin Stem Age 15 JE7.png|32px]] Pumpkin stems with age values 8 through 15 now show a tinted lit [[furnace]] texture.}}
{{History|||snap=13w43a|[[File:Pumpkin Stem Age 8 JE8.png|32px]] [[File:Pumpkin Stem Age 9 JE8.png|32px]] [[File:Pumpkin Stem Age 10 JE8.png|32px]] [[File:Pumpkin Stem Age 11 JE8.png|32px]] [[File:Pumpkin Stem Age 12 JE8.png|32px]] [[File:Pumpkin Stem Age 13 JE8.png|32px]] [[File:Pumpkin Stem Age 14 JE8.png|32px]] [[File:Pumpkin Stem Age 15 JE8.png|32px]] Pumpkin stems with age values 8 through 15 now show a tinted [[pumpkin]] top texture.}}
{{History||1.8|snap=14w10a|[[File:Pumpkin Stem Age 8 JE9.png|32px]] [[File:Pumpkin Stem Age 9 JE9.png|32px]] [[File:Pumpkin Stem Age 10 JE9.png|32px]] [[File:Pumpkin Stem Age 11 JE9.png|32px]] Pumpkin stems with data values 8-11 now display a tinted attached stem, with 8 facing west, 9 facing east, 10 facing north and 11 facing south.
|Invalid pumpkin stems with data values 12-15 now crash the game.}}
{{History|||snap=14w25a|[[File:Pumpkin Stem Age 0 JE5.png|32px]] [[File:Pumpkin Stem Age 1 JE5.png|32px]] [[File:Pumpkin Stem Age 2 JE5.png|32px]] [[File:Pumpkin Stem Age 3 JE5.png|32px]] [[File:Pumpkin Stem Age 4 JE5.png|32px]] [[File:Pumpkin Stem Age 5 JE5.png|32px]] [[File:Pumpkin Stem Age 6 JE5.png|32px]] [[File:Pumpkin Stem Age 7 JE5.png|32px]] Pumpkin stems now render as a single diagonal plane, or, in the case of attached stems, a diagonal and orthogonal plane.
|[[File:Attached Pumpkin Stem (N) JE3.png|32px]] [[File:Attached Pumpkin Stem (E) JE3.png|32px]] [[File:Attached Pumpkin Stem (S) JE3.png|32px]] [[File:Attached Pumpkin Stem (W) JE3.png|32px]] The attached pumpkin stem [[model]] now fully rotates to the direction the stem points. Prior to this update, the base of the pumpkin stem would stay the same while the long attaching section would differ, resulting in four possible attached stem appearances.
|Invalid overgrown pumpkin stems have now effectively been removed from the game, as attempting to place an out of range stem via {{cmd|setblock}} creates a stem of age 0 and loading a world with existing such stems cause a game crash.}}
{{History|||snap=14w26a|[[File:Pumpkin Stem Age 0 JE6.png|32px]] [[File:Pumpkin Stem Age 1 JE6.png|32px]] [[File:Pumpkin Stem Age 2 JE6.png|32px]] [[File:Pumpkin Stem Age 3 JE6.png|32px]] [[File:Pumpkin Stem Age 4 JE6.png|32px]] [[File:Pumpkin Stem Age 5 JE6.png|32px]] [[File:Pumpkin Stem Age 6 JE6.png|32px]] [[File:Pumpkin Stem Age 7 JE6.png|32px]] [[File:Attached Pumpkin Stem (N) JE4.png|32px]] [[File:Attached Pumpkin Stem (E) JE4.png|32px]] [[File:Attached Pumpkin Stem (S) JE4.png|32px]] [[File:Attached Pumpkin Stem (W) JE4.png|32px]] Pumpkin stems now correctly render as crosses again.<ref>{{bug|MC-58136}}</ref>}}
{{History|||snap=14w27a|[[File:Attached Stem Age 0 14w27a.png|32px]] [[File:Attached Stem Age 1 14w27a.png|32px]] [[File:Attached Stem Age 2 14w27a.png|32px]] [[File:Attached Stem Age 3 14w27a.png|32px]] [[File:Attached Stem Age 4 14w27a.png|32px]] [[File:Attached Stem Age 5 14w27a.png|32px]] [[File:Attached Stem Age 6 14w27a.png|32px]] Due to a bug, all pumpkin stems now appear attached regardless of age or any actual attachment.<ref>{{bug|MC-60208}}</ref>}}
{{History|||snap=14w28a|All pumpkin stems appearing attached regardless of the age of any actual attachment has been fixed. However, pumpkin stems still appear attached to adjacent fruits regardless of age due to a similar bug.<ref>{{bug|MC-61716}}</ref>}}
{{History|||snap=14w34d|Pumpkin seeds no longer can be used to breed [[chicken]]s.}}
{{History||1.9|snap=15w31a|Chickens can now use pumpkin seeds to [[breeding|breed]] again.}}
{{History|||snap=15w44a|Pumpkin seeds have been added to [[dungeon]] [[chest]]s.
|The average yield of pumpkin seeds in [[mineshaft]] chests has been decreased.}}
{{History|||snap=15w45a|Pumpkin stems must now be fully grown again to attach.}}
{{History||1.11|snap=16w39a|Pumpkin seeds are now found in the new [[woodland mansion]] chests.
|Pumpkin stems now generate inside [[woodland mansion]]s.}}
{{History||1.13|snap=17w47a|The different [[block]] states for the <code>pumpkin_stem</code> ID have been split up into their own IDs.
|Pumpkin seeds can now be obtained by [[shear]]ing an uncarved pumpkin.
|Prior to [[1.13/Flattening|''The Flattening'']], this [[block]]'s numeral ID was 104, and the [[item]]'s 361.}}
{{History|||snap=17w48a|Attached pumpkin stems no longer [[drops|drop]] seeds.}}
{{History||1.14|snap=18w43a|[[File:Pumpkin Stem Age 0 JE7.png|32px]] [[File:Pumpkin Stem Age 1 JE7.png|32px]] [[File:Pumpkin Stem Age 2 JE7.png|32px]] [[File:Pumpkin Stem Age 3 JE7.png|32px]] [[File:Pumpkin Stem Age 4 JE7.png|32px]] [[File:Pumpkin Stem Age 5 JE7.png|32px]] [[File:Pumpkin Stem Age 6 JE7.png|32px]] [[File:Pumpkin Stem Age 7 JE7.png|32px]] The stem texture has changed.
|[[File:Attached Pumpkin Stem (N) JE5.png|32px]] [[File:Attached Pumpkin Stem (E) JE5.png|32px]] [[File:Attached Pumpkin Stem (S) JE5.png|32px]] [[File:Attached Pumpkin Stem (W) JE5.png|32px]] The pumpkin stem texture change also affects the base cross on pumpkin stems.}}
{{History|||snap=18w50a|Pumpkin stems now generate in the updated [[taiga]] [[village]] farms.
|Pumpkin seeds can now be found in [[chest]]s in taiga village houses.}}
{{History|||snap=19w03a|Placing pumpkin seeds into the new [[composter]] has a 10% chance of raising the compost level by 1.}}
{{History|||snap=19w05a|Pumpkin seeds now have a 30% chance of increasing the compost level in a composter by 1.
|Added [[Wandering Trader|wandering trader]]s, which sell pumpkin seeds.}}
{{History||1.15|snap=19w34a|[[Bee]]s can now pollinate pumpkin stems.}}
{{History|||snap=19w39a|Attached pumpkin stems now [[drops|drop]] seeds again.<ref>{{bug|MC-136360}}</ref>}}
{{History|pocket alpha}}
{{History||v0.8.0|snap=build 1|[[File:Pumpkin Seeds JE1 BE1.png|32px]] Added pumpkin seeds.
|[[File:Pumpkin Stem Age 0 JE1.png|32px]] [[File:Pumpkin Stem Age 1 JE1.png|32px]] [[File:Pumpkin Stem Age 2 JE1.png|32px]] [[File:Pumpkin Stem Age 3 JE1.png|32px]] [[File:Pumpkin Stem Age 4 JE1.png|32px]] [[File:Pumpkin Stem Age 5 JE1.png|32px]] [[File:Pumpkin Stem Age 6 JE1.png|32px]] [[File:Pumpkin Stem Age 7 JE1.png|32px]] [[File:Attached Pumpkin Stem (N) JE1.png|32px]] [[File:Attached Pumpkin Stem (E) JE1.png|32px]] [[File:Attached Pumpkin Stem (S) JE1.png|32px]] [[File:Attached Pumpkin Stem (W) JE1.png|32px]]{{verify|Were these the models used by this edition?}} Added pumpkin stems.
|Pumpkin seeds are obtainable from the [[Nether reactor]].}}
{{History||v0.12.1|snap=build 1|Pumpkin seeds are no longer available from the Nether reactor.}}
{{History||v0.14.0|snap=build 1|Pumpkin seeds can now be found in [[minecart with chest]]s inside [[mineshaft]]s.}}
{{History|pocket}}
{{History||1.1.0|snap=alpha 1.1.0.0|Pumpkin stems now generate inside [[woodland mansion]]s.}}
{{History|bedrock}}
{{History||1.2.0|snap=beta 1.2.0.2|Pumpkin seeds are now used to tame [[parrot]]s.}}
{{History||1.4.0|snap=beta 1.2.13.8|Pumpkin seeds can now be obtained by [[shear]]ing an uncarved [[pumpkin]].}}
{{History||1.10.0|snap=beta 1.10.0.3|[[File:Attached Pumpkin Stem (W) JE5.png|32px]]{{info needed|More accurate image}} The texture of attached pumpkin stems has been changed.
|Pumpkin seeds can now be [[trading|bought]] from [[wandering trader]]s.
|A single pumpkin crop now generates in the new [[taiga]] and [[snowy taiga]] [[village]]s.}}
{{History||1.11.0|snap=beta 1.11.0.1|A single pumpkin seed can now be used to fill the [[composter]].
|Pumpkin seeds can now be found in [[taiga]] and [[snowy taiga]] [[village]] house [[chest]]s.}}
{{History|console}}
{{History||xbox=TU5|xbone=CU1|ps=1.0|wiiu=Patch 1|[[File:Pumpkin Seeds JE1 BE1.png|32px]] Added pumpkin seeds.
|[[File:Pumpkin Stem Age 0 JE1.png|32px]] [[File:Pumpkin Stem Age 1 JE1.png|32px]] [[File:Pumpkin Stem Age 2 JE1.png|32px]] [[File:Pumpkin Stem Age 3 JE1.png|32px]] [[File:Pumpkin Stem Age 4 JE1.png|32px]] [[File:Pumpkin Stem Age 5 JE1.png|32px]] [[File:Pumpkin Stem Age 6 JE1.png|32px]] [[File:Pumpkin Stem Age 7 JE1.png|32px]] [[File:Attached Pumpkin Stem (N) JE1.png|32px]] [[File:Attached Pumpkin Stem (E) JE1.png|32px]] [[File:Attached Pumpkin Stem (S) JE1.png|32px]] [[File:Attached Pumpkin Stem (W) JE1.png|32px]]{{verify|Were these the models used by this edition?}} Added pumpkin stems.}}
{{History||xbox=TU69|ps=1.76|wiiu=Patch 38|Pumpkin seeds can now be obtained by [[shear]]ing an uncarved [[pumpkin]].}}
{{History||xbox=none|xbone=none|ps=1.90|wiiu=none|switch=none|[[File:Attached Pumpkin Stem (W) JE5.png|32px]]{{info needed|More accurate image}} The texture of attached pumpkin stems has been changed.}}
{{History|New 3DS}}
{{History||0.1.0|[[File:Pumpkin Stem Age 0 JE1.png|32px]] [[File:Pumpkin Stem Age 1 JE1.png|32px]] [[File:Pumpkin Stem Age 2 JE1.png|32px]] [[File:Pumpkin Stem Age 3 JE1.png|32px]] [[File:Pumpkin Stem Age 4 JE1.png|32px]] [[File:Pumpkin Stem Age 5 JE1.png|32px]] [[File:Pumpkin Stem Age 6 JE1.png|32px]] [[File:Pumpkin Stem Age 7 JE1.png|32px]] [[File:Attached Pumpkin Stem (N) JE1.png|32px]] [[File:Attached Pumpkin Stem (E) JE1.png|32px]] [[File:Attached Pumpkin Stem (S) JE1.png|32px]] [[File:Attached Pumpkin Stem (W) JE1.png|32px]]{{verify|Were these the models used by this edition?}} Added pumpkin stems.}}
{{History|foot}}
<gallery>
Pumpkin Stem with data value 15.png|The final version of the pumpkin stem with age 15, as seen in-game.
Pumpkinstems.png|Pumpkin stems of ages 1 to 15 on a modded version of [[Java Edition 1.7.2|1.7.2]], hence the nearby melon stems using the melon top texture.
Stems of 13w02a.png|All 16 stem sizes in [[Java Edition 13w02a|13w02a]], with accompanying data values.
</gallery>
=== Pumpkin stem "item" ===
{{:Technical blocks/Pumpkin Stem}}
== Issues ==
{{issue list}}
== Gallery ==
<gallery>
Stem All Ages.png|All stages of growth.
AllSeeds.png|All the [[seeds]] that exist in the game.
</gallery>
== References ==
{{reflist}}
{{Blocks|vegetation}}
{{Items}}
[[Category:Plants]]
[[Category:Food]]
[[Category:Non-solid blocks]]
[[Category:Generated structure blocks]]
[[cs:Dýňová semínka]]
[[de:Kürbiskerne]]
[[es:Semillas de calabaza]]
[[fr:Graines de citrouille]]
[[hu:Tökmagok]]
[[ja:カボチャの種]]
[[ko:호박씨]]
[[nl:Pompoenpitten]]
[[pl:Nasiona dyni]]
[[pt:Sementes de abóbora]]
[[ru:Семена тыквы]]
[[th:เมล็ดฝักทอง]]
[[zh:南瓜种子]]</li></ul> | 19w36a | Nether portals in the Overworld now correctly link with portals placed in the top half (128–255) of the Nether dimension. | |||
| Search for an existing portal to connect to is now chunk based: the searched area is now 17×17 chunks instead of 257×257 blocks. | |||||
1.16{{Extension DPL}}<ul><li>[[3D|3D]]<br/>{{about|the edible item|the April Fools' snapshot itself|Java Edition 3D Shareware v1.34}}
{{Joke feature}}
{{Item
| image = 3D (item).png
| renewable = Yes
| stackable = Yes (64)
}}
'''3D''' was a joke item from [[Java Edition 3D Shareware v1.34]]. Eating it shows a picture of the developer cast.
== Obtaining ==
=== Mob drops ===
3D was dropped by a creeper summoned by the cheat code "'''NEEEERD'''".
== Usage ==
Eating the 3D item when the hunger bar was not full shows a picture of the developer cast of Minecraft.
== Data values ==
=== ID ===
{{ID table
|showforms=y
|generatetranslationkeys=java
|displayname=3D
|spritetype=item
|nameid=3d
|form=item
|foot=1}}
== History ==
{{History|java}}
{{History||3D Shareware v1.34|[[File:3D (item).png|32px]] Added the 3D item.}}
{{History|foot}}
== Gallery ==
<gallery>
File:3D Shareware Mojang Team.png|The developer cast of Minecraft.
File:Tasty 3D Item.gif|The "'''Tasty!'''" 3D Item lore.
</gallery>
{{Items}}
{{Jokes}}
[[Category:Non-renewable resources]]
[[Category:Joke items]]</li><li>[[Flower Pot|Flower Pot]]<br/>{{more images|The potted cherry sapling texture has been change in 1.19.4-pre2.}}
{{For|other uses|Pot}}
{{Block
| image = Flower Pot.png
| image2 = Potted Poppy.png
| extratext = View [[#Gallery|all renders]]
| transparent = Yes
| light = No
| tool = any
| renewable = Yes
| stackable = Yes (64)
| flammable = No
| lavasusceptible = No
}}
A '''flower pot''' is a decorative [[block]] that can contain flowers, bamboo, saplings, cacti, mushrooms, fungi, and other reasonably small plants.
== Obtaining ==
=== Natural generation ===
Flower pots naturally generate in [[witch hut]]s where they contain a red [[mushroom]], the basement of [[igloo]]s where they contain a [[cactus]], and in [[woodland mansion]]s, where they contain birch [[sapling]]s, dark oak saplings, dandelions, poppies, blue orchids, alliums, azure bluets, red and white tulips, and oxeye daisies.
Flower pots containing a dandelion can be found in some [[plains]] and [[savanna]] [[village]] houses. Flower pots containing a cactus or a dead bush can be found in some [[desert]] village houses. Flower pots containing a spruce sapling can be found in [[taiga]] village mason houses. Flower pots containing a poppy can be found in taiga village churches.
=== Breaking ===
Flower pots can be mined instantly using any [[tool]] or without a tool.
A flower pot drops itself as an [[item]] (any [[plant]] or [[mushroom]] in it separately) when pushed by a [[piston]] or washed away with [[water]].
[[Lava]] can flow into the space of a flower pot, destroying it.
=== Chest loot ===
{{LootChestItem|flower-pot}}
=== Crafting ===
{{Crafting
|A2= Brick
|C2= Brick
|B3= Brick
|Output= Flower Pot
|type= Decoration block
}}
== Usage ==
A flower pot can be used to hold [[mushroom]]s, [[Fungus|fungi]], and various [[plant]]s. Plants that can be {{control|placed}} in a pot include any one block high [[flower]]s, [[sapling]]s, [[fern]]s, [[dead bush]]es, [[cacti]], [[bamboo]], [[azalea]]s, [[mangrove propagule]], and [[roots]].
Plants can be removed by using the interact button.
{{IN|je}}, flower pots can be placed on any block, or over [[air]].<ref>{{bug|MC-127036|||WAI}}</ref>
{{IN|be}}, they must be placed on top of a full-[[block]] top surface, or the top of a [[fence]], stone [[wall]], or [[hopper]]. They cannot be placed on [[slab]]s and [[stairs]] unless those blocks are upside-down. Pots may also be placed on an upward facing trapdoor. If the trapdoor is opened, the pot will break.
Flower pots are {{frac|3|8}} of a block high and can be stepped on. It is not possible to walk from the top of a flower pot onto a full sized block without jumping. It is possible to jump from a flower pot onto a fence.
The plant or fungus can be removed from the flower pot by pressing the {{control|use}} control. This places the item directly back into the player's inventory.<ref>{{bug|MC-169496|||WAI}}</ref>
They can be used to display cacti and wither roses without inheriting their damaging properties.<ref>{{bug|MC-2241|||WAI}}</ref><ref>{{bug|MC-138024|||WAI}}</ref>
Potted [[Fungus|warped fungus]] can be used to repel [[hoglin]]s.
== Sounds ==
{{Sound table/Block/Normal}}
== Data values ==
=== ID ===
{{edition|java}}:
{{ID table
|edition=java
|showblocktags=y
|showforms=y
|generatetranslationkeys=y
|displayname=Flower Pot
|spritetype=block
|nameid=flower_pot
|blocktags=flower_pots
|translationkey=block.minecraft.flower_pot,item.minecraft.flower_pot}}
{{ID table
|displayname=Potted Dandelion
|spritetype=block
|nameid=potted_dandelion
|blocktags=flower_pots
|form=block}}
{{ID table
|displayname=Potted Poppy
|spritetype=block
|nameid=potted_poppy
|blocktags=flower_pots
|form=block}}
{{ID table
|displayname=Potted Blue Orchid
|spritetype=block
|nameid=potted_blue_orchid
|blocktags=flower_pots
|form=block}}
{{ID table
|displayname=Potted Allium
|spritetype=block
|nameid=potted_allium
|blocktags=flower_pots
|form=block}}
{{ID table
|displayname=Potted Azure Bluet
|spritetype=block
|nameid=potted_azure_bluet
|blocktags=flower_pots
|form=block}}
{{ID table
|displayname=Potted Red Tulip
|spritetype=block
|nameid=potted_red_tulip
|blocktags=flower_pots
|form=block}}
{{ID table
|displayname=Potted Orange Tulip
|spritetype=block
|nameid=potted_orange_tulip
|blocktags=flower_pots
|form=block}}
{{ID table
|displayname=Potted White Tulip
|spritetype=block
|nameid=potted_white_tulip
|blocktags=flower_pots
|form=block}}
{{ID table
|displayname=Potted Pink Tulip
|spritetype=block
|nameid=potted_pink_tulip
|blocktags=flower_pots
|form=block}}
{{ID table
|displayname=Potted Oxeye Daisy
|spritetype=block
|nameid=potted_oxeye_daisy
|blocktags=flower_pots
|form=block}}
{{ID table
|displayname=Potted Cornflower
|spritetype=block
|nameid=potted_cornflower
|blocktags=flower_pots
|form=block}}
{{ID table
|displayname=Potted Lily of the Valley
|spritetype=block
|nameid=potted_lily_of_the_valley
|blocktags=flower_pots
|form=block}}
{{ID table
|displayname=Potted Wither Rose
|spritetype=block
|nameid=potted_wither_rose
|blocktags=flower_pots
|form=block}}
{{ID table
|displayname=Potted Oak Sapling
|spritetype=block
|nameid=potted_oak_sapling
|blocktags=flower_pots
|form=block}}
{{ID table
|displayname=Potted Spruce Sapling
|spritetype=block
|nameid=potted_spruce_sapling
|blocktags=flower_pots
|form=block}}
{{ID table
|displayname=Potted Birch Sapling
|spritetype=block
|nameid=potted_birch_sapling
|blocktags=flower_pots
|form=block}}
{{ID table
|displayname=Potted Jungle Sapling
|spritetype=block
|nameid=potted_jungle_sapling
|blocktags=flower_pots
|form=block}}
{{ID table
|displayname=Potted Acacia Sapling
|spritetype=block
|nameid=potted_acacia_sapling
|blocktags=flower_pots
|form=block}}
{{ID table
|displayname=Potted Dark Oak Sapling
|spritetype=block
|nameid=potted_dark_oak_sapling
|blocktags=flower_pots
|form=block}}
{{ID table
|displayname=Potted Red Mushroom
|spritetype=block
|nameid=potted_red_mushroom
|blocktags=flower_pots
|form=block}}
{{ID table
|displayname=Potted Brown Mushroom
|spritetype=block
|nameid=potted_brown_mushroom
|blocktags=flower_pots
|form=block}}
{{ID table
|displayname=Potted Fern
|spritetype=block
|nameid=potted_fern
|blocktags=flower_pots
|form=block}}
{{ID table
|displayname=Potted Dead Bush
|spritetype=block
|nameid=potted_dead_bush
|blocktags=flower_pots
|form=block}}
{{ID table
|displayname=Potted Cactus
|spritetype=block
|nameid=potted_cactus
|blocktags=flower_pots
|form=block}}
{{ID table
|displayname=Potted Bamboo
|spritetype=block
|nameid=potted_bamboo
|blocktags=flower_pots
|form=block}}
{{ID table
|displayname=Potted Azalea
|spritetype=block
|nameid=potted_azalea_bush
|blocktags=flower_pots
|spritename=potted azalea bush
|form=block}}
{{ID table
|displayname=Potted Flowering Azalea
|spritetype=block
|nameid=potted_flowering_azalea_bush
|blocktags=flower_pots
|spritename=potted flowering azalea bush
|form=block}}
{{ID table
|displayname=Potted Crimson Fungus
|spritetype=block
|nameid=potted_crimson_fungus
|blocktags=flower_pots
|form=block}}
{{ID table
|displayname=Potted Warped Fungus
|spritetype=block
|nameid=potted_warped_fungus
|blocktags=flower_pots, hoglin_repellents
|form=block}}
{{ID table
|displayname=Potted Crimson Roots
|spritetype=block
|nameid=potted_crimson_roots
|blocktags=flower_pots
|form=block}}
{{ID table
|displayname=Potted Warped Roots
|spritetype=block
|nameid=potted_warped_roots
|blocktags=flower_pots
|form=block}}
{{ID table
|displayname=Potted Mangrove Propagule
|spritetype=block
|nameid=potted_mangrove_propagule
|blocktags=flower_pots
|form=block
|foot=1}}
{{edition|bedrock}}:
{{ID table
|edition=bedrock
|firstcolumnname=Flower Pot
|shownumericids=y
|showforms=y
|generatetranslationkeys=y
|displayname=Block
|spritename=flower-pot
|spritetype=block
|nameid=flower_pot
|id=140
|form=block
|itemform=item.flower_pot
|translationkey=-}}
{{ID table
|displayname=Item
|spritename=flower-pot
|spritetype=item
|nameid=flower_pot
|id=514
|form=item
|foot=1}}
=== Block states ===
{{see also|Block states}}
{{IN|be}}, flower pots use the following block states:
{{/BS}}
=== Block data ===
{{IN|bedrock}}, flower pot has a block entity associated with it that holds additional data about the block.
See [[Bedrock Edition level format/Block entity format]].
== Achievements ==
{{load achievements|Pot Planter}}
== History ==
{{History||August 16, 2012|link={{tweet|Dinnerbone|236062188555624448}}|[[Dinnerbone]] tweeted the first image of flower pots.}}
{{History|java}}
{{History||1.4.2|snap=12w34a|[[File:Flower Pot JE1.png|32px]] [[File:Potted Dandelion JE1.png|32px]] [[File:Potted Rose JE1.png|32px]] [[File:Potted Red Mushroom JE1.png|32px]] [[File:Potted Brown Mushroom JE1.png|32px]] [[File:Potted Oak Sapling JE1.png|32px]] [[File:Potted Birch Sapling JE1.png|32px]] [[File:Potted Spruce Sapling JE1.png|32px]] [[File:Potted Jungle Sapling JE1.png|32px]] [[File:Potted Cactus JE1.png|32px]] [[File:Potted Fern JE1.png|32px]] [[File:Potted Dead Bush JE1.png|32px]]<br>[[File:Flower Pot (item) JE1 BE1.png|32px]] Added flower pots.
|At this point, plants inside of pots rendered much like they do outside of flower pots, not being subject to directional shading.}}
{{History|||snap=12w40a|A potted [[red mushroom]] can now be found on one window of a [[witch hut]]. This changed to an empty pot in a far later unknown version,{{info needed}} but returned again afterward.{{info needed}}}}
{{History||1.7.2|snap=13w36a|[[File:Potted Allium JE1.png|32px]] [[File:Potted Azure Bluet JE1.png|32px]] [[File:Potted Oxeye Daisy JE1.png|32px]] [[File:Potted Blue Orchid JE1.png|32px]] [[File:Potted Red Tulip JE1.png|32px]] [[File:Potted Orange Tulip JE1.png|32px]] [[File:Potted White Tulip JE1.png|32px]] [[File:Potted Pink Tulip JE1.png|32px]] Allium, azure bluet, oxeye daisies, blue orchids, red tulips, orange tulips, white tulips and pink tulips can now be placed in flower pots.
|[[File:Potted Poppy JE1.png|32px]] As the rose has been replaced with the poppy, the potted rose is also now replaced with the potted poppy as a result.
|Flower pots can no longer use data values because more than 15 plants can be potted, it now has a [[block entity]] instead.
|[[File:Potted Green Shrub.png|32px]] [[File:Potted Cobweb JE1.png|32px]] Due to the tile entity handling, it is now possible to place any [[block]] inside of a flower pot via NBT editors. However, at this point, with the ones possible in vanilla [[survival]] aside, only [[grass]], [[shrub|green shrub]]s, and [[cobweb]]s actually render.
|[[File:Potted Grass JE1.png|32px]] Potted grass now exists can be placed in flower pots using [[commands]].
|[[File:Potted Grass (no tint) JE1.png|32px]] [[File:Potted Fern (no tint) JE1.png|32px]] Potted shrubs, grass, and ferns must now have block data value 11 to display biome colors, otherwise rendering as default/gray.}}
{{History|||snap=13w37a|Added {{cmd|setblock}}, allowing for the aforementioned potted plants to be obtained without map editing.}}
{{History|||snap=13w43a|[[File:Potted Acacia Sapling JE1.png|32px]] [[File:Potted Dark Oak Sapling JE1.png|32px]] Acacia sapling and dark oak saplings can now be placed in flower pots.}}
{{History||1.8|snap=14w06a|Many more blocks (almost all full cubes) placed into a flower pot by modifying the block entity now render, if in somewhat buggy fashion, as the texture is in a cross shape. {{LoadPage|Flower Pot/1.8 development gallery/14w06a|Click show to display all of the applicable blocks.|b}}
|[[File:Potted Cactus JE2.png|32px]] Potted cacti now appear as a cross formed of their bottom texture inside of a pot.<ref>{{bug|MC-47469}}</ref>}}
{{History|||snap=14w06b|Further blocks now render in flower pots than did in the previous snapshot. {{LoadPage|Flower Pot/1.8 development gallery/14w06b|Click show to display all of the applicable blocks.|b}}
|[[File:Potted Cactus JE3.png|32px]] The accidental potted cactus model change has been reverted.}}
{{History|||snap=14w07a|[[File:Potted Iron Trapdoor.png|32px]] The newly added [[iron trapdoor]] also renders in flower pots when created with commands.}}
{{History|||snap=14w17a|[[File:Flower Pot JE2.png|32px]] [[File:Potted Dandelion JE2.png|32px]] [[File:Potted Allium JE2.png|32px]] [[File:Potted Azure Bluet JE2.png|32px]] [[File:Potted Oxeye Daisy JE2.png|32px]] [[File:Potted Blue Orchid JE2.png|32px]] [[File:Potted Poppy JE2.png|32px]] [[File:Potted Red Tulip JE2.png|32px]] [[File:Potted Orange Tulip JE2.png|32px]] [[File:Potted White Tulip JE2.png|32px]] [[File:Potted Pink Tulip JE2.png|32px]] [[File:Potted Red Mushroom JE2.png|32px]] [[File:Potted Brown Mushroom JE2.png|32px]] [[File:Potted Oak Sapling JE2.png|32px]] [[File:Potted Birch Sapling JE2.png|32px]] [[File:Potted Spruce Sapling JE2.png|32px]] [[File:Potted Jungle Sapling JE2.png|32px]] [[File:Potted Acacia Sapling JE2.png|32px]] [[File:Potted Dark Oak Sapling JE2.png|32px]] [[File:Potted Cactus JE4.png|32px]] [[File:Potted Fern JE2.png|32px]] [[File:Potted Dead Bush JE2.png|32px]] The flower pot model and rendering has changed. The insides are now subject to directional shading, rather than being fully lit, much like the changes made to [[hopper]]s and [[cauldron]]s in 14w10a. In addition, the outer face (as well as the cuboids comprising the cactus in potted cactus) are no longer subject to ambient occlusion. The potted cactus also now uses the side texture on the top face, rather than the top texture.
|Invalid blocks no longer render inside flower pots. This also includes cobweb and grass.}}
{{History|||snap=14w25a|[[File:Potted Dandelion JE3.png|32px]] [[File:Potted Allium JE3.png|32px]] [[File:Potted Azure Bluet JE3.png|32px]] [[File:Potted Oxeye Daisy JE3.png|32px]] [[File:Potted Blue Orchid JE3.png|32px]] [[File:Potted Poppy JE3.png|32px]] [[File:Potted Red Tulip JE3.png|32px]] [[File:Potted Orange Tulip JE3.png|32px]] [[File:Potted White Tulip JE3.png|32px]] [[File:Potted Pink Tulip JE3.png|32px]] [[File:Potted Red Mushroom JE3.png|32px]] [[File:Potted Brown Mushroom JE3.png|32px]] [[File:Potted Oak Sapling JE3.png|32px]] [[File:Potted Birch Sapling JE3.png|32px]] [[File:Potted Spruce Sapling JE3.png|32px]] [[File:Potted Jungle Sapling JE3.png|32px]] [[File:Potted Acacia Sapling JE3.png|32px]] [[File:Potted Dark Oak Sapling JE3.png|32px]] [[File:Potted Fern JE3.png|32px]] [[File:Potted Dead Bush JE3.png|32px]] Potted cross shaped objects are now affected by directional shading.<ref>{{bug|MC-129826}}</ref>}}
{{History||1.9|snap=15w43a|A potted cactus can now be found on a table in [[igloo]] basements.}}
{{History||1.11|snap=16w32a|The block entity ID of flower pots has been changed from <code>FlowerPot</code> to <code>flower_pot</code>.}}
{{History|||snap=16w39a|Potted plants can now be removed from flower pots by pressing {{control|use}}.
|Flower pots now generate in [[woodland mansion]]s.}}
{{History||1.13|snap=17w47a|The different block states for the <code>flower_pot</code> ID have been split up into their own IDs.
|Flower pots are no longer block entities.
|Prior to [[1.13/Flattening|''The Flattening'']], this block's numeral ID was 140, and the item's was 390.}}
{{History||1.14|snap=18w43a|[[File:Flower Pot JE3.png|32px]] [[File:Potted Dandelion JE4.png|32px]] [[File:Potted Poppy JE4.png|32px]] [[File:Potted Allium JE4.png|32px]] [[File:Potted Azure Bluet JE4.png|32px]] [[File:Potted Oxeye Daisy JE4.png|32px]] [[File:Potted Blue Orchid JE4.png|32px]] [[File:Potted Red Tulip JE4.png|32px]] [[File:Potted Orange Tulip JE4.png|32px]] [[File:Potted White Tulip JE4.png|32px]] [[File:Potted Pink Tulip JE4.png|32px]] [[File:Potted Red Mushroom JE4.png|32px]] [[File:Potted Brown Mushroom JE4.png|32px]] [[File:Potted Oak Sapling JE4.png|32px]] [[File:Potted Birch Sapling JE4.png|32px]] [[File:Potted Spruce Sapling JE4.png|32px]] [[File:Potted Jungle Sapling JE4.png|32px]] [[File:Potted Acacia Sapling JE4.png|32px]] [[File:Potted Dark Oak Sapling JE4.png|32px]] [[File:Potted Cactus JE5.png|32px]] [[File:Potted Fern JE4.png|32px]] [[File:Potted Dead Bush JE4.png|32px]] <br>[[File:Flower Pot (item) JE2 BE2.png|32px]] The textures of flower pots and their contained plants have been changed.
|[[File:Potted Cornflower JE1 BE1.png|32px]] [[File:Potted Lily of the Valley JE1 BE1.png|32px]] [[File:Potted Wither Rose JE1 BE1.png|32px]] [[File:Potted Bamboo JE1 BE1.png|32px]] Cornflower, lily of the valley, wither rose and [[bamboo]] can now be placed in flower pots.}}
{{History|||snap=18w44a|[[File:Potted Cactus JE6.png|32px]] The texture of potted cacti has been changed.}}
{{History|||snap=18w47b|[[File:Potted Poppy JE5.png|32px]] The texture of potted poppies has been changed.}}
{{History|||snap=18w49a|Flower pots can now be found in [[chest]]s in [[village]] mason houses.}}
{{History|||snap=19w11a|Flower pots have become [[renewable resource|renewable]], as mason [[villager]]s now [[trading|sell]] [[brick]]s.}}
{{History||1.16|snap=20w06a|The model of flower pots has been fixed and has been given an underside, which has changed the model from [[File:Flower Pot UNKVER2 (facing NWU).png|32px]] to [[File:Flower Pot UNKVER3 (facing NWU).png|32px]].}}
{{History|||snap=20w09a|[[File:Potted Crimson Fungus JE1 BE1.png|32px]] [[File:Potted Warped Fungus JE1 BE1.png|32px]] [[File:Potted Crimson Roots JE1 BE1.png|32px]] [[File:Potted Warped Roots JE1 BE1.png|32px]] Crimson and warped [[fungi]] and crimson and warped [[roots]] can now be placed in flower pots.
|The model for potted plants has been fixed, so the bottom face now renders,<ref>{{bug|MC-170842}}</ref> which has changed the model from [[File:Potted Dandelion UNKVER1 (facing NWU).png|32px]] [[File:Potted Poppy UNKVER1 (facing NWU).png|32px]] [[File:Potted Allium UNKVER1 (facing NWU).png|32px]] [[File:Potted Azure Bluet UNKVER1 (facing NWU).png|32px]] [[File:Potted Oxeye Daisy UNKVER1 (facing NWU).png|32px]] [[File:Potted Blue Orchid UNKVER1 (facing NWU).png|32px]] [[File:Potted Red Tulip UNKVER1 (facing NWU).png|32px]] [[File:Potted Orange Tulip UNKVER1 (facing NWU).png|32px]] [[File:Potted White Tulip UNKVER1 (facing NWU).png|32px]] [[File:Potted Pink Tulip UNKVER1 (facing NWU).png|32px]] [[File:Potted Red Mushroom UNKVER1 (facing NWU).png|32px]] [[File:Potted Brown Mushroom UNKVER1 (facing NWU).png|32px]] [[File:Potted Oak Sapling UNKVER1 (facing NWU).png|32px]] [[File:Potted Birch Sapling UNKVER1 (facing NWU).png|32px]] [[File:Potted Spruce Sapling UNKVER1 (facing NWU).png|32px]] [[File:Potted Jungle Sapling UNKVER1 (facing NWU).png|32px]] [[File:Potted Acacia Sapling UNKVER1 (facing NWU).png|32px]] [[File:Potted Dark Oak Sapling UNKVER1 (facing NWU).png|32px]] [[File:Potted Cactus UNKVER1 (facing NWU).png|32px]] [[File:Potted Fern UNKVER1 (facing NWU).png|32px]] [[File:Potted Dead Bush UNKVER1 (facing NWU).png|32px]] [[File:Potted Cornflower UNKVER1 (facing NWU).png|32px]] [[File:Potted Lily of the Valley UNKVER1 (facing NWU).png|32px]] [[File:Potted Wither Rose UNKVER1 (facing NWU).png|32px]] [[File:Potted Bamboo UNKVER1 (facing NWU).png|32px]] to [[File:Potted Dandelion UNKVER2 (facing NWU).png|32px]] [[File:Potted Poppy UNKVER2 (facing NWU).png|32px]] [[File:Potted Allium UNKVER2 (facing NWU).png|32px]] [[File:Potted Azure Bluet UNKVER2 (facing NWU).png|32px]] [[File:Potted Oxeye Daisy UNKVER2 (facing NWU).png|32px]] [[File:Potted Blue Orchid UNKVER2 (facing NWU).png|32px]] [[File:Potted Red Tulip UNKVER2 (facing NWU).png|32px]] [[File:Potted Orange Tulip UNKVER2 (facing NWU).png|32px]] [[File:Potted White Tulip UNKVER2 (facing NWU).png|32px]] [[File:Potted Pink Tulip UNKVER2 (facing NWU).png|32px]] [[File:Potted Red Mushroom UNKVER2 (facing NWU).png|32px]] [[File:Potted Brown Mushroom UNKVER2 (facing NWU).png|32px]] [[File:Potted Oak Sapling UNKVER2 (facing NWU).png|32px]] [[File:Potted Birch Sapling UNKVER2 (facing NWU).png|32px]] [[File:Potted Spruce Sapling UNKVER2 (facing NWU).png|32px]] [[File:Potted Jungle Sapling UNKVER2 (facing NWU).png|32px]] [[File:Potted Acacia Sapling UNKVER2 (facing NWU).png|32px]] [[File:Potted Dark Oak Sapling UNKVER2 (facing NWU).png|32px]] [[File:Potted Cactus UNKVER2 (facing NWU).png|32px]] [[File:Potted Fern UNKVER2 (facing NWU).png|32px]] [[File:Potted Dead Bush UNKVER2 (facing NWU).png|32px]] [[File:Potted Cornflower UNKVER2 (facing NWU).png|32px]] [[File:Potted Lily of the Valley UNKVER2 (facing NWU).png|32px]] [[File:Potted Wither Rose UNKVER2 (facing NWU).png|32px]] [[File:Potted Bamboo UNKVER2 (facing NWU).png|32px]].}}
{{History|||snap=20w11a|[[File:Potted Bamboo UNKVER3 (facing NWU).png|32px]] An unneeded face has been removed from potted bamboo to solve a z-fighting issue.<ref>{{bug|MC-173156}}</ref>}}
{{History|||snap=Pre-release 3|[[File:Potted Cactus JE7.png|32px]] [[File:Potted Cactus UNKVER3 (facing NWU).png|32px]] The model of the potted cacti has been changed. The top face now uses the top texture of cactus, rather than the side texture and the bottom face has been changed to the top texture of the flower pot.}}
{{History||1.16.2|snap=20w28a|[[File:Potted Cactus UNKVER4 (facing NWU).png|32px]] The model of the potted cactus no longer has a hole in the bottom, although the texture is stretched.}}
{{History||1.17|snap=Pre-release 1|[[File:Potted Azalea JE1 BE1.png|32px]] [[File:Potted Flowering Azalea JE1 BE1.png|32px]][[Azalea]] and flowering azalea can now be placed in flower pots.
|[[File:Potted Flowering Azalea (plant texture) JE1.png|32px]] Potted flowering azalea has own unused plant texture but uses normal variant for consistency with flowering azalea: [[File:Potted Flowering Azalea (bottom) JE1 BE1.png|32px]] [[File:Flowering Azalea (bottom) JE2 BE2.png|32px]]}}
{{History||1.19|snap=22w11a|[[File:Potted Mangrove Propagule JE1.png|32px]] [[Mangrove propagule]]s can now be placed in flower pots.}}
{{History|||snap=22w18a|[[File:Potted Mangrove Propagule JE2.png|32px]] The western element of the flower pot in potted mangrove propagules has been deleted.<ref name="mc-251355">{{bug|MC-251355}}</ref>}}
{{History|||snap=Pre-release 1|[[File:Potted Mangrove Propagule JE1.png|32px]] The aforementioned western element has been restored.<ref name="mc-251355"/>}}
{{History||1.20<br>(Experimental)|link=1.19.4|snap=23w07a|[[File:Potted Torchflower JE1.png|32px]] [[File:Potted Cherry Sapling JE1.png|32px]] [[Torchflower]]s and [[cherry sapling]]s can now be placed in flower pots.}}
{{History|||snap=1.19.4-pre2|Changed the texture of potted cherry saplings.}}
{{History||1.20|snap=23w12a|Potted torchflower and cherry sapling are now available without using the "Update 1.20" experimental datapack.|Flower pot can now be found in [[suspicious gravel]] and [[suspicious sand]] in [[trail ruins]].}}
{{History|||snap=23w13a|[[File:Potted Flowering Azalea JE2.png|32px]] Flowering azalea now uses own plant texture, changing appearance from [[File:Potted Flowering Azalea (bottom) JE1 BE1.png|32px]] to [[File:Potted Flowering Azalea (bottom) JE2.png|32px]] and breaking consistency with flowering azalea.<ref>{{bug|MC-230916}}</ref>}}
{{History|||snap=23w16a|Flower pot no longer generates in [[suspicious sand]] in [[trail ruins]].|Due to the split of the archaeological loot tables for the suspicious gravel within the [[trail ruins]]; flower pot now is in the common loot.}}
{{History|pocket alpha}}
{{History||v0.12.1|snap=build 1|[[File:Flower Pot JE1.png|32px]] [[File:Potted Dandelion JE1.png|32px]] [[File:Potted Red Mushroom JE1.png|32px]] [[File:Potted Brown Mushroom JE1.png|32px]] [[File:Potted Oak Sapling JE1.png|32px]] [[File:Potted Birch Sapling JE1.png|32px]] [[File:Potted Spruce Sapling JE1.png|32px]] [[File:Potted Jungle Sapling JE1.png|32px]] [[File:Potted Cactus JE1.png|32px]] [[File:Potted Fern JE1.png|32px]] [[File:Potted Allium JE1.png|32px]] [[File:Potted Azure Bluet JE1.png|32px]] [[File:Potted Oxeye Daisy JE1.png|32px]] [[File:Potted Blue Orchid JE1.png|32px]] [[File:Potted Poppy JE1.png|32px]] [[File:Potted Red Tulip JE1.png|32px]] [[File:Potted Orange Tulip JE1.png|32px]] [[File:Potted White Tulip JE1.png|32px]] [[File:Potted Pink Tulip JE1.png|32px]] [[File:Potted Acacia Sapling JE1.png|32px]] [[File:Potted Dark Oak Sapling JE1.png|32px]]{{verify|Are these models the ones used in this version?}}<br>[[File:Flower Pot (item) JE1 BE1.png|32px]] Added flower pots.}}
{{History||v0.14.0|snap=build 1|Flower pots now generate in [[witch hut]]s.}}
{{History|pocket}}
{{History||1.0.0|snap=alpha 0.17.0.1|Flower pots now generate in [[igloo]] basements.}}
{{History||1.1.0|snap=alpha 1.1.0.0|Flower pots now generate naturally in [[woodland mansion]]s.}}
{{History|bedrock}}
{{History||1.8.0|snap=beta 1.8.0.8|[[File:Potted Bamboo JE1 BE1.png|32px]]{{verify|Is this how they really look in BE?}} [[Bamboo]] can now be placed in flower pots.}}
{{History||1.9.0|snap=beta 1.9.0.0|[[File:Potted Cornflower BE.jpg|32px]] [[File:Potted Lily of the Valley BE.jpg|32px]] Cornflower and lily of the valley can now be placed in flower pots.}}
{{History||1.10.0|snap=beta 1.10.0.3|[[File:Flower Pot BE.jpg|32px]] [[File:Potted Dandelion BE.jpg|32px]] [[File:Potted Poppy BE.jpg|32px]] [[File:Potted Allium BE.jpg|32px]] [[File:Potted Azure Bluet BE.jpg|32px]] [[File:Potted Oxeye Daisy BE.jpg|32px]] [[File:Potted Blue Orchid BE.jpg|32px]] [[File:Potted Red Tulip BE.jpg|32px]] [[File:Potted Orange Tulip BE.jpg|32px]] [[File:Potted White Tulip BE.jpg|32px]] [[File:Potted Pink Tulip BE.jpg|32px]] [[File:Potted Red Mushroom BE.jpg|32px]] [[File:Potted Brown Mushroom BE.jpg|32px]] [[File:Potted Oak Sapling BE.jpg|32px]] [[File:Potted Birch Sapling BE.jpg|32px]] [[File:Potted Spruce Sapling BE.jpg|32px]] [[File:Potted Jungle Sapling BE.jpg|32px]] [[File:Potted Acacia Sapling BE.jpg|32px]] [[File:Potted Dark Oak Sapling BE.jpg|32px]] [[File:Potted Cactus BE.png|32px]] [[File:Potted Fern BE.jpg|32px]]<br>[[File:Flower Pot (item) JE2 BE2.png|32px]] The textures of flower pots have been changed.
|Flower pots now generate in the new [[village]]s.}}
{{History||1.11.0|snap=beta 1.11.0.1|Flower pots can now be found in [[village]] mason [[chest]]s.}}
{{History||1.13.0|snap=beta 1.13.0.9|[[File:Potted Wither Rose JE1 BE1.png|32px]] [[Wither rose]]s can now be placed in flower pots.}}
{{History||1.16.0|snap=beta 1.15.0.51|Potted plants can now be removed from flower pots by pressing {{control|use}}.}}
{{History|||snap=beta 1.16.0.51|[[File:Potted Crimson Fungus JE1 BE1.png|32px]] [[File:Potted Warped Fungus JE1 BE1.png|32px]] [[File:Potted Crimson Roots JE1 BE1.png|32px]] [[File:Potted Warped Roots JE1 BE1.png|32px]] Crimson and warped [[fungi]] and crimson and warped [[roots]] can now be placed in flower pots.}}
{{History||1.17.10|snap=beta 1.17.10.21|[[File:Potted Azalea JE1 BE1.png|32px]] [[File:Potted Flowering Azalea JE1 BE1.png|32px]] [[Azalea]] and flowering azalea can now be placed in flower pots.}}
{{History|console}}
{{History||xbox=TU14|xbone=CU1|ps=1.04|wiiu=Patch 1|switch=1.0.1|[[File:Flower Pot JE1.png|32px]] [[File:Potted Dandelion JE1.png|32px]] [[File:Potted Red Mushroom JE1.png|32px]] [[File:Potted Brown Mushroom JE1.png|32px]] [[File:Potted Oak Sapling JE1.png|32px]] [[File:Potted Birch Sapling JE1.png|32px]] [[File:Potted Spruce Sapling JE1.png|32px]] [[File:Potted Jungle Sapling JE1.png|32px]] [[File:Potted Cactus JE1.png|32px]] [[File:Potted Fern JE1.png|32px]] [[File:Potted Allium JE1.png|32px]] [[File:Potted Azure Bluet JE1.png|32px]] [[File:Potted Oxeye Daisy JE1.png|32px]] [[File:Potted Blue Orchid JE1.png|32px]] [[File:Potted Poppy JE1.png|32px]] [[File:Potted Red Tulip JE1.png|32px]] [[File:Potted Orange Tulip JE1.png|32px]] [[File:Potted White Tulip JE1.png|32px]] [[File:Potted Pink Tulip JE1.png|32px]] [[File:Potted Acacia Sapling JE1.png|32px]] [[File:Potted Dark Oak Sapling JE1.png|32px]] [[File:Potted Dead Bush JE3.png|32px]]{{verify|Are these models the ones used in this version?}}<br>[[File:Flower Pot (item) JE1 BE1.png|32px]] Added flower pots.}}
{{History||xbox=none|xbone=none|ps=1.90|wiiu=none|switch=none|[[File:Flower Pot BE.png|32px]] [[File:Potted Dandelion BE.png|32px]] [[File:Potted Poppy BE.png|32px]] [[File:Potted Allium BE.png|32px]] [[File:Potted Azure Bluet BE.png|32px]] [[File:Potted Oxeye Daisy BE.png|32px]] [[File:Potted Blue Orchid BE.png|32px]] [[File:Potted Red Tulip BE.png|32px]] [[File:Potted Orange Tulip BE.png|32px]] [[File:Potted White Tulip BE.png|32px]] [[File:Potted Pink Tulip BE.png|32px]] [[File:Potted Red Mushroom BE.png|32px]] [[File:Potted Brown Mushroom BE.png|32px]] [[File:Potted Oak Sapling BE.png|32px]] [[File:Potted Birch Sapling BE.png|32px]] [[File:Potted Spruce Sapling BE.png|32px]] [[File:Potted Jungle Sapling BE.png|32px]] [[File:Potted Acacia Sapling BE.png|32px]] [[File:Potted Dark Oak Sapling BE.png|32px]] [[File:Potted Cactus BE.png|32px]] [[File:Potted Fern BE.png|32px]]<br>[[File:Flower Pot (item) JE2 BE2.png|32px]] The textures of flower pots have been changed.}}
{{History|new 3ds}}
{{History||0.1.0|[[File:Flower Pot JE1.png|32px]] [[File:Potted Dandelion JE1.png|32px]] [[File:Potted Red Mushroom JE1.png|32px]] [[File:Potted Brown Mushroom JE1.png|32px]] [[File:Potted Oak Sapling JE1.png|32px]] [[File:Potted Birch Sapling JE1.png|32px]] [[File:Potted Spruce Sapling JE1.png|32px]] [[File:Potted Jungle Sapling JE1.png|32px]] [[File:Potted Cactus JE1.png|32px]] [[File:Potted Fern JE1.png|32px]] [[File:Potted Allium JE1.png|32px]] [[File:Potted Azure Bluet JE1.png|32px]] [[File:Potted Oxeye Daisy JE1.png|32px]] [[File:Potted Blue Orchid JE1.png|32px]] [[File:Potted Poppy JE1.png|32px]] [[File:Potted Red Tulip JE1.png|32px]] [[File:Potted Orange Tulip JE1.png|32px]] [[File:Potted White Tulip JE1.png|32px]] [[File:Potted Pink Tulip JE1.png|32px]] [[File:Potted Acacia Sapling JE1.png|32px]] [[File:Potted Dark Oak Sapling JE1.png|32px]]{{verify|Are these models the ones used in this version?}}<br>[[File:Flower Pot (item) JE1 BE1.png|32px]] Added flower pots.}}
{{History|foot}}
<gallery>
Suggestion for itemframes.png|Original Reddit image suggesting item frames and flower pots.
FlowerPot.png|The first image of flower pots, released by [[Dinnerbone]].
Pots 1-100.png|An [[Java Edition 14w06a|14w06a]] example of some of the blocks that can be placed inside of flower pots, and their rendering.
Pots 1-100b.png|The same arrangement as prior in [[Java Edition 14w06b|14w06b]].
</gallery>
=== Flower pot "item" ===
{{:Technical blocks/Flower Pot}}
== Gallery ==
=== Renders ===
; Flowers
<gallery>
Potted Dandelion.png |
Potted Poppy.png |
Potted Blue Orchid.png |
Potted Allium.png |
Potted Azure Bluet.png |
Potted Red Tulip.png |
Potted Orange Tulip.png |
Potted White Tulip.png |
Potted Pink Tulip.png |
Potted Oxeye Daisy.png |
Potted Cornflower.png |
Potted Lily of the Valley.png |
Potted Wither Rose.png |
Potted Torchflower.png
</gallery>
; Saplings
<gallery>
Potted Oak Sapling.png |
Potted Spruce Sapling.png |
Potted Birch Sapling.png |
Potted Jungle Sapling.png |
Potted Acacia Sapling.png |
Potted Dark Oak Sapling.png |
Potted Azalea.png |
Potted Flowering Azalea.png |
Potted Mangrove Propagule.png |
Potted Cherry Sapling.png
</gallery>
; Mushrooms
<gallery>
Potted Red Mushroom.png |
Potted Brown Mushroom.png |
Potted Crimson Fungus.png |
Potted Warped Fungus.png |
</gallery>
; Roots and bushes
<gallery>
Potted Crimson Roots.png |
Potted Warped Roots.png |
Potted Fern.png |
Potted Dead Bush.png |
Potted Cactus.png |
Potted Cactus BE.png |
Potted Bamboo.png
</gallery>
=== Other ===
<gallery>
FiveFlowerPots.png | Five flower pots in a player-created village.
</gallery>
== Issues ==
{{issue list}}
== Trivia ==
* The flower pot is based on a suggestion from Reddit, like [[ender chest]]s and [[item frame]]s.<ref>{{tweet|dinnerbone|235747041286975488|My next task is going to be flower pots.|August 15, 2012}}</ref>
* Flower pots break [[falling block]]s.
* If a plant that has been [[Name Tag|named]] is put in a flower pot, the plant loses its name.
* The inside of the flower pot in ''Java Edition'' uses the center 4x4 pixels of the dirt texture while Bedrock Edition uses the center 6x6.
==References==
{{Reflist}}
{{Blocks|Utility}}
{{items}}
[[Category:Manufactured blocks]]
[[Category:Storage]]
[[Category:Generated structure blocks]]
[[Category:Non-solid blocks]]
[[Category:Utility blocks]]
[[cs:Květináč]]
[[de:Blumentopf]]
[[es:Maceta]]
[[fr:Pot de fleurs]]
[[hu:Virágcserép]]
[[it:Vaso da fiori]]
[[ja:植木鉢]]
[[ko:화분]]
[[nl:Bloempot]]
[[pl:Doniczka]]
[[pt:Vaso]]
[[ru:Цветочный горшок]]
[[zh:花盆]]
[[uk:Квітковий горщик]]</li></ul> | 20w06a | Traveling through nether portals is now almost seamless. | |||
| 20w14a | Hoglins are now scared of active portals. | ||||
1.16.2{{Extension DPL}}<ul><li>[[Super Fertilizer|Super Fertilizer]]<br/>{{education feature}}
{{Exclusive|Bedrock|Education}}
{{Item
| image = Super Fertilizer.png
| renewable = No
| stackable = Yes (64)
}}
'''Super fertilizer''' is a powerful form of [[bone meal]] that is created using [[ammonia]] and [[phosphorus]].
== Obtaining ==
=== Lab table ===
{| class="wikitable"
! Result
! Materials Needed
|-
!rowspan=2|{{slot|Super Fertilizer}}<br>[[Super Fertilizer]]
|{{slot}}{{slot|Ammonia|link=Compound}}{{slot|Phosphorus|link=Element}}{{slot}}
|-
|<center>[[Compound|Ammonia]], [[Element|Phosphorus]]</center>
|}
== Usage ==
Super fertilizer can be used in the same way as bone meal. It produces more [[flowers]] in a larger area when used on [[grass block]]s compared to bone meal. When super fertilizer is used on a [[sapling]], a [[tree]] is instantly grown after one use, instead of multiple uses as with bone meal. Super fertilizer matures crops with a single use.
Note that super fertilizer does not instantly grow a hanging [[mangrove propagule]]. This could be a bug.
== Sounds ==
{{Sound table
|type=bedrock
|sound=Gravel hit1.ogg
|sound2=Gravel hit2.ogg
|sound3=Gravel hit3.ogg
|sound4=Gravel hit4.ogg
|source=player
|description=When super fertilizer is created by a [[lab table]]
|id=step.gravel
|volume=1.0
|pitch=0.2/0.4}}
{{Sound table
|sound=Bonemeal1.ogg
|sound2=Bonemeal2.ogg
|sound3=Bonemeal3.ogg
|sound4=Bonemeal4.ogg
|sound5=Bonemeal5.ogg
|description=When super fertilizer is successfully used
|source=Blocks
|id=item.bone_meal.use
|foot=1}}
== Data values ==
=== ID ===
{{ID table
|edition=bedrock
|shownumericids=y
|showforms=y
|notshowbeitemforms=y
|generatetranslationkeys=y
|displayname=Super Fertilizer
|spritetype=item
|nameid=rapid_fertilizer
|id=597
|form=item
|foot=1}}
== History ==
{{History|bedrock}}
{{History||1.4.0|snap=beta 1.2.20.1|[[File:Super Fertilizer BE1.png|32px]] Added super fertilizer.}}
{{History|education}}
{{History||1.0.27|[[File:Super Fertilizer BE1.png|32px]] Added super fertilizer.}}
{{History|foot}}
{{items}}
{{Education Edition}}
[[Category:Plants]]
[[Category:Non-renewable resources]]
[[Category:Education Edition items]]
[[de:Superdünger]]
[[ja:スーパー肥料]]
[[ko:슈퍼 비료]]
[[lzh:神肥]]
[[pl:Supernawóz]]
[[pt:Super fertilizante]]
[[uk:Супердобриво]]
[[zh:超级肥料]]</li><li>[[:Category:Plants|Category:Plants]]<br/>All pages covering blocks of such things as tall grass and flowers.
[[Category:Blocks]]
[[Category:Items]]
[[cs:Kategorie:Rostliny]]
[[es:Categoría:Plantas]]
[[fr:Catégorie:Plante]]
[[hu:Kategória:Növények]]
[[it:Categoria:Piante]]
[[ja:カテゴリ:植物]]
[[ko:분류:식물]]
[[nl:Categorie:Planten]]
[[pl:Kategoria:Rośliny]]
[[pt:Categoria:Plantas]]
[[ru:Категория:Растения]]
[[th:หมวดหมู่:พืช]]
[[zh:Category:植物]]</li></ul> | 20w28a | The portal search has changed. | |||
1.20{{Extension DPL}}<ul><li>[[Horse Saddle|Horse Saddle]]<br/>{{About|the removed item|the current item|Saddle}}
{{outdated feature|edition=java}}
{{Item
| title = Horse Saddle
| image = Horse Saddle.png
| renewable = Yes
| stackable = Yes (32)
}}
'''Horse saddles''' were [[item]]s which allowed the player to ride [[horse]]s.
== Obtaining ==
=== Crafting ===
{{crafting |ignoreusage=1
|A1=Leather |B1=Leather |C1=Leather
|A2=Leather |B2=Iron Ingot |C2=Leather
|A3=Iron Ingot |C3=Iron Ingot
|Output=Horse Saddle
}}
== Usage ==
Horse saddles worked just like regular [[saddle]]s, but for [[horse]]s instead of [[pig]]s. Taming a horse was required before putting a horse saddle on it. Unlike any other items, horse saddles could be stacked up to 32.
== Sounds ==
''None''<ref>{{ytl|2a6BQeW6is4|t=330}}; sounds for horses were not added until [[13w22a]]</ref>
== Data values ==
=== ID ===
{{ID table
|nonameid=y
|shownumericids=y
|showforms=y
|generatetranslationkeys=java
|displayname=Horse Saddle
|spritetype=item
|id=416
|form=item
|translationkey=item.horsesaddle.name
|foot=y}}
== History ==
{{History|java}}
{{History||1.6.1|snap=13w16a|[[File:Horse Saddle JE1.png|32px]] Added horse saddles.}}
{{History|||snap=13w18a|Horse saddles have been removed.
|[[Horse]]s and [[zombie horse]]s can now be ridden using regular [[saddle]]s.}}
{{History|foot}}
== Issues ==
Horse saddles have been removed from the game, and as such are no longer supported.
{{Items}}
{{Removed Features}}
[[es:Montura de caballo]]
[[fr:Selle de cheval]]
[[it:Sella di cavallo]]
[[ja:ウマの鞍]]
[[ko:말 안장]]
[[pt:Sela para cavalo]]
[[zh:马鞍]]</li><li>[[La Baguette|La Baguette]]<br/>{{Exclusive|Java}}
{{Joke feature}}
{{WIP}}
{{Item
| rarity = Common
| renewable = Yes
| durability = 59
| stackable = No
}}
'''La Baguette''' is a joke weapon from [[Java Edition 23w13a_or_b]]. Its stats are identical to a wooden [[sword]], though La Baguette cannot be used to fuel furnaces.
== Obtaining ==
One [[Le Tricolore|tricolore]] and one baguette is given to all players when [[French mode]] gets activated.
=== Repairing ===
==== Grinding ====
{{Grinding
|showdescription=1
|ingredients=2x La Baguette
|La Baguette
|La Baguette
|La Baguette
|description=The durability of the two baguettes is added together, plus an extra 5% durability. Any enchantments, besides curses, would be removed.
}}
====Unit repair====
Strangely, La Baguette can be repaired using planks rather than bread, just like a wooden sword.
{{Anvil|Input1=Damaged La Baguette|Input2=Damaged La Baguette; Any Planks|Output=La Baguette}}
==Usage==
La Baguette functions identically to a wooden sword.
===Attacking===
It can be used to damage mobs for {{hp|4}} health points. La Baguette has an attack speed of 1.6 and takes 0.625 seconds to [[Damage#Attack cooldown|recover]].
=== Breaking ===
La Baguette, just like other swords, can be used to break certain blocks 50% faster. See [[Sword#Sword breaking times]] for more.
=== Enchantments ===
La Baguette, like other swords, can receive the following [[enchantment]]s:
{| class="wikitable sortable col-2-center col-3-right"
|+
!Name
!Max Level
![[Enchanting|Method]]
!Weight
|-
|[[Fire Aspect]]
|II
|{{Inventory slot|Enchanting Table}}{{Inventory slot|Anvil}}
|2
|-
|[[Looting]]
|III
|{{Inventory slot|Enchanting Table}}{{Inventory slot|Anvil}}
|2
|-
|[[Unbreaking]]
|III
|{{Inventory slot|Enchanting Table}}{{Inventory slot|Anvil}}
|5
|-
|[[Sharpness]]<ref group=note name=note1>Sharpness, Smite, and Bane of Arthropods are mutually exclusive.</ref>
|V
|{{Inventory slot|Enchanting Table}}{{Inventory slot|Anvil}}
|10
|-
|[[Smite]]<ref group=note name=note1/>
|V
|{{Inventory slot|Enchanting Table}}{{Inventory slot|Anvil}}
|5
|-
|[[Bane of Arthropods]]<ref group="note" name=note1/>
|V
|{{Inventory slot|Enchanting Table}}{{Inventory slot|Anvil}}
|5
|-
|[[Knockback]]
|II
|{{Inventory slot|Enchanting Table}}{{Inventory slot|Anvil}}
|5
|-
|[[Mending]]
|I
|{{Inventory slot|Anvil}}
|2
|-
|[[Curse of Vanishing]]
|I
|{{Inventory slot|Anvil}}
|1
|-
|[[Sweeping Edge]]{{Only|java|short=1}}
|III
|{{Inventory slot|Enchanting Table}}{{Inventory slot|Anvil}}
|2
|}
{{Notelist}}
==Trivia==
This item is simply called "Baguette" in the official French translation, without an article.
{{Items}}
{{Jokes}}
[[Category:Tools]]
[[Category:Combat]]
[[ja:La Baguette]]
[[pt:La Baguette]]
[[Category:Joke items]]</li></ul> | Pre-release 1 | Nether portals no longer produce a screen animation and sound after changing dimensions.[8] | |||
| Pocket Edition Alpha | |||||
| ? | The sounds of nether portals have been updated to match Java. | ||||
| Legacy Console Edition | |||||
| TU31 | CU19 | 1.22 | Patch 3 | If the nether portal in the Nether is big enough, ghasts can now travel through. | |
![Image released for 1.7.2 by Dinnerbone on September 11, 2013.[9]](https://static.wikia.nocookie.net/minecraft_gamepedia/images/b/bd/4x5-5x7_Nether_Portal.png/revision/latest?cb=20210202035126)
![7x7 portal.[10]](https://static.wikia.nocookie.net/minecraft_gamepedia/images/e/e9/7x7_Nether_Portal.png/revision/latest?cb=20210202035136)
![Large Portal.[11]](https://static.wikia.nocookie.net/minecraft_gamepedia/images/0/04/Portal_large.png/revision/latest?cb=20210202035152)
Issues
Issues relating to "Nether Portal (block)" are maintained on the bug tracker. Report issues there.
Trivia
- Portals can be placed together in a tunnel-like fashion, though it appears as if the third portal is lit as the first two in a row mimic glass. If more than six portals are connected, the inner portals are completely invisible while in the portal tunnel, however, the particle effects can still be seen throughout. These connected portals also share the 4-second countdown until teleportation, so as long as the player is within a connected portal, they are sent to another dimension.
- The player cannot open their inventory or the chat window while standing in an active portal, and any other GUI (such as that of a chest or villager) is immediately closed when opened.
- If 2 portals intersect, and the player lights a fire in the intersection (i.e., in both portals at once) only the portal that lies within the x-axis is activated. Lighting any other block activates whichever portal it is in.
- There is a splash text referencing the nether portal. It says "Slow acting portals!".
- There is a one in a trillion chance a ruined portal would generate as an active portal (verify, as SaraSushi7 saw that chance thing on home page)
Publicity
- A LEGO Minecraft nether portal was included in the LEGO Minecraft Set: "The Nether".
- On 29 October 2010 PC Gamer released this video, showing a portal being constructed and used.
- On 1 April 2011, Think Geek released this video to advertise one of their annual fake April Fools products: the Minecraft USB Desktop Nether Portal.
Gallery

A zombified piglin wandered through a nether portal and into the Overworld.
A view of inside a portal.
The biggest nether portal size (23×23 exterior, 21×21 opening).
Nether portal generated on a cliff in crimson forest.
A cluster of nether portal frames generated by repeatedly going through the Nether-side portal, deactivating the Overworld-side portal and teleporting back to the Nether.
A large nether portal.
Two nether portals next to each other.
Darngeek standing in front of a nether portal.
Screenshot from Searge showing a 3x4 nether portal.
A Nether portal in a mangrove swamp, as shown in the Wild Update trailer.
A Nether Portal as it appears in the Minecraft Legends Live Event.
An officially licensed "Nether Portal Glitter Motion Light."
Official artwork featuring a nether portal.
Official artwork featuring a nether portal.
Official artwork featuring a nether portal.
Official artwork featuring a nether portal.
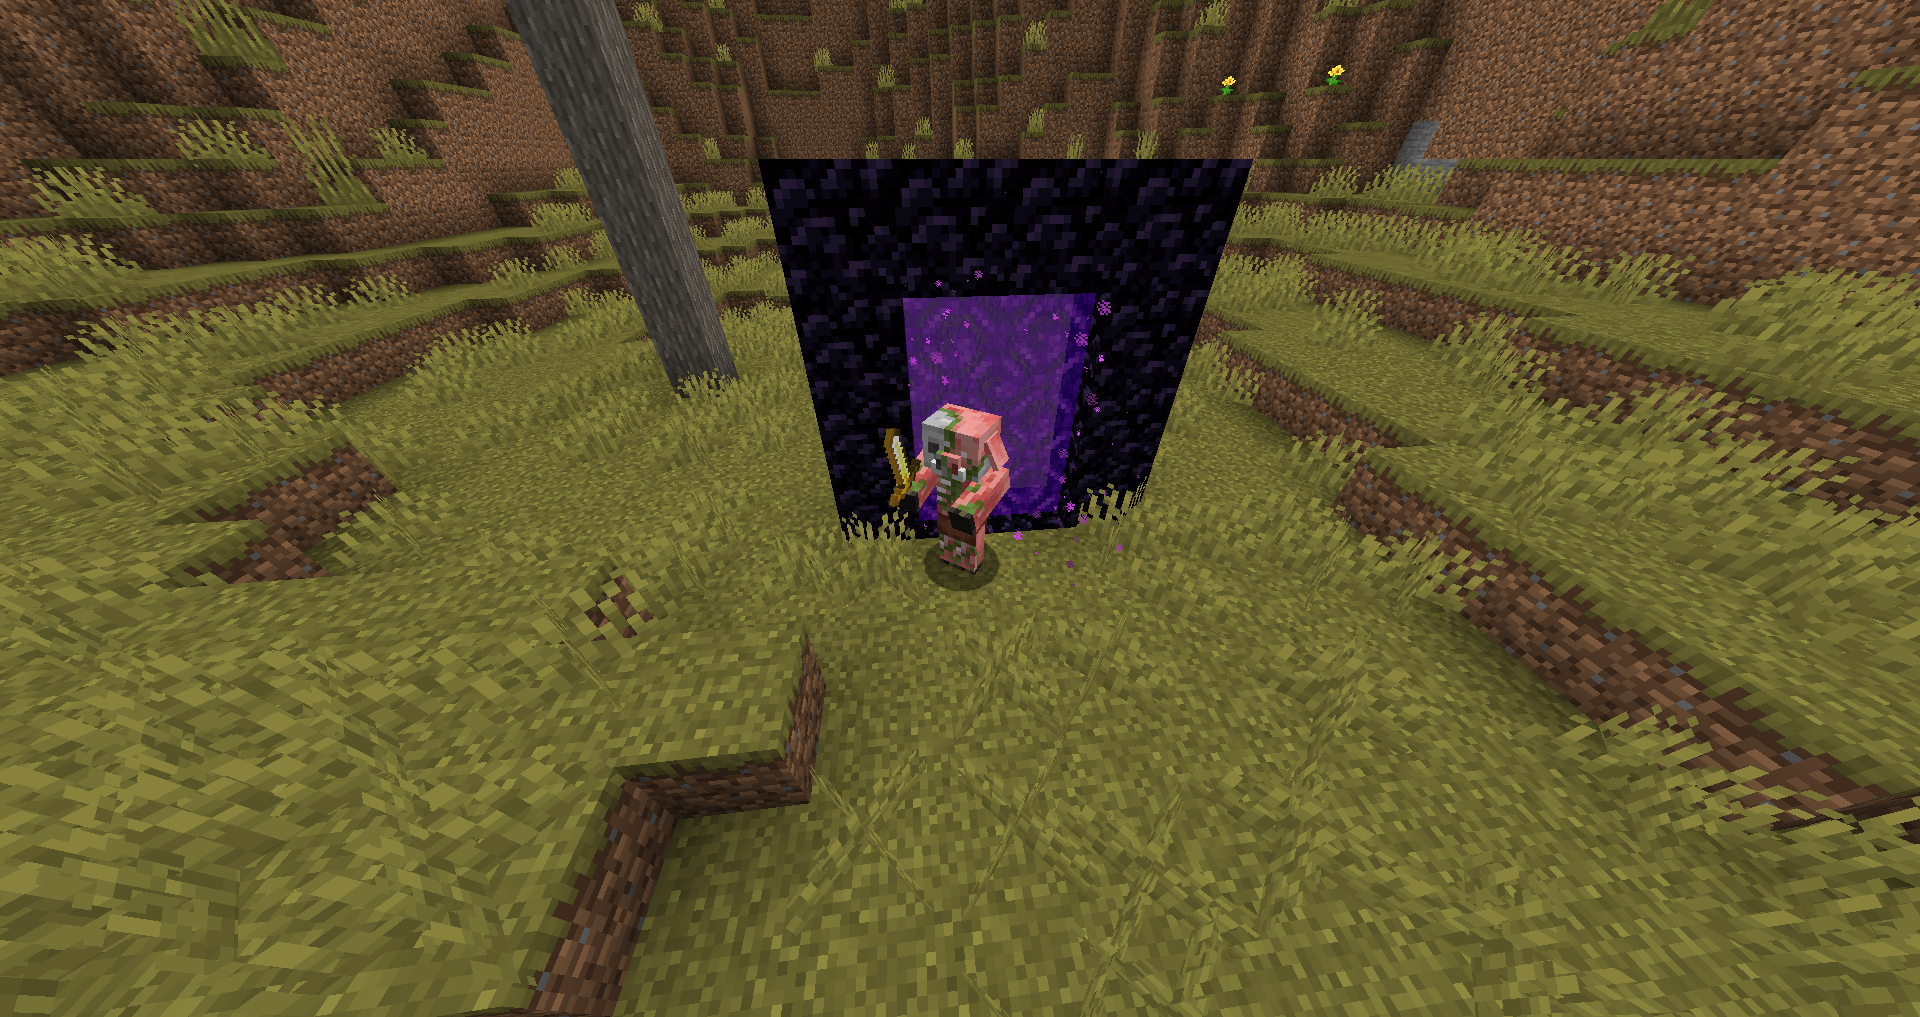
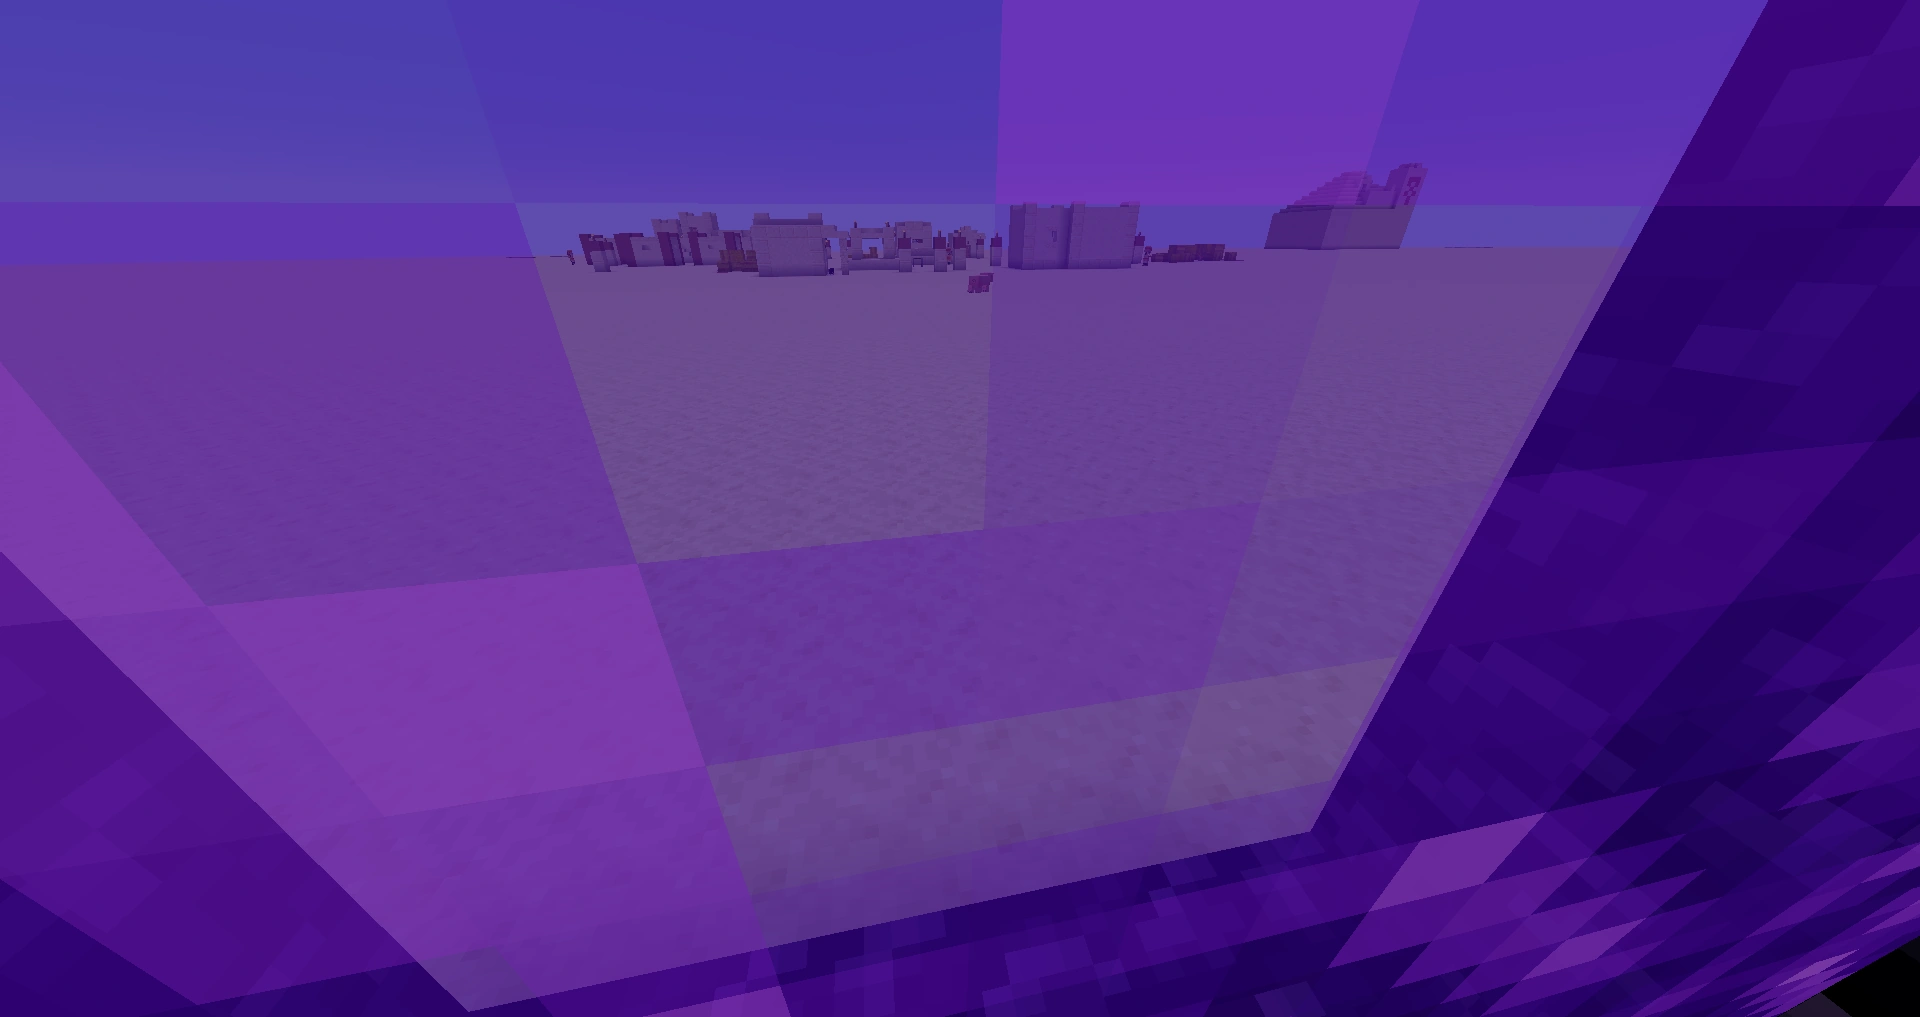
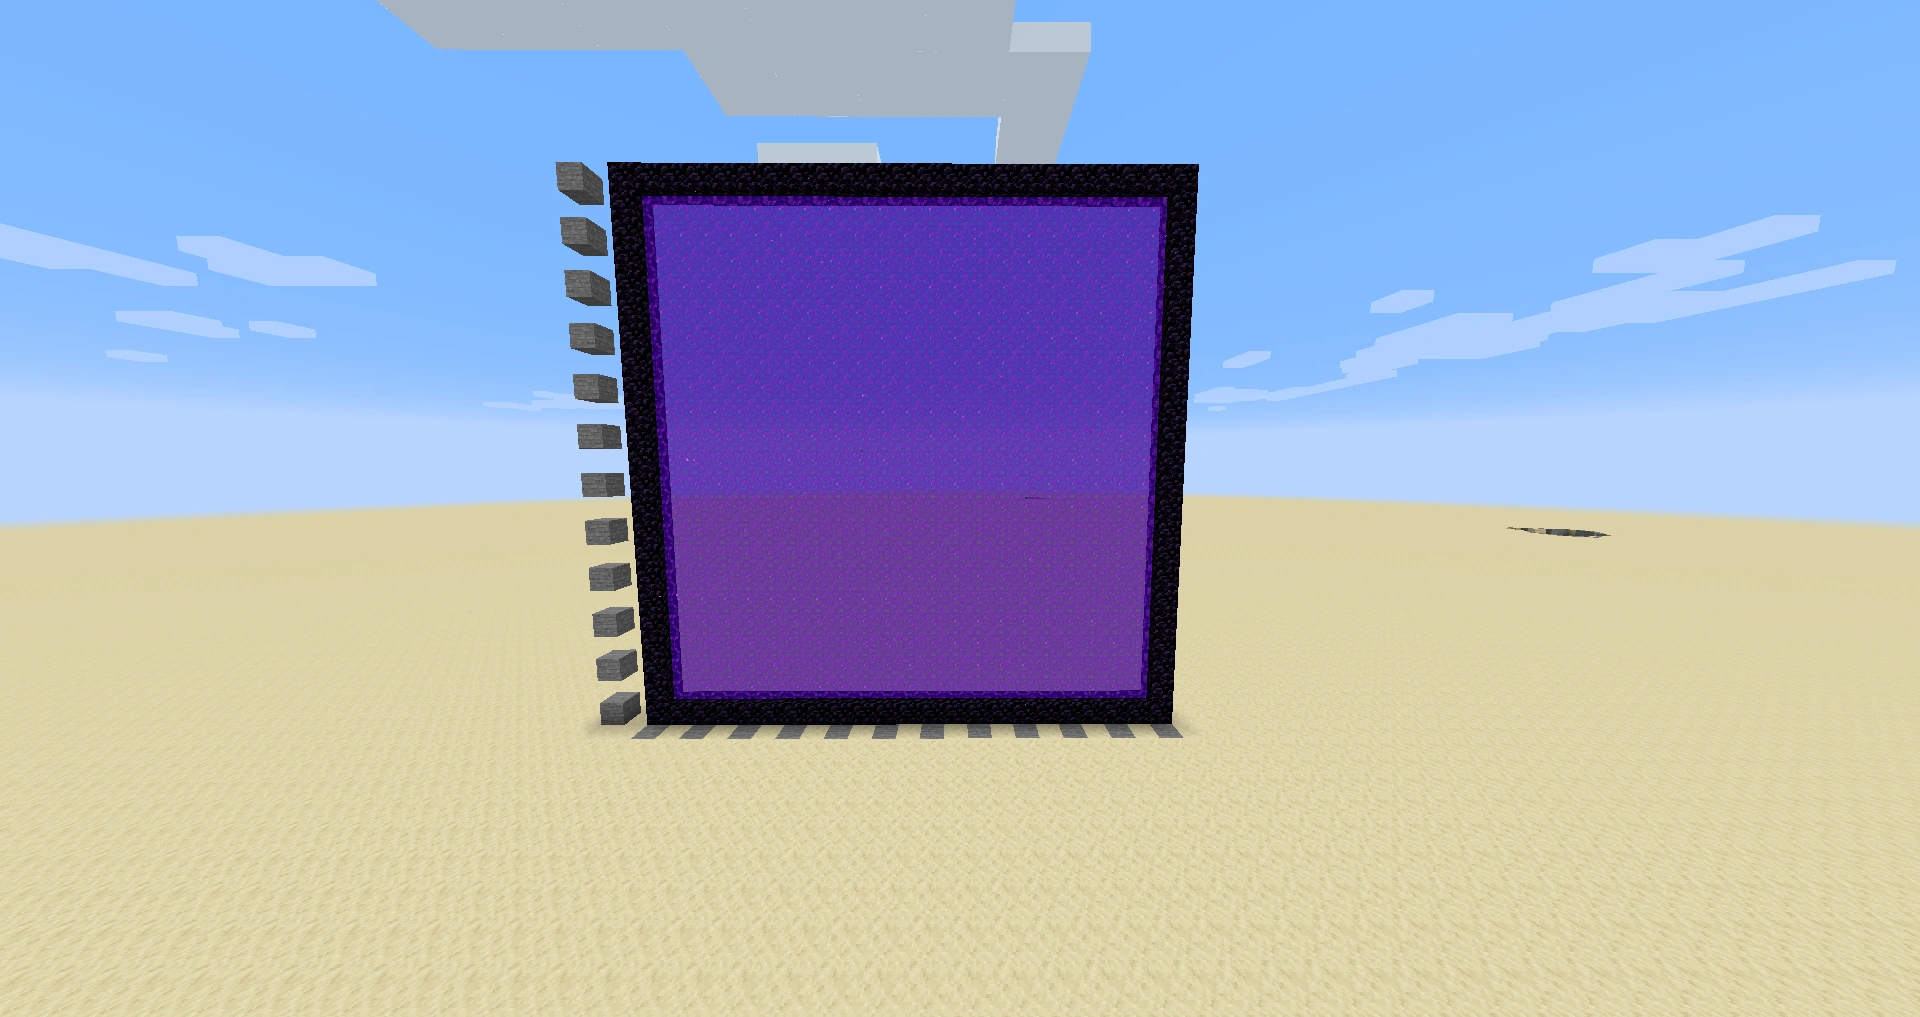
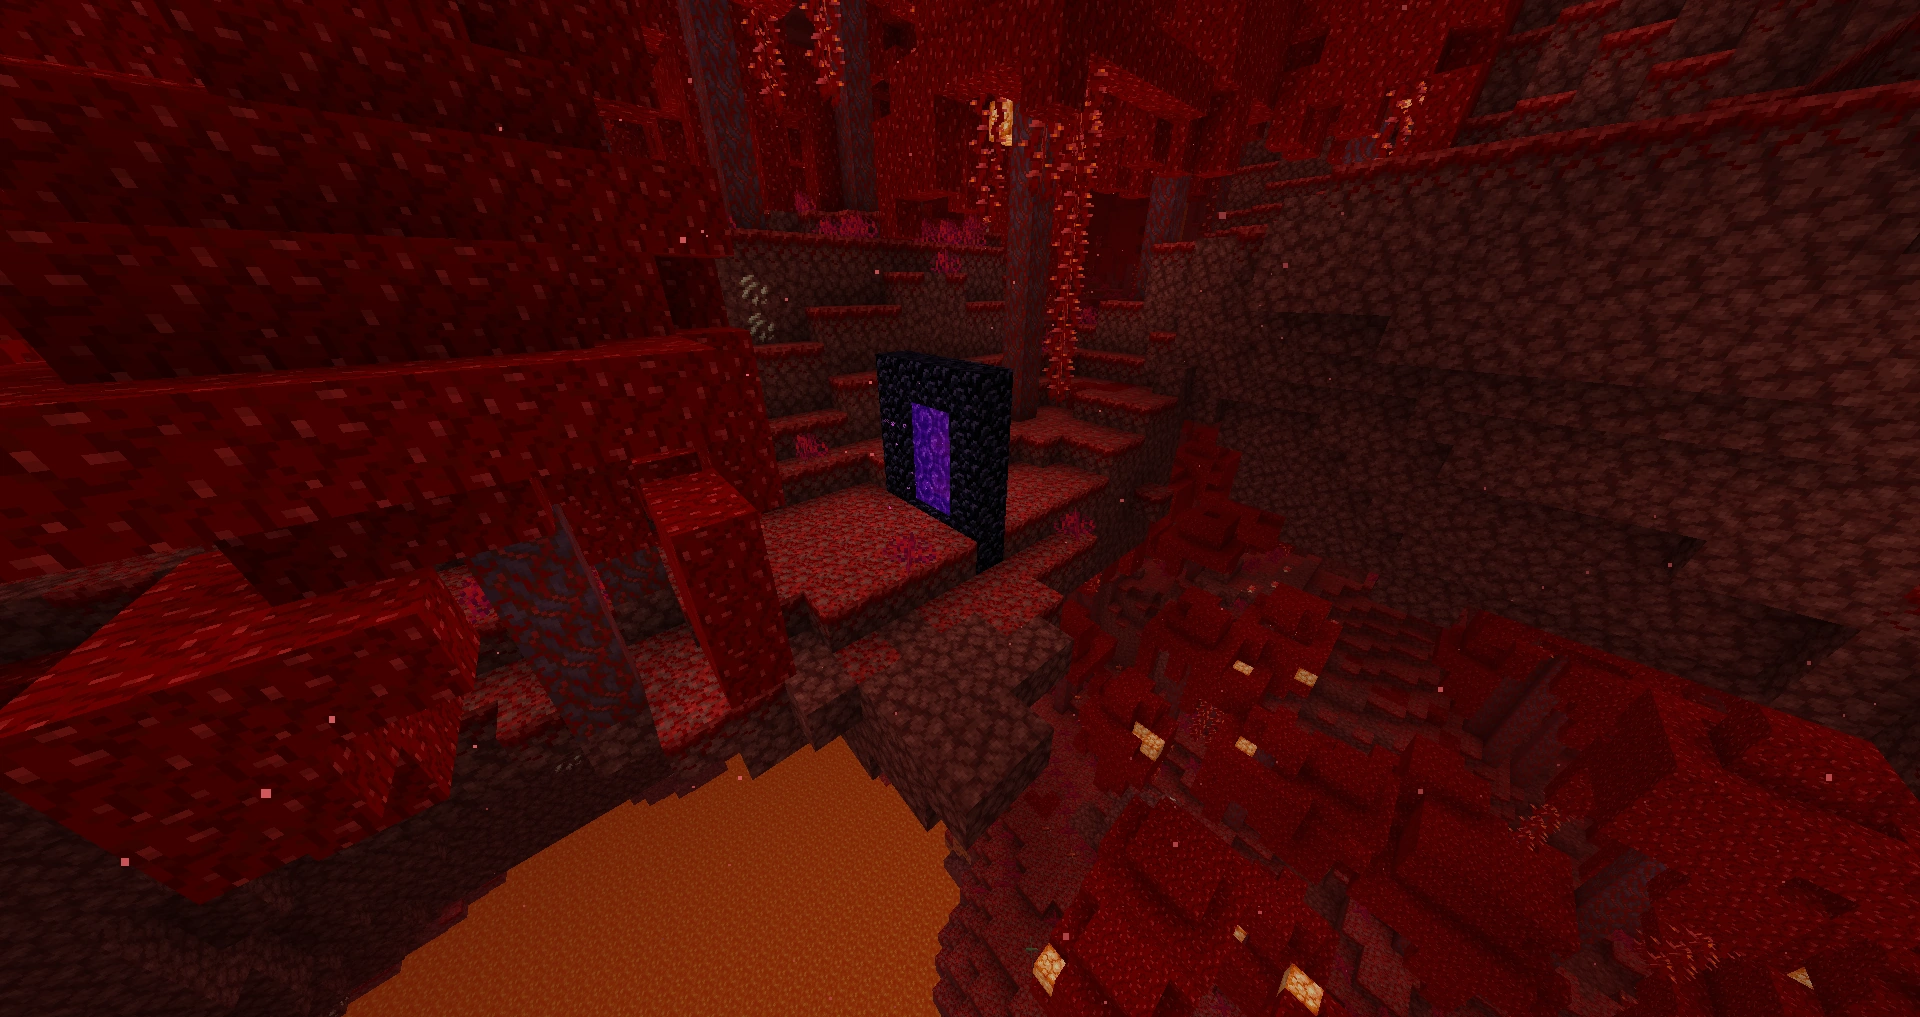
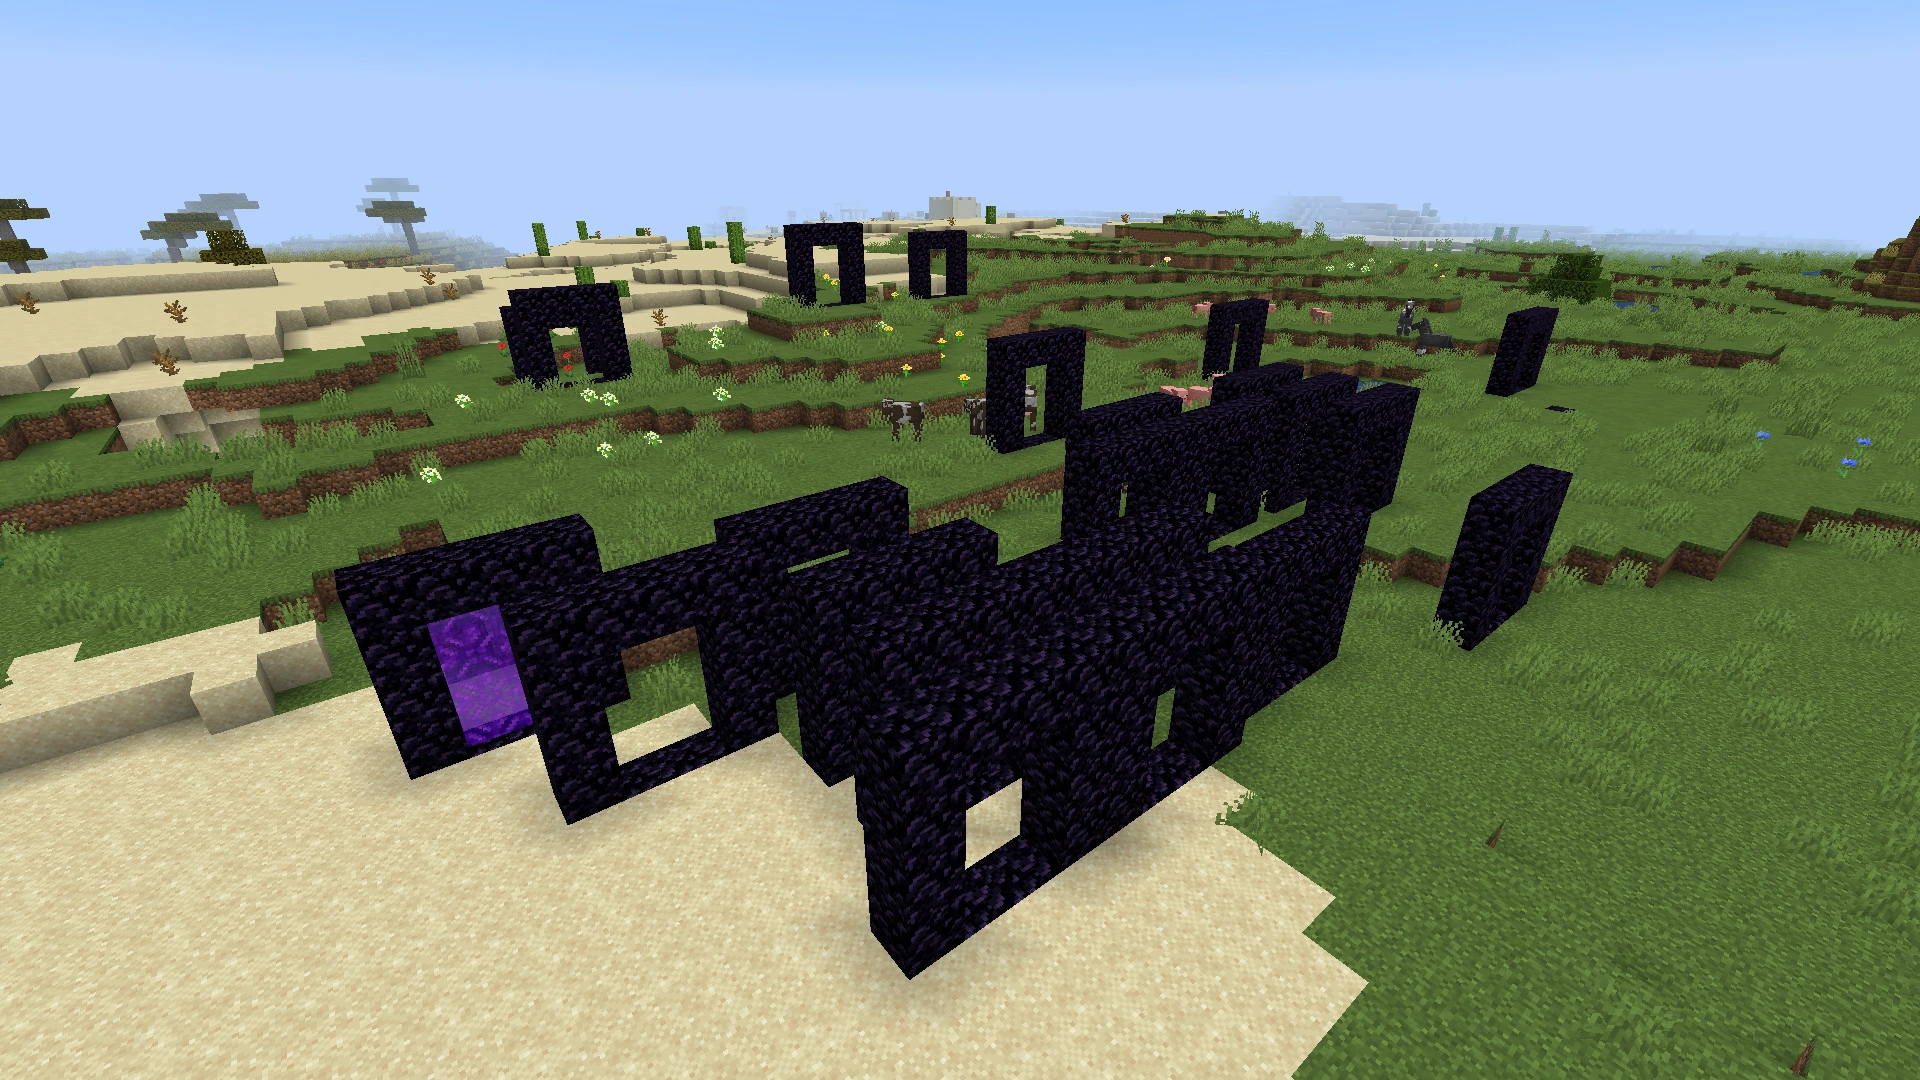

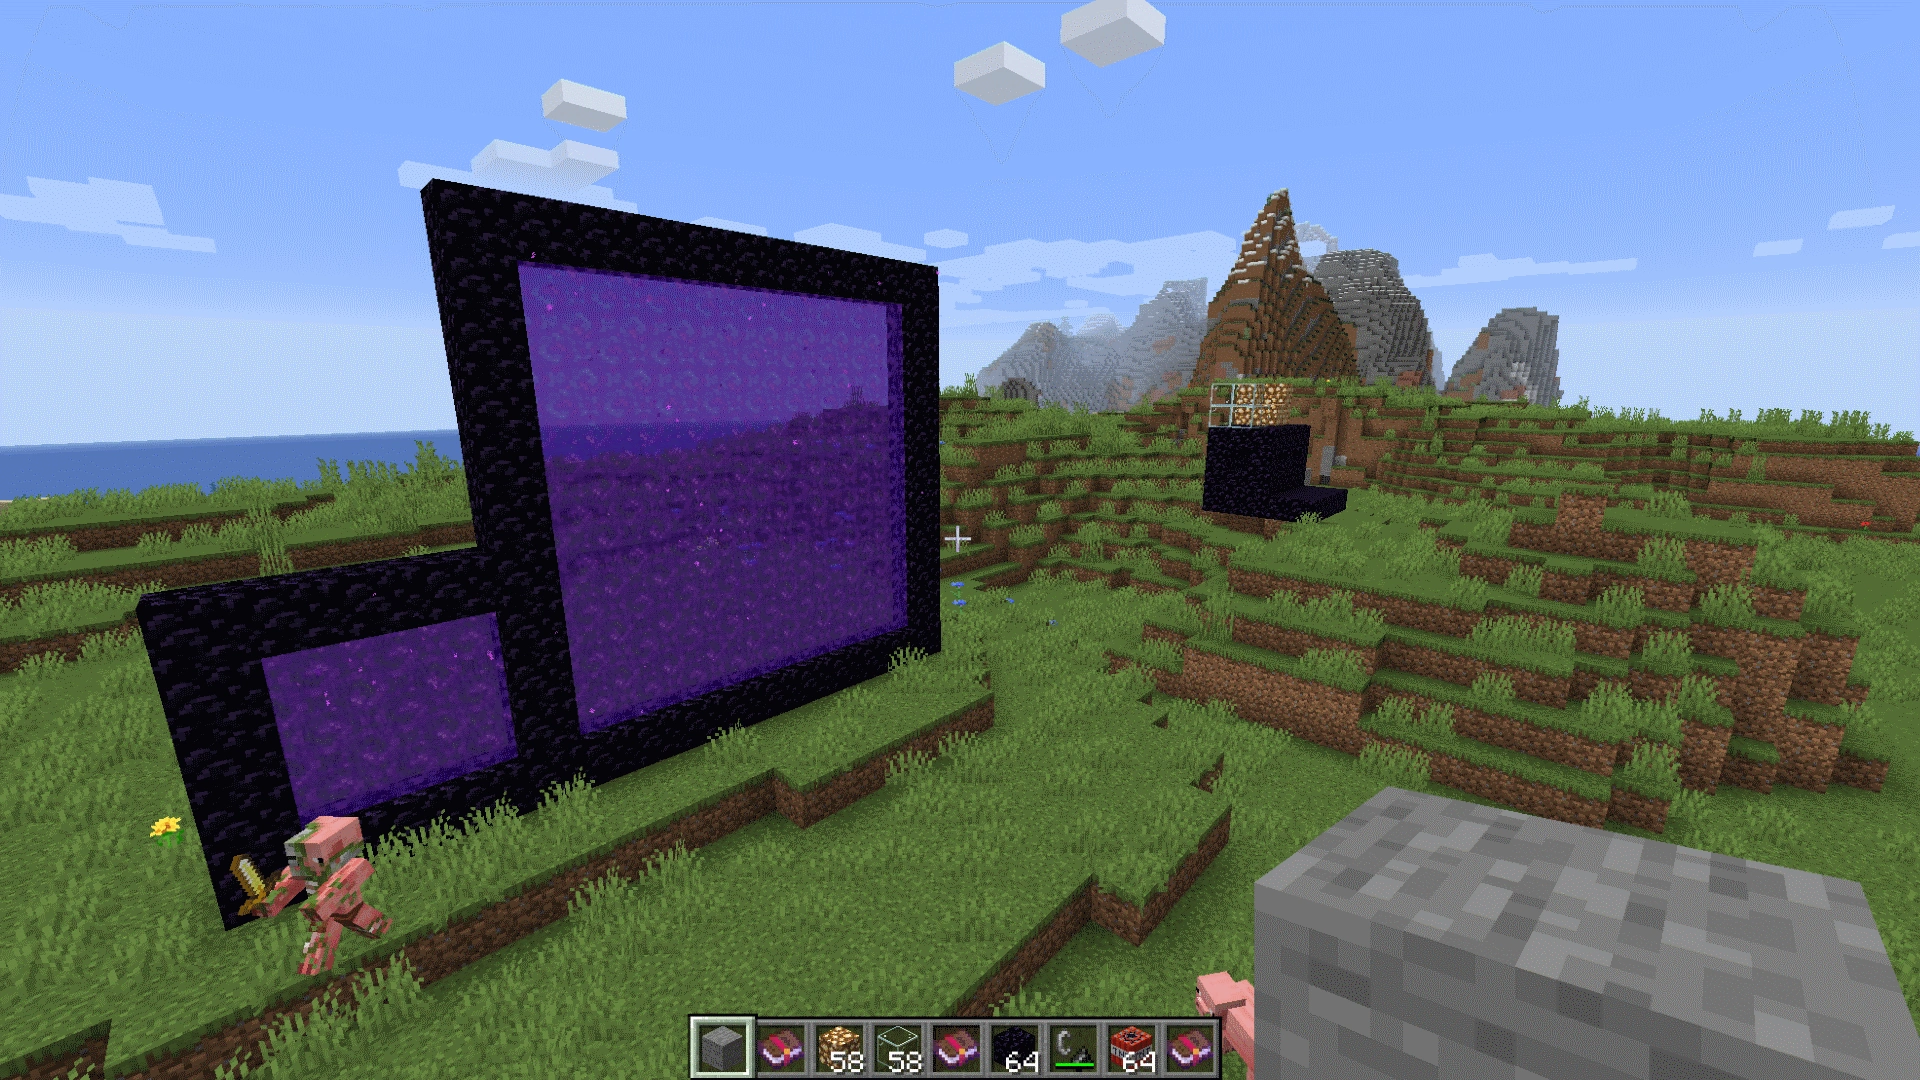
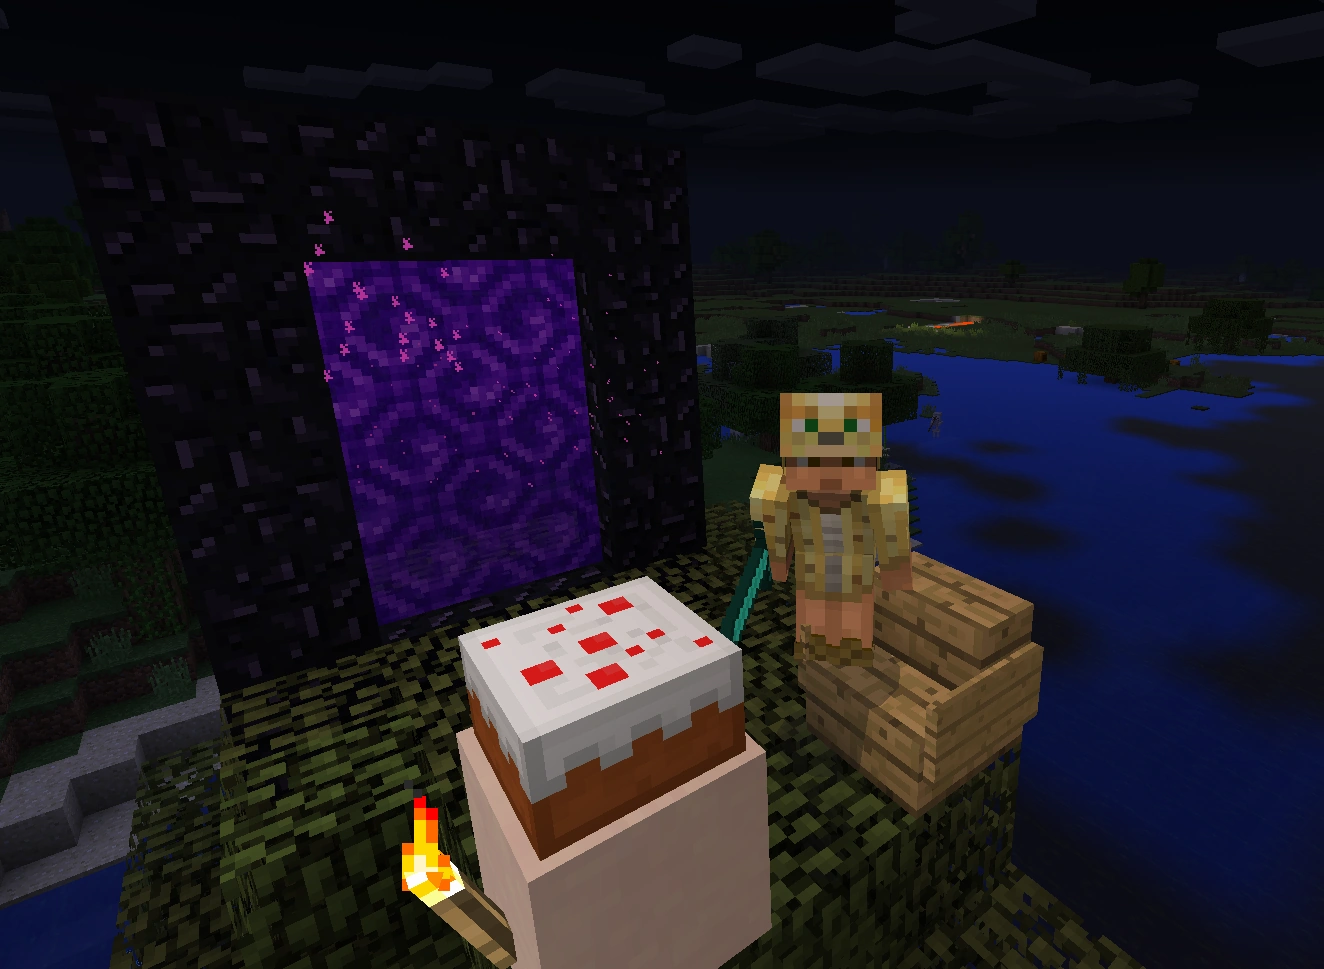
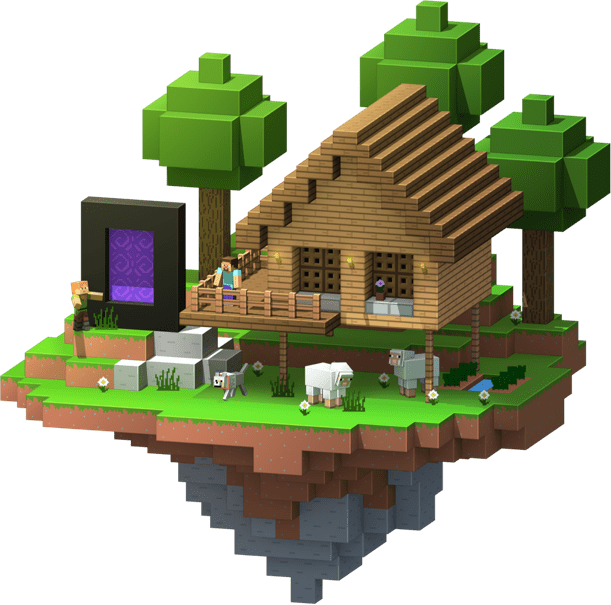

References
- ↑ MC-67
- ↑ MCPE-27950
- ↑ MC-197538 — resolved as "Works As Intended".
- ↑ "Bunch of other small tweaks to them too; you can light a portal from any block, not just the bottom row. Good for automatic on/off toggling" – @Dinnerbone (Nathan Adams) on X, September 11, 2013
- ↑ "@BlakesAwesome No it doesn't" – @jeb_ (Jens Bergensten) on X, April 1, 2011
- ↑ "Minecraft Halloween Update hands-on" by Tom Francis – PC Gamer, October 29, 2010.
- ↑ "Hands-On With the Minecraft Halloween Update" (Archive) by Michael Rose – IndieGames.com, October 29, 2010.
- ↑ MC-180 — resolved as "Fixed".
- ↑ "But anything that I come up with is just too big. This is my best whilst maintaining the "doorway" look: http://dinnerbone.com/media/uploads/2013-09/screenshots/10_19-45-08_ojqMLWCxZ.png" – @Dinnerbone (Nathan Adams) on X, September 10, 2013
- ↑ "http://dinnerbone.com/media/uploads/2013-09/screenshots/10_19-53-50_22cPJCCVd.png" – @Dinnerbone (Nathan Adams) on X, September 10, 2013
- ↑ "After a day of refactoring portal code, this is now possible. http://dinnerbone.com/media/uploads/2013-09/screenshots/Minecraft_13w36b_2013-09-11_16-03-26.png" – @Dinnerbone (Nathan Adams) on X, September 11, 2013
Issues
Issues relating to "Nether Portal (block)" are maintained on the bug tracker. Report issues there.
References