This article describes the village mechanics before the Village & Pillage update, found on the Xbox 360 Edition, PlayStation 3 Edition, PlayStation Vita Edition, Xbox One Edition, Wii U Edition, Nintendo Switch Edition, New Nintendo 3DS Edition, and older releases of the Java and Bedrock editions.
See Trading/Before Village & Pillage, Villager/Before Village & Pillage, and Village/Structure (old) for information for these old versions. See Tutorials/Village mechanics, Village and Villager for information on the current version.
Video explanation[]
Before reading on, you may like to watch the following videos which explain the mechanics of breeding villagers.
Terminology[]
A village is defined by several factors: the village center, radius, number of houses, population (number of villagers), population cap (max. number of villagers, based on housing), number of golems, and golem cap (based on population).
A village needs at least one house and at least one villager in order to be a "village". A "house" is defined simply as a wooden door with an "inside" and an "outside" (see the next section for details). A village tries to maintain its population above 35% of the number of houses if there are at least two villagers.
The village center is the geometric center point, or "average coordinates" of all the doors. The village radius is the distance from this center point to the furthest door, or 32 blocks, whichever is greater. This means that the radius is always at least 32, no matter what, but it can be bigger if there are any houses further than 32 blocks from the center. The center point coordinates are truncated, resulting in a tendency towards 0,0.
Symmetrical villages are easy to calculate the centers of, but for more complex villages, such as naturally generated villages, it's a good idea to give yourself a few blocks extra room. Try calculating from the position of the door closest to your build site. The easiest way is to take the average of all coordinates of the doors in the village:
(x.coordinate_door1 + x.coordinate_door2 + x.coordinate_door3 + ...)/ number-of-doors = x.coordinate_village-center
(y.coordinate_door1 + y.coordinate_door2 + y.coordinate_door3 + ...)/ number-of-doors = y.coordinate_village-center
Housing[]
A "house" is defined as a wooden door with an "inside" and an "outside." The "inside" is the side which has more spaces covered by "roof" blocks than the other, within five spaces horizontally of the door in the two directions it faces. A "roof" block is an opaque block at any height that blocks direct sunlight from reaching the spaces below it.
Another way to put it would be to say that an "outside" space has a direct view of the sky, and so has a "SL" (sky light) value of 15. An "inside" space does not have a direct view of the sky (looking straight up) and a "SL" value of less than 15. The "inside" is the side which has more "inside spaces" than the "outside" (which, in turn, has more "outside spaces" than the "inside.") Technically, a sky light as low as 11 (but not lower) is allowed.
A door is not counted as a house without a "roof," or with the same number of covered spaces on either side.
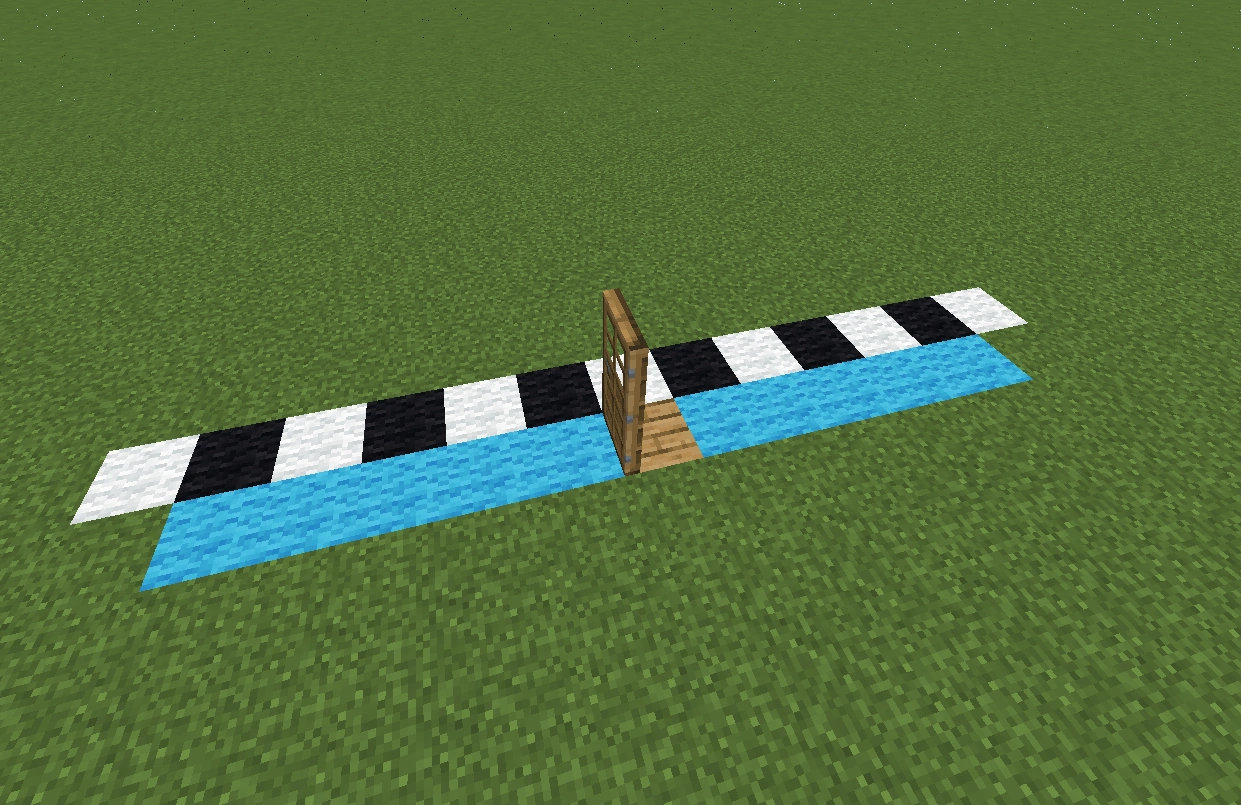
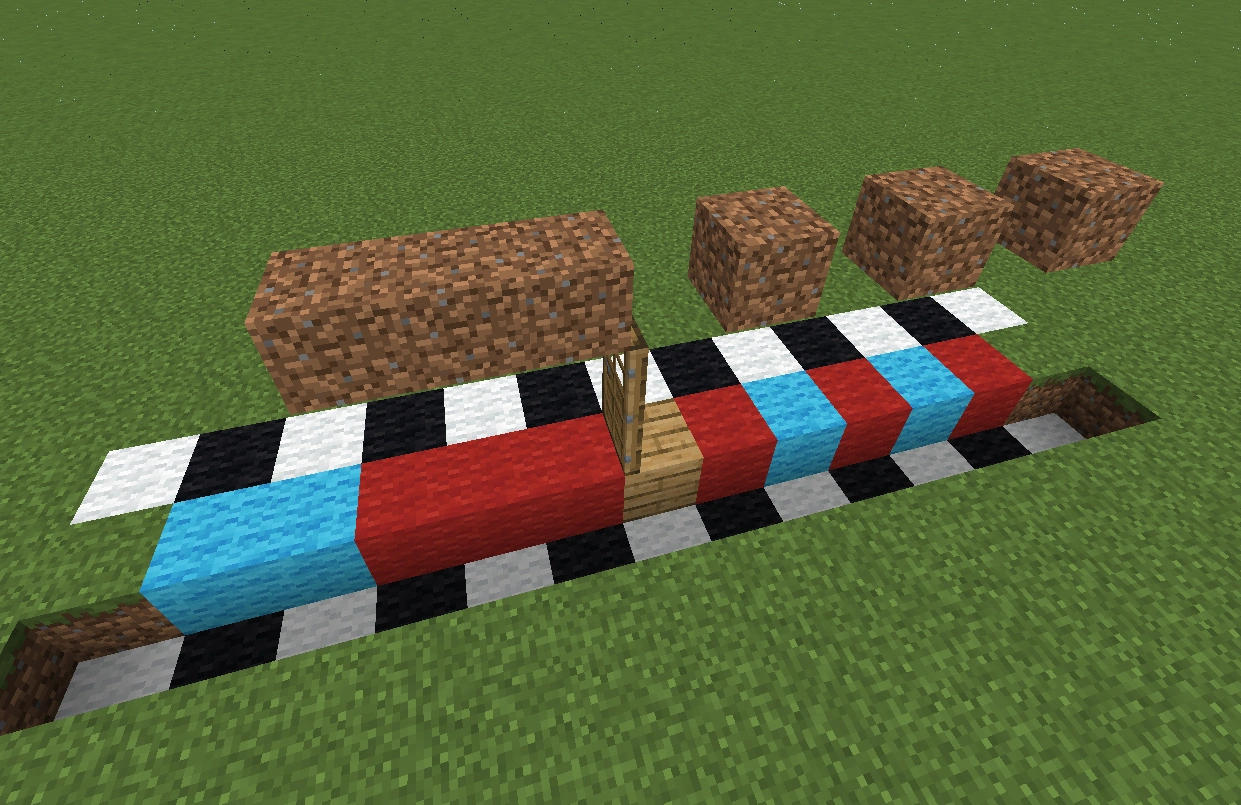
Example - The door is placed on the wooden planks. The game checks the spaces represented by the light blue wool, to see if they are covered by a "roof" block or not:
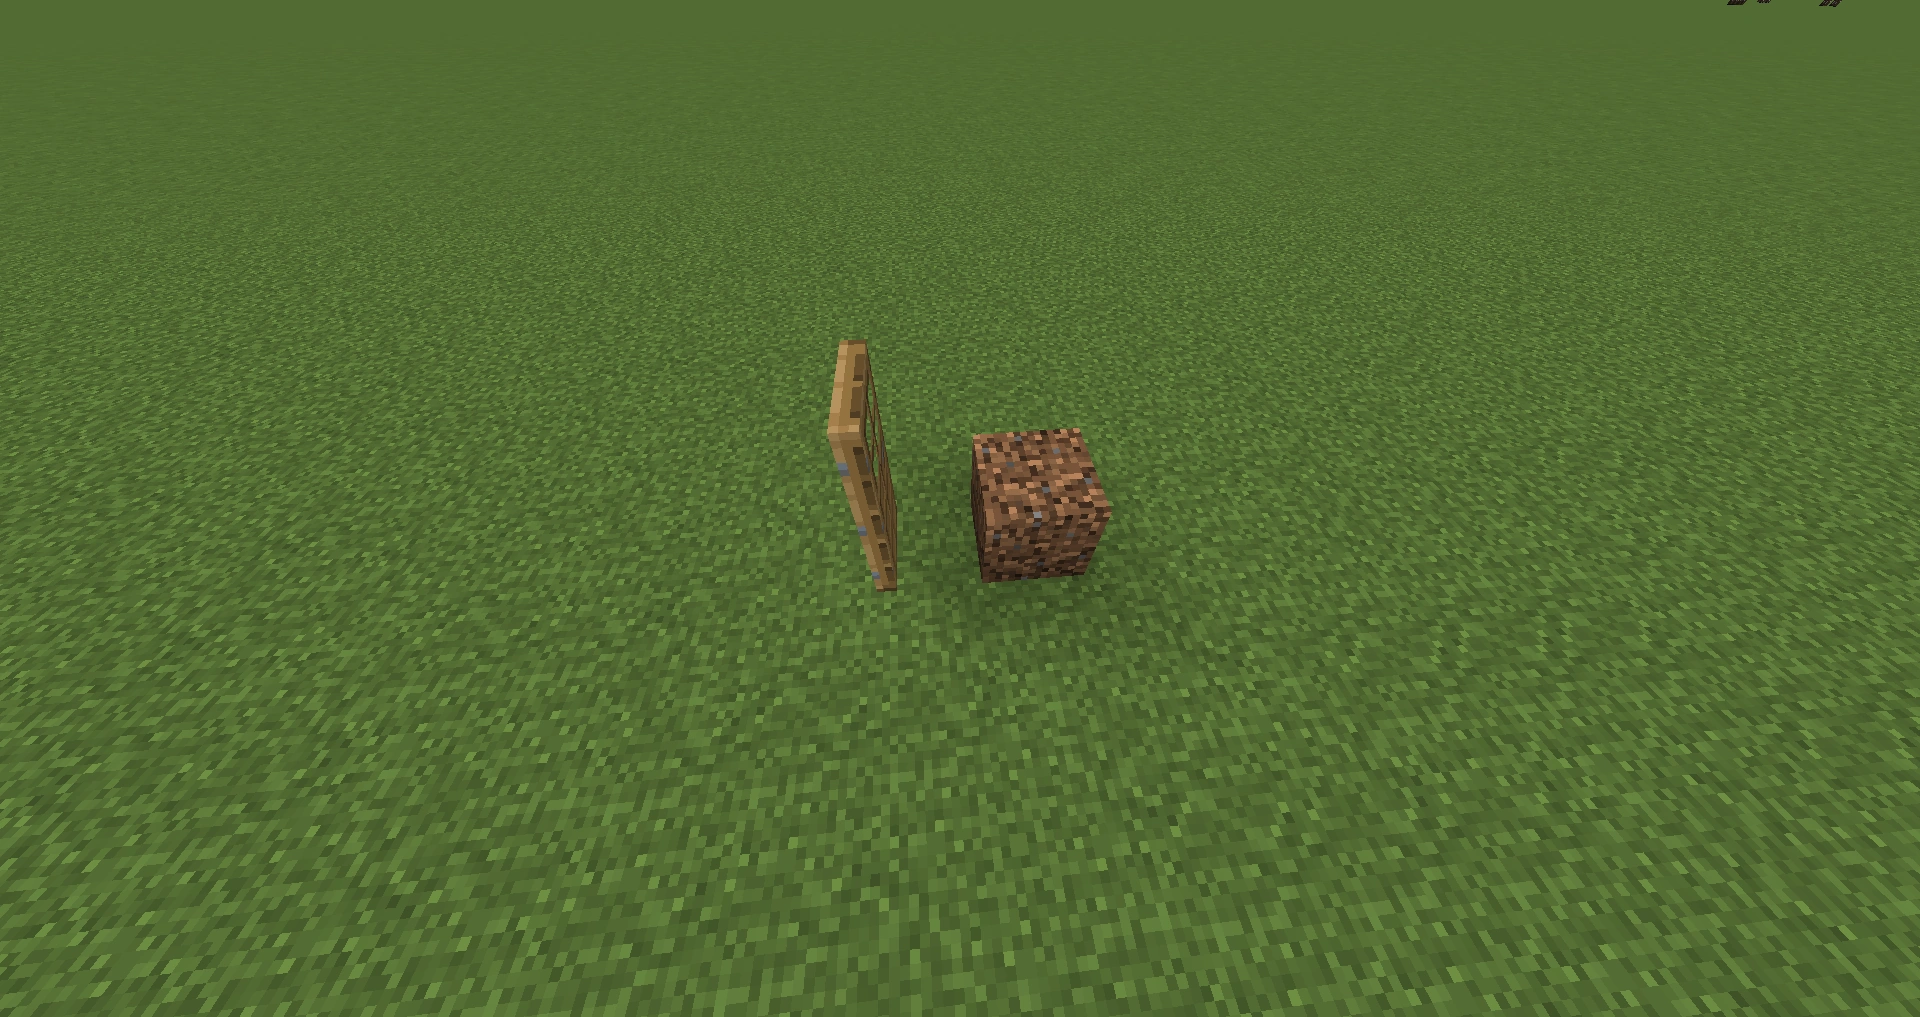
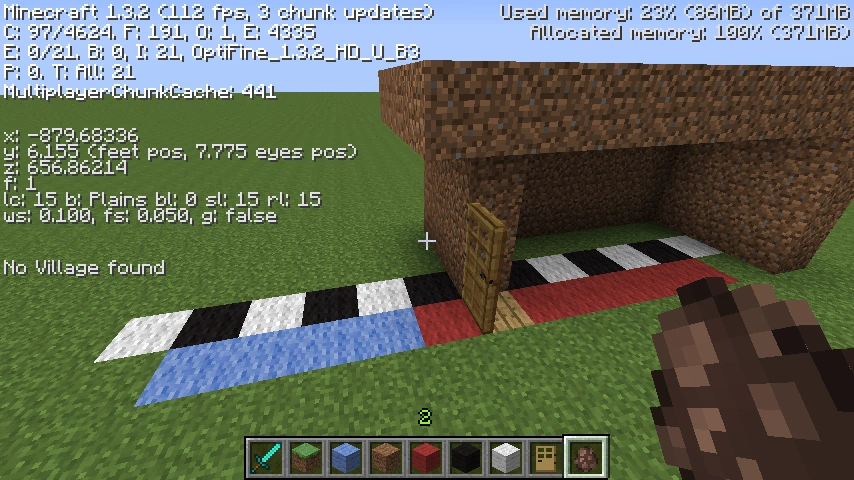
The simplest house looks something like this. Just a wooden door, with a dirt block on the ground next to it:
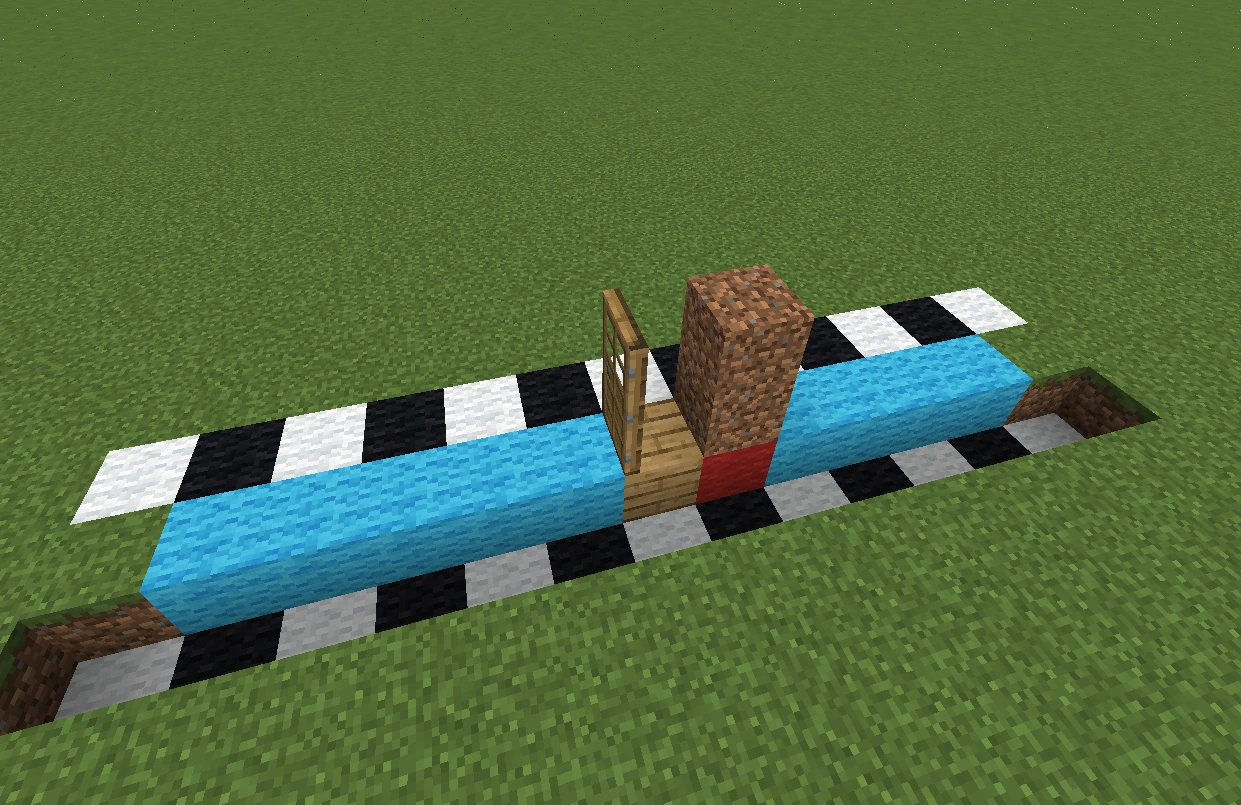
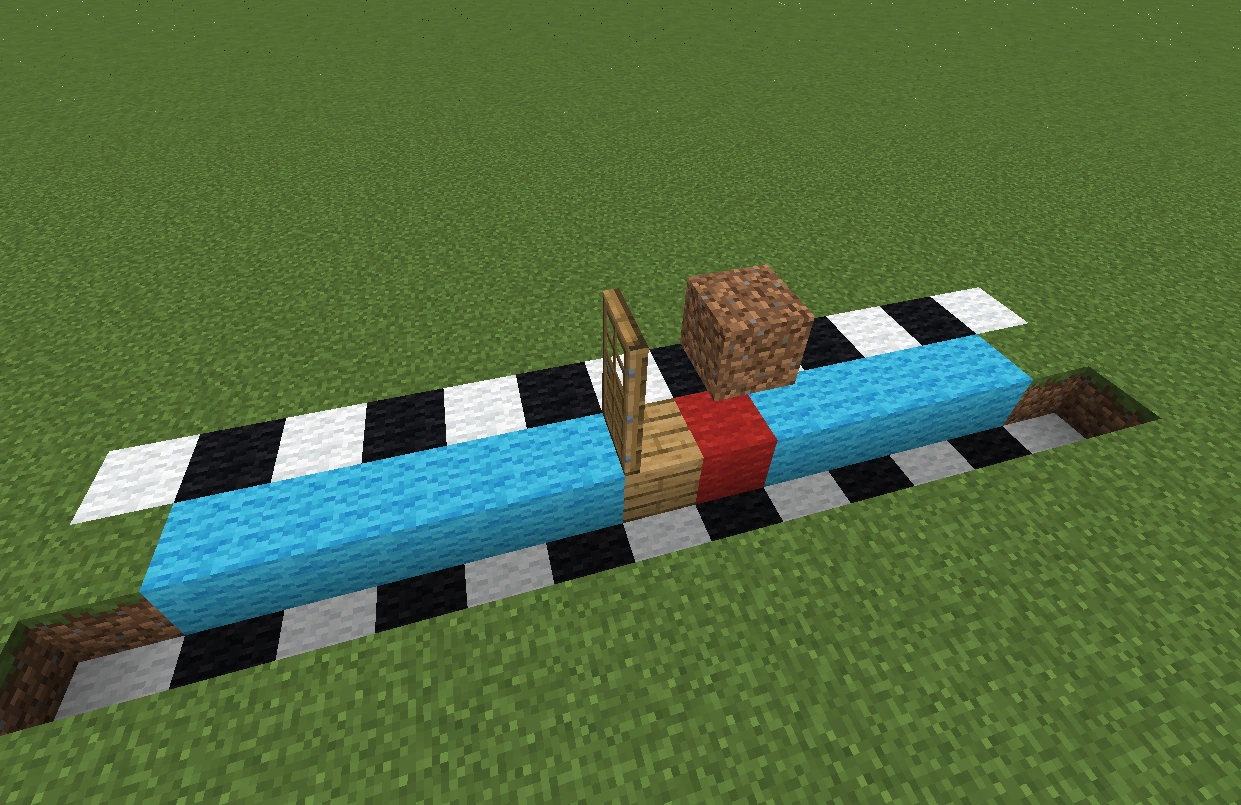
Not much to look at, is it? But it fits the criteria. The dirt blocks the light from reaching the space below it, and so counts as a roof block. There is one "inside" space, covered by a roof block, on the right side of the image (represented by the red wool below) and zero on the left. Since one is more than zero, there are more covered spaces on one side of the door than there are on the other, and so the game counts this as a house:

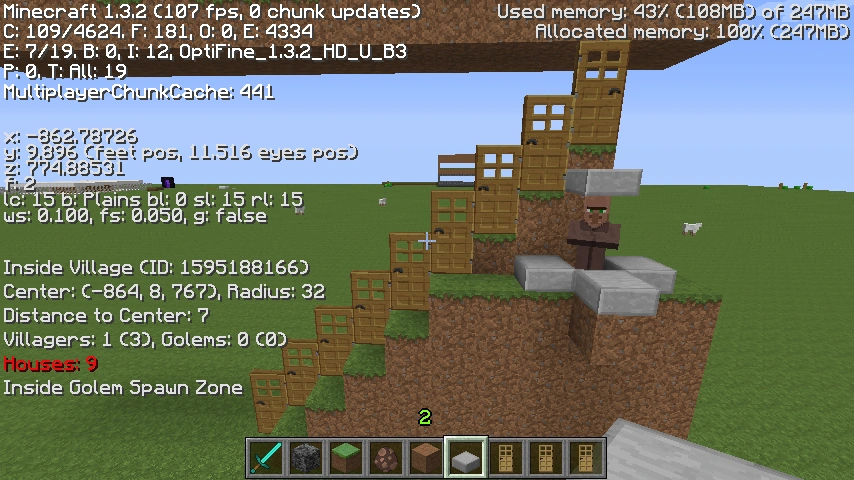
The following are all examples of houses as well:
It doesn't matter what you build, except for what's directly above the colored wool. Anything to the sides of this can be whatever you want, or nothing at all:
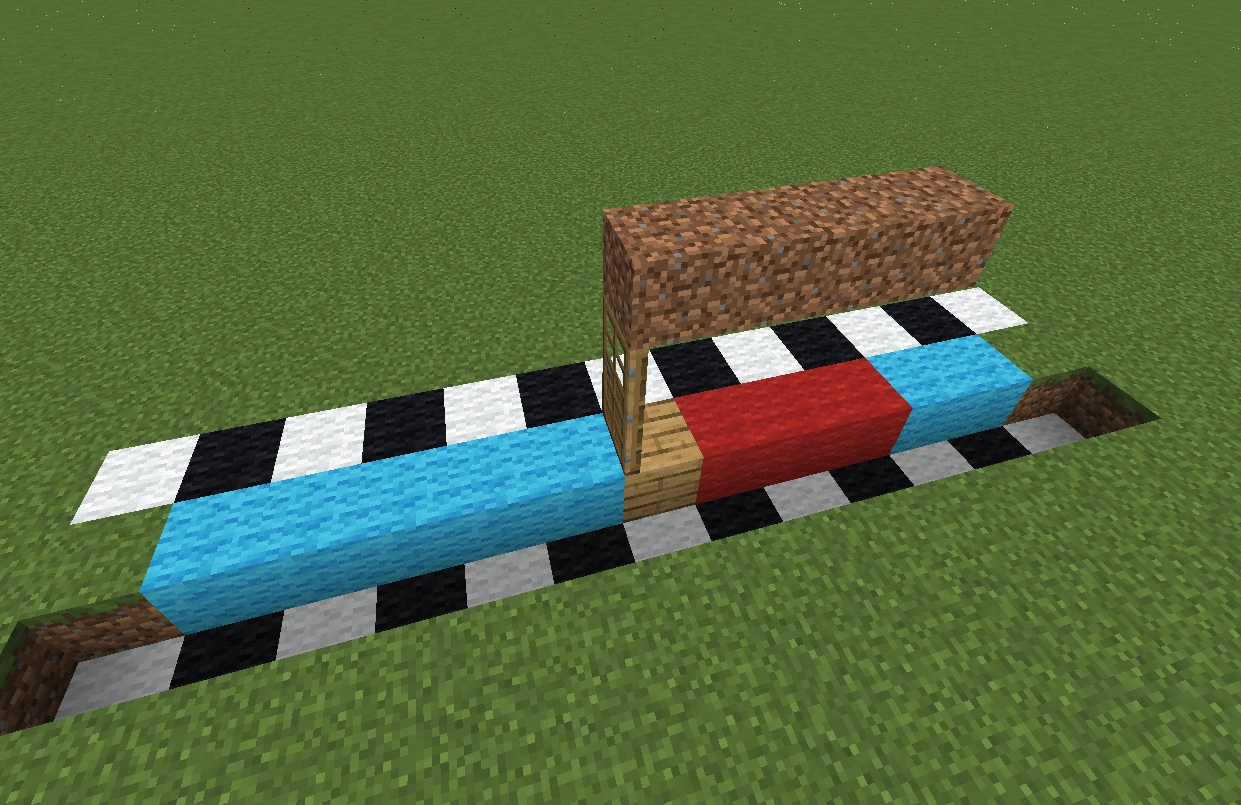
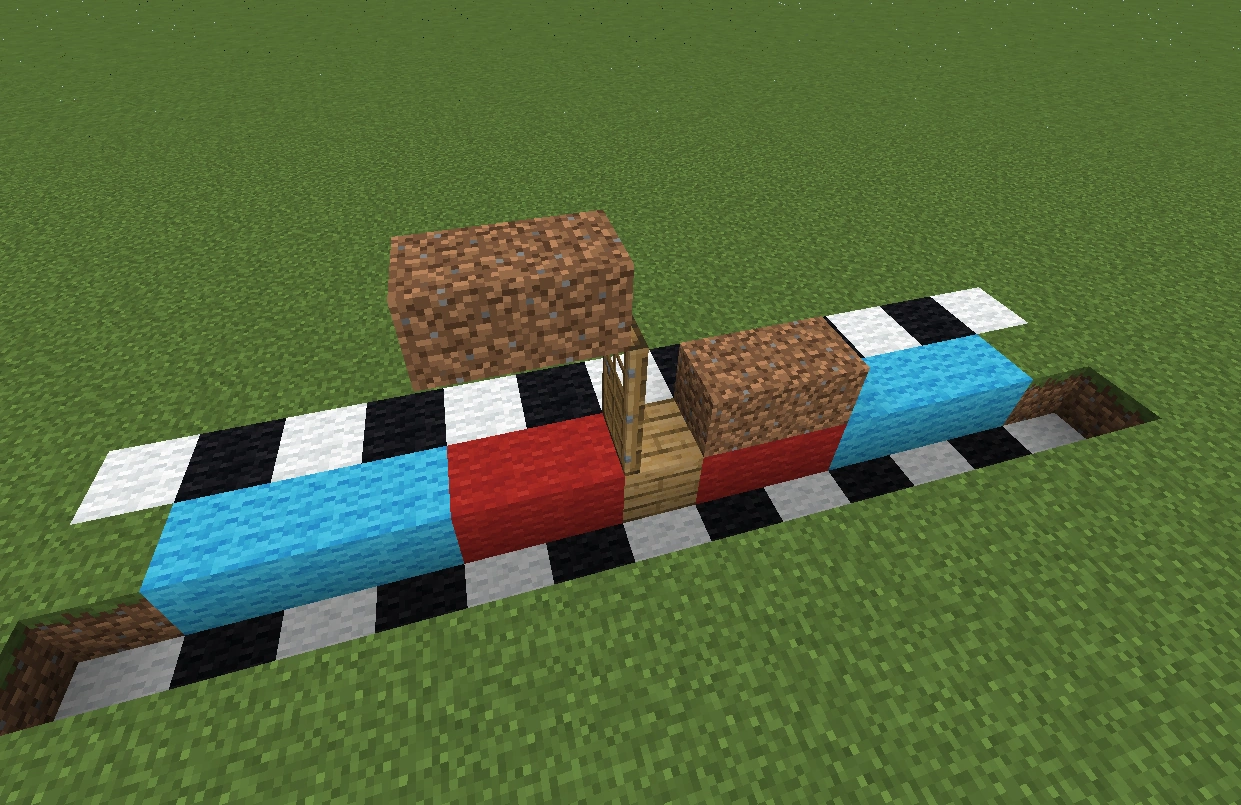
A door is two blocks tall, and this check is performed twice per door, if necessary. If the initial "roof check" (see Fig. 1) fails, then the bottom-most layer is ignored and the check is performed a second time, starting one layer higher. This time, only the spaces above the lime-green wool are checked for roof blocks:
Example - For the door pictured below, the initial roof check finds there are two spaces covered by roof blocks on the left side, and two covered spaces on the right also. With the same number of covered spaces on each side, neither one can be designated the "inside" or the "outside," and so the door is not counted as a house... yet, but we're not through yet, either:
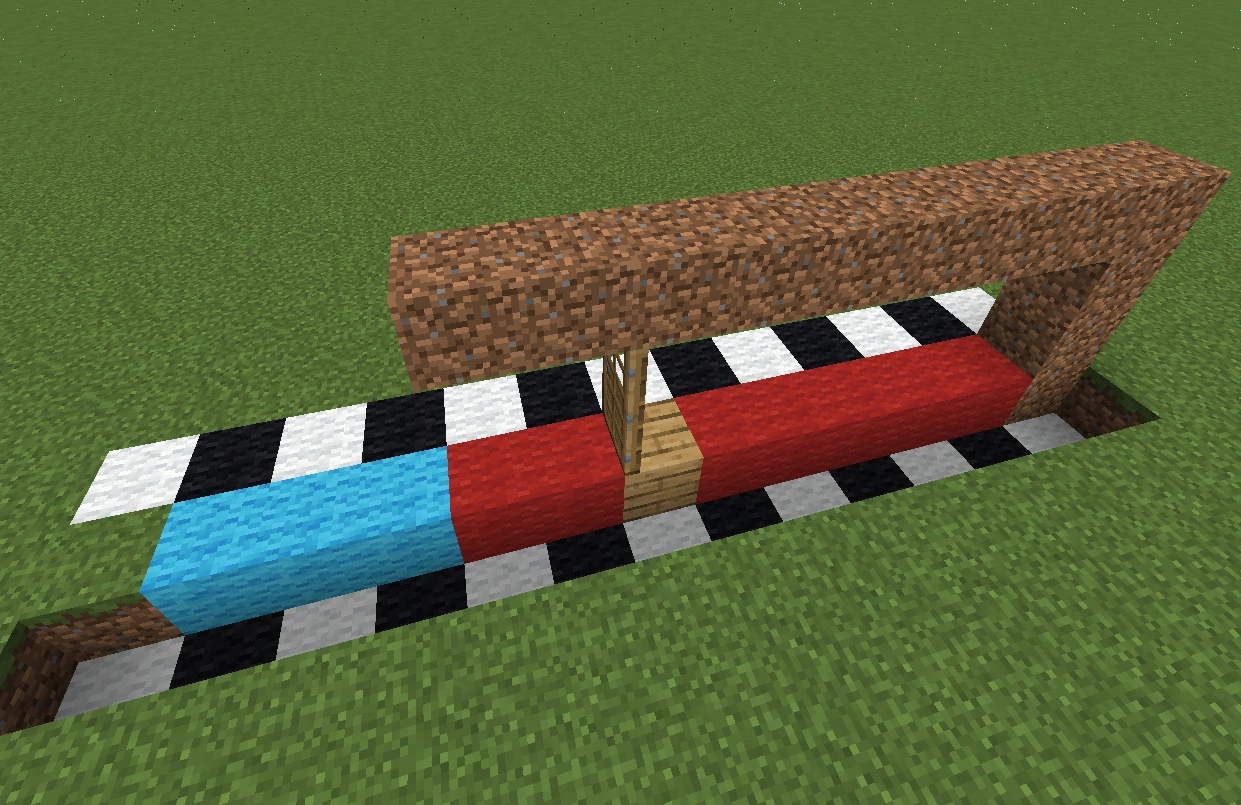
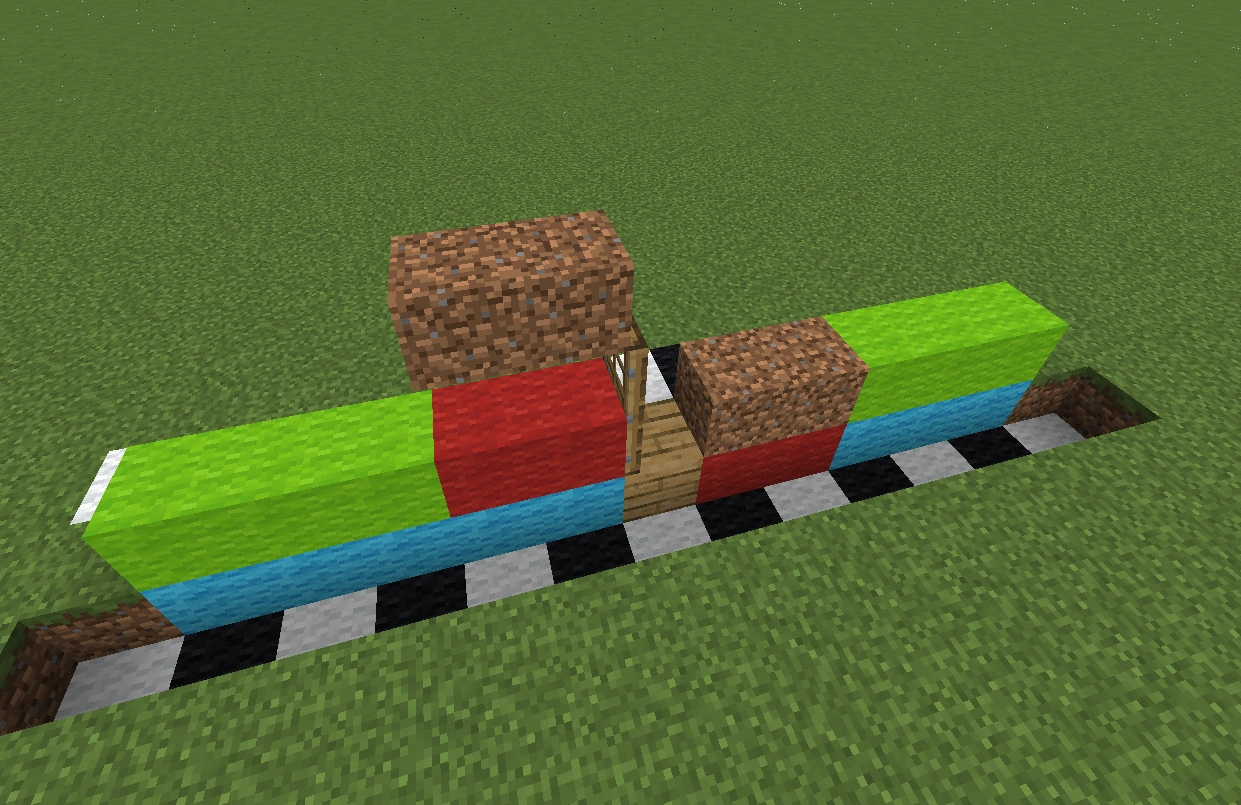
Then since the initial check failed, the bottom layer is ignored, and we perform the test again, this time checking for roof blocks only above (not level with) the green wool. This time, only the two spaces on the left-hand side of the image are covered. Since the "roof check" passed on this second try, the door counts as a house, and its "inside" is on the left where the more covered spaces are:
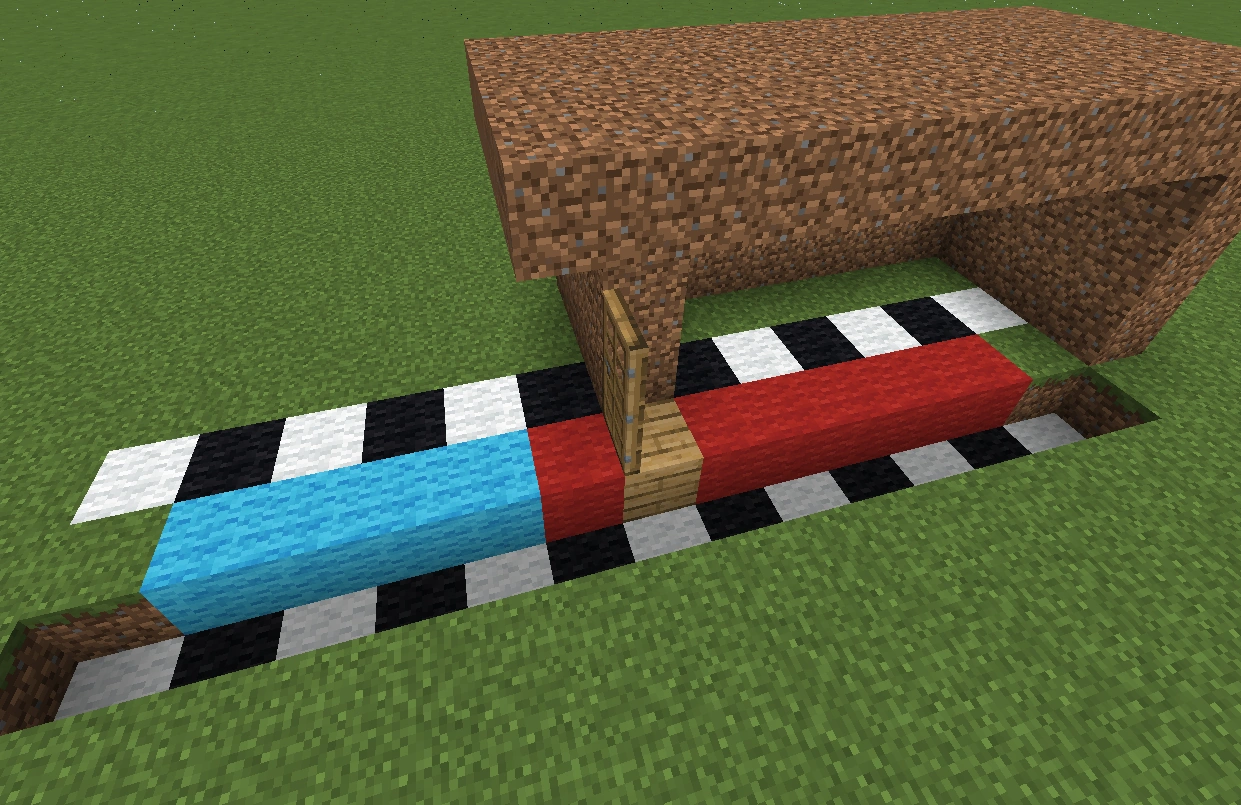
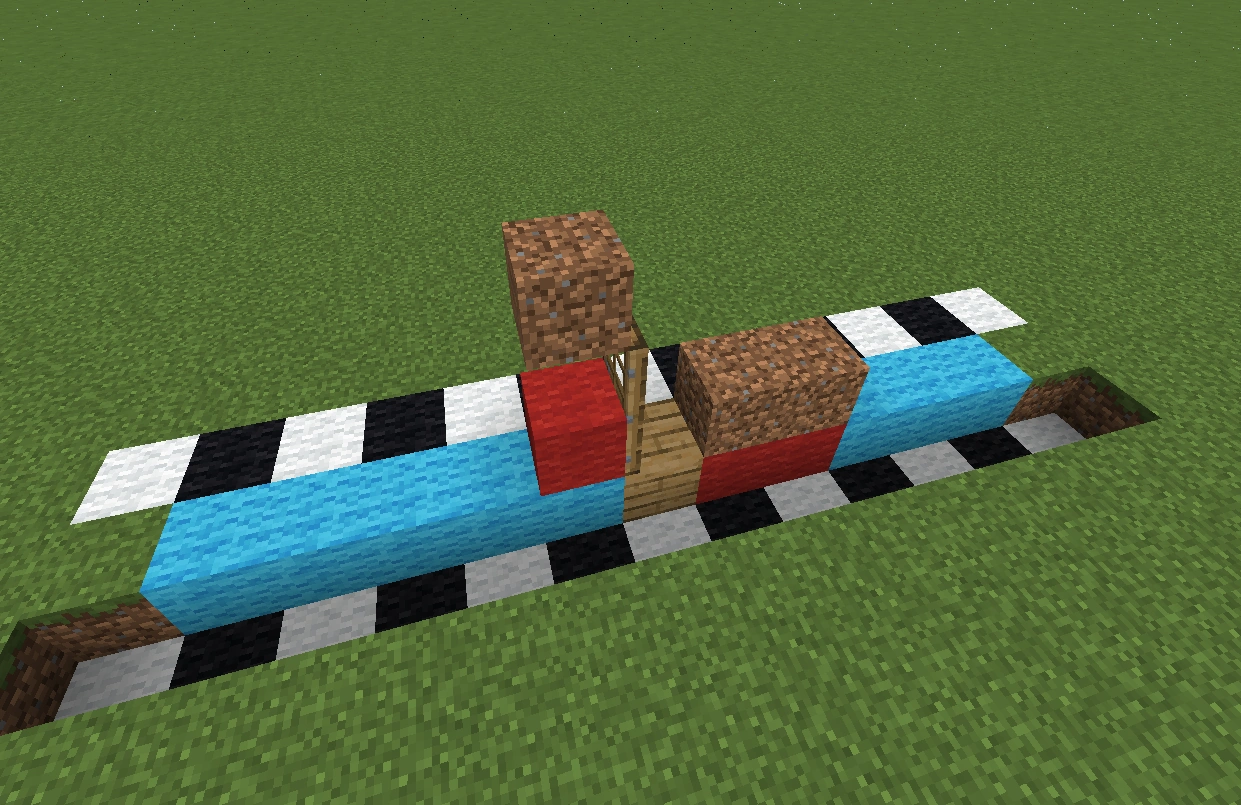
In the next example, the door passes the test on the initial first check. It has one covered space on the left side and two on the right. This makes it a house with the "inside" to the right. The second check would pass as well (with the "inside" on the left this time), but since the first one already passed, we don't even bother testing again. This door counts as a house, with the "inside" on the right:
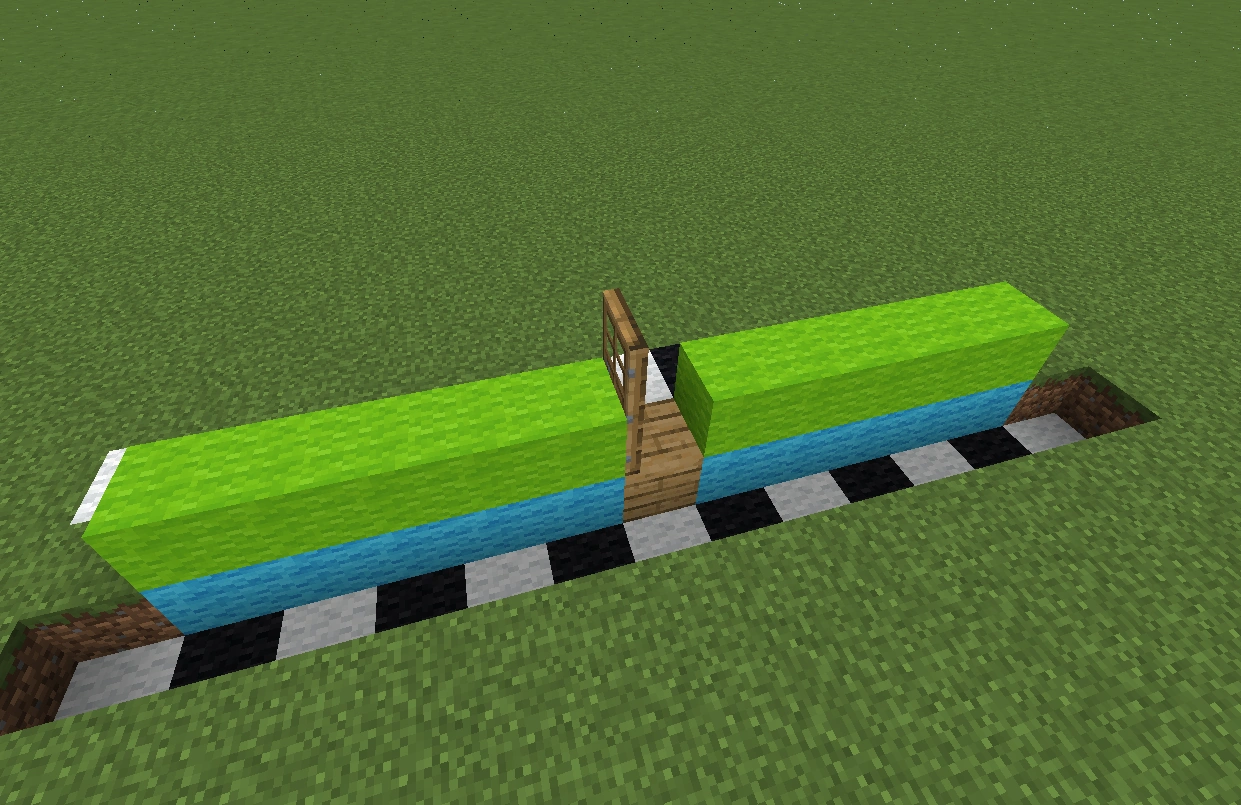
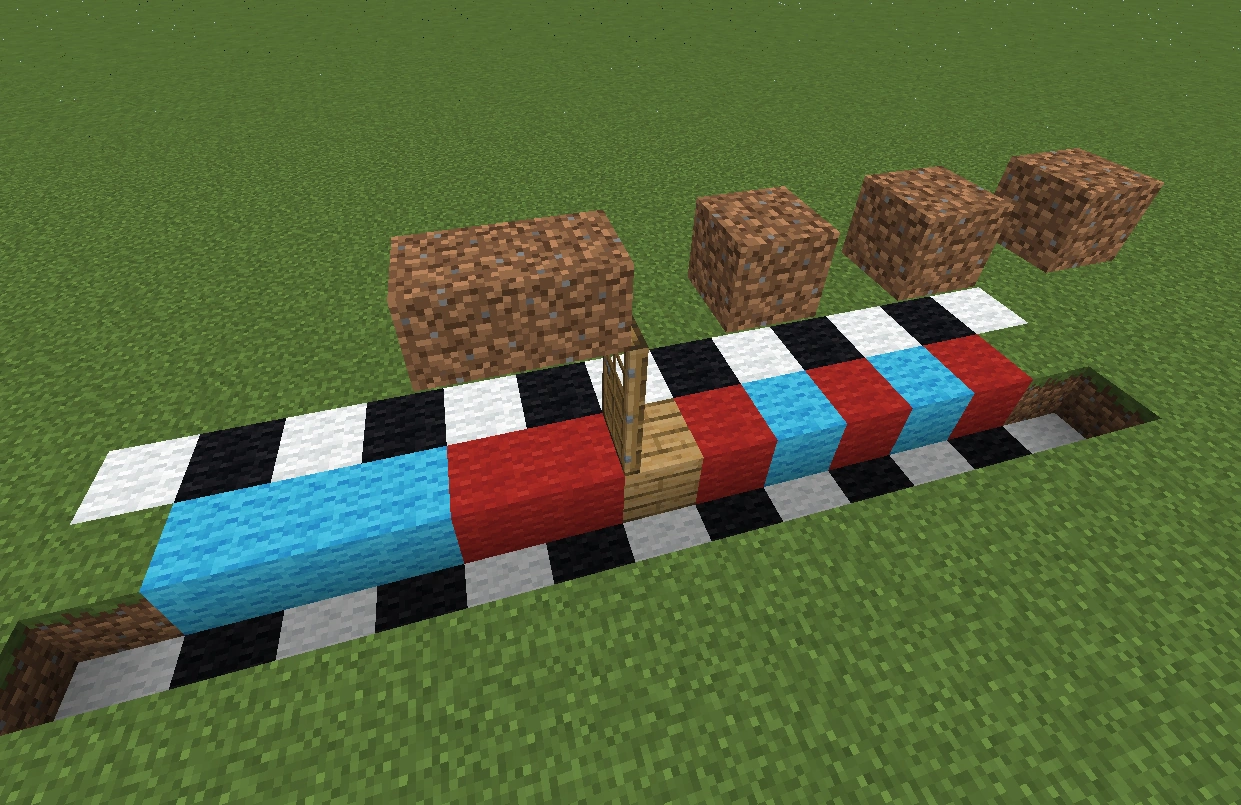
The covered spaces don't have to be contiguous. The door below is a house, with the "inside" on the right, which has three covered spaces within the 5-space limit, while the left side has only two:
This next door has three covered spaces on each side, and is not a house:
A house is initiated by a nearby villager. Without a villager nearby, it is not considered a "house," just some blocks and a door:
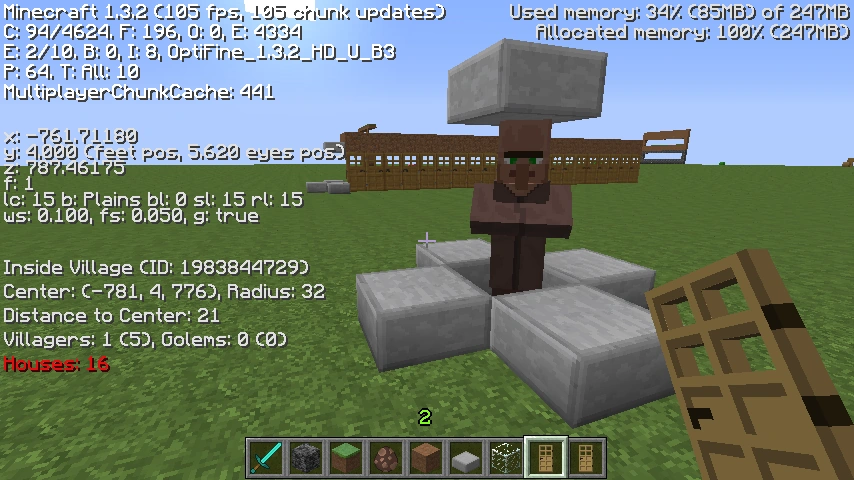
But as soon as that villager shows up, it becomes a house (and a village):

Villagers recognize a house within sixteen blocks along both horizontal axes, and up to three blocks above or five blocks below the level of the ground the villager is standing on:
Overlapping boundaries[]
Transparent blocks[]
It seems there are three kinds of transparent blocks. First, there are fully transparent blocks such as glass, torches, and fences. Then, there are what are called "partially transparent" blocks such as slabs, stairs, and leaves, which are treated as transparent by the rendering engine. Glowstone is also treated as transparent, although you cannot see through any part of it. Solid transparent blocks can be used as "floor" blocks in villages. Semi-transparent blocks still block light from passing through (at least partially, as is the case with leaves or water), so they're still somehow considered opaque to the lighting engine, which appears to be where it counts. These partially transparent blocks still block the sunlight, and count as roof blocks. Fully transparent blocks still do not count. Water and lava (both flowing and source blocks) are partially transparent, and count as roof blocks. Leaves, slabs, and stairs count as roof blocks.
Cancelling out[]
There is a rumor going around that two doors facing within a certain distance of each other somehow cancel each other out, and neither one of them (or sometimes only one, depending on who you hear it from) count as "houses." This is not true! It is nothing more than a misconception, a rumor, brought about by a misinterpretation.
The reason the doors on the left do not count as houses is not because they are facing each other, but rather because each one has exactly one space covered by a roof block on either side. So as you can see, it has nothing to do with the fact that they are facing each other!
Here is an image that demonstrates the overlap between the areas checked for roof blocks by each of the two doors. The door on the left checks above the pink blocks, and the door on the right checks above the blue ones (but only in the center row that's inline with the doors, clearly). Purple blocks represent the area where the two zones overlap, and these spaces are checked by both doors:
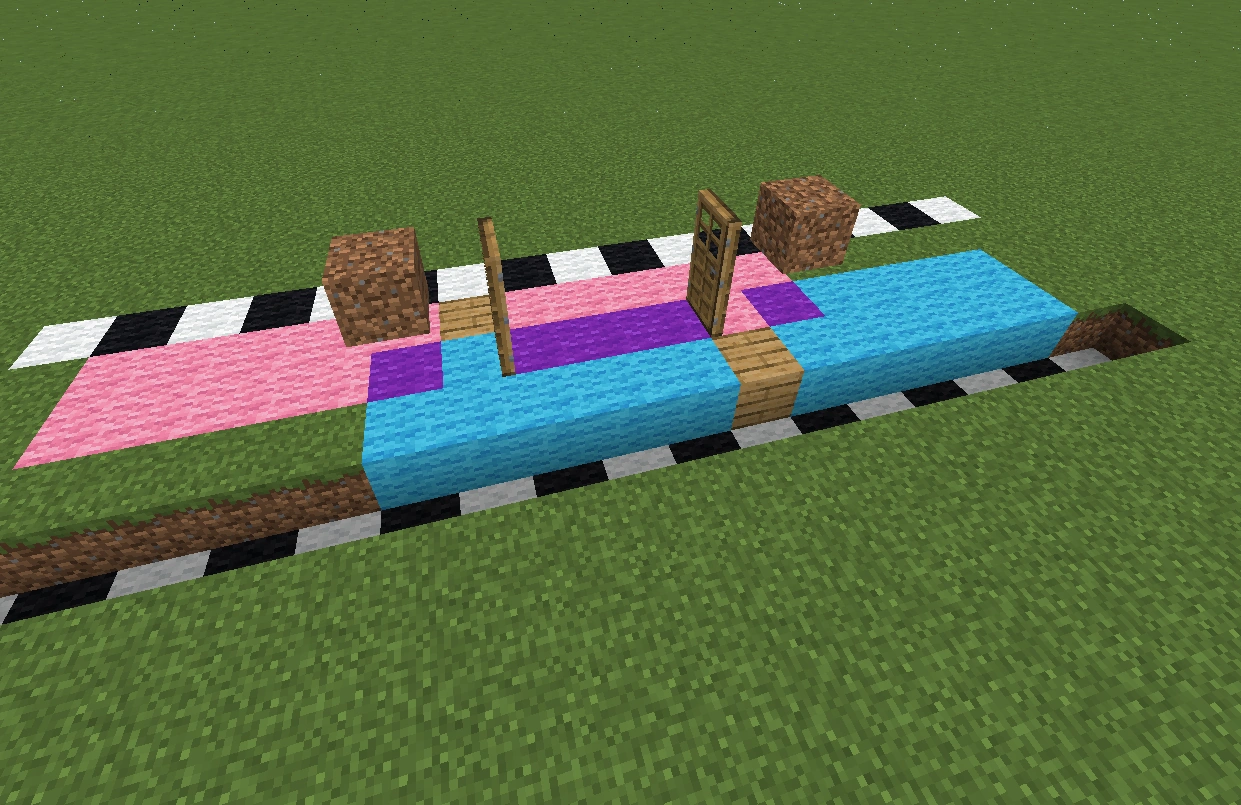
Since these doors both have the same number of covered spaces on either side, they don't have an "inside" or an "outside," and therefore can't be called "houses." However If you put additional blocks behind these (or just move them back by one space) then they are 6 blocks away from the far door, too far to be counted, but are still within range of the nearer door, creating the imbalance necessary to call them "houses":
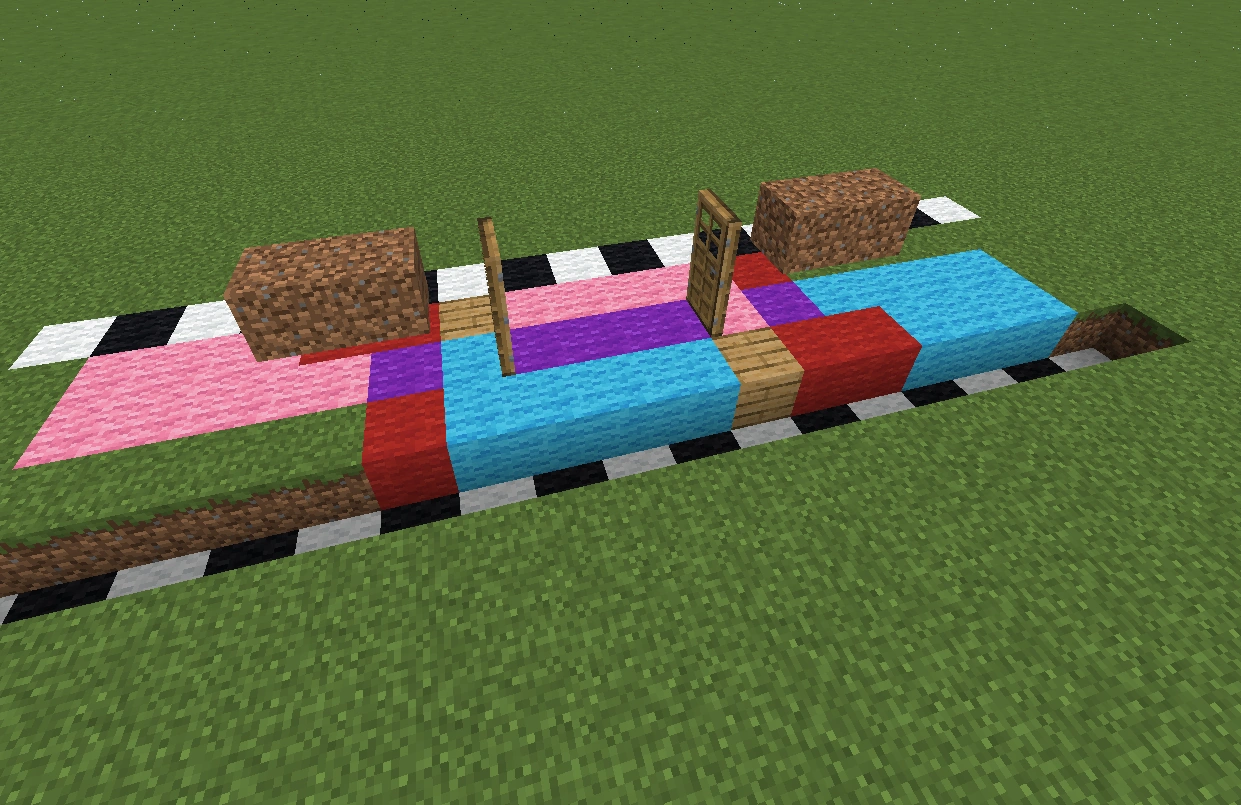
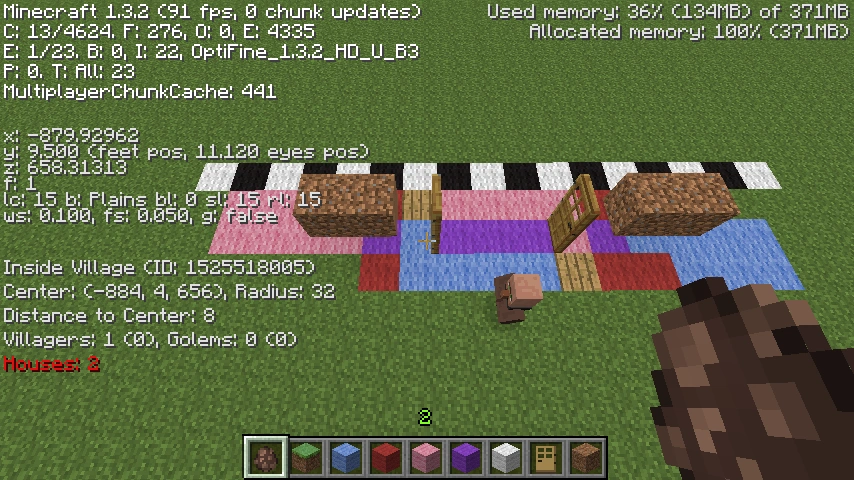
With these additional blocks in place, the doors now are valid houses. This is my understanding, and the Village Info mod agrees!:
Transporting villagers[]
There are several ways to transport villagers, some quite tedious.
Minecart technique[]
The first and most well known technique is the minecart technique, where you build a minecart track from the village to the end destination, and push the villagers one by one into a cart and push the cart to the destination.
Water tunnel technique[]
The second is more tedious but requires less resources, known as the water tunnel technique. Create a tunnel from one location to another, with no exits along the way (2×2, for example), then grab two buckets of water. Use water to push them down the path a few blocks, then use the second bucket to push them further, grab the first water, and repeat.
With the revisions to the water mechanics introduced in 1.13, this is an effective technique: Place a water source block, followed by several empty blocks at the same level for the water to drain through, then place an ice block under the last waster flow block, then finish by capping it off with a pressure plate or a sign. Repeat the process until you reach your intended destination. (This works best when buried deep underground and while well lit to keep mobs from killing your villagers in transit. Otherwise, you need to build a cover over the area you're using to keep them safe.) Then, if you need to move them upwards, create an upwards bubble column elevator and lift the villagers to the proper location.
Boat technique[]
A third technique is to transport villagers using a boat. As of PC version 1.9 mobs may enter boats, and players can enter the same boat and operate it while the mob sits in the back. This allows players to transport villagers over water, but also over land because as of 1.9.4 boats can be sailed on land (albeit very slowly). To move the boat upwards you have to create a bubble column.
Using fake houses[]
Using the gathered information above in this wiki, there is an easier way to transport villagers, rather than pushing them in a minecart, boat or using the water tunnel. Firstly find a village, and destroy all wooden doors except one to gather the villagers there. Then you can move the villagers by creating fake houses. As long as these meet the house requirements, the villagers 'follow' the doors. The easiest way to do this is to place a door with 2 blocks stacked up behind it, removing the old door so that the villagers follow and continuing the process again and again.
For a visual representation, watch the following video from 1:20 to 3:33.
Using Nether portals[]
A final and potentially least tedious method of transporting villagers is the "Nether Portal Method". Most entities can travel through nether portals. Keep in mind that this strategy only works if no Nether portals have yet been constructed in the Nether (see here for more details). Create a portal in the location where you want the Villagers to be, i.e. close to your house. Then travel to the nearest Village (it must be within 1024 distance of the first portal) and build another portal there. You can either use a minecart or manually push the Villagers into the portal, transporting them to the Nether, but keep in mind that Villagers cannot be pushed up blocks. Thus it would be ideal to build the portal so that the bottom blocks are level to the ground. Enter the portal and push the villagers out of the portal in the Nether, then wait about 30 seconds. After the villagers undergo "cooldown", they can be pushed back through the portal and should exit from the first portal that you constructed.
A few notes with this strategy. Once the villager has been transported through the portal, it is essentially impossible to return them to their village (but why would you want to do that, right?). However, while wandering they may accidentally reenter the portal, so it is a good idea to block off the portal by surrounding it with a fence.
Breeding and population cap[]
Villagers breed without player intervention, but there must be at least two adult villagers who can reach each other. If you are starting a village from scratch, or recovering from zombie villagers and there are no villagers left (or only one), then you need to acquire more. The only ways to do that are:
- Hauling them in from another village
- Curing infected zombie villagers
- Using cheat commands and/or creative mode spawn eggs
Given a breeding pair, a village's population is maintained at 0.35 times the number of "houses" (defined above.) Specifically, villagers may mate if the current population (updated only once per second) is below 0.35 times the number of "houses" rounded down.
Residents of a village that has not yet reached its population cap occasionally go into "love mode," indicated by animated hearts above their head (only visible if you have particle effects enabled, but still works even when you can't see it working). Much like with farm animals, when two villagers are feeling "romantic" and can see each other, they pathfind towards the other and "kiss" for a few seconds, after which a third, smaller ("baby") villager spawns next to them. This new villager gets assigned a random profession (indicated by the style and color of its clothing), not necessarily the same as either parent.
Because popularity is stored per village, if the entire village is destroyed, any accumulated popularity, positive or negative, is also eliminated. This may be useful in synthetic village designs, such as when only one villager is kept in range of doors to maintain the existence of the village but is moved out of range in order to destroy the village, such as to stop infinite villager breeding.
Willingness[]
Villagers must be "willing" in order to breed. After mating, they are longer willing and must be traded with again before becoming willing again.
Villagers can become willing by the player trading with them. Willingness is granted the first time a new offer is traded, or at a one-in-five chance on subsequent trades. This does not cause them to immediately seek out a mate, however.
Villagers can also become willing by having either 3 bread, 12 carrots 12 potatoes, or 12 beetroots in their inventory. Farmer villagers throw harvested crops at villagers, allowing them to pick them up to obtain enough food to become willing.
Curing zombie villagers[]
There are two ways to cure an infected zombie villager. The first method requires you to travel to the nether and collect at least two blaze rods, to craft a brewing stand, and then to turn the blaze rods into blaze powder to operate the brewing stand (as of 1.9). Then you need to brew a splash potion of weakness, and craft a golden apple (the "ordinary" one, that takes ingots to craft). When you find a zombie villager, toss the potion of weakness at it, and then right-click it with the golden apple. The zombie begins shaking for up to 5 minutes, then it turns into a villager of the corresponding profession and a random career.
Yes, there is another way, for Nether disabled servers, to give the zombie villager in question a potion of weakness, without having a brewing stand. You must get a witch and a zombie villager in the same proximity in order to do so. Witches sometimes throw a Splash Potion of Weakness (if a player is within 3 blocks), which you can use to your advantage, with a little work. This method is similar to getting a Skeleton to kill a Creeper, and as such tutorials on that should be followed in order to achieve the process. You will, however, need to have a golden apple ready this way too.
After you've used the splash potion of weakness and the golden apple, the zombie makes a loud sizzling sound, emits orange swirly particles, and begins to shake violently. It takes a couple of minutes for them to convert, so go ahead and trap it somewhere, and make sure it doesn't burn in the sunlight, or hurt any nearby villagers. After a few minutes, the zombie villager turns into a regular villager, at which point you can let it out to roam the village or do whatever.
Finding zombie villagers in the first place shouldn't be all that difficult. About every 20th zombie is a villager zombie, so it shouldn't take you too long to find two of them you can cure back into villagers and get the population booming by more..."natural" means. Additionally, when a villager is attacked by a zombie (any zombie) there is a chance (50% on normal difficulty, and 100% on hard) that they turn into a villager zombie instead of just being killed. There are also baby villager zombies, which are harder to trap, but can also be cured.
Zombie villagers are a great way to start an artificial village, because unlike villagers, zombie villagers follow the player long distances. Then when they arrive at the desired location they can be cured.
Breeding indefinitely[]
There is also a bug or glitch where the villagers can be coaxed to breed indefinitely without regard to the population cap.
Villagers need to be inside a sphere (radius = village radius) around the village center in order to breed, but the village population counts only villagers that are inside a box (width, length = 2× village radius, height: 8 [always!]) around the village center. So with a sphere that can grow to any size, and a box that's always only 8 high, it should be apparent that there are some zones only covered by the sphere (above and below the village center).
You can reproduce/abuse this behavior by building 6 houses on the ground level (enough to set the villager limit to 2), drop 2 (or more) villagers into a 6 blocks deep hole, and leave one villager at the top to keep the houses "alive". The villagers in the hole breed indefinitely, because they're not counted against the cap. As of Minecraft Java Edition 1.8, you need to make the villagers willing to breed, by also giving them food (or give them a farm, a crop, with a farmer), or trading with them.
Iron golems[]
Iron golems spawn near the center of a village if it has at least ten villagers and 21 houses. Additional houses beyond the 21st make no difference as far as golem spawning is concerned, although 29 would be needed to spawn ten villagers naturally. Additional villagers allow more golems to spawn, in increments of one golem for every ten extra villagers (so 0-9 villagers allows no golems to spawn, the cap is set at zero; 10-19 raises that cap to one, 20-29 raises it to two, etc.). This cap only limits the number of golems in a village at any one time; as soon as one is killed or leaves the village boundaries, a new one can spawn in its place immediately.
The golem spawning zone is a 16×16×6 area centered around the center point of the village. As long as all the conditions are met (10 villagers, 21 houses, golem cap not reached), then each game tick (1/20 of a second) there is a 1/7000 chance to try to spawn a golem. When a golem is to be spawned, up to ten attempts are made to spawn a golem. A random spot is chosen inside the spawning zone, and if that spot is above a solid-topped block with at least 2×2×4 space above it (including liquids—golems can spawn in water, which is key to most iron farm designs—and transparent blocks), then a golem is spawned there.
The average expected spawning rate, if the golems are killed or flushed outside the village boundary quickly enough so that the cap is never reached and new ones are able to spawn in their place immediately, is roughly 10 golems per hour. A higher cap doesn't increase this rate beyond reducing the amount of time that the cap is filled while the newly-spawned golem is killed or removed.
Zombie sieges[]
At night, there is a chance that a zombie siege might occur. This is when a large number of zombies spawn in or near a village, attacking what villagers they can reach, crowding around and pounding on the doors of those they can't. On hard or hardcore mode, they can actually break down the wooden doors of the villagers' homes (this is true of all zombies, not just during sieges.) A zombie siege requires a village of at least 10 houses and at least 20 villagers.
Zombies in sieges ignore light levels and the 24-block minimum distance from the player, but other than that, behave absolutely normal (i.e., they do not spawn on glowstone or any other transparent or half block, need a 2×1×1 minimum space, etc.). They can also spawn INSIDE doors, making Iron Golem farms difficult to build on hard, as zombies beat down doors on hard (they'll attempt to beat them down on other difficulties, but not succeed). However, zombies won't spawn 128 blocks away from you, even though the siege is technically happening in the game code, so you're safe if you build it high up. You can make houses virtually zombie-proof simply by taking out one ground block from directly in front of the door, and, if necessary, rehanging the door such that the outside is "smooth," i.e. the door's position on its ground block runs consistent with the outside wall. This is because zombies can only break the top half of a door, and if they have to jump, they can never get through.
Video[]
External links[]
- Village Info mod by trunkz - The mod provides a more detailed look at what's going on with your village. It adds a few lines to your F3 screen indicating if you're in or near a village, and info about its size, population (both current and maximum) number of houses, etc.
- Imgur gallery by Derrick - A briefer, more compact visualization of what makes a "house," and a bonus "villager breeding unit" that can support up to 35 villagers in an 11×10 or so space (the unit takes up that much space, the villagers themselves wander around outside of it)