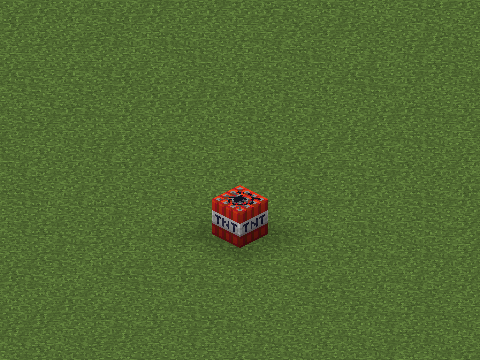
A TNT explosion.
An explosion is a physical event, generally destructive, that can be caused by several different circumstances. It can destroy nearby blocks, propel and damage nearby players, entities, and their armor, and cause one or more fires under correct circumstances. Explosions produce a "shockwave" particle effect.
Multiple close explosions may propel objects further, but have no cumulative effect on the destruction of a block. This is because explosions' damage to blocks is evaluated individually (per explosion), and blocks' blast resistance does not become "weakened" per explosion.
"Destroyed" blocks have a chance of dropping as collectible resources (and otherwise disappear), and this chance is 1⁄p, where p is the explosion power. So, a creeper blast (uncharged) will have a 1⁄3 chance of dropping a block.
The propulsion effect of explosions is often used for TNT cannons, and can also be used to shoot out gravity affected blocks.
Explosion strength
| Explosion Type | Power | Notes |
|---|---|---|
| Wither (when created) | 7 | |
| End crystal (when destroyed) | 6 | All other crystals nearby will also explode at the same time. |
| Charged creeper | 6 | Drops heads or skulls of mobs killed by explosion |
| Bed when used in the Nether or the End | 5 | Starts fires |
| TNT | 4 | |
| Creeper | 3 | |
| Ghast fireball | 1 | Starts fires |
| Black wither skull | 1 | |
| Blue wither skull | 1 | Treats blast radius blocks (except bedrock, end portal, end portal frame, command block, structure block, structure void and barrier) as having a blast resistance of less than 4. |
Despite being damaging to entities, fireworks do not destroy terrain and as such are not counted as conventional explosions.
Cauldrons perform a non-terrain-damaging explosion when incompatible liquids are mixed.[Bedrock Edition only]
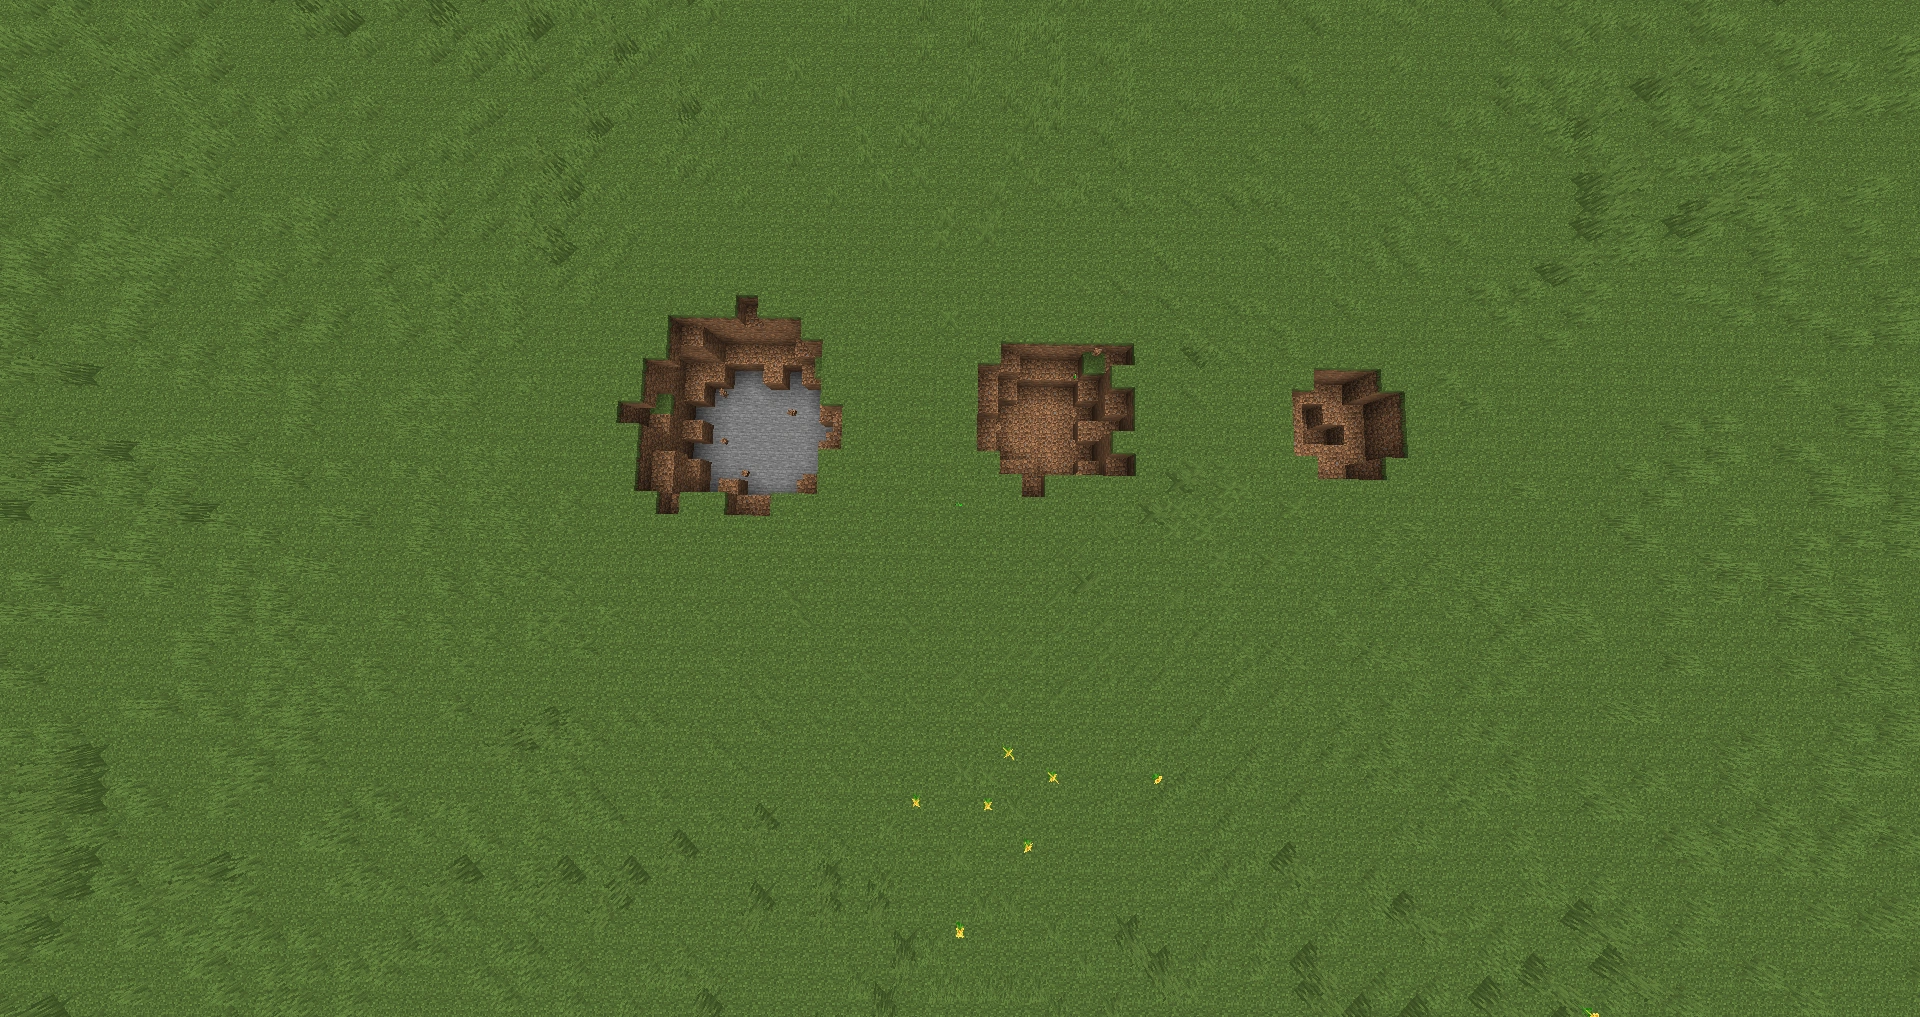
Comparison of explosion craters, from wither skull (top left), wither (far left), creeper (left), charged creeper (right) and TNT (far right).
Effect
Model of block destruction
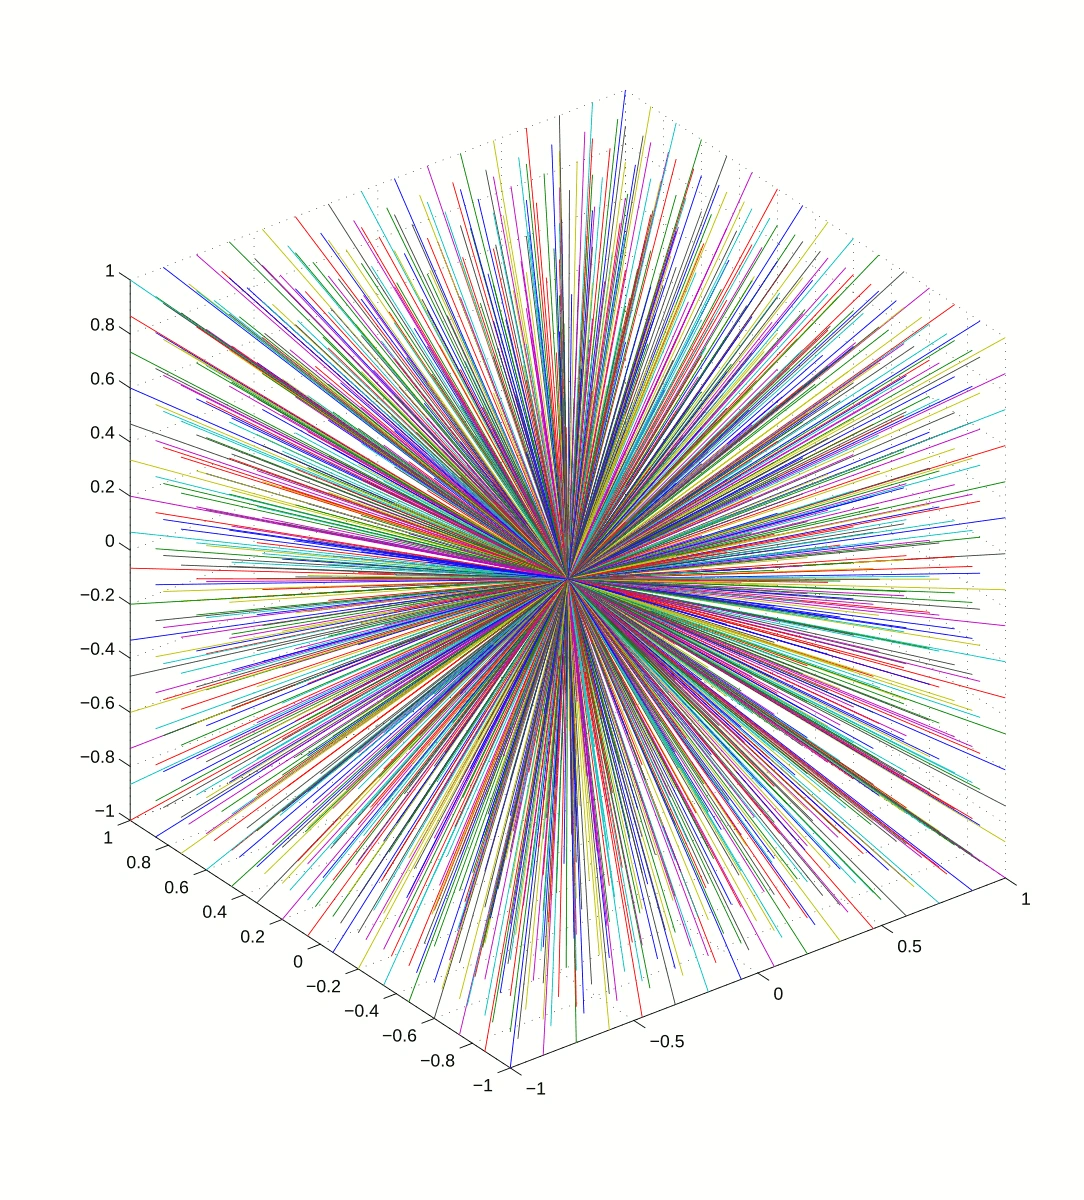
The rays from the explosion center to points that uniformly distributed on the surface of a cube centered at the explosion with an edge length of 2. (However, this only defines their directions, not their length).
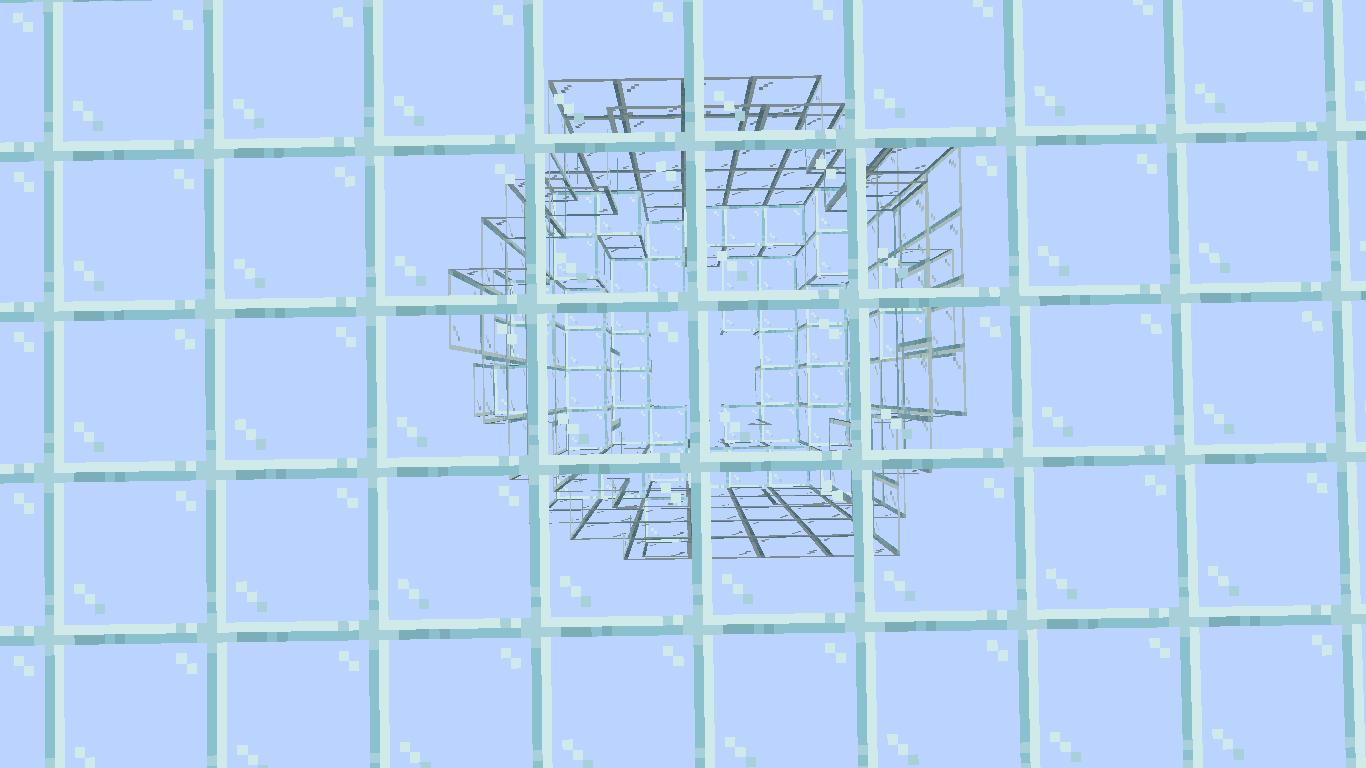
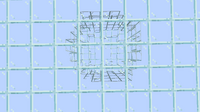
The roughly spherical pattern of blocks destroyed can be seen here.
An explosion can destroy nearby blocks. Its blast effect is evaluated independently on many explosion rays originating from the explosion center, as shown in the right figure.
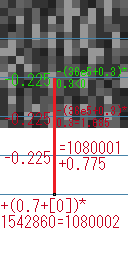
An explosion must be very powerful (power ~1542860) to destroy a bedrock block.
- A cube around the explosion is divided into a 16×16×16 grid, and rays are created from the center to each outer point of this grid, meaning that there are a total of 1352 rays.
- Each ray is given an intensity, calculated as (0.7 + [a random value from 0 to 0.6]) × [power].
- For every 0.3 blocks along the ray, the intensity of the ray decays/is attenuated by 0.3×0.75 (0.225), and the block it passes through absorbs/reduces it by ([blast resistance/5]+0.3)×0.3.
- The ray destroys all blocks that could not end the ray at any checkpoint.
From the above process, the following results can be deduced (where ⌊x⌋ is the floor function):
- The blast radius in the air of an explosion (i.e. only attenuated, not absorbed by blocks) =
 == 10.2 (charged creepers), 6.9 (TNT), 5.1 (creepers), 1.5 (fireballs). For example, a TNT explosion can destroy a torch 7 blocks away. However, how many blocks an explosion can destroy is non-deterministic and also dependent on the specific location of the explosion.
 - The minimum block resistance required to absorb maximum blast force of an explosion happening in nearby air = ((1.3 × power − attenuation steps × step length × 0.75)/step length − 0.3) × 5. To not be destroyed, a block has to absorb all blast force at the first checkpoint in it.
- The attenuation steps is subject to collision restrictions. For explosion in air, there is at least one attenuation step. TNT and creeper explosions are always 0.49 and 0.5 meter away from nearest block (2 att. steps), but fireball explosions can happen anywhere (1 att. step).
- Thus, the block resistances are 121.00 (charged creepers), 77.67 (TNT), 56.00 (creepers), 16.42 (fireballs).
- So water, lava (Note: Only the stationary block) obsidian, and bedrock are always indestructible, and fences and less blast-resistant blocks can be destroyed by fireballs. These are theoretical values, and in reality less resistant blocks are not always destroyed; there is no such mechanic.
Interaction with entities
An explosion has different effects on entities than blocks. Entities are damaged and propelled by an explosion if within its damage radius of 2 × power. Note that the "damage radius" is different from the blast radius of explosion effect on blocks.
- For every entity within a 2×[power] block sphere of the explosion center, the impact is (1-[distance from explosion/power/2])×[exposure] (see section below on exposure).
- The entity is damaged by (impact×impact+impact)×8×power+1 (armor enchantments for damage are handled separately).
- After damage, exposure is reduced by (exposure×[max blast protection from all armor]×0.15).
- The entity's eyes are propelled along the ray from the explosion center by the new exposure.
From the above process, the following results can be deduced:
- Entities will always get at least 1 point of damage if they are within the radius, regardless of their explosion exposure.
- The maximum damage that entities can take (at the explosion center with 100% exposure) = (1 × 1 + 1) × 8 × power + 1 point of damage = 97 (charged creepers), 65 (TNT), 49 (creepers), 17 (fireballs). When entities are away or covered by blocks from the explosion center, they take less damage.
- The maximum velocity gain that an entity can obtain from a TNT explosion is 1, at the explosion center with 100% exposure.

A primed TNT AABB has directionally asymmetrical sample points (1/2.96 spacing) because of rounding.
Calculation of explosion exposure
- The entity's bounding box is divided into a [2×width+1] by [2×height+1] by [2×depth+1] grid of unequally spaced points.
- A ray is drawn from the explosion center to each point.
- The exposure of the entity is the percentage of these rays that are unobstructed.
The approximation algorithm has sampling error that results in directional asymmetry of propulsion. For example, a typical TNT cannon has maximum range in the west direction partly because the primed TNT has largest sampled exposure in that direction.
Causing fire
If the explosion has the ability, it randomly starts fires in ⅓ of all destroyed air blocks that are above opaque blocks.
Prolonged lag
In addition to the initial lag from processing the explosion, which subsides once the explosion has occurred, there can also be a prolonged fallout from an explosion, that consists of dropped items, liquid physics, and increased render-complexity of the crater. Technically, the dropped items will disappear after 5 minutes, however those 5 in-game minutes may take a long time to process during extreme lag.
Using certain rules and commands can avoid this prolonged lag: setting the gamerule doTileDrops to false, for instance with /gamerule doTileDrops false, will stop dropped items from being generated by explosions. Also, the command /kill @e[type=Item] will destroy all dropped items.
Blast resistance
| Block name | Blast resistance |
|---|---|
| Barrier | 3,600,000.8 |
| Bedrock | 3,600,000 |
| Structure Block | 3,600,000 |
| Command Block | 3,600,000 |
| End Gateway Block | ? |
| End Portal | 3,600,000 |
| End Portal Frame | 3,600,000 |
| Anvil | 1,200 |
| Enchantment Table | ? |
| Obsidian | 1,200 |
| Ender Chest | 600 |
| Bubble Column | 100 |
| Lava | 100 |
| Water | 100 |
| Dragon Egg | 9 |
| End Stone | 9 |
| Block of Coal | 6 |
| Block of Diamond | 6 |
| Block of Emerald | 6 |
| Block of Gold | 6 |
| Block of Iron | 6 |
| Block of Redstone | 6 |
| Bricks | 6 |
| Brick Stairs | 6 |
| Andesite | 6 |
| Cobblestone | 6 |
| Cobblestone Stairs | 6 |
| Cobblestone Wall | ? |
| Diorite | 6 |
| Granite | 6 |
| Iron Bars | 6 |
| Jukebox | 6 |
| Moss Stone | ? |
| Nether Bricks | 6 |
| Nether Brick Fence | 6 |
| Nether Brick Stairs | 6 |
| Prismarine | 6 |
| Purpur Block | 6 |
| Purpur Pillar | 6 |
| Purpur Slab | 6 |
| Purpur Stairs | 6 |
| Red Nether Bricks | 6 |
| Shulker Box | 2 |
| Stone | 6 |
| Stone Brick | ? |
| Stone Brick Stairs | 6 |
| Stone Slabs | 6 |
| Iron Door | 5 |
| Iron Trapdoor | 5 |
| Monster Spawner | 5 |
| Hopper | 4.8 |
| Terracotta | 4.2 |
| Cobweb | 4 |
| Dispenser | 3.5 |
| Dropper | 3.5 |
| Furnace | 3.5 |
| Observer | 3 |
| Beacon | 3 |
| Coal Ore | 3 |
| Cocoa | ? |
| Diamond Ore | 3 |
| Block name | Blast resistance |
|---|---|
| Emerald Ore | 3 |
| Fence | ? |
| Fence Gate | 3 |
| Gold Ore | 3 |
| Iron Ore | 3 |
| Lab Table | 3 |
| Lapis Lazuli Block | ? |
| Lapis Lazuli Ore | 3 |
| Nether Quartz Ore | 3 |
| Redstone Ore | 3 |
| Trapdoor | ? |
| Planks | 3 |
| Wooden Door | 3 |
| Wood Slabs | ? |
| Wood Stairs | ? |
| Chest | 2.5 |
| Crafting Table | 2.5 |
| Trapped Chest | 2.5 |
| Bone Block | 2 |
| Cauldron | 2 |
| Compound Creator | 2 |
| Wood | 2 |
| Concrete | 1.8 |
| Bookshelf | 1.5 |
| Glazed Terracotta | 1.4 |
| Banner | 1 |
| Jack o'Lantern | 1 |
| Melon | 1 |
| Mob head | 1 |
| Nether Wart Block | 1 |
| Pumpkin | 1 |
| Sign | 1 |
| End Stone Bricks | 9 |
| Block of Quartz | 0.8 |
| Quartz Stairs | 0.8 |
| Note Block | 0.8 |
| Red Sandstone | 0.8 |
| Red Sandstone Stairs | 0.8 |
| Sandstone | 0.8 |
| Sandstone Stairs | 0.8 |
| Wool | 0.8 |
| Monster Egg | ? |
| Activator Rail | 0.7 |
| Detector Rail | 0.7 |
| Powered Rail | 0.7 |
| Rail | 0.7 |
| Grass Path | ? |
| Clay | 0.6 |
| Farmland | 0.6 |
| Grass Block | 0.6 |
| Gravel | 0.6 |
| Sponge | 0.6 |
| Wet Sponge | 0.6 |
| Brewing Stand | 0.5 |
| Button | 0.5 |
| Cake | 0.5 |
| Coarse Dirt | 0.5 |
| Concrete Powder | 0.5 |
| Dirt | 0.5 |
| Frosted Ice | 0.5 |
| Hay Bale | 0.5 |
| Ice | 0.5 |
| Block name | Blast resistance |
|---|---|
| Packed Ice | 0.5 |
| Lever | 0.5 |
| Magma Block | 0.5 |
| Mycelium | 0.6 |
| Piston | 0.5 |
| Piston Extension | ? |
| Piston Head | 0.5 |
| Podzol | 0.5 |
| Pressure Plate | 0.5 |
| Sand | 0.5 |
| Soul Sand | 0.5 |
| Sticky Piston | 0.5 |
| Weighted Pressure Plate | ? |
| Cactus | 0.4 |
| Chorus Flower | 0.4 |
| Chorus Plant | 0.4 |
| Ladder | 0.4 |
| Netherrack | 0.4 |
| Glass | 0.3 |
| Glass Pane | 0.3 |
| Glowstone | 0.3 |
| Redstone Lamp | 0.3 |
| Sea Lantern | 0.3 |
| Stained Glass | 0.3 |
| Stained Glass Pane | 0.3 |
| Bed | 0.2 |
| Daylight Sensor | ? |
| Huge Mushrooms | ? |
| Leaves | 0.2 |
| Snow Block | 0.2 |
| Vines | 0.2 |
| Carpet | 0.1 |
| Snow | 0.1 |
| Air | 0 |
| Beetroot | 0 |
| Carrot | 0 |
| Dead Bush | 0 |
| End Rod | 0 |
| Fire | 0 |
| Flower Pot | 0 |
| Flowers | 0 |
| Grass | 0 |
| Lily Pad | 0 |
| Locked chest | 0 |
| Melon Stem | 0 |
| Mushrooms | 0 |
| Nether Portal | 0 |
| Nether Wart | 0 |
| Potato | 0 |
| Pumpkin Stem | 0 |
| Redstone Comparator | 0 |
| Redstone Repeater | 0 |
| Redstone Torch | 0 |
| Redstone | 0 |
| Saplings | 0 |
| Slime Block | 0 |
| Structure Void | 0 |
| Sugar Canes | 0 |
| TNT | 0 |
| Torch | 0 |
| Tripwire | ? |
| Tripwire Hook | 0 |
| Wheat | 0 |
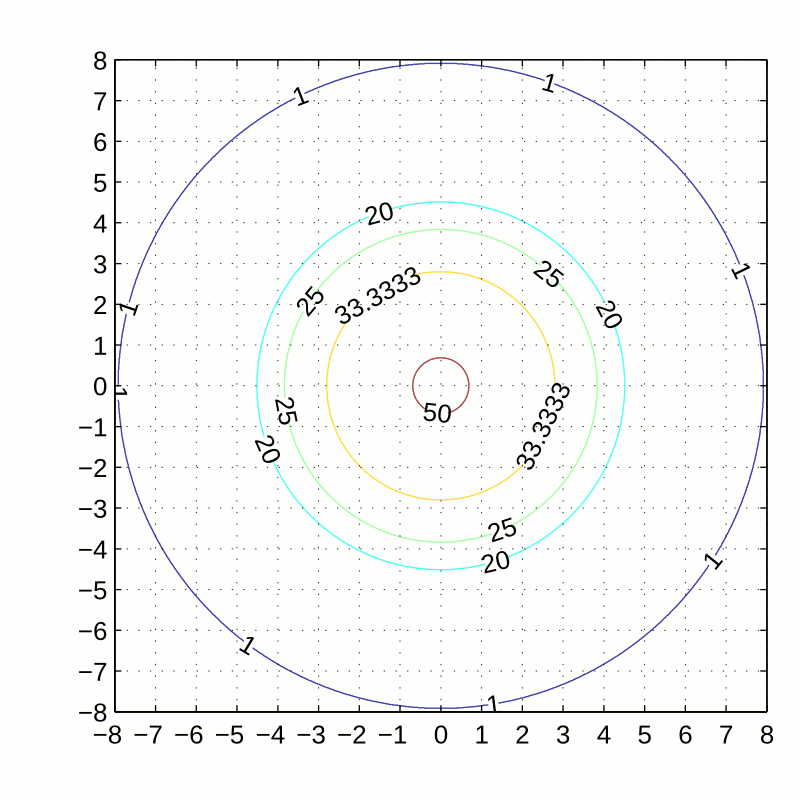
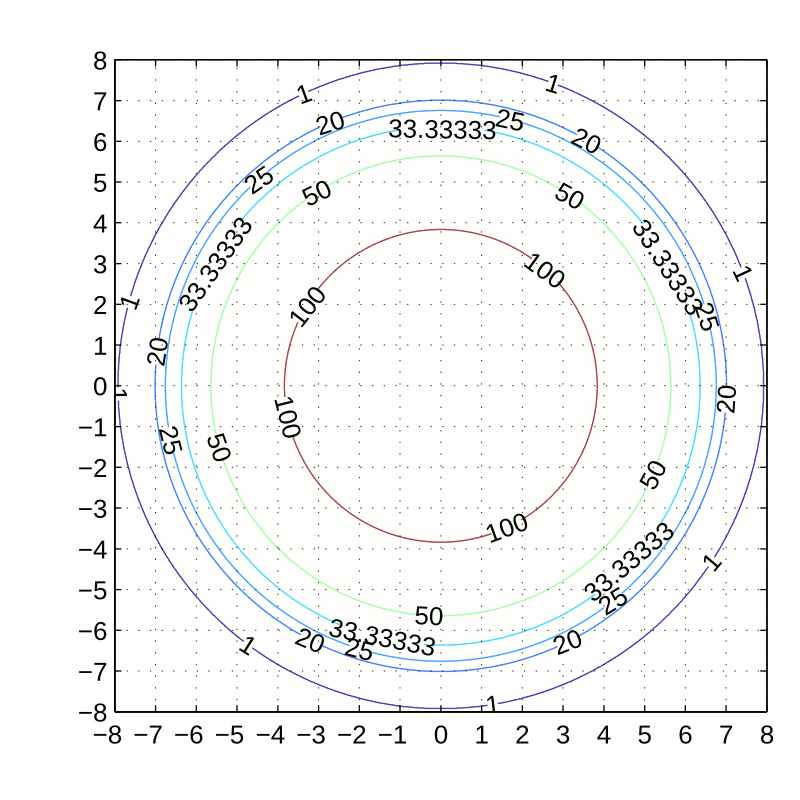
Typical damage radius
The player will receive damage, if within these radii of a 100% exposure ground 1 block, 2 blocks, or 4 blocks of TNT explosion, with the amount of damage labeled on each circle in the figures below.

History
| classic | |||||
|---|---|---|---|---|---|
| May 21, 2009 | Notch shows interest in adding an explosive block. | ||||
| August 24, 2009 | Notch screws up on making a pig model. | ||||
0.24_SURVIVAL_TEST{{Extension DPL}}<ul><li>[[Glass Bottle|Glass Bottle]]<br/>{{about|the empty bottle||Bottle}}
{{Item
| image = Glass Bottle.png
| renewable = Yes
| stackable = Yes (64)
}}
A '''glass bottle''' is an [[item]] that can hold [[water]], [[potion]]s, [[Honey Bottle|honey]], or [[dragon's breath]].
== Obtaining ==
Glass bottles can be obtained by crafting, drinking from bottles, [[fishing]], or from [[witch]] drops.
=== Crafting ===
{{Crafting
|A2= Glass
|C2= Glass
|B3= Glass
|Output= Glass Bottle,3
|type= Brewing
}}
=== Drinking ===
Drinking a [[potion]] or [[Honey Bottle|honey bottle]] returns the empty glass bottle. Throwing a splash potion or a lingering potion does not return a glass bottle, but brewing a lingering potion gives back a glass bottle.
=== Mob loot ===
[[Witch]]es have a chance of dropping 0–6 glass bottles upon death. This is increased by 3 per level of [[Looting]], for a maximum of 0–15 glass bottles.
=== Mud ===
{{control|Using}} a [[water bottle]], [[splash water bottle]] or [[lingering water bottle]] on [[dirt]], [[coarse dirt]] or [[rooted dirt]] will transforming it into a [[mud]] block, at the same time leaving the player with an empty glass bottle.
=== Cauldrons ===
{{control|Using}} a water bottle (or, {{in|bedrock}}, a potion, splash potion, or lingering potion) on a [[cauldron]] that is not yet full adds that liquid to the cauldron, leaving the player with an empty glass bottle.
== Usage ==
Glass bottles can be filled to make [[water bottle]]s, which can then be used to [[brew]] items with a [[brewing stand]]. Glass bottles are also used to hold the resulting [[potion]].
=== Collecting liquids ===
==== Water ====
A bottle may be filled with water by holding it in the hand and {{control|using}} it on a [[water]] source block or a [[cauldron]] that has water in it. It can also be filled using a waterlogged block.{{only|java}}<ref>{{bug|MCPE-83420}}</ref>
Also, a bottle may be filled by powering a [[dispenser]] containing a bottle and pointed at a water source block. This does not work with cauldrons.<ref>{{bug|MC-165196|||Invalid}}</ref>
If filled via a water source, the water is unaffected. If filled via a cauldron, {{frac|1|3}} of the water in the cauldron is removed. Therefore, using a cauldron to fill water bottles is inefficient, except in [[the Nether]] where it is normally the only way to fill bottles.
==== Potion ====
{{IN|bedrock}}, a bottle may be filled with potion by {{control|using}} it on a [[cauldron]] containing potion. When the bottle is filled, {{frac|1|3}} of the cauldron's potion is removed.
==== Honey ====
If a [[beehive|bee nest]] or [[beehive]] is full, the player can {{control|use}} a glass bottle on the block, or may power a [[dispenser]] that contains a bottle and is pointed at the block, which empties the block and creates a [[honey bottle]]. Honey bottles can also be emptied by using them in crafting recipes (such as [[sugar]] or [[honey block]]). However, a lingering potion use on tipped arrow recipe does not give the bottle back.
==== Dragon's breath ====
{{control|Using}} a glass bottle in clouds emitted when the [[ender dragon]] breathes or shoots a [[dragon fireball]] fills the bottle with [[dragon's breath]].
When put 2 or more dragon's breath in the brewing stand, after the brewing process, a glass bottle will drop as an [[Item (entity)|entity]]. However, if put only 1 dragon's breath in the brewing stand, after the brewing process, the glass bottle is consumed and cannot be retrieved.<ref>{{bug|MC-259583}}</ref>
=== Trading ===
Expert-level cleric [[villager]]s have a 50% chance to buy 9 glass bottles for one [[emerald]] as part of their trade.{{only|bedrock}}
Expert-level cleric villagers have a {{frac|2|3}} chance to buy 9 glass bottles for one emerald.{{only|java}}
=== Crafting ingredients ===
{{Crafting usage|Glass Bottle}}
== Sounds ==
{{edition|java}}:
{{Sound table
|rowspan=2
|sound=Bottle fill water1.ogg
|sound2=Bottle fill water2.ogg
|sound3=Bottle fill water3.ogg
|sound4=Bottle fill water4.ogg
|subtitle=Bottle fills
|source=block
|description=When a bottle is filled with a liquid from a cauldron, or honey from a bee nest or beehive
|id=item.bottle.fill
|translationkey=subtitles.item.bottle.fill
|volume=1.0
|pitch=1.0
|distance=16}}
{{Sound table
|subtitle=Bottle fills
|source=neutral
|description=When a bottle is filled with water from a water source
|id=item.bottle.fill
|translationkey=subtitles.item.bottle.fill
|volume=1.0
|pitch=1.0
|distance=16}}
{{Sound table
|sound=Bottle empty1.ogg
|sound2=Bottle empty2.ogg
|subtitle=Bottle empties
|source=block
|description=When a water bottle is emptied
|id=item.bottle.empty
|translationkey=subtitles.item.bottle.empty
|volume=1.0
|pitch=1.0
|distance=16}}
{{Sound table
|sound=Bottle fill dragon breath1.ogg
|sound2=Bottle fill dragon breath2.ogg
|subtitle=Bottle fills
|source=neutral
|description=When a bottle is filled with dragon's breath
|id=item.bottle.fill_dragonbreath
|translationkey=subtitles.item.bottle.fill
|volume=1.0
|pitch=1.0
|distance=16
|foot=1}}
{{edition|java}}:
{{Sound table
|type=bedrock
|rowspan=4
|sound=Water Splash Old.ogg
|source=block
|description=When water from a bottle is placed in a cauldron<wbr><ref group=sound name=potionsplash>{{Bug|MCPE-174867}}</ref>
|id=cauldron.fillwater
|volume=0.1
|pitch=1.0}}
{{Sound table
|source=block
|description=When water from a bottle is taken from a cauldron<wbr><ref group=sound name=potionsplash/>
|id=cauldron.takewater
|volume=0.1
|pitch=1.0}}
{{Sound table
|source=block
|description=When a bottle is filled with a potion from a cauldron<wbr><ref group=sound name=potionsplash/>
|id=cauldron.fillpotion
|volume=0.1
|pitch=1.0}}
{{Sound table
|source=block
|description=When a potion bottle is emptied into a cauldron<wbr><ref group=sound name=potionsplash/>
|id=cauldron.takepotion
|volume=0.1
|pitch=1.0}}
{{Sound table
|sound=Bottle empty1.ogg
|sound2=Bottle empty2.ogg
|source=sound<!--bottle-->
|description=When a bottle is emptied<wbr>{{Upcoming|BE 1.20.40}}
|id=bottle.empty
|volume=1.0
|pitch=1.0}}
{{Sound table
|sound=Bottle fill water1.ogg
|sound2=Bottle fill water2.ogg
|sound3=Bottle fill water3.ogg
|sound4=Bottle fill water4.ogg
|source=sound<!--bottle-->
|description=When a bottle is filled<wbr>{{Upcoming|BE 1.20.40}}
|id=bottle.fill
|volume=1.0
|pitch=1.0}}
{{Sound table
|sound=Fill water bucket1.ogg
|sound2=Fill water bucket2.ogg
|sound3=Fill water bucket3.ogg
|source=block
|description=When a bottle is filled with honey from a bee nest or beehive<wbr><ref group=sound>{{Bug|MCPE-53881}}</ref>
|id=bucket.fill_water
|volume=1.0
|pitch=1.0}}
{{Sound table
|sound=Bottle fill dragon breath1.ogg
|sound2=Bottle fill dragon breath2.ogg
|source=sound
|description=When a bottle is filled with dragon's breath
|id=bottle.dragonbreath
|volume=0.7<wbr>{{Until|BE 1.20.40}}<br>1.0<wbr>{{Upcoming|BE 1.20.40}}
|pitch=1.0
|foot=1}}
== Data values ==
=== ID ===
{{edition|java}}:
{{ID table
|edition=java
|showforms=y
|generatetranslationkeys=y
|displayname=Glass Bottle
|spritetype=item
|nameid=glass_bottle
|form=item
|foot=1}}
{{edition|bedrock}}:
{{ID table
|edition=bedrock
|shownumericids=y
|showforms=y
|notshowbeitemforms=y
|generatetranslationkeys=y
|displayname=Glass Bottle
|spritetype=item
|id=427
|nameid=glass_bottle
|form=item
|foot=1}}
== Achievements ==
{{Load achievements|You Need a Mint;Local Brewery;Bee Our guest}}
== Advancements ==
{{load advancements|Local Brewery;You Need a Mint;Bee Our Guest}}
== History ==
{{History|java}}
{{History||1.0.0|snap=Beta 1.9 Prerelease 2|[[File:Glass Bottle JE1 BE1.png|32px]] Added glass bottles.}}
{{History|||snap=Beta 1.9 Prerelease 3|[[File:Water Bottle JE1 BE1.png|32px]] Glass bottles have been given their sole function of picking up [[water]] for the [[brewing]] of [[potion]]s.}}
{{History||1.4.2|snap=12w38b|[[Witch]]es now have a chance of [[drops|dropping]] glass bottles upon [[death]].}}
{{history||1.9|snap=15w33a|[[File:Dragon's Breath JE1 BE1.png|32px]] Glass bottles can now be used to obtain [[dragon's breath]].}}
{{history|||snap=15w43a|A glass bottle can be found in the [[brewing stand]] in an [[igloo]] basement.}}
{{history|||snap=15w43c|The glass bottle has been removed from igloo basements.}}
{{History|||snap=15w50a|Added [[sound]]s: <code>item.bottle.fill</code> and <code>item.bottle.fill_dragonbreath</code>.}}
{{History||1.13|snap=17w47a|Prior to [[1.13/Flattening|''The Flattening'']], this [[item]]'s numeral ID was 374.}}
{{History||1.14|snap=18w43a|[[File:Glass Bottle JE2 BE2.png|32px]] [[File:Water Bottle JE2 BE2.png|32px]] [[File:Dragon's Breath JE2 BE2.png|32px]] The textures of glass bottles, [[water bottle]]s and [[dragon's breath]] have been changed.}}
{{History|||snap=19w11a|Cleric [[villager]]s now [[trading|buy]] glass bottles.}}
{{History||1.15|snap=19w34a|[[File:Honey Bottle JE1.png|32px]] Glass bottles can now be used to collect [[Honey Bottle|honey]].
|[[Dispenser]]s may now use glass bottles to collect [[water]] and honey.}}
{{History|||snap=19w46a|Using glass bottles to collect honey now unlocks the [[Bee Our Guest]] advancement.}}
{{History||1.19|snap=22w11a|Converting [[dirt]], [[coarse dirt]] or [[rooted dirt]] into [[mud]] using a [[water bottle]], [[splash water bottle]] or [[lingering water bottle]] now leaves the player with an empty glass bottle.}}
{{History|pocket alpha}}
{{History||v0.12.1|snap=build 1|[[File:Glass Bottle JE1 BE1.png|32px]] Added glass bottles.}}
{{History||v0.14.0|snap=build 1|Glass bottles can now be used to empty [[cauldron]]s filled with [[water]] or [[potion]]s.
|Glass bottles can now be dropped by [[witch]]es.
|Potions and [[splash potion]]s can now be used to fill cauldrons, which turns them into glass bottles.}}
{{History|pocket}}
{{History||1.0.0|snap=alpha 0.17.0.1|[[File:Dragon's Breath JE1 BE1.png|32px]] Glass bottles can now be used to obtain [[dragon's breath]].
|[[Lingering potion]]s can now be used to fill [[cauldron]]s, which turns them into glass bottles.}}
{{History|bedrock}}
{{History||1.10.0|snap=beta 1.10.0.3|[[File:Glass Bottle JE2 BE2.png|32px]] The texture of glass bottles has been changed.}}
{{History||1.11.0|snap=beta 1.11.0.4|Glass bottles can now be [[trading|sold]] to cleric [[villager]]s.}}
{{History||1.14.0|snap=beta 1.14.0.1|[[File:Honey Bottle BE1.png|32px]] Glass bottles can now be used to collect [[Honey Bottle|honey]].
|[[Dispenser]]s may now use glass bottles to collect [[water]] and honey.}}
{{History|console}}
{{History||xbox=TU7|xbone=CU1|ps=1.0|wiiu=Patch 1|[[File:Glass Bottle JE1 BE1.png|32px]] Added glass bottles.}}
{{History|PS4}}
{{History||1.90|[[File:Glass Bottle JE2 BE2.png|32px]] The texture of glass bottles has been changed.}}
{{History|new 3ds}}
{{History||0.1.0|[[File:Glass Bottle JE1 BE1.png|32px]] Added glass bottles.}}
{{History||1.7.10|[[File:Dragon's Breath JE1 BE1.png|32px]] Glass bottles can now be used to obtain [[dragon's breath]].}}
{{history|foot}}
== Issues ==
{{issue list}}
==References==
{{Reflist}}
{{Items}}
[[cs:Lahvička]]
[[de:Glasflasche]]
[[es:Frasco de cristal]]
[[fr:Fiole]]
[[hu:Üvegpalack]]
[[it:Ampolla]]
[[ja:ガラス瓶]]
[[ko:유리병]]
[[nl:Glazen fles]]
[[pl:Szklana butelka]]
[[pt:Frasco]]
[[ru:Колба]]
[[zh:玻璃瓶]]
[[Category:Renewable resources]]</li><li>[[Water|Water]]<br/>{{About|the fluid|the bucket|Water Bucket|other forms of water}}
{{Fluid
| image = <gallery>
Water.png|Java Edition
Water BE.png|Bedrock Edition
</gallery>
| invimage = Water Bucket
| invimage2 = Water
| renewable = Yes
| transparent = Partial <small>(-1 to light)</small>
| light = No
| tool = bucket
| infinite = Yes
| flowrate = 5 [[tick]]s/block
| flowdistance = 8 blocks
}}
'''Water''' is a [[fluid]] that naturally generates abundantly in the [[Overworld]].
== Obtaining ==
Water blocks do not exist as items,{{only|java}} but water can be collected by using a [[bucket]] on a water source block or a full water [[cauldron]], creating a [[water bucket]].
{{IN|BE}}, it may be obtained as an item via inventory editing or add-ons.
=== Natural generation ===
Water naturally generates in the [[Overworld]] to form [[ocean]]s, [[river]]s and [[spring]]s. The water level is at [[altitude|layer 63]] near oceans and rivers, but changes depending on location due to the [[aquifer]] system, filling some carvers, noise caves and canyons with water at different levels. Water also generates as small puddles on the floor next to [[dripstone cluster]]s, and as clay pools on the floor of [[lush caves]].
Water also generates in [[village]]s, [[desert well]]s, [[stronghold]]s, [[woodland mansion]]s, [[ancient city|ancient cities]] and [[ocean monument]]s.
Water never generates in [[the Nether]] and instantly disappears if placed there with a water bucket. However, water can exist in the Nether in a [[cauldron]]. Water can also be placed in the Nether using [[commands]] such as {{cmd|setblock}} and {{cmd|fill}}. Although it does not naturally generate there, water can be placed and function normally in [[the End]].
{{IN|be}}, water also generates as part of [[ocean ruins]] with loot [[chest]]s, but only two water blocks generate:
* One water block generates inside the loot chest, making it a [[Waterlogging|waterlogged]] loot chest.
* The other water block generates on top of the loot chest.
These water blocks generate even if the ruin is located on the surface.<ref>{{bug|MCPE-36793}}</ref> This is not the case in {{el|je}}; if an underwater ruin generates on the surface, no water generates.<ref>{{bug|MC-136156}}</ref> This also happens with [[shipwreck]]s.
Water spends most of its time as stationary, rather than flowing – regardless of its level, or whether it contains a current downward or to the side. When specifically triggered by a block update, water changes to 'flowing', updates its level, then changes back to stationary. Water springs are generated as flowing, and oceans, and rivers are generated as stationary. This happens before most types of generated structure are created, and the main cause of water "glitches" is that generated structures do not trigger a block update to let water flow into them.
== Usage ==
=== Appearance ===
Water uses a translucent animated texture that is tinted differently in different biomes. {{IN|Java}}, water in cauldrons is completely opaque.<ref>{{bug|MC-13187}}</ref>
Unlike other translucent blocks such as [[ice]], [[stained glass]] and [[tinted glass]], water shows the opposite sides of its external planes when viewed from within and from outside.<ref>{{bug|MC-202578|||WAI}}</ref> However, it applies only to the top plane and four side planes; the bottom face is always unseen from above.<ref>{{bug|MC-190053}}</ref>
=== Swimming ===
{{main|Swimming}}
The button for {{control|swim|text=swimming}} is the same as the button for jumping; non-swimming players and mobs sink slowly in water. Holding the swim button raises the player through the water, and when the surface is reached, the player bobs up and down. The {{control|crouch}} button can be used to sink faster. The {{control|sprint}} button can be used to put the player in "swim mode" when the player is completely submerged in water. When in swim mode, the player is horizontal and one block high. The player has an arm-waving animation when viewed in third person or by other players.
Swimming in water is considerably slower against currents (see [[#Current|Current]] below), but faster when going with the current.
Most mobs that can stand can also swim any time they are in water, except for [[iron golem]]s, [[piglin]]s, [[hoglin]]s, [[strider]]s, [[piglin brute]]s and undead mobs. This can lead to drowning if the water is falling from above.
Water of any depth prevents any entity, including the player, from sustaining falling damage if they fall into it, regardless of the distance fallen.
Being inside of water also imparts a [[fog]] effect, tinted accordingly.
=== Spreading ===
{{Main|Fluid#Spread}}
[[File:Water spread v1-13.png|300px|right|An image showing water's spreading distance]]
Water spreads horizontally and downward into nearby [[air]] blocks. Water can spread downward infinitely until stopped by a block, and 7 blocks horizontally from a source block on a flat surface. Water spreads at a rate of 1 block every 5 game ticks, or 4 blocks per second.
When spreading horizontally, a weight is assigned to every direction water can flow. For each direction, this weight is initially set to 1000. Then, for every adjacent block it can flow into it tries to find a way down that is reachable in four or fewer blocks from the block it wants to flow to. When found, the flow weight for that direction is set to the shortest path distance to the way down. Finally, water spreads in the directions with the lowest flow weight.
Spreading water extinguishes [[fire]] and washes away certain types of items or placed blocks, causing them to drop as items and then carrying them along in the flow until the edge of the spread. Affected items include [[plant]]s (except trees), [[snow]], [[torch]]es, [[carpet]]s, [[redstone dust]] and some other redstone components, [[cobweb]], [[end rod]]s, [[head]]s, and [[flower pot]]s.
==== Flow arrangement tables ====
{| class="wikitable"
|+
|
|
|
|
|
|
|
!7
|
|
|
|
|
|
|
|-
|
|
|
|
|
|
! 7
!6
! 7
|
|
|
|
|
|
|-
|
|
|
|
|
! 7
!6
!5
!6
! 7
|
|
|
|
|
|-
|
|
|
|
! 7
!6
!5
!4
!5
!6
! 7
|
|
|
|
|-
|
|
|
! 7
!6
!5
!4
!3
!4
!5
!6
! 7
|
|
|
|-
|
|
! 7
!6
!5
!4
!3
!2
!3
!4
!5
!6
! 7
|
|
|-
|
! 7
!6
!5
!4
!3
!2
!1
!2
!3
!4
!5
!6
! 7
|
|-
!7
!6
!5
!4
!3
!2
!1
!0
!1
!2
!3
!4
!5
!6
!7
|-
|
! 7
!6
!5
!4
!3
!2
!1
!2
!3
!4
!5
!6
! 7
|
|-
|
|
! 7
!6
!5
!4
!3
!2
!3
!4
!5
!6
! 7
|
|
|-
|
|
|
! 7
!6
!5
!4
!3
!4
!5
!6
! 7
|
|
|
|-
|
|
|
|
! 7
!6
!5
!4
!5
!6
! 7
|
|
|
|
|-
|
|
|
|
|
! 7
!6
!5
!6
! 7
|
|
|
|
|
|-
|
|
|
|
|
|
! 7
!6
! 7
|
|
|
|
|
|
|-
|
|
|
|
|
|
|
!7
|
|
|
|
|
|
|
|}
{| class="wikitable"
! colspan="2" |Range
!Height in blocks
|-
!1
|block
|1
|-
!2
|blocks
|0.75-1
|-
!3
|blocks
|0.625-0.75
|-
!4
|blocks
|0.5-0.625
|-
!5
|blocks
|0.375-0.5
|-
!6
|blocks
|0.25-0.375
|-
!7
|blocks
|0.125-0.25
|}
=== Source blocks ===
{{anchor|Water Spawner}} <!-- Compatibility anchor -->
{{about|the behavior and creation of source units of water|the removed block that created water sources|Water Spawner|section=1}}
A water source block is created from a flowing block that is horizontally adjacent to two or more other source blocks, and sitting on top of a solid block or another water source block. This allows water spawners to exist, in which a new source block immediately forms in the space left by removing a source block with a [[bucket]]. Pools of still water can be created by placing water source blocks in a confined area.
Water spawners can be constructed by arranging for two source blocks to flow into a third block. Each of the examples below require two source blocks, each on opposite ends of the hole, to create a renewable water source block in between.
While water source blocks only generate adjacent to solid blocks, they do not require a solid block to support them. Removing all adjacent blocks to a water source block only causes it to remain floating in the air.
{{IN|java}}, the formation of new water sources blocks can be disabled when the [[game rule]] {{cd|waterSourceConversion}} is set to {{cd|false}}.
<gallery>
2x2 water source.png|2x2 water spawner (every corner is renewable)
3x1 water source.png|3x1 water spawner (middle water block is renewable)
L-shaped water source.png|L-shaped water spawner (corner water block is renewable)
</gallery>
A [[dispenser]] loaded with a filled [[bucket]] places a water source block in an empty block in front of it when activated. A dispenser loaded with an empty bucket and a water source right in front of it sucks the source into the bucket when activated.
In snowy [[biome]]s, water source blocks have a chance to turn into [[ice]] if directly under the sky. Ice blocks under brighter light levels melt back into water source blocks (except in [[the Nether]]). Ice reverts to water when broken, but only if there is a solid block under it.
=== Current ===
The current in a water block determines both the direction it appears to flow and the direction an [[entity]] such as a player or [[boat]] is pushed from that block.
Water with a current pushes players and [[mob]]s at a speed of about 1.39 meters per second, or 25 blocks every 18 seconds. Players that are in creative flying mode don’t get pushed.{{only|je}}<ref>{{bug|MCPE-84592}}</ref>
The horizontal current in a water block is based on a vector sum of the flows to and from that block from its four horizontal neighbors. For example, if a block receives water from the north and sends it both south and east, but borders a solid block on its west edge, then a south-southeast current exits from that block, because 2 southward flows (in and out) are combined with 1 eastward flow (out). Thus, 16 horizontal directions are possible. If a branch in a channel is 2 blocks wide at its entrance, then entities float into it rather than continuing in a straight line.
Water blocks can create a downward current. A downward current in a water block is caused by the block below it. Most blocks that do not have a solid upper face cause downward current on above water blocks. Also, ice and falling water blocks (blocks created by spreading downward) cause downward current on the water block above. Falling water blocks have a downward current by default.
=== Light ===
{{IN|bedrock}}, every block of water reduces [[light]] by 1 extra level (in addition to the normal fading-out of light). {{IN|java}}, water does not cause any additional decrease for block light, but diffuses sky light, causing the light to fade with depth. Underwater visibility changes depending on the biome the player is in. The [[Night Vision]] and [[Conduit Power]] effects increase underwater visibility.
=== Color ===
Water has several colors, depending on the biome.
==== Java Edition ====
{| class="wikitable sortable mw-collapsible mw-collapsed" data-description="Water Color in Java Edition"
|-
!Biome!!Water color!!Water fog color!!Block
|-
|{{BiomeSprite|Plains|text=Default (biomes not listed below)}}||{{color|#3F76E4}}||{{color|#050533}}||[[File:Plains Water JE.png|32px]]
|-
|{{BiomeLink|Swamp}}||{{color|#617B64}}||{{color|#232317}}||[[File:Swamp Water.png|32px]]
|-
|{{BiomeLink|Lukewarm Ocean}}<br>{{BiomeLink|Deep Lukewarm Ocean}}||{{color|#45ADF2}}||{{color|#041633}}||[[File:Lukewarm Ocean Water JE.png|32px]]
|-
|{{BiomeLink|Warm Ocean}}||{{color|#43D5EE}}||{{color|#041F33}}||[[File:Warm Ocean Water JE.png|32px]]
|-
|{{BiomeLink|Cold Ocean}}<br>{{BiomeLink|Deep Cold Ocean}}<br>{{BiomeLink|Snowy Taiga}}<br>{{BiomeLink|Snowy Beach}}||{{color|#3D57D6}}||{{color|#050533}}||[[File:Cold Ocean Water JE.png|32px]]
|-
|{{BiomeLink|Frozen River}}<br>{{BiomeLink|Frozen Ocean}}<br>{{BiomeLink|Deep Frozen Ocean}}||{{color|#3938C9}}||{{color|#050533}}||[[File:Frozen Ocean Water JE.png|32px]]
|-
|{{BiomeLink|Meadow}}||{{color|#0E4ECF}}||{{color|#050533}}||[[File:Meadow Water.png|32px]]
|-
|{{BiomeLink|Mangrove Swamp}}||{{color|#3A7A6A}}||{{color|#4D7A60}}|||[[File:Mangrove Swamp Water.png|32px]]
|-
|{{BiomeLink|Cherry Grove}}||{{color|#5DB7EF}}||{{color|#5DB7EF}}||[[File:Cherry Grove Water.png|32px]]
|}
==== Bedrock Edition====
Biome tints
<!--[[File:Water color.png|500px|thumb|center|From left to right - Badlands Plateau, Birch Forest and Snowy Taiga]]-->
{| class="wikitable sortable mw-collapsible mw-collapsed" data-description="Water Color in Bedrock Edition"
! Biome
!Water Surface Color
! Water Fog Color
!Water Fog Distance
!Water Surface Transparency
!Block
|-
|Default<br>(biomes not listed below)
|{{color|#44aff5}}||{{color|#44aff5}}||15||65%||[[File:Water BE.png|32px]]
|-
|{{BiomeLink|Sunflower Plains}}<br>{{BiomeLink|Plains}}
|{{color|#44aff5}}||{{color|#44aff5}}||60||-||[[File:Water BE.png|32px]]
|-
|{{BiomeLink|Desert}}
|{{color|#32a598}}||{{color|#32a598}}||60||-||[[File:Desert Water.png|32px]]
|-
|{{BiomeLink|Mountains}}
|{{color|#007BF7}}||{{color|#007BF7}}||-||-||[[File:Mountains Water.png|32px]]
|-
|{{BiomeLink|Forest}}
|{{color|#1e97f2}}||{{color|#1e97f2}}||60||-||[[File:Forest Water.png|32px]]
|-
|{{BiomeLink|Flower Forest}}
|{{color|#20a3CC}}||{{color|#20a3CC}}||60||-||[[File:Flower Forest Water.png|32px]]
|-
| {{BiomeLink|Taiga}}
| {{color|#287082}}||{{color|#287082}}||60||-||[[File:Taiga Water.png|32px]]
|-
|{{BiomeLink|Taiga Mountains}}
|{{color|#1e6B82}}||{{color|#1e6B82}}||-||-||[[File:Taiga Mountains Water.png|32px]]
|-
|{{BiomeLink|Swamp}}
|{{color|#4c6559}}||{{color|#4c6559||30||100%||[[File:Swamp Water BE.png|32px]]
|-
| {{BiomeLink|River}}
|{{color|#0084ff}}||{{color|#0084ff}}||60||-||[[File:River Water.png|32px]]
|-
|{{BiomeLink|Nether Wastes}}<br>{{BiomeLink|Warped Forest}}<br>{{BiomeLink|Crimson Forest}}<br>{{BiomeLink|Soul Sand Valley}}
|{{color|#905957}}||{{color|#905957}}||15||-||[[File:Nether Water.png|32px]]
|-
|{{BiomeLink|Basalt Deltas}}
|{{color|#3f76e4}}||{{color|#423e42}}||15||-||[[File:Basalt Deltas Water.png|32px]]
|-
|{{BiomeLink|The End}}
| {{color|#62529e}}||{{color|#62529e}}||-||-||[[File:The End Water.png|32px]]
|-
|{{BiomeLink|Frozen River}}
|{{color|#185390}}||{{color|#185390}}||60||-||[[File:Frozen River Water.png|32px]]
|-
|{{BiomeLink|Snowy Tundra}}<br>{{BiomeLink|Ice Spikes}}
|{{color|#14559b}}||{{color|#14559b}}||-||-||[[File:Ice Spikes Water.png|32px]]
|-
| {{BiomeLink|Mushroom Fields}}
|{{color|#8a8997}}||{{color|#8a8997}}||-||-||[[File:Mushroom Fields Water.png|32px]]
|-
|{{BiomeLink|Beach}}
| {{color|#157cab}}||{{color|#157cab}}||60||-||[[File:Beach Water.png|32px]]
|-
|{{BiomeLink|Mountain Edge}}
|{{color|#045cd5}}||{{color|#045cd5}}||-||-||[[File:Mountain Edge Water.png|32px]]
|-
|{{BiomeLink|Jungle}}<br>{{BiomeLink|Bamboo Jungle}}
|{{color|#14a2c5}}||{{color|#14a2c5||60<br>15||-||[[File:Jungle Water.png|32px]]
|-
|{{BiomeLink|Jungle Edge}}
| {{color|#0D8AE3}}||{{color|#0D8AE3}}||-||-||[[File:Jungle Edge Water.png|32px]]
|-
|{{BiomeLink|Stone Shore}}
|{{color|#0d67bb}}||{{color|#0d67bb}}||60||-||[[File:Stone Shore Water.png|32px]]
|-
|{{BiomeLink|Snowy Beach}}
|{{color|#1463a5}}||{{color|#1463a5}}||60||-||[[File:Snowy Beach Water.png|32px]]
|-
|{{BiomeLink|Birch Forest}}
|{{color|#0677ce}}||{{color|#0677ce}}||60||-||[[File:Birch Forest Water.png|32px]]
|-
|{{BiomeLink|Dark Forest}}
|{{color|#3B6CD1}}||{{color|#3B6CD1}}||60||-||[[File:Dark Forest Water.png|32px]]
|-
|{{BiomeLink|Snowy Taiga}}
|{{color|#205e83}}||{{color|#205e83}}||60||-||[[File:Snowy Taiga Water.png|32px]]
|-
|{{BiomeLink|Giant Tree Taiga}}<br>{{BiomeLink|Giant Spruce Taiga}}
|{{color|#2d6d77}}||{{color|#2d6d77}}||60||-||[[File:Giant Tree Taiga Water.png|32px]]
|-
|{{BiomeLink|Windswept Forest}}<br>{{BiomeLink|Windswept Gravelly Hills}}
|{{color|#0E63AB}}||{{color|#0E63AB}}||-||-||[[File:Wooded Mountains Water.png|32px]]
|-
|{{BiomeLink|Savanna}}
|{{color|#2C8B9C}}||{{color|#2C8B9C}}||60||-||[[File:Savanna Water.png|32px]]
|-
|{{BiomeLink|Savanna Plateau}}<br>{{BiomeLink|Shattered Savanna}}
|{{color|#2590a8}}||{{color|#2590a8}}||-||-||[[File:Savanna Plateau Water.png|32px]]
|-
|{{BiomeLink|Badlands}}
|{{color|#4E7f81}}||{{color|#4E7f81||60
|<nowiki>-||[[File:Badlands Water.png|32px]]
|-
|{{BiomeLink|Eroded Badlands}}<br>{{BiomeLink|Wooded Badlands}}
|{{color|#497f99}}||{{color|#497f99}}||-||-||[[File:Eroded Badlands Water.png|32px]]
|-
|{{BiomeLink|Ocean}}
|{{color|#1787D4}}||{{color|#1165b0}}||60||-||[[File:Ocean Water.png|32px]]
|-
|{{BiomeLink|Deep Ocean}}
|{{color|#1787D4}}||{{color|#1463a5}}||60||-||[[File:Ocean Water.png|32px]]
|-
|{{BiomeLink|Warm Ocean}}
|{{color|#02B0E5}}||{{color|#0289d5}}||60||55%||[[File:Warm Ocean Water.png|32px]]
|-
| {{BiomeLink|Lukewarm Ocean}}
|{{color|#0D96DB}}||{{color|#0a74c4}}||60||-||[[File:Lukewarm Ocean Water.png|32px]]
|-
|{{BiomeLink|Deep Lukewarm Ocean|Lukewarm Deep Ocean}}
|{{color|#0D96DB}}||{{color|#0e72b9}}||60||-||[[File:Lukewarm Ocean Water.png|32px]]
|-
|{{BiomeLink|Cold Ocean}}
|{{color|#2080C9}}||{{color|#14559b}}||60||-||[[File:Cold Ocean Water.png|32px]]
|-
|{{BiomeLink|Deep Cold Ocean|Cold Deep Ocean}}
|{{color|#2080C9}}||{{color|#185390}}||60||-||[[File:Cold Ocean Water.png|32px]]
|-
|{{BiomeLink|Frozen Ocean}}
|{{color|#2570B5}}||{{color|#174985}}||60||-||[[File:Frozen Ocean Water.png|32px]]
|-
|{{BiomeLink|Deep Frozen Ocean|Frozen Deep Ocean}}
|{{color|#2570B5}}||{{color|#1a4879}}||60||-||[[File:Frozen Ocean Water.png|32px]]
|-
|{{BiomeLink|Mangrove Swamp}}
|{{color|#3a7a6a}}||{{color|#4d7a60}}||30||-||[[File:Mangrove Swamp Water BE.png|32px]]
|}
Biome tints from [[Biome/Before 1.18|unused biomes]]
{| class="wikitable sortable mw-collapsible mw-collapsed" data-description="Water Color in Bedrock Edition"
! Biome
!Water Surface Color
!Water Fog Color
!Water Fog Distance
!Water Surface Transparency
!Block
|-
|{{BiomeLink|Legacy Frozen Ocean}}
|{{color|#44aff5}}||{{color|#44aff5}}||-||-||[[File:Water BE.png|32px]]
|-
|{{BiomeLink|Mountains}}
|{{color|#007BF7}}||{{color|#007bf7}}||-||-||[[File:Mountains Water.png|32px]]
|-
|{{BiomeLink|Taiga Mountains}}
|{{color|#1e6B82}}||{{color|#1e6b82}}||-||-||[[File:Taiga Mountains Water.png|32px]]
|-
|{{BiomeLink|Swamp Hills}}
| {{color|#4c6156}}||{{color|#4c6156||30||100%||[[File:Swamp Hills Water.png|32px]]
|-
| {{BiomeLink|Snowy Mountains}}
|{{color|#1156a7}}||{{color|#1156a7}}||-||-||[[File:Snowy Mountains Water.png|32px]]
|-
|{{BiomeLink|Mushroom Field Shore}}
|{{color|#818193}}||{{color|#818193}}||-||-||[[File:Mushroom Field Shore Water.png|32px]]
|-
|{{BiomeLink|Desert Hills}}
|{{color|#1a7aa1}}||{{color|#1a7aa1}}||-||-||[[File:Desert Hills Water.png|32px]]
|-
|{{BiomeLink|Wooded Hills}}
|{{color|#056bd1}}||{{color|#056bd1}}||-||-||[[File:Wooded Hills Water.png|32px]]
|-
|{{BiomeLink|Taiga Hills}}
|{{color|#236583}}||{{color|#236583}}||-||-||[[File:Taiga Hills Water.png|32px]]
|-
|{{BiomeLink|Mountain Edge}}
|{{color|#045cd5}}||{{color|#045cd5}}||-||-||[[File:Mountain Edge Water.png|32px]]
|-
|{{BiomeLink|Jungle Hills}}<br>{{BiomeLink|Modified Jungle}}<br>{{BiomeLink|Bamboo Jungle Hills}}
|{{color|#1B9ED8}}||{{color|#1B9ED8}}||-||-||[[File:Jungle Hills Water.png|32px]]
|-
|{{BiomeLink|Modified Jungle Edge}}
|{{color|#0D8AE3}}||{{color|#0D8AE3}}||-||-||[[File:Jungle Edge Water.png|32px]]
|-
|{{BiomeLink|Birch Forest Hills}}
|{{color|#0a74c4}}||{{color|#0a74c4}}||-||-||[[File:Birch Forest Hills Water.png|32px]]
|-
|{{BiomeLink|Snowy Taiga Mountains}}
|{{color|#205e83}}||{{color|#205e83}}||60||-||[[File:Snowy Taiga Water.png|32px]]
|-
|{{BiomeLink|Snowy Taiga Hills}}
|{{color|#245b78}}||{{color|#245b78}}||-||-||[[File:Snowy Taiga Hills Water.png|32px]]
|-
|{{BiomeLink|Giant Tree Taiga Hills}}
|{{color|#286378}}||{{color|#286378}}||-||-||[[File:Giant Tree Taiga Hills Water.png|32px]]
|-
|{{BiomeLink|id=modified-gravelly-mountains|Gravelly Mountains+}}
|{{color|#0E63AB}}||{{color|#0e63ab}}||-||-||[[File:Wooded Mountains Water.png|32px]]
|-
|{{BiomeLink|Shattered Savanna Plateau}}
|{{color|#2590a8}}||{{color|#2590a8}}||-||-||[[File:Savanna Plateau Water.png|32px]]
|-
|{{BiomeLink|Badlands Plateau}}<br>{{BiomeLink|Modified Badlands Plateau}}
|{{color|#55809E}}||{{color|#55809e}}||-||-||[[File:Badlands Plateau Water.png|32px]]
|-
|{{BiomeLink|Deep Warm Ocean|Warm Deep Ocean}}
|{{color|#02B0E5}}||{{color|#0686ca}}||60||-||[[File:Warm Ocean Water.png|32px]]
|}
===Water and lava===
{{Main|Fluid#Mixing}}
Water and lava can produce [[stone]], [[cobblestone]], or [[obsidian]] based on how they interact. If water touches a lava source, the lava source turns to obsidian. If both touch each other while flowing, cobblestone is made and no sources are removed, and if lava flows downward onto water, the water turns to stone.
===Interactions with mobs===
====Direct contact====
Water damages [[endermen]], [[snow golem]]s, [[Strider|striders]] and [[blaze]]s, at a rate of {{hp|1}} per half second. If water comes into contact with a [[shulker]] or an [[enderman]], the mob teleports away.
====Suffocation====
{{Main|Damage#Suffocation in water}}
Players and mobs (except [[aquatic mob]]s, [[undead mob]]s and [[iron golem]]s) have a breath meter that lasts 15 seconds. After they run out of breath, they take {{hp|2}} suffocation damage every second until they die, surface, or enter [[bubble column]]s.
[[Dolphin]]s are a special case in drowning: they take suffocation damage when underwater for about 4 minutes, but also take suffocation damage when in air for about 2 minutes.
Each level of the [[Respiration]] enchantment adds 15 seconds to the breath meter and grants an x/(x+1) chance (where x is the Respiration level) of not taking damage after that time: 30 seconds and an average {{hp|1}}/second with Respiration I, 45 seconds and an average of {{frac|2|3}} damage/second with Respiration II, and 60 seconds and an average of {{frac|1|2}} damage/second with Respiration III.
If a [[husk]] suffocates underwater, it starts to shake and eventually becomes a [[zombie]]. If a [[zombie]] suffocates underwater, it starts to shake and eventually transforms into a [[drowned]].
=== Slower mining speed===
Players with their head underwater require 5 times the normal amount of time to mine blocks while standing on the ground, or 25 times while not on the ground. If a player wears a helmet with the [[Aqua Affinity]] enchantment, then underwater mining speed while standing on the ground is the same as on land, and 5 times slower if not standing on the ground.
===Explosions===
Water does not prevent explosions from activating. Water has a high blast resistance, causing it to absorb any normal blasts, with the exception of explosions from [[underwater TNT]].
===Hardening concrete powder ===
When water comes into contact with [[concrete powder]], the powder hardens into solid [[concrete]].
===Sponges===
When a dry [[sponge]] comes into contact with a water source or flowing block, it becomes a wet [[sponge]], absorbing all water within 3 to 5 blocks in all directions. [[Kelp]] and [[lily pad]]s within the absorbed water blocks are destroyed and drop as items, and [[seagrass]] is destroyed without dropping anything. Mobs that take damage out of water are affected as a side-effect.
Sponges do not absorb water from [[Waterlogging|waterlogged]] blocks, nor water that comes into contact by flowing back in from outside the area of absorption. For instance, placing a sponge 4 or more blocks from a single water source removes the flowing water in the area of effect, but as the flow from the source resumes it is not affected by the wet sponge.
A sponge instantly absorbs nearby water when it is placed next to water or when water comes into contact with it (by being placed next to the sponge, or by flowing toward it). A sponge absorbs [[water]] around itself (water source blocks or flowing water) out to a [[taxicab distance]] of 7 in all directions (including up and down), but won't absorb more than 65 blocks of water (water closest to the sponge is absorbed first). The absorption propagates only from water to water and does not "jump over" non-water blocks (including air).
===Dripping===
[[File:WaterDropletsExample.png|thumb|Dripping water.]]
Water above a non-transparent block (except for stairs, fences, or slabs) produces dripping particles on the underside of that block. If a block of [[Pointed Dripstone|pointed dripstone]] hangs under any block directly beneath a water source, the drips can slowly fill up a [[cauldron]] placed underneath. Without the dripstone, a cauldron does not fill.
===Vertical transport===
[[Bubble column]]s are created by placing magma blocks or [[soul sand]] under water. These can be used to transport [[mobs]] or items quickly vertically.
==Sounds==
{{el|je}}:
{{Sound table
|sound=Entering water1.ogg
|sound2=Entering water2.ogg
|sound3=Entering water3.ogg
|subtitle=MC-177092
|source=ambient
|description=When the player's eye level goes underwater
|id=ambient.underwater.enter
|translationkey=-
|volume=0.8<wbr>{{Until|JE 1.20.2}}<br>0.5<wbr>{{Upcoming|JE 1.20.2}}
|pitch=1.0
|distance=16}}
{{Sound table
|sound=Exiting water1.ogg
|sound2=Exiting water2.ogg
|sound3=Exiting water3.ogg
|subtitle=MC-177092
|source=ambient
|description=When the player's eye level goes above water
|id=ambient.underwater.exit
|translationkey=-
|volume=0.5<wbr>{{Until|JE 1.20.2}}<br>0.3<wbr>{{Upcoming|JE 1.20.2}}
|pitch=1.0
|distance=16}}
{{Sound table
|sound=Underwater Ambience.ogg
|subtitle=MC-196825
|source=ambient
|description=Randomly when underwater
|id=ambient.underwater.loop
|translationkey=-
|volume=0.65
|pitch=1.0
|distance=16}}
{{Sound table
|sound=Bubbles1.ogg
|sound2=Bubbles2.ogg
|sound3=Bubbles3.ogg
|sound4=Bubbles4.ogg
|sound5=Bubbles5.ogg
|sound6=Bubbles6.ogg
|sound7=Water1.ogg
|sound8=Water2.ogg
|subtitle=MC-196825
|source=ambient
|description=Randomly when underwater
|id=ambient.underwater.loop.additions
|translationkey=-
|volume=1.0
|pitch=1.0
|distance=16}}
{{Sound table
|sound=Animal1.ogg
|sound2=Bass Whale1.ogg
|sound3=Bass Whale2.ogg
|sound4=Crackles1.ogg
|sound5=Crackles2.ogg
|sound6=Driplets1.ogg
|sound7=Driplets2.ogg
|sound8=Earth Crack.ogg
|subtitle=MC-196825
|source=ambient
|description=Randomly when underwater
|id=ambient.underwater.loop.additions.rare
|translationkey=-
|volume=''varies'' <ref group=sound>The first, fifth, and eighth sounds are 1.0; the second sound is 0.45; the third, sixth, and seventh sounds are 0.5; the fourth sound is 0.7</ref>
|pitch=1.0
|distance=16}}
{{Sound table
|sound=Animal2.ogg
|sound2=Dark1.ogg
|sound3=Dark2.ogg
|sound4=Dark3.ogg
|sound5=Dark4.ogg
|subtitle=MC-196825
|source=ambient
|description=Randomly when underwater
|id=ambient.underwater.loop.additions.ultra_rare
|translationkey=-
|volume=1.0 <ref group=sound>Except the third sound, which is 0.7</ref>
|pitch=1.0
|distance=16}}
{{Sound table
|sound=Water1.ogg
|sound2=Water2.ogg
|subtitle=Water flows
|source=block
|description=Randomly from flowing water
|id=block.water.ambient
|translationkey=subtitles.block.water.ambient
|volume=0.75-1.0
|pitch=0.5-1.5
|distance=16}}
{{Sound table
|sound=Water splash1.ogg
|sound2=Water splash2.ogg
|subtitle=Splashing
|source=dependent
|description=When something enters water
|id=entity.generic.splash
|translationkey=subtitles.entity.generic.splash
|volume=0.0-1.0 <ref group=sound name=speedvolume>The mob's momentum, with the horizontal axes' velocities multiplied by 0.2 (capped at 1.0)</ref>
|pitch=0.6-1.4
|distance=16}}
{{Sound table
|sound=Swim1.ogg
|sound2=Swim2.ogg
|sound3=Swim3.ogg
|sound4=Swim4.ogg
|subtitle=Swimming
|source=dependent
|description=While something is moving through water
|id=entity.generic.swim
|translationkey=subtitles.entity.generic.swim
|volume=0.0-1.0 <ref group=sound name=speedvolume/>
|pitch=0.6-1.4
|distance=16}}
{{Sound table
|sound=Empty water bucket1.ogg
|sound2=Empty water bucket1.ogg
|sound3=Empty water bucket2.ogg
|sound4=Empty water bucket3.ogg
|subtitle=Bucket empties
|source=block
|description=When water is placed with a bucket
|id=item.bucket.empty
|translationkey=subtitles.item.bucket.empty
|volume=1.0 <ref group=sound>Except for the second copy of {{cd|empty1}}, which is 0.9</ref>
|pitch=1.0
|distance=16}}
{{Sound table
|sound=Fill water bucket1.ogg
|sound2=Fill water bucket2.ogg
|sound3=Fill water bucket3.ogg
|subtitle=Bucket fills
|source=player
|description=When water is collected with a bucket
|id=item.bucket.fill
|translationkey=subtitles.item.bucket.fill
|volume=1.0
|pitch=1.0
|distance=16}}
{{Sound table
|sound=Axolotl.ogg
|sound2=Dragon fish.ogg
|sound3=Shuniji.ogg
|subtitle=-
|source=music
|description=Randomly when underwater
|id=music.under_water
|translationkey=-
|volume=0.4
|pitch=1.0
|distance=16
|foot=1}}
{{el|be}}:
{{Sound table
|type=bedrock
|sound=Water2.ogg
|source=block
|description=Randomly from flowing water
|id=liquid.water
|volume=0.75-1.0
|pitch=0.5-1.5}}
{{Sound table
|sound=Water Splash Old.ogg
|source=player
|description=When something enters water<wbr><ref group=sound>{{Bug|MCPE-44120}}</ref>
|id=random.splash
|pitch=0.6-1.4}}
{{Sound table
|sound=Water splash1.ogg
|sound2=Water splash2.ogg
|source=ambient
|description=?[[Category:Pages missing sound description]]<wbr>{{Upcoming|BE 1.20.40}}
|id=entity.generic.splash
|pitch=0.6-1.4}}
{{Sound table
|sound=Entering water1.ogg
|sound2=Entering water2.ogg
|sound3=Entering water3.ogg
|source=player
|description=When the player's eye level goes underwater<wbr>{{Upcoming|BE 1.20.40}}
|id=ambient.underwater.enter
|volume=<!--0.8 (other multipliers)-->
|pitch=1.0}}
{{Sound table
|sound=Exiting water1.ogg
|sound2=Exiting water2.ogg
|sound3=Exiting water3.ogg
|source=player
|description=When the player's eye level goes above water<wbr>{{Upcoming|BE 1.20.40}}
|id=ambient.underwater.exit
|volume=<!--1.0 (other multipliers)-->
|pitch=1.0}}
{{Sound table
|sound=Swim1.ogg
|sound2=Swim2.ogg
|sound3=Swim3.ogg
|sound4=Swim4.ogg
|source=player
|description=While something is moving through water
|id=random.swim
|pitch=0.6-1.4}}
{{Sound table
|sound=Empty water bucket1.ogg
|sound2=Empty water bucket2.ogg
|sound3=Empty water bucket3.ogg
|source=block
|description=When water is placed with a bucket
|id=bucket.empty_water
|volume=1.0
|pitch=1.0}}
{{Sound table
|sound=Fill water bucket1.ogg
|sound2=Fill water bucket2.ogg
|sound3=Fill water bucket3.ogg
|source=block
|description=When water is collected with a bucket
|id=bucket.fill_water
|volume=1.0
|pitch=1.0}}
{{Sound table
|sound=Axolotl.ogg
|sound2=Dragon fish.ogg
|sound3=Shuniji.ogg
|source=music
|description=Randomly when underwater
|id=music.game.water
|volume=0.2
|pitch=1.0
|foot=1}}
==Data values==
===ID===
{{edition|java}}:
{{ID table
|edition=java
|firstcolumnname=Water
|showforms=y
|generatetranslationkeys=y
|displayname=Block
|spritename=water
|spritetype=block
|nameid=water
|form=block
|foot=1}}
{{ID table
|edition=java
|firstcolumnname=Water
|showfluidtags=y
|displayname=Fluid
|spritename=water
|spritetype=block
|nameid=water
|fluidtags=water}}
{{ID table
|displayname=Flowing Fluid
|spritetype=block
|spritename=water
|nameid=flowing_water
|fluidtags=water
|foot=1}}
{{edition|bedrock}}:
{{ID table
|edition=bedrock
|firstcolumnname=Water
|shownumericids=y
|showforms=y
|generatetranslationkeys=y
|displayname=Flowing
|spritename=water
|spritetype=block
|nameid=flowing_water
|id=8
|form=block}}
{{ID table
|displayname=Stationary
|spritename=water
|spritetype=block
|nameid=water
|id=9
|form=block
|foot=1}}
===Block states===
{{see also|Block states}}
{{/BS}}
=== Fluid states===
{{see also|Block states}}
{{/FS}}
==Achievements==
{{load achievements|Free Diver;Sleep with the Fishes}}
==Advancements==
{{load advancements|Tactical fishing;The Cutest Predator}}
==History==
{{Main|/History}}
{{History|java classic}}
{{History||May 17, 2009|link=https://archive.org/download/Minecraft_IRC_Logs_2009/history/files/May-15-to-June-03-2009/2009-05-17.140618-0400EDT.txt.~1~|Notch mentions developing water.{{q|a very very first version of the water is somewhat working now, heh [/] the level starts out without any water and is surrounded a by a huge ocean [/] it quickly fills, leaving islands}}}}
{{History||0.0.12a|snap=May 18, 2009|slink=Java Edition Classic 0.0.12a/Development#Water test (May 18, 2009)|[[File:Water (pre-release).png|32px]] Water is shown.}}
{{History|||snap=release|slink=Java Edition Classic 0.0.12a|[[File:Water JE1.png|32px]] Added water.
|Water flows to any available space below or beside it and creates a new source [[block]], making it easy to flood a whole world just with one source.}}
{{History||May 22, 2009|link=wordofnotch:111386404|[[Notch]] pointed out that when a [[plant]] or non-cube block is placed in water, it produces a box of [[air]] around it. He asked how it could be fixed, and whether he even had to.}}
{{History||0.0.13a|[[File:Water JE2.png|32px]] The model of water has been changed.}}
{{History||May 24, 2009|link=wordofnotch:112481256|A new water system is mentioned.}}
{{History||May 24, 2009|link=wordofnotch:112481370|A new water system is shown.}}
{{History||May 24, 2009|link=wordofnotch:112487511| Another test of water is shown.}}
{{History||May 26, 2009|link=wordofnotch:113350683|While sharing feedback on experiments with random vertex and color offsets, and deciding to scrap it, Notch said he would investigate salvaging the technique to add animation to water tiles.}}
{{History||0.0.19a|[[File:Water JE3.png|32px]] Added [[Procedural animated texture generation|procedural animated texture]] to water. The old texture is retained for use as a [[animation placeholder texture|placeholder]].
|Upscaled model 2% to fix z-fighting with blocks below water. It's created water or lava models overlapping and z-fighting with each other.
|Added [[sponge]]s, which remove water.
|Water part of the [[world boundary]] still uses the old water texture.}}
{{History||0.0.20a_02|[[File:Water JE4.png|32px]] Changed model scale back to normal with 1% offset on all coordinates.}}
{{History||0.26 SURVIVAL TEST|[[File:Water JE5.png|32px]] UV mapping on side faces now has 11% v offset up.}}
{{History||0.28|[[File:Water JE4.png|32px]] Fixed UV mapping.}}
{{History|java indev}}
{{History||0.31|snap=20091223-1|[[File:Water JE6.png|32px]] Added the flowing water texture, which is now used on the sides of water.}}
{{History|||snap=20100106|Water part of the [[world boundary]] now uses the animated water texture.}}
{{History|||snap=20100113|Water is now finite.|[[Ocean]]s now have infinite water.
|Water now always drains from its highest remove location.
|Water no longer moves on the surface on its own.
|Water now has a {{frac|2|3}} probability to evaporate and a {{frac|1|3}} probability to copy.}}
{{History|||snap=20100122|Water now spawns in level generation as [[spring]]s and lakes.}}
{{History|||snap=20100131|The texture of water is now seen when underwater.}}
{{History|java infdev}}
{{History||20100227-1|Water no longer flows due to changes in chunk handling for infinite worlds.{{verify|type=change}}}}
{{History||20100607|[[File:Water JE7.png|32px]] UV mapping now has 1% uv offset on top and bottom faces and 1% u, 11% v offset on side faces.}}
{{History||20100608|[[File:Water JE6.png|32px]] Fixed UV mapping, once again.}}
{{History||20100615|[[File:Water JE8.png|32px]] The model has been changed.
|Added flowing water.
|Sources placed in isolation flow exclusively downward, rather than spreading out one block in each direction as well.
|Water and lava do not produce any solid blocks when combined.
|Water does not replace plants.
|Water is now infinite again.
|Added [[water bucket]]s, which can be filled with water.}}
{{History||20100616-1|[[File:Water JE9.png|32px]] Added vertex offset.
|Water and flowing water now has visual connection to blocks.
|Downward flowing water now pushes the [[player]] out.{{info needed|and other entities?}}}}
{{History||20100617-2|[[File:Water JE10.png|32px]] Removed vertex offset.
|Water sources placed in the air now flow outward.
|Lava and flowing lava touching water, flowing water now replaces with [[obsidian]].
|Downward flowing water no longer pushes the player out.
|Water now can replace [[plants]]. However no items are dropped.}}
{{History||20100618|Water can now replace [[rail]]s.}}
{{History||20100624|Water now destroys plants, dropping as items.}}
{{History|java alpha}}
{{History||v1.0.2_02|[[Fluids]], including water, have been slightly tweaked.}}
{{History||v1.0.5_01|Water can now freeze into [[ice]].}}
{{History||v1.2.6|[[Lake]]s, which contain water, have been added.}}
{{History|java beta}}
<!--{{History||1.5|Dropped [[item]]s in flowing water now move faster.{{check version|Taken from trivia, may not be beta}}}}-->
{{History||1.6|snap=Test Build 3|[[Rain]] and [[snow]] no longer fall through water.
|Water sources now form over [[glass]].}}
{{History||1.8|snap=Pre-release|[[File:Water JE11.png|32px]] Changed [[lighting]].
|Underwater [[particles]] have been added.
|Because of the change in how land is generated, if a [[player]] is in a world that was made pre-1.8 and travels into new [[chunk]]s, there's a chance that a large [[ocean]] may be formed as the ocean [[biome]]. There is also a one-[[block]]-high drop in sea level along the discontinuity between the old and new chunks with the old chunks being higher.
|Water can now be found in the farms and wells of [[village]]s, and the fountain rooms of [[stronghold]]s.
|Two [[biome]]s have been added that are almost all water: [[ocean]]s and [[river]]s.}}
{{History|java}}
{{History||1.0.0|snap=Beta 1.9 Prerelease|[[File:Swamp Water JE1.png|32px]] {{color|#E0FF70}} Added water color in swampland.
|Added dripping water.}}
{{History|||snap=Beta 1.9 Prerelease 4|Added [[Respiration]] and [[Aqua Affinity]] enchantments, which allow more breathing time in water and normal digging speed in water.}}
{{History|||snap=Beta 1.9 Prerelease 5|Now flowing downward creates source blocks}}
{{History|||snap=RC1|[[File:Water JE12.png|32px]] [[File:Swamp Water JE2.png|32px]] Faces on model now 0.1% moved to center to fix z-fighting on inner faces.}}
{{History||1.1|snap=12w01a|[[File:Swamp Water JE3.png|32px]] {{color|#E0FFAE}} The water color in swampland is now less intense.}}
{{History||1.2.1|snap=12w04a|Added [[desert well]]s, which contain water.}}
{{History||1.3.1|snap=12w17a|The ability to bring water using [[ice]] into [[the Nether]] has been removed.}}
{{History|||snap=12w21a|[[Dispenser]]s have been given the ability to shoot out [[fluids]], including water, inside [[water bucket]]s. They can also collect the fluids if activated again.}}
{{History||1.4.2|snap=12w38a|The [[sound]] when jumping and swimming in water has been changed.
|The sound of flowing water is now continuous.
|The water overlay is a more saturated blue.}}
{{History||1.4.4|snap=1.4.3|Water of any depth now negates all [[Damage#Fall damage|fall damage]]. [[Player]]s and [[mob]]s no longer die from great heights in shallow water.<ref>{{bug|MC-1644}} resolved as Works As Intended</ref>}}
{{History||1.5|snap=13w02a|[[File:Water JE13.png|32px]] [[File:Swamp Water JE4.png|32px]] The texture of water has been changed to use an animated texture file. Prior to this version, the texture was procedurally generated by the game (see dedicated section below).}}
{{History|||snap=13w03a|A water source [[block]] now forms if there is another water source block below it.}}
{{History|||snap=13w04a|Flowing water in [[Creative]] mode no longer slows the [[player]] down when flying.}}
{{History||1.6.1|snap=13w17a|Water [[lake]]s no longer generate in [[desert]]s.}}
{{History||1.7.2|snap=13w36a|[[File:Swamp Water JE4.png|32px]] {{color|#E0FFAE}} Added water color in swampland M, which is the same as in swampland.}}
{{History||1.7.2|snap=13w36a|Water pools now generate in the new desert M [[biome]].
|[[Ocean]]s are much smaller.}}
{{History|||snap=13w41a|[[File:Water JE14.png|32px]] [[File:Swamp Water JE5.png|32px]] Water's six internal faces are now visible from the outside.
|Water, [[ice]] and [[portal]]s are now visible through each other. This also now allows water's inside faces to be visible from outside.}}
{{History|||snap=13w42a|[[File:Water JE13.png|32px]] [[File:Swamp Water JE6.png|32px]] Water's internal faces have been removed. This visually reverts water to its pre-13w41a appearance when seen from the outside.}}
{{History||1.7.4|snap=13w47a|Water's internal top face has been readded.<ref>{{bug|MC-35658}}</ref>}}
{{History|||snap=13w48a|[[File:Water JE15.png|32px]] [[File:Swamp Water JE7.png|32px]] Water's internal side faces except the bottom face, have been readded.<ref>{{bug|MC-40621}}</ref><ref>{{bug|MC-190053}}</ref>}}
{{History||1.9|snap=15w43b|When viewed through [[glass]], water now appears as a solid blue color, as opposed to a downward flowing water texture.<ref name="badwatergraphicsJE">{{bug|MC-35790}}</ref>}}
{{History||1.11|snap=16w39a|Water now generates in [[woodland mansion]]s.}}
{{History||1.12|snap=17w06a|Water now hardens [[concrete powder]] into [[concrete]], on contact.}}
{{History||1.13|snap=18w07a|[[Item]]s now float in water.
|The [[player]]'s underwater visibility has been changed - the longer a player stays underwater, the better they can see.}}
{{History|||snap=18w10a|Underwater visibility now depends on the [[biome]] the player is in.}}
{{History|||snap=18w10c|Water can now be placed in the same block as [[chest]]s, [[trapped chest]]s, [[stairs]], [[slab]]s, [[fence]]s, [[wall]]s, [[iron bars]] and [[glass pane]]s.}}
{{History|||snap=18w10d|Water can now be placed in [[ender chest]]s, [[trapdoor]]s, [[ladder]]s, and [[sign]]s.}}
{{History|||snap=18w15a|[[File:Water JE16.png|32px]] {{color|#3F76E4}} Added default water color. The textures of water have been changed from blue to grayscale.<ref>{{bug|MC-200838}}</ref>
|[[File:Warm Ocean Water JE.png|32px]] [[File:Lukewarm Ocean Water JE.png|32px]] [[File:Frozen Ocean Water JE.png|32px]] [[File:Cold Ocean Water JE.png|32px]] Added water colors for [[warm ocean]], [[lukewarm ocean]], [[frozen ocean]] and [[cold ocean]].
|[[File:Swamp Water.png|32px]] {{color|#617B64}} Water color in swampland has been changed.
|[[File:Swamp Hills Water 18w15a.png|32px]] {{color|#E0FFAE}} Water color in swampland M is unchanged.<ref>{{bug|MC-128558}}</ref>
|Water now blocks 1 [[light]] level per [[block]] instead of 3.
|[[Player]]s no longer receive the [[Night Vision]] effect while underwater.{{verify|type=change|Did this ever happen, or is it just being used as an analogy?}}}}
{{History|||snap=18w16a|When water spreads and would later turn into a source [[block]], it now immediately places a source block.}}
{{History|||snap=18w19a|[[Experience orb]]s now float in water.}}
{{History|||snap=pre3|[[File:Swamp Water.png|32px]] {{color|#617B64}} water color in swamp hills now the same as in [[swamp]].}}
{{History|||snap=pre7|Pressing the {{control|jump}} button in flowing water at <code>level=1</code>, <code>level=2</code> and <code>level=3</code> now do normal jumps instead of {{control|swimming}} up.}}
{{History||1.15|snap=19w34a|Added [[bee]]s, which get damaged while in water.}}
{{History|||snap=19w35a|Bees now try to avoid water.}}
{{History||1.17|snap=20w45a|Flowing water no longer breaks rails.}}
{{History|||snap=21w06a|[[Aquifer]]s, large bodies of water in caves, have been added.}}
{{History|||snap=21w07a|Aquifers generate less often.}}
{{History|||snap=21w08a|Water [[spring]]s are now able to generate below Y{{=}}0.}}
{{History|||snap=21w10a|The FOV shrinking effect now respects the "FOV Effects" accessibility slider.<ref>{{bug|MC-214629}}</ref>}}
{{History|||snap=21w15a|All changes to water generation from 21w06a to 21w08a have been reverted.}}
{{History|||snap=Pre-release 2|[[Smooth lighting]] now works properly underwater.<ref>{{bug|MC-68129}} resolved as "Fixed"</ref>}}
{{History||1.18|snap=Experimental Snapshot 1|[[File:Meadow Water.png|32px]] Added water color in [[meadow]].
|All changes to water generation in the 1.17 snapshots have been reintroduced.}}
{{History||1.18|snap=21w40a|[[Water lake]]s no longer generate.}}
{{History||1.19|snap=Deep Dark Experimental Snapshot 1|Water can now generate as part of [[Ancient City|ancient cities]].}}
{{History||1.19|snap=22w14a|[[File:Mangrove Swamp Water.png|32px]] Added water color in [[mangrove swamp]].}}
{{History||1.19.3|snap=22w44a|Added the [[game rule]] {{cd|waterSourceConversion}}, which disables the formation of new water source blocks when set to {{cd|false}}.}}
{{History||1.20<br>(experimental)|link=1.19.4|snap=23w07a|[[File:Cherry Grove Water JE1.png|32px]] Added water color in [[cherry grove]].}}
{{History|pocket alpha}}
{{History||v0.1.0|[[File:Water JE11.png|32px]]{{verify|type=change|Is this accurate to how it appeared in this edition at this time?}} Added water.
|[[File:Water JE2.png|32px]] On older or much newer devices, the old [[Java Edition|Java]] water texture is used, whereas the newer animated texture is used on intermediately modern devices.}}
{{History||v0.7.0|[[File:Water JE11.png|32px]]{{verify|type=change|Is this accurate to how it appeared in this edition at this time?}} The texture of water has been changed to the new texture for all devices.}}
{{History||v0.9.0|snap=build 1|[[File:Swamp Water BE1.png|32px]] Water now uses a dark blue coloration in [[swamp]]s.
|Water dripping [[particles]] have been changed.
|[[Water lake]]s have been added.
|Water can now be found in the farms and wells of [[village]]s.
|Two [[biome]]s have been added that are almost all water: [[ocean]]s and [[river]]s.
|Oasis now generate in the new [[desert]] M [[biome]].}}
{{History||v0.10.0|snap=build 1|Smooth lighting for water has been added.
|A gradient effect has been added to water that increases its opacity with distance.
|[[File:Old bedrock swamp water.png|32px]] Water color in swampland has been changed.
|Flowing water can now push [[entities]].}}
{{History|||snap=build 7|Running water now has [[sound]]s.}}
{{History|||snap=?|Water now destroys [[block]]s.{{info needed|if this is referring to washing away plants and torches and stuff, it's been able to do that since 0.1.0}}}}
{{History||v0.14.0|snap=build 1|[[Dispenser]]s can now shoot out water from [[water bucket]]s. They can also suck up [[fluids]], including water, directly adjacent to the side they are facing.}}
{{History||v0.14.2|[[File:Old bedrock water.png|32px]] Water now uses animated texture files.}}
{{History|pocket}}
{{History||1.0.0|snap=alpha 1.0.0.0|When viewed through [[glass]], water now appears as a solid blue color, as opposed to a downward flowing water texture.<ref name="badwatergraphicsBE">{{bug|MCPE-11140}}</ref>}}
{{History||1.1.0|snap=alpha 1.1.0.0|Water now generates in [[woodland mansion]]s.
|Water now hardens [[concrete powder]] into [[concrete]], on contact.}}
{{History|bedrock}}
{{History||?|The rendering change for water in 1.0.0 has been reverted for an unknown reason.}}
{{History||1.2.13|snap=beta 1.2.13.5|Water can now be placed in the same [[block]]s as [[slab]]s and [[stairs]].}}
{{History||1.4.0|snap=beta 1.2.14.2|Water can now be placed in the same block as most transparent blocks, instead of slabs and stairs only.}}
{{History|||snap=beta 1.2.20.1|[[File:Plains Water.png|32px]] Water now has a completely new look for every [[biome]] and it is now much easier to see above and underwater (see [[Water#Bedrock Edition]] for all biome colors).
|[[Item]]s now float to the top of water.
|Underwater visibility now depends on the [[biome]] the [[player]] is in.
|[[Respiration]] enchantment and [[Water Breathing]] effect no longer grants enhanced underwater visibility.}}
{{History|||snap=?|When viewed through [[glass]], water now appears as its own top texture, as opposed to a downward flowing water texture.<ref name="badwatergraphicsBE"/>}}
{{History||1.14.0|snap=beta 1.14.0.1|Added [[bee]]s, which get damaged when touching water and try to avoid it.}}
{{History|console}}
{{History||xbox=TU1|xbone=CU1|ps=1.0|wiiu=Patch 1|switch=1.0.1|[[File:Water JE11.png|32px]]{{verify|type=change|Is this accurate to how it appeared in this edition at this time?}} [[File:Swamp Water JE2.png|32px]] Added water.}}
{{History||xbox=TU9|[[Dispenser]]s have been given the ability to shoot out [[fluids]], including water, inside [[water bucket]]s. They can also suck up the fluids if activated again, but a bug prevents the empty [[bucket]] from being filled.}}
{{History||xbox=TU12|[[File:Water JE15.png|32px]] Water now uses animated texture files.}}
{{History||xbox=TU25|xbone=CU14|ps=1.17|Water can be used in custom superflats. It appears as a 3D block in the block selection screen of the custom superflat interface.}}
{{History||xbox=TU31|xbone=CU19|ps=1.22|wiiu=Patch 3|Water splash [[sound]]s have been updated.
|Most [[mob]]s can now [[swimming|swim]] in water.}}
{{History||xbox=TU69|xbone=none|ps=1.76|wiiu=Patch 38|switch=none|[[File:Warm Ocean Water.png|32px]] [[File:Lukewarm Ocean Water.png|32px]] [[File:Frozen Ocean Water.png|32px]] [[File:Cold Ocean Water.png|32px]] Added [[warm ocean]], [[lukewarm ocean]], [[frozen ocean]] and [[cold ocean]] texture colors for water in those [[biome]]s.}}
{{History||ps=1.78|The animation of water is now less smooth.}}
{{History|New 3DS}}
{{History||0.1.0|[[File:Water JE15.png|32px]]{{verify|type=change|Is this accurate to how it appeared in this edition at this time?}} [[File:Old bedrock swamp water.png|32px]] Added water.}}
{{History|foot}}
<!-- Still need to add in the right version: Drowning added, Water can turn into ice -->
<!--- Still need to add "1.16 pre-release 5 - Water overlay texture turned slightly darker" -->
{{More sounds|Old and older water splash sounds.|type=historical}}
===Data history===
{{History|java}}
{{History||1.13|snap=17w47a|Prior to [[1.13/Flattening|''The Flattening'']], these blocks' numeral IDs were 8 and 9. Both blocks have been merged into a single one.}}
{{History|||snap=18w10c|Removed <code>flowing_water</code>.}}
{{History|foot}}
<gallery>
EarlyFlowingWater.png|The water and flowing water in [[Infdev 20100615]].
</gallery>
==Issues==
{{Issue list}}
==Trivia==
*The texture subtly overlaid on the screen when underwater is that of the original water texture from 0.0.12a.
**The outdatedness of this texture is not considered a bug or oversight, unlike many other outdated textures.<ref>{{bug|MC-241000|||Invalid}}</ref>
**This texture is particularly difficult to notice due to its extreme transparency,<ref>{{bug|MC-128337}}</ref> as well as the fact that other blocks likely make the scene visually noisy enough to further obscure it under most conditions.
* While underwater, the player's FOV (field of vision) is lowered by 10 to simulate light {{w|refraction}}. This can be disabled via the "FOV Effects" [[option]].
*If a player or mob with the [[Levitation]] effect touches water, the effect is completely negated.<ref>{{bug|MC-83369}}</ref>
==Gallery==
<gallery>
1.8underwater.png|Underwater particles, or "bubbles".
Underground water mix.png|Water that is underground, but is still part of 2 different biomes. The color is split.
InvisibleWater.png|A glitch where water is invisible below its surface level.
Water Cave Filling.png|Water flowing into a [[cave]].
Under water.png|A view underwater.
Mac os water texture V1.13-920.gif|Animated view of the Java edition water texture.
Bubbles.gif|These bubbles appear above the [[hunger]] bar when the player's head is in water, and when all the bubbles pop, a heart of damage is dealt every second until the player is no longer entirely under water.
Waterfall.png|A naturally occurring waterfall.
Water (texture) JE1 BE1.png|This texture is subtly overlaid on the screen when underwater.
Land ruin.png|An underwater ruin {{in|bedrock}} that generated on land with a water block on top of it.
Land ruin Java.png|An underwater ruin {{in|java}} that generated on land with a visible loot chest that is not waterlogged and doesn't have water on top of it.
Largelake.png|A large lake, during a [[thunderstorm]].
Coral reef at night.png|A [[coral reef]] at night, in a [[warm ocean]] biome.
WaterRavine.jpg|A bug that causes the water to not flow into the pit.
Obsidian Spring.png|A water flowing on lava lake, creating obsidian. The water was placed by a player.
Two flowing streams.png|Waterfalls made by a player.
Watercave.png|Water flowing into the cave from nearby lake.
RavineandStornghold.png|Ravine with multiple ores, water and lava falls, and stronghold bridge over it.
Water shade.png|Different water colors in swamp biome.
File:Nonflowingwater.png|A block of water, which is not flowing because of a glitch, besides a village farm.
</gallery>
==See also==
*[[Waterlogging]]
==References ==
{{Reflist}}
==External Links ==
*[https://www.minecraft.net/en-us/article/block-week-water Block of the Week: Water] – Minecraft.net on July 14, 2017
{{Blocks|natural}}
{{Items}}
[[Category:Fluids]]
[[Category:Natural blocks]]
[[Category:Non-solid blocks]]
[[Category:Generated structure blocks]]
[[cs:Voda]]
[[de:Wasser]]
[[es:Agua]]
[[fr:Eau]]
[[hu:Víz]]
[[it:Acqua]]
[[ja:水]]
[[ko:물]]
[[nl:Water]]
[[pl:Woda]]
[[pt:Água]]
[[ru:Вода]]
[[th:น้ำ]]
[[tr:Su]]
[[uk:Вода]]
[[zh:水]]</li></ul></nowiki> | Creepers have been introduced, based on said pig model. | ||||
0.26 (October 24, 2009){{Extension DPL}}<ul><li>[[Dried Kelp|Dried Kelp]]<br/>{{about|the item|the block|Dried Kelp Block}}
{{Item
| title = Dried Kelp
| image = Dried Kelp.png
| renewable = Yes
| heals = {{hunger|1}}
| stackable = Yes (64)
}}
'''Dried kelp''' is a [[food]] item that can be quickly eaten by the [[player]]. It can also be crafted into [[Dried Kelp Block|dried kelp blocks]].
== Obtaining ==
=== Cooking ===
[[Kelp]] can be cooked in a [[furnace]], [[smoker]], or [[campfire]]. Each piece of dried kelp removed from a furnace output slot gives 0.1 [[experience]] (6.4 experience per stack).
{{Smelting
|Kelp
|Dried Kelp
|0,1
}}
=== Crafting ===
{{Crafting
|Dried Kelp Block
|Output= Dried Kelp,9
|type= Foodstuff
}}
== Usage ==
=== Food ===
[[File:Eating dried kelp.png|thumb|A player eating dried kelp.]]
To eat dried kelp, press and hold {{control|use}} while it is selected in the hotbar. Eating one restores {{hunger|1}} [[hunger]] and 0.6{{only|je|short=1}} / 0.2{{only|be|short=1}} hunger [[Hunger#Mechanics|saturation]].
A player can consume dried kelp about twice as fast as any other food item in the game.
=== Crafting ingredient ===
{{Crafting usage}}
=== Composting ===
Dried kelp placed into a [[composter]] has a 30% chance of raising the compost level by 1.
==Sounds==
{{Sound table/Entity/Food}}
== Achievements ==
{{load achievements|Castaway}}
== Advancements ==
{{load advancements|Husbandry;A Balanced Diet}}
== Data values ==
=== ID ===
{{edition|java}}:
{{ID table
|edition=java
|showforms=y
|generatetranslationkeys=y
|displayname=Dried Kelp
|spritetype=item
|nameid=dried_kelp
|form=item
|foot=1}}
{{edition|bedrock}}:
{{ID table
|edition=bedrock
|shownumericids=y
|showforms=y
|notshowbeitemforms=y
|generatetranslationkeys=y
|displayname=Dried Kelp
|spritetype=item
|nameid=dried_kelp
|id=270
|form=item
|foot=1}}
== History ==
{{History|java}}
{{History||1.13|snap=18w07a|[[File:Dried Kelp JE1.png|32px]] Added dried kelp.}}
{{History|||snap=18w08b|Dried kelp can now be used to craft [[dried kelp block]]s.}}
{{History||1.14|snap=19w03a|Placing dried kelp into the new [[composter]] has a 10% chance of raising the compost level by 1.}}
{{History|||snap=19w05a|Dried kelp now has a 30% chance of increasing the compost level in a composter.}}
{{History|bedrock}}
{{History||1.4.0|snap=beta 1.2.14.2|[[File:Dried Kelp BE1.png|32px]] Added dried kelp.}}
{{H||1.11.0|snap=beta 1.11.0.1|Dried kelp can now be used to fill up [[composter]]s.}}
{{History||1.17.10|snap=beta 1.17.10.20|[[FIle:Dried Kelp JE1.png|32px]] The texture of dried kelp has been changed to match ''Java Edition''.}}
{{History|console}}
{{History||xbox=TU69|ps=1.76|wiiu=Patch 38|[[File:Dried Kelp BE1.png|32px]] Added dried kelp.}}
{{History|foot}}
== Issues ==
{{issue list}}
{{Items}}
[[Category:Food]]
[[Category:Renewable resources]]
[[de:Getrockneter Seetang]]
[[es:Algas secas]]
[[fr:Algue séchée]]
[[ja:乾燥した昆布]]
[[ko:말린 켈프]]
[[lzh:乾海帶]]
[[nl:Gedroogde kelp]]
[[pl:Suszone wodorosty]]
[[pt:Algas secas]]
[[ru:Сушёная ламинария]]
[[th:สาหร่ายทะเลแห้ง]]
[[zh:干海带]]</li><li>[[Wheat|Wheat]]<br/>{{About||the artifact in ''Minecraft Dungeons''|Minecraft Dungeons:Wonderful Wheat|the seed|Wheat Seeds}}
{{Item
| image = Wheat.png
| renewable = Yes
| stackable = Yes (64)
}}
'''Wheat''' is an [[item]] primarily obtained by harvesting fully-grown [[Wheat Seeds|wheat crops]]. It is used for [[crafting]] as well as to feed certain animals.
== Obtaining ==
=== Natural generation ===
{{LootChestItem|wheat}}
=== Farming ===
{{main|Tutorials/Crop farming}}
When a fully-grown wheat crop is harvested, it drops 1 wheat and 1 to 4 [[wheat seeds]] ({{frac|2|5|7}} per crop harvested on average). A wheat crop has a total of eight stages (0-7) from the time it is planted until it can be harvested. If a crop is harvested before it is fully grown, it just drops one seed. Wheat needs light to grow; a seed is destroyed if planted without light. Harvesting with a [[Fortune]]-enchanted tool increases the number of seeds dropped but does not increase the yield of wheat.
=== Crafting ===
{{Crafting
|Hay Bale
|Output= Wheat,9
|type= Material
}}
=== Drops ===
A [[fox]] sometimes spawns holding wheat, which it always drops upon death. Alternatively, the player can drop a [[food]] item, causing the fox to drop the wheat.
== Usage ==
=== Food ===
[[File:New Cattle.png|thumb|Using wheat to lead a cow.]]
When wheat is held, it causes nearby [[cow]]s, [[sheep]], [[goat]]s and [[mooshroom]]s to follow the player, until either the player stops holding the wheat or goes too far away from the animal, thus leading them to lose interest.
Wheat may be used to [[breed]] cows, sheep, goats, and mooshrooms by first herding two of them together and then {{control|using}} the wheat on them to begin "Love Mode."
Wheat can heal a [[horse]] {{hp|1}} health or lower its temper by 3% when attempting to tame it. It can also decrease the time it takes for a foal to grow by 20 seconds.
Similarly, wheat can heal a [[llama]] {{hp|2}} health, and it decreases the time it takes a baby llama to grow by 10 seconds.
=== Crafting ingredient ===
{{crafting usage}}
=== Trading ===
Novice-level farmer [[Villager|villagers]] have a 25%{{only|bedrock}} or 40%{{only|java}} chance to buy 20 wheat for one [[emerald]].
=== Composting ===
Placing wheat into a [[composter]] has a 65% chance of raising the compost level by 1. A stack of wheat yields an average of 5.94 [[bone meal]].
== Achievements ==
{{load achievements|Bake Bread;The Lie;Repopulation}}
== Advancements ==
{{load advancements|A Seedy Place}}
== Data values ==
=== ID ===
{{edition|java}}:
{{ID table
|edition=java
|showforms=y
|generatetranslationkeys=y
|displayname=Wheat
|spritetype=item
|nameid=wheat
|form=item
|foot=1}}
{{edition|bedrock}}:
{{ID table
|edition=bedrock
|shownumericids=y
|showforms=y
|notshowbeitemforms=y
|generatetranslationkeys=y
|displayname=Wheat
|spritetype=item
|nameid=wheat
|id=334
|form=item
|foot=1}}
== Video ==
{{Video note|the narrator demonstrates at 0:56 that walking over wheat can destroy the crop and un-till the land. This is outdated: since version {{Version link|JE 1.1}}, wheat can be destroyed only by a player or mob jumping on it or falling on it.}}
<div style="text-align:center">{{yt|JbAURiYQZlA}}</div>
== History ==
{{History|java indev}}
{{History||20100206|[[File:Wheat JE1 BE1.png|32px]] Wheat has been added.
|Wheat can be used to craft [[bread]].}}
{{History||20100223|Bread now requires 3 wheat (1 row of 3) instead of 6 (2 rows of 3) to be crafted.}}
{{History|java infdev}}
{{History||20100625-2|Wheat can now be found in the new [[dungeon]] [[chest]]s.}}
{{History|java beta}}
{{History||1.2|Wheat can now be used to craft [[cake]].}}
{{History||1.4|Wheat can now be used to craft [[cookie]]s.}}
{{History|java}}
{{History||1.0.0|snap=Beta 1.9 Prerelease 2|Wheat can now be used in [[breeding]].}}
{{History||1.3.1|snap=12w21a|Wheat can now be [[trading|sold]] to farmer [[villager]]s, at 18–21 wheat for 1 [[emerald]].}}
{{History||1.4.2|snap=12w36a|[[Chicken]]s and [[pig]]s no longer use wheat to [[breeding|breed]].}}
{{History||1.6.1|snap=13w16a|[[Horse]]s can now be healed by being fed wheat.
|Foals can now have their growth increased by being fed wheat.}}
{{History|||snap=13w17a|[[Horse]]s can now have their tempers lowered with wheat.}}
{{History|||snap=13w18a|Nine wheat can now be crafted to make a [[hay bale]].}}
{{History||1.8|snap=14w02a|Trading has been changed: farmer [[villager]]s now [[trading|buy]] 18–22 wheat for 1 [[emerald]].}}
{{history||1.9|snap=15w43a|Wheat may now be found in [[igloo]] basement chests.}}
{{history|||snap=15w44a|The average yield of wheat in [[dungeon]] chests has been decreased.}}
{{History||1.11|snap=16w39a|Wheat can now be found in the new [[woodland mansion]] chests.}}
{{History||1.13|snap=17w47a|Prior to [[1.13/Flattening|''The Flattening'']], this [[item]]'s numeral ID was 296.}}
{{History|||snap=18w09a|Wheat can now generate in the chests of [[underwater ruins]].}}
{{History|||snap=18w11a|Wheat can now generate in [[shipwreck]] chests.}}
{{History||1.14|snap=18w43a|[[File:Wheat JE2 BE2.png|32px]] The texture of wheat has been changed.}}
{{History|||snap=18w47a|Wheat can now generate inside of loot chests on top of [[pillager outpost]]s.}}
{{History|||snap=18w49a|Wheat can now generate in chests in [[village]] butcher and shepherd houses.}}
{{History|||snap=18w50a|Wheat can now generate in chests in desert [[village]] houses.}}
{{History||1.14|snap=19w03a|Placing wheat into the new [[composter]] has a 50% chance of raising the compost level by 1.}}
{{History|||snap=19w05a|Wheat now has a 65% chance of increasing the compost level in a composter by 1.}}
{{History|||snap=19w07a|Added [[fox]]es, which sometimes spawn with wheat in their mouths.}}
{{History||1.17|snap=21w13a|Wheat can now be used to breed [[goat]]s.}}
{{History||1.19|snap=22w11a|Wheat can now be used to craft [[packed mud]].}}
{{History||1.20|snap=23w12a|Wheat can now be found in [[suspicious gravel]] and [[suspicious sand]] in cold and warm [[ocean ruins]] and in [[trail ruins]].}}
{{History|||snap=23w16a|Wheat no longer generates in [[suspicious sand]] in [[trail ruins]].|Due to the split of the archaeological loot tables for suspicious gravel within [[trail ruins]], wheat is now common loot.}}
{{History|pocket alpha}}
{{History||v0.2.0|[[File:Wheat JE1 BE1.png|32px]] Added wheat. It is currently unobtainable and serves no purpose.}}
{{History||v0.4.0|Wheat is now obtainable via farming and can be used to craft [[bread]].}}
{{History||v0.7.0|Wheat can now be used to craft [[cake]].}}
{{History||v0.8.0|snap=build 1|Wheat can now be used to breed [[cow]]s and [[sheep]].
|Wheat can now be used to craft [[hay bale]]s.}}
{{History||v0.9.0|snap=build 1|Wheat [[crop]]s now naturally spawn in [[village]]s.
|Wheat can now be used to craft [[cookie]]s.}}
{{History||v0.15.0|snap=build 1|Wheat can now be used to grow, increase tame and heal [[horse]]s, [[donkey]]s and [[mule]]s.}}
{{History||v0.16.2|Wheat can now be found in the [[chest]]s inside of large houses in [[ice plains]] and [[cold taiga]] [[village]]s.}}
{{History|pocket}}
{{History||1.0.0|snap=alpha 0.17.0.1|Wheat can now be found in [[igloo]] basement chests.}}
{{History||1.0.4|snap=alpha 1.0.4.0|Farmer [[villager]]s now [[trading|buy]] 18–22 wheat for 1 [[emerald]].}}
{{History||1.1.0|snap=alpha 1.1.0.0|Wheat can now be found in the new [[woodland mansion]] chests.}}
{{History|bedrock}}
{{History||1.4.0|snap=beta 1.2.14.2|Wheat can now be found inside [[shipwreck]] chests.}}
{{History|||snap=beta 1.2.20.1|Wheat can now be found inside [[underwater ruins]] chests.}}
{{History||1.10.0|snap=beta 1.10.0.3|Wheat can now be found in [[pillager outpost]] chests.
|[[File:Wheat JE2 BE2.png|32px]] The texture of wheat has been changed.}}
{{History||1.11.0|snap=beta 1.11.0.1|Wheat can now be found in [[desert]] [[village]] house chests, village shepherd and butcher house chests.
|Wheat can now be used to fill up [[composter]]s.}}
{{History|||snap=beta 1.11.0.4|[[Trading]] has changed, farmer [[villager]]s now have a 25% chance to buy 20 wheat for one [[emerald]] as part of their first tier trade.}}
{{History||1.13.0|snap=beta 1.13.0.1|Added [[fox]]es, which can drop wheat.}}
{{History|console}}
{{History||xbox=TU1|xbone=CU1|ps=1.0|wiiu=Patch 1|switch=1.0.1|[[File:Wheat JE1 BE1.png|32px]] Added wheat.}}
{{History||xbox=none|xbone=none|ps=1.90|wiiu=none|switch=none|[[File:Wheat JE2 BE2.png|32px]] The texture of wheat has been changed.}}
{{History|New 3DS}}
{{History||0.1.0|[[File:Wheat JE1 BE1.png|32px]] Added wheat.}}
{{History|foot}}
== Issues ==
{{issue list}}
== Gallery ==
<gallery>
Wheat SDGP.png|Wheat in the [[Super Duper Graphics Pack]].
File:Field of Wheat.jpg|[[Steve]] and [[Kai]] in a field of wheat crops.<ref>https://www.instagram.com/p/CumuJleg6Ij/</ref>
</gallery>
== External Links ==
*[https://www.minecraft.net/en-us/article/taking-inventory--wheat Taking Inventory: Wheat] – Minecraft.net on April 21, 2022
{{Items}}
[[Category:Plants]]
[[Category:Food]]
[[cs:Pšenice]]
[[de:Weizen]]
[[es:Trigo]]
[[fr:Blé]]
[[hu:Búza]]
[[it:Grano]]
[[ja:小麦]]
[[ko:밀]]
[[nl:Tarwe]]
[[pl:Pszenica]]
[[pt:Trigo]]
[[ru:Пшеница]]
[[th:ข้าวสาลี]]
[[uk:Пшениця]]
[[zh:小麦]]
[[Category:Renewable resources]]</li></ul> | TNT has been added. | ||||
| indev | |||||
0.31 (January 22, 2010){{Extension DPL}}<ul><li>[[Nautilus Shell|Nautilus Shell]]<br/>{{Item
| type =
| stackable = Yes (64)
| renewable = Yes
}}
A '''nautilus shell''' is an item that is used for crafting [[conduit]]s.
==Obtaining==
===Fishing===
{{main|Fishing#Junk and treasure}}
Nautilus shells can be rarely obtained as a treasure item from fishing. The drop chances of nautilus shells slightly increase with each level of [[Luck of the Sea]] on the [[player]]'s [[fishing rod]].
===Mob loot===
[[Drowned]] have a 3%{{only|java|short=1}} or 8%{{only|bedrock|short=1}} chance to spawn with a nautilus shell in their off-hand, and this nautilus shell always drops upon [[death]].
===Trading===
[[Wandering trader]]s may [[trading|sell]] a nautilus shell for 5 [[emerald]]s each, but they only sell 5 of them at a time.
==Usage==
{{IN|bedrock}}, a nautilus shell is one of the few items that can be held in the off-hand.
===Crafting ingredient===
{{crafting usage}}
=== Trading ===
Nautilus shells can be given to trident-wielding drowned with a chance for the drowned to pick up the shell and drop the trident.<sup>[''[[Bedrock Edition]] only'']</sup>
==Data values==
===ID===
{{edition|java}}:
{{ID table
|edition=java
|showforms=y
|generatetranslationkeys=y
|displayname=Nautilus Shell
|spritetype=item
|nameid=nautilus_shell
|form=item
|foot=1}}
{{edition|bedrock}}:
{{ID table
|edition=bedrock
|shownumericids=y
|showforms=y
|notshowbeitemforms=y
|generatetranslationkeys=y
|displayname=Nautilus Shell
|spritetype=item
|nameid=nautilus_shell
|id=570
|form=item
|foot=1}}
==History==
{{History|java}}
{{History||1.13|snap=18w15a|[[File:Nautilus Shell JE1 BE2.png|32px]] Added nautilus shells.}}
{{History||1.14|snap=19w05a|Added [[Wandering Trader|wandering trader]]s, which sell nautilus shells.}}
{{History|bedrock}}
{{History||1.4.0|snap=beta 1.2.20.1|[[File:Nautilus Shell BE1.png|32px]] Added nautilus shells.}}
{{History|||snap=beta 1.2.20.2|[[File:Nautilus Shell JE1 BE2.png|32px]] The texture of nautilus shells has now been changed.}}
{{History||1.5.0|snap=beta 1.5.0.0|[[Drowned]] now sometimes spawn holding a nautilus shell.
|Nautilus shells are no longer behind [[Experimental Gameplay]].}}
{{History|||snap=beta 1.5.0.1|Nautilus shells can now be used to craft [[conduit]]s.}}
{{History||1.10.0|snap=beta 1.10.0.3|Nautilus shells can now be obtained from [[trading]] with [[wandering trader]]s.}}
{{History|console}}
{{History||xbox=TU69|ps=1.76|wiiu=Patch 38|[[File:Nautilus Shell JE1 BE2.png|32px]] Added nautilus shells.}}
{{History||xbox=none|ps=1.91|wiiu=none|Nautilus shells can now be obtained from [[trading]] with [[wandering trader]]s.}}
{{History|foot}}
==Issues==
{{issue list}}
==Trivia==
*[[wikipedia:Nautilus|Nautilus]]es are animals that occupy deep oceans in the real world. However, they are absent in Minecraft and there are currently no plans to add nautilus [[mob]]s into the game.
*Because {{el|bedrock}} allows for Nautilus shells to be held in the off-hand (since drowned hold them), they are the only item in that version that can be put in the off-hand slot without having a specific function.
{{items}}
[[de:Nautilusschale]]
[[es:Caparazón de nautilo]]
[[fr:Coquille de nautile]]
[[it:Conchiglia di nautilus]]
[[ja:オウムガイの殻]]
[[ko:앵무조개 껍데기]]
[[nl:Nautilusschelp]]
[[pl:Muszla łodzika]]
[[pt:Concha de náutilo]]
[[ru:Раковина наутилуса]]
[[th:เปลือกหอยงวงช้าง]]
[[uk:Мушля наутилуса]]
[[zh:鹦鹉螺壳]]
[[Category:Renewable resources]]</li><li>[[Sugar Cane|Sugar Cane]]<br/>{{Block
|image=Sugar Cane.png
|image2=Sugar Cane (item) JE3.png
|extratext = View all [[#Gallery|renders]]
|transparent=Yes
|light=No
|tool=any
|renewable=Yes
|stackable=Yes (64)
|flammable=No
|lavasusceptible=No
}}
'''Sugar cane''' is a block found as 1–4-block-tall. It plants near water in the [[Overworld]]. As an item, it is an important crafting ingredient.
==Obtaining==
Sugar cane can be mined instantly with anything.
When the spot a sugar cane block is placed in becomes unsuitable, such as when the supporting block is removed, the sugar cane block uproots and drops as an item. {{IN|be}}, sugar cane uproots immediately after all adjacent water is removed. {{IN|je}}, sugar cane uproots on the next block update or [[Tick#Random tick|random tick]].
A sugar cane block drops itself as an item if a piston tries to push it (trying to pull it does nothing) or moves a block into its space.
===Natural generation===
[[File:Sugar Canez.png|thumb|250px|Naturally-occurring sugar cane near a river.]]
Sugar cane can generate naturally near [[water]] and [[ice]], as two ({{frac|11|18}} chance), three ({{frac|5|18}} chance), or four ({{frac|2|18}} chance) blocks tall. Rare taller sugar canes can be found if the world generator places two smaller canes on top of each other. It generates in approximately 0.8 sugar cane per chunk seeing as how they only generate near bodies of water.
Sugar canes attempt to generate 10 times in any Overworld biome, which requires water. An extra 10 attempts are made in [[swamp]] biomes, and 50 in [[desert]] biomes, which makes sugar cane twice as frequent in swamps and six times as frequent in desert biomes, making the banks of [[river]]s that cut through deserts lined with sugar canes. Sugar canes do not grow faster in swamps or deserts they only spawn a increased amount.
Sugar cane cannot generate in caves {{in|je}}.<ref>{{bug|MC-214959||Sugar cane generated in cave|Fixed}}</ref>
===Trading===
[[Wandering trader]]s can sell sugar cane for an [[emerald]].
==Usage==
Due to its water-displacing properties, sugar cane can interestingly be used to create underwater paths, allowing [[player]]s to move at normal speed and breathe if it is two blocks in height.{{only|java}}<ref>{{bug|MC-929||Sugar cane can be placed underwater|WAI}}</ref>
Sugar cane takes on a different shade of green depending on the biome in which it is placed.
===Crafting ingredient===
{{crafting usage}}
===Farming===
{{main|Tutorials/Sugar cane farming}}
[[File:Underground Sugar Farm.png|200px|thumb|An underground sugar cane farm.]]
Sugar cane can generate naturally up to any number of blocks tall, but ''grow'' only to a height of three blocks, adding a block of height when the top sugar cane block has received 16 random [[Tick#Block tick|block tick]]s (i.e. on average every 18 minutes on ''Java Edition''<!-- Average 68.27 seconds/tick * 16 ticks/growth = 18.2 minutes --> or 54 minutes on Bedrock Edition, but the actual rate can vary widely).
Sugar cane must be planted on a [[grass block]], [[dirt]], [[coarse dirt]], [[rooted dirt]], [[podzol]], [[mycelium]], [[sand]], [[red sand]], [[suspicious sand]], [[moss block]], or [[mud]] that is directly adjacent to [[water]], [[waterlogged]] block, or [[frosted ice]] (not merely above or diagonal to water), or on top of another sugar cane block. The adjacent water block can be covered with another block, whether [[opacity|opaque or transparent]], and sugar cane can still be placed and grow next to it. Sugar cane grows regardless of light level, even in complete darkness.
[[File:4blockcane.png|thumb|A natural 4-block-high sugar cane plant.]]
{{IN|bedrock}}, [[bone meal]] can be used to instantly grow sugar cane to three blocks. Only one bone meal is consumed. {{IN|java}}, bone meal cannot be used on sugar cane.<ref>{{bug|MC-73963||Can't use bonemeal on cacti or sugar cane|WAI}}</ref>
On average, it takes [[Tutorials/Sugar_cane_farming#Mechanics|18 minutes]] for a single block of sugar cane to grow 3 blocks tall.
=== Composting ===
Placing sugar cane into a [[composter]] has a 50% chance of raising the compost level by 1.
== List of colors ==
{{Missing information|Bedrock Edition colors (see [[Water#Color]]{{verify|it's there?}})}}
=== ''Java Edition'' ===
These values are generated by the biome dyeing algorithm. See [[Color#Biome colors|Biome colors]] for more information.
<div class="mw-collapsible mw-collapsed" style="float: left">
{| class="wikitable sortable" style="text-align:center" data-description="Java edition biome colors"
!Biome !! Category !! Rainfall !! Sugarcane Color !! Temperature Affects !! Render
|-
| {{BiomeLink|Badlands}} || Mesa || No || #90814d || No || [[File:Badlands Sugar Cane.png|32px]]
|-
| {{BiomeLink|Beach}} || Beach || Rain || #91bd59 || || [[File:Plains Sugar Cane.png|32px]]
|-
| {{BiomeLink|Birch Forest}} || Forest || Rain || #88bb67 || || [[File:Birch Forest Sugar Cane.png|32px]]
|-
| {{BiomeLink|Cold Ocean}} || Ocean || Rain || #8eb971 || || [[File:Ocean Sugar Cane.png|32px]]
|-
| {{BiomeLink|Dark Forest}} || Forest || Rain || #507a32 || || [[File:Dark Forest Sugar Cane.png|32px]]
|-
| {{BiomeLink|Deep Cold Ocean}} || Ocean || Rain || #8eb971 || || [[File:Ocean Sugar Cane.png|32px]]
|-
| {{BiomeLink|Deep Frozen Ocean}} || Ocean || Rain || #8eb971 || || [[File:Ocean Sugar Cane.png|32px]]
|-
| {{BiomeLink|Deep Lukewarm Ocean}} || Ocean || Rain || #8eb971 || || [[File:Ocean Sugar Cane.png|32px]]
|-
| {{BiomeLink|Deep Ocean}} || Ocean || Rain || #8eb971 || || [[File:Ocean Sugar Cane.png|32px]]
|-
| {{BiomeLink|Desert}} || Desert || No || #bfb755 || || [[File:Desert Sugar Cane.png|32px]]
|-
| {{BiomeLink|End Barrens}} || The End || No || #8eb971 || || [[File:Ocean Sugar Cane.png|32px]]
|-
| {{BiomeLink|End Highlands}} || The End || No || #8eb971 || || [[File:Ocean Sugar Cane.png|32px]]
|-
| {{BiomeLink|End Midlands}} || The End || No || #8eb971 || || [[File:Ocean Sugar Cane.png|32px]]
|-
| {{BiomeLink|Eroded Badlands}} || Mesa || No || #90814d || No || [[File:Badlands Sugar Cane.png|32px]]
|-
| {{BiomeLink|Flower Forest}} || Forest || Rain || #79c05a || || [[File:Forest Sugar Cane.png|32px]]
|-
| {{BiomeLink|Forest}} || Forest || Rain || #79c05a || || [[File:Forest Sugar Cane.png|32px]]
|-
| {{BiomeLink|Frozen Ocean}} || Ocean || Snow || #80b497 || || [[File:Snowy Plains Sugar Cane.png|32px]]
|-
| {{BiomeLink|Frozen River}} || River || Snow || #80b497 || || [[File:Snowy Plains Sugar Cane.png|32px]]
|-
| {{BiomeLink|Old Growth Spruce Taiga}} || Taiga || Rain || #86b783 || || [[File:Taiga Sugar Cane.png|32px]]
|-
| {{BiomeLink|Old Growth Pine Taiga}} || Taiga || Rain || #86b87f || || [[File:Old Growth Pine Taiga Sugar Cane.png|32px]]
|-
| {{BiomeLink|Ice Spikes}} || Icy || Snow || #80b497 || || [[File:Snowy Plains Sugar Cane.png|32px]]
|-
| {{BiomeLink|Jungle}} || Jungle || Rain || #59c93c || || [[File:Jungle Sugar Cane.png|32px]]
|-
| {{BiomeLink|Sparse Jungle}} || Jungle || Rain || #64c73f || || [[File:Sparse Jungle Sugar Cane.png|32px]]
|-
| {{BiomeLink|Lukewarm Ocean}} || Ocean || Rain || #8eb971 || || [[File:Ocean Sugar Cane.png|32px]]
|-
| {{BiomeLink|Windswept Hills}} || Extreme Hills || Rain || #8ab689 || || [[File:Windswept Hills Sugar Cane.png|32px]]
|-
| {{BiomeLink|Mushroom Fields}} || Mushroom || Rain || #55c93f || || [[File:Mushroom Fields Sugar Cane.png|32px]]
|-
| {{BiomeLink|Nether}} || Nether || No || #bfb755 || || [[File:Desert Sugar Cane.png|32px]]
|-
| {{BiomeLink|Ocean}} || Ocean || Rain || #8eb971 || || [[File:Ocean Sugar Cane.png|32px]]
|-
| {{BiomeLink|Plains}} || Plains || Rain || #91bd59 || || [[File:Plains Sugar Cane.png|32px]]
|-
| {{BiomeLink|River}} || River || Rain || #8eb971 || || [[File:Ocean Sugar Cane.png|32px]]
|-
| {{BiomeLink|Savanna}} || Savanna || No || #bfb755 || || [[File:Desert Sugar Cane.png|32px]]
|-
| {{BiomeLink|Savanna Plateau}} || Savanna || No || #bfb755 || || [[File:Desert Sugar Cane.png|32px]]
|-
| {{BiomeLink|Windswept Savanna}} || Savanna || No || #bfb755 || || [[File:Desert Sugar Cane.png|32px]]
|-
| {{BiomeLink|Small End Islands}} || The End || No || #8eb971 || || [[File:Ocean Sugar Cane.png|32px]]
|-
| {{BiomeLink|Snowy Beach}} || Beach || Snow || #83b593 || || [[File:Snowy Beach Sugar Cane.png|32px]]
|-
| {{BiomeLink|Snowy Taiga}} || Taiga || Snow || #80b497 || || [[File:Snowy Plains Sugar Cane.png|32px]]
|-
| {{BiomeLink|Snowy Plains}} || Icy || Snow || #80b497 || || [[File:Snowy Plains Sugar Cane.png|32px]]
|-
| {{BiomeLink|Stony Shore}} || None || Rain || #8ab689 || || [[File:Windswept Hills Sugar Cane.png|32px]]
|-
| {{BiomeLink|Sunflower Plains}} || Plains || Rain || #91bd59 || || [[File:Plains Sugar Cane.png|32px]]
|-
| {{BiomeLink|Swamp}} || Swamp || Rain || #6A7039 || If temperature below -0.1, used #4C763C. || [[File:Swamp Sugar Cane.png|32px]] / [[File:Swamp Sugar Cane (Cold).png|32px]]
|-
| {{BiomeLink|Taiga}} || Taiga || Rain || #86b783 || || [[File:Taiga Sugar Cane.png|32px]]
|-
| {{BiomeLink|Old Growth Birch Forest}} || Forest || Rain || #88bb67 || || [[File:Birch Forest Sugar Cane.png|32px]]
|-
| {{BiomeLink|The End}} || The End || No || #8eb971 || || [[File:Ocean Sugar Cane.png|32px]]
|-
| {{BiomeLink|The Void}} || None || No || #8eb971 || || [[File:Ocean Sugar Cane.png|32px]]
|-
| {{BiomeLink|Warm Ocean}} || Ocean || Rain || #8eb971 || || [[File:Ocean Sugar Cane.png|32px]]
|-
| {{BiomeLink|Wooded Badlands}} || Mesa || No || #90814d || No || [[File:Badlands Sugar Cane.png|32px]]
|-
| {{BiomeLink|Windswept Forest}} || Extreme Hills || Rain || #8ab689 || || [[File:Windswept Hills Sugar Cane.png|32px]]
|}
</div>
{{clear}}
=== Bedrock Edition ===
{{empty section}}
== Sounds ==
{{Sound table/Block/Grass}}
== Data values ==
=== ID ===
{{edition|java}}:
{{ID table
|edition=java
|showforms=y
|generatetranslationkeys=y
|displayname=Sugar Cane
|spritetype=block
|nameid=sugar_cane
|foot=1}}
{{edition|bedrock}}:
{{ID table
|edition=bedrock
|firstcolumnname=Sugar Cane
|shownumericids=y
|showforms=y
|showaliasids=y
|generatetranslationkeys=y
|displayname=Block
|spritename=sugar-cane
|spritetype=block
|nameid=reeds
|id=83
|form=block
|itemform=item.reeds}}
{{ID table
|displayname=Item
|spritename=sugar-cane
|spritetype=item
|nameid=sugar_cane
|id=385
|form=item
|aliasid=reeds
|translationkey=item.reeds.name
|foot=1}}
=== Block states ===
{{see also|Block states}}
{{/BS}}
== Video ==
{{Video note|This video was made before sugar cane had a different shade of green depending on the biome.|minor}}
<div style="text-align:center">{{yt|zlOnwn3PH5o}}</div>
== History ==
{{more images|Appearance when affected by {{bug|MC-48831}}}}
{{History|java alpha}}
{{History||v1.0.11|[[File:Sugar Cane JE1 BE1.png|32px]] [[File:Sugar Cane (item) JE1 BE1.png|32px]] Added reeds in the [[Seecret Updates|Seecret Friday Update 6]].
|Reeds are informally referred to as "bamboo" or "papyrus" by many [[player]]s.
|Since reeds can be washed away with [[water]] currents or instantly destroyed by removing the water adjacent to them, automated reed farms can be made.
|Reeds can be used to craft [[paper]].}}
{{History|java beta}}
{{History||1.2|[[Notch]] has [[wikipedia:Retroactive continuity|retconned]] reeds into sugar cane so that it can now be [[crafting|crafted]] into [[sugar]], included in the recipe for the [[cake]]s.}}
{{History||1.6|snap=Test Build 3|[[Arrow]]s no longer stick to sugar cane, and instead, they pass through. However, [[snowball]]s still come into contact with any sugar cane blocks, as if they are solid.}}
{{History||1.8|snap=Pre-release|Sugar cane can now grow and be placed onto [[sand]] as long as they are adjacent to [[water]]. This update allows sugar canes to appear next to [[water]] ponds in [[desert]] biomes.
|Sugar cane is now available in the [[creative]] [[inventory]] in both block and item forms.}}
{{History|java}}
{{History||1.0.0|snap=?|The sugar cane block has been removed from the creative inventory.}}
{{History||1.7.2|snap=13w36a|[[File:Sugar Cane JE2 BE2.png|32px]] Sugar cane is now [[tint]]ed depending on the [[biome]] it's in.
|The item texture remained unchanged, however, and still used the color palette from Alpha to 1.6.4.<ref name="Bug">{{bug|MC-216227}}</ref>}}
{{History||1.9|snap=15w43a|Sugar cane no longer breaks if its adjacent [[water]] is turned to [[frosted ice]].}}
{{History||1.13|snap=17w47a|The ID of sugar cane has now been changed from <code>reeds</code> to <code>sugar_cane</code>.
|"Sugar Canes" have now been renamed to "Sugar Cane".
|Prior to [[1.13/Flattening|''The Flattening'']], this [[block]]'s numeral ID was 83, and the [[item]]'s 338.}}
{{History||1.14|snap=18w43a|[[File:Sugar Cane (item) JE2 BE2.png|32px]] The texture of the sugar cane item has been changed.}}
{{History|||snap=19w03a|Placing sugar cane into a [[composter]] has a 20% chance of raising the compost level by 1.}}
{{History|||snap=19w05a|Sugar cane now has a 50% chance of increasing the compost level in a composter by 1.
|Added [[wandering trader]]s, which sell sugar cane.}}
{{History||1.16|snap=20w13a|Sugar cane has been moved from the Miscellaneous tab to the Decoration Blocks tab in the [[Creative inventory]].<ref name="misc decoration">https://bugs.mojang.com/browse/MC-174434</ref>}}
{{History||1.17|snap=21w11a|[[File:Sugar Cane (item) JE3.png|32px]] The texture of the sugar cane item has been changed, so that it actually matches the color it uses when placed again.<ref name="Bug"/>}}
{{History|||snap=Pre-release 1|Sugar cane now generates in mushroom fields.<ref>{{bug|MC-226683}}</ref>}}
{{History||1.19|snap=22w15a|Sugar cane can now be planted on mud.}}
{{History||1.20|snap=23w14a|Sugar cane can now be planted on [[suspicious sand]].}}
{{History|pocket alpha}}
{{History||Pre-release|[[File:Sugar Cane JE1 BE1.png|32px]] [[File:Sugar Cane (item) JE1 BE1.png|32px]] Added sugar cane.}}
{{History||v0.2.0|Despite being visible in the inventory, sugar cane does not drop anything when mined, making it unobtainable in Survival mode.}}
{{History||v0.2.1|Survival players now start with an infinite stack of sugar cane in the inventory.}}
{{History||v0.3.0|Sugar cane now drops its item form when mined.
|Survival players no longer start with an infinite stack of sugar cane in the inventory.}}
{{History||v0.5.0|Sugar cane can now be grown on [[sand]].
|Sugar cane can now be obtained after activating the [[nether reactor]].}}
{{History||v0.8.0|snap=build 5|[[Bone meal]] can now grow sugar cane to maximum height.}}
{{History||v0.9.0|snap=build 1|[[File:Sugar Cane JE2 BE2.png|32px]] The color of sugar cane now changes depending on the [[biome]] they are in.
|Using bone meal on sugar cane is no longer able to break blocks above it.}}
{{History||v0.12.1|snap=build 1|Sugar cane is no longer available from the [[nether reactor]].}}
{{History|pocket}}
{{History||1.0.0|snap=alpha 0.17.0.1|[[File:Sugar Cane JE1 BE1.png|32px]] Due to a bug, sugar canes no longer change color depending on the [[biome]].}}
{{History|bedrock}}
{{History||1.2.13|snap=beta 1.2.13.5|[[File:Sugar Cane JE2 BE2.png|32px]] The color of sugar canes now changes depending on the [[biome]], once again.}}
{{History||1.10.0|snap=beta 1.10.0.3|[[File:Sugar Cane (item) JE2 BE2.png|32px]] The texture of the sugar cane [[item]] has been changed.
|Sugar cane can now be [[trading|bought]] from [[wandering trader]]s.}}
{{History||1.11.0|snap=beta 1.11.0.1|Sugar canes can now be used to fill up [[composter]]s.}}
{{History||1.17.0|snap=beta 1.17.0.50|[[File:Sugar Cane (item) JE3.png|32px]] The texture of the sugar cane item has been changed, so that it actually matches the color it uses when placed again.}}
{{History|console}}
{{History||xbox=TU1|xbone=CU1|ps=1.0|wiiu=Patch 1|switch=1.0.1|[[File:Sugar Cane JE1 BE1.png|32px]] [[File:Sugar Cane (item) JE1 BE1.png|32px]] Added sugar canes.
|Sugar canes are solid, making it useful for growable walls. Unlike on Java Edition, they were never renamed to Sugar Cane.}}
{{History||xbox=TU2|Sugar canes are no longer solid, and arrows pass through them.}}
{{History||xbox=TU31|xbone=CU19|ps=1.22|wiiu=Patch 3|[[File:Sugar Cane JE2 BE2.png|32px]] The color of sugar cane now changes depending on the [[biome]] they're in.}}
{{History||xbox=TU60|xbone=CU51|ps=1.64|wiiu=Patch 30|switch=1.0.11|Sugar cane can now be grown with [[bonemeal]].}}
{{History||xbox=none|xbone=none|ps=1.90|wiiu=none|switch=none|[[File:Sugar Cane (item) JE2 BE2.png|32px]] The texture of the sugar cane [[item]] has been changed.}}
{{History||xbox=none|xbone=none|ps=1.91|wiiu=none|switch=none|Sugar cane can now be [[trading|bought]] from [[wandering trader]]s.
|Sugar canes can now be used to fill up [[composter]]s.}}
{{History|New Nintendo 3DS Edition}}
{{History||0.1.0|[[File:Sugar Cane JE1 BE1.png|32px]] [[File:Sugar Cane (item) JE1 BE1.png|32px]] Added sugar cane.}}
{{History|foot}}
=== Sugar cane "item" ===
{{:Technical blocks/Sugar Cane}}
== Issues ==
{{Issue list}}
== Trivia ==
*When a sugar cane is broken at the second level, the time resets (for example, if a two-block high sugar cane is broken, but is just about to grow to the third stage, it would reset that time).
*By placing more sugar canes on top of a sugar cane plant, it is possible to create tall sugar canes (up to y=319, the maximum height for building), although they do not naturally grow this high.
*Before sugar cane received an official name, they were sometimes referred to as [[bamboo]], a block added 9 years later. Other names were "reeds" and "papyrus".
== Gallery ==
=== Renders ===
<gallery>
Plains Sugar Cane.png|Plains
Taiga Sugar Cane.png|Taiga
Snowy Plains Sugar Cane.png|Snowy plains
Jungle Sugar Cane.png|Jungle
Desert Sugar Cane.png|Desert
Swamp Sugar Cane (Cold).png|Swamp (cold)
Swamp Sugar Cane.png|Swamp
Badlands Sugar Cane.png|Badlands
</gallery>
=== In-game ===
<gallery>
Huge Sugar Farm.png|A large sugar cane farm using 2×2 [[water]] holes.
Sugar Cane Waterfall.png|Water flowing over sugar cane.
UnderwaterSugarCane.png|Naturally generated sugar cane found underwater.
Sugar and Cactus.png|A [[cactus]] and sugar cane stalk generated next to each other.
SugarCaneRavine.png|Sugar cane found in the [[ravine]].
Reeds in Winter mode.png|Reeds generated in the [[winter mode]].
Sugar Cane Naturally Growing.png|Sugar cane growing between [[biome]]s.
Mesa Sugar Cane.jpg|Sugar cane growing on [[red sand]] in a [[badlands]] biome.
Sugarcanenowaterglitch.png|Sugar cane generated without a water source.
SwampCane.png|Sugar cane generated in a [[swamp]] biome.
Sugar cane savanna.png|Sugar cane growing in a [[savanna]] biome.
ForestSugarcane.png|Sugar cane growing in a [[forest]] biome.
Lava cane.png|Sugar cane growing with lava flowing around it.
Before breaking.png|Sugar canes few seconds before breaking because the water is frozen.
Undergroundreed.png|A sugar cane plant that generated in an underground [[water lake]].
Cave Sugar.png|Another example.
</gallery>
=== Heights ===
<gallery>
Tall Sugar Cane.png|Four-block tall sugar cane.
4RiverCane.png|Four-block tall sugar cane.
4-block tall sugar cane.png|Four-block tall sugar cane in a [[plains]] biome.
</gallery>
== References ==
{{Reflist}}
{{Blocks|vegetation}}
{{Items}}
[[Category:Plants]]
[[Category:Natural blocks]]
[[Category:Non-solid blocks]]
[[cs:Cukrová třtina]]
[[de:Zuckerrohr]]
[[es:Caña de azúcar]]
[[fr:Canne à sucre]]
[[hu:Cukornád]]
[[it:Canna da zucchero]]
[[ja:サトウキビ]]
[[ko:사탕수수]]
[[nl:Suikerriet]]
[[pl:Trzcina cukrowa]]
[[pt:Cana-de-açúcar]]
[[ru:Сахарный тростник]]
[[th:อ้อย]]
[[uk:Цукрова тростина]]
[[zh:甘蔗]]</li></ul> | Explosions are now "better". | ||||
0.31 (January 25, 2010, 1){{Extension DPL}}<ul><li>[[Sparkler|Sparkler]]<br/>{{About|the Education Edition exclusive item|the new melee weapon available from the ''Minecraft Dungeons'' anniversary event|MCD:Sparkler}}
{{Item
| image = <gallery>
Orange Sparkler.png | Orange
Blue Sparkler.png | Blue
Red Sparkler.png | Red
Purple Sparkler.png | Purple
Green Sparkler.png | Green
</gallery>
| image2 = <gallery>
Active Orange Sparkler.png | Active Orange
Active Blue Sparkler.png | Active Blue
Active Red Sparkler.png | Active Red
Active Purple Sparkler.png | Active Purple
Active Green Sparkler.png | Active Green
</gallery>
| renewable = No
| stackable = No
}}
{{education feature}}
{{exclusive|bedrock|education}}
A '''sparkler''' is a [[Chemistry Update|chemistry]]-related [[item]] that emits particles when lit.
Sparklers are available in orange, blue, red, purple, and green colors.
== Obtaining ==
=== Crafting ===
{{Crafting
|showdescription=1
|B1=Chloride |B2=Magnesium |B3=Stick
|Output=Sparkler
|description= Calcium Chloride: Orange<br>Cerium Chloride: Blue<br>Mercuric Chloride: Red<br>Potassium Chloride: Purple<br>Tungsten Chloride: Green<br>{{only|bedrock|education}}
|type=Miscellaneous
}}
== Usage ==
{{ctrl|Using}} a sparkler ignites it, causing its texture to change. When lit, the sparkler emits colored [[particles]]; the [[durability]] meter depletes while the sparkler is burning. Sparklers are one of the few [[item]]s that can be held in the [[off-hand]] {{in|be}}. Unlit sparklers have normal lighting like most items, while lit sparklers appear to glow when held in the player's hand, similarly to [[glow stick]]s.
When the [[player]] uses another item while a sparkler is lit, or holds the sparkler in the off-hand, the sparkler's durability stops depleting.
If the player has a lit sparkler in their [[inventory]] and goes into the [[water]], the sparkler is destroyed immediately. However, it does not get destroyed if dropped in water. It also cannot float.
Despite having durability, sparklers cannot be enchanted with [[Unbreaking]] or [[Mending]].
== Sounds ==
{{Sound table
|type=bedrock
|sound=Fuse.ogg
|source=sound
|description=While a sparkler is active
|id=sparkler.active
|volume=0.25
|pitch=0.8/1.2}}
{{Sound table
|sound=Fizz.ogg
|source=block
|description=While a sparkler is being lit
|id=random.fizz
|volume=1.0
|pitch=2.4/2.6
|foot=1}}
== Data values ==
=== ID ===
{{ID table
|edition=bedrock
|shownumericids=y
|showforms=y
|notshowbeitemforms=y
|generatetranslationkeys=y
|displayname=Sparkler
|spritename=sparklers
|spritetype=item
|nameid=sparkler
|id=600
|form=item
|translationkey=item.sparkler.orange.name,item.sparkler.blue.name,item.sparkler.red.name,item.sparkler.purple.name,item.sparkler.green.name
|foot=1}}
== History ==
{{History|bedrock}}
{{History||1.4.0|snap=beta 1.2.20.1|[[File:Orange Sparkler BE1.png|32px]] [[File:Blue Sparkler BE1.png|32px]] [[File:Red Sparkler BE1.png|32px]] [[File:Purple Sparkler BE1.png|32px]] [[File:Green Sparkler BE1.png|32px]] <br>[[File:Active Orange Sparkler BE1.png|32px]] [[File:Active Blue Sparkler BE1.png|32px]] [[File:Active Red Sparkler BE1.png|32px]] [[File:Active Purple Sparkler BE1.png|32px]] [[File:Active Green Sparkler BE1.png|32px]] Added sparklers.}}
{{History|education}}
{{History||1.0.27|[[File:Orange Sparkler BE1.png|32px]] [[File:Blue Sparkler BE1.png|32px]] [[File:Red Sparkler BE1.png|32px]] [[File:Purple Sparkler BE1.png|32px]] [[File:Green Sparkler BE1.png|32px]] <br>[[File:Active Orange Sparkler BE1.png|32px]] [[File:Active Blue Sparkler BE1.png|32px]] [[File:Active Red Sparkler BE1.png|32px]] [[File:Active Purple Sparkler BE1.png|32px]] [[File:Active Green Sparkler BE1.png|32px]] Added sparklers.}}
{{History|foot}}
== Issues ==
{{issue list}}
== Trivia ==
* The formula for sparkler roughly works in real life. Magnesium itself burns white in air, while the metal salts add [[wikipedia:flame test|color to the flame]].
{{items}}
{{Education Edition}}
[[Category:Non-renewable resources]]
[[Category:Education Edition items]]
[[de:Wunderkerze]]
[[ja:手持ち花火]]
[[ko:스파클러]]
[[pl:Zimne ognie]]
[[pt:Vela-Faísca]]
[[zh:烟花棒]]</li><li>[[White Dye|White Dye]]<br/>{{Item
| image = White Dye.png
| renewable = Yes
| stackable = Yes (64)
}}
'''White dye''' is a [[Dye#Primary|primary color dye]] similar to [[bone meal]].
== Obtaining ==
=== Crafting ===
{{Crafting
|showname=0
|Bone Meal
|Output=White Dye
|type=Material
|head=1
}}
{{Crafting
|Lily of the Valley
|Output=White Dye
|type=Material
|foot=1
}}
=== Loot chest ===
{{#invoke:LootChest|base3|white-dye}}
== Usage ==
{{dye usage}}
=== Crafting ingredient ===
{{crafting usage|ignore=Banner|continue=1}}
{{banner crafting usage}}
=== Loom ingredient ===
{{Banner loom usage|White Dye}}
=== Trading ===
Apprentice-level shepherd villagers have a 20% chance to buy 12 white dye for an emerald.
== Data values ==
=== ID ===
{{edition|java}}:
{{ID table
|edition=java
|showforms=y
|generatetranslationkeys=y
|displayname=White Dye
|spritetype=item
|nameid=white_dye
|form=item
|foot=1}}
{{edition|bedrock}}:
{{ID table
|edition=bedrock
|showaliasids=y
|shownumericids=y
|showforms=y
|notshowbeitemforms=y
|generatetranslationkeys=y
|displayname=White Dye
|spritetype=item
|nameid=white_dye
|aliasid=dye / 19
|id=410
|form=item
|translationkey=item.dye.white_new.name
|foot=1}}
== History ==
{{History|java}}
{{History||1.14|snap=18w43a|[[File:White Dye JE1 BE1.png|32px]] Added white dye.}}
{{History|||snap=18w44a|White dye can now change the text color on [[sign]]s to white.}}
{{History|||snap=19w05a|Added the [[wandering trader]], which sells white dye.}}
{{History|||snap=19w11a|White dye can now be [[trading|bought]] by shepherd villagers.}}
{{History||1.17|snap=20w45a|White dye can now be used to craft [[white candle]]s.}}
{{History|||snap=21w19a|White dyes can no longer be used to craft white candles.}}
{{History|||snap=Pre-release 1|White dye can once again be used to craft white candles.}}
{{History||1.20<br>(Experimental)|link=1.19.3|snap=22w42a|White dye can now change the text color on [[hanging sign]]s to white.}}
{{History||1.20|snap=23w12a|White dye can now be found in [[suspicious gravel]] and [[suspicious sand]] in [[trail ruins]].}}
{{History|||snap=23w16a|White dye no longer generates in [[suspicious sand]] in [[trail ruins]].|Due to the split of the archaeological loot tables for suspicious gravel within the [[trail ruins]]; white dye is now common loot.}}
{{History|bedrock}}
{{History||1.8.0|snap=beta 1.8.0.10|[[File:White Dye JE1 BE1.png|32px]] Added white dye.}}
{{History||1.9.0|snap=beta 1.9.0.0|Added [[flower|lilies of the valley]], which can be used to [[crafting|craft]] white dye.}}
{{History||1.11.0|snap=beta 1.11.0.4|White dye can now be [[trading|sold]] to shepherd [[villager]]s.}}
{{History||1.16.100|snap=beta 1.16.100.56|The ID of white dye has been changed from <code>dye/19</code> to <code>white_dye</code>.}}
{{History|ps4}}
{{History||1.83|[[File:White Dye JE1 BE1.png|32px]] Added white dye.}}
{{History|foot}}
== Issues ==
{{issue list}}
{{Items}}
[[Category:Items]]
[[Category:Dyes]]
[[Category:Renewable resources]]
[[de:Weißer Farbstoff]]
[[es:Tinte blanco]]
[[fr:Teinture blanche]]
[[ja:白色の染料]]
[[ko:하얀색 염료]]
[[pl:Biały barwnik]]
[[pt:Corante branco]]
[[zh:白色染料]]</li></ul> | Explosions will now lose power when going through stronger materials. | ||||
| alpha | |||||
v1.2.0{{Extension DPL}}<ul><li>[[Glistering Melon Slice|Glistering Melon Slice]]<br/>{{Item
| image = Glistering Melon Slice.png
| renewable = Yes
| stackable = Yes (64)
}}
A '''glistering melon slice'''{{fn|Known as '''Glistering Melon Slice''' {{in|java}} and '''Glistering Melon''' {{in|bedrock}}.}} is an inedible [[item]] used for brewing [[potion]]s of [[Healing]]. It is also one of the many potion ingredients that can be used to make mundane potions.
== Obtaining ==
=== Chest loot ===
{{LootChestItem|glistering-melon-slice}}
=== Crafting ===
{{Crafting
|A1= Gold Nugget
|B1= Gold Nugget
|C1= Gold Nugget
|A2= Gold Nugget
|B2= Melon Slice
|C2= Gold Nugget
|A3= Gold Nugget
|B3= Gold Nugget
|C3= Gold Nugget
|Output= Glistering Melon Slice
|type= Brewing
}}
=== Trading ===
Master-level farmer [[villager]]s sell 3 glistering melon for 4 [[emerald]]s.
== Usage ==
Despite being crafted with a [[melon slice]], a glistering melon slice cannot be eaten, unlike a [[golden apple]] or [[golden carrot]].
=== Brewing ingredient ===
{{Brewing
|head=1
|Glistering Melon Slice
|Mundane Potion
|base=Water Bottle
}}
{{Brewing
|Glistering Melon Slice
|Potion of Healing
|foot=1}}
===Piglins===
[[Piglin]]s are attracted to glistering melon slices. They run toward any glistering melon slice on the ground, and inspect it for 6 to 8 seconds before putting it in their inventory.
== Achievements ==
{{load achievements|Oooh, shiny!}}
== Advancements ==
{{load advancements|Oh Shiny}}
== Data values ==
=== ID ===
{{edition|java}}:
{{ID table
|edition=java
|showforms=y
|generatetranslationkeys=y
|displayname=Glistering Melon Slice
|spritetype=item
|nameid=glistering_melon_slice
|form=item
|foot=1}}
{{edition|bedrock}}:
{{ID table
|edition=bedrock
|showaliasids=y
|shownumericids=y
|showforms=y
|notshowbeitemforms=y
|generatetranslationkeys=y
|displayname=Glistering Melon
|spritetype=item
|nameid=glistering_melon_slice
|aliasid=speckled_melon
|id=434
|form=item
|translationkey=item.speckled_melon.name
|foot=1}}
== History ==
{{History|java}}
{{History||1.0.0|snap=Beta 1.9 Prerelease 4|[[File:Glistering Melon Slice JE1 BE1.png|32px]] Added glistering melons.
|The [[crafting]] recipe of glistering melons is one [[melon slice]] and one [[gold nugget]].
|Glistering melons have replaced [[ghast tear]]s as the ingredient to produce [[potions of Healing]] due to the difficulty in getting tears.<ref>{{tweet|jeb_|123671273904680960}}</ref> They also now brew with [[water bottle]]s to create [[mundane potion]]s.}}
{{History||1.6.1|snap=13w23a|The [[crafting]] recipe of glistering melons is changed from one [[gold nugget]] to eight.}}
{{History||1.9|snap=15w49a|[[File:Glistering Melon Slice JE2.png|32px]] The rotation of glistering melon [[item]]s has been changed to be consistent with [[melon slice]]s.<ref>{{bug|MC-85963}}</ref>}}
{{History|||snap=15w49b|[[File:Glistering Melon Slice JE1 BE1.png|32px]] The rotation of glistering melons has been reverted and is no longer consistent with melon slices.}}
{{History||1.13|snap=17w47a|Prior to [[1.13/Flattening|''The Flattening'']], this [[item]]'s numeral ID was 382.}}
{{History|||snap=18w20b|"Glistering Melon" has been renamed to "Glistering Melon Slice".
|The ID of glistering melon slices has been changed from <code>speckled_melon</code> to <code>glistering_melon_slice</code>.}}
{{History||1.14|snap=18w43a|[[File:Glistering Melon Slice JE3 BE2.png|32px]] The texture of glistering melon slices has been changed.}}
{{History|||snap=19w11a|Farmer [[villager]]s now [[trading|sell]] glistering melon slices.}}
{{History||1.16|snap=20w09a|Glistering melon slices are now admired by [[piglin]]s.<ref>{{bug|MC-172363}}</ref>}}
{{History|||snap=20w16a|Glistering melon slices now generate in [[ruined portal]] chests.}}
{{History|pocket alpha}}
{{History||v0.12.1|snap=build 1|[[File:Glistering Melon Slice JE1 BE1.png|32px]] Added glistering melons.}}
{{History|bedrock}}
{{History||1.10.0|snap=beta 1.10.0.3|[[File:Glistering Melon Slice JE3 BE2.png|32px]] The texture of glistering melons has been changed.}}
{{History||1.11.0|snap=beta 1.11.0.4|Glistering melons can now be [[trading|bought]] from farmer [[villager]]s.}}
{{History||1.13.0|snap=beta 1.13.0.9|[[Trading]] has been changed. Master-level farmer villagers now have a {{frac|1|3}} chance to [[trading|sell]] glistering melon slices.}}
{{History||1.16.0|snap=beta 1.16.0.57|Glistering melons are [[trading|sold]] from farmer villagers under a 50% chance, once again.
|Glistering melons now generate in [[ruined portal]] chests.}}
{{History||1.16.100|snap=beta 1.16.100.54|[[Ruined Portal]]s can now generate with 4–12 glistering melons instead of only one.}}
{{History|||snap=beta 1.16.100.56|The ID of glistering melon slices has been changed from <code>speckled_melon</code> to <code>glistering_melon_slice</code>.}}
{{History|console}}
{{History||xbox=TU7|xbone=CU1|ps=1.0|wiiu=Patch 1|[[File:Glistering Melon Slice JE1 BE1.png|32px]] Added glistering melons.}}
{{History||xbox=none|xbone=none|ps=1.90|wiiu=none|switch=none|[[File:Glistering Melon Slice JE3 BE2.png|32px]] The texture of glistering melons has been changed.}}
{{History|New 3DS}}
{{History||0.1.0|[[File:Glistering Melon Slice JE1 BE1.png|32px]] Added glistering melons.}}
{{History|foot}}
== Issues ==
{{issue list}}
== See also ==
* [[Melon Slice]]
* [[Melon]]
== Notes ==
{{fnlist}}
== References ==
{{reflist}}
{{Items}}
[[Category:Renewable resources]]
[[cs:Zlatavý kousek melounu]]
[[de:Glitzernde Melonenscheibe]]
[[es:Rodaja de sandía reluciente]]
[[fr:Tranche de pastèque scintillante]]
[[hu:Ragyogó dinnye]]
[[ja:きらめくスイカの薄切り]]
[[ko:반짝이는 수박 조각]]
[[nl:Glinsterende meloenschijf]]
[[pl:Błyszczący arbuz]]
[[pt:Fatia de melancia reluzente]]
[[ru:Сверкающий ломтик арбуза]]
[[uk:Блискуча скибка кавуна]]
[[zh:闪烁的西瓜片]]</li><li>[[Glow Stick|Glow Stick]]<br/>{{stub}}
{{education feature}}
{{Exclusive|Bedrock|Education}}
{{Item
| image = White Glow Stick.png
| extratext = View [[#Gallery|all renders]]
| renewable = No
| durability = 95
| stackable = No
}}
'''Glow sticks''' are [[Chemistry Update|chemistry]]-related [[item]]s, which can be lit up in the player's hand for a limited time.
== Obtaining ==
{{iN|be}}, glow sticks cannot be obtained by the {{cmd|give}} command. They also cannot be obtained in [[Survival]]. Cheats must be enabled to obtain glow sticks in Survival mode, or in [[Minecraft Education]].
=== Crafting ===
{{Crafting
|showdescription=1
|ingredients=[[Polyethylene]] +<br>[[Hydrogen Peroxide]] +<br>Matching [[Dye]] +<br>[[Luminol]]
|A1= Polyethylene
|B1= Hydrogen Peroxide
|C1= Polyethylene
|A2= Polyethylene
|B2= White Dye; Orange Dye; Magenta Dye; Light Blue Dye; Yellow Dye; Lime Dye; Pink Dye; Gray Dye; Cyan Dye; Purple Dye; Blue Dye; Brown Dye; Green Dye; Red Dye
|C2= Polyethylene
|A3= Polyethylene
|B3= Luminol
|C3= Polyethylene
|Output= Matching Glow Stick
|description={{only|bedrock|education}}
|type= Miscellaneous
}}
<div style="display:none">
<!--
This is so the pre-Village & Pillage dyes can have dye-related crafting recipes show on their respective pages.
They don't need to be displayed on this page because they already intuitively list "Any Matching Dye".
-->
{{Crafting
|showdescription=1
|ingredients=[[Polyethylene]] +<br>[[Hydrogen Peroxide]] +<br>Matching [[Dye]] +<br>[[Luminol]]
|A1= Polyethylene
|B1= Hydrogen Peroxide
|C1= Polyethylene
|A2= Polyethylene
|B2= Bone Meal; Lapis Lazuli; Cocoa Beans
|C2= Polyethylene
|A3= Polyethylene
|B3= Luminol
|C3= Polyethylene
|Output= White Glow Stick; Blue Glow Stick; Brown Glow Stick
|description={{only|bedrock|Education}}
|type= Miscellaneous
}}
</div>
== Usage ==
While equipped, [[player]]s can {{control|use}} glow sticks to shake them, causing them to appear bright regardless of the [[light]] level. This is only an aesthetic change, as no light is emitted to the surrounding area. A [[particle]] effect is visible until the [[durability]] runs out. The glow stick's durability depletes while lit{{Info needed}}, in both Survival and Creative modes.
== Sounds ==
{{Sound table
|type=bedrock
|sound=Flint and steel click.ogg
|source=block
|description=While a glowstick is being activated
|id=fire.ignite
|volume=1.0
|pitch=0.5/0.7
|foot=1}}
== Data values ==
=== ID ===
{{ID table
|edition=bedrock
|shownumericids=y
|showforms=y
|notshowbeitemforms=y
|generatetranslationkeys=y
|displayname=Glow Stick
|spritename=glow-sticks
|spritetype=item
|nameid=glow_stick
|id=601
|form=item
|translationkey=item.glow_stick.black.name,item.glow_stick.red.name,item.glow_stick.green.name,item.glow_stick.brown.name,item.glow_stick.blue.name,item.glow_stick.purple.name,item.glow_stick.cyan.name,item.glow_stick.silver.name,item.glow_stick.gray.name,item.glow_stick.pink.name,item.glow_stick.lime.name,item.glow_stick.yellow.name,item.glow_stick.lightBlue.name,item.glow_stick.magenta.name,item.glow_stick.orange.name,item.glow_stick.white.name
|foot=1}}
===Metadata===
{{/DV}}
===Item data===
See [[Bedrock Edition level format/Item format]].
== History ==
{{History|bedrock}}
{{History||1.4.0|snap=beta 1.2.20.1|[[File:White Glow Stick.png|32px]] [[File:Orange Glow Stick.png|32px]] [[File:Magenta Glow Stick.png|32px]] [[File:Light Blue Glow Stick.png|32px]] [[File:Yellow Glow Stick.png|32px]] [[File:Lime Glow Stick.png|32px]] [[File:Pink Glow Stick.png|32px]] [[File:Gray Glow Stick.png|32px]] [[File:Cyan Glow Stick.png|32px]] [[File:Purple Glow Stick.png|32px]] [[File:Blue Glow Stick.png|32px]] [[File:Brown Glow Stick.png|32px]] [[File:Green Glow Stick.png|32px]] [[File:Red Glow Stick.png|32px]] Added glow sticks.}}
{{History||1.14.60|snap=?|Making a glow stick results in an edible item called {{code|item.glow_stick.black.name}}.}}
{{History||?|Making a glow stick results in correct items again.
|Making a glow stick with dye has been made an upgrade{{info needed|what is this supposed to mean?}}
|Putting 2 glow sticks in a Crafting Table now outputs a correct glow stick.}}
{{History||1.17.0|snap=?|[[File:Missing Glow Stick.png|32px]] Two black glow sticks, using the [[missing texture]] if Education Edition is disabled, now generate in fake end portal rooms in [[mansion]]s instead of [[ender pearl]]s.}}
{{h||1.18.0|snap=beta 1.18.0.21|Glow sticks no longer generate in [[woodland mansion]]s.}}
{{History|education}}
{{History||1.0.27|[[File:White Glow Stick.png|32px]] [[File:Orange Glow Stick.png|32px]] [[File:Magenta Glow Stick.png|32px]] [[File:Light Blue Glow Stick.png|32px]] [[File:Yellow Glow Stick.png|32px]] [[File:Lime Glow Stick.png|32px]] [[File:Pink Glow Stick.png|32px]] [[File:Gray Glow Stick.png|32px]] [[File:Cyan Glow Stick.png|32px]] [[File:Purple Glow Stick.png|32px]] [[File:Blue Glow Stick.png|32px]] [[File:Brown Glow Stick.png|32px]] [[File:Green Glow Stick.png|32px]] [[File:Red Glow Stick.png|32px]] Added glow sticks.}}
{{History|foot}}
== Gallery ==
<gallery>
White Glow Stick.png|
Orange Glow Stick.png|
Magenta Glow Stick.png|
Light Blue Glow Stick.png|
Yellow Glow Stick.png|
Lime Glow Stick.png|
Pink Glow Stick.png|
Gray Glow Stick.png|
Cyan Glow Stick.png|
Purple Glow Stick.png|
Blue Glow Stick.png|
Brown Glow Stick.png|
Green Glow Stick.png|
Red Glow Stick.png|
</gallery>
== Trivia ==
* The glowing reaction of [[Wikipedia:Luminol|Luminol]] during oxidation exists in real life. It is used for detecting blood in crime scenes.
* Players cannot enchant glow sticks with Unbreaking or Mending, despite the items having [[durability]].
* The black and light gray glow sticks use the same texture as the red glow stick.{{verify|It seems they use the missing texture instead. Was this the case beforehand, and they only started using the missing texture later?}}
== Issues ==
{{issue list}}
{{items}}
{{Education Edition}}
[[Category:Non-renewable resources]]
[[Category:Education Edition items]]
[[de:Knicklicht]]
[[ja:ケミカルライト]]
[[ko:발광봉]]
[[pt:Graveto Brilhante]]
[[ru:Химический источник света]]
[[zh:荧光棒]]</li></ul> | ? | Added ghasts, which shoot explosive ghast fireballs. | |||
| beta | |||||
1.5{{Extension DPL}}<ul><li>[[Nether Quartz|Nether Quartz]]<br/>{{About|the item|the ore|Nether Quartz Ore|the mineral block|Block of Quartz|other uses|Quartz}}
{{Item
| image = Nether Quartz.png
|type=
| renewable = Yes
| stackable = Yes (64)
}}
'''Nether quartz''' is a white mineral found in [[the Nether]].
== Obtaining ==
{{see also|Nether Quartz Ore#Natural generation}}
=== Mining ===
[[Nether quartz ore]] mined using a [[pickaxe]] drops one unit of Nether quartz. If the pickaxe is enchanted with [[Fortune]], it may drop an extra unit per level of Fortune, up to a maximum of four with Fortune III. If the pickaxe is enchanted with [[Silk Touch]], the ore drops itself.
=== Chest loot ===
{{LootChestItem|nether-quartz}}
=== Smelting ===
{{Smelting
|Nether Quartz Ore
|Nether Quartz
|0,2
}}
=== Bartering ===
[[Piglin]]s may [[barter]] 5–12 nether quartz when given a [[gold ingot]].
== Usage ==
=== Crafting ingredient ===
{{crafting usage}}
=== Trading ===
Expert-level stone mason [[villagers]] have a {{frac|1|33}} chance to trade one [[emerald]] for 12 Nether quartz {{in|java}}. This trade is always offered {{in|bedrock}}.
=== Smithing ingredient ===
{{Smithing
|head=1
|ingredients=Any Armor Trim +<br/>Any Armor Piece + <br/>Nether Quartz
|Any Armor Trim Smithing Template
|Netherite Chestplate
|Nether Quartz
|Quartz Trim Netherite Chestplate
|showdescription=1
|description = All armor types can be used in this recipe,<br/>a netherite chestplate is shown as an example.<br/>
|tail=1
}}
;Trim color palette
The following color palette is shown on the designs on trimmed armor:
*{{TrimPalette|nether quartz}}
== Data values ==
=== ID ===
{{edition|java}}:
{{ID table
|edition=java
|showforms=y
|generatetranslationkeys=y
|displayname=Nether Quartz
|spritetype=item
|nameid=quartz
|form=item
|foot=1}}
{{edition|bedrock}}:
{{ID table
|edition=bedrock
|shownumericids=y
|showforms=y
|notshowbeitemforms=y
|generatetranslationkeys=y
|displayname=Nether Quartz
|spritetype=item
|nameid=quartz
|id=524
|form=item
|foot=1}}
== History ==
{{History|java}}
{{History||1.5|snap=13w01a|[[File:Nether Quartz JE1 BE1.png|32px]] Added Nether quartz.
|Nether quartz is used to craft [[daylight sensor]]s and [[redstone comparator]]s.}}
{{History|||snap=January 4, 2013|slink=http://twitter.com/jeb_/status/287481098760499201|[[Jeb]] tweeted that Nether quartz would be used for more decorative uses as well.}}
{{History|||snap=January 7, 2013|slink=http://twitter.com/jeb_/status/288311932304371712|Jeb tweeted a picture of some [[block of quartz]] tests potentially being replacements for the lack of limestone/marble in the game.}}
{{History|||snap=13w02a|Added [[block of quartz]], which is [[crafting|crafted]] with Nether quartz.}}
{{History||1.8|snap=14w02a|Nether quartz can now be used to craft [[granite]] and [[diorite]].}}
{{History||1.11|snap=16w39a|Nether quartz is now used to craft [[observer]]s.}}
{{History||1.13|snap=17w47a|Prior to [[1.13/Flattening|''The Flattening'']], this [[item]]'s numeric ID was 406.}}
{{History||1.14|snap=18w43a|[[File:Nether Quartz JE2 BE2.png|32px]] The texture of Nether quartz has now been changed.}}
{{History|||snap=19w11a|Nether quartz is now [[trading|bought]] by [[villager]]s of the new mason profession.}}
{{History||1.16|snap=20w07a|Nether quartz now has a {{frac|1|109}} (~0.92%) chance of being offered by [[piglin]]s when [[bartering]], in a stack size of 1–4, making it [[renewable resource|renewable]].}}
{{History|||snap=20w09a|Nether quartz now has a {{frac|10|226}} (~4.42%) chance of being offered by piglins when bartering, in a stack size of 1–5.}}
{{History|||snap=20w10a|Nether quartz now has a {{frac|20|411}} (~4.87%) chance of being offered by piglins when bartering, in a stack size of 8-16.}}
{{History|||snap=20w11a|Nether quartz now has a {{frac|20|417}} (~4.80%) chance of being offered by piglins when bartering.}}
{{History|||snap=20w13a|Nether quartz now has a {{frac|20|424}} (~4.72%) chance of being offered by piglins when bartering.}}
{{History|||snap=20w16a|Nether quartz can now be found in [[bastion remnant]] chests.}}
{{History|||snap=20w20a|Nether quartz now has a {{frac|20|423}} (~4.73%) chance of being offered by piglins when bartering.}}
{{History||1.16.2|snap=20w28a|Nether quartz now has a {{frac|20|459}} (~4.36%) chance of being offered by piglins when bartering, in a stack size of 5-12.}}
{{History||1.20<br>(Experimental)|link=1.19.4|snap=23w04a|Nether quartz can now be used as an armor trim material.}}
{{History|pocket alpha}}
{{History||v0.6.0|[[File:Nether Quartz JE1 BE1.png|32px]] Added Nether quartz.}}
{{History||v0.12.1|snap=build 1|Nether quartz is no longer available from the [[Nether reactor]] and is now available from [[the Nether]].}}
{{History||v0.13.0|snap=build 1|Nether quartz is now used to craft [[daylight sensor]]s.}}
{{History||v0.14.0|snap=build 1|Nether quartz can now be used to craft [[redstone comparator]]s.}}
{{History||v0.15.0|snap=build 1|Nether quartz is now used to craft [[observer]]s.}}
{{History|bedrock}}
{{History||1.10.0|snap=beta 1.10.0.3|[[File:Nether Quartz JE2 BE2.png|32px]] The texture of Nether quartz has now been changed.
|Between 20 and 26 nether quartz can now be [[trading|sold]] to stone mason [[villager]]s.}}
{{History||1.11.0|snap=beta 1.11.0.4|[[Trading]] has now been changed, 12 Nether quartz can now be sold to stone mason villagers.}}
{{History||1.16.0|snap=beta 1.16.0.57|Nether Quartz can now be obtained from bartering with piglin.}}
{{History||1.19.80|snap=beta 1.19.80.21|Nether quartz can now be used as an armor trim material.}}
{{History|console}}
{{History||xbox=TU14|xbone=CU1|ps=1.04|wiiu=Patch 1|switch=1.0.1|[[File:Nether Quartz JE1 BE1.png|32px]] Added Nether quartz.}}
{{History||xbox=none|xbone=none|ps=1.90|wiiu=none|switch=none|[[File:Nether Quartz JE2 BE2.png|32px]] The texture of Nether quartz has now been changed.}}
{{History|New 3DS}}
{{History||0.1.0|[[File:Nether Quartz JE1 BE1.png|32px]] Added Nether quartz.}}
{{History|foot}}
== Issues ==
{{issue list}}
== Trivia ==
* All of the sensor related items that are craftable (comparator, daylight sensor, observer) are crafted with some Nether quartz involved.
== References ==
{{reflist}}
{{items}}
[[Category:Renewable resources]]
[[cs:Netheritový křemen]]
[[de:Netherquarz]]
[[es:Cuarzo del Nether]]
[[fr:Quartz du Nether]]
[[hu:Alvilági kvarc]]
[[ja:ネザークォーツ]]
[[ko:네더 석영]]
[[nl:Netherkwarts]]
[[pl:Kwarc]]
[[pt:Quartzo do Nether]]
[[ru:Кварц Нижнего мира]]
[[uk:Пекельний кварц]]
[[zh:下界石英]]</li><li>[[Yellow Dye|Yellow Dye]]<br/>{{Item
| title = Yellow Dye
| renewable = Yes
| stackable = Yes (64)
}}
'''Yellow dye''' is a [[Dye#Primary|primary dye]] created by placing a [[dandelion]] or [[sunflower]] into a [[crafting]] grid.
== Obtaining ==
=== Crafting ===
{{Crafting
|Dandelion;Sunflower
|Output=Yellow Dye;Yellow Dye,2
|type=Material
}}
=== Chest loot ===
{{LootChestItem|yellow-dye}}
=== Trading ===
[[Wandering trader]]s sell 3 yellow dye for an [[emerald]].
== Usage ==
{{dye usage}}
=== Crafting ingredient ===
{{crafting usage|ignore=Banner|continue=1}}
{{banner crafting usage}}
=== Loom ingredient ===
{{Banner loom usage|Yellow Dye}}
=== Trading ===
Expert-level shepherd villagers have a {{frac|1|6}} chance to buy 12 yellow dye for an emerald.
== Data values ==
=== ID ===
{{edition|java}}:
{{ID table
|edition=java
|showforms=y
|generatetranslationkeys=y
|displayname=Yellow Dye
|spritetype=item
|nameid=yellow_dye
|form=item
|foot=1}}
{{edition|bedrock}}:
{{ID table
|edition=bedrock
|showaliasids=y
|shownumericids=y
|showforms=y
|notshowbeitemforms=y
|generatetranslationkeys=y
|displayname=Yellow Dye
|spritetype=item
|nameid=yellow_dye
|aliasid=dye / 11
|id=406
|form=item
|translationkey=item.dye.yellow.name
|foot=1}}
== Video ==
{{yt|nOQUDjEHGRg}}
== History ==
{{History|java beta}}
{{History||1.2|[[File:Yellow Dye JE1 BE1.png|32px]] Added dandelion yellow.}}
{{History||1.6.6|Dandelions can now be generated using [[Bone Meal|bone meal]], making dandelion yellow [[renewable resource|renewable]].}}
{{History|java}}
{{History||1.4.2|snap=12w34a|Added the ability to [[Armor#Dyeing|dye]] leather [[armor]] and [[wolf]] collars.}}
{{History||1.4.6|snap=12w49a|Dandelion yellow can be crafted with [[gunpowder]] to create a [[firework star]].}}
{{History||1.6.1|snap=13w19a|[[Stained clay]] can now be crafted.}}
{{History||1.7.2|snap=13w36a|Can now be crafted using sunflower.}}
{{History|||snap=13w37a|Each dandelion now yields only 1 dandelion yellow, instead of 2.}}
{{History|||snap=13w41a|[[Stained glass]] can now be [[crafting|crafted]].}}
{{History||1.8|snap=14w30a|Added [[banner]]s, which can be [[dye]]d.}}
{{History||1.11|snap=16w39a|Added the ability to dye [[shulker box]]es.}}
{{History||1.12|snap=17w06a|Yellow dye can now be used to craft yellow [[concrete powder]].}}
{{History|||snap=17w15a|Added the ability to dye [[bed]]s.}}
{{History||1.13|snap=17w47a|The different data values for the <code>dye</code> ID have now been split up into their own IDs.
|Prior to [[1.13/Flattening|''The Flattening'']], this [[item]]'s numeral ID was 351.}}
{{History||1.14|snap=18w43a|"Dandelion Yellow" has now been renamed to "Yellow Dye".
|[[File:Yellow Dye JE2 BE2.png|32px]] The texture of yellow dye has now been changed.}}
{{History|||snap=18w44a|Yellow dye can now change the text color on [[sign]]s to yellow.}}
{{History|||snap=18w49a|Yellow dye can now be found in [[chest]]s in [[village]] mason houses.}}
{{History|||snap=19w05a|Added the [[wandering trader]], which sells yellow dye.}}
{{History|||snap=19w11a|Yellow dye can now be [[trading|bought]] by shepherd villagers.}}
{{History||1.17|snap=20w45a|Yellow dye can now be used to craft [[yellow candle]]s.}}
{{History|||snap=21w19a|Yellow dye can no longer be used to craft yellow candles.}}
{{History|||snap=Pre-release 1|Yellow dye can once again used to craft yellow candles.}}
{{History||1.20<br>(Experimental)|link=1.19.3|snap=22w42a|Yellow dye can now change the text color on [[hanging sign]]s to yellow.}}
{{History||1.20|snap=23w12a|Yellow dye can now be found in [[suspicious gravel]] and [[suspicious sand]] in [[trail ruins]].}}
{{History|||snap=23w16a|Yellow dye no longer generates in [[suspicious sand]] in [[trail ruins]].|Due to the split of the archaeological loot tables for suspicious gravel within [[trail ruins]], yellow dye is now common loot.}}
{{History|pocket alpha}}
{{History||v0.3.0|[[File:Yellow Dye JE1 BE1.png|32px]] Added dandelion yellow.}}
{{History||v0.8.0|snap=build 1|Dandelion yellow is now used to craft [[cocoa beans]].}}
{{History||v0.14.0|snap=build 1|Yellow dye can now be used to dye [[water]] in [[cauldron]]s.}}
{{History||v0.16.0|snap=build 1|Dandelion yellow is no longer used to [[crafting|craft]] cocoa beans.}}
{{History|pocket}}
{{History||1.0.0|snap=alpha 0.17.0.1|Yellow dye can now be used to dye [[shulker]]s.}}
{{History||1.1.0|snap=alpha 1.1.0.0|Yellow dye can now be used to dye [[shulker box]]es, [[bed]]s, and craft [[concrete powder]].}}
{{History|bedrock}}
{{History||1.2.0|snap=beta 1.2.0.2|Yellow dye can now be used to craft patterns on [[banner]]s, [[firework star]]s, and [[stained glass]].}}
{{History||1.4.0|snap=beta 1.2.20.1|Yellow dye can now be used to craft [[balloon]]s and [[glow stick]]s.}}
{{History||1.8.0|snap=beta 1.8.0.8|Dandelion yellow can now be used to dye [[cat]] collars.}}
{{History|||snap=beta 1.8.0.10|"Dandelion Yellow" has now been renamed to "Yellow Dye".}}
{{History||1.10.0|snap=beta 1.10.0.3|Yellow dye is now [[trading|sold]] by [[wandering trader]]s.
|[[File:Yellow Dye JE2 BE2.png|32px]] The texture of yellow dye has now been changed.}}
{{History||1.11.0|snap=beta 1.11.0.1|Yellow dye can now be found in [[village]] mason [[chest]]s.}}
{{History|||snap=beta 1.11.0.4|Yellow dye can now be sold to shepherd [[villager]]s.}}
{{History||1.16.100|snap=beta 1.16.100.56|The ID of yellow dye has been changed from <code>dye/11</code> to <code>yellow_dye</code>.}}
{{History|console}}
{{History||xbox=TU1|xbone=CU1|ps=1.00|switch=1.0.1|wiiu=Patch 1|[[File:Yellow Dye JE1 BE1.png|32px]] Added dandelion yellow.}}
{{History|ps4}}
{{History||1.83|"Dandelion Yellow" has now been renamed to "Yellow Dye".}}
{{History||1.90|[[File:Yellow Dye JE2 BE2.png|32px]] The texture of yellow dye has now been changed.}}
{{History|new 3ds}}
{{History||0.1.0|[[File:Yellow Dye JE1 BE1.png|32px]] Added dandelion yellow.}}
{{History|foot}}
== Issues ==
{{issue list}}
== References ==
{{reflist}}
{{Items}}
[[cs:Pampelišková žluť]]
[[de:Gelber Farbstoff]]
[[es:Tinte amarillo]]
[[fr:Teinture jaune]]
[[hu:Pitypangsárga]]
[[ja:黄色の染料]]
[[ko:노란색 염료]]
[[nl:Paardenbloemgeel]]
[[pl:Żółty barwnik]]
[[pt:Corante amarelo]]
[[ru:Жёлтый краситель]]
[[zh:黄色染料]]
[[Category:Items]]
[[Category:Dyes]]
[[Category:Renewable resources]]</li></ul> | Creepers will now become charged when struck by lightning, increasing the explosion's radius and strength. | ||||
1.6{{Extension DPL}}<ul><li>[[Horse Saddle|Horse Saddle]]<br/>{{About|the removed item|the current item|Saddle}}
{{outdated feature|edition=java}}
{{Item
| title = Horse Saddle
| image = Horse Saddle.png
| renewable = Yes
| stackable = Yes (32)
}}
'''Horse saddles''' were [[item]]s which allowed the player to ride [[horse]]s.
== Obtaining ==
=== Crafting ===
{{crafting |ignoreusage=1
|A1=Leather |B1=Leather |C1=Leather
|A2=Leather |B2=Iron Ingot |C2=Leather
|A3=Iron Ingot |C3=Iron Ingot
|Output=Horse Saddle
}}
== Usage ==
Horse saddles worked just like regular [[saddle]]s, but for [[horse]]s instead of [[pig]]s. Taming a horse was required before putting a horse saddle on it. Unlike any other items, horse saddles could be stacked up to 32.
== Sounds ==
''None''<ref>{{ytl|2a6BQeW6is4|t=330}}; sounds for horses were not added until [[13w22a]]</ref>
== Data values ==
=== ID ===
{{ID table
|nonameid=y
|shownumericids=y
|showforms=y
|generatetranslationkeys=java
|displayname=Horse Saddle
|spritetype=item
|id=416
|form=item
|translationkey=item.horsesaddle.name
|foot=y}}
== History ==
{{History|java}}
{{History||1.6.1|snap=13w16a|[[File:Horse Saddle JE1.png|32px]] Added horse saddles.}}
{{History|||snap=13w18a|Horse saddles have been removed.
|[[Horse]]s and [[zombie horse]]s can now be ridden using regular [[saddle]]s.}}
{{History|foot}}
== Issues ==
Horse saddles have been removed from the game, and as such are no longer supported.
{{Items}}
{{Removed Features}}
[[es:Montura de caballo]]
[[fr:Selle de cheval]]
[[it:Sella di cavallo]]
[[ja:ウマの鞍]]
[[ko:말 안장]]
[[pt:Sela para cavalo]]
[[zh:马鞍]]</li><li>[[Raw Salmon|Raw Salmon]]<br/>{{about|the item|the mob|Salmon}}
{{Item
| title = Raw Salmon
| image = Raw Salmon.png
| renewable = Yes
| heals = {{hunger|2}}
| stackable = Yes (64)
}}
'''Raw salmon''' is a food item that can be eaten by the [[player]] or cooked to make [[cooked salmon]].
== Obtaining ==
=== Mob loot ===
====Salmon====
[[Salmon]] always drops 1 raw salmon when killed, unaffected by Looting.<ref>{{bug|MC-212795||Salmon & Fish mobs are not affected by Looting}}</ref> If it is killed while on [[fire]], it drops 1 [[Cooked Salmon|cooked salmon]] instead.
====Guardians and elder guardians ====
[[Guardian|Guardians]] and [[Elder Guardian|elder guardians]] have a 2.5% chance to drop a random fish, with 25% of them being raw salmon, which drops as cooked if the guardian was on fire. The chance of getting the fish drop is increased by 1% per level with [[Looting]] (for a maximum of 5.5% with Looting III), but the type of fish is not affected.
====Polar bears====
[[Polar bear]]s have a 25% chance of dropping 0–2 raw salmon when killed. The maximum amount can be increased by 1 per level of Looting, for a maximum of 0-5 with Looting III. If killed while on fire, they drop cooked salmon instead.
=== Fishing ===
{{main|Fishing}}Raw salmon can be obtained from [[fishing]]. The wait time of one being caught is decreased with the [[Lure]] enchantment and the chance of one being caught is slightly decreased with the [[Luck of the Sea]] enchantment (named as such because it increases treasure, not fish).
Catching salmon awards 1-6 experience.
=== Chest loot ===
{{LootChestItem|raw-salmon}}
=== Villager gifts ===
{{in|java}}, Fisherman villagers throw raw salmon at [[player]]s under the [[Hero of the Village]] effect.
== Usage ==
=== Smelting ingredient ===
{{smelting
|Raw Salmon
|Cooked Salmon
|0.35
}}
=== Food ===
Raw salmon restores {{hunger|2}} [[hunger]] and 0.2 [[Hunger#Mechanics|saturation]].
=== Cats ===
Raw salmon can be used to tame [[cat]]s with {{frac|1|3}} chance of success, get cats off of [[chest]]s, and [[bed]]s, [[breed]] cats, and make baby cats grow up faster by 10% of the remaining time. Additionally, raw salmon can be used to heal cats by {{hp|2|mob=1}}.
Raw salmon can be used to gain [[ocelot]] trust, breed ocelots, and make baby ocelots grow up by 10%.
=== Dolphins ===
A [[dolphin]] can be fed raw salmon to increase its trust of the player and cause it to interact with the player more often. However, unlike most other animal mobs, this does not cause them to breed.
Additionally, dolphins swim to the nearest chest in a [[shipwreck]] or [[underwater ruin]] after they are fed raw salmon. If the chest in the nearest structure is broken, they swim to another structure with a chest.
=== Trading ===
Apprentice-level Fisherman [[villager]]s have 50%{{only|bedrock}} or {{frac|2|3}}{{only|java}} chance to buy 6 raw salmon and one [[emerald]] for 6 cooked salmon.
Journeyman-level Fisherman villagers offer to buy 13 raw salmon for an emerald.
=== Wolves ===
{{IN|bedrock}}, raw salmon can be fed only to [[wolves]] not at full health, healing them by {{hp|2|mob=1}}. Unlike other wolf food, raw salmon cannot be used to breed wolves or to accelerate the growth of baby wolves.
==Sounds==
{{Sound table/Entity/Food}}
== Data values ==
=== ID ===
{{edition|java}}:
{{ID table
|edition=java
|showitemtags=y
|showforms=y
|generatetranslationkeys=y
|displayname=Raw Salmon
|spritetype=item
|nameid=salmon
|itemtags=fishes
|form=item
|foot=1}}
{{edition|bedrock}}:
{{ID table
|edition=bedrock
|shownumericids=y
|showforms=y
|notshowbeitemforms=y
|generatetranslationkeys=y
|displayname=Raw Salmon
|spritetype=item
|nameid=salmon
|id=265
|form=item
|foot=1}}
== Achievements ==
{{load achievements|Lion Hunter}}
== Advancements ==
{{load advancements|Husbandry;A Balanced Diet;Fishy Business;A Complete Catalogue}}
== Video ==
<span style="display:inline-block">{{yt|s_GcAFeoREk}}</span>
== History ==
{{History|java}}
{{History||1.7.2|snap=13w36a|[[File:Raw Salmon JE1 BE1.png|32px]] Added raw salmon.}}
{{History||1.8|snap=14w25a|Raw salmon is now obtainable rare drops from [[guardian]]s and [[elder guardians]].}}
{{History||1.9|snap=15w44a|Raw salmon can now be found in [[bonus chest]]s.}}
{{History||1.10|snap=16w20a|Raw salmon is now dropped from [[polar bear]]s.}}
{{History||1.13|snap=17w47a|The different data values for the <code>fish</code> and <code>cooked_fish</code> IDs have been split up into their own IDs.
|Prior to [[1.13/Flattening|''The Flattening'']], these [[item]]s' numeral IDs were 349 and 250.}}
{{History|||snap=18w08b|Salmon has been added as a [[mob]], which drops raw salmon when killed (cooked while on [[fire]]).
|[[File:Raw Salmon JE2 BE2.png|32px]] The texture for raw salmon has been changed.}}
{{History||1.14|snap=18w48a|Raw salmon can now be found in chests in [[village]] fisher cottages.}}
{{History|||snap=19w11a|Fisherman [[villager]]s now [[trading|buy]] raw salmon.}}
{{History|||snap=19w13a|Fisherman villagers now give raw salmon to players under the [[Hero of the Village]] effect.}}
{{History|pocket alpha}}
{{History||v0.11.0|snap=build 1|[[File:Raw Salmon JE1 BE1.png|32px]] Added raw salmon.}}
{{History||v0.12.1|snap=build 1|Salmon now restores [[hunger]] instead of [[health]].
|Raw salmon can now be used to tame [[ocelot]]s.}}
{{History||v0.16.0|snap=build 1|Salmon is now [[drops|dropped]] by [[guardian]]s and [[elder guardian]]s.}}
{{History|pocket}}
{{History||1.0.0|snap=alpha 0.17.0.1|Added [[polar bear]]s, which drop raw salmon.}}
{{History|bedrock}}
{{History||1.2.0|snap=beta 1.2.0.2|Raw salmon is now found inside [[bonus chest]]s.}}
{{History||1.4.0|snap=beta 1.2.14.2|Salmon has been added as a [[mob]], which drops raw salmon when killed (cooked while on [[fire]]).
|[[File:Raw Salmon JE2 BE2.png|32px]] The texture for raw salmon has been changed.}}
{{History|||snap=beta 1.2.20.1|Added [[dolphin]]s, which can be [[breeding|bred]] with raw salmon.}}
{{History||1.5.0|snap=beta 1.5.0.0|Raw salmon can no longer be used to breed dolphins.
|Giving raw salmon to dolphins now leads the [[player]] to nearest [[underwater ruins]] or [[shipwreck]].}}
{{History||1.8.0|snap=beta 1.8.0.8|Raw salmon can no longer be used to tame [[ocelot]]s.
|Raw salmon can now be used to [[breeding|breed]] ocelots.
|Added stray [[cat]]s, which can be tamed by being fed raw salmon.}}
{{History||1.11.0|snap=beta 1.11.0.4|Raw salmon can now be [[trading|sold]] to fisherman [[villager]]s.}}
{{History||1.16.100|snap=beta 1.16.100.52|If [[salmon]] is [[death|killed]] while on [[fire]], then they now drop [[cooked salmon]] instead of a raw salmon.}}
{{History|console}}
{{History||xbox=TU31|xbone=CU19|ps=1.22|wiiu=Patch 3|[[File:Raw Salmon JE1 BE1.png|32px]] Added raw salmon.}}
{{History||xbox=TU69|ps=1.76|wiiu=Patch 38|[[File:Raw Salmon JE2 BE2.png|32px]] The texture for raw salmon have been changed.}}
{{History|new 3ds}}
{{History||0.1.0|[[File:Raw Salmon JE1 BE1.png|32px]] Added raw salmon.}}
{{History|foot}}
== Issues ==
{{issue list}}
== See also ==
* [[Fishing]]
== References ==
{{reflist}}
{{items}}
[[de:Roher Lachs]]
[[es:Salmón crudo]]
[[ja:生鮭]]
[[ko:생연어]]
[[pt:Salmão cru]]
[[ru:Сырой лосось]]
[[tr:Çiğ Somon]]
[[zh:生鲑鱼]]
[[Category:Renewable resources]]
[[Category:Food]]</li></ul> | ? | When the player tries to sleep in the Nether, they will now cause the bed to explode. | |||
1.8{{Extension DPL}}<ul><li>[[Bottle o' Enchanting|Bottle o' Enchanting]]<br/>{{ItemEntity
|image=Bottle o' Enchanting.gif
|imagesize=160px
|invimage=Bottle o' Enchanting
|stackable=Yes (64)
|renewable=Yes
|size=Height: 0.25 Blocks<br>Width: 0.25 Blocks
|rarity=Uncommon
|networkid='''[[JE]]''': 75
}}
A '''bottle o' enchanting''' is a throwable item that releases [[experience]] orbs on impact.
== Obtaining ==
=== Trading ===
Master-level cleric [[villager]]s sell bottles o' enchanting for 3 emeralds as part of their trade.
=== Natural generation ===
{{LootChestItem|bottle-o'-enchanting}}
== Usage ==
A bottle o' enchanting can be thrown by pressing {{control|use}}. On impact, it drops [[experience]] orbs worth {{xp|3|11}} (average 7.0) and sends out blue particles.
== Sounds ==
{{Edition|Java}}:<br>
Bottles o' enchanting use the Friendly Creatures sound category for entity-dependent sound events.
{{Sound table
|sound=Glass dig1.ogg
|sound2=Glass dig2.ogg
|sound3=Glass dig3.ogg
|subtitle=Bottle smashes
|source=neutral
|description=When a bottle o' enchanting impacts something
|id=entity.splash_potion.break
|translationkey=subtitles.entity.potion.splash
|volume=1.0
|pitch=0.9-1.0
|distance=16}}
{{Sound table
|rowspan=2
|sound=Bow shoot.ogg
|subtitle=Bottle thrown
|source=neutral
|description=When a bottle o' enchanting is thrown by a player
|id=entity.experience_bottle.throw
|translationkey=subtitles.entity.potion.throw
|volume=0.5
|pitch={{frac|1|3}}-0.5
|distance=16}}
{{Sound table
|subtitle=Dispensed item
|source=block
|description=When a bottle o' enchanting is dispensed from a [[dispenser]]
|id=block.dispenser.launch
|translationkey=subtitles.block.dispenser.dispense
|volume=1.0
|pitch=1.2
|distance=16
|foot=1}}
{{Edition|Bedrock}}:
{{Sound table
|type=bedrock
|sound=Glass dig1.ogg
|sound2=Glass dig2.ogg
|sound3=Glass dig3.ogg
|source=block
|description=When a splash potion impacts something
|id=random.glass
|volume=1.0
|pitch=1.0}}
{{Sound table
|rowspan=2
|sound=Bow shoot.ogg
|source=player
|description=When a splash potion is thrown by a player
|id=random.bow
|volume=0.5
|pitch=0.33-0.5}}
{{Sound table
|source=player
|description=When a splash potion is dispensed from a dispenser
|id=random.bow
|volume=1.0
|pitch=0.83-1.25
|foot=1}}
== Data values ==
=== ID ===
{{edition|java}}:
{{ID table
|edition=java
|firstcolumnname=Item
|showforms=y
|generatetranslationkeys=y
|displayname=Bottle o' Enchanting
|spritetype=item
|nameid=experience_bottle
|form=item
|foot=1}}
{{ID table
|edition=java
|firstcolumnname=Entity
|generatetranslationkeys=y
|displayname=Thrown Bottle o' Enchanting
|spritetype=entity
|spritename=Bottle o' Enchanting
|nameid=experience_bottle
|foot=1}}
{{edition|bedrock}}:
{{ID table
|edition=bedrock
|firstcolumnname=Item
|shownumericids=y
|showforms=y
|notshowbeitemforms=y
|generatetranslationkeys=y
|displayname=Bottle o' Enchanting
|spritetype=item
|nameid=experience_bottle
|id=508
|form=item
|foot=1}}
{{ID table
|edition=bedrock
|firstcolumnname=Entity
|shownumericids=y
|generatetranslationkeys=y
|displayname=Bottle o' Enchanting
|spritetype=entity
|nameid=xp_bottle
|id=68
|foot=1}}
=== Entity data ===
{{see also|Chunk format}}
Thrown bottles o' enchanting have entity data that define various properties of the entity.
{{/ED}}
== History ==
<!--When were dispensers made able to fire these? Or was this always a thing?-->
{{History|java}}
{{History||1.2.1|snap=12w04a|[[File:Bottle o' Enchanting JE1 BE1.png|32px]] Added bottles o' enchanting.
|Bottles o' enchanting can currently be obtained only in [[creative]] mode.}}
{{History||1.3.1|snap=12w21a|With the implementation of the [[trading]] system, the [[player]] can now trade with priest [[villager]]s to obtain 2–4 bottles o' enchanting for 1 [[emerald]].}}
{{History||1.8|snap=14w02a|With the trading revamp, villagers no longer [[trading|sell]] bottles o' enchanting, making them again unobtainable in regular [[survival]].}}
{{History|||snap=14w31a|Cleric [[villager]]s now sell bottles o' enchanting for 3–11 [[emerald]]s each, making them [[renewable resource|renewable]] again.}}
{{History||1.9|snap=15w49a|Bottles o' enchanting, like all projectiles, now take thrower's motion into account.}}
{{History||1.11|snap=16w32a|The entity ID has now been changed from <code>ThrownExpBottle</code> to <code>xp_bottle</code>.}}
{{History||1.13|snap=17w47a|Prior to [[1.13/Flattening|''The Flattening'']], this [[item]]'s numeral ID was 384.}}
{{History|||snap=18w11a|Bottles o' enchanting can now generate in [[shipwreck]] chests.}}
{{History|||snap=pre5|The entity ID has now been changed to <code>experience_bottle</code>.}}
{{History||1.14|snap=18w43a|[[File:Bottle o' Enchanting JE2 BE2.png|32px]] The texture of bottles o' enchanting has now been changed.}}
{{History|||snap=18w47a|Bottles o' enchanting can now generate in [[pillager outpost]] chests.}}
{{History||1.19|snap=22w13a|Bottles o' enchanting may now be found in [[ancient city]] [[chest]]s.}}
{{History|pocket alpha}}
{{History||v0.12.1|snap=build 1|[[File:Bottle o' Enchanting JE1 BE1.png|32px]] Added bottles o' enchanting.
|Due to the lack of [[trading]], bottles o' enchanting are currently available only in [[creative]] mode, similar to [[Java Edition 12w04a|12w04a]] when it was first released.}}
{{History|pocket}}
{{History||1.0.4|snap=alpha 1.0.4.0|With [[villager]] [[trading]] added, it is now possible to obtain bottles o' enchanting legitimately.}}
{{History||1.1.0|snap=alpha 1.1.0.0|The entity ID has now been changed from <code>potion.experience</code> to <code>xp_bottle</code>.}}
{{History|bedrock}}
{{History||1.4.0|snap=beta 1.2.14.2|Bottles o' enchanting can now be found inside [[shipwreck]] and [[buried treasure]] [[chest]]s.}}
{{History||1.10.0|snap=beta 1.10.0.3|Bottles o' enchanting can now be found in [[pillager outpost]] chests.
|[[File:Bottle o' Enchanting JE2 BE2.png|32px]] The texture of bottles o' enchanting has now been changed.}}
{{History||1.11.0|snap=beta 1.11.0.4|[[Trading]] has now been changed and bottles o' enchanting are now [[trading|sold]] by cleric [[villager]]s for 3 [[emerald]]s.}}
{{History|console}}
{{History||xbox=TU7|xbone=CU1|ps=1.0|wiiu=Patch 1|[[File:Bottle o' Enchanting JE1 BE1.png|32px]] Added bottles o' enchanting.
|Bottle o' enchanting can be found in the Miscellaneous tab in the [[Creative inventory]].}}
{{History||xbox=TU12|Moved bottle o' enchanting to the Brewing tab in the Creative inventory.}}
{{History|PS4}}
{{History||1.90|[[File:Bottle o' Enchanting JE2 BE2.png|32px]] The texture of bottles o' enchanting has now been changed.}}
{{History|3ds}}
{{History||0.1.0|[[File:Bottle o' Enchanting JE1 BE1.png|32px]] Added bottles o' enchanting.
|Bottles o' enchanting are not available within the [[Creative inventory]].}}
{{History||?|Added bottles o' enchanting to the Creative inventory.{{info needed|Which update did this occur?}}}}
{{History|foot}}
== Issues ==
{{issue list|Bottle o' Enchanting|Experience Bottle}}
== Gallery ==
<gallery>
Bottle O' Enchanting Splash.gif|Bottle o' enchanting splash animation on impact.
Bottle O' Enchanting villager.png|Players may trade with villagers to obtain bottles o' enchanting in survival mode.
</gallery>
{{Items}}
{{Entities}}
[[cs:Lektvar očarování]]
[[de:Erfahrungsfläschchen]]
[[es:Frasco con experiencia]]
[[fr:Fiole d'expérience]]
[[ja:エンチャントの瓶]]
[[ko:경험치 병]]
[[pl:Zaklęta butelka]]
[[pt:Frasco de experiência]]
[[ru:Зелье опыта]]
[[th:ขวดแห่งเวทมนตร์]]
[[zh:附魔之瓶]]</li><li>[[Prismarine Shard|Prismarine Shard]]<br/>{{Item
| renewable = Yes
| stackable = Yes (64)
| type =
}}
A '''prismarine shard''' is an item obtained by defeating [[guardian]]s or [[elder guardian]]s. It can be used to craft various [[prismarine]] blocks as well as [[sea lantern]]s.
== Obtaining ==
Prismarine shards are dropped upon the death of [[guardian]]s and [[elder guardian]]s. From these mobs, 0–2 shards are dropped each time. This can be increased to a maximum of 5 with the [[Looting]] enchantment.
== Usage ==
=== Crafting ingredient ===
{{crafting usage}}
== Data values ==
=== ID ===
{{edition|java}}:
{{ID table
|edition=java
|showforms=y
|generatetranslationkeys=y
|displayname=Prismarine Shard
|spritetype=item
|nameid=prismarine_shard
|form=item
|foot=1}}
{{edition|bedrock}}:
{{ID table
|edition=bedrock
|showaliasids=y
|shownumericids=y
|showforms=y
|notshowbeitemforms=y
|generatetranslationkeys=y
|displayname=Prismarine Shard
|spritetype=item
|nameid=prismarine_shard
|aliasid=prismarineshard
|id=565
|form=item
|foot=1}}
== History ==
{{History|java}}
{{history||1.8|snap=14w25a|[[File:Prismarine Shard JE1 BE1.png|32px]] Added prismarine shards.}}
{{History||1.13|snap=17w47a|Prior to [[1.13/Flattening|''The Flattening'']], this [[item]]'s numeral ID was 409.}}
{{History||1.14|snap=18w43a|[[File:Prismarine Shard JE2 BE2.png|32px]] The texture of prismarine shards has now been changed.}}
{{History|pocket alpha}}
{{History||v0.16.0|snap=build 1|[[File:Prismarine Shard JE1 BE1.png|32px]] Added prismarine shards.}}
{{History|bedrock}}
{{History||1.10.0|snap=beta 1.10.0.3|[[File:Prismarine Shard JE2 BE2.png|32px]] The texture of prismarine shards has now been changed.}}
{{History|console}}
{{History||xbox=TU31|xbone=CU19|ps=1.22|wiiu=Patch 3|[[File:Prismarine Shard JE1 BE1.png|32px]] Added prismarine shards.}}
{{History||xbox=none|xbone=none|ps=1.90|wiiu=none|switch=none|[[File:Prismarine Shard JE2 BE2.png|32px]] The texture of prismarine shards has now been changed.}}
{{History|New 3DS}}
{{History||1.3.12|[[File:Prismarine Shard JE1 BE1.png|32px]] Added prismarine shards.}}
{{History|foot}}
== Issues ==
{{issue list}}
{{items}}
[[de:Prismarinscherbe]]
[[es:Fragmento de prismarina]]
[[fr:Éclat de prismarine]]
[[ja:プリズマリンの欠片]]
[[ko:프리즈머린 조각]]
[[nl:Prismarienscherf]]
[[pl:Odłamek pryzmarynu]]
[[pt:Pedaço de prismarinho]]
[[ru:Призмариновый осколок]]
[[uk:Призмариновий уламок]]
[[zh:海晶碎片]]
[[Category:Renewable resources]]</li></ul> | ? | Explosions will now emit shockwave particles. Prior to Beta 1.8, explosions only emitted smoke. | |||
Sound Update{{Extension DPL}}<ul><li>[[Map|Map]]<br/>{{about|the craftable map|maps showing the locations of certain structures|Explorer Map|other uses|Map (disambiguation)}}
{{distinguish|World}}
{{Item
| image = Map Zoom 4.png
| renewable = Yes
| stackable = Yes (64)
}}
A '''map''' is an [[item]] used to view explored [[Chunk|terrain]] and mark landmarks.
==Obtaining==
===Crafting===
{{crafting
|head=1
|showname=0
|showdescription=1
|A1= Paper
|B1= Paper
|C1= Paper
|A2= Paper
|B2= Compass
|C2= Paper
|A3= Paper
|B3= Paper
|C3= Paper
|Output= Empty Map
|type= Miscellaneous
|description=This variation is called an "empty locator map" {{in|bedrock}}, or an "empty map" {{in|java}}.
When the player first creates a map, it is blank. It needs to be activated by holding it and pressing ''{{Control|use item}}''. after which it records terrain and location markers as the player travels within (or close to) the area it maps.
}}
{{crafting
|A1= Paper
|B1= Paper
|C1= Paper
|A2= Paper
|B2= Paper
|C2= Paper
|A3= Paper
|B3= Paper
|C3= Paper
|Output= Empty Map
|type= Miscellaneous
|description={{only|bedrock}}
This variation is called an "empty map". It does not show location markers. It is intended for cloning and zooming locator maps without having to consume an additional [[compass]] (thereby saving [[iron ingot]]s and [[redstone dust]]), but it can also be {{Control|use|text=activated}} and later converted to a locator map by combining it with a compass on an [[anvil]], [[crafting table]], or [[cartography table]].
|foot=1
}}
=== Natural generation ===
==== Chest loot ====
{{LootChestItem|empty-map,map
}}
=== Cartography table ===
A map can also be created using a single paper on a [[cartography table]] to create an empty map, or a paper with a compass for an empty locator map.{{only|bedrock}}
=== Starting map ===
{{exclusive|bedrock|section=1}}
When creating a new world {{in|bedrock}}, the player can enable the "Starting Map" option to spawn with an empty locator map in the hotbar. The map's zoom scale is 1:8. The map is updated only while the player holds it.
=== Trading ===
Novice-level cartographer [[Villager|villagers]] sell a single empty map for 7 [[Emerald|emeralds]] as their trades.
{{IN|java}}, cartographer villagers may give players with the [[Hero of the Village]] effect an empty map.
== Usage ==
{{See also|Tutorials/Mapping}}
=== Mapping ===
Crafting a map creates an empty map. The map is drawn for the first time when it is held and used (with ''{{control|use item}}''). This map can then be adjusted to different zoom levels. After conversion to a drawn map item, it starts to draw a top-down view of the player's surroundings, with North pointing to the top of the map. A pointed oval pointer indicates the player's position on the map, and moves in real-time as the player moves across the terrain shown on the map. The map does ''not'' center on the player when created, rather, the world is broken up into large invisible grid squares, and the map displays the area of whichever grid square it is in when it is first used. For example, if a player uses a new map in a certain grid square, and then moves a distance away and uses another fresh map but is still within the same grid square, both maps appear identical. To make a map that is not identical to the first one, the player would have to move outside of the edges of the first map (because then they would be in a new grid square). This way, no two maps of the same size can ever partially overlap and every map can display only a fixed area.
To record the world on a map, that specific map must be held in the player's hands while the player moves around the world. The world is recorded as-is during exploration, meaning that if the world is modified, a player must revisit the area while holding the map to update the map's view. Maps can also be [[Map#Cloning|cloned]]. If a player holds a map whose one or more clones are on display in item frames, updates are made on all clone-connected maps.
Other players are displayed on the map only if they have a map in their inventory cloned from the one being looked at. When placing a map into an [[item frame]], the map displays with a green pointer shown at the location of the item frame. This is to help the player see where they are in relation to the area that the map is showing. If the player leaves a map in an item frame and views a clone of it, the green pointer remains in the spot of the framed copy. This can be used to set up waypoints. Unexplored areas are transparent, making the item frame visible.
When the player leaves the area shown on a specific map, the player pointer transforms into a white dot that moves on that map. The marker shrinks to a smaller white dot if the player is far from the map's center: the area is 320 by 320 blocks per scale factor. The dot moves along the edge of the map to show the relative location of the player. However {{in|bedrock}}, the pointer remains as an arrow but shrinks until the player is near the area shown on the map.
While maps in [[the Nether]] work, they show only the red-and-gray pattern, regardless of the blocks placed. The only useful function is finding where the player is in relation to placed framed maps, which show as green pointers. Additionally, the player pointer rapidly spins and is not a good indicator of direction. Placing a [[banner]] in [[the Nether]] still shows it on the map as usual. Having a smaller map image while riding a [[strider]] in the Nether can help one to see one's footing while traveling over [[lava]].
{{IN|java}}, when using a map from another dimension, the map shows the player's position and direction when they were last in the dimension of the map. {{IN|bedrock}}, however, the player can use maps from one dimension while in another dimension. For locator maps, the place marker changes color depending on the dimension that the player is currently in (white for the Overworld, red for [[the Nether]], and magenta for [[the End]]). An Overworld map in the Nether shows the player's corresponding location and direction in the Overworld.<ref name=multiverse>{{ytl|EpP1diZdEdI}}</ref> Similarly, a Nether Map in the Overworld shows the player's corresponding location in the Overworld, but the place marker spins, just like a Nether map in the Nether. An Overworld map in the End shows the world spawn.<ref name=multiverse/> A Nether map cannot be used in the End — the map appears, but the place marker is not shown anywhere — and similarly, an End map cannot be used in the Overworld or the Nether.
A player can make a large piece of pixel art (128×128) facing upward, center a map on it, and place that map in an [[item frame]] to create a custom picture. Locking is recommended. See [[Map item format#Map Pixel Art]] for details on the techniques.
Maps display as a mini-map when held in the off-hand, or if the off-hand slot is occupied; the map is full-sized only when held in the dominant hand with both hands free.
A map always positions itself facing towards North when placed horizontally within an item frame regardless of how the map is placed.
=== Map content ===
{{Main|Map item format}}
Maps consist of square pixels arranged like pixels in a 128×128 square pattern, with each pixel representing a square portion of land. {{IN|java}}, the [[Map item format#Color table|color of a map pixel]] generally matches the color of the most common [[opaque]] block in the corresponding area, as seen from the sky. 'Minority blocks' in the target area have no effect on the color of the pixel, thus small features tend to be undetectable on zoomed-out maps.
{{IN|bedrock}}, the [[Map item format#Color table|color of a map pixel]] instead matches the single top-most opaque block in a grid sized by the map magnification pixel size (see the table in the "Player marker and pointer" section below). For example, a 3/4 magnification map has a pixel size of 8x8 blocks; this means the map will read only the top-most opaque blocks at the 0,0 coordinate, the 8,0 coordinate, the 0,8 coordinate, etcetera, ignoring all other blocks in the area. This means that {{in|bedrock}}, map pixel art requires only one block per pixel regardless of map magnification.
{{IN|bedrock}}, grass, foliage and water colors that are biome-dependent are represented accurately on a map.
{| class="wikitable"
|-
! style="width: 300px;" | {{el|je}}
! style="width: 300px;" | {{el|be}}
|-
| style="text-align: center;" | [[File:Map Zoom 4.png|alt=All banners marked on a map, alongside a named banner.|216px]]
| style="text-align: center;" | [[File:Map item BE.png|216px]]
|-
| Biome colors on ''Java Edition''.
| Biome colors on ''Bedrock Edition''.
|-
|}
Maps also show ground up to about 15 blocks below the surface of the water in oceans as slightly lighter blue, to show where the ground rises. This is not true with land above water. Higher elevations in the world mean lighter colors on the map. The map records the surface even as the player moves below the surface.
A standard map represents 128x128 blocks (1 block per pixel, 8x8 [[chunks]]) but maps can be zoomed-out to represent up to 2048x2048 blocks (16 square blocks per pixel, 128x128 [[chunks]]).
Some relevant distances: 64 blocks (4 chunks) is the update radius from a player in the Overworld and the End. However, it is half this (32 blocks) in the Nether. Also, 1024 blocks is the minimum Overworld distance from a [[nether portal]], at which players can build another portal and expect to reach a new location in the Nether. This is the distance across a 1:8 map, and also from a 1:16 map's center to its edge.
=== Player marker and pointer ===
{{IN|java}}, every map contains a marker that marks the position of the player, and points in the same direction as the player. When a player moves out of a map, a big white dot appears and moves relative to the player's position. The pointer either disappears when the player moves away a certain distance from the border of the map or, in case of [[explorer map]]s, the big white dot changes to a smaller white dot. The distance required for the small white dot to appear(explorer maps) or for the big dot to vanish (normal maps) changes with the scaling of the map.
* '''Level 0/4 :''' 128×128 blocks (each map pixel represents 1 block)
* '''Level 1/4 :''' 256×256 blocks (2×2 blocks per map pixel)
* '''Level 2/4 :''' 512×512 blocks (4×4 blocks per map pixel)
* '''Level 3/4 :''' 1024×1024 blocks (8×8 blocks per map pixel)
* '''Level 4/4 :''' 2048×2048 blocks (16×16 blocks per map pixel)
{{IN|bedrock}}, a map can be crafted with or without this marker, and a map without a position marker can add one later by adding a compass to the map. When a map is crafted without a compass, it's simply called an "empty map", but when crafted with a compass, it's called an "empty locator map". The marker also turns red if the player enters the Nether with an Overworld map and shows the player's Overworld location relative to the Nether location. A map created in the End has a purple marker showing the player's location. If an Overworld map is used in the End, a magenta dot appears on the player's spawn point.{{/BE|position}}
{{crafting
|name=Map<br>(with marker)
|ingredients=[[Map]] or Empty Map +<br>[[Compass]]
|showdescription=1
|Map (no markers);Empty Map
|Compass
|Output= Locator Map;Empty Locator Map
|type= Miscellaneous
|description={{el|be}} only.
Maps crafted from only paper do not show the location marker; to add it, a compass must be added to the map.
|foot=1
}}
{{IN|bedrock}}, a cartography table can also be used to add a pointer to create a locator map or empty locator map. This can be done by adding a compass to paper, or to an empty map or map.
=== Zooming out ===
[[File:Cartography table UI zoom.png|thumb|300px|{{IN|java}}, cartography table's UI, showing the map is being zoomed out.]]
A [[cartography table]] can also be used to zoom out, taking only one piece of paper per zoom level.
A blank map can not be zoomed out. A map has to have something already marked on it for the zooming to be possible.
{{Crafting
|A1= Paper |B1= Paper |C1= Paper
|A2= Paper |B2= Map;Locator Map |C2= Paper
|A3= Paper |B3= Paper |C3= Paper
|Output= Map;Locator Map
|showdescription=1
|description=Locator Map {{el|be}} only.
}}
{{/BE|zoom}}
==== Zoom details ====
The zooming function starts from when the map is created (zoom level 0) up to its fourth zoom step (zoom level 4).
{| class="wikitable" style="text-align: center" data-description="Zoom levels"
! colspan="2" |
! Zoom step 0
! Zoom step 1
! Zoom step 2
! Zoom step 3
! Zoom step 4
|-
! colspan="2" |
| [[File:Map Zoom 0.png|116px|Zoom step 0, 1:1]]
| [[File:Map Zoom 1.png|116px|Zoom step 1, 1:2]]
| [[File:Map Zoom 2.png|116px|Zoom step 2, 1:4]]
| [[File:Map Zoom 3.png|116px|Zoom step 3, 1:8]]
| [[File:Map Zoom 4.png|116px|Zoom step 4, 1:16]]
|-
! colspan="2" | Zoom level
| 0/4
| 1/4
| 2/4
| 3/4
| 4/4
|-
! colspan="2" | 1 map pixel represents
| 1 block
| 2×2 blocks
| 4×4 blocks
| 8×8 blocks
| 16×16 blocks<br>(1×1 chunk)
|-
! colspan="2" | Scaling ratio
| 1:1
| 1:2
| 1:4
| 1:8
| 1:16
|-
! rowspan="2" colspan="2" | Map covers an area of
| 128×128 blocks
| 256×256 blocks
| 512×512 blocks
| 1024×1024 blocks
| 2048×2048 blocks
|-
| 8×8 chunks
| 16×16 chunks
| 32×32 chunks
| 64×64 chunks
| 128×128 chunks
|-
! colspan="2" | Smallest discernible features
| Blocks
| Trees, Paths
| Lakes, Buildings
| Mountains, Rivers
| Biomes, Mountain Ranges
|-
! colspan="2" | Use cases
| Pixel art, Base plans
| Base surroundings
| Structure mapping
| Landscape mapping
| Biome mapping
|-
! rowspan="2" | Total paper needed to zoom out from Level 0
! in anvil{{only|bedrock|short=1}} or crafting table
| -
| {{ItemSprite|Paper}} 8
| {{ItemSprite|Paper}} 16
| {{ItemSprite|Paper}} 24
| {{ItemSprite|Paper}} 32
|-
! in cartography table
| -
| {{ItemSprite|Paper}} 1
| {{ItemSprite|Paper}} 2
| {{ItemSprite|Paper}} 3
| {{ItemSprite|Paper}} 4
|}
Maps are always aligned to a grid at all zoom levels. That means zooming out any different map in a specific area covered by that map always has the same center. As such, maps are aligned by map width (1024 blocks for a level 3 maps) minus 64. A level 3 map generated at spawn covers X and Z coordinates from -64 to 959. All maps generated in this area zoom out to the same coordinates, guaranteeing that they are always 'aligned' on a map wall. For a zoomed-out map to cover a new area, it must start with a base (level 0) map that is in that area.
At zoom level 0, a map created on the point (0,0) has (0,0) at the center of the map. At higher zoom levels of the same map, the coordinate (0,0) is in the top left square of the map.
{{IN|java}}, zoom level can be seen on a map by turning on Advanced Tooltips (a [[Debug screen#More debug keys|debug screen]] option that can be toggled by using the key combination {{key|F3+H}}). The tooltip of the map then shows the zoom level, scaling factors, and map ID.
=== Cloning ===
[[File:Cartography table UI clone.png|thumb|300px|{{IN|Java}}, cartography table's UI, showing the map is being cloned.]]
A mix of empty maps and empty locator maps may be used. Whether the cloned maps show position markers is dependent only on the input map.
A [[cartography table]] can also be used to clone a map.
The parts of the world that have already been explored and mapped are copied, and newly explored areas appear on both instances. If one of the maps is later zoomed out, then the maps lose their connection to each other and function as completely separate maps that have to be individually filled by exploring.
In Creative mode, a map in an item frame may be cloned by using {{control|pick block}} on it, as long as that map is not also in the player's inventory.
It doesn't matter if the map to be cloned is at a higher zoom level (made of more paper) than the blank map. Upon copying the map, both resulting maps have the same magnification as the starting map.
{{/BE|clone}}
=== Crafting ingredient ===
{{crafting usage|Map, Empty Map}}
=== Marking points ===
{{IN|java}} the player has the ability to mark spots on a map. To do this, {{control|use}} a map on a placed-down [[banner]], and the spot of the banner gets marked on the map. The mark takes the color of whatever the base color is for the banner, and if the banner has a name, the mark shows that name. Banner marks on a map are always oriented with their top facing north, regardless of the banner's actual orientation. If the banner is destroyed, the mark of the banner remains at first, but if the player gets closer to where the banner previously was, it disappears as the area is updated on the map.
If a map is mounted on an item frame and is within the area it depicts, the mounted map displays its current location with a green indicator rotated to match its orientation.
[[File:Map Marker Bedrock on Item frame.png|thumb|181x181px|{{IN|bedrock}} this is what a map lying on an item frame looks like, while showing markers.]]
{{IN|bedrock}} the player can place copies of locator maps in [[item frame]]s in order to create a land mark. The marker is a green dot that resembles the shape of the player's marker, but in green color. The position the marker points at depends on the direction the item frame is facing. It is worth noting that the markers work only on copies of the same map. Other maps of the same area do not show the existing markers that the player(s) had placed.
If a player has a cloned map in their inventory, their pointer appears white when viewed on the same map held by another player. Hence, if all players have the same cloned map in their inventory, all markers would appear white when the clone map is viewed.
{| class="wikitable"
|-
! style="width: 300px;" | {{el|je}}
! style="width: 300px;" | {{el|be}}
|-
| style="text-align: center;" | [[File:Banner marked map.png|alt=All banners marked on a map, alongside a named banner.|216px]]
| style="text-align: center;" | [[File:Tracking map with markers bedrock.png|216px]]
|-
| How every banner appears {{IN|java}} on a map, including named banners.
| {{IN|bedrock}} this is how a locator map shows map markers while held by a player.
|-
|}
===Locking===
[[File:Cartography table UI lock.png|thumb|300px|{{IN|Java}}, cartography table's UI, showing the map is being locked.]]
Maps can be locked when using a [[glass pane]] in a [[cartography table]]. This creates a new map containing the same data and locks it. All copies of this new map are also locked. A locked map never changes, even when the depicted terrain changes. {{IN|Be}}, locked maps have a unique texture.
{| class="wikitable" style="text-align: center;"
|-
! Condition
! style="width: 200px;" | Newly created map
! style="width: 200px;" | Map after terrain alteration
|-
! Unlocked map
| [[File:Map Zoom 0.png|174px]] || [[File:Unlocked Map.png|174px]]
|-
! Locked map
| [[File:Map Zoom 0.png|174px]] || [[File:Map Zoom 0.png|174px]]
|-
|}
{{-}}
== Sounds ==
{{Edition|Java}}:
{{Sound table
|rowspan=2
|sound=Drawmap1.ogg
|sound2=Drawmap2.ogg
|sound3=Drawmap3.ogg
|subtitle=Map drawn
|source=player
|description=When a map is drawn
|id=ui.cartography_table.take_result
|translationkey=subtitles.ui.cartography_table.take_result
|volume=1.0
|pitch=1.0
|distance=16}}
{{Sound table
|subtitle=Map drawn
|source=block
|description=When a map is edited using a cartography table
|id=ui.cartography_table.take_result
|translationkey=subtitles.ui.cartography_table.take_result
|volume=1.0
|pitch=1.0
|distance=16
|foot=1}}
{{Edition|Bedrock}}:
{{Sound table
|type=bedrock
|rowspan=2
|sound=Drawmap1.ogg
|sound2=Drawmap2.ogg
|sound3=Drawmap3.ogg
|source=block
|description=When a map is drawn<wbr>{{Upcoming|BE 1.20.20.20}}
|id=ui.cartography_table.take_result|idnote={{Verify|Could be block.cartography_table.use}}
|volume=0.8
|pitch=1.0}}
{{Sound table
|type=bedrock
|source=block
|description=When a map is edited using a cartography table
|id=ui.cartography_table.take_result
|volume=0.8
|pitch=1.0
|foot=1}}
== Data values ==
=== ID ===
{{edition|java}}:
{{ID table
|edition=java
|showforms=y
|generatetranslationkeys=y
|displayname=Empty Map
|spritetype=item
|nameid=map
|form=item}}
{{ID table
|displayname=Map
|spritetype=item
|nameid=filled_map
|form=item
|translationkey=item.minecraft.filled_map, filled_map.buried_treasure, filled_map.explorer_jungle{{upcoming|java 1.20.2}}, filled_map.explorer_swamp{{upcoming|java 1.20.2}}, filled_map.mansion, filled_map.monument, filled_map.unknown, filled_map.village_desert{{upcoming|java 1.20.2}}, filled_map.village_plains{{upcoming|java 1.20.2}}, filled_map.village_savanna{{upcoming|java 1.20.2}}, filled_map.village_snowy{{upcoming|java 1.20.2}}, filled_map.village_taiga{{upcoming|java 1.20.2}}
|foot=1}}
{{edition|bedrock}}:
{{ID table
|edition=bedrock
|showaliasids=y
|shownumericids=y
|showforms=y
|notshowbeitemforms=y
|generatetranslationkeys=y
|displayname=Empty Map
|spritetype=item
|nameid=empty_map
|aliasid=emptymap
|id=515
|form=item
|translationkey=item.emptyMap.name, item.emptyLocatorMap.name}}
{{ID table
|displayname=Map
|spritetype=item
|spritename=map-be
|nameid=filled_map
|aliasid=map
|id=420
|form=item
|translationkey=item.map.name, item.map.exploration.mansion.name, item.map.exploration.monument.name, item.map.exploration.treasure.name
|foot=1}}
=== Metadata ===
{{see also|Bedrock Edition data values}}
{{IN|bedrock}}, maps use the following data values:
{{/DV}}
=== Item data ===
{{el|java}}:
{{main|Player.dat format}}
<div class="treeview">
* {{nbt|compound|tag}}: The item's '''tag''' tag.
{{:Player.dat_format/Maps}}
</div>
{{el|bedrock}}:
: See [[Bedrock Edition level format/Item format]].
=== Map icons ===
{{see also|Player.dat format|Map item format|map_icons.png}}
Map icons are 8×8 in ''Java Edition'', but 16×16 in Bedrock Edition. As such, there are minor misalignment issues in ''Java Edition''.<ref>{{bug|MC-214649|||WF}}</ref>
[[File:Map icons.png|thumb|128px|Map icons texture {{in|Java}}]]
[[File:Map icons BE.png|thumb|128px|Map icons texture {{in|Bedrock}}]]
{| class="wikitable"
|-
! Java ID !! Bedrock ID !! Text ID !! Appearance !! Purpose !! Shown in item frames?
|-
| 0 || ||<code>player</code> || [[File:Player (texture) JE1 BE1.png|16px]] [[File:Player (texture) BE2.png|16px]] White marker || Players (on map) || No
|-
| 1 || 1 ||<code>frame</code> || [[File:Green Marker (texture) JE1 BE1.png|16px]] [[File:Green Marker (texture) BE2.png|16px]] Green marker || The current map in an item frame || Yes
|-
| 2 || ||<code>red_marker</code> || [[File:Red Marker (texture) JE1 BE1.png|16px]] [[File:Red Marker (texture) BE2.png|16px]] Red marker || Position converted to Overworld when opening Overworld map in the Nether{{Only|bedrock}} || No
|-
| 3 || ||<code>blue_marker</code> || [[File:Blue Marker (texture) JE1 BE1.png|16px]] [[File:Blue Marker (texture) BE2.png|16px]] Blue marker || Other players || No
|-
| 4 || ||<code>target_x</code> || [[File:Target X (texture) JE1 BE1.png|16px]] White X || Unused || Yes
|-
| 5 ||5
|<code>target_point</code> || [[File:Target Point (texture) JE1 BE1.png|16px]] [[File:Target Point (texture) BE2.png|16px]] Red triangle || Unused || Yes
|-
| 6 || 6 ||<code>player_off_map</code> || [[File:Player Off Map (texture) JE1 BE1.png|16px]] Large white dot || Players off map, nearby{{only|java}} || No
|-
| 7 || 13 ||<code>player_off_limits</code> || [[File:Player Off Limits (texture) JE1.png|16px]] [[File:Player Off Limits (texture) BE.png|16px]] Small white dot || Players off map, far away{{only|java}} || No
|-
| 8 ||14
|<code>mansion</code> || [[File:Mansion (texture) JE1.png|16px]] [[File:Mansion (Texture) BE2.png|frameless|16x16px]] Woodland mansion || Woodland mansion || Yes
|-
| 9 || 15 ||<code>monument</code> || [[File:Monument (texture) JE1.png|16px]] [[File:Monument Texture BE2.png|frameless|16x16px]] Ocean monument || Ocean monument || Yes
|-
| 10 - 25 || ||<code>{{tooltip|banner_*|banner_white, banner_orange, banner_magenta, banner_light_blue, banner_yellow, banner_lime, banner_pink, banner_gray, banner_light_gray, banner_cyan, banner_purple, banner_blue, banner_brown, banner_green, banner_red, banner_black}}</code> || [[File:Banner White (texture) JE1.png|16px]] [[File:Banner Light Gray (texture) JE1.png|16px]] [[File:Banner Gray (texture) JE1.png|16px]] [[File:Banner Black (texture) JE1.png|16px]] [[File:Banner Brown (texture) JE1.png|16px]] [[File:Banner Red (texture) JE1.png|16px]] [[File:Banner Orange (texture) JE1.png|16px]] [[File:Banner Yellow (texture) JE1.png|16px]] [[File:Banner Lime (texture) JE1.png|16px]] [[File:Banner Green (texture) JE1.png|16px]] [[File:Banner Cyan (texture) JE1.png|16px]] [[File:Banner Light Blue (texture) JE1.png|16px]] [[File:Banner Blue (texture) JE1.png|16px]] [[File:Banner Magenta (texture) JE1.png|16px]] [[File:Banner Purple (texture) JE1.png|16px]] [[File:Banner Pink (texture) JE1.png|16px]]<br>Banners in all 16 wool colors{{only|java}}|| Banner markers || Yes
|-
| 26 ||4
|<code>red_x</code> || [[File:Red X (texture) JE1.png|16px]] [[File:Target X (texture) BE2.png|16px]] Red X || Buried treasure || Yes
|-
| || 8 || || [[File:Magenta Marker (texture) BE1.png|16px]] Magenta marker
| Position converted to Overworld when opening Overworld map in the End{{Only|bedrock}} || No
|-
| || 9 || || [[File:Orange Marker (texture) BE1.png|16px]] Orange marker{{more info}}
|Other players
|Yes
|-
| || 10 || || [[File:Yellow Marker (texture) BE1.png|16px]] Yellow marker
| Other players || No
|-
| || 11 || || [[File:Cyan Marker (texture) BE1.png|16px]] Cyan marker
| Other players || No
|-
| -
|12
| || [[File:Green Point (texture) BE1.png|16px]] Green Triangle
| Other structure such as stronghold, fortress, end city, etc. when used as explorer map destination{{Only|bedrock}} || Yes
|}
It should be noted that even if the player used a NBT editor to add an additional icon on the map, ''Minecraft'' shows only the first one listed when the player loads up their world.
== Achievements ==
{{load achievements|Map Room}}
== History ==
{{see also|section=24|map_icons.png|Java Edition history of textures#Map icons}}
{{more images|section=24|{{bug|MC-72962}}}}
{{History||April 27, 2011|link=https://web.archive.org/web/0/http://notch.tumblr.com/post/4988431144/the-maps|[[Notch]] unveiled screenshots of the map.}}
{{History||April 28, 2011|link={{tweet|notch|63500114005721088}}|[[Notch]] said that he would try to make maps place-able on [[wall]]s.}}
{{History|java beta}}
{{History||1.6|snap=Test Build 3|[[File:Map (item) JE1 BE1.png|32px]] Added maps.}}
{{History||1.6.6|The ability to auto-craft maps using shift-click has been disabled.}}
{{History||1.8|snap=Pre-release|Maps can now be found in library chests in the brand-new [[stronghold]]s.
|Auto crafting maps has been restored. Map cloning, therefore, is unavailable for a period of time.}}
{{History||1.8.1|Maps now work both while walking and flying.}}
{{History|java}}
{{History||1.0.0|snap=Beta 1.9 Prerelease 5|Prior to this update, the [[sun]] in ''[[Minecraft]]'' rose in the North, which threw off many [[player]]s and led to a common misconception that ''Minecraft'' maps/[[world]]s were oriented with East at the top. The sun now rises in the east and sets in the west, making navigation much more intuitive.
|Before the change in sun position, it was commonly said that ''Minecraft'' maps/worlds are oriented with East at the top; sunrise, by definition, occurs at the East, which means it is certainly true that the maps were oriented "East" since the Sun rose from the top (North). However, [[Jeb]] asserted (and [[Notch]] agreed) that the sun rose in the north.<ref>{{Tweet|jeb|87815841160237056}}</ref><ref>{{Tweet|notch|88155424880201728}}</ref> Most mods and map-making tools, however, used the terms East and North consistent with their actual definitions (e.g. a [[Programs and editors/Cartograph|Cartograph]]-generated map with North at the top is rotated 90 degrees from the in-game map).}}
{{History||1.4.2|snap=12w34a|[[File:Empty Map JE1 BE1.png|32px]] [[Crafting]] a map now creates an empty map. The map is drawn for the first time when it is held and right clicked, and is centered near the location of the [[player]] when clicked (not as before where it was centered on the location it was crafted.)
|Previously, in order to map a new area, the map had to be ''crafted'' in that area (rather than carrying a previously-crafted map to the new area). The point where a map is crafted becomes its permanent center, and could never be changed.
|The pointer no longer disappears when leaving the map, but transforms into a white dot, indicating on what side of the map the player is located.
|Maps now align to a grid, making it easier to create adjacent maps.
|Maps can now be zoomed out (but not zoomed in).
|Maps can now be cloned and scaled.}}
{{History||1.4.2|snap=12w34b|Maps now have a ''zoom level'', which was fixed at 1:8 prior to snapshot [[Java Edition 12w34a|12w34a]],<ref name="mapinfo">https://web.archive.org/web/0/http://notch.tumblr.com/post/4988431144/the-maps</ref> but now starts at 1:1 and can be increased up to 1:16 by re-crafting an existing map.
|Maps are no longer numbered on the top-left corner and is labeled through the tooltip.}}
{{History|||snap=12w36a|New maps are now crafted at a scale factor of 1:1. A zoomed in map can be zoomed out by re-crafting it with another 8 sheets of [[paper]] on a [[crafting table]]. Each time this is done, the scale increases - 1:1, 1:2, 1:4, 1:8, 1:16 with a map scale of 1:16 being the current maximum.}}
{{History||1.7.2|snap=13w38a|The map size has been increased when placed on a [[wall]] using the [[item frame]].
|More colors have been added to maps for different [[block]]s.<ref name="infodump2">https://web.archive.org/web/0/https://www.mojang.com/2013/10/minecraft-1-7-the-update-that-changed-the-world</ref>}}
{{History||1.8|snap=14w31a|Zoomed maps now conform to an expanded grid based on their zoom level. Previously, careful considerations would need to be taken to creating a wall of adjoining maps.}}
{{History||1.8.1|snap=pre1|Some colors have been changed on maps to more accurately represent their respective [[block]].}}
{{History||1.9|snap=15w31a|Maps now display as a mini-map when held in the off-hand, or if the off-hand slot is occupied; the (old) large version is visible only when held in the dominant hand with the secondary hand free.}}
{{History|||snap=15w34a|New maps can now be [[crafting|crafted]] at a scale factor of 1:4.
|A crafting recipe has been added for zooming in maps.}}
{{History|||snap=15w43a|The average yield of empty maps from [[stronghold]] library [[chest]]s has been doubled.}}
{{History|||snap=15w45a|New maps are once again [[crafting|crafted]] at a scale factor of 1:1, as they had been before snapshot [[15w34a]].
|The [[crafting]] recipe, that was introduced in 15w34a, for zooming in maps has been removed.}}
{{History|||snap=15w49a|Map making now uses armor equipping sounds.}}
{{History||1.11|snap=16w39a|Maps now work in [[the End]].
|Empty maps are now [[trading|sold]] by cartographer [[villager]]s as their tier 3 [[trading|trade]].
|Added [[explorer map]]s, sold by cartographers as their tier 4 trades.}}
{{History||1.12|snap=17w17a|Maps now have separate colors for colored [[terracotta]] blocks from other colored blocks.}}
{{History||1.13|snap=17w47a|Prior to [[1.13/Flattening|''The Flattening'']], these [[item]]s' numeral IDs were 358 and 395.
|Maps now use additional NBT to specify which map they contain. Prior to this version, they used the [[damage]] value instead.
|Map IDs are no longer limited to 32,768.}}
{{History|||snap=17w50a|Maps can now be placed on floor and ceiling [[item frame]]s.}}
{{History|||snap=18w10a|Spots on maps can now be marked using [[banner]]s.}}
{{History|||snap=18w11a|Empty maps can now generate in [[shipwreck]] [[chest]]s.}}
{{History|||snap=pre7|Maps have been changed slightly, in regard to which [[block]]s are shown and which blocks are not.}}
{{History||1.14|snap=18w43a|[[File:Empty Map JE2 BE2.png|32px]] [[File:Map (item) JE2 BE2.png|32px]] The textures of maps have been changed.}}
{{History|||snap=18w48a|Empty maps can now be found in chests in [[village]] cartographer houses.}}
{{History|||snap=19w02a|Maps can now be cloned and zoomed out (extended) by using a [[cartography table]].
|Maps can now be locked by using a [[glass pane]] with a cartography table.
|The recipes for cloning and zooming out maps have been removed.}}
{{History|||snap=19w06a|Map making is now silent again.}}
{{History|||snap=19w13a|Cartographer villagers now give empty maps to players under the [[Hero of the Village]] effect.}}
{{History||1.16|snap=20w21a|Map making sounds are now the same as when using a cartography table.}}
{{History|pocket alpha}}
{{History||v0.14.0|snap=build 1|[[File:Empty Map JE1 BE1.png|32px]] [[File:Map (item) JE1 BE1.png|32px]] Added maps.
|Maps are crafted using nine [[paper]], one for every slot of the [[crafting]] grid.
|Maps must be combined with a [[compass]] using an [[anvil]] in order to show the [[player]]'s position.
|Maps can be zoomed using an anvil.}}
{{History|||snap=build 3|New maps are now [[crafting|crafted]] at full zoom.
|Empty maps now have a "Create Map" button to initialize them.}}
{{History|||snap=build 7|New maps are now crafted at a scale factor of 1:1.}}
{{History||v0.15.0|snap=unknown|Maps can now be crafted either with 8 pieces of [[paper]] and a [[compass]] ''or'' 9 pieces of paper, to get a map with or without a position marker.}}
{{History||v0.16.0|snap=build 1|Different colors have been added to maps for different [[biome]]s.}}
{{History|pocket}}
{{History||1.0.0|snap=?|[[Windows 10 Edition]] can now use the [[anvil]] as well as the [[crafting table]] to clone, zoom and apply markers, just as [[Pocket Edition]] in general could.
|Maps can now be found inside [[stronghold]] library [[chest]]s.}}
{{History||1.1.0|snap=alpha 1.1.0.0|Empty maps with direction markers built-in are now called "locator maps".}}
{{History|||snap=alpha 1.1.0.3|"Locator maps" are now called "empty locator maps".
|Empty maps are now [[trading|sold]] by cartographer [[villager]]s for 7-11 [[emerald]]s as their tier 3 [[trading|trade]].}}
{{History|bedrock}}
{{History||1.4.0|snap=beta 1.2.14.2|Maps can now be found inside map room [[chest]]s in [[shipwreck]]s.}}
{{History||?|The texture of the filled map overlay has been changed.}}
{{History||?|Maps now function in dimensions other than the dimension in which they were created.}}
{{History||1.10.0|snap=beta 1.10.0.3|Maps can now be found in cartographer house [[chest]]s in [[village]]s.
|[[File:Empty Map JE2 BE2.png|32px]] The texture of empty maps has been changed.}}
{{History||1.11.0|snap=beta 1.11.0.1|Empty maps can now be created from 1 [[paper]] in [[cartography table]]s.
|Maps can now be zoomed, cloned, renamed, and have pointers added in cartography tables.}}
{{History|||snap=beta 1.11.0.4|Cartographer [[villager]]s now [[trading|sell]] empty map for an [[emerald]] as their first tier [[trading|trades]].
|Empty locator maps can now be [[trading|bought]] from cartographer villagers.}}
{{History||1.13.0|snap=beta 1.13.0.1|[[File:Map (item) BE3.png|32px]] [[File:Locked Map (item) BE2.png|32px]] Filled maps and locked maps now have unique inventory icons.}}
{{History||1.16.0|snap=beta 1.16.0.57|Trading has been changed, novice-level cartographer now sell an empty map for 7 emeralds. Cartographer villager no longer sell empty locator map.}}
{{History||1.16.100|snap=beta 1.16.100.56|The ID of maps have been changed from <code>emptymap</code> to <code>empty_map</code> and <code>map</code> to <code>filled_map</code>.}}
{{History|console}}
{{History||xbox=TU1|xbone=CU1|ps=1.00|wiiu=Patch 1|switch=1.0.1|[[File:Map (item) JE1 BE1.png|32px]] Added maps.
|The [[player]] spawns with a free map.
|Maps are available only as zoom step 3 maps centered at coordinates 0,0. Biome colors do not appear on maps.}}
{{History||xbox=none|xbone=CU1|ps=1.0|wiiu=none|Larger sized worlds on Xbox One, Playstation 4, and Nintendo Switch have zoom step 3 maps aligned to a grid with maps centered at 0, 1024, or 2048 on the X or Z coordinates.}}
{{History||xbox=TU21|xbone=CU9|ps=1.14|wiiu=Patch 1|[[File:Empty Map JE1 BE1.png|32px]] [[Crafting]] a map now produces an empty map.}}
{{History||xbox=TU46|xbone=CU36|ps=1.38|wiiu=Patch 15|The outer end islands appear on different maps; even on Xbox 360, Playstation 3, Vita, and Wii U editions.}}
{{History||xbox=none|xbone=none|ps=1.90|wiiu=none|switch=none|[[File:Empty Map JE2 BE2.png|32px]] [[File:Map (item) JE2 BE2.png|32px]] The textures of maps have been changed.}}
{{History||ps=1.91|Maps can now be created and used in [[cartography table]]s.}}
{{History|foot}}
== Issues ==
{{issue list}}
== Trivia ==
* Use of the {{key|F1}} key can allow the player to hold a map without blocking their view at all.
* In ''Java Edition'', a map created using {{cmd|give}} can be any map by using the Map parameter to specify the map number desired. E.g. {{cmd|give [player] minecraft:filled_map{map:5<nowiki>}}} gives the specified player map_5. If no data value is supplied it defaults to map_0. If map_0 has not ever been crafted, it is centered on x=0, z=0.
* The maps are stored separately as their own data (<code>.dat</code>) file as <code>map_x.dat</code> with (x) being the map number, see [[map item format]] for more info. By manipulating this number, players can organize their maps to suit them, or if they accidentally create a map in the same location, they can delete their extra map so as to save the number they make.
* Certain programs can be used to make customized maps with images or text on them instead of actual maps, many people use these in adventure maps to show pictures or to tell a story.
* Since all copies of a map are links to the same file, copying an unfinished map keeps it synchronized with the copy as the player fills it in. Thus, a copy stored in a chest can act as a remote backup.
* A map that is in an item frame does not update itself until a player picks it up, lets it reload, and places it back again. However, if a player holds a clone of the map, both maps update.
* Filled maps are the only items that make 90 degree rotations in item frames, and also the only items that can expand the item frame into full block wide.
* On [[Legacy Console Edition]], the player always spawns with a map in their inventory after creating a world. This was later added to Bedrock Edition as an optional feature in the world creation menu.
* Maps on Legacy Console Edition always show the player's current coordinates, as a substitute for the optional [[Coordinates|coordinate display]] in other editions.
* A map cannot be created on [[New Nintendo 3DS Edition]]. Instead, the map is always displayed on the bottom screen along with the coordinates. Biome colors do not appear on maps.
== Gallery ==
<gallery>
MapItem1.png|A fully zoomed map.
MapRotation.png|Having a map in hand does not stop the ability to see ahead.
MapItem3.png|A world being recorded onto a map.
Mcmap4.png|Nearly fully explored map.
Zoomed Map.png|A map edited to the scale of 1.
Sky Map.png|A map mapping the [[Sky Dimension]].
MapOfVillage.png|A village and how it is represented on a map.
Pumpkin map.png|A map containing a custom image made by placing a large number of blocks.
Complete Map.png|A completely explored map.
MapZooms.png|A diagram showing how maps zoomed out before [[Java Edition 1.8]]. Notice how the larger maps have borders made of half and quarter small maps.
Map18zooms.png|From 1.8, zoomed maps are aligned to this grid exactly.
Large Biome Map.png|A map of a [[Large Biomes]] world.
Map0140-0160.png|A comparison of maps between versions in Pocket Edition Alpha [[Pocket Edition Alpha 0.14.0|0.14.0]] and [[Pocket Edition Alpha 0.16.0|0.16.0]].
Mycelium Map.png|A map view of a mushroom biome, showing that mycelium appears purple on a map.
MiniMap.png|Maps held in the off-hand or in either hand while [[dual wielding]] appear as mini-maps.
Partly filled treasure map.png|Partly filled treasure map with an odd area at the bottom left. Normally a partly filled map would look striped (as in the top left), but this map seems to be bugged and is possibly showing caves, or something, in the bottom left.
Partly filled ocean explorer map.png|Partly filled ocean explorer map. Updating the game from an older version (in this case the area was first generated before 1.18) and buying a map after updating (in this case in 1.19.4) can result in the map displaying rivers and terrain where there is really a frozen sea.
Map Stained Glass 1.png|Stained glasses' appearances on maps before and after 1.13.
Map Stained Glass 2.png|Stained glasses' appearances on maps before and after 1.13.
Map Various Blocks 1.png|Various blocks' appearances on maps before and after 1.13.
Map Various Blocks 2.png|Various blocks' appearances on maps before and after 1.13.
Better Together Map.jpg|Holding a map in the offhand in ''Bedrock Edition''.
Better Together Map Icon.jpg|Holding a map in both hands in ''Bedrock Edition''.
File:MapFailedtoFill.png|A map that has not yet filled. A rare bug in Java.
</gallery>
=== The Nether ===
<gallery>
Nethermap.png|A map in [[the Nether]].
Maponnether.png|A map in the Nether; the arrow turns around itself, like in [[compass]].
</gallery>
=== The End ===
<gallery>
Jeb End Map.png|The first image of a map in [[the End]].
Endmap.png|A map in the End.
</gallery>
=== Maps in item frames ===
<gallery>
FramedMap.png|A map displayed on an item frame, as it looked before [[Java Edition 1.7.2]].
Structure Map Collection.png|Multiple maps in item frames. Notice a [[village]], two [[desert temple]]s and a lava lake.
Minecraft maps 3by3.png|A collection of 9 connected full maps.
Full Map.png|A combination of 25 maps pasted together as one map.
Map wall BE.png|A map wall on ''Bedrock Edition'', showing large areas of biome colors for each biome.
Map's in item frames.png|Maps can be placed into [[item frame]]s so they can be viewed together.
Comparing Maps.png|The comparison between 3 zooms of maps.
SuperflatMap.png|A map in a [[Superflat]] world, with some [[village]]s.
MapWallWithMarkers.png|A 3x3 map wall with banner markers.
HEYYEYAAEYAAAEYAEYAA.png|He-Man map art.
Map Player Icons 1.png|First image of player icons on maps.
Map Player Icons 2.png|Second image of player icons on maps.
</gallery>
== See also ==
* [[Explorer Map]]
* [[Clock]]
* [[Tutorials/Navigation|Navigation]]
== References ==
{{Reflist}}
{{Items}}
[[cs:Mapa]]
[[de:Karte]]
[[es:Mapa]]
[[fr:Carte (objet)]]
[[hu:Térkép (tárgy)]]
[[ja:地図]]
[[ko:지도]]
[[nl:Kaart]]
[[pl:Mapa]]
[[pt:Mapa]]
[[ru:Карта]]
[[tr:Harita]]
[[th:แผนที่]]
[[uk:Мапа]]
[[zh:地图]]
[[Category:Renewable resources]]</li><li>[[Bone|Bone]]<br/>{{about|the item|the block|Bone Block|other uses|Bone (disambiguation)}}
{{Item
| image = Bone.png
| renewable = Yes
| stackable = Yes (64)
}}
A '''bone''' is an [[item]] primarily obtained from [[skeleton]]s and similar mobs. It can be crafted into [[Bone Meal|bone meal]] or used to tame wild [[Wolf|wolves]].
== Obtaining ==
=== Chest loot ===
{{LootChestItem|bone}}
=== Mob loot ===
Skeletons, [[wither skeleton]]s, [[skeleton horse]]s, and [[stray]]s may drop 0–2 bones upon death. The maximum drop is increased by 1 per level of Looting, for a maximum of 0-5 bones with Looting III.
{{IN|bedrock}}, [[salmon]], [[cod]], [[pufferfish]], and [[tropical fish]] have 25% chance to drop 1-2 bones upon death. The maximum drop is increased by 1 to 2 per level of Looting, for a maximum of 2-8 bones with Looting III.
Salmon (small and medium size) have 25% chance to drop 1 bone upon death, The maximum drop is increased by 1 to 2 per level of [[Looting]], for a maximum of 2-7 bones with Looting III. The chance of dropping bones increases by 1% per looting level, so with Looting III there is up to a 28% chance of bones dropping.
=== Fishing ===
Bones can also be obtained by [[fishing]] as part of the junk category. The best chance of catching a bone is achieved without the [[Luck of the Sea]] enchantment, yielding a 1.1% chance.
== Usage ==
=== Helmet ===
[[File:Steve wearing Bone.png|thumb|right|75px]]
[[File:Alex wearing Bone.png|thumb|right|75px]]
While a bone cannot be equipped in the head slot in Survival mode, equipping it using commands causes it to appear in the player's mouth.
=== Taming ===
Using a bone on a wild [[wolf]] has a {{frac|1|3}} chance of [[taming]] it. Bones cannot tame a hostile wolf or a wolf that has already been tamed. However, bones can be used to attract the attention of the tamed ones.
=== Crafting ingredient ===
A bone can be crafted into 3 bone meal.
{{crafting usage}}
== Achievements ==
{{load achievements|Leader of the pack}}
== Advancements ==
{{load advancements|Best Friends Forever}}
== Data values ==
=== ID ===
{{edition|java}}:
{{ID table
|edition=java
|showforms=y
|generatetranslationkeys=y
|displayname=Bone
|spritetype=item
|nameid=bone
|form=item
|foot=1}}
{{edition|bedrock}}:
{{ID table
|edition=bedrock
|shownumericids=y
|showforms=y
|notshowbeitemforms=y
|generatetranslationkeys=y
|displayname=Bone
|spritetype=item
|nameid=bone
|id=415
|form=item
|foot=1}}
== History ==
{{History|java beta}}
{{History||1.2|[[File:Bone JE1 BE1.png|32px]] Added bones.
|Bones can be [[crafting|crafted]] into [[bone meal]].}}
{{History||1.4|Bones can now be used to tame [[wolves]].}}
{{History|java}}
{{History||1.3.1|snap=12w21a|Bones can now be found within [[desert temple]]s, allowing bones to be obtainable on Peaceful difficulty.}}
{{History||1.4.2|snap=12w36a|Added [[wither skeleton]]s, which has a chance to [[drops|drop]] bones when killed.}}
{{History||1.6.1|snap=13w16a|Added [[skeleton horse]]s, which drop bones when killed.}}
{{History||1.7.2|snap=13w36a|Bones can now be more easily obtained in Peaceful difficulty by [[fishing]]. Although, they are considered a "junk" [[item]].}}
{{History||1.9|snap=15w44a|The average yield of bones in [[desert temple]]s has been slightly decreased.
|Bones can now be found in [[dungeon]] [[chest]]s.}}
{{History||1.10|snap=16w20a|Added [[stray]]s, which [[drops|drop]] bones when killed.}}
{{History||1.11|snap=16w39a|Bones can now found in the new [[woodland mansion]] chests.}}
{{History||1.13|snap=17w47a|Prior to [[1.13/Flattening|''The Flattening'']], this [[item]]'s numeral ID was 352.}}
{{History||1.14|snap=18w43a|[[File:Bone JE2.png|32px]] The texture of bones has now been changed.}}
{{History|||snap=18w44a|[[File:Bone JE3 BE2.png|32px]] The texture of bones has now been slightly changed.}}
{{History||1.19|snap=Deep Dark Experimental Snapshot 1|Bones now generate in [[ancient city]] chests.}}
{{History|pocket alpha}}
{{History||v0.2.0|[[File:Bone JE1 BE1.png|32px]] Added bones. They are currently unobtainable and serve no purpose.}}
{{History||v0.3.3|Added skeletons, which drop bones when they die.
|Bones can now be used to craft [[bone meal]].}}
{{History||v0.5.0|Bones can now be obtained after activating the [[nether reactor]].}}
{{History||v0.9.0|snap=build 1|Added bones to [[Creative]] mode.}}
{{History||v0.11.0|snap=build 1|Bones can now be more easily obtained in Peaceful difficulty by [[fishing]]. Although, they are considered a "junk" [[item]].}}
{{History||v0.12.1|snap=build 1|Added [[wither skeleton]]s, which have a chance to [[drops|drop]] bones when killed.
|Bones are no longer available from the [[nether reactor]].}}
{{History||v0.13.0|snap=build 1|Bones can now be found inside of the [[desert temple]] hidden [[chest]] room.}}
{{History||v0.15.0|snap=build 1|Added [[stray]]s and [[skeleton horse]]s, which drop bones when killed.
|Bones can now be found in [[jungle temple]] [[chest]]s.}}
{{History|pocket}}
{{History||1.1.0|snap=alpha 1.1.0.0|Bone can now be found inside [[woodland mansion]] chests.}}
{{History|bedrock}}
{{History||1.4.0|snap=beta 1.2.14.2|Bones now [[drops|drop]] from [[fish]] mobs.}}
{{History||1.10.0|snap=beta 1.10.0.3|[[File:Bone JE3 BE2.png|32px]] The texture of bones has now been changed.}}
{{History|console}}
{{History||xbox=TU1|xbone=CU1|ps=1.00|wiiu=Patch 1|[[File:Bone JE1 BE1.png|32px]] Added bones.}}
{{History||xbox=TU5|Bones can be found in the Miscellaneous tab in the [[Creative inventory]].}}
{{History||xbox=TU12|Moved bones to the Materials tab in the Creative inventory.}}
{{History||xbox=TU19|xbone=CU7|ps=1.12|wiiu=Patch 1|Added [[wither skeleton]]s, which have a chance to [[drops|drop]] bones when killed.}}
{{History||xbox=TU31|xbone=CU19|ps=1.22|wiiu=Patch 3|Bones can now be obtained from [[fishing]].}}
{{History||xbox=TU46|xbone=CU36|ps=1.38|wiiu=Patch 15|Added [[stray]]s and [[skeleton horse]]s, which drop bones when killed.}}
{{History||xbox=none|xbone=none|ps=1.90|wiiu=none|switch=none|[[File:Bone JE3 BE2.png|32px]] The texture of bones has now been changed.}}
{{History|new 3ds}}
{{History||0.1.0|[[File:Bone JE1 BE1.png|32px]] Added bones.}}
{{History|foot}}
== Issues ==
{{issue list}}
== See also ==
* [[Bone meal]]
* [[Wolf]]
* [[Dyeing]]
{{Items}}
[[Category:Renewable resources]]
[[de:Knochen]]
[[es:Hueso]]
[[fr:Os]]
[[hu:Csont]]
[[it:Osso]]
[[ja:骨]]
[[ko:뼈]]
[[nl:Bot]]
[[pl:Kość]]
[[pt:Osso]]
[[ru:Кость]]
[[th:กระดูก]]
[[tr:Kemik]]
[[uk:Кістка]]
[[zh:骨头]]</li></ul></nowiki> | The 'Sound Update' on November 13th, 2011 gave TNT a new explosion sound. | ||||
| Java Edition | |||||
1.0.0{{Extension DPL}}<ul><li>[[Phantom Membrane|Phantom Membrane]]<br/>{{Item
| title = Phantom Membrane
| image = Phantom Membrane.png
| renewable = Yes
| stackable = Yes (64)
}}
'''Phantom membranes''' are items obtained from killing [[phantom]]s. They are used to repair [[elytra]] and brew [[Potion of Slow Falling|potions of Slow Falling]].
== Obtaining ==
=== Mob loot ===
[[Phantom]]s drop 0–1 phantom membrane when killed by a [[player]] or tamed [[wolf]]. [[Looting]] increases the maximum drops by 1 per level, for a maximum of 4 with Looting III.
=== Cat gifts ===
{{main|Cat#Gifts}}
Tamed [[cat]]s have a 70% chance to bring the player a gift when they wake up from a [[bed]], and the gift has a 3.22% chance to be a phantom membrane.
== Usage ==
=== Repairing ===
Phantom membranes can be used in an [[anvil]] to repair [[elytra]], restoring 108 durability points (25% of the pair's total durability) per membrane while preserving their [[enchantments]].
{| class="wikitable" data-description="Repairing elytra"
! scope="col" style="width:64px;" | Name
! Ingredients
! [[Anvil]] usage
|-
! scope="row" style="text-align: center;" | '''Elytra'''
| [[Elytra]] +<br>[[Phantom Membrane]]
| style="width: 260px; padding: 1px;" | {{Anvil| title = Elytra|Input1=Damaged Elytra|Input2=Phantom Membrane, 2|Output=Elytra}}
|-
|}
=== Brewing ingredient ===
Phantom membranes are used to [[brewing|brew]] [[Potion of Slow Falling|slow falling potions]] from an [[awkward potion]].
{{Brewing
|Phantom Membrane
|Potion of Slow Falling
|showname=3
}}
== Data values ==
=== ID ===
{{edition|java}}:
{{ID table
|edition=java
|showforms=y
|generatetranslationkeys=y
|displayname=Phantom Membrane
|spritetype=item
|nameid=phantom_membrane
|form=item
|foot=1}}
{{edition|bedrock}}:
{{ID table
|edition=bedrock
|shownumericids=y
|showforms=y
|notshowbeitemforms=y
|generatetranslationkeys=y
|displayname=Phantom Membrane
|spritetype=item
|nameid=phantom_membrane
|id=574
|form=item
|foot=1}}
== History ==
{{History|java}}
{{History||1.13|snap=18w14a|[[File:Phantom Membrane JE1 BE1.png|32px]] Added phantom membranes.}}
{{History||1.14|snap=18w44a|Tamed [[cat]]s now have a chance to give the [[player]] phantom membranes as [[Cat#Gifts|gifts]].}}
{{History|||snap=19w08a|[[File:Phantom Membrane JE2 BE2.png|32px]] The texture of phantom membranes has now been changed.}}
{{History|bedrock}}
{{History||1.6.0|snap=beta 1.6.0.5|[[File:Phantom Membrane JE1 BE1.png|32px]] Added phantom membranes.}}
{{History||1.8.0|snap=beta 1.8.0.8|Tamed [[cat]]s now have a chance to give the [[player]] phantom membranes as gifts.}}
{{History||1.10.0|snap=beta 1.10.0.3|[[File:Phantom Membrane JE2 BE2.png|32px]] The texture of phantom membranes has now been changed.}}
{{History|console}}
{{History||xbox=TU69|ps=1.76|wiiu=Patch 38|[[File:Phantom Membrane JE1 BE1.png|32px]] Added phantom membranes.}}
{{History||xbox=none|xbone=none|ps=1.90|wiiu=none|switch=none|[[File:Phantom Membrane JE2 BE2.png|32px]] The texture of phantom membranes has now been changed.}}
{{History|foot}}
== Issues ==
{{issue list}}
== References ==
{{reflist}}
== External Links ==
*[https://www.minecraft.net/en-us/article/taking-inventory--phantom-membrane Taking Inventory: Phantom Membrane] – Minecraft.net on August 2, 2019
{{items}}
[[de:Phantomhaut]]
[[fr:Membrane de Phantom]]
[[ja:ファントムの皮膜]]
[[ko:팬텀 막]]
[[pl:Błona fantoma]]
[[pt:Membrana de phantom]]
[[ru:Мембрана фантома]]
[[th:เนื้อเยื่อแฟนท่อม]]
[[uk:Перетинка фантома]]
[[zh:幻翼膜]]
[[Category:Renewable resources]]
[[Category:Brewing recipe]]</li><li>[[Glow Ink Sac|Glow Ink Sac]]<br/>{{For|the regular sac dropped by squids|Ink Sac}}
{{Item
|Image=Glow Ink Sac.png
| renewable = Yes
| stackable = Yes (64)
|}}
A '''glow ink sac''' is an item dropped by a [[glow squid]] upon death. Unlike regular ink sacs, it can be added to [[sign]]s to make glowing text, and can be used to craft glow item frames.
== Obtaining ==
=== Mob loot ===
[[Glow squid]]s drop 1–3 glow ink sacs upon death. The maximum amount is increased by 1 per level of [[Looting]], for a maximum of 1–6 with Looting III.
=== Compound creation ===
A glow ink sac can be created from its base [[element]]s, using the [[compound creator]].{{only|bedrock|education}}
{| class="wikitable"
!Name
!Elements
!Example recipe
|- <!-- Temporarily using crafting grid as substitute for compound creator (template not yet available), since the layout is the same, even if the appearance is different -->
!Glow Ink Sac
|1 Iron<br>1 Sulfur<br>4 Oxygen
|{{Crafting Table
|shapeless= 1
|A2=Iron |B2=Sulfur |C2=Oxygen,4
|Output=Glow Ink Sac}}
|}
== Usage ==
=== Crafting ingredient ===
{{Crafting usage}}
=== Signs ===
[[File:Glow Ink Sign with Orange Dye JE2.png|thumb|150px|An oak sign with a glow ink sac used on it.]]
Glow ink sacs can be used on [[sign]]s or [[hanging sign]]s to make their text brighter in low light levels. This also adds an outline around the text on the sign, the color of which is based on the color of the sign's text. The text does not emit any light, it is only more visible in darkness, similarly to the eyes of spiders and endermen. Normal [[ink sacs]] can be applied to revert glowing text back to default.
== Sounds ==
{{edition|java}}:
{{Sound table
|sound=Ink sac1.ogg
|sound2=Ink sac2.ogg
|sound3=Ink sac3.ogg
|subtitle=Glow Ink Sac splotches
|source=block
|description=When a glow ink sac is used on a [[sign]]
|id=item.glow_ink_sac.use
|translationkey=subtitles.item.glow_ink_sac.use
|volume=1.0
|pitch=''varies'' <ref group=sound>Can be 1.0, 0.95, or 1.05</ref>
|distance=16
|foot=1}}
{{edition|bedrock}}:
{{Sound table
|type=bedrock
|sound=Ink sac1.ogg
|sound2=Ink sac2.ogg
|sound3=Ink sac3.ogg
|source=sound
|description=When a glow ink sac is used on a sign
|id=sign.ink_sac.use
|volume=1.0
|pitch=1.0
|foot=1}}
== Data values ==
=== ID ===
{{edition|java}}:
{{ID table
|edition=java
|showforms=y
|generatetranslationkeys=y
|displayname=Glow Ink Sac
|spritetype=item
|nameid=glow_ink_sac
|form=item
|foot=1}}
{{edition|bedrock}}:
{{ID table
|edition=bedrock
|shownumericids=y
|showforms=y
|notshowbeitemforms=y
|generatetranslationkeys=y
|displayname=Glow Ink Sac
|spritetype=item
|nameid=glow_ink_sac
|form=item
|id=503
|foot=1}}
== Advancements ==
{{load advancements|Glow and Behold}}
== History ==
{{History|java}}
{{History||1.17|snap=21w03a|[[File:Glow Ink Sac JE1 BE1.png|32px]] Added glow ink sacs.}}
{{History||1.17.1|snap=Pre-release 1|[[Zombie]]s, [[husk]]s, [[zombie villager]]s, and [[drowned]] no longer pick up [[glow ink sac]]s.}}
{{History||1.20<br>(Experimental)|link=1.19.3|snap=22w42a|Glow ink sacs can now be used to make the text glow on a [[hanging sign]].}}
{{History|bedrock}}
{{History||Caves & Cliffs (experimental)|link=Bedrock Edition 1.17.0|snap=beta 1.16.210.59|[[File:Glow Ink Sac JE1 BE1.png|32px]] Added glow ink sacs.}}
{{History|||snap=beta 1.16.210.60|Glow ink sacs have been removed temporarily.}}
{{History|||snap=beta 1.16.220.50|[[File:Glow Ink Sac JE1 BE1.png|32px]] Re-added glow ink sacs.}}
{{History||1.17.0|snap=beta 1.17.0.52|Glow ink sacs are now available without enabling [[experimental gameplay]].}}
{{History||1.17.30|snap=beta 1.17.30.20|[[Zombie]]s, [[husk]]s, [[zombie villager]]s, and [[drowned]] no longer pick up [[glow ink sac]]s.}}
{{History|foot}}
== Issues ==
{{Issue list}}
== External Links ==
*[https://www.minecraft.net/en-us/article/taking-inventory--glow-ink-sac Taking Inventory: Glow Ink Sac] – Minecraft.net on October 14, 2021
{{Items}}
[[Category:Items]]
[[Category:Dyes]]
[[Category:Renewable resources]]
[[de:Leuchttintenbeutel]]
[[es:Saco de tinta luminosa]]
[[it:Sacca d'inchiostro luminescente]]
[[ja:輝くイカスミ]]
[[pl:Torbiel ze świecącym atramentem]]
[[pt:Bolsa de tinta brilhante]]
[[ru:Светящийся чернильный мешок]]
[[uk:Сяйний чорнильний мішок]]
[[zh:荧光墨囊]]</li></ul> | Beta 1.9 Prerelease 3 | Bed and ghast fireballs explosions will now cause fires. | |||
| Beta 1.9 Prerelease 4 | When the player tries to sleep in the End, they will now cause the bed to explode. | ||||
| Enchantment Blast Protection added, which can enhance an armor's resistance against explosions. | |||||
| Beta 1.9 Prerelease 6 | End crystal added, an entity, which sits atop of a block of bedrock. It can be destroyed with a melee or hit with an arrow or snowball, causing an explosion. | ||||
1.3.1{{Extension DPL}}<ul><li>[[Ice Bomb|Ice Bomb]]<br/>{{education feature}}
{{exclusive|bedrock|education}}
{{ItemEntity
|image=Ice Bomb.png
|renewable=No (unless [[Material Reducer]] is available)<!-- Well, CHO are everywhere in sugar and charcoal, and sodium is in cobblestone... -->
|stackable=Yes (16)
|size=Height: 0.25 Blocks<br>Width: 0.25 Blocks
}}
The '''ice bomb''' is an [[item]] that is used to freeze [[water]] into [[ice]].
== Obtaining ==
=== Lab Table ===
{| class="wikitable"
! Result
! Materials Needed
|-
!rowspan=2|{{slot|Ice Bomb}}<br>[[Ice Bomb]]
|{{slot|Sodium Acetate|link=Compound#List_of_compounds}}{{slot|Sodium Acetate|link=Compound#List_of_compounds}}{{slot|Sodium Acetate|link=Compound#List_of_compounds}}{{slot|Sodium Acetate|link=Compound#List_of_compounds}}
|-
|<center>[[Compound#List_of_compounds|Sodium Acetate]] x4</center>
|}
== Usage ==
Ice bombs can be thrown by {{control|using}} them. They are affected by gravity.
Like with [[ender pearl]]s, there is a short cooldown before the player can throw another ice bomb. The cooldown is shown in the [[hotbar]] by a white overlay that shrinks before the player is able to use it again.
Ice bombs explode upon hitting most [[blocks]], including non-solid blocks, but not [[air]]. They also explode upon hitting other entities, but do not deal [[damage]], and unlike [[egg]]s and [[snowball]]s, their impact is not considered an attack and does no damage or knockback. When exploding, any [[water]] (including flowing water, but not [[waterlogged]] blocks) in a 3×3×3 cube around the ice bomb freezes into [[ice]]. Ice bombs can be used to contain and displace [[mobs]] in ice under water.
While [[endermen]] teleport away from arrows shot at them, they can be hit by ice bombs.
Throwing an ice bomb while underwater encloses the player in ice.
{| class="wikitable"
|+Ice bomb arrangement table
!y\x
!-2
!-1
!0
!1
!2
|-
!64
|Air
|Air
|Air
|Air
|Air
|-
!63
|Air
|Air
|Ice bomb
|Air
|Air
|-
!62
!Water
!Ice
!Ice
!Ice
!Water
|-
!61
!Water
!Ice
!Ice
!Ice
!Water
|-
!60
!Water
!Water
!Water
!Water
!Water
|}
== Sounds ==
{{Sound table
|type=bedrock
|sound=Zombie breaks door.ogg
|source=hostile
|description=When an ice bomb is created by a [[lab table]]
|id=mob.wither.break_block
|volume=0.5
|pitch=1.1/1.3}}
{{Sound table
|sound=Glass dig1.ogg
|sound2=Glass dig2.ogg
|sound3=Glass dig3.ogg
|source=block
|description=When an ice bomb impacts something
|id=random.glass
|volume=1.0
|pitch=1.4/1.6
|foot=1}}
== Data values ==
=== ID ===
{{ID table
|edition=bedrock
|firstcolumnname=Ice Bomb
|shownumericids=y
|showforms=y
|notshowbeitemforms=y
|generatetranslationkeys=y
|displayname=Item
|spritename=ice-bomb
|spritetype=item
|nameid=ice_bomb
|id=595
|form=item
|foot=1}}
{{ID table
|edition=bedrock
|firstcolumnname=Ice Bomb
|shownumericids=y
|generatetranslationkeys=y
|displayname=Entity
|spritename=ice-bomb
|spritetype=entity
|nameid=ice_bomb
|id=106
|foot=1}}
== History ==
{{History|bedrock}}
{{History||1.4.0|snap=beta 1.2.20.1|[[File:Ice Bomb BE1.png|32px]] Added ice bombs.}}
{{History|education}}
{{History||1.0.27|[[File:Ice Bomb BE1.png|32px]] Added ice bombs.}}
{{History|foot}}
== Trivia ==
* In real life, mixing a sufficient amount of sodium acetate in water does solidify it, but creates [[wikipedia:Sodium acetate#Heating pad|hot ice]] (sodium acetate trihydrate) instead of normal ice.
{{items}}
{{entities}}
{{Education Edition}}
[[Category:Non-renewable resources]]
[[Category:Education Edition items]]
[[Category:Education Edition entities]]
[[pl:Lodowa bomba]]
[[de:Eisbombe]]
[[ja:氷の爆弾]]
[[ko:얼음 폭탄]]
[[lzh:冰丸]]
[[pt:Bomba de gelo]]
[[zh:冰弹]]</li><li>[[Boots|Boots]]<br/>{{Item
| image = <gallery>
Leather Boots.png | Leather
Chainmail Boots.png | Chainmail
Iron Boots.png | Iron
Diamond Boots.png | Diamond
Golden Boots.png | Golden
Netherite Boots.png | Netherite
</gallery>
| durability =
* Leather: 65
* Chainmail: 195
* Iron: 195
* Golden: 91
* Diamond: 429
* Netherite: 481
| renewable =
* '''Netherite''': No
* '''All others''': Yes
| stackable = No
}}
'''Boots''' are a type of [[armor]] that covers the feet of the player. There are six types of boots: '''leather boots''', '''chainmail boots''', '''iron boots''', '''diamond boots''', '''gold boots''', and '''netherite boots'''.
== Obtaining ==
=== Crafting ===
{{crafting
|head=1
|showname=0
|showdescription=1
|name=[[Boots]]
|A2= Leather;Gold Ingot;Iron Ingot;Diamond
|C2= Leather;Gold Ingot;Iron Ingot;Diamond
|A3= Leather;Gold Ingot;Iron Ingot;Diamond
|C3= Leather;Gold Ingot;Iron Ingot;Diamond
|Output= Leather Boots;Golden Boots;Iron Boots;Diamond Boots
|type= Combat
}}
{{crafting
|foot=1
|ignoreusage=1
|name=[[Boots]]
|ingredients=Damaged Matching [[Boots]]
|Damaged Leather Boots; Damaged Golden Boots; Damaged Chainmail Boots; Damaged Iron Boots; Damaged Diamond Boots; Damaged Netherite Boots
|Damaged Leather Boots; Damaged Golden Boots; Damaged Chainmail Boots; Damaged Iron Boots; Damaged Diamond Boots; Damaged Netherite Boots
|Output= Leather Boots; Golden Boots; Chainmail Boots; Iron Boots; Diamond Boots; Netherite Boots
|description= The durability of the two boots is added together, plus an extra 5% durability.
|type= Combat
}}
=== Upgrading ===
{{Smithing
|head=1
|Netherite Upgrade
|Diamond Boots
|Netherite Ingot
|Netherite Boots
|description=
|tail=1
}}
=== Repairing ===
==== Grinding ====
{{Grinding
|showdescription=1
|ingredients=2x Damaged [[Leather Boots]] or<br>2x Damaged [[Chainmail Boots]] or<br>2x Damaged [[Iron Boots]] or<br>2x Damaged [[Golden Boots]] or<br>2x Damaged [[Diamond Boots]] or<br>2x Damaged [[Netherite Boots]]
|Damaged Leather Boots; Damaged Chainmail Boots; Damaged Iron Boots; Damaged Golden Boots; Damaged Diamond Boots; Damaged Netherite Boots
|Damaged Leather Boots; Damaged Chainmail Boots; Damaged Iron Boots; Damaged Golden Boots; Damaged Diamond Boots; Damaged Netherite Boots
|Leather Boots; Chainmail Boots; Iron Boots; Golden Boots; Diamond Boots; Netherite Boots
|description=The durability of the two boots are added together, plus an extra 5% durability.
}}
==== Anvil ====
Boots can be repaired in an [[Anvil mechanics#Unit repair|anvil]] by adding units of the [[armor material]]'s repair material, with each repair material restoring 25% of the boots' maximum durability, rounded down. Chainmail boots may also be repaired in this way using iron ingots.
They can also be [[Anvil mechanics#Combining items|combined]] with other boots. When doing this, the item's enchantments are not lost, and can even be raised.
==== Crafting ====
You can craft two sets of boots together using a crafting table, but enchantments are removed.
=== Mob loot ===
If a [[zombie]], [[husk]], [[stray]], [[piglin]], or [[skeleton]] is wearing armor, there is a 8.5% chance (9.5% with Looting I, 10.5% with Looting II and 11.5% with Looting III) for the mob to drop boots upon death. The boots are usually badly damaged, and may be enchanted.
[[File:Zombie With Boots.png|alt=Zombie is shown wearing boots|thumb|Zombie is shown wearing full iron armor set, including boots.]]
{{IN|bedrock}}, [[vindicator]]s and [[pillager]]s that spawn in [[raid]]s have a chance to drop iron boots, which are usually badly damaged and have a 50% chance to be enchanted.
=== Chest loot ===
{{LootChestItem|leather-boots,random-enchanted-leather-boots,chainmail-boots,iron-boots,level-enchanted-iron-boots,golden-boots,random-enchanted-golden-boots,soul-speed-enchanted-golden-boots,diamond-boots,damaged-diamond-boots,damaged-random-enchanted-diamond-boots,damaged-random-enchanted-diamond-boots-2,level-enchanted-diamond-boots}}
=== Trading ===
{{IN|java}}, novice-level armorer [[villager]]s have 40% chance to sell iron boots for 4 [[emerald]]s. Apprentice-level armorers have a 50% chance to sell chainmail boots for an [[emerald]]. Expert-level armorers always sell enchanted<ref group="note" name="enchantment" /> diamond boots for 11–27 [[emerald]]s. Apprentice-level leatherworker [[villager]]s have {{frac|2|3}} chance to sell leather boots for 4 [[emerald]]s.
Armorer [[villager]]s may give the players with the [[Hero of the Village]] effect chainmail boots.{{only|java}}
{{IN|bedrock}}, novice-level armorer villagers have a 25% chance to sell iron boots for 4 emeralds. Apprentice-level armorers have a {{frac|1|3}} chance to sell chainmail boots for an emerald. Expert-level armorers have a 50% chance to sell enchanted<ref group="note" name="enchantment">When creating an enchantment offer, the game uses a random enchantment level from 5 – 19. The enchantments are never treasure enchantments.</ref> diamond boots for 8 emeralds. Apprentice-level leatherworker villagers have a 50% chance to sell leather boots for 4 emeralds.
{{notelist}}
=== Bartering ===
[[Piglin]]s may [[bartering|barter]] iron boots with [[Soul Speed]] when given a [[gold ingot]].
=== Fishing ===
Leather boots can be caught as a "junk" item when [[fishing]].
== Usage ==
Boots can be placed in the fourth armor slot of a player's [[inventory]] for activation.
=== Defense points ===
Defense points are each signified by half of a chestplate in the armor bar above the health bar. Each defense point reduces any damage dealt to the player that is absorbed by armor by 4%, increasing additively with the number of defense points. Different materials and combinations of armor provide different levels of defense.
The following table shows the amount of defense points added by boots.
{| class="wikitable" data-description="Boots defense points"
|-
!scope="col" | Material
!scope="col" | Defense points
|-
!scope="row" | Leather
| rowspan="3" | {{armor|1}}
|-
!scope="row" | Golden
|-
!scope="row" | Chainmail
|-
!scope="row" | Iron
| {{armor|2}}
|-
!scope="row" | Diamond
| rowspan="2" | {{armor|3}}
|-
!scope="row" | Netherite
|}
=== Knockback resistance ===
Netherite boots provide 10% knockback resistance.
=== Durability ===
The following table shows the amount of damage each piece of armor can absorb before being destroyed.
Any "hit" from a damage source that can be blocked by armor removes one point of durability from each piece of armor worn for every {{hp|4}} of incoming damage (rounded down, but never below 1). Damage taken that armor doesn't protect (such as [[Damage#Fall damage|falling]] or [[Damage#Drowning|drowning]]) does not damage the armor, even if it is enchanted to protect against that type of damage. The following chart displays how many hits boots can endure.
Netherite armor is not damaged by [[lava]] or [[fire]] when worn.
{| class="wikitable" data-description="Boots durability"
|-
! Material
!Durability
|-
!scope="row" | Leather
| 65
|-
!scope="row" | Golden
| 91
|-
!scope="row" | Chainmail/Iron
| 195
|-
!scope="row" | Diamond
| 429
|-
!scope="row" | Netherite
| 481
|}
=== Enchantments ===
Boots can receive the following [[enchantment]]s:
{| class="wikitable"
|-
! Enchantment !! Max Level !! Notes
|-
| [[Fire Protection]] || IV || <ref group=note name=exclusive>Fire Protection, Blast Protection, Projectile Protection and Protection are mutually exclusive.</ref>
|-
| [[Projectile Protection]] || IV || <ref group=note name="exclusive"/>
|-
| [[Blast Protection]] || IV || <ref group=note name="exclusive"/>
|-
| [[Protection]] || IV || <ref group=note name="exclusive"/>
|-
| [[Feather Falling]] || IV ||
|-
| [[Unbreaking]] || III ||
|-
| [[Thorns]] || III || <ref group="note" name="anvil">Only from using an [[anvil]] and [[enchanted book]]s.</ref>
|-
| [[Depth Strider]] || III || <ref group=note name=exclusive2>Frost Walker and Depth Strider are mutually exclusive.</ref>
|-
| [[Soul Speed]] || III || <ref group=note name="anvil">Only from using an [[anvil]] and [[enchanted book]]s.</ref>
|-
| [[Frost Walker]] || II || <ref group=note name=exclusive2 /><ref group="note" name="anvil2">Only from using an [[anvil]] and [[enchanted book]]s, or by finding enchanted boots in an [[End city]] chest.</ref>
|-
| [[Mending]] || I || <ref group=note name="anvil2" />
|-
| [[Curse of Binding]] || I || <ref group="note" name="anvil2"/>
|-
| [[Curse of Vanishing]] || I || <ref group="note" name="anvil2"/>
|}
{{notelist}}
=== Smelting usage ===
{{Smelting|showname=1|Iron Boots;Chainmail Boots;Golden Boots|Iron Nugget;Iron Nugget;Gold Nugget|0,1}}
=== Piglins ===
{{EntityLink|Piglin|Piglins}} are attracted to ''golden'' boots and pick them up, examining them for 6 to 8 seconds. Other boots do not attract piglins but can be worn by them. They prefer stronger boots over weaker boots, with one major exception: They always prefer golden boots over all other boots, throwing out stronger boots to equip them. Enchanted boots are preferred over unenchanted boots.
=== Powder snow===
Leather boots can be used to safely cross [[powder snow]] without sinking in it. The block behaves similar to [[scaffolding]], allowing the player to sink in by pressing {{control|crouch}} and move up by pressing {{control|jump}}. The boots also prevent the wearer from taking freezing damage.
===Decoration===
It is possible to upgrade armor with trims. This requires a [[Smithing Template#Gallery|Smithing Template]], an armor piece, and an ingot or crystal ({{ItemSprite|iron-ingot}}iron ingot/{{ItemSprite|copper-ingot}}copper ingot/{{ItemSprite|gold-ingot}}gold ingot/{{ItemSprite|netherite-ingot}}netherite ingot/{{ItemSprite|emerald}}emerald/{{ItemSprite|redstone-dust}}redstone dust/{{ItemSprite|lapis-lazuli}}lapis lazuli/{{ItemSprite|amethyst-shard}}amethyst shard/{{ItemSprite|nether-quartz}}nether quartz/{{ItemSprite|diamond}}diamond).
These trims have no effect on the gameplay or strength of the armor.
{{Smithing|Any Armor Trim Smithing Template|Netherite Boots|Amethyst Shard; Copper Ingot; Diamond; Emerald; Gold Ingot; Iron Ingot; Lapis Lazuli; Netherite Ingot; Nether Quartz; Redstone Dust|Amethyst Trim Netherite Boots; Copper Trim Netherite Boots; Diamond Trim Netherite Boots; Emerald Trim Netherite Boots; Gold Trim Netherite Boots; Iron Trim Netherite Boots; Lapis Trim Netherite Boots; Netherite Trim Netherite Boots; Quartz Trim Netherite Boots; Redstone Trim Netherite Boots|head=1|tail=1|ingredients=Any Armor Trim +<br>Any Armor Piece +<br>Any Ingot/Crystal|showdescription=1|description=}}
==Sounds==
{{el|je}}:
{{Sound table
|sound=Equip leather1.ogg
|sound2=Equip leather2.ogg
|sound3=Equip leather3.ogg
|sound4=Equip leather4.ogg
|sound5=Equip leather5.ogg
|sound6=Equip leather6.ogg
|subtitle=Leather armor rustles
|source=player
|description=When leather boots are equipped
|id=item.armor.equip_leather
|translationkey=subtitles.item.armor.equip_leather
|volume=1.0
|pitch=1.0
|distance=16}}
{{Sound table
|sound=Equip chain1.ogg
|sound2=Equip chain2.ogg
|sound3=Equip chain3.ogg
|sound4=Equip chain4.ogg
|sound5=Equip chain5.ogg
|sound6=Equip chain6.ogg
|subtitle=Chain armor jingles
|source=player
|description=When chainmail boots are equipped
|id=item.armor.equip_chain
|translationkey=subtitles.item.armor.equip_chain
|volume=1.0
|pitch=1.0
|distance=16}}
{{Sound table
|sound=Equip iron1.ogg
|sound2=Equip iron2.ogg
|sound3=Equip iron3.ogg
|sound4=Equip iron4.ogg
|sound5=Equip iron5.ogg
|sound6=Equip iron6.ogg
|subtitle=Iron armor clanks
|source=player
|description=When iron boots are equipped
|id=item.armor.equip_iron
|translationkey=subtitles.item.armor.equip_iron
|volume=1.0
|pitch=1.0
|distance=16}}
{{Sound table
|sound=Equip gold1.ogg
|sound2=Equip gold2.ogg
|sound3=Equip gold3.ogg
|sound4=Equip gold4.ogg
|sound5=Equip gold5.ogg
|sound6=Equip gold6.ogg
|subtitle=Gold armor clinks
|source=player
|description=When gold boots are equipped
|id=item.armor.equip_gold
|translationkey=subtitles.item.armor.equip_gold
|volume=1.0
|pitch=1.0
|distance=16}}
{{Sound table
|sound=Equip diamond1.ogg
|sound2=Equip diamond2.ogg
|sound3=Equip diamond3.ogg
|sound4=Equip diamond4.ogg
|sound5=Equip diamond5.ogg
|sound6=Equip diamond6.ogg
|subtitle=Diamond armor clangs
|source=player
|description=When diamond boots are equipped
|id=item.armor.equip_diamond
|translationkey=subtitles.item.armor.equip_diamond
|volume=1.0
|pitch=1.0
|distance=16}}
{{Sound table
|sound=Equip netherite1.ogg
|sound2=Equip netherite2.ogg
|sound3=Equip netherite3.ogg
|sound4=Equip netherite4.ogg
|subtitle=Netherite armor clanks
|source=player
|description=When netherite boots are equipped
|id=item.armor.equip_netherite
|translationkey=subtitles.item.armor.equip_netherite
|volume=0.8
|pitch=1.0/0.9
|distance=16}}
{{Sound table
|sound=Random break.ogg
|subtitle=Item breaks
|source=dependent
|description=When a pair of boots' durability is exhausted
|id=entity.item.break
|translationkey=subtitles.entity.item.break
|volume=0.8
|pitch=0.8-1.2
|distance=16
|foot=1}}
{{el|be}}:
{{Sound table
|type=bedrock
|sound=Equip leather1.ogg
|sound2=Equip leather2.ogg
|sound3=Equip leather3.ogg
|sound4=Equip leather4.ogg
|sound5=Equip leather5.ogg
|sound6=Equip leather6.ogg
|source=player
|description=When leather boots are equipped
|id=armor.equip_leather
|volume=1.0
|pitch=1.0}}
{{Sound table
|sound=Equip chain1.ogg
|sound2=Equip chain2.ogg
|sound3=Equip chain3.ogg
|sound4=Equip chain4.ogg
|sound5=Equip chain5.ogg
|sound6=Equip chain6.ogg
|source=player
|description=When chain boots are equipped
|id=armor.equip_chain
|volume=1.0
|pitch=1.0}}
{{Sound table
|sound=Equip iron1.ogg
|sound2=Equip iron2.ogg
|sound3=Equip iron3.ogg
|sound4=Equip iron4.ogg
|sound5=Equip iron5.ogg
|sound6=Equip iron6.ogg
|source=player
|description=When iron boots are equipped
|id=armor.equip_iron
|volume=1.0
|pitch=1.0}}
{{Sound table
|sound=Equip gold1.ogg
|sound2=Equip gold2.ogg
|sound3=Equip gold3.ogg
|sound4=Equip gold4.ogg
|sound5=Equip gold5.ogg
|sound6=Equip gold6.ogg
|source=player
|description=When gold boots are equipped
|id=armor.equip_gold
|volume=1.0
|pitch=1.0}}
{{Sound table
|sound=Equip diamond1.ogg
|sound2=Equip diamond2.ogg
|sound3=Equip diamond3.ogg
|sound4=Equip diamond4.ogg
|sound5=Equip diamond5.ogg
|sound6=Equip diamond6.ogg
|source=player
|description=When diamond boots are equipped
|id=armor.equip_diamond
|volume=1.0
|pitch=1.0}}
{{Sound table
|sound=Equip netherite1.ogg
|sound2=Equip netherite2.ogg
|sound3=Equip netherite3.ogg
|sound4=Equip netherite4.ogg
|source=player
|description=When netherite boots are equipped.
|id=armor.equip_netherite
|volume=1.0
|pitch=1.0}}
{{Sound table
|rowspan=2
|sound=Water Splash Old.ogg
|source=block
|description=When leather boots are dyed using a cauldron
|id=cauldron.dyearmor
|volume=0.1
|pitch=1.0}}
{{Sound table
|source=block
|description=When leather boots' dye is removed using a cauldron
|id=cauldron.cleanarmor
|volume=0.1
|pitch=1.0}}
{{Sound table
|sound=Random break.ogg
|source=player
|description=When a pair of boots' durability is exhausted
|id=random.break
|volume=1.0
|pitch=0.9
|foot=1}}
==Data values==
===ID===
{{edition|java}}:
{{ID table
|edition=java
|showitemtags=y
|showforms=y
|generatetranslationkeys=y
|displayname=Leather Boots
|spritetype=item
|nameid=leather_boots
|itemtags=freeze_immune_wearables
|form=item}}
{{ID table
|displayname=Chainmail Boots
|spritetype=item
|nameid=chainmail_boots
|form=item}}
{{ID table
|displayname=Iron Boots
|spritetype=item
|nameid=iron_boots
|form=item}}
{{ID table
|displayname=Diamond Boots
|spritetype=item
|nameid=diamond_boots
|form=item}}
{{ID table
|displayname=Golden Boots
|spritetype=item
|nameid=golden_boots
|form=item}}
{{ID table
|displayname=Netherite Boots
|spritetype=item
|nameid=netherite_boots
|form=item
|foot=1}}
{{edition|bedrock}}:
{{ID table
|edition=bedrock
|shownumericids=y
|showforms=y
|notshowbeitemforms=y
|generatetranslationkeys=y
|displayname=Leather Boots
|spritetype=item
|nameid=leather_boots
|id=338
|form=item}}
{{ID table
|displayname=Chainmail Boots
|spritetype=item
|nameid=chainmail_boots
|id=342
|form=item}}
{{ID table
|displayname=Iron Boots
|spritetype=item
|nameid=iron_boots
|id=346
|form=item}}
{{ID table
|displayname=Diamond Boots
|spritetype=item
|nameid=diamond_boots
|id=350
|form=item}}
{{ID table
|displayname=Golden Boots
|spritetype=item
|nameid=golden_boots
|id=354
|form=item}}
{{ID table
|displayname=Netherite Boots
|spritetype=item
|nameid=netherite_boots
|id=612
|form=item
|foot=1}}
=== Item data===
When leather boots are dyed, it has the following NBT:
<div class="treeview">
*{{nbt|compound|tag}}: Parent tag.
**{{nbt|compound|display}}: Display properties.
***{{nbt|int|color}}: The color of the leather armor. The tooltip displays "Dyed" if advanced tooltips are disabled, otherwise it displays the hexadecimal color value. Color codes are calculated from the Red, Green and Blue components using this formula:<br>'''<span style="color:red">Red</span>[[wikipedia:Logical shift|<<]]16 + <span style="color:green">Green</span><<8 + <span style="color:blue">Blue</span>'''<ref>For positive values larger than 0x00FFFFFF, the top byte is ignored. All negative values produce white.</ref>
</div>
==Achievements==
{{load achievements|Iron Man;Tie Dye Outfit;Let It Go!;Cover me in debris;Oooh, shiny!}}
==Advancements==
{{load advancements|Suit Up;Cover me With Diamonds;Oh Shiny;Cover Me in Debris;Light as a Rabbit}}
==History==
{{History|java indev}}
{{History||0.31|snap=20091231-2|[[File:Studded Boots (item) JE1.png|32px]] [[History of textures/Unused textures#Studded armor|Studded boots]] are now capable of being seen in the [[inventory]]. This was taken directly from one of [[Notch|Notch's]] game's ''[[Legend of the Chambered 2]]''.{{more info|When were they removed?}}}}
{{History||February 9, 2010|link=wordofnotch:380486636|[[File:Notch revealed armor.png|32px]] [[Notch]] revealed new models for armor, which included boots.}}
{{History||20100218|[[File:Leather Boots JE1.png|32px]] [[File:Chainmail Boots JE1 BE1.png|32px]] [[File:Iron Boots JE1 BE1.png|32px]] [[File:Golden Boots JE1 BE1.png|32px]] [[File:Diamond Boots JE1 BE1.png|32px]]<br>[[File:Leather Boots (item) JE1 BE1.png|32px]] [[File:Chainmail Boots (item) JE1 BE1.png|32px]] [[File:Iron Boots (item) JE1 BE1.png|32px]] [[File:Golden Boots (item) JE1 BE1.png|32px]] [[File:Diamond Boots (item) JE1 BE1.png|32px]] Added cloth, chain, iron, gold, and diamond boots{{verify|edition=java|type=change|Below, it says "wool armor" was renamed to leather, which name is incorrect, wool or cloth? Also, was it "gold" or "golden"?}}
|Boots can now be [[crafting|crafted]] and worn.
|Boots now function, giving {{Armor|3}}. Boots have limited [[item durability|durability]], with lower tier boots less durable than higher tier boots.}}
{{History|java alpha}}
{{History||v1.0.8|"Wool boots" have been renamed to "leather boots", despite item names not existing at this time.
|Leather boots are now [[crafting|crafted]] with [[leather]] instead of [[wool]].}}
{{History|java}}
{{History||1.0.0|snap=Beta 1.9 Prerelease|The armor protection behavior has been changed. Previous to this update, the total armor protection is based in this equation: (((''total equipped armor damage reduction'' − 1) × (''all equipped armor max damage'' − ''total equipped armor damage'')) ÷ (''total equipped armor max damage'' + 1)).}}
{{History|||snap=October 3, 2011|slink={{tweet|notch|120859830339637249}}|The first images of a [[player]] wearing enchanted armor, including boots, are revealed.}}
{{History|||snap=Beta 1.9 Prerelease 3|Iron boots can now be found in the new [[stronghold]] altar [[chest]]s.}}
{{History|||snap=Beta 1.9 Prerelease 4|Boots can now be [[enchanting|enchanted]].}}
{{History||1.1|snap=12w01a|Iron boots can now be found in the new blacksmith [[chest]]s in [[village]]s.}}
{{History||1.2.1|snap=1.2|Changed "Golden boots" to "Golden Boots".}}
{{History||1.3.1|snap=12w15a|{{key|Shift}}+clicking can now be used to equip boots.}}
{{History|||snap=12w21a|Chain boots can now be obtained legitimately in [[survival]] mode through [[trading]].
|Blacksmith [[villager]]s now [[trading|sell]] chain boots for 5–6 [[emerald]]s.
|Blacksmith villagers now sell diamond boots for 7 emeralds.
|Blacksmith villagers now sell iron boots for 4–5 emeralds.
|Butcher villagers now sell leather boots for 2-3 emeralds.}}
{{History||1.4.2|snap=12w32a|[[Mob]] armor has been reintroduced. A partial or full set of any armor is now sometimes worn by [[zombie]]s, [[skeleton]]s and [[zombie pigman|zombie pigmen]], with the likelihood increasing with difficulty.}}
{{History|||snap=August 17, 2012|slink={{tweet|Dinnerbone|236445090929844225}}|[[Jeb]] and [[Dinnerbone]] tweeted pictures of [[dye]]able leather armor, including boots.{{citation needed|Link to Jeb's tweet?}}}}
{{History|||snap=12w34a|Leather boots can now be dyed by [[crafting]] leather boots with [[dye]]s. Dyes can be removed by {{control|use|text=using}} dyed leather boots on a [[cauldron]] with [[water]].
|[[File:Leather Boots JE2 BE1.png|32px]] [[File:Leather Boots (item) JE2.png|32px]] Default leather boots are now slightly darker.}}
{{History|||snap=12w36a|[[Dye]]d leather boots are now more saturated and have a slight tint of tan in respect to the default armor color.
|[[Wither skeleton]]s can now spawn wearing boots.}}
{{History|||snap=12w37a|[[File:Leather Boots (item) JE3 BE2.png|32px]] Leather boots now have non-dyed parts. This has been implemented so that [[player]]s can distinguish between other types of armor and similarly colored leather armor.}}
{{History||1.5|snap=13w04a|Boots in the [[player]]'s hand can now be equipped by right-clicking.
|[[Dispenser]]s can now equip nearby players with boots.}}
{{History||1.7.2|snap=13w36a|Leather boots can now be obtained as one of the "junk" items through [[fishing]].}}
{{History||1.8|snap=14w02a|Armorer [[villager]]s now [[trading|sell]] chain boots for 5–7 [[emerald]]s.
|Armorer villagers no longer sell diamond boots.
|Armorer villagers no longer sell iron boots.
|Leatherworker villagers no longer sell leather boots.}}
{{History|||snap=14w05a|Boots no longer turn red when [[mob]]s and [[player]]s are hurt.}}
{{History|||snap=14w06a|Boots are now visible on [[giant]]s.}}
{{History|||snap=14w25a|Chain boots [[Java Edition removed features#Chain armor|can no longer be crafted anymore]] due to the [[item]] form of [[fire]] being [[Java Edition removed features#Obtainable until 1.8|removed]].}}
{{History||1.9|snap=15w31a|Enchanted iron and diamond boots can now be found in [[end city]] ship [[chest]]s.
|[[Mob]]s now wear armor from the bottom to the top, rather than from the top to the bottom. This means that a mob with three armor pieces, for example, spawn with all armor except a helmet.}}
{{History|||snap=15w34b|Boots' [[item durability|durability]] now affects armor value.}}
{{History|||snap=15w36a|Armor value and[[enchanting|enchantment]] calculations have been changed. For the original values, see [[Armor/Before 1.9|here]].}}
{{History|||snap=15w36d|Boots' durability affecting value has been removed.
|Boots now have an attribute controlling the defense points.}}
{{History|||snap=15w50a|Added {{cd|equip}} [[sound]]s for boots.}}
{{History|||snap=16w02a|Armor value and enchantment calculations have been changed again.}}
{{History|||snap=16w05a|Armor value calculations have been changed, once again.}}
{{History||1.11.1|snap=16w50a|Golden, chain and iron boots can now be [[smelting|smelted]] down into one of their respective [[nugget]]s. Chain boots smelt into iron nuggets.}}
{{History||1.13|snap=17w47a|Prior to [[1.13/Flattening|''The Flattening'']], these [[item]]s' numeral IDs were 298 through 317.{{more info|Specific values for boots}}}}
{{History|||snap=18w11a|Enchanted leather boots can now generate in the chests of [[shipwreck]]s.}}
{{History|||snap=18w20a|Chain armor boots have been renamed to "chainmail".}}
{{History||1.14|snap=18w43a|[[File:Leather Boots JE3 BE2.png|32px]] [[File:Chainmail Boots JE2 BE2.png|32px]] [[File:Iron Boots JE2 BE2.png|32px]] [[File:Golden Boots JE2 BE2.png|32px]] [[File:Diamond Boots JE2 BE2.png|32px]]<br>[[File:Leather Boots (item) JE4 BE3.png|32px]] [[File:Chainmail Boots (item) JE2 BE2.png|32px]] [[File:Iron Boots (item) JE2 BE2.png|32px]] [[File:Golden Boots (item) JE2 BE2.png|32px]] [[File:Diamond Boots (item) JE2 BE2.png|32px]] The textures of leather, chainmail, iron, golden, and diamond boots have been changed.}}
{{History|||snap=18w48a|Leather boots can now be found in [[chest]]s in [[village]] tanneries.}}
{{History|||snap=19w08a|[[File:Golden Boots (item) JE3 BE3.png|32px]] The textures of gold boots [[item]]s have been changed.}}
{{History|||snap=19w11a|Armorer villagers now sell iron and enchanted diamond boots, making diamond boots effectively [[renewable resource|renewable]] again.
|Leatherworker villagers now sell randomly [[dye]]d leather boots.}}
{{History|||snap=19w13a|Armorer villagers now give chainmail boots to players under the [[Hero of the Village]] effect.}}
{{History||1.16|snap=20w06a|[[File:Netherite Boots JE1.png|32px]] [[File:Netherite Boots (item) JE1.png|32px]] Added netherite boots.
|Netherite boots are obtained by combining diamond boots and one netherite ingot in a crafting table.}}
{{History|||snap=20w09a|[[File:Diamond Boots (item) JE3 BE3.png|32px]] The texture of diamond boots [[item]]s has been changed.}}
{{History|||snap=20w10a|[[File:Netherite Boots JE2 BE1.png|32px]] [[File:Netherite Boots (item) JE2.png|32px]] The texture of netherite boots has been changed.
|Netherite boots can no longer be crafted.
|Netherite boots are now obtained by combining diamond boots and one netherite ingot in a smithing table.}}
{{History|||snap=20w16a|Netherite boots now generate randomly enchanted in [[bastion remnants]] chests.
|Golden boots now generate randomly enchanted in [[ruined portal]] chests.}}
{{History|||snap=20w17a|Diamonds boots now generate in place of netherite boots in bastion remnant chests.}}
{{History||1.17|snap=20w46a|Leather boots can now be used to safely walk on [[powder snow]].|Leather armor now protects against [[powder snow]]'s freezing.}}
{{History|||snap=21w13a|Leather Boots now prevent fall damage when landing on [[powder snow]].}}
{{History||1.18.2|snap=22w03a|Netherite boots knockback resistance is no longer random.}}
{{History||1.19|snap=Deep Dark Experimental Snapshot 1|Added the [[Swift Sneak]] enchantment, which can only be applied to boots.}}
{{History|||snap=22w12a|The [[Swift Sneak]] enchantment can no longer applied to boots.}}
{{History||1.20<br>(Experimental)|link=1.19.4|snap=23w04a|Non-leather boots can now be trimmed using a [[smithing table]].
|There are 10 types of material that determine the color of the trim:
*Iron
*Copper
*Gold
*Lapis
*Emerald
*Diamond
*Netherite
*Redstone
*Amethyst
*Quartz
|Upgrading diamond boots to netherite boots now requires the netherite upgrade [[smithing template]].}}
{{History|||snap=23w05a|Leather boots can now be trimmed using a smithing table.|Boots can now have trims of the same material it is made out of.}}
{{History|||snap=23w06a|Swapped {{cd|iron}} and {{cd|iron_darker}} palette, then made {{cd|iron_darker}} darker overall.}}
{{History||1.19.4|snap=23w05a|Boots can now be swapped by {{ctrl|using}} them in the hotbar.<ref>{{bug|MC-216270|||Fixed}}</ref>}}
{{History||?|Boots can now be swapped in [[armor stand]]s by {{ctrl|using}} them in the armor stand's slot.}}
{{History||1.20|snap=23w12a|The pattern textures of dune and sentry armor trims are changed.|
Those previous patterns were left with different names: dune was renamed sentry and sentry was renamed shaper.}}
{{History|pocket alpha}}
{{History||v0.6.0|[[File:Leather Boots JE1 BE1.png|32px]] [[File:Chainmail Boots JE1 BE1.png|32px]] [[File:Iron Boots JE1 BE1.png|32px]] [[File:Golden Boots JE1 BE1.png|32px]] [[File:Diamond Boots JE1 BE1.png|32px]]<br> [[File:Leather Boots (item) JE1 BE1.png|32px]] [[File:Chainmail Boots (item) JE1 BE1.png|32px]] [[File:Iron Boots (item) JE1 BE1.png|32px]] [[File:Golden Boots (item) JE1 BE1.png|32px]] [[File:Diamond Boots (item) JE1 BE1.png|32px]] Added boots.}}
{{History||v0.8.0|snap=build 2|{{InvSprite|Leather Boots}} The leather boots sprites have been changed to that of the [[Java Edition|PC]] version, but its armor [[model]] remains that of older versions.}}
{{History||v0.9.0|snap=build 1|Iron boots now naturally generates in [[village]] [[chest]]s and a [[stronghold]] altar chest.}}
{{History||v0.12.1|snap=build 1|Chainmail boots can now be obtained in [[survival]] mode from a mob wearing it.
|Leather boots can now be obtained from [[fishing]] as a "junk" [[item]].}}
{{History||v0.14.0|snap=build 1|[[File:Leather Boots JE2 BE2.png|32px]] Leather boots can now be dyed and the model has been updated.}}
{{History|pocket}}
{{History||1.0.0|snap=alpha 0.17.0.1|[[Enchanting|Enchanted]] iron boots and enchanted diamond boots can now be found inside [[chest]]s within [[end city]].}}
{{History||1.0.4|snap=alpha 1.0.4.0|Chainmail boots are now [[trading|sold]] by armorer smith [[villager]]s via [[trading]].}}
{{History||1.1.0|snap=alpha 1.1.0.0|Golden, chain and iron boots can now be [[smelting|smelted]] down into one of their respective [[nugget]]s.}}
{{History|bedrock}}
{{History||1.4.0|snap=beta 1.2.14.2|Chainmail boots now generate in [[buried treasure]] chests.
|Enchanted leather boots can now be found inside [[shipwreck]] supply room [[chest]]s.}}
{{History||1.10.0|snap=beta 1.10.0.3|Iron boots now can be found in plains [[village]] weaponsmith [[chest]]s.
|Leather boots can now be found inside plains village tannery chests.
|[[File:Leather Boots JE3 BE2.png|32px]] [[File:Iron Boots JE2 BE2.png|32px]] [[File:Golden Boots JE2 BE2.png|32px]] [[File:Diamond Boots JE2 BE2.png|32px]]<br> [[File:Leather Boots (item) JE4 BE3.png|32px]] [[File:Iron Boots (item) JE2 BE2.png|32px]] [[File:Golden Boots (item) JE2 BE2.png|32px]] [[File:Diamond Boots (item) JE2 BE2.png|32px]] The textures of boots have been changed.{{more info|Did chain boots not change?}}}}
{{History||1.11.0|snap=beta 1.11.0.1|Iron boots now can be found in [[savanna]], [[taiga]], [[desert]], [[snowy taiga]] and [[snowy tundra]] [[village]] weaponsmith [[chest]]s.
|Leather boots can now be found inside savanna, taiga, desert, snowy taiga and snowy tundra village tannery chests.}}
{{History|||snap=beta 1.11.0.4|[[Pillager]]s and [[vindicator]]s that spawn in [[raid]]s can now drop iron boots.
|Iron and diamond boots are now sold by armorer villagers.}}
{{History||1.11.0|snap=beta 1.11.0.5|[[File:Golden Boots (item) JE3 BE3.png|32px]] The textures of golden boots [[item]]s have been changed.}}
{{History||1.12.0|snap=beta 1.12.0.2|[[File:Armor Stand with Leather Armor MCPE-44669.png|32px]] Leather boots no longer show as being [[dye]]d properly when worn by [[armor stand]]s.}}
{{History||1.13.0|snap=beta 1.13.0.1|Leather boots now appear dyed properly when worn by armor stands.}}
{{History||1.16.0|snap=beta 1.16.0.51|[[File:Netherite Boots JE2 BE1.png|32px]] [[File:Netherite Boots (item) BE1.png|32px]] Added netherite boots.|Netherite boots are obtained by combining diamond boots and one netherite ingot in a crafting table.
|[[File:Diamond Boots (item) JE3 BE3.png|32px]] The texture of diamond boots [[item]]s have been changed.}}
{{History|||snap=beta 1.16.0.57|Iron boots with soul speed enchantment can be obtained from bartering with piglin.
|Netherite boots can no longer be crafted.
|Netherite boots are now obtained by combining diamond boots and one netherite ingot in a smithing table.
|Golden boots can now be found in [[ruined portal]] chest.
|Golden and netherite boots can be found in [[bastion remnant]] chest.}}
{{History|||snap=beta 1.16.0.63|Diamonds boots now generate in place of netherite boots in bastion remnant chests.}}
{{History||1.16.200|snap=beta 1.16.200.52|Leather boots can now be used to safely walk on [[powder snow]].}}
{{History||1.17.10|snap=beta 1.17.10.20|[[File:Netherite Boots (item) JE2.png|32px]] The texture of netherite boots item has been changed to match ''Java Edition''.}}
{{History|console}}
{{History||xbox=TU1|xbone=CU1|ps=1.0|wiiu=Patch 1|switch=1.0.1|[[File:Leather Boots JE2 BE1.png|32px]] [[File:Leather Boots (item) JE1 BE1.png|32px]] Added leather boots.
|[[File:Iron Boots JE1 BE1.png|32px]] [[File:Iron Boots (item) JE1 BE1.png|32px]] Added iron boots.
|[[File:Golden Boots JE1 BE1.png|32px]] [[File:Golden Boots (item) JE1 BE1.png|32px]] Added golden boots.
|[[File:Diamond Boots JE1 BE1.png|32px]] [[File:Diamond Boots (item) JE1 BE1.png|32px]] Added diamond boots.}}
{{History||xbox=TU5|[[File:Chainmail Boots JE1 BE1.png|32px]] [[File:Chainmail Boots (item) JE1 BE1.png|32px]] Added chain boots.
|Added a quick equip for boots to the [[inventory]] interface.}}
{{History||xbox=TU12|ps=1.03|[[File:Leather Boots (item) JE3 BE2.png|32px]] The textures for leather boots [[item]]s have been changed.}}
{{History||xbox=TU14|ps=1.05|Leather boots can now be [[dye]]d.
|[[Item repair]] can now repair boots.}}
{{History||xbox=TU25|xbone=CU13|ps=1.16|Boots now have the quick equip functionality.}}
{{History||xbox=TU53|xbone=CU43|ps=1.49|wiiu=Patch 23|switch=1.0.3|Golden, chain and iron boots can now be [[smelting|smelted]] down into one of their respective [[nugget]]s. Chain boots smelt into iron nuggets.}}
{{History|PS4}}
{{History||1.90|[[File:Leather Boots JE3 BE2.png|32px]] [[File:Leather Boots (item) JE4 BE3.png|32px]] The textures of leather boots have been changed.
|[[File:Chainmail Boots JE2 BE2.png|32px]] [[File:Chainmail Boots (item) JE2 BE2.png|32px]] The textures of chainmail boots have been changed.
|[[File:Iron Boots JE2 BE2.png|32px]] [[File:Iron Boots (item) JE2 BE2.png|32px]] The textures of iron boots have been changed.
|[[File:Golden Boots JE2 BE2.png|32px]] [[File:Golden Boots (item) JE3 BE3.png|32px]] The textures of gold boots have been changed.
|[[File:Diamond Boots JE2 BE2.png|32px]] [[File:Diamond Boots (item) JE2 BE2.png|32px]] The textures of diamond boots have been changed.}}
{{History|new 3ds}}
{{History||0.1.0|[[File:Leather Boots JE2 BE1.png|32px]] [[File:Leather Boots (item) JE3 BE2.png|32px]] Added leather boots.
|[[File:Chainmail Boots JE1 BE1.png|32px]] [[File:Chainmail Boots (item) JE1 BE1.png|32px]] Added chain boots.
|[[File:Iron Boots JE1 BE1.png|32px]] [[File:Iron Boots (item) JE1 BE1.png|32px]] Added iron boots.
|[[File:Golden Boots JE1 BE1.png|32px]] [[File:Golden Boots (item) JE1 BE1.png|32px]] Added golden boots.
|[[File:Diamond Boots JE1 BE1.png|32px]] [[File:Diamond Boots (item) JE1 BE1.png|32px]] Added diamond boots.}}
{{History|foot}}
==Issues ==
{{issue list}}
==Trivia==
*Netherite boots are shorter in their item texture but are longer in their texture when being worn
*Leather armor originally used textures from one of [[Notch]]'s previous games, ''[[Legend of the Chambered]]''.
*Leather boots are the only piece of leather armor that has the same name as other armor materials.
*The netherite boots are the only type of boots to have a differently shaped item sprite when compared to the other boot types.
*Chainmail boots are the only boots that have transparent pixels in their texture currently
==Gallery==
===Enchanted Boots===
<gallery>
File:Enchanted Leather Boots (item).gif
File:Enchanted Chainmail Boots (item).gif
File:Enchanted Iron Boots (item).gif
File:Enchanted Golden Boots (item).gif
File:Enchanted Diamond Boots (item).gif
File:Enchanted Netherite Boots (item).gif
</gallery>
<gallery>
File:Enchanted Leather Boots.gif
File:Enchanted Chainmail Boots.gif
File:Enchanted Iron Boots.gif
File:Enchanted Golden Boots.gif
File:Enchanted Diamond Boots.gif
File:Enchanted Netherite Boots.gif
</gallery>
==References==
{{reflist}}
==External Links==
*[https://www.minecraft.net/en-us/article/taking-inventory--boots Taking Inventory: Boots] – Minecraft.net on November 24, 2019
{{Items}}
[[Category:Armor]]
[[ja:ブーツ]]
[[ko:부츠]]
[[pl:Buty]]
[[pt:Botas]]
[[th:รองเท้า]]
[[zh:靴子]]</li></ul> | 12w24a | Fixed the issue of explosions not propelling players. | |||
| ? | Explosions will now damage the player different amounts on different difficulties. However, no damage is dealt to the player on Peaceful. | ||||
1.4.2{{Extension DPL}}<ul><li>[[Shears|Shears]]<br/>{{Item
| image = Shears.png
| rarity = Common
| renewable = Yes
| durability = 238
| stackable = No
}}
'''Shears''' are tools required to obtain some organic blocks or otherwise mine them faster as well as to shear certain entities and blocks.
==Obtaining==
===Crafting===
{{Crafting
|head=1
|showdescription=1
|B2= Iron Ingot
|A3= Iron Ingot
|Output= Shears
|type= Tool
}}
{{crafting
|foot=1
|ignoreusage=1
|Damaged Shears
|Damaged Shears
|Output= Shears
|description= The durability of the two shears is added together, plus an extra 5% durability.
|type= Tool
}}
Despite using [[Iron Ingot|iron]] in its crafting recipe, shears cannot be smelted into [[iron nugget]]s.<ref>{{bug|MC-111738}}</ref>
===Trading===
Novice-level Shepherd [[villager]]s have a 40% chance to sell shears for 2 [[emerald]]s in Java Edition. This trade is always offered in Bedrock Edition.
===Chest loot===
{{LootChestItem|shears}}
==Usage==
===Shearing===
Shears lose 1 [[durability]] when used to shear something.
Shears can be {{Control|use|text=used}} on a [[sheep]] to remove its coat and drop 1–3 [[wool]] of the corresponding color. The same sheep can be sheared again after it eats from a [[grass block]] to regenerate its coat.
Shearing a [[mooshroom]] drops 5 [[mushroom]]s of the corresponding color and irreversibly turns it into a normal [[cow]].
Shearing a [[snow golem]] irreversibly removes its pumpkin, dropping it and revealing its face.
Shearing either a [[beehive]] or [[bee nest]] that is full of honey makes it drop 3 [[honeycomb]]s and resets it to honey level 0. The same beehive or bee nest can be sheared again if it is able to reach full honey again. If sheared by hand without a [[campfire]] below the hive or nest all bees within will exit and all nearby bees will attack the offending player.
[[Dispenser]]s can use shears in any of the above listed ways, interacting with any valid block or entity in front of the dispenser's face. This decreases the shears' [[durability]]. A dispenser shearing a beehive or bee nest will not anger bees or cause them to leave even if there is not a campfire below it.
Shearing a [[pumpkin]] turns it into a [[carved pumpkin]], dropping 4 [[pumpkin seeds]].
{{IN|java}}, shearing the tip of [[cave vines]], [[kelp]], [[weeping vines]], or [[twisting vines]] sets its age value to 25 and stops further growth.
===Breaking blocks===
Shears use 1 [[durability]] when is used to break any block, even if it [[instant mining|breaks instantly]] by hand.
Shears can be used to harvest [[cobweb|cobwebs]], [[leaves]], [[grass|grass, tall grass]], [[seagrass|seagrass, tall seagrass]], [[fern|ferns, large fern]]s, [[dead bush]]es, [[nether sprouts]], [[vines]], [[glow lichen]] or [[hanging roots]] and obtain them in item form. They can also be used to break [[tripwire]] connected to a [[tripwire hook]] without activating it.
When shears are used to break [[Weeping Vines|weeping vines]] or [[Twisting Vines|twisting vines]] they are guaranteed to drop in item form instead of the usual 33% chance. This only applies to vines directly broken by shears and not vines that are broken due to the destruction of their supporting vines.
The following table shows information about blocks that can be broken with shears. Colors indicate what gets dropped when the block is broken:
*White: The original block.
*Blue: The block's normal drop (i.e. string, sticks, seeds, saplings, apples).
*Red: Nothing.
{| class="wikitable" style="text-align:center" data-description="Blocks broken with shears"
!
!No shears breaking time
!Shears breaking time
|-
! style="text-align:left" |{{BlockLink|Cobweb}}
| {{tc|no|20 s}}<ref group="note">Breaking cobwebs with a sword is as fast as breaking with shears, and yields string. This costs double durability.</ref>
|0.4 s
|-
! style="text-align:left" |{{BlockLink|Dead Bush}}
| {{tc|planned|0 s}}
|0 s
|-
! style="text-align:left" |{{BlockLink|id=fern|Grass|Fern}}
| {{tc|planned|0 s}}
|0 s
|-
! style="text-align:left" |{{BlockLink|Grass}}
| {{tc|planned|0 s}}
| 0 s
|-
! style="text-align:left" |{{BlockLink|Nether Sprouts}}
| {{tc|no|0 s}}<ref group="note">{{IN|bedrock}}, the item drops when breaking it with fists.</ref>
|0 s
|-
! style="text-align:left" |{{BlockLink|Leaves}}
| {{tc|planned|0.35 s}}
|0.05 s
|-
! style="text-align:left" |{{BlockLink|id=tripwire|String#Tripwire|Tripwire}}
|0 s
|0 s<ref group="note">Using shears does not trigger a redstone pulse.</ref>
|-
! style="text-align:left" |{{BlockLink|Vines}}
| {{tc|no|0.35 s}}
|0.35 s
|-
! style="text-align:left" |{{BlockLink|Wool}}
|1.25 s
|0.25 s
|-
! style="text-align:left" |{{BlockLink|Seagrass}}
| {{tc|no|0 s}}
|0 s
|-
! style="text-align:left" | {{BlockLink|Glow Lichen}}
| {{tc|no|0.3 s}}
|0.3 s
|-
! style="text-align:left" |{{BlockLink|Hanging Roots}}
| {{tc|no|0 s}}
|0 s
|-
! style="text-align:left" |{{BlockSprite|Twisting Vines Plant}}{{BlockLink|Twisting Vines}}<br> {{BlockSprite|Weeping Vines Plant}}{{BlockLink|Weeping Vines}}
|0 s
|0 s<ref group="note">Using shears will increase the chance of dropping from 33% to 100%.</ref>
|}
{{notelist}}
===Enchantments===
Shears can receive the following [[Enchanting|enchantments]]:
{| class="wikitable col-2-center col-3-right"
|+
!Name
! Max Level
![[Enchanting|Method]]
|-
|[[Efficiency]]
|V
|{{Inventory slot|Anvil}}
|-
|[[Unbreaking]]
| III
|{{Inventory slot|Anvil}}
|-
|[[Mending]]
|I
|{{Inventory slot|Anvil}}
|-
|[[Curse of Vanishing]]
|I
|{{Inventory slot|Anvil}}
|-
|[[Silk Touch]]{{only|be|short=1}}
|I
|{{Inventory slot|Anvil}}
|}
{{notelist}}
== Sounds ==
{{edition|java}}:
{{Sound table
|rowspan=4
|sound=Shear.ogg
|subtitle=Shears click
|source=player
|description=When a mooshroom is sheared
|id=entity.mooshroom.shear
|translationkey=subtitles.item.shears.shear
|volume=1.0
|pitch=1.0
|distance=16}}
{{Sound table
|subtitle=Shears click
|source=player
|description=When a sheep is sheared
|id=entity.sheep.shear
|translationkey=subtitles.item.shears.shear
|volume=1.0
|pitch=1.0
|distance=16}}
{{Sound table
|subtitle=Shears click
|source=player
|description=When a snow golem is sheared
|id=entity.snow_golem.shear
|translationkey=subtitles.item.shears.shear
|volume=1.0
|pitch=1.0
|distance=16}}
{{Sound table
|subtitle=Plant cropped
|source=block
|description=When a growing plant is cropped
|id=block.growing_plant.crop
|translationkey=subtitles.block.growing_plant.crop
|volume=1.0
|pitch=1.0
|distance=16}}
{{Sound table
|sound=Beehive shear.ogg
|source=block
|subtitle=Shears scrape
|description=When honeycombs are harvested from a beehive
|id=block.beehive.shear
|translationkey=subtitles.block.beehive.shear
|volume=0.8
|pitch=1.0/0.8/0.9
|distance=16}}
{{Sound table
|sound=Pumpkin carve1.ogg
|sound2=Pumpkin carve2.ogg
|source=block
|subtitle=Shears carve
|description=When a pumpkin is carved
|id=block.pumpkin.carve
|translationkey=subtitles.block.pumpkin.carve
|volume=1.0
|pitch=1.0
|distance=16}}
{{Sound table
|sound=Random break.ogg
|subtitle=Item breaks
|source=player
|description=When a pair of shears' durability is exhausted
|id=entity.item.break
|translationkey=subtitles.entity.item.break
|volume=0.8
|pitch=0.8-1.2
|distance=16
|foot=1}}
{{edition|bedrock}}:<br>
Pumpkins do not have carve sounds.
{{Sound table
|type=bedrock
|sound=Shear.ogg
|source=player
|description=When something is sheared
|id=mob.sheep.shear
|volume=1.0
|pitch=1.0}}
{{Sound table
|sound=Beehive shear.ogg
|source=block
|description=When honeycombs are harvested from a beehive
|id=block.beehive.shear
|volume=0.8
|pitch=0.8-1.0}}
{{Sound table
|sound=Random break.ogg
|source=player
|description=When a pair of shears' durability is exhausted
|id=random.break
|volume=1.0
|pitch=0.9
|foot=1}}
==Data values==
===ID===
{{edition|java}}:
{{ID table
|edition=java
|showforms=y
|generatetranslationkeys=y
|displayname=Shears
|spritetype=item
|nameid=shears
|form=item
|foot=1}}
{{edition|bedrock}}:
{{ID table
|edition=bedrock
|shownumericids=y
|showforms=y
|notshowbeitemforms=y
|generatetranslationkeys=y
|displayname=Shears
|spritetype=item
|nameid=shears
|id=421
|form=item
|foot=1}}
==Achievements==
{{load achievements|Have a Shearful Day}}<div style="text-align:center"></div>
==History==
{{History||June 3, 2011|link=https://twitter.com/jeb_/status/76570646074765312|Shears were first mentioned by [[Jeb]] on [[wikipedia:Twitter|Twitter]]. The tweet revealing Jeb's work on shears was written in Swedish (''Jag jobbar på shears nu''), which translates to "I'm working on shears now".}}
{{History||June 7, 2011|link=https://twitter.com/jeb_/status/78154891637436416|Jeb tweets about how shears were originally planned as a way to defuse [[TNT]], but he dropped this shortly after deciding TNT would detonate only with [[redstone]] or [[fire]].}}
{{History|java beta}}
{{History||1.7|[[File:Shears JE1 BE1.png|32px]] Added shears.
|Before [[Beta 1.7]], [[sheep]] would drop 1-3 [[wool]] blocks at most when hit, but shears can harvest up to 4 wool blocks per sheep.}}
{{History||1.8|snap=Pre-release|Shears can now be used to harvest a [[fern]], [[vines]] and [[grass]].}}
{{History|java}}
{{History||1.0.0|snap=Beta 1.9 Prerelease|Shears now harvest [[red mushroom]]s from a [[mooshroom]] and turn it back into a normal [[cow]].}}
{{History||1.1|snap=11w49a|[[Sheep]] now drop only 1-3 wool blocks when sheared, but they can also regrow their wool by eating [[grass block|grass]], which is part of a plan to have [[animal]]s stay in the game longer.<ref>{{Tweet|jeb|76647002317930496}}</ref>}}
{{History||1.2.1|snap=12w05a|Shears can now be used to harvest [[dead bush]]es.}}
{{History|||snap=12w06a|Shears are now [[renewable]], due to [[zombie]]s occassionally dropping iron ingots.}}
{{History||1.3.1|snap=12w21a|Shears can now be [[trading|bought]] from farmer [[villager]]s for 3 [[emerald]]s each.}}
{{History|||snap=12w22a|Shears can now be used to break [[tripwire]] string and not set it off.}}
{{History||1.4.2|snap=12w38a|Added a [[sound]] when using shears on [[sheep]].}}
{{History||1.4.6|snap=12w50a|Shears can now be [[enchanting|enchanted]].}}
{{History||1.8|snap=14w02a|[[Trading]] has been changed: Shepherd [[villager]]s now [[trading|sell]] shears for 3–4 [[emerald]]s each.
|Farmers no longer trade shears.}}
{{History|||snap=pre1|Shears now lose [[item durability|durability]] when breaking [[wool]] blocks. In previous versions, shears would take [[item durability|durability]] [[damage]] only when destroyed or when breaking [[tall grass]] or [[leaves]], the damage remaining the same for all other [[block]]s.<ref>{{bug|MC-5313}}</ref>}}
{{History||1.9|snap=15w34a|Shears may now be used in a crafting grid to zoom in [[map]]s.}}
{{History|||snap=15w45a|Shears no longer zoom in maps.}}
{{History|||snap=15w47b|Shears can no longer be enchanted with [[Silk Touch]].
|Shears now lose durability when used to break any block (formerly lost durability only from [[leaves]], [[web]], [[grass]], [[vines]], [[tripwire]] and [[wool]]).}}
{{History|||snap=15w47c|Shears now harvest [[cobweb]] without requiring [[Silk Touch]].}}
{{History|||snap=15w49a|[[Snow golem]]'s [[pumpkin]] can now be removed with shears.}}
{{History||1.13|snap=17w47a|When shears are {{control|used}} on an un-carved [[pumpkin]], it now turns into a carved pumpkin and drops 4 [[pumpkin seeds]].
|Prior to [[1.13/Flattening|''The Flattening'']], this [[item]]'s numeral ID was 359.}}
{{History||1.14|snap=18w43a|Shears placed in a [[dispenser]] can now shear [[sheep]].
|[[File:Shears JE2 BE2.png|32px]] The texture of shears has been changed.}}
{{History|||snap=18w49a|Shears can now be found in [[chest]]s in [[village]] shepherd houses.}}
{{History||1.15|snap=19w34a|Shears can now be used on [[bee nest]]s and [[beehive]]s to harvest [[honeycomb]].}}
{{History||1.16|snap=20w15a|Shears placed in a dispenser can now shear [[mooshrooms]] and [[snow golem]]s.}}
{{History||1.16.2|snap=pre1|Shears are now required in order to pick up [[roots]].}}
{{History||1.16.2|snap=pre2|Shears are no longer required to pick up [[roots]].}}
{{History||1.17|snap=?|Shears are now required in order to pick up [[hanging roots]].}}
{{History||1.18|snap=21w37a|Shears can now stop [[cave vines]], [[kelp]], [[weeping vines]], and [[twisting vines]] from aging.}}
{{History||1.19|snap=22w11a|Shears are now required in order to pick up [[mangrove leaves]].}}
{{History|pocket alpha}}
{{History||v0.2.0|[[File:Shears JE1 BE1.png|32px]] Added shears.}}
{{History||v0.3.2|Survival [[player]]s no longer start out with infinite durability shears in the [[inventory]].}}
{{History||v0.4.0|Removed shears from the creative inventory.}}
{{History||v0.8.0|snap=build 3|Re-added shears to [[creative]] mode.}}
{{History||v0.9.0|snap=build 1|Shears can now be used to transform [[mooshroom]]s into [[cow]]s.}}
{{History||v0.12.1|snap=build 3|Shearing a [[snow golem]] now removes its [[pumpkin]].
|Shears can now be [[enchanting|enchanted]] in an [[anvil]].}}
{{History||v0.13.0|snap=build 1|Shears can now be used to break [[tripwire]] string without triggering it.}}
{{History||v0.15.0|snap=build 1|Shears now lose durability when used to break any [[block]].}}
{{History|pocket}}
{{History||1.0.4|snap=alpha 1.0.4.0|Shears can now be [[trading|bought]] from shepherd [[villager]]s.}}
{{History||1.1.0|snap=alpha 1.1.0.0|Breaking a [[melon|melon block]] with shears now always drop 9 [[melon slice|melons]].}}
{{History|bedrock}}
{{History||1.4.0|snap=beta 1.2.13.8|Shears can now be used to turn un-carved [[pumpkin]]s into [[carved pumpkin]] and spit out 4 [[pumpkin seeds]].}}
{{History||?|Shears now harvest [[cobweb]] without requiring [[Silk Touch]].}}
{{History||1.10.0|snap=beta 1.10.0.3|Shears placed in a [[dispenser]] can now shear [[sheep]].
|[[File:Shears JE2 BE2.png|32px]] The texture of shears has been changed.}}
{{History||1.11.0|snap=beta 1.11.0.1|Shears can now be found in [[village]] shepherd houses.}}
{{History|||snap=beta 1.11.0.4|Shears [[trading|sold]] by shepherd [[villager]]s now cost only 2 [[emerald]]s.}}
{{History||1.14.0|snap=beta 1.14.0.1|Shears can now be used on [[bee nest]]s and [[beehive]]s to harvest [[honeycomb]].}}
{{History|console}}
{{History||xbox=TU3|xbone=CU1|ps=1.0|wiiu=Patch 1|switch=1.0.1|[[File:Shears JE1 BE1.png|32px]] Added shears.}}
{{History||xbox=TU69|xbone=none|ps=1.76|wiiu=Patch 38|switch=none|Shears can now be used to turn regular [[pumpkin]]s into [[carved pumpkin]]s.}}
{{History||xbox=none|xbone=none|ps=1.90|wiiu=none|switch=none|[[File:Shears JE2 BE2.png|32px]] The texture of shears has been changed.
|Shears placed in a [[dispenser]] can now shear [[sheep]].}}
{{History|New 3DS}}
{{History||0.1.0|[[File:Shears JE1 BE1.png|32px]] Added shears.}}
{{History|foot}}
==Issues==
{{issue list}}
==Gallery==
<gallery>
File:Enchanted Shears.gif|An enchanted pair of shears.
</gallery>
==References==
{{reflist}}
==External links==
*[https://www.minecraft.net/en-us/article/taking-inventory--shears Taking Inventory: Shears] – Minecraft.net on November 20, 2019
{{Items}}
[[cs:Nůžky]]
[[de:Schere]]
[[es:Tijeras]]
[[fr:Cisailles]]
[[hu:Metszőolló]]
[[it:Cesoie]]
[[ja:ハサミ]]
[[ko:가위]]
[[nl:Schaar]]
[[pl:Nożyce]]
[[pt:Tesoura]]
[[ru:Ножницы]]
[[zh:剪刀]]
[[Category:Renewable resources]]</li><li>[[Raw Porkchop|Raw Porkchop]]<br/>{{Item
| title = Raw Porkchop
| image = Raw Porkchop.png
| renewable = Yes
| heals = {{hunger|3}}
| stackable = Yes (64)
}}
A '''raw porkchop''' is a [[food]] item that can be eaten by the [[player]] or cooked to make a [[cooked porkchop]].
== Obtaining ==
=== Mob loot ===
==== Pigs ====
Adult [[pig]]s drop 1–3 raw porkchop when killed. The maximum amount is increased by 1 per level of [[Looting]], for a maximum of 1-6 with Looting III. If killed while on fire, they drop [[cooked porkchop]] instead.
==== Hoglins ====
Adult [[hoglin]]s drop 2–4 raw porkchop when killed. The maximum amount is increased by 1 per level of [[Looting]], for a maximum of 7 with Looting III. If killed while on fire, they drop [[cooked porkchop]] instead.
=== Chest loot ===
{{LootChestItem|raw-porkchop}}
== Usage ==
=== Food ===
To eat raw porkchop, press and hold {{control|use}} while it is selected in the hotbar. Eating one restores {{hunger|3}} [[hunger]] and 0.6 [[Hunger#Mechanics|saturation]].
=== Smelting ingredient ===
{{Smelting
|showname=1
|Raw Porkchop
|Cooked Porkchop
|0.35
}}
=== Trading ===
{{IN|bedrock}}, novice-level butcher [[villager]]s have a {{frac|1|3}} chance to [[trading|buy]] 7 raw porkchop for an [[emerald]] as part of their [[trading|trades]].
{{IN|java}}, novice-level butcher villagers have a 40% chance to buy 7 raw porkchop for an emerald.
=== Wolves ===
Raw porkchops can be used to [[breed]] and heal tamed [[wolves]], lead them around, and make baby tamed wolves grow up faster by 10% of the remaining time.
=== Piglins ===
[[Piglin|Piglins]] instantly pick up raw or [[Cooked Porkchop|cooked porkchops]] that are within 1 block of them, unless they have already picked up one within the last 10 seconds. Porkchops picked up are not dropped upon the piglin's death.
==Sounds==
{{Sound table/Entity/Food}}
== Data values ==
=== ID ===
{{edition|java}}:
{{ID table
|edition=java
|showitemtags=y
|showforms=y
|generatetranslationkeys=y
|displayname=Raw Porkchop
|spritetype=item
|nameid=porkchop
|itemtags=piglin_food
|form=item
|foot=1}}
{{edition|bedrock}}:
{{ID table
|edition=bedrock
|shownumericids=y
|showforms=y
|notshowbeitemforms=y
|generatetranslationkeys=y
|displayname=Raw Porkchop
|spritetype=item
|nameid=porkchop
|id=262
|form=item
|foot=1}}
== Achievements ==
{{load achievements|Pork Chop}}
== Advancements ==
{{load advancements|Husbandry;A Balanced Diet}}
== History ==
{{History|java indev}}
{{History||20100219|[[File:Raw Porkchop JE1 BE1.png|32px]] Added raw porkchops.
|Raw porkchops restore {{hp|3}} and do not stack in the [[inventory]].
|Raw porkchops are [[drops|dropped]] by [[pig]]s.}}
{{History|java beta}}
{{History||1.4|Raw porkchops can now be given to [[wolf|wolves]].}}
{{History||1.8|snap=Pre-release|Raw porkchops can now be stacked to 64.<ref>{{Tweet|jeb|103408168356421632|Some Minecraft food changes...}}</ref>
|Raw porkchops now restore {{hunger|3}} to the [[Hunger|food bar]].}}
{{History|java}}
{{History||1.2.1|snap=12w03a|Raw porkchops can now be used to breed wolves.}}
{{History||1.3.1|snap=12w21a|Raw porkchops can now be [[trading|sold]] to butcher [[villager]]s, at 14–17 pork chops for 1 [[emerald]].}}
{{History|||snap=12w25a|[[Pig]]s now [[drops|drop]] 1–3 porkchops instead of 0–2.}}
{{History||1.4.2|snap=12w37a|[[File:Raw Porkchop JE2 BE2.png|32px]] The texture of raw porkchops has been changed, so that it no longer has a dark outline.}}
{{History||1.8|snap=14w02a|[[Trading]] has been changed; butcher villagers now [[trading|buy]] 14–18 porkchops for 1 emerald.}}
{{History||1.13|snap=17w47a|Prior to [[1.13/Flattening|''The Flattening'']], this [[item]]'s numeral ID was 319.}}
{{History||1.14|snap=18w43a|[[File:Raw Porkchop.png|32px]] The texture of raw porkchops has been changed.}}
{{History|||snap=18w49a|Raw porkchops can now be found in [[chest]]s in [[village]] butcher shops.}}
{{History||1.16|snap=20w07a|Raw porkchops are dropped by the new [[hoglin]]s.
|Raw porkchops have a {{frac|5|109}} (~4.59%) chance of being given by the new [[piglin]]s when [[bartering]], in a stack size of 2–5.}}
{{History|||snap=20w09a|Raw porkchops can no longer be obtained by bartering with piglins.}}
{{History|||snap=20w16a|Raw porkchops now generate in [[bastion remnants]] chests.}}
{{History|pocket alpha}}
{{History||v0.4.0|[[File:Raw Porkchop JE1 BE1.png|32px]] Added raw porkchops.}}
{{History||v0.5.0|Raw porkchops now restore {{hp|3}} instead of {{hp|1}}.}}
{{History||v0.8.0|snap=build 1|[[File:Raw Porkchop JE2 BE2.png|32px]] The texture of raw porkchops has been changed, so that it no longer has that dark outline.}}
{{History||v0.12.1|snap=build 1|Raw porkchops now restore [[hunger]] instead of [[health]].}}
{{History||v0.16.2|[[Pig]]s now [[drops|drop]] 1–3 raw porkchops rather than 0–2.}}
{{History|pocket}}
{{History||1.0.4|snap=alpha 1.0.4.0|14–18 raw porkchops can now be [[trading|sold]] to butcher [[villager]]s for an [[emerald]].}}
{{History|bedrock}}
{{History||1.10.0|snap=beta 1.10.0.3|[[File:Raw Porkchop.png|32px]] The texture of raw porkchops has been changed.}}
{{History||1.11.0|snap=beta 1.11.0.3|Raw porkchops can now be found in [[village]] butcher [[chest]]s.}}
{{History|||snap=beta 1.11.0.4|Butcher [[villager]]s now have {{frac|1|3}} chance to [[trading|buy]] 7 raw porkchops.}}
{{History|console}}
{{History||xbox=TU1|xbone=CU1|ps=1.0|wiiu=Patch 1|switch=1.0.1|[[File:Raw Porkchop JE1 BE1.png|32px]] Added raw porkchops.}}
{{History||xbox=TU5|Raw porkchops are now stackable to 64 and fills [[hunger]] instead of [[health]].}}
{{History||xbox=TU12|[[File:Raw Porkchop JE2 BE2.png|32px]] The texture of raw porkchops has been changed, so that it no longer has a dark outline.}}
{{History||xbox=none|xbone=none|ps=1.90|wiiu=none|switch=none|[[File:Raw Porkchop.png|32px]] The texture of raw porkchops has been changed.}}
{{History|new3DS}}
{{History||0.1.0|[[File:Raw Porkchop JE2 BE2.png|32px]] Added raw porkchops.}}
{{History|foot}}
== Issues ==
{{issue list}}
== Gallery ==
<gallery>
I Porkchop Minecraft JINX.jpg|Official T-shirt artwork "I Porkchop Minecraft" sold by [https://www.jinx.com JINX].
I Brake for Porkchop Bumper Sticker JINX.jpg|An official bumper sticker featuring a raw porkchop sold by JINX.
</gallery>
== References ==
{{reflist}}
== External Links ==
*[https://www.minecraft.net/en-us/article/taking-inventory--porkchop Taking Inventory: Porkchop] – Minecraft.net on February 13, 2020
{{Items}}
[[Category:Food]]
[[cs:Syrová kotleta]]
[[de:Rohes Schweinefleisch]]
[[es:Chuleta de cerdo cruda]]
[[fr:Côtelette de porc crue]]
[[hu:Nyers disznóhús]]
[[ja:生の豚肉]]
[[nl:Rauw varkensvlees]]
[[pl:Surowy schab]]
[[pt:Costeleta de porco crua]]
[[ru:Сырая свинина]]
[[uk:Сира свинина]]
[[zh:生猪排]]
[[Category:Renewable resources]]</li></ul> | 12w34a | Added the wither, which shoots black wither skulls. | |||
| 12w37a | An emergent wither will now make a massive explosion when its health is fully charged. | ||||
| Blue wither skulls added. | |||||
| 12w38b | New creeper fall mechanics have been added. Creepers will now explode if they fall on the player from a certain height. | ||||
1.5{{Extension DPL}}<ul><li>[[Beetroot|Beetroot]]<br/>{{about|the basic food item|the seeds|Beetroot Seeds|the soup|Beetroot Soup}}
{{Item
| title = Beetroot
| image = Beetroot.png
| heals = {{hunger|1}}
| renewable = Yes
| stackable = Yes (64)
}}
A '''beetroot''' is a food and [[dye]] ingredient.
== Obtaining ==
=== Farming ===
Beetroots are obtained from harvesting a fully grown [[beetroots|crop block]], which drops 1 beetroot and 1-4 seeds ({{frac|2|5|7}} seeds per plant harvested on average). Seed yield can be increased using a tool enchanted with [[Fortune]], with Fortune III harvesting an average of {{frac|5|3|7}} seeds per plant.
These crops can be found growing in [[village]]s or can be grown from planted [[beetroot seeds]].<!-- Do not add locations for finding seeds. Where to find seeds is described in the article about the seeds. -->
== Usage ==
=== Food ===
A beetroot can be eaten to restore {{hunger|1}} [[hunger]] and 1.2 hunger [[Hunger#Mechanics|saturation]]. Six beetroots can be crafted into [[beetroot soup]], which restores six times the hunger and saturation of a single beetroot.
=== Crafting ingredient ===
{{crafting usage}}
=== Breeding ===
Beetroots can be used to [[breeding|breed]] [[pig]]s. Pigs also follow a player who is holding beetroot.
[[Villager]]s can pick up beetroot items to become willing, allowing them to breed. Villagers need 12 beetroots before they can breed.
=== Composting ===
Placing beetroot into a [[composter]] has a 65% chance of raising the compost level by 1.
=== Trading ===
Novice-level Farmer villagers have a 25%{{only|bedrock}} or 40%{{only|java}} chance to buy 15 beetroots for an emerald.
== Sounds ==
{{Sound table/Entity/Food}}
== Data values ==
=== ID ===
{{edition|java}}:
{{ID table
|edition=java
|showforms=y
|generatetranslationkeys=y
|displayname=Beetroot
|spritetype=item
|nameid=beetroot
|form=item
|foot=1}}
{{edition|bedrock}}:
{{ID table
|edition=bedrock
|shownumericids=y
|showforms=y
|notshowbeitemforms=y
|generatetranslationkeys=y
|displayname=Beetroot
|spritetype=item
|nameid=beetroot
|id=285
|form=item
|foot=1}}
== Advancements ==
{{load advancements|Husbandry;A Balanced Diet}}
== History ==
{{History|java}}
{{History||1.9|snap=15w31a|[[File:Beetroot JE1 BE1.png|32px]] Beetroots have been added, along with its [[beetroot seeds|seeds]] and [[beetroot soup]]. Beetroot can also be used to craft [[rose red]] dye.}}
{{History||1.13|snap=17w47a|Prior to [[1.13/Flattening|''The Flattening'']], this [[item]]'s numeral ID was 434.}}
{{History||1.14|snap=18w43a|[[File:Beetroot JE2 BE2.png|32px]] The texture of beetroot has been changed.}}
{{History|||snap=19w03a|Placing beetroot into the new [[composter]] has a 50% chance of raising the compost level by 1.}}
{{History|||snap=19w05a|Beetroot now has a 65% chance of increasing the compost level in a composter by 1.}}
{{History|||snap=19w11a|Farmer [[villager]]s now [[trading|buy]] beetroots.}}
{{History||1.17|snap=21w13a|The model of the [[crop]] for the beetroot crops has been tweaked that the backside textures are mirrored.}}
{{History|pocket alpha}}
{{History||November 13, 2013|link=http://instagram.com/p/gnkWOlJMB3/|[[Jeb]] announces on [[wikipedia:Instagram|Instagram]] that [[Johan Bernhardsson]] is working on a surprise feature for 0.8.0 alongside a picture of the [[player]] holding beetroot.}}
{{History||November 14, 2013|link={{tweet|jbernhardsson|400902957782147072}}|Johan posts another image of beetroot, confirming that the image previously posted by Jeb was indeed beetroot.}}
{{History||v0.8.0|snap=build 2|[[File:Beetroot JE1 BE1.png|32px]] Added beetroots. They are not obtainable in the Creative inventory.}}
{{History||v0.9.0|snap=build 1|Beetroot can now be used to lead and [[breeding|breed]] [[pig]]s.}}
{{History||v0.12.1|snap=build 1|Beetroot now restore [[hunger]], rather than [[health]].
|Beetroot can now generate in [[village]]s as [[crop]]s.}}
{{History||v0.13.1|Added beetroot to the Creative inventory.<ref name="missing beetroot item">https://bugs.mojang.com/browse/MCPE-10497</ref><!---{{info needed}}, the bug tracker has very little information. It's not in the Creative inventory in v0.12.1 or v0.13.0 initial release, but is in v0.14.0--->}}
{{History||v0.16.0|snap=build 1|Beetroot can now be used to craft [[rose red]] dye.}}
{{History||v0.16.2|Beetroot can now be found in [[chest]]s inside large houses in [[snowy taiga]] and [[snowy tundra]] [[village]]s.}}
{{History|pocket}}
{{History||1.0.4|snap=alpha 1.0.4.0|[[Villager]]s can now can pick up beetroot to become willing.}}
{{History|bedrock}}
{{History||1.10.0|snap=beta 1.10.0.3|[[File:Beetroot JE2 BE2.png|32px]] The texture of beetroot has been changed.}}
{{History||1.11.0|snap=beta 1.11.0.1|Beetroot can now be used to fill up [[composter]]s.}}
{{History|||snap=beta 1.11.0.4|Beetroot can now be sold to farmer villagers.}}
{{History|console}}
{{History||xbox=TU43|xbone=CU33|ps=1.36|wiiu=Patch 13|switch=1.0.1|[[File:Beetroot JE1 BE1.png|32px]] Added beetroots.}}
{{History||xbox=none|xbone=none|ps=1.90|wiiu=none|switch=none|[[File:Beetroot JE2 BE2.png|32px]] The texture of beetroot has been changed.}}
{{History|new 3ds}}
{{History||0.1.0|[[File:Beetroot JE1 BE1.png|32px]] Added beetroots.}}
{{History|foot}}
== Issues ==
{{Issue list}}
== Gallery ==
<gallery>
File:Beetrootstwitpic.png|The image released by [[Johan Bernhardsson]] on [[Wikipedia:Twitter|Twitter]].
File:Pigs following beetroot holder.png|Pigs following the [[player]].
File:Village Wheat Beetroot Farm.png|Beetroots generated in a [[village]].
File:Beetroot farm.png|A beetroot garden.
</gallery>
== References ==
{{Reflist}}
{{Items}}
[[Category:Plants]]
[[Category:Food]]
[[Category:Renewable resources]]
[[cs:Červená řepa]]
[[de:Rote Bete]]
[[es:Remolacha]]
[[fr:Betterave]]
[[hu:Cékla]]
[[it:Barbabietola]]
[[ja:ビートルート]]
[[ko:비트]]
[[nl:Biet]]
[[pl:Burak]]
[[pt:Beterraba]]
[[ru:Свёкла]]
[[th:บีทรูท]]
[[uk:Буряк]]
[[zh:甜菜根]]</li><li>[[Map|Map]]<br/>{{about|the craftable map|maps showing the locations of certain structures|Explorer Map|other uses|Map (disambiguation)}}
{{distinguish|World}}
{{Item
| image = Map Zoom 4.png
| renewable = Yes
| stackable = Yes (64)
}}
A '''map''' is an [[item]] used to view explored [[Chunk|terrain]] and mark landmarks.
==Obtaining==
===Crafting===
{{crafting
|head=1
|showname=0
|showdescription=1
|A1= Paper
|B1= Paper
|C1= Paper
|A2= Paper
|B2= Compass
|C2= Paper
|A3= Paper
|B3= Paper
|C3= Paper
|Output= Empty Map
|type= Miscellaneous
|description=This variation is called an "empty locator map" {{in|bedrock}}, or an "empty map" {{in|java}}.
When the player first creates a map, it is blank. It needs to be activated by holding it and pressing ''{{Control|use item}}''. after which it records terrain and location markers as the player travels within (or close to) the area it maps.
}}
{{crafting
|A1= Paper
|B1= Paper
|C1= Paper
|A2= Paper
|B2= Paper
|C2= Paper
|A3= Paper
|B3= Paper
|C3= Paper
|Output= Empty Map
|type= Miscellaneous
|description={{only|bedrock}}
This variation is called an "empty map". It does not show location markers. It is intended for cloning and zooming locator maps without having to consume an additional [[compass]] (thereby saving [[iron ingot]]s and [[redstone dust]]), but it can also be {{Control|use|text=activated}} and later converted to a locator map by combining it with a compass on an [[anvil]], [[crafting table]], or [[cartography table]].
|foot=1
}}
=== Natural generation ===
==== Chest loot ====
{{LootChestItem|empty-map,map
}}
=== Cartography table ===
A map can also be created using a single paper on a [[cartography table]] to create an empty map, or a paper with a compass for an empty locator map.{{only|bedrock}}
=== Starting map ===
{{exclusive|bedrock|section=1}}
When creating a new world {{in|bedrock}}, the player can enable the "Starting Map" option to spawn with an empty locator map in the hotbar. The map's zoom scale is 1:8. The map is updated only while the player holds it.
=== Trading ===
Novice-level cartographer [[Villager|villagers]] sell a single empty map for 7 [[Emerald|emeralds]] as their trades.
{{IN|java}}, cartographer villagers may give players with the [[Hero of the Village]] effect an empty map.
== Usage ==
{{See also|Tutorials/Mapping}}
=== Mapping ===
Crafting a map creates an empty map. The map is drawn for the first time when it is held and used (with ''{{control|use item}}''). This map can then be adjusted to different zoom levels. After conversion to a drawn map item, it starts to draw a top-down view of the player's surroundings, with North pointing to the top of the map. A pointed oval pointer indicates the player's position on the map, and moves in real-time as the player moves across the terrain shown on the map. The map does ''not'' center on the player when created, rather, the world is broken up into large invisible grid squares, and the map displays the area of whichever grid square it is in when it is first used. For example, if a player uses a new map in a certain grid square, and then moves a distance away and uses another fresh map but is still within the same grid square, both maps appear identical. To make a map that is not identical to the first one, the player would have to move outside of the edges of the first map (because then they would be in a new grid square). This way, no two maps of the same size can ever partially overlap and every map can display only a fixed area.
To record the world on a map, that specific map must be held in the player's hands while the player moves around the world. The world is recorded as-is during exploration, meaning that if the world is modified, a player must revisit the area while holding the map to update the map's view. Maps can also be [[Map#Cloning|cloned]]. If a player holds a map whose one or more clones are on display in item frames, updates are made on all clone-connected maps.
Other players are displayed on the map only if they have a map in their inventory cloned from the one being looked at. When placing a map into an [[item frame]], the map displays with a green pointer shown at the location of the item frame. This is to help the player see where they are in relation to the area that the map is showing. If the player leaves a map in an item frame and views a clone of it, the green pointer remains in the spot of the framed copy. This can be used to set up waypoints. Unexplored areas are transparent, making the item frame visible.
When the player leaves the area shown on a specific map, the player pointer transforms into a white dot that moves on that map. The marker shrinks to a smaller white dot if the player is far from the map's center: the area is 320 by 320 blocks per scale factor. The dot moves along the edge of the map to show the relative location of the player. However {{in|bedrock}}, the pointer remains as an arrow but shrinks until the player is near the area shown on the map.
While maps in [[the Nether]] work, they show only the red-and-gray pattern, regardless of the blocks placed. The only useful function is finding where the player is in relation to placed framed maps, which show as green pointers. Additionally, the player pointer rapidly spins and is not a good indicator of direction. Placing a [[banner]] in [[the Nether]] still shows it on the map as usual. Having a smaller map image while riding a [[strider]] in the Nether can help one to see one's footing while traveling over [[lava]].
{{IN|java}}, when using a map from another dimension, the map shows the player's position and direction when they were last in the dimension of the map. {{IN|bedrock}}, however, the player can use maps from one dimension while in another dimension. For locator maps, the place marker changes color depending on the dimension that the player is currently in (white for the Overworld, red for [[the Nether]], and magenta for [[the End]]). An Overworld map in the Nether shows the player's corresponding location and direction in the Overworld.<ref name=multiverse>{{ytl|EpP1diZdEdI}}</ref> Similarly, a Nether Map in the Overworld shows the player's corresponding location in the Overworld, but the place marker spins, just like a Nether map in the Nether. An Overworld map in the End shows the world spawn.<ref name=multiverse/> A Nether map cannot be used in the End — the map appears, but the place marker is not shown anywhere — and similarly, an End map cannot be used in the Overworld or the Nether.
A player can make a large piece of pixel art (128×128) facing upward, center a map on it, and place that map in an [[item frame]] to create a custom picture. Locking is recommended. See [[Map item format#Map Pixel Art]] for details on the techniques.
Maps display as a mini-map when held in the off-hand, or if the off-hand slot is occupied; the map is full-sized only when held in the dominant hand with both hands free.
A map always positions itself facing towards North when placed horizontally within an item frame regardless of how the map is placed.
=== Map content ===
{{Main|Map item format}}
Maps consist of square pixels arranged like pixels in a 128×128 square pattern, with each pixel representing a square portion of land. {{IN|java}}, the [[Map item format#Color table|color of a map pixel]] generally matches the color of the most common [[opaque]] block in the corresponding area, as seen from the sky. 'Minority blocks' in the target area have no effect on the color of the pixel, thus small features tend to be undetectable on zoomed-out maps.
{{IN|bedrock}}, the [[Map item format#Color table|color of a map pixel]] instead matches the single top-most opaque block in a grid sized by the map magnification pixel size (see the table in the "Player marker and pointer" section below). For example, a 3/4 magnification map has a pixel size of 8x8 blocks; this means the map will read only the top-most opaque blocks at the 0,0 coordinate, the 8,0 coordinate, the 0,8 coordinate, etcetera, ignoring all other blocks in the area. This means that {{in|bedrock}}, map pixel art requires only one block per pixel regardless of map magnification.
{{IN|bedrock}}, grass, foliage and water colors that are biome-dependent are represented accurately on a map.
{| class="wikitable"
|-
! style="width: 300px;" | {{el|je}}
! style="width: 300px;" | {{el|be}}
|-
| style="text-align: center;" | [[File:Map Zoom 4.png|alt=All banners marked on a map, alongside a named banner.|216px]]
| style="text-align: center;" | [[File:Map item BE.png|216px]]
|-
| Biome colors on ''Java Edition''.
| Biome colors on ''Bedrock Edition''.
|-
|}
Maps also show ground up to about 15 blocks below the surface of the water in oceans as slightly lighter blue, to show where the ground rises. This is not true with land above water. Higher elevations in the world mean lighter colors on the map. The map records the surface even as the player moves below the surface.
A standard map represents 128x128 blocks (1 block per pixel, 8x8 [[chunks]]) but maps can be zoomed-out to represent up to 2048x2048 blocks (16 square blocks per pixel, 128x128 [[chunks]]).
Some relevant distances: 64 blocks (4 chunks) is the update radius from a player in the Overworld and the End. However, it is half this (32 blocks) in the Nether. Also, 1024 blocks is the minimum Overworld distance from a [[nether portal]], at which players can build another portal and expect to reach a new location in the Nether. This is the distance across a 1:8 map, and also from a 1:16 map's center to its edge.
=== Player marker and pointer ===
{{IN|java}}, every map contains a marker that marks the position of the player, and points in the same direction as the player. When a player moves out of a map, a big white dot appears and moves relative to the player's position. The pointer either disappears when the player moves away a certain distance from the border of the map or, in case of [[explorer map]]s, the big white dot changes to a smaller white dot. The distance required for the small white dot to appear(explorer maps) or for the big dot to vanish (normal maps) changes with the scaling of the map.
* '''Level 0/4 :''' 128×128 blocks (each map pixel represents 1 block)
* '''Level 1/4 :''' 256×256 blocks (2×2 blocks per map pixel)
* '''Level 2/4 :''' 512×512 blocks (4×4 blocks per map pixel)
* '''Level 3/4 :''' 1024×1024 blocks (8×8 blocks per map pixel)
* '''Level 4/4 :''' 2048×2048 blocks (16×16 blocks per map pixel)
{{IN|bedrock}}, a map can be crafted with or without this marker, and a map without a position marker can add one later by adding a compass to the map. When a map is crafted without a compass, it's simply called an "empty map", but when crafted with a compass, it's called an "empty locator map". The marker also turns red if the player enters the Nether with an Overworld map and shows the player's Overworld location relative to the Nether location. A map created in the End has a purple marker showing the player's location. If an Overworld map is used in the End, a magenta dot appears on the player's spawn point.{{/BE|position}}
{{crafting
|name=Map<br>(with marker)
|ingredients=[[Map]] or Empty Map +<br>[[Compass]]
|showdescription=1
|Map (no markers);Empty Map
|Compass
|Output= Locator Map;Empty Locator Map
|type= Miscellaneous
|description={{el|be}} only.
Maps crafted from only paper do not show the location marker; to add it, a compass must be added to the map.
|foot=1
}}
{{IN|bedrock}}, a cartography table can also be used to add a pointer to create a locator map or empty locator map. This can be done by adding a compass to paper, or to an empty map or map.
=== Zooming out ===
[[File:Cartography table UI zoom.png|thumb|300px|{{IN|java}}, cartography table's UI, showing the map is being zoomed out.]]
A [[cartography table]] can also be used to zoom out, taking only one piece of paper per zoom level.
A blank map can not be zoomed out. A map has to have something already marked on it for the zooming to be possible.
{{Crafting
|A1= Paper |B1= Paper |C1= Paper
|A2= Paper |B2= Map;Locator Map |C2= Paper
|A3= Paper |B3= Paper |C3= Paper
|Output= Map;Locator Map
|showdescription=1
|description=Locator Map {{el|be}} only.
}}
{{/BE|zoom}}
==== Zoom details ====
The zooming function starts from when the map is created (zoom level 0) up to its fourth zoom step (zoom level 4).
{| class="wikitable" style="text-align: center" data-description="Zoom levels"
! colspan="2" |
! Zoom step 0
! Zoom step 1
! Zoom step 2
! Zoom step 3
! Zoom step 4
|-
! colspan="2" |
| [[File:Map Zoom 0.png|116px|Zoom step 0, 1:1]]
| [[File:Map Zoom 1.png|116px|Zoom step 1, 1:2]]
| [[File:Map Zoom 2.png|116px|Zoom step 2, 1:4]]
| [[File:Map Zoom 3.png|116px|Zoom step 3, 1:8]]
| [[File:Map Zoom 4.png|116px|Zoom step 4, 1:16]]
|-
! colspan="2" | Zoom level
| 0/4
| 1/4
| 2/4
| 3/4
| 4/4
|-
! colspan="2" | 1 map pixel represents
| 1 block
| 2×2 blocks
| 4×4 blocks
| 8×8 blocks
| 16×16 blocks<br>(1×1 chunk)
|-
! colspan="2" | Scaling ratio
| 1:1
| 1:2
| 1:4
| 1:8
| 1:16
|-
! rowspan="2" colspan="2" | Map covers an area of
| 128×128 blocks
| 256×256 blocks
| 512×512 blocks
| 1024×1024 blocks
| 2048×2048 blocks
|-
| 8×8 chunks
| 16×16 chunks
| 32×32 chunks
| 64×64 chunks
| 128×128 chunks
|-
! colspan="2" | Smallest discernible features
| Blocks
| Trees, Paths
| Lakes, Buildings
| Mountains, Rivers
| Biomes, Mountain Ranges
|-
! colspan="2" | Use cases
| Pixel art, Base plans
| Base surroundings
| Structure mapping
| Landscape mapping
| Biome mapping
|-
! rowspan="2" | Total paper needed to zoom out from Level 0
! in anvil{{only|bedrock|short=1}} or crafting table
| -
| {{ItemSprite|Paper}} 8
| {{ItemSprite|Paper}} 16
| {{ItemSprite|Paper}} 24
| {{ItemSprite|Paper}} 32
|-
! in cartography table
| -
| {{ItemSprite|Paper}} 1
| {{ItemSprite|Paper}} 2
| {{ItemSprite|Paper}} 3
| {{ItemSprite|Paper}} 4
|}
Maps are always aligned to a grid at all zoom levels. That means zooming out any different map in a specific area covered by that map always has the same center. As such, maps are aligned by map width (1024 blocks for a level 3 maps) minus 64. A level 3 map generated at spawn covers X and Z coordinates from -64 to 959. All maps generated in this area zoom out to the same coordinates, guaranteeing that they are always 'aligned' on a map wall. For a zoomed-out map to cover a new area, it must start with a base (level 0) map that is in that area.
At zoom level 0, a map created on the point (0,0) has (0,0) at the center of the map. At higher zoom levels of the same map, the coordinate (0,0) is in the top left square of the map.
{{IN|java}}, zoom level can be seen on a map by turning on Advanced Tooltips (a [[Debug screen#More debug keys|debug screen]] option that can be toggled by using the key combination {{key|F3+H}}). The tooltip of the map then shows the zoom level, scaling factors, and map ID.
=== Cloning ===
[[File:Cartography table UI clone.png|thumb|300px|{{IN|Java}}, cartography table's UI, showing the map is being cloned.]]
A mix of empty maps and empty locator maps may be used. Whether the cloned maps show position markers is dependent only on the input map.
A [[cartography table]] can also be used to clone a map.
The parts of the world that have already been explored and mapped are copied, and newly explored areas appear on both instances. If one of the maps is later zoomed out, then the maps lose their connection to each other and function as completely separate maps that have to be individually filled by exploring.
In Creative mode, a map in an item frame may be cloned by using {{control|pick block}} on it, as long as that map is not also in the player's inventory.
It doesn't matter if the map to be cloned is at a higher zoom level (made of more paper) than the blank map. Upon copying the map, both resulting maps have the same magnification as the starting map.
{{/BE|clone}}
=== Crafting ingredient ===
{{crafting usage|Map, Empty Map}}
=== Marking points ===
{{IN|java}} the player has the ability to mark spots on a map. To do this, {{control|use}} a map on a placed-down [[banner]], and the spot of the banner gets marked on the map. The mark takes the color of whatever the base color is for the banner, and if the banner has a name, the mark shows that name. Banner marks on a map are always oriented with their top facing north, regardless of the banner's actual orientation. If the banner is destroyed, the mark of the banner remains at first, but if the player gets closer to where the banner previously was, it disappears as the area is updated on the map.
If a map is mounted on an item frame and is within the area it depicts, the mounted map displays its current location with a green indicator rotated to match its orientation.
[[File:Map Marker Bedrock on Item frame.png|thumb|181x181px|{{IN|bedrock}} this is what a map lying on an item frame looks like, while showing markers.]]
{{IN|bedrock}} the player can place copies of locator maps in [[item frame]]s in order to create a land mark. The marker is a green dot that resembles the shape of the player's marker, but in green color. The position the marker points at depends on the direction the item frame is facing. It is worth noting that the markers work only on copies of the same map. Other maps of the same area do not show the existing markers that the player(s) had placed.
If a player has a cloned map in their inventory, their pointer appears white when viewed on the same map held by another player. Hence, if all players have the same cloned map in their inventory, all markers would appear white when the clone map is viewed.
{| class="wikitable"
|-
! style="width: 300px;" | {{el|je}}
! style="width: 300px;" | {{el|be}}
|-
| style="text-align: center;" | [[File:Banner marked map.png|alt=All banners marked on a map, alongside a named banner.|216px]]
| style="text-align: center;" | [[File:Tracking map with markers bedrock.png|216px]]
|-
| How every banner appears {{IN|java}} on a map, including named banners.
| {{IN|bedrock}} this is how a locator map shows map markers while held by a player.
|-
|}
===Locking===
[[File:Cartography table UI lock.png|thumb|300px|{{IN|Java}}, cartography table's UI, showing the map is being locked.]]
Maps can be locked when using a [[glass pane]] in a [[cartography table]]. This creates a new map containing the same data and locks it. All copies of this new map are also locked. A locked map never changes, even when the depicted terrain changes. {{IN|Be}}, locked maps have a unique texture.
{| class="wikitable" style="text-align: center;"
|-
! Condition
! style="width: 200px;" | Newly created map
! style="width: 200px;" | Map after terrain alteration
|-
! Unlocked map
| [[File:Map Zoom 0.png|174px]] || [[File:Unlocked Map.png|174px]]
|-
! Locked map
| [[File:Map Zoom 0.png|174px]] || [[File:Map Zoom 0.png|174px]]
|-
|}
{{-}}
== Sounds ==
{{Edition|Java}}:
{{Sound table
|rowspan=2
|sound=Drawmap1.ogg
|sound2=Drawmap2.ogg
|sound3=Drawmap3.ogg
|subtitle=Map drawn
|source=player
|description=When a map is drawn
|id=ui.cartography_table.take_result
|translationkey=subtitles.ui.cartography_table.take_result
|volume=1.0
|pitch=1.0
|distance=16}}
{{Sound table
|subtitle=Map drawn
|source=block
|description=When a map is edited using a cartography table
|id=ui.cartography_table.take_result
|translationkey=subtitles.ui.cartography_table.take_result
|volume=1.0
|pitch=1.0
|distance=16
|foot=1}}
{{Edition|Bedrock}}:
{{Sound table
|type=bedrock
|rowspan=2
|sound=Drawmap1.ogg
|sound2=Drawmap2.ogg
|sound3=Drawmap3.ogg
|source=block
|description=When a map is drawn<wbr>{{Upcoming|BE 1.20.20.20}}
|id=ui.cartography_table.take_result|idnote={{Verify|Could be block.cartography_table.use}}
|volume=0.8
|pitch=1.0}}
{{Sound table
|type=bedrock
|source=block
|description=When a map is edited using a cartography table
|id=ui.cartography_table.take_result
|volume=0.8
|pitch=1.0
|foot=1}}
== Data values ==
=== ID ===
{{edition|java}}:
{{ID table
|edition=java
|showforms=y
|generatetranslationkeys=y
|displayname=Empty Map
|spritetype=item
|nameid=map
|form=item}}
{{ID table
|displayname=Map
|spritetype=item
|nameid=filled_map
|form=item
|translationkey=item.minecraft.filled_map, filled_map.buried_treasure, filled_map.explorer_jungle{{upcoming|java 1.20.2}}, filled_map.explorer_swamp{{upcoming|java 1.20.2}}, filled_map.mansion, filled_map.monument, filled_map.unknown, filled_map.village_desert{{upcoming|java 1.20.2}}, filled_map.village_plains{{upcoming|java 1.20.2}}, filled_map.village_savanna{{upcoming|java 1.20.2}}, filled_map.village_snowy{{upcoming|java 1.20.2}}, filled_map.village_taiga{{upcoming|java 1.20.2}}
|foot=1}}
{{edition|bedrock}}:
{{ID table
|edition=bedrock
|showaliasids=y
|shownumericids=y
|showforms=y
|notshowbeitemforms=y
|generatetranslationkeys=y
|displayname=Empty Map
|spritetype=item
|nameid=empty_map
|aliasid=emptymap
|id=515
|form=item
|translationkey=item.emptyMap.name, item.emptyLocatorMap.name}}
{{ID table
|displayname=Map
|spritetype=item
|spritename=map-be
|nameid=filled_map
|aliasid=map
|id=420
|form=item
|translationkey=item.map.name, item.map.exploration.mansion.name, item.map.exploration.monument.name, item.map.exploration.treasure.name
|foot=1}}
=== Metadata ===
{{see also|Bedrock Edition data values}}
{{IN|bedrock}}, maps use the following data values:
{{/DV}}
=== Item data ===
{{el|java}}:
{{main|Player.dat format}}
<div class="treeview">
* {{nbt|compound|tag}}: The item's '''tag''' tag.
{{:Player.dat_format/Maps}}
</div>
{{el|bedrock}}:
: See [[Bedrock Edition level format/Item format]].
=== Map icons ===
{{see also|Player.dat format|Map item format|map_icons.png}}
Map icons are 8×8 in ''Java Edition'', but 16×16 in Bedrock Edition. As such, there are minor misalignment issues in ''Java Edition''.<ref>{{bug|MC-214649|||WF}}</ref>
[[File:Map icons.png|thumb|128px|Map icons texture {{in|Java}}]]
[[File:Map icons BE.png|thumb|128px|Map icons texture {{in|Bedrock}}]]
{| class="wikitable"
|-
! Java ID !! Bedrock ID !! Text ID !! Appearance !! Purpose !! Shown in item frames?
|-
| 0 || ||<code>player</code> || [[File:Player (texture) JE1 BE1.png|16px]] [[File:Player (texture) BE2.png|16px]] White marker || Players (on map) || No
|-
| 1 || 1 ||<code>frame</code> || [[File:Green Marker (texture) JE1 BE1.png|16px]] [[File:Green Marker (texture) BE2.png|16px]] Green marker || The current map in an item frame || Yes
|-
| 2 || ||<code>red_marker</code> || [[File:Red Marker (texture) JE1 BE1.png|16px]] [[File:Red Marker (texture) BE2.png|16px]] Red marker || Position converted to Overworld when opening Overworld map in the Nether{{Only|bedrock}} || No
|-
| 3 || ||<code>blue_marker</code> || [[File:Blue Marker (texture) JE1 BE1.png|16px]] [[File:Blue Marker (texture) BE2.png|16px]] Blue marker || Other players || No
|-
| 4 || ||<code>target_x</code> || [[File:Target X (texture) JE1 BE1.png|16px]] White X || Unused || Yes
|-
| 5 ||5
|<code>target_point</code> || [[File:Target Point (texture) JE1 BE1.png|16px]] [[File:Target Point (texture) BE2.png|16px]] Red triangle || Unused || Yes
|-
| 6 || 6 ||<code>player_off_map</code> || [[File:Player Off Map (texture) JE1 BE1.png|16px]] Large white dot || Players off map, nearby{{only|java}} || No
|-
| 7 || 13 ||<code>player_off_limits</code> || [[File:Player Off Limits (texture) JE1.png|16px]] [[File:Player Off Limits (texture) BE.png|16px]] Small white dot || Players off map, far away{{only|java}} || No
|-
| 8 ||14
|<code>mansion</code> || [[File:Mansion (texture) JE1.png|16px]] [[File:Mansion (Texture) BE2.png|frameless|16x16px]] Woodland mansion || Woodland mansion || Yes
|-
| 9 || 15 ||<code>monument</code> || [[File:Monument (texture) JE1.png|16px]] [[File:Monument Texture BE2.png|frameless|16x16px]] Ocean monument || Ocean monument || Yes
|-
| 10 - 25 || ||<code>{{tooltip|banner_*|banner_white, banner_orange, banner_magenta, banner_light_blue, banner_yellow, banner_lime, banner_pink, banner_gray, banner_light_gray, banner_cyan, banner_purple, banner_blue, banner_brown, banner_green, banner_red, banner_black}}</code> || [[File:Banner White (texture) JE1.png|16px]] [[File:Banner Light Gray (texture) JE1.png|16px]] [[File:Banner Gray (texture) JE1.png|16px]] [[File:Banner Black (texture) JE1.png|16px]] [[File:Banner Brown (texture) JE1.png|16px]] [[File:Banner Red (texture) JE1.png|16px]] [[File:Banner Orange (texture) JE1.png|16px]] [[File:Banner Yellow (texture) JE1.png|16px]] [[File:Banner Lime (texture) JE1.png|16px]] [[File:Banner Green (texture) JE1.png|16px]] [[File:Banner Cyan (texture) JE1.png|16px]] [[File:Banner Light Blue (texture) JE1.png|16px]] [[File:Banner Blue (texture) JE1.png|16px]] [[File:Banner Magenta (texture) JE1.png|16px]] [[File:Banner Purple (texture) JE1.png|16px]] [[File:Banner Pink (texture) JE1.png|16px]]<br>Banners in all 16 wool colors{{only|java}}|| Banner markers || Yes
|-
| 26 ||4
|<code>red_x</code> || [[File:Red X (texture) JE1.png|16px]] [[File:Target X (texture) BE2.png|16px]] Red X || Buried treasure || Yes
|-
| || 8 || || [[File:Magenta Marker (texture) BE1.png|16px]] Magenta marker
| Position converted to Overworld when opening Overworld map in the End{{Only|bedrock}} || No
|-
| || 9 || || [[File:Orange Marker (texture) BE1.png|16px]] Orange marker{{more info}}
|Other players
|Yes
|-
| || 10 || || [[File:Yellow Marker (texture) BE1.png|16px]] Yellow marker
| Other players || No
|-
| || 11 || || [[File:Cyan Marker (texture) BE1.png|16px]] Cyan marker
| Other players || No
|-
| -
|12
| || [[File:Green Point (texture) BE1.png|16px]] Green Triangle
| Other structure such as stronghold, fortress, end city, etc. when used as explorer map destination{{Only|bedrock}} || Yes
|}
It should be noted that even if the player used a NBT editor to add an additional icon on the map, ''Minecraft'' shows only the first one listed when the player loads up their world.
== Achievements ==
{{load achievements|Map Room}}
== History ==
{{see also|section=24|map_icons.png|Java Edition history of textures#Map icons}}
{{more images|section=24|{{bug|MC-72962}}}}
{{History||April 27, 2011|link=https://web.archive.org/web/0/http://notch.tumblr.com/post/4988431144/the-maps|[[Notch]] unveiled screenshots of the map.}}
{{History||April 28, 2011|link={{tweet|notch|63500114005721088}}|[[Notch]] said that he would try to make maps place-able on [[wall]]s.}}
{{History|java beta}}
{{History||1.6|snap=Test Build 3|[[File:Map (item) JE1 BE1.png|32px]] Added maps.}}
{{History||1.6.6|The ability to auto-craft maps using shift-click has been disabled.}}
{{History||1.8|snap=Pre-release|Maps can now be found in library chests in the brand-new [[stronghold]]s.
|Auto crafting maps has been restored. Map cloning, therefore, is unavailable for a period of time.}}
{{History||1.8.1|Maps now work both while walking and flying.}}
{{History|java}}
{{History||1.0.0|snap=Beta 1.9 Prerelease 5|Prior to this update, the [[sun]] in ''[[Minecraft]]'' rose in the North, which threw off many [[player]]s and led to a common misconception that ''Minecraft'' maps/[[world]]s were oriented with East at the top. The sun now rises in the east and sets in the west, making navigation much more intuitive.
|Before the change in sun position, it was commonly said that ''Minecraft'' maps/worlds are oriented with East at the top; sunrise, by definition, occurs at the East, which means it is certainly true that the maps were oriented "East" since the Sun rose from the top (North). However, [[Jeb]] asserted (and [[Notch]] agreed) that the sun rose in the north.<ref>{{Tweet|jeb|87815841160237056}}</ref><ref>{{Tweet|notch|88155424880201728}}</ref> Most mods and map-making tools, however, used the terms East and North consistent with their actual definitions (e.g. a [[Programs and editors/Cartograph|Cartograph]]-generated map with North at the top is rotated 90 degrees from the in-game map).}}
{{History||1.4.2|snap=12w34a|[[File:Empty Map JE1 BE1.png|32px]] [[Crafting]] a map now creates an empty map. The map is drawn for the first time when it is held and right clicked, and is centered near the location of the [[player]] when clicked (not as before where it was centered on the location it was crafted.)
|Previously, in order to map a new area, the map had to be ''crafted'' in that area (rather than carrying a previously-crafted map to the new area). The point where a map is crafted becomes its permanent center, and could never be changed.
|The pointer no longer disappears when leaving the map, but transforms into a white dot, indicating on what side of the map the player is located.
|Maps now align to a grid, making it easier to create adjacent maps.
|Maps can now be zoomed out (but not zoomed in).
|Maps can now be cloned and scaled.}}
{{History||1.4.2|snap=12w34b|Maps now have a ''zoom level'', which was fixed at 1:8 prior to snapshot [[Java Edition 12w34a|12w34a]],<ref name="mapinfo">https://web.archive.org/web/0/http://notch.tumblr.com/post/4988431144/the-maps</ref> but now starts at 1:1 and can be increased up to 1:16 by re-crafting an existing map.
|Maps are no longer numbered on the top-left corner and is labeled through the tooltip.}}
{{History|||snap=12w36a|New maps are now crafted at a scale factor of 1:1. A zoomed in map can be zoomed out by re-crafting it with another 8 sheets of [[paper]] on a [[crafting table]]. Each time this is done, the scale increases - 1:1, 1:2, 1:4, 1:8, 1:16 with a map scale of 1:16 being the current maximum.}}
{{History||1.7.2|snap=13w38a|The map size has been increased when placed on a [[wall]] using the [[item frame]].
|More colors have been added to maps for different [[block]]s.<ref name="infodump2">https://web.archive.org/web/0/https://www.mojang.com/2013/10/minecraft-1-7-the-update-that-changed-the-world</ref>}}
{{History||1.8|snap=14w31a|Zoomed maps now conform to an expanded grid based on their zoom level. Previously, careful considerations would need to be taken to creating a wall of adjoining maps.}}
{{History||1.8.1|snap=pre1|Some colors have been changed on maps to more accurately represent their respective [[block]].}}
{{History||1.9|snap=15w31a|Maps now display as a mini-map when held in the off-hand, or if the off-hand slot is occupied; the (old) large version is visible only when held in the dominant hand with the secondary hand free.}}
{{History|||snap=15w34a|New maps can now be [[crafting|crafted]] at a scale factor of 1:4.
|A crafting recipe has been added for zooming in maps.}}
{{History|||snap=15w43a|The average yield of empty maps from [[stronghold]] library [[chest]]s has been doubled.}}
{{History|||snap=15w45a|New maps are once again [[crafting|crafted]] at a scale factor of 1:1, as they had been before snapshot [[15w34a]].
|The [[crafting]] recipe, that was introduced in 15w34a, for zooming in maps has been removed.}}
{{History|||snap=15w49a|Map making now uses armor equipping sounds.}}
{{History||1.11|snap=16w39a|Maps now work in [[the End]].
|Empty maps are now [[trading|sold]] by cartographer [[villager]]s as their tier 3 [[trading|trade]].
|Added [[explorer map]]s, sold by cartographers as their tier 4 trades.}}
{{History||1.12|snap=17w17a|Maps now have separate colors for colored [[terracotta]] blocks from other colored blocks.}}
{{History||1.13|snap=17w47a|Prior to [[1.13/Flattening|''The Flattening'']], these [[item]]s' numeral IDs were 358 and 395.
|Maps now use additional NBT to specify which map they contain. Prior to this version, they used the [[damage]] value instead.
|Map IDs are no longer limited to 32,768.}}
{{History|||snap=17w50a|Maps can now be placed on floor and ceiling [[item frame]]s.}}
{{History|||snap=18w10a|Spots on maps can now be marked using [[banner]]s.}}
{{History|||snap=18w11a|Empty maps can now generate in [[shipwreck]] [[chest]]s.}}
{{History|||snap=pre7|Maps have been changed slightly, in regard to which [[block]]s are shown and which blocks are not.}}
{{History||1.14|snap=18w43a|[[File:Empty Map JE2 BE2.png|32px]] [[File:Map (item) JE2 BE2.png|32px]] The textures of maps have been changed.}}
{{History|||snap=18w48a|Empty maps can now be found in chests in [[village]] cartographer houses.}}
{{History|||snap=19w02a|Maps can now be cloned and zoomed out (extended) by using a [[cartography table]].
|Maps can now be locked by using a [[glass pane]] with a cartography table.
|The recipes for cloning and zooming out maps have been removed.}}
{{History|||snap=19w06a|Map making is now silent again.}}
{{History|||snap=19w13a|Cartographer villagers now give empty maps to players under the [[Hero of the Village]] effect.}}
{{History||1.16|snap=20w21a|Map making sounds are now the same as when using a cartography table.}}
{{History|pocket alpha}}
{{History||v0.14.0|snap=build 1|[[File:Empty Map JE1 BE1.png|32px]] [[File:Map (item) JE1 BE1.png|32px]] Added maps.
|Maps are crafted using nine [[paper]], one for every slot of the [[crafting]] grid.
|Maps must be combined with a [[compass]] using an [[anvil]] in order to show the [[player]]'s position.
|Maps can be zoomed using an anvil.}}
{{History|||snap=build 3|New maps are now [[crafting|crafted]] at full zoom.
|Empty maps now have a "Create Map" button to initialize them.}}
{{History|||snap=build 7|New maps are now crafted at a scale factor of 1:1.}}
{{History||v0.15.0|snap=unknown|Maps can now be crafted either with 8 pieces of [[paper]] and a [[compass]] ''or'' 9 pieces of paper, to get a map with or without a position marker.}}
{{History||v0.16.0|snap=build 1|Different colors have been added to maps for different [[biome]]s.}}
{{History|pocket}}
{{History||1.0.0|snap=?|[[Windows 10 Edition]] can now use the [[anvil]] as well as the [[crafting table]] to clone, zoom and apply markers, just as [[Pocket Edition]] in general could.
|Maps can now be found inside [[stronghold]] library [[chest]]s.}}
{{History||1.1.0|snap=alpha 1.1.0.0|Empty maps with direction markers built-in are now called "locator maps".}}
{{History|||snap=alpha 1.1.0.3|"Locator maps" are now called "empty locator maps".
|Empty maps are now [[trading|sold]] by cartographer [[villager]]s for 7-11 [[emerald]]s as their tier 3 [[trading|trade]].}}
{{History|bedrock}}
{{History||1.4.0|snap=beta 1.2.14.2|Maps can now be found inside map room [[chest]]s in [[shipwreck]]s.}}
{{History||?|The texture of the filled map overlay has been changed.}}
{{History||?|Maps now function in dimensions other than the dimension in which they were created.}}
{{History||1.10.0|snap=beta 1.10.0.3|Maps can now be found in cartographer house [[chest]]s in [[village]]s.
|[[File:Empty Map JE2 BE2.png|32px]] The texture of empty maps has been changed.}}
{{History||1.11.0|snap=beta 1.11.0.1|Empty maps can now be created from 1 [[paper]] in [[cartography table]]s.
|Maps can now be zoomed, cloned, renamed, and have pointers added in cartography tables.}}
{{History|||snap=beta 1.11.0.4|Cartographer [[villager]]s now [[trading|sell]] empty map for an [[emerald]] as their first tier [[trading|trades]].
|Empty locator maps can now be [[trading|bought]] from cartographer villagers.}}
{{History||1.13.0|snap=beta 1.13.0.1|[[File:Map (item) BE3.png|32px]] [[File:Locked Map (item) BE2.png|32px]] Filled maps and locked maps now have unique inventory icons.}}
{{History||1.16.0|snap=beta 1.16.0.57|Trading has been changed, novice-level cartographer now sell an empty map for 7 emeralds. Cartographer villager no longer sell empty locator map.}}
{{History||1.16.100|snap=beta 1.16.100.56|The ID of maps have been changed from <code>emptymap</code> to <code>empty_map</code> and <code>map</code> to <code>filled_map</code>.}}
{{History|console}}
{{History||xbox=TU1|xbone=CU1|ps=1.00|wiiu=Patch 1|switch=1.0.1|[[File:Map (item) JE1 BE1.png|32px]] Added maps.
|The [[player]] spawns with a free map.
|Maps are available only as zoom step 3 maps centered at coordinates 0,0. Biome colors do not appear on maps.}}
{{History||xbox=none|xbone=CU1|ps=1.0|wiiu=none|Larger sized worlds on Xbox One, Playstation 4, and Nintendo Switch have zoom step 3 maps aligned to a grid with maps centered at 0, 1024, or 2048 on the X or Z coordinates.}}
{{History||xbox=TU21|xbone=CU9|ps=1.14|wiiu=Patch 1|[[File:Empty Map JE1 BE1.png|32px]] [[Crafting]] a map now produces an empty map.}}
{{History||xbox=TU46|xbone=CU36|ps=1.38|wiiu=Patch 15|The outer end islands appear on different maps; even on Xbox 360, Playstation 3, Vita, and Wii U editions.}}
{{History||xbox=none|xbone=none|ps=1.90|wiiu=none|switch=none|[[File:Empty Map JE2 BE2.png|32px]] [[File:Map (item) JE2 BE2.png|32px]] The textures of maps have been changed.}}
{{History||ps=1.91|Maps can now be created and used in [[cartography table]]s.}}
{{History|foot}}
== Issues ==
{{issue list}}
== Trivia ==
* Use of the {{key|F1}} key can allow the player to hold a map without blocking their view at all.
* In ''Java Edition'', a map created using {{cmd|give}} can be any map by using the Map parameter to specify the map number desired. E.g. {{cmd|give [player] minecraft:filled_map{map:5<nowiki>}}} gives the specified player map_5. If no data value is supplied it defaults to map_0. If map_0 has not ever been crafted, it is centered on x=0, z=0.
* The maps are stored separately as their own data (<code>.dat</code>) file as <code>map_x.dat</code> with (x) being the map number, see [[map item format]] for more info. By manipulating this number, players can organize their maps to suit them, or if they accidentally create a map in the same location, they can delete their extra map so as to save the number they make.
* Certain programs can be used to make customized maps with images or text on them instead of actual maps, many people use these in adventure maps to show pictures or to tell a story.
* Since all copies of a map are links to the same file, copying an unfinished map keeps it synchronized with the copy as the player fills it in. Thus, a copy stored in a chest can act as a remote backup.
* A map that is in an item frame does not update itself until a player picks it up, lets it reload, and places it back again. However, if a player holds a clone of the map, both maps update.
* Filled maps are the only items that make 90 degree rotations in item frames, and also the only items that can expand the item frame into full block wide.
* On [[Legacy Console Edition]], the player always spawns with a map in their inventory after creating a world. This was later added to Bedrock Edition as an optional feature in the world creation menu.
* Maps on Legacy Console Edition always show the player's current coordinates, as a substitute for the optional [[Coordinates|coordinate display]] in other editions.
* A map cannot be created on [[New Nintendo 3DS Edition]]. Instead, the map is always displayed on the bottom screen along with the coordinates. Biome colors do not appear on maps.
== Gallery ==
<gallery>
MapItem1.png|A fully zoomed map.
MapRotation.png|Having a map in hand does not stop the ability to see ahead.
MapItem3.png|A world being recorded onto a map.
Mcmap4.png|Nearly fully explored map.
Zoomed Map.png|A map edited to the scale of 1.
Sky Map.png|A map mapping the [[Sky Dimension]].
MapOfVillage.png|A village and how it is represented on a map.
Pumpkin map.png|A map containing a custom image made by placing a large number of blocks.
Complete Map.png|A completely explored map.
MapZooms.png|A diagram showing how maps zoomed out before [[Java Edition 1.8]]. Notice how the larger maps have borders made of half and quarter small maps.
Map18zooms.png|From 1.8, zoomed maps are aligned to this grid exactly.
Large Biome Map.png|A map of a [[Large Biomes]] world.
Map0140-0160.png|A comparison of maps between versions in Pocket Edition Alpha [[Pocket Edition Alpha 0.14.0|0.14.0]] and [[Pocket Edition Alpha 0.16.0|0.16.0]].
Mycelium Map.png|A map view of a mushroom biome, showing that mycelium appears purple on a map.
MiniMap.png|Maps held in the off-hand or in either hand while [[dual wielding]] appear as mini-maps.
Partly filled treasure map.png|Partly filled treasure map with an odd area at the bottom left. Normally a partly filled map would look striped (as in the top left), but this map seems to be bugged and is possibly showing caves, or something, in the bottom left.
Partly filled ocean explorer map.png|Partly filled ocean explorer map. Updating the game from an older version (in this case the area was first generated before 1.18) and buying a map after updating (in this case in 1.19.4) can result in the map displaying rivers and terrain where there is really a frozen sea.
Map Stained Glass 1.png|Stained glasses' appearances on maps before and after 1.13.
Map Stained Glass 2.png|Stained glasses' appearances on maps before and after 1.13.
Map Various Blocks 1.png|Various blocks' appearances on maps before and after 1.13.
Map Various Blocks 2.png|Various blocks' appearances on maps before and after 1.13.
Better Together Map.jpg|Holding a map in the offhand in ''Bedrock Edition''.
Better Together Map Icon.jpg|Holding a map in both hands in ''Bedrock Edition''.
File:MapFailedtoFill.png|A map that has not yet filled. A rare bug in Java.
</gallery>
=== The Nether ===
<gallery>
Nethermap.png|A map in [[the Nether]].
Maponnether.png|A map in the Nether; the arrow turns around itself, like in [[compass]].
</gallery>
=== The End ===
<gallery>
Jeb End Map.png|The first image of a map in [[the End]].
Endmap.png|A map in the End.
</gallery>
=== Maps in item frames ===
<gallery>
FramedMap.png|A map displayed on an item frame, as it looked before [[Java Edition 1.7.2]].
Structure Map Collection.png|Multiple maps in item frames. Notice a [[village]], two [[desert temple]]s and a lava lake.
Minecraft maps 3by3.png|A collection of 9 connected full maps.
Full Map.png|A combination of 25 maps pasted together as one map.
Map wall BE.png|A map wall on ''Bedrock Edition'', showing large areas of biome colors for each biome.
Map's in item frames.png|Maps can be placed into [[item frame]]s so they can be viewed together.
Comparing Maps.png|The comparison between 3 zooms of maps.
SuperflatMap.png|A map in a [[Superflat]] world, with some [[village]]s.
MapWallWithMarkers.png|A 3x3 map wall with banner markers.
HEYYEYAAEYAAAEYAEYAA.png|He-Man map art.
Map Player Icons 1.png|First image of player icons on maps.
Map Player Icons 2.png|Second image of player icons on maps.
</gallery>
== See also ==
* [[Explorer Map]]
* [[Clock]]
* [[Tutorials/Navigation|Navigation]]
== References ==
{{Reflist}}
{{Items}}
[[cs:Mapa]]
[[de:Karte]]
[[es:Mapa]]
[[fr:Carte (objet)]]
[[hu:Térkép (tárgy)]]
[[ja:地図]]
[[ko:지도]]
[[nl:Kaart]]
[[pl:Mapa]]
[[pt:Mapa]]
[[ru:Карта]]
[[tr:Harita]]
[[th:แผนที่]]
[[uk:Мапа]]
[[zh:地图]]
[[Category:Renewable resources]]</li></ul></nowiki> | ? | Destroyed blocks will now have a 1/power chance of dropping as items; previously it was a fixed 30% chance. | |||
1.8.2{{Extension DPL}}<ul><li>[[Super Fertilizer|Super Fertilizer]]<br/>{{education feature}}
{{Exclusive|Bedrock|Education}}
{{Item
| image = Super Fertilizer.png
| renewable = No
| stackable = Yes (64)
}}
'''Super fertilizer''' is a powerful form of [[bone meal]] that is created using [[ammonia]] and [[phosphorus]].
== Obtaining ==
=== Lab table ===
{| class="wikitable"
! Result
! Materials Needed
|-
!rowspan=2|{{slot|Super Fertilizer}}<br>[[Super Fertilizer]]
|{{slot}}{{slot|Ammonia|link=Compound}}{{slot|Phosphorus|link=Element}}{{slot}}
|-
|<center>[[Compound|Ammonia]], [[Element|Phosphorus]]</center>
|}
== Usage ==
Super fertilizer can be used in the same way as bone meal. It produces more [[flowers]] in a larger area when used on [[grass block]]s compared to bone meal. When super fertilizer is used on a [[sapling]], a [[tree]] is instantly grown after one use, instead of multiple uses as with bone meal. Super fertilizer matures crops with a single use.
Note that super fertilizer does not instantly grow a hanging [[mangrove propagule]]. This could be a bug.
== Sounds ==
{{Sound table
|type=bedrock
|sound=Gravel hit1.ogg
|sound2=Gravel hit2.ogg
|sound3=Gravel hit3.ogg
|sound4=Gravel hit4.ogg
|source=player
|description=When super fertilizer is created by a [[lab table]]
|id=step.gravel
|volume=1.0
|pitch=0.2/0.4}}
{{Sound table
|sound=Bonemeal1.ogg
|sound2=Bonemeal2.ogg
|sound3=Bonemeal3.ogg
|sound4=Bonemeal4.ogg
|sound5=Bonemeal5.ogg
|description=When super fertilizer is successfully used
|source=Blocks
|id=item.bone_meal.use
|foot=1}}
== Data values ==
=== ID ===
{{ID table
|edition=bedrock
|shownumericids=y
|showforms=y
|notshowbeitemforms=y
|generatetranslationkeys=y
|displayname=Super Fertilizer
|spritetype=item
|nameid=rapid_fertilizer
|id=597
|form=item
|foot=1}}
== History ==
{{History|bedrock}}
{{History||1.4.0|snap=beta 1.2.20.1|[[File:Super Fertilizer BE1.png|32px]] Added super fertilizer.}}
{{History|education}}
{{History||1.0.27|[[File:Super Fertilizer BE1.png|32px]] Added super fertilizer.}}
{{History|foot}}
{{items}}
{{Education Edition}}
[[Category:Plants]]
[[Category:Non-renewable resources]]
[[Category:Education Edition items]]
[[de:Superdünger]]
[[ja:スーパー肥料]]
[[ko:슈퍼 비료]]
[[lzh:神肥]]
[[pl:Supernawóz]]
[[pt:Super fertilizante]]
[[uk:Супердобриво]]
[[zh:超级肥料]]</li><li>[[Shovel|Shovel]]<br/>{{Item
| image = <gallery>
Wooden Shovel.png | Wooden
Stone Shovel.png | Stone
Iron Shovel.png | Iron
Golden Shovel.png | Golden
Diamond Shovel.png | Diamond
Netherite Shovel.png | Netherite
</gallery>
| rarity = Common
| renewable = '''Netherite''': No<br>'''All others''': Yes
| durability =
* Wood: 59
* Stone: 131
* Iron: 250
* Golden: 32
* Diamond: 1561
* Netherite: 2031
| stackable = No
}}
'''Shovels''' are [[tool]]s used to hasten the process of breaking [[dirt]], [[sand]], [[gravel]] and other soil blocks, as well as to convert [[Dirt (disambiguation)|dirt]] blocks into [[Dirt Path|dirt paths]].
== Obtaining ==
=== Crafting ===
{{Crafting
|head=1
|showname=0
|showdescription=1
|name=[[Shovel]]s
|B1= {Any Planks}; Iron Ingot; Gold Ingot; Diamond
|B2= Stick
|B3= Stick
|Output= Wooden Shovel; Iron Shovel; Golden Shovel; Diamond Shovel
|type= Tool
}}
{{Crafting
|name=[[Stone Shovel]]
|B1=Any stone-tier block
|B2=Stick
|B3=Stick
|Output=Stone Shovel
|description=Can use any variant of cobblestone
|type=Tool
}}
{{Crafting
|foot=1
|ignoreusage=1
|name=[[Shovel]]
|ingredients=Damaged Matching [[Shovel]]
|Damaged Wooden Shovel; Damaged Stone Shovel; Damaged Iron Shovel; Damaged Golden Shovel; Damaged Diamond Shovel; Damaged Netherite Shovel
|Damaged Wooden Shovel; Damaged Stone Shovel; Damaged Iron Shovel; Damaged Golden Shovel; Damaged Diamond Shovel; Damaged Netherite Shovel
|Output=Wooden Shovel; Stone Shovel; Iron Shovel; Golden Shovel; Diamond Shovel; Netherite Shovel
|description= The durability of the two shovels is added together, plus an extra 5% durability.
|type= Tool
}}
=== Upgrading ===
Like other diamond tools, a diamond shovel can be upgraded to a netherite shovel, although increased durability and resistance to fire/lava in item form are the only benefits. The shovel's performance as a digging tool or a weapon is unchanged by the upgrade.
{{Smithing
|Netherite Upgrade
|Diamond Shovel
|Netherite Ingot
|Netherite Shovel
|description=
|tail=1
}}
=== Repairing ===
==== Grinding ====
{{Grinding
|showdescription=1
|ingredients=2x Damaged [[Wooden Shovel]] or<br>2x Damaged [[Stone Shovel]] or<br>2x Damaged [[Iron Shovel]] or<br>2x Damaged [[Golden Shovel]] or<br>2x Damaged [[Diamond Shovel]] or<br>2x Damaged [[Netherite Shovel]]
|Damaged Wooden Shovel; Damaged Stone Shovel; Damaged Iron Shovel; Damaged Golden Shovel; Damaged Diamond Shovel; Damaged Netherite Shovel
|Damaged Wooden Shovel; Damaged Stone Shovel; Damaged Iron Shovel; Damaged Golden Shovel; Damaged Diamond Shovel; Damaged Netherite Shovel
|Wooden Shovel; Stone Shovel; Iron Shovel; Golden Shovel; Diamond Shovel; Netherite Shovel
|description=The durability of the two shovels is added together, plus an extra 5% durability.
}}
==== [[Anvil mechanics#Unit repair|Unit repair]] ====
{{/Repairing with Anvils}}
A shovel can be repaired in an [[anvil]] by adding units of the [[tiers]]' repair material, with each repair material restoring 25% the shovel's maximum durability, rounded down. It also keeps the shovel's [[Enchanting|enchantments]].
=== Chest loot ===
On <code>ancient_city/city_center/city_center_2</code>, they generate a furnace with a wooden shovel inside of it.
{{LootChestItem|iron-shovel,level-enchanted-iron-shovel,random-enchanted-golden-shovel,diamond-shovel,level-enchanted-diamond-shovel,damaged-random-enchanted-diamond-shovel,damaged-random-enchanted-diamond-shovel-2}}
=== Mob loot ===
==== Equipment ====
{{Main|Drops#Equipped items}}
[[Zombie]]s and [[husk]]s have a 0.67% (3.33% in Hard [[difficulty]]) chance of spawning with an iron shovel. They have an 8.5% (9.5% with [[Looting]] I, 10.5% with Looting II and 11.5% with Looting III) chance of dropping that shovel if they are killed by the player. The dropped shovel is usually badly damaged, and may be enchanted: 0%–25% on Normal difficulty and 3.125%–25% on Hard difficulty, varying with [[regional difficulty]], and enchanted as if on an enchanting table at level 5–22.
==== Raids ====
Vindicators and pillagers that spawn from raids have a 4.1% chance(5.12% on hard) to drop a badly-damaged iron shovel that is sometimes enchanted with a random enchantment.{{only|bedrock}}
=== Trading ===
Novice-level toolsmith villagers have a 25% chance to sell stone shovels for one emerald, journeyman-level toolsmith villagers have a 25% chance to sell enchanted iron shovels for 2 emeralds, and expert-level toolsmith villagers have a 50% chance to sell enchanted diamond shovels for 5 emeralds as part of their trades.{{only|bedrock}}
Novice-level toolsmith villagers have a 40% chance to sell stone shovels for one emerald, journeyman-level tool smiths have a 40% chance to sell an enchanted iron shovel for 7-22 emeralds, and expert-level tool smiths have a {{frac|2|3}} chance to sell an enchanted diamond shovel for 11-27 emeralds.{{only|java}}
The enchantments are the same as the ones obtained from an [[enchanting table]] at levels 5–19.
=== Villager gifts ===
{{in|java}}, toolsmith [[villager]]s occasionally throw stone shovels at players with the [[Hero of the Village]] effect.
== Usage ==
=== Digging ===
A shovel can be used to break some materials faster. When breaking a block, it uses 1 durability. For blocks that break instantly, it uses 0 durability.
==== Durability ====
Each different tier of shovel has a different durability:
{| class="wikitable sortable"
! Material
! [[Durability]]
|-
| {{itemLink|Wooden Shovel|Wood|link=Shovel}}
| 59
|-
| {{itemLink|Stone Shovel|Stone|link=Shovel}}
| 131
|-
| {{itemLink|Iron Shovel|Iron|link=Shovel}}
| 250
|-
| {{itemLink|Diamond Shovel|Diamond|link=Shovel}}
| 1561
|-
| {{itemLink|Golden Shovel|Golden|link=Shovel}}
| 32
|-
| {{itemLink|Netherite Shovel|Netherite|link=Shovel}}
| 2031
|}
==== Speed ====
The following table summarizes the speed at which different quality shovels perform on different block types. Values with a red background indicate that no resource is dropped when the block is destroyed without a shovel.
{{breaking row|Clay|simple=1}}
{{breaking row|Coarse Dirt}}
{{Breaking row|Concrete Powder}}
{{breaking row|Dirt}}
{{breaking row|Dirt Path}}
{{breaking row|Farmland}}
{{breaking row|Grass Block}}
{{breaking row|Gravel}}
{{breaking row|Mud}}
{{breaking row|Muddy Mangrove Roots}}
{{breaking row|Mycelium}}
{{breaking row|Podzol}}
{{breaking row|Red Sand}}
{{breaking row|Rooted Dirt}}
{{breaking row|Sand}}
{{breaking row|Snow|Wooden}}
{{breaking row|Snow Block|Wooden}}
{{breaking row|Soul Sand}}
{{breaking row|Soul Soil}}
{{breaking row|Suspicious Gravel}}
{{breaking row|Suspicious Sand|foot=1}}
=== Dirt paths ===
A shovel can be used to create a [[dirt path]] by {{control|using}} (not digging) the shovel on any one of the following blocks, losing one durability point:
* {{BlockLink|Grass Block}}
* {{BlockLink|Dirt}}
* {{BlockLink|Coarse Dirt}}
* {{BlockLink|Rooted Dirt}}
* {{BlockLink|Podzol}}
* {{BlockLink|Mycelium}}
=== Campfire ===
A shovel can be used to extinguish a [[campfire]].
===Weapon===
Hitting a mob while holding a shovel is a stronger attack than barehanded. Shovels take 2 damage when used as a weapon.
====Java Edition====
[[Category:Java Edition specific information]]
Shovels have an attack speed modifier of -3, meaning they take 1 second to [[Damage#Attack cooldown|recover]]. Shovels deal different damage based on the type:
{| class="wikitable" style="text-align:center" data-description="Attack damage"
!Shovel type
! Attack damage
! Attack speed
!Damage per<br>second (DPS)
|-
|{{ItemLink|Wooden Shovel}}<br>{{ItemLink|Golden Shovel}}||{{hp|2.5}}|| rowspan="4" |1||2.5
|-
|{{ItemLink|Stone Shovel}}||{{hp|3.5}}||3.5
|-
|{{ItemLink|Iron Shovel}}||{{hp|4.5}}||4.5
|-
|{{ItemLink|Diamond Shovel}}||{{hp|5.5}}||5.5
|-
|{{ItemLink|Netherite Shovel}}||{{hp|6.5}}
|1.6||10.4
|}
====Bedrock Edition====
{{IN|bedrock}}, shovels always attack instantly and do the following damage:
{| class="wikitable" style="text-align:center" data-description="Attack damage"
! colspan="5" |Attack damage
|-
|{{ItemSprite|Wooden Shovel}}{{ItemSprite|Golden Shovel}} {{hp|2}}
|{{ItemSprite|Stone Shovel}} {{hp|3}}
|{{ItemSprite|Iron Shovel}} {{hp|4}}
|{{ItemSprite|Diamond Shovel}} {{hp|5}}
|{{ItemSprite|Netherite Shovel}} {{hp|6}}
|}
===Enchantments===
A shovel can receive, or be found in an [[End City]] with the following [[enchantment]]s:
{| class="wikitable col-2-center col-3-right"
|+
!Name
!Max Level
![[Enchanting|Method]]
|-
|[[Fortune]]<ref group="note" name="exc">Silk Touch and Fortune are mutually exclusive</ref>
|III
|{{Inventory slot|Enchanting Table}}{{Inventory slot|Anvil}}
|-
|[[Silk Touch]]<ref group="note" name="exc" />
|I
|{{Inventory slot|Enchanting Table}}{{Inventory slot|Anvil}}
|-
|[[Efficiency]]
|V
|{{Inventory slot|Enchanting Table}}{{Inventory slot|Anvil}}
|-
|[[Unbreaking]]
|III
|{{Inventory slot|Enchanting Table}}{{Inventory slot|Anvil}}
|-
|[[Mending]]
|I
|{{Inventory slot|Anvil}}
|-
|[[Curse of Vanishing]]
|I
|{{Inventory slot|Anvil}}
|}
{{notelist}}
=== Fuel===
Wooden shovels can be used as a fuel in [[furnace]]s, smelting 1 item per shovel.
===Smelting ingredient===
{{Smelting|showname=1|Iron Shovel;Golden Shovel|Iron Nugget;Gold Nugget|0,1}}
===Piglins ===
{{EntityLink|Piglin|Piglins}} are attracted to golden shovels and run toward any golden shovels on the ground, and inspect it for 6 to 8 seconds before putting it in their inventory.
== Sounds ==
{{edition|java}}:
{{Sound table
|sound=Shovel flatten1.ogg
|sound2=Shovel flatten2.ogg
|sound3=Shovel flatten3.ogg
|sound4=Shovel flatten4.ogg
|subtitle=Shovel flattens
|source=block
|description=When a shovel creates a [[dirt path]]
|id=item.shovel.flatten
|translationkey=subtitles.item.shovel.flatten
|volume=1.0
|pitch=1.0
|distance=16}}
{{Sound table
|sound=Random break.ogg
|subtitle=Item breaks
|source=player
|description=When a shovel's durability is exhausted
|id=entity.item.break
|translationkey=subtitles.entity.item.break
|volume=0.8
|pitch=0.8-1.2
|distance=16
|foot=1}}
{{edition|bedrock}}:
{{Sound table
|type=bedrock
|sound=Grass hit1.ogg
|sound2=Grass hit2.ogg
|sound3=Grass hit3.ogg
|sound4=Grass hit4.ogg
|sound5=Grass hit5.ogg
|sound6=Grass hit6.ogg
|source=block
|description=When a shovel creates a dirt path <ref group=sound>{{Bug|MCPE-114390}}</ref>
|id=use.grass
|volume=1.0
|pitch=0.8}}
{{Sound table
|sound=Random break.ogg
|source=player
|description=When a shovel's durability is exhausted
|id=random.break
|volume=1.0
|pitch=0.9
|foot=1}}
==Data values==
===ID===
{{edition|java}}:
{{ID table
|edition=java
|showforms=y
|generatetranslationkeys=y
|displayname=Wooden Shovel
|spritetype=item
|nameid=wooden_shovel
|form=item}}
{{ID table
|displayname=Stone Shovel
|spritetype=item
|nameid=stone_shovel
|form=item}}
{{ID table
|displayname=Iron Shovel
|spritetype=item
|nameid=iron_shovel
|form=item}}
{{ID table
|displayname=Diamond Shovel
|spritetype=item
|nameid=diamond_shovel
|form=item}}
{{ID table
|displayname=Golden Shovel
|spritetype=item
|nameid=golden_shovel
|form=item}}
{{ID table
|displayname=Netherite Shovel
|spritetype=item
|nameid=netherite_shovel
|form=item
|foot=1}}
{{edition|bedrock}}:
{{ID table
|edition=bedrock
|shownumericids=y
|showforms=y
|notshowbeitemforms=y
|generatetranslationkeys=y
|displayname=Wooden Shovel
|spritetype=item
|nameid=wooden_shovel
|id=309
|form=item}}
{{ID table
|displayname=Stone Shovel
|spritetype=item
|nameid=stone_shovel
|id=313
|form=item}}
{{ID table
|displayname=Iron Shovel
|spritetype=item
|nameid=iron_shovel
|id=296
|form=item}}
{{ID table
|displayname=Diamond Shovel
|spritetype=item
|nameid=diamond_shovel
|id=317
|form=item}}
{{ID table
|displayname=Golden Shovel
|spritetype=item
|nameid=golden_shovel
|id=323
|form=item}}
{{ID table
|displayname=Netherite Shovel
|spritetype=item
|nameid=netherite_shovel
|id=605
|form=item
|foot=1}}
==Achievements==
{{load achievements|MOAR Tools ;Oooh, shiny!}}
==Advancements==
{{load advancements|Oh Shiny}}
== Video==
<div style="text-align:center">{{yt|U4X-4S4neYM}}</div>
==History==
{{Missing information|there are so many missing blocks that need shovel to break}}
{{History|java indev}}
{{History||0.31|snap=20091231-2|[[File:Iron Shovel JE1.png|32px]] Added iron shovels which are located in the player's [[inventory]].
|Shovels cannot be crafted yet and are not functional in this version.}}
{{History|||snap=20100110|Shovels are now functional and can now be used to gather [[material]]s like [[dirt]], [[sand]] and [[gravel]] 400% faster than by hand.}}
{{History|||snap=20100124|A complete [[tool]] set is no longer given to the [[player]] on starting a new world. Instead, there are multiple [[chest]]s in the later called "[[Indev House]]" containing a stack of most accessible [[blocks]]/[[items]] including [[tools]].}}
{{History|||snap=20100128|[[File:Wooden Shovel JE1 BE1.png|32px]] [[File:Stone Shovel JE1 BE1.png|32px]] [[File:Diamond Shovel JE1 BE1.png|32px]] [[Tools]] now have tiers. Shovels made from wood, stone, and diamond have been added.
|[[File:Iron Shovel JE2 BE1.png|32px]] The texture of iron shovels has been changed.
|A shovel held by the player is now rendered to appear more 3D.|They cannot be crafted yet, but have been added to the item chest in the Indev house.}}
{{History|||snap=20100129|Wood, stone, iron, and diamond shovels can now be [[craft]]ed.}}
{{History|||snap=20100130|[[File:Golden Shovel JE1.png|32px]] Shovels can now be made out of gold.}}
{{History|||snap=20100201-1|[[Tools]], including shovels, now take [[damage]] when being used.
|Better tools, including shovels, now last longer.}}
{{History||20100206|[[File:Golden Shovel JE2 BE1.png|32px]] The texture of golden shovels has been changed.}}
{{History|java alpha}}
{{History||1.0.5_01|Shovels are now used to get snowballs out of snow layers.}}
{{History|java beta}}
{{History||April 9, 2011|link=https://www.youtube.com/watch?v=qy882ILYJMM&t=154s|[[File:Iron Shovel (pre-release).png|32px]] Alternate iron shovel texture was shown in [[Mojang]] test video.}}
{{History|java}}
{{History||1.2.4|snap=release|[[Spruce planks]], [[birch planks]], and [[jungle planks]] can now be used to craft wooden shovels.}}
{{History||1.3.1|snap=12w18a|Wooden shovels can now be used as [[fuel]] in a [[furnace]].}}
{{History|||snap=12w21a|Blacksmith [[villager]]s now [[trading|sell]] diamond shovels for 7 [[emerald]]s, and iron shovels for 4–5 emeralds.}}
{{History||1.6.1|snap=13w21a|Instead of replacing the barehanded [[damage]] ({{hp|1}}), shovels now add their damage onto the barehanded damage, which results in all shovels doing {{hp|1}} more damage than before.}}
{{History||1.7.2|snap=1.7.1|[[Acacia planks]] and [[dark oak planks]] can now be used to craft wooden shovels.}}
{{History||1.8|snap=14w02a|Tool smith villagers now [[trading|sell]] enchanted iron shovels for 5–7 emeralds. The previous trades are now unavailable, making diamond shovels [[non-renewable resource|non-renewable]].}}
{{History||1.9|snap=15w31a|A shovel can now be used on a [[grass block]] to create [[grass path]] blocks.
|[[Enchanting|Enchanted]] iron or diamond shovels can now be found in [[end city]] chests.}}
{{History|||snap=15w34a|Shovels now use the "attack strength" combat mechanic meter. The time it takes for the meter to fill up for a shovel is 0.8 seconds.}}
{{History|||snap=15w34c|Shovels now do more [[damage]] and take longer to recover.}}
{{History|||snap=15w35a|The damage of shovels has been reduced.}}
{{History|||snap=15w41a|Wooden shovels are now used to craft [[boat]]s.}}
{{History|||snap=15w50a|The [[sound]] <code>item.shovel.flatten</code> has been added to shovels.}}
{{History|||snap=16w04a|Wooden shovels are no longer used to [[crafting|craft]] boats.}}
{{History||1.11.1|snap=16w50a|Golden and iron shovels now [[smelting|smelt]] down into one of their respective [[nugget]]s.}}
{{History||1.13|snap=17w47a|Prior to [[1.13/Flattening|''The Flattening'']], these [[item]]s' numeral IDs were 269, 273, 256, 277 and 284.}}
{{History||1.14|snap=18w43a|[[File:Wooden Shovel JE2 BE2.png|32px]] [[File:Stone Shovel JE2 BE2.png|32px]] [[File:Iron Shovel JE3 BE2.png|32px]] [[File:Golden Shovel JE3 BE2.png|32px]] [[File:Diamond Shovel JE2 BE2.png|32px]] The textures of all shovels have been changed.}}
{{History|||snap=18w50a|Iron shovels can now be found in chests in [[village]] toolsmith houses.}}
{{History|||snap=19w11a|Toolsmith [[villager]]s now [[trading|sell]] stone shovels and enchanted diamond shovels, making diamond shovels [[renewable resource|renewable]] again.}}
{{History|||snap=19w13a|Toolsmith villagers now give stone shovels to players under the [[Hero of the Village]] effect.}}
{{History||1.15|snap=19w37a|Shovels can now be used to extinguish [[campfire]]s.}}
{{History||1.16|snap=20w06a|[[File:Netherite Shovel JE1.png|32px]] Added netherite shovels.
|Netherite shovels are obtained by combining one diamond shovel and one netherite ingot in a crafting table.
|[[Crimson planks]] and [[warped planks]] can now be used to craft wooden shovels.}}
{{History|||snap=20w09a|[[File:Diamond Shovel JE3 BE3.png|32px]] The texture of diamond shovels has been changed.
|Shovels can now break soul soil quickly.}}
{{History|||snap=20w10a|[[File:Netherite Shovel JE2 BE1.png|32px]] The texture of netherite shovels has been changed.
|Netherite shovels can no longer be crafted.
|Netherite shovels are now obtained by combining one diamond shovel and one netherite ingot in a smithing table.}}
{{History|||snap=20w15a|Stone shovels can now be crafted using [[blackstone]].}}
{{History|||snap=20w16a|Netherite shovels now generate randomly enchanted in [[bastion remnants]] chests.
|Golden shovels now generate randomly enchanted in [[ruined portal]] chests.}}
{{History|||snap=20w17a|Diamonds shovels now generate in place of netherite shovels in bastion remnant chests.}}
{{History||1.16.2|snap=20w30a|Increases the chance of finding randomly enchanted diamond shovels in bastion remnant chests.
|Unenchanted, undamaged diamond shovels can also be found in bastion remnant chests.}}
{{History||1.17|snap=21w08a|Stone shovels can now be crafted using [[cobbled deepslate]].}}
{{History||1.19|snap=22w11a|[[Mangrove planks]] can now be used to craft wooden shovels.}}
{{History|||snap=22w13a|Wooden shovels may now be found in [[ancient city]] [[furnace]]s.}}
{{History||1.20<br>(Experimental)|link=1.19.4|snap=23w04a|Upgrading diamond shovels to netherite shovels now requires the netherite upgrade [[smithing template]].}}
{{History||1.20|snap=23w14a|Shovel now breaks [[suspicious sand]] and [[suspicious gravel]] quickly.}}
{{History|upcoming java}}
{{History||Combat Tests|snap=1.14.3 - Combat Test|The attack speed for all shovels has been increased to 2.|The [[damage]] for all shovels has been decreased by {{hp|1}}.}}
{{History|pocket alpha}}
{{History||v0.2.0|[[File:Stone Shovel JE1 BE1.png|32px]] Added stone shovels.}}
{{History||v0.3.0|[[File:Wooden Shovel JE1 BE1.png|32px]] Added wooden shovels.
|Survival players no longer start out with an infinite durability stone shovel in the inventory.}}
{{History||v0.3.2|[[File:Iron Shovel JE2 BE1.png|32px]] [[File:Golden Shovel JE2 BE1.png|32px]] [[File:Diamond Shovel JE1 BE1.png|32px]] Added iron, gold, and diamond shovels.}}
{{History||v0.4.0|Removed stone shovels from the creative inventory.}}
{{History||v0.11.0|snap=build 1|Wooden shovels are now used to craft [[boat]]s.
|Iron shovels are now available in the [[creative]] [[inventory]].
|A shovel can now be used on a [[grass block]] to create [[grass path]] blocks.}}
{{History|||snap=build 11|Wooden, stone, golden, and diamond shovels are now available in the [[creative]] inventory.}}
{{History|||snap=build 12|All shovels have been removed from creative.}}
{{History|||snap=build 13|Shovel have been re-added to creative mode.}}
{{History||v0.12.1|snap=build 1|Shovels can now be [[enchanting|enchanted]].
|[[Zombie]]s now have a small chance to spawn holding an iron shovel.}}
{{History||v0.15.0|snap=build 1|Added [[husk]]s, which have a small chance to spawn holding an iron shovel.}}
{{History|pocket}}
{{History||1.0.0|snap=alpha 0.17.0.1|[[Enchanting|Enchanted]] iron and diamond shovels can now be found inside [[end city]] chests.}}
{{History||1.0.4|snap=alpha 1.0.4.0|Enchanted iron shovels are now [[trading|sold]] by toolsmith [[villager]]s for 4-5 [[emerald]]s.}}
{{History||1.1.0|snap=alpha 1.1.0.0|Iron and golden shovels are now [[smelting|smeltable]].}}
{{History|bedrock}}
{{History||1.10.0|snap=beta 1.10.0.3|[[File:Wooden Shovel JE2 BE2.png|32px]] [[File:Stone Shovel JE2 BE2.png|32px]] [[File:Iron Shovel JE3 BE2.png|32px]] [[File:Golden Shovel JE3 BE2.png|32px]] [[File:Diamond Shovel JE2 BE2.png|32px]] The textures of all shovels have been changed.}}
{{History||1.11.0|snap=beta 1.11.0.1|Iron shovels can now be found in [[village]] toolsmith houses.}}
{{History|||snap=beta 1.11.0.4|[[Vindicator]]s and [[pillager]]s that spawn in [[raid]]s can now drop iron shovels upon [[death]].
|[[Trading]] has been changed, toolsmith [[villager]]s now have a 25% chance to [[trading|sell]] enchanted iron shovels for 2 [[emerald]]s as part of their third tier trades.
|Stone shovels and [[enchanting|enchanted]] diamond shovels can now be [[trading|bought]] from toolsmith villagers.}}
{{History||1.16.0|snap=beta 1.16.0.51|[[File:Netherite Shovel JE2 BE1.png|32px]] Added netherite shovels.|Netherite shovels are obtained by combining one diamond shovel and one netherite ingot in a crafting table.
|[[File:Diamond Shovel JE3 BE3.png|32px]] The texture of diamond shovels has been changed.}}
{{History|||snap=beta 1.16.0.57|Netherite shovels can no longer be crafted.
|Netherite shovels are now obtained by combining one diamond shovel and one netherite ingot in a smithing table.
|Stone shovels can now be crafted using [[blackstone]].
|Netherite shovels now generate randomly enchanted in [[bastion remnants]] chests.
|Golden shovels now generate randomly enchanted in [[ruined portal]] chests.}}
{{History|||snap=beta 1.16.0.63|Diamonds shovels now generate in place of netherite shovels in bastion remnant chests.}}
{{History||1.20.10|snap=beta 1.20.10.20|The [[wooden shovel]] in the crafting recipe has been removed for all boat types except the bamboo raft.}}
{{History|||snap=beta 1.20.10.21|The bamboo raft recipe no longer needs a wooden shovel.}}
{{History|console}}
{{History||xbox=TU1|xbone=CU1|ps=1.0|wiiu=Patch 1|switch=1.0.1|[[File:Wooden Shovel JE1 BE1.png|32px]] [[File:Stone Shovel JE1 BE1.png|32px]] [[File:Iron Shovel JE2 BE1.png|32px]] [[File:Golden Shovel JE2 BE1.png|32px]] [[File:Diamond Shovel JE1 BE1.png|32px]] Added shovels (all five types).}}
{{History||xbox=TU53|xbone=CU43|ps=1.49|wiiu=Patch 23|switch=1.0.3|Iron and golden shovels are now [[smelting|smeltable]].}}
{{History||xbox=none|xbone=none|ps=1.90|wiiu=none|switch=none|[[File:Wooden Shovel JE2 BE2.png|32px]] [[File:Stone Shovel JE2 BE2.png|32px]] [[File:Iron Shovel JE3 BE2.png|32px]] [[File:Golden Shovel JE3 BE2.png|32px]] [[File:Diamond Shovel JE2 BE2.png|32px]] The textures of all shovels have been changed.}}
{{History|New Nintendo 3DS Edition}}
{{History||0.1.0|[[File:Wooden Shovel JE1 BE1.png|32px]] [[File:Stone Shovel JE1 BE1.png|32px]] [[File:Iron Shovel JE2 BE1.png|32px]] [[File:Golden Shovel JE2 BE1.png|32px]] [[File:Diamond Shovel JE1 BE1.png|32px]] Added shovels.}}
{{History|foot}}
==Issues==
{{issue list}}
==Gallery==
<gallery>
Shovel JINX.jpg|Official shovel T-shirt made by JINX.
Stone Shovel SDGP.png|Stone shovel in the [[Super Duper Graphics Pack]].
Adventure Shovel.png|An "adventure shovel" that can break blocks in [[adventure mode]].
</gallery>
===Enchanted shovels===
<gallery>
Enchanted_Wooden_Shovel.gif
Enchanted_Stone_Shovel.gif
Enchanted_Iron_Shovel.gif
Enchanted_Golden_Shovel.gif
Enchanted_Diamond_Shovel.gif
Enchanted_Netherite_Shovel.gif
</gallery>
==References==
{{reflist}}
== External Links ==
*[https://www.minecraft.net/en-us/article/taking-inventory-shovel Taking Inventory: Shovel] – Minecraft.net on November 16, 2018
{{items}}
[[Category:Combat]]
[[cs:Lopata]]
[[de:Schaufel]]
[[es:Pala]]
[[fr:Pelle]]
[[hu:Ásó]]
[[ja:シャベル]]
[[ko:삽]]
[[nl:Schep]]
[[pl:Łopata]]
[[pt:Pá]]
[[ru:Лопата]]
[[uk:Лопата]]
[[zh:锹]]</li></ul> | ? | Explosions are now no longer directionally biased. | |||
| Pocket Edition Alpha | |||||
0.1.0{{Extension DPL}}<ul><li>[[Poisonous Potato|Poisonous Potato]]<br/>{{Item
| title = Poisonous Potato
| image = Poisonous Potato.png
| heals = {{hunger|2}}
|effects={{EffectLink|Poison}} (0:05) (60% chance)
| stackable = Yes (64)
| renewable = Yes
}}
A '''poisonous potato''' is a type of [[potato]] that can [[poison]] the [[player]].
== Obtaining ==
The poisonous potato is a rare [[drop]] when harvesting (destroying) [[potato|potato crops]]; a fully grown plant has a 2% chance of dropping one in addition to the 2-5 regular potatoes.
=== Chest loot ===
{{LootChestItem|poisonous-potato}}
== Usage ==
Poisonous potatoes cannot be planted on [[farmland]] or [[Baked Potato|baked]]. They also have no use with the [[composter]].<ref>{{bug|MC-142373|resolution=WAI}}</ref>
=== Food ===
{{see also|Tutorials/Hunger management|title1=Hunger management}}
To eat a poisonous potato, press and hold {{control|use}} while it is selected in the hotbar. Eating one restores {{hunger|2}} [[hunger]] and 1.2 hunger [[Hunger#Mechanics|saturation]] and has a 60% chance of applying 5 seconds of [[Poison]] II, draining {{hp|4|poisoned=1}} points of [[health]].
Interestingly, a poisonous potato actually restores double the hunger and saturation than a normal, unpoisoned potato. (A normal potato gives {{hunger|1}} hunger and 0.6 saturation points.)
==Sounds==
{{Sound table/Entity/Food}}
== Advancements ==
{{load advancements|Husbandry;A Balanced Diet}}
== Data values ==
=== ID ===
{{edition|java}}:
{{ID table
|edition=java
|showforms=y
|generatetranslationkeys=y
|displayname=Poisonous Potato
|spritetype=item
|nameid=poisonous_potato
|form=item
|foot=1}}
{{edition|bedrock}}:
{{ID table
|edition=bedrock
|shownumericids=y
|showforms=y
|notshowbeitemforms=y
|generatetranslationkeys=y
|displayname=Poisonous Potato
|spritetype=item
|nameid=poisonous_potato
|id=282
|form=item
|foot=1}}
== History ==
{{History|java}}
{{History||1.4.2|snap=12w34a|[[File:Poisonous Potato JE1 BE1.png|32px]] Added poisonous potatoes.}}
{{History||1.13|snap=17w47a|Prior to [[Java_Edition_1.13/Flattening|''The Flattening'']], this [[item]]'s numeral ID was 394.}}
{{History|||snap=18w11a|Poisonous potatoes now generate in the [[chest]]s of [[shipwreck]]s.}}
{{History||1.14|snap=18w43a|[[File:Poisonous Potato JE2.png|32px]] The texture of poisonous potatoes has been changed.}}
{{History|||snap=18w50a|[[File:Poisonous Potato JE3 BE2.png|32px]] The texture of poisonous potatoes has been changed, once again.}}
{{History|pocket alpha}}
{{History||v0.12.1|snap=build 1|[[File:Poisonous Potato JE1 BE1.png|32px]] Added poisonous potatoes.}}
{{History|bedrock}}
{{History||1.4.0|snap=beta 1.2.14.2|Poisonous potatoes can now be found inside of [[shipwreck]] [[chest]]s.}}
{{History||1.10.0|snap=beta 1.10.0.3|[[File:Poisonous Potato JE3 BE2.png|32px]] The texture of poisonous potatoes has been changed.}}
{{History|console}}
{{History||xbox=TU14|xbone=CU1|ps=1.04|wiiu=Patch 1|switch=1.0.1|[[File:Poisonous Potato JE1 BE1.png|32px]] Added poisonous potatoes.}}
{{History||xbox=none|xbone=none|ps=1.90|wiiu=none|switch=none|[[File:Poisonous Potato JE3 BE2.png|32px]] The texture of poisonous potatoes has been changed.}}
{{History|New 3DS}}
{{History||0.1.0|[[File:Poisonous Potato JE1 BE1.png|32px]] Added poisonous potatoes.}}
{{History|foot}}
== Issues ==
{{issue list}}
== References ==
{{reflist}}
{{Items}}
[[Category:Plants]]
[[cs:Jedovatá brambora]]
[[de:Giftige Kartoffel]]
[[es:Patata envenenada]]
[[fr:Pomme de terre empoisonnée]]
[[hu:Mérgező burgonya]]
[[it:Patata velenosa]]
[[ja:青くなったジャガイモ]]
[[ko:독이 있는 감자]]
[[nl:Giftige aardappel]]
[[pl:Trujący ziemniak]]
[[pt:Batata venenosa]]
[[ru:Ядовитый картофель]]
[[th:มันฝรั่งพิษ]]
[[uk:Отруйна картопля]]
[[zh:毒马铃薯]]
[[Category:Food]]
[[Category:Renewable resources]]</li><li>[[Nether Wart|Nether Wart]]<br/><!--Please do not change "nether wart" to "Nether wart". According to style guide, block names should not be capitalized.-->
{{about|the fungus used for potions|the block found in crimson forests|Nether Wart Block}}{{Block
| group = Age 0
| 1-1 = Nether Wart Age 0.png
| 1-2 = Nether Wart Age 0 BE.png
| group2 = Age 1-2
| 2-1 = Nether Wart Age 1-2.png
| 2-2 = Nether Wart Age 1-2 BE.png
| group3 = Age 3
| 3-1 = Nether Wart Age 3.png
| 3-2 = Nether Wart Age 3 BE.png
|image= Nether Wart (item).png
|transparent=Yes
|light=No
|tool=any
|renewable=Yes
|stackable=Yes (64)
|flammable=No
|lavasusceptible=No
}}
'''Nether wart''' is a fungus harvested from nether wart crops and is used to plant them, as well as being vital in the creation of [[potions]].
'''Nether wart crops''' are found in [[Nether Fortress/Structure|nether fortresses]] and [[Bastion Remnant|bastions]] and is used to grow nether wart in [[Soul Sand|soul sand]].
== Obtaining ==
=== Breaking ===
Nether wart can be mined instantly with any tool. A fully mature nether wart crop yields 2–4 nether wart. This is increased by one for each level of [[Fortune]], this allows for a maximum of 7 nether warts dropping from one crop. Less mature stages drop one nether wart, even with the Fortune enchantment.
=== Natural generation ===
Nether wart can generate in [[nether fortress]]es in [[soul sand]] gardens around stairwells. Nether wart can also generate in the courtyards of housing unit [[bastion remnant]]s. Due to only spawning in these specific structures, it's entirely possible for a nether fortress or bastion remnant to generate without nether wart (though they may still appear in the chests that generate in the fortress).
{| class="wikitable"
|+
!Location
!Description
!Image
|-
|{{anchor|Nether Fortress}}'''Nether Fortress'''
|Nether wart can be found growing near stairwells in small soul sand gardens.
|[[File:Nether wart garden.png|thumb|Nether wart growing in a nether fortress.]]
|-
|{{anchor|Bastion Remnant}}'''Bastion Remnant'''
|Nether wart can be found growing in the central courtyard of each of the sections of piglin housing unit bastions.
|[[File:Bastion Courtyard.png|thumb|Nether wart growing in a bastion remnant.]]
|}
<br>
=== Chest loot ===
{{LootChestItem|nether-wart}}
== Usage ==
=== Brewing ingredient ===
Nether wart's primary purpose is to [[brew]] the [[Potion|awkward potion]], the base for all potions, but optional for Weakness.
{{brewing
|showname=1
|Nether Wart
|Awkward Potion
|base=Water Bottle
}}
=== Crafting ingredient ===
{{crafting usage}}
=== Trading ===
Master-level cleric [[villager]]s buy 22 nether warts for an [[emerald]] as part of their trades.
=== Farming ===
{{main|Tutorials/Nether Wart farming}}
When planted on [[soul sand]], nether wart grows through four stages, though the middle two stages use the same texture (the hitbox of stage 3 is three pixels taller). {{IN|java}}, the exact age can be seen using the [[debug screen]], and the ages range from 0 to 3. Each random tick, nether wart has a 10% chance of growing one stage. At default random tick speed, each nether wart grows one age step approximately every {{convert|13653|ticks|minutes}} on average, and fully grows from planting to harvest every {{convert|40960|ticks|minutes}} on average. The growth rate is not affected by light or any other environmental factors. [[Bone meal]] cannot be used on the nether wart.
Nether wart can only be planted on [[soul sand]]. It cannot be planted on [[soul soil]]. It can grow in any [[dimension]].
Nether wart is ready to harvest when it reaches its fourth stage (age:3). Breaking a fully grown nether wart drops 2 to 4 nether wart, while an immature one drops a single nether wart. Using a tool enchanted with fortune increases the maximum number of nether wart dropped by 1 per level, for a maximum of 7 for a tool enchanted with [[Fortune|Fortune III]].
=== Composting ===
Placing a nether wart into a [[composter]] has a 30% chance of raising the compost level by 1.
== Sounds ==
{{Sound table/Block/Nether wart}}
== Data values ==
=== ID ===
{{edition|java}}:
{{ID table
|edition=java
|showforms=y
|generatetranslationkeys=y
|displayname=Nether Wart
|spritetype=block
|nameid=nether_wart
|translationkey=block.minecraft.nether_wart,item.minecraft.nether_wart
|foot=1}}
{{edition|bedrock}}:
{{ID table
|edition=bedrock
|firstcolumnname=Nether Wart
|shownumericids=y
|showforms=y
|generatetranslationkeys=y
|displayname=Block
|spritename=nether-wart
|spritetype=block
|nameid=nether_wart
|id=115
|form=block
|itemform=item.nether_wart}}
{{ID table
|displayname=Item
|spritename=nether-wart
|spritetype=item
|nameid=nether_wart
|id=294
|form=item
|foot=1}}
=== Block states ===
{{see also|Block states}}
{{/BS}}
== Advancements ==
{{load advancements|A Seedy Place}}
== History ==
{{History|java}}
{{History||1.0.0|snap=Beta 1.9 Prerelease|[[File:Nether Wart Age 0 JE1.png|32px]] [[File:Nether Wart Age 1-2 JE1.png|32px]] [[File:Nether Wart Age 3 JE1.png|32px]] [[File:Nether Wart (item) JE1.png|32px]] Added nether wart.}}
{{History|||snap=Beta 1.9 Prerelease 3|Nether wart can now be brewed in a [[water bottle]] to create an [[awkward potion]].}}
{{History||1.3.1|snap=12w27a|Nether wart can now grow outside of [[the Nether]].}}
{{History|||snap=1.3|[[File:Nether Wart (item) JE2 BE1.png|32px]] The item texture has been changed.}}
{{History||1.4.2|snap=12w36a|Nether wart can now be used to breed [[chicken]]s.}}
{{History||1.6.1|snap=13w18a|Nether wart is now found in the new [[chest]]s in [[nether fortress]]es.}}
{{History||1.8|snap=14w06a|[[File:Nether Wart Age 0 JE2.png|32px]] [[File:Nether Wart Age 1-2 JE2.png|32px]] [[File:Nether Wart Age 3 JE2.png|32px]] Nether wart crops are now a pixel higher, likely as an accidental result of model conversion. Previously they were offset one pixel downwards like the other crops (wheat, carrots potatoes) to match farmland, although in nether wart's case such a downwards offset hides some pixels of the texture inside of the soul sand.<ref>{{bug|MC-250679}}</ref>}}
{{History|||snap=14w10a|[[File:Missing Model JE2.png|32px]] [[File:Missing Model JE2.png|32px]] [[File:Missing Model JE2.png|32px]]<br>[[File:Missing Model (anisotropic filtering) JE2.png|32px]] [[File:Missing Model (anisotropic filtering) JE2.png|32px]] [[File:Missing Model (anisotropic filtering) JE2.png|32px]] Nether wart crops of all ages [[Missing model|no longer have a model]].}}
{{History|||snap=14w10b|[[File:Nether Wart Age 0 JE4.png|32px]] [[File:Nether Wart Age 1-2 JE4.png|32px]] [[File:Nether Wart Age 3 JE4.png|32px]] Nether wart crops now have models again.<ref>{{bug|MC-50276}}</ref> In addition, they are now offset downwards by one pixel once more, hiding the bottom row of pixels again.}}
{{History|||snap=14w25a|[[File:Nether Wart Age 0 JE5.png|32px]] [[File:Nether Wart Age 1-2 JE5.png|32px]] [[File:Nether Wart Age 3 JE5.png|32px]] Nether wart crops are now darker and subject to directional shading.}}
{{History|||snap=14w27a|[[File:Nether Wart Age 0 JE6.png|32px]] [[File:Nether Wart Age 1-2 JE6.png|32px]] [[File:Nether Wart Age 3 JE6.png|32px]] Nether wart crops are no longer subject to directional shading.}}
{{History|||snap=14w34d|Nether wart can no longer be used to breed [[chicken]]s.}}
{{History||1.9|snap=15w43a|The average yield of nether wart from [[nether fortress]] chests has now been slightly decreased.}}
{{History||1.10|snap=16w20a|Nether wart can now be used to [[crafting|craft]] the new [[red nether brick]] blocks and [[nether wart block]]s.}}
{{History||1.12|snap=17w18b|Placing a nether wart in soul sand now gives the player the "A Seedy Place" [[advancement]].{{verify}}}}
{{History||1.13|snap=17w47a|Prior to [[1.13/Flattening|''The Flattening'']], this block's numeral ID was 115, and the item's 372.}}
{{History||1.14|snap=18w43a|[[File:Nether Wart Age 0 JE7.png|32px]] [[File:Nether Wart Age 1-2 JE7.png|32px]] [[File:Nether Wart Age 3 JE7.png|32px]] The textures of nether wart crops have changed.}}
{{History|||snap=19w03a|Placement and breaking [[sound]]s have now been added to nether wart. Before this version, nether wart made stone sounds.}}
{{History|||snap=19w11a|Cleric [[villager]]s now [[trading|buy]] nether wart.
|Nether wart can now be planted by aiming against the sides and underside of blocks, rather than just the top surface of the soul sand.}}
{{History||1.16|snap=20w15a|Nether wart can now be [[composter|composted]].}}
{{History|||snap=20w16a|Nether wart now generates as part of [[bastion remnant]]s.}}
{{History||1.17|snap=21w13a|[[File:Nether Wart Age 0 JE8.png|32px]] [[File:Nether Wart Age 1-2 JE8.png|32px]] [[File:Nether Wart Age 3 JE8.png|32px]] The "crop" template model has changed such that pixels appear in the same physical positions on opposite sides of texture planes, changing the nether wart crop's appearance in the process.<ref>{{bug|MC-199242}}</ref>}}
{{History|pocket alpha}}
{{History||v0.12.1|snap=build 1|[[File:Nether Wart Age 0 BE1.png|32px]] [[File:Nether Wart Age 1-2 BE1.png|32px]] [[File:Nether Wart Age 3 BE1.png|32px]] [[File:Nether Wart (item) JE2 BE1.png|32px]] Added nether wart.
|Nether wart uses a cross model instead of the "hash" shape associated with crops.}}
{{History||?|[[File:Nether Wart Age 0 JE6 BE2.png|32px]] [[File:Nether Wart Age 1-2 JE6 BE2.png|32px]] [[File:Nether Wart Age 3 JE6 BE2.png|32px]]{{verify|Correct models? check UV, etc.}} Nether wart now uses a more conventional crop model.}}
{{History|pocket}}
{{History||1.1.3|snap=alpha 1.1.3.0|Nether wart can now be used to [[crafting|craft]] [[red nether bricks]] and [[nether wart block]]s.}}
{{History|bedrock}}
{{History||1.10.0|snap=beta 1.10.0.3|[[File:Nether Wart Age 0 BE.png|32px]] [[File:Nether Wart Age 1-2 BE.png|32px]] [[File:Nether Wart Age 3 BE.png|32px]] The textures of nether wart crops have changed.
|Placement and breaking [[sound]]s have now been added to nether wart.}}
{{History||1.11.0|snap=beta 1.11.0.4|Nether wart can now be [[trading|sold]] to cleric [[villager]]s.}}
{{History||1.16.0|snap=beta 1.16.0.57|Nether wart now generates as part of [[bastion remnant]]s.
|The placement and breaking [[sound]]s for nether wart have been changed to match {{el|je}}.
|Nether wart can now be [[composter|composted]].}}
{{History|console}}
{{History||xbox=TU7|xbone=CU1|ps=1.0|wiiu=Patch 1|switch=1.0.1|[[File:Nether Wart Age 0 JE6 BE2.png|32px]] [[File:Nether Wart Age 1-2 JE6 BE2.png|32px]] [[File:Nether Wart Age 3 JE6 BE2.png|32px]]{{verify|Correct models? check UV, etc.}} [[File:Nether Wart (item) JE2 BE1.png|32px]] Added nether wart.}}
{{History||xbox=TU9|Nether wart now spawns randomly wherever [[soul sand]] is generated in [[the Nether]].
|[[Nether fortress]]es have now been changed to make nether wart rooms more likely.
|Nether wart can now grow outside of [[the Nether]].}}
{{History||xbox=none|xbone=none|ps=1.90|wiiu=none|switch=none|[[File:Nether Wart Age 0 JE7.png|32px]] [[File:Nether Wart Age 1-2 JE7.png|32px]] [[File:Nether Wart Age 3 JE7.png|32px]]{{verify|Correct models?}} The textures of nether wart crops have now been changed.}}
{{History|New 3DS}}
{{History||0.1.0|[[File:Nether Wart Age 0 JE6 BE2.png|32px]] [[File:Nether Wart Age 1-2 JE6 BE2.png|32px]] [[File:Nether Wart Age 3 JE6 BE2.png|32px]]{{verify|Correct models? check UV, etc.}} [[File:Nether Wart (item) JE2 BE1.png|32px]] Added nether wart.}}
{{History|foot}}
=== Nether wart "item" ===
{{:Technical blocks/Nether Wart}}
==Issues==
{{issue list}}
== Trivia ==
* Nether wart's stage changes cannot be detected by a [[block update detector]], but can by an [[observer]] block.
* Unlike other crimson "plants", nether wart doesn't have a warped equivalent. This is also the case with [[nether sprouts]], which lack a crimson equivalent.
== Gallery ==
<gallery>
Nether Brick And Wart.png|Nether wart found in a nether fortress.
Nether Wart Closeup.png| Another example of nether wart found in a nether fortress.
Nether wart three sizes.png|The three different sizes of the nether wart as viewed from the side.
Nether Fortress Large Stairs Room.png
</gallery>
== References ==
{{reflist}}
{{Blocks|vegetation}}
{{Items}}
[[Category:Nether blocks]]
[[Category:Fungi]]
[[Category:Non-solid blocks]]
[[Category:Generated structure blocks]]
[[de:Netherwarze]]
[[es:Verruga del Nether]]
[[fr:Verrues du Nether]]
[[hu:Bibircsók]]
[[it:Verruca del Nether]]
[[ja:ネザーウォート]]
[[ko:네더 사마귀]]
[[nl:Netherkruid]]
[[pl:Netherowa brodawka]]
[[pt:Fungo do Nether]]
[[ru:Адский нарост]]
[[th:หูดเนเธอร์]]
[[uk:Пекельний наріст]]
[[zh:下界疣]]
[[Category:Brewing recipe]]</li></ul> | Added TNT. | ||||
0.2.1{{Extension DPL}}<ul><li>[[:Category:Planned items|Category:Planned items]]<br/>All pages relating to items that have been officially announced, but are not yet in the game.
__EXPECTUNUSEDCATEGORY__
[[Category:Items]]
[[Category:Planned]]
[[pt:Itens planejados]]</li><li>[[Tool|Tool]]<br/>{{About|the in-game items|program enhancing software|Programs and Editors}}
A '''tool''' is an [[item]] used by the [[player]] while held to perform actions faster and more efficiently, to gather materials not obtainable by hand, to gain information, or to perform completely new actions. With the exception of the [[clock]], [[compass]], empty [[bucket]], and [[lead]], tools do not stack in the inventory. Tools can be repaired; see [[Item repair]].
== Obtaining ==
=== Mob loot ===
{{main|Drops#Mob drops|title1=Drops}}
Some tools can be obtained by killing mobs that carry the equipment.
=== Crafting ===
Most tools can be obtained through crafting.
{{:Crafting/Tools}}
=== Upgrading ===
[[Netherite]] tools can be obtained only through upgrading.
{{Smithing
|head=1
|Netherite Upgrade
|Diamond Pickaxe; Diamond Axe; Diamond Shovel; Diamond Hoe
|Netherite Ingot
|Netherite Pickaxe; Netherite Axe; Netherite Shovel; Netherite Hoe
}}
== Usage ==
=== Best tools ===
{{main|Breaking#Best tools|title1=Breaking}}
Many blocks have a preferred tool to break them. Some blocks can be broken only with certain tools. The tool's material also affects how fast a block is mined. Materials from worst to best in terms of mining speed are wooden, stone, iron, diamond, netherite, gold.
=== Item durability ===
{{main|Durability}}
Different tools have different amounts of durability. Some uses require more durability to be used than others. A tool's durability is also affected by its material. Materials from worst to best in terms of durability are gold, wooden, stone, iron, diamond, netherite.
Some tools are not block-breaking tools: This includes bows, fishing rods, carrots on sticks, flint & steel, and buckets. Such tools are no better than bare fists at breaking blocks, but they do not take damage from doing so—they take damage from being used in their own intended manners.
=== Item enchantability ===
Materials from worst to best in terms of [[enchantability]] are stone, diamond, iron, wooden/netherite, gold.
=== Smelting ===
{{main|Smelting}}
Iron or golden tools can be smelted into [[nugget]]s.
{{Smelting|showname=1|head=1|Any iron tools|Iron Nugget|0,1}}
{{Smelting|showname=1|foot=1|Any golden tools|Gold Nugget|0,1}}
; Fuel
* Wooden tools can be used as a fuel in [[furnace]]s, smelting 1 item per tool.
* A [[fishing rod]] can be used as fuel in [[furnace]]s, smelting 1.5{{only|java|short=1}}/1{{only|bedrock|short=1}} items per fishing rod.
== History ==
{{info needed section|earlier Java Edition history between Indev and 1.3.1|section=10}}
{{History|java indev}}
{{History||0.31|snap=20091231-2|Added iron shovels.}}
{{History|||snap=20100110|Added iron axes and pickaxes.}}
{{History|||snap=20100128|Added wooden, stone, and diamond tools.}}
{{History|||snap=20100129|Added crafting recipes for wooden, stone, iron, and diamond tools.}}
{{History|||snap=20100130|Added golden tools.}}
{{History|||snap=20100131|A [[Tiers|tier system]] for wooden, stone, iron, diamond, and gold tools is added. Each tier has a different mining speed multiplier and durability.}}
{{History|||snap=20100201-2|Tools are now required to break blocks and ores.}}
{{history|java}}
{{History||1.0.0|snap=RC1|Tools now make a breaking sound and have a breaking animation.
|All tools now also have breaking animation.}}
{{History|||snap=RC2|Tools no longer break quickly after loading a world that was saved in RC1.}}
{{History||1.3.1|snap=12w17a|Tools now have infinite [[durability]] in [[Creative]] mode.}}
{{history|||snap=12w18a|Wooden tools became able to be used as [[fuel]] for [[furnace]]s in case players didn't want to repair them or finish using them.}}
{{History|||snap=12w24a|Breaking a block that can be [[instant mining|instantly mined]] by hand ([[tall grass]], [[torch]], etc.) while holding a block-breaking tool no longer reduces the tool's [[durability]].}}
{{history||1.6.1|snap=13w21a|Instead of replacing the barehanded damage ({{hp|1}}), pickaxes, shovels, axes and swords now add their damage onto the barehanded damage.}}
{{History||1.11.1|snap=16w50a|Golden and iron tools now smelt down into one of their respective nuggets.}}
{{History||1.14|snap=18w48a|Tools cannot be repaired by crafting.}}
{{History||1.14.3|snap=Pre-Release 3|Tools can be once again be repaired by crafting.}}
{{History||1.16.2|snap=20w29a|Tools have a new arrange in the Creative inventory.}}
{{History||1.20<br>(Experimental)|link=1.19.4|snap=23w04a|Upgrading diamond tools to netherite tools now requires the netherite upgrade [[smithing template]].}}
{{History|||snap=23w07a|Added brushes.}}
{{History|pocket alpha}}
{{History||v0.2.0|Added stone tools and shears.}}
{{History||v0.3.0|Added wooden tools.}}
{{History||v0.3.2|Added iron, diamond, and golden tools.}}
{{History||v0.3.3|Added bows.}}
{{History||v0.4.0|Added flint and steel and all hoe types.}}
{{History||v0.7.0|Added buckets.}}
{{History||v0.7.4|Flint and steel now ignite creepers.}}
{{History||v0.8.0|snap=build 1|Added flint and steel to the Creative inventory.}}
{{History|||snap=build 3|Added shears to the Creative inventory.}}
{{History||v0.11.0|snap=build 1|Added fishing rod.}}
{{History||v0.15.0|snap=build 1|Added carrot on a stick and leads.}}
{{History|pocket}}
{{History||1.1.0|snap=alpha 1.1.0.0|Golden and iron tools now smelt down into one of their respective nuggets.}}
{{History|console}}
{{History||xbox=TU53|xbone=CU43|ps=1.49|wiiu=Patch 23|switch=1.0.3|Golden and iron tools now smelt down into one of their respective nuggets.}}
{{History|foot}}
== Issues ==
{{issue list}}
== Trivia ==
* Gold tools are actually ranked as superior to diamond tools on the [[Legacy Console Edition]]'s crafting screen.
* Wooden tools can be burned in a furnace regardless of its durability; this means the player can burn a wooden tool that has only 1 use left.
== See also ==
* [[Item Repair]]
* [[Breaking]]
* [[Weapon]]
{{Items}}
[[Category:Tools|*]]
[[cs:Nástroje]]
[[de:Werkzeug]]
[[es:Herramientas]]
[[fr:Outils]]
[[hu:Eszközök]]
[[it:Attrezzi]]
[[ja:道具]]
[[ko:도구]]
[[nl:Gereedschap]]
[[pl:Narzędzia]]
[[pt:Ferramentas]]
[[ru:Инструменты]]
[[tr:Alet]]
[[zh:工具]]</li></ul> | TNT will now actually explode. | ||||
0.4.0{{Extension DPL}}<ul><li>[[Saddle|Saddle]]<br/>{{about|normal saddles|the removed horse saddle|Horse Saddle}}
{{item
| image = <gallery>
Saddle (Pig).png | Pig
Saddle (Horse).png | Horse
Saddle (Strider).png | Strider
</gallery>
| invimage = Saddle
| renewable = Yes
| stackable = No
}}
A '''saddle''' is an [[item]] required to ride [[Pig|pigs]] and [[Strider|striders]] or control ridden [[camel]]s, [[Horse|horses]], [[Donkey|donkeys]] and [[Mule|mules]].
== Obtaining ==
=== Chest loot ===
{{LootChestItem|saddle}}
=== Fishing ===
Saddles can be obtained as a "treasure" item from [[fishing]] with a base chance (without fishing rod enchantments) of 0.8%.
=== Trading ===
Master-level [[Trading#Leatherworker|leatherworker]] [[villager]]s have a 50% chance to sell a saddle for 6 [[Emerald|emeralds]] as their trade.{{only|bedrock}} This trade is always offered in ''Java Edition''.
=== Mob loot ===
Any mob that the player equips with a saddle drops the saddle upon death.
A [[strider]] may spawn being ridden by a [[zombified piglin]], which causes it to spawn wearing a saddle. This saddle always drops when the strider is killed.
A [[ravager]] always spawns with a saddle and always drops the saddle upon death. Looting does not affect the drop.
== Usage ==
[[File:SaddledHorse.png|thumb|right|A [[horse]] equipped with a saddle.]]
While [[camel]]s, [[horse]]s, [[donkey]]s, [[mule]]s and [[Skeleton Horse|skeleton horse]]s{{Only|Java}} can always be ridden, a saddle is required to control them. These mobs (only after being tamed, in the case of equine mobs) can be equipped with a saddle by placing it in their inventory, which can be opened by pressing {{control|use}} while holding a saddle or {{control|sneaking}}. The saddle can be unequipped by removing it from {{SlotSprite|Saddle}} the specific inventory slot.
Saddles are required to ride [[Pig|pigs]] and [[Strider|striders]], but even with a saddle their movement cannot be controlled like other mobs. A [[Carrot on a Stick|carrot on a stick]] (for pigs) or a [[Warped Fungus on a Stick|warped fungus on a stick]] (for striders) is required to direct these mobs. {{control|Using}} a saddle on one of these mobs equips them with the saddle, and, since they have no inventory, there is no way to retrieve the saddle without killing the mob.
Animals can also be equipped with saddles by a [[dispenser]].
Although [[ravager]]s are equipped with saddles and sometimes ridden by other mobs, the [[player]] is unable to ride ravagers.
== Sounds ==
{{edition|java}}:
{{Sound table
|rowspan=4
|sound=Saddle equip.ogg
|source=neutral
|subtitle=Saddle equips
|description=When a saddle is equipped to a camel
|id=entity.camel.saddle
|translationkey=subtitles.entity.horse.saddle
|volume=0.5
|pitch=0.8
|distance=16}}
{{Sound table
|subtitle=MC-184399
|source=neutral
|description=When a saddle is equipped to a strider
|id=entity.strider.saddle
|translationkey=-
|volume=0.5
|pitch=1.0
|distance=16}}
{{Sound table
|subtitle=Saddle equips
|source=neutral
|description=When a saddle is equipped to a horse, donkey, mule, skeleton horse, or zombie horse
|id=entity.horse.saddle
|translationkey=subtitles.entity.horse.saddle
|volume=0.5
|pitch=1.0
|distance=16}}
{{Sound table
|subtitle=Saddle equips
|source=neutral
|description=When a saddle is equipped to a pig
|id=entity.pig.saddle
|translationkey=subtitles.entity.pig.saddle
|volume=0.5
|pitch=1.0
|distance=16
|foot=1}}
{{edition|bedrock}}:
{{Sound table
|type=bedrock
|rowspan=3
|sound=Saddle equip.ogg
|source=neutral
|description=When a saddle is equipped to a camel
|id=mob.horse.leather
|volume=1.0
|pitch=1.0}}
{{Sound table
|source=neutral
|description=When a saddle is equipped to a horse, mule, skeleton horse, or zombie horse
|id=mob.horse.leather
|volume=0.6
|pitch=1.0}}
{{Sound table
|source=neutral
|description=When a saddle is equipped to a donkey
|id=mob.horse.leather
|volume=0.5
|pitch=1.0
|foot=1}}
== Data values ==
=== ID ===
{{edition|java}}:
{{ID table
|edition=java
|showforms=y
|generatetranslationkeys=y
|displayname=Saddle
|spritetype=item
|nameid=saddle
|form=item
|foot=1}}
{{edition|bedrock}}:
{{ID table
|edition=bedrock
|shownumericids=y
|showforms=y
|notshowbeitemforms=y
|generatetranslationkeys=y
|displayname=Saddle
|spritetype=item
|nameid=saddle
|id=371
|form=item
|foot=1}}
== Achievements ==
{{load achievements|When Pigs Fly}}
== Advancements ==
{{load advancements|This Boat Has Legs}}
== History ==
{{needs render|type=old|isolated saddles in 1.13 dev|section=11}}
{{History|java infdev}}
{{History||20100625-2|[[File:Saddle (Pig) JE1 BE1.png|32px]] [[File:Saddle JE1 BE1.png|32px]] Added saddles.
|Saddles do not [[drops|drop]] from saddled [[pig]]s.
|Saddles can be found in the new [[dungeon]] [[chest]]s.}}
{{History|java}}
{{History||1.2.4|snap=release|When baby animals were introduced, baby [[pig]]s could be ridden just like adult pigs. After this version, baby pigs can no longer be saddled.}}
{{History||1.3.1|snap=12w21a|Saddles can now be [[trading|bought]] from butcher [[villager]]s for 6–7 [[emerald]]s each, and thus have become [[renewable resource|renewable]].}}
{{History||1.4.2|snap=12w36a|Saddles now [[drops|drop]] from killing saddled [[pig]]s.
|Added [[Carrot on a Stick|carrot on a stick]] to direct saddled pigs, effectively controlling them.}}
{{History|||snap=12w37a|Pigs can now jump when being ridden.}}
{{History||1.6.1|snap=13w18a|Regular saddles can now be used to ride [[horse]]s, while previously they required [[Horse Saddle|horse saddle]]s.
|Added saddles to the loot tables of [[mineshaft]] minecarts, [[stronghold]] altar chests, [[village]] blacksmith chests, as well as [[Desert pyramid|desert]] and [[jungle pyramid]]s.
|Added chests to [[Nether Fortress|nether fortresses]], where saddles can be found.}}
{{History||1.7.2|snap=13w36a|Saddles can now be [[fishing|fished]] with [[Fishing Rod|fishing rod]]s and are described as treasure.}}
{{History||1.8|snap=14w02a|[[Trading]] has been changed: leatherworker [[villager]]s now [[trading|sell]] saddles for 8–10 [[emerald]]s each, and butchers no longer [[trading|trade]] saddles.}}
{{History||1.9|snap=15w31a|Saddles can now be found in [[End City|end city]] [[chest]]s.}}
{{History|||snap=15w43a|The average yield of saddles in [[Nether Fortress|nether fortress]] chests has been slightly decreased.}}
{{History|||snap=15w44a|Saddles have been removed from [[mineshaft]] chests.
|The average yield of saddles in [[dungeon]] chests has been decreased.
|The average yield of saddles in [[desert pyramid|desert temple]] chests has been increased.}}
{{History||1.13|snap=17w45a|[[File:White Horse (Saddle) 17w45a.png|50px]] The models of the horse's saddle has been changed.}}
{{History|||snap=17w46a|[[File:White Horse (Saddle) 17w46a.png|50px]] The models of the horse's saddle has been changed once again.}}
{{History|||snap=17w47a|Prior to [[Java Edition 1.13/Flattening|''The Flattening'']], this [[item]]'s numeral ID was 329.}}
{{History|||snap=18w03a|[[File:White Horse (Saddle) 18w03a.png|50px]] The models of the horse's saddle has been changed once again.}}
{{History|||snap=pre2|[[File:White Horse (Saddle) 1.13pre2.png|50px]] The models of the horse's saddle has been changed once again. The reins bit has now been rendered. Also, the lines of the reins are no longer rendered except when riding.}}
{{History||1.14|snap=18w43a|Added [[ravager|illager beast]]s, which [[drops|drop]] saddles.
|[[File:Saddle (Pig) JE2 BE2.png|32px]] [[File:Saddle (Horse) JE2 BE2.png|32px]] <br>[[File:Saddle JE2 BE2.png|32px]] The textures of saddles have been changed.}}
{{History|||snap=18w48a|Saddles can now be found in [[chest]]s in [[village]] tanneries.}}
{{History|||snap=18w49a|Saddles can now be found in chests in [[savanna]] village houses.}}
{{History||1.16|snap=20w13a|[[File:Saddle (Strider) JE1 BE1.png|32px]] Added [[strider]]s, which can be ridden with saddles.}}
{{History|||snap=20w15a|Saddles placed in a [[dispenser]] can now saddle pigs, striders, and tamed horses, donkeys and mules.}}
{{History|||snap=20w16a|Saddles now generate in [[Bastion Remnant|bastion remnant]] chests.}}
{{History|||snap=20w17a|[[File:Saddle (Strider) JE2.png|32px]] The texture of the strider saddles has been changed. The front and back orientation of the saddle has been corrected.<ref>{{bug|MC-176116}}</ref>}}
{{History||1.19|snap=22w13a|Saddles may now be found in [[ancient city]] [[chest]]s.}}
{{History||1.20<br>(Experimental)|link=1.19.3|snap=22w42a|Saddles can be used to ride [[camel]]s with the use of a built-in experimental data pack.}}
{{History|pocket alpha}}
{{History||v0.7.0|[[File:Saddle JE1 BE1.png|32px]] Added saddles. They are currently unobtainable and have no practical usage since they cannot be equipped on any mobs.}}
{{History||v0.9.0|snap=build 1|Saddles can now be obtained from [[village]] blacksmith [[chest]]s.}}
{{History||v0.11.0|snap=build 1|Saddles can now be [[fishing|fished]] with [[fishing rod]]s and are described as treasure.}}
{{History||v0.12.1|snap=build 1|Saddles can now be found in [[nether fortress]]es.}}
{{History||v0.13.0|snap=build 1|Saddles can now be found in [[desert temple]]s.}}
{{History||v0.15.0|snap=build 1|[[File:Saddle (Pig) JE1 BE1.png|32px]] [[File:Saddle (Horse) JE1 BE1.png|32px]] Saddles can now be used for riding [[horse]]s and [[pig]]s.|Saddles can now be found inside [[jungle temple]]s.}}
{{History||snap=?||Added saddles to the [[Creative inventory]].{{info needed}}}}
{{History|pocket}}
{{History||1.0.0|snap=alpha 0.17.0.1|Saddles can now be found in [[end cities]].}}
{{History||1.0.4|snap=alpha 1.0.4.0|Saddles are now [[trading|sold]] by leatherworker [[villager]]s for 8-10 [[emerald]]s as their only third tiers [[trading|trades]].}}
{{History|bedrock}}
{{History||1.10.0|snap=beta 1.10.0.3|Saddles can now be found in [[plains]] [[village]] tannery and weaponsmith [[chest]]s.
|Added [[ravager]]s, which [[drops|drop]] a saddle upon death.
|[[File:Saddle (Pig) JE2 BE2.png|32px]] [[File:Saddle (Horse) JE2 BE2.png|32px]] <br>[[File:Saddle JE2 BE2.png|32px]] The textures of saddles have been changed.}}
{{History||1.11.0|snap=beta 1.11.0.1|Saddles can now be found in [[savanna]], [[snowy taiga]], [[taiga]] and [[snowy tundra]] village tannery [[chest]]s.
|Saddles can now be found in savanna, taiga, snowy taiga, and [[desert]] village weaponsmith chests.
|Saddles can now be found in savanna [[village]] house chests.}}
{{History|||snap=beta 1.11.0.4|[[Trading]] has been changed. Leatherworker [[villager]]s now have 50% chance to [[trading|sell]] saddles for 10 [[emerald]]s as part of their last tier [[trading|trade]].}}
{{History||1.12.0|snap=beta 1.12.0.3|The trading price of saddles has been lowered to 6 emeralds.}}
{{History||1.16.0|snap=beta 1.16.0.57|[[File:Saddle (Strider) JE1 BE1.png|32px]] Added [[strider]]s, which can be ridden with saddles.|Saddles now generate in [[Bastion Remnant|bastion remnant]] chests.}}
{{History||1.20.0<br>(Experimental)|link=Bedrock Edition 1.19.50|snap=beta 1.19.50.21|Saddles can now be used to ride [[camel]]s with the use of the "[[Bedrock Edition 1.20|Next Major Update]]" [[experimental]] toggle.}}
{{History|console}}
{{History||xbox=TU1|xbone=CU1|ps=1.0|wiiu=Patch 1|switch=1.0.1|[[File:Saddle (Pig) JE1 BE1.png|32px]] <br>[[File:Saddle JE1 BE1.png|32px]] Added saddles.}}
{{History||xbox=none|xbone=none|ps=1.90|wiiu=none|switch=none|[[File:Saddle (Pig) JE2 BE2.png|32px]] [[File:Saddle (Horse) JE2 BE2.png|32px]] <br>[[File:Saddle JE2 BE2.png|32px]] The textures of saddles have been changed.}}
{{History|3ds}}
{{History||0.1.0|[[File:Saddle (Pig) JE1 BE1.png|32px]] <br>[[File:Saddle JE1 BE1.png|32px]] Added saddles.}}
{{History|foot}}
== Issues ==
{{issue list}}
== Trivia ==
* A saddle is considered "armor" by the game, but the value of protection to the animal is zero.
* A saddle on a pig can still be seen if the pig is afflicted with [[Invisibility]].
* When riding a saddled mob, the hunger bar is replaced by hearts (representing the mounted mob's health) resembling the look of the saddle.
== Gallery ==
<gallery>
File:Pig saddle.png|A [[player]] riding a [[pig]] (before [[Java Edition Beta 1.8|Beta 1.8]]).
File:Horse saddle.png|A player riding a [[horse]].
File:13w21a-new-HorseUI-inventory.png|The horse interface implemented in [[Java Edition 13w21a|13w21a]] that allows for the removal of saddles, but only on horses, [[donkey]]s or [[mule]]s.
File:Saddled Mule (picture).png|Mule equipped with both a saddle and a [[chest]].
File:GodSpawner.png|A saddle found in a monster room chest, which coincidentally contains an [[enchanted golden apple]].
</gallery>
== See also ==
* [[Transportation]]
== References ==
{{reflist}}
{{items}}
[[cs:Sedlo]]
[[de:Sattel]]
[[es:Montura]]
[[fr:Selle]]
[[hu:Nyereg]]
[[it:Sella]]
[[ja:鞍]]
[[ko:안장]]
[[nl:Zadel]]
[[pl:Siodło]]
[[pt:Sela]]
[[ru:Седло]]
[[zh:鞍]]
[[Category:Renewable resources]]
[[uk:Сідло]]</li><li>[[Hoe|Hoe]]<br/>{{Item
| image = <gallery>
Wooden Hoe.png | Wooden
Stone Hoe.png | Stone
Iron Hoe.png | Iron
Golden Hoe.png | Golden
Diamond Hoe.png | Diamond
Netherite Hoe.png | Netherite
</gallery>
|rarity = Common
|renewable =
* '''Netherite''': No
* '''All others''': Yes
| durability =
* Wood: 59
* Stone: 131
* Iron: 250
* Golden: 32
* Diamond: 1561
* Netherite: 2031
| stackable = No
}}
A '''hoe''' is a [[tool]] used to harvest certain plant-based or organic blocks more quickly, as well as to till most types of [[Dirt (disambiguation)|dirt]] into [[farmland]] and convert [[Coarse Dirt|coarse dirt]] and [[Rooted Dirt|rooted dirt]] to regular [[dirt]].
== Obtaining ==
=== Crafting ===
{{Crafting
|head=1
|showname=0
|showdescription=1
|name=[[Hoe]]
|A1= {Any Planks}; Iron Ingot; Gold Ingot; Diamond
|B1= {Any Planks}; Iron Ingot; Gold Ingot; Diamond
|B2= Stick
|B3= Stick
|Output=Wooden Hoe; Iron Hoe; Golden Hoe; Diamond Hoe
|type=Tool
}}
{{Crafting
|name=[[Stone Hoe]]
|A1=Any stone-tier block |B1=Any stone-tier block
|B2=Stick
|B3=Stick
|Output=Stone Hoe
|type=Tool
||description=Can use cobblestone and its other variants interchangeably.
}}
{{Crafting
|foot=1
|ignoreusage=1
|name=[[Hoe]]
|ingredients=Damaged Matching Hoe
|Damaged Wooden Hoe; Damaged Stone Hoe; Damaged Iron Hoe; Damaged Golden Hoe; Damaged Diamond Hoe; Damaged Netherite Hoe
|Damaged Wooden Hoe; Damaged Stone Hoe; Damaged Iron Hoe; Damaged Golden Hoe; Damaged Diamond Hoe; Damaged Netherite Hoe
|Output=Wooden Hoe; Stone Hoe; Iron Hoe; Golden Hoe; Diamond Hoe; Netherite Hoe
|description= The durability of the two hoes is added together, plus an extra 5% durability.
|type= Tool
}}
=== Upgrading ===
Like other diamond tools, a diamond hoe can be upgraded to a netherite hoe, increasing its durability and slightly increasing its mining speed.
{{Smithing
|head=1
|Netherite Upgrade
|Diamond Hoe
|Netherite Ingot
|Netherite Hoe
|tail=1
}}
=== Repairing ===
==== Grinding ====
{{Grinding
|showdescription=1
|ingredients=2x Damaged [[Wooden Hoe]] or<br>2x Damaged [[Stone Hoe]] or<br>2x Damaged [[Iron Hoe]] or<br>2x Damaged [[Golden Hoe]] or<br>2x Damaged [[Diamond Hoe]] or<br>2x Damaged [[Netherite Hoe]]
|Damaged Wooden Hoe; Damaged Stone Hoe; Damaged Iron Hoe; Damaged Golden Hoe; Damaged Diamond Hoe; Damaged Netherite Hoe
|Damaged Wooden Hoe; Damaged Stone Hoe; Damaged Iron Hoe; Damaged Golden Hoe; Damaged Diamond Hoe; Damaged Netherite Hoe
|Wooden Hoe; Stone Hoe; Iron Hoe; Golden Hoe; Diamond Hoe; Netherite Hoe
|description=The durability of the two hoes is added together, plus an extra 5% durability.
}}
==== Unit repair ====
{{main|Anvil mechanics#Unit repair}}
{{/Repairing with Anvils}}
A hoe can be repaired in an [[anvil]] by adding units of the [[tiers]]' repair material (or the same hoe of that tier), with each repair material restoring 25% of the hoe's maximum durability, rounded down. It also keeps the hoe's [[Enchanting|enchantments]].
=== Chest loot ===
{{LootChestItem|wooden-hoe,diamond-hoe,golden-hoe,random-enchanted-golden-hoe,damaged-level-enchanted-diamond-hoe}}
=== Trading ===
Novice-level toolsmith [[villager]]s have a chance to sell a stone hoe for one [[emerald]], and journeyman-level toolsmiths have a chance to sell a diamond hoe for 4 emeralds. {{IN|bedrock}}, these are 25% chances, and {{in|java}}, these are 40% chances.
=== Villager gifts ===
Toolsmith [[Villager|villagers]] occasionally throw stone hoes at players with the [[Hero of the Village]] status effect.{{Only|java}}
== Usage ==
=== Harvesting ===
Hoes are used to harvest certain plant-based or organic blocks more quickly. Breaking one of these blocks takes 1 [[durability]].
{{breaking row|Sculk Catalyst|sort=1|simple=1}}
{{breaking row|Sculk Shrieker|sort=1|simple=1}}
{{breaking row|Sculk Sensor|sort=1|simple=1}}
{{breaking row|Calibrated Sculk Sensor|sort=1|simple=1}}
{{breaking row|Nether Wart Block,Warped Wart Block|sort=1|simple=1}}
{{breaking row|Shroomlight|sort=1|simple=1}}
{{breaking row|Hay Bale|sort=1|simple=1}}
{{breaking row|Target|sort=1|simple=1}}
{{breaking row|Dried Kelp Block|sort=1|simple=1}}
{{breaking row|Sponge,Wet Sponge|sort=1|simple=1}}
{{breaking row|Leaves|sort=1|simple=1}}
{{breaking row|Sculk|sort=1|simple=1}}
{{breaking row|Sculk Vein|sort=1|simple=1}}
{{breaking row|Moss Block|foot=1}}
Breaking any other block takes 0 durability if the block breaks instantly when broken by hand, or 1 otherwise.
=== Tilling ===
Hoes are used to turn dirt, grass blocks, and dirt paths into [[farmland]]. To till, press {{control|use}} on a grass or dirt block while holding a hoe. This does not work on [[mycelium]] or [[podzol]],<ref>{{bug|MC-8231||Mycelium and podzol cannot be tilled with hoes}}</ref> nor does it work if there are other blocks on top of the targeted blocks, including snow layers or torches. However, mycelium and podzol can be first converted to dirt paths with a shovel, then tilled into farmland with a hoe.
Hoes can be used to convert [[coarse dirt]] into regular dirt by pressing {{control|use}} on the coarse dirt. Similar to tilling dirt, the space above the coarse dirt must be empty for it to be tilled.
Hoes can also be used on [[rooted dirt]], which turns it into normal dirt, and yields a [[hanging roots]] item.
Tilling is effectively instantaneous, regardless of material, and uses 1 durability. Breaking blocks with a hoe uses 0 or 1 durability, depending on the block.
Hoes are unable to work on blocks with a plant on top, even if that plant could normally be placed on top of farmland without reverting it to dirt.<ref>{{bug|MC-167846||Hoe cannot be used on blocks with certain blocks on top even if said blocks can normally exist on farmland|WAI}}</ref>
=== Weapon ===
Hoes may be used as a weapon, although they deal only {{hp|1}} damage {{in|java}}. {{IN|bedrock}}, hoes can do as much as a pickaxe in terms of damage. Hoes use 2 durability when used as a weapon.
{{IN|java}}, hoes have an attack speed modifier depending on the material: wood and gold have a modifier of -3 (refill in 1s), stone has a modifier of -2 (refill in 0.5s), iron has a modifier of -1 (refill in 0.33s), and diamond and netherite have a modifier of 0 (refill in 0.25s).
{| class="wikitable" style="text-align:center" data-description="Attack damage"
! Attack damage
! colspan="4" | Attack speed
! colspan="4" | Damage/Second (DPS)
|-
| {{hp|1}}
| {{ItemSprite|Wooden Hoe}}{{ItemSprite|Golden Hoe}} 1
| {{ItemSprite|Stone Hoe}} 2
| {{ItemSprite|Iron Hoe}} 3
| {{ItemSprite|Diamond Hoe}}{{ItemSprite|Netherite Hoe}} 4
| {{ItemSprite|Wooden Hoe}}{{ItemSprite|Golden Hoe}} 1
| {{ItemSprite|Stone Hoe}} 2
| {{ItemSprite|Iron Hoe}} 3
| {{ItemSprite|Diamond Hoe}}{{ItemSprite|Netherite Hoe}} 4
|}
Hoes always attack instantly {{in|bedrock}}.
=== Enchantments ===
A hoe can receive the following enchantments and curses:
{| class="wikitable col-2-center"
|+
!Name
!Max Level
![[Enchanting|Method]]
|-
|[[Efficiency]]
|V
|{{Inventory slot|Enchanting Table}}{{Inventory slot|Anvil}}
|-
|[[Fortune]] <ref group=note name=note1>Fortune and Silk Touch are mutually exclusive.</ref>
|III
|{{Inventory slot|Enchanting Table}}{{Inventory slot|Anvil}}
|-
|[[Unbreaking]]
|III
|{{Inventory slot|Enchanting Table}}{{Inventory slot|Anvil}}
|-
|[[Silk Touch]] <ref group=note name=note1>Fortune and Silk Touch are mutually exclusive.</ref>
|I
|{{Inventory slot|Enchanting Table}}{{Inventory slot|Anvil}}
|-
|[[Mending]]
|I
|{{Inventory slot|Anvil}}
|-
|[[Curse of Vanishing]]
|I
|{{Inventory slot|Anvil}}
|}
{{Notelist}}
=== Fuel ===
Wooden hoes can be used as a [[fuel]] in [[furnace]]s, smelting 1 item per hoe.
=== Smelting ingredient ===
{{Smelting|showname=1|Iron Hoe;Golden Hoe|Iron Nugget;Gold Nugget|0,1}}
===Piglins===
{{EntityLink|Piglin|Piglins}} are attracted to golden hoes and run toward any golden hoes on the ground, and inspect them for 6 to 8 seconds before putting them in their inventory.
== Sounds ==
{{edition|java}}:
{{Sound table
|sound=Hoe till1.ogg
|sound2=Hoe till2.ogg
|sound3=Hoe till3.ogg
|sound4=Hoe till4.ogg
|subtitle=Hoe tills
|source=block
|description=When a block is tilled into farmland
|id=item.hoe.till
|translationkey=subtitles.item.hoe.till
|volume=1.0
|pitch=1.0
|distance=16}}
{{Sound table
|sound=Random break.ogg
|subtitle=Item breaks
|source=player
|description=When a hoe's durability is exhausted
|id=entity.item.break
|translationkey=subtitles.entity.item.break
|volume=0.8
|pitch=0.8-1.2
|distance=16
|foot=1}}
{{edition|bedrock}}:
{{Sound table
|type=bedrock
|sound=Gravel hit1.ogg
|sound2=Gravel hit2.ogg
|sound3=Gravel hit3.ogg
|sound4=Gravel hit4.ogg
|source=block
|description=When a block is tilled into farmland
|id=use.gravel
|volume=1.0
|pitch=0.8}}
{{Sound table
|sound=Random break.ogg
|source=player
|description=When a hoe's durability is exhausted
|id=random.break
|volume=1.0
|pitch=0.9
|foot=1}}
== Data values ==
=== ID ===
{{edition|java}}:
{{ID table
|edition=java
|showforms=y
|generatetranslationkeys=y
|displayname=Wooden Hoe
|spritetype=item
|nameid=wooden_hoe
|form=item}}
{{ID table
|displayname=Stone Hoe
|spritetype=item
|nameid=stone_hoe
|form=item}}
{{ID table
|displayname=Iron Hoe
|spritetype=item
|nameid=iron_hoe
|form=item}}
{{ID table
|displayname=Diamond Hoe
|spritetype=item
|nameid=diamond_hoe
|form=item}}
{{ID table
|displayname=Golden Hoe
|spritetype=item
|nameid=golden_hoe
|form=item}}
{{ID table
|displayname=Netherite Hoe
|spritetype=item
|nameid=netherite_hoe
|form=item
|foot=1}}
{{edition|bedrock}}:
{{ID table
|edition=bedrock
|shownumericids=y
|showforms=y
|notshowbeitemforms=y
|generatetranslationkeys=y
|displayname=Wooden hoe
|spritetype=item
|nameid=wooden_hoe
|id=329
|form=item}}
{{ID table
|displayname=Stone hoe
|spritetype=item
|nameid=stone_hoe
|id=330
|form=item}}
{{ID table
|displayname=Iron hoe
|spritetype=item
|nameid=iron_hoe
|id=331
|form=item}}
{{ID table
|displayname=Diamond hoe
|spritetype=item
|nameid=diamond_hoe
|id=332
|form=item}}
{{ID table
|displayname=Golden hoe
|spritetype=item
|nameid=golden_hoe
|id=333
|form=item}}
{{ID table
|displayname=Netherite hoe
|spritetype=item
|nameid=netherite_hoe
|id=608
|form=item
|foot=1}}
== Achievements ==
{{load achievements|Time to Farm!; MOAR Tools;Oooh, shiny!}}
== Advancements ==
{{load advancements|Oh Shiny;Serious Dedication;A Seedy Place}}
== Video ==
<div style="text-align:center">{{yt|Wkqfv6QLEs0}}</div>
== History ==
{{History|java indev}}
{{History||20100206|[[File:Wooden Hoe JE1 BE1.png|32px]] [[File:Stone Hoe JE1 BE1.png|32px]] [[File:Iron Hoe JE1 BE1.png|32px]] [[File:Golden Hoe JE1 BE1.png|32px]] [[File:Diamond Hoe JE1 BE1.png|32px]] Added hoes.
|Compared to other golden tools, golden hoes had much higher durability, which was 513 instead of 33.}}
{{History|java alpha}}
{{History||v1.0.17|Golden hoes' durability has been decreased from 513 to 65, matching the stone tools.}}
{{History|java beta}}
{{History||1.2|Golden hoes now have the same durability as the other gold tools.}}
{{History||1.6|snap=Test Build 3|Before, using a hoe on [[grass block]]s was the only way to collect [[Wheat Seeds|seeds]] for planting. As [[tall grass]] has been introduced, this feature has been removed.}}
{{History|java}}
{{History||1.2.1|snap=12w07a|Player is now unable to till [[dirt]] or [[grass block]] when there is block on top of them.}}
{{History||1.2.4|snap=release|[[Spruce planks]], [[birch planks]], and [[jungle planks]] can now be used to craft wooden hoes.}}
{{History||1.3.1|snap=12w18a|Wooden hoes can now be used as [[Smelting#Fuel|fuel]] in a [[furnace]].}}
{{History|||snap=12w21a|Blacksmith [[villager]]s now [[trading|sell]] 1 diamond hoe for 7 [[emerald]]s, and 1 iron hoe for 4–5 emeralds.}}
{{History||1.4.2|snap=12w38a|Hoes now have a [[sound]] when tilling [[dirt]].}}
{{History||1.7.2|snap=1.7.1|[[Acacia planks]] and [[dark oak planks]] can now be used to craft wooden hoes.}}
{{History||1.8|snap=14w02a|Villagers no longer trade iron or diamond hoes, making diamond hoes [[non-renewable resource|non-renewable]].}}
{{History|||snap=14w32a|Hoes can now be used to convert [[coarse dirt]] into regular [[dirt]].}}
{{History||1.9|snap=15w34c|Stone, iron and diamond hoes now do slightly more [[damage]] than an unarmed attack.}}
{{History|||snap=15w34d|All hoes now lose 1 [[durability]] when used as a [[weapon]].}}
{{History|||snap=15w35a|Hoes now all do the same damage, but better materials have higher speeds.}}
{{History|||snap=15w50a|Added a [[sound]] for hoes: <code>item.hoe.till</code>.}}
{{History||1.11|snap=16w39a|Diamond hoes are now found in the new [[woodland mansion]] [[chest]]s.}}
{{History||1.11.1|snap=16w50a|Golden and iron hoes can now be [[smelting|smelted]] down into one of their respective [[nugget]]s.}}
{{History||1.13|snap=17w47a|Prior to ''[[1.13/Flattening|The Flattening]]'', these items' numeral IDs were 290 (wooden), 291 (stone), 292 (iron), 293 (diamond) and 294 (golden).}}
{{History||1.14|snap=18w43a|[[File:Wooden Hoe JE2 BE2.png|32px]] [[File:Stone Hoe JE2 BE2.png|32px]] [[File:Iron Hoe JE2 BE2.png|32px]] [[File:Golden Hoe JE2 BE2.png|32px]] [[File:Diamond Hoe JE2 BE2.png|32px]] The textures of all hoes have been changed.}}
{{History|||snap=19w11a|Toolsmith villagers now sell stone hoes and diamond hoes, making diamond hoes [[renewable resource|renewable]] again.}}
{{History|||snap=19w13a|Toolsmith villagers now give stone hoes to players under the [[Hero of the Village]] effect.}}
{{History||1.16|snap=20w06a|[[File:Netherite Hoe JE1.png|32px]] Added netherite hoes.
|Netherite hoes are obtained by combining one diamond hoe and one netherite ingot in a crafting table.
|[[Crimson planks]] and [[warped planks]] can now be used to craft wooden hoes.}}
{{History|||snap=20w09a|Hoes can now break [[Nether Wart Block|nether wart and warped wart block]]s quickly.
|Netherite hoes can now be obtained through [[bartering]] with [[piglin]]s.
|[[File:Wooden Hoe JE3 BE3.png|32px]] [[File:Golden Hoe JE3 BE3.png|32px]] [[File:Diamond Hoe JE3 BE3.png|32px]] The textures of wooden, golden, and diamond hoes have been changed.}}
{{History|||snap=20w10a|Each tier of hoes now has different a speed while [[breaking|mining]] blocks they are effective against.
|Hoes can now be enchanted with [[Efficiency]], [[Fortune]] and [[Silk Touch]].
|Hoes now mine [[hay bale]]s faster than other tools.
|Netherite hoes are now less common when bartering with piglins.
|Hoes now lose 2 durability when used as a weapon.
|[[File:Netherite Hoe JE2.png|32px]] The texture of netherite hoes has been changed.
|Netherite hoes can no longer be [[crafted]].
|Netherite hoes are now obtained by combining one diamond hoe and one [[netherite ingot]] in a [[smithing table]].}}
{{History|||snap=20w11a|Hoes can now mine [[dried kelp block]]s, [[target]]s, and [[shroomlight]]s faster than other [[tool]]s.}}
{{History|||snap=20w12a|Hoes can now mine [[sponge]]s faster than other tools.}}
{{History|||snap=20w15a|Hoes can now mine [[leaves]] faster.
|Stone hoes can now be crafted using [[blackstone]].}}
{{History|||snap=20w16a|Golden hoes now generate randomly enchanted in [[bastion remnant]]s and [[ruined portal]] chests.}}
{{History|||snap=20w20a|Netherite hoes can no longer be obtained through bartering with piglins, making them no longer renewable.}}
{{History||1.17|snap=20w49a|Hoes can now mine [[sculk sensor]]s faster than other tools.}}
{{History|||snap=21w11a|Hoes are now the appropriate tool for breaking [[moss block]]s.}}
{{History|||snap=21w08a|Stone hoes can now be crafted using [[cobbled deepslate]].}}
{{History|||snap=21w20a|Hoes can now be used on [[rooted dirt]], turning it into normal dirt, yielding a [[hanging roots]] item.}}
{{History||1.19|snap=22w11a|[[Mangrove planks]] can now be used to craft wooden hoes.}}
{{History|||snap=22w12a|Hoes can now mine mangrove [[leaves]] faster.<ref>{{Cite bug|MC|249270|Mangrove leaves do not have a hoe as their preferred tool|date=March 19, 2022}}</ref>}}
{{History|||snap=22w13a|Diamond hoes may now be found in [[ancient city]] [[chest]]s.}}
{{History||1.20<br>(Experimental)|link=1.19.4|snap=23w04a|Upgrading diamond hoes to netherite hoes now requires the netherite upgrade [[smithing template]].}}
{{History||1.20|snap=23w12a|Wooden hoes may now be found when brushing [[suspicious sand]] and [[suspicious gravel]] in cold and warm [[ocean ruins]] and [[trail ruins]].}}
{{History|||snap=23w16a|Wooden hoe no longer generates in [[suspicious sand]] in [[trail ruins]].|Due to the split of the archaeological loot tables for the suspicious gravel within the [[trail ruins]]; wooden hoe now is in the common loot.}}
{{History|upcoming java}}
{{History||Combat Tests|snap=1.14.3 - Combat Test|The attack speed of wooden hoes has been changed to 2, stone to 2.5, and diamond and gold to 3.5.
|The [[damage]] dealt for wooden, stone, and gold hoes have been changed to {{hp|2}} and iron and diamond hoes to {{hp|3}}.
|The attack reach of hoes has been increased to 4 [[block]]s.}}
{{History|pocket alpha}}
{{History||v0.4.0|[[File:Wooden Hoe JE1 BE1.png|32px]] [[File:Stone Hoe JE1 BE1.png|32px]] [[File:Iron Hoe JE1 BE1.png|32px]] [[File:Golden Hoe JE1 BE1.png|32px]] [[File:Diamond Hoe JE1 BE1.png|32px]] Added hoes.
|Only iron hoes are available in the Creative inventory.
|[[Wheat seed]]s are now obtained by using a hoe on [[grass]] blocks.}}
{{History||v0.8.0|snap=build 3|[[Beetroot seeds]], [[carrot]]s, and [[potato]]es are now obtained by using a hoe on [[grass]] blocks.}}
{{History|||snap=build 4|[[Carrot]]s and [[potato]]es no longer spawn from tilling [[grass]] blocks with a hoe.}}
{{History||v0.11.0|snap=build 11|Wooden, stone, golden, and diamond hoes are now available in the [[creative]] [[inventory]].}}
{{History|||snap=build 12|Wooden, stone, golden, and diamond hoes have been removed from creative.}}
{{History|||snap=build 13|All hoes are now available in [[creative]] mode again.}}
{{History||v0.16.2|Wooden hoes can now be found inside the [[chest]] in the large house of [[ice plains]] [[village]]s.}}
{{History|pocket}}
{{History||1.1.0|snap=alpha 1.1.0.0|Iron and golden hoes are now [[smelting|smeltable]].
|Diamond hoes can now be found inside [[woodland mansion]] [[chest]]s.}}
{{History|bedrock}}
{{History||1.2.0|snap=beta 1.2.0.2|Hoes can now be used to transform [[coarse dirt]] into normal [[dirt]].}}
{{History||1.10.0|snap=beta 1.10.0.3|Due to [[village]]s being overhauled, wooden hoes can no longer be found in [[village]]s.
|[[File:Wooden Hoe JE2 BE2.png|32px]] [[File:Stone Hoe JE2 BE2.png|32px]] [[File:Iron Hoe JE2 BE2.png|32px]] [[File:Golden Hoe JE2 BE2.png|32px]] [[File:Diamond Hoe JE2 BE2.png|32px]] The textures of all hoes have been changed.}}
{{History||1.11.0|snap=beta 1.11.0.4|Stone and diamond hoes can now be [[trading|bought]] from toolsmith [[villager]]s.}}
{{History||1.12.0|snap=beta 1.12.0.4|The price of diamond hoes [[trading|sold]] by toolsmith villagers has been lowered to 4 [[emerald]]s.}}
{{History||1.16.0|snap=beta 1.16.0.51|[[File:Netherite Hoe BE1.png|32px]] Added netherite hoes.|Netherite hoes are obtained by combining one diamond hoe and one netherite ingot in a crafting table.
|[[File:Wooden Hoe JE3 BE3.png|32px]] [[File:Golden Hoe JE3 BE3.png|32px]] [[File:Diamond Hoe JE3 BE3.png|32px]] The textures of wooden, golden, and diamond hoes have been changed.}}
{{History|||snap=beta 1.16.0.57|Each tier of hoes now has different a speed while [[breaking|mining]] blocks they are effective against.
|Hoes can now break [[hay bale]]s, [[dried kelp block]]s, [[target block]]s, [[Sponge|dry and wet sponges]], [[shroomlight]]s, [[leaves]], [[Nether Wart Block|nether wart and warped wart block]]s quickly.
|Hoes can now be enchanted with [[Efficiency]], [[Fortune]] and [[Silk Touch]].
|Netherite hoes can now be obtained through [[bartering]] with [[piglin]]s.
|Netherite hoes can no longer be [[crafting|crafted]].
|Netherite hoes are now obtained by combining one diamond hoe and one [[netherite ingot]] in a [[smithing table]].
|Stone Hoes can now be created using Blackstone.
|Golden and netherite hoes now generate randomly enchanted in [[bastion remnants]] chests.
|Golden hoes now generate randomly enchanted in ruined portal chests.
|Hoes now deal the same damage as pickaxes of each tier.}}
{{History||1.16.100|snap=beta 1.16.100.54|Netherite hoes can no longer be obtained through [[bartering]] with [[piglin]]s, making them no longer renewable.}}
{{History||1.17.10|snap=beta 1.17.10.20|[[File:Netherite Hoe JE2.png|32px]] The texture of netherite hoes has been changed to match ''Java Edition''.}}
{{History|console}}
{{History||xbox=TU1|xbone=CU1|ps=1.0|wiiu=Patch 1|switch=1.0.1|[[File:Wooden Hoe JE1 BE1.png|32px]] [[File:Stone Hoe JE1 BE1.png|32px]] [[File:Iron Hoe JE1 BE1.png|32px]] [[File:Golden Hoe JE1 BE1.png|32px]] [[File:Diamond Hoe JE1 BE1.png|32px]] Added hoes (all five types).}}
{{History||xbox=TU53|xbone=CU43|ps=1.49|wiiu=Patch 23|switch=1.0.3|Iron and golden hoes are now [[smelting|smeltable]].}}
{{History|ps4}}
{{History||1.90|[[File:Wooden Hoe JE2 BE2.png|32px]] [[File:Stone Hoe JE2 BE2.png|32px]] [[File:Iron Hoe.png|32px]] [[File:Golden Hoe JE2 BE2.png|32px]] [[File:Diamond Hoe JE2 BE2.png|32px]] The textures of all hoes have been changed.}}
{{History|New 3DS}}
{{History||0.1.0|[[File:Wooden Hoe JE1 BE1.png|32px]] [[File:Stone Hoe JE1 BE1.png|32px]] [[File:Iron Hoe JE1 BE1.png|32px]] [[File:Golden Hoe JE1 BE1.png|32px]] [[File:Diamond Hoe JE1 BE1.png|32px]] Added hoes.}}
{{History|foot}}
== Issues ==
{{issue list}}
== Trivia ==
*Tilling a [[dirt]] block that has a dirt block on top of it changes it to [[farmland]] even though it cannot be used. If a hoe is used on a [[block]] horizontally adjacent to such a block, the first block reverts to dirt and the selected block is not tilled.
*When a hoe breaks, it does not display the tool breaking animation like on other tools, because tilling is not predicted client-side.
*The textures for the post 1.14 iron and stone hoes have an error, where the color for the edge of the handle is partly the same color as the edge of the top part. This isn't present in any other tool.
== Gallery ==
<gallery>
Stone Hoe SDGP.png|Stone hoe in the [[Super Duper Graphics Pack]].
Kingbdogz Hoe.jpg|[[Kingbdgoz]] holding a hoe.
</gallery>
=== Enchanted hoes ===
<gallery>
Enchanted Wooden Hoe.gif
Enchanted Stone Hoe.gif
Enchanted Iron Hoe.gif
Enchanted Golden Hoe.gif
Enchanted Diamond Hoe.gif
Enchanted Netherite Hoe.gif
</gallery>
== References ==
{{reflist}}
== External Links ==
*[https://www.minecraft.net/en-us/article/taking-inventory--hoe Taking Inventory: Hoe] – Minecraft.net on June 25, 2019
{{Items}}
[[Category:Combat]]
[[cs:Motyka]]
[[de:Hacke]]
[[es:Azada]]
[[fr:Houe]]
[[hu:Kapa]]
[[it:Zappa]]
[[ja:クワ]]
[[ko:괭이]]
[[nl:Schoffel]]
[[pl:Motyka]]
[[pt:Enxada]]
[[ru:Мотыга]]
[[tr:Çapa]]
[[uk:Мотика]]
[[zh:锄]]</li></ul> | Added creepers. | ||||
0.12.1{{Extension DPL}}<ul><li>[[Purple Dye|Purple Dye]]<br/>{{Item
| image = Purple_Dye_JE2_BE2.png
| renewable = Yes
| stackable = Yes (64)
}}
'''Purple dye''' is a [[Dyeing#Secondary colors|secondary dye color]] created by combining [[red dye]] and [[blue dye]] in a crafting grid.
== Obtaining ==
=== Crafting ===
{{Crafting
|head=1
|showname=0
|Blue Dye
|Red Dye
|Output=Purple Dye,2
|type=Material
}}
{{Crafting
|foot=1
|Lapis Lazuli
|Red Dye
|Output=Purple Dye,2
|description={{only|bedrock|education}}
|type=Material
}}
=== Trading ===
[[Wandering trader]]s sometimes sell 3 purple dye for an [[emerald]].
== Usage ==
{{dye usage}}
=== Crafting ingredient ===
{{crafting usage|ignore=Banner|continue=1}}
{{banner crafting usage}}
=== Loom ingredient ===
{{Banner loom usage|Purple Dye}}
=== Trading ===
Apprentice-level Shepherd villagers have a 20% chance to buy 12 purple dye for an emerald as part of their trades.{{only|bedrock}}
Expert-level Shepherd villagers have a {{frac|2|7}} chance to buy 12 purple dye for an emerald.{{only|java}}
== Data values ==
=== ID ===
{{edition|java}}:
{{ID table
|edition=java
|showforms=y
|generatetranslationkeys=y
|displayname=Purple Dye
|spritetype=item
|nameid=purple_dye
|form=item
|foot=1}}
{{edition|bedrock}}:
{{ID table
|edition=bedrock
|showaliasids=y
|shownumericids=y
|showforms=y
|notshowbeitemforms=y
|generatetranslationkeys=y
|displayname=Purple Dye
|spritetype=item
|nameid=purple_dye
|aliasid=dye / 5
|id=400
|form=item
|translationkey=item.dye.purple.name
|foot=1}}
== Video ==
<div style="text-align:center">{{yt|Cx52CGo5QnI}}</div>
== History ==
{{History|java beta}}
{{History||1.2|[[File:Purple Dye JE1 BE1.png|32px]] Added purple dye.}}
{{History|java}}
{{History||1.4.2|snap=12w34a|Added the ability to [[Armor#Dyeing|dye]] leather [[armor]] and [[wolf]] collars.}}
{{History||1.4.6|snap=12w49a|Purple dye can now be [[crafting|crafted]] with [[gunpowder]] to create a [[firework star]].}}
{{History||1.6.1|snap=13w19a|[[Stained clay]] can now be crafted.}}
{{history||1.7.2|snap=13w36a|With the addition of new [[flower]]s, many secondary and tertiary dyes are now primary [[dye]]s.}}
{{History|||snap=13w41a|[[Stained glass]] can now be crafted.}}
{{History||1.8|snap=14w02a|Due to [[lapis lazuli]] being [[renewable resource|renewable]] now, purple dye is also now renewable.}}
{{History|||snap=14w30a|Added [[banner]]s which can be dyed.}}
{{History||1.13|snap=17w47a|The different data values for the <code>dye</code> ID have now been split up into their own IDs.
|Prior to [[1.13/Flattening|''The Flattening'']], this [[item]]'s numeral ID was 351.}}
{{History||1.14|snap=18w43a|Purple dye is now [[crafting|crafted]] using [[blue dye]], instead of [[lapis lazuli]].
|[[File:Purple_Dye_JE2_BE2.png|32px]] The texture of purple dye has now been changed.}}
{{History|||snap=18w44a|Purple dye can now change the text color on [[sign]]s to purple.}}
{{History|||snap=19w05a|Added the [[wandering trader]], which sells purple dye.}}
{{History|||snap=19w11a|Purple dye can now be [[trading|bought]] by shepherd villagers.}}
{{History||1.17|snap=20w45a|Purple dye can now be used to craft [[purple candle]]s.}}
{{History|||snap=21w19a|Purple dye can no longer be used to craft purple candles.}}
{{History|||snap=Pre-release 1|Purple dye can once again be used to craft purple candles.}}
{{History||1.20<br>(Experimental)|link=1.19.3|snap=22w42a|Purple dye can now change the text color on [[hanging sign]]s to purple.}}
{{History|pocket alpha}}
{{History||v0.3.0|[[File:Purple Dye JE1 BE1.png|32px]] Added purple dye. It is currently unobtainable and serves no purpose.}}
{{History||v0.4.0|Purple dye is now [[craft]]able with rose red and lapis lazuli.
|Purple dye can now be used to craft purple [[wool]].}}
{{History||v0.6.0|Purple dye can now be used to dye [[sheep]].}}
{{History||v0.8.0|snap=build 1|Purple dye can now be used to craft [[magenta dye]].}}
{{History||v0.9.0|snap=build 11|Purple dye can now be used to craft colored [[terracotta]].}}
{{History||v0.11.0|snap=build 1|Purple dye can now be used to dye tamed [[wolf]] collars.}}
{{History||v0.14.0|snap=build 1|Purple dye can now be used to dye [[water]] in [[cauldron]]s.}}
{{History|pocket}}
{{History||1.0.0|snap=alpha 0.17.0.1|Purple dye can now be used to dye [[shulker]]s.}}
{{History||1.1.0|snap=alpha 1.1.0.0|Purple dye can now be used to craft [[concrete powder]], colored [[bed]]s and dyed [[shulker box]]es.}}
{{History|bedrock}}
{{History||1.2.0|snap=beta 1.2.0.2|Purple dye can now be used to craft [[firework star]]s, [[stained glass]] and patterns on [[banner]]s.}}
{{History||1.4.0|snap=beta 1.2.20.1|Purple dye can now be used to craft [[balloon]]s and [[glow stick]]s.}}
{{History||1.8.0|snap=beta 1.8.0.8|Purple dye can now be used to dye tamed [[cat]] collars.}}
{{History||1.10.0|snap=beta 1.10.0.3|Purple dye is now [[trading|sold]] by [[wandering trader]]s.
|Purple dye can now be used to dye white [[carpet]]s and undyed [[glass pane]]s.
|[[File:Purple_Dye_JE2_BE2.png|32px]] The texture of purple dye has now been changed.}}
{{History||1.11.0|snap=beta 1.11.0.4|Purple dye can now be [[trading|sold]] to shepherd [[villager]]s.}}
{{History||1.16.100|snap=beta 1.16.100.56|The ID of purple dye has been changed from <code>dye/5</code> to <code>purple_dye</code>.}}
{{History|console}}
{{History||xbox=TU1|xbone=CU1|ps=1.00|switch=1.0.1|wiiu=Patch 1|[[File:Purple Dye JE1 BE1.png|32px]] Added purple dye.}}
{{History|PS4}}
{{History||1.90|[[File:Purple_Dye_JE2_BE2.png|32px]] The texture of purple dye has now been changed.}}
{{History|new 3ds}}
{{History||0.1.0|[[File:Purple Dye JE1 BE1.png|32px]] Added purple dye.}}
{{History|foot}}
== Issues ==
{{issue list}}
{{Items}}
[[Category:Items]]
[[Category:Dyes]]
[[Category:Renewable resources]]
[[cs:Fialové barvivo]]
[[de:Violetter Farbstoff]]
[[es:Tinte morado]]
[[fr:Teinture violette]]
[[hu:Lila festék]]
[[ja:紫色の染料]]
[[ko:보라색 염료]]
[[nl:Paarse kleurstof]]
[[pl:Fioletowy barwnik]]
[[pt:Corante roxo]]
[[ru:Фиолетовый краситель]]
[[zh:紫色染料]]</li><li>[[Dried Kelp|Dried Kelp]]<br/>{{about|the item|the block|Dried Kelp Block}}
{{Item
| title = Dried Kelp
| image = Dried Kelp.png
| renewable = Yes
| heals = {{hunger|1}}
| stackable = Yes (64)
}}
'''Dried kelp''' is a [[food]] item that can be quickly eaten by the [[player]]. It can also be crafted into [[Dried Kelp Block|dried kelp blocks]].
== Obtaining ==
=== Cooking ===
[[Kelp]] can be cooked in a [[furnace]], [[smoker]], or [[campfire]]. Each piece of dried kelp removed from a furnace output slot gives 0.1 [[experience]] (6.4 experience per stack).
{{Smelting
|Kelp
|Dried Kelp
|0,1
}}
=== Crafting ===
{{Crafting
|Dried Kelp Block
|Output= Dried Kelp,9
|type= Foodstuff
}}
== Usage ==
=== Food ===
[[File:Eating dried kelp.png|thumb|A player eating dried kelp.]]
To eat dried kelp, press and hold {{control|use}} while it is selected in the hotbar. Eating one restores {{hunger|1}} [[hunger]] and 0.6{{only|je|short=1}} / 0.2{{only|be|short=1}} hunger [[Hunger#Mechanics|saturation]].
A player can consume dried kelp about twice as fast as any other food item in the game.
=== Crafting ingredient ===
{{Crafting usage}}
=== Composting ===
Dried kelp placed into a [[composter]] has a 30% chance of raising the compost level by 1.
==Sounds==
{{Sound table/Entity/Food}}
== Achievements ==
{{load achievements|Castaway}}
== Advancements ==
{{load advancements|Husbandry;A Balanced Diet}}
== Data values ==
=== ID ===
{{edition|java}}:
{{ID table
|edition=java
|showforms=y
|generatetranslationkeys=y
|displayname=Dried Kelp
|spritetype=item
|nameid=dried_kelp
|form=item
|foot=1}}
{{edition|bedrock}}:
{{ID table
|edition=bedrock
|shownumericids=y
|showforms=y
|notshowbeitemforms=y
|generatetranslationkeys=y
|displayname=Dried Kelp
|spritetype=item
|nameid=dried_kelp
|id=270
|form=item
|foot=1}}
== History ==
{{History|java}}
{{History||1.13|snap=18w07a|[[File:Dried Kelp JE1.png|32px]] Added dried kelp.}}
{{History|||snap=18w08b|Dried kelp can now be used to craft [[dried kelp block]]s.}}
{{History||1.14|snap=19w03a|Placing dried kelp into the new [[composter]] has a 10% chance of raising the compost level by 1.}}
{{History|||snap=19w05a|Dried kelp now has a 30% chance of increasing the compost level in a composter.}}
{{History|bedrock}}
{{History||1.4.0|snap=beta 1.2.14.2|[[File:Dried Kelp BE1.png|32px]] Added dried kelp.}}
{{H||1.11.0|snap=beta 1.11.0.1|Dried kelp can now be used to fill up [[composter]]s.}}
{{History||1.17.10|snap=beta 1.17.10.20|[[FIle:Dried Kelp JE1.png|32px]] The texture of dried kelp has been changed to match ''Java Edition''.}}
{{History|console}}
{{History||xbox=TU69|ps=1.76|wiiu=Patch 38|[[File:Dried Kelp BE1.png|32px]] Added dried kelp.}}
{{History|foot}}
== Issues ==
{{issue list}}
{{Items}}
[[Category:Food]]
[[Category:Renewable resources]]
[[de:Getrockneter Seetang]]
[[es:Algas secas]]
[[fr:Algue séchée]]
[[ja:乾燥した昆布]]
[[ko:말린 켈프]]
[[lzh:乾海帶]]
[[nl:Gedroogde kelp]]
[[pl:Suszone wodorosty]]
[[pt:Algas secas]]
[[ru:Сушёная ламинария]]
[[th:สาหร่ายทะเลแห้ง]]
[[zh:干海带]]</li></ul> | ? | Added charged creepers. | |||
| ? | Added explosion particles. | ||||
0.14.0{{Extension DPL}}<ul><li>[[Nautilus Shell|Nautilus Shell]]<br/>{{Item
| type =
| stackable = Yes (64)
| renewable = Yes
}}
A '''nautilus shell''' is an item that is used for crafting [[conduit]]s.
==Obtaining==
===Fishing===
{{main|Fishing#Junk and treasure}}
Nautilus shells can be rarely obtained as a treasure item from fishing. The drop chances of nautilus shells slightly increase with each level of [[Luck of the Sea]] on the [[player]]'s [[fishing rod]].
===Mob loot===
[[Drowned]] have a 3%{{only|java|short=1}} or 8%{{only|bedrock|short=1}} chance to spawn with a nautilus shell in their off-hand, and this nautilus shell always drops upon [[death]].
===Trading===
[[Wandering trader]]s may [[trading|sell]] a nautilus shell for 5 [[emerald]]s each, but they only sell 5 of them at a time.
==Usage==
{{IN|bedrock}}, a nautilus shell is one of the few items that can be held in the off-hand.
===Crafting ingredient===
{{crafting usage}}
=== Trading ===
Nautilus shells can be given to trident-wielding drowned with a chance for the drowned to pick up the shell and drop the trident.<sup>[''[[Bedrock Edition]] only'']</sup>
==Data values==
===ID===
{{edition|java}}:
{{ID table
|edition=java
|showforms=y
|generatetranslationkeys=y
|displayname=Nautilus Shell
|spritetype=item
|nameid=nautilus_shell
|form=item
|foot=1}}
{{edition|bedrock}}:
{{ID table
|edition=bedrock
|shownumericids=y
|showforms=y
|notshowbeitemforms=y
|generatetranslationkeys=y
|displayname=Nautilus Shell
|spritetype=item
|nameid=nautilus_shell
|id=570
|form=item
|foot=1}}
==History==
{{History|java}}
{{History||1.13|snap=18w15a|[[File:Nautilus Shell JE1 BE2.png|32px]] Added nautilus shells.}}
{{History||1.14|snap=19w05a|Added [[Wandering Trader|wandering trader]]s, which sell nautilus shells.}}
{{History|bedrock}}
{{History||1.4.0|snap=beta 1.2.20.1|[[File:Nautilus Shell BE1.png|32px]] Added nautilus shells.}}
{{History|||snap=beta 1.2.20.2|[[File:Nautilus Shell JE1 BE2.png|32px]] The texture of nautilus shells has now been changed.}}
{{History||1.5.0|snap=beta 1.5.0.0|[[Drowned]] now sometimes spawn holding a nautilus shell.
|Nautilus shells are no longer behind [[Experimental Gameplay]].}}
{{History|||snap=beta 1.5.0.1|Nautilus shells can now be used to craft [[conduit]]s.}}
{{History||1.10.0|snap=beta 1.10.0.3|Nautilus shells can now be obtained from [[trading]] with [[wandering trader]]s.}}
{{History|console}}
{{History||xbox=TU69|ps=1.76|wiiu=Patch 38|[[File:Nautilus Shell JE1 BE2.png|32px]] Added nautilus shells.}}
{{History||xbox=none|ps=1.91|wiiu=none|Nautilus shells can now be obtained from [[trading]] with [[wandering trader]]s.}}
{{History|foot}}
==Issues==
{{issue list}}
==Trivia==
*[[wikipedia:Nautilus|Nautilus]]es are animals that occupy deep oceans in the real world. However, they are absent in Minecraft and there are currently no plans to add nautilus [[mob]]s into the game.
*Because {{el|bedrock}} allows for Nautilus shells to be held in the off-hand (since drowned hold them), they are the only item in that version that can be put in the off-hand slot without having a specific function.
{{items}}
[[de:Nautilusschale]]
[[es:Caparazón de nautilo]]
[[fr:Coquille de nautile]]
[[it:Conchiglia di nautilus]]
[[ja:オウムガイの殻]]
[[ko:앵무조개 껍데기]]
[[nl:Nautilusschelp]]
[[pl:Muszla łodzika]]
[[pt:Concha de náutilo]]
[[ru:Раковина наутилуса]]
[[th:เปลือกหอยงวงช้าง]]
[[uk:Мушля наутилуса]]
[[zh:鹦鹉螺壳]]
[[Category:Renewable resources]]</li><li>[[Blue Dye|Blue Dye]]<br/>{{Item
|image = Blue_Dye_JE1_BE1.png
|renewable = Yes
|stackable = Yes (64)
}}
'''Blue dye''' is a [[Dye#Primary|primary dye color]].
== Obtaining ==
=== Crafting ===
{{Crafting
|Lapis Lazuli
|Output=Blue Dye
|type=Material
|head=1
}}
{{Crafting
|Cornflower
|Output=Blue Dye
|type=Material
|foot=1
}}
=== Chest loot ===
{{#invoke:LootChest|base3|blue-dye}}
== Usage ==
{{dye usage}}
=== Crafting ingredient ===
{{crafting usage|ignore=Banner|continue=1}}
{{banner crafting usage}}
=== Loom ingredient ===
{{Banner loom usage|Blue Dye}}
=== Trading ===
Expert-level shepherd villagers have a {{frac|1|6}} chance to buy 12 blue dye for an emerald.
== Data values ==
=== ID ===
{{edition|java}}:
{{ID table
|edition=java
|showforms=y
|generatetranslationkeys=y
|displayname=Blue Dye
|spritetype=item
|nameid=blue_dye
|form=item
|foot=1}}
{{edition|bedrock}}:
{{ID table
|edition=bedrock
|showaliasids=y
|shownumericids=y
|showforms=y
|notshowbeitemforms=y
|generatetranslationkeys=y
|displayname=Blue Dye
|spritetype=item
|nameid=blue_dye
|aliasid=dye / 18
|id=399
|form=item
|translationkey=item.dye.blue_new.name
|foot=1}}
== History ==
{{History|java}}
{{History||1.14|snap=18w43a|[[File:Blue_Dye_JE1_BE1.png|32px]] Added blue dye.}}
{{History|||snap=18w44a|Blue dyes now can changed the text color on the [[sign]]s to blue.}}
{{History|||snap=19w05a|Added the [[wandering trader]], which sell blue dyes.}}
{{History|||snap=19w11a|Blue dyes can now be [[trading|bought]] by shepherd villagers.}}
{{History||1.17|snap=20w45a|Blue dyes can now used to craft newly added [[blue candle]]s.}}
{{History|||snap=21w19a|Blue dyes can no longer used to craft blue candles.}}
{{History|||snap=Pre-release 1|Blue dyes can once again used to craft blue candles.}}
{{History||1.20<br>(Experimental)|link=1.19.3|snap=22w42a|Blue dyes can now change the text color on [[hanging sign]]s to blue.}}
{{History||1.20|snap=23w12a|Blue dye can now be found in [[suspicious gravel]] and [[suspicious sand]] in [[trail ruins]].}}
{{History|||snap=23w16a|Blue dye no longer generates in [[suspicious sand]] in [[trail ruins]].|Due to the split of the archaeological loot tables for the suspicious gravel within the [[trail ruins]]; blue dye now is in the common loot.}}
{{History|bedrock}}
{{History||1.8.0|snap=beta 1.8.0.10|[[File:Blue_Dye_JE1_BE1.png|32px]] Added blue dye.}}
{{History||1.9.0|snap=beta 1.9.0.0|Added [[flower|cornflowers]], which can be used to [[crafting|craft]] blue dye.}}
{{History||1.10.0|snap=beta 1.10.0.3|Blue dye can now be used to [[dye]] white [[carpet]]s and uncolored [[glass pane]]s.}}
{{History||1.11.0|snap=beta 1.11.0.4|Blue dye can now be [[trading|sold]] to shepherd [[villager]]s.}}
{{History||1.16.100|snap=beta 1.16.100.56|The ID of blue dye has been changed from <code>dye/18</code> to <code>blue_dye</code>.}}
{{History|ps4}}
{{History||1.83|[[File:Blue_Dye_JE1_BE1.png|32px]] Added blue dye.}}
{{History|foot}}
== Issues ==
{{issue list}}
== References ==
{{Reflist}}
{{Items}}
[[Category:Items]]
[[Category:Dyes]]
[[Category:Renewable resources]]
[[de:Blauer Farbstoff]]
[[es:Tinte azul]]
[[fr:Teinture bleue]]
[[ja:青色の染料]]
[[ko:파란색 염료]]
[[pl: Niebieski barwnik]]
[[pt:Corante azul]]
[[zh:蓝色染料]]</li></ul> | ? | An invalid mixture of liquids in cauldrons will now result in a non-damaging explosion effect. | |||
0.16.0{{Extension DPL}}<ul><li>[[Apple|Apple]]<br/>{{for}}
{{Item
| title = Apple
| image = Apple.png
| renewable = Yes
| heals = {{hunger|4}}
| stackable = Yes (64)
}}
'''Apples''' are [[food]] items that can be eaten by the [[player]].
== Obtaining ==
=== Block loot ===
Oak and dark oak [[leaves]] have 0.5% ({{frac|1|200}}) chance of dropping an apple when decayed or broken, but not if burned. Breaking leaves with a [[tool]] enchanted with the [[Fortune]] enchantment increases the chances of dropping an apple: 0.556% ({{frac|1|180}}) with Fortune I, 0.625% ({{frac|1|160}}) with Fortune II, and 0.833% ({{frac|1|120}}) with Fortune III.
=== Chest loot ===
{{LootChestItem|apple}}
=== Trading ===
Apprentice-level [[Trading#Farmer|farmer]] [[Villager|villagers]] have a 50% ({{frac|1|2}}){{only|bedrock}} or 66.7% ({{frac|2|3}}){{only|java}} chance of selling 4 apples as part of their trades.
== Usage ==
{{see also|Tutorials/Hunger management|title1=Hunger management}}
To eat an apple, press and hold {{control|use}} while it is selected in the hotbar. Eating one restores {{hunger|4}} [[hunger]] and 2.4 [[Hunger#Mechanics|saturation]].
=== Crafting ingredient ===
{{crafting usage}}
=== Composting ===
Placing an apple into a [[composter]] has a 65% ({{frac|13|20}}) chance of raising the compost level by 1.
== Sounds ==
{{Sound table/Entity/Food}}
== Data values ==
=== ID ===
{{edition|java}}:
{{ID table
|edition=java
|showforms=y
|generatetranslationkeys=y
|displayname=Apple
|spritetype=item
|nameid=apple
|form=item
|foot=1}}
{{edition|bedrock}}:
{{ID table
|edition=bedrock
|shownumericids=y
|showforms=y
|notshowbeitemforms=y
|generatetranslationkeys=y
|displayname=Apple
|spritetype=item
|nameid=apple
|id=257
|form=item
|foot=1}}
== Advancements ==
{{load advancements|Husbandry;A Balanced Diet}}
== History ==
{{History|java indev}}
{{History||0.31|snap=20091231-2|[[File:Apple JE1 BE1.png|32px]] Added apples.
|Apples are currently non-functional in this version.}}
{{History|||snap=20100110|Apples are now functional and are edible, restoring {{hp|2}}. They are intended to replace [[mushroom]]s, which were previously edible.}}
{{History|||snap=20100128|Apples now used to [[craft]] [[arrow]]s.}}
{{History|||snap=20100129|Apples no longer used to craft [[arrow]]s.}}
{{History||20100206|Apples now use the texture of [[golden helmet]]s.}}
{{History|java infdev}}
{{History||February 23, 2010|link=none|At the bottom of a [[crafting]] guide they made, a player named JTE jokingly indicated that [[Notch]] dropped an apple when killed, and that apples could be crafted into something called a "[[golden apple]]" – this was a joke on the fact that apples were totally unobtainable.<ref>http://www.minecraftforum.net/topic/2750582-the-secret-history-of-minecraft/</ref><ref name="JTECraftingGuide">https://echidnatribe.org/Minecraft/crafting.php (This is an unofficial recreation with the original domain)</ref>}}
{{History||20100227-1|Players named "[[Notch]]" now drop an apple when they die in addition to their [[inventory]].
|Apples are now used to craft golden apples.
|Apples now correctly use the apple texture again.}}
{{History||20100327|With the addition of the respawn feature, apples have become legitimately obtainable in Survival and renewable for players named "Notch".}}
{{History|java beta}}
{{History||1.8|snap=Pre-release|Apples can now be found in the new [[stronghold]] storeroom [[chest]]s, making them obtainable in normal [[Survival]] gameplay for the first time.
|Apples now restore {{hunger|4}} instead of {{hp|4}}.
|Apples are now stackable.}}
{{History|java}}
{{History||1.0.0|snap=Beta 1.9 Prerelease 3|Apples are now found in the new stronghold altar chests.}}
{{History||1.1|snap=11w48a|Oak [[leaves]] now have a 1/200 chance of dropping an apple when destroyed, making apples fully [[renewable]].}}
{{History|||snap=12w01a|Apples are now found in the new [[village]] blacksmith chests.}}
{{History||1.3.1|snap=12w16a|Apples can now be found in the new [[bonus chest]]s.}}
{{History|||snap=12w18a|"[[Notch]]" players no longer drop apples when they die.}}
{{History|||snap=12w21a|Farmer [[villager]]s now [[trade|sell]] 5 apples for 1 [[emerald]].
|Apples are now used to craft [[enchanted golden apple]]s.}}
{{History||1.4.2|snap=12w37a|[[File:Apple JE2 BE2.png|32px]] The apple's texture has been changed: the [[item]] sprite no longer has a dark outline and now has a more detailed look.}}
{{History||1.5|snap=13w09b|The [[Fortune]] enchantment now increases the chance of dropping apples.}}
{{History||1.7.2|snap=13w43a|Added [[dark oak]] leaves, which drop apples.}}
{{history||1.9|snap=15w43a|Apples may now be found in [[igloo]] basement chests.}}
{{history|||snap=15w44a|Average yield of apples has been slightly increased in bonus chests.
|Apples can no longer be used to craft enchanted golden apples.}}
{{History||1.11|snap=16w33a|Farmer villagers now sell 5–7 apples for 1 emerald.}}
{{History||1.13|snap=17w47a|Prior to [[1.13/Flattening|''The Flattening'']], this item's numeral ID was 260.}}
{{History||1.14|snap=18w43a|[[File:Apple JE3 BE3.png|32px]] The texture of apples has been changed.}}
{{History|||snap=18w48a|Apples can now be found in [[chest]]s in [[plains]] village houses.}}
{{History|||snap=19w03a|Placing an apple into the new [[composter]] has a 50% chance of raising the compost level by 1.}}
{{History|||snap=19w05a|Apples now have a 65% chance of increasing the compost level in a composter by 1.}}
{{History|pocket alpha}}
{{History||v0.4.0|[[File:Apple JE1 BE1.png|32px]] Added apples.}}
{{History||v0.5.0|Apples now restore {{hp|4}} instead of {{hp|2}}.}}
{{History||v0.8.0|snap=build 1|[[File:Apple JE2 BE2.png|32px]] The apple's texture has been changed: the item sprite no longer has a dark outline and now has a more detailed look.}}
{{History||v0.12.1|snap=build 1|Added apples to the [[Creative inventory]].
|Apples are now stackable.
|Apples now restore {{hunger|4}} instead of {{hp|4}}.
|The [[Fortune]] [[enchantment]] can now be used to increase chance of dropping apples.
|Apples can now be used to craft golden apples and enchanted golden apples.}}
{{History||v0.15.0|snap=build 1|Apples can now be used to feed [[horse]]s.}}
{{History|pocket}}
{{History||1.0.0|snap=alpha 0.17.0.1|Apples can now be found inside [[igloo]] chests.}}
{{History||1.0.4|snap=alpha 1.0.4.0|Farmer villagers now sell 5-7 apples for 1 emerald.}}
{{History|bedrock}}
{{History||1.2.0|snap=beta 1.2.0.2|Apples can no longer be used to craft enchanted golden apples.
|Apples can now be found inside bonus chests.}}
{{History||1.10.0|snap=beta 1.10.0.3|Apples can now be found in [[plains]] village weaponsmith chests and plains house chests.
|[[File:Apple JE3 BE3.png|32px]] The texture of apples has been changed.}}
{{History||1.11.0|snap=beta 1.11.0.1|Apples can now be found in [[desert]], [[savanna]], [[taiga]] and [[snowy taiga]] village weaponsmith chests.
|Apples can now be used to fill up composters.}}
{{History|||snap=beta 1.11.0.4|Farmer villagers now sell 4 apples as part of their second tier trades.}}
{{History|console}}
{{History||xbox=TU1|wiiu=Patch 1|[[File:Apple JE1 BE1.png|32px]] Added apples.}}
{{History||xbox=TU5|Apples are now stackable.
|Apples now restore {{hunger|4}} instead of {{hp|4}}.}}
{{History||xbox=TU12|ps=1.03|[[File:Apple JE2 BE2.png|32px]] The apple's texture has been changed: the item sprite no longer has a dark outline and now has a more detailed look.}}
{{History||xbox=none|xbone=none|ps=1.90|wiiu=none|switch=none|[[File:Apple JE3 BE3.png|32px]] The texture of apples has been changed.}}
{{History|New 3DS}}
{{History||0.1.0|[[File:Apple JE2 BE2.png|32px]] Added apples.}}
{{History|foot}}
== Issues ==
{{issue list}}
== Trivia ==
*Prior to the texture update in Java Edition 1.4.2, the sprite of the apple was the same one used in [[Notch]]'s game ''[[Legend of the Chambered]]''.
*Before it was added to ''Minecraft'', apples dropping from trees was already a feature in ''[[Minicraft]]''.
== Gallery ==
<gallery>
Apple in Stronghold.png|An apple found in a stronghold chest.
Apple Item.png|An apple that dropped from decaying leaves.
Obtaining an apple by trading.png|Obtaining apples via villager trading.
File:Candy Apple (Trails and Tales Summer Event) Render.png|The Candy Apple, an item featured in the [[Trails & Tales Event]].
</gallery>
== References ==
{{reflist}}
== External Links ==
*[https://www.minecraft.net/en-us/article/taking-inventory-apple Taking Inventory: Apple] – Minecraft.net on November 23, 2018
{{items}}
[[Category:Plants]]
[[Category:Food]]
[[Category:Renewable resources]]
[[cs:Jablko]]
[[de:Apfel]]
[[es:Manzana]]
[[fr:Pomme]]
[[hu:Alma]]
[[it:Mela]]
[[ja:リンゴ]]
[[ko:사과]]
[[nl:Appel]]
[[pl:Jabłko]]
[[pt:Maçã]]
[[ru:Яблоко]]
[[th:แอปเปิ้ล]]
[[uk:Яблуко]]
[[zh:苹果]]</li><li>[[Diamond|Diamond]]<br/>{{For}}
{{redirect|Diamonds|the achievement|Achievements#DIAMONDS!|the advancement|Advancements#Diamonds!}}
{{Item
| image = Diamond.png
| renewable = No
| stackable = Yes (64)
| rarity = Common}}
A '''diamond''' is a mineral that can only be obtained from [[Diamond Ore|diamond ore]], [[chest loot|loot chests]] and [[Suspicious Block|suspicious blocks]]. It is required to craft diamond [[tool]]s and [[armor]] (and therefore obtain [[obsidian]] to access the [[The Nether|Nether]]), [[enchanting table]]s, [[jukebox]]es and duplicate [[smithing template]]s.
== Obtaining ==
{{see also|Tutorials/Diamonds}}
=== Mining ===
{{see also|Diamond Ore#Natural generation}}
[[Diamond ore]] can be mined using an iron [[pickaxe]] or stronger. An ore drops a single diamond. If mined by any other tool, it drops nothing. If the pickaxe is enchanted with [[Fortune]], it can drop an extra diamond per level of Fortune, allowing for a maximum of 4 diamonds with Fortune III. If the ore is mined using a pickaxe enchanted with [[Silk Touch]], it drops an ore block rather than a diamond. The ore is found at level 15 or lower, most commonly between -50 and -64; levels -58 and -59 are the preferred levels to mine at since they don't contain [[bedrock]], as it starts spawning at -60.
=== Chest loot ===
{{LootChestItem|diamond}}
=== Suspicious sand ===
When brushing [[suspicious sand]] in [[desert pyramid]]s, they have a {{frac|1|7}} chance to drop a diamond.
=== Crafting ===
{{Crafting
|Block of Diamond
|Output= Diamond,9
|type= Material
}}
=== Smelting ===
{{Smelting
|showname=1
|Diamond Ore; Deepslate Diamond Ore
|Diamond
|1
}}
== Usage ==
Diamonds are mainly used to craft high-tier armor and equipment, which in turn are also used in making [[netherite]] armor and equipment.
=== Crafting ingredient ===
{{crafting usage}}
=== Trading ===
{{IN|bedrock}}, expert-level armorer, toolsmith, and weaponsmith villagers buy one diamond for an emerald as part of their trades.
{{IN|java}}, journeyman-level armorer villagers have a 40% chance of offering to buy one diamond for one emerald. Expert-level toolsmith villagers have {{frac|2|3}} chance of offering to buy one diamond for one emerald. Expert-level weaponsmith villagers always offer to buy one diamond for one emerald.
=== Repairing ===
Diamonds are the repair items for the diamond [[tier]] and [[armor material]], and thus can be used to [[item repair|repair]] the following items in an [[anvil]] or [[grindstone]]:
* {{ItemLink|Diamond Helmet}}
* {{ItemLink|Diamond Chestplate}}
* {{ItemLink|Diamond Leggings}}
* {{ItemLink|Diamond Boots}}
* {{ItemLink|Diamond Sword}}
* {{ItemLink|Diamond Pickaxe}}
* {{ItemLink|Diamond Axe}}
* {{ItemLink|Diamond Shovel}}
* {{ItemLink|Diamond Hoe}}
=== Beacons ===
Diamonds can be used to select powers from a [[beacon]]. The player must select one of the available powers then insert a diamond into the item slot.
A diamond can be substituted for an [[iron ingot]], a [[gold ingot]], an [[emerald]] or a [[netherite ingot]].
=== Smithing ingredient ===
{{Smithing
|head=1
|ingredients=Any Armor Trim +<br/>Any Armor Piece + <br/>Diamond
|Any Armor Trim Smithing Template
|Netherite Chestplate
|Diamond
|Diamond Trim Netherite Chestplate
|showdescription=1
|description = All armor types can be used in this recipe,<br/>a netherite chestplate is shown as an example.<br/>
|tail=1
}}
;Trim color palette
The following color palettes are shown on the designs on trimmed armor:
*{{TrimPalette|diamond}}
*{{TrimPalette|diamond|darker=1}} (a darker color palette is used when a diamond armor piece is trimmed using a diamond).
== Data values ==
=== ID ===
{{edition|java}}:
{{ID table
|edition=java
|showitemtags=y
|showforms=y
|generatetranslationkeys=y
|displayname=Diamond
|spritetype=item
|nameid=diamond
|itemtags=beacon_payment_items
|form=item
|foot=1}}
{{edition|bedrock}}:
{{ID table
|edition=bedrock
|shownumericids=y
|showforms=y
|notshowbeitemforms=y
|generatetranslationkeys=y
|displayname=Diamond
|spritetype=item
|nameid=diamond
|id=304
|form=item
|foot=1}}
== Achievements ==
{{load achievements|DIAMONDS!;Diamonds to you!;Enchanter}}
== Advancements ==
{{load advancements|Diamonds!}}
== History ==
{{History|java indev}}
{{History||0.31|snap=20100128|[[File:Diamond JE1 BE1.png|32px]] Added diamonds. Initially, they were referred to as "emeralds".
|A stack of 100 diamonds can be found inside the [[Indev house]] [[chest]]s.}}
{{History|||snap=20100129|Diamond can be used to craft [[diamond block]]s and diamond [[sword]]s, [[shovel]]s, [[pickaxe]]s and [[axe]]s.
|Diamonds can no longer be found inside the Indev House due to all items having been removed from its chests.
|Diamond can be obtained by smelting diamond blocks.}}
{{History|||snap=20100130|[[Emerald]]s from the previous version are now officially known as "diamonds", though this has no actual effect as item names are not yet displayed in-game.
|[[Diamond block]]s now require 9 diamonds (3×3) instead of 4 (2×2) to be [[crafting|crafted]], making them much more expensive.}}
{{History||20100206|Diamonds are now used to craft diamond [[hoe]]s.}}
{{History||20100212-1|Diamonds are now used to craft diamond [[helmet]]s, [[chestplate]]s, [[leggings]] and [[boots]].}}
{{History|java alpha}}
{{History||v1.0.14|Diamonds are now used to craft [[jukebox]]es.}}
{{History|java beta}}
{{History||1.8|snap=Pre-release|Diamonds are now found in [[mineshaft]] [[chest]]s.}}
{{History|java}}
{{History||1.0.0|snap=Beta 1.9 Prerelease 2|[[Diamond ore]] can now be [[smelting|smelted]] into diamonds.}}
{{History|||snap=Beta 1.9 Prerelease 3|Diamonds are now used to craft [[enchantment table]]s.
|Diamonds are now found in [[stronghold]] altar [[chest]]s.}}
{{History||1.1|snap=12w01a|Diamonds are now found in [[village]] [[villager|blacksmith]] [[chest]]s.}}
{{History||1.3.1|snap=12w21a|Diamonds can now be [[trading|traded]] to blacksmith [[villager]]s in quantities of 3–5 for 1 [[emerald]].
|Added [[desert temple]]s, with a hidden [[chest]] room and loot containing diamonds.}}
{{History|||snap=12w21b|Diamonds have been changed in the game code from "emerald" to "diamond", due to actual [[emerald]]s being added. Diamond's original name during [[Indev]], as stated above, was emerald in the code, and was kept this way until this snapshot.}}
{{History|||snap=12w22a|Added [[jungle temple]]s, which contain loot [[chest]]s with diamonds.}}
{{History|||snap=1.3|[[File:Diamond JE2 BE2.png|32px]] The texture of diamonds has been changed.}}
{{History||1.4.6|snap=12w49a|Diamonds can now be used to [[crafting|craft]] a [[firework star]] with a trail.}}
{{History||1.6.1|snap=13w16a|Diamond is now used to craft diamond [[horse armor]].}}
{{History|||snap=13w18a|Diamond is no longer used to craft diamond [[horse armor]].|Diamonds are now found in [[nether fortress]] [[chest]]s.}}
{{History||1.8|snap=14w02a|Diamonds can now be [[traded]] to any black apron [[villager]] in quantities of 3–4 for 1 [[emerald]], as their tier III trade.}}
{{History||1.9|snap=15w31a|Diamonds now generate in [[end city]] [[chest]]s.}}
{{History|||snap=15w43a|The average yield of diamonds have been slightly decreased in [[nether fortress]] chests.}}
{{History|||snap=15w44a|The average yield of diamonds in [[desert temple]] and [[mineshaft]] chests have been decreased.}}
{{History||1.13|snap=17w47a|Prior to [[1.13/Flattening|''The Flattening'']], this [[item]]'s numeral ID was 264.}}
{{History|||snap=18w10a|Diamonds now generate in [[buried treasure]] [[chest]]s.}}
{{History|||snap=18w11a|Diamonds now generate in [[shipwreck]] treasure chests.}}
{{History||1.14|snap=18w43a|[[File:Diamond JE3 BE3.png|32px]] The texture of diamonds has been changed.}}
{{History|||snap=18w50a|Diamonds can now be found in [[chest]]s in [[village]] toolsmith houses.}}
{{History||1.16|snap=20w16a|Diamonds now generate in bastion remnants chests.}}
{{History||1.16.2|snap=20w30a|The chance of finding diamonds in bastion remnant chests is increased from 8.6% to 15.8%.}}
{{History||1.17|snap=21w08a|Diamonds can now drop and be smelted from [[deepslate diamond ore]].}}
{{History||1.20<br>(Experimental)|link=1.19.4|snap=23w04a|Diamonds can now be used to craft [[smithing template]]s.
|Diamonds can now be used as an armor trim material.}}
{{History|||snap=23w07a|Diamonds now drop when brushing [[suspicious sand]] in [[desert pyramid]]s.}}
{{History||1.20|snap=23w12a|The probability for the diamond to generate in the [[suspicious sand]] in [[desert temple]] has been changed from 1/7 to 1/8.}}
{{History|pocket alpha}}
{{History||v0.2.0|[[File:Diamond JE1 BE1.png|32px]] Added diamonds. They are currently unobtainable and serve no purpose.}}
{{History||v0.3.2|Diamonds can be collected and used to craft [[blocks of diamond]] and diamond [[axe]]s, [[pickaxe]]s, [[sword]]s and [[shovel]]s.}}
{{History||v0.4.0|Diamonds are now used to [[crafting|craft]] diamond [[hoe]]s.}}
{{History||v0.5.0|Diamonds are now used to craft [[nether reactor core]]s.}}
{{History||v0.6.0|Diamonds are now used to craft diamond [[armor]].}}
{{History||v0.8.0|snap=build 1|[[File:Diamond JE2 BE2.png|32px]] The texture of diamonds has been changed.}}
{{History||v0.12.1|snap=build 1|Diamonds are now used to craft [[enchanting table]]s.
|Diamonds are no longer used to craft [[nether reactor core]]s and are now instead dropped by it.
|Diamonds now generate in [[nether fortress]] [[chest]]s.}}
{{History||v0.13.0|snap=build 1|Diamonds now have a chance to generate in [[desert temple]] chests.}}
{{History||v0.14.0|snap=build 1|Diamonds are now found in [[minecart with chest]]s in [[mineshaft]]s.}}
{{History||v0.15.0|snap=build 1|Diamonds can now be found in [[jungle temple]] [[chest]]s.}}
{{History|pocket}}
{{History||1.0.0|snap=alpha 0.17.0.1|Diamonds can now be found in altar [[chest]]s in [[stronghold]]s, [[dungeon]] chests and [[end city]] chests.}}
{{History|||snap=alpha 1.0.0.0|Diamonds can now be found in [[villager|blacksmith]] [[chest]]s in [[village]]s.}}
{{History||1.0.4|snap=alpha 1.0.4.0|3-4 diamonds can now be traded to blacksmith [[villager]]s for an [[emerald]] as part of their third tier trades.}}
{{History|bedrock}}
{{History||1.2.0|snap=beta 1.2.0.2|Diamonds can now be used to [[crafting|craft]] a [[firework star]] with a trail.
|Diamonds can now be used to craft [[jukebox]]es.}}
{{History||1.4.0|snap=beta 1.2.14.2|Diamonds can now be found inside [[buried treasure]] [[chest]]s and [[shipwreck]]s.}}
{{History||1.10.0|snap=beta 1.10.0.3|Diamonds can now be found in [[plains]] [[village]] weaponsmith chests.
|[[File:Diamond JE3 BE3.png|32px]] The texture of diamonds has been changed.}}
{{History||1.11.0|snap=beta 1.11.0.1|Diamonds can now be found in village toolsmith chests and in [[savanna]], [[desert]], [[taiga]], and [[snowy taiga]] village weaponsmith chests.}}
{{History|||snap=beta 1.11.0.4|Armorer, toolsmith, and weaponsmith [[villager]]s now [[trading|buy]] one diamond for an [[emerald]] as part of their fourth tier [[trading|trades]].}}
{{History||1.16.0|snap=beta 1.16.0.57|Diamonds can now be found in [[bastion remnant]] chests.}}
{{History||1.17.0|snap=beta 1.16.230.52|Diamonds can now drop and be smelted from [[deepslate diamond ore]].}}
{{History||1.20.0<br>(Experimental)|link=Bedrock Edition 1.19.70|snap=beta 1.19.70.23|Diamonds now drop when brushing [[suspicious sand]] in [[desert pyramid]]s.}}
{{History||1.20.0<br>(Experimental)|link=Bedrock Edition 1.19.80|snap=beta 1.19.80.21|Diamonds can now be used to craft [[smithing template]]s.
|Diamonds can now be used as an armor trim material.}}
{{History|console}}
{{History||xbox=TU1|xbone=CU1|ps=1.0|wiiu=Patch 1|switch=1.0.1|[[File:Diamond JE1 BE1.png|32px]] Added diamonds.}}
{{History||xbox=TU5|Diamonds are now found in the new [[mineshaft]] [[chest]]s.}}
{{History||xbox=TU7|Diamonds are now used to craft [[enchantment table]]s.}}
{{History||xbox=TU9|Diamonds are now found in [[village]] [[villager|blacksmith]] [[chest]]s.}}
{{History||xbox=TU14|ps=1.04|Diamonds can now be [[trading|traded]] to blacksmith [[villager]]s in quantities of 3–5 for 1 [[emerald]].
|Added [[desert temple]]s, with a hidden [[chest]] room and loot containing diamonds.|Added [[jungle temple]]s, which contain loot [[chest]]s with diamonds.|[[File:Diamond JE2 BE2.png|32px]] The texture of diamonds has been changed.}}
{{History||xbox=TU19|xbone=CU7|ps=1.12|Diamonds can now be used to [[crafting|craft]] a [[firework star]] with a trail|Diamonds are now found in the new [[nether fortress]] [[chest]]s.}}
{{History||xbox=TU31|xbone=CU19|ps=1.22|wiiu=Patch 3|Diamonds can now be [[traded]] to any black apron [[villager]] in quantities of 3–4 for 1 [[emerald]], as their tier III trade.}}
{{History||xbox=TU46|xbone=CU36|ps=1.36|wiiu=Patch 15|Diamonds now generate in [[end city]] [[chest]]s.}}
{{History||xbox=TU69|xbone=none|ps=1.76|wiiu=Patch 38|switch=none|Diamonds now generate in [[buried treasure]] [[chest]]s.|Diamonds now generate in [[shipwreck]] treasure chests.}}
{{History||xbox=none|ps=1.90|wiiu=none|[[File:Diamond JE3 BE3.png|32px]] The texture of diamonds has been changed.}}
{{History|new3DS}}
{{History||0.1.0|[[File:Diamond JE2 BE2.png|32px]] Added diamonds.}}
{{History|foot}}
==Issues==
{{issue list}}
==Trivia==
*Unlike in ''Minecraft'', newly mined [[Wikipedia:Diamond|diamond]]s in real life are rough, cloudy stones. The largest, purest ones are polished into crystal-clear gemstones, while the rest are used in industry for cutting and grinding.
*Although diamonds themselves are not renewable, all tools, weapons, and armor made from diamonds can be acquired through [[trading]], and are therefore renewable. Other items crafted from diamonds are not renewable.
*In the April fools version [[Java Edition 2.0]], [[Diamond Chicken|diamond chickens]] can lay diamonds. This does not exist in newer versions, as this was a joke.
*The item forms of diamonds and [[Turtle Egg|turtle eggs]] have the same shape.
==Gallery==
<gallery>
File:DiamondOre.png|Naturally occurring diamonds.
File:MultipleOreBlobs.png|Multiple ore blobs.
File:Lava Diamond.png|Diamond ore near Lava.
File:Diamond ore blob.png|Another Diamond ore blob near Lava.
File:10 ore diamond blob.png|10 ore diamond blob.
File:Trading a diamond for an emerald.png|A blacksmith offering an [[emerald]] for a diamond.
File:Diamond Pendant Necklace JINX.jpg|Official diamond pendant made by [https://www.jinx.com JINX].
File:All Mine JINX.jpg|Official t-shirt artwork "All Mine" which features a diamond. Made by JINX
File:4 ways of viewing 12 diamonds in stone form.png|4 ways of viewing 12 diamonds in stone form
</gallery>
== External Links ==
*[https://www.minecraft.net/en-us/article/taking-inventory--diamond Taking Inventory: Diamond] – Minecraft.net on February 20, 2019
{{items}}
[[cs:Diamant]]
[[de:Diamant]]
[[el:Διαμάντι]]
[[es:Diamante]]
[[fr:Diamant]]
[[hu:Gyémánt]]
[[it:Diamante]]
[[ja:ダイヤモンド]]
[[ko:다이아몬드]]
[[nl:Diamant]]
[[pl:Diament]]
[[pt:Diamante]]
[[ru:Алмаз]]
[[th:เพชร]]
[[tr:Elmas]]
[[uk:Діамант]]
[[zh:钻石]]
[[Category:Non-renewable resources]]</li></ul> | ? | Wither added. | |||
| Pocket Edition | |||||
1.0{{Extension DPL}}<ul><li>[[Cyan Dye|Cyan Dye]]<br/>{{Item
| image = Cyan Dye.png
| renewable = Yes
| stackable = Yes (64)
}}
'''Cyan dye''' is a [[Dyeing#Secondary|secondary dye color]].
== Obtaining ==
=== Crafting ===
{{Crafting
|head=1
|showdescription=1
|showname=0
|Blue Dye
|Green Dye
|Output=Cyan Dye,2
|type=Material
}}
{{Crafting
|Lapis Lazuli
|Green Dye
|Output=Cyan Dye,2
|description={{only|bedrock|education}}
|type=Material
}}
{{Crafting
|Pitcher Plant
|Output=Cyan Dye,2
|description=
|type=Material
|foot=1
}}
=== Trading ===
[[Wandering trader]]s sell 3 cyan dye for an [[emerald]].
== Usage ==
{{dye usage}}
=== Crafting ingredient ===
{{crafting usage|ignore=Banner|continue=1}}
{{banner crafting usage}}
=== Loom ingredient ===
{{Banner loom usage|Cyan Dye}}
=== Trading ===
{{IN|bedrock}}, journeyman-level shepherd villagers have 20% chance to buy 12 cyan dye for an emerald.
{{More info|java=1|Java UI does not use a specific trade slot, which results in a different chance to offer this trade.}}
== Data values ==
=== ID ===
{{edition|java}}:
{{ID table
|edition=java
|showforms=y
|generatetranslationkeys=y
|displayname=Cyan Dye
|spritetype=item
|nameid=cyan_dye
|form=item
|foot=1}}
{{edition|bedrock}}:
{{ID table
|edition=bedrock
|showaliasids=y
|shownumericids=y
|showforms=y
|notshowbeitemforms=y
|generatetranslationkeys=y
|displayname=Cyan Dye
|spritetype=item
|nameid=cyan_dye
|aliasid=dye / 6
|id=401
|form=item
|translationkey=item.dye.cyan.name
|foot=1}}
== History ==
{{History|java beta}}
{{History||1.2|[[File:Cyan Dye JE1 BE1.png|32px]] Added cyan dye.}}
{{History|java}}
{{History||1.4.2|snap=12w34a|Added the ability to [[Armor#Dyeing|dye]] leather [[armor]] and [[wolf]] collars.}}
{{History||1.4.6|snap=12w49a|Cyan dye can now be [[crafting|crafted]] with [[gunpowder]] to create a [[firework star]].}}
{{History||1.6.1|snap=13w19a|[[Stained clay]] can now be crafted.}}
{{history||1.7.2|snap=13w36a|With the addition of new [[flower]]s, many secondary and tertiary dyes are now primary [[dye]]s.}}
{{History|||snap=13w41a|[[Stained glass]] can now be crafted.}}
{{History||1.8|snap=14w02a|Due to [[lapis lazuli]] being [[renewable resource|renewable]], cyan dye is also renewable.}}
{{History|||snap=14w30a|Added [[banner]]s, which can be dyed.}}
{{History||1.13|snap=17w47a|The different data values for the <code>dye</code> ID have now been split up into their own IDs.
|Prior to [[1.13/Flattening|''The Flattening'']], this [[item]]'s numeral ID was 351.}}
{{History||1.14|snap=18w43a|Cyan dye is now [[crafting|crafted]] using [[blue dye]], instead of [[lapis lazuli]].
|[[File:Cyan Dye.png|32px]] The texture of cyan dye has now been changed.}}
{{History|||snap=18w44a|Cyan dye can now change the text color on [[sign]]s to cyan.}}
{{History|||snap=19w05a|Added the [[wandering trader]], which sell cyan dyes.}}
{{History|||snap=19w11a|Cyan dye can now be [[trading|bought]] by shepherd villagers.}}
{{History||1.17|snap=20w45a|Cyan dye can now be used to craft [[cyan candle]]s.}}
{{History|||snap=21w19a|Cyan dye can no longer be used to craft cyan candles.}}
{{History|||snap=Pre-release 1|Cyan dye can once again be used to craft cyan candles.}}
{{History||1.20<br>(Experimental)|link=1.19.3|snap=22w42a|Cyan dye can now change the text color on [[hanging sign]]s to cyan.}}
{{History||1.20|snap=23w12a|Added [[pitcher plant]]s, which can be crafted into cyan dye.}}
{{History|||snap=23w14a|[[Pitcher plant]]s now craft into 2 cyan dye instead of 1.}}
{{History|pocket alpha}}
{{History||v0.3.0|[[File:Cyan Dye JE1 BE1.png|32px]] Added cyan dye. It is currently unobtainable and serves no purpose.}}
{{History||v0.4.0|Cyan dye is now craftable with [[lapis lazuli]] and [[cactus green]].
|Cyan dye can now be used to craft cyan wool.}}
{{History||v0.6.0|Cyan dye can now be used to dye [[sheep]].}}
{{History||v0.9.0|snap=build 11|Cyan dye can now be used to craft colored [[terracotta]].}}
{{History||v0.11.0|snap=build 1|Cyan dye can now be used to dye tamed [[wolf]] collars.}}
{{History||v0.14.0|snap=build 1|Cyan dye can now be used to dye water in [[cauldron]]s.}}
{{History|pocket}}
{{History||1.0.0|snap=alpha 0.17.0.1|Cyan dye can now be used to dye [[shulker]]s.}}
{{History||1.1.0|snap=alpha 1.1.0.0|Cyan dye can now be used to craft [[concrete powder]], colored [[bed]]s and dyed [[shulker box]]es.}}
{{History|bedrock}}
{{History||1.2.0|snap=beta 1.2.0.2|Cyan dye can now be used to craft [[firework star]]s, [[stained glass]] and patterns on [[banner]]s.}}
{{History||1.4.0|snap=beta 1.2.20.1|Cyan dye can now be used to craft [[balloon|ballons]] and [[glow stick|glow sticks]].}}
{{History||1.8.0|snap=beta 1.8.0.8|Cyan dye can now be used to dye tamed [[cat]] collars.}}
{{History||1.10.0|snap=beta 1.10.0.3|Cyan dye are now [[trading|sold]] by [[wandering trader]]s.
|Cyan dye can now be used to dye white [[carpet|carpets]] and undyed [[glass pane]]s.
|[[File:Cyan Dye.png|32px]] The texture of cyan dye has now been changed.}}
{{History||1.11.0|snap=beta 1.11.0.4|Cyan dye can be [[trading|sold]] to shepherd [[villager]]s.}}
{{History||1.16.100|snap=beta 1.16.100.56|The ID of cyan dye has been changed from <code>dye/6</code> to <code>cyan_dye</code>.}}
{{History|console}}
{{History||xbox=TU1|xbone=CU1|ps=1.00|switch=1.0.1|wiiu=Patch 1|[[File:Cyan Dye JE1 BE1.png|32px]] Added cyan dye.}}
{{History|PS4}}
{{History||1.90|[[File:Cyan Dye.png|32px]] The texture of cyan dye has now been changed.}}
{{History|new 3ds}}
{{History||0.1.0|[[File:Cyan Dye JE1 BE1.png|32px]] Added cyan dye.}}
{{History|foot}}
== Issues ==
{{issue list}}
{{Items}}
[[Category:Items]]
[[Category:Dyes]]
[[Category:Renewable resources]]
[[cs:Azurové barvivo]]
[[de:Türkiser Farbstoff]]
[[es:Tinte cian]]
[[fr:Teinture cyan]]
[[hu:Ciánkék festék]]
[[ja:青緑色の染料]]
[[ko:청록색 염료]]
[[nl:Turquoise kleurstof]]
[[pl:Błękitny barwnik]]
[[pt:Corante ciano]]
[[ru:Бирюзовый краситель]]
[[zh:青色染料]]</li><li>[[Flower Pot|Flower Pot]]<br/>{{more images|The potted cherry sapling texture has been change in 1.19.4-pre2.}}
{{For|other uses|Pot}}
{{Block
| image = Flower Pot.png
| image2 = Potted Poppy.png
| extratext = View [[#Gallery|all renders]]
| transparent = Yes
| light = No
| tool = any
| renewable = Yes
| stackable = Yes (64)
| flammable = No
| lavasusceptible = No
}}
A '''flower pot''' is a decorative [[block]] that can contain flowers, bamboo, saplings, cacti, mushrooms, fungi, and other reasonably small plants.
== Obtaining ==
=== Natural generation ===
Flower pots naturally generate in [[witch hut]]s where they contain a red [[mushroom]], the basement of [[igloo]]s where they contain a [[cactus]], and in [[woodland mansion]]s, where they contain birch [[sapling]]s, dark oak saplings, dandelions, poppies, blue orchids, alliums, azure bluets, red and white tulips, and oxeye daisies.
Flower pots containing a dandelion can be found in some [[plains]] and [[savanna]] [[village]] houses. Flower pots containing a cactus or a dead bush can be found in some [[desert]] village houses. Flower pots containing a spruce sapling can be found in [[taiga]] village mason houses. Flower pots containing a poppy can be found in taiga village churches.
=== Breaking ===
Flower pots can be mined instantly using any [[tool]] or without a tool.
A flower pot drops itself as an [[item]] (any [[plant]] or [[mushroom]] in it separately) when pushed by a [[piston]] or washed away with [[water]].
[[Lava]] can flow into the space of a flower pot, destroying it.
=== Chest loot ===
{{LootChestItem|flower-pot}}
=== Crafting ===
{{Crafting
|A2= Brick
|C2= Brick
|B3= Brick
|Output= Flower Pot
|type= Decoration block
}}
== Usage ==
A flower pot can be used to hold [[mushroom]]s, [[Fungus|fungi]], and various [[plant]]s. Plants that can be {{control|placed}} in a pot include any one block high [[flower]]s, [[sapling]]s, [[fern]]s, [[dead bush]]es, [[cacti]], [[bamboo]], [[azalea]]s, [[mangrove propagule]], and [[roots]].
Plants can be removed by using the interact button.
{{IN|je}}, flower pots can be placed on any block, or over [[air]].<ref>{{bug|MC-127036|||WAI}}</ref>
{{IN|be}}, they must be placed on top of a full-[[block]] top surface, or the top of a [[fence]], stone [[wall]], or [[hopper]]. They cannot be placed on [[slab]]s and [[stairs]] unless those blocks are upside-down. Pots may also be placed on an upward facing trapdoor. If the trapdoor is opened, the pot will break.
Flower pots are {{frac|3|8}} of a block high and can be stepped on. It is not possible to walk from the top of a flower pot onto a full sized block without jumping. It is possible to jump from a flower pot onto a fence.
The plant or fungus can be removed from the flower pot by pressing the {{control|use}} control. This places the item directly back into the player's inventory.<ref>{{bug|MC-169496|||WAI}}</ref>
They can be used to display cacti and wither roses without inheriting their damaging properties.<ref>{{bug|MC-2241|||WAI}}</ref><ref>{{bug|MC-138024|||WAI}}</ref>
Potted [[Fungus|warped fungus]] can be used to repel [[hoglin]]s.
== Sounds ==
{{Sound table/Block/Normal}}
== Data values ==
=== ID ===
{{edition|java}}:
{{ID table
|edition=java
|showblocktags=y
|showforms=y
|generatetranslationkeys=y
|displayname=Flower Pot
|spritetype=block
|nameid=flower_pot
|blocktags=flower_pots
|translationkey=block.minecraft.flower_pot,item.minecraft.flower_pot}}
{{ID table
|displayname=Potted Dandelion
|spritetype=block
|nameid=potted_dandelion
|blocktags=flower_pots
|form=block}}
{{ID table
|displayname=Potted Poppy
|spritetype=block
|nameid=potted_poppy
|blocktags=flower_pots
|form=block}}
{{ID table
|displayname=Potted Blue Orchid
|spritetype=block
|nameid=potted_blue_orchid
|blocktags=flower_pots
|form=block}}
{{ID table
|displayname=Potted Allium
|spritetype=block
|nameid=potted_allium
|blocktags=flower_pots
|form=block}}
{{ID table
|displayname=Potted Azure Bluet
|spritetype=block
|nameid=potted_azure_bluet
|blocktags=flower_pots
|form=block}}
{{ID table
|displayname=Potted Red Tulip
|spritetype=block
|nameid=potted_red_tulip
|blocktags=flower_pots
|form=block}}
{{ID table
|displayname=Potted Orange Tulip
|spritetype=block
|nameid=potted_orange_tulip
|blocktags=flower_pots
|form=block}}
{{ID table
|displayname=Potted White Tulip
|spritetype=block
|nameid=potted_white_tulip
|blocktags=flower_pots
|form=block}}
{{ID table
|displayname=Potted Pink Tulip
|spritetype=block
|nameid=potted_pink_tulip
|blocktags=flower_pots
|form=block}}
{{ID table
|displayname=Potted Oxeye Daisy
|spritetype=block
|nameid=potted_oxeye_daisy
|blocktags=flower_pots
|form=block}}
{{ID table
|displayname=Potted Cornflower
|spritetype=block
|nameid=potted_cornflower
|blocktags=flower_pots
|form=block}}
{{ID table
|displayname=Potted Lily of the Valley
|spritetype=block
|nameid=potted_lily_of_the_valley
|blocktags=flower_pots
|form=block}}
{{ID table
|displayname=Potted Wither Rose
|spritetype=block
|nameid=potted_wither_rose
|blocktags=flower_pots
|form=block}}
{{ID table
|displayname=Potted Oak Sapling
|spritetype=block
|nameid=potted_oak_sapling
|blocktags=flower_pots
|form=block}}
{{ID table
|displayname=Potted Spruce Sapling
|spritetype=block
|nameid=potted_spruce_sapling
|blocktags=flower_pots
|form=block}}
{{ID table
|displayname=Potted Birch Sapling
|spritetype=block
|nameid=potted_birch_sapling
|blocktags=flower_pots
|form=block}}
{{ID table
|displayname=Potted Jungle Sapling
|spritetype=block
|nameid=potted_jungle_sapling
|blocktags=flower_pots
|form=block}}
{{ID table
|displayname=Potted Acacia Sapling
|spritetype=block
|nameid=potted_acacia_sapling
|blocktags=flower_pots
|form=block}}
{{ID table
|displayname=Potted Dark Oak Sapling
|spritetype=block
|nameid=potted_dark_oak_sapling
|blocktags=flower_pots
|form=block}}
{{ID table
|displayname=Potted Red Mushroom
|spritetype=block
|nameid=potted_red_mushroom
|blocktags=flower_pots
|form=block}}
{{ID table
|displayname=Potted Brown Mushroom
|spritetype=block
|nameid=potted_brown_mushroom
|blocktags=flower_pots
|form=block}}
{{ID table
|displayname=Potted Fern
|spritetype=block
|nameid=potted_fern
|blocktags=flower_pots
|form=block}}
{{ID table
|displayname=Potted Dead Bush
|spritetype=block
|nameid=potted_dead_bush
|blocktags=flower_pots
|form=block}}
{{ID table
|displayname=Potted Cactus
|spritetype=block
|nameid=potted_cactus
|blocktags=flower_pots
|form=block}}
{{ID table
|displayname=Potted Bamboo
|spritetype=block
|nameid=potted_bamboo
|blocktags=flower_pots
|form=block}}
{{ID table
|displayname=Potted Azalea
|spritetype=block
|nameid=potted_azalea_bush
|blocktags=flower_pots
|spritename=potted azalea bush
|form=block}}
{{ID table
|displayname=Potted Flowering Azalea
|spritetype=block
|nameid=potted_flowering_azalea_bush
|blocktags=flower_pots
|spritename=potted flowering azalea bush
|form=block}}
{{ID table
|displayname=Potted Crimson Fungus
|spritetype=block
|nameid=potted_crimson_fungus
|blocktags=flower_pots
|form=block}}
{{ID table
|displayname=Potted Warped Fungus
|spritetype=block
|nameid=potted_warped_fungus
|blocktags=flower_pots, hoglin_repellents
|form=block}}
{{ID table
|displayname=Potted Crimson Roots
|spritetype=block
|nameid=potted_crimson_roots
|blocktags=flower_pots
|form=block}}
{{ID table
|displayname=Potted Warped Roots
|spritetype=block
|nameid=potted_warped_roots
|blocktags=flower_pots
|form=block}}
{{ID table
|displayname=Potted Mangrove Propagule
|spritetype=block
|nameid=potted_mangrove_propagule
|blocktags=flower_pots
|form=block
|foot=1}}
{{edition|bedrock}}:
{{ID table
|edition=bedrock
|firstcolumnname=Flower Pot
|shownumericids=y
|showforms=y
|generatetranslationkeys=y
|displayname=Block
|spritename=flower-pot
|spritetype=block
|nameid=flower_pot
|id=140
|form=block
|itemform=item.flower_pot
|translationkey=-}}
{{ID table
|displayname=Item
|spritename=flower-pot
|spritetype=item
|nameid=flower_pot
|id=514
|form=item
|foot=1}}
=== Block states ===
{{see also|Block states}}
{{IN|be}}, flower pots use the following block states:
{{/BS}}
=== Block data ===
{{IN|bedrock}}, flower pot has a block entity associated with it that holds additional data about the block.
See [[Bedrock Edition level format/Block entity format]].
== Achievements ==
{{load achievements|Pot Planter}}
== History ==
{{History||August 16, 2012|link={{tweet|Dinnerbone|236062188555624448}}|[[Dinnerbone]] tweeted the first image of flower pots.}}
{{History|java}}
{{History||1.4.2|snap=12w34a|[[File:Flower Pot JE1.png|32px]] [[File:Potted Dandelion JE1.png|32px]] [[File:Potted Rose JE1.png|32px]] [[File:Potted Red Mushroom JE1.png|32px]] [[File:Potted Brown Mushroom JE1.png|32px]] [[File:Potted Oak Sapling JE1.png|32px]] [[File:Potted Birch Sapling JE1.png|32px]] [[File:Potted Spruce Sapling JE1.png|32px]] [[File:Potted Jungle Sapling JE1.png|32px]] [[File:Potted Cactus JE1.png|32px]] [[File:Potted Fern JE1.png|32px]] [[File:Potted Dead Bush JE1.png|32px]]<br>[[File:Flower Pot (item) JE1 BE1.png|32px]] Added flower pots.
|At this point, plants inside of pots rendered much like they do outside of flower pots, not being subject to directional shading.}}
{{History|||snap=12w40a|A potted [[red mushroom]] can now be found on one window of a [[witch hut]]. This changed to an empty pot in a far later unknown version,{{info needed}} but returned again afterward.{{info needed}}}}
{{History||1.7.2|snap=13w36a|[[File:Potted Allium JE1.png|32px]] [[File:Potted Azure Bluet JE1.png|32px]] [[File:Potted Oxeye Daisy JE1.png|32px]] [[File:Potted Blue Orchid JE1.png|32px]] [[File:Potted Red Tulip JE1.png|32px]] [[File:Potted Orange Tulip JE1.png|32px]] [[File:Potted White Tulip JE1.png|32px]] [[File:Potted Pink Tulip JE1.png|32px]] Allium, azure bluet, oxeye daisies, blue orchids, red tulips, orange tulips, white tulips and pink tulips can now be placed in flower pots.
|[[File:Potted Poppy JE1.png|32px]] As the rose has been replaced with the poppy, the potted rose is also now replaced with the potted poppy as a result.
|Flower pots can no longer use data values because more than 15 plants can be potted, it now has a [[block entity]] instead.
|[[File:Potted Green Shrub.png|32px]] [[File:Potted Cobweb JE1.png|32px]] Due to the tile entity handling, it is now possible to place any [[block]] inside of a flower pot via NBT editors. However, at this point, with the ones possible in vanilla [[survival]] aside, only [[grass]], [[shrub|green shrub]]s, and [[cobweb]]s actually render.
|[[File:Potted Grass JE1.png|32px]] Potted grass now exists can be placed in flower pots using [[commands]].
|[[File:Potted Grass (no tint) JE1.png|32px]] [[File:Potted Fern (no tint) JE1.png|32px]] Potted shrubs, grass, and ferns must now have block data value 11 to display biome colors, otherwise rendering as default/gray.}}
{{History|||snap=13w37a|Added {{cmd|setblock}}, allowing for the aforementioned potted plants to be obtained without map editing.}}
{{History|||snap=13w43a|[[File:Potted Acacia Sapling JE1.png|32px]] [[File:Potted Dark Oak Sapling JE1.png|32px]] Acacia sapling and dark oak saplings can now be placed in flower pots.}}
{{History||1.8|snap=14w06a|Many more blocks (almost all full cubes) placed into a flower pot by modifying the block entity now render, if in somewhat buggy fashion, as the texture is in a cross shape. {{LoadPage|Flower Pot/1.8 development gallery/14w06a|Click show to display all of the applicable blocks.|b}}
|[[File:Potted Cactus JE2.png|32px]] Potted cacti now appear as a cross formed of their bottom texture inside of a pot.<ref>{{bug|MC-47469}}</ref>}}
{{History|||snap=14w06b|Further blocks now render in flower pots than did in the previous snapshot. {{LoadPage|Flower Pot/1.8 development gallery/14w06b|Click show to display all of the applicable blocks.|b}}
|[[File:Potted Cactus JE3.png|32px]] The accidental potted cactus model change has been reverted.}}
{{History|||snap=14w07a|[[File:Potted Iron Trapdoor.png|32px]] The newly added [[iron trapdoor]] also renders in flower pots when created with commands.}}
{{History|||snap=14w17a|[[File:Flower Pot JE2.png|32px]] [[File:Potted Dandelion JE2.png|32px]] [[File:Potted Allium JE2.png|32px]] [[File:Potted Azure Bluet JE2.png|32px]] [[File:Potted Oxeye Daisy JE2.png|32px]] [[File:Potted Blue Orchid JE2.png|32px]] [[File:Potted Poppy JE2.png|32px]] [[File:Potted Red Tulip JE2.png|32px]] [[File:Potted Orange Tulip JE2.png|32px]] [[File:Potted White Tulip JE2.png|32px]] [[File:Potted Pink Tulip JE2.png|32px]] [[File:Potted Red Mushroom JE2.png|32px]] [[File:Potted Brown Mushroom JE2.png|32px]] [[File:Potted Oak Sapling JE2.png|32px]] [[File:Potted Birch Sapling JE2.png|32px]] [[File:Potted Spruce Sapling JE2.png|32px]] [[File:Potted Jungle Sapling JE2.png|32px]] [[File:Potted Acacia Sapling JE2.png|32px]] [[File:Potted Dark Oak Sapling JE2.png|32px]] [[File:Potted Cactus JE4.png|32px]] [[File:Potted Fern JE2.png|32px]] [[File:Potted Dead Bush JE2.png|32px]] The flower pot model and rendering has changed. The insides are now subject to directional shading, rather than being fully lit, much like the changes made to [[hopper]]s and [[cauldron]]s in 14w10a. In addition, the outer face (as well as the cuboids comprising the cactus in potted cactus) are no longer subject to ambient occlusion. The potted cactus also now uses the side texture on the top face, rather than the top texture.
|Invalid blocks no longer render inside flower pots. This also includes cobweb and grass.}}
{{History|||snap=14w25a|[[File:Potted Dandelion JE3.png|32px]] [[File:Potted Allium JE3.png|32px]] [[File:Potted Azure Bluet JE3.png|32px]] [[File:Potted Oxeye Daisy JE3.png|32px]] [[File:Potted Blue Orchid JE3.png|32px]] [[File:Potted Poppy JE3.png|32px]] [[File:Potted Red Tulip JE3.png|32px]] [[File:Potted Orange Tulip JE3.png|32px]] [[File:Potted White Tulip JE3.png|32px]] [[File:Potted Pink Tulip JE3.png|32px]] [[File:Potted Red Mushroom JE3.png|32px]] [[File:Potted Brown Mushroom JE3.png|32px]] [[File:Potted Oak Sapling JE3.png|32px]] [[File:Potted Birch Sapling JE3.png|32px]] [[File:Potted Spruce Sapling JE3.png|32px]] [[File:Potted Jungle Sapling JE3.png|32px]] [[File:Potted Acacia Sapling JE3.png|32px]] [[File:Potted Dark Oak Sapling JE3.png|32px]] [[File:Potted Fern JE3.png|32px]] [[File:Potted Dead Bush JE3.png|32px]] Potted cross shaped objects are now affected by directional shading.<ref>{{bug|MC-129826}}</ref>}}
{{History||1.9|snap=15w43a|A potted cactus can now be found on a table in [[igloo]] basements.}}
{{History||1.11|snap=16w32a|The block entity ID of flower pots has been changed from <code>FlowerPot</code> to <code>flower_pot</code>.}}
{{History|||snap=16w39a|Potted plants can now be removed from flower pots by pressing {{control|use}}.
|Flower pots now generate in [[woodland mansion]]s.}}
{{History||1.13|snap=17w47a|The different block states for the <code>flower_pot</code> ID have been split up into their own IDs.
|Flower pots are no longer block entities.
|Prior to [[1.13/Flattening|''The Flattening'']], this block's numeral ID was 140, and the item's was 390.}}
{{History||1.14|snap=18w43a|[[File:Flower Pot JE3.png|32px]] [[File:Potted Dandelion JE4.png|32px]] [[File:Potted Poppy JE4.png|32px]] [[File:Potted Allium JE4.png|32px]] [[File:Potted Azure Bluet JE4.png|32px]] [[File:Potted Oxeye Daisy JE4.png|32px]] [[File:Potted Blue Orchid JE4.png|32px]] [[File:Potted Red Tulip JE4.png|32px]] [[File:Potted Orange Tulip JE4.png|32px]] [[File:Potted White Tulip JE4.png|32px]] [[File:Potted Pink Tulip JE4.png|32px]] [[File:Potted Red Mushroom JE4.png|32px]] [[File:Potted Brown Mushroom JE4.png|32px]] [[File:Potted Oak Sapling JE4.png|32px]] [[File:Potted Birch Sapling JE4.png|32px]] [[File:Potted Spruce Sapling JE4.png|32px]] [[File:Potted Jungle Sapling JE4.png|32px]] [[File:Potted Acacia Sapling JE4.png|32px]] [[File:Potted Dark Oak Sapling JE4.png|32px]] [[File:Potted Cactus JE5.png|32px]] [[File:Potted Fern JE4.png|32px]] [[File:Potted Dead Bush JE4.png|32px]] <br>[[File:Flower Pot (item) JE2 BE2.png|32px]] The textures of flower pots and their contained plants have been changed.
|[[File:Potted Cornflower JE1 BE1.png|32px]] [[File:Potted Lily of the Valley JE1 BE1.png|32px]] [[File:Potted Wither Rose JE1 BE1.png|32px]] [[File:Potted Bamboo JE1 BE1.png|32px]] Cornflower, lily of the valley, wither rose and [[bamboo]] can now be placed in flower pots.}}
{{History|||snap=18w44a|[[File:Potted Cactus JE6.png|32px]] The texture of potted cacti has been changed.}}
{{History|||snap=18w47b|[[File:Potted Poppy JE5.png|32px]] The texture of potted poppies has been changed.}}
{{History|||snap=18w49a|Flower pots can now be found in [[chest]]s in [[village]] mason houses.}}
{{History|||snap=19w11a|Flower pots have become [[renewable resource|renewable]], as mason [[villager]]s now [[trading|sell]] [[brick]]s.}}
{{History||1.16|snap=20w06a|The model of flower pots has been fixed and has been given an underside, which has changed the model from [[File:Flower Pot UNKVER2 (facing NWU).png|32px]] to [[File:Flower Pot UNKVER3 (facing NWU).png|32px]].}}
{{History|||snap=20w09a|[[File:Potted Crimson Fungus JE1 BE1.png|32px]] [[File:Potted Warped Fungus JE1 BE1.png|32px]] [[File:Potted Crimson Roots JE1 BE1.png|32px]] [[File:Potted Warped Roots JE1 BE1.png|32px]] Crimson and warped [[fungi]] and crimson and warped [[roots]] can now be placed in flower pots.
|The model for potted plants has been fixed, so the bottom face now renders,<ref>{{bug|MC-170842}}</ref> which has changed the model from [[File:Potted Dandelion UNKVER1 (facing NWU).png|32px]] [[File:Potted Poppy UNKVER1 (facing NWU).png|32px]] [[File:Potted Allium UNKVER1 (facing NWU).png|32px]] [[File:Potted Azure Bluet UNKVER1 (facing NWU).png|32px]] [[File:Potted Oxeye Daisy UNKVER1 (facing NWU).png|32px]] [[File:Potted Blue Orchid UNKVER1 (facing NWU).png|32px]] [[File:Potted Red Tulip UNKVER1 (facing NWU).png|32px]] [[File:Potted Orange Tulip UNKVER1 (facing NWU).png|32px]] [[File:Potted White Tulip UNKVER1 (facing NWU).png|32px]] [[File:Potted Pink Tulip UNKVER1 (facing NWU).png|32px]] [[File:Potted Red Mushroom UNKVER1 (facing NWU).png|32px]] [[File:Potted Brown Mushroom UNKVER1 (facing NWU).png|32px]] [[File:Potted Oak Sapling UNKVER1 (facing NWU).png|32px]] [[File:Potted Birch Sapling UNKVER1 (facing NWU).png|32px]] [[File:Potted Spruce Sapling UNKVER1 (facing NWU).png|32px]] [[File:Potted Jungle Sapling UNKVER1 (facing NWU).png|32px]] [[File:Potted Acacia Sapling UNKVER1 (facing NWU).png|32px]] [[File:Potted Dark Oak Sapling UNKVER1 (facing NWU).png|32px]] [[File:Potted Cactus UNKVER1 (facing NWU).png|32px]] [[File:Potted Fern UNKVER1 (facing NWU).png|32px]] [[File:Potted Dead Bush UNKVER1 (facing NWU).png|32px]] [[File:Potted Cornflower UNKVER1 (facing NWU).png|32px]] [[File:Potted Lily of the Valley UNKVER1 (facing NWU).png|32px]] [[File:Potted Wither Rose UNKVER1 (facing NWU).png|32px]] [[File:Potted Bamboo UNKVER1 (facing NWU).png|32px]] to [[File:Potted Dandelion UNKVER2 (facing NWU).png|32px]] [[File:Potted Poppy UNKVER2 (facing NWU).png|32px]] [[File:Potted Allium UNKVER2 (facing NWU).png|32px]] [[File:Potted Azure Bluet UNKVER2 (facing NWU).png|32px]] [[File:Potted Oxeye Daisy UNKVER2 (facing NWU).png|32px]] [[File:Potted Blue Orchid UNKVER2 (facing NWU).png|32px]] [[File:Potted Red Tulip UNKVER2 (facing NWU).png|32px]] [[File:Potted Orange Tulip UNKVER2 (facing NWU).png|32px]] [[File:Potted White Tulip UNKVER2 (facing NWU).png|32px]] [[File:Potted Pink Tulip UNKVER2 (facing NWU).png|32px]] [[File:Potted Red Mushroom UNKVER2 (facing NWU).png|32px]] [[File:Potted Brown Mushroom UNKVER2 (facing NWU).png|32px]] [[File:Potted Oak Sapling UNKVER2 (facing NWU).png|32px]] [[File:Potted Birch Sapling UNKVER2 (facing NWU).png|32px]] [[File:Potted Spruce Sapling UNKVER2 (facing NWU).png|32px]] [[File:Potted Jungle Sapling UNKVER2 (facing NWU).png|32px]] [[File:Potted Acacia Sapling UNKVER2 (facing NWU).png|32px]] [[File:Potted Dark Oak Sapling UNKVER2 (facing NWU).png|32px]] [[File:Potted Cactus UNKVER2 (facing NWU).png|32px]] [[File:Potted Fern UNKVER2 (facing NWU).png|32px]] [[File:Potted Dead Bush UNKVER2 (facing NWU).png|32px]] [[File:Potted Cornflower UNKVER2 (facing NWU).png|32px]] [[File:Potted Lily of the Valley UNKVER2 (facing NWU).png|32px]] [[File:Potted Wither Rose UNKVER2 (facing NWU).png|32px]] [[File:Potted Bamboo UNKVER2 (facing NWU).png|32px]].}}
{{History|||snap=20w11a|[[File:Potted Bamboo UNKVER3 (facing NWU).png|32px]] An unneeded face has been removed from potted bamboo to solve a z-fighting issue.<ref>{{bug|MC-173156}}</ref>}}
{{History|||snap=Pre-release 3|[[File:Potted Cactus JE7.png|32px]] [[File:Potted Cactus UNKVER3 (facing NWU).png|32px]] The model of the potted cacti has been changed. The top face now uses the top texture of cactus, rather than the side texture and the bottom face has been changed to the top texture of the flower pot.}}
{{History||1.16.2|snap=20w28a|[[File:Potted Cactus UNKVER4 (facing NWU).png|32px]] The model of the potted cactus no longer has a hole in the bottom, although the texture is stretched.}}
{{History||1.17|snap=Pre-release 1|[[File:Potted Azalea JE1 BE1.png|32px]] [[File:Potted Flowering Azalea JE1 BE1.png|32px]][[Azalea]] and flowering azalea can now be placed in flower pots.
|[[File:Potted Flowering Azalea (plant texture) JE1.png|32px]] Potted flowering azalea has own unused plant texture but uses normal variant for consistency with flowering azalea: [[File:Potted Flowering Azalea (bottom) JE1 BE1.png|32px]] [[File:Flowering Azalea (bottom) JE2 BE2.png|32px]]}}
{{History||1.19|snap=22w11a|[[File:Potted Mangrove Propagule JE1.png|32px]] [[Mangrove propagule]]s can now be placed in flower pots.}}
{{History|||snap=22w18a|[[File:Potted Mangrove Propagule JE2.png|32px]] The western element of the flower pot in potted mangrove propagules has been deleted.<ref name="mc-251355">{{bug|MC-251355}}</ref>}}
{{History|||snap=Pre-release 1|[[File:Potted Mangrove Propagule JE1.png|32px]] The aforementioned western element has been restored.<ref name="mc-251355"/>}}
{{History||1.20<br>(Experimental)|link=1.19.4|snap=23w07a|[[File:Potted Torchflower JE1.png|32px]] [[File:Potted Cherry Sapling JE1.png|32px]] [[Torchflower]]s and [[cherry sapling]]s can now be placed in flower pots.}}
{{History|||snap=1.19.4-pre2|Changed the texture of potted cherry saplings.}}
{{History||1.20|snap=23w12a|Potted torchflower and cherry sapling are now available without using the "Update 1.20" experimental datapack.|Flower pot can now be found in [[suspicious gravel]] and [[suspicious sand]] in [[trail ruins]].}}
{{History|||snap=23w13a|[[File:Potted Flowering Azalea JE2.png|32px]] Flowering azalea now uses own plant texture, changing appearance from [[File:Potted Flowering Azalea (bottom) JE1 BE1.png|32px]] to [[File:Potted Flowering Azalea (bottom) JE2.png|32px]] and breaking consistency with flowering azalea.<ref>{{bug|MC-230916}}</ref>}}
{{History|||snap=23w16a|Flower pot no longer generates in [[suspicious sand]] in [[trail ruins]].|Due to the split of the archaeological loot tables for the suspicious gravel within the [[trail ruins]]; flower pot now is in the common loot.}}
{{History|pocket alpha}}
{{History||v0.12.1|snap=build 1|[[File:Flower Pot JE1.png|32px]] [[File:Potted Dandelion JE1.png|32px]] [[File:Potted Red Mushroom JE1.png|32px]] [[File:Potted Brown Mushroom JE1.png|32px]] [[File:Potted Oak Sapling JE1.png|32px]] [[File:Potted Birch Sapling JE1.png|32px]] [[File:Potted Spruce Sapling JE1.png|32px]] [[File:Potted Jungle Sapling JE1.png|32px]] [[File:Potted Cactus JE1.png|32px]] [[File:Potted Fern JE1.png|32px]] [[File:Potted Allium JE1.png|32px]] [[File:Potted Azure Bluet JE1.png|32px]] [[File:Potted Oxeye Daisy JE1.png|32px]] [[File:Potted Blue Orchid JE1.png|32px]] [[File:Potted Poppy JE1.png|32px]] [[File:Potted Red Tulip JE1.png|32px]] [[File:Potted Orange Tulip JE1.png|32px]] [[File:Potted White Tulip JE1.png|32px]] [[File:Potted Pink Tulip JE1.png|32px]] [[File:Potted Acacia Sapling JE1.png|32px]] [[File:Potted Dark Oak Sapling JE1.png|32px]]{{verify|Are these models the ones used in this version?}}<br>[[File:Flower Pot (item) JE1 BE1.png|32px]] Added flower pots.}}
{{History||v0.14.0|snap=build 1|Flower pots now generate in [[witch hut]]s.}}
{{History|pocket}}
{{History||1.0.0|snap=alpha 0.17.0.1|Flower pots now generate in [[igloo]] basements.}}
{{History||1.1.0|snap=alpha 1.1.0.0|Flower pots now generate naturally in [[woodland mansion]]s.}}
{{History|bedrock}}
{{History||1.8.0|snap=beta 1.8.0.8|[[File:Potted Bamboo JE1 BE1.png|32px]]{{verify|Is this how they really look in BE?}} [[Bamboo]] can now be placed in flower pots.}}
{{History||1.9.0|snap=beta 1.9.0.0|[[File:Potted Cornflower BE.jpg|32px]] [[File:Potted Lily of the Valley BE.jpg|32px]] Cornflower and lily of the valley can now be placed in flower pots.}}
{{History||1.10.0|snap=beta 1.10.0.3|[[File:Flower Pot BE.jpg|32px]] [[File:Potted Dandelion BE.jpg|32px]] [[File:Potted Poppy BE.jpg|32px]] [[File:Potted Allium BE.jpg|32px]] [[File:Potted Azure Bluet BE.jpg|32px]] [[File:Potted Oxeye Daisy BE.jpg|32px]] [[File:Potted Blue Orchid BE.jpg|32px]] [[File:Potted Red Tulip BE.jpg|32px]] [[File:Potted Orange Tulip BE.jpg|32px]] [[File:Potted White Tulip BE.jpg|32px]] [[File:Potted Pink Tulip BE.jpg|32px]] [[File:Potted Red Mushroom BE.jpg|32px]] [[File:Potted Brown Mushroom BE.jpg|32px]] [[File:Potted Oak Sapling BE.jpg|32px]] [[File:Potted Birch Sapling BE.jpg|32px]] [[File:Potted Spruce Sapling BE.jpg|32px]] [[File:Potted Jungle Sapling BE.jpg|32px]] [[File:Potted Acacia Sapling BE.jpg|32px]] [[File:Potted Dark Oak Sapling BE.jpg|32px]] [[File:Potted Cactus BE.png|32px]] [[File:Potted Fern BE.jpg|32px]]<br>[[File:Flower Pot (item) JE2 BE2.png|32px]] The textures of flower pots have been changed.
|Flower pots now generate in the new [[village]]s.}}
{{History||1.11.0|snap=beta 1.11.0.1|Flower pots can now be found in [[village]] mason [[chest]]s.}}
{{History||1.13.0|snap=beta 1.13.0.9|[[File:Potted Wither Rose JE1 BE1.png|32px]] [[Wither rose]]s can now be placed in flower pots.}}
{{History||1.16.0|snap=beta 1.15.0.51|Potted plants can now be removed from flower pots by pressing {{control|use}}.}}
{{History|||snap=beta 1.16.0.51|[[File:Potted Crimson Fungus JE1 BE1.png|32px]] [[File:Potted Warped Fungus JE1 BE1.png|32px]] [[File:Potted Crimson Roots JE1 BE1.png|32px]] [[File:Potted Warped Roots JE1 BE1.png|32px]] Crimson and warped [[fungi]] and crimson and warped [[roots]] can now be placed in flower pots.}}
{{History||1.17.10|snap=beta 1.17.10.21|[[File:Potted Azalea JE1 BE1.png|32px]] [[File:Potted Flowering Azalea JE1 BE1.png|32px]] [[Azalea]] and flowering azalea can now be placed in flower pots.}}
{{History|console}}
{{History||xbox=TU14|xbone=CU1|ps=1.04|wiiu=Patch 1|switch=1.0.1|[[File:Flower Pot JE1.png|32px]] [[File:Potted Dandelion JE1.png|32px]] [[File:Potted Red Mushroom JE1.png|32px]] [[File:Potted Brown Mushroom JE1.png|32px]] [[File:Potted Oak Sapling JE1.png|32px]] [[File:Potted Birch Sapling JE1.png|32px]] [[File:Potted Spruce Sapling JE1.png|32px]] [[File:Potted Jungle Sapling JE1.png|32px]] [[File:Potted Cactus JE1.png|32px]] [[File:Potted Fern JE1.png|32px]] [[File:Potted Allium JE1.png|32px]] [[File:Potted Azure Bluet JE1.png|32px]] [[File:Potted Oxeye Daisy JE1.png|32px]] [[File:Potted Blue Orchid JE1.png|32px]] [[File:Potted Poppy JE1.png|32px]] [[File:Potted Red Tulip JE1.png|32px]] [[File:Potted Orange Tulip JE1.png|32px]] [[File:Potted White Tulip JE1.png|32px]] [[File:Potted Pink Tulip JE1.png|32px]] [[File:Potted Acacia Sapling JE1.png|32px]] [[File:Potted Dark Oak Sapling JE1.png|32px]] [[File:Potted Dead Bush JE3.png|32px]]{{verify|Are these models the ones used in this version?}}<br>[[File:Flower Pot (item) JE1 BE1.png|32px]] Added flower pots.}}
{{History||xbox=none|xbone=none|ps=1.90|wiiu=none|switch=none|[[File:Flower Pot BE.png|32px]] [[File:Potted Dandelion BE.png|32px]] [[File:Potted Poppy BE.png|32px]] [[File:Potted Allium BE.png|32px]] [[File:Potted Azure Bluet BE.png|32px]] [[File:Potted Oxeye Daisy BE.png|32px]] [[File:Potted Blue Orchid BE.png|32px]] [[File:Potted Red Tulip BE.png|32px]] [[File:Potted Orange Tulip BE.png|32px]] [[File:Potted White Tulip BE.png|32px]] [[File:Potted Pink Tulip BE.png|32px]] [[File:Potted Red Mushroom BE.png|32px]] [[File:Potted Brown Mushroom BE.png|32px]] [[File:Potted Oak Sapling BE.png|32px]] [[File:Potted Birch Sapling BE.png|32px]] [[File:Potted Spruce Sapling BE.png|32px]] [[File:Potted Jungle Sapling BE.png|32px]] [[File:Potted Acacia Sapling BE.png|32px]] [[File:Potted Dark Oak Sapling BE.png|32px]] [[File:Potted Cactus BE.png|32px]] [[File:Potted Fern BE.png|32px]]<br>[[File:Flower Pot (item) JE2 BE2.png|32px]] The textures of flower pots have been changed.}}
{{History|new 3ds}}
{{History||0.1.0|[[File:Flower Pot JE1.png|32px]] [[File:Potted Dandelion JE1.png|32px]] [[File:Potted Red Mushroom JE1.png|32px]] [[File:Potted Brown Mushroom JE1.png|32px]] [[File:Potted Oak Sapling JE1.png|32px]] [[File:Potted Birch Sapling JE1.png|32px]] [[File:Potted Spruce Sapling JE1.png|32px]] [[File:Potted Jungle Sapling JE1.png|32px]] [[File:Potted Cactus JE1.png|32px]] [[File:Potted Fern JE1.png|32px]] [[File:Potted Allium JE1.png|32px]] [[File:Potted Azure Bluet JE1.png|32px]] [[File:Potted Oxeye Daisy JE1.png|32px]] [[File:Potted Blue Orchid JE1.png|32px]] [[File:Potted Poppy JE1.png|32px]] [[File:Potted Red Tulip JE1.png|32px]] [[File:Potted Orange Tulip JE1.png|32px]] [[File:Potted White Tulip JE1.png|32px]] [[File:Potted Pink Tulip JE1.png|32px]] [[File:Potted Acacia Sapling JE1.png|32px]] [[File:Potted Dark Oak Sapling JE1.png|32px]]{{verify|Are these models the ones used in this version?}}<br>[[File:Flower Pot (item) JE1 BE1.png|32px]] Added flower pots.}}
{{History|foot}}
<gallery>
Suggestion for itemframes.png|Original Reddit image suggesting item frames and flower pots.
FlowerPot.png|The first image of flower pots, released by [[Dinnerbone]].
Pots 1-100.png|An [[Java Edition 14w06a|14w06a]] example of some of the blocks that can be placed inside of flower pots, and their rendering.
Pots 1-100b.png|The same arrangement as prior in [[Java Edition 14w06b|14w06b]].
</gallery>
=== Flower pot "item" ===
{{:Technical blocks/Flower Pot}}
== Gallery ==
=== Renders ===
; Flowers
<gallery>
Potted Dandelion.png |
Potted Poppy.png |
Potted Blue Orchid.png |
Potted Allium.png |
Potted Azure Bluet.png |
Potted Red Tulip.png |
Potted Orange Tulip.png |
Potted White Tulip.png |
Potted Pink Tulip.png |
Potted Oxeye Daisy.png |
Potted Cornflower.png |
Potted Lily of the Valley.png |
Potted Wither Rose.png |
Potted Torchflower.png
</gallery>
; Saplings
<gallery>
Potted Oak Sapling.png |
Potted Spruce Sapling.png |
Potted Birch Sapling.png |
Potted Jungle Sapling.png |
Potted Acacia Sapling.png |
Potted Dark Oak Sapling.png |
Potted Azalea.png |
Potted Flowering Azalea.png |
Potted Mangrove Propagule.png |
Potted Cherry Sapling.png
</gallery>
; Mushrooms
<gallery>
Potted Red Mushroom.png |
Potted Brown Mushroom.png |
Potted Crimson Fungus.png |
Potted Warped Fungus.png |
</gallery>
; Roots and bushes
<gallery>
Potted Crimson Roots.png |
Potted Warped Roots.png |
Potted Fern.png |
Potted Dead Bush.png |
Potted Cactus.png |
Potted Cactus BE.png |
Potted Bamboo.png
</gallery>
=== Other ===
<gallery>
FiveFlowerPots.png | Five flower pots in a player-created village.
</gallery>
== Issues ==
{{issue list}}
== Trivia ==
* The flower pot is based on a suggestion from Reddit, like [[ender chest]]s and [[item frame]]s.<ref>{{tweet|dinnerbone|235747041286975488|My next task is going to be flower pots.|August 15, 2012}}</ref>
* Flower pots break [[falling block]]s.
* If a plant that has been [[Name Tag|named]] is put in a flower pot, the plant loses its name.
* The inside of the flower pot in ''Java Edition'' uses the center 4x4 pixels of the dirt texture while Bedrock Edition uses the center 6x6.
==References==
{{Reflist}}
{{Blocks|Utility}}
{{items}}
[[Category:Manufactured blocks]]
[[Category:Storage]]
[[Category:Generated structure blocks]]
[[Category:Non-solid blocks]]
[[Category:Utility blocks]]
[[cs:Květináč]]
[[de:Blumentopf]]
[[es:Maceta]]
[[fr:Pot de fleurs]]
[[hu:Virágcserép]]
[[it:Vaso da fiori]]
[[ja:植木鉢]]
[[ko:화분]]
[[nl:Bloempot]]
[[pl:Doniczka]]
[[pt:Vaso]]
[[ru:Цветочный горшок]]
[[zh:花盆]]
[[uk:Квітковий горщик]]</li></ul> | build 1 | End crystal added. | |||
1.0.7{{Extension DPL}}<ul><li>[[Clock|Clock]]<br/>{{about|the item|the redstone circuit|Redstone circuits/Clock}}
{{Item
| image = Clock.gif
| renewable = Yes
| stackable = Yes (64)
}}
'''Clocks''' are [[Daylight cycle|time]]-telling devices that display the current in-game position of the sun and the moon. Clocks only function properly in the [[Overworld]].
== Obtaining ==
=== Crafting ===
{{Crafting
|B1= Gold Ingot
|A2= Gold Ingot
|B2= Redstone Dust
|C2= Gold Ingot
|B3= Gold Ingot
|Output= Clock
|type= Tool
}}
=== Natural generation ===
{{LootChestItem|clock}}
=== Trading ===
Expert-level [[Trading#Librarian|librarian villagers]] have a {{frac|1|3}} (roughly 33.3%) chance to sell a single clock for 4 [[emerald]]s as part of their trades.{{only|bedrock}}
Expert-level librarian villagers have a {{frac|1|2}} (50%) chance to sell a clock for 5 emeralds.{{only|java}}
== Usage ==
[[File:WatchCycle.gif|thumb|Clock animation]]
The clock dial consists of two halves, a day side and a night side. The dial spins clockwise slowly to indicate the time of day, corresponding to the sun or moon's actual position in the sky. The player is able to [[bed|sleep]] a few seconds after the clock shows exactly dusk.
The dial always shows the current in-game time when in the [[Overworld]], regardless of where it appears. This includes a player's hand, an inventory slot, a [[Crafting table|crafting grid]], an [[item frame]], or even as a dropped [[Item (entity)|item]]. For a clock to be mounted on a wall, an [[item frame]] is required.
Because there is no day/night cycle in [[the Nether]] or [[the End]], clocks do not work properly in these dimensions. Instead, the dial rotates rapidly and randomly {{in|JE}} or clockwise {{in|BE}}, making them useless.
=== Piglins ===
{{EntityLink|Piglin|Piglins}} are attracted to clocks and run toward any clock on the ground, and inspect it for 6 to 8 seconds before putting it in their inventory.
== Data values ==
=== ID ===
{{edition|java}}:
{{ID table
|edition=java
|showforms=y
|generatetranslationkeys=y
|displayname=Clock
|spritetype=item
|nameid=clock
|form=item
|foot=1}}
{{edition|bedrock}}:
{{ID table
|edition=bedrock
|shownumericids=y
|showforms=y
|notshowbeitemforms=y
|generatetranslationkeys=y
|displayname=Clock
|spritetype=item
|nameid=clock
|id=393
|form=item
|foot=1}}
== Achievements ==
{{load achievements|Oooh, shiny!}}
== Advancements ==
{{load advancements|Oh Shiny}}
== Video ==
''Note: This video doesn't state that clocks can be found in [[shipwreck]]s or [[ruined portal]]s because the video was released in an earlier [[Java Edition version history|version]].''
<div style="text-align:center">{{yt|Q3bsT84oVz4}}</div>
== History ==
{{History|java alpha}}
{{History||v1.2.0|snap=<nowiki>?|slink=:Category:Information needed requiring unarchived version|[[File:Clock JE1.gif|32px]] Added clocks.
|They have 228 visually distinct frames due to how the texture is generated – see the section below.}}
{{History|java}}
{{History||1.3.1|snap=12w21a|Librarian [[villager]]s now [[trading|sell]] clocks for 10-11 [[emerald]]s, making them [[renewable]].}}
{{History||1.5|snap=13w02a|[[File:Clock JE2 BE2.gif|32px]] Clocks now use the new animation feature included in [[texture pack]]s. As a result, they are considerably less precise, having only 64 frames.}}
{{History||1.8|snap=14w02a|Librarian [[villager]]s now [[trading|sell]] clocks for 10-12 [[emerald]]s.}}
{{History||1.9|snap=15w31a|Clocks are now broken up into individual textures, instead of having every individual frame on one vertical strip like with animated textures.}}
{{History||1.13|snap=17w47a|Prior to [[1.13/Flattening|''The Flattening'']], this [[item]]'s numeral ID was 347.}}
{{History|||snap=18w14a|Clocks can now be found in [[shipwreck]] map rooms.}}
{{History||1.16|snap=20w09a|Clocks can now be used to distract [[piglin]]s.<ref>{{bug|MC-172363}}</ref>}}
{{History|||snap=20w16a|Clocks now generate in [[ruined portal]] chests.}}
{{History|||snap=20w19a|Clocks no longer work in the [[recipe book]].<ref>{{bug|MC-116293}}</ref>}}
{{History|||snap=20w22a|Clocks no longer work in the villager trading GUI.<ref>{{bug|MC-182888}}</ref>}}
{{History||1.17|snap=20w48a|[[File:Clock JE3.gif|32px]] The texture of clocks has been changed to match the new gold ingot texture from the texture update.}}
{{History|pocket alpha}}
{{History||v0.2.0|[[File:Clock BE1.png|32px]] Added clocks.
|Clocks currently have no function or legitimate method of obtaining them.}}
{{History||v0.8.0|snap=build 1|Clocks are now functional and [[crafting|craftable]]. They have been added into the Creative inventory.
|[[File:Clock JE2 BE2.gif|32px]] The texture of clocks has been changed. They use an predefined texture file with 64 different frames.}}
{{History|pocket}}
{{History||1.0.4|snap=alpha 1.0.4.0|Librarian [[villager]]s now [[trading|sell]] clocks for 10-12 [[emerald]]s.}}
{{History|bedrock}}
{{History||1.4.0|snap=beta 1.2.20.1|Clocks can now be found inside map room [[chest]]s in [[shipwreck]]s.}}
{{History||1.11.0|snap=beta 1.11.0.4|[[Trading]] has been changed, librarian [[villager]]s now have {{frac|1|3}} chance to [[trading|sell]] a clock for 4 [[emerald]]s as part of their [[trading|trades]].}}
{{History||1.16.0|snap=beta 1.16.0.57|Clocks now generate in [[ruined portal]] chests.}}
{{History||1.17.0|snap=beta 1.17.0.54|[[File:Clock JE3.gif|32px]] The texture of clocks has been changed to match the new gold ingot texture from the texture update.}}
{{History|console}}
{{History||xbox=TU1|xbone=CU1|ps=1.0|wiiu=Patch 1|switch=1.0.1|[[File:Clock JE2 BE2.gif|32px]] Added clocks.}}
{{History||xbox=TU69|xbone=none|ps=1.76|wiiu=Patch 38|switch=none|Clocks can now be found in [[shipwreck]] map rooms.}}
{{History|New Nintendo 3DS Edition}}
{{History||0.1.0|[[File:Clock JE2 BE2.gif|32px]] Added clocks.}}
{{History|foot}}
=== Texture generation prior to Java Edition 13w02a ===
{{:Procedural animated texture generation/Clocks}}
== Issues ==
{{issue list}}
== Trivia ==
* {{IN|java}}, a clock can be viewed under the item [[statistics]] page as long as one obtained a clock at some point.
* {{IN|java}}, the default resource pack for the clock contains 64 individual frames, each frame lasting about 18.75 seconds in real time (375 ticks) (1350 seconds (22 minutes, 30 seconds) in Minecraft time).
* When the time of day changes suddenly, such as after sleeping or when {{cmd|time}} is used, the clock dial spins rapidly to catch up.
* Although clocks do not function in the Nether or the End, the actual daylight cycle does continue.
== Gallery ==
<gallery>
File:Clockonawall.png|A clock in an [[item frame]] on a wall in a [[player]]'s base, showing the night is near.
File:Player Holding Clock.png|Early-game player holding a clock.
File:Clock In Item Frame.png|A clock placed in an item frame.
</gallery>
== References ==
{{Reflist}}
{{Items}}
[[Category:Tools]]
[[Category:Renewable resources]]
[[cs:Hodiny]]
[[de:Uhr]]
[[es:Reloj]]
[[fr:Montre]]
[[hu:Óra]]
[[it:Orologio]]
[[ja:時計]]
[[ko:시계]]
[[nl:Klok]]
[[pl:Zegar]]
[[pt:Relógio]]
[[ru:Часы]]
[[th:นาฬิกา]]
[[uk:Годинник]]
[[zh:时钟]]</li><li>[[Cooked Mutton|Cooked Mutton]]<br/>{{Item
| title = Cooked Mutton
| heals = {{hunger|6}}
| renewable = Yes
| stackable = Yes (64)
| rarity = Common}}
{{redirect|Mutton|the raw version|Raw Mutton}}
'''Cooked mutton''' is a [[food]] item obtained from cooking [[raw mutton]].
== Obtaining ==
=== Mob loot ===
==== Sheep ====
Adult [[sheep]] drop 1–2 cooked mutton if killed while on fire. The maximum amount is increased by 1 per level of [[looting]], for a maximum of 1-5 with Looting III.
=== Cooking ===
Cooked mutton can be obtained by cooking raw mutton in a [[furnace]], [[smoker]], or [[campfire]].
{{Smelting
|showname=1
|Raw Mutton
|Cooked Mutton
|0,35
}}
=== Trading ===
{{IN|bedrock}}, apprentice-level butcher [[villager]]s have a 25% chance to sell 4 cooked mutton for one [[emerald]] as part of their trades.
{{IN|java}}, butcher villagers may give the players with the [[Hero of the Village]] effect cooked mutton.
== Usage ==
=== Food ===
To eat cooked mutton, press and hold {{control|use}} while it is selected in the hotbar. Eating one restores {{hunger|6}} [[hunger]] and 9.6 [[Hunger#Mechanics|saturation]], the same as [[cooked salmon]].
=== Wolves ===
Cooked mutton can be used to [[breed]] and heal tamed [[wolves]], lead them around, and make baby tamed wolves grow up faster by 10% of the remaining time.
==Sounds==
{{Sound table/Entity/Food}}
== Data values ==
=== ID ===
{{edition|java}}:
{{ID table
|edition=java
|showforms=y
|generatetranslationkeys=y
|displayname=Cooked Mutton
|spritetype=item
|nameid=cooked_mutton
|form=item
|foot=1}}
{{edition|bedrock}}:
{{ID table
|edition=bedrock
|showaliasids=y
|shownumericids=y
|showforms=y
|notshowbeitemforms=y
|generatetranslationkeys=y
|displayname=Cooked Mutton
|spritetype=item
|nameid=cooked_mutton
|aliasid=muttoncooked
|id=551
|form=item
|translationkey=item.muttonCooked.name
|foot=1}}
== Advancements ==
{{load advancements|Husbandry;A Balanced Diet}}
== Video ==
<div style="text-align:center">{{yt|PXlW-sZygTs}}</div>
== History ==
{{History|java}}
{{History||1.8|snap=June 30, 2014|slink=https://twitter.com/TheMogMiner/status/483636993780232192|[[Ryan Holtz]] tweeted images of cooked mutton and some other new [[item]]s.}}
{{History|||snap=14w27a|[[File:Cooked Mutton JE1.png|32px]] Added cooked mutton.}}
{{History|||snap=14w33b|[[File:Cooked Mutton JE2 BE1.png|32px]] The texture of raw mutton has been changed. The new texture was created by [[wikipedia:Reddit|Reddit]] user [http://www.reddit.com/u/zeldahuman zeldahuman].<ref>{{reddit|2bjzes/a_reminder_of_the_blocks_and_items_added_in_18_so|cj69zie|context=3}}</ref>}}
{{History||1.13|snap=17w47a|Prior to [[1.13/Flattening|''The Flattening'']], this [[item]]'s numeral ID was 424.}}
{{History||1.14|snap=18w43a|[[File:Cooked Mutton JE3 BE2.png|32px]] The texture of cooked mutton has been changed.}}
{{History|||snap=19w13a|Butcher villagers now give cooked mutton to players under the [[Hero of the Village]] effect.}}
{{History|pocket alpha}}
{{History||v0.15.0|snap=build 1|[[File:Cooked Mutton JE2 BE1.png|32px]] Added cooked mutton.}}
{{History|bedrock}}
{{History||1.10.0|snap=beta 1.10.0.3|[[File:Cooked Mutton JE3 BE2.png|32px]] The texture of cooked mutton has been changed.}}
{{History||1.11.0|snap=beta 1.11.0.4|Cooked mutton can now be [[trading|bought]] from butcher [[villager]]s.}}
{{History||1.16.100|snap=beta 1.16.100.56|The ID of cooked mutton has been changed from <code>muttoncooked</code> to <code>cooked_mutton</code>.}}
{{History|console}}
{{History||xbox=TU31|xbone=CU19|ps=1.22|wiiu=Patch 3|[[File:Cooked Mutton JE2 BE1.png|32px]] Added cooked mutton.}}
{{History|PS4}}
{{History||1.90|[[File:Cooked Mutton JE3 BE2.png|32px]] The texture of cooked mutton has been changed.}}
{{History|3ds}}
{{History||0.1.0|[[File:Cooked Mutton JE2 BE1.png|32px]] Added cooked mutton.}}
{{History|foot}}
== Issues ==
{{issue list}}
== Gallery ==
<gallery>
File:Rabbit Items 3 Ryan Holtz.png|First image of the item by [[Ryan Holtz]].
</gallery>
== References ==
{{reflist}}
{{items}}
[[Category:Food]]
[[Category:Renewable resources]]
[[de:Gebratenes Hammelfleisch]]
[[es:Cordero asado]]
[[fr:Mouton cuit]]
[[it:Carne ovina cotta]]
[[ja:焼き羊肉]]
[[ko:익힌 양고기]]
[[nl:Gebraden schapenvlees]]
[[pl:Pieczona baranina]]
[[pt:Carneiro assado]]
[[ru:Жареная баранина]]
[[zh:熟羊肉]]</li></ul></nowiki> | Explosions will no longer deal damage to a player, if the explosion is in water. | ||||
Trivia
- Explosions with a power greater than 100 look mostly the same from the outside, as only certain lines are used to determine if a block breaks. However, some of those lines continue underground.
- An explosion powerful enough to break bedrock would have a blast radius of over 30,000,000 blocks. If it were an uninterrupted blast, it would cover 238,775,501.2 blocks. However, explosions only follow certain lines, not every block (see previous).
- However, this would not drop the bedrock.
- Explosions going off in flowing water or lava will apply propulsion to entities, but won't affect any blocks, regardless of the blocks' blast resistance.
- Underwater explosions won't emit smoke particles.
- Explosions can redirect projectiles, including ender pearls.
- Explosions can break blocks on the other side of surviving blast-resistant blocks.
- Explosions will propel dead mobs' bodies, if they go off just after the mob dies.
- If primed TNT explodes in a large, solid cube of stone blocks, it will create an exact 3x3x3 cube inside.
- Experimentation confirms that a TNT detonation will cause a 3x3 hole in a solid block of anything with a blast resistance less than that of water, but more than 12.5 (e.g. crafting tables). This implies that 3x3 is the minimum possible result of a TNT detonation without the blast being resisted altogether.
- If a Falling Sand entity falls into Primed TNT when in water, it will do block damage.
| Help | |||||||||||||||||||
|---|---|---|---|---|---|---|---|---|---|---|---|---|---|---|---|---|---|---|---|
| Menu screens |
| ||||||||||||||||||
| Game customization | |||||||||||||||||||
| Editions |
| ||||||||||||||||||
| Miscellaneous | |||||||||||||||||||