This article is about the mechanics of enchanting.
Basic mechanics[]
Whenever the player places an eligible item on the enchanting table, the enchantment levels available are randomly generated for each slot using the formula below. The enchantment level is dependent upon the number of nearby bookshelves (capped at 15) and which slot position it is in.
- Base enchantment level available (base) = (randomInt(1,8) + floor(b / 2) + randomInt(0,b)),
where b is the number of nearby bookshelves (maximum of 15) and x..y generates a uniformly distributed random integer between x and y, inclusive. This is then modified according to the slot position:
- Top slot enchantment level = floor(max(base / 3, 1))
- Middle slot enchantment level = floor((base × 2) / 3 + 1)
- Bottom slot enchantment level = floor(max(base, b × 2))
where max(x, y) returns the greater of two values x and y.
| # of bookshelves | 0 | 1 | 2 | 3 | 4 | 5 | 6 | 7 | 8 | 9 | 10 | 11 | 12 | 13 | 14 | 15 |
|---|---|---|---|---|---|---|---|---|---|---|---|---|---|---|---|---|
| Min level (in top slot) | 1 | 1 | 1 | 1 | 1 | 1 | 1 | 1 | 1 | 1 | 2 | 2 | 2 | 2 | 2 | 2 |
| Max level (in bottom slot) | 8 | 9 | 11 | 12 | 14 | 15 | 17 | 18 | 20 | 21 | 23 | 24 | 26 | 27 | 29 | 30 |
| # of bookshelves | 0 | 1 | 2 | 3 | 4 | 5 | 6 | 7 | 8 | 9 | 10 | 11 | 12 | 13 | 14 | 15 |
|---|---|---|---|---|---|---|---|---|---|---|---|---|---|---|---|---|
| Level range of top slot | 1–2 | 1–3 | 1–3 | 1–4 | 1–4 | 1–5 | 1–5 | 1–6 | 1–6 | 1–7 | 2–7 | 2–8 | 2–8 | 2–9 | 2–9 | 2–10 |
| Level range of middle slot | 1–6 | 1–7 | 2–8 | 2–9 | 3–10 | 3–11 | 3–12 | 3–13 | 4–14 | 4–15 | 5–16 | 5–17 | 5–18 | 5–19 | 6–20 | 6–21 |
| Level range of bottom slot | 1–8 | 2–9 | 4–11 | 6–12 | 8–14 | 10–15 | 12–17 | 14–18 | 16–20 | 18–21 | 20–23 | 22–24 | 24–26 | 26–27 | 28–29 | 30 |
Note that a higher experience cost for a specific slot does not necessarily mean that the enchantments from that slot are better than the others with less cost.
In Creative mode, no levels of experience are necessary for enchantments.
Bookshelf placement[]
Nearby bookshelves raise the available enchantment levels; without any bookshelves, the experience level requirement never exceeds 8.
In order to have an effect, a bookshelf must be placed exactly 2 blocks, laterally, off the enchanting table and be on the same level or one block height above the table. Additionally, the bookshelf must not be blocked. The meaning of "blocked" differs on Java Edition and Bedrock Edition.
Bedrock Edition[]
The 2-high space between the bookshelf and table must be air (even a torch, snow cover or carpet blocks the effect), where "between" is as shown in the following diagrams (the white spaces are air, and the do not matter):
| Like this from the top: | or | ||
|---|---|---|---|
| and like this from the side: | or |
Java Edition[]
The space between the bookshelf and table, at the height of the bookshelf must be air or a replaceable block like snow or grass. For corner bookshelves, the space between is 1 block diagonal from the enchanting table; for all other bookshelves, the gap must be to the side of the enchanting table. This is illustrated in the following diagrams (the white spaces are air, and the do not matter):
| Like this from the top: | or | ||
|---|---|---|---|
| and like this from the side: | or |
The glyph particles, which fly from bookshelves, follow different rules and may appear even if the bookshelves are not enhancing the table.
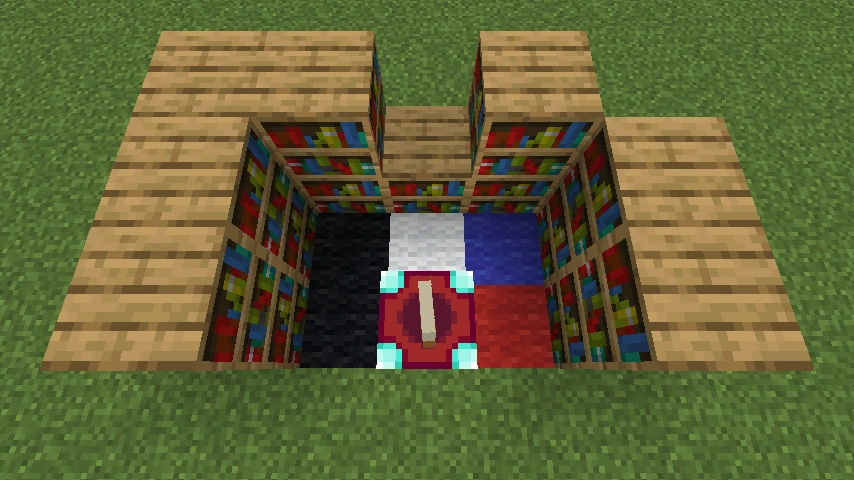
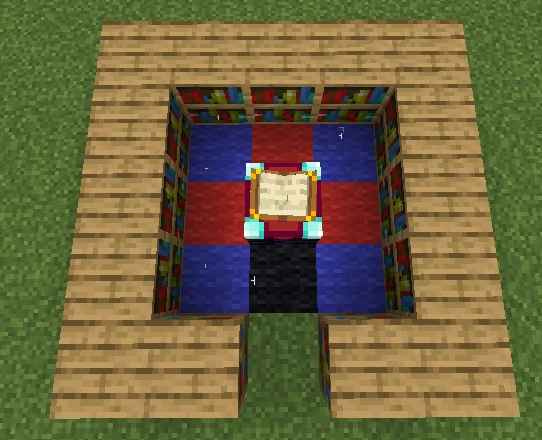
There are many possible bookshelf arrangements that can reach the enchantment limit. A simple method is to surround the enchanting table with a 1-block high square of bookshelves with an empty space anywhere on the perimeter:
Another alternative that is now available is to build a 'library corner' where each bookshelf is two blocks high, as in the plan below. This arrangement gives space for 16 shelves, which is one more than needed, so if the corner bookshelf column cannot be seen, removing one of the two bookshelves in that does not have any effect, either technically or visually.
Selecting an enchantment level[]
As enchantments offered depend on the enchantment level and the enchantment level depends on the number of active bookshelves, an easy way to change the enchantments offered is to disable bookshelves by placing torches between them and the enchanting table. That way one can still have the entire 'ring' of bookshelves around the table but get lower-level enchantments. Breaking the torches restores the effect of the bookshelves.
Bedrock Edition[]
With the layout shown here, enchantments with any number of bookshelves from 0 to 15 may be easily obtained:
| Active bookshelves | ||||
|---|---|---|---|---|
| 0 | ||||
| 1 | ||||
| 2 | ||||
| 3 | ||||
| 4 | ||||
| 5 | ||||
| 6 | ||||
| 7 | ||||
| 8 | ||||
| 9 | ||||
| 10 | ||||
| 11 | ||||
| 12 | ||||
| 13 | ||||
| 14 | ||||
| 15 |
Java Edition[]
With the layout shown here, enchantments with any number of bookshelves from 0 to 15 may be easily obtained:
| Active bookshelves | |||
|---|---|---|---|
| 0 | |||
| 1 | |||
| 2 | |||
| 3 | |||
| 4 | |||
| 5 | |||
| 6 | |||
| 7 | |||
| 8 | |||
| 9 | |||
| 10 | |||
| 11 | |||
| 12 | |||
| 13 | |||
| 14 | |||
| 15 |
How enchantments are chosen[]
"Enchantment level" is the required experience level (the green number on the bottom-right). "Enchantment power" is the strength of the particular enchantment. For example, "Sharpness IV" has a power of 4. The enchantment algorithm uses a three-step process.
Step one – Applying modifiers to the enchantment level[]
The first thing that Minecraft does is apply two modifiers to the base enchantment level. Each modifier is restricted to a certain range, with numbers close to the middle of the range more common than those near the ends.
The first modifier is based on the item's "enchantability," which depends on the material and the type of the item (see the table below). Other enchantable items such as books, bows, crossbows, tridents, and fishing rods have an enchantability of 1 for this purpose. Minecraft picks a number between 0 and half the enchantability, then adds that number plus one to the enchantment level. This random value follows a triangular distribution (like rolling a pair of dice and adding) so results close to a quarter of the enchantability are much more likely than results at the extremes.
The modified enchantment level is calculated with the following formula:
- Modified enchantment level = B + R1 + R2 + 1
Where:
- R1 and R2 are two individual randomly generated integers:
- R1 = randomInt(0, floor(E / 4))
- R2 = randomInt(0, floor(E / 4))
- B is the base enchantment level.
- E is the enchantability of the item.
Enchantability[]
| Material | Armor enchantability | Sword/Tool enchantability |
|---|---|---|
| Wood | N/A | 15 |
| Leather | 15 | N/A |
| Stone | N/A | 5 |
| Chain | 12 | N/A |
| Iron | 9 | 14 |
| Gold | 25 | 22 |
| Diamond | 10 | 10 |
| Turtle | 9 | N/A |
| Netherite | 15 | 15 |
| Other | 1 | 1 |
Next, Minecraft picks a value between 0.85 and 1.15, again with a triangular distribution. The modified enchantment level is multiplied by this value (so it could increase or decrease by up to 15%) and then rounded to the nearest integer.
Step 1 pseudocode[]
// Returns a uniformly distributed random integer between 0 and n–1, inclusive
function randomInt(n);

// Returns a uniformly distributed random real (fractional) number between 0 (inclusive) and 1 (exclusive)
function randomFloat();

// Returns the real number n rounded to the nearest integer.
function round(n);


// Generate a random number between 1 and 1+(enchantability/2), with a triangular distribution
int rand_enchantability = 1 + randomInt(enchantability / 4 + 1) + randomInt(enchantability / 4 + 1);

// Choose the enchantment level
int k = chosen_enchantment_level + rand_enchantability;

// A random bonus, between .85 and 1.15
float rand_bonus_percent = 1 + (randomFloat() + randomFloat() - 1) * 0.15;

// Finally, we calculate the level
int final_level = round(k * rand_bonus_percent);
if ( final_level < 1 ) final_level = 1
The source is Minecraft 1.8 source code.
Step two – Find possible enchantments[]
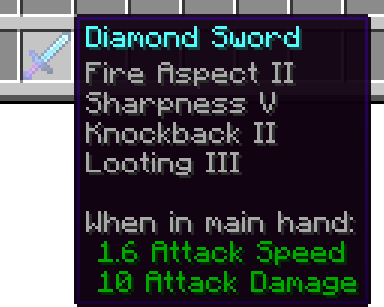
A sword with several enchantments.
Now, based on the modified level, Minecraft makes a list of all enchantment types that can be applied to the target item along with the power that each enchantment has.
The power of each enchantment type is determined by the level and the values in the enchantments levels table. For each power value of an enchantment type, there is a minimum and maximum modified level that can produce the enchantment at that power. If the modified enchantment level (calculated at the first step) is within the range of an enchantment's possible power values, then the enchantment is assigned the modified enchantment level as power. If the modified level is within two overlapping ranges for the same enchantment type, the higher power value is used.
Treasure[]
Some enchantments are "treasure enchantments" (shown in the table below), meaning they can never be created by an enchanting table, and can be discovered only in certain situations: when generating chest loot (equipment and books), when fishing, when generating enchanted book trades, when bartering, and when an enchanted book is dropped by a raiding illager.[Bedrock Edition only]
Step three – Select a set of enchantments from the list[]
Now that it has a list of the possible enchantments for the item, Minecraft must pick some of them to apply. Each enchantment has a statistical "weight". Enchantments with higher weights have a higher chance of being selected.
Minecraft uses the following weighted random selection algorithm:
- Calculate the total weight of all enchantments in the list (T). The total of every enchantment is 136.
- Pick a random integer from 0 to T – 1 as a number w.
- Iterate through each enchantment in the list, subtracting its weight from w. If w is now negative, select the current enchantment.
This algorithm produces the same results as listing each enchantment the number of times given by its weight, then choosing a random entry from the combined list.
So, for each enchantment in the list, the probability of it being selected is:
- P = wT
Where:
- w is the enchantment's weight.
- T is the total weight of all enchantments in the list.
| Type of enchantment | Enchantment | Weight | Obtainable from an enchanting table |
|---|---|---|---|
| Armor | Protection | 10 | Yes |
| Feather Falling | 5 | Yes | |
| Fire Protection | 5 | Yes | |
| Projectile Protection | 5 | Yes | |
| Aqua Affinity | 2 | Yes | |
| Blast Protection | 2 | Yes | |
| Respiration | 2 | Yes | |
| Depth Strider | 2 | Yes | |
| Frost Walker | 2 | No | |
| Thorns | 1 | Yes | |
| Swift Sneak | 1 | No | |
| Curse of Binding | 1 | No | |
| Soul Speed | 1 | No | |
| Sword | Sharpness | 10 | Yes |
| Bane of Arthropods | 5 | Yes | |
| Knockback | 5 | Yes | |
| Smite | 5 | Yes | |
| Fire Aspect | 2 | Yes | |
| Looting | 2 | Yes | |
| Sweeping Edge | 2 | Yes | |
| Pickaxe Shovel Axe Hoe Shears |
Efficiency | 10 | Yes |
| Fortune | 2 | Yes | |
| Silk Touch | 1 | Yes | |
| Bow | Power | 10 | Yes |
| Flame | 2 | Yes | |
| Punch | 2 | Yes | |
| Infinity | 1 | Yes | |
| Fishing rod | Luck of the Sea | 2 | Yes |
| Lure | 2 | Yes | |
| Trident | Loyalty | 5 | Yes |
| Impaling | 2 | Yes | |
| Riptide | 2 | Yes | |
| Channeling | 1 | Yes | |
| Crossbow | Piercing | 10 | Yes |
| Quick Charge | 5 | Yes | |
| Multishot | 2 | Yes | |
| All applicable | Unbreaking | 5 | Yes |
| Mending | 2 | No | |
| Curse of Vanishing | 1 | No |
Shields can be given the enchantments Unbreaking, Mending, Curse of Vanishing, and Curse of Binding by using Enchanted Books. The player always gets at least one enchantment on an item, and there is a chance of receiving more. Additional enchantments are chosen by this algorithm:
- With probability (modified level + 1) / 50, keep going. Otherwise, stop picking bonus enchantments.
- Remove from the list of possible enchantments anything that conflicts with previously-chosen enchantments.
- Pick one enchantment from the remaining possible enchantments (based on the weights, as before) and apply it to the item.
- Divide the modified level in half, rounded down (this does not affect the possible enchantments themselves, because they were all pre-calculated in Step Two).
- Repeat from the beginning.
When enchanting books using an enchanting table, if multiple enchantments were generated, then one selected at random is removed from the final list. This does not apply to other sources of enchanted books that use enchantment mechanics, such as fishing or chests in generated structures.
Conflicting enchantments[]
Some enchantments conflict with other enchantments and thus both can't be enchanted into the same item, effectively taking down the possibility for one to get an overpowered weapon.
The rules for enchantment conflicts are:
- Every enchantment conflicts with itself. (The player can't get a tool with two copies of the Efficiency enchantment.)
- All damage enchantments (Sharpness, Smite, and Bane of Arthropods) conflict with each other.
- All protection enchantments (Protection, Blast Protection, Fire Protection, Projectile Protection) conflict with each other.
- Silk Touch conflicts with Fortune, Looting, and Luck of the Sea.
- Depth Strider and Frost Walker conflict with each other.
- Mending and Infinity conflict with each other.
- Riptide conflicts with Loyalty and Channeling.
- Multishot and Piercing conflict with each other.
Conflicting enchantments may appear on an item with specially-crafted /give commands. The behavior of such items should not be relied upon, but in general:
- An item with multiple copies of the same enchantment uses the level of the first copy of that enchantment in the list.
- For armor with conflicting protection enchantments, all enchantments take effect individually.
- For weapons with conflicting damage enchantments, all enchantments take effect individually.
- For tools with both Silk Touch and Fortune, Silk Touch takes priority over Fortune on blocks affected by both enchantments. Fortune still applies to blocks such as crops that are not affected by Silk Touch.
- For bows with both Mending and Infinity, both enchantments work individually.
- For tridents with both Loyalty and Riptide, Riptide still functions normally but the trident can no longer be thrown by the player. However, tridents can still be thrown using dispensers[Bedrock Edition only].
- For crossbows with both Multishot and Piercing, both enchantments work individually.
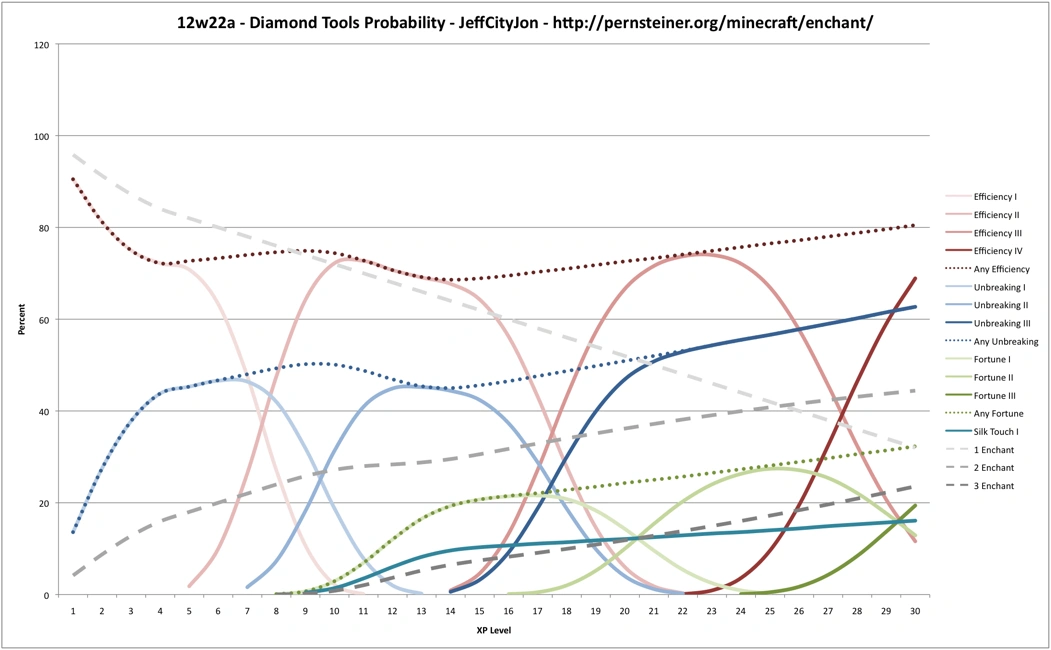
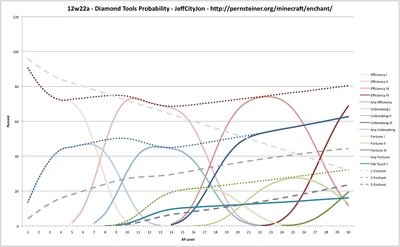
A chart showing all possible enchantments on diamond tools.[needs updating]
History[]
| Java Edition | |||||
|---|---|---|---|---|---|
1.18.2{{Extension DPL}}<ul><li>[[Explorer Map|Explorer Map]]<br/>{{about|the map used to find rare structures|the craftable map|Map|others|Map (disambiguation)}}{{Needs updating|Add info on the new jungle, swamp, and village maps in Java 1.20.2 Pre-Release 1}}{{Item
| image = <gallery>
Ocean Explorer Map.png | Ocean
Woodland Explorer Map.png | Woodland
Buried Treasure Map.png | Buried Treasure
</gallery>
|image2 = <gallery>
Ocean Explorer Map BE.png | Ocean (BE)
Woodland Explorer Map BE.png | Woodland (BE)
Buried Treasure Map BE.png | Buried in Treasure (BE)
</gallery>
| renewable =
* '''Buried Treasure''': No
* '''Woodland and Ocean''': Yes
| stackable = Yes (64)
}}
An '''explorer map''' is a special [[map]] used to aid in finding rare [[generated structures]], including [[woodland mansion]]s, [[ocean monument]]s, and [[buried treasure]]s.
== Obtaining ==
=== Trading ===
Apprentice-level [[cartographer]] villagers sell ocean explorer maps for 13 emeralds and a compass. Journeyman-level cartographer villagers sell woodland explorer maps for 14 emeralds and a compass.
{{IN|java}}, if the cartographer is in [[the Nether]] or [[the End]], either spawned or transported, the trades for the map do not unlock. However, {{in|bedrock}}, the cartographer trades for the map are unlocked, but the purchased map shows the same layout as in the corresponding dimension and shows no destination structure, but if cartographer trades are unlocked in an old world type (prior-1.11.0), the game stops ticking.
In ''Java Edition'', each cartographer sells its own unique explorer map that points to a different location than other cartographers. Purchasing another explorer map from the same cartographer results in the same explorer map. In Bedrock Edition, a cartographer sells an explorer map that points to the nearest location, regardless of whether it is explored or previously mapped by another cartographer.<!-- start to glitched out-->
=== Chest loot ===
Treasure maps, in contrast to explorer maps, generate in underwater ruins or in shipwrecks.
{{LootChestItem|buried-treasure-map}}
== Usage ==
[[File:Explorer Map Comparison.gif|thumb|217px|Unexplored and partially explored maps.]]
{{See also|Map#Mapping|Map#Map content}}
=== Locating structures ===
There are three types of explorer maps: woodland, [[ocean]], and buried treasure. The maps differ from a normal map, in that it shows the area's land-water outline, with an orange striated (striped) texture for water<ref>Specifically, biomes in the "water_on_map_outlines" [[Tag#Biomes|biome tag]].</ref>, and the blank map texture for land. The maps show a section of land that contains a [[woodland mansion]], [[monument]] or [[buried treasure]] respectively. This may not be the nearest such [[structure]] to the [[player]]. The structures are displayed as a small icon. If the player icon is smaller than it would be on a normal map, that means the player is a great distance away. When the player is less than 1027 blocks away from the map border, the icon returns to the proper size. When the player reaches the map's area of land (512×512), the [[map]] fills in like a normal map.
The basic functions of a buried treasure explorer map are similar to that of the other two. However, instead of showing the structure icon on the map, it shows a red X instead. The [[buried treasure]] structure is located on the same X and Z coordinates as the middle of the X (the player marker may need to be aligned with the bottom of the middle 2×2 pixel square of the X). To locate the [[chest]] spot, hold the treasure map with both hands, not in the offhand slot.
=== Cloning ===
{{Crafting
|showdescription=1
|shapeless=1
|name=[[Explorer Map]]<br>(cloned)
|;;;Empty Map;Empty Map;Empty Map;Empty Map;Empty Map
|;;;;Empty Map;Empty Map;Empty Map;Empty Map
|;;;;;Empty Map;Empty Map;Empty Map
|Ocean Explorer Map; Woodland Explorer Map; Buried Treasure Map; Ocean Explorer Map; Woodland Explorer Map; Buried Treasure Map; Ocean Explorer Map; Woodland Explorer Map
|Empty Map
|;;;;;;Empty Map;Empty Map
|;Empty Map;Empty Map;Empty Map;Empty Map;Empty Map;Empty Map;Empty Map
|;;Empty Map;Empty Map;Empty Map;Empty Map;Empty Map;Empty Map
|;;;;;;;Empty Map
|Output= Ocean Explorer Map,2; Woodland Explorer Map,3; Buried Treasure Map,4; Ocean Explorer Map,5; Woodland Explorer Map,6; Buried Treasure Map,7; Ocean Explorer Map,8; Woodland Explorer Map,9
|type= Miscellaneous
|description=The output has the same map center as the input map, and the same [[monument]], [[woodland mansion]] or [[buried treasure]] marker. Cloned maps are stackable.
}}
The parts of the world that have already been explored and mapped are copied, and newly explored areas appear on both instances. In Creative mode, cloned explorer maps can be obtained by pick blocking on the explorer map displayed on [[item frames]] (the map needs to be out of the [[player]]'s inventory when using pick block, or else that map moves into the active hotbar slot).
== Sounds ==
{{edition|java}}:
{{Sound table
|sound=Drawmap1.ogg
|sound2=Drawmap2.ogg
|sound3=Drawmap3.ogg
|subtitle=Map drawn
|source=block
|description=When an explorer map is edited using a cartography table
|id=ui.cartography_table.take_result
|translationkey=subtitles.ui.cartography_table.take_result
|volume=1.0
|pitch=1.0
|distance=16
|foot=1}}
{{edition|bedrock}}: ''None''
== Data values ==
=== ID ===
{{edition|java}}:
{{ID table
|edition=java
|showforms=y
|generatetranslationkeys=y
|displayname=Map
|spritetype=item
|nameid=filled_map
|form=item
|translationkey=filled_map.mansion,filled_map.ocean,filled_map.buried_treasure
|foot=1}}
{{edition|bedrock}}:
{{ID table
|edition=bedrock
|showaliasids=y
|shownumericids=y
|showforms=y
|notshowbeitemforms=y
|generatetranslationkeys=y
|displayname=Map
|spritetype=item
|nameid=filled_map
|aliasid=map
|id=358
|form=item
|translationkey=item.map.exploration.monument.name,item.map.exploration.mansion.name,item.map.exploration.treasure.name
|foot=1}}
=== Metadata ===
{{see also|Bedrock Edition data values}}
{{IN|bedrock}}, the item [[Data value]] distinguishes explorer maps from one another:
{{:Map/DV}}
=== Item data ===
An explorer map differs from a map in that its <code>display</code> tag is set, which includes a <code>Mapcolor</code> and a <code>LocName</code>; also its <code>Decorations</code> list includes an entry for its target monument, mansion or buried treasure. Its [[Map item format#map_<#>.dat format|map item entry]] is identical to that of a normal map, except that by the time the player sees it, its <code>colors</code> byte array is pre-filled with explorer maps' characteristic land-water boundary lines and water shading.
<div class="treeview">
It should be noted that this additional data is stored in the Cartographer's NBT data and in the inventory item's NBT data, and not in the map file (e.g. <samp>map_0.dat</samp>). If the [[player]] were to use the {{cmd|give}} command to give themselves a map with the same map ID as an existing explorer map, it would still have the Ocean Monument or the Woodland Mansion icon on the map, but it would simply be named "Map" instead of, for example, "Ocean Explorer Map".
* {{nbt|compound}} Item data
** {{nbt|compound|tag}}:
*** {{nbt|compound|display}}: How the map looks in an item slot. See also [[Player.dat_format#Display Properties]].
**** {{nbt|string|Name}}: The name the map is given. In this case, they are localized strings: either <code>{"translate":"filled_map.monument"}</code>,<code>{"translate":"filled_map.mansion"}</code> or <code>{"translate":"filled_map.buried_treasure"}</code>.
**** {{nbt|int|MapColor}}: Color codes are calculated from the Red, Green and Blue components using this formula:<br>'''<span style="color:red">Red</span>[[wikipedia:Logical shift|<<]]16 + <span style="color:green">Green</span><<8 + <span style="color:blue">Blue</span>'''.<ref group=note>For positive values larger than 0x00FFFFFF, the top byte is ignored. All negative values produce white.</ref> Monument maps use 3830373, which is {{color swatch|58|114|101}}. Mansion maps use 5393476, which is {{color swatch|82|76|68}}. Buried treasure explorer maps do not use a color code.
*** {{nbt|list|Decorations}}:
**** {{nbt|compound}}: One of these for each icon on the map. Explorer maps always have at least one representing their target.
***** {{nbt|string|id}}: An arbitrary unique string identifying the decoration. For explorer map target structures, this is "+".
***** {{nbt|double|rot}}: The rotation of the icon. For explorer map target structures, this is always 180.
***** {{nbt|byte|type}}: The ID of the [[Map#Map icons|map icon]]: 8 for a mansion map, 9 for a monument map, 26 for a treasure map.
***** {{nbt|double|x}}: The world x-coordinate of the target structure icon.
***** {{nbt|double|z}}: The world z-coordinate of the target structure icon.
</div>
; Notes
{{notelist}}
== Achievements ==
{{load achievements|Treasure Hunter}}
== History ==
{{History|java}}
{{History||1.11|snap=16w39a|[[File:Woodland Explorer Map JE1 BE1.png|32px]] [[File:Ocean Explorer Map JE1 BE1.png|32px]] Added woodland and ocean explorer maps.}}
{{History|||snap=16w41a|Explorer maps can now no longer be zoomed out.}}
{{History||1.13|snap=18w10a|[[File:Map (item) JE1 BE1.png|32px]] Added buried treasure explorer maps.}}
{{History|||snap=18w11a|Buried treasure explorer maps now generate in the [[chest]]s of [[shipwreck]]s.}}
{{History||1.14|snap=18w43a|[[File:Woodland Explorer Map JE2 BE2.png|32px]] [[File:Ocean Explorer Map JE2 BE2.png|32px]] [[File:Map (item) JE2 BE2.png|32px]] The textures for explorer maps have now been changed.}}
{{History||1.20.2|snap=1.20.2 Pre-release 1|Updated structure icons on explorer maps sold by cartographers.}}
{{History||Villager Trade Rebalance<br>(Experimental)|link=Java Edition 1.20.2|snap=1.20.2 Pre-release 1|Added seven new maps which cartographers can sell.}}
{{History|pocket}}
{{History||1.1.0|snap=alpha 1.1.0.0|[[File:Woodland Explorer Map JE1 BE1.png|32px]] [[File:Ocean Explorer Map JE1 BE1.png|32px]] Added explorer maps.<ref>{{Mcnet|discovery-update-pocket-and-win-10-soon|The Discovery Update: on Pocket and Win 10 soon|March 29, 2017}}</ref>
|Explorer maps are not yet obtainable in [[survival]] mode.}}
{{History|||snap=alpha 1.1.0.3|Explorer maps are now obtainable as [[trading|trades]] from [[cartographer]] [[villager]]s.}}
{{History|bedrock}}
{{History||1.4.0|snap=beta 1.2.14.2|[[File:Map (item) JE1 BE1.png|32px]] Added buried treasure explorer maps.}}
{{History|||snap=beta 1.2.20.1|Treasure maps now generate in [[underwater ruins]] [[chest]]s.}}
{{History||1.10.0|snap=beta 1.10.0.3|[[File:Woodland Explorer Map JE2 BE2.png|32px]] [[File:Ocean Explorer Map JE2 BE2.png|32px]] [[File:Map (item) JE2 BE2.png|32px]] The textures for explorer maps have now been changed.}}
{{History||1.11.0|snap=beta 1.11.0.4|[[Trading]] has now been changed, woodland and ocean explorer maps now cost a [[compass]] and 12 [[emerald]]s.
|Journeyman-level [[cartographer]] [[villager]]s no longer [[trading|sell]] 2 type of explorer map as they now have {{frac|1|3}} chance to sell woodland explorer maps, {{frac|1|3}} chance to sell ocean explorer maps, or {{frac|1|3}} chance to sell other [[item]]s<!-- empty locator map--> as part of their [[trading|trades]].
|Woodland explorer maps can now be [[trading|bought]] from fletcher [[villager]]s.}}
{{History||1.12.0|snap=beta 1.12.0.3|Journeyman-level fletcher villagers no longer [[trading|sell]] woodland explorer maps.}}
{{History||1.13.0|snap=beta 1.13.0.1|[[File:Woodland Explorer Map BE3.png|32px]] [[File:Ocean Explorer Map BE3.png|32px]] [[File:Buried Treasure Map BE3.png|32px]] The textures of explorer maps have now been changed.}}
{{History||1.16.100|snap=beta 1.16.100.56|The ID of maps has been changed from <code>map</code> to <code>filled_map</code>.}}
{{History|console}}
{{History||xbox=TU54|xbone=CU44|ps=1.52|wiiu=Patch 24|switch=1.0.4|[[File:Woodland Explorer Map JE1 BE1.png|32px]] [[File:Ocean Explorer Map JE1 BE1.png|32px]] Added explorer maps.}}
{{History|PS4}}
{{History||1.90|[[File:Woodland Explorer Map JE2 BE2.png|32px]] [[File:Ocean Explorer Map JE2 BE2.png|32px]] The textures for explorer maps have now been changed.}}
{{History|new3ds}}
{{History||1.9.19|[[File:Woodland Explorer Map JE1 BE1.png|32px]] [[File:Ocean Explorer Map JE1 BE1.png|32px]] Added explorer maps.}}
{{History|foot}}
== Issues ==
{{Issue list}}
== Trivia ==
* When a [[cartographer]] generates the trade offers for the explorer maps, it chooses the location of one of the nearest structures of the respective type ([[monument]] or [[woodland mansion]]).
* For the reason above, explorer maps obtained from one cartographer are always the same. Also, if two cartographers unlock the explorer map trades approximately at the same place and at the same time, the map locations are usually identical. This sometimes also happens when finding multiple treasure maps from [[ocean ruins]].
* Explorer maps fill as the [[chunk]]s are generated, rather than when the [[player]] holds them while in the area; leaving an explorer map while exploring the area still fills the map.
* Buried treasure explorer maps are named ''Buried Treasure Map'' {{in|java}} while {{in|bedrock}}, they are named ''Treasure Map''.
* It is possible for a cartographer to give a monument or woodland mansion explorer map for areas where the [[generated structures|structures]] would have spawned in the world, but were unable to as a result of terrain generation. As a result, explorer maps, unfortunately, don't always guarantee that a structure exists at the purported location. This is most common with woodland mansion explorer maps, due to its generation algorithm.
* On [[Bedrock Edition]], inventory editors and add-ons can be used to create Explorer Maps that lead to any structure.
== Gallery ==
<gallery>
File:Explorer Maps.png|An ocean explorer map in the [[off-hand]], a woodland explorer map in the main hand, and a [[cartographer]] [[villager]] in between them.
File:Partial Explorer Map.png|A partially-explored explorer map.
File:ExplorerToNormal Map Comparison.png|Two fully-explored maps of the same place, one of which is a woodland explorer map.
File:Buried Treasure Explorer Map.png|An [[item frame]] holding a buried treasure explorer map. The player can see the red X on the left side of the map.
File:Purchase.png|Purchasing explorer maps from a cartographer.
</gallery>
== See also ==
* [[Map]]
* [[Woodland Mansion]]
* [[Ocean Monument]]
* [[Shipwreck]]
* [[Buried treasure]]
== References ==
{{reflist}}
== External Links ==
*[https://www.minecraft.net/en-us/article/taking-inventory--explorer-map Taking Inventory: Explorer Map] – Minecraft.net on November 13, 2019
{{Items}}
[[de:Schatzkarte]]
[[es:Mapa (localización de estructura)]]
[[fr:Carte d'exploration]]
[[ja:探検家の地図]]
[[ko:탐험 지도]]
[[pl:Mapa eksploracyjna]]
[[pt:Mapa de exploração]]
[[ru:Карта сокровищ]]
[[zh:探险家地图]]</li><li>[[Ghast Tear|Ghast Tear]]<br/>{{Item
| image = Ghast Tear.png
| renewable = Yes
| stackable = Yes (64)
}}
'''Ghast tears''' are items [[Drops|dropped]] by [[ghast]]s. They can be used to make potions of [[Regeneration]] and [[end crystal]]s.
== Obtaining ==
=== Mob loot ===
[[Ghast]]s drop 0–1 ghast tears. [[Looting]] increases the maximum ghast tears dropped by one per level, for a maximum of 4 ghast tears with Looting III. Looting also works when knocking back a [[fireball]] with an enchanted item.
== Usage ==
=== Brewing ingredient ===
{{brewing
|showname=1
|head=1
|Ghast Tear
|Mundane Potion
|base=Water Bottle
}}
{{brewing
|foot=1
|Ghast Tear
|Potion of Regeneration
}}
=== Crafting ingredient ===
{{crafting usage}}
== Data values ==
=== ID ===
{{edition|java}}:
{{ID table
|edition=java
|showforms=y
|generatetranslationkeys=y
|displayname=Ghast Tear
|spritetype=item
|nameid=ghast_tear
|form=item
|foot=1}}
{{edition|bedrock}}:
{{ID table
|edition=bedrock
|shownumericids=y
|showforms=y
|notshowbeitemforms=y
|generatetranslationkeys=y
|displayname=Ghast Tear
|spritetype=item
|nameid=ghast_tear
|id=424
|form=item
|foot=1}}
== History ==
{{History|java}}
{{History||1.0.0|snap=Beta 1.9 Prerelease|[[File:Ghast Tear JE1 BE1.png|32px]] Added ghast tears.}}
{{History|||snap=Beta 1.9 Prerelease 3|Ghast tears can now be brewed in a [[water bottle]] to create a [[mundane potion]], or in an [[awkward potion]] to create a [[potion of Healing]].}}
{{History|||snap=Beta 1.9 Prerelease 4|Ghast tears now create [[potion of regeneration|potions of Regeneration]]. This was due to the sheer difficulty in obtaining them.<ref>{{tweet|jeb|123671273904680960|Since Ghast Tears are so hard to get, I've decided to replace the "Instant Health" with "Regeneration" for them|October 11, 2011}}</ref> [[Glistering melon]]s have been added to create potions of Healing, instead.}}
{{History||1.9|snap=15w44b|A ghast tear is now used to [[crafting|craft]] an [[end crystal]].}}
{{History||1.13|snap=17w47a|Prior to [[1.13/Flattening|''The Flattening'']], this [[item]]'s numeral ID was 370.}}
{{History||1.14|snap=18w43a|[[File:Ghast Tear JE2 BE2.png|32px]] The texture of ghast tears has been changed.}}
{{History|pocket alpha}}
{{History||v0.12.1|snap=build 1|[[File:Ghast Tear JE1 BE1.png|32px]] Added ghast tears.|Ghast tears are currently unobtainable as [[ghast]]s don’t [[drops|drop]] them.}}
{{History|||snap=build 7|Ghasts now drop ghast tears.<ref>{{bug|MCPE-9338}}</ref>}}
{{History|pocket}}
{{History||1.0.0|snap=alpha 0.17.0.1|A ghast tear is now used to [[crafting|craft]] an [[end crystal]].}}
{{History|bedrock}}
{{History||1.10.0|snap=beta 1.10.0.3|[[File:Ghast Tear JE2 BE2.png|32px]] The texture of ghast tears has been changed.}}
{{History|console}}
{{History||xbox=TU7|xbone=CU1|ps=1.0|wiiu=Patch 1|switch=1.0.1|[[File:Ghast Tear JE1 BE1.png|32px]] Added ghast tears.}}
{{History||xbox=none|xbone=none|ps=1.90|wiiu=none|switch=none|[[File:Ghast Tear JE2 BE2.png|32px]] The texture of ghast tears has been changed.}}
{{History|New 3DS}}
{{History||0.1.0|[[File:Ghast Tear JE1 BE1.png|32px]] Added ghast tears.}}
{{History|foot}}
== Issues ==
{{issue list}}
== References ==
{{reflist}}
{{items}}
[[Category:Renewable resources]]
[[Category:Brewing recipe]]
[[cs:Ďasova slza]]
[[de:Ghast-Träne]]
[[es:Lágrima de ghast]]
[[fr:Larme de Ghast]]
[[hu:Kísértetkönny]]
[[it:Lacrima di ghast]]
[[ja:ガストの涙]]
[[ko:가스트 눈물]]
[[nl:Ghasttraan]]
[[pl:Łza ghasta]]
[[pt:Lágrima de ghast]]
[[ru:Слеза гаста]]
[[uk:Сльоза ґаста]]
[[zh:恶魂之泪]]</li></ul> | 22w07a | Bookshelf detection method changed. Previously, both the block at the level of the enchanting table and the layer above needed to be air, or the enchanting table was blocked. Additionally, bookshelves 2 across 1 over changed from being blocked by the corner block to being blocked by the edge block. | |||
References[]
External links[]
- There was a Web page for testing enchantments. While it no longer exists, it is still available on the WayBack Machine
- This site provides some ability to test enchantments, although its interface is significantly less verbose on the specifics