Tired of the same old dirt cube shelter? Wants to make something bigger, to inspire awe in your friends? Here goes some tips and suggestions about what and how to build bigger projects. They're not intended to be easy, even on Creative Mode; a bigger construction demands time and patience, but for some players, it's well worth.
Project suggestions[]
Man-made forest[]
Let's say you deforested a lot of the world around your base, or you spawned in the middle of the desert. Or even, you decided to go fully underground. You can build an efficient tree farm, but doesn't it lack that Nature feeling? Well, for everything, that's a solution...
Project difficulty: easy
Time needed to build: the building itself is fast, but the trees need ~2 Minecraft days to grow.
Materials needed: lots of saplings at its bare minimum.
How to: just plant the saplings!
You can combine different types of trees - oak and birch are commonly found together in Minecraft, but nothing stops you from making a jungle+pine forest or even with all the four types of wood. If building it in the desert, make sure having at least one block of dirt for each sapling. When grown-up, the trees will hide the dirt and it will look like the trees grow from the sand. Making a small lake and planting the trees around it will look like an oasis, especially if using jungle trees (remove their topmost layers to look like palm trees). Building a forest inside a big cave is doable, but more time-consuming due to necessary digging - putting dirt for them to grow and ensuring they have enough vertical space. It's suggested oak trees, since they need the least space to grow (six blocks high). Three or four blocks between each sapling is enough, but avoid following preset patterns or grids, looks unnatural. With this spacing, a stack of 64 saplings will cover between 30x30 and 40x40 blocks. Fencing and/or making a path inside your forest is optional, but both looks nice. For the path, cobblestone or gravel can do the work.
Gladiator arena[]
Required blocks: stone blocks(any kind) ALOT Glass Door
Instructions: Place the stone bricks in a square area. A large area. Place glass on top of the stone bricks.Place more stone bricks on the glass. Enclose the top area. Wherever you want, place a door, preferably iron. Now watch the fight!
Strongholds[]
Strongholds are, in short, massive castle complexes. A stronghold is probably one of the longest worked-on project you will ever do. You will need:
1. At least 100,000 of whatever you are building with(stone or stone bricks work best).
2. A quarry mine(see here) to get your materials.
3. Hundreds of pickaxes of any kind.
(optional)4. A crew of helpers.
The first step is to find a nice, flat area to dig your quarry in. Once you finish a rather large quarry down to about layer 40 or 30, you are ready to build. Again, this is time consuming. Using your stone and/or stone bricks, build a main wall one tall. This will be your Entrance Courtyard. The dimensions should be (Length x Width) 40x30. Make the walls 3 or 4 high now. Place a pathway going in from the gate in the middle of the width. The gate should have only one layer of blocks at the top. The gate should have 12 blocks on each side of it, using a 6 wide space. The path should go all the way through in a straight line and 6 blocks wide. At the very middle of the length, the path should head in every single Cardinal Direction (N-E-S-W). A gateway should be at each of these ends, each one being a room with doors to more rooms. The buildings for a stronghold are:
- Nether room
- Barracks
- Throne room
- Treasury
- Armory
- Sleeping quarters
- Training grounds
- Dining quarters
- Villages(Not rooms, but non-royal homes)
- Quarry room(around your quarry works best)
- Courtyards
- Royal bedroom
- Any other royal building
Keep in mind that Strongholds are not just for a big building. Having some lips on the tops of defensive, outer walls will protect from spiders and having one of these on a SMP server will be bound to get attacked. Be ready to defend one of these colossal projects from grievers, especially TNT and lava, or archers.
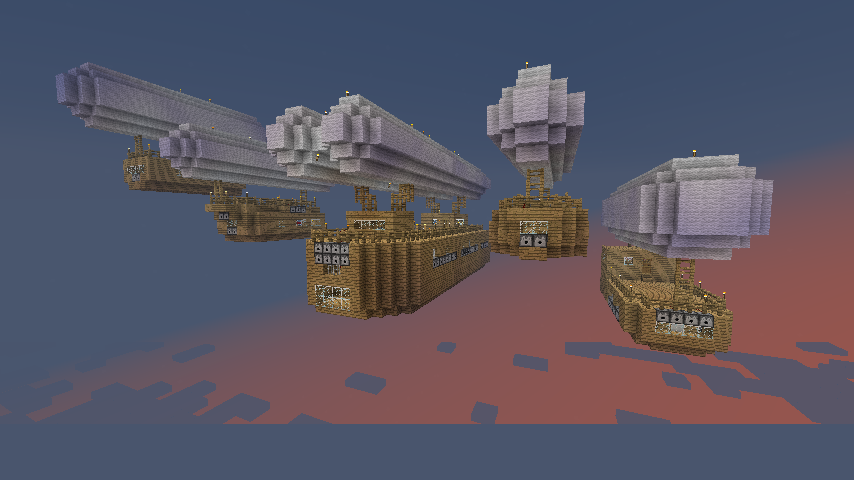
Airships[]
A large fleet of airships
Airships are large flying ships that have gasbags full of lighter-than-air gasses so they fly. In the real world, that is. In Minecraft, an airship can be a lot of things. This is tutorial on the classic airship:
1. You will need a lot of wooden planks ( at least 3-4 stacks, depending on size of ship)
2. A lot of white wool ( at least 2 stacks, probably more)
3. Some glass ( maybe 20 or 30)
4. Lots of fences
5. If you want, some dispensers and ammo (fire charges and arrows)
6. Torches
To build your airship, you first have to jump-stack up as high up as you want it. Make an area out of wood that is at least 6 blocks wide and 14 blocks long. this will be your floor. Next, make some walls. These walls will be one block out from the floor, if your floor is 6 blocks wide the walls will make it look like it is 8 blocks wide from the top. The key part here is that the floor and the walls aren't connected by a block, the edges are diagonal to each other, like this:
AW
WA
W= Wooden planks
A=Air
It will look like this from the front or back. Once you have the walls, you have to build a ceiling. The ceiling is the same as the floor, except on top. Make sure you leave a space for ladders to go up to the next level. If You want to add windows, just add glass to some areas of the wall. If you want bedrooms, just section off an area and add some beds and chests. Dispenser batteries are relatively simple, as you just replace a section of the wall with dispensers facing outwards, and hook them up with redstone to a button. You can add as many levels as you want, but you will need lots of resources for them. For the deck, you start by surrounding the edge with fences. if you want any dispensers up here, then add them before the fence. You can add a raised up area by building a little shed on the back, but making it possible to get on top, and add fences around the top. For the gasbag: this is optional, but I highly recommend it, because if well done it looks awesome. To start, add fences up to the height you want the bottom of the bag to be. Add the fences on both the front fences and the back fences. Next, connect the to fenceposts using a 2 block wide bridge of wool (this bridge can be as wide as you want later, but start with 2 blocks). If you want your gasbag to be 2 blocks, then build out one block and up one block from the main part, like with the floor and wall before, but only go up 1 block. Do this on both sides, so it is symmetrical. Build this all the way down to each end of your wool bridge. Next, Build 1 block out again, but this time build 2 blocks up. Do this on both sides again. Now you should have all but the top of your gasbag finished. For the top, just copy the bottom. Now, you should have a cylinder of white wool. For the end, from the bottom you go out 1 block and up 1 block. Do this again, but go up 2 blocks. Then copy the bottom again and build this on both sides. Make sure to light up the inside or mobs will spawn in it. Now you should have a closed cylinder of wool that looks a bit like a circle. Now, your airship is finished! You can add interior decoration as you see fit.