Here are some little hints for those who are new to Minecraft. You can also find tips under the "Trivia" section of some pages, and those are likely to be more in-depth.
Controls
On desktop editions, the default key for throwing an item is Q, which is right next to the movement keys. This makes it way too easy to throw away the tool in hand, such as your pickaxe or sword. You can use the options screens to change they key to a less "convenient" key such as O, which will mostly avoid such embarrassing (and perhaps fatal) mistakes.
Finding your directions
Within the Minecraft world, a compass is not how you tell which way is north! Rather, it always points to a fixed point, the "world spawn". Sometimes, though, you do need to tell north from south, and so on. There are a few ways:
- You can find north by hitting a block and checking the directions of the cracks which occur on a block as it is mined.
- This may not work if you are using a texture pack that changes the crack pattern.
- First, learn the crack pattern. If a block is hit on its side, there should be one crack going almost straight up, one to the right, and one going almost straight down.
- If you hit a block on the ground, the same crack pattern will appear. The crack which went almost straight up on the side of the block, will point north on the top of a block.
- You can watch which direction the sun, moon, stars, or clouds are moving. Each of these always move from east to west.
- In the Java Edition, the debug screen (activated by pressing F3) gives information on which way you are facing.
- If you have a map (In Bedrock Edition, a locator map) covering where you are, the map will shows an arrow-like player icon. This points the same way that you are facing in the world. The top of the map is north, the right edge is east, and so on.
Changing the rules
Peaceful mode
If you are having too much difficulty with hostile mobs, such as a zombie or a creeper, or can't find any food to eat, you may be able to set the world difficulty to peaceful. In peaceful mode, hunger and health will quickly regenerate, the hunger bar will not harm the player's health, and all hostile mobs will instantly despawn.
This is a controversial move -- in a pure survival game, many players will consider it to be cheating, which takes away much of what they see as the challenge and fun of Minecraft, especially when used as a "panic button". That said, it's better than a ragequit, and Minecraft is meant to accommodate many different styles of play.
When the "point" of your own game is more about construction or artistic builds than about surviving the monsters, peaceful mode becomes very helpful. It can also be used as a "training" mode to learn the game controls and get used to the Minecraft world.
Single-player worlds have an option to lock world difficulties and eliminate this option, keeping you "honest" in the gameplay; for multi-player worlds, you will not be allowed to change the world's difficulty unless you are the world owner (or at least an "op").
Game rules
Another option for moderating the game difficulty is to alter the game rules with "cheat commands", or by choosing them when creating the world. As with peaceful mode, these are controversial, but in single-player... well, it's your game. On a multi-player server, you probably will not be able to change these rules in any case, unless you are the server owner. See the linked page for full details.
- The most powerful rule in this respect is probably
keepInventory. Once set to true, players who die will respawn with their items and experience intact, instead of dropping their equipment where they died. This takes a lot of the threat out of "lava deaths", and also the Nether and End in general. - Another, less controversial, rule, is
mobGriefing. This will prevent all mobs from breaking blocks, picking up items, or trampling your crops. Most obviously, this prevents creepers and Endermen from damaging your builds; it will also prevent mobs from picking up your items after your death. As a non-obvious side effect, it will prevent villagers from breeding, because they need to collect food to do so. It will also have significant effects in the Nether (Ghasts, Blazes, Piglins) and will drastically affect the late-game Wither fight, and the Ender Dragon battle.
Open the world to LAN
If you have a lot of valuable items like diamond armor, a diamond sword, diamonds, gold, and iron, then you will be more afraid to have all your hard work come to nothing. Unfortunately, this means that if you dug a hole into lava, all of the items that you were carrying will be lost forever. Many players delete the world when this happens; however, never delete any world. Just think about the effort of building the base. It took more time to build it than to find the resources you needed. If it is deleted, then that world is gone forever. There is an alternate way to get the items back. There is an "Open to LAN" option, which allows you to enable cheats. When cheats are enabled, you can go into creative mode and replace lost items, as well as set /gamerule keepInventory to true. However, note that many players consider this as cheating. Many players believe that it's better to think about their mistakes and start over.
However, if you are playing multiplayer and you are not the server owner, you cannot just enable cheats. In that case, you could ask the one that hosts the Multiplayer game to replace the items or create a new world in singleplayer.
Crafting tips
Recent versions of Minecraft feature a recipe book, which will supply most of the recipes that can be made with all items you've ever picked up. It can also make it easier to craft as well as remember recipes. That said, it is possible to craft recipes that aren't in the book yet, by remembering their crafting pattern. (They will then be added to the book, along with many recipes using the new item.)
For several common wooden tools, there are routines to quickly craft them with an even number of logs, dragging the planks or sticks into place and using shift-click to craft multiple recipes.
- For fences, you will want a multiple of 5 logs. Convert them to planks, then convert one-fifth (1/5) of the total to sticks. With 20 logs, you can just turn the smaller stack of 16 planks into sticks, then craft that with the other stack of 64 planks, for 48 fences.
- By comparison, fence gates are easy, and cost exactly 1 log each. Convert the logs to planks, then convert half of the planks to sticks.
- For ladders, crafting 7 logs at a time into sticks will let you just drag the resulting pile into the ladder shape, for 24 ladders.
- If you have a lot of spare sticks, a stack of them will make 27 ladders with one left over.
- For slabs, doors, or trapdoors, multiples of 3 will come out even, (Likewise for stone slabs and walls.)
- Chests cost 2 logs each. Crafting 16 logs will get you a stack of 64 planks, which you can drag into the box shape to make 8 chests at a time.
When working with the many kinds of stone, a stonecutter is very useful. Not only does it let you make various decorative blocks individually (without needing to craft 3 or 4 blocks at a time), but it makes stone stairs cheaper: The stonecutter can make 1 stair per block, while the crafting table needs 6 blocks to make only 4 stairs.
Later, you will get hold of netherrack, and one of the important things to make from it is nether brick fences. The recipe is a little complex, but can likewise be made in bulk: Smelt your netherrack into nether brick items, and take 180 bricks at a time (3 stacks minus 12). Drag these across the crafting table to split them into 9 stacks. Set aside one of the stacks, and combine the other stacks pairwise into the 2x2 nether brick block recipe. That gives you the blocks and set-aside bricks for 60 fences. Even if you don't bother setting aside the 12 bricks, this will still work, you'll just be crafting a couple of extra nether brick blocks in the process.
| Name | Ingredients | Crafting recipe |
|---|---|---|
| Nether Bricks | Nether Brick | |
| Nether Brick Fence | Nether Bricks + Nether Brick |
If you are struggling to remember crafting patterns, try taking a closer look at a pattern, like the fishing rod pattern. Take notice of how the sticks and string line up to look like a fishing rod. Many patterns follow this trait, such as doors, which use two columns of wood planks to make the rectangular shape of a door, and swords, which use two wooden planks, cobblestone, iron ingots, gold ingots, or diamonds for the blade and a stick for the handle.
In single-player, you can also pause the game and visit the wiki for that item for the recipe.
You can also save a bit of time by stacking some items to make two or more different items in a pass. The examples below show how to stack items to craft two or three items in quick succession.
| Name | Ingredients | Crafting recipe |
|---|---|---|
| Stone Pickaxe or Stone Shovel |
Cobblestone + Stick |
|
| Leather Pants or Leather Cap |
Leather | |
| Golden Chestplate or Golden Helmet or Golden Boots |
Gold Ingot | |
| Minecart or Bucket |
Iron Ingot |
Beds and bases
Building a house
There are some recommendations for early building:
For beginners, the player might want to hollow out the side of a hill or mountain. This can be done quickly and turn into a good shelter, but keep in mind it will be harder to find the home if the player wanders off, or the player could place torches if they have any around the entrance. Good thing is that the mobs can't track any players down by light sources, except zombies. A second design is to collect a lot of logs and build a house of planks. These stand out easily, look good, and function well. The bad thing is they and their slab counterparts are flammable and may be set on fire by lightning.
A more durable shelter can be made of cobblestone, stone (including andesite, diorite or granite), or stone bricks, but don't use dirt for anything but strictly temporary shelters (dirt is easily demolished by creepers). Don't build with or on sand or gravel, since they are affected by gravity, which will make things very difficult when a player decides to expand the shelter or dig a basement. The best material to make a house with is obsidian since it is impossible for creepers to blow it up, although obsidian is quite difficult to obtain.
These are some recommendations for later building:
Take the time to make a dedicated storage area with a good amount of chests. Reorganizing every 30 minutes is a pain.
Make some farms that are modular and therefore can be easily expanded.
If the shelter was made out of wood at first, then players may want to change it to something more blast-resistant, like Cobblestone, or even obsidian, if supplies allow. However, resistance isn't always a top priority, and you may just want to build a nice house, if that is the case, then just be wary of any nearby mobs, and try to spawn proof the area to the best of your ability.
Set your spawn
If your base is far away from the spawn point, and if you have 3 wool and 3 planks, you can make a bed. Clicking on the bed will set your spawn point to the bed, and as of version 1.15 this will work even during the daytime (actually sleeping in the bed will also set your spawn point). However, if the bed is not there (or blocked) when you do die, the spawn point will be lost entirely and you will respawn near the world spawn point. When moving your spawn point within the base, make sure to set your spawn point to the new bed immediately.
Be careful when decorating around the bed. Some block placements will allow you to sleep in the bed, but will prevent the bed from actually letting you respawn. Never completely surround the bed, even with half-height blocks, such as stone slabs. Also, if you put glass beside your bed, you may not be able to spawn beside it, as players cannot naturally spawn on glass. If your bed is obstructed and you died somewhere, you will end up near the world spawn point with a message saying that "Your bed is missing or obstructed".
Also, you need to be able to stand on the bed if you want to set a new spawn point, meaning that the spawn point won't be reset if you sleep in a bed with a block above it.[verify]
Field Bases
If you have discovered a structure that could yield you many items, such as a mineshaft, a stronghold, or a swamp hut, you may be tempted by the riches. However, don't attempt to enter right away, as you may lose any valuables and may not be able to reach them in time. To prevent this from happening, set up a new spawn point at the outskirts of the discovered structure by placing a bed and sleeping in it. Carry a bed at all times when exploring far away from home. This will also let you skip past dangerous nights and storms, rather than fighting or hiding for the duration.
Consider that when you die, you will respawn without your items. If you died someplace deep underground, you are likely to have monsters between you and the dropped items. If you plan to create a spawn base nearby, that base needs to have enough resources for you to be properly equipped before charging back into the fray. The basic kit for a spawn base should be at least half a stack of iron (or the equipment it makes, sees below), at least half a stack of planks and a quarter-stack of coal, plus bow and arrows, and food. Supplies of other equipment (torches, fences, ladders, etc.) are also helpful. Another technique is to use ender chests. This way, you can access resources from your main base. However, for this to work, you need to have another one in your main base, and also remember to stock it with items. This technique is better for more advanced players who have the necessary resources.
If there is not enough to spare to stock the base, then you may be better off respawning at your distant base, well out of chunk loading range from the death. Your items will not disappear in unloaded chunks, so if you want to easily regain your items, move to a few hundred blocks from the death site, and then zip back there as fast as possible before the five-minute timer runs out. As preparation for this, you can mark out your route from the surface to the mine, especially the proper entrances.
If you decide on a nearby spawn base, the first priority is safety—pick an area that is well lit and closed off from dangerous areas, and specially protected from creepers (stone/cobblestone walls, a door, and glassed or fenced windows to view the area in front of the entrance). A small room will do, but there needs to be enough space for a crafting table, a furnace, and at least one double-chest to store supplies (these can be embedded in the floor if needed.) Of course, you also need space for the bed, and free space next to the head of the bed to respawn. There should also be room for an infinite water source, which can be tucked half under a wall.
What you need for the base will be a bed, crafting table, furnace, and a chest. If there is no wool for the bed, you can use string (plentiful in mineshafts) to make some. The chest should contain at minimum a full set of iron armor, iron sword, a bucket, and either a second bucket, an iron pick, or shears and a flint-and-steel. (By an amazing coincidence, this is exactly what can be made with half a stack of iron ingots.) You should also have a stone pick, shovel, and axe, a bow and at least half a stack of arrows, preferably a full-stack. Pre-craft some tools: Another chest, and at least half a stack of torches. Some fences, gates, and ladders, a door, or whatever, may come in handy too. You will need a fair bit of food, at least a quarter-stack of steak or porkchops or more of lesser foods. Just to be careful, stick some spare blocks in there too—a half-stack to a stack apiece of cobblestone, dirt, and gravel, as well as extra wood. (Sand is less useful, but some glass might come in handy.) Having some extra raw materials handy: coal, string, redstone, etc., is always good. If possible, top off the selection with a spare copy of the map, and a clock—these can be in frames if desired.
Before delving into the depths, remember to use that bed to set your spawn point (watch for the message). Just placing it is not enough, remember to sleep in the bed to reset the spawn point there. Now when you die, you will reappear not helpless in the midst of a dangerous cavern, but in a secure base with a full set of supplies to go back and seek revenge, or at least the items. Note that creeper attacks and other liabilities are not covered.
Zombie-proof door
Zombies can break down doors, if the game difficulty is set to hard when night falls. Here's a solution that doesn't require the player to craft an iron door or compromise the base's security. Simply break down the door, then turn so that the player is perpendicular to where the door just was, and place the door. Get out of the hole the door is occupying, and open it by right-clicking. Now, if the door is placed it the right way, zombies will think that the door is open and avoid it. One can also place any regular block such as dirt or cobblestone in front of the door to prevent zombies from getting to it. If the block is placed on the outside side of the door, the zombie will not be able to damage the door. If the block is placed on the inside side of the door, the zombie can break down the door, but cannot proceed further inside.
One can also place sand or gravel above the door, that way, if the zombie does break the door, it will fall and close the entrance off; or can make a water or lava ditch after the door, also preventing zombies and other mobs from entering. Make sure that the house is not a flammable substance, or that anything is around the ditch.
The simplest solution is to use a fence gate instead of a door, as zombies do not recognize them as doors. One must, however, guard against creepers, which will treat fence gates as fences as per priming-time detection range mechanics (creepers will start the countdown even if blocked by fences, as they are in the same space as the fence). The laziest way to protect against undead intruders is to dig a 1×3 trench in front of the door—to break down doors, zombies must destroy the top half of the door. If zombies are on the door trench, they must jump to attempt to break the top half of the door, which resets the zombie door breaking mechanic. Note that this method only works if the door was installed flush to the outside wall of the dwelling. Also, putting a block underneath the door forces the zombies to jump, break, fall, fail, repeat, exact same mechanic, simply make a 3 high doorway and instead of a door and another block on top, put a block on the bottom and door on the top two block spaces, allowing villagers to still use these doors.
Another way is to build a door frame around the door. Then, add a trapdoor to the middle blocks. Zombies will not be able to break down the door.
Legitimate Motion Sensor
To detect mobs in their tracks, simply surround the house with a ton of planks. The mobs should walk on the planks and make plank sounds, therefore alerting the player of their presence. Then the player can dig down or prepare for battle. The preferable radius is 5 blocks out.
Note: The volume must be somewhat high for this to be effective.
Adding pressure plates with note blocks underneath it can increase the loudness and allow the player to detect invisible mobs/players by seeing which pressure plates are pressed down.
Minecart perimeter
A trick to defend the base that works best once the player is settled in, and have enough iron to make at least tracks, and ideally powered rails and a minecart. The simple version is to just ring the house with rails -- mobs will not walk across tracks. However, this will not prevent creepers exploding, skeletons shooting across the rails, or endermen teleporting into your base.
If you have enough gold and some redstone for powered rails, you can craft those plus a few minecarts, and set the carts spinning around the perimeter. Any mobs that come close enough to the tracks will be scooped up by the minecart and taken for a ride. This trap can be modified with one-block-high tunnels to suffocate any mobs in the cart. The player can also ride the carts by the player - they will travel fast enough that most mobs can't attack him or her. This, however, takes much more skill to use, and can still trigger creeper explosions.
Emergency Shelters
If you are stuck outside in the middle of the night with many hostile mobs coming to attack you, you can make an emergency shelter. Ideally, you should dig three blocks down and place a block above you, making a cramped yet safe area to stay in. You should have a torch however; if you wish to avoid being in the dark without a light source. If the monsters aren't already too close, you can even dig out more space to place a bed. You can get out of the hole by pillar jumping if you do not have any ladders. This method is not terribly though, as you are completely exposed to mobs as you leave.
Pillar jumping, instead of digging down is another solution. You simply make a pillar directly under yourself; 10 or 12 blocks will put you out of reach of arrows from skeletons, and out of range from monsters in general, except phantoms. To hold off spiders, however, you will have to build an overhang around the top block of the pillar. Pillar jumping rather than digging down also removes the possibility of digging into a pit of lava or a cave, although it is rare for one of these to generate 3 blocks from the surface. Note that this will backfire horribly if you have not slept in a bed for a few days, as phantoms will easily swarm you and knock you off your pillar. These can be avoided by building out a mini-shelter atop your pillar, just enough that you have a ceiling to stand under.
As a last resort, you can simply set the difficulty to peaceful mode, getting rid of all the mobs. (See Peaceful mode.)
Mining
Mining is pretty important as the player can tell from the game's name. The player needs to mine to get resources.
Log collecting technique from trees
If you can get to every block of wood on a tree but just can't reach the top block, try leaving the bottom block intact, then jump on it to get the rest. Once done, harvest the bottom. If you still can't reach the top you can "pillar jump" up Jump and place a block beneath you (use a block that's easy to break, like dirt, wood, or stone). Once done, you can mine away from your own blocks, and either break the "tree stump" or leave it to mark the tree's drops when you come back later.
Always have a spare pickaxe -- stone pickaxes are cheap, and for the early game you should be using mostly those, saving your iron pickaxe for the ores that need it. Once you have plenty of iron, you can start using iron pickaxes for "everyday" mining -- they are faster and last longer -- while saving your diamond/enchanted pickaxe. A diamond pickaxe will last a long time, but not forever -- don't start using it for ordinary excavation until you have plenty of diamonds.
Try to keep at least 32 torches on hand at all times, whenever you drop below that make another batch from a log and some coal or charcoal. Keep shovels around too, they make dealing with their blocks (dirt, gravel, sand)
Note: On Java Edition, the player can press F3 to show the light level (BL, SL). If its 7 or under monsters will spawn.
Collecting sand or gravel without using a shovel
Instead of wasting a shovel's durability by digging piles of sand, gravel, or even concrete powder, you can use torches or various other blocks to break entire columns at once. This works with any "passable" block, including rails, Redstone dust, or even slabs; but torches are almost always handy.
For this trick, the player should hold a torch, and use it to break the bottom-most block if a stack then immediately place a torch on the floor of the newly empty space. The column should collapse into a scattering of items. If you placed the torch too fast, the sand, etc. might not have time to start falling, and the torch will just hold them up -- in this case just break the next block above the torch as well.
Breaking gravel using this trick will never drop flint, which should be considered by the player depending on the resources they desire.
Also, you can dig down underneath it so that the sand or gravel is two blocks from the floor. Dig out the block that is two blocks away from the gravel, then place a torch there. Mine the block above the torch and the sand or gravel will fall on the torch and will drop as items.
How it works: The pillar of gravity affected blocks will turn into falling block entities, which can land on any full block, but pass through non-solid blocks (much as a player or mob would). If they land in an empty space, they will turn back into a proper block. However, if they land and find there is already a block in that space, they will instead break as an item.
| YouTube Video (view on YouTube) |
|---|
Branch mining
This is perhaps the safest method of mining, with higher rewards. This method consists of digging a staircase down to level 11, blocking off any caves the player may find along the way. This is the ideal level to find diamonds. Diamond ore can be found between levels 5 and 16, but lava pools make a real hazard below level 11. Keep a water bucket in the hotbar, just in case. Press F3 in Java Edition. When the player is at Y=11, start mining a 3 block tall, 1 block wide tunnel, or branch, in any direction. Continue for about 30 or 40 blocks, gathering all resources, placing torches intermittently, and blocking any caves along the way. If the player wants to explore the caves they may do so, although this no longer classifies as branch mining. Go back to the beginning of the branch, move 3 spaces over, and repeat the same process.
Here's an example:
X = Tunnel
|_|_|X|_|_|X|_|_|X|
The reason for leaving a 2 block wide space in between each branch is that if the player only left one, it would be seen as the right wall in one tunnel and the left wall in the other.
When mining, always make sure to have at least a half to a full stack of wood, iron ingots (or cobblestone), and coal or charcoal. This ensures a large renewable supply of tools and torches that takes up very little inventory. Just craft more as needed.
For large sections of mining on many levels, move 4 spaces over. This might be a bit more dangerous, but it will save pickaxes.
X = Tunnel
|_|_|_|X|_|_|_|X|_|_|_|
|_|X|_|_|_|X|_|_|_|X|_|
|_|_|_|X|_|_|_|X|_|_|_|
Compact
This can be any size so for example, dig 1 block down 8×8. Then, mine all of the blocks down 1 more, but don't mine a block that was in one of the corners. Then, repeat this, but instead of not mining that one block, mine the block next to it. As it gets deeper, it starts to form stairs. This is possibly the best way to get lots of ores, and the safest, but by far the hardest to make, recover, and get blocks. Players will need about 1-2 stacks of torches, glowstone, etc., and a lot of pickaxes.
Above ground
Make a 1×2×2 doorway in the back of the base. After that easy step, make a huge room and have several different ways to mine. Low and high, left and right - the player are sure to hollow out a mountain soon, getting hefty supplies of coal and iron, however they will not encounter gold, redstone, lapis lazuli or diamond, and there is still a slight danger of lava.
Spelunking
Find a cave, and explore a branch of the cave. If the cave branches off while exploring the current branch, go down one of the paths at random. When the player reaches a dead end, they should go back and mine the coal, iron, etc. that the player has passed. Leave at least some of the torches that are placed, to keep the area lit and prevent monsters from spawning. After the player does that, go down another branch of the cave, and repeat the above process until the cave is done. Now, mark the cave in some way so that the player knows they have mined out this cave. This is best for peaceful mode or easy, as whilst the ores are more obvious, there is more danger of mobs attacking.
Mineshaft with a water drop
The player will need about 7 stacks of ladders, 1 water bucket, a few iron or diamond pickaxe and a sign. The sign is optional, though it is helpful in marking where to place the water.
First, dig a 1×2 hole down to bedrock level. Remember not to dig straight below themselves. If the player hit non-flowing lava, stop mining, or try and find a way around the lava.
Once the player has done that, or as they go down, place ladders along one side so that they can climb back out of the hole. Place the sign 3 blocks above the bottom on the opposite side of the ladders. Place water just above the sign. Now, the player doesn't have to use the ladders to go down; instead, players can just fall down.
Much further into the game, once the player has access to the nether, a quick way to exit a mineshaft is to build a tunnel down, roughly 2 blocks from the side of the pit, and then upon reaching the bottom place a block of Soulsand, and then fill the tunnel just made with water. If done correctly, this should create a bubble column due to the Soulsand, and entering the column should shoot the player straight to the surface, both quickly and safely, if it doesn't reach, just add more water source blocks. Just watch out for lava during the initial mine down. Feel free to edit it as desired once working!
Grid mining
Similar to branch mining, except make 2×2 tunnels instead of 1×2, and dig a new tunnel every 16 blocks, creating a grid pattern. This method isolates chunks, if built on a chunk border, which can then be mined out for ores.
Ravine mining
Ravines are a structure in Minecraft that are deep cuts into the world, often exposing ores such as coal or iron, or even gold or redstone if the ravine goes low enough. Many players are tempted by this, and decide to jump right down into the ravine. However, if the player does this, it will be much harder to get back up, and the player will take fall damage. Instead, the player will need to make a safe way to get down to the bottom of the ravine. There are several ways to do this.
One way is to get plenty of sand or gravel. Place blocks in midair, next to the edge, and allow them to fall to the bottom of the ravine in a stack. When they reach the level of the player, jump on and dig down. (Note: This is the only time when digging straight down should be attempted.) When the player reaches the bottom, go get the ore, and re-stack the blocks to get back up. (See Pillar jumping.) The player can also use shears to get vines from trees, where jungle and swamp biomes have plenty of them, and place some at the top of the ravine edge. They will grow down over time and can be used the same way as a ladder, allowing the player to return to an easier climb each time they come back.
Other methods are to make a waterfall. Build a simple pool on the edge of the ravine, leaving the side that borders the ravine open. Make a bucket, fill it with water, and fill the pool so that it overflows into the ravine, or the player can also just dump a water bucket a block or two away from the edge. The water will leak out of the pool and fall to the bottom of the ravine. This can be used as an easy way to get down and back up. If the player is really impatient, they can actually jump down the ravine into the water at the bottom, which will protect them from fall damage. Be careful, however, as most ravines found underground have lava pouring from the sides or in lakes at the bottom. Don't miss it. Doing this over lava is dangerous: The water will quench lava directly under it, but if the lava extends more than 7 blocks away, the player will have a water current trying to carry the player into the remaining lava. Be prepared to swim back up or deal with the situation: Fences or blocks might contain the original waterfall, or the player can bring a second water bucket to dump and then retrieve closer to the edge of the lava. Either way, the idea is to get some water-free obsidian to stand on.
Obtaining coal without mining
If the player has made the shelter and mined some cobblestone, but cannot find any coal to fuel or light the environment, just make a furnace, and smelt some logs (not planks). Use the planks for fuel—2 planks for every three logs the player wants to smelt. This will smelt into charcoal, which is almost identical to coal, except that it cannot be packed into coal blocks (or sold to villagers).
Darkness
If a player runs out of coal or charcoal, remember that hostile mobs require a light level of 7 or less to spawn. Use this knowledge to save some torches in the shelter: even if things are a little dim, any space within 6 blocks of a torch is spawn proof. Also, monsters won't randomly spawn near the player (24 blocks): The player may want to light up a perimeter just to see what's coming and light the base so the player does not need to come back to find a new tenant, but monsters won't be appearing in front of them.
Light Tip
To avoid vision problems, such as trying to see ores in dark places is very hard for the eyes, they get tired and degrades vision, change the brightness by going into settings. By default, the game has a "Moody" brightness setting. Set it up ("Bright" recommended). This will save a player's vision. Moreover, the player will not need as many torches. Especially in the Nether, where everything is somewhat lit without torches on a "bright" setting, and mob spawning never depends on the light level. In order to save torches while mining, they can be placed along the floor every 13 blocks, since a torch has a light level of 14, and that spacing will ensure the light level never drops to 7, where mobs will be able to spawn. If F3 is enabled, place the torch when the light level of the block the player is standing on is 2.
Upper-tier ores
If the player sees some redstone, diamond, or some other upper-tier ore, don't use low-level pickaxes to mine them. When the ore mines as slowly as breaking stone with bare hands, that is a hint that it will not drop anything. Indeed, if any ores or stone except obsidian takes more than two seconds to mine, the player is using the wrong pickaxe (assuming the wrong pickaxe is not enchanted with the Efficiency). The rules are that wooden or gold pickaxes only mine coal and stone, while stone mines iron, coal, and lapis lazuli ore. Iron mines all blocks except obsidian, (and bedrock), and diamond/netherite pickaxes can mine every block except bedrock, even obsidian. Though, if visiting the stronghold looking to get an end portal frame, don't waste time, it is unbreakable. Be careful, upper-tier ores are deep enough that players are likely to run into lava lakes. Remember the water bucket.
Item durability
If the player is new to Minecraft, they may not know what happens if they are mining with a tool, and suddenly it turns into the hand and the tool is gone. This is because the durability of the tool has run out. Take care to look at the durability of items (the little colored bar underneath the item) before departing on any long trips, be it exploring or mining, as the last thing players will want to do is to take the long trip back home just for an axe, or a pickaxe. Time is precious, so try bringing along a crafting table, or stock up on tools if needed. Try not to use tools up completely—instead, hang onto the almost-dead tool and switch to a new one. Then, when the new tool is itself mostly used up, the player can combine the two. This pools their remaining durability, with a "repair bonus" for good measure. Also, F3+H shows the durability of weapons/armor, and this setting is retained through restarts of the client.
Farming techniques
Passive mobs will spawn very seldom after they have been killed, which means that meat will eventually short of demand if the player keeps killing animals without breeding them. The same is true for plants. A solution to this is to make farms.
Wheat farms
Most players like starting a wheat farm first because wheat seeds are one of the first items one can acquire. Note that all methods for wheat will work identically for potatoes and carrots, except that those don't have separate seeds, re-plant the crop.
Besides seeds, players will need dirt/grass, a hoe, light, and water. One source block of water will hydrate farmland four blocks in every direction, including diagonally. Therefore, the most effective (using a small area) wheat farm is 9×9 with a source block in the middle. Again, that one source block extends to all tilled soil in the 9×9 areas. That area yields 80 wheat after fully grown. This not only saves water sources but also gives more room to grow crops for less water. However, wheat grows faster when planted in individual rows, so for maximizing growth speed and return over time, other setups are more efficient.
If players want to farm more efficiently with only having to use a single bucket of water/Water source, it's best to make a multi-level greenhouse. Here is one plan:
Make the floors 12 long by 13 wide. It will allow for a walkway to put torches on. The plots go as follows: 8 rows by 4 columns, a trench 8 blocks long, then another 8 rows by 4 columns. Make each level 5 blocks high minus the foundation layer. Place an extra layer of cobblestone or wood beneath each new level to prevent water drops from leaking. Place a hole in the ceiling where the water will enter from the top levels and on the ceiling of each floor, torches or glowstone can be placed to accelerate crop growth. Repeat for as many levels as desired. When flooding the trench at the top, remember this, it is necessary to have the holes in a zigzag pattern to allow the water to flow from level to level. This will net 64 Wheat per floor and will allow faster crop growth since the crops will all be in the same confined area. To clarify the trench system: If the ceiling of one level has a hole on one side of the water trench, make the hole of the floor above or below on the other side of the water trench. This allows for only one bucket of water to be used for optimal farming. Water flows 8 blocks in a trench and will spread the same for each level it goes to, the last block is purposely made to be a hole to capitalize on this.
Villagers can be used to automate breaking and replacing of the crops. Just make sure the villager's profession is Farmer (Farmers have straw hats) and is holding 8 stacks of seeds.
Pumpkin/Melon farms
Players will likely find pumpkins first, and these are far more useful—melons provide small-change food (similar to cookies) and are used for brewing, but pumpkins provide jack o'lanterns, which are valuable for marking a path and the direction home. They can even provide light underwater! They can be used to create golems and make pumpkin pie as well. They can also be worn on the player's head to prevent being seen by endermen. However, the two crops grow almost identically. They do use farmland so that 9×9 plot with a water block works well, but instead of planting the whole field, plant half the squares, in strips. These will grow into stalks, each of which needs dirt or farmland next to it to place a fruit. Harvest the pumpkins or melons, but leave the stalk to grow another fruit. See the appropriate tutorial for advice on how to arrange the fields. Observers and pistons can automate this!
Sugar cane farms
Once past the initial stage when players eat any food they can without bothering with extra preparations and are ready to craft some more complex items, players may want to start sugar cane farming in order to craft sugar and paper, sugar being a key component of cake, pumpkin pie, and some potions; and paper being required to craft maps, books, bookshelves, cartography tables, enchantment tables, and firework rockets. Find a patch of sugar cane (it grows near water), break it down, and take it to the base. One more tip is to place sugar cane underwater (doesn't matter how deep) on sand or dirt that is adjacent to water. Doing this should create an air bubble, allowing the player to breathe underwater. This trick can be used to aid in the creation of underwater structures. Observers and pistons can be used to automate sugar cane farms.
This bug has been patched, and in turn, may not work with some exceptions.
Fishing
With string, fishing becomes an extremely viable source of food, especially as fish are infinite but passive mobs do not respawn. Catching 7 or 8 fish will easily earn players a couple of levels per day, depending on what level the player is on, to begin with. Fishing can be used to gain the needed levels for the desired enchantment. (Although, a better option is to kill mobs at a spawner). Fish, while they do not replenish a lot of hunger, can be much easier to obtain compared to other foods. Try building a small island in the middle of a lake, as this will prevent mobs from attacking from behind at night. If playing PC release Java Edition 1.7.2 or higher, there is also a chance to fish up treasure such as saddles and enchanted bows and fishing rods. See fishing for more information.
You will eventually catch enchanted fishing rods, and once you get into enchanting you can even create your own. Caught rods will have little durability, but can be saved to combine (at an anvil) as below. Any rod with Mending will tend to repair itself with use instead of wearing out, especially if it also has Unbreaking. Fishing rods do have a "perfect" enchantment setup, and it's straightforward to create : Once you make a "god rod" with Mending, Unbreaking III, Lure III, and Luck of the Sea III, it will last forever and provide a steady stream of experience, food, and treasure.
Animal farming
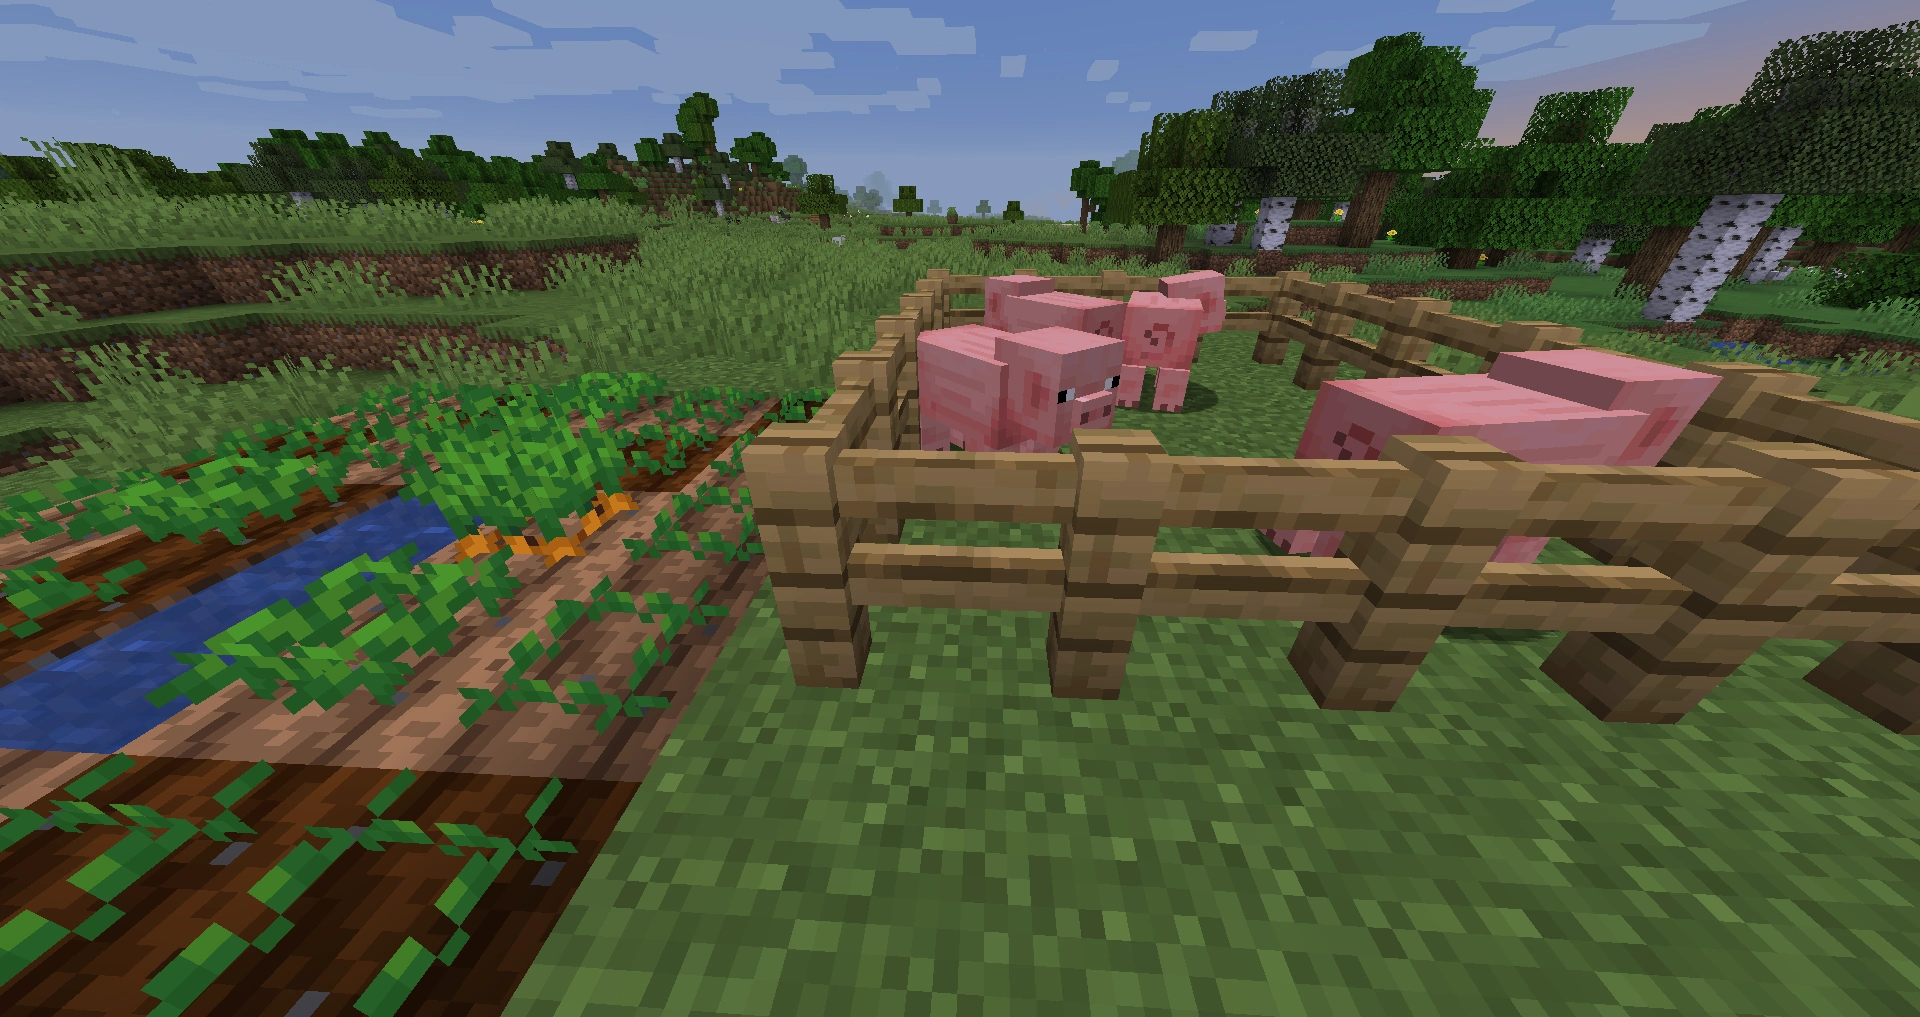
A simple pig farm, with a carrot farm right next to it to make it easy to breed the pigs.
Ranching, or animal farming, usually refers to breeding animals so that there can be an infinite supply of meat and other passive mob drops. Simply right-click an animal with their "desired" food to breed, and then right-click the same animal with that same food (see "Breeding" for more) To make an animal farm, simply make an enclosure with fences and one fence gate to access the farm.[jumping on a carpet on a fence can also be used to get in.] Then, lead at least 2 of the animal to the enclosure. It is recommended to have plant farms nearby and harvest the crops to breed the animals quickly.
Stuck in the Nether
It is common knowledge that the player should always have a flint and steel or a fire charge in the inventory in the Nether, just in case. Building a cobblestone house around your portal will also protect it from ghasts and prevent Nether mobs from wandering through. Always remember the coordinates of the portal so you can find your way back!
If a player is stuck in the Nether without a flint and steel or a fire source, there are still ways to relight the Nether portal.
- Baiting a ghast into blasting the empty portal again will work.
- Nether fortress and other structures may have chests with flint-and-steel or fire charges to relight the portal. They can also provide obsidian to build a new one.
- The makings of a fire charge can also be harvested in the Nether and Nether Fortress, if the chest are not being helpful: A ghast drops gunpowder, A blaze provides a blaze rod, and a wither skeleton drops coal.
- In recent versions, gold can be mined in the Nether, and then traded to Piglins to get a fire charge and perhaps obsidian.
Item Storage
Many players dispose of unwanted items by dropping them into fire pits, lava, and cacti to destroy the items. But by doing so they risk accidentally dropping something valuable and losing it forever, like a diamond pickaxe. So rather than destroying the items, a smarter method of getting rid of items is to drop them into a hole with a trapdoor over it, eventually the items will despawn. By doing this you can easily recover items that you accidentally drop; plus you can't pickup items through closed trapdoors so you don't have to worry about accidentally picking up unwanted items.
Once you have picked up some spare blaze rods, you can make an ender chest to store items and get at them from elsewhere. You will need a second ender chest to take with you, and a Silk Touch pickaxe to pick it up after using it.
Late in the game, you can craft shulker boxes to store extra items later on in the game. These shulker boxes can then be stored inside an ender chest. Color code the shulker boxes to create an organized inventory. This basically gives you an extremely large backpack that keeps your items after death.
Bucket jumping
To ascend a cliff, an alternative to ladders or pillar jumping is to use a bucket of water to place water as high as possible, then swim to the top of the waterfall, put the water back into the bucket, and quickly place a new waterfall at an even higher point. By repeating this process, a player can reach the top of the cliff. If the waterfall is left there, it can be used to travel back and forth.
Video
If you still want more tips into survival, check out these videos. These are basically chunks of information to get you started.