(→Jeb door: It's the lack of QC, not a recent update) |
(Edited diagram) |
||
| Line 390: | Line 390: | ||
{{FakeImage| |
{{FakeImage| |
||
| − | {{BlockGrid |W=stone|S=piston+side-down|A=air|P= |
+ | {{BlockGrid |W=stone|S=piston+side-down|A=air|P=Red carpet |
|ASA |
|ASA |
||
|WWW |
|WWW |
||
| Line 398: | Line 398: | ||
}} |
}} |
||
| |
| |
||
| − | Side view of retracted state. |
+ | Side view of retracted state. (The red carpet marks the pressure plate.) |
}} |
}} |
||
Revision as of 13:44, 30 April 2020
Since pistons were introduced in Beta 1.7, players have been experimenting with their potential uses. Below are some demonstrations and guides. The interest in pistons is their ability to manipulate the position of other blocks.
Please however keep in mind that as of the "Better Together" update on console editions that "Quasi-Connectivity" has been removed and its function replaced with the observer block. In doing so, many of the contraptions listed below might have been made non-functional.
Jeb door
A Jeb Door is a piston door that is completely hidden in the wall that it is in. Jeb Doors come in two varieties: half and full. A half Jeb Door reveals a 2x1 passegeway (y x). A full Jeb Door opens to a 2x2 tunnel. Unfortunately, due to the lack of quasi-connectivity, this particular design does not work in Bedrock Edition, though there are other designs that work.
Smallest Full door
Level 1
Level 2
Level 3
Level 4
Half Jeb Door
Level 1
Level 2
Level 3
Level 4
Pros:
- 1. Easy to build.
- 2. Simple.
- 3. Requires few materials compared to hidden piston stairs.
- 4. Easy to modify. For example, you can modify it to open with a self-destructing lever, or you can use mods like ComputerCraft and use the computer to request a password to open the door.
Cons:
- 1. To blend in well into the environment, you will need a stone or dirt wall. Stone walls can be found on the mountains biome (and its variants).
- 2. If you need to build it on a plains biome or other flat terrain, you will need to somehow blend the door on the environment. If this is impossible for some reason, your only choice will be the hidden piston stairs.
- 3. Players can accidentally mine the door, as no one knows there's a door on the wall.
Horizontal Jeb Door
This version features a Jeb Door fixed horizontally on the ground. It can be used as a hidden door to a secret base or passageway.
Videos
Secret Entrances
This video showcases a simple and easy to use Mini Base design (although it no longer works due to updates).
| Mini-Base (view on YouTube) |
|---|
Secret fireplace entrance
This is a design for a 2x2 secret fireplace entrance to a hidden base.
| Fireplace entrance (view on YouTube) |
|---|
Small double piston extender
Small double piston extender that is resource friendly and easy to make.
| Small double piston extender (view on YouTube) |
|---|
Hidden Piston Stairs
Below are examples of hidden piston stairs.
| Hidden Piston Stairs (view on YouTube) |
|---|
| Piston Stairs (view on YouTube) |
|---|
| Combination Lock Piston Stairs (view on YouTube) |
|---|
Piston Escalator
Uses pistons and different repeater timings to create a wave motion that can propel the player up a number of levels.
| Piston Escalator (view on YouTube) |
|---|
Doors
Base entrance
| Piston Secret entrance (view on YouTube) |
|---|
Compact 3x2 piston door with pressure plates
| 3×2 Piston Door Tutorial (view on YouTube) |
|---|
Simple 2x2 piston door
| 2×2 Piston Door tutorial (view on YouTube) |
|---|
3x3 piston door
| 3x3 piston door (view on YouTube) |
|---|
Simplest 1×2 piston door
Uses 2 pistons to pull out the top and bottom of the door. Put a redstone torch powering each piston and connect them both as inverters. Put a lever on one block with wire on it, build a wall on the front, and it's done!
Another version of a 1x2 piston door can be seen here:
| Simple 1x2 piston door (view on YouTube) |
|---|
3×3 Spiraling Iris door
| 3×3 Spiraling Iris door (view on YouTube) |
|---|
(1.12+) Scalable Piston Door (up to 15×7)
Uses observer blocks for a design that can be easily scaled to any size up to 15 wide and 7 tall. The design is resource efficient enough to allow for the creation of larger doors even in survival mode.
| Scalable Piston Door (view on YouTube) |
|---|
Self-resetting Sand Door
| Self-resetting Sand Door (view on YouTube) |
|---|
Easy To Follow Piston Door Tutorial
| Piston Door Tutorial (view on YouTube) |
|---|
Simplified Redstone circuit for Piston Door
| Simplified Circuit for Piston Door (view on YouTube) |
|---|
Piston Lava Door
A lava door that allows for safe entry to rooms without the player getting burnt, uses pistons, redstone and pressure plates to accomplish this!
| Piston Lava Door (view on YouTube) |
|---|
Fully Hidden Piston Door
This design is fully hidden, no pistons or redstone visible. Also, this design can be activated from both sides, and still, everything will be hidden. The design isn't too complicated and doesn't take up a whole lot of resources either. The only cons are that the ceiling must be 2 blocks high, or you'll have to make the door more complicated. Though, another problem is that the bottom part of the door MUST come out from the floor, not from the sides, or as mentioned earlier, you'll have to make the door more complicated. Not to mention that it'll slow down the process, however, this door is just a little bit slower (around 5 torch delays slower). This design runs smooth on multiplayer servers, and is actually pretty much the main reason to build this, more complicated version - it is easy to change the directions in tunnels, confusing people and they won't see the pistons so they won't realize that the path has been changed. This does make sound though, so make sure they get far away before you activate it, if you don't want them to hear it.
| Fully Hidden Piston Door (view on YouTube) |
|---|
Improved Hidden Piston Door
The improved hidden piston door is a 'flush inset' 2x2 piston door that can be opened through the use of a redstone torch on a wall. PearSquirrel improved this by compacting it and configuring it with pressure plates on the inside.
| Improved Hidden Piston Door (view on YouTube) |
|---|
Smallest 3x3 Piston Door with Slime Blocks
This is a 3x3 piston door using slime blocks in versions Java Edition 1.8 and above. It is the smallest 3x3 piston door to date. It is only 11x8x1 (88 blocks total)!
| 3x3 Hidden Slime Block Piston Door (view on YouTube) |
|---|
2x1 Completely Hidden Seamless Inside and Out In-Wall Piston Door
This is a piston door that cannot be seen on the outside, and no wiring/pistons are exposed when the door is open. The video below includes a demo and how to build it.
| Seamless Hidden In-Wall piston Door (view on YouTube) |
|---|
2x2 Out of Ground Piston Door
This is a secret door with a twist: The blocks aren't being pushed from the sides, they are pushed from the ground and are pushed twice. This design uses a double extender in order to push the blocks 2 up to hide the entrance. Note that this design is space and resource unfriendly, thus you'd get more benefits out of it if you used it in a custom map.
| 2×2 Out-of-Ground Piston Door (view on YouTube) |
|---|
Multiplexing Piston Door
This is a very over complex piston door that has way too many repeaters to be useful at all. It all runs off of a button that is connected to many different small piston doors.
| Multiplexing Piston Door (view on YouTube) |
|---|
Piston Door
You can make doors with pistons and here is the most compact way. You can add a combination to the mechanism.
| Compact Piston Door (view on YouTube) |
|---|
Underground door
| Underground Door (view on YouTube) |
|---|
Hidden Door
For a door that is completely hidden except the lever/pressure plate/button to power it, you can use a piston door. A very simple version is one that just moves 2 blocks to the side with 2 sticky pistons, which are hidden inside a wall and are powered by redstone. To make some more complicated and fancy ones, you can get the blocks to move first away from the player, and then sideways, allowing for 2 wide doors and it also allows you to build it so that the door appears at the middle of a wall, instead of it only being possible to make it either in a corner or in a tunnel of the desired width of the door, because now all the pistons are behind it. You have to do some redstone wiring, though, and if you want to make the door 2 wide it will need at least 12 sticky pistons, 4 to move the blocks into the wall, 4 to move them sideways, and 4 to move the four pistons that moved the blocks sideways sideways. You have to make the delay from the input to the first four pistons, the ones that move the blocks into the wall, 2 ticks. Then split the redstone wires that go to the other 8 pistons; one way has a delay of 1 tick, the other one a delay of 4 ticks. Then after the delays you can join the wires again and bring them to the pistons. To make it more hidden, replace the blocks with bookcases. An example of this can be found below.
| Hidden Door (view on YouTube) |
|---|
If you really want it to be invisible, remove the button or lever, and instead carry a redstone torch. Place it where the button was when you are ready to enter. It will stay open until you exit but hey, who carries those things around randomly anyway?
You can also completely hide your button or lever by putting it underground in a specific place only you know of and once your in it can't be open from the outside. An example of that is below.
| Hidden button/lever (view on YouTube) |
|---|
Simple piston door
Notes:
- The empty squares in Layer 2 should be lit with a torch, otherwise mobs can spawn inside.
- This design can be easily extended to be 3 blocks high - simply place redstone dust on top of the blocks with redstone torches underneath.
Structures
Piston Draw Bridge
A redstone operated "Sticky Piston Draw Bridge" that can be used to cross a lava pit, it also acts as a moat as it can expand and contract to reveal or hide a secret path.
| Sticky Piston Draw Bridge (view on YouTube) |
|---|
Piston Table
By placing an upward-facing piston on top of a redstone torch, one can easily and effectively create a 1x1 table.
An example of a piston table with chairs below!
| Piston Table (view on YouTube) |
|---|
Scrolling Display
This will make a columns of blocks move in sync. Make two rows of a movable material (it can only be 13 blocks long because the piston can only move it that far, can be as tall as you want) and make your image or message built into it. Use pistons to move the blocks across, then back, the across the other way, back to the front/beginning.
Garbage Disposal
By placing a row of three cobble, then on top of it, cobblestone on the left one, and piston (facing right) on the middle one, nothing on the third one and a hole in the ground at the end, one could create a lava garbage disposal. After following those steps, put a lava bucket in the 2 block deep hole at the end, and place a button on the top left block. Unwanted blocks can be 'dropped', using the Q button (by default), onto the top middle block, then, after pushing the button the little blocks will be pushed into the lava. This device does not destroy placed blocks, only dropped icons of blocks. While it does demonstrate concepts of using pistons, and looks cool, this device is not as practical as most other incinerators and garbage disposals, which are much simpler. For example, you could make a small pit of lava and drop items in it manually. After adding a trapdoor, it is a safe efficient way to dispose of unused items. You could also clear out a plus 2 blocks down. Put sand in the center place a cactus and trapdoor and one that if you fall in, you can save yourself.
| Simple Garbage Disposal (view on YouTube) |
|---|
Dry Docks
A dry dock can be made by reversing a Floodgate: instead of controlling the liquid, the player is controlling a solid. Place a piston facing upwards in a 1 block deep pool of water and wire this piston to a lever. When a boat comes over the piston, flip the lever to raise the boat out of the water. This will stop the boat from being influenced by currents or being bumped.
A dry dock with an water powered launcher feature:
| Dry dock with water-powered launcher (view on YouTube) |
|---|
| Simple Dock Tutorial (view on YouTube) |
|---|
As an upgrade, using soul sand for the parts that come in direct contact with the boat will help conserve its durability.
Variable Enchantment Room
This design has three settings - low-level, medium-level, high-level. You can choose a level range depending on how much levels you have.
| Adjustable Enchantment Room (view on YouTube) |
|---|
Self-Repairing Structures
Self-repairing structures use a piston cobblestone generator to endlessly create blocks that get pushed into place by pistons. The following video shows how to create a cobblestone generator, a simple clock and connect it all together to push cobblestone.
| Self repairing bridge (view on YouTube) |
|---|
The following video shows a bigger, self-generating floor. By removing some blocks the same machine can also generate a wall, as shown in the video.
| Self repairing floor (view on YouTube) |
|---|
Self-repairing structures are not limited to cobblestone, however, it is by far the easiest material to manipulate as its generation can be fully automated.
Pistons can only push 12 blocks which limits the scale of the structure. Pistons cannot push chests, note blocks, obsidian, bedrock, spawners, or furnaces, so these can be used to stop a line of blocks before the 12 block limit is reached.
Moving vehicles/machines
Moving vehicles are a result of Java Edition 1.8 adding the capability to slime blocks and pistons, allowing adjacent blocks to attach to the slime block. How to make moving vehicles. You will need 2 sticky pistons, 1 regular piston, 4 slime blocks and a redstone block. Go four blocks above ground and place a sticky piston, then put a slime block in front of that, go two down (underneath the piston) and on the second block put a regular piston and finally, put a sticky piston in front of the regular piston as showed.
Traps
Disappearing Floor Trap
When triggered, the section of the floor will be withdrawn from below the target. This design is best used inside to hide the pistons and circuitry. This can easily be added to a tunnel. Under the floor, dig out a 2-block deep pit for each of the trap blocks you want to move. Mine out two blocks horizontally from each space where the trap floor will go and put a sticky piston at the back of each hole. In front of the sticky piston, replace the floor blocks (make sure that the trap block is the same as the regular floor blocks so as not to cause suspicion. In the space beneath the floor can be a long drop, lava, dispensers filled with arrows. For simplicity, we chose lava.
The floor trap when the pistons are activated. Players who activate the pressure plate often have no time to react.
Triggering this is best done with a pressure plate, however, this can be difficult to hide from other players. You will need to wire the pressure plate to the input of a NOT-gate and the pistons to the output. A delay can be helpful to ensure the player is over the right blocks when the trap triggers, which can be accomplished by putting in redstone repeaters. Stone pressure plates will only trigger when players or mobs walk over, whereas wooden pressure plates trigger also for dropped items. Metal pressure plates act differently still. This trap will be reset once the signal from the pressure plates is disabled.
Alternatively, the pistons could be connected to a lever. This requires input from the player, but can be activated when the target is above the trap, which removes the need for a delay.
You could also use sand or gravel to make a refillable trap, as well. Make sure to hide the refilling station for secrecy!
If you think this is bad, feel free to revert to the previous "version".
Simple Floor Trap Tutorial!!
| Simple Floor Trap Tutorial (view on YouTube) |
|---|
Hidden Bridges
Like disappearing floors, but in reverse, hidden bridges show an impassible obstacle (usually lava or a long fall) to hinder other players or kill mobs. These bridges can be activated by lever to allow a player to cross, then deactivated on the other side or by a set delay, done by placing redstone repeaters and setting the second redstone torch to any four positions (Right clicking it). Adding multiple repeaters can make a longer delay if necessary.
Suffocation Trap
When a piston moves a block into the same space, as the head of a mob or the player, the entity takes damage from suffocation. Tunnels work well for this type of trap because the area is small and can hide the components.
In a tunnel, mine out the ceiling an additional two blocks high. At the top of every part of the tunnel, place a sticky piston, then replace the ceiling with the same material used in the tunnel. This trap can be triggered in a number of ways, the simplest being a pressure plate or lever. If you choose to use a lever, this trap can also act as a door, since aggressive non-baby mobs won't be able to enter. For this example, we'll use a pressure plate.
Since players are pushed into the nearest air pocket to avoid suffocation, the trigger should be in the middle of a series. To ensure the trap doesn't reset too early, add an RS-NOR latch that is either reset manually or by an automatic delay.
You can also make a piston door, mine two blocks down and place a slab on the bottom block(s), so the thief or griefer who activates it can't escape, but can still be suffocated.
Floodgate
One of the piston's most important uses is its ability to stop fluids. A floodgate is a device that does just that. Fluids don't destroy pressure plates, which makes them ideal for triggering this trap. In a tunnel, have a pressure plate activate an RS-NOR latch that blocks the player into that tunnel, which will also minimize other damage caused by the fluid. From the same output, have the floodgates open, dropping lava on the target.
Storage
Hidden Chest/Store Room
A redstone operated "Sticky Piston Hidden Room" that is ideally big enough to hold a large chest, furnace and a crafting table, easily hidden, but very bulky, remove lever to leave just a bare wall!
Easy To Follow Tutorial
| Hidden Chest/Storeroom (view on YouTube) |
|---|
Farming
To see the uses of pistons in farming, see the respective farming tutorial.
Redstone Circuits
Light Switches
Pistons can be used to cover and uncover holes with light sources. This can be triggered by a lever or a button on a T flip-flop.
Players tend to use glowstone for lighting, however, lava is another viable method. A lava light uses an opaque block to hold the source block of lava from the area it will flow into (generally a glass tube). Since lava can flow, it can be a very space efficient light source. However, lava takes a long time to dissipate. If you need to flip a switch for immediate darkness, flowing lava lamps are not recommended. However, you may want to consider using a redstone lamp, as it tends to be more resource friendly.
Since light levels affect mob spawning, light switches can activate and deactivate a mob farm.
| Light Switch Tutorial 1 (view on YouTube) |
|---|
| Light Switch Tutorial 2 (view on YouTube) |
|---|
Caution: This video uses the piston mod, which was released before it was implemented in the game. They function identically though.
Mining
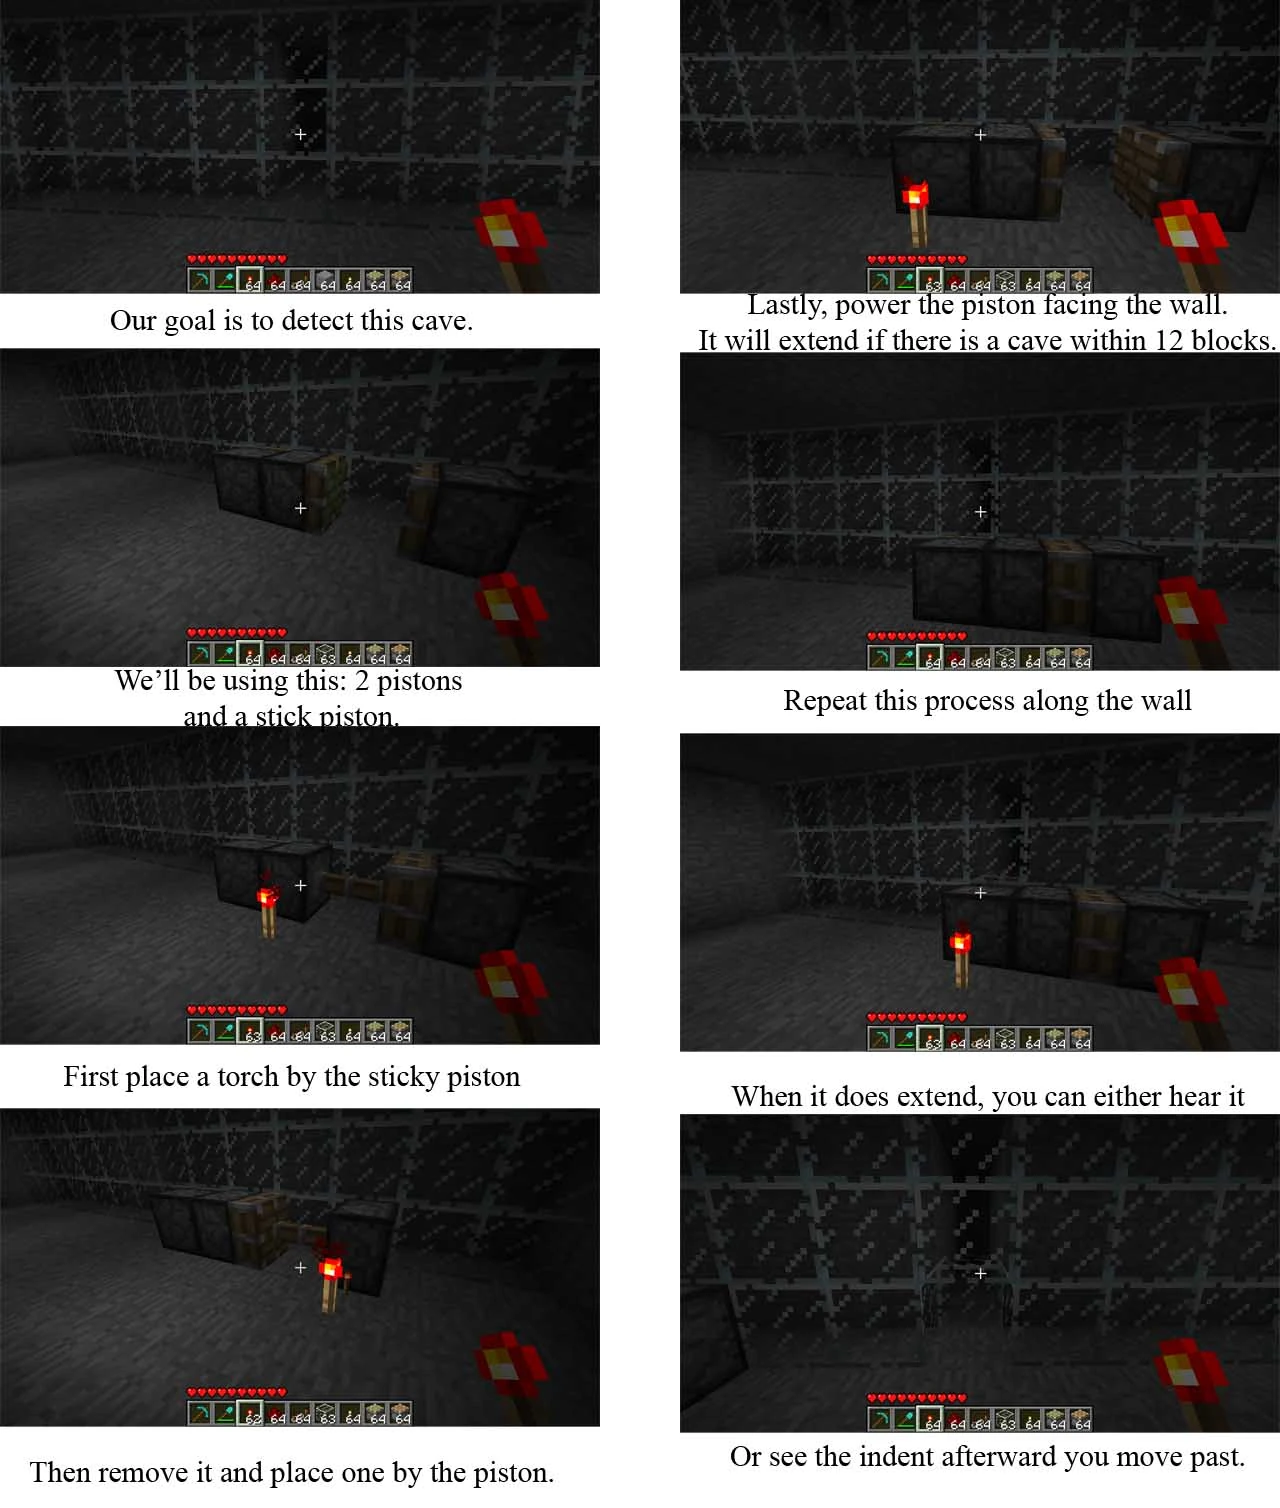
To speed things up, a player can use an additional piston, a sticky piston and a redstone torch (2 or 3 is preferred) to move the testing piston.
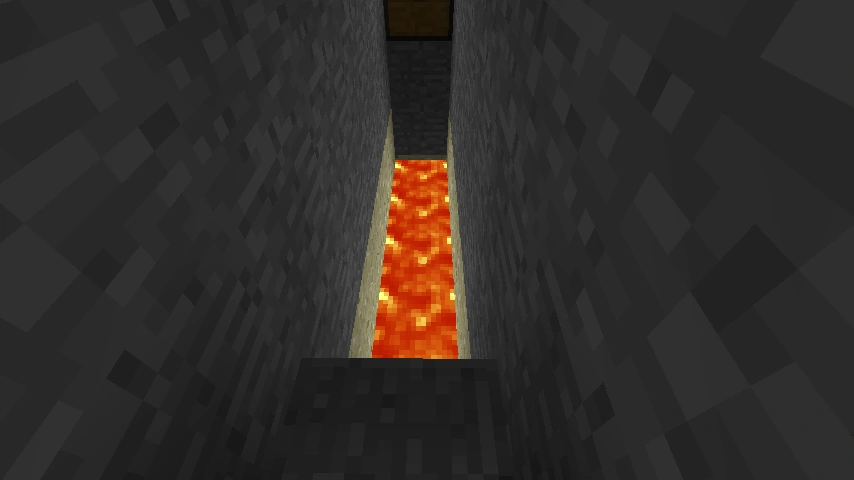
Pistons can be used to locate caves through solid rock. In order to do so, one places the piston on the ground facing the ground, on the ceiling facing the ceiling, or facing straight into any wall. The piston is then powered. If the piston extends, it indicates an opening within 12 blocks. If it does not extend, then there are at least 12 blocks in that direction. This allows a player to find caves from nothing more than a 2x2 tunnel.
The effectiveness of this technique is limited. Close caves will have sounds (either mobs or ambient sounds) to indicate whether or not a cave is nearby. The limit of 12 blocks can also hinder this method.
A variation can be used in a 1x2 passage,
| in a 1×2 passage (view on YouTube) |
|---|
is a video of it in action. The basic idea is the same except the torches are placed on the wall above the pistons, and you use a piston facing to each side not just one. There are only 2 positions you place torches in, above the side-facing piston which is touching the sticky piston, and above the forward facing piston. As they are wall mounted, placing the torch above the side-facing piston powers both side-facing pistons as well as the sticky piston, saving time.
Other devices
Minecart Direction Shifter
This small device is a shifter for minecart tracks. Using this device, you can choose to ride your minecart AFK or switch tracks at will.
Showcase: Track Switcher
Locking Chests
A chest with an opaque block above it cannot be opened. A sticky piston can be used to replace or remove that block, effectively locking the chest and its contents. Note that chests themselves cannot be moved by pistons. This can be combined with a combination lock for added security.
There is a disadvantage, though, griefers or theifs may just break the block protecting the chest or the chest itself.
| Example of a locking chest. (view on YouTube) |
|---|
Tutorial for a locking chest below!
| Tutorial for Locking Chest (view on YouTube) |
|---|
Free standing self-refilling anvil system Flush with floor!
This video showcases an anvil setup for easy access. It is huge, but flush with the floor and easily usable. Anvil system
Modular Button Speedlock using Pistons
This video showcases a Modular Button speedlock, in which you have to press the buttons in a limited time and a very weird way, in order to open the door. Button speedlock
Upgrade system for Minigames
In this video, the creator shows an easy design for an upgrade system with various uses in minigames or adventure maps.
| Upgrade System (view on YouTube) |
|---|
Tileable upwards 1 wide double extender
This video showcases a small tileable horizontal double extender in this design everything but the input is flush as well.
| Tileable upwards 1 wide double extender (view on YouTube) |
|---|
Tileable ceiling double extender
Here we have a tileable ceiling double extender.
| Tileable Ceiling Double Extender (view on YouTube) |
|---|
1 wide Double extender (downwards)
This is a Double extender. This time its directed downwards.
| 10BITable's downward double extender (view on YouTube) |
|---|
1 Wide Horizontal Double Piston Extender
Here we have a very small Double extender, which is horizontal and directed upwards.
| 10BITable's upward double extender (view on YouTube) |
|---|
1 wide tileable infinitely expandable downward transmission
Of course, downward transmission is rather easy, but using this design, you can place the output at any place.
| Tilable downward transmission (view on YouTube) |
|---|
EmbedVideo received the bad id "sYadO5CbKLg&lc=rzrh6Kj6lDtLXxh2hYH1B90qUtnrTt6rhUB5ym" for the service "youtube".
|
Lamp-BUD designs
Here we have a tutorial for different Lamp-BUDs.
| Lamp-BUD design tutorial (view on YouTube) |
|---|
JPE (Jesabel Piston Engine)
This is a machine that moves any block back and forth that runs on a repeating loop. It is started by pressing a button, but can also turn sand back into item form when it is stacked between the pistons.
| Jesabel Piston Engine (view on YouTube) |
|---|
Making Sand Produce Light!
First, attach a lever to a not gate.
L = Lever B = Block R = Redstone T = Redstone Torch
Side View: LBRBT
Then, attach it to a Redstone Clock.
P = Repeater A = Air
Top View:
BRR
TPR
AAR
Note: The redstone repeater is facing the redstone on the right. It must be set to two ticks.
On top of the torch, put a piston and then sand.
I = Piston S = Sand
Side View:
S
I
When you activate the lever, the sand will go up and down. It will glow. What's more, when the game starts to lag, remove the piston and the sand will still float.