m (→Item models) |
m (Undo revision 1859996 by 177.239.33.105 (talk)) Tag: Undo |
||
| (One intermediate revision by one other user not shown) | |||
Revision as of 23:34, 25 February 2021
Block models are used to depict all the blocks in the game, whereas item models are used to display the items in the players hand, on their head (helmets and hats), on the ground, in the inventory, in item frames and on armor stands. As there are different variants of some blocks, block states are used to link these with the corresponding models. Each model and each block state has its own file, which is of the .json format. Even the icons used in the inventory are defined in these files.
File path
In JSON files of models and block states, the namespaced ID in the form of namespace:name (the namespace minecraft: can be omitted) is used to represent the local file path. See also Namespaced ID#Locating contents in packs.
In these files, the path corresponding to the namespaced ID namespace:name is assets/namespace/object_type/name.suffix, where the name can contain subfolders separated by /, such as namespace:foo/bar/baz (foo and bar are folders, baz is the real file name).
The object specified by namespaced ID and its corresponding object_type and suffix are as follows:
| Object | object_type substitution |
suffix substitution
|
|---|---|---|
| Block States | blockstates | json |
| Models | models | json |
| Textures | textures | png |
Block states
There are several different variants of some blocks (like doors, which can be open or closed), hence each block has its own block state file, which lists all its existing variants and links them to their corresponding models. Blocks can also be compound of several different models at the same time, called "multipart". The models are then used depending on the block states of the block.
These files are stored in the following folder: assets/<namespace>/blockstates. The files are used directly based on their filename, thus a block state file with another name than the existing ones does not affect any block.
- The root tag
- variants: Holds the names of all the variants of the block.
- or A variant: Name of a variant, which consists of the relevant block states separated by commas. A block with just one variant uses
""as a name for its variant. Each variant can have one model or an array of models and contains their properties. If set to an array, the model is chosen randomly from the options given, with each option being specified in separate subsidiary -tags. Item frames are treated as blocks and use"map=false"for a map-less item frame, and"map=true"for item frames with maps.- A model: Contains the properties of a model, if more than one model is used for the same variant. All specified models alternate in the game.
- model: Specifies the path to the model file of the block, in form of namespaced ID.
- x: Rotation of the model on the x-axis in increments of 90 degrees.
- y: Rotation of the model on the y-axis in increments of 90 degrees.
- uvlock: Can be
trueorfalse(default). Locks the rotation of the texture of a block, if set totrue. This way the texture does not rotate with the block when using the x and y-tags above. - weight: Sets the probability of the model for being used in the game, defaults to 1 (=100%). If more than one model is used for the same variant, the probability is calculated by dividing the individual model's weight by the sum of the weights of all models. (For example, if three models are used with weights 1, 1, and 2, then their combined weight would be 4 (1+1+2). The probability of each model being used would then be determined by dividing each weight by 4: 1/4, 1/4 and 2/4, or 25%, 25% and 50%, respectively.)
- model: Specifies the path to the model file of the block, in form of namespaced ID.
- x: Rotation of the model on the x-axis in increments of 90 degrees.
- y: Rotation of the model on the y-axis in increments of 90 degrees.
- uvlock: Can be
trueorfalse(default). Locks the rotation of the texture of a block, if set totrue. This way the texture does not rotate with the block when using the x and y-tags above.
- A model: Contains the properties of a model, if more than one model is used for the same variant. All specified models alternate in the game.
- or A variant: Name of a variant, which consists of the relevant block states separated by commas. A block with just one variant uses
- multipart: Used instead of variants to combine models based on block state attributes.
- A case Determines a case and the model that should apply in that case.
- when: A list of cases that have to be met for the model to be applied. If unset, the model always applies.
- OR: Matches if any of the contained cases return true. Cannot be set alongside other cases.
- A condition A list of cases that all have to match the block to return true.
- State Name of a block state. A single case that has to match one of the block states. It can be set to a list separated by
|to allow multiple values to match.
- State Name of a block state. A single case that has to match one of the block states. It can be set to a list separated by
- A condition A list of cases that all have to match the block to return true.
- State Name of a block state. A single case that has to match one of the block states. It can be set to a list separated by
|to allow multiple values to match. Cannot be set alongside the OR-tag.
- OR: Matches if any of the contained cases return true. Cannot be set alongside other cases.
- apply: Determines the model(s) to apply and its properties. There can be one model or an array of models. If set to an array, the model is chosen randomly from the options given, with each option being specified in separate subsidiary -tags.
- A model: Contains the properties of a model, if more than one model is used for the same variant. All specified models alternate in the game.
- model: Specifies the path to the model file of the block, in form of namespaced ID.
- x: Rotation of the model on the x-axis in increments of 90 degrees.
- y: Rotation of the model on the y-axis in increments of 90 degrees.
- uvlock: Can be
trueorfalse(default). Locks the rotation of the texture of a block, if set totrue. This way the texture does not rotate with the block when using the x and y-tags above. - weight: Sets the probability of the model for being used in the game, defaults to 1 (=100%). If more than one model is used for the same variant, the probability is calculated by dividing the individual model's weight by the sum of the weights of all models. (For example, if three models are used with weights 1, 1, and 2, then their combined weight would be 4 (1+1+2). The probability of each model being used would then be determined by dividing each weight by 4: 1/4, 1/4 and 2/4, or 25%, 25% and 50%, respectively.)
- model: Specifies the path to the model file of the block, in form of namespaced ID.
- x: Rotation of the model on the x-axis in increments of 90 degrees.
- y: Rotation of the model on the y-axis in increments of 90 degrees.
- uvlock: Can be
trueorfalse(default). Locks the rotation of the texture of a block, if set totrue. This way the texture does not rotate with the block when using the x and y-tags above.
- A model: Contains the properties of a model, if more than one model is used for the same variant. All specified models alternate in the game.
- when: A list of cases that have to be met for the model to be applied. If unset, the model always applies.
- A case Determines a case and the model that should apply in that case.
- variants: Holds the names of all the variants of the block.
"uvlock": true
|
"uvlock": false
|
|
|
Example: Wall Torch
The wall torch has several variants: It can be placed at a wall facing in four different directions. This example is taken from the file wall_torch.json, which can be found at assets/minecraft/blockstates.
- wall_torch.json
{
    "variants": {
        "facing=east": { "model": "block/wall_torch" },
        "facing=south": { "model": "block/wall_torch", "y": 90 },
        "facing=west": { "model": "block/wall_torch", "y": 180 },
        "facing=north": { "model": "block/wall_torch", "y": 270 }
    }
}
A torch can be placed on all four sides of a block and therefore needs four different variants, one for each side. These are called "facing=east", "facing=west", "facing=south" and "facing=north". All four variants use "block/wall_torch" as their model, which is rotated by a multiple of 90 degrees around the "y" axis to align with the different sides of the block they are placed on.
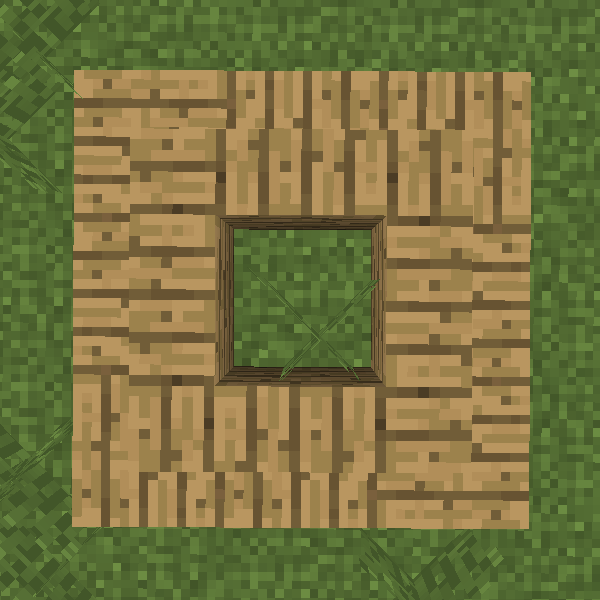
Example: Grass Block
The grass block has two variants, whereby the first one holds four different models. This example is taken from the file grass_block.json, which can be found at assets/minecraft/blockstates.
- grass_block.json
{
    "variants": {
        "snowy=false": [
            { "model": "block/grass_block" },
            { "model": "block/grass_block", "y": 90 },
            { "model": "block/grass_block", "y": 180 },
            { "model": "block/grass_block", "y": 270 }
        ],
        "snowy=true":  { "model": "block/grass_block_snow" }
    }
}
The non-snow-covered grass block ("snowy=false") holds four models, which all use the same block model, but each one is rotated by a multiple of 90 degrees. As there are four models and the weight-tag is not used for any of them, each one has a chance of 25% to be used every time a block is placed.
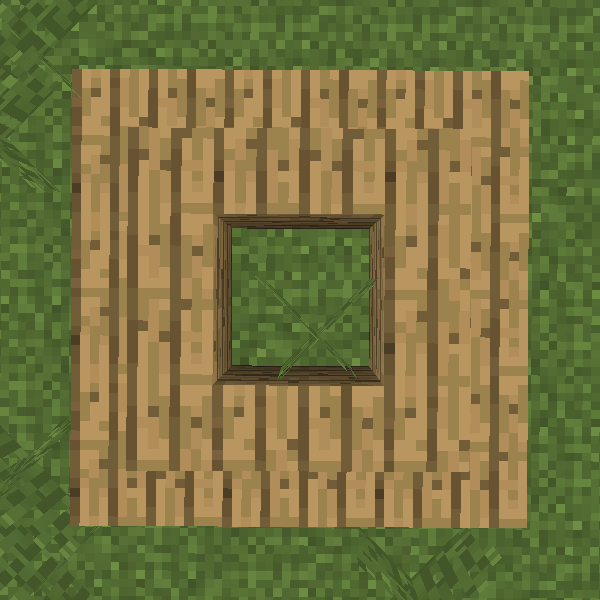
Example: Oak Fence
The oak fence uses the multipart format. This example is taken from oak_fence.json in assets/minecraft/blockstates.
- oak_fence.json
{
    "multipart": [
        {   "apply": { "model": "block/oak_fence_post" }},
        {   "when": { "north": "true" },
            "apply": { "model": "block/oak_fence_side", "uvlock": true }
        },
        {   "when": { "east": "true" },
            "apply": { "model": "block/oak_fence_side", "y": 90, "uvlock": true }
        },
        {   "when": { "south": "true" },
            "apply": { "model": "block/oak_fence_side", "y": 180, "uvlock": true }
        },
        {   "when": { "west": "true" },
            "apply": { "model": "block/oak_fence_side", "y": 270, "uvlock": true }
        }
    ]
}
While the first model, the fence post, is always used, the other models are used only if certain conditions are met. Here the sides of the fence are applied only if there is another adjacent block next to this one. As there is just one model for the post and another one for all the sides of the fence, which then is rotated by increments of 90 degrees, the amount of models needed for all the different possible set-ups of fences can be reduced to two. Compared to the five models and 16 variants used in Java Edition 1.8, this is a rather big improvement. This tool helps to edit JSON data JSON Parser and you can also use Json validator.
Example: Redstone Wire
The redstone wire model uses the multipart format. This example is taken from redstone_wire.json in assets/minecraft/blockstates
- redstone_wire.json
{
    "multipart": [
        {   "when": { "OR": [
                {"north": "none", "east": "none", "south": "none", "west": "none"},
                {"north": "side|up", "east": "side|up" },
                {"east": "side|up", "south": "side|up" },
                {"south": "side|up", "west": "side|up"},
                {"west": "side|up", "north": "side|up"}
            ]},
            "apply": { "model": "block/redstone_dust_dot" }
        },
        {   "when": { "OR": [
                { "north": "side|up" },
                { "north": "none", "east": "none", "south": "side|up", "west": "none" }
            ]},
            "apply": { "model": "block/redstone_dust_side0" }
        },
        {   "when": { "OR": [
                { "south": "side|up" },
                { "north": "side|up", "east": "none", "south": "none", "west": "none" }
            ]},
            "apply": { "model": "block/redstone_dust_side_alt0" }
        },
        {   "when": { "OR": [
                { "east": "side|up" },
                { "north": "none", "east": "none", "south": "none", "west": "side|up" }
            ]},
            "apply": { "model": "block/redstone_dust_side_alt1", "y": 270 }
        },
        {   "when": { "OR": [
                { "west": "side|up" },
                { "north": "none", "east": "side|up", "south": "none", "west": "none" }
            ]},
            "apply": { "model": "block/redstone_dust_side1", "y": 270 }
        },
        {   "when": { "north": "up" },
            "apply": { "model": "block/redstone_dust_up" }
        },
        {   "when": { "east": "up" },
            "apply": { "model": "block/redstone_dust_up", "y": 90 }
        },
        {   "when": { "south": "up" },
            "apply": { "model": "block/redstone_dust_up", "y": 180 }
        },
        {   "when": { "west": "up" },
            "apply": { "model": "block/redstone_dust_up", "y": 270 }
        }
    ]
}
This model is dynamically created. With the first condition, it is determining cases where the redstone_dust_dot model should be added, which requires either all of the four sides being set to "none", or any two sides that form a corner both being set either to up or side.
The last case tests only one condition, which asks if "west" is set to "up", and if so it applies the model redstone_dust_up.
Block models
The folder assets/<namespace>/models/block holds the model files for all the specified variants. The names of the files can be changed, but must always correspond with the names used in the variant files.
- The root tag
- parent: Loads a different model from the given path, in form of namespaced ID. If both
"parent"and"elements"are set, the"elements"tag overrides the"elements"tag from the previous model.- Can be set to
"builtin/generated"to use a model that is created out of the specified icon. Note that only the first layer is supported, and rotation can be achieved only by using block states files.
- Can be set to
- ambientocclusion: Whether to use ambient occlusion (
true- default), or not (false). - display: Holds the different places where item models are displayed.
- Position: Named
thirdperson_righthand,thirdperson_lefthand,firstperson_righthand,firstperson_lefthand,gui,head,ground, orfixed. Place where an item model is displayed. Holds its rotation, translation and scale for the specified situation. fixed refers to item frames, while the rest are as their name states. Note that translations are applied to the model before rotations.- rotation: Specifies the rotation of the model according to the scheme
[x, y, z]. - translation: Specifies the position of the model according to the scheme
[x, y, z]. If the value is greater than 80, it is displayed as 80. If the value is less than -80, it is displayed as -80. - scale: Specifies the scale of the model according to the scheme
[x, y, z]. If the value is greater than 4, it is displayed as 4.
- rotation: Specifies the rotation of the model according to the scheme
- Position: Named
- textures: Holds the textures of the model, in form of namespaced ID or can be another texture variable.
- particle: What texture to load particles from. This texture is used if you are in a nether portal. Note: All breaking particles from non-model blocks are hard-coded.
- Texture variable: Defines a texture variable and assigns a texture.
- elements: Contains all the elements of the model. They can have only cubic forms. If both
"parent"and"elements"are set, the"elements"tag overrides the"elements"tag from the previous model.- An element.
- from: Start point of a cube according to the scheme
[x, y, z]. Values must be between -16 and 32. - to: Stop point of a cube according to the scheme
[x, y, z]. Values must be between -16 and 32. - rotation: Defines the rotation of an element.
- origin: Sets the center of the rotation according to the scheme
[x, y, z]. - axis: Specifies the direction of rotation, can be
"x","y"or"z". - angle: Specifies the angle of rotation. Can be 45 through -45 degrees in 22.5 degree increments.
- rescale: Specifies whether or not to scale the faces across the whole block. Can be true or false. Defaults to false.
- origin: Sets the center of the rotation according to the scheme
- shade: Defines if shadows are rendered (
true- default), not (false). - faces: Holds all the faces of the cube. If a face is left out, it does not render.
- Face: Named
down,up,north,south,westoreast. Contains the properties of the specified face.- uv: Defines the area of the texture to use according to the scheme
[x1, y1, x2, y2]. If unset, it defaults to values equal to xyz position of the element. The texture behavior is inconsistent if UV extends below 0 or above 16. If the numbers ofx1andx2are swapped (e.g. from0, 0, 16, 16to16, 0, 0, 16), the texture flips. UV is optional, and if not supplied it automatically generates based on the element's position. - texture: Specifies the texture in form of the texture variable prepended with a
#. - cullface: Specifies whether a face does not need to be rendered when there is a block touching it in the specified position. The position can be:
down,up,north,south,west, oreast. It also determines the side of the block to use the light level from for lighting the face, and if unset, defaults to the side. - rotation: Rotates the texture by the specified number of degrees. Can be 0, 90, 180, or 270. Defaults to 0. Rotation does not affect which part of the texture is used. Instead, it amounts to permutation of the selected texture vertexes (selected implicitly, or explicitly though
uv). - tintindex: Determines whether to tint the texture using a hardcoded tint index. The default is not using the tint, and any number causes it to use tint. Note that only certain blocks have a tint index; all others are unaffected.
- uv: Defines the area of the texture to use according to the scheme
- Face: Named
- from: Start point of a cube according to the scheme
- An element.
- parent: Loads a different model from the given path, in form of namespaced ID. If both
Example: Standing Torch
For simplicity, this example describes only the standing torch, which is defined in the files torch.json and template_torch.json stored in the folder assets/minecraft/models/block.
- template_torch.json
{
   "ambientocclusion": false,
   "textures": {
       "particle": "#torch"
   },
   "elements": [
       {   "from": [ 7, 0, 7 ],
           "to": [ 9, 10, 9 ],
           "shade": false,
           "faces": {
               "down": { "uv": [ 7, 13, 9, 15 ], "texture": "#torch" },
               "up":   { "uv": [ 7,  6, 9,  8 ], "texture": "#torch" }
           }
       },
       {   "from": [ 7, 0, 0 ],
           "to": [ 9, 16, 16 ],
           "shade": false,
           "faces": {
               "west": { "uv": [ 0, 0, 16, 16 ], "texture": "#torch" },
               "east": { "uv": [ 0, 0, 16, 16 ], "texture": "#torch" }
           }
       },
       {   "from": [ 0, 0, 7 ],
           "to": [ 16, 16, 9 ],
           "shade": false,
           "faces": {
               "north": { "uv": [ 0, 0, 16, 16 ], "texture": "#torch" },
               "south": { "uv": [ 0, 0, 16, 16 ], "texture": "#torch" }
           }
       }
   ]
}
This file is used to create the model of the torch, which is used for the normal, redstone torch and the soul fire torch. Therefore, the "elements" tag is used to create three elements or cubes. Only two faces of each cube are rendered, as only two faces of each one have been specified. "uv" is used to determine the area where the texture is used. The texture variable "#torch" is used for the particles and the cubes and has not yet been defined.
- torch.json
{
   "parent": "block/template_torch",
   "textures": {
       "torch": "block/torch"
   }
}
This file represents the model of the normal standing torch. It loads the model of previously defined standing torch with the help of "parent" and inherits all the properties of the file torch.json. As this file is used only for the normal torch, the texture can now be specified. The texture"torch" is now assigned to the texture variable "torch" (in form of namespaced ID) and therefore is used for the previously loaded model and its particles, as specified in the other file.
Example: Any Block
This example describes the fundamental structure of most normal blocks in Minecraft. All these blocks use the same basic model and apply their texture to it, as already described in the example above. This model is defined in the file cube.json, which can be found in the folder assets/minecraft/models/block.
- cube.json
{
  "elements": [
    {
      "from": [ 0, 0, 0 ],
      "to": [ 16, 16, 16 ],
      "faces": {
        "down":  { "texture": "#down", "cullface": "down" },
        "up":    { "texture": "#up", "cullface": "up" },
        "north": { "texture": "#north", "cullface": "north" },
        "south": { "texture": "#south", "cullface": "south" },
        "west":  { "texture": "#west", "cullface": "west" },
        "east":  { "texture": "#east", "cullface": "east" }
      }
    }
  ]
}
Features that have already been described above are not discussed further. The use of "cullface": "down" prevents the bottom face of the block from being rendered, if there is another adjacent block underneath it. The same applies to all the other faces of the block.
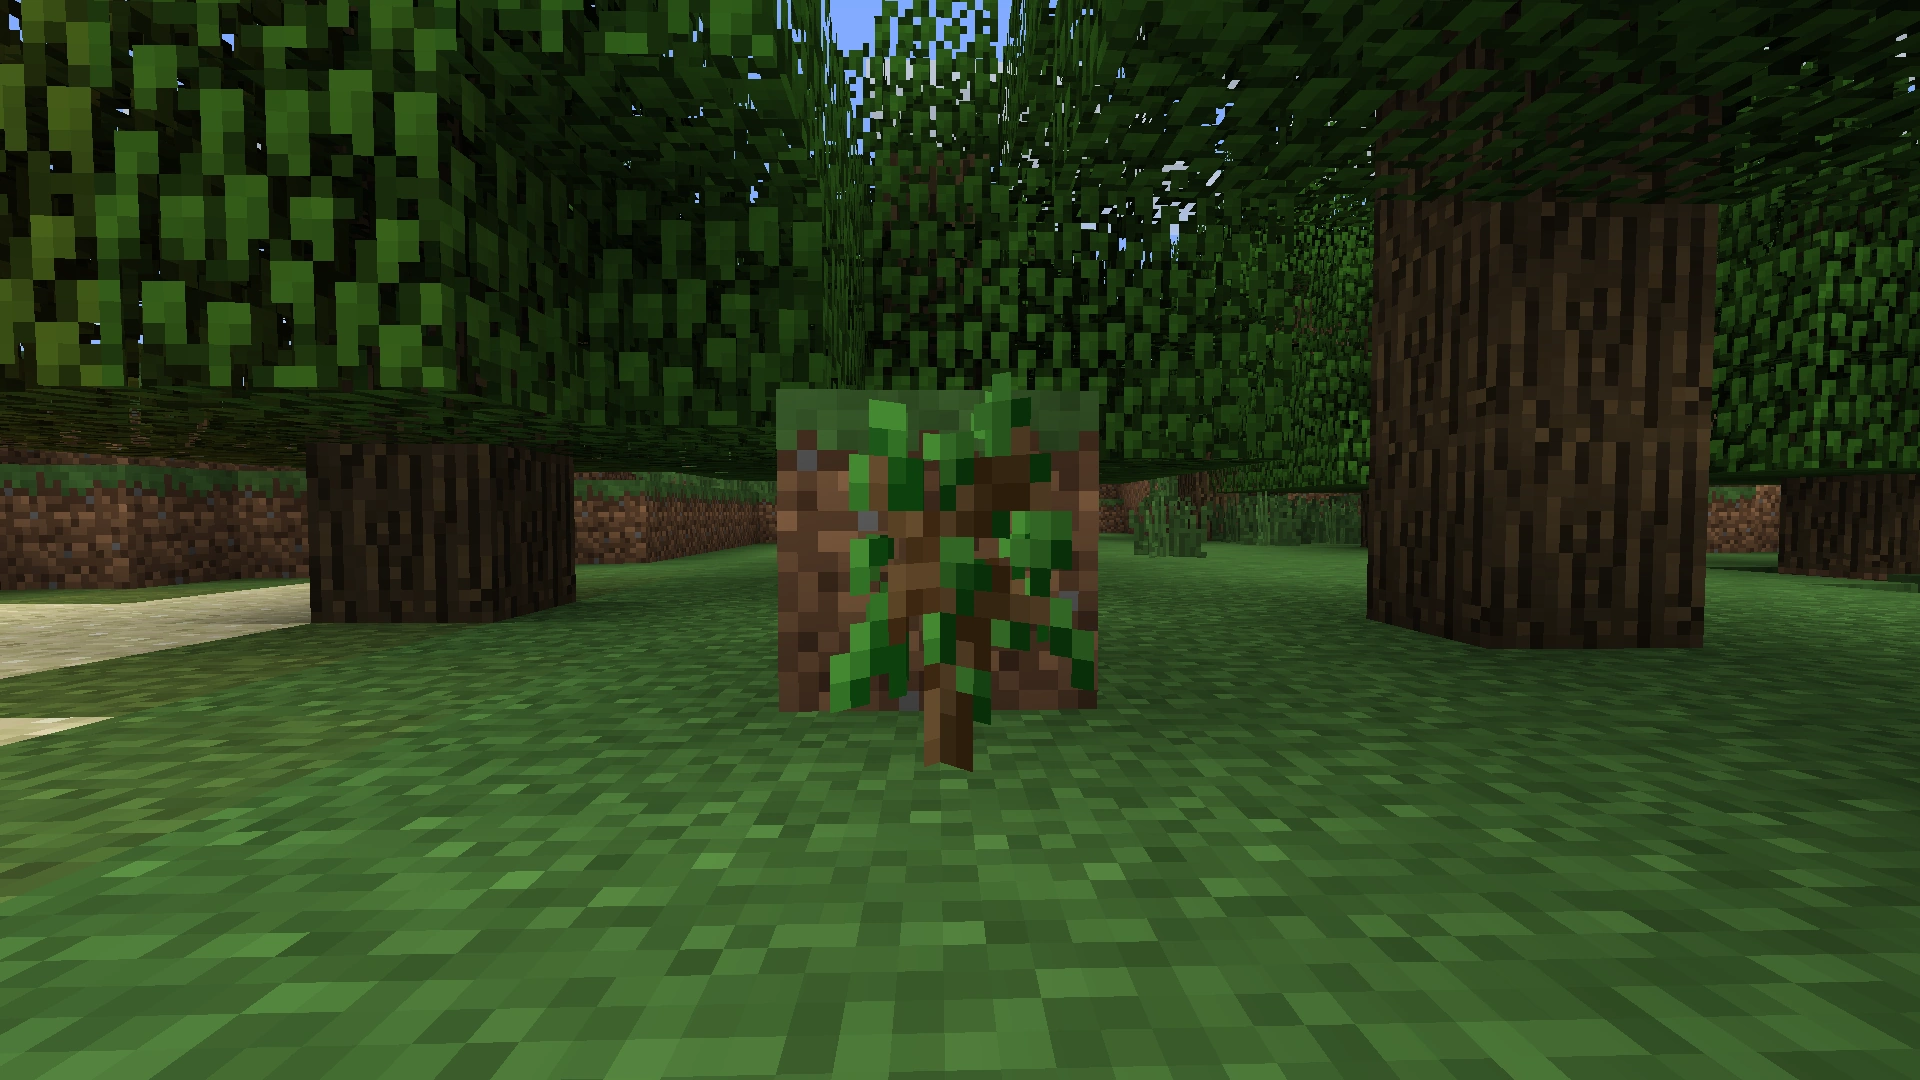
Example: Sapling
This example describes the fundamental structure used by all saplings, without assigning a specific texture. The model is specified in cross.json, the texture would e.g. be assigned in oak_sapling.json. Both files are stored in the folder assets/minecraft/models/block.
- cross.json
{
  "ambientocclusion": false,
  "textures": {
    "particle": "#cross"
  },
  "elements": [
    {
      "from": [ 0.8, 0, 8 ],
      "to": [ 15.2, 16, 8 ],
      "rotation": { "origin": [ 8, 8, 8 ], "axis": "y", "angle": 45, "rescale": true },
      "shade": false,
      "faces": {
        "north": { "uv": [ 0, 0, 16, 16 ], "texture": "#cross" },
        "south": { "uv": [ 0, 0, 16, 16 ], "texture": "#cross" }
      }
    },
    {
      "from": [ 8, 0, 0.8 ],
      "to": [ 8, 16, 15.2 ],
      "rotation": { "origin": [ 8, 8, 8 ], "axis": "y", "angle": 45, "rescale": true },
      "shade": false,
      "faces": {
        "west": { "uv": [ 0, 0, 16, 16 ], "texture": "#cross" },
        "east": { "uv": [ 0, 0, 16, 16 ], "texture": "#cross" }
      }
    }
  ]
}
To create the usual shape of the saplings, both elements are being rotated by 45 degrees. Therefore, the origin and the axis of rotation are set to the specified values, the angle is set to 45 degrees and "rescale" is set to true. The latter causes the model to be scaled on the axes it has not been rotated on, so that it takes up the same space as it did before rotating it (see comparison images).
"rescale": true
|
"rescale": false
|

|
|
Examples: Condensing multiple textures into one file
Using the "uv" compound, textures can be read from one file and parts of the file can be used for each side of the block. "uv" doesn't take the pixels of the file, it instead takes percentages of the file in terms of 16; for example taking the top half of a file uses "uv": [0,0, 16,8]: from the coordinates ([0% of 16], [0% of 16]) – (0,0) – which is the top-left pixel, and ends at ([100% of 16], [50% of 16]) – (16,8), which is the middle-right pixel. Because this works in percentages, resizing an image from 16×16 to 32×32, 64×64, etc., does not require changing the model file.

In this example, a fletching table is used (see image) with combined textures (in this example, saved as fletching_table.png): the top 16×16 pixels (if each of the textures are 32×32, etc., then the top 32×32, etc., textures are taken using the same code) textures the top of the block, the center 16×16 textures the front and back, and the bottom 16×16 textures the other sides. The bottom texture is birch_planks. For three textures, this code can be used:
{
    "parent": "block/cube",
    "textures": {
        "particle": "block/fletching_table",
        "all": "block/fletching_table",
        "bottom": "block/birch_planks"
    },
    "elements": [
        {
           "from": [ 0, 0, 0 ],
            "to": [ 16, 16, 16 ],
            "faces": {
                "down":  { "texture": "#bottom", "cullface": "down" },
                "up":    { "uv": [0,0, 16,5.34], "texture": "#all", "cullface": "up" },
                "north": { "uv": [0,5.35, 16,10.66], "texture": "#all", "cullface": "north" },
                "south": { "uv": [0,5.35, 16,10.66], "texture": "#all", "cullface": "south" },
                "west":  { "uv": [0,10.67, 16,16], "texture": "#all", "cullface": "west" },
                "east":  { "uv": [0,10.67, 16,16], "texture": "#all", "cullface": "east" }
            }
        }
    ]
}

In this example, only two textures are condensed into one file, in this case for a bone block. For two textures, this code can be used:
{
    "parent": "block/cube",
    "textures": {
        "particle": "block/bone_block",
        "all": "block/bone_block"
    },
    "elements": [
        {
           "from": [ 0, 0, 0 ],
            "to": [ 16, 16, 16 ],
            "faces": {
                "down":  { "uv": [0,0, 16,8], "texture": "#all", "cullface": "down" },
                "up":    { "uv": [0,0, 16,8], "texture": "#all", "cullface": "up" },
                "north": { "uv": [0,8, 16,16], "texture": "#all", "cullface": "north" },
                "south": { "uv": [0,8, 16,16], "texture": "#all", "cullface": "south" },
                "west":  { "uv": [0,8, 16,16], "texture": "#all", "cullface": "west" },
                "east":  { "uv": [0,8, 16,16], "texture": "#all", "cullface": "east" }
            }
        }
    ]
}

In this example, four textures are condensed into one file, in this case for a barrel. For four textures, this code can be used:
{
    "parent": "block/cube",
    "textures": {
        "particle": "block/barrel",
        "all": "block/barrel"
    },
    "elements": [
        {
           "from": [ 0, 0, 0 ],
            "to": [ 16, 16, 16 ],
            "faces": {
                "down":  { "uv": [8,8, 16,16], "texture": "#all", "cullface": "down" },
                "up":    { "uv": [8,0, 16,8], "texture": "#all", "cullface": "up" },
                "north": { "uv": [0,8, 8,16], "texture": "#all", "cullface": "north" },
                "south": { "uv": [0,8, 8,16], "texture": "#all", "cullface": "south" },
                "west":  { "uv": [0,8, 8,16], "texture": "#all", "cullface": "west" },
                "east":  { "uv": [0,8, 8,16], "texture": "#all", "cullface": "east" }
            }
        }
    ]
}
Item models
As items do not have different variants, there is no need to specify them. The folder assets/<namespace>/models/item contains all the model files. The names of the files are hardcoded and should not be changed.
- : The root tag
- parent: Loads a different model from the given path, in form of namespaced ID. If both
"parent"and"elements"are set, the"elements"tag overrides the"elements"tag from the previous model. - display: Holds the different places where item models are displayed.
- Position: Named
thirdperson_righthand,thirdperson_lefthand,firstperson_righthand,firstperson_lefthand,gui,head,ground, orfixed. Place where an item model is displayed. Holds its rotation, translation and scale for the specified situation. fixed refers to item frames, while the rest are as their name states. Note that translations are applied to the model before rotations.- rotation: Specifies the rotation of the model according to the scheme
[x, y, z]. - translation: Specifies the position of the model according to the scheme
[x, y, z]. If the value is greater than 80, it is displayed as 80. If the value is less than -80, it is displayed as -80. - scale: Specifies the scale of the model according to the scheme
[x, y, z]. If the value is greater than 4, it is displayed as 4.
- rotation: Specifies the rotation of the model according to the scheme
- Position: Named
- textures: Holds the textures of the model, in form of namespaced ID or can be another texture variable.
- layerN: Only used to specify the icon of the item used in the inventory. There can be more than just one layer (e.g. for spawn eggs), but the amount of possible layers is hardcoded for each item. Works only in combination with
"builtin/generated". - particle: What texture to load particles from. Used to determine the "crumb" particles generated by food items, as well as to determine the barrier particle (but it always uses
items/barrier.pngas blockbreaking particle), which otherwise uses "layer0". - Texture variable: Defines a texture variable and assigns a texture.
- layerN: Only used to specify the icon of the item used in the inventory. There can be more than just one layer (e.g. for spawn eggs), but the amount of possible layers is hardcoded for each item. Works only in combination with
- gui_light: Can be
"front"or"side". If set to"side", the model is rendered like a block. If set to"front", model is shaded like a flat item. - elements: Contains all the elements of the model. They can have only cubic forms. If both
"parent"and"elements"are set, the"elements"tag overrides the"elements"tag from the previous model.- An element.
- from: Start point of a cube according to the scheme
[x, y, z]. Values must be between -16 and 32. - to: Stop point of a cube according to the scheme
[x, y, z]. Values must be between -16 and 32. - rotation: Defines the rotation of an element.
- origin: Sets the center of the rotation according to the scheme
[x, y, z]. - axis: Specifies the direction of rotation, can be
"x","y"or"z". - angle: Specifies the angle of rotation. Can be 45 through -45 degrees in 22.5 degree increments.
- rescale: Specifies whether or not to scale the faces across the whole block. Can be true or false. Defaults to false.
- origin: Sets the center of the rotation according to the scheme
- shade: Defines if shadows are rendered (
true- default), not (false). - faces: Holds all the faces of the cube. If a face is left out, it does not render.
- Face: Named
down,up,north,south,westoreast. Contains the properties of the specified face.- uv: Defines the area of the texture to use according to the scheme
[x1, y1, x2, y2]. If unset, it defaults to values equal to xyz position of the element. The texture behavior is inconsistent if UV extends below 0 or above 16. If the numbers ofx1andx2are swapped (e.g. from0, 0, 16, 16to16, 0, 0, 16), the texture flips. UV is optional, and if not supplied it automatically generates based on the element's position. - texture: Specifies the texture in form of the texture variable prepended with a
#. - cullface: Specifies whether a face does not need to be rendered when there is a block touching it in the specified position. The position can be:
down,up,north,south,west, oreast. It also determines the side of the block to use the light level from for lighting the face, and if unset, defaults to the side. - rotation: Rotates the texture by the specified number of degrees. Can be 0, 90, 180, or 270. Defaults to 0. Rotation does not affect which part of the texture is used. Instead, it amounts to permutation of the selected texture vertexes (selected implicitly, or explicitly though
uv). - tintindex: Determines whether to tint the texture using a hardcoded tint index. The default is not using the tint, and any number causes it to use tint. Note that only certain blocks have a tint index; all others remain unaffected.
- uv: Defines the area of the texture to use according to the scheme
- Face: Named
- from: Start point of a cube according to the scheme
- An element.
- overrides: Determines cases in which a different model should be used based on item tags. All cases are evaluated in order from top to bottom and last predicate that matches overrides. However, overrides are ignored if it has been already overridden once, for example this avoids recursion on overriding to the same model.
- A case.
- predicate: Holds the cases.
- Case A single case tag. See item predicates for a full list of available tags.
- model: The path to the model to use if the case is met, in form of namespaced ID.
- predicate: Holds the cases.
- A case.
- parent: Loads a different model from the given path, in form of namespaced ID. If both
Simple example: 2D beds
This example replaces the bed item render with the textures currently found in Bedrock Edition and formerly found in Java Edition, such as ![]() . This file should be placed in the
. This file should be placed in the assets/minecraft/models/item folder with the name "red_bed.json":
{
    "parent": "item/generated",
    "textures": {
        "layer0": "item/red_bed"
    }
}
In this example, the parent is set to item/generated, which means that this item model is a flat texture. In the textures tag, layer0 is set to the texture set for this item; in this case, the texture is called red_bed and is found in the assets/minecraft/textures/item folder. The "red" can be changed out for all other colors of bed, but each must be put in a separate JSON file (e.g., black_bed.json, green_bed.json, etc.). There must be item texture files (which is what layer0 is requesting) for beds found in the textures/item folder; these textures can be found below:
Rename the above files to <color>_bed (keep the file extension .png) and place them inside the assets/minecraft/textures/item folder. Make sure to match the layer0 reference to the name of the item texture.
Item predicates
Some items support additional predicates for model overrides. Below is a full list of available predicates.
"angle": Used on compasses to determine the current angle, expressed in a decimal value of less than one."blocking": Used on shields to determine if currently blocking. If1, the player is blocking."broken": Used on Elytra to determine if broken. If1, the Elytra is broken."cast": Used on fishing rods to determine if the fishing rod has been cast. If1, the fishing rod has been cast."cooldown": Used on ender pearls and chorus fruit to determine the remaining cooldown, expressed in a decimal value between 0 and 1."damage": Used on items with durability to determine the amount of damage, expressed in a decimal value between 0 and 1."damaged": Used on items with durability to determine if it is damaged. If1, the item is damaged. Note that if an item has the unbreakable tag, this may be0while the item has a non-zero"damage"tag."lefthanded": Determines the model used by left handed players. It affects the item they see in inventories, along with the item players see them holding or wearing."pull": Determines the amount a bow or crossbow has been pulled, expressed in a decimal value of less than one."pulling": Used on bows and crossbows to determine if the bow is being pulled. If1, the bow is currently being pulled."charged": Used on crossbows to determine if they are charged with any projectile. If1, the crossbow is charged."firework": Used on crossbows. If1, the crossbow is charged with a firework rocket."throwing": Used on the trident to determine if the trident is ready to be thrown by the player. If1, the trident is ready for fire."time": Used on clocks to determine the current time, expressed in a decimal value of less than one."custom_model_data": Used on any item and is compared to thetag.CustomModelDataNBT, expressed in an integer value. The number is still internally converted to float, causing a precision loss for some numbers above 16 million. If the value read from the item data is greater than or equal to the value used for the predicate, the predicate is positive.
Example: Torch
This example describes the torch as an item. The model can be found in the torch.json, which is stored in the folder assets/minecraft/models/item.
- torch.json
{
  "parent": "item/generated",
  "textures": {
    "layer0": "block/torch"
  },
  "display": {
    "thirdperson_righthand": {
      "rotation": [ -90, 0, 0 ],
      "translation": [ 0, 1, -3 ],
      "scale": [ 0.55, 0.55, 0.55 ]
    },
    "firstperson_lefthand": {
      "rotation": [ 0, -135, 25 ],
      "translation": [ 0, 4, 2 ],
      "scale": [ 1.7, 1.7, 1.7 ],
      "scale": [ 0.9, 0.9, 0.9 ]
    }
  }
}
The "parent"-tag uses "builtin/generated", so that the game uses the standard model of the torch, which has been generated out of the 2D graphic used for the item icon. The icon is specified with the "layer0"-tag and the texture, that has already been used for the block model, is used for the icon as well. As there is just one layer hard coded for the torch, there cannot be any more layers added. Furthermore, the display properties for the torch are specified, so that it displays correctly in every possible situation. The torch cannot be placed on a players head and uses the specified icon in the inventory, so there is no need to adjust the model for these situations. To line the model up with the players left or right hand in first and third person view, the model needs to be rotated, moved and scaled, which is done for each of the two situation separately.
Example: Fishing Rod
This example describes the fishing rod as of Java Edition 1.9. The model can be found in the fishing_rod.json, which is stored in the folder assets/minecraft/models/item.
- fishing_rod.json
{
  "parent": "item/handheld_rod",
  "textures": {
    "layer0": "item/fishing_rod_uncast"
  },
  "overrides": [
    {
      "predicate": {
        "cast": 1
      },
      "model": "item/fishing_rod_cast"
    }
  ]
}
In this model, the normal model is overridden if the fishing rod is cast, causing it to instead display the model "item/fishing_rod_cast"
History
Reason: Nearly everything after 1.9 is missing
| Java Edition | |||||
|---|---|---|---|---|---|
1.7.2{{Extension DPL}}<ul><li>[[Paper|Paper]]<br/>{{Item
| image = Paper.png
| renewable = Yes
| stackable = Yes (64)
}}
'''Paper''' is an item crafted from [[sugar cane]].
== Obtaining ==
=== Chest loot ===
{{LootChestItem|paper}}
=== Crafting ===
{{Crafting
|A2= Sugar Cane |B2= Sugar Cane |C2= Sugar Cane
|Output= Paper,3
|type= Miscellaneous
}}
=== Villagers ===
{{IN|java}}, cartographer [[Villager|villagers]] may give paper to players with the [[Hero of the Village]] effect.
== Usage ==
=== Crafting ingredient ===
{{crafting usage}}
=== Anvil usage ===
{{:Map/BE|zoom}}
=== Trading ===
{{IN|bedrock}}, novice-level librarian and cartographer villagers buy 24 paper for an [[emerald]] as part of their trades.
{{IN|java}}, novice-level cartographer villagers always offer to buy 24 paper for an emerald, while novice-level librarians have a {{frac|2|3}} chance of offering the same trade.
== Data values ==
=== ID ===
{{edition|java}}:
{{ID table
|edition=java
|showforms=y
|generatetranslationkeys=y
|displayname=Paper
|spritetype=item
|nameid=paper
|form=item
|foot=1}}
{{edition|bedrock}}:
{{ID table
|edition=bedrock
|shownumericids=y
|showforms=y
|notshowbeitemforms=y
|generatetranslationkeys=y
|displayname=Paper
|spritetype=item
|nameid=paper
|id=386
|form=item
|foot=1}}
==History==
{{History|java alpha}}
{{History||v1.0.11|[[File:Paper JE1 BE1.png|32px]] Added paper, which can be used to craft [[book]]s.}}
{{History|java beta}}
{{History||1.6|snap=Test Build 3|Paper can now be used to craft [[map]]s.}}
{{History||1.8|snap=Pre-release|Paper can now be found in the new [[stronghold]] library [[chest]]s.}}
{{History|java}}
{{History||1.3.1|snap=12w21a|Paper can now be [[trading|sold]] to librarian [[villager]]s, at 24–35 paper for 1 [[emerald]].}}
{{History||1.4.2|snap=12w34a|Paper can now be used to craft an empty [[map]].
|Maps start out at their closest zoom level and can be extended by adding more paper.}}
{{History||1.4.6|snap=12w49a|Paper can now be used to craft [[firework rocket]]s.}}
{{History||1.8|snap=14w02a|[[Trading]] has been changed: librarian [[villager]]s now [[trading|buy]] 24–46 paper for 1 [[emerald]].}}
{{History||1.9|snap=15w43a|The average yield of paper from [[stronghold]] library [[chest]]s has more than doubled.}}
{{History||1.11|snap=16w39a|Added cartographer [[villager]]s, which [[trading|buy]] paper as their tier 1 trade.}}
{{History||1.13|snap=17w47a|Prior to [[1.13/Flattening|''The Flattening'']], this [[item]]'s numeral ID was 339.}}
{{History|||snap=18w11a|Paper now generates in the [[chest]]s of some [[shipwreck]]s.}}
{{History||1.14|snap=18w43a|[[File:Paper JE2 BE2.png|32px]] The texture of paper has now been changed.
|Paper can now be used to craft [[banner pattern]]s.}}
{{History|||snap=18w48a|Paper can now be found in chests in [[village]] cartographer houses.}}
{{History|||snap=19w02a|Paper can now be used to craft a [[cartography table]].}}
{{History|||snap=19w13a|Cartographer villagers now give paper to players under the [[Hero of the Village]] effect.}}
{{History|pocket alpha}}
{{History||v0.2.0|[[File:Paper JE1 BE1.png|32px]] Added paper. It is currently unobtainable and serves no purpose.}}
{{History||v0.3.0|Paper is now [[craft]]able, and can be used to craft [[book]]s.}}
{{History||v0.14.0|snap=build 1|Paper can now be used to craft empty [[map]]s and empty locator maps.
|Paper can now be used to zoom in maps, using [[anvil]]s.}}
{{History|pocket}}
{{History||1.0.0|snap=?|The [[Windows 10 Edition]] can now use the [[anvil]], as well as the [[crafting table]], to zoom in [[map]]s, just as [[Pocket Edition]] in general can.}}
{{History||1.0.4|snap=alpha 1.0.4.0|Librarian [[villager]]s now [[trading|buy]] 24–36 paper for 1 [[emerald]].}}
{{History||1.1.0|snap=alpha 1.1.0.3|Added cartographer villagers, which [[trading|buy]] 24–36 paper as their tier 1 trade.}}
{{History|bedrock}}
{{History||1.2.0|snap=beta 1.2.0.2|Paper can now be used to craft [[firework rocket]]s.}}
{{History||1.4.0|snap=beta 1.2.14.2|Paper can now be found inside [[chest]]s of some [[shipwreck]]s.}}
{{History||1.10.0|snap=beta 1.10.0.3|[[File:Paper JE2 BE2.png|32px]] The texture of paper has now been changed.
|Paper can now be found in cartographer house chests in [[village]]s.
|Paper can now be used to craft [[banner pattern]]s and [[cartography table]]s.}}
{{History||1.11.0|snap=beta 1.11.0.4|Librarian and cartographer villagers now buy 24 paper for an [[emerald]].}}
{{History|console}}
{{History||xbox=TU1|xbone=CU1|ps=1.0|wiiu=Patch 1|[[File:Paper JE1 BE1.png|32px]] Added paper.}}
{{History||xbox=none|xbone=none|ps=1.90|wiiu=none|switch=none|[[File:Paper JE2 BE2.png|32px]] The texture of paper has now been changed.}}
{{History|New 3DS}}
{{History||0.1.0|[[File:Paper JE1 BE1.png|32px]] Added paper.}}
{{History|foot}}
== Issues ==
{{issue list}}
== References ==
{{Reflist}}
==External Links==
*[https://www.minecraft.net/en-us/article/paper Taking Inventory: Paper] – Minecraft.net on August 4, 2023
{{Items}}
[[cs:Papír]]
[[de:Papier]]
[[es:Papel]]
[[fr:Papier]]
[[hu:Papír]]
[[ja:紙]]
[[ko:종이]]
[[nl:Papier]]
[[pl:Papier]]
[[pt:Papel]]
[[ru:Бумага]]
[[th:กระดาษ]]
[[uk:Папір]]
[[zh:纸]]
[[Category:Renewable resources]]</li><li>[[Shears|Shears]]<br/>{{Item
| image = Shears.png
| rarity = Common
| renewable = Yes
| durability = 238
| stackable = No
}}
'''Shears''' are tools required to obtain some organic blocks or otherwise mine them faster as well as to shear certain entities and blocks.
==Obtaining==
===Crafting===
{{Crafting
|head=1
|showdescription=1
|B2= Iron Ingot
|A3= Iron Ingot
|Output= Shears
|type= Tool
}}
{{crafting
|foot=1
|ignoreusage=1
|Damaged Shears
|Damaged Shears
|Output= Shears
|description= The durability of the two shears is added together, plus an extra 5% durability.
|type= Tool
}}
Despite using [[Iron Ingot|iron]] in its crafting recipe, shears cannot be smelted into [[iron nugget]]s.<ref>{{bug|MC-111738}}</ref>
===Trading===
Novice-level Shepherd [[villager]]s have a 40% chance to sell shears for 2 [[emerald]]s in Java Edition. This trade is always offered in Bedrock Edition.
===Chest loot===
{{LootChestItem|shears}}
==Usage==
===Shearing===
Shears lose 1 [[durability]] when used to shear something.
Shears can be {{Control|use|text=used}} on a [[sheep]] to remove its coat and drop 1–3 [[wool]] of the corresponding color. The same sheep can be sheared again after it eats from a [[grass block]] to regenerate its coat.
Shearing a [[mooshroom]] drops 5 [[mushroom]]s of the corresponding color and irreversibly turns it into a normal [[cow]].
Shearing a [[snow golem]] irreversibly removes its pumpkin, dropping it and revealing its face.
Shearing either a [[beehive]] or [[bee nest]] that is full of honey makes it drop 3 [[honeycomb]]s and resets it to honey level 0. The same beehive or bee nest can be sheared again if it is able to reach full honey again. If sheared by hand without a [[campfire]] below the hive or nest all bees within will exit and all nearby bees will attack the offending player.
[[Dispenser]]s can use shears in any of the above listed ways, interacting with any valid block or entity in front of the dispenser's face. This decreases the shears' [[durability]]. A dispenser shearing a beehive or bee nest will not anger bees or cause them to leave even if there is not a campfire below it.
Shearing a [[pumpkin]] turns it into a [[carved pumpkin]], dropping 4 [[pumpkin seeds]].
{{IN|java}}, shearing the tip of [[cave vines]], [[kelp]], [[weeping vines]], or [[twisting vines]] sets its age value to 25 and stops further growth.
===Breaking blocks===
Shears use 1 [[durability]] when is used to break any block, even if it [[instant mining|breaks instantly]] by hand.
Shears can be used to harvest [[cobweb|cobwebs]], [[leaves]], [[grass|grass, tall grass]], [[seagrass|seagrass, tall seagrass]], [[fern|ferns, large fern]]s, [[dead bush]]es, [[nether sprouts]], [[vines]], [[glow lichen]] or [[hanging roots]] and obtain them in item form. They can also be used to break [[tripwire]] connected to a [[tripwire hook]] without activating it.
When shears are used to break [[Weeping Vines|weeping vines]] or [[Twisting Vines|twisting vines]] they are guaranteed to drop in item form instead of the usual 33% chance. This only applies to vines directly broken by shears and not vines that are broken due to the destruction of their supporting vines.
The following table shows information about blocks that can be broken with shears. Colors indicate what gets dropped when the block is broken:
*White: The original block.
*Blue: The block's normal drop (i.e. string, sticks, seeds, saplings, apples).
*Red: Nothing.
{| class="wikitable" style="text-align:center" data-description="Blocks broken with shears"
!
!No shears breaking time
!Shears breaking time
|-
! style="text-align:left" |{{BlockLink|Cobweb}}
| {{tc|no|20 s}}<ref group="note">Breaking cobwebs with a sword is as fast as breaking with shears, and yields string. This costs double durability.</ref>
|0.4 s
|-
! style="text-align:left" |{{BlockLink|Dead Bush}}
| {{tc|planned|0 s}}
|0 s
|-
! style="text-align:left" |{{BlockLink|id=fern|Grass|Fern}}
| {{tc|planned|0 s}}
|0 s
|-
! style="text-align:left" |{{BlockLink|Grass}}
| {{tc|planned|0 s}}
| 0 s
|-
! style="text-align:left" |{{BlockLink|Nether Sprouts}}
| {{tc|no|0 s}}<ref group="note">{{IN|bedrock}}, the item drops when breaking it with fists.</ref>
|0 s
|-
! style="text-align:left" |{{BlockLink|Leaves}}
| {{tc|planned|0.35 s}}
|0.05 s
|-
! style="text-align:left" |{{BlockLink|id=tripwire|String#Tripwire|Tripwire}}
|0 s
|0 s<ref group="note">Using shears does not trigger a redstone pulse.</ref>
|-
! style="text-align:left" |{{BlockLink|Vines}}
| {{tc|no|0.35 s}}
|0.35 s
|-
! style="text-align:left" |{{BlockLink|Wool}}
|1.25 s
|0.25 s
|-
! style="text-align:left" |{{BlockLink|Seagrass}}
| {{tc|no|0 s}}
|0 s
|-
! style="text-align:left" | {{BlockLink|Glow Lichen}}
| {{tc|no|0.3 s}}
|0.3 s
|-
! style="text-align:left" |{{BlockLink|Hanging Roots}}
| {{tc|no|0 s}}
|0 s
|-
! style="text-align:left" |{{BlockSprite|Twisting Vines Plant}}{{BlockLink|Twisting Vines}}<br> {{BlockSprite|Weeping Vines Plant}}{{BlockLink|Weeping Vines}}
|0 s
|0 s<ref group="note">Using shears will increase the chance of dropping from 33% to 100%.</ref>
|}
{{notelist}}
===Enchantments===
Shears can receive the following [[Enchanting|enchantments]]:
{| class="wikitable col-2-center col-3-right"
|+
!Name
! Max Level
![[Enchanting|Method]]
|-
|[[Efficiency]]
|V
|{{Inventory slot|Anvil}}
|-
|[[Unbreaking]]
| III
|{{Inventory slot|Anvil}}
|-
|[[Mending]]
|I
|{{Inventory slot|Anvil}}
|-
|[[Curse of Vanishing]]
|I
|{{Inventory slot|Anvil}}
|-
|[[Silk Touch]]{{only|be|short=1}}
|I
|{{Inventory slot|Anvil}}
|}
{{notelist}}
== Sounds ==
{{edition|java}}:
{{Sound table
|rowspan=4
|sound=Shear.ogg
|subtitle=Shears click
|source=player
|description=When a mooshroom is sheared
|id=entity.mooshroom.shear
|translationkey=subtitles.item.shears.shear
|volume=1.0
|pitch=1.0
|distance=16}}
{{Sound table
|subtitle=Shears click
|source=player
|description=When a sheep is sheared
|id=entity.sheep.shear
|translationkey=subtitles.item.shears.shear
|volume=1.0
|pitch=1.0
|distance=16}}
{{Sound table
|subtitle=Shears click
|source=player
|description=When a snow golem is sheared
|id=entity.snow_golem.shear
|translationkey=subtitles.item.shears.shear
|volume=1.0
|pitch=1.0
|distance=16}}
{{Sound table
|subtitle=Plant cropped
|source=block
|description=When a growing plant is cropped
|id=block.growing_plant.crop
|translationkey=subtitles.block.growing_plant.crop
|volume=1.0
|pitch=1.0
|distance=16}}
{{Sound table
|sound=Beehive shear.ogg
|source=block
|subtitle=Shears scrape
|description=When honeycombs are harvested from a beehive
|id=block.beehive.shear
|translationkey=subtitles.block.beehive.shear
|volume=0.8
|pitch=1.0/0.8/0.9
|distance=16}}
{{Sound table
|sound=Pumpkin carve1.ogg
|sound2=Pumpkin carve2.ogg
|source=block
|subtitle=Shears carve
|description=When a pumpkin is carved
|id=block.pumpkin.carve
|translationkey=subtitles.block.pumpkin.carve
|volume=1.0
|pitch=1.0
|distance=16}}
{{Sound table
|sound=Random break.ogg
|subtitle=Item breaks
|source=player
|description=When a pair of shears' durability is exhausted
|id=entity.item.break
|translationkey=subtitles.entity.item.break
|volume=0.8
|pitch=0.8-1.2
|distance=16
|foot=1}}
{{edition|bedrock}}:<br>
Pumpkins do not have carve sounds.
{{Sound table
|type=bedrock
|sound=Shear.ogg
|source=player
|description=When something is sheared
|id=mob.sheep.shear
|volume=1.0
|pitch=1.0}}
{{Sound table
|sound=Beehive shear.ogg
|source=block
|description=When honeycombs are harvested from a beehive
|id=block.beehive.shear
|volume=0.8
|pitch=0.8-1.0}}
{{Sound table
|sound=Random break.ogg
|source=player
|description=When a pair of shears' durability is exhausted
|id=random.break
|volume=1.0
|pitch=0.9
|foot=1}}
==Data values==
===ID===
{{edition|java}}:
{{ID table
|edition=java
|showforms=y
|generatetranslationkeys=y
|displayname=Shears
|spritetype=item
|nameid=shears
|form=item
|foot=1}}
{{edition|bedrock}}:
{{ID table
|edition=bedrock
|shownumericids=y
|showforms=y
|notshowbeitemforms=y
|generatetranslationkeys=y
|displayname=Shears
|spritetype=item
|nameid=shears
|id=421
|form=item
|foot=1}}
==Achievements==
{{load achievements|Have a Shearful Day}}<div style="text-align:center"></div>
==History==
{{History||June 3, 2011|link=https://twitter.com/jeb_/status/76570646074765312|Shears were first mentioned by [[Jeb]] on [[wikipedia:Twitter|Twitter]]. The tweet revealing Jeb's work on shears was written in Swedish (''Jag jobbar på shears nu''), which translates to "I'm working on shears now".}}
{{History||June 7, 2011|link=https://twitter.com/jeb_/status/78154891637436416|Jeb tweets about how shears were originally planned as a way to defuse [[TNT]], but he dropped this shortly after deciding TNT would detonate only with [[redstone]] or [[fire]].}}
{{History|java beta}}
{{History||1.7|[[File:Shears JE1 BE1.png|32px]] Added shears.
|Before [[Beta 1.7]], [[sheep]] would drop 1-3 [[wool]] blocks at most when hit, but shears can harvest up to 4 wool blocks per sheep.}}
{{History||1.8|snap=Pre-release|Shears can now be used to harvest a [[fern]], [[vines]] and [[grass]].}}
{{History|java}}
{{History||1.0.0|snap=Beta 1.9 Prerelease|Shears now harvest [[red mushroom]]s from a [[mooshroom]] and turn it back into a normal [[cow]].}}
{{History||1.1|snap=11w49a|[[Sheep]] now drop only 1-3 wool blocks when sheared, but they can also regrow their wool by eating [[grass block|grass]], which is part of a plan to have [[animal]]s stay in the game longer.<ref>{{Tweet|jeb|76647002317930496}}</ref>}}
{{History||1.2.1|snap=12w05a|Shears can now be used to harvest [[dead bush]]es.}}
{{History|||snap=12w06a|Shears are now [[renewable]], due to [[zombie]]s occassionally dropping iron ingots.}}
{{History||1.3.1|snap=12w21a|Shears can now be [[trading|bought]] from farmer [[villager]]s for 3 [[emerald]]s each.}}
{{History|||snap=12w22a|Shears can now be used to break [[tripwire]] string and not set it off.}}
{{History||1.4.2|snap=12w38a|Added a [[sound]] when using shears on [[sheep]].}}
{{History||1.4.6|snap=12w50a|Shears can now be [[enchanting|enchanted]].}}
{{History||1.8|snap=14w02a|[[Trading]] has been changed: Shepherd [[villager]]s now [[trading|sell]] shears for 3–4 [[emerald]]s each.
|Farmers no longer trade shears.}}
{{History|||snap=pre1|Shears now lose [[item durability|durability]] when breaking [[wool]] blocks. In previous versions, shears would take [[item durability|durability]] [[damage]] only when destroyed or when breaking [[tall grass]] or [[leaves]], the damage remaining the same for all other [[block]]s.<ref>{{bug|MC-5313}}</ref>}}
{{History||1.9|snap=15w34a|Shears may now be used in a crafting grid to zoom in [[map]]s.}}
{{History|||snap=15w45a|Shears no longer zoom in maps.}}
{{History|||snap=15w47b|Shears can no longer be enchanted with [[Silk Touch]].
|Shears now lose durability when used to break any block (formerly lost durability only from [[leaves]], [[web]], [[grass]], [[vines]], [[tripwire]] and [[wool]]).}}
{{History|||snap=15w47c|Shears now harvest [[cobweb]] without requiring [[Silk Touch]].}}
{{History|||snap=15w49a|[[Snow golem]]'s [[pumpkin]] can now be removed with shears.}}
{{History||1.13|snap=17w47a|When shears are {{control|used}} on an un-carved [[pumpkin]], it now turns into a carved pumpkin and drops 4 [[pumpkin seeds]].
|Prior to [[1.13/Flattening|''The Flattening'']], this [[item]]'s numeral ID was 359.}}
{{History||1.14|snap=18w43a|Shears placed in a [[dispenser]] can now shear [[sheep]].
|[[File:Shears JE2 BE2.png|32px]] The texture of shears has been changed.}}
{{History|||snap=18w49a|Shears can now be found in [[chest]]s in [[village]] shepherd houses.}}
{{History||1.15|snap=19w34a|Shears can now be used on [[bee nest]]s and [[beehive]]s to harvest [[honeycomb]].}}
{{History||1.16|snap=20w15a|Shears placed in a dispenser can now shear [[mooshrooms]] and [[snow golem]]s.}}
{{History||1.16.2|snap=pre1|Shears are now required in order to pick up [[roots]].}}
{{History||1.16.2|snap=pre2|Shears are no longer required to pick up [[roots]].}}
{{History||1.17|snap=?|Shears are now required in order to pick up [[hanging roots]].}}
{{History||1.18|snap=21w37a|Shears can now stop [[cave vines]], [[kelp]], [[weeping vines]], and [[twisting vines]] from aging.}}
{{History||1.19|snap=22w11a|Shears are now required in order to pick up [[mangrove leaves]].}}
{{History|pocket alpha}}
{{History||v0.2.0|[[File:Shears JE1 BE1.png|32px]] Added shears.}}
{{History||v0.3.2|Survival [[player]]s no longer start out with infinite durability shears in the [[inventory]].}}
{{History||v0.4.0|Removed shears from the creative inventory.}}
{{History||v0.8.0|snap=build 3|Re-added shears to [[creative]] mode.}}
{{History||v0.9.0|snap=build 1|Shears can now be used to transform [[mooshroom]]s into [[cow]]s.}}
{{History||v0.12.1|snap=build 3|Shearing a [[snow golem]] now removes its [[pumpkin]].
|Shears can now be [[enchanting|enchanted]] in an [[anvil]].}}
{{History||v0.13.0|snap=build 1|Shears can now be used to break [[tripwire]] string without triggering it.}}
{{History||v0.15.0|snap=build 1|Shears now lose durability when used to break any [[block]].}}
{{History|pocket}}
{{History||1.0.4|snap=alpha 1.0.4.0|Shears can now be [[trading|bought]] from shepherd [[villager]]s.}}
{{History||1.1.0|snap=alpha 1.1.0.0|Breaking a [[melon|melon block]] with shears now always drop 9 [[melon slice|melons]].}}
{{History|bedrock}}
{{History||1.4.0|snap=beta 1.2.13.8|Shears can now be used to turn un-carved [[pumpkin]]s into [[carved pumpkin]] and spit out 4 [[pumpkin seeds]].}}
{{History||?|Shears now harvest [[cobweb]] without requiring [[Silk Touch]].}}
{{History||1.10.0|snap=beta 1.10.0.3|Shears placed in a [[dispenser]] can now shear [[sheep]].
|[[File:Shears JE2 BE2.png|32px]] The texture of shears has been changed.}}
{{History||1.11.0|snap=beta 1.11.0.1|Shears can now be found in [[village]] shepherd houses.}}
{{History|||snap=beta 1.11.0.4|Shears [[trading|sold]] by shepherd [[villager]]s now cost only 2 [[emerald]]s.}}
{{History||1.14.0|snap=beta 1.14.0.1|Shears can now be used on [[bee nest]]s and [[beehive]]s to harvest [[honeycomb]].}}
{{History|console}}
{{History||xbox=TU3|xbone=CU1|ps=1.0|wiiu=Patch 1|switch=1.0.1|[[File:Shears JE1 BE1.png|32px]] Added shears.}}
{{History||xbox=TU69|xbone=none|ps=1.76|wiiu=Patch 38|switch=none|Shears can now be used to turn regular [[pumpkin]]s into [[carved pumpkin]]s.}}
{{History||xbox=none|xbone=none|ps=1.90|wiiu=none|switch=none|[[File:Shears JE2 BE2.png|32px]] The texture of shears has been changed.
|Shears placed in a [[dispenser]] can now shear [[sheep]].}}
{{History|New 3DS}}
{{History||0.1.0|[[File:Shears JE1 BE1.png|32px]] Added shears.}}
{{History|foot}}
==Issues==
{{issue list}}
==Gallery==
<gallery>
File:Enchanted Shears.gif|An enchanted pair of shears.
</gallery>
==References==
{{reflist}}
==External links==
*[https://www.minecraft.net/en-us/article/taking-inventory--shears Taking Inventory: Shears] – Minecraft.net on November 20, 2019
{{Items}}
[[cs:Nůžky]]
[[de:Schere]]
[[es:Tijeras]]
[[fr:Cisailles]]
[[hu:Metszőolló]]
[[it:Cesoie]]
[[ja:ハサミ]]
[[ko:가위]]
[[nl:Schaar]]
[[pl:Nożyce]]
[[pt:Tesoura]]
[[ru:Ножницы]]
[[zh:剪刀]]
[[Category:Renewable resources]]</li></ul> | 13w36a | Flowers are now discentered like tall grass. | |||
1.8{{Extension DPL}}<ul><li>[[Smarter Watch|Smarter Watch]]<br/>{{Joke feature}}{{Exclusive|Java}}{{Item
| title = Smarter Watch
| image = Smarter Watch.png
| renewable = No
| stackable = Yes (64)
}}
The '''Smarter Watch''' was a joke offhand [[item]].
== Usage ==
Smarter watches were "equipped" by having them placed into the offhand slot. Upon equipping, they would display the current time above the hotbar, in minutes and seconds, with one minute of in-game time being 5/6 of a real-time second, and one in-game hour being 5/6 of a real-time minute or 50 seconds.
The smarter watch would also notify the [[player]] of statistics milestones, alongside taken [[damage]], [[item]] specific info, [[crafting]] items and more.{{info needed|What exactly?}}
== Sounds ==
{{Sound table
|sound=Tick1.ogg
|sound2=Tick2.ogg
|subtitle=''None''
|source=player
|description=When a notification is displayed
|id=item.smarter_watch.notice
|translationkey=''None''
|volume=1.0
|pitch=1.0
|distance=16
|foot=1}}
== Data values ==
=== ID ===
{{ID table
|edition=java
|shownumericids=y
|showforms=y
|generatetranslationkeys=y
|displayname=Smarter Watch
|spritetype=item
|nameid=smarter_watch
|id=502
|form=item
|translationkey=item.smarterWatch.name
|foot=1}}
== History ==
{{History|java}}
{{History||1.RV|snap=1.RV-Pre1|[[File:Smarter_Watch_(item).png|32px]] [[File:Smarter Watch.png|32px]] Added the smarter watch.}}
{{History|foot}}
== Issues ==
Smarter Watches are an unsupported [[item]] due to being an [[Wikipedia:April Fools' Day|April Fools']] joke, and therefore issues relating to them will not be fixed.
== Gallery ==
<gallery>
TechGear.png|A [[player]] wearing the smarter watch, featured in this [[wikipedia:April Fools' Day|April Fools']] joke version.
</gallery>
{{Items}}
{{Jokes}}
[[Category:Non-renewable resources]]
[[Category:Joke items]]
[[pt:Relógio inteligente]]</li><li>[[:Category:Joke items|Category:Joke items]]<br/>[[Category:Joke features|Items]]
[[Category:Items]]</li></ul> | 14w06a | Added custom block models. | |||
| 14w07a | The model format has now been rewritten. Instead of having just "planes", it now has "planes" and "cubes". | ||||
| The rotation of objects are now limited to one directional rotation per object in increments of 22.5 degrees. | |||||
| 14w11a | Lighting on solid block no longer makes inner sections completely black. | ||||
| 14w11b | Generic blocks now load models instead of pre-defined shapes. | ||||
| April 12, 2014 | TheMogMiner posts about upcoming changes to the model format. | ||||
| 14w17a | Converted most of the remaining static blocks to the model format. | ||||
Added "rotateVariantTextures" to preserve uv details through rotation. | |||||
| 14w25a | The directional attribute from the uv definition has now been removed and replaced it with explicit texture references. "textureFacing" has been replaced with "texture" parameter, which is now prepended with the hash symbol (#).
| ||||
| "useAmbientOcclusion" has now been renamed to "ambientocclusion". | |||||
| "rotateVariantTextures" has now been renamed to "UV lock". | |||||
| "cull" has now been renamed to "cullface", specifies the opposite of which neighboring face causes culling to occur. | |||||
Rotation has now been made more verbose, it is now more clear that it can occur only on a single axis. Example, the rotation for one of the two faces of the "cross" model is now: "rotation": { "origin": [ 8, 8, 8 ], "axis": "y", "angle": 45, "rescale": true },. | |||||
The folder models/blocks/meshes has now been removed and model files are now stored in models/block. | |||||
The folder blockstates has now been added and stores the model selection files previously found in models/block. | |||||
| The model format now supports custom item models. | |||||
| 14w27a | Block state names have now been replaced with data that better reflects the internal data. This does not yet reflect all data for some blocks and switches to using the actual stored data in a future version when numerical data values are completely dropped in favor of block states. | ||||
| 14w27b | The block state files now support an array of models allowing for random models. | ||||
| 14w30a | Added the item model "builtin/entity". | ||||
1.8.2{{Extension DPL}}<ul><li>[[Dupe Hack|Dupe Hack]]<br/>{{for|the method to duplicate items and blocks|Tutorials/Block and item duplication}}
{{stub}}
{{Joke feature}}
{{exclusive|java}}{{item
| image = Missing Texture.png
| rarity=Common
| stackable=No
|title=minecraft:dupe_hack|renewable=Yes}}
'''minecraft:dupe_hack''' is a joke item from [[Java Edition 23w13a_or_b]].
==Obtaining==
Once the <code>dupe_hack_occurrence_chance</code> vote is approved the '''dupe hack''' item has a random chance of dropping whenever an entity with chests is killed by a player, e.g. when destroying a [[Minecart with Chest|minecart with chest]] with a [[sword]].
It doesn't appear in the [[creative]] menu, not even when the [[Options#Controls|option]] "Operator Items Tab" is enabled, but can be given to the player with [[Commands/give|<code>/give</code>]] and other commands.
==Usage==
The dupe hack item can be used to create a limited amount of duplicate items by placing it on a [[crafting table]] with any other item. It has a random chance of breaking, controlled by the <code>dupe_hack_break_chance</code> vote. This limitation can be mostly bypassed by putting the items in an [[Ender Chest|ender chest]] first and duplicating the chest.
When using the Dupe Hack, it has a random chance of breaking, which is often decided by votes.
===Crafting ingredient===
{{Crafting
|Any Item
|Dupe Hack
|Output=Any Item, 2
|showdescription=1
|description=The dupe hack item remains in the crafting grid after duplicating an item.
|foot=1
}}
==Data values==
===ID===
{{edition|java}}:{{ID table
|edition=java
|showforms=y
|generatetranslationkeys=y
|displayname=minecraft:dupe_hack
|spritetype=item
|nameid=dupe_hack
|form=item|foot=1|spritename=missingno}}
==History==
{{History|java}}
{{History||23w13a_or_b|[[File:Missing Texture JE4.png|32px]] Added minecraft:dupe_hack.}}
{{History|foot}}
{{items}}
{{Jokes}}
<references />
[[Category:Joke items]]
[[ja:Dupe Hack]]
[[pt:Dupe Hack]]</li><li>[[Smithing Template|Smithing Template]]<br/>{{for|the block|Smithing Table}}
{{Item
| title = Smithing Template
| image = <gallery>
Netherite Upgrade Smithing Template.png | Netherite Upgrade
Sentry Armor Trim Smithing Template.png | Armor Trim
</gallery>
| rarity = Rare
| renewable = No<!--Smithing templates are not renewable because diamonds, their only other method of creation, are not renewable.-->
| stackable = Yes (64)
}}
'''Smithing templates''' are items used in [[Smithing Table|smithing tables]] to alter [[Tool|tools]] and [[armor]]. They are consumed when used, but can be [[Crafting|duplicated]] using an existing template, its material and [[Diamond|diamonds]].
The sixteen '''armor trim smithing templates''' are found in a variety of [[Generated structures|structures]], and are used to apply various decorative trims (dependent on the variant) to armor using certain minerals for different colors.
'''Netherite upgrade smithing templates''' are required to upgrade diamond equipment with a [[Netherite Ingot|netherite ingot]]. They are only found in [[Bastion Remnant|bastion remnants]], but are guaranteed only in [[:en:Bastion_Remnant#Treasure_room|treasure rooms]].
== Obtaining ==
Smithing templates can be found in various [[Generated structures|structures]] and can be duplicated by using seven diamonds and a block based on what the template is.
=== Crafting ===
{{Crafting
|A1=Diamond |B1=Matching Smithing Template |C1=Diamond
|A2=Diamond |B2=Netherrack;Cobblestone;Sandstone;End Stone;Terracotta;Terracotta;Netherrack;Cobblestone;Terracotta;Cobbled Deepslate;Blackstone;Purpur Block;Prismarine;Cobblestone;Cobbled Deepslate;Terracotta;Mossy Cobblestone |C2=Diamond
|A3=Diamond |B3=Diamond |C3=Diamond
|Output=Matching Smithing Template,2
}}
{| class="article-table"
|+ Duplication
! Item !! Material
|-
| {{ItemSprite|netherite-upgrade|text=Netherite Upgrade}} || {{BlockSprite|Netherrack|text=Netherrack}}
|-
| {{ItemSprite|sentry-armor-trim|text=Sentry Armor Trim}} || {{BlockSprite|Cobblestone|text=Cobblestone}}
|-
| {{ItemSprite|vex-armor-trim|text=Vex Armor Trim}} || {{BlockSprite|Cobblestone|text=Cobblestone}}
|-
| {{ItemSprite|wild-armor-trim|text=Wild Armor Trim}} || {{BlockSprite|Mossy Cobblestone|text=Mossy Cobblestone}}
|-
| {{ItemSprite|coast-armor-trim|text=Coast Armor Trim}} || {{BlockSprite|Cobblestone|text=Cobblestone}}
|-
| {{ItemSprite|dune-armor-trim|text=Dune Armor Trim}} || {{BlockSprite|Sandstone|text=Sandstone}}
|-
| {{ItemSprite|wayfinder-armor-trim|text=Wayfinder Armor Trim}} || {{BlockSprite|Terracotta|text=Terracotta}}
|-
| {{ItemSprite|raiser-armor-trim|text=Raiser Armor Trim}} || {{BlockSprite|Terracotta|text=Terracotta}}
|-
| {{ItemSprite|shaper-armor-trim|text=Shaper Armor Trim}} || {{BlockSprite|Terracotta|text=Terracotta}}
|-
| {{ItemSprite|host-armor-trim|text=Host Armor Trim}} || {{BlockSprite|Terracotta|text=Terracotta}}
|-
| {{ItemSprite|ward-armor-trim|text=Ward Armor Trim}} || {{BlockSprite|Cobbled Deepslate|text=Cobbled Deepslate}}
|-
| {{ItemSprite|silence-armor-trim|text=Silence Armor Trim}} || {{BlockSprite|Cobbled Deepslate|text=Cobbled Deepslate}}
|-
| {{ItemSprite|tide-armor-trim|text=Tide Armor Trim}} || {{BlockSprite|Prismarine|text=Prismarine}}
|-
| {{ItemSprite|snout-armor-trim|text=Snout Armor Trim}} || {{BlockSprite|Blackstone|text=Blackstone}}
|-
| {{ItemSprite|rib-armor-trim|text=Rib Armor Trim}} || {{BlockSprite|Netherrack|text=Netherrack}}
|-
| {{ItemSprite|eye-armor-trim|text=Eye Armor Trim}} || {{BlockSprite|End Stone|text=End Stone}}
|-
| {{ItemSprite|spire-armor-trim|text=Spire Armor Trim}} || {{BlockSprite|Purpur Block|text=Purpur Block}}
|}
{{IN|bedrock}}, spire, tide, and dune armor trims can be duplicated with more blocks than {{in|java}}. In addition to the normal blocks, Tide armor trims can be duplicated using Prismarine Bricks or Dark Prismarine, dune armor trims can be duplicated with smooth sandstone, cut sandstone, or chiseled sandstone, and spire armor trims can be duplicated with purpur pillars.<ref>{{bug|MCPE-172711||Tide, Spire, and Dune Armor Trims can be crafted from more blocks than in Java Edition}}</ref>
=== Mob loot ===
[[Elder guardian]]s have a 20% chance to drop 1 tide armor trim upon death. [[Looting]] doesn't affect this percentage, and the elder guardian doesn't need to be killed by a player in order for the trim to drop and can be duplicated with [[prismarine]].
=== Chest loot ===
{{#invoke:LootChest|base3|netherite-upgrade-smithing-template,sentry-armor-trim-smithing-template,vex-armor-trim-smithing-template,wild-armor-trim-smithing-template,coast-armor-trim-smithing-template,dune-armor-trim-smithing-template,ward-armor-trim-smithing-template,silence-armor-trim-smithing-template,snout-armor-trim-smithing-template,rib-armor-trim-smithing-template,eye-armor-trim-smithing-template,spire-armor-trim-smithing-template}}
Note: In Woodland Mansions, only chests with random loot have the chance to contain the Vex Smithing Template, chests in the "Allium room", "Sapling farm", "Tree-chopping room" and "Fake End portal room" always generate with the same, room specific, loot.
=== Suspicious block loot ===
Items can only be extracted from [[Suspicious Block|suspicious blocks]] using a [[brush]].{{#invoke:LootChest|base3|wayfinder-armor-trim-smithing-template,raiser-armor-trim-smithing-template,shaper-armor-trim-smithing-template,host-armor-trim-smithing-template}}
== Usage ==
=== Crafting ingredient ===
{{Crafting
|A1=Diamond |B1=Matching Smithing Template |C1=Diamond
|A2=Diamond |B2=Netherrack;Cobblestone;Sandstone;End Stone;Terracotta;Terracotta;Netherrack;Cobblestone;Terracotta;Cobbled Deepslate;Blackstone;Purpur Block;Prismarine;Cobblestone;Cobbled Deepslate;Terracotta;Mossy Cobblestone |C2=Diamond
|A3=Diamond |B3=Diamond |C3=Diamond
|Output=Matching Smithing Template,2
}}
=== Smithing ingredient ===
Smithing templates are used at a [[smithing table]]. Netherite upgrade smithing templates are used to upgrade diamond gear into netherite gear by using a netherite upgrade, a piece of diamond gear, and a [[netherite ingot]].
{{Smithing
|head=1
|ingredients=Netherite Upgrade +<br>Any Diamond Gear +<br>[[Netherite Ingot]]
|Netherite Upgrade
|Diamond Helmet; Diamond Chestplate; Diamond Leggings; Diamond Boots; Diamond Sword; Diamond Pickaxe; Diamond Axe; Diamond Shovel
|Netherite Ingot
|Netherite Helmet; Netherite Chestplate; Netherite Leggings; Netherite Boots; Netherite Sword; Netherite Pickaxe; Netherite Axe; Netherite Shovel
|tail=1
}}
{{FakeImage|{{Animate|Iron_Armor_with_Iron_Shaper_Trim.png; Golden_Armor_with_Golden_Shaper_Trim.png; Diamond_Armor_with_Diamond_Shaper_Trim.png; Netherite_Armor_with_Netherite_Shaper_Trim.png|180px}}|If the armor material and the trimming material are the same, the color palette used for the armor trim is darker.}}
Armor trim smithing templates are used to customize an armor piece's appearance by using a smithing template, an armor piece, and an ingot or crystal ([[emerald]], [[redstone dust]], [[lapis lazuli]], [[amethyst shard]], [[nether quartz]], [[netherite ingot]], [[diamond]], [[gold ingot]], [[iron ingot]], or [[copper ingot]]). Including all dyed leather armor colors and regular armor, there are ≈3.679x10<sup>9</sup> different possible armor pieces<!--5713438 leather colors, plus the 4 other armor materials = 5713442. 5713442 * 161 (the 160 trim combos (16 trims, 10 materials) + untrimmed) = 919864162. 919864162 * 4 (helmet, chestplate, leggings, boots) = 3679456648 ≈ 3.679x10^9-->, and 7.16x10<sup>35</sup> <!--919864162 + 1 (no armor in that slot) = 919864163. 919864163^4 = 715969952015045562662444917041515536 ≈ 7.16x10^35 total possible armor combinations-->total possible armor combinations excluding enchantments and the player not wearing armor.
Already trimmed armor can be trimmed again by applying another template on it; the old trim pattern is overwritten in the process.<ref>{{bug|MC-262538||When combining armor trims the new trim deletes the old one|WAI}}</ref> Therefore, one piece of armor cannot possess multiple trims at the same time.
Most armor trims cover a small portion of the armor piece's surface with the trim material, except for the silence armor trim, which allows the trim material to cover a majority of the armor piece's surface.
All of the trims are purely decorative, and don't impact gameplay or strength(without the use of mods or plugins) of the armor they are applied to in any way. [[Piglin]]s do not pick up any gold-trimmed armor pieces, and they are not pacified by players wearing even a full set of gold-trimmed armor (unless, of course, the armor pieces in question are themselves golden), and netherite-trimmed armor pieces can still be burned by [[fire]].
{{Smithing
|head=1
|ingredients=Any Armor Trim +<br>Any Armor Piece +<br>Any Ingot/Crystal
|Any Armor Trim Smithing Template
|Iron Helmet; Netherite Chestplate;Golden Leggings;Diamond Boots
|Amethyst Shard; Copper Ingot; Diamond; Emerald; Gold Ingot; Iron Ingot; Lapis Lazuli; Nether Quartz; Netherite Ingot; Redstone Dust; Diamond; Emerald
|Amethyst Trim Iron Helmet; Copper Trim Netherite Chestplate; Diamond Trim Golden Leggings; Emerald Trim Diamond Boots; Gold Trim Iron Helmet; Iron Trim Netherite Chestplate; Lapis Trim Golden Leggings; Quartz Trim Diamond Boots; Netherite Trim Iron Helmet; Redstone Trim Netherite Chestplate; Diamond Trim Golden Leggings; Emerald Trim Diamond Boots
|tail=1
}}
;List of color palettes for all materials
*{{ItemSprite|emerald }} - {{TrimPalette| emerald }}
*{{ItemSprite|redstone dust }} - {{TrimPalette| redstone dust }}
*{{ItemSprite|lapis lazuli }} - {{TrimPalette| lapis lazuli }}
*{{ItemSprite|amethyst shard }} - {{TrimPalette| amethyst shard }}
*{{ItemSprite|nether quartz }} - {{TrimPalette| nether quartz }}
*{{ItemSprite|netherite ingot }} - {{TrimPalette| netherite ingot }} (Darker: {{TrimPalette| netherite ingot |darker=1}})
*{{ItemSprite|diamond }} - {{TrimPalette| diamond }} (Darker: {{TrimPalette| diamond |darker=1}})
*{{ItemSprite|gold ingot }} - {{TrimPalette| gold ingot }} (Darker: {{TrimPalette| gold ingot |darker=1}})
*{{ItemSprite|iron ingot }} - {{TrimPalette| iron ingot }} (Darker: {{TrimPalette| iron ingot |darker=1}})
*{{ItemSprite|copper ingot }} - {{TrimPalette| copper ingot }}
== Data values ==
=== ID ===
{{edition|java}}:
{{ID table
|edition=java
|firstcolumnname=Smithing Template
|showforms=y
|generatetranslationkeys=y
|displayname=Netherite Upgrade
|spritename=netherite-upgrade-smithing-template
|spritetype=item
|nameid=netherite_upgrade_smithing_template
|form=item}}
{{ID table
|displayname=Sentry Armor Trim
|spritename=sentry-armor-trim-smithing-template
|spritetype=item
|nameid=sentry_armor_trim_smithing_template
|form=item}}
{{ID table
|displayname=Vex Armor Trim
|spritename=vex-armor-trim-smithing-template
|spritetype=item
|nameid=vex_armor_trim_smithing_template
|form=item}}
{{ID table
|displayname=Wild Armor Trim
|spritename=wild-armor-trim-smithing-template
|spritetype=item
|nameid=wild_armor_trim_smithing_template
|form=item}}
{{ID table
|displayname=Coast Armor Trim
|spritename=coast-armor-trim-smithing-template
|spritetype=item
|nameid=coast_armor_trim_smithing_template
|form=item}}
{{ID table
|displayname=Dune Armor Trim
|spritename=dune-armor-trim-smithing-template
|spritetype=item
|nameid=dune_armor_trim_smithing_template
|form=item}}
{{ID table
|displayname=Wayfinder Armor Trim
|spritename=wayfinder-armor-trim-smithing-template
|spritetype=item
|nameid=wayfinder_armor_trim_smithing_template
|form=item}}
{{ID table
|displayname=Raiser Armor Trim
|spritename=raiser-armor-trim-smithing-template
|spritetype=item
|nameid=raiser_armor_trim_smithing_template
|form=item}}
{{ID table
|displayname=Shaper Armor Trim
|spritename=shaper-armor-trim-smithing-template
|spritetype=item
|nameid=shaper_armor_trim_smithing_template
|form=item}}
{{ID table
|displayname=Host Armor Trim
|spritename=host-armor-trim-smithing-template
|spritetype=item
|nameid=host_armor_trim_smithing_template
|form=item}}
{{ID table
|displayname=Ward Armor Trim
|spritename=ward-armor-trim-smithing-template
|spritetype=item
|nameid=ward_armor_trim_smithing_template
|form=item}}
{{ID table
|displayname=Silence Armor Trim
|spritename=silence-armor-trim-smithing-template
|spritetype=item
|nameid=silence_armor_trim_smithing_template
|form=item}}
{{ID table
|displayname=Tide Armor Trim
|spritename=tide-armor-trim-smithing-template
|spritetype=item
|nameid=tide_armor_trim_smithing_template
|form=item}}
{{ID table
|displayname=Snout Armor Trim
|spritename=snout-armor-trim-smithing-template
|spritetype=item
|nameid=snout_armor_trim_smithing_template
|form=item}}
{{ID table
|displayname=Rib Armor Trim
|spritename=rib-armor-trim-smithing-template
|spritetype=item
|nameid=rib_armor_trim_smithing_template
|form=item}}
{{ID table
|displayname=Eye Armor Trim
|spritename=eye-armor-trim-smithing-template
|spritetype=item
|nameid=eye_armor_trim_smithing_template
|form=item}}
{{ID table
|displayname=Spire Armor Trim
|spritename=spire-armor-trim-smithing-template
|spritetype=item
|nameid=spire_armor_trim_smithing_template
|form=item
|foot=1}}
{{edition|bedrock}}:
{{ID table
|edition=bedrock
|firstcolumnname=Smithing Template
|shownumericids=y
|showforms=y
|notshowbeitemforms=y
|generatetranslationkeys=y
|displayname=Netherite Upgrade
|spritename=netherite-upgrade-smithing-template
|spritetype=item
|nameid=netherite_upgrade_smithing_template
|id=685
|form=item
|translationkey=item.smithing_template.name, upgrade.netherite_upgrade.name}}
{{ID table
|displayname=Sentry Armor Trim
|spritename=sentry-armor-trim-smithing-template
|spritetype=item
|nameid=sentry_armor_trim_smithing_template
|id=686
|form=item
|translationkey=item.smithing_template.name, trim_pattern.sentry.name}}
{{ID table
|displayname=Vex Armor Trim
|spritename=vex-armor-trim-smithing-template
|spritetype=item
|nameid=vex_armor_trim_smithing_template
|id=692
|form=item
|translationkey=item.smithing_template.name, trim_pattern.vex.name}}
{{ID table
|displayname=Wild Armor Trim
|spritename=wild-armor-trim-smithing-template
|spritetype=item
|nameid=wild_armor_trim_smithing_template
|id=689
|form=item
|translationkey=item.smithing_template.name, trim_pattern.wild.name}}
{{ID table
|displayname=Coast Armor Trim
|spritename=coast-armor-trim-smithing-template
|spritetype=item
|nameid=coast_armor_trim_smithing_template
|id=688
|form=item
|translationkey=item.smithing_template.name, trim_pattern.coast.name}}
{{ID table
|displayname=Dune Armor Trim
|spritename=dune-armor-trim-smithing-template
|spritetype=item
|nameid=dune_armor_trim_smithing_template
|id=687
|form=item
|translationkey=item.smithing_template.name, trim_pattern.dune.name}}
{{ID table
|displayname=Wayfinder Armor Trim
|spritename=wayfinder-armor-trim-smithing-template
|spritetype=item
|nameid=wayfinder_armor_trim_smithing_template
|id=698
|form=item
|translationkey=item.smithing_template.name, trim_pattern.wayfinder.name}}
{{ID table
|displayname=Raiser Armor Trim
|spritename=raiser-armor-trim-smithing-template
|spritetype=item
|nameid=raiser_armor_trim_smithing_template
|id=699
|form=item
|translationkey=item.smithing_template.name, trim_pattern.raiser.name}}
{{ID table
|displayname=Shaper Armor Trim
|spritename=shaper-armor-trim-smithing-template
|spritetype=item
|nameid=shaper_armor_trim_smithing_template
|id=700
|form=item
|translationkey=item.smithing_template.name, trim_pattern.shaper.name}}
{{ID table
|displayname=Host Armor Trim
|spritename=host-armor-trim-smithing-template
|spritetype=item
|nameid=host_armor_trim_smithing_template
|id=701
|form=item
|translationkey=item.smithing_template.name, trim_pattern.host.name}}
{{ID table
|displayname=Ward Armor Trim
|spritename=ward-armor-trim-smithing-template
|spritetype=item
|nameid=ward_armor_trim_smithing_template
|id=690
|form=item
|translationkey=item.smithing_template.name, trim_pattern.ward.name}}
{{ID table
|displayname=Silence Armor Trim
|spritename=silence-armor-trim-smithing-template
|spritetype=item
|nameid=silence_armor_trim_smithing_template
|id=697
|form=item
|translationkey=item.smithing_template.name, trim_pattern.silence.name}}
{{ID table
|displayname=Tide Armor Trim
|spritename=tide-armor-trim-smithing-template
|spritetype=item
|nameid=tide_armor_trim_smithing_template
|id=693
|form=item
|translationkey=item.smithing_template.name, trim_pattern.tide.name}}
{{ID table
|displayname=Snout Armor Trim
|spritename=snout-armor-trim-smithing-template
|spritetype=item
|nameid=snout_armor_trim_smithing_template
|id=694
|form=item
|translationkey=item.smithing_template.name, trim_pattern.snout.name}}
{{ID table
|displayname=Rib Armor Trim
|spritename=rib-armor-trim-smithing-template
|spritetype=item
|nameid=rib_armor_trim_smithing_template
|id=695
|form=item
|translationkey=item.smithing_template.name, trim_pattern.rib.name}}
{{ID table
|displayname=Eye Armor Trim
|spritename=eye-armor-trim-smithing-template
|spritetype=item
|nameid=eye_armor_trim_smithing_template
|id=691
|form=item
|translationkey=item.smithing_template.name, trim_pattern.eye.name}}
{{ID table
|displayname=Spire Armor Trim
|spritename=spire-armor-trim-smithing-template
|spritetype=item
|nameid=spire_armor_trim_smithing_template
|id=696
|form=item
|translationkey=item.smithing_template.name, trim_pattern.spire.name
|foot=1}}
== Achievements ==
{{load achievements|Smithing with style}}
== Advancements ==
{{load advancements|Crafting a New Look;Smithing with Style}}
== Video ==
{{yt|klP9SrJFDU8}}
== History ==
{{History|java}}
{{History||1.20<br>(Experimental)|link=1.19.4|snap=23w04a|[[File:Netherite Upgrade Smithing Template JE1 BE1.png|32px]] [[File:Sentry Armor Trim Smithing Template JE1 BE1.png|32px]] [[File:Vex Armor Trim Smithing Template JE1 BE1.png|32px]] [[File:Wild Armor Trim Smithing Template JE1 BE1.png|32px]] [[File:Coast Armor Trim Smithing Template JE1 BE1.png|32px]] [[File:Dune Armor Trim Smithing Template JE1 BE1.png|32px]] [[File:Ward Armor Trim Smithing Template JE1 BE1.png|32px]] [[File:Tide Armor Trim Smithing Template JE1 BE1.png|32px]] [[File:Snout Armor Trim Smithing Template JE1 BE1.png|32px]] [[File:Rib Armor Trim Smithing Template JE1 BE1.png|32px]] [[File:Eye Armor Trim Smithing Template JE1 BE1.png|32px]] [[File:Spire Armor Trim Smithing Template JE1 BE1.png|32px]] Added smithing templates behind the "Update 1.20" experimental datapack.}}
{{History|||snap=23w05a|Smithing templates can be used to trim leather armor.
|Gold, iron, diamond, and netherite armor can be trimmed with their respective material.
|The dune, coast, wild, and sentry armor trims now always generate two templates in a chest when found.
|Increased the chances for all smithing templates that generate in chest loot to spawn:
*Netherite upgrade chance to find increased from 3.2% to 10%.
*Coast chance to find increased from 11.1% to 16.7%.
*Dune chance to find increased from 11.1% to 14.3%.
*Eye chance to find increased from 4.7% to 10% in alter chests, and to 100% in library chests.
*Rib chance to find increased from 4.7% to 6.7%.
*Sentry chance to find increased from 20% to 25%.
*Snout chance to find increased from 4.7% to 8.3%.
*Spire chance to find increased from 4.7% to 6.7%.
*Vex chance to find increased from 4.7% to 50%.
*Ward chance to find increased from 4.7% to 5%.
*Wild chance to find increased from 20% to 33%.}}
{{History||1.20|snap=23w12a|Smithing templates are now available without using the "Update 1.20" experimental datapack.|[[File:Wayfinder Armor Trim Smithing Template JE1 BE1.png|32px]] [[File:Raiser Armor Trim Smithing Template JE1 BE1.png|32px]] [[File:Shaper Armor Trim Smithing Template JE1 BE1.png|32px]] [[File:Host Armor Trim Smithing Template JE1 BE1.png|32px]] [[File:Silence Armor Trim Smithing Template JE1 BE1.png|32px]] Added wayfinder, raiser, shaper, host, and silence armor trim smithing templates.
|[[File:Sentry Armor Trim Smithing Template JE2 BE2.png|32px]] [[File:Dune Armor Trim Smithing Template JE2 BE2.png|32px]] Changed the textures of the sentry and dune armor trim smithing templates.
|The pattern textures of dune and sentry armor trims are changed from [[File:Armor Trim Dune (sample model) JE1 BE1.png|24px]] [[File:Armor Trim Sentry (sample model) JE1 BE1.png|24px]] to [[File:Armor Trim Dune (sample model) JE2 BE2.png|24px]] [[File:Armor Trim Sentry (sample model) JE2 BE2.png|24px]].<br>
Those previous patterns were left with different names: dune was renamed sentry and sentry was renamed shaper.}}
{{History|||snap=23w16a|Wayfinder, raiser, shaper, and host armor trim no longer generates in [[suspicious sand]] in [[trail ruins]].|Due to the split of the archaeological loot tables for the suspicious gravel within the [[trail ruins]]; wayfinder, raiser, shaper, and host armor trim now are in the rare loot.}}
{{History|||snap=23w17a|The probability of the wayfinder, raiser, shaper, and host armor trim to generate in [[suspicious gravel]] in [[trail ruins]] has been changed from 1/11 to 1/12.|The player now get the [[advancement]] "Crafting a new look" when they craft a trimmed armor at a [[smithing table]] using a smithing template, "Smithing with style" when they apply these smithing templates at least once on their armor: Spire, Snout, Rib, Ward, Silence, Vex, Tide, and Wayfinder.}}
{{History|bedrock}}
{{History||Next Major Update<br>(Experimental)|link=Bedrock Edition 1.19.80|snap=beta 1.19.80.21|[[File:Netherite Upgrade Smithing Template JE1 BE1.png|32px]] [[File:Sentry Armor Trim Smithing Template JE1 BE1.png|32px]] [[File:Vex Armor Trim Smithing Template JE1 BE1.png|32px]] [[File:Wild Armor Trim Smithing Template JE1 BE1.png|32px]] [[File:Coast Armor Trim Smithing Template JE1 BE1.png|32px]] [[File:Dune Armor Trim Smithing Template JE1 BE1.png|32px]] [[File:Ward Armor Trim Smithing Template JE1 BE1.png|32px]] [[File:Tide Armor Trim Smithing Template JE1 BE1.png|32px]] [[File:Snout Armor Trim Smithing Template JE1 BE1.png|32px]] [[File:Rib Armor Trim Smithing Template JE1 BE1.png|32px]] [[File:Eye Armor Trim Smithing Template JE1 BE1.png|32px]] [[File:Spire Armor Trim Smithing Template JE1 BE1.png|32px]] Added smithing templates behind the "[[Bedrock Edition 1.20.0|Next Major Update]]" [[experimental]] toggle.}}
{{History|||snap=beta 1.19.80.22|[[File:Wayfinder Armor Trim Smithing Template JE1 BE1.png|32px]] [[File:Raiser Armor Trim Smithing Template JE1 BE1.png|32px]] [[File:Shaper Armor Trim Smithing Template JE1 BE1.png|32px]] [[File:Host Armor Trim Smithing Template JE1 BE1.png|32px]] [[File:Silence Armor Trim Smithing Template JE1 BE1.png|32px]] Added wayfinder, raiser, shaper, host, and silence armor trim smithing templates.
|[[File:Sentry Armor Trim Smithing Template JE2 BE2.png|32px]] [[File:Dune Armor Trim Smithing Template JE2 BE2.png|32px]] Changed the textures of the sentry and dune armor trim smithing templates.
|The pattern textures of dune and sentry armor trims are changed from [[File:Armor Trim Dune (sample model) JE1 BE1.png|24px]] [[File:Armor Trim Sentry (sample model) JE1 BE1.png|24px]] to [[File:Armor Trim Dune (sample model) JE2 BE2.png|24px]] [[File:Armor Trim Sentry (sample model) JE2 BE2.png|24px]].<br>
Those previous patterns were left with different names: dune was renamed sentry and sentry was renamed shaper.}}
{{History||1.20.0|snap=beta 1.20.0.21|Smithing templates are now available without using the "Next Major Update" experimental toggle.}}
{{History|foot}}
== Issues ==
{{Issue list}}
== Trivia ==
* Smithing templates were named "Smithing Blueprints" in the prototype but was changed because the word "blueprint" sounded modern and technical.<ref>{{ytl|klP9SrJFDU8|Minecraft 1.20: Armor Trims - What Do They Mean?|Minecraft|May 4, 2023|t=98}}</ref>
* When Mojang developer Gnembon was working on armor trims, he accidentally messed up their rendering, making them jet through the player's body in a weird fashion, similar to what appears in {{w|Salvador Dalí}}'s paintings where a hand might poke through a forehead.<ref>{{ytl|ghQODkq4ITI|Mojang Dev Comes To Hermitcraft! (Mojang Developer Gnembom Interview)|GoodVodsWithScar|June 23, 2023|t=1980}}</ref>
* Some of the armor trims feature patterns based on a [[mob]] or [[block]] that is found in the same [[Generated structures|structure]] as the corresponding smithing template.<ref name=":0">"Some of the armor trims reflect the place where you found the template, for example bastions contain a piglin-inspired trim."-[[Sofia Dankis]]-{{Mcnet|armor-trims-coming-minecraft-1-20|Armor Trims Coming to Minecraft 1.20|January 24, 2023}}</ref>
** The spire armor trim resembles a [[shulker]].
** The vex armor trim resembles an [[evoker]]. As an item in the [[inventory]], it resembles the wing or the vein texture of a [[vex]].
** The wild armor trim has moss growing on 3 of its corners.
** The coast armor trim appears to have barnacles attached to it.
** The ward armor trim, as an item in the inventory, resembles the faces inside a [[warden]]'s chest.
** The silence armor trim appears to have sculk creeping onto / infecting it.
** The tide armor trim resembles [[Prismarine|prismarine bricks]].
** The snout armor trim resembles a [[piglin]]<ref name=":0" />.
** The rib armor trim resembles a [[wither skeleton]].
** The eye armor trim resembles an [[eye of ender]]. There are also two eyes on the head part of the armor trim that resemble those of an [[enderman]].
* ''Netherite upgrade smithing template'' (35 characters with "_" and 32 characters without "_") and ''sentry armor trim smithing template'' (35 characters with "_" and 31 characters without "_") are the current longest name for item ID, while ''[[polished blackstone pressure plate]]'' and ''[[cracked polished blackstone bricks]]'' have 34 characters with "_" and 31 characters without "_".
* The silence armor trim is the rarest trim, due to being found in ancient cities in the deep dark, and having only a 1.2% chance to be per chest.
* When [[lapis lazuli]] is used as trim material, it is called "Lapis" instead of its full name "Lapis Lazuli"; this is the only instance of the abbreviation "Lapis" being used in-game.<ref>{{bug|MC-262486|||WAI}}</ref>
== Gallery ==
=== Sprites ===
<gallery>
Netherite Upgrade Smithing Template.png|Netherite Upgrade
Sentry Armor Trim Smithing Template.png|Sentry Armor Trim
Vex Armor Trim Smithing Template.png|Vex Armor Trim
Wild Armor Trim Smithing Template.png|Wild Armor Trim
Coast Armor Trim Smithing Template.png|Coast Armor Trim
Dune Armor Trim Smithing Template.png|Dune Armor Trim
Wayfinder Armor Trim Smithing Template.png|Wayfinder Armor Trim
Raiser Armor Trim Smithing Template.png|Raiser Armor Trim
Shaper Armor Trim Smithing Template.png|Shaper Armor Trim
Host Armor Trim Smithing Template.png|Host Armor Trim
Ward Armor Trim Smithing Template.png|Ward Armor Trim
Silence Armor Trim Smithing Template.png|Silence Armor Trim
Tide Armor Trim Smithing Template.png|Tide Armor Trim
Snout Armor Trim Smithing Template.png|Snout Armor Trim
Rib Armor Trim Smithing Template.png|Rib Armor Trim
Eye Armor Trim Smithing Template.png|Eye Armor Trim
Spire Armor Trim Smithing Template.png|Spire Armor Trim
</gallery>
=== Armor trim patterns ===
<gallery>
Armor Trim Sentry (sample model).png|Sentry Armor Trim
Armor Trim Vex (sample model).png|Vex Armor Trim
Armor Trim Wild (sample model).png|Wild Armor Trim
Armor Trim Coast (sample model).png|Coast Armor Trim
Armor Trim Dune (sample model).png|Dune Armor Trim
Armor Trim Wayfinder (sample model).png|Wayfinder Armor Trim
Armor Trim Raiser (sample model).png|Raiser Armor Trim
Armor Trim Shaper (sample model).png|Shaper Armor Trim
Armor Trim Host (sample model).png|Host Armor Trim
Armor Trim Ward (sample model).png|Ward Armor Trim
Armor Trim Silence (sample model).png|Silence Armor Trim
Armor Trim Tide (sample model).png|Tide Armor Trim
Armor Trim Snout (sample model).png|Snout Armor Trim
Armor Trim Rib (sample model).png|Rib Armor Trim
Armor Trim Eye (sample model).png|Eye Armor Trim
Armor Trim Spire (sample model).png|Spire Armor Trim
</gallery>
=== Official Artwork ===
<gallery>
T&T Thumbnail.jpg|[[Sunny]] wearing amethyst armor trims.
Warden Chasing Alex with Silence Trim Pixel Art.png|A [[warden]] chasing Alex holding the silence armor trim.
Alex Trimming Armor in Smithing Table Pixel Art.png|Alex adding the silence armor trim and amethyst on iron armor.
Alex Wearing Iron Armor with Amethyst Pixel Art.jpg|Alex wearing the trimmed iron armor.
File:Live2023-01.jpeg|Noor working on trimmed iron armor.
</gallery>
=== Screenshots ===
<gallery>
Kingbdogz Armor Trim 1.jpg|Redstone trims on diamond armor.
Kingbdogz Armor Trim 2.jpg|Gold trims on netherite armor.
Too Many Trims.jpg|A large amount of armor trims.
Kingbdogz Armor Trim 3.jpg|Gold on netherite.
Kingbdogz Armor Trim 4.jpg|Diamond on diamond.
New Armor Trims in 23W12A.jpg|<ref>{{Tweet|kingbdogz|1638580472962850831|new trims got the drip The new "Silence" armor trim to the left is now the hardest trim to get, with only a 1% chance per chest to spawn in Ancient Cities. Definitely gonna be a challenge to get!|March 22, 2023}}</ref>
Emerald Armor.png|Emerald on gold.
Xilefian Armor Trims 1.png|[[Xilefian]] showing how armor trims work.
Xilefian Armor Trims 2.png|[[Xilefian]] showing how armor trims work.
Xilefian Armor Trims 3.png|[[Xilefian]] showing how armor trims work.
Armor Trims On Netherite Armors.png|A display of all eleven (before [[Java Edition 23w12a]]) armor trims and ten colors on netherite armors.
Armor Trim Showcase.png|A display of all eleven (before [[Java Edition 23w12a]]) armor trims, on netherite armor using emerald as the trim material.
Armor Trim Colors.png|A display of all ten armor trim colors, using the ward trim on a netherite helmet.
Silence Armor Trim on All Armors.png|A display of all ten colors of the silence armor trim on all armors.
Image 2023-06-07 154100087.png|A screenshot of every armor trim in every color(besides quartz) on leather armor.
Armor Trim Friends.jpg|Official screenshot of [[Alex]] and [[Zuri]] wearing armor trims.
LadyAgnes Armor Trims.jpg|Copper trims on netherite armor.
Trim Lineup.jpg
Fancy Delta.jpg|[[Kai]] wearing trimmed armor in a [[Basalt Delta]].
Trims & Pots.jpg
Noor Gold Armor Trim .jpeg
Noor Diamond Armor Trim.jpeg
Noor Netherite Armor Trim.jpeg
Noor Iron Armor Trim.jpeg
</gallery>
== References ==
{{Reflist}}
{{Items}}
[[Category:Bedrock Edition]]
[[Category:Non-renewable resources]]
[[de:Schmiedevorlage]]
[[es:Molde de herrería]]
[[fr:Modèle de forge]]
[[ja:鍛冶型]]
[[pl:Szablon kowalski]]
[[pt:Molde de ferraria]]
[[ru:Кузнечный шаблон]]
[[uk:Ковальський шаблон]]
[[zh:锻造模板]]</li></ul> | pre5 | The tag "translation" is now limited to the range of -24 to 24. | |||
| The tag "scale" is now limited to 4 or less. | |||||
1.9{{Extension DPL}}<ul><li>[[Bleach|Bleach]]<br/>{{education feature}}
{{exclusive|bedrock|education}}
{{Item
| image = Bleach.png
| renewable = No
| stackable = Yes (64)
}}
'''Bleach''' is an [[item]] used to [[dye]] things white. It is a [[compound]], as it is made using a [[lab table]].
== Obtaining ==
=== Lab Table ===
Bleach is not obtainable in the [[creative inventory]] or {{cmd|give}}. The only way to obtain it is using a [[lab table]].
{| class="wikitable"
! Result
! Materials Needed
|-
!rowspan=2|{{slot|Bleach}}<br>[[Bleach]]
|{{slot|Water (compound)|link=Compound}}{{slot|Water (compound)|link=Compound}}{{slot|Water (compound)|link=Compound}}{{slot|Sodium Hypochlorite|link=Compound}}{{slot|Sodium Hypochlorite|link=Compound}}{{slot|Sodium Hypochlorite|link=Compound}}
|-
|<center>[[Water (compound)|Water]] x3, [[Compound|Sodium Hypochlorite]] x3</center>
|}
== Usage ==
=== Crafting ingredient ===
{{crafting usage}}
== Sounds ==
{{Sound table
|type=bedrock
|sound=Fire.ogg
|source=sound
|description=When bleach is created by a lab table
|id=lt.reaction.fire
|volume=6.0
|pitch=0.7/0.9
|foot=1}}
== Data values ==
=== ID ===
{{ID table
|edition=bedrock
|shownumericids=y
|showforms=y
|notshowbeitemforms=y
|generatetranslationkeys=y
|displayname=Bleach
|spritetype=item
|nameid=bleach
|id=596
|form=item
|foot=1}}
== History ==
{{History|bedrock}}
{{History||1.4.0|snap=beta 1.2.20.1|[[File:Bleach BE1.png|32px]] Added bleach.}}
{{History|education}}
{{History||1.0.27|[[File:Bleach BE1.png|32px]] Added bleach.}}
{{History|foot}}
== Trivia ==
*[[File:Bleach (compound).png|32px]] There is an [[History of textures/Unused textures#Unused compounds|unused bleach texture]] in the compounds folder of the chemistry resource pack, which is slightly different from the one used in the game.
== Issues ==
{{issue list}}
{{Items}}
{{Education Edition}}
[[Category:Dyes]]
[[Category:Non-renewable resources]]
[[Category:Education Edition items]]
[[de:Bleichmittel]]
[[es:Lejía]]
[[ja:漂白剤]]
[[ko:표백제]]
[[pl:Wybielacz]]
[[pt:Alvejante]]
[[zh:漂白剂]]
[[lzh:素精]]</li><li>[[Chalkboard|Chalkboard]]<br/>{{Education feature}}
{{unobtainable|edition=be}}{{Block
|image=<gallery>
Chalkboard Slate.png|Slate
Chalkboard Poster.png|Poster
Chalkboard Board.png|Board
</gallery>
|invimage=Slate
|invimage2=Poster
|invimage3=Board
|transparent=Yes
|renewable=No
|light=No
|tool=None
|stackable=Yes (16)
|flammable=No
}}
A '''chalkboard''' is a [[block]] that can display more text than a [[sign]].<ref>https://education.minecraft.net/support/knowledge-base/using-slates-posters-boards/</ref> Three sizes are available: 1×1 (slate), 2×1 (poster), and 3×2 (board).
== Obtaining ==
In ''[[Education Edition]]'', chalkboards can be obtained in the [[Creative inventory]] or through the {{cmd|give}} command.
In ''[[Bedrock Edition]]'', chalkboards cannot be obtained by commands or the creative inventory, and can only be obtained by using glitches or inventory editors.
== Usage ==
A chalkboard can be used similarly to a [[sign]], to display text. Once placed, select the chalkboard and enter the desired text and click the "OK" button. The "×" in the upper right corner of the board closes the edit screen.
=== Placement ===
Chalkboards may be placed on the top or side of other blocks (including non-solid blocks like [[fence]]s, [[glass]], [[rail]]s, and other chalkboards). To place a chalkboard, {{control|use}} a chalkboard item while pointing at the block the chalkboard should be attached to. To place a chalkboard on a block that can be interacted with by the {{control|use}} control (for example, [[chest]]s, [[note block]]s, etc.), {{control|sneak}} while placing the chalkboard.
1×1 slates placed on the top of a block stand on a short post, facing in the direction of the player who placed it, in any of 16 different directions. 2×1 posters and 2×3 boards can be placed in any of 4 different directions. Chalkboards placed on the side of a block simply float there, even if the block doesn't make contact with the chalkboards.
=== Text ===
When entering text, six lines of text are available for the slates and posters, while fifteen lines of text are available for the 2×3 boards. To switch between lines, the player can press Enter or the up/down arrow keys. The location of text currently selected has a flashing cursor.
While editing, typing and backspacing can occur at any point in the line by moving the cursor using the left and right arrow keys. Once the end of the line has been reached, the word is hyphenated and is continued on the next line.
After the editing window is closed, right-clicking on a chalkboard reopens the editing menu. Copy and paste can be performed, and no more than the basic/shifted keyboard characters may be entered.
=== Interaction ===
Chalkboards act as though they have a {{control|use}} action, so {{control|sneaking}} is required to place blocks or use items while the cursor is pointed at them.
Unlike signs, boards block a [[piston]] from moving.
Boards have no collision box (they are completely non-solid), so [[item]]s and [[mob]]s can move through boards blocks. Other blocks (including other boards) can be placed on any edge of a board.
[[Water]] and [[lava]] flow around boards. Lava can create [[fire]] in [[air]] blocks next to boards as if the boards were flammable, but the boards do not burn.
== Sounds ==
{{Sound table/Block/Stone/BE}}
== Data values ==
=== ID ===
{{ID table
|edition=bedrock
|shownumericids=y
|showforms=y
|generatetranslationkeys=y
|displayname=Block
|spritename=chalkboard
|spritetype=block
|nameid=chalkboard
|id=230
|form=block
|translationkey=tile.chalkboard.oneByOne.name, tile.chalkboard.twoByOne.name, tile.chalkboard.threeByTwo.name}}
{{ID table
|displayname=Item
|spritename=board
|spritetype=item
|nameid=board
|translationkey=tile.chalkboard.oneByOne.name, tile.chalkboard.twoByOne.name, tile.chalkboard.threeByTwo.name
|id=454
|form=item
|foot=1}}
=== Metadata ===
{{see also|Data values}}
Chalkboards uses the following data values:
*Slate: 1
*Board: 2
*Poster: 3
<!--{{/DV}}-->
=== Block states ===
{{see also|Block states}}
{{info needed}}
<!--{{/BS}}-->
== History ==
{{History|pocket alpha}}
{{History||v0.16.0|snap=build 1|[[File:Chalkboard Slate.png|32px]] [[File:Chalkboard Poster.png|32px]] [[File:Chalkboard Board.png|32px]]<br>[[File:Chalkboard_Slate_(item)_BE1.png|32px]] [[File:Chalkboard_Poster_(item)_BE1.png|32px]] [[File:Chalkboard_Board_(item)_BE1.png|32px]] Added chalkboards, likely as an accidental addition.
|Chalkboards can be obtained and placed using the {{cmd|give}} and {{cmd|setblock}} [[command]]s respectively. However, they serve no purpose.}}
{{History|||snap=build 2|Chalkboards have now been removed. However, the textures still exist.}}
{{History|bedrock}}
{{History||1.11.0|snap=beta 1.11.0.1|Re-added chalkboards. They still exist as entities, but can't be spawned. The items can't be spawned either.}}
{{h||1.17.30|snap=beta 1.17.30.20|Chalkboards can now be placed consistently.}}
{{History|education}}
{{History||MinecraftEdu|link=MinecraftEdu|[[File:Oak Sign JE1 BE1.png|30px]] [[MinecraftEdu]], Education Edition's predecessor, had "[[Big Sign]]s", 3 block wide signs that served a similar purpose.}}
{{History||1.0|[[File:Chalkboard Slate.png|32px]] [[File:Chalkboard Poster.png|32px]] [[File:Chalkboard Board.png|32px]]<br>[[File:Chalkboard_Slate_(item)_BE1.png|32px]] [[File:Chalkboard_Poster_(item)_BE1.png|32px]] [[File:Chalkboard_Board_(item)_BE1.png|32px]] Added chalkboards.}}
{{History||1.0.2|The UI of chalkboards now has a locked option.
|[[Player|Students]] now can place their own chalkboards even without a worldbuilder ability.}}
{{History|foot}}
== Gallery ==
<gallery>
Education Edition Exclusive Features.png|The chalkboard placed in a world along with other Education Edition features.
Chalkboardsingamepe.png|The chalkboard in [[Pocket Edition v0.16.0 alpha build 1]].
</gallery>
== References ==
{{Reflist}}
{{Blocks|Utility}}
{{Items}}
{{Education Edition}}
[[Category:Utility blocks]]
[[Category:Block entities]]
[[Category:Education Edition blocks]]
[[Category:Education Edition items]]
[[pt:Lousa]]
[[de:Tafel]]
[[fr:Ardoise]]
[[ja:黒板]]
[[pl:Tablica kredowa]]
[[ru:Доска]]
[[uk:Дошка]]
[[zh:黑板]]</li></ul> | 15w31a | UV is now optional, and if not supplied it automatically generates based on the element's position. | |||
| Added different models/textures for different damage values, item states, and whether the player is left handed. This works on compasses, clocks, and anything that can have a durability bar. It also contains additional tags for bows and fishing rods. | |||||
| Models can now be put together based on block state attributes, such as fences. As a result, the vanilla set of block models was reduced by almost 300 models. | |||||
| Block model JSON is now strict, comments and quoteless identifiers are now not allowed. | |||||
"display" tag defaults have now been changed, and the "thirdperson" and "firstperson" tags have now been replaced with "thirdperson_righthand", "thirdperson_lefthand", "firstperson_righthand", and "firstperson_lefthand". | |||||
| "parent" and "elements" tags can now coexist, though the top level elements tag overwrites all former ones. | |||||
| The option to disable alternate block models has now been removed. | |||||
1.14{{Extension DPL}}<ul><li>[[Block Inspector|Block Inspector]]<br/>{{MinecraftEdu feature}}
{{stub}}
{{Item
| image = BlockInspector.png
| stackable = No {{verify}}
}}
'''Block Inspector''' is an item used to display the name of the block the player is looking at on screen.
== Data values ==
{{ID table
|generatetranslationkeys=java
|displayname=Block Inspector
|spritetype=item
|nameid=block_inspector|foot=1}}
==History==
{{History|MinecraftEDU}}
{{History||0.9848|[[File:BlockInspector.png|32px]] Added block inspectors.}}
{{History|foot}}
{{Items}}</li><li>[[Emerald|Emerald]]<br/>{{About|the item|the currency in ''Minecraft Dungeons''|MCD:Emerald|the skin|MCD:Emerald (skin)|the ore|Emerald Ore|the mineral block|Block of Emerald}}
{{Item
| image = Emerald.png
| renewable = Yes
| stackable = Yes (64)
| rarity = Common}}
'''Emeralds''' are rare minerals that are used primarily as the currency for [[trading]] with [[villager]]s and [[wandering trader]]s. Naturally-occurring emeralds are rarer than [[diamond]]s.
== Obtaining ==
=== Trading (how emerald is renewable) ===
{{main|Trading}}
Emeralds can be obtained by trading with [[villager]]s, since they are the currency that villagers use for trading. Villagers either buy or sell specific goods for emeralds. Some villagers trade stuff that is renewable with emerald.
=== Mining ===
[[Emerald ore]] drops one emerald when mined using an iron or better [[pickaxe]]. If the pickaxe is enchanted with [[Fortune]], it may drop an extra emerald per level of Fortune, up to a maximum of 4 emeralds with Fortune III. If the ore is mined using a pickaxe enchanted with [[Silk Touch]], it drops itself in ore form instead of an emerald.
=== Crafting ===
{{Crafting
|Block of Emerald
|Output= Emerald,9
|type= Material
}}
=== Smelting ===
{{Smelting
|Emerald Ore; Deepslate Emerald Ore
|Emerald
|1
}}
=== Natural generation ===
{{see also|Emerald Ore#Natural generation}}
Emeralds can generate in [[chest]]s in some [[village]] houses or other generated [[Generated structures|structures]].
{{needs update|inaccurate=1|section=1}}
{{LootChestItem|emerald}}
=== Drops ===
[[Vindicator]]s and [[evoker]]s drop 0–1 emeralds upon death. [[Looting]] increases the maximum emerald drop by one per level, for a maximum of 4 emeralds with Looting III.
[[Fox]]es that are holding emeralds also have a chance of 100% to drop the emerald they are holding upon death. Alternatively, the player can drop a food item to entice the fox to drop the emerald without killing it.
{{IN|bedrock}}, vindicators and [[pillager]]s spawned from [[raids]] can drop 0–1 emeralds. Depending on difficulty, vindicators and pillagers spawned from raids also have a chance of dropping additional emeralds. There is a 65% chance of dropping on easy and normal, and an 80% chance of dropping on hard. If this additional drop condition is met, different emerald counts can drop with different chances. There is a {{frac|10|39}} chance to drop an additional 0–1 emeralds, a {{frac|5|39}} chance to drop an additional 2–3, and a {{frac|2|39}} chance to drop an additional 4–5.
{{IN|bedrock}}, with Looting III, it is possible for a vindicator in a raid to drop up to 16 emeralds upon death (vindicator drops + raid drops + an additional drop<!-- emerald from 2/39 chance-->).
== Usage ==
=== Trading ===
{{main|Trading}}
Emeralds are primarily used as currency for [[trading]] with villagers and wandering traders. Trading is typically a faster way to obtain emeralds than by mining, as an emerald ore is rarer than a diamond ore.
=== Crafting ingredient ===
{{crafting usage}}
===Beacons===
Emeralds can be used to select powers from a [[beacon]]. The player must select one of the available powers and then insert an emerald into the item slot.
An emerald can be substituted for an [[iron ingot]], a [[gold ingot]], a [[diamond]] or a [[netherite ingot]] in a beacon.
=== Smithing ingredient ===
{{Smithing
|head=1
|ingredients=Any Armor Trim +<br/>Any Armor Piece + <br/>Emerald
|Any Armor Trim Smithing Template
|Netherite Chestplate
|Emerald
|Emerald Trim Netherite Chestplate
|showdescription=1
|description = All armor types can be used in this recipe,<br/>a netherite chestplate is shown as an example.
|tail=1
}}
;Trim color palette
The following color palette is shown on the designs on trimmed armor:
*{{TrimPalette|emerald}}
== Achievements ==
{{load achievements|The Haggler;Buy Low;Master Trader}}
== Advancements ==
{{load advancements|What a Deal!}}
== Data values ==
=== ID ===
{{edition|java}}:
{{ID table
|edition=java
|showitemtags=y
|showforms=y
|generatetranslationkeys=y
|displayname=Emerald
|spritetype=item
|nameid=emerald
|itemtags=beacon_payment_items
|form=item
|foot=1}}
{{edition|bedrock}}:
{{ID table
|edition=bedrock
|shownumericids=y
|showforms=y
|notshowbeitemforms=y
|generatetranslationkeys=y
|displayname=Emerald
|spritetype=item
|nameid=emerald
|id=512
|form=item
|foot=1}}
== History ==
{{History|java indev}}
{{History||0.31|snap=20100129|Added [[diamond]]s, referred to as emeralds in the code.}}
{{History|java}}
{{History||May 21, 2012|link={{tweet|jeb_|204619936616808451}}|[[File:Ruby pJE20120521.png|32px]] [[Jens Bergensten|Jeb]] released a screenshot of himself testing the [[trading]] system. At this time, what would become emeralds were [[History_of_textures/Unused_textures#Ruby|rubies]].<ref>http://www.minecraftforum.net/topic/1621716-15-new-blocksitems/#entry19977082</ref>}}
{{History||1.3.1|snap=12w21a|[[File:Emerald JE1 BE1.png|32px]] Added emeralds and [[emerald ore]].
|Emeralds can be [[trading|traded]] with [[villager]]s in exchange for different [[item]]s.
|Added [[desert temple]]s, with a hidden [[chest]] room and loot containing emeralds.
|[[File:Ruby JE1 BE1.png|32px]] The texture of [[History_of_textures/Unused_textures#Ruby|rubies]] can be found in the (at this time unused) file {{cd|items.png}}.<ref name="en_US 12w21">Snapshot 12w21a/b ''lang/en_US.lang'': '''item.ruby.name=Ruby'''</ref>}}
{{History|||snap=12w22a|[[Block of emerald]] has now been added, which is [[crafting|crafted]] from nine emeralds and can be placed as a decorative [[block]].
|Added [[jungle temple]]s, which contain loot [[chest]]s with emeralds.}}
{{History||1.4.2|snap=12w32a|As [[zombie villager]]s can now spawn and be cured, emeralds can now still be obtained in [[trading|trades]] even if [[generated structures]] are disabled.}}
{{history||1.9|snap=15w31a|Emeralds now generate in [[end city]] ship [[chest]]s.}}
{{history|||snap=15w43a|Emeralds now generate in [[igloo]] basement chests.}}
{{history|||snap=15w44a|The average yield of emeralds in [[desert temple]] chests has now been increased.}}
{{History||1.11|snap=16w39a|Added [[vindicator]]s and [[evoker]]s, which drop emeralds if killed by a player.}}
{{History||1.13|snap=17w47a|Prior to [[1.13/Flattening|''The Flattening'']], this [[item]]'s numeral ID was 388.}}
{{History|||snap=18w09a|Emeralds can now generate in the loot [[chest]]s of [[underwater ruins]].}}
{{History|||snap=18w10a|Emeralds can now generate in [[buried treasure]] chests.}}
{{History|||snap=18w11a|Emeralds can now generate in the chests of [[shipwreck]]s.}}
{{History||1.14|snap=18w43a|[[File:Emerald JE2 BE2.png|32px]] The texture of emeralds has now been changed.
|Added [[pillager]]s, which can [[drops|drop]] emeralds.}}
{{History|||snap=18w46a|Pillagers no longer drop emeralds.}}
{{History|||snap=18w48a|Emeralds now generate in chests in [[village]] tanneries, fisher cottages and plains village houses.}}
{{History|||snap=18w49a|Emeralds now generate in chests in [[village]] shepherd houses, mason houses, butcher shops, and savanna and snowy village houses.}}
{{History|||snap=18w50a|Emeralds now generate in chests in [[village]] fletcher houses, temples, and desert and taiga village houses.}}
{{History|||snap=19w07a|Added [[fox]]es, which sometimes spawn with emeralds in their mouths.}}
{{History|||snap=19w08a|[[File:Emerald JE3 BE3.png|32px]] The texture of emeralds has now been changed, once again and it looks smaller.}}
{{History||1.17|snap=21w13a|The unused [[History_of_textures/Unused_textures#Ruby|rubies]] texture was removed.}}
{{History||1.20<br>(Experimental)|link=1.19.4|snap=23w04a|Emeralds can now be used as an armor trim material.}}
{{History|||snap=23w07a|Emeralds now drop when brushing [[suspicious sand]] in [[desert pyramid]]s or [[desert well]]s.}}
{{History||1.20|snap=23w12a|The probability for the emerald to generate in the [[suspicious sand]] in [[desert temple]] and in [[desert well]] has been changed from 1/7 to 1/8.|Emerald can now be found in [[suspicious gravel]] and [[suspicious sand]] in cold and warm [[ocean ruins]] and in [[trail ruins]].}}
{{History|||snap=23w16a|Emerald no longer generates in [[suspicious sand]] in [[trail ruins]].|Due to the split of the archaeological loot tables for the suspicious gravel within the [[trail ruins]]; emerald now is in the common loot.}}
{{History|pocket alpha}}
{{History||v0.9.0|snap=build 1|[[File:Emerald JE1 BE1.png|32px]] Added emeralds.}}
{{History|||snap=build 5|Emeralds can now be used to craft [[blocks of emerald]].}}
{{History||v0.13.0|snap=build 1|Emeralds can now be found inside [[desert temple]] [[chest]]s.}}
{{History||v0.15.0|snap=build 1|Added [[jungle temple]]s, which contain loot chests with emeralds.}}
{{History||v0.16.0|snap=build 1|Emeralds can now be used to power [[beacon]]s.}}
{{History|pocket}}
{{History||1.0.0|snap=alpha 0.17.0.1|Emeralds can now be found in [[end city]] ship [[chest]]s.
|Emeralds can now be found in [[igloo]] basement chests.}}
{{History||1.0.4|snap=alpha 1.0.4.0|Emeralds are now used as "currency" for [[villager]] [[trading]].}}
{{History||1.1.0|snap=alpha 1.1.0.0|Added [[evoker]]s and [[vindicator]]s, which [[drops|drop]] emeralds when killed.}}
{{History|bedrock}}
{{History||1.4.0|snap=beta 1.2.14.2|Emeralds can now be found in some [[shipwreck]] [[chest]]s.}}
{{History|||snap=beta 1.2.20.1|Emeralds can now be found inside [[underwater ruins]] chests.}}
{{History||1.10.0|snap=beta 1.10.0.3|Emeralds can now be used to [[trading|buy]] items from [[wandering trader]]s.
|Emeralds can now be found in [[plains]] [[village]] house and tannery [[chest]]s.
|[[File:Emerald JE2 BE2.png|32px]] The texture of emeralds has now been changed.}}
{{History||1.11.0|snap=beta 1.11.0.1|Emeralds can now be found in [[village]] [[chest]]s other than [[plains]].}}
{{History|||snap=beta 1.11.0.4|[[Vindicator]]s and [[pillager]]s that spawn from [[raid]]s can now [[drops|drop]] bonus emeralds.}}
{{History|||snap=beta 1.11.0.5|[[File:Emerald JE3 BE3.png|32px]] The texture of emeralds has now been changed, once again.}}
{{History||1.13.0|snap=beta 1.13.0.1|Added [[fox]]es, which can [[drops|drop]] emeralds.}}
{{History||Next Major Update<br>(Experimental)|link=Bedrock Edition 1.19.70|snap=beta 1.19.70.23|Emeralds now drop when brushing [[suspicious sand]] in [[desert pyramid]]s or [[desert well]]s.}}
{{History|||snap=beta 1.19.80.21|Emeralds can now be used as an armor trim material.}}
{{History|console}}
{{History||xbox=TU14|xbone=CU1|ps=1.04|wiiu=Patch 1|switch=1.0.1|[[File:Emerald JE1 BE1.png|32px]] Added emeralds.}}
{{History|Ps4}}
{{History||1.90|[[File:Emerald JE2 BE2.png|32px]] The texture of emeralds has now been changed.}}
{{History|new3DS}}
{{History||0.1.0|[[File:Emerald JE1 BE1.png|32px]] Added emeralds.}}
{{History|foot}}
== Issues ==
{{issue list}}
== Gallery ==
<gallery>
Villager trading preview.png|The first image of the trading system released by [[Jeb]]. What would become emeralds can be seen in the [[inventory]] space.
Emerald Ore 12w21a.png|A wall of [[emerald ore]] utilizing a previous texture in snapshot [[12w21a]].
Room of Emeralds.png|All forms of emeralds in one photo: emerald (in the form of [[emerald block|block]], [[emerald ore|ore]] and the emerald itself).
</gallery>
==Trivia==
*The [[History_of_textures/Unused_textures#Ruby|ruby]] was going to be the [[villager]] currency but was changed to emeralds before the update's release.
== References ==
{{Reflist}}
{{Items}}
[[Category:Renewable resources]]
[[cs:Smaragd]]
[[de:Smaragd]]
[[es:Esmeralda]]
[[fr:Émeraude]]
[[hu:Smaragd]]
[[it:Smeraldo]]
[[ja:エメラルド]]
[[ko:에메랄드]]
[[nl:Smaragd]]
[[pl:Szmaragd]]
[[pt:Esmeralda]]
[[ru:Изумруд]]
[[th:มรกต]]
[[tr:Zümrüt]]
[[uk:Смарагд]]
[[zh:绿宝石]]</li></ul> | 18w43a | Added the item model property "custom_model_data". | |||
1.15{{Extension DPL}}<ul><li>[[Written Book|Written Book]]<br/>{{Item
| title = Written Book
| image = Written Book.gif
| renewable = Yes
| stackable = Yes (16)
}}
A '''written book''' is an [[item]] created after a [[book and quill]] is signed.
== Obtaining ==
=== Signing a book and quill ===
Written books can be obtained by signing a [[book and quill]]. After it has been signed, it cannot be edited again. The label does not say "Written Book", but whatever the [[player]] titles it. The title appears on the top line of the label, and "by <''player''>" (the player's username) on the bottom. {{IN|bedrock}}, this is customizable without [[commands]].
=== Copying ===
{{crafting
|name=Written Book
|showdescription=1
|;;;Book and Quill;Book and Quill;Book and Quill;Book and Quill;Book and Quill
|;;;;Book and Quill;Book and Quill;Book and Quill;Book and Quill
|;;;;;Book and Quill;Book and Quill;Book and Quill
|Book and Quill
|Written Book
|;;;;;;Book and Quill;Book and Quill
|;Book and Quill;Book and Quill;Book and Quill;Book and Quill;Book and Quill;Book and Quill;Book and Quill
|;;Book and Quill;Book and Quill;Book and Quill;Book and Quill;Book and Quill;Book and Quill
|;;;;;;;Book and Quill
|Output= Written Book; Written Book,2; Written Book,3; Written Book,4; Written Book,5; Written Book,6; Written Book,7; Written Book,8
|description=The input written book is not consumed.<br>The new copies are "Copy of Original" or "Copy of Copy", depending on whether the input written book is "Original" or "Copy of Original".<br>Copies of copies cannot be copied.<br>Copied books of the same generation ("Original", "Copy of Original", "Copy of Copy", or "Tattered") stack.
|type=Miscellaneous
}}
== Usage ==
Written books can be opened by right-clicking (or holding down on the screen {{in|bedrock}}), and display a GUI allowing the [[player]] to read it or turn the page.
The contents of a book are an extra set of data attached to the item. This means that when a book is destroyed, its contents are lost with it.
=== Lecterns ===
One can place a [[written book]] on an empty [[lectern]].
The lectern then emits a redstone signal depending on the displayed page in the book. On the last page, the lectern emits a signal strength of 15.
=== Chiseled bookshelf ===
{{control|Use|text=Using}} the [[chiseled bookshelf]] while having a written book in the main hand will put the book inside the chiseled bookshelf.
== Sounds ==
{{edition|java}}:
{{Sound table
|sound=Page turn1.ogg
|sound2=Page turn2.ogg
|sound3=Page turn3.ogg
|subtitle=Page rustles
|source=master
|description=When the page of a book is turned
|id=item.book.page_turn
|translationkey=subtitles.item.book.page_turn
|volume=2.0
|pitch=1.0
|distance=16}}
{{Sound table
|sound=Page turn1.ogg
|sound2=Page turn2.ogg
|sound3=Page turn3.ogg
|subtitle=Page rustles
|source=block
|description=When the page of a book is turned on a lectern
|id=item.book.page_turn
|translationkey=subtitles.item.book.page_turn
|volume=2.0
|pitch=0.9-1.0
|distance=16}}
{{Sound table
|sound=Book thump1.ogg
|sound2=Book thump2.ogg
|subtitle=Book thumps
|source=block
|description=When a book is placed on a lectern
|id=item.book.put
|translationkey=subtitles.item.book.put
|volume=1.0
|pitch=1.0
|distance=16}}
{{Sound table
|sound=Chiseled bookshelf insert1.ogg
|sound2=Chiseled bookshelf insert2.ogg
|sound3=Chiseled bookshelf insert3.ogg
|sound4=Chiseled bookshelf insert4.ogg
|subtitle=Book placed
|source=block
|description=When a written book is placed in a chiseled bookshelf
|id=block.chiseled_bookshelf.insert
|translationkey=subtitles.chiseled_bookshelf.insert
|volume=0.8
|pitch=''varies'' <ref group=sound>Can be 1.0, 0.85, or 1.1 for each sound</ref>
|distance=16}}
{{Sound table
|sound=Chiseled bookshelf pickup1.ogg
|sound2=Chiseled bookshelf pickup2.ogg
|sound3=Chiseled bookshelf pickup3.ogg
|subtitle=Book taken
|source=block
|description=When a written book is removed from a chiseled bookshelf
|id=block.chiseled_bookshelf.pickup
|translationkey=subtitles.chiseled_bookshelf.take
|volume=0.8
|pitch=''varies'' <ref group=sound>Can be 1.0, 0.8, or 1.1 for each sound</ref>
|distance=16
|foot=1}}
{{edition|bedrock}}:
{{Sound table
|type=bedrock
|sound=Page turn1.ogg
|sound2=Page turn2.ogg
|sound3=Page turn3.ogg
|source=sound
|description=When the page of a book is turned
|id=item.book.page_turn
|volume=2.0
|pitch=1.0}}
{{Sound table
|sound=Book thump1.ogg
|sound2=Book thump2.ogg
|source=block
|description=When a book is placed on a lectern
|id=item.book.put
|volume=4.8
|pitch=1.0}}
{{Sound table
|type=bedrock
|sound=Chiseled bookshelf insert1.ogg
|sound2=Chiseled bookshelf insert2.ogg
|sound3=Chiseled bookshelf insert3.ogg
|sound4=Chiseled bookshelf insert4.ogg
|source=block
|description=When a written book is placed in a chiseled bookshelf
|id=insert.chiseled_bookshelf
|volume=0.8
|pitch=''varies'' <ref group=sound>Can be 1.0, 0.85, or 1.1 for each sound</ref>}}
{{Sound table
|sound=Chiseled bookshelf pickup1.ogg
|sound2=Chiseled bookshelf pickup2.ogg
|sound3=Chiseled bookshelf pickup3.ogg
|source=block
|description=When a written book is removed from a chiseled bookshelf
|id=pickup.chiseled_bookshelf
|volume=0.8
|pitch=''varies'' <ref group=sound>Can be 1.0, 0.8, or 1.1 for each sound</ref>
|foot=1}}
== Data values ==
=== ID ===
{{JE}}:
{{ID table
|edition=java
|showitemtags=y
|showforms=y
|generatetranslationkeys=y
|displayname=Written Book
|spritetype=item
|nameid=written_book
|itemtags=bookshelf_books, lectern_books
|form=item
|foot=1}}
{{BE}}:
{{ID table
|edition=bedrock
|showitemtags=y
|shownumericids=y
|showforms=y
|notshowbeitemforms=y
|generatetranslationkeys=y
|displayname=Written Book
|spritetype=item
|nameid=written_book
|id=511
|itemtags=minecraft:bookshelf_books, minecraft:lectern_books
|form=item
|foot=1}}
=== Item data ===
{{el|java}}:
{{main|Player.dat format}}
<div class="treeview">
* {{nbt|compound|tag}}: The item's '''tag''' tag.
{{:Player.dat_format/Written Books}}
</div>
{{el|bedrock}}:
: See [[Bedrock Edition level format/Item format]].
== History ==
{{History|java}}
{{History||1.3.1|snap=12w17a|[[File:Written Book JE1 BE1.png|32px]] Added written books.}}
{{History|||snap=12w21a|Written books can now be [[trading|sold]] to librarian [[villager]]s, at 1 written book for 1 [[emerald]].}}
{{History||1.7.2|snap=13w36a|Written books can now be cloned the same way [[map]]s can, but by using [[book and quill|books and quills]] instead of Empty Maps. Multiple copies of the same written book can be cloned by putting more book and quills in the crafting grid.
|Written books can now be stacked (up to 16 per stack).}}
{{History||1.8|snap=14w02a|[[Trading]] has been changed: librarian [[villager]]s now [[trading|buy]] 2 written books for 1 [[emerald]].}}
{{History|||snap=14w05a|Copying written books now mark them as "Copy of Original" or "Copy of Copy". The copying status of a book is denoted in a separate line in the tooltip, beneath the author's name. Copies of copies cannot be copied.}}
{{History||1.9|snap=15w33c|A written book titled "Work in Progress" now generates within a [[hopper]] as a part of the [[end ship]] in the [[end cities]]. It reads: "We will have something else here soon..." and is signed by [[Searge]].}}
{{History|||snap=15w41a|End ships no longer contain a written book.}}
{{History||1.13|snap=17w47a|Prior to [[1.13/Flattening|''The Flattening'']], this [[item]]'s numeral ID was 387.}}
{{History||1.14|snap=18w43a|[[File:Written Book JE2 BE2.png|32px]] The texture of written books has been changed.}}
{{History|||snap=19w02a|Written books can now be held on [[lectern]]s.}}
{{History|||snap=19w11a|Librarian [[villager]]s no longer [[trading|buy]] written books.}}
{{History||1.20<br>(Experimental)|link=1.19.3|snap=22w42a|Written books can now interact with [[chiseled bookshelves]].}}
{{History|bedrock}}
{{History||1.2.0|snap=beta 1.2.0.2|[[File:Written Book JE1 BE1.png|32px]] Added written books.}}
{{History||1.10.0|snap=beta 1.10.0.3|[[File:Written Book JE2 BE2.png|32px]] The texture of written books has been changed.
|Written books can now be held on [[lectern]]s.}}
{{History|console}}
{{History||xbox=TU25|xbone=CU14|ps=1.17|wiiu=Patch 1|[[File:Written Book JE1 BE1.png|32px]] Added written books.}}
{{History|PS4}}
{{History||1.90|[[File:Written Book JE2 BE2.png|32px]] The texture of written books has been changed.}}
{{History|foot}}
== Issues ==
{{issue list}}
== Trivia ==
*When written books are obtained with [[commands]] (without the correct [[Player.dat format#Written Books|data tag]]), the label shows "Written Book" and has the text "*Invalid book tag*" when opened. The book is signed and cannot be edited without commands.
*Commands that were added to a written book using serialized JSON objects are executed through the chat system. This means that any command added to a written book can't be longer than 256 characters, which is the maximum chat line limit.
*During the 2020 April Fools Update [[Java Edition 20w14∞]], throwing a written book into a lit [[Nether Portal (block)|nether portal]] would create a portal to one of the 2,147,483,645 new dimensions.
== Gallery ==
<gallery>
Written Book tooltip.png|A signed book.
Test by Dinnerbone.png|Copying a signed book.
BookandQuillOperators12w17a.png|Different types of characters can be used to simulate a different font.
JSON Book.png|First image of a book using JSON text.
No NBT written book GUI.png|A no NBT written book using commands.
Book Background (JE).png|Java Edition book background texture.
Book Background (BE).png|Bedrock Edition book background texture.
Book Arrowleft (JE).png|Java Edition left arrow texture.
Book Arrowright (JE).png|Java Edition right arrow texture.
Book Arrowleft (BE).png|Bedrock Edition left arrow texture.
Book Arrowright (BE).png|Bedrock Edition Right arrow texture.
</gallery>
== See also ==
*[[Book]]
*[[Bookshelf]]
*[[Book and Quill]]
{{Items}}
[[Category:Renewable resources]]
[[cs:Napsaná kniha]]
[[es:Libro escrito]]
[[fr:Livre édité]]
[[hu:Megírt könyv]]
[[it:Libro]]
[[ja:記入済みの本]]
[[ko:글이 쓰인 책]]
[[nl:Geschreven boek]]
[[pl:Zapisana książka]]
[[pt:Livro escrito]]
[[ru:Написанная книга]]
[[uk:Написана книга]]
[[zh:成书]]</li><li>[[Phantom Membrane|Phantom Membrane]]<br/>{{Item
| title = Phantom Membrane
| image = Phantom Membrane.png
| renewable = Yes
| stackable = Yes (64)
}}
'''Phantom membranes''' are items obtained from killing [[phantom]]s. They are used to repair [[elytra]] and brew [[Potion of Slow Falling|potions of Slow Falling]].
== Obtaining ==
=== Mob loot ===
[[Phantom]]s drop 0–1 phantom membrane when killed by a [[player]] or tamed [[wolf]]. [[Looting]] increases the maximum drops by 1 per level, for a maximum of 4 with Looting III.
=== Cat gifts ===
{{main|Cat#Gifts}}
Tamed [[cat]]s have a 70% chance to bring the player a gift when they wake up from a [[bed]], and the gift has a 3.22% chance to be a phantom membrane.
== Usage ==
=== Repairing ===
Phantom membranes can be used in an [[anvil]] to repair [[elytra]], restoring 108 durability points (25% of the pair's total durability) per membrane while preserving their [[enchantments]].
{| class="wikitable" data-description="Repairing elytra"
! scope="col" style="width:64px;" | Name
! Ingredients
! [[Anvil]] usage
|-
! scope="row" style="text-align: center;" | '''Elytra'''
| [[Elytra]] +<br>[[Phantom Membrane]]
| style="width: 260px; padding: 1px;" | {{Anvil| title = Elytra|Input1=Damaged Elytra|Input2=Phantom Membrane, 2|Output=Elytra}}
|-
|}
=== Brewing ingredient ===
Phantom membranes are used to [[brewing|brew]] [[Potion of Slow Falling|slow falling potions]] from an [[awkward potion]].
{{Brewing
|Phantom Membrane
|Potion of Slow Falling
|showname=3
}}
== Data values ==
=== ID ===
{{edition|java}}:
{{ID table
|edition=java
|showforms=y
|generatetranslationkeys=y
|displayname=Phantom Membrane
|spritetype=item
|nameid=phantom_membrane
|form=item
|foot=1}}
{{edition|bedrock}}:
{{ID table
|edition=bedrock
|shownumericids=y
|showforms=y
|notshowbeitemforms=y
|generatetranslationkeys=y
|displayname=Phantom Membrane
|spritetype=item
|nameid=phantom_membrane
|id=574
|form=item
|foot=1}}
== History ==
{{History|java}}
{{History||1.13|snap=18w14a|[[File:Phantom Membrane JE1 BE1.png|32px]] Added phantom membranes.}}
{{History||1.14|snap=18w44a|Tamed [[cat]]s now have a chance to give the [[player]] phantom membranes as [[Cat#Gifts|gifts]].}}
{{History|||snap=19w08a|[[File:Phantom Membrane JE2 BE2.png|32px]] The texture of phantom membranes has now been changed.}}
{{History|bedrock}}
{{History||1.6.0|snap=beta 1.6.0.5|[[File:Phantom Membrane JE1 BE1.png|32px]] Added phantom membranes.}}
{{History||1.8.0|snap=beta 1.8.0.8|Tamed [[cat]]s now have a chance to give the [[player]] phantom membranes as gifts.}}
{{History||1.10.0|snap=beta 1.10.0.3|[[File:Phantom Membrane JE2 BE2.png|32px]] The texture of phantom membranes has now been changed.}}
{{History|console}}
{{History||xbox=TU69|ps=1.76|wiiu=Patch 38|[[File:Phantom Membrane JE1 BE1.png|32px]] Added phantom membranes.}}
{{History||xbox=none|xbone=none|ps=1.90|wiiu=none|switch=none|[[File:Phantom Membrane JE2 BE2.png|32px]] The texture of phantom membranes has now been changed.}}
{{History|foot}}
== Issues ==
{{issue list}}
== References ==
{{reflist}}
== External Links ==
*[https://www.minecraft.net/en-us/article/taking-inventory--phantom-membrane Taking Inventory: Phantom Membrane] – Minecraft.net on August 2, 2019
{{items}}
[[de:Phantomhaut]]
[[fr:Membrane de Phantom]]
[[ja:ファントムの皮膜]]
[[ko:팬텀 막]]
[[pl:Błona fantoma]]
[[pt:Membrana de phantom]]
[[ru:Мембрана фантома]]
[[th:เนื้อเยื่อแฟนท่อม]]
[[uk:Перетинка фантома]]
[[zh:幻翼膜]]
[[Category:Renewable resources]]
[[Category:Brewing recipe]]</li></ul> | 19w39a | Lighting of blocks in the inventory has been swapped from being dark on the right to being dark on the left. | |||
| 19w40a | Lighting of blocks in the inventory is once again darker on the right, as it was before 19w39a. | ||||