The launcher is responsible for downloading the main Javapackages, including client.jar, which holds the code and resources of the game such as textures and Lightweight Java Game Library (LWJGL). It also acts somewhat like a basic copy-restriction by forcing the user to login to an account when running for the first time.
It is possible for the launcher to run all release versions of Minecraft: Java Edition, as well as most Beta versions, and a small fraction of Classic, Indev, Infdev and Alpha versions. Not every version of the game is included (see Missing launcher versions).
The current launcher is the seventh launcher for Minecraft: Java Edition, and the third that was built to automatically update itself.
On February 24, 2020, in launcher version 2.1.1230x, a new section for the game Minecraft Dungeons was added where one could sign up for its beta. This is the first time the Minecraft launcher includes a game other than Minecraft: Java Edition.
The login screen for the launcher when the player isn't logged-in.
Every time the launcher is executed, it checks a specific directory where Minecraft stores its files called ".minecraft". It checks a file called "launcher_profiles.json" for login credentials. If the file does not exist, is corrupt, or no user is logged in, the user must login with a valid account, otherwise, the user is directed to register an account and purchase the game or play the demo mode.
When logging in, the launcher first tries to verify the login. If a valid launcher_profiles.json file exists but there is no Internet connection, the launcher offers a "play offline" mode if a player was logged in when it was last closed. If the connection is successful, the launcher then, depending on profile options, compares the latest version in the latest "versions" directory to the latest version reported by the server. If the selected version does not exist or the latest installed version is outdated when "Use latest version" is selected in the profile, the launcher downloads all Minecraft components and Java binary files. It also synchronizes everything in the assets folder (see Resource pack).
Finally, upon a successful update or installation, the launcher executes the Minecraft jar (via javaw.exe, Oracle's Java virtual machineexecutable.) It is possible however for there to be missing .jar files, in which case the launcher attempts to replace the missing files automatically but stops if there is no connection.
Features
Launcher
Manage multiple profiles (stored in launcher_profiles.json). Each profile can control:
Game version. Includes access to outdated development builds and previous releases. Older/custom versions can also be added manually.[1]
Mojang account used to play the game
Command line arguments for Java (such as heap size)
Game directory (where the game files are saved on disk)
Edit profile pictures or custom made ones
The launcher doesn't store the password locally. Instead of this, it uses a 'refresh token'
The launcher supports multiple instances (as the game also does)
Crashes are indexed through a database for information on how to fix the issue
Launcher Settings
Switching accounts or logging off
Changing skins
Downloads servers on versions
Help button
Shows the player the launcher version information when the player clicks the launcher version
Backward compatibility
Selecting old versions in the launcher
The Minecraft launcher has the ability to play old versions of the game. All release versions are available to play, along with most snapshots, alpha, and beta versions. Additionally, four Pre-classic versions, four Classic versions, and one Infdev version are available under "old_alpha".[2] No Indev versions are available in the launcher. Pre-1.0.0 versions are hidden unless "Historical Versions" are enabled.
To play old versions of the game, go to the Installations tab, enable Historical Versions if necessary, create a new profile, and set it to the specified version. Because these versions are outdated and unsupported, they may contain bugs and errors which are not present in newer versions, and these will never be fixed. It is recommended to run old versions of the game in a separate directory to avoid save corruption or other problems. To do this, enter the desired folder path into the "game directory" field in the profile settings. Mojang also recommends backing up worlds in case any corruption occurs.[3]
While the launcher is able to run these versions in a playable state, they don't work perfectly. Changes to the game's code and Mojang's servers have resulted in some features of these versions no longer working as they did originally. Most of this functionality can be restored with the use of third-party tools, however. Some things which are broken include:
Sounds are wrong; bows, doors, and explosions use their sounds from RC1, even in versions released prior to it.
Skins are missing in versions prior to 1.7, as earlier versions used a different skin server which has since been shut down. Capes may still work, however.[needs testing]
In Alpha 1.0.15 and from Alpha 1.2.0 to Alpha 1.2.6, the launcher does not set the player's name properly, resulting in everyone using default names: "Player" followed by a random 3-digit number. This makes multiplayer very difficult to play, as a player's location and inventory will be reset every time they relaunch their client.
In Alpha 1.2.5 and Alpha 1.2.6 specifically, players will always be named "Player524". This makes multiplayer in these versions completely impossible, as joining a server will kick other players with the same name.
As a side effect of the above, and as a result of old Mojang servers being shut down, online mode no longer works in versions before Beta 1.8.
Skins
Skin library
Skin options in the launcher
The player can change or add their custom skin within the Minecraft launcher. To change or add their skin, the player must click the "Skins" button, then click the "Browse" button to navigate through their file system for their skin file. The file must have a resolution of 64×64 in order for the launcher to accept it as a skin file. Additionally, the skin file must be in a .png format. After the player has found the skin file, they must click the "Save" button to confirm their in-game skin.
The player can reset their skin to the Steve or Alex defaults by clicking "Click to reset".
The player can choose between player models – either Classic (Steve) or Slim (Alex).
Installations
When the player opens the launcher for the first time, it creates a profile that selects the latest version of Minecraft: Java Edition. If snapshots are enabled, another profile will also be created that selects the latest snapshot. These profiles cannot have their versions manually changed, and cannot be removed.
However, the player may create a game profile of their own in the launcher. In order to do so, they must click on the "Installations" button, then click "New..." to create one. After this, the player can name their profile as they want it. If the player leaves it, it is named "<unnamed installation>". Then, optionally, the player can select a profile picture from the launcher or a custom one. However, it must be a 128×128 .png picture. After, the player can select the version they wish to play, and click "Create" to confirm their profile. If the player wants to edit a profile, they can just click it. The same applies if the player wishes to delete a profile. Simply click the three dots button and press Delete. A popup appears; press Delete.
Installations settings in the launcher
The player can download server versions by clicking "Server".
If the player wants to resize the game, they can turn "Resolution" on to change the game window size.
The player can turn "More options" on to show more profile options.
If the player wants to change the location of the Minecraft directory, they can turn on the "Game directory" option. Navigate to the folder where the player wishes the game files to be placed. The player can also open the chosen directory by clicking the green arrow-shaped "Go to folder" button.
The player can also duplicate a profile by clicking the stacked 3 dots button while hovering a profile.
Command line usage
As of 2.1.1432, the launcher has 9 command-line options available:
--clean – This option deletes the "game" and "runtime" folders, including their contents, from the working directory.
--launcherui
--workDir – This option, followed by a path (relative or absolute), changes the location (and/or name) of the .minecraft folder.
Can be used to create a portable installation of the game. For example, --workDir . (or --workDir=.) can be used to make the launcher use the current directory (no matter what the current folder is called).
--nativeLauncherVersion
--tmpDir – This option, followed by a path (relative or absolute), changes the location (and/or name) of the tmp folder.
--lockDir
--winTen – This option adds support for Windows 10. Since the launcher now supports Windows 10 fully, this option is unnecessary and seems to have no effect.
{{Extension DPL}}<ul><li>[[End Crystal|End Crystal]]<br/>{{ItemEntity
|image=End Crystal.gif
|imagesize=150px
|invimage=End Crystal
|renewable=Yes
|stackable=Yes (64)
|rarity=Rare
|drops=None
|size=
Height: 2 Blocks<br>Width: 2 Blocks
}}
An '''end crystal''' is an [[entity]] that can be [[Crafting|crafted]] or found on [[the End]]'s main island, where it heals the [[Ender Dragon|ender dragon]]. It can only be placed on [[obsidian]] or [[bedrock]] and [[Explosion|explodes]] instantly when attacked or damaged in most ways.

== Spawning ==

=== Natural generation ===

An end crystal is found atop each [[obsidian pillar]] on the central island of the End, each on top of a piece of [[bedrock]]. There are 10 end crystals in total, of which two are protected in "cages" of [[iron bars]]. All end crystals respawn one after another as the respawning process of the [[ender dragon]] starts.

== Obtaining ==

=== Crafting ===

{{Crafting
  |A1=Glass
  |B1=Glass
  |C1=Glass
  |A2=Glass
  |B2=Eye of Ender
  |C2=Glass
  |A3=Glass
  |B3=Ghast Tear
  |C3=Glass
  |Output= End Crystal
  |type= Decoration block
}}

== Usage ==

=== Healing the ender dragon ===

Their primary purpose is to recharge the health of the ender dragon, who gains a charge from the nearest crystal within a cuboid extending 32 blocks from the dragon in all directions. The dragon is healed {{hp|1}} each half-second. If multiple ender dragons are spawned, an end crystal can affect multiple dragons at the same time. The healing beam is neither obstructed nor is its power diminished by entities or blocks.

=== Respawning the ender dragon ===
[[File:End Crystals on the Exit portal.png|right|thumb|How to arrange end crystals on the exit portal to respawn the ender dragon.]]

As items, end crystals may be placed on bedrock and [[obsidian]], if the two blocks above the bedrock or obsidian block are air or replaceable blocks and no other entities intersect the area. When an end crystal is placed in [[the End]], a [[fire]] block is created at the end crystal location. If four are placed on the end [[exit portal]], one on each of the flat sides, the crystals respawn the original end crystals on the obsidian pillars, as well as resurrect the dragon itself, before exploding. The top of each pillar also explodes, destroying any player-placed blocks. This happens even if TNT explosions are turned off in settings.

If the exit portal is ever broken for any reason, end crystals can still be placed on obsidian blocks with the same location as the exit portal.

=== Explosions ===

End crystals explode when attacked or damaged in most ways, even by attacks that normally do zero damage. They are not affected by exploding fireworks, and if damaged by an explosion, they disappear instead of exploding.{{Only|Java}}<ref>{{bug|MC-118429||End crystals don't explode when destroyed by nearby explosions}}</ref> The end crystal's [[explosion]] has an [[Explosion#Explosion strength|explosion strength]] of 6, the same as a [[charged creeper]]. The end crystal's fire often remains after the crystal explodes. Any ender dragon charging from the crystal when it is destroyed takes {{hp|10}} damage.

{{IN|java}}, an end crystal's explosion can be [[blocking|blocked]] by a [[shield]].

Although an ender dragon damages most blocks and entities in its path, it cannot destroy end crystals simply by going near them.

Placing [[water]] on the end crystal will neutralize the blast effect, but not the [[damage]] or knockback.

End crystals with obsidian or bedrock below them will not damage blocks below them when they explode.

{{IN|bedrock}}, having the game rule {{cd|mobGriefing}} to {{cd|false}} will prevent the End Crystal from destroying any blocks. While {{in|java}} the same game rule will not prevent the End Crystal from destroying any blocks.

=== Beams ===
The end crystal naturally shoots a beam at the ender dragon and heals it when the dragon is within range. This beam can be manually created using the command {{cmd|data merge entity @e[type{{=}}end_crystal,limit{{=}}1] {BeamTarget:{X:0, Y:0, Z:0<nowiki>}}}}. The beam can be pointed in any direction, allowing it to mark locations or objects.

=== Properties ===
[[File:End Crystal (Slateless).gif|thumb|A base-less end crystal.]]

End crystals are of two kinds: the ones with a base beneath them are created either by game mechanism or by the {{cmd|summon}} command; while the base-less ones are created by players by manually placing the crystal items on top of [[obsidian]] or [[bedrock]].

The base appears to be made of bedrock, with a crystal hovering over it. While in the End, a crystal continually generates fire at its current position, one block above the base (directly on top of the block the base is embedded in), replacing any other block at that location. This fire is capable of spreading.

The end crystal entity is not solid and can be walked through freely. End crystals can be pushed by [[piston]]s, but they explode if moved while on fire. Because fire is checked only when an entity moves, end crystals do not normally take damage from their own fire unless moved.

== Sounds ==
{{edition|java}}:
{{Sound table
|sound=Explosion1.ogg
|sound2=Explosion2.ogg
|sound3=Explosion3.ogg
|sound4=Explosion4.ogg
|subtitle=Explosion
|source=block
|description=When an end crystal explodes
|id=entity.generic.explode
|translationkey=subtitles.entity.generic.explode
|volume=4.0
|pitch=0.56-0.84
|distance=16
|foot=1}}

{{edition|bedrock}}:
{{Sound table
|type=bedrock
|sound=Explosion1.ogg
|sound2=Explosion2.ogg
|sound3=Explosion3.ogg
|sound4=Explosion4.ogg
|source=block
|description=When an end crystal explodes
|id=random.explode
|volume=4.0
|pitch=1.0
|foot=1}}

== Data values ==
=== ID ===
{{edition|java}}:
{{ID table
|edition=java
|firstcolumnname=Item
|showforms=y
|generatetranslationkeys=y
|displayname=End Crystal
|spritetype=item
|nameid=end_crystal
|form=item
|foot=1}}
{{ID table
|edition=java
|firstcolumnname=Entity
|generatetranslationkeys=y
|displayname=End Crystal
|spritetype=entity
|nameid=end_crystal
|foot=1}}

{{edition|bedrock}}:
{{ID table
|edition=bedrock
|firstcolumnname=Item
|shownumericids=y
|showforms=y
|notshowbeitemforms=y
|generatetranslationkeys=y
|displayname=End Crystal
|spritetype=item
|nameid=end_crystal
|id=637
|form=item
|foot=1}}
{{ID table
|edition=bedrock
|firstcolumnname=Entity
|shownumericids=y
|generatetranslationkeys=y
|displayname=End Crystal
|spritetype=entity
|nameid=ender_crystal
|id=71
|foot=1}}

=== Entity data ===

End crystals have entity data that define various properties of the entity.

{{el|java}}:
{{main|Entity format}}
{{/ED}}

{{el|bedrock}}:
: See [[Bedrock Edition level format/Entity format]].

== Achievements ==
{{load achievements|The End... Again...}}

== Advancements ==
{{load advancements|The End... Again...}}

== History ==
[[File:End Crystal 19w38a.gif|thumb|Java Edition 19w38a]]
{{History|java}}
{{History||1.0.0|snap=Beta 1.9 Prerelease 6|[[File:End Crystal JE1 BE1.png|32px]] Added ender crystals.}}
{{History||1.2.1|snap=12w04a|Previously, ender crystals could be spawned using [[spawn egg]]s with ID 200 (in a [[server]], these were created using {{cmd|give 383 1 200}}). The spawned crystal would be positioned where a natural crystal would be if there was a bedrock block at the location. It was still possible until 1.9 to obtain an end crystal spawn egg, but it would not spawn anything.}}
{{History||1.7.2|snap=13w36a|Ender crystals can now be spawned with the {{cmd|summon}} command.}}
{{History||1.8|snap=14w06a|Ender crystals now generate one [[block]] lower. The fire they generate destroys the [[bedrock]] block that is supposed to be underneath (see {{bug|MC-47526}}).}}
{{History||1.9|snap=15w31a|Ender crystals generate at the correct Y-level again.}}
{{History|||snap=15w33c|Respawning the ender dragon now also respawns the ender crystals on the obsidian pillars.
|Ender crystals now have a compound BeamTarget tag that hold the X, Y, Z block location the beam points to.}}
{{History|||snap=15w44a|"Ender crystals" have been renamed to "end crystals".
|[[File:End Crystal (item) JE1 BE1.png|32px]] End crystals can now be obtained as an item.
|End crystals now drop from [[skeleton trap]] horses and can be placed only on [[obsidian]] or bedrock. Placing several of them atop the end exit portal respawns the ender dragon.}}
{{History|||snap=15w44b|End crystals are no longer dropped by [[skeleton horse]]s.
|Added crafting recipe for end crystals, making end crystals [[renewable]].}}
{{History|||snap=15w49a|End crystals now require [[air]]/replaceable [[block]]s and lack of [[entity|entities]] for placement.}}
{{History|||snap=15w51a|End crystals can no longer be placed in [[Adventure mode]].}}
{{History||1.11|snap=16w32a|The entity ID has been changed from <code>EnderCrystal</code> to <code>ender_crystal</code>.}}
{{History||1.13|snap=17w47a|Prior to [[1.13/Flattening|''The Flattening'']], this [[item]]'s numeral ID was 426.}}
{{History|||snap=18w20b|Renamed to "End Crystal".}}
{{History|||snap=pre5|Entity ID has been changed to <code>end_crystal</code>.}}
{{History||1.14|snap=18w43a|[[File:End Crystal JE2.png|32px]][[File:End Crystal (item) JE2 BE2.png|32px]] The textures of end crystals and the end crystal [[item]] have been changed.}}
{{History||1.19.3|snap=22w43a|End crystal explosions can now be [[blocking|blocked]] by [[shield]]s.<ref>{{bug|MC-188247|||Fixed}}</ref>}}

{{History|pocket}}
{{History||1.0.0|snap=alpha 0.17.0.1|[[File:End Crystal JE1 BE1.png|32px]][[File:End Crystal (item) JE1 BE1.png|32px]] Added end crystals.}}
{{History|bedrock}}
{{History||1.6.0|snap=?|[[File:End Crystal BE2.png|32px]] [[File:End Crystal BE2.gif|32px]] The model of the end crystals has been changed. It has now two cubes instead of three.}}
{{History||1.10.0|snap=beta 1.10.0.3|[[File:End Crystal BE3.png|32px]][[File:End Crystal (item) JE2 BE2.png|32px]] The textures of end crystals and the end crystal item have been changed.}}
{{History||1.17.10|snap=beta 1.17.10.20|[[File:End Crystal JE2.png|32px]] The model of the end crystals has been changed to have three cubes again, and to match ''Java Edition''.}}
{{History||1.19.70|snap=beta 1.19.70.20|Increased end crystal collision box size to match ''Java Edition''.|End crystals with obsidian or bedrock below them now will not damage blocks below them when they explode.}}

{{History|console}}
{{History||xbox=TU9|xbone=CU1|ps=1.0|wiiu=Patch 1|[[File:End Crystal JE1 BE1.png|32px]] Added ender crystals.}}
{{History||xbox=TU31|xbone=CU19|ps=1.22|wiiu=Patch 3|Ender crystals now generate one block lower. The fire they generate destroys the [[bedrock]] block that is supposed to be underneath.}}
{{History||xbox=TU46|xbone=CU36|ps=1.38|wiiu=Patch 15|"Ender crystals" have been renamed to "end crystals".
|[[File:End Crystal (item) JE1 BE1.png|32px]] End crystals can now be obtained as an [[item]].
|End crystals now drop from [[skeleton trap]] horses and can be placed only on [[obsidian]] or bedrock. Placing several of them atop the [[end portal|end exit portal]] respawns the ender dragon.
|Added a crafting recipe for end crystals.}}
{{History||xbox=none|xbone=none|ps=1.90|wiiu=none|switch=none|[[File:End Crystal JE2.png|32px]][[File:End Crystal (item) JE2 BE2.png|32px]] The textures of end crystals and the end crystal item have been changed.}}

{{History|new 3ds}}
{{History||1.7.10|[[File:End Crystal JE1 BE1.png|32px]][[File:End Crystal (item) JE1 BE1.png|32px]] Added end crystals.}}
{{History|foot}}

== Issues ==
{{issue list}}

== Trivia ==
* According to [[Jens Bergensten|Jeb]], the reason behind the current crafting recipe using glass as opposed to [[Chorus Fruit|chorus fruit]] or any materials introduced in [[Java Edition 1.9|1.9]] is as a means for players to craft end crystals in older worlds that the dragon has already been killed in.<ref>{{tweet|jeb_|667000226524372992|The problem is that you need to be able to craft the crystals on worlds in which the dragon has been destroyed already|November 18, 2015}}</ref>
* A historical rendition of the [[beacon]] block featured an animated entity within it, which resembled a yellow miniaturized end crystal. The bedrock platform of the end crystal entity would also render below the beacon, though this would normally be hidden within the block below.
* Using a [[piston]] to push an end crystal's fire into an end portal block deletes the end portal block. However, natural portal blocks regenerate if the end crystal is moved.

== Gallery ==
<gallery>
End Crystal Usage.png|Using end crystals to respawn the ender dragon.
Crystal Link.png|An ender dragon being hit with the "healing beam" of an end crystal.
Ender Crystal.png|An end crystal.
EnderCrystalOverworld.png|An end crystal in the Overworld spawned using {{cmd|summon}} {{code|end_crystal}}.
Ender Dragon Revival.png|End crystals respawning the ender dragon.
CagedEnderCrystal.png|A caged end crystal.
Respawn ender dragon.png|A [[player]] trying to respawn the ender dragon.
End Crystal (item).gif|An animation of the item of the end crystal.
</gallery>

== References ==
{{reflist}}

{{Entities}}
{{Items}}

[[de:Enderkristall]]
[[el:Κρύσταλλος του Ender]]
[[es:Cristal del End]]
[[fr:Cristal de l'End]]
[[ja:エンドクリスタル]]
[[ko:엔드 수정]]
[[nl:Endkristal]]
[[pl:Kryształ Endu]]
[[pt:Cristal do End]]
[[ru:Кристалл Края]]
[[th:คริสตัลเอนด์]]
[[uk:Кристал Енду]]
[[zh:末影水晶]]</li><li>[[:Category:Combat|Category:Combat]]<br/>[[Category:Items]]

[[fr:Catégorie:Combat]]
[[zh:Category:武器]]</li></ul></nowiki>
Initial release. In this version users can choose not only the current version but also Infdev.
The client requires an internet connection on the first run and for updates, but after that the game supports playing offline.
Command line arguments are accepted to launch the game. Using the format java -cp Minecraft.jar net.minecraft.LauncherFrame usernamepassword allows login without joining a server, while the format java -cp minecraft.jar net.minecraft.LauncherFrame usernamepasswordserveraddress:portnumber allows joining a server.
v1.2.2
{{Extension DPL}}<ul><li>[[Gold Nugget|Gold Nugget]]<br/>{{About|the nugget|the block that can drop nuggets|Gilded Blackstone|the ore|Gold Ore|the ingot form|Gold Ingot|the mineral block|Block of Gold}}
{{Item
| image = Gold Nugget.png
| renewable = Yes
| stackable = Yes (64)
}}
'''Gold nuggets''' are items used to make [[gold ingot]]s and other various golden items. One gold nugget is effectively worth one-ninth of a gold ingot.

== Obtaining ==

=== Mob loot ===

[[Zombified Piglin|Zombified piglin]]s, when killed, may drop 0-1 gold nuggets. When killed using a weapon enchanted with [[Looting]], they may drop an additional gold nugget per level of Looting used, up to a maximum of 4.

=== Crafting ===

{{Crafting
|Gold Ingot
|Output= Gold Nugget, 9
|type= Material
}}

=== Smelting ===

{{Smelting
|Golden Sword; {Any golden tools}; {Any golden armor}; Golden Horse Armor
|Gold Nugget
|0,25
}}

=== Chest loot ===

{{LootChestItem|gold-nugget}}

=== Mining ===

[[Nether gold ore]] mined using a [[pickaxe]] drops 2-6 gold nuggets. If the pickaxe is enchanted with [[Fortune]], it has a 33.3% chance to multiply the drops by 2, Fortune II has a 25% chance to multiply the drops by 2 or 3 and Fortune III has a 20% chance each to multiply the drops by 2, 3, or 4 for a maximum possible drop of 24 golden nuggets. The average drop rate for a Fortune III pickaxe is 8.8, while the drop rate for a [[Silk Touch]] pickaxe is a single ingot, or a flat rate of 9. It is slightly more efficient to mine with a Silk Touch pickaxe.

[[Gilded Blackstone|Gilded blackstone]] mined using a pickaxe has a 10% chance to drop 2-5 gold nuggets. If the pickaxe is enchanted with Fortune I, the chance gold nuggets drop is increased 14.29%, Fortune II increases the drop chance to 25%, and Fortune III guarantees the drop.

== Usage ==

Gold nuggets can be used to craft a [[golden carrot]] or [[glistering melon]] for brewing. Also, gold nuggets can be combined with gunpowder and dye to create a [[firework star]] that bursts in a star-shaped explosion.

[[Piglin]]s instantly pick up any gold nuggets that are within 1 [[block]] of them. Unlike other gold-related items, they do not intentionally seek out gold nuggets to pick up and only pick them up if they walk near it. Unlike gold ingots, gold nuggets picked up are dropped upon the piglin's death.

=== Crafting ingredient ===

{{crafting usage}}

== Data values ==
=== ID ===
{{edition|java}}:
{{ID table
|edition=java
|showforms=y
|generatetranslationkeys=y
|displayname=Gold Nugget
|spritetype=item
|nameid=gold_nugget
|form=item
|foot=1}}

{{edition|bedrock}}:
{{ID table
|edition=bedrock
|shownumericids=y
|showforms=y
|notshowbeitemforms=y
|generatetranslationkeys=y
|displayname=Gold Nugget
|spritetype=item
|nameid=gold_nugget
|id=425
|form=item
|foot=1}}

== History ==

{{History|Java}}
{{History||1.0.0|snap=Beta 1.9 Prerelease|[[File:Gold Nugget JE1.png|32px]] Added gold nuggets.
|Gold nuggets are [[drops|dropped]] by [[zombie pigmen]].
|Gold nuggets can be used to craft [[gold ingot]]s.
|Gold nuggets currently do not have a mouseover name.}}
{{History|||snap=Beta 1.9 Prerelease 2|Gold nuggets now have a mouseover name.}}
{{History|||snap=Beta 1.9 Prerelease 4|Gold nuggets are now used to craft [[glistering melon]]s.
|Gold nuggets can now be [[crafting|crafted]] from a single [[gold ingot]].}}
{{History||1.1|snap=release|Normal [[golden apple]]s are now crafted with gold nuggets.}}
{{History||1.3.1|snap=1.3|[[File:Gold Nugget JE2 BE1.png|32px]] The texture of gold nuggets has been changed.}}
{{History||1.4.2|snap=12w34a|Gold nuggets are now used to craft [[golden carrot]]s.}}
{{History||1.4.6|snap=12w49a|Gold nuggets can now be used to craft a [[firework star]] for a star shaped effect on a [[firework rocket|firework]].}}
{{History||1.6.1|snap=13w23a|Gold nuggets can no longer be used to [[crafting|craft]] a [[golden apple]].}}
{{History||1.9|snap=15w43a|Gold nuggets may now be found among the loot in [[igloo]] basement [[chest]]s.}}
{{History||1.11.1|snap=16w50a|Gold nuggets can now be [[smelting|smelted]] from golden [[tool]]s and [[armor]].}}
{{History||1.13|snap=17w47a|Prior to [[1.13/Flattening|''The Flattening'']], this [[item]]'s numeral ID was 371.}}
{{History|||snap=18w09a|Gold nuggets can now be found in [[underwater ruins]] loot [[chest]]s.}}
{{History|||snap=18w11a|Gold nuggets now generate in the chests of [[shipwreck]]s.}}
{{History||1.14|snap=18w43a|[[File:Gold Nugget JE3 BE2.png|32px]] The texture of gold nuggets has been changed.}}
{{History|||snap=18w48a|Gold nuggets can now be found in chests in [[plains]] [[village]] houses.}}
{{History|||snap=18w49a|Gold nuggets can now be found in chests in [[savanna]] village houses.}}
{{History||1.16|snap=20w12a|[[Nether gold ore]] now [[drops]] 2-6 gold nuggets, affected by [[Fortune]].}}
{{History|||snap=20w15a|[[Gilded blackstone]] now has 10% chance to drop 2-5 gold nuggets. Only the drop chance is affected by [[Fortune]].}}
{{History|||snap=20w16a|Gold nuggets now generate in [[bastion remnant]]s and [[ruined portal]] chests.}}
{{History|||snap=Pre-release 1|Gold nuggets can now be used to distract [[piglin]]s.}}
{{History|||snap=Pre-release 3|Gold nuggets can no longer be used to distract [[piglin]]s.}}
{{History||1.20|snap=23w12a|Gold nuggets can now be found in [[suspicious gravel]] and [[suspicious sand]] in cold and warm [[ocean ruins]] and in [[trail ruins]].}}
{{History|||snap=23w16a|Gold nuggets no longer generate in [[suspicious sand]] in [[trail ruins]].|Due to the split of the archaeological loot tables for suspicious gravel within [[trail ruins]], gold nuggets are now common loot.}}

{{History|pocket alpha}}
{{History||v0.12.1|snap=build 1|[[File:Gold Nugget JE2 BE1.png|32px]] Added gold nuggets. |Gold nuggets can be used to craft [[glistering melon]]s, [[gold ingot]]s and [[golden carrot]]s.|[[Gold ingot]]s can now be [[crafting|crafted]] into 9 gold nuggets.|[[Zombie pigmen]] now [[drops|drop]] gold nuggets upon being killed.}}
{{History|pocket}}
{{History||1.0.0|snap=alpha 0.17.0.1|Gold nuggets can now be found inside [[igloo]] basement [[chest]]s.}}
{{History||1.1.0|snap=alpha 1.1.0.0|Gold nuggets can now be [[smelting|smelted]] from golden [[tool]]s and [[armor]].}}
{{History|bedrock}}
{{History||1.2.0|snap=beta 1.2.0.2|Gold nuggets can now be used to craft [[firework star]]s.}}
{{History||1.4.0|snap=beta 1.2.14.2|Gold nuggets can now be found in some [[shipwreck]] [[chest]]s.}}
{{History|||snap=beta 1.2.20.1|Gold nuggets can now be found in [[underwater ruins]] chests.}}
{{History||1.10.0|snap=beta 1.10.0.3|The gold nugget can now be found in [[plains]] [[village]] house chests.|[[File:Gold Nugget JE3 BE2.png|32px]] The texture of gold nuggets has been changed.}}
{{History||1.11.0|snap=beta 1.11.0.1|The gold nugget can now be found in [[savanna]] village house [[chest]]s.}}
{{History||1.16.0|snap=beta 1.16.0.57|[[Nether gold ore]] now [[drops]] 2-6 gold nuggets.|[[Gilded blackstone]] now has 10% chance to drop 2-5 gold nuggets.}}
{{History||1.16.100|snap=beta 1.16.100.50|Gold nuggets can now be used as fuel for a [[furnace]].<ref>{{bug|MCPE-114216}}</ref>}}
{{History||1.18.30|snap=beta 1.18.30.26|Gold nuggets can no longer be used as fuel for a furnace.}}

{{History|Legacy Console}}
{{History||xbox=TU7|xbone=CU1|ps=1.0|wiiu=Patch 1|switch=1.0.1|[[File:Gold Nugget JE2 BE1.png|32px]] Added gold nuggets.}}
{{History||xbox=TU53|xbone=CU43|ps=1.49|wiiu=Patch 23|switch=1.0.3|Gold nuggets can now be [[smelting|smelted]] from golden [[tool]]s and [[armor]].}}
{{History||xbox=none|xbone=none|ps=1.90|wiiu=none|switch=none|[[File:Gold Nugget JE3 BE2.png|32px]] The texture of gold nuggets has been changed.}}

{{History|3DS}}
{{History||0.1.0|[[File:Gold Nugget JE2 BE1.png|32px]] Added gold nuggets.}}
{{History||1.9.19|Gold nuggets can now be [[smelting|smelted]] from golden [[tool]]s and [[armor]].}}
{{History|foot}}

== Issues ==

{{issue list}}

== See also ==

* [[Iron Nugget]]
* [[Gold]]

{{Items}}

[[cs:Zlatý nuget]]
[[de:Goldklumpen]]
[[es:Pepita de oro]]
[[fr:Pépite d'or]]
[[hu:Aranyrög]]
[[it:Pepita d'oro]]
[[ja:金塊]]
[[ko:황금 조각]]
[[nl:Goudklompje]]
[[pl:Bryłka złota]]
[[pt:Pepita de ouro]]
[[ru:Кусочек золота]]
[[uk:Золотий самородок]]
[[zh:金粒]]
[[Category:Renewable resources]]</li><li>[[Sign|Sign]]<br/>{{Block
| image = <gallery>
Oak Sign.png|Sign
Oak Wall Sign.png|Wall Sign
Oak Hanging Sign.png|Hanging Sign
Oak Wall Hanging Sign.png|Wall Hanging Sign
</gallery>
| image2 = <gallery>
Oak Sign JE3.png|Sign
Oak Hanging Sign (item) JE1 BE1.png|Hanging Sign
</gallery>
| extratext = [[#Gallery|View all renders]]
| transparent = Yes
| light = No
| tool = axe
| renewable = Yes
| stackable = Yes (16)
| flammable = No
| lavasusceptible = No
}}
A '''sign''' is a non-solid [[block]] that displays text and can be placed on the top or side of other blocks. A '''hanging sign''' is a decorative block that also displays text, and can be placed underneath blocks or with a solid self-supporting bracket. The text of both types of signs can be customized with [[dye]]s and [[glow ink sac]]s.

== Obtaining ==
=== Breaking ===
Signs can be broken with any tool or without a tool, but an [[axe]] is fastest.
{{breaking row|horizontal=1|Sign|sprite=oak-sign|Axe|foot=1|item=1}}

A sign or a hanging sign also breaks and drops itself as an [[item]] if the block the sign is attached to is moved, removed or destroyed. However, a wall hanging sign will stay here if the block the hanging sign is attached to is removed.<ref>{{bug|MC-256501|||WAI}}</ref>

If a sign is broken while being edited, the player continues to edit the sign<ref>{{bug|MC-117815}}</ref>, although {{in|bedrock}} breaking the sign stops the editing operation.

=== Natural generation ===
An oak sign can be found in [[igloo]] basements. Spruce signs can be found in taiga [[village]] houses, as part of a chair.

=== Chest loot ===
{{LootChestItem|oak-sign,oak-hanging-sign,spruce-sign,spruce-hanging-sign}}

=== Crafting ===
[[The player]] can place six stripped [[log]] [[block]]s at the bottom half of the crafting table and place two [[chain]]s on the top-left and top-right slots to create hanging signs. This crafting recipe will create six hanging signs. Hanging signs can only be crafted with stripped logs or [[stem]]s; non-stripped wood cannot be used to craft hanging signs.
{{Crafting
|head=1
|showdescription=1
|nolink=1
|A1= Matching Planks
|B1= Matching Planks
|C1= Matching Planks
|A2= Matching Planks
|B2= Matching Planks
|C2= Matching Planks
|B3= Stick
|Output=Matching Sign,3
|type=Decoration block
}}
{{Crafting
|name= Hanging Sign
|A1= Chain
|C1= Chain
|A2= Matching Stripped Log or Stem; Block of Stripped Bamboo
|B2= Matching Stripped Log or Stem; Block of Stripped Bamboo
|C2= Matching Stripped Log or Stem; Block of Stripped Bamboo
|A3= Matching Stripped Log or Stem; Block of Stripped Bamboo
|B3= Matching Stripped Log or Stem; Block of Stripped Bamboo
|C3= Matching Stripped Log or Stem; Block of Stripped Bamboo
|Output= Matching Hanging Sign,6; Bamboo Hanging Sign,6
|type=Decoration block
|foot=1
}}

== Usage ==
Signs can be used to display text; they can be used to label storage, display information to other players or note areas of interest. Signs are also not destroyed by [[water]] or [[lava]] and therefore may be used to control the flow of these fluids.

=== Placement ===
==== Signs ====
Signs may be placed on the top or side of other [[block]]s (including semi-solid and non-solid blocks such as [[fence]]s, [[Trapdoor|trapdoors]] and other signs). To place a sign, {{control|use}} a sign [[item]] while pointing at the block the sign should be attached to, enter the desired text (or none), and click the "Done" button or press "escape" on a keyboard (or press × {{in|bedrock}}, {{xbtn|b}} on an Xbox controller, {{psbtn|o}} on a PlayStation controller, or {{nsbutton|B}} on a Nintendo Switch controller. Closing the virtual keyboard on a mobile device also exits the typing menu). To place a sign on a block that can be interacted with by the {{control|use}} control (for example, [[chest]]s, [[note block]]s, etc.), {{control|sneak}} while placing the sign.

Signs on the top of a block stand on a short post and face toward the player who placed it, in any of 16 different directions. Signs placed on the side of a block simply float there, even if the block doesn't make contact with the sign.

Even if placed on a vertical surface, a sign may not co-exist in the same block of air as any other item, despite not necessarily visibly obstructing eachother.

For more information about the blocks signs can be placed on, see [[Opacity/Placement]].

==== Hanging signs ====
Hanging signs can be placed in three different ways:
* Placing a hanging sign on the side of a block will result in it being placed with a self-supporting bracket, which allows it to float without any supporting block. This version can be placed in four different directions.
* Placing a hanging sign on the bottom of a block will result in the sign hanging below the block.
** If the block is wide enough, the chains holding the sign will be parallel. This version can be placed in four different directions.
** If the block is too narrow, the chains will meet together in a upwards arrow shape. This version is also placed if the player is {{control|sneaking}} when placing a hanging sign below a wide-enough block. This version can be placed in sixteen different directions.

=== Text ===
[[File:Oak Sign GUI.png|thumb|240px|Oak Sign editing.]]
Placing a sign opens an editor interface resembling a magnified view of the sign. Up to four lines of text can then be entered using a keyboard (hardware or on-screen). The editor supports limited editing, including moving the cursor and inserting and deleting characters. {{IN|bedrock}}, [[formatting codes]] can also be used to apply decorative effects such as color, bold, italic and underline to various bits of the text. Depending on the edition and platform in use, copy and paste operations may be supported and the editor may also support keyboard entry of Alt-codes for displaying Unicode characters.


Text can be added to the back side of a sign by interacting with the that side of the sign after placing it and editing the front.

Signs can be waxed by {{Control|use|text=using}} a [[honeycomb]] on it. Once waxed, a sign cannot be unwaxed or edited.

After placing and affixing text on a sign, a player can change the text color by {{control|using}} a [[dye]] on it. When colored with dye, the text color may differ from any color specified by formatting codes.{{Info needed|How does this work? Does the dye affect all the text? One line? One word? Does dye override all formatting codes, including font effects?}}

[[File:Glow Ink Sign with Orange Dye JE2.png|thumb|216px|Oak sign with glow ink and orange dye applied in {{JE}}.]]

A player can {{control|use}} a [[glow ink sac]] on a sign to make its text glow. The glowing text is not affected by lighting. The player can use a regular black [[ink sac]] on the sign to remove the glowing effect.

{| class="wikitable mw-collapsible mw-collapsed"
|+ class="nowrap" | Glow ink colors
!Name !! Main Color !! Edge Color
|-
! Black
| {{color|#000000}}
| {{color|#EDE8CA}}
|-
! Red
| {{color|#FC0000}}
| {{color|#650000}}
|-
! Green
| {{color|#00FC00}}
| {{color|#006500}}
|-
! Brown
| {{color|#894413}}
| {{color|#361B07}}
|-
! Blue
| {{color|#0000FC}}
| {{color|#000065}}
|-
! Purple
| {{color|#9E20ED}}
| {{color|#3F0C5F}}
|-
! Cyan
| {{color|#00D6D6}}
| {{color|#006565}}
|-
! Light Gray
| {{color|#D0D0D0}}
| {{color|#535353}}
|-
! Gray
| {{color|#7E7E7E}}
| {{color|#323232}}
|-
! Pink
| {{color|#FC68B2}}
| {{color|#652947}}
|-
! Lime
| {{color|#8DFC00}}
| {{color|#4B6500}}
|-
! Yellow
| {{color|#FCFC00}}
| {{color|#656500}}
|-
! Light Blue
| {{color|#98BECB}}
| {{color|#3C4B51}}
|-
! Magenta
| {{color|#FC00FC}}
| {{color|#650065}}
|-
! Orange
| {{color|#FC671F}}
| {{color|#65280C}}
|-
! White
| {{color|#FCFCFC}}
| {{color|#656565}}
|}

In [[Creative]] mode, the combination {{key|Ctrl}} + {{control|pick block}} on Windows/Linux, or {{key|cmd}} + {{control|pick block}} on macOS, can be used to copy an already-placed sign, including its text (with decorations), into the player's inventory.

A dyed sign facing east or west will have its text appear more saturated and bright than a sign facing north or south. However, it is actually the sign that is dimmer, because ''Minecraft'''s lighting engine uses side lighting to make the world appear less flat, but the text on signs is not affected by this.

{{IN|bedrock}}, inappropriate words or phrases in a sign's text are displayed as asterisks.

{{IN|java}}, signs can be created with [[Commands#Raw JSON Text|JSON text]], which allows complex formatting (colors, bold, italic, etc.), hover and click events, localized translation (for ''Minecraft'' technical terms, like "Redstone Repeater", otherwise translations must be provided in language files in resource packs), and the incorporation of scoreboard values into text. Use the {{cmd|data merge block}} command to create or alter JSON signs.

: Example: {{cmd|long=1|data merge block ~ ~1 ~ <nowiki>{front_text:{ color:"green", messages:[ '{"selector":"@p", "bold":false, "italic":false, "underlined":false, "strikethrough":false, "obfuscated":false}' , '{"text":"Second Line"}']}}}}

Signs can post the success count of JSON text hover and click events to [[scoreboard]] objectives. The objectives to be used can be specified by running the {{cmd|execute store}} command or by modifying the sign's NBT data directly with the {{cmd|data merge block}} command.

=== Interaction ===
Signs act as though they have a {{control|use}} action, so the [[player]] is unable to place [[block]]s or use [[item]]s while the cursor is pointed at them without {{control|sneaking}}.

Signs are destroyed and drop as an item when pushed by a [[piston]].{{Only|bedrock}}

Signs are non-solid and have no collision, so [[item]]s and [[mob]]s can move through sign blocks. Other [[block]]s (including other signs) can be placed on any edge of a sign.

[[Water]] and [[lava]] flow around signs. Lava can create [[fire]] in [[air]] blocks next to signs as if the signs were flammable, but the signs do not burn (and cannot be burned by other methods either, except {{in|be}}).

=== Fuel ===
Wooden signs can be used as a fuel in [[furnace]]s, smelting an [[item]] per sign.

=== Note Blocks ===
Signs can be placed under [[note block]]s to produce a "bass" sounds.

== Sounds ==
=== Generic ===
==== Normal wood ====
; Sign
{{Sound table/Block/Wood|forcecollapsed=1}}
; Hanging sign
{{Sound table/Block/Hanging sign|forcecollapsed=1}}

==== Cherry wood ====
; Sign
{{Sound table/Block/Cherry wood|forcecollapsed=1}}
; Hanging sign
{{Sound table/Block/Cherry wood hanging sign|forcecollapsed=1}}

==== Bamboo wood ====
; Sign
{{Sound table/Block/Bamboo wood|forcecollapsed=1}}
; Hanging sign
{{edition|java}}:
{{Sound table/Block/Bamboo wood hanging sign/JE|forcecollapsed=1}}

{{edition|bedrock}}:
{{Sound table/Block/Bamboo wood hanging sign/BE|forcecollapsed=1}}

==== Nether wood ====
; Sign
{{Sound table/Block/Nether wood|forcecollapsed=1}}
; Hanging sign
{{edition|java}}:
{{Sound table/Block/Nether wood hanging sign/JE|forcecollapsed=1}}

{{edition|bedrock}}:
{{Sound table/Block/Nether wood hanging sign/BE|forcecollapsed=1}}

=== Unique ===
{{edition|java}}:
{{Sound table|forcecollapsed=1
|rowspan=2
|sound=Ink sac1.ogg
|sound2=Ink sac2.ogg
|sound3=Ink sac3.ogg
|subtitle=Glow Ink Sac splotches
|source=block
|description=When a [[glow ink sac]] is used on a sign
|id=item.glow_ink_sac.use
|translationkey=subtitles.item.glow_ink_sac.use
|volume=1.0
|pitch=''varies'' <ref group=sound>Can be 1.0, 0.95, or 1.05 for each sound</ref>
|distance=16}}
{{Sound table
|subtitle=Ink Sac splotches
|source=block
|description=When an [[ink sac]] is used on a sign
|id=item.ink_sac.use
|translationkey=subtitles.item.ink_sac.use
|volume=1.0
|pitch=''varies'' <ref group=sound>Can be 0.85, 0.88, or 0.9 for each sound</ref>
|distance=16}}
{{Sound table
|sound=Dye.ogg
|subtitle=Dye stains
|source=block
|description=When [[dye]] is used on a sign
|id=item.dye.use
|translationkey=subtitles.item.dye.use
|volume=1.0
|pitch=''varies'' <ref group=sound>Can be 1.0, 0.9, 0.95, or 1.1</ref>
|distance=16}}
{{Sound table
|sound=Wax on1.ogg
|sound2=Wax on2.ogg
|sound3=Wax on3.ogg
|subtitle=Wax on
|source=block
|description=When a sign is waxed
|id=item.honeycomb.wax_on
|translationkey=subtitles.item.honeycomb.wax_on
|volume=1.0
|pitch=1.0/0.9/1.1
|distance=16}}
{{Sound table
|sound=Sign waxed interact fail1.ogg
|sound2=Sign waxed interact fail2.ogg
|sound3=Sign waxed interact fail3.ogg
|subtitle=Sign wobbles
|source=block
|description=When a player attempts to edit a waxed sign
|id=block.sign.waxed_interact_fail
|translationkey=subtitles.block.sign.waxed_interact_fail
|volume=1.0
|pitch=''varies''<ref group=sound>{{cd|fail1}} can be 1.0 or 0.9; {{cd|fail2}} and {{cd|fail3}} can be 0.8 or 0.9</ref>
|distance=16
|foot=1}}

{{edition|bedrock}}:
{{Sound table|forcecollapsed=1
|type=bedrock
|sound=Ink sac1.ogg
|sound2=Ink sac2.ogg
|sound3=Ink sac3.ogg
|source=sound
|description=When a glow ink sac or an ink sac is used on a sign
|id=sign.ink_sac.use
|volume=1.0
|pitch=1.0}}
{{Sound table
|type=bedrock
|sound=Dye.ogg
|source=sound
|description=When dye is used on a sign
|id=sign.dye.use
|volume=1.0
|pitch=1.0}}
{{Sound table
|sound=Wax on1.ogg
|sound2=Wax on2.ogg
|sound3=Wax on3.ogg
|source=neutral
|description=When a honeycomb waxes a sign
|id=copper.wax.on
|volume=1.0
|pitch=0.8-1.2}}
{{Sound table
|sound=Sign waxed interact fail1.ogg
|sound2=Sign waxed interact fail2.ogg
|sound3=Sign waxed interact fail3.ogg
|source=block
|description=When a player attempts to edit a waxed sign
|id=block.sign.waxed_interact_fail
|volume=1.0
|pitch=''varies'' <ref group=sound>Can be 1.0 or 0.9 for <code>waxed_interact_fail1</code>; can be 0.8 or 0.9 for <code>waxed_interact_fail2</code> and <code>waxed_interact_fail3</code></ref>
|foot=1}}

== Data values ==
=== ID ===
{{edition|java}}:
{{ID table
|edition=java
|showblocktags=y
|showitemtags=y
|showforms=y
|generatetranslationkeys=y
|displayname=Oak Sign
|spritetype=block
|nameid=oak_sign
|blocktags=signs, standing_signs, wall_post_override
|itemtags=signs}}
{{ID table
|displayname=Spruce Sign
|spritetype=block
|nameid=spruce_sign
|blocktags=signs, standing_signs, wall_post_override
|itemtags=signs}}
{{ID table
|displayname=Birch Sign
|spritetype=block
|nameid=birch_sign
|blocktags=signs, standing_signs, wall_post_override
|itemtags=signs}}
{{ID table
|displayname=Jungle Sign
|spritetype=block
|nameid=jungle_sign
|blocktags=signs, standing_signs, wall_post_override
|itemtags=signs}}
{{ID table
|displayname=Acacia Sign
|spritetype=block
|nameid=acacia_sign
|blocktags=signs, standing_signs, wall_post_override
|itemtags=signs}}
{{ID table
|displayname=Dark Oak Sign
|spritetype=block
|nameid=dark_oak_sign
|blocktags=signs, standing_signs, wall_post_override
|itemtags=signs}}
{{ID table
|displayname=Mangrove Sign
|spritetype=block
|nameid=mangrove_sign
|blocktags=signs, standing_signs, wall_post_override
|itemtags=signs}}
{{ID table
|displayname=Cherry Sign
|spritename=Cherry Sign
|spritetype=block
|nameid=cherry_sign
|blocktags=signs, standing_signs, wall_post_override
|itemtags=signs}}
{{ID table
|displayname=Bamboo Sign
|spritename=Bamboo Sign
|spritetype=block
|nameid=bamboo_sign
|blocktags=signs, standing_signs, wall_post_override
|itemtags=signs}}
{{ID table
|displayname=Crimson Sign
|spritetype=block
|nameid=crimson_sign
|blocktags= signs, standing_signs, wall_post_override
|itemtags=non_flammable_wood, signs}}
{{ID table
|displayname=Warped Sign
|spritetype=block
|nameid=warped_sign
|blocktags=signs, standing_signs, wall_post_override
|itemtags=non_flammable_wood, signs}}
{{ID table
|displayname=Oak Wall Sign
|spritetype=block
|nameid=oak_wall_sign
|blocktags=signs, wall_signs
|form=block}}
{{ID table
|displayname=Spruce Wall Sign
|spritetype=block
|nameid=spruce_wall_sign
|blocktags=signs, wall_signs
|form=block}}
{{ID table
|displayname=Birch Wall Sign
|spritetype=block
|nameid=birch_wall_sign
|blocktags=signs, wall_signs
|form=block}}
{{ID table
|displayname=Jungle Wall Sign
|spritetype=block
|nameid=jungle_wall_sign
|blocktags=signs, wall_signs
|form=block}}
{{ID table
|displayname=Acacia Wall Sign
|spritetype=block
|nameid=acacia_wall_sign
|blocktags=signs, wall_signs
|form=block}}
{{ID table
|displayname=Dark Oak Wall Sign
|spritetype=block
|nameid=dark_oak_wall_sign
|blocktags=signs, wall_signs
|form=block}}
{{ID table
|displayname=Mangrove Wall Sign
|spritetype=block
|nameid=mangrove_wall_sign
|blocktags=signs, wall_signs
|form=block}}
{{ID table
|displayname=Cherry Wall Sign
|spritename=Cherry Wall Sign
|spritetype=block
|nameid=cherry_wall_sign
|blocktags=signs, wall_signs
|form=block}}
{{ID table
|displayname=Bamboo Wall Sign
|spritename=Bamboo Wall Sign
|spritetype=block
|nameid=bamboo_wall_sign
|blocktags=signs, wall_signs
|form=block}}
{{ID table
|displayname=Crimson Wall Sign
|spritetype=block
|nameid=crimson_wall_sign
|blocktags=signs, wall_signs
|form=block}}
{{ID table
|displayname=Warped Wall Sign
|spritetype=block
|nameid=warped_wall_sign
|blocktags=signs, wall_signs
|form=block}}
{{ID table
|displayname=Oak Hanging Sign
|spritename=Oak Hanging Sign
|spritetype=block
|nameid=oak_hanging_sign
|blocktags=all_hanging_signs, ceiling_hanging_signs
|itemtags=hanging_signs}}
{{ID table
|displayname=Spruce Hanging Sign
|spritename=Spruce Hanging Sign
|spritetype=block
|nameid=spruce_hanging_sign
|blocktags=all_hanging_signs, ceiling_hanging_signs
|itemtags=hanging_signs}}
{{ID table
|displayname=Birch Hanging Sign
|spritename=Birch Hanging Sign
|spritetype=block
|nameid=birch_hanging_sign
|blocktags=all_hanging_signs, ceiling_hanging_signs
|itemtags=hanging_signs}}
{{ID table
|displayname=Jungle Hanging Sign
|spritename=Jungle Hanging Sign
|spritetype=block
|nameid=jungle_hanging_sign
|blocktags=all_hanging_signs, ceiling_hanging_signs
|itemtags=hanging_signs}}
{{ID table
|displayname=Acacia Hanging Sign
|spritename=Acacia Hanging Sign
|spritetype=block
|nameid=acacia_hanging_sign
|blocktags=all_hanging_signs, ceiling_hanging_signs
|itemtags=hanging_signs}}
{{ID table
|displayname=Dark Oak Hanging Sign
|spritename=Dark Oak Hanging Sign
|spritetype=block
|nameid=dark_oak_hanging_sign
|blocktags=all_hanging_signs, ceiling_hanging_signs
|itemtags=hanging_signs}}
{{ID table
|displayname=Mangrove Hanging Sign
|spritename=Mangrove Hanging Sign
|spritetype=block
|nameid=mangrove_hanging_sign
|blocktags=all_hanging_signs, ceiling_hanging_signs
|itemtags=hanging_signs}}
{{ID table
|displayname=Cherry Hanging Sign
|spritename=Cherry Hanging Sign
|spritetype=block
|nameid=cherry_hanging_sign
|blocktags=all_hanging_signs, ceiling_hanging_signs
|itemtags=hanging_signs}}
{{ID table
|displayname=Bamboo Hanging Sign
|spritename=Bamboo Hanging Sign
|spritetype=block
|nameid=bamboo_hanging_sign
|blocktags=all_hanging_signs, ceiling_hanging_signs
|itemtags=hanging_signs}}
{{ID table
|displayname=Crimson Hanging Sign
|spritename=Crimson Hanging Sign
|spritetype=block
|nameid=crimson_hanging_sign
|blocktags=all_hanging_signs, ceiling_hanging_signs
|itemtags=hanging_signs, non_flammable_wood}}
{{ID table
|displayname=Warped Hanging Sign
|spritename=Warped Hanging Sign
|spritetype=block
|nameid=warped_hanging_sign
|blocktags=all_hanging_signs, ceiling_hanging_signs
|itemtags=hanging_signs, non_flammable_wood}}
{{ID table
|displayname=Oak Wall Hanging Sign
|spritename=Oak Wall Hanging Sign
|spritetype=block
|nameid=oak_wall_hanging_sign
|blocktags=all_hanging_signs, wall_hanging_signs
|form=block}}
{{ID table
|displayname=Spruce Wall Hanging Sign
|spritename=Spruce Wall Hanging Sign
|spritetype=block
|nameid=spruce_wall_hanging_sign
|blocktags=all_hanging_signs, wall_hanging_signs
|form=block}}
{{ID table
|displayname=Birch Wall Hanging Sign
|spritename=Birch Wall Hanging Sign
|spritetype=block
|nameid=birch_wall_hanging_sign
|blocktags=all_hanging_signs, wall_hanging_signs
|form=block}}
{{ID table
|displayname=Jungle Wall Hanging Sign
|spritename=Jungle Wall Hanging Sign
|spritetype=block
|nameid=jungle_wall_hanging_sign
|blocktags=all_hanging_signs, wall_hanging_signs
|form=block}}
{{ID table
|displayname=Acacia Wall Hanging Sign
|spritename=Acacia Wall Hanging Sign
|spritetype=block
|nameid=acacia_wall_hanging_sign
|blocktags=all_hanging_signs, wall_hanging_signs
|form=block}}
{{ID table
|displayname=Dark Oak Wall Hanging Sign
|spritename=Dark Oak Wall Hanging Sign
|spritetype=block
|nameid=dark_oak_wall_hanging_sign
|blocktags=all_hanging_signs, wall_hanging_signs
|form=block}}
{{ID table
|displayname=Mangrove Wall Hanging Sign
|spritename=Mangrove Wall Hanging Sign
|spritetype=block
|nameid=mangrove_wall_hanging_sign
|blocktags=all_hanging_signs, wall_hanging_signs
|form=block}}
{{ID table
|displayname=Cherry Wall Hanging Sign
|spritename=Cherry Wall Hanging Sign
|spritetype=block
|nameid=cherry_wall_hanging_sign
|blocktags=all_hanging_signs, wall_hanging_signs
|form=block}}
{{ID table
|displayname=Bamboo Wall Hanging Sign
|spritename=Bamboo Wall Hanging Sign
|spritetype=block
|nameid=bamboo_wall_hanging_sign
|blocktags=all_hanging_signs, wall_hanging_signs
|form=block}}
{{ID table
|displayname=Crimson Wall Hanging Sign
|spritename=Crimson Wall Hanging Sign
|spritetype=block
|nameid=crimson_wall_hanging_sign
|blocktags=all_hanging_signs, wall_hanging_signs
|form=block}}
{{ID table
|displayname=Warped Wall Hanging Sign
|spritename=Warped Wall Hanging Sign
|spritetype=block
|nameid=warped_wall_hanging_sign
|blocktags=all_hanging_signs, wall_hanging_signs
|form=block
|foot=1}}
{{ID table
|displayname=Block entity
|spritename=signs
|spritetype=block
|nameid=sign}}
{{ID table
|displayname=Block entity
|spritename=hanging-signs
|spritetype=block
|nameid=hanging_sign
|foot=1}}

{{edition|bedrock}}:
{{ID table
|edition=bedrock
|firstcolumnname=Sign
|shownumericids=y
|showforms=y
|showaliasids=y
|showitemtags=y
|generatetranslationkeys=y
|displayname=Oak standing
|spritename=oak-sign
|spritetype=block
|nameid=standing_sign
|id=63
|form=block}}
{{ID table
|displayname=Spruce standing
|spritename=spruce-sign
|spritetype=block
|nameid=spruce_standing_sign
|id=436
|form=block}}
{{ID table
|displayname=Birch standing
|spritename=birch-sign
|spritetype=block
|nameid=birch_standing_sign
|id=441
|form=block}}
{{ID table
|displayname=Jungle standing
|spritename=jungle-sign
|spritetype=block
|nameid=jungle_standing_sign
|id=443
|form=block}}
{{ID table
|displayname=Acacia standing
|spritename=acacia-sign
|spritetype=block
|nameid=acacia_standing_sign
|id=445
|form=block}}
{{ID table
|displayname=Dark Oak standing
|spritename=dark-oak-sign
|spritetype=block
|nameid=darkoak_standing_sign
|id=447
|form=block}}
{{ID table
|displayname=Mangrove standing
|spritename=mangrove-sign
|spritetype=block
|nameid=mangrove_standing_sign
|id=-494
|form=block
|translationkey=-}}
{{ID table
|displayname=Cherry standing
|spritename=cherry-sign
|spritetype=block
|nameid=cherry_standing_sign
|id=-542
|form=block
|translationkey=-}}
{{ID table
|displayname=Bamboo standing
|spritename=bamboo-sign
|spritetype=block
|nameid=bamboo_standing_sign
|id=-518
|form=block
|translationkey=-}}
{{ID table
|displayname=Crimson standing
|spritename=crimson-sign
|spritetype=block
|nameid=crimson_standing_sign
|id=505
|form=block}}
{{ID table
|displayname=Warped standing
|spritename=warped-sign
|spritetype=block
|nameid=warped_standing_sign
|id=506
|form=block}}
{{ID table
|displayname=Oak wall
|spritename=oak-wall-sign
|spritetype=block
|nameid=wall_sign
|id=68
|form=block
|translationkey=-}}
{{ID table
|displayname=Spruce wall
|spritename=spruce-wall-sign
|spritetype=block
|nameid=spruce_wall_sign
|id=437
|form=block
|translationkey=-}}
{{ID table
|displayname=Birch wall
|spritename=birch-wall-sign
|spritetype=block
|nameid=birch_wall_sign
|id=442
|form=block
|translationkey=-}}
{{ID table
|displayname=Jungle wall
|spritename=jungle-wall-sign
|spritetype=block
|nameid=jungle_wall_sign
|id=444
|form=block
|translationkey=-}}
{{ID table
|displayname=Acacia wall
|spritename=acacia-wall-sign
|spritetype=block
|nameid=acacia_wall_sign
|id=446
|form=block
|translationkey=-}}
{{ID table
|displayname=Dark Oak wall
|spritename=dark-oak-wall-sign
|spritetype=block
|nameid=darkoak_wall_sign
|id=448
|form=block
|translationkey=-}}
{{ID table
|displayname=Mangrove wall
|spritename=mangrove-wall-sign
|spritetype=block
|nameid=mangrove_wall_sign
|id=-495
|form=block
|translationkey=-}}
{{ID table
|displayname=Cherry wall
|spritename=cherry-wall-sign
|spritetype=block
|nameid=cherry_wall_sign
|id=-544
|form=block
|translationkey=-}}
{{ID table
|displayname=Bamboo wall
|spritename=bamboo-wall-sign
|spritetype=block
|nameid=bamboo_wall_sign
|id=-519
|form=block
|translationkey=-}}
{{ID table
|displayname=Crimson wall
|spritename=crimson-wall-sign
|spritetype=block
|nameid=crimson_wall_sign
|id=507
|form=block}}
{{ID table
|displayname=Warped wall
|spritename=warped-wall-sign
|spritetype=block
|nameid=warped_wall_sign
|id=508
|form=block}}
{{ID table
|displayname=Oak item
|spritename=oak-sign
|spritetype=item
|nameid=oak_sign
|aliasid=sign
|id=360
|form=item
|itemtags=minecraft:sign
|translationkey=item.sign.name}}
{{ID table
|displayname=Spruce item
|spritename=spruce-sign
|spritetype=item
|nameid=spruce_sign
|id=576
|form=item
|itemtags=minecraft:sign}}
{{ID table
|displayname=Birch item
|spritename=birch-sign
|spritetype=item
|nameid=birch_sign
|id=577
|form=item
|itemtags=minecraft:sign}}
{{ID table
|displayname=Jungle item
|spritename=jungle-sign
|spritetype=item
|nameid=jungle_sign
|id=578
|form=item
|itemtags=minecraft:sign}}
{{ID table
|displayname=Acacia item
|spritename=acacia-sign
|spritetype=item
|nameid=acacia_sign
|id=579
|form=item
|itemtags=minecraft:sign}}
{{ID table
|displayname=Dark Oak item
|spritename=dark-oak-sign
|spritetype=item
|nameid=dark_oak_sign
|aliasid=darkoak_sign
|id=587
|form=item
|itemtags=minecraft:sign
|translationkey=item.darkoak_sign.name}}
{{ID table
|displayname=Mangrove item
|spritename=mangrove-sign
|spritetype=item
|nameid=mangrove_sign
|id=642
|form=item
|itemtags=minecraft:sign}}
{{ID table
|displayname=Cherry item
|spritename=cherry-sign
|spritetype=item
|nameid=cherry_sign
|id=659
|form=item
|itemtags=minecraft:sign}}
{{ID table
|displayname=Bamboo item
|spritename=bamboo-sign
|spritetype=item
|nameid=bamboo_sign
|id=660
|form=item
|itemtags=minecraft:sign}}
{{ID table
|displayname=Crimson item
|spritename=crimson-sign
|spritetype=item
|nameid=crimson_sign
|id=614
|form=item
|itemtags=minecraft:sign}}
{{ID table
|displayname=Warped item
|spritename=warped-sign
|spritetype=item
|nameid=warped_sign
|id=615
|form=item
|itemtags=minecraft:sign}}
{{ID table
|displayname=Oak Hanging Sign
|spritename=Oak Wall Hanging Sign
|spritetype=block
|nameid=oak_hanging_sign
|id=-500
|itemtags=minecraft:hanging_sign
|translationkey=item.oak_hanging_sign.name}}
{{ID table
|displayname=Spruce Hanging Sign
|spritename=Spruce Wall Hanging Sign
|spritetype=block
|nameid=spruce_hanging_sign
|id=-501
|itemtags=minecraft:hanging_sign
|translationkey=item.spruce_hanging_sign.name}}
{{ID table
|displayname=Birch Hanging Sign
|spritename=Birch Wall Hanging Sign
|spritetype=block
|nameid=birch_hanging_sign
|id=-502
|itemtags=minecraft:hanging_sign
|translationkey=item.birch_hanging_sign.name}}
{{ID table
|displayname=Jungle Hanging Sign
|spritename=Jungle Wall Hanging Sign
|spritetype=block
|nameid=jungle_hanging_sign
|id=-503
|itemtags=minecraft:hanging_sign
|translationkey=item.jungle_hanging_sign.name}}
{{ID table
|displayname=Acacia Hanging Sign
|spritename=Acacia Wall Hanging Sign
|spritetype=block
|nameid=acacia_hanging_sign
|id=-504
|itemtags=minecraft:hanging_sign
|translationkey=item.acacia_hanging_sign.name}}
{{ID table
|displayname=Dark Oak Hanging Sign
|spritename=Dark Oak Wall Hanging Sign
|spritetype=block
|nameid=dark_oak_hanging_sign
|id=-505
|itemtags=minecraft:hanging_sign
|translationkey=item.dark_oak_hanging_sign.name}}
{{ID table
|displayname=Mangrove Hanging Sign
|spritename=Mangrove Wall Hanging Sign
|spritetype=block
|nameid=mangrove_hanging_sign
|id=-508
|itemtags=minecraft:hanging_sign
|translationkey=item.mangrove_hanging_sign.name}}
{{ID table
|displayname=Cherry Hanging Sign
|spritename=Cherry Wall Hanging Sign
|spritetype=block
|nameid=cherry_hanging_sign
|id=-534
|itemtags=minecraft:hanging_sign
|translationkey=item.cherry_hanging_sign.name}}
{{ID table
|displayname=Bamboo Hanging Sign
|spritename=Bamboo Wall Hanging Sign
|spritetype=block
|nameid=bamboo_hanging_sign
|id=-522
|itemtags=minecraft:hanging_sign
|translationkey=item.bamboo_hanging_sign.name}}
{{ID table
|displayname=Crimson Hanging Sign
|spritename=Crimson Wall Hanging Sign
|spritetype=block
|nameid=crimson_hanging_sign
|id=-506
|itemtags=minecraft:hanging_sign
|translationkey=item.crimson_hanging_sign.name}}
{{ID table
|displayname=Warped Hanging Sign
|spritename=Warped Wall Hanging Sign
|spritetype=block
|nameid=warped_hanging_sign
|id=-507
|itemtags=minecraft:hanging_sign
|translationkey=item.warped_hanging_sign.name
|foot=1}}
{{ID table
|notnamespaced=y
|displayname=Block entity
|spritename=signs
|spritetype=block
|nameid=Sign}}
{{ID table
|displayname=Block entity
|spritename=hanging-signs
|spritetype=block
|nameid=HangingSign
|foot=1}}

=== Block states ===
{{see also|Block states}}
{{/BS}}

=== Block data ===
A sign has a block entity associated with it that holds additional data about the block.

{{el|java}}:
{{see also|Block entity format}}
{{/BE}}

{{el|bedrock}}:
:See [[Bedrock Edition level format/Block entity format]].

== Achievements ==
{{load achievements|It's a Sign}}

== Advancements ==
{{load advancements|Glow and Behold}}

== History ==
{{main|/History}}
{{History|java classic}}
{{History||0.24_SURVIVAL_TEST|[[File:Sign Entity.png|32px]] Signs are currently being tested as [[entity|entities]]. They always display "This is a test of the signs. Each line can be 15 chars!" and can only be spawned by pressing {{key|B}}.<ref>{{ytl|bdT76iFEnLk}}</ref>}}
{{History||0.26  SURVIVAL TEST|Removed signs.}}
{{History|java infdev}}
{{History||20100607|[[File:Oak Sign (0) JE1.png|32px]] Signs have been re-implemented as [[block]]s, although still rendering as entities.
|Signs now have a [[crafting]] recipe and the text can now be edited. Editing a sign pauses the game in [[singleplayer]].
|Signs are currently huge and drop [[planks]] when destroyed.
|Signs do not have a particle texture defined. As such, they [[Placeholder texture#Default texture|default to using the grass block texture instead]].}}
{{History||20100608|Signs are now broken faster.
|Signs now [[drops|drop]] themselves when [[breaking|destroyed]], instead of planks.
|Signs now use planks particles.}}
{{History|java alpha}}
{{History||v1.0.1|[[File:Oak Wall Sign (S) JE1 BE1.png|32px]] Added wall signs.
|[[File:Oak Sign (0) JE2.png|32px]] Signs are now smaller.}}
{{History||v1.0.5|Signs no longer require a free [[block]] above it to place.}}
{{History|java beta}}
{{History||April 27, 2011|link=https://notch.tumblr.com/post/4988431144|Hand-drawn signs are mentioned.}}
{{History|java}}
{{History||1.0.0|snap=Beta 1.9 Prerelease 6|Signs are now broken faster using an [[axe]].}}
{{History||1.3.1|snap=12w18a|Editing a sign no longer pauses the game in [[singleplayer]].}}
{{History|||snap=12w27a|Signs are now stackable up to 16.
|The same [[crafting]] recipe now produces 3 signs instead of 1.}}
{{History||June 9, 2014|link=https://twitter.com/SeargeDP/status/476047216541700096|[[Searge]] tweeted a picture of a sign showing a username and a [[scoreboard]] score.}}
{{History||1.8|snap=14w25a|Added support for JSON text to signs.
|Sign character limit now depends on character width.}}
{{History|||snap=14w29a|Signs now display the cracking animation.}}
{{History||1.9|snap=15w43a|A sign now generates within [[igloo]] basements.}}
{{History||1.11|snap=16w33a|Signs can now be used as [[fuel]] in [[furnace]]s.}}
{{History||1.13|snap=17w47a|The standing sign ID has been changed from <code>standing_sign</code> to <code>sign</code>.
|Prior to [[1.13/Flattening|''The Flattening'']], these [[block]]s' numeral IDs were 63 and 68, and the [[item]]'s 323.}}
{{History|||snap=18w10d|[[Water]] can now be placed on the same block as signs.}}
{{History||1.14|snap=18w43a|"Sign" has been renamed to "Oak Sign".
|[[File:Oak Sign JE2 BE2.png|32px]] The texture of oak sign [[item]]s has been changed.
|[[File:Spruce Standing Sign JE1 BE1.png|32px]] [[File:Birch Standing Sign JE1 BE1.png|32px]] [[File:Jungle Standing Sign JE1 BE1.png|32px]] [[File:Acacia Standing Sign JE1 BE1.png|32px]] [[File:Dark Oak Standing Sign JE1 BE1.png|32px]] [[File:Spruce Sign JE1 BE1.png|32px]] [[File:Birch Sign JE1 BE1.png|32px]] [[File:Jungle Sign JE1 BE1.png|32px]] [[File:Acacia Sign JE1 BE1.png|32px]] [[File:Dark Oak Sign JE1 BE1.png|32px]] Added spruce, birch, jungle, acacia and dark oak signs.
|The sign's text has been changed from black to white.
|A sign's recipe now requires the same type of [[wood]] instead of a random assortment.}}
{{History|||snap=18w44a|Signs can now be {{control|used}} while holding a [[dye]] to change the text color.
|Default text color for signs has been changed back to black.}}
{{History|||snap=18w45a|A new movable cursor for free text editing to signs has been added.
|Selection and copy/paste support have been added to signs.}}
{{History|||snap=18w50a|Spruce signs now generate in some [[taiga]] [[village]] houses.
|Spruce sign items can now be found in [[chest]]s in taiga village houses.}}
{{History|||snap=19w12a|Signs can now be [[dye]]d only in [[Creative mode]].}}
{{History|||snap=19w12b|Signs can now be dyed in [[Survival mode]] again.}}
{{History||1.16|snap=20w06a|[[File:Crimson Standing Sign JE1 BE1.png|32px]] [[File:Warped Standing Sign JE1 BE1.png|32px]] [[File:Crimson Sign JE1 BE1.png|32px]] [[File:Warped Sign JE1 BE1.png|32px]] Added crimson and warped signs.}}
{{History|||snap=20w09a|Crimson and warped signs can now be [[crafting|crafted]].}}
{{History||1.17|snap=21w03a|Signs can now be tinted with [[Glow Ink Sac|glow ink sac]]s to make the text glow.
|Works with both undyed and dyed signs.
|Signs now have a sound for being dyed.}}
{{History|||snap=21w11a|[[File:Oak Standing Sign (S) JE2.png|32px]][[File:Spruce Standing Sign (S) JE2 BE2.png|32px]] [[File:Birch Standing Sign (S) JE2 BE2.png|32px]] [[File:Jungle Standing Sign (S) JE2 BE2.png|32px]] [[File:Acacia Standing Sign (S) JE2 BE2.png|32px]] [[File:Dark Oak Standing Sign (S) JE2 BE2.png|32px]] [[File:Oak Wall Sign (S) JE2.png|32px]] [[File:Spruce Wall Sign (S) JE2 BE2.png|32px]] [[File:Birch Wall Sign (S) JE2 BE2.png|32px]] [[File:Jungle Wall Sign (S) JE2 BE2.png|32px]] [[File:Acacia Wall Sign (S) JE2 BE2.png|32px]] [[File:Dark Oak Wall Sign (S) JE2 BE2.png|32px]] The textures of signs have been changed to reflect the changes made to planks in the [[Texture Update]].}}
{{History|||snap=Pre-release 1|Glowing text on signs now has an outer glow, making text more visible in the dark.}}
{{History||1.18|snap=21w41a|[[File:Oak Sign JE3.png|32px]] [[File:Spruce Sign JE2.png|32px]] [[File:Birch Sign JE2.png|32px]] [[File:Jungle Sign JE2.png|32px]] [[File:Acacia Sign JE2.png|32px]] [[File:Dark Oak Sign JE2.png|32px]] [[File:Crimson Sign JE2.png|32px]] [[File:Warped Sign JE2.png|32px]] Changed all signs textures as items.}}
{{History||1.19|snap=22w11a|[[File:Mangrove Sign JE1 BE1.png|32px]][[File:Mangrove Wall Sign JE1 BE1.png|32px]][[File:Mangrove Sign (item) JE1 BE1.png|32px]] Added mangrove signs.}}
{{History|||snap=22w14a|Due to the addition of the [[mangrove tree]] and [[mangrove swamp]], mangrove signs are now obtainable in survival and renewable.}}
{{History||October 15, 2022|link={{ytl|https://youtu.be/iM9KtHaDcUg?t=5437}}|Hanging signs were announced and shown on [[Minecraft Live 2022]].|Hanging signs were conceptualized by [[Agnes Larsson]] with input from her daughter.<ref>{{ytl|vJCMpPyaN8Q|Minecraft 1.20: New Blocks and Their Functions! @ 0:29|Minecraft|February 24, 2023|t=29s}}</ref>}}
{{History||1.20<br>(Experimental)|link=1.19.3|snap=22w42a|[[File:Bamboo Sign (0) JE1 BE1.png|32px]] [[File:Bamboo Wall Sign (S) JE1 BE1.png|32px]] [[File:Bamboo Sign (item) JE1 BE1.png|32px]] Added bamboo signs behind the [[Java Edition 1.20|Update 1.20 experimental datapack]].
|[[File:Oak Hanging Sign JE1 BE1.png|32px]] [[File:Spruce Hanging Sign JE1 BE1.png|32px]] [[File:Birch Hanging Sign JE1 BE1.png|32px]] [[File:Jungle Hanging Sign JE1 BE1.png|32px]] [[File:Acacia Hanging Sign JE1 BE1.png|32px]] [[File:Dark Oak Hanging Sign JE1 BE1.png|32px]] [[File:Mangrove Hanging Sign JE1 BE1.png|32px]] [[File:Bamboo Hanging Sign JE1 BE1.png|32px]] [[File:Crimson Hanging Sign JE1 BE1.png|32px]] [[File:Warped Hanging Sign JE1 BE1.png|32px]]<br>[[File:Oak Wall Hanging Sign JE1 BE1.png|32px]] [[File:Spruce Wall Hanging Sign JE1 BE1.png|32px]] [[File:Birch Wall Hanging Sign JE1 BE1.png|32px]] [[File:Jungle Wall Hanging Sign JE1 BE1.png|32px]] [[File:Acacia Wall Hanging Sign JE1 BE1.png|32px]] [[File:Dark Oak Wall Hanging Sign JE1 BE1.png|32px]] [[File:Mangrove Wall Hanging Sign JE1 BE1.png|32px]] [[File:Bamboo Wall Hanging Sign (S) JE1 BE1.png|32px]] [[File:Crimson Wall Hanging Sign JE1 BE1.png|32px]] [[File:Warped Wall Hanging Sign JE1 BE1.png|32px]]<br>[[File:Oak Hanging Sign (item) JE1 BE1.png|32px]] [[File:Spruce Hanging Sign (item) JE1 BE1.png|32px]] [[File:Birch Hanging Sign (item) JE1 BE1.png|32px]] [[File:Jungle Hanging Sign (item) JE1 BE1.png|32px]] [[File:Acacia Hanging Sign (item) JE1 BE1.png|32px]] [[File:Dark Oak Hanging Sign (item) JE1 BE1.png|32px]] [[File:Mangrove Hanging Sign (item) JE1 BE1.png|32px]] [[File:Bamboo Hanging Sign (item) JE1 BE1.png|32px]] [[File:Crimson Hanging Sign (item) JE1 BE1.png|32px]] [[File:Warped Hanging Sign (item) JE1 BE1.png|32px]]<br>Added hanging signs behind the [[Java Edition 1.20|Update 1.20 experimental datapack]].|Added unique sounds for Nether and bamboo wood signs.}}
{{History|||snap=22w45a|[[File:Jungle Wall Hanging Sign JE2 BE2.png|32px]] The texture of jungle hanging wall signs have been changed.|Added unique sounds for Nether and bamboo wood hanging signs.|Bamboo hanging signs now can be crafted using [[block of stripped bamboo]] instead of bamboo planks.|Crafting bamboo hanging signs now outputs 6 hanging signs instead of 2.}}
{{History||1.20<br>(Experimental)|link=1.19.4|snap=23w07a|[[File:Cherry Sign (0) JE1.png|32px]] [[File:Cherry Wall Sign (S) JE1.png|32px]] [[File:Cherry Sign (item) JE1.png|32px]] [[File:Cherry Hanging Sign JE1.png|32px]] [[File:Cherry Wall Hanging Sign JE1.png|32px]] [[File:Cherry Hanging Sign (item) JE1.png|32px]] Added cherry signs and hanging signs behind the [[Java Edition 1.20|Update 1.20 experimental datapack]]. There used to be a glitch where right clicking on a sign would play the “use” animation. This was fixed in the snapshots for 1.20, where signs are editable.}}
{{History|||snap=1.19.4 Pre-release 4|[[File:Cherry Sign (0) JE2 BE2.png|32px]] Updated the texture of cherry signs.}}
{{History||1.20|snap=23w12a|Bamboo sign, cherry sign and all of the hanging signs are now available without using the "Update 1.20" experimental datapack.|Signs and hanging signs can now be edited after being placed.|Signs and hanging signs now support text on both sides.|Signs and hanging signs can now be waxed with [[honeycomb]] to prevent editing.|Oak and spruce hanging sign can now be found in [[suspicious gravel]] and [[suspicious sand]] in [[trail ruins]].}}
{{History|||snap=23w14a|Signs and hanging signs with click commands can now be interacted with even if the sign is not waxed.|Signs and hanging signs can no longer be edited by players in [[Adventure]] mode.|Signs and hanging signs with non-text chat components can no longer be edited, even if the sign is not waxed.|Signs and hanging signs now save text even if the edit screen is closed by the player being moved far away.}}
{{History|||snap=23w16a|Oak and spruce hanging sign no longer generates in [[suspicious sand]] in [[trail ruins]].|Due to the split of the archaeological loot tables for the suspicious gravel within the [[trail ruins]]; oak and spruce hanging sign now are in the common loot.}}
{{History||1.20.2|snap=23w31a|Changed sounds for Nether wood hanging signs.<ref>{{Bug|MC-262295||Warped and Crimson hanging signs uses their respective plank sounds, despite their stripped stems having unique sounds|Fixed}}</ref>}}

{{History|pocket alpha}}
{{History||v0.5.0|[[File:Oak Standing Sign.png|32px]] [[File:Oak Sign JE1 BE1.png|32px]] Signs have been added, though they can be obtained only through [[inventory]] editors. |The [[player]] currently cannot write on signs.}}
{{History||v0.6.0|Signs can now be legitimately obtained in [[Survival]] and [[Creative]] mode.|The player can now write on signs.}}
{{History||v0.10.0|snap=build 1|Signs now have a selection overlay.}}
{{History|pocket}}
{{History||1.0.0|snap=alpha 0.17.0.1|Signs can now be found in [[igloo]] basements.}}
{{History|bedrock}}
{{History||1.9.0|snap=beta 1.9.0.0|"Sign" has been renamed to "Oak Sign".
|[[File:Spruce Standing Sign (S) JE2 BE2.png|32px]] [[File:Birch Standing Sign (S) JE2 BE2.png|32px]] [[File:Jungle Standing Sign (S) JE2 BE2.png|32px]] [[File:Acacia Standing Sign (S) JE2 BE2.png|32px]] [[File:Dark Oak Standing Sign (S) JE2 BE2.png|32px]] [[File:Spruce Sign JE1 BE1.png|32px]] [[File:Birch Sign JE1 BE1.png|32px]] [[File:Jungle Sign JE1 BE1.png|32px]] [[File:Acacia Sign JE1 BE1.png|32px]] [[File:Dark Oak Sign JE1 BE1.png|32px]] Added spruce, birch, jungle, acacia and dark oak signs.|The sign's text has been changed from black to white.|A sign's recipe now requires the same type of [[wood]] instead of a random assortment.}}
{{History|||snap=beta 1.9.0.2|The default sign text color has been changed back to black.|Sign variants are now grouped in their own [[inventory]] category.}}
{{History||1.10.0|snap=beta 1.10.0.3|[[File:Oak Sign JE2 BE2.png|32px]] The texture of oak sign [[item]]s has been changed.|Spruce signs now generate in new [[taiga]] and [[snowy taiga]] [[village]] houses.}}
{{History||1.11.0|snap=beta 1.11.0.1|Signs can now be used as a [[fuel]] in [[furnace]]s.|Oak signs can now be found inside taiga and snowy taiga village house [[chest]]s.}}
{{History||1.16.0|snap=beta 1.16.0.51|[[File:Crimson Standing Sign JE1 BE1.png|32px]] [[File:Warped Standing Sign JE1 BE1.png|32px]] [[File:Crimson Sign JE1 BE1.png|32px]] [[File:Warped Sign JE1 BE1.png|32px]] Added crimson and warped signs.|[[File:Spruce Standing Sign (S) JE2 BE2.png|32px]] [[File:Birch Standing Sign (S) JE2 BE2.png|32px]] [[File:Jungle Standing Sign (S) JE2 BE2.png|32px]] [[File:Acacia Standing Sign (S) JE2 BE2.png|32px]] [[File:Dark Oak Standing Sign (S) JE2 BE2.png|32px]] [[File:Spruce Wall Sign (S) JE2 BE2.png|32px]] [[File:Birch Wall Sign (S) JE2 BE2.png|32px]] [[File:Jungle Wall Sign (S) JE2 BE2.png|32px]] [[File:Acacia Wall Sign (S) JE2 BE2.png|32px]] [[File:Dark Oak Wall Sign (S) JE2 BE2.png|32px]] The texture of all signs except oak sign have been changed.}}
{{History||1.16.20|snap=beta 1.16.20.50|Crimson and warped signs now uses regular plank [[sound]]s instead of their stem variant sounds.}}
{{History||1.16.210|snap=beta 1.16.210.59|Signs can now be {{control|used}} while holding a [[dye]] to change the text color.|Signs can now be tinted with [[Glow Ink Sac|glow ink sac]]s to make the text glow.
|Works with both default and dyed signs.}}
{{History|||snap=beta 1.16.210.60|Color on dyed signs disappears and the text turns back to black.|Signs with applied glowing effect as well as color stops glowing and color is removed.}}
{{History||1.16.220|snap=beta 1.16.220.50|Signs can now be {{control|used}} while holding a [[dye]] to change the text color again.|Signs can now be tinted with [[Glow Ink Sac|glow ink sac]]s to make the text glow again.}}
{{History|||snap=beta 1.16.220.52|Now has sounds for being dyed.}}
{{History|||snap=release|A glowing effect can no longer be applied to signs due to glow ink sacs becoming inaccessible in the full release.}}
{{History||1.17.0|snap=beta 1.17.0.50|[[File:Oak Sign BE3.png|32px]] [[File:Spruce Sign BE2.png|32px]] [[File:Birch Sign BE2.png|32px]] [[File:Jungle Sign BE2.png|32px]] [[File:Acacia Sign BE2.png|32px]] [[File:Dark Oak Sign BE2.png|32px]] Textures of sign items was updated.
|[[File:Oak Standing Sign (S) JE2 BE2.png|32px]] [[File:Oak Wall Sign (S) JE2 BE2.png|32px]] The textures of oak signs have been changed to reflect the changes made to planks in the [[Texture Update]].}}
{{History||1.17.10|snap=beta 1.17.10.21|Glowing text on signs now has an outer glow, making text more visible in the dark.}}
{{History||1.18.10|snap=beta 1.18.10.20|[[File:Oak Sign JE3.png|32px]] [[File:Spruce Sign JE2.png|32px]] [[File:Birch Sign JE2.png|32px]] [[File:Jungle Sign JE2.png|32px]] [[File:Acacia Sign JE2.png|32px]] [[File:Dark Oak Sign JE2.png|32px]] [[File:Crimson Sign JE2.png|32px]] [[File:Warped Sign JE2.png|32px]] Changed all signs textures as items.}}
{{History||1.19.0|snap=beta 1.19.0.20|[[File:Mangrove Sign JE1 BE1.png|32px]][[File:Mangrove Wall Sign JE1 BE1.png|32px]][[File:Mangrove Sign (item) JE1 BE1.png|32px]] Added mangrove signs.}}
{{History||Next Major Update<br>(Experimental)|link=Bedrock Edition 1.20|snap=beta 1.19.50.21|[[File:Bamboo Sign (0) JE1 BE1.png|32px]] [[File:Bamboo Wall Sign (S) JE1 BE1.png|32px]] [[File:Bamboo Sign (item) JE1 BE1.png|32px]] Added bamboo signs behind the "[[Bedrock Edition 1.20|Next Major Update]]" [[experimental]] toggle.|[[File:Oak Hanging Sign JE1 BE1.png|32px]] [[File:Spruce Hanging Sign JE1 BE1.png|32px]] [[File:Birch Hanging Sign JE1 BE1.png|32px]] [[File:Jungle Hanging Sign JE1 BE1.png|32px]] [[File:Acacia Hanging Sign JE1 BE1.png|32px]] [[File:Dark Oak Hanging Sign JE1 BE1.png|32px]] [[File:Mangrove Hanging Sign JE1 BE1.png|32px]] [[File:Bamboo Hanging Sign JE1 BE1.png|32px]] [[File:Crimson Hanging Sign JE1 BE1.png|32px]] [[File:Warped Hanging Sign JE1 BE1.png|32px]]<br>[[File:Oak Wall Hanging Sign JE1 BE1.png|32px]] [[File:Spruce Wall Hanging Sign JE1 BE1.png|32px]] [[File:Birch Wall Hanging Sign JE1 BE1.png|32px]] [[File:Jungle Wall Hanging Sign JE1 BE1.png|32px]] [[File:Acacia Wall Hanging Sign JE1 BE1.png|32px]] [[File:Dark Oak Wall Hanging Sign JE1 BE1.png|32px]] [[File:Mangrove Wall Hanging Sign JE1 BE1.png|32px]] [[File:Bamboo Wall Hanging Sign (S) JE1 BE1.png|32px]] [[File:Crimson Wall Hanging Sign JE1 BE1.png|32px]] [[File:Warped Wall Hanging Sign JE1 BE1.png|32px]]<br>[[File:Oak Hanging Sign (item) JE1 BE1.png|32px]] [[File:Spruce Hanging Sign (item) JE1 BE1.png|32px]] [[File:Birch Hanging Sign (item) JE1 BE1.png|32px]] [[File:Jungle Hanging Sign (item) JE1 BE1.png|32px]] [[File:Acacia Hanging Sign (item) JE1 BE1.png|32px]] [[File:Dark Oak Hanging Sign (item) JE1 BE1.png|32px]] [[File:Mangrove Hanging Sign (item) JE1 BE1.png|32px]] [[File:Bamboo Hanging Sign (item) JE1 BE1.png|32px]] [[File:Crimson Hanging Sign (item) JE1 BE1.png|32px]] [[File:Warped Hanging Sign (item) JE1 BE1.png|32px]]<br>Added hanging signs behind the "[[Bedrock Edition 1.20.0|Next Major Update]]" [[experimental]] toggle.|Added unique sounds for Nether and bamboo wood signs.}}
{{History|||snap=beta 1.19.60.20|[[File:Jungle Wall Hanging Sign JE2 BE2.png|32px]] The texture of jungle hanging wall signs have been changed.|Bamboo hanging signs now can be crafted using [[block of stripped bamboo]] instead of bamboo planks.|Crafting bamboo hanging signs now outputs 6 hanging signs instead of 2.}}
{{History||Next Major Update<br>(Experimental)|link=Bedrock Edition 1.19.80|snap=beta 1.19.80.20|[[File:Cherry Sign (0).png|32px]] [[File:Cherry Wall Sign (S) JE1.png|32px]] [[File:Cherry Sign (item) JE1.png|32px]] [[File:Cherry Hanging Sign JE1.png|32px]] [[File:Cherry Wall Hanging Sign JE1.png|32px]] [[File:Cherry Hanging Sign (item) JE1.png|32px]] Added cherry signs and hanging signs behind the "[[Bedrock Edition 1.20.0|Next Major Update]]" [[experimental]] toggle.}}
{{History|||snap=beta 1.19.80.21|[[File:Cherry Sign (0) JE2 BE2.png|32px]] Updated the texture of cherry signs.}}
{{History|||snap=beta 1.19.80.22|Signs and hanging signs can now be edited after being placed.|Signs and hanging signs now support text on both sides.|Signs and hanging signs can now be waxed with [[honeycomb]] to prevent editing.}}
{{History|||snap=beta 1.20.0.20|Crimson, warped, and bamboo hanging signs now have custom sounds to match their wood type.<ref name=badnewsounds>{{Bug|MCPE-164246}}</ref>}}
{{History||1.20.0|snap=beta 1.20.0.21|Bamboo sign, cherry sign and all of the hanging signs are now available without using the "Next Major Update" experimental toggle.}}

{{History|console}}
{{History||xbox=TU1|xbone=CU1|ps=1.0|wiiu=Patch 1|switch=1.0.1|[[File:Oak Standing Sign.png|32px]] [[File:Oak Sign JE1 BE1.png|32px]] Added signs.}}
{{History||xbox=TU9|Signs are now stackable up to 16.
|The same [[crafting]] recipe for signs now produces 3 signs instead of 1.}}
{{History||xbox=none|xbone=none|ps=1.88|wiiu=none|switch=none|[[File:Spruce Standing Sign (S) JE2 BE2.png|32px]] [[File:Birch Standing Sign (S) JE2 BE2.png|32px]] [[File:Jungle Standing Sign (S) JE2 BE2.png|32px]] [[File:Acacia Standing Sign (S) JE2 BE2.png|32px]] [[File:Dark Oak Standing Sign (S) JE2 BE2.png|32px]] [[File:Spruce Sign JE1 BE1.png|32px]] [[File:Birch Sign JE1 BE1.png|32px]] [[File:Jungle Sign JE1 BE1.png|32px]] [[File:Acacia Sign JE1 BE1.png|32px]] [[File:Dark Oak Sign JE1 BE1.png|32px]] Added spruce, birch, jungle, acacia and dark oak signs.}}
{{History||xbox=none|xbone=none|ps=1.90|wiiu=none|switch=none|[[File:Oak Sign JE2 BE2.png|32px]] The texture of oak sign [[item]]s has been changed.}}

{{History|new 3ds}}
{{History||0.1.0|[[File:Oak Standing Sign (S) JE2 BE2.png|32px]] [[File:Oak Sign JE1 BE1.png|32px]] Added signs.}}
{{History|foot}}

== Trivia ==
* The first concept art of hanging signs came from [[Agnes Larsson]]'s daughter.<ref>{{Ytl|vJCMpPyaN8Q|Minecraft 1.20: New Blocks and Their Functions!|Minecraft|t=30s}}</ref>

== Gallery ==
=== Screenshots ===
<gallery>
Signs classic.png|Test of signs in early [[Java Edition Classic]].
Sigh test.jpg|Another early sign image.
Signs PreRelease.png|First image of sign blocks during [[Java Edition Infdev|Infdev]].
Pocket Edition v0.6.0 alpha Development sign.png|First image of signs on [[Pocket Edition]].
Pocket Edition v0.6.0 alpha Development sign editing.png|First image of editing text on [[PE]] iOS.
Pocket Edition v0.6.0 alpha Development sign editing 2.png|First image of editing text on [[PE]] Android.
Pocket Edition v0.6.0 alpha Development sky.png
Door Sign.png|A sign placed on a door.
Breaking News.png|A sign being broken.
Sign Text Dark.jpg|A dark oak sign with black text.
Sign Text Light.jpg|A dark oak sign with white text.
Sign Blockdata.gif|A sign using blockdata to dynamically change.
JSON Sign.png|First image of a sign using JSON text.
Width Based Character Limit.png|First image of a sign using width based character limits.
Glow Ink Sign with Pink Dye.png|Oak sign with glow ink in the dark in [[Java Edition 21w03a]].
Lit vs unlit signs.png|Difference in visibility of a lime text, from left to right, in a lit birch sign, unlit birch sign, lit dark oak sign, and unlit dark oak sign.
Glowing Text Comparison.png|The comparison between glow text and non-glow text.
Example Of Signs Being Weird.png|alt=Shading differences|Signs being different shades depending on orientation.
Glow text.gif|All sixteen colors of glow text.
Glow Ink Signs.jpg|Signs with glowing ink in several colors.
Lots of Glowing Signs.jpg|More signs with glowing ink.
Sign Platforms.jpg|[[Ari]] standing on top of a hanged sign.
Eric Shop.jpg|[[Sunny]] looking at a double sided hanging sign.
Hanging Sign Bedrock.png|Hanging sign with small text.
Hanging Sign Java.png|Hanging sign with large text.
New Hanging Sign Text Length 1.jpg|Text on hanging sign.
New Hanging Sign Text Length 2.jpg|Text on hanging sign.
</gallery>

=== Concept Art ===
<gallery>
Hanging_Sign_Concept_Art.png|Hanging sign concept art.
Hanging_Sign_Concept_Art2.png|Ditto.
Hanging_Sign_Concept_Art3.png|Hanging sign dimensions concept art.
Hanging_Sign_Concept_Art4.png|Hanging sign crafting recipe, block states concept art.
</gallery>

=== Renders ===
{{hidden begin}}
<div style="clear: both"></div>
<gallery>
Oak Sign.png|Oak Sign
Spruce Sign.png|Spruce Sign
Birch Sign.png|Birch Sign
Jungle Sign.png|Jungle Sign
Acacia Sign.png|Acacia Sign
Dark Oak Sign.png|Dark Oak Sign
Mangrove Sign.png|Mangrove Sign
Cherry Sign.png|Cherry Sign
Bamboo Sign.png|Bamboo Sign
Crimson Sign.png|Crimson Sign
Warped Sign.png|Warped Sign
Oak Wall Sign.png|Oak Wall Sign
Spruce Wall Sign.png|Spruce Wall Sign
Birch Wall Sign.png|Birch Wall Sign
Jungle Wall Sign.png|Jungle Wall Sign
Acacia Wall Sign.png|Acacia Wall Sign
Dark Oak Wall Sign.png|Dark Oak Wall Sign
Mangrove Wall Sign.png|Mangrove Wall Sign
Cherry Wall Sign.png|Cherry Wall Sign
Bamboo Wall Sign.png|Bamboo Wall Sign
Crimson Wall Sign.png|Crimson Wall Sign
Warped Wall Sign.png|Warped Wall Sign
Oak Hanging Sign.png|Oak Hanging Sign
Spruce Hanging Sign.png|Spruce Hanging Sign
Birch Hanging Sign.png|Birch Hanging Sign
Jungle Hanging Sign.png|Jungle Hanging Sign
Acacia Hanging Sign.png|Acacia Hanging Sign
Dark Oak Hanging Sign.png|Dark Oak Hanging Sign
Mangrove Hanging Sign.png|Mangrove Hanging Sign
Cherry Hanging Sign.png|Cherry Hanging Sign
Bamboo Hanging Sign.png|Bamboo Hanging Sign
Crimson Hanging Sign.png|Crimson Hanging Sign
Warped Hanging Sign.png|Warped Hanging Sign
Oak Wall Hanging Sign.png|Oak Wall Hanging Sign
Spruce Wall Hanging Sign.png|Spruce Wall Hanging Sign
Birch Wall Hanging Sign.png|Birch Wall Hanging Sign
Jungle Wall Hanging Sign.png|Jungle Wall Hanging Sign
Acacia Wall Hanging Sign.png|Acacia Wall Hanging Sign
Dark Oak Wall Hanging Sign.png|Dark Oak Wall Hanging Sign
Mangrove Wall Hanging Sign.png|Mangrove Wall Hanging Sign
Cherry Wall Hanging Sign.png|Cherry Wall Hanging Sign
Bamboo Wall Hanging Sign.png|Bamboo Wall Hanging Sign
Crimson Wall Hanging Sign.png|Crimson Wall Hanging Sign
Warped Wall Hanging Sign.png|Warped Wall Hanging Sign
</gallery>
<gallery>
Oak Sign JE3.png
Spruce Sign JE2.png
Birch Sign JE2.png
Jungle Sign JE2.png
Acacia Sign JE2.png
Dark Oak Sign JE2.png
Mangrove Sign (item) JE1 BE1.png
Cherry Sign (item) JE1.png
Bamboo Sign (item) JE1 BE1.png
Crimson Sign JE2.png
Warped Sign JE2.png
Oak Hanging Sign (item) JE1 BE1.png
Spruce Hanging Sign (item) JE1 BE1.png
Birch Hanging Sign (item) JE1 BE1.png
Jungle Hanging Sign (item) JE1 BE1.png
Acacia Hanging Sign (item) JE1 BE1.png
Dark Oak Hanging Sign (item) JE1 BE1.png
Mangrove Hanging Sign (item) JE1 BE1.png
Cherry Hanging Sign (item) JE1.png
Bamboo Hanging Sign (item) JE1 BE1.png
Crimson Hanging Sign (item) JE1 BE1.png
Warped Hanging Sign (item) JE1 BE1.png
</gallery>
{{hidden end}}
{{-}}

== Issues ==
{{issue list}}

== See also ==
* [[Chalkboard]]

== References ==
{{Reflist}}

== External Links ==
*[https://www.minecraft.net/en-us/article/taking-inventory--sign Taking Inventory: Sign] – Minecraft.net on January 9, 2020

{{Blocks|utility}}
{{Items}}

[[Category:Utility blocks]]
[[Category:Manufactured blocks]]
[[Category:Generated structure blocks]]
[[Category:Block entities]]
[[Category:Non-solid blocks]]

[[cs:Cedule]]
[[de:Schild (Schrift)]]
[[es:Cartel]]
[[fr:Pancarte]]
[[hu:Tábla]]
[[it:Cartello]]
[[ja:看板]]
[[ko:표지판]]
[[nl:Bord]]
[[pl:Tabliczka]]
[[pt:Placa]]
[[ru:Табличка]]
[[th:ป้าย]]
[[uk:Табличка]]
[[zh:告示牌]]</li></ul></nowiki>
{{Extension DPL}}<ul><li>[[Super Fertilizer|Super Fertilizer]]<br/>{{education feature}}
{{Exclusive|Bedrock|Education}}
{{Item
| image = Super Fertilizer.png
| renewable = No
| stackable = Yes (64)
}}
'''Super fertilizer''' is a powerful form of [[bone meal]] that is created using [[ammonia]] and [[phosphorus]].

== Obtaining ==

=== Lab table ===
{| class="wikitable"
! Result
! Materials Needed
|-
!rowspan=2|{{slot|Super Fertilizer}}<br>[[Super Fertilizer]]
|{{slot}}{{slot|Ammonia|link=Compound}}{{slot|Phosphorus|link=Element}}{{slot}}
|-
|<center>[[Compound|Ammonia]], [[Element|Phosphorus]]</center>
|}

== Usage ==

Super fertilizer can be used in the same way as bone meal. It produces more [[flowers]] in a larger area when used on [[grass block]]s compared to bone meal. When super fertilizer is used on a [[sapling]], a [[tree]] is instantly grown after one use, instead of multiple uses as with bone meal. Super fertilizer matures crops with a single use.

Note that super fertilizer does not instantly grow a hanging [[mangrove propagule]]. This could be a bug.

== Sounds ==
{{Sound table
|type=bedrock
|sound=Gravel hit1.ogg
|sound2=Gravel hit2.ogg
|sound3=Gravel hit3.ogg
|sound4=Gravel hit4.ogg
|source=player
|description=When super fertilizer is created by a [[lab table]]
|id=step.gravel
|volume=1.0
|pitch=0.2/0.4}}
{{Sound table
|sound=Bonemeal1.ogg
|sound2=Bonemeal2.ogg
|sound3=Bonemeal3.ogg
|sound4=Bonemeal4.ogg
|sound5=Bonemeal5.ogg
|description=When super fertilizer is successfully used
|source=Blocks
|id=item.bone_meal.use
|foot=1}}

== Data values ==
=== ID ===
{{ID table
|edition=bedrock
|shownumericids=y
|showforms=y
|notshowbeitemforms=y
|generatetranslationkeys=y
|displayname=Super Fertilizer
|spritetype=item
|nameid=rapid_fertilizer
|id=597
|form=item
|foot=1}}

== History ==
{{History|bedrock}}
{{History||1.4.0|snap=beta 1.2.20.1|[[File:Super Fertilizer BE1.png|32px]] Added super fertilizer.}}

{{History|education}}
{{History||1.0.27|[[File:Super Fertilizer BE1.png|32px]] Added super fertilizer.}}
{{History|foot}}

{{items}}
{{Education Edition}}

[[Category:Plants]]
[[Category:Non-renewable resources]]
[[Category:Education Edition items]]

[[de:Superdünger]]
[[ja:スーパー肥料]]
[[ko:슈퍼 비료]]
[[lzh:神肥]]
[[pl:Supernawóz]]
[[pt:Super fertilizante]]
[[uk:Супердобриво]]
[[zh:超级肥料]]</li><li>[[Hopper|Hopper]]<br/>{{About|the block|the crash utility|Hopper (crash utility)}}
{{Block
|image=<gallery>
Hopper (D).png|Java
Hopper (D) BE.png|Bedrock
</gallery>
|extratext = View [[#Gallery|all renders]]
|transparent=Yes
|light=No
|tool=wooden pickaxe
|renewable=Yes
|stackable=Yes (64)
|flammable=No
|lavasusceptible=No
}}
A '''hopper''' is a low-capacity storage [[block]] that can be used to collect [[item (entity)|item entities]] directly above it, as well as to transfer [[item]]s into and out of other containers. A hopper can be locked with [[Redstone Dust|redstone power]] to stop it from moving items into or out of itself.

== Obtaining ==
=== Breaking ===
To obtain a hopper, {{control|mine}} it with a [[pickaxe]]. Using any other item to mine a hopper drops only its contents.
{{breaking row|horizontal=1|Hopper|Pickaxe|Wood|foot=1}}

===Crafting===
A hopper can be crafted from 5 iron ingots and a chest.
{{Crafting
|A1= Iron Ingot
|C1= Iron Ingot
|A2= Iron Ingot
|B2= Chest
|C2= Iron Ingot
|B3= Iron Ingot
|Output= Hopper
|type= Redstone
}}

==Usage==
{{see also|Tutorials/Hopper}}
[[File:Hopper aligment.png|Hoppers can face down or sideways.|thumb]]

A hopper can be used as a container, as a crafting ingredient, and as a redstone component.

A hopper has an "output" tube at its bottom that can face down or sideways and provides a visual indication of which block the hopper is set up to drop its items into, if that block has an inventory. To place a hopper, use the {{control|Place Block}} control while aiming at the surface to which its output should face (Hoppers ''do not'' orient themselves automatically). To place a hopper directly on the face of an already interactable block, the player can {{control|sneak}} while placing the hopper. Attempting to place a hopper aimed on the bottom face of a block instead faces downward. With some blocks, such as the [[furnace]] and [[brewing stand]], the hopper has multiple uses. A hopper does not change direction after placement, and it is not attached to the container it faces; the container can be removed or replaced, and the hopper remains unchanged.

Hoppers cannot be moved by [[piston]]s.{{only|java}} Despite not being a solid block, attached blocks such as [[rail]]s, [[lever]]s, [[tripwire]] and [[redstone]] dust can be placed on top of hoppers, but not on their sides.

===Container===
[[File:Hopper GUI.png|thumb|176px|Hopper GUI showing the hopper's five slots of inventory at the top and the player's inventory below.]]

A hopper can be used as a container and has 5 slots of inventory space.

To open the hopper GUI, use the {{control|use item|text=Use Item/Place Block}} [[control]]. To move items between the hopper inventory and the player inventory or hotbar while the hopper GUI is open, drag or shift-click the items. To exit the hopper GUI, use the {{key|Esc}} key, B button or circle button, depending on the device.

By default, the GUI of a hopper is labeled "Item Hopper". A hopper's GUI label can be changed by naming the hopper in an [[anvil]] before placing it, or, {{in|java}}, by using the [[Commands#data|data]] command (for example, to label a hopper at (0,64,0) "Steve's Hopper", use <code>/data merge block 0 64 0 {CustomName:'"Steve's Hopper"'}</code>).

{{IN|java}}, a hopper's GUI can be "locked" (or subsequently unlocked) by setting the hopper's <code>Lock</code> tag with the [[Commands#data|data]] command. If a hopper's <code>Lock</code> tag is not blank, the hopper cannot be accessed except by players holding an item with the same name as the <code>Lock</code> tag's text. For example, to lock a hopper at (0,64,0) so that only players holding an item named "Steve's Key" can access the hopper, use <code>/data merge block 0 64 0 {Lock:"Steve's Key"}</code>.

===Crafting ingredient===
A hopper can be used to craft a [[minecart with hopper]].
{{crafting usage}}

===Redstone component===
{{see also|Redstone circuit|Redstone components#Hopper}}
[[File:Hopper logic flowchart.png|thumb|Flowchart of hopper logic]]

While a hopper is ''not'' powered by redstone signals, it operates with three functions:

*'''Collect''' [[Item (entity)|item entities]] (free-floating items in the world) into its inventory from the space above it
*'''Pull''' a single item into its inventory from a container above it
*'''Push''' a single item from its own inventory into a container it faces

A hopper first attempts to push any items inside it. Afterward, it checks if the block above it is a type of container. If so, it attempts to pull from it. Otherwise, the hopper attempts to collect item entities. Notably, hoppers can push to and pull from other hoppers, forming '''hopper pipes''' or '''hopper chains''', which allow transporting items across several blocks and are further discussed below.

====Redstone signals====
When a hopper receives a redstone signal (and is considered to be "activated"), all three functions stop. To avoid confusion over the terms "activated" and "deactivated", powered hoppers are often described as being '''locked''' and unpowered hoppers described as being '''unlocked'''. Hoppers can be powered by [[Redstone_mechanics#Power|soft powered]] blocks, meaning a [[redstone dust]] trail pointing into a block touching the hopper locks it just as effectively as a [[redstone block]] or any other [[Redstone components#Power components|power component]] touching the hopper. When the hopper is unlocked during a redstone tick, it does not push or pull/collect during the same tick, but has a delay of 1 redstone tick instead.

While a locked hopper does not push or pull/collect items, it may still receive items from [[dispenser]]s, [[dropper]]s and other hoppers, and may have its items pulled out by another hopper beneath it. Hence, the item flow in a horizontal hopper pipe may be stopped by locking just one of the hoppers, but stopping a vertical hopper pipe requires locking two adjacent hoppers at the same time, such that both the pushing of the top one and the pulling of the bottom one are stopped.

A hopper does not output any redstone signals by itself, but its fullness can be read using a [[Redstone Comparator|redstone comparator]], which needs to be placed next to it and facing away from it. An empty hopper outputs a signal strength of 0 and a completely full hopper outputs a signal strength of 15. Notably, a single stackable item (16 or 64) outputs a signal strength of 1 and a single non-stackable item outputs a signal strength of 3.

{{IN|Java}}, if the hopper being read is part of a horizontal hopper pipe, the comparator can individually read each item passing through the chain, because items are pushed through the hoppers one by one at a speed that is manageable by the comparator. If there is an uninterrupted stream of items, the comparator does not switch off in between items. On the other hand, in a vertical hopper pipe, some of the hoppers may never produce a reading above 0, even with a continuous stream of items, because pushes and pulls both occur in the same game tick: The hoppers' items get pulled out a single game tick after they're pushed in and this isn't measurable by a comparator, because comparators need measurements lasting at least 1.5 redstone ticks to produce a reading.

====Collecting items====
A hopper collects items dropped on top of it if the space above the hopper not occupied by a storage block. Items are gathered from the entire 1 block space above the hopper, meaning that items sitting on partial blocks such as [[soul sand]] directly above a hopper can be collected.<ref>https://bugs.mojang.com/browse/MCPE-55824</ref> It is also possible for a hopper to collect items from inside a full, solid block, a situation that might come from items rising up through solid blocks or being [[commands/summon|summoned]]. Item entities are not collected when they are outside of the collection area however; for example, items on top of a stone block directly above a hopper are not collected. Collected items are placed in the leftmost empty slot of a hopper's inventory.

{{IN|java}}, if there is no container above the hopper, then the hopper collects dropped items in the order in which they landed on the hopper. This order is remembered even while a hopper is locked. For instance, if a hopper is locked under a carpet while a fully equipped [[armor stand]] is broken above it, then it always collects items in this order when it is unlocked: [[armor stand]], [[boots]], [[leggings]], [[chestplates]], [[helmets]]. This is due to the order in which these items land.{{Verify|Wouldn't this be due to the order in which the game creates the item entities that drop drop from the armor stand?}} {{IN|Bedrock}}, hoppers do not remember the order in which items land on the hopper. Instead, hoppers with multiple dropped items above them collect the items in the order in which they entered the chunk in which the hopper is located. Items that drop from a broken armor stand are collected in a random order.<ref>https://bugs.mojang.com/browse/MCPE-120586</ref>

Hoppers usually check for dropped items every [[game tick]] and they can collect items even before they are picked up by a [[player]]{{Verify|Does this happen always, or sometimes, and in Java only or also in Bedrock?}} or destroyed by [[lava]]. However, {{In|Bedrock}} hoppers have a "collection cooldown" time. After collecting an item (or stack of items), a hopper waits {{tooltip|4 redstone ticks|8 game ticks}} (0.4 seconds, barring lag) before attempting to collect again.

Hoppers collect groups of items all at once rather than collecting them as single items one at a time. As a result, hoppers can collect item entities much faster than they can pull items from a container. Pulling from a moving [[minecart with chest]] or [[minecart with hopper]] is even slower, since the minecart is not always above the hopper.

====Pushing and pulling items====
A hopper with a storage container above it (such as a [[furnace]], [[chest]], [[dropper]], [[composter]], or another hopper) attempts to pull from the container instead of checking for floating items above it, and hence can not collect items.  A hopper always tries to push or pull items using the leftmost available slot. When a hopper is removing items from a chest, the items disappear from left to right. Similarly, when filling up a chest, the chest fills up from left to right. Hoppers prioritize pulling from the first slot of a container over pulling into the first hopper slot. If a hopper has stone in its first slot and nothing in its second while the container it is pulling from has chicken in its first slot but stone in the second, the hopper pulls the chicken from the first slot of the container into its empty second slot. However, if the hopper is unable to pull the chicken, such as if all slots are filled with stone, the hopper pulls the stone from the second slot of the container instead. Similarly, hoppers prioritize pushing from their first slot over pushing into the first slot of a container. If a hopper has stone in its first slot and chicken in its second while the container it is pushing to has chicken it its first slot but stone in the second, the hopper pushes stone from its first slot into the second slot of the container.

In [[Java Edition]] the checks done by a hopper while pulling generally require less processing than the checks done by a hopper attempting collection. Therefore, a chain of hoppers topped with storage containers rather than air/solid blocks has better performance (measured as milliseconds of processing per tick) and lower potential for processing lag. <ref name=":0">https://www.youtube.com/watch?v=LC3ZOOI1Rf0</ref> The performance improvement achieved is correlated with the number of storage slots the container has. Placing composters (with no storage slots but still with custom output logic) on top of hoppers provide the greatest efficiency, while double chests actually degrade performance, even when sharing each double chest across two hoppers.<ref name=":0" /> In [[Bedrock Edition]] a chain of hoppers with air or non-container blocks on top has better performance than a chain of hoppers topped by container blocks.<ref>https://cdn.discordapp.com/attachments/715523208530362389/890030941282631741/Redstone_MSPT_measure.xlsx</ref> This may be because, even though hoppers with containers on top do not check for items, they do check for hopper-minecarts and chest-minecarts to pull from, and that involves scanning the chunk entity list.<ref>{{bug|MCPE-109449}}</ref>

{{Schematic|caption='''Push then Pull'''
Chest A is full of items while the hopper and Chest B are empty.
|ch-$+A||-
|ho-$e|ch-$+B
}}

Item pushes and pulls are processed in the same game tick, but pushes are processed before pulls. In the schematic, the empty hopper first pulls an item from chest A as it cannot push anything into chest B. After the cooldown, the hopper first pushes its item into chest B before pulling another item from chest A, both pushing and pulling in the same tick, and the process repeats. The hopper stops pulling when A is empty, and stops pushing when B becomes full.

Hoppers also have a "transfer cooldown" time. After pulling and/or pushing items, a hopper waits {{tooltip|4 redstone ticks|8 game ticks}} (0.4 seconds, barring lag) before pulling or pushing again (a transfer rate of 2.5 items per second, barring lag). A hopper that has an item pushed into it from another hopper also starts a 4 tick cooldown period, regardless of whether it pushed or pulled items itself. Item entities can be collected at any time without affecting the transfer cooldown time. The transfer cooldown and the Bedrock Edition collection cooldown are independent of each other.

====Container interactions====
Some [[container]]s interact with hoppers in specific ways:

:;{{BlockLink|Composter}}
::Hoppers above composters can push compostable items into the composter's top face with a chance of increasing the level of the composter as if the player used the item on the composter. Items that are not compostable cannot be pushed into the composter. Hoppers below the composter can pull [[bone meal]] when the composter is in stage 8, emptying the composter and resetting it to stage 0. Hoppers to the side of a composter do not interact with it.

:;{{BlockLink|Brewing Stand}}
::A working hopper on the top face of a brewing stand deposits only into the ingredient slot and it can push only valid [[brewing]] ingredients. A hopper on side face of a brewing stand can deposit only [[blaze powder]] or filled bottles into the three brew slots. A hopper underneath a brewing stand always extracts from the three brew slots, whether brewing is finished or not—The hopper must be locked to allow potions to finish brewing.

:;{{BlockLink|Chest}}
:;{{BlockLink|Trapped Chest}}
::Large chests and large trapped chests are treated as a single container: A hopper depositing into a large chest fills up the entire chest and a hopper underneath a large chest empties the entire chest. Trapped chests being accessed by a player lock any adjacent hoppers, per the standard behavior of a hopper next to an active power source.

:;{{BlockLink|Furnace}}
:;{{BlockLink|Blast Furnace}}
:;{{BlockLink|Smoker}}
::A working hopper pointing into top of a furnace deposits only into the ingredient slot. It can push any item, including items that can't be smelted by the furnace. A hopper pointing into the side of a furnace deposits into the fuel slot, and only items that are usable as fuel. A hopper below a furnace pulls everything from the output slot and empty [[bucket]]s from the fuel slot left over from using [[lava bucket]]s as fuel. When a hopper removes items from a furnace, the experience points are 'stored' in the furnace until a player removes at least one smelted item, or the furnace block is broken.

:;{{BlockSprite|Hopper}} Hopper
::A sequence of three or more hoppers, each pushing items into the next, is called a '''hopper pipe'''. Working horizontal hopper pipes simply push items into each other at the expected rate of 2.5 items per second, but vertical hopper pipes are more complicated, as the hoppers are trying both to pull and to push. When a vertical pipe pulls from a single container, it simply transfers items at 2.5 items per second because the transfer rate is limited by the first hopper pulling items from the container. If a ''stack of items'' is in a vertical pipe, the items can be transferred twice as fast, because the hopper with the item stack is pushing items down while the hopper below it is also pulling items down.

:;{{EntityLink|Minecart with Chest}}
:;{{EntityLink|Minecart with Hopper}}
::Unlocked hoppers fill chest minecarts and hopper minecarts if any part of the entity's hitbox is within the hopper's target block-space. Hopper minecarts try to pull items from the hopper at high speed. Hoppers can pull items from minecarts above them so rails can be placed directly on the top faces of a hoppers. If a [[detector rail]] is in the right position, it could lock the hopper per standard redstone-hopper behavior.

:;{{BlockLink|Jukebox}}
::Hoppers can insert [[music disc]]s into jukeboxes, and extract the music discs after they finish playing.

:;{{BlockLink|Shulker Box}}
::Hoppers cannot put shulker boxes into other shulker boxes. This allows for the creation of certain [[Tutorials/Hopper#Potions and shulker boxes|item filters]].
::Otherwise, hoppers interact with shulker boxes normally.

:;{{BlockLink|Lectern}}
::Hoppers cannot remove or place books on lecterns. The redstone pulse emitted from a lectern when a page is turned can temporarily lock hoppers.

:;{{BlockLink|Ender Chest}}
::Hoppers cannot interact with ender chests in any way.

:;{{BlockLink|Barrel}}
:;{{BlockLink|Dispenser}}
:;{{BlockLink|Dropper}}
:;{{EntityLink|Boat with Chest}}
::Hoppers interact normally with barrels, dispensers, droppers, and boats with chests.

:;{{BlockLink|Chiseled Bookshelf}}
::Hoppers and minecart with hoppers can insert and remove books from the bookshelf. As with any other container, items are taken from the first slot that has an item that can fit in the hopper and are inserted into the first empty slot.

==Sounds==
===Generic===
{{Sound table/Block/Metal}}
===Unique===
{{Edition|Java}}:
{{Sound table
|sound=Door close.ogg
|sound2=Door open.ogg
|subtitle=Chest locked<ref group=sound name=lock>{{Bug|MC-98316||Wrong subtitles caused by missing distinction}}</ref>
|source=block
|description=When a player attempts to open a hopper locked using the {{nbt|string|Lock}} tag
|id=block.chest.locked|idnote=<ref group=sound name=lock/>
|translationkey=subtitles.block.chest.locked|translationkeynote=<ref group=sound name=lock/>
|volume=1.0
|pitch=1.0
|distance=16
|foot=1}}

{{Edition|Bedrock}}: ''None''

==Data values==
===ID===
{{edition|java}}:
{{ID table
|edition=java
|showforms=y
|generatetranslationkeys=y
|displayname=Hopper
|spritetype=block
|nameid=hopper
|foot=1}}
{{ID table
|displayname=Block entity
|spritename=hopper
|spritetype=block
|nameid=hopper
|foot=1}}

{{edition|bedrock}}:
{{ID table
|edition=bedrock
|firstcolumnname=Hopper
|shownumericids=y
|showforms=y
|generatetranslationkeys=y
|displayname=Block
|spritename=hopper
|spritetype=block
|nameid=hopper
|id=154
|form=block
|itemform=item.hopper}}
{{ID table
|displayname=Item
|spritename=hopper
|spritetype=item
|nameid=hopper
|id=527
|form=item
|translationkey=tile.hopper.name
|foot=1}}
{{ID table
|notnamespaced=y
|displayname=Block entity
|spritename=hopper
|spritetype=block
|nameid=Hopper
|foot=1}}

===Block states===
{{see also|Block states}}

{{/BS}}

===Block data===
A hopper has a block entity associated with it that holds additional data about the block.

{{el|java}}:
{{see also|Block entity format}}
{{/BE}}

{{el|bedrock}}:
:See [[Bedrock Edition level format/Block entity format]].

==Achievements==
{{load achievements|Freight Station;Smelt Everything}}

==Video==
<div style="text-align:center">{{yt|XO0IKUsGiG8}}</div>

==History==
{{History|java}}
{{History||1.5|snap=13w01a|[[File:Hopper (D) JE1.png|32px]] [[File:Hopper (N) JE1.png|32px]] [[File:Hopper (E) JE1.png|32px]] [[File:Hopper (S) JE1.png|32px]] [[File:Hopper (W) JE1.png|32px]] [[File:Hopper (U) JE1.png|32px]] Added hoppers.
|Hoppers with the [[damage]] value of 1, which are obtainable only through world editing, visually point in no direction. They functionally push items upward, however the behavior is inconsistent.
|[[File:Hopper (item) JE1.png|32px]] There is currently a temporary "work in progress" sprite for hoppers in the [[inventory]].
|Hoppers can be [[crafting|crafted]] from a [[chest]] and [[stone]] blocks with the following recipe:
{{{!}} class{{=}}"collapsible collapsed"
! Recipe
{{!}}-
{{!}}
{{Crafting Table
  |A1= Stone
  |C1= Stone
  |A2= Stone
  |B2= Chest
  |C2= Stone
  |B3= Stone
  |Output= Hopper
}}
{{!}}}
}}
{{History|||snap=13w01b|[[Rail]]s can now be placed on top of hoppers.
|Hoppers no longer load [[item]]s into [[minecart]]s without [[chest]]s.}}
{{History|||snap=13w02a|[[File:Hopper (item) JE2 BE1.png|32px]] The [[inventory]] sprite of hoppers has been changed.
|[[File:Hopper (item) 13w02a.png|32px]] However, the [[item]] of hoppers appears bugged if [[drops|dropped]] or placed in an [[item frame]].<ref>{{bug|MC-6737}}</ref> This may be due to the game attempting to pull the item sprite from the hopper's equivalent spot in <samp>[[stitched_terrain.png]]</samp> (compare files: [[:File:13w02a stitched terrain.png|terrain]], [[:File:13w02a stitched items.png|items]]), a region which contains parts of the oak planks, end stone and iron bars textures.
|Applying a [[redstone]] signal to a hopper now deactivates the hopper until the signal is removed.
|Hoppers can no longer be used as [[fuel]] in a [[furnace]].
|Hoppers are now [[crafting|crafted]] using 5 [[iron ingot]]s rather than 5 [[stone]] blocks.
{{{!}} class{{=}}"collapsible collapsed"
! Recipe
{{!}}-
{{!}}
{{Crafting
|A1= Iron Ingot
|C1= Iron Ingot
|A2= Iron Ingot
|B2= Chest
|C2= Iron Ingot
|B3= Iron Ingot
|Output= Hopper
}}
{{!}}}
|Hoppers now pull only from the output slot of [[furnace]]s.
|Hoppers now output 1 signal strengh per 1/3 of a stack (21 [[item]]s) when interacting with a [[redstone comparator]].
|[[File:Hopper (D) JE2.png|32px]] [[File:Hopper (N) JE2.png|32px]] [[File:Hopper (E) JE2.png|32px]] [[File:Hopper (S) JE2.png|32px]] [[File:Hopper (W) JE2.png|32px]] [[File:Hopper (U) JE2.png|32px]] The texture of hoppers has been given a unique texture. Hoppers no longer use the [[cauldron]] texture. Note that the top texture does not rotate with facing direction.
|The preferred tool is now a pickaxe, rather than the axe.}}
{{History|||snap=13w02b|Hoppers now treat large [[chest]]s properly, no longer needing two hoppers connected to them to fill up the entire [[inventory]].
|Hoppers no longer take [[item]]s from containers when powered via a [[redstone]] current.
|Hoppers now display correctly as a [[drops|dropped]] or [[item frame|frame]] [[item]].}}
{{History|||snap=13w03a|Hoppers are now used to [[crafting|craft]] a [[minecart with hopper]].
|Hoppers can now empty a [[minecart with hopper]].}}
{{History|||snap=13w04a|The transfer rate of hoppers has been changed from 7 to 8 [[game tick]]s per [[item]] (2.5 items per second).}}
{{History||1.5.1|snap=pre|Hoppers now take empty [[bucket]]s out of furnace fuel slots.}}
{{History||1.7.2|snap=release|[[File:Hopper (D) JE3.png|32px]] [[File:Hopper (N) JE3.png|32px]] [[File:Hopper (E) JE3.png|32px]] [[File:Hopper (S) JE3.png|32px]] [[File:Hopper (W) JE3.png|32px]] [[File:Hopper (U) JE3.png|32px]] The UV of all blocks is broken on certain sides as a result of {{bug|MC-37106}} (few cases are listed on the wiki so far - this is a future project). This includes hoppers.}}
{{History||1.7.4|snap=13w47a|[[File:Hopper (D) JE4.png|32px]] [[File:Hopper (N) JE4.png|32px]] [[File:Hopper (E) JE4.png|32px]] [[File:Hopper (S) JE4.png|32px]] [[File:Hopper (W) JE4.png|32px]] [[File:Hopper (U) JE4.png|32px]] MC-37106 has been fixed, reverting hoppers to their pre-1.7.2 appearences.}}
{{History|||snap=13w48a|This version fixed {{bug|MC-190}}, which hoppers were allegedly subject to since their introduction. However, a comparison of hopper UV in 13w02a and 14w08a failed to reveal any visible differences, even accounting for the example images on the ticket. More research is needed on this matter.}}
{{History||1.8|snap=?|Hoppers no longer generate [[multiplayer]] lag when idle.}}
{{History|||snap=14w10a|[[File:Hopper (D) JE5.png|32px]] [[File:Hopper (N) JE5.png|32px]] [[File:Hopper (E) JE5.png|32px]] [[File:Hopper (S) JE5.png|32px]] [[File:Hopper (W) JE5.png|32px]] [[File:Missing Model JE2.png|32px]] Hoppers now use block models rather than having a hardcoded shape. This brings multiple changes: the inside texture now rotates with the hopper rather than being constant, the inside planes of hoppers are now shaded/have ambient occlusion, and some minor UV changes have occurred, notably on the smallest cuboid. The directionless hopper also [[Missing model|no longer has a model]].}}
{{History|||snap=14w26a|The directionless hopper has been removed.}}
{{History|||snap=14w31a|Hoppers now no longer use wood [[sound]]s.<ref>{{bug|MC-5991}}</ref>}}
{{History||1.9|snap=15w33c|A hopper now generates as a part of the [[end ship]] in the [[end city|end cities]].}}
{{History|||snap=15w41a|End ships no longer contain a hopper.}}
{{History|||snap=15w43a|[[Loot table]]s have been added; hoppers can now use loot tables.}}
{{History|||snap=15w43c|[[File:Hopper (D) JE6.png|32px]] [[File:Hopper (N) JE6.png|32px]] [[File:Hopper (E) JE6.png|32px]] [[File:Hopper (S) JE6.png|32px]] [[File:Hopper (W) JE6.png|32px]] The UV on the hopper model has changed, resulting in minor differences, particularly to the smallest cuboid. This is likely due to the fix for {{bug|MC-73401}}.}}
{{History|||snap=15w44a|[[File:Hopper (D) JE7.png|32px]] [[File:Hopper (N) JE7.png|32px]] [[File:Hopper (E) JE7.png|32px]] [[File:Hopper (S) JE7.png|32px]] [[File:Hopper (W) JE7.png|32px]] A mapping issue introduced in the previous snapshot for the sides of the large funnel region has been fixed. This may be due to the fix for {{bug|MC-50344}}.}}
{{History||1.9.1|snap=pre1|A hopper can now push into and pull [[item]]s from a blocked [[chest]].}}
{{History||1.13|snap=17w47a|Prior to [[1.13/Flattening|''The Flattening'']], this [[block]]'s numeral ID was 154.}}
{{History||1.14|snap=18w43a|[[File:Hopper (D) JE8.png|32px]] [[File:Hopper (N) JE8.png|32px]] [[File:Hopper (E) JE8.png|32px]] [[File:Hopper (S) JE8.png|32px]] [[File:Hopper (W) JE8.png|32px]]<br>[[File:Hopper (item) JE3 BE2.png|32px]] The textures of hoppers have been changed.}}
{{History|||snap=19w03c|Hoppers now use correct cullface arguments, and some redundant faces have also been deleted.}}
{{History||1.19|snap=22w13a|Hoppers no longer drop when breaking a [[minecart with hopper]].}}
{{History||1.19.4|snap=23w07a|Hoppers can now interact with jukeboxes.}}

{{History|pocket alpha}}
{{History||v0.14.0|snap=build 1|[[File:Hopper (D) JE2.png|32px]]{{verify|Is this model correct?}}<br>[[File:Hopper (item) JE2 BE1.png|32px]] Added hoppers. Upward hoppers also exist.}}
{{History||v0.15.0|snap=build 1|Hoppers can now be moved by [[piston]]s.}}
{{History|bedrock}}
{{History||1.10.0|snap=beta 1.10.0.3|[[File:Hopper (D) BE.png|32px]] [[File:Hopper (N) BE.png|32px]] [[File:Hopper (E) BE.png|32px]] [[File:Hopper (S) BE.png|32px]] [[File:Hopper (W) BE.png|32px]] [[File:Hopper (U) BE.png|32px]]<br>[[File:Hopper (item) JE3 BE2.png|32px]] The textures of hoppers have been changed.}}
{{History||1.19.70|snap=beta 1.19.70.20|Hoppers can now collect items through all blocks that have a lower height than a full block.}}

{{History|console}}
{{History||xbox=TU19|xbone=CU7|ps=1.12|wiiu=Patch 1|switch=1.0.1|[[File:Hopper (D) JE2.png|32px]]{{verify|Is this model correct?}}<br>[[File:Hopper (item) JE2 BE1.png|32px]] Added hoppers.}}
{{History||xbox=none|xbone=none|ps=1.90|wiiu=none|switch=none|[[File:Hopper (D) JE8.png|32px]]{{verify|Is this model correct?}}<br>[[File:Hopper (item) JE3 BE2.png|32px]] The textures of hoppers have been changed.}}
{{History||ps=1.91|Hoppers can now fill [[composter]]s.}}

{{History|new 3ds}}
{{History||0.1.0|[[File:Hopper (D) JE2.png|32px]]{{verify|Is this model correct?}}<br>[[File:Hopper (item) JE2 BE1.png|32px]] Added hoppers.}}
{{History|foot}}

==Issues==
{{Issue list}}

==Trivia==
* A [[wikipedia:Hopper (particulate collection container)|real-world hopper]] is a large, pyramidal or cone-shaped container used in industrial processes to hold particulate matter, like dust, gravel, nuts, seeds, etc., and can then dispense them from the bottom.
* A hopper can transfer 9000 items per hour, or 150 items per minute.

==Gallery==
=== Renders ===
<gallery>
Hopper (N).png
Hopper (E).png
Hopper (S).png
Hopper (W).png
</gallery>
<gallery>
Hopper (N) BE.png
Hopper (E) BE.png
Hopper (S) BE.png
Hopper (W) BE.png
</gallery>

=== Screenshots ===
<gallery>
File:Hopper screenshot 1.png|In snapshot 13w01a, the hopper item uses a 'WIP' sprite, though the item still read "Hopper".
File:13w02a Banner.png|The 13w02a Banner includes a [[minecart with TNT]]  and a hopper.
</gallery>

==References==
{{Reflist}}

{{Redstone}}
{{Blocks|Utility}}
{{Items}}

[[Category:Mechanisms]]
[[Category:Redstone mechanics]]
[[Category:Mechanics]]
[[Category:Storage]]
[[Category:Utility blocks]]
[[Category:Manufactured blocks]]
[[Category:Block entities]]

[[cs:Násypka]]
[[de:Trichter]]
[[el:Hopper]]
[[es:Tolva]]
[[fr:Entonnoir]]
[[it:tramoggia]]
[[ja:ホッパー]]
[[ko:호퍼]]
[[nl:Trechter]]
[[pl:Lej]]
[[pt:Funil]]
[[ru:Загрузочная воронка]]
[[uk:Лійка]]
[[zh:漏斗]]</li></ul>
Released in February 21, 2011.[4] A technical sneak preview was published by Notch on February 18, 2011.[5]
Added capability of automatic login to the game and/or server by command line arguments.
Added smarter update system that updates only changed files, prompts the user to update, allows HTTPS logins for a more secure connection, and offers general UI improvements.
Link to the Minecraft install directory for easy access.
Add Force Update button under the Options dialog.
The launcher also featured an inline "changelog" via a Tumblr called MCUpdate, and supports command-line arguments.[6]
Added the new Minecraft logo.
Added official links, community links and Mojang on Twitter links.
{{Extension DPL}}<ul><li>[[Cyan Dye|Cyan Dye]]<br/>{{Item
| image = Cyan Dye.png
| renewable = Yes
| stackable = Yes (64)
}}
'''Cyan dye''' is a [[Dyeing#Secondary|secondary dye color]].

== Obtaining ==

=== Crafting ===

{{Crafting
  |head=1
  |showdescription=1
  |showname=0
  |Blue Dye
  |Green Dye
  |Output=Cyan Dye,2
  |type=Material
}}
{{Crafting
  |Lapis Lazuli
  |Green Dye
  |Output=Cyan Dye,2
  |description={{only|bedrock|education}}
  |type=Material
}}
{{Crafting
  |Pitcher Plant
  |Output=Cyan Dye,2
  |description=
  |type=Material
  |foot=1
}}

=== Trading ===

[[Wandering trader]]s sell 3 cyan dye for an [[emerald]].

== Usage ==

{{dye usage}}

=== Crafting ingredient ===

{{crafting usage|ignore=Banner|continue=1}}
{{banner crafting usage}}

=== Loom ingredient ===
{{Banner loom usage|Cyan Dye}}

=== Trading ===
{{IN|bedrock}}, journeyman-level shepherd villagers have 20% chance to buy 12 cyan dye for an emerald.
{{More info|java=1|Java UI does not use a specific trade slot, which results in a different chance to offer this trade.}}

== Data values ==
=== ID ===
{{edition|java}}:
{{ID table
|edition=java
|showforms=y
|generatetranslationkeys=y
|displayname=Cyan Dye
|spritetype=item
|nameid=cyan_dye
|form=item
|foot=1}}

{{edition|bedrock}}:
{{ID table
|edition=bedrock
|showaliasids=y
|shownumericids=y
|showforms=y
|notshowbeitemforms=y
|generatetranslationkeys=y
|displayname=Cyan Dye
|spritetype=item
|nameid=cyan_dye
|aliasid=dye / 6
|id=401
|form=item
|translationkey=item.dye.cyan.name
|foot=1}}

== History ==

{{History|java beta}}
{{History||1.2|[[File:Cyan Dye JE1 BE1.png|32px]] Added cyan dye.}}
{{History|java}}
{{History||1.4.2|snap=12w34a|Added the ability to [[Armor#Dyeing|dye]] leather [[armor]] and [[wolf]] collars.}}
{{History||1.4.6|snap=12w49a|Cyan dye can now be [[crafting|crafted]] with [[gunpowder]] to create a [[firework star]].}}
{{History||1.6.1|snap=13w19a|[[Stained clay]] can now be crafted.}}
{{history||1.7.2|snap=13w36a|With the addition of new [[flower]]s, many secondary and tertiary dyes are now primary [[dye]]s.}}
{{History|||snap=13w41a|[[Stained glass]] can now be crafted.}}
{{History||1.8|snap=14w02a|Due to [[lapis lazuli]] being [[renewable resource|renewable]], cyan dye is also renewable.}}
{{History|||snap=14w30a|Added [[banner]]s, which can be dyed.}}
{{History||1.13|snap=17w47a|The different data values for the <code>dye</code> ID have now been split up into their own IDs.
|Prior to [[1.13/Flattening|''The Flattening'']], this [[item]]'s numeral ID was 351.}}
{{History||1.14|snap=18w43a|Cyan dye is now [[crafting|crafted]] using [[blue dye]], instead of [[lapis lazuli]].
|[[File:Cyan Dye.png|32px]] The texture of cyan dye has now been changed.}}
{{History|||snap=18w44a|Cyan dye can now change the text color on [[sign]]s to cyan.}}
{{History|||snap=19w05a|Added the [[wandering trader]], which sell cyan dyes.}}
{{History|||snap=19w11a|Cyan dye can now be [[trading|bought]] by shepherd villagers.}}
{{History||1.17|snap=20w45a|Cyan dye can now be used to craft [[cyan candle]]s.}}
{{History|||snap=21w19a|Cyan dye can no longer be used to craft cyan candles.}}
{{History|||snap=Pre-release 1|Cyan dye can once again be used to craft cyan candles.}}
{{History||1.20<br>(Experimental)|link=1.19.3|snap=22w42a|Cyan dye can now change the text color on [[hanging sign]]s to cyan.}}
{{History||1.20|snap=23w12a|Added [[pitcher plant]]s, which can be crafted into cyan dye.}}
{{History|||snap=23w14a|[[Pitcher plant]]s now craft into 2 cyan dye instead of 1.}}

{{History|pocket alpha}}
{{History||v0.3.0|[[File:Cyan Dye JE1 BE1.png|32px]] Added cyan dye. It is currently unobtainable and serves no purpose.}}
{{History||v0.4.0|Cyan dye is now craftable with [[lapis lazuli]] and [[cactus green]].
|Cyan dye can now be used to craft cyan wool.}}
{{History||v0.6.0|Cyan dye can now be used to dye [[sheep]].}}
{{History||v0.9.0|snap=build 11|Cyan dye can now be used to craft colored [[terracotta]].}}
{{History||v0.11.0|snap=build 1|Cyan dye can now be used to dye tamed [[wolf]] collars.}}
{{History||v0.14.0|snap=build 1|Cyan dye can now be used to dye water in [[cauldron]]s.}}
{{History|pocket}}
{{History||1.0.0|snap=alpha 0.17.0.1|Cyan dye can now be used to dye [[shulker]]s.}}
{{History||1.1.0|snap=alpha 1.1.0.0|Cyan dye can now be used to craft [[concrete powder]], colored [[bed]]s and dyed [[shulker box]]es.}}
{{History|bedrock}}
{{History||1.2.0|snap=beta 1.2.0.2|Cyan dye can now be used to craft [[firework star]]s, [[stained glass]] and patterns on [[banner]]s.}}
{{History||1.4.0|snap=beta 1.2.20.1|Cyan dye can now be used to craft [[balloon|ballons]] and [[glow stick|glow sticks]].}}
{{History||1.8.0|snap=beta 1.8.0.8|Cyan dye can now be used to dye tamed [[cat]] collars.}}
{{History||1.10.0|snap=beta 1.10.0.3|Cyan dye are now [[trading|sold]] by [[wandering trader]]s.
|Cyan dye can now be used to dye white [[carpet|carpets]] and undyed [[glass pane]]s.
|[[File:Cyan Dye.png|32px]] The texture of cyan dye has now been changed.}}
{{History||1.11.0|snap=beta 1.11.0.4|Cyan dye can be [[trading|sold]] to shepherd [[villager]]s.}}
{{History||1.16.100|snap=beta 1.16.100.56|The ID of cyan dye has been changed from <code>dye/6</code> to <code>cyan_dye</code>.}}

{{History|console}}
{{History||xbox=TU1|xbone=CU1|ps=1.00|switch=1.0.1|wiiu=Patch 1|[[File:Cyan Dye JE1 BE1.png|32px]] Added cyan dye.}}
{{History|PS4}}
{{History||1.90|[[File:Cyan Dye.png|32px]] The texture of cyan dye has now been changed.}}

{{History|new 3ds}}
{{History||0.1.0|[[File:Cyan Dye JE1 BE1.png|32px]] Added cyan dye.}}
{{History|foot}}

== Issues ==

{{issue list}}

{{Items}}

[[Category:Items]]
[[Category:Dyes]]
[[Category:Renewable resources]]

[[cs:Azurové barvivo]]
[[de:Türkiser Farbstoff]]
[[es:Tinte cian]]
[[fr:Teinture cyan]]
[[hu:Ciánkék festék]]
[[ja:青緑色の染料]]
[[ko:청록색 염료]]
[[nl:Turquoise kleurstof]]
[[pl:Błękitny barwnik]]
[[pt:Corante ciano]]
[[ru:Бирюзовый краситель]]
[[zh:青色染料]]</li><li>[[Chorus Fruit|Chorus Fruit]]<br/>{{about|the fruit that drops from [[chorus tree]]s|the building material|Popped Chorus Fruit|other uses|Chorus}}
{{Item
| title = Chorus Fruit
| image = Chorus Fruit.png
| renewable = Yes
| heals = {{hunger|4}}
| stackable = Yes (64)
}}

'''Chorus fruit''' is a [[food]] [[item]] native to [[the End]] that can be eaten, or [[smelting|smelted]] into [[Popped Chorus Fruit|popped chorus fruit]]. It can be eaten even when the hunger bar is full, and eating it may teleport the [[player]] up to 8 blocks in any direction.

== Obtaining ==
{{see also|Tutorials/Chorus fruit farming}}

Chorus fruit can be obtained by breaking [[Chorus Plant (block)|chorus plant blocks]]. Each block of chorus plant has a 50% chance to drop a chorus fruit. This is not affected by [[Fortune]].<ref>{{bug|MC-198924||Chorus Fruit doesn't have a higher chance with Fortune|Invalid}}</ref>

== Usage ==
To eat chorus fruit, press and hold {{control|use}} while it is selected in the hotbar. Eating one restores {{hunger|4}} [[hunger]] and 2.4 hunger [[Hunger#Mechanics|saturation]].

Unlike most foods, chorus fruits can be eaten even when the player has a full hunger bar.

The player may also be [[teleportation|teleported]]: up to 16 attempts are made to choose a random destination within ±8 on all three axes in the same manner as [[Enderman#Teleportation|enderman teleportation]], with the exception that the player may teleport into an area only 2 blocks high, or one block tall if the player is crawling. The player does not land in the average centroid of the block, but rather to any position within an 8-block range. The player will be teleported directly down to the ground regardless of the height it was used at if the player is too far from a valid destination.

The chorus fruit, unlike an [[Ender Pearl|ender pearl]], can teleport the player through [[solid block]]s. The algorithm tries to avoid [[fluid]]s; the player cannot teleport into a space occupied by [[water]] or [[lava]]. However, the player can be teleported onto dangerous blocks such as fire, cacti and magma blocks.<ref>{{bug|MC-102836||Enderman and chorus fruit can teleport to some dangerous places}}</ref>

If a teleport succeeds, a sound similar to an enderman teleporting plays originating from the teleportation origin location. Chorus fruit has a cooldown of 1 second before being able to be used again. The cooldown is represented by a white overlay on the chorus fruit in the hotbar. The cooldown is applied to all chorus fruits items, including those in the player's inventory and containers.<ref>{{bug|MC-88236|||WAI}}</ref>

Eating chorus fruit may teleport the player into areas protected by [[bedrock]], [[barrier|barrier blocks]], or other blocks that are otherwise unbreakable in [[Survival]] mode. However, it cannot teleport the player onto [[the Nether]] roof.<ref>{{bug|MC-84198|||Fixed}}</ref>

Chorus fruit is completely non-functional above the nether roof.

[[Fox]]es can also eat chorus fruit and the teleportation effect works the same as with players.

=== Smelting ingredient ===

{{smelting
|Chorus Fruit
|Popped Chorus Fruit
|0.1}}

== Sounds ==
===Generic===
{{Sound table/Entity/Food}}
===Unique===
{{edition|java}}:
{{Sound table
|rowspan=2
|sound=Teleport1.ogg
|sound2=Teleport2.ogg
|subtitle=Player teleports
|source=player
|description=When a player teleports by eating a chorus fruit
|id=item.chorus_fruit.teleport
|translationkey=subtitles.item.chorus_fruit.teleport
|volume=1.0
|pitch=1.0
|distance=16}}
{{Sound table
|subtitle=Fox teleports
|source=Players & Friendly Creatures<wbr><ref group=sound>{{Bug|MC-257516||"Fox teleports" sound plays for both Players and Friendly Creatures sound categories}}</ref>|overridesource=1
|description=When a fox teleports by eating a chorus fruit
|id=entity.fox.teleport
|translationkey=subtitles.entity.fox.teleport
|volume=1.0
|pitch=1.0
|distance=16
|foot=1}}

{{edition|bedrock}}:
{{Sound table
|type=bedrock
|sound=Teleport1.ogg
|sound2=Teleport2.ogg
|source=hostile
|description=When something teleports by eating a chorus fruit
|id=mob.shulker.teleport
|volume=1.0
|pitch=1.0
|foot=1}}

==Data values ==

===ID===
{{edition|java}}:
{{ID table
|edition=java
|showforms=y
|generatetranslationkeys=y
|displayname=Chorus Fruit
|spritetype=item
|nameid=chorus_fruit
|form=item
|foot=1}}

{{edition|bedrock}}:
{{ID table
|edition=bedrock
|shownumericids=y
|showforms=y
|notshowbeitemforms=y
|generatetranslationkeys=y
|displayname=Chorus Fruit
|spritetype=item
|nameid=chorus_fruit
|id=558
|form=item
|foot=1}}

==Advancements==
{{load advancements|Husbandry;A Balanced Diet}}

==History==
{{History|java}}
{{History||1.9|snap=15w31a|[[File:Chorus Fruit JE1 BE1.png|32px]] Added chorus fruit.}}
{{History|||snap=15w34c|A cooldown for using chorus fruit has now been added.}}
{{History|||snap=15w37a|The chorus fruit's teleportation range has now been reduced from ±32 to ±8.}}
{{History|||snap=15w50a|Added a [[sound]] for chorus fruit: <code>item.chorus_fruit.teleport</code>.}}
{{History||1.10|snap=16w21a|Chorus fruit can now teleport riders off their mounts.}}
{{History||1.13|snap=17w47a|Prior to [[1.13/Flattening|''The Flattening'']], this [[item]]'s numeral ID was 432.}}
{{History||1.14|snap=18w43a|[[File:Chorus Fruit JE2 BE2.png|32px]] The texture of chorus fruit has now been changed.}}
{{History||1.20.2|snap=23w33a|Eating chorus fruit now resets fall distance.<ref>{{bug|MC-112133||Eating chorus fruit does not reset fall distance|Fixed}}</ref>}}

{{History|pocket}}
{{History||1.0.0|snap=alpha 0.17.0.1|[[File:Chorus Fruit JE1 BE1.png|32px]] Added chorus fruit.}}
{{History|||snap=alpha 1.0.0.1|The cooldown of chorus fruit now has an animation.}}
{{History|bedrock}}
{{History||1.7.0|snap=beta 1.7.0.2|The category that chorus fruit are apart of in the [[Creative inventory]] has been changed from "Nature" to "Items".}}
{{History||1.10.0|snap=beta 1.10.0.3|[[File:Chorus Fruit JE2 BE2.png|32px]] The texture of chorus fruit has now been changed.}}
{{History||1.13.0|snap=beta 1.13.0.15|Chorus fruit has been moved back to the "Nature" section in the Creative inventory.}}

{{History|console}}
{{History||xbox=TU46|xbone=CU36|switch=1.0.1|ps=1.38|wiiu=Patch 15|[[File:Chorus Fruit JE1 BE1.png|32px]] Added chorus fruit.}}
{{History||xbox=none|xbone=none|ps=1.90|wiiu=none|switch=none|[[File:Chorus Fruit JE2 BE2.png|32px]] The texture of chorus fruit has now been changed.}}

{{History|new 3ds}}
{{History||1.7.10|[[File:Chorus Fruit JE1 BE1.png|32px]] Added chorus fruit.}}
{{History|foot}}

==Issues==
{{issue list}}

==References==
{{reflist}}

==External Links==
*[https://www.minecraft.net/en-us/article/taking-inventory--chorus-fruit Taking Inventory: Chorus Fruit] – Minecraft.net on November 5, 2020

{{Items}}

[[Category:Plants]]
[[Category:Food]]
[[Category:Renewable resources]]

[[de:Chorusfrucht]]
[[es:Fruta chorus]]
[[fr:Chorus]]
[[ja:コーラスフルーツ]]
[[ko:후렴과]]
[[nl:Chorusfruit]]
[[pl:Owoc refrenusu]]
[[pt:Fruta do coro]]
[[ru:Плод коруса]]
[[uk:Фрукт хорусу]]
[[zh:紫颂果]]</li></ul>
Properly selects 64-bit Java installations for macOS users.[7]
{{Extension DPL}}<ul><li>[[:Category:Tools|Category:Tools]]<br/>[[Category:Items]]

[[fr:Catégorie:Outil]]
[[it:Categoria:Attrezzi]]</li><li>[[Redstone Repeater|Redstone Repeater]]<br/>{{Block
| image = <gallery>
Redstone Repeater.png|Redstone Repeater
Redstone Repeater BE.png|Redstone Repeater (BE)
</gallery>
| extratext = View [[#Renders|all renders]]
| transparent = Yes
| light = No
| tool = any
| stackable = Yes (64)
| flammable = No
| lavasusceptible = No
| renewable = Yes
}}
{{about|the block|repeater circuits|Transmission circuit#Repeater|other topics related to redstone|Redstone (disambiguation)}}
A '''redstone repeater''' is a [[block]] that produces a full-strength [[Redstone Dust|output signal]] from its front when its back is powered, with four configurable delay settings. It can also be locked into a power state by its side being directly powered by a repeater or a [[Redstone Comparator|comparator]].

== Obtaining ==
=== Breaking ===
A redstone repeater can be broken instantly using any [[tool]], or without a tool, and drops itself as an item. To remove a redstone repeater, {{control|mine}} it.

A redstone repeater is removed and drops as an item if:
* its attachment block is moved, removed, or destroyed;
* [[water]] or [[lava]] flows into its space;{{only|java}}
* a [[piston]] tries to push it or moves a block into its space.

=== Natural generation ===
[[File:Redstone Repeater naturally generated.png|thumb|A redstone repeater generated in the jungle temple's hidden room.]]
A single redstone repeater is generated naturally in each [[jungle temple]].
They also generate in [[Ancient City|ancient cities]].

=== Crafting ===
{{Crafting
|A2= Redstone Torch
|B2= Redstone Dust
|C2= Redstone Torch
|B3= Stone
|C3= Stone
|A3= Stone
|Output= Redstone Repeater
|type= Redstone
}}

== Usage ==
{{see also|Redstone circuit}}
A redstone repeater can be used in four different ways: to "repeat" redstone signals back to full strength, delay signals, prevent signals moving backwards, or to "lock" signals in one state.

A repeater can be placed only on top of [[opaque]] blocks (dirt, stone, etc.), on top of upside-down [[slab]]s, upside-down [[stairs]], furnaces, and glass. {{IN|be}}, a repeater can also be placed on fences and stone walls. They can also be placed on some transparent blocks. See [[Opacity/Placement]] for more information. To place a repeater, use the {{control|Place Block}} [[control]].

A redstone repeater has a front and back – the arrow on the top points to the repeater's front. A repeater also has two small redstone torches on its top – the color of the torches indicates whether its output is on (dark red when off, bright red when on) and the distance between them indicates the delay the repeater adds to the signal transmission.

A repeater is 0.125 ({{frac|1|8}}) blocks high.

=== Signal transmission ===
A repeater transmits signals only from its back to its front, but its behavior can be modified from the side (see [[#Signal locking|signal locking]], below).

[[File:Redstone Torch Power.png|Different ways to power a repeater|thumb]]
A redstone repeater can be powered by any of the following components at its back:
* an active [[power component]] (redstone torch, lever, block of redstone, etc.)
* powered [[redstone dust]]
* a powered [[redstone comparator]] or another powered redstone repeater facing the repeater
* a powered opaque block (including any opaque [[mechanism component]]s, such as [[dispenser]]s, [[redstone lamp]]s, etc.)

A redstone repeater can power any of the following components at its front:
* redstone dust
* a redstone comparator or another redstone repeater facing away from the repeater
* any opaque block (including any opaque [[mechanism component]]s)

A redstone repeater can activate any [[mechanism component]] it is facing.

An opaque block powered by a redstone repeater is called "strongly-powered" (as opposed to an opaque block "weakly-powered" by redstone dust). A strongly-powered opaque block can power adjacent redstone dust, as well as other redstone components.

=== Signal repeating ===
{{see also|Transmission circuit#Repeater}}
A redstone repeater can "repeat" a [[Redstone Dust|redstone]] signal, boosting it back up to power level 15.

Redstone signals have a maximum power level of 15 and that level drops by 1 for every block of [[redstone dust]] the signal travels through. If a signal must travel through more than 15 [[block]]s of redstone dust, a redstone repeater can be used to boost the signal back up to full strength. An extra two blocks of distance can be achieved by placing solid opaque blocks before and after the repeater.

While redstone repeaters can allow signals to travel great distances, each always adds some delay to the transmission since the minimum amount of delay is 1 redstone tick (0.1 seconds, barring lag).

=== Signal delay ===
When initially placed, a redstone repeater has a delay of one [[redstone tick]] (equivalent to two game ticks, or 0.1 seconds barring lag).

A repeater's delay can be modified by using the {{control|Use Item}} control. Each use increases the repeater's delay by one redstone tick, to a maximum of four redstone ticks, then back to one redstone tick. Longer delays can be made with multiple repeaters – for example, a repeater set to 'four' and another to 'one' provides a half-second delay (0.4s + 0.1s = 0.5s).

A repeater set to a delay of two to four redstone ticks increases the length of any shorter [[Pulse circuit#Pulses|on-pulse]] to match the length of the repeater's delay, and suppress any shorter off-pulse. For example, a repeater set to a 4-tick delay changes a 1-tick, 2-tick, or 3-tick on-pulse into a 4-tick on-pulse, and does not allow through any off-pulse shorter than 4 ticks.

Although a repeater cannot be set to have a delay of zero, [[Transmission circuit#Instant repeater|instant repeater circuits]] are possible (circuits that repeat a signal with no delay).

In Bedrock Edition, the first repeater have a delay of zero but the repeater is still showing 1-tick{{info needed}}

=== {{anchor|diode}} Signal direction ===
{{see also| Mechanics/Redstone/Transmission circuit#Diode}}

A redstone repeater acts as a diode – it allows redstone signals through in one direction (unlike [[redstone dust]] or opaque blocks that can transmit redstone signals in any direction).

A diode can be used to protect a [[redstone circuit]] from redstone signals feeding back into the circuit from its output, or can be used to isolate one part of a circuit from another.

=== {{anchor|lock}} Signal locking ===
{{see also| Mechanics/Redstone/Memory circuit}}
[[File:Latch.png|thumb|The left repeater has been locked in an unpowered output state by the right repeater.]]
A redstone repeater can be "locked" by another powered redstone repeater facing its side. When locked, the repeater does not change its output (whether powered or unpowered), no matter what the input does. When the side repeater turns back off, the repeater returns to its normal behavior.

A repeater can also be locked by a powered [[redstone comparator]] facing its side. This offers additional possibilities for locking signals because a comparator's output can be affected from 3 sides as well as by containers.

If a repeater is locked again too quickly after unlocking (e.g. the lock is controlled by a fast clock circuit), or the lock and the input are changed only on the same tick (e.g. because they're fed by the same clock and both repeaters have the same delay), the repeater does not switch states.

== Sounds ==
{{Edition|java}}:
{{Sound table/Block/Stone/JE}}
{{Edition|bedrock}}:
{{Sound table/Block/Wood/BE}}

== Data values ==
=== ID ===
{{edition|java}}:
{{ID table
|edition=java
|showforms=y
|generatetranslationkeys=y
|displayname=Redstone Repeater
|spritetype=block
|nameid=repeater
|foot=1}}

{{edition|bedrock}}:
{{ID table
|edition=bedrock
|firstcolumnname=Redstone Repeater
|shownumericids=y
|showforms=y
|generatetranslationkeys=y
|displayname=Unpowered block
|spritename=unpowered-repeater
|spritetype=block
|nameid=unpowered_repeater
|id=93
|form=block
|translationkey=-}}
{{ID table
|displayname=Powered block
|spritename=powered-repeater
|spritetype=block
|nameid=powered_repeater
|id=94
|form=block
|translationkey=-}}
{{ID table
|displayname=Item
|spritename=redstone-repeater
|spritetype=item
|nameid=repeater
|id=419
|form=item
|foot=1}}

=== Block states ===
{{see also|Block states}}
{{/BS}}

== Video ==
<div style="text-align:center">{{yt|0Ij_qMLiRzE}}</div>

== History ==
''For a more in-depth breakdown of changes to repeater textures and models, including a set of renders for each state combination, see [[/Asset history]]''
{{History|java beta}}
{{History||1.3|[[File:Redstone Repeater (S) JE1.png|32px]] [[File:Redstone Repeater (item) JE1.png|32px]] Added redstone repeaters.
|Originally, the four possible settings were "1, 2, 5 and 7",<ref>http://twitter.com/jeb_/status/33888465502339073</ref> but [[Jeb]] decided to change the settings to "1, 2, 3, and 4".<ref>http://www.reddit.com/r/Minecraft/comments/fmdtp/teammojang_redstone_repeater_video/c1gzrn6</ref>
|The particles when [[breaking]] redstone repeaters erroneously use the [[pumpkin]] top texture.}}
{{History||unknown|The breaking particles of redstone repeaters now use the smooth stone [[slab]] top texture, even though none of the elements on the [[model]] use it.}}
{{History||1.7|[[File:Redstone Repeater (S) JE2.png|32px]] The side texture of redstone repeaters has been changed to the previous bottom part of the texture.
|[[Redstone dust]] now automatically connects to the input of a redstone repeater. Previously, it needed to be specifically pointed towards the repeater like with other blocks.}}
{{History||unknown|Redstone dust now visually connects to the output of redstone repeaters, though this does not change its behavior.}}
{{History|java}}
{{History||unknown|The breaking particles of redstone repeaters have been changed to an unlit [[redstone torch]] when unpowered and a lit redstone torch when powered.}}
{{History||1.3.1|snap=12w22a|Redstone repeaters now naturally generate inside [[jungle temple]]s.}}
{{History|||snap=1.3|[[File:Redstone Repeater (item) JE2 BE1.png|32px]] The texture of redstone repeater [[item]]s have been changed.}}
{{History||1.4.2|snap=12w42a|[[File:Redstone Repeater (S) JE3.png|32px]] The top texture of redstone repeaters has now been changed.
|[[File:Locked Redstone Repeater (S) JE1.png|32px]] Added repeater locking to redstone repeaters. Interestingly, the smallest face of the bedrock cuboid's texture changes depending on the delay, but the other two faces remain the same. When/if this changed is unknown.}}
{{History||1.5|snap=13w02a|[[File:Redstone Repeater (S) JE4.png|32px]] The side textures of redstone repeaters have been changed to use the top texture of stone [[slab]]s.}}
{{History||unknown|The breaking [[particles|particle]] of redstone repeaters has been changed once again and now matches the top texture of redstone repeaters.}}
{{History||1.8|snap=14w06a|Repeaters no longer produce block [[light]] when powered.}}
{{History|||snap=14w10a|[[File:Powered Redstone Repeater (S) JE5.png|32px]] Torches on repeaters now no longer have protruding features.
|The torches underneath redstone repeaters have now been shortened, which has changed the underside textures from [[File:Redstone Repeater JE2 BE1 (facing NWU).png|32px]] [[File: Redstone Repeater Delay 2 JE2 BE1 (facing NWU).png|32px]] [[File: Redstone Repeater Delay 3 JE2 BE1 (facing NWU).png|32px]] [[File: Redstone Repeater Delay 4 JE2 BE1 (facing NWU).png|32px]] [[File: Active Redstone Repeater JE2 BE1 (facing NWU).png|32px]] [[File: Active Redstone Repeater Delay 2 JE2 BE1 (facing NWU).png|32px]] [[File: Active Redstone Repeater Delay 3 JE2 BE1 (facing NWU).png|32px]] [[File: Active Redstone Repeater Delay 4 JE2 BE1 (facing NWU).png|32px]] [[File: Locked Redstone Repeater JE2 BE1 (facing NWU).png|32px]] [[File: Locked Redstone Repeater Delay 2 JE2 BE1 (facing NWU).png|32px]] [[File: Locked Redstone Repeater Delay 3 JE2 BE1 (facing NWU).png|32px]] [[File: Locked Redstone Repeater Delay 4 JE2 BE1 (facing NWU).png|32px]] [[File: Active Locked Redstone Repeater JE2 BE1 (facing NWU).png|32px]] [[File: Active Locked Redstone Repeater Delay 2 JE2 BE1 (facing NWU).png|32px]] [[File: Active Locked Redstone Repeater Delay 3 JE2 BE1 (facing NWU).png|32px]] [[File: Active Locked Redstone Repeater Delay 4 JE2 BE1 (facing NWU).png|32px]] to [[File:Redstone Repeater JE3 (facing NWU).png|32px]] [[File: Redstone Repeater Delay 2 JE3 (facing NWU).png|32px]] [[File: Redstone Repeater Delay 3 JE3 (facing NWU).png|32px]] [[File: Redstone Repeater Delay 4 JE3 (facing NWU).png|32px]] [[File: Active Redstone Repeater JE3 (facing NWU).png|32px]] [[File: Active Redstone Repeater Delay 2 JE3 (facing NWU).png|32px]] [[File: Active Redstone Repeater Delay 3 JE3 (facing NWU).png|32px]] [[File: Active Redstone Repeater Delay 4 JE3 (facing NWU).png|32px]] [[File: Locked Redstone Repeater JE3 (facing NWU).png|32px]] [[File: Locked Redstone Repeater Delay 2 JE3 (facing NWU).png|32px]] [[File: Locked Redstone Repeater Delay 3 JE3 (facing NWU).png|32px]] [[File: Locked Redstone Repeater Delay 4 JE3 (facing NWU).png|32px]] [[File: Locked Active Redstone Repeater JE3 (facing NWU).png|32px]] [[File: Locked Active Redstone Repeater Delay 2 JE3 (facing NWU).png|32px]] [[File: Locked Active Redstone Repeater Delay 3 JE3 (facing NWU).png|32px]] [[File: Locked Active Redstone Repeater Delay 4 JE3 (facing NWU).png|32px]].}}
{{History|||snap=14w10b|[[File:Powered Redstone Repeater (S) JE4.png|32px]] Repeater torches now have protruding features again.<ref>{{bug|MC-50242}}</ref>}}
{{History|||snap=?|[[File:Powered Redstone Repeater (S) JE7.png|32px]] The torches on redstone repeaters are now affected by directional shading.}}
{{History||1.13|snap=17w47a|All 3 IDs for the redstone repeater have now been merged into 1 ID: <code>repeater</code>.
|Added powered block state to redstone repeaters.
|Redstone repeaters now render their underside, which has changed their undersides from [[File:Redstone Repeater JE3 (facing NWU).png|32px]] [[File: Redstone Repeater Delay 2 JE3 (facing NWU).png|32px]] [[File: Redstone Repeater Delay 3 JE3 (facing NWU).png|32px]] [[File: Redstone Repeater Delay 4 JE3 (facing NWU).png|32px]] [[File: Active Redstone Repeater JE3 (facing NWU).png|32px]] [[File: Active Redstone Repeater Delay 2 JE3 (facing NWU).png|32px]] [[File: Active Redstone Repeater Delay 3 JE3 (facing NWU).png|32px]] [[File: Active Redstone Repeater Delay 4 JE3 (facing NWU).png|32px]] [[File: Locked Redstone Repeater JE3 (facing NWU).png|32px]] [[File: Locked Redstone Repeater Delay 2 JE3 (facing NWU).png|32px]] [[File: Locked Redstone Repeater Delay 3 JE3 (facing NWU).png|32px]] [[File: Locked Redstone Repeater Delay 4 JE3 (facing NWU).png|32px]] [[File: Locked Active Redstone Repeater JE3 (facing NWU).png|32px]] [[File: Locked Active Redstone Repeater Delay 2 JE3 (facing NWU).png|32px]] [[File: Locked Active Redstone Repeater Delay 3 JE3 (facing NWU).png|32px]] [[File: Locked Active Redstone Repeater Delay 4 JE3 (facing NWU).png|32px]] to [[File:Redstone Repeater JE4 BE2 (facing NWU).png|32px]] [[File: Redstone Repeater Delay 2 JE4 BE2 (facing NWU).png|32px]] [[File: Redstone Repeater Delay 3 JE4 BE2 (facing NWU).png|32px]] [[File: Redstone Repeater Delay 4 JE4 BE2 (facing NWU).png|32px]] [[File: Active Redstone Repeater JE4 BE2 (facing NWU).png|32px]] [[File: Active Redstone Repeater Delay 2 JE4 BE2 (facing NWU).png|32px]] [[File: Active Redstone Repeater Delay 3 JE4 BE2 (facing NWU).png|32px]] [[File: Active Redstone Repeater Delay 4 JE4 BE2 (facing NWU).png|32px]] [[File: Locked Redstone Repeater JE4 BE2 (facing NWU).png|32px]] [[File: Locked Redstone Repeater Delay 2 JE4 BE2 (facing NWU).png|32px]] [[File: Locked Redstone Repeater Delay 3 JE4 BE2 (facing NWU).png|32px]] [[File: Locked Redstone Repeater Delay 4 JE4 BE2 (facing NWU).png|32px]] [[File: Locked Active Redstone Repeater JE4 BE2 (facing NWU).png|32px]] [[File: Locked Active Redstone Repeater Delay 2 JE4 BE2 (facing NWU).png|32px]] [[File: Locked Active Redstone Repeater Delay 3 JE4 BE2 (facing NWU).png|32px]] [[File: Locked Active Redstone Repeater Delay 4 JE4 BE2 (facing NWU).png|32px]].
|Prior to [[1.13/Flattening|''The Flattening'']], these [[block]]s' numeral IDs were 93 and 94, and the [[item]]'s 356.}}
{{History||1.14|snap=18w43a|[[File:Redstone Repeater (S) JE5.png|32px]] [[File:Powered Redstone Repeater (S) JE9.png|32px]] [[File:Locked Redstone Repeater (S) JE5.png|32px]] [[File:Powered Locked Redstone Repeater (S) JE6.png|32px]] [[File:Redstone Repeater (item) JE3 BE2.png|32px]] The textures of redstone repeaters have now been changed.}}
{{History|||snap=18w50a|[[File:Locked Redstone Repeater (S) JE6.png|32px]] [[File:Powered Locked Redstone Repeater (S) JE7.png|32px]] As the texture of [[bedrock]] has been changed, the textures of locked redstone repeaters have also now been changed.}}
{{History|||snap=19w12b|Redstone repeaters can now be placed on [[glass]], [[ice]], [[glowstone]] and [[sea lantern]]s.}}
{{History||1.19|snap=22w13a|Redstone repeaters now generate in [[Ancient City|ancient cities]].}}
{{History||1.20.2|snap=23w33a|Redstone repeaters now use stone sounds instead of wood sounds.<ref>{{bug|MC-182820|||Fixed}}</ref>}}

{{History|pocket alpha}}
{{History||v0.14.0|snap=build 1|[[File:Redstone Repeater (S) JE3.png|32px]] [[File:Redstone Repeater (item) JE2 BE1.png|32px]] Added redstone repeaters.}}
{{History|bedrock}}
{{History||1.2.0|snap=beta 1.2.0.2|Redstone repeaters now render their underside, which has changed their undersides from [[File:Redstone Repeater JE2 BE1 (facing NWU).png|32px]] [[File: Redstone Repeater Delay 2 JE2 BE1 (facing NWU).png|32px]] [[File: Redstone Repeater Delay 3 JE2 BE1 (facing NWU).png|32px]] [[File: Redstone Repeater Delay 4 JE2 BE1 (facing NWU).png|32px]] [[File: Active Redstone Repeater JE2 BE1 (facing NWU).png|32px]] [[File: Active Redstone Repeater Delay 2 JE2 BE1 (facing NWU).png|32px]] [[File: Active Redstone Repeater Delay 3 JE2 BE1 (facing NWU).png|32px]] [[File: Active Redstone Repeater Delay 4 JE2 BE1 (facing NWU).png|32px]] [[File: Locked Redstone Repeater JE2 BE1 (facing NWU).png|32px]] [[File: Locked Redstone Repeater Delay 2 JE2 BE1 (facing NWU).png|32px]] [[File: Locked Redstone Repeater Delay 3 JE2 BE1 (facing NWU).png|32px]] [[File: Locked Redstone Repeater Delay 4 JE2 BE1 (facing NWU).png|32px]] [[File: Active Locked Redstone Repeater JE2 BE1 (facing NWU).png|32px]] [[File: Active Locked Redstone Repeater Delay 2 JE2 BE1 (facing NWU).png|32px]] [[File: Active Locked Redstone Repeater Delay 3 JE2 BE1 (facing NWU).png|32px]] [[File: Active Locked Redstone Repeater Delay 4 JE2 BE1 (facing NWU).png|32px]] to [[File:Redstone Repeater JE4 BE2 (facing NWU).png|32px]] [[File: Redstone Repeater Delay 2 JE4 BE2 (facing NWU).png|32px]] [[File: Redstone Repeater Delay 3 JE4 BE2 (facing NWU).png|32px]] [[File: Redstone Repeater Delay 4 JE4 BE2 (facing NWU).png|32px]] [[File: Active Redstone Repeater JE4 BE2 (facing NWU).png|32px]] [[File: Active Redstone Repeater Delay 2 JE4 BE2 (facing NWU).png|32px]] [[File: Active Redstone Repeater Delay 3 JE4 BE2 (facing NWU).png|32px]] [[File: Active Redstone Repeater Delay 4 JE4 BE2 (facing NWU).png|32px]] [[File: Locked Redstone Repeater JE4 BE2 (facing NWU).png|32px]] [[File: Locked Redstone Repeater Delay 2 JE4 BE2 (facing NWU).png|32px]] [[File: Locked Redstone Repeater Delay 3 JE4 BE2 (facing NWU).png|32px]] [[File: Locked Redstone Repeater Delay 4 JE4 BE2 (facing NWU).png|32px]] [[File: Locked Active Redstone Repeater JE4 BE2 (facing NWU).png|32px]] [[File: Locked Active Redstone Repeater Delay 2 JE4 BE2 (facing NWU).png|32px]] [[File: Locked Active Redstone Repeater Delay 3 JE4 BE2 (facing NWU).png|32px]] [[File: Locked Active Redstone Repeater Delay 4 JE4 BE2 (facing NWU).png|32px]].}}
{{History||1.10.0|snap=beta 1.10.0.3|[[File:Redstone Repeater (S) BE2.png|32px]] [[File:Powered Redstone Repeater (S) BE2.png|32px]] [[File:Redstone Repeater (item) JE3 BE2.png|32px]] The textures of redstone repeaters have now been changed.}}
{{History||1.20.30|snap=beta 1.20.30.20|Redstone Repeaters now use the <code>minecraft:cardinal_direction</code> [[block state]] instead of <code>direction</code>.}}

{{History|console}}
{{History||xbox=TU1|xbone=CU1|ps=1.0|wiiu=Patch 1|switch=1.0.1|[[File:Redstone Repeater (S) JE3.png|32px]]{{verify|Was this model actually used here?}} [[File:Redstone Repeater (item) JE2 BE1.png|32px]] Added redstone repeaters.}}
{{History||xbox=TU19|xbone=CU7|ps=1.12|wiiu=Patch 1|switch=1.0.1|[[File:Locked Redstone Repeater (S) JE1.png|32px]]{{verify|Was this model actually used here?}} Added repeater locking to redstone repeaters.}}
{{History||xbox=none|xbone=none|ps=1.90|wiiu=none|switch=none|[[File:Redstone Repeater (S) JE4.png|32px]]{{verify|Was this model actually used here?}} [[File:Redstone Repeater (item) JE3 BE2.png|32px]] The textures of redstone repeaters have now been changed.}}

{{History|new 3ds}}
{{History||0.1.0|[[File:Redstone Repeater (S) JE3.png|32px]]{{verify|Was this model actually used here?}} [[File:Redstone Repeater (item) JE2 BE1.png|32px]] Added redstone repeaters and repeater locking.}}
{{History|foot}}

=== Redstone repeater "items" ===
{{:Technical blocks/Redstone Repeater}}

== Issues ==
{{Issue list}}

== Trivia ==
* The recipe and appearance of redstone repeaters are a likely reference to the old method of repeating signals, which would also use two torches at a time, inverting each other

== Gallery ==
<gallery>
Repeater clock.gif|A redstone clock formed from a redstone torch and a repeater.
Repeater feedback.gif|A redstone clock formed from two repeaters.
Two way repeater.gif|MCRedstoneSim diagram of a two-way repeater.
Repeater bridge.png|Crossing redstone wires using repeaters.
Jeb Repeaters 1.png|
Jeb Repeaters 2.png|
Jeb Repeaters 3.png|
</gallery>

=== Renders ===
<gallery>
Redstone Repeater.png
Redstone Repeater Delay 2.png
Redstone Repeater Delay 3.png
Redstone Repeater Delay 4.png
Powered Redstone Repeater.png
Powered Redstone Repeater Delay 2.png
Powered Redstone Repeater Delay 3.png
Powered Redstone Repeater Delay 4.png
Locked Redstone Repeater.png
Locked Redstone Repeater Delay 2.png
Locked Redstone Repeater Delay 3.png
Locked Redstone Repeater Delay 4.png
Powered Locked Redstone Repeater.png
Powered Locked Redstone Repeater Delay 2.png
Powered Locked Redstone Repeater Delay 3.png
Powered Locked Redstone Repeater Delay 4.png
Redstone Repeater BE.png
Redstone Repeater Delay 2 BE.png
Redstone Repeater Delay 3 BE.png
Redstone Repeater Delay 4 BE.png
Powered Redstone Repeater BE.png
Powered Redstone Repeater Delay 2 BE.png
Powered Redstone Repeater Delay 3 BE.png
Powered Redstone Repeater Delay 4 BE.png
Locked Redstone Repeater BE.png
Locked Redstone Repeater Delay 2 BE.png
Locked Redstone Repeater Delay 3 BE.png
Locked Redstone Repeater Delay 4 BE.png
Powered Locked Redstone Repeater BE.png
Powered Locked Redstone Repeater Delay 2 BE.png
Powered Locked Redstone Repeater Delay 3 BE.png
Powered Locked Redstone Repeater Delay 4 BE.png
</gallery>

== References ==
{{Reflist}}

{{Redstone}}
{{Blocks|Utility}}
{{Items}}

[[Category:Mechanics]]
[[Category:Redstone mechanics]]
[[Category:Redstone]]
[[Category:Mechanisms]]
[[Category:Manufactured blocks]]
[[Category:Generated structure blocks]]
[[Category:Non-solid blocks]]

[[de:Redstone-Verstärker]]
[[es:Repetidor de redstone]]
[[fr:Répéteur de redstone]]
[[hu:Redstone-jelismétlő]]
[[it:Ripetitore di redstone]]
[[ja:レッドストーンリピーター]]
[[ko:레드스톤 중계기]]
[[nl:Redstoneversterker]]
[[pl:Przekaźnik]]
[[pt:Repetidor de redstone]]
[[ru:Красный повторитель]]
[[tr:Kızıltaş tekrarlayıcı]]
[[zh:红石中继器]]</li></ul>
Added ability to launch demo mode for non-premium users.
{{Extension DPL}}<ul><li>[[Horse Saddle|Horse Saddle]]<br/>{{About|the removed item|the current item|Saddle}}
{{outdated feature|edition=java}}
{{Item
| title = Horse Saddle
| image = Horse Saddle.png
| renewable = Yes
| stackable = Yes (32)
}}

'''Horse saddles''' were [[item]]s which allowed the player to ride [[horse]]s.

== Obtaining ==
=== Crafting ===
{{crafting |ignoreusage=1
|A1=Leather    |B1=Leather    |C1=Leather
|A2=Leather    |B2=Iron Ingot |C2=Leather
|A3=Iron Ingot                |C3=Iron Ingot
|Output=Horse Saddle
}}

== Usage ==
Horse saddles worked just like regular [[saddle]]s, but for [[horse]]s instead of [[pig]]s. Taming a horse was required before putting a horse saddle on it. Unlike any other items, horse saddles could be stacked up to 32.

== Sounds ==
''None''<ref>{{ytl|2a6BQeW6is4|t=330}}; sounds for horses were not added until [[13w22a]]</ref>

== Data values ==
=== ID ===
{{ID table
|nonameid=y
|shownumericids=y
|showforms=y
|generatetranslationkeys=java
|displayname=Horse Saddle
|spritetype=item
|id=416
|form=item
|translationkey=item.horsesaddle.name
|foot=y}}

== History ==
{{History|java}}
{{History||1.6.1|snap=13w16a|[[File:Horse Saddle JE1.png|32px]] Added horse saddles.}}
{{History|||snap=13w18a|Horse saddles have been removed.
|[[Horse]]s and [[zombie horse]]s can now be ridden using regular [[saddle]]s.}}
{{History|foot}}

== Issues ==
Horse saddles have been removed from the game, and as such are no longer supported.

{{Items}}
{{Removed Features}}

[[es:Montura de caballo]]
[[fr:Selle de cheval]]
[[it:Sella di cavallo]]
[[ja:ウマの鞍]]
[[ko:말 안장]]
[[pt:Sela para cavalo]]
[[zh:马鞍]]</li><li>[[:Category:Minecraft Earth items|Category:Minecraft Earth items]]<br/>All items in ''[[Minecraft Earth]]''.
[[Category:Items]]
[[Category:Minecraft Earth|Items]]</li></ul>
{{Extension DPL}}<ul><li>[[Water|Water]]<br/>{{About|the fluid|the bucket|Water Bucket|other forms of water}}
{{Fluid
| image = <gallery>
Water.png|Java Edition
Water BE.png|Bedrock Edition
</gallery>
| invimage = Water Bucket
| invimage2 = Water
| renewable = Yes
| transparent = Partial <small>(-1 to light)</small>
| light = No
| tool = bucket
| infinite = Yes
| flowrate = 5 [[tick]]s/block
| flowdistance = 8 blocks
}}

'''Water''' is a [[fluid]] that naturally generates abundantly in the [[Overworld]].

== Obtaining ==
Water blocks do not exist as items,{{only|java}} but water can be collected by using a [[bucket]] on a water source block or a full water [[cauldron]], creating a [[water bucket]].

{{IN|BE}}, it may be obtained as an item via inventory editing or add-ons.

=== Natural generation ===
Water naturally generates in the [[Overworld]] to form [[ocean]]s, [[river]]s and [[spring]]s. The water level is at [[altitude|layer 63]] near oceans and rivers, but changes depending on location due to the [[aquifer]] system, filling some carvers, noise caves and canyons with water at different levels. Water also generates as small puddles on the floor next to [[dripstone cluster]]s, and as clay pools on the floor of [[lush caves]].

Water also generates in [[village]]s, [[desert well]]s, [[stronghold]]s, [[woodland mansion]]s, [[ancient city|ancient cities]] and [[ocean monument]]s.

Water never generates in [[the Nether]] and instantly disappears if placed there with a water bucket. However, water can exist in the Nether in a [[cauldron]]. Water can also be placed in the Nether using [[commands]] such as {{cmd|setblock}} and {{cmd|fill}}. Although it does not naturally generate there, water can be placed and function normally in [[the End]].

{{IN|be}}, water also generates as part of [[ocean ruins]] with loot [[chest]]s, but only two water blocks generate:
* One water block generates inside the loot chest, making it a [[Waterlogging|waterlogged]] loot chest.
* The other water block generates on top of the loot chest.
These water blocks generate even if the ruin is located on the surface.<ref>{{bug|MCPE-36793}}</ref> This is not the case in {{el|je}}; if an underwater ruin generates on the surface, no water generates.<ref>{{bug|MC-136156}}</ref> This also happens with [[shipwreck]]s.

Water spends most of its time as stationary, rather than flowing – regardless of its level, or whether it contains a current downward or to the side. When specifically triggered by a block update, water changes to 'flowing', updates its level, then changes back to stationary. Water springs are generated as flowing, and oceans, and rivers are generated as stationary. This happens before most types of generated structure are created, and the main cause of water "glitches" is that generated structures do not trigger a block update to let water flow into them.

== Usage ==
=== Appearance ===
Water uses a translucent animated texture that is tinted differently in different biomes. {{IN|Java}}, water in cauldrons is completely opaque.<ref>{{bug|MC-13187}}</ref>

Unlike other translucent blocks such as [[ice]], [[stained glass]] and [[tinted glass]], water shows the opposite sides of its external planes when viewed from within and from outside.<ref>{{bug|MC-202578|||WAI}}</ref> However, it applies only to the top plane and four side planes; the bottom face is always unseen from above.<ref>{{bug|MC-190053}}</ref>

=== Swimming ===
{{main|Swimming}}

The button for {{control|swim|text=swimming}} is the same as the button for jumping; non-swimming players and mobs sink slowly in water. Holding the swim button raises the player through the water, and when the surface is reached, the player bobs up and down. The {{control|crouch}} button can be used to sink faster. The {{control|sprint}} button can be used to put the player in "swim mode" when the player is completely submerged in water. When in swim mode, the player is horizontal and one block high. The player has an arm-waving animation when viewed in third person or by other players.

Swimming in water is considerably slower against currents (see [[#Current|Current]] below), but faster when going with the current.

Most mobs that can stand can also swim any time they are in water, except for [[iron golem]]s, [[piglin]]s, [[hoglin]]s, [[strider]]s, [[piglin brute]]s and undead mobs. This can lead to drowning if the water is falling from above.

Water of any depth prevents any entity, including the player, from sustaining falling damage if they fall into it, regardless of the distance fallen.

Being inside of water also imparts a [[fog]] effect, tinted accordingly.

=== Spreading ===
{{Main|Fluid#Spread}}
[[File:Water spread v1-13.png|300px|right|An image showing water's spreading distance]]
Water spreads horizontally and downward into nearby [[air]] blocks. Water can spread downward infinitely until stopped by a block, and 7 blocks horizontally from a source block on a flat surface. Water spreads at a rate of 1 block every 5 game ticks, or 4 blocks per second.

When spreading horizontally, a weight is assigned to every direction water can flow. For each direction, this weight is initially set to 1000. Then, for every adjacent block it can flow into it tries to find a way down that is reachable in four or fewer blocks from the block it wants to flow to. When found, the flow weight for that direction is set to the shortest path distance to the way down. Finally, water spreads in the directions with the lowest flow weight.

Spreading water extinguishes [[fire]] and washes away certain types of items or placed blocks, causing them to drop as items and then carrying them along in the flow until the edge of the spread. Affected items include [[plant]]s (except trees), [[snow]], [[torch]]es, [[carpet]]s, [[redstone dust]] and some other redstone components, [[cobweb]], [[end rod]]s, [[head]]s, and [[flower pot]]s.

==== Flow arrangement tables ====
{| class="wikitable"
|+
|
|
|
|
|
|
|
!7
|
|
|
|
|
|
|
|-
|
|
|
|
|
|
! 7
!6
! 7
|
|
|
|
|
|
|-
|
|
|
|
|
! 7
!6
!5
!6
! 7
|
|
|
|
|
|-
|
|
|
|
! 7
!6
!5
!4
!5
!6
! 7
|
|
|
|
|-
|
|
|
! 7
!6
!5
!4
!3
!4
!5
!6
! 7
|
|
|
|-
|
|
! 7
!6
!5
!4
!3
!2
!3
!4
!5
!6
! 7
|
|
|-
|
! 7
!6
!5
!4
!3
!2
!1
!2
!3
!4
!5
!6
! 7
|
|-
!7
!6
!5
!4
!3
!2
!1
!0
!1
!2
!3
!4
!5
!6
!7
|-
|
! 7
!6
!5
!4
!3
!2
!1
!2
!3
!4
!5
!6
! 7
|
|-
|
|
! 7
!6
!5
!4
!3
!2
!3
!4
!5
!6
! 7
|
|
|-
|
|
|
! 7
!6
!5
!4
!3
!4
!5
!6
! 7
|
|
|
|-
|
|
|
|
! 7
!6
!5
!4
!5
!6
! 7
|
|
|
|
|-
|
|
|
|
|
! 7
!6
!5
!6
! 7
|
|
|
|
|
|-
|
|
|
|
|
|
! 7
!6
! 7
|
|
|
|
|
|
|-
|
|
|
|
|
|
|
!7
|
|
|
|
|
|
|
|}

{| class="wikitable"
! colspan="2" |Range
!Height in blocks
|-
!1
|block
|1
|-
!2
|blocks
|0.75-1
|-
!3
|blocks
|0.625-0.75
|-
!4
|blocks
|0.5-0.625
|-
!5
|blocks
|0.375-0.5
|-
!6
|blocks
|0.25-0.375
|-
!7
|blocks
|0.125-0.25
|}

=== Source blocks ===
{{anchor|Water Spawner}} <!-- Compatibility anchor -->
{{about|the behavior and creation of source units of water|the removed block that created water sources|Water Spawner|section=1}}
A water source block is created from a flowing block that is horizontally adjacent to two or more other source blocks, and sitting on top of a solid block or another water source block. This allows water spawners to exist, in which a new source block immediately forms in the space left by removing a source block with a [[bucket]]. Pools of still water can be created by placing water source blocks in a confined area.

Water spawners can be constructed by arranging for two source blocks to flow into a third block. Each of the examples below require two source blocks, each on opposite ends of the hole, to create a renewable water source block in between.

While water source blocks only generate adjacent to solid blocks, they do not require a solid block to support them. Removing all adjacent blocks to a water source block only causes it to remain floating in the air.

{{IN|java}}, the formation of new water sources blocks can be disabled when the [[game rule]] {{cd|waterSourceConversion}} is set to {{cd|false}}.

<gallery>
2x2 water source.png|2x2 water spawner (every corner is renewable)
3x1 water source.png|3x1 water spawner (middle water block is renewable)
L-shaped water source.png|L-shaped water spawner (corner water block is renewable)
</gallery>

A [[dispenser]] loaded with a filled [[bucket]] places a water source block in an empty block in front of it when activated. A dispenser loaded with an empty bucket and a water source right in front of it sucks the source into the bucket when activated.

In snowy [[biome]]s, water source blocks have a chance to turn into [[ice]] if directly under the sky. Ice blocks under brighter light levels melt back into water source blocks (except in [[the Nether]]). Ice reverts to water when broken, but only if there is a solid block under it.

=== Current ===
The current in a water block determines both the direction it appears to flow and the direction an [[entity]] such as a player or [[boat]] is pushed from that block.

Water with a current pushes players and [[mob]]s at a speed of about 1.39 meters per second, or 25 blocks every 18 seconds. Players that are in creative flying mode don’t get pushed.{{only|je}}<ref>{{bug|MCPE-84592}}</ref>

The horizontal current in a water block is based on a vector sum of the flows to and from that block from its four horizontal neighbors. For example, if a block receives water from the north and sends it both south and east, but borders a solid block on its west edge, then a south-southeast current exits from that block, because 2 southward flows (in and out) are combined with 1 eastward flow (out). Thus, 16 horizontal directions are possible. If a branch in a channel is 2 blocks wide at its entrance, then entities float into it rather than continuing in a straight line.

Water blocks can create a downward current. A downward current in a water block is caused by the block below it. Most blocks that do not have a solid upper face cause downward current on above water blocks. Also, ice and falling water blocks (blocks created by spreading downward) cause downward current on the water block above. Falling water blocks have a downward current by default.

=== Light ===
{{IN|bedrock}}, every block of water reduces [[light]] by 1 extra level (in addition to the normal fading-out of light). {{IN|java}}, water does not cause any additional decrease for block light, but diffuses sky light, causing the light to fade with depth. Underwater visibility changes depending on the biome the player is in. The [[Night Vision]] and [[Conduit Power]] effects increase underwater visibility.

=== Color ===
Water has several colors, depending on the biome.

==== Java Edition ====
{| class="wikitable sortable mw-collapsible mw-collapsed" data-description="Water Color in Java Edition"
|-
!Biome!!Water color!!Water fog color!!Block
|-
|{{BiomeSprite|Plains|text=Default (biomes not listed below)}}||{{color|#3F76E4}}||{{color|#050533}}||[[File:Plains Water JE.png|32px]]
|-
|{{BiomeLink|Swamp}}||{{color|#617B64}}||{{color|#232317}}||[[File:Swamp Water.png|32px]]
|-
|{{BiomeLink|Lukewarm Ocean}}<br>{{BiomeLink|Deep Lukewarm Ocean}}||{{color|#45ADF2}}||{{color|#041633}}||[[File:Lukewarm Ocean Water JE.png|32px]]
|-
|{{BiomeLink|Warm Ocean}}||{{color|#43D5EE}}||{{color|#041F33}}||[[File:Warm Ocean Water JE.png|32px]]
|-
|{{BiomeLink|Cold Ocean}}<br>{{BiomeLink|Deep Cold Ocean}}<br>{{BiomeLink|Snowy Taiga}}<br>{{BiomeLink|Snowy Beach}}||{{color|#3D57D6}}||{{color|#050533}}||[[File:Cold Ocean Water JE.png|32px]]
|-
|{{BiomeLink|Frozen River}}<br>{{BiomeLink|Frozen Ocean}}<br>{{BiomeLink|Deep Frozen Ocean}}||{{color|#3938C9}}||{{color|#050533}}||[[File:Frozen Ocean Water JE.png|32px]]
|-
|{{BiomeLink|Meadow}}||{{color|#0E4ECF}}||{{color|#050533}}||[[File:Meadow Water.png|32px]]
|-
|{{BiomeLink|Mangrove Swamp}}||{{color|#3A7A6A}}||{{color|#4D7A60}}|||[[File:Mangrove Swamp Water.png|32px]]
|-
|{{BiomeLink|Cherry Grove}}||{{color|#5DB7EF}}||{{color|#5DB7EF}}||[[File:Cherry Grove Water.png|32px]]
|}

==== Bedrock Edition====
Biome tints
<!--[[File:Water color.png|500px|thumb|center|From left to right - Badlands Plateau, Birch Forest and Snowy Taiga]]-->
{| class="wikitable sortable mw-collapsible mw-collapsed" data-description="Water Color in Bedrock Edition"
! Biome
!Water Surface Color
! Water Fog Color
!Water Fog Distance
!Water Surface Transparency
!Block
|-
|Default<br>(biomes not listed below)
|{{color|#44aff5}}||{{color|#44aff5}}||15||65%||[[File:Water BE.png|32px]]
|-
|{{BiomeLink|Sunflower Plains}}<br>{{BiomeLink|Plains}}
|{{color|#44aff5}}||{{color|#44aff5}}||60||-||[[File:Water BE.png|32px]]
|-
|{{BiomeLink|Desert}}
|{{color|#32a598}}||{{color|#32a598}}||60||-||[[File:Desert Water.png|32px]]
|-
|{{BiomeLink|Mountains}}
|{{color|#007BF7}}||{{color|#007BF7}}||-||-||[[File:Mountains Water.png|32px]]
|-
|{{BiomeLink|Forest}}
|{{color|#1e97f2}}||{{color|#1e97f2}}||60||-||[[File:Forest Water.png|32px]]
|-
|{{BiomeLink|Flower Forest}}
|{{color|#20a3CC}}||{{color|#20a3CC}}||60||-||[[File:Flower Forest Water.png|32px]]
|-
| {{BiomeLink|Taiga}}
| {{color|#287082}}||{{color|#287082}}||60||-||[[File:Taiga Water.png|32px]]
|-
|{{BiomeLink|Taiga Mountains}}
|{{color|#1e6B82}}||{{color|#1e6B82}}||-||-||[[File:Taiga Mountains Water.png|32px]]
|-
|{{BiomeLink|Swamp}}
|{{color|#4c6559}}||{{color|#4c6559||30||100%||[[File:Swamp Water BE.png|32px]]
|-
| {{BiomeLink|River}}
|{{color|#0084ff}}||{{color|#0084ff}}||60||-||[[File:River Water.png|32px]]
|-
|{{BiomeLink|Nether Wastes}}<br>{{BiomeLink|Warped Forest}}<br>{{BiomeLink|Crimson Forest}}<br>{{BiomeLink|Soul Sand Valley}}
|{{color|#905957}}||{{color|#905957}}||15||-||[[File:Nether Water.png|32px]]
|-
|{{BiomeLink|Basalt Deltas}}
|{{color|#3f76e4}}||{{color|#423e42}}||15||-||[[File:Basalt Deltas Water.png|32px]]
|-
|{{BiomeLink|The End}}
| {{color|#62529e}}||{{color|#62529e}}||-||-||[[File:The End Water.png|32px]]
|-
|{{BiomeLink|Frozen River}}
|{{color|#185390}}||{{color|#185390}}||60||-||[[File:Frozen River Water.png|32px]]
|-
|{{BiomeLink|Snowy Tundra}}<br>{{BiomeLink|Ice Spikes}}
|{{color|#14559b}}||{{color|#14559b}}||-||-||[[File:Ice Spikes Water.png|32px]]
|-
| {{BiomeLink|Mushroom Fields}}
|{{color|#8a8997}}||{{color|#8a8997}}||-||-||[[File:Mushroom Fields Water.png|32px]]
|-
|{{BiomeLink|Beach}}
| {{color|#157cab}}||{{color|#157cab}}||60||-||[[File:Beach Water.png|32px]]
|-
|{{BiomeLink|Mountain Edge}}
|{{color|#045cd5}}||{{color|#045cd5}}||-||-||[[File:Mountain Edge Water.png|32px]]
|-
|{{BiomeLink|Jungle}}<br>{{BiomeLink|Bamboo Jungle}}
|{{color|#14a2c5}}||{{color|#14a2c5||60<br>15||-||[[File:Jungle Water.png|32px]]
|-
|{{BiomeLink|Jungle Edge}}
| {{color|#0D8AE3}}||{{color|#0D8AE3}}||-||-||[[File:Jungle Edge Water.png|32px]]
|-
|{{BiomeLink|Stone Shore}}
|{{color|#0d67bb}}||{{color|#0d67bb}}||60||-||[[File:Stone Shore Water.png|32px]]
|-
|{{BiomeLink|Snowy Beach}}
|{{color|#1463a5}}||{{color|#1463a5}}||60||-||[[File:Snowy Beach Water.png|32px]]
|-
|{{BiomeLink|Birch Forest}}
|{{color|#0677ce}}||{{color|#0677ce}}||60||-||[[File:Birch Forest Water.png|32px]]
|-
|{{BiomeLink|Dark Forest}}
|{{color|#3B6CD1}}||{{color|#3B6CD1}}||60||-||[[File:Dark Forest Water.png|32px]]
|-
|{{BiomeLink|Snowy Taiga}}
|{{color|#205e83}}||{{color|#205e83}}||60||-||[[File:Snowy Taiga Water.png|32px]]
|-
|{{BiomeLink|Giant Tree Taiga}}<br>{{BiomeLink|Giant Spruce Taiga}}
|{{color|#2d6d77}}||{{color|#2d6d77}}||60||-||[[File:Giant Tree Taiga Water.png|32px]]
|-
|{{BiomeLink|Windswept Forest}}<br>{{BiomeLink|Windswept Gravelly Hills}}
|{{color|#0E63AB}}||{{color|#0E63AB}}||-||-||[[File:Wooded Mountains Water.png|32px]]
|-
|{{BiomeLink|Savanna}}
|{{color|#2C8B9C}}||{{color|#2C8B9C}}||60||-||[[File:Savanna Water.png|32px]]
|-
|{{BiomeLink|Savanna Plateau}}<br>{{BiomeLink|Shattered Savanna}}
|{{color|#2590a8}}||{{color|#2590a8}}||-||-||[[File:Savanna Plateau Water.png|32px]]
|-
|{{BiomeLink|Badlands}}
|{{color|#4E7f81}}||{{color|#4E7f81||60
|<nowiki>-||[[File:Badlands Water.png|32px]]
|-
|{{BiomeLink|Eroded Badlands}}<br>{{BiomeLink|Wooded Badlands}}
|{{color|#497f99}}||{{color|#497f99}}||-||-||[[File:Eroded Badlands Water.png|32px]]
|-
|{{BiomeLink|Ocean}}
|{{color|#1787D4}}||{{color|#1165b0}}||60||-||[[File:Ocean Water.png|32px]]
|-
|{{BiomeLink|Deep Ocean}}
|{{color|#1787D4}}||{{color|#1463a5}}||60||-||[[File:Ocean Water.png|32px]]
|-
|{{BiomeLink|Warm Ocean}}
|{{color|#02B0E5}}||{{color|#0289d5}}||60||55%||[[File:Warm Ocean Water.png|32px]]
|-
| {{BiomeLink|Lukewarm Ocean}}
|{{color|#0D96DB}}||{{color|#0a74c4}}||60||-||[[File:Lukewarm Ocean Water.png|32px]]
|-
|{{BiomeLink|Deep Lukewarm Ocean|Lukewarm Deep Ocean}}
|{{color|#0D96DB}}||{{color|#0e72b9}}||60||-||[[File:Lukewarm Ocean Water.png|32px]]
|-
|{{BiomeLink|Cold Ocean}}
|{{color|#2080C9}}||{{color|#14559b}}||60||-||[[File:Cold Ocean Water.png|32px]]
|-
|{{BiomeLink|Deep Cold Ocean|Cold Deep Ocean}}
|{{color|#2080C9}}||{{color|#185390}}||60||-||[[File:Cold Ocean Water.png|32px]]
|-
|{{BiomeLink|Frozen Ocean}}
|{{color|#2570B5}}||{{color|#174985}}||60||-||[[File:Frozen Ocean Water.png|32px]]
|-
|{{BiomeLink|Deep Frozen Ocean|Frozen Deep Ocean}}
|{{color|#2570B5}}||{{color|#1a4879}}||60||-||[[File:Frozen Ocean Water.png|32px]]
|-
|{{BiomeLink|Mangrove Swamp}}
|{{color|#3a7a6a}}||{{color|#4d7a60}}||30||-||[[File:Mangrove Swamp Water BE.png|32px]]
|}
Biome tints from [[Biome/Before 1.18|unused biomes]]
{| class="wikitable sortable mw-collapsible mw-collapsed" data-description="Water Color in Bedrock Edition"
! Biome
!Water Surface Color
!Water Fog Color
!Water Fog Distance
!Water Surface Transparency
!Block
|-
|{{BiomeLink|Legacy Frozen Ocean}}
|{{color|#44aff5}}||{{color|#44aff5}}||-||-||[[File:Water BE.png|32px]]
|-
|{{BiomeLink|Mountains}}
|{{color|#007BF7}}||{{color|#007bf7}}||-||-||[[File:Mountains Water.png|32px]]
|-
|{{BiomeLink|Taiga Mountains}}
|{{color|#1e6B82}}||{{color|#1e6b82}}||-||-||[[File:Taiga Mountains Water.png|32px]]
|-
|{{BiomeLink|Swamp Hills}}
| {{color|#4c6156}}||{{color|#4c6156||30||100%||[[File:Swamp Hills Water.png|32px]]
|-
| {{BiomeLink|Snowy Mountains}}
|{{color|#1156a7}}||{{color|#1156a7}}||-||-||[[File:Snowy Mountains Water.png|32px]]
|-
|{{BiomeLink|Mushroom Field Shore}}
|{{color|#818193}}||{{color|#818193}}||-||-||[[File:Mushroom Field Shore Water.png|32px]]
|-
|{{BiomeLink|Desert Hills}}
|{{color|#1a7aa1}}||{{color|#1a7aa1}}||-||-||[[File:Desert Hills Water.png|32px]]
|-
|{{BiomeLink|Wooded Hills}}
|{{color|#056bd1}}||{{color|#056bd1}}||-||-||[[File:Wooded Hills Water.png|32px]]
|-
|{{BiomeLink|Taiga Hills}}
|{{color|#236583}}||{{color|#236583}}||-||-||[[File:Taiga Hills Water.png|32px]]
|-
|{{BiomeLink|Mountain Edge}}
|{{color|#045cd5}}||{{color|#045cd5}}||-||-||[[File:Mountain Edge Water.png|32px]]
|-
|{{BiomeLink|Jungle Hills}}<br>{{BiomeLink|Modified Jungle}}<br>{{BiomeLink|Bamboo Jungle Hills}}
|{{color|#1B9ED8}}||{{color|#1B9ED8}}||-||-||[[File:Jungle Hills Water.png|32px]]
|-
|{{BiomeLink|Modified Jungle Edge}}
|{{color|#0D8AE3}}||{{color|#0D8AE3}}||-||-||[[File:Jungle Edge Water.png|32px]]
|-
|{{BiomeLink|Birch Forest Hills}}
|{{color|#0a74c4}}||{{color|#0a74c4}}||-||-||[[File:Birch Forest Hills Water.png|32px]]
|-
|{{BiomeLink|Snowy Taiga Mountains}}
|{{color|#205e83}}||{{color|#205e83}}||60||-||[[File:Snowy Taiga Water.png|32px]]
|-
|{{BiomeLink|Snowy Taiga Hills}}
|{{color|#245b78}}||{{color|#245b78}}||-||-||[[File:Snowy Taiga Hills Water.png|32px]]
|-
|{{BiomeLink|Giant Tree Taiga Hills}}
|{{color|#286378}}||{{color|#286378}}||-||-||[[File:Giant Tree Taiga Hills Water.png|32px]]
|-
|{{BiomeLink|id=modified-gravelly-mountains|Gravelly Mountains+}}
|{{color|#0E63AB}}||{{color|#0e63ab}}||-||-||[[File:Wooded Mountains Water.png|32px]]
|-
|{{BiomeLink|Shattered Savanna Plateau}}
|{{color|#2590a8}}||{{color|#2590a8}}||-||-||[[File:Savanna Plateau Water.png|32px]]
|-
|{{BiomeLink|Badlands Plateau}}<br>{{BiomeLink|Modified Badlands Plateau}}
|{{color|#55809E}}||{{color|#55809e}}||-||-||[[File:Badlands Plateau Water.png|32px]]
|-
|{{BiomeLink|Deep Warm Ocean|Warm Deep Ocean}}
|{{color|#02B0E5}}||{{color|#0686ca}}||60||-||[[File:Warm Ocean Water.png|32px]]
|}

===Water and lava===
{{Main|Fluid#Mixing}}

Water and lava can produce [[stone]], [[cobblestone]], or [[obsidian]] based on how they interact. If water touches a lava source, the lava source turns to obsidian. If both touch each other while flowing, cobblestone is made and no sources are removed, and if lava flows downward onto water, the water turns to stone.

===Interactions with mobs===
====Direct contact====

Water damages [[endermen]], [[snow golem]]s, [[Strider|striders]] and [[blaze]]s, at a rate of {{hp|1}} per half second. If water comes into contact with a [[shulker]] or an [[enderman]], the mob teleports away.

====Suffocation====
{{Main|Damage#Suffocation in water}}

Players and mobs (except [[aquatic mob]]s, [[undead mob]]s and [[iron golem]]s) have a breath meter that lasts 15 seconds. After they run out of breath, they take {{hp|2}} suffocation damage every second until they die, surface, or enter [[bubble column]]s.

[[Dolphin]]s are a special case in drowning: they take suffocation damage when underwater for about 4 minutes, but also take suffocation damage when in air for about 2 minutes.

Each level of the [[Respiration]] enchantment adds 15 seconds to the breath meter and grants an x/(x+1) chance (where x is the Respiration level) of not taking damage after that time: 30 seconds and an average {{hp|1}}/second with Respiration I, 45 seconds and an average of {{frac|2|3}} damage/second with Respiration II, and 60 seconds and an average of {{frac|1|2}} damage/second with Respiration III.

If a [[husk]] suffocates underwater, it starts to shake and eventually becomes a [[zombie]]. If a [[zombie]] suffocates underwater, it starts to shake and eventually transforms into a [[drowned]].

=== Slower mining speed===
Players with their head underwater require 5 times the normal amount of time to mine blocks while standing on the ground, or 25 times while not on the ground. If a player wears a helmet with the [[Aqua Affinity]] enchantment, then underwater mining speed while standing on the ground is the same as on land, and 5 times slower if not standing on the ground.

===Explosions===
Water does not prevent explosions from activating. Water has a high blast resistance, causing it to absorb any normal blasts, with the exception of explosions from [[underwater TNT]].

===Hardening concrete powder ===
When water comes into contact with [[concrete powder]], the powder hardens into solid [[concrete]].

===Sponges===
When a dry [[sponge]] comes into contact with a water source or flowing block, it becomes a wet [[sponge]], absorbing all water within 3 to 5 blocks in all directions. [[Kelp]] and [[lily pad]]s within the absorbed water blocks are destroyed and drop as items, and [[seagrass]] is destroyed without dropping anything. Mobs that take damage out of water are affected as a side-effect.

Sponges do not absorb water from [[Waterlogging|waterlogged]] blocks, nor water that comes into contact by flowing back in from outside the area of absorption. For instance, placing a sponge 4 or more blocks from a single water source removes the flowing water in the area of effect, but as the flow from the source resumes it is not affected by the wet sponge.

A sponge instantly absorbs nearby water when it is placed next to water or when water comes into contact with it (by being placed next to the sponge, or by flowing toward it). A sponge absorbs [[water]] around itself (water source blocks or flowing water) out to a [[taxicab distance]] of 7 in all directions (including up and down), but won't absorb more than 65 blocks of water (water closest to the sponge is absorbed first). The absorption propagates only from water to water and does not "jump over" non-water blocks (including air).

===Dripping===
[[File:WaterDropletsExample.png|thumb|Dripping water.]]
Water above a non-transparent block (except for stairs, fences, or slabs) produces dripping particles on the underside of that block. If a block of [[Pointed Dripstone|pointed dripstone]] hangs under any block directly beneath a water source, the drips can slowly fill up a [[cauldron]] placed underneath. Without the dripstone, a cauldron does not fill.

===Vertical transport===
[[Bubble column]]s are created by placing magma blocks or [[soul sand]] under water. These can be used to transport [[mobs]] or items quickly vertically.

==Sounds==
{{el|je}}:
{{Sound table
|sound=Entering water1.ogg
|sound2=Entering water2.ogg
|sound3=Entering water3.ogg
|subtitle=MC-177092
|source=ambient
|description=When the player's eye level goes underwater
|id=ambient.underwater.enter
|translationkey=-
|volume=0.8<wbr>{{Until|JE 1.20.2}}<br>0.5<wbr>{{Upcoming|JE 1.20.2}}
|pitch=1.0
|distance=16}}
{{Sound table
|sound=Exiting water1.ogg
|sound2=Exiting water2.ogg
|sound3=Exiting water3.ogg
|subtitle=MC-177092
|source=ambient
|description=When the player's eye level goes above water
|id=ambient.underwater.exit
|translationkey=-
|volume=0.5<wbr>{{Until|JE 1.20.2}}<br>0.3<wbr>{{Upcoming|JE 1.20.2}}
|pitch=1.0
|distance=16}}
{{Sound table
|sound=Underwater Ambience.ogg
|subtitle=MC-196825
|source=ambient
|description=Randomly when underwater
|id=ambient.underwater.loop
|translationkey=-
|volume=0.65
|pitch=1.0
|distance=16}}
{{Sound table
|sound=Bubbles1.ogg
|sound2=Bubbles2.ogg
|sound3=Bubbles3.ogg
|sound4=Bubbles4.ogg
|sound5=Bubbles5.ogg
|sound6=Bubbles6.ogg
|sound7=Water1.ogg
|sound8=Water2.ogg
|subtitle=MC-196825
|source=ambient
|description=Randomly when underwater
|id=ambient.underwater.loop.additions
|translationkey=-
|volume=1.0
|pitch=1.0
|distance=16}}
{{Sound table
|sound=Animal1.ogg
|sound2=Bass Whale1.ogg
|sound3=Bass Whale2.ogg
|sound4=Crackles1.ogg
|sound5=Crackles2.ogg
|sound6=Driplets1.ogg
|sound7=Driplets2.ogg
|sound8=Earth Crack.ogg
|subtitle=MC-196825
|source=ambient
|description=Randomly when underwater
|id=ambient.underwater.loop.additions.rare
|translationkey=-
|volume=''varies'' <ref group=sound>The first, fifth, and eighth sounds are 1.0; the second sound is 0.45; the third, sixth, and seventh sounds are 0.5; the fourth sound is 0.7</ref>
|pitch=1.0
|distance=16}}
{{Sound table
|sound=Animal2.ogg
|sound2=Dark1.ogg
|sound3=Dark2.ogg
|sound4=Dark3.ogg
|sound5=Dark4.ogg
|subtitle=MC-196825
|source=ambient
|description=Randomly when underwater
|id=ambient.underwater.loop.additions.ultra_rare
|translationkey=-
|volume=1.0 <ref group=sound>Except the third sound, which is 0.7</ref>
|pitch=1.0
|distance=16}}
{{Sound table
|sound=Water1.ogg
|sound2=Water2.ogg
|subtitle=Water flows
|source=block
|description=Randomly from flowing water
|id=block.water.ambient
|translationkey=subtitles.block.water.ambient
|volume=0.75-1.0
|pitch=0.5-1.5
|distance=16}}
{{Sound table
|sound=Water splash1.ogg
|sound2=Water splash2.ogg
|subtitle=Splashing
|source=dependent
|description=When something enters water
|id=entity.generic.splash
|translationkey=subtitles.entity.generic.splash
|volume=0.0-1.0 <ref group=sound name=speedvolume>The mob's momentum, with the horizontal axes' velocities multiplied by 0.2 (capped at 1.0)</ref>
|pitch=0.6-1.4
|distance=16}}
{{Sound table
|sound=Swim1.ogg
|sound2=Swim2.ogg
|sound3=Swim3.ogg
|sound4=Swim4.ogg
|subtitle=Swimming
|source=dependent
|description=While something is moving through water
|id=entity.generic.swim
|translationkey=subtitles.entity.generic.swim
|volume=0.0-1.0 <ref group=sound name=speedvolume/>
|pitch=0.6-1.4
|distance=16}}
{{Sound table
|sound=Empty water bucket1.ogg
|sound2=Empty water bucket1.ogg
|sound3=Empty water bucket2.ogg
|sound4=Empty water bucket3.ogg
|subtitle=Bucket empties
|source=block
|description=When water is placed with a bucket
|id=item.bucket.empty
|translationkey=subtitles.item.bucket.empty
|volume=1.0 <ref group=sound>Except for the second copy of {{cd|empty1}}, which is 0.9</ref>
|pitch=1.0
|distance=16}}
{{Sound table
|sound=Fill water bucket1.ogg
|sound2=Fill water bucket2.ogg
|sound3=Fill water bucket3.ogg
|subtitle=Bucket fills
|source=player
|description=When water is collected with a bucket
|id=item.bucket.fill
|translationkey=subtitles.item.bucket.fill
|volume=1.0
|pitch=1.0
|distance=16}}
{{Sound table
|sound=Axolotl.ogg
|sound2=Dragon fish.ogg
|sound3=Shuniji.ogg
|subtitle=-
|source=music
|description=Randomly when underwater
|id=music.under_water
|translationkey=-
|volume=0.4
|pitch=1.0
|distance=16
|foot=1}}

{{el|be}}:
{{Sound table
|type=bedrock
|sound=Water2.ogg
|source=block
|description=Randomly from flowing water
|id=liquid.water
|volume=0.75-1.0
|pitch=0.5-1.5}}
{{Sound table
|sound=Water Splash Old.ogg
|source=player
|description=When something enters water<wbr><ref group=sound>{{Bug|MCPE-44120}}</ref>
|id=random.splash
|pitch=0.6-1.4}}
{{Sound table
|sound=Water splash1.ogg
|sound2=Water splash2.ogg
|source=ambient
|description=?[[Category:Pages missing sound description]]<wbr>{{Upcoming|BE 1.20.40}}
|id=entity.generic.splash
|pitch=0.6-1.4}}
{{Sound table
|sound=Entering water1.ogg
|sound2=Entering water2.ogg
|sound3=Entering water3.ogg
|source=player
|description=When the player's eye level goes underwater<wbr>{{Upcoming|BE 1.20.40}}
|id=ambient.underwater.enter
|volume=<!--0.8 (other multipliers)-->
|pitch=1.0}}
{{Sound table
|sound=Exiting water1.ogg
|sound2=Exiting water2.ogg
|sound3=Exiting water3.ogg
|source=player
|description=When the player's eye level goes above water<wbr>{{Upcoming|BE 1.20.40}}
|id=ambient.underwater.exit
|volume=<!--1.0 (other multipliers)-->
|pitch=1.0}}
{{Sound table
|sound=Swim1.ogg
|sound2=Swim2.ogg
|sound3=Swim3.ogg
|sound4=Swim4.ogg
|source=player
|description=While something is moving through water
|id=random.swim
|pitch=0.6-1.4}}
{{Sound table
|sound=Empty water bucket1.ogg
|sound2=Empty water bucket2.ogg
|sound3=Empty water bucket3.ogg
|source=block
|description=When water is placed with a bucket
|id=bucket.empty_water
|volume=1.0
|pitch=1.0}}
{{Sound table
|sound=Fill water bucket1.ogg
|sound2=Fill water bucket2.ogg
|sound3=Fill water bucket3.ogg
|source=block
|description=When water is collected with a bucket
|id=bucket.fill_water
|volume=1.0
|pitch=1.0}}
{{Sound table
|sound=Axolotl.ogg
|sound2=Dragon fish.ogg
|sound3=Shuniji.ogg
|source=music
|description=Randomly when underwater
|id=music.game.water
|volume=0.2
|pitch=1.0
|foot=1}}

==Data values==
===ID===
{{edition|java}}:
{{ID table
|edition=java
|firstcolumnname=Water
|showforms=y
|generatetranslationkeys=y
|displayname=Block
|spritename=water
|spritetype=block
|nameid=water
|form=block
|foot=1}}
{{ID table
|edition=java
|firstcolumnname=Water
|showfluidtags=y
|displayname=Fluid
|spritename=water
|spritetype=block
|nameid=water
|fluidtags=water}}
{{ID table
|displayname=Flowing Fluid
|spritetype=block
|spritename=water
|nameid=flowing_water
|fluidtags=water
|foot=1}}

{{edition|bedrock}}:
{{ID table
|edition=bedrock
|firstcolumnname=Water
|shownumericids=y
|showforms=y
|generatetranslationkeys=y
|displayname=Flowing
|spritename=water
|spritetype=block
|nameid=flowing_water
|id=8
|form=block}}
{{ID table
|displayname=Stationary
|spritename=water
|spritetype=block
|nameid=water
|id=9
|form=block
|foot=1}}

===Block states===
{{see also|Block states}}

{{/BS}}

=== Fluid states===
{{see also|Block states}}

{{/FS}}

==Achievements==
{{load achievements|Free Diver;Sleep with the Fishes}}

==Advancements==
{{load advancements|Tactical fishing;The Cutest Predator}}

==History==
{{Main|/History}}
{{History|java classic}}
{{History||May 17, 2009|link=https://archive.org/download/Minecraft_IRC_Logs_2009/history/files/May-15-to-June-03-2009/2009-05-17.140618-0400EDT.txt.~1~|Notch mentions developing water.{{q|a very very first version of the water is somewhat working now, heh [/] the level starts out without any water and is surrounded a by a huge ocean [/] it quickly fills, leaving islands}}}}
{{History||0.0.12a|snap=May 18, 2009|slink=Java Edition Classic 0.0.12a/Development#Water test (May 18, 2009)|[[File:Water (pre-release).png|32px]] Water is shown.}}
{{History|||snap=release|slink=Java Edition Classic 0.0.12a|[[File:Water JE1.png|32px]] Added water.
|Water flows to any available space below or beside it and creates a new source [[block]], making it easy to flood a whole world just with one source.}}
{{History||May 22, 2009|link=wordofnotch:111386404|[[Notch]] pointed out that when a [[plant]] or non-cube block is placed in water, it produces a box of [[air]] around it. He asked how it could be fixed, and whether he even had to.}}
{{History||0.0.13a|[[File:Water JE2.png|32px]] The model of water has been changed.}}
{{History||May 24, 2009|link=wordofnotch:112481256|A new water system is mentioned.}}
{{History||May 24, 2009|link=wordofnotch:112481370|A new water system is shown.}}
{{History||May 24, 2009|link=wordofnotch:112487511| Another test of water is shown.}}
{{History||May 26, 2009|link=wordofnotch:113350683|While sharing feedback on experiments with random vertex and color offsets, and deciding to scrap it, Notch said he would investigate salvaging the technique to add animation to water tiles.}}
{{History||0.0.19a|[[File:Water JE3.png|32px]] Added [[Procedural animated texture generation|procedural animated texture]] to water. The old texture is retained for use as a [[animation placeholder texture|placeholder]].
|Upscaled model 2% to fix z-fighting with blocks below water. It's created water or lava models overlapping and z-fighting with each other.
|Added [[sponge]]s, which remove water.
|Water part of the [[world boundary]] still uses the old water texture.}}
{{History||0.0.20a_02|[[File:Water JE4.png|32px]] Changed model scale back to normal with 1% offset on all coordinates.}}
{{History||0.26 SURVIVAL TEST|[[File:Water JE5.png|32px]] UV mapping on side faces now has 11% v offset up.}}
{{History||0.28|[[File:Water JE4.png|32px]] Fixed UV mapping.}}
{{History|java indev}}
{{History||0.31|snap=20091223-1|[[File:Water JE6.png|32px]] Added the flowing water texture, which is now used on the sides of water.}}
{{History|||snap=20100106|Water part of the [[world boundary]] now uses the animated water texture.}}
{{History|||snap=20100113|Water is now finite.|[[Ocean]]s now have infinite water.
|Water now always drains from its highest remove location.
|Water no longer moves on the surface on its own.
|Water now has a {{frac|2|3}} probability to evaporate and a {{frac|1|3}} probability to copy.}}
{{History|||snap=20100122|Water now spawns in level generation as [[spring]]s and lakes.}}
{{History|||snap=20100131|The texture of water is now seen when underwater.}}
{{History|java infdev}}
{{History||20100227-1|Water no longer flows due to changes in chunk handling for infinite worlds.{{verify|type=change}}}}
{{History||20100607|[[File:Water JE7.png|32px]] UV mapping now has 1% uv offset on top and bottom faces and 1% u, 11% v offset on side faces.}}
{{History||20100608|[[File:Water JE6.png|32px]] Fixed UV mapping, once again.}}
{{History||20100615|[[File:Water JE8.png|32px]] The model has been changed.
|Added flowing water.
|Sources placed in isolation flow exclusively downward, rather than spreading out one block in each direction as well.
|Water and lava do not produce any solid blocks when combined.
|Water does not replace plants.
|Water is now infinite again.
|Added [[water bucket]]s, which can be filled with water.}}
{{History||20100616-1|[[File:Water JE9.png|32px]] Added vertex offset.
|Water and flowing water now has visual connection to blocks.
|Downward flowing water now pushes the [[player]] out.{{info needed|and other entities?}}}}
{{History||20100617-2|[[File:Water JE10.png|32px]] Removed vertex offset.
|Water sources placed in the air now flow outward.
|Lava and flowing lava touching water, flowing water now replaces with [[obsidian]].
|Downward flowing water no longer pushes the player out.
|Water now can replace [[plants]]. However no items are dropped.}}
{{History||20100618|Water can now replace [[rail]]s.}}
{{History||20100624|Water now destroys plants, dropping as items.}}
{{History|java alpha}}
{{History||v1.0.2_02|[[Fluids]], including water, have been slightly tweaked.}}
{{History||v1.0.5_01|Water can now freeze into [[ice]].}}
{{History||v1.2.6|[[Lake]]s, which contain water, have been added.}}
{{History|java beta}}
<!--{{History||1.5|Dropped [[item]]s in flowing water now move faster.{{check version|Taken from trivia, may not be beta}}}}-->
{{History||1.6|snap=Test Build 3|[[Rain]] and [[snow]] no longer fall through water.
|Water sources now form over [[glass]].}}
{{History||1.8|snap=Pre-release|[[File:Water JE11.png|32px]] Changed [[lighting]].
|Underwater [[particles]] have been added.
|Because of the change in how land is generated, if a [[player]] is in a world that was made pre-1.8 and travels into new [[chunk]]s, there's a chance that a large [[ocean]] may be formed as the ocean [[biome]]. There is also a one-[[block]]-high drop in sea level along the discontinuity between the old and new chunks with the old chunks being higher.
|Water can now be found in the farms and wells of [[village]]s, and the fountain rooms of [[stronghold]]s.
|Two [[biome]]s have been added that are almost all water: [[ocean]]s and [[river]]s.}}
{{History|java}}
{{History||1.0.0|snap=Beta 1.9 Prerelease|[[File:Swamp Water JE1.png|32px]] {{color|#E0FF70}} Added water color in swampland.
|Added dripping water.}}
{{History|||snap=Beta 1.9 Prerelease 4|Added [[Respiration]] and [[Aqua Affinity]] enchantments, which allow more breathing time in water and normal digging speed in water.}}
{{History|||snap=Beta 1.9 Prerelease 5|Now flowing downward creates source blocks}}
{{History|||snap=RC1|[[File:Water JE12.png|32px]] [[File:Swamp Water JE2.png|32px]] Faces on model now 0.1% moved to center to fix z-fighting on inner faces.}}
{{History||1.1|snap=12w01a|[[File:Swamp Water JE3.png|32px]] {{color|#E0FFAE}} The water color in swampland is now less intense.}}
{{History||1.2.1|snap=12w04a|Added [[desert well]]s, which contain water.}}
{{History||1.3.1|snap=12w17a|The ability to bring water using [[ice]] into [[the Nether]] has been removed.}}
{{History|||snap=12w21a|[[Dispenser]]s have been given the ability to shoot out [[fluids]], including water, inside [[water bucket]]s. They can also collect the fluids if activated again.}}
{{History||1.4.2|snap=12w38a|The [[sound]] when jumping and swimming in water has been changed.
|The sound of flowing water is now continuous.
|The water overlay is a more saturated blue.}}
{{History||1.4.4|snap=1.4.3|Water of any depth now negates all [[Damage#Fall damage|fall damage]]. [[Player]]s and [[mob]]s no longer die from great heights in shallow water.<ref>{{bug|MC-1644}} resolved as Works As Intended</ref>}}
{{History||1.5|snap=13w02a|[[File:Water JE13.png|32px]] [[File:Swamp Water JE4.png|32px]] The texture of water has been changed to use an animated texture file. Prior to this version, the texture was procedurally generated by the game (see dedicated section below).}}
{{History|||snap=13w03a|A water source [[block]] now forms if there is another water source block below it.}}
{{History|||snap=13w04a|Flowing water in [[Creative]] mode no longer slows the [[player]] down when flying.}}
{{History||1.6.1|snap=13w17a|Water [[lake]]s no longer generate in [[desert]]s.}}
{{History||1.7.2|snap=13w36a|[[File:Swamp Water JE4.png|32px]] {{color|#E0FFAE}} Added water color in swampland M, which is the same as in swampland.}}
{{History||1.7.2|snap=13w36a|Water pools now generate in the new desert M [[biome]].
|[[Ocean]]s are much smaller.}}
{{History|||snap=13w41a|[[File:Water JE14.png|32px]] [[File:Swamp Water JE5.png|32px]] Water's six internal faces are now visible from the outside.
|Water, [[ice]] and [[portal]]s are now visible through each other. This also now allows water's inside faces to be visible from outside.}}
{{History|||snap=13w42a|[[File:Water JE13.png|32px]] [[File:Swamp Water JE6.png|32px]] Water's internal faces have been removed. This visually reverts water to its pre-13w41a appearance when seen from the outside.}}
{{History||1.7.4|snap=13w47a|Water's internal top face has been readded.<ref>{{bug|MC-35658}}</ref>}}
{{History|||snap=13w48a|[[File:Water JE15.png|32px]] [[File:Swamp Water JE7.png|32px]] Water's internal side faces except the bottom face, have been readded.<ref>{{bug|MC-40621}}</ref><ref>{{bug|MC-190053}}</ref>}}
{{History||1.9|snap=15w43b|When viewed through [[glass]], water now appears as a solid blue color, as opposed to a downward flowing water texture.<ref name="badwatergraphicsJE">{{bug|MC-35790}}</ref>}}
{{History||1.11|snap=16w39a|Water now generates in [[woodland mansion]]s.}}
{{History||1.12|snap=17w06a|Water now hardens [[concrete powder]] into [[concrete]], on contact.}}
{{History||1.13|snap=18w07a|[[Item]]s now float in water.
|The [[player]]'s underwater visibility has been changed - the longer a player stays underwater, the better they can see.}}
{{History|||snap=18w10a|Underwater visibility now depends on the [[biome]] the player is in.}}
{{History|||snap=18w10c|Water can now be placed in the same block as [[chest]]s, [[trapped chest]]s, [[stairs]], [[slab]]s, [[fence]]s, [[wall]]s, [[iron bars]] and [[glass pane]]s.}}
{{History|||snap=18w10d|Water can now be placed in [[ender chest]]s, [[trapdoor]]s, [[ladder]]s, and [[sign]]s.}}
{{History|||snap=18w15a|[[File:Water JE16.png|32px]] {{color|#3F76E4}} Added default water color. The textures of water have been changed from blue to grayscale.<ref>{{bug|MC-200838}}</ref>
|[[File:Warm Ocean Water JE.png|32px]] [[File:Lukewarm Ocean Water JE.png|32px]] [[File:Frozen Ocean Water JE.png|32px]] [[File:Cold Ocean Water JE.png|32px]] Added water colors for [[warm ocean]], [[lukewarm ocean]], [[frozen ocean]] and [[cold ocean]].
|[[File:Swamp Water.png|32px]] {{color|#617B64}} Water color in swampland has been changed.
|[[File:Swamp Hills Water 18w15a.png|32px]] {{color|#E0FFAE}} Water color in swampland M is unchanged.<ref>{{bug|MC-128558}}</ref>
|Water now blocks 1 [[light]] level per [[block]] instead of 3.
|[[Player]]s no longer receive the [[Night Vision]] effect while underwater.{{verify|type=change|Did this ever happen, or is it just being used as an analogy?}}}}
{{History|||snap=18w16a|When water spreads and would later turn into a source [[block]], it now immediately places a source block.}}
{{History|||snap=18w19a|[[Experience orb]]s now float in water.}}
{{History|||snap=pre3|[[File:Swamp Water.png|32px]] {{color|#617B64}} water color in swamp hills now the same as in [[swamp]].}}
{{History|||snap=pre7|Pressing the {{control|jump}} button in flowing water at <code>level=1</code>, <code>level=2</code> and <code>level=3</code> now do normal jumps instead of {{control|swimming}} up.}}
{{History||1.15|snap=19w34a|Added [[bee]]s, which get damaged while in water.}}
{{History|||snap=19w35a|Bees now try to avoid water.}}
{{History||1.17|snap=20w45a|Flowing water no longer breaks rails.}}
{{History|||snap=21w06a|[[Aquifer]]s, large bodies of water in caves, have been added.}}
{{History|||snap=21w07a|Aquifers generate less often.}}
{{History|||snap=21w08a|Water [[spring]]s are now able to generate below Y{{=}}0.}}
{{History|||snap=21w10a|The FOV shrinking effect now respects the "FOV Effects" accessibility slider.<ref>{{bug|MC-214629}}</ref>}}
{{History|||snap=21w15a|All changes to water generation from 21w06a to 21w08a have been reverted.}}
{{History|||snap=Pre-release 2|[[Smooth lighting]] now works properly underwater.<ref>{{bug|MC-68129}} resolved as "Fixed"</ref>}}
{{History||1.18|snap=Experimental Snapshot 1|[[File:Meadow Water.png|32px]] Added water color in [[meadow]].
|All changes to water generation in the 1.17 snapshots have been reintroduced.}}
{{History||1.18|snap=21w40a|[[Water lake]]s no longer generate.}}
{{History||1.19|snap=Deep Dark Experimental Snapshot 1|Water can now generate as part of [[Ancient City|ancient cities]].}}
{{History||1.19|snap=22w14a|[[File:Mangrove Swamp Water.png|32px]] Added water color in [[mangrove swamp]].}}
{{History||1.19.3|snap=22w44a|Added the [[game rule]] {{cd|waterSourceConversion}}, which disables the formation of new water source blocks when set to {{cd|false}}.}}
{{History||1.20<br>(experimental)|link=1.19.4|snap=23w07a|[[File:Cherry Grove Water JE1.png|32px]] Added water color in [[cherry grove]].}}

{{History|pocket alpha}}
{{History||v0.1.0|[[File:Water JE11.png|32px]]{{verify|type=change|Is this accurate to how it appeared in this edition at this time?}} Added water.
|[[File:Water JE2.png|32px]] On older or much newer devices, the old [[Java Edition|Java]] water texture is used, whereas the newer animated texture is used on intermediately modern devices.}}
{{History||v0.7.0|[[File:Water JE11.png|32px]]{{verify|type=change|Is this accurate to how it appeared in this edition at this time?}} The texture of water has been changed to the new texture for all devices.}}
{{History||v0.9.0|snap=build 1|[[File:Swamp Water BE1.png|32px]] Water now uses a dark blue coloration in [[swamp]]s.
|Water dripping [[particles]] have been changed.
|[[Water lake]]s have been added.
|Water can now be found in the farms and wells of [[village]]s.
|Two [[biome]]s have been added that are almost all water: [[ocean]]s and [[river]]s.
|Oasis now generate in the new [[desert]] M [[biome]].}}
{{History||v0.10.0|snap=build 1|Smooth lighting for water has been added.
|A gradient effect has been added to water that increases its opacity with distance.
|[[File:Old bedrock swamp water.png|32px]] Water color in swampland has been changed.
|Flowing water can now push [[entities]].}}
{{History|||snap=build 7|Running water now has [[sound]]s.}}
{{History|||snap=?|Water now destroys [[block]]s.{{info needed|if this is referring to washing away plants and torches and stuff, it's been able to do that since 0.1.0}}}}
{{History||v0.14.0|snap=build 1|[[Dispenser]]s can now shoot out water from [[water bucket]]s. They can also suck up [[fluids]], including water, directly adjacent to the side they are facing.}}
{{History||v0.14.2|[[File:Old bedrock water.png|32px]] Water now uses animated texture files.}}
{{History|pocket}}
{{History||1.0.0|snap=alpha 1.0.0.0|When viewed through [[glass]], water now appears as a solid blue color, as opposed to a downward flowing water texture.<ref name="badwatergraphicsBE">{{bug|MCPE-11140}}</ref>}}
{{History||1.1.0|snap=alpha 1.1.0.0|Water now generates in [[woodland mansion]]s.
|Water now hardens [[concrete powder]] into [[concrete]], on contact.}}
{{History|bedrock}}
{{History||?|The rendering change for water in 1.0.0 has been reverted for an unknown reason.}}
{{History||1.2.13|snap=beta 1.2.13.5|Water can now be placed in the same [[block]]s as [[slab]]s and [[stairs]].}}
{{History||1.4.0|snap=beta 1.2.14.2|Water can now be placed in the same block as most transparent blocks, instead of slabs and stairs only.}}
{{History|||snap=beta 1.2.20.1|[[File:Plains Water.png|32px]] Water now has a completely new look for every [[biome]] and it is now much easier to see above and underwater (see [[Water#Bedrock Edition]] for all biome colors).
|[[Item]]s now float to the top of water.
|Underwater visibility now depends on the [[biome]] the [[player]] is in.
|[[Respiration]] enchantment and [[Water Breathing]] effect no longer grants enhanced underwater visibility.}}
{{History|||snap=?|When viewed through [[glass]], water now appears as its own top texture, as opposed to a downward flowing water texture.<ref name="badwatergraphicsBE"/>}}
{{History||1.14.0|snap=beta 1.14.0.1|Added [[bee]]s, which get damaged when touching water and try to avoid it.}}

{{History|console}}
{{History||xbox=TU1|xbone=CU1|ps=1.0|wiiu=Patch 1|switch=1.0.1|[[File:Water JE11.png|32px]]{{verify|type=change|Is this accurate to how it appeared in this edition at this time?}} [[File:Swamp Water JE2.png|32px]] Added water.}}
{{History||xbox=TU9|[[Dispenser]]s have been given the ability to shoot out [[fluids]], including water, inside [[water bucket]]s. They can also suck up the fluids if activated again, but a bug prevents the empty [[bucket]] from being filled.}}
{{History||xbox=TU12|[[File:Water JE15.png|32px]] Water now uses animated texture files.}}
{{History||xbox=TU25|xbone=CU14|ps=1.17|Water can be used in custom superflats. It appears as a 3D block in the block selection screen of the custom superflat interface.}}
{{History||xbox=TU31|xbone=CU19|ps=1.22|wiiu=Patch 3|Water splash [[sound]]s have been updated.
|Most [[mob]]s can now [[swimming|swim]] in water.}}
{{History||xbox=TU69|xbone=none|ps=1.76|wiiu=Patch 38|switch=none|[[File:Warm Ocean Water.png|32px]] [[File:Lukewarm Ocean Water.png|32px]] [[File:Frozen Ocean Water.png|32px]] [[File:Cold Ocean Water.png|32px]] Added [[warm ocean]], [[lukewarm ocean]], [[frozen ocean]] and [[cold ocean]] texture colors for water in those [[biome]]s.}}
{{History||ps=1.78|The animation of water is now less smooth.}}

{{History|New 3DS}}
{{History||0.1.0|[[File:Water JE15.png|32px]]{{verify|type=change|Is this accurate to how it appeared in this edition at this time?}} [[File:Old bedrock swamp water.png|32px]] Added water.}}
{{History|foot}}
<!-- Still need to add in the right version: Drowning added, Water can turn into ice -->
<!--- Still need to add "1.16 pre-release 5 - Water overlay texture turned slightly darker" -->
{{More sounds|Old and older water splash sounds.|type=historical}}

===Data history===
{{History|java}}
{{History||1.13|snap=17w47a|Prior to [[1.13/Flattening|''The Flattening'']], these blocks' numeral IDs were 8 and 9. Both blocks have been merged into a single one.}}
{{History|||snap=18w10c|Removed <code>flowing_water</code>.}}
{{History|foot}}

<gallery>
EarlyFlowingWater.png|The water and flowing water in [[Infdev 20100615]].
</gallery>

==Issues==
{{Issue list}}

==Trivia==
*The texture subtly overlaid on the screen when underwater is that of the original water texture from 0.0.12a.
**The outdatedness of this texture is not considered a bug or oversight, unlike many other outdated textures.<ref>{{bug|MC-241000|||Invalid}}</ref>
**This texture is particularly difficult to notice due to its extreme transparency,<ref>{{bug|MC-128337}}</ref> as well as the fact that other blocks likely make the scene visually noisy enough to further obscure it under most conditions.
* While underwater, the player's FOV (field of vision) is lowered by 10 to simulate light {{w|refraction}}. This can be disabled via the "FOV Effects" [[option]].
*If a player or mob with the [[Levitation]] effect touches water, the effect is completely negated.<ref>{{bug|MC-83369}}</ref>

==Gallery==
<gallery>
1.8underwater.png|Underwater particles, or "bubbles".
Underground water mix.png|Water that is underground, but is still part of 2 different biomes. The color is split.
InvisibleWater.png|A glitch where water is invisible below its surface level.
Water Cave Filling.png|Water flowing into a [[cave]].
Under water.png|A view underwater.
Mac os water texture V1.13-920.gif|Animated view of the Java edition water texture.
Bubbles.gif|These bubbles appear above the [[hunger]] bar when the player's head is in water, and when all the bubbles pop, a heart of damage is dealt every second until the player is no longer entirely under water.
Waterfall.png|A naturally occurring waterfall.
Water (texture) JE1 BE1.png|This texture is subtly overlaid on the screen when underwater.
Land ruin.png|An underwater ruin {{in|bedrock}} that generated on land with a water block on top of it.
Land ruin Java.png|An underwater ruin {{in|java}} that generated on land with a visible loot chest that is not waterlogged and doesn't have water on top of it.
Largelake.png|A large lake, during a [[thunderstorm]].
Coral reef at night.png|A [[coral reef]] at night, in a [[warm ocean]] biome.
WaterRavine.jpg|A bug that causes the water to not flow into the pit.
Obsidian Spring.png|A water flowing on lava lake, creating obsidian. The water was placed by a player.
Two flowing streams.png|Waterfalls made by a player.
Watercave.png|Water flowing into the cave from nearby lake.
RavineandStornghold.png|Ravine with multiple ores, water and lava falls, and stronghold bridge over it.
Water shade.png|Different water colors in swamp biome.
File:Nonflowingwater.png|A block of water, which is not flowing because of a glitch, besides a village farm.
</gallery>

==See also==
*[[Waterlogging]]

==References ==
{{Reflist}}

==External Links ==
*[https://www.minecraft.net/en-us/article/block-week-water Block of the Week: Water] – Minecraft.net on July 14, 2017

{{Blocks|natural}}
{{Items}}

[[Category:Fluids]]
[[Category:Natural blocks]]
[[Category:Non-solid blocks]]
[[Category:Generated structure blocks]]

[[cs:Voda]]
[[de:Wasser]]
[[es:Agua]]
[[fr:Eau]]
[[hu:Víz]]
[[it:Acqua]]
[[ja:水]]
[[ko:물]]
[[nl:Water]]
[[pl:Woda]]
[[pt:Água]]
[[ru:Вода]]
[[th:น้ำ]]
[[tr:Su]]
[[uk:Вода]]
[[zh:水]]</li><li>[[Iron Ingot|Iron Ingot]]<br/>{{About|the ingot|the ore|Iron Ore|the mineral block|Block of Iron|the nugget|Iron Nugget|the raw mineral|Raw Iron}}
{{Item
| image = Iron Ingot.png
|type=
| renewable = Yes
| stackable = Yes (64)
}}

'''Iron ingots''' are versatile [[metal]] ingots used extensively in [[crafting]].

== Obtaining ==
=== Chest loot ===
{{LootChestItem|iron-ingot}}

=== Crafting ===

{{Crafting
|head=1
|showname=0
|Block of Iron
|Output=Iron Ingot,9
|type=Material
}}

{{Crafting
|A1= Iron Nugget
|B1= Iron Nugget
|C1= Iron Nugget
|A2= Iron Nugget
|B2= Iron Nugget
|C2= Iron Nugget
|A3= Iron Nugget
|B3= Iron Nugget
|C3= Iron Nugget
|Output=Iron Ingot
|type= Material
|foot=1
}}

=== Smelting ===
{{see also|Iron Ore#Natural generation}}[[Smelting]] raw iron in a [[furnace]] or [[blast furnace]] is the most common way to obtain iron ingots.

{{Smelting
|head=1
|Iron Ore;Deepslate Iron Ore
|Iron Ingot
|0,7
}}
{{Smelting
|foot=1
|Raw Iron
|Iron Ingot
|0,7
}}

=== Compound creation ===

Iron Ingot can be created from its base [[element]]s, using the [[compound creator]].{{only|bedrock|education}}

{| class="wikitable"
!Name
!Elements
!Example recipe
|- <!-- Temporarily using crafting grid as a substitute for the compound creator (template not yet available), since the layout is the same, even if the appearance is different -->
!Iron Ingot
|Iron <br>
|{{Crafting Table
|shapeless= 1
|A2=Iron
|Output=Iron Ingot}}
|}

=== Mob loot ===
{{see also|Tutorials/Iron golem farming}}
[[Iron golem]]s drop 3-5 iron ingots upon death, regardless of the way they die. The looting enchantment does not increase the amount of iron ingots dropped.

[[Zombie]]s, [[husk]]s, and [[zombie villager]]s have a 2.5% ({{frac|1|40}}) chance of dropping either an iron ingot, [[carrot]], or [[potato]] when killed by a player or tamed wolf. This is increased by 1% ({{frac|1|100}}) per level of looting. This gives iron ingots the following chances of dropping:
* {{frac|1|120}} (about 0.83%)
* {{frac|7|600}} (about 1.17%) with Looting I
* {{frac|9|600}} (1.50%) with Looting II
* {{frac|11|600}} (about 1.83%) with Looting III

== Usage ==

=== Crafting ingredient ===

{{crafting usage}}

=== Trading ===
Apprentice-level Armorer, Toolsmith, and Weaponsmith [[Villager|villagers]] buy 3 iron ingots for an [[emerald]] as their third trade.{{only|bedrock}}

Apprentice-level Armorer villagers have a 50% chance to buy 4 iron ingots for one emerald, and apprentice-level Toolsmith and Weaponsmith villagers always offer to buy 4 iron ingots for one emerald.{{only|java}}

=== Repairing ===

Iron ingots are the repair items for the iron [[tier]] and chainmail and iron [[armor material]]s, and thus can be used to [[item repair|repair]] the following items in an [[anvil]]:
* {{ItemLink|Chainmail Helmet}}
* {{ItemLink|Chainmail Chestplate}}
* {{ItemLink|Chainmail Leggings}}
* {{ItemLink|Chainmail Boots}}
* {{ItemLink|Iron Helmet}}
* {{ItemLink|Iron Chestplate}}
* {{ItemLink|Iron Leggings}}
* {{ItemLink|Iron Boots}}
* {{ItemLink|Iron Sword}}
* {{ItemLink|Iron Axe}}
* {{ItemLink|Iron Pickaxe}}
* {{ItemLink|Iron Shovel}}
* {{ItemLink|Iron Hoe}}

=== Healing iron golems ===

{{control|Using}} an iron ingot on an [[iron golem]] restores its health by {{hp|25}}.

=== Beacons ===

Iron ingots can be used to select powers from a [[beacon]]. The player must select one of the available powers, and then insert an iron ingot in the item slot.

An iron ingot can be substituted for an [[emerald]], a [[gold ingot]], a [[diamond]], or a [[netherite ingot]].

=== Smithing ingredient ===
{{Smithing
|head=1
|ingredients=Any Armor Trim +<br/>Any Armor Piece + <br/>Iron Ingot
|Any Armor Trim Smithing Template
|Netherite Chestplate
|Iron Ingot
|Iron Trim Netherite Chestplate
|showdescription=1
|description = All armor types can be used in this recipe,<br/>a netherite chestplate is shown as an example.<br/>
|tail=1
}}

;Trim color palette
The following color palettes are shown on the designs on trimmed armor:
*{{TrimPalette|iron ingot}}
*{{TrimPalette|iron ingot|darker=1}} (a darker color palette is used when an iron armor piece is trimmed using an iron ingot).

== Achievements ==
{{load achievements|Acquire Hardware}}

== Advancements ==
{{load advancements|Acquire Hardware}}

== Data values ==
=== ID ===
{{edition|java}}:
{{ID table
|edition=java
|showitemtags=y
|showforms=y
|generatetranslationkeys=y
|displayname=Iron Ingot
|spritetype=item
|nameid=iron_ingot
|itemtags=beacon_payment_items
|form=item
|foot=1}}

{{edition|bedrock}}:
{{ID table
|edition=bedrock
|shownumericids=y
|showforms=y
|notshowbeitemforms=y
|generatetranslationkeys=y
|displayname=Iron Ingot
|spritetype=item
|nameid=iron_ingot
|id=305
|form=item
|foot=1}}

== History ==

{{History|java indev}}
{{History||0.31|snap=20100128|[[File:Iron Ingot JE1.png|32px]] Added iron ingots.}}
{{History|||snap=20100129|[[File:Iron Ingot JE2 BE1.png|32px]] The texture of iron ingots has been changed.
|Iron ingots can be [[smelting|smelted]] from [[iron ore]] and [[drops|drop]] 3–5 iron ingots.
|Iron ingots can be used to craft [[iron block]]s, [[flint and steel]] and iron [[sword]]s, [[shovel]]s, [[pickaxe]]s and [[axe]]s.}}
{{History|||snap=20100130|Iron ingots are now used to craft [[arrow]]s.|[[Iron block]]s now require 9 iron ingots (3×3) instead 4 (2×2) to be [[crafting|crafted]], making them much more expensive.}}
{{History||20100206|Iron ingots can now be used to [[crafting|craft]] iron [[hoe]]s.}}
{{History||?|[[Smelting]] now [[drops]] only 1 iron ingot (down from 3–5).}}
{{History||20100218|Iron ingots are now used to craft iron [[helmet]]s, [[chestplate]]s, [[leggings]] and [[boots]].}}
{{History|java infdev}}
{{History||20100615|Iron ingots are now used to craft [[bucket]]s.}}
{{History||20100618|Iron ingots are now used to craft [[rail]]s and [[minecart]]s.}}
{{History||20100625-2|Iron ingots can be found in [[dungeon]] [[chest]]s.}}
{{History|java alpha}}
{{History||v1.0.1|Iron ingots are now used to [[crafting|craft]] iron [[door]]s.}}
{{History||v1.0.14|Iron ingots are no longer used to craft [[arrow]]s.}}
{{History||v1.1.0|Iron ingots are now used to craft [[compass]]es.}}
{{History|java beta}}
{{History||1.5|Iron ingots are now used to craft [[detector rail]]s.}}
{{History||1.7|Iron ingots are now used to craft [[piston]]s and [[shears]].}}
{{History||1.8|snap=Pre-release|Iron ingots are found in the new [[stronghold]] storeroom and [[mineshaft]] [[chest]]s.
|Iron ingots are now used to craft [[iron bars]].}}
{{History|java}}
{{History||1.0.0|snap=Beta 1.9 Prerelease 2|Iron ingots are now used to craft [[cauldron]]s.}}
{{History|||snap=Beta 1.9 Prerelease 3|Iron ingots are now found in the new stronghold altar [[chest]]s.}}
{{History||1.1|snap=12w01a|Iron ingots are now found in [[village]] blacksmith chests.}}
{{History||1.2.1|snap=12w06a|[[Zombie]]s now rarely [[drops|drop]] iron ingots, making it a [[renewable resource]].}}
{{History|||snap=12w08a|[[Iron golem]]s now drop 3–5 iron ingots.}}
{{History||1.3.1|snap=12w21a|Added [[desert temple]]s, with a hidden [[chest]] room and loot containing iron ingots.
|Blacksmith [[villager]]s now [[trading|buy]] 8–9 iron ingots for 1 [[emerald]].}}
{{History|||snap=12w22a|Added [[jungle temple]]s, which contain loot [[chest]]s with iron ingots.
|Iron ingots are now used to craft [[tripwire hook]]s.}}
{{History||1.4.2|snap=12w32a|Iron ingots can be used to activate [[beacon]]s.}}
{{History|||snap=12w41a|Iron ingots are now used to craft [[anvil]]s.}}
{{History|||snap=12w42a|Anvils now need 4 iron ingots to [[craft]] instead of 1.}}
{{History||1.5|snap=13w01a|Iron ingots are now used to [[crafting|craft]] heavy [[weighted pressure plate]]s.}}
{{History|||snap=13w02a|Iron ingots are now used to craft [[hopper]]s and [[activator rail]]s.}}
{{History||1.6.1|snap=13w16a|Iron ingot is now used to craft iron [[horse armor]] and [[horse saddle]].}}
{{History|||snap=13w18a|Iron ingot is no longer used to craft iron [[horse armor]] and [[horse saddle]].|Iron ingots are now found in [[nether fortress]] [[chest]]s.}}
{{History||1.8|snap=14w02a|[[Trading]] for iron ingots has been changed: armorer, weapon smith and tool smith [[villager]]s now [[trading|buy]] 7–9 iron ingots for 1 [[emerald]].}}
{{History|||snap=14w07a|Iron ingots are now used to craft [[iron trapdoor]]s.}}
{{History||1.9|snap=15w31a|Iron ingots are now found in [[end city]] ship [[chest]]s.}}
{{History|||snap=15w33c|Iron ingots are now used to craft [[shield]]s.}}
{{History|||snap=15w44a|The average yield from [[dungeon]] and [[desert temple]] chests has been substantially decreased.
|The average yield from [[mineshaft]] and [[nether fortress]] chests has been slightly decreased.}}
{{History||1.11|snap=16w39a|Iron ingots are now found in the new [[woodland mansion]] chests.}}
{{History||1.11.1|snap=16w50a|Iron ingots are now used to craft [[iron nugget]]s.}}
{{History||1.13|snap=17w47a|Prior to [[1.13/Flattening|''The Flattening'']], this [[item]]'s numeral ID was 265.}}
{{History|||snap=18w10a|Iron ingots now generate in [[buried treasure]] [[chest]]s.}}
{{History|||snap=18w11a|Iron ingots can now be found in the chests of [[shipwreck]]s.}}
{{History||1.14|snap=18w43a|Iron ingots can now be used to craft [[crossbow]]s.
|[[File:Iron Ingot JE3 BE2.png|32px]] The texture of iron ingots has been changed.}}
{{History|||snap=18w47a|Iron ingots can now be found inside of loot [[chest]]s on top of [[pillager outpost]]s.}}
{{History|||snap=18w50a|Iron ingots can now be found in chests in [[village]] toolsmith houses.
|Iron ingots can now be used to craft a [[blast furnace]].}}
{{History|||snap=19w04a|Iron ingots can now be used to craft [[stonecutter]]s.}}
{{History||1.15|snap=19w41a|Iron ingots can now be used to heal [[iron golem]]s.}}
{{History||1.16|snap=20w16a|Iron ingots now generate in [[bastion remnants]] chests.
|Iron ingots are now used to craft [[chain]]s.}}
{{History||1.16.2|snap=20w30a|The average yield of iron ingots from bastion remnant chests has been slightly increased.}}
{{History||1.17|snap=21w08a|Iron ingots can now be smelted from [[deepslate iron ore]].}}
{{History|||snap=21w14a|Iron ingots can now be smelted from [[raw iron]].}}
{{History||1.20<br>(Experimental)|link=1.19.4|snap=23w04a|Iron ingots can now be used as an armor trim material.}}
{{History|||snap=23w05a|Iron ingots can now be trimmed with iron [[armor]].}}

{{History|pocket alpha}}
{{History||v0.2.0|[[File:Iron Ingot JE2 BE1.png|32px]] Added iron ingots. They are currently unobtainable and serve no purpose.}}
{{History||v0.3.2|Iron ingots are now obtainable by [[smelting]] iron ore in a [[furnace]].
|Iron ingots can be used to craft [[shears]], [[blocks of iron]] and iron [[pickaxe]]s, [[axe]]s, [[sword]]s and [[shovel]]s.}}
{{History||v0.4.0|Iron ingots are now used to craft [[flint and steel]] and iron [[hoe]]s.}}
{{History||v0.5.0|Iron ingots are now used to craft [[nether reactor core]]s.}}
{{History||v0.6.0|Iron ingots are now used to craft iron [[armor]].}}
{{History||v0.7.0|Iron ingots are now used to craft [[bucket]]s.}}
{{History||v0.8.0|snap=build 1|Iron ingots are now used to craft [[compass]]es and [[iron bars]].}}
{{History|||snap=build 2|Iron ingots are now used to craft [[minecart]]s and [[rail]]s.}}
{{History||v0.9.0|snap=build 1|Iron ingots can now be found in [[village]] blacksmith [[chest]]s, [[stronghold]] altar chests and [[dungeon]] chests.
|[[Zombie]]s now rarely drop iron ingots.}}
{{History||v0.12.1|snap=build 1|Iron ingots are no longer used to craft [[nether reactor core]]s and are instead dropped by it.
|Iron ingots are now used to craft [[anvil]]s.
|Iron ingots are now found in [[nether fortress]] chests.
|Added [[iron golem]]s, which [[drops|drop]] iron ingots.
|Iron ingots can now be used to repair iron [[tool]]s, [[armor]] and [[weapon]]s in [[anvil]]s.
|Added [[zombie villager]]s, which rarely drop iron ingots.}}
{{History||v0.13.0|snap=build 1|Iron ingots are now used to craft [[tripwire hook]]s, [[detector rail]]s, [[iron trapdoor]]s and heavy [[weighted pressure plate]]s.
|Added [[desert temple]]s, which have hidden [[chest]] rooms and loot containing iron ingots.}}
{{History||v0.14.0|snap=build 1|Iron ingots are now used to craft [[hoppers]] and [[cauldron]]s.
|Iron ingots can now be found in [[minecart with chest|minecart chests]] generated in [[mineshaft]]s.}}
{{History||v0.15.0|snap=build 1|Iron ingots are now used to craft [[piston]]s.
|Added [[jungle temple]]s, which have hidden [[chest]] rooms and main treasure rooms that have loot containing iron ingots.
|Added [[husk]]s, which rarely [[drops|drop]] iron ingots.}}
{{History||v0.16.0|snap=build 4|Iron ingots can now be used to activate [[beacon]]s.}}
{{History|pocket}}
{{History||1.0.0|snap=alpha 0.17.0.1|Iron ingots can now be found in [[end city]] ship [[chest]]s.
|Iron ingots can now be found in [[stronghold]] storeroom chests.}}
{{History||1.0.4|snap=alpha 1.0.4.0|Added [[trading]]—armorer, weaponsmith and toolsmith [[villager]]s now [[trading|buy]] 7–9 iron ingots for 1 [[emerald]].}}
{{History||1.1.0|snap=alpha 1.1.0.0|Iron ingots can now be [[crafting|crafted]] using [[iron nugget]]s.
|Iron ingots can now be used to [[crafting|craft]] iron nuggets.
|Iron ingots can now be found in [[woodland mansion]] [[chest]]s.}}
{{History|bedrock}}
{{History||1.4.0|snap=beta 1.2.14.2|Iron ingots now generate in [[buried treasure]] [[chest]]s.
|Iron ingots can now be found in [[shipwreck]] treasure chests.}}
{{History||1.8.0|snap=beta 1.8.0.10|Iron ingots can now be used to craft [[crossbow]]s.}}
{{History||1.10.0|snap=beta 1.10.0.3|Iron ingots can now be found inside [[pillager outpost]]s and plains [[village]]s' weaponsmith chests.
|Iron ingots can now be used to craft [[blast furnace]]s, [[stonecutter]]s and [[shield]]s.
|[[File:Iron Ingot JE3 BE2.png|32px]] The texture of iron ingots has been changed.}}
{{History||1.11.0|snap=beta 1.11.0.1|Iron ingots can now be found in [[village]] armorer and toolsmith [[chest]]s.
|Iron ingots can now be found in [[savanna]], [[taiga]], [[desert]] and [[snowy taiga]] village weaponsmiths.}}
{{History|||snap=beta 1.11.0.4|Armorer, toolsmith, and weaponsmith [[villager]]s now [[trading|buy]] 4 iron ingots for an [[emerald]].}}
{{History||1.16.0|snap=beta 1.16.0.57|Iron ingots now generate in bastion remnants chests.}}
{{History||1.17.0|snap=beta 1.16.230.52|Iron ingots can now be smelted from [[deepslate iron ore]].}}
{{History|||snap=beta 1.17.0.50|Iron ingots can now be smelted from [[raw iron]].}}
{{History||1.18.10|snap=beta 1.18.10.26|Iron ingots can now be used to heal iron golems.}}
{{History||1.19.80|snap=beta 1.19.80.21|Iron ingots can now be used as an armor trim material.}}

{{History|console}}
{{History||xbox=TU1|xbone=CU1|ps=1.0|wiiu=Patch 1|switch=1.0.1|[[File:Iron Ingot JE2 BE1.png|32px]] Added iron ingots.}}
{{History||xbox=none|xbone=none|ps=1.90|wiiu=none|switch=none|[[File:Iron Ingot JE3 BE2.png|32px]] The texture of iron ingots has been changed.}}

{{History|new3DS}}
{{History||0.1.0|[[File:Iron Ingot JE2 BE1.png|32px]] Added iron ingots.}}
{{History|foot}}

== Issues ==

{{issue list}}

== Trivia ==

* To craft each recipe once, a player would need 152 iron ingots, including 27 for the iron blocks in an [[anvil]], while using the extra tripwire hook for the [[crossbow]] and the [[iron nuggets]] for the [[chain]].

== See also ==

* {{BlockLink|Block of Iron}}
* {{ItemSprite|Iron Chestplate}} [[Iron armor]]
* {{ItemLink|Iron Nugget}}
* {{BlockLink|Iron Ore}}
* [[Ores]]

== External links ==
* {{Mcnet|taking-inventory--iron-ignot|Taking Inventory: Iron Ingot}}

{{Items}}

[[cs:Železný ingot]]
[[de:Eisenbarren]]
[[es:Lingote de hierro]]
[[fr:Lingot de fer]]
[[hu:Vasrúd]]
[[it:Lingotto di ferro]]
[[ja:鉄インゴット]]
[[ko:철괴]]
[[nl:IJzerstaaf]]
[[pl:Sztabka żelaza]]
[[pt:Barra de ferro]]
[[ru:Железный слиток]]
[[uk:Залізний зливок]]
[[zh:铁锭]]
[[Category:Renewable resources]]</li></ul></nowiki>
New 'beta' launcher added. See Launcher version history for version history from this point onwards.
Gallery
Version history
The first Minecraft launcher.
The second Minecraft launcher. The old Minecraft logo can be seen.
The third Minecraft launcher.
The fourth Minecraft launcher.
The fifth Minecraft launcher, version 1.6.
The sixth Minecraft launcher, version 2.0.
The seventh and current Minecraft launcher.
The new version 2.x launchers are no longer written in Java, and are a lot larger (~85MB). If you are short on space or need to run it cross-platform, you can try using the fifth launcher, version 1.6.93 here (~4.6MB).
2013–16
The Launcher Log tab after the Launcher starts
The Local Version Editor (NYI) tab (replaced by Time Machine)
Error message that is displayed if a development launcher is outdated
Error message that is displayed if an old launcher is opened after using the 9.0 launcher
2016–19
Profile icons selection from the launcher.
Launcher in offline mode
The Help page
Game crash
Launcher warning about running another copy of Minecraft if it is already running.
Older skin options.
2019–present
The News tab of the launcher.
The Java Edition tab of the launcher.
The Minecraft Dungeons tab of the launcher.
Launcher login screen.
Default installations.
Editing an installation.
The "About" section of the launcher.
Skin options.
Game crash.
Launcher warning about running another copy of Minecraft: Java Edition if it is already running.
Backgrounds
The background when logging in to an account.
The background for Java Edition.
The background for Minecraft Dungeons.
The background for Dungeons when purchased.
Icon
The icon for the launcher.
Trivia
In the top left corner of the 2016–2019 launcher, a barely visible button could be found which randomly shows either a creeper face or a shrug kaomoji ¯\_(ツ)_/¯. It glowed white when clicked, but had no use at all. This was removed in the 2019 redesign of the launcher.
The creeper face, as well as a shrug, were used for the language selection menu during the beta phase of the launcher, but when a globe was added instead both were simply moved down to be kept as an Easter egg.
Hovering long enough over the "Play" button in the 2016–2019 launcher causes random mobs to appear on the right side of the window.

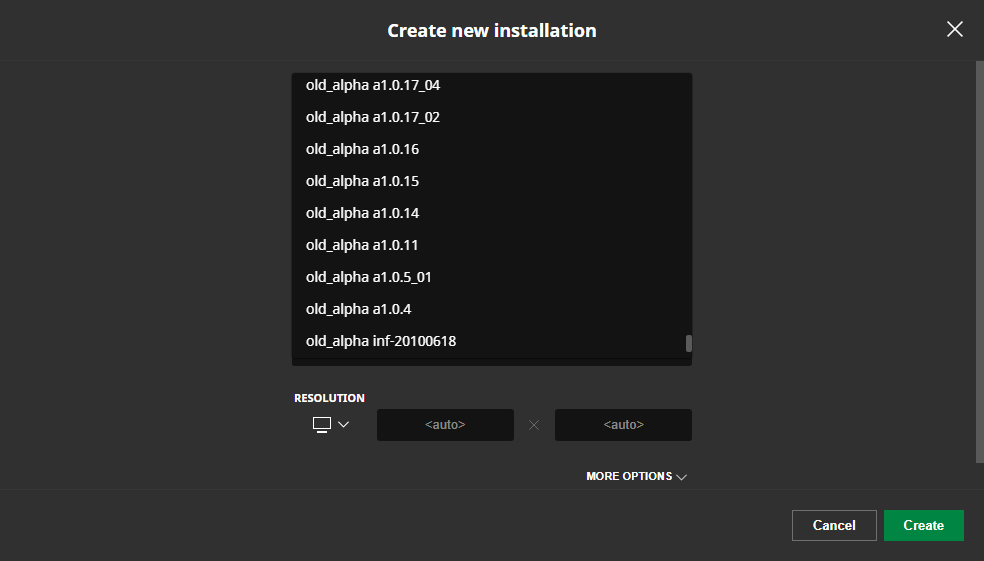

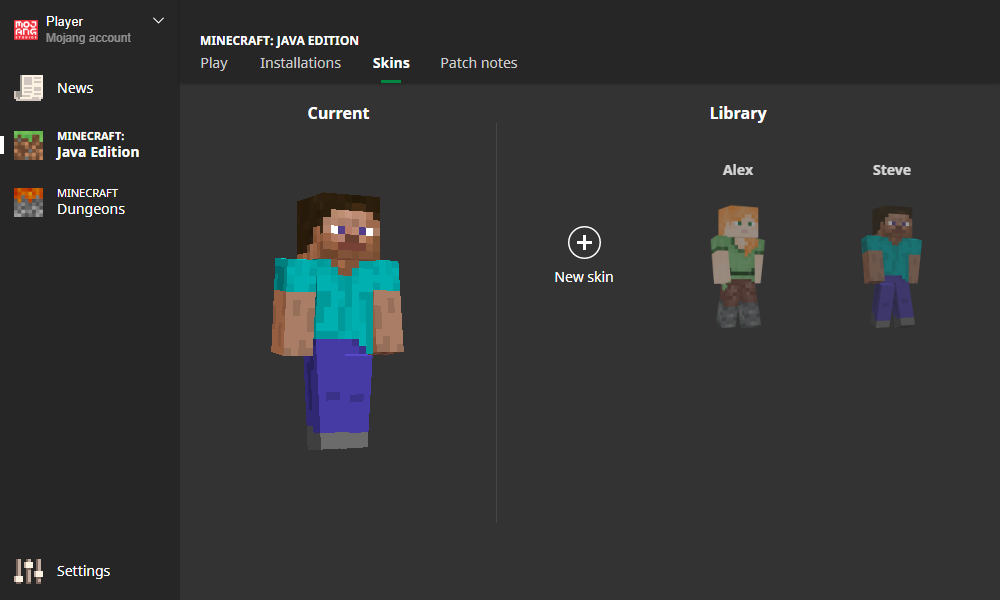

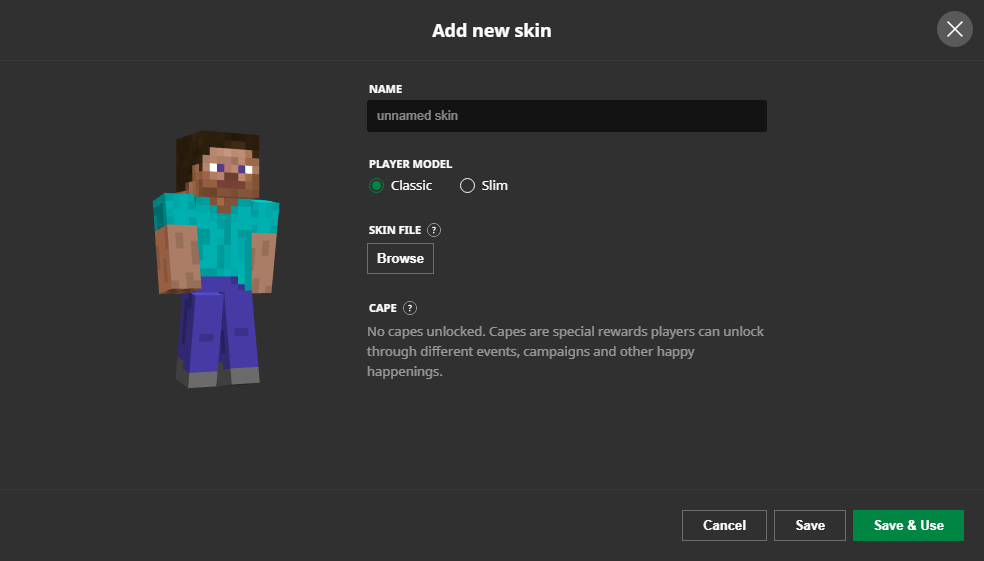


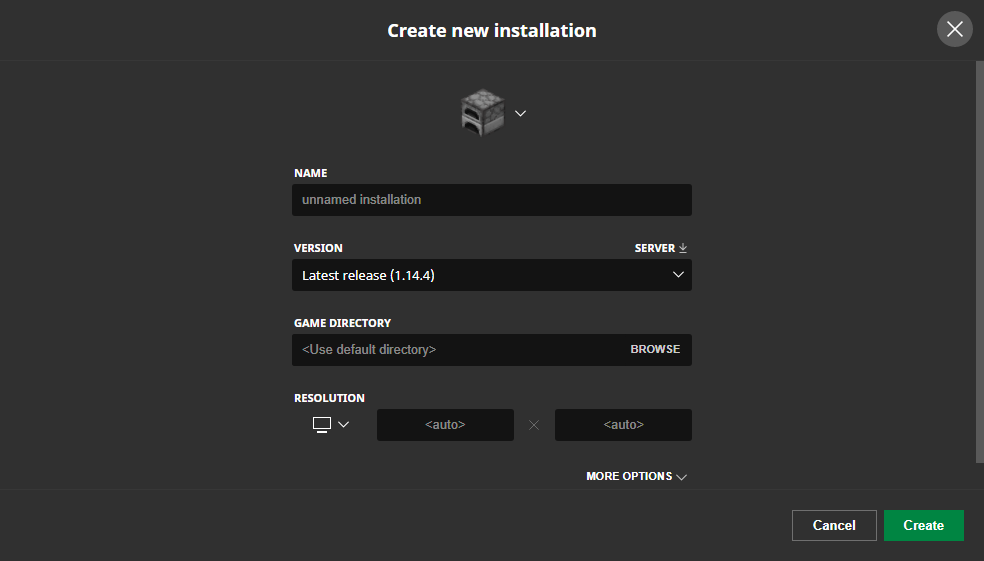


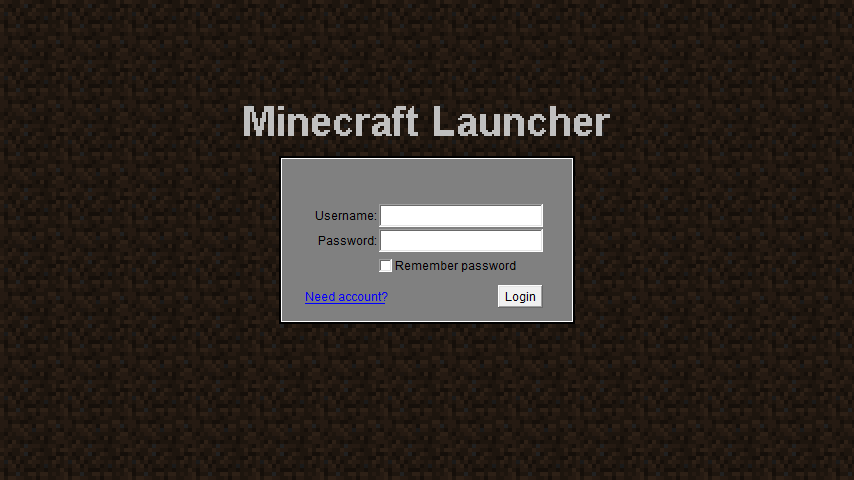
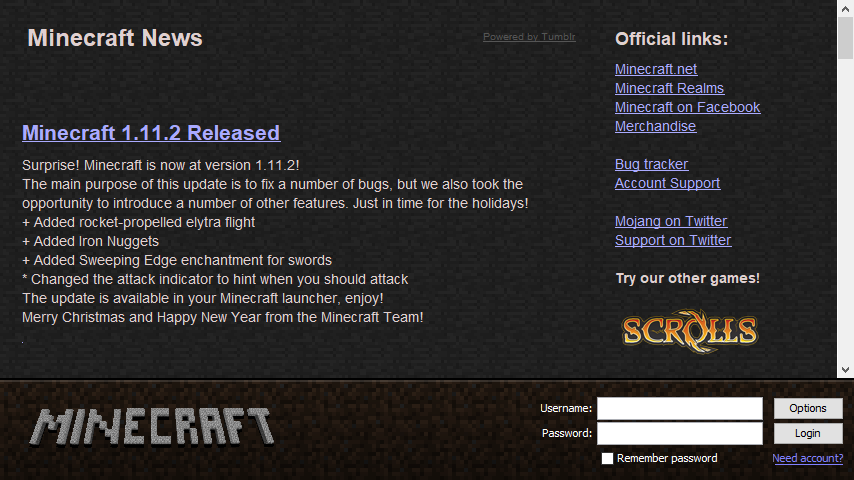

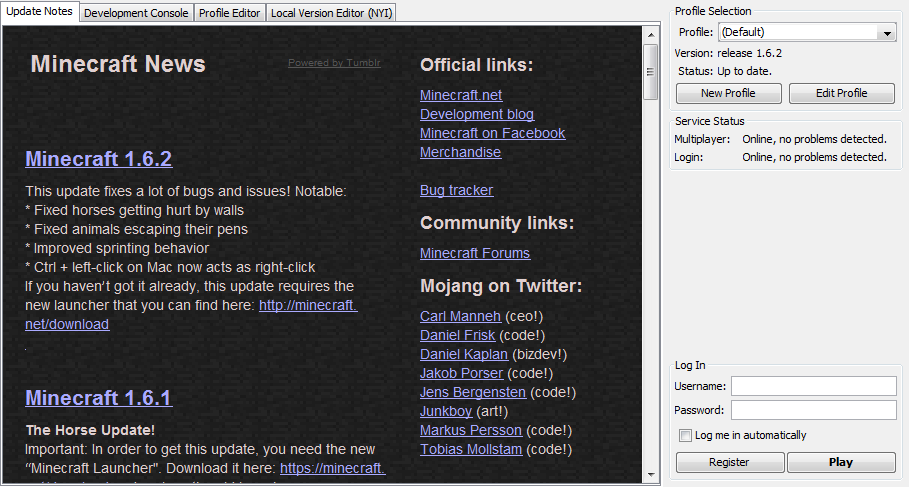
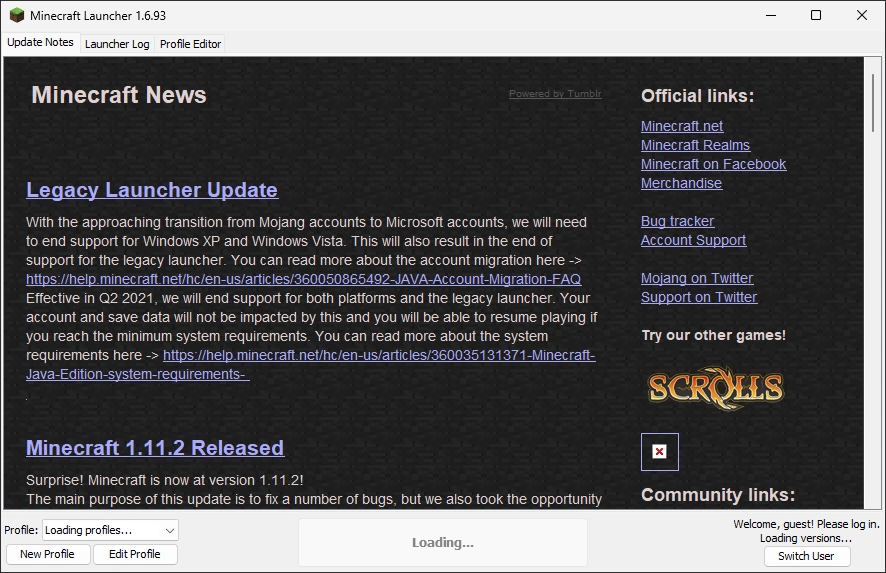
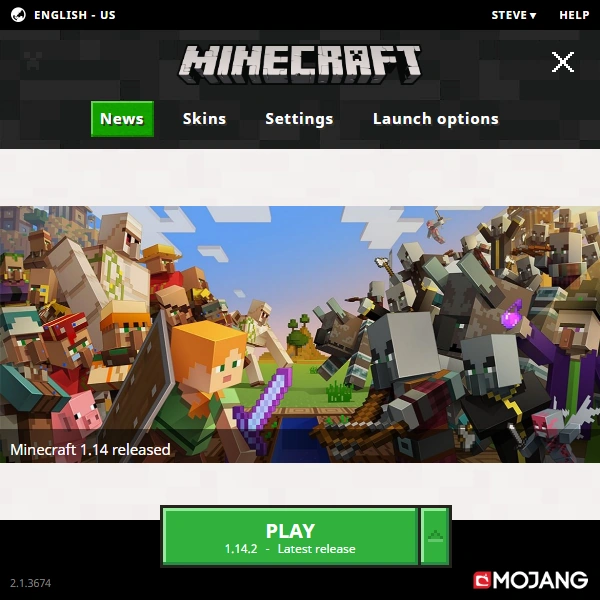
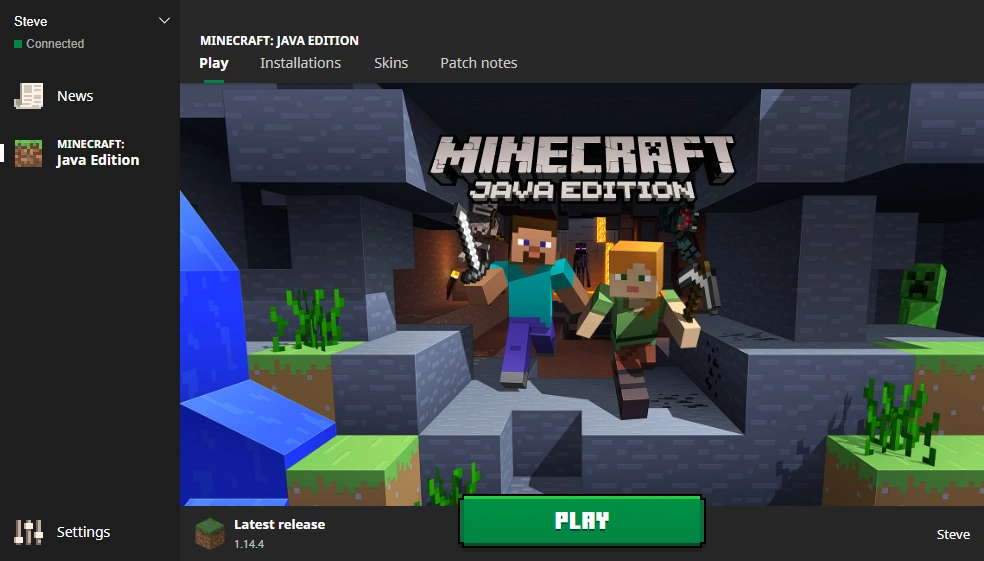
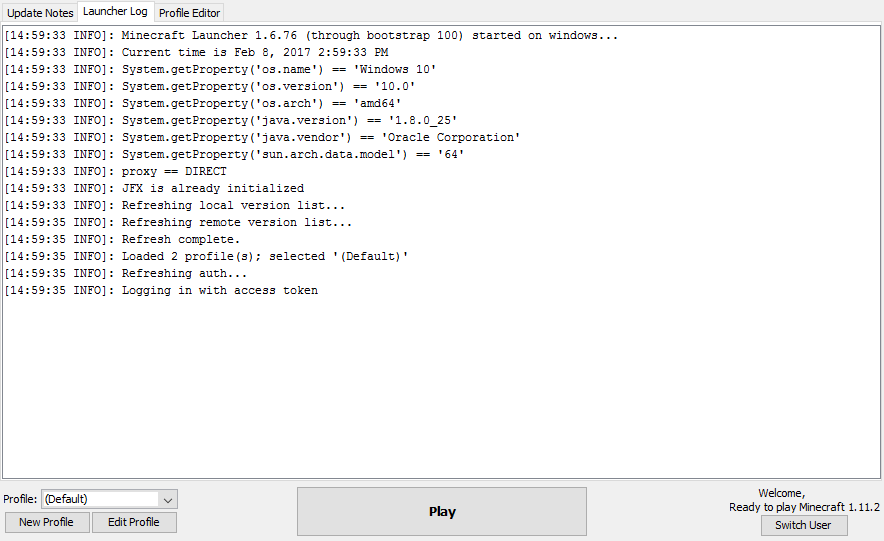
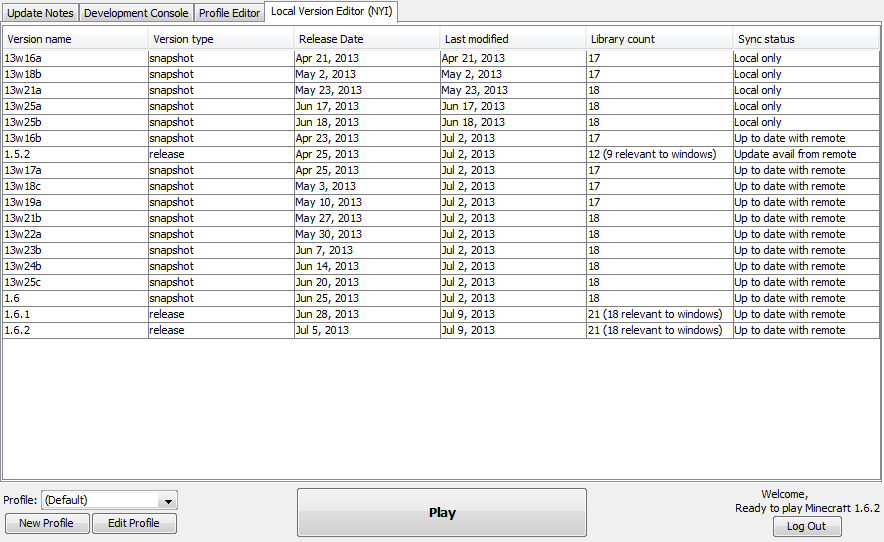
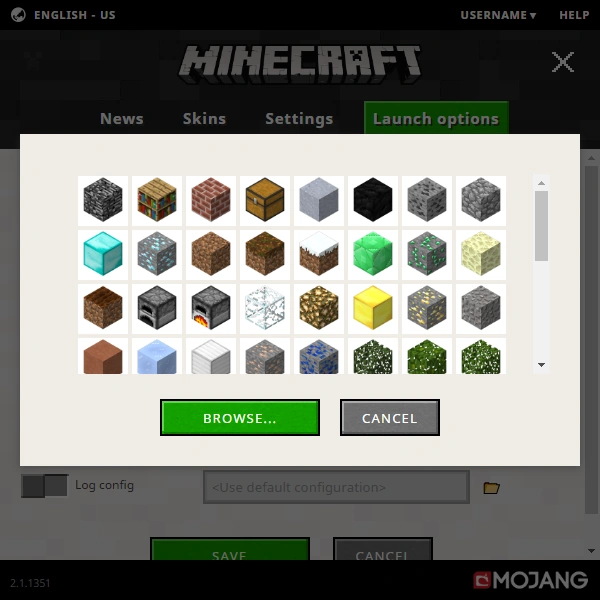
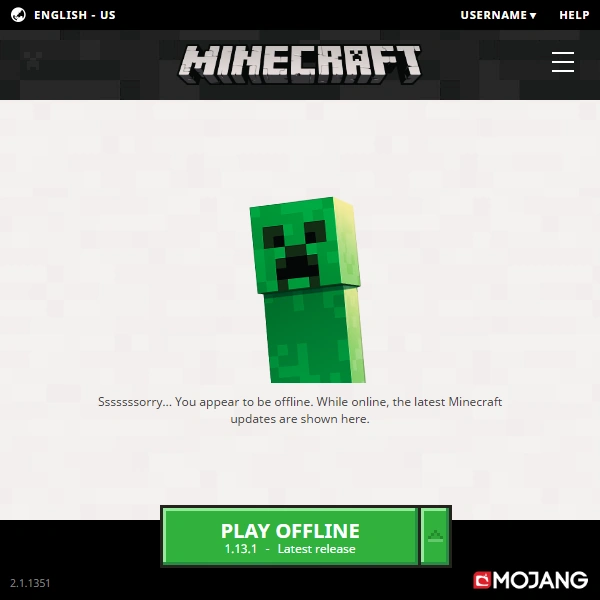
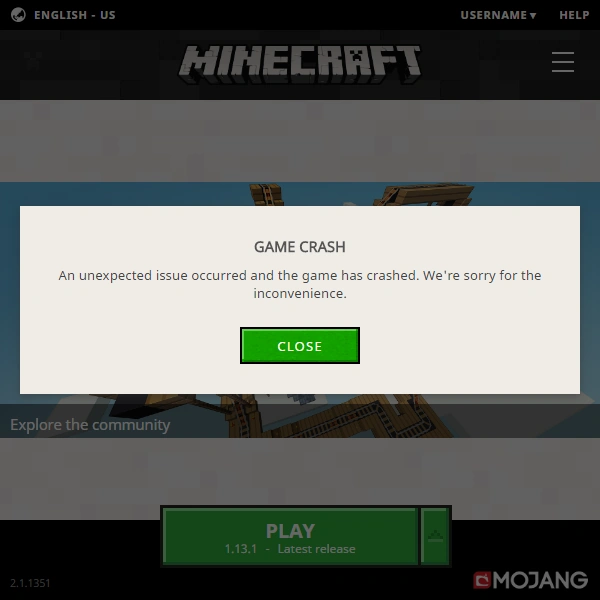
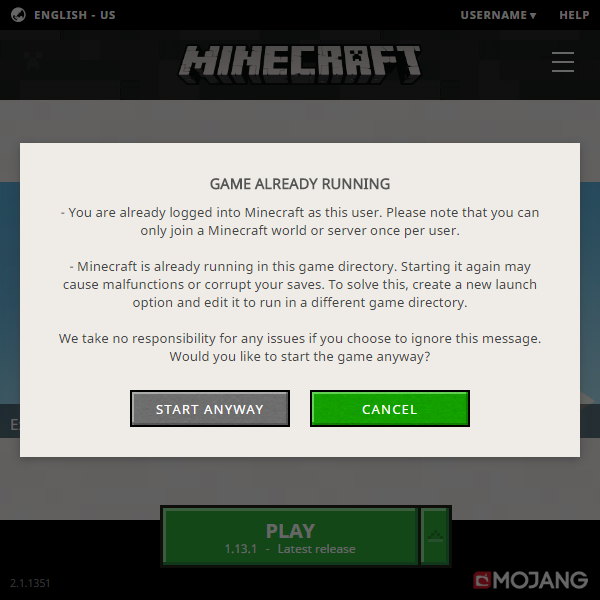
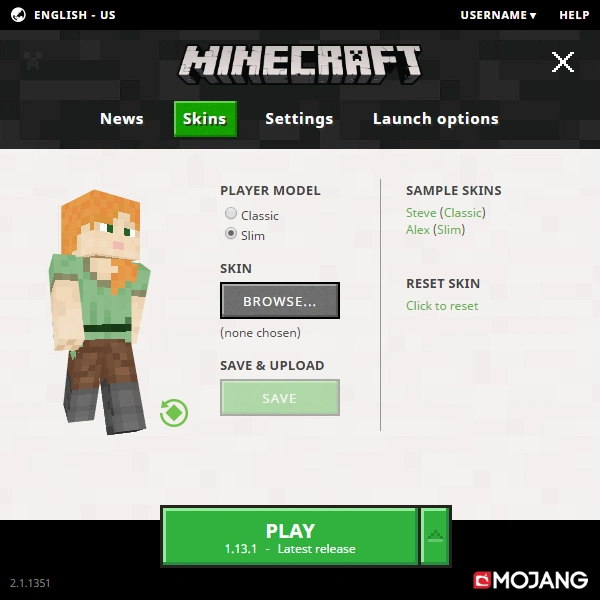

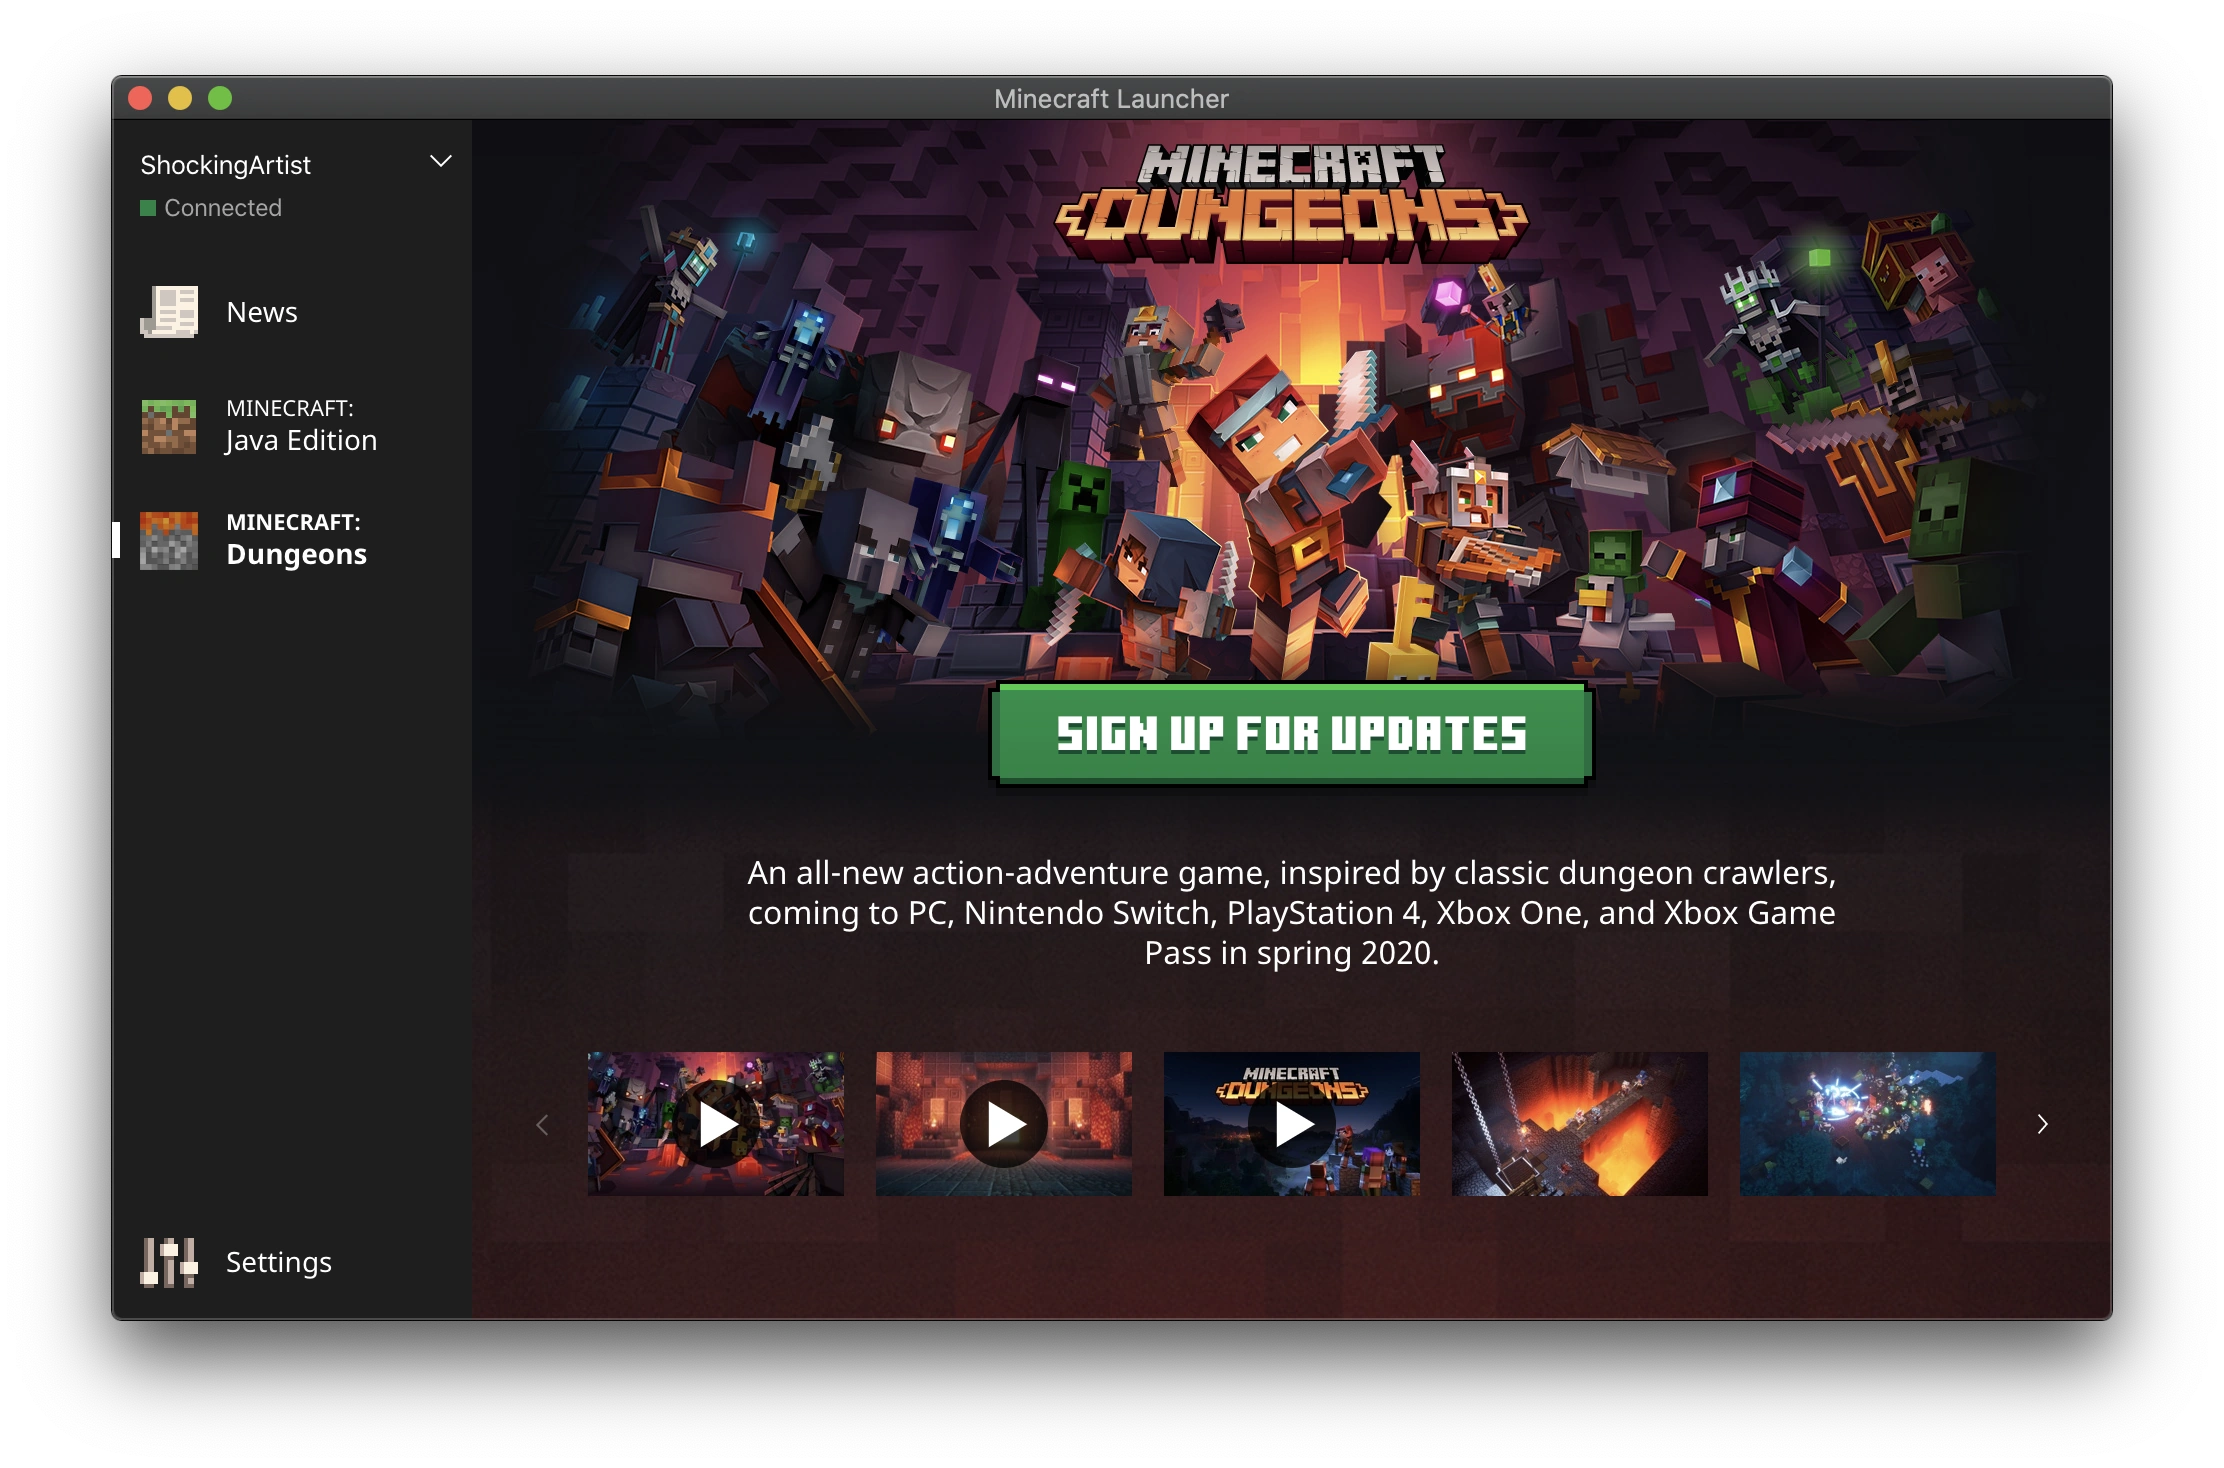
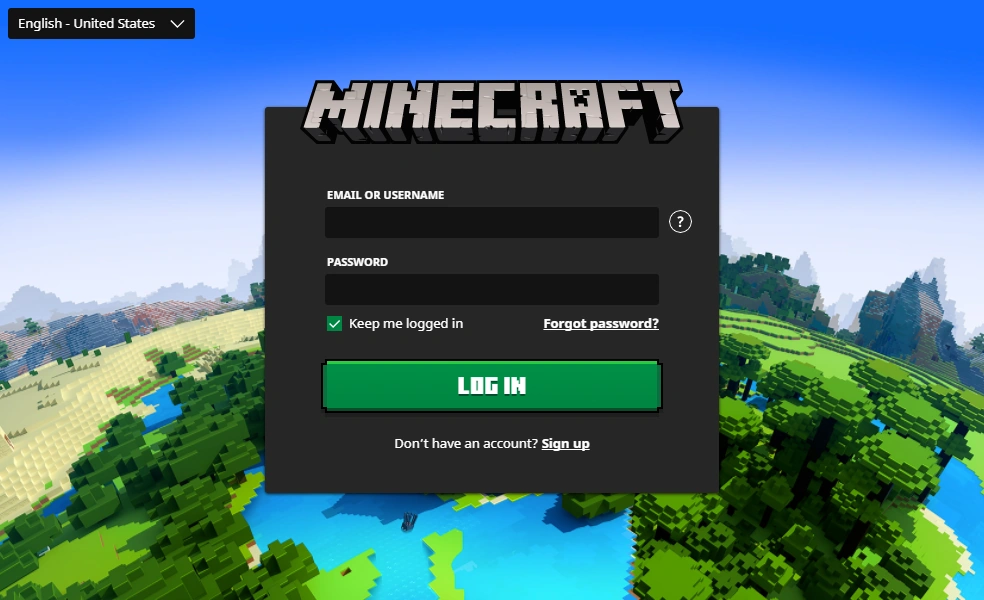
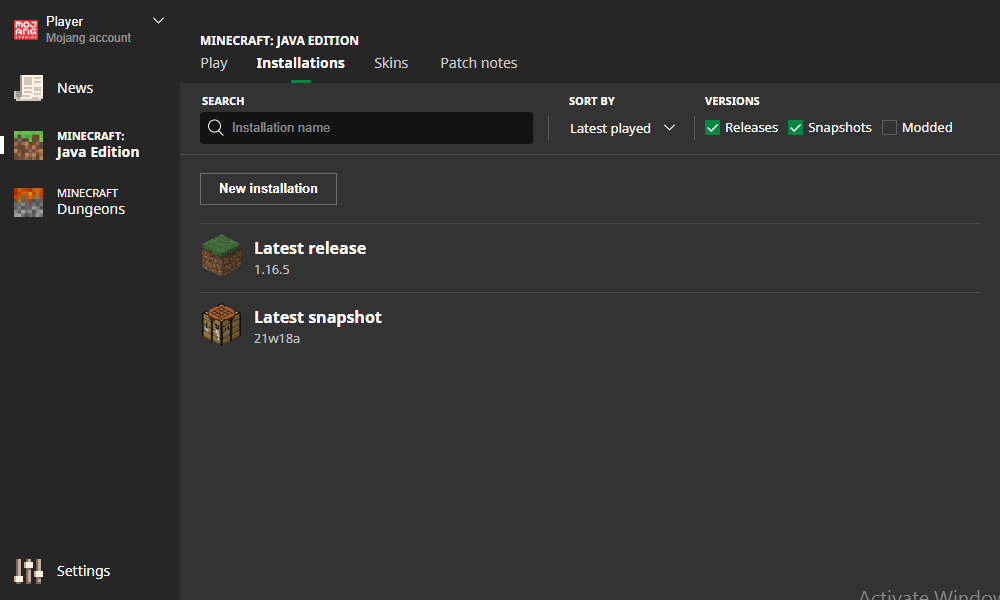
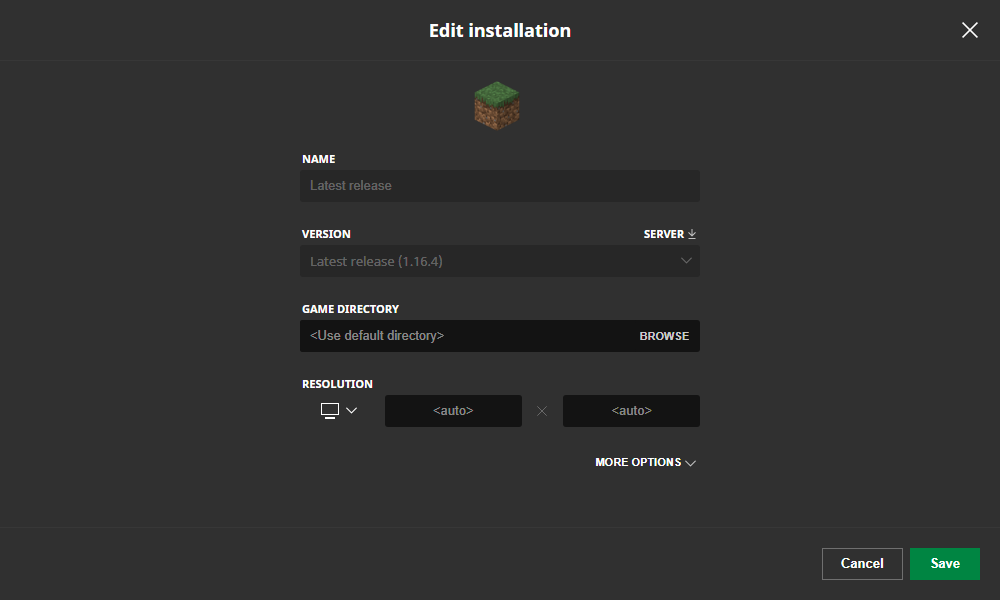
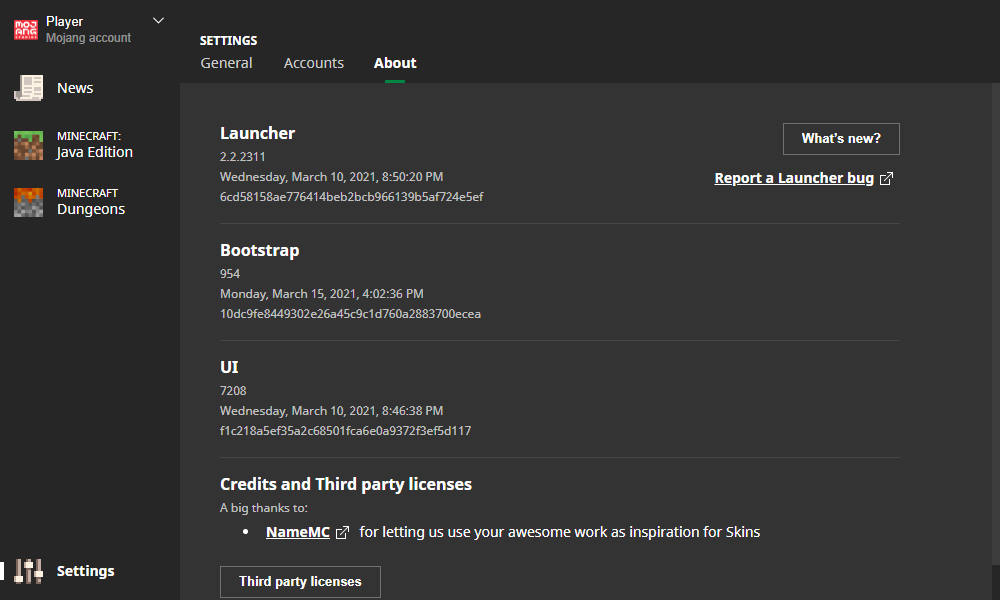
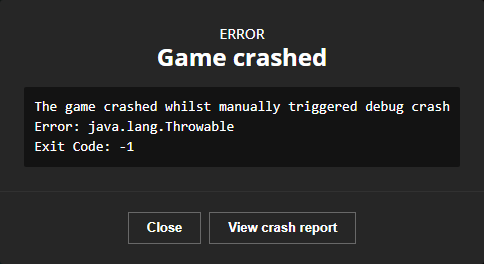
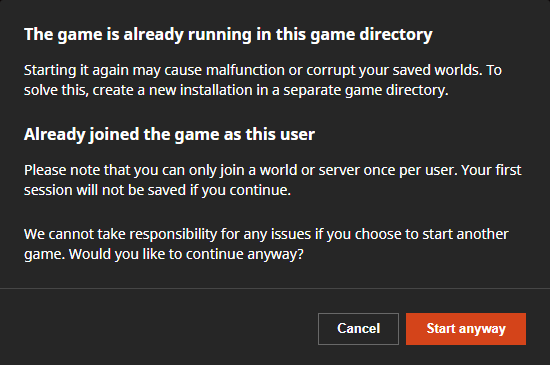
