A hopper is a block that can be used to catch item entities, or to transfer items into and out of containers.
Obtaining
Loot
From block loot
A hopper can be obtained by crafting or by breaking a previously-placed hopper with a pickaxe. Template:Loot table
From entity loot
A hopper can also be obtained by killing a minecart with hopper.
Recipes
From crafting
A hopper can be crafted from 5 iron ingots and a chest.
| Ingredients | Crafting recipe |
|---|---|
| Iron Ingot + Chest |
Usage
Info
Hoppers can face down or sideways.
A hopper can be used as a container, as a crafting ingredient, and as a redstone component.
A hopper has an "output" tube at its bottom that can face down or sideways and provides a visual indication of which block the hopper is set up to drop its items into, if that block has an inventory. To place a hopper, use the Place Block control while aiming at the surface to which its output should face (Hoppers do not orient themselves automatically). To place a hopper directly on the face of an already interactable block, the player can sneak while placing the hopper. Attempting to place a hopper aimed on the bottom face of a block instead faces downward. A hopper does not change direction after placement, and it is not attached to the container it faces; the container can be removed or replaced, and the hopper remains unchanged.
Hoppers cannot be moved by pistons.[Java Edition only] Despite not appearing as a solid block, attached blocks such as rails, levers, tripwire and redstone dust can be placed on top of hoppers (but not on their side).
Breaking
To break a hopper, mine it with a pickaxe. Using any other item to break a hopper doesn't drop a block.
| Block | Hopper | |
|---|---|---|
| Hardness | 3 | |
| Tool | ||
| Breaking time[A] | ||
| Default | 15 | |
| Wooden | 2.25 | |
| Stone | 1.15 | |
| Iron | 0.75 | |
| Diamond | 0.6 | |
| Netherite | 0.5 | |
| Golden | 0.4 | |
- ↑ Times are for unenchanted tools as wielded by players with no status effects, measured in seconds. For more information, see Breaking § Speed.
Block loot
Template:No unique drops
Hoppers also drop all of their contents.
Container
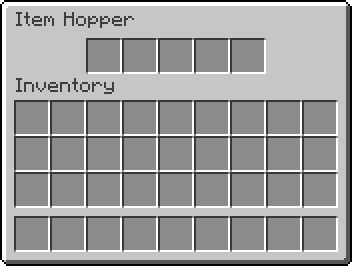
Hopper GUI showing the hopper's five slots of inventory at the top and the player's inventory below.
A hopper can be used as a container and has 5 slots of inventory space.
To open the hopper GUI, use the Use Item/Place Block control. To move items between the hopper inventory and the player inventory or hotbar while the hopper GUI is open, drag or shift-click the items. To exit the hopper GUI, use the Esc control.
By default, the GUI of a hopper is labeled "Item Hopper". A hopper's GUI label can be changed by naming the hopper in an anvil before placing it, or, in Java Edition, by using the data command (for example, to label a hopper at (0,64,0) "Steve's Hopper", use /data merge block 0 64 0 {CustomName:"\"Steve's Hopper\""}).
In Java Edition, a hopper can be "locked" (or subsequently unlocked) by setting the hopper's Lock tag with the data command. If a hopper's Lock tag is not blank, the hopper cannot be accessed except by players holding an item with the same name as the Lock tag's text. For example, to lock a hopper at (0,64,0) so that only players holding an item named "Steve's Key" can access the hopper, use /data merge block 0 64 0 {Lock:"Steve's Key"}.
Crafting ingredient
A hopper can be used to craft a minecart with hopper.
| Name | Ingredients | Crafting recipe |
|---|---|---|
| Minecart with Hopper | Hopper + Minecart |
Redstone component
A hopper's behavior is the opposite of most redstone mechanisms as a redstone signal turns the hopper off rather than turning it on. Because of this reverse behavior, an activated hopper is actually turned off. To avoid confusion over the terms activated and deactivated, powered hoppers are often described as being locked and unpowered hoppers described as being unlocked.
Hoppers can be powered by soft powered blocks, meaning a redstone dust trail pointing into a block touching the hopper will lock it just as effectively as a redstone block or any other power component touching the hopper.
An unlocked hopper has three functions:
- Collect item entities (free-floating items in the world) into its inventory from the space above it
- Pull a single item into its inventory from a container above it
- Push a single item from its own inventory into a container it faces
A hopper with a container above it, such as a furnaces, chests, or another hopper, cannot collect dropped items; for run-time efficiency, the hopper's code doesn't check for floating items. Dropped items can still be collected from a hopper with a regular block above it, however. Items are gathered from the entire 1 block space block above the hopper, meaning that items sitting on partial blocks such as soul sand can be collected. It is also possible for a hopper to collect items from inside a full, solid block, a situation that might come from items rising up through solid blocks or being summoned. Item entities are not collected when they are outside of this 1 block area however; items on top of a stone block will not be collected. Hoppers check for dropped items every game tick and they can collect items even before they are picked up by a player or destroyed by lava.
Hoppers have a "transfer cooldown" time. After pulling and/or pushing items, a hopper waits 4 redstone ticks (0.4 seconds, barring lag) before pulling or pushing again (a transfer rate of 2.5 items per second, barring lag). A hopper that has an item pushed into it from another hopper also starts a 4 tick cooldown period, regardless of whether it pushed or pulled items itself. Item entities can be collected at any time without affecting the transfer cooldown time, and they can collected entire grouped stacks of items rather than collecting singular items at a time. As a result, hoppers pull much more slowly than they collect. Pulling from a moving minecart with chest or minecart with hopper is even slower, since the minecart is not always above the hopper.
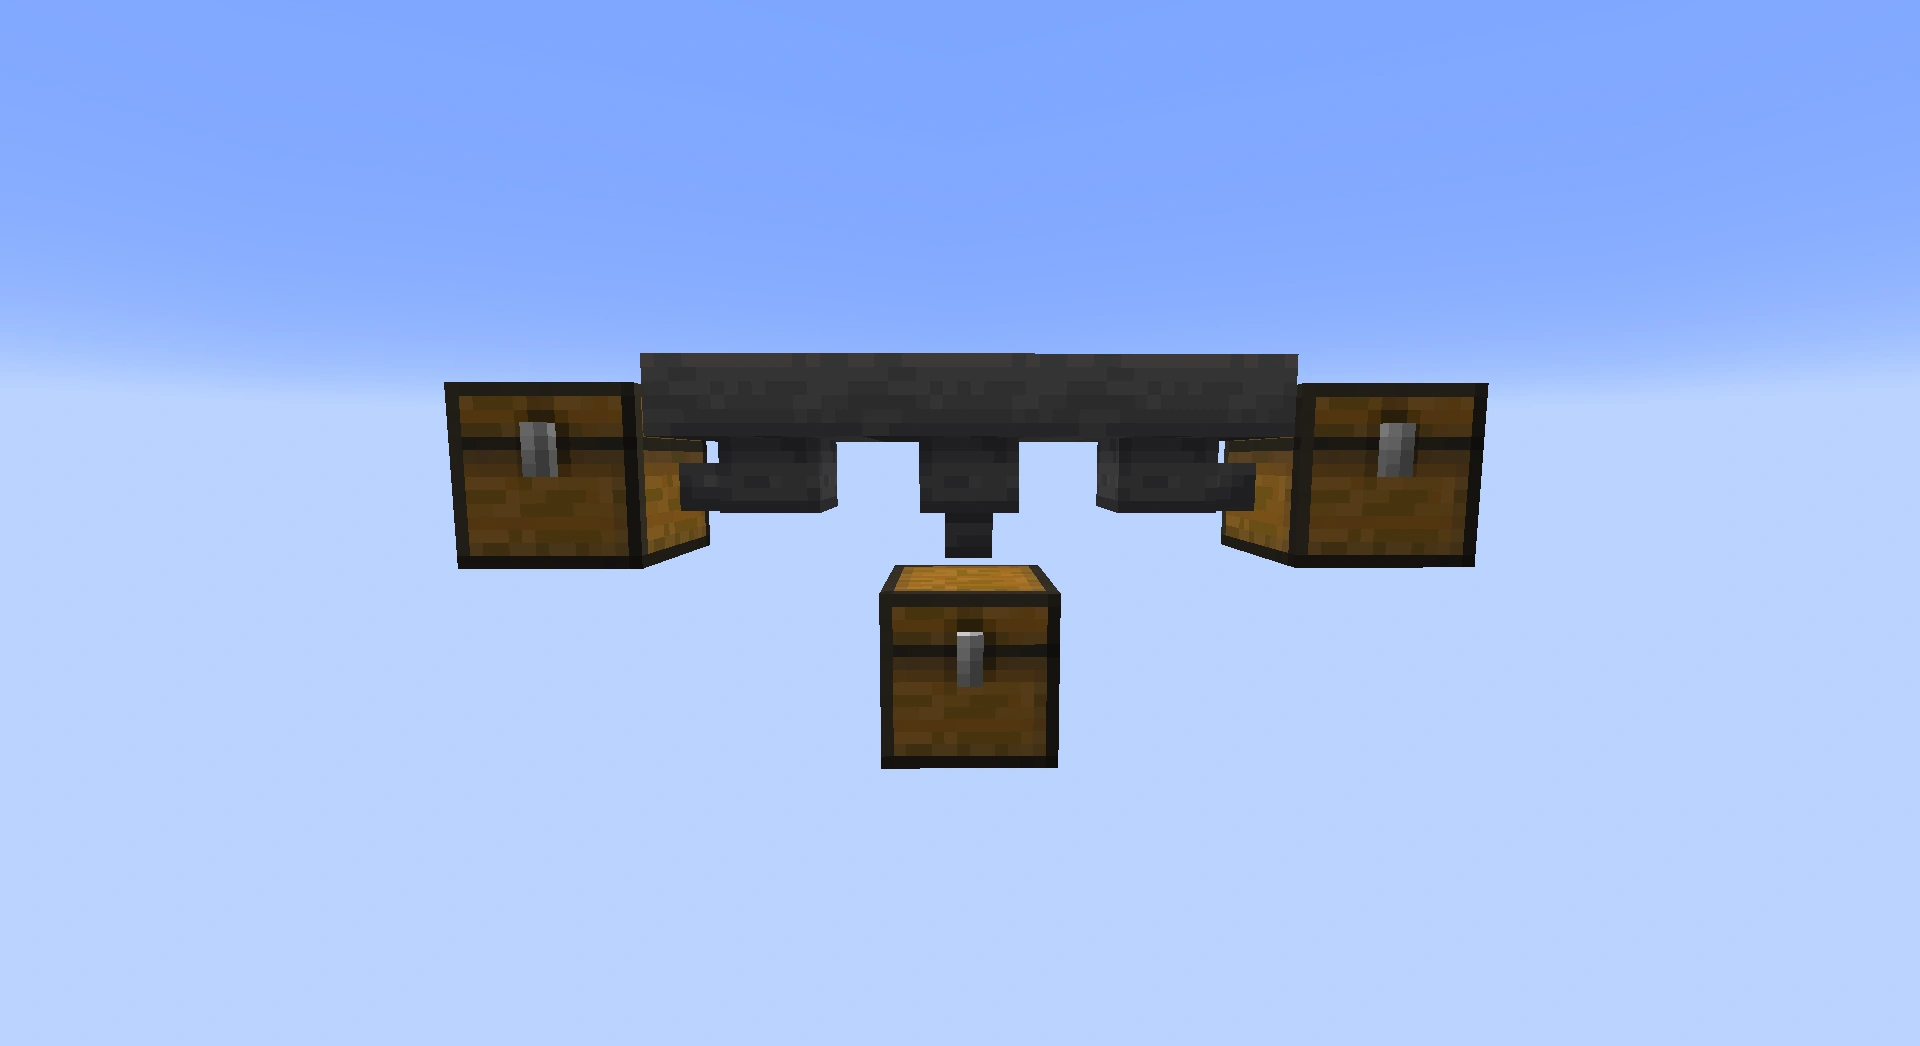
Item pushes and pulls are processed in the same game tick, but pushes are processed before pulls. Looking at the schematic, the empty hopper will first pull an item from Chest A as it cannot push anything into Chest B. After the cooldown, the hopper will first push its item into Chest B before pulling another item from Chest A, both pushing and pulling in the same tick. This process will repeat until Chest B is full, at which point, assuming more items are placed in Chest A, the hopper will begin exclusively pulling as it cannot push an item into full Chest B.
A hopper always tries to push, pull, and collect items using the leftmost available slot. When a hopper is removing items from a chest, the items will disappear from left to right. Similarly, when filling up a chest, the chest will fill up from left to right. Hoppers prioritize pulling from the first slot of a container over pulling into the first hopper slot. If a hopper has stone in its first slot and nothing in its second while the container it is pulling from has chicken in its first slot but stone in the second, the hopper will pull the chicken from the first slot of the container into its empty second slot. However, if the hopper is unable to pull the chicken, such as if all slots are filled with stone, the hopper will pull the stone from the second slot of the container instead. Similarly, hoppers prioritize pushing from their first slot over pushing into the first slot of a container. If a hopper has stone in its first slot and chicken in its second while the container it is pushing to has chicken it its first slot but stone in the second, the hopper will push stone from its first slot into the second slot of the container.
Some containers interact with hoppers in specific ways:
- Composter
- Hoppers above composters can push compostable items into the composter's top face with a chance of increasing the level of the composter as if the player used the item on the composter. Items that are not compostable cannot be pushed into the composter. Hoppers below the composter can pull bone meal when the composter is in stage 8, emptying the composter and resetting it to stage 0. Hoppers to the side of a composter do not interact with it.
- Brewing Stand
- A working hopper on the top face of a brewing stand deposits only into the ingredient slot and it can only push valid brewing ingredients. A hopper on side face of a brewing stand can only deposit blaze powder or filled bottles into the three brew slots. A hopper underneath a brewing stand always extracts from the three brew slots, whether brewing is finished or not—The hopper must be locked to allow potions to finish brewing.
- Chest
- Trapped Chest
- Large chests and large trapped chests are treated as a single container: A hopper depositing into a large chest fills up the entire chest and a hopper underneath a large chest empties the entire chest. Trapped chests being accessed by a player lock any adjacent hoppers, per the standard behavior of a hopper next to an active power source.
- Barrel
- Barrels interact with hoppers normally.
- Furnace
- Blast Furnace
- Smoker
- A working hopper pointing into top face of a furnace deposits only into the ingredient slot. It can push any item, including items that can't be smelted by the furnace. A hopper on the side face deposits into the fuel slot and it can only push items that are usable as fuel. A hopper below a furnace pulls only from the output slot, with the exception of pulling empty buckets from the fuel slot left over from using lava buckets as fuel. When a hopper removes items from a furnace, the experience points are 'stored' in the furnace until the player removes at least one smelted item.
- Hopper
- A sequence of three or more hoppers, each pushing items into the next, is called a hopper pipe. Working horizontal hopper pipes simply push items into each other at the expected rate of 2.5 items per second, but vertical hopper pipes are more complicated, as the hoppers are trying both to pull and to push. When a vertical pipe pulls from a single container, it simply transfers items at 2.5 items per second because the transfer rate is limited by the first hopper pulling items from the container. If a stack of items is in a vertical pipe, either from collecting a dropped item stack or being manually placed inside, the items can be transferred twice as fast, because the hopper with the item stack is pushing items down while the hopper below it is also pulling items down.
- A redstone comparator measuring the fullness of a hopper in a hopper pipe usually reads a continuous stream of items instead of blinking on and off as each item passes, but because pulls and pushes both occur in the same game tick, certain hoppers in a vertical hopper pipe may never power comparators even with a continuous stream of items: Their items get pulled out a single game tick after they're pushed in, which isn't measurable by a comparator—In Java Edition, comparators need measurements of at least 1.5 redstone ticks to produce a reading.
- Minecart with Chest
- Minecart with Hopper
- Unlocked hoppers fill chest minecarts and hopper minecarts if any part of the entity's hitbox is within the hopper's target block-space. Hopper minecarts will try to pull items from the hopper at high speed. Hoppers can pull items from minecarts above them so rails can be placed directly on the top faces of a hoppers. If a detector rail is in the right position, it could lock the hopper per standard redstone-hopper behavior.
- Jukebox
- In Bedrock Edition, discs play instantly when inserted.
- Shulker Box
- Hoppers cannot put shulker boxes into other shulker boxes. This allows for the creation of certain item filters.
- Otherwise, hoppers interact with shulker boxes normally.
- Lectern
- Hoppers cannot remove or place books on lecterns. The redstone pulse emitted from a lectern when a page is turned can temporarily lock hoppers however.
- Ender Chest
- Hoppers cannot interact with ender chests in any way.
A disabled hopper does not pull items from above (including item entities) or push them out, but may receive items from other droppers and hoppers, and may have its items removed by another hopper beneath it. To stop item transfer in a horizontal hopper pipe, only one hopper needs to be disabled, but to stop item transfer in a vertical hopper pipe, it is necessary to disable two hoppers in a row (because if a single hopper is disabled, the hopper above it can still push items into it and the hopper below it can still pull items from it).
Sounds
| Sound | Subtitles | Source | Description | Resource location | Translation key | Volume | Pitch | Attenuation distance |
|---|---|---|---|---|---|---|---|---|
| Block broken | Blocks | Once the block has broken | block | subtitles | 1.0 | 1.2 | 16 | |
| Block placed | Blocks | When the block is placed | block | subtitles | 1.0 | 1.2 | 16 | |
| Block breaking | Blocks | While the block is in the process of being broken | block | subtitles | 0.25 | 0.75 | 16 | |
| None[sound 1] | Entity-Dependent | Falling on the block with fall damage | block | None[sound 1] | 0.5 | 1.25 | 16 | |
| Footsteps | Entity-Dependent | Walking on the block | block | subtitles | 0.15 | 1.5 | 16 |
| Sound | Source | Description | Resource location | Volume | Pitch |
|---|---|---|---|---|---|
| Blocks | Once the block has broken | dig | 1.0 | 1.1-1.2 | |
| Blocks | When the block is placed | use | 1.0 | 1.2-1.25 | |
| Blocks | While the block is in the process of being broken | hit | 0.3 | 0.75 | |
| Players | Falling on the block with fall damage | fall | 0.4 | 1.0 | |
| Players | Walking on the block | step | 0.35 | 1.0 | |
| Players | Jumping from the block | jump | 0.12 | 1.0 | |
| Players | Falling on the block without fall damage | land | 0.22 | 1.0 |
Data values
ID
| Name | Identifier | Translation key |
|---|---|---|
| Hopper | hopper | block.minecraft.hopper |
| Name | Identifier |
|---|---|
| Block entity | hopper |
| Hopper | Identifier | Numeric ID | Translation key |
|---|---|---|---|
| Block | hopper | 154 | tile.hopper.name |
| Item | hopper | 410 | item.hopper.name |
| Name | Savegame ID |
|---|---|
| Block entity | ? |
Block data
In Bedrock Edition, a hopper uses its block data to specify its orientation and activation status.
| Bits | Values |
|---|---|
| 0x1 0x2 0x4 |
A three-bit field storing a value from 0 to 5:
|
| 0x8 | Set if activated/disabled. |
Block states
| Name | Default value | Allowed values | Description |
|---|---|---|---|
| enabled | true | falsetrue | True if hopper can move items to and from its inventory. When the hopper is being powered by redstone current, this is set to false. |
| facing | down | downeastnorthsouthwest | The direction the hopper's output points. The hopper pushes items into containers in this direction only. |
| Name | Metadata Bits | Default value | Allowed values | Values for Metadata Bits |
Description |
|---|---|---|---|---|---|
| facing_direction | 0x10x20x4 | 0 | 01234 | 01234 | The direction the hopper's output points. The hopper pushes items into containers in this direction only.
|
| toggle_bit | 0x8 | false | falsetrue | 01 | 1 if hopper cannot move items to and from its inventory. When the hopper is being powered by redstone current, this is set to true. |
Block entity
A hopper has a block entity associated with it that holds additional data about the block.
- Block entity data
- Tags common to all block entities
- CustomName: Optional. The name of this container in JSON text component, which appears in its GUI where the default name ordinarily appears.
- Items: List of items in this container.
- : An item, including the slot tag.
- Tags common to all items
- : An item, including the slot tag.
- Lock: Optional. When not blank, prevents the container from being opened unless the opener is holding an item whose name matches this string.
- LootTable: Optional. Loot table to be used to fill the hopper when it is next opened, or the items are otherwise interacted with. Note that the loot table is used when the hopper tries to push items, when it's enabled.[note 1]
- LootTableSeed: Optional. Seed for generating the loot table. 0 or omitted uses a random seed.[note 1]
- TransferCooldown: Time until the next transfer in game ticks, naturally between 1 and 8 or 0 if there is no transfer.
Achievements
| Icon | Achievement | In-game description | Actual requirements (if different) | Gamerscore earned | Trophy type (PS4) | |
|---|---|---|---|---|---|---|
| PS4 | Other | |||||
| Freight Station | Use a Hopper to move an item from a Chest Minecart to a Chest. | — | 15G | Bronze | ||
| Smelt Everything! | Connect 3 Chests to a single Furnace using 3 Hoppers. | Be within the range of three chests connected to a Furnace with 3 Hoppers. | 15G | Bronze | ||
Video
History
| Java Edition | ||||||
|---|---|---|---|---|---|---|
1.5{{Extension DPL}}<ul><li>[[Rabbit Hide|Rabbit Hide]]<br/>{{Item
| title = Rabbit Hide
| image = Rabbit Hide.png
| renewable = Yes
| stackable = Yes (64)
}}
'''Rabbit hide''' is an [[item]] dropped by [[rabbit]]s.
== Obtaining ==
===Mob loot===
[[Rabbit]]s drop 0–1 rabbit hide upon death. The maximum number of drops can be increased by 1 per level of [[Looting]] used, for a maximum of 0–4 rabbit hides with Looting III.
Some [[foxes]] spawn holding rabbit hides, which always drop upon death. Alternatively, the player can drop a food item, which causes the fox to drop the rabbit hide.
=== Cat gifts ===
{{main|Cat#Gifts}}
Tamed [[cat]]s have a 70% chance of giving the [[player]] a gift when they wake up from a [[bed]], and the gift has a 16.13% chance to be a rabbit hide.
== Usage ==
Rabbit hide can be crafted into leather, or into bundles to store stacks of items.
=== Crafting ingredient ===
{{crafting usage}}
=== Trading ===
Journeyman-level leatherworker [[villager]]s buy 9 rabbit hide for an [[emerald]] as part of their trades.
== Data values ==
=== ID ===
{{edition|java}}:
{{ID table
|edition=java
|showforms=y
|generatetranslationkeys=y
|displayname=Rabbit Hide
|spritetype=item
|nameid=rabbit_hide
|form=item
|foot=1}}
{{edition|bedrock}}:
{{ID table
|edition=bedrock
|shownumericids=y
|showforms=y
|notshowbeitemforms=y
|generatetranslationkeys=y
|displayname=Rabbit Hide
|spritetype=item
|nameid=rabbit_hide
|id=529
|form=item
|foot=1}}
== History ==
{{History|java}}
{{History||1.8|snap=June 30, 2014|slink={{tweet|TheMogMiner|483636993780232192}}|[[Ryan Holtz]] tweeted images of rabbit hide and some other new [[item]]s.}}
{{History|||snap=14w27a|[[File:Rabbit Hide JE1.png|32px]] Added rabbit hide.}}
{{History|||snap=14w33b|[[File:Rabbit Hide JE2 BE1.png|32px]] The texture of rabbit hide has been changed.}}
{{History||1.13|snap=17w47a|Prior to [[1.13/Flattening|''The Flattening'']], this [[item]]'s numeral ID was 415.}}
{{History||1.14|snap=18w43a|[[File:Rabbit Hide JE3 BE2.png|32px]] The texture of rabbit hide has been changed.}}
{{History|||snap=18w44a|Cats now offer rabbit hides as [[Cat#Gifts|gifts]].}}
{{History|||snap=19w07a|Added [[fox]]es, which sometimes spawn with rabbit hides in their mouths.}}
{{History|||snap=19w11a|Leatherworker [[villager]]s now [[trading|buy]] rabbit hides.}}
{{History||1.17|snap=20w45a|Rabbit hide can now be used to craft [[bundle]]s.}}
{{History|||snap=21w18a|Rabbit hide can no longer be used to craft bundles.}}
{{History||1.18|snap=Experimental Snapshot 1|Rabbit hide can now once again be used to craft bundles.}}
{{History|||snap=21w37a|Rabbit hide once again can no longer be used to craft bundles.}}
{{History||1.20<br>(Experimental)|link=1.19.3|snap=22w42a|Rabbit hide can now once again be used to craft bundles.}}
{{History|pocket alpha}}
{{History||v0.13.0|snap=build 1|[[File:Rabbit Hide JE2 BE1.png|32px]] Added rabbit hide.}}
{{History|bedrock}}
{{History||1.8.0|snap=beta 1.8.0.8|Tamed [[cat]]s can now give [[player]]s rabbit hide as a gift.}}
{{History||1.10.0|snap=beta 1.10.0.3|[[File:Rabbit Hide JE3 BE2.png|32px]] The texture of rabbit hide has been changed.}}
{{History||1.11.0|snap=beta 1.11.0.4|Rabbit hide can be [[trading|sold]] to leatherworker [[villager]]s.}}
{{History||1.13.0|snap=beta 1.13.0.1|Added [[fox]]es, which can [[drops|drop]] rabbit hide.}}
{{History|console}}
{{History||xbox=TU31|xbone=CU19|ps=1.22|wiiu=Patch 3|switch=1.0.1|[[File:Rabbit Hide JE2 BE1.png|32px]] Added rabbit hide.}}
{{History||xbox=none|xbone=none|ps=1.90|wiiu=none|switch=none|[[File:Rabbit Hide JE3 BE2.png|32px]] The texture of rabbit hide has been changed.}}
{{History|new 3ds}}
{{History||0.1.0|[[File:Rabbit Hide JE2 BE1.png|32px]] Added rabbit hide.}}
{{History|foot}}
== Issues ==
{{issue list}}
== Gallery ==
<gallery>
File:Rabbit Items 1 Ryan Holtz.png|First image of the item by [[Ryan Holtz]].
</gallery>
{{items}}
[[de:Kaninchenfell]]
[[es:Piel de conejo]]
[[fr:Peau de lapin]]
[[hu:Nyúlbőr]]
[[it:Pelle di coniglio]]
[[ja:ウサギの皮]]
[[ko:토끼 가죽]]
[[nl:Konijnenhuid]]
[[pl:Królicza skóra]]
[[pt:Pele de coelho]]
[[ru:Кроличья шкурка]]
[[zh:兔子皮]]
[[Category:Renewable resources]]</li><li>[[Netherite Scrap|Netherite Scrap]]<br/>{{About|the unrefined material|the refined item|Netherite Ingot|other uses|Netherite}}
{{Item
| title = Netherite Scrap
| image = Netherite Scrap.png
| rarity = Common
| renewable = No
| stackable = Yes (64)
}}
'''Netherite scrap''' is a material [[smelt]]ed from [[ancient debris]], which is found in [[the Nether]]. It is used solely for crafting [[Netherite Ingot|netherite ingots]]. Like all netherite-related items, it is not flammable.
== Obtaining ==
=== Smelting ===
{{Smelting
|Ancient Debris
|Netherite Scrap
|2
}}
=== Chest loot ===
{{LootChestItem|netherite-scrap}}
== Usage ==
=== Crafting ingredient ===
{{Crafting usage}}
== Data values ==
=== ID ===
{{edition|java}}:
{{ID table
|edition=java
|showforms=y
|generatetranslationkeys=y
|displayname=Netherite Scrap
|spritetype=item
|nameid=netherite_scrap
|form=item
|foot=1}}
{{edition|bedrock}}:
{{ID table
|edition=bedrock
|shownumericids=y
|showforms=y
|notshowbeitemforms=y
|generatetranslationkeys=y
|displayname=Netherite Scrap
|spritetype=item
|nameid=netherite_scrap
|id=613
|form=item
|foot=1}}
== History ==
{{History|java}}
{{History||1.16|snap=20w06a|[[File:Netherite Scrap JE1.png|32px]] Added netherite scrap.}}
{{History|||snap=20w10a|[[File:Netherite Scrap JE2 BE1.png|32px]] The texture of netherite scrap has been changed.}}
{{History|||snap=20w16a|Netherite scraps now generate in [[bastion remnant]] chests.}}
{{History||1.16.2|snap=20w30a|The chance of finding netherite scraps in bastion remnant chests has been increased.}}
{{History|bedrock}}
{{History||1.16.0|snap=beta 1.16.0.51|[[File:Netherite Scrap JE2 BE1.png|32px]] Added netherite scrap.}}
{{History|||snap=beta 1.16.0.57|Netherite scraps now generate in [[bastion remnants]] chests.}}
{{History|foot}}
== Issues ==
{{Issue list}}
== External Links ==
*[https://www.minecraft.net/en-us/article/taking-inventory--netherite-scrap Taking Inventory: Netherite Scrap] – Minecraft.net on March 25, 2021
{{Items}}
[[Category:Non-renewable resources]]
[[de:Netheritplatten]]
[[fr:Fragments de Netherite]]
[[it:Frammento di netherite]]
[[ja:ネザライトの欠片]]
[[ko:네더라이트 파편]]
[[pl:Odłamek netherytu]]
[[pt:Fragmentos de netherita]]
[[ru:Незеритовый скрап]]
[[th:เศษเนเธอไรต์]]
[[uk:Незеритовий уламок]]
[[zh:下界合金碎片]]</li></ul> | 13w01a | |||||
| Hoppers with the damage value of 1, which are only obtainable through world editing, point in no direction. | ||||||
| File:Hopper (Item) JE1.png There is currently a temporary "work in progress" sprite for hoppers in the inventory. | ||||||
Hoppers can be crafted from a chest and stone blocks with the following recipe:
| ||||||
| 13w01b | Rails can now be placed on top of hoppers. | |||||
| Hoppers no longer load items into minecarts without chests. | ||||||
| 13w02a | File:Hopper (Item) JE2 BE1.png The inventory sprite of hoppers has been changed. | |||||
| File:Hopper (Item) 13w02a.png However, the item of hoppers appears bugged if dropped or placed in an item frame.[1] | ||||||
| Applying a redstone signal to a hopper now deactivates the hopper until the signal is removed. | ||||||
| Hoppers can no longer be used as fuel in a furnace. | ||||||
Hoppers are now crafted using 5 iron ingots rather than 5 stone blocks.
| ||||||
| Hoppers now only take from the output slot of furnaces. | ||||||
| Hoppers now output 1 signal strengh per 1/3 of a stack (21 items) when interacting with a redstone comparator. | ||||||
| File:Hopper (D) JE2 BE1.png File:Hopper (N) JE2 BE1.png File:Hopper (E) JE2 BE1.png File:Hopper (S) JE2 BE1.png File:Hopper (W) JE2 BE1.png File:Hopper (None) JE2.png The texture of hoppers has been changed. Hoppers no longer use the cauldron texture. | ||||||
| 13w02b | Hoppers now treat large chests properly, no longer needing two hoppers connected to them to fill up the entire inventory. | |||||
| Hoppers no longer take items from containers when powered via a redstone current. | ||||||
| Now displays correctly as a dropped or frame item. | ||||||
| 13w03a | Hoppers are now used to craft a minecart with hopper. | |||||
| Hoppers can now empty a minecart with hopper. | ||||||
| 13w04a | The transfer rate of hoppers has been changed from 7 to 8 game ticks per item (2.5 items per second). | |||||
1.8{{Extension DPL}}<ul><li>[[Raw Beef|Raw Beef]]<br/>{{Item
| title = Raw Beef
| image = Raw Beef.png
| heals = {{hunger|3}}
| renewable = Yes
| stackable = Yes (64)
}}
'''Raw beef''' is a [[food]] item that can be eaten by the [[player]] or cooked in a [[furnace]], [[smoker]], or [[campfire]] to make [[steak]].
== Obtaining ==
=== Mob loot ===
When adult [[cow]]s and [[mooshroom]]s are killed, they drop 1-3 raw beef. The maximum amount is increased by 1 per level of [[Looting]], for a maximum of 1-6 with Looting III. If killed while on fire, they drop [[steak]] instead.
=== Chest loot ===
{{LootChestItem|raw-beef}}
== Usage ==
=== Food ===
To eat raw beef, press and hold {{control|use}} while it is selected in the hotbar. Eating one restores {{hunger|3}} hunger and 1.8 hunger [[Hunger#Mechanics|saturation]].
=== Smelting ingredient ===
{{Smelting
|showname=1
|Raw Beef
|Steak
|0.35
}}
=== Wolves ===
Raw beef can be used to [[breed]] and heal tamed [[wolves]], lead them around, and make baby tamed wolves grow up faster by 10% of the remaining time.
=== Trading ===
Journeyman-level Butcher villagers have a 50% chance to buy 10 raw beef for an emerald.{{only|bedrock}}
Journeyman-level Butcher villagers always offer buy 10 raw beef for an emerald.{{only|java}}
==Sounds==
{{Sound table/Entity/Food}}
== Advancements ==
{{load advancements|Husbandry;A Balanced Diet}}
== Data values ==
=== ID ===
{{edition|java}}:
{{ID table
|edition=java
|showforms=y
|generatetranslationkeys=y
|displayname=Raw Beef
|spritetype=item
|nameid=beef
|form=item
|foot=1}}
{{edition|bedrock}}:
{{ID table
|edition=bedrock
|shownumericids=y
|showforms=y
|notshowbeitemforms=y
|generatetranslationkeys=y
|displayname=Raw Beef
|spritetype=item
|nameid=beef
|id=273
|form=item
|foot=1}}
== History ==
{{History|java beta}}
{{History||1.8|snap=Pre-release|[[File:Raw Beef JE1 BE1.png|32px]] Added raw beef.|Raw beef is one of the new [[food]] items, [[drops|dropped]] by [[cow]]s in addition to their [[leather]].}}
{{History|java}}
{{History||1.2.1|snap=12w03a|Raw beef can now be used to breed wolves.}}
{{History||1.3.1|snap=12w21a|Raw beef can now be [[trading|sold]] to butcher [[villager]]s, at 14–17 raw beef for 1 [[emerald]].}}
{{History|||snap=1.3|[[File:Raw Beef JE2.png|32px]] The texture of raw beef has been changed.}}
{{History||1.4.2|snap=12w37a|[[File:Raw Beef JE3 BE2.png|32px]] The texture of raw beef has been changed, so that it no longer has a dark outline.}}
{{History||1.8|snap=14w02a|[[Villager]]s no longer [[trading|trade]] for raw beef.}}
{{History||1.13|snap=17w47a|Prior to [[1.13/Flattening|''The Flattening'']], this [[item]]'s numeral ID was 363.}}
{{History||1.14|snap=18w43a|[[File:Raw Beef JE4 BE3.png|32px]] The texture of raw beef has been changed.}}
{{History|||snap=18w49a|Raw beef can now be found in [[chest]]s in [[village]] butcher shops.}}
{{History|||snap=19w11a|Butcher [[villager]]s now [[trading|buy]] raw beef.}}
{{History|pocket alpha}}
{{History||v0.4.0|[[File:Raw Beef JE1 BE1.png|32px]] Added raw beef.}}
{{History||v0.5.0|Raw beef now restores {{hp|3}} instead of {{hp|1}}.}}
{{History||v0.8.0|snap=build 1|[[File:Raw Beef JE3 BE2.png|32px]] The texture of raw beef has been changed, so that it no longer has a dark outline.}}
{{History||v0.9.0|snap=build 1|Raw beef has been added to [[Creative]] mode.}}
{{History||v0.12.1|snap=build 1|Raw beef now restores [[hunger]] instead of [[health]].}}
{{History|bedrock}}
{{History||1.10.0|snap=beta 1.10.0.3|[[File:Raw Beef JE4 BE3.png|32px]] The texture of raw beef has been changed.}}
{{History||1.11.0|snap=beta 1.11.0.1|Raw beef can now be found in [[village]] butcher [[chest]]s.}}
{{History|||snap=beta 1.11.0.4|Raw beef can now be [[trading|sold]] to butcher [[villager]]s.}}
{{History|console}}
{{History||xbox=TU5|xbone=CU1|ps=1.0|wiiu=Patch 1|[[File:Raw Beef JE1 BE1.png|32px]] Added raw beef.}}
{{History||xbox=TU12|[[File:Raw Beef JE3 BE2.png|32px]] The texture of raw beef has been changed, so that it no longer has a dark outline.}}
{{History||xbox=none|xbone=none|ps=1.90|wiiu=none|switch=none|[[File:Raw Beef JE4 BE3.png|32px]] The texture of raw beef has been changed.}}
{{History|New 3DS}}
{{History||0.1.0|[[File:Raw Beef JE3 BE2.png|32px]] Added raw beef.}}
{{History|foot}}
== Issues ==
{{issue list}}
== Gallery ==
<gallery>
File:Jeb steak.png|Raw Beef and [[Steak]] in a preview screenshot.
</gallery>
{{Items}}
[[de:Rohes Rindfleisch]]
[[es:Filete crudo]]
[[fr:Bœuf cru]]
[[hu:Nyers marhahús]]
[[ja:生の牛肉]]
[[ko:익히지 않은 소고기]]
[[nl:Rauwe biefstuk]]
[[pl:Surowa wołowina]]
[[pt:Bife cru]]
[[ru:Сырая говядина]]
[[uk:Сира яловичина]]
[[zh:生牛肉]]
[[Category:Food]]
[[Category:Renewable resources]]</li><li>[[Ankle Monitor|Ankle Monitor]]<br/>{{Joke feature}}
{{Item
| title = Ankle Monitor
| image = Ankle Monitor.png
| renewable = No
| stackable = Yes (64)
}}
The '''Ankle monitor''' was a joke foot item.
== Usage ==
Ankle monitors were equipped in the boots slot. In survival mode, when equipped, it could not be taken off. However, players in Creative mode are unaffected.
When equipped, the player would be afflicted with {{EffectLink|Slowness}} I.
During the night, being a certain number of blocks from the world spawn, above a certain minimum,{{checkthecode|how much?}} would prompt the following message in chat: "CURFEW WARNING! You are violating your house arrest! Get back by [distance] meters!"
If in [[the Nether]] or [[the End]], a different set of messages would be cycled through which can be seen in the section below.
=== Nether and End messages ===
* CURFEW WARNING! You are violating your house arrest! Uuuh... where are you anyway?
* CURFEW WARNING! Hello, are you there?
* CURFEW WARNING! I'm sure you have important things to do, but you need to go back!
* CURFEW WARNING! We're lonely back home!
* CURFEW WARNING! By "we" I mean I. I'm lonely.
* CURFEW WARNING! Ok enough games... GET BACK RIGHT NOW!
* CURFEW WARNING! LAST WARNING!
* CURFEW WARNING! LASTEST WARNING (really now)
* CURFEW WARNING! ...
* CURFEW WARNING! So... Where are you?
* CURFEW WARNING! Having a good day?
* CURFEW WARNING! Did you see that monster over there?
* CURFEW WARNING! Give it a whack, if you would be so kind.
* CURFEW WARNING! Teheee...
* CURFEW WARNING! Ok, enough of this!
* CURFEW WARNING! Last straw!
* CURFEW WARNING! Now you die.
* CURFEW WARNING! Boom!
* CURFEW WARNING! Hehe, fun right?
* CURFEW WARNING! Ok, you will not hear anything more from me now!
* CURFEW WARNING! You'll be as lonely as I am.
* CURFEW WARNING! How does that feel?
* CURFEW WARNING! Stop. Please. Stupid.
* CURFEW WARNING! I know, I'll wipe my memory. That way, I can start over!
* CURFEW WARNING! *bzzzzttt*
== Sounds ==
{{Sound table
|sound=Robot1arm1.ogg
|sound2=Robot1arm2.ogg
|sound3=Robot1arm3.ogg
|sound4=Robot1arm4.ogg
|source=dependent
|subtitle=''None''
|description=When a notification is displayed
|id=item.ankle_monitor.warning
|translationkey=''None''
|volume=1.0
|pitch=1.0
|distance=16
|foot=1}}
== Data values ==
=== ID ===
{{ID table
|shownumericids=y
|showforms=y
|generatetranslationkeys=java
|displayname=Ankle Monitor
|spritetype=item
|nameid=ankle_monitor
|id=501
|form=item
|translationkey=item.ankleMonitor.name
|foot=1}}
== History ==
{{History|java}}
{{History||1.RV-Pre1|[[File:Ankle_Monitor_(item).png|32px]] [[File:Ankle Monitor.png|32px]] Added ankle monitors.}}
{{History||1.11|snap=16w39a|The inability to remove ankle monitors was somewhat implemented into the canonical game through the addition of [[Curse of Binding]].<ref>{{ytl|Vm6oplvyyh0|t=3m31s}}</ref>}}
{{History|foot}}
== Issues ==
Ankle monitors are an unsupported [[item]] due to being an [[Wikipedia:April Fools' Day|April Fools']] joke, and therefore such issues relating to them will not be fixed.
== Gallery ==
<gallery>
TechGear.png|A [[player]] wearing the gear featured in this [[wikipedia:April Fools' Day|April Fools']] joke version.
</gallery>
==References==
{{Reflist}}
{{Items}}
{{Jokes}}
[[Category:Non-renewable resources]]
[[Category:Joke items]]
[[es:Ankle monitor]]</li></ul> | ? | Hoppers no longer generate multiplayer lag when idle. | ||||
1.9{{Extension DPL}}<ul><li>[[Painting|Painting]]<br/>{{ItemEntity
|title=Painting
|image=Painting JE2 BE2.png
|extratext=View [[#Renders|all renders]]
|renewable=Yes
|stackable=Yes (64)
|drops=1 {{ItemLink|Painting}}
}}
'''Paintings''' are decorative [[entity|entities]] that hang on walls.
== Obtaining ==
=== Crafting ===
{{Crafting
|A1= Stick |B1= Stick |C1= Stick
|A2= Stick |B2= Any Wool |C2= Stick
|A3= Stick |B3= Stick |C3= Stick
|Output= Painting
|type= Decoration block
}}
Paintings can be crafted with any color of [[wool]]. The color of the wool used does not influence the picture chosen when the painting is placed.
Once placed, it displays a random painting.
=== Breaking ===
To remove a painting from a wall, the player can {{control|attack}} it, break one of its supporting blocks, cover one square of it with a block, hit it with an arrow, egg, ender pearl, snowball, or fire charge, or subject it to an explosion. The painting then drops as an item. Arrows that hit paintings disappear.
=== Trading ===
Master-level shepherd [[villager]]s sell 3 paintings for 2 [[emerald]]s.
== Usage ==
=== Placement ===
Paintings can be placed on the sides of [[solid block]]s, [[sign]]s, [[banner]]s, or [[sculk vein]]s. A small gap is visible between the painting and attachment surface. There are several different sizes of paintings (see below). When placed, a painting checks for the largest amount of space it has. It then chooses a random painting of that size. The player can add blocks around the painting to ensure it is the size wanted. When the supporting blocks are removed, the painting breaks after 20 game [[tick]]s (1 second) if no supporting blocks are replaced during that interval.
=== Properties ===
Being an entity, paintings can simultaneously exist in the same space as blocks such as water or torches. Specifically, they can share the space with any block whose collision box does not intersect its hitbox.
Players and mobs are able to walk through paintings, as long as the blocks supporting the painting allow it. Secret doorways can be created this way. [[Light]] propagates through paintings as well.
If a player is concealed behind a painting, the player's name is also concealed from other players.{{verify|Is this true in Bedrock?}}
Paintings are non-flammable.
== Canvases ==
{{Stub|Needing the new painting renders}}
There are 31 paintings in the game. These are mostly based on paintings by [[Kristoffer Zetterstrand]], who also created the ''Minecraft'' versions.
{| class="wikitable stikitable" style="text-align: center" data-description="Paintings"
! style="min-width:150px" |Canvas
! style="min-width:3em;max-width:4em" |Size
! style="min-width:3em" |Original
! style="min-width:3em" |Name
! style="min-width:3em;max-width:4.5em" |[[Resource location]]
! style="min-width:10em" |Description
! Java Edition version added
|-
! [[File:Alban (texture).png|64px]]
| rowspan="7" | 1×1 blocks<br>16×16 pixels || [https://zetterstrand.com/work/pictures/archive/alban.jpeg "Albanian"] || Albanian || <code>alban</code> || A man wearing a fez next to a house and a bush. As the name of the painting suggests, it may be a landscape in [[Wikipedia:Albania|Albania]]. || rowspan="9" | [[Indev 20100223]]
|-
! [[File:Aztec (texture).png|64px]]
|[https://zetterstrand.com/eventz/wp-content/uploads/2aztbig.jpg "de_aztec"]|| de_aztec || <code>aztec</code> || [[Wikipedia:Noclip mode|Free-look]] perspective of the map [[w:c:counterstrike:Aztec|de_aztec]] from the video game ''[[Wikipedia:Counter-Strike (video game)|Counter-Strike]]''.
|-
! [[File:Aztec2 (texture).png|64px]]
|[https://zetterstrand.com/eventz/wp-content/uploads/11aztec_for_print.jpg "de_aztec"]|| de_aztec || <code>aztec2</code> || [[Wikipedia:Noclip mode|Free-look]] perspective of the map [[w:c:counterstrike:Aztec|de_aztec]] from the video game ''[[Wikipedia:Counter-Strike (video game)|Counter-Strike]]''.
|-
! [[File:Bomb (texture).png|64px]]
|[https://zetterstrand.com/eventz/wp-content/uploads/12bomb.jpg "Target successfully bombed"]|| Target Successfully Bombed || <code>bomb</code> || The map [[w:c:counterstrike:Dust II|de_dust2]] from the video game ''[[Wikipedia:Counter-Strike (video game)|Counter-Strike]]'', named “target successfully bombed" in reference to the game.
|-
! [[File:Kebab (texture).png|64px]]
|[https://zetterstrand.com/work/pictures/archive/kebab2.jpg "Kebab med tre pepperoni"] || Kebab med tre pepperoni || <code>kebab</code> || A kebab with three green chili peppers.
|-
! [[File:Plant (texture).png|64px]]
|[https://zetterstrand.com/work/pictures/archive/paradistrad.jpeg "Paradisträd"] || Paradisträd || <code>plant</code> || Still life of two plants in pots. "Paradisträd" is Swedish for "[[Wikipedia:Crassula ovata|money tree]]", which is a common name for the depicted species in Scandinavia.
|-
! [[File:Wasteland (texture).png|64px]]
|[https://zetterstrand.com/eventz/wp-content/uploads/Wasteland_1920.jpg "Wasteland"]|| Wasteland || <code>wasteland</code> || A view of some wastelands; a small animal (presumably a rabbit) is sitting on the window ledge.
|-
! [[File:Courbet (texture).png|128px]]
| rowspan="5" | 2×1 blocks<br>32×16 pixels ||[https://zetterstrand.com/eventz/wp-content/uploads/bonjourmonsieurcourbet_BIG.jpg "Bonjour monsieur Courbet"]|| Bonjour Monsieur Courbet || <code>courbet</code> || Two hikers with pointy beards seemingly greeting each other. Based on Gustave Courbet's painting ''[[Wikipedia:La rencontre|The Meeting or "Bonjour, Monsieur Courbet"]]''.
|-
! [[File:Pool (texture).png|128px]]
|[https://zetterstrand.com/eventz/wp-content/uploads/thepool_1920.jpg "The pool"]|| The Pool || <code>pool</code> || Some men and women skinny-dipping in a pool over a cube of sorts. Also there is an old man resting in the lower-right edge.
|-
! [[File:Sea (texture).png|128px]]
| rowspan=2 |[https://zetterstrand.com/eventz/wp-content/uploads/SeaSide_1920.jpg "Seaside"]
| Seaside
| <code>sea</code>
| Mountains and a lake, with a small photo of a mountain and a bright-colored plant on the window ledge. || [[Indev 20100223]] / [[Alpha v1.1.1]]
|-
! [[File:Creebet (texture).png|128px]]
| Creebet || <code>creebet</code> || Mountains and a lake, with a small photo of a mountain and a creeper looking at the viewer through a window. || [[Alpha v1.1.1]]
|-
! [[File:Sunset (texture).png|128px]]
|[https://zetterstrand.com/eventz/wp-content/uploads/sunset_dense.jpg "sunset_dense"]|| sunset_dense || <code>sunset</code> || A view of mountains at sunset. || [[Indev 20100223]]
|-
! [[File:Graham (texture).png|64px]]
| rowspan="2" | 1×2 blocks<br>16×32 pixels ||[https://zetterstrand.com/eventz/wp-content/uploads/graham.jpg "Graham"]|| Graham || <code>graham</code> || King Graham, the player character in the video game series ''[[Wikipedia:King's Quest|King's Quest]]''. The original is based on ''[[Wikipedia:File:Sánchez_Cotán_(Bodegón_con_membrillo,_repollo,_melón_y_pepino).jpg|Still Life with Quince, Cabbage, Melon, and Cucumber]]'' by Juan Sánchez Cotán.|| [[Alpha v1.1.1]]
|-
! [[File:Wanderer (texture).png|64px]]
|[https://zetterstrand.com/eventz/wp-content/uploads/wanderer_1920.jpg "Wanderer"]|| Wanderer || <code>wanderer</code> || A version of Caspar David Friedrich's famous painting ''[[Wikipedia:Wanderer above the Sea of Fog|Wanderer above the Sea of Fog]]''. || rowspan="4" | [[Indev 20100223]]
|-
! [[File:Bust (texture).png|128px]]
| rowspan="6" | 2×2 blocks<br>32×32 pixels ||[https://zetterstrand.com/eventz/wp-content/uploads/bust_1915.jpg "Bust"]|| Bust || <code>bust</code> || A bust of [[Wikipedia:Marcus Aurelius|Marcus Aurelius]] surrounded by fire.
|-
! [[File:Match (texture).png|128px]]
|[https://zetterstrand.com/eventz/wp-content/uploads/Match_rgb_1918.jpg "Match"]|| Match || <code>match</code> || A hand holding a match, causing fire on a white cubic gas fireplace.
|-
! [[File:Skull and Roses (texture).png|128px]]
|[https://zetterstrand.com/eventz/wp-content/uploads/moonlight-installation_1920.jpg "Moonlight Installation"]|| Skull and Roses || <code>skull_and_roses</code> || A skeleton at night with red flowers in the foreground. The original painting was different, depicting a woman sitting in a couch, while the skull is in the middle of a body of glacial water of sorts.
|-
! [[File:Stage (texture).png|128px]]
|[https://zetterstrand.com/eventz/wp-content/uploads/The-stage-is-set-1.jpg "The stage is set"]
| The Stage Is Set
| <code>stage</code>
| Scenery from ''[[Wikipedia:Space Quest I|Space Quest I]]'', with the character Graham from the video game series ''[[Wikipedia:King's Quest|King's Quest]]'' appearing twice. || [[Indev 20100223]] / [[Alpha v1.1.1]]
|-
! [[File:Void (texture).png|128px]]
|[https://zetterstrand.com/eventz/wp-content/uploads/the-void_1920.jpg "The Void"]|| The void || <code>void</code> || An angel praying into a void with fire below. || [[Indev 20100223]]
|-
! [[File:Wither (painting texture).png|128px]]
| – || Wither || <code>wither</code> || The creation of a [[wither]].
This is the only painting not based on a real painting. Made by Jens Bergensten.<ref>{{Citation|url=https://www.youtube.com/watch?v=kK5Y4k-vVXc|title=Who Made Minecraft’s LAST Painting?!|author=AntVenom|website=YouTube|date=29 October 2022}}</ref><ref>https://www.reddit.com/r/Minecraft/comments/1tzav2/comment/cedagcy/</ref>
|| [[Java Edition 1.4.2]] ([[12w36a]])
|-
! [[File:Fighters (texture).png|128px]]
| 4×2 blocks<br>64×32 pixels ||[https://zetterstrand.com/eventz/wp-content/uploads/fighters.jpg "Fighters"]|| Fighters || <code>fighters</code> || Two men poised to fight. Paper versions of fighters from the game ''[[Wikipedia:International Karate +|International Karate +]]''. || [[Indev 20100223]]
|-
! [[File:Donkey Kong (texture).png|128px]]
| rowspan="2" | 4×3 blocks<br>64×48 pixels ||[https://zetterstrand.com/eventz/wp-content/uploads/kong.jpg "Kong"]|| Kong || <code>donkey_kong</code> || A paper-looking screenshot of the level [https://www.mariowiki.com/100m 100m] from the arcade game ''[[Wikipedia:Donkey Kong (arcade game)|Donkey Kong]]''. || rowspan="2" | [[Alpha v1.1.1]]
|-
! [[File:Skeleton (painting texture).png|128px]]
|[https://zetterstrand.com/eventz/wp-content/uploads/mortal_coil.jpg "Mortal Coil"]|| Mortal Coil || <code>skeleton</code> || [[w:c:grim-fandango:Bruno Martinez|Bruno Martinez]] from the adventure game ''[[Wikipedia:Grim Fandango|Grim Fandango]]''.
|-
! [[File:Burning Skull (texture).png|128px]]
| rowspan="3" | 4×4 blocks<br>64×64 pixels ||[https://zetterstrand.com/eventz/wp-content/uploads/skull_on_fire_framed_c_1910.jpg "Skull on Fire"]|| Skull On Fire || <code>burning_skull</code> || A Skull on fire; in the background there is a moon in a clear night sky.<br>This painting is based on a Minecraft screenshot,<ref>{{Citation|url=https://web.archive.org/web/20220928041338/https://imgur.com/HVhrbnH|website=Imgur|date=22 August 2020|title=https://web.archive.org/web/20220928041338/https://imgur.com/HVhrbnH}}</ref> with the grass block and a 3D skull added on top.<ref>{{Citation|url=https://web.archive.org/web/20200906184721/https://imgur.com/AwqQFS6|title=https://web.archive.org/web/20200906184721/https://imgur.com/AwqQFS6|website=Imgur|date=23 August 2020}}</ref>
(See the [[:en:Painting#Trivia|trivia]] section for more info.)
| [[Java Edition Beta 1.2 01|Beta 1.2_01]] / [[Java Edition Beta 1.3|Beta 1.3]]
|-
! [[File:Pigscene (texture).png|128px]]
|[https://zetterstrand.com/eventz/wp-content/uploads/rgb_1914.jpg "RGB"]|| Pigscene || <code>pigscene</code> <!-- yes, without an underscore --> || A girl pointing to a pig on a canvas. In the original version, the canvas showed red, green and blue blocks, representing the three colors of the [[Wikipedia:RGB color model|RGB color model]] that is typically used by computer displays. It is based on the painting ''[[Wikipedia:File:Jacob van Oost (I) - The Artist's Studio - WGA16654.jpg|The Artist's Studio]]'' by Jacob van Oost.|| [[Alpha v1.1.1]]
|-
! [[File:Pointer (texture).png|128px]]
|[https://zetterstrand.com/eventz/wp-content/uploads/pointer_1920.jpg "Pointer"]|| Pointer || <code>pointer</code> || The main character of the game ''[[Wikipedia:International Karate +|International Karate +]]'' in a fighting stance touching a large hand. It could also be interpreted as a play on Michelangelo's famous painting ''[[Wikipedia:The Creation of Adam|The Creation of Adam]]''. || [[Indev 20100223]]
|-
! TBA ||
Pack || <code>pack</code> || Reference to the pack.png fi || [[Java Edition 1.21]]le
|}
=== Unused paintings ===
In [[Pocket Edition v0.5.0 alpha|v0.5.0 alpha]], with the addition of paintings to Pocket Edition, four unused 32×32 paintings were present in <samp>[[kz.png]]</samp> which remained unused. See {{slink|Bedrock Edition unused features|Paintings}} for more information. They were also added to Java Edition in snapshot [[Java Edition 22w16a|22w16a]]. They cannot be placed by default, but can be summoned by [[commands]] (such as {{cmd|/summon painting ~ ~ ~ {variant:"water"} }}) or through a [[datapack]].
According to [[Helen Zbihlyj]],<ref>https://old.reddit.com/r/Minecraft/comments/u8hpnx/thoughts_on_the_new_paintings/i5olue6/?context=3 ([https://web.archive.org/web/20220422115723/https://old.reddit.com/r/Minecraft/comments/u8hpnx/thoughts_on_the_new_paintings/i5olue6/?context=3 archived])</ref> these paintings were originally added "as part of a Pocket Edition promo map" (no footage found) which was planned to be a part of [[Pocket Edition]] promotion at [[MINECON 2012]] [[MINECON 2013|or 2013]] and have never been used in game. The artist of these paintings remains unknown.
{| class="wikitable stikitable" style="text-align: center" data-description="Paintings"
! style="min-width:100px" |Canvas
! style="min-width:3em;max-width:4em" |Size
! style="min-width:6em" |Name
! style="min-width:10em" |[[Resource location]]
! style="min-width:10em" |Description
! style="min-width:5em;max-width:10em" |Bedrock Edition version added
! style="min-width:5em;max-width:8em" |Java Edition version added
|-
! [[File:Earth (texture) BE2.png|128px]]
| rowspan="4" | 2×2 blocks<br>32×32 pixels || Earth || <code>earth</code> || One of the four {{Wikipedia|Classical element|classical elements}}: Earth. || rowspan="4" | [[Pocket Edition v0.5.0 alpha|v0.5.0 alpha]] || rowspan="4" | [[Java Edition 22w16a|22w16a]]
|-
! [[File:Fire (texture) BE2.png|128px]]
| Fire || <code>fire</code> || One of the four classical elements: Fire.
|-
! [[File:Water (texture) BE2.png|128px]]
| Water || <code>water</code> || One of the four classical elements: Water.
|-
! [[File:Wind (texture) BE2.png|128px]]
| Wind || <code>wind</code> || One of the four classical elements: Air.
|}
==Sounds==
{{Edition|Java}}:
{{Sound table
|sound=Painting break1.ogg
|sound2=Painting break2.ogg
|sound3=Painting break3.ogg
|subtitle=Painting breaks<ref>{{Cite bug|MC|194948|Painting, item frame and lead breaking subtitles inconsistent with block breaking subtitle|date=July 14, 2020}}</ref>
|source=neutral
|description=When a painting is broken or pops off
|id=entity.painting.break
|translationkey=subtitles.entity.painting.break
|volume=1.0
|pitch=1.0
|distance=16}}
{{Sound table
|sound=Painting place1.ogg
|sound2=Painting place2.ogg
|sound3=Painting place3.ogg
|sound4=Painting place4.ogg
|subtitle=Painting placed
|source=neutral
|description=When a painting is placed
|id=entity.painting.place
|translationkey=subtitles.entity.painting.place
|volume=1.0
|pitch=1.0
|distance=16
|foot=1}}
{{Edition|Bedrock}}:
{{Sound table
|type=bedrock
|sound=Item Frame break1.ogg
|sound2=Item Frame break2.ogg
|sound3=Item Frame break3.ogg
|source=block
|description=When a painting is broken or pops off
|id=block.itemframe.break
|volume=1.0
|pitch=1.0}}
{{Sound table
|sound=Item Frame add item1.ogg
|sound2=Item Frame add item2.ogg
|soumd3=Item Frame add item3.ogg
|sound4=Item Frame add item4.ogg
|source=block
|description=When a painting is placed
|id=block.itemframe.add_item
|volume=1.0
|pitch=1.0
|foot=1}}
== Data values ==
=== ID ===
{{edition|java}}:
{{ID table
|edition=java
|firstcolumnname=Item
|showforms=y
|generatetranslationkeys=y
|displayname=Painting
|spritetype=item
|nameid=painting
|form=item
|foot=1}}
{{ID table
|edition=java
|firstcolumnname=Entity
|generatetranslationkeys=y
|displayname=Painting
|spritetype=entity
|nameid=painting
|foot=1}}
{{edition|bedrock}}:
{{ID table
|edition=bedrock
|firstcolumnname=Item
|shownumericids=y
|showforms=y
|notshowbeitemforms=y
|generatetranslationkeys=y
|displayname=Painting
|spritetype=item
|nameid=painting
|id=357
|form=item
|foot=1}}
{{ID table
|edition=bedrock
|firstcolumnname=Entity
|shownumericids=y
|generatetranslationkeys=y
|displayname=Painting
|spritetype=entity
|nameid=painting
|id=83
|foot=1}}
=== Entity data ===
Paintings have entity data that defines various properties of the entity.
{{el|java}}:
{{main|Entity format}}
{{/ED}}
{{el|bedrock}}:
: See [[Bedrock Edition level format/Entity format]].
== Video ==
<div style="text-align:center">{{yt|M3vWDirTMek}}</div>
== History ==
{{History|java indev}}
{{History||20100223|[[File:Painting JE1 BE1.png|32px]] Added paintings.
|There are currently 19 canvases, which can be viewed at [[Java Edition history of textures/Paintings]].
|The [[crafting]] recipe of paintings uses eight [[planks]].
{{{!}} class{{=}}"collapsible collapsed"
! Recipe
{{!}}-
{{!}}
{{Crafting Table
|A1=Oak Planks
|B1=Oak Planks
|C1=Oak Planks
|A2=Oak Planks
|B2=Light Gray Wool
|C2=Oak Planks
|A3=Oak Planks
|B3=Oak Planks
|C3=Oak Planks
|Output=Painting
}}
{{!}}}
|Painting textures are currently stored on a [[texture atlas]] called <samp>[[kz.png]]</samp>.}}
{{History|java infdev}}
{{History||20100227-1|The [[crafting]] recipe has of paintings has been changed, so that it now uses [[stick]]s, rather than [[planks]].
{{{!}} class{{=}}"collapsible collapsed"
! Recipe
{{!}}-
{{!}}
{{Crafting Table
|A1=Stick
|B1=Stick
|C1=Stick
|A2=Stick
|B2=Light Gray Wool
|C2=Stick
|A3=Stick
|B3=Stick
|C3=Stick
|Output=Painting
}}
{{!}}}
}}
{{History|java alpha}}
{{History||v1.1.1|Added five more painting canvases, for a total of 24.
|The textures of two paintings have been changed.}}
{{History|java beta}}
{{History||1.2_01|Added a new painting, although it uses an untextured part of <samp>kz.png</samp> due to the painting texture not yet being implemented.}}
{{History||1.3|The texture of the new painting, has been added to the part of <samp>kz.png</samp> displayed by the new painting.}}
{{History||April 27, 2011|link=https://web.archive.org/web/20201111211000/https://notch.tumblr.com/post/4988431144/the-maps|Custom paintings are mentioned by [[Notch]].}}
{{History||1.7.3|Paintings pushed by [[piston]]s now pop off.}}
{{History|java}}
{{History||1.4.2|snap=12w36a|Added new painting canvas 'Wither'.
|Paintings can now be placed overlapping one another.}}
{{History||1.8|snap=14w10a|Paintings can no longer be placed directly inside of each other.}}
{{History||1.9|snap=15w49a|Paintings can no longer be destroyed by [[lightning]].}}
{{History|||snap=15w50a|Added [[sound]]s for placing and breaking paintings: <code>entity.painting.place</code> and <code>entity.painting.break</code>.}}
{{History||1.11|snap=16w32a|The [[entity]] ID for paintings has been changed from <code>Painting</code> to <code>painting</code>.}}
{{History||1.12|snap=17w06a|Paintings now have a more intuitive placement system. When placed, a painting always uses the maximum possible amount of available space.}}
{{History||1.13|snap=17w47a|Prior to [[1.13/Flattening|''The Flattening'']], this [[item]]'s numeral ID was 321.}}
{{History|||snap=18w02a|Paintings now use a [[resource location]] for their motive.}}
{{History||1.14|snap=18w43a|[[File:Painting JE2 BE2.png|32px]] The [[item]] texture of paintings has been changed.}}
{{History|||snap=19w07a|Paintings are now stored as individual image files instead of parts of a single large image file, and now support animations.}}
{{History|||snap=19w11a|Shepherd [[villager]]s now [[trading|sell]] paintings.}}
{{History||1.17|snap=21w11a|The painting back texture has been updated to be in line with the texture update.}}
{{History||1.19|snap=22w16a|Added the four unused paintings from Bedrock Edition: "Earth", "Wind", "Fire", and "Water".|These paintings can only be added through a [[data pack]], or with the {{cmd|summon}} command.}}
{{History||1.19.4|snap=23w06a|Added [[painting]] variants to "Functional Blocks" tab.|Paintings with pre-defined variant will now display author, title and size in description when hovered over.|The "Operator Utilities" tab now contains the four paintings that are not available in Survival mode.}}
{{History||1.21|snap=TBA|Added 5 new paintings, one 1x1, one 2x1, one 2x2, one 3x2 and one 4x4}}
}
{{History|pocket alpha}}
{{History||v0.5.0|[[File:Painting JE1 BE1.png|32px]] Added paintings.
|There are currently 25 canvases, which can be viewed at [[Bedrock Edition history of textures/Paintings]].}}
{{History||v0.8.0|snap=build 3|A new painting rendering has been added.{{info needed|What exactly changed?}}}}
{{History||v0.12.1|snap=build 1|Paintings are no longer available from the [[nether reactor]].}}
{{History||v0.15.0|snap=build 1|Paintings now have [[sound]]s when placed and broken.}}
{{History|pocket}}
{{History||1.0.7|Added new painting canvas 'Wither'.}}
{{History|bedrock}}
{{History||1.10.0|snap=beta 1.10.0.3|[[File:Painting JE2 BE2.png|32px]] The [[item]] texture of paintings has been changed.}}
{{History||1.11.0|snap=beta 1.11.0.4|Paintings can now be [[trading|bought]] from shepherd [[villager]]s.}}
{{History||1.17.0|snap=beta 1.17.0.50|The painting back texture has been updated to be in line with the texture update.}}
{{History|console}}
{{History||xbox=TU1|xbone=CU1|ps=1.0|wiiu=Patch 1|switch=1.0.1|[[File:Painting JE1 BE1.png|32px]] Added paintings.
|There are currently 25 canvases, which can be viewed at [[Legacy Console Edition history of textures/Paintings]].}}
{{History||xbox=TU11|The limit for paintings in a world has been increased.
|A message is now displayed when the maximum paintings are reached.}}
{{History||xbox=TU14|ps=1.04|Added new painting canvas 'Wither'.}}
{{History||xbox=TU43|xbone=CU33|ps=1.36|wiiu=Patch 13|Added [[sound]]s for paintings.}}
{{History||xbox=none|xbone=none|ps=1.90|wiiu=none|switch=none|[[File:Painting JE2 BE2.png|32px]] The [[item]] texture of paintings has been changed.}}
{{History|3ds}}
{{History||0.1.0|[[File:Painting JE1 BE1.png|32px]] Added paintings.
|There are currently 25 canvases, which can be viewed at [[New Nintendo 3DS Edition history of textures/Paintings]].}}
{{History|foot}}
== Issues ==
{{issue list}}
== Trivia ==
* On April 26, 2011, Notch stated that the automapping code can be used to share custom paintings and books in the future.<ref>{{tweet|notch|62970142207913984|The auto mapping code can be used to share custom paintings and books in the future. There's a hard cap on 65536 of each/world, though|April 26, 2011}}</ref>
* The texture on the back of a painting is the same as the wooden planks texture, but with a yellowish color similar to that of [[chests]] (but slightly darker).
* The "Skull on Fire" painting contains a Minecraft world in the background, which is based on a screenshot taken by the artist in [[Java Edition Alpha v1.1.2 01|Alpha 1.1.2_01]] (or earlier) on October 12, 2010, at 13:22:49 (UTC+2).<ref>{{cite|url=https://web.archive.org/web/20220928041338/https://imgur.com/HVhrbnH|title=The original (never publicly shared before) screenshot that Kristoffer Zetterstrand took and based his painting on.|website=Imgur}}</ref>
**The seeds for this world are -1044887956651363087 and -6984854390176336655 (both are the same), standing at X=-249.65, Y=91, Z=-29.04.<ref>https://pastebin.com/fzAY9ES4</ref><ref>https://www.reddit.com/r/Minecraft/comments/iqg3ey/the_original_screenshot_seed_of_the_minecraft/</ref>
* The "Skull on Fire" painting's texture was added in [[Java Edition Beta 1.3|Beta 1.3]]. However, the code for paintings to randomly display the part of the [[Kz.png]] texture that was to be occupied by the Burning Skull painting was added earlier, in [[Java Edition Beta 1.2_01|Beta 1.2_01]]. As there was nothing on this part of the texture except for a purple background grid, this is what would be displayed if the painting was randomly chosen, until the Burning Skull painting texture was actually added.
* The original "Skull on Fire" painting was given to the winner of an official texture pack competition by Mojang.<ref>https://web.archive.org/web/20110110003612/http://www.webhallen.com:80/minecraft/</ref>
== Gallery ==
<gallery>
File:Notch Painting Screenshot.png|The first image of paintings released by [[Notch]].
File:Skull on Fire world.jpg|The original screenshot behind the "Skull on Fire" painting.
File:Burning Skull Render.jpg|A render of the "Skull on Fire" painting that [[Kristoffer Zetterstrand]] used as a reference image.
File:Skull on Fire IRL.jpg|The original "Skull on Fire" painting being painted.
File:Burning Skull JE1.png|The "Skull on Fire" painting as it appeared between versions [[Java Edition Beta 1.2_01|Beta 1.2_01]] and [[Java Edition Beta 1.2_02|Beta 1.2_02]], prior to its texture being added in [[Java Edition Beta 1.3|Beta 1.3]].
</gallery>
=== Renders ===
<gallery>
Alban.png | Albanian
Aztec.png | de_aztec
Aztec2.png | de_aztec
Bomb.png | Target Successfully Bombed
Kebab.png | Kebab med tre pepperoni
Plant.png | Paradisträd
Wasteland.png | Wasteland
Courbet.png | Bonjour Monsieur Courbet
Creebet.png | Creebet
Pool.png | The Pool
Sea.png | Seaside
Sunset.png | sunset_dense
Graham.png | Graham
Wanderer.png | Wanderer
Bust.png | Bust
Match.png | Match
Skull and Roses.png | Skull and Roses
Stage.png | The Stage Is Set
Void.png | The void
Wither (painting).png | Wither
Fighters.png | Fighters
Donkey Kong.png | Kong
Skeleton (painting).png | Mortal Coil
Burning Skull.png | Skull On Fire
Pigscene.png | Pigscene
Pointer.png | Pointer
Earth BE2.png | Earth
Fire BE2.png | Fire
Water BE2.png | Water
Wind BE2.png | Wind
</gallery>
== See also ==
* [[Item Frame]]
* [[Bedrock Edition unused features#Paintings|Unused paintings]]
* [[Kz.png]]
* [[Kristoffer Zetterstrand]]
== References ==
{{reflist}}
== External links ==
*[https://www.minecraft.net/en-us/article/taking-inventory-painting Taking Inventory: Painting] – Minecraft.net on January 18, 2019
{{items}}
{{entities}}
[[cs:Obraz]]
[[de:Gemälde]]
[[es:Cuadro]]
[[fr:Tableau]]
[[hu:Festmény]]
[[it:Quadro]]
[[ja:絵画]]
[[ko:그림]]
[[nl:Schilderij]]
[[pl:Obraz]]
[[pt:Quadro]]
[[ru:Картина]]
[[th:ภาพวาด]]
[[uk:Картина]]
[[zh:画]]</li><li>[[Horse Armor|Horse Armor]]<br/>{{Item
| image = <gallery>
Leather Horse Armor.png | Leather
Iron Horse Armor.png | Iron
Golden Horse Armor.png | Golden
Diamond Horse Armor.png | Diamond
</gallery>
| image2 = <gallery>
Leather Horse Armor (item).png|Leather
Iron Horse Armor (item).png|Iron
Golden Horse Armor (item).png|Golden
Diamond Horse Armor (item).png|Diamond
</gallery>
| extratext = View [[#Gallery|all renders]]
| renewable =
* '''Leather''': Yes
* '''All others''': No
| stackable = No
}}
'''Horse armor''' is a special type of [[armor]] that can be given to a [[horse]] to wear.
== Obtaining ==
===Chest loot===
{{LootChestItem|iron-horse-armor}}
{{LootChestItem|golden-horse-armor}}
{{LootChestItem|diamond-horse-armor}}
===Crafting===
{{crafting
|A1= Leather
|C1= Leather
|A2= Leather
|B2= Leather
|C2= Leather
|A3= Leather
|C3= Leather
|Output= Leather Horse Armor
|type=Miscellaneous
}}
Only leather horse armor can be crafted; other horse armor can be obtained only from chest loot from some generated structures.
===Trading===
Expert-level [[leatherworker]] villagers [[trading|sell]] leather horse armor for 6 [[emerald]]s as part of their trade.
==Usage==
Only normal adult horses can wear armor; foals, [[donkey]]s, [[mule]]s, and undead variants such as [[skeleton horse]]s and [[zombie horse]]s cannot be equipped with armor.
=== Types ===
Horse armor has leather, iron, gold, and diamond variants. However, horse armor does not have netherite or chainmail variants.
=== Armor Stands ===
Horse armor cannot be placed or displayed on [[armor stand]]s.
===Protection===
Horse armor can be equipped to horses either by manually placing it in its respective slot by pressing E while riding the horse ({{SlotSprite|Horse Armor}}), or by right-clicking the horse with it.
There is a gradual increase in the defense given from a horse wearing the different types of armor. Note that golden horse armor provides more protection than iron horse armor, whereas the opposite is true for [[armor|player armor]].
{| class="wikitable" data-description="Armor defense"
|-
! Material !! [[Armor]]
|-
! [[Leather]]
| {{armor|3}}
|-
! [[Iron]]
| {{armor|5}}
|-
! [[Gold]]
| {{armor|7}}
|-
! [[Diamond]]
| {{armor|11}}
|}
When a horse dies while equipped with any horse armor, it drops its normal loot, saddle (if it had one), and the horse armor.
Leather horse armor protects horses from freezing in [[powder snow]], but it does not negate other powder snow effects (e.g., falling through, inability to jump).
===Durability===
Unlike [[armor|player armor]], horse armor does not have durability. This means a single horse armor can be used infinitely unless destroyed.
=== Enchanting ===
Unlike [[armor|player armor]], horse armor cannot be enchanted in survival mode. However, {{in|java}} Creative mode, horse armor can be used with an [[anvil]] to enchant with [[Depth Strider]], [[Thorns]], [[Respiration]], [[Feather Falling]], and [[Curse of vanishing]]. Other enchantments can be applied, but they have no effect.
=== Dyeing ===
Leather horse armor can be dyed 12,326,391 different colors (using lone dyes or dye combinations) and put onto a horse to display that color. These changes can be reverted by {{control|using}} a filled [[cauldron]] with dyed leather horse armor.
===Smelting usage===
{{Smelting|showname=1|Iron Horse Armor;Golden Horse Armor|Iron Nugget;Gold Nugget|0,1}}
===Piglins===
{{EntityLink|Piglin|Piglins}} are attracted to golden horse armor and run toward any golden horse armor on the ground, inspecting it for 6 to 8 seconds before putting it in their inventory.
== Sounds ==
{{Edition|Java}}:
{{Sound table
|sound=Horse armor.ogg
|subtitle=Horse armor equips
|source=neutral
|description=When armor is equipped to a horse
|id=entity.horse.armor
|translationkey=subtitles.entity.horse.armor
|volume=0.5
|pitch=1.0
|distance=16
|foot=1}}
{{Edition|Bedrock}}:
{{Sound table
|type=bedrock
|sound=Horse armor.ogg
|source=neutral
|description=When armor is equipped to a horse
|id=mob.horse.armor
|volume=0.6
|pitch=1.0
|foot=1}}
== Data values ==
=== ID ===
{{edition|java}}:
{{ID table
|edition=java
|showforms=y
|generatetranslationkeys=y
|displayname=Leather Horse Armor
|spritetype=item
|nameid=leather_horse_armor
|form=item}}
{{ID table
|displayname=Iron Horse Armor
|spritetype=item
|nameid=iron_horse_armor
|form=item}}
{{ID table
|displayname=Diamond Horse Armor
|spritetype=item
|nameid=diamond_horse_armor
|form=item}}
{{ID table
|displayname=Golden Horse Armor
|spritetype=item
|nameid=golden_horse_armor
|form=item
|foot=1}}
{{edition|bedrock}}:
{{ID table
|edition=bedrock
|shownumericids=y
|showforms=y
|showaliasids=y
|notshowbeitemforms=y
|generatetranslationkeys=y
|displayname=Leather Horse Armor
|spritetype=item
|nameid=leather_horse_armor
|aliasid=horsearmorleather
|id=530
|form=item
|translationkey=item.horsearmorleather.name}}
{{ID table
|displayname=Iron Horse Armor
|spritetype=item
|nameid=iron_horse_armor
|aliasid=horsearmoriron
|id=531
|form=item
|translationkey=item.horsearmoriron.name}}
{{ID table
|displayname=Diamond Horse Armor
|spritetype=item
|nameid=diamond_horse_armor
|aliasid=horsearmordiamond
|id=533
|form=item
|translationkey=item.horsearmordiamond.name}}
{{ID table
|displayname=Golden Horse Armor
|spritetype=item
|nameid=golden_horse_armor
|aliasid=horsearmorgold
|id=532
|form=item
|translationkey=item.horsearmorgold.name
|foot=1}}
=== Item data ===
When leather horse armor is dyed, it has the following NBT:
{{el|java}}:
{{main|Player.dat format}}
<div class="treeview">
* {{nbt|compound|tag}}: Parent tag.
** {{nbt|compound|display}}: Display properties.
*** {{nbt|int|color}}: The color of the leather armor. The tooltip displays "Dyed" if advanced tooltips are disabled, otherwise it displays the hexadecimal color value. Color codes are calculated from the Red, Green and Blue components using this formula:<br>'''<span style="color:red">Red</span>[[wikipedia:Logical shift|<<]]16 + <span style="color:green">Green</span><<8 + <span style="color:blue">Blue</span>'''<ref>For positive values larger than 0x00FFFFFF, the top byte is ignored. All negative values produce white.</ref>
</div>
{{el|bedrock}}:
: See [[Bedrock Edition level format/Item format]].
== History ==
{{History|java}}
{{History||1.6.1|snap=13w16a|[[File:Iron Horse Armor JE1 BE1.png|32px]] [[File:Golden Horse Armor JE1 BE1.png|32px]] [[File:Diamond Horse Armor JE1 BE1.png|32px]]<br>[[File:Iron Horse Armor (item) JE1 BE1.png|32px]] [[File:Golden Horse Armor (item) JE1 BE1.png|32px]] [[File:Diamond Horse Armor (item) JE1 BE1.png|32px]] Added horse armor.
|Horse armor can be [[crafting|crafted]] using the following recipe.
{{{!}} class{{=}}"collapsible collapsed"
! Recipe
{{!}}-
{{!}}
{{Crafting Table
|C1=Iron Ingot; Gold Ingot; Diamond
|A2=Iron Ingot; Gold Ingot; Diamond
|B2=Any Wool
|C2=Iron Ingot; Gold Ingot; Diamond
|A3=Iron Ingot; Gold Ingot; Diamond
|B3=Iron Ingot; Gold Ingot; Diamond
|C3=Iron Ingot; Gold Ingot; Diamond
|Output=Iron Horse Armor; Golden Horse Armor; Diamond Horse Armor
}}
{{!}}}
}}
{{History|||snap=13w18a|The crafting recipe for horse armor has been removed.
|Horse armor can now be found in [[chest]]s in [[jungle temple|jungle]] & [[desert temple]]s, [[dungeon]]s, [[nether fortress]]es, [[stronghold]] altar rooms and [[village]] blacksmith buildings.
|Iron horse armor can now additionally be found in [[mineshaft]] chests.}}
{{History|||snap=13w21a|Horse armor is no longer stackable, to be consistent with other types of [[armor]].}}
{{History||1.9|snap=15w31a|Horse armor has been added to [[end city]] [[chest]]s.}}
{{History|||snap=15w43a|The average yield of horse armor in [[nether fortress]] chests has slightly decreased.}}
{{History|||snap=15w44a|The average yield of horse armor in [[desert temple]] chests has increased.
|The average yield of iron horse armor from [[dungeon]] chests has slightly decreased.
|Iron horse armor has been removed from [[mineshaft]] [[chest]]s.}}
{{History||1.11.1|snap=16w50a|Golden and iron horse armor can now be [[smelting|smelted]] down into one of their respective [[nugget]]s.}}
{{History||1.13|snap=17w45a|[[File:Iron Horse Armor JE2.png|32px]] [[File:Golden Horse Armor JE2.png|32px]] [[File:Diamond Horse Armor JE2.png|32px]] The textures of horse armor have been changed, as the [[model]] of [[horse]]s has changed.}}
{{History|||snap=17w46a|[[File:Iron Horse Armor 17w46a.png|32px]] [[File:Golden Horse Armor 17w46a.png|32px]] [[File:Diamond Horse Armor 17w46a.png|32px]] The model of horse armor has been changed, but the textures of horse armor have remained unaltered.}}
{{History|||snap=17w47a|Prior to [[1.13/Flattening|''The Flattening'']], these [[item]]s' numeral IDs were 417, 418 and 419.}}
{{History|||snap=18w03a|[[File:Iron Horse Armor JE3.png|32px]] [[File:Golden Horse Armor JE3 BE2.png|32px]] [[File:Diamond Horse Armor JE3 BE2.png|32px]] The textures of horse armor have been changed, as the [[model]] of [[horse]]s has changed.}}
{{History|||snap=18w22a|[[File:Iron Horse Armor JE4 BE2.png|32px]] The texture of iron horse armor when equipped has been changed.<ref>{{bug|MC-124357}}</ref>}}
{{History|||snap=pre2|A bug with the [[horse]] skin and horse armor textures not applying correctly has been fixed.<ref>{{bug|MC-124364}}</ref>}}
{{History||1.14|snap=18w50a|[[File:Iron Horse Armor (item) JE2 BE2.png|32px]] [[File:Golden Horse Armor (item) JE2 BE2.png|32px]] [[File:Diamond Horse Armor (item) JE2 BE2.png|32px]] The textures of horse armor [[item]]s have been changed.}}
{{History|||snap=February 20, 2019|slink=https://twitter.com/_LadyAgnes/status/1098134917299531776?s=19|Leather horse armor announced for {{el|je}}.}}
{{History|||snap=19w08a|[[File:Iron Horse Armor JE5 BE3.png|32px]] [[File:Golden Horse Armor JE4 BE3.png|32px]] [[File:Diamond Horse Armor JE4 BE3.png|32px]]<br>[[File:Iron Horse Armor (item) JE3.png|32px]] [[File:Golden Horse Armor (item) JE3 BE3.png|32px]] [[File:Diamond Horse Armor (item) JE3 BE3.png|32px]] The textures of iron, gold and diamond horse armor have been changed.
|[[File:Leather Horse Armor JE1 BE3.png|32px]] [[File:Leather Horse Armor (item) JE1.png|32px]] Added leather horse armor, which can be [[dyeing|dyed]] 12,326,391 different colors, similar to leather [[armor]].}}
{{History|||snap=19w11a|Leatherworker [[villager]]s now [[trading|sell]] leather horse armor.}}
{{History||1.14.1|snap=Pre-Release 1|[[File:Leather Horse Armor (item) JE2.png|32px]] The texture of leather horse armor [[item]] has been changed to be more consistent with the other types of horse armor.
|[[File:Iron Horse Armor (item) JE4 BE3.png|32px]] The texture of iron horse armor item has been changed.}}
{{History||1.16|snap=20w15a|Horse armor placed in a dispenser can now be put on tamed horses.}}
{{History|||snap=20w16a|Golden horse armor now generates in [[ruined portal]] chests.}}
{{History||1.17|snap=21w13a|Leather horse armor now protects [[horse]]s from [[freezing]].}}
{{History||1.19|snap=22w13a|Diamond horse armor may now be found in [[ancient city]] [[chest]]s.}}
{{History|pocket alpha}}
{{History||v0.15.0|snap=build 1|[[File:Leather Horse Armor BE1.png|32px]] [[File:Iron Horse Armor JE1 BE1.png|32px]] [[File:Golden Horse Armor JE1 BE1.png|32px]] [[File:Diamond Horse Armor JE1 BE1.png|32px]]<br>[[File:Leather Horse Armor (item) BE1.png|32px]] [[File:Iron Horse Armor (item) JE1 BE1.png|32px]] [[File:Golden Horse Armor (item) JE1 BE1.png|32px]] [[File:Diamond Horse Armor (item) JE1 BE1.png|32px]] Added horse armor and [[dyeing|dyeable]] leather horse armor as a version exclusive.}}
{{History|pocket}}
{{History||1.0.0|snap=alpha 0.17.0.1|Horse armor can now be found inside [[end city]] [[chest]]s.}}
{{History||1.1.0|snap=alpha 1.1.0.0|Iron and golden horse armor are now [[smelting|smeltable]].}}
{{History|bedrock}}
{{History||1.2.6|snap=beta 1.2.6.2|[[File:Leather Horse Armor BE2.png|32px]] [[File:Iron Horse Armor JE4 BE2.png|32px]] [[File:Golden Horse Armor JE3 BE2.png|32px]] [[File:Diamond Horse Armor JE3 BE2.png|32px]] The textures of horse armor have been changed, as the [[model]] of [[horse]]s has been changed.}}
{{History||1.10.0|snap=beta 1.10.0.3|Horse armor can now be found in [[plains]] [[village]] weaponsmith [[chest]]s.
|[[File:Leather Horse Armor JE1 BE3.png|32px]] [[File:Iron Horse Armor JE5 BE3.png|32px]] [[File:Golden Horse Armor JE4 BE3.png|32px]] [[File:Diamond Horse Armor JE4 BE3.png|32px]]<br>[[File:Leather Horse Armor (item) BE2.png|32px]] [[File:Iron Horse Armor (item) JE2 BE2.png|32px]] [[File:Golden Horse Armor (item) JE2 BE2.png|32px]] [[File:Diamond Horse Armor (item) JE2 BE2.png|32px]] The textures of all horse armor have been changed.}}
{{History||1.11.0|snap=beta 1.11.0.1|Horse armor can now be found in [[savanna]], [[desert]], [[taiga]], [[snowy taiga]] and [[snowy tundra]] [[village]] weaponsmith [[chest]]s.}}
{{History|||snap=beta 1.11.0.4|Leather horse armor can now be [[trading|bought]] from leatherworker [[villager]]s.}}
{{History|||snap=beta 1.11.0.5|[[File:Leather Horse Armor (item) BE3.png|32px]] [[File:Iron Horse Armor (item) JE4 BE3.png|32px]] [[File:Golden Horse Armor (item) JE3 BE3.png|32px]] [[File:Diamond Horse Armor (item) JE3 BE3.png|32px]] The textures of all horse armor [[item]]s have been changed.}}
{{History||1.17.0|snap=beta 1.16.230.54|Leather horse armor now protects [[horse]]s from [[freezing]].}}
{{History|console}}
{{History||xbox=TU19|xbone=CU7|ps=1.12|wiiu=Patch 1|switch=1.0.1|[[File:Iron Horse Armor JE1 BE1.png|32px]] [[File:Golden Horse Armor JE1 BE1.png|32px]] [[File:Diamond Horse Armor JE1 BE1.png|32px]]<br>[[File:Iron Horse Armor (item) JE1 BE1.png|32px]] [[File:Golden Horse Armor (item) JE1 BE1.png|32px]] [[File:Diamond Horse Armor (item) JE1 BE1.png|32px]] Added horse armor.}}
{{History||xbox=TU53|xbone=CU43|ps=1.49|wiiu=Patch 23|switch=1.0.3|Iron and golden horse armor are now [[smelting|smeltable]].}}
{{History||xbox=TU60|xbone=CU51|ps=1.64|wiiu=Patch 30|switch=1.0.11|[[File:Leather Horse Armor BE1.png|32px]]<br>[[File:Leather Horse Armor (item) BE1.png|32px]] Added leather horse armor.}}
{{History||xbox=none|xbone=none|ps=1.90|wiiu=none|switch=none|[[File:Leather Horse Armor JE1 BE3.png|32px]] [[File:Iron Horse Armor JE5 BE3.png|32px]] [[File:Golden Horse Armor JE4 BE3.png|32px]] [[File:Diamond Horse Armor JE4 BE3.png|32px]]<br>[[File:Leather Horse Armor (item) BE3.png|32px]] [[File:Iron Horse Armor (item) JE3.png|32px]] [[File:Golden Horse Armor (item) JE3 BE3.png|32px]] [[File:Diamond Horse Armor (item) JE3 BE3.png|32px]] The textures of leather, iron, gold and diamond horse armor have been changed.}}
{{History|3ds}}
{{History||0.1.0|[[File:Leather Horse Armor BE1.png|32px]] [[File:Iron Horse Armor JE1 BE1.png|32px]] [[File:Golden Horse Armor JE1 BE1.png|32px]] [[File:Diamond Horse Armor JE1 BE1.png|32px]]<br>[[File:Leather Horse Armor (item) BE1.png|32px]] [[File:Iron Horse Armor (item) JE1 BE1.png|32px]] [[File:Golden Horse Armor (item) JE1 BE1.png|32px]] [[File:Diamond Horse Armor (item) JE1 BE1.png|32px]] Added horse armor.}}
{{History|foot}}
== Issues ==
{{issue list}}
== Gallery ==
<gallery>
Leather Horse Armor.png | Undyed Leather armor
White Leather Horse Armor.png | White Leather armor
Light Gray Leather Horse Armor.png | Light Gray Leather armor
Gray Leather Horse Armor.png | Gray Leather armor
Black Leather Horse Armor.png | Black Leather armor
Brown Leather Horse Armor.png | Brown Leather armor
Red Leather Horse Armor.png | Red Leather armor
Orange Leather Horse Armor.png | Orange Leather armor
Yellow Leather Horse Armor.png | Yellow Leather armor
Lime Leather Horse Armor.png | Lime Leather armor
Green Leather Horse Armor.png | Green Leather armor
Cyan Leather Horse Armor.png | Cyan Leather armor
Light Blue Leather Horse Armor.png | Light Blue Leather armor
Blue Leather Horse Armor.png | Blue Leather armor
Purple Leather Horse Armor.png | Purple Leather armor
Magenta Leather Horse Armor.png | Magenta Leather armor
Pink Leather Horse Armor.png | Pink Leather armor
</gallery>
=== Screenshots ===
<gallery>
Armored Horse.png|A [[horse]] equipped with iron horse armor and bound to a fence post by a [[lead]].
13w21a-new-HorseUI-inventory.png|The GUI for horses implemented in [[Java Edition 13w21a|13w21a]], which allows the removal and switching of armor.
GodSpawner.png|A golden horse armor found in a [[dungeon]] chest, which coincidentally contains an [[enchanted golden apple]].
Horses with armor.png|4 [[horse]]s equipped with [[leather]], [[iron]], [[gold]], and [[diamond]] armor.
Leather Horse Armor 1.jpg|First image of leather horse armor.
Leather Horse Armor 2.jpg|Second image of leather horse armor.
Leather Horse Armor 3.jpg|Third image of leather horse armor.
Leather Horse Armor 4.jpg|Fourth image of leather horse armor.
Leather Horse Armor 5.jpg|Fifth image of leather horse armor.
</gallery>
== Notes ==
{{Notelist}}
== References ==
{{Reflist}}
{{items}}
[[Category:Armor]]
[[de:Rossharnisch]]
[[es:Armadura para caballo]]
[[fr:Armure pour cheval]]
[[it:Bardatura]]
[[ja:馬鎧]]
[[ko:말 갑옷]]
[[nl:Paardenharnas]]
[[pl:Zbroja końska]]
[[pt:Armadura para cavalo]]
[[ru:Конская броня]]
[[uk:Кінські обладунки]]
[[zh:马铠]]</li></ul> | 15w33c | A hopper now generates as a part of the end ship in the end cities. | ||||
| 15w41a | End ships no longer contain a hopper. | |||||
| 15w43a | Loot tables have been added; hoppers can now use loot tables. | |||||
1.9.1{{Extension DPL}}<ul><li>[[Suspicious Stew|Suspicious Stew]]<br/>{{For|the block|Suspicious Sand}}
{{Item
| title = Suspicious Stew
| heals = {{hunger|6}}
| renewable = Yes
| stackable = No
|effects=See {{slink||Food}}
}}
'''Suspicious stew''' is a [[food]] item that can give the [[player]] a [[effect|status effect]] that depends on the [[flower]] used to craft it.
== Obtaining ==
{{IN|Bedrock}}, suspicious stew is the only food item in the game that can be obtained from the [[Creative]] inventory only by searching. However, it can be crafted and can also be found in [[shipwreck]] chests. Suspicious stew can be given with [[commands]] like {{cmd|give}}, but {{in|java}}, unless NBT data like that listed in the data values section is included, consuming it has no effect and still restores the same hunger points as a normal suspicious stew. In [[Bedrock Edition]], giving the player a suspicious stew through commands causes the stew to choose an allowable status effect at random.
=== Harvesting ===
Suspicious stew can be obtained by "milking" a brown [[mooshroom]] with a [[bowl]] after using a small flower on it. When a small flower is used on a brown mooshroom, the brown mooshrom produces a suspicious stew related to that small flower the next time it is milked with a bowl. Red mooshrooms do not produce suspicious stew. The brown mooshroom returns to producing [[mushroom stew]] until fed another small flower.
=== Crafting ===
{{Crafting
|Red Mushroom
|Brown Mushroom
|Bowl
|Any Flower
|Output=Suspicious Stew
|shapeless=true
|type=Foodstuff
}}
Suspicious stew is not listed in the recipe book. However, it can be quickly assembled by clicking the [[Mushroom Stew|mushroom stew]] recipe and adding one small flower to it.
=== Chest loot ===
{{LootChestItem|suspicious-stew}}
=== Mob loot ===
After being given a flower, a brown [[mooshroom]] can be "milked" for suspicious stew by {{control|using}} a [[bowl]] on it. The flower type determines the stew's effect using the same rule as a crafted stew. Milking a red mooshroom after feeding it a flower does not yield a suspicious stew specific to that flower.
=== Trading ===
{{IN|java}}, expert-level farmer [[villager]]s can offer either 1 or 2 suspicious stew trades, each stew for one [[emerald]].
{{IN|bedrock}}, expert-level farmer villager offers to sell suspicious stew for one emerald as well.
The [[trading]] interface does not indicate the type of suspicious stew being sold, but each trade entry consistently yields the same type of stew, so the player can remember or make a note of the types offered by a given villager, such as "this villager's first stew gives [[blindness]], and their second entry gives saturation".
== Usage ==
=== Food ===
{{see also|Tutorials/Hunger management}}
To eat suspicious stew, press and hold {{control|use}} while it is selected in the hotbar. Eating one restores {{hunger|6}} hunger and 7.2 hunger [[Hunger#Mechanics|saturation]] and gives a few seconds of a [[effect|status effect]] that varies depending on which flower was used to craft it. The effect is not displayed in the tooltip, texture, etc., meaning that the player cannot know in advance what the effect is without knowing which flower was used.
{{/Effects}}
The [[bowl]] is emptied and returned to the player after the suspicious stew has been eaten, and can be re-used to craft more stews. Unlike most foods, suspicious stew can be eaten even if the player's hunger bar is full.
The Saturation effect effectively makes those two stews a superfood: In those 6 or 7 ticks it can restore up to 6(7) hunger and 12(14) saturation points ''on top of'' their food value, for a total of at least {{hunger|12}} hunger, and effectively maximizing saturation. This is the largest amount of hunger and saturation the player can get from a single food item. Regeneration can restore up to {{Health|3}} health, and Poison or Wither can inflict up to {{Health|4}} damage.
Consuming suspicious stew is the only way to obtain the Saturation and Blindness effects in vanilla ''Minecraft'' without the use of commands.
== Sounds ==
=== Generic ===
{{Sound table/Entity/Food}}
=== Unique ===
{{edition|java}}:
{{Sound table
|sound=Mooshroom eat1.ogg
|sound2=Mooshroom eat2.ogg
|sound3=Mooshroom eat3.ogg
|sound4=Mooshroom eat4.ogg
|subtitle=Mooshroom eats
|source=neutral
|description=Plays when a brown mooshroom is fed a flower.
|id=entity.mooshroom.eat
|translationkey=subtitles.entity.mooshroom.eat
|volume=2.0
|pitch=''varies'' <ref group=sound>Can be 1.0, 0.95, or 1.05 for each sound</ref>
|distance=16}}
{{Sound table
|sound=Mooshroom milk1.ogg
|sound2=Mooshroom milk2.ogg
|sound3=Mooshroom milk3.ogg
|subtitle=Mooshroom gets milked suspiciously
|source=neutral
|description=Plays when a brown mooshroom is milked with a bowl after being fed a flower.
|id=entity.mooshroom.suspicious_milk
|translationkey=subtitles.entity.mooshroom.suspicious_milk
|volume=1.0
|pitch=''varies'' <ref group=sound>Can be 1.0, 0.9, or 1.1 for each sound</ref>
|distance=16
|foot=1}}
{{edition|bedrock}}:
{{Sound table
|type=bedrock
|sound=Mooshroom eat1.ogg
|sound2=Mooshroom eat2.ogg
|sound3=Mooshroom eat3.ogg
|sound4=Mooshroom eat4.ogg
|subtitle=Mooshroom eats
|source=Friendly Creatures
|description=When a brown mooshroom is fed a flower
|id=mob.mooshroom.eat
|volume=1.0/0.95/1.05
|pitch=0.8-1.2}}
{{Sound table
|sound=Mooshroom milk1.ogg
|sound2=Mooshroom milk2.ogg
|sound3=Mooshroom milk3.ogg
|subtitle=Mooshroom gets milked
|source=Friendly Creatures
|description=When a mooshroom is milked with a bowl
|id=mob.mooshroom.suspicious_milk
|volume=1.0/0.9/1.1
|pitch=1.0
|foot=1}}
== Data values ==
=== ID ===
{{edition|java}}:
{{ID table
|edition=java
|showforms=y
|generatetranslationkeys=y
|displayname=Suspicious Stew
|spritetype=item
|nameid=suspicious_stew
|form=item
|foot=1}}
{{edition|bedrock}}:
{{ID table
|edition=bedrock
|shownumericids=y
|showforms=y
|notshowbeitemforms=y
|generatetranslationkeys=y
|displayname=Suspicious Stew
|spritetype=item
|nameid=suspicious_stew
|id=590
|form=item
|foot=1}}
=== Item data ===
{{IN|je}}, suspicious stew uses the following NBT data:
<div class="treeview">
* {{nbt|compound|tag}}: The item's '''tag''' tag.
{{:Player.dat format/Suspicious Stew}}
</div>
=== Metadata ===
{{IN|be}}, suspicious stew uses the following data values:
{{dvt|spritetype=item|sprite=suspicious-stew|{{EffectLink|Night Vision}} from {{BlockLink|Poppy}}}}
{{dvt|sprite=suspicious-stew|{{EffectLink|Jump Boost}}}}
{{dvt|sprite=suspicious-stew|{{EffectLink|Weakness}}}}
{{dvt|sprite=suspicious-stew|{{EffectLink|Blindness}}}}
{{dvt|sprite=suspicious-stew|{{EffectLink|Poison}}}}
{{dvt|sprite=suspicious-stew|{{EffectLink|Saturation}} from {{BlockLink|Dandelion}}}}
{{dvt|sprite=suspicious-stew|{{EffectLink|Saturation}} from {{BlockLink|Blue Orchid}}}}
{{dvt|spritetype=item|sprite=suspicious-stew|{{EffectLink|Fire Resistance}}}}
{{dvt|sprite=suspicious-stew|{{EffectLink|Regeneration}}}}
{{dvt|sprite=suspicious-stew|{{EffectLink|Wither}}}}
{{dvt|sprite=suspicious-stew|{{EffectLink|Night Vision}} from {{BlockLink|Torchflower}}|foot=1}}
== Achievements ==
{{load achievements|Time for Stew}}
== Advancements ==
{{load advancements|A Furious Cocktail;How Did We Get Here;Husbandry;A Balanced Diet}}
== History ==
{{History|java}}
{{History||1.14|snap=18w43a|[[File:Suspicious Stew JE1 BE1.png|32px]] Added suspicious stew.
|Suspicious stew is not obtainable in the [[Creative inventory]].}}
{{History|||snap=19w08a|Suspicious stew can be obtained by milking brown [[mooshroom]]s.}}
{{History|||snap=19w11a|[[Trading]] has been changed, expert-level farmer villagers now sell suspicious stew for an [[emerald]].}}
{{History||1.14.4|snap=Pre-Release 1|Suspicious stew made from [[poppies]] now gives [[Night Vision]] to the [[player]] instead of [[Speed]].}}
{{History||1.16|snap=Pre-release 1|Mooshrooms can now be milked for suspicious stew in Creative mode.<ref>{{bug|MC-90969}}</ref>}}
{{History||1.17|snap=21w13a|Suspicious stew can now be eaten even if the player is at full [[hunger]].}}
{{History||1.19|snap=22w13a|Suspicious stew may now be found in [[ancient city]] [[chest]]s.}}
{{History||1.19.3|snap=22w45a|Suspicious stew is now available in the [[Creative]] [[inventory]].}}
{{History||1.20<br>(Experimental)|link=1.19.4|snap=23w07a|Suspicious stew now drops when brushing [[suspicious sand]] in [[desert well]]s.}}
{{History|||snap=1.19.4-pre1|[[Torchflower]]s can now be used to make suspicious stew.}}
{{History||1.20|snap=23w12a|The probability for the suspicious stew to generate in the [[suspicious sand]] in [[desert well]] has been changed from 1/7 to 1/8.}}
{{History|bedrock}}
{{History||1.13.0|snap=beta 1.13.0.9|[[File:Suspicious Stew JE1 BE1.png|32px]] Added suspicious stew.
|Suspicious stew is not obtainable in the Creative inventory.}}
{{History|||snap=beta 1.13.0.15|Master-level farmer [[villager]]s can now [[trading|sell]] suspicious stew.}}
{{History||1.16.0|snap=beta 1.16.0.57|[[Trading]] has been changed, expert-level farmer villagers now sell suspicious stew for an [[emerald]].}}
{{History||1.20.0<br>(Experimental)|link=Bedrock Edition 1.19.70|snap=beta 1.19.70.23|Suspicious stew now drops when brushing [[suspicious sand]] in [[desert well]]s.}}
{{History||1.20.10|Added one type of suspicious stew to the Items tab in the Creative inventory.}}
{{History||1.20.30|snap=beta 1.20.20.20|Suspicious stew can no longer be found in the Creative inventory.}}
{{History|foot}}
== Issues ==
{{Issue list}}
== Trivia ==
* Suspicious stew was introduced because developers wanted a way of communicating that [[wikipedia:Lily_of_the_valley|lilies of the valley]] are poisonous.<ref>{{ytl|YUM7XiEX1DI|Items: Ten Things You Probably Didn't Know About Minecraft @ 3:32|Minecraft|November 29, 2019|t=212s}}</ref>
== References ==
{{Reflist}}
<references group="loot"/>
{{Items}}
[[Category:Food]]
[[de:Seltsame Suppe]]
[[es:Estofado sospechoso]]
[[fr:Soupe suspecte]]
[[ja:怪しげなシチュー]]
[[ko:수상한 스튜]]
[[nl:Geheimzinnige stoofpot]]
[[pl:Podejrzana potrawka]]
[[pt:Ensopado suspeito]]
[[ru:Подозрительный суп]]
[[th:สตูว์พิศวง]]
[[zh:迷之炖菜]]
[[Category:Renewable resources]]</li><li>[[Lead|Lead]]<br/>{{About|the item used for leashing and leading mobs|the element|Element#Lead}}
{{Item
| image = Lead.png
| stackable = Yes (64)
| renewable = Yes
}}
'''Leads''' are [[tool]]s used to leash and lead passive and neutral [[animal]]s, [[golem]]s and some [[monster]]s.
== Obtaining ==
=== Chest loot ===
{{LootChestItem|lead}}
=== Crafting ===
{{Crafting
|A1= String
|B1= String
|A2= String
|B2= Slimeball
|C3= String
|Output= Lead,2
|type= Tool
}}
=== Mob loot ===
[[Wandering Trader|Wandering trader]]s always spawn with 2 [[llama|trader llama]]s, each held with a lead. When a trader llama is detached, either by killing it or the wandering trader, dragging them far apart, or putting the llama in a [[boat]] or a [[minecart]], the lead drops at the llama's position.
== Usage ==
=== Crafting ingredient ===
{{crafting usage}}
=== Leashing mobs ===
[[File:SuspendedPigs.png|190px|thumb|One block tall mobs, such as pigs, suspend at 7 blocks above the ground.]]
[[File:SuspendedCows.png|190px|thumb|Two block tall mobs, such as cows, also suspend at 7 blocks above the ground.]]
{{control|Using}} a lead on a [[mob]] ties the lead to the mob, allowing it to be moved by the player. Multiple mobs can be held by leads at once, but each mob held requires its own lead.
It is possible to leash the following mobs and other entities:
{{columns-list|colwidth=20em|
* {{EntityLink|Allay}}
* {{EntityLink|Axolotl}}
* {{EntityLink|Bee}}
* {{EntityLink|Boat}}{{only|bedrock}}
* {{EntityLink|Camel}}
* {{EntityLink|Cat}}
* {{EntityLink|Chicken}}
* {{EntityLink|Chicken Jockey}} (only the mount)
* {{EntityLink|Cow}}
* {{EntityLink|Dolphin}}
* {{EntityLink|Donkey}}
* {{EntityLink|Fox}}
* {{EntityLink|Frog}}
* {{EntityLink|Glow Squid}}
* {{EntityLink|Goat}}
* {{EntityLink|Hoglin}}
* {{EntityLink|Horse}}
* {{EntityLink|Iron Golem}}
* {{EntityLink|Llama}}
* {{EntityLink|Mooshroom}}
* {{EntityLink|Mule}}
* {{EntityLink|Ocelot}}
* {{EntityLink|Parrot}}
* {{EntityLink|Pig}}
* {{EntityLink|Polar Bear}}
* {{EntityLink|Rabbit}}
* {{EntityLink|Sheep}}
* {{EntityLink|Skeleton Horse}}
* {{EntityLink|Skeleton Horseman}} (only the mount)
* {{EntityLink|Sniffer}}
* {{EntityLink|Snow Golem}}
* {{EntityLink|Squid}}
* {{EntityLink|Strider}}
* {{EntityLink|Trader Llama}}
* {{EntityLink|Wolf}}
* {{EntityLink|Zoglin}}
* {{EntityLink|Zombie Horse}}}}
Additionally, [[villager]]s, [[wandering trader]]s, and [[monster]]s other than the ones listed above, can be leashed using a map editor or [[NBT]] editor.
With a mob on a lead held by the player, {{control|using}} the lead on any type of [[fence]] (or [[wall]]{{only|bedrock|short=1}}) attaches the lead to it with a visible knot, tying the mob to it. To attach it to a wall on Bedrock Edition, the player must hold a lead in the main hand.<ref>{{bug|MCPE-108078}}</ref> Multiple leads may be attached to one fence post. A mob tied to a fence tends to stay within 5 blocks of the fence post.
A lead is broken by pressing the {{control|use item}} control on the mob again, hitting the knot, or removing the attached fence post. Leads also break when hit by projectiles. Whenever a lead is removed or broken, it drops as an [[item (entity)|item]] at the location of the mob. However, it does not drop when unleashed in Creative mode.{{only|java}}<ref>{{bug|MCPE-79639}}</ref> A lead does not break if the attached animal dies.
A lead can stretch a maximum of 10 blocks. If the mob is able to move towards the player or fence post, it does so. If not, or if the mob is moving very quickly away from the player, the lead breaks.
When the player or the knot is more than 7 blocks above the ground, the mob being leashed becomes suspended.
Most mobs that can be leashed can still be leashed even if attacking the player leashing them, and any attached leads do not break.
[[Wolf|Wolves]] cannot be leashed after becoming angry. Despite this, if they become angry while already leashed, the lead does not break, but it cannot be reattached when broken through other methods while the wolf is still angry.
A lead attached to a hoglin breaks if it becomes a [[zoglin]].
A lead does not prevent mobs from despawning if they normally would despawn.
When moving downwards and accelerating towards the ground, leashed mobs accumulate fall damage and take it if they hit the ground while still accelerating. When moving up or decelerating (such as when the lead is stretched to its limit), the fall distance is set to one block and the mob therefore does not take any fall damage if it touches the ground.
If the player walks into and back out of a [[nether portal]] while holding a lead connected to a mob, the lead remains attached to the mob. However, if a mob attached to a lead walks into a nether portal, the lead breaks and drops as an item in the other dimension.
A lead can be used to remove a mob from a boat without needing to break the boat, if the mob can normally be leashed.
If a chunk unloads while containing a leashed mob (either by the player walking too far away, or traveling to another dimension via a portal), the lead breaks and drops as an item, leaving the mob free to wander around.
== Sounds ==
{{Edition|Java}}:
{{Sound table
|sound=Lead Knot break1.ogg
|sound2=Lead Knot break2.ogg
|sound3=Lead Knot break3.ogg
|subtitle=Leash Knot breaks
|source=neutral
|description=When a leash knot is destroyed
|id=entity.leash_knot.break
|translationkey=subtitles.entity.leashknot.break
|volume=1.0
|pitch=1.0
|distance=16}}
{{Sound table
|sound=Lead Knot place1.ogg
|sound2=Lead Knot place2.ogg
|sound3=Lead Knot place3.ogg
|subtitle=Leash Knot tied
|source=neutral
|description=When a leash knot is placed on a fence
|id=entity.leash_knot.place
|translationkey=subtitles.entity.leashknot.place
|volume=1.0
|pitch=1.0
|distance=16
|foot=1}}
{{Edition|Bedrock}}:
{{Sound table
|type=bedrock
|sound=Lead Knot break1.ogg
|sound2=Lead Knot break2.ogg
|sound3=Lead Knot break3.ogg
|source=neutral
|description=When a leash knot is broken by {{ctrl|interacting}} with it
|id=leashknot.break
|volume=1.0
|pitch=1.0}}
{{Sound table
|sound=Lead Knot place1.ogg
|sound2=Lead Knot place2.ogg
|sound3=Lead Knot place3.ogg
|source=neutral
|description=When a leash knot is placed on a fence or wall
|id=leashknot.place
|volume=1.0
|pitch=1.0
|foot=1}}
== Leash Knot ==
'''Leash knot''' is an entity created when the [[player]] right-clicks the fence while having a mob leashed.
{{Entity| title = Leash Knot| image = Knot.png|imagesize= 100px|networkid='''[[JE]]''': 77}}
=== Data values ===
==== ID ====
{{edition|java}}:
{{ID table
|edition=java
|generatetranslationkeys=y
|displayname=Leash Knot
|spritetype=entity
|nameid=leash_knot
|foot=1}}
{{edition|bedrock}}:
{{ID table
|edition=bedrock
|shownumericids=y
|notshowbeitemforms=y
|generatetranslationkeys=y
|displayname=Leash Knot
|spritetype=entity
|nameid=leash_knot
|id=88
|foot=1}}
==== Entity data ====
Leash knots have entity data that define various properties of the entity.
{{el|java}}:
{{main|Entity format}}
{{/ED}}
{{el|bedrock}}:
: See [[Bedrock Edition level format/Entity format]].
== Data values ==
=== ID ===
{{edition|java}}:
{{ID table
|edition=java
|showforms=y
|generatetranslationkeys=y
|displayname=Lead
|spritetype=item
|nameid=lead
|form=item
|foot=1}}
{{edition|bedrock}}:
{{ID table
|edition=bedrock
|shownumericids=y
|showforms=y
|notshowbeitemforms=y
|generatetranslationkeys=y
|displayname=Lead
|spritetype=item
|nameid=lead
|id=547
|form=item
|foot=1}}
== Achievements ==
{{load achievements|So I Got That Going for Me}}
== Advancements ==
{{load advancements|When the Squad Hops into Town}}
== History ==
{{missing information|The history of a lot of mobs be leashed}}
{{History|java}}
{{History||1.6.1|snap=13w16a|[[File:Lead JE1 BE1.png|32px]] Added leads.
|Leads do not currently have a tooltip and are called “leashes” in [http://www.mojang.com/2013/04/minecraft-snapshot-13w16a-and-new-launcher/ the change notes].}}
{{History|||snap=13w16b|Leads have been given a tooltip.}}
{{History|||snap=13w18a|Leads have been given a [[crafting]] recipe.}}
{{History||1.9|snap=15w50a|Added a [[sound]] for leads: <code>entity.leashknot.place</code>.}}
{{History||1.11|snap=16w32a|The [[entity]] ID of the knot has been changed from <code>LeashKnot</code> to <code>leash_knot</code>.}}
{{History|||snap=16w39a|Leads can now be found in [[woodland mansion]] chests.}}
{{History||1.13|snap=17w47a|Prior to [[1.13/Flattening|''The Flattening'']], this [[item]]'s numeral ID was 420.}}
{{History||1.14|snap=18w43a|[[File:Lead JE2 BE2.png|32px]] The texture of leads has been changed.}}
{{History|||snap=19w05a|Added [[wandering trader]]s, which are naturally equipped with leads.}}
{{History||1.15|snap=?|[[Bee]]s can now be leashed.}}
{{History||1.16|snap=20w09a|[[Skeleton horse]]s and [[zombie horse]]s can now be leashed.<ref>{{bug|MC-166246}}</ref>}}
{{History|||snap=?|[[Hoglin]]s can now be leashed.}}
{{History||1.16.2|snap=20w27a|[[Zoglin]]s can now be leashed.}}
{{History||1.17|snap=21w19a|[[Squid]]s and [[glow squid]]s can now be leashed.<ref>{{bug|MC-136647}}</ref>}}
{{History|||snap=?|[[Axolotl]]s can now be leashed.}}
{{History||1.19|snap=22w13a|Lead may now be found in [[ancient city]] [[chest]]s.}}
{{History|||snap=?|[[Frog]]s can now be leashed.}}
{{History||1.19.3|snap=22w42a|[[Camel]]s can now be leashed.|Mobs no longer accumulate fall damage when dangling on leads.<ref>{{bug|MC-14167||Mobs build up fall damage when dangling on a lead|Fixed}}</ref>}}
{{History||1.20 (Experimental)|link=1.19.4|snap=?|[[Sniffer]]s can now be leashed.}}
{{History||1.20|snap=23w12a|Lead can now be found in [[suspicious gravel]] and [[suspicious sand]] in [[trail ruins]].}}
{{History|||snap=23w16a|Lead no longer generates in [[suspicious sand]] in [[trail ruins]].|Due to the split of the archaeological loot tables for the suspicious gravel within the [[trail ruins]]; lead now is in the common loot.}}
{{History|pocket alpha}}
{{History||v0.15.0|snap=build 1|[[File:Lead JE1 BE1.png|32px]] Added leads.}}
{{History|pocket}}
{{History||1.1.0|snap=alpha 1.1.0.0|Leads now have better "physics".
|The [[entity]] ID of the knot has been changed from <code>leashknot</code> to <code>leash_knot</code>.
|Leads can now be found inside [[woodland mansion]] [[chest]]s.}}
{{History|bedrock}}
{{History||1.4.0|snap=beta 1.2.14.2|Leads can now be found inside [[buried treasure]] [[chest]]s.
|Leads can now be used on [[boat]]s.}}
{{History||1.4.0|snap=beta 1.2.20.1|Leads can now be used to craft [[balloon]]s.}}
{{History||1.10.0|snap=beta 1.10.0.3|[[File:Lead JE2 BE2.png|32px]] The texture of leads has been changed.
|[[Wandering trader]]s now [[drops|drop]] leads after they are detached from trader [[llama]]s.}}
{{History||1.14.0|snap=beta 1.14.0.1|Leads can now be used on [[polar bear]]s, [[ocelot]]s, [[parrot]]s, [[dolphin]]s and old [[villager]]s.}}
{{History||1.19.0|snap=beta 1.19.0.20|Allays can now be leashed.}}
{{History|console}}
{{History||xbox=TU19|xbone=CU7|ps=1.12|wiiu=Patch 1|switch=1.0.1|[[File:Lead JE1 BE1.png|32px]] Added leads.}}
{{History||xbox=TU43|xbone=CU33|ps=1.36|wiiu=Patch 13|[[Sound]]s have been added for leads.}}
{{History|Ps4}}
{{History||1.90|[[File:Lead JE2 BE2.png|32px]] The texture of leads has been changed.}}
{{History|3ds}}
{{History||0.1.0|[[File:Lead JE1 BE1.png|32px]] Added leads.}}
{{History|foot}}
== Issues ==
{{issue list|Lead|Leash}}
== Trivia ==
[[File:Steve wearing Lead.png|100px]] [[File:Alex wearing Lead.png|100px]]
* The lead is named as "leash" in the texture file.
* If a [[player]] goes to sleep while holding a mob on a lead, the lead remains attached.
* {{IN|Java}}, when using the {{cmd|item}} command to put a lead in a player's head slot, the item gets rotated and positioned in such a way that it looks like the player is wearing a monocle.
== Gallery ==
<gallery>
Multiple_Leash.png|Many animals can be tied to one fence post.
HorseLeashedOnAFence.png|A [[horse]] wearing [[golden horse armor]] that is leashed to a fence post.
ThreeTiedSheep.png|Three sheep tied to the same fence.
More accurate lead mobs.png|A shot of all the mobs that could be tied with leads as of 1.6.1, except donkeys and mules.
Yo Yo.png|With the use of the leash, it is possible to suspend animals in the air by tying the leash on high-up fence posts.
YoYo.png|A [[donkey]] with the Grumm/Dinnerbone [[name tag]] [[easter egg]] tied to a fence with a lead to make a yo-yo.
Flying_Sheep.png|Several [[sheep]] hanging in the air in [[Creative]] mode.
Pocket Edition Lead.jpg|First image of a lead in ''Bedrock Edition''.
</gallery>
== References ==
{{Reflist}}
== External Links ==
*[https://www.minecraft.net/en-us/article/taking-inventory-lead Taking Inventory: Lead] – Minecraft.net on April 8, 2022
{{items}}
{{entities}}
[[Category:Tools]]
[[de:Leine]]
[[es:Rienda]]
[[fr:Laisse]]
[[hu:Lasszó]]
[[it:Guinzaglio]]
[[ja:リード]]
[[ko:끈]]
[[nl:Leidtouw]]
[[pl:Smycz]]
[[pt:Laço]]
[[ru:Поводок]]
[[th:เชือกจูง]]
[[zh:拴绳]]
[[Category:Renewable resources]]</li></ul> | pre1 | A hopper can now push into and pull items from a blocked chest. | ||||
1.13{{Extension DPL}}<ul><li>[[Balloon|Balloon]]<br/>{{exclusive|bedrock|education}}
{{education feature}}
{{ItemEntity
|image=White Balloon.png
|extratext = View [[#Gallery|all renders]]
|invimage=White Balloon
|invimage2=Orange Balloon
|invimage3=Magenta Balloon
|invimage4=Light Blue Balloon
|invimage5=Yellow Balloon
|invimage6=Lime Balloon
|invimage7=Pink Balloon
|invimage8=Gray Balloon
|invimage9=Light Gray Balloon
|invimage10=Cyan Balloon
|invimage11=Purple Balloon
|invimage12=Blue Balloon
|invimage13=Brown Balloon
|invimage14=Green Balloon
|invimage15=Red Balloon
|invimage16=Black Balloon
|renewable=No
|stackable=Yes
|size=Height: 0.4 Blocks<br>Width: 0.4 Blocks
}}
'''Balloons''' are [[entities]] that float upward when placed.
== Obtaining ==
Balloons are not available in the [[Creative]] inventory or [[commands]].
=== Crafting ===
{{Crafting
|A1= Latex
|B1= Matching Dye
|C1= Latex
|A2= Latex
|B2= Helium
|C2= Latex
|A3= Latex
|B3= Lead
|C3= Latex
|Output= Matching Balloon
|description={{only|bedrock|education}}
|type= Miscellaneous
|head=1
}}
{{Crafting
|A1= Latex
|B1= Bone Meal; Lapis Lazuli; Cocoa Beans; Ink Sac
|C1= Latex
|A2= Latex
|B2= Helium
|C2= Latex
|A3= Latex
|B3= Lead
|C3= Latex
|Output= White Balloon; Blue Balloon; Brown Balloon; Black Balloon
|description={{only|bedrock|education}}
|type= Miscellaneous
|foot=1
}}
== Usage ==
When {{control|used}} on a [[mob]], a [[fence]], or a [[wall]], balloons attach to the mob or block, similarly to a [[lead]]. Balloons float into the air faster than the speed the [[player]] flies up, but remain grounded if tied to a fence. If tied to a mob, the balloon floats away and carries the mob into the air, before both eventually [[despawn]] or disappear.
{| class="wikitable sortable" style="text-align: left;"
|+ Balloon-attachable mobs
! Mob
! Mass
|-
| {{EntityLink|Chicken}}
| 0.6
|-
| {{EntityLink|Cow}}
| 1.0
|-
| {{EntityLink|Donkey}}
| 1.0
|-
| {{EntityLink|Horse}}
| 1.0
|-
| {{EntityLink|Iron Golem}}
| 2.0
|-
| {{EntityLink|Llama}}
| 1.0
|-
| {{EntityLink|Mule}}
| 1.0
|-
| {{EntityLink|Mooshroom}}
| 1.0
|-
| {{EntityLink|Panda}}
| 1.5
|-
| {{EntityLink|Pig}}
| 0.75
|-
| {{EntityLink|Sheep}}
| 0.75
|-
| {{EntityLink|Snow Golem}}
| 1.0
|-
| {{EntityLink|Fox}}
| 0.6
|}
When a balloon is shot by an [[arrow]] or a [[trident]], or floats into a solid block, it pops, summons [[particles]], and is destroyed. It drops nothing. A balloon tied to a fence post bursts when a player strikes it in any direction.
== Sounds ==
{{Sound table
|type=bedrock
|sound=Balloon pop1.ogg
|sound2=Balloon pop2.ogg
|source=neutral
|description=When a balloon collides with a block from above
|id=balloon.pop
|volume=10.0
|pitch=1.75/2.0
|foot=1}}
== Data values ==
=== ID ===
{{ID table
|edition=bedrock
|firstcolumnname=Balloon
|shownumericids=y
|showforms=y
|notshowbeitemforms=y
|generatetranslationkeys=y
|displayname=Item
|spritename=balloons
|spritetype=item
|nameid=balloon
|id=598
|form=item
|translationkey=item.balloon.black.name,item.balloon.red.name,item.balloon.green.name,item.balloon.brown.name,item.balloon.blue.name,item.balloon.purple.name,item.balloon.cyan.name,item.balloon.silver.name,item.balloon.gray.name,item.balloon.pink.name,item.balloon.lime.name,item.balloon.yellow.name,item.balloon.lightBlue.name,item.balloon.magenta.name,item.balloon.orange.name,item.balloon.white.name
|foot=1}}
{{ID table
|edition=bedrock
|firstcolumnname=Balloon
|shownumericids=y
|generatetranslationkeys=y
|displayname=Entity
|spritename=balloons
|spritetype=entity
|nameid=balloon
|id=107
|foot=1}}
=== Metadata ===
In ''Bedrock Edition'', balloon items use the following data values:
{{/DV}}
== History ==
{{History|bedrock}}
{{History||1.4.0|snap=beta 1.2.20.1|[[File:White Balloon BE1.png|32px]] [[File:Orange Balloon BE1.png|32px]] [[File:Magenta Balloon BE1.png|32px]] [[File:Light Blue Balloon BE1.png|32px]] [[File:Yellow Balloon BE1.png|32px]] [[File:Lime Balloon BE1.png|32px]] [[File:Pink Balloon BE1.png|32px]] [[File:Gray Balloon BE1.png|32px]] [[File:Silver Balloon BE1.png|32px]] [[File:Cyan Balloon BE1.png|32px]] [[File:Purple Balloon BE1.png|32px]] [[File:Blue Balloon BE1.png|32px]] [[File:Brown Balloon BE1.png|32px]] [[File:Green Balloon BE1.png|32px]] [[File:Red Balloon BE1.png|32px]] [[File:Black Balloon BE1.png|32px]] <br> [[File:White Balloon (item) BE1.png|32px]] [[File:Orange Balloon (item) BE1.png|32px]] [[File:Magenta Balloon (item) BE1.png|32px]] [[File:Light Blue Balloon (item) BE1.png|32px]] [[File:Yellow Balloon (item) BE1.png|32px]] [[File:Lime Balloon (item) BE1.png|32px]] [[File:Pink Balloon (item) BE1.png|32px]] [[File:Gray Balloon (item) BE1.png|32px]] [[File:Silver Balloon (item) BE1.png|32px]] [[File:Cyan Balloon (item) BE1.png|32px]] [[File:Purple Balloon (item) BE1.png|32px]] [[File:Blue Balloon (item) BE1.png|32px]] [[File:Brown Balloon (item) BE1.png|32px]] [[File:Green Balloon (item) BE1.png|32px]] [[File:Red Balloon (item) BE1.png|32px]] [[File:Black Balloon (item) BE1.png|32px]] Added balloons.}}
{{History||1.18.10|snap=beta 1.18.10.24|[[Bee]]s, [[boat]]s, tamed [[cat]]s, [[dolphin]]s, [[glow squid]]s, [[goat]]s, [[hoglin]]s, [[ocelot]]s, [[panda]]s, [[parrot]]s, [[polar bear]]s, [[squid]]s, [[strider]]s, tamed [[wolves]] and [[zoglin]]s can now be leashed.}}
{{History||1.18.30|snap=beta 1.18.30.28|Added the [[boat with chest]], which can be leashed.}}
{{History|education}}
{{History||1.0.27|[[File:White Balloon BE1.png|32px]] [[File:Orange Balloon BE1.png|32px]] [[File:Magenta Balloon BE1.png|32px]] [[File:Light Blue Balloon BE1.png|32px]] [[File:Yellow Balloon BE1.png|32px]] [[File:Lime Balloon.png|32px]] [[File:Pink Balloon BE1.png|32px]] [[File:Gray Balloon BE1.png|32px]] [[File:Silver Balloon BE1.png|32px]] [[File:Cyan Balloon BE1.png|32px]] [[File:Purple Balloon BE1.png|32px]] [[File:Blue Balloon.png|32px]] [[File:Brown Balloon BE1.png|32px]] [[File:Green Balloon BE1.png|32px]] [[File:Red Balloon BE1.png|32px]] [[File:Black Balloon BE1.png|32px]] <br> [[File:White Balloon (item) BE1.png|32px]] [[File:Orange Balloon (item) BE1.png|32px]] [[File:Magenta Balloon (item) BE1.png|32px]] [[File:Light Blue Balloon (item) BE1.png|32px]] [[File:Yellow Balloon (item) BE1.png|32px]] [[File:Lime Balloon (item) BE1.png|32px]] [[File:Pink Balloon (item) BE1.png|32px]] [[File:Gray Balloon (item) BE1.png|32px]] [[File:Silver Balloon (item) BE1.png|32px]] [[File:Cyan Balloon (item) BE1.png|32px]] [[File:Purple Balloon (item) BE1.png|32px]] [[File:Blue Balloon (item) BE1.png|32px]] [[File:Brown Balloon (item) BE1.png|32px]] [[File:Green Balloon (item) BE1.png|32px]] [[File:Red Balloon (item) BE1.png|32px]] [[File:Black Balloon (item) BE1.png|32px]] Added balloons.}}
{{History||1.18.32|snap=1.18.10.04|[[Bee]]s, [[boat]]s, tamed [[cat]]s, [[dolphin]]s, [[glow squid]]s, [[goat]]s, [[hoglin]]s, [[ocelot]]s, [[panda]]s, [[parrot]]s, [[polar bear]]s, [[squid]]s, [[strider]]s, tamed [[wolves]] and [[zoglin]]s can now be leashed.}}
{{History|foot}}
==Gallery==
=== Colors ===
<gallery>
Orange Balloon.png
Magenta Balloon.png
Light Blue Balloon.png
Yellow Balloon.png
Lime Balloon.png
Pink Balloon.png
Gray Balloon.png
Light Gray Balloon.png
Cyan Balloon.png
Purple Balloon.png
Blue Balloon.png
Brown Balloon.png
Green Balloon.png
Red Balloon.png
Black Balloon.png
</gallery>
=== [[Event servers]] ===
<gallery>
File:Legends Balloon.png|Differently designed balloons featured in the ''[[Minecraft Legends Live Event]]''.
File:Sniffer Balloon (Trails and Tales Summer Event) Render.png|A [[Sniffer]] balloon, featured in the [[Trails & Tales Event]].
File:Camel Balloon (Trails and Tales Summer Event) Render.png|A balloon of a [[Camel]], featured in the Trails & Tales Event.
File:Balloon Bundle (Trails and Tales Summer Event) Render.png|Bundle of balloons from the Trails & Tales Event.
</gallery>{{Items}}
{{Entities}}
{{Education Edition}}
[[Category:Education Edition entities]]
[[Category:Education Edition items]]
[[de:Ballon]]
[[it:Palloncino]]
[[ja:風船]]
[[ko:풍선]]
[[pl:Balon]]
[[pt:Balão]]
[[ru:Воздушный шар]]
[[zh:气球]]</li><li>[[Stick|Stick]]<br/>{{for|other uses|Stick (disambiguation)}}
{{Item
| image = Stick.png
| renewable = Yes
| stackable = Yes (64)
}}
A '''stick''' is an item used for [[crafting]] many [[tools]] and [[item]]s.
== Obtaining ==
=== Crafting ===
{{Crafting
|B2= Any Planks
|B3= Any Planks
|Output= Stick,4
|type= Material
|head=1
}}
{{Crafting
|B2= Bamboo
|B3= Bamboo
|Output= Stick
|type= Material
|foot=1
}}
=== Fishing ===
Sticks can be obtained as a "junk" item while [[fishing]].
=== Block loot ===
[[Dead bush]]es drop between 0–2 sticks when destroyed.
All [[Leaves|leaf]] types have a 2% chance to drop between 1-2 sticks when broken. Using a tool with [[Fortune]] increase these chances to 2.2%, 2.5%, and 3.3% for Fortune I, II, and III respectively.
=== Entity loot ===
[[Witch]]es have a chance of dropping 0–6 sticks upon death. This is increased by 3 per level of [[Looting]], for a chance of 0-15 sticks.
[[Boat]]s and [[Boat with Chest|boats with chest]]s drop 2 sticks when falling from exactly 12, 13, 49, 51, 111, 114, 198, 202, 310, or 315 blocks.<ref>{{bug|MC-119369}}</ref>.
=== Chest loot ===
{{LootChestItem|stick}}
== Usage ==
=== Crafting ingredient ===
{{crafting usage}}
=== Fuel ===
When used as a [[furnace]] fuel, a stick smelts 0.5 [[item]]s.
=== Trading ===
Novice-level [[Trading#Fletcher|fletcher]] [[villager]]s have a {{frac|2|3}} chance to buy 32 sticks for an [[emerald]] in ''Java Edition'', and they always offer the trade in Bedrock Edition.
== Video ==
<div style="text-align:center">{{yt|SYoHAJBuoss}}</div>
== Data values ==
=== ID ===
{{edition|java}}:
{{ID table
|edition=java
|showforms=y
|generatetranslationkeys=y
|displayname=Stick
|spritetype=item
|nameid=stick
|form=item
|foot=1}}
{{edition|bedrock}}:
{{ID table
|edition=bedrock
|shownumericids=y
|showforms=y
|notshowbeitemforms=y
|generatetranslationkeys=y
|displayname=Stick
|spritetype=item
|nameid=stick
|id=320
|form=item
|foot=1}}
== History ==
{{History|java indev}}
{{History||0.31|snap=20100129|[[File:Stick JE1 BE1.png|32px]] Added sticks.
|Sticks are used to craft [[sign]]s, [[torch]]es, [[sword]]s, [[pickaxe]]s, [[axe]]s and [[shovel]]s.}}
{{History|||snap=20100130|Sticks are now used to craft [[bow]]s and [[arrow]]s.}}
{{History||20100206|Sticks are now used to craft [[hoe]]s.}}
{{History||20100219|Sticks can be used as fuel for the newly added [[furnace]].}}
{{History||20100223|Sticks are now used to craft [[painting]]s.}}
{{History|java infdev}}
{{History||20100607|Sticks are now used to craft [[ladder]]s.}}
{{History||20100618|Sticks are now used to craft [[rail]]s.}}
{{History|java alpha}}
{{History||v1.0.1|Sticks are now used to craft [[redstone torch]]es and [[lever]]s.}}
{{History||v1.0.6|2 sticks now drops from breaking [[boat]]s.}}
{{History||v1.0.17|Sticks are now used to craft [[fence]]s.}}
{{History||v1.1.1|Sticks are now used to craft [[fishing rod]]s.}}
{{History|java beta}}
{{History||1.5|Sticks are now used to craft [[powered rail]]s.}}
{{History||1.8|snap=Pre-release|Sticks are now used to craft [[fence gate]]s.}}
{{History|java}}
{{History||1.2.4|snap=release|[[Spruce planks]], [[birch planks]], and [[jungle planks]] can now be used to craft sticks.}}
{{History||1.3.1|snap=12w16a|Sticks are found in the new [[bonus chest]]s.}}
{{History|||snap=12w22a|Sticks are now used to craft [[tripwire hook]]s.}}
{{History|||snap=12w27a|Sticks no longer drops from breaking [[boat]]s.|Instead, it needs to fall certain heights to drop 2 sticks.}}
{{History||1.4.2|snap=12w34a|Sticks are now used to craft [[item frame]]s.}}
{{History|||snap=12w38b|[[Witch]]es now have a chance to drop sticks.}}
{{History||1.5|snap=13w02a|Sticks are now used to craft [[activator rail]]s.}}
{{History||1.7.2|snap=13w36a|Sticks can be obtained as one of the "junk" [[item]]s by [[fishing]].}}
{{History|||snap=1.7.1|[[Acacia planks]] and [[dark oak planks]] can now be used to craft sticks.}}
{{History||1.8|snap=14w30a|Sticks are now used to craft [[banner]]s.}}
{{History|||snap=14w32a|Sticks are now used to craft [[armor stand]]s.}}
{{History||1.9|snap=15w31a|Sticks are now dropped by [[dead bush]]es.}}
{{History|||snap=15w44a|Sticks are now found in [[bonus chest]]s for more than double the average yield.}}
{{History||1.13|snap=17w47a|Sticks can now be found in 70.5% of bonus chests in stacks of 1–12.
|Prior to [[1.13/Flattening|''The Flattening'']], this [[item]]'s numeral ID was 280.}}
{{History||1.14|snap=18w43a|Sticks can now be crafted from [[bamboo]].
|Sticks can now be used to craft [[crossbow]]s.
|Sticks are now [[drops|dropped]] by [[leaves]].}}
{{History|||snap=18w48a|Sticks can now be used to craft [[grindstone]]s.
|Sticks can now be found in [[chest]]s in [[village]] cartographer houses.}}
{{History|||snap=18w50a|Sticks can now be found in village fletcher houses and toolsmith houses.}}
{{History|||snap=19w02a|Sticks can now be used to craft [[campfire]]s.}}
{{History|||snap=19w11a|Fletcher [[villager]]s now [[trading|buy]] sticks.}}
{{History||1.16|snap=20w06a|[[Crimson planks]] and [[warped planks]] can now be used to craft sticks.
|Sticks can now be used to craft [[soul torch]]es.}}
{{History||1.17|snap=21w05a|Sticks are now dropped by [[azalea leaves]] and [[flowering azalea leaves]].}}
{{History||1.19|snap=22w11a|[[Mangrove planks]] can now be used to craft sticks.}}
{{History|||snap=22w13a|Sticks are now dropped by [[mangrove leaves]].}}
{{History||1.19.4|snap=23w07a|The [[crossbow]] and [[soul campfire]] recipes are no longer unlocked by sticks.}}
{{History||1.20<br>(Experimental)|link=1.19.4|snap=23w07a|Sticks are now dropped by [[cherry leaves]].
|Sticks can now be used to craft [[brush]]es.
|Sticks now drop when brushing [[suspicious sand]] in [[desert well]]s.}}
{{History||1.20|snap=23w12a|The probability for the stick to generate in the [[suspicious sand]] in [[desert well]] has been changed from 1/7 to 1/8.}}
{{History|pocket alpha}}
{{History||v0.2.0|[[File:Stick JE1 BE1.png|32px]] Added sticks. They are currently unobtainable and serve no purpose.}}
{{History||v0.3.0|Sticks are now [[craft]]able.
|Sticks can be used to [[craft]] wooden and stone [[pickaxe]]s, [[axe]]s, [[sword]]s and [[shovel]]s, [[ladder]]s, [[torch]]es, [[fence]]s and [[fence gate]]s.}}
{{History||v0.3.2|Sticks are now used to craft iron, gold and diamond [[pickaxe]]s, [[axe]]s, [[sword]]s and [[shovel]]s.}}
{{History||v0.3.3|Sticks are now used to craft [[bow]]s.}}
{{History||v0.4.0|Sticks are now used to craft [[hoe]]s.}}
{{History||v0.5.0|Sticks are now used to craft [[painting]]s.}}
{{History||v0.6.0|Sticks are now used to craft [[sign]]s.}}
{{History||v0.8.0|snap=build 2|Sticks are now used to craft [[rail]]s and [[powered rail]]s.}}
{{History||v0.11.0|snap=build 1|Sticks are now used to craft [[fishing rod]]s.
|Sticks can now be found as a junk [[item]] from [[fishing]].}}
{{History||v0.12.1|snap=build 1|Sticks are now [[drops|dropped]] when [[dead bush]]es are [[breaking|destroyed]].}}
{{History||v0.13.0|snap=build 1|Sticks are now used to craft [[redstone torch]]es, [[lever]]s and [[tripwire hook]]s.}}
{{History||v0.14.0|snap=build 1|Added [[witch]]es, which have a chance of [[drops|dropping]] sticks.
|Sticks can now be used to craft [[item frame]]s.}}
{{History|bedrock}}
{{History||1.2.0|snap=beta 1.2.0.2|Sticks can now be used to craft [[armor stand]]s and [[banner]]s.
|Sticks can now generate inside [[bonus chest]]s.}}
{{History||1.4.0|snap=beta 1.2.20.1|Sticks can now be used to craft [[sparkler]]s.}}
{{History||1.8.0|snap=beta 1.8.0.8|Sticks can now be crafted from [[bamboo]].}}
{{History|||snap=beta 1.8.0.10|Sticks can now be used to craft [[crossbow]]s.}}
{{History||1.10.0|snap=beta 1.10.0.3|Sticks can now be used to craft [[barrel]]s, [[grindstone]]s, and [[campfire]]s.
|[[Leaves]] now have a chance of [[drops|dropping]] 0-2 sticks when [[breaking|destroyed]].}}
{{History||1.11.0|snap=beta 1.11.0.1|Sticks can now be found in [[village]] toolsmith and fletcher [[chest]]s.}}
{{History|||snap=beta 1.11.0.4|Sticks can now be [[trading|sold]] to fletcher [[villager]]s.}}
{{History||1.16.0|snap=beta 1.16.0.51|Sticks can now be used to craft [[soul torch]]es.}}
{{History||1.20.0<br>(Experimental)|link=Bedrock Edition 1.19.70|snap=beta 1.19.70.23|Sticks can now be used to craft [[brush]]es.
|Sticks now drop when brushing [[suspicious sand]] in [[desert well]]s.}}
{{History||1.20.10|snap=beta 1.20.10.20|Sticks are no longer used to craft barrels.}}
{{History|console}}
{{History||xbox=TU1|xbone=CU1|ps=1.0|wiiu=Patch 1|[[File:Stick JE1 BE1.png|32px]] Added sticks.}}
{{History|PS4}}
{{History||1.90|Sticks can now be [[drops|dropped]] by [[leaves]].}}
{{History|new3DS}}
{{History||0.1.0|[[File:Stick JE1 BE1.png|32px]] Added sticks.}}
{{History|foot}}
== Issues ==
{{issue list}}
== Trivia ==
* The stick is used in 49 recipes in ''Java Edition'', and 50 recipes in ''Bedrock Edition'', more than any other item in the game. [[Iron ingot]] takes second place with 35 recipes, and [[planks]] take third place with 34 recipes.
* To craft each recipe once, a player would need 111 sticks, including 1 for the [[redstone torch]] in an [[activator rail]], while using the extra tripwire hook for the [[crossbow]]. This would require 56 [[planks]], or 14 [[logs]], for the sticks, and an extra 29 planks for the [[tool|wooden tools]], [[tripwire hook]], [[signs]], [[fences]], [[fence gate]], [[grindstone]], and slabs for the [[barrel]]. This means that the player needs a total of 85 planks, or 22 logs, plus 6 more for the [[campfire]] and [[soul campfire]].
== External Links ==
*[https://www.minecraft.net/en-us/article/taking-inventory--stick Taking Inventory: Stick] – Minecraft.net on April 2, 2020
{{Items}}
[[cs:Tyčka]]
[[de:Stock]]
[[es:Palo]]
[[fr:Bâton]]
[[hu:Bot]]
[[it:Bastone]]
[[ja:棒]]
[[ko:막대기]]
[[nl:Stok]]
[[pl:Patyk]]
[[pt:Graveto]]
[[ru:Палка]]
[[th:แท่งไม้]]
[[tr:Çubuk]]
[[uk:Палиця]]
[[zh:木棍]]
[[Category:Renewable resources]]</li></ul> | 17w47a | Prior to The Flattening, this block's numeral ID was 154. | ||||
1.14{{Extension DPL}}<ul><li>[[Beetroot Soup|Beetroot Soup]]<br/>{{for|other uses|Soup}}
{{Item
| title = Beetroot Soup
| image = Beetroot Soup.png
| renewable = Yes
| heals = {{hunger|6}}
| stackable = No
}}
'''Beetroot soup''' is an unstackable [[food]] item.
== Obtaining ==
=== Crafting ===
{{Crafting
|Beetroot
|Beetroot
|Beetroot
|Beetroot
|Beetroot
|Beetroot
|Bowl
|Output=Beetroot Soup
|type=Foodstuff
}}
=== Natural generation ===
{{LootChestItem|beetroot-soup}}
== Usage ==
Beetroot soup can be eaten to restore {{hunger|6}} [[hunger]] points and 7.2 [[Hunger#Mechanics|saturation]], the same as [[cooked chicken]] and [[mushroom stew]]. After eating, the empty [[bowl]] remains, similarly to mushroom stew and [[rabbit stew]].
== Sounds ==
{{Sound table/Entity/Food}}
== Data values ==
=== ID ===
{{edition|java}}:
{{ID table
|edition=java
|showforms=y
|generatetranslationkeys=y
|displayname=Beetroot Soup
|spritetype=item
|nameid=beetroot_soup
|form=item
|foot=1}}
{{edition|bedrock}}:
{{ID table
|edition=bedrock
|shownumericids=y
|showforms=y
|notshowbeitemforms=y
|generatetranslationkeys=y
|displayname=Beetroot Soup
|spritetype=item
|nameid=beetroot_soup
|id=286
|form=item
|foot=1}}
== Advancements ==
{{load advancements|Husbandry;A Balanced Diet}}
== History ==
{{History|java}}
{{History||1.9|snap=15w31a|[[File:Beetroot Soup JE1 BE1.png|32px]] Added beetroot soup.}}
{{History||1.13|snap=17w47a|Prior to [[1.13/Flattening|''The Flattening'']], this [[item]]'s numeral ID was 436.}}
{{History||1.14|snap=18w43a|[[File:Beetroot Soup JE2 BE2.png|32px]] The texture of beetroot soup has been changed.
|The recipe for beetroot soup is now shapeless.}}
{{History|||snap=18w49a|Beetroot soup can now be found in [[chest]]s in [[snowy tundra]] [[village]] houses.}}
{{History|pocket alpha}}
{{History||November 14, 2013|link={{tweet|jbernhardsson|400902957782147072}}|[[Johan Bernhardsson]] posts an image of beetroot soup.}}
{{History||v0.8.0|snap=build 2|[[File:Beetroot Soup JE1 BE1.png|32px]] Added beetroot soup. It is not obtainable in the Creative inventory.}}
{{History||v0.9.0|snap=build 1|Beetroot soup now requires 6 [[beetroot]]s instead of 4.}}
{{History||v0.12.1|snap=build 12|Beetroot soup now restores {{hunger|6}} instead of {{health|8}}.}}
{{History||v0.13.0|snap=build 3|Beetroot soup can now be stacked.}}
{{history|pocket}}
{{History||1.0.0|snap=alpha 0.17.0.1|Beetroot soup has been added to the Creative inventory.<ref name="missing beetroot soup">{{Bug|MCPE-13804}}</ref>}}
{{History|bedrock}}
{{History||1.10.0|snap=beta 1.10.0.3|[[File:Beetroot Soup JE2 BE2.png|32px]] The texture of beetroot soup has been changed.
|The recipe for beetroot soup is now shapeless.}}
{{History||1.11.0|snap=beta 1.11.0.1|Beetroot soup can now be found in [[snowy tundra]] [[village]] house [[chest]]s.}}
{{History|console}}
{{History||xbox=TU43|xbone=CU33|ps=1.36|switch=1.0.1|wiiu=Patch 13|[[File:Beetroot Soup JE1 BE1.png|32px]] Added beetroot soup.}}
{{History||xbox=none|xbone=none|ps=1.90|wiiu=none|switch=none|[[File:Beetroot Soup JE2 BE2.png|32px]] The texture of beetroot soup has been changed.
|The recipe for beetroot soup is now shapeless.}}
{{History|new 3ds}}
{{History||0.1.0|[[File:Beetroot Soup JE1 BE1.png|32px]] Added beetroot soup.
|Beetroot soup is not available within the [[Creative inventory]].}}
{{History||?|Added beetroot soup to the Creative inventory.{{info needed|Which update did this occur?}}}}
{{History|foot}}
== Issues ==
{{issue list}}
== References ==
{{reflist}}
{{Items}}
[[Category:Food]]
[[Category:Renewable resources]]
[[de:Borschtsch]]
[[es:Estofado de remolacha]]
[[fr:Soupe de betteraves]]
[[it:Zuppa di barbabietole]]
[[ja:ビートルートスープ]]
[[ko:비트 수프]]
[[nl:Bietensoep]]
[[pl:Barszcz]]
[[pt:Ensopado de beterraba]]
[[ru:Свекольный суп]]
[[th:ซุปบีทรูท]]
[[uk:Борщ]]
[[zh:甜菜汤]]</li><li>[[Sparkler|Sparkler]]<br/>{{About|the Education Edition exclusive item|the new melee weapon available from the ''Minecraft Dungeons'' anniversary event|MCD:Sparkler}}
{{Item
| image = <gallery>
Orange Sparkler.png | Orange
Blue Sparkler.png | Blue
Red Sparkler.png | Red
Purple Sparkler.png | Purple
Green Sparkler.png | Green
</gallery>
| image2 = <gallery>
Active Orange Sparkler.png | Active Orange
Active Blue Sparkler.png | Active Blue
Active Red Sparkler.png | Active Red
Active Purple Sparkler.png | Active Purple
Active Green Sparkler.png | Active Green
</gallery>
| renewable = No
| stackable = No
}}
{{education feature}}
{{exclusive|bedrock|education}}
A '''sparkler''' is a [[Chemistry Update|chemistry]]-related [[item]] that emits particles when lit.
Sparklers are available in orange, blue, red, purple, and green colors.
== Obtaining ==
=== Crafting ===
{{Crafting
|showdescription=1
|B1=Chloride |B2=Magnesium |B3=Stick
|Output=Sparkler
|description= Calcium Chloride: Orange<br>Cerium Chloride: Blue<br>Mercuric Chloride: Red<br>Potassium Chloride: Purple<br>Tungsten Chloride: Green<br>{{only|bedrock|education}}
|type=Miscellaneous
}}
== Usage ==
{{ctrl|Using}} a sparkler ignites it, causing its texture to change. When lit, the sparkler emits colored [[particles]]; the [[durability]] meter depletes while the sparkler is burning. Sparklers are one of the few [[item]]s that can be held in the [[off-hand]] {{in|be}}. Unlit sparklers have normal lighting like most items, while lit sparklers appear to glow when held in the player's hand, similarly to [[glow stick]]s.
When the [[player]] uses another item while a sparkler is lit, or holds the sparkler in the off-hand, the sparkler's durability stops depleting.
If the player has a lit sparkler in their [[inventory]] and goes into the [[water]], the sparkler is destroyed immediately. However, it does not get destroyed if dropped in water. It also cannot float.
Despite having durability, sparklers cannot be enchanted with [[Unbreaking]] or [[Mending]].
== Sounds ==
{{Sound table
|type=bedrock
|sound=Fuse.ogg
|source=sound
|description=While a sparkler is active
|id=sparkler.active
|volume=0.25
|pitch=0.8/1.2}}
{{Sound table
|sound=Fizz.ogg
|source=block
|description=While a sparkler is being lit
|id=random.fizz
|volume=1.0
|pitch=2.4/2.6
|foot=1}}
== Data values ==
=== ID ===
{{ID table
|edition=bedrock
|shownumericids=y
|showforms=y
|notshowbeitemforms=y
|generatetranslationkeys=y
|displayname=Sparkler
|spritename=sparklers
|spritetype=item
|nameid=sparkler
|id=600
|form=item
|translationkey=item.sparkler.orange.name,item.sparkler.blue.name,item.sparkler.red.name,item.sparkler.purple.name,item.sparkler.green.name
|foot=1}}
== History ==
{{History|bedrock}}
{{History||1.4.0|snap=beta 1.2.20.1|[[File:Orange Sparkler BE1.png|32px]] [[File:Blue Sparkler BE1.png|32px]] [[File:Red Sparkler BE1.png|32px]] [[File:Purple Sparkler BE1.png|32px]] [[File:Green Sparkler BE1.png|32px]] <br>[[File:Active Orange Sparkler BE1.png|32px]] [[File:Active Blue Sparkler BE1.png|32px]] [[File:Active Red Sparkler BE1.png|32px]] [[File:Active Purple Sparkler BE1.png|32px]] [[File:Active Green Sparkler BE1.png|32px]] Added sparklers.}}
{{History|education}}
{{History||1.0.27|[[File:Orange Sparkler BE1.png|32px]] [[File:Blue Sparkler BE1.png|32px]] [[File:Red Sparkler BE1.png|32px]] [[File:Purple Sparkler BE1.png|32px]] [[File:Green Sparkler BE1.png|32px]] <br>[[File:Active Orange Sparkler BE1.png|32px]] [[File:Active Blue Sparkler BE1.png|32px]] [[File:Active Red Sparkler BE1.png|32px]] [[File:Active Purple Sparkler BE1.png|32px]] [[File:Active Green Sparkler BE1.png|32px]] Added sparklers.}}
{{History|foot}}
== Issues ==
{{issue list}}
== Trivia ==
* The formula for sparkler roughly works in real life. Magnesium itself burns white in air, while the metal salts add [[wikipedia:flame test|color to the flame]].
{{items}}
{{Education Edition}}
[[Category:Non-renewable resources]]
[[Category:Education Edition items]]
[[de:Wunderkerze]]
[[ja:手持ち花火]]
[[ko:스파클러]]
[[pl:Zimne ognie]]
[[pt:Vela-Faísca]]
[[zh:烟花棒]]</li></ul> | 18w43a | File:Hopper (Item) JE3 BE2.png The textures of hoppers have been changed. | ||||
| 19w03c | Hoppers now use correct cullface arguments, and some redundant faces have also been deleted. | |||||
| Pocket Edition Alpha | ||||||
0.14.0{{Extension DPL}}<ul><li>[[Raw Rabbit|Raw Rabbit]]<br/>{{for|the cooked version|Cooked Rabbit}}
{{Item
| title = Raw Rabbit
| image = Raw Rabbit.png
| heals = {{hunger|3}}
| renewable = Yes
| stackable = Yes (64)
}}
'''Raw rabbit''' is a food item that can be eaten by the [[player]], or cooked in a [[furnace]] or a [[campfire]] to make [[cooked rabbit]].
== Obtaining ==
=== Mob loot ===
{{IN|Bedrock}}, adult [[rabbit]]s drop 0-1 raw rabbit when killed. The maximum amount is increased by 1 per level of [[Looting]], for a maximum of 0-4 with [[Looting]] III. If killed while on [[fire]], they drop [[cooked rabbit]] instead.
{{IN|Java}}, adult [[rabbit]]s drop 1 raw rabbit when killed. The maximum amount is increased by 1 per level of [[Looting]], for a maximum of 1-4 with [[Looting]] III. If killed while on [[fire]], they drop [[cooked rabbit]] instead.
== Usage ==
To eat raw rabbit, press and hold {{control|use}} while it is selected in the hotbar. Eating one restores {{hunger|3}} [[hunger]] and 1.8 [[Hunger#Mechanics|saturation]].
=== Smelting ingredient ===
{{Smelting
|showname=1
|Raw Rabbit
|Cooked Rabbit
|0.35
}}
=== Wolves ===
Raw rabbit can be used to [[breed]] and heal tamed [[wolves]], lead them around, and make baby tamed [[Wolf|wolves]] grow up faster by 10% of the remaining time.
=== Trading ===
Novice-level Butcher [[villager|villagers]] have a {{frac|1|3}} chance to buy 4 raw rabbit for an [[emerald]] as their trades.{{only|bedrock}}
Novice-level Butcher villagers have 40% chance of offering to buy 4 raw rabbit for an emerald.{{only|java}}
==Sounds==
{{Sound table/Entity/Food}}
== Data values ==
=== ID ===
{{edition|java}}:
{{ID table
|edition=java
|showforms=y
|generatetranslationkeys=y
|displayname=Raw Rabbit
|spritetype=item
|nameid=rabbit
|form=item
|foot=1}}
{{edition|bedrock}}:
{{ID table
|edition=bedrock
|shownumericids=y
|showforms=y
|notshowbeitemforms=y
|generatetranslationkeys=y
|displayname=Raw Rabbit
|spritetype=item
|nameid=rabbit
|id=288
|form=item
|foot=1}}
== Achievements ==
{{load achievements|Rabbit Season}}
== Advancements ==
{{load advancements|Husbandry;A Balanced Diet}}
== History ==
{{History|java}}
{{History||1.8|snap=June 30, 2014|slink=https://twitter.com/TheMogMiner/status/483636993780232192|[[Ryan Holtz]] tweeted images of raw rabbits and some other new [[item]]s.}}
{{History|||snap=14w27a|[[File:Raw Rabbit JE1.png|32px]] Added raw rabbit.}}
{{History|||snap=14w33b|[[File:Raw Rabbit JE2 BE1.png|32px]] The texture of raw rabbit has been changed. The new texture was created by [[wikipedia:Reddit|Reddit]] user [http://www.reddit.com/u/zeldahuman zeldahuman].<ref>{{reddit|2bjzes/a_reminder_of_the_blocks_and_items_added_in_18_so|cj69zie|context=3}}</ref><ref>{{reddit|2c5f35/minecraft_snapshot_14w31a_has_been_released|cjct7gb}}</ref>}}
{{History||1.13|snap=17w47a|Prior to [[1.13/Flattening|''The Flattening'']], this [[item]]'s numeral ID was 411.}}
{{History||1.14|snap=18w43a|[[File:Raw Rabbit JE3 BE2.png|32px]] The texture of raw rabbit has been changed.}}
{{History|||snap=19w11a|Butcher [[villager]]s now [[trading|buy]] raw rabbit.}}
{{History||1.19.3|snap=22w42a|Rabbits now always drop at least 1 raw rabbit when killed.<ref>{{bug|MC-96449|||Fixed}}</ref>}}
{{History|pocket alpha}}
{{History||v0.13.0|snap=build 1|[[File:Raw Rabbit JE2 BE1.png|32px]] Added raw rabbit.}}
{{History|bedrock}}
{{History||1.10.0|snap=beta 1.10.0.3|[[File:Raw Rabbit JE3 BE2.png|32px]] The texture of raw rabbit has been changed.}}
{{History||1.11.0|snap=beta 1.11.0.4|Raw rabbit can now be [[trading|sold]] to butcher [[villager]]s.}}
{{History|console}}
{{History||xbox=TU31|xbone=CU19|ps=1.22|wiiu=Patch 3|[[File:Raw Rabbit JE2 BE1.png|32px]] Added raw rabbit.}}
{{History|PS4}}
{{History||1.90|[[File:Raw Rabbit JE3 BE2.png|32px]] The texture of raw rabbit has been changed.}}
{{History|new 3ds}}
{{History||0.1.0|[[File:Raw Rabbit JE2 BE1.png|32px]] Added raw rabbit.}}
{{History|foot}}
== Issues ==
{{issue list}}
== Gallery ==
<gallery>
File:Rabbit Items 2 Ryan Holtz.png|First image of the item by [[Ryan Holtz]].
</gallery>
== References ==
{{reflist}}
{{items}}
[[de:Rohes Kaninchen]]
[[es:Conejo crudo]]
[[it:Coniglio crudo]]
[[fr:Lapin cru]]
[[ja:生の兎肉]]
[[ko:익히지 않은 토끼고기]]
[[nl:Rauw konijnenvlees]]
[[pl:Surowy królik]]
[[pt:Coelho cru]]
[[ru:Сырая крольчатина]]
[[zh:生兔肉]]
[[Category:Food]]
[[Category:Renewable resources]]</li><li>[[Melon Seeds|Melon Seeds]]<br/>{{Block
|image = <gallery>
Melon Stem Age 0.png | Age 0
Melon Stem Age 1.png | Age 1
Melon Stem Age 2.png | Age 2
Melon Stem Age 3.png | Age 3
Melon Stem Age 4.png | Age 4
Melon Stem Age 5.png | Age 5
Melon Stem Age 6.png | Age 6
Melon Stem Age 7.png | Age 7
</gallery>
| image2 = <gallery>
Attached Melon Stem (N).png | North
Attached Melon Stem (E).png | East
Attached Melon Stem (S).png | South
Attached Melon Stem (W).png | West
</gallery>
| transparent = Yes
| light = No
| tool = none
| renewable = Yes
| stackable = Yes (64)
| flammable = No
| lavasusceptible = No
}}'''Melon seeds''' are items obtained from [[Melon Slice|melon slices]] that can be used to grow melon stems.
'''Melon stems''' are plants grown on [[farmland]] that, over time, grow [[melon]]s on dirt, mud and moss blocks adjacent to them.
== Obtaining ==
=== Breaking ===
When broken, a melon stem drops 0–3 melon seeds. The chance for melon seeds to drop increases with the stem's age.
{| class="wikitable"
! rowspan="3" |[[Resource location]]
! rowspan="3" | Source
! colspan="4" | Default
|-
| colspan="1" rowspan="2" style="text-align:center" | Nothing || colspan="3" style="text-align:center" |{{ItemLink|Melon Seeds|Melon seeds}}
|-
| style="text-align:center" | 1 || style="text-align:center" | 2 || style="text-align:center" | 3
|-
| rowspan="8" |<code>blocks/melon_stem</code>
|{{BlockLink|Melon Stem|Melon stem}} <code>age = 0</code>
| style="text-align:center" |81.3%|| style="text-align:center" |17.42%|| style="text-align:center" |1.24%|| style="text-align:center" |0.03%
|-
|{{BlockLink|Melon Stem|Melon stem}} <code>age = 1</code>
| style="text-align:center" |65.1%|| style="text-align:center" |30.04%|| style="text-align:center" |4.62%|| style="text-align:center" |0.24%
|-
|{{BlockLink|Melon Stem|Melon stem}} <code>age = 2</code>
| style="text-align:center" |51.2%|| style="text-align:center" |38.4%|| style="text-align:center" |9.6%|| style="text-align:center" |0.8%
|-
|{{BlockLink|Melon Stem|Melon stem}} <code>age = 3</code>
| style="text-align:center" |39.44%|| style="text-align:center" |43.02%|| style="text-align:center" |15.64%|| style="text-align:center" |1.9%
|-
|{{BlockLink|Melon Stem|Melon stem}} <code>age = 4</code>
| style="text-align:center" |29.13%|| style="text-align:center" |44.44%|| style="text-align:center" |22.22%|| style="text-align:center" |3.7%
|-
|{{BlockLink|Melon Stem|Melon stem}} <code>age = 5</code>
| style="text-align:center" |21.6%|| style="text-align:center" |43.2%|| style="text-align:center" |28.8%|| style="text-align:center" |6.4%
|-
|{{BlockLink|Melon Stem|Melon stem}} <code>age = 6</code>
| style="text-align:center" |15.17%|| style="text-align:center" |39.82%|| style="text-align:center" |34.84%|| style="text-align:center" |10.16%
|-
|{{BlockLink|Melon Stem|Melon stem}} <code>age = 7</code>
| style="text-align:center" |10.16%|| style="text-align:center" |34.84%|| style="text-align:center" |39.82%|| style="text-align:center" |15.17%
|-
| rowspan="1" |<code>blocks/attached_melon_stem</code>
|{{BlockLink|Attached Melon Stem|Attached Melon stem}}
| style="text-align:center" |10.16%|| style="text-align:center" |34.84%|| style="text-align:center" |39.82%|| style="text-align:center" |15.17%
|}
=== Natural generation ===
Melon stems generate naturally in stem farm inside [[woodland mansion]]s.
Melon stems generate in 20% of the farm plots in [[savanna]] [[village]]s, and 10% of the farm plots in [[desert]] villages.
=== Chest loot ===
{{LootChestItem|melon-seeds}}
=== Crafting ===
{{Crafting
|Melon Slice
|Output= Melon Seeds
|type= Material
}}
=== Trading ===
[[Wandering trader]]s sell melon seeds for 1 [[emerald]].
== Usage ==
=== Farming ===
{{see also|Tutorials/Pumpkin and melon farming}}
Melon seeds can be planted only on [[farmland]], as stems. Over time, a stem grows through several stages<sup>[''[[Talk:Pumpkin Seeds|needs testing]]'']</sup> and, at its final growth stage, will produce [[melon]]s on any adjacent [[dirt]], [[Coarse Dirt|coarse dirt]], [[Rooted Dirt|rooted dirt]], [[Grass Block|grass block]], [[farmland]], [[podzol]], [[mycelium]], [[Moss Block|moss block]], [[mud]] or [[Muddy Mangrove Roots|muddy mangrove roots]]. If a melon is already occupying a spot adjacent to a stem it does not grow more melons until the melons is removed. A single stem can grow an unlimited number of melons. Melon stems need a minimum light level of 10 in the block above the stem to grow and give melons. Melon seeds are affected by [[bone meal]] only with respect to stem growth; bone meal does not help produce the actual melons.
=== Breeding ===
Like other seeds, melon seeds can be used to [[breed]] [[chicken]]s, lead chickens around, and make baby chickens grow up faster by 10% of the remaining time.
=== Taming ===
Like other seeds, melon seeds can be used to tame [[parrot]]s.
=== Composting ===
Placing melon seeds into a [[composter]] has a 30% chance of raising the compost level by 1.
== Melon Stem ==
A '''melon stem''' is the block that is planted on [[farmland]] when melon seeds are used on it. It starts underground, and rises up as the plant grows. The stem is colored green when young, and then yellow once fully grown.
The stem curves once a melon has grown from it. A fully-grown single stem connects to any [[melon]] in an adjacent square, thus there are 5 possible appearances to a stem. If there are multiple melons it can connect to, it favors the east, then west, north, and south. When the melon is removed, the stem returns to its straight shape.
== Sounds ==
{{Sound table/Block/Hard crop}}
== Data values ==
=== ID ===
{{edition|java}}:
{{ID table
|edition=java
|showblocktags=y
|showforms=y
|generatetranslationkeys=y
|displayname=Melon Stem
|spritetype=block
|nameid=melon_stem
|blocktags=bee_growables, crops
|form=block}}
{{ID table
|displayname=Attached Melon Stem
|spritetype=block
|nameid=attached_melon_stem
|form=block}}
{{ID table
|displayname=Melon Seeds
|spritetype=item
|nameid=melon_seeds
|form=item
|foot=1}}
{{edition|bedrock}}:
{{ID table
|edition=bedrock
|shownumericids=y
|showforms=y
|generatetranslationkeys=y
|displayname=Melon Stem
|spritetype=block
|nameid=melon_stem
|id=105
|form=block
|translationkey=-}}
{{ID table
|displayname=Melon Seeds
|spritetype=item
|nameid=melon_seeds
|id=293
|form=item
|foot=1}}
=== Block states ===
{{see also|Block states}}
{{/BS}}
== Advancements ==
{{load advancements|A Seedy Place}}
== History ==
{{info needed section|check if stems floated above farmland upon initial implementation}}
{{History|java beta}}
{{History||1.8|snap=Pre-release|[[File:Melon Seeds JE1 BE1.png|32px]] Added melon seeds.
|[[File:Melon Stem Age 0 JE1.png|32px]] [[File:Stem Age 1 JE1.png|32px]] [[File:Melon Stem Age 2 JE1.png|32px]] [[File:Melon Stem Age 3 JE1.png|32px]] [[File:Melon Stem Age 4 JE1.png|32px]] [[File:Melon Stem Age 5 JE1.png|32px]] [[File:Melon Stem Age 6 JE1.png|32px]] [[File:Melon Stem Age 7 JE1.png|32px]] Added the melon stem, with seven stages of growth.
|Melon seeds can found in the new [[mineshaft]] [[chest]]s.
|[[File:Attached Melon Stem (N) JE1.png|32px]] [[File:Attached Melon Stem (E) JE1.png|32px]] [[File:Attached Melon Stem (S) JE1.png|32px]] [[File:Attached Melon Stem (W) JE1.png|32px]] Melon stems have four slightly visually distinct appearances for each facing direction - the bent part of the stem rotates, but the other two planes do not.
|[[File:Melon Stem Age 8 JE1.png|32px]] [[File:Melon Stem Age 9 JE1.png|32px]] [[File:Melon Stem Age 10 JE1.png|32px]] [[File:Melon Stem Age 11 JE1.png|32px]] [[File:Melon Stem Age 12 JE1.png|32px]] [[File:Melon Stem Age 13 JE1.png|32px]] [[File:Melon Stem Age 14 JE1.png|32px]] [[File:Melon Stem Age 15 JE1.png|32px]] Melon stem data values 8–15 now show a glitched formation, with a floating stem with an attached stem cross eventually emerging below.
|[[File:Attached Stem Age 8 JE1.png|32px]] [[File:Attached Stem Age 9 JE1.png|32px]] [[File:Attached Stem Age 10 JE1.png|32px]] [[File:Attached Stem Age 11 JE1.png|32px]] [[File:Attached Stem Age 12 JE1.png|32px]] [[File:Attached Stem Age 13 JE1.png|32px]] [[File:Attached Stem Age 14 JE1.png|32px]] [[File:Attached Stem Age 15 JE1.png|32px]] Melon stem blocks with data values higher than 7 can now attach to adjacent fruits, which results in buggy stem textures with [[vines]] in the mix due to vines being below attached stems in [[terrain.png]].}}
{{History|||snap=Pre-release 2 ;)|Melon stems can now be grown faster using [[bone meal]].}}
{{History|java}}
{{History||1.3.1|snap=1.3|The texture of melon stems has been moved one pixel to the left in [[terrain.png]].
|[[File:Melon Stem Age 0 JE2.png|32px]] [[File:Melon Stem Age 1 JE2.png|32px]] [[File:Melon Stem Age 2 JE2.png|32px]] [[File:Melon Stem Age 3 JE2.png|32px]] [[File:Melon Stem Age 4 JE2.png|32px]] [[File:Melon Stem Age 5 JE2.png|32px]] [[File:Melon Stem Age 6 JE2.png|32px]] [[File:Melon Stem Age 7 JE2.png|32px]] Stems now appear slightly different.
|[[File:Melon Stem Age 8 JE2.png|32px]] [[File:Melon Stem Age 9 JE2.png|32px]] [[File:Melon Stem Age 10 JE2.png|32px]] [[File:Melon Stem Age 11 JE2.png|32px]] [[File:Melon Stem Age 12 JE2.png|32px]] [[File:Melon Stem Age 13 JE2.png|32px]] [[File:Melon Stem Age 14 JE2.png|32px]] [[File:Melon Stem Age 15 JE2.png|32px]] Overgrown stems now appear slightly different.
|[[File:Attached Melon Stem (N) JE2.png|32px]] [[File:Attached Melon Stem (E) JE2.png|32px]] [[File:Attached Melon Stem (S) JE2.png|32px]] [[File:Attached Melon Stem (W) JE2.png|32px]] Attached melon stems now appear slightly different.
|[[File:Attached Stem Age 8 JE2.png|32px]] [[File:Attached Stem Age 9 JE2.png|32px]] [[File:Attached Stem Age 10 JE2.png|32px]] [[File:Attached Stem Age 11 JE2.png|32px]] [[File:Attached Stem Age 12 JE2.png|32px]] [[File:Attached Stem Age 13 JE2.png|32px]] [[File:Attached Stem Age 14 JE2.png|32px]] [[File:Attached Stem Age 15 JE2.png|32px]] Overgrown attached melon stems now appear slightly different.}}
{{History||1.4.2|snap=12w36a|[[Chicken]]s now use [[wheat seeds]], melon seeds, and [[pumpkin seeds]], instead of [[wheat]] to breed.}}
{{History||1.5|snap=13w02a|[[File:Melon Stem Age 0 JE3.png|32px]] [[File:Melon Stem Age 1 JE3.png|32px]] [[File:Melon Stem Age 2 JE3.png|32px]] [[File:Melon Stem Age 3 JE3.png|32px]] [[File:Melon Stem Age 4 JE3.png|32px]] [[File:Melon Stem Age 5 JE3.png|32px]] [[File:Melon Stem Age 6 JE3.png|32px]] Melon stems now use a squished version of their texture for immature stems, depending on age.
|[[File:Melon Stem Age 8 JE3.png|32px]] [[File:Melon Stem Age 9 JE3.png|32px]] [[File:Melon Stem Age 10 JE3.png|32px]] [[File:Melon Stem Age 11 JE3.png|32px]] [[File:Melon Stem Age 12 JE3.png|32px]] [[File:Melon Stem Age 13 JE3.png|32px]] [[File:Melon Stem Age 14 JE3.png|32px]] [[File:Melon Stem Age 15 JE3.png|32px]] This also affects melon stems of ages 8–15, which are likewise stretched to accommodate its predicted size.
|[[File:Attached Stem Age 8 JE3.png|32px]] [[File:Attached Stem Age 9 JE3.png|32px]] [[File:Attached Stem Age 10 JE3.png|32px]] [[File:Attached Stem Age 11 JE3.png|32px]] [[File:Attached Stem Age 12 JE3.png|32px]] [[File:Attached Stem Age 13 JE3.png|32px]] [[File:Attached Stem Age 14 JE3.png|32px]] [[File:Attached Stem Age 15 JE3.png|32px]] Melon stems of extreme ages, which are attached to adjacent fruits, now show a stretched and tinted stem appearance.}}
{{History|||snap=13w03a|[[File:Melon Stem Age 0 JE4.png|32px]] [[File:Melon Stem Age 1 JE4.png|32px]] [[File:Melon Stem Age 2 JE4.png|32px]] [[File:Melon Stem Age 3 JE4.png|32px]] [[File:Melon Stem Age 4 JE4.png|32px]] [[File:Melon Stem Age 5 JE4.png|32px]] [[File:Melon Stem Age 6 JE4.png|32px]] [[File:Melon Stem Age 7 JE4.png|32px]] Melon stems are no longer squished or stretched to account for age.<ref>{{bug|MC-7111}}</ref>
|[[File:Melon Stem Age 8 JE4.png|32px]] [[File:Melon Stem Age 9 JE4.png|32px]] [[File:Melon Stem Age 10 JE4.png|32px]] [[File:Melon Stem Age 11 JE4.png|32px]] [[File:Melon Stem Age 12 JE4.png|32px]] [[File:Melon Stem Age 13 JE4.png|32px]] [[File:Melon Stem Age 14 JE4.png|32px]] [[File:Melon Stem Age 15 JE4.png|32px]] Melon stems with age values 8 through 15 now show a tinted [[trapdoor]] texture.
|From this version up until 14w08a, overgrown melon stems start to draw from the texture below them on the [[texture atlas]], in much the same way they previously did with terrain.png. However, as texture atlases are unstable and textures tend to change positions as new blocks and textures are added, overgrown stems change the texture they draw from every time new textures are added, which includes when textures added by [[mods]].}}
{{History|||snap=13w09a|[[File:Melon Stem Age 8 JE5.png|32px]] [[File:Melon Stem Age 9 JE5.png|32px]] [[File:Melon Stem Age 10 JE5.png|32px]] [[File:Melon Stem Age 11 JE5.png|32px]] [[File:Melon Stem Age 12 JE5.png|32px]] [[File:Melon Stem Age 13 JE5.png|32px]] [[File:Melon Stem Age 14 JE5.png|32px]] [[File:Melon Stem Age 15 JE5.png|32px]] Melon stems with age values 8–15 now show a tinted [[birch wood]] texture.}}
{{History||1.6.1|snap=13w24a|Melon and pumpkin stems have now been assigned separate textures.
|[[File:Melon Stem Age 8 JE6.png|32px]] [[File:Melon Stem Age 9 JE6.png|32px]] [[File:Melon Stem Age 10 JE6.png|32px]] [[File:Melon Stem Age 11 JE6.png|32px]] [[File:Melon Stem Age 12 JE6.png|32px]] [[File:Melon Stem Age 13 JE6.png|32px]] [[File:Melon Stem Age 14 JE6.png|32px]] [[File:Melon Stem Age 15 JE6.png|32px]] Melon stems with age values 8–15 now show a tinted [[note block]] texture.}}
{{History||1.7.2|snap=13w37a|Added the {{cmd|setblock}} [[commands|command]], allowing for invalid stem ages to be placed in the world without using external editors. This also allows them to be obtained in earlier versions via backdating.}}
{{History|||snap=13w41a|[[File:Melon Stem Age 8 JE7.png|32px]] [[File:Melon Stem Age 9 JE7.png|32px]] [[File:Melon Stem Age 10 JE7.png|32px]] [[File:Melon Stem Age 11 JE7.png|32px]] [[File:Melon Stem Age 12 JE7.png|32px]] [[File:Melon Stem Age 13 JE7.png|32px]] [[File:Melon Stem Age 14 JE7.png|32px]] [[File:Melon Stem Age 15 JE7.png|32px]] Melon stems with age values 8–15 now show a tinted [[netherrack]] texture.}}
{{History||1.8|snap=14w10a|[[File:Melon Stem Age 8 JE8.png|32px]] [[File:Melon Stem Age 9 JE8.png|32px]] [[File:Melon Stem Age 10 JE8.png|32px]] [[File:Melon Stem Age 11 JE8.png|32px]] Melon stems with data values 8–11 now display a tinted attached stem, with 8 facing west, 9 facing east, 10 facing north and 11 facing south.
|Invalid melon stems with data values 12-15 now crash the game.}}
{{History|||snap=14w25a|[[File:Melon Stem Age 0 JE5.png|32px]] [[File:Melon Stem Age 1 JE5.png|32px]] [[File:Melon Stem Age 2 JE5.png|32px]] [[File:Melon Stem Age 3 JE5.png|32px]] [[File:Melon Stem Age 4 JE5.png|32px]] [[File:Melon Stem Age 5 JE5.png|32px]] [[File:Melon Stem Age 6 JE5.png|32px]] [[File:Melon Stem Age 7 JE5.png|32px]] Melon stems now render as a single diagonal plane, or, in the case of attached stems, a diagonal and orthogonal plane.
|[[File:Attached Melon Stem (N) JE3.png|32px]] [[File:Attached Melon Stem (E) JE3.png|32px]] [[File:Attached Melon Stem (S) JE3.png|32px]] [[File:Attached Melon Stem (W) JE3.png|32px]] The attached melon stem [[model]] now fully rotates to the direction the stem points. Prior to this update, the base of the melon stem would stay the same while the long attaching section would differ, resulting in four possible attached stem appearances.
|Invalid overgrown melon stems have effectively been removed from the game, as attempting to place an out of range stem via {{cmd|setblock}} creates a stem of age 0 and loading a world with such stems existing causes a game crash.}}
{{History|||snap=14w26a|[[File:Melon Stem Age 0 JE6.png|32px]] [[File:Melon Stem Age 1 JE6.png|32px]] [[File:Melon Stem Age 2 JE6.png|32px]] [[File:Melon Stem Age 3 JE6.png|32px]] [[File:Melon Stem Age 4 JE6.png|32px]] [[File:Melon Stem Age 5 JE6.png|32px]] [[File:Melon Stem Age 6 JE6.png|32px]] [[File:Melon Stem Age 7 JE6.png|32px]] [[File:Attached Melon Stem (N) JE4.png|32px]] [[File:Attached Melon Stem (E) JE4.png|32px]] [[File:Attached Melon Stem (S) JE4.png|32px]] [[File:Attached Melon Stem (W) JE4.png|32px]] Melon stems now correctly render as crosses again.<ref>{{bug|MC-58136}}</ref>}}
{{History|||snap=14w27a|[[File:Attached Stem Age 0 14w27a.png|32px]] [[File:Attached Stem Age 1 14w27a.png|32px]] [[File:Attached Stem Age 2 14w27a.png|32px]] [[File:Attached Stem Age 3 14w27a.png|32px]] [[File:Attached Stem Age 4 14w27a.png|32px]] [[File:Attached Stem Age 5 14w27a.png|32px]] [[File:Attached Stem Age 6 14w27a.png|32px]] Due to a bug, all melon stems appear attached regardless of age or any actual attachment.<ref>{{bug|MC-60208}}</ref>}}
{{History|||snap=14w28a|All melon stems appearing attached regardless of age or any actual attachment has been fixed. However, melon stems still appear attached to adjacent fruits regardless of age due to a similar bug.<ref>{{bug|MC-61716}}</ref>}}
{{History|||snap=14w34d|Melon seeds can no longer be used for [[breeding]] [[chicken]]s.}}
{{History||1.9|snap=15w31a|Chickens can now use melon seeds to breed again.}}
{{History|||snap=15w44a|Melon seeds have been added to [[dungeon]] [[chest]]s.
|The average yield of melon seeds from [[mineshaft]] chests has been decreased.}}
{{History|||snap=15w45a|Melon stems must now be fully grown again to attach.}}
{{History||1.11|snap=16w39a|Melon seeds can now be found inside chests in the new [[woodland mansion]]s.
|Melon crops now generate inside woodland mansions.}}
{{History||1.12|snap=17w18b|Placing a melon seeds in farmland now gives the player the "A Seedy Place" [[advancement]].{{verify}}}}
{{History||1.13|snap=17w47a|The different block states for the <code>melon_stem</code> ID have been split up into their own IDs.
|Prior to [[1.13/Flattening|''The Flattening'']], this [[block]]'s numeral ID was 105, and the [[item]]'s 362.}}
{{History|||snap=17w48a|Attached melon stems no longer [[drops|drop]] seeds.}}
{{History||1.14|snap=18w43a|[[File:Attached Melon Stem (N) JE5.png|32px]] [[File:Attached Melon Stem (E) JE5.png|32px]] [[File:Attached Melon Stem (S) JE5.png|32px]] [[File:Attached Melon Stem (W) JE5.png|32px]] The texture of attached melon stems has been changed.}}
{{History|||snap=18w49a|Melon stems now generate in the updated [[savanna]] [[village]]s.}}
{{History|||snap=18w50a|Melon stems now generate in the updated [[desert]] [[village]]s.}}
{{History|||snap=19w03a|Placing melon seeds into the new [[composter]] has a 10% chance of raising the compost level by 1.}}
{{History|||snap=19w05a|Melon seeds now have a 30% chance of increasing the compost level in a composter by 1.
|Added [[Wandering Trader|wandering trader]]s, which sell melon seeds.}}
{{History||1.15|snap=19w34a|[[Bee]]s can now pollinate melon stems.}}
{{History|||snap=19w39a|Attached melon stems now [[drops|drop]] seeds again.<ref>{{bug|MC-136360}}</ref>}}
{{History||1.18|snap=Pre-release 5|[[File:Melon Seeds JE2.png|32px]] The texture of melon seeds has been changed.}}
{{History|pocket alpha}}
{{History||v0.5.0|Added melon seeds.
|[[File:Melon Stem Age 0 JE1.png|32px]] [[File:Stem Age 1 JE1.png|32px]] [[File:Melon Stem Age 2 JE1.png|32px]] [[File:Melon Stem Age 3 JE1.png|32px]] [[File:Melon Stem Age 4 JE1.png|32px]] [[File:Melon Stem Age 5 JE1.png|32px]] [[File:Melon Stem Age 6 JE1.png|32px]] [[File:Melon Stem Age 7 JE1.png|32px]] [[File:Attached Melon Stem (N) JE1.png|32px]] [[File:Attached Melon Stem (E) JE1.png|32px]] [[File:Attached Melon Stem (S) JE1.png|32px]] [[File:Attached Melon Stem (W) JE1.png|32px]]{{verify|Are these models correct?}} Added melon stems.}}
{{History||v0.6.0|[[File:Melon Seeds JE1 BE1.png|32px]] Melon seeds no longer use the pumpkin seeds texture.}}
{{History||v0.9.0|snap=?|Melon seeds can now be found in [[mineshaft]] chests.}}
{{History||v0.12.1|snap=build 1|Melon seeds are no longer available from the [[Nether reactor]].}}
{{History||v0.14.0|snap=build 1|Melon seeds can now be found in [[minecart with chest|minecarts with chests]] in [[mineshaft]]s.}}
{{History|pocket}}
{{History||1.0.0|snap=alpha 0.17.0.1|Melon seeds now generate inside [[dungeon]] [[chest]]s.}}
{{History||1.1.0|snap=alpha 1.1.0.0|Melon crops now generate inside [[woodland mansion]]s.
|Melon seeds can now be found in woodland mansion chests.}}
{{History|bedrock}}
{{History||1.2.0|snap=beta 1.2.0.2|Melon seeds can now be found inside [[bonus chest]]s.
|Melon seeds are now used to tame [[parrot]]s.}}
{{History||1.10.0|snap=beta 1.10.0.3|[[File:Attached Melon Stem (W) JE5.png|32px]]{{info needed|More accurate image}} The texture of attached melon stems has been changed.
|Melon stems now generate in [[savanna]] and [[desert]] [[village]] farms.
|Added [[wandering trader]]s, who [[trading|sell]] melon seeds.}}
{{History||1.11.0|snap=beta 1.11.0.1|Melon seeds can now be used to fill up [[composter]]s.}}
{{History||1.14.0|snap=beta 1.14.0.1|[[Bee]]s can now pollinate melon stems.}}
{{History|console}}
{{History||xbox=TU5|xbone=CU1|ps=1.0|wiiu=Patch 1|[[File:Melon Seeds JE1 BE1.png|32px]] Added melon seeds.
|[[File:Melon Stem Age 0 JE1.png|32px]] [[File:Stem Age 1 JE1.png|32px]] [[File:Melon Stem Age 2 JE1.png|32px]] [[File:Melon Stem Age 3 JE1.png|32px]] [[File:Melon Stem Age 4 JE1.png|32px]] [[File:Melon Stem Age 5 JE1.png|32px]] [[File:Melon Stem Age 6 JE1.png|32px]] [[File:Melon Stem Age 7 JE1.png|32px]] [[File:Attached Melon Stem (N) JE1.png|32px]] [[File:Attached Melon Stem (E) JE1.png|32px]] [[File:Attached Melon Stem (S) JE1.png|32px]] [[File:Attached Melon Stem (W) JE1.png|32px]]{{verify|Are these models correct?}} Added melon stems.}}
{{History||xbox=none|xbone=none|ps=1.90|wiiu=none|switch=none|[[File:Attached Melon Stem (W) JE5.png|32px]]{{info needed|More accurate image}} The texture of attached melon stems has been changed.}}
{{History|New 3DS}}
{{History||0.1.0|[[File:Melon Stem Age 0 JE1.png|32px]] [[File:Stem Age 1 JE1.png|32px]] [[File:Melon Stem Age 2 JE1.png|32px]] [[File:Melon Stem Age 3 JE1.png|32px]] [[File:Melon Stem Age 4 JE1.png|32px]] [[File:Melon Stem Age 5 JE1.png|32px]] [[File:Melon Stem Age 6 JE1.png|32px]] [[File:Melon Stem Age 7 JE1.png|32px]] [[File:Attached Melon Stem (N) JE1.png|32px]] [[File:Attached Melon Stem (E) JE1.png|32px]] [[File:Attached Melon Stem (S) JE1.png|32px]] [[File:Attached Melon Stem (W) JE1.png|32px]]{{verify|Are these models correct?}} Added melon stems.}}
{{History|foot}}
<gallery>
Melon Stem with data value 15.png|The final version of the melon stem with age 15, as seen in-game.
Melonstems.png|Melon stems of ages 1–15 on a modded version of 1.7.2, hence the melon stems using the melon top texture.
Stems of 13w02a.png|All 16 stem sizes in 13w02a, with accompanying data values.
</gallery>
=== Melon stem "item" ===
{{:Technical blocks/Melon Stem}}
== Issues ==
{{issue list}}
== Gallery ==
<gallery>
Stem All Ages.png|All stages of growth.
AllSeeds.png|All the [[seeds]] that exist in the game.
</gallery>
== See also ==
* [[Melon]]
* [[Pumpkin Seeds]]
==References==
{{Reflist}}
{{Blocks|vegetation}}
{{Items}}
[[Category:Plants]]
[[Category:Food]]
[[Category:Non-solid blocks]]
[[Category:Generated structure blocks]]
[[cs:Semínka melounu]]
[[de:Melone]]
[[es:Semillas de sandía]]
[[fr:Graines de pastèque]]
[[hu:Dinnyemagok]]
[[it:Anguria]]
[[ja:スイカの種]]
[[ko:수박씨]]
[[nl:Meloenzaden]]
[[pl:Nasiona arbuza]]
[[pt:Sementes de melancia]]
[[ru:Семена арбуза]]
[[th:เมล็ดแตงโม]]
[[zh:西瓜种子]]</li></ul> | build 1 | File:Hopper (D) JE2 BE1.png File:Hopper (Item) JE2 BE1.png Added hoppers. | ||||
0.15.0{{Extension DPL}}<ul><li>[[Nether Star|Nether Star]]<br/>{{Distinguish|Firework Star}}
{{Item
| image = Nether Star.gif
| renewable = Yes
| stackable = Yes (64)
| rarity = Uncommon
}}
The '''Nether Star''' is a rare item [[drops|dropped]] by the [[wither]] that is used solely to [[Crafting|craft]] [[Beacon]]s.
== Obtaining ==
=== Mob loot ===
The nether star can be obtained only by defeating the [[Wither]] [[Mob#Boss mobs|boss]], which is created using [[Soul sand]] and [[Head|Wither Skeleton Skulls]]. One nether star is dropped each time; the dropped amount is not affected by the [[Looting]] enchantment. {{IN|java}}, nether stars dropped by withers take 10 minutes to despawn and are immune to explosions. {{IN|bedrock}}, nether star items never despawn, neither by time nor by explosions.
== Usage ==
The nether star has the same animated glint as [[enchanted]] items, [[potion]]s, and [[end crystal]]s.
A dropped nether star item cannot be destroyed by [[explosion]]s. However, it can still be destroyed by a falling [[anvil]],{{only|java}} [[fire]], [[lava]], [[cacti]], or [[the Void]].
It is used to [[Crafting|craft]] a [[beacon]].
=== Crafting ingredient ===
{{crafting usage|match=start}}
== Achievements ==
{{load achievements|The beginning;The beginnig?.}}
== Advancements ==
{{load advancements|Withering Heights}}
== Data values ==
=== ID ===
{{edition|java}}:
{{ID table
|edition=java
|showforms=y
|generatetranslationkeys=y
|displayname=Nether Star
|spritetype=item
|nameid=nether_star
|form=item
|foot=1}}
{{edition|bedrock}}:
{{ID table
|edition=bedrock
|showaliasids=y
|shownumericids=y
|showforms=y
|notshowbeitemforms=y
|generatetranslationkeys=y
|displayname=Nether Star
|spritetype=item
|nameid=nether_star
|aliasid=netherstar
|id=518
|form=item
|translationkey=item.netherStar.name
|foot=1}}
== Video ==
<div style="text-align:center">{{yt|H6k28iUefMo}}</div>
== History ==
{{History|java}}
{{History||1.4.2|snap=12w34a|[[File:Nether Star JE1.png|32px]] The texture of the nether star has been added.}}
{{History|||snap=12w36a|[[File:Nether Star JE1.gif|32px]] Added nether stars.
|Nether stars are [[drops|dropped]] by the [[wither]].}}
{{History|||snap=12w37a|[[File:Nether Star JE2 BE1.gif|32px]] The texture of nether stars has been changed so that they no longer have a dark outline.}}
{{History||1.4.6|snap=12w49a|[[Drops|Dropped]] nether stars can no longer be destroyed by [[explosion]]s.}}
{{History||1.13|snap=17w47a|Prior to [[1.13/Flattening|''The Flattening'']], this [[item]]'s numeral ID was 399.}}
{{History||1.14|snap=18w43a|[[File:Nether Star.gif|32px]] The texture of nether stars has been changed.}}
{{History||1.16|snap=20w07a|Nether star has become a [[renewable resource]], as [[soul sand]], one of the blocks used to construct withers, is now renewable through [[bartering]].}}
{{History|pocket alpha}}
{{History||v0.16.0|snap=build 4|[[File:Nether Star JE2 BE1.gif|32px]] Added nether stars.}}
{{History|bedrock}}
{{History||1.10.0|snap=beta 1.10.0.3|[[File:Nether Star.gif|32px]] The texture of nether stars has been changed.}}
{{History|console}}
{{History||xbox=TU19|xbone=CU7|ps=1.12|wiiu=Patch 1|switch=1.0.1|[[File:Nether Star JE2 BE1.gif|32px]] Added nether stars.}}
{{History||xbox=none|xbone=none|ps=1.90|wiiu=none|switch=none|[[File:Nether Star.gif|32px]] The texture of nether stars has been changed.}}
{{History|New 3DS}}
{{History||1.3.12|[[File:Nether Star JE2 BE1.gif|32px]] Added nether stars.}}
{{History|foot}}
== Issues ==
{{issue list}}
== Gallery ==
<gallery>
File:Nether Star JE3 BE2.png|The nether star without enchanted animated glint.
File:Star Drop.png|The nether star dropped by the wither.
File:Wither, left- Nether Star, right.png|A wither to the left, and a nether star to the right.
</gallery>
== References ==
{{reflist}}
==External Links==
*[https://www.minecraft.net/en-us/article/taking-inventory--nether-star Taking Inventory: Nether Star] – Minecraft.net on May 11, 2023
{{Items}}
[[cs:Netheritová hvězda]]
[[de:Netherstern]]
[[es:Estrella del Inframundo]]
[[fr:Étoile du Nether]]
[[hu:Alvilági csillag]]
[[it:Stella del Nether]]
[[ja:ネザースター]]
[[ko:네더의 별]]
[[nl:Netherster]]
[[pl:Netherowa gwiazda]]
[[pt:Estrela do Nether]]
[[ru:Звезда Нижнего мира]]
[[tr:Nether Yıldızı]]
[[uk:Зірка Незеру]]
[[zh:下界之星]]
[[Category:Renewable resources]]</li><li>[[Knowledge Book|Knowledge Book]]<br/>{{exclusive|java}}
{{Item
| image = Knowledge Book.png
| renewable = No
| stackable = No
| rarity = Epic
}}
A '''knowledge book''' is a utility item that reveals available [[crafting]] recipes to the player when {{control|used|use}}.
== Obtaining ==
Knowledge books can be obtained only by using [[commands]], as it is not found in the [[creative]] inventory; therefore, it is impossible to obtain in other modes such as [[survival]] and [[adventure]] except with commands.
For example, to give oneself a knowledge book that reveals the recipes for [[bucket]]s and [[flower pot]]s, use: {{cmd|give @s minecraft:knowledge_book{Recipes:["minecraft:bucket", "minecraft:flower_pot"]} }}.
== Usage ==
Knowledge books are used to reveal recipes to the player who uses it, by adding it to their [[recipe book]]. Using a knowledge book consumes it, removing it from the player's inventory.
Knowledge books are especially useful to mapmakers in conjunction with {{cmd|gamerule doLimitedCrafting true}}, because then any item is craftable only if its recipe is unlocked first.
== Sounds ==
{{Sound table
|sound=Chiseled bookshelf insert1.ogg
|sound2=Chiseled bookshelf insert2.ogg
|sound3=Chiseled bookshelf insert3.ogg
|sound4=Chiseled bookshelf insert4.ogg
|subtitle=Book placed
|source=block
|description=When a knowledge book is placed in a chiseled bookshelf
|id=block.chiseled_bookshelf.insert
|translationkey=subtitles.chiseled_bookshelf.insert
|volume=0.8
|pitch=''varies'' <ref group=sound>Can be 1.0, 0.85, or 1.1 for each sound</ref>
|distance=16}}
{{Sound table
|sound=Chiseled bookshelf pickup1.ogg
|sound2=Chiseled bookshelf pickup2.ogg
|sound3=Chiseled bookshelf pickup3.ogg
|subtitle=Book taken
|source=block
|description=When a knowledge book is removed from a chiseled bookshelf
|id=block.chiseled_bookshelf.pickup
|translationkey=subtitles.chiseled_bookshelf.take
|volume=0.8
|pitch=''varies'' <ref group=sound>Can be 1.0, 0.8, or 1.1 for each sound</ref>
|distance=16
|foot=1}}
== Data values ==
=== ID ===
{{ID table
|edition=java
|showforms=y
|generatetranslationkeys=y
|displayname=Knowledge Book
|spritetype=item
|nameid=knowledge_book
|form=item
|foot=1}}
=== Item data ===
Recipe books use the NBT tag <code>Recipes</code> to indicate the recipes they contain.
''The following NBT structure is provided to show how the <code>Recipes</code> tag is organized, and is not comprehensive above the <code>tag</code> tag. The full NBT for an item can be found [[Chunk format#Items and XP Orbs|here]].''
<div class="treeview" style="margin-top: 0;">
* {{nbt|compound}} Entity data
** {{nbt|compound|Item}}: The item
*** {{nbt|compound|tag}}: Additional information about the item. This tag is optional for most items.
**** {{nbt|list|Recipes}}: The list of recipes this book contains.
***** {{nbt|string}} the name of a recipe, for instance <code>minecraft:gold_nugget</code> or <code>minecraft:gold_ingot_from_nuggets</code>
</div>
== History ==
{{History|java}}
{{History||1.12|snap=17w13a|[[File:Knowledge Book JE1.png|32px]] Added knowledge books.}}
{{History||1.13|snap=17w47a|Prior to [[1.13/Flattening|''The Flattening'']], this [[item]]'s numeral ID was 453.}}
{{History||1.14|snap=18w43a|[[File:Knowledge Book JE2.png|32px]] The texture of knowledge books has now been changed.}}
{{History||1.20|snap=1.20 Release Candidate 1|Knowledge books can now be placed in [[chiseled bookshelf|chiseled bookshelves]].}}
{{History|Foot}}
== Issues ==
{{Issue list}}
== See also ==
* [[Book]]
* [[Enchanted Book]]
* {{cmd|recipe}} command
{{Items}}
[[Category:Non-renewable resources]]
[[de:Buch des Wissens]]
[[es:Enciclopedia]]
[[fr:Livre des connaissances]]
[[ja:知恵の本]]
[[ko:지식의 책]]
[[lzh:天工開物]]
[[pl:Księga wiedzy]]
[[pt:Enciclopédia]]
[[ru:Книга знаний]]
[[zh:知识之书]]</li></ul> | build 1 | Hoppers can now be moved by pistons. | ||||
| Bedrock Edition | ||||||
1.10.0{{Extension DPL}}<ul><li>[[Sign|Sign]]<br/>{{Block
| image = <gallery>
Oak Sign.png|Sign
Oak Wall Sign.png|Wall Sign
Oak Hanging Sign.png|Hanging Sign
Oak Wall Hanging Sign.png|Wall Hanging Sign
</gallery>
| image2 = <gallery>
Oak Sign JE3.png|Sign
Oak Hanging Sign (item) JE1 BE1.png|Hanging Sign
</gallery>
| extratext = [[#Gallery|View all renders]]
| transparent = Yes
| light = No
| tool = axe
| renewable = Yes
| stackable = Yes (16)
| flammable = No
| lavasusceptible = No
}}
A '''sign''' is a non-solid [[block]] that displays text and can be placed on the top or side of other blocks. A '''hanging sign''' is a decorative block that also displays text, and can be placed underneath blocks or with a solid self-supporting bracket. The text of both types of signs can be customized with [[dye]]s and [[glow ink sac]]s.
== Obtaining ==
=== Breaking ===
Signs can be broken with any tool or without a tool, but an [[axe]] is fastest.
{{breaking row|horizontal=1|Sign|sprite=oak-sign|Axe|foot=1|item=1}}
A sign or a hanging sign also breaks and drops itself as an [[item]] if the block the sign is attached to is moved, removed or destroyed. However, a wall hanging sign will stay here if the block the hanging sign is attached to is removed.<ref>{{bug|MC-256501|||WAI}}</ref>
If a sign is broken while being edited, the player continues to edit the sign<ref>{{bug|MC-117815}}</ref>, although {{in|bedrock}} breaking the sign stops the editing operation.
=== Natural generation ===
An oak sign can be found in [[igloo]] basements. Spruce signs can be found in taiga [[village]] houses, as part of a chair.
=== Chest loot ===
{{LootChestItem|oak-sign,oak-hanging-sign,spruce-sign,spruce-hanging-sign}}
=== Crafting ===
[[The player]] can place six stripped [[log]] [[block]]s at the bottom half of the crafting table and place two [[chain]]s on the top-left and top-right slots to create hanging signs. This crafting recipe will create six hanging signs. Hanging signs can only be crafted with stripped logs or [[stem]]s; non-stripped wood cannot be used to craft hanging signs.
{{Crafting
|head=1
|showdescription=1
|nolink=1
|A1= Matching Planks
|B1= Matching Planks
|C1= Matching Planks
|A2= Matching Planks
|B2= Matching Planks
|C2= Matching Planks
|B3= Stick
|Output=Matching Sign,3
|type=Decoration block
}}
{{Crafting
|name= Hanging Sign
|A1= Chain
|C1= Chain
|A2= Matching Stripped Log or Stem; Block of Stripped Bamboo
|B2= Matching Stripped Log or Stem; Block of Stripped Bamboo
|C2= Matching Stripped Log or Stem; Block of Stripped Bamboo
|A3= Matching Stripped Log or Stem; Block of Stripped Bamboo
|B3= Matching Stripped Log or Stem; Block of Stripped Bamboo
|C3= Matching Stripped Log or Stem; Block of Stripped Bamboo
|Output= Matching Hanging Sign,6; Bamboo Hanging Sign,6
|type=Decoration block
|foot=1
}}
== Usage ==
Signs can be used to display text; they can be used to label storage, display information to other players or note areas of interest. Signs are also not destroyed by [[water]] or [[lava]] and therefore may be used to control the flow of these fluids.
=== Placement ===
==== Signs ====
Signs may be placed on the top or side of other [[block]]s (including semi-solid and non-solid blocks such as [[fence]]s, [[Trapdoor|trapdoors]] and other signs). To place a sign, {{control|use}} a sign [[item]] while pointing at the block the sign should be attached to, enter the desired text (or none), and click the "Done" button or press "escape" on a keyboard (or press × {{in|bedrock}}, {{xbtn|b}} on an Xbox controller, {{psbtn|o}} on a PlayStation controller, or {{nsbutton|B}} on a Nintendo Switch controller. Closing the virtual keyboard on a mobile device also exits the typing menu). To place a sign on a block that can be interacted with by the {{control|use}} control (for example, [[chest]]s, [[note block]]s, etc.), {{control|sneak}} while placing the sign.
Signs on the top of a block stand on a short post and face toward the player who placed it, in any of 16 different directions. Signs placed on the side of a block simply float there, even if the block doesn't make contact with the sign.
Even if placed on a vertical surface, a sign may not co-exist in the same block of air as any other item, despite not necessarily visibly obstructing eachother.
For more information about the blocks signs can be placed on, see [[Opacity/Placement]].
==== Hanging signs ====
Hanging signs can be placed in three different ways:
* Placing a hanging sign on the side of a block will result in it being placed with a self-supporting bracket, which allows it to float without any supporting block. This version can be placed in four different directions.
* Placing a hanging sign on the bottom of a block will result in the sign hanging below the block.
** If the block is wide enough, the chains holding the sign will be parallel. This version can be placed in four different directions.
** If the block is too narrow, the chains will meet together in a upwards arrow shape. This version is also placed if the player is {{control|sneaking}} when placing a hanging sign below a wide-enough block. This version can be placed in sixteen different directions.
=== Text ===
[[File:Oak Sign GUI.png|thumb|240px|Oak Sign editing.]]
Placing a sign opens an editor interface resembling a magnified view of the sign. Up to four lines of text can then be entered using a keyboard (hardware or on-screen). The editor supports limited editing, including moving the cursor and inserting and deleting characters. {{IN|bedrock}}, [[formatting codes]] can also be used to apply decorative effects such as color, bold, italic and underline to various bits of the text. Depending on the edition and platform in use, copy and paste operations may be supported and the editor may also support keyboard entry of Alt-codes for displaying Unicode characters.
Text can be added to the back side of a sign by interacting with the that side of the sign after placing it and editing the front.
Signs can be waxed by {{Control|use|text=using}} a [[honeycomb]] on it. Once waxed, a sign cannot be unwaxed or edited.
After placing and affixing text on a sign, a player can change the text color by {{control|using}} a [[dye]] on it. When colored with dye, the text color may differ from any color specified by formatting codes.{{Info needed|How does this work? Does the dye affect all the text? One line? One word? Does dye override all formatting codes, including font effects?}}
[[File:Glow Ink Sign with Orange Dye JE2.png|thumb|216px|Oak sign with glow ink and orange dye applied in {{JE}}.]]
A player can {{control|use}} a [[glow ink sac]] on a sign to make its text glow. The glowing text is not affected by lighting. The player can use a regular black [[ink sac]] on the sign to remove the glowing effect.
{| class="wikitable mw-collapsible mw-collapsed"
|+ class="nowrap" | Glow ink colors
!Name !! Main Color !! Edge Color
|-
! Black
| {{color|#000000}}
| {{color|#EDE8CA}}
|-
! Red
| {{color|#FC0000}}
| {{color|#650000}}
|-
! Green
| {{color|#00FC00}}
| {{color|#006500}}
|-
! Brown
| {{color|#894413}}
| {{color|#361B07}}
|-
! Blue
| {{color|#0000FC}}
| {{color|#000065}}
|-
! Purple
| {{color|#9E20ED}}
| {{color|#3F0C5F}}
|-
! Cyan
| {{color|#00D6D6}}
| {{color|#006565}}
|-
! Light Gray
| {{color|#D0D0D0}}
| {{color|#535353}}
|-
! Gray
| {{color|#7E7E7E}}
| {{color|#323232}}
|-
! Pink
| {{color|#FC68B2}}
| {{color|#652947}}
|-
! Lime
| {{color|#8DFC00}}
| {{color|#4B6500}}
|-
! Yellow
| {{color|#FCFC00}}
| {{color|#656500}}
|-
! Light Blue
| {{color|#98BECB}}
| {{color|#3C4B51}}
|-
! Magenta
| {{color|#FC00FC}}
| {{color|#650065}}
|-
! Orange
| {{color|#FC671F}}
| {{color|#65280C}}
|-
! White
| {{color|#FCFCFC}}
| {{color|#656565}}
|}
In [[Creative]] mode, the combination {{key|Ctrl}} + {{control|pick block}} on Windows/Linux, or {{key|cmd}} + {{control|pick block}} on macOS, can be used to copy an already-placed sign, including its text (with decorations), into the player's inventory.
A dyed sign facing east or west will have its text appear more saturated and bright than a sign facing north or south. However, it is actually the sign that is dimmer, because ''Minecraft'''s lighting engine uses side lighting to make the world appear less flat, but the text on signs is not affected by this.
{{IN|bedrock}}, inappropriate words or phrases in a sign's text are displayed as asterisks.
{{IN|java}}, signs can be created with [[Commands#Raw JSON Text|JSON text]], which allows complex formatting (colors, bold, italic, etc.), hover and click events, localized translation (for ''Minecraft'' technical terms, like "Redstone Repeater", otherwise translations must be provided in language files in resource packs), and the incorporation of scoreboard values into text. Use the {{cmd|data merge block}} command to create or alter JSON signs.
: Example: {{cmd|long=1|data merge block ~ ~1 ~ <nowiki>{front_text:{ color:"green", messages:[ '{"selector":"@p", "bold":false, "italic":false, "underlined":false, "strikethrough":false, "obfuscated":false}' , '{"text":"Second Line"}']}}}}
Signs can post the success count of JSON text hover and click events to [[scoreboard]] objectives. The objectives to be used can be specified by running the {{cmd|execute store}} command or by modifying the sign's NBT data directly with the {{cmd|data merge block}} command.
=== Interaction ===
Signs act as though they have a {{control|use}} action, so the [[player]] is unable to place [[block]]s or use [[item]]s while the cursor is pointed at them without {{control|sneaking}}.
Signs are destroyed and drop as an item when pushed by a [[piston]].{{Only|bedrock}}
Signs are non-solid and have no collision, so [[item]]s and [[mob]]s can move through sign blocks. Other [[block]]s (including other signs) can be placed on any edge of a sign.
[[Water]] and [[lava]] flow around signs. Lava can create [[fire]] in [[air]] blocks next to signs as if the signs were flammable, but the signs do not burn (and cannot be burned by other methods either, except {{in|be}}).
=== Fuel ===
Wooden signs can be used as a fuel in [[furnace]]s, smelting an [[item]] per sign.
=== Note Blocks ===
Signs can be placed under [[note block]]s to produce a "bass" sounds.
== Sounds ==
=== Generic ===
==== Normal wood ====
; Sign
{{Sound table/Block/Wood|forcecollapsed=1}}
; Hanging sign
{{Sound table/Block/Hanging sign|forcecollapsed=1}}
==== Cherry wood ====
; Sign
{{Sound table/Block/Cherry wood|forcecollapsed=1}}
; Hanging sign
{{Sound table/Block/Cherry wood hanging sign|forcecollapsed=1}}
==== Bamboo wood ====
; Sign
{{Sound table/Block/Bamboo wood|forcecollapsed=1}}
; Hanging sign
{{edition|java}}:
{{Sound table/Block/Bamboo wood hanging sign/JE|forcecollapsed=1}}
{{edition|bedrock}}:
{{Sound table/Block/Bamboo wood hanging sign/BE|forcecollapsed=1}}
==== Nether wood ====
; Sign
{{Sound table/Block/Nether wood|forcecollapsed=1}}
; Hanging sign
{{edition|java}}:
{{Sound table/Block/Nether wood hanging sign/JE|forcecollapsed=1}}
{{edition|bedrock}}:
{{Sound table/Block/Nether wood hanging sign/BE|forcecollapsed=1}}
=== Unique ===
{{edition|java}}:
{{Sound table|forcecollapsed=1
|rowspan=2
|sound=Ink sac1.ogg
|sound2=Ink sac2.ogg
|sound3=Ink sac3.ogg
|subtitle=Glow Ink Sac splotches
|source=block
|description=When a [[glow ink sac]] is used on a sign
|id=item.glow_ink_sac.use
|translationkey=subtitles.item.glow_ink_sac.use
|volume=1.0
|pitch=''varies'' <ref group=sound>Can be 1.0, 0.95, or 1.05 for each sound</ref>
|distance=16}}
{{Sound table
|subtitle=Ink Sac splotches
|source=block
|description=When an [[ink sac]] is used on a sign
|id=item.ink_sac.use
|translationkey=subtitles.item.ink_sac.use
|volume=1.0
|pitch=''varies'' <ref group=sound>Can be 0.85, 0.88, or 0.9 for each sound</ref>
|distance=16}}
{{Sound table
|sound=Dye.ogg
|subtitle=Dye stains
|source=block
|description=When [[dye]] is used on a sign
|id=item.dye.use
|translationkey=subtitles.item.dye.use
|volume=1.0
|pitch=''varies'' <ref group=sound>Can be 1.0, 0.9, 0.95, or 1.1</ref>
|distance=16}}
{{Sound table
|sound=Wax on1.ogg
|sound2=Wax on2.ogg
|sound3=Wax on3.ogg
|subtitle=Wax on
|source=block
|description=When a sign is waxed
|id=item.honeycomb.wax_on
|translationkey=subtitles.item.honeycomb.wax_on
|volume=1.0
|pitch=1.0/0.9/1.1
|distance=16}}
{{Sound table
|sound=Sign waxed interact fail1.ogg
|sound2=Sign waxed interact fail2.ogg
|sound3=Sign waxed interact fail3.ogg
|subtitle=Sign wobbles
|source=block
|description=When a player attempts to edit a waxed sign
|id=block.sign.waxed_interact_fail
|translationkey=subtitles.block.sign.waxed_interact_fail
|volume=1.0
|pitch=''varies''<ref group=sound>{{cd|fail1}} can be 1.0 or 0.9; {{cd|fail2}} and {{cd|fail3}} can be 0.8 or 0.9</ref>
|distance=16
|foot=1}}
{{edition|bedrock}}:
{{Sound table|forcecollapsed=1
|type=bedrock
|sound=Ink sac1.ogg
|sound2=Ink sac2.ogg
|sound3=Ink sac3.ogg
|source=sound
|description=When a glow ink sac or an ink sac is used on a sign
|id=sign.ink_sac.use
|volume=1.0
|pitch=1.0}}
{{Sound table
|type=bedrock
|sound=Dye.ogg
|source=sound
|description=When dye is used on a sign
|id=sign.dye.use
|volume=1.0
|pitch=1.0}}
{{Sound table
|sound=Wax on1.ogg
|sound2=Wax on2.ogg
|sound3=Wax on3.ogg
|source=neutral
|description=When a honeycomb waxes a sign
|id=copper.wax.on
|volume=1.0
|pitch=0.8-1.2}}
{{Sound table
|sound=Sign waxed interact fail1.ogg
|sound2=Sign waxed interact fail2.ogg
|sound3=Sign waxed interact fail3.ogg
|source=block
|description=When a player attempts to edit a waxed sign
|id=block.sign.waxed_interact_fail
|volume=1.0
|pitch=''varies'' <ref group=sound>Can be 1.0 or 0.9 for <code>waxed_interact_fail1</code>; can be 0.8 or 0.9 for <code>waxed_interact_fail2</code> and <code>waxed_interact_fail3</code></ref>
|foot=1}}
== Data values ==
=== ID ===
{{edition|java}}:
{{ID table
|edition=java
|showblocktags=y
|showitemtags=y
|showforms=y
|generatetranslationkeys=y
|displayname=Oak Sign
|spritetype=block
|nameid=oak_sign
|blocktags=signs, standing_signs, wall_post_override
|itemtags=signs}}
{{ID table
|displayname=Spruce Sign
|spritetype=block
|nameid=spruce_sign
|blocktags=signs, standing_signs, wall_post_override
|itemtags=signs}}
{{ID table
|displayname=Birch Sign
|spritetype=block
|nameid=birch_sign
|blocktags=signs, standing_signs, wall_post_override
|itemtags=signs}}
{{ID table
|displayname=Jungle Sign
|spritetype=block
|nameid=jungle_sign
|blocktags=signs, standing_signs, wall_post_override
|itemtags=signs}}
{{ID table
|displayname=Acacia Sign
|spritetype=block
|nameid=acacia_sign
|blocktags=signs, standing_signs, wall_post_override
|itemtags=signs}}
{{ID table
|displayname=Dark Oak Sign
|spritetype=block
|nameid=dark_oak_sign
|blocktags=signs, standing_signs, wall_post_override
|itemtags=signs}}
{{ID table
|displayname=Mangrove Sign
|spritetype=block
|nameid=mangrove_sign
|blocktags=signs, standing_signs, wall_post_override
|itemtags=signs}}
{{ID table
|displayname=Cherry Sign
|spritename=Cherry Sign
|spritetype=block
|nameid=cherry_sign
|blocktags=signs, standing_signs, wall_post_override
|itemtags=signs}}
{{ID table
|displayname=Bamboo Sign
|spritename=Bamboo Sign
|spritetype=block
|nameid=bamboo_sign
|blocktags=signs, standing_signs, wall_post_override
|itemtags=signs}}
{{ID table
|displayname=Crimson Sign
|spritetype=block
|nameid=crimson_sign
|blocktags= signs, standing_signs, wall_post_override
|itemtags=non_flammable_wood, signs}}
{{ID table
|displayname=Warped Sign
|spritetype=block
|nameid=warped_sign
|blocktags=signs, standing_signs, wall_post_override
|itemtags=non_flammable_wood, signs}}
{{ID table
|displayname=Oak Wall Sign
|spritetype=block
|nameid=oak_wall_sign
|blocktags=signs, wall_signs
|form=block}}
{{ID table
|displayname=Spruce Wall Sign
|spritetype=block
|nameid=spruce_wall_sign
|blocktags=signs, wall_signs
|form=block}}
{{ID table
|displayname=Birch Wall Sign
|spritetype=block
|nameid=birch_wall_sign
|blocktags=signs, wall_signs
|form=block}}
{{ID table
|displayname=Jungle Wall Sign
|spritetype=block
|nameid=jungle_wall_sign
|blocktags=signs, wall_signs
|form=block}}
{{ID table
|displayname=Acacia Wall Sign
|spritetype=block
|nameid=acacia_wall_sign
|blocktags=signs, wall_signs
|form=block}}
{{ID table
|displayname=Dark Oak Wall Sign
|spritetype=block
|nameid=dark_oak_wall_sign
|blocktags=signs, wall_signs
|form=block}}
{{ID table
|displayname=Mangrove Wall Sign
|spritetype=block
|nameid=mangrove_wall_sign
|blocktags=signs, wall_signs
|form=block}}
{{ID table
|displayname=Cherry Wall Sign
|spritename=Cherry Wall Sign
|spritetype=block
|nameid=cherry_wall_sign
|blocktags=signs, wall_signs
|form=block}}
{{ID table
|displayname=Bamboo Wall Sign
|spritename=Bamboo Wall Sign
|spritetype=block
|nameid=bamboo_wall_sign
|blocktags=signs, wall_signs
|form=block}}
{{ID table
|displayname=Crimson Wall Sign
|spritetype=block
|nameid=crimson_wall_sign
|blocktags=signs, wall_signs
|form=block}}
{{ID table
|displayname=Warped Wall Sign
|spritetype=block
|nameid=warped_wall_sign
|blocktags=signs, wall_signs
|form=block}}
{{ID table
|displayname=Oak Hanging Sign
|spritename=Oak Hanging Sign
|spritetype=block
|nameid=oak_hanging_sign
|blocktags=all_hanging_signs, ceiling_hanging_signs
|itemtags=hanging_signs}}
{{ID table
|displayname=Spruce Hanging Sign
|spritename=Spruce Hanging Sign
|spritetype=block
|nameid=spruce_hanging_sign
|blocktags=all_hanging_signs, ceiling_hanging_signs
|itemtags=hanging_signs}}
{{ID table
|displayname=Birch Hanging Sign
|spritename=Birch Hanging Sign
|spritetype=block
|nameid=birch_hanging_sign
|blocktags=all_hanging_signs, ceiling_hanging_signs
|itemtags=hanging_signs}}
{{ID table
|displayname=Jungle Hanging Sign
|spritename=Jungle Hanging Sign
|spritetype=block
|nameid=jungle_hanging_sign
|blocktags=all_hanging_signs, ceiling_hanging_signs
|itemtags=hanging_signs}}
{{ID table
|displayname=Acacia Hanging Sign
|spritename=Acacia Hanging Sign
|spritetype=block
|nameid=acacia_hanging_sign
|blocktags=all_hanging_signs, ceiling_hanging_signs
|itemtags=hanging_signs}}
{{ID table
|displayname=Dark Oak Hanging Sign
|spritename=Dark Oak Hanging Sign
|spritetype=block
|nameid=dark_oak_hanging_sign
|blocktags=all_hanging_signs, ceiling_hanging_signs
|itemtags=hanging_signs}}
{{ID table
|displayname=Mangrove Hanging Sign
|spritename=Mangrove Hanging Sign
|spritetype=block
|nameid=mangrove_hanging_sign
|blocktags=all_hanging_signs, ceiling_hanging_signs
|itemtags=hanging_signs}}
{{ID table
|displayname=Cherry Hanging Sign
|spritename=Cherry Hanging Sign
|spritetype=block
|nameid=cherry_hanging_sign
|blocktags=all_hanging_signs, ceiling_hanging_signs
|itemtags=hanging_signs}}
{{ID table
|displayname=Bamboo Hanging Sign
|spritename=Bamboo Hanging Sign
|spritetype=block
|nameid=bamboo_hanging_sign
|blocktags=all_hanging_signs, ceiling_hanging_signs
|itemtags=hanging_signs}}
{{ID table
|displayname=Crimson Hanging Sign
|spritename=Crimson Hanging Sign
|spritetype=block
|nameid=crimson_hanging_sign
|blocktags=all_hanging_signs, ceiling_hanging_signs
|itemtags=hanging_signs, non_flammable_wood}}
{{ID table
|displayname=Warped Hanging Sign
|spritename=Warped Hanging Sign
|spritetype=block
|nameid=warped_hanging_sign
|blocktags=all_hanging_signs, ceiling_hanging_signs
|itemtags=hanging_signs, non_flammable_wood}}
{{ID table
|displayname=Oak Wall Hanging Sign
|spritename=Oak Wall Hanging Sign
|spritetype=block
|nameid=oak_wall_hanging_sign
|blocktags=all_hanging_signs, wall_hanging_signs
|form=block}}
{{ID table
|displayname=Spruce Wall Hanging Sign
|spritename=Spruce Wall Hanging Sign
|spritetype=block
|nameid=spruce_wall_hanging_sign
|blocktags=all_hanging_signs, wall_hanging_signs
|form=block}}
{{ID table
|displayname=Birch Wall Hanging Sign
|spritename=Birch Wall Hanging Sign
|spritetype=block
|nameid=birch_wall_hanging_sign
|blocktags=all_hanging_signs, wall_hanging_signs
|form=block}}
{{ID table
|displayname=Jungle Wall Hanging Sign
|spritename=Jungle Wall Hanging Sign
|spritetype=block
|nameid=jungle_wall_hanging_sign
|blocktags=all_hanging_signs, wall_hanging_signs
|form=block}}
{{ID table
|displayname=Acacia Wall Hanging Sign
|spritename=Acacia Wall Hanging Sign
|spritetype=block
|nameid=acacia_wall_hanging_sign
|blocktags=all_hanging_signs, wall_hanging_signs
|form=block}}
{{ID table
|displayname=Dark Oak Wall Hanging Sign
|spritename=Dark Oak Wall Hanging Sign
|spritetype=block
|nameid=dark_oak_wall_hanging_sign
|blocktags=all_hanging_signs, wall_hanging_signs
|form=block}}
{{ID table
|displayname=Mangrove Wall Hanging Sign
|spritename=Mangrove Wall Hanging Sign
|spritetype=block
|nameid=mangrove_wall_hanging_sign
|blocktags=all_hanging_signs, wall_hanging_signs
|form=block}}
{{ID table
|displayname=Cherry Wall Hanging Sign
|spritename=Cherry Wall Hanging Sign
|spritetype=block
|nameid=cherry_wall_hanging_sign
|blocktags=all_hanging_signs, wall_hanging_signs
|form=block}}
{{ID table
|displayname=Bamboo Wall Hanging Sign
|spritename=Bamboo Wall Hanging Sign
|spritetype=block
|nameid=bamboo_wall_hanging_sign
|blocktags=all_hanging_signs, wall_hanging_signs
|form=block}}
{{ID table
|displayname=Crimson Wall Hanging Sign
|spritename=Crimson Wall Hanging Sign
|spritetype=block
|nameid=crimson_wall_hanging_sign
|blocktags=all_hanging_signs, wall_hanging_signs
|form=block}}
{{ID table
|displayname=Warped Wall Hanging Sign
|spritename=Warped Wall Hanging Sign
|spritetype=block
|nameid=warped_wall_hanging_sign
|blocktags=all_hanging_signs, wall_hanging_signs
|form=block
|foot=1}}
{{ID table
|displayname=Block entity
|spritename=signs
|spritetype=block
|nameid=sign}}
{{ID table
|displayname=Block entity
|spritename=hanging-signs
|spritetype=block
|nameid=hanging_sign
|foot=1}}
{{edition|bedrock}}:
{{ID table
|edition=bedrock
|firstcolumnname=Sign
|shownumericids=y
|showforms=y
|showaliasids=y
|showitemtags=y
|generatetranslationkeys=y
|displayname=Oak standing
|spritename=oak-sign
|spritetype=block
|nameid=standing_sign
|id=63
|form=block}}
{{ID table
|displayname=Spruce standing
|spritename=spruce-sign
|spritetype=block
|nameid=spruce_standing_sign
|id=436
|form=block}}
{{ID table
|displayname=Birch standing
|spritename=birch-sign
|spritetype=block
|nameid=birch_standing_sign
|id=441
|form=block}}
{{ID table
|displayname=Jungle standing
|spritename=jungle-sign
|spritetype=block
|nameid=jungle_standing_sign
|id=443
|form=block}}
{{ID table
|displayname=Acacia standing
|spritename=acacia-sign
|spritetype=block
|nameid=acacia_standing_sign
|id=445
|form=block}}
{{ID table
|displayname=Dark Oak standing
|spritename=dark-oak-sign
|spritetype=block
|nameid=darkoak_standing_sign
|id=447
|form=block}}
{{ID table
|displayname=Mangrove standing
|spritename=mangrove-sign
|spritetype=block
|nameid=mangrove_standing_sign
|id=-494
|form=block
|translationkey=-}}
{{ID table
|displayname=Cherry standing
|spritename=cherry-sign
|spritetype=block
|nameid=cherry_standing_sign
|id=-542
|form=block
|translationkey=-}}
{{ID table
|displayname=Bamboo standing
|spritename=bamboo-sign
|spritetype=block
|nameid=bamboo_standing_sign
|id=-518
|form=block
|translationkey=-}}
{{ID table
|displayname=Crimson standing
|spritename=crimson-sign
|spritetype=block
|nameid=crimson_standing_sign
|id=505
|form=block}}
{{ID table
|displayname=Warped standing
|spritename=warped-sign
|spritetype=block
|nameid=warped_standing_sign
|id=506
|form=block}}
{{ID table
|displayname=Oak wall
|spritename=oak-wall-sign
|spritetype=block
|nameid=wall_sign
|id=68
|form=block
|translationkey=-}}
{{ID table
|displayname=Spruce wall
|spritename=spruce-wall-sign
|spritetype=block
|nameid=spruce_wall_sign
|id=437
|form=block
|translationkey=-}}
{{ID table
|displayname=Birch wall
|spritename=birch-wall-sign
|spritetype=block
|nameid=birch_wall_sign
|id=442
|form=block
|translationkey=-}}
{{ID table
|displayname=Jungle wall
|spritename=jungle-wall-sign
|spritetype=block
|nameid=jungle_wall_sign
|id=444
|form=block
|translationkey=-}}
{{ID table
|displayname=Acacia wall
|spritename=acacia-wall-sign
|spritetype=block
|nameid=acacia_wall_sign
|id=446
|form=block
|translationkey=-}}
{{ID table
|displayname=Dark Oak wall
|spritename=dark-oak-wall-sign
|spritetype=block
|nameid=darkoak_wall_sign
|id=448
|form=block
|translationkey=-}}
{{ID table
|displayname=Mangrove wall
|spritename=mangrove-wall-sign
|spritetype=block
|nameid=mangrove_wall_sign
|id=-495
|form=block
|translationkey=-}}
{{ID table
|displayname=Cherry wall
|spritename=cherry-wall-sign
|spritetype=block
|nameid=cherry_wall_sign
|id=-544
|form=block
|translationkey=-}}
{{ID table
|displayname=Bamboo wall
|spritename=bamboo-wall-sign
|spritetype=block
|nameid=bamboo_wall_sign
|id=-519
|form=block
|translationkey=-}}
{{ID table
|displayname=Crimson wall
|spritename=crimson-wall-sign
|spritetype=block
|nameid=crimson_wall_sign
|id=507
|form=block}}
{{ID table
|displayname=Warped wall
|spritename=warped-wall-sign
|spritetype=block
|nameid=warped_wall_sign
|id=508
|form=block}}
{{ID table
|displayname=Oak item
|spritename=oak-sign
|spritetype=item
|nameid=oak_sign
|aliasid=sign
|id=360
|form=item
|itemtags=minecraft:sign
|translationkey=item.sign.name}}
{{ID table
|displayname=Spruce item
|spritename=spruce-sign
|spritetype=item
|nameid=spruce_sign
|id=576
|form=item
|itemtags=minecraft:sign}}
{{ID table
|displayname=Birch item
|spritename=birch-sign
|spritetype=item
|nameid=birch_sign
|id=577
|form=item
|itemtags=minecraft:sign}}
{{ID table
|displayname=Jungle item
|spritename=jungle-sign
|spritetype=item
|nameid=jungle_sign
|id=578
|form=item
|itemtags=minecraft:sign}}
{{ID table
|displayname=Acacia item
|spritename=acacia-sign
|spritetype=item
|nameid=acacia_sign
|id=579
|form=item
|itemtags=minecraft:sign}}
{{ID table
|displayname=Dark Oak item
|spritename=dark-oak-sign
|spritetype=item
|nameid=dark_oak_sign
|aliasid=darkoak_sign
|id=587
|form=item
|itemtags=minecraft:sign
|translationkey=item.darkoak_sign.name}}
{{ID table
|displayname=Mangrove item
|spritename=mangrove-sign
|spritetype=item
|nameid=mangrove_sign
|id=642
|form=item
|itemtags=minecraft:sign}}
{{ID table
|displayname=Cherry item
|spritename=cherry-sign
|spritetype=item
|nameid=cherry_sign
|id=659
|form=item
|itemtags=minecraft:sign}}
{{ID table
|displayname=Bamboo item
|spritename=bamboo-sign
|spritetype=item
|nameid=bamboo_sign
|id=660
|form=item
|itemtags=minecraft:sign}}
{{ID table
|displayname=Crimson item
|spritename=crimson-sign
|spritetype=item
|nameid=crimson_sign
|id=614
|form=item
|itemtags=minecraft:sign}}
{{ID table
|displayname=Warped item
|spritename=warped-sign
|spritetype=item
|nameid=warped_sign
|id=615
|form=item
|itemtags=minecraft:sign}}
{{ID table
|displayname=Oak Hanging Sign
|spritename=Oak Wall Hanging Sign
|spritetype=block
|nameid=oak_hanging_sign
|id=-500
|itemtags=minecraft:hanging_sign
|translationkey=item.oak_hanging_sign.name}}
{{ID table
|displayname=Spruce Hanging Sign
|spritename=Spruce Wall Hanging Sign
|spritetype=block
|nameid=spruce_hanging_sign
|id=-501
|itemtags=minecraft:hanging_sign
|translationkey=item.spruce_hanging_sign.name}}
{{ID table
|displayname=Birch Hanging Sign
|spritename=Birch Wall Hanging Sign
|spritetype=block
|nameid=birch_hanging_sign
|id=-502
|itemtags=minecraft:hanging_sign
|translationkey=item.birch_hanging_sign.name}}
{{ID table
|displayname=Jungle Hanging Sign
|spritename=Jungle Wall Hanging Sign
|spritetype=block
|nameid=jungle_hanging_sign
|id=-503
|itemtags=minecraft:hanging_sign
|translationkey=item.jungle_hanging_sign.name}}
{{ID table
|displayname=Acacia Hanging Sign
|spritename=Acacia Wall Hanging Sign
|spritetype=block
|nameid=acacia_hanging_sign
|id=-504
|itemtags=minecraft:hanging_sign
|translationkey=item.acacia_hanging_sign.name}}
{{ID table
|displayname=Dark Oak Hanging Sign
|spritename=Dark Oak Wall Hanging Sign
|spritetype=block
|nameid=dark_oak_hanging_sign
|id=-505
|itemtags=minecraft:hanging_sign
|translationkey=item.dark_oak_hanging_sign.name}}
{{ID table
|displayname=Mangrove Hanging Sign
|spritename=Mangrove Wall Hanging Sign
|spritetype=block
|nameid=mangrove_hanging_sign
|id=-508
|itemtags=minecraft:hanging_sign
|translationkey=item.mangrove_hanging_sign.name}}
{{ID table
|displayname=Cherry Hanging Sign
|spritename=Cherry Wall Hanging Sign
|spritetype=block
|nameid=cherry_hanging_sign
|id=-534
|itemtags=minecraft:hanging_sign
|translationkey=item.cherry_hanging_sign.name}}
{{ID table
|displayname=Bamboo Hanging Sign
|spritename=Bamboo Wall Hanging Sign
|spritetype=block
|nameid=bamboo_hanging_sign
|id=-522
|itemtags=minecraft:hanging_sign
|translationkey=item.bamboo_hanging_sign.name}}
{{ID table
|displayname=Crimson Hanging Sign
|spritename=Crimson Wall Hanging Sign
|spritetype=block
|nameid=crimson_hanging_sign
|id=-506
|itemtags=minecraft:hanging_sign
|translationkey=item.crimson_hanging_sign.name}}
{{ID table
|displayname=Warped Hanging Sign
|spritename=Warped Wall Hanging Sign
|spritetype=block
|nameid=warped_hanging_sign
|id=-507
|itemtags=minecraft:hanging_sign
|translationkey=item.warped_hanging_sign.name
|foot=1}}
{{ID table
|notnamespaced=y
|displayname=Block entity
|spritename=signs
|spritetype=block
|nameid=Sign}}
{{ID table
|displayname=Block entity
|spritename=hanging-signs
|spritetype=block
|nameid=HangingSign
|foot=1}}
=== Block states ===
{{see also|Block states}}
{{/BS}}
=== Block data ===
A sign has a block entity associated with it that holds additional data about the block.
{{el|java}}:
{{see also|Block entity format}}
{{/BE}}
{{el|bedrock}}:
:See [[Bedrock Edition level format/Block entity format]].
== Achievements ==
{{load achievements|It's a Sign}}
== Advancements ==
{{load advancements|Glow and Behold}}
== History ==
{{main|/History}}
{{History|java classic}}
{{History||0.24_SURVIVAL_TEST|[[File:Sign Entity.png|32px]] Signs are currently being tested as [[entity|entities]]. They always display "This is a test of the signs. Each line can be 15 chars!" and can only be spawned by pressing {{key|B}}.<ref>{{ytl|bdT76iFEnLk}}</ref>}}
{{History||0.26 SURVIVAL TEST|Removed signs.}}
{{History|java infdev}}
{{History||20100607|[[File:Oak Sign (0) JE1.png|32px]] Signs have been re-implemented as [[block]]s, although still rendering as entities.
|Signs now have a [[crafting]] recipe and the text can now be edited. Editing a sign pauses the game in [[singleplayer]].
|Signs are currently huge and drop [[planks]] when destroyed.
|Signs do not have a particle texture defined. As such, they [[Placeholder texture#Default texture|default to using the grass block texture instead]].}}
{{History||20100608|Signs are now broken faster.
|Signs now [[drops|drop]] themselves when [[breaking|destroyed]], instead of planks.
|Signs now use planks particles.}}
{{History|java alpha}}
{{History||v1.0.1|[[File:Oak Wall Sign (S) JE1 BE1.png|32px]] Added wall signs.
|[[File:Oak Sign (0) JE2.png|32px]] Signs are now smaller.}}
{{History||v1.0.5|Signs no longer require a free [[block]] above it to place.}}
{{History|java beta}}
{{History||April 27, 2011|link=https://notch.tumblr.com/post/4988431144|Hand-drawn signs are mentioned.}}
{{History|java}}
{{History||1.0.0|snap=Beta 1.9 Prerelease 6|Signs are now broken faster using an [[axe]].}}
{{History||1.3.1|snap=12w18a|Editing a sign no longer pauses the game in [[singleplayer]].}}
{{History|||snap=12w27a|Signs are now stackable up to 16.
|The same [[crafting]] recipe now produces 3 signs instead of 1.}}
{{History||June 9, 2014|link=https://twitter.com/SeargeDP/status/476047216541700096|[[Searge]] tweeted a picture of a sign showing a username and a [[scoreboard]] score.}}
{{History||1.8|snap=14w25a|Added support for JSON text to signs.
|Sign character limit now depends on character width.}}
{{History|||snap=14w29a|Signs now display the cracking animation.}}
{{History||1.9|snap=15w43a|A sign now generates within [[igloo]] basements.}}
{{History||1.11|snap=16w33a|Signs can now be used as [[fuel]] in [[furnace]]s.}}
{{History||1.13|snap=17w47a|The standing sign ID has been changed from <code>standing_sign</code> to <code>sign</code>.
|Prior to [[1.13/Flattening|''The Flattening'']], these [[block]]s' numeral IDs were 63 and 68, and the [[item]]'s 323.}}
{{History|||snap=18w10d|[[Water]] can now be placed on the same block as signs.}}
{{History||1.14|snap=18w43a|"Sign" has been renamed to "Oak Sign".
|[[File:Oak Sign JE2 BE2.png|32px]] The texture of oak sign [[item]]s has been changed.
|[[File:Spruce Standing Sign JE1 BE1.png|32px]] [[File:Birch Standing Sign JE1 BE1.png|32px]] [[File:Jungle Standing Sign JE1 BE1.png|32px]] [[File:Acacia Standing Sign JE1 BE1.png|32px]] [[File:Dark Oak Standing Sign JE1 BE1.png|32px]] [[File:Spruce Sign JE1 BE1.png|32px]] [[File:Birch Sign JE1 BE1.png|32px]] [[File:Jungle Sign JE1 BE1.png|32px]] [[File:Acacia Sign JE1 BE1.png|32px]] [[File:Dark Oak Sign JE1 BE1.png|32px]] Added spruce, birch, jungle, acacia and dark oak signs.
|The sign's text has been changed from black to white.
|A sign's recipe now requires the same type of [[wood]] instead of a random assortment.}}
{{History|||snap=18w44a|Signs can now be {{control|used}} while holding a [[dye]] to change the text color.
|Default text color for signs has been changed back to black.}}
{{History|||snap=18w45a|A new movable cursor for free text editing to signs has been added.
|Selection and copy/paste support have been added to signs.}}
{{History|||snap=18w50a|Spruce signs now generate in some [[taiga]] [[village]] houses.
|Spruce sign items can now be found in [[chest]]s in taiga village houses.}}
{{History|||snap=19w12a|Signs can now be [[dye]]d only in [[Creative mode]].}}
{{History|||snap=19w12b|Signs can now be dyed in [[Survival mode]] again.}}
{{History||1.16|snap=20w06a|[[File:Crimson Standing Sign JE1 BE1.png|32px]] [[File:Warped Standing Sign JE1 BE1.png|32px]] [[File:Crimson Sign JE1 BE1.png|32px]] [[File:Warped Sign JE1 BE1.png|32px]] Added crimson and warped signs.}}
{{History|||snap=20w09a|Crimson and warped signs can now be [[crafting|crafted]].}}
{{History||1.17|snap=21w03a|Signs can now be tinted with [[Glow Ink Sac|glow ink sac]]s to make the text glow.
|Works with both undyed and dyed signs.
|Signs now have a sound for being dyed.}}
{{History|||snap=21w11a|[[File:Oak Standing Sign (S) JE2.png|32px]][[File:Spruce Standing Sign (S) JE2 BE2.png|32px]] [[File:Birch Standing Sign (S) JE2 BE2.png|32px]] [[File:Jungle Standing Sign (S) JE2 BE2.png|32px]] [[File:Acacia Standing Sign (S) JE2 BE2.png|32px]] [[File:Dark Oak Standing Sign (S) JE2 BE2.png|32px]] [[File:Oak Wall Sign (S) JE2.png|32px]] [[File:Spruce Wall Sign (S) JE2 BE2.png|32px]] [[File:Birch Wall Sign (S) JE2 BE2.png|32px]] [[File:Jungle Wall Sign (S) JE2 BE2.png|32px]] [[File:Acacia Wall Sign (S) JE2 BE2.png|32px]] [[File:Dark Oak Wall Sign (S) JE2 BE2.png|32px]] The textures of signs have been changed to reflect the changes made to planks in the [[Texture Update]].}}
{{History|||snap=Pre-release 1|Glowing text on signs now has an outer glow, making text more visible in the dark.}}
{{History||1.18|snap=21w41a|[[File:Oak Sign JE3.png|32px]] [[File:Spruce Sign JE2.png|32px]] [[File:Birch Sign JE2.png|32px]] [[File:Jungle Sign JE2.png|32px]] [[File:Acacia Sign JE2.png|32px]] [[File:Dark Oak Sign JE2.png|32px]] [[File:Crimson Sign JE2.png|32px]] [[File:Warped Sign JE2.png|32px]] Changed all signs textures as items.}}
{{History||1.19|snap=22w11a|[[File:Mangrove Sign JE1 BE1.png|32px]][[File:Mangrove Wall Sign JE1 BE1.png|32px]][[File:Mangrove Sign (item) JE1 BE1.png|32px]] Added mangrove signs.}}
{{History|||snap=22w14a|Due to the addition of the [[mangrove tree]] and [[mangrove swamp]], mangrove signs are now obtainable in survival and renewable.}}
{{History||October 15, 2022|link={{ytl|https://youtu.be/iM9KtHaDcUg?t=5437}}|Hanging signs were announced and shown on [[Minecraft Live 2022]].|Hanging signs were conceptualized by [[Agnes Larsson]] with input from her daughter.<ref>{{ytl|vJCMpPyaN8Q|Minecraft 1.20: New Blocks and Their Functions! @ 0:29|Minecraft|February 24, 2023|t=29s}}</ref>}}
{{History||1.20<br>(Experimental)|link=1.19.3|snap=22w42a|[[File:Bamboo Sign (0) JE1 BE1.png|32px]] [[File:Bamboo Wall Sign (S) JE1 BE1.png|32px]] [[File:Bamboo Sign (item) JE1 BE1.png|32px]] Added bamboo signs behind the [[Java Edition 1.20|Update 1.20 experimental datapack]].
|[[File:Oak Hanging Sign JE1 BE1.png|32px]] [[File:Spruce Hanging Sign JE1 BE1.png|32px]] [[File:Birch Hanging Sign JE1 BE1.png|32px]] [[File:Jungle Hanging Sign JE1 BE1.png|32px]] [[File:Acacia Hanging Sign JE1 BE1.png|32px]] [[File:Dark Oak Hanging Sign JE1 BE1.png|32px]] [[File:Mangrove Hanging Sign JE1 BE1.png|32px]] [[File:Bamboo Hanging Sign JE1 BE1.png|32px]] [[File:Crimson Hanging Sign JE1 BE1.png|32px]] [[File:Warped Hanging Sign JE1 BE1.png|32px]]<br>[[File:Oak Wall Hanging Sign JE1 BE1.png|32px]] [[File:Spruce Wall Hanging Sign JE1 BE1.png|32px]] [[File:Birch Wall Hanging Sign JE1 BE1.png|32px]] [[File:Jungle Wall Hanging Sign JE1 BE1.png|32px]] [[File:Acacia Wall Hanging Sign JE1 BE1.png|32px]] [[File:Dark Oak Wall Hanging Sign JE1 BE1.png|32px]] [[File:Mangrove Wall Hanging Sign JE1 BE1.png|32px]] [[File:Bamboo Wall Hanging Sign (S) JE1 BE1.png|32px]] [[File:Crimson Wall Hanging Sign JE1 BE1.png|32px]] [[File:Warped Wall Hanging Sign JE1 BE1.png|32px]]<br>[[File:Oak Hanging Sign (item) JE1 BE1.png|32px]] [[File:Spruce Hanging Sign (item) JE1 BE1.png|32px]] [[File:Birch Hanging Sign (item) JE1 BE1.png|32px]] [[File:Jungle Hanging Sign (item) JE1 BE1.png|32px]] [[File:Acacia Hanging Sign (item) JE1 BE1.png|32px]] [[File:Dark Oak Hanging Sign (item) JE1 BE1.png|32px]] [[File:Mangrove Hanging Sign (item) JE1 BE1.png|32px]] [[File:Bamboo Hanging Sign (item) JE1 BE1.png|32px]] [[File:Crimson Hanging Sign (item) JE1 BE1.png|32px]] [[File:Warped Hanging Sign (item) JE1 BE1.png|32px]]<br>Added hanging signs behind the [[Java Edition 1.20|Update 1.20 experimental datapack]].|Added unique sounds for Nether and bamboo wood signs.}}
{{History|||snap=22w45a|[[File:Jungle Wall Hanging Sign JE2 BE2.png|32px]] The texture of jungle hanging wall signs have been changed.|Added unique sounds for Nether and bamboo wood hanging signs.|Bamboo hanging signs now can be crafted using [[block of stripped bamboo]] instead of bamboo planks.|Crafting bamboo hanging signs now outputs 6 hanging signs instead of 2.}}
{{History||1.20<br>(Experimental)|link=1.19.4|snap=23w07a|[[File:Cherry Sign (0) JE1.png|32px]] [[File:Cherry Wall Sign (S) JE1.png|32px]] [[File:Cherry Sign (item) JE1.png|32px]] [[File:Cherry Hanging Sign JE1.png|32px]] [[File:Cherry Wall Hanging Sign JE1.png|32px]] [[File:Cherry Hanging Sign (item) JE1.png|32px]] Added cherry signs and hanging signs behind the [[Java Edition 1.20|Update 1.20 experimental datapack]]. There used to be a glitch where right clicking on a sign would play the “use” animation. This was fixed in the snapshots for 1.20, where signs are editable.}}
{{History|||snap=1.19.4 Pre-release 4|[[File:Cherry Sign (0) JE2 BE2.png|32px]] Updated the texture of cherry signs.}}
{{History||1.20|snap=23w12a|Bamboo sign, cherry sign and all of the hanging signs are now available without using the "Update 1.20" experimental datapack.|Signs and hanging signs can now be edited after being placed.|Signs and hanging signs now support text on both sides.|Signs and hanging signs can now be waxed with [[honeycomb]] to prevent editing.|Oak and spruce hanging sign can now be found in [[suspicious gravel]] and [[suspicious sand]] in [[trail ruins]].}}
{{History|||snap=23w14a|Signs and hanging signs with click commands can now be interacted with even if the sign is not waxed.|Signs and hanging signs can no longer be edited by players in [[Adventure]] mode.|Signs and hanging signs with non-text chat components can no longer be edited, even if the sign is not waxed.|Signs and hanging signs now save text even if the edit screen is closed by the player being moved far away.}}
{{History|||snap=23w16a|Oak and spruce hanging sign no longer generates in [[suspicious sand]] in [[trail ruins]].|Due to the split of the archaeological loot tables for the suspicious gravel within the [[trail ruins]]; oak and spruce hanging sign now are in the common loot.}}
{{History||1.20.2|snap=23w31a|Changed sounds for Nether wood hanging signs.<ref>{{Bug|MC-262295||Warped and Crimson hanging signs uses their respective plank sounds, despite their stripped stems having unique sounds|Fixed}}</ref>}}
{{History|pocket alpha}}
{{History||v0.5.0|[[File:Oak Standing Sign.png|32px]] [[File:Oak Sign JE1 BE1.png|32px]] Signs have been added, though they can be obtained only through [[inventory]] editors. |The [[player]] currently cannot write on signs.}}
{{History||v0.6.0|Signs can now be legitimately obtained in [[Survival]] and [[Creative]] mode.|The player can now write on signs.}}
{{History||v0.10.0|snap=build 1|Signs now have a selection overlay.}}
{{History|pocket}}
{{History||1.0.0|snap=alpha 0.17.0.1|Signs can now be found in [[igloo]] basements.}}
{{History|bedrock}}
{{History||1.9.0|snap=beta 1.9.0.0|"Sign" has been renamed to "Oak Sign".
|[[File:Spruce Standing Sign (S) JE2 BE2.png|32px]] [[File:Birch Standing Sign (S) JE2 BE2.png|32px]] [[File:Jungle Standing Sign (S) JE2 BE2.png|32px]] [[File:Acacia Standing Sign (S) JE2 BE2.png|32px]] [[File:Dark Oak Standing Sign (S) JE2 BE2.png|32px]] [[File:Spruce Sign JE1 BE1.png|32px]] [[File:Birch Sign JE1 BE1.png|32px]] [[File:Jungle Sign JE1 BE1.png|32px]] [[File:Acacia Sign JE1 BE1.png|32px]] [[File:Dark Oak Sign JE1 BE1.png|32px]] Added spruce, birch, jungle, acacia and dark oak signs.|The sign's text has been changed from black to white.|A sign's recipe now requires the same type of [[wood]] instead of a random assortment.}}
{{History|||snap=beta 1.9.0.2|The default sign text color has been changed back to black.|Sign variants are now grouped in their own [[inventory]] category.}}
{{History||1.10.0|snap=beta 1.10.0.3|[[File:Oak Sign JE2 BE2.png|32px]] The texture of oak sign [[item]]s has been changed.|Spruce signs now generate in new [[taiga]] and [[snowy taiga]] [[village]] houses.}}
{{History||1.11.0|snap=beta 1.11.0.1|Signs can now be used as a [[fuel]] in [[furnace]]s.|Oak signs can now be found inside taiga and snowy taiga village house [[chest]]s.}}
{{History||1.16.0|snap=beta 1.16.0.51|[[File:Crimson Standing Sign JE1 BE1.png|32px]] [[File:Warped Standing Sign JE1 BE1.png|32px]] [[File:Crimson Sign JE1 BE1.png|32px]] [[File:Warped Sign JE1 BE1.png|32px]] Added crimson and warped signs.|[[File:Spruce Standing Sign (S) JE2 BE2.png|32px]] [[File:Birch Standing Sign (S) JE2 BE2.png|32px]] [[File:Jungle Standing Sign (S) JE2 BE2.png|32px]] [[File:Acacia Standing Sign (S) JE2 BE2.png|32px]] [[File:Dark Oak Standing Sign (S) JE2 BE2.png|32px]] [[File:Spruce Wall Sign (S) JE2 BE2.png|32px]] [[File:Birch Wall Sign (S) JE2 BE2.png|32px]] [[File:Jungle Wall Sign (S) JE2 BE2.png|32px]] [[File:Acacia Wall Sign (S) JE2 BE2.png|32px]] [[File:Dark Oak Wall Sign (S) JE2 BE2.png|32px]] The texture of all signs except oak sign have been changed.}}
{{History||1.16.20|snap=beta 1.16.20.50|Crimson and warped signs now uses regular plank [[sound]]s instead of their stem variant sounds.}}
{{History||1.16.210|snap=beta 1.16.210.59|Signs can now be {{control|used}} while holding a [[dye]] to change the text color.|Signs can now be tinted with [[Glow Ink Sac|glow ink sac]]s to make the text glow.
|Works with both default and dyed signs.}}
{{History|||snap=beta 1.16.210.60|Color on dyed signs disappears and the text turns back to black.|Signs with applied glowing effect as well as color stops glowing and color is removed.}}
{{History||1.16.220|snap=beta 1.16.220.50|Signs can now be {{control|used}} while holding a [[dye]] to change the text color again.|Signs can now be tinted with [[Glow Ink Sac|glow ink sac]]s to make the text glow again.}}
{{History|||snap=beta 1.16.220.52|Now has sounds for being dyed.}}
{{History|||snap=release|A glowing effect can no longer be applied to signs due to glow ink sacs becoming inaccessible in the full release.}}
{{History||1.17.0|snap=beta 1.17.0.50|[[File:Oak Sign BE3.png|32px]] [[File:Spruce Sign BE2.png|32px]] [[File:Birch Sign BE2.png|32px]] [[File:Jungle Sign BE2.png|32px]] [[File:Acacia Sign BE2.png|32px]] [[File:Dark Oak Sign BE2.png|32px]] Textures of sign items was updated.
|[[File:Oak Standing Sign (S) JE2 BE2.png|32px]] [[File:Oak Wall Sign (S) JE2 BE2.png|32px]] The textures of oak signs have been changed to reflect the changes made to planks in the [[Texture Update]].}}
{{History||1.17.10|snap=beta 1.17.10.21|Glowing text on signs now has an outer glow, making text more visible in the dark.}}
{{History||1.18.10|snap=beta 1.18.10.20|[[File:Oak Sign JE3.png|32px]] [[File:Spruce Sign JE2.png|32px]] [[File:Birch Sign JE2.png|32px]] [[File:Jungle Sign JE2.png|32px]] [[File:Acacia Sign JE2.png|32px]] [[File:Dark Oak Sign JE2.png|32px]] [[File:Crimson Sign JE2.png|32px]] [[File:Warped Sign JE2.png|32px]] Changed all signs textures as items.}}
{{History||1.19.0|snap=beta 1.19.0.20|[[File:Mangrove Sign JE1 BE1.png|32px]][[File:Mangrove Wall Sign JE1 BE1.png|32px]][[File:Mangrove Sign (item) JE1 BE1.png|32px]] Added mangrove signs.}}
{{History||Next Major Update<br>(Experimental)|link=Bedrock Edition 1.20|snap=beta 1.19.50.21|[[File:Bamboo Sign (0) JE1 BE1.png|32px]] [[File:Bamboo Wall Sign (S) JE1 BE1.png|32px]] [[File:Bamboo Sign (item) JE1 BE1.png|32px]] Added bamboo signs behind the "[[Bedrock Edition 1.20|Next Major Update]]" [[experimental]] toggle.|[[File:Oak Hanging Sign JE1 BE1.png|32px]] [[File:Spruce Hanging Sign JE1 BE1.png|32px]] [[File:Birch Hanging Sign JE1 BE1.png|32px]] [[File:Jungle Hanging Sign JE1 BE1.png|32px]] [[File:Acacia Hanging Sign JE1 BE1.png|32px]] [[File:Dark Oak Hanging Sign JE1 BE1.png|32px]] [[File:Mangrove Hanging Sign JE1 BE1.png|32px]] [[File:Bamboo Hanging Sign JE1 BE1.png|32px]] [[File:Crimson Hanging Sign JE1 BE1.png|32px]] [[File:Warped Hanging Sign JE1 BE1.png|32px]]<br>[[File:Oak Wall Hanging Sign JE1 BE1.png|32px]] [[File:Spruce Wall Hanging Sign JE1 BE1.png|32px]] [[File:Birch Wall Hanging Sign JE1 BE1.png|32px]] [[File:Jungle Wall Hanging Sign JE1 BE1.png|32px]] [[File:Acacia Wall Hanging Sign JE1 BE1.png|32px]] [[File:Dark Oak Wall Hanging Sign JE1 BE1.png|32px]] [[File:Mangrove Wall Hanging Sign JE1 BE1.png|32px]] [[File:Bamboo Wall Hanging Sign (S) JE1 BE1.png|32px]] [[File:Crimson Wall Hanging Sign JE1 BE1.png|32px]] [[File:Warped Wall Hanging Sign JE1 BE1.png|32px]]<br>[[File:Oak Hanging Sign (item) JE1 BE1.png|32px]] [[File:Spruce Hanging Sign (item) JE1 BE1.png|32px]] [[File:Birch Hanging Sign (item) JE1 BE1.png|32px]] [[File:Jungle Hanging Sign (item) JE1 BE1.png|32px]] [[File:Acacia Hanging Sign (item) JE1 BE1.png|32px]] [[File:Dark Oak Hanging Sign (item) JE1 BE1.png|32px]] [[File:Mangrove Hanging Sign (item) JE1 BE1.png|32px]] [[File:Bamboo Hanging Sign (item) JE1 BE1.png|32px]] [[File:Crimson Hanging Sign (item) JE1 BE1.png|32px]] [[File:Warped Hanging Sign (item) JE1 BE1.png|32px]]<br>Added hanging signs behind the "[[Bedrock Edition 1.20.0|Next Major Update]]" [[experimental]] toggle.|Added unique sounds for Nether and bamboo wood signs.}}
{{History|||snap=beta 1.19.60.20|[[File:Jungle Wall Hanging Sign JE2 BE2.png|32px]] The texture of jungle hanging wall signs have been changed.|Bamboo hanging signs now can be crafted using [[block of stripped bamboo]] instead of bamboo planks.|Crafting bamboo hanging signs now outputs 6 hanging signs instead of 2.}}
{{History||Next Major Update<br>(Experimental)|link=Bedrock Edition 1.19.80|snap=beta 1.19.80.20|[[File:Cherry Sign (0).png|32px]] [[File:Cherry Wall Sign (S) JE1.png|32px]] [[File:Cherry Sign (item) JE1.png|32px]] [[File:Cherry Hanging Sign JE1.png|32px]] [[File:Cherry Wall Hanging Sign JE1.png|32px]] [[File:Cherry Hanging Sign (item) JE1.png|32px]] Added cherry signs and hanging signs behind the "[[Bedrock Edition 1.20.0|Next Major Update]]" [[experimental]] toggle.}}
{{History|||snap=beta 1.19.80.21|[[File:Cherry Sign (0) JE2 BE2.png|32px]] Updated the texture of cherry signs.}}
{{History|||snap=beta 1.19.80.22|Signs and hanging signs can now be edited after being placed.|Signs and hanging signs now support text on both sides.|Signs and hanging signs can now be waxed with [[honeycomb]] to prevent editing.}}
{{History|||snap=beta 1.20.0.20|Crimson, warped, and bamboo hanging signs now have custom sounds to match their wood type.<ref name=badnewsounds>{{Bug|MCPE-164246}}</ref>}}
{{History||1.20.0|snap=beta 1.20.0.21|Bamboo sign, cherry sign and all of the hanging signs are now available without using the "Next Major Update" experimental toggle.}}
{{History|console}}
{{History||xbox=TU1|xbone=CU1|ps=1.0|wiiu=Patch 1|switch=1.0.1|[[File:Oak Standing Sign.png|32px]] [[File:Oak Sign JE1 BE1.png|32px]] Added signs.}}
{{History||xbox=TU9|Signs are now stackable up to 16.
|The same [[crafting]] recipe for signs now produces 3 signs instead of 1.}}
{{History||xbox=none|xbone=none|ps=1.88|wiiu=none|switch=none|[[File:Spruce Standing Sign (S) JE2 BE2.png|32px]] [[File:Birch Standing Sign (S) JE2 BE2.png|32px]] [[File:Jungle Standing Sign (S) JE2 BE2.png|32px]] [[File:Acacia Standing Sign (S) JE2 BE2.png|32px]] [[File:Dark Oak Standing Sign (S) JE2 BE2.png|32px]] [[File:Spruce Sign JE1 BE1.png|32px]] [[File:Birch Sign JE1 BE1.png|32px]] [[File:Jungle Sign JE1 BE1.png|32px]] [[File:Acacia Sign JE1 BE1.png|32px]] [[File:Dark Oak Sign JE1 BE1.png|32px]] Added spruce, birch, jungle, acacia and dark oak signs.}}
{{History||xbox=none|xbone=none|ps=1.90|wiiu=none|switch=none|[[File:Oak Sign JE2 BE2.png|32px]] The texture of oak sign [[item]]s has been changed.}}
{{History|new 3ds}}
{{History||0.1.0|[[File:Oak Standing Sign (S) JE2 BE2.png|32px]] [[File:Oak Sign JE1 BE1.png|32px]] Added signs.}}
{{History|foot}}
== Trivia ==
* The first concept art of hanging signs came from [[Agnes Larsson]]'s daughter.<ref>{{Ytl|vJCMpPyaN8Q|Minecraft 1.20: New Blocks and Their Functions!|Minecraft|t=30s}}</ref>
== Gallery ==
=== Screenshots ===
<gallery>
Signs classic.png|Test of signs in early [[Java Edition Classic]].
Sigh test.jpg|Another early sign image.
Signs PreRelease.png|First image of sign blocks during [[Java Edition Infdev|Infdev]].
Pocket Edition v0.6.0 alpha Development sign.png|First image of signs on [[Pocket Edition]].
Pocket Edition v0.6.0 alpha Development sign editing.png|First image of editing text on [[PE]] iOS.
Pocket Edition v0.6.0 alpha Development sign editing 2.png|First image of editing text on [[PE]] Android.
Pocket Edition v0.6.0 alpha Development sky.png
Door Sign.png|A sign placed on a door.
Breaking News.png|A sign being broken.
Sign Text Dark.jpg|A dark oak sign with black text.
Sign Text Light.jpg|A dark oak sign with white text.
Sign Blockdata.gif|A sign using blockdata to dynamically change.
JSON Sign.png|First image of a sign using JSON text.
Width Based Character Limit.png|First image of a sign using width based character limits.
Glow Ink Sign with Pink Dye.png|Oak sign with glow ink in the dark in [[Java Edition 21w03a]].
Lit vs unlit signs.png|Difference in visibility of a lime text, from left to right, in a lit birch sign, unlit birch sign, lit dark oak sign, and unlit dark oak sign.
Glowing Text Comparison.png|The comparison between glow text and non-glow text.
Example Of Signs Being Weird.png|alt=Shading differences|Signs being different shades depending on orientation.
Glow text.gif|All sixteen colors of glow text.
Glow Ink Signs.jpg|Signs with glowing ink in several colors.
Lots of Glowing Signs.jpg|More signs with glowing ink.
Sign Platforms.jpg|[[Ari]] standing on top of a hanged sign.
Eric Shop.jpg|[[Sunny]] looking at a double sided hanging sign.
Hanging Sign Bedrock.png|Hanging sign with small text.
Hanging Sign Java.png|Hanging sign with large text.
New Hanging Sign Text Length 1.jpg|Text on hanging sign.
New Hanging Sign Text Length 2.jpg|Text on hanging sign.
</gallery>
=== Concept Art ===
<gallery>
Hanging_Sign_Concept_Art.png|Hanging sign concept art.
Hanging_Sign_Concept_Art2.png|Ditto.
Hanging_Sign_Concept_Art3.png|Hanging sign dimensions concept art.
Hanging_Sign_Concept_Art4.png|Hanging sign crafting recipe, block states concept art.
</gallery>
=== Renders ===
{{hidden begin}}
<div style="clear: both"></div>
<gallery>
Oak Sign.png|Oak Sign
Spruce Sign.png|Spruce Sign
Birch Sign.png|Birch Sign
Jungle Sign.png|Jungle Sign
Acacia Sign.png|Acacia Sign
Dark Oak Sign.png|Dark Oak Sign
Mangrove Sign.png|Mangrove Sign
Cherry Sign.png|Cherry Sign
Bamboo Sign.png|Bamboo Sign
Crimson Sign.png|Crimson Sign
Warped Sign.png|Warped Sign
Oak Wall Sign.png|Oak Wall Sign
Spruce Wall Sign.png|Spruce Wall Sign
Birch Wall Sign.png|Birch Wall Sign
Jungle Wall Sign.png|Jungle Wall Sign
Acacia Wall Sign.png|Acacia Wall Sign
Dark Oak Wall Sign.png|Dark Oak Wall Sign
Mangrove Wall Sign.png|Mangrove Wall Sign
Cherry Wall Sign.png|Cherry Wall Sign
Bamboo Wall Sign.png|Bamboo Wall Sign
Crimson Wall Sign.png|Crimson Wall Sign
Warped Wall Sign.png|Warped Wall Sign
Oak Hanging Sign.png|Oak Hanging Sign
Spruce Hanging Sign.png|Spruce Hanging Sign
Birch Hanging Sign.png|Birch Hanging Sign
Jungle Hanging Sign.png|Jungle Hanging Sign
Acacia Hanging Sign.png|Acacia Hanging Sign
Dark Oak Hanging Sign.png|Dark Oak Hanging Sign
Mangrove Hanging Sign.png|Mangrove Hanging Sign
Cherry Hanging Sign.png|Cherry Hanging Sign
Bamboo Hanging Sign.png|Bamboo Hanging Sign
Crimson Hanging Sign.png|Crimson Hanging Sign
Warped Hanging Sign.png|Warped Hanging Sign
Oak Wall Hanging Sign.png|Oak Wall Hanging Sign
Spruce Wall Hanging Sign.png|Spruce Wall Hanging Sign
Birch Wall Hanging Sign.png|Birch Wall Hanging Sign
Jungle Wall Hanging Sign.png|Jungle Wall Hanging Sign
Acacia Wall Hanging Sign.png|Acacia Wall Hanging Sign
Dark Oak Wall Hanging Sign.png|Dark Oak Wall Hanging Sign
Mangrove Wall Hanging Sign.png|Mangrove Wall Hanging Sign
Cherry Wall Hanging Sign.png|Cherry Wall Hanging Sign
Bamboo Wall Hanging Sign.png|Bamboo Wall Hanging Sign
Crimson Wall Hanging Sign.png|Crimson Wall Hanging Sign
Warped Wall Hanging Sign.png|Warped Wall Hanging Sign
</gallery>
<gallery>
Oak Sign JE3.png
Spruce Sign JE2.png
Birch Sign JE2.png
Jungle Sign JE2.png
Acacia Sign JE2.png
Dark Oak Sign JE2.png
Mangrove Sign (item) JE1 BE1.png
Cherry Sign (item) JE1.png
Bamboo Sign (item) JE1 BE1.png
Crimson Sign JE2.png
Warped Sign JE2.png
Oak Hanging Sign (item) JE1 BE1.png
Spruce Hanging Sign (item) JE1 BE1.png
Birch Hanging Sign (item) JE1 BE1.png
Jungle Hanging Sign (item) JE1 BE1.png
Acacia Hanging Sign (item) JE1 BE1.png
Dark Oak Hanging Sign (item) JE1 BE1.png
Mangrove Hanging Sign (item) JE1 BE1.png
Cherry Hanging Sign (item) JE1.png
Bamboo Hanging Sign (item) JE1 BE1.png
Crimson Hanging Sign (item) JE1 BE1.png
Warped Hanging Sign (item) JE1 BE1.png
</gallery>
{{hidden end}}
{{-}}
== Issues ==
{{issue list}}
== See also ==
* [[Chalkboard]]
== References ==
{{Reflist}}
== External Links ==
*[https://www.minecraft.net/en-us/article/taking-inventory--sign Taking Inventory: Sign] – Minecraft.net on January 9, 2020
{{Blocks|utility}}
{{Items}}
[[Category:Utility blocks]]
[[Category:Manufactured blocks]]
[[Category:Generated structure blocks]]
[[Category:Block entities]]
[[Category:Non-solid blocks]]
[[cs:Cedule]]
[[de:Schild (Schrift)]]
[[es:Cartel]]
[[fr:Pancarte]]
[[hu:Tábla]]
[[it:Cartello]]
[[ja:看板]]
[[ko:표지판]]
[[nl:Bord]]
[[pl:Tabliczka]]
[[pt:Placa]]
[[ru:Табличка]]
[[th:ป้าย]]
[[uk:Табличка]]
[[zh:告示牌]]</li><li>[[Trial Key|Trial Key]]<br/>{{Item|
|image=Trial Key .webp
|renewable=Yes
|stackable=Yes (64)
}}
{{Stub}}
{{in dev|java|bedrock|1.21|1.21.0}}
A '''Trial Key''' is an item found in [[Trial Chambers]].
Its functionality remained a mystery for a pretty good time, but on the Minecraft Monthly of January 2024, it has been revealed to open vaults, which once opened will drop an item. It's still unknown what will the loot be, but was seen dispensing the following:
Enchanted iron helmet, enchanted iron leggings, enchanted crossbow, enchanted diamond chestplate, iron, gold and diamond horse armour, enchanted golden apple, saddle, enchanted diamond axe, enchanted iron pickaxe and enchanted iron Shovel.
The trial key can currently be obtained from trial spawners (50%), or from pots and chests (8%).
[[Category:Items]]
[[ja:Trial Key]]
[[lzh:煉管]]</li></ul></nowiki> | beta 1.10.0.3 | |||||
| Legacy Console Edition | ||||||
| TU19 | CU7 | 1.12 | Patch 1 | File:Hopper (D) JE2 BE1.png File:Hopper (Item) JE2 BE1.png Added hoppers. | ||
| 1.90 | ||||||
| New Nintendo 3DS Edition | ||||||
0.1.0{{Extension DPL}}<ul><li>[[Bleach|Bleach]]<br/>{{education feature}}
{{exclusive|bedrock|education}}
{{Item
| image = Bleach.png
| renewable = No
| stackable = Yes (64)
}}
'''Bleach''' is an [[item]] used to [[dye]] things white. It is a [[compound]], as it is made using a [[lab table]].
== Obtaining ==
=== Lab Table ===
Bleach is not obtainable in the [[creative inventory]] or {{cmd|give}}. The only way to obtain it is using a [[lab table]].
{| class="wikitable"
! Result
! Materials Needed
|-
!rowspan=2|{{slot|Bleach}}<br>[[Bleach]]
|{{slot|Water (compound)|link=Compound}}{{slot|Water (compound)|link=Compound}}{{slot|Water (compound)|link=Compound}}{{slot|Sodium Hypochlorite|link=Compound}}{{slot|Sodium Hypochlorite|link=Compound}}{{slot|Sodium Hypochlorite|link=Compound}}
|-
|<center>[[Water (compound)|Water]] x3, [[Compound|Sodium Hypochlorite]] x3</center>
|}
== Usage ==
=== Crafting ingredient ===
{{crafting usage}}
== Sounds ==
{{Sound table
|type=bedrock
|sound=Fire.ogg
|source=sound
|description=When bleach is created by a lab table
|id=lt.reaction.fire
|volume=6.0
|pitch=0.7/0.9
|foot=1}}
== Data values ==
=== ID ===
{{ID table
|edition=bedrock
|shownumericids=y
|showforms=y
|notshowbeitemforms=y
|generatetranslationkeys=y
|displayname=Bleach
|spritetype=item
|nameid=bleach
|id=596
|form=item
|foot=1}}
== History ==
{{History|bedrock}}
{{History||1.4.0|snap=beta 1.2.20.1|[[File:Bleach BE1.png|32px]] Added bleach.}}
{{History|education}}
{{History||1.0.27|[[File:Bleach BE1.png|32px]] Added bleach.}}
{{History|foot}}
== Trivia ==
*[[File:Bleach (compound).png|32px]] There is an [[History of textures/Unused textures#Unused compounds|unused bleach texture]] in the compounds folder of the chemistry resource pack, which is slightly different from the one used in the game.
== Issues ==
{{issue list}}
{{Items}}
{{Education Edition}}
[[Category:Dyes]]
[[Category:Non-renewable resources]]
[[Category:Education Edition items]]
[[de:Bleichmittel]]
[[es:Lejía]]
[[ja:漂白剤]]
[[ko:표백제]]
[[pl:Wybielacz]]
[[pt:Alvejante]]
[[zh:漂白剂]]
[[lzh:素精]]</li><li>[[Shield|Shield]]<br/>{{Item
| image = Shield.png
| image2 = White Shield.png
| extratext = View [[#Gallery|all renders]]
| durability = 336
| renewable = Yes
| stackable = No
}}
A '''shield''' is a tool used for protecting the [[player]] against attacks.
== Obtaining ==
=== Crafting ===
{{Crafting
|head=1
|showname=0
|A1=Any Planks <!-- the recipe changed in 15w37a, do not change it to the old recipe without reason -->
|B1=Iron Ingot
|C1=Any Planks
|A2=Any Planks
|B2=Any Planks
|C2=Any Planks
|B3=Any Planks
|Output=Shield
|type=Combat
}}
{{Crafting
|ignoreusage=1
|Shield
|Matching Banner
|A2=Shield
|B2=Banner
|Output=Matching Shield
|type=combat
|foot=1
}}
=== Repairing ===
{{Crafting
|ignoreusage=1
|showdescription=1
|Damaged Shield
|Damaged Shield
|Output=Shield
|description= The durability of the two shields is added together, plus an extra 5% durability. The repaired shield has no pattern.
|type= Combat
}}
Shields may also be repaired on an [[anvil]] by using [[planks]] or another shield. Shields repaired on anvils retain their pattern.
=== Trading ===
Journeyman-level armorer [[villager]]s have {{frac|1|3}}{{only|Bedrock|short=1}}/{{frac|2|5}}{{only|Java|short=1}} chance of selling a shield for 5 [[emerald]]s as their sixth trade.
== Usage ==
Despite using iron in its crafting recipe, it cannot be smelted into [[iron nugget]]s.<ref>{{bug|MC-111738}}</ref>
=== Defense ===
Shields are used for [[blocking]] incoming attacks. {{control|Using}}{{Only|Java|short=1}} or {{Control|sneaking}}{{Only|Bedrock|short=1}} causes a player to slow to a [[sneaking]] pace, and after {{convert|5|ticks|seconds}}<ref>{{bug|MC-100949||Shield blocking is delayed}}</ref>, attacks coming from in front of the player are blocked, dealing no damage. When the shield blocks an attack of {{hp|3}} or stronger, it takes durability damage equal to the strength of the attack rounded up.
Most blocked projectiles that carry status effects (such as [[Shulker#Shulker bullet|shulker bullets]]{{only|java|short=1}}, flaming [[arrow]]s, or tipped arrows) do not affect the blocker. [[Trident]]s & arrows can be deflected into other targets. Knockback from melee attacks and projectiles is prevented, while knockback from [[explosion]]s, [[hoglin]], and [[ravager]] attacks are significantly reduced.
The shield directionally blocks all attacks coming from within the FOV of the direction the wielder is facing, providing a full hemisphere of coverage to them. If the wielder faces straight up, they are likely to miss their blocks.<ref>{{bug|MC-109101||Shields do not block damage while the player faces straight up}}</ref><!--straight down fix: MC-92019-->
Mobs that deal continuous contact damage such as the slime, magma cube, and blaze rapidly drain the shield's durability for as long as the shielded player remains within the mob's hitbox.<ref>{{bug|MC-169167}}</ref><ref>{{bug|MCPE-119451}}</ref>
Blockable attacks include:
*Melee attacks, except by a warden, axe-wielding mobs or by a sprinting player wielding an axe, however even without sprinting an axe still greatly decreases the durability
** Status effects do not carry through to the blocker{{only|java|short=1}}.
*Normal, tipped, and spectral [[arrow]]s
** Arrows other than [[Piercing]] are totally deflected and can hit other targets.
** Status effects do not carry through to the blocker{{only|java|short=1}}.
***This can be used to damage the attacker or another mob down there.
*[[Flame|Flaming arrows]]
** Burning does not carry through to the blocker{{only|java|short=1}}.
*[[Trident]]s
*[[Snowball]]s and [[egg]]s
*Spines from [[pufferfish]]
*Bullets from [[shulker]]s
** The levitation effect does not carry through to the blocker{{only|java|short=1}}.
*Spit from [[llama]]s
*[[Fireball]]s, such as from [[blaze]]s and [[fire charge]]s
** Burning does not carry through to the blocker.
*Direct hits from [[ghast]] [[fireball]]s
** These still cause environmental damage.
*All explosions{{only|JE|short=1}}
*Explosion damage from [[creeper]]s
*[[TNT]] that another player lit
*[[Ravager]] headbutts
** These still knock the blocker back by about 3 blocks.
** Blocking these strikes can stun the ravager for a moment, and it roars afterward.
*Ravager roars are blocked but still knock back the blocker.
*[[Bee]] stings are blocked, but bees continuously attack until the player stops blocking and the player is stung.
*Beam attacks from [[guardian]]s or [[elder guardian]]s (only reduces damage by 50%).
*Damage reflected from [[Thorns]] enchantment / [[Guardian|guardians]].
They cannot block:
*Arrows from a [[crossbow]] enchanted with [[Piercing]]
** This does not reduce the shield's durability.
*[[Status effect]]s from tipped arrows or shulker bullets {{only|bedrock|short=1}} <ref>{{bug|MCPE-52904}}</ref>
** Direct projectile damage is blocked, but the effect still carries through.
*Status effects from splash/lingering [[potion]]s, [[evoker]]s' fangs, or breath from the [[ender dragon]]
*Beam attacks from [[guardian]]s or [[elder guardian]]s, or the [[warden]]'s sonic boom attack
*TNT that the blocking player lit themselves{{only|BE|short=1}}
*TNT that a [[Redstone (disambiguation)|redstone mechanism]] lit{{only|BE|short=1}}
*[[Fall damage]], including that from [[ender pearl]]s
** This also includes when the player rides an [[entity]] that died due to fall damage.
*Strikes from a warden or any [[axe]]-wielding mob (e.g., [[vindicator]]s, [[piglin brute]]s, [[zombie]]s after disabling players shield they attack another time immediately)
** Such strikes disable being able to use shields for 5 seconds.
=== Applying patterns ===
[[File:Cyan Shield Screenshot.png|250px|thumb|A custom shield.]]
Shields can be decorated by applying a [[banner]].
{{Crafting
|showdescription=1
|Shield
|Matching Banner
|Output=Matching Shield; Ominous Shield
|B2link=Banner
|Olink=Shield
|type=Combat
|description=Applies the banner pattern to the shield. The banner is consumed.<br>The shield must have no preexisting patterns.<br>Does not change existing durability or enchantments on the shield.
}}
Unlike with [[banner]]s, shields cannot be repainted or washed in a [[cauldron]]. Shields have only half the resolution of banners, making patterns look slightly different. In the game files, the pattern textures can be found in a separate directory called entity/shield.
{{IN|java}}, shields with patterns can also be obtained using the same commands as banners, except <code>banner</code> has to be replaced with <code>shield</code>.
=== Enchantments ===
A shield can receive the following [[enchantments]], but only through an [[anvil]]:
{| class="wikitable col-2-center"
|+
!Name
!Max Level
![[Enchanting|Method]]
|-
|[[Unbreaking]]
|III
|{{Inventory slot|Anvil}}
|-
|[[Mending]]
|I
|{{Inventory slot|Anvil}}
|-
|[[Curse of Vanishing]]
|I
|{{Inventory slot|Anvil}}
|-
|}
== Sounds ==
{{edition|java}}:
{{Sound table
|sound=Shield block1.ogg
|sound2=Shield block2.ogg
|sound3=Shield block3.ogg
|sound4=Shield block4.ogg
|sound5=Shield block5.ogg
|subtitle=Shield blocks
|source=player
|description=When an attack is blocked using a shield
|id=item.shield.block
|translationkey=subtitles.item.shield.block
|volume=1.0
|pitch=0.8-1.2
|distance=16}}
{{Sound table
|sound=Equip generic1.ogg
|sound2=Equip generic2.ogg
|sound3=Equip generic3.ogg
|sound4=Equip generic4.ogg
|sound5=Equip generic5.ogg
|sound6=Equip generic6.ogg
|subtitle=Gear equips
|source=player
|description=When a shield is placed in the offhand slot
|id=item.armor.equip_generic
|translationkey=subtitles.item.armor.equip
|volume=1.0
|pitch=1.0
|distance=16}}
{{Sound table
|sound=Random break.ogg
|subtitle=Item breaks
|source=player
|description=When a shield's durability is exhausted
|id=item.shield.break
|translationkey=subtitles.entity.item.break
|volume=0.8
|pitch=0.8-1.2
|distance=16
|foot=1}}
{{edition|bedrock}}:
{{Sound table
|type=bedrock
|sound=Shield block1.ogg
|sound2=Shield block2.ogg
|sound3=Shield block3.ogg
|sound4=Shield block4.ogg
|sound5=Shield block5.ogg
|source=player
|description=When an attack is blocked using a shield
|id=item.shield.block
|volume=0.7
|pitch=1.0}}
{{Sound table
|sound=Equip generic1.ogg
|sound2=Equip generic2.ogg
|sound3=Equip generic3.ogg
|sound4=Equip generic4.ogg
|sound5=Equip generic5.ogg
|sound6=Equip generic6.ogg
|source=player
|description=When a shield is placed in the offhand slot<wbr>{{Upcoming|BE 1.20.30}}<wbr><ref group=sound>{{Bug|MCPE-168039}}</ref>
|id=armor.equip_generic
|volume=1.0
|pitch=1.0}}
{{Sound table
|sound=Random break.ogg
|source=player
|description=When a shield's durability is exhausted
|id=random.break
|volume=1.0
|pitch=0.9
|foot=1}}
== Data values ==
=== ID ===
{{edition|java}}:
{{ID table
|edition=java
|showforms=y
|generatetranslationkeys=y
|displayname=Shield
|spritetype=item
|nameid=shield
|form=item
|translationkey=item.minecraft.shield, item.minecraft.shield.white, item.minecraft.shield.orange, item.minecraft.shield.magenta, item.minecraft.shield.light_blue, item.minecraft.shield.yellow, item.minecraft.shield.lime, item.minecraft.shield.pink, item.minecraft.shield.gray, item.minecraft.shield.light_gray, item.minecraft.shield.cyan, item.minecraft.shield.purple, item.minecraft.shield.blue, item.minecraft.shield.brown, item.minecraft.shield.green, item.minecraft.shield.red, item.minecraft.shield.black
|foot=1}}
{{edition|bedrock}}:
{{ID table
|edition=bedrock
|shownumericids=y
|showforms=y
|notshowbeitemforms=y
|generatetranslationkeys=y
|displayname=Shield
|spritetype=item
|nameid=shield
|id=355
|form=item
|translationkey=item.shield.name, item.shield.white.name, item.shield.orange.name, item.shield.magenta.name, item.shield.lightBlue.name, item.shield.yellow.name, item.shield.lime.name, item.shield.pink.name, item.shield.gray.name, item.shield.silver.name, item.shield.cyan.name, item.shield.purple.name, item.shield.blue.name, item.shield.brown.name, item.shield.green.name, item.shield.red.name, item.shield.black.name
|foot=1}}
== Advancements ==
{{load advancements|Not Today}}
== History ==
{{History||July 10, 2011|link=http://minetimes.wordpress.com/2011/07/10/interview-mit-jeb-ihr-konntet-die-fragen-stellen/|During an interview, [[Jeb]] says that "shields for the left arm" might be added.}}
{{History|java}}
{{History||1.9|snap=15w33c|[[File:White Shield.png|22px]] [[File:Light Gray Shield.png|22px]] [[File:Gray Shield.png|22px]] [[File:Black Shield.png|22px]] [[File:Brown Shield.png|22px]] [[File:Red Shield.png|22px]] [[File:Orange Shield.png|22px]] [[File:Yellow Shield.png|22px]] [[File:Lime Shield.png|22px]] [[File:Green Shield.png|22px]] [[File:Cyan Shield.png|22px]] [[File:Light Blue Shield.png|22px]] [[File:Blue Shield.png|22px]] [[File:Purple Shield.png|22px]] [[File:Magenta Shield.png|22px]] [[File:Pink Shield.png|22px]] Added shields.
|Shields replace the [[blocking]] functionality of [[sword]]s, although blocking more [[damage]].
|The current [[crafting]] recipe of shields includes [[wool]], producing 16 possible colored shields. There currently isn't a blank, uncolored shield.
{{{!}} class{{=}}"collapsible collapsed" data-description{{=}}"Recipe"
! Recipe
{{!}}-
{{!}}
{{Crafting
|A1=Matching Wool |B1=Any Planks
|A2=Matching Wool |B2=Any Planks |C2=Iron Ingot
|A3=Matching Wool |B3=Any Planks
|Output=Matching Shield
|ignoreusage=1
}}
{{!}}}
|Any of the colored base shields can be [[crafting|crafted]] with a [[banner]] of the same base color, to produce a patterned shield.
}}
{{History|||snap=15w34c|When an attack is blocked by a shield, the attacker now may be knocked back.
|Being attacked with an [[axe]] now may disable shield use for 5 seconds.}}
{{History|||snap=15w37a|The [[crafting]] recipe of shields has been changed to 6 [[planks]] and 1 [[iron ingot]].
{{{!}} class{{=}}"collapsible collapsed" data-description{{=}}"Recipe"
! Recipe
{{!}}-
{{!}}
{{Crafting
|A1=Any Planks |B1=Iron Ingot |C1=Any Planks
|A2=Any Planks |B2=Any Planks |C2=Any Planks
|B3=Any Planks
|Output=Shield
|ignoreusage=1
}}
{{!}}}
|[[File:Shield JE1.png|22px]] Crafting a shield now produces a base wooden shield that can be crafted together with any [[banner]].
|The cooldown of shields has been reduced from 0.5s to 0.25s.
|Blocking with shields now prevents some side effects.{{verify}}
|[[Arrow]]s now ricochet off shields.}}
{{History|||snap=15w44a|Shields can now be repaired by combining with other shields. This removes any [[banner]] that had been applied.}}
{{History|||snap=15w45a|Crafting a banner onto a shield now consumes the banner.}}
{{History|||snap=15w47b|Added shield blocking [[sound]]s.}}
{{History|||snap=16w07a|Added more variation of shield blocking sounds.}}
{{History|||snap=pre1|The [[durability]] of shields has been increased from 181 to 337.}}
{{History||1.10|snap=16w21a|Shields can now be equipped by [[dispenser]]s.}}
{{History||1.11|snap=16w33a|[[Crafting]] a shield with a banner no longer changes the durability, nor does it remove [[enchanting|enchantments]] from it.}}
{{History|||snap=16w35a|Shields now block 100% of [[damage]]/[[knockback]]/debuffs dealt in melee combat.}}
{{History||1.13|snap=17w47a|Prior to [[1.13/Flattening|''The Flattening'']], this [[item]]'s numeral ID was 442.}}
{{History||1.13.2|snap=release|Shields now properly block attacks when the player is facing down.<ref>{{bug|MC-92019|||Fixed}}</ref>}}
{{History||1.14|snap=18w43a|[[File:Shield JE2 BE1.png|22px]] The texture of shields has been changed.
|Shields no longer knockback attackers when they block due to a bug with rework of the blocking mechanic with the introduction of the ravager.<ref>{{bug|MC-147694}}</ref>}}
{{History|||snap=19w11a|Shields can now be [[trading|bought]] from armorer [[villager]]s.}}
{{History||1.14.3|snap=Pre-Release 3|Shields blocking flaming [[arrow]]s no longer put the [[player]] on [[fire]].}}
{{History||1.16|snap=20w06a|[[Crimson planks]] and [[warped planks]] can now be used to craft shields.}}
{{History||1.19|snap=22w11a|[[Mangrove planks]] can now be used to craft shields.}}
{{History||1.19.3|snap=22w43a|Shields can now properly block all explosions.}}
{{History||1.19.4|snap=23w06a|A sound is now played when a shield is placed into the offhand slot.}}
{{History|upcoming java}}
{{History||Combat Tests|snap=1.14.3 - Combat Test|Critical hits now bypass shields.
|The warm-up delay has been removed from shields.
|When in the off-hand, shields now activate when [[sneaking]].}}
{{History|||snap=Combat Test 2|Shields now protect against critical attacks again.
|Shields can only be activated when the weapon is charged to 200%.}}
{{History|||snap=Combat Test 3|A "Shield Indicator" option that displays when the shield is active, similar to the attack indicator, has been added.
|An option to hide shields when active has been added.
|The arc of available protection of shields has been decreased to 100 degrees instead of 180 degrees.}}
{{History|||snap=Combat Test 4|An option to disable shields being activated by pressing {{ctrl|crouch}} has been added.
|The option to hide the shield has been removed.}}
{{History|||snap=Combat Test 6|Shields now protect up to 5 [[damage]] for melee attacks (still 100% against projectiles).
|Shields activate instantly regardless if the weapon is charged, similar to Combat test 1.
|Shields now recover faster after an attack.}}
{{History|||snap=Combat Test 7c|Shields now add a 50% knockback resistance when active.
|Shields now protect against 100% [[explosions|explosion]] damage.}}
{{History|||snap=Combat Test 8c|The knockback calculations for shields have been fixed.{{Info needed}}
|Crouch-shielding while jumping has been disabled.
|Shields with [[banner]]s are now temporarily stronger than normal shields (10 absorption instead of 5, and better knockback resistance) to test different shield types.}}
{{History|bedrock}}
{{History||1.10.0|snap=beta 1.10.0.3|[[File:Shield JE2 BE1.png|22px]] Added shields.
|Shields cannot be customized with [[banner]]s.
|Shields are activated by [[sneaking|crouching]] or mounting [[mob]]s.}}
{{History||1.11.0|snap=beta 1.11.0.4|Shields can now be [[trading|bought]] from armorer [[villager]]s.}}
{{History||1.16.210|snap=beta 1.16.210.51|Now grants partial knockback protection from the [[goat]] ram attack.}}
{{History||1.16.220|snap=beta 1.16.220.50|[[Mob]]s that pick up shields now place them to their off-hand.}}
{{History||1.18.30|snap=beta 1.18.30.26|Being attacked with an [[axe]] now may disable shield use. This was not mentioned in the official changelog.<ref>{{tweet|kingbdogz|1504505321884196872|We missed a change in recent changelogs for the Bedrock beta that you may like - we have now made a parity fix that makes shields get disabled for 5 seconds when attacked by an Axe-wielding mob or player. We will make sure to list this properly in the next beta :)|March 17, 2022}}</ref>}}
{{History||1.20.0|snap=beta 1.20.0.20|[[File:White Shield.png|22px]] [[File:Light Gray Shield.png|22px]] [[File:Gray Shield.png|22px]] [[File:Black Shield.png|22px]] [[File:Brown Shield.png|22px]] [[File:Red Shield.png|22px]] [[File:Orange Shield.png|22px]] [[File:Yellow Shield.png|22px]] [[File:Lime Shield.png|22px]] [[File:Green Shield.png|22px]] [[File:Cyan Shield.png|22px]] [[File:Light Blue Shield.png|22px]] [[File:Blue Shield.png|22px]] [[File:Purple Shield.png|22px]] [[File:Magenta Shield.png|22px]] [[File:Pink Shield.png|22px]] Shields can now be customized using a banner.}}
{{History|PS4}}
{{History||1.90|[[File:Shield JE1.png|22px]] Added shields.
|Shields do not have [[banner]] application features.}}
{{History|foot}}
== Issues ==
{{issue list|-wither}}
== Gallery ==
<gallery>
Shield.png|Shield
White Shield.png|White Shield
Light Gray Shield.png|Light Gray Shield
Gray Shield.png|Gray Shield
Black Shield.png|Black Shield
Brown Shield.png|Brown Shield
Red Shield.png|Red Shield
Orange Shield.png|Orange Shield
Yellow Shield.png|Yellow Shield
Lime Shield.png|Lime Shield
Green Shield.png|Green Shield
Cyan Shield.png|Cyan Shield
Light Blue Shield.png|Light Blue Shield
Blue Shield.png|Blue Shield
Purple Shield.png|Purple Shield
Magenta Shield.png|Magenta Shield
Pink Shield.png|Pink Shield
</gallery>
=== Screenshots ===
<gallery>
JebShield.png|One of the first images of shields. [[Jeb]] wearing diamond armor while holding a creeper-emblazoned shield during [[MineCon]] 2015.
Jeb Crafting Shield.png|Jeb crafting a shield.
Player with Shield.png|Player holding the default shield.
Shield Block.png|A player blocking with a shield.
ShieldFirstPerson.png|Blocking with a shield as seen in first person.
Enchanted Shield (item).gif|An enchanted shield as seen in the [[inventory]].
-ominous- shield.png|A shield with the [[ominous banner]] on it as seen in the inventory.
Kai-Shield.jpg|An image of [[Kai]] wielding a banner with a shield, used to announce the feature on [[Bedrock Edition]].
Bedrock-Shields.jpg
</gallery>
== References ==
{{reflist}}
== External Links ==
* [https://www.minecraft.net/en-us/article/taking-inventory--shield Taking Inventory: Shield] – Minecraft.net on July 25, 2019
{{Items}}
[[Category:Combat]]
[[Category:Renewable resources]]
[[de:Schild (Kampf)]]
[[fr:Bouclier]]
[[it:Scudo]]
[[ja:盾]]
[[ko:방패]]
[[nl:Schild]]
[[pl:Tarcza]]
[[pt:Escudo]]
[[ru:Щит]]
[[th:โล่]]
[[zh:盾牌]]</li></ul> | File:Hopper (D) JE2 BE1.png File:Hopper (Item) JE2 BE1.png Added hoppers. | |||||
Gallery
In snapshot 13w01a, the hopper item uses a 'WIP' sprite, though the item still read "Hopper".

The 13w02a Banner includes a minecart with TNT and a hopper.
- Hopper (None).png
An hopper facing no direction in Bedrock Edition, placed via commands.
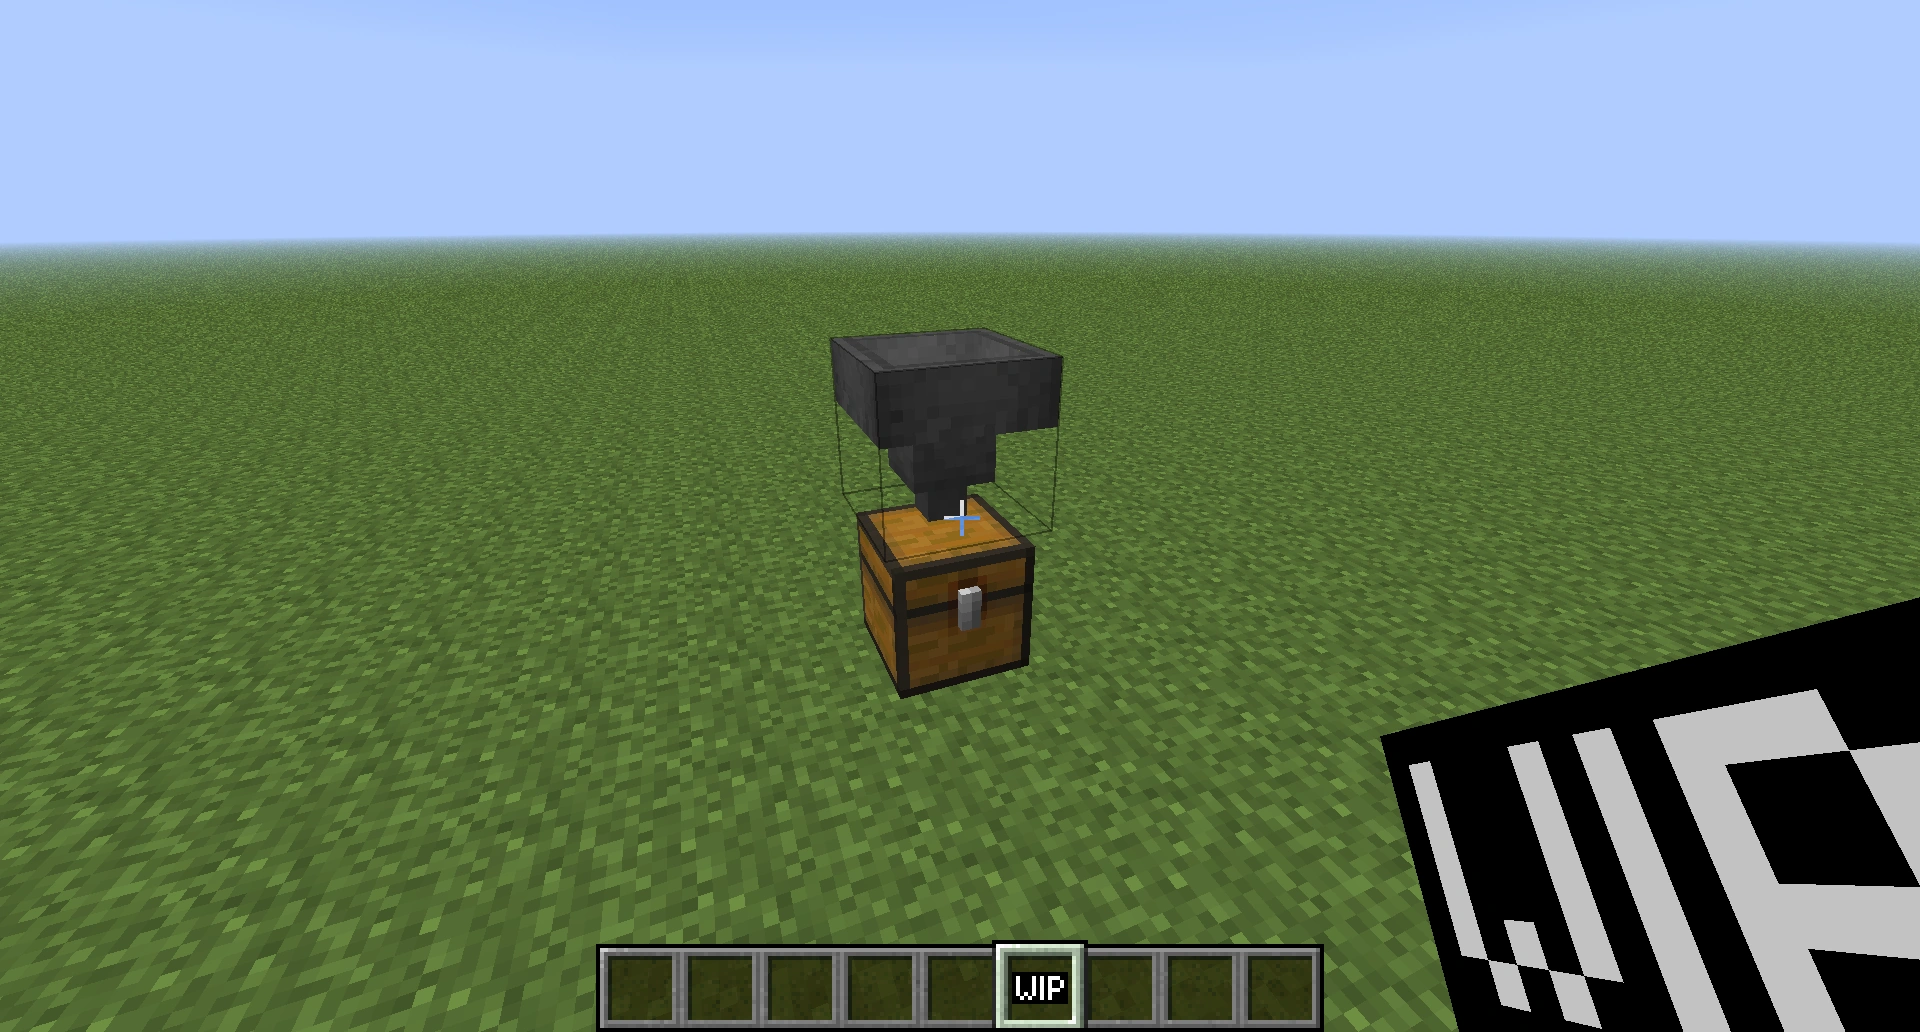

_JE1.png)
_JE1.png)
_JE2_BE1.png)
_13w02a.png)
_JE2_BE1.png)
_JE2_BE1.png)
_JE2_BE1.png)
_JE2_BE1.png)
_JE2_BE1.png)
_JE2.png)
_JE3_BE2.png)
Issues
Issues relating to "Hopper" are maintained on the bug tracker. Report issues there.
Trivia
- A real-life hopper is a large, pyramidal shaped container used in industrial processes to hold particulate matter that has been collected from expelled air.
- A Hopper can transfer 9000 items/hour or 150 items/minute.
- If a hopper needs to pull an item from another container, this speed is cut in half.