The "Create New World" screen is a menu screen that allows the player to create a new world.
Java Edition[]
Respective options for world creation are organized into three different tabs: "Game", "World", and "More".
Game[]
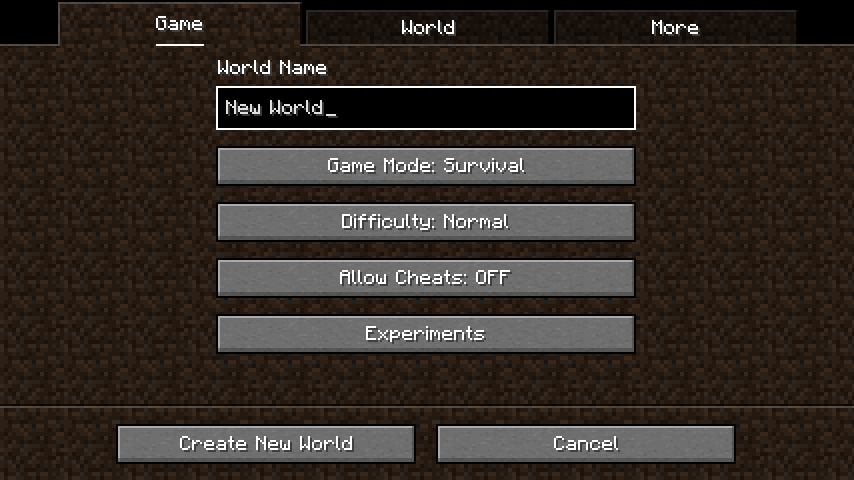
The "Game" tab.
- World Name
- Allows the name of the world to be set to a custom string. This name correlates to the folder in .minecraft/saves where the world save can be found.
- Game Mode
- Allows the default game mode of the world to be changed. Clicking the button cycles through to the next game mode. The available game modes are Survival, Hardcore, and Creative.
- Difficulty
- Allows the default difficulty setting to be changed. Clicking the button cycles through to the next difficulty. There are four options available; in order, Peaceful, Easy, Normal, and Hard.
- Allow Cheats
- Controls whether or not certain commands and debug functions are able to be used. Clicking the button toggles the option on and off (default).
World[]

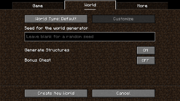
The "World" tab.
- World Type
- Controls the world type. Clicking the button cycles through the available world types, which are Default, Superflat, Large Biomes, AMPLIFIED, Single Biome, and, when Alt is held down, Debug Mode. Selecting Superflat or Single Biome enables the "Customize" button. With a world type of Superflat, the Customize button options the "Superflat Customization" menu is shown; with Single Biome, the button brings you to a list of selectable biomes.
- Seed
- Allows the world seed to be changed. Any string of characters can be placed here.
- Generate Structures
- Controls whether or not structures should generate in the world.
- Bonus Chest
- Controls whether a bonus chest full of beginner loot should generate near the player when they first spawn in to the world.
More[]
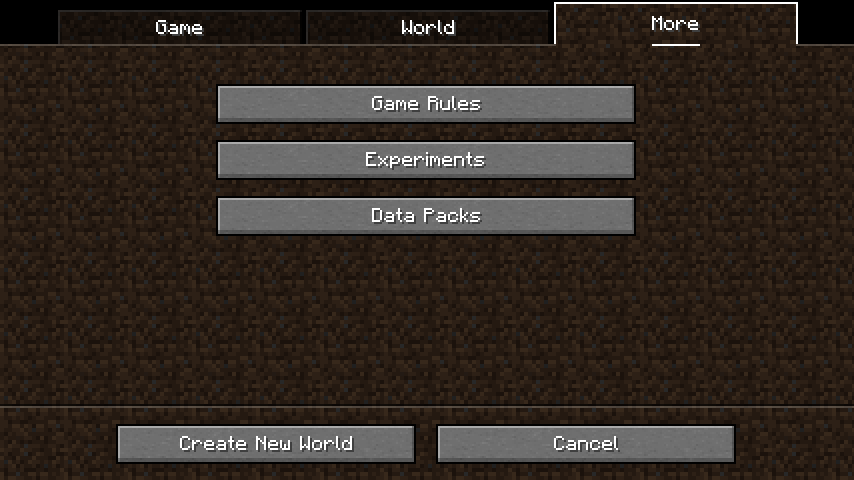

The "More" tab.
- Data Packs
- Opens a menu that controls which data packs the world should start off with. Data packs cannot be added or removed from the world after it is created.
- Experiments
- Allows experimental features to be enabled or disabled.
- Game Rules
- Opens a menu that controls which game rules should be enabled by default. Can be set even when cheats are disabled.
Bedrock Edition[]
The Create New World screen in Bedrock Edition allows for various settings to be changed and add-ons to be enabled. The menu is split into two sections, Edit Settings and Add-Ons, which are each split into two subsections.
Edit Settings[]
Game settings[]
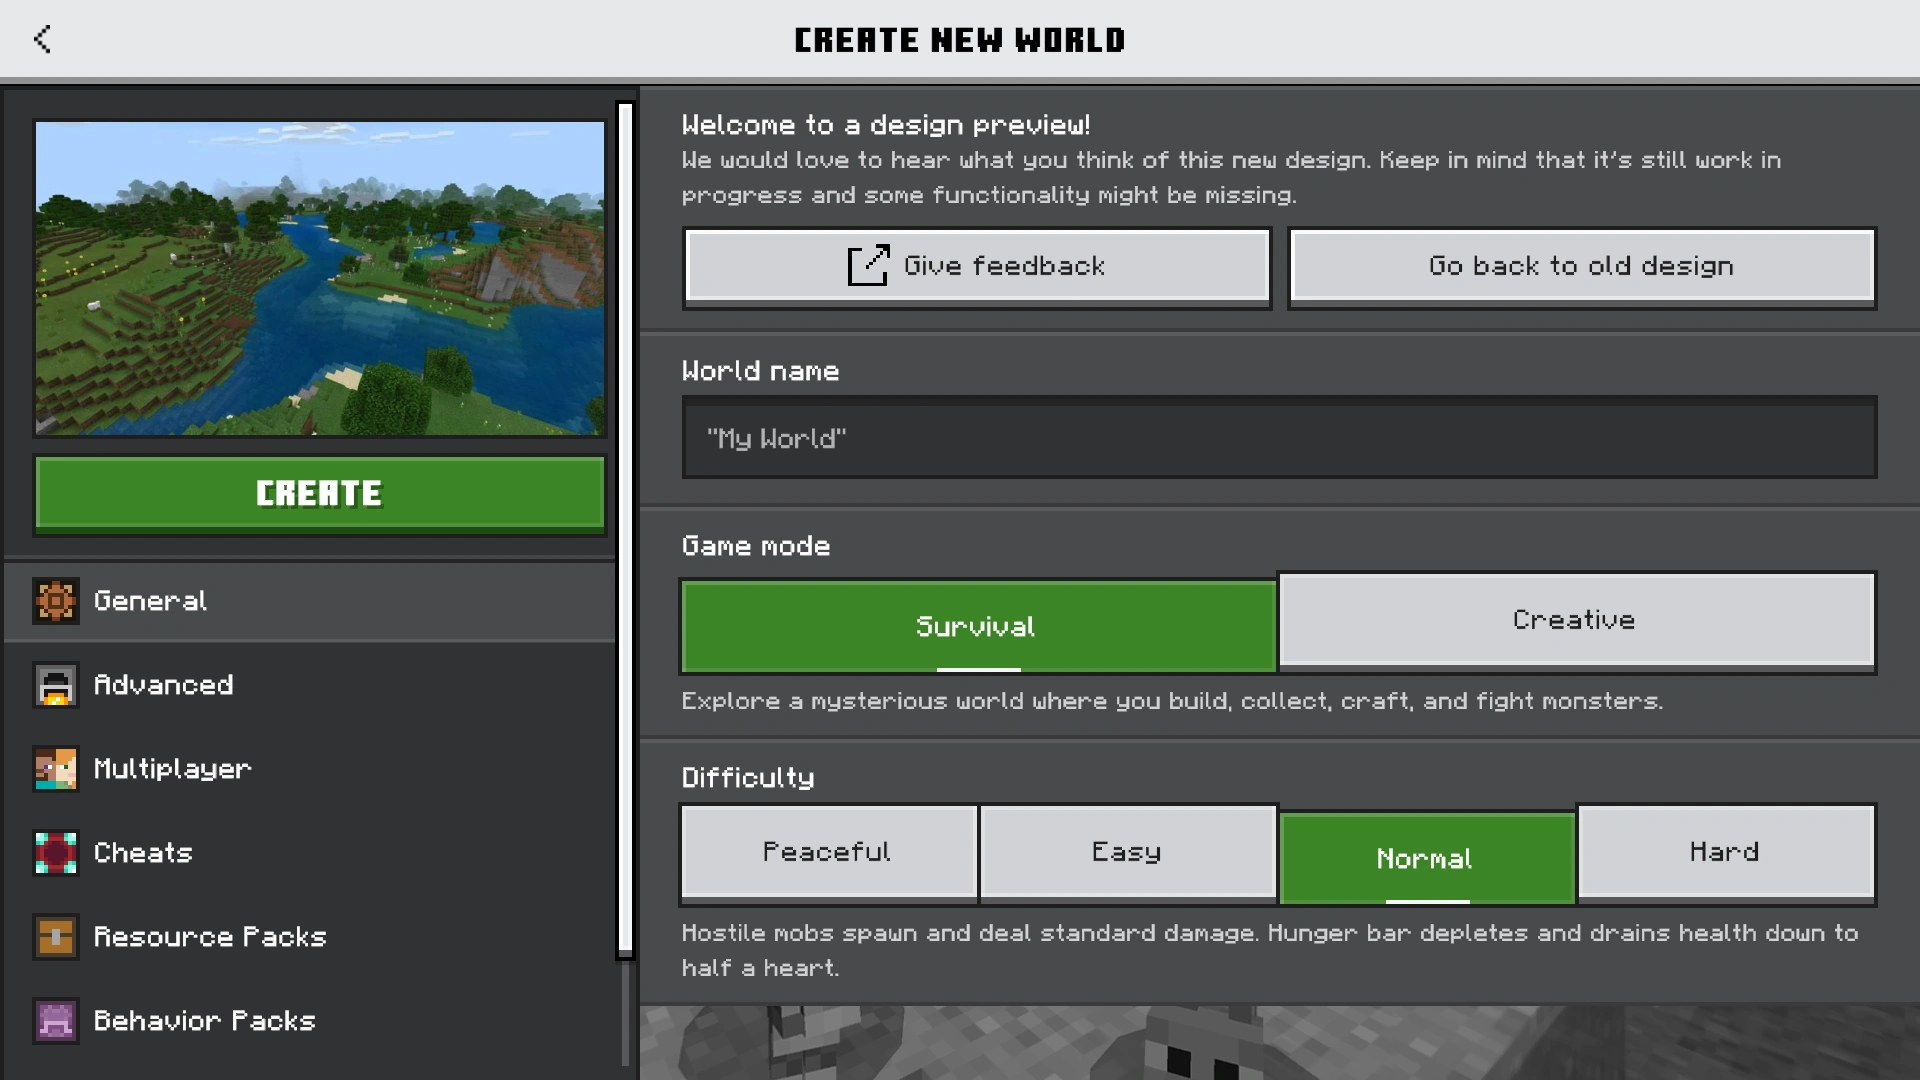

The Game Settings menu.
- World Name
- Allows the name of the world to be set to a custom string.
- Default Game Mode
- Allows the default game mode of the world to be changed. Clicking the button opens a dropdown allowing the player to select between Survival (default) and Creative.
- Difficulty
- Allows the default difficulty setting to be changed. Clicking the button opens a dropdown allowing the player to select between Peaceful, Easy, Normal (default), and Hard.
- World Preferences
- Contains two toggles: Starting Map (disabled by default) and Bonus Chest (also disabled).
- Player permission when joining from invite
- Opens an annotated dropdown where the player can select the default player permission level of any players who join that world. Options are Visitor (players cannot interact with the world), Member (default; players can interact with the world), and Operator (players can use commands).
- World Type
- Allows the world type to be selected. Clicking the button opens a dropdown allowing the player to select between Flat, Infinite (default), and Old.
- Seed
- Allows the world seed to be changed. Any string of characters can be placed here.
- Simulation Distance
- A slider that allows the simulation distance to be changed. Defaults to 10 chunks.
- World Options
- Various world options such as game rules that can be toggled, including Friendly Fire, Mob Loot, and Tile Drops.
- Respawn Radius
- An integer representing the spread distance around the world spawn where players will spawn.
- Experiments
- Lists tentative features that can be toggled.
- Cheats
- A list of further game rules that are considered cheats.
- Random Tick Speed
- An integer input that controls the rate at which random events occur in the world. Defaults to 1. Contains a reset button next to the box.
Multiplayer settings[]
- Multiplayer Game
- A toggle that controls whether multiplayer is enabled in this world.
- Microsoft Account Settings
- Shown when signed in with a Microsoft account.[more information needed]
- Visible to LAN Players
- A toggle controlling whether the server is visible to others on the same network.
Add-Ons[]
Resource Packs[]
- Require players to accept resource packs to join
- A checkbox that controls whether the resource packs are optional (default) or forced.
- Active
- A dropdown widget that lists active resource packs.
- My Packs
- A dropdown widget that lists available resource packs gotten from the Marketplace, along with a link there.
- Get More Packs
- A dropdown widget containing previews of resource packs from the Marketplace, with a link to browse more.
Behavior Packs[]
- Active
- A dropdown widget that lists active behavior packs.
- My Packs
- A dropdown widget that lists available behavior packs gotten from the Marketplace, along with a link there.
Legacy Console Edition[]
History[]
| Java Edition Indev | |||||
|---|---|---|---|---|---|
0.31{{Extension DPL}}<ul><li>[[Sparkler|Sparkler]]<br/>{{About|the Education Edition exclusive item|the new melee weapon available from the ''Minecraft Dungeons'' anniversary event|MCD:Sparkler}}
{{Item
| image = <gallery>
Orange Sparkler.png | Orange
Blue Sparkler.png | Blue
Red Sparkler.png | Red
Purple Sparkler.png | Purple
Green Sparkler.png | Green
</gallery>
| image2 = <gallery>
Active Orange Sparkler.png | Active Orange
Active Blue Sparkler.png | Active Blue
Active Red Sparkler.png | Active Red
Active Purple Sparkler.png | Active Purple
Active Green Sparkler.png | Active Green
</gallery>
| renewable = No
| stackable = No
}}
{{education feature}}
{{exclusive|bedrock|education}}
A '''sparkler''' is a [[Chemistry Update|chemistry]]-related [[item]] that emits particles when lit.
Sparklers are available in orange, blue, red, purple, and green colors.
== Obtaining ==
=== Crafting ===
{{Crafting
|showdescription=1
|B1=Chloride |B2=Magnesium |B3=Stick
|Output=Sparkler
|description= Calcium Chloride: Orange<br>Cerium Chloride: Blue<br>Mercuric Chloride: Red<br>Potassium Chloride: Purple<br>Tungsten Chloride: Green<br>{{only|bedrock|education}}
|type=Miscellaneous
}}
== Usage ==
{{ctrl|Using}} a sparkler ignites it, causing its texture to change. When lit, the sparkler emits colored [[particles]]; the [[durability]] meter depletes while the sparkler is burning. Sparklers are one of the few [[item]]s that can be held in the [[off-hand]] {{in|be}}. Unlit sparklers have normal lighting like most items, while lit sparklers appear to glow when held in the player's hand, similarly to [[glow stick]]s.
When the [[player]] uses another item while a sparkler is lit, or holds the sparkler in the off-hand, the sparkler's durability stops depleting.
If the player has a lit sparkler in their [[inventory]] and goes into the [[water]], the sparkler is destroyed immediately. However, it does not get destroyed if dropped in water. It also cannot float.
Despite having durability, sparklers cannot be enchanted with [[Unbreaking]] or [[Mending]].
== Sounds ==
{{Sound table
|type=bedrock
|sound=Fuse.ogg
|source=sound
|description=While a sparkler is active
|id=sparkler.active
|volume=0.25
|pitch=0.8/1.2}}
{{Sound table
|sound=Fizz.ogg
|source=block
|description=While a sparkler is being lit
|id=random.fizz
|volume=1.0
|pitch=2.4/2.6
|foot=1}}
== Data values ==
=== ID ===
{{ID table
|edition=bedrock
|shownumericids=y
|showforms=y
|notshowbeitemforms=y
|generatetranslationkeys=y
|displayname=Sparkler
|spritename=sparklers
|spritetype=item
|nameid=sparkler
|id=600
|form=item
|translationkey=item.sparkler.orange.name,item.sparkler.blue.name,item.sparkler.red.name,item.sparkler.purple.name,item.sparkler.green.name
|foot=1}}
== History ==
{{History|bedrock}}
{{History||1.4.0|snap=beta 1.2.20.1|[[File:Orange Sparkler BE1.png|32px]] [[File:Blue Sparkler BE1.png|32px]] [[File:Red Sparkler BE1.png|32px]] [[File:Purple Sparkler BE1.png|32px]] [[File:Green Sparkler BE1.png|32px]] <br>[[File:Active Orange Sparkler BE1.png|32px]] [[File:Active Blue Sparkler BE1.png|32px]] [[File:Active Red Sparkler BE1.png|32px]] [[File:Active Purple Sparkler BE1.png|32px]] [[File:Active Green Sparkler BE1.png|32px]] Added sparklers.}}
{{History|education}}
{{History||1.0.27|[[File:Orange Sparkler BE1.png|32px]] [[File:Blue Sparkler BE1.png|32px]] [[File:Red Sparkler BE1.png|32px]] [[File:Purple Sparkler BE1.png|32px]] [[File:Green Sparkler BE1.png|32px]] <br>[[File:Active Orange Sparkler BE1.png|32px]] [[File:Active Blue Sparkler BE1.png|32px]] [[File:Active Red Sparkler BE1.png|32px]] [[File:Active Purple Sparkler BE1.png|32px]] [[File:Active Green Sparkler BE1.png|32px]] Added sparklers.}}
{{History|foot}}
== Issues ==
{{issue list}}
== Trivia ==
* The formula for sparkler roughly works in real life. Magnesium itself burns white in air, while the metal salts add [[wikipedia:flame test|color to the flame]].
{{items}}
{{Education Edition}}
[[Category:Non-renewable resources]]
[[Category:Education Edition items]]
[[de:Wunderkerze]]
[[ja:手持ち花火]]
[[ko:스파클러]]
[[pl:Zimne ognie]]
[[pt:Vela-Faísca]]
[[zh:烟花棒]]</li><li>[[Eye of Ender|Eye of Ender]]<br/>{{redirect|Ender Eye|the boss|Ender Dragon|item that teleports the player to where it lands|Ender Pearl}}
{{ItemEntity
|image=Eye of Ender.png
|stackable=Yes (64)
|renewable=Yes
|size=Height: 0.25 Blocks<br>Width: 0.25 Blocks
|networkid='''[[JE]]''': 72
}}
An '''eye of ender''' is a craftable item used to locate [[stronghold]]s and activate the [[end portal]]s within them.
== Obtaining ==
=== Crafting ===
{{Crafting
|Blaze Powder
|Ender Pearl
|Output=Eye of Ender
|type=Miscellaneous
}}
== Usage ==
=== Locating strongholds ===
[[File:Eye of Ender (break).gif|thumb|right|An animation of an eye of ender shattering.]]
To locate [[stronghold]]s (and the [[end portal]]s they house):
* Pressing {{control|use}} while holding an eye of ender causes it to fly approximately 12 blocks in the direction of the nearest stronghold, traveling through any blocks necessary, and leave a trail of purple particles, the same particle effect used for [[endermen]] and [[ender chests]].
** The eye leads to the [[chunk]] where a spiral staircase, the first room generated in the stronghold, is located.
** The center of this entrance staircase is always exactly at the chunk coordinates 4, ~, 4, although the eye of ender leads to chunk coordinates 0, ~, 0 (the northwest corner of the chunk).
* While over 12 blocks away from the northwest corner of the staircase chunk, the eye will travel upward to offer an easily-visible indication of the horizontal direction the player must travel.
* When closer than 12 blocks to the northwest corner of the staircase chunk, the eye will travel downward, to indicate the player is above a stronghold and must mine downward.
* After two or three seconds of travel, the eye floats in the air briefly, then either falls (becoming collectable again) or shatters in mid-air. The eye has a 20% chance of shattering (80% chance of surviving) per throw, therefore throwing it three times has approximately 50% overall chance to shatter the eye (0.8<sup>3</sup>=51.2%).
* The eye of ender's flying function works only in the [[Overworld]]. It does nothing in [[the Nether]], [[the End]], [[custom dimension]]s{{verify|type=current}}, or in worlds with no strongholds.
Note that the eyes may point to an incorrect location if the target chunks were generated with a different biomes map in an older version or through different generation settings.<ref>See also {{bug|MC-135996}}</ref>
=== Activating end portals ===
[[File:Active End Portal.png|thumb|right|An end portal activated with eyes of ender.]]
Once an end portal is found, the eyes of ender are required to activate it. End portals require a total of 12 eyes of ender in order to activate, though each individual frame-block has a 10% chance of containing an eye of ender when generated. Eyes can be placed in empty [[End portal frame]]s by pressing {{control|use}} on them until the entire ring of 12 is filled, thereby activating the portal. Due to the fact that there is a 10% chance of each individual end portal frame having an eye in it, there is a one out of one trillion chance of every frame having an eye in it thereby activating the portal even if the player doesn't have any eyes of ender.
{| class="wikitable sortable mw-collapsible"
|+End Portal Pre-Filled Eyes
!Eyes
!0
!1
!2
!3
!4
!5-12
|-
|Exactly
|28%
|38%
|23%
|9%
|2%
|<1%
|-
|Or More
|100%
|72%
|34%
|11%
|3%
|<1%
|}
=== Crafting ingredient ===
{{crafting usage}}
== Sounds ==
{{Edition|Java}}:<br>
Eyes of ender use the Friendly Creatures sound category for entity-dependent sound events.
{{Sound table
|sound=Ender Eye death1.ogg
|sound2=Ender Eye death2.ogg
|subtitle=Eye of Ender falls <ref group=sound name=LousyEvents>{{Bug|MC-98316||Wrong subtitles caused by missing distinction}}</ref>
|source=neutral
|description=When an eye of ender drops or breaks
|id=entity.ender_eye.death|idnote=<ref group=sound name=LousyEvents/>
|translationkey=subtitles.entity.ender_eye.death|translationkeynote=<ref group=sound name=LousyEvents/>
|volume=1.3
|pitch=1.0
|distance=16}}
{{Sound table
|sound=Ender Eye launch1.ogg
|sound2=Ender Eye launch2.ogg
|subtitle=Eye of Ender shoots
|source=neutral
|description=When an eye of ender is thrown
|id=entity.ender_eye.launch
|translationkey=subtitles.entity.ender_eye.launch
|volume=0.5
|pitch={{frac|1|3}}-0.5
|distance=16}}
{{Sound table
|sound=End portal eye place1.ogg
|sound2=End portal eye place2.ogg
|sound3=End portal eye place3.ogg
|subtitle=Eye of Ender attaches
|source=block
|description=When an eye of ender is placed in an end portal frame
|id=block.end_portal_frame.fill
|translationkey=subtitles.block.end_portal_frame.fill
|volume=1.0
|pitch=1.0
|distance=16
|foot=1}}
{{Edition|Bedrock}}:
{{Sound table
|type=bedrock
|sound=Item Frame break1.ogg
|sound2=Item Frame break2.ogg
|sound3=Item Frame break3.ogg
|source=block
|description=When an eye of ender breaks <ref group=sound>{{Bug|MCPE-115646}}</ref>
|id=block.itemframe.break}}
{{Sound table
|sound=Bow shoot.ogg
|source=player
|description=When an eye of ender is thrown
|id=random.bow
|volume=0.5
|pitch=0.33-0.5}}
{{Sound table
|sound=End portal eye place1.ogg
|sound2=End portal eye place2.ogg
|sound3=End portal eye place3.ogg
|source=block
|description=When an eye of ender is placed in an end portal frame
|id=block.end_portal_frame.fill
|volume=0.3
|pitch=0.9/1.0/1.1
|foot=1}}
==Data values==
===ID===
{{edition|java}}:
{{ID table
|edition=java
|firstcolumnname=Item
|showforms=y
|generatetranslationkeys=y
|displayname=Eye of Ender
|spritetype=item
|nameid=ender_eye
|form=item
|foot=1}}
{{ID table
|edition=java
|firstcolumnname=Entity
|generatetranslationkeys=y
|displayname=Eye of Ender
|spritetype=entity
|nameid=eye_of_ender
|foot=1}}
{{edition|bedrock}}:
{{ID table
|edition=bedrock
|firstcolumnname=Item
|shownumericids=y
|showforms=y
|notshowbeitemforms=y
|generatetranslationkeys=y
|displayname=Eye of Ender
|spritetype=item
|nameid=ender_eye
|id=433
|form=item
|foot=1}}
{{ID table
|edition=bedrock
|firstcolumnname=Entity
|shownumericids=y
|generatetranslationkeys=y
|displayname=Eye of Ender
|spritetype=entity
|nameid=eye_of_ender_signal
|id=70
|foot=1}}
===Entity data===
The purple particles left by eyes of ender have entity data that define various properties of the entity.
{{el|java}}:
{{main|Entity format}}
{{/ED}}
{{el|bedrock}}:
:See [[Bedrock Edition level format/Entity format]].
==Advancements==
{{load advancements|Eye Spy}}
==Video ==
{{Video note|This video does not mention that eyes of ender can be used to craft [[ender chest]]s or [[end crystal]]s.}}
<div style="text-align:center">{{yt|E0AhoxYLomc}}</div>
==History==
{{History|java}}
{{History||1.0.0|snap=Beta 1.9 Prerelease 3|[[File:Eye of Ender JE1 BE1.png|32px]] Added eyes of ender.
|Eyes of ender can be used on a [[end portal frame|portal block]] to repair them, but repairing them does nothing.}}
{{History|||snap=Beta 1.9 Prerelease 4|Each eye can now be placed in a [[end portal frame|portal block]] or used to hone in on a [[stronghold]]. [[Jens Bergensten|Jeb]] demonstrated the new uses for an eye in his livestream.<ref>http://www.twitch.tv/jebox/b/297000418</ref> An [[end portal]] within a stronghold could be seen in the stream with two eyes inserted into blocks.
|In older worlds with chunks generated before [[Java Edition Beta 1.9 Prerelease 3|Beta 1.9 Prerelease 3]], the eyes may mislead the [[player]] to a place where there isn't a [[stronghold]] at all. This happens because the eyes lead to where a stronghold should be based on the world seed in the current version, but before Beta 1.9 Prerelease 3 strongholds generated differently based on the seed. Therefore, if the player saved the coordinates the eye traveled to in an old world and generated a new world with the same seed, the player could travel to those same coordinates and find a stronghold.}}
{{History|||snap=Beta 1.9 Prerelease 6|Eyes of ender no longer render like a tool in third person.}}
{{History|||snap=RC1|The throwing sound of eyes of ender has been changed.}}
{{History||1.3.1|snap=12w21a|Eyes of ender can now be used to craft [[ender chest]]s.
|Priest [[villager]]s would [[trading|buy]] 2–3 eyes of ender for one [[emerald]].}}
{{History|||snap=12w22a|Priest villagers no longer buy eyes of ender, instead selling them for 7–10 emeralds.}}
{{History||1.6.4|snap=1.6.3-pre|Eyes of ender now lead to [[stronghold]]s based on the structure data saved in the world file instead of calculating their approximate location via the [[seed (level generation)|world seed]]. Therefore, strongholds generated in old versions can still be found even if the distribution of strongholds is changed.}}
{{History||1.7.2|snap=13w41a|Eyes of Ender now lead to the entrance of a stronghold instead of the portal room.}}
{{History||1.8|snap=14w02a|With changes that have been made to villagers and the [[trading]] system, cleric villagers now sell eyes of ender for 7–11 [[emerald]]s, as one of their tier III trades.}}
{{History||1.9|snap=15w41a|Eyes of ender are no longer [[trading|sold]] by cleric [[villager]]s.}}
{{History|||snap=15w44b|An eye of ender is now used to craft an [[end crystal]].}}
{{History|||snap=pre3|Eyes of ender now point to the 125 new strongholds.<ref>{{bug|MC-91173}} resolved as "Fixed"</ref>}}
{{History||1.11|snap=16w32a|The [[entity]] ID has been changed from <code>EyeOfEnderSignal</code> to <code>eye_of_ender_signal</code>.}}
{{History||1.12|snap=17w17a|A new ''pop'' [[sound]] has been added when a thrown eye of ender bursts.}}
{{History||1.13|snap=17w47a|Prior to [[1.13/Flattening|''The Flattening'']], this [[item]]'s numeral ID was 381.}}
{{History|||snap=pre5|The [[entity]] ID has been changed to <code>eye_of_ender</code>.}}
{{History||1.14|snap=18w43a|[[File:Eye of Ender JE2 BE2.png|32px]] The texture of eyes of ender has been changed.}}
{{History||1.19|snap=22w11a|Eyes of Ender now lead to the corner of the chunk (0, ~, 0) instead of the center (8-9, ~, 8-9).<ref>{{bug|MC-253394}}</ref>}}
{{History|pocket}}
{{History||1.0.0|snap=alpha 0.17.0.1|[[File:Eye of Ender JE1 BE1.png|32px]] Added eyes of ender.}}
{{History|bedrock}}
{{History||1.10.0|snap=beta 1.10.0.3|[[File:Eye of Ender JE2 BE2.png|32px]] The texture of eyes of ender has been changed.}}
{{History||1.16.0|snap=beta 1.15.0.51|The [[particles]] of eyes of ender have been changed to match {{el|je}}.}}
{{History|console}}
{{History||xbox=TU7|xbone=CU1|ps=1.0|wiiu=Patch 1|[[File:Eye of Ender JE1 BE1.png|32px]] Added eyes of ender.}}
{{History||xbox=none|xbone=none|ps=1.90|wiiu=none|switch=none|[[File:Eye of Ender JE2 BE2.png|32px]] The texture of eyes of ender has been changed.}}
{{History|new 3ds}}
{{History||1.7.10|[[File:Eye of Ender JE1 BE1.png|32px]] Added eyes of ender.}}
{{History|foot}}
=== Historical images ===
<gallery>
File:Held_Eye_of_Ender.png|The eye of ender used to appear large in third-person view.
</gallery>
==Issues==
{{issue list}}
==Trivia ==
*When thrown in third-person view, the eyes of ender fly out from the player's feet instead of their hand.
*Before [[Java Edition 1.9]], eyes of ender can be purchased from cleric villagers, which means players can find a [[stronghold]] and go to [[the End]] without accessing [[the Nether]] at all.
*{{IN|bedrock}} if the player travels beyond a certain radius (roughly 740,000 blocks), eyes of ender always point to a stronghold near spawn, even though strongholds continue to generate past this limit. If one travels to this limit, they can see eyes of ender suddenly switching direction. A similar phenomenon occurs with the {{cmd|locate}} command.
==Gallery==
===Screenshots===
<gallery>
Stronghold Portal Room.png|An end portal frame containing a few eyes of ender.
EnderChestexample.png|An [[ender chest]] depicting an eye of ender on the front.
</gallery>
===In other media===
<gallery>
File:Eye of Ender JINX.jpg|Official T-shirt artwork "Eye of Ender" sold by JINX.
File:Happy Halloween Eye.jpg|A Halloween T-Shirt design featuring an eye of ender.
</gallery>
==External links==
*[http://www.strongholdfinder.com/ A super-easy stronghold triangulation tool]
*[http://jsfiddle.net/42EDX/40/ JSFiddle Eye of Ender triangulator - can guess the location of other 2 strongholds in the first ring]
*[https://ens-gijs.github.io/minecraft-stronghold-locator/ Minecraft Stronghold Locator Eye of Ender throw plotting visualizer - zoomable to show all possible stronghold rings]
*[https://github.com/winny-/stronghold Python Eye of Ender throw plotting tool]
*[http://www.purplefrog.com/~thoth/MinecraftStronghold/stronghold.html HTML Eye of Ender throw plotting visualizer (not updated after 1.9 stronghold placement changes)]
*[http://chunkbase.com/apps/stronghold-finder Chunk Base Stronghold Finder (seed-based)]
*[https://github.com/toolbox4minecraft/amidst/releases Amidst - File-based world visualizer]
*[http://minecraft.tournier.org/StrongholdLocator/ Find strongholds by analyzing stronghold.dat file]
== References==
{{reflist}}
{{Items}}
{{entities}}
[[cs:Endové oko]]
[[de:Enderauge]]
[[es:Ojo de ender]]
[[fr:Œil de l'Ender]]
[[hu:Végzet szeme]]
[[ja:エンダーアイ]]
[[ko:엔더의 눈]]
[[nl:Enderoog]]
[[pl:Oko Endera]]
[[pt:Olho de ender]]
[[ru:Око Края]]
[[th:ดวงตาแห่งเอนเดอร์]]
[[uk:Око Краю]]
[[zh:末影之眼]]</li></ul> | 20100106 | Added world types to the world creation screen. | |||
| Added level types to the world creation screen – island, floating, flat, or original – which can now be set when generating a world. | |||||
| Added level shapes to the world creation screen: square, long, or deep. | |||||
| Added level sizes to the world creation screen: small, normal, or huge. | |||||
| 20100107 | Added level themes to the world creation screen: normal or hell. | ||||
| Java Edition Infdev | |||||
| Minecraft Infdev | 20100227-1 | World types no longer function. | |||
| 20100327 | Removed map types, shapes and themes. | ||||
| Removed world types. | |||||
| Java Edition Beta | |||||
1.3{{Extension DPL}}<ul><li>[[Yellow Dye|Yellow Dye]]<br/>{{Item
| title = Yellow Dye
| renewable = Yes
| stackable = Yes (64)
}}
'''Yellow dye''' is a [[Dye#Primary|primary dye]] created by placing a [[dandelion]] or [[sunflower]] into a [[crafting]] grid.
== Obtaining ==
=== Crafting ===
{{Crafting
|Dandelion;Sunflower
|Output=Yellow Dye;Yellow Dye,2
|type=Material
}}
=== Chest loot ===
{{LootChestItem|yellow-dye}}
=== Trading ===
[[Wandering trader]]s sell 3 yellow dye for an [[emerald]].
== Usage ==
{{dye usage}}
=== Crafting ingredient ===
{{crafting usage|ignore=Banner|continue=1}}
{{banner crafting usage}}
=== Loom ingredient ===
{{Banner loom usage|Yellow Dye}}
=== Trading ===
Expert-level shepherd villagers have a {{frac|1|6}} chance to buy 12 yellow dye for an emerald.
== Data values ==
=== ID ===
{{edition|java}}:
{{ID table
|edition=java
|showforms=y
|generatetranslationkeys=y
|displayname=Yellow Dye
|spritetype=item
|nameid=yellow_dye
|form=item
|foot=1}}
{{edition|bedrock}}:
{{ID table
|edition=bedrock
|showaliasids=y
|shownumericids=y
|showforms=y
|notshowbeitemforms=y
|generatetranslationkeys=y
|displayname=Yellow Dye
|spritetype=item
|nameid=yellow_dye
|aliasid=dye / 11
|id=406
|form=item
|translationkey=item.dye.yellow.name
|foot=1}}
== Video ==
{{yt|nOQUDjEHGRg}}
== History ==
{{History|java beta}}
{{History||1.2|[[File:Yellow Dye JE1 BE1.png|32px]] Added dandelion yellow.}}
{{History||1.6.6|Dandelions can now be generated using [[Bone Meal|bone meal]], making dandelion yellow [[renewable resource|renewable]].}}
{{History|java}}
{{History||1.4.2|snap=12w34a|Added the ability to [[Armor#Dyeing|dye]] leather [[armor]] and [[wolf]] collars.}}
{{History||1.4.6|snap=12w49a|Dandelion yellow can be crafted with [[gunpowder]] to create a [[firework star]].}}
{{History||1.6.1|snap=13w19a|[[Stained clay]] can now be crafted.}}
{{History||1.7.2|snap=13w36a|Can now be crafted using sunflower.}}
{{History|||snap=13w37a|Each dandelion now yields only 1 dandelion yellow, instead of 2.}}
{{History|||snap=13w41a|[[Stained glass]] can now be [[crafting|crafted]].}}
{{History||1.8|snap=14w30a|Added [[banner]]s, which can be [[dye]]d.}}
{{History||1.11|snap=16w39a|Added the ability to dye [[shulker box]]es.}}
{{History||1.12|snap=17w06a|Yellow dye can now be used to craft yellow [[concrete powder]].}}
{{History|||snap=17w15a|Added the ability to dye [[bed]]s.}}
{{History||1.13|snap=17w47a|The different data values for the <code>dye</code> ID have now been split up into their own IDs.
|Prior to [[1.13/Flattening|''The Flattening'']], this [[item]]'s numeral ID was 351.}}
{{History||1.14|snap=18w43a|"Dandelion Yellow" has now been renamed to "Yellow Dye".
|[[File:Yellow Dye JE2 BE2.png|32px]] The texture of yellow dye has now been changed.}}
{{History|||snap=18w44a|Yellow dye can now change the text color on [[sign]]s to yellow.}}
{{History|||snap=18w49a|Yellow dye can now be found in [[chest]]s in [[village]] mason houses.}}
{{History|||snap=19w05a|Added the [[wandering trader]], which sells yellow dye.}}
{{History|||snap=19w11a|Yellow dye can now be [[trading|bought]] by shepherd villagers.}}
{{History||1.17|snap=20w45a|Yellow dye can now be used to craft [[yellow candle]]s.}}
{{History|||snap=21w19a|Yellow dye can no longer be used to craft yellow candles.}}
{{History|||snap=Pre-release 1|Yellow dye can once again used to craft yellow candles.}}
{{History||1.20<br>(Experimental)|link=1.19.3|snap=22w42a|Yellow dye can now change the text color on [[hanging sign]]s to yellow.}}
{{History||1.20|snap=23w12a|Yellow dye can now be found in [[suspicious gravel]] and [[suspicious sand]] in [[trail ruins]].}}
{{History|||snap=23w16a|Yellow dye no longer generates in [[suspicious sand]] in [[trail ruins]].|Due to the split of the archaeological loot tables for suspicious gravel within [[trail ruins]], yellow dye is now common loot.}}
{{History|pocket alpha}}
{{History||v0.3.0|[[File:Yellow Dye JE1 BE1.png|32px]] Added dandelion yellow.}}
{{History||v0.8.0|snap=build 1|Dandelion yellow is now used to craft [[cocoa beans]].}}
{{History||v0.14.0|snap=build 1|Yellow dye can now be used to dye [[water]] in [[cauldron]]s.}}
{{History||v0.16.0|snap=build 1|Dandelion yellow is no longer used to [[crafting|craft]] cocoa beans.}}
{{History|pocket}}
{{History||1.0.0|snap=alpha 0.17.0.1|Yellow dye can now be used to dye [[shulker]]s.}}
{{History||1.1.0|snap=alpha 1.1.0.0|Yellow dye can now be used to dye [[shulker box]]es, [[bed]]s, and craft [[concrete powder]].}}
{{History|bedrock}}
{{History||1.2.0|snap=beta 1.2.0.2|Yellow dye can now be used to craft patterns on [[banner]]s, [[firework star]]s, and [[stained glass]].}}
{{History||1.4.0|snap=beta 1.2.20.1|Yellow dye can now be used to craft [[balloon]]s and [[glow stick]]s.}}
{{History||1.8.0|snap=beta 1.8.0.8|Dandelion yellow can now be used to dye [[cat]] collars.}}
{{History|||snap=beta 1.8.0.10|"Dandelion Yellow" has now been renamed to "Yellow Dye".}}
{{History||1.10.0|snap=beta 1.10.0.3|Yellow dye is now [[trading|sold]] by [[wandering trader]]s.
|[[File:Yellow Dye JE2 BE2.png|32px]] The texture of yellow dye has now been changed.}}
{{History||1.11.0|snap=beta 1.11.0.1|Yellow dye can now be found in [[village]] mason [[chest]]s.}}
{{History|||snap=beta 1.11.0.4|Yellow dye can now be sold to shepherd [[villager]]s.}}
{{History||1.16.100|snap=beta 1.16.100.56|The ID of yellow dye has been changed from <code>dye/11</code> to <code>yellow_dye</code>.}}
{{History|console}}
{{History||xbox=TU1|xbone=CU1|ps=1.00|switch=1.0.1|wiiu=Patch 1|[[File:Yellow Dye JE1 BE1.png|32px]] Added dandelion yellow.}}
{{History|ps4}}
{{History||1.83|"Dandelion Yellow" has now been renamed to "Yellow Dye".}}
{{History||1.90|[[File:Yellow Dye JE2 BE2.png|32px]] The texture of yellow dye has now been changed.}}
{{History|new 3ds}}
{{History||0.1.0|[[File:Yellow Dye JE1 BE1.png|32px]] Added dandelion yellow.}}
{{History|foot}}
== Issues ==
{{issue list}}
== References ==
{{reflist}}
{{Items}}
[[cs:Pampelišková žluť]]
[[de:Gelber Farbstoff]]
[[es:Tinte amarillo]]
[[fr:Teinture jaune]]
[[hu:Pitypangsárga]]
[[ja:黄色の染料]]
[[ko:노란색 염료]]
[[nl:Paardenbloemgeel]]
[[pl:Żółty barwnik]]
[[pt:Corante amarelo]]
[[ru:Жёлтый краситель]]
[[zh:黄色染料]]
[[Category:Items]]
[[Category:Dyes]]
[[Category:Renewable resources]]</li><li>[[Smithing Template|Smithing Template]]<br/>{{for|the block|Smithing Table}}
{{Item
| title = Smithing Template
| image = <gallery>
Netherite Upgrade Smithing Template.png | Netherite Upgrade
Sentry Armor Trim Smithing Template.png | Armor Trim
</gallery>
| rarity = Rare
| renewable = No<!--Smithing templates are not renewable because diamonds, their only other method of creation, are not renewable.-->
| stackable = Yes (64)
}}
'''Smithing templates''' are items used in [[Smithing Table|smithing tables]] to alter [[Tool|tools]] and [[armor]]. They are consumed when used, but can be [[Crafting|duplicated]] using an existing template, its material and [[Diamond|diamonds]].
The sixteen '''armor trim smithing templates''' are found in a variety of [[Generated structures|structures]], and are used to apply various decorative trims (dependent on the variant) to armor using certain minerals for different colors.
'''Netherite upgrade smithing templates''' are required to upgrade diamond equipment with a [[Netherite Ingot|netherite ingot]]. They are only found in [[Bastion Remnant|bastion remnants]], but are guaranteed only in [[:en:Bastion_Remnant#Treasure_room|treasure rooms]].
== Obtaining ==
Smithing templates can be found in various [[Generated structures|structures]] and can be duplicated by using seven diamonds and a block based on what the template is.
=== Crafting ===
{{Crafting
|A1=Diamond |B1=Matching Smithing Template |C1=Diamond
|A2=Diamond |B2=Netherrack;Cobblestone;Sandstone;End Stone;Terracotta;Terracotta;Netherrack;Cobblestone;Terracotta;Cobbled Deepslate;Blackstone;Purpur Block;Prismarine;Cobblestone;Cobbled Deepslate;Terracotta;Mossy Cobblestone |C2=Diamond
|A3=Diamond |B3=Diamond |C3=Diamond
|Output=Matching Smithing Template,2
}}
{| class="article-table"
|+ Duplication
! Item !! Material
|-
| {{ItemSprite|netherite-upgrade|text=Netherite Upgrade}} || {{BlockSprite|Netherrack|text=Netherrack}}
|-
| {{ItemSprite|sentry-armor-trim|text=Sentry Armor Trim}} || {{BlockSprite|Cobblestone|text=Cobblestone}}
|-
| {{ItemSprite|vex-armor-trim|text=Vex Armor Trim}} || {{BlockSprite|Cobblestone|text=Cobblestone}}
|-
| {{ItemSprite|wild-armor-trim|text=Wild Armor Trim}} || {{BlockSprite|Mossy Cobblestone|text=Mossy Cobblestone}}
|-
| {{ItemSprite|coast-armor-trim|text=Coast Armor Trim}} || {{BlockSprite|Cobblestone|text=Cobblestone}}
|-
| {{ItemSprite|dune-armor-trim|text=Dune Armor Trim}} || {{BlockSprite|Sandstone|text=Sandstone}}
|-
| {{ItemSprite|wayfinder-armor-trim|text=Wayfinder Armor Trim}} || {{BlockSprite|Terracotta|text=Terracotta}}
|-
| {{ItemSprite|raiser-armor-trim|text=Raiser Armor Trim}} || {{BlockSprite|Terracotta|text=Terracotta}}
|-
| {{ItemSprite|shaper-armor-trim|text=Shaper Armor Trim}} || {{BlockSprite|Terracotta|text=Terracotta}}
|-
| {{ItemSprite|host-armor-trim|text=Host Armor Trim}} || {{BlockSprite|Terracotta|text=Terracotta}}
|-
| {{ItemSprite|ward-armor-trim|text=Ward Armor Trim}} || {{BlockSprite|Cobbled Deepslate|text=Cobbled Deepslate}}
|-
| {{ItemSprite|silence-armor-trim|text=Silence Armor Trim}} || {{BlockSprite|Cobbled Deepslate|text=Cobbled Deepslate}}
|-
| {{ItemSprite|tide-armor-trim|text=Tide Armor Trim}} || {{BlockSprite|Prismarine|text=Prismarine}}
|-
| {{ItemSprite|snout-armor-trim|text=Snout Armor Trim}} || {{BlockSprite|Blackstone|text=Blackstone}}
|-
| {{ItemSprite|rib-armor-trim|text=Rib Armor Trim}} || {{BlockSprite|Netherrack|text=Netherrack}}
|-
| {{ItemSprite|eye-armor-trim|text=Eye Armor Trim}} || {{BlockSprite|End Stone|text=End Stone}}
|-
| {{ItemSprite|spire-armor-trim|text=Spire Armor Trim}} || {{BlockSprite|Purpur Block|text=Purpur Block}}
|}
{{IN|bedrock}}, spire, tide, and dune armor trims can be duplicated with more blocks than {{in|java}}. In addition to the normal blocks, Tide armor trims can be duplicated using Prismarine Bricks or Dark Prismarine, dune armor trims can be duplicated with smooth sandstone, cut sandstone, or chiseled sandstone, and spire armor trims can be duplicated with purpur pillars.<ref>{{bug|MCPE-172711||Tide, Spire, and Dune Armor Trims can be crafted from more blocks than in Java Edition}}</ref>
=== Mob loot ===
[[Elder guardian]]s have a 20% chance to drop 1 tide armor trim upon death. [[Looting]] doesn't affect this percentage, and the elder guardian doesn't need to be killed by a player in order for the trim to drop and can be duplicated with [[prismarine]].
=== Chest loot ===
{{#invoke:LootChest|base3|netherite-upgrade-smithing-template,sentry-armor-trim-smithing-template,vex-armor-trim-smithing-template,wild-armor-trim-smithing-template,coast-armor-trim-smithing-template,dune-armor-trim-smithing-template,ward-armor-trim-smithing-template,silence-armor-trim-smithing-template,snout-armor-trim-smithing-template,rib-armor-trim-smithing-template,eye-armor-trim-smithing-template,spire-armor-trim-smithing-template}}
Note: In Woodland Mansions, only chests with random loot have the chance to contain the Vex Smithing Template, chests in the "Allium room", "Sapling farm", "Tree-chopping room" and "Fake End portal room" always generate with the same, room specific, loot.
=== Suspicious block loot ===
Items can only be extracted from [[Suspicious Block|suspicious blocks]] using a [[brush]].{{#invoke:LootChest|base3|wayfinder-armor-trim-smithing-template,raiser-armor-trim-smithing-template,shaper-armor-trim-smithing-template,host-armor-trim-smithing-template}}
== Usage ==
=== Crafting ingredient ===
{{Crafting
|A1=Diamond |B1=Matching Smithing Template |C1=Diamond
|A2=Diamond |B2=Netherrack;Cobblestone;Sandstone;End Stone;Terracotta;Terracotta;Netherrack;Cobblestone;Terracotta;Cobbled Deepslate;Blackstone;Purpur Block;Prismarine;Cobblestone;Cobbled Deepslate;Terracotta;Mossy Cobblestone |C2=Diamond
|A3=Diamond |B3=Diamond |C3=Diamond
|Output=Matching Smithing Template,2
}}
=== Smithing ingredient ===
Smithing templates are used at a [[smithing table]]. Netherite upgrade smithing templates are used to upgrade diamond gear into netherite gear by using a netherite upgrade, a piece of diamond gear, and a [[netherite ingot]].
{{Smithing
|head=1
|ingredients=Netherite Upgrade +<br>Any Diamond Gear +<br>[[Netherite Ingot]]
|Netherite Upgrade
|Diamond Helmet; Diamond Chestplate; Diamond Leggings; Diamond Boots; Diamond Sword; Diamond Pickaxe; Diamond Axe; Diamond Shovel
|Netherite Ingot
|Netherite Helmet; Netherite Chestplate; Netherite Leggings; Netherite Boots; Netherite Sword; Netherite Pickaxe; Netherite Axe; Netherite Shovel
|tail=1
}}
{{FakeImage|{{Animate|Iron_Armor_with_Iron_Shaper_Trim.png; Golden_Armor_with_Golden_Shaper_Trim.png; Diamond_Armor_with_Diamond_Shaper_Trim.png; Netherite_Armor_with_Netherite_Shaper_Trim.png|180px}}|If the armor material and the trimming material are the same, the color palette used for the armor trim is darker.}}
Armor trim smithing templates are used to customize an armor piece's appearance by using a smithing template, an armor piece, and an ingot or crystal ([[emerald]], [[redstone dust]], [[lapis lazuli]], [[amethyst shard]], [[nether quartz]], [[netherite ingot]], [[diamond]], [[gold ingot]], [[iron ingot]], or [[copper ingot]]). Including all dyed leather armor colors and regular armor, there are ≈3.679x10<sup>9</sup> different possible armor pieces<!--5713438 leather colors, plus the 4 other armor materials = 5713442. 5713442 * 161 (the 160 trim combos (16 trims, 10 materials) + untrimmed) = 919864162. 919864162 * 4 (helmet, chestplate, leggings, boots) = 3679456648 ≈ 3.679x10^9-->, and 7.16x10<sup>35</sup> <!--919864162 + 1 (no armor in that slot) = 919864163. 919864163^4 = 715969952015045562662444917041515536 ≈ 7.16x10^35 total possible armor combinations-->total possible armor combinations excluding enchantments and the player not wearing armor.
Already trimmed armor can be trimmed again by applying another template on it; the old trim pattern is overwritten in the process.<ref>{{bug|MC-262538||When combining armor trims the new trim deletes the old one|WAI}}</ref> Therefore, one piece of armor cannot possess multiple trims at the same time.
Most armor trims cover a small portion of the armor piece's surface with the trim material, except for the silence armor trim, which allows the trim material to cover a majority of the armor piece's surface.
All of the trims are purely decorative, and don't impact gameplay or strength(without the use of mods or plugins) of the armor they are applied to in any way. [[Piglin]]s do not pick up any gold-trimmed armor pieces, and they are not pacified by players wearing even a full set of gold-trimmed armor (unless, of course, the armor pieces in question are themselves golden), and netherite-trimmed armor pieces can still be burned by [[fire]].
{{Smithing
|head=1
|ingredients=Any Armor Trim +<br>Any Armor Piece +<br>Any Ingot/Crystal
|Any Armor Trim Smithing Template
|Iron Helmet; Netherite Chestplate;Golden Leggings;Diamond Boots
|Amethyst Shard; Copper Ingot; Diamond; Emerald; Gold Ingot; Iron Ingot; Lapis Lazuli; Nether Quartz; Netherite Ingot; Redstone Dust; Diamond; Emerald
|Amethyst Trim Iron Helmet; Copper Trim Netherite Chestplate; Diamond Trim Golden Leggings; Emerald Trim Diamond Boots; Gold Trim Iron Helmet; Iron Trim Netherite Chestplate; Lapis Trim Golden Leggings; Quartz Trim Diamond Boots; Netherite Trim Iron Helmet; Redstone Trim Netherite Chestplate; Diamond Trim Golden Leggings; Emerald Trim Diamond Boots
|tail=1
}}
;List of color palettes for all materials
*{{ItemSprite|emerald }} - {{TrimPalette| emerald }}
*{{ItemSprite|redstone dust }} - {{TrimPalette| redstone dust }}
*{{ItemSprite|lapis lazuli }} - {{TrimPalette| lapis lazuli }}
*{{ItemSprite|amethyst shard }} - {{TrimPalette| amethyst shard }}
*{{ItemSprite|nether quartz }} - {{TrimPalette| nether quartz }}
*{{ItemSprite|netherite ingot }} - {{TrimPalette| netherite ingot }} (Darker: {{TrimPalette| netherite ingot |darker=1}})
*{{ItemSprite|diamond }} - {{TrimPalette| diamond }} (Darker: {{TrimPalette| diamond |darker=1}})
*{{ItemSprite|gold ingot }} - {{TrimPalette| gold ingot }} (Darker: {{TrimPalette| gold ingot |darker=1}})
*{{ItemSprite|iron ingot }} - {{TrimPalette| iron ingot }} (Darker: {{TrimPalette| iron ingot |darker=1}})
*{{ItemSprite|copper ingot }} - {{TrimPalette| copper ingot }}
== Data values ==
=== ID ===
{{edition|java}}:
{{ID table
|edition=java
|firstcolumnname=Smithing Template
|showforms=y
|generatetranslationkeys=y
|displayname=Netherite Upgrade
|spritename=netherite-upgrade-smithing-template
|spritetype=item
|nameid=netherite_upgrade_smithing_template
|form=item}}
{{ID table
|displayname=Sentry Armor Trim
|spritename=sentry-armor-trim-smithing-template
|spritetype=item
|nameid=sentry_armor_trim_smithing_template
|form=item}}
{{ID table
|displayname=Vex Armor Trim
|spritename=vex-armor-trim-smithing-template
|spritetype=item
|nameid=vex_armor_trim_smithing_template
|form=item}}
{{ID table
|displayname=Wild Armor Trim
|spritename=wild-armor-trim-smithing-template
|spritetype=item
|nameid=wild_armor_trim_smithing_template
|form=item}}
{{ID table
|displayname=Coast Armor Trim
|spritename=coast-armor-trim-smithing-template
|spritetype=item
|nameid=coast_armor_trim_smithing_template
|form=item}}
{{ID table
|displayname=Dune Armor Trim
|spritename=dune-armor-trim-smithing-template
|spritetype=item
|nameid=dune_armor_trim_smithing_template
|form=item}}
{{ID table
|displayname=Wayfinder Armor Trim
|spritename=wayfinder-armor-trim-smithing-template
|spritetype=item
|nameid=wayfinder_armor_trim_smithing_template
|form=item}}
{{ID table
|displayname=Raiser Armor Trim
|spritename=raiser-armor-trim-smithing-template
|spritetype=item
|nameid=raiser_armor_trim_smithing_template
|form=item}}
{{ID table
|displayname=Shaper Armor Trim
|spritename=shaper-armor-trim-smithing-template
|spritetype=item
|nameid=shaper_armor_trim_smithing_template
|form=item}}
{{ID table
|displayname=Host Armor Trim
|spritename=host-armor-trim-smithing-template
|spritetype=item
|nameid=host_armor_trim_smithing_template
|form=item}}
{{ID table
|displayname=Ward Armor Trim
|spritename=ward-armor-trim-smithing-template
|spritetype=item
|nameid=ward_armor_trim_smithing_template
|form=item}}
{{ID table
|displayname=Silence Armor Trim
|spritename=silence-armor-trim-smithing-template
|spritetype=item
|nameid=silence_armor_trim_smithing_template
|form=item}}
{{ID table
|displayname=Tide Armor Trim
|spritename=tide-armor-trim-smithing-template
|spritetype=item
|nameid=tide_armor_trim_smithing_template
|form=item}}
{{ID table
|displayname=Snout Armor Trim
|spritename=snout-armor-trim-smithing-template
|spritetype=item
|nameid=snout_armor_trim_smithing_template
|form=item}}
{{ID table
|displayname=Rib Armor Trim
|spritename=rib-armor-trim-smithing-template
|spritetype=item
|nameid=rib_armor_trim_smithing_template
|form=item}}
{{ID table
|displayname=Eye Armor Trim
|spritename=eye-armor-trim-smithing-template
|spritetype=item
|nameid=eye_armor_trim_smithing_template
|form=item}}
{{ID table
|displayname=Spire Armor Trim
|spritename=spire-armor-trim-smithing-template
|spritetype=item
|nameid=spire_armor_trim_smithing_template
|form=item
|foot=1}}
{{edition|bedrock}}:
{{ID table
|edition=bedrock
|firstcolumnname=Smithing Template
|shownumericids=y
|showforms=y
|notshowbeitemforms=y
|generatetranslationkeys=y
|displayname=Netherite Upgrade
|spritename=netherite-upgrade-smithing-template
|spritetype=item
|nameid=netherite_upgrade_smithing_template
|id=685
|form=item
|translationkey=item.smithing_template.name, upgrade.netherite_upgrade.name}}
{{ID table
|displayname=Sentry Armor Trim
|spritename=sentry-armor-trim-smithing-template
|spritetype=item
|nameid=sentry_armor_trim_smithing_template
|id=686
|form=item
|translationkey=item.smithing_template.name, trim_pattern.sentry.name}}
{{ID table
|displayname=Vex Armor Trim
|spritename=vex-armor-trim-smithing-template
|spritetype=item
|nameid=vex_armor_trim_smithing_template
|id=692
|form=item
|translationkey=item.smithing_template.name, trim_pattern.vex.name}}
{{ID table
|displayname=Wild Armor Trim
|spritename=wild-armor-trim-smithing-template
|spritetype=item
|nameid=wild_armor_trim_smithing_template
|id=689
|form=item
|translationkey=item.smithing_template.name, trim_pattern.wild.name}}
{{ID table
|displayname=Coast Armor Trim
|spritename=coast-armor-trim-smithing-template
|spritetype=item
|nameid=coast_armor_trim_smithing_template
|id=688
|form=item
|translationkey=item.smithing_template.name, trim_pattern.coast.name}}
{{ID table
|displayname=Dune Armor Trim
|spritename=dune-armor-trim-smithing-template
|spritetype=item
|nameid=dune_armor_trim_smithing_template
|id=687
|form=item
|translationkey=item.smithing_template.name, trim_pattern.dune.name}}
{{ID table
|displayname=Wayfinder Armor Trim
|spritename=wayfinder-armor-trim-smithing-template
|spritetype=item
|nameid=wayfinder_armor_trim_smithing_template
|id=698
|form=item
|translationkey=item.smithing_template.name, trim_pattern.wayfinder.name}}
{{ID table
|displayname=Raiser Armor Trim
|spritename=raiser-armor-trim-smithing-template
|spritetype=item
|nameid=raiser_armor_trim_smithing_template
|id=699
|form=item
|translationkey=item.smithing_template.name, trim_pattern.raiser.name}}
{{ID table
|displayname=Shaper Armor Trim
|spritename=shaper-armor-trim-smithing-template
|spritetype=item
|nameid=shaper_armor_trim_smithing_template
|id=700
|form=item
|translationkey=item.smithing_template.name, trim_pattern.shaper.name}}
{{ID table
|displayname=Host Armor Trim
|spritename=host-armor-trim-smithing-template
|spritetype=item
|nameid=host_armor_trim_smithing_template
|id=701
|form=item
|translationkey=item.smithing_template.name, trim_pattern.host.name}}
{{ID table
|displayname=Ward Armor Trim
|spritename=ward-armor-trim-smithing-template
|spritetype=item
|nameid=ward_armor_trim_smithing_template
|id=690
|form=item
|translationkey=item.smithing_template.name, trim_pattern.ward.name}}
{{ID table
|displayname=Silence Armor Trim
|spritename=silence-armor-trim-smithing-template
|spritetype=item
|nameid=silence_armor_trim_smithing_template
|id=697
|form=item
|translationkey=item.smithing_template.name, trim_pattern.silence.name}}
{{ID table
|displayname=Tide Armor Trim
|spritename=tide-armor-trim-smithing-template
|spritetype=item
|nameid=tide_armor_trim_smithing_template
|id=693
|form=item
|translationkey=item.smithing_template.name, trim_pattern.tide.name}}
{{ID table
|displayname=Snout Armor Trim
|spritename=snout-armor-trim-smithing-template
|spritetype=item
|nameid=snout_armor_trim_smithing_template
|id=694
|form=item
|translationkey=item.smithing_template.name, trim_pattern.snout.name}}
{{ID table
|displayname=Rib Armor Trim
|spritename=rib-armor-trim-smithing-template
|spritetype=item
|nameid=rib_armor_trim_smithing_template
|id=695
|form=item
|translationkey=item.smithing_template.name, trim_pattern.rib.name}}
{{ID table
|displayname=Eye Armor Trim
|spritename=eye-armor-trim-smithing-template
|spritetype=item
|nameid=eye_armor_trim_smithing_template
|id=691
|form=item
|translationkey=item.smithing_template.name, trim_pattern.eye.name}}
{{ID table
|displayname=Spire Armor Trim
|spritename=spire-armor-trim-smithing-template
|spritetype=item
|nameid=spire_armor_trim_smithing_template
|id=696
|form=item
|translationkey=item.smithing_template.name, trim_pattern.spire.name
|foot=1}}
== Achievements ==
{{load achievements|Smithing with style}}
== Advancements ==
{{load advancements|Crafting a New Look;Smithing with Style}}
== Video ==
{{yt|klP9SrJFDU8}}
== History ==
{{History|java}}
{{History||1.20<br>(Experimental)|link=1.19.4|snap=23w04a|[[File:Netherite Upgrade Smithing Template JE1 BE1.png|32px]] [[File:Sentry Armor Trim Smithing Template JE1 BE1.png|32px]] [[File:Vex Armor Trim Smithing Template JE1 BE1.png|32px]] [[File:Wild Armor Trim Smithing Template JE1 BE1.png|32px]] [[File:Coast Armor Trim Smithing Template JE1 BE1.png|32px]] [[File:Dune Armor Trim Smithing Template JE1 BE1.png|32px]] [[File:Ward Armor Trim Smithing Template JE1 BE1.png|32px]] [[File:Tide Armor Trim Smithing Template JE1 BE1.png|32px]] [[File:Snout Armor Trim Smithing Template JE1 BE1.png|32px]] [[File:Rib Armor Trim Smithing Template JE1 BE1.png|32px]] [[File:Eye Armor Trim Smithing Template JE1 BE1.png|32px]] [[File:Spire Armor Trim Smithing Template JE1 BE1.png|32px]] Added smithing templates behind the "Update 1.20" experimental datapack.}}
{{History|||snap=23w05a|Smithing templates can be used to trim leather armor.
|Gold, iron, diamond, and netherite armor can be trimmed with their respective material.
|The dune, coast, wild, and sentry armor trims now always generate two templates in a chest when found.
|Increased the chances for all smithing templates that generate in chest loot to spawn:
*Netherite upgrade chance to find increased from 3.2% to 10%.
*Coast chance to find increased from 11.1% to 16.7%.
*Dune chance to find increased from 11.1% to 14.3%.
*Eye chance to find increased from 4.7% to 10% in alter chests, and to 100% in library chests.
*Rib chance to find increased from 4.7% to 6.7%.
*Sentry chance to find increased from 20% to 25%.
*Snout chance to find increased from 4.7% to 8.3%.
*Spire chance to find increased from 4.7% to 6.7%.
*Vex chance to find increased from 4.7% to 50%.
*Ward chance to find increased from 4.7% to 5%.
*Wild chance to find increased from 20% to 33%.}}
{{History||1.20|snap=23w12a|Smithing templates are now available without using the "Update 1.20" experimental datapack.|[[File:Wayfinder Armor Trim Smithing Template JE1 BE1.png|32px]] [[File:Raiser Armor Trim Smithing Template JE1 BE1.png|32px]] [[File:Shaper Armor Trim Smithing Template JE1 BE1.png|32px]] [[File:Host Armor Trim Smithing Template JE1 BE1.png|32px]] [[File:Silence Armor Trim Smithing Template JE1 BE1.png|32px]] Added wayfinder, raiser, shaper, host, and silence armor trim smithing templates.
|[[File:Sentry Armor Trim Smithing Template JE2 BE2.png|32px]] [[File:Dune Armor Trim Smithing Template JE2 BE2.png|32px]] Changed the textures of the sentry and dune armor trim smithing templates.
|The pattern textures of dune and sentry armor trims are changed from [[File:Armor Trim Dune (sample model) JE1 BE1.png|24px]] [[File:Armor Trim Sentry (sample model) JE1 BE1.png|24px]] to [[File:Armor Trim Dune (sample model) JE2 BE2.png|24px]] [[File:Armor Trim Sentry (sample model) JE2 BE2.png|24px]].<br>
Those previous patterns were left with different names: dune was renamed sentry and sentry was renamed shaper.}}
{{History|||snap=23w16a|Wayfinder, raiser, shaper, and host armor trim no longer generates in [[suspicious sand]] in [[trail ruins]].|Due to the split of the archaeological loot tables for the suspicious gravel within the [[trail ruins]]; wayfinder, raiser, shaper, and host armor trim now are in the rare loot.}}
{{History|||snap=23w17a|The probability of the wayfinder, raiser, shaper, and host armor trim to generate in [[suspicious gravel]] in [[trail ruins]] has been changed from 1/11 to 1/12.|The player now get the [[advancement]] "Crafting a new look" when they craft a trimmed armor at a [[smithing table]] using a smithing template, "Smithing with style" when they apply these smithing templates at least once on their armor: Spire, Snout, Rib, Ward, Silence, Vex, Tide, and Wayfinder.}}
{{History|bedrock}}
{{History||Next Major Update<br>(Experimental)|link=Bedrock Edition 1.19.80|snap=beta 1.19.80.21|[[File:Netherite Upgrade Smithing Template JE1 BE1.png|32px]] [[File:Sentry Armor Trim Smithing Template JE1 BE1.png|32px]] [[File:Vex Armor Trim Smithing Template JE1 BE1.png|32px]] [[File:Wild Armor Trim Smithing Template JE1 BE1.png|32px]] [[File:Coast Armor Trim Smithing Template JE1 BE1.png|32px]] [[File:Dune Armor Trim Smithing Template JE1 BE1.png|32px]] [[File:Ward Armor Trim Smithing Template JE1 BE1.png|32px]] [[File:Tide Armor Trim Smithing Template JE1 BE1.png|32px]] [[File:Snout Armor Trim Smithing Template JE1 BE1.png|32px]] [[File:Rib Armor Trim Smithing Template JE1 BE1.png|32px]] [[File:Eye Armor Trim Smithing Template JE1 BE1.png|32px]] [[File:Spire Armor Trim Smithing Template JE1 BE1.png|32px]] Added smithing templates behind the "[[Bedrock Edition 1.20.0|Next Major Update]]" [[experimental]] toggle.}}
{{History|||snap=beta 1.19.80.22|[[File:Wayfinder Armor Trim Smithing Template JE1 BE1.png|32px]] [[File:Raiser Armor Trim Smithing Template JE1 BE1.png|32px]] [[File:Shaper Armor Trim Smithing Template JE1 BE1.png|32px]] [[File:Host Armor Trim Smithing Template JE1 BE1.png|32px]] [[File:Silence Armor Trim Smithing Template JE1 BE1.png|32px]] Added wayfinder, raiser, shaper, host, and silence armor trim smithing templates.
|[[File:Sentry Armor Trim Smithing Template JE2 BE2.png|32px]] [[File:Dune Armor Trim Smithing Template JE2 BE2.png|32px]] Changed the textures of the sentry and dune armor trim smithing templates.
|The pattern textures of dune and sentry armor trims are changed from [[File:Armor Trim Dune (sample model) JE1 BE1.png|24px]] [[File:Armor Trim Sentry (sample model) JE1 BE1.png|24px]] to [[File:Armor Trim Dune (sample model) JE2 BE2.png|24px]] [[File:Armor Trim Sentry (sample model) JE2 BE2.png|24px]].<br>
Those previous patterns were left with different names: dune was renamed sentry and sentry was renamed shaper.}}
{{History||1.20.0|snap=beta 1.20.0.21|Smithing templates are now available without using the "Next Major Update" experimental toggle.}}
{{History|foot}}
== Issues ==
{{Issue list}}
== Trivia ==
* Smithing templates were named "Smithing Blueprints" in the prototype but was changed because the word "blueprint" sounded modern and technical.<ref>{{ytl|klP9SrJFDU8|Minecraft 1.20: Armor Trims - What Do They Mean?|Minecraft|May 4, 2023|t=98}}</ref>
* When Mojang developer Gnembon was working on armor trims, he accidentally messed up their rendering, making them jet through the player's body in a weird fashion, similar to what appears in {{w|Salvador Dalí}}'s paintings where a hand might poke through a forehead.<ref>{{ytl|ghQODkq4ITI|Mojang Dev Comes To Hermitcraft! (Mojang Developer Gnembom Interview)|GoodVodsWithScar|June 23, 2023|t=1980}}</ref>
* Some of the armor trims feature patterns based on a [[mob]] or [[block]] that is found in the same [[Generated structures|structure]] as the corresponding smithing template.<ref name=":0">"Some of the armor trims reflect the place where you found the template, for example bastions contain a piglin-inspired trim."-[[Sofia Dankis]]-{{Mcnet|armor-trims-coming-minecraft-1-20|Armor Trims Coming to Minecraft 1.20|January 24, 2023}}</ref>
** The spire armor trim resembles a [[shulker]].
** The vex armor trim resembles an [[evoker]]. As an item in the [[inventory]], it resembles the wing or the vein texture of a [[vex]].
** The wild armor trim has moss growing on 3 of its corners.
** The coast armor trim appears to have barnacles attached to it.
** The ward armor trim, as an item in the inventory, resembles the faces inside a [[warden]]'s chest.
** The silence armor trim appears to have sculk creeping onto / infecting it.
** The tide armor trim resembles [[Prismarine|prismarine bricks]].
** The snout armor trim resembles a [[piglin]]<ref name=":0" />.
** The rib armor trim resembles a [[wither skeleton]].
** The eye armor trim resembles an [[eye of ender]]. There are also two eyes on the head part of the armor trim that resemble those of an [[enderman]].
* ''Netherite upgrade smithing template'' (35 characters with "_" and 32 characters without "_") and ''sentry armor trim smithing template'' (35 characters with "_" and 31 characters without "_") are the current longest name for item ID, while ''[[polished blackstone pressure plate]]'' and ''[[cracked polished blackstone bricks]]'' have 34 characters with "_" and 31 characters without "_".
* The silence armor trim is the rarest trim, due to being found in ancient cities in the deep dark, and having only a 1.2% chance to be per chest.
* When [[lapis lazuli]] is used as trim material, it is called "Lapis" instead of its full name "Lapis Lazuli"; this is the only instance of the abbreviation "Lapis" being used in-game.<ref>{{bug|MC-262486|||WAI}}</ref>
== Gallery ==
=== Sprites ===
<gallery>
Netherite Upgrade Smithing Template.png|Netherite Upgrade
Sentry Armor Trim Smithing Template.png|Sentry Armor Trim
Vex Armor Trim Smithing Template.png|Vex Armor Trim
Wild Armor Trim Smithing Template.png|Wild Armor Trim
Coast Armor Trim Smithing Template.png|Coast Armor Trim
Dune Armor Trim Smithing Template.png|Dune Armor Trim
Wayfinder Armor Trim Smithing Template.png|Wayfinder Armor Trim
Raiser Armor Trim Smithing Template.png|Raiser Armor Trim
Shaper Armor Trim Smithing Template.png|Shaper Armor Trim
Host Armor Trim Smithing Template.png|Host Armor Trim
Ward Armor Trim Smithing Template.png|Ward Armor Trim
Silence Armor Trim Smithing Template.png|Silence Armor Trim
Tide Armor Trim Smithing Template.png|Tide Armor Trim
Snout Armor Trim Smithing Template.png|Snout Armor Trim
Rib Armor Trim Smithing Template.png|Rib Armor Trim
Eye Armor Trim Smithing Template.png|Eye Armor Trim
Spire Armor Trim Smithing Template.png|Spire Armor Trim
</gallery>
=== Armor trim patterns ===
<gallery>
Armor Trim Sentry (sample model).png|Sentry Armor Trim
Armor Trim Vex (sample model).png|Vex Armor Trim
Armor Trim Wild (sample model).png|Wild Armor Trim
Armor Trim Coast (sample model).png|Coast Armor Trim
Armor Trim Dune (sample model).png|Dune Armor Trim
Armor Trim Wayfinder (sample model).png|Wayfinder Armor Trim
Armor Trim Raiser (sample model).png|Raiser Armor Trim
Armor Trim Shaper (sample model).png|Shaper Armor Trim
Armor Trim Host (sample model).png|Host Armor Trim
Armor Trim Ward (sample model).png|Ward Armor Trim
Armor Trim Silence (sample model).png|Silence Armor Trim
Armor Trim Tide (sample model).png|Tide Armor Trim
Armor Trim Snout (sample model).png|Snout Armor Trim
Armor Trim Rib (sample model).png|Rib Armor Trim
Armor Trim Eye (sample model).png|Eye Armor Trim
Armor Trim Spire (sample model).png|Spire Armor Trim
</gallery>
=== Official Artwork ===
<gallery>
T&T Thumbnail.jpg|[[Sunny]] wearing amethyst armor trims.
Warden Chasing Alex with Silence Trim Pixel Art.png|A [[warden]] chasing Alex holding the silence armor trim.
Alex Trimming Armor in Smithing Table Pixel Art.png|Alex adding the silence armor trim and amethyst on iron armor.
Alex Wearing Iron Armor with Amethyst Pixel Art.jpg|Alex wearing the trimmed iron armor.
File:Live2023-01.jpeg|Noor working on trimmed iron armor.
</gallery>
=== Screenshots ===
<gallery>
Kingbdogz Armor Trim 1.jpg|Redstone trims on diamond armor.
Kingbdogz Armor Trim 2.jpg|Gold trims on netherite armor.
Too Many Trims.jpg|A large amount of armor trims.
Kingbdogz Armor Trim 3.jpg|Gold on netherite.
Kingbdogz Armor Trim 4.jpg|Diamond on diamond.
New Armor Trims in 23W12A.jpg|<ref>{{Tweet|kingbdogz|1638580472962850831|new trims got the drip The new "Silence" armor trim to the left is now the hardest trim to get, with only a 1% chance per chest to spawn in Ancient Cities. Definitely gonna be a challenge to get!|March 22, 2023}}</ref>
Emerald Armor.png|Emerald on gold.
Xilefian Armor Trims 1.png|[[Xilefian]] showing how armor trims work.
Xilefian Armor Trims 2.png|[[Xilefian]] showing how armor trims work.
Xilefian Armor Trims 3.png|[[Xilefian]] showing how armor trims work.
Armor Trims On Netherite Armors.png|A display of all eleven (before [[Java Edition 23w12a]]) armor trims and ten colors on netherite armors.
Armor Trim Showcase.png|A display of all eleven (before [[Java Edition 23w12a]]) armor trims, on netherite armor using emerald as the trim material.
Armor Trim Colors.png|A display of all ten armor trim colors, using the ward trim on a netherite helmet.
Silence Armor Trim on All Armors.png|A display of all ten colors of the silence armor trim on all armors.
Image 2023-06-07 154100087.png|A screenshot of every armor trim in every color(besides quartz) on leather armor.
Armor Trim Friends.jpg|Official screenshot of [[Alex]] and [[Zuri]] wearing armor trims.
LadyAgnes Armor Trims.jpg|Copper trims on netherite armor.
Trim Lineup.jpg
Fancy Delta.jpg|[[Kai]] wearing trimmed armor in a [[Basalt Delta]].
Trims & Pots.jpg
Noor Gold Armor Trim .jpeg
Noor Diamond Armor Trim.jpeg
Noor Netherite Armor Trim.jpeg
Noor Iron Armor Trim.jpeg
</gallery>
== References ==
{{Reflist}}
{{Items}}
[[Category:Bedrock Edition]]
[[Category:Non-renewable resources]]
[[de:Schmiedevorlage]]
[[es:Molde de herrería]]
[[fr:Modèle de forge]]
[[ja:鍛冶型]]
[[pl:Szablon kowalski]]
[[pt:Molde de ferraria]]
[[ru:Кузнечный шаблон]]
[[uk:Ковальський шаблон]]
[[zh:锻造模板]]</li></ul> | Added the seed option to the world creation screen. | ||||
1.8{{Extension DPL}}<ul><li>[[Rabbit Stew|Rabbit Stew]]<br/>{{Item
| title = Rabbit Stew
| heals = {{hunger|10}}
| renewable = Yes
| stackable = No
}}
'''Rabbit stew''' is a [[food]] [[item]] that can be eaten by the [[player]].
== Obtaining ==
=== Crafting ===
{{Crafting
|shapeless=true
|B1=Cooked Rabbit
|A2=Carrot
|B2=Baked Potato
|C2=Any Mushroom
|B3=Bowl
|Output=Rabbit Stew
|type=Foodstuff
}}
=== Trading ===
{{IN|bedrock}}, novice-level Butcher villagers always offer to sell rabbit stew for one emerald as their second trade.
{{IN|java}}, novice-level Butcher villagers have a 50% chance of offering rabbit stew for one emerald.
== Usage ==
=== Food ===
To eat rabbit stew, press and hold {{control|use}} while it is selected in the hotbar. Eating one restores {{hunger|10}} [[hunger]] and 12 hunger [[Hunger#Mechanics|saturation]]. This restores more hunger than any other food type in the game except [[cake]], but has less saturation than a [[golden carrot]], a [[cooked porkchop]], or a [[steak]].
Eating rabbit stew leaves the player with an empty bowl, similar to [[mushroom stew]], [[suspicious stew]], and [[beetroot soup]].
=== Wolves ===
{{IN|bedrock}}, rabbit stew can be used to feed [[wolves]], healing them by {{hp|10|mob=1}}. However, unlike other wolf food, rabbit stew does not speed up the growth of baby wolves, and it cannot be used to breed them. It is usable only on a wolf that has less than full health.
== Sounds ==
{{Sound table/Entity/Food}}
== Data values ==
=== ID ===
{{edition|java}}:
{{ID table
|edition=java
|showforms=y
|generatetranslationkeys=y
|displayname=Rabbit Stew
|spritetype=item
|nameid=rabbit_stew
|form=item
|foot=1}}
{{edition|bedrock}}:
{{ID table
|edition=bedrock
|shownumericids=y
|showforms=y
|notshowbeitemforms=y
|generatetranslationkeys=y
|displayname=Rabbit Stew
|spritetype=item
|nameid=rabbit_stew
|id=290
|form=item
|foot=1}}
== Advancements ==
{{load advancements|Husbandry;A Balanced Diet}}
== Video ==
<div style="text-align:center">{{yt|GwCqwtydRBc}}</div>
== History ==
{{History|java}}
{{History||1.8|snap=June 30, 2014|slink={{tweet|TheMogMiner|483725253018157057}}|[[Ryan Holtz]] tweets the recipe of rabbit stew, and that it can restore hunger better than any other item other than [[golden apple]]s (which was incorrect, as golden apples restore less hunger, but a whole [[cake]] restores more).}}
{{History|||snap=14w27a|[[File:Rabbit Stew JE1 BE1.png|32px]] Added rabbit stew.}}
{{History||1.13|snap=17w47a|Prior to [[1.13/Flattening|''The Flattening'']], this [[item]]'s numeral ID was 413.}}
{{History||1.14|snap=18w43a|[[File:Rabbit Stew JE2.png|32px]] The texture of rabbit stew has been changed.
|The rabbit stew's [[recipe]] is now shapeless.}}
{{History|||snap=18w50a|[[File:Rabbit Stew JE3 BE2.png|32px]] The texture of rabbit stew has been changed.}}
{{History|||snap=19w11a|Butcher [[villager]]s now [[trading|sell]] rabbit stew.}}
{{History|pocket alpha}}
{{History||v0.13.0|snap=build 1|[[File:Rabbit Stew JE1 BE1.png|32px]] Added rabbit stew.}}
{{History|bedrock}}
{{History||1.10.0|snap=beta 1.10.0.3|[[File:Rabbit Stew JE3 BE2.png|32px]] The texture of rabbit stew has been changed.
|The recipe for rabbit stew is now shapeless.}}
{{History||1.11.0|snap=beta 1.11.0.4|Butcher [[villager]]s now [[trading|sell]] rabbit stew.}}
{{History|console}}
{{History||xbox=TU31|xbone=CU19|ps=1.22|wiiu=Patch 3|switch=1.0.1|[[File:Rabbit Stew JE1 BE1.png|32px]] Added rabbit stew.}}
{{History||xbox=none|xbone=none|ps=1.90|wiiu=none|switch=none|[[File:Rabbit Stew JE3 BE2.png|32px]] The texture of rabbit stew has been changed.
|The recipe for rabbit stew is now shapeless.}}
{{History|new 3ds}}
{{History||0.1.0|[[File:Rabbit Stew JE1 BE1.png|32px]] Added rabbit stew.}}
{{History|foot}}
== Issues ==
{{issue list}}
== Trivia ==
* If the ingredients of rabbit stew were eaten separately and the [[mushroom]] had become half of a [[mushroom stew]], they would restore a total of {{Hunger|16}} and 19.2 saturation points. Without counting the mushroom, the separate ingredients would restore {{Hunger|13}} and 15.6 saturation points. Therefore, crafting rabbit stew results in a net loss of restorative points, though it is quicker than eating all the ingredients separately.
* Rabbit stew restores more hunger and total food points (hunger + saturation) than nearly any other single item (the exception is a suspicious stew with Saturation). This is balanced by the point that the stew does not stack, and with its complex recipe it's not so easy to make "on the road". The suspicious stew shares the unstackability, but with only four ingredients it can at least be crafted in the inventory.
==Gallery==
<gallery>
Rabbit Stew Crafting.jpg|Crafting rabbit stew.
</gallery>
== References ==
{{Reflist}}
{{items}}
[[de:Kaninchenragout]]
[[es:Estofado de conejo]]
[[it:Stufato di coniglio]]
[[fr:Ragoût de lapin]]
[[ja:ウサギシチュー]]
[[ko:토끼 스튜]]
[[nl:Konijnenstoofpot]]
[[pl:Gulasz z królika]]
[[pt:Ensopado de coelho]]
[[ru:Тушёный кролик]]
[[uk:Тушкований кролик]]
[[zh:兔肉煲]]
[[Category:Food]]
[[Category:Renewable resources]]</li><li>[[Nether Wart|Nether Wart]]<br/><!--Please do not change "nether wart" to "Nether wart". According to style guide, block names should not be capitalized.-->
{{about|the fungus used for potions|the block found in crimson forests|Nether Wart Block}}{{Block
| group = Age 0
| 1-1 = Nether Wart Age 0.png
| 1-2 = Nether Wart Age 0 BE.png
| group2 = Age 1-2
| 2-1 = Nether Wart Age 1-2.png
| 2-2 = Nether Wart Age 1-2 BE.png
| group3 = Age 3
| 3-1 = Nether Wart Age 3.png
| 3-2 = Nether Wart Age 3 BE.png
|image= Nether Wart (item).png
|transparent=Yes
|light=No
|tool=any
|renewable=Yes
|stackable=Yes (64)
|flammable=No
|lavasusceptible=No
}}
'''Nether wart''' is a fungus harvested from nether wart crops and is used to plant them, as well as being vital in the creation of [[potions]].
'''Nether wart crops''' are found in [[Nether Fortress/Structure|nether fortresses]] and [[Bastion Remnant|bastions]] and is used to grow nether wart in [[Soul Sand|soul sand]].
== Obtaining ==
=== Breaking ===
Nether wart can be mined instantly with any tool. A fully mature nether wart crop yields 2–4 nether wart. This is increased by one for each level of [[Fortune]], this allows for a maximum of 7 nether warts dropping from one crop. Less mature stages drop one nether wart, even with the Fortune enchantment.
=== Natural generation ===
Nether wart can generate in [[nether fortress]]es in [[soul sand]] gardens around stairwells. Nether wart can also generate in the courtyards of housing unit [[bastion remnant]]s. Due to only spawning in these specific structures, it's entirely possible for a nether fortress or bastion remnant to generate without nether wart (though they may still appear in the chests that generate in the fortress).
{| class="wikitable"
|+
!Location
!Description
!Image
|-
|{{anchor|Nether Fortress}}'''Nether Fortress'''
|Nether wart can be found growing near stairwells in small soul sand gardens.
|[[File:Nether wart garden.png|thumb|Nether wart growing in a nether fortress.]]
|-
|{{anchor|Bastion Remnant}}'''Bastion Remnant'''
|Nether wart can be found growing in the central courtyard of each of the sections of piglin housing unit bastions.
|[[File:Bastion Courtyard.png|thumb|Nether wart growing in a bastion remnant.]]
|}
<br>
=== Chest loot ===
{{LootChestItem|nether-wart}}
== Usage ==
=== Brewing ingredient ===
Nether wart's primary purpose is to [[brew]] the [[Potion|awkward potion]], the base for all potions, but optional for Weakness.
{{brewing
|showname=1
|Nether Wart
|Awkward Potion
|base=Water Bottle
}}
=== Crafting ingredient ===
{{crafting usage}}
=== Trading ===
Master-level cleric [[villager]]s buy 22 nether warts for an [[emerald]] as part of their trades.
=== Farming ===
{{main|Tutorials/Nether Wart farming}}
When planted on [[soul sand]], nether wart grows through four stages, though the middle two stages use the same texture (the hitbox of stage 3 is three pixels taller). {{IN|java}}, the exact age can be seen using the [[debug screen]], and the ages range from 0 to 3. Each random tick, nether wart has a 10% chance of growing one stage. At default random tick speed, each nether wart grows one age step approximately every {{convert|13653|ticks|minutes}} on average, and fully grows from planting to harvest every {{convert|40960|ticks|minutes}} on average. The growth rate is not affected by light or any other environmental factors. [[Bone meal]] cannot be used on the nether wart.
Nether wart can only be planted on [[soul sand]]. It cannot be planted on [[soul soil]]. It can grow in any [[dimension]].
Nether wart is ready to harvest when it reaches its fourth stage (age:3). Breaking a fully grown nether wart drops 2 to 4 nether wart, while an immature one drops a single nether wart. Using a tool enchanted with fortune increases the maximum number of nether wart dropped by 1 per level, for a maximum of 7 for a tool enchanted with [[Fortune|Fortune III]].
=== Composting ===
Placing a nether wart into a [[composter]] has a 30% chance of raising the compost level by 1.
== Sounds ==
{{Sound table/Block/Nether wart}}
== Data values ==
=== ID ===
{{edition|java}}:
{{ID table
|edition=java
|showforms=y
|generatetranslationkeys=y
|displayname=Nether Wart
|spritetype=block
|nameid=nether_wart
|translationkey=block.minecraft.nether_wart,item.minecraft.nether_wart
|foot=1}}
{{edition|bedrock}}:
{{ID table
|edition=bedrock
|firstcolumnname=Nether Wart
|shownumericids=y
|showforms=y
|generatetranslationkeys=y
|displayname=Block
|spritename=nether-wart
|spritetype=block
|nameid=nether_wart
|id=115
|form=block
|itemform=item.nether_wart}}
{{ID table
|displayname=Item
|spritename=nether-wart
|spritetype=item
|nameid=nether_wart
|id=294
|form=item
|foot=1}}
=== Block states ===
{{see also|Block states}}
{{/BS}}
== Advancements ==
{{load advancements|A Seedy Place}}
== History ==
{{History|java}}
{{History||1.0.0|snap=Beta 1.9 Prerelease|[[File:Nether Wart Age 0 JE1.png|32px]] [[File:Nether Wart Age 1-2 JE1.png|32px]] [[File:Nether Wart Age 3 JE1.png|32px]] [[File:Nether Wart (item) JE1.png|32px]] Added nether wart.}}
{{History|||snap=Beta 1.9 Prerelease 3|Nether wart can now be brewed in a [[water bottle]] to create an [[awkward potion]].}}
{{History||1.3.1|snap=12w27a|Nether wart can now grow outside of [[the Nether]].}}
{{History|||snap=1.3|[[File:Nether Wart (item) JE2 BE1.png|32px]] The item texture has been changed.}}
{{History||1.4.2|snap=12w36a|Nether wart can now be used to breed [[chicken]]s.}}
{{History||1.6.1|snap=13w18a|Nether wart is now found in the new [[chest]]s in [[nether fortress]]es.}}
{{History||1.8|snap=14w06a|[[File:Nether Wart Age 0 JE2.png|32px]] [[File:Nether Wart Age 1-2 JE2.png|32px]] [[File:Nether Wart Age 3 JE2.png|32px]] Nether wart crops are now a pixel higher, likely as an accidental result of model conversion. Previously they were offset one pixel downwards like the other crops (wheat, carrots potatoes) to match farmland, although in nether wart's case such a downwards offset hides some pixels of the texture inside of the soul sand.<ref>{{bug|MC-250679}}</ref>}}
{{History|||snap=14w10a|[[File:Missing Model JE2.png|32px]] [[File:Missing Model JE2.png|32px]] [[File:Missing Model JE2.png|32px]]<br>[[File:Missing Model (anisotropic filtering) JE2.png|32px]] [[File:Missing Model (anisotropic filtering) JE2.png|32px]] [[File:Missing Model (anisotropic filtering) JE2.png|32px]] Nether wart crops of all ages [[Missing model|no longer have a model]].}}
{{History|||snap=14w10b|[[File:Nether Wart Age 0 JE4.png|32px]] [[File:Nether Wart Age 1-2 JE4.png|32px]] [[File:Nether Wart Age 3 JE4.png|32px]] Nether wart crops now have models again.<ref>{{bug|MC-50276}}</ref> In addition, they are now offset downwards by one pixel once more, hiding the bottom row of pixels again.}}
{{History|||snap=14w25a|[[File:Nether Wart Age 0 JE5.png|32px]] [[File:Nether Wart Age 1-2 JE5.png|32px]] [[File:Nether Wart Age 3 JE5.png|32px]] Nether wart crops are now darker and subject to directional shading.}}
{{History|||snap=14w27a|[[File:Nether Wart Age 0 JE6.png|32px]] [[File:Nether Wart Age 1-2 JE6.png|32px]] [[File:Nether Wart Age 3 JE6.png|32px]] Nether wart crops are no longer subject to directional shading.}}
{{History|||snap=14w34d|Nether wart can no longer be used to breed [[chicken]]s.}}
{{History||1.9|snap=15w43a|The average yield of nether wart from [[nether fortress]] chests has now been slightly decreased.}}
{{History||1.10|snap=16w20a|Nether wart can now be used to [[crafting|craft]] the new [[red nether brick]] blocks and [[nether wart block]]s.}}
{{History||1.12|snap=17w18b|Placing a nether wart in soul sand now gives the player the "A Seedy Place" [[advancement]].{{verify}}}}
{{History||1.13|snap=17w47a|Prior to [[1.13/Flattening|''The Flattening'']], this block's numeral ID was 115, and the item's 372.}}
{{History||1.14|snap=18w43a|[[File:Nether Wart Age 0 JE7.png|32px]] [[File:Nether Wart Age 1-2 JE7.png|32px]] [[File:Nether Wart Age 3 JE7.png|32px]] The textures of nether wart crops have changed.}}
{{History|||snap=19w03a|Placement and breaking [[sound]]s have now been added to nether wart. Before this version, nether wart made stone sounds.}}
{{History|||snap=19w11a|Cleric [[villager]]s now [[trading|buy]] nether wart.
|Nether wart can now be planted by aiming against the sides and underside of blocks, rather than just the top surface of the soul sand.}}
{{History||1.16|snap=20w15a|Nether wart can now be [[composter|composted]].}}
{{History|||snap=20w16a|Nether wart now generates as part of [[bastion remnant]]s.}}
{{History||1.17|snap=21w13a|[[File:Nether Wart Age 0 JE8.png|32px]] [[File:Nether Wart Age 1-2 JE8.png|32px]] [[File:Nether Wart Age 3 JE8.png|32px]] The "crop" template model has changed such that pixels appear in the same physical positions on opposite sides of texture planes, changing the nether wart crop's appearance in the process.<ref>{{bug|MC-199242}}</ref>}}
{{History|pocket alpha}}
{{History||v0.12.1|snap=build 1|[[File:Nether Wart Age 0 BE1.png|32px]] [[File:Nether Wart Age 1-2 BE1.png|32px]] [[File:Nether Wart Age 3 BE1.png|32px]] [[File:Nether Wart (item) JE2 BE1.png|32px]] Added nether wart.
|Nether wart uses a cross model instead of the "hash" shape associated with crops.}}
{{History||?|[[File:Nether Wart Age 0 JE6 BE2.png|32px]] [[File:Nether Wart Age 1-2 JE6 BE2.png|32px]] [[File:Nether Wart Age 3 JE6 BE2.png|32px]]{{verify|Correct models? check UV, etc.}} Nether wart now uses a more conventional crop model.}}
{{History|pocket}}
{{History||1.1.3|snap=alpha 1.1.3.0|Nether wart can now be used to [[crafting|craft]] [[red nether bricks]] and [[nether wart block]]s.}}
{{History|bedrock}}
{{History||1.10.0|snap=beta 1.10.0.3|[[File:Nether Wart Age 0 BE.png|32px]] [[File:Nether Wart Age 1-2 BE.png|32px]] [[File:Nether Wart Age 3 BE.png|32px]] The textures of nether wart crops have changed.
|Placement and breaking [[sound]]s have now been added to nether wart.}}
{{History||1.11.0|snap=beta 1.11.0.4|Nether wart can now be [[trading|sold]] to cleric [[villager]]s.}}
{{History||1.16.0|snap=beta 1.16.0.57|Nether wart now generates as part of [[bastion remnant]]s.
|The placement and breaking [[sound]]s for nether wart have been changed to match {{el|je}}.
|Nether wart can now be [[composter|composted]].}}
{{History|console}}
{{History||xbox=TU7|xbone=CU1|ps=1.0|wiiu=Patch 1|switch=1.0.1|[[File:Nether Wart Age 0 JE6 BE2.png|32px]] [[File:Nether Wart Age 1-2 JE6 BE2.png|32px]] [[File:Nether Wart Age 3 JE6 BE2.png|32px]]{{verify|Correct models? check UV, etc.}} [[File:Nether Wart (item) JE2 BE1.png|32px]] Added nether wart.}}
{{History||xbox=TU9|Nether wart now spawns randomly wherever [[soul sand]] is generated in [[the Nether]].
|[[Nether fortress]]es have now been changed to make nether wart rooms more likely.
|Nether wart can now grow outside of [[the Nether]].}}
{{History||xbox=none|xbone=none|ps=1.90|wiiu=none|switch=none|[[File:Nether Wart Age 0 JE7.png|32px]] [[File:Nether Wart Age 1-2 JE7.png|32px]] [[File:Nether Wart Age 3 JE7.png|32px]]{{verify|Correct models?}} The textures of nether wart crops have now been changed.}}
{{History|New 3DS}}
{{History||0.1.0|[[File:Nether Wart Age 0 JE6 BE2.png|32px]] [[File:Nether Wart Age 1-2 JE6 BE2.png|32px]] [[File:Nether Wart Age 3 JE6 BE2.png|32px]]{{verify|Correct models? check UV, etc.}} [[File:Nether Wart (item) JE2 BE1.png|32px]] Added nether wart.}}
{{History|foot}}
=== Nether wart "item" ===
{{:Technical blocks/Nether Wart}}
==Issues==
{{issue list}}
== Trivia ==
* Nether wart's stage changes cannot be detected by a [[block update detector]], but can by an [[observer]] block.
* Unlike other crimson "plants", nether wart doesn't have a warped equivalent. This is also the case with [[nether sprouts]], which lack a crimson equivalent.
== Gallery ==
<gallery>
Nether Brick And Wart.png|Nether wart found in a nether fortress.
Nether Wart Closeup.png| Another example of nether wart found in a nether fortress.
Nether wart three sizes.png|The three different sizes of the nether wart as viewed from the side.
Nether Fortress Large Stairs Room.png
</gallery>
== References ==
{{reflist}}
{{Blocks|vegetation}}
{{Items}}
[[Category:Nether blocks]]
[[Category:Fungi]]
[[Category:Non-solid blocks]]
[[Category:Generated structure blocks]]
[[de:Netherwarze]]
[[es:Verruga del Nether]]
[[fr:Verrues du Nether]]
[[hu:Bibircsók]]
[[it:Verruca del Nether]]
[[ja:ネザーウォート]]
[[ko:네더 사마귀]]
[[nl:Netherkruid]]
[[pl:Netherowa brodawka]]
[[pt:Fungo do Nether]]
[[ru:Адский нарост]]
[[th:หูดเนเธอร์]]
[[uk:Пекельний наріст]]
[[zh:下界疣]]
[[Category:Brewing recipe]]</li></ul> | Pre-release | Added Creative mode. | |||
| Java Edition | |||||
1.0.0{{Extension DPL}}<ul><li>[[Mushroom Stew|Mushroom Stew]]<br/>{{Item
| title = Mushroom Stew
| image = Mushroom Stew.png
| renewable = Yes
| heals = {{hunger|6}}
| stackable = No
}}
'''Mushroom stew''' is a [[food]] item.
== Obtaining ==
=== Harvesting ===
Mushroom stew can be obtained by “milking” a [[mooshroom]] with an empty [[bowl]]. This is accomplished by {{Control|using}} a bowl on a mooshroom. The bowl gets replaced by the mushroom stew item. There is no cooldown for doing so.
If a stack of more than one bowl is used on a mooshroom, only one bowl is consumed, and the mushroom stew goes into an empty inventory slot, or is dropped if the player's inventory is full.
=== Crafting ===
{{Crafting
|Red Mushroom
|Brown Mushroom
|Bowl
|Output= Mushroom Stew
|type= Foodstuff
}}
== Usage ==
=== Food ===
{{see also|Tutorials/Hunger management|title1=Hunger management}}
To eat mushroom stew, press and hold {{control|use}} while it is selected in the hotbar. Eating one restores {{hunger|6}} [[hunger]] and 7.2 hunger
[[Hunger#Mechanics|saturation]].
The bowl is returned to the player empty after the mushroom stew has been eaten, and can be reused to craft more, similarly to [[Rabbit Stew|rabbit stew]] and [[Beetroot Soup|beetroot soup]].
== Sounds ==
=== Generic ===
{{Sound table/Entity/Food}}
=== Unique ===
{{Edition|Java}}:
{{Sound table
|sound=Mooshroom milk1.ogg
|sound2=Mooshroom milk2.ogg
|sound3=Mooshroom milk3.ogg
|subtitle=Mooshroom gets milked
|source=neutral
|description=When a mooshroom is milked with a bowl
|id=entity.mooshroom.milk
|translationkey=subtitles.entity.mooshroom.milk
|volume=1.0
|pitch=''varies'' <ref group=sound name=milkpitch>Can be 1.0, 0.9, or 1.1 for each sound</ref>
|distance=16
|foot=1}}
{{Edition|Bedrock}}:
{{Sound table
|type=bedrock
|sound=Mooshroom milk1.ogg
|sound2=Mooshroom milk2.ogg
|sound3=Mooshroom milk3.ogg
|subtitle=Mooshroom gets milked
|source=Friendly Creatures
|description=When a mooshroom is milked with a bowl
|id=mob.mooshroom.suspicious_milk
|volume=1.0/0.9/1.1
|pitch=1.0
|foot=1}}
== Data values ==
=== ID ===
{{edition|java}}:
{{ID table
|edition=java
|showforms=y
|generatetranslationkeys=y
|displayname=Mushroom Stew
|spritetype=item
|nameid=mushroom_stew
|form=item
|foot=1}}
{{edition|bedrock}}:
{{ID table
|edition=bedrock
|shownumericids=y
|showforms=y
|notshowbeitemforms=y
|generatetranslationkeys=y
|displayname=Mushroom Stew
|spritetype=item
|nameid=mushroom_stew
|id=260
|form=item
|foot=1}}
== Advancements ==
{{load advancements|Husbandry;A Balanced Diet}}
== History ==
{{History|java indev}}
{{History||0.31|snap=20100130|[[File:Mushroom Stew JE1 BE1.png|32px]] Added mushroom stew.
|Restores {{hp|8}} [[health]].}}
{{History||20100206|Mushroom stew now restores {{hp|10}} health.}}
{{History|java beta}}
{{History||1.6|snap=Test Build 3|[[Mushroom]] spreading mechanic added, making mushroom stew [[renewable]].}}
{{History||1.8|snap=Pre-release|Now restores {{hunger|8}} [[hunger]].}}
{{History|java}}
{{History||1.0.0|snap=Beta 1.9 Prerelease|More fungi sources have now been introduced with the addition of the [[Mushroom Fields|mushroom biome]].
|A [[mooshroom]] can now be "milked" with a [[bowl]] to obtain mushroom stew.}}
{{History|||snap=Beta 1.9 Prerelease 3|Mushroom stew can now be crafted in the [[2×2 crafting grid]] in the [[inventory]]. Previously, the crafting recipe was shaped, now it's shapeless.}}
{{History||1.2.5|snap=release|The [[player]] milking a [[mooshroom]] with a stack of [[bowl]]s no longer results in receiving back a single bowl of mushroom stew.}}
{{History||1.4.2|snap=?|Mushroom stew now restores {{Hunger|6}} instead of {{Hunger|8}}.}}
{{History||1.13|snap=17w47a|Prior to [[1.13/Flattening|''The Flattening'']], this [[item]]'s numeral ID was 282.}}
{{History||1.14|snap=18w43a|[[File:Mushroom Stew JE2 BE2.png|32px]] The texture of mushroom stew has now been changed.}}
{{History||1.16|snap=Pre-release 1|Mooshrooms can now be milked for mushroom stew in Creative mode.<ref>{{Cite bug|MC|90969|Cannot get mushroom stew from mooshrooms / milk from cows in creative mode|date=October 19, 2015}}</ref>}}
{{History|pocket alpha}}
{{History||v0.4.0|[[File:Mushroom Stew JE1 BE1.png|32px]] Added mushroom stew.}}
{{History||v0.5.0|Mushroom stew now restores {{hp|8}} instead of {{hp|4}}.}}
{{History||v0.9.0|snap=build 1|A mooshroom can now be "milked" with a [[bowl]] to obtain mushroom stew.}}
{{History||v0.12.1|snap=build 1|Mushroom stew now restores [[hunger]] instead of [[health]].}}
{{History|bedrock}}
{{History||1.10.0|snap=beta 1.10.0.3|[[File:Mushroom Stew JE2 BE2.png|32px]] The texture of mushroom stew has now been changed.}}
{{History|console}}
{{History||xbox=TU1|xbone=CU1|ps=1.0|switch=1.0.1|wiiu=Patch 1|[[File:Mushroom Stew JE1 BE1.png|32px]] Added mushroom stew.}}
{{History||xbox=none|xbone=none|ps=1.90|wiiu=none|switch=none|[[File:Mushroom Stew JE2 BE2.png|32px]] The texture of mushroom stew has now been changed.}}
{{History|new3ds}}
{{History||0.1.0|[[File:Mushroom Stew JE1 BE1.png|32px]] Added mushroom stew.}}
{{History|foot}}
== Issues ==
{{Issue list}}
== References ==
{{reflist}}
== External Links ==
*[https://www.minecraft.net/en-us/article/taking-inventory--mushroom-stew Taking Inventory: Mushroom Stew] – Minecraft.net on September 1, 2022
{{items}}
[[de:Pilzsuppe]]
[[es:Estofado de champiñones]]
[[fr:Soupe de champignons]]
[[hu:Gombaragu]]
[[ja:キノコシチュー]]
[[ko:버섯 스튜]]
[[nl:Paddenstoelenstoofpot]]
[[pl:Zupa grzybowa]]
[[pt:Ensopado de cogumelos]]
[[ru:Тушёные грибы]]
[[zh:蘑菇煲]]
[[Category:Food]]
[[Category:Renewable resources]]
<references /></li><li>[[Dye|Dye]]<br/>{{Item
| title = Dyes
| image = White Dye.png
| extratext = View [[#Gallery|all renders]]
| renewable = Yes
| stackable = Yes (64)
}}
'''Dyes''' are a set of sixteen items used to change the color of [[wool]], [[carpet]]s, [[terracotta]], [[concrete powder]], [[glass]], [[shulker box]]es, [[bed]]s, [[candle]]s, the patterns on [[banner]]s, [[firework star]]s, certain mobs, and text on [[sign]]s and [[hanging sign]]s. {{IN|bedrock}} they can also be used to dye water in a [[cauldron]] (which is thereafter used to dye leather [[armor]]); {{in|java}} leather armor can be dyed directly. {{IN|education}} dyes can also be used to dye [[balloon]]s and [[glow stick]]s.
{{IN|bedrock|education}}, [[bone meal]], [[ink sac]]s, [[lapis lazuli]], and [[cocoa bean]]s can generally substitute for [[white dye]], [[black dye]], [[blue dye]], and [[brown dye]], respectively, in crafting recipes and for use in dyeing items or mobs. However, they have other important uses that aren't related to color, and are therefore not considered true dyes. They are mentioned in this article only in regard to their use as dyeing agents; see their individual articles for complete information about them.
[[File:Dye Recipes.png|400px|thumb|A guide for creating all the dyes]]
== Obtaining ==
<!--[[File:Dye Chart.png|350px|thumb|A guide to crafting all the dyes.{{until|java 1.14}}]]-->
Dyes can be produced by crafting them from plants (mainly flowers), by crafting dyes of different colors together, by smelting plants, or by trading with a [[wandering trader]].
{{loadPage|Crafting/Dye|Crafting|h3}}
=== Smelting ===
{{smelting|head=1|Sea Pickle|Lime Dye|0,2}}
{{smelting|foot=1|Cactus|Green Dye|1||b=Lapis Lazuli|c=Any fuel|d=1}}
=== Trading ===
[[Wandering trader]]s can sell 3 dyes for an [[emerald]]. {{IN|bedrock}}, they can also sell 3 lapis lazuli, bone meal, cocoa beans, or ink sacs for one emerald.
Apprentice-level cleric [[villager]]s sell one lapis lazuli per emerald.
=== Chest loot ===
{{#invoke:LootChest|base3|blue-dye,green-dye,orange-dye,light-blue-dye,yellow-dye,white-dye}}
=== Other ===
Ink sacs can also be created using 1 iron, 1 sulfur, and 4 oxygen in the [[compound creator]]. {{only|bedrock|education}}
== Usage ==
Similar to their use in crafting, [[bone meal]], [[ink sac]]s, [[lapis lazuli]], and [[cocoa beans]] can be substituted for the corresponding dye in any of the following usages unless otherwise specified.{{only|bedrock}} <!--- sections are ordered by craftable dyeable blocks, dyeable items, version exclusive sections, and non-crafting miscellaneous uses--->
=== Dyeing wool and mobs ===
Players can dye wool by placing [[wool]] and any dye in a crafting grid.
{{Crafting
|nocat=1
|Any Wool
|Matching Dye
|Output=Any Wool
}}
Dyes can be {{control|use|text=used}} on sheep to change the color of the wool. Shearing a colored sheep drops the corresponding color of the wool, and the sheep retains the color when the wool regenerates. [[Breeding]] colored sheep produces a lamb colored as one of the parent sheep, or a color resulting from the combination of both parents' color. The color combining follows the same rules that dyes use – red and yellow sheep produce an orange lamb, but a blue and yellow sheep cannot create a green lamb. The unlimited reproduction of colored sheep makes dyeing and shearing sheep infinitely more efficient than just dyeing wool directly.
Dye can also be used on a tamed [[wolf]] or [[cat]] to change the color of its collar from the default red to the color of the dye.
=== Dyeing carpets ===
Carpets can be dyed.
{{Crafting
|Any Carpet
|Matching Dye
|Output= Matching Carpet
|type= Building block
}}
=== Dyeing terracotta ===
[[Terracotta]] can be dyed by placing 8 blocks around a dye on a crafting table.
{{Crafting
|nocat=1
|A1=Terracotta |B1=Terracotta |C1=Terracotta
|A2=Terracotta |B2=Matching Dye |C2=Terracotta
|A3=Terracotta |B3=Terracotta |C3=Terracotta
|Output=Matching Dyed Terracotta,8
}}
=== Creating concrete powder ===
Dyes can also be used to craft [[concrete powder]], which can then be set into their respective [[concrete]] blocks (they cannot be dyed directly).
{{Crafting
|nocat=1
|Sand |Gravel |Sand
|Gravel |Matching Dye |Gravel
|Sand |Gravel |Sand
|Output=Matching Concrete Powder,8
}}
=== Staining glass ===
[[Stained glass]] can be stained by placing 8 blocks of glass around a dye on a [[crafting table]]. Just like regular glass, stained glass can be crafted into stained glass panes. The recipe for this is the same as with regular glass.
{{Crafting
|nocat=1
|A1=Glass |B1=Glass |C1=Glass
|A2=Glass |B2=Matching Dye |C2=Glass
|A3=Glass |B3=Glass |C3=Glass
|Output=Matching Stained Glass,8
|head=1
}}
{{Crafting
|nocat=1
|A1= Glass Pane
|B1= Glass Pane
|C1= Glass Pane
|A2= Glass Pane
|B2= Matching Dye
|C2= Glass Pane
|A3= Glass Pane
|B3= Glass Pane
|C3= Glass Pane
|Output= Matching Stained Glass Pane,8
|type= Decoration block
|foot=1
}}
=== Dyeing shulker boxes ===
[[Shulker box]]es are generated in a light shade of purple (like the [[purpur block]]), but can be dyed any color. They can also be re-dyed as often as desired.
{{Crafting
|ignoreusage=1
|showname=1
|Any Shulker Box
|Matching Dye
|Output=Matching Shulker Box
}}
=== Dyeing beds ===
Players can dye beds by placing a [[bed]] and any color dye in a crafting grid.
{{Crafting
|nocat=1
|Any Bed
|Matching Dye
|Output=Matching Bed
}}
=== Dyeing candles ===
Players can dye [[candles]] by placing an undyed candle and any color dye in a crafting grid.
{{Crafting
|ignoreusage=1
|Candle
|Matching Dye
|Output=Matching Dyed Candle
}}
=== Banner patterns ===
{{main|Banner#Patterns}}
Dyes are used in most banner patterns to determine the pattern and color displayed.
=== Dyeing armor ===
[[File:DyeGraph2.png|200px|thumb|A graph showing all combinations of two dyes on a [[tunic]].]]
Leather [[armor]] can be dyed by:
* Crafting dyes with a piece of leather armor or leather [[horse armor]].{{Only|java}}
* Dousing the leather armor or leather [[horse armor]] in a [[cauldron]] to which dyes have been added.{{Only|bedrock}}
There are 5,713,438<ref>https://anrar4.github.io/DyeLeatherArmor/</ref> (34.1% of sRGB) colors leather armor can be, as it is possible to put more than one dye on the crafting bench alongside the leather armor. Armor can be dyed multiple times with previous colors affecting the final outcome. Colored armor can be reverted to their original color using a [[cauldron]] with undyed water.
The game has a specific formula for calculating the color of dyed armor: each color, in the RGB color model, has a red value, green value, and blue value. For each dye in the crafting grid, and the armor itself (if it is already dyed), the red, green, and blue values are added to running totals. In addition, a running total of the highest value (be it red, green, or blue) is also kept. After this, each total is divided by the number of colors used. This effectively produces the average red, green, blue, and maximum values. The maximum value of the average RGB values is also calculated. Finally, each average RGB value is multiplied by the average maximum value and divided by the maximum of the average RGB values. The modified average RGB values are then used as the final color. This procedure can be summed up with the following equations:
for each color (all "total" variables start at 0 before counting):
totalRed = totalRed + redValue
totalGreen = totalGreen + greenValue
totalBlue = totalBlue + blueValue
totalMaximum = totalMaximum + max(redValue, greenValue, blueValue)
numberOfColors = numberOfColors + 1
averageRed = totalRed / numberOfColors
averageGreen = totalGreen / numberOfColors
averageBlue = totalBlue / numberOfColors
averageMaximum = totalMaximum / numberOfColors
maximumOfAverage = max(averageRed, averageGreen, averageBlue)
gainFactor = averageMaximum / maximumOfAverage
resultRed = averageRed * gainFactor
resultGreen = averageGreen * gainFactor
resultBlue = averageBlue * gainFactor
Due to the way this formula works, the resulting color can never be darker than the average of the input colors and is often lighter and more saturated. Of course, the resulting color can never be lighter or more saturated than the lightest or most saturated input color. In addition, this formula never creates an RGB value higher than 255 (which would be invalid in the 8-bit RGB color model).
If leather armor is renamed on an [[anvil]], it retains its name when dyed or undyed.
;Mixing Samples
: {{ItemSprite|Yellow Dye}} + {{ItemSprite|Yellow Dye}} = {{Tint|leather-chestplate| #{{CalcDye| yellow=2 }} | code=1}}
: {{ItemSprite|Red Dye}} + {{ItemSprite|Blue Dye}} + {{ItemSprite|White Dye}} = {{Tint|leather-chestplate| #{{CalcDye| red=1 | blue=1 | white=1}} | code=1}}
: {{ItemSprite|Green Dye}} + {{ItemSprite|Red Dye}} + {{ItemSprite|Pink Dye}} = {{Tint|leather-chestplate| #{{CalcDye| green=1 | red=1 | pink=1}} | code=1}}
=== Dyeing firework stars ===
A [[firework star]] can have a single color or a combination of up to eight colors when crafted with dyes. Adding one or more dyes to a crafted firework star adds a "fade to color" effect to it, overwriting any existing fade colors.
{{Crafting
|head=1
|ignoreusage=1
|ingredients=[[Gunpowder]] +<br>Any Dye (1–8) +<br>Extra ingredient (optional)
|Gunpowder
|Matching Dye
|Diamond;Glowstone Dust;Head;Gold Nugget;Feather;Fire Charge;
|Output=Matching Firework Star
}}
{{Crafting
|ignoreusage=1
|Matching Firework Star
|Any Dye
|Output=Matching Firework Star
|foot=1
}}
=== Creating balloons ===
Dye can be used to craft balloons.{{only|education}}
{{Crafting
|nocat=1
|A1= Latex
|B1= Matching Dye
|C1= Latex
|A2= Latex
|B2= Helium
|C2= Latex
|A3= Latex
|B3= Lead
|C3= Latex
|Output= Matching Balloon
}}
=== Creating glow sticks ===
Dye can also be used to craft glow sticks.{{only|education}}
{{Crafting
|nocat=1
|A1= Polyethylene
|B1= Hydrogen Peroxide
|C1= Polyethylene
|A2= Polyethylene
|B2= Matching Dye
|C2= Polyethylene
|A3= Polyethylene
|B3= Luminol
|C3= Polyethylene
|Output= Matching Glow Stick
}}
=== Dyeing water inside cauldrons ===
Water can be dyed in a cauldron by holding any dye in the hand and pressing {{Ctrl|use}} on a cauldron filled with water.{{only|bedrock}}
=== Signs ===
Dye can be {{control|used}} on a [[sign]] or a [[hanging sign]] to change the text color. {{IN|bedrock}}, [[ink sac]]s cannot be used for this purpose; black dye must be used to change the text to black.
=== Trading ===
Apprentice, journeyman and expert-level shepherd [[villager]]s buy any of the 12 dyes for an [[emerald]].
== Color values ==
The "color codes" are used to determine the color imparted on sheep, wolf and cat collars, firework stars, [[beacon]] beams, and dyed leather armor. The hex value is shown in the extended tooltips of dyed leather armor; however, to set the color using an NBT data tag in a [[command]], the decimal value must be used instead. The color values for firework stars are slightly different from the ones listed below, and use [[Item colors#Firework stars|these values]] instead.
{| class="wikitable" style="margin:2px; border: 1px solid silver; text-align: left;" data-description="Data values"
! rowspan=2 | Description
! colspan=2 style="text-align:center" | Color Code
|-
! Dec
! <abbr title="Hexadecimal color code">Hex</abbr>
|-
| style="text-align:center" | White || 16383998 || {{color|#F9FFFE}}
|-
| style="text-align:center" | Light gray || 10329495 || {{color|#9D9D97}}
|-
| style="text-align:center" | Gray || 4673362 || {{color|#474F52}}
|-
| style="text-align:center" | Black || 1908001|| {{color|#1D1D21}}
|-
| style="text-align:center" | Brown || 8606770 || {{color|#835432}}
|-
| style="text-align:center" | Red || 11546150 || {{color|#B02E26}}
|-
| style="text-align:center" | Orange || 16351261 || {{color|#F9801D}}
|-
| style="text-align:center" | Yellow || 16701501 || {{color|#FED83D}}
|-
| style="text-align:center" | Lime || 8439583 || {{color|#80C71F}}
|-
| style="text-align:center" | Green || 6192150 || {{color|#5E7C16}}
|-
| style="text-align:center" | Cyan || 1481884|| {{color|#169C9C}}
|-
| style="text-align:center" | Light blue || 3847130 || {{color|#3AB3DA}}
|-
| style="text-align:center" | Blue || 3949738 || {{color|#3C44AA}}
|-
| style="text-align:center" | Purple || 8991416 || {{color|#8932B8}}
|-
| style="text-align:center" | Magenta || 13061821 || {{color|#C74EBD}}
|-
| style="text-align:center" | Pink || 15961002 || {{color|#F38BAA}}
|}
== Sounds ==
{{edition|java}}:
{{Sound table
|rowspan=2
|sound=Dye.ogg
|subtitle=Dye stains
|source=block
|description=When dye is used on a [[sign]]
|id=item.dye.use
|translationkey=subtitles.item.dye.use
|volume=1.0
|pitch=1.0/0.9/0.95/1.1
|distance=16}}
{{Sound table
|subtitle=Dye stains
|source=player
|description=When dye is used on a [[sheep]]
|id=item.dye.use
|translationkey=subtitles.item.dye.use
|volume=1.0
|pitch=1.0/0.9/0.95/1.1
|distance=16
|foot=1}}
{{edition|bedrock}}:
{{Sound table
|type=bedrock
|sound=Dye.ogg
|source=sound
|description=When dye is used on a sign
|id=sign.dye.use
|volume=1.0
|pitch=1.0}}
{{Sound table
|rowspan=3
|sound=Water Splash Old.ogg
|source=block
|description=When dye is added to a cauldron
|id=cauldron.adddye
|volume=0.1
|pitch=1.0}}
{{Sound table
|source=block
|description=When armor is dyed using a cauldron
|id=cauldron.dyearmor
|volume=0.1
|pitch=1.0}}
{{Sound table
|source=block
|description=When dye is removed from armor using a cauldron
|id=cauldron.cleanarmor
|volume=0.1
|pitch=1.0
|foot=1}}
== Achievements ==
{{load achievements|Rainbow Collection;Tie dye outfit}}
== Video ==
{{Video note|These videos are outdated, as it does not include details of the [[Java Edition 1.7.2|1.7.2]] update's changes to the dyeing system/production chain.}}
<div style="text-align:center">
<span style="display:inline-block">{{yt|8YD7oauNZHE}}</span>
<span style="display:inline-block">{{yt|7tETaRt7STM}}</span>
</div>
== History ==
{{History|java beta}}
{{History||January 3, 2011|link=https://web.archive.org/web/0/http://notch.tumblr.com/post/2582321901/2011-here-we-go|Notch mentions adding a "paint" feature if he can figure out how.}}
{{History||January 10, 2011<ref group="n">Supposed time when fragment was filmed. Based on modified date of client.jar/gui/trap.png in [[Beta 1.2]].</ref>|link=https://www.youtube.com/watch?v=cBF2ugTzXqQ&t=181s|[[File:Red Dye (pre-release).png|32px]] Shown rose red in development as part of [[Minecraft: The Story of Mojang]].}}
{{History||1.2|[[File:Ink Sac JE1 BE1.png|32px]] [[File:Red Dye JE1 BE1.png|32px]] [[File:Green Dye JE1 BE1.png|32px]] [[File:Cocoa Beans JE1 BE1.png|32px]] [[File:Lapis Lazuli JE1 BE1.png|32px]] [[File:Purple Dye JE1 BE1.png|32px]] [[File:Cyan Dye JE1 BE1.png|32px]] [[File:Light Gray Dye JE1 BE1.png|32px]] [[File:Gray Dye JE1 BE1.png|32px]] [[File:Pink Dye JE1 BE1.png|32px]] [[File:Lime Dye JE1 BE1.png|32px]] [[File:Yellow Dye JE1 BE1.png|32px]] [[File:Light Blue Dye JE1 BE1.png|32px]] [[File:Magenta Dye JE1 BE1.png|32px]] [[File:Orange Dye JE1 BE1.png|32px]] [[File:Bone Meal JE1 BE1.png|32px]] Added dyes.
|[[File:Black Dye (Recreated).png|32px]] [[File:Red Dye (pre-release).png|32px]] [[File:Green Dye (Recreated).png|32px]] [[File:Brown Dye (Recreated).png|32px]] [[File:Blue Dye (Recreated).png|32px]] [[File:Purple Dye (Recreated).png|32px]] [[File:Cyan Dye (Recreated).png|32px]] [[File:Light Gray Dye (Recreated).png|32px]] [[File:Gray Dye (Recreated).png|32px]] [[File:Pink Dye (Recreated).png|32px]] [[File:Lime Dye (Recreated).png|32px]] [[File:Yellow Dye (Recreated).png|32px]] [[File:Light Blue Dye (Recreated).png|32px]] [[File:Magenta Dye (Recreated).png|32px]] [[File:Orange Dye (Recreated).png|32px]] [[File:White Dye (Recreated).png|32px]] Leftovers of old textures can be seen in [[items.png]] with 100% opacity. The white dye texture was reused for [[Sugar]].
| The colors were as follows:{{verify|Did the color codes remain the same between Beta 1.2 and Java 1.11.2?}}
{{:Color/Java Edition dye colors before 17w06a}}
}}
{{History|java}}
{{History||1.1|snap=11w49a|[[Sheep]] can now regrow their [[wool]] by eating [[grass block|grass]]. Dyed sheep regrow wool in their new color.}}
{{History||1.3.1|snap=12w19a|[[File:Cocoa Beans JE2.png|32px]] The texture of [[cocoa beans]] has been changed.}}
{{History|||snap=1.3|[[File:bone meal changes.gif|32px]] The textures of [[bone meal]], [[cactus green]], cocoa beans and [[rose red]] have been changed. The textures have been lowered one pixel.}}
{{History||1.4.2|snap=12w34a|Added the ability to dye leather [[armor]] and [[wolf]] collars.}}
{{History||1.4.4|snap=1.4.3|Color codes have been changed. The colors of red, brown, blue, purple, cyan, pink, light blue, magenta and orange were adjusted a little vividly.}}
{{History||1.6.1|snap=13w19a|[[Stained clay]] can now be crafted using dyes.}}
{{history||1.7.2|snap=13w36a|With the addition of new [[flower]]s, many secondary and tertiary dyes are now primary dyes.}}
{{History|||snap=13w41a|[[Stained glass]] can now be crafted using dyes.}}
{{History||1.8|snap=14w02a|As cleric [[villager]]s now sell lapis lazuli, all dyes have become fully renewable.}}
{{History|||snap=14w30a|Added [[banner]]s, which can be dyed.}}
{{History||1.9|snap=15w34a|Added [[shield]]s, which can be dyed indirectly by applying a matching [[banner]].}}
{{History||1.11|snap=16w39b|Dyes are now used to change the color of [[shulker box]]es.}}
{{History||1.12|snap=17w06a|Dyes are now used to craft [[concrete powder]].
|Color codes have been changed. All colors are adjusted more vividly. The changes were as follows:
{{:Color/Java Edition dye color changes in 17w06a}}
|Light blue dye, stained glass, and stained glass panes, did not change colors in this update. This means that they still use old colors.<ref name="unchanged dyes">{{Bug|MC-214643}}<br>{{Bug|MC-214641}}</ref>
}}
{{History|||snap=17w15a|Dyes can now apply color to white [[bed]]s.}}
{{History||1.13|snap=17w47a|The different data values for the <code>dye</code> ID have been split up into their own IDs.}}
{{History||1.14|snap=18w43a|[[Bone meal]], [[ink sac]]s, [[cocoa beans]] and [[lapis lazuli]] are no longer considered dyes.
|[[File:White Dye JE1 BE1.png|32px]] [[File:Black Dye JE1 BE1.png|32px]] [[File:Brown Dye JE1 BE1.png|32px]] [[File:Blue Dye JE1 BE1.png|32px]] Added [[white dye|white]], [[black dye|black]], [[brown dye|brown]] and [[blue dye]]s.
|"Rose Red", "Dandelion Yellow" and "Cactus Green" have been renamed to "Red Dye", "Yellow Dye" and "Green Dye", respectively.
|[[Glass pane]]s and [[carpet]]s can now be dyed.
|[[File:Light Gray Dye JE2 BE2.png|32px]] [[File:Gray Dye JE2 BE2.png|32px]] [[File:Red Dye JE2 BE2.png|32px]] [[File:Orange Dye JE2 BE2.png|32px]] [[File:Yellow Dye JE2 BE2.png|32px]] [[File:Lime Dye JE2 BE2.png|32px]] [[File:Green Dye JE2 BE2.png|32px]] [[File:Cyan Dye.png|32px]] [[File:Light Blue Dye JE2 BE2.png|32px]] [[File:Purple Dye JE2 BE2.png|32px]] [[File:Magenta Dye JE2 BE2.png|32px]] [[File:Pink Dye JE2 BE2.png|32px]] The textures of light gray, gray, red, orange, yellow, lime, green, cyan, light blue, purple, magenta, and pink dyes, have been changed. The color texture for light blue dye was not changed to reflect the updated colors from 1.12.<ref name="unchanged dyes"></ref>}}
{{History|||snap=18w44a|The color of the text on [[sign]]s can now be changed with dye.}}
{{History|||snap=18w49a|Yellow dyes can now be found in [[chest]]s in [[village]] mason houses.}}
{{History|||snap=18w50a|Green dyes can now be found in [[chest]]s in [[desert]] [[village]] houses.}}
{{History|||snap=19w05a|Added the [[wandering trader]], which can sell any type of dye.}}
{{History|||snap=19w11a|All 16 types of dyes can now be [[trading|bought]] by shepherd villagers.}}
{{History||1.16.2|snap=Pre-release 2|Reversed the order of dyes to match other colored items in the [[Creative inventory]].<ref name="reverse dye">{{Bug|MC-136553}}</ref>
|Regrouped dyes in the Creative inventory such that white, blue, brown, and black dyes are within and not [[cocoa beans]], [[ink sacs]], [[lapis lazuli]], and [[bone meal]].<ref name="regroup dye">{{Bug|MC-177684}}</ref>}}
{{History||1.17|snap=20w45a|Added [[candle]]s, which can be dyed.}}
{{History|||snap=21w03a|Added a sound for applying dyes.}}
{{History|||snap=21w19a|Candles can no longer be dyed.}}
{{History|||snap=Pre-release 1|Candles can now once again be dyed.}}
{{History||1.20<br>(Experimental)|link=1.19.3|snap=22w42a|The color of the text on [[hanging sign]]s can now be changed with dye.}}
{{History||1.20<br>(Experimental)|link=1.19.4|snap=23w07a|[[Torchflower]]s can now be crafted into orange dye.|[[Pink petals]] can now be crafted into pink dye.}}
{{History||1.20|snap=23w12a|[[Pitcher plant]]s can now be crafted into cyan dye.|Blue, light blue, orange, white, and yellow dye can now be found in [[suspicious gravel]] and [[suspicious sand]] in [[trail ruins]].}}
{{History|||snap=23w14a|Pitcher plants can now craft two [[cyan dye]] instead of one.}}
{{History|||snap=23w16a|Blue, light blue, orange, white, and yellow dye no longer generates in [[suspicious sand]] in [[trail ruins]].|Due to the split of the archaeological loot tables for the suspicious gravel within the [[trail ruins]]; blue, light blue, orange, white, and yellow dye now are in the common loot.}}
{{History|pocket alpha}}
{{History||v0.3.0|[[File:Bone Meal JE1 BE1.png|32px]] [[File:Light Gray Dye JE1 BE1.png|32px]] [[File:Gray Dye JE1 BE1.png|32px]] [[File:Ink Sac JE1 BE1.png|32px]] [[File:Cocoa Beans JE1 BE1.png|32px]] [[File:Red Dye JE1 BE1.png|32px]] [[File:Orange Dye JE1 BE1.png|32px]] [[File:Yellow Dye JE1 BE1.png|32px]] [[File:Lime Dye JE1 BE1.png|32px]] [[File:Green Dye JE1 BE1.png|32px]] [[File:Cyan Dye JE1 BE1.png|32px]] [[File:Light Blue Dye JE1 BE1.png|32px]] [[File:Lapis Lazuli JE1 BE1.png|32px]] [[File:Purple Dye JE1 BE1.png|32px]] [[File:Magenta Dye JE1 BE1.png|32px]] [[File:Pink Dye JE1 BE1.png|32px]] Added dyes. Only [[dandelion yellow]] and [[lapis lazuli]] are currently obtainable and have functionality.}}
{{History||v0.3.2|[[Cactus green]] is now obtainable by smelting [[cacti]].}}
{{History||v0.3.3|[[Bone meal]] is now obtainable via [[crafting]].}}
{{History||v0.4.0|[[Cyan dye]], [[light blue dye]], [[lime dye]], [[magenta dye]], [[orange dye]], [[pink dye]], and [[purple dye]] are now obtainable via crafting.
|[[Rose red]] is now obtainable by smelting red [[mushroom]]s.
|All available dyes, excluding bone meal, can now be used to craft their respective [[wool]] color.}}
{{History||v0.8.0|snap=build 1|[[File:Cocoa Beans JE3 BE2.png|32px]] The texture of cocoa beans has been changed.}}
{{History|||snap=build 3|[[Ink sac]]s, [[cocoa bean]]s, [[gray dye]], and [[light gray dye]] are now available in the [[creative]] [[inventory]].
|Rose red can now be obtained from [[beetroot]]s.}}
{{History||v0.9.0|snap=build 1|Cocoa beans can now be obtained from [[cocoa pod]]s.
|The [[rose]] has been removed and replaced with a new poppy [[flower]] that can be crafted into rose red.}}
{{History|||snap=build 3|All new [[flower]]s can now be [[crafting|crafted]] into dyes. Because of this, many secondary and tertiary dyes are now primary dyes.
|[[Gray dye]] and [[light gray dye]] can now be obtained in [[survival]].}}
{{History|||snap=build 11|[[Terracotta|Stained clay]] can now be crafted using dyes.}}
{{History||v0.11.0|snap=build 1|[[Ink sac]]s can now be obtained from [[squid]].
|Added the ability to dye [[wolf]] collars.}}
{{History||v0.12.1|snap=build 1|Red [[mushroom]]s can no longer be smelted to obtain [[rose red]].}}
{{History||v0.14.0|snap=build 1|[[Cauldron]]s now used for leather dyeing, by applying a dye to a [[water]]-filled cauldron.}}
{{History||v0.16.0|snap=build 1|[[Cocoa bean]]s can no longer be crafted.}}
{{History|pocket}}
{{History||1.0.0|snap=alpha 0.17.0.1|Added a ''Dye'' button for [[sheep]].
|Added [[shulker]]s, which can be dyed.
|Added [[stained glass]]. Stain glass cannot be [[crafting|crafted]], but purple glass generates in [[end city|end cities]].}}
{{History||1.1.0|snap=alpha 1.1.0.0|Dyes can now apply color to a white [[bed]]s.
|Dyes are now used to craft [[concrete powder]].
|The color palette has been changed.}}
{{History|bedrock}}
{{History||1.2.0|snap=beta 1.2.0.2|Dyes can now be used for [[banner]] crafting.
|Dyes can now be used to craft [[firework star]]s.
|[[Stained glass]] is now [[crafting|craftable]], using dyes.}}
{{History||1.4.0|snap=beta 1.2.20.1|[[Lime dye]] can now be obtained from smelting [[sea pickle]]s.
|Dyes can now used to craft [[glow stick]]s and [[balloon]]s.}}
{{History||1.8.0|snap=beta 1.8.0.8|Dyes can now be used to dye [[cat]] collars.}}
{{History|||snap=beta 1.8.0.10|[[File:White Dye JE1 BE1.png|32px]] [[File:Black Dye JE1 BE1.png|32px]] [[File:Brown Dye JE1 BE1.png|32px]] [[File:Blue Dye JE1 BE1.png|32px]] Added [[white dye|white]], [[brown dye|brown]], [[black dye|black]] and [[blue dye]]s, which can be crafted from [[lapis lazuli]], [[bone meal]], [[cocoa beans]] and [[ink sac]]s. This, however, the later four still use as dyes.<ref>{{Bug|MCPE-42473}}</ref>
|"Rose Red", "Dandelion Yellow" and "Cactus Green" have been renamed to "Red Dye", "Yellow Dye" and "Green Dye", respectively.}}
{{History||1.9.0|snap=beta 1.9.0.0|Blue and white dye can now be obtained from [[cornflower]]s and [[lily of the valley]]s.}}
{{History||1.10.0|snap=beta 1.10.0.3|[[Glass pane]]s and [[carpet]]s can now be dyed.
|Only a single dye is now required to apply a banner pattern in a [[loom]].
|Various dyes except black dye, white dye, brown dye and blue dye are now [[trading|sold]] by [[wandering trader]]s.
|[[File:Bone Meal JE2 BE2.png|32px]] [[File:Light Gray Dye JE2 BE2.png|32px]] [[File:Gray Dye JE2 BE2.png|32px]] [[File:Ink Sac JE2 BE2.png|32px]] [[File:Cocoa Beans JE4 BE3.png|32px]] [[File:Red Dye JE3 BE3.png|32px]] [[File:Orange Dye JE2 BE2.png|32px]] [[File:Yellow Dye JE2 BE2.png|32px]] [[File:Lime Dye JE2 BE2.png|32px]] [[File:Green Dye JE2 BE2.png|32px]] [[File:Cyan Dye.png|32px]] [[File:Light Blue Dye JE2 BE2.png|32px]] [[File:Lapis Lazuli JE2 BE2.png|32px]] [[File:Purple Dye JE2 BE2.png|32px]] [[File:Magenta Dye JE2 BE2.png|32px]] [[File:Pink Dye JE2 BE2.png|32px]] The textures of bone meal, light gray, gray, ink sac, cocoa beans, red, orange, yellow, lime, green, cyan, light blue, lapis lazuli, purple, magenta, and pink dyes have been changed.}}
{{History||1.11.0|snap=beta 1.11.0.4|Dye can now be [[trading|sold]] to shepherd [[villager]]s.}}
{{History||1.16.210|snap=beta 1.16.210.59|The color of the text on [[sign]]s can now be changed with dye.}}
{{History|||snap=beta 1.16.210.60|The ability to dye the color of the text on [[sign]]s was temporarily removed.}}
{{History||1.16.220|snap=beta 1.16.220.50|The color of the text on [[sign]]s can now be changed with dye again.}}
{{History||1.17.10|snap=beta 1.17.10.22|Added [[candles]], which can be dyed.}}
{{History|console}}
{{History||xbox=TU1|xbone=CU1|ps=1.0|wiiu=Patch 1|switch=1.0.1|[[File:Bone Meal JE1 BE1.png|32px]] [[File:Light Gray Dye JE1 BE1.png|32px]] [[File:Gray Dye JE1 BE1.png|32px]] [[File:Ink Sac JE1 BE1.png|32px]] [[File:Cocoa Beans JE1 BE1.png|32px]] [[File:Red Dye JE1 BE1.png|32px]] [[File:Orange Dye JE1 BE1.png|32px]] [[File:Yellow Dye JE1 BE1.png|32px]] [[File:Lime Dye JE1 BE1.png|32px]] [[File:Green Dye JE1 BE1.png|32px]] [[File:Cyan Dye JE1 BE1.png|32px]] [[File:Light Blue Dye JE1 BE1.png|32px]] [[File:Lapis Lazuli JE1 BE1.png|32px]] [[File:Purple Dye JE1 BE1.png|32px]] [[File:Magenta Dye JE1 BE1.png|32px]] [[File:Pink Dye JE1 BE1.png|32px]] Added dyes.}}
{{History||xbox=TU9|[[File:Cocoa Beans JE3 BE2.png|32px]] The texture of cocoa beans has been changed.}}
{{History||xbox=none|xbone=none|ps=1.83|wiiu=none|switch=none|[[File:White Dye JE1 BE1.png|32px]] [[File:Black Dye JE1 BE1.png|32px]] [[File:Brown Dye JE1 BE1.png|32px]] [[File:Blue Dye JE1 BE1.png|32px]] Added [[white dye|white]], [[black dye|black]], [[brown dye|brown]], and [[blue dye|blue]] dyes, which can crafted from [[bone meal]], [[ink sac]], [[cocoa beans]], and [[lapis lazuli]].
|"Rose Red", "Dandelion Yellow" and "Cactus Green" have been renamed to "Red Dye", "Yellow Dye" and "Green Dye", respectively.}}
{{History||ps=1.90|[[File:Bone Meal JE2 BE2.png|32px]] [[File:Light Gray Dye JE2 BE2.png|32px]] [[File:Gray Dye JE2 BE2.png|32px]] [[File:Ink Sac JE2 BE2.png|32px]] [[File:Cocoa Beans JE4 BE3.png|32px]] [[File:Red Dye JE2 BE2.png|32px]] [[File:Orange Dye JE2 BE2.png|32px]] [[File:Yellow Dye JE2 BE2.png|32px]] [[File:Lime Dye JE2 BE2.png|32px]] [[File:Green Dye JE2 BE2.png|32px]] [[File:Cyan Dye.png|32px]] [[File:Light Blue Dye JE2 BE2.png|32px]] [[File:Lapis Lazuli JE2 BE2.png|32px]] [[File:Purple Dye JE2 BE2.png|32px]] [[File:Magenta Dye JE2 BE2.png|32px]] [[File:Pink Dye JE2 BE2.png|32px]] The textures of bone meal, light gray, gray, ink sac, cocoa beans, red, orange, yellow, lime, green, cyan, light blue, lapis lazuli, purple, magenta, and pink dyes have been changed.}}
{{History|3ds}}
{{History||0.1.0|[[File:Bone Meal JE1 BE1.png|32px]] [[File:Light Gray Dye JE1 BE1.png|32px]] [[File:Gray Dye JE1 BE1.png|32px]] [[File:Ink Sac JE1 BE1.png|32px]] [[File:Cocoa Beans JE3 BE2.png|32px]] [[File:Red Dye JE1 BE1.png|32px]] [[File:Orange Dye JE1 BE1.png|32px]] [[File:Yellow Dye JE1 BE1.png|32px]] [[File:Lime Dye JE1 BE1.png|32px]] [[File:Green Dye JE1 BE1.png|32px]] [[File:Cyan Dye JE1 BE1.png|32px]] [[File:Light Blue Dye JE1 BE1.png|32px]] [[File:Lapis Lazuli JE1 BE1.png|32px]] [[File:Purple Dye JE1 BE1.png|32px]] [[File:Magenta Dye JE1 BE1.png|32px]] [[File:Pink Dye JE1 BE1.png|32px]] Added dyes from [[Pocket Edition v0.15.4 alpha]].}}
{{History|foot}}
<gallery>
Pre-release dyes.png|Pre-release dye textures hidden within [[Items.png]].
</gallery>
;Notes
{{reflist|group=n}}
== Gallery ==
<gallery>
White Dye.png|White Dye
Light Gray Dye.png|Light Gray Dye
Gray Dye.png|Gray Dye
Black Dye.png|Black Dye
Brown Dye.png|Brown Dye
Red Dye.png|Red Dye
Orange Dye.png|Orange Dye
Yellow Dye.png|Yellow Dye
Lime Dye.png|Lime Dye
Green Dye.png|Green Dye
Cyan Dye.png|Cyan Dye
Light Blue Dye.png|Light Blue Dye
Blue Dye.png|Blue Dye
Purple Dye.png|Purple Dye
Magenta Dye.png|Magenta Dye
Pink Dye.png|Pink Dye
</gallery>
==Issues==
{{issue list}}
== Trivia ==
* Players can obtain each one of every color with 1 cocoa bean, 2 yellow dye, 2 ink sac, 3 green dye, 4 lapis lazuli, 4 red dye, and 6 bone meal (2 bones).
* The dyed sheep breeding behavior mirrors [[wikipedia:Lamarckism|Lamarck's theory]], in which the organisms evolve inheriting the external changes and adaptations of the previous generation, transmitting them to their offspring.
* In ''Bedrock Edition'', tertiary colors, along with their regular crafting recipes, can be crafted with primary colors. E.g.: Magenta can be crafted with one rose red and two bone meals.
* The colors of the dyes match the chat colors in [[color codes]] except for brown (dye only), light aqua, and gold (color codes only).
* The texture for light blue dye still uses the color from prior to the 1.12 World of Color update.<ref name="unchanged dyes"></ref>
== References ==
{{reflist}}
== External Links ==
* Tools for calculating leather dye combination: [https://minecraft.tools/en/armor.php minecraft.tools] (webapp); [https://github.com/pudquick/pyMCdyes/ pyMCDyes] (open-source Python script, outdated); [https://anrar4.github.io/DyeLeatherArmor/ DyeLeatherArmor]: a tool for calculating an exact crafting recipe for any sRGB color
{{Items}}
[[Category:Dyes]]
[[Category:Renewable resources]]
[[cs:Barvivo]]
[[de:Farbstoff]]
[[es:Tinte]]
[[fr:Teinture]]
[[hu:Színezés]]
[[it:Colorante]]
[[ja:染料]]
[[ko:염료]]
[[nl:Kleurstof]]
[[pl:Barwniki]]
[[pt:Corante]]
[[ru:Красители]]
[[th:สีย้อม]]
[[uk:Барвники]]
[[zh:染料]]</li></ul> | Beta 1.9 Prerelease 2 | Added Hardcore mode. | |||
1.1{{Extension DPL}}<ul><li>[[Raw Iron|Raw Iron]]<br/>{{Item
| image = Raw Iron.png
| renewable = No
| stackable = Yes (64)
}}
'''Raw iron''' is a raw metal resource obtained from mining [[iron ore]].
== Obtaining ==
=== Mining ===
[[Iron ore]] and [[deepslate iron ore]] mined with a [[stone pickaxe]] or higher drops 1 unit of raw iron. If the pickaxe is enchanted with [[Fortune]], it can drop an extra unit per level of Fortune, allowing for a maximum of 4 with Fortune III. If the ore is mined using a pickaxe enchanted with [[Silk Touch]], it drops the ore block instead.
=== Crafting ===
{{Crafting
|showname=1
|Block of Raw Iron
|Output=Raw Iron,9
|type=Material
|foot=1
}}
== Usage ==
The primary usage of raw iron is smelting it into [[iron ingot]]s.
=== Crafting ===
{{crafting usage}}
=== Smelting ingredient ===
{{Smelting
|showname=2
|Raw Iron
|Iron Ingot
|0.7
}}
== Data values ==
=== ID ===
{{edition|java}}:
{{ID table
|edition=java
|showitemtags=y
|showforms=y
|generatetranslationkeys=y
|displayname=Raw Iron
|spritetype=item
|nameid=raw_iron
|form=item
|foot=1}}
{{edition|bedrock}}:
{{ID table
|edition=bedrock
|shownumericids=y
|showforms=y
|notshowbeitemforms=y
|generatetranslationkeys=y
|displayname=Raw Iron
|spritetype=item
|nameid=raw_iron
|form=item
|id=505
|foot=1}}
== History ==
{{History|java}}
{{History||1.17|snap=21w14a|[[File:Raw Iron JE1.png|32px]] Added raw iron.}}
{{History|||snap=April 13, 2021|slink={{Tweet|JasperBoerstra|1381991999952277513}}|[[File:Raw Iron JE2.png|32px]] [[JAPPA]] shows a new raw iron texture.}}
{{History|||snap=21w15a|[[File:Raw Iron JE2.png|32px]] The texture of raw iron has been changed.
|Raw iron can now be used to craft [[block of raw iron]].}}
{{History|||snap=April 16, 2021|slink={{Tweet|JasperBoerstra|1383047666037325829}}|[[File:Raw Iron (pre-release).png|32px]] [[JAPPA]] shows a new raw iron texture again.}}
{{History|||snap=21w16a|[[File:Raw Iron JE3.png|32px]] The texture of raw iron has been changed.}}
{{History|Bedrock}}
{{History||1.17.0|snap=beta 1.17.0.50|[[File:Raw Iron JE2.png|32px]] Added raw iron.}}
{{History|||snap=beta 1.17.0.52|Raw iron are now available without enabling [[experimental gameplay]].}}
{{History|||snap=beta 1.17.0.54|[[File:Raw Iron JE3.png|32px]] The texture of raw iron has been changed.}}
{{History|foot}}
== Issues ==
{{Issue list}}
==Gallery==
<gallery>
JE 1.17 Dev Raw Metals.jpg|Jappa shows raw ore textures.
Jappa Raw Ores 1.jpg|Jappa shows raw ore textures.
Jappa Raw Ores 2.png|Jappa shows raw ore textures.
Jappa Raw Ores 3.jpg|Jappa shows raw ore textures.
Jappa Raw Ores 4.jpg|Jappa shows raw ore textures.
Jappa Raw Ores 5.jpg|Jappa shows raw ore textures.
</gallery>
{{Items}}
[[Category:Non-renewable resources]]
[[de:Roheisen]]
[[es:Hierro en bruto]]
[[fr:Fer brut]]
[[it:Ferro grezzo]]
[[ja:鉄の原石]]
[[lzh:砂鐵]]
[[pl:Surowe żelazo]]
[[pt:Ferro bruto]]
[[ru:Необработанное железо]]
[[uk:Необроблене залізо]]
[[zh:粗铁]]</li><li>[[Sugar|Sugar]]<br/>{{Item
| image = Sugar.png
| renewable = Yes
| stackable = Yes (64)
}}
'''Sugar''' is a [[food]] ingredient and [[brewing]] ingredient made from [[sugar canes]].
== Obtaining ==
=== Mob loot ===
[[Witch]]es have a chance of dropping 0–2 sugar upon death. This is increased by 1 per level of [[Looting]], for a maximum of 0–5 sugar.
=== Crafting ===
{{Crafting
|head= 1
|Sugar Cane
|Output= Sugar
|type= Material
}}
{{Crafting
|Honey Bottle
|Output= Sugar, 3
|type= Material
|foot= 1
}}
=== Compound creation ===
Sugar can be created from its base [[element]]s, using the [[compound creator]].{{only|bedrock|education}}
{| class="wikitable"
!Name
!Elements
!Example recipe
|- <!-- Temporarily using crafting grid as a substitute for the compound creator (template not yet available), since the layout is the same, even if the appearance is different -->
!Sugar
|6 Carbon<br>12 Hydrogen<br>6 Oxygen
|{{Crafting Table
|shapeless= 1
|A2=Carbon,6 |B2=Hydrogen,12 |C2=Oxygen,6
|Output=Sugar}}
|}
== Usage ==
=== Crafting ingredient ===
{{crafting usage}}
=== Brewing ingredient ===
{{Brewing
|head=1
|Sugar
|Mundane Potion
|base=Water Bottle
}}
{{brewing
|foot=1
|showname=1
|Sugar
|Potion of Swiftness
}}
=== Horses ===
Sugar can be fed to [[horse]]s to heal {{hp|1}}, speed growth by 30 seconds, and increase taming probability by 3%.
== Achievements ==
{{load achievements|The Lie}}
== Data values ==
=== ID ===
{{edition|java}}:
{{ID table
|edition=java
|showforms=y
|generatetranslationkeys=y
|displayname=Sugar
|spritetype=item
|nameid=sugar
|form=item
|foot=1}}
{{edition|bedrock}}:
{{ID table
|edition=bedrock
|notshowbeitemforms=y
|shownumericids=y
|showforms=y
|generatetranslationkeys=y
|displayname=Sugar
|spritetype=item
|nameid=sugar
|id=416
|form=item
|foot=1}}
== Video ==
<div style="text-align:center">{{yt|DnMFkmC7BxE}}</div>
== History ==
{{History|java beta}}
{{History||1.2|[[File:Sugar JE1 BE1.png|32px]] Sugar has been introduced as an ingredient for [[cake]].}}
{{History|java}}
{{History||1.0.0|snap=Beta 1.9 Prerelease 2|Sugar is now used to craft [[fermented spider eye]]s.}}
{{History|||snap=Beta 1.9 Prerelease 3|Sugar can now be [[brewing|brewed]] in a [[water bottle]] to create a [[Mundane Potion]], or in an [[Awkward Potion]] to create a [[Potion of Swiftness]].}}
{{History||1.4.2|snap=12w37a|Sugar is now used to make [[pumpkin pie]].}}
{{History|||snap=12w38b|[[Witch]]es can now [[drops|drop]] sugar.}}
{{History||1.13|snap=17w47a|Prior to [[1.13/Flattening|''The Flattening'']], this [[item]]'s numeral ID was 353.}}
{{History||1.14|snap=18w43a|[[File:Sugar JE2 BE2.png|32px]] The texture of sugar has been changed.}}
{{History||1.15|snap=19w34a|Sugar can now can be created using 1 [[honey bottle]].}}
{{History|pocket alpha}}
{{History||v0.2.0|[[File:Sugar JE1 BE1.png|32px]] Added sugar. It is currently unobtainable and serves no purpose.}}
{{History||v0.3.0|Sugar is now [[craft]]able using [[sugar cane]].}}
{{History||v0.7.0|Sugar is now used to craft [[cake]].}}
{{History||v0.8.0|snap=build 1|Sugar is now used to craft [[pumpkin pie]].}}
{{History||v0.12.1|snap=build 1|Sugar has been added to the [[creative]] [[inventory]].|Sugar is now used to craft [[fermented spider eye]]s.
|Sugar can now be used for [[brewing]], to get mundane [[potion]]s and potions of [[Swiftness]].}}
{{History||v0.14.0|snap=build 1|Added [[witch]]es, which can [[drops|drop]] sugar upon [[death]].}}
{{History||v0.15.0|snap=build 1|Sugar can now be used to feed [[horse]]s, which can increase their temper, heal them, and speed up the growth of foals.}}
{{History|bedrock}}
{{History||1.4.0|snap=beta 1.2.20.1|Sugar can now be created using 6 Carbon, 12 Hydrogen, and 6 Oxygen in the [[compound creator]].}}
{{History||1.10.0|snap=beta 1.10.0.3|[[File:Sugar JE2 BE2.png|32px]] The texture of sugar has been changed.}}
{{History||1.14.0|snap=beta 1.14.0.1|Sugar can now be created using 1 [[honey bottle]].}}
{{History|console}}
{{History||xbox=TU1|xbone=CU1|ps=1.0|wiiu=Patch 1|switch=1.0.1|[[File:Sugar JE1 BE1.png|32px]] Added sugar.
|Sugar is used to craft [[cake]].}}
{{History||xbox=TU7|Sugar is now used to craft [[fermented spider eye]]s.|Sugar can now be [[brewing|brewed]] in a [[water bottle]] to create a [[Mundane Potion]], or in an [[Awkward Potion]] to create a [[Potion of Swiftness]].}}
{{History||xbox=TU14|ps=1.04|Sugar is now used to make [[pumpkin pie]].}}
{{History||xbox=TU19|xbone=CU7|ps=1.12|wiiu=Patch 1|switch=1.0.1|[[Witch]]es can now [[drops|drop]] sugar.}}
{{History||xbox=none|xbone=none|ps=1.90|wiiu=none|switch=none|[[File:Sugar JE2 BE2.png|32px]] The texture of sugar has been changed.}}
{{History|New 3DS}}
{{History||0.1.0|[[File:Sugar JE1 BE1.png|32px]] Added sugar.}}
{{History|foot}}
== Issues ==
{{issue list}}
== External Links ==
*[https://www.minecraft.net/en-us/article/taking-inventory--sugar Taking Inventory: Sugar] – Minecraft.net on January 27, 2022
{{Items}}
[[cs:Cukr]]
[[de:Zucker]]
[[es:Azúcar]]
[[fr:Sucre]]
[[hu:Cukor]]
[[it:Zucchero]]
[[ja:砂糖]]
[[ko:설탕]]
[[nl:Suiker]]
[[pl:Cukier]]
[[pt:Açúcar]]
[[ru:Сахар]]
[[th:น้ำตาล]]
[[uk:Цукор]]
[[zh:糖]]
[[Category:Renewable resources]]
[[Category:Brewing recipe]]</li></ul> | 12w01a | Re-added world types to the world creation screen. | |||
| Added the Superflat world type. | |||||
1.3.1{{Extension DPL}}<ul><li>[[Spider Eye|Spider Eye]]<br/>{{Item
| title = Spider Eye
| image = Spider Eye.png
| renewable = Yes
| heals = {{Hunger|2}}
|effects={{EffectLink|Poison}} (0:05)
| stackable = Yes (64)
}}
A '''spider eye''' is a poisonous [[food]] and [[brewing]] item.
== Obtaining ==
=== Mob loot ===
==== Spiders ====
[[Spider]]s and [[cave spider]]s have a {{frac|1|3}} chance of dropping a [[spider eye]] when killed by a player or tamed wolf, but not when killed by environmental damage (such as falling). The maximum amount of spider eyes is increased by 1 per level of [[Looting]]. The chance of a spider '''not''' dropping any spider eyes can be found using the formula <code>2 / (Looting Level + 3)</code>. For example, Looting III gives a {{frac|1|3}} chance of not dropping any spider eyes. All other amounts have an equal chance of occurring.
==== Witches ====
[[Witch]]es have a chance of dropping 0–6 spider eyes upon death. This is increased by 3 per level of [[Looting]], for a maximum of 0-15 spider eyes.
=== Chest loot ===
{{LootChestItem|spider-eye}}
== Usage ==
=== Food ===
When [[Food|eaten]], a spider eye restores {{hunger|2}} [[Hunger|hunger points]] and 3.2 [[Hunger#Mechanics|saturation points]], giving a nourishment value of 1.6. It also applies a [[Poison]] [[effect]] lasting 5 seconds to the player, causing {{hp|4|poisoned=1}} damage, which reduces hunger/saturation by 6 points.
=== Crafting ingredient ===
{{crafting usage}}
=== Brewing ingredient ===
{{brewing
|showname=1
|head=1
|Spider Eye
|Mundane Potion
|base=Water Bottle
}}
{{brewing
|foot=1
|Spider Eye
|Potion of Poison
}}
==Sounds==
{{Sound table/Entity/Food}}
== Data values ==
=== ID ===
{{edition|java}}:
{{ID table
|edition=java
|showforms=y
|generatetranslationkeys=y
|displayname=Spider Eye
|spritetype=item
|nameid=spider_eye
|form=item
|foot=1}}
{{edition|bedrock}}:
{{ID table
|edition=bedrock
|shownumericids=y
|showforms=y
|notshowbeitemforms=y
|generatetranslationkeys=y
|displayname=Spider Eye
|spritetype=item
|nameid=spider_eye
|id=278
|form=item
|foot=1}}
== Advancements ==
{{load advancements|Husbandry;A Balanced Diet}}
== Video ==
<div style="text-align:center">{{yt|-PD-wX07TCg}}</div>
== History ==
{{History|java}}
{{History||1.0.0|snap=Beta 1.9 Prerelease 2|[[File:Spider Eye JE1 BE1.png|32px]] Added spider eyes.
|Spider eyes can be used to craft [[fermented spider eye]]s.}}
{{History|||snap=Beta 1.9 Prerelease 3|Spider eyes can now be [[brewing|brewed]] in a [[water bottle]] to create a [[Mundane Potion]], or in an [[Awkward Potion]] to create a [[Potion of Poison]].}}
{{History||1.4.2|snap=12w38b|Spider eyes can now be dropped by [[witch]]es.}}
{{History||1.9|snap=15w44a|Spider eyes can now be found in [[desert pyramid|desert temple]] [[chest]]s.}}
{{History||1.13|snap=17w47a|Prior to [[1.13/Flattening|''The Flattening'']], this [[item]]'s numeral ID was 375.}}
{{History||1.14|snap=18w43a|[[File:Spider Eye JE2 BE2.png|32px]] The texture of spider eyes has been changed.}}
{{History|pocket alpha}}
{{History||v0.12.1|snap=build 1|[[File:Spider Eye JE1 BE1.png|32px]] Added spider eyes.|Spider eyes can be used to craft [[fermented spider eye]]s and for [[brewing]].}}
{{History||v0.13.0|snap=build 1|Spider eyes can now be found in [[desert pyramid|desert temple]] [[chest]]s.}}
{{History||v0.14.0|snap=build 1|Spider eyes can now dropped by [[witch]]es.}}
{{History|bedrock}}
{{History||1.10.0|snap=beta 1.10.0.3|[[File:Spider Eye JE2 BE2.png|32px]] The texture of spider eyes has been changed.}}
{{History|console}}
{{History||xbox=TU7|xbone=CU1|ps=1.0|wiiu=Patch 1|[[File:Spider Eye JE1 BE1.png|32px]] Added spider eyes.}}
{{History||xbox=none|xbone=none|ps=1.90|wiiu=none|[[File:Spider Eye JE2 BE2.png|32px]] The texture of spider eyes has been changed.}}
{{History|New 3DS}}
{{History||0.1.0|[[File:Spider Eye JE1 BE1.png|32px]] Added spider eyes.}}
{{History|foot}}
== Issues ==
{{issue list}}
== References ==
{{reflist}}
{{items}}
[[cs:Pavoučí oko]]
[[de:Spinnenauge]]
[[es:Ojo de araña]]
[[fr:Œil d'araignée]]
[[hu:Pókszem]]
[[it:Occhio di ragno]]
[[ja:クモの目]]
[[ko:거미 눈]]
[[nl:Spinnenoog]]
[[pl:Oko pająka]]
[[pt:Olho de aranha]]
[[ru:Паучий глаз]]
[[zh:蜘蛛眼]]
[[Category:Food]]
[[Category:Renewable resources]]
[[Category:Brewing recipe]]</li><li>[[Arrow|Arrow]]<br/>{{ItemEntity
|title=Arrow
|image=Arrow.png
|image2=Spectral Arrow.png
|renewable='''Uncraftable and Luck{{only|java|short=1}}''': No <br/>
'''All others''': Yes
|stackable='''Normal / Spectral:''' Yes (64)<br/>
'''Tipped:''' Yes (64, only if same effect)
|size=Height: 0.5 Blocks<br>Width: 0.5 Blocks
|networkid='''Normal / Tipped:'''<br>'''[[JE]]''': 60<br>
'''Spectral:'''<br>'''[[JE]]''': 91
}}
An '''arrow''' serves as ammunition for [[bow]]s, [[crossbow]]s, and [[dispenser]]s. Arrows can be modified to give [[status effects]] to [[player]]s and [[mob]]s.
== Obtaining ==
=== Picking up arrows ===
Arrows shot by players can always be [[#Retrieving|picked up]] in Creative mode.
An arrow ''cannot'' be picked up by a player in [[Survival]] or [[Adventure]] mode if:
* It is shot by a player in [[Creative]] mode.
* It is shot by any [[mob]] able to shoot arrows, such as [[skeleton]]s, [[stray]]s, [[pillager]]s, or [[piglin]]s. This includes mobs that do not shoot arrows in normal gameplay, such as [[illusioner]]s and bow-wielding [[wither skeleton]]s.
** This is the case even in Creative mode.<ref>{{bug|MC-128845|||WAI}}</ref>
* It is shot with an [[Infinity]]-enchanted [[bow]].
* It is one of the two extra arrows shot with a [[Multishot]]-enchanted [[crossbow]].
=== Mob loot ===
[[Skeleton]]s and [[stray]]s drop 0-2 arrows upon death. The maximum drop is increased by 1 per level of [[Looting]], for a maximum of 0–5 arrows with Looting III.
Strays have a 50% chance of dropping 1 arrow of [[Slowness]] when killed by a player. Each level of Looting increases the chance of this drop by 50% of the previous chance. This results in a maximum of 93.75% with Looting III.
{{IN|bedrock}}, [[pillager]]s also drop 0–2 arrows upon death. The maximum drop is increased by 1 per level of Looting, for a maximum of 0-5 arrows with Looting III.
=== Trading ===
Novice-level fletcher [[villager]]s have a 50% chance {{in|bedrock}}, or a {{frac|2|3}} chance {{in|java}}, to sell 16 arrows for one [[emerald]] as part of their trades.
{{IN|bedrock}}, master-level fletcher villagers have a {{frac|1|2}} chance to sell 5 tipped arrows for 2 emeralds and 5 arrows. {{IN|java}}, they have a {{frac|2|3}} chance to sell 5 tipped arrows for 2 emeralds and 5 arrows. Trades {{in|java}} can be the base effect, level II, or extended; {{in|bedrock}}, only the arrow of decay is level II.<!-- A check should be made if it chooses randomly from the whole of the list of possible arrows variants, or it it chooses a base arrow potion effect, then randomly choose from that arrow's options. The first one would make arrow's without a level II, like Fire Resistance for example, slightly less likely than ones with all three options like Swiftness. -->
<!-- None are extended duration, but villagers can trade level 2 arrows. -->
* Arrow of [[Fire Resistance]]
* Arrow of [[Harming]]
* Arrow of [[Healing]]
* Arrow of [[Invisibility]]
* Arrow of [[Leaping]]
* Arrow of [[Night Vision]]
* Arrow of [[Poison]]
* Arrow of [[Regeneration]]
* Arrow of [[Slowness]]
* Arrow of [[Strength]]
* Arrow of [[Swiftness]]
* Arrow of the [[Potion of the Turtle Master|Turtle Master]]
* Arrow of [[Water Breathing]]
* Arrow of [[Weakness]]
* Arrow of [[Slow Falling]]{{only|java}}<!-- bedrock fletchers never sell arrows of slow falling -->
* Arrow of [[Decay]]{{only|bedrock}}
These are all potion effects except Slow Falling {{in|bedrock}} and [[Luck]] {{in|java}}. Trading is the only legitimate way to obtain arrows of Decay in [[Survival]] mode.
=== Bartering ===
Spectral arrows{{only|java}}/normal arrows{{only|bedrock}} can be obtained through [[bartering]] with [[piglin]]s, and have a ~8.71% chance to give the [[player]] 6-12 arrows.
=== Villager gifts ===
{{IN|java}}, any regular or tipped arrow (except for [[luck]] and [[Bad Luck]] arrows) can be obtained as a reward item from [[fletcher]] [[villager]]s when the player has the [[Hero of the Village]] status effect.
=== Crafting ===
{{Crafting
|head=1
|B1= Flint
|B2= Stick
|B3= Feather
|Output = Arrow,4
|type = Combat
|showdescription=1
}}
{{Crafting
|A2= Glowstone Dust
|B1= Glowstone Dust
|B2= Arrow
|B3= Glowstone Dust
|C2= Glowstone Dust
|Output = Spectral Arrow,2
|type = Combat
|description = {{only|java}}
}}
{{Crafting
|foot=1
|description=Arrows of Decay are exclusive to {{el|be}} unless obtained via [[creative]] or [[commands]]. Arrows of luck are exclusive to {{el|je}}. A custom potion obtained via [[commands]] cannot craft arrows with the potion's custom name, lore, or the <code>CustomPotionColor</code>.
|A1= Arrow
|A2= Arrow
|A3= Arrow
|B1= Arrow
|B2= Matching Lingering Potion
|B3= Arrow
|C1= Arrow
|C2= Arrow
|C3= Arrow
|Output = Matching Tipped Arrow,8
|type = Combat
}}
=== Chest loot ===
{{LootChestItem|arrow}}
{{LootChestItem|spectral-arrow}}
=== Retrieving ===
Arrows stuck in a block that were originally shot by dispensers or by players in [[Survival]] without the [[Infinity]] enchantment may be collected. Arrows originally shot by [[skeleton]]s, [[stray]]s, [[illusioner]]s, [[pillager]]s, [[piglin]]s, players in [[Creative]], players using the [[Infinity]] enchantment, or duplicate arrows created by [[Crossbow]]s with the [[Multishot]] enchantment cannot be collected. Arrows cannot be retrieved when they are stuck in a player or mob, and players or mobs do not drop them when killed. Retrievable arrows have a despawn timer of 60 seconds.
=== Cauldrons ===
{{main|Cauldron#Potions}}
{{IN|bedrock}}, tipped arrows can also be obtained by using arrows on [[Cauldron#Potions|cauldrons]] that contain [[potion]]s. The number of tipped arrows created depends on the potion inside the cauldron. When the cauldron is {{frac|1|3}} full, 16 arrows can be tipped. When the cauldron is {{frac|2|3}} full, up to 32 arrows can be tipped and when the cauldron is full, an entire stack of 64 arrows can be tipped. This is more efficient than using lingering potions as up to 21.33 arrows can be tipped per potion.
== Usage ==
{{see also|Bow}}
When fired, arrows fly in a [[wikipedia:Trajectory of a projectile|ballistic trajectory]] affected by gravity and drag in [[air]], [[water]], and [[lava]]. The arrow's velocity is multiplied by 0.99 every game tick, and it also experiences 20 block/s<sup>2</sup> of downward acceleration induced by gravity.
Arrows travel approximately 3 [[block]]s when fired parallel to a flat plane with no charge, 15 blocks average with medium charge, and 24 blocks average with maximum charge. When fired from a fully charged bow, arrows can travel 120 blocks if fired from an optimal angle. The maximum height an arrow fired by a bow can reach is around 66 blocks.
An arrow fired in water experiences much more drag than in air: it moves less than 8 blocks before completely losing horizontal speed and falling straight down, although the knockback of the arrow remains unaffected. It also leaves a trail of bubbles in its wake.
There is a random variable to the trajectory of an arrow, given by <code>this.rand.nextGaussian() * 0.0075 * (double)inaccuracy</code> for the x, y and z coordinate. The inaccuracy is relatively small, becoming noticeable over larger distances. The inaccuracy of different arrow delivery devices may differ. Dispensers fire with an inaccuracy of 6, while bows fire with an inaccuracy of 1.
An arrow's speed determine the damage it inflicts. The damage inflicted is calculated by multiplying the arrow's [[#Entity data|damage value]] with its velocity in blocks per [[Tick#Game tick|game tick]]. When fired from a fully-charged unenchanted bow, arrows do {{hp|6}} of damage, with a smaller chance to damage for up to {{hp|11}} via critical hits. They inflict up to {{hp|5}} damage from a medium-charged bow, and {{hp|1}} from a bow with no charge. Arrows fired from dispensers always do {{hp|3}} of damage unless their velocity is modified by an external source. Arrows fired from [[crossbow]]s do {{hp|6}} to {{hp|11}} of damage.
Arrows trigger [[Damage#Immunity|damage immunity]] on hit. However, unlike other methods of damage that may bypass invulnerability under certain conditions, arrows hitting the mob while it is invulnerable lose all speed and drop to the ground, dealing no damage unless they contact another mob.
[[File:ArrowShotInTree.png|thumb|An arrow shot into a [[tree]].]]
Arrows also stick into objects they come in contact with and remain there for one minute before disappearing; the distance from the object and the angle determine how far into the target the arrow penetrates. Such arrows may be [[#Retrieving|retrieved]].
If the arrow has any custom potion effects (NBT tag <code>CustomPotionEffects</code>), all potion effects, including vanilla potion effects (NBT tag <code>Potion</code>) are removed 30 seconds after the arrow stops moving.
If an arrow is stuck in a block, and that block is broken or disappears (e.g., [[leaves]] upon decay), then the arrow falls straight down and damages entities below, but never deals a critical hit. The 1-minute despawn timer is then refreshed, meaning it will take another minute for the arrow to despawn.
Arrows bounce off players and mobs immune to damage, like a player in Creative mode, a [[wither]] under the "wither armor" effect, and a perching [[ender dragon]].
Arrows shot through [[lava]] or (if there's at least a 2 block gap) [[fire]] catch on fire and show an appropriate animation until they pass through water. Like arrows shot from a bow with the Flame enchantment, they can set other entities they hit on fire for 5 seconds as well as ignite TNT and campfires.
An arrow shot at any kind of boat{{only|java|short=1}} or minecart causes the vehicle to break, dropping any components (including container contents).
Arrows can get visually stuck in players {{in|java}}, although not any mobs. They appear as regular arrows regardless of type.<ref>{{bug|MC-83933|||WAI}}</ref>
<gallery>
Steve got shot.png|Steve got shot.
Alex got shot.png|Alex got shot.
</gallery>
=== Redstone circuits ===
An arrow can activate a wooden [[button]], wooden [[pressure plate]], a [[tripwire]], or a [[target]]. An arrow will continue to power these blocks until it is removed, either due to despawning, or being picked up. Target blocks emit a redstone pulse for one second, as opposed to the static depressed state of the other switches. Non-wooden switches are not affected by arrows.
When arrows are fired into the sides of blocks, they change their orientation to point more downward than their original flight path might indicate. This can cause them to intersect and thus trigger switches above them that they didn't actually hit, or block rails above them.
=== Explosions ===
Arrows are affected by explosions while they are in flight. Since explosions can increase the speed of an arrow, they can also increase the damage dealt by them. {{only|Java}}
== Variants ==
=== Tipped arrows ===
{{See also|#Crafting}}
Tipped arrows are arrows that imbue a potion effect when hitting a mob or player. The duration of the effect is {{frac|1|8}} that of the corresponding potion, if applicable, and is not affected by the power of the arrow. The status effect is the same as the regular power effect for the potion. If a bow is enchanted with [[Infinity]], tipped arrows are still consumed.
The types of arrows are:
<div class="list-style-none" style="-moz-column-width:19em;-webkit-column-width:19em;column-width:19em">
* {{ItemLink|link=none|Arrow of Regeneration}}
* {{ItemLink|link=none|Arrow of Swiftness}}
* {{ItemLink|link=none|Arrow of Fire Resistance}}
* {{ItemLink|link=none|Arrow of Healing}}
* {{ItemLink|link=none|Arrow of Night Vision}}
* {{ItemLink|link=none|Arrow of Strength}}
* {{ItemLink|link=none|Arrow of Leaping}}
* {{ItemLink|link=none|Arrow of Invisibility}}
* {{ItemLink|link=none|Arrow of Poison}}
* {{ItemLink|link=none|Arrow of Weakness}}
* {{ItemLink|link=none|Arrow of Slowness}}
* {{ItemLink|link=none|Arrow of Harming}}
* {{ItemLink|link=none|Arrow of Water Breathing}}
* {{ItemLink|link=none|Arrow of Luck}}{{only|java|short=1}}
* {{ItemLink|link=none|Arrow of Decay}}{{only|bedrock|short=1}}
* {{ItemLink|link=none|Arrow of the Turtle Master}}
* {{ItemLink|link=none|Arrow of Slow Falling}}
</div>
Arrows of Harming (and arrows of Healing when used against undead mobs) do not add a static amount of damage to the arrow.<ref>{{bug|MC-107856||Arrows of harming/healing do not stack with bow damage}}</ref> Instead, the arrow's damage is first calculated, then checked to see if it is below {{Health|12}}. If the arrow's damage is less than 12, the Harming effect of the arrow makes up the difference, to ensure the arrow does exactly {{Health|12}}. Therefore, an unenchanted bow cannot deal more than 12 damage using Harming (or Healing) arrows, as it can deal a maximum of {{Health|11}} damage on level ground. However, if the arrow would deal more than 12 damage, the harming effect is entirely neutralized. This means that bows enchanted with Power I through Power III has a chance to not utilize the arrow at full charge, and any Power level above III never utilizes Arrows of Harming effectively at full charge when against unarmored mobs/players.
==== No-effect tipped arrows ====
It is possible to craft tipped arrows using [[Lingering Potion#Lingering water bottle|Lingering Water Bottles]] as well as Awkward, Thick, and Mundane [[Lingering Potion|Lingering potions]]. If crafted with a water bottle, the arrow is called an arrow of Splashing. If crafted with Mundane, Awkward, or Thick potions, it is called a tipped arrow.<ref>{{bug|MC-158539}}</ref> Tipped arrows crafted from different potions do not stack, as resultant tipped arrows all have different potion tags.
In Bedrock Edition, all four kinds as well as the long mundane tipped arrow aren't obtainable either in creative, by cauldrons, by crafting, or by commands.
All four kinds generate blue particles in flight and upon landing, but otherwise behave like regular arrows. In particular, arrow of Splashing has no effect on fire and campfires and when shot from a bow with the Flame enchantment, can light campfires and TNT just like regular arrows on fire.
{| class="wikitable" style="text-align: center;" data-description="Unused potions"
! Icon
! Name
|-
| {{Slot|Arrow of Splashing|link=none}}
! Arrow of Splashing
|-
| {{Slot|Tipped Arrow|link=none}}
! Tipped Arrow
|}
==== Uncraftable tipped arrows ====
{{IN|java}}, the uncraftable tipped arrow is a tipped arrow with no effect that is unobtainable in regular gameplay. It is available in two variants that don't stack together:
* {{cmd|/give @s minecraft:tipped_arrow{Potion:"minecraft:empty"} }} - arrow assigned an effect placeholder "empty"
* {{cmd|/give @s minecraft:tipped_arrow }} - arrow not assigned any effect.
The uncraftable arrow doesn't differ from regular arrows in behavior when used as a projectile.
{| class="wikitable" style="text-align: center;" data-description="Unused potions"
! Icon
! Name
|-
| {{Slot|Uncraftable Tipped Arrow|link=none}}
! Uncraftable Tipped Arrow
|}
=== Spectral arrows ===
{{exclusive|java}}
A spectral arrow confers the [[Glowing]] status effect for 10 seconds. The Glowing effect creates an outline of the target, which is visible through blocks, and colored based on the target's [[team]] (white by default). Even if a bow is enchanted with [[Infinity]], spectral arrows are still consumed. Spectral arrows can be acquired through [[bartering]] or crafted by combining 4 [[Glowstone Dust#Crafting ingredient|glowstone dust]] with one arrow, yielding 2 spectral arrows.
{| class="wikitable" style="text-align: center;"
! Icon
! Name
|-
| {{Slot|Spectral Arrow|link=none}}
! Spectral Arrow
|}
== Sounds ==
{{edition|java}}:<br>
Arrows and spectral arrows use the Friendly Creatures sound category for entity-dependent sound events.
{{Sound table
|sound=Arrow hit1.ogg
|sound2=Arrow hit2.ogg
|sound3=Arrow hit3.ogg
|sound4=Arrow hit4.ogg
|subtitle=Arrow hits
|source=Friendly Creatures
|description=When an arrow impacts something
|id=entity.arrow.hit
|translationkey=subtitles.entity.arrow.hit
|volume=1.0
|pitch={{frac|12|11}} - {{frac|4|3}}
|distance=16}}
{{Sound table
|sound=Succesfull Hit.ogg
|subtitle=Player hit
|source=Players
|description=When an arrow shot by a player hits another player
|id=entity.arrow.hit_player
|translationkey=subtitles.entity.arrow.hit_player
|volume=1.0
|pitch=1.0
|distance=16}}
{{Sound table
|rowspan=3
|sound=Bow shoot.ogg
|subtitle=Arrow fired
|source=Players
|description=When an arrow is fired by a player
|id=entity.arrow.shoot
|translationkey=subtitles.entity.arrow.shoot
|volume=1.0
|pitch=Around 1.2<ref group=sound>Depends on how long the bow is charged for, around 1.2 with a fully charged bow. The exact formula is <math>\frac{1}{\operatorname{randomFloat()}\times 4+1.2}+\frac{\text{progress}}{2}</math> </ref>
|distance=16}}
{{Sound table
|subtitle=Skeleton shoots
|source=Hostile Creatures
|description=When a skeleton shoots an arrow
|id=entity.skeleton.shoot
|translationkey=subtitles.entity.skeleton.shoot
|volume=1.0
|pitch={{frac|5|6}} - 1.25
|distance=16}}
{{Sound table
|subtitle=Dispensed item
|source=Blocks
|description=When a dispenser shoots an arrow
|id=block.dispenser.launch
|translationkey=subtitles.block.dispenser.dispense
|volume=1.0
|pitch=1.2
|distance=16}}
{{Sound table
|sound=Crossbow shoot1.ogg
|sound2=Crossbow shoot2.ogg
|sound3=Crossbow shoot3.ogg
|subtitle=Crossbow fires
|source=Players
|description=When a crossbow shoots an arrow
|id=item.crossbow.shoot
|translationkey=subtitles.item.crossbow.shoot
|volume=0.8 / 0.9
|pitch=0.9 / 1.0
|distance=16
|foot=1}}
{{edition|bedrock}}:
{{Sound table
|type=bedrock
|sound=Arrow hit1.ogg
|sound2=Arrow hit2.ogg
|sound3=Arrow hit3.ogg
|sound4=Arrow hit4.ogg
|source=player
|description=When an arrow impacts something
|id=random.bowhit
|volume=1.0
|pitch=1.09-1.3}}
{{Sound table
|sound=Bow shoot.ogg
|source=player
|description=When something shoots an arrow
|id=random.bow
|volume=1.0
|pitch=0.83-1.25}}
{{Sound table
|sound=Crossbow shoot1.ogg
|sound2=Crossbow shoot2.ogg
|sound3=Crossbow shoot3.ogg
|source=player
|description=When a crossbow shoots an arrow
|id=crossbow.shoot
|volume=1.0
|pitch=1.0
|foot=1}}
== Data values ==
=== ID ===
{{edition|java}}:
{{ID table
|edition=java
|showitemtags=y
|showforms=y
|generatetranslationkeys=y
|displayname=Arrow
|spritetype=item
|nameid=arrow
|itemtags=arrows
|form=item}}
{{ID table
|displayname=Spectral Arrow
|spritetype=item
|nameid=spectral_arrow
|itemtags=arrows
|form=item}}
{{ID table
|displayname=Tipped Arrow
|spritetype=item
|nameid=tipped_arrow
|itemtags=arrows
|form=item
|translationkey=item.minecraft.tipped_arrow, item.minecraft.tipped_arrow.effect.empty, item.minecraft.tipped_arrow.effect.water, item.minecraft.tipped_arrow.effect.mundane, item.minecraft.tipped_arrow.effect.thick, item.minecraft.tipped_arrow.effect.awkward, item.minecraft.tipped_arrow.effect.night_vision, item.minecraft.tipped_arrow.effect.invisibility, item.minecraft.tipped_arrow.effect.leaping, item.minecraft.tipped_arrow.effect.fire_resistance, item.minecraft.tipped_arrow.effect.swiftness, item.minecraft.tipped_arrow.effect.slowness, item.minecraft.tipped_arrow.effect.water_breathing, item.minecraft.tipped_arrow.effect.healing, item.minecraft.tipped_arrow.effect.harming, item.minecraft.tipped_arrow.effect.poison, item.minecraft.tipped_arrow.effect.regeneration, item.minecraft.tipped_arrow.effect.strength, item.minecraft.tipped_arrow.effect.weakness, item.minecraft.tipped_arrow.effect.levitation, item.minecraft.tipped_arrow.effect.luck, item.minecraft.tipped_arrow.effect.turtle_master, item.minecraft.tipped_arrow.effect.slow_falling
|foot=1}}
{{ID table
|edition=java
|showentitytags=y
|generatetranslationkeys=y
|displayname=Arrow
|spritetype=entity
|nameid=arrow
|entitytags=arrows, impact_projectiles}}
{{ID table
|displayname=Spectral Arrow
|spritetype=entity
|nameid=spectral_arrow
|entitytags=arrows, impact_projectiles
|foot=1}}
{{edition|bedrock}}:
{{ID table
|edition=bedrock
|showitemtags=y
|notshowbeitemforms=y
|shownumericids=y
|showforms=y
|generatetranslationkeys=y
|displayname=Arrow
|spritetype=item
|nameid=arrow
|id=301
|itemtags=minecraft:arrow
|form=item
|translationkey=item.arrow.name, item.tipped_arrow.name, tipped_arrow.effect.water, tipped_arrow.effect.mundane, tipped_arrow.effect.thick, tipped_arrow.effect.awkward, tipped_arrow.effect.nightVision, tipped_arrow.effect.invisibility, tipped_arrow.effect.jump, tipped_arrow.effect.fireResistance, tipped_arrow.effect.moveSpeed, tipped_arrow.effect.moveSlowdown, tipped_arrow.effect.waterBreathing, tipped_arrow.effect.heal, tipped_arrow.effect.harm, tipped_arrow.effect.poison, tipped_arrow.effect.regeneration, tipped_arrow.effect.damageBoost, tipped_arrow.effect.weakness, tipped_arrow.effect.wither, tipped_arrow.effect.turtleMaster, tipped_arrow.effect.slowFalling
|foot=1}}
{{ID table
|edition=bedrock
|shownumericids=y
|generatetranslationkeys=y
|displayname=Arrow
|spritetype=entity
|nameid=arrow
|id=80
|foot=1}}
=== Metadata ===
{{IN|bedrock}}, arrows use the following item data values:
{{/DV}}
=== Entity data ===
==== Normal and tipped arrows ====
Arrows have entity data that define various properties of the entity.
{{el|java}}:
{{main|Entity format}}
{{/ED}}
{{el|bedrock}}:
: See [[Bedrock Edition level format/Entity format]].
==== Spectral arrows ====
Spectral arrows also have entity data that define various properties of the entity.
{{el|java}}:
{{main|Entity format}}
{{/ED1}}
{{el|bedrock}}
: See [[Bedrock Edition level format/Entity format]].
== Achievements ==
{{load achievements|Sniper Duel;Archer;Bullseye}}
== Advancements ==
{{load advancements|Take Aim;Sniper Duel;Not Today;Bullseye;Ol' Betsy;Two Birds;Who's the Pillager Now;Arbalistic;How Did We Get Here}}
== Video ==
<div style="text-align:center">{{yt|STQkD1Oa65s}}</div>
== History ==
{{History|java classic}}
{{History||0.24_SURVIVAL_TEST|[[File:Arrow JE1.png|42px]] Arrows have been added as an object and are fired by pressing {{Key|Tab}}.}}
{{History||0.25 SURVIVAL TEST|[[File:Arrow JE2 BE1.png|42px]] The texture of arrows has been changed.
|Arrows now deal more [[damage]], and can damage the player.
|The [[player]] now spawns with 20 arrows; the remaining amount is shown above the hotbar labeled as "Arrows".
|[[File:Purple Arrow JE1.png|42px]] [[Skeleton]]s now fire purple arrows, instead of hitting the [[player]] directly. These arrows can't be collected by the [[player]].
|When a skeleton is killed, it now drops 6-9 normal arrows for the player to gather.}}
{{History||0.29|Arrows can no longer be shot by the player in Creative Mode.}}
{{History|java indev}}
{{History||0.31|snap=20100122|[[File:Arrow (item) JE1 BE1.png|32px]] Arrows have been added as [[item]]s alongside with [[bow]]s.
|The "Arrows" display above the hotbar has been removed.}}
{{History|||snap=20100124|Arrows now have a [[sound]] effect. What this sound effect is is completely unknown; it could be for hitting a block, for being fired or for something else entirely.}}
{{History|||snap=20100128|Arrows can now be [[craft]]ed using [[apple]]s.}}
{{History|||snap=20100129|Arrows can no longer be crafted.}}
{{History|||snap=20100130|Arrows are once again now craftable. Iron is used instead of steel.}}
{{History||20100219|Arrows are now dropped by [[skeleton]]s.}}
{{History|java infdev}}
{{History||20100316|Arrows now have a high chance of spawning either a [[sheep]], a [[pig]], a [[skeleton]], a [[creeper]], a [[spider]], or a [[zombie]] upon hitting a [[block]].
|The player now spawns with 999 arrows.}}
{{History||20100320|The player now spawns with 64 arrows.}}
{{History||20100327|The player no longer spawns with any arrows in new worlds.}}
{{History||20100413|Arrows no longer spawn [[mob]]s.}}
{{History|java alpha}}
{{History||v1.0.14|The tip of an arrow in crafting is now made from [[flint]] rather than an [[iron ingot]].}}
{{History|java beta}}
{{History||1.2|Arrows can now be fired by [[dispenser]]s.}}
{{History||1.6|snap=Test Build 3|Arrows could be used to stick in any [[block]] before this update, even some non-solid ones. For example, they could stick in [[torch]]es, [[sugar cane]] and [[nether portal]]s.}}
{{History||1.8|snap=Pre-release|Arrows can no longer be rapid-fired from [[bow]]s; they must be charged first.
|Arrows (with a bow at full strength) can now travel 120 blocks when fired from the optimal angle, and stick to [[mob]]s.}}
{{History||Sound Update|Arrow firing [[sound]]s have been changed - see sounds section}}
{{History|java}}
{{History||November 21, 2011|link={{ytl|BES9EKK4Aw4}}|Exploding arrows are mentioned.}}
{{History||1.0.0|snap=Beta 1.9 Prerelease|Arrows no longer stick to [[mob]]s.
|Arrows remain visible in players.{{verify|then when were they removed? bug fix in 1.4.3 implies it was removed for players as well in this version}}}}
{{History|||snap=RC1|Arrow landing [[sound]]s have been changed.}}
{{History||1.1|snap=release|Arrows on [[fire]] now set the [[entity|entities]] they hit on fire. Before, arrows could be on fire (like other [[entities]]), but they did not set what they hit on fire, and there was no [[enchanting|enchantment]] to fire flaming arrows.}}
{{History||1.3.1|snap=12w21a|Farmer [[villager]]s now [[trading|sell]] 9–12 arrows for 1 [[emerald]].}}
{{History|||snap=12w22a|Arrows can now be found inside [[dispenser]]s in the newly added [[jungle temple]]s.}}
{{History|||snap=12w23a|Arrows can now activate [[tripwire]] switches and wooden [[pressure plate]]s.}}
{{History||1.4.2|snap=12w34a|Arrows can now activate wooden [[button]]s.}}
{{History|||snap=12w34b|Arrows on [[fire]] can now ignite [[TNT]].}}
{{History||1.4.4|snap=1.4.3|Arrows now stick to [[player]]s again, but not [[mob]]s.}}
{{History||1.4.6|snap=pre|Arrows now make a "ding" sound when they hit a player.}}
{{History||1.8|snap=14w02a|Farmer [[villager]]s no longer [[trading|sell]] arrows.
|Fletcher villagers now sell 8–12 arrows for 1 [[emerald]].}}
{{History|||snap=14w25a|An underwater arrow now loses all velocity after a few blocks and slowly falls.
|A flaming arrow underwater now gets extinguished.}}
{{History|||snap=14w26a|Fire arrows can now be used to detonate [[minecarts with TNT]].}}
{{History||1.9|snap=15w31a|[[File:Tipped Arrow Revision 1.png|32px]] [[File:Tipped Arrow MC-84253.png|32px]] Added 14 new tipped arrows. Due to a bug<ref>{{bug|MC-84253}}</ref>, all tipped arrows except arrow of Splashing are black.
|[[File:Spectral Arrow JE1.png|42px]] [[File:Spectral Arrow (item) JE1.png|32px]] Added spectral arrows. They show [[mob]] and [[player]] outlines in their team color when hit. They have no texture when shot.}}
{{History|||snap=15w31b|[[File:Spectral Arrow JE2.png|42px]] Spectral arrows now use their intended texture.<ref>{{bug|MC-82809}}</ref>}}
{{History|||snap=15w32a|[[File:Arrow of Night Vision JE1 BE1.png|32px]] [[File:Arrow of Invisibility JE1 BE1.png|32px]] [[File:Arrow of Leaping JE1 BE1.png|32px]] [[File:Arrow of Fire Resistance JE1 BE1.png|32px]] [[File:Arrow of Swiftness JE1 BE1.png|32px]] [[File:Arrow of Slowness JE1 BE1.png|32px]] [[File:Arrow of Water Breathing JE1 BE1.png|32px]] [[File:Arrow of Healing JE1 BE1.png|32px]] [[File:Arrow of Harming JE1 BE1.png|32px]] [[File:Arrow of Poison JE1 BE1.png|32px]] [[File:Arrow of Regeneration JE1 BE1.png|32px]] [[File:Arrow of Strength JE1 BE1.png|32px]] [[File:Arrow of Weakness JE1 BE1.png|32px]] 13 tipped arrows now have the correct textures.}}
{{History|||snap=15w33c|Added [[shield]]s; though they fully block [[damage]] from arrows, arrows still visually stick into the [[player]].}}
{{History|||snap=15w37a|Arrows now ricochet off of [[shield]]s.}}
{{History|||snap=15w44b|Added the initial method for obtaining tipped arrows, which lasted until snapshot [[16w06a]] – firing arrows into a [[lingering potion]] cloud.
|[[File:Arrow of Luck JE1 BE1.png|32px]] Added the Arrow of [[Luck]].
|[[File:Tipped Arrow Revision 1.png|32px]] [[File:Tipped Arrow Revision 1.png|32px]] [[File:Tipped Arrow Revision 1.png|32px]] [[File:Tipped Arrow Revision 1.png|32px]] Add tipped arrows for uncraftable potions, mundane potions, thick potions, and awkward potions. These are all available in the creative inventory.
|Add tipped arrows for all enhanced and extended potions
|[[File:Tipped Arrow Revision 1.png|32px]] Arrow of Splashing has been added to the creative inventory.}}
{{History|||snap=15w47b|Arrows now ricochet off of [[creative]] mode [[player]]s, whereas before they would pass straight through.}}
{{History|||snap=15w49a|Arrows now take the archer's motion into account. For example, if the player is falling, an arrow fired upward travels slower than if the player was standing still, and an arrow fired downward flies faster.
|Tipped and spectral arrows are no longer affected by the [[Infinity]] [[enchanting|enchantment]].}}
{{History|||snap=16w06a|Tipped arrows have been given a crafting recipe, and are no longer obtained by shooting them into a [[lingering potion]] cloud.}}
{{History||1.10|snap=16w20a|Arrows of [[slowness]] may now drop from [[stray]]s when they are killed by a [[player]].}}
{{History||1.11|snap=16w32a|The [[entity]] IDs have been changed from {{cd|Arrow}} and {{cd|SpectralArrow}} to {{cd|arrow}} and {{cd|spectral_arrow}}.|Tipped arrows of instant healing and instant damage now function. Previously, the fact that tipped arrows have 1/8th the duration was reducing 1 game tick to zero game ticks.}}{{History|||snap=16w42a|Arrows now have a {{cd|crit}} tag that determines whether it deals [[critical hit|critical damage]].}}
{{History||1.11|snap=16w39a|Tipped arrows without effects and the uncraftable tipped arrow have been removed from the creative inventory.<ref name="removed tipped arrow">https://bugs.mojang.com/browse/MC-92139</ref>}}
{{History||1.11.1|snap=16w50a|The arrow [[entity]] now has a {{cd|Color}} integer tag, for displaying the custom [[potion]] color of a fired arrow item that has a {{cd|CustomPotionColor}} tag.}}
{{History||1.13|snap=17w47a|Prior to [[1.13/Flattening|''The Flattening'']], these [[item]]s' numeral IDs were 262, 439 and 440.}}
{{History|||snap=18w07a|[[File:Arrow of the Turtle Master JE1 BE1.png|32px]] Added the Arrow of the Turtle Master.}}
{{History|||snap=18w14a|[[File:Arrow of Slow Falling JE1 BE1.png|32px]] Added the Arrow of [[Slow Falling]].}}
{{History||1.14|snap=18w43a|Arrows are now used as ammo for [[crossbow]]s.
|Arrows can now break [[chorus flower]]s.
|[[File:Uncraftable Tipped Arrow JE2.png|32px]] [[File:Arrow of Splashing JE2.png|32px]] [[File:Arrow of Night Vision JE2 BE2.png|32px]] [[File:Arrow of Invisibility JE2 BE2.png|32px]] [[File:Arrow of Leaping JE2 BE2.png|32px]] [[File:Arrow of Fire Resistance JE2 BE2.png|32px]] [[File:Arrow of Swiftness JE2 BE2.png|32px]] [[File:Arrow of Slowness JE2 BE2.png|32px]] [[File:Arrow of the Turtle Master JE2 BE2.png|32px]] [[File:Arrow of Water Breathing JE2 BE2.png|32px]] [[File:Arrow of Healing JE2 BE2.png|32px]] [[File:Arrow of Harming JE2 BE2.png|32px]] [[File:Arrow of Poison JE2 BE2.png|32px]] [[File:Arrow of Regeneration JE2 BE2.png|32px]] [[File:Arrow of Strength JE2 BE2.png|32px]] [[File:Arrow of Weakness JE2 BE2.png|32px]] [[File:Arrow of Luck JE2 BE2.png|32px]] [[File:Arrow of Slow Falling JE2 BE2.png|32px]] The [[item]] sprite textures of tipped arrows has been changed.
|[[File:Spectral Arrow (item) JE2.png|32px]] The [[item]] sprite texture for spectral arrows has been changed.}}
{{History|||snap=18w47a|Arrows can now be generated inside of [[pillager outpost]] chests.}}
{{History|||snap=18w50a|Arrows can now be found in chests in fletcher houses.}}
{{History|||snap=19w11a|Fletcher [[villager]]s now [[trading|sell]] tipped arrows.}}
{{History|||snap=19w13a|Any regular or tipped arrow can be obtained as a reward [[item]] from fletcher villagers when the [[player]] has the [[Hero of the Village]] status effect.}}
{{History||1.14.1|snap=Pre-Release 2|Flaming arrows can now light [[campfire]]s.}}
{{History||1.16|snap=20w16a|Arrows and spectral arrows now generate in [[bastion remnant]] chests.}}
{{History||1.16.2|snap=20w28a|Spectral arrows can now be obtained through [[bartering]] with [[piglin]]s.}}
{{History|||snap=20w30a|The average yield of spectral arrows from bastion remnant chests have been substantially increased.}}
{{History||1.17|snap=21w11a|[[File:Spectral Arrow JE3.png|42px]] The texture of the spectral arrow is now have been changed.}}
{{History|||snap=21w13a|The unused original texture of the arrow<ref>[[File:Arrow (texture) JE2.png|48px]] <code>/asset/minecraft/textures/entity/arrow.png</code></ref> have been removed.}}
{{History||1.19.3|snap=22w43a|Tipped arrows for mundane, thick, and awkward potions, and the no-effect tipped arrow, are now available again in the Creative inventory.}}
{{History||1.19.4|snap=Pre-release 3|[[File:Arrow of Night Vision JE3.png|32px]] [[File:Arrow of Invisibility JE3.png|32px]] [[File:Arrow of Leaping JE3.png|32px]] [[File:Arrow of Fire Resistance JE3.png|32px]] [[File:Arrow of Swiftness JE3.png|32px]] [[File:Arrow of Slowness JE3.png|32px]] [[File:Arrow of the Turtle Master JE3.png|32px]] [[File:Arrow of Water Breathing JE3.png|32px]] [[File:Arrow of Harming JE3.png|32px]] [[File:Arrow of Poison JE3.png|32px]] [[File:Arrow of Strength JE3.png|32px]] Changed colors of the following tipped arrows: Night Vision, Invisibility, Leaping, Fire Resistance, Swiftness, Slowness, Turtle Master, Water Breathing, Harming, Poison, Strength, Resistance.}}
{{History||1.20|snap=23w12a|Wither [[effect]] particle colors have been adjusted to make them more distinguishable.
|The arrow of [[Slow Falling]] has had its color tweaked to make it more distinguishable from the arrow of [[Invisibility]].}}
{{History|pocket alpha}}
{{History||v0.2.0|[[File:Arrow (item) JE1 BE1.png|32px]] Added arrows. They are currently unobtainable and serve no purpose.}}
{{History||v0.3.3|[[File:Arrow JE2 BE1.png|42px]] Arrows now serve as ammunition for bows.
|Added skeletons, which drop arrows when they die.
|Arrows are now craftable.}}
{{History||v0.5.0|Arrows can now be obtained after activating the [[nether reactor]].}}
{{History||v0.12.1|snap=build 1|Arrows on [[fire]] now set the [[entity|entities]] they hit on fire. Before, arrows could be on fire (like other entities), but they would not set what they hit on fire, and there was no [[enchantment]] to fire flaming arrows.
|Arrows on fire can now ignite [[TNT]].
|An underwater arrow now loses all velocity after a few [[block]]s and slowly falls.
|Arrows are no longer available from the [[nether reactor]].}}
{{History||v0.13.0|snap=build 1|Arrows now update [[sand]] and [[gravel]].}}
{{History||v0.15.0|snap=build 1|[[File:Arrow of Night Vision JE1 BE1.png|32px]] [[File:Arrow of Invisibility JE1 BE1.png|32px]] [[File:Arrow of Leaping JE1 BE1.png|32px]] [[File:Arrow of Fire Resistance JE1 BE1.png|32px]] [[File:Arrow of Swiftness JE1 BE1.png|32px]] [[File:Arrow of Slowness JE1 BE1.png|32px]] [[File:Arrow of Water Breathing JE1 BE1.png|32px]] [[File:Arrow of Healing JE1 BE1.png|32px]] [[File:Arrow of Harming JE1 BE1.png|32px]] [[File:Arrow of Poison JE1 BE1.png|32px]] [[File:Arrow of Regeneration JE1 BE1.png|32px]] [[File:Arrow of Strength JE1 BE1.png|32px]] [[File:Arrow of Weakness JE1 BE1.png|32px]] Added tipped arrows.
|Tipped arrows are made by using [[cauldron]]s filled with [[potion]]s.
|Arrows can now be found inside [[dispenser]]s in [[jungle temple]]s.}}
{{History||v0.16.0|snap=build 4|[[File:Arrow of Decay BE1.png|32px]] Added the Arrow of [[Wither (status effect)|Decay]].
|Arrows of Decay currently have a white pixelated texture.}}
{{History|pocket}}
{{History||1.0.0|snap=alpha 0.17.0.1|Tipped arrows are now [[crafting|craftable]], but they can still be obtained by using [[cauldron]]s filled with [[potion]]s.}}
{{History||1.0.4|snap=alpha 1.0.4.0|Arrows are now [[trading|sold]] by fletcher [[villager]]s.}}
{{History||1.1.0|snap=alpha 1.1.0.0|The [[entity]] ID has been changed from {{cd|arrow.skeleton}} to {{cd|arrow}}.}}
{{History|||snap=alpha 1.1.0.9|[[File:Arrow of Decay BE2.png|32px]] The texture of arrows of [[Wither (status effect)|Decay]] has been changed.}}
{{History|bedrock}}
{{History||1.5.0|snap=beta 1.5.0.4|[[File:Arrow of the Turtle Master JE1 BE1.png|32px]] Added the Arrow of the Turtle Master.}}
{{History||1.6.0|snap=beta 1.6.0.5|[[File:Arrow of Slow Falling JE1 BE1.png|32px]] Added the Arrow of [[Slow Falling]].}}
{{History||1.8.0|snap=beta 1.8.0.10|Arrows can now be used as ammo for the new [[crossbow]]s.}}
{{History||1.9.0|snap=beta 1.9.0.0|Added [[pillager]]s, which [[drops|drop]] arrows upon [[death]].}}
{{History|||snap=beta 1.9.0.2|Arrows and tipped arrows can now be used to craft [[fletching table]]s.}}
{{History||1.10.0|snap=beta 1.10.0.3|[[File:Arrow of Night Vision JE2 BE2.png|32px]] [[File:Arrow of Invisibility JE2 BE2.png|32px]] [[File:Arrow of Leaping JE2 BE2.png|32px]] [[File:Arrow of Fire Resistance JE2 BE2.png|32px]] [[File:Arrow of Swiftness JE2 BE2.png|32px]] [[File:Arrow of Slowness JE2 BE2.png|32px]] [[File:Arrow of Water Breathing JE2 BE2.png|32px]] [[File:Arrow of Healing JE2 BE2.png|32px]] [[File:Arrow of Harming JE2 BE2.png|32px]] [[File:Arrow of Poison JE2 BE2.png|32px]] [[File:Arrow of Regeneration JE2 BE2.png|32px]] [[File:Arrow of Strength JE2 BE2.png|32px]] [[File:Arrow of Weakness JE2 BE2.png|32px]] [[File:Arrow of Decay BE3.png|32px]] [[File:Arrow of the Turtle Master JE2 BE2.png|32px]] [[File:Arrow of Slow Falling JE2 BE2.png|32px]] The [[item]] sprite textures of tipped arrows have been changed.
|Arrows can now be found in [[pillager outpost]] chests.
|Arrows can now break [[chorus flower]]s.}}
{{History||1.11.0|snap=beta 1.11.0.1|Arrows can now be found in [[village]] fletcher [[chest]]s.
|Flaming arrows can now light [[campfire]]s.}}
{{History|||snap=beta 1.11.0.4|Fletcher [[villager]]s now [[trading|sell]] 5 arrows for one [[emerald]].
|Various regular tipped arrows can now be obtained via [[trading]] with fletcher villagers.}}
{{History|||snap=beta 1.11.0.7|Arrow no longer can be used to craft [[fletching table]].}}
{{History||1.12.0|snap=beta 1.12.0.3|Novice-level fletcher villagers now [[trading|sell]] 16 regular arrows instead of 5 arrows.}}
{{History||1.16.0|snap=beta 1.16.0.51|Added [[piglin]]s, which [[drops|drop]] arrows upon [[death]].}}
{{History|||snap=beta 1.16.0.57|Arrows now generate in [[bastion remnants]] chests.
|Master-level fletcher villager now always offer 1 of 15 tipped arrows.
|Piglins no longer drop arrows upon death.}}
{{History||1.16.100|snap=beta 1.16.100.54|Arrows can now be obtained through [[bartering]].}}
{{History||1.19.80|snap=beta 1.19.80.21|Changed potion colors for the following tipped arrows: Fire Resistance, Harming, Invisibility, Leaping, Night Vision, Poison, Slowness, Strength, Swiftness, Turtle Master, and Water Breathing.}}
{{History|console}}
{{History||xbox=TU1|xbone=CU1|ps=1.00|wiiu=Patch 1|switch=1.0.1|[[File:Arrow JE2 BE1.png|42px]] [[File:Arrow (item) JE1 BE1.png|32px]] Added arrows.}}
{{History||xbox=TU31|xbone=CU19|ps=1.22|wiiu=Patch 3|An underwater arrow now loses all velocity after a few [[block]]s and slowly falls.
|A flaming arrow underwater now gets extinguished.}}
{{History||xbox=TU46|xbone=CU36|ps=1.38|wiiu=Patch 15|[[File:Arrow of Night Vision JE1 BE1.png|32px]] [[File:Arrow of Invisibility JE1 BE1.png|32px]] [[File:Arrow of Leaping JE1 BE1.png|32px]] [[File:Arrow of Fire Resistance JE1 BE1.png|32px]] [[File:Arrow of Swiftness JE1 BE1.png|32px]] [[File:Arrow of Slowness JE1 BE1.png|32px]] [[File:Arrow of Water Breathing JE1 BE1.png|32px]] [[File:Arrow of Healing JE1 BE1.png|32px]] [[File:Arrow of Harming JE1 BE1.png|32px]] [[File:Arrow of Poison JE1 BE1.png|32px]] [[File:Arrow of Regeneration JE1 BE1.png|32px]] [[File:Arrow of Strength JE1 BE1.png|32px]] [[File:Arrow of Weakness JE1 BE1.png|32px]] [[File:Arrow of Luck JE1 BE1.png|32px]] Added tipped arrows.
|[[File:Spectral Arrow (item) JE1.png|32px]] Added spectral arrows.
|Spectral arrows are currently unobtainable and do not any effects.}}
{{History||xbox=TU57|xbone=CU49|ps=1.56|wiiu=Patch 27|switch=1.0.7|Spectral arrows now have effects but are not craftable. They can be obtained only via inventory editing.}}
{{History||xbox=TU69|xbone=none|ps=1.76|wiiu=Patch 38|switch=none|[[File:Arrow of Decay BE2.png|32px]] [[File:Arrow of the Turtle Master JE1 BE1.png|32px]] [[File:Arrow of Slow Falling JE1 BE1.png|32px]] Added the Arrow of the [[Wither (status effect)|Decay]], Turtle Master, and [[Slow Falling]].}}
{{History||xbox=none|xbone=none|ps=1.90|wiiu=none|switch=none|[[File:Arrow of Night Vision JE2 BE2.png|32px]] [[File:Arrow of Invisibility JE2 BE2.png|32px]] [[File:Arrow of Leaping JE2 BE2.png|32px]] [[File:Arrow of Fire Resistance JE2 BE2.png|32px]] [[File:Arrow of Swiftness JE2 BE2.png|32px]] [[File:Arrow of Slowness JE2 BE2.png|32px]] [[File:Arrow of Water Breathing JE2 BE2.png|32px]] [[File:Arrow of Healing JE2 BE2.png|32px]] [[File:Arrow of Harming JE2 BE2.png|32px]] [[File:Arrow of Poison JE2 BE2.png|32px]] [[File:Arrow of Regeneration JE2 BE2.png|32px]] [[File:Arrow of Strength JE2 BE2.png|32px]] [[File:Arrow of Weakness JE2 BE2.png|32px]] [[File:Arrow of Luck JE2 BE2.png|32px]] [[File:Arrow of Decay BE3.png|32px]] [[File:Arrow of the Turtle Master JE2 BE2.png|32px]] [[File:Arrow of Slow Falling JE2 BE2.png|32px]] The [[item]] sprite textures of tipped arrows have been changed.
|[[File:Spectral Arrow (item) JE2.png|32px]] The [[item]] sprite texture for spectral arrow has been changed.}}
{{History|3ds}}
{{History||0.1.0|[[File:Arrow JE2 BE1.png|42px]] [[File:Arrow (item) JE1 BE1.png|32px]] Added arrows.
|[[File:Arrow of Night Vision JE1 BE1.png|32px]] [[File:Arrow of Invisibility JE1 BE1.png|32px]] [[File:Arrow of Leaping JE1 BE1.png|32px]] [[File:Arrow of Fire Resistance JE1 BE1.png|32px]] [[File:Arrow of Swiftness JE1 BE1.png|32px]] [[File:Arrow of Slowness JE1 BE1.png|32px]] [[File:Arrow of Water Breathing JE1 BE1.png|32px]] [[File:Arrow of Healing JE1 BE1.png|32px]] [[File:Arrow of Harming JE1 BE1.png|32px]] [[File:Arrow of Poison JE1 BE1.png|32px]] [[File:Arrow of Regeneration JE1 BE1.png|32px]] [[File:Arrow of Strength JE1 BE1.png|32px]] [[File:Arrow of Weakness JE1 BE1.png|32px]] Added tipped arrows.}}
{{History||1.3.12|[[File:Arrow of Decay BE2.png|32px]] Added arrows of [[Wither (effect)|Decay]].}}
{{History|foot}}
Historical sounds:
{| class="wikitable"
! Sound
! From
! to
! Pitch
|-
| {{sound||Arrow Old.ogg}}
| ?
| ?
| ?
|}
== Issues ==
{{issue list}}
== Trivia ==
* By default, arrows fly slightly offset to the right. If the player stands close to a wall and fires several arrows without moving the crosshair, the arrows cluster around a point slightly to the right of the crosshair. If the player switches their main hand to be the left hand in options, the arrows instead cluster to the left.
* Arrows fired at [[Nether Portal]]s often skip through the portal block completely and fail to collide, thus continuing through to the opposite side of the block.
* Arrows stuck in blocks vibrate upon a world reload.<ref>{{bug|MC-93992}} – "Arrow shakes when world loads" resolved as "Won't Fix"</ref>
* Although [[enderman|endermen]] teleport when hit by any tipped arrow, they are still given the said effects while avoiding arrow damage.
* {{IN|bedrock}}, even if a tipped arrow is blocked with a shield, while the direct damage from the arrows is negated, the player still gets the effect from the tipped arrow.<ref>{{bug|MCPE-52904}}</ref>
== Gallery ==
===Renders===
<gallery>
Arrow (item).png|Arrow
Spectral Arrow (item) JE2.png|Spectral Arrow
</gallery>
;Tipped Arrows
<gallery>
Arrow of Splashing JE2.png|Splashing
Arrow of Night Vision.png|Night Vision
Arrow of Invisibility.png|Invisibility
Arrow of Leaping.png|Leaping
Arrow of Fire Resistance.png|Fire Resistance
Arrow of Swiftness.png|Swiftness
Arrow of Slowness.png|Slowness
Arrow of the Turtle Master.png|Turtle Master
Arrow of Water Breathing.png|Water Breathing
Arrow of Healing.png|Healing
Arrow of Harming.png|Harming
Arrow of Poison.png|Poison
Arrow of Regeneration.png|Regeneration
Arrow of Strength.png|Strength
Arrow of Weakness.png|Weakness
Arrow of Slow Falling.png|Slow Falling
Arrow of Luck.png|Luck
Arrow of Decay.png|Decay
Uncraftable Tipped Arrow JE2.png|Uncraftable
</gallery>
===Other Media===
<gallery>
Tipped Arrow Ultra High Resolution Screenshot.png|Teaser image from [[Searge]] showing tipped arrows.
AllArrowTypes.png|All the arrow types present in [[Minecraft]].
Custom arrows.png|Examples of custom arrow types using {{cmd|/give}}.
Arrow in Sugar Cane.png|Some arrows stick into [[sugar cane]]s. This no longer works since Java Edition Beta 1.6.
Arrow Burning.gif|An arrow caught on [[fire]].
Flaming_stuck_spectral_arrow.png|A flaming spectral arrow stuck in a tree.
arrows_in_player.png|Many arrows stuck in the player, seen through the [[inventory]] screen.
Arrow Debugging.png|[[Searge]] with a bunch of arrows summoned above him.
Inventory Tipped Arrows 1.jpg|Tipped arrows in the inventory.
Inventory Tipped Arrows 2.jpg|Tipped arrows in the inventory.
Inventory Tipped Arrows 3.jpg|Tipped arrows in the inventory.
Inventory Tipped Arrows 4.jpg|Tipped arrows in the inventory.
Tipped Arrow (empty texture) BE1.png|Unused old texture file for an empty tipped arrow on ''Bedrock Edition''.
</gallery>
== References ==
{{reflist}}
{{Items}}
{{Entities}}
[[Category:Combat]]
[[Category:Renewable resources]]
[[de:Pfeil]]
[[es:Flecha]]
[[fr:Flèche]]
[[hu:Nyíl]]
[[it:Freccia]]
[[ja:矢]]
[[ko:화살]]
[[nl:Pijl]]
[[pl:Strzała]]
[[pt:Flecha]]
[[ru:Стрела]]
[[th:ลูกธนู]]
[[zh:箭]]</li></ul> | 12w16a | Added the Bonus Chest option to the world creation menu. | |||
| Added the Allow Cheats option to the world creation menu. | |||||
| 12w17a | The Bonus Chest and Enable Cheats options are now disabled when Hardcore mode is selected. | ||||
| 12w19a | Added the Large Biomes world type. | ||||
1.4.2{{Extension DPL}}<ul><li>[[Netherite Scrap|Netherite Scrap]]<br/>{{About|the unrefined material|the refined item|Netherite Ingot|other uses|Netherite}}
{{Item
| title = Netherite Scrap
| image = Netherite Scrap.png
| rarity = Common
| renewable = No
| stackable = Yes (64)
}}
'''Netherite scrap''' is a material [[smelt]]ed from [[ancient debris]], which is found in [[the Nether]]. It is used solely for crafting [[Netherite Ingot|netherite ingots]]. Like all netherite-related items, it is not flammable.
== Obtaining ==
=== Smelting ===
{{Smelting
|Ancient Debris
|Netherite Scrap
|2
}}
=== Chest loot ===
{{LootChestItem|netherite-scrap}}
== Usage ==
=== Crafting ingredient ===
{{Crafting usage}}
== Data values ==
=== ID ===
{{edition|java}}:
{{ID table
|edition=java
|showforms=y
|generatetranslationkeys=y
|displayname=Netherite Scrap
|spritetype=item
|nameid=netherite_scrap
|form=item
|foot=1}}
{{edition|bedrock}}:
{{ID table
|edition=bedrock
|shownumericids=y
|showforms=y
|notshowbeitemforms=y
|generatetranslationkeys=y
|displayname=Netherite Scrap
|spritetype=item
|nameid=netherite_scrap
|id=613
|form=item
|foot=1}}
== History ==
{{History|java}}
{{History||1.16|snap=20w06a|[[File:Netherite Scrap JE1.png|32px]] Added netherite scrap.}}
{{History|||snap=20w10a|[[File:Netherite Scrap JE2 BE1.png|32px]] The texture of netherite scrap has been changed.}}
{{History|||snap=20w16a|Netherite scraps now generate in [[bastion remnant]] chests.}}
{{History||1.16.2|snap=20w30a|The chance of finding netherite scraps in bastion remnant chests has been increased.}}
{{History|bedrock}}
{{History||1.16.0|snap=beta 1.16.0.51|[[File:Netherite Scrap JE2 BE1.png|32px]] Added netherite scrap.}}
{{History|||snap=beta 1.16.0.57|Netherite scraps now generate in [[bastion remnants]] chests.}}
{{History|foot}}
== Issues ==
{{Issue list}}
== External Links ==
*[https://www.minecraft.net/en-us/article/taking-inventory--netherite-scrap Taking Inventory: Netherite Scrap] – Minecraft.net on March 25, 2021
{{Items}}
[[Category:Non-renewable resources]]
[[de:Netheritplatten]]
[[fr:Fragments de Netherite]]
[[it:Frammento di netherite]]
[[ja:ネザライトの欠片]]
[[ko:네더라이트 파편]]
[[pl:Odłamek netherytu]]
[[pt:Fragmentos de netherita]]
[[ru:Незеритовый скрап]]
[[th:เศษเนเธอไรต์]]
[[uk:Незеритовий уламок]]
[[zh:下界合金碎片]]</li><li>[[Helmet|Helmet]]<br/>{{Update|Include information about armor trims and updated netherite upgrade information.}}
{{redirect|Cap|mob spawning caps|Spawn}}
{{redirect|Turtle Shell|the item dropped by maturing turtles|Scute}}
{{Item
| image = <gallery>
Leather Cap.png| Leather
Chainmail Helmet.png| Chainmail
Iron Helmet.png| Iron
Diamond Helmet.png| Diamond
Golden Helmet.png| Golden
Netherite Helmet.png| Netherite
Turtle Shell.png| Turtle Shell
</gallery>
| durability =
* Leather: 55
* Chainmail: 165
* Iron: 165
* Golden: 77
* Diamond: 363
* Netherite: 407
* Turtle Shell: 275
| renewable =
* '''Netherite''': No
* '''All others''': Yes
| stackable = No
}}
'''Helmets''' are a type of [[armor]] that covers the head of the player. There are seven types of helmets: '''leather cap''', '''chainmail helmet''', '''iron helmet''', '''diamond helmet''', '''gold helmet''', '''netherite helmet''', and '''turtle shell'''.
==Obtaining ==
===Crafting===
{{crafting
|head=1
|showname=0
|showdescription=1
|name=Helmet
|A2= Leather;Gold Ingot;Iron Ingot;Diamond;Scute
|B2= Leather;Gold Ingot;Iron Ingot;Diamond;Scute
|C2= Leather;Gold Ingot;Iron Ingot;Diamond;Scute
|A3= Leather;Gold Ingot;Iron Ingot;Diamond;Scute
|C3= Leather;Gold Ingot;Iron Ingot;Diamond;Scute
|description=
|Output= Leather Cap;Golden Helmet;Iron Helmet;Diamond Helmet;Turtle Shell
|type= Combat
}}
{{crafting
|ignoreusage=1
|name=[[Helmet]]
|ingredients=Damaged matching helmet
|Damaged Leather Cap; Damaged Golden Helmet; Damaged Chainmail Helmet; Damaged Iron Helmet; Damaged Diamond Helmet; Damaged Turtle Shell; Damaged Netherite Helmet
|Damaged Leather Cap; Damaged Golden Helmet; Damaged Chainmail Helmet; Damaged Iron Helmet; Damaged Diamond Helmet; Damaged Turtle Shell; Damaged Netherite Helmet
|Output= Leather Cap; Golden Helmet; Chainmail Helmet; Iron Helmet; Diamond Helmet; Turtle Shell; Netherite Helmet
|description= The durability of the two helmets is added together, plus an extra 5% durability.
|type= Combat
|foot=1
}}
===Upgrading===
{{Smithing
|head=1
|Netherite Upgrade
|Diamond Helmet
|Netherite Ingot
|Netherite Helmet
|tail=1
}}
===Repairing===
====Grinding====
{{Grinding
|showdescription=1
|ingredients=2x Damaged [[Leather Cap]] or<br>2x Damaged [[Chainmail Helmet]] or<br>2x Damaged [[Iron Helmet]] or<br>2x Damaged [[Golden Helmet]] or<br>2x Damaged [[Diamond Helmet]] or<br>2x Damaged [[Netherite Helmet]] or<br>2x Damaged [[Turtle Shell]]
|Damaged Leather Cap; Damaged Chainmail Helmet; Damaged Iron Helmet; Damaged Golden Helmet; Damaged Diamond Helmet; Damaged Netherite Helmet; Damaged Turtle Shell
|Damaged Leather Cap; Damaged Chainmail Helmet; Damaged Iron Helmet; Damaged Golden Helmet; Damaged Diamond Helmet; Damaged Netherite Helmet; Damaged Turtle Shell
|Leather Cap; Chainmail Helmet; Iron Helmet; Golden Helmet; Diamond Helmet; Netherite Helmet; Turtle Shell
|description=The durability of the two helmets are added together, plus an extra 5% durability.
}}
====[[Anvil mechanics#Unit repair|Unit repair]]====
Helmets can be repaired in an [[anvil]] by adding units of the [[armor material]]'s repair material, with each repair material restoring 25% of the helmet's maximum durability, rounded down.
===Mob loot===
If a [[zombie]], [[husk]], [[stray]] or [[skeleton]] is wearing armor, there is a 8.5% chance (9.5% with [[Looting]] I, 10.5% with Looting II and 11.5% with Looting III) for the mob to drop a helmet upon death. The dropped helmet is usually badly damaged, and may be [[enchanted]] with enchantment levels 5-19.
{{IN|bedrock}}, [[vindicator]]s and [[pillager]]s spawned in [[raid]]s have a 8.3525% chance (10.28% on hard) to drop [[iron]] helmets. The dropped helmets are usually badly damaged, and have a 50% chance of being [[enchanted]] with a random [[enchantment]].
===Natural generation===
Two [[armor stand]]s are found in each taiga [[village]] outdoor armory, one of them equipped with an [[iron helmet]].
===Chest loot===
{{IN|BE}}, a sealed room in [[woodland mansion]]s can appear that has a chest sometimes containing an [[Efficiency]] I leather cap.<ref>{{bug|MCPE-109048}}</ref>
{{LootChestItem|leather-cap,random-enchanted-leather-cap,chainmail-helmet,iron-helmet,level-enchanted-iron-helmet,golden-helmet,random-enchanted-golden-helmet,diamond-helmet,damaged-diamond-helmet,level-enchanted-diamond-helmet,damaged-random-enchanted-diamond-helmet,damaged-random-enchanted-diamond-helmet-2}}
===Trading===
{{IN|java}}, novice-level armorer villagers have a 40% chance to sell an iron helmet for 4 emeralds. Journeyman-level armorers have a 40% chance to sell a chainmail helmet for 1 emerald. Master-level armorers always sell an enchanted diamond helmet for 11-27 emeralds. Apprentice-level leatherworker villagers have a {{frac|2|3}} chance to sell a leather cap<ref group="note" name="dye note">The leather armor has a random color created by two dyes (possibly the same dye twice.)</ref> for 5 emeralds. Master-level leatherworker villagers offer the same trade.
Armorer villagers may give the players with the [[Hero of the Village]] effect a chainmail helmet.
{{IN|bedrock}}, novice-level armorer villagers have a 25% chance to sell iron helmet for 5 emeralds, {{frac|1|3}} chance to sell chainmail helmet at journeyman-level for an emerald, and 50% chance to sell enchanted diamond helmet for 8 emeralds at master-level. Apprentice-level leatherworker villagers have a 50% chance to sell leather cap for 5 emeralds as part of their trades, and 50% chance to sell an enchanted leather cap for 5 emeralds at the master level.
{{notelist|columns=1}}
==Usage ==
Helmets can be placed in the top armor slot of a player's [[inventory]] for activation.
===Defense points===
Defense points are each signified by half of a shirt of mail in the armor bar above the health bar. Each defense point reduces any damage dealt to the player that is absorbed by armor by 4%, increasing additively with the number of defense points. Different materials and combinations of armor provide different levels of defense.
The following table shows the number of defense points added by helmets.
{| class="wikitable" data-description="Helmet defense points"
|-
! scope="col" |Material
! scope="col" |
|-
! scope="row" |Leather
|{{armor|1}}
|-
! scope="row" |Golden
| rowspan="4" |{{armor|2}}
|-
! scope="row" |Chainmail
|-
! scope="row" |Iron
|-
! scope="row" |Turtle Shell
|-
! scope="row" |Diamond
| rowspan="2" |{{armor|3}}
|-
! scope="row" |Netherite
|}
===Knockback resistance===
A netherite helmet provides 10% knockback resistance.
===Durability===
The following table shows the amount of damage each piece of armor can absorb before being destroyed.
Any "hit" from a damage source that can be blocked by armor removes one point of durability from each piece of armor worn for every {{hp|4}} of incoming damage (rounded down, but never below 1). Damage taken that armor doesn't protect (such as [[Damage#Fall damage|falling]] or [[Damage#Drowning|drowning]]) does not damage the armor, even if it is enchanted to protect against that type of damage. The following chart displays how many hits helmets can endure.
Netherite armor is not damaged by [[lava]] or [[fire]] when worn.
{| class="wikitable" data-description="Helmet durability"
|-
!Material
!Durability
|-
! scope="row" |Leather
|55
|-
! scope="row" |Golden
|77
|-
! scope="row" |Chainmail
| rowspan="2" |165
|-
! scope="row" |Iron
|-
! scope="row" |Turtle Shell
|275
|-
! scope="row" |Diamond
|363
|-
! scope="row" |Netherite
|407
|}
====Repair====
Helmets may be [[item repair|repaired]] by using them along with some of their crafting material (leather, gold ingots, iron ingots, diamonds or netherite) in an [[anvil]]. Chainmail helmets may be repaired in this way with iron ingots. They may also be repaired by crafting them together with another helmet of like material.
===Enchantments===
A helmet can receive the following [[enchantment]]s. Note that while iron and chainmail have the same durability, chainmail has a higher [[Tutorials/Enchanting mechanics#Enchantability|enchantability]] than iron or diamond.
{| class="wikitable"
|-
!Enchantment !!Max Level !!Notes
|-
|[[Fire Protection]]|| IV ||<ref group="note" name="exclusive">Fire Protection, Blast Protection, Projectile Protection and Protection are mutually exclusive</ref>
|-
|[[Projectile Protection]]|| IV ||<ref group="note" name="exclusive" />
|-
|[[Blast Protection]]|| IV ||<ref group="note" name="exclusive" />
|-
|[[Protection]]|| IV ||<ref group="note" name="exclusive" />
|-
|[[Unbreaking]]||III
|
|-
|[[Respiration]]||III
|
|-
|[[Aqua Affinity]]||I
|
|-
|[[Thorns]]||III ||<ref group="note" name="anvil">Only from using an [[anvil]] and [[enchanted book]]s.</ref>
|-
|[[Mending]]||I ||<ref group="note" name="anvil2">Only from chest loot, fishing, or an anvil and enchanted books.</ref>
|-
|[[Curse of Binding]]||I ||<ref group="note" name="anvil2" />
|-
|[[Curse of Vanishing]]||I ||<ref group="note" name="anvil2" />
|}
{{notelist}}
===Turtle shell effect===
Equipping a {{ItemSprite|Turtle Shell}} turtle shell provides the {{EffectLink|Water Breathing}} status effect, allowing the player to remain underwater for an additional 10 seconds. The time that this effect lasts does not begin to count down until the player dives underwater, then the 10 seconds are counted down. The effect immediately recharges after exposure to air.
===Brewing ingredient===
A turtle shell can also be used as a potion brewing ingredient.
{{Brewing
|Turtle Shell
|Potion of the Turtle Master
|Potion of the Turtle Master
|Potion of the Turtle Master
|showname=1
}}
===Smelting usage===
{{Smelting|showname=1|Iron Helmet;Chainmail Helmet;Golden Helmet|Iron Nugget;Iron Nugget;Gold Nugget|0,1}}
===Piglins===
{{EntityLink|Piglin|Piglins}} are attracted to ''golden'' helmets and pick them up, examining them for 6 to 8 seconds. Piglins can wear other helmets but are not attracted to them. They prefer stronger helmets over weaker helmets, with one exception: They always prefer golden helmets, throwing out stronger helmets in favor of gold helmets. Enchanted helmets are preferred over unenchanted helmets.
==Sounds ==
{{el|je}}:
{{Sound table
|sound=Equip leather1.ogg
|sound2=Equip leather2.ogg
|sound3=Equip leather3.ogg
|sound4=Equip leather4.ogg
|sound5=Equip leather5.ogg
|sound6=Equip leather6.ogg
|subtitle=Leather armor rustles
|source=player
|description=When a leather helmet is equipped
|id=item.armor.equip_leather
|translationkey=subtitles.item.armor.equip_leather
|volume=1.0
|pitch=1.0
|distance=16}}
{{Sound table
|sound=Equip chain1.ogg
|sound2=Equip chain2.ogg
|sound3=Equip chain3.ogg
|sound4=Equip chain4.ogg
|sound5=Equip chain5.ogg
|sound6=Equip chain6.ogg
|subtitle=Chain armor jingles
|source=player
|description=When a chainmail helmet is equipped
|id=item.armor.equip_chain
|translationkey=subtitles.item.armor.equip_chain
|volume=1.0
|pitch=1.0
|distance=16}}
{{Sound table
|sound=Equip iron1.ogg
|sound2=Equip iron2.ogg
|sound3=Equip iron3.ogg
|sound4=Equip iron4.ogg
|sound5=Equip iron5.ogg
|sound6=Equip iron6.ogg
|subtitle=Iron armor clanks
|source=player
|description=When an iron helmet is equipped
|id=item.armor.equip_iron
|translationkey=subtitles.item.armor.equip_iron
|volume=1.0
|pitch=1.0
|distance=16}}
{{Sound table
|sound=Equip gold1.ogg
|sound2=Equip gold2.ogg
|sound3=Equip gold3.ogg
|sound4=Equip gold4.ogg
|sound5=Equip gold5.ogg
|sound6=Equip gold6.ogg
|subtitle=Gold armor clinks
|source=player
|description=When a gold helmet is equipped
|id=item.armor.equip_gold
|translationkey=subtitles.item.armor.equip_gold
|volume=1.0
|pitch=1.0
|distance=16}}
{{Sound table
|sound=Equip diamond1.ogg
|sound2=Equip diamond2.ogg
|sound3=Equip diamond3.ogg
|sound4=Equip diamond4.ogg
|sound5=Equip diamond5.ogg
|sound6=Equip diamond6.ogg
|subtitle=Diamond armor clangs
|source=player
|description=When a diamond helmet is equipped
|id=item.armor.equip_diamond
|translationkey=subtitles.item.armor.equip_diamond
|volume=1.0
|pitch=1.0
|distance=16}}
{{Sound table
|sound=Equip netherite1.ogg
|sound2=Equip netherite2.ogg
|sound3=Equip netherite3.ogg
|sound4=Equip netherite4.ogg
|subtitle=Netherite armor clanks
|source=player
|description=When a netherite helmet is equipped
|id=item.armor.equip_netherite
|translationkey=subtitles.item.armor.equip_netherite
|volume=0.8
|pitch=1.0/0.9
|distance=16}}
{{Sound table
|sound=Equip turtle shell.ogg
|subtitle=Turtle Shell thunks
|source=player
|description=When a turtle shell is equipped
|id=item.armor.equip_turtle
|translationkey=subtitles.item.armor.equip_turtle
|volume=1.0
|pitch=1.0/0.85/1.1
|distance=16}}
{{Sound table
|sound=Random break.ogg
|subtitle=Item breaks
|source=dependent
|description=When a helmet's durability is exhausted
|id=entity.item.break
|translationkey=subtitles.entity.item.break
|volume=0.8
|pitch=0.8-1.2
|distance=16
|foot=1}}
{{el|be}}:
{{Sound table
|type=bedrock
|sound=Equip leather1.ogg
|sound2=Equip leather2.ogg
|sound3=Equip leather3.ogg
|sound4=Equip leather4.ogg
|sound5=Equip leather5.ogg
|sound6=Equip leather6.ogg
|source=player
|description=When a leather helmet or a turtle shell is equipped
|id=armor.equip_leather
|volume=1.0
|pitch=1.0}}
{{Sound table
|sound=Equip chain1.ogg
|sound2=Equip chain2.ogg
|sound3=Equip chain3.ogg
|sound4=Equip chain4.ogg
|sound5=Equip chain5.ogg
|sound6=Equip chain6.ogg
|source=player
|description=When a chain helmet is equipped
|id=armor.equip_chain
|volume=1.0
|pitch=1.0}}
{{Sound table
|sound=Equip iron1.ogg
|sound2=Equip iron2.ogg
|sound3=Equip iron3.ogg
|sound4=Equip iron4.ogg
|sound5=Equip iron5.ogg
|sound6=Equip iron6.ogg
|source=player
|description=When an iron helmet is equipped
|id=armor.equip_iron
|volume=1.0
|pitch=1.0}}
{{Sound table
|sound=Equip gold1.ogg
|sound2=Equip gold2.ogg
|sound3=Equip gold3.ogg
|sound4=Equip gold4.ogg
|sound5=Equip gold5.ogg
|sound6=Equip gold6.ogg
|source=player
|description=When a gold helmet is equipped
|id=armor.equip_gold
|volume=1.0
|pitch=1.0}}
{{Sound table
|sound=Equip diamond1.ogg
|sound2=Equip diamond2.ogg
|sound3=Equip diamond3.ogg
|sound4=Equip diamond4.ogg
|sound5=Equip diamond5.ogg
|sound6=Equip diamond6.ogg
|source=player
|description=When a diamond helmet is equipped
|id=armor.equip_diamond
|volume=1.0
|pitch=1.0}}
{{Sound table
|sound=Equip netherite1.ogg
|sound2=Equip netherite2.ogg
|sound3=Equip netherite3.ogg
|sound4=Equip netherite4.ogg
|source=player
|description=When a netherite helmet is equipped.
|id=armor.equip_netherite
|volume=1.0
|pitch=1.0}}
{{Sound table
|rowspan=2
|sound=Water Splash Old.ogg
|source=block
|description=When a leather helmet is dyed using a cauldron
|id=cauldron.dyearmor
|volume=0.1
|pitch=1.0}}
{{Sound table
|source=block
|description=When a leather helmet's dye is removed using a cauldron
|id=cauldron.cleanarmor
|volume=0.1
|pitch=1.0}}
{{Sound table
|sound=Random break.ogg
|source=player
|description=When a helmet's durability is exhausted
|id=random.break
|volume=1.0
|pitch=0.9
|foot=1}}
==Data values ==
=== ID===
{{edition|java}}:
{{ID table
|edition=java
|showitemtags=y
|showforms=y
|generatetranslationkeys=y
|displayname=Leather Cap
|spritetype=item
|nameid=leather_helmet
|itemtags=freeze_immune_wearables
|form=item}}
{{ID table
|displayname=Chainmail Helmet
|spritetype=item
|nameid=chainmail_helmet
|form=item}}
{{ID table
|displayname=Iron Helmet
|spritetype=item
|nameid=iron_helmet
|form=item}}
{{ID table
|displayname=Diamond Helmet
|spritetype=item
|nameid=diamond_helmet
|form=item}}
{{ID table
|displayname=Golden Helmet
|spritetype=item
|nameid=golden_helmet
|form=item}}
{{ID table
|displayname=Netherite Helmet
|spritetype=item
|nameid=netherite_helmet
|form=item}}
{{ID table
|displayname=Turtle Shell
|spritetype=item
|nameid=turtle_helmet
|form=item
|foot=1}}
{{edition|bedrock}}:
{{ID table
|edition=bedrock
|shownumericids=y
|showforms=y
|notshowbeitemforms=y
|generatetranslationkeys=y
|displayname=Leather Cap
|spritetype=item
|nameid=leather_helmet
|id=335
|form=item}}
{{ID table
|displayname=Chainmail Helmet
|spritetype=item
|nameid=chainmail_helmet
|id=339
|form=item}}
{{ID table
|displayname=Iron Helmet
|spritetype=item
|nameid=iron_helmet
|id=343
|form=item}}
{{ID table
|displayname=Diamond Helmet
|spritetype=item
|nameid=diamond_helmet
|id=347
|form=item}}
{{ID table
|displayname=Golden Helmet
|spritetype=item
|nameid=golden_helmet
|id=351
|form=item}}
{{ID table
|displayname=Netherite Helmet
|spritetype=item
|nameid=netherite_helmet
|id=609
|form=item}}
{{ID table
|displayname=Turtle Shell
|spritetype=item
|nameid=turtle_helmet
|id=573
|form=item
|foot=1}}
===Item data===
When leather caps are dyed, it has the following NBT:
<div class="treeview">
*{{nbt|compound|tag}}: Parent tag.
**{{nbt|compound|display}}: Display properties.
***{{nbt|int|color}}: The color of the leather armor. The tooltip displays "Dyed" if advanced tooltips are disabled, otherwise it displays the hexadecimal color value. Color codes are calculated from the Red, Green and Blue components using this formula:<br>'''<span style="color:red">Red</span>[[wikipedia:Logical shift|<<]]16 + <span style="color:green">Green</span><<8 + <span style="color:blue">Blue</span>'''<ref>For positive values larger than 0x00FFFFFF, the top byte is ignored. All negative values produce white.</ref>
</div>
==Achievements ==
{{load achievements|Iron Man;Tie Dye Outfit;Cover me in debris;Oooh, shiny!}}
==Advancements ==
{{load advancements|Suit Up;Cover me With Diamonds;Oh Shiny;Cover Me in Debris;A Furious Cocktail;How Did We Get Here}}
==History ==
{{History|java classic}}
{{History||August 13, 2009|link=wordofnotch:162091556|Notch tested armor models on [[mob (entity)|mob]]. Only [[chestplate]]s and helmets were available. They were merely aesthetic at the time and had no effect on gameplay.}}
{{History||0.24_SURVIVAL_TEST|[[File:Plate Helmet.png|32px]] Added [[Java_Edition_removed_features#Armor_in_Survival_Test|plate helmet]]s.
|[[File:Chainmail Helmet JE1.png|32px]] Added the model and the texture for unused [[Java_Edition_removed_features#Armor_in_Survival_Test|chain helmet]]s.
|[[File:Zombie full set.png|32px]] [[File:Skeleton helmet.png|26px]] Plate armor models have been tested on [[zombie]]s and [[skeleton]]s. It had no effect on gameplay.}}
{{History|java indev}}
{{History||0.31|snap=20091223-1|Plate and chain armor [[model]]s are no longer used.}}
{{History|||snap=20091231-2|[[File:Leather Cap (item) JE1 BE1.png|32px]] [[File:Studded Helmet (item) JE1.png|32px]] [[File:Chainmail Helmet (item) JE1 BE1.png|32px]] [[File:Iron Helmet (item) JE1 BE1.png|32px]] Added [[item]]s of relation to leather, [[History of textures/Unused textures#Studded armor|studded]], chainmail and plate (iron) helmets.
|The textures of leather helmets are taken from one of [[Notch]]'s previous games, ''[[Legend of the Chambered]]''. The rest are from ''[[Legend of the Chambered 2]]''.}}
{{History||20100206|[[File:Golden Helmet (item) JE1 BE1.png|32px]] [[File:Diamond Helmet (item) JE1 BE1.png|32px]] Added items of golden and diamond helmets.
|Removed leather-chain helmets.}}
{{History||20100212-1|Added armor models.
|[[File:Indev 20100212 armor.png|50px]] Armor models are now displayed on the [[player]] in the [[inventory]].}}
{{History||20100218|[[File:Leather Cap JE1 BE1.png|32px]] [[File:Chainmail Helmet JE2 BE1.png|32px]] [[File:Iron Helmet JE1 BE1.png|32px]] [[File:Golden Helmet JE1 BE1.png|32px]] [[File:Diamond Helmet JE1 BE1.png|32px]] Added models of leather, chainmail, iron, gold, and diamond helmets.
|Helmets can now be [[crafting|crafted]] and worn.
|Helmets now function. All helmets give {{Armor|3}}. Helmets have limited [[item durability|durability]], with lower tier helmets less durable than higher tier helmets.}}
{{History|java alpha}}
{{History||v1.0.8|With the introduction of [[leather]], "Cloth Cap" has been renamed to "Leather Cap".
|Leather cap is now [[crafting|crafted]] with leather instead of [[wool|cloth]].}}
{{History|java}}
{{History||1.0.0|snap=Beta 1.9 Prerelease|The armor protection behavior has been changed. Prior to this update, the total armor protection is based in this equation: (((''total equipped armor damage reduction'' − 1) × (''all equipped armor max damage'' − ''total equipped armor damage'')) ÷ (''total equipped armor max damage'' + 1)). Armor no longer reduces certain damage types to be covered by enchantments.}}
{{History|||snap=October 3, 2011|slink={{tweet|notch|120859830339637249}}|The first images of a [[player]] wearing enchanted armor are revealed.}}
{{History|||snap=Beta 1.9 Prerelease 3|Iron helmets can now be found in the new [[stronghold]] altar [[chest]]s.}}
{{History|||snap=Beta 1.9 Prerelease 4|Helmets can now be [[enchanting|enchanted]].}}
{{History||1.1|snap=12w01a|Iron helmets can now be found in the new blacksmith [[chest]]s in [[village]]s.}}
{{History||1.2.1|snap=12w06a|[[Zombie]]s now drop iron helmets on rare occasions and [[zombie pigman|zombie pigmen]] now drop golden helmets.}}
{{History||1.3.1|snap=12w15a|{{key|Shift}}+clicking can now be used to wear helmets.}}
{{History|||snap=12w21a|Chain helmets can now be obtained legitimately in [[survival]] mode through [[trading]].
|Blacksmith [[villager]]s now [[trading|sell]] chain helmets for 5–6 emeralds.
|Blacksmith villagers now sell diamond helmets for 7 emeralds.
|Blacksmith villagers now sell iron helmets for 4–5 emeralds.
|Butchers now sell leather caps for 2–3 emeralds.}}
{{History||1.4.2|snap=12w32a|[[Mob]] armor has been reintroduced. A partial or full set of any armor is now sometimes worn by [[zombie]]s, [[skeleton]]s and [[zombified piglins|zombie pigmen]], with the likelihood increasing with difficulty.}}
{{History|||snap=August 17, 2012|slink={{tweet|Dinnerbone|236445090929844225}}|[[Jeb]] and [[Dinnerbone]] tweeted pictures of [[dye]]able leather armor.}}
{{History|||snap=12w34a|Leather helmets can now be dyed by [[crafting]] a leather armor piece with [[dye]]s. Dyes can be removed by {{control|use|text=using}} dyed leather armor on a [[cauldron]] with [[water]].
|[[File:Leather Cap JE2.png|32px]] [[File:Leather Cap (item) JE2.png|32px]] Default leather caps textures are now slightly darker.}}
{{History|||snap=12w36a|[[Dye]]d leather caps are now more saturated and have a slight tint of tan in respect to the default armor color.}}
{{History|||snap=12w37a|[[File:Leather Cap JE3 BE2.png|32px]] [[File:Leather Cap (item) JE3 BE2.png|32px]] Leather armor now has non-dyed parts on the cap. This has been implemented so that [[player]]s can distinguish between other types of helmets and similarly colored leather caps.}}
{{History||1.5|snap=13w04a|Helmets in the [[player]]'s hand can now be equipped by right-clicking.
|[[Dispenser]]s can now equip nearby players with helmets.}}
{{History||1.8|snap=14w02a|[[Trading|Trades]] changed: armorer [[villager]]s now [[trading|sell]] chain helmets for 5–7 emeralds.
|Armorer villagers no longer sell diamond helmets.
|Armorer villagers now sell iron helmets for 4–6 emeralds.
|Leatherworkers no longer sell other leather caps.}}
{{History|||snap=14w05a|Helmets no longer turns red when [[mob]]s and [[player]]s are hurt.}}
{{History|||snap=14w06a|Helmets are now visible on [[giant]]s.}}
{{History|||snap=14w25a|Chain helmets [[Java Edition removed features#Chainmail armor|cannot be crafted anymore]] due to the [[item]] form of [[fire]] being [[Java Edition removed features#Obtainable until 1.8|removed]].}}
{{History||1.9|snap=15w31a|Enchanted iron and diamond helmets can now be found in [[end city]] ship [[chest]]s.
|[[Mob]]s now wear armor from the bottom to the top, rather than from the top to the bottom. This means that a mob with three armor pieces, for example, spawn with all armor except a helmet.}}
{{History|||snap=15w34b|Helmet [[item durability|durability]] now affects armor value.}}
{{History|||snap=15w36a|Armor and armor [[enchanting|enchantment]] calculations have been changed. For the original values, see [[Armor/Before 1.9|here]].}}
{{History|||snap=15w36d|Helmet durability affecting value has been removed.
|Helmets now has an attribute controlling the defense points.}}
{{History|||snap=15w50a|Added <code>equip</code> [[sound]]s for leather armor.}}
{{History|||snap=16w02a|Armor and armor enchantment calculations have been changed again.}}
{{History|||snap=16w05a|Armor calculations have been changed, once again.}}
{{History||1.13|snap=17w47a|Prior to [[1.13/Flattening|''The Flattening'']], these [[item]]s' numeral IDs were 298, 302, 306, 310 and 314.}}
{{History|||snap=18w07a|[[File:Turtle Shell.png|32px]] [[File:Turtle Shell (item) JE1 BE1.png|32px]] Added turtle shells.}}
{{History|||snap=18w09a|Golden helmets now have a chance of generating in [[underwater ruins]].}}
{{History|||snap=18w11a|Enchanted leather caps can now generate in the chests of [[shipwreck]]s.}}
{{History|||snap=18w20a|"Chain Helmet" has now been renamed to "Chainmail Helmet".}}
{{History||1.14|snap=18w43a|[[File:Leather Cap JE4 BE2.png|32px]] [[File:Chainmail Helmet JE3 BE2.png|32px]] [[File:Iron Helmet JE2 BE2.png|32px]] [[File:Golden Helmet JE2 BE2.png|32px]] [[File:Diamond Helmet JE2 BE2.png|32px]]<br>[[File:Leather Cap (item) JE4 BE3.png|32px]] [[File:Chainmail Helmet (item) JE2 BE2.png|32px]] [[File:Iron Helmet (item) JE2 BE2.png|32px]] [[File:Golden Helmet (item) JE2 BE2.png|32px]] [[File:Diamond Helmet (item) JE2 BE2.png|32px]] The textures of all types of helmets have been changed.}}
{{History|||snap=18w48a|Leather caps can now be found in [[chest]]s in [[village]] tanneries.}}
{{History|||snap=18w50a|Iron helmets can now be found on [[armor stand]]s in [[taiga]] villages.}}
{{History|||snap=19w08a|[[File:Golden Helmet (item) JE3 BE3.png|32px]] The textures of gold helmet [[item]]s have been changed.}}
{{History|||snap=19w11a|Armorer villagers now sell enchanted diamond helmets, making diamond helmets effectively [[renewable resource|renewable]] again.
|Leatherworker villagers now sell randomly [[dye]]d leather caps.}}
{{History|||snap=19w13a|Armorer villagers now give chainmail helmets to players under the [[Hero of the Village]] effect.}}
{{History||1.16|snap=20w06a|[[File:Netherite Helmet JE1.png|32px]] [[File:Netherite Helmet (item) JE1.png|32px]] Added netherite helmets.}}
{{History|||snap=20w07a|[[File:Leather piglin helmet.png|32px]] [[File:Chainmail piglin helmet.png|32px]] [[File:Iron piglin helmet.png|32px]] [[File:Golden piglin helmet.png|32px]] [[File:Diamond piglin helmet.png|32px]] [[File:Netherite piglin helmet JE1.png|32px]] Added textures and [[model]]s for all helmets when they are used by [[piglin]]s.
|Netherite helmets are now obtained by combining one diamond armor piece and one netherite ingot in a crafting table.
|[[File:Turtle Shell piglin MC-172110.png|32px]] Turtle shells, when used by piglins and [[zombified piglin]]s, result in a [[missing texture]] when being displayed.<ref>{{Cite bug|MC|172110|Texture of turtle shells is missing when worn by a piglin or zombified piglin|date=February 14, 2020}}</ref>}}
{{History|||snap=20w09a|[[File:Diamond Helmet (item) JE3 BE3.png|32px]] The textures of diamond helmet [[item]]s have been changed.}}
{{History|||snap=20w10a|[[File:Netherite Helmet JE2 BE1.png|32px]] [[File:Netherite Helmet (item) JE2 BE1.png|32px]] The texture of netherite helmets has been changed.
|[[File:Netherite piglin helmet.png|32px]] The texture of netherite helmets for [[piglin]]s has been changed.
|Netherite helmets can no longer be [[crafting|crafted]].
|Netherite helmets are now obtained by combining one diamond helmet and one netherite ingot in a [[smithing table]].}}
{{History|||snap=20w16a|Golden and netherite helmets now generate randomly [[enchanting|enchanted]], and sometimes [[damage]]d, in [[bastion remnant]] and [[ruined portal]] chests.}}
{{History|||snap=20w17a|Diamonds helmets now generate in place of netherite helmets in bastion remnant [[chest]]s.}}
{{History|||snap=pre3|The special helmet [[model]]s and textures created for [[piglin]]s have been removed except for leather helmets.}}
{{History||1.17|snap=20w48a|Wearing a leather helmet now prevents [[Powder Snow#Freezing|freezing]] entirely.}}
{{History|||snap=21w13a|The two unused textures of the leather cap for [[piglin]]s<ref><code>/assets/minecraft/textures/models/armor/piglin_leather_layer_1.png</code></ref><ref><code>/assets/minecraft/textures/models/armor/piglin_leather_layer_1_overlay.png</code></ref> have been removed.}}
{{History||1.18.2|snap=22w03a|Netherite helmet knockback resistance is no longer random.}}
{{History||1.19|snap=22w17a|[[File:Leather Cap JE5.png|32px]] The texture of the leather cap item has been changed.|Changed the leather cap texture when worn so the center bar now extends to the bottom of the back face.}}
{{History||1.20<br>(Experimental)|link=1.19.4|snap=23w04a|Non-leather helmets can now be trimmed using a [[smithing table]].
|There are 10 types of material that determine the color of the trim:
*Iron
*Copper
*Gold
*Lapis
*Emerald
*Diamond
*Netherite
*Redstone
*Amethyst
*Quartz
|Upgrading diamond helmets to netherite helmets now requires the netherite upgrade [[smithing template]].}}
{{History|||snap=23w05a|Leather caps can now be trimmed using a smithing table.|Helmets can now have trims of the same material it is made out of.}}
{{History|||snap=23w06a|Swapped {{cd|iron}} and {{cd|iron_darker}} palette, then made {{cd|iron_darker}} darker overall.}}
{{History||1.19.4|snap=23w05a|Helmets can now be swapped by {{ctrl|using}} them in the hotbar.<ref>{{bug|MC-216270|||Fixed}}</ref>}}
{{History||?|Helmets can now be swapped in [[armor stand]]s by {{ctrl|using}} them/[[head]]s/[[carved pumpkin]]s in the armor stand's slot.}}
{{History||1.20|snap=23w12a|The pattern textures of dune and sentry armor trims are changed.|Those previous patterns were left with different names: dune was renamed sentry and sentry was renamed shaper.}}
{{History|pocket alpha}}
{{History||v0.6.0|[[File:Leather Cap JE1 BE1.png|32px]] [[File:Chainmail Helmet JE2 BE1.png|32px]] [[File:Iron Helmet JE1 BE1.png|32px]] [[File:Golden Helmet JE1 BE1.png|32px]] [[File:Diamond Helmet JE1 BE1.png|32px]]<br>[[File:Leather Cap (item) JE1 BE1.png|32px]] [[File:Chainmail Helmet (item) JE1 BE1.png|32px]] [[File:Iron Helmet (item) JE1 BE1.png|32px]] [[File:Golden Helmet (item) JE1 BE1.png|32px]] [[File:Diamond Helmet (item) JE1 BE1.png|32px]] Added helmets.}}
{{History||v0.8.0|snap=build 2|[[File:Leather Cap (item) JE3 BE2.png|32px]] The leather helmet sprite has been changed to that of {{el|je}}, but its armor [[model]] remains that of older versions.}}
{{History||v0.9.0|snap=build 1|Iron helmets now naturally generate in [[village]] [[chest]]s and in [[stronghold]] altar chests.}}
{{History||v0.11.0|snap=build 11|Helmets now protect against [[damage]] from [[mob]]s only.}}
{{History||v0.12.1|snap=build 1|Helmets can now be worn by mobs.
|Chainmail helmets can now be obtained in [[survival]] mode from a mob wearing it.}}
{{History||?|Helmets no longer turn red when [[mob]]s and [[player]]s are hurt.}}
{{History||v0.14.0|snap=build 1|[[File:Leather Cap JE3 BE2.png|32px]] The texture of leather helmets have been changed.
|Leather helmets can now be dyed.}}
{{History||v0.15.0|snap=build 1|Helmets can now be obtained from [[stray]]s and [[husk]]s that naturally spawn with armor.}}
{{History|pocket}}
{{History||1.0.0|snap=alpha 0.17.0.1|[[Enchanting|Enchanted]] iron helmets and enchanted diamond helmets can now be found inside [[chest]]s within [[end city|end cities]].}}
{{History||1.0.4|snap=alpha 1.0.4.0|Iron helmets and chainmail helmets are now [[trading|sold]] by armorer smith [[villager]]s via trading.}}
{{History||1.1.0|snap=alpha 1.1.0.0|Golden, chain and iron helmets can now be [[smelting|smelted]] down into one of their respective [[nugget]]s.}}
{{History|bedrock}}
{{History||1.4.0|snap=beta 1.2.14.2|Chainmail helmets now generate in [[buried treasure]] chests.
|Enchanted leather helmets can now be found inside [[shipwreck]] supply room [[chest]]s.}}
{{History|||snap=beta 1.2.20.1|Golden helmets can now be found inside [[underwater ruins]] chests.}}
{{History||1.5.0|snap=beta 1.5.0.4|[[File:Turtle Shell.png|32px]] [[File:Turtle Shell (item) JE1 BE1.png|32px]] Added turtle shells.}}
{{History||1.10.0|snap=beta 1.10.0.3|[[File:Leather Cap JE4 BE2.png|32px]] [[File:Chainmail Helmet JE3 BE2.png|32px]] [[File:Iron Helmet JE2 BE2.png|32px]] [[File:Golden Helmet JE2 BE2.png|32px]] [[File:Diamond Helmet JE2 BE2.png|32px]]<br>[[File:Leather Cap (item) JE4 BE3.png|32px]] [[File:Chainmail Helmet (item) JE2 BE2.png|32px]] [[File:Iron Helmet (item) JE2 BE2.png|32px]] [[File:Golden Helmet (item) JE2 BE2.png|32px]] [[File:Diamond Helmet (item) JE2 BE2.png|32px]] The textures of all types of helmets have been changed.
|Iron helmets now can be found in plains [[village]] weaponsmith [[chest]]s.
|Leather helmets can now be found inside plains village tannery chests.}}
{{History||1.11.0|snap=beta 1.11.0.1|Iron helmets now can be found in [[savanna]], [[taiga]], [[desert]], [[snowy taiga]] and [[snowy tundra]] [[village]] weaponsmith [[chest]]s.
|Leather helmets can now be found inside savanna, taiga, desert, snowy taiga and snowy tundra village tannery chests.
|Iron helmets can now be found in [[village]] armorer chests.}}
{{History|||snap=beta 1.11.0.4|[[Pillager]]s and [[vindicator]]s that spawn in [[raid]]s can now drop iron helmets.
|Diamond helmets are now sold by armorer villagers.}}
{{History||1.11.0|snap=beta 1.11.0.5|[[File:Golden Helmet (item) JE3 BE3.png|32px]] The textures of gold helmet [[item]]s have been changed.}}
{{History||1.12.0|snap=beta 1.12.0.2|[[File:Armor Stand with Leather Armor MCPE-44669.png|32px]] Leather armor no longer shows as being [[dye]]d properly when worn by [[armor stand]]s.}}
{{History||1.13.0|snap=beta 1.13.0.1|Leather armor now appears properly dyed when worn by armor stands.}}
{{History||1.16.0|snap=beta 1.16.0.51|[[File:Netherite Helmet JE2 BE1.png|32px]] [[File:Netherite Helmet (item) JE2 BE1.png|32px]] Added netherite helmets.
|[[File:Diamond Helmet (item) JE3 BE3.png|32px]] The textures of diamond helmet [[item]]s have been changed.
|Helmets can now be obtained from [[piglin]]s that naturally spawn with golden helmets.}}
{{History|||snap=beta 1.16.0.57|Golden and netherite helmets now generate randomly [[enchanting|enchanted]], and sometimes [[damage]]d, in [[bastion remnant]] chests.
|Netherite helmets can no longer be [[crafting|crafted]].
|Netherite helmets are now obtained by combining one diamond helmet and one netherite ingot in a [[smithing table]].}}
{{History|||snap=beta 1.16.0.63|Diamonds helmets now generate in place of netherite helmets in bastion remnant [[chest]]s.}}
{{History|||snap=beta 1.16.200.53|Netherite helmets now gives a 90% reduction in knockback.}}
{{History||1.16.210|snap=beta 1.16.210.53|Wearing leather helmets now prevents [[Powder Snow#Freezing|freezing]] entirely.}}
{{History|console}}
{{History||xbox=TU1|xbone=CU1|ps=1.0|wiiu=Patch 1|switch=1.0.1|[[File:Leather Cap JE1 BE1.png|32px]] [[File:Chainmail Helmet JE2 BE1.png|32px]] [[File:Iron Helmet JE1 BE1.png|32px]] [[File:Golden Helmet JE1 BE1.png|32px]] [[File:Diamond Helmet JE1 BE1.png|32px]]<br>[[File:Leather Cap (item) JE1 BE1.png|32px]] [[File:Chainmail Helmet (item) JE1 BE1.png|32px]] [[File:Iron Helmet (item) JE1 BE1.png|32px]] [[File:Golden Helmet (item) JE1 BE1.png|32px]] [[File:Diamond Helmet (item) JE1 BE1.png|32px]] Added helmets.
|Added a quick equip for armor to the [[inventory]] interface.}}
{{History||xbox=TU12|ps=1.03|[[File:Leather Cap JE3 BE2.png|32px]] [[File:Leather Cap (item) JE3 BE2.png|32px]] The textures for leather helmets have been changed.}}
{{History||xbox=TU14|ps=1.05|Leather helmets can now be [[dye]]d.
|[[Item repair]] can now repair helmets.}}
{{History||xbox=TU25|xbone=CU13|ps=1.16|Helmets now have the quick equip functionality.}}
{{History||xbox=TU53|xbone=CU43|ps=1.49|wiiu=Patch 23|switch=1.0.3|Golden, chain and iron helmets can now be [[smelting|smelted]] down into one of their respective [[nugget]]s.}}
{{History|PS4}}
{{History||1.90|[[File:Chainmail Helmet (item) JE2 BE2.png|32px]] [[File:Iron Helmet (item) JE2 BE2.png|32px]] [[File:Golden Helmet (item) JE2 BE2.png|32px]] [[File:Diamond Helmet (item) JE2 BE2.png|32px]] The textures of all types of helmet items have been changed (except for the leather helmets).}}
{{History|new 3ds}}
{{History||0.1.0|[[File:Leather Cap JE1 BE1.png|32px]] [[File:Chainmail Helmet JE2 BE1.png|32px]] [[File:Iron Helmet JE1 BE1.png|32px]] [[File:Golden Helmet JE1 BE1.png|32px]] [[File:Diamond Helmet JE1 BE1.png|32px]]<br>[[File:Leather Cap (item) JE3 BE2.png|32px]] [[File:Chainmail Helmet (item) JE1 BE1.png|32px]] [[File:Iron Helmet (item) JE1 BE1.png|32px]] [[File:Golden Helmet (item) JE1 BE1.png|32px]] [[File:Diamond Helmet (item) JE1 BE1.png|32px]] Added helmets.}}
{{History|foot}}
<gallery>
File:ArmorModel Aug 13 2009.jpg|First image of armor.
File:DinnerboneArmor.png|[[Dinnerbone]]'s first screenshot of dyed armor.
File:ArmorPE.png
</gallery>
;Armor durability from Indev until late Beta
{| class="wikitable" data-description="Armor Durability during Indev until late Beta" style="text-align:center;"
|-
!Leather
!Golden
!Chainmail
!Iron
!Diamond
|-
|33
|66
|66
|132
|264
|}
==Issues ==
{{issue list}}
==Trivia ==
*Unlike the other helmets, the netherite helmet covers most of the player's face, due to a nose guard and cheek plates.
*The turtle shell is the only helmet that is not part of a complete set.
* In Bedrock Edition, there exists a bug<ref>{{Cite bug|MCPE|109048|Efficiency 1 Leather Cap in Woodland Mansions|date=December 1, 2020}}</ref> that makes it possible to obtain a Leather Cap enchanted with Efficiency I from [[Woodland Mansion]] chests with a chance of 1.45%. The enchantment has no effect on the cap, however.
==Gallery ==
<gallery>
File:Zombie helmet.png|A zombie wearing a helmet in [[Survival Test]].
</gallery>
===Enchanted Helmets===
<gallery>
File:Enchanted Leather Cap (item).gif
File:Enchanted Chainmail Helmet (item).gif
File:Enchanted Iron Helmet (item).gif
File:Enchanted Golden Helmet (item).gif
File:Enchanted Diamond Helmet (item).gif
File:Enchanted Netherite Helmet (item).gif
File:Enchanted Turtle Shell (item).gif
</gallery>
<gallery>
File:Enchanted Leather Helmet.gif
File:Enchanted Chainmail Helmet.gif
File:Enchanted Iron Helmet.gif
File:Enchanted Golden Helmet.gif
File:Enchanted Diamond Helmet.gif
File:Enchanted Netherite Helmet.gif
File:Enchanted Turtle Shell.gif
</gallery>
==References ==
{{reflist}}
==External Links ==
*[https://www.minecraft.net/en-us/article/taking-inventory--helmet Taking Inventory: Helmet] – Minecraft.net on February 20, 2020
{{Items}}
[[Category:Armor]]
[[es:Casco]]
[[ja:ヘルメット]]
[[ko:투구]]
[[pt:Capacete]]
[[pl:Hełm]]
[[zh:头盔]]</li></ul> | 12w37a | Added the Superflat customization button. | |||
1.7.2{{Extension DPL}}<ul><li>[[Elytra|Elytra]]<br/>{{Item
| image = Elytra.png
| rarity = Uncommon
| renewable = No
| durability = 432
| stackable = No
}}
'''Elytra''' ({{Audio|ElytraPronunciation.mp3|/ˈɛl ɪ trə/|link2=''ᴇʟ-i-trə''}}<ref>“Elytron.” ''Merriam-Webster.com Dictionary'', Merriam-Webster, https://www.merriam-webster.com/dictionary/elytron. Accessed 22 May. 2022.</ref>)<!--"Elytra" is the plural of "elytron," a single half of a beetle's protective wing covers. Verbs should agree accordingly (e.g. "Elytra allow flight"). https://www.merriam-webster.com/dictionary/elytron--> are rare wings found in [[end ship]]s that are a source of flight in [[Survival]] mode.
== Obtaining ==
=== Natural generation ===
Elytra are found only in [[end city|end cities]] in [[item frame|item frames]] in the treasure room of the [[end ship]]. A [[shulker]] guards the elytra and the ship's two loot chests.
=== Repairing ===
Elytra can be enchanted with [[Mending]] so that they get [[Item repair|repaired]] as the player collects [[experience]] orbs while wearing/holding them.
Elytra can also be repaired in the player crafting grid, by combining two damaged pairs of elytra together.
{{crafting
|showname=0
|showdescription=1
|ignoreusage=1
|Damaged Elytra
|Damaged Elytra
|Output= Elytra
|description= The durability of the two pairs is added together, plus an extra 5% durability, but removes any enchantments.
|type= Transportation
}}
Similarly, two damaged elytra pairs can be combined on a [[grindstone]].
{{Grinding
|showdescription=1
|ingredients=2x Damaged [[Elytra]]
|Damaged Elytra
|Damaged Elytra
|Elytra
|description=The durability of the two pairs is added together, plus an extra 5% durability, but removes any enchantments.
}}
Elytra can also be repaired at an anvil using [[phantom membrane]]s, which has the advantage that it preserves [[enchantments]] on elytra. Each phantom membrane restores 108 durability points, exactly 25% of the elytra's total durability.
{| class="wikitable" data-description="Repairing elytra"
! scope="col" style="width:64px;" | Name
! Ingredients
! [[Anvil]] usage
|-
! scope="row" style="text-align: center;" | '''Elytra'''
| [[Elytra]] +<br>[[Phantom Membrane]]
| style="width: 260px; padding: 1px;" | {{Anvil| title = Elytra|Input1=Damaged Elytra|Input2=Phantom Membrane, 2|Output=Elytra}}
|-
|}
Each repair on the anvil, however, also increases the [[Anvil mechanics|prior work]] penalty for the Elytra, making every subsequent repair increasingly expensive and eventually reaching an upper limit where repairs are no longer allowed because they are "too expensive" (even if the player has many xp levels to spare). However, the prior work penalty can be reset to 0 for an enchanted elytra pair when it is disenchanted on a grindstone. Unenchanted elytra cannot be used on the grindstone alone.
== Usage ==
[[File:Steve in elytra.png|75px]] [[File:Alex in elytra.png|75px]]
Elytra are equipped in the [[chestplate]] slot, either by placing the item directly in the slot, by pressing {{ctrl|use item}} while [[hotbar|held in hand]], or by firing a point-blank [[dispenser]] at a target. They are gray in color by default, but they adopt the design of any [[cape]] the player is wearing. They maintain their in-world texture design even when they're [[#Repair|broken]] or [[enchanted]].
=== Flying ===
To fly, the player must press the {{ctrl|jump}} key while falling, and the elytra spread apart like a beetle's elytra. The player can aim their view around to turn or adjust their pitch. Losing altitude increases speed, and gaining altitude decreases speed. [[Firework rocket]]s can be used to increase speed. Additionally, speed is quickly lost from sharp changes in direction.
Directly hitting any surface while gliding too fast causes damage to the player and their armor proportional to flight speed (although this may be calculated from another factor). When a player dies in this way, they receive the [[death messages|death message]] "'''<player> experienced kinetic energy'''". The player does not take [[fall damage]] from colliding at a shallow angle or a low enough speed. The critical, damaging angle is about 50° with the collision surface, and the calculation for damage seems to be as if the player had fallen from their maximum potential glide height to the height of the struck surface.
A safe and simple cruise with the highest travel distance can be achieved by aiming directly at the horizon while at the glide's altitude limit. The player's speed is slow enough to allow them time to do other things during a long flight, like sort out their inventory.
In [[Creative]] mode or when the "mayfly" [[ability]] has been given, the player can alternatively hold the {{ctrl|jump}} key to fly up,{{only|bedrock}} or double press the jump key to move around freely.
Flight can be stopped by pressing the [[jump]] key.{{only|bedrock}}
==== Speed and altitude ====
Elytra have a minimum speed of about 7.2 m/s (obtained by gliding at the altitude cap with a strong upward pitch of 30°). If the diver drops to 0 speed, they quickly get accelerated back up to at least this minimum. The diver can increase speed by choosing to descend faster, but afterward, they do not regain nearly as much altitude. In the real world, drag increases with speed, and drag, in turn, slows the aircraft; Minecraft mimics this. To glide from cliff to cliff, a player's best bet is to aim slightly above the horizon.
Sharp turns are a fast way to lose speed. Quicker turns cause greater losses, while gentle movements have small effects. Making a hairpin turn can actually be used for making high-speed landings safe as well as for precise landings on small targets like rooftops. The player aims to glide just above the target, then as they're right over it they immediately reverse directions, then they make readjustments as necessary.
The lowest rate of altitude loss is about 1.5 m/sec, obtained by gliding at the altitude cap with a slight upward pitch (12° or 15°).
To get the best possible glide ratio (and thus the furthest distance out of their altitude), the diver pilot should aim directly at the horizon. This ratio is about 9.47 to 1.
[[Slow Falling]] potions greatly decrease the player's vertical (fall) speed, which also greatly decreases their ''horizontal'' speed (clearly, it depends on the vertical fall rate, as one might expect from flight modeling). The net result is that the player flies extremely slowly - but their Elytra still takes durability damage at the usual rate (1 durability per second without Unbreaking, etc.). Due to this combination, Elytra plus Slow Falling is largely a novelty that most players won't use. The [[Feather Falling]] enchantment does not affect Elytra speed and does not reduce fall damage from hitting things with elytra.
It is possible to calculate the glide range by dividing the altitude by tan of the glide angle (altitude/tan(glide angle)). For example, if the player glides from an altitude of 64 blocks above ground with a glide angle of 15 degrees, they can glide for 237 blocks (assume that they are on superflat), since floor(64 / tan(15)) is 237.
==== Stalling ====
Trying for too high a pitch reduces the player's lift. At a pitch of 30° above the horizon, the player has the lowest possible airspeed of 7.2 m/sec. Above that, the player might be considered to be in a stall. Increasing the pitch gets closer to a free-fall, and stalled flight at 60° is enough to cause fall damage. Stalling at 90° is a true free-fall.
Recovering from a stall is done by readjusting to any safe pitch as quickly as the player likes. This can be just changing to look at the horizon.
==== Powered flight ====
{{fakeImage|{{invSprite|Firework Rocket}}|Firework rockets are used for speed boosts while gliding.}}
[[Firework rocket]]s can be used for propulsion during flight by placing it in either hand and {{ctrl|using}}. Using a firework rocket while gliding quickly maximizes the player's speed for a time similar to the rocket's flight duration.
If the rocket is equipped with [[firework star]]s, it explodes at the end of its flight, inflicting damage based on the number of stars.
It is possible to gain altitude during powered flight. This makes it possible to glide for extreme distances and had been used extensively by [[far lands]]/[[World Border]] challenges.
=== Durability and Repair ===
{{fakeImage|{{invSprite|Broken Elytra}}|A broken pair of elytra.}}
[[Durability]] decreases by one point each second when gliding. A pair of elytra has 432 durability, allowing 7 minutes and 12 seconds of gliding time without enchantments, providing more than 10,000 blocks of transport distance. It is possible to apply the [[Unbreaking]] enchantment using an [[anvil]] and an [[enchanted book]], which affects the elytra, in the same way it does to [[tool]]s. Unbreaking III increases elytra's flight time to about four seconds per durability point, a total of 28 minutes and 44 seconds.
When the durability reaches 1, elytra stop working until they are repaired, adopting a tattered texture in the inventory. The damage ends at durability 1, so they can never fully break. A pair may be repaired by either using the [[Mending]] enchantment, combining two pairs in a [[grindstone]], or combining it in an anvil with [[phantom membrane]]s. In an anvil, each piece of membrane repairs elytra by 108 durability points, requiring 4 pieces to fully repair them.
Each repair on the anvil will also increase the [[Anvil mechanics|prior work]] penalty for the Elytra, making every subsequent repair increasingly expensive, with an upper limit where repairs are no longer allowed because they are "too expensive". However, the prior work penalty can be reset to 0 for an enchanted elytra pair when it is disenchanted on a grindstone (by adding nothing to it). Unenchanted elytra cannot be used on the grindstone alone.
=== Enchantments ===
Elytra can receive the following [[enchantments]] by combining in an anvil:
{| class="wikitable sortable"
|-
! Enchantment
! Max Level
![[Enchanting|Method]]
|-
| [[Unbreaking]]
| III
|{{Inventory slot|Anvil}}
|-
| [[Mending]]
| I
|{{Inventory slot|Anvil}}
|-
| [[Curse of Vanishing]]
| I
|{{Inventory slot|Anvil}}
|-
| [[Curse of Binding]]
| I
|{{Inventory slot|Anvil}}
|}
{{notelist|columns=1}}
== Sounds ==
{{edition|java}}:
{{Sound table
|sound=Equip leather1.ogg
|sound2=Equip leather2.ogg
|sound3=Equip leather3.ogg
|sound4=Equip leather4.ogg
|sound5=Equip leather5.ogg
|sound6=Equip leather6.ogg
|subtitle=Elytra rustles
|source=player
|description=When a pair of elytra is equipped
|id=item.armor.equip_elytra
|translationkey=subtitles.item.armor.equip_elytra
|volume=1.0
|pitch=1.0
|distance=16}}
{{Sound table
|sound=Elytra loop.ogg
|subtitle=MC-177084
|source=player
|description=While flying with a pair of elytra
|id=item.elytra.flying
|translationkey=-
|volume=0.0-1.0 <ref group=sound>Is a quarter of the player's velocity. If flying for less than 1 second, it is 0.0; otherwise, if flying for less than 2 seconds, it is between 0.0 and a quarter of the player's velocity (scaling up with time until 2 seconds)</ref>
|pitch=1.0 <ref group=sound>If the volume is greater than 0.8, 0.8-volume is added to the pitch</ref>
|distance=16}}
{{Sound table
|sound=Random break.ogg
|subtitle=Item breaks
|source=dependent
|description=When a pair of elytra's durability is exhausted
|id=entity.item.break
|translationkey=subtitles.entity.item.break
|volume=0.8
|pitch=0.8-1.2
|distance=16
|foot=1}}
{{edition|bedrock}}:
{{Sound table
|type=bedrock
|sound=Equip leather1.ogg
|sound2=Equip leather2.ogg
|sound3=Equip leather3.ogg
|sound4=Equip leather4.ogg
|sound5=Equip leather5.ogg
|sound6=Equip leather6.ogg
|source=player
|description=When a pair of elytra is equipped
|id=armor.equip_leather
|volume=1.0
|pitch=1.0}}
{{Sound table
|sound=Elytra loop.ogg
|source=player
|description=While flying with a pair of elytra
|id=elytra.loop
|volume=''Depends'' {{checkthecode}}
|pitch=1.0}}
{{Sound table
|sound=Random break.ogg
|source=player
|description=When a pair of elytra's durability is exhausted
|id=random.break
|volume=1.0
|pitch=0.9
|foot=1}}
== Data values ==
=== ID ===
{{edition|java}}:
{{ID table
|edition=java
|showforms=y
|generatetranslationkeys=y
|displayname=Elytra
|spritetype=item
|nameid=elytra
|form=item
|foot=1}}
{{edition|bedrock}}:
{{ID table
|edition=bedrock
|shownumericids=y
|showforms=y
|notshowbeitemforms=y
|generatetranslationkeys=y
|displayname=Elytra
|spritetype=item
|nameid=elytra
|id=564
|form=item
|foot=1}}
== Achievements ==
{{Load achievements|Super Sonic}}
== Advancements ==
{{load advancements|Sky's the Limit}}
== History ==
{{History|java}}
{{History||1.9|snap=October 5, 2015|slink=https://twitter.com/_tomcc/status/651042141397979136|[[Tommaso Checchi]] tweets that [[Jeb]] is working on a secret feature for Minecraft Java Edition, saying "it's like [[W:c:Mario:Super Mario 64|Mario 64]]."}}
{{History|||snap=October 6, 2015|slink=https://twitter.com/jeb_/status/651416814791081984|[[Jeb]] tweets a [https://web.archive.org/web/20230820173231/https://gfycat.com/serpentinehighlevelamurminnow-minecraftsuggestions-ethoslab animated GIF] revealing a [[player]] gliding around an [[end city]]. Elytra have a dragon-wing texture.}}
{{History|||snap=October 6, 2015|slink=https://twitter.com/jeb_/status/651419480187346944|Jeb tweets an [https://web.archive.org/web/20230219045525/https://i.imgur.com/LBgZCyW.png image] of folded wings, which replace the cape the player is wearing.}}
{{History|||snap=October 6, 2015|slink=https://twitter.com/jeb_/status/651423700777074688|Jeb tweets another [https://web.archive.org/web/20230820083025/https://gfycat.com/leadingindolentgangesdolphin animated GIF] of his character with Mojang-themed elytra, gliding along a [[river]] through a [[taiga]] forest.}}
{{History|||snap=15w41a|[[File:Elytra JE1 BE1.png|32px]] <br>[[File:Elytra (item) JE1 BE1.png|32px]] [[File:Broken Elytra (item) JE1 BE1.png|32px]] Added elytra.
|Elytra are currently repaired with [[leather]] when using [[anvil]].}}
{{History|||snap=15w42a|Elytra now spread slightly when the [[player]] crouches.
|The player can now take [[damage]] from gliding into walls, and crashing into a wall now has its own [[Health#Death messages|death message]].
|When flying with elytra, players are only 0.6 blocks tall. They, therefore, can now fit through 1-block gaps while gliding.
|The [[player]] can no longer go higher than the starting point of the glide.}}
{{History|||snap=15w43a|The player's point of view now shifts while gliding.}}
{{History|||snap=16w06a|Elytra now recognize the [[player]]'s [[cape]] and adopt a different elytron design for every official cape (see [[#Gallery|Gallery]]). In addition, Jeb is working on a feature to allow players to change the elytron design like regular player skins.}}
{{History|||snap=16w07a|Elytra are now activated by jumping mid-air. The player no longer glides automatically when falling.
|The cape option in the [[options|options menu]] now also disables custom elytra textures.
|Added the [[game rule]] {{cd|disableElytraMovementCheck}}.}}
{{History||1.9.1|snap=pre1|[[Sound]]s while gliding with elytra have been added.}}
{{History||1.11|snap=16w32a|Elytra can now be placed on [[armor stand]]s, just like any other [[chestplate]].}}
{{History|||snap=16w38a|Elytra are now visible on [[zombie]]s, [[skeleton]]s, and armor stands.}}
{{History|||snap=16w41a|Elytra now have their own [[sound]] when equipped.}}
{{History||1.11.1|snap=16w50a|Elytra can now be propelled through the [[air]] by using [[firework rocket]]s.}}
{{History||1.13|snap=17w47a|Prior to [[1.13/Flattening|''The Flattening'']], this [[item]]'s numeral ID was 443.}}
{{History|||snap=18w14a|Elytra now require [[phantom membrane]] to be repaired, instead of [[leather]].}}
{{History||1.14|snap=18w43a|[[File:Elytra JE2 BE2.png|32px]] <br>[[File:Elytra (item) JE2 BE2.png|32px]] [[File:Broken Elytra (item) JE2 BE2.png|32px]] The textures of the elytra have been changed.}}
{{History||1.15|snap=19w39a|The deployment animation of elytra causes [[player]] blinks when the deployment events has overlapped.}}
{{History|||snap=19w42a|The deployment and folding animations of elytra have been improved and become smoother.
|Elytra can now start to glide immediately after a jump, not only during falls.}}
{{History||1.18|snap=experimental snapshot 7|Elytra no longer use up durability when gliding regularly. Durability is now only consumed when a [[firework rocket]] is used.
|Speed boosts from firework rockets are slightly weaker.
|Now break when the item reaches 0 durability.}}
{{History|||snap=21w37a|The elytra changes in experimental snapshot 7 have been reverted.}}
{{History||1.19|snap=Pre-release 1|Equipping elytra through the inventory now plays a sound.<ref>{{bug|MC-94060||Equipping armor/elytra through inventory or dispenser doesn't play sounds|Fixed}}</ref>}}
{{History||1.19.4|snap=23w05a|Equipping elytra while held with an item already in the chestplate slot now swaps the two items.}}
{{History|pocket}}
{{History||1.0.0|snap=alpha 0.17.0.1|[[File:Elytra JE1 BE1.png|32px]] <br>[[File:Elytra (item) JE1 BE1.png|32px]] [[File:Broken Elytra (item) JE1 BE1.png|32px]] Added elytra. In-game, they are known as ''elytra wings''.}}
{{History|bedrock}}
{{History||1.2.0|snap=beta 1.2.0.2|Elytra can now be propelled through the [[air]] by using [[firework rocket]]s.}}
{{History||1.2.3|snap=beta 1.2.3.3|''Elytra Wings'' have been renamed to ''Elytra''.}}
{{History||1.6.0|snap=beta 1.6.0.5|Elytra can now be repaired in an [[anvil]] using [[phantom membrane]], instead of [[leather]].}}
{{History||1.10.0|snap=beta 1.10.0.3|[[File:Elytra JE2 BE2.png|32px]] <br>[[File:Elytra (item) JE2 BE2.png|32px]] [[File:Broken Elytra (item) JE2 BE2.png|32px]] The textures of elytra have been changed.}}
{{History|console}}
{{History||xbox=TU46|xbone=CU36|ps=1.38|wiiu=Patch 15|switch=1.0.1|[[File:Elytra JE1 BE1.png|32px]] <br>[[File:Elytra (item) JE1 BE1.png|32px]] [[File:Broken Elytra (item) JE1 BE1.png|32px]] Added elytra.}}
{{History||xbox=TU53|xbone=CU43|ps=1.49|wiiu=Patch 23|switch=1.0.3|Elytra can now be propelled through the [[air]] by using [[firework rocket]]s.}}
{{History||xbox=TU69|xbone=none|ps=1.76|wiiu=Patch 38|switch=none|Elytra are now repaired on the [[anvil]] using [[phantom membrane]] instead of [[leather]].}}
{{History||xbox=none|xbone=none|ps=1.90|wiiu=none|switch=none|[[File:Elytra JE2 BE2.png|32px]] <br>[[File:Elytra (item) JE2 BE2.png|32px]] [[File:Broken Elytra (item) JE2 BE2.png|32px]] The textures of elytra have been changed.}}
{{History|new 3ds}}
{{History||1.7.10|[[File:Elytra JE1 BE1.png|32px]] <br>[[File:Elytra (item) JE1 BE1.png|32px]] [[File:Broken Elytra (item) JE1 BE1.png|32px]] Added elytra.}}
{{History|foot}}
== Issues ==
{{issue list}}
== Trivia ==
* The singular form of elytra is an {{w|elytron}}.
* In reality, elytra are not used for flight. They are the tough forewings of beetles and earwigs that cover the wings they actually use for flight. However, like ''Minecraft'' elytra, beetles can use them for gliding.
* A flying player has a shorter hitbox than usual: A 0.6 block cube centered on the player's feet.
* It is possible to glide while on a [[ladder]], by pressing {{key|shift}} followed by {{key|space}}, causing the player to fall with a speed determined by the player's visual angle. This means that the player can descend fast on a ladder, but if the speed is too fast when hitting the ground, they can take fatal fall damage. Using a [[firework rocket]] can also speed up the player's descent.
* {{IN|java}} if the player glides into deep [[water]] with elytra equipped, the animation does not stop, giving it the appearance of a [[swimming]] animation.<ref name="MC-97190">{{bug|MC-97190||While gliding into water or lava, player continues gliding|WAI}}</ref> The animation stops once the player touches the ground. Additionally, [[firework rocket]]s can be used with elytra underwater with a short boost duration.
* Elytra do not deactivate when the player flies into [[lava]].<ref name="MC-97190"/>
* Elytra can be equipped onto some [[mob]]s using [[command]]s. This has no effect unless the mob has the {{cd|FallFlying}} tag set to {{cd|1b}}. Mobs glide forward, unable to control the movement before landing, at which time they regain their AI.
** Exceptions to this are [[squid]]s as the squid's AI causes it to attempt swimming in midair, making it fall straight down because it conflicts with the elytra mechanics.
**Because [[chicken]]s fall slowly, they can move more distance.
** [[Enderman|Endermen]], tamed [[wolf|wolves]] and tamed [[cat]]s that are not sitting cannot teleport until they hit the ground.
** Because mobs do not regain control until they hit the ground, [[vex]]es fall until they die or despawn as they cannot touch the ground.
** Mobs capable of flying, such as [[parrot]]s or vexes can steer in air, though they cannot travel up or down. Dolphins also have this ability.
* [[4J Studios]] created an elytron-centered tutorial map for console edition when elytra were first introduced to this platform, this map is themed as "ruins of an ancient civilization of ''[[Minecraft]]'' worshipers" and showcases the new amplified terrain generation. This map can be seen behind the scenes.<ref>{{Mcnet|learning-fly|Learning To Fly}}</ref> On 28 March 2017, 4J Studios added an elytron-themed [[Mini Games]] for console edition called "Glide;" it consists of Time Attack and Score Attack mode.<ref>{{Mcnet|glide-mini-game-consoles-tomorrow|Glide Mini Game on Consoles Tomorrow|March 23, 2017}}</ref><ref>{{Mcnet|mini-game-masters-glide-console|Mini Game Masters Glide onto Console|March 28, 2017}}</ref>
* A player who jumps with both elytra and the [[Slow Falling]] effect travels slightly upward, which is a cheap but time-consuming alternative to [[fireworks]] and [[Riptide]]-enchanted [[trident]]s.
* On May 5, 2019, [[Mojang]] tweeted '[[The End]] never yields enough adequate resources, sadly,' along with a sad emoji.<ref>{{tweet|Minecraft|1125053038757068802|The End never yields enough adequate resources, sadly. 😔}}</ref> The first letter of each word spells 'T E n y e a r s' (Ten Years). Attached was a picture of [[player|Steve and Alex]] wearing both a [[chestplate]] and elytra. The next day, they tweeted, "Have you noticed something ''suspic10us'' here lately?"<ref>{{tweet|Minecraft|1125415169495064576|Have you noticed something suspic10us here lately?}}</ref>
* Mojang has considered the suggestion of combining elytra with a chestplate, but eventually decided against it, stating that elytra taking up armor is an intentional decision of game balancing.<ref>
{{cite
|url=https://feedback.minecraft.net/hc/en-us/articles/360005029872-Previously-Considered-Suggestions
| title = Part of the tradeoff of having an Elytra is it takes up half your armor.
|website=Minecraft Feedback
|date=July 12, 2018}}
</ref>
== Gallery ==
<gallery>
ElytraFlight.gif|The first image of elytra, tweeted by [[Jeb]]. Click to play.
FoldedWings.png|Folded elytra, which resembles the [[cape]] the user is wearing.
Minecon2015Alternative.png|The minecon 2015 cape elytra.
Dinnerbone Elytra.png|[[Dinnerbone]] flying upside down.
ElytraEnd.png|Elytra in an [[end ship]].
PlayerElytraBack.png|A [[player]] wearing elytra.
PlayerElytraFront.png|A player using elytra.
Broken Elytra.png|Elytra with only 1 [[item durability|durability]].
UpcomingElytras.jpg|Elytra designs fitting to the official capes, posted by Jeb on {{w|Reddit}}.
FlyBlock.png|A player gliding while blocking with a [[shield]].
Suspic10us.jpg|An image of players using elytra.
Steve Gliding with Elytra.png|Steve gliding with elytra.
Alex Gliding with Elytra.png|Alex gliding with elytra.
Enchanted Elytra (item).gif|A pair of enchanted elytra.
</gallery>
=== Console exclusive ===
<gallery>
Glide Score Cavern 2.png|Screenshot of Glide mini-games.
Glide Time Cavern 2.png|Another screenshot of Glide mini-games.
GLIDE Official.jpg|''Glide'' launch poster.
Elytra Tutorial Map.jpg|Official elytra themed tutorial map.
</gallery>(These maps can be found for a price on the Microsoft Store)
=== Designs when wearing capes ===
<blockquote>Designs that are not listed here have default elytron texture or don't have any.</blockquote><gallery>
File:Mojang employees Elytra.png|Old [[Mojang]] cape
File:Mojang employees 2015 Elytra.png|New Mojang cape
File:Mojang Studios employees 2021 Elytra.png|Mojang Studios cape
File:Crowdin Translator Elytra.png|[[Crowdin]] Translator cape
File:DannyBstyle's Elytra.png|dannyBstyle's cape
File:JulianClark's Elyrtra.png|JulianClark's cape
File:Millionth Customer Elytra.png|Millionth Customer cape
File:MINECON 2011 Attendees Elytra.png|[[MINECON 2011]] Attendees cape
File:MINECON 2012 Attendees Elytra.png|[[MINECON 2012]] Attendees cape
File:MINECON 2013 Attendees Elytra.png|[[MINECON 2013]] Attendees cape
File:MINECON 2015 Attendees Elytra.png|[[MINECON 2015]] Attendees cape
File:MINECON 2016 Attendees Elytra.png|[[MINECON 2016]] Attendees cape
File:MINECON LIVE 2019 Founder's Elytra.png|[[MINECON Live 2019]] Founder's cape
File:Mojira Moderator Elytra.png|[[bug tracker|Mojira]] Moderator cape
File:MrMessiah's Elytra.png|MrMessiah's cape
File:Prismarine Elytra.png|[[Prismarine]] cape
File:Realms Mapmaker Elytra.png|[[Realms]] mapmaker's cape
File:Cobalt Elytra.png|[[Cobalt (game)|Cobalt]] cape
File:Scrolls Elytra.png|[[Scrolls]] cape
File:Turtle Elytra.png|[[Turtle]] cape
File:PancapeElyR.png|Pancape cape
File:MSCapeElyR.png|Migrator cape
File:Gr8 Escape's elytra.png|Gr8_Escape's cape
File:Valentine Elytra.png|Valentine cape
File:Vanilla Cape Elytra JE.png|Vanilla cape{{only|java}}
File:Vanilla cape elytra BE.png|Vanilla cape{{only|bedrock}}
</gallery>
== References ==
{{reflist}}
== External Links ==
*[https://www.minecraft.net/en-us/article/taking-inventory--elytra Taking Inventory: Elytra] – Minecraft.net on December 14, 2019
{{Items}}
[[de:Elytren]]
[[es:Élitros]]
[[fr:Élytres]]
[[ja:エリトラ]]
[[ko:겉날개]]
[[nl:Dekschild]]
[[pl:Elytry]]
[[pt:Élitros]]
[[ru:Элитры]]
[[tr:Elitra]]
[[zh:鞘翅]]
[[Category:Non-renewable resources]]</li><li>[[Redstone Repeater|Redstone Repeater]]<br/>{{Block
| image = <gallery>
Redstone Repeater.png|Redstone Repeater
Redstone Repeater BE.png|Redstone Repeater (BE)
</gallery>
| extratext = View [[#Renders|all renders]]
| transparent = Yes
| light = No
| tool = any
| stackable = Yes (64)
| flammable = No
| lavasusceptible = No
| renewable = Yes
}}
{{about|the block|repeater circuits|Transmission circuit#Repeater|other topics related to redstone|Redstone (disambiguation)}}
A '''redstone repeater''' is a [[block]] that produces a full-strength [[Redstone Dust|output signal]] from its front when its back is powered, with four configurable delay settings. It can also be locked into a power state by its side being directly powered by a repeater or a [[Redstone Comparator|comparator]].
== Obtaining ==
=== Breaking ===
A redstone repeater can be broken instantly using any [[tool]], or without a tool, and drops itself as an item. To remove a redstone repeater, {{control|mine}} it.
A redstone repeater is removed and drops as an item if:
* its attachment block is moved, removed, or destroyed;
* [[water]] or [[lava]] flows into its space;{{only|java}}
* a [[piston]] tries to push it or moves a block into its space.
=== Natural generation ===
[[File:Redstone Repeater naturally generated.png|thumb|A redstone repeater generated in the jungle temple's hidden room.]]
A single redstone repeater is generated naturally in each [[jungle temple]].
They also generate in [[Ancient City|ancient cities]].
=== Crafting ===
{{Crafting
|A2= Redstone Torch
|B2= Redstone Dust
|C2= Redstone Torch
|B3= Stone
|C3= Stone
|A3= Stone
|Output= Redstone Repeater
|type= Redstone
}}
== Usage ==
{{see also|Redstone circuit}}
A redstone repeater can be used in four different ways: to "repeat" redstone signals back to full strength, delay signals, prevent signals moving backwards, or to "lock" signals in one state.
A repeater can be placed only on top of [[opaque]] blocks (dirt, stone, etc.), on top of upside-down [[slab]]s, upside-down [[stairs]], furnaces, and glass. {{IN|be}}, a repeater can also be placed on fences and stone walls. They can also be placed on some transparent blocks. See [[Opacity/Placement]] for more information. To place a repeater, use the {{control|Place Block}} [[control]].
A redstone repeater has a front and back – the arrow on the top points to the repeater's front. A repeater also has two small redstone torches on its top – the color of the torches indicates whether its output is on (dark red when off, bright red when on) and the distance between them indicates the delay the repeater adds to the signal transmission.
A repeater is 0.125 ({{frac|1|8}}) blocks high.
=== Signal transmission ===
A repeater transmits signals only from its back to its front, but its behavior can be modified from the side (see [[#Signal locking|signal locking]], below).
[[File:Redstone Torch Power.png|Different ways to power a repeater|thumb]]
A redstone repeater can be powered by any of the following components at its back:
* an active [[power component]] (redstone torch, lever, block of redstone, etc.)
* powered [[redstone dust]]
* a powered [[redstone comparator]] or another powered redstone repeater facing the repeater
* a powered opaque block (including any opaque [[mechanism component]]s, such as [[dispenser]]s, [[redstone lamp]]s, etc.)
A redstone repeater can power any of the following components at its front:
* redstone dust
* a redstone comparator or another redstone repeater facing away from the repeater
* any opaque block (including any opaque [[mechanism component]]s)
A redstone repeater can activate any [[mechanism component]] it is facing.
An opaque block powered by a redstone repeater is called "strongly-powered" (as opposed to an opaque block "weakly-powered" by redstone dust). A strongly-powered opaque block can power adjacent redstone dust, as well as other redstone components.
=== Signal repeating ===
{{see also|Transmission circuit#Repeater}}
A redstone repeater can "repeat" a [[Redstone Dust|redstone]] signal, boosting it back up to power level 15.
Redstone signals have a maximum power level of 15 and that level drops by 1 for every block of [[redstone dust]] the signal travels through. If a signal must travel through more than 15 [[block]]s of redstone dust, a redstone repeater can be used to boost the signal back up to full strength. An extra two blocks of distance can be achieved by placing solid opaque blocks before and after the repeater.
While redstone repeaters can allow signals to travel great distances, each always adds some delay to the transmission since the minimum amount of delay is 1 redstone tick (0.1 seconds, barring lag).
=== Signal delay ===
When initially placed, a redstone repeater has a delay of one [[redstone tick]] (equivalent to two game ticks, or 0.1 seconds barring lag).
A repeater's delay can be modified by using the {{control|Use Item}} control. Each use increases the repeater's delay by one redstone tick, to a maximum of four redstone ticks, then back to one redstone tick. Longer delays can be made with multiple repeaters – for example, a repeater set to 'four' and another to 'one' provides a half-second delay (0.4s + 0.1s = 0.5s).
A repeater set to a delay of two to four redstone ticks increases the length of any shorter [[Pulse circuit#Pulses|on-pulse]] to match the length of the repeater's delay, and suppress any shorter off-pulse. For example, a repeater set to a 4-tick delay changes a 1-tick, 2-tick, or 3-tick on-pulse into a 4-tick on-pulse, and does not allow through any off-pulse shorter than 4 ticks.
Although a repeater cannot be set to have a delay of zero, [[Transmission circuit#Instant repeater|instant repeater circuits]] are possible (circuits that repeat a signal with no delay).
In Bedrock Edition, the first repeater have a delay of zero but the repeater is still showing 1-tick{{info needed}}
=== {{anchor|diode}} Signal direction ===
{{see also| Mechanics/Redstone/Transmission circuit#Diode}}
A redstone repeater acts as a diode – it allows redstone signals through in one direction (unlike [[redstone dust]] or opaque blocks that can transmit redstone signals in any direction).
A diode can be used to protect a [[redstone circuit]] from redstone signals feeding back into the circuit from its output, or can be used to isolate one part of a circuit from another.
=== {{anchor|lock}} Signal locking ===
{{see also| Mechanics/Redstone/Memory circuit}}
[[File:Latch.png|thumb|The left repeater has been locked in an unpowered output state by the right repeater.]]
A redstone repeater can be "locked" by another powered redstone repeater facing its side. When locked, the repeater does not change its output (whether powered or unpowered), no matter what the input does. When the side repeater turns back off, the repeater returns to its normal behavior.
A repeater can also be locked by a powered [[redstone comparator]] facing its side. This offers additional possibilities for locking signals because a comparator's output can be affected from 3 sides as well as by containers.
If a repeater is locked again too quickly after unlocking (e.g. the lock is controlled by a fast clock circuit), or the lock and the input are changed only on the same tick (e.g. because they're fed by the same clock and both repeaters have the same delay), the repeater does not switch states.
== Sounds ==
{{Edition|java}}:
{{Sound table/Block/Stone/JE}}
{{Edition|bedrock}}:
{{Sound table/Block/Wood/BE}}
== Data values ==
=== ID ===
{{edition|java}}:
{{ID table
|edition=java
|showforms=y
|generatetranslationkeys=y
|displayname=Redstone Repeater
|spritetype=block
|nameid=repeater
|foot=1}}
{{edition|bedrock}}:
{{ID table
|edition=bedrock
|firstcolumnname=Redstone Repeater
|shownumericids=y
|showforms=y
|generatetranslationkeys=y
|displayname=Unpowered block
|spritename=unpowered-repeater
|spritetype=block
|nameid=unpowered_repeater
|id=93
|form=block
|translationkey=-}}
{{ID table
|displayname=Powered block
|spritename=powered-repeater
|spritetype=block
|nameid=powered_repeater
|id=94
|form=block
|translationkey=-}}
{{ID table
|displayname=Item
|spritename=redstone-repeater
|spritetype=item
|nameid=repeater
|id=419
|form=item
|foot=1}}
=== Block states ===
{{see also|Block states}}
{{/BS}}
== Video ==
<div style="text-align:center">{{yt|0Ij_qMLiRzE}}</div>
== History ==
''For a more in-depth breakdown of changes to repeater textures and models, including a set of renders for each state combination, see [[/Asset history]]''
{{History|java beta}}
{{History||1.3|[[File:Redstone Repeater (S) JE1.png|32px]] [[File:Redstone Repeater (item) JE1.png|32px]] Added redstone repeaters.
|Originally, the four possible settings were "1, 2, 5 and 7",<ref>http://twitter.com/jeb_/status/33888465502339073</ref> but [[Jeb]] decided to change the settings to "1, 2, 3, and 4".<ref>http://www.reddit.com/r/Minecraft/comments/fmdtp/teammojang_redstone_repeater_video/c1gzrn6</ref>
|The particles when [[breaking]] redstone repeaters erroneously use the [[pumpkin]] top texture.}}
{{History||unknown|The breaking particles of redstone repeaters now use the smooth stone [[slab]] top texture, even though none of the elements on the [[model]] use it.}}
{{History||1.7|[[File:Redstone Repeater (S) JE2.png|32px]] The side texture of redstone repeaters has been changed to the previous bottom part of the texture.
|[[Redstone dust]] now automatically connects to the input of a redstone repeater. Previously, it needed to be specifically pointed towards the repeater like with other blocks.}}
{{History||unknown|Redstone dust now visually connects to the output of redstone repeaters, though this does not change its behavior.}}
{{History|java}}
{{History||unknown|The breaking particles of redstone repeaters have been changed to an unlit [[redstone torch]] when unpowered and a lit redstone torch when powered.}}
{{History||1.3.1|snap=12w22a|Redstone repeaters now naturally generate inside [[jungle temple]]s.}}
{{History|||snap=1.3|[[File:Redstone Repeater (item) JE2 BE1.png|32px]] The texture of redstone repeater [[item]]s have been changed.}}
{{History||1.4.2|snap=12w42a|[[File:Redstone Repeater (S) JE3.png|32px]] The top texture of redstone repeaters has now been changed.
|[[File:Locked Redstone Repeater (S) JE1.png|32px]] Added repeater locking to redstone repeaters. Interestingly, the smallest face of the bedrock cuboid's texture changes depending on the delay, but the other two faces remain the same. When/if this changed is unknown.}}
{{History||1.5|snap=13w02a|[[File:Redstone Repeater (S) JE4.png|32px]] The side textures of redstone repeaters have been changed to use the top texture of stone [[slab]]s.}}
{{History||unknown|The breaking [[particles|particle]] of redstone repeaters has been changed once again and now matches the top texture of redstone repeaters.}}
{{History||1.8|snap=14w06a|Repeaters no longer produce block [[light]] when powered.}}
{{History|||snap=14w10a|[[File:Powered Redstone Repeater (S) JE5.png|32px]] Torches on repeaters now no longer have protruding features.
|The torches underneath redstone repeaters have now been shortened, which has changed the underside textures from [[File:Redstone Repeater JE2 BE1 (facing NWU).png|32px]] [[File: Redstone Repeater Delay 2 JE2 BE1 (facing NWU).png|32px]] [[File: Redstone Repeater Delay 3 JE2 BE1 (facing NWU).png|32px]] [[File: Redstone Repeater Delay 4 JE2 BE1 (facing NWU).png|32px]] [[File: Active Redstone Repeater JE2 BE1 (facing NWU).png|32px]] [[File: Active Redstone Repeater Delay 2 JE2 BE1 (facing NWU).png|32px]] [[File: Active Redstone Repeater Delay 3 JE2 BE1 (facing NWU).png|32px]] [[File: Active Redstone Repeater Delay 4 JE2 BE1 (facing NWU).png|32px]] [[File: Locked Redstone Repeater JE2 BE1 (facing NWU).png|32px]] [[File: Locked Redstone Repeater Delay 2 JE2 BE1 (facing NWU).png|32px]] [[File: Locked Redstone Repeater Delay 3 JE2 BE1 (facing NWU).png|32px]] [[File: Locked Redstone Repeater Delay 4 JE2 BE1 (facing NWU).png|32px]] [[File: Active Locked Redstone Repeater JE2 BE1 (facing NWU).png|32px]] [[File: Active Locked Redstone Repeater Delay 2 JE2 BE1 (facing NWU).png|32px]] [[File: Active Locked Redstone Repeater Delay 3 JE2 BE1 (facing NWU).png|32px]] [[File: Active Locked Redstone Repeater Delay 4 JE2 BE1 (facing NWU).png|32px]] to [[File:Redstone Repeater JE3 (facing NWU).png|32px]] [[File: Redstone Repeater Delay 2 JE3 (facing NWU).png|32px]] [[File: Redstone Repeater Delay 3 JE3 (facing NWU).png|32px]] [[File: Redstone Repeater Delay 4 JE3 (facing NWU).png|32px]] [[File: Active Redstone Repeater JE3 (facing NWU).png|32px]] [[File: Active Redstone Repeater Delay 2 JE3 (facing NWU).png|32px]] [[File: Active Redstone Repeater Delay 3 JE3 (facing NWU).png|32px]] [[File: Active Redstone Repeater Delay 4 JE3 (facing NWU).png|32px]] [[File: Locked Redstone Repeater JE3 (facing NWU).png|32px]] [[File: Locked Redstone Repeater Delay 2 JE3 (facing NWU).png|32px]] [[File: Locked Redstone Repeater Delay 3 JE3 (facing NWU).png|32px]] [[File: Locked Redstone Repeater Delay 4 JE3 (facing NWU).png|32px]] [[File: Locked Active Redstone Repeater JE3 (facing NWU).png|32px]] [[File: Locked Active Redstone Repeater Delay 2 JE3 (facing NWU).png|32px]] [[File: Locked Active Redstone Repeater Delay 3 JE3 (facing NWU).png|32px]] [[File: Locked Active Redstone Repeater Delay 4 JE3 (facing NWU).png|32px]].}}
{{History|||snap=14w10b|[[File:Powered Redstone Repeater (S) JE4.png|32px]] Repeater torches now have protruding features again.<ref>{{bug|MC-50242}}</ref>}}
{{History|||snap=?|[[File:Powered Redstone Repeater (S) JE7.png|32px]] The torches on redstone repeaters are now affected by directional shading.}}
{{History||1.13|snap=17w47a|All 3 IDs for the redstone repeater have now been merged into 1 ID: <code>repeater</code>.
|Added powered block state to redstone repeaters.
|Redstone repeaters now render their underside, which has changed their undersides from [[File:Redstone Repeater JE3 (facing NWU).png|32px]] [[File: Redstone Repeater Delay 2 JE3 (facing NWU).png|32px]] [[File: Redstone Repeater Delay 3 JE3 (facing NWU).png|32px]] [[File: Redstone Repeater Delay 4 JE3 (facing NWU).png|32px]] [[File: Active Redstone Repeater JE3 (facing NWU).png|32px]] [[File: Active Redstone Repeater Delay 2 JE3 (facing NWU).png|32px]] [[File: Active Redstone Repeater Delay 3 JE3 (facing NWU).png|32px]] [[File: Active Redstone Repeater Delay 4 JE3 (facing NWU).png|32px]] [[File: Locked Redstone Repeater JE3 (facing NWU).png|32px]] [[File: Locked Redstone Repeater Delay 2 JE3 (facing NWU).png|32px]] [[File: Locked Redstone Repeater Delay 3 JE3 (facing NWU).png|32px]] [[File: Locked Redstone Repeater Delay 4 JE3 (facing NWU).png|32px]] [[File: Locked Active Redstone Repeater JE3 (facing NWU).png|32px]] [[File: Locked Active Redstone Repeater Delay 2 JE3 (facing NWU).png|32px]] [[File: Locked Active Redstone Repeater Delay 3 JE3 (facing NWU).png|32px]] [[File: Locked Active Redstone Repeater Delay 4 JE3 (facing NWU).png|32px]] to [[File:Redstone Repeater JE4 BE2 (facing NWU).png|32px]] [[File: Redstone Repeater Delay 2 JE4 BE2 (facing NWU).png|32px]] [[File: Redstone Repeater Delay 3 JE4 BE2 (facing NWU).png|32px]] [[File: Redstone Repeater Delay 4 JE4 BE2 (facing NWU).png|32px]] [[File: Active Redstone Repeater JE4 BE2 (facing NWU).png|32px]] [[File: Active Redstone Repeater Delay 2 JE4 BE2 (facing NWU).png|32px]] [[File: Active Redstone Repeater Delay 3 JE4 BE2 (facing NWU).png|32px]] [[File: Active Redstone Repeater Delay 4 JE4 BE2 (facing NWU).png|32px]] [[File: Locked Redstone Repeater JE4 BE2 (facing NWU).png|32px]] [[File: Locked Redstone Repeater Delay 2 JE4 BE2 (facing NWU).png|32px]] [[File: Locked Redstone Repeater Delay 3 JE4 BE2 (facing NWU).png|32px]] [[File: Locked Redstone Repeater Delay 4 JE4 BE2 (facing NWU).png|32px]] [[File: Locked Active Redstone Repeater JE4 BE2 (facing NWU).png|32px]] [[File: Locked Active Redstone Repeater Delay 2 JE4 BE2 (facing NWU).png|32px]] [[File: Locked Active Redstone Repeater Delay 3 JE4 BE2 (facing NWU).png|32px]] [[File: Locked Active Redstone Repeater Delay 4 JE4 BE2 (facing NWU).png|32px]].
|Prior to [[1.13/Flattening|''The Flattening'']], these [[block]]s' numeral IDs were 93 and 94, and the [[item]]'s 356.}}
{{History||1.14|snap=18w43a|[[File:Redstone Repeater (S) JE5.png|32px]] [[File:Powered Redstone Repeater (S) JE9.png|32px]] [[File:Locked Redstone Repeater (S) JE5.png|32px]] [[File:Powered Locked Redstone Repeater (S) JE6.png|32px]] [[File:Redstone Repeater (item) JE3 BE2.png|32px]] The textures of redstone repeaters have now been changed.}}
{{History|||snap=18w50a|[[File:Locked Redstone Repeater (S) JE6.png|32px]] [[File:Powered Locked Redstone Repeater (S) JE7.png|32px]] As the texture of [[bedrock]] has been changed, the textures of locked redstone repeaters have also now been changed.}}
{{History|||snap=19w12b|Redstone repeaters can now be placed on [[glass]], [[ice]], [[glowstone]] and [[sea lantern]]s.}}
{{History||1.19|snap=22w13a|Redstone repeaters now generate in [[Ancient City|ancient cities]].}}
{{History||1.20.2|snap=23w33a|Redstone repeaters now use stone sounds instead of wood sounds.<ref>{{bug|MC-182820|||Fixed}}</ref>}}
{{History|pocket alpha}}
{{History||v0.14.0|snap=build 1|[[File:Redstone Repeater (S) JE3.png|32px]] [[File:Redstone Repeater (item) JE2 BE1.png|32px]] Added redstone repeaters.}}
{{History|bedrock}}
{{History||1.2.0|snap=beta 1.2.0.2|Redstone repeaters now render their underside, which has changed their undersides from [[File:Redstone Repeater JE2 BE1 (facing NWU).png|32px]] [[File: Redstone Repeater Delay 2 JE2 BE1 (facing NWU).png|32px]] [[File: Redstone Repeater Delay 3 JE2 BE1 (facing NWU).png|32px]] [[File: Redstone Repeater Delay 4 JE2 BE1 (facing NWU).png|32px]] [[File: Active Redstone Repeater JE2 BE1 (facing NWU).png|32px]] [[File: Active Redstone Repeater Delay 2 JE2 BE1 (facing NWU).png|32px]] [[File: Active Redstone Repeater Delay 3 JE2 BE1 (facing NWU).png|32px]] [[File: Active Redstone Repeater Delay 4 JE2 BE1 (facing NWU).png|32px]] [[File: Locked Redstone Repeater JE2 BE1 (facing NWU).png|32px]] [[File: Locked Redstone Repeater Delay 2 JE2 BE1 (facing NWU).png|32px]] [[File: Locked Redstone Repeater Delay 3 JE2 BE1 (facing NWU).png|32px]] [[File: Locked Redstone Repeater Delay 4 JE2 BE1 (facing NWU).png|32px]] [[File: Active Locked Redstone Repeater JE2 BE1 (facing NWU).png|32px]] [[File: Active Locked Redstone Repeater Delay 2 JE2 BE1 (facing NWU).png|32px]] [[File: Active Locked Redstone Repeater Delay 3 JE2 BE1 (facing NWU).png|32px]] [[File: Active Locked Redstone Repeater Delay 4 JE2 BE1 (facing NWU).png|32px]] to [[File:Redstone Repeater JE4 BE2 (facing NWU).png|32px]] [[File: Redstone Repeater Delay 2 JE4 BE2 (facing NWU).png|32px]] [[File: Redstone Repeater Delay 3 JE4 BE2 (facing NWU).png|32px]] [[File: Redstone Repeater Delay 4 JE4 BE2 (facing NWU).png|32px]] [[File: Active Redstone Repeater JE4 BE2 (facing NWU).png|32px]] [[File: Active Redstone Repeater Delay 2 JE4 BE2 (facing NWU).png|32px]] [[File: Active Redstone Repeater Delay 3 JE4 BE2 (facing NWU).png|32px]] [[File: Active Redstone Repeater Delay 4 JE4 BE2 (facing NWU).png|32px]] [[File: Locked Redstone Repeater JE4 BE2 (facing NWU).png|32px]] [[File: Locked Redstone Repeater Delay 2 JE4 BE2 (facing NWU).png|32px]] [[File: Locked Redstone Repeater Delay 3 JE4 BE2 (facing NWU).png|32px]] [[File: Locked Redstone Repeater Delay 4 JE4 BE2 (facing NWU).png|32px]] [[File: Locked Active Redstone Repeater JE4 BE2 (facing NWU).png|32px]] [[File: Locked Active Redstone Repeater Delay 2 JE4 BE2 (facing NWU).png|32px]] [[File: Locked Active Redstone Repeater Delay 3 JE4 BE2 (facing NWU).png|32px]] [[File: Locked Active Redstone Repeater Delay 4 JE4 BE2 (facing NWU).png|32px]].}}
{{History||1.10.0|snap=beta 1.10.0.3|[[File:Redstone Repeater (S) BE2.png|32px]] [[File:Powered Redstone Repeater (S) BE2.png|32px]] [[File:Redstone Repeater (item) JE3 BE2.png|32px]] The textures of redstone repeaters have now been changed.}}
{{History||1.20.30|snap=beta 1.20.30.20|Redstone Repeaters now use the <code>minecraft:cardinal_direction</code> [[block state]] instead of <code>direction</code>.}}
{{History|console}}
{{History||xbox=TU1|xbone=CU1|ps=1.0|wiiu=Patch 1|switch=1.0.1|[[File:Redstone Repeater (S) JE3.png|32px]]{{verify|Was this model actually used here?}} [[File:Redstone Repeater (item) JE2 BE1.png|32px]] Added redstone repeaters.}}
{{History||xbox=TU19|xbone=CU7|ps=1.12|wiiu=Patch 1|switch=1.0.1|[[File:Locked Redstone Repeater (S) JE1.png|32px]]{{verify|Was this model actually used here?}} Added repeater locking to redstone repeaters.}}
{{History||xbox=none|xbone=none|ps=1.90|wiiu=none|switch=none|[[File:Redstone Repeater (S) JE4.png|32px]]{{verify|Was this model actually used here?}} [[File:Redstone Repeater (item) JE3 BE2.png|32px]] The textures of redstone repeaters have now been changed.}}
{{History|new 3ds}}
{{History||0.1.0|[[File:Redstone Repeater (S) JE3.png|32px]]{{verify|Was this model actually used here?}} [[File:Redstone Repeater (item) JE2 BE1.png|32px]] Added redstone repeaters and repeater locking.}}
{{History|foot}}
=== Redstone repeater "items" ===
{{:Technical blocks/Redstone Repeater}}
== Issues ==
{{Issue list}}
== Trivia ==
* The recipe and appearance of redstone repeaters are a likely reference to the old method of repeating signals, which would also use two torches at a time, inverting each other
== Gallery ==
<gallery>
Repeater clock.gif|A redstone clock formed from a redstone torch and a repeater.
Repeater feedback.gif|A redstone clock formed from two repeaters.
Two way repeater.gif|MCRedstoneSim diagram of a two-way repeater.
Repeater bridge.png|Crossing redstone wires using repeaters.
Jeb Repeaters 1.png|
Jeb Repeaters 2.png|
Jeb Repeaters 3.png|
</gallery>
=== Renders ===
<gallery>
Redstone Repeater.png
Redstone Repeater Delay 2.png
Redstone Repeater Delay 3.png
Redstone Repeater Delay 4.png
Powered Redstone Repeater.png
Powered Redstone Repeater Delay 2.png
Powered Redstone Repeater Delay 3.png
Powered Redstone Repeater Delay 4.png
Locked Redstone Repeater.png
Locked Redstone Repeater Delay 2.png
Locked Redstone Repeater Delay 3.png
Locked Redstone Repeater Delay 4.png
Powered Locked Redstone Repeater.png
Powered Locked Redstone Repeater Delay 2.png
Powered Locked Redstone Repeater Delay 3.png
Powered Locked Redstone Repeater Delay 4.png
Redstone Repeater BE.png
Redstone Repeater Delay 2 BE.png
Redstone Repeater Delay 3 BE.png
Redstone Repeater Delay 4 BE.png
Powered Redstone Repeater BE.png
Powered Redstone Repeater Delay 2 BE.png
Powered Redstone Repeater Delay 3 BE.png
Powered Redstone Repeater Delay 4 BE.png
Locked Redstone Repeater BE.png
Locked Redstone Repeater Delay 2 BE.png
Locked Redstone Repeater Delay 3 BE.png
Locked Redstone Repeater Delay 4 BE.png
Powered Locked Redstone Repeater BE.png
Powered Locked Redstone Repeater Delay 2 BE.png
Powered Locked Redstone Repeater Delay 3 BE.png
Powered Locked Redstone Repeater Delay 4 BE.png
</gallery>
== References ==
{{Reflist}}
{{Redstone}}
{{Blocks|Utility}}
{{Items}}
[[Category:Mechanics]]
[[Category:Redstone mechanics]]
[[Category:Redstone]]
[[Category:Mechanisms]]
[[Category:Manufactured blocks]]
[[Category:Generated structure blocks]]
[[Category:Non-solid blocks]]
[[de:Redstone-Verstärker]]
[[es:Repetidor de redstone]]
[[fr:Répéteur de redstone]]
[[hu:Redstone-jelismétlő]]
[[it:Ripetitore di redstone]]
[[ja:レッドストーンリピーター]]
[[ko:레드스톤 중계기]]
[[nl:Redstoneversterker]]
[[pl:Przekaźnik]]
[[pt:Repetidor de redstone]]
[[ru:Красный повторитель]]
[[tr:Kızıltaş tekrarlayıcı]]
[[zh:红石中继器]]</li></ul> | 13w36a | Added the AMPLIFIED world type. | |||
1.8{{Extension DPL}}<ul><li>[[Minecart with Furnace|Minecart with Furnace]]<br/>{{ItemEntity
|image=Minecart with Furnace.png
|renewable=Yes
|stackable=No
|size=Height: 0.7 Blocks<br>Width: 0.98 Blocks
|networkid=10
|drops= 1 {{ItemLink|Minecart with Furnace}}
|health={{Hp|6}}
}}
A '''minecart with furnace''' is a [[furnace]] inside a [[minecart]]. It can be powered with [[coal]] or [[charcoal]] to propel it across a [[rail]] line for a limited time, which can be used to move other minecarts.
==Obtaining==
Minecarts with furnace can be retrieved by attacking them, and by doing so it drops as an [[item]].
===Crafting===
{{Crafting
|Output= Minecart with Furnace
|type= Transportation
|Furnace|Minecart}}
==Usage==
Minecarts with furnaces are placed in the same way as other minecarts. It does not have a graphical user interface, unlike a [[furnace]].
Minecarts with furnaces can be powered, done by feeding fuel ([[coal]] or [[charcoal]]) into the furnace minecart with the {{Control|use}} button. The fuel is consumed immediately and it starts to move in the same direction the player clicked toward. Pressing {{Control|use}} always turns it to that direction, even when not holding coal.
Any piece of fuel, added at any time, increases the total range by an additional 3600 ticks (equal to 180 seconds or 3 minutes). The upper limit is 32767 ticks, approximately 27 minutes.
When powered, minecarts with furnaces cover 240m per minute (about 4 m/s, slightly slower than walking speed) or 720m per piece of coal. They do not accelerate beyond this speed when going downhill or on active [[powered rail]]s, and as long as they remain powered, they do not slow down when going uphill, on inactive powered rails, or when pushing or pulling other minecarts.
If a powered furnace minecart is derailed and then pushed back onto a rail, it starts moving again in the direction it came from, so they are not easily turned around in this state unless a player is nearby to redirect it with {{Control|use}}.
Minecarts with furnaces can climb up steep inclines while pushing other minecarts as long as they have fuel. If a minecart with furnace reaches a slope while pulling another minecart, the pulled minecart is switched to the forward position so that it can be pushed along the slope instead of pulled.
When a minecart with furnace bumps into another minecart or multiple minecarts, the other minecarts are pushed forward with great speed. The furnace minecart continues on with its own speed. Because of this speed difference, some of the minecarts may end up inside unloaded chunks on straight tracks.
===Train mechanics===
{{Schematic
|caption=weakly-shunted 1-cart train, one cart was used only to push the train together and is left behind
|AB|mc-$ew|mc-$ew|mc/Fu-$ew|-
|AB|ra-$wu|ra-$ew|ra-$ew|ra-$ew|ellipsis-ew
}}
{{Schematic
|caption=Creating a strongly-shunted 1-cart train. The sloped rail must be replaced with a horizontal rail before powering.
|AB|mc-$ew||mc/Fu-$ew|-
|AB|ra-$ew|ra-$ew|ra-$eu|ra-$ew|ra-$ew|ellipsis-ew
}}
[[File:FurnaceMinecartTrain.png|thumb|right|A Minecart train powered by furnace [[Minecart|minecarts.]]|alt=]]
A furnace minecart can be made to pull up to four other minecarts. All minecarts in this train move at the constant speed of the furnace minecart. Trains are formed when a minecart is pushed into the back of a powered furnace minecart or a short-enough train. These shunts are fragile at best and easily come undone, but some methods are stronger than others. For example, pushing a minecart into a furnace minecart and then powering the furnace gives a weaker shunt than pushing the furnace minecart into the other minecart against a wall, and then powering the furnace in the other direction.
A high-speed minecart running into the back of a furnace minecart going in the same direction automatically creates a weak shunt with it, pulling it along.
Pulling a minecart with TNT causes it to explode.
{| class="wikitable"
|+Pulled minecart/Shunt behavior
!Condition
!Result
|-
|Furnace loses power/speed||Shunt comes undone
|-
|Entity bumping besides those part of the train||Jettisoned forward
|-
|Upward sloped track||Jettisoned forward
|-
|Downward sloped track||Jettisoned forward (strong shunt) or shunt comes undone (weak shunt)
|-
|90° turn in track||Jettisoned backward
|-
|Turn toward north/south or east/west that is not the direction the train was shunted in||Train derails
|}
When a train comes to a turn, the shunt comes undone with the pulled minecart jettisoned backward. The correct way to make such a turn is having the shunt undone before a turn, and then make the two rejoin on a straight rail later by having the pulled cart catch up with the minecart with furnace.<ref name=mango/>
Since the train runs slower on a fully powered track than a normal minecart (~5 m/s compared to 8m/s), a train pulled by an unpowered furnace minecart is ideal for AFK farms involving breaking or placing blocks like [[nether wart]].<ref name=mango>{{YouTubeLink|1=pRLiAQfhTG8|2=Why The Furnace Minecart Isn't As Useless As You Think|3=ilmango}}</ref>
==Properties==
The coal is not stored as an item in the entity, but in the object data in the fuel property as a time in ticks. ''Fuel'' is a short value, i.e. a maximum of 32767 ticks, which is about 27 minutes. However, {{cmd|/summon furnace_minecart ~ ~ ~ {Fuel:32000} }} alone doesn't make it go since it doesn't have a direction. It can be right-clicked on a track to give it a direction, or it can be summoned with the properties ''PushX'' and ''PushZ'' set, which are responsible for the direction. The <code>Motion</code> property of every entity allows for movement of the minecart, but it does not direct the minecart to move on its own.
==Sounds==
{{Edition|Java}}:<br>
Minecarts with furnaces use the Friendly Creatures sound category for entity-dependent sound events.<ref group=sound name=rollsource>{{bug|MC-42132}}</ref>
{{Sound table
|sound=Minecart rolling.ogg
|subtitle=Minecart rolls
|source=Friendly Creatures <ref group=sound name=rollsource/>
|overridesource=1
|description=While a minecart with furnace is moving
|id=entity.minecart.riding
|translationkey=subtitles.entity.minecart.riding
|volume=0.0-0.35 <ref group=sound>Relates linearly with horizontal velocity (max 0.5)</ref>
|pitch=0.0-1.0 <ref group=sound>Will increase by 0.0025 per tick if the minecart's horizontal velocity is more than 0.01</ref>
|distance=16
|foot=1}}
{{Edition|Bedrock}}:
{{Sound table
|type=bedrock
|sound=Minecart rolling.ogg
|source=neutral
|description=While a minecart with furnace is moving
|id=minecart.base
|foot=1}}
==Data values==
===ID===
{{ID table
|edition=java
|firstcolumnname=Item
|showforms=y
|generatetranslationkeys=y
|displayname=Minecart with Furnace
|spritetype=item
|nameid=furnace_minecart
|form=item
|foot=1}}
{{ID table
|edition=java
|firstcolumnname=Entity
|generatetranslationkeys=y
|displayname=Minecart with Furnace
|spritetype=entity
|nameid=furnace_minecart
|foot=1}}
===Entity data===
Minecarts with furnace have entity data associated with them that contain various properties of the entity.
{{el|java}}:
{{main|Entity format}}
{{/ED}}
{{el|bedrock}}:
: See [[Bedrock Edition level format/Entity format]].
==History==
{{History|java alpha}}
{{History||v1.0.14|[[File:Minecart with Furnace JE1.png|32px]] [[File:Minecart with Furnace (item) JE1.png|32px]] Minecarts with furnace were added.
|Since no in-game name was indicated, they were referred to by names such as "powered minecart" or "furnace minecart".
|No matter how much fuel was added to the minecart, it would never move for more than 3 minutes after the last fuel.}}
{{History|java beta}}
{{History||1.0|When tooltips were added to items in inventory, this was named "Minecart with Furnace".}}
{{History||1.2|[[File:Minecart with Furnace JE2.png|32px]] The texture of the minecart with furnace has been changed.}}
{{History|java}}
{{History||1.0.0|snap=?|Each piece of [[coal]] now powers a [[minecart]] with furnace for {{convert|3|minutes|ticks}}, so that adding another piece of coal at any time increases the total range by another 3 minutes. A full stack of 64 coal now powers it for {{convert|192|minutes|ticks}}.
|Minecarts with furnace on a level track cover 204 meters per minute.}}
{{History||1.8|snap=14w11a|Minecarts with furnace now give a much greater boost to other minecarts.
|When powered, minecarts with furnace now move on non-powered rails without decelerating.}}
{{History|||snap=14w17a|Minecarts with furnace's behavior has been reverted, so that no change was released in [[Java Edition 1.8]].}}
{{History||1.11|snap=16w32a|The entity ID of the minecart with furnace has been changed from <code>MinecartFurnace</code> to <code>furnace_minecart</code>.}}
{{History||1.13|snap=17w47a|Prior to [[1.13/Flattening|''The Flattening'']], this [[item]]'s numeral ID was 343.}}
{{History||1.14|snap=18w43a|[[File:Minecart with Furnace JE3.png|32px]] [[File:Minecart with Furnace (item) JE2.png|32px]] The texture of the minecart with furnace has been changed.}}
{{History||1.15|snap=19w38a|[[File:Minecart with Furnace 19w38a.png|32px]] The furnace now appears dark, like suffocating mobs.}}
{{History|||snap=19w39a|The furnace texture is now colored correctly.}}
{{History||1.15.2|snap=Pre-Release 1|Furnace minecarts can now navigate around any corner.}}
{{History||1.19|snap=22w13a|The crafting recipe for a minecart with furnace is now shapeless.
|Breaking a minecart with furnace will now drop the item instead of the minecart and furnace separately.<ref>{{bug|MC-249493|||Fixed}}</ref>}}
{{History|console}}
{{History||xbox=TU1|xbone=CU1|ps=1.0|wiiu=Patch 1|switch=1.0.1|[[File:Minecart with Furnace JE2.png|32px]] [[File:Minecart with Furnace (item) JE1.png|32px]] Added minecart with furnace.}}
{{History|Ps4}}
{{History||1.90|[[File:Minecart with Furnace JE3.png|32px]] [[File:Minecart with Furnace (item) JE2.png|32px]] The texture of the minecart with furnace has been changed.}}
{{History|foot}}
==Issues==
{{issue list}}
==Trivia==
*The minecart with furnace is excluded from {{els|be|3ds}} on purpose. In a tweet, [[Jeb]] considered removing it from {{el|je}}.<ref>{{tweet|jeb|699241247391772672|I think we will phase out the furnace minecraft ''(sic)''|15 Feb 2016}}</ref>
**When converting a [[Legacy Console Edition]] world to a [[Bedrock Edition]] world, any present minecarts with furnaces are converted into a normal minecart.
**Despite the above-described poor standing of the minecart, it was most recently briefly featured in an animation in the [[Minecraft Live 2022]], where one was depicted as moving a train of about 20 minecarts at a higher than normal speed.
==Gallery==
<gallery>
Running Powered Minecart.png|A powered minecart in action.
</gallery>
==References==
{{reflist}}
{{Items}}
{{Entities}}
[[Category:Mechanics]]
[[cs:Parní vozík]]
[[de:Antriebslore]]
[[es:Vagoneta con horno]]
[[fr:Wagonnet motorisé]]
[[hu:Gőzmeghajtású csille]]
[[ja:かまど付きのトロッコ]]
[[ko:화로가 실린 광산 수레]]
[[nl:Mijnkar met oven]]
[[pl:Wagonik z piecem]]
[[ru:Вагонетка с печью]]
[[uk:Вагонетка з піччю]]
[[zh:动力矿车]]</li><li>[[Smithing Template|Smithing Template]]<br/>{{for|the block|Smithing Table}}
{{Item
| title = Smithing Template
| image = <gallery>
Netherite Upgrade Smithing Template.png | Netherite Upgrade
Sentry Armor Trim Smithing Template.png | Armor Trim
</gallery>
| rarity = Rare
| renewable = No<!--Smithing templates are not renewable because diamonds, their only other method of creation, are not renewable.-->
| stackable = Yes (64)
}}
'''Smithing templates''' are items used in [[Smithing Table|smithing tables]] to alter [[Tool|tools]] and [[armor]]. They are consumed when used, but can be [[Crafting|duplicated]] using an existing template, its material and [[Diamond|diamonds]].
The sixteen '''armor trim smithing templates''' are found in a variety of [[Generated structures|structures]], and are used to apply various decorative trims (dependent on the variant) to armor using certain minerals for different colors.
'''Netherite upgrade smithing templates''' are required to upgrade diamond equipment with a [[Netherite Ingot|netherite ingot]]. They are only found in [[Bastion Remnant|bastion remnants]], but are guaranteed only in [[:en:Bastion_Remnant#Treasure_room|treasure rooms]].
== Obtaining ==
Smithing templates can be found in various [[Generated structures|structures]] and can be duplicated by using seven diamonds and a block based on what the template is.
=== Crafting ===
{{Crafting
|A1=Diamond |B1=Matching Smithing Template |C1=Diamond
|A2=Diamond |B2=Netherrack;Cobblestone;Sandstone;End Stone;Terracotta;Terracotta;Netherrack;Cobblestone;Terracotta;Cobbled Deepslate;Blackstone;Purpur Block;Prismarine;Cobblestone;Cobbled Deepslate;Terracotta;Mossy Cobblestone |C2=Diamond
|A3=Diamond |B3=Diamond |C3=Diamond
|Output=Matching Smithing Template,2
}}
{| class="article-table"
|+ Duplication
! Item !! Material
|-
| {{ItemSprite|netherite-upgrade|text=Netherite Upgrade}} || {{BlockSprite|Netherrack|text=Netherrack}}
|-
| {{ItemSprite|sentry-armor-trim|text=Sentry Armor Trim}} || {{BlockSprite|Cobblestone|text=Cobblestone}}
|-
| {{ItemSprite|vex-armor-trim|text=Vex Armor Trim}} || {{BlockSprite|Cobblestone|text=Cobblestone}}
|-
| {{ItemSprite|wild-armor-trim|text=Wild Armor Trim}} || {{BlockSprite|Mossy Cobblestone|text=Mossy Cobblestone}}
|-
| {{ItemSprite|coast-armor-trim|text=Coast Armor Trim}} || {{BlockSprite|Cobblestone|text=Cobblestone}}
|-
| {{ItemSprite|dune-armor-trim|text=Dune Armor Trim}} || {{BlockSprite|Sandstone|text=Sandstone}}
|-
| {{ItemSprite|wayfinder-armor-trim|text=Wayfinder Armor Trim}} || {{BlockSprite|Terracotta|text=Terracotta}}
|-
| {{ItemSprite|raiser-armor-trim|text=Raiser Armor Trim}} || {{BlockSprite|Terracotta|text=Terracotta}}
|-
| {{ItemSprite|shaper-armor-trim|text=Shaper Armor Trim}} || {{BlockSprite|Terracotta|text=Terracotta}}
|-
| {{ItemSprite|host-armor-trim|text=Host Armor Trim}} || {{BlockSprite|Terracotta|text=Terracotta}}
|-
| {{ItemSprite|ward-armor-trim|text=Ward Armor Trim}} || {{BlockSprite|Cobbled Deepslate|text=Cobbled Deepslate}}
|-
| {{ItemSprite|silence-armor-trim|text=Silence Armor Trim}} || {{BlockSprite|Cobbled Deepslate|text=Cobbled Deepslate}}
|-
| {{ItemSprite|tide-armor-trim|text=Tide Armor Trim}} || {{BlockSprite|Prismarine|text=Prismarine}}
|-
| {{ItemSprite|snout-armor-trim|text=Snout Armor Trim}} || {{BlockSprite|Blackstone|text=Blackstone}}
|-
| {{ItemSprite|rib-armor-trim|text=Rib Armor Trim}} || {{BlockSprite|Netherrack|text=Netherrack}}
|-
| {{ItemSprite|eye-armor-trim|text=Eye Armor Trim}} || {{BlockSprite|End Stone|text=End Stone}}
|-
| {{ItemSprite|spire-armor-trim|text=Spire Armor Trim}} || {{BlockSprite|Purpur Block|text=Purpur Block}}
|}
{{IN|bedrock}}, spire, tide, and dune armor trims can be duplicated with more blocks than {{in|java}}. In addition to the normal blocks, Tide armor trims can be duplicated using Prismarine Bricks or Dark Prismarine, dune armor trims can be duplicated with smooth sandstone, cut sandstone, or chiseled sandstone, and spire armor trims can be duplicated with purpur pillars.<ref>{{bug|MCPE-172711||Tide, Spire, and Dune Armor Trims can be crafted from more blocks than in Java Edition}}</ref>
=== Mob loot ===
[[Elder guardian]]s have a 20% chance to drop 1 tide armor trim upon death. [[Looting]] doesn't affect this percentage, and the elder guardian doesn't need to be killed by a player in order for the trim to drop and can be duplicated with [[prismarine]].
=== Chest loot ===
{{#invoke:LootChest|base3|netherite-upgrade-smithing-template,sentry-armor-trim-smithing-template,vex-armor-trim-smithing-template,wild-armor-trim-smithing-template,coast-armor-trim-smithing-template,dune-armor-trim-smithing-template,ward-armor-trim-smithing-template,silence-armor-trim-smithing-template,snout-armor-trim-smithing-template,rib-armor-trim-smithing-template,eye-armor-trim-smithing-template,spire-armor-trim-smithing-template}}
Note: In Woodland Mansions, only chests with random loot have the chance to contain the Vex Smithing Template, chests in the "Allium room", "Sapling farm", "Tree-chopping room" and "Fake End portal room" always generate with the same, room specific, loot.
=== Suspicious block loot ===
Items can only be extracted from [[Suspicious Block|suspicious blocks]] using a [[brush]].{{#invoke:LootChest|base3|wayfinder-armor-trim-smithing-template,raiser-armor-trim-smithing-template,shaper-armor-trim-smithing-template,host-armor-trim-smithing-template}}
== Usage ==
=== Crafting ingredient ===
{{Crafting
|A1=Diamond |B1=Matching Smithing Template |C1=Diamond
|A2=Diamond |B2=Netherrack;Cobblestone;Sandstone;End Stone;Terracotta;Terracotta;Netherrack;Cobblestone;Terracotta;Cobbled Deepslate;Blackstone;Purpur Block;Prismarine;Cobblestone;Cobbled Deepslate;Terracotta;Mossy Cobblestone |C2=Diamond
|A3=Diamond |B3=Diamond |C3=Diamond
|Output=Matching Smithing Template,2
}}
=== Smithing ingredient ===
Smithing templates are used at a [[smithing table]]. Netherite upgrade smithing templates are used to upgrade diamond gear into netherite gear by using a netherite upgrade, a piece of diamond gear, and a [[netherite ingot]].
{{Smithing
|head=1
|ingredients=Netherite Upgrade +<br>Any Diamond Gear +<br>[[Netherite Ingot]]
|Netherite Upgrade
|Diamond Helmet; Diamond Chestplate; Diamond Leggings; Diamond Boots; Diamond Sword; Diamond Pickaxe; Diamond Axe; Diamond Shovel
|Netherite Ingot
|Netherite Helmet; Netherite Chestplate; Netherite Leggings; Netherite Boots; Netherite Sword; Netherite Pickaxe; Netherite Axe; Netherite Shovel
|tail=1
}}
{{FakeImage|{{Animate|Iron_Armor_with_Iron_Shaper_Trim.png; Golden_Armor_with_Golden_Shaper_Trim.png; Diamond_Armor_with_Diamond_Shaper_Trim.png; Netherite_Armor_with_Netherite_Shaper_Trim.png|180px}}|If the armor material and the trimming material are the same, the color palette used for the armor trim is darker.}}
Armor trim smithing templates are used to customize an armor piece's appearance by using a smithing template, an armor piece, and an ingot or crystal ([[emerald]], [[redstone dust]], [[lapis lazuli]], [[amethyst shard]], [[nether quartz]], [[netherite ingot]], [[diamond]], [[gold ingot]], [[iron ingot]], or [[copper ingot]]). Including all dyed leather armor colors and regular armor, there are ≈3.679x10<sup>9</sup> different possible armor pieces<!--5713438 leather colors, plus the 4 other armor materials = 5713442. 5713442 * 161 (the 160 trim combos (16 trims, 10 materials) + untrimmed) = 919864162. 919864162 * 4 (helmet, chestplate, leggings, boots) = 3679456648 ≈ 3.679x10^9-->, and 7.16x10<sup>35</sup> <!--919864162 + 1 (no armor in that slot) = 919864163. 919864163^4 = 715969952015045562662444917041515536 ≈ 7.16x10^35 total possible armor combinations-->total possible armor combinations excluding enchantments and the player not wearing armor.
Already trimmed armor can be trimmed again by applying another template on it; the old trim pattern is overwritten in the process.<ref>{{bug|MC-262538||When combining armor trims the new trim deletes the old one|WAI}}</ref> Therefore, one piece of armor cannot possess multiple trims at the same time.
Most armor trims cover a small portion of the armor piece's surface with the trim material, except for the silence armor trim, which allows the trim material to cover a majority of the armor piece's surface.
All of the trims are purely decorative, and don't impact gameplay or strength(without the use of mods or plugins) of the armor they are applied to in any way. [[Piglin]]s do not pick up any gold-trimmed armor pieces, and they are not pacified by players wearing even a full set of gold-trimmed armor (unless, of course, the armor pieces in question are themselves golden), and netherite-trimmed armor pieces can still be burned by [[fire]].
{{Smithing
|head=1
|ingredients=Any Armor Trim +<br>Any Armor Piece +<br>Any Ingot/Crystal
|Any Armor Trim Smithing Template
|Iron Helmet; Netherite Chestplate;Golden Leggings;Diamond Boots
|Amethyst Shard; Copper Ingot; Diamond; Emerald; Gold Ingot; Iron Ingot; Lapis Lazuli; Nether Quartz; Netherite Ingot; Redstone Dust; Diamond; Emerald
|Amethyst Trim Iron Helmet; Copper Trim Netherite Chestplate; Diamond Trim Golden Leggings; Emerald Trim Diamond Boots; Gold Trim Iron Helmet; Iron Trim Netherite Chestplate; Lapis Trim Golden Leggings; Quartz Trim Diamond Boots; Netherite Trim Iron Helmet; Redstone Trim Netherite Chestplate; Diamond Trim Golden Leggings; Emerald Trim Diamond Boots
|tail=1
}}
;List of color palettes for all materials
*{{ItemSprite|emerald }} - {{TrimPalette| emerald }}
*{{ItemSprite|redstone dust }} - {{TrimPalette| redstone dust }}
*{{ItemSprite|lapis lazuli }} - {{TrimPalette| lapis lazuli }}
*{{ItemSprite|amethyst shard }} - {{TrimPalette| amethyst shard }}
*{{ItemSprite|nether quartz }} - {{TrimPalette| nether quartz }}
*{{ItemSprite|netherite ingot }} - {{TrimPalette| netherite ingot }} (Darker: {{TrimPalette| netherite ingot |darker=1}})
*{{ItemSprite|diamond }} - {{TrimPalette| diamond }} (Darker: {{TrimPalette| diamond |darker=1}})
*{{ItemSprite|gold ingot }} - {{TrimPalette| gold ingot }} (Darker: {{TrimPalette| gold ingot |darker=1}})
*{{ItemSprite|iron ingot }} - {{TrimPalette| iron ingot }} (Darker: {{TrimPalette| iron ingot |darker=1}})
*{{ItemSprite|copper ingot }} - {{TrimPalette| copper ingot }}
== Data values ==
=== ID ===
{{edition|java}}:
{{ID table
|edition=java
|firstcolumnname=Smithing Template
|showforms=y
|generatetranslationkeys=y
|displayname=Netherite Upgrade
|spritename=netherite-upgrade-smithing-template
|spritetype=item
|nameid=netherite_upgrade_smithing_template
|form=item}}
{{ID table
|displayname=Sentry Armor Trim
|spritename=sentry-armor-trim-smithing-template
|spritetype=item
|nameid=sentry_armor_trim_smithing_template
|form=item}}
{{ID table
|displayname=Vex Armor Trim
|spritename=vex-armor-trim-smithing-template
|spritetype=item
|nameid=vex_armor_trim_smithing_template
|form=item}}
{{ID table
|displayname=Wild Armor Trim
|spritename=wild-armor-trim-smithing-template
|spritetype=item
|nameid=wild_armor_trim_smithing_template
|form=item}}
{{ID table
|displayname=Coast Armor Trim
|spritename=coast-armor-trim-smithing-template
|spritetype=item
|nameid=coast_armor_trim_smithing_template
|form=item}}
{{ID table
|displayname=Dune Armor Trim
|spritename=dune-armor-trim-smithing-template
|spritetype=item
|nameid=dune_armor_trim_smithing_template
|form=item}}
{{ID table
|displayname=Wayfinder Armor Trim
|spritename=wayfinder-armor-trim-smithing-template
|spritetype=item
|nameid=wayfinder_armor_trim_smithing_template
|form=item}}
{{ID table
|displayname=Raiser Armor Trim
|spritename=raiser-armor-trim-smithing-template
|spritetype=item
|nameid=raiser_armor_trim_smithing_template
|form=item}}
{{ID table
|displayname=Shaper Armor Trim
|spritename=shaper-armor-trim-smithing-template
|spritetype=item
|nameid=shaper_armor_trim_smithing_template
|form=item}}
{{ID table
|displayname=Host Armor Trim
|spritename=host-armor-trim-smithing-template
|spritetype=item
|nameid=host_armor_trim_smithing_template
|form=item}}
{{ID table
|displayname=Ward Armor Trim
|spritename=ward-armor-trim-smithing-template
|spritetype=item
|nameid=ward_armor_trim_smithing_template
|form=item}}
{{ID table
|displayname=Silence Armor Trim
|spritename=silence-armor-trim-smithing-template
|spritetype=item
|nameid=silence_armor_trim_smithing_template
|form=item}}
{{ID table
|displayname=Tide Armor Trim
|spritename=tide-armor-trim-smithing-template
|spritetype=item
|nameid=tide_armor_trim_smithing_template
|form=item}}
{{ID table
|displayname=Snout Armor Trim
|spritename=snout-armor-trim-smithing-template
|spritetype=item
|nameid=snout_armor_trim_smithing_template
|form=item}}
{{ID table
|displayname=Rib Armor Trim
|spritename=rib-armor-trim-smithing-template
|spritetype=item
|nameid=rib_armor_trim_smithing_template
|form=item}}
{{ID table
|displayname=Eye Armor Trim
|spritename=eye-armor-trim-smithing-template
|spritetype=item
|nameid=eye_armor_trim_smithing_template
|form=item}}
{{ID table
|displayname=Spire Armor Trim
|spritename=spire-armor-trim-smithing-template
|spritetype=item
|nameid=spire_armor_trim_smithing_template
|form=item
|foot=1}}
{{edition|bedrock}}:
{{ID table
|edition=bedrock
|firstcolumnname=Smithing Template
|shownumericids=y
|showforms=y
|notshowbeitemforms=y
|generatetranslationkeys=y
|displayname=Netherite Upgrade
|spritename=netherite-upgrade-smithing-template
|spritetype=item
|nameid=netherite_upgrade_smithing_template
|id=685
|form=item
|translationkey=item.smithing_template.name, upgrade.netherite_upgrade.name}}
{{ID table
|displayname=Sentry Armor Trim
|spritename=sentry-armor-trim-smithing-template
|spritetype=item
|nameid=sentry_armor_trim_smithing_template
|id=686
|form=item
|translationkey=item.smithing_template.name, trim_pattern.sentry.name}}
{{ID table
|displayname=Vex Armor Trim
|spritename=vex-armor-trim-smithing-template
|spritetype=item
|nameid=vex_armor_trim_smithing_template
|id=692
|form=item
|translationkey=item.smithing_template.name, trim_pattern.vex.name}}
{{ID table
|displayname=Wild Armor Trim
|spritename=wild-armor-trim-smithing-template
|spritetype=item
|nameid=wild_armor_trim_smithing_template
|id=689
|form=item
|translationkey=item.smithing_template.name, trim_pattern.wild.name}}
{{ID table
|displayname=Coast Armor Trim
|spritename=coast-armor-trim-smithing-template
|spritetype=item
|nameid=coast_armor_trim_smithing_template
|id=688
|form=item
|translationkey=item.smithing_template.name, trim_pattern.coast.name}}
{{ID table
|displayname=Dune Armor Trim
|spritename=dune-armor-trim-smithing-template
|spritetype=item
|nameid=dune_armor_trim_smithing_template
|id=687
|form=item
|translationkey=item.smithing_template.name, trim_pattern.dune.name}}
{{ID table
|displayname=Wayfinder Armor Trim
|spritename=wayfinder-armor-trim-smithing-template
|spritetype=item
|nameid=wayfinder_armor_trim_smithing_template
|id=698
|form=item
|translationkey=item.smithing_template.name, trim_pattern.wayfinder.name}}
{{ID table
|displayname=Raiser Armor Trim
|spritename=raiser-armor-trim-smithing-template
|spritetype=item
|nameid=raiser_armor_trim_smithing_template
|id=699
|form=item
|translationkey=item.smithing_template.name, trim_pattern.raiser.name}}
{{ID table
|displayname=Shaper Armor Trim
|spritename=shaper-armor-trim-smithing-template
|spritetype=item
|nameid=shaper_armor_trim_smithing_template
|id=700
|form=item
|translationkey=item.smithing_template.name, trim_pattern.shaper.name}}
{{ID table
|displayname=Host Armor Trim
|spritename=host-armor-trim-smithing-template
|spritetype=item
|nameid=host_armor_trim_smithing_template
|id=701
|form=item
|translationkey=item.smithing_template.name, trim_pattern.host.name}}
{{ID table
|displayname=Ward Armor Trim
|spritename=ward-armor-trim-smithing-template
|spritetype=item
|nameid=ward_armor_trim_smithing_template
|id=690
|form=item
|translationkey=item.smithing_template.name, trim_pattern.ward.name}}
{{ID table
|displayname=Silence Armor Trim
|spritename=silence-armor-trim-smithing-template
|spritetype=item
|nameid=silence_armor_trim_smithing_template
|id=697
|form=item
|translationkey=item.smithing_template.name, trim_pattern.silence.name}}
{{ID table
|displayname=Tide Armor Trim
|spritename=tide-armor-trim-smithing-template
|spritetype=item
|nameid=tide_armor_trim_smithing_template
|id=693
|form=item
|translationkey=item.smithing_template.name, trim_pattern.tide.name}}
{{ID table
|displayname=Snout Armor Trim
|spritename=snout-armor-trim-smithing-template
|spritetype=item
|nameid=snout_armor_trim_smithing_template
|id=694
|form=item
|translationkey=item.smithing_template.name, trim_pattern.snout.name}}
{{ID table
|displayname=Rib Armor Trim
|spritename=rib-armor-trim-smithing-template
|spritetype=item
|nameid=rib_armor_trim_smithing_template
|id=695
|form=item
|translationkey=item.smithing_template.name, trim_pattern.rib.name}}
{{ID table
|displayname=Eye Armor Trim
|spritename=eye-armor-trim-smithing-template
|spritetype=item
|nameid=eye_armor_trim_smithing_template
|id=691
|form=item
|translationkey=item.smithing_template.name, trim_pattern.eye.name}}
{{ID table
|displayname=Spire Armor Trim
|spritename=spire-armor-trim-smithing-template
|spritetype=item
|nameid=spire_armor_trim_smithing_template
|id=696
|form=item
|translationkey=item.smithing_template.name, trim_pattern.spire.name
|foot=1}}
== Achievements ==
{{load achievements|Smithing with style}}
== Advancements ==
{{load advancements|Crafting a New Look;Smithing with Style}}
== Video ==
{{yt|klP9SrJFDU8}}
== History ==
{{History|java}}
{{History||1.20<br>(Experimental)|link=1.19.4|snap=23w04a|[[File:Netherite Upgrade Smithing Template JE1 BE1.png|32px]] [[File:Sentry Armor Trim Smithing Template JE1 BE1.png|32px]] [[File:Vex Armor Trim Smithing Template JE1 BE1.png|32px]] [[File:Wild Armor Trim Smithing Template JE1 BE1.png|32px]] [[File:Coast Armor Trim Smithing Template JE1 BE1.png|32px]] [[File:Dune Armor Trim Smithing Template JE1 BE1.png|32px]] [[File:Ward Armor Trim Smithing Template JE1 BE1.png|32px]] [[File:Tide Armor Trim Smithing Template JE1 BE1.png|32px]] [[File:Snout Armor Trim Smithing Template JE1 BE1.png|32px]] [[File:Rib Armor Trim Smithing Template JE1 BE1.png|32px]] [[File:Eye Armor Trim Smithing Template JE1 BE1.png|32px]] [[File:Spire Armor Trim Smithing Template JE1 BE1.png|32px]] Added smithing templates behind the "Update 1.20" experimental datapack.}}
{{History|||snap=23w05a|Smithing templates can be used to trim leather armor.
|Gold, iron, diamond, and netherite armor can be trimmed with their respective material.
|The dune, coast, wild, and sentry armor trims now always generate two templates in a chest when found.
|Increased the chances for all smithing templates that generate in chest loot to spawn:
*Netherite upgrade chance to find increased from 3.2% to 10%.
*Coast chance to find increased from 11.1% to 16.7%.
*Dune chance to find increased from 11.1% to 14.3%.
*Eye chance to find increased from 4.7% to 10% in alter chests, and to 100% in library chests.
*Rib chance to find increased from 4.7% to 6.7%.
*Sentry chance to find increased from 20% to 25%.
*Snout chance to find increased from 4.7% to 8.3%.
*Spire chance to find increased from 4.7% to 6.7%.
*Vex chance to find increased from 4.7% to 50%.
*Ward chance to find increased from 4.7% to 5%.
*Wild chance to find increased from 20% to 33%.}}
{{History||1.20|snap=23w12a|Smithing templates are now available without using the "Update 1.20" experimental datapack.|[[File:Wayfinder Armor Trim Smithing Template JE1 BE1.png|32px]] [[File:Raiser Armor Trim Smithing Template JE1 BE1.png|32px]] [[File:Shaper Armor Trim Smithing Template JE1 BE1.png|32px]] [[File:Host Armor Trim Smithing Template JE1 BE1.png|32px]] [[File:Silence Armor Trim Smithing Template JE1 BE1.png|32px]] Added wayfinder, raiser, shaper, host, and silence armor trim smithing templates.
|[[File:Sentry Armor Trim Smithing Template JE2 BE2.png|32px]] [[File:Dune Armor Trim Smithing Template JE2 BE2.png|32px]] Changed the textures of the sentry and dune armor trim smithing templates.
|The pattern textures of dune and sentry armor trims are changed from [[File:Armor Trim Dune (sample model) JE1 BE1.png|24px]] [[File:Armor Trim Sentry (sample model) JE1 BE1.png|24px]] to [[File:Armor Trim Dune (sample model) JE2 BE2.png|24px]] [[File:Armor Trim Sentry (sample model) JE2 BE2.png|24px]].<br>
Those previous patterns were left with different names: dune was renamed sentry and sentry was renamed shaper.}}
{{History|||snap=23w16a|Wayfinder, raiser, shaper, and host armor trim no longer generates in [[suspicious sand]] in [[trail ruins]].|Due to the split of the archaeological loot tables for the suspicious gravel within the [[trail ruins]]; wayfinder, raiser, shaper, and host armor trim now are in the rare loot.}}
{{History|||snap=23w17a|The probability of the wayfinder, raiser, shaper, and host armor trim to generate in [[suspicious gravel]] in [[trail ruins]] has been changed from 1/11 to 1/12.|The player now get the [[advancement]] "Crafting a new look" when they craft a trimmed armor at a [[smithing table]] using a smithing template, "Smithing with style" when they apply these smithing templates at least once on their armor: Spire, Snout, Rib, Ward, Silence, Vex, Tide, and Wayfinder.}}
{{History|bedrock}}
{{History||Next Major Update<br>(Experimental)|link=Bedrock Edition 1.19.80|snap=beta 1.19.80.21|[[File:Netherite Upgrade Smithing Template JE1 BE1.png|32px]] [[File:Sentry Armor Trim Smithing Template JE1 BE1.png|32px]] [[File:Vex Armor Trim Smithing Template JE1 BE1.png|32px]] [[File:Wild Armor Trim Smithing Template JE1 BE1.png|32px]] [[File:Coast Armor Trim Smithing Template JE1 BE1.png|32px]] [[File:Dune Armor Trim Smithing Template JE1 BE1.png|32px]] [[File:Ward Armor Trim Smithing Template JE1 BE1.png|32px]] [[File:Tide Armor Trim Smithing Template JE1 BE1.png|32px]] [[File:Snout Armor Trim Smithing Template JE1 BE1.png|32px]] [[File:Rib Armor Trim Smithing Template JE1 BE1.png|32px]] [[File:Eye Armor Trim Smithing Template JE1 BE1.png|32px]] [[File:Spire Armor Trim Smithing Template JE1 BE1.png|32px]] Added smithing templates behind the "[[Bedrock Edition 1.20.0|Next Major Update]]" [[experimental]] toggle.}}
{{History|||snap=beta 1.19.80.22|[[File:Wayfinder Armor Trim Smithing Template JE1 BE1.png|32px]] [[File:Raiser Armor Trim Smithing Template JE1 BE1.png|32px]] [[File:Shaper Armor Trim Smithing Template JE1 BE1.png|32px]] [[File:Host Armor Trim Smithing Template JE1 BE1.png|32px]] [[File:Silence Armor Trim Smithing Template JE1 BE1.png|32px]] Added wayfinder, raiser, shaper, host, and silence armor trim smithing templates.
|[[File:Sentry Armor Trim Smithing Template JE2 BE2.png|32px]] [[File:Dune Armor Trim Smithing Template JE2 BE2.png|32px]] Changed the textures of the sentry and dune armor trim smithing templates.
|The pattern textures of dune and sentry armor trims are changed from [[File:Armor Trim Dune (sample model) JE1 BE1.png|24px]] [[File:Armor Trim Sentry (sample model) JE1 BE1.png|24px]] to [[File:Armor Trim Dune (sample model) JE2 BE2.png|24px]] [[File:Armor Trim Sentry (sample model) JE2 BE2.png|24px]].<br>
Those previous patterns were left with different names: dune was renamed sentry and sentry was renamed shaper.}}
{{History||1.20.0|snap=beta 1.20.0.21|Smithing templates are now available without using the "Next Major Update" experimental toggle.}}
{{History|foot}}
== Issues ==
{{Issue list}}
== Trivia ==
* Smithing templates were named "Smithing Blueprints" in the prototype but was changed because the word "blueprint" sounded modern and technical.<ref>{{ytl|klP9SrJFDU8|Minecraft 1.20: Armor Trims - What Do They Mean?|Minecraft|May 4, 2023|t=98}}</ref>
* When Mojang developer Gnembon was working on armor trims, he accidentally messed up their rendering, making them jet through the player's body in a weird fashion, similar to what appears in {{w|Salvador Dalí}}'s paintings where a hand might poke through a forehead.<ref>{{ytl|ghQODkq4ITI|Mojang Dev Comes To Hermitcraft! (Mojang Developer Gnembom Interview)|GoodVodsWithScar|June 23, 2023|t=1980}}</ref>
* Some of the armor trims feature patterns based on a [[mob]] or [[block]] that is found in the same [[Generated structures|structure]] as the corresponding smithing template.<ref name=":0">"Some of the armor trims reflect the place where you found the template, for example bastions contain a piglin-inspired trim."-[[Sofia Dankis]]-{{Mcnet|armor-trims-coming-minecraft-1-20|Armor Trims Coming to Minecraft 1.20|January 24, 2023}}</ref>
** The spire armor trim resembles a [[shulker]].
** The vex armor trim resembles an [[evoker]]. As an item in the [[inventory]], it resembles the wing or the vein texture of a [[vex]].
** The wild armor trim has moss growing on 3 of its corners.
** The coast armor trim appears to have barnacles attached to it.
** The ward armor trim, as an item in the inventory, resembles the faces inside a [[warden]]'s chest.
** The silence armor trim appears to have sculk creeping onto / infecting it.
** The tide armor trim resembles [[Prismarine|prismarine bricks]].
** The snout armor trim resembles a [[piglin]]<ref name=":0" />.
** The rib armor trim resembles a [[wither skeleton]].
** The eye armor trim resembles an [[eye of ender]]. There are also two eyes on the head part of the armor trim that resemble those of an [[enderman]].
* ''Netherite upgrade smithing template'' (35 characters with "_" and 32 characters without "_") and ''sentry armor trim smithing template'' (35 characters with "_" and 31 characters without "_") are the current longest name for item ID, while ''[[polished blackstone pressure plate]]'' and ''[[cracked polished blackstone bricks]]'' have 34 characters with "_" and 31 characters without "_".
* The silence armor trim is the rarest trim, due to being found in ancient cities in the deep dark, and having only a 1.2% chance to be per chest.
* When [[lapis lazuli]] is used as trim material, it is called "Lapis" instead of its full name "Lapis Lazuli"; this is the only instance of the abbreviation "Lapis" being used in-game.<ref>{{bug|MC-262486|||WAI}}</ref>
== Gallery ==
=== Sprites ===
<gallery>
Netherite Upgrade Smithing Template.png|Netherite Upgrade
Sentry Armor Trim Smithing Template.png|Sentry Armor Trim
Vex Armor Trim Smithing Template.png|Vex Armor Trim
Wild Armor Trim Smithing Template.png|Wild Armor Trim
Coast Armor Trim Smithing Template.png|Coast Armor Trim
Dune Armor Trim Smithing Template.png|Dune Armor Trim
Wayfinder Armor Trim Smithing Template.png|Wayfinder Armor Trim
Raiser Armor Trim Smithing Template.png|Raiser Armor Trim
Shaper Armor Trim Smithing Template.png|Shaper Armor Trim
Host Armor Trim Smithing Template.png|Host Armor Trim
Ward Armor Trim Smithing Template.png|Ward Armor Trim
Silence Armor Trim Smithing Template.png|Silence Armor Trim
Tide Armor Trim Smithing Template.png|Tide Armor Trim
Snout Armor Trim Smithing Template.png|Snout Armor Trim
Rib Armor Trim Smithing Template.png|Rib Armor Trim
Eye Armor Trim Smithing Template.png|Eye Armor Trim
Spire Armor Trim Smithing Template.png|Spire Armor Trim
</gallery>
=== Armor trim patterns ===
<gallery>
Armor Trim Sentry (sample model).png|Sentry Armor Trim
Armor Trim Vex (sample model).png|Vex Armor Trim
Armor Trim Wild (sample model).png|Wild Armor Trim
Armor Trim Coast (sample model).png|Coast Armor Trim
Armor Trim Dune (sample model).png|Dune Armor Trim
Armor Trim Wayfinder (sample model).png|Wayfinder Armor Trim
Armor Trim Raiser (sample model).png|Raiser Armor Trim
Armor Trim Shaper (sample model).png|Shaper Armor Trim
Armor Trim Host (sample model).png|Host Armor Trim
Armor Trim Ward (sample model).png|Ward Armor Trim
Armor Trim Silence (sample model).png|Silence Armor Trim
Armor Trim Tide (sample model).png|Tide Armor Trim
Armor Trim Snout (sample model).png|Snout Armor Trim
Armor Trim Rib (sample model).png|Rib Armor Trim
Armor Trim Eye (sample model).png|Eye Armor Trim
Armor Trim Spire (sample model).png|Spire Armor Trim
</gallery>
=== Official Artwork ===
<gallery>
T&T Thumbnail.jpg|[[Sunny]] wearing amethyst armor trims.
Warden Chasing Alex with Silence Trim Pixel Art.png|A [[warden]] chasing Alex holding the silence armor trim.
Alex Trimming Armor in Smithing Table Pixel Art.png|Alex adding the silence armor trim and amethyst on iron armor.
Alex Wearing Iron Armor with Amethyst Pixel Art.jpg|Alex wearing the trimmed iron armor.
File:Live2023-01.jpeg|Noor working on trimmed iron armor.
</gallery>
=== Screenshots ===
<gallery>
Kingbdogz Armor Trim 1.jpg|Redstone trims on diamond armor.
Kingbdogz Armor Trim 2.jpg|Gold trims on netherite armor.
Too Many Trims.jpg|A large amount of armor trims.
Kingbdogz Armor Trim 3.jpg|Gold on netherite.
Kingbdogz Armor Trim 4.jpg|Diamond on diamond.
New Armor Trims in 23W12A.jpg|<ref>{{Tweet|kingbdogz|1638580472962850831|new trims got the drip The new "Silence" armor trim to the left is now the hardest trim to get, with only a 1% chance per chest to spawn in Ancient Cities. Definitely gonna be a challenge to get!|March 22, 2023}}</ref>
Emerald Armor.png|Emerald on gold.
Xilefian Armor Trims 1.png|[[Xilefian]] showing how armor trims work.
Xilefian Armor Trims 2.png|[[Xilefian]] showing how armor trims work.
Xilefian Armor Trims 3.png|[[Xilefian]] showing how armor trims work.
Armor Trims On Netherite Armors.png|A display of all eleven (before [[Java Edition 23w12a]]) armor trims and ten colors on netherite armors.
Armor Trim Showcase.png|A display of all eleven (before [[Java Edition 23w12a]]) armor trims, on netherite armor using emerald as the trim material.
Armor Trim Colors.png|A display of all ten armor trim colors, using the ward trim on a netherite helmet.
Silence Armor Trim on All Armors.png|A display of all ten colors of the silence armor trim on all armors.
Image 2023-06-07 154100087.png|A screenshot of every armor trim in every color(besides quartz) on leather armor.
Armor Trim Friends.jpg|Official screenshot of [[Alex]] and [[Zuri]] wearing armor trims.
LadyAgnes Armor Trims.jpg|Copper trims on netherite armor.
Trim Lineup.jpg
Fancy Delta.jpg|[[Kai]] wearing trimmed armor in a [[Basalt Delta]].
Trims & Pots.jpg
Noor Gold Armor Trim .jpeg
Noor Diamond Armor Trim.jpeg
Noor Netherite Armor Trim.jpeg
Noor Iron Armor Trim.jpeg
</gallery>
== References ==
{{Reflist}}
{{Items}}
[[Category:Bedrock Edition]]
[[Category:Non-renewable resources]]
[[de:Schmiedevorlage]]
[[es:Molde de herrería]]
[[fr:Modèle de forge]]
[[ja:鍛冶型]]
[[pl:Szablon kowalski]]
[[pt:Molde de ferraria]]
[[ru:Кузнечный шаблон]]
[[uk:Ковальський шаблон]]
[[zh:锻造模板]]</li></ul> | 14w17a | Added the Customized world type. | |||
| 14w26a | Added the Debug Mode world type. | ||||
| 14w27a | World creation options are now disabled when "Debug Mode" is selected as the world type. | ||||
1.13{{Extension DPL}}<ul><li>[[Gold Nugget|Gold Nugget]]<br/>{{About|the nugget|the block that can drop nuggets|Gilded Blackstone|the ore|Gold Ore|the ingot form|Gold Ingot|the mineral block|Block of Gold}}
{{Item
| image = Gold Nugget.png
| renewable = Yes
| stackable = Yes (64)
}}
'''Gold nuggets''' are items used to make [[gold ingot]]s and other various golden items. One gold nugget is effectively worth one-ninth of a gold ingot.
== Obtaining ==
=== Mob loot ===
[[Zombified Piglin|Zombified piglin]]s, when killed, may drop 0-1 gold nuggets. When killed using a weapon enchanted with [[Looting]], they may drop an additional gold nugget per level of Looting used, up to a maximum of 4.
=== Crafting ===
{{Crafting
|Gold Ingot
|Output= Gold Nugget, 9
|type= Material
}}
=== Smelting ===
{{Smelting
|Golden Sword; {Any golden tools}; {Any golden armor}; Golden Horse Armor
|Gold Nugget
|0,25
}}
=== Chest loot ===
{{LootChestItem|gold-nugget}}
=== Mining ===
[[Nether gold ore]] mined using a [[pickaxe]] drops 2-6 gold nuggets. If the pickaxe is enchanted with [[Fortune]], it has a 33.3% chance to multiply the drops by 2, Fortune II has a 25% chance to multiply the drops by 2 or 3 and Fortune III has a 20% chance each to multiply the drops by 2, 3, or 4 for a maximum possible drop of 24 golden nuggets. The average drop rate for a Fortune III pickaxe is 8.8, while the drop rate for a [[Silk Touch]] pickaxe is a single ingot, or a flat rate of 9. It is slightly more efficient to mine with a Silk Touch pickaxe.
[[Gilded Blackstone|Gilded blackstone]] mined using a pickaxe has a 10% chance to drop 2-5 gold nuggets. If the pickaxe is enchanted with Fortune I, the chance gold nuggets drop is increased 14.29%, Fortune II increases the drop chance to 25%, and Fortune III guarantees the drop.
== Usage ==
Gold nuggets can be used to craft a [[golden carrot]] or [[glistering melon]] for brewing. Also, gold nuggets can be combined with gunpowder and dye to create a [[firework star]] that bursts in a star-shaped explosion.
[[Piglin]]s instantly pick up any gold nuggets that are within 1 [[block]] of them. Unlike other gold-related items, they do not intentionally seek out gold nuggets to pick up and only pick them up if they walk near it. Unlike gold ingots, gold nuggets picked up are dropped upon the piglin's death.
=== Crafting ingredient ===
{{crafting usage}}
== Data values ==
=== ID ===
{{edition|java}}:
{{ID table
|edition=java
|showforms=y
|generatetranslationkeys=y
|displayname=Gold Nugget
|spritetype=item
|nameid=gold_nugget
|form=item
|foot=1}}
{{edition|bedrock}}:
{{ID table
|edition=bedrock
|shownumericids=y
|showforms=y
|notshowbeitemforms=y
|generatetranslationkeys=y
|displayname=Gold Nugget
|spritetype=item
|nameid=gold_nugget
|id=425
|form=item
|foot=1}}
== History ==
{{History|Java}}
{{History||1.0.0|snap=Beta 1.9 Prerelease|[[File:Gold Nugget JE1.png|32px]] Added gold nuggets.
|Gold nuggets are [[drops|dropped]] by [[zombie pigmen]].
|Gold nuggets can be used to craft [[gold ingot]]s.
|Gold nuggets currently do not have a mouseover name.}}
{{History|||snap=Beta 1.9 Prerelease 2|Gold nuggets now have a mouseover name.}}
{{History|||snap=Beta 1.9 Prerelease 4|Gold nuggets are now used to craft [[glistering melon]]s.
|Gold nuggets can now be [[crafting|crafted]] from a single [[gold ingot]].}}
{{History||1.1|snap=release|Normal [[golden apple]]s are now crafted with gold nuggets.}}
{{History||1.3.1|snap=1.3|[[File:Gold Nugget JE2 BE1.png|32px]] The texture of gold nuggets has been changed.}}
{{History||1.4.2|snap=12w34a|Gold nuggets are now used to craft [[golden carrot]]s.}}
{{History||1.4.6|snap=12w49a|Gold nuggets can now be used to craft a [[firework star]] for a star shaped effect on a [[firework rocket|firework]].}}
{{History||1.6.1|snap=13w23a|Gold nuggets can no longer be used to [[crafting|craft]] a [[golden apple]].}}
{{History||1.9|snap=15w43a|Gold nuggets may now be found among the loot in [[igloo]] basement [[chest]]s.}}
{{History||1.11.1|snap=16w50a|Gold nuggets can now be [[smelting|smelted]] from golden [[tool]]s and [[armor]].}}
{{History||1.13|snap=17w47a|Prior to [[1.13/Flattening|''The Flattening'']], this [[item]]'s numeral ID was 371.}}
{{History|||snap=18w09a|Gold nuggets can now be found in [[underwater ruins]] loot [[chest]]s.}}
{{History|||snap=18w11a|Gold nuggets now generate in the chests of [[shipwreck]]s.}}
{{History||1.14|snap=18w43a|[[File:Gold Nugget JE3 BE2.png|32px]] The texture of gold nuggets has been changed.}}
{{History|||snap=18w48a|Gold nuggets can now be found in chests in [[plains]] [[village]] houses.}}
{{History|||snap=18w49a|Gold nuggets can now be found in chests in [[savanna]] village houses.}}
{{History||1.16|snap=20w12a|[[Nether gold ore]] now [[drops]] 2-6 gold nuggets, affected by [[Fortune]].}}
{{History|||snap=20w15a|[[Gilded blackstone]] now has 10% chance to drop 2-5 gold nuggets. Only the drop chance is affected by [[Fortune]].}}
{{History|||snap=20w16a|Gold nuggets now generate in [[bastion remnant]]s and [[ruined portal]] chests.}}
{{History|||snap=Pre-release 1|Gold nuggets can now be used to distract [[piglin]]s.}}
{{History|||snap=Pre-release 3|Gold nuggets can no longer be used to distract [[piglin]]s.}}
{{History||1.20|snap=23w12a|Gold nuggets can now be found in [[suspicious gravel]] and [[suspicious sand]] in cold and warm [[ocean ruins]] and in [[trail ruins]].}}
{{History|||snap=23w16a|Gold nuggets no longer generate in [[suspicious sand]] in [[trail ruins]].|Due to the split of the archaeological loot tables for suspicious gravel within [[trail ruins]], gold nuggets are now common loot.}}
{{History|pocket alpha}}
{{History||v0.12.1|snap=build 1|[[File:Gold Nugget JE2 BE1.png|32px]] Added gold nuggets. |Gold nuggets can be used to craft [[glistering melon]]s, [[gold ingot]]s and [[golden carrot]]s.|[[Gold ingot]]s can now be [[crafting|crafted]] into 9 gold nuggets.|[[Zombie pigmen]] now [[drops|drop]] gold nuggets upon being killed.}}
{{History|pocket}}
{{History||1.0.0|snap=alpha 0.17.0.1|Gold nuggets can now be found inside [[igloo]] basement [[chest]]s.}}
{{History||1.1.0|snap=alpha 1.1.0.0|Gold nuggets can now be [[smelting|smelted]] from golden [[tool]]s and [[armor]].}}
{{History|bedrock}}
{{History||1.2.0|snap=beta 1.2.0.2|Gold nuggets can now be used to craft [[firework star]]s.}}
{{History||1.4.0|snap=beta 1.2.14.2|Gold nuggets can now be found in some [[shipwreck]] [[chest]]s.}}
{{History|||snap=beta 1.2.20.1|Gold nuggets can now be found in [[underwater ruins]] chests.}}
{{History||1.10.0|snap=beta 1.10.0.3|The gold nugget can now be found in [[plains]] [[village]] house chests.|[[File:Gold Nugget JE3 BE2.png|32px]] The texture of gold nuggets has been changed.}}
{{History||1.11.0|snap=beta 1.11.0.1|The gold nugget can now be found in [[savanna]] village house [[chest]]s.}}
{{History||1.16.0|snap=beta 1.16.0.57|[[Nether gold ore]] now [[drops]] 2-6 gold nuggets.|[[Gilded blackstone]] now has 10% chance to drop 2-5 gold nuggets.}}
{{History||1.16.100|snap=beta 1.16.100.50|Gold nuggets can now be used as fuel for a [[furnace]].<ref>{{bug|MCPE-114216}}</ref>}}
{{History||1.18.30|snap=beta 1.18.30.26|Gold nuggets can no longer be used as fuel for a furnace.}}
{{History|Legacy Console}}
{{History||xbox=TU7|xbone=CU1|ps=1.0|wiiu=Patch 1|switch=1.0.1|[[File:Gold Nugget JE2 BE1.png|32px]] Added gold nuggets.}}
{{History||xbox=TU53|xbone=CU43|ps=1.49|wiiu=Patch 23|switch=1.0.3|Gold nuggets can now be [[smelting|smelted]] from golden [[tool]]s and [[armor]].}}
{{History||xbox=none|xbone=none|ps=1.90|wiiu=none|switch=none|[[File:Gold Nugget JE3 BE2.png|32px]] The texture of gold nuggets has been changed.}}
{{History|3DS}}
{{History||0.1.0|[[File:Gold Nugget JE2 BE1.png|32px]] Added gold nuggets.}}
{{History||1.9.19|Gold nuggets can now be [[smelting|smelted]] from golden [[tool]]s and [[armor]].}}
{{History|foot}}
== Issues ==
{{issue list}}
== See also ==
* [[Iron Nugget]]
* [[Gold]]
{{Items}}
[[cs:Zlatý nuget]]
[[de:Goldklumpen]]
[[es:Pepita de oro]]
[[fr:Pépite d'or]]
[[hu:Aranyrög]]
[[it:Pepita d'oro]]
[[ja:金塊]]
[[ko:황금 조각]]
[[nl:Goudklompje]]
[[pl:Bryłka złota]]
[[pt:Pepita de ouro]]
[[ru:Кусочек золота]]
[[uk:Золотий самородок]]
[[zh:金粒]]
[[Category:Renewable resources]]</li><li>[[Elytra|Elytra]]<br/>{{Item
| image = Elytra.png
| rarity = Uncommon
| renewable = No
| durability = 432
| stackable = No
}}
'''Elytra''' ({{Audio|ElytraPronunciation.mp3|/ˈɛl ɪ trə/|link2=''ᴇʟ-i-trə''}}<ref>“Elytron.” ''Merriam-Webster.com Dictionary'', Merriam-Webster, https://www.merriam-webster.com/dictionary/elytron. Accessed 22 May. 2022.</ref>)<!--"Elytra" is the plural of "elytron," a single half of a beetle's protective wing covers. Verbs should agree accordingly (e.g. "Elytra allow flight"). https://www.merriam-webster.com/dictionary/elytron--> are rare wings found in [[end ship]]s that are a source of flight in [[Survival]] mode.
== Obtaining ==
=== Natural generation ===
Elytra are found only in [[end city|end cities]] in [[item frame|item frames]] in the treasure room of the [[end ship]]. A [[shulker]] guards the elytra and the ship's two loot chests.
=== Repairing ===
Elytra can be enchanted with [[Mending]] so that they get [[Item repair|repaired]] as the player collects [[experience]] orbs while wearing/holding them.
Elytra can also be repaired in the player crafting grid, by combining two damaged pairs of elytra together.
{{crafting
|showname=0
|showdescription=1
|ignoreusage=1
|Damaged Elytra
|Damaged Elytra
|Output= Elytra
|description= The durability of the two pairs is added together, plus an extra 5% durability, but removes any enchantments.
|type= Transportation
}}
Similarly, two damaged elytra pairs can be combined on a [[grindstone]].
{{Grinding
|showdescription=1
|ingredients=2x Damaged [[Elytra]]
|Damaged Elytra
|Damaged Elytra
|Elytra
|description=The durability of the two pairs is added together, plus an extra 5% durability, but removes any enchantments.
}}
Elytra can also be repaired at an anvil using [[phantom membrane]]s, which has the advantage that it preserves [[enchantments]] on elytra. Each phantom membrane restores 108 durability points, exactly 25% of the elytra's total durability.
{| class="wikitable" data-description="Repairing elytra"
! scope="col" style="width:64px;" | Name
! Ingredients
! [[Anvil]] usage
|-
! scope="row" style="text-align: center;" | '''Elytra'''
| [[Elytra]] +<br>[[Phantom Membrane]]
| style="width: 260px; padding: 1px;" | {{Anvil| title = Elytra|Input1=Damaged Elytra|Input2=Phantom Membrane, 2|Output=Elytra}}
|-
|}
Each repair on the anvil, however, also increases the [[Anvil mechanics|prior work]] penalty for the Elytra, making every subsequent repair increasingly expensive and eventually reaching an upper limit where repairs are no longer allowed because they are "too expensive" (even if the player has many xp levels to spare). However, the prior work penalty can be reset to 0 for an enchanted elytra pair when it is disenchanted on a grindstone. Unenchanted elytra cannot be used on the grindstone alone.
== Usage ==
[[File:Steve in elytra.png|75px]] [[File:Alex in elytra.png|75px]]
Elytra are equipped in the [[chestplate]] slot, either by placing the item directly in the slot, by pressing {{ctrl|use item}} while [[hotbar|held in hand]], or by firing a point-blank [[dispenser]] at a target. They are gray in color by default, but they adopt the design of any [[cape]] the player is wearing. They maintain their in-world texture design even when they're [[#Repair|broken]] or [[enchanted]].
=== Flying ===
To fly, the player must press the {{ctrl|jump}} key while falling, and the elytra spread apart like a beetle's elytra. The player can aim their view around to turn or adjust their pitch. Losing altitude increases speed, and gaining altitude decreases speed. [[Firework rocket]]s can be used to increase speed. Additionally, speed is quickly lost from sharp changes in direction.
Directly hitting any surface while gliding too fast causes damage to the player and their armor proportional to flight speed (although this may be calculated from another factor). When a player dies in this way, they receive the [[death messages|death message]] "'''<player> experienced kinetic energy'''". The player does not take [[fall damage]] from colliding at a shallow angle or a low enough speed. The critical, damaging angle is about 50° with the collision surface, and the calculation for damage seems to be as if the player had fallen from their maximum potential glide height to the height of the struck surface.
A safe and simple cruise with the highest travel distance can be achieved by aiming directly at the horizon while at the glide's altitude limit. The player's speed is slow enough to allow them time to do other things during a long flight, like sort out their inventory.
In [[Creative]] mode or when the "mayfly" [[ability]] has been given, the player can alternatively hold the {{ctrl|jump}} key to fly up,{{only|bedrock}} or double press the jump key to move around freely.
Flight can be stopped by pressing the [[jump]] key.{{only|bedrock}}
==== Speed and altitude ====
Elytra have a minimum speed of about 7.2 m/s (obtained by gliding at the altitude cap with a strong upward pitch of 30°). If the diver drops to 0 speed, they quickly get accelerated back up to at least this minimum. The diver can increase speed by choosing to descend faster, but afterward, they do not regain nearly as much altitude. In the real world, drag increases with speed, and drag, in turn, slows the aircraft; Minecraft mimics this. To glide from cliff to cliff, a player's best bet is to aim slightly above the horizon.
Sharp turns are a fast way to lose speed. Quicker turns cause greater losses, while gentle movements have small effects. Making a hairpin turn can actually be used for making high-speed landings safe as well as for precise landings on small targets like rooftops. The player aims to glide just above the target, then as they're right over it they immediately reverse directions, then they make readjustments as necessary.
The lowest rate of altitude loss is about 1.5 m/sec, obtained by gliding at the altitude cap with a slight upward pitch (12° or 15°).
To get the best possible glide ratio (and thus the furthest distance out of their altitude), the diver pilot should aim directly at the horizon. This ratio is about 9.47 to 1.
[[Slow Falling]] potions greatly decrease the player's vertical (fall) speed, which also greatly decreases their ''horizontal'' speed (clearly, it depends on the vertical fall rate, as one might expect from flight modeling). The net result is that the player flies extremely slowly - but their Elytra still takes durability damage at the usual rate (1 durability per second without Unbreaking, etc.). Due to this combination, Elytra plus Slow Falling is largely a novelty that most players won't use. The [[Feather Falling]] enchantment does not affect Elytra speed and does not reduce fall damage from hitting things with elytra.
It is possible to calculate the glide range by dividing the altitude by tan of the glide angle (altitude/tan(glide angle)). For example, if the player glides from an altitude of 64 blocks above ground with a glide angle of 15 degrees, they can glide for 237 blocks (assume that they are on superflat), since floor(64 / tan(15)) is 237.
==== Stalling ====
Trying for too high a pitch reduces the player's lift. At a pitch of 30° above the horizon, the player has the lowest possible airspeed of 7.2 m/sec. Above that, the player might be considered to be in a stall. Increasing the pitch gets closer to a free-fall, and stalled flight at 60° is enough to cause fall damage. Stalling at 90° is a true free-fall.
Recovering from a stall is done by readjusting to any safe pitch as quickly as the player likes. This can be just changing to look at the horizon.
==== Powered flight ====
{{fakeImage|{{invSprite|Firework Rocket}}|Firework rockets are used for speed boosts while gliding.}}
[[Firework rocket]]s can be used for propulsion during flight by placing it in either hand and {{ctrl|using}}. Using a firework rocket while gliding quickly maximizes the player's speed for a time similar to the rocket's flight duration.
If the rocket is equipped with [[firework star]]s, it explodes at the end of its flight, inflicting damage based on the number of stars.
It is possible to gain altitude during powered flight. This makes it possible to glide for extreme distances and had been used extensively by [[far lands]]/[[World Border]] challenges.
=== Durability and Repair ===
{{fakeImage|{{invSprite|Broken Elytra}}|A broken pair of elytra.}}
[[Durability]] decreases by one point each second when gliding. A pair of elytra has 432 durability, allowing 7 minutes and 12 seconds of gliding time without enchantments, providing more than 10,000 blocks of transport distance. It is possible to apply the [[Unbreaking]] enchantment using an [[anvil]] and an [[enchanted book]], which affects the elytra, in the same way it does to [[tool]]s. Unbreaking III increases elytra's flight time to about four seconds per durability point, a total of 28 minutes and 44 seconds.
When the durability reaches 1, elytra stop working until they are repaired, adopting a tattered texture in the inventory. The damage ends at durability 1, so they can never fully break. A pair may be repaired by either using the [[Mending]] enchantment, combining two pairs in a [[grindstone]], or combining it in an anvil with [[phantom membrane]]s. In an anvil, each piece of membrane repairs elytra by 108 durability points, requiring 4 pieces to fully repair them.
Each repair on the anvil will also increase the [[Anvil mechanics|prior work]] penalty for the Elytra, making every subsequent repair increasingly expensive, with an upper limit where repairs are no longer allowed because they are "too expensive". However, the prior work penalty can be reset to 0 for an enchanted elytra pair when it is disenchanted on a grindstone (by adding nothing to it). Unenchanted elytra cannot be used on the grindstone alone.
=== Enchantments ===
Elytra can receive the following [[enchantments]] by combining in an anvil:
{| class="wikitable sortable"
|-
! Enchantment
! Max Level
![[Enchanting|Method]]
|-
| [[Unbreaking]]
| III
|{{Inventory slot|Anvil}}
|-
| [[Mending]]
| I
|{{Inventory slot|Anvil}}
|-
| [[Curse of Vanishing]]
| I
|{{Inventory slot|Anvil}}
|-
| [[Curse of Binding]]
| I
|{{Inventory slot|Anvil}}
|}
{{notelist|columns=1}}
== Sounds ==
{{edition|java}}:
{{Sound table
|sound=Equip leather1.ogg
|sound2=Equip leather2.ogg
|sound3=Equip leather3.ogg
|sound4=Equip leather4.ogg
|sound5=Equip leather5.ogg
|sound6=Equip leather6.ogg
|subtitle=Elytra rustles
|source=player
|description=When a pair of elytra is equipped
|id=item.armor.equip_elytra
|translationkey=subtitles.item.armor.equip_elytra
|volume=1.0
|pitch=1.0
|distance=16}}
{{Sound table
|sound=Elytra loop.ogg
|subtitle=MC-177084
|source=player
|description=While flying with a pair of elytra
|id=item.elytra.flying
|translationkey=-
|volume=0.0-1.0 <ref group=sound>Is a quarter of the player's velocity. If flying for less than 1 second, it is 0.0; otherwise, if flying for less than 2 seconds, it is between 0.0 and a quarter of the player's velocity (scaling up with time until 2 seconds)</ref>
|pitch=1.0 <ref group=sound>If the volume is greater than 0.8, 0.8-volume is added to the pitch</ref>
|distance=16}}
{{Sound table
|sound=Random break.ogg
|subtitle=Item breaks
|source=dependent
|description=When a pair of elytra's durability is exhausted
|id=entity.item.break
|translationkey=subtitles.entity.item.break
|volume=0.8
|pitch=0.8-1.2
|distance=16
|foot=1}}
{{edition|bedrock}}:
{{Sound table
|type=bedrock
|sound=Equip leather1.ogg
|sound2=Equip leather2.ogg
|sound3=Equip leather3.ogg
|sound4=Equip leather4.ogg
|sound5=Equip leather5.ogg
|sound6=Equip leather6.ogg
|source=player
|description=When a pair of elytra is equipped
|id=armor.equip_leather
|volume=1.0
|pitch=1.0}}
{{Sound table
|sound=Elytra loop.ogg
|source=player
|description=While flying with a pair of elytra
|id=elytra.loop
|volume=''Depends'' {{checkthecode}}
|pitch=1.0}}
{{Sound table
|sound=Random break.ogg
|source=player
|description=When a pair of elytra's durability is exhausted
|id=random.break
|volume=1.0
|pitch=0.9
|foot=1}}
== Data values ==
=== ID ===
{{edition|java}}:
{{ID table
|edition=java
|showforms=y
|generatetranslationkeys=y
|displayname=Elytra
|spritetype=item
|nameid=elytra
|form=item
|foot=1}}
{{edition|bedrock}}:
{{ID table
|edition=bedrock
|shownumericids=y
|showforms=y
|notshowbeitemforms=y
|generatetranslationkeys=y
|displayname=Elytra
|spritetype=item
|nameid=elytra
|id=564
|form=item
|foot=1}}
== Achievements ==
{{Load achievements|Super Sonic}}
== Advancements ==
{{load advancements|Sky's the Limit}}
== History ==
{{History|java}}
{{History||1.9|snap=October 5, 2015|slink=https://twitter.com/_tomcc/status/651042141397979136|[[Tommaso Checchi]] tweets that [[Jeb]] is working on a secret feature for Minecraft Java Edition, saying "it's like [[W:c:Mario:Super Mario 64|Mario 64]]."}}
{{History|||snap=October 6, 2015|slink=https://twitter.com/jeb_/status/651416814791081984|[[Jeb]] tweets a [https://web.archive.org/web/20230820173231/https://gfycat.com/serpentinehighlevelamurminnow-minecraftsuggestions-ethoslab animated GIF] revealing a [[player]] gliding around an [[end city]]. Elytra have a dragon-wing texture.}}
{{History|||snap=October 6, 2015|slink=https://twitter.com/jeb_/status/651419480187346944|Jeb tweets an [https://web.archive.org/web/20230219045525/https://i.imgur.com/LBgZCyW.png image] of folded wings, which replace the cape the player is wearing.}}
{{History|||snap=October 6, 2015|slink=https://twitter.com/jeb_/status/651423700777074688|Jeb tweets another [https://web.archive.org/web/20230820083025/https://gfycat.com/leadingindolentgangesdolphin animated GIF] of his character with Mojang-themed elytra, gliding along a [[river]] through a [[taiga]] forest.}}
{{History|||snap=15w41a|[[File:Elytra JE1 BE1.png|32px]] <br>[[File:Elytra (item) JE1 BE1.png|32px]] [[File:Broken Elytra (item) JE1 BE1.png|32px]] Added elytra.
|Elytra are currently repaired with [[leather]] when using [[anvil]].}}
{{History|||snap=15w42a|Elytra now spread slightly when the [[player]] crouches.
|The player can now take [[damage]] from gliding into walls, and crashing into a wall now has its own [[Health#Death messages|death message]].
|When flying with elytra, players are only 0.6 blocks tall. They, therefore, can now fit through 1-block gaps while gliding.
|The [[player]] can no longer go higher than the starting point of the glide.}}
{{History|||snap=15w43a|The player's point of view now shifts while gliding.}}
{{History|||snap=16w06a|Elytra now recognize the [[player]]'s [[cape]] and adopt a different elytron design for every official cape (see [[#Gallery|Gallery]]). In addition, Jeb is working on a feature to allow players to change the elytron design like regular player skins.}}
{{History|||snap=16w07a|Elytra are now activated by jumping mid-air. The player no longer glides automatically when falling.
|The cape option in the [[options|options menu]] now also disables custom elytra textures.
|Added the [[game rule]] {{cd|disableElytraMovementCheck}}.}}
{{History||1.9.1|snap=pre1|[[Sound]]s while gliding with elytra have been added.}}
{{History||1.11|snap=16w32a|Elytra can now be placed on [[armor stand]]s, just like any other [[chestplate]].}}
{{History|||snap=16w38a|Elytra are now visible on [[zombie]]s, [[skeleton]]s, and armor stands.}}
{{History|||snap=16w41a|Elytra now have their own [[sound]] when equipped.}}
{{History||1.11.1|snap=16w50a|Elytra can now be propelled through the [[air]] by using [[firework rocket]]s.}}
{{History||1.13|snap=17w47a|Prior to [[1.13/Flattening|''The Flattening'']], this [[item]]'s numeral ID was 443.}}
{{History|||snap=18w14a|Elytra now require [[phantom membrane]] to be repaired, instead of [[leather]].}}
{{History||1.14|snap=18w43a|[[File:Elytra JE2 BE2.png|32px]] <br>[[File:Elytra (item) JE2 BE2.png|32px]] [[File:Broken Elytra (item) JE2 BE2.png|32px]] The textures of the elytra have been changed.}}
{{History||1.15|snap=19w39a|The deployment animation of elytra causes [[player]] blinks when the deployment events has overlapped.}}
{{History|||snap=19w42a|The deployment and folding animations of elytra have been improved and become smoother.
|Elytra can now start to glide immediately after a jump, not only during falls.}}
{{History||1.18|snap=experimental snapshot 7|Elytra no longer use up durability when gliding regularly. Durability is now only consumed when a [[firework rocket]] is used.
|Speed boosts from firework rockets are slightly weaker.
|Now break when the item reaches 0 durability.}}
{{History|||snap=21w37a|The elytra changes in experimental snapshot 7 have been reverted.}}
{{History||1.19|snap=Pre-release 1|Equipping elytra through the inventory now plays a sound.<ref>{{bug|MC-94060||Equipping armor/elytra through inventory or dispenser doesn't play sounds|Fixed}}</ref>}}
{{History||1.19.4|snap=23w05a|Equipping elytra while held with an item already in the chestplate slot now swaps the two items.}}
{{History|pocket}}
{{History||1.0.0|snap=alpha 0.17.0.1|[[File:Elytra JE1 BE1.png|32px]] <br>[[File:Elytra (item) JE1 BE1.png|32px]] [[File:Broken Elytra (item) JE1 BE1.png|32px]] Added elytra. In-game, they are known as ''elytra wings''.}}
{{History|bedrock}}
{{History||1.2.0|snap=beta 1.2.0.2|Elytra can now be propelled through the [[air]] by using [[firework rocket]]s.}}
{{History||1.2.3|snap=beta 1.2.3.3|''Elytra Wings'' have been renamed to ''Elytra''.}}
{{History||1.6.0|snap=beta 1.6.0.5|Elytra can now be repaired in an [[anvil]] using [[phantom membrane]], instead of [[leather]].}}
{{History||1.10.0|snap=beta 1.10.0.3|[[File:Elytra JE2 BE2.png|32px]] <br>[[File:Elytra (item) JE2 BE2.png|32px]] [[File:Broken Elytra (item) JE2 BE2.png|32px]] The textures of elytra have been changed.}}
{{History|console}}
{{History||xbox=TU46|xbone=CU36|ps=1.38|wiiu=Patch 15|switch=1.0.1|[[File:Elytra JE1 BE1.png|32px]] <br>[[File:Elytra (item) JE1 BE1.png|32px]] [[File:Broken Elytra (item) JE1 BE1.png|32px]] Added elytra.}}
{{History||xbox=TU53|xbone=CU43|ps=1.49|wiiu=Patch 23|switch=1.0.3|Elytra can now be propelled through the [[air]] by using [[firework rocket]]s.}}
{{History||xbox=TU69|xbone=none|ps=1.76|wiiu=Patch 38|switch=none|Elytra are now repaired on the [[anvil]] using [[phantom membrane]] instead of [[leather]].}}
{{History||xbox=none|xbone=none|ps=1.90|wiiu=none|switch=none|[[File:Elytra JE2 BE2.png|32px]] <br>[[File:Elytra (item) JE2 BE2.png|32px]] [[File:Broken Elytra (item) JE2 BE2.png|32px]] The textures of elytra have been changed.}}
{{History|new 3ds}}
{{History||1.7.10|[[File:Elytra JE1 BE1.png|32px]] <br>[[File:Elytra (item) JE1 BE1.png|32px]] [[File:Broken Elytra (item) JE1 BE1.png|32px]] Added elytra.}}
{{History|foot}}
== Issues ==
{{issue list}}
== Trivia ==
* The singular form of elytra is an {{w|elytron}}.
* In reality, elytra are not used for flight. They are the tough forewings of beetles and earwigs that cover the wings they actually use for flight. However, like ''Minecraft'' elytra, beetles can use them for gliding.
* A flying player has a shorter hitbox than usual: A 0.6 block cube centered on the player's feet.
* It is possible to glide while on a [[ladder]], by pressing {{key|shift}} followed by {{key|space}}, causing the player to fall with a speed determined by the player's visual angle. This means that the player can descend fast on a ladder, but if the speed is too fast when hitting the ground, they can take fatal fall damage. Using a [[firework rocket]] can also speed up the player's descent.
* {{IN|java}} if the player glides into deep [[water]] with elytra equipped, the animation does not stop, giving it the appearance of a [[swimming]] animation.<ref name="MC-97190">{{bug|MC-97190||While gliding into water or lava, player continues gliding|WAI}}</ref> The animation stops once the player touches the ground. Additionally, [[firework rocket]]s can be used with elytra underwater with a short boost duration.
* Elytra do not deactivate when the player flies into [[lava]].<ref name="MC-97190"/>
* Elytra can be equipped onto some [[mob]]s using [[command]]s. This has no effect unless the mob has the {{cd|FallFlying}} tag set to {{cd|1b}}. Mobs glide forward, unable to control the movement before landing, at which time they regain their AI.
** Exceptions to this are [[squid]]s as the squid's AI causes it to attempt swimming in midair, making it fall straight down because it conflicts with the elytra mechanics.
**Because [[chicken]]s fall slowly, they can move more distance.
** [[Enderman|Endermen]], tamed [[wolf|wolves]] and tamed [[cat]]s that are not sitting cannot teleport until they hit the ground.
** Because mobs do not regain control until they hit the ground, [[vex]]es fall until they die or despawn as they cannot touch the ground.
** Mobs capable of flying, such as [[parrot]]s or vexes can steer in air, though they cannot travel up or down. Dolphins also have this ability.
* [[4J Studios]] created an elytron-centered tutorial map for console edition when elytra were first introduced to this platform, this map is themed as "ruins of an ancient civilization of ''[[Minecraft]]'' worshipers" and showcases the new amplified terrain generation. This map can be seen behind the scenes.<ref>{{Mcnet|learning-fly|Learning To Fly}}</ref> On 28 March 2017, 4J Studios added an elytron-themed [[Mini Games]] for console edition called "Glide;" it consists of Time Attack and Score Attack mode.<ref>{{Mcnet|glide-mini-game-consoles-tomorrow|Glide Mini Game on Consoles Tomorrow|March 23, 2017}}</ref><ref>{{Mcnet|mini-game-masters-glide-console|Mini Game Masters Glide onto Console|March 28, 2017}}</ref>
* A player who jumps with both elytra and the [[Slow Falling]] effect travels slightly upward, which is a cheap but time-consuming alternative to [[fireworks]] and [[Riptide]]-enchanted [[trident]]s.
* On May 5, 2019, [[Mojang]] tweeted '[[The End]] never yields enough adequate resources, sadly,' along with a sad emoji.<ref>{{tweet|Minecraft|1125053038757068802|The End never yields enough adequate resources, sadly. 😔}}</ref> The first letter of each word spells 'T E n y e a r s' (Ten Years). Attached was a picture of [[player|Steve and Alex]] wearing both a [[chestplate]] and elytra. The next day, they tweeted, "Have you noticed something ''suspic10us'' here lately?"<ref>{{tweet|Minecraft|1125415169495064576|Have you noticed something suspic10us here lately?}}</ref>
* Mojang has considered the suggestion of combining elytra with a chestplate, but eventually decided against it, stating that elytra taking up armor is an intentional decision of game balancing.<ref>
{{cite
|url=https://feedback.minecraft.net/hc/en-us/articles/360005029872-Previously-Considered-Suggestions
| title = Part of the tradeoff of having an Elytra is it takes up half your armor.
|website=Minecraft Feedback
|date=July 12, 2018}}
</ref>
== Gallery ==
<gallery>
ElytraFlight.gif|The first image of elytra, tweeted by [[Jeb]]. Click to play.
FoldedWings.png|Folded elytra, which resembles the [[cape]] the user is wearing.
Minecon2015Alternative.png|The minecon 2015 cape elytra.
Dinnerbone Elytra.png|[[Dinnerbone]] flying upside down.
ElytraEnd.png|Elytra in an [[end ship]].
PlayerElytraBack.png|A [[player]] wearing elytra.
PlayerElytraFront.png|A player using elytra.
Broken Elytra.png|Elytra with only 1 [[item durability|durability]].
UpcomingElytras.jpg|Elytra designs fitting to the official capes, posted by Jeb on {{w|Reddit}}.
FlyBlock.png|A player gliding while blocking with a [[shield]].
Suspic10us.jpg|An image of players using elytra.
Steve Gliding with Elytra.png|Steve gliding with elytra.
Alex Gliding with Elytra.png|Alex gliding with elytra.
Enchanted Elytra (item).gif|A pair of enchanted elytra.
</gallery>
=== Console exclusive ===
<gallery>
Glide Score Cavern 2.png|Screenshot of Glide mini-games.
Glide Time Cavern 2.png|Another screenshot of Glide mini-games.
GLIDE Official.jpg|''Glide'' launch poster.
Elytra Tutorial Map.jpg|Official elytra themed tutorial map.
</gallery>(These maps can be found for a price on the Microsoft Store)
=== Designs when wearing capes ===
<blockquote>Designs that are not listed here have default elytron texture or don't have any.</blockquote><gallery>
File:Mojang employees Elytra.png|Old [[Mojang]] cape
File:Mojang employees 2015 Elytra.png|New Mojang cape
File:Mojang Studios employees 2021 Elytra.png|Mojang Studios cape
File:Crowdin Translator Elytra.png|[[Crowdin]] Translator cape
File:DannyBstyle's Elytra.png|dannyBstyle's cape
File:JulianClark's Elyrtra.png|JulianClark's cape
File:Millionth Customer Elytra.png|Millionth Customer cape
File:MINECON 2011 Attendees Elytra.png|[[MINECON 2011]] Attendees cape
File:MINECON 2012 Attendees Elytra.png|[[MINECON 2012]] Attendees cape
File:MINECON 2013 Attendees Elytra.png|[[MINECON 2013]] Attendees cape
File:MINECON 2015 Attendees Elytra.png|[[MINECON 2015]] Attendees cape
File:MINECON 2016 Attendees Elytra.png|[[MINECON 2016]] Attendees cape
File:MINECON LIVE 2019 Founder's Elytra.png|[[MINECON Live 2019]] Founder's cape
File:Mojira Moderator Elytra.png|[[bug tracker|Mojira]] Moderator cape
File:MrMessiah's Elytra.png|MrMessiah's cape
File:Prismarine Elytra.png|[[Prismarine]] cape
File:Realms Mapmaker Elytra.png|[[Realms]] mapmaker's cape
File:Cobalt Elytra.png|[[Cobalt (game)|Cobalt]] cape
File:Scrolls Elytra.png|[[Scrolls]] cape
File:Turtle Elytra.png|[[Turtle]] cape
File:PancapeElyR.png|Pancape cape
File:MSCapeElyR.png|Migrator cape
File:Gr8 Escape's elytra.png|Gr8_Escape's cape
File:Valentine Elytra.png|Valentine cape
File:Vanilla Cape Elytra JE.png|Vanilla cape{{only|java}}
File:Vanilla cape elytra BE.png|Vanilla cape{{only|bedrock}}
</gallery>
== References ==
{{reflist}}
== External Links ==
*[https://www.minecraft.net/en-us/article/taking-inventory--elytra Taking Inventory: Elytra] – Minecraft.net on December 14, 2019
{{Items}}
[[de:Elytren]]
[[es:Élitros]]
[[fr:Élytres]]
[[ja:エリトラ]]
[[ko:겉날개]]
[[nl:Dekschild]]
[[pl:Elytry]]
[[pt:Élitros]]
[[ru:Элитры]]
[[tr:Elitra]]
[[zh:鞘翅]]
[[Category:Non-renewable resources]]</li></ul> | 18w06a | The Customized world type has now been removed. | |||
| 18w16a | Added the Buffet world type. | ||||
1.14{{Extension DPL}}<ul><li>[[Green Dye|Green Dye]]<br/>{{redirect|Cactus Green|the plant|Cactus}}{{Item
| title = Green Dye
| renewable = Yes
| stackable = Yes (64)
}}
'''Green dye''' is a [[primary color dye]].
== Obtaining ==
=== Chest loot ===
{{LootChestItem|green-dye}}
=== Smelting ===
{{Smelting
|head=1
|showdescription=1
|Cactus
|Green Dye
|1
|description={{only|Java}}<ref>{{bug|MC-210211||Smelting cactus gives too much experience since 1.13}}</ref>
}}
{{Smelting
|head=0
|showdescription=1
|Cactus
|Green Dye
|0,2
|description={{only|Bedrock}}
|foot=1
}}
=== Trading ===
[[Wandering trader]]s sell 3 green dye for an [[emerald]].
== Usage ==
{{dye usage}}
=== Crafting ingredient ===
{{crafting usage|ignore=Banner|continue=1}}
{{banner crafting usage}}
=== Loom ingredient ===
{{Banner loom usage|Green Dye}}
=== Trading ===
Expert level shepherd villagers have {{frac|1|6}} chance to buy 12 green dye for an emerald.{{only|bedrock}} Expert level shepherds have a {{frac|2|7}} chance to buy 12 green dye for 1 emerald.{{only|java}}
== Data values ==
=== ID ===
{{edition|java}}:
{{ID table
|edition=java
|showforms=y
|generatetranslationkeys=y
|displayname=Green Dye
|spritetype=item
|nameid=green_dye
|form=item
|foot=1}}
{{edition|bedrock}}:
{{ID table
|edition=bedrock
|showaliasids=y
|shownumericids=y
|showforms=y
|notshowbeitemforms=y
|generatetranslationkeys=y
|displayname=Green Dye
|spritetype=item
|nameid=green_dye
|aliasid=dye / 2
|id=397
|form=item
|translationkey=item.dye.green.name
|foot=1}}
== Video ==
<div style="text-align:center">{{yt|O4KVTPI4qIc}}</div>
== History ==
{{History|java beta}}
{{History||1.2|[[File:Green Dye JE1 BE1.png|32px]] Added cactus green, together with all other dyes.}}
{{History|java}}
{{History||1.3.1|snap=1.3|[[File:Green Dye JE2 BE2.png|32px]] The texture of cactus green has been changed.}}
{{History||1.4.2|snap=12w34a|Added the ability to [[Armor#Dyeing|dye]] leather [[armor]] and [[wolf]] collars.}}
{{History||1.4.6|snap=12w49a|Cactus green can be crafted with [[gunpowder]] to create a [[firework star]].}}
{{History||1.6.1|snap=13w19a|[[Stained clay]] can now be [[crafting|crafted]].}}
{{History||1.7.2|snap=13w41a|[[Stained glass]] can now be crafted.}}
{{History||1.8|snap=14w30a|Added [[banner]]s, which can be dyed.}}
{{History||1.11|snap=16w39a|Added the ability to dye [[shulker box]]es.}}
{{History||1.12|snap=17w06a|Cactus green can now be used to craft green [[concrete powder]].}}
{{History||1.12|snap=17w15a|Added the ability to dye [[bed]]s.}}
{{History||1.13|snap=17w47a|The different data values for the <code>dye</code> ID have now been split up into their own IDs.
|Prior to [[1.13/Flattening|''The Flattening'']], this [[item]]'s numeral ID was 351.}}
{{History||1.14|snap=18w43a|"Cactus Green" has been renamed to "Green Dye".
|[[File:Green Dye JE3 BE3.png|32px]] The texture of green dye has been changed.}}
{{History|||snap=18w44a|Green dye can now change the text color on [[sign]]s to green.}}
{{History|||snap=18w50a|Green dye can now be found in [[chest]]s in [[desert]] [[village]] houses.}}
{{History|||snap=19w05a|Added the [[wandering trader]], which sells green dye.}}
{{History|||snap=19w11a|Green dye can now be [[trading|bought]] by shepherd villagers.}}
{{History||1.17|snap=20w45a|Green dye can now be used to craft [[green candle]]s.}}
{{History|||snap=21w19a|Green dye can no longer be used to craft green candles.}}
{{History|||snap=Pre-release 1|Green dye can once again be used to craft green candles.}}
{{History||1.20<br>(Experimental)|link=1.19.3|snap=22w42a|Green dye can now change the text color on [[hanging sign]]s to green.}}
{{History|pocket alpha}}
{{History||v0.3.0|[[File:Green Dye JE1 BE1.png|32px]] Added cactus green. It is currently unobtainable and has no usage.}}
{{History||v0.3.2|Cactus green is now obtainable by [[smelting]] cacti in a [[furnace]]. It still has no usage.}}
{{History||v0.4.0|Cactus green can now be used to craft [[cyan dye]], [[lime dye]], and [[green wool]].}}
{{History||v0.8.0|snap=build 1|[[File:Green Dye JE2 BE2.png|32px]] The texture of cactus green has been changed.}}
{{History||v0.14.0|snap=build 1|Cactus green can now be used to dye [[water]] in [[cauldron]]s.}}
{{History|pocket}}
{{History||1.0.0|snap=alpha 0.17.0.1|Cactus green can now be used to dye [[shulker]]s.}}
{{History||1.1.0|snap=alpha 1.1.0.0|Cactus green can now be used to dye [[bed]]s, [[shulker box]]es, and craft [[concrete powder]].}}
{{History|bedrock}}
{{History||1.2.0|snap=beta 1.2.0.2|Cactus green can now be used to craft [[stained glass]], patterns on [[banner]]s, and [[firework star]]s.}}
{{History||1.4.0|snap=beta 1.2.20.1|Cactus green can now be used to craft [[balloon]]s and [[glow stick]]s.}}
{{History||1.8.0|snap=beta 1.8.0.10|"Cactus Green" has been renamed to "Green Dye".}}
{{History||1.10.0|snap=beta 1.10.0.3|Green dye is now sold by [[wandering trader]]s.
|[[File:Green Dye JE3 BE3.png|32px]] The texture of green dye has been changed.}}
{{History||1.11.0|snap=beta 1.11.0.1|Green dye can now be found in [[desert]] [[village]] house [[chest]]s.}}
{{History|||snap=beta 1.11.0.4|Green dye can now be [[trading|sold]] to shepherd [[villager]]s.}}
{{History||1.16.100|snap=beta 1.16.100.56|The ID of green dye has been changed from <code>dye/2</code> to <code>green_dye</code>.}}
{{History|console}}
{{History||xbox=TU1|xbone=CU1|ps=1.00|wiiu=Patch 1|[[File:Green Dye JE1 BE1.png|32px]] Added cactus green.}}
{{History|PS4}}
{{History||1.83|"Cactus Green" has been renamed to "Green Dye".}}
{{History||1.90|[[File:Green Dye JE3 BE3.png|32px]] The texture of green dye has been changed.}}
{{History|new 3ds}}
{{History||0.1.0|[[File:Green Dye JE1 BE1.png|32px]] Added cactus green.}}
{{History|foot}}
== Issues ==
{{issue list}}
{{Items}}
[[cs:Kaktusová zeleň]]
[[de:Grüner Farbstoff]]
[[es:Tinte verde]]
[[fr:Teinture verte]]
[[hu:Kaktuszzöld]]
[[ja:緑色の染料]]
[[ko:초록색 염료]]
[[nl:Cactusgroen]]
[[pl:Zielony barwnik]]
[[pt:Corante verde]]
[[ru:Зелёный краситель]]
[[Category:Items]]
[[Category:Dyes]]
[[Category:Renewable resources]]</li><li>[[Bundle|Bundle]]<br/>{{Experimental feature|bundle}}
{{planned|BE}}
{{Item
| image = Bundle.png
| image2 = Bundle Filled.png
| rarity = Common
| renewable = No
| stackable = No
}}
A '''bundle''' is an [[item]] that can store up to a stack's worth of mixed [[item]] types within itself in a single [[inventory]] slot. Items that stack to 16 occupy more space within the bundle, and items that do not stack occupy the entire bundle without allowing space for any other items.
== Obtaining ==
=== Crafting ===
{{Crafting
|showdescription=1
|A1=String |B1=Rabbit Hide |C1=String
|A2=Rabbit Hide |C2=Rabbit Hide
|A3=Rabbit Hide |B3=Rabbit Hide |C3=Rabbit Hide
|Output=Bundle
|type=Tool
|description={{OnlyExperimental|bundle}}
}}
== Usage ==
<!--The tooltip does not reflect the current bundle "tooltip"-->
{{FakeImage|style=max-width:250px;
|1={{Slot|Stick,64}}{{Slot|Ender Pearl,16}}{{Slot|Iron Sword}}<br>{{Slot|Stick,1}}{{Slot|Ender Pearl,4}}{{Slot|Iron Sword,64}}<br>{{Slot|Filled Bundle[Stick x32/Ender Pearl x8]| title = Bundle|link=none}}
|2=Item stack sizes (top row) and the number of bundle slots they take up (middle row). Sticks stack to 64, so they take up one bundle slot; ender pearls stack to 16, so they take up four; and swords do not stack, so they take up the whole bundle. So, for instance, a bundle may have 32 sticks and 8 ender pearls inside (bottom), which take up a total of {{Tooltip|(32×1)|32 Sticks}}+{{Tooltip|(8×4)|8 Ender Pearls}}=64 bundle slots.
}}
Bundles are used to store different [[item|item type]]s in the same [[inventory]] slot. This does not, however, increase the total capacity of the slot: each bundle has 64 "bundle slots" and each item placed in the bundle takes up these slots similar to how they take up space in a normal inventory slot: items that stack to 64 take up 1 bundle slot, items that stack to 16 (for example, [[egg]]s) take up 4, and items that do not stack (such as tools/weapons/armor) take up the whole bundle, all 64 slots.
Although bundles themselves cannot be stacked, a bundle can be placed inside another (nested): the inner bundle itself uses 4 slots plus the number of slots already occupied by the items in that bundle.<ref>{{bug|MC-203567||Bundles can be placed inside of bundles|WAI}}</ref>
To place items inside a bundle, either (1) pick up the bundle in the inventory and right-click on the item(s) to be placed inside or (2) pick up the item(s) and right-click on the bundle. When placing bundles inside another bundle, the interface uses the first method: picking up Bundle A and right clicking on Bundle B attempts to store Bundle B inside A.
Bundles can be {{ctrl|used}} inside the inventory to take out the last item put in. In this way, items are accessible LIFO (last in, first out). When {{ctrl|used}} outside the inventory, it dumps all the items out into the world.
Hovering over the bundle shows its contained items in its inventory slots. The number of bundle slots used is displayed as ''<fullness>''/64 in the tooltip. If the bundle is full, then the empty slots are greyed out with an <span class="invslot">{{SlotSprite|Bundle full}}</span>.
[[Shulker box]]es cannot be placed inside of bundles.
[[File:MinecraftBundle.jpg|thumb|Hovering the mouse over a bundle filled with mob loot, nearly full, with 61 items.]]
== Sounds ==
{{Sound table
|sound=Bundle drop contents1.ogg
|sound2=Bundle drop contents2.ogg
|sound3=Bundle drop contents3.ogg
|subtitle=Bundle empties
|source=player
|description=When a bundle's items are thrown onto the ground
|id=item.bundle.drop_contents
|translationkey=subtitles.item.bundle.drop_contents
|volume=0.8
|pitch=''varies'' <ref group=sound>Can be 0.8-1.2 or 0.76-1.14 for each sound</ref>
|distance=16}}
{{Sound table
|sound=Bundle insert1.ogg
|sound2=Bundle insert2.ogg
|sound3=Bundle insert3.ogg
|subtitle=Item packed
|source=player
|description=When items are placed into a bundle
|id=item.bundle.insert
|translationkey=subtitles.item.bundle.insert
|volume=0.8
|pitch=''varies'' <ref group=sound>Can be 0.8-1.2, 0.76-1.14, or 0.84-1.26 for each sound</ref>
|distance=16}}
{{Sound table
|sound=Bundle remove one1.ogg
|sound2=Bundle remove one2.ogg
|sound3=Bundle remove one3.ogg
|subtitle=Item unpacked
|source=player
|description=When items are removed from a bundle
|id=item.bundle.remove_one
|translationkey=subtitles.item.bundle.remove_one
|volume=0.8
|pitch=''varies' <ref group=sound>Can be 0.8-1.2, 0.84-1.26, or 0.88-1.32 for each sound</ref>
|distance=16
|foot=1}}
== Data values ==
=== ID ===
{{JE}}:
{{ID table
|edition=java
|showforms=y
|generatetranslationkeys=y
|displayname=Bundle
|spritetype=item
|nameid=bundle
|form=item
|foot=1}}
=== Item data ===
<div class="treeview" style="margin-top: 0;">
* {{nbt|compound|tag}}: The '''tag''' tag.
{{:Player.dat_format/Bundle}}
</div>
== History ==
{{History||October 3, 2020|link={{ytl|DBvZ2Iqmm3M|t=1846s}}|[[File:Bundle JE1.png|32px]][[File:Bundle Filled JE1.png|32px]] Bundles are revealed at [[Minecraft Live 2020]]. Hovering over them shows all items inside scattered around a large area, and incomplete bundles have the empty texture.}}
{{History||October 16, 2021|link=https://clips.twitch.tv/AffluentEncouragingOryxPeteZaroll-cd8pIapkfD4PRHxO|Ulraf, a game developer on ''Minecraft'', states that bundles will not be included in [[Caves & Cliffs]].}}
{{History||November 17, 2021|link=https://www.minecraft.net/en-us/article/caves---cliffs-update-part-ii-coming|Bundles are announced to be added after [[The Wild Update]].}}
{{History|java}}
{{History||1.17|snap=20w45a|[[File:Bundle JE1.png|32px]][[File:Bundle Filled JE1.png|32px]] Added bundles. Hovering over them shows some of the items contained and their quantities, much like the tooltip of a [[shulker box]]. Incomplete bundles have the full texture.}}
{{History|||snap=20w46a|[[File:Bundle JE2.png|32px]][[File:Bundle Filled JE2.png|32px]] The textures of bundles have been changed.
|Hovering over bundles now shows its contained items in special slots, similar to slots in the [[inventory]]. If the bundle is not full, it also has an empty slot with a plus on it.}}
{{History|||snap=20w48a|Bundles now show fullness as a number when [[advanced tooltips]] are enabled.
|{{ctrl|Using}} a bundle in the inventory now empties one item from the bundle instead of emptying all the contents out to the [[inventory]].
|{{ctrl|Using}} a bundle now throws out its entire content into the world.}}
{{History|||snap=20w49a|Bundle fullness is now always shown.
|Full bundles now show the blue bar instead of hiding it, to distinguish from empty bundles.}}
{{History|||snap=20w51a|Bundles now drop its contents when destroyed as an [[Item (entity)|item entity]].
|Bundle fullness has been changed from <code>Fullness: ''<fullness>'' / 64</code> to <code>''<fullness>''/64</code>
|The slots in the tooltip when hovering over bundles have changed to have a border, and rows of slot have a thicker edge between them.
|When the bundle is not full, it instead shows empty slots instead of one slot with a plus. When it is full, those empty slots become greyed out with an X.}}
{{History|||snap=21w05a|The player now receives a tutorial when first having a bundle in the inventory.}}
{{History|||snap=21w19a|Bundles are now accessible only through commands.}}
{{History||1.18|snap=Experimental Snapshot 1|Bundles are now available in the creative inventory and can be crafted once again.}}
{{History|||snap=21w37a|Bundles are once again accessible only through commands.}}
{{History||1.19.3|snap=22w42a|Bundles have been made available once again, and have been moved behind their own datapack.}}
{{h|bedrock}}
{{h||1.19.50|snap=beta 1.19.50.21|Added bundle GUI textures in the Vanilla Packs.}}
{{History|foot}}
== Issues ==
{{Issue list}}
== Gallery ==
<gallery>
JE 1.17 Development Bundle.png|The original bundle UI
Bundle in Inventory.jpg|A bundle inventory in the inventory
</gallery>
== References ==
{{Reflist}}
{{Items}}
[[Category:Storage]]
[[Category:Tools]]
[[Category:Renewable resources]]
[[de:Bündel]]
[[es:Saco]]
[[fr:Sac]]
[[ja:バンドル]]
[[pl:Sakwa]]
[[pt:Trouxa]]
[[ru:Мешок]]
[[zh:收纳袋]]</li></ul> | 19w12a | Worlds with names already being used will now prepend a number in parentheses to the folder name instead of adding hyphens. | |||
1.16{{Extension DPL}}<ul><li>[[Clay Ball|Clay Ball]]<br/>{{Item
| image = Clay Ball.png
| stackable = Yes (64)
| renewable = Yes
}}
{{about|the item|the block|Clay|other uses|Clay (disambiguation)}}
A '''clay ball''' is the item obtained from [[clay]] used for [[crafting]] or making [[brick]]s.
== Obtaining ==
=== Block loot ===
Clay balls are obtained when a [[clay]] block is broken with a non-[[Silk Touch]] tool. Each block yields four clay balls regardless of [[Fortune]].
=== Chest loot ===
{{LootChestItem|clay-ball}}
=== Villager gifts ===
If a [[player]] has the [[Hero of the Village]] status effect, a Mason [[villager]] might throw that player a [[clay block]] as a gift. {{Only|java}} This can be placed and [[breaking|broken]] to harvest clay balls.
== Usage ==
Clay balls can be [[crafting|crafted]] back together to form [[clay]] blocks or baked in a [[furnace]] to create [[brick]]s.
=== Crafting ingredient ===
{{crafting usage}}
=== Smelting ingredient ===
{{Smelting
|showname=1
|Clay Ball
|Brick
|0.3
}}
=== Trading ===
Novice-level [[Villager|mason villagers]] buy 10 clay balls for 1 [[emerald]] as part of their [[trades]].
== Data values ==
=== ID ===
{{edition|java}}:
{{ID table
|edition=java
|showforms=y
|generatetranslationkeys=y
|displayname=Clay Ball
|spritetype=item
|nameid=clay_ball
|form=item
|foot=1}}
{{edition|bedrock}}:
{{ID table
|edition=bedrock
|shownumericids=y
|showforms=y
|notshowbeitemforms=y
|generatetranslationkeys=y
|displayname=Clay
|spritetype=item
|nameid=clay_ball
|id=384
|form=item
|foot=1}}
== History ==
{{History|java alpha}}
{{History||v1.0.11|[[File:Clay Ball JE1 BE1.png|32px]] Added clay.}}
{{History|java}}
{{History||1.13|snap=17w47a|Prior to [[1.13/Flattening|''The Flattening'']], this [[item]]'s numeral ID was 337.}}
{{History||1.14|snap=18w43a|[[File:Clay Ball JE2 BE2.png|32px]] The texture of clay has been changed.}}
{{History|||snap=18w49a|Clay can now be found in [[chest]]s in [[village]] mason houses.}}
{{History|||snap=18w50a|Clay can now be found in [[chest]]s in [[desert]] [[village]] houses.}}
{{History|||snap=19w11a|Clay is now [[trading|bought]] by [[villager]]s of the new mason profession.}}
{{History||1.16|snap=20w06a|"Clay" has been renamed to "Clay Ball."}}
{{History|pocket alpha}}
{{History||v0.2.0|[[File:Clay Ball JE1 BE1.png|32px]] Added clay. It is currently unobtainable and serves no purpose.}}
{{History||v0.3.2|4 clay items are now dropped from clay blocks when broken.
|Clay can now be crafted into clay blocks.
|Clay can now be smelted into bricks.}}
{{History|bedrock}}
{{History||1.10.0|snap=beta 1.10.0.3|[[File:Clay Ball JE2 BE2.png|32px]] The texture of clay has been changed.|10–13 clay can now be [[trading|sold]] to stone mason [[villager]]s for an [[emerald]].}}
{{History||1.11.0|snap=beta 1.11.0.1|Clay can now be found in [[village]] mason [[chest]]s and [[desert]] village house chests.}}
{{History|||snap=beta 1.11.0.4|[[Trading]] has been changed, stone mason villagers now [[trading|buy]] 10 clay for an emerald<!-- previously 10-13 -->.}}
{{History||1.19.0|snap=beta 1.19.0.24|Clay ball now [[renewable]] by placing [[mud]] above a block which has [[pointed dripstone]] underneath.}}
{{History|console}}
{{History||xbox=TU1|xbone=CU1|ps=1.0|wiiu=Patch 1|[[File:Clay Ball JE1 BE1.png|32px]] Added clay.}}
{{History||xbox=none|xbone=none|ps=1.90|wiiu=none|switch=none|[[File:Clay Ball JE2 BE2.png|32px]] The texture of clay has been changed.}}
{{History|3ds}}
{{History||0.1.0|[[File:Clay Ball JE1 BE1.png|32px]] Added clay.}}
{{History|foot}}
== Issues ==
{{issue list}}
== Gallery ==
<gallery>
File:ClayInNumerousForms.png
</gallery>
== Notes ==
{{fnlist}}
{{Items}}
[[cs:Jíl]]
[[de:Tonklumpen]]
[[es:Bola de arcilla]]
[[fr:Motte d'argile]]
[[hu:Agyag (Tárgy)]]
[[it:Zolla di argilla]]
[[ja:粘土玉]]
[[ko:점토 덩이]]
[[nl:Klei (voorwerp)]]
[[pl:Glina]]
[[pt:Bola de argila]]
[[ru:Глина]]
[[uk:Глиняна кулька]]
[[zh:黏土球]]</li><li>[[Cooked Cod|Cooked Cod]]<br/>{{redirect|Cooked Fish|cooked salmon|Cooked Salmon}}
{{Item
| title = Cooked Cod
| image = Cooked Cod.png
| renewable = Yes
| heals = {{hunger|5}}
| stackable = Yes (64)
}}
'''Cooked cod''' is a food item obtained by cooking [[raw cod]].
== Obtaining ==
=== Mob loot ===
====Cod====
[[Cod]] always drops 1 [[Raw Cod|raw cod]] when killed, unaffected by Looting.<ref>{{bug|MC-212795||Salmon & Fish mobs are not affected by Looting}}</ref> If it is killed while on [[fire]], it drops 1 cooked cod instead.
====Dolphins ====
When killed, [[Dolphin|dolphins]] drop 0–1 raw cod. The maximum amount is increased by 1 per level of [[Looting]], for a maximum of 0-4 with Looting III. If killed while on fire, they drop cooked cod instead.
====Guardians and elder guardians====
[[Guardian]]s and [[elder guardian]]s have a 40% and 50% chance, respectively, to drop raw cod when killed. {{IN|java}}, cooked cod is dropped if a guardian is on fire when killed.
Guardians and elder guardians also drop a 2.5% chance to drop a random fish, with 60% of them being raw cod, which drops as cooked if the guardian was on fire. The chance of getting the fish drop is increased by 1% per level with [[Looting]] (for a maximum of 5.5% with Looting III), but the type of fish is not affected.
====Polar bears====
[[Polar bear]]s have a 75% chance of dropping 0–2 raw cod when killed. The maximum amount can be increased by 1 per level of Looting, for a maximum of 0-5 with Looting III. If killed while on fire, they drop cooked cod instead.
===Chest loot===
{{LootChestItem|cooked-cod}}
===Cooking===
Cooked cod can be obtained by cooking [[raw cod]] in a [[furnace]], [[smoker]], or [[campfire]].
{{smelting|Raw Cod|Cooked Cod|0,35}}
===Trading===
Novice-level Fisherman [[Villager|villagers]] have a 50% chance to sell 6 cooked cod for 6 raw cod and 1 [[emerald]].
== Usage ==
=== Food ===
To eat cooked cod, press and hold {{control|use}} while it is selected in the hotbar. Eating one restores {{hunger|5}} [[hunger]] and 6 hunger [[Hunger#Mechanics|saturation]].
=== Wolves ===
{{IN|Bedrock}}, cooked cod can be used to feed a wolf not at full health, healing by {{hp|5|mob=1}}. However, unlike other wolf food, cooked cod cannot be used to speed up the growth of baby wolves nor used to breed them.
==Sounds==
{{Sound table/Entity/Food}}
== Data values ==
=== ID ===
{{edition|java}}:
{{ID table
|edition=java
|showitemtags=y
|showforms=y
|generatetranslationkeys=y
|displayname=Cooked Cod
|spritetype=item
|nameid=cooked_cod
|itemtags=fishes
|form=item
|foot=1}}
{{edition|bedrock}}:
{{ID table
|edition=bedrock
|shownumericids=y
|showforms=y
|showaliasids=y
|notshowbeitemforms=y
|generatetranslationkeys=y
|displayname=Cooked Cod
|spritetype=item
|nameid=cooked_cod
|aliasid=cooked_fish
|id=268
|form=item
|translationkey=item.cooked_fish.name
|foot=1}}
== Achievements ==
{{load achievements|Delicious Fish}}
== Advancements ==
{{load advancements|Husbandry;A Balanced Diet}}
== Video ==
<div style="text-align:center">{{yt|nPl0HUGPMcA}}</div>
== History ==
{{History|java alpha}}
{{History||v1.2.0|snap=<nowiki>?|slink=:Category:Information needed requiring unarchived version|[[File:Cooked Cod JE1 BE1.png|32px]] Added cooked fish, which restores {{hp|5}}.}}
{{History|java beta}}
{{History||1.5|Cooking fish now gives the '''Delicious Fish''' [[achievement]].}}
{{History||1.8|snap=Pre-release|Cooked fish is now stackable to 64.
|Cooked fish now fills {{hunger|5}} instead of {{hp|5}}.}}
{{History|java}}
{{History||1.3.1|snap=12w21a|Farmer [[villager]]s now [[trading|buy]] 9–12 cooked fish for 1 [[emerald]].}}
{{History||1.8|snap=14w02a|[[Trading]] has been changed: fisherman [[villager]]s now [[trading|sell]] 6 cooked fish for 1 [[emerald]] plus 6 [[raw cod|raw fish]].
|Farmer villagers no longer buy cooked fish.}}
{{History|||snap=14w04a|The name of cooked fish has been corrected from <code>cooked_fished</code> to <code>cooked_fish</code>.}}
{{History|||snap=14w25a|Cooked fish are now obtainable rare [[drops]] from [[guardian]]s and [[elder guardians]].}}
{{History||1.13|snap=17w47a|The different data values for the <code>cooked_fish</code> IDs have been split up into their own IDs.
|"Cooked Fish" have been renamed to "Cooked Cod".
|Prior to [[1.13/Flattening|''The Flattening'']], these [[item]]s' numeral ID were 349 and 350.}}
{{History|||snap=18w08b|[[Cod]], and other [[fish]], have been added as [[mob]]s, which [[drops|drop]] their cooked [[item]] form when killed with [[fire]].
|[[File:Cooked Cod JE2 BE2.png|32px]] The texture of cooked cod has been changed.}}
{{History|||snap=18w10a|Cooked cod now generates in [[buried treasure]] [[chest]]s.}}
{{History||1.14|snap=18w43a|[[File:Cooked Cod JE3.png|32px]] The texture of cooked cod has been changed.}}
{{History|||snap=18w47b|[[File:Cooked Cod JE4 BE3.png|32px]] The texture of cooked cod has been changed, once again to match {{el|be}}.}}
{{History|pocket alpha}}
{{History||v0.11.0|snap=build 1|[[File:Cooked Cod JE1 BE1.png|32px]] Added cooked fish.}}
{{History||v0.12.1|snap=build 1|Cooked fish now restores [[hunger]] instead of [[health]].}}
{{History||v0.16.0|snap=build 1|Cooked fish is now [[drops|dropped]] by [[guardian]]s and [[elder guardian]]s.}}
{{History|pocket}}
{{History||1.0.4|snap=alpha 1.0.4.0|Fisherman [[villager]]s now [[trading|sell]] 6 cooked fish for 1 [[emerald]] plus 6 [[raw cod|raw fish]].}}
{{History|bedrock}}
{{History||1.4.0|snap=beta 1.2.14.2|[[Cod]] and other [[fish]] have been added as [[mob]]s, which [[drops|drop]] their cooked [[item]] form when killed with [[fire]].
|[[File:Cooked Cod JE2 BE2.png|32px]] The texture of cooked fish has been changed.}}
{{History||1.5.0|snap=beta 1.5.0.4|[[File:Cooked Cod JE4 BE3.png|32px]] The texture of cooked fish has been changed.}}
{{History||1.7.0|snap=beta 1.7.0.2|"Cooked Fish" has been renamed to "Cooked Cod".}}
{{History||1.11.0|snap=beta 1.11.0.4|Fisherman [[villager]]s now have a 50% chance to [[trading|sell]] 6 cooked cod for 6 [[raw cod]] and 1 [[emerald]].}}
{{History||1.16.100|snap=beta 1.16.100.52|Cod now drop their cooked cod when killed with fire.}}
{{History|console}}
{{History||xbox=TU1|xbone=CU1|ps=1.0|wiiu=Patch 1|[[File:Cooked Cod JE1 BE1.png|32px]] Added cooked fish.}}
{{History||xbox=TU5|Cooked fish is now stackable to 64.
|Cooked fish now fills [[hunger]] instead of [[health]].}}
{{History||xbox=TU69|ps=1.76|wiiu=Patch 38|"Cooked Fish" has been renamed to "Cooked Cod".
|[[File:Cooked Cod JE2 BE2.png|32px]] The texture of cooked cod has been changed.}}
{{History|new 3ds}}
{{History||0.1.0|[[File:Cooked Cod JE1 BE1.png|32px]] Added cooked fish.}}
{{History|foot}}
== Issues ==
{{Issue list}}
{{Items}}
[[Category:Food]]
[[Category:Renewable resources]]
[[de:Gebratener Kabeljau]]
[[es:Bacalao cocinado]]
[[ko:익힌 대구]]
[[pt:Bacalhau assado]]
[[ru:Жареная треска]]
[[th:Cod (ไอเทม)]]
[[zh:熟鳕鱼]]</li></ul></nowiki> | 20w17a | Added the Game Rules button. | |||
| Added the Difficulty button. | |||||
| 20w21a | Added the Import Settings button. | ||||
| Split the Buffet world type option into Single Biome, Caves, and Floating Islands. | |||||
| Pre-release 1 | Added the Data Packs button. | ||||
1.17{{Extension DPL}}<ul><li>[[Sign|Sign]]<br/>{{Block
| image = <gallery>
Oak Sign.png|Sign
Oak Wall Sign.png|Wall Sign
Oak Hanging Sign.png|Hanging Sign
Oak Wall Hanging Sign.png|Wall Hanging Sign
</gallery>
| image2 = <gallery>
Oak Sign JE3.png|Sign
Oak Hanging Sign (item) JE1 BE1.png|Hanging Sign
</gallery>
| extratext = [[#Gallery|View all renders]]
| transparent = Yes
| light = No
| tool = axe
| renewable = Yes
| stackable = Yes (16)
| flammable = No
| lavasusceptible = No
}}
A '''sign''' is a non-solid [[block]] that displays text and can be placed on the top or side of other blocks. A '''hanging sign''' is a decorative block that also displays text, and can be placed underneath blocks or with a solid self-supporting bracket. The text of both types of signs can be customized with [[dye]]s and [[glow ink sac]]s.
== Obtaining ==
=== Breaking ===
Signs can be broken with any tool or without a tool, but an [[axe]] is fastest.
{{breaking row|horizontal=1|Sign|sprite=oak-sign|Axe|foot=1|item=1}}
A sign or a hanging sign also breaks and drops itself as an [[item]] if the block the sign is attached to is moved, removed or destroyed. However, a wall hanging sign will stay here if the block the hanging sign is attached to is removed.<ref>{{bug|MC-256501|||WAI}}</ref>
If a sign is broken while being edited, the player continues to edit the sign<ref>{{bug|MC-117815}}</ref>, although {{in|bedrock}} breaking the sign stops the editing operation.
=== Natural generation ===
An oak sign can be found in [[igloo]] basements. Spruce signs can be found in taiga [[village]] houses, as part of a chair.
=== Chest loot ===
{{LootChestItem|oak-sign,oak-hanging-sign,spruce-sign,spruce-hanging-sign}}
=== Crafting ===
[[The player]] can place six stripped [[log]] [[block]]s at the bottom half of the crafting table and place two [[chain]]s on the top-left and top-right slots to create hanging signs. This crafting recipe will create six hanging signs. Hanging signs can only be crafted with stripped logs or [[stem]]s; non-stripped wood cannot be used to craft hanging signs.
{{Crafting
|head=1
|showdescription=1
|nolink=1
|A1= Matching Planks
|B1= Matching Planks
|C1= Matching Planks
|A2= Matching Planks
|B2= Matching Planks
|C2= Matching Planks
|B3= Stick
|Output=Matching Sign,3
|type=Decoration block
}}
{{Crafting
|name= Hanging Sign
|A1= Chain
|C1= Chain
|A2= Matching Stripped Log or Stem; Block of Stripped Bamboo
|B2= Matching Stripped Log or Stem; Block of Stripped Bamboo
|C2= Matching Stripped Log or Stem; Block of Stripped Bamboo
|A3= Matching Stripped Log or Stem; Block of Stripped Bamboo
|B3= Matching Stripped Log or Stem; Block of Stripped Bamboo
|C3= Matching Stripped Log or Stem; Block of Stripped Bamboo
|Output= Matching Hanging Sign,6; Bamboo Hanging Sign,6
|type=Decoration block
|foot=1
}}
== Usage ==
Signs can be used to display text; they can be used to label storage, display information to other players or note areas of interest. Signs are also not destroyed by [[water]] or [[lava]] and therefore may be used to control the flow of these fluids.
=== Placement ===
==== Signs ====
Signs may be placed on the top or side of other [[block]]s (including semi-solid and non-solid blocks such as [[fence]]s, [[Trapdoor|trapdoors]] and other signs). To place a sign, {{control|use}} a sign [[item]] while pointing at the block the sign should be attached to, enter the desired text (or none), and click the "Done" button or press "escape" on a keyboard (or press × {{in|bedrock}}, {{xbtn|b}} on an Xbox controller, {{psbtn|o}} on a PlayStation controller, or {{nsbutton|B}} on a Nintendo Switch controller. Closing the virtual keyboard on a mobile device also exits the typing menu). To place a sign on a block that can be interacted with by the {{control|use}} control (for example, [[chest]]s, [[note block]]s, etc.), {{control|sneak}} while placing the sign.
Signs on the top of a block stand on a short post and face toward the player who placed it, in any of 16 different directions. Signs placed on the side of a block simply float there, even if the block doesn't make contact with the sign.
Even if placed on a vertical surface, a sign may not co-exist in the same block of air as any other item, despite not necessarily visibly obstructing eachother.
For more information about the blocks signs can be placed on, see [[Opacity/Placement]].
==== Hanging signs ====
Hanging signs can be placed in three different ways:
* Placing a hanging sign on the side of a block will result in it being placed with a self-supporting bracket, which allows it to float without any supporting block. This version can be placed in four different directions.
* Placing a hanging sign on the bottom of a block will result in the sign hanging below the block.
** If the block is wide enough, the chains holding the sign will be parallel. This version can be placed in four different directions.
** If the block is too narrow, the chains will meet together in a upwards arrow shape. This version is also placed if the player is {{control|sneaking}} when placing a hanging sign below a wide-enough block. This version can be placed in sixteen different directions.
=== Text ===
[[File:Oak Sign GUI.png|thumb|240px|Oak Sign editing.]]
Placing a sign opens an editor interface resembling a magnified view of the sign. Up to four lines of text can then be entered using a keyboard (hardware or on-screen). The editor supports limited editing, including moving the cursor and inserting and deleting characters. {{IN|bedrock}}, [[formatting codes]] can also be used to apply decorative effects such as color, bold, italic and underline to various bits of the text. Depending on the edition and platform in use, copy and paste operations may be supported and the editor may also support keyboard entry of Alt-codes for displaying Unicode characters.
Text can be added to the back side of a sign by interacting with the that side of the sign after placing it and editing the front.
Signs can be waxed by {{Control|use|text=using}} a [[honeycomb]] on it. Once waxed, a sign cannot be unwaxed or edited.
After placing and affixing text on a sign, a player can change the text color by {{control|using}} a [[dye]] on it. When colored with dye, the text color may differ from any color specified by formatting codes.{{Info needed|How does this work? Does the dye affect all the text? One line? One word? Does dye override all formatting codes, including font effects?}}
[[File:Glow Ink Sign with Orange Dye JE2.png|thumb|216px|Oak sign with glow ink and orange dye applied in {{JE}}.]]
A player can {{control|use}} a [[glow ink sac]] on a sign to make its text glow. The glowing text is not affected by lighting. The player can use a regular black [[ink sac]] on the sign to remove the glowing effect.
{| class="wikitable mw-collapsible mw-collapsed"
|+ class="nowrap" | Glow ink colors
!Name !! Main Color !! Edge Color
|-
! Black
| {{color|#000000}}
| {{color|#EDE8CA}}
|-
! Red
| {{color|#FC0000}}
| {{color|#650000}}
|-
! Green
| {{color|#00FC00}}
| {{color|#006500}}
|-
! Brown
| {{color|#894413}}
| {{color|#361B07}}
|-
! Blue
| {{color|#0000FC}}
| {{color|#000065}}
|-
! Purple
| {{color|#9E20ED}}
| {{color|#3F0C5F}}
|-
! Cyan
| {{color|#00D6D6}}
| {{color|#006565}}
|-
! Light Gray
| {{color|#D0D0D0}}
| {{color|#535353}}
|-
! Gray
| {{color|#7E7E7E}}
| {{color|#323232}}
|-
! Pink
| {{color|#FC68B2}}
| {{color|#652947}}
|-
! Lime
| {{color|#8DFC00}}
| {{color|#4B6500}}
|-
! Yellow
| {{color|#FCFC00}}
| {{color|#656500}}
|-
! Light Blue
| {{color|#98BECB}}
| {{color|#3C4B51}}
|-
! Magenta
| {{color|#FC00FC}}
| {{color|#650065}}
|-
! Orange
| {{color|#FC671F}}
| {{color|#65280C}}
|-
! White
| {{color|#FCFCFC}}
| {{color|#656565}}
|}
In [[Creative]] mode, the combination {{key|Ctrl}} + {{control|pick block}} on Windows/Linux, or {{key|cmd}} + {{control|pick block}} on macOS, can be used to copy an already-placed sign, including its text (with decorations), into the player's inventory.
A dyed sign facing east or west will have its text appear more saturated and bright than a sign facing north or south. However, it is actually the sign that is dimmer, because ''Minecraft'''s lighting engine uses side lighting to make the world appear less flat, but the text on signs is not affected by this.
{{IN|bedrock}}, inappropriate words or phrases in a sign's text are displayed as asterisks.
{{IN|java}}, signs can be created with [[Commands#Raw JSON Text|JSON text]], which allows complex formatting (colors, bold, italic, etc.), hover and click events, localized translation (for ''Minecraft'' technical terms, like "Redstone Repeater", otherwise translations must be provided in language files in resource packs), and the incorporation of scoreboard values into text. Use the {{cmd|data merge block}} command to create or alter JSON signs.
: Example: {{cmd|long=1|data merge block ~ ~1 ~ <nowiki>{front_text:{ color:"green", messages:[ '{"selector":"@p", "bold":false, "italic":false, "underlined":false, "strikethrough":false, "obfuscated":false}' , '{"text":"Second Line"}']}}}}
Signs can post the success count of JSON text hover and click events to [[scoreboard]] objectives. The objectives to be used can be specified by running the {{cmd|execute store}} command or by modifying the sign's NBT data directly with the {{cmd|data merge block}} command.
=== Interaction ===
Signs act as though they have a {{control|use}} action, so the [[player]] is unable to place [[block]]s or use [[item]]s while the cursor is pointed at them without {{control|sneaking}}.
Signs are destroyed and drop as an item when pushed by a [[piston]].{{Only|bedrock}}
Signs are non-solid and have no collision, so [[item]]s and [[mob]]s can move through sign blocks. Other [[block]]s (including other signs) can be placed on any edge of a sign.
[[Water]] and [[lava]] flow around signs. Lava can create [[fire]] in [[air]] blocks next to signs as if the signs were flammable, but the signs do not burn (and cannot be burned by other methods either, except {{in|be}}).
=== Fuel ===
Wooden signs can be used as a fuel in [[furnace]]s, smelting an [[item]] per sign.
=== Note Blocks ===
Signs can be placed under [[note block]]s to produce a "bass" sounds.
== Sounds ==
=== Generic ===
==== Normal wood ====
; Sign
{{Sound table/Block/Wood|forcecollapsed=1}}
; Hanging sign
{{Sound table/Block/Hanging sign|forcecollapsed=1}}
==== Cherry wood ====
; Sign
{{Sound table/Block/Cherry wood|forcecollapsed=1}}
; Hanging sign
{{Sound table/Block/Cherry wood hanging sign|forcecollapsed=1}}
==== Bamboo wood ====
; Sign
{{Sound table/Block/Bamboo wood|forcecollapsed=1}}
; Hanging sign
{{edition|java}}:
{{Sound table/Block/Bamboo wood hanging sign/JE|forcecollapsed=1}}
{{edition|bedrock}}:
{{Sound table/Block/Bamboo wood hanging sign/BE|forcecollapsed=1}}
==== Nether wood ====
; Sign
{{Sound table/Block/Nether wood|forcecollapsed=1}}
; Hanging sign
{{edition|java}}:
{{Sound table/Block/Nether wood hanging sign/JE|forcecollapsed=1}}
{{edition|bedrock}}:
{{Sound table/Block/Nether wood hanging sign/BE|forcecollapsed=1}}
=== Unique ===
{{edition|java}}:
{{Sound table|forcecollapsed=1
|rowspan=2
|sound=Ink sac1.ogg
|sound2=Ink sac2.ogg
|sound3=Ink sac3.ogg
|subtitle=Glow Ink Sac splotches
|source=block
|description=When a [[glow ink sac]] is used on a sign
|id=item.glow_ink_sac.use
|translationkey=subtitles.item.glow_ink_sac.use
|volume=1.0
|pitch=''varies'' <ref group=sound>Can be 1.0, 0.95, or 1.05 for each sound</ref>
|distance=16}}
{{Sound table
|subtitle=Ink Sac splotches
|source=block
|description=When an [[ink sac]] is used on a sign
|id=item.ink_sac.use
|translationkey=subtitles.item.ink_sac.use
|volume=1.0
|pitch=''varies'' <ref group=sound>Can be 0.85, 0.88, or 0.9 for each sound</ref>
|distance=16}}
{{Sound table
|sound=Dye.ogg
|subtitle=Dye stains
|source=block
|description=When [[dye]] is used on a sign
|id=item.dye.use
|translationkey=subtitles.item.dye.use
|volume=1.0
|pitch=''varies'' <ref group=sound>Can be 1.0, 0.9, 0.95, or 1.1</ref>
|distance=16}}
{{Sound table
|sound=Wax on1.ogg
|sound2=Wax on2.ogg
|sound3=Wax on3.ogg
|subtitle=Wax on
|source=block
|description=When a sign is waxed
|id=item.honeycomb.wax_on
|translationkey=subtitles.item.honeycomb.wax_on
|volume=1.0
|pitch=1.0/0.9/1.1
|distance=16}}
{{Sound table
|sound=Sign waxed interact fail1.ogg
|sound2=Sign waxed interact fail2.ogg
|sound3=Sign waxed interact fail3.ogg
|subtitle=Sign wobbles
|source=block
|description=When a player attempts to edit a waxed sign
|id=block.sign.waxed_interact_fail
|translationkey=subtitles.block.sign.waxed_interact_fail
|volume=1.0
|pitch=''varies''<ref group=sound>{{cd|fail1}} can be 1.0 or 0.9; {{cd|fail2}} and {{cd|fail3}} can be 0.8 or 0.9</ref>
|distance=16
|foot=1}}
{{edition|bedrock}}:
{{Sound table|forcecollapsed=1
|type=bedrock
|sound=Ink sac1.ogg
|sound2=Ink sac2.ogg
|sound3=Ink sac3.ogg
|source=sound
|description=When a glow ink sac or an ink sac is used on a sign
|id=sign.ink_sac.use
|volume=1.0
|pitch=1.0}}
{{Sound table
|type=bedrock
|sound=Dye.ogg
|source=sound
|description=When dye is used on a sign
|id=sign.dye.use
|volume=1.0
|pitch=1.0}}
{{Sound table
|sound=Wax on1.ogg
|sound2=Wax on2.ogg
|sound3=Wax on3.ogg
|source=neutral
|description=When a honeycomb waxes a sign
|id=copper.wax.on
|volume=1.0
|pitch=0.8-1.2}}
{{Sound table
|sound=Sign waxed interact fail1.ogg
|sound2=Sign waxed interact fail2.ogg
|sound3=Sign waxed interact fail3.ogg
|source=block
|description=When a player attempts to edit a waxed sign
|id=block.sign.waxed_interact_fail
|volume=1.0
|pitch=''varies'' <ref group=sound>Can be 1.0 or 0.9 for <code>waxed_interact_fail1</code>; can be 0.8 or 0.9 for <code>waxed_interact_fail2</code> and <code>waxed_interact_fail3</code></ref>
|foot=1}}
== Data values ==
=== ID ===
{{edition|java}}:
{{ID table
|edition=java
|showblocktags=y
|showitemtags=y
|showforms=y
|generatetranslationkeys=y
|displayname=Oak Sign
|spritetype=block
|nameid=oak_sign
|blocktags=signs, standing_signs, wall_post_override
|itemtags=signs}}
{{ID table
|displayname=Spruce Sign
|spritetype=block
|nameid=spruce_sign
|blocktags=signs, standing_signs, wall_post_override
|itemtags=signs}}
{{ID table
|displayname=Birch Sign
|spritetype=block
|nameid=birch_sign
|blocktags=signs, standing_signs, wall_post_override
|itemtags=signs}}
{{ID table
|displayname=Jungle Sign
|spritetype=block
|nameid=jungle_sign
|blocktags=signs, standing_signs, wall_post_override
|itemtags=signs}}
{{ID table
|displayname=Acacia Sign
|spritetype=block
|nameid=acacia_sign
|blocktags=signs, standing_signs, wall_post_override
|itemtags=signs}}
{{ID table
|displayname=Dark Oak Sign
|spritetype=block
|nameid=dark_oak_sign
|blocktags=signs, standing_signs, wall_post_override
|itemtags=signs}}
{{ID table
|displayname=Mangrove Sign
|spritetype=block
|nameid=mangrove_sign
|blocktags=signs, standing_signs, wall_post_override
|itemtags=signs}}
{{ID table
|displayname=Cherry Sign
|spritename=Cherry Sign
|spritetype=block
|nameid=cherry_sign
|blocktags=signs, standing_signs, wall_post_override
|itemtags=signs}}
{{ID table
|displayname=Bamboo Sign
|spritename=Bamboo Sign
|spritetype=block
|nameid=bamboo_sign
|blocktags=signs, standing_signs, wall_post_override
|itemtags=signs}}
{{ID table
|displayname=Crimson Sign
|spritetype=block
|nameid=crimson_sign
|blocktags= signs, standing_signs, wall_post_override
|itemtags=non_flammable_wood, signs}}
{{ID table
|displayname=Warped Sign
|spritetype=block
|nameid=warped_sign
|blocktags=signs, standing_signs, wall_post_override
|itemtags=non_flammable_wood, signs}}
{{ID table
|displayname=Oak Wall Sign
|spritetype=block
|nameid=oak_wall_sign
|blocktags=signs, wall_signs
|form=block}}
{{ID table
|displayname=Spruce Wall Sign
|spritetype=block
|nameid=spruce_wall_sign
|blocktags=signs, wall_signs
|form=block}}
{{ID table
|displayname=Birch Wall Sign
|spritetype=block
|nameid=birch_wall_sign
|blocktags=signs, wall_signs
|form=block}}
{{ID table
|displayname=Jungle Wall Sign
|spritetype=block
|nameid=jungle_wall_sign
|blocktags=signs, wall_signs
|form=block}}
{{ID table
|displayname=Acacia Wall Sign
|spritetype=block
|nameid=acacia_wall_sign
|blocktags=signs, wall_signs
|form=block}}
{{ID table
|displayname=Dark Oak Wall Sign
|spritetype=block
|nameid=dark_oak_wall_sign
|blocktags=signs, wall_signs
|form=block}}
{{ID table
|displayname=Mangrove Wall Sign
|spritetype=block
|nameid=mangrove_wall_sign
|blocktags=signs, wall_signs
|form=block}}
{{ID table
|displayname=Cherry Wall Sign
|spritename=Cherry Wall Sign
|spritetype=block
|nameid=cherry_wall_sign
|blocktags=signs, wall_signs
|form=block}}
{{ID table
|displayname=Bamboo Wall Sign
|spritename=Bamboo Wall Sign
|spritetype=block
|nameid=bamboo_wall_sign
|blocktags=signs, wall_signs
|form=block}}
{{ID table
|displayname=Crimson Wall Sign
|spritetype=block
|nameid=crimson_wall_sign
|blocktags=signs, wall_signs
|form=block}}
{{ID table
|displayname=Warped Wall Sign
|spritetype=block
|nameid=warped_wall_sign
|blocktags=signs, wall_signs
|form=block}}
{{ID table
|displayname=Oak Hanging Sign
|spritename=Oak Hanging Sign
|spritetype=block
|nameid=oak_hanging_sign
|blocktags=all_hanging_signs, ceiling_hanging_signs
|itemtags=hanging_signs}}
{{ID table
|displayname=Spruce Hanging Sign
|spritename=Spruce Hanging Sign
|spritetype=block
|nameid=spruce_hanging_sign
|blocktags=all_hanging_signs, ceiling_hanging_signs
|itemtags=hanging_signs}}
{{ID table
|displayname=Birch Hanging Sign
|spritename=Birch Hanging Sign
|spritetype=block
|nameid=birch_hanging_sign
|blocktags=all_hanging_signs, ceiling_hanging_signs
|itemtags=hanging_signs}}
{{ID table
|displayname=Jungle Hanging Sign
|spritename=Jungle Hanging Sign
|spritetype=block
|nameid=jungle_hanging_sign
|blocktags=all_hanging_signs, ceiling_hanging_signs
|itemtags=hanging_signs}}
{{ID table
|displayname=Acacia Hanging Sign
|spritename=Acacia Hanging Sign
|spritetype=block
|nameid=acacia_hanging_sign
|blocktags=all_hanging_signs, ceiling_hanging_signs
|itemtags=hanging_signs}}
{{ID table
|displayname=Dark Oak Hanging Sign
|spritename=Dark Oak Hanging Sign
|spritetype=block
|nameid=dark_oak_hanging_sign
|blocktags=all_hanging_signs, ceiling_hanging_signs
|itemtags=hanging_signs}}
{{ID table
|displayname=Mangrove Hanging Sign
|spritename=Mangrove Hanging Sign
|spritetype=block
|nameid=mangrove_hanging_sign
|blocktags=all_hanging_signs, ceiling_hanging_signs
|itemtags=hanging_signs}}
{{ID table
|displayname=Cherry Hanging Sign
|spritename=Cherry Hanging Sign
|spritetype=block
|nameid=cherry_hanging_sign
|blocktags=all_hanging_signs, ceiling_hanging_signs
|itemtags=hanging_signs}}
{{ID table
|displayname=Bamboo Hanging Sign
|spritename=Bamboo Hanging Sign
|spritetype=block
|nameid=bamboo_hanging_sign
|blocktags=all_hanging_signs, ceiling_hanging_signs
|itemtags=hanging_signs}}
{{ID table
|displayname=Crimson Hanging Sign
|spritename=Crimson Hanging Sign
|spritetype=block
|nameid=crimson_hanging_sign
|blocktags=all_hanging_signs, ceiling_hanging_signs
|itemtags=hanging_signs, non_flammable_wood}}
{{ID table
|displayname=Warped Hanging Sign
|spritename=Warped Hanging Sign
|spritetype=block
|nameid=warped_hanging_sign
|blocktags=all_hanging_signs, ceiling_hanging_signs
|itemtags=hanging_signs, non_flammable_wood}}
{{ID table
|displayname=Oak Wall Hanging Sign
|spritename=Oak Wall Hanging Sign
|spritetype=block
|nameid=oak_wall_hanging_sign
|blocktags=all_hanging_signs, wall_hanging_signs
|form=block}}
{{ID table
|displayname=Spruce Wall Hanging Sign
|spritename=Spruce Wall Hanging Sign
|spritetype=block
|nameid=spruce_wall_hanging_sign
|blocktags=all_hanging_signs, wall_hanging_signs
|form=block}}
{{ID table
|displayname=Birch Wall Hanging Sign
|spritename=Birch Wall Hanging Sign
|spritetype=block
|nameid=birch_wall_hanging_sign
|blocktags=all_hanging_signs, wall_hanging_signs
|form=block}}
{{ID table
|displayname=Jungle Wall Hanging Sign
|spritename=Jungle Wall Hanging Sign
|spritetype=block
|nameid=jungle_wall_hanging_sign
|blocktags=all_hanging_signs, wall_hanging_signs
|form=block}}
{{ID table
|displayname=Acacia Wall Hanging Sign
|spritename=Acacia Wall Hanging Sign
|spritetype=block
|nameid=acacia_wall_hanging_sign
|blocktags=all_hanging_signs, wall_hanging_signs
|form=block}}
{{ID table
|displayname=Dark Oak Wall Hanging Sign
|spritename=Dark Oak Wall Hanging Sign
|spritetype=block
|nameid=dark_oak_wall_hanging_sign
|blocktags=all_hanging_signs, wall_hanging_signs
|form=block}}
{{ID table
|displayname=Mangrove Wall Hanging Sign
|spritename=Mangrove Wall Hanging Sign
|spritetype=block
|nameid=mangrove_wall_hanging_sign
|blocktags=all_hanging_signs, wall_hanging_signs
|form=block}}
{{ID table
|displayname=Cherry Wall Hanging Sign
|spritename=Cherry Wall Hanging Sign
|spritetype=block
|nameid=cherry_wall_hanging_sign
|blocktags=all_hanging_signs, wall_hanging_signs
|form=block}}
{{ID table
|displayname=Bamboo Wall Hanging Sign
|spritename=Bamboo Wall Hanging Sign
|spritetype=block
|nameid=bamboo_wall_hanging_sign
|blocktags=all_hanging_signs, wall_hanging_signs
|form=block}}
{{ID table
|displayname=Crimson Wall Hanging Sign
|spritename=Crimson Wall Hanging Sign
|spritetype=block
|nameid=crimson_wall_hanging_sign
|blocktags=all_hanging_signs, wall_hanging_signs
|form=block}}
{{ID table
|displayname=Warped Wall Hanging Sign
|spritename=Warped Wall Hanging Sign
|spritetype=block
|nameid=warped_wall_hanging_sign
|blocktags=all_hanging_signs, wall_hanging_signs
|form=block
|foot=1}}
{{ID table
|displayname=Block entity
|spritename=signs
|spritetype=block
|nameid=sign}}
{{ID table
|displayname=Block entity
|spritename=hanging-signs
|spritetype=block
|nameid=hanging_sign
|foot=1}}
{{edition|bedrock}}:
{{ID table
|edition=bedrock
|firstcolumnname=Sign
|shownumericids=y
|showforms=y
|showaliasids=y
|showitemtags=y
|generatetranslationkeys=y
|displayname=Oak standing
|spritename=oak-sign
|spritetype=block
|nameid=standing_sign
|id=63
|form=block}}
{{ID table
|displayname=Spruce standing
|spritename=spruce-sign
|spritetype=block
|nameid=spruce_standing_sign
|id=436
|form=block}}
{{ID table
|displayname=Birch standing
|spritename=birch-sign
|spritetype=block
|nameid=birch_standing_sign
|id=441
|form=block}}
{{ID table
|displayname=Jungle standing
|spritename=jungle-sign
|spritetype=block
|nameid=jungle_standing_sign
|id=443
|form=block}}
{{ID table
|displayname=Acacia standing
|spritename=acacia-sign
|spritetype=block
|nameid=acacia_standing_sign
|id=445
|form=block}}
{{ID table
|displayname=Dark Oak standing
|spritename=dark-oak-sign
|spritetype=block
|nameid=darkoak_standing_sign
|id=447
|form=block}}
{{ID table
|displayname=Mangrove standing
|spritename=mangrove-sign
|spritetype=block
|nameid=mangrove_standing_sign
|id=-494
|form=block
|translationkey=-}}
{{ID table
|displayname=Cherry standing
|spritename=cherry-sign
|spritetype=block
|nameid=cherry_standing_sign
|id=-542
|form=block
|translationkey=-}}
{{ID table
|displayname=Bamboo standing
|spritename=bamboo-sign
|spritetype=block
|nameid=bamboo_standing_sign
|id=-518
|form=block
|translationkey=-}}
{{ID table
|displayname=Crimson standing
|spritename=crimson-sign
|spritetype=block
|nameid=crimson_standing_sign
|id=505
|form=block}}
{{ID table
|displayname=Warped standing
|spritename=warped-sign
|spritetype=block
|nameid=warped_standing_sign
|id=506
|form=block}}
{{ID table
|displayname=Oak wall
|spritename=oak-wall-sign
|spritetype=block
|nameid=wall_sign
|id=68
|form=block
|translationkey=-}}
{{ID table
|displayname=Spruce wall
|spritename=spruce-wall-sign
|spritetype=block
|nameid=spruce_wall_sign
|id=437
|form=block
|translationkey=-}}
{{ID table
|displayname=Birch wall
|spritename=birch-wall-sign
|spritetype=block
|nameid=birch_wall_sign
|id=442
|form=block
|translationkey=-}}
{{ID table
|displayname=Jungle wall
|spritename=jungle-wall-sign
|spritetype=block
|nameid=jungle_wall_sign
|id=444
|form=block
|translationkey=-}}
{{ID table
|displayname=Acacia wall
|spritename=acacia-wall-sign
|spritetype=block
|nameid=acacia_wall_sign
|id=446
|form=block
|translationkey=-}}
{{ID table
|displayname=Dark Oak wall
|spritename=dark-oak-wall-sign
|spritetype=block
|nameid=darkoak_wall_sign
|id=448
|form=block
|translationkey=-}}
{{ID table
|displayname=Mangrove wall
|spritename=mangrove-wall-sign
|spritetype=block
|nameid=mangrove_wall_sign
|id=-495
|form=block
|translationkey=-}}
{{ID table
|displayname=Cherry wall
|spritename=cherry-wall-sign
|spritetype=block
|nameid=cherry_wall_sign
|id=-544
|form=block
|translationkey=-}}
{{ID table
|displayname=Bamboo wall
|spritename=bamboo-wall-sign
|spritetype=block
|nameid=bamboo_wall_sign
|id=-519
|form=block
|translationkey=-}}
{{ID table
|displayname=Crimson wall
|spritename=crimson-wall-sign
|spritetype=block
|nameid=crimson_wall_sign
|id=507
|form=block}}
{{ID table
|displayname=Warped wall
|spritename=warped-wall-sign
|spritetype=block
|nameid=warped_wall_sign
|id=508
|form=block}}
{{ID table
|displayname=Oak item
|spritename=oak-sign
|spritetype=item
|nameid=oak_sign
|aliasid=sign
|id=360
|form=item
|itemtags=minecraft:sign
|translationkey=item.sign.name}}
{{ID table
|displayname=Spruce item
|spritename=spruce-sign
|spritetype=item
|nameid=spruce_sign
|id=576
|form=item
|itemtags=minecraft:sign}}
{{ID table
|displayname=Birch item
|spritename=birch-sign
|spritetype=item
|nameid=birch_sign
|id=577
|form=item
|itemtags=minecraft:sign}}
{{ID table
|displayname=Jungle item
|spritename=jungle-sign
|spritetype=item
|nameid=jungle_sign
|id=578
|form=item
|itemtags=minecraft:sign}}
{{ID table
|displayname=Acacia item
|spritename=acacia-sign
|spritetype=item
|nameid=acacia_sign
|id=579
|form=item
|itemtags=minecraft:sign}}
{{ID table
|displayname=Dark Oak item
|spritename=dark-oak-sign
|spritetype=item
|nameid=dark_oak_sign
|aliasid=darkoak_sign
|id=587
|form=item
|itemtags=minecraft:sign
|translationkey=item.darkoak_sign.name}}
{{ID table
|displayname=Mangrove item
|spritename=mangrove-sign
|spritetype=item
|nameid=mangrove_sign
|id=642
|form=item
|itemtags=minecraft:sign}}
{{ID table
|displayname=Cherry item
|spritename=cherry-sign
|spritetype=item
|nameid=cherry_sign
|id=659
|form=item
|itemtags=minecraft:sign}}
{{ID table
|displayname=Bamboo item
|spritename=bamboo-sign
|spritetype=item
|nameid=bamboo_sign
|id=660
|form=item
|itemtags=minecraft:sign}}
{{ID table
|displayname=Crimson item
|spritename=crimson-sign
|spritetype=item
|nameid=crimson_sign
|id=614
|form=item
|itemtags=minecraft:sign}}
{{ID table
|displayname=Warped item
|spritename=warped-sign
|spritetype=item
|nameid=warped_sign
|id=615
|form=item
|itemtags=minecraft:sign}}
{{ID table
|displayname=Oak Hanging Sign
|spritename=Oak Wall Hanging Sign
|spritetype=block
|nameid=oak_hanging_sign
|id=-500
|itemtags=minecraft:hanging_sign
|translationkey=item.oak_hanging_sign.name}}
{{ID table
|displayname=Spruce Hanging Sign
|spritename=Spruce Wall Hanging Sign
|spritetype=block
|nameid=spruce_hanging_sign
|id=-501
|itemtags=minecraft:hanging_sign
|translationkey=item.spruce_hanging_sign.name}}
{{ID table
|displayname=Birch Hanging Sign
|spritename=Birch Wall Hanging Sign
|spritetype=block
|nameid=birch_hanging_sign
|id=-502
|itemtags=minecraft:hanging_sign
|translationkey=item.birch_hanging_sign.name}}
{{ID table
|displayname=Jungle Hanging Sign
|spritename=Jungle Wall Hanging Sign
|spritetype=block
|nameid=jungle_hanging_sign
|id=-503
|itemtags=minecraft:hanging_sign
|translationkey=item.jungle_hanging_sign.name}}
{{ID table
|displayname=Acacia Hanging Sign
|spritename=Acacia Wall Hanging Sign
|spritetype=block
|nameid=acacia_hanging_sign
|id=-504
|itemtags=minecraft:hanging_sign
|translationkey=item.acacia_hanging_sign.name}}
{{ID table
|displayname=Dark Oak Hanging Sign
|spritename=Dark Oak Wall Hanging Sign
|spritetype=block
|nameid=dark_oak_hanging_sign
|id=-505
|itemtags=minecraft:hanging_sign
|translationkey=item.dark_oak_hanging_sign.name}}
{{ID table
|displayname=Mangrove Hanging Sign
|spritename=Mangrove Wall Hanging Sign
|spritetype=block
|nameid=mangrove_hanging_sign
|id=-508
|itemtags=minecraft:hanging_sign
|translationkey=item.mangrove_hanging_sign.name}}
{{ID table
|displayname=Cherry Hanging Sign
|spritename=Cherry Wall Hanging Sign
|spritetype=block
|nameid=cherry_hanging_sign
|id=-534
|itemtags=minecraft:hanging_sign
|translationkey=item.cherry_hanging_sign.name}}
{{ID table
|displayname=Bamboo Hanging Sign
|spritename=Bamboo Wall Hanging Sign
|spritetype=block
|nameid=bamboo_hanging_sign
|id=-522
|itemtags=minecraft:hanging_sign
|translationkey=item.bamboo_hanging_sign.name}}
{{ID table
|displayname=Crimson Hanging Sign
|spritename=Crimson Wall Hanging Sign
|spritetype=block
|nameid=crimson_hanging_sign
|id=-506
|itemtags=minecraft:hanging_sign
|translationkey=item.crimson_hanging_sign.name}}
{{ID table
|displayname=Warped Hanging Sign
|spritename=Warped Wall Hanging Sign
|spritetype=block
|nameid=warped_hanging_sign
|id=-507
|itemtags=minecraft:hanging_sign
|translationkey=item.warped_hanging_sign.name
|foot=1}}
{{ID table
|notnamespaced=y
|displayname=Block entity
|spritename=signs
|spritetype=block
|nameid=Sign}}
{{ID table
|displayname=Block entity
|spritename=hanging-signs
|spritetype=block
|nameid=HangingSign
|foot=1}}
=== Block states ===
{{see also|Block states}}
{{/BS}}
=== Block data ===
A sign has a block entity associated with it that holds additional data about the block.
{{el|java}}:
{{see also|Block entity format}}
{{/BE}}
{{el|bedrock}}:
:See [[Bedrock Edition level format/Block entity format]].
== Achievements ==
{{load achievements|It's a Sign}}
== Advancements ==
{{load advancements|Glow and Behold}}
== History ==
{{main|/History}}
{{History|java classic}}
{{History||0.24_SURVIVAL_TEST|[[File:Sign Entity.png|32px]] Signs are currently being tested as [[entity|entities]]. They always display "This is a test of the signs. Each line can be 15 chars!" and can only be spawned by pressing {{key|B}}.<ref>{{ytl|bdT76iFEnLk}}</ref>}}
{{History||0.26 SURVIVAL TEST|Removed signs.}}
{{History|java infdev}}
{{History||20100607|[[File:Oak Sign (0) JE1.png|32px]] Signs have been re-implemented as [[block]]s, although still rendering as entities.
|Signs now have a [[crafting]] recipe and the text can now be edited. Editing a sign pauses the game in [[singleplayer]].
|Signs are currently huge and drop [[planks]] when destroyed.
|Signs do not have a particle texture defined. As such, they [[Placeholder texture#Default texture|default to using the grass block texture instead]].}}
{{History||20100608|Signs are now broken faster.
|Signs now [[drops|drop]] themselves when [[breaking|destroyed]], instead of planks.
|Signs now use planks particles.}}
{{History|java alpha}}
{{History||v1.0.1|[[File:Oak Wall Sign (S) JE1 BE1.png|32px]] Added wall signs.
|[[File:Oak Sign (0) JE2.png|32px]] Signs are now smaller.}}
{{History||v1.0.5|Signs no longer require a free [[block]] above it to place.}}
{{History|java beta}}
{{History||April 27, 2011|link=https://notch.tumblr.com/post/4988431144|Hand-drawn signs are mentioned.}}
{{History|java}}
{{History||1.0.0|snap=Beta 1.9 Prerelease 6|Signs are now broken faster using an [[axe]].}}
{{History||1.3.1|snap=12w18a|Editing a sign no longer pauses the game in [[singleplayer]].}}
{{History|||snap=12w27a|Signs are now stackable up to 16.
|The same [[crafting]] recipe now produces 3 signs instead of 1.}}
{{History||June 9, 2014|link=https://twitter.com/SeargeDP/status/476047216541700096|[[Searge]] tweeted a picture of a sign showing a username and a [[scoreboard]] score.}}
{{History||1.8|snap=14w25a|Added support for JSON text to signs.
|Sign character limit now depends on character width.}}
{{History|||snap=14w29a|Signs now display the cracking animation.}}
{{History||1.9|snap=15w43a|A sign now generates within [[igloo]] basements.}}
{{History||1.11|snap=16w33a|Signs can now be used as [[fuel]] in [[furnace]]s.}}
{{History||1.13|snap=17w47a|The standing sign ID has been changed from <code>standing_sign</code> to <code>sign</code>.
|Prior to [[1.13/Flattening|''The Flattening'']], these [[block]]s' numeral IDs were 63 and 68, and the [[item]]'s 323.}}
{{History|||snap=18w10d|[[Water]] can now be placed on the same block as signs.}}
{{History||1.14|snap=18w43a|"Sign" has been renamed to "Oak Sign".
|[[File:Oak Sign JE2 BE2.png|32px]] The texture of oak sign [[item]]s has been changed.
|[[File:Spruce Standing Sign JE1 BE1.png|32px]] [[File:Birch Standing Sign JE1 BE1.png|32px]] [[File:Jungle Standing Sign JE1 BE1.png|32px]] [[File:Acacia Standing Sign JE1 BE1.png|32px]] [[File:Dark Oak Standing Sign JE1 BE1.png|32px]] [[File:Spruce Sign JE1 BE1.png|32px]] [[File:Birch Sign JE1 BE1.png|32px]] [[File:Jungle Sign JE1 BE1.png|32px]] [[File:Acacia Sign JE1 BE1.png|32px]] [[File:Dark Oak Sign JE1 BE1.png|32px]] Added spruce, birch, jungle, acacia and dark oak signs.
|The sign's text has been changed from black to white.
|A sign's recipe now requires the same type of [[wood]] instead of a random assortment.}}
{{History|||snap=18w44a|Signs can now be {{control|used}} while holding a [[dye]] to change the text color.
|Default text color for signs has been changed back to black.}}
{{History|||snap=18w45a|A new movable cursor for free text editing to signs has been added.
|Selection and copy/paste support have been added to signs.}}
{{History|||snap=18w50a|Spruce signs now generate in some [[taiga]] [[village]] houses.
|Spruce sign items can now be found in [[chest]]s in taiga village houses.}}
{{History|||snap=19w12a|Signs can now be [[dye]]d only in [[Creative mode]].}}
{{History|||snap=19w12b|Signs can now be dyed in [[Survival mode]] again.}}
{{History||1.16|snap=20w06a|[[File:Crimson Standing Sign JE1 BE1.png|32px]] [[File:Warped Standing Sign JE1 BE1.png|32px]] [[File:Crimson Sign JE1 BE1.png|32px]] [[File:Warped Sign JE1 BE1.png|32px]] Added crimson and warped signs.}}
{{History|||snap=20w09a|Crimson and warped signs can now be [[crafting|crafted]].}}
{{History||1.17|snap=21w03a|Signs can now be tinted with [[Glow Ink Sac|glow ink sac]]s to make the text glow.
|Works with both undyed and dyed signs.
|Signs now have a sound for being dyed.}}
{{History|||snap=21w11a|[[File:Oak Standing Sign (S) JE2.png|32px]][[File:Spruce Standing Sign (S) JE2 BE2.png|32px]] [[File:Birch Standing Sign (S) JE2 BE2.png|32px]] [[File:Jungle Standing Sign (S) JE2 BE2.png|32px]] [[File:Acacia Standing Sign (S) JE2 BE2.png|32px]] [[File:Dark Oak Standing Sign (S) JE2 BE2.png|32px]] [[File:Oak Wall Sign (S) JE2.png|32px]] [[File:Spruce Wall Sign (S) JE2 BE2.png|32px]] [[File:Birch Wall Sign (S) JE2 BE2.png|32px]] [[File:Jungle Wall Sign (S) JE2 BE2.png|32px]] [[File:Acacia Wall Sign (S) JE2 BE2.png|32px]] [[File:Dark Oak Wall Sign (S) JE2 BE2.png|32px]] The textures of signs have been changed to reflect the changes made to planks in the [[Texture Update]].}}
{{History|||snap=Pre-release 1|Glowing text on signs now has an outer glow, making text more visible in the dark.}}
{{History||1.18|snap=21w41a|[[File:Oak Sign JE3.png|32px]] [[File:Spruce Sign JE2.png|32px]] [[File:Birch Sign JE2.png|32px]] [[File:Jungle Sign JE2.png|32px]] [[File:Acacia Sign JE2.png|32px]] [[File:Dark Oak Sign JE2.png|32px]] [[File:Crimson Sign JE2.png|32px]] [[File:Warped Sign JE2.png|32px]] Changed all signs textures as items.}}
{{History||1.19|snap=22w11a|[[File:Mangrove Sign JE1 BE1.png|32px]][[File:Mangrove Wall Sign JE1 BE1.png|32px]][[File:Mangrove Sign (item) JE1 BE1.png|32px]] Added mangrove signs.}}
{{History|||snap=22w14a|Due to the addition of the [[mangrove tree]] and [[mangrove swamp]], mangrove signs are now obtainable in survival and renewable.}}
{{History||October 15, 2022|link={{ytl|https://youtu.be/iM9KtHaDcUg?t=5437}}|Hanging signs were announced and shown on [[Minecraft Live 2022]].|Hanging signs were conceptualized by [[Agnes Larsson]] with input from her daughter.<ref>{{ytl|vJCMpPyaN8Q|Minecraft 1.20: New Blocks and Their Functions! @ 0:29|Minecraft|February 24, 2023|t=29s}}</ref>}}
{{History||1.20<br>(Experimental)|link=1.19.3|snap=22w42a|[[File:Bamboo Sign (0) JE1 BE1.png|32px]] [[File:Bamboo Wall Sign (S) JE1 BE1.png|32px]] [[File:Bamboo Sign (item) JE1 BE1.png|32px]] Added bamboo signs behind the [[Java Edition 1.20|Update 1.20 experimental datapack]].
|[[File:Oak Hanging Sign JE1 BE1.png|32px]] [[File:Spruce Hanging Sign JE1 BE1.png|32px]] [[File:Birch Hanging Sign JE1 BE1.png|32px]] [[File:Jungle Hanging Sign JE1 BE1.png|32px]] [[File:Acacia Hanging Sign JE1 BE1.png|32px]] [[File:Dark Oak Hanging Sign JE1 BE1.png|32px]] [[File:Mangrove Hanging Sign JE1 BE1.png|32px]] [[File:Bamboo Hanging Sign JE1 BE1.png|32px]] [[File:Crimson Hanging Sign JE1 BE1.png|32px]] [[File:Warped Hanging Sign JE1 BE1.png|32px]]<br>[[File:Oak Wall Hanging Sign JE1 BE1.png|32px]] [[File:Spruce Wall Hanging Sign JE1 BE1.png|32px]] [[File:Birch Wall Hanging Sign JE1 BE1.png|32px]] [[File:Jungle Wall Hanging Sign JE1 BE1.png|32px]] [[File:Acacia Wall Hanging Sign JE1 BE1.png|32px]] [[File:Dark Oak Wall Hanging Sign JE1 BE1.png|32px]] [[File:Mangrove Wall Hanging Sign JE1 BE1.png|32px]] [[File:Bamboo Wall Hanging Sign (S) JE1 BE1.png|32px]] [[File:Crimson Wall Hanging Sign JE1 BE1.png|32px]] [[File:Warped Wall Hanging Sign JE1 BE1.png|32px]]<br>[[File:Oak Hanging Sign (item) JE1 BE1.png|32px]] [[File:Spruce Hanging Sign (item) JE1 BE1.png|32px]] [[File:Birch Hanging Sign (item) JE1 BE1.png|32px]] [[File:Jungle Hanging Sign (item) JE1 BE1.png|32px]] [[File:Acacia Hanging Sign (item) JE1 BE1.png|32px]] [[File:Dark Oak Hanging Sign (item) JE1 BE1.png|32px]] [[File:Mangrove Hanging Sign (item) JE1 BE1.png|32px]] [[File:Bamboo Hanging Sign (item) JE1 BE1.png|32px]] [[File:Crimson Hanging Sign (item) JE1 BE1.png|32px]] [[File:Warped Hanging Sign (item) JE1 BE1.png|32px]]<br>Added hanging signs behind the [[Java Edition 1.20|Update 1.20 experimental datapack]].|Added unique sounds for Nether and bamboo wood signs.}}
{{History|||snap=22w45a|[[File:Jungle Wall Hanging Sign JE2 BE2.png|32px]] The texture of jungle hanging wall signs have been changed.|Added unique sounds for Nether and bamboo wood hanging signs.|Bamboo hanging signs now can be crafted using [[block of stripped bamboo]] instead of bamboo planks.|Crafting bamboo hanging signs now outputs 6 hanging signs instead of 2.}}
{{History||1.20<br>(Experimental)|link=1.19.4|snap=23w07a|[[File:Cherry Sign (0) JE1.png|32px]] [[File:Cherry Wall Sign (S) JE1.png|32px]] [[File:Cherry Sign (item) JE1.png|32px]] [[File:Cherry Hanging Sign JE1.png|32px]] [[File:Cherry Wall Hanging Sign JE1.png|32px]] [[File:Cherry Hanging Sign (item) JE1.png|32px]] Added cherry signs and hanging signs behind the [[Java Edition 1.20|Update 1.20 experimental datapack]]. There used to be a glitch where right clicking on a sign would play the “use” animation. This was fixed in the snapshots for 1.20, where signs are editable.}}
{{History|||snap=1.19.4 Pre-release 4|[[File:Cherry Sign (0) JE2 BE2.png|32px]] Updated the texture of cherry signs.}}
{{History||1.20|snap=23w12a|Bamboo sign, cherry sign and all of the hanging signs are now available without using the "Update 1.20" experimental datapack.|Signs and hanging signs can now be edited after being placed.|Signs and hanging signs now support text on both sides.|Signs and hanging signs can now be waxed with [[honeycomb]] to prevent editing.|Oak and spruce hanging sign can now be found in [[suspicious gravel]] and [[suspicious sand]] in [[trail ruins]].}}
{{History|||snap=23w14a|Signs and hanging signs with click commands can now be interacted with even if the sign is not waxed.|Signs and hanging signs can no longer be edited by players in [[Adventure]] mode.|Signs and hanging signs with non-text chat components can no longer be edited, even if the sign is not waxed.|Signs and hanging signs now save text even if the edit screen is closed by the player being moved far away.}}
{{History|||snap=23w16a|Oak and spruce hanging sign no longer generates in [[suspicious sand]] in [[trail ruins]].|Due to the split of the archaeological loot tables for the suspicious gravel within the [[trail ruins]]; oak and spruce hanging sign now are in the common loot.}}
{{History||1.20.2|snap=23w31a|Changed sounds for Nether wood hanging signs.<ref>{{Bug|MC-262295||Warped and Crimson hanging signs uses their respective plank sounds, despite their stripped stems having unique sounds|Fixed}}</ref>}}
{{History|pocket alpha}}
{{History||v0.5.0|[[File:Oak Standing Sign.png|32px]] [[File:Oak Sign JE1 BE1.png|32px]] Signs have been added, though they can be obtained only through [[inventory]] editors. |The [[player]] currently cannot write on signs.}}
{{History||v0.6.0|Signs can now be legitimately obtained in [[Survival]] and [[Creative]] mode.|The player can now write on signs.}}
{{History||v0.10.0|snap=build 1|Signs now have a selection overlay.}}
{{History|pocket}}
{{History||1.0.0|snap=alpha 0.17.0.1|Signs can now be found in [[igloo]] basements.}}
{{History|bedrock}}
{{History||1.9.0|snap=beta 1.9.0.0|"Sign" has been renamed to "Oak Sign".
|[[File:Spruce Standing Sign (S) JE2 BE2.png|32px]] [[File:Birch Standing Sign (S) JE2 BE2.png|32px]] [[File:Jungle Standing Sign (S) JE2 BE2.png|32px]] [[File:Acacia Standing Sign (S) JE2 BE2.png|32px]] [[File:Dark Oak Standing Sign (S) JE2 BE2.png|32px]] [[File:Spruce Sign JE1 BE1.png|32px]] [[File:Birch Sign JE1 BE1.png|32px]] [[File:Jungle Sign JE1 BE1.png|32px]] [[File:Acacia Sign JE1 BE1.png|32px]] [[File:Dark Oak Sign JE1 BE1.png|32px]] Added spruce, birch, jungle, acacia and dark oak signs.|The sign's text has been changed from black to white.|A sign's recipe now requires the same type of [[wood]] instead of a random assortment.}}
{{History|||snap=beta 1.9.0.2|The default sign text color has been changed back to black.|Sign variants are now grouped in their own [[inventory]] category.}}
{{History||1.10.0|snap=beta 1.10.0.3|[[File:Oak Sign JE2 BE2.png|32px]] The texture of oak sign [[item]]s has been changed.|Spruce signs now generate in new [[taiga]] and [[snowy taiga]] [[village]] houses.}}
{{History||1.11.0|snap=beta 1.11.0.1|Signs can now be used as a [[fuel]] in [[furnace]]s.|Oak signs can now be found inside taiga and snowy taiga village house [[chest]]s.}}
{{History||1.16.0|snap=beta 1.16.0.51|[[File:Crimson Standing Sign JE1 BE1.png|32px]] [[File:Warped Standing Sign JE1 BE1.png|32px]] [[File:Crimson Sign JE1 BE1.png|32px]] [[File:Warped Sign JE1 BE1.png|32px]] Added crimson and warped signs.|[[File:Spruce Standing Sign (S) JE2 BE2.png|32px]] [[File:Birch Standing Sign (S) JE2 BE2.png|32px]] [[File:Jungle Standing Sign (S) JE2 BE2.png|32px]] [[File:Acacia Standing Sign (S) JE2 BE2.png|32px]] [[File:Dark Oak Standing Sign (S) JE2 BE2.png|32px]] [[File:Spruce Wall Sign (S) JE2 BE2.png|32px]] [[File:Birch Wall Sign (S) JE2 BE2.png|32px]] [[File:Jungle Wall Sign (S) JE2 BE2.png|32px]] [[File:Acacia Wall Sign (S) JE2 BE2.png|32px]] [[File:Dark Oak Wall Sign (S) JE2 BE2.png|32px]] The texture of all signs except oak sign have been changed.}}
{{History||1.16.20|snap=beta 1.16.20.50|Crimson and warped signs now uses regular plank [[sound]]s instead of their stem variant sounds.}}
{{History||1.16.210|snap=beta 1.16.210.59|Signs can now be {{control|used}} while holding a [[dye]] to change the text color.|Signs can now be tinted with [[Glow Ink Sac|glow ink sac]]s to make the text glow.
|Works with both default and dyed signs.}}
{{History|||snap=beta 1.16.210.60|Color on dyed signs disappears and the text turns back to black.|Signs with applied glowing effect as well as color stops glowing and color is removed.}}
{{History||1.16.220|snap=beta 1.16.220.50|Signs can now be {{control|used}} while holding a [[dye]] to change the text color again.|Signs can now be tinted with [[Glow Ink Sac|glow ink sac]]s to make the text glow again.}}
{{History|||snap=beta 1.16.220.52|Now has sounds for being dyed.}}
{{History|||snap=release|A glowing effect can no longer be applied to signs due to glow ink sacs becoming inaccessible in the full release.}}
{{History||1.17.0|snap=beta 1.17.0.50|[[File:Oak Sign BE3.png|32px]] [[File:Spruce Sign BE2.png|32px]] [[File:Birch Sign BE2.png|32px]] [[File:Jungle Sign BE2.png|32px]] [[File:Acacia Sign BE2.png|32px]] [[File:Dark Oak Sign BE2.png|32px]] Textures of sign items was updated.
|[[File:Oak Standing Sign (S) JE2 BE2.png|32px]] [[File:Oak Wall Sign (S) JE2 BE2.png|32px]] The textures of oak signs have been changed to reflect the changes made to planks in the [[Texture Update]].}}
{{History||1.17.10|snap=beta 1.17.10.21|Glowing text on signs now has an outer glow, making text more visible in the dark.}}
{{History||1.18.10|snap=beta 1.18.10.20|[[File:Oak Sign JE3.png|32px]] [[File:Spruce Sign JE2.png|32px]] [[File:Birch Sign JE2.png|32px]] [[File:Jungle Sign JE2.png|32px]] [[File:Acacia Sign JE2.png|32px]] [[File:Dark Oak Sign JE2.png|32px]] [[File:Crimson Sign JE2.png|32px]] [[File:Warped Sign JE2.png|32px]] Changed all signs textures as items.}}
{{History||1.19.0|snap=beta 1.19.0.20|[[File:Mangrove Sign JE1 BE1.png|32px]][[File:Mangrove Wall Sign JE1 BE1.png|32px]][[File:Mangrove Sign (item) JE1 BE1.png|32px]] Added mangrove signs.}}
{{History||Next Major Update<br>(Experimental)|link=Bedrock Edition 1.20|snap=beta 1.19.50.21|[[File:Bamboo Sign (0) JE1 BE1.png|32px]] [[File:Bamboo Wall Sign (S) JE1 BE1.png|32px]] [[File:Bamboo Sign (item) JE1 BE1.png|32px]] Added bamboo signs behind the "[[Bedrock Edition 1.20|Next Major Update]]" [[experimental]] toggle.|[[File:Oak Hanging Sign JE1 BE1.png|32px]] [[File:Spruce Hanging Sign JE1 BE1.png|32px]] [[File:Birch Hanging Sign JE1 BE1.png|32px]] [[File:Jungle Hanging Sign JE1 BE1.png|32px]] [[File:Acacia Hanging Sign JE1 BE1.png|32px]] [[File:Dark Oak Hanging Sign JE1 BE1.png|32px]] [[File:Mangrove Hanging Sign JE1 BE1.png|32px]] [[File:Bamboo Hanging Sign JE1 BE1.png|32px]] [[File:Crimson Hanging Sign JE1 BE1.png|32px]] [[File:Warped Hanging Sign JE1 BE1.png|32px]]<br>[[File:Oak Wall Hanging Sign JE1 BE1.png|32px]] [[File:Spruce Wall Hanging Sign JE1 BE1.png|32px]] [[File:Birch Wall Hanging Sign JE1 BE1.png|32px]] [[File:Jungle Wall Hanging Sign JE1 BE1.png|32px]] [[File:Acacia Wall Hanging Sign JE1 BE1.png|32px]] [[File:Dark Oak Wall Hanging Sign JE1 BE1.png|32px]] [[File:Mangrove Wall Hanging Sign JE1 BE1.png|32px]] [[File:Bamboo Wall Hanging Sign (S) JE1 BE1.png|32px]] [[File:Crimson Wall Hanging Sign JE1 BE1.png|32px]] [[File:Warped Wall Hanging Sign JE1 BE1.png|32px]]<br>[[File:Oak Hanging Sign (item) JE1 BE1.png|32px]] [[File:Spruce Hanging Sign (item) JE1 BE1.png|32px]] [[File:Birch Hanging Sign (item) JE1 BE1.png|32px]] [[File:Jungle Hanging Sign (item) JE1 BE1.png|32px]] [[File:Acacia Hanging Sign (item) JE1 BE1.png|32px]] [[File:Dark Oak Hanging Sign (item) JE1 BE1.png|32px]] [[File:Mangrove Hanging Sign (item) JE1 BE1.png|32px]] [[File:Bamboo Hanging Sign (item) JE1 BE1.png|32px]] [[File:Crimson Hanging Sign (item) JE1 BE1.png|32px]] [[File:Warped Hanging Sign (item) JE1 BE1.png|32px]]<br>Added hanging signs behind the "[[Bedrock Edition 1.20.0|Next Major Update]]" [[experimental]] toggle.|Added unique sounds for Nether and bamboo wood signs.}}
{{History|||snap=beta 1.19.60.20|[[File:Jungle Wall Hanging Sign JE2 BE2.png|32px]] The texture of jungle hanging wall signs have been changed.|Bamboo hanging signs now can be crafted using [[block of stripped bamboo]] instead of bamboo planks.|Crafting bamboo hanging signs now outputs 6 hanging signs instead of 2.}}
{{History||Next Major Update<br>(Experimental)|link=Bedrock Edition 1.19.80|snap=beta 1.19.80.20|[[File:Cherry Sign (0).png|32px]] [[File:Cherry Wall Sign (S) JE1.png|32px]] [[File:Cherry Sign (item) JE1.png|32px]] [[File:Cherry Hanging Sign JE1.png|32px]] [[File:Cherry Wall Hanging Sign JE1.png|32px]] [[File:Cherry Hanging Sign (item) JE1.png|32px]] Added cherry signs and hanging signs behind the "[[Bedrock Edition 1.20.0|Next Major Update]]" [[experimental]] toggle.}}
{{History|||snap=beta 1.19.80.21|[[File:Cherry Sign (0) JE2 BE2.png|32px]] Updated the texture of cherry signs.}}
{{History|||snap=beta 1.19.80.22|Signs and hanging signs can now be edited after being placed.|Signs and hanging signs now support text on both sides.|Signs and hanging signs can now be waxed with [[honeycomb]] to prevent editing.}}
{{History|||snap=beta 1.20.0.20|Crimson, warped, and bamboo hanging signs now have custom sounds to match their wood type.<ref name=badnewsounds>{{Bug|MCPE-164246}}</ref>}}
{{History||1.20.0|snap=beta 1.20.0.21|Bamboo sign, cherry sign and all of the hanging signs are now available without using the "Next Major Update" experimental toggle.}}
{{History|console}}
{{History||xbox=TU1|xbone=CU1|ps=1.0|wiiu=Patch 1|switch=1.0.1|[[File:Oak Standing Sign.png|32px]] [[File:Oak Sign JE1 BE1.png|32px]] Added signs.}}
{{History||xbox=TU9|Signs are now stackable up to 16.
|The same [[crafting]] recipe for signs now produces 3 signs instead of 1.}}
{{History||xbox=none|xbone=none|ps=1.88|wiiu=none|switch=none|[[File:Spruce Standing Sign (S) JE2 BE2.png|32px]] [[File:Birch Standing Sign (S) JE2 BE2.png|32px]] [[File:Jungle Standing Sign (S) JE2 BE2.png|32px]] [[File:Acacia Standing Sign (S) JE2 BE2.png|32px]] [[File:Dark Oak Standing Sign (S) JE2 BE2.png|32px]] [[File:Spruce Sign JE1 BE1.png|32px]] [[File:Birch Sign JE1 BE1.png|32px]] [[File:Jungle Sign JE1 BE1.png|32px]] [[File:Acacia Sign JE1 BE1.png|32px]] [[File:Dark Oak Sign JE1 BE1.png|32px]] Added spruce, birch, jungle, acacia and dark oak signs.}}
{{History||xbox=none|xbone=none|ps=1.90|wiiu=none|switch=none|[[File:Oak Sign JE2 BE2.png|32px]] The texture of oak sign [[item]]s has been changed.}}
{{History|new 3ds}}
{{History||0.1.0|[[File:Oak Standing Sign (S) JE2 BE2.png|32px]] [[File:Oak Sign JE1 BE1.png|32px]] Added signs.}}
{{History|foot}}
== Trivia ==
* The first concept art of hanging signs came from [[Agnes Larsson]]'s daughter.<ref>{{Ytl|vJCMpPyaN8Q|Minecraft 1.20: New Blocks and Their Functions!|Minecraft|t=30s}}</ref>
== Gallery ==
=== Screenshots ===
<gallery>
Signs classic.png|Test of signs in early [[Java Edition Classic]].
Sigh test.jpg|Another early sign image.
Signs PreRelease.png|First image of sign blocks during [[Java Edition Infdev|Infdev]].
Pocket Edition v0.6.0 alpha Development sign.png|First image of signs on [[Pocket Edition]].
Pocket Edition v0.6.0 alpha Development sign editing.png|First image of editing text on [[PE]] iOS.
Pocket Edition v0.6.0 alpha Development sign editing 2.png|First image of editing text on [[PE]] Android.
Pocket Edition v0.6.0 alpha Development sky.png
Door Sign.png|A sign placed on a door.
Breaking News.png|A sign being broken.
Sign Text Dark.jpg|A dark oak sign with black text.
Sign Text Light.jpg|A dark oak sign with white text.
Sign Blockdata.gif|A sign using blockdata to dynamically change.
JSON Sign.png|First image of a sign using JSON text.
Width Based Character Limit.png|First image of a sign using width based character limits.
Glow Ink Sign with Pink Dye.png|Oak sign with glow ink in the dark in [[Java Edition 21w03a]].
Lit vs unlit signs.png|Difference in visibility of a lime text, from left to right, in a lit birch sign, unlit birch sign, lit dark oak sign, and unlit dark oak sign.
Glowing Text Comparison.png|The comparison between glow text and non-glow text.
Example Of Signs Being Weird.png|alt=Shading differences|Signs being different shades depending on orientation.
Glow text.gif|All sixteen colors of glow text.
Glow Ink Signs.jpg|Signs with glowing ink in several colors.
Lots of Glowing Signs.jpg|More signs with glowing ink.
Sign Platforms.jpg|[[Ari]] standing on top of a hanged sign.
Eric Shop.jpg|[[Sunny]] looking at a double sided hanging sign.
Hanging Sign Bedrock.png|Hanging sign with small text.
Hanging Sign Java.png|Hanging sign with large text.
New Hanging Sign Text Length 1.jpg|Text on hanging sign.
New Hanging Sign Text Length 2.jpg|Text on hanging sign.
</gallery>
=== Concept Art ===
<gallery>
Hanging_Sign_Concept_Art.png|Hanging sign concept art.
Hanging_Sign_Concept_Art2.png|Ditto.
Hanging_Sign_Concept_Art3.png|Hanging sign dimensions concept art.
Hanging_Sign_Concept_Art4.png|Hanging sign crafting recipe, block states concept art.
</gallery>
=== Renders ===
{{hidden begin}}
<div style="clear: both"></div>
<gallery>
Oak Sign.png|Oak Sign
Spruce Sign.png|Spruce Sign
Birch Sign.png|Birch Sign
Jungle Sign.png|Jungle Sign
Acacia Sign.png|Acacia Sign
Dark Oak Sign.png|Dark Oak Sign
Mangrove Sign.png|Mangrove Sign
Cherry Sign.png|Cherry Sign
Bamboo Sign.png|Bamboo Sign
Crimson Sign.png|Crimson Sign
Warped Sign.png|Warped Sign
Oak Wall Sign.png|Oak Wall Sign
Spruce Wall Sign.png|Spruce Wall Sign
Birch Wall Sign.png|Birch Wall Sign
Jungle Wall Sign.png|Jungle Wall Sign
Acacia Wall Sign.png|Acacia Wall Sign
Dark Oak Wall Sign.png|Dark Oak Wall Sign
Mangrove Wall Sign.png|Mangrove Wall Sign
Cherry Wall Sign.png|Cherry Wall Sign
Bamboo Wall Sign.png|Bamboo Wall Sign
Crimson Wall Sign.png|Crimson Wall Sign
Warped Wall Sign.png|Warped Wall Sign
Oak Hanging Sign.png|Oak Hanging Sign
Spruce Hanging Sign.png|Spruce Hanging Sign
Birch Hanging Sign.png|Birch Hanging Sign
Jungle Hanging Sign.png|Jungle Hanging Sign
Acacia Hanging Sign.png|Acacia Hanging Sign
Dark Oak Hanging Sign.png|Dark Oak Hanging Sign
Mangrove Hanging Sign.png|Mangrove Hanging Sign
Cherry Hanging Sign.png|Cherry Hanging Sign
Bamboo Hanging Sign.png|Bamboo Hanging Sign
Crimson Hanging Sign.png|Crimson Hanging Sign
Warped Hanging Sign.png|Warped Hanging Sign
Oak Wall Hanging Sign.png|Oak Wall Hanging Sign
Spruce Wall Hanging Sign.png|Spruce Wall Hanging Sign
Birch Wall Hanging Sign.png|Birch Wall Hanging Sign
Jungle Wall Hanging Sign.png|Jungle Wall Hanging Sign
Acacia Wall Hanging Sign.png|Acacia Wall Hanging Sign
Dark Oak Wall Hanging Sign.png|Dark Oak Wall Hanging Sign
Mangrove Wall Hanging Sign.png|Mangrove Wall Hanging Sign
Cherry Wall Hanging Sign.png|Cherry Wall Hanging Sign
Bamboo Wall Hanging Sign.png|Bamboo Wall Hanging Sign
Crimson Wall Hanging Sign.png|Crimson Wall Hanging Sign
Warped Wall Hanging Sign.png|Warped Wall Hanging Sign
</gallery>
<gallery>
Oak Sign JE3.png
Spruce Sign JE2.png
Birch Sign JE2.png
Jungle Sign JE2.png
Acacia Sign JE2.png
Dark Oak Sign JE2.png
Mangrove Sign (item) JE1 BE1.png
Cherry Sign (item) JE1.png
Bamboo Sign (item) JE1 BE1.png
Crimson Sign JE2.png
Warped Sign JE2.png
Oak Hanging Sign (item) JE1 BE1.png
Spruce Hanging Sign (item) JE1 BE1.png
Birch Hanging Sign (item) JE1 BE1.png
Jungle Hanging Sign (item) JE1 BE1.png
Acacia Hanging Sign (item) JE1 BE1.png
Dark Oak Hanging Sign (item) JE1 BE1.png
Mangrove Hanging Sign (item) JE1 BE1.png
Cherry Hanging Sign (item) JE1.png
Bamboo Hanging Sign (item) JE1 BE1.png
Crimson Hanging Sign (item) JE1 BE1.png
Warped Hanging Sign (item) JE1 BE1.png
</gallery>
{{hidden end}}
{{-}}
== Issues ==
{{issue list}}
== See also ==
* [[Chalkboard]]
== References ==
{{Reflist}}
== External Links ==
*[https://www.minecraft.net/en-us/article/taking-inventory--sign Taking Inventory: Sign] – Minecraft.net on January 9, 2020
{{Blocks|utility}}
{{Items}}
[[Category:Utility blocks]]
[[Category:Manufactured blocks]]
[[Category:Generated structure blocks]]
[[Category:Block entities]]
[[Category:Non-solid blocks]]
[[cs:Cedule]]
[[de:Schild (Schrift)]]
[[es:Cartel]]
[[fr:Pancarte]]
[[hu:Tábla]]
[[it:Cartello]]
[[ja:看板]]
[[ko:표지판]]
[[nl:Bord]]
[[pl:Tabliczka]]
[[pt:Placa]]
[[ru:Табличка]]
[[th:ป้าย]]
[[uk:Табличка]]
[[zh:告示牌]]</li><li>[[Smithing Template|Smithing Template]]<br/>{{for|the block|Smithing Table}}
{{Item
| title = Smithing Template
| image = <gallery>
Netherite Upgrade Smithing Template.png | Netherite Upgrade
Sentry Armor Trim Smithing Template.png | Armor Trim
</gallery>
| rarity = Rare
| renewable = No<!--Smithing templates are not renewable because diamonds, their only other method of creation, are not renewable.-->
| stackable = Yes (64)
}}
'''Smithing templates''' are items used in [[Smithing Table|smithing tables]] to alter [[Tool|tools]] and [[armor]]. They are consumed when used, but can be [[Crafting|duplicated]] using an existing template, its material and [[Diamond|diamonds]].
The sixteen '''armor trim smithing templates''' are found in a variety of [[Generated structures|structures]], and are used to apply various decorative trims (dependent on the variant) to armor using certain minerals for different colors.
'''Netherite upgrade smithing templates''' are required to upgrade diamond equipment with a [[Netherite Ingot|netherite ingot]]. They are only found in [[Bastion Remnant|bastion remnants]], but are guaranteed only in [[:en:Bastion_Remnant#Treasure_room|treasure rooms]].
== Obtaining ==
Smithing templates can be found in various [[Generated structures|structures]] and can be duplicated by using seven diamonds and a block based on what the template is.
=== Crafting ===
{{Crafting
|A1=Diamond |B1=Matching Smithing Template |C1=Diamond
|A2=Diamond |B2=Netherrack;Cobblestone;Sandstone;End Stone;Terracotta;Terracotta;Netherrack;Cobblestone;Terracotta;Cobbled Deepslate;Blackstone;Purpur Block;Prismarine;Cobblestone;Cobbled Deepslate;Terracotta;Mossy Cobblestone |C2=Diamond
|A3=Diamond |B3=Diamond |C3=Diamond
|Output=Matching Smithing Template,2
}}
{| class="article-table"
|+ Duplication
! Item !! Material
|-
| {{ItemSprite|netherite-upgrade|text=Netherite Upgrade}} || {{BlockSprite|Netherrack|text=Netherrack}}
|-
| {{ItemSprite|sentry-armor-trim|text=Sentry Armor Trim}} || {{BlockSprite|Cobblestone|text=Cobblestone}}
|-
| {{ItemSprite|vex-armor-trim|text=Vex Armor Trim}} || {{BlockSprite|Cobblestone|text=Cobblestone}}
|-
| {{ItemSprite|wild-armor-trim|text=Wild Armor Trim}} || {{BlockSprite|Mossy Cobblestone|text=Mossy Cobblestone}}
|-
| {{ItemSprite|coast-armor-trim|text=Coast Armor Trim}} || {{BlockSprite|Cobblestone|text=Cobblestone}}
|-
| {{ItemSprite|dune-armor-trim|text=Dune Armor Trim}} || {{BlockSprite|Sandstone|text=Sandstone}}
|-
| {{ItemSprite|wayfinder-armor-trim|text=Wayfinder Armor Trim}} || {{BlockSprite|Terracotta|text=Terracotta}}
|-
| {{ItemSprite|raiser-armor-trim|text=Raiser Armor Trim}} || {{BlockSprite|Terracotta|text=Terracotta}}
|-
| {{ItemSprite|shaper-armor-trim|text=Shaper Armor Trim}} || {{BlockSprite|Terracotta|text=Terracotta}}
|-
| {{ItemSprite|host-armor-trim|text=Host Armor Trim}} || {{BlockSprite|Terracotta|text=Terracotta}}
|-
| {{ItemSprite|ward-armor-trim|text=Ward Armor Trim}} || {{BlockSprite|Cobbled Deepslate|text=Cobbled Deepslate}}
|-
| {{ItemSprite|silence-armor-trim|text=Silence Armor Trim}} || {{BlockSprite|Cobbled Deepslate|text=Cobbled Deepslate}}
|-
| {{ItemSprite|tide-armor-trim|text=Tide Armor Trim}} || {{BlockSprite|Prismarine|text=Prismarine}}
|-
| {{ItemSprite|snout-armor-trim|text=Snout Armor Trim}} || {{BlockSprite|Blackstone|text=Blackstone}}
|-
| {{ItemSprite|rib-armor-trim|text=Rib Armor Trim}} || {{BlockSprite|Netherrack|text=Netherrack}}
|-
| {{ItemSprite|eye-armor-trim|text=Eye Armor Trim}} || {{BlockSprite|End Stone|text=End Stone}}
|-
| {{ItemSprite|spire-armor-trim|text=Spire Armor Trim}} || {{BlockSprite|Purpur Block|text=Purpur Block}}
|}
{{IN|bedrock}}, spire, tide, and dune armor trims can be duplicated with more blocks than {{in|java}}. In addition to the normal blocks, Tide armor trims can be duplicated using Prismarine Bricks or Dark Prismarine, dune armor trims can be duplicated with smooth sandstone, cut sandstone, or chiseled sandstone, and spire armor trims can be duplicated with purpur pillars.<ref>{{bug|MCPE-172711||Tide, Spire, and Dune Armor Trims can be crafted from more blocks than in Java Edition}}</ref>
=== Mob loot ===
[[Elder guardian]]s have a 20% chance to drop 1 tide armor trim upon death. [[Looting]] doesn't affect this percentage, and the elder guardian doesn't need to be killed by a player in order for the trim to drop and can be duplicated with [[prismarine]].
=== Chest loot ===
{{#invoke:LootChest|base3|netherite-upgrade-smithing-template,sentry-armor-trim-smithing-template,vex-armor-trim-smithing-template,wild-armor-trim-smithing-template,coast-armor-trim-smithing-template,dune-armor-trim-smithing-template,ward-armor-trim-smithing-template,silence-armor-trim-smithing-template,snout-armor-trim-smithing-template,rib-armor-trim-smithing-template,eye-armor-trim-smithing-template,spire-armor-trim-smithing-template}}
Note: In Woodland Mansions, only chests with random loot have the chance to contain the Vex Smithing Template, chests in the "Allium room", "Sapling farm", "Tree-chopping room" and "Fake End portal room" always generate with the same, room specific, loot.
=== Suspicious block loot ===
Items can only be extracted from [[Suspicious Block|suspicious blocks]] using a [[brush]].{{#invoke:LootChest|base3|wayfinder-armor-trim-smithing-template,raiser-armor-trim-smithing-template,shaper-armor-trim-smithing-template,host-armor-trim-smithing-template}}
== Usage ==
=== Crafting ingredient ===
{{Crafting
|A1=Diamond |B1=Matching Smithing Template |C1=Diamond
|A2=Diamond |B2=Netherrack;Cobblestone;Sandstone;End Stone;Terracotta;Terracotta;Netherrack;Cobblestone;Terracotta;Cobbled Deepslate;Blackstone;Purpur Block;Prismarine;Cobblestone;Cobbled Deepslate;Terracotta;Mossy Cobblestone |C2=Diamond
|A3=Diamond |B3=Diamond |C3=Diamond
|Output=Matching Smithing Template,2
}}
=== Smithing ingredient ===
Smithing templates are used at a [[smithing table]]. Netherite upgrade smithing templates are used to upgrade diamond gear into netherite gear by using a netherite upgrade, a piece of diamond gear, and a [[netherite ingot]].
{{Smithing
|head=1
|ingredients=Netherite Upgrade +<br>Any Diamond Gear +<br>[[Netherite Ingot]]
|Netherite Upgrade
|Diamond Helmet; Diamond Chestplate; Diamond Leggings; Diamond Boots; Diamond Sword; Diamond Pickaxe; Diamond Axe; Diamond Shovel
|Netherite Ingot
|Netherite Helmet; Netherite Chestplate; Netherite Leggings; Netherite Boots; Netherite Sword; Netherite Pickaxe; Netherite Axe; Netherite Shovel
|tail=1
}}
{{FakeImage|{{Animate|Iron_Armor_with_Iron_Shaper_Trim.png; Golden_Armor_with_Golden_Shaper_Trim.png; Diamond_Armor_with_Diamond_Shaper_Trim.png; Netherite_Armor_with_Netherite_Shaper_Trim.png|180px}}|If the armor material and the trimming material are the same, the color palette used for the armor trim is darker.}}
Armor trim smithing templates are used to customize an armor piece's appearance by using a smithing template, an armor piece, and an ingot or crystal ([[emerald]], [[redstone dust]], [[lapis lazuli]], [[amethyst shard]], [[nether quartz]], [[netherite ingot]], [[diamond]], [[gold ingot]], [[iron ingot]], or [[copper ingot]]). Including all dyed leather armor colors and regular armor, there are ≈3.679x10<sup>9</sup> different possible armor pieces<!--5713438 leather colors, plus the 4 other armor materials = 5713442. 5713442 * 161 (the 160 trim combos (16 trims, 10 materials) + untrimmed) = 919864162. 919864162 * 4 (helmet, chestplate, leggings, boots) = 3679456648 ≈ 3.679x10^9-->, and 7.16x10<sup>35</sup> <!--919864162 + 1 (no armor in that slot) = 919864163. 919864163^4 = 715969952015045562662444917041515536 ≈ 7.16x10^35 total possible armor combinations-->total possible armor combinations excluding enchantments and the player not wearing armor.
Already trimmed armor can be trimmed again by applying another template on it; the old trim pattern is overwritten in the process.<ref>{{bug|MC-262538||When combining armor trims the new trim deletes the old one|WAI}}</ref> Therefore, one piece of armor cannot possess multiple trims at the same time.
Most armor trims cover a small portion of the armor piece's surface with the trim material, except for the silence armor trim, which allows the trim material to cover a majority of the armor piece's surface.
All of the trims are purely decorative, and don't impact gameplay or strength(without the use of mods or plugins) of the armor they are applied to in any way. [[Piglin]]s do not pick up any gold-trimmed armor pieces, and they are not pacified by players wearing even a full set of gold-trimmed armor (unless, of course, the armor pieces in question are themselves golden), and netherite-trimmed armor pieces can still be burned by [[fire]].
{{Smithing
|head=1
|ingredients=Any Armor Trim +<br>Any Armor Piece +<br>Any Ingot/Crystal
|Any Armor Trim Smithing Template
|Iron Helmet; Netherite Chestplate;Golden Leggings;Diamond Boots
|Amethyst Shard; Copper Ingot; Diamond; Emerald; Gold Ingot; Iron Ingot; Lapis Lazuli; Nether Quartz; Netherite Ingot; Redstone Dust; Diamond; Emerald
|Amethyst Trim Iron Helmet; Copper Trim Netherite Chestplate; Diamond Trim Golden Leggings; Emerald Trim Diamond Boots; Gold Trim Iron Helmet; Iron Trim Netherite Chestplate; Lapis Trim Golden Leggings; Quartz Trim Diamond Boots; Netherite Trim Iron Helmet; Redstone Trim Netherite Chestplate; Diamond Trim Golden Leggings; Emerald Trim Diamond Boots
|tail=1
}}
;List of color palettes for all materials
*{{ItemSprite|emerald }} - {{TrimPalette| emerald }}
*{{ItemSprite|redstone dust }} - {{TrimPalette| redstone dust }}
*{{ItemSprite|lapis lazuli }} - {{TrimPalette| lapis lazuli }}
*{{ItemSprite|amethyst shard }} - {{TrimPalette| amethyst shard }}
*{{ItemSprite|nether quartz }} - {{TrimPalette| nether quartz }}
*{{ItemSprite|netherite ingot }} - {{TrimPalette| netherite ingot }} (Darker: {{TrimPalette| netherite ingot |darker=1}})
*{{ItemSprite|diamond }} - {{TrimPalette| diamond }} (Darker: {{TrimPalette| diamond |darker=1}})
*{{ItemSprite|gold ingot }} - {{TrimPalette| gold ingot }} (Darker: {{TrimPalette| gold ingot |darker=1}})
*{{ItemSprite|iron ingot }} - {{TrimPalette| iron ingot }} (Darker: {{TrimPalette| iron ingot |darker=1}})
*{{ItemSprite|copper ingot }} - {{TrimPalette| copper ingot }}
== Data values ==
=== ID ===
{{edition|java}}:
{{ID table
|edition=java
|firstcolumnname=Smithing Template
|showforms=y
|generatetranslationkeys=y
|displayname=Netherite Upgrade
|spritename=netherite-upgrade-smithing-template
|spritetype=item
|nameid=netherite_upgrade_smithing_template
|form=item}}
{{ID table
|displayname=Sentry Armor Trim
|spritename=sentry-armor-trim-smithing-template
|spritetype=item
|nameid=sentry_armor_trim_smithing_template
|form=item}}
{{ID table
|displayname=Vex Armor Trim
|spritename=vex-armor-trim-smithing-template
|spritetype=item
|nameid=vex_armor_trim_smithing_template
|form=item}}
{{ID table
|displayname=Wild Armor Trim
|spritename=wild-armor-trim-smithing-template
|spritetype=item
|nameid=wild_armor_trim_smithing_template
|form=item}}
{{ID table
|displayname=Coast Armor Trim
|spritename=coast-armor-trim-smithing-template
|spritetype=item
|nameid=coast_armor_trim_smithing_template
|form=item}}
{{ID table
|displayname=Dune Armor Trim
|spritename=dune-armor-trim-smithing-template
|spritetype=item
|nameid=dune_armor_trim_smithing_template
|form=item}}
{{ID table
|displayname=Wayfinder Armor Trim
|spritename=wayfinder-armor-trim-smithing-template
|spritetype=item
|nameid=wayfinder_armor_trim_smithing_template
|form=item}}
{{ID table
|displayname=Raiser Armor Trim
|spritename=raiser-armor-trim-smithing-template
|spritetype=item
|nameid=raiser_armor_trim_smithing_template
|form=item}}
{{ID table
|displayname=Shaper Armor Trim
|spritename=shaper-armor-trim-smithing-template
|spritetype=item
|nameid=shaper_armor_trim_smithing_template
|form=item}}
{{ID table
|displayname=Host Armor Trim
|spritename=host-armor-trim-smithing-template
|spritetype=item
|nameid=host_armor_trim_smithing_template
|form=item}}
{{ID table
|displayname=Ward Armor Trim
|spritename=ward-armor-trim-smithing-template
|spritetype=item
|nameid=ward_armor_trim_smithing_template
|form=item}}
{{ID table
|displayname=Silence Armor Trim
|spritename=silence-armor-trim-smithing-template
|spritetype=item
|nameid=silence_armor_trim_smithing_template
|form=item}}
{{ID table
|displayname=Tide Armor Trim
|spritename=tide-armor-trim-smithing-template
|spritetype=item
|nameid=tide_armor_trim_smithing_template
|form=item}}
{{ID table
|displayname=Snout Armor Trim
|spritename=snout-armor-trim-smithing-template
|spritetype=item
|nameid=snout_armor_trim_smithing_template
|form=item}}
{{ID table
|displayname=Rib Armor Trim
|spritename=rib-armor-trim-smithing-template
|spritetype=item
|nameid=rib_armor_trim_smithing_template
|form=item}}
{{ID table
|displayname=Eye Armor Trim
|spritename=eye-armor-trim-smithing-template
|spritetype=item
|nameid=eye_armor_trim_smithing_template
|form=item}}
{{ID table
|displayname=Spire Armor Trim
|spritename=spire-armor-trim-smithing-template
|spritetype=item
|nameid=spire_armor_trim_smithing_template
|form=item
|foot=1}}
{{edition|bedrock}}:
{{ID table
|edition=bedrock
|firstcolumnname=Smithing Template
|shownumericids=y
|showforms=y
|notshowbeitemforms=y
|generatetranslationkeys=y
|displayname=Netherite Upgrade
|spritename=netherite-upgrade-smithing-template
|spritetype=item
|nameid=netherite_upgrade_smithing_template
|id=685
|form=item
|translationkey=item.smithing_template.name, upgrade.netherite_upgrade.name}}
{{ID table
|displayname=Sentry Armor Trim
|spritename=sentry-armor-trim-smithing-template
|spritetype=item
|nameid=sentry_armor_trim_smithing_template
|id=686
|form=item
|translationkey=item.smithing_template.name, trim_pattern.sentry.name}}
{{ID table
|displayname=Vex Armor Trim
|spritename=vex-armor-trim-smithing-template
|spritetype=item
|nameid=vex_armor_trim_smithing_template
|id=692
|form=item
|translationkey=item.smithing_template.name, trim_pattern.vex.name}}
{{ID table
|displayname=Wild Armor Trim
|spritename=wild-armor-trim-smithing-template
|spritetype=item
|nameid=wild_armor_trim_smithing_template
|id=689
|form=item
|translationkey=item.smithing_template.name, trim_pattern.wild.name}}
{{ID table
|displayname=Coast Armor Trim
|spritename=coast-armor-trim-smithing-template
|spritetype=item
|nameid=coast_armor_trim_smithing_template
|id=688
|form=item
|translationkey=item.smithing_template.name, trim_pattern.coast.name}}
{{ID table
|displayname=Dune Armor Trim
|spritename=dune-armor-trim-smithing-template
|spritetype=item
|nameid=dune_armor_trim_smithing_template
|id=687
|form=item
|translationkey=item.smithing_template.name, trim_pattern.dune.name}}
{{ID table
|displayname=Wayfinder Armor Trim
|spritename=wayfinder-armor-trim-smithing-template
|spritetype=item
|nameid=wayfinder_armor_trim_smithing_template
|id=698
|form=item
|translationkey=item.smithing_template.name, trim_pattern.wayfinder.name}}
{{ID table
|displayname=Raiser Armor Trim
|spritename=raiser-armor-trim-smithing-template
|spritetype=item
|nameid=raiser_armor_trim_smithing_template
|id=699
|form=item
|translationkey=item.smithing_template.name, trim_pattern.raiser.name}}
{{ID table
|displayname=Shaper Armor Trim
|spritename=shaper-armor-trim-smithing-template
|spritetype=item
|nameid=shaper_armor_trim_smithing_template
|id=700
|form=item
|translationkey=item.smithing_template.name, trim_pattern.shaper.name}}
{{ID table
|displayname=Host Armor Trim
|spritename=host-armor-trim-smithing-template
|spritetype=item
|nameid=host_armor_trim_smithing_template
|id=701
|form=item
|translationkey=item.smithing_template.name, trim_pattern.host.name}}
{{ID table
|displayname=Ward Armor Trim
|spritename=ward-armor-trim-smithing-template
|spritetype=item
|nameid=ward_armor_trim_smithing_template
|id=690
|form=item
|translationkey=item.smithing_template.name, trim_pattern.ward.name}}
{{ID table
|displayname=Silence Armor Trim
|spritename=silence-armor-trim-smithing-template
|spritetype=item
|nameid=silence_armor_trim_smithing_template
|id=697
|form=item
|translationkey=item.smithing_template.name, trim_pattern.silence.name}}
{{ID table
|displayname=Tide Armor Trim
|spritename=tide-armor-trim-smithing-template
|spritetype=item
|nameid=tide_armor_trim_smithing_template
|id=693
|form=item
|translationkey=item.smithing_template.name, trim_pattern.tide.name}}
{{ID table
|displayname=Snout Armor Trim
|spritename=snout-armor-trim-smithing-template
|spritetype=item
|nameid=snout_armor_trim_smithing_template
|id=694
|form=item
|translationkey=item.smithing_template.name, trim_pattern.snout.name}}
{{ID table
|displayname=Rib Armor Trim
|spritename=rib-armor-trim-smithing-template
|spritetype=item
|nameid=rib_armor_trim_smithing_template
|id=695
|form=item
|translationkey=item.smithing_template.name, trim_pattern.rib.name}}
{{ID table
|displayname=Eye Armor Trim
|spritename=eye-armor-trim-smithing-template
|spritetype=item
|nameid=eye_armor_trim_smithing_template
|id=691
|form=item
|translationkey=item.smithing_template.name, trim_pattern.eye.name}}
{{ID table
|displayname=Spire Armor Trim
|spritename=spire-armor-trim-smithing-template
|spritetype=item
|nameid=spire_armor_trim_smithing_template
|id=696
|form=item
|translationkey=item.smithing_template.name, trim_pattern.spire.name
|foot=1}}
== Achievements ==
{{load achievements|Smithing with style}}
== Advancements ==
{{load advancements|Crafting a New Look;Smithing with Style}}
== Video ==
{{yt|klP9SrJFDU8}}
== History ==
{{History|java}}
{{History||1.20<br>(Experimental)|link=1.19.4|snap=23w04a|[[File:Netherite Upgrade Smithing Template JE1 BE1.png|32px]] [[File:Sentry Armor Trim Smithing Template JE1 BE1.png|32px]] [[File:Vex Armor Trim Smithing Template JE1 BE1.png|32px]] [[File:Wild Armor Trim Smithing Template JE1 BE1.png|32px]] [[File:Coast Armor Trim Smithing Template JE1 BE1.png|32px]] [[File:Dune Armor Trim Smithing Template JE1 BE1.png|32px]] [[File:Ward Armor Trim Smithing Template JE1 BE1.png|32px]] [[File:Tide Armor Trim Smithing Template JE1 BE1.png|32px]] [[File:Snout Armor Trim Smithing Template JE1 BE1.png|32px]] [[File:Rib Armor Trim Smithing Template JE1 BE1.png|32px]] [[File:Eye Armor Trim Smithing Template JE1 BE1.png|32px]] [[File:Spire Armor Trim Smithing Template JE1 BE1.png|32px]] Added smithing templates behind the "Update 1.20" experimental datapack.}}
{{History|||snap=23w05a|Smithing templates can be used to trim leather armor.
|Gold, iron, diamond, and netherite armor can be trimmed with their respective material.
|The dune, coast, wild, and sentry armor trims now always generate two templates in a chest when found.
|Increased the chances for all smithing templates that generate in chest loot to spawn:
*Netherite upgrade chance to find increased from 3.2% to 10%.
*Coast chance to find increased from 11.1% to 16.7%.
*Dune chance to find increased from 11.1% to 14.3%.
*Eye chance to find increased from 4.7% to 10% in alter chests, and to 100% in library chests.
*Rib chance to find increased from 4.7% to 6.7%.
*Sentry chance to find increased from 20% to 25%.
*Snout chance to find increased from 4.7% to 8.3%.
*Spire chance to find increased from 4.7% to 6.7%.
*Vex chance to find increased from 4.7% to 50%.
*Ward chance to find increased from 4.7% to 5%.
*Wild chance to find increased from 20% to 33%.}}
{{History||1.20|snap=23w12a|Smithing templates are now available without using the "Update 1.20" experimental datapack.|[[File:Wayfinder Armor Trim Smithing Template JE1 BE1.png|32px]] [[File:Raiser Armor Trim Smithing Template JE1 BE1.png|32px]] [[File:Shaper Armor Trim Smithing Template JE1 BE1.png|32px]] [[File:Host Armor Trim Smithing Template JE1 BE1.png|32px]] [[File:Silence Armor Trim Smithing Template JE1 BE1.png|32px]] Added wayfinder, raiser, shaper, host, and silence armor trim smithing templates.
|[[File:Sentry Armor Trim Smithing Template JE2 BE2.png|32px]] [[File:Dune Armor Trim Smithing Template JE2 BE2.png|32px]] Changed the textures of the sentry and dune armor trim smithing templates.
|The pattern textures of dune and sentry armor trims are changed from [[File:Armor Trim Dune (sample model) JE1 BE1.png|24px]] [[File:Armor Trim Sentry (sample model) JE1 BE1.png|24px]] to [[File:Armor Trim Dune (sample model) JE2 BE2.png|24px]] [[File:Armor Trim Sentry (sample model) JE2 BE2.png|24px]].<br>
Those previous patterns were left with different names: dune was renamed sentry and sentry was renamed shaper.}}
{{History|||snap=23w16a|Wayfinder, raiser, shaper, and host armor trim no longer generates in [[suspicious sand]] in [[trail ruins]].|Due to the split of the archaeological loot tables for the suspicious gravel within the [[trail ruins]]; wayfinder, raiser, shaper, and host armor trim now are in the rare loot.}}
{{History|||snap=23w17a|The probability of the wayfinder, raiser, shaper, and host armor trim to generate in [[suspicious gravel]] in [[trail ruins]] has been changed from 1/11 to 1/12.|The player now get the [[advancement]] "Crafting a new look" when they craft a trimmed armor at a [[smithing table]] using a smithing template, "Smithing with style" when they apply these smithing templates at least once on their armor: Spire, Snout, Rib, Ward, Silence, Vex, Tide, and Wayfinder.}}
{{History|bedrock}}
{{History||Next Major Update<br>(Experimental)|link=Bedrock Edition 1.19.80|snap=beta 1.19.80.21|[[File:Netherite Upgrade Smithing Template JE1 BE1.png|32px]] [[File:Sentry Armor Trim Smithing Template JE1 BE1.png|32px]] [[File:Vex Armor Trim Smithing Template JE1 BE1.png|32px]] [[File:Wild Armor Trim Smithing Template JE1 BE1.png|32px]] [[File:Coast Armor Trim Smithing Template JE1 BE1.png|32px]] [[File:Dune Armor Trim Smithing Template JE1 BE1.png|32px]] [[File:Ward Armor Trim Smithing Template JE1 BE1.png|32px]] [[File:Tide Armor Trim Smithing Template JE1 BE1.png|32px]] [[File:Snout Armor Trim Smithing Template JE1 BE1.png|32px]] [[File:Rib Armor Trim Smithing Template JE1 BE1.png|32px]] [[File:Eye Armor Trim Smithing Template JE1 BE1.png|32px]] [[File:Spire Armor Trim Smithing Template JE1 BE1.png|32px]] Added smithing templates behind the "[[Bedrock Edition 1.20.0|Next Major Update]]" [[experimental]] toggle.}}
{{History|||snap=beta 1.19.80.22|[[File:Wayfinder Armor Trim Smithing Template JE1 BE1.png|32px]] [[File:Raiser Armor Trim Smithing Template JE1 BE1.png|32px]] [[File:Shaper Armor Trim Smithing Template JE1 BE1.png|32px]] [[File:Host Armor Trim Smithing Template JE1 BE1.png|32px]] [[File:Silence Armor Trim Smithing Template JE1 BE1.png|32px]] Added wayfinder, raiser, shaper, host, and silence armor trim smithing templates.
|[[File:Sentry Armor Trim Smithing Template JE2 BE2.png|32px]] [[File:Dune Armor Trim Smithing Template JE2 BE2.png|32px]] Changed the textures of the sentry and dune armor trim smithing templates.
|The pattern textures of dune and sentry armor trims are changed from [[File:Armor Trim Dune (sample model) JE1 BE1.png|24px]] [[File:Armor Trim Sentry (sample model) JE1 BE1.png|24px]] to [[File:Armor Trim Dune (sample model) JE2 BE2.png|24px]] [[File:Armor Trim Sentry (sample model) JE2 BE2.png|24px]].<br>
Those previous patterns were left with different names: dune was renamed sentry and sentry was renamed shaper.}}
{{History||1.20.0|snap=beta 1.20.0.21|Smithing templates are now available without using the "Next Major Update" experimental toggle.}}
{{History|foot}}
== Issues ==
{{Issue list}}
== Trivia ==
* Smithing templates were named "Smithing Blueprints" in the prototype but was changed because the word "blueprint" sounded modern and technical.<ref>{{ytl|klP9SrJFDU8|Minecraft 1.20: Armor Trims - What Do They Mean?|Minecraft|May 4, 2023|t=98}}</ref>
* When Mojang developer Gnembon was working on armor trims, he accidentally messed up their rendering, making them jet through the player's body in a weird fashion, similar to what appears in {{w|Salvador Dalí}}'s paintings where a hand might poke through a forehead.<ref>{{ytl|ghQODkq4ITI|Mojang Dev Comes To Hermitcraft! (Mojang Developer Gnembom Interview)|GoodVodsWithScar|June 23, 2023|t=1980}}</ref>
* Some of the armor trims feature patterns based on a [[mob]] or [[block]] that is found in the same [[Generated structures|structure]] as the corresponding smithing template.<ref name=":0">"Some of the armor trims reflect the place where you found the template, for example bastions contain a piglin-inspired trim."-[[Sofia Dankis]]-{{Mcnet|armor-trims-coming-minecraft-1-20|Armor Trims Coming to Minecraft 1.20|January 24, 2023}}</ref>
** The spire armor trim resembles a [[shulker]].
** The vex armor trim resembles an [[evoker]]. As an item in the [[inventory]], it resembles the wing or the vein texture of a [[vex]].
** The wild armor trim has moss growing on 3 of its corners.
** The coast armor trim appears to have barnacles attached to it.
** The ward armor trim, as an item in the inventory, resembles the faces inside a [[warden]]'s chest.
** The silence armor trim appears to have sculk creeping onto / infecting it.
** The tide armor trim resembles [[Prismarine|prismarine bricks]].
** The snout armor trim resembles a [[piglin]]<ref name=":0" />.
** The rib armor trim resembles a [[wither skeleton]].
** The eye armor trim resembles an [[eye of ender]]. There are also two eyes on the head part of the armor trim that resemble those of an [[enderman]].
* ''Netherite upgrade smithing template'' (35 characters with "_" and 32 characters without "_") and ''sentry armor trim smithing template'' (35 characters with "_" and 31 characters without "_") are the current longest name for item ID, while ''[[polished blackstone pressure plate]]'' and ''[[cracked polished blackstone bricks]]'' have 34 characters with "_" and 31 characters without "_".
* The silence armor trim is the rarest trim, due to being found in ancient cities in the deep dark, and having only a 1.2% chance to be per chest.
* When [[lapis lazuli]] is used as trim material, it is called "Lapis" instead of its full name "Lapis Lazuli"; this is the only instance of the abbreviation "Lapis" being used in-game.<ref>{{bug|MC-262486|||WAI}}</ref>
== Gallery ==
=== Sprites ===
<gallery>
Netherite Upgrade Smithing Template.png|Netherite Upgrade
Sentry Armor Trim Smithing Template.png|Sentry Armor Trim
Vex Armor Trim Smithing Template.png|Vex Armor Trim
Wild Armor Trim Smithing Template.png|Wild Armor Trim
Coast Armor Trim Smithing Template.png|Coast Armor Trim
Dune Armor Trim Smithing Template.png|Dune Armor Trim
Wayfinder Armor Trim Smithing Template.png|Wayfinder Armor Trim
Raiser Armor Trim Smithing Template.png|Raiser Armor Trim
Shaper Armor Trim Smithing Template.png|Shaper Armor Trim
Host Armor Trim Smithing Template.png|Host Armor Trim
Ward Armor Trim Smithing Template.png|Ward Armor Trim
Silence Armor Trim Smithing Template.png|Silence Armor Trim
Tide Armor Trim Smithing Template.png|Tide Armor Trim
Snout Armor Trim Smithing Template.png|Snout Armor Trim
Rib Armor Trim Smithing Template.png|Rib Armor Trim
Eye Armor Trim Smithing Template.png|Eye Armor Trim
Spire Armor Trim Smithing Template.png|Spire Armor Trim
</gallery>
=== Armor trim patterns ===
<gallery>
Armor Trim Sentry (sample model).png|Sentry Armor Trim
Armor Trim Vex (sample model).png|Vex Armor Trim
Armor Trim Wild (sample model).png|Wild Armor Trim
Armor Trim Coast (sample model).png|Coast Armor Trim
Armor Trim Dune (sample model).png|Dune Armor Trim
Armor Trim Wayfinder (sample model).png|Wayfinder Armor Trim
Armor Trim Raiser (sample model).png|Raiser Armor Trim
Armor Trim Shaper (sample model).png|Shaper Armor Trim
Armor Trim Host (sample model).png|Host Armor Trim
Armor Trim Ward (sample model).png|Ward Armor Trim
Armor Trim Silence (sample model).png|Silence Armor Trim
Armor Trim Tide (sample model).png|Tide Armor Trim
Armor Trim Snout (sample model).png|Snout Armor Trim
Armor Trim Rib (sample model).png|Rib Armor Trim
Armor Trim Eye (sample model).png|Eye Armor Trim
Armor Trim Spire (sample model).png|Spire Armor Trim
</gallery>
=== Official Artwork ===
<gallery>
T&T Thumbnail.jpg|[[Sunny]] wearing amethyst armor trims.
Warden Chasing Alex with Silence Trim Pixel Art.png|A [[warden]] chasing Alex holding the silence armor trim.
Alex Trimming Armor in Smithing Table Pixel Art.png|Alex adding the silence armor trim and amethyst on iron armor.
Alex Wearing Iron Armor with Amethyst Pixel Art.jpg|Alex wearing the trimmed iron armor.
File:Live2023-01.jpeg|Noor working on trimmed iron armor.
</gallery>
=== Screenshots ===
<gallery>
Kingbdogz Armor Trim 1.jpg|Redstone trims on diamond armor.
Kingbdogz Armor Trim 2.jpg|Gold trims on netherite armor.
Too Many Trims.jpg|A large amount of armor trims.
Kingbdogz Armor Trim 3.jpg|Gold on netherite.
Kingbdogz Armor Trim 4.jpg|Diamond on diamond.
New Armor Trims in 23W12A.jpg|<ref>{{Tweet|kingbdogz|1638580472962850831|new trims got the drip The new "Silence" armor trim to the left is now the hardest trim to get, with only a 1% chance per chest to spawn in Ancient Cities. Definitely gonna be a challenge to get!|March 22, 2023}}</ref>
Emerald Armor.png|Emerald on gold.
Xilefian Armor Trims 1.png|[[Xilefian]] showing how armor trims work.
Xilefian Armor Trims 2.png|[[Xilefian]] showing how armor trims work.
Xilefian Armor Trims 3.png|[[Xilefian]] showing how armor trims work.
Armor Trims On Netherite Armors.png|A display of all eleven (before [[Java Edition 23w12a]]) armor trims and ten colors on netherite armors.
Armor Trim Showcase.png|A display of all eleven (before [[Java Edition 23w12a]]) armor trims, on netherite armor using emerald as the trim material.
Armor Trim Colors.png|A display of all ten armor trim colors, using the ward trim on a netherite helmet.
Silence Armor Trim on All Armors.png|A display of all ten colors of the silence armor trim on all armors.
Image 2023-06-07 154100087.png|A screenshot of every armor trim in every color(besides quartz) on leather armor.
Armor Trim Friends.jpg|Official screenshot of [[Alex]] and [[Zuri]] wearing armor trims.
LadyAgnes Armor Trims.jpg|Copper trims on netherite armor.
Trim Lineup.jpg
Fancy Delta.jpg|[[Kai]] wearing trimmed armor in a [[Basalt Delta]].
Trims & Pots.jpg
Noor Gold Armor Trim .jpeg
Noor Diamond Armor Trim.jpeg
Noor Netherite Armor Trim.jpeg
Noor Iron Armor Trim.jpeg
</gallery>
== References ==
{{Reflist}}
{{Items}}
[[Category:Bedrock Edition]]
[[Category:Non-renewable resources]]
[[de:Schmiedevorlage]]
[[es:Molde de herrería]]
[[fr:Modèle de forge]]
[[ja:鍛冶型]]
[[pl:Szablon kowalski]]
[[pt:Molde de ferraria]]
[[ru:Кузнечный шаблон]]
[[uk:Ковальський шаблон]]
[[zh:锻造模板]]</li></ul></nowiki> | 20w45a | Changed the order of the Game Mode button from Survival→Hardcore→Creative to Survival→Creative→Hardcore. | |||
| 21w03a | Reverted the game mode order change. | ||||
1.18{{Extension DPL}}<ul><li>[[Horse Saddle|Horse Saddle]]<br/>{{About|the removed item|the current item|Saddle}}
{{outdated feature|edition=java}}
{{Item
| title = Horse Saddle
| image = Horse Saddle.png
| renewable = Yes
| stackable = Yes (32)
}}
'''Horse saddles''' were [[item]]s which allowed the player to ride [[horse]]s.
== Obtaining ==
=== Crafting ===
{{crafting |ignoreusage=1
|A1=Leather |B1=Leather |C1=Leather
|A2=Leather |B2=Iron Ingot |C2=Leather
|A3=Iron Ingot |C3=Iron Ingot
|Output=Horse Saddle
}}
== Usage ==
Horse saddles worked just like regular [[saddle]]s, but for [[horse]]s instead of [[pig]]s. Taming a horse was required before putting a horse saddle on it. Unlike any other items, horse saddles could be stacked up to 32.
== Sounds ==
''None''<ref>{{ytl|2a6BQeW6is4|t=330}}; sounds for horses were not added until [[13w22a]]</ref>
== Data values ==
=== ID ===
{{ID table
|nonameid=y
|shownumericids=y
|showforms=y
|generatetranslationkeys=java
|displayname=Horse Saddle
|spritetype=item
|id=416
|form=item
|translationkey=item.horsesaddle.name
|foot=y}}
== History ==
{{History|java}}
{{History||1.6.1|snap=13w16a|[[File:Horse Saddle JE1.png|32px]] Added horse saddles.}}
{{History|||snap=13w18a|Horse saddles have been removed.
|[[Horse]]s and [[zombie horse]]s can now be ridden using regular [[saddle]]s.}}
{{History|foot}}
== Issues ==
Horse saddles have been removed from the game, and as such are no longer supported.
{{Items}}
{{Removed Features}}
[[es:Montura de caballo]]
[[fr:Selle de cheval]]
[[it:Sella di cavallo]]
[[ja:ウマの鞍]]
[[ko:말 안장]]
[[pt:Sela para cavalo]]
[[zh:马鞍]]</li><li>[[Redstone Repeater|Redstone Repeater]]<br/>{{Block
| image = <gallery>
Redstone Repeater.png|Redstone Repeater
Redstone Repeater BE.png|Redstone Repeater (BE)
</gallery>
| extratext = View [[#Renders|all renders]]
| transparent = Yes
| light = No
| tool = any
| stackable = Yes (64)
| flammable = No
| lavasusceptible = No
| renewable = Yes
}}
{{about|the block|repeater circuits|Transmission circuit#Repeater|other topics related to redstone|Redstone (disambiguation)}}
A '''redstone repeater''' is a [[block]] that produces a full-strength [[Redstone Dust|output signal]] from its front when its back is powered, with four configurable delay settings. It can also be locked into a power state by its side being directly powered by a repeater or a [[Redstone Comparator|comparator]].
== Obtaining ==
=== Breaking ===
A redstone repeater can be broken instantly using any [[tool]], or without a tool, and drops itself as an item. To remove a redstone repeater, {{control|mine}} it.
A redstone repeater is removed and drops as an item if:
* its attachment block is moved, removed, or destroyed;
* [[water]] or [[lava]] flows into its space;{{only|java}}
* a [[piston]] tries to push it or moves a block into its space.
=== Natural generation ===
[[File:Redstone Repeater naturally generated.png|thumb|A redstone repeater generated in the jungle temple's hidden room.]]
A single redstone repeater is generated naturally in each [[jungle temple]].
They also generate in [[Ancient City|ancient cities]].
=== Crafting ===
{{Crafting
|A2= Redstone Torch
|B2= Redstone Dust
|C2= Redstone Torch
|B3= Stone
|C3= Stone
|A3= Stone
|Output= Redstone Repeater
|type= Redstone
}}
== Usage ==
{{see also|Redstone circuit}}
A redstone repeater can be used in four different ways: to "repeat" redstone signals back to full strength, delay signals, prevent signals moving backwards, or to "lock" signals in one state.
A repeater can be placed only on top of [[opaque]] blocks (dirt, stone, etc.), on top of upside-down [[slab]]s, upside-down [[stairs]], furnaces, and glass. {{IN|be}}, a repeater can also be placed on fences and stone walls. They can also be placed on some transparent blocks. See [[Opacity/Placement]] for more information. To place a repeater, use the {{control|Place Block}} [[control]].
A redstone repeater has a front and back – the arrow on the top points to the repeater's front. A repeater also has two small redstone torches on its top – the color of the torches indicates whether its output is on (dark red when off, bright red when on) and the distance between them indicates the delay the repeater adds to the signal transmission.
A repeater is 0.125 ({{frac|1|8}}) blocks high.
=== Signal transmission ===
A repeater transmits signals only from its back to its front, but its behavior can be modified from the side (see [[#Signal locking|signal locking]], below).
[[File:Redstone Torch Power.png|Different ways to power a repeater|thumb]]
A redstone repeater can be powered by any of the following components at its back:
* an active [[power component]] (redstone torch, lever, block of redstone, etc.)
* powered [[redstone dust]]
* a powered [[redstone comparator]] or another powered redstone repeater facing the repeater
* a powered opaque block (including any opaque [[mechanism component]]s, such as [[dispenser]]s, [[redstone lamp]]s, etc.)
A redstone repeater can power any of the following components at its front:
* redstone dust
* a redstone comparator or another redstone repeater facing away from the repeater
* any opaque block (including any opaque [[mechanism component]]s)
A redstone repeater can activate any [[mechanism component]] it is facing.
An opaque block powered by a redstone repeater is called "strongly-powered" (as opposed to an opaque block "weakly-powered" by redstone dust). A strongly-powered opaque block can power adjacent redstone dust, as well as other redstone components.
=== Signal repeating ===
{{see also|Transmission circuit#Repeater}}
A redstone repeater can "repeat" a [[Redstone Dust|redstone]] signal, boosting it back up to power level 15.
Redstone signals have a maximum power level of 15 and that level drops by 1 for every block of [[redstone dust]] the signal travels through. If a signal must travel through more than 15 [[block]]s of redstone dust, a redstone repeater can be used to boost the signal back up to full strength. An extra two blocks of distance can be achieved by placing solid opaque blocks before and after the repeater.
While redstone repeaters can allow signals to travel great distances, each always adds some delay to the transmission since the minimum amount of delay is 1 redstone tick (0.1 seconds, barring lag).
=== Signal delay ===
When initially placed, a redstone repeater has a delay of one [[redstone tick]] (equivalent to two game ticks, or 0.1 seconds barring lag).
A repeater's delay can be modified by using the {{control|Use Item}} control. Each use increases the repeater's delay by one redstone tick, to a maximum of four redstone ticks, then back to one redstone tick. Longer delays can be made with multiple repeaters – for example, a repeater set to 'four' and another to 'one' provides a half-second delay (0.4s + 0.1s = 0.5s).
A repeater set to a delay of two to four redstone ticks increases the length of any shorter [[Pulse circuit#Pulses|on-pulse]] to match the length of the repeater's delay, and suppress any shorter off-pulse. For example, a repeater set to a 4-tick delay changes a 1-tick, 2-tick, or 3-tick on-pulse into a 4-tick on-pulse, and does not allow through any off-pulse shorter than 4 ticks.
Although a repeater cannot be set to have a delay of zero, [[Transmission circuit#Instant repeater|instant repeater circuits]] are possible (circuits that repeat a signal with no delay).
In Bedrock Edition, the first repeater have a delay of zero but the repeater is still showing 1-tick{{info needed}}
=== {{anchor|diode}} Signal direction ===
{{see also| Mechanics/Redstone/Transmission circuit#Diode}}
A redstone repeater acts as a diode – it allows redstone signals through in one direction (unlike [[redstone dust]] or opaque blocks that can transmit redstone signals in any direction).
A diode can be used to protect a [[redstone circuit]] from redstone signals feeding back into the circuit from its output, or can be used to isolate one part of a circuit from another.
=== {{anchor|lock}} Signal locking ===
{{see also| Mechanics/Redstone/Memory circuit}}
[[File:Latch.png|thumb|The left repeater has been locked in an unpowered output state by the right repeater.]]
A redstone repeater can be "locked" by another powered redstone repeater facing its side. When locked, the repeater does not change its output (whether powered or unpowered), no matter what the input does. When the side repeater turns back off, the repeater returns to its normal behavior.
A repeater can also be locked by a powered [[redstone comparator]] facing its side. This offers additional possibilities for locking signals because a comparator's output can be affected from 3 sides as well as by containers.
If a repeater is locked again too quickly after unlocking (e.g. the lock is controlled by a fast clock circuit), or the lock and the input are changed only on the same tick (e.g. because they're fed by the same clock and both repeaters have the same delay), the repeater does not switch states.
== Sounds ==
{{Edition|java}}:
{{Sound table/Block/Stone/JE}}
{{Edition|bedrock}}:
{{Sound table/Block/Wood/BE}}
== Data values ==
=== ID ===
{{edition|java}}:
{{ID table
|edition=java
|showforms=y
|generatetranslationkeys=y
|displayname=Redstone Repeater
|spritetype=block
|nameid=repeater
|foot=1}}
{{edition|bedrock}}:
{{ID table
|edition=bedrock
|firstcolumnname=Redstone Repeater
|shownumericids=y
|showforms=y
|generatetranslationkeys=y
|displayname=Unpowered block
|spritename=unpowered-repeater
|spritetype=block
|nameid=unpowered_repeater
|id=93
|form=block
|translationkey=-}}
{{ID table
|displayname=Powered block
|spritename=powered-repeater
|spritetype=block
|nameid=powered_repeater
|id=94
|form=block
|translationkey=-}}
{{ID table
|displayname=Item
|spritename=redstone-repeater
|spritetype=item
|nameid=repeater
|id=419
|form=item
|foot=1}}
=== Block states ===
{{see also|Block states}}
{{/BS}}
== Video ==
<div style="text-align:center">{{yt|0Ij_qMLiRzE}}</div>
== History ==
''For a more in-depth breakdown of changes to repeater textures and models, including a set of renders for each state combination, see [[/Asset history]]''
{{History|java beta}}
{{History||1.3|[[File:Redstone Repeater (S) JE1.png|32px]] [[File:Redstone Repeater (item) JE1.png|32px]] Added redstone repeaters.
|Originally, the four possible settings were "1, 2, 5 and 7",<ref>http://twitter.com/jeb_/status/33888465502339073</ref> but [[Jeb]] decided to change the settings to "1, 2, 3, and 4".<ref>http://www.reddit.com/r/Minecraft/comments/fmdtp/teammojang_redstone_repeater_video/c1gzrn6</ref>
|The particles when [[breaking]] redstone repeaters erroneously use the [[pumpkin]] top texture.}}
{{History||unknown|The breaking particles of redstone repeaters now use the smooth stone [[slab]] top texture, even though none of the elements on the [[model]] use it.}}
{{History||1.7|[[File:Redstone Repeater (S) JE2.png|32px]] The side texture of redstone repeaters has been changed to the previous bottom part of the texture.
|[[Redstone dust]] now automatically connects to the input of a redstone repeater. Previously, it needed to be specifically pointed towards the repeater like with other blocks.}}
{{History||unknown|Redstone dust now visually connects to the output of redstone repeaters, though this does not change its behavior.}}
{{History|java}}
{{History||unknown|The breaking particles of redstone repeaters have been changed to an unlit [[redstone torch]] when unpowered and a lit redstone torch when powered.}}
{{History||1.3.1|snap=12w22a|Redstone repeaters now naturally generate inside [[jungle temple]]s.}}
{{History|||snap=1.3|[[File:Redstone Repeater (item) JE2 BE1.png|32px]] The texture of redstone repeater [[item]]s have been changed.}}
{{History||1.4.2|snap=12w42a|[[File:Redstone Repeater (S) JE3.png|32px]] The top texture of redstone repeaters has now been changed.
|[[File:Locked Redstone Repeater (S) JE1.png|32px]] Added repeater locking to redstone repeaters. Interestingly, the smallest face of the bedrock cuboid's texture changes depending on the delay, but the other two faces remain the same. When/if this changed is unknown.}}
{{History||1.5|snap=13w02a|[[File:Redstone Repeater (S) JE4.png|32px]] The side textures of redstone repeaters have been changed to use the top texture of stone [[slab]]s.}}
{{History||unknown|The breaking [[particles|particle]] of redstone repeaters has been changed once again and now matches the top texture of redstone repeaters.}}
{{History||1.8|snap=14w06a|Repeaters no longer produce block [[light]] when powered.}}
{{History|||snap=14w10a|[[File:Powered Redstone Repeater (S) JE5.png|32px]] Torches on repeaters now no longer have protruding features.
|The torches underneath redstone repeaters have now been shortened, which has changed the underside textures from [[File:Redstone Repeater JE2 BE1 (facing NWU).png|32px]] [[File: Redstone Repeater Delay 2 JE2 BE1 (facing NWU).png|32px]] [[File: Redstone Repeater Delay 3 JE2 BE1 (facing NWU).png|32px]] [[File: Redstone Repeater Delay 4 JE2 BE1 (facing NWU).png|32px]] [[File: Active Redstone Repeater JE2 BE1 (facing NWU).png|32px]] [[File: Active Redstone Repeater Delay 2 JE2 BE1 (facing NWU).png|32px]] [[File: Active Redstone Repeater Delay 3 JE2 BE1 (facing NWU).png|32px]] [[File: Active Redstone Repeater Delay 4 JE2 BE1 (facing NWU).png|32px]] [[File: Locked Redstone Repeater JE2 BE1 (facing NWU).png|32px]] [[File: Locked Redstone Repeater Delay 2 JE2 BE1 (facing NWU).png|32px]] [[File: Locked Redstone Repeater Delay 3 JE2 BE1 (facing NWU).png|32px]] [[File: Locked Redstone Repeater Delay 4 JE2 BE1 (facing NWU).png|32px]] [[File: Active Locked Redstone Repeater JE2 BE1 (facing NWU).png|32px]] [[File: Active Locked Redstone Repeater Delay 2 JE2 BE1 (facing NWU).png|32px]] [[File: Active Locked Redstone Repeater Delay 3 JE2 BE1 (facing NWU).png|32px]] [[File: Active Locked Redstone Repeater Delay 4 JE2 BE1 (facing NWU).png|32px]] to [[File:Redstone Repeater JE3 (facing NWU).png|32px]] [[File: Redstone Repeater Delay 2 JE3 (facing NWU).png|32px]] [[File: Redstone Repeater Delay 3 JE3 (facing NWU).png|32px]] [[File: Redstone Repeater Delay 4 JE3 (facing NWU).png|32px]] [[File: Active Redstone Repeater JE3 (facing NWU).png|32px]] [[File: Active Redstone Repeater Delay 2 JE3 (facing NWU).png|32px]] [[File: Active Redstone Repeater Delay 3 JE3 (facing NWU).png|32px]] [[File: Active Redstone Repeater Delay 4 JE3 (facing NWU).png|32px]] [[File: Locked Redstone Repeater JE3 (facing NWU).png|32px]] [[File: Locked Redstone Repeater Delay 2 JE3 (facing NWU).png|32px]] [[File: Locked Redstone Repeater Delay 3 JE3 (facing NWU).png|32px]] [[File: Locked Redstone Repeater Delay 4 JE3 (facing NWU).png|32px]] [[File: Locked Active Redstone Repeater JE3 (facing NWU).png|32px]] [[File: Locked Active Redstone Repeater Delay 2 JE3 (facing NWU).png|32px]] [[File: Locked Active Redstone Repeater Delay 3 JE3 (facing NWU).png|32px]] [[File: Locked Active Redstone Repeater Delay 4 JE3 (facing NWU).png|32px]].}}
{{History|||snap=14w10b|[[File:Powered Redstone Repeater (S) JE4.png|32px]] Repeater torches now have protruding features again.<ref>{{bug|MC-50242}}</ref>}}
{{History|||snap=?|[[File:Powered Redstone Repeater (S) JE7.png|32px]] The torches on redstone repeaters are now affected by directional shading.}}
{{History||1.13|snap=17w47a|All 3 IDs for the redstone repeater have now been merged into 1 ID: <code>repeater</code>.
|Added powered block state to redstone repeaters.
|Redstone repeaters now render their underside, which has changed their undersides from [[File:Redstone Repeater JE3 (facing NWU).png|32px]] [[File: Redstone Repeater Delay 2 JE3 (facing NWU).png|32px]] [[File: Redstone Repeater Delay 3 JE3 (facing NWU).png|32px]] [[File: Redstone Repeater Delay 4 JE3 (facing NWU).png|32px]] [[File: Active Redstone Repeater JE3 (facing NWU).png|32px]] [[File: Active Redstone Repeater Delay 2 JE3 (facing NWU).png|32px]] [[File: Active Redstone Repeater Delay 3 JE3 (facing NWU).png|32px]] [[File: Active Redstone Repeater Delay 4 JE3 (facing NWU).png|32px]] [[File: Locked Redstone Repeater JE3 (facing NWU).png|32px]] [[File: Locked Redstone Repeater Delay 2 JE3 (facing NWU).png|32px]] [[File: Locked Redstone Repeater Delay 3 JE3 (facing NWU).png|32px]] [[File: Locked Redstone Repeater Delay 4 JE3 (facing NWU).png|32px]] [[File: Locked Active Redstone Repeater JE3 (facing NWU).png|32px]] [[File: Locked Active Redstone Repeater Delay 2 JE3 (facing NWU).png|32px]] [[File: Locked Active Redstone Repeater Delay 3 JE3 (facing NWU).png|32px]] [[File: Locked Active Redstone Repeater Delay 4 JE3 (facing NWU).png|32px]] to [[File:Redstone Repeater JE4 BE2 (facing NWU).png|32px]] [[File: Redstone Repeater Delay 2 JE4 BE2 (facing NWU).png|32px]] [[File: Redstone Repeater Delay 3 JE4 BE2 (facing NWU).png|32px]] [[File: Redstone Repeater Delay 4 JE4 BE2 (facing NWU).png|32px]] [[File: Active Redstone Repeater JE4 BE2 (facing NWU).png|32px]] [[File: Active Redstone Repeater Delay 2 JE4 BE2 (facing NWU).png|32px]] [[File: Active Redstone Repeater Delay 3 JE4 BE2 (facing NWU).png|32px]] [[File: Active Redstone Repeater Delay 4 JE4 BE2 (facing NWU).png|32px]] [[File: Locked Redstone Repeater JE4 BE2 (facing NWU).png|32px]] [[File: Locked Redstone Repeater Delay 2 JE4 BE2 (facing NWU).png|32px]] [[File: Locked Redstone Repeater Delay 3 JE4 BE2 (facing NWU).png|32px]] [[File: Locked Redstone Repeater Delay 4 JE4 BE2 (facing NWU).png|32px]] [[File: Locked Active Redstone Repeater JE4 BE2 (facing NWU).png|32px]] [[File: Locked Active Redstone Repeater Delay 2 JE4 BE2 (facing NWU).png|32px]] [[File: Locked Active Redstone Repeater Delay 3 JE4 BE2 (facing NWU).png|32px]] [[File: Locked Active Redstone Repeater Delay 4 JE4 BE2 (facing NWU).png|32px]].
|Prior to [[1.13/Flattening|''The Flattening'']], these [[block]]s' numeral IDs were 93 and 94, and the [[item]]'s 356.}}
{{History||1.14|snap=18w43a|[[File:Redstone Repeater (S) JE5.png|32px]] [[File:Powered Redstone Repeater (S) JE9.png|32px]] [[File:Locked Redstone Repeater (S) JE5.png|32px]] [[File:Powered Locked Redstone Repeater (S) JE6.png|32px]] [[File:Redstone Repeater (item) JE3 BE2.png|32px]] The textures of redstone repeaters have now been changed.}}
{{History|||snap=18w50a|[[File:Locked Redstone Repeater (S) JE6.png|32px]] [[File:Powered Locked Redstone Repeater (S) JE7.png|32px]] As the texture of [[bedrock]] has been changed, the textures of locked redstone repeaters have also now been changed.}}
{{History|||snap=19w12b|Redstone repeaters can now be placed on [[glass]], [[ice]], [[glowstone]] and [[sea lantern]]s.}}
{{History||1.19|snap=22w13a|Redstone repeaters now generate in [[Ancient City|ancient cities]].}}
{{History||1.20.2|snap=23w33a|Redstone repeaters now use stone sounds instead of wood sounds.<ref>{{bug|MC-182820|||Fixed}}</ref>}}
{{History|pocket alpha}}
{{History||v0.14.0|snap=build 1|[[File:Redstone Repeater (S) JE3.png|32px]] [[File:Redstone Repeater (item) JE2 BE1.png|32px]] Added redstone repeaters.}}
{{History|bedrock}}
{{History||1.2.0|snap=beta 1.2.0.2|Redstone repeaters now render their underside, which has changed their undersides from [[File:Redstone Repeater JE2 BE1 (facing NWU).png|32px]] [[File: Redstone Repeater Delay 2 JE2 BE1 (facing NWU).png|32px]] [[File: Redstone Repeater Delay 3 JE2 BE1 (facing NWU).png|32px]] [[File: Redstone Repeater Delay 4 JE2 BE1 (facing NWU).png|32px]] [[File: Active Redstone Repeater JE2 BE1 (facing NWU).png|32px]] [[File: Active Redstone Repeater Delay 2 JE2 BE1 (facing NWU).png|32px]] [[File: Active Redstone Repeater Delay 3 JE2 BE1 (facing NWU).png|32px]] [[File: Active Redstone Repeater Delay 4 JE2 BE1 (facing NWU).png|32px]] [[File: Locked Redstone Repeater JE2 BE1 (facing NWU).png|32px]] [[File: Locked Redstone Repeater Delay 2 JE2 BE1 (facing NWU).png|32px]] [[File: Locked Redstone Repeater Delay 3 JE2 BE1 (facing NWU).png|32px]] [[File: Locked Redstone Repeater Delay 4 JE2 BE1 (facing NWU).png|32px]] [[File: Active Locked Redstone Repeater JE2 BE1 (facing NWU).png|32px]] [[File: Active Locked Redstone Repeater Delay 2 JE2 BE1 (facing NWU).png|32px]] [[File: Active Locked Redstone Repeater Delay 3 JE2 BE1 (facing NWU).png|32px]] [[File: Active Locked Redstone Repeater Delay 4 JE2 BE1 (facing NWU).png|32px]] to [[File:Redstone Repeater JE4 BE2 (facing NWU).png|32px]] [[File: Redstone Repeater Delay 2 JE4 BE2 (facing NWU).png|32px]] [[File: Redstone Repeater Delay 3 JE4 BE2 (facing NWU).png|32px]] [[File: Redstone Repeater Delay 4 JE4 BE2 (facing NWU).png|32px]] [[File: Active Redstone Repeater JE4 BE2 (facing NWU).png|32px]] [[File: Active Redstone Repeater Delay 2 JE4 BE2 (facing NWU).png|32px]] [[File: Active Redstone Repeater Delay 3 JE4 BE2 (facing NWU).png|32px]] [[File: Active Redstone Repeater Delay 4 JE4 BE2 (facing NWU).png|32px]] [[File: Locked Redstone Repeater JE4 BE2 (facing NWU).png|32px]] [[File: Locked Redstone Repeater Delay 2 JE4 BE2 (facing NWU).png|32px]] [[File: Locked Redstone Repeater Delay 3 JE4 BE2 (facing NWU).png|32px]] [[File: Locked Redstone Repeater Delay 4 JE4 BE2 (facing NWU).png|32px]] [[File: Locked Active Redstone Repeater JE4 BE2 (facing NWU).png|32px]] [[File: Locked Active Redstone Repeater Delay 2 JE4 BE2 (facing NWU).png|32px]] [[File: Locked Active Redstone Repeater Delay 3 JE4 BE2 (facing NWU).png|32px]] [[File: Locked Active Redstone Repeater Delay 4 JE4 BE2 (facing NWU).png|32px]].}}
{{History||1.10.0|snap=beta 1.10.0.3|[[File:Redstone Repeater (S) BE2.png|32px]] [[File:Powered Redstone Repeater (S) BE2.png|32px]] [[File:Redstone Repeater (item) JE3 BE2.png|32px]] The textures of redstone repeaters have now been changed.}}
{{History||1.20.30|snap=beta 1.20.30.20|Redstone Repeaters now use the <code>minecraft:cardinal_direction</code> [[block state]] instead of <code>direction</code>.}}
{{History|console}}
{{History||xbox=TU1|xbone=CU1|ps=1.0|wiiu=Patch 1|switch=1.0.1|[[File:Redstone Repeater (S) JE3.png|32px]]{{verify|Was this model actually used here?}} [[File:Redstone Repeater (item) JE2 BE1.png|32px]] Added redstone repeaters.}}
{{History||xbox=TU19|xbone=CU7|ps=1.12|wiiu=Patch 1|switch=1.0.1|[[File:Locked Redstone Repeater (S) JE1.png|32px]]{{verify|Was this model actually used here?}} Added repeater locking to redstone repeaters.}}
{{History||xbox=none|xbone=none|ps=1.90|wiiu=none|switch=none|[[File:Redstone Repeater (S) JE4.png|32px]]{{verify|Was this model actually used here?}} [[File:Redstone Repeater (item) JE3 BE2.png|32px]] The textures of redstone repeaters have now been changed.}}
{{History|new 3ds}}
{{History||0.1.0|[[File:Redstone Repeater (S) JE3.png|32px]]{{verify|Was this model actually used here?}} [[File:Redstone Repeater (item) JE2 BE1.png|32px]] Added redstone repeaters and repeater locking.}}
{{History|foot}}
=== Redstone repeater "items" ===
{{:Technical blocks/Redstone Repeater}}
== Issues ==
{{Issue list}}
== Trivia ==
* The recipe and appearance of redstone repeaters are a likely reference to the old method of repeating signals, which would also use two torches at a time, inverting each other
== Gallery ==
<gallery>
Repeater clock.gif|A redstone clock formed from a redstone torch and a repeater.
Repeater feedback.gif|A redstone clock formed from two repeaters.
Two way repeater.gif|MCRedstoneSim diagram of a two-way repeater.
Repeater bridge.png|Crossing redstone wires using repeaters.
Jeb Repeaters 1.png|
Jeb Repeaters 2.png|
Jeb Repeaters 3.png|
</gallery>
=== Renders ===
<gallery>
Redstone Repeater.png
Redstone Repeater Delay 2.png
Redstone Repeater Delay 3.png
Redstone Repeater Delay 4.png
Powered Redstone Repeater.png
Powered Redstone Repeater Delay 2.png
Powered Redstone Repeater Delay 3.png
Powered Redstone Repeater Delay 4.png
Locked Redstone Repeater.png
Locked Redstone Repeater Delay 2.png
Locked Redstone Repeater Delay 3.png
Locked Redstone Repeater Delay 4.png
Powered Locked Redstone Repeater.png
Powered Locked Redstone Repeater Delay 2.png
Powered Locked Redstone Repeater Delay 3.png
Powered Locked Redstone Repeater Delay 4.png
Redstone Repeater BE.png
Redstone Repeater Delay 2 BE.png
Redstone Repeater Delay 3 BE.png
Redstone Repeater Delay 4 BE.png
Powered Redstone Repeater BE.png
Powered Redstone Repeater Delay 2 BE.png
Powered Redstone Repeater Delay 3 BE.png
Powered Redstone Repeater Delay 4 BE.png
Locked Redstone Repeater BE.png
Locked Redstone Repeater Delay 2 BE.png
Locked Redstone Repeater Delay 3 BE.png
Locked Redstone Repeater Delay 4 BE.png
Powered Locked Redstone Repeater BE.png
Powered Locked Redstone Repeater Delay 2 BE.png
Powered Locked Redstone Repeater Delay 3 BE.png
Powered Locked Redstone Repeater Delay 4 BE.png
</gallery>
== References ==
{{Reflist}}
{{Redstone}}
{{Blocks|Utility}}
{{Items}}
[[Category:Mechanics]]
[[Category:Redstone mechanics]]
[[Category:Redstone]]
[[Category:Mechanisms]]
[[Category:Manufactured blocks]]
[[Category:Generated structure blocks]]
[[Category:Non-solid blocks]]
[[de:Redstone-Verstärker]]
[[es:Repetidor de redstone]]
[[fr:Répéteur de redstone]]
[[hu:Redstone-jelismétlő]]
[[it:Ripetitore di redstone]]
[[ja:レッドストーンリピーター]]
[[ko:레드스톤 중계기]]
[[nl:Redstoneversterker]]
[[pl:Przekaźnik]]
[[pt:Repetidor de redstone]]
[[ru:Красный повторитель]]
[[tr:Kızıltaş tekrarlayıcı]]
[[zh:红石中继器]]</li></ul> | experimental snapshot 1 | Removed the Amplified and Large Biomes world types. | |||
| Pre-release 1 | Removed the “Caves” and “Floating Islands” world types. | ||||
| Re-added the Amplified and Large Biomes world types. | |||||
1.19.4{{Extension DPL}}<ul><li>[[:Category:Minecraft Dungeons items|Category:Minecraft Dungeons items]]<br/>All items that are in ''[[Minecraft Dungeons]]''.
{{Minecraft Dungeons items}}
[[Category:Minecraft Dungeons]]
[[Category:Items]]
[[ja:カテゴリ:アイテム (Minecraft Dungeons)]]
[[pl:Kategoria:Przedmioty w Minecraft Dungeons]]
[[pt:Categoria:Itens do Minecraft Dungeons]]</li><li>[[Sign|Sign]]<br/>{{Block
| image = <gallery>
Oak Sign.png|Sign
Oak Wall Sign.png|Wall Sign
Oak Hanging Sign.png|Hanging Sign
Oak Wall Hanging Sign.png|Wall Hanging Sign
</gallery>
| image2 = <gallery>
Oak Sign JE3.png|Sign
Oak Hanging Sign (item) JE1 BE1.png|Hanging Sign
</gallery>
| extratext = [[#Gallery|View all renders]]
| transparent = Yes
| light = No
| tool = axe
| renewable = Yes
| stackable = Yes (16)
| flammable = No
| lavasusceptible = No
}}
A '''sign''' is a non-solid [[block]] that displays text and can be placed on the top or side of other blocks. A '''hanging sign''' is a decorative block that also displays text, and can be placed underneath blocks or with a solid self-supporting bracket. The text of both types of signs can be customized with [[dye]]s and [[glow ink sac]]s.
== Obtaining ==
=== Breaking ===
Signs can be broken with any tool or without a tool, but an [[axe]] is fastest.
{{breaking row|horizontal=1|Sign|sprite=oak-sign|Axe|foot=1|item=1}}
A sign or a hanging sign also breaks and drops itself as an [[item]] if the block the sign is attached to is moved, removed or destroyed. However, a wall hanging sign will stay here if the block the hanging sign is attached to is removed.<ref>{{bug|MC-256501|||WAI}}</ref>
If a sign is broken while being edited, the player continues to edit the sign<ref>{{bug|MC-117815}}</ref>, although {{in|bedrock}} breaking the sign stops the editing operation.
=== Natural generation ===
An oak sign can be found in [[igloo]] basements. Spruce signs can be found in taiga [[village]] houses, as part of a chair.
=== Chest loot ===
{{LootChestItem|oak-sign,oak-hanging-sign,spruce-sign,spruce-hanging-sign}}
=== Crafting ===
[[The player]] can place six stripped [[log]] [[block]]s at the bottom half of the crafting table and place two [[chain]]s on the top-left and top-right slots to create hanging signs. This crafting recipe will create six hanging signs. Hanging signs can only be crafted with stripped logs or [[stem]]s; non-stripped wood cannot be used to craft hanging signs.
{{Crafting
|head=1
|showdescription=1
|nolink=1
|A1= Matching Planks
|B1= Matching Planks
|C1= Matching Planks
|A2= Matching Planks
|B2= Matching Planks
|C2= Matching Planks
|B3= Stick
|Output=Matching Sign,3
|type=Decoration block
}}
{{Crafting
|name= Hanging Sign
|A1= Chain
|C1= Chain
|A2= Matching Stripped Log or Stem; Block of Stripped Bamboo
|B2= Matching Stripped Log or Stem; Block of Stripped Bamboo
|C2= Matching Stripped Log or Stem; Block of Stripped Bamboo
|A3= Matching Stripped Log or Stem; Block of Stripped Bamboo
|B3= Matching Stripped Log or Stem; Block of Stripped Bamboo
|C3= Matching Stripped Log or Stem; Block of Stripped Bamboo
|Output= Matching Hanging Sign,6; Bamboo Hanging Sign,6
|type=Decoration block
|foot=1
}}
== Usage ==
Signs can be used to display text; they can be used to label storage, display information to other players or note areas of interest. Signs are also not destroyed by [[water]] or [[lava]] and therefore may be used to control the flow of these fluids.
=== Placement ===
==== Signs ====
Signs may be placed on the top or side of other [[block]]s (including semi-solid and non-solid blocks such as [[fence]]s, [[Trapdoor|trapdoors]] and other signs). To place a sign, {{control|use}} a sign [[item]] while pointing at the block the sign should be attached to, enter the desired text (or none), and click the "Done" button or press "escape" on a keyboard (or press × {{in|bedrock}}, {{xbtn|b}} on an Xbox controller, {{psbtn|o}} on a PlayStation controller, or {{nsbutton|B}} on a Nintendo Switch controller. Closing the virtual keyboard on a mobile device also exits the typing menu). To place a sign on a block that can be interacted with by the {{control|use}} control (for example, [[chest]]s, [[note block]]s, etc.), {{control|sneak}} while placing the sign.
Signs on the top of a block stand on a short post and face toward the player who placed it, in any of 16 different directions. Signs placed on the side of a block simply float there, even if the block doesn't make contact with the sign.
Even if placed on a vertical surface, a sign may not co-exist in the same block of air as any other item, despite not necessarily visibly obstructing eachother.
For more information about the blocks signs can be placed on, see [[Opacity/Placement]].
==== Hanging signs ====
Hanging signs can be placed in three different ways:
* Placing a hanging sign on the side of a block will result in it being placed with a self-supporting bracket, which allows it to float without any supporting block. This version can be placed in four different directions.
* Placing a hanging sign on the bottom of a block will result in the sign hanging below the block.
** If the block is wide enough, the chains holding the sign will be parallel. This version can be placed in four different directions.
** If the block is too narrow, the chains will meet together in a upwards arrow shape. This version is also placed if the player is {{control|sneaking}} when placing a hanging sign below a wide-enough block. This version can be placed in sixteen different directions.
=== Text ===
[[File:Oak Sign GUI.png|thumb|240px|Oak Sign editing.]]
Placing a sign opens an editor interface resembling a magnified view of the sign. Up to four lines of text can then be entered using a keyboard (hardware or on-screen). The editor supports limited editing, including moving the cursor and inserting and deleting characters. {{IN|bedrock}}, [[formatting codes]] can also be used to apply decorative effects such as color, bold, italic and underline to various bits of the text. Depending on the edition and platform in use, copy and paste operations may be supported and the editor may also support keyboard entry of Alt-codes for displaying Unicode characters.
Text can be added to the back side of a sign by interacting with the that side of the sign after placing it and editing the front.
Signs can be waxed by {{Control|use|text=using}} a [[honeycomb]] on it. Once waxed, a sign cannot be unwaxed or edited.
After placing and affixing text on a sign, a player can change the text color by {{control|using}} a [[dye]] on it. When colored with dye, the text color may differ from any color specified by formatting codes.{{Info needed|How does this work? Does the dye affect all the text? One line? One word? Does dye override all formatting codes, including font effects?}}
[[File:Glow Ink Sign with Orange Dye JE2.png|thumb|216px|Oak sign with glow ink and orange dye applied in {{JE}}.]]
A player can {{control|use}} a [[glow ink sac]] on a sign to make its text glow. The glowing text is not affected by lighting. The player can use a regular black [[ink sac]] on the sign to remove the glowing effect.
{| class="wikitable mw-collapsible mw-collapsed"
|+ class="nowrap" | Glow ink colors
!Name !! Main Color !! Edge Color
|-
! Black
| {{color|#000000}}
| {{color|#EDE8CA}}
|-
! Red
| {{color|#FC0000}}
| {{color|#650000}}
|-
! Green
| {{color|#00FC00}}
| {{color|#006500}}
|-
! Brown
| {{color|#894413}}
| {{color|#361B07}}
|-
! Blue
| {{color|#0000FC}}
| {{color|#000065}}
|-
! Purple
| {{color|#9E20ED}}
| {{color|#3F0C5F}}
|-
! Cyan
| {{color|#00D6D6}}
| {{color|#006565}}
|-
! Light Gray
| {{color|#D0D0D0}}
| {{color|#535353}}
|-
! Gray
| {{color|#7E7E7E}}
| {{color|#323232}}
|-
! Pink
| {{color|#FC68B2}}
| {{color|#652947}}
|-
! Lime
| {{color|#8DFC00}}
| {{color|#4B6500}}
|-
! Yellow
| {{color|#FCFC00}}
| {{color|#656500}}
|-
! Light Blue
| {{color|#98BECB}}
| {{color|#3C4B51}}
|-
! Magenta
| {{color|#FC00FC}}
| {{color|#650065}}
|-
! Orange
| {{color|#FC671F}}
| {{color|#65280C}}
|-
! White
| {{color|#FCFCFC}}
| {{color|#656565}}
|}
In [[Creative]] mode, the combination {{key|Ctrl}} + {{control|pick block}} on Windows/Linux, or {{key|cmd}} + {{control|pick block}} on macOS, can be used to copy an already-placed sign, including its text (with decorations), into the player's inventory.
A dyed sign facing east or west will have its text appear more saturated and bright than a sign facing north or south. However, it is actually the sign that is dimmer, because ''Minecraft'''s lighting engine uses side lighting to make the world appear less flat, but the text on signs is not affected by this.
{{IN|bedrock}}, inappropriate words or phrases in a sign's text are displayed as asterisks.
{{IN|java}}, signs can be created with [[Commands#Raw JSON Text|JSON text]], which allows complex formatting (colors, bold, italic, etc.), hover and click events, localized translation (for ''Minecraft'' technical terms, like "Redstone Repeater", otherwise translations must be provided in language files in resource packs), and the incorporation of scoreboard values into text. Use the {{cmd|data merge block}} command to create or alter JSON signs.
: Example: {{cmd|long=1|data merge block ~ ~1 ~ <nowiki>{front_text:{ color:"green", messages:[ '{"selector":"@p", "bold":false, "italic":false, "underlined":false, "strikethrough":false, "obfuscated":false}' , '{"text":"Second Line"}']}}}}
Signs can post the success count of JSON text hover and click events to [[scoreboard]] objectives. The objectives to be used can be specified by running the {{cmd|execute store}} command or by modifying the sign's NBT data directly with the {{cmd|data merge block}} command.
=== Interaction ===
Signs act as though they have a {{control|use}} action, so the [[player]] is unable to place [[block]]s or use [[item]]s while the cursor is pointed at them without {{control|sneaking}}.
Signs are destroyed and drop as an item when pushed by a [[piston]].{{Only|bedrock}}
Signs are non-solid and have no collision, so [[item]]s and [[mob]]s can move through sign blocks. Other [[block]]s (including other signs) can be placed on any edge of a sign.
[[Water]] and [[lava]] flow around signs. Lava can create [[fire]] in [[air]] blocks next to signs as if the signs were flammable, but the signs do not burn (and cannot be burned by other methods either, except {{in|be}}).
=== Fuel ===
Wooden signs can be used as a fuel in [[furnace]]s, smelting an [[item]] per sign.
=== Note Blocks ===
Signs can be placed under [[note block]]s to produce a "bass" sounds.
== Sounds ==
=== Generic ===
==== Normal wood ====
; Sign
{{Sound table/Block/Wood|forcecollapsed=1}}
; Hanging sign
{{Sound table/Block/Hanging sign|forcecollapsed=1}}
==== Cherry wood ====
; Sign
{{Sound table/Block/Cherry wood|forcecollapsed=1}}
; Hanging sign
{{Sound table/Block/Cherry wood hanging sign|forcecollapsed=1}}
==== Bamboo wood ====
; Sign
{{Sound table/Block/Bamboo wood|forcecollapsed=1}}
; Hanging sign
{{edition|java}}:
{{Sound table/Block/Bamboo wood hanging sign/JE|forcecollapsed=1}}
{{edition|bedrock}}:
{{Sound table/Block/Bamboo wood hanging sign/BE|forcecollapsed=1}}
==== Nether wood ====
; Sign
{{Sound table/Block/Nether wood|forcecollapsed=1}}
; Hanging sign
{{edition|java}}:
{{Sound table/Block/Nether wood hanging sign/JE|forcecollapsed=1}}
{{edition|bedrock}}:
{{Sound table/Block/Nether wood hanging sign/BE|forcecollapsed=1}}
=== Unique ===
{{edition|java}}:
{{Sound table|forcecollapsed=1
|rowspan=2
|sound=Ink sac1.ogg
|sound2=Ink sac2.ogg
|sound3=Ink sac3.ogg
|subtitle=Glow Ink Sac splotches
|source=block
|description=When a [[glow ink sac]] is used on a sign
|id=item.glow_ink_sac.use
|translationkey=subtitles.item.glow_ink_sac.use
|volume=1.0
|pitch=''varies'' <ref group=sound>Can be 1.0, 0.95, or 1.05 for each sound</ref>
|distance=16}}
{{Sound table
|subtitle=Ink Sac splotches
|source=block
|description=When an [[ink sac]] is used on a sign
|id=item.ink_sac.use
|translationkey=subtitles.item.ink_sac.use
|volume=1.0
|pitch=''varies'' <ref group=sound>Can be 0.85, 0.88, or 0.9 for each sound</ref>
|distance=16}}
{{Sound table
|sound=Dye.ogg
|subtitle=Dye stains
|source=block
|description=When [[dye]] is used on a sign
|id=item.dye.use
|translationkey=subtitles.item.dye.use
|volume=1.0
|pitch=''varies'' <ref group=sound>Can be 1.0, 0.9, 0.95, or 1.1</ref>
|distance=16}}
{{Sound table
|sound=Wax on1.ogg
|sound2=Wax on2.ogg
|sound3=Wax on3.ogg
|subtitle=Wax on
|source=block
|description=When a sign is waxed
|id=item.honeycomb.wax_on
|translationkey=subtitles.item.honeycomb.wax_on
|volume=1.0
|pitch=1.0/0.9/1.1
|distance=16}}
{{Sound table
|sound=Sign waxed interact fail1.ogg
|sound2=Sign waxed interact fail2.ogg
|sound3=Sign waxed interact fail3.ogg
|subtitle=Sign wobbles
|source=block
|description=When a player attempts to edit a waxed sign
|id=block.sign.waxed_interact_fail
|translationkey=subtitles.block.sign.waxed_interact_fail
|volume=1.0
|pitch=''varies''<ref group=sound>{{cd|fail1}} can be 1.0 or 0.9; {{cd|fail2}} and {{cd|fail3}} can be 0.8 or 0.9</ref>
|distance=16
|foot=1}}
{{edition|bedrock}}:
{{Sound table|forcecollapsed=1
|type=bedrock
|sound=Ink sac1.ogg
|sound2=Ink sac2.ogg
|sound3=Ink sac3.ogg
|source=sound
|description=When a glow ink sac or an ink sac is used on a sign
|id=sign.ink_sac.use
|volume=1.0
|pitch=1.0}}
{{Sound table
|type=bedrock
|sound=Dye.ogg
|source=sound
|description=When dye is used on a sign
|id=sign.dye.use
|volume=1.0
|pitch=1.0}}
{{Sound table
|sound=Wax on1.ogg
|sound2=Wax on2.ogg
|sound3=Wax on3.ogg
|source=neutral
|description=When a honeycomb waxes a sign
|id=copper.wax.on
|volume=1.0
|pitch=0.8-1.2}}
{{Sound table
|sound=Sign waxed interact fail1.ogg
|sound2=Sign waxed interact fail2.ogg
|sound3=Sign waxed interact fail3.ogg
|source=block
|description=When a player attempts to edit a waxed sign
|id=block.sign.waxed_interact_fail
|volume=1.0
|pitch=''varies'' <ref group=sound>Can be 1.0 or 0.9 for <code>waxed_interact_fail1</code>; can be 0.8 or 0.9 for <code>waxed_interact_fail2</code> and <code>waxed_interact_fail3</code></ref>
|foot=1}}
== Data values ==
=== ID ===
{{edition|java}}:
{{ID table
|edition=java
|showblocktags=y
|showitemtags=y
|showforms=y
|generatetranslationkeys=y
|displayname=Oak Sign
|spritetype=block
|nameid=oak_sign
|blocktags=signs, standing_signs, wall_post_override
|itemtags=signs}}
{{ID table
|displayname=Spruce Sign
|spritetype=block
|nameid=spruce_sign
|blocktags=signs, standing_signs, wall_post_override
|itemtags=signs}}
{{ID table
|displayname=Birch Sign
|spritetype=block
|nameid=birch_sign
|blocktags=signs, standing_signs, wall_post_override
|itemtags=signs}}
{{ID table
|displayname=Jungle Sign
|spritetype=block
|nameid=jungle_sign
|blocktags=signs, standing_signs, wall_post_override
|itemtags=signs}}
{{ID table
|displayname=Acacia Sign
|spritetype=block
|nameid=acacia_sign
|blocktags=signs, standing_signs, wall_post_override
|itemtags=signs}}
{{ID table
|displayname=Dark Oak Sign
|spritetype=block
|nameid=dark_oak_sign
|blocktags=signs, standing_signs, wall_post_override
|itemtags=signs}}
{{ID table
|displayname=Mangrove Sign
|spritetype=block
|nameid=mangrove_sign
|blocktags=signs, standing_signs, wall_post_override
|itemtags=signs}}
{{ID table
|displayname=Cherry Sign
|spritename=Cherry Sign
|spritetype=block
|nameid=cherry_sign
|blocktags=signs, standing_signs, wall_post_override
|itemtags=signs}}
{{ID table
|displayname=Bamboo Sign
|spritename=Bamboo Sign
|spritetype=block
|nameid=bamboo_sign
|blocktags=signs, standing_signs, wall_post_override
|itemtags=signs}}
{{ID table
|displayname=Crimson Sign
|spritetype=block
|nameid=crimson_sign
|blocktags= signs, standing_signs, wall_post_override
|itemtags=non_flammable_wood, signs}}
{{ID table
|displayname=Warped Sign
|spritetype=block
|nameid=warped_sign
|blocktags=signs, standing_signs, wall_post_override
|itemtags=non_flammable_wood, signs}}
{{ID table
|displayname=Oak Wall Sign
|spritetype=block
|nameid=oak_wall_sign
|blocktags=signs, wall_signs
|form=block}}
{{ID table
|displayname=Spruce Wall Sign
|spritetype=block
|nameid=spruce_wall_sign
|blocktags=signs, wall_signs
|form=block}}
{{ID table
|displayname=Birch Wall Sign
|spritetype=block
|nameid=birch_wall_sign
|blocktags=signs, wall_signs
|form=block}}
{{ID table
|displayname=Jungle Wall Sign
|spritetype=block
|nameid=jungle_wall_sign
|blocktags=signs, wall_signs
|form=block}}
{{ID table
|displayname=Acacia Wall Sign
|spritetype=block
|nameid=acacia_wall_sign
|blocktags=signs, wall_signs
|form=block}}
{{ID table
|displayname=Dark Oak Wall Sign
|spritetype=block
|nameid=dark_oak_wall_sign
|blocktags=signs, wall_signs
|form=block}}
{{ID table
|displayname=Mangrove Wall Sign
|spritetype=block
|nameid=mangrove_wall_sign
|blocktags=signs, wall_signs
|form=block}}
{{ID table
|displayname=Cherry Wall Sign
|spritename=Cherry Wall Sign
|spritetype=block
|nameid=cherry_wall_sign
|blocktags=signs, wall_signs
|form=block}}
{{ID table
|displayname=Bamboo Wall Sign
|spritename=Bamboo Wall Sign
|spritetype=block
|nameid=bamboo_wall_sign
|blocktags=signs, wall_signs
|form=block}}
{{ID table
|displayname=Crimson Wall Sign
|spritetype=block
|nameid=crimson_wall_sign
|blocktags=signs, wall_signs
|form=block}}
{{ID table
|displayname=Warped Wall Sign
|spritetype=block
|nameid=warped_wall_sign
|blocktags=signs, wall_signs
|form=block}}
{{ID table
|displayname=Oak Hanging Sign
|spritename=Oak Hanging Sign
|spritetype=block
|nameid=oak_hanging_sign
|blocktags=all_hanging_signs, ceiling_hanging_signs
|itemtags=hanging_signs}}
{{ID table
|displayname=Spruce Hanging Sign
|spritename=Spruce Hanging Sign
|spritetype=block
|nameid=spruce_hanging_sign
|blocktags=all_hanging_signs, ceiling_hanging_signs
|itemtags=hanging_signs}}
{{ID table
|displayname=Birch Hanging Sign
|spritename=Birch Hanging Sign
|spritetype=block
|nameid=birch_hanging_sign
|blocktags=all_hanging_signs, ceiling_hanging_signs
|itemtags=hanging_signs}}
{{ID table
|displayname=Jungle Hanging Sign
|spritename=Jungle Hanging Sign
|spritetype=block
|nameid=jungle_hanging_sign
|blocktags=all_hanging_signs, ceiling_hanging_signs
|itemtags=hanging_signs}}
{{ID table
|displayname=Acacia Hanging Sign
|spritename=Acacia Hanging Sign
|spritetype=block
|nameid=acacia_hanging_sign
|blocktags=all_hanging_signs, ceiling_hanging_signs
|itemtags=hanging_signs}}
{{ID table
|displayname=Dark Oak Hanging Sign
|spritename=Dark Oak Hanging Sign
|spritetype=block
|nameid=dark_oak_hanging_sign
|blocktags=all_hanging_signs, ceiling_hanging_signs
|itemtags=hanging_signs}}
{{ID table
|displayname=Mangrove Hanging Sign
|spritename=Mangrove Hanging Sign
|spritetype=block
|nameid=mangrove_hanging_sign
|blocktags=all_hanging_signs, ceiling_hanging_signs
|itemtags=hanging_signs}}
{{ID table
|displayname=Cherry Hanging Sign
|spritename=Cherry Hanging Sign
|spritetype=block
|nameid=cherry_hanging_sign
|blocktags=all_hanging_signs, ceiling_hanging_signs
|itemtags=hanging_signs}}
{{ID table
|displayname=Bamboo Hanging Sign
|spritename=Bamboo Hanging Sign
|spritetype=block
|nameid=bamboo_hanging_sign
|blocktags=all_hanging_signs, ceiling_hanging_signs
|itemtags=hanging_signs}}
{{ID table
|displayname=Crimson Hanging Sign
|spritename=Crimson Hanging Sign
|spritetype=block
|nameid=crimson_hanging_sign
|blocktags=all_hanging_signs, ceiling_hanging_signs
|itemtags=hanging_signs, non_flammable_wood}}
{{ID table
|displayname=Warped Hanging Sign
|spritename=Warped Hanging Sign
|spritetype=block
|nameid=warped_hanging_sign
|blocktags=all_hanging_signs, ceiling_hanging_signs
|itemtags=hanging_signs, non_flammable_wood}}
{{ID table
|displayname=Oak Wall Hanging Sign
|spritename=Oak Wall Hanging Sign
|spritetype=block
|nameid=oak_wall_hanging_sign
|blocktags=all_hanging_signs, wall_hanging_signs
|form=block}}
{{ID table
|displayname=Spruce Wall Hanging Sign
|spritename=Spruce Wall Hanging Sign
|spritetype=block
|nameid=spruce_wall_hanging_sign
|blocktags=all_hanging_signs, wall_hanging_signs
|form=block}}
{{ID table
|displayname=Birch Wall Hanging Sign
|spritename=Birch Wall Hanging Sign
|spritetype=block
|nameid=birch_wall_hanging_sign
|blocktags=all_hanging_signs, wall_hanging_signs
|form=block}}
{{ID table
|displayname=Jungle Wall Hanging Sign
|spritename=Jungle Wall Hanging Sign
|spritetype=block
|nameid=jungle_wall_hanging_sign
|blocktags=all_hanging_signs, wall_hanging_signs
|form=block}}
{{ID table
|displayname=Acacia Wall Hanging Sign
|spritename=Acacia Wall Hanging Sign
|spritetype=block
|nameid=acacia_wall_hanging_sign
|blocktags=all_hanging_signs, wall_hanging_signs
|form=block}}
{{ID table
|displayname=Dark Oak Wall Hanging Sign
|spritename=Dark Oak Wall Hanging Sign
|spritetype=block
|nameid=dark_oak_wall_hanging_sign
|blocktags=all_hanging_signs, wall_hanging_signs
|form=block}}
{{ID table
|displayname=Mangrove Wall Hanging Sign
|spritename=Mangrove Wall Hanging Sign
|spritetype=block
|nameid=mangrove_wall_hanging_sign
|blocktags=all_hanging_signs, wall_hanging_signs
|form=block}}
{{ID table
|displayname=Cherry Wall Hanging Sign
|spritename=Cherry Wall Hanging Sign
|spritetype=block
|nameid=cherry_wall_hanging_sign
|blocktags=all_hanging_signs, wall_hanging_signs
|form=block}}
{{ID table
|displayname=Bamboo Wall Hanging Sign
|spritename=Bamboo Wall Hanging Sign
|spritetype=block
|nameid=bamboo_wall_hanging_sign
|blocktags=all_hanging_signs, wall_hanging_signs
|form=block}}
{{ID table
|displayname=Crimson Wall Hanging Sign
|spritename=Crimson Wall Hanging Sign
|spritetype=block
|nameid=crimson_wall_hanging_sign
|blocktags=all_hanging_signs, wall_hanging_signs
|form=block}}
{{ID table
|displayname=Warped Wall Hanging Sign
|spritename=Warped Wall Hanging Sign
|spritetype=block
|nameid=warped_wall_hanging_sign
|blocktags=all_hanging_signs, wall_hanging_signs
|form=block
|foot=1}}
{{ID table
|displayname=Block entity
|spritename=signs
|spritetype=block
|nameid=sign}}
{{ID table
|displayname=Block entity
|spritename=hanging-signs
|spritetype=block
|nameid=hanging_sign
|foot=1}}
{{edition|bedrock}}:
{{ID table
|edition=bedrock
|firstcolumnname=Sign
|shownumericids=y
|showforms=y
|showaliasids=y
|showitemtags=y
|generatetranslationkeys=y
|displayname=Oak standing
|spritename=oak-sign
|spritetype=block
|nameid=standing_sign
|id=63
|form=block}}
{{ID table
|displayname=Spruce standing
|spritename=spruce-sign
|spritetype=block
|nameid=spruce_standing_sign
|id=436
|form=block}}
{{ID table
|displayname=Birch standing
|spritename=birch-sign
|spritetype=block
|nameid=birch_standing_sign
|id=441
|form=block}}
{{ID table
|displayname=Jungle standing
|spritename=jungle-sign
|spritetype=block
|nameid=jungle_standing_sign
|id=443
|form=block}}
{{ID table
|displayname=Acacia standing
|spritename=acacia-sign
|spritetype=block
|nameid=acacia_standing_sign
|id=445
|form=block}}
{{ID table
|displayname=Dark Oak standing
|spritename=dark-oak-sign
|spritetype=block
|nameid=darkoak_standing_sign
|id=447
|form=block}}
{{ID table
|displayname=Mangrove standing
|spritename=mangrove-sign
|spritetype=block
|nameid=mangrove_standing_sign
|id=-494
|form=block
|translationkey=-}}
{{ID table
|displayname=Cherry standing
|spritename=cherry-sign
|spritetype=block
|nameid=cherry_standing_sign
|id=-542
|form=block
|translationkey=-}}
{{ID table
|displayname=Bamboo standing
|spritename=bamboo-sign
|spritetype=block
|nameid=bamboo_standing_sign
|id=-518
|form=block
|translationkey=-}}
{{ID table
|displayname=Crimson standing
|spritename=crimson-sign
|spritetype=block
|nameid=crimson_standing_sign
|id=505
|form=block}}
{{ID table
|displayname=Warped standing
|spritename=warped-sign
|spritetype=block
|nameid=warped_standing_sign
|id=506
|form=block}}
{{ID table
|displayname=Oak wall
|spritename=oak-wall-sign
|spritetype=block
|nameid=wall_sign
|id=68
|form=block
|translationkey=-}}
{{ID table
|displayname=Spruce wall
|spritename=spruce-wall-sign
|spritetype=block
|nameid=spruce_wall_sign
|id=437
|form=block
|translationkey=-}}
{{ID table
|displayname=Birch wall
|spritename=birch-wall-sign
|spritetype=block
|nameid=birch_wall_sign
|id=442
|form=block
|translationkey=-}}
{{ID table
|displayname=Jungle wall
|spritename=jungle-wall-sign
|spritetype=block
|nameid=jungle_wall_sign
|id=444
|form=block
|translationkey=-}}
{{ID table
|displayname=Acacia wall
|spritename=acacia-wall-sign
|spritetype=block
|nameid=acacia_wall_sign
|id=446
|form=block
|translationkey=-}}
{{ID table
|displayname=Dark Oak wall
|spritename=dark-oak-wall-sign
|spritetype=block
|nameid=darkoak_wall_sign
|id=448
|form=block
|translationkey=-}}
{{ID table
|displayname=Mangrove wall
|spritename=mangrove-wall-sign
|spritetype=block
|nameid=mangrove_wall_sign
|id=-495
|form=block
|translationkey=-}}
{{ID table
|displayname=Cherry wall
|spritename=cherry-wall-sign
|spritetype=block
|nameid=cherry_wall_sign
|id=-544
|form=block
|translationkey=-}}
{{ID table
|displayname=Bamboo wall
|spritename=bamboo-wall-sign
|spritetype=block
|nameid=bamboo_wall_sign
|id=-519
|form=block
|translationkey=-}}
{{ID table
|displayname=Crimson wall
|spritename=crimson-wall-sign
|spritetype=block
|nameid=crimson_wall_sign
|id=507
|form=block}}
{{ID table
|displayname=Warped wall
|spritename=warped-wall-sign
|spritetype=block
|nameid=warped_wall_sign
|id=508
|form=block}}
{{ID table
|displayname=Oak item
|spritename=oak-sign
|spritetype=item
|nameid=oak_sign
|aliasid=sign
|id=360
|form=item
|itemtags=minecraft:sign
|translationkey=item.sign.name}}
{{ID table
|displayname=Spruce item
|spritename=spruce-sign
|spritetype=item
|nameid=spruce_sign
|id=576
|form=item
|itemtags=minecraft:sign}}
{{ID table
|displayname=Birch item
|spritename=birch-sign
|spritetype=item
|nameid=birch_sign
|id=577
|form=item
|itemtags=minecraft:sign}}
{{ID table
|displayname=Jungle item
|spritename=jungle-sign
|spritetype=item
|nameid=jungle_sign
|id=578
|form=item
|itemtags=minecraft:sign}}
{{ID table
|displayname=Acacia item
|spritename=acacia-sign
|spritetype=item
|nameid=acacia_sign
|id=579
|form=item
|itemtags=minecraft:sign}}
{{ID table
|displayname=Dark Oak item
|spritename=dark-oak-sign
|spritetype=item
|nameid=dark_oak_sign
|aliasid=darkoak_sign
|id=587
|form=item
|itemtags=minecraft:sign
|translationkey=item.darkoak_sign.name}}
{{ID table
|displayname=Mangrove item
|spritename=mangrove-sign
|spritetype=item
|nameid=mangrove_sign
|id=642
|form=item
|itemtags=minecraft:sign}}
{{ID table
|displayname=Cherry item
|spritename=cherry-sign
|spritetype=item
|nameid=cherry_sign
|id=659
|form=item
|itemtags=minecraft:sign}}
{{ID table
|displayname=Bamboo item
|spritename=bamboo-sign
|spritetype=item
|nameid=bamboo_sign
|id=660
|form=item
|itemtags=minecraft:sign}}
{{ID table
|displayname=Crimson item
|spritename=crimson-sign
|spritetype=item
|nameid=crimson_sign
|id=614
|form=item
|itemtags=minecraft:sign}}
{{ID table
|displayname=Warped item
|spritename=warped-sign
|spritetype=item
|nameid=warped_sign
|id=615
|form=item
|itemtags=minecraft:sign}}
{{ID table
|displayname=Oak Hanging Sign
|spritename=Oak Wall Hanging Sign
|spritetype=block
|nameid=oak_hanging_sign
|id=-500
|itemtags=minecraft:hanging_sign
|translationkey=item.oak_hanging_sign.name}}
{{ID table
|displayname=Spruce Hanging Sign
|spritename=Spruce Wall Hanging Sign
|spritetype=block
|nameid=spruce_hanging_sign
|id=-501
|itemtags=minecraft:hanging_sign
|translationkey=item.spruce_hanging_sign.name}}
{{ID table
|displayname=Birch Hanging Sign
|spritename=Birch Wall Hanging Sign
|spritetype=block
|nameid=birch_hanging_sign
|id=-502
|itemtags=minecraft:hanging_sign
|translationkey=item.birch_hanging_sign.name}}
{{ID table
|displayname=Jungle Hanging Sign
|spritename=Jungle Wall Hanging Sign
|spritetype=block
|nameid=jungle_hanging_sign
|id=-503
|itemtags=minecraft:hanging_sign
|translationkey=item.jungle_hanging_sign.name}}
{{ID table
|displayname=Acacia Hanging Sign
|spritename=Acacia Wall Hanging Sign
|spritetype=block
|nameid=acacia_hanging_sign
|id=-504
|itemtags=minecraft:hanging_sign
|translationkey=item.acacia_hanging_sign.name}}
{{ID table
|displayname=Dark Oak Hanging Sign
|spritename=Dark Oak Wall Hanging Sign
|spritetype=block
|nameid=dark_oak_hanging_sign
|id=-505
|itemtags=minecraft:hanging_sign
|translationkey=item.dark_oak_hanging_sign.name}}
{{ID table
|displayname=Mangrove Hanging Sign
|spritename=Mangrove Wall Hanging Sign
|spritetype=block
|nameid=mangrove_hanging_sign
|id=-508
|itemtags=minecraft:hanging_sign
|translationkey=item.mangrove_hanging_sign.name}}
{{ID table
|displayname=Cherry Hanging Sign
|spritename=Cherry Wall Hanging Sign
|spritetype=block
|nameid=cherry_hanging_sign
|id=-534
|itemtags=minecraft:hanging_sign
|translationkey=item.cherry_hanging_sign.name}}
{{ID table
|displayname=Bamboo Hanging Sign
|spritename=Bamboo Wall Hanging Sign
|spritetype=block
|nameid=bamboo_hanging_sign
|id=-522
|itemtags=minecraft:hanging_sign
|translationkey=item.bamboo_hanging_sign.name}}
{{ID table
|displayname=Crimson Hanging Sign
|spritename=Crimson Wall Hanging Sign
|spritetype=block
|nameid=crimson_hanging_sign
|id=-506
|itemtags=minecraft:hanging_sign
|translationkey=item.crimson_hanging_sign.name}}
{{ID table
|displayname=Warped Hanging Sign
|spritename=Warped Wall Hanging Sign
|spritetype=block
|nameid=warped_hanging_sign
|id=-507
|itemtags=minecraft:hanging_sign
|translationkey=item.warped_hanging_sign.name
|foot=1}}
{{ID table
|notnamespaced=y
|displayname=Block entity
|spritename=signs
|spritetype=block
|nameid=Sign}}
{{ID table
|displayname=Block entity
|spritename=hanging-signs
|spritetype=block
|nameid=HangingSign
|foot=1}}
=== Block states ===
{{see also|Block states}}
{{/BS}}
=== Block data ===
A sign has a block entity associated with it that holds additional data about the block.
{{el|java}}:
{{see also|Block entity format}}
{{/BE}}
{{el|bedrock}}:
:See [[Bedrock Edition level format/Block entity format]].
== Achievements ==
{{load achievements|It's a Sign}}
== Advancements ==
{{load advancements|Glow and Behold}}
== History ==
{{main|/History}}
{{History|java classic}}
{{History||0.24_SURVIVAL_TEST|[[File:Sign Entity.png|32px]] Signs are currently being tested as [[entity|entities]]. They always display "This is a test of the signs. Each line can be 15 chars!" and can only be spawned by pressing {{key|B}}.<ref>{{ytl|bdT76iFEnLk}}</ref>}}
{{History||0.26 SURVIVAL TEST|Removed signs.}}
{{History|java infdev}}
{{History||20100607|[[File:Oak Sign (0) JE1.png|32px]] Signs have been re-implemented as [[block]]s, although still rendering as entities.
|Signs now have a [[crafting]] recipe and the text can now be edited. Editing a sign pauses the game in [[singleplayer]].
|Signs are currently huge and drop [[planks]] when destroyed.
|Signs do not have a particle texture defined. As such, they [[Placeholder texture#Default texture|default to using the grass block texture instead]].}}
{{History||20100608|Signs are now broken faster.
|Signs now [[drops|drop]] themselves when [[breaking|destroyed]], instead of planks.
|Signs now use planks particles.}}
{{History|java alpha}}
{{History||v1.0.1|[[File:Oak Wall Sign (S) JE1 BE1.png|32px]] Added wall signs.
|[[File:Oak Sign (0) JE2.png|32px]] Signs are now smaller.}}
{{History||v1.0.5|Signs no longer require a free [[block]] above it to place.}}
{{History|java beta}}
{{History||April 27, 2011|link=https://notch.tumblr.com/post/4988431144|Hand-drawn signs are mentioned.}}
{{History|java}}
{{History||1.0.0|snap=Beta 1.9 Prerelease 6|Signs are now broken faster using an [[axe]].}}
{{History||1.3.1|snap=12w18a|Editing a sign no longer pauses the game in [[singleplayer]].}}
{{History|||snap=12w27a|Signs are now stackable up to 16.
|The same [[crafting]] recipe now produces 3 signs instead of 1.}}
{{History||June 9, 2014|link=https://twitter.com/SeargeDP/status/476047216541700096|[[Searge]] tweeted a picture of a sign showing a username and a [[scoreboard]] score.}}
{{History||1.8|snap=14w25a|Added support for JSON text to signs.
|Sign character limit now depends on character width.}}
{{History|||snap=14w29a|Signs now display the cracking animation.}}
{{History||1.9|snap=15w43a|A sign now generates within [[igloo]] basements.}}
{{History||1.11|snap=16w33a|Signs can now be used as [[fuel]] in [[furnace]]s.}}
{{History||1.13|snap=17w47a|The standing sign ID has been changed from <code>standing_sign</code> to <code>sign</code>.
|Prior to [[1.13/Flattening|''The Flattening'']], these [[block]]s' numeral IDs were 63 and 68, and the [[item]]'s 323.}}
{{History|||snap=18w10d|[[Water]] can now be placed on the same block as signs.}}
{{History||1.14|snap=18w43a|"Sign" has been renamed to "Oak Sign".
|[[File:Oak Sign JE2 BE2.png|32px]] The texture of oak sign [[item]]s has been changed.
|[[File:Spruce Standing Sign JE1 BE1.png|32px]] [[File:Birch Standing Sign JE1 BE1.png|32px]] [[File:Jungle Standing Sign JE1 BE1.png|32px]] [[File:Acacia Standing Sign JE1 BE1.png|32px]] [[File:Dark Oak Standing Sign JE1 BE1.png|32px]] [[File:Spruce Sign JE1 BE1.png|32px]] [[File:Birch Sign JE1 BE1.png|32px]] [[File:Jungle Sign JE1 BE1.png|32px]] [[File:Acacia Sign JE1 BE1.png|32px]] [[File:Dark Oak Sign JE1 BE1.png|32px]] Added spruce, birch, jungle, acacia and dark oak signs.
|The sign's text has been changed from black to white.
|A sign's recipe now requires the same type of [[wood]] instead of a random assortment.}}
{{History|||snap=18w44a|Signs can now be {{control|used}} while holding a [[dye]] to change the text color.
|Default text color for signs has been changed back to black.}}
{{History|||snap=18w45a|A new movable cursor for free text editing to signs has been added.
|Selection and copy/paste support have been added to signs.}}
{{History|||snap=18w50a|Spruce signs now generate in some [[taiga]] [[village]] houses.
|Spruce sign items can now be found in [[chest]]s in taiga village houses.}}
{{History|||snap=19w12a|Signs can now be [[dye]]d only in [[Creative mode]].}}
{{History|||snap=19w12b|Signs can now be dyed in [[Survival mode]] again.}}
{{History||1.16|snap=20w06a|[[File:Crimson Standing Sign JE1 BE1.png|32px]] [[File:Warped Standing Sign JE1 BE1.png|32px]] [[File:Crimson Sign JE1 BE1.png|32px]] [[File:Warped Sign JE1 BE1.png|32px]] Added crimson and warped signs.}}
{{History|||snap=20w09a|Crimson and warped signs can now be [[crafting|crafted]].}}
{{History||1.17|snap=21w03a|Signs can now be tinted with [[Glow Ink Sac|glow ink sac]]s to make the text glow.
|Works with both undyed and dyed signs.
|Signs now have a sound for being dyed.}}
{{History|||snap=21w11a|[[File:Oak Standing Sign (S) JE2.png|32px]][[File:Spruce Standing Sign (S) JE2 BE2.png|32px]] [[File:Birch Standing Sign (S) JE2 BE2.png|32px]] [[File:Jungle Standing Sign (S) JE2 BE2.png|32px]] [[File:Acacia Standing Sign (S) JE2 BE2.png|32px]] [[File:Dark Oak Standing Sign (S) JE2 BE2.png|32px]] [[File:Oak Wall Sign (S) JE2.png|32px]] [[File:Spruce Wall Sign (S) JE2 BE2.png|32px]] [[File:Birch Wall Sign (S) JE2 BE2.png|32px]] [[File:Jungle Wall Sign (S) JE2 BE2.png|32px]] [[File:Acacia Wall Sign (S) JE2 BE2.png|32px]] [[File:Dark Oak Wall Sign (S) JE2 BE2.png|32px]] The textures of signs have been changed to reflect the changes made to planks in the [[Texture Update]].}}
{{History|||snap=Pre-release 1|Glowing text on signs now has an outer glow, making text more visible in the dark.}}
{{History||1.18|snap=21w41a|[[File:Oak Sign JE3.png|32px]] [[File:Spruce Sign JE2.png|32px]] [[File:Birch Sign JE2.png|32px]] [[File:Jungle Sign JE2.png|32px]] [[File:Acacia Sign JE2.png|32px]] [[File:Dark Oak Sign JE2.png|32px]] [[File:Crimson Sign JE2.png|32px]] [[File:Warped Sign JE2.png|32px]] Changed all signs textures as items.}}
{{History||1.19|snap=22w11a|[[File:Mangrove Sign JE1 BE1.png|32px]][[File:Mangrove Wall Sign JE1 BE1.png|32px]][[File:Mangrove Sign (item) JE1 BE1.png|32px]] Added mangrove signs.}}
{{History|||snap=22w14a|Due to the addition of the [[mangrove tree]] and [[mangrove swamp]], mangrove signs are now obtainable in survival and renewable.}}
{{History||October 15, 2022|link={{ytl|https://youtu.be/iM9KtHaDcUg?t=5437}}|Hanging signs were announced and shown on [[Minecraft Live 2022]].|Hanging signs were conceptualized by [[Agnes Larsson]] with input from her daughter.<ref>{{ytl|vJCMpPyaN8Q|Minecraft 1.20: New Blocks and Their Functions! @ 0:29|Minecraft|February 24, 2023|t=29s}}</ref>}}
{{History||1.20<br>(Experimental)|link=1.19.3|snap=22w42a|[[File:Bamboo Sign (0) JE1 BE1.png|32px]] [[File:Bamboo Wall Sign (S) JE1 BE1.png|32px]] [[File:Bamboo Sign (item) JE1 BE1.png|32px]] Added bamboo signs behind the [[Java Edition 1.20|Update 1.20 experimental datapack]].
|[[File:Oak Hanging Sign JE1 BE1.png|32px]] [[File:Spruce Hanging Sign JE1 BE1.png|32px]] [[File:Birch Hanging Sign JE1 BE1.png|32px]] [[File:Jungle Hanging Sign JE1 BE1.png|32px]] [[File:Acacia Hanging Sign JE1 BE1.png|32px]] [[File:Dark Oak Hanging Sign JE1 BE1.png|32px]] [[File:Mangrove Hanging Sign JE1 BE1.png|32px]] [[File:Bamboo Hanging Sign JE1 BE1.png|32px]] [[File:Crimson Hanging Sign JE1 BE1.png|32px]] [[File:Warped Hanging Sign JE1 BE1.png|32px]]<br>[[File:Oak Wall Hanging Sign JE1 BE1.png|32px]] [[File:Spruce Wall Hanging Sign JE1 BE1.png|32px]] [[File:Birch Wall Hanging Sign JE1 BE1.png|32px]] [[File:Jungle Wall Hanging Sign JE1 BE1.png|32px]] [[File:Acacia Wall Hanging Sign JE1 BE1.png|32px]] [[File:Dark Oak Wall Hanging Sign JE1 BE1.png|32px]] [[File:Mangrove Wall Hanging Sign JE1 BE1.png|32px]] [[File:Bamboo Wall Hanging Sign (S) JE1 BE1.png|32px]] [[File:Crimson Wall Hanging Sign JE1 BE1.png|32px]] [[File:Warped Wall Hanging Sign JE1 BE1.png|32px]]<br>[[File:Oak Hanging Sign (item) JE1 BE1.png|32px]] [[File:Spruce Hanging Sign (item) JE1 BE1.png|32px]] [[File:Birch Hanging Sign (item) JE1 BE1.png|32px]] [[File:Jungle Hanging Sign (item) JE1 BE1.png|32px]] [[File:Acacia Hanging Sign (item) JE1 BE1.png|32px]] [[File:Dark Oak Hanging Sign (item) JE1 BE1.png|32px]] [[File:Mangrove Hanging Sign (item) JE1 BE1.png|32px]] [[File:Bamboo Hanging Sign (item) JE1 BE1.png|32px]] [[File:Crimson Hanging Sign (item) JE1 BE1.png|32px]] [[File:Warped Hanging Sign (item) JE1 BE1.png|32px]]<br>Added hanging signs behind the [[Java Edition 1.20|Update 1.20 experimental datapack]].|Added unique sounds for Nether and bamboo wood signs.}}
{{History|||snap=22w45a|[[File:Jungle Wall Hanging Sign JE2 BE2.png|32px]] The texture of jungle hanging wall signs have been changed.|Added unique sounds for Nether and bamboo wood hanging signs.|Bamboo hanging signs now can be crafted using [[block of stripped bamboo]] instead of bamboo planks.|Crafting bamboo hanging signs now outputs 6 hanging signs instead of 2.}}
{{History||1.20<br>(Experimental)|link=1.19.4|snap=23w07a|[[File:Cherry Sign (0) JE1.png|32px]] [[File:Cherry Wall Sign (S) JE1.png|32px]] [[File:Cherry Sign (item) JE1.png|32px]] [[File:Cherry Hanging Sign JE1.png|32px]] [[File:Cherry Wall Hanging Sign JE1.png|32px]] [[File:Cherry Hanging Sign (item) JE1.png|32px]] Added cherry signs and hanging signs behind the [[Java Edition 1.20|Update 1.20 experimental datapack]]. There used to be a glitch where right clicking on a sign would play the “use” animation. This was fixed in the snapshots for 1.20, where signs are editable.}}
{{History|||snap=1.19.4 Pre-release 4|[[File:Cherry Sign (0) JE2 BE2.png|32px]] Updated the texture of cherry signs.}}
{{History||1.20|snap=23w12a|Bamboo sign, cherry sign and all of the hanging signs are now available without using the "Update 1.20" experimental datapack.|Signs and hanging signs can now be edited after being placed.|Signs and hanging signs now support text on both sides.|Signs and hanging signs can now be waxed with [[honeycomb]] to prevent editing.|Oak and spruce hanging sign can now be found in [[suspicious gravel]] and [[suspicious sand]] in [[trail ruins]].}}
{{History|||snap=23w14a|Signs and hanging signs with click commands can now be interacted with even if the sign is not waxed.|Signs and hanging signs can no longer be edited by players in [[Adventure]] mode.|Signs and hanging signs with non-text chat components can no longer be edited, even if the sign is not waxed.|Signs and hanging signs now save text even if the edit screen is closed by the player being moved far away.}}
{{History|||snap=23w16a|Oak and spruce hanging sign no longer generates in [[suspicious sand]] in [[trail ruins]].|Due to the split of the archaeological loot tables for the suspicious gravel within the [[trail ruins]]; oak and spruce hanging sign now are in the common loot.}}
{{History||1.20.2|snap=23w31a|Changed sounds for Nether wood hanging signs.<ref>{{Bug|MC-262295||Warped and Crimson hanging signs uses their respective plank sounds, despite their stripped stems having unique sounds|Fixed}}</ref>}}
{{History|pocket alpha}}
{{History||v0.5.0|[[File:Oak Standing Sign.png|32px]] [[File:Oak Sign JE1 BE1.png|32px]] Signs have been added, though they can be obtained only through [[inventory]] editors. |The [[player]] currently cannot write on signs.}}
{{History||v0.6.0|Signs can now be legitimately obtained in [[Survival]] and [[Creative]] mode.|The player can now write on signs.}}
{{History||v0.10.0|snap=build 1|Signs now have a selection overlay.}}
{{History|pocket}}
{{History||1.0.0|snap=alpha 0.17.0.1|Signs can now be found in [[igloo]] basements.}}
{{History|bedrock}}
{{History||1.9.0|snap=beta 1.9.0.0|"Sign" has been renamed to "Oak Sign".
|[[File:Spruce Standing Sign (S) JE2 BE2.png|32px]] [[File:Birch Standing Sign (S) JE2 BE2.png|32px]] [[File:Jungle Standing Sign (S) JE2 BE2.png|32px]] [[File:Acacia Standing Sign (S) JE2 BE2.png|32px]] [[File:Dark Oak Standing Sign (S) JE2 BE2.png|32px]] [[File:Spruce Sign JE1 BE1.png|32px]] [[File:Birch Sign JE1 BE1.png|32px]] [[File:Jungle Sign JE1 BE1.png|32px]] [[File:Acacia Sign JE1 BE1.png|32px]] [[File:Dark Oak Sign JE1 BE1.png|32px]] Added spruce, birch, jungle, acacia and dark oak signs.|The sign's text has been changed from black to white.|A sign's recipe now requires the same type of [[wood]] instead of a random assortment.}}
{{History|||snap=beta 1.9.0.2|The default sign text color has been changed back to black.|Sign variants are now grouped in their own [[inventory]] category.}}
{{History||1.10.0|snap=beta 1.10.0.3|[[File:Oak Sign JE2 BE2.png|32px]] The texture of oak sign [[item]]s has been changed.|Spruce signs now generate in new [[taiga]] and [[snowy taiga]] [[village]] houses.}}
{{History||1.11.0|snap=beta 1.11.0.1|Signs can now be used as a [[fuel]] in [[furnace]]s.|Oak signs can now be found inside taiga and snowy taiga village house [[chest]]s.}}
{{History||1.16.0|snap=beta 1.16.0.51|[[File:Crimson Standing Sign JE1 BE1.png|32px]] [[File:Warped Standing Sign JE1 BE1.png|32px]] [[File:Crimson Sign JE1 BE1.png|32px]] [[File:Warped Sign JE1 BE1.png|32px]] Added crimson and warped signs.|[[File:Spruce Standing Sign (S) JE2 BE2.png|32px]] [[File:Birch Standing Sign (S) JE2 BE2.png|32px]] [[File:Jungle Standing Sign (S) JE2 BE2.png|32px]] [[File:Acacia Standing Sign (S) JE2 BE2.png|32px]] [[File:Dark Oak Standing Sign (S) JE2 BE2.png|32px]] [[File:Spruce Wall Sign (S) JE2 BE2.png|32px]] [[File:Birch Wall Sign (S) JE2 BE2.png|32px]] [[File:Jungle Wall Sign (S) JE2 BE2.png|32px]] [[File:Acacia Wall Sign (S) JE2 BE2.png|32px]] [[File:Dark Oak Wall Sign (S) JE2 BE2.png|32px]] The texture of all signs except oak sign have been changed.}}
{{History||1.16.20|snap=beta 1.16.20.50|Crimson and warped signs now uses regular plank [[sound]]s instead of their stem variant sounds.}}
{{History||1.16.210|snap=beta 1.16.210.59|Signs can now be {{control|used}} while holding a [[dye]] to change the text color.|Signs can now be tinted with [[Glow Ink Sac|glow ink sac]]s to make the text glow.
|Works with both default and dyed signs.}}
{{History|||snap=beta 1.16.210.60|Color on dyed signs disappears and the text turns back to black.|Signs with applied glowing effect as well as color stops glowing and color is removed.}}
{{History||1.16.220|snap=beta 1.16.220.50|Signs can now be {{control|used}} while holding a [[dye]] to change the text color again.|Signs can now be tinted with [[Glow Ink Sac|glow ink sac]]s to make the text glow again.}}
{{History|||snap=beta 1.16.220.52|Now has sounds for being dyed.}}
{{History|||snap=release|A glowing effect can no longer be applied to signs due to glow ink sacs becoming inaccessible in the full release.}}
{{History||1.17.0|snap=beta 1.17.0.50|[[File:Oak Sign BE3.png|32px]] [[File:Spruce Sign BE2.png|32px]] [[File:Birch Sign BE2.png|32px]] [[File:Jungle Sign BE2.png|32px]] [[File:Acacia Sign BE2.png|32px]] [[File:Dark Oak Sign BE2.png|32px]] Textures of sign items was updated.
|[[File:Oak Standing Sign (S) JE2 BE2.png|32px]] [[File:Oak Wall Sign (S) JE2 BE2.png|32px]] The textures of oak signs have been changed to reflect the changes made to planks in the [[Texture Update]].}}
{{History||1.17.10|snap=beta 1.17.10.21|Glowing text on signs now has an outer glow, making text more visible in the dark.}}
{{History||1.18.10|snap=beta 1.18.10.20|[[File:Oak Sign JE3.png|32px]] [[File:Spruce Sign JE2.png|32px]] [[File:Birch Sign JE2.png|32px]] [[File:Jungle Sign JE2.png|32px]] [[File:Acacia Sign JE2.png|32px]] [[File:Dark Oak Sign JE2.png|32px]] [[File:Crimson Sign JE2.png|32px]] [[File:Warped Sign JE2.png|32px]] Changed all signs textures as items.}}
{{History||1.19.0|snap=beta 1.19.0.20|[[File:Mangrove Sign JE1 BE1.png|32px]][[File:Mangrove Wall Sign JE1 BE1.png|32px]][[File:Mangrove Sign (item) JE1 BE1.png|32px]] Added mangrove signs.}}
{{History||Next Major Update<br>(Experimental)|link=Bedrock Edition 1.20|snap=beta 1.19.50.21|[[File:Bamboo Sign (0) JE1 BE1.png|32px]] [[File:Bamboo Wall Sign (S) JE1 BE1.png|32px]] [[File:Bamboo Sign (item) JE1 BE1.png|32px]] Added bamboo signs behind the "[[Bedrock Edition 1.20|Next Major Update]]" [[experimental]] toggle.|[[File:Oak Hanging Sign JE1 BE1.png|32px]] [[File:Spruce Hanging Sign JE1 BE1.png|32px]] [[File:Birch Hanging Sign JE1 BE1.png|32px]] [[File:Jungle Hanging Sign JE1 BE1.png|32px]] [[File:Acacia Hanging Sign JE1 BE1.png|32px]] [[File:Dark Oak Hanging Sign JE1 BE1.png|32px]] [[File:Mangrove Hanging Sign JE1 BE1.png|32px]] [[File:Bamboo Hanging Sign JE1 BE1.png|32px]] [[File:Crimson Hanging Sign JE1 BE1.png|32px]] [[File:Warped Hanging Sign JE1 BE1.png|32px]]<br>[[File:Oak Wall Hanging Sign JE1 BE1.png|32px]] [[File:Spruce Wall Hanging Sign JE1 BE1.png|32px]] [[File:Birch Wall Hanging Sign JE1 BE1.png|32px]] [[File:Jungle Wall Hanging Sign JE1 BE1.png|32px]] [[File:Acacia Wall Hanging Sign JE1 BE1.png|32px]] [[File:Dark Oak Wall Hanging Sign JE1 BE1.png|32px]] [[File:Mangrove Wall Hanging Sign JE1 BE1.png|32px]] [[File:Bamboo Wall Hanging Sign (S) JE1 BE1.png|32px]] [[File:Crimson Wall Hanging Sign JE1 BE1.png|32px]] [[File:Warped Wall Hanging Sign JE1 BE1.png|32px]]<br>[[File:Oak Hanging Sign (item) JE1 BE1.png|32px]] [[File:Spruce Hanging Sign (item) JE1 BE1.png|32px]] [[File:Birch Hanging Sign (item) JE1 BE1.png|32px]] [[File:Jungle Hanging Sign (item) JE1 BE1.png|32px]] [[File:Acacia Hanging Sign (item) JE1 BE1.png|32px]] [[File:Dark Oak Hanging Sign (item) JE1 BE1.png|32px]] [[File:Mangrove Hanging Sign (item) JE1 BE1.png|32px]] [[File:Bamboo Hanging Sign (item) JE1 BE1.png|32px]] [[File:Crimson Hanging Sign (item) JE1 BE1.png|32px]] [[File:Warped Hanging Sign (item) JE1 BE1.png|32px]]<br>Added hanging signs behind the "[[Bedrock Edition 1.20.0|Next Major Update]]" [[experimental]] toggle.|Added unique sounds for Nether and bamboo wood signs.}}
{{History|||snap=beta 1.19.60.20|[[File:Jungle Wall Hanging Sign JE2 BE2.png|32px]] The texture of jungle hanging wall signs have been changed.|Bamboo hanging signs now can be crafted using [[block of stripped bamboo]] instead of bamboo planks.|Crafting bamboo hanging signs now outputs 6 hanging signs instead of 2.}}
{{History||Next Major Update<br>(Experimental)|link=Bedrock Edition 1.19.80|snap=beta 1.19.80.20|[[File:Cherry Sign (0).png|32px]] [[File:Cherry Wall Sign (S) JE1.png|32px]] [[File:Cherry Sign (item) JE1.png|32px]] [[File:Cherry Hanging Sign JE1.png|32px]] [[File:Cherry Wall Hanging Sign JE1.png|32px]] [[File:Cherry Hanging Sign (item) JE1.png|32px]] Added cherry signs and hanging signs behind the "[[Bedrock Edition 1.20.0|Next Major Update]]" [[experimental]] toggle.}}
{{History|||snap=beta 1.19.80.21|[[File:Cherry Sign (0) JE2 BE2.png|32px]] Updated the texture of cherry signs.}}
{{History|||snap=beta 1.19.80.22|Signs and hanging signs can now be edited after being placed.|Signs and hanging signs now support text on both sides.|Signs and hanging signs can now be waxed with [[honeycomb]] to prevent editing.}}
{{History|||snap=beta 1.20.0.20|Crimson, warped, and bamboo hanging signs now have custom sounds to match their wood type.<ref name=badnewsounds>{{Bug|MCPE-164246}}</ref>}}
{{History||1.20.0|snap=beta 1.20.0.21|Bamboo sign, cherry sign and all of the hanging signs are now available without using the "Next Major Update" experimental toggle.}}
{{History|console}}
{{History||xbox=TU1|xbone=CU1|ps=1.0|wiiu=Patch 1|switch=1.0.1|[[File:Oak Standing Sign.png|32px]] [[File:Oak Sign JE1 BE1.png|32px]] Added signs.}}
{{History||xbox=TU9|Signs are now stackable up to 16.
|The same [[crafting]] recipe for signs now produces 3 signs instead of 1.}}
{{History||xbox=none|xbone=none|ps=1.88|wiiu=none|switch=none|[[File:Spruce Standing Sign (S) JE2 BE2.png|32px]] [[File:Birch Standing Sign (S) JE2 BE2.png|32px]] [[File:Jungle Standing Sign (S) JE2 BE2.png|32px]] [[File:Acacia Standing Sign (S) JE2 BE2.png|32px]] [[File:Dark Oak Standing Sign (S) JE2 BE2.png|32px]] [[File:Spruce Sign JE1 BE1.png|32px]] [[File:Birch Sign JE1 BE1.png|32px]] [[File:Jungle Sign JE1 BE1.png|32px]] [[File:Acacia Sign JE1 BE1.png|32px]] [[File:Dark Oak Sign JE1 BE1.png|32px]] Added spruce, birch, jungle, acacia and dark oak signs.}}
{{History||xbox=none|xbone=none|ps=1.90|wiiu=none|switch=none|[[File:Oak Sign JE2 BE2.png|32px]] The texture of oak sign [[item]]s has been changed.}}
{{History|new 3ds}}
{{History||0.1.0|[[File:Oak Standing Sign (S) JE2 BE2.png|32px]] [[File:Oak Sign JE1 BE1.png|32px]] Added signs.}}
{{History|foot}}
== Trivia ==
* The first concept art of hanging signs came from [[Agnes Larsson]]'s daughter.<ref>{{Ytl|vJCMpPyaN8Q|Minecraft 1.20: New Blocks and Their Functions!|Minecraft|t=30s}}</ref>
== Gallery ==
=== Screenshots ===
<gallery>
Signs classic.png|Test of signs in early [[Java Edition Classic]].
Sigh test.jpg|Another early sign image.
Signs PreRelease.png|First image of sign blocks during [[Java Edition Infdev|Infdev]].
Pocket Edition v0.6.0 alpha Development sign.png|First image of signs on [[Pocket Edition]].
Pocket Edition v0.6.0 alpha Development sign editing.png|First image of editing text on [[PE]] iOS.
Pocket Edition v0.6.0 alpha Development sign editing 2.png|First image of editing text on [[PE]] Android.
Pocket Edition v0.6.0 alpha Development sky.png
Door Sign.png|A sign placed on a door.
Breaking News.png|A sign being broken.
Sign Text Dark.jpg|A dark oak sign with black text.
Sign Text Light.jpg|A dark oak sign with white text.
Sign Blockdata.gif|A sign using blockdata to dynamically change.
JSON Sign.png|First image of a sign using JSON text.
Width Based Character Limit.png|First image of a sign using width based character limits.
Glow Ink Sign with Pink Dye.png|Oak sign with glow ink in the dark in [[Java Edition 21w03a]].
Lit vs unlit signs.png|Difference in visibility of a lime text, from left to right, in a lit birch sign, unlit birch sign, lit dark oak sign, and unlit dark oak sign.
Glowing Text Comparison.png|The comparison between glow text and non-glow text.
Example Of Signs Being Weird.png|alt=Shading differences|Signs being different shades depending on orientation.
Glow text.gif|All sixteen colors of glow text.
Glow Ink Signs.jpg|Signs with glowing ink in several colors.
Lots of Glowing Signs.jpg|More signs with glowing ink.
Sign Platforms.jpg|[[Ari]] standing on top of a hanged sign.
Eric Shop.jpg|[[Sunny]] looking at a double sided hanging sign.
Hanging Sign Bedrock.png|Hanging sign with small text.
Hanging Sign Java.png|Hanging sign with large text.
New Hanging Sign Text Length 1.jpg|Text on hanging sign.
New Hanging Sign Text Length 2.jpg|Text on hanging sign.
</gallery>
=== Concept Art ===
<gallery>
Hanging_Sign_Concept_Art.png|Hanging sign concept art.
Hanging_Sign_Concept_Art2.png|Ditto.
Hanging_Sign_Concept_Art3.png|Hanging sign dimensions concept art.
Hanging_Sign_Concept_Art4.png|Hanging sign crafting recipe, block states concept art.
</gallery>
=== Renders ===
{{hidden begin}}
<div style="clear: both"></div>
<gallery>
Oak Sign.png|Oak Sign
Spruce Sign.png|Spruce Sign
Birch Sign.png|Birch Sign
Jungle Sign.png|Jungle Sign
Acacia Sign.png|Acacia Sign
Dark Oak Sign.png|Dark Oak Sign
Mangrove Sign.png|Mangrove Sign
Cherry Sign.png|Cherry Sign
Bamboo Sign.png|Bamboo Sign
Crimson Sign.png|Crimson Sign
Warped Sign.png|Warped Sign
Oak Wall Sign.png|Oak Wall Sign
Spruce Wall Sign.png|Spruce Wall Sign
Birch Wall Sign.png|Birch Wall Sign
Jungle Wall Sign.png|Jungle Wall Sign
Acacia Wall Sign.png|Acacia Wall Sign
Dark Oak Wall Sign.png|Dark Oak Wall Sign
Mangrove Wall Sign.png|Mangrove Wall Sign
Cherry Wall Sign.png|Cherry Wall Sign
Bamboo Wall Sign.png|Bamboo Wall Sign
Crimson Wall Sign.png|Crimson Wall Sign
Warped Wall Sign.png|Warped Wall Sign
Oak Hanging Sign.png|Oak Hanging Sign
Spruce Hanging Sign.png|Spruce Hanging Sign
Birch Hanging Sign.png|Birch Hanging Sign
Jungle Hanging Sign.png|Jungle Hanging Sign
Acacia Hanging Sign.png|Acacia Hanging Sign
Dark Oak Hanging Sign.png|Dark Oak Hanging Sign
Mangrove Hanging Sign.png|Mangrove Hanging Sign
Cherry Hanging Sign.png|Cherry Hanging Sign
Bamboo Hanging Sign.png|Bamboo Hanging Sign
Crimson Hanging Sign.png|Crimson Hanging Sign
Warped Hanging Sign.png|Warped Hanging Sign
Oak Wall Hanging Sign.png|Oak Wall Hanging Sign
Spruce Wall Hanging Sign.png|Spruce Wall Hanging Sign
Birch Wall Hanging Sign.png|Birch Wall Hanging Sign
Jungle Wall Hanging Sign.png|Jungle Wall Hanging Sign
Acacia Wall Hanging Sign.png|Acacia Wall Hanging Sign
Dark Oak Wall Hanging Sign.png|Dark Oak Wall Hanging Sign
Mangrove Wall Hanging Sign.png|Mangrove Wall Hanging Sign
Cherry Wall Hanging Sign.png|Cherry Wall Hanging Sign
Bamboo Wall Hanging Sign.png|Bamboo Wall Hanging Sign
Crimson Wall Hanging Sign.png|Crimson Wall Hanging Sign
Warped Wall Hanging Sign.png|Warped Wall Hanging Sign
</gallery>
<gallery>
Oak Sign JE3.png
Spruce Sign JE2.png
Birch Sign JE2.png
Jungle Sign JE2.png
Acacia Sign JE2.png
Dark Oak Sign JE2.png
Mangrove Sign (item) JE1 BE1.png
Cherry Sign (item) JE1.png
Bamboo Sign (item) JE1 BE1.png
Crimson Sign JE2.png
Warped Sign JE2.png
Oak Hanging Sign (item) JE1 BE1.png
Spruce Hanging Sign (item) JE1 BE1.png
Birch Hanging Sign (item) JE1 BE1.png
Jungle Hanging Sign (item) JE1 BE1.png
Acacia Hanging Sign (item) JE1 BE1.png
Dark Oak Hanging Sign (item) JE1 BE1.png
Mangrove Hanging Sign (item) JE1 BE1.png
Cherry Hanging Sign (item) JE1.png
Bamboo Hanging Sign (item) JE1 BE1.png
Crimson Hanging Sign (item) JE1 BE1.png
Warped Hanging Sign (item) JE1 BE1.png
</gallery>
{{hidden end}}
{{-}}
== Issues ==
{{issue list}}
== See also ==
* [[Chalkboard]]
== References ==
{{Reflist}}
== External Links ==
*[https://www.minecraft.net/en-us/article/taking-inventory--sign Taking Inventory: Sign] – Minecraft.net on January 9, 2020
{{Blocks|utility}}
{{Items}}
[[Category:Utility blocks]]
[[Category:Manufactured blocks]]
[[Category:Generated structure blocks]]
[[Category:Block entities]]
[[Category:Non-solid blocks]]
[[cs:Cedule]]
[[de:Schild (Schrift)]]
[[es:Cartel]]
[[fr:Pancarte]]
[[hu:Tábla]]
[[it:Cartello]]
[[ja:看板]]
[[ko:표지판]]
[[nl:Bord]]
[[pl:Tabliczka]]
[[pt:Placa]]
[[ru:Табличка]]
[[th:ป้าย]]
[[uk:Табличка]]
[[zh:告示牌]]</li></ul></nowiki> | 23w05a | Overhauled the world creation screen screen. It is now separated into three tabs: Game, World, and More. | |||
| 23w06a | Added a new screen for toggling experimental features. | ||||
| Pre-release 1 | The three tabs now have a unique look instead of being traditional buttons. | ||||
| Pre-release 2 | The save location for the new world now shows up in a tooltip when placing the cursor over the world name. | ||||
| Pocket Edition Alpha | |||||
Pre-release{{Extension DPL}}<ul><li>[[Goat Horn|Goat Horn]]<br/>{{redirect|Horn}}
{{Item
| image = Goat Horn JE1 BE1.png
| renewable = Yes
| stackable = No
}}
A '''goat horn''' is an [[item]] dropped by [[goat]]s. It has eight variants, and each plays a unique sound when {{Control|used}} which can be heard by [[Player|players]] in a large radius.
== Obtaining ==
=== Mob loot ===
A horn is dropped when an adult [[goat]] rams a tree or any other hard block that occurs naturally where goats spawn. These include [[stone]], [[coal ore]], [[copper ore]], [[iron ore]], [[emerald ore]], [[log]], or [[packed ice]]. Goats do not ram other solid blocks. {{IN|java}}, these blocks are listed under the {{cd|snaps_goat_horn}} [[tag]], and can be modified by [[data pack]]s.
Up to two horns can be dropped from an adult goat. Regular goats may drop the Ponder, Sing, Seek, and Feel horns, while screaming goats drop the Admire, Call, Yearn, and Dream horns. A specific goat drops only one type of horn; that is, if a goat drops a Sing horn, its other horn is also a Sing horn.
=== Natural generation ===
{{LootChestItem|goat-horn}}
Only the four variants from regular goats can be found here.
== Usage ==
When {{control|used}}, they play a loud sound that can be heard from up to 256 blocks, but are also limited by the server view distance. Each horn variant plays a unique sound. There are eight variants, four of which are exclusive to [[Goat#Spawning|screaming goats]].
There is a cooldown of seven seconds between each use of the horn. All goat horns are affected by this cooldown.
== Sounds ==
=== Generic ===
{{edition|java}}:
{{Sound table
|sound=Goat horn break1.ogg
|sound2=Goat horn break2.ogg
|sound3=Goat horn break3.ogg
|sound4=Goat horn break4.ogg
|subtitle=Goat Horn breaks off
|source=neutral
|description=When a goat's horn breaks off
|id=entity.goat.horn_break
|translationkey=subtitles.entity.goat.horn_break
|volume=0.9
|pitch=1.0
|distance=16
|foot=1}}
{{edition|bedrock}}:
{{Sound table
|type=bedrock
|sound=Goat horn break1.ogg
|sound2=Goat horn break2.ogg
|sound3=Goat horn break3.ogg
|sound4=Goat horn break4.ogg
|description=When a goat's horn breaks off
|source=hostile
|id=mob.goat.horn_break
|volume=1.0
|pitch=1.0
|foot=1}}
=== Playing ===
{{edition|java}}:
{{Sound table
|sound=Goat Horn Call0.ogg
|description="Ponder"
|subtitle=Goat horn plays
|source=Jukebox/Note Blocks
|id=item.goat_horn.sound.0
|translationkey=subtitles.item.goat_horn.play
|volume=16.0
|pitch=1.0
|distance=256}}
{{Sound table
|sound=Goat Horn Call1.ogg
|description="Sing"
|subtitle=Goat horn plays
|source=Jukebox/Note Blocks
|id=item.goat_horn.sound.1
|translationkey=subtitles.item.goat_horn.play
|volume=16.0
|pitch=1.0
|distance=256}}
{{Sound table
|sound=Goat Horn Call2.ogg
|description="Seek"
|subtitle=Goat horn plays
|source=Jukebox/Note Blocks
|id=item.goat_horn.sound.2
|translationkey=subtitles.item.goat_horn.play
|volume=16.0
|pitch=1.0
|distance=256}}
{{Sound table
|sound=Goat Horn Call3.ogg
|description="Feel"
|subtitle=Goat horn plays
|source=Jukebox/Note Blocks
|id=item.goat_horn.sound.3
|translationkey=subtitles.item.goat_horn.play
|volume=16.0
|pitch=1.0
|distance=256}}
{{Sound table
|sound=Goat Horn Call4.ogg
|description="Admire"<ref group=note name=screaming>These are dropped by screaming goats.</ref>
|subtitle=Goat horn plays
|source=Jukebox/Note Blocks
|id=item.goat_horn.sound.4
|translationkey=subtitles.item.goat_horn.play
|volume=16.0
|pitch=1.0
|distance=256}}
{{Sound table
|sound=Goat Horn Call5.ogg
|description="Call"<ref group=note name=screaming/>
|subtitle=Goat horn plays
|source=Jukebox/Note Blocks
|id=item.goat_horn.sound.5
|translationkey=subtitles.item.goat_horn.play
|volume=16.0
|pitch=1.0
|distance=256}}
{{Sound table
|sound=Goat Horn Call6.ogg
|description="Yearn"<ref group=note name=screaming/>
|subtitle=Goat horn plays
|source=Jukebox/Note Blocks
|id=item.goat_horn.sound.6
|translationkey=subtitles.item.goat_horn.play
|volume=16.0
|pitch=1.0
|distance=256}}
{{Sound table
|sound=Goat Horn Call7.ogg
|description="Dream"<ref group=note name=screaming/>
|subtitle=Goat horn plays
|source=Jukebox/Note Blocks
|id=item.goat_horn.sound.7
|translationkey=subtitles.item.goat_horn.play
|volume=16.0
|pitch=1.0
|distance=256
|foot=1}}
{{edition|bedrock}}:
{{Sound table
|type=bedrock
|sound=Goat Horn Call0.ogg
|source=Jukebox/Note Blocks<wbr>{{Until|BE 1.20.40}}<br>Hostile Creatures<wbr>{{Upcoming|BE 1.20.40}}|overridesource=1
|description="Ponder"
|id=horn.call.0
|volume=1.0<wbr><ref group=sound name=nodistance>{{Bug|MCPE-153254}}</ref><wbr>{{Until|BE 1.20.40}}<br>16.0<wbr>{{Upcoming|BE 1.20.40}}
|pitch=1.0}}
{{Sound table
|sound=Goat Horn Call1.ogg
|source=Jukebox/Note Blocks<wbr>{{Until|BE 1.20.40}}<br>Hostile Creatures<wbr>{{Upcoming|BE 1.20.40}}|overridesource=1
|description="Sing"
|id=horn.call.1
|volume=1.0<wbr><ref group=sound name=nodistance/><wbr>{{Until|BE 1.20.40}}<br>16.0<wbr>{{Upcoming|BE 1.20.40}}
|pitch=1.0}}
{{Sound table
|sound=Goat Horn Call2.ogg
|source=Jukebox/Note Blocks<wbr>{{Until|BE 1.20.40}}<br>Hostile Creatures<wbr>{{Upcoming|BE 1.20.40}}|overridesource=1
|description="Seek"
|id=horn.call.2
|volume=1.0<wbr><ref group=sound name=nodistance/><wbr>{{Until|BE 1.20.40}}<br>16.0<wbr>{{Upcoming|BE 1.20.40}}
|pitch=1.0}}
{{Sound table
|sound=Goat Horn Call3.ogg
|source=Jukebox/Note Blocks<wbr>{{Until|BE 1.20.40}}<br>Hostile Creatures<wbr>{{Upcoming|BE 1.20.40}}|overridesource=1
|description="Feel"
|id=horn.call.3
|volume=1.0<wbr><ref group=sound name=nodistance/><wbr>{{Until|BE 1.20.40}}<br>16.0<wbr>{{Upcoming|BE 1.20.40}}
|pitch=1.0}}
{{Sound table
|sound=Goat Horn Call4.ogg
|source=Jukebox/Note Blocks<wbr>{{Until|BE 1.20.40}}<br>Hostile Creatures<wbr>{{Upcoming|BE 1.20.40}}|overridesource=1
|description="Admire"<ref group=note name=screaming/>
|id=horn.call.4
|volume=1.0<wbr><ref group=sound name=nodistance/><wbr>{{Until|BE 1.20.40}}<br>16.0<wbr>{{Upcoming|BE 1.20.40}}
|pitch=1.0}}
{{Sound table
|sound=Goat Horn Call5.ogg
|source=Jukebox/Note Blocks<wbr>{{Until|BE 1.20.40}}<br>Hostile Creatures<wbr>{{Upcoming|BE 1.20.40}}|overridesource=1
|description="Call"<ref group=note name=screaming/>
|id=horn.call.5
|volume=1.0<wbr><ref group=sound name=nodistance/><wbr>{{Until|BE 1.20.40}}<br>16.0<wbr>{{Upcoming|BE 1.20.40}}
|pitch=1.0}}
{{Sound table
|sound=Goat Horn Call6.ogg
|source=Jukebox/Note Blocks<wbr>{{Until|BE 1.20.40}}<br>Hostile Creatures<wbr>{{Upcoming|BE 1.20.40}}|overridesource=1
|description="Yearn"<ref group=note name=screaming/>
|id=horn.call.6
|volume=1.0<wbr><ref group=sound name=nodistance/><wbr>{{Until|BE 1.20.40}}<br>16.0<wbr>{{Upcoming|BE 1.20.40}}
|pitch=1.0}}
{{Sound table
|sound=Goat Horn Call7.ogg
|source=Jukebox/Note Blocks<wbr>{{Until|BE 1.20.40}}<br>Hostile Creatures<wbr>{{Upcoming|BE 1.20.40}}|overridesource=1
|description="Dream"<ref group=note name=screaming/>
|id=horn.call.7
|volume=1.0<wbr><ref group=sound name=nodistance/><wbr>{{Until|BE 1.20.40}}<br>16.0<wbr>{{Upcoming|BE 1.20.40}}
|pitch=1.0
|foot=1}}
== Data values ==
=== ID ===
{{el|je}}:
{{ID table
|edition=java
|showforms=y
|generatetranslationkeys=y
|displayname=Goat Horn
|spritetype=item
|nameid=goat_horn
|form=item
|foot=1}}
{{el|be}}:
{{ID table
|edition=bedrock
|shownumericids=y
|showforms=y
|notshowbeitemforms=y
|generatetranslationkeys=y
|displayname=Goat Horn
|spritetype=item
|nameid=goat_horn
|form=item
|id=624
|translationkey=item.goat_horn.name, item.minecraft.goat_horn.sound.0, item.minecraft.goat_horn.sound.1, item.minecraft.goat_horn.sound.2, item.minecraft.goat_horn.sound.3, item.minecraft.goat_horn.sound.4, item.minecraft.goat_horn.sound.5, item.minecraft.goat_horn.sound.6, item.minecraft.goat_horn.sound.7
|foot=1}}
=== Item data ===
==== ''Java Edition'' ====
<div class="treeview">
*{{nbt|compound|tag}}: The item's '''tag''' tag.
{{:Player.dat_format/Goat Horn}}
</div>
Goat horns use the "instrument" tag to control which sound can be played when using a goat horn. The values of the tag (to be prefixed with <code>minecraft:</code>) are:
{| class="wikitable sortable" style="text-align: center;"
!Sound type !![[Resource location|Identifier]]
|-
|Ponder||<code>ponder_goat_horn</code>
|-
|Sing ||<code>sing_goat_horn</code>
|-
|Seek ||<code>seek_goat_horn</code>
|-
|Feel ||<code>feel_goat_horn</code>
|-
|Admire||<code>admire_goat_horn</code>
|-
|Call ||<code>call_goat_horn</code>
|-
|Yearn||<code>yearn_goat_horn</code>
|-
|Dream||<code>dream_goat_horn</code>
|}
== History ==
{{History||October 16, 2021|link=https://www.twitch.tv/videos/1178420217?t=02h46m05s|Ulraf, a game developer on ''Minecraft'', states that goat horns are not included in [[Java Edition 1.18]].}}
{{History||November 17, 2021|link=https://www.minecraft.net/en-us/article/caves---cliffs-update-part-ii-coming|Goat horns are initially announced to be added after "The Wild Update".}}
{{History|java}}
{{History||1.19|snap=22w17a|[[File:Goat Horn JE1 BE1.png|32px]]Added goat horns.}}
{{History||1.19|snap=Pre-release 2|Goat Horns now snap when a goat rams into [[copper ore]].<ref>{{bug|MC-250941|||Fixed }}</ref>}}
{{History|Bedrock}}
{{History||Caves & Cliffs<br>(experimental)|link=Caves & Cliffs|snap=beta 1.16.200.52|[[File:Goat Horn JE1 BE1.png|32px]]Added goat horns behind the "Caves and Cliffs" experimental toggle.}}
{{History|||snap=beta 1.16.210.51|Goats now drop 2 horns each.}}
{{History|||snap=beta 1.17.20.20|Baby goats no longer drop horns.}}
{{History||1.18.0|snap=beta 1.18.0.20|Goat horns are now available outside of experimental gameplay.}}
{{History|||snap=beta 1.18.0.22|Goat horns have been moved behind the "Vanilla Experiments" [[experimental gameplay|experiments]] toggle.}}
{{History||Vanilla Experiments (experimental)|link=Experimental Gameplay|snap=beta 1.18.20.23|Goat horns now have a cooldown after being used.}}
{{History|||snap=beta 1.18.20.25|Goat horns now have an animation when being used in first person.
|Goats now make a sound when they drop goat horns.}}
{{History|||snap=beta 1.18.30.26|Goat horns are now used to craft [[copper horn]]s.|Changed goat horn sounds.}}
{{History||Vanilla Experiments (experimental)|link=Experimental Gameplay|snap=beta 1.19.0.24|Goat horns are no longer used to craft copper horns, as copper horns have been removed.|Changed goat horn sounds.{{verify}}|Removed "Fly" and "Dream" goat horns.}}
{{History||1.19.0|snap=beta 1.19.0.28|Goat horns are now available without enabling experimental gameplay.}}
{{History||1.19.10|snap=beta 1.19.10.22|Renamed the "Resist" goat horn to the "Dream" goat horn to match ''Java Edition''.|The "Feel" goat horn now plays the same sound as ''Java Edition''.}}
{{History|upcoming bedrock}}
{{History||1.20.40|snap=beta 1.20.40.22|Goat horns now have a range of 256 blocks.<ref name=nodistance>{{Bug|MCPE-153254}}</ref>}}
{{History|foot}}
== Issues ==
{{issue list}}
== Trivia ==
* The "seek" horn sounds similar to the "ominous horn" that announces a [[raid]].
== Gallery ==
<gallery>
File:Screenshot (17).png|Steve using a goat horn.
File:Alex uses a goat horn.png|Alex using a goat horn.
File:Screenshot (18).png|The goat horn animation in first person.
File:Screenshot (19).png|The goat horn animation with "Left Hand" option enabled.
</gallery>
== Notes ==
<references group="note" />
== References ==
{{reflist}}
== External Links ==
* [https://www.minecraft.net/en-us/article/taking-inventory--goat-horn Taking Inventory: Goat Horn] - Minecraft.net on February 16, 2023
{{Items}}
[[Category:Renewable resources]]
[[Category:Tools]]
[[de:Ziegenhorn]]
[[es:Cuerno de cabra]]
[[fr:Corne de chèvre]]
[[it:Corno di capra]]
[[ja:ヤギの角笛]]
[[pl:Kozi róg]]
[[pt:Chifre de cabra]]
[[ru:Козий рог]]
[[zh:山羊角]]</li><li>[[Redstone Dust|Redstone Dust]]<br/>{{Redirect|Redstone|the ore|Redstone Ore|the powered mineral block|Block of Redstone|other uses|Redstone (disambiguation)}}
{{Block
| group = Inactive (connected)
| 1-1= Inactive Redstone Wire (NESW).png
| 1-2 = Inactive Redstone Wire (NESW) BE.png
| group2 = Inactive (unconnected)
| 2-1 = Inactive Redstone Wire (unconnected).png
| 2-2 = Inactive Redstone Wire (unconnected).png
| group3 = Active (connected)
| 3-1 = Active Redstone Wire (NESW).png
| 3-2 = Active Redstone Wire (NESW) BE.png
| group4 = Active (unconnected)
| 4-1 = Active Redstone Wire (unconnected).png
| 4-2 = Active Redstone Wire (unconnected).png
| image = Redstone Dust JE2 BE2.png
| extratext = [[#Gallery|View all renders]]
| transparent = Yes
| light = No
| tool = all
| renewable = Yes
| stackable = Yes (64)
| flammable = No
| lavasusceptible = No
}}
'''Redstone dust''' is a mineral that can transmit [[Redstone circuit#Power|redstone power]] as a wire when placed as a [[block]]. It is also used in [[crafting]] and [[brewing]].
== Obtaining ==
=== Mining ===
{{see also|Redstone Ore#Natural generation}}
[[Redstone ore]] mined using an iron [[pickaxe]] or higher drops 4 or 5 redstone dust (or more with [[Fortune]], averaging at 6 redstone dust with Fortune III). If mined with [[Silk Touch]], the block drops itself instead of redstone dust.
=== Natural generation ===
15 lengths of redstone dust are naturally generated as part of the trap in each [[jungle pyramid]]. 5 lengths of redstone dust can be found in one type of jail cell room in a [[woodland mansion]]. In [[Ancient City|ancient cities]], multiple pieces of redstone dust can be found integrated into circuitry.
=== Breaking ===
Redstone dust can be broken instantly using any tool, or without a tool, and drops itself as an item.
Redstone dust is removed and drops as an item if:
* its attachment block is moved, removed, or destroyed
* [[water]] or [[lava]] flows into its space
* a [[piston]] tries to push it or moves a block into its space
=== Mob loot ===
[[Witch]]es have a chance of dropping 0–2 redstone dust upon death. This is increased by 1 per level of [[Looting]], for a maximum of 0–5 redstone dust.
=== Chest loot ===
{{LootChestItem|redstone}}
=== Crafting ===
Redstone dust can be crafted from [[blocks of redstone]].
{{Crafting
|Block of Redstone
|Output=Redstone Dust,9
|type=Redstone
}}
=== Smelting ===
{{Smelting
|showname=1
|Redstone Ore; Deepslate Redstone Ore
|Redstone Dust
|0.7
}}
=== Trading ===
{{IN|java}}, novice-level cleric [[villager]]s sell two redstone dust for one [[emerald]].
{{IN|bedrock}}, novice-level cleric villagers sell four redstone dust for one emerald.
=== Villager gifts ===
{{see also|Tutorials/Raid farming}}
{{IN|Java}}, when the player has the [[Hero of the Village]] status effect, clerics might throw that player a redstone dust as a gift.
== Usage ==
Redstone dust is used for [[#Brewing ingredient|brewing]], [[#Crafting ingredient|crafting]], and in redstone circuits by placing it on the ground to create [[#Redstone component|redstone wire]]. It can also be used to power redstone components.
=== Brewing ingredient ===
{{Brewing
|head=1
|Redstone Dust
|Mundane Potion
|base=Water Bottle
}}
{{Brewing
|foot=1
|name=Increased Duration
|Redstone Dust
|showbase=1
|base=Potion of Fire Resistance; Potion of Invisibility; Potion of Night Vision; Potion of Poison; Potion of Regeneration; Potion of Slowness; Potion of Strength; Potion of Swiftness; Potion of Water Breathing; Potion of Weakness; Potion of Leaping; Potion of Slow Falling
}}
=== Crafting ingredient ===
{{crafting usage|Redstone Dust}}
=== {{anchor|Redstone dust}} Redstone component ===
When placed in the world, redstone dust becomes a block of "redstone wire"{{Info needed|other blco? BE?}}, which can transmit [[Redstone circuit#Power|redstone power]].
=== Smithing ingredient ===
{{Smithing
|head=1
|ingredients=Any Armor Trim +<br/>Any Armor Piece + <br/>Redstone Dust
|Any Armor Trim Smithing Template
|Netherite Chestplate
|Redstone
|Redstone Trim Netherite Chestplate
|showdescription=1
|description = All armor types can be used in this recipe,<br/>a netherite chestplate is shown as an example.<br/>
|tail=1
}}
;Trim color palette
The following color palette is shown on the designs on trimmed armor:
*{{TrimPalette|redstone dust}}
=== Placement ===
[[File:Redstone wire as circuit component.png|Examples of redstone wire configuration. ''Top Left:'' Redstone wire connects diagonally vertically through non-opaque blocks. ''Top Right:'' Redstone wire does ''not'' connect diagonally vertically through opaque blocks. ''Center:'' Redstone wire gets darker as its power level drops, to a maximum of 15 blocks from a power source.|thumb]]
[[File:Redstone on Glowstone, Stairs, Slabs.png|Examples of redstone wire placements.|thumb]]
Redstone dust can be placed on [[opaque]] blocks as well as [[glowstone]], upside-down [[slab]]s, [[glass]], upside-down [[stairs]], and [[hopper]]s. It can also be placed on some transparent blocks; see [[Opacity/Placement]] for more information. It cannot be placed suspended in midair, even with commands, which is not unintentional.<ref>{{bug|MC-182709}}</ref>
Redstone wire configures itself to point toward adjacent redstone [[Redstone components#Power components|power components]] and [[Redstone components#Transmission components|transmission component]] connection points. Redstone wire also configures itself to point toward adjacent redstone wire one block higher or lower – unless there is a solid opaque block above the lower redstone wire.
If there is only one such adjacent redstone component, redstone wire configures itself into a {{BlockSprite|redstone-dust}} line pointing both at the neighbor and away from it. If there are two or more such adjacent components, redstone wire connects them in the form of {{BlockSprite|redstone-dust}}, {{BlockSprite|redstone-dust-upleft}}, {{BlockSprite|redstone-dust-t-up}}, or {{BlockSprite|redstone-dust-cross}} as needed.
When there are no adjacent components, a single redstone wire configures itself into a {{BlockSprite|redstone-dust-cross}} plus sign, which can provide power in all four directions. By right-clicking it can be changed into a {{BlockSprite|redstone-dust-dot}} dot, which does not provide power to any of the four directions.
{{IN|bedrock}}, redstone wire automatically configures itself to point toward adjacent blocks or [[Redstone components#Mechanism components|mechanism components]]. {{IN|java}}, it does not. If such a configuration is desired, the other neighbors of the redstone wire must be arranged to create it, i.e the redstone dust must be placed in a way that it would be pointed at the block’s location even if it were not there.
When redstone wire is reconfigured after placement, it does not update other redstone components around it of the change unless that reconfiguration also includes a change in power level or another component provides an update. This can create situations where a mechanism component remains activated when it shouldn't, or vice versa, until it receives an update from something else – a "feature" of redstone wire that can be used to make a [[BUD|block update detector]].
{{-}}
=== Behavior ===
{{Schematic|caption=
{{IN|be}}, the signal can go down from glass blocks.
|||rd-$ew!|RL-!||||rd-$ew!|RL-!|-
|rt-$!|rd-$ew!|SB|||rt-$!|rd-$ew!|glass||-
|ts-$|SB|rd-$ew|RL||ts-$|SB|rd-$ew!|RL-!
}}{{Schematic|caption =
However, the signal can never go down from slabs.
|||rd-$ew!|RL-!||||rd-$ew!|RL-!|-
|rt-$!|rd-$ew!|SB|||rt-$!|rd-$ew!|glass||-
|ts-$|ts-$|rd-$ew|RL||ts-$|ts-$|rd-$ew|RL
}}
Redstone wire can transmit power, which can be used to operate [[Redstone components#Mechanism components|mechanism components]] ([[door]]s, [[piston]]s, [[redstone lamp]]s, etc.).
Redstone wire can be "powered" by a number of methods:
* from an adjacent [[Redstone components#Power components|power component]] or a strongly-powered block
* from the output of a redstone repeater or redstone comparator
* from adjacent redstone wire. The powering dust can be a level higher or lower, but with restrictions:
** Redstone dust can be powered by redstone dust that is one level lower, or on an [[opaque]] block one level higher. A transparent block cannot{{only|java}} pass power downward.
** The block "between" the two dust blocks must be air or transparent. A solid block there "cuts" the connection between the higher and lower dust.
The "power level" of redstone dust can vary from 0 to 15. Most power components power-up adjacent redstone dust to power level 15, but a few ([[daylight sensor]]s, [[trapped chest]]s, and [[weighted pressure plate]]s) may create a lower power level. Redstone repeaters output power level 15 (when turned on), but [[redstone comparator]]s may output a lower power level.
{{Schematic | caption =
Redstone wire can transmit power up to 15 blocks.
|rt-$!|rd-$ew!+15|rd-$ew!+14|rd-$ew!+13|rd-$ew!+12|rd-$ew!+11|rd-$ew!+10|rd-$ew!+9
|rd-$ew!+8|rd-$ew!+7|rd-$ew!+6|rd-$ew!+5|rd-$ew!+4|rd-$ew!+3|rd-$ew!+2|rd-$ew!+1|rd-$ew+0
}}
Power level drops by 1 for every block of redstone wire it crosses. Thus, redstone wire can transmit power for no more than 15 blocks. To go further, the power level must be re-strengthened – typically with a redstone repeater.
Powered redstone wire on top of, or pointing at, an opaque block provides ''weak'' power to the block. A weakly-powered block cannot power other adjacent redstone wire, but can still power redstone repeaters and comparators, and activate adjacent mechanism components. Transparent blocks cannot be powered.
When redstone wire is unpowered, it appears dark red. When powered, it becomes bright red at power level 15, fading to darker shades with decreasing power. Powered redstone wire also produces "dust" [[particles]] of the same color.
While redstone wire always provides power to the directions it points into, it can still point into directions in which it cannot give power. If redstone wire comes in the form of a cross, the player can right-click to toggle it between a cross and dot. A redstone dot does not power anything adjacent to it, but powers the block under it.
== Sounds ==
{{Sound table/Block/Normal}}
== Data values ==
=== ID ===
{{edition|java}}:
{{ID table
|edition=java
|firstcolumnname=Redstone Dust
|showforms=y
|generatetranslationkeys=y
|displayname=Block
|spritename=redstone-dust
|spritetype=block
|nameid=redstone_wire
|form=block}}
{{ID table
|displayname=Item
|spritename=redstone-dust
|spritetype=item
|nameid=redstone
|form=item
|foot=1}}
{{edition|bedrock}}:
{{ID table
|edition=bedrock
|firstcolumnname=Redstone Dust
|shownumericids=y
|showforms=y
|generatetranslationkeys=y
|displayname=Block
|spritename=redstone-dust
|spritetype=block
|nameid=redstone_wire
|id=55
|form=block}}
{{ID table
|displayname=Item
|spritename=redstone-dust
|spritetype=item
|nameid=redstone
|id=373
|form=item
|foot=1}}
=== Block states ===
{{see also|Block states}}
{{/BS}}
{{LoadPage|Redstone Dust/Asset history|List of block state combinations|h4}}
== Achievements ==
{{load achievements|Dispense With This}}
== Video ==
{{Video note|These videos do not show all uses for redstone in crafting and all methods of obtaining. This video is also outdated, as of 1.13 Java Edition, redstone is now called Redstone Dust.}}
<div style="text-align:center">
<span style="display:inline-block">{{yt|zldqknGFWb4}}</span>
<span style="display:inline-block">{{yt|_IApwvCLJW8}}</span>
</div>
== History ==
{{History||May 21, 2009|link=https://web.archive.org/web/0/http://notch.tumblr.com/post/110762705/my-list-on-tile-types-so-far|[[Notch]] shows interest in adding wire-type [[block]]s.}}
{{History|java alpha}}
{{History||v1.0.1|[[File:Redstone Dust JE1 BE1.png|32px]] Added redstone dust as an [[item]].
|[[File:Inactive Redstone Wire (NS) JE1.png|32px]] [[File:Inactive Redstone Wire (EW) JE1.png|32px]] [[File:Inactive Redstone Wire (NE) JE1.png|32px]] [[File:Inactive Redstone Wire (ES) JE1.png|32px]] [[File:Inactive Redstone Wire (SW) JE1.png|32px]] [[File:Inactive Redstone Wire (NW) JE1.png|32px]] [[File:Inactive Redstone Wire (NEW) JE1.png|32px]] [[File:Inactive Redstone Wire (NES) JE1.png|32px]] [[File:Inactive Redstone Wire (ESW) JE1.png|32px]] [[File:Inactive Redstone Wire (NSW) JE1.png|32px]] [[File:Inactive Redstone Wire (NESW) JE1.png|32px]]<br>[[File:Active Redstone Wire (NS) JE1.png|32px]] [[File:Active Redstone Wire (EW) JE1.png|32px]] [[File:Active Redstone Wire (NE) JE1.png|32px]] [[File:Active Redstone Wire (ES) JE1.png|32px]] [[File:Active Redstone Wire (SW) JE1.png|32px]] [[File:Active Redstone Wire (NW) JE1.png|32px]] [[File:Active Redstone Wire (NEW) JE1.png|32px]] [[File:Active Redstone Wire (NES) JE1.png|32px]] [[File:Active Redstone Wire (ESW) JE1.png|32px]] [[File:Active Redstone Wire (NSW) JE1.png|32px]] [[File:Active Redstone Wire (NESW) JE1.png|32px]] Added redstone dust as a placed [[block]].
|Redstone dust as a placed block has two power appearances; either completely on, or completely off.
|Redstone dust is used to craft [[redstone torch]]es.
|At this time, redstone has not been given an official name.}}
{{History||v1.0.2_01|Redstone dust now doesn't connect through solid [[block]]s diagonally down.{{needs testing|may have been changed in v1.0.2|type=untestable}}
|Walking on redstone dust no longer [[breaking|breaks]] it.{{needs testing|may have been changed in v1.0.2|type=untestable}}
|Active redstone dust now gives off [[particles]].{{needs testing|may have been changed in v1.0.2|type=untestable}}}}
{{History||v1.1.0|Redstone is now used to craft [[compass]]es.}}
{{History||v1.2.0|snap=<nowiki>?|slink=:Category:Information needed requiring unarchived version|Redstone is now used to craft [[clock]]s.}}
{{History|java beta}}
{{History||1.0|With the addition of inventory tooltips, the [[item]] form of redstone dust has been named "Redstone", and the usually unobtainable block form has been named "Redstone Dust".}}
{{History||1.2|Redstone is now used to craft [[dispenser]]s and [[note block]]s.}}
{{History||1.3|[[File:Inactive Redstone Wire (NS) JE2.png|32px]] [[File:Inactive Redstone Wire (EW) JE2.png|32px]] [[File:Inactive Redstone Wire (NE) JE2.png|32px]] [[File:Inactive Redstone Wire (ES) JE2.png|32px]] [[File:Inactive Redstone Wire (SW) JE2.png|32px]] [[File:Inactive Redstone Wire (NW) JE2.png|32px]] [[File:Inactive Redstone Wire (NEW) JE2.png|32px]] [[File:Inactive Redstone Wire (NES) JE2.png|32px]] [[File:Inactive Redstone Wire (ESW) JE2.png|32px]] [[File:Inactive Redstone Wire (NSW) JE2.png|32px]] [[File:Inactive Redstone Wire (NESW) JE2.png|32px]]<br>[[File:Active Redstone Wire (NS) JE2.png|32px]] [[File:Active Redstone Wire (EW) JE2.png|32px]] [[File:Active Redstone Wire (NE) JE2.png|32px]] [[File:Active Redstone Wire (ES) JE2.png|32px]] [[File:Active Redstone Wire (SW) JE2.png|32px]] [[File:Active Redstone Wire (NW) JE2.png|32px]] [[File:Active Redstone Wire (NEW) JE2.png|32px]] [[File:Active Redstone Wire (NES) JE2.png|32px]] [[File:Active Redstone Wire (ESW) JE2.png|32px]] [[File:Active Redstone Wire (NSW) JE2.png|32px]] [[File:Active Redstone Wire (NESW) JE2.png|32px]] Redstone wire gets darker the farther away it is from a source of power, using a dedicated [[tint]] system. Previously, it was fully on until it reached its limit.
|Its particles now appear gray due to not being tinted.
|Redstone is now used to craft [[redstone repeater]]s.}}
{{History||1.5|[[File:Inactive Redstone Wire (NS) JE3.png|32px]] [[File:Inactive Redstone Wire (EW) JE3.png|32px]] [[File:Inactive Redstone Wire (NE) JE3.png|32px]] [[File:Inactive Redstone Wire (ES) JE3.png|32px]] [[File:Inactive Redstone Wire (SW) JE3.png|32px]] [[File:Inactive Redstone Wire (NW) JE3.png|32px]] [[File:Inactive Redstone Wire (NEW) JE3.png|32px]] [[File:Inactive Redstone Wire (NES) JE3.png|32px]] [[File:Inactive Redstone Wire (ESW) JE3.png|32px]] [[File:Inactive Redstone Wire (NSW) JE3.png|32px]] [[File:Inactive Redstone Wire (NESW) JE3.png|32px]]<br>[[File:Active Redstone Wire (NS) JE3.png|32px]] [[File:Active Redstone Wire (EW) JE3.png|32px]] [[File:Active Redstone Wire (NE) JE3.png|32px]] [[File:Active Redstone Wire (ES) JE3.png|32px]] [[File:Active Redstone Wire (SW) JE3.png|32px]] [[File:Active Redstone Wire (NW) JE3.png|32px]] [[File:Active Redstone Wire (NEW) JE3.png|32px]] [[File:Active Redstone Wire (NES) JE3.png|32px]] [[File:Active Redstone Wire (ESW) JE3.png|32px]] [[File:Active Redstone Wire (NSW) JE3.png|32px]] [[File:Active Redstone Wire (NESW) JE3.png|32px]] Fully off redstone wire is no longer black.
|Redstone dust can now be placed on [[snow]].
|Redstone is now used to craft [[powered rail]]s and [[detector rail]]s.}}
{{History||1.6.6|Redstone dust now checks if the block below has a solid top face or [[glowstone]], allowing it to be placed on it.}}
{{History||1.7|Redstone dust now connects to a [[redstone repeater|repeater]] without the dust being explicitly pointed at it.
|Redstone can now be used to craft [[piston]]s.}}
{{History||1.8|snap=Pre-release|Redstone can now be found in the new [[stronghold]] storeroom [[chest]]s, and in the new [[mineshaft]] chests.}}
{{History|java}}
{{History||1.0.0|snap=Beta 1.9 Prerelease 3|Redstone can now be [[brewing|brewed]] in a [[water bottle]] to create a [[mundane potion]].
|Redstone can now be found in the new [[stronghold]] altar [[chest]]s.
|Redstone now extends the [[potion]]s of [[Fire Resistance]], [[Slowness]], [[Swiftness]], [[Poison]], [[Weakness]] and [[Strength]].}}
{{History|||snap=Beta 1.9 Prerelease 4|Redstone now extends the new potion of [[Regeneration]].}}
{{History|||snap=RC1|[[File:Inactive Redstone Wire (unconnected) JE1.png|32px]] <br>[[File:Active Redstone Wire (unconnected) JE1.png|32px]] Redstone dust placement on one [[block]] has been changed from a "+" to a "•" shape.}}
{{History||?|Redstone wire block particles are now correctly colored.}}
{{History||1.1|snap=11w49a|Fixed redstone update bug.{{more info}}}}
{{History||1.2.1|snap=12w06a|Redstone can now be placed on [[glowstone]].}}
{{History|||snap=12w07a|Redstone is now used to craft [[redstone lamp]]s.}}
{{History||1.3.1|snap=12w21a|Redstone can now be [[trading|bought]] from priest [[villager]]s, at 2–4 redstone for 1 [[emerald]], making them [[renewable]].}}
{{History|||snap=12w22a|Redstone dust now generates in [[jungle temple]]s.}}
{{History|||snap=12w25a|Redstone dust can now be placed on top of upside-down [[slabs]] and [[stairs]].}}
{{History||1.4.2|snap=12w34a|Redstone now extends the new [[potion]]s of [[Night Vision]] and [[Invisibility]].}}
{{History|||snap=12w38a|[[Witch]]es have been added, which sometimes [[drops|drop]] redstone when killed.}}
{{History||1.5|snap=13w01a|Redstone can now be used to craft [[blocks of redstone]] and [[dropper]]s.}}
{{History||1.7.2|snap=13w36a|Redstone now extends the new [[potion]] of [[Water Breathing]].}}
{{History||1.8|snap=14w02a|[[Trading]] has been changed: cleric [[villager]]s now [[trading|sell]] 1–4 redstone for 1 [[emerald]].}}
{{History|||snap=14w25a|Redstone dust no longer changes to [[obsidian]] next to water when [[lava]] flows into it.}}
{{History|||snap=14w27a|Redstone now extends the new [[potion]] of [[Leaping]].}}
{{History||1.9|snap=15w31a|[[File:Inactive Redstone Wire (unconnected) JE2.png|32px]] [[File:Inactive Redstone Wire (NS) JE4.png|32px]] [[File:Inactive Redstone Wire (EW) JE4.png|32px]] [[File:Inactive Redstone Wire (NE) JE4.png|32px]] [[File:Inactive Redstone Wire (ES) JE4.png|32px]] [[File:Inactive Redstone Wire (SW) JE4.png|32px]] [[File:Inactive Redstone Wire (NW) JE4.png|32px]] [[File:Inactive Redstone Wire (NEW) JE4.png|32px]] [[File:Inactive Redstone Wire (NES) JE4.png|32px]] [[File:Inactive Redstone Wire (ESW) JE4.png|32px]] [[File:Inactive Redstone Wire (NSW) JE4.png|32px]] [[File:Inactive Redstone Wire (NESW) JE4.png|32px]]<br>[[File:Active Redstone Wire (unconnected) JE2.png|32px]] [[File:Active Redstone Wire (NS) JE4.png|32px]] [[File:Active Redstone Wire (EW) JE4.png|32px]] [[File:Active Redstone Wire (NE) JE4.png|32px]] [[File:Active Redstone Wire (ES) JE4.png|32px]] [[File:Active Redstone Wire (SW) JE4.png|32px]] [[File:Active Redstone Wire (NW) JE4.png|32px]] [[File:Active Redstone Wire (NEW) JE4.png|32px]] [[File:Active Redstone Wire (NES) JE4.png|32px]] [[File:Active Redstone Wire (ESW) JE4.png|32px]] [[File:Active Redstone Wire (NSW) JE4.png|32px]] [[File:Active Redstone Wire (NESW) JE4.png|32px]] Some slight changes have been made to redstone wire's appearance - the dot now extends outward with two more pixels, and the south-facing section of bends, T shapes and crosses now has one fewer pixel. It also appears straighter and more continuous in straight wire form.
|Redstone can no longer be added to extended [[potion]]s or tier-II potions.}}
{{History|||snap=15w44a|The average yield of redstone from [[dungeon]] [[chest]]s has been cut by more than half.
|The average yield of redstone in [[mineshaft]] chests has been increased.}}
{{History|||snap=15w46a|The hitbox of redstone now covers only part of the surface of the [[block]] below, based on the orientation of the redstone.}}
{{History||1.11|snap=16w39a|Redstone dust can now be found in chests in [[woodland mansion]]s.
|Redstone can now used to craft [[observer]]s.}}
{{History||1.13|snap=17w47a|The [[item]] form of "Redstone" has been renamed to "Redstone Wire".
|Prior to [[1.13/Flattening|''The Flattening'']], this [[block]]'s numeral ID was 55, and the [[item]]'s 331.}}
{{History|||snap=17w48a|"Redstone" has been renamed to "Redstone Dust".}}
{{History|||snap=18w07a|Redstone now extends the new [[potion of the Turtle Master]].}}
{{History||1.14|snap=18w43a|[[File:Redstone Dust JE2 BE2.png|32px]] The texture of redstone dust has been changed.}}
{{History|||snap=18w50a|Redstone dust can now be found in chests in [[village]] temples.}}
{{History|||snap=19w12b|Redstone dust can now be placed on [[glass]], [[ice]] and [[sea lantern]]s.}}
{{History|||snap=19w13a|Cleric villagers now give redstone dust to players under the [[Hero of the Village]] effect.}}
{{History||1.16|snap=20w06a|Redstone dust now has a bottom texture.}}
{{History|||snap=20w09a|Redstone can now be used to craft [[target]]s.}}
{{History|||snap=20w18a|Redstone dust placement on one [[block]] has been changed from a "•" back to a "+" shape.
|Redstone dust's hitbox is now no longer strictly a cuboid, and more closely matches the shape of the wiring.<ref>{{bug|MC-137336}}</ref>
|Upward going redstone dust now has a hitbox on the side of the [[block]] too, rather than only on the floor.<ref>{{bug|MC-153508}}</ref>
|Unconnected redstone dust now has all direction block states set to "side".
|The direction block states of redstone dust are now properly set to "side" at the end of a redstone wire on both ends, rather than only the one with other redstone besides it.
|[[File:Inactive Redstone Wire (N).png|32px]] [[File:Inactive Redstone Wire (E).png|32px]] [[File:Inactive Redstone Wire (S).png|32px]] [[File:Inactive Redstone Wire (W).png|32px]]<br>[[File:Active Redstone Wire (N).png|32px]] [[File:Active Redstone Wire (E).png|32px]] [[File:Active Redstone Wire (S).png|32px]] [[File:Active Redstone Wire (W).png|32px]] While not accessible in normal gameplay, redstone dust that points into one side, but not the opposite, now visually reaches halfway across the [[block]].}}
{{History|||snap=20w19a|Redstone dust now visually connects when going up [[soul sand]], 8-layer [[snow]] stacks and the back side of upside-down [[stairs]].
|[[Particles]] are now generated across the length of the redstone wire rather than the center of the [[block]].}}
{{History|||snap=20w21a|Redstone dust placement on one [[block]] is now toggleable between a "+" and a "•" shape, by {{control|interacting}} with it.}}
{{History||1.17|snap=21w08a|Redstone dust can now drop and be smelted from [[deepslate redstone ore]].}}
{{History||1.19|snap=22w13a|Redstone wire now generates in [[Ancient City|ancient cities]].}}
{{History||1.20<br>(Experimental)|link=1.19.4|snap=23w04a|Redstone dust can now be used as an armor trim material.}}
{{History|pocket alpha}}
{{History||v0.8.0|snap=build 1|[[File:Redstone Dust JE1 BE1.png|32px]] Added redstone as an [[item]].
|Redstone is now [[drops|dropped]] when [[breaking|mined]] from [[redstone ore]].
|Redstone can be used to craft [[compass]]es and [[clock]]s.}}
{{History|||snap=build 2|Redstone can now be used to craft [[powered rail]]s.}}
{{History||v0.11.0|snap=build 1|Redstone is now used to craft [[redstone block]]s.}}
{{History||v0.12.1|snap=build 1|Redstone has been added to the [[Creative]] [[inventory]], but it still cannot be placed. }}
{{History||v0.13.0|snap=build 1|Redstone can now be placed.
|Redstone is now used to craft [[redstone lamp]]s, [[note block]]s, [[detector rail]]s and [[redstone torch]]es.}}
{{History||v0.14.0|snap=build 1|Redstone is now used to craft [[dispenser]]s and [[dropper]]s.}}
{{History||v0.15.0|snap=build 1|Redstone is now used to craft [[piston]]s and [[observer]]s.}}
{{History|pocket}}
{{History||1.0.4|snap=alpha 1.0.4.0|Cleric [[villager]]s now [[trading|sell]] 1–4 redstone for an [[emerald]].}}
{{History||1.1.0|snap=alpha 1.1.0.0|Redstone can now be found in [[woodland mansion]]s.}}
{{History|bedrock}}
{{History||?|[[File:Inactive Redstone Wire (NE) BE.png|32px]] [[File:Inactive Redstone Wire (ES) BE.png|32px]] [[File:Inactive Redstone Wire (SW) BE.png|32px]] [[File:Inactive Redstone Wire (NW) BE.png|32px]] [[File:Inactive Redstone Wire (NEW) BE.png|32px]] [[File:Inactive Redstone Wire (NES) BE.png|32px]] [[File:Inactive Redstone Wire (ESW) BE.png|32px]] [[File:Inactive Redstone Wire (NSW) BE.png|32px]] [[File:Inactive Redstone Wire (NESW) BE.png|32px]]<br>[[File:Active Redstone Wire (NE) BE.png|32px]] [[File:Active Redstone Wire (ES) BE.png|32px]] [[File:Active Redstone Wire (SW) BE.png|32px]] [[File:Active Redstone Wire (NW) BE.png|32px]] [[File:Active Redstone Wire (NEW) BE.png|32px]] [[File:Active Redstone Wire (NES) BE.png|32px]] [[File:Active Redstone Wire (ESW) BE.png|32px]] [[File:Active Redstone Wire (NSW) BE.png|32px]] [[File:Active Redstone Wire (NESW) BE.png|32px]]<br>Placed redstone now assumes its current appearance with a more solid center. Its linear state appearences are unknown.}}
{{History||1.10.0|snap=beta 1.10.0.3|[[File:Redstone Dust JE2 BE2.png|32px]] The texture of redstone has been changed.}}
{{History||1.11.0|snap=beta 1.11.0.1|Redstone can now be found in [[desert]] [[village]] temple [[chest]]s.}}
{{History|||snap=beta 1.11.0.4|Cleric [[villager]]s now [[trading|sell]] 4 redstone as part of their first tier [[trading|trade]].}}
{{History||1.16.210|snap=beta 1.16.210.57|"Redstone" has been renamed to "Redstone Dust".}}
{{History||1.17.0|snap=beta 1.16.230.52|Redstone dust can now drop and be smelted from [[deepslate redstone ore]].}}
{{History||1.19.0|snap=beta 1.19.0.26|Redstone wire now generates in [[Ancient City|ancient cities]].}}
{{History||1.19.80|snap=beta 1.19.80.21|Redstone dust can now be used as an armor trim material.}}
{{History|console}}
{{History||xbox=TU1|xbone=CU1|ps=1.0|wiiu=Patch 1|switch=1.0.1|[[File:Redstone Dust JE1 BE1.png|32px]] Added redstone.}}
{{History||xbox=TU3|Redstone now connects to a [[redstone repeater|repeater]] without the dust being explicitly pointed at it.}}
{{History||xbox=none|xbone=none|ps=1.90|wiiu=none|switch=none|[[File:Redstone Dust JE2 BE2.png|32px]] The texture of redstone has been changed.}}
{{History||ps=1.95|Redstone can now be placed on [[glass]].}}
{{History|new 3ds}}
{{History||0.1.0|[[File:Redstone Dust JE1 BE1.png|32px]] Added redstone dust.}}
{{History|foot}}
=== Redstone wire "item" ===
{{:Technical blocks/Redstone Wire}}
== Gallery ==
=== Renders ===
; Java Edition
<gallery>
Inactive Redstone Wire (NESW).png |
Inactive Redstone Wire (unconnected).png |
Inactive Redstone Wire (NS).png |
Inactive Redstone Wire (EW).png |
Inactive Redstone Wire (NE).png |
Inactive Redstone Wire (ES).png |
Inactive Redstone Wire (SW).png |
Inactive Redstone Wire (NW).png |
Inactive Redstone Wire (NEW).png |
Inactive Redstone Wire (NES).png |
Inactive Redstone Wire (ESW).png |
Inactive Redstone Wire (NSW).png
</gallery>
<gallery>
Active Redstone Wire (NESW).png |
Active Redstone Wire (unconnected).png |
Active Redstone Wire (NS).png |
Active Redstone Wire (EW).png |
Active Redstone Wire (NE).png |
Active Redstone Wire (ES).png |
Active Redstone Wire (SW).png |
Active Redstone Wire (NW).png |
Active Redstone Wire (NEW).png |
Active Redstone Wire (NES).png |
Active Redstone Wire (ESW).png |
Active Redstone Wire (NSW).png
</gallery>
; Bedrock Edition
<gallery>
Inactive Redstone Wire (NESW) BE.png |
Inactive Redstone Wire (NESW) BE.png |
Inactive Redstone Wire (NS).png |
Inactive Redstone Wire (EW).png |
Inactive Redstone Wire (NE) BE.png |
Inactive Redstone Wire (ES) BE.png |
Inactive Redstone Wire (SW) BE.png |
Inactive Redstone Wire (NW) BE.png |
Inactive Redstone Wire (NEW) BE.png |
Inactive Redstone Wire (NES) BE.png |
Inactive Redstone Wire (ESW) BE.png |
Inactive Redstone Wire (NSW) BE.png
</gallery>
<gallery>
Active Redstone Wire (NESW) BE.png |
Active Redstone Wire (NESW) BE.png |
Active Redstone Wire (NS).png |
Active Redstone Wire (EW).png |
Active Redstone Wire (NE) BE.png |
Active Redstone Wire (ES) BE.png |
Active Redstone Wire (SW) BE.png |
Active Redstone Wire (NW) BE.png |
Active Redstone Wire (NEW) BE.png |
Active Redstone Wire (NES) BE.png |
Active Redstone Wire (ESW) BE.png |
Active Redstone Wire (NSW) BE.png
</gallery>
=== Screenshots ===
<gallery>
Slab Stair Redstone.png|First image of redstone dust on top of slabs and stairs.
File:Olivia Tinkering.jpeg|[[Olivia]] using a scarce amount of redstone dust.
File:23w32a.jpg|[[Sunny]] using a very long strip of redstone dust.
</gallery>
=== In other media ===
<gallery>
Powered By Redstone JINX.jpg|Official T-shirt artwork "Powered By Redstone" made by [https://www.jinx.com JINX].
File:Redstone Behind Chiseled Bookshelf Pixel Art.png|Pixel art of redstone dust.
</gallery>
== Issues ==
{{issue list|redstone|redstone dust|redstone wire}}
== Trivia ==
* Five updates for [[wikipedia:Windows 10 version history|Windows 10]] released from 2016 to 2018 were codenamed "Redstone", referencing ''Minecraft''.<ref>{{link|url=https://www.theverge.com/2015/4/7/8364355/microsoft-redstone-windows-updates|title=Microsoft plans ‘Redstone’ updates for Windows 10 in 2016|author=Tom Warren|website=The Verge|date=April 7, 2015}}</ref>
* The block has 1,296 possible block state combinations, the highest of all blocks as of 1.15.2, beating [[fire]]'s 512 and [[note block]]'s 800.
* According to {{el|ee}}, redstone dust contains radioactive [[element]]s.
== References ==
{{Reflist}}
{{Redstone}}
{{Blocks|Utility}}
{{Items}}
[[Category:Redstone mechanics]]
[[Category:Mechanisms]]
[[Category:Mechanics]]
[[Category:Generated structure blocks]]
[[Category:Non-solid blocks]]
[[Category:Brewing recipe]]
[[cs:Rudit]]
[[de:Redstone]]
[[el:Σκόνη Κοκκινόπετρας]]
[[es:Polvo de redstone]]
[[fr:Poudre de redstone]]
[[hu:Redstone]]
[[it:Polvere di redstone]]
[[ja:レッドストーンダスト]]
[[ko:레드스톤 가루]]
[[nl:Redstonestof]]
[[pl:Redstone]]
[[pt:Pó de redstone]]
[[ru:Красная пыль]]
[[th:ผงเรดสโตน]]
[[tr:Kızıltaş]]
[[uk:Редстоун]]
[[zh:红石粉]]</li></ul></nowiki> | Added the "Create new" screen. It only had settings to change the world name and the seed at the time. | ||||
| World name by default is "New World". | |||||
v0.1.1{{Extension DPL}}<ul><li>[[Horse Armor|Horse Armor]]<br/>{{Item
| image = <gallery>
Leather Horse Armor.png | Leather
Iron Horse Armor.png | Iron
Golden Horse Armor.png | Golden
Diamond Horse Armor.png | Diamond
</gallery>
| image2 = <gallery>
Leather Horse Armor (item).png|Leather
Iron Horse Armor (item).png|Iron
Golden Horse Armor (item).png|Golden
Diamond Horse Armor (item).png|Diamond
</gallery>
| extratext = View [[#Gallery|all renders]]
| renewable =
* '''Leather''': Yes
* '''All others''': No
| stackable = No
}}
'''Horse armor''' is a special type of [[armor]] that can be given to a [[horse]] to wear.
== Obtaining ==
===Chest loot===
{{LootChestItem|iron-horse-armor}}
{{LootChestItem|golden-horse-armor}}
{{LootChestItem|diamond-horse-armor}}
===Crafting===
{{crafting
|A1= Leather
|C1= Leather
|A2= Leather
|B2= Leather
|C2= Leather
|A3= Leather
|C3= Leather
|Output= Leather Horse Armor
|type=Miscellaneous
}}
Only leather horse armor can be crafted; other horse armor can be obtained only from chest loot from some generated structures.
===Trading===
Expert-level [[leatherworker]] villagers [[trading|sell]] leather horse armor for 6 [[emerald]]s as part of their trade.
==Usage==
Only normal adult horses can wear armor; foals, [[donkey]]s, [[mule]]s, and undead variants such as [[skeleton horse]]s and [[zombie horse]]s cannot be equipped with armor.
=== Types ===
Horse armor has leather, iron, gold, and diamond variants. However, horse armor does not have netherite or chainmail variants.
=== Armor Stands ===
Horse armor cannot be placed or displayed on [[armor stand]]s.
===Protection===
Horse armor can be equipped to horses either by manually placing it in its respective slot by pressing E while riding the horse ({{SlotSprite|Horse Armor}}), or by right-clicking the horse with it.
There is a gradual increase in the defense given from a horse wearing the different types of armor. Note that golden horse armor provides more protection than iron horse armor, whereas the opposite is true for [[armor|player armor]].
{| class="wikitable" data-description="Armor defense"
|-
! Material !! [[Armor]]
|-
! [[Leather]]
| {{armor|3}}
|-
! [[Iron]]
| {{armor|5}}
|-
! [[Gold]]
| {{armor|7}}
|-
! [[Diamond]]
| {{armor|11}}
|}
When a horse dies while equipped with any horse armor, it drops its normal loot, saddle (if it had one), and the horse armor.
Leather horse armor protects horses from freezing in [[powder snow]], but it does not negate other powder snow effects (e.g., falling through, inability to jump).
===Durability===
Unlike [[armor|player armor]], horse armor does not have durability. This means a single horse armor can be used infinitely unless destroyed.
=== Enchanting ===
Unlike [[armor|player armor]], horse armor cannot be enchanted in survival mode. However, {{in|java}} Creative mode, horse armor can be used with an [[anvil]] to enchant with [[Depth Strider]], [[Thorns]], [[Respiration]], [[Feather Falling]], and [[Curse of vanishing]]. Other enchantments can be applied, but they have no effect.
=== Dyeing ===
Leather horse armor can be dyed 12,326,391 different colors (using lone dyes or dye combinations) and put onto a horse to display that color. These changes can be reverted by {{control|using}} a filled [[cauldron]] with dyed leather horse armor.
===Smelting usage===
{{Smelting|showname=1|Iron Horse Armor;Golden Horse Armor|Iron Nugget;Gold Nugget|0,1}}
===Piglins===
{{EntityLink|Piglin|Piglins}} are attracted to golden horse armor and run toward any golden horse armor on the ground, inspecting it for 6 to 8 seconds before putting it in their inventory.
== Sounds ==
{{Edition|Java}}:
{{Sound table
|sound=Horse armor.ogg
|subtitle=Horse armor equips
|source=neutral
|description=When armor is equipped to a horse
|id=entity.horse.armor
|translationkey=subtitles.entity.horse.armor
|volume=0.5
|pitch=1.0
|distance=16
|foot=1}}
{{Edition|Bedrock}}:
{{Sound table
|type=bedrock
|sound=Horse armor.ogg
|source=neutral
|description=When armor is equipped to a horse
|id=mob.horse.armor
|volume=0.6
|pitch=1.0
|foot=1}}
== Data values ==
=== ID ===
{{edition|java}}:
{{ID table
|edition=java
|showforms=y
|generatetranslationkeys=y
|displayname=Leather Horse Armor
|spritetype=item
|nameid=leather_horse_armor
|form=item}}
{{ID table
|displayname=Iron Horse Armor
|spritetype=item
|nameid=iron_horse_armor
|form=item}}
{{ID table
|displayname=Diamond Horse Armor
|spritetype=item
|nameid=diamond_horse_armor
|form=item}}
{{ID table
|displayname=Golden Horse Armor
|spritetype=item
|nameid=golden_horse_armor
|form=item
|foot=1}}
{{edition|bedrock}}:
{{ID table
|edition=bedrock
|shownumericids=y
|showforms=y
|showaliasids=y
|notshowbeitemforms=y
|generatetranslationkeys=y
|displayname=Leather Horse Armor
|spritetype=item
|nameid=leather_horse_armor
|aliasid=horsearmorleather
|id=530
|form=item
|translationkey=item.horsearmorleather.name}}
{{ID table
|displayname=Iron Horse Armor
|spritetype=item
|nameid=iron_horse_armor
|aliasid=horsearmoriron
|id=531
|form=item
|translationkey=item.horsearmoriron.name}}
{{ID table
|displayname=Diamond Horse Armor
|spritetype=item
|nameid=diamond_horse_armor
|aliasid=horsearmordiamond
|id=533
|form=item
|translationkey=item.horsearmordiamond.name}}
{{ID table
|displayname=Golden Horse Armor
|spritetype=item
|nameid=golden_horse_armor
|aliasid=horsearmorgold
|id=532
|form=item
|translationkey=item.horsearmorgold.name
|foot=1}}
=== Item data ===
When leather horse armor is dyed, it has the following NBT:
{{el|java}}:
{{main|Player.dat format}}
<div class="treeview">
* {{nbt|compound|tag}}: Parent tag.
** {{nbt|compound|display}}: Display properties.
*** {{nbt|int|color}}: The color of the leather armor. The tooltip displays "Dyed" if advanced tooltips are disabled, otherwise it displays the hexadecimal color value. Color codes are calculated from the Red, Green and Blue components using this formula:<br>'''<span style="color:red">Red</span>[[wikipedia:Logical shift|<<]]16 + <span style="color:green">Green</span><<8 + <span style="color:blue">Blue</span>'''<ref>For positive values larger than 0x00FFFFFF, the top byte is ignored. All negative values produce white.</ref>
</div>
{{el|bedrock}}:
: See [[Bedrock Edition level format/Item format]].
== History ==
{{History|java}}
{{History||1.6.1|snap=13w16a|[[File:Iron Horse Armor JE1 BE1.png|32px]] [[File:Golden Horse Armor JE1 BE1.png|32px]] [[File:Diamond Horse Armor JE1 BE1.png|32px]]<br>[[File:Iron Horse Armor (item) JE1 BE1.png|32px]] [[File:Golden Horse Armor (item) JE1 BE1.png|32px]] [[File:Diamond Horse Armor (item) JE1 BE1.png|32px]] Added horse armor.
|Horse armor can be [[crafting|crafted]] using the following recipe.
{{{!}} class{{=}}"collapsible collapsed"
! Recipe
{{!}}-
{{!}}
{{Crafting Table
|C1=Iron Ingot; Gold Ingot; Diamond
|A2=Iron Ingot; Gold Ingot; Diamond
|B2=Any Wool
|C2=Iron Ingot; Gold Ingot; Diamond
|A3=Iron Ingot; Gold Ingot; Diamond
|B3=Iron Ingot; Gold Ingot; Diamond
|C3=Iron Ingot; Gold Ingot; Diamond
|Output=Iron Horse Armor; Golden Horse Armor; Diamond Horse Armor
}}
{{!}}}
}}
{{History|||snap=13w18a|The crafting recipe for horse armor has been removed.
|Horse armor can now be found in [[chest]]s in [[jungle temple|jungle]] & [[desert temple]]s, [[dungeon]]s, [[nether fortress]]es, [[stronghold]] altar rooms and [[village]] blacksmith buildings.
|Iron horse armor can now additionally be found in [[mineshaft]] chests.}}
{{History|||snap=13w21a|Horse armor is no longer stackable, to be consistent with other types of [[armor]].}}
{{History||1.9|snap=15w31a|Horse armor has been added to [[end city]] [[chest]]s.}}
{{History|||snap=15w43a|The average yield of horse armor in [[nether fortress]] chests has slightly decreased.}}
{{History|||snap=15w44a|The average yield of horse armor in [[desert temple]] chests has increased.
|The average yield of iron horse armor from [[dungeon]] chests has slightly decreased.
|Iron horse armor has been removed from [[mineshaft]] [[chest]]s.}}
{{History||1.11.1|snap=16w50a|Golden and iron horse armor can now be [[smelting|smelted]] down into one of their respective [[nugget]]s.}}
{{History||1.13|snap=17w45a|[[File:Iron Horse Armor JE2.png|32px]] [[File:Golden Horse Armor JE2.png|32px]] [[File:Diamond Horse Armor JE2.png|32px]] The textures of horse armor have been changed, as the [[model]] of [[horse]]s has changed.}}
{{History|||snap=17w46a|[[File:Iron Horse Armor 17w46a.png|32px]] [[File:Golden Horse Armor 17w46a.png|32px]] [[File:Diamond Horse Armor 17w46a.png|32px]] The model of horse armor has been changed, but the textures of horse armor have remained unaltered.}}
{{History|||snap=17w47a|Prior to [[1.13/Flattening|''The Flattening'']], these [[item]]s' numeral IDs were 417, 418 and 419.}}
{{History|||snap=18w03a|[[File:Iron Horse Armor JE3.png|32px]] [[File:Golden Horse Armor JE3 BE2.png|32px]] [[File:Diamond Horse Armor JE3 BE2.png|32px]] The textures of horse armor have been changed, as the [[model]] of [[horse]]s has changed.}}
{{History|||snap=18w22a|[[File:Iron Horse Armor JE4 BE2.png|32px]] The texture of iron horse armor when equipped has been changed.<ref>{{bug|MC-124357}}</ref>}}
{{History|||snap=pre2|A bug with the [[horse]] skin and horse armor textures not applying correctly has been fixed.<ref>{{bug|MC-124364}}</ref>}}
{{History||1.14|snap=18w50a|[[File:Iron Horse Armor (item) JE2 BE2.png|32px]] [[File:Golden Horse Armor (item) JE2 BE2.png|32px]] [[File:Diamond Horse Armor (item) JE2 BE2.png|32px]] The textures of horse armor [[item]]s have been changed.}}
{{History|||snap=February 20, 2019|slink=https://twitter.com/_LadyAgnes/status/1098134917299531776?s=19|Leather horse armor announced for {{el|je}}.}}
{{History|||snap=19w08a|[[File:Iron Horse Armor JE5 BE3.png|32px]] [[File:Golden Horse Armor JE4 BE3.png|32px]] [[File:Diamond Horse Armor JE4 BE3.png|32px]]<br>[[File:Iron Horse Armor (item) JE3.png|32px]] [[File:Golden Horse Armor (item) JE3 BE3.png|32px]] [[File:Diamond Horse Armor (item) JE3 BE3.png|32px]] The textures of iron, gold and diamond horse armor have been changed.
|[[File:Leather Horse Armor JE1 BE3.png|32px]] [[File:Leather Horse Armor (item) JE1.png|32px]] Added leather horse armor, which can be [[dyeing|dyed]] 12,326,391 different colors, similar to leather [[armor]].}}
{{History|||snap=19w11a|Leatherworker [[villager]]s now [[trading|sell]] leather horse armor.}}
{{History||1.14.1|snap=Pre-Release 1|[[File:Leather Horse Armor (item) JE2.png|32px]] The texture of leather horse armor [[item]] has been changed to be more consistent with the other types of horse armor.
|[[File:Iron Horse Armor (item) JE4 BE3.png|32px]] The texture of iron horse armor item has been changed.}}
{{History||1.16|snap=20w15a|Horse armor placed in a dispenser can now be put on tamed horses.}}
{{History|||snap=20w16a|Golden horse armor now generates in [[ruined portal]] chests.}}
{{History||1.17|snap=21w13a|Leather horse armor now protects [[horse]]s from [[freezing]].}}
{{History||1.19|snap=22w13a|Diamond horse armor may now be found in [[ancient city]] [[chest]]s.}}
{{History|pocket alpha}}
{{History||v0.15.0|snap=build 1|[[File:Leather Horse Armor BE1.png|32px]] [[File:Iron Horse Armor JE1 BE1.png|32px]] [[File:Golden Horse Armor JE1 BE1.png|32px]] [[File:Diamond Horse Armor JE1 BE1.png|32px]]<br>[[File:Leather Horse Armor (item) BE1.png|32px]] [[File:Iron Horse Armor (item) JE1 BE1.png|32px]] [[File:Golden Horse Armor (item) JE1 BE1.png|32px]] [[File:Diamond Horse Armor (item) JE1 BE1.png|32px]] Added horse armor and [[dyeing|dyeable]] leather horse armor as a version exclusive.}}
{{History|pocket}}
{{History||1.0.0|snap=alpha 0.17.0.1|Horse armor can now be found inside [[end city]] [[chest]]s.}}
{{History||1.1.0|snap=alpha 1.1.0.0|Iron and golden horse armor are now [[smelting|smeltable]].}}
{{History|bedrock}}
{{History||1.2.6|snap=beta 1.2.6.2|[[File:Leather Horse Armor BE2.png|32px]] [[File:Iron Horse Armor JE4 BE2.png|32px]] [[File:Golden Horse Armor JE3 BE2.png|32px]] [[File:Diamond Horse Armor JE3 BE2.png|32px]] The textures of horse armor have been changed, as the [[model]] of [[horse]]s has been changed.}}
{{History||1.10.0|snap=beta 1.10.0.3|Horse armor can now be found in [[plains]] [[village]] weaponsmith [[chest]]s.
|[[File:Leather Horse Armor JE1 BE3.png|32px]] [[File:Iron Horse Armor JE5 BE3.png|32px]] [[File:Golden Horse Armor JE4 BE3.png|32px]] [[File:Diamond Horse Armor JE4 BE3.png|32px]]<br>[[File:Leather Horse Armor (item) BE2.png|32px]] [[File:Iron Horse Armor (item) JE2 BE2.png|32px]] [[File:Golden Horse Armor (item) JE2 BE2.png|32px]] [[File:Diamond Horse Armor (item) JE2 BE2.png|32px]] The textures of all horse armor have been changed.}}
{{History||1.11.0|snap=beta 1.11.0.1|Horse armor can now be found in [[savanna]], [[desert]], [[taiga]], [[snowy taiga]] and [[snowy tundra]] [[village]] weaponsmith [[chest]]s.}}
{{History|||snap=beta 1.11.0.4|Leather horse armor can now be [[trading|bought]] from leatherworker [[villager]]s.}}
{{History|||snap=beta 1.11.0.5|[[File:Leather Horse Armor (item) BE3.png|32px]] [[File:Iron Horse Armor (item) JE4 BE3.png|32px]] [[File:Golden Horse Armor (item) JE3 BE3.png|32px]] [[File:Diamond Horse Armor (item) JE3 BE3.png|32px]] The textures of all horse armor [[item]]s have been changed.}}
{{History||1.17.0|snap=beta 1.16.230.54|Leather horse armor now protects [[horse]]s from [[freezing]].}}
{{History|console}}
{{History||xbox=TU19|xbone=CU7|ps=1.12|wiiu=Patch 1|switch=1.0.1|[[File:Iron Horse Armor JE1 BE1.png|32px]] [[File:Golden Horse Armor JE1 BE1.png|32px]] [[File:Diamond Horse Armor JE1 BE1.png|32px]]<br>[[File:Iron Horse Armor (item) JE1 BE1.png|32px]] [[File:Golden Horse Armor (item) JE1 BE1.png|32px]] [[File:Diamond Horse Armor (item) JE1 BE1.png|32px]] Added horse armor.}}
{{History||xbox=TU53|xbone=CU43|ps=1.49|wiiu=Patch 23|switch=1.0.3|Iron and golden horse armor are now [[smelting|smeltable]].}}
{{History||xbox=TU60|xbone=CU51|ps=1.64|wiiu=Patch 30|switch=1.0.11|[[File:Leather Horse Armor BE1.png|32px]]<br>[[File:Leather Horse Armor (item) BE1.png|32px]] Added leather horse armor.}}
{{History||xbox=none|xbone=none|ps=1.90|wiiu=none|switch=none|[[File:Leather Horse Armor JE1 BE3.png|32px]] [[File:Iron Horse Armor JE5 BE3.png|32px]] [[File:Golden Horse Armor JE4 BE3.png|32px]] [[File:Diamond Horse Armor JE4 BE3.png|32px]]<br>[[File:Leather Horse Armor (item) BE3.png|32px]] [[File:Iron Horse Armor (item) JE3.png|32px]] [[File:Golden Horse Armor (item) JE3 BE3.png|32px]] [[File:Diamond Horse Armor (item) JE3 BE3.png|32px]] The textures of leather, iron, gold and diamond horse armor have been changed.}}
{{History|3ds}}
{{History||0.1.0|[[File:Leather Horse Armor BE1.png|32px]] [[File:Iron Horse Armor JE1 BE1.png|32px]] [[File:Golden Horse Armor JE1 BE1.png|32px]] [[File:Diamond Horse Armor JE1 BE1.png|32px]]<br>[[File:Leather Horse Armor (item) BE1.png|32px]] [[File:Iron Horse Armor (item) JE1 BE1.png|32px]] [[File:Golden Horse Armor (item) JE1 BE1.png|32px]] [[File:Diamond Horse Armor (item) JE1 BE1.png|32px]] Added horse armor.}}
{{History|foot}}
== Issues ==
{{issue list}}
== Gallery ==
<gallery>
Leather Horse Armor.png | Undyed Leather armor
White Leather Horse Armor.png | White Leather armor
Light Gray Leather Horse Armor.png | Light Gray Leather armor
Gray Leather Horse Armor.png | Gray Leather armor
Black Leather Horse Armor.png | Black Leather armor
Brown Leather Horse Armor.png | Brown Leather armor
Red Leather Horse Armor.png | Red Leather armor
Orange Leather Horse Armor.png | Orange Leather armor
Yellow Leather Horse Armor.png | Yellow Leather armor
Lime Leather Horse Armor.png | Lime Leather armor
Green Leather Horse Armor.png | Green Leather armor
Cyan Leather Horse Armor.png | Cyan Leather armor
Light Blue Leather Horse Armor.png | Light Blue Leather armor
Blue Leather Horse Armor.png | Blue Leather armor
Purple Leather Horse Armor.png | Purple Leather armor
Magenta Leather Horse Armor.png | Magenta Leather armor
Pink Leather Horse Armor.png | Pink Leather armor
</gallery>
=== Screenshots ===
<gallery>
Armored Horse.png|A [[horse]] equipped with iron horse armor and bound to a fence post by a [[lead]].
13w21a-new-HorseUI-inventory.png|The GUI for horses implemented in [[Java Edition 13w21a|13w21a]], which allows the removal and switching of armor.
GodSpawner.png|A golden horse armor found in a [[dungeon]] chest, which coincidentally contains an [[enchanted golden apple]].
Horses with armor.png|4 [[horse]]s equipped with [[leather]], [[iron]], [[gold]], and [[diamond]] armor.
Leather Horse Armor 1.jpg|First image of leather horse armor.
Leather Horse Armor 2.jpg|Second image of leather horse armor.
Leather Horse Armor 3.jpg|Third image of leather horse armor.
Leather Horse Armor 4.jpg|Fourth image of leather horse armor.
Leather Horse Armor 5.jpg|Fifth image of leather horse armor.
</gallery>
== Notes ==
{{Notelist}}
== References ==
{{Reflist}}
{{items}}
[[Category:Armor]]
[[de:Rossharnisch]]
[[es:Armadura para caballo]]
[[fr:Armure pour cheval]]
[[it:Bardatura]]
[[ja:馬鎧]]
[[ko:말 갑옷]]
[[nl:Paardenharnas]]
[[pl:Zbroja końska]]
[[pt:Armadura para cavalo]]
[[ru:Конская броня]]
[[uk:Кінські обладунки]]
[[zh:马铠]]</li><li>[[Door|Door]]<br/>{{About|the block|the music track|Minecraft - Volume Alpha}}
{{See also|Trapdoor}}
{{Block
| image = <gallery>
Iron Door.png|Java Edition
Iron Door BE.png|Bedrock Edition
</gallery>
| extratext = View [[#Gallery|all renders]]
| transparent = Partial
| light = No
| tntres = {{Blast resistance values|Wooden Door}} <small>(Wood)</small><br>{{Blast resistance values|Iron Door|Copper Door}}<small> (Iron)</small>
| hardness = {{Hardness values|Wooden Door}} <small>(Wood)</small><br>{{Hardness values|Iron Door|Copper Door}}<small> (Iron)</small>
| tool = axe
| tool2 = wooden pickaxe
| renewable = Yes
| stackable = Yes (64)
| flammable = No
| lavasusceptible = '''Overworld wood''': Yes<br>'''Nether wood''','''iron''','''copper''': No
}}
A '''door''' is a block that can be used as a barrier that can be opened by hand or with [[redstone]].
== Obtaining ==
Doors can be found in any Overworld biome, and can also be crafted from any type of [[wood]] as well as materials found in [[the Nether]]. Some have built-in openings that are useful for determining the time of day.
=== Breaking ===
Wooden doors can be broken with anything, but [[axe]]s are fastest. An iron door can be broken with anything if the top half of the door is broken.<ref>{{bug|MC-189739}}</ref><ref>{{bug|MCPE-126620}}</ref> All doors drop themselves if they no longer have a block beneath them that can support them.
{{breaking row
|Oak Door, Spruce Door, Birch Door, Jungle Door, Acacia Door, Dark Oak Door, Mangrove Door, Cherry Door, Bamboo Door, Crimson Door, Warped Door; Iron Door
|textTrim=Door
|Axe;Pickaxe
|;
|item=1;1
|link=none;none
}}
A door is removed and drops itself as an item:
* if the block beneath the door is moved, removed, or destroyed
* if a [[piston]] tries to push the door (trying to pull a door does nothing) or moves a block into its space
=== Natural generation ===
Doors generate in some generated structures, forming the entrances to the majority of buildings. Doors do not generate in [[zombie village]]s.
;{{BlockSprite|Oak Door|text=Oak}}
Oak doors generate as part of:
* Plains [[village]]s
* [[Stronghold]]s
* Right-side-up [[shipwreck]]s
;{{BlockSprite|Spruce Door|text=Spruce}}
Spruce doors generate as part of:
* Taiga, snowy tundra and snowy taiga [[village]]s
* Right-side-up [[shipwreck]]s
;{{BlockSprite|Jungle Door|text=Jungle}}
Jungle doors generate as part of:
* Desert [[village]]s
* Right-side-up [[shipwreck]]s
;{{BlockSprite|Acacia Door|text=Acacia}}
Acacia doors generate as part of:
* Savanna [[village]]s
<!-- * Right-side-up [[shipwreck]]s{{only|BE}}{{need testing}} -->
;{{BlockSprite|Dark Oak Door|text=Dark oak}}
Dark oak doors generate as part of:
* Master bedroom closets in [[woodland mansion]]s
* Right-side-up [[shipwreck]]s
;{{BlockSprite|Iron Door|text=Iron}}
Iron doors generate as part of:
* Prison rooms in [[woodland mansion]]s
* [[Stronghold]]s with a stone [[button]] to open{{only|JE}}
=== Crafting ===
{{Crafting
|head=1
|name=[[Wood Door]]
|A1= Matching Planks
|B1= Matching Planks
|A2= Matching Planks
|B2= Matching Planks
|A3= Matching Planks
|B3= Matching Planks
|Output= Matching wood Door,3
|type= Redstone
}}
{{Crafting
|A1= Iron Ingot
|B1= Iron Ingot
|A2= Iron Ingot
|B2= Iron Ingot
|A3= Iron Ingot
|B3= Iron Ingot
|Output= Iron Door,3
|type= Redstone
|foot=1
}}
== Usage ==
Wooden doors can be opened and closed by players, [[villager]]s, [[wandering trader]]s{{only|bedrock|short=1}}<!--Wandering traders cannot open doors in java edition. -->, [[vindicator]]s{{only|java|short=1}}, and [[piglin]]s. Wooden doors can be broken by all variants of [[zombie]]s (except [[drowned]]) and [[vindicator]]s in Hard difficulty.
Iron doors can be opened only with redstone power.
=== Placement ===
Doors must be "attached" to a block beneath them. To place a door, {{control|use}} a door item while pointing at the top of the block it should be attached to. A door can be attached to:
* the '''top''' of any full solid [[opaque]] block ([[stone]], [[dirt]], [[blocks of gold]], etc.)
* the '''top''' of an upside-down [[slab]] or upside-down [[stairs]]
* the '''top''' of a [[slime block]] or downward-facing [[piston]]
More information about placement on transparent blocks can be found at [[Opacity/Placement]].
When placed, a door occupies the side of the block facing the player, or behind a player if placed in the player's own space.
By default, a door's "hinge" appears on the side of the half of the block that the player pointed at when placing and its "handle" on the opposite side{{only|java}}, but the hinge is forced to other side by:
* Placing a door besides another door (creating a double door where both doors open away from each other)
* Placing a door between a full solid and any opaque block (top or bottom), making the hinge appear to attach to the solid block.
=== Behavior ===
[[Water]] and [[lava]] flow around doors. Lava can create [[fire]] in air blocks next to wooden doors as if the wooden doors were flammable, but the doors do not burn (and cannot be burned by other methods either, except throwing them into lava).
[[Mob]]s can spawn in a space occupied by a door.
The sound of opening and closing of a door can be heard up to 16 blocks away, like most mob sounds.
When placed using the {{cmd|setblock}} command, only one half of a door is placed, because doors are actually two separate blocks. The lower half still works, but with graphical bugs, and the upper half does not. Redstone cannot be used because it updates the half, breaking it. The upper half does not drop anything when broken, the lower half drops a normal door. This implies that the upper half is dependent on the lower.
=== Barrier ===
A door can be used as a switchable barrier to entity movement. Although primarily used to block movement by mobs and players, a door can also be used to control the movement of boats (for example, a door placed in a two-wide water flow stops a boat when perpendicular to the flow, but allow it to move again when parallel), items and minecarts (a door can stop a falling item or minecart, then allow it to drop again when the door moves), etc.
{{IN|Java}}, doors provide a breathable space if placed underwater. {{IN|bedrock}}, doors in water source blocks are [[waterlogging|waterlogged]] and do not displace water source blocks.
Doors are 0.1875 ({{frac|3|16}}) blocks thick (0.1825 {{in|bedrock}}). The rest of a door's space can be moved through freely. A door occupies two block spaces and both halves normally act as a single barrier, although doors can be opened or closed with a player or mob occupying the bottom block of the door,<ref>{{bug|MC-54255}} – "You can stand on the bottom block of a door, allowing you to climb it like a ladder" resolved as "Won't Fix"</ref> in which case the player can jump up to land on the bottom half of the door and then again to land on top of the door.
To open or close a wooden door, use the {{control|use|text=Use Item/Place Block}} [[control]]. When a door opens or closes, it immediately changes its orientation without affecting anything in the space it "swings through". Moving doors do not push entities the way that pistons do.
[[Villager]]s, [[wandering trader]]s,{{only|bedrock|short=1}} [[vindicator]]s{{only|java|short=1}}, [[piglin]]s and [[piglin brute]]s can open and close wooden doors when pathfinding.
Some [[zombie]]s can break wooden doors in [[Hard]] [[difficulty]]. Zombies have a 5% chance to spawn with the ability to break doors. Vindicators spawned from a [[raid]] in [[Normal]] and Hard difficulty can also break wooden doors, but they do so only to reach targeted players, villagers, or wandering traders. Some vindicators may sometimes open a wooden door instead of breaking it.{{only|java}} Both zombies and vindicators attempt to break wooden doors only when in their "closed" state, even if a door is placed so that its "open" state blocks access (for example, by facing sideways when placing a door so that it allows passage when closed and blocks passage when open).
Iron doors can be opened only with redstone power (a [[button]], a [[redstone circuit]], etc.). Any mob can activate an iron door by stepping on a pressure plate or by triggering a tripwire.
=== Redstone component ===
{{see also|Redstone circuit}}
Both wood and iron doors can be controlled with redstone power.
A door is a redstone [[mechanism component]] and can be activated by:
* an adjacent active '''[[power component]]''', including above or below: for example, a [[redstone torch]], a [[block of redstone]], a [[daylight sensor]], etc.
* an adjacent '''powered block''' (for example, a block with an active redstone torch under it), including above or below
* a powered '''[[redstone comparator]]''' or '''[[redstone repeater]]''' facing the door
* powered '''[[redstone dust]]''' configured to point at the door or a directionless "dot" next to it; a door is ''not'' activated by adjacent powered redstone dust that is configured to point in another direction.
All methods of activating a door can be applied to either the top or bottom parts of a door.
When activated, a door immediately rotates around its hinge side to its open state. When deactivated, a door immediately returns to its closed state.
An activated wood door can still be closed by a player or villager and does not re-open until it receives a new activation signal (if a door has been closed "by hand", it still needs to be deactivated and then reactivated to open by redstone).
=== Fuel ===
Overworld wooden doors can be used as a [[Smelting#Fuel|fuel]] in [[furnace]]s, smelting 1 item per door.
=== Note blocks ===
Wooden doors can be placed under [[note block]]s to produce "bass" sound.
== Sounds ==
=== Generic ===
==== Iron ====
{{Sound table/Block/Metal}}
==== Normal wood ====
{{Sound table/Block/Wood}}
==== Cherry wood ====
{{Sound table/Block/Cherry wood}}
==== Bamboo wood ====
{{Sound table/Block/Bamboo wood}}
==== Nether wood ====
{{Sound table/Block/Nether wood}}
=== Unique ===
{{el|java}}:
{{Sound table
|sound=Iron Door open1.ogg
|sound2=Iron Door open2.ogg
|sound3=Iron Door open3.ogg
|sound4=Iron Door open4.ogg
|subtitle=Door creaks
|source=block
|description=When an iron door opens
|id=block.iron_door.open
|translationkey=subtitles.block.door.toggle
|volume=0.9
|pitch=0.9-1.0
|distance=16}}
{{Sound table
|sound=Iron Door close1.ogg
|sound2=Iron Door close2.ogg
|sound3=Iron Door close3.ogg
|sound4=Iron Door close4.ogg
|subtitle=Door creaks
|source=block
|description=When an iron door closes
|id=block.iron_door.close
|translationkey=subtitles.block.door.toggle
|volume=0.9
|pitch=0.9-1.0
|distance=16}}
{{Sound table
|sound=Wooden Door open3.ogg
|sound2=Wooden Door open4.ogg
|subtitle=Door creaks
|source=block
|description=When a wooden door opens
|id=block.wooden_door.open
|translationkey=subtitles.block.door.toggle
|volume=0.9
|pitch=0.9-1.0
|distance=16}}
{{Sound table
|sound=Wooden Door close2.ogg
|sound2=Wooden Door close5.ogg
|sound3=Wooden Door close6.ogg
|subtitle=Door creaks
|source=block
|description=When a wooden door closes
|id=block.wooden_door.close
|translationkey=subtitles.block.door.toggle
|volume=0.9
|pitch=0.9-1.0
|distance=16}}
{{Sound table
|rowspan=2
|sound=Cherry door toggle1.ogg
|sound2=Cherry door toggle2.ogg
|sound3=Cherry door toggle3.ogg
|sound4=Cherry door toggle4.ogg
|subtitle=Door creaks
|source=block
|description=When a cherry wood door opens
|id=block.cherry_wood_door.open
|translationkey=subtitles.block.door.toggle
|volume=0.9
|pitch=0.9-1.0
|distance=16}}
{{Sound table
|subtitle=Door creaks
|source=block
|description=When a cherry wood door closes
|id=block.cherry_wood_door.close
|translationkey=subtitles.block.door.toggle
|volume=0.9
|pitch=0.9-1.0
|distance=16}}
{{Sound table
|rowspan=2
|sound=Bamboo Door toggle1.ogg
|sound2=Bamboo Door toggle2.ogg
|sound3=Bamboo Door toggle3.ogg
|sound4=Bamboo Door toggle4.ogg
|subtitle=Door creaks
|source=block
|description=When a bamboo wood door opens
|id=block.bamboo_wood_door.open
|translationkey=subtitles.block.door.toggle
|volume=0.9
|pitch=0.9-1.0
|distance=16}}
{{Sound table
|subtitle=Door creaks
|source=block
|description=When a bamboo wood door closes
|id=block.bamboo_wood_door.close
|translationkey=subtitles.block.door.toggle
|volume=0.9
|pitch=0.9-1.0
|distance=16}}
{{Sound table
|rowspan=2
|sound=Nether Door toggle1.ogg
|sound2=Nether Door toggle2.ogg
|sound3=Nether Door toggle3.ogg
|sound4=Nether Door toggle4.ogg
|subtitle=Door creaks
|source=block
|description=When a Nether wood door opens
|id=block.nether_wood_door.open
|translationkey=subtitles.block.door.toggle
|volume=1.0
|pitch=0.9-1.0
|distance=16}}
{{Sound table
|subtitle=Door creaks
|source=block
|description=When a Nether wood door closes
|id=block.nether_wood_door.close
|translationkey=subtitles.block.door.toggle
|volume=1.0
|pitch=0.9-1.0
|distance=16}}
{{Sound table
|sound=Zombie hit wood1.ogg
|sound2=Zombie hit wood2.ogg
|sound3=Zombie hit wood3.ogg
|sound4=Zombie hit wood4.ogg
|subtitle=Door shakes
|source=hostile
|description=When a [[zombie]] attacks a door
|id=entity.zombie.attack_wooden_door
|translationkey=subtitles.entity.zombie.attack_wooden_door
|volume=2.0
|pitch=0.8-1.2
|distance=16}}
{{Sound table
|sound=Zombie hit metal1.ogg
|sound2=Zombie hit metal2.ogg
|sound3=Zombie hit metal3.ogg
|subtitle=Block broken <ref group=sound name=ironsubtitle>{{Bug|MC-226770}}</ref>
|source=None
|description=''Unused sound event''<ref group=sound>{{bug|MC-218122}}</ref>
|id=entity.zombie.attack_iron_door
|translationkey=subtitles.block.generic.break|translationkeynote=<ref group=sound name=ironsubtitle/>
|volume=''None''
|pitch=''None''
|distance=''None''}}
{{Sound table
|sound=Zombie breaks door.ogg
|subtitle=Door breaks
|source=hostile
|description=When a zombie breaks a door
|id=entity.zombie.break_wooden_door
|translationkey=subtitles.entity.zombie.break_wooden_door
|volume=2.0
|pitch=0.8-1.2
|distance=16
|foot=1}}
{{el|bedrock}}:
{{Sound table
|type=bedrock
|sound=Iron Door open1.ogg
|sound2=Iron Door open2.ogg
|sound3=Iron Door open3.ogg
|sound4=Iron Door open4.ogg
|source=block
|description=When an iron door opens
|id=open.iron_door
|volume=0.9
|pitch=0.9-1.0}}
{{Sound table
|sound=Iron Door close1.ogg
|sound2=Iron Door close2.ogg
|sound3=Iron Door close3.ogg
|sound4=Iron Door close4.ogg
|source=block
|description=When an iron door closes
|id=close.iron_door
|volume=0.9
|pitch=0.9-1.0}}
{{Sound table
|sound=Wooden Door open3.ogg
|sound2=Wooden Door open4.ogg
|source=block
|description=When a wooden door opens
|id=open.wooden_door
|volume=0.9
|pitch=0.9-1.0}}
{{Sound table
|sound=Wooden Door close2.ogg
|sound2=Wooden Door close5.ogg
|sound3=Wooden Door close6.ogg
|source=block
|description=When a wooden door closes
|id=close.wooden_door
|volume=0.9
|pitch=0.9-1.0}}
{{Sound table
|rowspan=2
|sound=Cherry door toggle1.ogg
|sound2=Cherry door toggle2.ogg
|sound3=Cherry door toggle3.ogg
|sound4=Cherry door toggle4.ogg
|source=block
|description=When a cherry wood door opens
|id=open.cherry_wood_door
|volume=1.0
|pitch=0.9-1.0}}
{{Sound table
|source=block
|description=When a cherry wood door closes
|id=close.cherry_wood_door
|volume=1.0
|pitch=0.9-1.0}}
{{Sound table
|rowspan=2
|sound=Bamboo Door toggle1.ogg
|sound2=Bamboo Door toggle2.ogg
|sound3=Bamboo Door toggle3.ogg
|sound4=Bamboo Door toggle4.ogg
|source=block
|description=When a bamboo wood door opens
|id=open.bamboo_wood_door
|volume=0.9
|pitch=0.9-1.0}}
{{Sound table
|source=block
|description=When a bamboo wood door closes
|id=close.bamboo_wood_door
|volume=0.9
|pitch=0.9-1.0}}
{{Sound table
|rowspan=2
|sound=Nether Door toggle1.ogg
|sound2=Nether Door toggle2.ogg
|sound3=Nether Door toggle3.ogg
|sound4=Nether Door toggle4.ogg
|source=block
|description=When a Nether wood door opens
|id=open.nether_wood_door
|volume=1.0
|pitch=0.9-1.0}}
{{Sound table
|source=block
|description=When a Nether wood door closes
|id=close.nether_wood_door
|volume=1.0
|pitch=0.9-1.0}}
{{Sound table
|sound=Zombie hit wood1.ogg
|sound2=Zombie hit wood2.ogg
|sound3=Zombie hit wood3.ogg
|sound4=Zombie hit wood4.ogg
|source=hostile
|description=While a zombie is breaking a wooden door
|id=mob.zombie.wood
|volume=1.0
|pitch=1.0}}
{{Sound table
|sound=Zombie breaks door.ogg
|source=hostile
|description=When a zombie breaks a wooden door
|id=mob.zombie.woodbreak
|volume=1.0
|pitch=1.0
|foot=1}}
== Data values ==
=== ID ===
{{edition|java}}:
{{ID table
|edition=java
|showblocktags=y
|showitemtags=y
|showforms=y
|generatetranslationkeys=y
|displayname=Iron Door
|spritetype=block
|nameid=iron_door
|blocktags=doors
|itemtags=doors}}
{{ID table
|displayname=Oak Door
|spritetype=block
|nameid=oak_door
|blocktags=doors, wooden_doors
|itemtags=doors, wooden_doors}}
{{ID table
|displayname=Spruce Door
|spritetype=block
|nameid=spruce_door
|blocktags=doors, wooden_doors
|itemtags=doors, wooden_doors}}
{{ID table
|displayname=Birch Door
|spritetype=block
|nameid=birch_door
|blocktags=doors, wooden_doors
|itemtags=doors, wooden_doors}}
{{ID table
|displayname=Jungle Door
|spritetype=block
|nameid=jungle_door
|blocktags=doors, wooden_doors
|itemtags=doors, wooden_doors}}
{{ID table
|displayname=Acacia Door
|spritetype=block
|nameid=acacia_door
|blocktags=doors, wooden_doors
|itemtags=doors, wooden_doors}}
{{ID table
|displayname=Dark Oak Door
|spritetype=block
|nameid=dark_oak_door
|blocktags=doors, wooden_doors
|itemtags=doors, wooden_doors}}
{{ID table
|displayname=Mangrove Door
|spritetype=block
|nameid=mangrove_door
|blocktags=doors, wooden_doors
|itemtags=doors, wooden_doors}}
{{ID table
|displayname=Cherry Door
|spritetype=block
|nameid=cherry_door
|blocktags=doors, wooden_doors
|itemtags=doors, wooden_doors}}
{{ID table
|displayname=Bamboo Door
|spritetype=block
|nameid=bamboo_door
|blocktags=doors, wooden_doors
|itemtags=doors, wooden_doors}}
{{ID table
|displayname=Crimson Door
|spritetype=block
|nameid=crimson_door
|blocktags=doors, non_flammable_wood, wooden_doors
|itemtags=doors, non_flammable_wood, wooden_doors}}
{{ID table
|displayname=Warped Door
|spritetype=block
|nameid=warped_door
|blocktags=doors, non_flammable_wood, wooden_doors
|itemtags=doors, non_flammable_wood, wooden_doors
|foot=1}}
{{edition|bedrock}}:
{{ID table
|edition=bedrock
|showitemtags=y
|firstcolumnname=Door
|shownumericids=y
|showforms=y
|generatetranslationkeys=y
|spritename=iron-door
|displayname=Iron block
|spritetype=block
|nameid=iron_door
|id=71
|form=block
|itemform=item.iron_door}}
{{ID table
|spritename=oak-door
|displayname=Oak block
|spritetype=block
|nameid=wooden_door
|id=64
|form=block
|itemform=item.wooden_door
|translationkey=-}}
{{ID table
|spritename=spruce-door
|displayname=Spruce block
|spritetype=block
|nameid=spruce_door
|id=193
|form=block
|itemform=item.spruce_door
|translationkey=-}}
{{ID table
|spritename=birch-door
|displayname=Birch block
|spritetype=block
|nameid=birch_door
|id=194
|form=block
|itemform=item.birch_door
|translationkey=-}}
{{ID table
|spritename=jungle-door
|displayname=Jungle block
|spritetype=block
|nameid=jungle_door
|id=195
|form=block
|itemform=item.jungle_door
|translationkey=-}}
{{ID table
|spritename=acacia-door
|displayname=Acacia block
|spritetype=block
|nameid=acacia_door
|id=196
|form=block
|itemform=item.acacia_door
|translationkey=-}}
{{ID table
|spritename=dark-oak-door
|displayname=Dark Oak block
|spritetype=block
|nameid=dark_oak_door
|id=197
|form=block
|itemform=item.dark_oak_door
|translationkey=-}}
{{ID table
|spritename=mangrove-door
|displayname=Mangrove block
|spritetype=block
|nameid=mangrove_door
|id=-493
|form=block
|itemform=item.mangrove_door
|translationkey=-}}
{{ID table
|displayname=Cherry Door
|spritetype=block
|nameid=cherry_door
|id=-531
|itemtags=minecraft:door
|translationkey=item.cherry_door.name}}
{{ID table
|displayname=Bamboo Door
|spritetype=block
|nameid=bamboo_door
|id=-517
|itemtags=minecraft:door
|translationkey=item.bamboo_door.name}}
{{ID table
|spritename=crimson-door
|displayname=Crimson block
|spritetype=block
|nameid=crimson_door
|id=499
|form=block
|itemform=item.crimson_door}}
{{ID table
|spritename=warped-door
|displayname=Warped block
|spritetype=block
|nameid=warped_door
|id=500
|form=block
|itemform=item.warped_door}}
{{ID table
|spritename=iron-door
|displayname=Iron item
|spritetype=item
|nameid=iron_door
|id=372
|form=item
|itemtags=minecraft:door}}
{{ID table
|spritename=oak-door
|displayname=Oak item
|spritetype=item
|nameid=wooden_door
|id=359
|form=item
|itemtags=minecraft:door}}
{{ID table
|spritename=spruce-door
|displayname=Spruce item
|spritetype=item
|nameid=spruce_door
|id=553
|form=item
|itemtags=minecraft:door}}
{{ID table
|spritename=birch-door
|displayname=Birch item
|spritetype=item
|nameid=birch_door
|id=554
|form=item
|itemtags=minecraft:door}}
{{ID table
|spritename=jungle-door
|displayname=Jungle item
|spritetype=item
|nameid=jungle_door
|id=555
|form=item
|itemtags=minecraft:door}}
{{ID table
|spritename=acacia-door
|displayname=Acacia item
|spritetype=item
|nameid=acacia_door
|id=556
|form=item
|itemtags=minecraft:door}}
{{ID table
|spritename=dark-oak-door
|displayname=Dark Oak item
|spritetype=item
|nameid=dark_oak_door
|id=557
|form=item
|itemtags=minecraft:door}}
{{ID table
|spritename=mangrove-door
|displayname=Mangrove item
|spritetype=item
|nameid=mangrove_door
|id=641
|form=item
|itemtags=minecraft:door}}
{{ID table
|spritename=crimson-door
|displayname=Crimson item
|spritetype=item
|nameid=crimson_door
|id=616
|form=item
|itemtags=minecraft:door}}
{{ID table
|spritename=warped-door
|displayname=Warped item
|spritetype=item
|nameid=warped_door
|id=617
|form=item
|itemtags=minecraft:door
|foot=1}}
=== Block states ===
{{see also|Block states}}
{{/BS}}
== Video ==
Note: The videos do not mention or state Crimson, Warped, Bamboo, or Cherry doors, since the videos were uploaded before 1.16.
<div style="text-align:center">
<span style="display:inline-block">{{yt|7jlIQcbHFts}}</span>
<span style="display:inline-block">{{yt|CC6ujEdvzQY}}</span>
</div>
== History ==
''For a history of changes to textures and models for each block state, see [[/Asset history]]''
{{History||3 June 2010|link=https://notch.tumblr.com/post/659506746/asynchronous-saving-and-loading-and-slightly-more|Notch states plans to implement doors.}}
{{History|java infdev}}{{History||20100607|[[File:Oak Door JE1.png|32px]] [[File:Oak Door (Right) JE1.png|32px]] [[File:Oak Door (item) JE1.png|32px]] Added wooden doors.}}
{{History||20100608|Doors have been given smarter rotation logic.}}
{{History||20100611|[[File:Oak Door JE2.png|32px]] [[File:Oak Door (Right) JE2.png|32px]] The models of doors have been changed to use door bottom half texture on sides instead of the wooden [[planks]] texture.}}
{{History||20100618|[[File:Oak Door JE3 BE1.png|32px]] [[File:Oak Door (Right) JE3.png|32px]] The textures of doors have been changed.}}
{{History||20100624|[[File:Oak Door (Right) JE4 BE1.png|32px]] The model of door with right hinge has been changed to mirror and use textures of door with left hinge.}}
{{History|java alpha}}
{{History||v1.0.1|[[File:Iron Door JE1 BE1.png|32px]] [[File:Iron Door (Right) JE1 BE1.png|32px]] [[File:Iron Door (item) JE1 BE1.png|32px]] Added iron doors.
|[[File:Oak Door (item) JE2 BE1.png|32px]] The texture of wooden doors in [[item]] form has been changed.
|Doors can now be controlled by redstone power.}}
{{History|java beta}}
{{History||1.7|Punching the back face of a left-hinge oak or iron door or the front face of a right-hinge door, as well as destroying a door, would [[Java Edition placeholder texture uses|create]] particles using the [[Placeholder texture#Texture atlas blank spaces|block placeholder texture]].}}
{{History||1.7.3|Doors no longer produce placeholder texture particles.}}
{{History||1.8|snap=Pre-release|Doors now occur naturally in [[village]]s and [[stronghold]]s.}}
{{History|java}}
{{History||1.0.0|snap=Beta 1.9 Prerelease 6|Wooden doors are now broken faster using an [[axe]].
|Iron doors are broken much faster using a [[pickaxe]], and the [[mining]] speed is now [[tier]] dependent.}}
{{History|||snap=RC1|The opening and closing [[sound]]s for doors have been changed.}}
{{History||1.1|snap=11w47a|Double doors now open correctly.}}
{{History||1.2.1|snap=12w05b|[[Villager]]s can now open and close doors.}}
{{History|||snap=12w06a|[[File:Oak Door JE4 BE3.png|32px]] [[File:Iron Door JE2 BE5.png|32px]] Changed top model of door.
|[[Zombie]]s can now break wooden doors.
|Doors have been changed to properly detect if they are open or closed. Placing two [[pressure plate]]s directly in front of doors and stepping on them now opens them correctly.}}
{{History|||snap=12w07a|Zombies can no longer break iron doors.}}
{{History||1.4.2|snap=12w40a|Wooden doors can no longer be opened by attacking (left-click).}}
{{History||1.8|snap=December 13, 2013|slink=https://twitter.com/jeb_/status/411425952338808832|[[Jens Bergensten|Jeb]] tweeted an image showing that the crafting recipes for doors are changed so that 3 doors are crafted at once. Doors are also stackable to 64.}}
{{History|||snap=14w02a|Doors are now stackable to 64.
|The [[crafting]] recipes of doors now yield 3 doors instead of 1.}}
{{History|||snap=14w10a|[[File:Oak Door JE5.png|32px]] [[File:Iron Door JE3.png|32px]] The models of doors have been changed.}}
{{History|||snap=August 8, 2014|slink=https://twitter.com/TheMogMiner/status/497751889102905344|[[Ryan Holtz|TheMogMiner]] tweeted an image showing new types of [[wood]] doors.}}
{{History|||snap=14w32d|[[File:Spruce Door JE1 BE1.png|32px]] [[File:Birch Door JE1 BE1.png|32px]] [[File:Jungle Door JE1.png|32px]] [[File:Acacia Door JE1.png|32px]] [[File:Dark Oak Door JE1 BE1.png|32px]] [[File:Spruce Door (item) JE1.png|32px]] [[File:Birch Door (item) JE1.png|32px]] [[File:Jungle Door (item) JE1.png|32px]] [[File:Acacia Door (item) JE1.png|32px]] [[File:Dark Oak Door (item) JE1.png|32px]] New types of wood doors have been added: spruce, birch, jungle, acacia and dark oak.}}
{{History|||snap=14w33a|[[File:Jungle Door JE2 BE1.png|32px]] [[File:Acacia Door JE2 BE1.png|32px]] The models of jungle and acacia doors no longer have inner faces in the holes in their models.
|[[File:Spruce Door (item) JE2.png|32px]] [[File:Birch Door (item) JE2.png|32px]] [[File:Jungle Door (item) JE2.png|32px]] [[File:Acacia Door (item) JE2.png|32px]] [[File:Dark Oak Door (item) JE2.png|32px]] [[Item]] textures of new doors have been changed to match the dimensions of oak and iron doors.
|The wooden door (''Door'') has been renamed to ''Oak Door''.}}
{{History|||snap=14w33b|[[File:Oak Door (item) JE3 BE2.png|32px]] [[File:Spruce Door (item) JE3 BE1.png|32px]] [[File:Birch Door (item) JE3 BE1.png|32px]] [[File:Jungle Door (item) JE3 BE1.png|32px]] [[File:Acacia Door (item) JE3 BE1.png|32px]] [[File:Dark Oak Door (item) JE3 BE1.png|32px]][[File:Iron Door (item) JE2 BE2.png|32px]] All [[item]] textures for all doors have been changed. Doors now have hinges on the left and handles on the right, existing wooden doors & iron doors have a slight item textures change as well.}}
{{History||1.9|snap=15w31a|[[File:Birch Door JE2.png|32px]] [[File:Jungle Door JE3.png|32px]] [[File:Acacia Door JE3.png|32px]] [[File:Dark Oak Door JE2.png|32px]] Shading on the [[block]] textures of birch, jungle, acacia, and dark oak doors have been changed, so that the shadow is in the upper left and the highlight is in the lower right.}}
{{History|||snap=15w43a|Iron doors now have different [[sound]]s than wooden doors.
|Doors now have [[sound]]s for placing and different sounds for opening and closing - see sounds section.}}
{{History|||snap=15w47a|Doors now make [[sound]]s when placed,<ref>{{bug|MC-2844}} – "Doors have no placement sound." resolved as "Fixed"</ref> despite these apparently already being added in 15w43a.}}
{{History|||snap=15w49a|Doors are now placed facing left/right depending on which half of the [[block]] the [[player]] clicks on, unless neighboring doors or solid/opaque blocks cause them to place a certain way.}}
{{History||1.10|snap=16w20a|Acacia and spruce doors now generate in [[savanna]] and [[taiga]] [[villages]].}}
{{History||1.11|snap=16w33a|Wooden doors can now be used to fuel [[furnace]]s.|Iron doors no longer have a right-click action - previously they would result in the hand swinging, and would override other valid right click actions such as snowball throwing.}}
{{History|||snap=16w39a|Dark oak doors and iron doors now generate in [[woodland mansion]]s.}}
{{History||July 19, 2017|link=https://twitter.com/jeb_/status/887599625045250048|[[Jeb]] tweets image of a new jungle [[wood planks]], jungle doors, [[cauldron]], and [[dandelion]] textures.}}
{{History||1.13|snap=17w47a|The oak door ID has been changed from <code>wooden_door</code> to <code>oak_door</code>.
|Prior to [[1.13/Flattening|''The Flattening'']], these [[block]]s' numeral IDs were 64, 71, 193, 194, 195, 196 and 197, and the [[item]]s' 324, 330, 427, 428, 429, 430 and 431.}}
{{History|||snap=18w11a|Doors now generate as part of the newly added [[shipwreck]]s.}}
{{History||1.14|snap=18w43a|[[File:Oak Door JE6.png|32px]] [[File:Spruce Door JE2.png|32px]] [[File:Birch Door JE3.png|32px]] [[File:Jungle Door JE4.png|32px]] [[File:Acacia Door JE4.png|32px]] [[File:Dark Oak Door JE3.png|32px]] [[File:Iron Door JE4.png|32px]] The textures of all doors have been changed.
|[[Vindicator]]s can now break doors.}}
{{History|||snap=18w47b|[[File:Spruce Door JE3.png|32px]] The textures of spruce doors have been changed.}}
{{History|||snap=18w49a|Added [[snowy tundra]] villages, which generate with spruce doors.}}
{{History|||snap=18w50a|The updated [[desert]] villages now generate with jungle doors instead of oak doors.}}
{{History|||snap=19w08a|[[File:Oak Door JE7.png|32px]] The texture of oak doors has been changed.}}
{{History|||snap=19w12b|Doors can now be placed on glass, ice, glowstone and sea lanterns.}}
{{History|||snap=19w13a|[[Evoker]]s and [[pillager]]s can now open doors during [[raid]]s.}}
{{History|||snap=19w14a|Pillagers can no longer open doors.}}
{{History||1.15|snap=19w39a|Iron doors must now be mined with a [[pickaxe]] for it to be dropped as an [[item]].}}
{{History||1.16|snap=20w06a|[[File:Crimson Door JE1.png|32px]] [[File:Warped Door JE1.png|32px]] [[File:Crimson Door (item) JE1 BE1.png|32px]] [[File:Warped Door (item) JE1 BE1.png|32px]] Added crimson and warped doors.}}
{{History|||snap=20w07a|Added [[piglin]]s, which can open and close doors.}}
{{History|||snap=20w19a|[[File:Crimson Door JE2.png|32px]] [[File:Warped Door JE2.png|32px]] [[File:Crimson Door (item) JE2 BE2.png|32px]] [[File:Warped Door (item) JE2 BE2.png|32px]] The textures of crimson and warped doors have been changed.}}
{{History||1.17|snap=21w11a|[[File:Jungle Door (item) JE4 BE2.png|32px]] Changed the texture of the jungle door item.}}
{{History||1.18|snap=21w41a|[[File:Oak Door (item) JE4 BE3.png|32px]] [[File:Spruce Door (item) JE4 BE2.png|32px]] [[File:Birch Door (item) JE4 BE2.png|32px]] [[File:Jungle Door (item) JE5 BE3.png|32px]] [[File:Acacia Door (item) JE4 BE2.png|32px]] [[File:Dark Oak Door (item) JE4 BE2.png|32px]][[File:Iron Door (item) JE3 BE3.png|32px]] All [[item]] textures for all doors except crimson and warped have been changed.}}
{{History|||snap=Pre-release 5|[[File:Oak Door JE8.png|32px]] [[File:Spruce Door JE4.png|32px]] [[File:Birch Door JE4.png|32px]] [[File:Jungle Door JE5.png|32px]] [[File:Acacia Door JE5.png|32px]] [[File:Dark Oak Door JE4.png|32px]] [[File:Crimson Door JE3.png|32px]] [[File:Warped Door JE3.png|32px]] [[File:Iron Door JE5.png|32px]] Changed top and bottom models of door. Changed oak and iron doors textures.}}
{{History||1.19|snap=22w11a|[[File:Mangrove Door JE1.png|32px]][[File:Mangrove Door (item) JE1 BE1.png|32px]] Added mangrove door.}}
{{History|||snap=22w14a|Due to the addition of the [[mangrove tree]] and [[mangrove swamp]], mangrove doors are now obtainable and renewable.}}
{{History||October 15, 2022|link={{ytl|https://youtu.be/iM9KtHaDcUg?t=5659}}|[[File:Bamboo Door JE1.png|32px]] Bamboo doors were shown on [[Minecraft Live 2022]].}}
{{History||1.20<br>(Experimental)|link=1.19.3|snap=22w42a|[[File:Bamboo Door JE1.png|32px]] [[File:Bamboo Door (item) JE1 BE1.png|32px]] Added bamboo doors behind the [[Java Edition 1.20|Update 1.20 experimental datapack]].}}
{{History||1.20<br>(Experimental)|link=1.19.4|snap=23w07a|[[File:Cherry Door JE1.png|32px]] [[File:Cherry Door (item) JE1.png|32px]] Added cherry doors behind the [[Java Edition 1.20|Update 1.20 experimental datapack]].}}
{{History|||snap=1.19.4-pre2|[[File:Cherry Door JE2.png|32px]] [[File:Cherry Door (item) JE2.png|32px]] Changed the texture of cherry doors.}}
{{History||1.20|snap=23w12a|Bamboo and cherry doors are now available without using the "Update 1.20" experimental datapack.}}
{{History|pocket alpha}}
{{History||v0.1.0|[[File:Oak Door JE3 BE1.png|32px]] [[File:Iron Door JE1 BE1.png|32px]] Added doors.
[[File:Oak Door (bottom texture) JE2 BE1.png|32px]] [[File:Iron Door (bottom texture) JE1 BE1.png|32px]] These are the textures defined for the door blocks in <samp>[[gui_blocks.png]]</samp>. The door items exist, but due to a bug in the code that renders items in the hotbar, they cannot be used.}}
{{History||v0.1.3|[[File:Oak Door BE2.png|32px]] [[File:Iron Door BE2.png|32px]] The models of doors have been changed to not display transparency on upper half.}}
{{History||v0.2.0|[[File:Oak Door (item) JE2 BE1.png|32px]] [[File:Iron Door (item) JE1 BE1.png|32px]] Added door inventory icons.
|[[File:Oak Door JE3 BE1.png|32px]] [[File:Iron Door JE1 BE1.png|32px]] The models of doors have been changed to display transparency on upper half.
|Wooden doors are now available in the inventory, including in [[Creative]].}}
{{History||v0.2.1 alpha2|link=Pocket Edition v0.2.1 alpha2|[[File:Iron Door BE3.png|32px]] The textures of iron doors have been changed.}}
{{History||v0.3.0|A crafting recipe for wooden doors has been added.
|Survival players no longer start out with an infinite stack of wooden doors in the inventory.}}
{{History||v0.3.2|Wooden doors now drop their item form when broken.}}
{{History||v0.5.0|[[File:Oak Door JE4 BE3.png|32px]] [[File:Iron Door BE4.png|32px]] The models of doors have been changed.
|Wooden doors can now be obtained after activating the [[nether reactor]].}}
{{History||v0.8.0|snap=build 2|[[File:Iron Door JE2 BE5.png|32px]] The textures of iron doors have been changed to before v0.2.1 alpha2.}}
{{History||v0.11.0|snap=build 1|''Door'' has been now renamed to ''Oak Door''.}}
{{History||v0.12.1|snap=build 1|Doors are now stackable to 64.
|The [[crafting]] recipes of doors now yield 3 doors instead of 1.
|[[Zombie]]s can now break down wooden doors.
|Oak doors can now be opened by [[villager]]s.
|Oak doors are no longer available from the [[nether reactor]].}}
{{History||v0.13.0|snap=build 1|[[File:Spruce Door JE1 BE1.png|32px]] [[File:Birch Door JE1 BE1.png|32px]] [[File:Jungle Door JE2 BE1.png|32px]] [[File:Acacia Door JE2 BE1.png|32px]] [[File:Dark Oak Door JE1 BE1.png|32px]] [[File:Spruce Door (item) JE3 BE1.png|32px]] [[File:Birch Door (item) JE3 BE1.png|32px]] [[File:Jungle Door (item) JE3 BE1.png|32px]] [[File:Acacia Door (item) JE3 BE1.png|32px]] [[File:Dark Oak Door (item) JE3 BE1.png|32px]] Added spruce, birch, jungle, acacia and dark oak doors.
|Iron doors are now available in the [[Creative]] [[inventory]].
|A [[crafting]] recipe for iron doors has been added.
|Redstone mechanics added, making iron doors able to function normally.}}
{{History|||snap=build 2|Spruce, birch, jungle, acacia, and dark oak doors can now be opened by [[villager]]s.}}
{{History|||snap=build 4|[[File:Oak Door (item) JE3 BE2.png|32px]] [[File:Iron Door (item) JE2 BE2.png|32px]] The [[item]] textures of oak and iron door has been changed.}}
{{History||v0.15.0|snap=build 1|Acacia doors now generate in [[savanna]] [[village]]s.
|Spruce doors now generate in [[taiga]] and [[snowy tundra]] villages.}}
{{History|pocket}}
{{History||1.1.0|snap=alpha 1.1.0.0|Dark oak doors and iron doors now generate in [[woodland mansion]]s.
|Doors now have [[sound]]s when placed.<ref>{{bug|MCPE-10079}} – "Doors don't have a placement sound" resolved as "Fixed"</ref>}}
{{History|bedrock}}
{{History||1.4.0|snap=beta 1.2.14.2|Various wooden doors now generate in [[shipwreck]]s.}}
{{History||1.10.0|snap=beta 1.10.0.3|[[File:Oak Door BE4.png|32px]] [[File:Spruce Door BE2.png|32px]] [[File:Birch Door BE2.png|32px]] [[File:Jungle Door BE2.png|32px]] [[File:Acacia Door BE2.png|32px]] [[File:Dark Oak Door BE2.png|32px]] [[File:Iron Door BE6.png|32px]] The textures of all doors have been changed.
|Jungle doors now generate in the new [[desert]] [[village]]s.
|Added [[wandering trader]]s, which can open and close wooden doors.}}
{{History||1.11.0|snap=beta 1.11.0.7|[[Vindicator]]s can now break doors during [[raid]]s.}}
{{History||1.16.0|snap=beta 1.15.0.51|Zombies can no longer break iron doors.<ref>{{bug|MCPE-43725}}</ref>}}
{{History|||snap=beta 1.16.0.51|[[File:Crimson Door BE1.png|32px]] [[File:Warped Door BE1.png|32px]] [[File:Crimson Door (item) JE1 BE1.png|32px]] [[File:Warped Door (item) JE1 BE1.png|32px]] Added crimson and warped doors.
|Added [[piglin]]s, which can open and close doors.}}
{{History|||snap=beta 1.16.0.63|[[File:Crimson Door BE2.png|32px]] [[File:Warped Door BE2.png|32px]] [[File:Crimson Door (item) JE2 BE2.png|32px]] [[File:Warped Door (item) JE2 BE2.png|32px]] The textures of crimson and warped doors have been changed.}}
{{History||1.17.0|snap=beta 1.17.0.50|[[File:Jungle Door (item) JE4 BE2.png|32px]] Changed the texture of the jungle door item.}}
{{History||1.18.10|snap=beta 1.18.10.20|[[File:Oak Door (item) JE4 BE3.png|32px]] [[File:Spruce Door (item) JE4 BE2.png|32px]] [[File:Birch Door (item) JE4 BE2.png|32px]] [[File:Jungle Door (item) JE5 BE3.png|32px]] [[File:Acacia Door (item) JE4 BE2.png|32px]] [[File:Dark Oak Door (item) JE4 BE2.png|32px]][[File:Iron Door (item) JE3 BE3.png|32px]] All [[item]] textures for all doors except crimson and warped have been changed.}}
{{History||1.19.0|snap=beta 1.19.0.20|[[File:Mangrove Door BE1.png|32px]] [[File:Mangrove Door (item) JE1 BE1.png|32px]] Added mangrove doors.}}
{{History||Next Major Update<br>(Experimental)|link=Bedrock Edition 1.19.50|snap=beta 1.19.50.21|[[File:Bamboo Door BE1.png|32px]] [[File:Bamboo Door (item) JE1 BE1.png|32px]] Added bamboo doors behind the "[[Bedrock Edition 1.20|Next Major Update]]" [[experimental]] toggle.
|The doors now use the same opening and closing [[sound]] effects as ''[[Java Edition]]''.}}
{{History||Next Major Update<br>(Experimental)|link=Bedrock Edition 1.19.80|snap=beta 1.19.80.20|[[File:Cherry Door JE2.png|32px]] [[File:Cherry Door (item) JE2.png|32px]] Added cherry doors behind the "[[Bedrock Edition 1.20|Next Major Update]]" [[experimental]] toggle.}}
{{History||1.20.0|snap=beta 1.20.0.21|Bamboo and cherry doors are now available without using the "Next Major Update" experimental toggle.}}
{{History|console}}
{{History||xbox=TU1|xbone=CU1|ps=1.0|wiiu=Patch 1|switch=1.0.1|[[File:Oak Door JE3 BE1.png|32px]] [[File:Iron Door JE1 BE1.png|32px]] [[File:Oak Door (item) JE2 BE1.png|32px]] [[File:Iron Door (item) JE1 BE1.png|32px]] Added doors.}}
{{History||xbox=TU5|Doors can be found in the Redstone & Transportation tab in the [[Creative inventory]].}}
{{History||xbox=TU14|ps=1.04|Doors being broken by [[zombie]]s now show [[damage]].
|Moved doors to the Building Blocks tab in the Creative inventory.}}
{{History||xbox=TU25|xbone=CU14|ps=1.17|[[File:Spruce Door JE1 BE1.png|32px]] [[File:Birch Door JE1 BE1.png|32px]] [[File:Jungle Door JE2 BE1.png|32px]] [[File:Spruce Door (item) JE3 BE1.png|32px]] [[File:Birch Door (item) JE3 BE1.png|32px]] [[File:Jungle Door (item) JE3 BE1.png|32px]] Added spruce, birch, and jungle door variants.
|The [[crafting]] recipes of doors now yield 3 doors instead of 1.
|The original wooden door (''Door'') has been renamed to ''Oak Door''.}}
{{History||xbox=TU27|xbone=CU15|ps=1.18|[[File:Acacia Door JE2 BE1.png|32px]] [[File:Dark Oak Door JE1 BE1.png|32px]] [[File:Acacia Door (item) JE3 BE1.png|32px]] [[File:Dark Oak Door (item) JE3 BE1.png|32px]] Acacia and dark oak doors have been added to the [[Creative]] [[inventory]].}}
{{History||xbox=TU31|xbone=CU19|ps=1.22|wiiu=Patch 3|Acacia doors and dark oak doors are now obtainable in [[survival]] mode.}}
{{History||?| [[File:Oak Door (item) JE3 BE2.png|32px]] [[File:Iron Door (item) JE2 BE2.png|32px]] Oak and iron door's inventory textures have been changed to match Java Edition}}
{{History||xbox=none|xbone=none|ps=1.90|wiiu=none|switch=none|[[File:Oak Door BE4.png|32px]] [[File:Spruce Door BE2.png|32px]] [[File:Birch Door BE2.png|32px]] [[File:Jungle Door BE2.png|32px]] [[File:Acacia Door BE2.png|32px]] [[File:Dark Oak Door BE2.png|32px]] [[File:Iron Door BE6.png|32px]] The textures of all doors have been changed.}}
{{History|new 3ds}}
{{History||0.1.0|[[File:Oak Door JE2.png|32px]] [[File:Spruce Door JE1 BE1.png|32px]] [[File:Birch Door JE1 BE1.png|32px]] [[File:Jungle Door JE2 BE1.png|32px]] [[File:Acacia Door JE2 BE1.png|32px]] [[File:Dark Oak Door JE1 BE1.png|32px]] [[File:Iron Door JE2 BE5.png|32px]] [[File:Oak Door (item) JE3 BE2.png|32px]] [[File:Spruce Door (item) JE3 BE1.png|32px]] [[File:Birch Door (item) JE3 BE1.png|32px]] [[File:Jungle Door (item) JE3 BE1.png|32px]] [[File:Acacia Door (item) JE3 BE1.png|32px]] [[File:Dark Oak Door (item) JE3 BE1.png|32px]] [[File:Iron Door (item) JE1 BE1.png|32px]] Added doors.}}
{{History|foot}}
<gallery>
Beta 1.7 punching oak door.png|From [[Java Edition Beta 1.7]] to Beta 1.7.2, doors produced [[placeholder texture]] particles when broken or punched on some sides.
</gallery>
Historical sounds:
{| class="wikitable"
! Sound
! From
! to
! Pitch
|-
| {{sound||Door closing old.ogg|Door opening old.ogg}}
| ?
| Sound Update
| ?
|-
| {{sound||Door open.ogg|Door close.ogg}}
| Sound Update
| 15w43a
| ?
|}
=== Door "items" ===
{{:Technical blocks/Doors}}
== Issues ==
{{Issue list}}
== Trivia ==
* Door models have an extra hinge on the opposite side of the actual functional hinge.<ref>{{bug|MC-106697|||WAI}}</ref>
== Gallery ==
<gallery>
Oak Door.png|Oak Door
Spruce Door.png|Spruce Door
Birch Door.png|Birch Door
Jungle Door.png|Jungle Door
Acacia Door.png|Acacia Door
Dark Oak Door.png|Dark Oak Door
Mangrove Door.png|Mangrove Door
Cherry Door.png|Cherry Door
Bamboo Door.png|Bamboo Door
Crimson Door.png|Crimson Door
Warped Door.png|Warped Door
Iron Door.png|Iron Door
Oak Door (item) JE4 BE3.png|Oak Door (item)
Spruce Door (item) JE4 BE2.png|Spruce Door (item)
Birch Door (item) JE4 BE2.png|Birch Door (item)
Jungle Door (item) JE5 BE3.png|Jungle Door (item)
Acacia Door (item) JE4 BE2.png|Acacia Door (item)
Dark Oak Door (item) JE4 BE2.png|Dark Oak Door (item)
Mangrove Door (item) JE1 BE1.png|Mangrove Door (item)
Cherry Door (item) JE2.png|Cherry Door (item)
Bamboo Door (item) JE1 BE1.png|Bamboo Door (item)
Crimson Door (item) JE2 BE2.png|Crimson Door (item)
Warped Door (item) JE2 BE2.png|Warped Door (item)
Iron Door (item) JE3 BE3.png|Iron Door (item)
</gallery>
=== Screenshots ===
<gallery>
Iron Door in Stronghold.png|Naturally occurring iron door in a [[stronghold]].
Wooden Doors 1.8.png|First picture of brand-new 1.8 variants of doors.
Door Creeper.png|A creeper behind some dark oak doors.
Doortypes.png|All types of doors with their respective trapdoors.
FloatingDoorArrows.jpg|Arrows shot into a door that was opened, causing a floating bug.
Jeb Crafting Doors.png|First image of three doors being crafted at once.
Jappa Closet.jpg|A closet made from oak doors.
</gallery>
=== Concept Art ===
<gallery>
Bamboo Wood and Door Concept Art.png|Bamboo door concept art.
Bamboo Door Prototype Textures.png|Bamboo door prototype textures.
</gallery>
== References ==
{{Reflist}}
== External Links ==
*[https://www.minecraft.net/en-us/article/taking-inventory--door Taking Inventory: Door] – Minecraft.net on September 29, 2022
{{Redstone}}
{{Blocks|Utility}}
{{Items}}
[[Category:Manufactured blocks]]
[[Category:Generated structure blocks]]
[[Category:Utility blocks]]
[[Category:Mechanics]]
[[Category:Redstone mechanics]]
[[Category:Mechanisms]]
[[cs:Dveře]]
[[de:Tür]]
[[el:Door]]
[[es:Puerta]]
[[fr:Porte]]
[[hu:Ajtók]]
[[it:Porta]]
[[ja:ドア]]
[[ko:문]]
[[nl:Deur]]
[[pl:Drzwi]]
[[pt:Porta]]
[[ru:Дверь]]
[[th:ประตู]]
[[uk:Двері]]
[[zh:门]]</li></ul> | |||||
| Changed world name by default to "Unnamed world". | |||||
v0.1.2{{Extension DPL}}<ul><li>[[Reality Vision|Reality Vision]]<br/>{{Joke feature}}
{{Item
| title = Reality Vision
| image = Reality Vision.png
| renewable = No
| stackable = Yes (64)
}}
The '''Reality vision''' was a joke [[helmet]].
== Usage ==
Reality vision was equipped via the [[helmet]] slot. When equipped, it showed a [[wikipedia:Mini-map|minimap]] in the bottom-center of the screen (which moved when the [[player]]'s camera moves). The minimap showed all [[chunk]]s that were currently rendered. The player's location was represented by a green [[beacon]] beam marker on the map.
It displayed a vision overlay (similar to the [[pumpkin]] overlay). The overlay would change to a new overlay if the player went into third person (unlike the pumpkin overlay), which made the screen appear like an old [[wikipedia:Television|television]] screen. The overlay was called <code>cantseeshit<!-- Do not change this; this is that word that is actually used-->captain.png</code> in the assets folder. It activated a [[Shaders|shader]] when equipped (<code>scan_pincushion</code>).
== Sounds ==
{{Sound table
|sound=Equipvr.ogg
|subtitle=''None''
|source=player
|description=When equipped
|id=item.reality_vision.use
|translationkey=''None''
|volume=1.0
|pitch=1.0
|distance=16
|foot=1}}
== Data values ==
=== ID ===
{{ID table
|edition=java
|shownumericids=y
|showforms=y
|generatetranslationkeys=y
|displayname=Reality Vision
|spritetype=item
|nameid=reality_vision
|id=500
|form=item
|translationkey=item.realityVision.name
|foot=1}}
== History ==
{{History|java}}
{{History||1.RV-Pre1|[[File:Reality_Vision_(item).png|32px]] [[File:Reality Vision.png|32px]] Added reality vision.}}
{{History|foot}}
== Issues ==
Reality Vision is an unsupported item due to being an [[Wikipedia:April Fools' Day|April Fools']] joke, and therefore such issues relating to them will not be fixed.
== Trivia ==
* [[Sign]]s display the text "OBEY" while equipped, a reference to the movie [[wikipedia:They Live|''They Live'']].
== Gallery ==
<gallery>
Sign2.png|The [[sign]] texture found in the game files.
OBEY.png|OBEY seen in a sign.
OBEY sign in 1.RV-Pre1..png|OBEY seen in a sign, but seen from a better perspective.
TechGear.png|A [[player]] wearing reality vision, featured in this [[wikipedia:April Fools' Day|April Fools']] joke version.
</gallery>
{{Items}}
{{Jokes}}
[[Category:Non-renewable resources]]
[[Category:Joke items]]
[[pt:Visão da realidade]]
[[es:Reality Vision]]</li><li>[[Rotten Flesh|Rotten Flesh]]<br/>{{Item
| title = Rotten Flesh
| image = Rotten Flesh.png
| renewable = Yes
| heals = {{hunger|4}}
|effects={{EffectLink|link=Hunger (status effect)|Hunger}} (0:30) (80% chance)
| stackable = Yes (64)
}}
'''Rotten flesh''' is a [[food]] item that can be eaten by the [[player]], with high risk of inflicting [[Hunger (status effect)|Hunger]] and low [[Saturation]].
== Obtaining ==
=== Mob loot ===
==== Zombies ====
[[Zombie]]s, [[zombie villager]]s, [[zombie horse]]s, [[husk]]s, and [[drowned]] drop from 0 to 2 units of rotten flesh. [[Looting]] can increase this by one per level, for a maximum of 5 rotten flesh.
==== Zoglins ====
[[Zoglin]]s drop 1-3. Looting III grants a maximum of 6.
==== Zombified piglins ====
[[Zombified Piglin|Zombified piglins]] drop 0-1. Looting III grants a maximum of 4.
=== Fishing ===
Rotten flesh can be obtained as a "junk" item while [[fishing]].
=== Chest loot ===
{{LootChestItem|rotten-flesh}}
=== Cat gifts ===
{{main|Cat#Gifts}}
Tamed [[cat]]s have a 70% chance of giving the [[player]] a gift when they wake up from a [[bed]], and the gift has a 16.13% chance to be a rotten flesh.
== Usage ==
=== Food ===
{{see also|Tutorials/Hunger management}}
To eat rotten flesh, press and hold {{control|use}} while rotten flesh is selected in the hotbar.
Eating rotten flesh restores {{hunger|4}} [[hunger]] and 0.8 hunger [[Hunger#Mechanics|saturation]], but has an 80% chance of inflicting {{EffectLink|Hunger (effect)|id=Hunger}} for 30 seconds. Note that the duration does ''not'' accumulate when eating multiple pieces. However, if more is consumed and the [[Hunger (effect)|Hunger]] status effect is inflicted, the duration resets to 30 seconds.
=== Wolves ===
Rotten flesh can be used to [[breed]] and heal tamed [[wolves]], lead them around, and make baby tamed wolves grow up faster by 10% of the remaining time.
Wolves are immune to the Hunger effect.
=== Trading ===
Novice-level [[Trading#Cleric|cleric villagers]] buy 32 rotten flesh for 1 [[emerald]] as part of their trades.
==Sounds==
{{Sound table/Entity/Food}}
== Data values ==
=== ID ===
{{edition|java}}:
{{ID table
|edition=java
|showforms=y
|generatetranslationkeys=y
|displayname=Rotten Flesh
|spritetype=item
|nameid=rotten_flesh
|form=item
|foot=1}}
{{edition|bedrock}}:
{{ID table
|edition=bedrock
|shownumericids=y
|showforms=y
|notshowbeitemforms=y
|generatetranslationkeys=y
|displayname=Rotten Flesh
|spritetype=item
|nameid=rotten_flesh
|id=277
|form=item
|foot=1}}
== Achievements ==
{{load achievements|Iron Belly}}
== Advancements ==
{{load advancements|Husbandry;A Balanced Diet}}
== Video ==
{{Video note|The video is outdated, as rotten flesh can now be also gained from [[fishing]], [[trading]], or loot chests.}}
<div style="text-align:center">{{yt|xTrUEVoe9Tw}}</div>
== History ==
{{History|java beta}}
{{History||1.8|snap=Pre-release|[[File:Rotten Flesh JE1.png|32px]] Added rotten flesh.
|[[Zombie]]s and [[zombie pigmen]] now drop rotten flesh instead of [[feather]]s and [[cooked porkchop]]s respectively.}}
{{History|java}}
{{History||1.0.0|snap=Beta 1.9 Prerelease 2|Food poisoning can now be stopped by drinking [[milk]].}}
{{History||1.2.1|snap=12w03a|Rotten flesh can now be used to [[Breeding|breed]] wolves. When a wolf eats rotten flesh, it will not receive the [[Hunger (effect)|Hunger]] effect.}}
{{History||1.3.1|snap=12w21a|Rotten flesh can now be found in [[desert temple]] [[chest]]s.
|Priest [[villager]]s now [[trading|buy]] rotten flesh.}}
{{History|||snap=1.3|[[File:Rotten Flesh JE2 BE1.png|32px]] The texture of rotten flesh has been changed.}}
{{History|||snap=12w22a|Rotten flesh now generates in [[jungle temple]] chests.
|Priest [[villager]]s no longer [[trading|buy]] rotten flesh.}}
{{History||1.7.2|snap=13w36a|Rotten flesh can now be obtained as one of the "junk" [[item]]s from [[fishing]].}}
{{History||1.8|snap=14w02a|Cleric [[villager]]s now [[trading|buy]] 36–40 rotten flesh for 1 [[emerald]], as their tier I trade.}}
{{history||1.9|snap=15w43a|Rotten flesh may now be found in [[igloo]] basement [[chest]]s.}}
{{history|||snap=15w44a|Rotten flesh now generates in [[dungeon]] chests.
|The average yield of rotten flesh has been decreased in [[desert temple]] chests.}}
{{History||1.11|snap=16w39a|Rotten flesh can now be found in [[woodland mansion]] [[chest]]s.}}
{{History||1.13|snap=17w47a|Prior to [[1.13/Flattening|''The Flattening'']], this [[item]]'s numeral ID was 367.}}
{{History|||snap=18w09a|Rotten flesh now generates in the loot [[chest]]s of [[underwater ruins]].}}
{{History|||snap=18w11a|[[Drowned]] may now [[drops|drop]] rotten flesh upon death.
|Rotten flesh now sometimes generates in [[shipwreck]] [[chest]]s.}}
{{History||1.14|snap=18w43a|[[File:Rotten Flesh JE3 BE2.png|32px]] The texture of rotten flesh has been changed.}}
{{History|||snap=18w44a|[[Cat]]s now offer rotten flesh as [[Cat#Gifts|gift]]s.}}
{{History|||snap=18w50a|Rotten flesh can now be found in [[village]] temple chests.}}
{{History||1.16|snap=20w06a|Added [[hoglin]]s, which can drop rotten flesh if killed.}}
{{History|||snap=20w07a|Rotten flesh has a {{frac|10|109}} (~9.17%) chance of being given by the new [[piglin]]s when [[bartering]], in a stack size of 4–12.
|[[Hoglin]]s no longer drop rotten flesh.}}
{{History|||snap=20w09a|Rotten flesh can no longer be obtained by bartering with piglins.}}
{{History|||snap=20w14a|Added [[zoglin]]s, which drop rotten flesh when killed.}}
{{History|pocket alpha}}
{{History||v0.11.0|snap=build 1|[[File:Rotten Flesh JE2 BE1.png|32px]] Added rotten flesh.
|As the hunger bar has not yet been added, rotten flesh inflicts [[poison]] rather than [[hunger]].
|[[Zombie]]s and [[zombie pigmen]] now [[drops|drop]] rotten flesh.}}
{{History|||snap=build 11|Rotten flesh can now be used to feed [[wolves]].}}
{{History||v0.12.1|snap=build 1|Eating rotten flesh now gives the [[player]] the [[Hunger]] status effect.
|Rotten flesh now restores [[hunger]] instead of [[health]].
|Added [[zombie villager]]s, which [[drops|drop]] rotten flesh when killed.}}
{{History||v0.13.0|snap=build 1|Rotten flesh can now be found inside [[desert temple]] [[chest]]s.}}
{{History||v0.15.0|snap=build 1|Added [[husk]]s and [[zombie horse]]s, both of which drop rotten flesh when killed.
|Rotten flesh can now be found inside [[jungle temple]] chests.}}
{{History|pocket}}
{{History||1.0.0|snap=alpha 0.17.0.1|Rotten flesh can now be found inside the basement [[chest]]s of [[igloo]]s.}}
{{History||1.0.4|snap=alpha 1.0.4.0|36-40 rotten flesh can now be [[trading|sold]] to cleric [[villager]]s.}}
{{History||1.1.0|snap=alpha 1.1.0.0|Rotten flesh can now be found in [[woodland mansion]] chests.}}
{{History|bedrock}}
{{History||1.4.0|snap=beta 1.2.13.8|Added [[drowned]], which [[drops|drop]] rotten flesh when killed.}}
{{History|||snap=beta 1.2.14.2|Rotten flesh can now be found in some [[shipwreck]] [[chest]]s.}}
{{History|||snap=beta 1.2.20.1|Rotten flesh can now be found inside [[underwater ruins]] chests.}}
{{History||1.8.0|snap=beta 1.8.0.8|Tamed [[cat]]s can now give the [[player]] rotten flesh as a gift.}}
{{History||1.10.0|snap=beta 1.10.0.3|[[File:Rotten Flesh JE3 BE2.png|32px]] The texture of rotten flesh has been changed.}}
{{History||1.11.0|snap=beta 1.11.0.1|Rotten flesh can now be found in [[desert]] [[village]] temple [[chest]]s.}}
{{History|||snap=beta 1.11.0.4|[[Trading]] has been changed, cleric [[villager]]s now [[trading|buy]] 32 rotten flesh for an [[emerald]].}}
{{History|console}}
{{History||xbox=TU5|xbone=CU1|ps=1.0|wiiu=Patch 1|switch=1.0.1|[[File:Rotten Flesh JE2 BE1.png|32px]] Added rotten flesh.}}
{{History||xbox=none|xbone=none|ps=1.90|wiiu=none|switch=none|[[File:Rotten Flesh JE3 BE2.png|32px]] The texture of rotten flesh has been changed.}}
{{History|new3ds}}
{{History||0.1.0|[[File:Rotten Flesh JE2 BE1.png|32px]] Added rotten flesh.}}
{{History|foot}}
== Issues ==
{{issue list}}
== External Links ==
*[https://www.minecraft.net/en-us/article/taking-inventory--rotten-flesh Taking Inventory: Rotten Flesh] – Minecraft.net on June 8, 2020
{{Items}}
[[cs:Shnilé maso]]
[[de:Verrottetes Fleisch]]
[[es:Carne podrida]]
[[fr:Chair putréfiée]]
[[hu:Rohadt hús]]
[[it:Carne marcia]]
[[ja:腐った肉]]
[[ko:썩은 살점]]
[[nl:Bedorven vlees]]
[[pl:Zgniłe mięso]]
[[pt:Carne podre]]
[[ru:Гнилая плоть]]
[[uk:Гнила плоть]]
[[zh:腐肉]]
[[Category:Renewable resources]]
[[Category:Food]]</li></ul> | Added the "Create new" menu version for iOS. | ||||
v0.2.0{{Extension DPL}}<ul><li>[[:Category:Dyes|Category:Dyes]]<br/>These are items that can be used to dye sheep, wool blocks, or combined to make other dyes.
[[Category:Items]]
[[es:Categoría:Tintes]]
[[fr:Catégorie:Teinture]]
[[hu:Kategória:Festékek]]
[[zh:Category:染料]]</li><li>[[Bed|Bed]]<br/>{{Block
| image = White Bed (N).png
| extratext = View [[#Gallery|all renders]]
| transparent = Yes
| tntres = 25
| hardness = 4
| light = No
| tool = any
| renewable = Yes
| stackable = No
| flammable = No
| lavasusceptible = {{jebe|Yes|No}}
}}
A '''bed''' is a [[Dye|dyeable]] [[block]] that allows a player to sleep and to reset their [[spawn]] point to within a few blocks of the bed in the [[Overworld]]. If the bed is obstructed or removed, the player spawns at the default world spawning location.
== Obtaining ==
=== Natural generation ===
;Igloo
A red bed naturally generates in each [[igloo]].
;Village
Beds of various colors generate in [[village]] houses, depending on the specific structure and [[biome]]:
* [[Desert]] village houses have cyan, green, or lime beds.
* [[Plains]] village houses have white or yellow beds.
* [[Savanna]] village houses have orange, red, or yellow beds.
* [[Snowy taiga]]{{only|bedrock|short=1}} and [[taiga]] village houses have blue or purple beds.
* [[Snowy tundra]] village houses have blue, red, or white beds.
=== Breaking ===
Beds can be mined with any [[tool]], or without a tool.<ref>{{bug|MC-192722||Beds have no assigned tool}}</ref>
{{breaking row|horizontal=1|Bed|sprite=red-bed|any}}
A bed also drops itself as an item when pushed by a [[piston]].
=== Crafting ===
{{Crafting
|head=1
|showname=0
|showdescription=1
|A2=Matching Wool
|B2=Matching Wool
|C2=Matching Wool
|A3=Any Planks
|B3=Any Planks
|C3=Any Planks
|Output= Matching Bed
|type=Decoration block
|description=The wool color must match. The planks can be different.
}}
<!--recipe removed
{{Crafting
|showdescription=1
|White Bed
|Matching Colored Dye
|Output= Matching Dyed Bed
|type=Decoration block
|description=White beds can be re-dyed using dyes.{{only|java}}{{until|JE 1.20}}
}}-->
{{Crafting
|showdescription=1
|Any Bed
|Matching Dye
|Output= Matching Bed
|type=Decoration block
|description=A bed of any color can be re-dyed using dyes.
}}
{{Crafting
|showdescription=1
|Any Dyed Bed
|Bleach
|Output=White Bed
|type=Decoration block
|description=This removes the color from the bed.{{only|bedrock|education}}
|foot=1
}}
<div style="display:none">
<!--
This is so the pre-Village & Pillage dyes can have dye-related crafting recipes show on their respective pages.
They don't need to be displayed on this page because they already intuitively list "Any Matching Dye".
-->
{{Crafting
|showdescription=1
|Any Bed
|Bone Meal; Lapis Lazuli; Cocoa Beans; Ink Sac
|Output=White Bed; Blue Bed; Brown Bed; Black Bed
|type=Decoration block
|description={{only|bedrock|education}}
}}
</div>
=== Trading ===
Journeyman-level shepherd villagers sell 1 of 16 beds for 3 [[emerald]]s as part of their trades.
== Usage ==
=== Sleeping ===
[[File:Sleep Animation.gif|240px|thumb|Player falling asleep.]]
Beds are used by pressing the {{control|use item}} button while looking at the bed.
A player sleeps by {{control|using|using}} a bed during a [[thunderstorm]], or at [[night]] (between 12542 and 23459 ticks in clear weather, when stars appear in the sky, or between 12010 and 23991 ticks in rainy weather). Players can sleep during a thunderstorm even if they are in a biome where it does not rain (i.e. Desert). Attempting to use a bed at any other time results in the message "You can only sleep at night or during thunderstorms". A player sleeps in a bed for 101 in-game [[tick]]s, or 5.05 seconds before the time skips to the next day. Sleeping in a bed with the {{cmd|gamerule doDaylightCycle}} set to <code>false</code> results in the player being kicked out of the bed after the 101 ticks, but does not change time of the world to day.
Sleeping in a bed is possible only in the [[Overworld]]. Attempting to sleep in a bed in [[the Nether]], [[the End]], and [[custom dimension]]s in which they are disabled causes it to [[explosion|explode]] and set [[fire]] to surrounding blocks; unless {{cmd|gamerule respawnBlocksExplode}}{{only|bedrock}} is set to {{cd|false}}.<ref>{{bug|mcpe-28723}} – "Exploding bed in the Nether" resolved as "Works As Intended". This is referenced {{in|je}} when a player is killed by "Intentional Game Design". </ref> The explosion has power 5, which is stronger than [[TNT]] (4), but not as strong as a charged [[creeper]] or [[End Crystal|end crystal]] (6). The explosion centers on the head part of the bed. [[Villager]]s can sleep normally in any dimension without the bed being blown up.<ref>{{bug|MC-146515|||WAI}}</ref> Upon death from a bed explosion, the [[death messages|message]] "'''(Player) was killed by [Intentional Game Design]'''" appears.
The player must be close to the bed to sleep. If the player is close enough to click on the bed, but not close enough to sleep in it, the message "You may not rest now, the bed is too far away"{{only|java|short=1}}/"Bed is too far away"{{only|bedrock|short=1}} appears. A player must be within 2 blocks of the bed {{in|JE}} or 3 blocks {{in|BE}} to use the bed.
If a "monster" is within 8 blocks of the bed horizontally (in the X- and Z-axis), and 5 blocks vertically (in the Y-axis), the message "You may not rest now, there are monsters nearby" appears and the player is prevented from sleeping until the monsters leave or are killed. Most hostile mobs, as well as some neutral mobs prevent players from sleeping, as shown in the table below.
{| class="wikitable mw-collapsible"
!Mob
!Prevent the player from sleeping
|-
|{{EntityLink|Blaze}}
|{{Tc|yes}}
|-
|{{EntityLink|Chicken Jockey}}
|{{Tc|partial|when hostile{{Only|Java|short=1}}/Yes{{Only|Bedrock|short=1}}}}
|-
|{{EntityLink|Creeper}}
|{{Tc|yes}}
|-
|{{EntityLink|Drowned}}
|{{Tc|yes}}
|-
|{{EntityLink|Endermite}}
|{{Tc|yes}}
|-
|{{EntityLink|Enderman}}
|{{Tc|partial|when hostile}}
|-
|{{EntityLink|Ender Dragon}}
|{{Tc|no}}
|-
|{{EntityLink|Evoker}}
|{{Tc|yes}}
|-
|{{EntityLink|Ghast}}
|{{Tc|no}}
|-
|{{EntityLink|Giant}}
|{{Tc|yes}}
|-
|{{EntityLink|Guardian}}, {{EntityLink|Elder Guardian}}
|{{Tc|yes}}
|-
|{{EntityLink|Hoglin}}
|{{Tc|no}}
|-
|{{EntityLink|Illusioner}}
|{{Tc|yes}}
|-
|{{EntityLink|Killer Bunny}}
|{{Tc|no}}
|-
|{{EntityLink|Magma Cube}}
|{{Tc|partial|no{{Only|Java|short=1}}/Yes{{Only|Bedrock|short=1}}}}
|-
|{{EntityLink|Piglin}}
|{{Tc|no}}
|-
|{{EntityLink|Piglin Brute}}
|{{Tc|yes}}
|-
|{{EntityLink|Pillager}}
|{{Tc|yes}}
|-
|{{EntityLink|Phantom}}
|{{Tc|yes}}
|-
|{{EntityLink|Ravager}}
|{{Tc|yes}}
|-
|{{EntityLink|Shulker}}
|{{Tc|no}}
|-
|{{EntityLink|Silverfish}}
|{{Tc|yes}}
|-
|{{EntityLink|Skeleton}}, {{EntityLink|Skeleton Horseman}}, {{EntityLink|Stray}}, {{EntityLink|Wither Skeleton}}
|{{Tc|yes}}
|-
|{{EntityLink|Spider}}, {{EntityLink|Cave Spider}}, {{EntityLink|Spider Jockey}}
|{{Tc|yes}}
|-
|{{EntityLink|Slime}}
|{{Tc|partial|no{{Only|Java|short=1}}/Yes{{Only|Bedrock|short=1}}}}
|-
|{{EntityLink|Vex}}
|{{Tc|yes}}
|-
|{{EntityLink|Vindicator}}
|{{Tc|yes}}
|-
|{{EntityLink|Warden}}
|{{Tc|yes}}
|-
|{{EntityLink|Witch}}
|{{Tc|yes}}
|-
|{{EntityLink|Wither}}
|{{Tc|yes}}
|-
|{{EntityLink|Zoglin}}
|{{Tc|yes}}
|-
|{{EntityLink|Zombie}}, {{EntityLink|Zombie Villager}}, {{EntityLink|Husk}}
|{{Tc|yes}}
|-
|{{EntityLink|Zombified Piglin}}
|{{Tc|partial|when hostile{{Only|Java|short=1}}/Yes{{Only|Bedrock|short=1}}}}
|-
|}
{{notelist}}
If the player has not entered a bed and didn't die for 3 in-game days, [[phantom]]s can spawn unless {{cmd|gamerule doInsomnia}} is set to {{cd|false}}. {{in|java}}, this can be verified by checking if the "Time Since Last Rest" [[statistic]] is greater than 1.00 h.
A hostile mob can wake a player that is sleeping.
The player also cannot sleep in a bed occupied by another player, resulting in the message, "This bed is occupied".
A player can, however, sleep in a bed being used by a villager. The player may first wake the villager (pressing {{control|use}} on the villager) and then quickly enter the bed before the villager can lie down again. The villager reclaims the bed after the player wakes. The villager is kicked out of its bed when a player attempts to sleep there.
A player also cannot sleep while on fire, while poisoned, or while starving.
If all sleeping requirements are met and the player enters a bed, the player is positioned in the bed. The player falls asleep as the screen fades to black. {{IN|bedrock}}, the sleeping animation slowly lowers the player into bed.
Once all players in a world are asleep, after 5 seconds (100 ticks) the time of day changes to sunrise. (time 0)
During this time, the chat window is focused, and the player can leave the bed by clicking the {{btn|Leave Bed}} button.
[[Waterlogging|Waterlogged]] beds{{only|bedrock}} cannot be slept in unless the player or villager has the {{EffectLink|Water Breathing}} or {{EffectLink|Conduit Power}} status effects. Attempting to use a waterlogged bed otherwise does not display any message.<ref>{{bug|MCPE-35802}}</ref>
Beds displaying an error above the hotbar is a feature exclusive to beds; other blocks that cannot be used do not display such a message.<ref>{{bug|MC-160479}} resolved as "Works As Intended"</ref>
If there are two or more blocks of space above the bed, then the player can wake up on the bed. If there is less than two blocks above the bed and there is room on the side, then the player wakes up on the side of the bed. If there is no space on the side of the bed and there is less than two blocks above the bed, then the player still wakes up on top of the bed, but suffocates if it's a solid block.
Villagers always wake up on top of the bed, meaning they can suffocate if there isn't enough room above the bed.
====Passing the night====
Sleeping changes the [[daylight cycle|time of day]] to sunrise and resets the [[weather]] cycle, changing the weather to clear conditions. {{IN|JE}}, the weather cycle is only reset if it is currently raining or snowing. The player wakes up next to the bed, facing the bed.
Sleeping does not accelerate processes that take place over time such as the growth of [[crops]] or [[smelting]]. If {{cmd|gamerule doDaylightCycle}} is <code>false</code>, the player instead wakes up in the night.
To skip the night in multiplayer, all players in the [[Overworld]] must be in bed at the same time. Pressing the {{btn|Leave Bed}} button is not necessary in this case. The percentage of players that need to sleep to skip the night can be customized with the game rule {{cd|playersSleepingPercentage}}.
Villagers are unable to skip the night by sleeping in beds, unlike players.
If the bed is destroyed while the player is in it, due to for example an explosion or by another player, the player wakes prematurely and the night does not pass.
====Setting the spawn point====
Once a player has entered a bed (or right clicked the bed during daytime), their spawn point is set to the location of that bed. {{IN|java}}, multiple players can set their spawn point on a single bed. {{IN|bedrock}}, the last player to use a specific bed is the only player who can respawn there, and players who had previously slept there respawn at the world spawn.
{{ctrl|Using}} a bed in the daytime likewise sets the spawn point, without actually entering the bed.
When a bed explodes, it does not set the spawn point.
The message "Respawn point set" is displayed in chat when the respawn point is successfully changed.
The check for a bed is made only when the player respawns. This means that the bed can be destroyed and replaced or even reoriented, but as long as there is a bed present in the same location, the player can respawn there. If a player's bed is absent, or if the area around the bed is made unsuitable for respawning (see below), a message is displayed saying ''You have no home bed or charged respawn anchor, or it was obstructed''{{only|je}}/''Your home bed was missing or obstructed''{{only|be}}, and the player respawns at the [[Spawn#World spawn|world spawn]] point.
When choosing where to respawn the player, the northwesternmost (lowest X- and Z-coordinates) location of the seven blocks adjacent to the head of the bed is chosen first. If this location is obstructed, the next choice is to its south (+Z), rather than the east (+X). Only when all seven locations around the head are obstructed are the three remaining ones adjacent to the foot then to be considered.
For a location to be unobstructed, the block at the level of the bed must be air or non-solid (e.g. torches, but not glass) and there must be a space with a solid block below it and two non-colliding blocks for the player to stand in 0-2 blocks below the bed. It does not matter if the bed itself has blocks above it. Putting a slab one block above a bed can act as a two block tall space, as the bed is half a block tall. The bed never spawns the player on or directly below itself even if all other locations are obstructed. If a bed is obstructed, the player's spawn point is cleared after they respawn. That is, even if the bed is subsequently made usable again, the player continues to respawn at the world spawn until interacting with the bed again.
Specifically, when interacting with it, the location of the ''head'' of the bed is saved as the spawn point, and if a bed is in that space (whether it is the foot or the head) then the respawn works. This can be observed by reorienting the bed with its head in the same location. Interacting with it does not produce a "Respawn point set" message as the game doesn't change the saved spawn point. If a bed is reoriented so that its foot is in this space, it still functions on the next respawn, but it can also be interacted with to update the spawn point to the new head of the bed and cause a "Respawn point set" message. Attempting the reverse, reorienting the bed so that it overlaps the original location of the foot, results in a respawn at world spawn. However, the location of the foot of the bed is also saved. If the bed is moved so that part of it overlaps the original location of the head, it can be observed that the same locations need to be obstructed to stop spawning. It is possible to respawn 2 blocks away from the bed this way.
=== Bouncing===
Falling onto a bed bounces the player with 66% strength – the bouncing-up velocity is 66% of the impact velocity. The player also takes 50% of normal fall damage.
Baby villagers bounce on beds during the day.
If the player is falling while sleeping requirements are met, and presses {{control|use}} on a bed within reach before hitting the ground, the fall damage is delayed until the player wakes.
A player can bounce on a bed while another player or villager is sleeping on it without waking the player or the villager up.
Villagers can be pushed onto beds, as the bed is half a block tall.
=== Curing===
Each bed in the vicinity of a zombie villager has a chance to speed up the [[Zombie_Villager#Curing|process of curing the zombie villager]]. Iron bars (such as in a prison cell) also have this effect.
=== Placement===
Beds require two blocks of floor space. Placement requires at least 2 blocks from the player's facing direction. When placed, the foot of the bed is placed on the block selected and the head of the bed on the block farther away from the player. {{IN|bedrock}}, beds require solid blocks below them when placed. However, the bed remains in place if its supporting blocks are later removed. {{IN|java}}, beds do not require supporting blocks and can be placed anywhere, provided there is enough room.
==Sounds ==
===Generic===
{{Sound table/Block/Wood}}
===Unique===
{{edition|java}}:
{{Sound table
|sound=Explosion1.ogg
|sound2=Explosion2.ogg
|sound3=Explosion3.ogg
|sound4=Explosion4.ogg
|subtitle=Explosion
|source=block
|description=When a player attempts to sleep while not in the Overworld
|id=entity.generic.explode
|translationkey=subtitles.entity.generic.explode
|volume=4.0
|pitch=0.56-0.84
|distance=16
|foot=1}}
{{edition|bedrock}}:
{{Sound table
|type=bedrock
|sound=Explosion1.ogg
|sound2=Explosion2.ogg
|sound3=Explosion3.ogg
|sound4=Explosion4.ogg
|source=block
|description=When a player attempts to sleep while not in the Overworld
|id=random.explode
|volume=4.0
|pitch=1.0
|foot=1}}
==Data values==
===ID===
{{edition|java}}:
{{ID table|
|edition=java
|showblocktags=y
|showitemtags=y
|showforms=y
|generatetranslationkeys=y
|displayname=White Bed
|spritetype=block
|nameid=white_bed
|blocktags=beds
|itemtags=beds}}
{{ID table
|displayname=Orange Bed
|spritetype=block
|nameid=orange_bed
|blocktags=beds
|itemtags=beds}}
{{ID table
|displayname=Magenta Bed
|spritetype=block
|nameid=magenta_bed
|blocktags=beds
|itemtags=beds}}
{{ID table
|displayname=Light Blue Bed
|spritetype=block
|nameid=light_blue_bed
|blocktags=beds
|itemtags=beds}}
{{ID table
|displayname=Yellow Bed
|spritetype=block
|nameid=yellow_bed
|blocktags=beds
|itemtags=beds}}
{{ID table
|displayname=Lime Bed
|spritetype=block
|nameid=lime_bed
|blocktags=beds
|itemtags=beds}}
{{ID table
|displayname=Pink Bed
|spritetype=block
|nameid=pink_bed
|blocktags=beds
|itemtags=beds}}
{{ID table
|displayname=Gray Bed
|spritetype=block
|nameid=gray_bed
|blocktags=beds
|itemtags=beds}}
{{ID table
|displayname=Light Gray Bed
|spritetype=block
|nameid=light_gray_bed
|blocktags=beds
|itemtags=beds}}
{{ID table
|displayname=Cyan Bed
|spritetype=block
|nameid=cyan_bed
|blocktags=beds
|itemtags=beds}}
{{ID table
|displayname=Purple Bed
|spritetype=block
|nameid=purple_bed
|blocktags=beds
|itemtags=beds}}
{{ID table
|displayname=Blue Bed
|spritetype=block
|nameid=blue_bed
|blocktags=beds
|itemtags=beds}}
{{ID table
|displayname=Brown Bed
|spritetype=block
|nameid=brown_bed
|blocktags=beds
|itemtags=beds}}
{{ID table
|displayname=Green Bed
|spritetype=block
|nameid=green_bed
|blocktags=beds
|itemtags=beds}}
{{ID table
|displayname=Red Bed
|spritetype=block
|nameid=red_bed
|blocktags=beds
|itemtags=beds}}
{{ID table
|displayname=Black Bed
|spritetype=block
|nameid=black_bed
|blocktags=beds
|itemtags=beds
|foot=1}}
{{ID table
|displayname=Block entity
|spritename=beds
|spritetype=block
|nameid=bed
|foot=1}}
{{edition|bedrock}}:
{{ID table
|edition=bedrock
|firstcolumnname=Bed
|shownumericids=y
|showforms=y
|generatetranslationkeys=y
|displayname=Block
|spritename=Beds
|spritetype=block
|nameid=bed
|id=26
|form=block
|itemform=item.bed}}
{{ID table
|displayname=Item
|spritename=bed
|spritetype=item
|nameid=bed
|id=418
|form=item
|translationkey=item.bed.black.name,item.bed.red.name,item.bed.green.name,item.bed.brown.name,item.bed.blue.name,item.bed.cyan.name,item.bed.silver.name,item.bed.gray.name,item.bed.pink.name,item.bed.lime.name,item.bed.yellow.name,item.bed.lightBlue.name,item.bed.magenta.name,item.bed.orange.name,item.bed.white.name
|foot=1}}
{{ID table
|notnamespaced=y
|displayname=Block entity
|spritename=beds
|spritetype=block
|nameid=Bed
|foot=1}}
===Metadata===
{{see also|Data values}}
{{IN|be}}, bed items use the following data values:
{{/DV}}
===Block states===
{{see also|Block states}}
{{/BS}}
===Block data===
A bed has a block entity associated with it that holds additional data about the block.
{{el|java}}:
{{see also|Block entity format}}
{{/BE}}
{{el|bedrock}}:
: See [[Bedrock Edition level format/Block entity format]].
==Advancements==
{{load advancements|Sweet Dreams}}
==History==
''For a more in-depth breakdown of changes to textures and models, including a set of renders for each state combination, see [[/Asset history]]''
{{History|java beta}}
{{History||November 26, 2011|link={{tweet|jeb|140410431394160640}}|Originally, [[crying obsidian]] was intended to act as a block to reset spawn points, until beds were introduced.}}
{{History||1.3|[[File:Red Bed JE1 BE1.png|32px]] [[File:Red Bed (item) JE1 BE1.png|32px]] Added beds.
|The only color for beds is red.
|Beds can currently be crafted using any color combination of wool.
|Sleeping in an area potentially exposed to monsters can cause [[player]]s to wake up early, with a [[skeleton]] or [[zombie]] spawned next to them.
|Trying to sleep in a bed in [[the Nether]] does nothing.}}
{{History||1.4|Sleeping in a bed now resets the player's spawn position, though it does not work for most users. The spawn point unintentionally changes only if ''Leave Bed'' is clicked and the function is limited to [[multiplayer]].}}
{{History||1.4_01|Beds now act as a respawn point as intended.}}
{{History||1.6|snap=Test Build 3|Trying to sleep in a bed in the Nether now causes the bed to [[explosion|explode]].}}
{{History||1.7|As blocks now pull textures from the expected places for model application, this has resulted in the bed texture shifting downward in <samp>[[terrain.png]]</samp>. No visual difference has resulted for the actual bed.}}
{{History|java}}
{{History||1.0.0|snap=Beta 1.9 Prerelease 4|Bed explosions in the Nether now light nearby blocks on fire.}}
{{History|||snap=Beta 1.9 Prerelease 5|The bottom textures of beds have been changed to the texture of the new [[oak]] planks from [[File:Red Bed JE1 (facing NWU).png|32px]] to [[File:Red Bed JE2 BE1 (facing NWU).png|32px]].}}
{{History|||snap=Beta 1.9 Prerelease 6|Beds no longer spawn monsters. Instead, trying to sleep when monsters are around displays a message saying ''You may not rest now, there are monsters nearby''.}}
{{History||1.2.4|snap=release|[[Cat]]s while in standing position now purposely go and sit on beds.
|[[Spruce]], [[birch]], and [[jungle tree|jungle]] planks can now be used to craft beds.}}
{{History||1.5|snap=?|Beds now check their [[biome]] for detonation rather than just their dimension.}}
{{History||1.7.2|snap=1.7.1|[[Acacia]] planks and [[dark oak]] planks can now be used to craft beds.}}
{{History||1.8|snap=14w29a|Beds now display the cracking animation on top and bottom.}}
{{History|||snap=14w33a|Beds now make [[sound]]s when placed, and play logical sounds when stepped on and [[breaking|broken]].<ref>{{bug|MC-66347||Beds make incorrect sounds|Fixed}}</ref>}}
{{History||1.9|snap=15w43a|Bed now generates inside [[igloo]]s.}}
{{History||1.11|snap=16w32a|The messages "You can only sleep at night", "You may not rest now, there are monsters nearby", and "This bed is occupied" now appear on top of the hotbar, the place that the message "Press <whatever your sneak key is> to dismount" also appears when the player is riding a [[mob]].}}
{{History|||snap=16w33a|If the player is close enough to click on the bed, but not close enough to sleep in it, the message "You may not rest now, the bed is too far away" is now displayed.}}
{{History||1.12|snap=17w06a|Neutral [[zombie pigmen]] no longer prevent the player from sleeping in a bed.}}
{{History|||snap=March 13, 2017|slink={{tweet|jeb_|841311279784591361}}|[[Jeb]] mentions colored beds for [[Java Edition 1.12|1.12]].}}
{{History|||snap=17w15a|[[File:White Bed JE1.png|32px]] [[File:Light Gray Bed JE1.png|32px]] [[File:Gray Bed JE1.png|32px]] [[File:Black Bed JE1.png|32px]] [[File:Brown Bed JE1.png|32px]] [[File:Orange Bed JE1.png|32px]] [[File:Yellow Bed JE1.png|32px]] [[File:Lime Bed JE1.png|32px]] [[File:Green Bed JE1.png|32px]] [[File:Cyan Bed JE1.png|32px]] [[File:Light Blue Bed JE1.png|32px]] [[File:Blue Bed JE1.png|32px]] [[File:Purple Bed JE1.png|32px]] [[File:Magenta Bed JE1.png|32px]] [[File:Pink Bed JE1.png|32px]] [[Dye]]d beds have been added.
|The "Bed" has been renamed to "Red Bed".
|Beds can now only be crafted using wool of the same color.
|[[File:Red Bed JE2.png|32px]] The texture of red beds has been changed. The top of the beds are no longer mirrored. <!--- the numbers appear out of order but it is correct since it orders all beds in the current order in the Java Creative inventory --->
|{{Sprite|pos=1|image=Bed Icons 1.12.png|size=32|sheetsize=512}} {{Sprite|pos=9|image=Bed Icons 1.12.png|size=32|sheetsize=512}} {{Sprite|pos=8|image=Bed Icons 1.12.png|size=32|sheetsize=512}} {{Sprite|pos=16|image=Bed Icons 1.12.png|size=32|sheetsize=512}} {{Sprite|pos=13|image=Bed Icons 1.12.png|size=32|sheetsize=512}} {{Sprite|pos=15|image=Bed Icons 1.12.png|size=32|sheetsize=512}} {{Sprite|pos=2|image=Bed Icons 1.12.png|size=32|sheetsize=512}} {{Sprite|pos=5|image=Bed Icons 1.12.png|size=32|sheetsize=512}} {{Sprite|pos=6|image=Bed Icons 1.12.png|size=32|sheetsize=512}} {{Sprite|pos=14|image=Bed Icons 1.12.png|size=32|sheetsize=512}} {{Sprite|pos=10|image=Bed Icons 1.12.png|size=32|sheetsize=512}} {{Sprite|pos=4|image=Bed Icons 1.12.png|size=32|sheetsize=512}} {{Sprite|pos=12|image=Bed Icons 1.12.png|size=32|sheetsize=512}} {{Sprite|pos=11|image=Bed Icons 1.12.png|size=32|sheetsize=512}} {{Sprite|pos=3|image=Bed Icons 1.12.png|size=32|sheetsize=512}} {{Sprite|pos=7|image=Bed Icons 1.12.png|size=32|sheetsize=512}} Beds now appear 3D in the [[inventory]].
|[[File:Red Bed JE3 (facing NWU).png|32px]] Beds now have 3D legs.<ref>{{bug|MC-11963||bed hind legs not rendered|Fixed}}</ref>
|Beds have been made bouncy, though they do not completely reduce all [[fall damage]].
|Beds are now a [[block entity]].}}
{{History|||snap=17w17a|[[File:Red Bed JE4 BE2 (facing NWU).png|32px]] The four legs of a bed are now each textured separately, and their [[model]] is different.
|[[File:White Bed JE2 BE2.png|32px]] [[File:Light Gray Bed JE2 BE2.png|32px]] [[File:Gray Bed JE2 BE2.png|32px]] [[File:Black Bed JE2 BE2.png|32px]] [[File:Brown Bed JE2 BE2.png|32px]] [[File:Red Bed JE3 BE2.png|32px]] [[File:Orange Bed JE2 BE2.png|32px]] [[File:Yellow Bed JE2 BE2.png|32px]] [[File:Lime Bed JE2 BE2.png|32px]] [[File:Green Bed JE2 BE2.png|32px]] [[File:Cyan Bed JE2 BE2.png|32px]] [[File:Light Blue Bed JE2 BE2.png|32px]] [[File:Blue Bed JE2 BE2.png|32px]] [[File:Purple Bed JE2 BE2.png|32px]] [[File:Magenta Bed JE2 BE2.png|32px]] [[File:Pink Bed JE2 BE2.png|32px]]<br> <!--- the numbers appear out of order but it is correct since it orders all beds in the current order in the Java Creative inventory --->
{{Sprite|pos=17|image=Bed Icons 1.12.png|size=32|sheetsize=512}} {{Sprite|pos=25|image=Bed Icons 1.12.png|size=32|sheetsize=512}} {{Sprite|pos=24|image=Bed Icons 1.12.png|size=32|sheetsize=512}} {{Sprite|pos=32|image=Bed Icons 1.12.png|size=32|sheetsize=512}} {{Sprite|pos=29|image=Bed Icons 1.12.png|size=32|sheetsize=512}} {{Sprite|pos=31|image=Bed Icons 1.12.png|size=32|sheetsize=512}} {{Sprite|pos=18|image=Bed Icons 1.12.png|size=32|sheetsize=512}} {{Sprite|pos=21|image=Bed Icons 1.12.png|size=32|sheetsize=512}} {{Sprite|pos=22|image=Bed Icons 1.12.png|size=32|sheetsize=512}} {{Sprite|pos=30|image=Bed Icons 1.12.png|size=32|sheetsize=512}} {{Sprite|pos=26|image=Bed Icons 1.12.png|size=32|sheetsize=512}} {{Sprite|pos=20|image=Bed Icons 1.12.png|size=32|sheetsize=512}} {{Sprite|pos=28|image=Bed Icons 1.12.png|size=32|sheetsize=512}} {{Sprite|pos=27|image=Bed Icons 1.12.png|size=32|sheetsize=512}} {{Sprite|pos=19|image=Bed Icons 1.12.png|size=32|sheetsize=512}} {{Sprite|pos=23|image=Bed Icons 1.12.png|size=32|sheetsize=512}} The textures of beds have now also been changed.}}
{{History||1.13|snap=17w47a|Beds now require solid blocks below them, or they break into an item. Previously, a bed needed to be placed on solid blocks, but the blocks could later be removed.}}
{{History|||snap=18w07a|Sleeping in a bed is now important to keep [[phantom]]s from spawning.}}
{{History|||snap=18w20a|Players in [[Creative]] mode can now sleep even if monsters are nearby.}}
{{History|||snap=18w22a|Beds no longer require supporting blocks below them; they do not break into an [[item (entity)|item]] if said blocks are removed, and can be directly placed on top of non-solid blocks.}}
{{History|||snap=pre2|The "You can only sleep at night" message when using a bed has been changed to "You can sleep only at night and during [[thunderstorm]]s."}}
{{History||1.14|snap=18w43a|[[File:White Bed JE3 BE3.png|32px]] [[File:Light Gray Bed JE3 BE3.png|32px]] [[File:Gray Bed JE3 BE3.png|32px]] [[File:Black Bed JE3 BE3.png|32px]] [[File:Brown Bed JE3 BE3.png|32px]] [[File:Red Bed JE4 BE3.png|32px]] [[File:Orange Bed JE3 BE3.png|32px]] [[File:Yellow Bed JE3 BE3.png|32px]] [[File:Lime Bed JE3 BE3.png|32px]] [[File:Green Bed JE3 BE3.png|32px]] [[File:Cyan Bed JE3 BE3.png|32px]] [[File:Light Blue Bed JE3 BE3.png|32px]] [[File:Blue Bed JE3 BE3.png|32px]] [[File:Purple Bed JE3 BE3.png|32px]] [[File:Magenta Bed JE3 BE3.png|32px]] [[File:Pink Bed JE3 BE3.png|32px]]<br>{{InvSprite|White Bed}} {{InvSprite|Light Gray Bed}} {{InvSprite|Gray Bed}} {{InvSprite|Black Bed}} {{InvSprite|Brown Bed}} {{InvSprite|Red Bed}} {{InvSprite|Orange Bed}} {{InvSprite|Yellow Bed}} {{InvSprite|Lime Bed}} {{InvSprite|Green Bed}} {{InvSprite|Cyan Bed}} {{InvSprite|Light Blue Bed}} {{InvSprite|Blue Bed}} {{InvSprite|Purple Bed}} {{InvSprite|Magenta Bed}} {{InvSprite|Pink Bed}} The textures of all beds have been changed.
|[[File:Red Bed JE5 (facing NWU).png|32px]] The bottom textures of beds have been changed to new oak planks texture.}}
{{History|||snap=18w44a|Cats can now sleep in empty beds or sit on their owner when their owner is sleeping.}}
{{History|||snap=18w47a|[[File:Red Bed JE6 BE3 (facing NWU).png|32px]] The bottom textures of beds have been changed to the new oak planks to texture, once again.}}
{{History|||snap=18w48a|Beds now generate in the updated [[plains]] [[village]]s.}}
{{History|||snap=18w49a|Beds now generate in the updated [[savanna]] villages and the new [[snowy tundra]] villages.}}
{{History|||snap=18w50a|Beds now generate in the updated [[desert]] and [[taiga]] villages.}}
{{History|||snap=19w08a|All mobs can now sleep in beds using [[command]]s.}}
{{History|||snap=19w11a|[[Villager]]s now claim beds and sleep in them during the night.
|Shepherd villagers now [[trading|sell]] beds.}}
{{History||1.15|snap=19w35a|If a player tries to sleep in a bed that is occupied by a villager, that villager is now kicked out of the bed.}}
{{History|||snap=19w36a|Trying to sleep in a bed during the daytime now sets the player's spawn location to that bed.}}
{{History|||snap=pre2|Successfully changing a spawn point using a bed now displays a message in [[chat]].}}
{{History||1.16|snap=20w06a|Crimson and warped planks can now be used to craft beds.}}
{{History|||snap=20w12a|The message "Your home bed was missing or obstructed" has been changed to "You have no home bed or respawn anchor, or it was obstructed" due to the addition of the [[respawn anchor]], used to set the player's spawn in [[the Nether]].}}
{{History||1.16.2|snap=20w30a|Beds now prioritize the side of the bed the player or villager entered from and then spaces circling around the foot of the bed up to the head of the bed.}}
{{History||1.17|snap=20w51a|Added gamerules for sleeping in multiplayer.}}
{{History||1.18|snap=21w44a|Sleeping now only resets the weather cycle if it is currently raining or snowing.<ref>{{bug|MC-63340||Sleeping always resets time until rain|Fixed}}</ref>}}
{{History||1.19|snap=22w11a|[[Mangrove]] planks can now be used to craft beds.}}
{{History||1.19.3|snap=22w43a|Bed explosions can now be properly [[blocking|blocked]] by [[shield]]s.<ref>{{bug|MC-200006|||Fixed}}</ref>}}
{{History||1.20|snap=Pre-release 1|Beds of any color can now be dyed into any other color.}}
{{History|pocket alpha}}
{{History||v0.4.0|[[File:Red Bed JE1 BE1.png|32px]] [[File:Red Bed (item) JE1 BE1.png|32px]] Added beds.}}
{{History||v0.5.0|Beds can now be obtained after activating the [[nether reactor]].}}
{{History||v0.9.0|snap=build 1|Beds no longer restore [[health]] in normal difficulty, making [[food]] a more required [[Survival]]-needed resource.
|Added smooth lighting to beds.}}
{{History||v0.11.0|snap=build 8|The lighting on beds has been improved.}}
{{History||v0.12.1|snap=build 1|Tamed [[cat|ocelots]] while standing now purposely go and sit on beds.
|Beds are no longer available from the [[nether reactor]].}}
{{History||v0.16.0|snap=build 1|Beds now make a [[sound]] when placed, identical to [[block]]s like [[stone]].<ref name="lazilycodedsounds">{{bug|MCPE-10077}} – "Incorrect sounds on beds" resolved as "Fixed".</ref>}}
{{History|pocket}}
{{History||1.0.0|snap=alpha 0.17.0.1|Beds are now generated in [[igloo]]s.}}
{{History|||snap=alpha 0.17.0.2|[[File:Leave Bed 1.0.jpg|36px]] The ''Leave Bed'' button now has a new texture.}}
{{History|||snap=alpha 1.0.0.0|Sleeping now ends [[weather]].}}
{{History||1.1.0|snap=alpha 1.1.0.0|[[File:White Bed JE2 BE2.png|32px]] [[File:Light Gray Bed JE2 BE2.png|32px]] [[File:Gray Bed JE2 BE2.png|32px]] [[File:Black Bed JE2 BE2.png|32px]] [[File:Brown Bed JE2 BE2.png|32px]] [[File:Orange Bed JE2 BE2.png|32px]] [[File:Yellow Bed JE2 BE2.png|32px]] [[File:Lime Bed JE2 BE2.png|32px]] [[File:Green Bed JE2 BE2.png|32px]] [[File:Cyan Bed JE2 BE2.png|32px]] [[File:Light Blue Bed JE2 BE2.png|32px]] [[File:Blue Bed JE2 BE2.png|32px]] [[File:Purple Bed JE2 BE2.png|32px]] [[File:Magenta Bed JE2 BE2.png|32px]] [[File:Pink Bed JE2 BE2.png|32px]]<br>[[File:White Bed (item) BE1.png|32px]] [[File:Light Gray Bed (item) BE1.png|32px]] [[File:Gray Bed (item) BE1.png|32px]] [[File:Black Bed (item) BE1.png|32px]] [[File:Brown Bed (item) BE1.png|32px]] [[File:Orange Bed (item) BE1.png|32px]] [[File:Yellow Bed (item) BE1.png|32px]] [[File:Lime Bed (item) BE1.png|32px]] [[File:Green Bed (item) BE1.png|32px]] [[File:Cyan Bed (item) BE1.png|32px]] [[File:Light Blue Bed (item) BE1.png|32px]] [[File:Blue Bed (item) BE1.png|32px]] [[File:Purple Bed (item) BE1.png|32px]] [[File:Magenta Bed (item) BE1.png|32px]] [[File:Pink Bed (item) BE1.png|32px]] Added the other 15 colors of beds.
|The "Bed" has been renamed to "Red Bed".
|[[File:Red Bed JE3 BE2.png|32px]] The texture of red beds has been changed.
|A new animation when sleeping has been added to beds.
|Beds in [[igloo]]s are now white in [[ice plains]] and brown in [[cold taiga]]s.
|Beds now bounce the [[player]] two [[block]]s up, and have 3D legs.
|Placement, stepping and breaking [[sound]]s for beds are now correctly wooden.<ref name="lazilycodedsounds"/>}}
{{History|bedrock}}
{{History||1.4.0|snap=beta 1.2.14.2|Beds can now be [[waterlogging|waterlogged]] and require [[Water Breathing]] to sleep in.}}
{{History|||snap=beta 1.2.20.1|Colored beds can now be turned into white beds by adding [[bleach]]. This works only if {{el|ee}} features are turned on.}}
{{History||1.6.0|snap=beta 1.6.0.1|Sleeping in a bed is now important to keep [[phantom]]s from spawning.}}
{{History||1.8.0|snap=beta 1.8.0.8|[[Cat]]s can now sleep in empty beds or sit on their [[player|owner]] when their owner is sleeping.}}
{{History||1.10.0|snap=beta 1.10.0.3|Various beds now generate in the new [[village]]s.
|[[Villager]]s can now sleep by occupying a bed, which prevent [[player]]s from using it.
|[[Igloo]]s now generate with red beds.
|Beds are now used to count the number of available houses in [[village]]s.
|[[File:White Bed JE3 BE3.png|32px]] [[File:Light Gray Bed JE3 BE3.png|32px]] [[File:Gray Bed JE3 BE3.png|32px]] [[File:Black Bed JE3 BE3.png|32px]] [[File:Brown Bed JE3 BE3.png|32px]] [[File:Red Bed JE4 BE3.png|32px]] [[File:Orange Bed JE3 BE3.png|32px]] [[File:Yellow Bed JE3 BE3.png|32px]] [[File:Lime Bed JE3 BE3.png|32px]] [[File:Green Bed JE3 BE3.png|32px]] [[File:Cyan Bed JE3 BE3.png|32px]] [[File:Light Blue Bed JE3 BE3.png|32px]] [[File:Blue Bed JE3 BE3.png|32px]] [[File:Purple Bed JE3 BE3.png|32px]] [[File:Magenta Bed JE3 BE3.png|32px]] [[File:Pink Bed JE3 BE3.png|32px]] The textures of all beds have been changed.}}
{{History||1.11.0|snap=beta 1.11.0.4|Beds can now be [[trading|bought]] from shepherd [[villager]]s.}}
{{History||1.13.0|snap=?|[[Player]]s now succeed in attempting to sleep on villager-occupied beds, kicking the villager off.}}
{{History|console}}
{{History||xbox=TU1|xbone=CU1|ps=1.00|wiiu=Patch 1|switch=1.0.1|[[File:Red Bed JE1 BE1.png|32px]] [[File:Red Bed (item) JE1 BE1.png|32px]] Added beds.}}
{{History||xbox=TU12|xbone=CU1|ps=1.00|wiiu= Patch 1|[[Cat]]s in standing position now purposely go and sit on beds, preventing [[player]]s from using them.}}
{{History||xbox=TU43|xbone=CU33|ps=1.36|wiiu=Patch 13|The sleeping animation while in beds has been changed.}}
{{History||xbox=TU54|xbone=CU44|ps=1.52|wiiu=Patch 24|switch=1.0.4|[[File:White Bed JE2 BE2.png|32px]] [[File:Light Gray Bed JE2 BE2.png|32px]] [[File:Gray Bed JE2 BE2.png|32px]] [[File:Black Bed JE2 BE2.png|32px]] [[File:Brown Bed JE2 BE2.png|32px]] [[File:Orange Bed JE2 BE2.png|32px]] [[File:Yellow Bed JE2 BE2.png|32px]] [[File:Lime Bed JE2 BE2.png|32px]] [[File:Green Bed JE2 BE2.png|32px]] [[File:Cyan Bed JE2 BE2.png|32px]] [[File:Light Blue Bed JE2 BE2.png|32px]] [[File:Blue Bed JE2 BE2.png|32px]] [[File:Purple Bed JE2 BE2.png|32px]] [[File:Magenta Bed JE2 BE2.png|32px]] [[File:Pink Bed JE2 BE2.png|32px]]<br>[[File:White Bed (item) LCE.png|32px]] [[File:Light Gray Bed (item) LCE.png|32px]] [[File:Gray Bed (item) LCE.png|32px]] [[File:Black Bed (item) LCE.png|32px]] [[File:Brown Bed (item) LCE.png|32px]] [[File:Orange Bed (item) LCE.png|32px]] [[File:Yellow Bed (item) LCE.png|32px]] [[File:Lime Bed (item) LCE.png|32px]] [[File:Green Bed (item) LCE.png|32px]] [[File:Cyan Bed (item) LCE.png|32px]] [[File:Light Blue Bed (item) LCE.png|32px]] [[File:Blue Bed (item) LCE.png|32px]] [[File:Purple Bed (item) LCE.png|32px]] [[File:Magenta Bed (item) LCE.png|32px]] [[File:Pink Bed (item) LCE.png|32px]] Added the other 15 colors of beds.
|The "Bed" has been now renamed to "Red Bed".
|[[File:Red Bed JE3 BE2.png|32px]] [[File:Red Bed (item) LCE.png|32px]] The textures of red beds has been changed.
|Beds are now [[dye]]able and bounce the [[player]] two [[block]]s up, and have a single 3D legs.}}
{{History||xbox=TU60|xbone=CU51|ps=1.64|wiiu=Patch 30|switch=1.0.11|The sleeping animation in beds has been changed again.}}
{{History||xbox=TU69|xbone=none|ps=1.76|wiiu=Patch 38|switch=none|Sleeping in a bed is now important to keep [[phantom]]s from spawning.
|Beds can now be [[waterlogging|waterlogged]] and require {{EffectLink|Water Breathing}} to sleep in.}}
{{History||xbox=none|xbone=none|ps=1.83|wiiu=none|switch=none|The sleeping animation for beds has been reverted to how it was before [[Legacy Console Edition version history#ps-1.64|1.64]].}}
{{History||xbox=none|xbone=none|ps=1.91|wiiu=none|switch=none|Various beds now generate in the new [[village]]s.
|[[Villager]]s can now sleep by occupying a bed, which prevents [[player]]s from using it.
|Beds are now used to count the number of available houses in villages.
|Beds can now be [[trading|bought]] from shepherd [[villager]]s.}}
{{History|New 3DS}}
{{History||0.1.0|[[File:Red Bed JE1 BE1.png|32px]] [[File:Red Bed (item) JE1 BE1.png|32px]] Added beds.}}
{{History||1.9.19|[[File:White Bed JE2 BE2.png|32px]] [[File:Light Gray Bed JE2 BE2.png|32px]] [[File:Gray Bed JE2 BE2.png|32px]] [[File:Black Bed JE2 BE2.png|32px]] [[File:Brown Bed JE2 BE2.png|32px]] [[File:Orange Bed JE2 BE2.png|32px]] [[File:Yellow Bed JE2 BE2.png|32px]] [[File:Lime Bed JE2 BE2.png|32px]] [[File:Green Bed JE2 BE2.png|32px]] [[File:Cyan Bed JE2 BE2.png|32px]] [[File:Light Blue Bed JE2 BE2.png|32px]] [[File:Blue Bed JE2 BE2.png|32px]] [[File:Purple Bed JE2 BE2.png|32px]] [[File:Magenta Bed JE2 BE2.png|32px]] [[File:Pink Bed JE2 BE2.png|32px]]<br>[[File:White Bed (item) BE1.png|32px]] [[File:Light Gray Bed (item) BE1.png|32px]] [[File:Gray Bed (item) BE1.png|32px]] [[File:Black Bed (item) BE1.png|32px]] [[File:Brown Bed (item) BE1.png|32px]] [[File:Orange Bed (item) BE1.png|32px]] [[File:Yellow Bed (item) BE1.png|32px]] [[File:Lime Bed (item) BE1.png|32px]] [[File:Green Bed (item) BE1.png|32px]] [[File:Cyan Bed (item) BE1.png|32px]] [[File:Light Blue Bed (item) BE1.png|32px]] [[File:Blue Bed (item) BE1.png|32px]] [[File:Purple Bed (item) BE1.png|32px]] [[File:Magenta Bed (item) BE1.png|32px]] [[File:Pink Bed (item) BE1.png|32px]] Added the other 15 colors of beds.
|The "Bed" has been renamed to "Red Bed".
|[[File:Red Bed JE3 BE2.png|32px]] The texture of red beds has been changed.
|Beds now bounce the [[player]] two [[block]]s up and have 3D legs.}}
{{History|Education}}
{{History||1.0|[[File:Red Bed JE1 BE1.png|32px]] [[File:Red Bed (item) JE1 BE1.png|32px]] Added beds.}}
{{History||1.0.1|[[File:White Bed JE2 BE2.png|32px]] [[File:Light Gray Bed JE2 BE2.png|32px]] [[File:Gray Bed JE2 BE2.png|32px]] [[File:Black Bed JE2 BE2.png|32px]] [[File:Brown Bed JE2 BE2.png|32px]] [[File:Orange Bed JE2 BE2.png|32px]] [[File:Yellow Bed JE2 BE2.png|32px]] [[File:Lime Bed JE2 BE2.png|32px]] [[File:Green Bed JE2 BE2.png|32px]] [[File:Cyan Bed JE2 BE2.png|32px]] [[File:Light Blue Bed JE2 BE2.png|32px]] [[File:Blue Bed JE2 BE2.png|32px]] [[File:Purple Bed JE2 BE2.png|32px]] [[File:Magenta Bed JE2 BE2.png|32px]] [[File:Pink Bed JE2 BE2.png|32px]]<br>[[File:White Bed (item) BE1.png|32px]] [[File:Light Gray Bed (item) BE1.png|32px]] [[File:Gray Bed (item) BE1.png|32px]] [[File:Black Bed (item) BE1.png|32px]] [[File:Brown Bed (item) BE1.png|32px]] [[File:Orange Bed (item) BE1.png|32px]] [[File:Yellow Bed (item) BE1.png|32px]] [[File:Lime Bed (item) BE1.png|32px]] [[File:Green Bed (item) BE1.png|32px]] [[File:Cyan Bed (item) BE1.png|32px]] [[File:Light Blue Bed (item) BE1.png|32px]] [[File:Blue Bed (item) BE1.png|32px]] [[File:Purple Bed (item) BE1.png|32px]] [[File:Magenta Bed (item) BE1.png|32px]] [[File:Pink Bed (item) BE1.png|32px]] Added the other 15 colors of beds.
|The "Bed" has been renamed to "Red Bed".
|[[File:Red Bed JE3 BE2.png|32px]] The texture of red beds has been changed.
|Beds now bounce the [[player]] two [[block]]s up, and have 3D legs.}}
{{History||1.0.27|Colored beds can now be turned into white beds by adding [[bleach]].}}
{{History||1.12|[[File:White Bed JE3 BE3.png|32px]] [[File:Light Gray Bed JE3 BE3.png|32px]] [[File:Gray Bed JE3 BE3.png|32px]] [[File:Black Bed JE3 BE3.png|32px]] [[File:Brown Bed JE3 BE3.png|32px]] [[File:Red Bed JE4 BE3.png|32px]] [[File:Orange Bed JE3 BE3.png|32px]] [[File:Yellow Bed JE3 BE3.png|32px]] [[File:Lime Bed JE3 BE3.png|32px]] [[File:Green Bed JE3 BE3.png|32px]] [[File:Cyan Bed JE3 BE3.png|32px]] [[File:Light Blue Bed JE3 BE3.png|32px]] [[File:Blue Bed JE3 BE3.png|32px]] [[File:Purple Bed JE3 BE3.png|32px]] [[File:Magenta Bed JE3 BE3.png|32px]] [[File:Pink Bed JE3 BE3.png|32px]] The textures of all beds have been changed.}}
{{History|foot}}
=== Data history ===
{{History|java}}
{{History||1.13|snap=17w47a|The different block states for the <code>bed</code> ID have been split up into their own IDs.
|Prior to [[1.13/Flattening|''The Flattening'']], this block's numeral ID was 26, and the item's 355.}}
{{History|foot}}
=== Bed "item"===
{{:Technical blocks/Bed}}
==Issues==
{{Issue list}}
== Trivia==
* The reason beds explode in the Nether and the End is because Notch found it was the easiest solution to dimension-unique respawning.<ref>{{tweet|Notch|1259681657793077250|duh|11 May 2020}}, in response to {{tweet|NoahBandito|1259681319392550912|So you're telling me the "Inteded Game Design" should actually be "Sorry, I was too lazy to code"?|11 May 2020}}</ref>
** Dimension-unique respawning was eventually implemented via the [[respawn anchor]], and gained command support at the same time. Despite this, beds and respawn anchors still explode in invalid dimensions.
* If the player quits the game while sleeping, upon return the player wakes up beside the bed.
* Using the {{cmd|teleport}} command while another player is sleeping still teleports the sleeping player, but the player wakes immediately.{{only|java}}
* If the player places a bed on [[ice]], running over the bed acts like running over ice, similar to slabs.
* When placed using the {{cmd|setblock}} command, only one half of a bed is placed, because beds are two blocks long. A single half can be slept in like a whole bed.
* Villagers can sleep in the Nether and the End without causing the bed to explode.<ref>{{bug|MC-146515}} Resolved as Works As Intended</ref>
* While the block state used to determine the half of a two-block block such as [[door]]s and double-tall [[flower]]s is called ''half'', in the case of beds this is called ''part''.
* Players and villagers do not drown or take damage from lava while in a bed, even if the bed is covered in lava.
*The red bed was the original default bed color. In [[Java Edition 1.12]] and [[Pocket Edition 1.1.0]] version of the game, the default color was changed to white.
== Gallery ==
=== All renders ===
<gallery>
White Bed.png|White
Light Gray Bed.png|Light gray
Gray Bed.png|Gray
Black Bed.png|Black
Brown Bed.png|Brown
Red Bed.png|Red
Orange Bed.png|Orange
Yellow Bed.png|Yellow
Lime Bed.png|Lime
Green Bed.png|Green
Cyan Bed.png|Cyan
Light Blue Bed.png|Light blue
Blue Bed.png|Blue
Purple Bed.png|Purple
Magenta Bed.png|Magenta
Pink Bed.png|Pink
</gallery>
=== Screenshots ===
<gallery>
Multiplayer Sleeping.png|A sleeping player in multiplayer.
Missing Bed.png|The message that can be seen after a failed attempt to respawn at the spawn point set by a bed.
Nether Bed.png|A crater created by attempting to sleep in the Nether.
Ender Bed.png|A crater created by attempting to sleep in the End.
16 color beds.png|All the different color variants.
Old Village New Village VillagerSleeping MCEE.png|An unemployed [[villager]] and a [[butcher]] villager goes to sleep, unaware of the zombies outside.
Stackedbeds.png|A stack of beds.
Mob wakeup.png|Player being awakened by a [[zombie]].
Day Sleeping.png|The message that can be seen when any players attempt to sleep during daytime.
Sleeping.png|A player going to sleep in a bed on the first day of a ''Minecraft'' world.
CobwebVillage.png|A bed in an abandoned village has its bottom half replaced by wheat crops.
</gallery>
=== In other media ===
<gallery>
File:Rainbow Bed.png|The [[MCE:Rainbow Bed|rainbow bed]], a unique coloration featured in [[Minecraft Earth]].
File:The Sham.jpg|The Sham, a villainous, sentient bed featured in the [[skin pack|Campfire Tales]] skin pack.
</gallery>
==References==
{{Reflist}}
{{Blocks|Utility}}
{{Items}}
[[Category:Utility blocks]]
[[Category:Manufactured blocks]]
[[Category:Generated structure blocks]]
[[Category:Block entities]]
[[cs:Postel]]
[[de:Bett]]
[[es:Cama]]
[[fr:Lit]]
[[hu:Ágy]]
[[it:Letto]]
[[ja:ベッド]]
[[ko:침대]]
[[nl:Bed]]
[[pl:Łóżko]]
[[pt:Cama]]
[[ru:Кровать]]
[[th:เตียง]]
[[uk:Ліжко]]
[[zh:床]]</li></ul> | |||||
| Added Survival mode. | |||||
v0.7.0{{Extension DPL}}<ul><li>[[Milk Bucket|Milk Bucket]]<br/>{{Item
| title=Milk Bucket
| image = Milk Bucket.png
| renewable = Yes
| effects = Clears all
| stackable = No
}}
A '''milk bucket'''{{fn|Known as '''Milk Bucket''' {{in|java}} and '''Milk''' {{in|bedrock}}.}} is a [[drink]] obtained from {{Control|use|text=using}} a [[bucket]] on [[cow]]s, [[mooshroom]]s and [[goat]]s that can be consumed to clear all [[Effect|effects]].
== Obtaining ==
=== Harvesting ===
Milk buckets can be obtained from [[cow]]s, [[mooshroom]]s, and [[goat]]s by pressing {{control|use}} while looking at them with an empty [[bucket]].
=== Mob loot ===
A milk bucket has a chance of dropping from a [[wandering trader]], if the trader is killed while holding it.{{only|java}}
== Usage ==
Holding {{control|use}} with a milk bucket starts the drinking sound and animation. {{IN|java}}, the animation is shown only in first-person camera mode.
When consumed, milk immediately removes all status [[effect]]s from the [[player]]. [[Fire]] is not a status effect; therefore, drinking milk doesn't extinguish a burning player.
The benefits of area status effects granted by [[beacon]]s and [[Conduit Power|conduit power]] are restored almost immediately in Bedrock Edition and after a few seconds in ''Java Edition''.
=== Crafting ingredient ===
{{crafting usage|Milk Bucket}}
== Sounds ==
{{el|je}}:
{{Sound table
|sound=Drink.ogg
|subtitle=Sipping
|source=player
|description=While a player is drinking milk
|id=entity.generic.drink
|translationkey=subtitles.entity.generic.drink
|volume=0.5
|pitch=0.9-1.0
|distance=16}}
{{Sound table
|sound=Cow milk1.ogg
|sound2=Cow milk2.ogg
|sound3=Cow milk3.ogg
|source=player
|subtitle=Cow gets milked
|description=When a cow is milked
|id=entity.cow.milk
|translationkey=subtitles.entity.cow.milk
|volume=1.0
|pitch=1.0
|distance=16}}
{{Sound table
|sound=Mooshroom milk1.ogg
|sound2=Mooshroom milk2.ogg
|sound3=Mooshroom milk3.ogg
|subtitle=Goat gets milked
|description=When a regular goat is milked
|source=neutral
|id=entity.goat.milk
|translationkey=subtitles.entity.goat.milk
|volume=1.0
|pitch=1.0
|distance=16}}
{{Sound table
|sound=Goat screaming milk1.ogg
|sound2=Goat screaming milk2.ogg
|sound3=Goat screaming milk3.ogg
|sound4=Goat screaming milk4.ogg
|sound5=Goat screaming milk5.ogg
|subtitle=Goat gets milked
|description=When a screaming goat is milked
|source=neutral
|id=entity.goat.screaming.milk
|translationkey=subtitles.entity.goat.milk
|volume=1.0
|pitch=1.0
|distance=16}}
{{Sound table
|sound=Wandering trader drink milk1.ogg
|sound2=Wandering trader drink milk2.ogg
|sound3=Wandering trader drink milk3.ogg
|sound4=Wandering trader drink milk4.ogg
|sound5=Wandering trader drink milk5.ogg
|subtitle=Wandering Trader drinks milk
|source=neutral
|description=While a wandering trader is drinking milk to become visible during daytime
|id=entity.wandering_trader.drink_milk
|translationkey=subtitles.entity.wandering_trader.drink_milk
|volume=0.5
|pitch=0.9-1.0
|distance=16
|foot=1}}
{{el|be}}:
{{Sound table
|type=bedrock
|sound=Drink.ogg
|source=player
|description=While a player is drinking milk
|id=random.drink
|volume=0.35
|pitch=0.9-1.1}}
{{Sound table
|sound=Cow milk1.ogg
|sound2=Cow milk2.ogg
|sound3=Cow milk3.ogg
|source=neutral
|description=When a cow is milked
|id=mob.cow.milk
|volume=1.0
|pitch=1.0}}
{{Sound table
|sound=Mooshroom milk1.ogg
|sound2=Mooshroom milk2.ogg
|sound3=Mooshroom milk3.ogg
|description=When a regular goat is milked
|source=neutral
|id=mob.mooshroom.suspicious_milk
|volume=1.0
|pitch=1.0/0.9/1.1}}
{{Sound table
|sound=Goat screaming milk1.ogg
|sound2=Goat screaming milk2.ogg
|sound3=Goat screaming milk3.ogg
|sound4=Goat screaming milk4.ogg
|sound5=Goat screaming milk5.ogg
|description=When a screaming goat is milked
|source=neutral
|id=mob.goat.milk.screamer
|volume=1.0
|pitch=1.0}}
{{Sound table
|sound=Wandering trader drink milk1.ogg
|sound2=Wandering trader drink milk2.ogg
|sound3=Wandering trader drink milk3.ogg
|sound4=Wandering trader drink milk4.ogg
|sound5=Wandering trader drink milk5.ogg
|source=neutral
|description=While a wandering trader is drinking milk to become visible during daytime
|id=mob.wanderingtrader.drink_milk
|volume=1.0
|pitch=0.8-1.2
|foot=1}}
== Data values ==
=== ID ===
{{edition|java}}:
{{ID table
|edition=java
|showforms=y
|generatetranslationkeys=y
|displayname=Milk Bucket
|spritetype=item
|nameid=milk_bucket
|form=item
|foot=1}}
{{edition|bedrock}}:
{{ID table
|edition=bedrock
|showaliasids=y
|shownumericids=y
|showforms=y
|notshowbeitemforms=y
|generatetranslationkeys=y
|displayname=Milk
|spritetype=item
|nameid=milk_bucket
|aliasid=bucket / 1
|id=361
|form=item
|translationkey=item.milk.name
|foot=1}}
== Achievements ==
{{load achievements|The Lie}}
== Advancements ==
{{Load advancements|Husbandry}}
== Video ==
<div style="text-align:center">{{yt|eyxea_d0b3s}}</div>
== History ==
{{History|java alpha}}
{{History||v1.0.8|[[File:Milk Bucket JE1 BE1.png|32px]] Milk has been introduced, but it has no purpose and is obtainable only through inventory editing.}}
{{History||v1.0.11|Milk can now be obtained by {{control|use|text=milking}} a [[cow]] with a [[bucket]]. However, it is not yet drinkable.}}
{{History||v1.0.17|Milk buckets can now be emptied.}}
{{History|java beta}}
{{History||1.2|Milk has been incorporated into the [[crafting]] recipe of [[cake]].}}
{{History||1.2_01|[[Squid]] can now be milked by right-clicking on their mouth if part of their body was exposed to [[air]] or if they were not touching another [[block]]. An easy way to accomplish this is to pull a squid with a [[fishing rod]] away from other blocks and then milk it.}}
{{History||1.3_01|Squid milking has been removed.}}
{{History|java}}
{{History||1.0.0|snap=Beta 1.9 Prerelease|Milk can now be obtained by milking [[mooshroom]]s.}}
{{History|||snap=Beta 1.9 Prerelease 2|Milk has been made drinkable.
|According to a tweet by [[Jeb]] on September 30th 2011, milk was made a cure for all status effects.<ref>{{tweet|jeb_|119842906528944129|@Nexusdog_UK I haven't! In beta 1.9 pre2 milk works like a clear-everything drink|September 30, 2011}}</ref>
|Milk is no longer emptiable.}}
{{History||1.13|snap=17w47a|Prior to [[1.13/Flattening|''The Flattening'']], this [[item]]'s numeral ID was 335.}}
{{History|||snap=18w20a|"Milk" has been renamed to "Milk Bucket".}}
{{History||1.14|snap=18w43a|[[File:Milk Bucket JE2 BE2.png|32px]] The texture of milk buckets has been changed.}}
{{History||1.14|snap=19w06a|[[Wandering trader]]s now drink from milk buckets at dawn, and have a change to drop them.}}
{{History||1.17|snap=21w13a|Milk can now be obtained by milking [[goat]]s.}}
{{History|upcoming java}}
{{History||Villager Trade Rebalance<br>(Experimental)|link=Java Edition 1.20.2|snap=23w31a|Wander traders now have a chance to [[trading|buy]] a milk bucket from the player.}}
{{History|pocket alpha}}
{{History||v0.7.0|[[File:Milk Bucket JE1 BE1.png|32px]] Added milk buckets.
|Milk buckets are not yet drinkable.}}
{{History||v0.11.0|snap=build 4|Drinking milk now removes [[status effects]].
|Added milk buckets to the Creative inventory.{{verify|type=update}}{{info needed}}<!---same update?--->}}
{{History|bedrock}}
{{History||1.4.0|snap=beta 1.2.14.2|Moved all bucket items, including milk, from the Equipment tab to the Items tab in the [[Creative inventory]].{{verify|type=update}}{{info needed}}<!---please check snapshots, only 1 major release version was checked each--->}}
{{History||1.10.0|snap=beta 1.10.0.3|[[File:Milk Bucket JE2 BE2.png|32px]] The texture of milk buckets has been changed.}}
{{History||1.16.100|snap=beta 1.16.100.56|The ID of milk has been changed from <code>bucket/1</code> to <code>milk_bucket</code>.}}
{{History||1.16.200|snap=beta 1.16.200.52|Milk can now be obtained by milking [[goat]]s.}}
{{History|console}}
{{History||xbox=TU1|xbone=CU1|ps=1.0|wiiu=Patch 1|switch=1.0.1|[[File:Milk Bucket JE1 BE1.png|32px]] Added milk buckets.}}
{{History|Ps4}}
{{History||1.90|[[File:Milk Bucket JE2 BE2.png|32px]] The texture of milk buckets has been changed.}}
{{History|New 3DS}}
{{History||0.1.0|[[File:Milk Bucket JE1 BE1.png|32px]] Added milk buckets.}}
{{History|foot}}
== Issues ==
{{issue list}}
== See also ==
*[[Water Bucket]]
*[[Lava]]
*[[Food]]
*[[Cake]]
*[[Honey Bottle]] (alternative to remove poison effect)
*[[Medicine]]
== Notes ==
{{fnlist}}
== References ==
{{reflist}}
== External Links ==
*[https://www.minecraft.net/en-us/article/taking-inventory--milk-bucket Taking Inventory: Milk Bucket] – Minecraft.net on October 8, 2019
{{Items}}
[[Category:Food]]
[[Category:Renewable resources]]
[[Category:Tools]]
[[cs:Mléko]]
[[de:Milcheimer]]
[[es:Cubo con leche]]
[[fr:Seau de lait]]
[[hu:Tej]]
[[it:Secchio di latte]]
[[ja:ミルク入りバケツ]]
[[ko:우유 양동이]]
[[nl:Emmer melk]]
[[pl:Wiadro mleka]]
[[pt:Balde de leite]]
[[ru:Ведро с молоком]]
[[th:ถังนม]]
[[uk:Відро молока]]
[[zh:奶桶]]</li><li>[[:Category:Combat|Category:Combat]]<br/>[[Category:Items]]
[[fr:Catégorie:Combat]]
[[zh:Category:武器]]</li></ul> | |||||
| World Name option is now blank but world saved by default with name "Level". | |||||
v0.7.3{{Extension DPL}}<ul><li>[[Reality Vision|Reality Vision]]<br/>{{Joke feature}}
{{Item
| title = Reality Vision
| image = Reality Vision.png
| renewable = No
| stackable = Yes (64)
}}
The '''Reality vision''' was a joke [[helmet]].
== Usage ==
Reality vision was equipped via the [[helmet]] slot. When equipped, it showed a [[wikipedia:Mini-map|minimap]] in the bottom-center of the screen (which moved when the [[player]]'s camera moves). The minimap showed all [[chunk]]s that were currently rendered. The player's location was represented by a green [[beacon]] beam marker on the map.
It displayed a vision overlay (similar to the [[pumpkin]] overlay). The overlay would change to a new overlay if the player went into third person (unlike the pumpkin overlay), which made the screen appear like an old [[wikipedia:Television|television]] screen. The overlay was called <code>cantseeshit<!-- Do not change this; this is that word that is actually used-->captain.png</code> in the assets folder. It activated a [[Shaders|shader]] when equipped (<code>scan_pincushion</code>).
== Sounds ==
{{Sound table
|sound=Equipvr.ogg
|subtitle=''None''
|source=player
|description=When equipped
|id=item.reality_vision.use
|translationkey=''None''
|volume=1.0
|pitch=1.0
|distance=16
|foot=1}}
== Data values ==
=== ID ===
{{ID table
|edition=java
|shownumericids=y
|showforms=y
|generatetranslationkeys=y
|displayname=Reality Vision
|spritetype=item
|nameid=reality_vision
|id=500
|form=item
|translationkey=item.realityVision.name
|foot=1}}
== History ==
{{History|java}}
{{History||1.RV-Pre1|[[File:Reality_Vision_(item).png|32px]] [[File:Reality Vision.png|32px]] Added reality vision.}}
{{History|foot}}
== Issues ==
Reality Vision is an unsupported item due to being an [[Wikipedia:April Fools' Day|April Fools']] joke, and therefore such issues relating to them will not be fixed.
== Trivia ==
* [[Sign]]s display the text "OBEY" while equipped, a reference to the movie [[wikipedia:They Live|''They Live'']].
== Gallery ==
<gallery>
Sign2.png|The [[sign]] texture found in the game files.
OBEY.png|OBEY seen in a sign.
OBEY sign in 1.RV-Pre1..png|OBEY seen in a sign, but seen from a better perspective.
TechGear.png|A [[player]] wearing reality vision, featured in this [[wikipedia:April Fools' Day|April Fools']] joke version.
</gallery>
{{Items}}
{{Jokes}}
[[Category:Non-renewable resources]]
[[Category:Joke items]]
[[pt:Visão da realidade]]
[[es:Reality Vision]]</li><li>[[Bed|Bed]]<br/>{{Block
| image = White Bed (N).png
| extratext = View [[#Gallery|all renders]]
| transparent = Yes
| tntres = 25
| hardness = 4
| light = No
| tool = any
| renewable = Yes
| stackable = No
| flammable = No
| lavasusceptible = {{jebe|Yes|No}}
}}
A '''bed''' is a [[Dye|dyeable]] [[block]] that allows a player to sleep and to reset their [[spawn]] point to within a few blocks of the bed in the [[Overworld]]. If the bed is obstructed or removed, the player spawns at the default world spawning location.
== Obtaining ==
=== Natural generation ===
;Igloo
A red bed naturally generates in each [[igloo]].
;Village
Beds of various colors generate in [[village]] houses, depending on the specific structure and [[biome]]:
* [[Desert]] village houses have cyan, green, or lime beds.
* [[Plains]] village houses have white or yellow beds.
* [[Savanna]] village houses have orange, red, or yellow beds.
* [[Snowy taiga]]{{only|bedrock|short=1}} and [[taiga]] village houses have blue or purple beds.
* [[Snowy tundra]] village houses have blue, red, or white beds.
=== Breaking ===
Beds can be mined with any [[tool]], or without a tool.<ref>{{bug|MC-192722||Beds have no assigned tool}}</ref>
{{breaking row|horizontal=1|Bed|sprite=red-bed|any}}
A bed also drops itself as an item when pushed by a [[piston]].
=== Crafting ===
{{Crafting
|head=1
|showname=0
|showdescription=1
|A2=Matching Wool
|B2=Matching Wool
|C2=Matching Wool
|A3=Any Planks
|B3=Any Planks
|C3=Any Planks
|Output= Matching Bed
|type=Decoration block
|description=The wool color must match. The planks can be different.
}}
<!--recipe removed
{{Crafting
|showdescription=1
|White Bed
|Matching Colored Dye
|Output= Matching Dyed Bed
|type=Decoration block
|description=White beds can be re-dyed using dyes.{{only|java}}{{until|JE 1.20}}
}}-->
{{Crafting
|showdescription=1
|Any Bed
|Matching Dye
|Output= Matching Bed
|type=Decoration block
|description=A bed of any color can be re-dyed using dyes.
}}
{{Crafting
|showdescription=1
|Any Dyed Bed
|Bleach
|Output=White Bed
|type=Decoration block
|description=This removes the color from the bed.{{only|bedrock|education}}
|foot=1
}}
<div style="display:none">
<!--
This is so the pre-Village & Pillage dyes can have dye-related crafting recipes show on their respective pages.
They don't need to be displayed on this page because they already intuitively list "Any Matching Dye".
-->
{{Crafting
|showdescription=1
|Any Bed
|Bone Meal; Lapis Lazuli; Cocoa Beans; Ink Sac
|Output=White Bed; Blue Bed; Brown Bed; Black Bed
|type=Decoration block
|description={{only|bedrock|education}}
}}
</div>
=== Trading ===
Journeyman-level shepherd villagers sell 1 of 16 beds for 3 [[emerald]]s as part of their trades.
== Usage ==
=== Sleeping ===
[[File:Sleep Animation.gif|240px|thumb|Player falling asleep.]]
Beds are used by pressing the {{control|use item}} button while looking at the bed.
A player sleeps by {{control|using|using}} a bed during a [[thunderstorm]], or at [[night]] (between 12542 and 23459 ticks in clear weather, when stars appear in the sky, or between 12010 and 23991 ticks in rainy weather). Players can sleep during a thunderstorm even if they are in a biome where it does not rain (i.e. Desert). Attempting to use a bed at any other time results in the message "You can only sleep at night or during thunderstorms". A player sleeps in a bed for 101 in-game [[tick]]s, or 5.05 seconds before the time skips to the next day. Sleeping in a bed with the {{cmd|gamerule doDaylightCycle}} set to <code>false</code> results in the player being kicked out of the bed after the 101 ticks, but does not change time of the world to day.
Sleeping in a bed is possible only in the [[Overworld]]. Attempting to sleep in a bed in [[the Nether]], [[the End]], and [[custom dimension]]s in which they are disabled causes it to [[explosion|explode]] and set [[fire]] to surrounding blocks; unless {{cmd|gamerule respawnBlocksExplode}}{{only|bedrock}} is set to {{cd|false}}.<ref>{{bug|mcpe-28723}} – "Exploding bed in the Nether" resolved as "Works As Intended". This is referenced {{in|je}} when a player is killed by "Intentional Game Design". </ref> The explosion has power 5, which is stronger than [[TNT]] (4), but not as strong as a charged [[creeper]] or [[End Crystal|end crystal]] (6). The explosion centers on the head part of the bed. [[Villager]]s can sleep normally in any dimension without the bed being blown up.<ref>{{bug|MC-146515|||WAI}}</ref> Upon death from a bed explosion, the [[death messages|message]] "'''(Player) was killed by [Intentional Game Design]'''" appears.
The player must be close to the bed to sleep. If the player is close enough to click on the bed, but not close enough to sleep in it, the message "You may not rest now, the bed is too far away"{{only|java|short=1}}/"Bed is too far away"{{only|bedrock|short=1}} appears. A player must be within 2 blocks of the bed {{in|JE}} or 3 blocks {{in|BE}} to use the bed.
If a "monster" is within 8 blocks of the bed horizontally (in the X- and Z-axis), and 5 blocks vertically (in the Y-axis), the message "You may not rest now, there are monsters nearby" appears and the player is prevented from sleeping until the monsters leave or are killed. Most hostile mobs, as well as some neutral mobs prevent players from sleeping, as shown in the table below.
{| class="wikitable mw-collapsible"
!Mob
!Prevent the player from sleeping
|-
|{{EntityLink|Blaze}}
|{{Tc|yes}}
|-
|{{EntityLink|Chicken Jockey}}
|{{Tc|partial|when hostile{{Only|Java|short=1}}/Yes{{Only|Bedrock|short=1}}}}
|-
|{{EntityLink|Creeper}}
|{{Tc|yes}}
|-
|{{EntityLink|Drowned}}
|{{Tc|yes}}
|-
|{{EntityLink|Endermite}}
|{{Tc|yes}}
|-
|{{EntityLink|Enderman}}
|{{Tc|partial|when hostile}}
|-
|{{EntityLink|Ender Dragon}}
|{{Tc|no}}
|-
|{{EntityLink|Evoker}}
|{{Tc|yes}}
|-
|{{EntityLink|Ghast}}
|{{Tc|no}}
|-
|{{EntityLink|Giant}}
|{{Tc|yes}}
|-
|{{EntityLink|Guardian}}, {{EntityLink|Elder Guardian}}
|{{Tc|yes}}
|-
|{{EntityLink|Hoglin}}
|{{Tc|no}}
|-
|{{EntityLink|Illusioner}}
|{{Tc|yes}}
|-
|{{EntityLink|Killer Bunny}}
|{{Tc|no}}
|-
|{{EntityLink|Magma Cube}}
|{{Tc|partial|no{{Only|Java|short=1}}/Yes{{Only|Bedrock|short=1}}}}
|-
|{{EntityLink|Piglin}}
|{{Tc|no}}
|-
|{{EntityLink|Piglin Brute}}
|{{Tc|yes}}
|-
|{{EntityLink|Pillager}}
|{{Tc|yes}}
|-
|{{EntityLink|Phantom}}
|{{Tc|yes}}
|-
|{{EntityLink|Ravager}}
|{{Tc|yes}}
|-
|{{EntityLink|Shulker}}
|{{Tc|no}}
|-
|{{EntityLink|Silverfish}}
|{{Tc|yes}}
|-
|{{EntityLink|Skeleton}}, {{EntityLink|Skeleton Horseman}}, {{EntityLink|Stray}}, {{EntityLink|Wither Skeleton}}
|{{Tc|yes}}
|-
|{{EntityLink|Spider}}, {{EntityLink|Cave Spider}}, {{EntityLink|Spider Jockey}}
|{{Tc|yes}}
|-
|{{EntityLink|Slime}}
|{{Tc|partial|no{{Only|Java|short=1}}/Yes{{Only|Bedrock|short=1}}}}
|-
|{{EntityLink|Vex}}
|{{Tc|yes}}
|-
|{{EntityLink|Vindicator}}
|{{Tc|yes}}
|-
|{{EntityLink|Warden}}
|{{Tc|yes}}
|-
|{{EntityLink|Witch}}
|{{Tc|yes}}
|-
|{{EntityLink|Wither}}
|{{Tc|yes}}
|-
|{{EntityLink|Zoglin}}
|{{Tc|yes}}
|-
|{{EntityLink|Zombie}}, {{EntityLink|Zombie Villager}}, {{EntityLink|Husk}}
|{{Tc|yes}}
|-
|{{EntityLink|Zombified Piglin}}
|{{Tc|partial|when hostile{{Only|Java|short=1}}/Yes{{Only|Bedrock|short=1}}}}
|-
|}
{{notelist}}
If the player has not entered a bed and didn't die for 3 in-game days, [[phantom]]s can spawn unless {{cmd|gamerule doInsomnia}} is set to {{cd|false}}. {{in|java}}, this can be verified by checking if the "Time Since Last Rest" [[statistic]] is greater than 1.00 h.
A hostile mob can wake a player that is sleeping.
The player also cannot sleep in a bed occupied by another player, resulting in the message, "This bed is occupied".
A player can, however, sleep in a bed being used by a villager. The player may first wake the villager (pressing {{control|use}} on the villager) and then quickly enter the bed before the villager can lie down again. The villager reclaims the bed after the player wakes. The villager is kicked out of its bed when a player attempts to sleep there.
A player also cannot sleep while on fire, while poisoned, or while starving.
If all sleeping requirements are met and the player enters a bed, the player is positioned in the bed. The player falls asleep as the screen fades to black. {{IN|bedrock}}, the sleeping animation slowly lowers the player into bed.
Once all players in a world are asleep, after 5 seconds (100 ticks) the time of day changes to sunrise. (time 0)
During this time, the chat window is focused, and the player can leave the bed by clicking the {{btn|Leave Bed}} button.
[[Waterlogging|Waterlogged]] beds{{only|bedrock}} cannot be slept in unless the player or villager has the {{EffectLink|Water Breathing}} or {{EffectLink|Conduit Power}} status effects. Attempting to use a waterlogged bed otherwise does not display any message.<ref>{{bug|MCPE-35802}}</ref>
Beds displaying an error above the hotbar is a feature exclusive to beds; other blocks that cannot be used do not display such a message.<ref>{{bug|MC-160479}} resolved as "Works As Intended"</ref>
If there are two or more blocks of space above the bed, then the player can wake up on the bed. If there is less than two blocks above the bed and there is room on the side, then the player wakes up on the side of the bed. If there is no space on the side of the bed and there is less than two blocks above the bed, then the player still wakes up on top of the bed, but suffocates if it's a solid block.
Villagers always wake up on top of the bed, meaning they can suffocate if there isn't enough room above the bed.
====Passing the night====
Sleeping changes the [[daylight cycle|time of day]] to sunrise and resets the [[weather]] cycle, changing the weather to clear conditions. {{IN|JE}}, the weather cycle is only reset if it is currently raining or snowing. The player wakes up next to the bed, facing the bed.
Sleeping does not accelerate processes that take place over time such as the growth of [[crops]] or [[smelting]]. If {{cmd|gamerule doDaylightCycle}} is <code>false</code>, the player instead wakes up in the night.
To skip the night in multiplayer, all players in the [[Overworld]] must be in bed at the same time. Pressing the {{btn|Leave Bed}} button is not necessary in this case. The percentage of players that need to sleep to skip the night can be customized with the game rule {{cd|playersSleepingPercentage}}.
Villagers are unable to skip the night by sleeping in beds, unlike players.
If the bed is destroyed while the player is in it, due to for example an explosion or by another player, the player wakes prematurely and the night does not pass.
====Setting the spawn point====
Once a player has entered a bed (or right clicked the bed during daytime), their spawn point is set to the location of that bed. {{IN|java}}, multiple players can set their spawn point on a single bed. {{IN|bedrock}}, the last player to use a specific bed is the only player who can respawn there, and players who had previously slept there respawn at the world spawn.
{{ctrl|Using}} a bed in the daytime likewise sets the spawn point, without actually entering the bed.
When a bed explodes, it does not set the spawn point.
The message "Respawn point set" is displayed in chat when the respawn point is successfully changed.
The check for a bed is made only when the player respawns. This means that the bed can be destroyed and replaced or even reoriented, but as long as there is a bed present in the same location, the player can respawn there. If a player's bed is absent, or if the area around the bed is made unsuitable for respawning (see below), a message is displayed saying ''You have no home bed or charged respawn anchor, or it was obstructed''{{only|je}}/''Your home bed was missing or obstructed''{{only|be}}, and the player respawns at the [[Spawn#World spawn|world spawn]] point.
When choosing where to respawn the player, the northwesternmost (lowest X- and Z-coordinates) location of the seven blocks adjacent to the head of the bed is chosen first. If this location is obstructed, the next choice is to its south (+Z), rather than the east (+X). Only when all seven locations around the head are obstructed are the three remaining ones adjacent to the foot then to be considered.
For a location to be unobstructed, the block at the level of the bed must be air or non-solid (e.g. torches, but not glass) and there must be a space with a solid block below it and two non-colliding blocks for the player to stand in 0-2 blocks below the bed. It does not matter if the bed itself has blocks above it. Putting a slab one block above a bed can act as a two block tall space, as the bed is half a block tall. The bed never spawns the player on or directly below itself even if all other locations are obstructed. If a bed is obstructed, the player's spawn point is cleared after they respawn. That is, even if the bed is subsequently made usable again, the player continues to respawn at the world spawn until interacting with the bed again.
Specifically, when interacting with it, the location of the ''head'' of the bed is saved as the spawn point, and if a bed is in that space (whether it is the foot or the head) then the respawn works. This can be observed by reorienting the bed with its head in the same location. Interacting with it does not produce a "Respawn point set" message as the game doesn't change the saved spawn point. If a bed is reoriented so that its foot is in this space, it still functions on the next respawn, but it can also be interacted with to update the spawn point to the new head of the bed and cause a "Respawn point set" message. Attempting the reverse, reorienting the bed so that it overlaps the original location of the foot, results in a respawn at world spawn. However, the location of the foot of the bed is also saved. If the bed is moved so that part of it overlaps the original location of the head, it can be observed that the same locations need to be obstructed to stop spawning. It is possible to respawn 2 blocks away from the bed this way.
=== Bouncing===
Falling onto a bed bounces the player with 66% strength – the bouncing-up velocity is 66% of the impact velocity. The player also takes 50% of normal fall damage.
Baby villagers bounce on beds during the day.
If the player is falling while sleeping requirements are met, and presses {{control|use}} on a bed within reach before hitting the ground, the fall damage is delayed until the player wakes.
A player can bounce on a bed while another player or villager is sleeping on it without waking the player or the villager up.
Villagers can be pushed onto beds, as the bed is half a block tall.
=== Curing===
Each bed in the vicinity of a zombie villager has a chance to speed up the [[Zombie_Villager#Curing|process of curing the zombie villager]]. Iron bars (such as in a prison cell) also have this effect.
=== Placement===
Beds require two blocks of floor space. Placement requires at least 2 blocks from the player's facing direction. When placed, the foot of the bed is placed on the block selected and the head of the bed on the block farther away from the player. {{IN|bedrock}}, beds require solid blocks below them when placed. However, the bed remains in place if its supporting blocks are later removed. {{IN|java}}, beds do not require supporting blocks and can be placed anywhere, provided there is enough room.
==Sounds ==
===Generic===
{{Sound table/Block/Wood}}
===Unique===
{{edition|java}}:
{{Sound table
|sound=Explosion1.ogg
|sound2=Explosion2.ogg
|sound3=Explosion3.ogg
|sound4=Explosion4.ogg
|subtitle=Explosion
|source=block
|description=When a player attempts to sleep while not in the Overworld
|id=entity.generic.explode
|translationkey=subtitles.entity.generic.explode
|volume=4.0
|pitch=0.56-0.84
|distance=16
|foot=1}}
{{edition|bedrock}}:
{{Sound table
|type=bedrock
|sound=Explosion1.ogg
|sound2=Explosion2.ogg
|sound3=Explosion3.ogg
|sound4=Explosion4.ogg
|source=block
|description=When a player attempts to sleep while not in the Overworld
|id=random.explode
|volume=4.0
|pitch=1.0
|foot=1}}
==Data values==
===ID===
{{edition|java}}:
{{ID table|
|edition=java
|showblocktags=y
|showitemtags=y
|showforms=y
|generatetranslationkeys=y
|displayname=White Bed
|spritetype=block
|nameid=white_bed
|blocktags=beds
|itemtags=beds}}
{{ID table
|displayname=Orange Bed
|spritetype=block
|nameid=orange_bed
|blocktags=beds
|itemtags=beds}}
{{ID table
|displayname=Magenta Bed
|spritetype=block
|nameid=magenta_bed
|blocktags=beds
|itemtags=beds}}
{{ID table
|displayname=Light Blue Bed
|spritetype=block
|nameid=light_blue_bed
|blocktags=beds
|itemtags=beds}}
{{ID table
|displayname=Yellow Bed
|spritetype=block
|nameid=yellow_bed
|blocktags=beds
|itemtags=beds}}
{{ID table
|displayname=Lime Bed
|spritetype=block
|nameid=lime_bed
|blocktags=beds
|itemtags=beds}}
{{ID table
|displayname=Pink Bed
|spritetype=block
|nameid=pink_bed
|blocktags=beds
|itemtags=beds}}
{{ID table
|displayname=Gray Bed
|spritetype=block
|nameid=gray_bed
|blocktags=beds
|itemtags=beds}}
{{ID table
|displayname=Light Gray Bed
|spritetype=block
|nameid=light_gray_bed
|blocktags=beds
|itemtags=beds}}
{{ID table
|displayname=Cyan Bed
|spritetype=block
|nameid=cyan_bed
|blocktags=beds
|itemtags=beds}}
{{ID table
|displayname=Purple Bed
|spritetype=block
|nameid=purple_bed
|blocktags=beds
|itemtags=beds}}
{{ID table
|displayname=Blue Bed
|spritetype=block
|nameid=blue_bed
|blocktags=beds
|itemtags=beds}}
{{ID table
|displayname=Brown Bed
|spritetype=block
|nameid=brown_bed
|blocktags=beds
|itemtags=beds}}
{{ID table
|displayname=Green Bed
|spritetype=block
|nameid=green_bed
|blocktags=beds
|itemtags=beds}}
{{ID table
|displayname=Red Bed
|spritetype=block
|nameid=red_bed
|blocktags=beds
|itemtags=beds}}
{{ID table
|displayname=Black Bed
|spritetype=block
|nameid=black_bed
|blocktags=beds
|itemtags=beds
|foot=1}}
{{ID table
|displayname=Block entity
|spritename=beds
|spritetype=block
|nameid=bed
|foot=1}}
{{edition|bedrock}}:
{{ID table
|edition=bedrock
|firstcolumnname=Bed
|shownumericids=y
|showforms=y
|generatetranslationkeys=y
|displayname=Block
|spritename=Beds
|spritetype=block
|nameid=bed
|id=26
|form=block
|itemform=item.bed}}
{{ID table
|displayname=Item
|spritename=bed
|spritetype=item
|nameid=bed
|id=418
|form=item
|translationkey=item.bed.black.name,item.bed.red.name,item.bed.green.name,item.bed.brown.name,item.bed.blue.name,item.bed.cyan.name,item.bed.silver.name,item.bed.gray.name,item.bed.pink.name,item.bed.lime.name,item.bed.yellow.name,item.bed.lightBlue.name,item.bed.magenta.name,item.bed.orange.name,item.bed.white.name
|foot=1}}
{{ID table
|notnamespaced=y
|displayname=Block entity
|spritename=beds
|spritetype=block
|nameid=Bed
|foot=1}}
===Metadata===
{{see also|Data values}}
{{IN|be}}, bed items use the following data values:
{{/DV}}
===Block states===
{{see also|Block states}}
{{/BS}}
===Block data===
A bed has a block entity associated with it that holds additional data about the block.
{{el|java}}:
{{see also|Block entity format}}
{{/BE}}
{{el|bedrock}}:
: See [[Bedrock Edition level format/Block entity format]].
==Advancements==
{{load advancements|Sweet Dreams}}
==History==
''For a more in-depth breakdown of changes to textures and models, including a set of renders for each state combination, see [[/Asset history]]''
{{History|java beta}}
{{History||November 26, 2011|link={{tweet|jeb|140410431394160640}}|Originally, [[crying obsidian]] was intended to act as a block to reset spawn points, until beds were introduced.}}
{{History||1.3|[[File:Red Bed JE1 BE1.png|32px]] [[File:Red Bed (item) JE1 BE1.png|32px]] Added beds.
|The only color for beds is red.
|Beds can currently be crafted using any color combination of wool.
|Sleeping in an area potentially exposed to monsters can cause [[player]]s to wake up early, with a [[skeleton]] or [[zombie]] spawned next to them.
|Trying to sleep in a bed in [[the Nether]] does nothing.}}
{{History||1.4|Sleeping in a bed now resets the player's spawn position, though it does not work for most users. The spawn point unintentionally changes only if ''Leave Bed'' is clicked and the function is limited to [[multiplayer]].}}
{{History||1.4_01|Beds now act as a respawn point as intended.}}
{{History||1.6|snap=Test Build 3|Trying to sleep in a bed in the Nether now causes the bed to [[explosion|explode]].}}
{{History||1.7|As blocks now pull textures from the expected places for model application, this has resulted in the bed texture shifting downward in <samp>[[terrain.png]]</samp>. No visual difference has resulted for the actual bed.}}
{{History|java}}
{{History||1.0.0|snap=Beta 1.9 Prerelease 4|Bed explosions in the Nether now light nearby blocks on fire.}}
{{History|||snap=Beta 1.9 Prerelease 5|The bottom textures of beds have been changed to the texture of the new [[oak]] planks from [[File:Red Bed JE1 (facing NWU).png|32px]] to [[File:Red Bed JE2 BE1 (facing NWU).png|32px]].}}
{{History|||snap=Beta 1.9 Prerelease 6|Beds no longer spawn monsters. Instead, trying to sleep when monsters are around displays a message saying ''You may not rest now, there are monsters nearby''.}}
{{History||1.2.4|snap=release|[[Cat]]s while in standing position now purposely go and sit on beds.
|[[Spruce]], [[birch]], and [[jungle tree|jungle]] planks can now be used to craft beds.}}
{{History||1.5|snap=?|Beds now check their [[biome]] for detonation rather than just their dimension.}}
{{History||1.7.2|snap=1.7.1|[[Acacia]] planks and [[dark oak]] planks can now be used to craft beds.}}
{{History||1.8|snap=14w29a|Beds now display the cracking animation on top and bottom.}}
{{History|||snap=14w33a|Beds now make [[sound]]s when placed, and play logical sounds when stepped on and [[breaking|broken]].<ref>{{bug|MC-66347||Beds make incorrect sounds|Fixed}}</ref>}}
{{History||1.9|snap=15w43a|Bed now generates inside [[igloo]]s.}}
{{History||1.11|snap=16w32a|The messages "You can only sleep at night", "You may not rest now, there are monsters nearby", and "This bed is occupied" now appear on top of the hotbar, the place that the message "Press <whatever your sneak key is> to dismount" also appears when the player is riding a [[mob]].}}
{{History|||snap=16w33a|If the player is close enough to click on the bed, but not close enough to sleep in it, the message "You may not rest now, the bed is too far away" is now displayed.}}
{{History||1.12|snap=17w06a|Neutral [[zombie pigmen]] no longer prevent the player from sleeping in a bed.}}
{{History|||snap=March 13, 2017|slink={{tweet|jeb_|841311279784591361}}|[[Jeb]] mentions colored beds for [[Java Edition 1.12|1.12]].}}
{{History|||snap=17w15a|[[File:White Bed JE1.png|32px]] [[File:Light Gray Bed JE1.png|32px]] [[File:Gray Bed JE1.png|32px]] [[File:Black Bed JE1.png|32px]] [[File:Brown Bed JE1.png|32px]] [[File:Orange Bed JE1.png|32px]] [[File:Yellow Bed JE1.png|32px]] [[File:Lime Bed JE1.png|32px]] [[File:Green Bed JE1.png|32px]] [[File:Cyan Bed JE1.png|32px]] [[File:Light Blue Bed JE1.png|32px]] [[File:Blue Bed JE1.png|32px]] [[File:Purple Bed JE1.png|32px]] [[File:Magenta Bed JE1.png|32px]] [[File:Pink Bed JE1.png|32px]] [[Dye]]d beds have been added.
|The "Bed" has been renamed to "Red Bed".
|Beds can now only be crafted using wool of the same color.
|[[File:Red Bed JE2.png|32px]] The texture of red beds has been changed. The top of the beds are no longer mirrored. <!--- the numbers appear out of order but it is correct since it orders all beds in the current order in the Java Creative inventory --->
|{{Sprite|pos=1|image=Bed Icons 1.12.png|size=32|sheetsize=512}} {{Sprite|pos=9|image=Bed Icons 1.12.png|size=32|sheetsize=512}} {{Sprite|pos=8|image=Bed Icons 1.12.png|size=32|sheetsize=512}} {{Sprite|pos=16|image=Bed Icons 1.12.png|size=32|sheetsize=512}} {{Sprite|pos=13|image=Bed Icons 1.12.png|size=32|sheetsize=512}} {{Sprite|pos=15|image=Bed Icons 1.12.png|size=32|sheetsize=512}} {{Sprite|pos=2|image=Bed Icons 1.12.png|size=32|sheetsize=512}} {{Sprite|pos=5|image=Bed Icons 1.12.png|size=32|sheetsize=512}} {{Sprite|pos=6|image=Bed Icons 1.12.png|size=32|sheetsize=512}} {{Sprite|pos=14|image=Bed Icons 1.12.png|size=32|sheetsize=512}} {{Sprite|pos=10|image=Bed Icons 1.12.png|size=32|sheetsize=512}} {{Sprite|pos=4|image=Bed Icons 1.12.png|size=32|sheetsize=512}} {{Sprite|pos=12|image=Bed Icons 1.12.png|size=32|sheetsize=512}} {{Sprite|pos=11|image=Bed Icons 1.12.png|size=32|sheetsize=512}} {{Sprite|pos=3|image=Bed Icons 1.12.png|size=32|sheetsize=512}} {{Sprite|pos=7|image=Bed Icons 1.12.png|size=32|sheetsize=512}} Beds now appear 3D in the [[inventory]].
|[[File:Red Bed JE3 (facing NWU).png|32px]] Beds now have 3D legs.<ref>{{bug|MC-11963||bed hind legs not rendered|Fixed}}</ref>
|Beds have been made bouncy, though they do not completely reduce all [[fall damage]].
|Beds are now a [[block entity]].}}
{{History|||snap=17w17a|[[File:Red Bed JE4 BE2 (facing NWU).png|32px]] The four legs of a bed are now each textured separately, and their [[model]] is different.
|[[File:White Bed JE2 BE2.png|32px]] [[File:Light Gray Bed JE2 BE2.png|32px]] [[File:Gray Bed JE2 BE2.png|32px]] [[File:Black Bed JE2 BE2.png|32px]] [[File:Brown Bed JE2 BE2.png|32px]] [[File:Red Bed JE3 BE2.png|32px]] [[File:Orange Bed JE2 BE2.png|32px]] [[File:Yellow Bed JE2 BE2.png|32px]] [[File:Lime Bed JE2 BE2.png|32px]] [[File:Green Bed JE2 BE2.png|32px]] [[File:Cyan Bed JE2 BE2.png|32px]] [[File:Light Blue Bed JE2 BE2.png|32px]] [[File:Blue Bed JE2 BE2.png|32px]] [[File:Purple Bed JE2 BE2.png|32px]] [[File:Magenta Bed JE2 BE2.png|32px]] [[File:Pink Bed JE2 BE2.png|32px]]<br> <!--- the numbers appear out of order but it is correct since it orders all beds in the current order in the Java Creative inventory --->
{{Sprite|pos=17|image=Bed Icons 1.12.png|size=32|sheetsize=512}} {{Sprite|pos=25|image=Bed Icons 1.12.png|size=32|sheetsize=512}} {{Sprite|pos=24|image=Bed Icons 1.12.png|size=32|sheetsize=512}} {{Sprite|pos=32|image=Bed Icons 1.12.png|size=32|sheetsize=512}} {{Sprite|pos=29|image=Bed Icons 1.12.png|size=32|sheetsize=512}} {{Sprite|pos=31|image=Bed Icons 1.12.png|size=32|sheetsize=512}} {{Sprite|pos=18|image=Bed Icons 1.12.png|size=32|sheetsize=512}} {{Sprite|pos=21|image=Bed Icons 1.12.png|size=32|sheetsize=512}} {{Sprite|pos=22|image=Bed Icons 1.12.png|size=32|sheetsize=512}} {{Sprite|pos=30|image=Bed Icons 1.12.png|size=32|sheetsize=512}} {{Sprite|pos=26|image=Bed Icons 1.12.png|size=32|sheetsize=512}} {{Sprite|pos=20|image=Bed Icons 1.12.png|size=32|sheetsize=512}} {{Sprite|pos=28|image=Bed Icons 1.12.png|size=32|sheetsize=512}} {{Sprite|pos=27|image=Bed Icons 1.12.png|size=32|sheetsize=512}} {{Sprite|pos=19|image=Bed Icons 1.12.png|size=32|sheetsize=512}} {{Sprite|pos=23|image=Bed Icons 1.12.png|size=32|sheetsize=512}} The textures of beds have now also been changed.}}
{{History||1.13|snap=17w47a|Beds now require solid blocks below them, or they break into an item. Previously, a bed needed to be placed on solid blocks, but the blocks could later be removed.}}
{{History|||snap=18w07a|Sleeping in a bed is now important to keep [[phantom]]s from spawning.}}
{{History|||snap=18w20a|Players in [[Creative]] mode can now sleep even if monsters are nearby.}}
{{History|||snap=18w22a|Beds no longer require supporting blocks below them; they do not break into an [[item (entity)|item]] if said blocks are removed, and can be directly placed on top of non-solid blocks.}}
{{History|||snap=pre2|The "You can only sleep at night" message when using a bed has been changed to "You can sleep only at night and during [[thunderstorm]]s."}}
{{History||1.14|snap=18w43a|[[File:White Bed JE3 BE3.png|32px]] [[File:Light Gray Bed JE3 BE3.png|32px]] [[File:Gray Bed JE3 BE3.png|32px]] [[File:Black Bed JE3 BE3.png|32px]] [[File:Brown Bed JE3 BE3.png|32px]] [[File:Red Bed JE4 BE3.png|32px]] [[File:Orange Bed JE3 BE3.png|32px]] [[File:Yellow Bed JE3 BE3.png|32px]] [[File:Lime Bed JE3 BE3.png|32px]] [[File:Green Bed JE3 BE3.png|32px]] [[File:Cyan Bed JE3 BE3.png|32px]] [[File:Light Blue Bed JE3 BE3.png|32px]] [[File:Blue Bed JE3 BE3.png|32px]] [[File:Purple Bed JE3 BE3.png|32px]] [[File:Magenta Bed JE3 BE3.png|32px]] [[File:Pink Bed JE3 BE3.png|32px]]<br>{{InvSprite|White Bed}} {{InvSprite|Light Gray Bed}} {{InvSprite|Gray Bed}} {{InvSprite|Black Bed}} {{InvSprite|Brown Bed}} {{InvSprite|Red Bed}} {{InvSprite|Orange Bed}} {{InvSprite|Yellow Bed}} {{InvSprite|Lime Bed}} {{InvSprite|Green Bed}} {{InvSprite|Cyan Bed}} {{InvSprite|Light Blue Bed}} {{InvSprite|Blue Bed}} {{InvSprite|Purple Bed}} {{InvSprite|Magenta Bed}} {{InvSprite|Pink Bed}} The textures of all beds have been changed.
|[[File:Red Bed JE5 (facing NWU).png|32px]] The bottom textures of beds have been changed to new oak planks texture.}}
{{History|||snap=18w44a|Cats can now sleep in empty beds or sit on their owner when their owner is sleeping.}}
{{History|||snap=18w47a|[[File:Red Bed JE6 BE3 (facing NWU).png|32px]] The bottom textures of beds have been changed to the new oak planks to texture, once again.}}
{{History|||snap=18w48a|Beds now generate in the updated [[plains]] [[village]]s.}}
{{History|||snap=18w49a|Beds now generate in the updated [[savanna]] villages and the new [[snowy tundra]] villages.}}
{{History|||snap=18w50a|Beds now generate in the updated [[desert]] and [[taiga]] villages.}}
{{History|||snap=19w08a|All mobs can now sleep in beds using [[command]]s.}}
{{History|||snap=19w11a|[[Villager]]s now claim beds and sleep in them during the night.
|Shepherd villagers now [[trading|sell]] beds.}}
{{History||1.15|snap=19w35a|If a player tries to sleep in a bed that is occupied by a villager, that villager is now kicked out of the bed.}}
{{History|||snap=19w36a|Trying to sleep in a bed during the daytime now sets the player's spawn location to that bed.}}
{{History|||snap=pre2|Successfully changing a spawn point using a bed now displays a message in [[chat]].}}
{{History||1.16|snap=20w06a|Crimson and warped planks can now be used to craft beds.}}
{{History|||snap=20w12a|The message "Your home bed was missing or obstructed" has been changed to "You have no home bed or respawn anchor, or it was obstructed" due to the addition of the [[respawn anchor]], used to set the player's spawn in [[the Nether]].}}
{{History||1.16.2|snap=20w30a|Beds now prioritize the side of the bed the player or villager entered from and then spaces circling around the foot of the bed up to the head of the bed.}}
{{History||1.17|snap=20w51a|Added gamerules for sleeping in multiplayer.}}
{{History||1.18|snap=21w44a|Sleeping now only resets the weather cycle if it is currently raining or snowing.<ref>{{bug|MC-63340||Sleeping always resets time until rain|Fixed}}</ref>}}
{{History||1.19|snap=22w11a|[[Mangrove]] planks can now be used to craft beds.}}
{{History||1.19.3|snap=22w43a|Bed explosions can now be properly [[blocking|blocked]] by [[shield]]s.<ref>{{bug|MC-200006|||Fixed}}</ref>}}
{{History||1.20|snap=Pre-release 1|Beds of any color can now be dyed into any other color.}}
{{History|pocket alpha}}
{{History||v0.4.0|[[File:Red Bed JE1 BE1.png|32px]] [[File:Red Bed (item) JE1 BE1.png|32px]] Added beds.}}
{{History||v0.5.0|Beds can now be obtained after activating the [[nether reactor]].}}
{{History||v0.9.0|snap=build 1|Beds no longer restore [[health]] in normal difficulty, making [[food]] a more required [[Survival]]-needed resource.
|Added smooth lighting to beds.}}
{{History||v0.11.0|snap=build 8|The lighting on beds has been improved.}}
{{History||v0.12.1|snap=build 1|Tamed [[cat|ocelots]] while standing now purposely go and sit on beds.
|Beds are no longer available from the [[nether reactor]].}}
{{History||v0.16.0|snap=build 1|Beds now make a [[sound]] when placed, identical to [[block]]s like [[stone]].<ref name="lazilycodedsounds">{{bug|MCPE-10077}} – "Incorrect sounds on beds" resolved as "Fixed".</ref>}}
{{History|pocket}}
{{History||1.0.0|snap=alpha 0.17.0.1|Beds are now generated in [[igloo]]s.}}
{{History|||snap=alpha 0.17.0.2|[[File:Leave Bed 1.0.jpg|36px]] The ''Leave Bed'' button now has a new texture.}}
{{History|||snap=alpha 1.0.0.0|Sleeping now ends [[weather]].}}
{{History||1.1.0|snap=alpha 1.1.0.0|[[File:White Bed JE2 BE2.png|32px]] [[File:Light Gray Bed JE2 BE2.png|32px]] [[File:Gray Bed JE2 BE2.png|32px]] [[File:Black Bed JE2 BE2.png|32px]] [[File:Brown Bed JE2 BE2.png|32px]] [[File:Orange Bed JE2 BE2.png|32px]] [[File:Yellow Bed JE2 BE2.png|32px]] [[File:Lime Bed JE2 BE2.png|32px]] [[File:Green Bed JE2 BE2.png|32px]] [[File:Cyan Bed JE2 BE2.png|32px]] [[File:Light Blue Bed JE2 BE2.png|32px]] [[File:Blue Bed JE2 BE2.png|32px]] [[File:Purple Bed JE2 BE2.png|32px]] [[File:Magenta Bed JE2 BE2.png|32px]] [[File:Pink Bed JE2 BE2.png|32px]]<br>[[File:White Bed (item) BE1.png|32px]] [[File:Light Gray Bed (item) BE1.png|32px]] [[File:Gray Bed (item) BE1.png|32px]] [[File:Black Bed (item) BE1.png|32px]] [[File:Brown Bed (item) BE1.png|32px]] [[File:Orange Bed (item) BE1.png|32px]] [[File:Yellow Bed (item) BE1.png|32px]] [[File:Lime Bed (item) BE1.png|32px]] [[File:Green Bed (item) BE1.png|32px]] [[File:Cyan Bed (item) BE1.png|32px]] [[File:Light Blue Bed (item) BE1.png|32px]] [[File:Blue Bed (item) BE1.png|32px]] [[File:Purple Bed (item) BE1.png|32px]] [[File:Magenta Bed (item) BE1.png|32px]] [[File:Pink Bed (item) BE1.png|32px]] Added the other 15 colors of beds.
|The "Bed" has been renamed to "Red Bed".
|[[File:Red Bed JE3 BE2.png|32px]] The texture of red beds has been changed.
|A new animation when sleeping has been added to beds.
|Beds in [[igloo]]s are now white in [[ice plains]] and brown in [[cold taiga]]s.
|Beds now bounce the [[player]] two [[block]]s up, and have 3D legs.
|Placement, stepping and breaking [[sound]]s for beds are now correctly wooden.<ref name="lazilycodedsounds"/>}}
{{History|bedrock}}
{{History||1.4.0|snap=beta 1.2.14.2|Beds can now be [[waterlogging|waterlogged]] and require [[Water Breathing]] to sleep in.}}
{{History|||snap=beta 1.2.20.1|Colored beds can now be turned into white beds by adding [[bleach]]. This works only if {{el|ee}} features are turned on.}}
{{History||1.6.0|snap=beta 1.6.0.1|Sleeping in a bed is now important to keep [[phantom]]s from spawning.}}
{{History||1.8.0|snap=beta 1.8.0.8|[[Cat]]s can now sleep in empty beds or sit on their [[player|owner]] when their owner is sleeping.}}
{{History||1.10.0|snap=beta 1.10.0.3|Various beds now generate in the new [[village]]s.
|[[Villager]]s can now sleep by occupying a bed, which prevent [[player]]s from using it.
|[[Igloo]]s now generate with red beds.
|Beds are now used to count the number of available houses in [[village]]s.
|[[File:White Bed JE3 BE3.png|32px]] [[File:Light Gray Bed JE3 BE3.png|32px]] [[File:Gray Bed JE3 BE3.png|32px]] [[File:Black Bed JE3 BE3.png|32px]] [[File:Brown Bed JE3 BE3.png|32px]] [[File:Red Bed JE4 BE3.png|32px]] [[File:Orange Bed JE3 BE3.png|32px]] [[File:Yellow Bed JE3 BE3.png|32px]] [[File:Lime Bed JE3 BE3.png|32px]] [[File:Green Bed JE3 BE3.png|32px]] [[File:Cyan Bed JE3 BE3.png|32px]] [[File:Light Blue Bed JE3 BE3.png|32px]] [[File:Blue Bed JE3 BE3.png|32px]] [[File:Purple Bed JE3 BE3.png|32px]] [[File:Magenta Bed JE3 BE3.png|32px]] [[File:Pink Bed JE3 BE3.png|32px]] The textures of all beds have been changed.}}
{{History||1.11.0|snap=beta 1.11.0.4|Beds can now be [[trading|bought]] from shepherd [[villager]]s.}}
{{History||1.13.0|snap=?|[[Player]]s now succeed in attempting to sleep on villager-occupied beds, kicking the villager off.}}
{{History|console}}
{{History||xbox=TU1|xbone=CU1|ps=1.00|wiiu=Patch 1|switch=1.0.1|[[File:Red Bed JE1 BE1.png|32px]] [[File:Red Bed (item) JE1 BE1.png|32px]] Added beds.}}
{{History||xbox=TU12|xbone=CU1|ps=1.00|wiiu= Patch 1|[[Cat]]s in standing position now purposely go and sit on beds, preventing [[player]]s from using them.}}
{{History||xbox=TU43|xbone=CU33|ps=1.36|wiiu=Patch 13|The sleeping animation while in beds has been changed.}}
{{History||xbox=TU54|xbone=CU44|ps=1.52|wiiu=Patch 24|switch=1.0.4|[[File:White Bed JE2 BE2.png|32px]] [[File:Light Gray Bed JE2 BE2.png|32px]] [[File:Gray Bed JE2 BE2.png|32px]] [[File:Black Bed JE2 BE2.png|32px]] [[File:Brown Bed JE2 BE2.png|32px]] [[File:Orange Bed JE2 BE2.png|32px]] [[File:Yellow Bed JE2 BE2.png|32px]] [[File:Lime Bed JE2 BE2.png|32px]] [[File:Green Bed JE2 BE2.png|32px]] [[File:Cyan Bed JE2 BE2.png|32px]] [[File:Light Blue Bed JE2 BE2.png|32px]] [[File:Blue Bed JE2 BE2.png|32px]] [[File:Purple Bed JE2 BE2.png|32px]] [[File:Magenta Bed JE2 BE2.png|32px]] [[File:Pink Bed JE2 BE2.png|32px]]<br>[[File:White Bed (item) LCE.png|32px]] [[File:Light Gray Bed (item) LCE.png|32px]] [[File:Gray Bed (item) LCE.png|32px]] [[File:Black Bed (item) LCE.png|32px]] [[File:Brown Bed (item) LCE.png|32px]] [[File:Orange Bed (item) LCE.png|32px]] [[File:Yellow Bed (item) LCE.png|32px]] [[File:Lime Bed (item) LCE.png|32px]] [[File:Green Bed (item) LCE.png|32px]] [[File:Cyan Bed (item) LCE.png|32px]] [[File:Light Blue Bed (item) LCE.png|32px]] [[File:Blue Bed (item) LCE.png|32px]] [[File:Purple Bed (item) LCE.png|32px]] [[File:Magenta Bed (item) LCE.png|32px]] [[File:Pink Bed (item) LCE.png|32px]] Added the other 15 colors of beds.
|The "Bed" has been now renamed to "Red Bed".
|[[File:Red Bed JE3 BE2.png|32px]] [[File:Red Bed (item) LCE.png|32px]] The textures of red beds has been changed.
|Beds are now [[dye]]able and bounce the [[player]] two [[block]]s up, and have a single 3D legs.}}
{{History||xbox=TU60|xbone=CU51|ps=1.64|wiiu=Patch 30|switch=1.0.11|The sleeping animation in beds has been changed again.}}
{{History||xbox=TU69|xbone=none|ps=1.76|wiiu=Patch 38|switch=none|Sleeping in a bed is now important to keep [[phantom]]s from spawning.
|Beds can now be [[waterlogging|waterlogged]] and require {{EffectLink|Water Breathing}} to sleep in.}}
{{History||xbox=none|xbone=none|ps=1.83|wiiu=none|switch=none|The sleeping animation for beds has been reverted to how it was before [[Legacy Console Edition version history#ps-1.64|1.64]].}}
{{History||xbox=none|xbone=none|ps=1.91|wiiu=none|switch=none|Various beds now generate in the new [[village]]s.
|[[Villager]]s can now sleep by occupying a bed, which prevents [[player]]s from using it.
|Beds are now used to count the number of available houses in villages.
|Beds can now be [[trading|bought]] from shepherd [[villager]]s.}}
{{History|New 3DS}}
{{History||0.1.0|[[File:Red Bed JE1 BE1.png|32px]] [[File:Red Bed (item) JE1 BE1.png|32px]] Added beds.}}
{{History||1.9.19|[[File:White Bed JE2 BE2.png|32px]] [[File:Light Gray Bed JE2 BE2.png|32px]] [[File:Gray Bed JE2 BE2.png|32px]] [[File:Black Bed JE2 BE2.png|32px]] [[File:Brown Bed JE2 BE2.png|32px]] [[File:Orange Bed JE2 BE2.png|32px]] [[File:Yellow Bed JE2 BE2.png|32px]] [[File:Lime Bed JE2 BE2.png|32px]] [[File:Green Bed JE2 BE2.png|32px]] [[File:Cyan Bed JE2 BE2.png|32px]] [[File:Light Blue Bed JE2 BE2.png|32px]] [[File:Blue Bed JE2 BE2.png|32px]] [[File:Purple Bed JE2 BE2.png|32px]] [[File:Magenta Bed JE2 BE2.png|32px]] [[File:Pink Bed JE2 BE2.png|32px]]<br>[[File:White Bed (item) BE1.png|32px]] [[File:Light Gray Bed (item) BE1.png|32px]] [[File:Gray Bed (item) BE1.png|32px]] [[File:Black Bed (item) BE1.png|32px]] [[File:Brown Bed (item) BE1.png|32px]] [[File:Orange Bed (item) BE1.png|32px]] [[File:Yellow Bed (item) BE1.png|32px]] [[File:Lime Bed (item) BE1.png|32px]] [[File:Green Bed (item) BE1.png|32px]] [[File:Cyan Bed (item) BE1.png|32px]] [[File:Light Blue Bed (item) BE1.png|32px]] [[File:Blue Bed (item) BE1.png|32px]] [[File:Purple Bed (item) BE1.png|32px]] [[File:Magenta Bed (item) BE1.png|32px]] [[File:Pink Bed (item) BE1.png|32px]] Added the other 15 colors of beds.
|The "Bed" has been renamed to "Red Bed".
|[[File:Red Bed JE3 BE2.png|32px]] The texture of red beds has been changed.
|Beds now bounce the [[player]] two [[block]]s up and have 3D legs.}}
{{History|Education}}
{{History||1.0|[[File:Red Bed JE1 BE1.png|32px]] [[File:Red Bed (item) JE1 BE1.png|32px]] Added beds.}}
{{History||1.0.1|[[File:White Bed JE2 BE2.png|32px]] [[File:Light Gray Bed JE2 BE2.png|32px]] [[File:Gray Bed JE2 BE2.png|32px]] [[File:Black Bed JE2 BE2.png|32px]] [[File:Brown Bed JE2 BE2.png|32px]] [[File:Orange Bed JE2 BE2.png|32px]] [[File:Yellow Bed JE2 BE2.png|32px]] [[File:Lime Bed JE2 BE2.png|32px]] [[File:Green Bed JE2 BE2.png|32px]] [[File:Cyan Bed JE2 BE2.png|32px]] [[File:Light Blue Bed JE2 BE2.png|32px]] [[File:Blue Bed JE2 BE2.png|32px]] [[File:Purple Bed JE2 BE2.png|32px]] [[File:Magenta Bed JE2 BE2.png|32px]] [[File:Pink Bed JE2 BE2.png|32px]]<br>[[File:White Bed (item) BE1.png|32px]] [[File:Light Gray Bed (item) BE1.png|32px]] [[File:Gray Bed (item) BE1.png|32px]] [[File:Black Bed (item) BE1.png|32px]] [[File:Brown Bed (item) BE1.png|32px]] [[File:Orange Bed (item) BE1.png|32px]] [[File:Yellow Bed (item) BE1.png|32px]] [[File:Lime Bed (item) BE1.png|32px]] [[File:Green Bed (item) BE1.png|32px]] [[File:Cyan Bed (item) BE1.png|32px]] [[File:Light Blue Bed (item) BE1.png|32px]] [[File:Blue Bed (item) BE1.png|32px]] [[File:Purple Bed (item) BE1.png|32px]] [[File:Magenta Bed (item) BE1.png|32px]] [[File:Pink Bed (item) BE1.png|32px]] Added the other 15 colors of beds.
|The "Bed" has been renamed to "Red Bed".
|[[File:Red Bed JE3 BE2.png|32px]] The texture of red beds has been changed.
|Beds now bounce the [[player]] two [[block]]s up, and have 3D legs.}}
{{History||1.0.27|Colored beds can now be turned into white beds by adding [[bleach]].}}
{{History||1.12|[[File:White Bed JE3 BE3.png|32px]] [[File:Light Gray Bed JE3 BE3.png|32px]] [[File:Gray Bed JE3 BE3.png|32px]] [[File:Black Bed JE3 BE3.png|32px]] [[File:Brown Bed JE3 BE3.png|32px]] [[File:Red Bed JE4 BE3.png|32px]] [[File:Orange Bed JE3 BE3.png|32px]] [[File:Yellow Bed JE3 BE3.png|32px]] [[File:Lime Bed JE3 BE3.png|32px]] [[File:Green Bed JE3 BE3.png|32px]] [[File:Cyan Bed JE3 BE3.png|32px]] [[File:Light Blue Bed JE3 BE3.png|32px]] [[File:Blue Bed JE3 BE3.png|32px]] [[File:Purple Bed JE3 BE3.png|32px]] [[File:Magenta Bed JE3 BE3.png|32px]] [[File:Pink Bed JE3 BE3.png|32px]] The textures of all beds have been changed.}}
{{History|foot}}
=== Data history ===
{{History|java}}
{{History||1.13|snap=17w47a|The different block states for the <code>bed</code> ID have been split up into their own IDs.
|Prior to [[1.13/Flattening|''The Flattening'']], this block's numeral ID was 26, and the item's 355.}}
{{History|foot}}
=== Bed "item"===
{{:Technical blocks/Bed}}
==Issues==
{{Issue list}}
== Trivia==
* The reason beds explode in the Nether and the End is because Notch found it was the easiest solution to dimension-unique respawning.<ref>{{tweet|Notch|1259681657793077250|duh|11 May 2020}}, in response to {{tweet|NoahBandito|1259681319392550912|So you're telling me the "Inteded Game Design" should actually be "Sorry, I was too lazy to code"?|11 May 2020}}</ref>
** Dimension-unique respawning was eventually implemented via the [[respawn anchor]], and gained command support at the same time. Despite this, beds and respawn anchors still explode in invalid dimensions.
* If the player quits the game while sleeping, upon return the player wakes up beside the bed.
* Using the {{cmd|teleport}} command while another player is sleeping still teleports the sleeping player, but the player wakes immediately.{{only|java}}
* If the player places a bed on [[ice]], running over the bed acts like running over ice, similar to slabs.
* When placed using the {{cmd|setblock}} command, only one half of a bed is placed, because beds are two blocks long. A single half can be slept in like a whole bed.
* Villagers can sleep in the Nether and the End without causing the bed to explode.<ref>{{bug|MC-146515}} Resolved as Works As Intended</ref>
* While the block state used to determine the half of a two-block block such as [[door]]s and double-tall [[flower]]s is called ''half'', in the case of beds this is called ''part''.
* Players and villagers do not drown or take damage from lava while in a bed, even if the bed is covered in lava.
*The red bed was the original default bed color. In [[Java Edition 1.12]] and [[Pocket Edition 1.1.0]] version of the game, the default color was changed to white.
== Gallery ==
=== All renders ===
<gallery>
White Bed.png|White
Light Gray Bed.png|Light gray
Gray Bed.png|Gray
Black Bed.png|Black
Brown Bed.png|Brown
Red Bed.png|Red
Orange Bed.png|Orange
Yellow Bed.png|Yellow
Lime Bed.png|Lime
Green Bed.png|Green
Cyan Bed.png|Cyan
Light Blue Bed.png|Light blue
Blue Bed.png|Blue
Purple Bed.png|Purple
Magenta Bed.png|Magenta
Pink Bed.png|Pink
</gallery>
=== Screenshots ===
<gallery>
Multiplayer Sleeping.png|A sleeping player in multiplayer.
Missing Bed.png|The message that can be seen after a failed attempt to respawn at the spawn point set by a bed.
Nether Bed.png|A crater created by attempting to sleep in the Nether.
Ender Bed.png|A crater created by attempting to sleep in the End.
16 color beds.png|All the different color variants.
Old Village New Village VillagerSleeping MCEE.png|An unemployed [[villager]] and a [[butcher]] villager goes to sleep, unaware of the zombies outside.
Stackedbeds.png|A stack of beds.
Mob wakeup.png|Player being awakened by a [[zombie]].
Day Sleeping.png|The message that can be seen when any players attempt to sleep during daytime.
Sleeping.png|A player going to sleep in a bed on the first day of a ''Minecraft'' world.
CobwebVillage.png|A bed in an abandoned village has its bottom half replaced by wheat crops.
</gallery>
=== In other media ===
<gallery>
File:Rainbow Bed.png|The [[MCE:Rainbow Bed|rainbow bed]], a unique coloration featured in [[Minecraft Earth]].
File:The Sham.jpg|The Sham, a villainous, sentient bed featured in the [[skin pack|Campfire Tales]] skin pack.
</gallery>
==References==
{{Reflist}}
{{Blocks|Utility}}
{{Items}}
[[Category:Utility blocks]]
[[Category:Manufactured blocks]]
[[Category:Generated structure blocks]]
[[Category:Block entities]]
[[cs:Postel]]
[[de:Bett]]
[[es:Cama]]
[[fr:Lit]]
[[hu:Ágy]]
[[it:Letto]]
[[ja:ベッド]]
[[ko:침대]]
[[nl:Bed]]
[[pl:Łóżko]]
[[pt:Cama]]
[[ru:Кровать]]
[[th:เตียง]]
[[uk:Ліжко]]
[[zh:床]]</li></ul> | |||||
v0.9.0{{Extension DPL}}<ul><li>[[Bleach|Bleach]]<br/>{{education feature}}
{{exclusive|bedrock|education}}
{{Item
| image = Bleach.png
| renewable = No
| stackable = Yes (64)
}}
'''Bleach''' is an [[item]] used to [[dye]] things white. It is a [[compound]], as it is made using a [[lab table]].
== Obtaining ==
=== Lab Table ===
Bleach is not obtainable in the [[creative inventory]] or {{cmd|give}}. The only way to obtain it is using a [[lab table]].
{| class="wikitable"
! Result
! Materials Needed
|-
!rowspan=2|{{slot|Bleach}}<br>[[Bleach]]
|{{slot|Water (compound)|link=Compound}}{{slot|Water (compound)|link=Compound}}{{slot|Water (compound)|link=Compound}}{{slot|Sodium Hypochlorite|link=Compound}}{{slot|Sodium Hypochlorite|link=Compound}}{{slot|Sodium Hypochlorite|link=Compound}}
|-
|<center>[[Water (compound)|Water]] x3, [[Compound|Sodium Hypochlorite]] x3</center>
|}
== Usage ==
=== Crafting ingredient ===
{{crafting usage}}
== Sounds ==
{{Sound table
|type=bedrock
|sound=Fire.ogg
|source=sound
|description=When bleach is created by a lab table
|id=lt.reaction.fire
|volume=6.0
|pitch=0.7/0.9
|foot=1}}
== Data values ==
=== ID ===
{{ID table
|edition=bedrock
|shownumericids=y
|showforms=y
|notshowbeitemforms=y
|generatetranslationkeys=y
|displayname=Bleach
|spritetype=item
|nameid=bleach
|id=596
|form=item
|foot=1}}
== History ==
{{History|bedrock}}
{{History||1.4.0|snap=beta 1.2.20.1|[[File:Bleach BE1.png|32px]] Added bleach.}}
{{History|education}}
{{History||1.0.27|[[File:Bleach BE1.png|32px]] Added bleach.}}
{{History|foot}}
== Trivia ==
*[[File:Bleach (compound).png|32px]] There is an [[History of textures/Unused textures#Unused compounds|unused bleach texture]] in the compounds folder of the chemistry resource pack, which is slightly different from the one used in the game.
== Issues ==
{{issue list}}
{{Items}}
{{Education Edition}}
[[Category:Dyes]]
[[Category:Non-renewable resources]]
[[Category:Education Edition items]]
[[de:Bleichmittel]]
[[es:Lejía]]
[[ja:漂白剤]]
[[ko:표백제]]
[[pl:Wybielacz]]
[[pt:Alvejante]]
[[zh:漂白剂]]
[[lzh:素精]]</li><li>[[Helmet|Helmet]]<br/>{{Update|Include information about armor trims and updated netherite upgrade information.}}
{{redirect|Cap|mob spawning caps|Spawn}}
{{redirect|Turtle Shell|the item dropped by maturing turtles|Scute}}
{{Item
| image = <gallery>
Leather Cap.png| Leather
Chainmail Helmet.png| Chainmail
Iron Helmet.png| Iron
Diamond Helmet.png| Diamond
Golden Helmet.png| Golden
Netherite Helmet.png| Netherite
Turtle Shell.png| Turtle Shell
</gallery>
| durability =
* Leather: 55
* Chainmail: 165
* Iron: 165
* Golden: 77
* Diamond: 363
* Netherite: 407
* Turtle Shell: 275
| renewable =
* '''Netherite''': No
* '''All others''': Yes
| stackable = No
}}
'''Helmets''' are a type of [[armor]] that covers the head of the player. There are seven types of helmets: '''leather cap''', '''chainmail helmet''', '''iron helmet''', '''diamond helmet''', '''gold helmet''', '''netherite helmet''', and '''turtle shell'''.
==Obtaining ==
===Crafting===
{{crafting
|head=1
|showname=0
|showdescription=1
|name=Helmet
|A2= Leather;Gold Ingot;Iron Ingot;Diamond;Scute
|B2= Leather;Gold Ingot;Iron Ingot;Diamond;Scute
|C2= Leather;Gold Ingot;Iron Ingot;Diamond;Scute
|A3= Leather;Gold Ingot;Iron Ingot;Diamond;Scute
|C3= Leather;Gold Ingot;Iron Ingot;Diamond;Scute
|description=
|Output= Leather Cap;Golden Helmet;Iron Helmet;Diamond Helmet;Turtle Shell
|type= Combat
}}
{{crafting
|ignoreusage=1
|name=[[Helmet]]
|ingredients=Damaged matching helmet
|Damaged Leather Cap; Damaged Golden Helmet; Damaged Chainmail Helmet; Damaged Iron Helmet; Damaged Diamond Helmet; Damaged Turtle Shell; Damaged Netherite Helmet
|Damaged Leather Cap; Damaged Golden Helmet; Damaged Chainmail Helmet; Damaged Iron Helmet; Damaged Diamond Helmet; Damaged Turtle Shell; Damaged Netherite Helmet
|Output= Leather Cap; Golden Helmet; Chainmail Helmet; Iron Helmet; Diamond Helmet; Turtle Shell; Netherite Helmet
|description= The durability of the two helmets is added together, plus an extra 5% durability.
|type= Combat
|foot=1
}}
===Upgrading===
{{Smithing
|head=1
|Netherite Upgrade
|Diamond Helmet
|Netherite Ingot
|Netherite Helmet
|tail=1
}}
===Repairing===
====Grinding====
{{Grinding
|showdescription=1
|ingredients=2x Damaged [[Leather Cap]] or<br>2x Damaged [[Chainmail Helmet]] or<br>2x Damaged [[Iron Helmet]] or<br>2x Damaged [[Golden Helmet]] or<br>2x Damaged [[Diamond Helmet]] or<br>2x Damaged [[Netherite Helmet]] or<br>2x Damaged [[Turtle Shell]]
|Damaged Leather Cap; Damaged Chainmail Helmet; Damaged Iron Helmet; Damaged Golden Helmet; Damaged Diamond Helmet; Damaged Netherite Helmet; Damaged Turtle Shell
|Damaged Leather Cap; Damaged Chainmail Helmet; Damaged Iron Helmet; Damaged Golden Helmet; Damaged Diamond Helmet; Damaged Netherite Helmet; Damaged Turtle Shell
|Leather Cap; Chainmail Helmet; Iron Helmet; Golden Helmet; Diamond Helmet; Netherite Helmet; Turtle Shell
|description=The durability of the two helmets are added together, plus an extra 5% durability.
}}
====[[Anvil mechanics#Unit repair|Unit repair]]====
Helmets can be repaired in an [[anvil]] by adding units of the [[armor material]]'s repair material, with each repair material restoring 25% of the helmet's maximum durability, rounded down.
===Mob loot===
If a [[zombie]], [[husk]], [[stray]] or [[skeleton]] is wearing armor, there is a 8.5% chance (9.5% with [[Looting]] I, 10.5% with Looting II and 11.5% with Looting III) for the mob to drop a helmet upon death. The dropped helmet is usually badly damaged, and may be [[enchanted]] with enchantment levels 5-19.
{{IN|bedrock}}, [[vindicator]]s and [[pillager]]s spawned in [[raid]]s have a 8.3525% chance (10.28% on hard) to drop [[iron]] helmets. The dropped helmets are usually badly damaged, and have a 50% chance of being [[enchanted]] with a random [[enchantment]].
===Natural generation===
Two [[armor stand]]s are found in each taiga [[village]] outdoor armory, one of them equipped with an [[iron helmet]].
===Chest loot===
{{IN|BE}}, a sealed room in [[woodland mansion]]s can appear that has a chest sometimes containing an [[Efficiency]] I leather cap.<ref>{{bug|MCPE-109048}}</ref>
{{LootChestItem|leather-cap,random-enchanted-leather-cap,chainmail-helmet,iron-helmet,level-enchanted-iron-helmet,golden-helmet,random-enchanted-golden-helmet,diamond-helmet,damaged-diamond-helmet,level-enchanted-diamond-helmet,damaged-random-enchanted-diamond-helmet,damaged-random-enchanted-diamond-helmet-2}}
===Trading===
{{IN|java}}, novice-level armorer villagers have a 40% chance to sell an iron helmet for 4 emeralds. Journeyman-level armorers have a 40% chance to sell a chainmail helmet for 1 emerald. Master-level armorers always sell an enchanted diamond helmet for 11-27 emeralds. Apprentice-level leatherworker villagers have a {{frac|2|3}} chance to sell a leather cap<ref group="note" name="dye note">The leather armor has a random color created by two dyes (possibly the same dye twice.)</ref> for 5 emeralds. Master-level leatherworker villagers offer the same trade.
Armorer villagers may give the players with the [[Hero of the Village]] effect a chainmail helmet.
{{IN|bedrock}}, novice-level armorer villagers have a 25% chance to sell iron helmet for 5 emeralds, {{frac|1|3}} chance to sell chainmail helmet at journeyman-level for an emerald, and 50% chance to sell enchanted diamond helmet for 8 emeralds at master-level. Apprentice-level leatherworker villagers have a 50% chance to sell leather cap for 5 emeralds as part of their trades, and 50% chance to sell an enchanted leather cap for 5 emeralds at the master level.
{{notelist|columns=1}}
==Usage ==
Helmets can be placed in the top armor slot of a player's [[inventory]] for activation.
===Defense points===
Defense points are each signified by half of a shirt of mail in the armor bar above the health bar. Each defense point reduces any damage dealt to the player that is absorbed by armor by 4%, increasing additively with the number of defense points. Different materials and combinations of armor provide different levels of defense.
The following table shows the number of defense points added by helmets.
{| class="wikitable" data-description="Helmet defense points"
|-
! scope="col" |Material
! scope="col" |
|-
! scope="row" |Leather
|{{armor|1}}
|-
! scope="row" |Golden
| rowspan="4" |{{armor|2}}
|-
! scope="row" |Chainmail
|-
! scope="row" |Iron
|-
! scope="row" |Turtle Shell
|-
! scope="row" |Diamond
| rowspan="2" |{{armor|3}}
|-
! scope="row" |Netherite
|}
===Knockback resistance===
A netherite helmet provides 10% knockback resistance.
===Durability===
The following table shows the amount of damage each piece of armor can absorb before being destroyed.
Any "hit" from a damage source that can be blocked by armor removes one point of durability from each piece of armor worn for every {{hp|4}} of incoming damage (rounded down, but never below 1). Damage taken that armor doesn't protect (such as [[Damage#Fall damage|falling]] or [[Damage#Drowning|drowning]]) does not damage the armor, even if it is enchanted to protect against that type of damage. The following chart displays how many hits helmets can endure.
Netherite armor is not damaged by [[lava]] or [[fire]] when worn.
{| class="wikitable" data-description="Helmet durability"
|-
!Material
!Durability
|-
! scope="row" |Leather
|55
|-
! scope="row" |Golden
|77
|-
! scope="row" |Chainmail
| rowspan="2" |165
|-
! scope="row" |Iron
|-
! scope="row" |Turtle Shell
|275
|-
! scope="row" |Diamond
|363
|-
! scope="row" |Netherite
|407
|}
====Repair====
Helmets may be [[item repair|repaired]] by using them along with some of their crafting material (leather, gold ingots, iron ingots, diamonds or netherite) in an [[anvil]]. Chainmail helmets may be repaired in this way with iron ingots. They may also be repaired by crafting them together with another helmet of like material.
===Enchantments===
A helmet can receive the following [[enchantment]]s. Note that while iron and chainmail have the same durability, chainmail has a higher [[Tutorials/Enchanting mechanics#Enchantability|enchantability]] than iron or diamond.
{| class="wikitable"
|-
!Enchantment !!Max Level !!Notes
|-
|[[Fire Protection]]|| IV ||<ref group="note" name="exclusive">Fire Protection, Blast Protection, Projectile Protection and Protection are mutually exclusive</ref>
|-
|[[Projectile Protection]]|| IV ||<ref group="note" name="exclusive" />
|-
|[[Blast Protection]]|| IV ||<ref group="note" name="exclusive" />
|-
|[[Protection]]|| IV ||<ref group="note" name="exclusive" />
|-
|[[Unbreaking]]||III
|
|-
|[[Respiration]]||III
|
|-
|[[Aqua Affinity]]||I
|
|-
|[[Thorns]]||III ||<ref group="note" name="anvil">Only from using an [[anvil]] and [[enchanted book]]s.</ref>
|-
|[[Mending]]||I ||<ref group="note" name="anvil2">Only from chest loot, fishing, or an anvil and enchanted books.</ref>
|-
|[[Curse of Binding]]||I ||<ref group="note" name="anvil2" />
|-
|[[Curse of Vanishing]]||I ||<ref group="note" name="anvil2" />
|}
{{notelist}}
===Turtle shell effect===
Equipping a {{ItemSprite|Turtle Shell}} turtle shell provides the {{EffectLink|Water Breathing}} status effect, allowing the player to remain underwater for an additional 10 seconds. The time that this effect lasts does not begin to count down until the player dives underwater, then the 10 seconds are counted down. The effect immediately recharges after exposure to air.
===Brewing ingredient===
A turtle shell can also be used as a potion brewing ingredient.
{{Brewing
|Turtle Shell
|Potion of the Turtle Master
|Potion of the Turtle Master
|Potion of the Turtle Master
|showname=1
}}
===Smelting usage===
{{Smelting|showname=1|Iron Helmet;Chainmail Helmet;Golden Helmet|Iron Nugget;Iron Nugget;Gold Nugget|0,1}}
===Piglins===
{{EntityLink|Piglin|Piglins}} are attracted to ''golden'' helmets and pick them up, examining them for 6 to 8 seconds. Piglins can wear other helmets but are not attracted to them. They prefer stronger helmets over weaker helmets, with one exception: They always prefer golden helmets, throwing out stronger helmets in favor of gold helmets. Enchanted helmets are preferred over unenchanted helmets.
==Sounds ==
{{el|je}}:
{{Sound table
|sound=Equip leather1.ogg
|sound2=Equip leather2.ogg
|sound3=Equip leather3.ogg
|sound4=Equip leather4.ogg
|sound5=Equip leather5.ogg
|sound6=Equip leather6.ogg
|subtitle=Leather armor rustles
|source=player
|description=When a leather helmet is equipped
|id=item.armor.equip_leather
|translationkey=subtitles.item.armor.equip_leather
|volume=1.0
|pitch=1.0
|distance=16}}
{{Sound table
|sound=Equip chain1.ogg
|sound2=Equip chain2.ogg
|sound3=Equip chain3.ogg
|sound4=Equip chain4.ogg
|sound5=Equip chain5.ogg
|sound6=Equip chain6.ogg
|subtitle=Chain armor jingles
|source=player
|description=When a chainmail helmet is equipped
|id=item.armor.equip_chain
|translationkey=subtitles.item.armor.equip_chain
|volume=1.0
|pitch=1.0
|distance=16}}
{{Sound table
|sound=Equip iron1.ogg
|sound2=Equip iron2.ogg
|sound3=Equip iron3.ogg
|sound4=Equip iron4.ogg
|sound5=Equip iron5.ogg
|sound6=Equip iron6.ogg
|subtitle=Iron armor clanks
|source=player
|description=When an iron helmet is equipped
|id=item.armor.equip_iron
|translationkey=subtitles.item.armor.equip_iron
|volume=1.0
|pitch=1.0
|distance=16}}
{{Sound table
|sound=Equip gold1.ogg
|sound2=Equip gold2.ogg
|sound3=Equip gold3.ogg
|sound4=Equip gold4.ogg
|sound5=Equip gold5.ogg
|sound6=Equip gold6.ogg
|subtitle=Gold armor clinks
|source=player
|description=When a gold helmet is equipped
|id=item.armor.equip_gold
|translationkey=subtitles.item.armor.equip_gold
|volume=1.0
|pitch=1.0
|distance=16}}
{{Sound table
|sound=Equip diamond1.ogg
|sound2=Equip diamond2.ogg
|sound3=Equip diamond3.ogg
|sound4=Equip diamond4.ogg
|sound5=Equip diamond5.ogg
|sound6=Equip diamond6.ogg
|subtitle=Diamond armor clangs
|source=player
|description=When a diamond helmet is equipped
|id=item.armor.equip_diamond
|translationkey=subtitles.item.armor.equip_diamond
|volume=1.0
|pitch=1.0
|distance=16}}
{{Sound table
|sound=Equip netherite1.ogg
|sound2=Equip netherite2.ogg
|sound3=Equip netherite3.ogg
|sound4=Equip netherite4.ogg
|subtitle=Netherite armor clanks
|source=player
|description=When a netherite helmet is equipped
|id=item.armor.equip_netherite
|translationkey=subtitles.item.armor.equip_netherite
|volume=0.8
|pitch=1.0/0.9
|distance=16}}
{{Sound table
|sound=Equip turtle shell.ogg
|subtitle=Turtle Shell thunks
|source=player
|description=When a turtle shell is equipped
|id=item.armor.equip_turtle
|translationkey=subtitles.item.armor.equip_turtle
|volume=1.0
|pitch=1.0/0.85/1.1
|distance=16}}
{{Sound table
|sound=Random break.ogg
|subtitle=Item breaks
|source=dependent
|description=When a helmet's durability is exhausted
|id=entity.item.break
|translationkey=subtitles.entity.item.break
|volume=0.8
|pitch=0.8-1.2
|distance=16
|foot=1}}
{{el|be}}:
{{Sound table
|type=bedrock
|sound=Equip leather1.ogg
|sound2=Equip leather2.ogg
|sound3=Equip leather3.ogg
|sound4=Equip leather4.ogg
|sound5=Equip leather5.ogg
|sound6=Equip leather6.ogg
|source=player
|description=When a leather helmet or a turtle shell is equipped
|id=armor.equip_leather
|volume=1.0
|pitch=1.0}}
{{Sound table
|sound=Equip chain1.ogg
|sound2=Equip chain2.ogg
|sound3=Equip chain3.ogg
|sound4=Equip chain4.ogg
|sound5=Equip chain5.ogg
|sound6=Equip chain6.ogg
|source=player
|description=When a chain helmet is equipped
|id=armor.equip_chain
|volume=1.0
|pitch=1.0}}
{{Sound table
|sound=Equip iron1.ogg
|sound2=Equip iron2.ogg
|sound3=Equip iron3.ogg
|sound4=Equip iron4.ogg
|sound5=Equip iron5.ogg
|sound6=Equip iron6.ogg
|source=player
|description=When an iron helmet is equipped
|id=armor.equip_iron
|volume=1.0
|pitch=1.0}}
{{Sound table
|sound=Equip gold1.ogg
|sound2=Equip gold2.ogg
|sound3=Equip gold3.ogg
|sound4=Equip gold4.ogg
|sound5=Equip gold5.ogg
|sound6=Equip gold6.ogg
|source=player
|description=When a gold helmet is equipped
|id=armor.equip_gold
|volume=1.0
|pitch=1.0}}
{{Sound table
|sound=Equip diamond1.ogg
|sound2=Equip diamond2.ogg
|sound3=Equip diamond3.ogg
|sound4=Equip diamond4.ogg
|sound5=Equip diamond5.ogg
|sound6=Equip diamond6.ogg
|source=player
|description=When a diamond helmet is equipped
|id=armor.equip_diamond
|volume=1.0
|pitch=1.0}}
{{Sound table
|sound=Equip netherite1.ogg
|sound2=Equip netherite2.ogg
|sound3=Equip netherite3.ogg
|sound4=Equip netherite4.ogg
|source=player
|description=When a netherite helmet is equipped.
|id=armor.equip_netherite
|volume=1.0
|pitch=1.0}}
{{Sound table
|rowspan=2
|sound=Water Splash Old.ogg
|source=block
|description=When a leather helmet is dyed using a cauldron
|id=cauldron.dyearmor
|volume=0.1
|pitch=1.0}}
{{Sound table
|source=block
|description=When a leather helmet's dye is removed using a cauldron
|id=cauldron.cleanarmor
|volume=0.1
|pitch=1.0}}
{{Sound table
|sound=Random break.ogg
|source=player
|description=When a helmet's durability is exhausted
|id=random.break
|volume=1.0
|pitch=0.9
|foot=1}}
==Data values ==
=== ID===
{{edition|java}}:
{{ID table
|edition=java
|showitemtags=y
|showforms=y
|generatetranslationkeys=y
|displayname=Leather Cap
|spritetype=item
|nameid=leather_helmet
|itemtags=freeze_immune_wearables
|form=item}}
{{ID table
|displayname=Chainmail Helmet
|spritetype=item
|nameid=chainmail_helmet
|form=item}}
{{ID table
|displayname=Iron Helmet
|spritetype=item
|nameid=iron_helmet
|form=item}}
{{ID table
|displayname=Diamond Helmet
|spritetype=item
|nameid=diamond_helmet
|form=item}}
{{ID table
|displayname=Golden Helmet
|spritetype=item
|nameid=golden_helmet
|form=item}}
{{ID table
|displayname=Netherite Helmet
|spritetype=item
|nameid=netherite_helmet
|form=item}}
{{ID table
|displayname=Turtle Shell
|spritetype=item
|nameid=turtle_helmet
|form=item
|foot=1}}
{{edition|bedrock}}:
{{ID table
|edition=bedrock
|shownumericids=y
|showforms=y
|notshowbeitemforms=y
|generatetranslationkeys=y
|displayname=Leather Cap
|spritetype=item
|nameid=leather_helmet
|id=335
|form=item}}
{{ID table
|displayname=Chainmail Helmet
|spritetype=item
|nameid=chainmail_helmet
|id=339
|form=item}}
{{ID table
|displayname=Iron Helmet
|spritetype=item
|nameid=iron_helmet
|id=343
|form=item}}
{{ID table
|displayname=Diamond Helmet
|spritetype=item
|nameid=diamond_helmet
|id=347
|form=item}}
{{ID table
|displayname=Golden Helmet
|spritetype=item
|nameid=golden_helmet
|id=351
|form=item}}
{{ID table
|displayname=Netherite Helmet
|spritetype=item
|nameid=netherite_helmet
|id=609
|form=item}}
{{ID table
|displayname=Turtle Shell
|spritetype=item
|nameid=turtle_helmet
|id=573
|form=item
|foot=1}}
===Item data===
When leather caps are dyed, it has the following NBT:
<div class="treeview">
*{{nbt|compound|tag}}: Parent tag.
**{{nbt|compound|display}}: Display properties.
***{{nbt|int|color}}: The color of the leather armor. The tooltip displays "Dyed" if advanced tooltips are disabled, otherwise it displays the hexadecimal color value. Color codes are calculated from the Red, Green and Blue components using this formula:<br>'''<span style="color:red">Red</span>[[wikipedia:Logical shift|<<]]16 + <span style="color:green">Green</span><<8 + <span style="color:blue">Blue</span>'''<ref>For positive values larger than 0x00FFFFFF, the top byte is ignored. All negative values produce white.</ref>
</div>
==Achievements ==
{{load achievements|Iron Man;Tie Dye Outfit;Cover me in debris;Oooh, shiny!}}
==Advancements ==
{{load advancements|Suit Up;Cover me With Diamonds;Oh Shiny;Cover Me in Debris;A Furious Cocktail;How Did We Get Here}}
==History ==
{{History|java classic}}
{{History||August 13, 2009|link=wordofnotch:162091556|Notch tested armor models on [[mob (entity)|mob]]. Only [[chestplate]]s and helmets were available. They were merely aesthetic at the time and had no effect on gameplay.}}
{{History||0.24_SURVIVAL_TEST|[[File:Plate Helmet.png|32px]] Added [[Java_Edition_removed_features#Armor_in_Survival_Test|plate helmet]]s.
|[[File:Chainmail Helmet JE1.png|32px]] Added the model and the texture for unused [[Java_Edition_removed_features#Armor_in_Survival_Test|chain helmet]]s.
|[[File:Zombie full set.png|32px]] [[File:Skeleton helmet.png|26px]] Plate armor models have been tested on [[zombie]]s and [[skeleton]]s. It had no effect on gameplay.}}
{{History|java indev}}
{{History||0.31|snap=20091223-1|Plate and chain armor [[model]]s are no longer used.}}
{{History|||snap=20091231-2|[[File:Leather Cap (item) JE1 BE1.png|32px]] [[File:Studded Helmet (item) JE1.png|32px]] [[File:Chainmail Helmet (item) JE1 BE1.png|32px]] [[File:Iron Helmet (item) JE1 BE1.png|32px]] Added [[item]]s of relation to leather, [[History of textures/Unused textures#Studded armor|studded]], chainmail and plate (iron) helmets.
|The textures of leather helmets are taken from one of [[Notch]]'s previous games, ''[[Legend of the Chambered]]''. The rest are from ''[[Legend of the Chambered 2]]''.}}
{{History||20100206|[[File:Golden Helmet (item) JE1 BE1.png|32px]] [[File:Diamond Helmet (item) JE1 BE1.png|32px]] Added items of golden and diamond helmets.
|Removed leather-chain helmets.}}
{{History||20100212-1|Added armor models.
|[[File:Indev 20100212 armor.png|50px]] Armor models are now displayed on the [[player]] in the [[inventory]].}}
{{History||20100218|[[File:Leather Cap JE1 BE1.png|32px]] [[File:Chainmail Helmet JE2 BE1.png|32px]] [[File:Iron Helmet JE1 BE1.png|32px]] [[File:Golden Helmet JE1 BE1.png|32px]] [[File:Diamond Helmet JE1 BE1.png|32px]] Added models of leather, chainmail, iron, gold, and diamond helmets.
|Helmets can now be [[crafting|crafted]] and worn.
|Helmets now function. All helmets give {{Armor|3}}. Helmets have limited [[item durability|durability]], with lower tier helmets less durable than higher tier helmets.}}
{{History|java alpha}}
{{History||v1.0.8|With the introduction of [[leather]], "Cloth Cap" has been renamed to "Leather Cap".
|Leather cap is now [[crafting|crafted]] with leather instead of [[wool|cloth]].}}
{{History|java}}
{{History||1.0.0|snap=Beta 1.9 Prerelease|The armor protection behavior has been changed. Prior to this update, the total armor protection is based in this equation: (((''total equipped armor damage reduction'' − 1) × (''all equipped armor max damage'' − ''total equipped armor damage'')) ÷ (''total equipped armor max damage'' + 1)). Armor no longer reduces certain damage types to be covered by enchantments.}}
{{History|||snap=October 3, 2011|slink={{tweet|notch|120859830339637249}}|The first images of a [[player]] wearing enchanted armor are revealed.}}
{{History|||snap=Beta 1.9 Prerelease 3|Iron helmets can now be found in the new [[stronghold]] altar [[chest]]s.}}
{{History|||snap=Beta 1.9 Prerelease 4|Helmets can now be [[enchanting|enchanted]].}}
{{History||1.1|snap=12w01a|Iron helmets can now be found in the new blacksmith [[chest]]s in [[village]]s.}}
{{History||1.2.1|snap=12w06a|[[Zombie]]s now drop iron helmets on rare occasions and [[zombie pigman|zombie pigmen]] now drop golden helmets.}}
{{History||1.3.1|snap=12w15a|{{key|Shift}}+clicking can now be used to wear helmets.}}
{{History|||snap=12w21a|Chain helmets can now be obtained legitimately in [[survival]] mode through [[trading]].
|Blacksmith [[villager]]s now [[trading|sell]] chain helmets for 5–6 emeralds.
|Blacksmith villagers now sell diamond helmets for 7 emeralds.
|Blacksmith villagers now sell iron helmets for 4–5 emeralds.
|Butchers now sell leather caps for 2–3 emeralds.}}
{{History||1.4.2|snap=12w32a|[[Mob]] armor has been reintroduced. A partial or full set of any armor is now sometimes worn by [[zombie]]s, [[skeleton]]s and [[zombified piglins|zombie pigmen]], with the likelihood increasing with difficulty.}}
{{History|||snap=August 17, 2012|slink={{tweet|Dinnerbone|236445090929844225}}|[[Jeb]] and [[Dinnerbone]] tweeted pictures of [[dye]]able leather armor.}}
{{History|||snap=12w34a|Leather helmets can now be dyed by [[crafting]] a leather armor piece with [[dye]]s. Dyes can be removed by {{control|use|text=using}} dyed leather armor on a [[cauldron]] with [[water]].
|[[File:Leather Cap JE2.png|32px]] [[File:Leather Cap (item) JE2.png|32px]] Default leather caps textures are now slightly darker.}}
{{History|||snap=12w36a|[[Dye]]d leather caps are now more saturated and have a slight tint of tan in respect to the default armor color.}}
{{History|||snap=12w37a|[[File:Leather Cap JE3 BE2.png|32px]] [[File:Leather Cap (item) JE3 BE2.png|32px]] Leather armor now has non-dyed parts on the cap. This has been implemented so that [[player]]s can distinguish between other types of helmets and similarly colored leather caps.}}
{{History||1.5|snap=13w04a|Helmets in the [[player]]'s hand can now be equipped by right-clicking.
|[[Dispenser]]s can now equip nearby players with helmets.}}
{{History||1.8|snap=14w02a|[[Trading|Trades]] changed: armorer [[villager]]s now [[trading|sell]] chain helmets for 5–7 emeralds.
|Armorer villagers no longer sell diamond helmets.
|Armorer villagers now sell iron helmets for 4–6 emeralds.
|Leatherworkers no longer sell other leather caps.}}
{{History|||snap=14w05a|Helmets no longer turns red when [[mob]]s and [[player]]s are hurt.}}
{{History|||snap=14w06a|Helmets are now visible on [[giant]]s.}}
{{History|||snap=14w25a|Chain helmets [[Java Edition removed features#Chainmail armor|cannot be crafted anymore]] due to the [[item]] form of [[fire]] being [[Java Edition removed features#Obtainable until 1.8|removed]].}}
{{History||1.9|snap=15w31a|Enchanted iron and diamond helmets can now be found in [[end city]] ship [[chest]]s.
|[[Mob]]s now wear armor from the bottom to the top, rather than from the top to the bottom. This means that a mob with three armor pieces, for example, spawn with all armor except a helmet.}}
{{History|||snap=15w34b|Helmet [[item durability|durability]] now affects armor value.}}
{{History|||snap=15w36a|Armor and armor [[enchanting|enchantment]] calculations have been changed. For the original values, see [[Armor/Before 1.9|here]].}}
{{History|||snap=15w36d|Helmet durability affecting value has been removed.
|Helmets now has an attribute controlling the defense points.}}
{{History|||snap=15w50a|Added <code>equip</code> [[sound]]s for leather armor.}}
{{History|||snap=16w02a|Armor and armor enchantment calculations have been changed again.}}
{{History|||snap=16w05a|Armor calculations have been changed, once again.}}
{{History||1.13|snap=17w47a|Prior to [[1.13/Flattening|''The Flattening'']], these [[item]]s' numeral IDs were 298, 302, 306, 310 and 314.}}
{{History|||snap=18w07a|[[File:Turtle Shell.png|32px]] [[File:Turtle Shell (item) JE1 BE1.png|32px]] Added turtle shells.}}
{{History|||snap=18w09a|Golden helmets now have a chance of generating in [[underwater ruins]].}}
{{History|||snap=18w11a|Enchanted leather caps can now generate in the chests of [[shipwreck]]s.}}
{{History|||snap=18w20a|"Chain Helmet" has now been renamed to "Chainmail Helmet".}}
{{History||1.14|snap=18w43a|[[File:Leather Cap JE4 BE2.png|32px]] [[File:Chainmail Helmet JE3 BE2.png|32px]] [[File:Iron Helmet JE2 BE2.png|32px]] [[File:Golden Helmet JE2 BE2.png|32px]] [[File:Diamond Helmet JE2 BE2.png|32px]]<br>[[File:Leather Cap (item) JE4 BE3.png|32px]] [[File:Chainmail Helmet (item) JE2 BE2.png|32px]] [[File:Iron Helmet (item) JE2 BE2.png|32px]] [[File:Golden Helmet (item) JE2 BE2.png|32px]] [[File:Diamond Helmet (item) JE2 BE2.png|32px]] The textures of all types of helmets have been changed.}}
{{History|||snap=18w48a|Leather caps can now be found in [[chest]]s in [[village]] tanneries.}}
{{History|||snap=18w50a|Iron helmets can now be found on [[armor stand]]s in [[taiga]] villages.}}
{{History|||snap=19w08a|[[File:Golden Helmet (item) JE3 BE3.png|32px]] The textures of gold helmet [[item]]s have been changed.}}
{{History|||snap=19w11a|Armorer villagers now sell enchanted diamond helmets, making diamond helmets effectively [[renewable resource|renewable]] again.
|Leatherworker villagers now sell randomly [[dye]]d leather caps.}}
{{History|||snap=19w13a|Armorer villagers now give chainmail helmets to players under the [[Hero of the Village]] effect.}}
{{History||1.16|snap=20w06a|[[File:Netherite Helmet JE1.png|32px]] [[File:Netherite Helmet (item) JE1.png|32px]] Added netherite helmets.}}
{{History|||snap=20w07a|[[File:Leather piglin helmet.png|32px]] [[File:Chainmail piglin helmet.png|32px]] [[File:Iron piglin helmet.png|32px]] [[File:Golden piglin helmet.png|32px]] [[File:Diamond piglin helmet.png|32px]] [[File:Netherite piglin helmet JE1.png|32px]] Added textures and [[model]]s for all helmets when they are used by [[piglin]]s.
|Netherite helmets are now obtained by combining one diamond armor piece and one netherite ingot in a crafting table.
|[[File:Turtle Shell piglin MC-172110.png|32px]] Turtle shells, when used by piglins and [[zombified piglin]]s, result in a [[missing texture]] when being displayed.<ref>{{Cite bug|MC|172110|Texture of turtle shells is missing when worn by a piglin or zombified piglin|date=February 14, 2020}}</ref>}}
{{History|||snap=20w09a|[[File:Diamond Helmet (item) JE3 BE3.png|32px]] The textures of diamond helmet [[item]]s have been changed.}}
{{History|||snap=20w10a|[[File:Netherite Helmet JE2 BE1.png|32px]] [[File:Netherite Helmet (item) JE2 BE1.png|32px]] The texture of netherite helmets has been changed.
|[[File:Netherite piglin helmet.png|32px]] The texture of netherite helmets for [[piglin]]s has been changed.
|Netherite helmets can no longer be [[crafting|crafted]].
|Netherite helmets are now obtained by combining one diamond helmet and one netherite ingot in a [[smithing table]].}}
{{History|||snap=20w16a|Golden and netherite helmets now generate randomly [[enchanting|enchanted]], and sometimes [[damage]]d, in [[bastion remnant]] and [[ruined portal]] chests.}}
{{History|||snap=20w17a|Diamonds helmets now generate in place of netherite helmets in bastion remnant [[chest]]s.}}
{{History|||snap=pre3|The special helmet [[model]]s and textures created for [[piglin]]s have been removed except for leather helmets.}}
{{History||1.17|snap=20w48a|Wearing a leather helmet now prevents [[Powder Snow#Freezing|freezing]] entirely.}}
{{History|||snap=21w13a|The two unused textures of the leather cap for [[piglin]]s<ref><code>/assets/minecraft/textures/models/armor/piglin_leather_layer_1.png</code></ref><ref><code>/assets/minecraft/textures/models/armor/piglin_leather_layer_1_overlay.png</code></ref> have been removed.}}
{{History||1.18.2|snap=22w03a|Netherite helmet knockback resistance is no longer random.}}
{{History||1.19|snap=22w17a|[[File:Leather Cap JE5.png|32px]] The texture of the leather cap item has been changed.|Changed the leather cap texture when worn so the center bar now extends to the bottom of the back face.}}
{{History||1.20<br>(Experimental)|link=1.19.4|snap=23w04a|Non-leather helmets can now be trimmed using a [[smithing table]].
|There are 10 types of material that determine the color of the trim:
*Iron
*Copper
*Gold
*Lapis
*Emerald
*Diamond
*Netherite
*Redstone
*Amethyst
*Quartz
|Upgrading diamond helmets to netherite helmets now requires the netherite upgrade [[smithing template]].}}
{{History|||snap=23w05a|Leather caps can now be trimmed using a smithing table.|Helmets can now have trims of the same material it is made out of.}}
{{History|||snap=23w06a|Swapped {{cd|iron}} and {{cd|iron_darker}} palette, then made {{cd|iron_darker}} darker overall.}}
{{History||1.19.4|snap=23w05a|Helmets can now be swapped by {{ctrl|using}} them in the hotbar.<ref>{{bug|MC-216270|||Fixed}}</ref>}}
{{History||?|Helmets can now be swapped in [[armor stand]]s by {{ctrl|using}} them/[[head]]s/[[carved pumpkin]]s in the armor stand's slot.}}
{{History||1.20|snap=23w12a|The pattern textures of dune and sentry armor trims are changed.|Those previous patterns were left with different names: dune was renamed sentry and sentry was renamed shaper.}}
{{History|pocket alpha}}
{{History||v0.6.0|[[File:Leather Cap JE1 BE1.png|32px]] [[File:Chainmail Helmet JE2 BE1.png|32px]] [[File:Iron Helmet JE1 BE1.png|32px]] [[File:Golden Helmet JE1 BE1.png|32px]] [[File:Diamond Helmet JE1 BE1.png|32px]]<br>[[File:Leather Cap (item) JE1 BE1.png|32px]] [[File:Chainmail Helmet (item) JE1 BE1.png|32px]] [[File:Iron Helmet (item) JE1 BE1.png|32px]] [[File:Golden Helmet (item) JE1 BE1.png|32px]] [[File:Diamond Helmet (item) JE1 BE1.png|32px]] Added helmets.}}
{{History||v0.8.0|snap=build 2|[[File:Leather Cap (item) JE3 BE2.png|32px]] The leather helmet sprite has been changed to that of {{el|je}}, but its armor [[model]] remains that of older versions.}}
{{History||v0.9.0|snap=build 1|Iron helmets now naturally generate in [[village]] [[chest]]s and in [[stronghold]] altar chests.}}
{{History||v0.11.0|snap=build 11|Helmets now protect against [[damage]] from [[mob]]s only.}}
{{History||v0.12.1|snap=build 1|Helmets can now be worn by mobs.
|Chainmail helmets can now be obtained in [[survival]] mode from a mob wearing it.}}
{{History||?|Helmets no longer turn red when [[mob]]s and [[player]]s are hurt.}}
{{History||v0.14.0|snap=build 1|[[File:Leather Cap JE3 BE2.png|32px]] The texture of leather helmets have been changed.
|Leather helmets can now be dyed.}}
{{History||v0.15.0|snap=build 1|Helmets can now be obtained from [[stray]]s and [[husk]]s that naturally spawn with armor.}}
{{History|pocket}}
{{History||1.0.0|snap=alpha 0.17.0.1|[[Enchanting|Enchanted]] iron helmets and enchanted diamond helmets can now be found inside [[chest]]s within [[end city|end cities]].}}
{{History||1.0.4|snap=alpha 1.0.4.0|Iron helmets and chainmail helmets are now [[trading|sold]] by armorer smith [[villager]]s via trading.}}
{{History||1.1.0|snap=alpha 1.1.0.0|Golden, chain and iron helmets can now be [[smelting|smelted]] down into one of their respective [[nugget]]s.}}
{{History|bedrock}}
{{History||1.4.0|snap=beta 1.2.14.2|Chainmail helmets now generate in [[buried treasure]] chests.
|Enchanted leather helmets can now be found inside [[shipwreck]] supply room [[chest]]s.}}
{{History|||snap=beta 1.2.20.1|Golden helmets can now be found inside [[underwater ruins]] chests.}}
{{History||1.5.0|snap=beta 1.5.0.4|[[File:Turtle Shell.png|32px]] [[File:Turtle Shell (item) JE1 BE1.png|32px]] Added turtle shells.}}
{{History||1.10.0|snap=beta 1.10.0.3|[[File:Leather Cap JE4 BE2.png|32px]] [[File:Chainmail Helmet JE3 BE2.png|32px]] [[File:Iron Helmet JE2 BE2.png|32px]] [[File:Golden Helmet JE2 BE2.png|32px]] [[File:Diamond Helmet JE2 BE2.png|32px]]<br>[[File:Leather Cap (item) JE4 BE3.png|32px]] [[File:Chainmail Helmet (item) JE2 BE2.png|32px]] [[File:Iron Helmet (item) JE2 BE2.png|32px]] [[File:Golden Helmet (item) JE2 BE2.png|32px]] [[File:Diamond Helmet (item) JE2 BE2.png|32px]] The textures of all types of helmets have been changed.
|Iron helmets now can be found in plains [[village]] weaponsmith [[chest]]s.
|Leather helmets can now be found inside plains village tannery chests.}}
{{History||1.11.0|snap=beta 1.11.0.1|Iron helmets now can be found in [[savanna]], [[taiga]], [[desert]], [[snowy taiga]] and [[snowy tundra]] [[village]] weaponsmith [[chest]]s.
|Leather helmets can now be found inside savanna, taiga, desert, snowy taiga and snowy tundra village tannery chests.
|Iron helmets can now be found in [[village]] armorer chests.}}
{{History|||snap=beta 1.11.0.4|[[Pillager]]s and [[vindicator]]s that spawn in [[raid]]s can now drop iron helmets.
|Diamond helmets are now sold by armorer villagers.}}
{{History||1.11.0|snap=beta 1.11.0.5|[[File:Golden Helmet (item) JE3 BE3.png|32px]] The textures of gold helmet [[item]]s have been changed.}}
{{History||1.12.0|snap=beta 1.12.0.2|[[File:Armor Stand with Leather Armor MCPE-44669.png|32px]] Leather armor no longer shows as being [[dye]]d properly when worn by [[armor stand]]s.}}
{{History||1.13.0|snap=beta 1.13.0.1|Leather armor now appears properly dyed when worn by armor stands.}}
{{History||1.16.0|snap=beta 1.16.0.51|[[File:Netherite Helmet JE2 BE1.png|32px]] [[File:Netherite Helmet (item) JE2 BE1.png|32px]] Added netherite helmets.
|[[File:Diamond Helmet (item) JE3 BE3.png|32px]] The textures of diamond helmet [[item]]s have been changed.
|Helmets can now be obtained from [[piglin]]s that naturally spawn with golden helmets.}}
{{History|||snap=beta 1.16.0.57|Golden and netherite helmets now generate randomly [[enchanting|enchanted]], and sometimes [[damage]]d, in [[bastion remnant]] chests.
|Netherite helmets can no longer be [[crafting|crafted]].
|Netherite helmets are now obtained by combining one diamond helmet and one netherite ingot in a [[smithing table]].}}
{{History|||snap=beta 1.16.0.63|Diamonds helmets now generate in place of netherite helmets in bastion remnant [[chest]]s.}}
{{History|||snap=beta 1.16.200.53|Netherite helmets now gives a 90% reduction in knockback.}}
{{History||1.16.210|snap=beta 1.16.210.53|Wearing leather helmets now prevents [[Powder Snow#Freezing|freezing]] entirely.}}
{{History|console}}
{{History||xbox=TU1|xbone=CU1|ps=1.0|wiiu=Patch 1|switch=1.0.1|[[File:Leather Cap JE1 BE1.png|32px]] [[File:Chainmail Helmet JE2 BE1.png|32px]] [[File:Iron Helmet JE1 BE1.png|32px]] [[File:Golden Helmet JE1 BE1.png|32px]] [[File:Diamond Helmet JE1 BE1.png|32px]]<br>[[File:Leather Cap (item) JE1 BE1.png|32px]] [[File:Chainmail Helmet (item) JE1 BE1.png|32px]] [[File:Iron Helmet (item) JE1 BE1.png|32px]] [[File:Golden Helmet (item) JE1 BE1.png|32px]] [[File:Diamond Helmet (item) JE1 BE1.png|32px]] Added helmets.
|Added a quick equip for armor to the [[inventory]] interface.}}
{{History||xbox=TU12|ps=1.03|[[File:Leather Cap JE3 BE2.png|32px]] [[File:Leather Cap (item) JE3 BE2.png|32px]] The textures for leather helmets have been changed.}}
{{History||xbox=TU14|ps=1.05|Leather helmets can now be [[dye]]d.
|[[Item repair]] can now repair helmets.}}
{{History||xbox=TU25|xbone=CU13|ps=1.16|Helmets now have the quick equip functionality.}}
{{History||xbox=TU53|xbone=CU43|ps=1.49|wiiu=Patch 23|switch=1.0.3|Golden, chain and iron helmets can now be [[smelting|smelted]] down into one of their respective [[nugget]]s.}}
{{History|PS4}}
{{History||1.90|[[File:Chainmail Helmet (item) JE2 BE2.png|32px]] [[File:Iron Helmet (item) JE2 BE2.png|32px]] [[File:Golden Helmet (item) JE2 BE2.png|32px]] [[File:Diamond Helmet (item) JE2 BE2.png|32px]] The textures of all types of helmet items have been changed (except for the leather helmets).}}
{{History|new 3ds}}
{{History||0.1.0|[[File:Leather Cap JE1 BE1.png|32px]] [[File:Chainmail Helmet JE2 BE1.png|32px]] [[File:Iron Helmet JE1 BE1.png|32px]] [[File:Golden Helmet JE1 BE1.png|32px]] [[File:Diamond Helmet JE1 BE1.png|32px]]<br>[[File:Leather Cap (item) JE3 BE2.png|32px]] [[File:Chainmail Helmet (item) JE1 BE1.png|32px]] [[File:Iron Helmet (item) JE1 BE1.png|32px]] [[File:Golden Helmet (item) JE1 BE1.png|32px]] [[File:Diamond Helmet (item) JE1 BE1.png|32px]] Added helmets.}}
{{History|foot}}
<gallery>
File:ArmorModel Aug 13 2009.jpg|First image of armor.
File:DinnerboneArmor.png|[[Dinnerbone]]'s first screenshot of dyed armor.
File:ArmorPE.png
</gallery>
;Armor durability from Indev until late Beta
{| class="wikitable" data-description="Armor Durability during Indev until late Beta" style="text-align:center;"
|-
!Leather
!Golden
!Chainmail
!Iron
!Diamond
|-
|33
|66
|66
|132
|264
|}
==Issues ==
{{issue list}}
==Trivia ==
*Unlike the other helmets, the netherite helmet covers most of the player's face, due to a nose guard and cheek plates.
*The turtle shell is the only helmet that is not part of a complete set.
* In Bedrock Edition, there exists a bug<ref>{{Cite bug|MCPE|109048|Efficiency 1 Leather Cap in Woodland Mansions|date=December 1, 2020}}</ref> that makes it possible to obtain a Leather Cap enchanted with Efficiency I from [[Woodland Mansion]] chests with a chance of 1.45%. The enchantment has no effect on the cap, however.
==Gallery ==
<gallery>
File:Zombie helmet.png|A zombie wearing a helmet in [[Survival Test]].
</gallery>
===Enchanted Helmets===
<gallery>
File:Enchanted Leather Cap (item).gif
File:Enchanted Chainmail Helmet (item).gif
File:Enchanted Iron Helmet (item).gif
File:Enchanted Golden Helmet (item).gif
File:Enchanted Diamond Helmet (item).gif
File:Enchanted Netherite Helmet (item).gif
File:Enchanted Turtle Shell (item).gif
</gallery>
<gallery>
File:Enchanted Leather Helmet.gif
File:Enchanted Chainmail Helmet.gif
File:Enchanted Iron Helmet.gif
File:Enchanted Golden Helmet.gif
File:Enchanted Diamond Helmet.gif
File:Enchanted Netherite Helmet.gif
File:Enchanted Turtle Shell.gif
</gallery>
==References ==
{{reflist}}
==External Links ==
*[https://www.minecraft.net/en-us/article/taking-inventory--helmet Taking Inventory: Helmet] – Minecraft.net on February 20, 2020
{{Items}}
[[Category:Armor]]
[[es:Casco]]
[[ja:ヘルメット]]
[[ko:투구]]
[[pt:Capacete]]
[[pl:Hełm]]
[[zh:头盔]]</li></ul> | build 1 | ||||
| Bedrock Edition | |||||
1.2.0{{Extension DPL}}<ul><li>[[Raw Beef|Raw Beef]]<br/>{{Item
| title = Raw Beef
| image = Raw Beef.png
| heals = {{hunger|3}}
| renewable = Yes
| stackable = Yes (64)
}}
'''Raw beef''' is a [[food]] item that can be eaten by the [[player]] or cooked in a [[furnace]], [[smoker]], or [[campfire]] to make [[steak]].
== Obtaining ==
=== Mob loot ===
When adult [[cow]]s and [[mooshroom]]s are killed, they drop 1-3 raw beef. The maximum amount is increased by 1 per level of [[Looting]], for a maximum of 1-6 with Looting III. If killed while on fire, they drop [[steak]] instead.
=== Chest loot ===
{{LootChestItem|raw-beef}}
== Usage ==
=== Food ===
To eat raw beef, press and hold {{control|use}} while it is selected in the hotbar. Eating one restores {{hunger|3}} hunger and 1.8 hunger [[Hunger#Mechanics|saturation]].
=== Smelting ingredient ===
{{Smelting
|showname=1
|Raw Beef
|Steak
|0.35
}}
=== Wolves ===
Raw beef can be used to [[breed]] and heal tamed [[wolves]], lead them around, and make baby tamed wolves grow up faster by 10% of the remaining time.
=== Trading ===
Journeyman-level Butcher villagers have a 50% chance to buy 10 raw beef for an emerald.{{only|bedrock}}
Journeyman-level Butcher villagers always offer buy 10 raw beef for an emerald.{{only|java}}
==Sounds==
{{Sound table/Entity/Food}}
== Advancements ==
{{load advancements|Husbandry;A Balanced Diet}}
== Data values ==
=== ID ===
{{edition|java}}:
{{ID table
|edition=java
|showforms=y
|generatetranslationkeys=y
|displayname=Raw Beef
|spritetype=item
|nameid=beef
|form=item
|foot=1}}
{{edition|bedrock}}:
{{ID table
|edition=bedrock
|shownumericids=y
|showforms=y
|notshowbeitemforms=y
|generatetranslationkeys=y
|displayname=Raw Beef
|spritetype=item
|nameid=beef
|id=273
|form=item
|foot=1}}
== History ==
{{History|java beta}}
{{History||1.8|snap=Pre-release|[[File:Raw Beef JE1 BE1.png|32px]] Added raw beef.|Raw beef is one of the new [[food]] items, [[drops|dropped]] by [[cow]]s in addition to their [[leather]].}}
{{History|java}}
{{History||1.2.1|snap=12w03a|Raw beef can now be used to breed wolves.}}
{{History||1.3.1|snap=12w21a|Raw beef can now be [[trading|sold]] to butcher [[villager]]s, at 14–17 raw beef for 1 [[emerald]].}}
{{History|||snap=1.3|[[File:Raw Beef JE2.png|32px]] The texture of raw beef has been changed.}}
{{History||1.4.2|snap=12w37a|[[File:Raw Beef JE3 BE2.png|32px]] The texture of raw beef has been changed, so that it no longer has a dark outline.}}
{{History||1.8|snap=14w02a|[[Villager]]s no longer [[trading|trade]] for raw beef.}}
{{History||1.13|snap=17w47a|Prior to [[1.13/Flattening|''The Flattening'']], this [[item]]'s numeral ID was 363.}}
{{History||1.14|snap=18w43a|[[File:Raw Beef JE4 BE3.png|32px]] The texture of raw beef has been changed.}}
{{History|||snap=18w49a|Raw beef can now be found in [[chest]]s in [[village]] butcher shops.}}
{{History|||snap=19w11a|Butcher [[villager]]s now [[trading|buy]] raw beef.}}
{{History|pocket alpha}}
{{History||v0.4.0|[[File:Raw Beef JE1 BE1.png|32px]] Added raw beef.}}
{{History||v0.5.0|Raw beef now restores {{hp|3}} instead of {{hp|1}}.}}
{{History||v0.8.0|snap=build 1|[[File:Raw Beef JE3 BE2.png|32px]] The texture of raw beef has been changed, so that it no longer has a dark outline.}}
{{History||v0.9.0|snap=build 1|Raw beef has been added to [[Creative]] mode.}}
{{History||v0.12.1|snap=build 1|Raw beef now restores [[hunger]] instead of [[health]].}}
{{History|bedrock}}
{{History||1.10.0|snap=beta 1.10.0.3|[[File:Raw Beef JE4 BE3.png|32px]] The texture of raw beef has been changed.}}
{{History||1.11.0|snap=beta 1.11.0.1|Raw beef can now be found in [[village]] butcher [[chest]]s.}}
{{History|||snap=beta 1.11.0.4|Raw beef can now be [[trading|sold]] to butcher [[villager]]s.}}
{{History|console}}
{{History||xbox=TU5|xbone=CU1|ps=1.0|wiiu=Patch 1|[[File:Raw Beef JE1 BE1.png|32px]] Added raw beef.}}
{{History||xbox=TU12|[[File:Raw Beef JE3 BE2.png|32px]] The texture of raw beef has been changed, so that it no longer has a dark outline.}}
{{History||xbox=none|xbone=none|ps=1.90|wiiu=none|switch=none|[[File:Raw Beef JE4 BE3.png|32px]] The texture of raw beef has been changed.}}
{{History|New 3DS}}
{{History||0.1.0|[[File:Raw Beef JE3 BE2.png|32px]] Added raw beef.}}
{{History|foot}}
== Issues ==
{{issue list}}
== Gallery ==
<gallery>
File:Jeb steak.png|Raw Beef and [[Steak]] in a preview screenshot.
</gallery>
{{Items}}
[[de:Rohes Rindfleisch]]
[[es:Filete crudo]]
[[fr:Bœuf cru]]
[[hu:Nyers marhahús]]
[[ja:生の牛肉]]
[[ko:익히지 않은 소고기]]
[[nl:Rauwe biefstuk]]
[[pl:Surowa wołowina]]
[[pt:Bife cru]]
[[ru:Сырая говядина]]
[[uk:Сира яловичина]]
[[zh:生牛肉]]
[[Category:Food]]
[[Category:Renewable resources]]</li><li>[[Phantom Membrane|Phantom Membrane]]<br/>{{Item
| title = Phantom Membrane
| image = Phantom Membrane.png
| renewable = Yes
| stackable = Yes (64)
}}
'''Phantom membranes''' are items obtained from killing [[phantom]]s. They are used to repair [[elytra]] and brew [[Potion of Slow Falling|potions of Slow Falling]].
== Obtaining ==
=== Mob loot ===
[[Phantom]]s drop 0–1 phantom membrane when killed by a [[player]] or tamed [[wolf]]. [[Looting]] increases the maximum drops by 1 per level, for a maximum of 4 with Looting III.
=== Cat gifts ===
{{main|Cat#Gifts}}
Tamed [[cat]]s have a 70% chance to bring the player a gift when they wake up from a [[bed]], and the gift has a 3.22% chance to be a phantom membrane.
== Usage ==
=== Repairing ===
Phantom membranes can be used in an [[anvil]] to repair [[elytra]], restoring 108 durability points (25% of the pair's total durability) per membrane while preserving their [[enchantments]].
{| class="wikitable" data-description="Repairing elytra"
! scope="col" style="width:64px;" | Name
! Ingredients
! [[Anvil]] usage
|-
! scope="row" style="text-align: center;" | '''Elytra'''
| [[Elytra]] +<br>[[Phantom Membrane]]
| style="width: 260px; padding: 1px;" | {{Anvil| title = Elytra|Input1=Damaged Elytra|Input2=Phantom Membrane, 2|Output=Elytra}}
|-
|}
=== Brewing ingredient ===
Phantom membranes are used to [[brewing|brew]] [[Potion of Slow Falling|slow falling potions]] from an [[awkward potion]].
{{Brewing
|Phantom Membrane
|Potion of Slow Falling
|showname=3
}}
== Data values ==
=== ID ===
{{edition|java}}:
{{ID table
|edition=java
|showforms=y
|generatetranslationkeys=y
|displayname=Phantom Membrane
|spritetype=item
|nameid=phantom_membrane
|form=item
|foot=1}}
{{edition|bedrock}}:
{{ID table
|edition=bedrock
|shownumericids=y
|showforms=y
|notshowbeitemforms=y
|generatetranslationkeys=y
|displayname=Phantom Membrane
|spritetype=item
|nameid=phantom_membrane
|id=574
|form=item
|foot=1}}
== History ==
{{History|java}}
{{History||1.13|snap=18w14a|[[File:Phantom Membrane JE1 BE1.png|32px]] Added phantom membranes.}}
{{History||1.14|snap=18w44a|Tamed [[cat]]s now have a chance to give the [[player]] phantom membranes as [[Cat#Gifts|gifts]].}}
{{History|||snap=19w08a|[[File:Phantom Membrane JE2 BE2.png|32px]] The texture of phantom membranes has now been changed.}}
{{History|bedrock}}
{{History||1.6.0|snap=beta 1.6.0.5|[[File:Phantom Membrane JE1 BE1.png|32px]] Added phantom membranes.}}
{{History||1.8.0|snap=beta 1.8.0.8|Tamed [[cat]]s now have a chance to give the [[player]] phantom membranes as gifts.}}
{{History||1.10.0|snap=beta 1.10.0.3|[[File:Phantom Membrane JE2 BE2.png|32px]] The texture of phantom membranes has now been changed.}}
{{History|console}}
{{History||xbox=TU69|ps=1.76|wiiu=Patch 38|[[File:Phantom Membrane JE1 BE1.png|32px]] Added phantom membranes.}}
{{History||xbox=none|xbone=none|ps=1.90|wiiu=none|switch=none|[[File:Phantom Membrane JE2 BE2.png|32px]] The texture of phantom membranes has now been changed.}}
{{History|foot}}
== Issues ==
{{issue list}}
== References ==
{{reflist}}
== External Links ==
*[https://www.minecraft.net/en-us/article/taking-inventory--phantom-membrane Taking Inventory: Phantom Membrane] – Minecraft.net on August 2, 2019
{{items}}
[[de:Phantomhaut]]
[[fr:Membrane de Phantom]]
[[ja:ファントムの皮膜]]
[[ko:팬텀 막]]
[[pl:Błona fantoma]]
[[pt:Membrana de phantom]]
[[ru:Мембрана фантома]]
[[th:เนื้อเยื่อแฟนท่อม]]
[[uk:Перетинка фантома]]
[[zh:幻翼膜]]
[[Category:Renewable resources]]
[[Category:Brewing recipe]]</li></ul> | beta 1.2.0.2 | Added the Bonus Chest option, which can be toggled in World Options. | |||
| ? | various changes added such as adding experimental toggle section and random tick. | ||||
1.18.30{{Extension DPL}}<ul><li>[[Shulker Shell|Shulker Shell]]<br/>{{Item
| image = Shulker Shell.png
|type=
|renewable = Yes
| stackable = Yes (64)
}}
{{about|the item that drops from the mob|the mob |Shulker|the storage block|Shulker Box}}
'''Shulker shells''' are [[item]]s dropped by [[shulker]]s that are used solely to craft [[shulker box]]es.
== Obtaining ==
=== Mob loot ===
{{IN|bedrock}}, [[shulker]]s drop 0-1 shulker shells. The maximum can be increased by 1 per level of [[Looting]], which is 0-4 shells with Looting III.
{{IN|java}}, shulkers have a 50% chance of dropping a shulker shell when killed. This is increased by 6.25% per level of [[Looting]], for a maximum of 68.75% with Looting III.
== Usage ==
=== Crafting ingredient ===
{{crafting usage}}
== Data values ==
=== ID ===
{{edition|java}}:
{{ID table
|edition=java
|showforms=y
|generatetranslationkeys=y
|displayname=Shulker Shell
|spritetype=item
|nameid=shulker_shell
|form=item
|foot=1}}
{{edition|bedrock}}:
{{ID table
|edition=bedrock
|shownumericids=y
|showforms=y
|notshowbeitemforms=y
|generatetranslationkeys=y
|displayname=Shulker Shell
|spritetype=item
|nameid=shulker_shell
|id=566
|form=item
|foot=1}}
== History ==
{{History|java}}
{{History||1.11|snap=16w39a|[[File:Shulker Shell JE1 BE1.png|32px]] Added shulker shells.}}
{{History||1.13|snap=17w47a|Prior to [[1.13/Flattening|''The Flattening'']], this [[item]]'s numeral ID was 450.}}
{{History||1.14|snap=18w43a|[[File:Shulker Shell JE2 BE2.png|32px]] The texture of the shulker shell has now been changed.}}
{{History||1.17|snap=20w45a|When a shulker is hit by a shulker bullet, the shulker can spawn another shulker depending on the amount of shulkers in the area, making shulker shells [[renewable resource|renewable]].}}
{{History|pocket}}
{{History||1.0.0|snap=alpha 1.0.0.1|[[File:Shulker Shell JE1 BE1.png|32px]] Added shulker shells.
|Shulker shells currently have no purpose as [[shulker box]]es haven't been implemented yet.}}
{{History||1.1.0|snap=alpha 1.1.0.0|Shulker shells can now be used to [[crafting|craft]] shulker boxes.}}
{{History|bedrock}}
{{History||1.10.0|snap=beta 1.10.0.3|[[File:Shulker Shell JE2 BE2.png|32px]] The texture of the shulker shell has now been changed.}}
{{History||1.18.30|snap=beta 1.18.30.22|Shulkers now have a chance to spawn another shulker when hit by a shulker projectile, making shulker shells [[renewable resource|renewable]].}}
{{History|console}}
{{History||xbox=TU53|xbone=CU43|ps=1.49|wiiu=Patch 23|switch=1.0.3|[[File:Shulker Shell JE1 BE1.png|32px]] Added shulker shells.}}
{{History||xbox=none|xbone=none|ps=1.90|wiiu=none|switch=none|[[File:Shulker Shell JE2 BE2.png|32px]] The texture of the shulker shell has now been changed.}}
{{History|new 3ds}}
{{History||1.7.10|[[File:Shulker Shell JE1 BE1.png|32px]] Added shulker shells.}}
{{History|foot}}
== Issues ==
{{Issue list}}
{{Items}}
[[de:Shulkerschale]]
[[es:Caparazón de shulker]]
[[fr:Carapace de Shulker]]
[[it:Guscio di shulker]]
[[ja:シュルカーの殻]]
[[ko:셜커 껍데기]]
[[nl:Shulkerschelp]]
[[pl:Skorupa Shulkera]]
[[pt:Casco de shulker]]
[[ru:Панцирь шалкера]]
[[th:เปลือกชัลเกอร์]]
[[zh:潜影壳]]</li><li>[[Gold Nugget|Gold Nugget]]<br/>{{About|the nugget|the block that can drop nuggets|Gilded Blackstone|the ore|Gold Ore|the ingot form|Gold Ingot|the mineral block|Block of Gold}}
{{Item
| image = Gold Nugget.png
| renewable = Yes
| stackable = Yes (64)
}}
'''Gold nuggets''' are items used to make [[gold ingot]]s and other various golden items. One gold nugget is effectively worth one-ninth of a gold ingot.
== Obtaining ==
=== Mob loot ===
[[Zombified Piglin|Zombified piglin]]s, when killed, may drop 0-1 gold nuggets. When killed using a weapon enchanted with [[Looting]], they may drop an additional gold nugget per level of Looting used, up to a maximum of 4.
=== Crafting ===
{{Crafting
|Gold Ingot
|Output= Gold Nugget, 9
|type= Material
}}
=== Smelting ===
{{Smelting
|Golden Sword; {Any golden tools}; {Any golden armor}; Golden Horse Armor
|Gold Nugget
|0,25
}}
=== Chest loot ===
{{LootChestItem|gold-nugget}}
=== Mining ===
[[Nether gold ore]] mined using a [[pickaxe]] drops 2-6 gold nuggets. If the pickaxe is enchanted with [[Fortune]], it has a 33.3% chance to multiply the drops by 2, Fortune II has a 25% chance to multiply the drops by 2 or 3 and Fortune III has a 20% chance each to multiply the drops by 2, 3, or 4 for a maximum possible drop of 24 golden nuggets. The average drop rate for a Fortune III pickaxe is 8.8, while the drop rate for a [[Silk Touch]] pickaxe is a single ingot, or a flat rate of 9. It is slightly more efficient to mine with a Silk Touch pickaxe.
[[Gilded Blackstone|Gilded blackstone]] mined using a pickaxe has a 10% chance to drop 2-5 gold nuggets. If the pickaxe is enchanted with Fortune I, the chance gold nuggets drop is increased 14.29%, Fortune II increases the drop chance to 25%, and Fortune III guarantees the drop.
== Usage ==
Gold nuggets can be used to craft a [[golden carrot]] or [[glistering melon]] for brewing. Also, gold nuggets can be combined with gunpowder and dye to create a [[firework star]] that bursts in a star-shaped explosion.
[[Piglin]]s instantly pick up any gold nuggets that are within 1 [[block]] of them. Unlike other gold-related items, they do not intentionally seek out gold nuggets to pick up and only pick them up if they walk near it. Unlike gold ingots, gold nuggets picked up are dropped upon the piglin's death.
=== Crafting ingredient ===
{{crafting usage}}
== Data values ==
=== ID ===
{{edition|java}}:
{{ID table
|edition=java
|showforms=y
|generatetranslationkeys=y
|displayname=Gold Nugget
|spritetype=item
|nameid=gold_nugget
|form=item
|foot=1}}
{{edition|bedrock}}:
{{ID table
|edition=bedrock
|shownumericids=y
|showforms=y
|notshowbeitemforms=y
|generatetranslationkeys=y
|displayname=Gold Nugget
|spritetype=item
|nameid=gold_nugget
|id=425
|form=item
|foot=1}}
== History ==
{{History|Java}}
{{History||1.0.0|snap=Beta 1.9 Prerelease|[[File:Gold Nugget JE1.png|32px]] Added gold nuggets.
|Gold nuggets are [[drops|dropped]] by [[zombie pigmen]].
|Gold nuggets can be used to craft [[gold ingot]]s.
|Gold nuggets currently do not have a mouseover name.}}
{{History|||snap=Beta 1.9 Prerelease 2|Gold nuggets now have a mouseover name.}}
{{History|||snap=Beta 1.9 Prerelease 4|Gold nuggets are now used to craft [[glistering melon]]s.
|Gold nuggets can now be [[crafting|crafted]] from a single [[gold ingot]].}}
{{History||1.1|snap=release|Normal [[golden apple]]s are now crafted with gold nuggets.}}
{{History||1.3.1|snap=1.3|[[File:Gold Nugget JE2 BE1.png|32px]] The texture of gold nuggets has been changed.}}
{{History||1.4.2|snap=12w34a|Gold nuggets are now used to craft [[golden carrot]]s.}}
{{History||1.4.6|snap=12w49a|Gold nuggets can now be used to craft a [[firework star]] for a star shaped effect on a [[firework rocket|firework]].}}
{{History||1.6.1|snap=13w23a|Gold nuggets can no longer be used to [[crafting|craft]] a [[golden apple]].}}
{{History||1.9|snap=15w43a|Gold nuggets may now be found among the loot in [[igloo]] basement [[chest]]s.}}
{{History||1.11.1|snap=16w50a|Gold nuggets can now be [[smelting|smelted]] from golden [[tool]]s and [[armor]].}}
{{History||1.13|snap=17w47a|Prior to [[1.13/Flattening|''The Flattening'']], this [[item]]'s numeral ID was 371.}}
{{History|||snap=18w09a|Gold nuggets can now be found in [[underwater ruins]] loot [[chest]]s.}}
{{History|||snap=18w11a|Gold nuggets now generate in the chests of [[shipwreck]]s.}}
{{History||1.14|snap=18w43a|[[File:Gold Nugget JE3 BE2.png|32px]] The texture of gold nuggets has been changed.}}
{{History|||snap=18w48a|Gold nuggets can now be found in chests in [[plains]] [[village]] houses.}}
{{History|||snap=18w49a|Gold nuggets can now be found in chests in [[savanna]] village houses.}}
{{History||1.16|snap=20w12a|[[Nether gold ore]] now [[drops]] 2-6 gold nuggets, affected by [[Fortune]].}}
{{History|||snap=20w15a|[[Gilded blackstone]] now has 10% chance to drop 2-5 gold nuggets. Only the drop chance is affected by [[Fortune]].}}
{{History|||snap=20w16a|Gold nuggets now generate in [[bastion remnant]]s and [[ruined portal]] chests.}}
{{History|||snap=Pre-release 1|Gold nuggets can now be used to distract [[piglin]]s.}}
{{History|||snap=Pre-release 3|Gold nuggets can no longer be used to distract [[piglin]]s.}}
{{History||1.20|snap=23w12a|Gold nuggets can now be found in [[suspicious gravel]] and [[suspicious sand]] in cold and warm [[ocean ruins]] and in [[trail ruins]].}}
{{History|||snap=23w16a|Gold nuggets no longer generate in [[suspicious sand]] in [[trail ruins]].|Due to the split of the archaeological loot tables for suspicious gravel within [[trail ruins]], gold nuggets are now common loot.}}
{{History|pocket alpha}}
{{History||v0.12.1|snap=build 1|[[File:Gold Nugget JE2 BE1.png|32px]] Added gold nuggets. |Gold nuggets can be used to craft [[glistering melon]]s, [[gold ingot]]s and [[golden carrot]]s.|[[Gold ingot]]s can now be [[crafting|crafted]] into 9 gold nuggets.|[[Zombie pigmen]] now [[drops|drop]] gold nuggets upon being killed.}}
{{History|pocket}}
{{History||1.0.0|snap=alpha 0.17.0.1|Gold nuggets can now be found inside [[igloo]] basement [[chest]]s.}}
{{History||1.1.0|snap=alpha 1.1.0.0|Gold nuggets can now be [[smelting|smelted]] from golden [[tool]]s and [[armor]].}}
{{History|bedrock}}
{{History||1.2.0|snap=beta 1.2.0.2|Gold nuggets can now be used to craft [[firework star]]s.}}
{{History||1.4.0|snap=beta 1.2.14.2|Gold nuggets can now be found in some [[shipwreck]] [[chest]]s.}}
{{History|||snap=beta 1.2.20.1|Gold nuggets can now be found in [[underwater ruins]] chests.}}
{{History||1.10.0|snap=beta 1.10.0.3|The gold nugget can now be found in [[plains]] [[village]] house chests.|[[File:Gold Nugget JE3 BE2.png|32px]] The texture of gold nuggets has been changed.}}
{{History||1.11.0|snap=beta 1.11.0.1|The gold nugget can now be found in [[savanna]] village house [[chest]]s.}}
{{History||1.16.0|snap=beta 1.16.0.57|[[Nether gold ore]] now [[drops]] 2-6 gold nuggets.|[[Gilded blackstone]] now has 10% chance to drop 2-5 gold nuggets.}}
{{History||1.16.100|snap=beta 1.16.100.50|Gold nuggets can now be used as fuel for a [[furnace]].<ref>{{bug|MCPE-114216}}</ref>}}
{{History||1.18.30|snap=beta 1.18.30.26|Gold nuggets can no longer be used as fuel for a furnace.}}
{{History|Legacy Console}}
{{History||xbox=TU7|xbone=CU1|ps=1.0|wiiu=Patch 1|switch=1.0.1|[[File:Gold Nugget JE2 BE1.png|32px]] Added gold nuggets.}}
{{History||xbox=TU53|xbone=CU43|ps=1.49|wiiu=Patch 23|switch=1.0.3|Gold nuggets can now be [[smelting|smelted]] from golden [[tool]]s and [[armor]].}}
{{History||xbox=none|xbone=none|ps=1.90|wiiu=none|switch=none|[[File:Gold Nugget JE3 BE2.png|32px]] The texture of gold nuggets has been changed.}}
{{History|3DS}}
{{History||0.1.0|[[File:Gold Nugget JE2 BE1.png|32px]] Added gold nuggets.}}
{{History||1.9.19|Gold nuggets can now be [[smelting|smelted]] from golden [[tool]]s and [[armor]].}}
{{History|foot}}
== Issues ==
{{issue list}}
== See also ==
* [[Iron Nugget]]
* [[Gold]]
{{Items}}
[[cs:Zlatý nuget]]
[[de:Goldklumpen]]
[[es:Pepita de oro]]
[[fr:Pépite d'or]]
[[hu:Aranyrög]]
[[it:Pepita d'oro]]
[[ja:金塊]]
[[ko:황금 조각]]
[[nl:Goudklompje]]
[[pl:Bryłka złota]]
[[pt:Pepita de ouro]]
[[ru:Кусочек золота]]
[[uk:Золотий самородок]]
[[zh:金粒]]
[[Category:Renewable resources]]</li></ul> | beta 1.18.20.21 | Enabled new UI for Create New World screen, a UI for preview currently. | |||
| Legacy Console Edition | |||||
| TU5 | CU1 | 1.00 | Patch 1 | 1.0.1 | Added "Superflat" world type. |
| Added the bonus chest option to the options menu. | |||||
| TU25 | CU14 | 1.17 | Added ability to customize a Superflat world. | ||
| CU36 | 1.38 | Added the "Amplified World" option. | |||
Gallery[]
Java Edition[]

Select World in Beta 1.2.

Create New World in Beta 1.6.

Create New World in 1.17.1.
More World Options in 1.17.1.
Create New World in 1.12.2.
More World Options in 1.12.2.
The "Game" tab in Java Edition 1.19.4.
The "World" tab in Java Edition 1.19.4.
The "More" tab in Java Edition 1.19.4.
The "Experiments" screen.
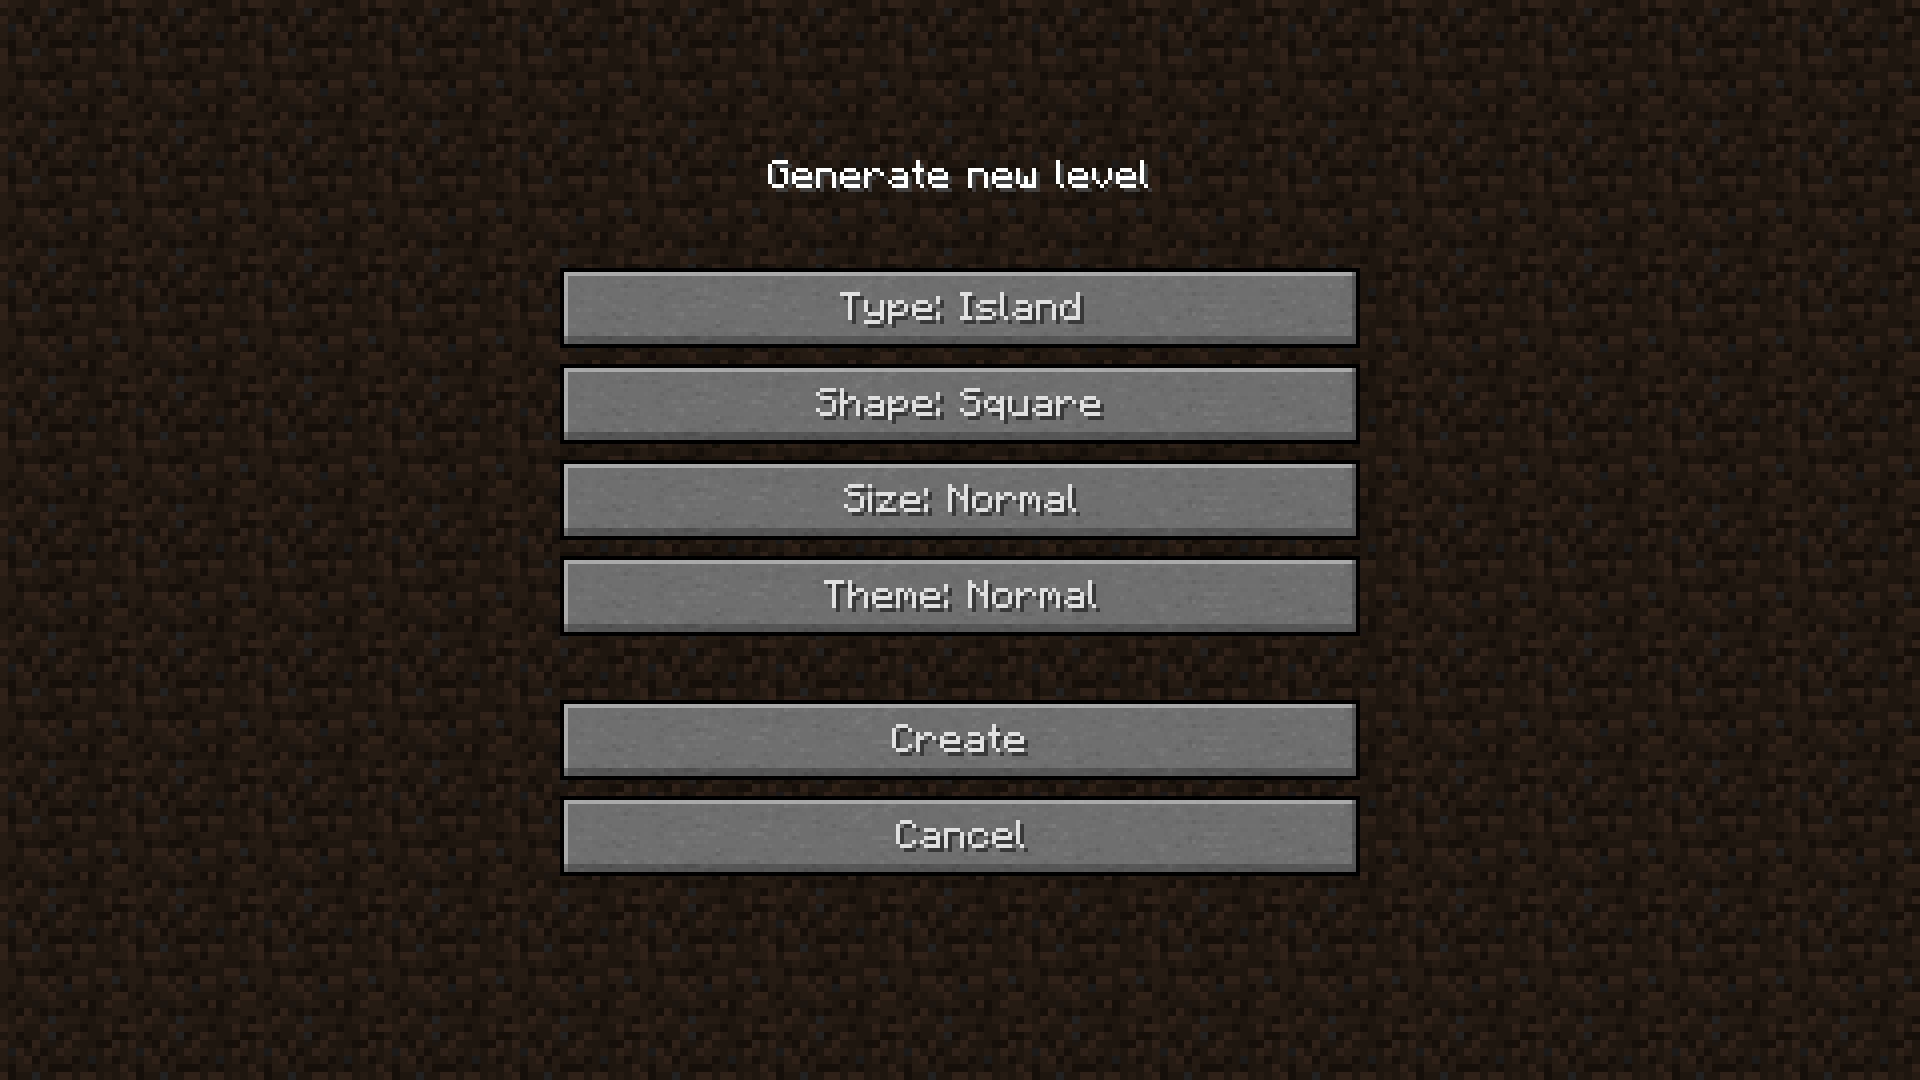

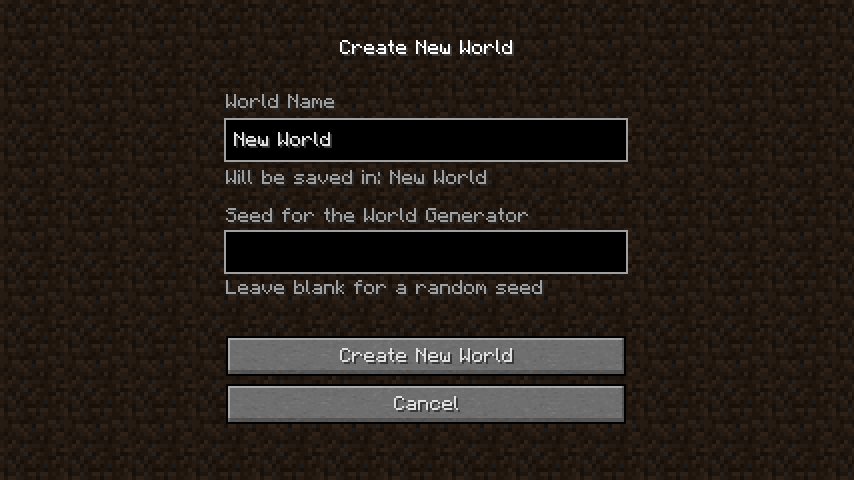
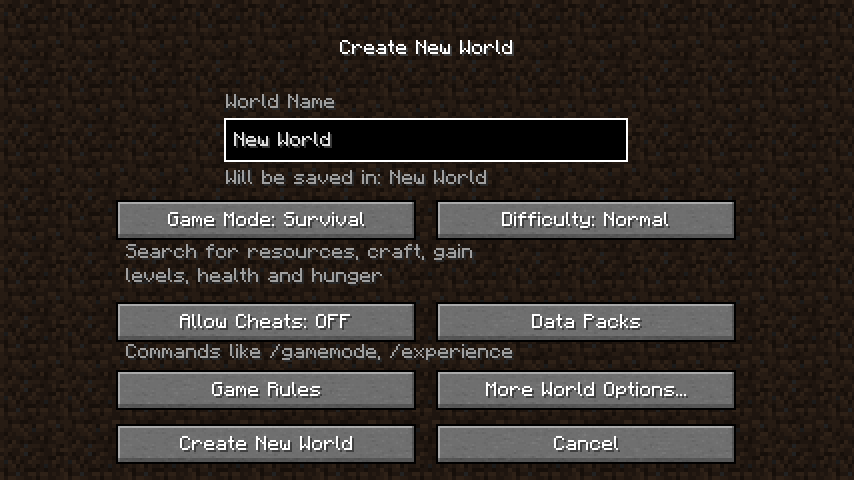
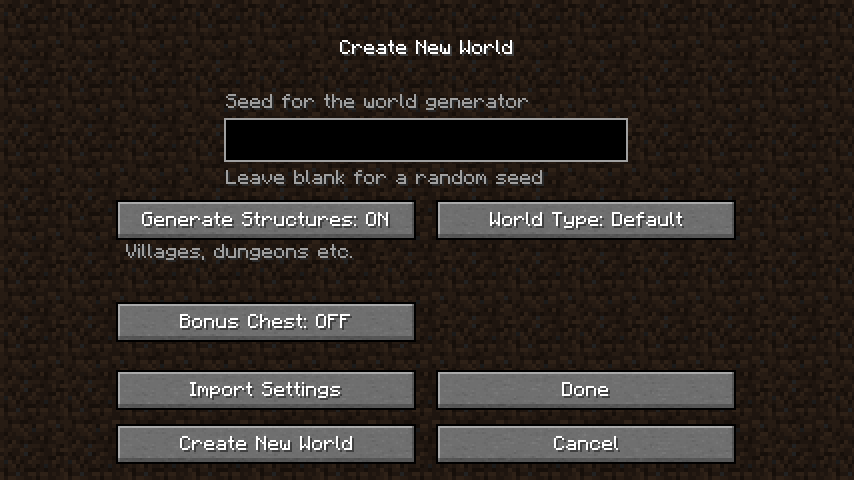
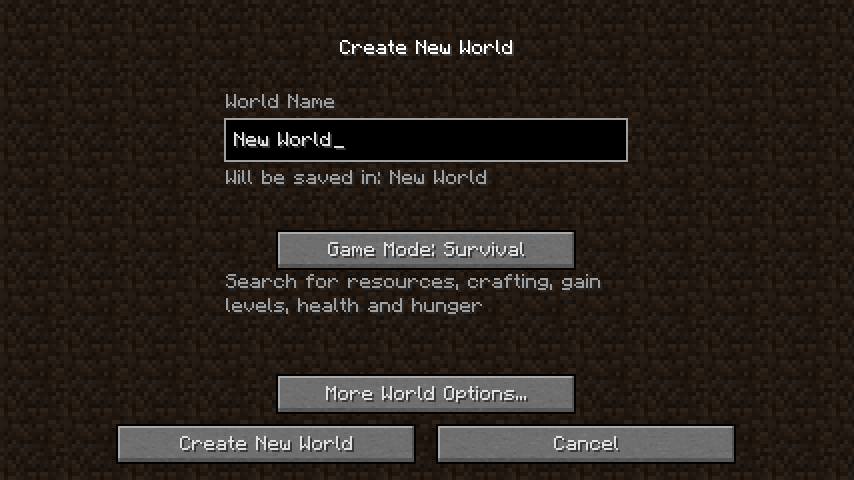
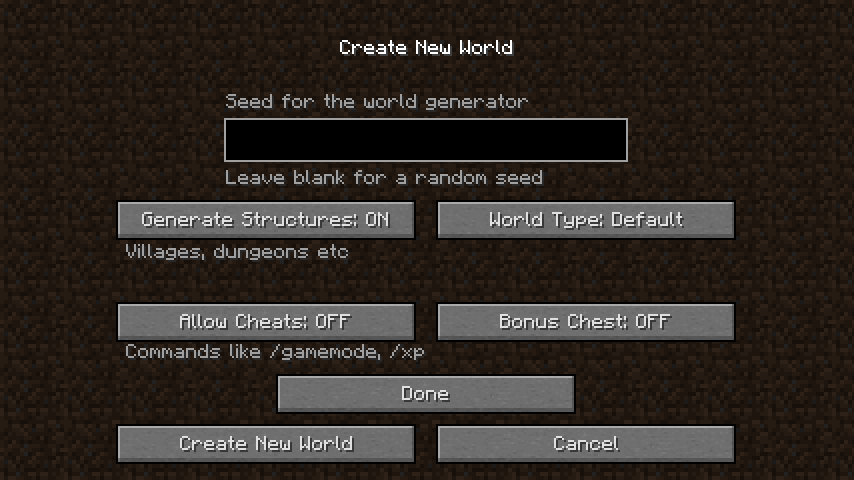
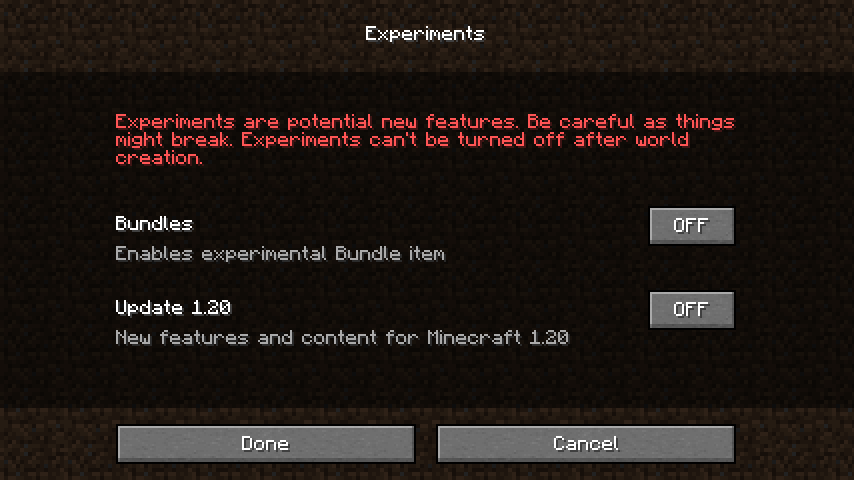
Bedrock Edition[]
Create World screen from 1.2 development.
Create World screen from 1.3 development.
Another version.
Create World screen from 1.19.20 onwards (certain platforms only)
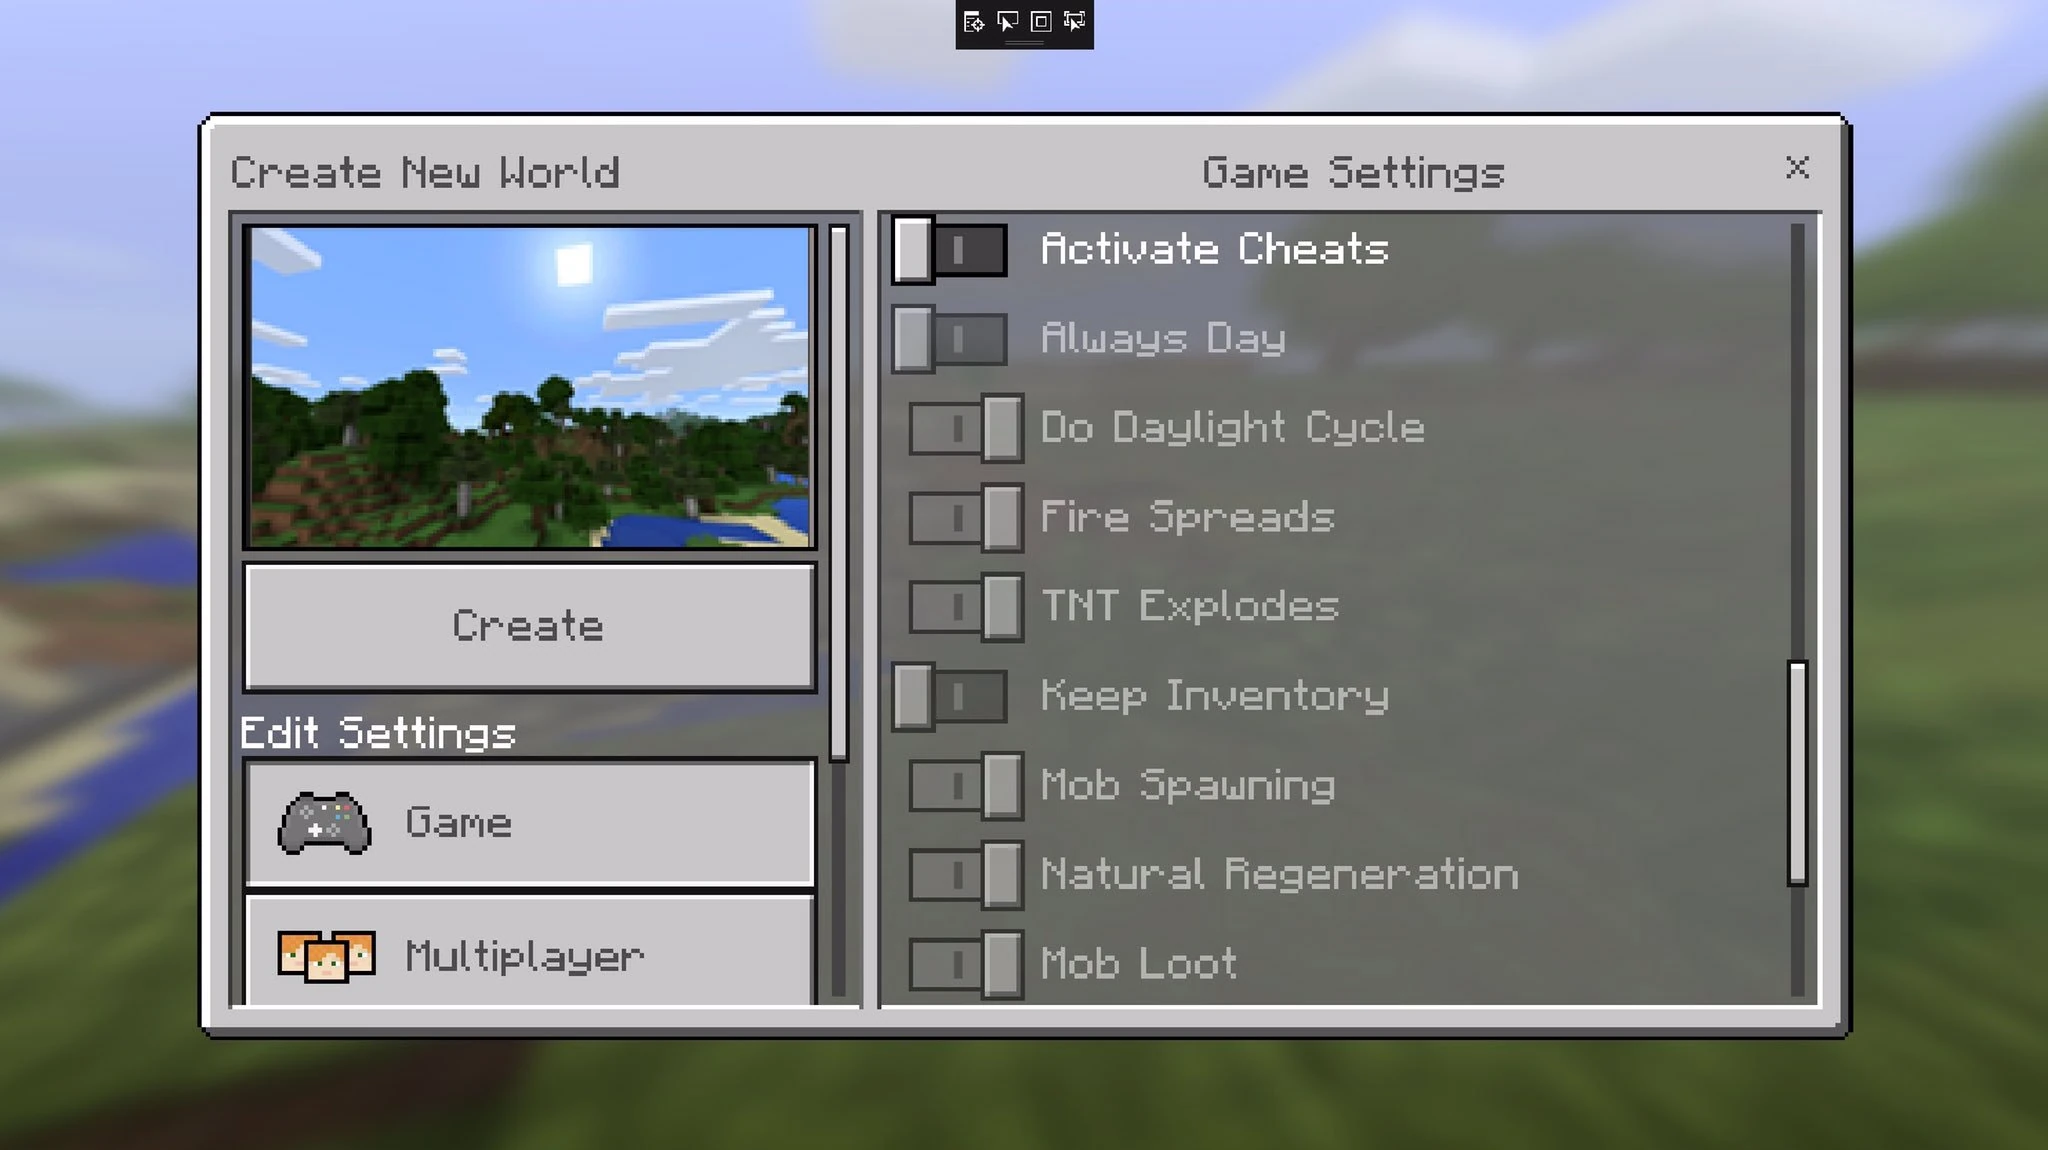
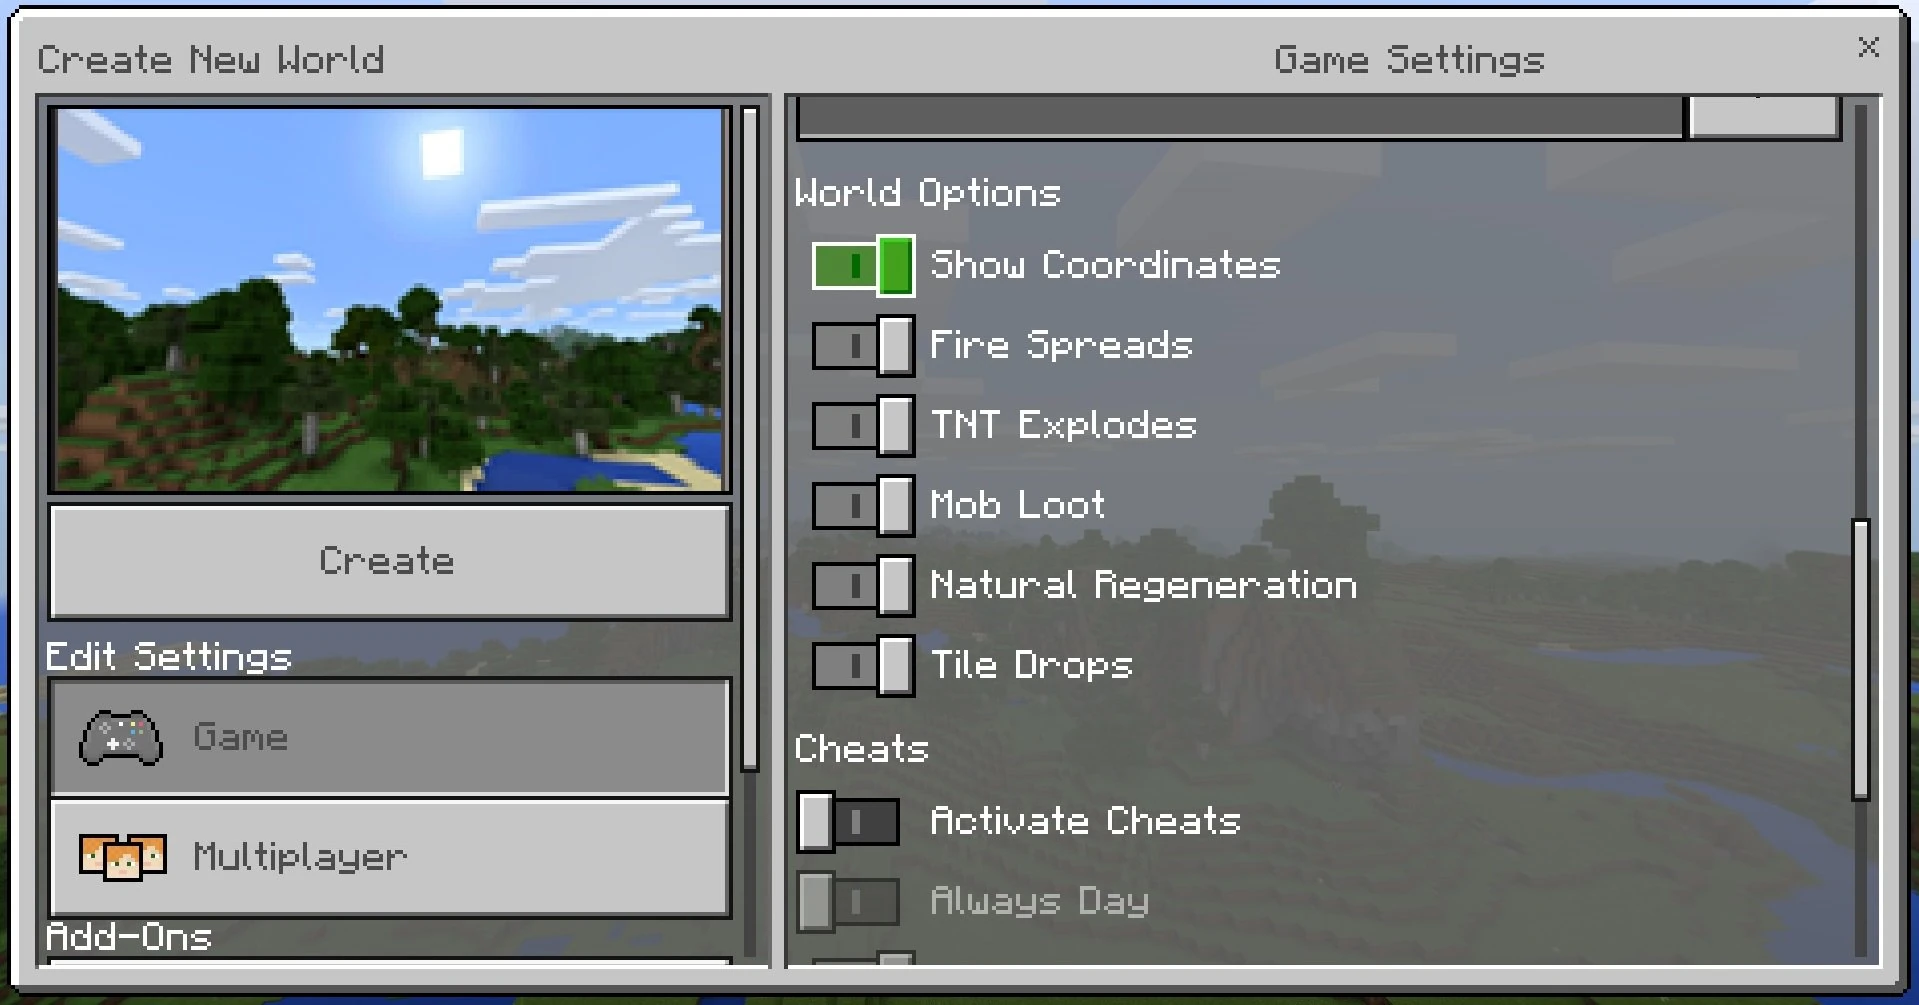
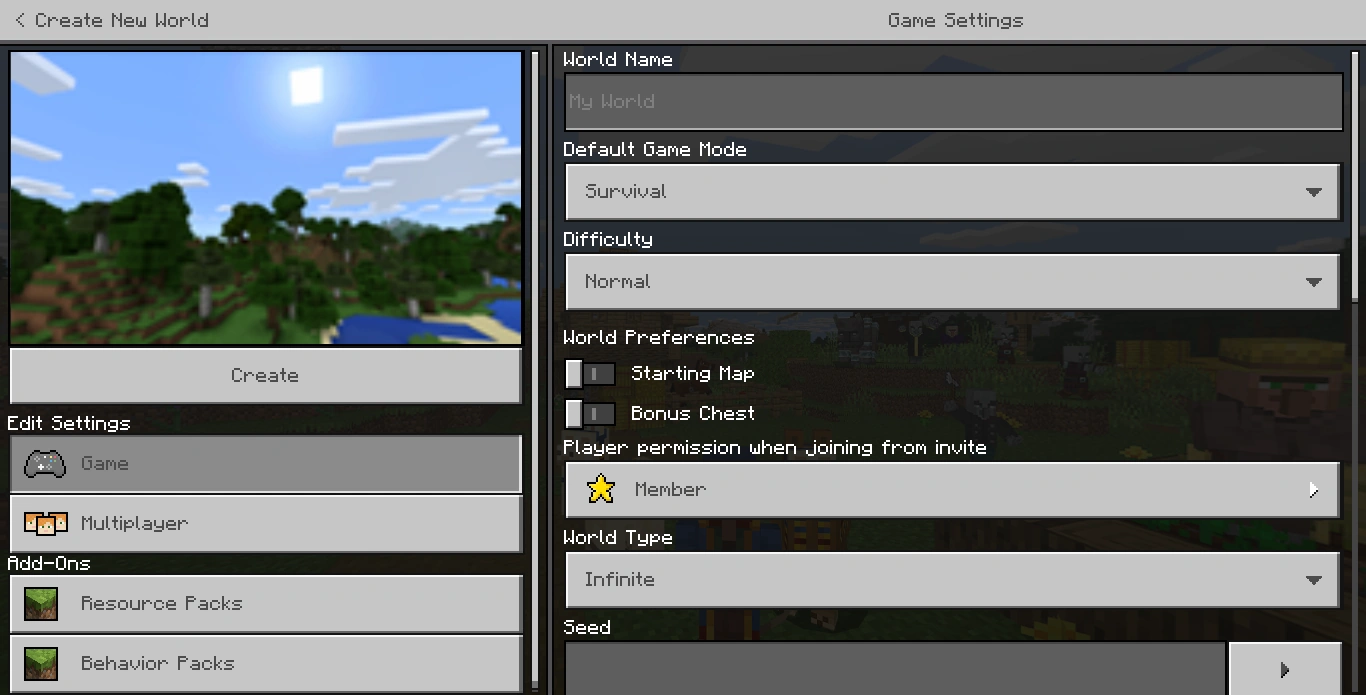
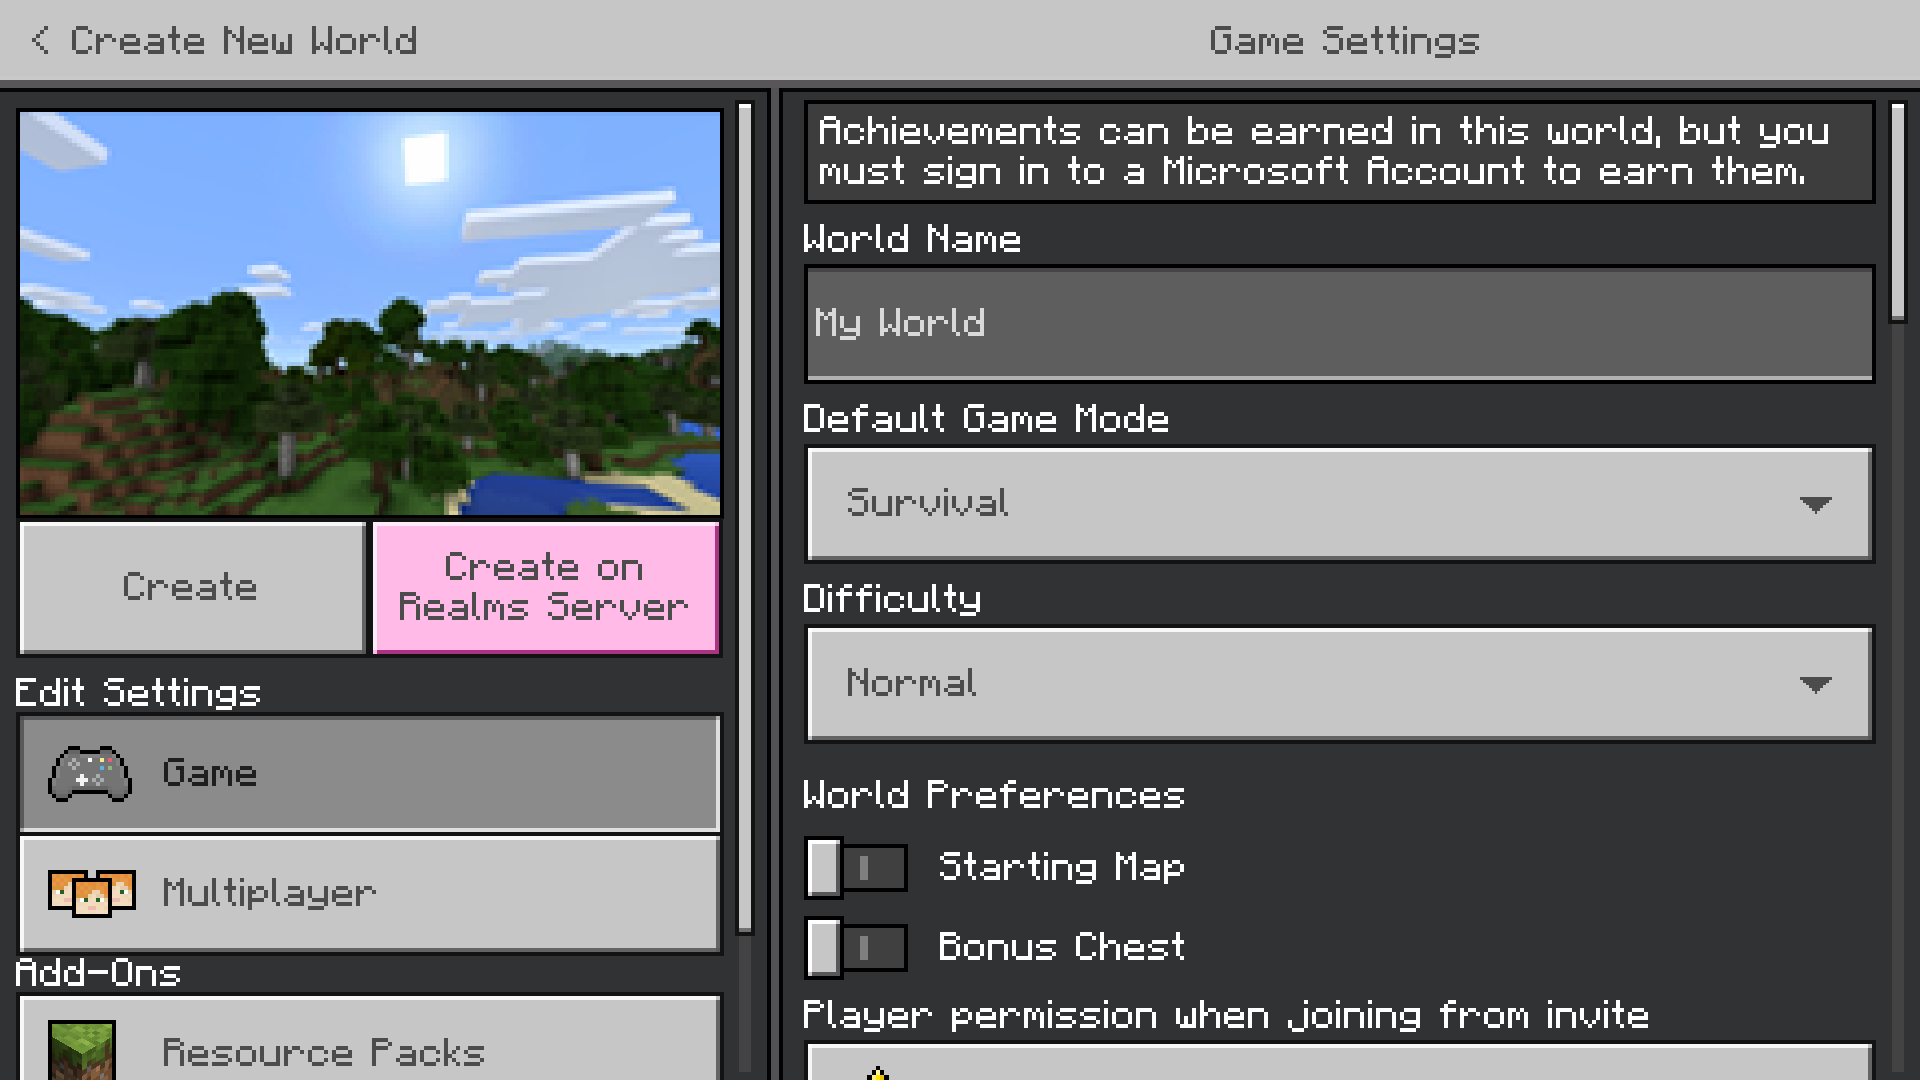
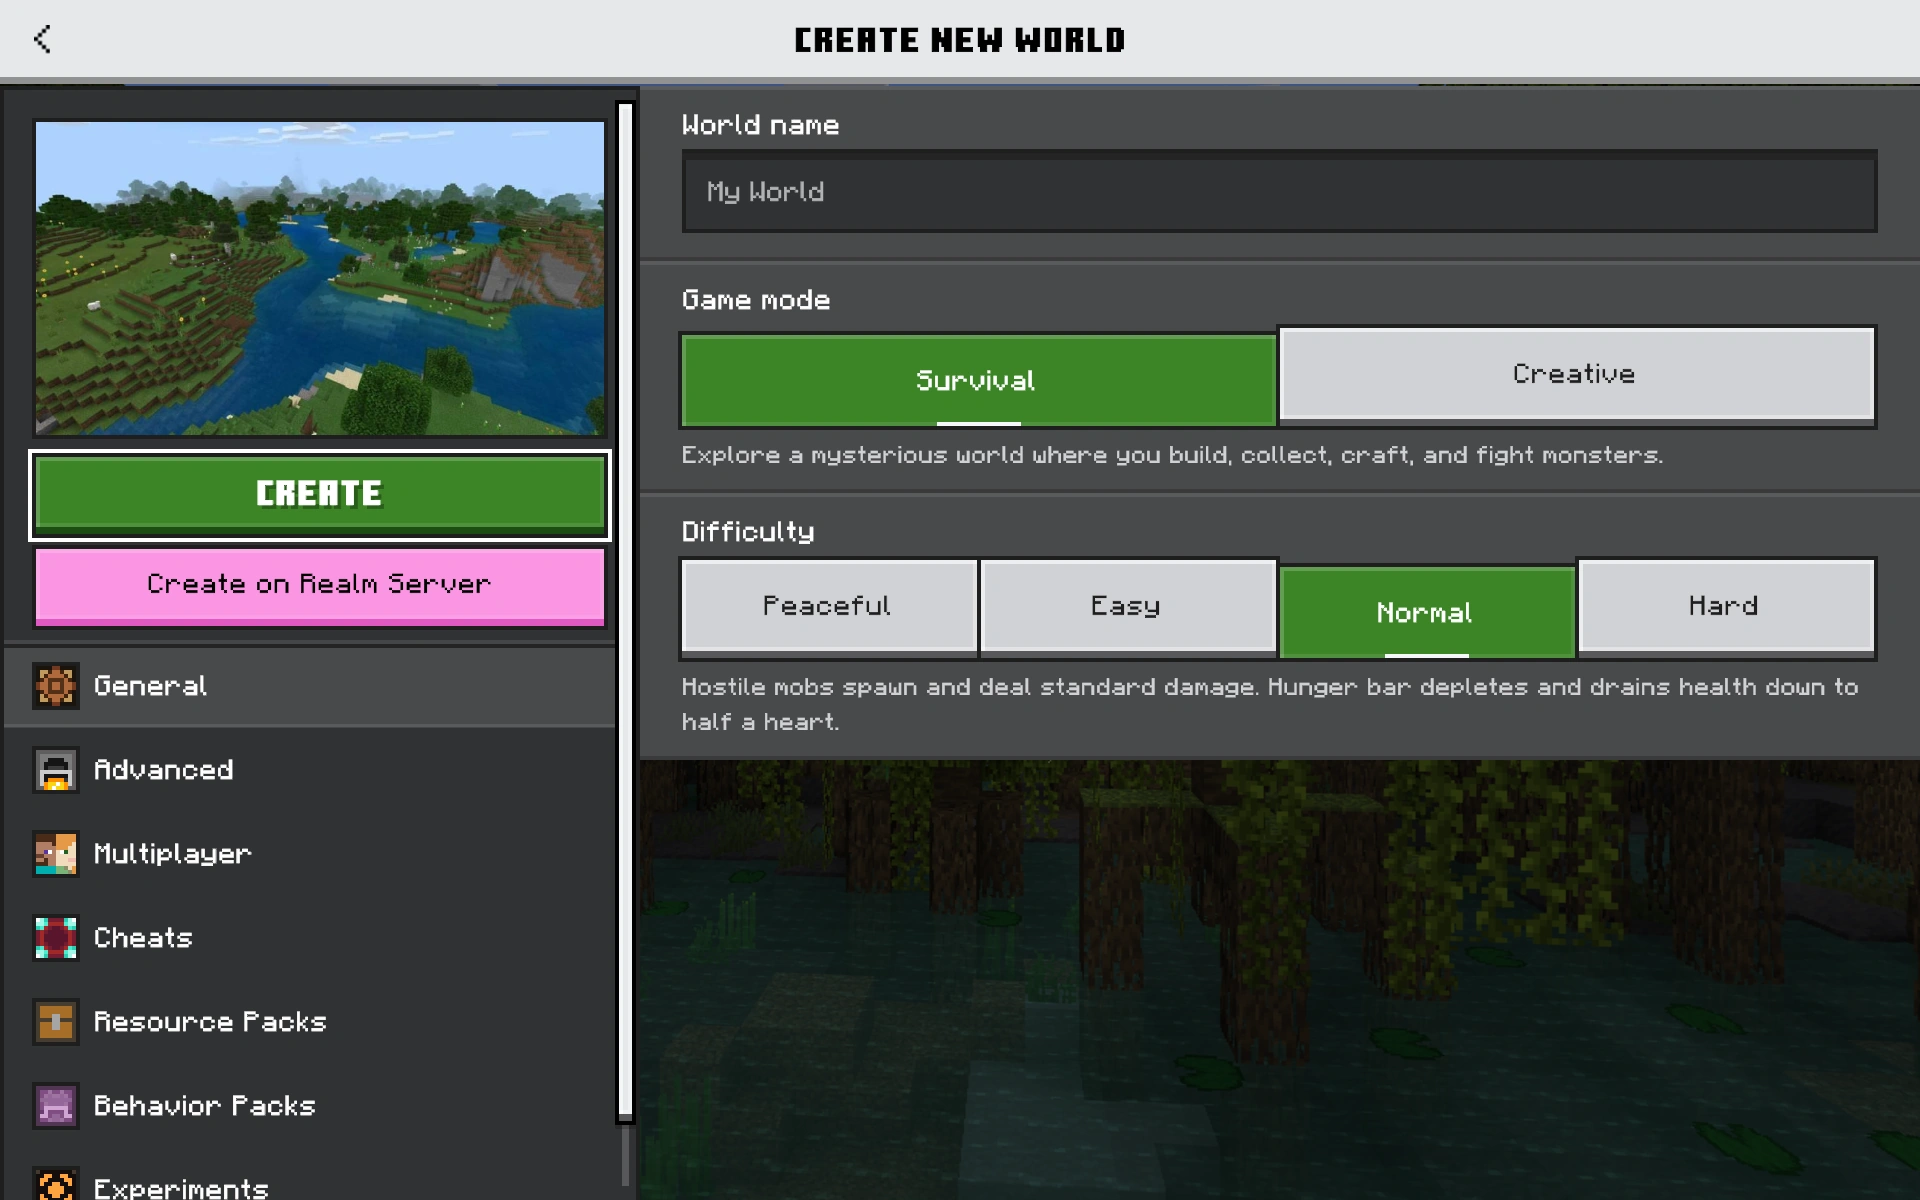
.png)
| Help | |||||||||||||||||||
|---|---|---|---|---|---|---|---|---|---|---|---|---|---|---|---|---|---|---|---|
| Menu screens |
| ||||||||||||||||||
| Game customization | |||||||||||||||||||
| Editions |
| ||||||||||||||||||
| Miscellaneous | |||||||||||||||||||