A command block is a block that can execute commands. Because it cannot be obtained or edited in Survival mode without cheats, it is primarily used on multiplayer servers and in custom maps. Blue Chain_Command_block
Obtaining
Command blocks are not available in the Creative inventory. It can either be obtained by using the pick block control, or by using various commands, such as /give @s command_block, or /setblock ~ ~ ~ command_block.
In Java Edition, just like other blocks that can store NBT data, using pick block + CTRL copies the command and options inside the command block. This allows it to be placed elsewhere without having to re-enter the data inside.
Command blocks also cannot be broken in Survival mode without operator permissions, are not flammable, cannot be moved by pistons, and have the same blast resistance as bedrock. Command blocks, structure blocks, jigsaw blocks, and dragon eggs cannot be mined in survival.
Usage
A command block can execute commands when activated by redstone power. It always has permissions of 2 level, so it can be used to allow a specific use of a command by players who can't use that command in general (for example, allowing anyone to obtain a specific item with /give without allowing everyone to /give themselves whatever they want).
A command block has an orientation that determines the chain command block to activate, and the blocks to be checked to see if a command block in "Conditional" mode executes.
To execute the command, in Java Edition in multiplayer enable-command-block in the server.properties file must be set to true (default is false); in Bedrock Edition "Command Blocks Enabled" in options must be enabled.
Modification
Java Edition command block GUI.
To enter command or modify the command block, use the Use Item control on the command block to open the command block GUI (graphical user interface). The GUI opens only if the player is in Creative mode, and has the proper permissions. That means, in singleplayer, "Allow Cheats"[JE only] or "Activate Cheats"[BE only] in options must be enabled. In multiplayer, Gui can be opened only by operators in Creative mode, and in Java Edition op-permission-level in the server.properties file must be set to 2 or above (default is 4).
In Java Edition to enter command or modify the command block, enable-command-block in the server.properties file must be set to true (default is false).
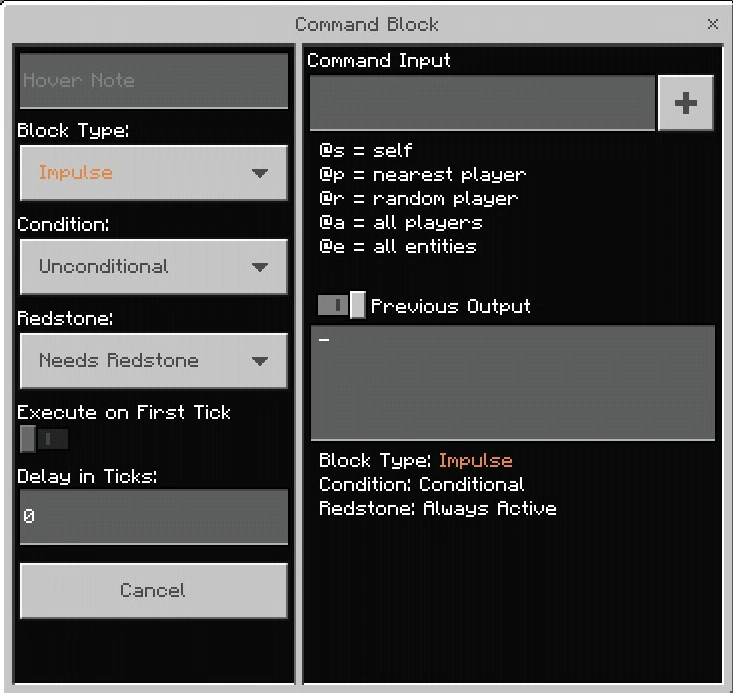
Bedrock edition command block GUI.
In Java Edition, opening the GUI in singleplayer pauses the game.
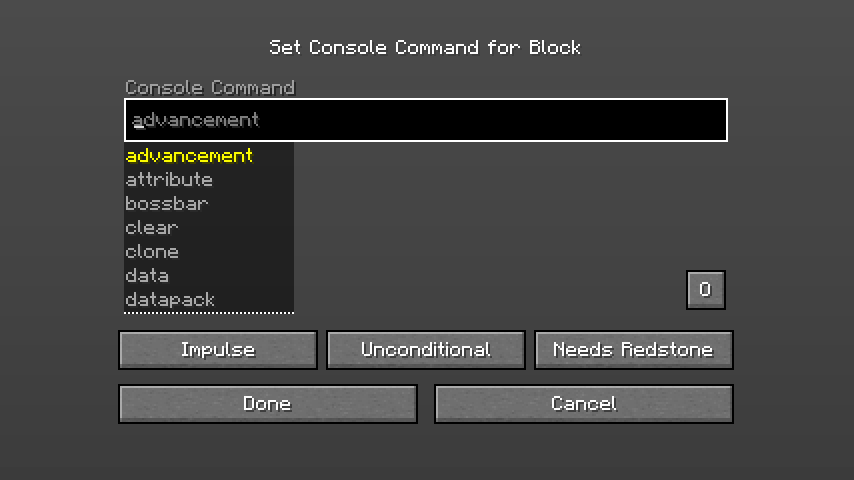
- Commands can be entered in the top text pane. The text limit for commands in a command block is 32,500 characters, but the text pane can show only a small portion of this amount at a time.
- Commands in a command block do not need to be prefixed with the forward-slash (
/) as they do in the chat window, but doing so still works.
- Press Tab ↹ to complete words or cycle through options.
- In Bedrock Edition, below the console command text pane are some reminder tips about how to use target selectors.
- Previous Output
- The bottom text pane displays the output message (success or failure) of the last executed command (it is blank[JE only] or "
-"[BE only] initially). Its text is not editable.
- A button to the right of the Previous Output text pane[JE only] or the left of the "Previous Output"[BE only] specifies whether the last output should be stored and displayed. It is
O[JE only]/enabled[BE only] when the output text should be stored andX[JE only]/disabled[BE only] when the output text should not be stored. For worlds with many command blocks, especially command blocks running on fast clocks, not storing the output text can reduce memory and storage requirements.
- If gamerule
sendCommandFeedbackis true (the default), default toO[JE only]/enabled[BE only]. Otherwise defaults toX[JE only]/disabled[BE only].
- Block Type
- Click the "Impulse/Chain/Repeat"[JE only]/"Block Type"[BE only] button to change the command block's type. The default state is "Impulse", but non-default command blocks can be obtained and placed. The command block also changes color when changing its command block type:
- "Impulse" command blocks are orange. These execute once every time they are activated.
- "Chain" command blocks are green. These execute once every time they are triggered if they have been activated.
- "Repeat" command blocks are purple. These execute their commands once every one game tick (or more[BE only]) as long as they are activated.
- Condition
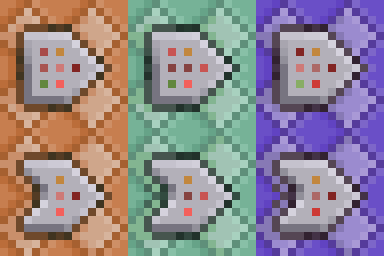
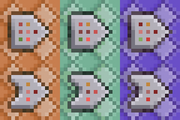
Top: Command blocks in "Unconditional" mode. Bottom: Command blocks in "Conditional" mode.
- Click the "Conditional/Unconditional"[JE only]/"Condition"[BE only] button to change the command block's conditional behavior:
- "Conditional": A command block in conditional mode executes its command only when the command block behind it has executed successfully ("Success count" is greater than 0).
- "Unconditional" (default): A command block in unconditional mode executes its command even if there's a command block behind it that didn't execute its command successfully.
- "Behind it" in the sense of opposite to the direction the command block is facing, regardless of chain direction or even if chaining is occurring.
- Redstone
- Click the "Always Active/Needs Redstone"[JE only]/"Redstone"[BE only] button to change the command block's activation requirements:
- "Needs Redstone" (the default for impulse and repeat command blocks): A command block in the "Needs Redstone" setting can be activated only with redstone.
- "Always Active" (the default for chain command blocks): The command block is activated when set to "Always Active". Then it is always active even without redstone activation.
- Execute on First Tick[BE only]
- Specifies whether a repeat command block executes its command as soon as it is activated. If it's disabled, executes the first time after the delay from the time when it is activated.
- Delay in Ticks[BE only]
- For impulse or chain command block, specifies how many game ticks it delays before executing command after it is activated or triggered.
- For repeat command block, specifies how many game ticks it delays to execute again.
- Note that for impulse or repeat command block, 0 and 1 work the same; the game takes 0 as 1. However, For chain command block, 0 and 1 is different.
- Hover Note[BE only]
- Specifies the name of command block, which can be seen when you point to the block. It is also used for message commands. If the command block had been named in an anvil before placement, that name is used as well. If it is empty, defaults to
!.
- Done
- In Java Edition, click the "Done" button or ↵ Enter to save the command and leave the command block GUI.
- In Bedrock Edition, close the GUI to save the command and changes.
- Cancel
- Click the "Cancel" button or Esc to leave the command block GUI without saving any changes.
Activation
Command blocks are redstone mechanisms and can be activated by:
- An adjacent active power component: for example, a lever, a block of redstone, a daylight sensor, a button etc.
- An adjacent powered block (for example, an opaque block with an active redstone torch under it)
- A powered redstone comparator or redstone repeater facing the mechanism component
- Powered redstone dust configured to point at the command block (or on top of it) or directionless; a command block is not activated by adjacent powered redstone dust that is configured to point away from it.
A command block can also be activated by setting to "Always Active" mode.
When activated, a command block executes its command, depending on the command block's type:
- A impulse command block executes its command once.
- A chain command block does not execute its command until it is triggered.
- A repeat command block executes its command once every one game tick (or more[BE only]) until no longer activated.
Execution
An impulse command block, when it is activated, checks whether the command block behind it has executed successfully (if in conditional mode). After the delay of 1 gametick (or more[BE only]), if the condition is met before the delay (if in "Conditional" mode), it executes its command once and triggers the chain command block it is pointing to.
A repeat command block, when it is activated, after 1 gametick (always 1 no matter how many "Delay in Ticks" is), checks whether the command block behind it has executed successfully (if in conditional mode). If the condition is met, and if "Execute on First Tick" is enabled in Bedrock Edition, it executes its command once and triggers the chain command block it is pointing to. If it is still activated, it then checks, executes, and triggers the chain command block again after 1 gametick (or more[BE only]).
When executing a command, it also updates its success count: If in "Conditional" mode, if the command block behind it didn't execute successfully, it sets its success count to 0. Otherwise, it sets it to the success count of the command.
In addition:
- When an impulse or repeat command block in "Needs Redstone" mode with a command is placed or is cloned by a command to a powered location, the new command block executes its command only if it hasn't been activated with redstone. In Java Edition, it also needs a block update in order to execute its command.
- When an impulse or repeat command block in "Always Active" mode with a command is placed or is cloned by a command to a powered location, the new command block executes its command only if it hasn't been activated with redstone.
- When an impulse or chain command block is set to "Repeat", if it has been activated, checks whether the command block behind it has executed successfully (if in conditional mode). After 1 gametick (always 1 no matter how many "Delay in Ticks" is), if the condition is met, it executes its command once and triggers the chain command block it is pointing to. Then it checks, executes, and triggers the chain command block again after 1 gametick (or more[BE only]).
Trigger and chaining
If any command block having executed its command (whether successfully or unsuccessfully) faces a chain command block, it triggers the chain command block to also attempt execution.
When a chain command block is triggered,
- If it has been activated,
- It checks whether it is in "Conditional" mode and the command block behind it hasn't executed successfully (Behind in the sense of the direction it is facing, not in the sense of which command block chained to it),
- If true, it triggers another chain command block it is facing, without executing the command.
- If false, it checks whether it has been already executed in this game tick. If false, it executes the command and triggers another chain command block it is facing. If true, it does nothing. That means that chained execution cannot be passed to a command block that has already executed in that game tick (loops execute only once).
- It checks whether it is in "Conditional" mode and the command block behind it hasn't executed successfully (Behind in the sense of the direction it is facing, not in the sense of which command block chained to it),
- If it has not been activated, it triggers the chain command block it is facing to attempt execution.
Chained command blocks execute simultaneously in the same game tick in the order they are chained.
In Bedrock Edition, it can also delay before executing commands if "Delay in Ticks" is not 0:
- When it is triggered,
- If it has been activated, the chain command block checks whether the command block behind it has executed successfully (if in conditional mode), then it delays.
- After delay, if the condition is met before the delay (if in "Conditional" mode), it executes its command once and triggers the chain command block it is pointing to no matter whether the condition met.
- If it has not been activated, it triggers (without delay) the chain command block it is facing to attempt execution.
- If it has been activated, the chain command block checks whether the command block behind it has executed successfully (if in conditional mode), then it delays.
In Java Edition, it can execute multiple times in the same game tick if "UpdateLastExecution" is set to false. In this case, it does not check whether it has already executed in this game tick.
If the chain command block has been activated when triggered, it also updates its success count: If in "Conditional" mode, if the command block behind it didn't execute successfully, it sets its success count to 0. Otherwise, it sets it to the success count of the command.
Output
When activated, a command block can produce multiple types of output:
Success count
- A command block can power a redstone comparator facing away from it (possibly separated by a block) with signal strength specific to the success count. Success count is an integer between 0 to 2,147,483,647 (inclusive).
- The signal strength always reflects the last command executed, even after the command block is deactivated.
- In Java Edition, success count is usually 0 or 1, except for
/functionand/execute.
- In Bedrock Edition, success count is a integer related to command (e.g., the number of players affected by the command, the number of blocks that were altered, the value returned by the command, etc.)
- In Java Edition, leaving the command block GUI with clicking the "Done" button or ↵ Enter resets the success count to 0, no matter whether making changes in the GUI. In Bedrock Edition, leaving the GUI with changes resets the success count to 0.
Message
- The output message describes the success or failure of the executed command, and may be written to multiple destinations:
- Previous Output: The output message is always written to the "Previous Output" text pane of the command block GUI.
- Chat: The output message is written to the chat text in singleplayer mode, or broadcast to all other ops in multiplayer mode, unless it has been suppressed with
/gamerule commandBlockOutput false. Some commands may write additional text to the chat as their normal function, which won't be suppressed (for example, the/saycommand writes a message to the chat of all players), separate from the output message. Chat messages that would usually be prefaced by a player's name (such as from the/me,/sayand/tellcommands) use@[Java Edition only] /![Bedrock Edition only] as the player name. If the command block had been named in an anvil before placement, that name is used instead. In Bedrock Edition, it can also modified in the GUI.
- Logs: The output message is written to multiplayer server logs unless it has been suppressed with
/gamerule logAdminCommands false.
Notes
Command blocks execute commands with OP level 2. The following commands cannot be used in a command block: /ban, /banlist, /ban-ip, /debug, /deop, /kick, /op, /pardon, /pardon-ip, /publish, /save-all, /save-off, /save-on, /stop, and /whitelist (i.e., /debug, /publish, and all of the multiplayer-only commands except /list).
Easter eggs
Running "Searge" (case insensitive) as the command in the command block without a preceding "/" now set the previous output to "#itzlipofutzli". Its success count is 1.
Sounds
| Sound | Subtitles | Source | Description | Resource location | Translation key | Volume | Pitch | Attenuation distance |
|---|---|---|---|---|---|---|---|---|
| Block broken | Blocks | Once the block has broken | block | subtitles | 1.0 | 1.2 | 16 | |
| Block placed | Blocks | When the block is placed | block | subtitles | 1.0 | 1.2 | 16 | |
| Block breaking | Blocks | While the block is in the process of being broken | block | subtitles | 0.25 | 0.75 | 16 | |
| None[sound 1] | Entity-Dependent | Falling on the block with fall damage | block | None[sound 1] | 0.5 | 1.25 | 16 | |
| Footsteps | Entity-Dependent | Walking on the block | block | subtitles | 0.15 | 1.5 | 16 |
| Sound | Source | Description | Resource location | Volume | Pitch |
|---|---|---|---|---|---|
| Blocks | Once the block has broken | dig | 1.0 | 1.1-1.2 | |
| Blocks | When the block is placed | use | 1.0 | 1.2-1.25 | |
| Blocks | While the block is in the process of being broken | hit | 0.3 | 0.75 | |
| Players | Falling on the block with fall damage | fall | 0.4 | 1.0 | |
| Players | Walking on the block | step | 0.35 | 1.0 | |
| Players | Jumping from the block | jump | 0.12 | 1.0 | |
| Players | Falling on the block without fall damage | land | 0.22 | 1.0 |
Data values
ID
| Name | Identifier | Block tags (JE) | Translation key |
|---|---|---|---|
| Command Block | command_block | dragon_immune wither_immune | block.minecraft.command_block |
| Chain Command Block | chain_command_block | dragon_immune wither_immune | block.minecraft.chain_command_block |
| Repeating Command Block | repeating_command_block | dragon_immune wither_immune | block.minecraft.repeating_command_block |
| Name | Identifier |
|---|---|
| Block entity | command_block |
| Name | Identifier | Numeric ID | Translation key |
|---|---|---|---|
| Command Block | command_block | 137 | tile.command_block.name |
| Chain Command Block | chain_command_block | 189 | tile.chain_command_block.name |
| Repeating Command Block | repeating_command_block | 188 | tile.repeating_command_block.name |
| Name | Savegame ID |
|---|---|
| Block entity | ? |
Block data
In Bedrock Edition, a command block's block data specifies its orientation and condition mode.
| Bits | Values |
|---|---|
| 0x1 0x2 0x4 |
A 3-bit field storing the command block's facing:
6 and 7 are unused but produce command blocks facing down and up respectively. |
| 0x8 | Whether the block is in conditional mode. |
Block states
| Name | Default value | Allowed values | Description |
|---|---|---|---|
| conditional | false | falsetrue | True if the command block is in conditional mode. |
| facing | north | downeastnorthsouthupwest | The direction the command block is pointing. |
| Name | Metadata Bits | Default value | Allowed values | Values for Metadata Bits |
Description |
|---|---|---|---|---|---|
| conditional_bit | 0x8 | false | falsetrue | 01 | True if the command block is in conditional mode. |
| facing_direction | 0x10x20x4 | 0 | 012345 | 012345 | The direction the command block is pointing.
|
Block entity
A command block has a block entity associated with it that holds additional data about the block.
- Block entity data
- Tags common to all block entities
- auto: 1 or 0 (true/false) - Allows to activate the command without the requirement of a redstone signal.
- Command: The command to issue to the server.
- conditionMet: 1 or 0 (true/false) - Indicates whether a conditional command block had its condition met when last activated. True if not a conditional command block.
- CustomName: Optional. The name JSON text component of this command block, replacing the usual '@' when using commands such as
/sayand/tell. - LastExecution: stores the tick a chain command block was last executed in.
- LastOutput: The last line of output generated by the command block. Still stored even if the game rule
commandBlockOutputisfalse. Appears in the GUI of the block when right-clicked, and includes a timestamp of when the output was produced. - powered: 1 or 0 (true/false) - States whether or not the command block is powered by redstone or not.
- SuccessCount: Represents the strength of the analog signal output by redstone comparators attached to this command block.
- TrackOutput: 1 or 0 (true/false) - Determines whether the LastOutput is stored. Can be toggled in the GUI by clicking a button near the "Previous Output" textbox. Caption on the button indicates current state: "O" if true, "X" if false.
- UpdateLastExecution: 1 or 0 (true/false) - Defaults to true. If set to false, loops can be created where the same command block can run multiple times in one tick.
History
| Java Edition | |||||
|---|---|---|---|---|---|
| July 27, 2012 | Jeb began tweeting of a new block he had created to start expanding Adventure mode. He began posting pictures, ideas and hints of what the block can do. | ||||
| July 31, 2012 | During Notch's AMA on Reddit, he hinted the block may be in Java Edition 1.4. | ||||
1.4.2{{Extension DPL}}<ul><li>[[Cooked Mutton|Cooked Mutton]]<br/>{{Item
| title = Cooked Mutton
| heals = {{hunger|6}}
| renewable = Yes
| stackable = Yes (64)
| rarity = Common}}
{{redirect|Mutton|the raw version|Raw Mutton}}
'''Cooked mutton''' is a [[food]] item obtained from cooking [[raw mutton]].
== Obtaining ==
=== Mob loot ===
==== Sheep ====
Adult [[sheep]] drop 1–2 cooked mutton if killed while on fire. The maximum amount is increased by 1 per level of [[looting]], for a maximum of 1-5 with Looting III.
=== Cooking ===
Cooked mutton can be obtained by cooking raw mutton in a [[furnace]], [[smoker]], or [[campfire]].
{{Smelting
|showname=1
|Raw Mutton
|Cooked Mutton
|0,35
}}
=== Trading ===
{{IN|bedrock}}, apprentice-level butcher [[villager]]s have a 25% chance to sell 4 cooked mutton for one [[emerald]] as part of their trades.
{{IN|java}}, butcher villagers may give the players with the [[Hero of the Village]] effect cooked mutton.
== Usage ==
=== Food ===
To eat cooked mutton, press and hold {{control|use}} while it is selected in the hotbar. Eating one restores {{hunger|6}} [[hunger]] and 9.6 [[Hunger#Mechanics|saturation]], the same as [[cooked salmon]].
=== Wolves ===
Cooked mutton can be used to [[breed]] and heal tamed [[wolves]], lead them around, and make baby tamed wolves grow up faster by 10% of the remaining time.
==Sounds==
{{Sound table/Entity/Food}}
== Data values ==
=== ID ===
{{edition|java}}:
{{ID table
|edition=java
|showforms=y
|generatetranslationkeys=y
|displayname=Cooked Mutton
|spritetype=item
|nameid=cooked_mutton
|form=item
|foot=1}}
{{edition|bedrock}}:
{{ID table
|edition=bedrock
|showaliasids=y
|shownumericids=y
|showforms=y
|notshowbeitemforms=y
|generatetranslationkeys=y
|displayname=Cooked Mutton
|spritetype=item
|nameid=cooked_mutton
|aliasid=muttoncooked
|id=551
|form=item
|translationkey=item.muttonCooked.name
|foot=1}}
== Advancements ==
{{load advancements|Husbandry;A Balanced Diet}}
== Video ==
<div style="text-align:center">{{yt|PXlW-sZygTs}}</div>
== History ==
{{History|java}}
{{History||1.8|snap=June 30, 2014|slink=https://twitter.com/TheMogMiner/status/483636993780232192|[[Ryan Holtz]] tweeted images of cooked mutton and some other new [[item]]s.}}
{{History|||snap=14w27a|[[File:Cooked Mutton JE1.png|32px]] Added cooked mutton.}}
{{History|||snap=14w33b|[[File:Cooked Mutton JE2 BE1.png|32px]] The texture of raw mutton has been changed. The new texture was created by [[wikipedia:Reddit|Reddit]] user [http://www.reddit.com/u/zeldahuman zeldahuman].<ref>{{reddit|2bjzes/a_reminder_of_the_blocks_and_items_added_in_18_so|cj69zie|context=3}}</ref>}}
{{History||1.13|snap=17w47a|Prior to [[1.13/Flattening|''The Flattening'']], this [[item]]'s numeral ID was 424.}}
{{History||1.14|snap=18w43a|[[File:Cooked Mutton JE3 BE2.png|32px]] The texture of cooked mutton has been changed.}}
{{History|||snap=19w13a|Butcher villagers now give cooked mutton to players under the [[Hero of the Village]] effect.}}
{{History|pocket alpha}}
{{History||v0.15.0|snap=build 1|[[File:Cooked Mutton JE2 BE1.png|32px]] Added cooked mutton.}}
{{History|bedrock}}
{{History||1.10.0|snap=beta 1.10.0.3|[[File:Cooked Mutton JE3 BE2.png|32px]] The texture of cooked mutton has been changed.}}
{{History||1.11.0|snap=beta 1.11.0.4|Cooked mutton can now be [[trading|bought]] from butcher [[villager]]s.}}
{{History||1.16.100|snap=beta 1.16.100.56|The ID of cooked mutton has been changed from <code>muttoncooked</code> to <code>cooked_mutton</code>.}}
{{History|console}}
{{History||xbox=TU31|xbone=CU19|ps=1.22|wiiu=Patch 3|[[File:Cooked Mutton JE2 BE1.png|32px]] Added cooked mutton.}}
{{History|PS4}}
{{History||1.90|[[File:Cooked Mutton JE3 BE2.png|32px]] The texture of cooked mutton has been changed.}}
{{History|3ds}}
{{History||0.1.0|[[File:Cooked Mutton JE2 BE1.png|32px]] Added cooked mutton.}}
{{History|foot}}
== Issues ==
{{issue list}}
== Gallery ==
<gallery>
File:Rabbit Items 3 Ryan Holtz.png|First image of the item by [[Ryan Holtz]].
</gallery>
== References ==
{{reflist}}
{{items}}
[[Category:Food]]
[[Category:Renewable resources]]
[[de:Gebratenes Hammelfleisch]]
[[es:Cordero asado]]
[[fr:Mouton cuit]]
[[it:Carne ovina cotta]]
[[ja:焼き羊肉]]
[[ko:익힌 양고기]]
[[nl:Gebraden schapenvlees]]
[[pl:Pieczona baranina]]
[[pt:Carneiro assado]]
[[ru:Жареная баранина]]
[[zh:熟羊肉]]</li><li>[[Lingering Potion|Lingering Potion]]<br/>{{about|throwable potions that leave a lingering area of effect|the throwable potions without a lingering effect|Splash Potion|the drinkable potions|Potion}}
{{Item
| image = <gallery>
Lingering Water Bottle.png | Water Bottle
Uncraftable Lingering Potion.png | Uncraftable
</gallery>
| extratext = View [[#Gallery|all renders]]
| renewable = Uncraftable, Luck{{only|java|short=1}}, Decay{{only|bedrock|short=1}}: No<br>
All others: Yes
| stackable = No
}}
'''Lingering potions''' are variants of [[splash potion]]s that can be thrown to leave clouds with [[status effect]]s that linger on the ground in an area.
== Obtaining ==
=== Brewing ===
{{main|Brewing}}
{{brewing
|Dragon's Breath
|Any Lingering Potion
|ingredients=[[Dragon's Breath]] + <br>Any [[Splash Potion]]
}}
== Usage ==
=== Creating area effect clouds ===
Lingering potions are thrown, like [[splash potion]]s, by {{control|using}} them. On impact they explode, creating a cloud. The cloud is made of the potion particles corresponding to the potion that was thrown.
The cloud starts with a radius of 3 blocks, decreasing to 0 over the course of 30 seconds. During the cloud's existence, any player or mob that walks into it after the first second gets the corresponding status effect; this decreases the radius by a {{frac|1|2}} block immediately, reducing the cloud's lifespan by 5 seconds.
For effects with duration, the duration applied by the cloud is {{frac|1|4}} that of the corresponding [[potion]]. For effects without duration such as healing or harming, the potency of the effect is {{frac|1|2}} that of the corresponding potion.
The effect may be applied consecutively if the player or mob remains in the cloud. For example, a player throwing the Lingering Potion of Healing II straight down consumes the cloud within a few seconds while being healed 5 times for a total of {{hp|20}} health. As far as healing is concerned, this makes the lingering potion much more powerful than the regular or splash potion, provided that the player is away from other mobs or players.
Lingering potions can also be thrown out of [[dispenser]]s like splash potions.
=== Lingering water bottle ===
Like the [[Splash potion#Splash water bottles|splash water bottle]], a lingering water bottle puts out fire and damages endermen and blazes by {{hp|1}}. It creates no effect cloud.
==== Mud ====
Lingering water bottles can be {{control|used}} on [[dirt]], [[coarse dirt]], or [[rooted dirt]] to turn it into [[mud]].
=== Crafting ingredient ===
{{crafting usage|Lingering Potion, Lingering Water Bottle|match=any}}
=== Filling cauldrons ===
{{IN|bedrock}}, using a lingering potion on a cauldron adds one level of that potion to the cauldron. Attempting to add a lingering potion to a cauldron with water, dyed water or a non-matching potion empties the cauldron and creates an explosion sound (but no actual explosion).
=== Uncraftable lingering potion ===
{{IN|java}}, the uncraftable potion is a splash potion with no effect that is unobtainable in regular gameplay. It is also available in potion and splash potion forms, as well as for tipped arrows.
It can be obtained using the following command: {{cmd|give @s minecraft:lingering_potion{Potion:"minecraft:empty"} }}. It is also obtained any time a potion has invalid or missing potion effect tags, and thus serves as a placeholder.
{| class="wikitable" style="text-align: center;" data-description="Unused potions"
! Icon
! Name
|-
| {{Slot|Uncraftable Lingering Potion|link=none}}
! Uncraftable Lingering Potion
|}
== Custom effects ==
{{IN|java}}, lingering potions can be obtained with any status effect using {{cmd|give}} and the tag {{code|CustomPotionEffects}}, which is an array of effects for the potion. See [[Item format#Potion Effects]] for more information, and [[status effect]] for a list of effects and IDs.
== Sounds ==
{{edition|java}}:<br>
Lingering potions use the Friendly Creatures sound category for entity-dependent sound events.
{{Sound table
|sound=Glass dig1.ogg
|sound2=Glass dig2.ogg
|sound3=Glass dig3.ogg
|subtitle=Bottle smashes
|source=neutral
|description=When a lingering potion impacts something
|id=entity.splash_potion.break
|translationkey=subtitles.entity.potion.splash
|volume=1.0
|pitch=0.9-1.0
|distance=16}}
{{Sound table
|rowspan=2
|sound=Bow shoot.ogg
|subtitle=Bottle thrown
|source=neutral
|description=When a lingering potion is thrown by a player
|id=entity.lingering_potion.throw
|translationkey=subtitles.entity.potion.throw
|volume=0.5
|pitch={{frac|1|3}}-0.5
|distance=16}}
{{Sound table
|subtitle=Dispensed item
|source=block
|description=When a lingering potion is dispensed by a [[dispenser]]
|id=block.dispenser.launch
|translationkey=subtitles.block.dispenser.dispense
|volume=1.0
|pitch=1.2
|distance=16
|foot=1}}
{{edition|bedrock}}:
{{Sound table
|type=bedrock
|sound=Glass dig1.ogg
|sound2=Glass dig2.ogg
|sound3=Glass dig3.ogg
|source=block
|description=When a splash potion impacts something
|id=random.glass
|volume=1.0
|pitch=1.0}}
{{Sound table
|rowspan=2
|sound=Bow shoot.ogg
|source=player
|description=When a splash potion is thrown by a player
|id=random.bow
|volume=0.5
|pitch=0.33-0.5}}
{{Sound table
|source=player
|description=When a splash potion is dispensed from a dispenser
|id=random.bow
|volume=1.0
|pitch=0.83-1.25
|foot=1}}
== Data values ==
=== ID ===
{{edition|java}}:
{{ID table
|edition=java
|showforms=y
|generatetranslationkeys=y
|displayname=Lingering Potion
|spritetype=item
|nameid=lingering_potion
|form=item
|translationkey=item.minecraft.lingering_potion,item.minecraft.lingering_potion.effect.empty,item.minecraft.lingering_potion.effect.water,item.minecraft.lingering_potion.effect.mundane,item.minecraft.lingering_potion.effect.thick,item.minecraft.lingering_potion.effect.awkward,item.minecraft.lingering_potion.effect.night_vision,item.minecraft.lingering_potion.effect.invisibility,item.minecraft.lingering_potion.effect.leaping,item.minecraft.lingering_potion.effect.fire_resistance,item.minecraft.lingering_potion.effect.swiftness,item.minecraft.lingering_potion.effect.slowness,item.minecraft.lingering_potion.effect.water_breathing,item.minecraft.lingering_potion.effect.healing,item.minecraft.lingering_potion.effect.harming,item.minecraft.lingering_potion.effect.poison,item.minecraft.lingering_potion.effect.regeneration,item.minecraft.lingering_potion.effect.strength,item.minecraft.lingering_potion.effect.weakness,item.minecraft.lingering_potion.effect.levitation,item.minecraft.lingering_potion.effect.luck,item.minecraft.lingering_potion.effect.turtle_master,item.minecraft.lingering_potion.effect.slow_falling
|foot=1}}
{{edition|bedrock}}:
{{ID table
|edition=bedrock
|shownumericids=y
|showforms=y
|notshowbeitemforms=y
|generatetranslationkeys=y
|displayname=Lingering Potion
|spritetype=item
|nameid=lingering_potion
|id=562
|form=item
|translationkey=potion.emptyPotion.linger.name,potion.mundane.linger.name,potion.mundane.extended.linger.name,potion.thick.linger.name,potion.awkward.linger.name,potion.nightVision.linger.name,potion.invisibility.linger.name,potion.jump.linger.name,potion.fireResistance.linger.name,potion.moveSpeed.linger.name,potion.moveSlowdown.linger.name,potion.heal.linger.name,potion.harm.linger.name,potion.poison.linger.name,potion.regeneration.linger.name,potion.damageBoost.linger.name,potion.weakness.linger.name,potion.wither.linger.name,potion.turtleMaster.linger.name,potion.slowFalling.linger.name
|foot=1}}
=== Item data ===
<div class="treeview">
* {{nbt|compound|tag}}: The item's '''tag''' tag.
{{:Player.dat_format/Potion}}
</div>
=== Thrown potion ===
{{Entity
| title = Thrown lingering potion
| networkid = '''[[JE]]''': 73
}}
==== ID ====
{{edition|java}}:
{{ID table
|generatetranslationkeys=java
|displayname=Lingering Potion
|spritetype=entity
|nameid=potion
|foot=1}}
{{edition|bedrock}}:
{{ID table
|shownumericids=y
|generatetranslationkeys=bedrock
|displayname=Lingering Potion
|spritetype=entity
|nameid=lingering_potion
|id=101
|foot=1}}
==== Entity Data ====
{{see also|Chunk format|Potions#Data values|title2=Potion data values}}
Lingering potions when thrown have entity data that define various properties of the entity.
{{:Splash Potion/ED}}
=== Area Effect Cloud ===
{{Entity
| title = Area Effect Cloud
| image = Area Effect Cloud.png
|imagesize=290px
}}
==== ID ====
{{edition|java}}:
{{ID table
|generatetranslationkeys=java
|displayname=Area Effect Cloud
|spritetype=entity
|nameid=area_effect_cloud
|foot=1}}
{{edition|bedrock}}:
{{ID table
|shownumericids=y
|generatetranslationkeys=bedrock
|displayname=Area Effect Cloud
|spritetype=entity
|nameid=area_effect_cloud
|id=95
|foot=1}}
==== Entity data ====
{{see also|Chunk format}}
The cloud that is created when: lingering potions are thrown; [[creeper]]s with potion effects explode; [[Ender Dragon#Dragon_Fireball|dragon fireballs]] hit the ground, is an entity, which has entity data that defines the properties of the entity.
{{/ED}}
==Advancements==
{{Load advancements|Zombie Doctor;A Furious Cocktail;How Did We Get Here?;Bullseye}}
== History ==
{{Info needed section|Lingering Potion of Decay; Lingering Potion of Weakness; Uncraftable Lingering Potion}}
{{History|java}}
{{History||1.9|snap=15w33a|[[File:Lingering Potion of Night Vision JE1 BE1.png|32px]] [[File:Lingering Potion of Invisibility JE1 BE1.png|32px]] [[File:Lingering Potion of Leaping JE1 BE1.png|32px]] [[File:Lingering Potion of Fire Resistance JE1 BE1.png|32px]] [[File:Lingering Potion of Swiftness JE1 BE1.png|32px]] [[File:Lingering Potion of Slowness JE1 BE1.png|32px]] [[File:Lingering Potion of Water Breathing JE1 BE1.png|32px]] [[File:Lingering Potion of Healing JE1 BE1.png|32px]] [[File:Lingering Potion of Harming JE1 BE1.png|32px]] [[File:Lingering Potion of Poison JE1 BE1.png|32px]] [[File:Lingering Potion of Regeneration JE1 BE1.png|32px]] [[File:Lingering Potion of Strength JE1 BE1.png|32px]] [[File:Lingering Potion of Weakness JE1 BE1.png|32px]] [[File:Lingering Potion of Luck JE1.png|32px]] Added lingering potions.
|[[File:Lingering Water Bottle JE1 BE1.png|32px]] [[File:Lingering Water Bottle JE1 BE1.png|32px]] [[File:Lingering Water Bottle JE1 BE1.png|32px]] [[File:Lingering Water Bottle JE1 BE1.png|32px]] Added lingering water bottle, and Mundane, Thick, and Awkward lingering potions.}}
{{History|||snap=15w33c|The bug where the [[player]] could not place [[splash potion]]s in the [[brewing stand]] has been fixed. This now allows for easier creation of lingering potions.}}
{{History|||snap=16w06a|Lingering potions can now be used to craft [[tipped arrow]]s.}}
{{History||1.11|snap=16w32a|The [[entity]] ID has been changed from {{code|AreaEffectCloud}} to {{code|area_effect_cloud}}.}}
{{History||1.13|snap=17w47a|Prior to [[1.13/Flattening|''The Flattening'']], this [[item]]'s numeral ID was 441.}}
{{History|||snap=18w07a|[[File:Lingering Potion of the Turtle Master JE1 BE1.png|32px]] Added the lingering potions of the Turtle Master.}}
{{History|||snap=18w14a|[[File:Lingering Potion of Slow Falling JE1 BE1.png|32px]] Added lingering potions of [[Slow Falling]].}}
{{History||1.14|snap=18w43a|[[File:Lingering Water Bottle JE2 BE2.png|32px]] [[File:Lingering Potion of Night Vision JE2 BE2.png|32px]] [[File:Lingering Potion of Invisibility JE2 BE2.png|32px]] [[File:Lingering Potion of Leaping JE2 BE2.png|32px]] [[File:Lingering Potion of Fire Resistance JE2 BE2.png|32px]] [[File:Lingering Potion of Swiftness JE2 BE2.png|32px]] [[File:Lingering Potion of Slowness JE2 BE2.png|32px]] [[File:Lingering Potion of the Turtle Master JE2 BE2.png|32px]] [[File:Lingering Potion of Water Breathing JE2 BE2.png|32px]] [[File:Lingering Potion of Healing JE2 BE2.png|32px]] [[File:Lingering Potion of Harming JE2 BE2.png|32px]] [[File:Lingering Potion of Poison JE2 BE2.png|32px]] [[File:Lingering Potion of Regeneration JE2 BE2.png|32px]] [[File:Lingering Potion of Strength JE2 BE2.png|32px]] [[File:Lingering Potion of Weakness JE2 BE2.png|32px]] [[File:Lingering Potion of Luck JE2.png|32px]] [[File:Lingering Potion of Slow Falling JE2 BE2.png|32px]] The textures of lingering potions have been changed.}}
{{History||1.19|snap=22w11a|Lingering water bottles can be {{control|used}} on [[dirt]], [[coarse dirt]], or [[rooted dirt]] to turn it into [[mud]].}}
{{History||1.19.3|snap=22w43a|Lingering water bottles can now extinguish burning entities.<ref>{{bug|MC-189911|||Fixed}}</ref>}}
{{History||1.19.4|snap=Pre-release 1|Lingering potions no longer have an enchantment glint.}}
{{History|||snap=Pre-release 3|[[File:Lingering Potion of Night Vision JE3.png|32px]] [[File:Lingering Potion of Invisibility JE3.png|32px]] [[File:Lingering Potion of Leaping JE3.png|32px]] [[File:Lingering Potion of Fire Resistance JE3.png|32px]] [[File:Lingering Potion of Swiftness JE3.png|32px]] [[File:Lingering Potion of Slowness JE3.png|32px]] [[File:Lingering Potion of the Turtle Master JE3.png|32px]] [[File:Lingering Potion of Water Breathing JE3.png|32px]] [[File:Lingering Potion of Harming JE3.png|32px]] [[File:Lingering Potion of Poison JE3.png|32px]] [[File:Lingering Potion of Strength JE3.png|32px]] Changed colors of the following lingering potions: Night Vision, Invisibility, Leaping, Fire Resistance, Swiftness, Slowness, Turtle Master, Water Breathing, Harming, Poison, Strength, Resistance.}}
{{History||1.20|snap=23w12a|Wither [[effect]] particle colors have been adjusted to make them more distinguishable.
|The lingering potion of [[Slow Falling]] has had its color tweaked to make it more distinguishable from the lingering potion of [[Invisibility]].}}
{{History|pocket}}
{{History||1.0.0|snap=alpha 0.17.0.1|[[File:Lingering Water Bottle JE1 BE1.png|32px]] [[File:Lingering Potion of Night Vision JE1 BE1.png|32px]] [[File:Lingering Potion of Invisibility JE1 BE1.png|32px]] [[File:Lingering Potion of Leaping JE1 BE1.png|32px]] [[File:Lingering Potion of Fire Resistance JE1 BE1.png|32px]] [[File:Lingering Potion of Swiftness JE1 BE1.png|32px]] [[File:Lingering Potion of Slowness JE1 BE1.png|32px]] [[File:Lingering Potion of Water Breathing JE1 BE1.png|32px]] [[File:Lingering Potion of Healing JE1 BE1.png|32px]] [[File:Lingering Potion of Harming JE1 BE1.png|32px]] [[File:Lingering Potion of Poison JE1 BE1.png|32px]] [[File:Lingering Potion of Regeneration JE1 BE1.png|32px]] [[File:Lingering Potion of Strength JE1 BE1.png|32px]] [[File:Lingering Potion of Weakness JE1 BE1.png|32px]] [[File:Lingering Potion of Decay BE1.png|32px]] Added lingering potions.
|Lingering water bottles, mundane, long mundane, thick, and awkward lingering potions are all available in the Creative inventory.}}
{{History|bedrock}}
{{History||1.5.0|snap=beta 1.5.0.4|[[File:Lingering Potion of the Turtle Master JE1 BE1.png|32px]] Added lingering potions of the Turtle Master.}}
{{History||1.6.0|snap=beta 1.6.0.5|[[File:Lingering Potion of Slow Falling JE1 BE1.png|32px]] Added lingering potions of [[Slow Falling]].}}
{{History||1.10.0|snap=beta 1.10.0.3|[[File:Lingering Water Bottle JE2 BE2.png|32px]] [[File:Lingering Potion of Night Vision JE2 BE2.png|32px]] [[File:Lingering Potion of Invisibility JE2 BE2.png|32px]] [[File:Lingering Potion of Leaping JE2 BE2.png|32px]] [[File:Lingering Potion of Fire Resistance JE2 BE2.png|32px]] [[File:Lingering Potion of Swiftness JE2 BE2.png|32px]] [[File:Lingering Potion of Slowness JE2 BE2.png|32px]] [[File:Lingering Potion of Water Breathing JE2 BE2.png|32px]] [[File:Lingering Potion of Healing JE2 BE2.png|32px]] [[File:Lingering Potion of Harming JE2 BE2.png|32px]] [[File:Lingering Potion of Poison JE2 BE2.png|32px]] [[File:Lingering Potion of Regeneration JE2 BE2.png|32px]] [[File:Lingering Potion of Strength JE2 BE2.png|32px]] [[File:Lingering Potion of Weakness JE2 BE2.png|32px]] [[File:Lingering Potion of Decay BE2.png|32px]] [[File:Lingering Potion of the Turtle Master JE2 BE2.png|32px]] [[File:Lingering Potion of Slow Falling JE2 BE2.png|32px]] The textures of lingering potions have been changed.}}
{{History||1.19.80|snap=beta 1.19.80.21|Changed potion colors for the following lingering potions: Fire Resistance, Harming, Invisibility, Leaping, Night Vision, Poison, Slowness, Strength, Swiftness, Turtle Master, and Water Breathing.
|Removed enchantment glint from lingering potions.}}
{{History|console}}
{{History||xbox=TU46|xbone=CU36|ps=1.38|wiiu=Patch 15|switch=1.0.1|[[File:Lingering Water Bottle JE1 BE1.png|32px]] [[File:Lingering Potion of Night Vision JE1 BE1.png|32px]] [[File:Lingering Potion of Invisibility JE1 BE1.png|32px]] [[File:Lingering Potion of Leaping JE1 BE1.png|32px]] [[File:Lingering Potion of Fire Resistance JE1 BE1.png|32px]] [[File:Lingering Potion of Swiftness JE1 BE1.png|32px]] [[File:Lingering Potion of Slowness JE1 BE1.png|32px]] [[File:Lingering Potion of Water Breathing JE1 BE1.png|32px]] [[File:Lingering Potion of Healing JE1 BE1.png|32px]] [[File:Lingering Potion of Harming JE1 BE1.png|32px]] [[File:Lingering Potion of Poison JE1 BE1.png|32px]] [[File:Lingering Potion of Regeneration JE1 BE1.png|32px]] [[File:Lingering Potion of Strength JE1 BE1.png|32px]] [[File:Lingering Potion of Weakness JE1 BE1.png|32px]] [[File:Lingering Potion of Luck JE1.png|32px]] Added lingering potions.}}
{{History||xbox=TU69|xbone=none|ps=1.76|wiiu=Patch 38|switch=none|[[File:Lingering Potion of Decay BE1.png|32px]] [[File:Lingering Potion of the Turtle Master JE1 BE1.png|32px]] [[File:Lingering Potion of Slow Falling JE1 BE1.png|32px]] Added lingering potions of the [[Wither (effect)|Decay]], [[Slow Falling]], and Turtle Master.}}
{{History||xbox=none|xbone=none|ps=1.90|wiiu=none|switch=none|[[File:Lingering Water Bottle JE2 BE2.png|32px]] [[File:Lingering Potion of Night Vision JE2 BE2.png|32px]] [[File:Lingering Potion of Invisibility JE2 BE2.png|32px]] [[File:Lingering Potion of Leaping JE2 BE2.png|32px]] [[File:Lingering Potion of Fire Resistance JE2 BE2.png|32px]] [[File:Lingering Potion of Swiftness JE2 BE2.png|32px]] [[File:Lingering Potion of Slowness JE2 BE2.png|32px]] [[File:Lingering Potion of Water Breathing JE2 BE2.png|32px]] [[File:Lingering Potion of Healing JE2 BE2.png|32px]] [[File:Lingering Potion of Harming JE2 BE2.png|32px]] [[File:Lingering Potion of Poison JE2 BE2.png|32px]] [[File:Lingering Potion of Regeneration JE2 BE2.png|32px]] [[File:Lingering Potion of Strength JE2 BE2.png|32px]] [[File:Lingering Potion of Weakness JE2 BE2.png|32px]] [[File:Lingering Potion of Luck JE2.png|32px]] [[File:Lingering Potion of Decay BE2.png|32px]] [[File:Lingering Potion of the Turtle Master JE2 BE2.png|32px]] [[File:Lingering Potion of Slow Falling JE2 BE2.png|32px]] The textures of lingering potions have been changed.}}
{{History|new 3ds}}
{{History||1.7.10|[[File:Lingering Water Bottle JE1 BE1.png|32px]] [[File:Lingering Potion of Night Vision JE1 BE1.png|32px]] [[File:Lingering Potion of Invisibility JE1 BE1.png|32px]] [[File:Lingering Potion of Leaping JE1 BE1.png|32px]] [[File:Lingering Potion of Fire Resistance JE1 BE1.png|32px]] [[File:Lingering Potion of Swiftness JE1 BE1.png|32px]] [[File:Lingering Potion of Slowness JE1 BE1.png|32px]] [[File:Lingering Potion of Water Breathing JE1 BE1.png|32px]] [[File:Lingering Potion of Healing JE1 BE1.png|32px]] [[File:Lingering Potion of Harming JE1 BE1.png|32px]] [[File:Lingering Potion of Poison JE1 BE1.png|32px]] [[File:Lingering Potion of Regeneration JE1 BE1.png|32px]] [[File:Lingering Potion of Strength JE1 BE1.png|32px]] [[File:Lingering Potion of Weakness JE1 BE1.png|32px]] [[File:Lingering Potion of Decay BE1.png|32px]] Added lingering potions.
|Lingering water bottles, mundane, long mundane, thick, and awkward lingering potions are all available in the Creative inventory.}}
{{History|foot}}
== Issues ==
{{issue list}}
== Trivia ==
* A thrown lingering potion faces toward the [[player]] in first-person view while it appears rotated horizontally in third-person view. This is the case for all throwable [[item]]s ([[ender pearl]]s, [[eggs]], [[snowball]]s, and all throwable potions).
== Gallery ==
<gallery>
Lingering Water Bottle.png|Water Bottle
Lingering Potion of Night Vision.png|Night Vision
Lingering Potion of Invisibility.png|Invisibility
Lingering Potion of Leaping.png|Leaping
Lingering Potion of Fire Resistance.png|Fire Resistance
Lingering Potion of Swiftness.png|Swiftness
Lingering Potion of Slowness.png|Slowness
Lingering Potion of the Turtle Master.png|Turtle Master
Lingering Potion of Water Breathing.png|Water Breathing
Lingering Potion of Healing.png|Healing
Lingering Potion of Harming.png|Harming
Lingering Potion of Poison.png|Poison
Lingering Potion of Regeneration.png|Regeneration
Lingering Potion of Strength.png|Strength
Lingering Potion of Weakness.png|Weakness
Lingering Potion of Slow Falling.png|Slow Falling
Lingering Potion of Luck.png|Luck
Lingering Potion of Decay.png|Decay
Uncraftable Lingering Potion.png|Uncraftable
</gallery>
=== Screenshots ===
<gallery>
Transparent Area Effect Cloud Image.png|Just area affect cloud particles
</gallery>
== See also ==
* {{ItemLink|Glass Bottle}}
* {{ItemLink|Potion}}
* {{ItemLink|Splash Potion}}
{{Items}}
{{Entities}}
[[Category:Combat]]
[[de:Verweiltrank]]
[[fr:Potion persistante]]
[[ko:잔류형 물약]]
[[ja:残留ポーション]]
[[pl:Trwałe miotane mikstury]]
[[pt:Poção prolongada]]
[[ru:Оседающие зелья]]
[[uk:Осідаючі зілля]]
[[zh:滞留药水]]</li></ul> | 12w32a | ||||
1.5{{Extension DPL}}<ul><li>[[Baked Potato|Baked Potato]]<br/>{{Item
| title = Baked Potato
| renewable = Yes
| heals = {{hunger|5}}
| stackable = Yes (64)}}
A '''baked potato''' is a [[food]] [[item]] that can be eaten by the [[player]].
== Obtaining ==
Baked potatoes can be obtained by cooking [[potato]]es in a [[furnace]], [[smoker]], or [[campfire]].
{{Smelting
|Potato
|Baked Potato
|0,35
}}
{{IN|JE}}, baked potatoes can also be obtained by killing a zombie or one of its variants while it is on fire. The drop chance is still affected by [[Looting]].
=== Chest loot ===
{{LootChestItem|baked-potato}}
== Usage ==
To eat a baked potato, press and hold {{control|use}} while it is selected in the [[hotbar]]. Eating one restores {{hunger|5}} hunger and 6.0 hunger [[Hunger#Mechanics|saturation]].
=== Crafting ingredient ===
{{crafting usage}}
=== Composting ===
Placing a baked potato into a [[composter]] has an 85% chance of raising the compost level by 1. This is more efficient than composting with raw potatoes.
== Sounds ==
{{Sound table/Entity/Food}}
== Data values ==
=== ID ===
{{edition|java}}:
{{ID table
|edition=java
|showforms=y
|generatetranslationkeys=y
|displayname=Baked Potato
|spritetype=item
|nameid=baked_potato
|form=item
|foot=1}}
{{edition|bedrock}}:
{{ID table
|edition=bedrock
|shownumericids=y
|showforms=y
|notshowbeitemforms=y
|generatetranslationkeys=y
|displayname=Baked Potato
|spritetype=item
|nameid=baked_potato
|id=281
|form=item
|foot=1}}
== Advancements ==
{{load advancements|Husbandry;A Balanced Diet}}
== History ==
{{History|java}}
{{History||1.4.2|snap=12w34a|[[File:Baked Potato JE1.png|32px]] Added baked potatoes.}}
{{History|||snap=12w37a|[[File:Baked Potato JE2 BE1.png|32px]] The texture of baked potatoes has been slightly changed.}}
{{History||1.8|snap=14w02a|Baked potatoes now restore {{Hunger|5}} hunger points instead of 6.}}
{{History|||snap=14w27a|Baked potatoes are now used to craft [[rabbit stew]].}}
{{History||1.13|snap=17w47a|Prior to [[1.13/Flattening|''The Flattening'']], this [[item]]'s numeral ID was 393.}}
{{History||1.14|snap=18w43a|[[File:Baked Potato JE3.png|32px]] The texture of baked potatoes has been changed.}}
{{History|||snap=18w50a|[[File:Baked Potato JE4 BE2.png|32px]] The texture of baked potatoes has been changed, once again.}}
{{History|||snap=19w03a|Placing a baked potato into the new [[composter]] has an 80% chance of raising the compost level by 1.}}
{{History|||snap=19w05a|Baked potatoes now have an 85% chance of increasing the compost level in a composter by 1.}}
{{History||1.17|snap=21w13a|Baked potatoes can now be dropped by flaming [[zombie]]s.<ref>{{bug|MC-199065}}</ref>}}
{{History||1.19|snap=22w13a|Baked potatoes can now be found in [[ancient city]] ice box [[chest]]s.}}
{{History|upcoming java}}
{{History||Villager Trade Rebalance<br>(Experimental)|link=Java Edition 1.20.2|snap=23w31a|[[Wandering trader]]s now have a chance to [[trading|buy]] baked potatoes from the player.}}
{{History|pocket alpha}}
{{History||v0.8.0|snap=build 1|[[File:Baked Potato JE2 BE1.png|32px]] Added baked potatoes.}}
{{History||v0.12.1|snap=build 1|Baked potatoes now restore [[hunger]] instead of [[health]].}}
{{History||v0.13.0|snap=build 1|Baked potatoes are now used to craft [[rabbit stew]].}}
{{History|bedrock}}
{{History||1.10.0|snap=beta 1.10.0.3|[[File:Baked Potato JE4 BE2.png|32px]] The texture of baked potatoes has been changed.}}
{{History||1.11.0|snap=beta 1.11.0.1|Baked potatoes can now be used to fill up [[composter]]s.}}
{{History|console}}
{{History||xbox=TU14|xbone=CU1|ps=1.04|wiiu=Patch 1|switch=1.0.1|[[File:Baked Potato JE2 BE1.png|32px]] Added baked potatoes.}}
{{History||ps=1.00|[[File:Baked Potato JE2 BE1.png|32px]] Added baked potatoes to the [[PlayStation 4 Edition|PS4]] and [[PlayStation Vita Edition|PSVita]].}}
{{History||xbox=none|xbone=none|ps=1.90|wiiu=none|switch=none|[[File:Baked Potato JE4 BE2.png|32px]] The texture of baked potatoes has been changed.}}
{{History|new3DS}}
{{History||0.1.0|[[File:Baked Potato JE2 BE1.png|32px]] Added baked potatoes.}}
{{History|foot}}
== Issues ==
{{issue list}}
== See also ==
* {{ItemLink|Poisonous Potato}}
{{Items}}
[[Category:Food]]
[[Category:Renewable resources]]
[[cs:Pečená brambora]]
[[de:Ofenkartoffel]]
[[es:Patata cocida]]
[[fr:Pomme de terre cuite]]
[[hu:Sült burgonya]]
[[it:Patata al forno]]
[[ja:ベイクドポテト]]
[[ko:구운 감자]]
[[nl:Gebakken aardappel]]
[[pl:Pieczony ziemniak]]
[[pt:Batata assada]]
[[ru:Печёный картофель]]
[[th:มันฝรั่งอบ]]
[[zh:烤马铃薯]]</li><li>[[Heart of the Sea|Heart of the Sea]]<br/>{{Item
| image = Heart of the Sea.png
| stackable = Yes (64)
| rarity = Uncommon
| renewable = No
}}
A '''heart of the sea''' is a rare [[item]] that can be crafted into a [[conduit]].
== Obtaining ==
The heart of the sea must be found. It cannot be crafted or obtained by trading, making it a [[non-renewable resource]].
A heart of the sea is obtained from a [[buried treasure]]. The location is marked with a noticeable red X on a [[Explorer Map|buried treasure map]], which is found in [[Ocean_Ruins|ocean ruins]] and [[Shipwreck|shipwrecks]]. Feeding [[raw cod]] or [[raw salmon]] to a [[dolphin]] causes the dolphin to swim toward the nearest [[buried treasure]], [[shipwreck]], or [[ocean ruins]].
=== Chest loot ===
{{LootChestItem|heart-of-the-sea}}
== Usage ==
=== Crafting===
{{crafting usage}}
== Data values ==
=== ID ===
{{edition|java}}:
{{ID table
|edition=java
|showforms=y
|generatetranslationkeys=y
|displayname=Heart of the Sea
|spritetype=item
|nameid=heart_of_the_sea
|form=item
|foot=1}}
{{edition|bedrock}}:
{{ID table
|edition=bedrock
|shownumericids=y
|showforms=y
|notshowbeitemforms=y
|generatetranslationkeys=y
|displayname=Heart of the Sea
|spritetype=item
|nameid=heart_of_the_sea
|id=571
|form=item
|foot=1}}
== History ==
{{History|java}}
{{History||1.13|snap=18w15a|[[File:Heart of the Sea JE1 BE2.png|32px]] Added heart of the sea.}}
{{History|||snap=18w19a|Heart of the sea now generates in all [[buried treasure]] [[chest]]s in a stack of 1.}}
{{History|bedrock}}
{{History||1.4.0|snap=beta 1.2.14.2|An entry in the [[buried treasure]] loot table has been added named <code>nautilus_core</code>. It is unobtainable though since the <code>nautilus_core</code> has not been added into the game yet.}}
{{History|||snap=beta 1.2.20.1|[[File:Heart of the Sea BE1.png|32px]] Added heart of the sea as an [[item]] obtainable in buried treasure [[chest]]s. It cannot be used to craft [[conduit]]s yet.}}
{{History|||snap=beta 1.2.20.2|[[File:Heart of the Sea JE1 BE2.png|32px]] The texture of heart of the sea has been changed.}}
{{History||1.5.0|snap=beta 1.5.0.1|Heart of the sea can now be used to craft [[conduit]]s.}}
{{History|console}}
{{History||xbox=TU69|ps=1.76|wiiu=Patch 38|[[File:Heart of the Sea JE1 BE2.png|32px]] Added heart of the sea.}}
{{History|education}}
{{History||1.4.0|[[File:Heart of the Sea JE1 BE2.png|32px]] Added heart of the sea. It generates in all [[buried treasure]] [[chest]]s in a stack of 1.}}
{{History|foot}}
== Issues ==
{{issue list}}
== Trivia ==
* Before the heart of the sea was added to {{el|be}}, there was an entry found in the buried treasure chest loot table named <code>nautilus_core</code>, which was later revealed to be the heart of the sea. Despite the name change, the heart of the sea continues to be referred to as the <code>nautilus_core</code> in most game files.
== External Links ==
*[https://www.minecraft.net/en-us/article/heart-sea Taking Inventory: Heart of the Sea] – Minecraft.net on August 31, 2023
{{items}}
[[Category:Non-renewable resources]]
[[de:Herz des Meeres]]
[[fr:Cœur de la mer]]
[[es:Corazón del mar]]
[[it:Cuore del mare]]
[[ja:海洋の心]]
[[ko:바다의 심장]]
[[nl:Hart van de zee]]
[[pl:Serce oceanu]]
[[pt:Coração do mar]]
[[ru:Сердце моря]]
[[uk:Серце моря]]
[[zh:海洋之心]]</li></ul> | 13w03a | Command block success can now power a redstone comparator. | |||
| 13w04a | Command blocks renamed with an anvil now use their name instead of @ in the chat. | ||||
1.6.1{{Extension DPL}}<ul><li>[[Feather|Feather]]<br/>{{about|a item|a enchantent|Feather Falling}}
{{Item
| image = Feather.png
| stackable = Yes (64)
| renewable = Yes
}}
'''Feathers''' are items dropped by [[chicken]]s and [[parrot]]s, as well as tamed [[cats]] as morning gifts.
== Obtaining ==
=== Mob loot ===
Adult [[chicken]]s drop 0–2 feathers upon death. The maximum is increased by 1 per level of [[Looting]], for a maximum of 0–5 with Looting III.
[[Parrot]]s drop 1–2 feathers upon death. The maximum is increased by 1 per level of Looting, for a maximum of 1–5 with Looting III.
A [[fox]] sometimes spawns holding a feather, which always drops upon death. Alternatively, the player can drop a [[food]] item, causing the fox to drop the feather in favor of the food.
=== Natural generation ===
{{LootChestItem|feather}}
=== Cat gifts ===
{{main|Cat#Gifts}}
Tamed [[cat]]s have a 70% chance of giving the [[player]] a "morning gift", and the gift has a 16.13% chance to be a feather.
== Usage ==
=== Helmet ===
<div style='float:right'></div>
While a feather cannot be equipped in the head slot in [[Survival]] mode, equipping it using commands causes it to appear completely upright unlike other items.
[[File:Steve wearing Feather.png|75px]]
[[File:Alex wearing Feather.png|75px]]
=== Crafting ingredient ===
{{crafting usage}}
=== Trading ===
Expert-level fletcher [[villager]]s buy 24 feathers for an [[emerald]] as part of their trade.
== Data values ==
=== ID ===
{{edition|java}}:
{{ID table
|edition=java
|showforms=y
|generatetranslationkeys=y
|displayname=Feather
|spritetype=item
|nameid=feather
|form=item
|foot=1}}
{{edition|bedrock}}:
{{ID table
|edition=bedrock
|shownumericids=y
|showforms=y
|notshowbeitemforms=y
|generatetranslationkeys=y
|displayname=Feather
|spritetype=item
|nameid=feather
|id=327
|form=item
|foot=1}}
== History ==
{{History|java indev}}
{{History||0.31|snap=20100130|[[File:Feather JE1.png|32px]] Added feathers.|Feathers can be used to [[craft]] [[arrow]]s.
|Feathers are [[drop]]ped by every [[mob]] in quantities of 0 to 2.}}
{{History||20100206|[[File:Feather JE2 BE1.png|32px]] The feather's texture has been changed; it is now not as straight anymore.}}
{{History||20100219|[[Zombie]]s are now the only [[mob]] that can drop feathers. This was a placeholder as [[Notch]] has stated he currently doesn't know what else they should drop.<ref>{{tweet|notch|21723172931895296}}</ref>}}
{{History|java alpha}}
{{History||v1.0.14|[[Chicken]]s now [[drop]] 0–2 feathers upon death.}}
{{History|java beta}}
{{History||1.8|snap=Pre-release|[[Zombie]]s now drop [[rotten flesh]], instead of feathers.
|[[Chicken]]s are now the only source of feathers.}}
{{History|java}}
{{History||1.3.1|snap=12w17a|Feathers are now used to craft [[book and quill]]s.}}
{{History||1.4.6|snap=12w49a|Feathers are now used to craft a [[firework star]] with a burst effect.}}
{{History||1.12|snap=17w13a|[[Parrot]]s now [[drop]] feathers.}}
{{History||1.13|snap=17w47a|Prior to ''[[The Flattening]]'', this [[item]]'s numeral ID was 288.}}
{{History|||snap=18w11a|Feathers now generate in [[shipwreck]] [[chest]]s.}}
{{History||1.14|snap=18w43a|[[File:Feather JE3 BE2.png|32px]] The texture of feathers has been changed.}}
{{History|||snap=18w44a|[[Cat]]s now offer feathers as [[Cat#Gifts|gift]]s.}}
{{History|||snap=18w48a|Feathers can now be found in chests in plains [[village]] houses.}}
{{History|||snap=18w50a|Feathers can now be found in chests in fletcher houses.}}
{{History|||snap=19w07a|Added [[fox]]es, which sometimes spawn with feather in their mouths.}}
{{History|||snap=19w11a|Fletcher [[villager]]s now [[trading|buy]] feathers.}}
{{History||1.20<br>(Experimental)|link=1.19.4|snap=1.19.4 Pre-release 1|Feathers can now be used to craft [[brush]]es.}}
{{History|pocket alpha}}
{{History||v0.2.0|[[File:Feather JE2 BE1.png|32px]] Added feathers. They are currently unobtainable and serve no purpose.}}
{{History||v0.3.3|Chickens now drop 0–2 feathers upon death.|Feathers can now be used to [[craft]] [[arrow]]s.}}
{{History||v0.5.0|Feathers can now be obtained after activating the [[nether reactor]].}}
{{History||v0.11.0|snap=build 1|[[Zombie]]s now drop [[rotten flesh]], instead of feathers.}}
{{History||v0.12.1|snap=build 1|Feathers are no longer available from the [[nether reactor]].}}
{{History|bedrock}}
{{History||1.2.0|snap=beta 1.2.0.2|Feathers can now be used to craft [[book and quill]]s.|Added [[parrot]]s, which [[drop]] feathers.|Feathers can now be used as an ingredient to craft a [[firework star]].}}
{{History||1.4.0|snap=beta 1.2.14.2|Feathers can now be found in [[shipwreck]] [[chest]]s.}}
{{History||1.8.0|snap=beta 1.8.0.8|Feathers can now be given as a gift to the [[player]] by tamed [[cat]]s.}}
{{History||1.10.0|snap=beta 1.10.0.3|[[File:Feather JE3 BE2.png|32px]] The texture of feathers has been changed.|Feathers can now be found in the new [[plains]] [[village]] house.}}
{{History||1.11.0|snap=beta 1.11.0.1|Feathers can now be found in village fletcher [[chest]]s.}}
{{History|||snap=beta 1.11.0.4|Feathers can now be [[trading|sold]] to fletcher [[villager]]s.}}
{{History||1.13.0|snap=beta 1.13.0.1|Added [[fox]]es, which can [[drops|drop]] feathers.}}
{{History||1.20.0<br>(Experimental)|link=Bedrock Edition 1.19.80|snap=beta 1.19.80.20|Feathers can now be used to craft [[brush]]es.}}
{{History|console}}
{{History||xbox=TU1|xbone=CU1|ps=1.0|wiiu=Patch 1|[[File:Feather JE2 BE1.png|32px]] Added feathers.}}
{{History|Ps4}}
{{History||1.90|[[File:Feather JE3 BE2.png|32px]] The texture of feathers has been changed.}}
{{History|New Nintendo 3DS Edition}}
{{History||0.1.0|[[File:Feather JE2 BE1.png|32px]] Added feathers.}}
{{History|foot}}
== Issues ==
{{issue list}}
== References ==
{{reflist}}
== External Links ==
*[https://www.minecraft.net/en-us/article/taking-inventory--feather Taking Inventory: Feather] – Minecraft.net on March 3, 2019
{{Items}}
[[Category:Renewable resources]]
[[cs:Pírko]]
[[de:Feder]]
[[es:Pluma]]
[[fr:Plume]]
[[hu:Toll]]
[[it:Piuma]]
[[ja:羽根]]
[[ko:깃털]]
[[nl:Veer]]
[[pl:Pióro]]
[[pt:Pena]]
[[ru:Перо]]
[[uk:Перо]]
[[zh:羽毛]]</li><li>[[Map|Map]]<br/>{{about|the craftable map|maps showing the locations of certain structures|Explorer Map|other uses|Map (disambiguation)}}
{{distinguish|World}}
{{Item
| image = Map Zoom 4.png
| renewable = Yes
| stackable = Yes (64)
}}
A '''map''' is an [[item]] used to view explored [[Chunk|terrain]] and mark landmarks.
==Obtaining==
===Crafting===
{{crafting
|head=1
|showname=0
|showdescription=1
|A1= Paper
|B1= Paper
|C1= Paper
|A2= Paper
|B2= Compass
|C2= Paper
|A3= Paper
|B3= Paper
|C3= Paper
|Output= Empty Map
|type= Miscellaneous
|description=This variation is called an "empty locator map" {{in|bedrock}}, or an "empty map" {{in|java}}.
When the player first creates a map, it is blank. It needs to be activated by holding it and pressing ''{{Control|use item}}''. after which it records terrain and location markers as the player travels within (or close to) the area it maps.
}}
{{crafting
|A1= Paper
|B1= Paper
|C1= Paper
|A2= Paper
|B2= Paper
|C2= Paper
|A3= Paper
|B3= Paper
|C3= Paper
|Output= Empty Map
|type= Miscellaneous
|description={{only|bedrock}}
This variation is called an "empty map". It does not show location markers. It is intended for cloning and zooming locator maps without having to consume an additional [[compass]] (thereby saving [[iron ingot]]s and [[redstone dust]]), but it can also be {{Control|use|text=activated}} and later converted to a locator map by combining it with a compass on an [[anvil]], [[crafting table]], or [[cartography table]].
|foot=1
}}
=== Natural generation ===
==== Chest loot ====
{{LootChestItem|empty-map,map
}}
=== Cartography table ===
A map can also be created using a single paper on a [[cartography table]] to create an empty map, or a paper with a compass for an empty locator map.{{only|bedrock}}
=== Starting map ===
{{exclusive|bedrock|section=1}}
When creating a new world {{in|bedrock}}, the player can enable the "Starting Map" option to spawn with an empty locator map in the hotbar. The map's zoom scale is 1:8. The map is updated only while the player holds it.
=== Trading ===
Novice-level cartographer [[Villager|villagers]] sell a single empty map for 7 [[Emerald|emeralds]] as their trades.
{{IN|java}}, cartographer villagers may give players with the [[Hero of the Village]] effect an empty map.
== Usage ==
{{See also|Tutorials/Mapping}}
=== Mapping ===
Crafting a map creates an empty map. The map is drawn for the first time when it is held and used (with ''{{control|use item}}''). This map can then be adjusted to different zoom levels. After conversion to a drawn map item, it starts to draw a top-down view of the player's surroundings, with North pointing to the top of the map. A pointed oval pointer indicates the player's position on the map, and moves in real-time as the player moves across the terrain shown on the map. The map does ''not'' center on the player when created, rather, the world is broken up into large invisible grid squares, and the map displays the area of whichever grid square it is in when it is first used. For example, if a player uses a new map in a certain grid square, and then moves a distance away and uses another fresh map but is still within the same grid square, both maps appear identical. To make a map that is not identical to the first one, the player would have to move outside of the edges of the first map (because then they would be in a new grid square). This way, no two maps of the same size can ever partially overlap and every map can display only a fixed area.
To record the world on a map, that specific map must be held in the player's hands while the player moves around the world. The world is recorded as-is during exploration, meaning that if the world is modified, a player must revisit the area while holding the map to update the map's view. Maps can also be [[Map#Cloning|cloned]]. If a player holds a map whose one or more clones are on display in item frames, updates are made on all clone-connected maps.
Other players are displayed on the map only if they have a map in their inventory cloned from the one being looked at. When placing a map into an [[item frame]], the map displays with a green pointer shown at the location of the item frame. This is to help the player see where they are in relation to the area that the map is showing. If the player leaves a map in an item frame and views a clone of it, the green pointer remains in the spot of the framed copy. This can be used to set up waypoints. Unexplored areas are transparent, making the item frame visible.
When the player leaves the area shown on a specific map, the player pointer transforms into a white dot that moves on that map. The marker shrinks to a smaller white dot if the player is far from the map's center: the area is 320 by 320 blocks per scale factor. The dot moves along the edge of the map to show the relative location of the player. However {{in|bedrock}}, the pointer remains as an arrow but shrinks until the player is near the area shown on the map.
While maps in [[the Nether]] work, they show only the red-and-gray pattern, regardless of the blocks placed. The only useful function is finding where the player is in relation to placed framed maps, which show as green pointers. Additionally, the player pointer rapidly spins and is not a good indicator of direction. Placing a [[banner]] in [[the Nether]] still shows it on the map as usual. Having a smaller map image while riding a [[strider]] in the Nether can help one to see one's footing while traveling over [[lava]].
{{IN|java}}, when using a map from another dimension, the map shows the player's position and direction when they were last in the dimension of the map. {{IN|bedrock}}, however, the player can use maps from one dimension while in another dimension. For locator maps, the place marker changes color depending on the dimension that the player is currently in (white for the Overworld, red for [[the Nether]], and magenta for [[the End]]). An Overworld map in the Nether shows the player's corresponding location and direction in the Overworld.<ref name=multiverse>{{ytl|EpP1diZdEdI}}</ref> Similarly, a Nether Map in the Overworld shows the player's corresponding location in the Overworld, but the place marker spins, just like a Nether map in the Nether. An Overworld map in the End shows the world spawn.<ref name=multiverse/> A Nether map cannot be used in the End — the map appears, but the place marker is not shown anywhere — and similarly, an End map cannot be used in the Overworld or the Nether.
A player can make a large piece of pixel art (128×128) facing upward, center a map on it, and place that map in an [[item frame]] to create a custom picture. Locking is recommended. See [[Map item format#Map Pixel Art]] for details on the techniques.
Maps display as a mini-map when held in the off-hand, or if the off-hand slot is occupied; the map is full-sized only when held in the dominant hand with both hands free.
A map always positions itself facing towards North when placed horizontally within an item frame regardless of how the map is placed.
=== Map content ===
{{Main|Map item format}}
Maps consist of square pixels arranged like pixels in a 128×128 square pattern, with each pixel representing a square portion of land. {{IN|java}}, the [[Map item format#Color table|color of a map pixel]] generally matches the color of the most common [[opaque]] block in the corresponding area, as seen from the sky. 'Minority blocks' in the target area have no effect on the color of the pixel, thus small features tend to be undetectable on zoomed-out maps.
{{IN|bedrock}}, the [[Map item format#Color table|color of a map pixel]] instead matches the single top-most opaque block in a grid sized by the map magnification pixel size (see the table in the "Player marker and pointer" section below). For example, a 3/4 magnification map has a pixel size of 8x8 blocks; this means the map will read only the top-most opaque blocks at the 0,0 coordinate, the 8,0 coordinate, the 0,8 coordinate, etcetera, ignoring all other blocks in the area. This means that {{in|bedrock}}, map pixel art requires only one block per pixel regardless of map magnification.
{{IN|bedrock}}, grass, foliage and water colors that are biome-dependent are represented accurately on a map.
{| class="wikitable"
|-
! style="width: 300px;" | {{el|je}}
! style="width: 300px;" | {{el|be}}
|-
| style="text-align: center;" | [[File:Map Zoom 4.png|alt=All banners marked on a map, alongside a named banner.|216px]]
| style="text-align: center;" | [[File:Map item BE.png|216px]]
|-
| Biome colors on ''Java Edition''.
| Biome colors on ''Bedrock Edition''.
|-
|}
Maps also show ground up to about 15 blocks below the surface of the water in oceans as slightly lighter blue, to show where the ground rises. This is not true with land above water. Higher elevations in the world mean lighter colors on the map. The map records the surface even as the player moves below the surface.
A standard map represents 128x128 blocks (1 block per pixel, 8x8 [[chunks]]) but maps can be zoomed-out to represent up to 2048x2048 blocks (16 square blocks per pixel, 128x128 [[chunks]]).
Some relevant distances: 64 blocks (4 chunks) is the update radius from a player in the Overworld and the End. However, it is half this (32 blocks) in the Nether. Also, 1024 blocks is the minimum Overworld distance from a [[nether portal]], at which players can build another portal and expect to reach a new location in the Nether. This is the distance across a 1:8 map, and also from a 1:16 map's center to its edge.
=== Player marker and pointer ===
{{IN|java}}, every map contains a marker that marks the position of the player, and points in the same direction as the player. When a player moves out of a map, a big white dot appears and moves relative to the player's position. The pointer either disappears when the player moves away a certain distance from the border of the map or, in case of [[explorer map]]s, the big white dot changes to a smaller white dot. The distance required for the small white dot to appear(explorer maps) or for the big dot to vanish (normal maps) changes with the scaling of the map.
* '''Level 0/4 :''' 128×128 blocks (each map pixel represents 1 block)
* '''Level 1/4 :''' 256×256 blocks (2×2 blocks per map pixel)
* '''Level 2/4 :''' 512×512 blocks (4×4 blocks per map pixel)
* '''Level 3/4 :''' 1024×1024 blocks (8×8 blocks per map pixel)
* '''Level 4/4 :''' 2048×2048 blocks (16×16 blocks per map pixel)
{{IN|bedrock}}, a map can be crafted with or without this marker, and a map without a position marker can add one later by adding a compass to the map. When a map is crafted without a compass, it's simply called an "empty map", but when crafted with a compass, it's called an "empty locator map". The marker also turns red if the player enters the Nether with an Overworld map and shows the player's Overworld location relative to the Nether location. A map created in the End has a purple marker showing the player's location. If an Overworld map is used in the End, a magenta dot appears on the player's spawn point.{{/BE|position}}
{{crafting
|name=Map<br>(with marker)
|ingredients=[[Map]] or Empty Map +<br>[[Compass]]
|showdescription=1
|Map (no markers);Empty Map
|Compass
|Output= Locator Map;Empty Locator Map
|type= Miscellaneous
|description={{el|be}} only.
Maps crafted from only paper do not show the location marker; to add it, a compass must be added to the map.
|foot=1
}}
{{IN|bedrock}}, a cartography table can also be used to add a pointer to create a locator map or empty locator map. This can be done by adding a compass to paper, or to an empty map or map.
=== Zooming out ===
[[File:Cartography table UI zoom.png|thumb|300px|{{IN|java}}, cartography table's UI, showing the map is being zoomed out.]]
A [[cartography table]] can also be used to zoom out, taking only one piece of paper per zoom level.
A blank map can not be zoomed out. A map has to have something already marked on it for the zooming to be possible.
{{Crafting
|A1= Paper |B1= Paper |C1= Paper
|A2= Paper |B2= Map;Locator Map |C2= Paper
|A3= Paper |B3= Paper |C3= Paper
|Output= Map;Locator Map
|showdescription=1
|description=Locator Map {{el|be}} only.
}}
{{/BE|zoom}}
==== Zoom details ====
The zooming function starts from when the map is created (zoom level 0) up to its fourth zoom step (zoom level 4).
{| class="wikitable" style="text-align: center" data-description="Zoom levels"
! colspan="2" |
! Zoom step 0
! Zoom step 1
! Zoom step 2
! Zoom step 3
! Zoom step 4
|-
! colspan="2" |
| [[File:Map Zoom 0.png|116px|Zoom step 0, 1:1]]
| [[File:Map Zoom 1.png|116px|Zoom step 1, 1:2]]
| [[File:Map Zoom 2.png|116px|Zoom step 2, 1:4]]
| [[File:Map Zoom 3.png|116px|Zoom step 3, 1:8]]
| [[File:Map Zoom 4.png|116px|Zoom step 4, 1:16]]
|-
! colspan="2" | Zoom level
| 0/4
| 1/4
| 2/4
| 3/4
| 4/4
|-
! colspan="2" | 1 map pixel represents
| 1 block
| 2×2 blocks
| 4×4 blocks
| 8×8 blocks
| 16×16 blocks<br>(1×1 chunk)
|-
! colspan="2" | Scaling ratio
| 1:1
| 1:2
| 1:4
| 1:8
| 1:16
|-
! rowspan="2" colspan="2" | Map covers an area of
| 128×128 blocks
| 256×256 blocks
| 512×512 blocks
| 1024×1024 blocks
| 2048×2048 blocks
|-
| 8×8 chunks
| 16×16 chunks
| 32×32 chunks
| 64×64 chunks
| 128×128 chunks
|-
! colspan="2" | Smallest discernible features
| Blocks
| Trees, Paths
| Lakes, Buildings
| Mountains, Rivers
| Biomes, Mountain Ranges
|-
! colspan="2" | Use cases
| Pixel art, Base plans
| Base surroundings
| Structure mapping
| Landscape mapping
| Biome mapping
|-
! rowspan="2" | Total paper needed to zoom out from Level 0
! in anvil{{only|bedrock|short=1}} or crafting table
| -
| {{ItemSprite|Paper}} 8
| {{ItemSprite|Paper}} 16
| {{ItemSprite|Paper}} 24
| {{ItemSprite|Paper}} 32
|-
! in cartography table
| -
| {{ItemSprite|Paper}} 1
| {{ItemSprite|Paper}} 2
| {{ItemSprite|Paper}} 3
| {{ItemSprite|Paper}} 4
|}
Maps are always aligned to a grid at all zoom levels. That means zooming out any different map in a specific area covered by that map always has the same center. As such, maps are aligned by map width (1024 blocks for a level 3 maps) minus 64. A level 3 map generated at spawn covers X and Z coordinates from -64 to 959. All maps generated in this area zoom out to the same coordinates, guaranteeing that they are always 'aligned' on a map wall. For a zoomed-out map to cover a new area, it must start with a base (level 0) map that is in that area.
At zoom level 0, a map created on the point (0,0) has (0,0) at the center of the map. At higher zoom levels of the same map, the coordinate (0,0) is in the top left square of the map.
{{IN|java}}, zoom level can be seen on a map by turning on Advanced Tooltips (a [[Debug screen#More debug keys|debug screen]] option that can be toggled by using the key combination {{key|F3+H}}). The tooltip of the map then shows the zoom level, scaling factors, and map ID.
=== Cloning ===
[[File:Cartography table UI clone.png|thumb|300px|{{IN|Java}}, cartography table's UI, showing the map is being cloned.]]
A mix of empty maps and empty locator maps may be used. Whether the cloned maps show position markers is dependent only on the input map.
A [[cartography table]] can also be used to clone a map.
The parts of the world that have already been explored and mapped are copied, and newly explored areas appear on both instances. If one of the maps is later zoomed out, then the maps lose their connection to each other and function as completely separate maps that have to be individually filled by exploring.
In Creative mode, a map in an item frame may be cloned by using {{control|pick block}} on it, as long as that map is not also in the player's inventory.
It doesn't matter if the map to be cloned is at a higher zoom level (made of more paper) than the blank map. Upon copying the map, both resulting maps have the same magnification as the starting map.
{{/BE|clone}}
=== Crafting ingredient ===
{{crafting usage|Map, Empty Map}}
=== Marking points ===
{{IN|java}} the player has the ability to mark spots on a map. To do this, {{control|use}} a map on a placed-down [[banner]], and the spot of the banner gets marked on the map. The mark takes the color of whatever the base color is for the banner, and if the banner has a name, the mark shows that name. Banner marks on a map are always oriented with their top facing north, regardless of the banner's actual orientation. If the banner is destroyed, the mark of the banner remains at first, but if the player gets closer to where the banner previously was, it disappears as the area is updated on the map.
If a map is mounted on an item frame and is within the area it depicts, the mounted map displays its current location with a green indicator rotated to match its orientation.
[[File:Map Marker Bedrock on Item frame.png|thumb|181x181px|{{IN|bedrock}} this is what a map lying on an item frame looks like, while showing markers.]]
{{IN|bedrock}} the player can place copies of locator maps in [[item frame]]s in order to create a land mark. The marker is a green dot that resembles the shape of the player's marker, but in green color. The position the marker points at depends on the direction the item frame is facing. It is worth noting that the markers work only on copies of the same map. Other maps of the same area do not show the existing markers that the player(s) had placed.
If a player has a cloned map in their inventory, their pointer appears white when viewed on the same map held by another player. Hence, if all players have the same cloned map in their inventory, all markers would appear white when the clone map is viewed.
{| class="wikitable"
|-
! style="width: 300px;" | {{el|je}}
! style="width: 300px;" | {{el|be}}
|-
| style="text-align: center;" | [[File:Banner marked map.png|alt=All banners marked on a map, alongside a named banner.|216px]]
| style="text-align: center;" | [[File:Tracking map with markers bedrock.png|216px]]
|-
| How every banner appears {{IN|java}} on a map, including named banners.
| {{IN|bedrock}} this is how a locator map shows map markers while held by a player.
|-
|}
===Locking===
[[File:Cartography table UI lock.png|thumb|300px|{{IN|Java}}, cartography table's UI, showing the map is being locked.]]
Maps can be locked when using a [[glass pane]] in a [[cartography table]]. This creates a new map containing the same data and locks it. All copies of this new map are also locked. A locked map never changes, even when the depicted terrain changes. {{IN|Be}}, locked maps have a unique texture.
{| class="wikitable" style="text-align: center;"
|-
! Condition
! style="width: 200px;" | Newly created map
! style="width: 200px;" | Map after terrain alteration
|-
! Unlocked map
| [[File:Map Zoom 0.png|174px]] || [[File:Unlocked Map.png|174px]]
|-
! Locked map
| [[File:Map Zoom 0.png|174px]] || [[File:Map Zoom 0.png|174px]]
|-
|}
{{-}}
== Sounds ==
{{Edition|Java}}:
{{Sound table
|rowspan=2
|sound=Drawmap1.ogg
|sound2=Drawmap2.ogg
|sound3=Drawmap3.ogg
|subtitle=Map drawn
|source=player
|description=When a map is drawn
|id=ui.cartography_table.take_result
|translationkey=subtitles.ui.cartography_table.take_result
|volume=1.0
|pitch=1.0
|distance=16}}
{{Sound table
|subtitle=Map drawn
|source=block
|description=When a map is edited using a cartography table
|id=ui.cartography_table.take_result
|translationkey=subtitles.ui.cartography_table.take_result
|volume=1.0
|pitch=1.0
|distance=16
|foot=1}}
{{Edition|Bedrock}}:
{{Sound table
|type=bedrock
|rowspan=2
|sound=Drawmap1.ogg
|sound2=Drawmap2.ogg
|sound3=Drawmap3.ogg
|source=block
|description=When a map is drawn<wbr>{{Upcoming|BE 1.20.20.20}}
|id=ui.cartography_table.take_result|idnote={{Verify|Could be block.cartography_table.use}}
|volume=0.8
|pitch=1.0}}
{{Sound table
|type=bedrock
|source=block
|description=When a map is edited using a cartography table
|id=ui.cartography_table.take_result
|volume=0.8
|pitch=1.0
|foot=1}}
== Data values ==
=== ID ===
{{edition|java}}:
{{ID table
|edition=java
|showforms=y
|generatetranslationkeys=y
|displayname=Empty Map
|spritetype=item
|nameid=map
|form=item}}
{{ID table
|displayname=Map
|spritetype=item
|nameid=filled_map
|form=item
|translationkey=item.minecraft.filled_map, filled_map.buried_treasure, filled_map.explorer_jungle{{upcoming|java 1.20.2}}, filled_map.explorer_swamp{{upcoming|java 1.20.2}}, filled_map.mansion, filled_map.monument, filled_map.unknown, filled_map.village_desert{{upcoming|java 1.20.2}}, filled_map.village_plains{{upcoming|java 1.20.2}}, filled_map.village_savanna{{upcoming|java 1.20.2}}, filled_map.village_snowy{{upcoming|java 1.20.2}}, filled_map.village_taiga{{upcoming|java 1.20.2}}
|foot=1}}
{{edition|bedrock}}:
{{ID table
|edition=bedrock
|showaliasids=y
|shownumericids=y
|showforms=y
|notshowbeitemforms=y
|generatetranslationkeys=y
|displayname=Empty Map
|spritetype=item
|nameid=empty_map
|aliasid=emptymap
|id=515
|form=item
|translationkey=item.emptyMap.name, item.emptyLocatorMap.name}}
{{ID table
|displayname=Map
|spritetype=item
|spritename=map-be
|nameid=filled_map
|aliasid=map
|id=420
|form=item
|translationkey=item.map.name, item.map.exploration.mansion.name, item.map.exploration.monument.name, item.map.exploration.treasure.name
|foot=1}}
=== Metadata ===
{{see also|Bedrock Edition data values}}
{{IN|bedrock}}, maps use the following data values:
{{/DV}}
=== Item data ===
{{el|java}}:
{{main|Player.dat format}}
<div class="treeview">
* {{nbt|compound|tag}}: The item's '''tag''' tag.
{{:Player.dat_format/Maps}}
</div>
{{el|bedrock}}:
: See [[Bedrock Edition level format/Item format]].
=== Map icons ===
{{see also|Player.dat format|Map item format|map_icons.png}}
Map icons are 8×8 in ''Java Edition'', but 16×16 in Bedrock Edition. As such, there are minor misalignment issues in ''Java Edition''.<ref>{{bug|MC-214649|||WF}}</ref>
[[File:Map icons.png|thumb|128px|Map icons texture {{in|Java}}]]
[[File:Map icons BE.png|thumb|128px|Map icons texture {{in|Bedrock}}]]
{| class="wikitable"
|-
! Java ID !! Bedrock ID !! Text ID !! Appearance !! Purpose !! Shown in item frames?
|-
| 0 || ||<code>player</code> || [[File:Player (texture) JE1 BE1.png|16px]] [[File:Player (texture) BE2.png|16px]] White marker || Players (on map) || No
|-
| 1 || 1 ||<code>frame</code> || [[File:Green Marker (texture) JE1 BE1.png|16px]] [[File:Green Marker (texture) BE2.png|16px]] Green marker || The current map in an item frame || Yes
|-
| 2 || ||<code>red_marker</code> || [[File:Red Marker (texture) JE1 BE1.png|16px]] [[File:Red Marker (texture) BE2.png|16px]] Red marker || Position converted to Overworld when opening Overworld map in the Nether{{Only|bedrock}} || No
|-
| 3 || ||<code>blue_marker</code> || [[File:Blue Marker (texture) JE1 BE1.png|16px]] [[File:Blue Marker (texture) BE2.png|16px]] Blue marker || Other players || No
|-
| 4 || ||<code>target_x</code> || [[File:Target X (texture) JE1 BE1.png|16px]] White X || Unused || Yes
|-
| 5 ||5
|<code>target_point</code> || [[File:Target Point (texture) JE1 BE1.png|16px]] [[File:Target Point (texture) BE2.png|16px]] Red triangle || Unused || Yes
|-
| 6 || 6 ||<code>player_off_map</code> || [[File:Player Off Map (texture) JE1 BE1.png|16px]] Large white dot || Players off map, nearby{{only|java}} || No
|-
| 7 || 13 ||<code>player_off_limits</code> || [[File:Player Off Limits (texture) JE1.png|16px]] [[File:Player Off Limits (texture) BE.png|16px]] Small white dot || Players off map, far away{{only|java}} || No
|-
| 8 ||14
|<code>mansion</code> || [[File:Mansion (texture) JE1.png|16px]] [[File:Mansion (Texture) BE2.png|frameless|16x16px]] Woodland mansion || Woodland mansion || Yes
|-
| 9 || 15 ||<code>monument</code> || [[File:Monument (texture) JE1.png|16px]] [[File:Monument Texture BE2.png|frameless|16x16px]] Ocean monument || Ocean monument || Yes
|-
| 10 - 25 || ||<code>{{tooltip|banner_*|banner_white, banner_orange, banner_magenta, banner_light_blue, banner_yellow, banner_lime, banner_pink, banner_gray, banner_light_gray, banner_cyan, banner_purple, banner_blue, banner_brown, banner_green, banner_red, banner_black}}</code> || [[File:Banner White (texture) JE1.png|16px]] [[File:Banner Light Gray (texture) JE1.png|16px]] [[File:Banner Gray (texture) JE1.png|16px]] [[File:Banner Black (texture) JE1.png|16px]] [[File:Banner Brown (texture) JE1.png|16px]] [[File:Banner Red (texture) JE1.png|16px]] [[File:Banner Orange (texture) JE1.png|16px]] [[File:Banner Yellow (texture) JE1.png|16px]] [[File:Banner Lime (texture) JE1.png|16px]] [[File:Banner Green (texture) JE1.png|16px]] [[File:Banner Cyan (texture) JE1.png|16px]] [[File:Banner Light Blue (texture) JE1.png|16px]] [[File:Banner Blue (texture) JE1.png|16px]] [[File:Banner Magenta (texture) JE1.png|16px]] [[File:Banner Purple (texture) JE1.png|16px]] [[File:Banner Pink (texture) JE1.png|16px]]<br>Banners in all 16 wool colors{{only|java}}|| Banner markers || Yes
|-
| 26 ||4
|<code>red_x</code> || [[File:Red X (texture) JE1.png|16px]] [[File:Target X (texture) BE2.png|16px]] Red X || Buried treasure || Yes
|-
| || 8 || || [[File:Magenta Marker (texture) BE1.png|16px]] Magenta marker
| Position converted to Overworld when opening Overworld map in the End{{Only|bedrock}} || No
|-
| || 9 || || [[File:Orange Marker (texture) BE1.png|16px]] Orange marker{{more info}}
|Other players
|Yes
|-
| || 10 || || [[File:Yellow Marker (texture) BE1.png|16px]] Yellow marker
| Other players || No
|-
| || 11 || || [[File:Cyan Marker (texture) BE1.png|16px]] Cyan marker
| Other players || No
|-
| -
|12
| || [[File:Green Point (texture) BE1.png|16px]] Green Triangle
| Other structure such as stronghold, fortress, end city, etc. when used as explorer map destination{{Only|bedrock}} || Yes
|}
It should be noted that even if the player used a NBT editor to add an additional icon on the map, ''Minecraft'' shows only the first one listed when the player loads up their world.
== Achievements ==
{{load achievements|Map Room}}
== History ==
{{see also|section=24|map_icons.png|Java Edition history of textures#Map icons}}
{{more images|section=24|{{bug|MC-72962}}}}
{{History||April 27, 2011|link=https://web.archive.org/web/0/http://notch.tumblr.com/post/4988431144/the-maps|[[Notch]] unveiled screenshots of the map.}}
{{History||April 28, 2011|link={{tweet|notch|63500114005721088}}|[[Notch]] said that he would try to make maps place-able on [[wall]]s.}}
{{History|java beta}}
{{History||1.6|snap=Test Build 3|[[File:Map (item) JE1 BE1.png|32px]] Added maps.}}
{{History||1.6.6|The ability to auto-craft maps using shift-click has been disabled.}}
{{History||1.8|snap=Pre-release|Maps can now be found in library chests in the brand-new [[stronghold]]s.
|Auto crafting maps has been restored. Map cloning, therefore, is unavailable for a period of time.}}
{{History||1.8.1|Maps now work both while walking and flying.}}
{{History|java}}
{{History||1.0.0|snap=Beta 1.9 Prerelease 5|Prior to this update, the [[sun]] in ''[[Minecraft]]'' rose in the North, which threw off many [[player]]s and led to a common misconception that ''Minecraft'' maps/[[world]]s were oriented with East at the top. The sun now rises in the east and sets in the west, making navigation much more intuitive.
|Before the change in sun position, it was commonly said that ''Minecraft'' maps/worlds are oriented with East at the top; sunrise, by definition, occurs at the East, which means it is certainly true that the maps were oriented "East" since the Sun rose from the top (North). However, [[Jeb]] asserted (and [[Notch]] agreed) that the sun rose in the north.<ref>{{Tweet|jeb|87815841160237056}}</ref><ref>{{Tweet|notch|88155424880201728}}</ref> Most mods and map-making tools, however, used the terms East and North consistent with their actual definitions (e.g. a [[Programs and editors/Cartograph|Cartograph]]-generated map with North at the top is rotated 90 degrees from the in-game map).}}
{{History||1.4.2|snap=12w34a|[[File:Empty Map JE1 BE1.png|32px]] [[Crafting]] a map now creates an empty map. The map is drawn for the first time when it is held and right clicked, and is centered near the location of the [[player]] when clicked (not as before where it was centered on the location it was crafted.)
|Previously, in order to map a new area, the map had to be ''crafted'' in that area (rather than carrying a previously-crafted map to the new area). The point where a map is crafted becomes its permanent center, and could never be changed.
|The pointer no longer disappears when leaving the map, but transforms into a white dot, indicating on what side of the map the player is located.
|Maps now align to a grid, making it easier to create adjacent maps.
|Maps can now be zoomed out (but not zoomed in).
|Maps can now be cloned and scaled.}}
{{History||1.4.2|snap=12w34b|Maps now have a ''zoom level'', which was fixed at 1:8 prior to snapshot [[Java Edition 12w34a|12w34a]],<ref name="mapinfo">https://web.archive.org/web/0/http://notch.tumblr.com/post/4988431144/the-maps</ref> but now starts at 1:1 and can be increased up to 1:16 by re-crafting an existing map.
|Maps are no longer numbered on the top-left corner and is labeled through the tooltip.}}
{{History|||snap=12w36a|New maps are now crafted at a scale factor of 1:1. A zoomed in map can be zoomed out by re-crafting it with another 8 sheets of [[paper]] on a [[crafting table]]. Each time this is done, the scale increases - 1:1, 1:2, 1:4, 1:8, 1:16 with a map scale of 1:16 being the current maximum.}}
{{History||1.7.2|snap=13w38a|The map size has been increased when placed on a [[wall]] using the [[item frame]].
|More colors have been added to maps for different [[block]]s.<ref name="infodump2">https://web.archive.org/web/0/https://www.mojang.com/2013/10/minecraft-1-7-the-update-that-changed-the-world</ref>}}
{{History||1.8|snap=14w31a|Zoomed maps now conform to an expanded grid based on their zoom level. Previously, careful considerations would need to be taken to creating a wall of adjoining maps.}}
{{History||1.8.1|snap=pre1|Some colors have been changed on maps to more accurately represent their respective [[block]].}}
{{History||1.9|snap=15w31a|Maps now display as a mini-map when held in the off-hand, or if the off-hand slot is occupied; the (old) large version is visible only when held in the dominant hand with the secondary hand free.}}
{{History|||snap=15w34a|New maps can now be [[crafting|crafted]] at a scale factor of 1:4.
|A crafting recipe has been added for zooming in maps.}}
{{History|||snap=15w43a|The average yield of empty maps from [[stronghold]] library [[chest]]s has been doubled.}}
{{History|||snap=15w45a|New maps are once again [[crafting|crafted]] at a scale factor of 1:1, as they had been before snapshot [[15w34a]].
|The [[crafting]] recipe, that was introduced in 15w34a, for zooming in maps has been removed.}}
{{History|||snap=15w49a|Map making now uses armor equipping sounds.}}
{{History||1.11|snap=16w39a|Maps now work in [[the End]].
|Empty maps are now [[trading|sold]] by cartographer [[villager]]s as their tier 3 [[trading|trade]].
|Added [[explorer map]]s, sold by cartographers as their tier 4 trades.}}
{{History||1.12|snap=17w17a|Maps now have separate colors for colored [[terracotta]] blocks from other colored blocks.}}
{{History||1.13|snap=17w47a|Prior to [[1.13/Flattening|''The Flattening'']], these [[item]]s' numeral IDs were 358 and 395.
|Maps now use additional NBT to specify which map they contain. Prior to this version, they used the [[damage]] value instead.
|Map IDs are no longer limited to 32,768.}}
{{History|||snap=17w50a|Maps can now be placed on floor and ceiling [[item frame]]s.}}
{{History|||snap=18w10a|Spots on maps can now be marked using [[banner]]s.}}
{{History|||snap=18w11a|Empty maps can now generate in [[shipwreck]] [[chest]]s.}}
{{History|||snap=pre7|Maps have been changed slightly, in regard to which [[block]]s are shown and which blocks are not.}}
{{History||1.14|snap=18w43a|[[File:Empty Map JE2 BE2.png|32px]] [[File:Map (item) JE2 BE2.png|32px]] The textures of maps have been changed.}}
{{History|||snap=18w48a|Empty maps can now be found in chests in [[village]] cartographer houses.}}
{{History|||snap=19w02a|Maps can now be cloned and zoomed out (extended) by using a [[cartography table]].
|Maps can now be locked by using a [[glass pane]] with a cartography table.
|The recipes for cloning and zooming out maps have been removed.}}
{{History|||snap=19w06a|Map making is now silent again.}}
{{History|||snap=19w13a|Cartographer villagers now give empty maps to players under the [[Hero of the Village]] effect.}}
{{History||1.16|snap=20w21a|Map making sounds are now the same as when using a cartography table.}}
{{History|pocket alpha}}
{{History||v0.14.0|snap=build 1|[[File:Empty Map JE1 BE1.png|32px]] [[File:Map (item) JE1 BE1.png|32px]] Added maps.
|Maps are crafted using nine [[paper]], one for every slot of the [[crafting]] grid.
|Maps must be combined with a [[compass]] using an [[anvil]] in order to show the [[player]]'s position.
|Maps can be zoomed using an anvil.}}
{{History|||snap=build 3|New maps are now [[crafting|crafted]] at full zoom.
|Empty maps now have a "Create Map" button to initialize them.}}
{{History|||snap=build 7|New maps are now crafted at a scale factor of 1:1.}}
{{History||v0.15.0|snap=unknown|Maps can now be crafted either with 8 pieces of [[paper]] and a [[compass]] ''or'' 9 pieces of paper, to get a map with or without a position marker.}}
{{History||v0.16.0|snap=build 1|Different colors have been added to maps for different [[biome]]s.}}
{{History|pocket}}
{{History||1.0.0|snap=?|[[Windows 10 Edition]] can now use the [[anvil]] as well as the [[crafting table]] to clone, zoom and apply markers, just as [[Pocket Edition]] in general could.
|Maps can now be found inside [[stronghold]] library [[chest]]s.}}
{{History||1.1.0|snap=alpha 1.1.0.0|Empty maps with direction markers built-in are now called "locator maps".}}
{{History|||snap=alpha 1.1.0.3|"Locator maps" are now called "empty locator maps".
|Empty maps are now [[trading|sold]] by cartographer [[villager]]s for 7-11 [[emerald]]s as their tier 3 [[trading|trade]].}}
{{History|bedrock}}
{{History||1.4.0|snap=beta 1.2.14.2|Maps can now be found inside map room [[chest]]s in [[shipwreck]]s.}}
{{History||?|The texture of the filled map overlay has been changed.}}
{{History||?|Maps now function in dimensions other than the dimension in which they were created.}}
{{History||1.10.0|snap=beta 1.10.0.3|Maps can now be found in cartographer house [[chest]]s in [[village]]s.
|[[File:Empty Map JE2 BE2.png|32px]] The texture of empty maps has been changed.}}
{{History||1.11.0|snap=beta 1.11.0.1|Empty maps can now be created from 1 [[paper]] in [[cartography table]]s.
|Maps can now be zoomed, cloned, renamed, and have pointers added in cartography tables.}}
{{History|||snap=beta 1.11.0.4|Cartographer [[villager]]s now [[trading|sell]] empty map for an [[emerald]] as their first tier [[trading|trades]].
|Empty locator maps can now be [[trading|bought]] from cartographer villagers.}}
{{History||1.13.0|snap=beta 1.13.0.1|[[File:Map (item) BE3.png|32px]] [[File:Locked Map (item) BE2.png|32px]] Filled maps and locked maps now have unique inventory icons.}}
{{History||1.16.0|snap=beta 1.16.0.57|Trading has been changed, novice-level cartographer now sell an empty map for 7 emeralds. Cartographer villager no longer sell empty locator map.}}
{{History||1.16.100|snap=beta 1.16.100.56|The ID of maps have been changed from <code>emptymap</code> to <code>empty_map</code> and <code>map</code> to <code>filled_map</code>.}}
{{History|console}}
{{History||xbox=TU1|xbone=CU1|ps=1.00|wiiu=Patch 1|switch=1.0.1|[[File:Map (item) JE1 BE1.png|32px]] Added maps.
|The [[player]] spawns with a free map.
|Maps are available only as zoom step 3 maps centered at coordinates 0,0. Biome colors do not appear on maps.}}
{{History||xbox=none|xbone=CU1|ps=1.0|wiiu=none|Larger sized worlds on Xbox One, Playstation 4, and Nintendo Switch have zoom step 3 maps aligned to a grid with maps centered at 0, 1024, or 2048 on the X or Z coordinates.}}
{{History||xbox=TU21|xbone=CU9|ps=1.14|wiiu=Patch 1|[[File:Empty Map JE1 BE1.png|32px]] [[Crafting]] a map now produces an empty map.}}
{{History||xbox=TU46|xbone=CU36|ps=1.38|wiiu=Patch 15|The outer end islands appear on different maps; even on Xbox 360, Playstation 3, Vita, and Wii U editions.}}
{{History||xbox=none|xbone=none|ps=1.90|wiiu=none|switch=none|[[File:Empty Map JE2 BE2.png|32px]] [[File:Map (item) JE2 BE2.png|32px]] The textures of maps have been changed.}}
{{History||ps=1.91|Maps can now be created and used in [[cartography table]]s.}}
{{History|foot}}
== Issues ==
{{issue list}}
== Trivia ==
* Use of the {{key|F1}} key can allow the player to hold a map without blocking their view at all.
* In ''Java Edition'', a map created using {{cmd|give}} can be any map by using the Map parameter to specify the map number desired. E.g. {{cmd|give [player] minecraft:filled_map{map:5<nowiki>}}} gives the specified player map_5. If no data value is supplied it defaults to map_0. If map_0 has not ever been crafted, it is centered on x=0, z=0.
* The maps are stored separately as their own data (<code>.dat</code>) file as <code>map_x.dat</code> with (x) being the map number, see [[map item format]] for more info. By manipulating this number, players can organize their maps to suit them, or if they accidentally create a map in the same location, they can delete their extra map so as to save the number they make.
* Certain programs can be used to make customized maps with images or text on them instead of actual maps, many people use these in adventure maps to show pictures or to tell a story.
* Since all copies of a map are links to the same file, copying an unfinished map keeps it synchronized with the copy as the player fills it in. Thus, a copy stored in a chest can act as a remote backup.
* A map that is in an item frame does not update itself until a player picks it up, lets it reload, and places it back again. However, if a player holds a clone of the map, both maps update.
* Filled maps are the only items that make 90 degree rotations in item frames, and also the only items that can expand the item frame into full block wide.
* On [[Legacy Console Edition]], the player always spawns with a map in their inventory after creating a world. This was later added to Bedrock Edition as an optional feature in the world creation menu.
* Maps on Legacy Console Edition always show the player's current coordinates, as a substitute for the optional [[Coordinates|coordinate display]] in other editions.
* A map cannot be created on [[New Nintendo 3DS Edition]]. Instead, the map is always displayed on the bottom screen along with the coordinates. Biome colors do not appear on maps.
== Gallery ==
<gallery>
MapItem1.png|A fully zoomed map.
MapRotation.png|Having a map in hand does not stop the ability to see ahead.
MapItem3.png|A world being recorded onto a map.
Mcmap4.png|Nearly fully explored map.
Zoomed Map.png|A map edited to the scale of 1.
Sky Map.png|A map mapping the [[Sky Dimension]].
MapOfVillage.png|A village and how it is represented on a map.
Pumpkin map.png|A map containing a custom image made by placing a large number of blocks.
Complete Map.png|A completely explored map.
MapZooms.png|A diagram showing how maps zoomed out before [[Java Edition 1.8]]. Notice how the larger maps have borders made of half and quarter small maps.
Map18zooms.png|From 1.8, zoomed maps are aligned to this grid exactly.
Large Biome Map.png|A map of a [[Large Biomes]] world.
Map0140-0160.png|A comparison of maps between versions in Pocket Edition Alpha [[Pocket Edition Alpha 0.14.0|0.14.0]] and [[Pocket Edition Alpha 0.16.0|0.16.0]].
Mycelium Map.png|A map view of a mushroom biome, showing that mycelium appears purple on a map.
MiniMap.png|Maps held in the off-hand or in either hand while [[dual wielding]] appear as mini-maps.
Partly filled treasure map.png|Partly filled treasure map with an odd area at the bottom left. Normally a partly filled map would look striped (as in the top left), but this map seems to be bugged and is possibly showing caves, or something, in the bottom left.
Partly filled ocean explorer map.png|Partly filled ocean explorer map. Updating the game from an older version (in this case the area was first generated before 1.18) and buying a map after updating (in this case in 1.19.4) can result in the map displaying rivers and terrain where there is really a frozen sea.
Map Stained Glass 1.png|Stained glasses' appearances on maps before and after 1.13.
Map Stained Glass 2.png|Stained glasses' appearances on maps before and after 1.13.
Map Various Blocks 1.png|Various blocks' appearances on maps before and after 1.13.
Map Various Blocks 2.png|Various blocks' appearances on maps before and after 1.13.
Better Together Map.jpg|Holding a map in the offhand in ''Bedrock Edition''.
Better Together Map Icon.jpg|Holding a map in both hands in ''Bedrock Edition''.
File:MapFailedtoFill.png|A map that has not yet filled. A rare bug in Java.
</gallery>
=== The Nether ===
<gallery>
Nethermap.png|A map in [[the Nether]].
Maponnether.png|A map in the Nether; the arrow turns around itself, like in [[compass]].
</gallery>
=== The End ===
<gallery>
Jeb End Map.png|The first image of a map in [[the End]].
Endmap.png|A map in the End.
</gallery>
=== Maps in item frames ===
<gallery>
FramedMap.png|A map displayed on an item frame, as it looked before [[Java Edition 1.7.2]].
Structure Map Collection.png|Multiple maps in item frames. Notice a [[village]], two [[desert temple]]s and a lava lake.
Minecraft maps 3by3.png|A collection of 9 connected full maps.
Full Map.png|A combination of 25 maps pasted together as one map.
Map wall BE.png|A map wall on ''Bedrock Edition'', showing large areas of biome colors for each biome.
Map's in item frames.png|Maps can be placed into [[item frame]]s so they can be viewed together.
Comparing Maps.png|The comparison between 3 zooms of maps.
SuperflatMap.png|A map in a [[Superflat]] world, with some [[village]]s.
MapWallWithMarkers.png|A 3x3 map wall with banner markers.
HEYYEYAAEYAAAEYAEYAA.png|He-Man map art.
Map Player Icons 1.png|First image of player icons on maps.
Map Player Icons 2.png|Second image of player icons on maps.
</gallery>
== See also ==
* [[Explorer Map]]
* [[Clock]]
* [[Tutorials/Navigation|Navigation]]
== References ==
{{Reflist}}
{{Items}}
[[cs:Mapa]]
[[de:Karte]]
[[es:Mapa]]
[[fr:Carte (objet)]]
[[hu:Térkép (tárgy)]]
[[ja:地図]]
[[ko:지도]]
[[nl:Kaart]]
[[pl:Mapa]]
[[pt:Mapa]]
[[ru:Карта]]
[[tr:Harita]]
[[th:แผนที่]]
[[uk:Мапа]]
[[zh:地图]]
[[Category:Renewable resources]]</li></ul></nowiki> | 13w19a | Command blocks are no longer mineable in survival. | |||
| Command blocks are no longer damaged by explosions, except by blue wither skulls. | |||||
1.7.2{{Extension DPL}}<ul><li>[[Glow Stick|Glow Stick]]<br/>{{stub}}
{{education feature}}
{{Exclusive|Bedrock|Education}}
{{Item
| image = White Glow Stick.png
| extratext = View [[#Gallery|all renders]]
| renewable = No
| durability = 95
| stackable = No
}}
'''Glow sticks''' are [[Chemistry Update|chemistry]]-related [[item]]s, which can be lit up in the player's hand for a limited time.
== Obtaining ==
{{iN|be}}, glow sticks cannot be obtained by the {{cmd|give}} command. They also cannot be obtained in [[Survival]]. Cheats must be enabled to obtain glow sticks in Survival mode, or in [[Minecraft Education]].
=== Crafting ===
{{Crafting
|showdescription=1
|ingredients=[[Polyethylene]] +<br>[[Hydrogen Peroxide]] +<br>Matching [[Dye]] +<br>[[Luminol]]
|A1= Polyethylene
|B1= Hydrogen Peroxide
|C1= Polyethylene
|A2= Polyethylene
|B2= White Dye; Orange Dye; Magenta Dye; Light Blue Dye; Yellow Dye; Lime Dye; Pink Dye; Gray Dye; Cyan Dye; Purple Dye; Blue Dye; Brown Dye; Green Dye; Red Dye
|C2= Polyethylene
|A3= Polyethylene
|B3= Luminol
|C3= Polyethylene
|Output= Matching Glow Stick
|description={{only|bedrock|education}}
|type= Miscellaneous
}}
<div style="display:none">
<!--
This is so the pre-Village & Pillage dyes can have dye-related crafting recipes show on their respective pages.
They don't need to be displayed on this page because they already intuitively list "Any Matching Dye".
-->
{{Crafting
|showdescription=1
|ingredients=[[Polyethylene]] +<br>[[Hydrogen Peroxide]] +<br>Matching [[Dye]] +<br>[[Luminol]]
|A1= Polyethylene
|B1= Hydrogen Peroxide
|C1= Polyethylene
|A2= Polyethylene
|B2= Bone Meal; Lapis Lazuli; Cocoa Beans
|C2= Polyethylene
|A3= Polyethylene
|B3= Luminol
|C3= Polyethylene
|Output= White Glow Stick; Blue Glow Stick; Brown Glow Stick
|description={{only|bedrock|Education}}
|type= Miscellaneous
}}
</div>
== Usage ==
While equipped, [[player]]s can {{control|use}} glow sticks to shake them, causing them to appear bright regardless of the [[light]] level. This is only an aesthetic change, as no light is emitted to the surrounding area. A [[particle]] effect is visible until the [[durability]] runs out. The glow stick's durability depletes while lit{{Info needed}}, in both Survival and Creative modes.
== Sounds ==
{{Sound table
|type=bedrock
|sound=Flint and steel click.ogg
|source=block
|description=While a glowstick is being activated
|id=fire.ignite
|volume=1.0
|pitch=0.5/0.7
|foot=1}}
== Data values ==
=== ID ===
{{ID table
|edition=bedrock
|shownumericids=y
|showforms=y
|notshowbeitemforms=y
|generatetranslationkeys=y
|displayname=Glow Stick
|spritename=glow-sticks
|spritetype=item
|nameid=glow_stick
|id=601
|form=item
|translationkey=item.glow_stick.black.name,item.glow_stick.red.name,item.glow_stick.green.name,item.glow_stick.brown.name,item.glow_stick.blue.name,item.glow_stick.purple.name,item.glow_stick.cyan.name,item.glow_stick.silver.name,item.glow_stick.gray.name,item.glow_stick.pink.name,item.glow_stick.lime.name,item.glow_stick.yellow.name,item.glow_stick.lightBlue.name,item.glow_stick.magenta.name,item.glow_stick.orange.name,item.glow_stick.white.name
|foot=1}}
===Metadata===
{{/DV}}
===Item data===
See [[Bedrock Edition level format/Item format]].
== History ==
{{History|bedrock}}
{{History||1.4.0|snap=beta 1.2.20.1|[[File:White Glow Stick.png|32px]] [[File:Orange Glow Stick.png|32px]] [[File:Magenta Glow Stick.png|32px]] [[File:Light Blue Glow Stick.png|32px]] [[File:Yellow Glow Stick.png|32px]] [[File:Lime Glow Stick.png|32px]] [[File:Pink Glow Stick.png|32px]] [[File:Gray Glow Stick.png|32px]] [[File:Cyan Glow Stick.png|32px]] [[File:Purple Glow Stick.png|32px]] [[File:Blue Glow Stick.png|32px]] [[File:Brown Glow Stick.png|32px]] [[File:Green Glow Stick.png|32px]] [[File:Red Glow Stick.png|32px]] Added glow sticks.}}
{{History||1.14.60|snap=?|Making a glow stick results in an edible item called {{code|item.glow_stick.black.name}}.}}
{{History||?|Making a glow stick results in correct items again.
|Making a glow stick with dye has been made an upgrade{{info needed|what is this supposed to mean?}}
|Putting 2 glow sticks in a Crafting Table now outputs a correct glow stick.}}
{{History||1.17.0|snap=?|[[File:Missing Glow Stick.png|32px]] Two black glow sticks, using the [[missing texture]] if Education Edition is disabled, now generate in fake end portal rooms in [[mansion]]s instead of [[ender pearl]]s.}}
{{h||1.18.0|snap=beta 1.18.0.21|Glow sticks no longer generate in [[woodland mansion]]s.}}
{{History|education}}
{{History||1.0.27|[[File:White Glow Stick.png|32px]] [[File:Orange Glow Stick.png|32px]] [[File:Magenta Glow Stick.png|32px]] [[File:Light Blue Glow Stick.png|32px]] [[File:Yellow Glow Stick.png|32px]] [[File:Lime Glow Stick.png|32px]] [[File:Pink Glow Stick.png|32px]] [[File:Gray Glow Stick.png|32px]] [[File:Cyan Glow Stick.png|32px]] [[File:Purple Glow Stick.png|32px]] [[File:Blue Glow Stick.png|32px]] [[File:Brown Glow Stick.png|32px]] [[File:Green Glow Stick.png|32px]] [[File:Red Glow Stick.png|32px]] Added glow sticks.}}
{{History|foot}}
== Gallery ==
<gallery>
White Glow Stick.png|
Orange Glow Stick.png|
Magenta Glow Stick.png|
Light Blue Glow Stick.png|
Yellow Glow Stick.png|
Lime Glow Stick.png|
Pink Glow Stick.png|
Gray Glow Stick.png|
Cyan Glow Stick.png|
Purple Glow Stick.png|
Blue Glow Stick.png|
Brown Glow Stick.png|
Green Glow Stick.png|
Red Glow Stick.png|
</gallery>
== Trivia ==
* The glowing reaction of [[Wikipedia:Luminol|Luminol]] during oxidation exists in real life. It is used for detecting blood in crime scenes.
* Players cannot enchant glow sticks with Unbreaking or Mending, despite the items having [[durability]].
* The black and light gray glow sticks use the same texture as the red glow stick.{{verify|It seems they use the missing texture instead. Was this the case beforehand, and they only started using the missing texture later?}}
== Issues ==
{{issue list}}
{{items}}
{{Education Edition}}
[[Category:Non-renewable resources]]
[[Category:Education Edition items]]
[[de:Knicklicht]]
[[ja:ケミカルライト]]
[[ko:발광봉]]
[[pt:Graveto Brilhante]]
[[ru:Химический источник света]]
[[zh:荧光棒]]</li><li>[[3D|3D]]<br/>{{about|the edible item|the April Fools' snapshot itself|Java Edition 3D Shareware v1.34}}
{{Joke feature}}
{{Item
| image = 3D (item).png
| renewable = Yes
| stackable = Yes (64)
}}
'''3D''' was a joke item from [[Java Edition 3D Shareware v1.34]]. Eating it shows a picture of the developer cast.
== Obtaining ==
=== Mob drops ===
3D was dropped by a creeper summoned by the cheat code "'''NEEEERD'''".
== Usage ==
Eating the 3D item when the hunger bar was not full shows a picture of the developer cast of Minecraft.
== Data values ==
=== ID ===
{{ID table
|showforms=y
|generatetranslationkeys=java
|displayname=3D
|spritetype=item
|nameid=3d
|form=item
|foot=1}}
== History ==
{{History|java}}
{{History||3D Shareware v1.34|[[File:3D (item).png|32px]] Added the 3D item.}}
{{History|foot}}
== Gallery ==
<gallery>
File:3D Shareware Mojang Team.png|The developer cast of Minecraft.
File:Tasty 3D Item.gif|The "'''Tasty!'''" 3D Item lore.
</gallery>
{{Items}}
{{Jokes}}
[[Category:Non-renewable resources]]
[[Category:Joke items]]</li></ul> | 13w37a | A bar that shows the previous output of command blocks has been added. | |||
| The character limit when inserting a command in a command block has been increased from 256 to 16,369. Using a third-party editor allows the player to reach 32,767 characters. | |||||
1.8{{Extension DPL}}<ul><li>[[Drinks|Drinks]]<br/>[[File:Drinking Steve.png|150px|right]] [[File:Drinking Alex.png|150px|right]]
'''Drinks''' are a narrow class of consumable [[item]]s that can be ingested by the [[player]] in an extremely similar manner to [[food]]. However, drinks are not encountered quite as commonly as food is, and they are not nearly as integral to Survival gameplay. Drinks can generally be distinguished from food by the sounds they make upon consumption, the lack of [[particles]] they emit, and the fact that they leave an empty container item in the [[inventory]] after consumption. Drinks do not affect [[hunger]] or saturation values upon use (with the exception of [[honey bottle]]s), and do not need those values to be depleted in order to be consumed.
Drinks are drunk by holding {{control|use item}} while having the drink item selected in the hotbar or in the off hand.
== Drinks ==
{{/table}}
== History ==
{{main|Milk#History|Potion#History|Honey Bottle#History}}
{{History|java alpha}}
{{History||v1.0.11|[[File:Milk Bucket JE1 BE1.png|32px]] Added milk.}}
{{History|java}}
{{History||1.0.0|snap=Beta 1.9 Prerelease 3|Added water bottles and potions.}}
{{History||1.15|snap=19w34a|[[File:Honey Bottle JE1.png|32px]] Added honey bottles.}}
{{History|pocket alpha}}
{{History||v0.7.0|[[File:Milk Bucket JE1 BE1.png|32px]] Added milk buckets.}}
{{History||v0.12.1|snap=build 1|Added water bottles and potions.}}
{{History|bedrock}}
{{History||1.14.0|snap=beta 1.14.0.1|[[File:Honey Bottle BE1.png|32px]] Added honey bottles.}}
{{History|foot}}
{{Items}}
[[ja:飲み物]]
[[pt:Bebidas]]
[[Category:Food]]</li><li>[[Kelp|Kelp]]<br/>{{About|the plant|the dried variant|Dried Kelp}}
{{For}}
{{Block
|image=Kelp.gif
|invimage=Kelp
|transparent=Yes
|tool=Any
|renewable=Yes
|stackable=Yes (64)
|flammable=No
|lavasusceptible=No
|light=No
|hardness=0}}
'''Kelp''' is an underwater plant that generates in most [[ocean]]s.
== Obtaining ==
=== Natural generation ===
Kelp naturally generates in any [[ocean]] [[biome]]s (except in [[Frozen Ocean|frozen]], [[Deep Frozen Ocean|deep frozen]] and [[Warm Ocean|warm]]), near and around [[seagrass]]. Each chunk has {{frac|1|18}} chance to generate a [[vegetation]] of kelp.
=== Breaking ===
Kelp can be mined instantly with any [[tool]] or with the player's fist. Removing water from the kelp block destroys the kelp. Breaking one part of a kelp stalk destroys all kelp [[block]]s above it. Each block drops a kelp [[item (entity)|item]].
=== Trading ===
Kelp can be bought from [[wandering trader]]s for 3 emeralds.
== Usage ==
Kelp can be placed underwater by hand, or anywhere by the use of [[commands]] such as {{cmd|setblock}}. Placing it by hand gives it a random {{code|age}} value between 0 and 24. Kelp can be placed only in [[water]] source blocks or downward-flowing water, not horizontally flowing water.
When placed in downward-flowing water, the flowing water transforms into a water source block,<ref>{{bug|MC-134229}}</ref> which is useful for faster [[bubble column]] elevator creation.
Any building block can be placed on top of a kelp plant, which is useful for building structures over a deep ocean without needing to build from the ocean floor (see also [[lily pad]]).
=== Cooking ingredient ===
{{smelting
| showname = 1
| Kelp
| Dried Kelp
| 0.1
}}
=== Composting ===
Placing kelp into a [[composter]] has a 30% chance of raising the compost level by 1.
=== Growth mechanics ===
Kelp can be planted on a broad variety of blocks. It grows underwater if it has either a source block of water or, {{in|Java}}, flowing water above it.<ref>{{bug|MC-133354}}</ref> Neither [[player]]s nor [[dispenser]]s can remove the water source block that kelp grows in without breaking the kelp first.
Kelp does not require any [[light]] level to grow. Kelp also grows without having [[sky]] access. [[Bone meal]] can be used to grow kelp by 1 block on each use.
Kelp, when planted, is generated with a randomly chosen age value, which can be checked when pressing [[Debug screen|<kbd>F3</kbd>]]{{only|java}}. The age value of a newly planted kelp plant varies randomly from 0 to 24. Each time the kelp grows in height by one block, the newly generated top of the kelp plant increases its age by 1. When the top block of the kelp plant reaches an age of 25, it stops growing. This means that kelp can naturally grow to a height between 2 (if the first kelp plant had an age of 24) and 26 blocks (if the first kelp plant had an age of 0).
When a kelp plant block is broken, the age of the kelp plant block underneath is randomized to a value from 0 to 24 and the kelp continues growing until it reaches age 25. It is possible to use this mechanic to cultivate a kelp plant to increase its growth height beyond its natural maximum height of 26 blocks. This can be done by breaking the top-most block of the kelp plant each time it reaches age 25. A kelp plant cultivated by a player in this way repeatedly grows until it reaches the water surface.
Each time it receives a [[random tick]], kelp has a 14% chance of growing.
If [[shears]] are used on the topmost block of kelp, that block automatically sets its {{cd|age}} value to {{cd|25}} and stop growing.{{only|JE}}
=== Farming ===
{{Main|Tutorials/Kelp farming}}
Kelp farming is similar to farming [[sugar cane]], although kelp must be placed underwater. Automation of harvest is easier because items float up in water.
== Sounds ==
=== Generic ===
{{Sound table/Block/Wet grass}}
=== Unique ===
{{edition|java}}:
{{Sound table
|sound=Shear.ogg
|subtitle=Plant cropped
|source=block
|description=When the tip of kelp is cropped with [[Shears#Cropping growing plants|shears]]
|id=block.growing_plant.crop
|translationkey=subtitles.block.growing_plant.crop
|volume=1.0
|pitch=1.0
|distance=16
|foot=1}}
{{edition|bedrock}}: ''None''
== Data values ==
=== ID ===
{{edition|java}}:
{{ID table
|edition=java
|showforms=y
|generatetranslationkeys=y
|displayname=Kelp
|spritetype=block
|nameid=kelp}}
{{ID table
|displayname=Kelp Plant
|spritetype=block
|nameid=kelp_plant
|form=block
|foot=1}}
{{edition|bedrock}}:
{{ID table
|edition=bedrock
|firstcolumnname=Kelp
|shownumericids=y
|showforms=y
|generatetranslationkeys=y
|displayname=Item
|spritename=kelp
|spritetype=item
|nameid=kelp
|id=382
|form=item}}
{{ID table
|displayname=Block
|spritename=kelp
|spritetype=block
|nameid=kelp
|id=393
|form=block
|itemform=item.kelp
|translationkey=-
|foot=1}}
=== Block states ===
{{see also|Block states}}
{{/BS}}
== History ==
{{History|java classic}}
{{History||May 21, 2009|link=https://web.archive.org/web/0/http://notch.tumblr.com/post/110762705/my-list-on-tile-types-so-far|[[Notch]] shows interest in adding a "[[seaweed]]" [[block]].}}
{{History|java}}
{{History||November 18, 2017|link={{YouTubeLink|mAapz_nIC_Y}}|Kelp plants were shown in a clip of [[MineCon Earth]].}}
{{History||1.13|snap=18w07a|[[File:Kelp JE1 BE1.gif|32px]] [[File:Kelp (item) JE1 BE2.png|32px]] Added kelp.}}
{{History|||snap=18w07b|Kelp now behaves more like [[water]], meaning [[mob]]s can no longer spawn within the plant under water nor can they replenish their breath by [[swimming]] through it.}}
{{History|||snap=18w10a|[[File:Kelp JE2.gif|32px]] The texture for kelp has been overhauled.}}
{{History|||snap=18w14a|[[File:Kelp.gif|32px]] Top of the kelp textures have been shifted slightly downward.
|The generation rules for kelp have been changed, it now mainly generates in [[cold ocean]] [[biome]]s and can no longer generate in [[warm ocean]]s.}}
{{History|||snap=18w20a|The {{cd|kelp_top}} has been changed ID to {{cd|kelp}} and {{cd|kelp}} has been changed to {{cd|kelp_plant}}, for both the [[block]] and [[item]] forms.}}
{{History|||snap=pre2|Kelp is now destroyed by [[sponge]]s.<ref>{{bug|MC-127111}}</ref>}}
{{History|||snap=pre6|Added 5 new [[sound]] events that apply to kelp: <code>block.wet_grass.break</code>, <code>block.wet_grass.fall</code>, <code>block.wet_grass.hit</code>, <code>block.wet_grass.place</code>, and <code>block.wet_grass.step</code>.}}
{{History||1.14|snap=19w03a|Placing kelp into the new [[composter]] has a 10% chance of raising the compost level by 1.}}
{{History|||snap=19w05a|Kelp now has a 30% chance of increasing the compost level in a composter by 1.
|Added [[Wandering Trader|wandering trader]]s, which sell kelp.}}
{{History||1.16|snap=20w11a|Kelp can now be grown with [[bone meal]].}}
{{History|||snap=20w13a|Kelp has been moved from the Miscellaneous tab to the Decoration Blocks tab in the [[Creative inventory]].<ref name="misc decoration">https://bugs.mojang.com/browse/MC-174434</ref>}}
{{History||1.17|snap=20w46a|Kelp no longer generates on magma blocks.<ref>{{Bug|MC-185605|resolution=Fixed}}</ref>}}
{{History||1.18|snap=21w37a|Kelp now stops growing if [[shears]] are used on the tip.}}
{{History|bedrock}}
{{History||1.4.0|snap=beta 1.2.14.2|[[File:Kelp JE1 BE1.gif|32px]] [[File:Kelp (item) BE1.png|32px]] Added kelp.}}
{{History|||snap=beta 1.2.20.1|[[File:Kelp (item) JE1 BE2.png|32px]] The kelp [[item]] texture has been updated to the {{el|je}}'s.}}
{{History||1.5.0|snap=beta 1.5.0.4|[[File:Kelp.gif|32px]] The texture of the kelp plant has been updated.}}
{{History||1.10.0|snap=beta 1.10.0.3|Kelp can now be bought from [[wandering trader]]s for 3 [[emerald]]s.}}
{{History||1.11.0|snap=beta 1.11.0.1|Kelp can now be used to fill [[composter]]s.}}
{{History|console}}
{{History||xbox=TU69|ps=1.76|wiiu=Patch 38|[[File:Kelp.gif|32px]] [[File:Kelp (item) JE1 BE2.png|32px]] Added kelp.}}
{{History|foot}}
== Issues ==
{{issue list}}
== Trivia ==
* In real life, [[wikipedia:kelp|kelp]] is not considered a [[wikipedia:plant|plant]]. It is classified by scientists as a [[wikipedia:Brown algae|brown algae]].
** Kelp in real life absorbs nutrients directly from the water, instead of through its root-like structure, [[wikipedia:Holdfast (biology)|holdfast]], which merely attaches it to the seabed. This is in accordance with kelp being able to grow on almost any solid block in ''Minecraft''.
== Gallery ==
<gallery heights="60">
SeaPlantsMineConEarth2017.jpg|Kelp shown in a clip from MINECON Earth 2017.
Kelp in ocean with Jappa textures.jpg|Naturally generated kelp in an [[ocean]] biome.
Kelp on shoreline.png|Naturally generated kelp near the shore.
Ocean life.png|An ocean with kelp visible in the far distance.
Kelp on Land.png|Kelp placed outside of [[water]] using the {{cmd|setblock}} command before 18w07b.
Waterless kelp.png|What kelp looks like without water (water removed using a [[resource pack]]).
Coral reef at night.png|Kelp within a [[coral reef]].
Floating Kelp.png|Kelp that generated in mid-air due to an [[ocean monument]]'s water cutting through it.
Kelp in ocean.jpg|Multiple kelps.
Kelp 255 blocks tall.png|Without obstacles, kelp can grow all the way to building limit.
ArgoMajor Kelp.jpg|First image of kelp in ''Bedrock Edition''.
</gallery>
== References ==
{{reflist}}
{{Blocks|vegetation}}
{{Items}}
[[Category:Plants]]
[[Category:Natural blocks]]
[[Category:Non-solid blocks]]
[[de:Seetang]]
[[es:Alga]]
[[fr:Algue]]
[[ja:コンブ]]
[[ko:켈프]]
[[pl:Wodorosty]]
[[pt:Alga]]
[[ru:Ламинария]]
[[th:สาหร่ายทะเล]]
[[zh:海带]]</li></ul> | 14w07a | Dispensers now place command blocks, instead of shooting them out. | |||
| 14w20a | The in-game character limit of 16,369 has been removed, allowing access to the full 32,767 characters. | ||||
| 14w27a | Added CommandStats NBT tag to command blocks. | ||||
1.8.6{{Extension DPL}}<ul><li>[[Minecart with Chest|Minecart with Chest]]<br/>{{ItemEntity
|image=Minecart with Chest.png
|renewable=Yes
|stackable=No
|size=Height: 0.7 Blocks<br>Width: 0.98 Blocks
|networkid='''[[JE]]''': 10
|drops=1 {{ItemLink|Minecart with Chest}}<br> plus contents
|health={{hp|6}}
}}
A '''minecart with chest''' is a single [[chest]] inside a [[minecart]], and functions as such.
== Natural generation ==
Minecarts with chests containing loot naturally generate in [[mineshaft]]s, each on top of a piece of [[rail]].
== Obtaining ==
=== Crafting ===
{{Crafting|Chest|Minecart|Output=Minecart with Chest|type=Transportation}}
Minecarts with chests can be retrieved by attacking them. By doing so it drops as an [[item]] and any other contents of the chest are dropped as well.
==Usage==
[[File:Minecart with Chest GUI.png|thumb|176px|The GUI of a minecart with chest.]]
Minecarts with chests can be placed by {{control|use item|text=using its item}} on any type of [[rail]].
Chest minecarts' contents can be accessed by pressing {{control|use item}} button on them. The interaction makes no sounds and the chest does not show the opening or closing animation, unlike regular chests.
The boost that minecarts with chests gain from [[powered rail]]s is dependent on their load. For example, from a 1 powered rail starter track, an empty minecart with chest travels 64 blocks, but a full minecart with chest travels only 16 blocks (opposed to 80 blocks for an occupied normal minecart and 8 blocks for an empty normal minecart).
Another physical property of chest minecarts is their ability to be stacked. While three chests can fit in an area three blocks tall, up to four chest minecarts can fit in the same area. Like other minecarts, an unlimited number of minecarts with chests can exist in the same block space.
Minecarts with chests are also able to interact with [[hopper]]s. Hoppers can take items out from the minecart chest if they are below the track as the minecart rolls over it or put them in if the minecart rolls under a downward facing hopper. Hoppers can also input items if they are facing into the side of the minecart.
Opening or destroying a minecart with chest angers [[piglin]]s.
{{See also|Tutorials/Storage minecarts}}
When on top of [[detector rail]]s, nearby [[redstone comparators]] will give out redstone signals based on how full the minecarts with chests are.
== Sounds ==
{{Edition|Java}}:<br>
Minecarts with chests use the Friendly Creatures sound category for entity-dependent sound events.<ref group=sound name=rollsource>{{bug|MC-42132}}</ref>
{{Sound table
|sound=Minecart rolling.ogg
|subtitle=Minecart rolls
|source=Friendly Creatures <ref group=sound name=rollsource/>
|overridesource=1
|description=While a minecart with chest is moving
|id=entity.minecart.riding
|translationkey=subtitles.entity.minecart.riding
|volume=0.0-0.35 <ref group=sound>Relates linearly with horizontal velocity (max 0.5)</ref>
|pitch=0.0-1.0 <ref group=sound>Will increase by 0.0025 per tick if the minecart's horizontal velocity is more than 0.01</ref>
|distance=16
|foot=1}}
{{Edition|Bedrock}}:
{{Sound table
|type=bedrock
|sound=Minecart rolling.ogg
|source=neutral
|description=While a minecart with chest is moving
|id=minecart.base
|foot=1}}
==Data values==
===ID===
{{edition|java}}:
{{ID table
|edition=java
|firstcolumnname=Item
|showforms=y
|generatetranslationkeys=y
|displayname=Minecart with Chest
|spritetype=item
|nameid=chest_minecart
|form=item
|foot=1}}
{{ID table
|edition=java
|firstcolumnname=Entity
|generatetranslationkeys=y
|displayname=Minecart with Chest
|spritetype=entity
|nameid=chest_minecart
|foot=1}}
{{edition|bedrock}}:
{{ID table
|edition=bedrock
|firstcolumnname=Item
|shownumericids=y
|showforms=y
|notshowbeitemforms=y
|generatetranslationkeys=y
|displayname=Minecart with Chest
|spritetype=item
|nameid=chest_minecart
|id=389
|form=item
|foot=1}}
{{ID table
|edition=bedrock
|firstcolumnname=Entity
|shownumericids=y
|generatetranslationkeys=y
|displayname=Minecart with Chest
|spritetype=entity
|nameid=chest_minecart
|id=98
|foot=1}}
===Entity data===
Minecarts with chests have entity data associated with them that contain various properties of the entity.
{{el|java}}:
{{main|Entity format}}
{{/ED}}
{{el|bedrock}}:
: See [[Bedrock Edition level format/Entity format]].
==Achievements==
{{load achievements|Freight Station}}
== Video==
<div style="text-align:center">{{yt|2yVVMiQrCwo}}</div>
==History ==
[[File:Minecart with Chest BE3.png|thumb|The Minecart models in the Bedrock Edition were north or south on the sides. In the latest version, the front and rear sides are north or south. But the absolute orientation of the chest was not changed.]]
{{info needed section|In bedrock edition 1.16.100 it seems that chests in minecarts face sideways instead of forward - when was this changed?}}
{{History|java alpha}}
{{History||v1.0.14|[[File:Minecart with Chest JE1.png|32px]] [[File:Minecart with Chest (item) JE1 BE1.png|32px]] Minecarts with chests have been added.
|At this point, they are either called "chest minecarts" or "storage minecarts" because no in-game name was indicated.}}
{{History|java beta}}
{{History||1.0|"Minecart with Chest" has been first indicated as its name, via the new item tooltips.}}
{{History||1.8|snap=Pre-release|[[File:Minecart with Chest JE2.png|32px]] The [[model]] of the minecart with chest has been changed to match the new [[chest]] model. However, the [[chest]] is incorrectly offset.<ref>[[mcw:Issues/Beta 1.8pre2#Graphical]]</ref>}}
{{History|||snap=release|[[File:Minecart with Chest JE3 BE1.png|32px]] The model of minecarts with chests has been fixed.}}
{{History|java}}
{{History||1.5|snap=13w02a|Minecarts with chests now generate in [[mineshaft]]s in place of normal chests.}}
{{History||1.9|snap=15w43a|[[Loot table]]s have been added; minecarts with chests now use loot tables, and those in generated in [[mineshaft]]s now use loot tables.}}
{{History||1.9.1|snap=pre2|The title of the [[inventory]] has been changed from 'Chest minecart' to 'Minecart with Chest'.}}
{{History||1.11|snap=16w32a|The [[entity]] ID has been changed from <code>MinecartChest</code> to <code>chest_minecart</code>.}}
{{History||1.13|snap=17w47a|Prior to [[1.13/Flattening|''The Flattening'']], this [[item]]'s numeral ID was 342.}}
{{History||1.14|snap=18w43a|[[File:Minecart with Chest JE4 BE2.png|32px]] [[File:Minecart with Chest (item) JE2 BE2.png|32px]] The textures of minecarts with chests have been changed.}}
{{History||1.16.2|snap=Pre-release 1|[[Piglin]]s now become angry with players who open or destroy a chest minecart.}}
{{History||1.19|snap=22w13a|The crafting recipe for a minecart with chest is now shapeless.
|Breaking a minecart with chest will now drop the item instead of the minecart and chest separately, though the contents of the chest are still dropped.<ref>{{bug|MC-249493|||Fixed}}</ref>}}
{{History|pocket alpha}}
{{History||v0.14.0|snap=build 1|[[File:Minecart with Chest JE3 BE1.png|32px]] [[File:Minecart with Chest (item) JE1 BE1.png|32px]] Added minecarts with chests.}}
{{History|||snap=build 3|Minecarts with chests now drop [[item]]s when destroyed in [[Creative]] mode.}}
{{History|pocket}}
{{History||1.1.0|snap=alpha 1.1.0.0|The [[entity]] ID has been changed from <code>minecartchest</code> to <code>chest_minecart</code>.}}
{{History|bedrock}}
{{History||1.10.0|snap=beta 1.10.0.3|[[File:Minecart with Chest JE4 BE2.png|32px]] [[File:Minecart with Chest (item) JE2 BE2.png|32px]] The textures of minecarts with chests have been changed.}}
{{History||1.19.0|snap=beta 1.19.0.30|Breaking a minecart with chest will now drop the item instead of the minecart and chest separately, though the contents of the chest are still dropped.}}
{{History|console}}
{{History||xbox=TU1|xbone=CU1|ps=1.0|wiiu=Patch 1|switch=1.0.1|[[File:Minecart with Chest JE3 BE1.png|32px]] [[File:Minecart with Chest (item) JE1 BE1.png|32px]] Added minecarts with chests.}}
{{History||xbox=none|xbone=none|ps=1.90|wiiu=none|switch=none|[[File:Minecart with Chest JE4 BE2.png|32px]] [[File:Minecart with Chest (item) JE2 BE2.png|32px]] The textures of minecarts with chests have been changed.}}
{{History|new 3ds}}
{{History||0.1.0|[[File:Minecart_with_Chest_JE3_BE1.png|32px]] [[File:Minecart_with_Chest_(item)_JE1_BE1.png|32px]] Added minecarts with chests.
|Minecarts with chests emit smoke [[particles]] when destroyed.}}
{{History|foot}}
==Issues==
{{issue list}}
==Gallery ==
<gallery>
Compact Minecart Storage.png|A compact storage using chest minecarts (left) compared to chest storage in the same volume. Notice how chests cannot be placed next to each other, which is no longer the case after Java Edition 1.13.
GlitchedMinecartChest.png|This minecart with chest is trapped inside a block, due to a [[stronghold]] and a [[mineshaft]] that generated partially overlapping.
Minecartportal.png|A minecart with chest generated on top of an [[end portal frame]], because there is a mineshaft behind the wall.
Chest Minecart Stack.png|A large stack of chest minecarts.
</gallery>
==References==
{{Reflist}}
{{items}}
{{entities}}
[[Category:Mechanics]]
[[Category:Storage]]
[[cs:Nákladní vozík]]
[[de:Güterlore]]
[[es:Vagoneta con cofre]]
[[fr:Wagonnet de stockage]]
[[hu:Tárolócsille]]
[[it:Carrello da miniera]]
[[ja:チェスト付きのトロッコ]]
[[ko:상자가 실린 광산 수레]]
[[nl:Mijnkar met kist]]
[[pl:Wagonik ze skrzynią]]
[[pt:Carrinho de mina com baú]]
[[ru:Вагонетка с сундуком]]
[[uk:Вагонетка зі скринею]]
[[zh:运输矿车]]</li><li>[[Phantom Membrane|Phantom Membrane]]<br/>{{Item
| title = Phantom Membrane
| image = Phantom Membrane.png
| renewable = Yes
| stackable = Yes (64)
}}
'''Phantom membranes''' are items obtained from killing [[phantom]]s. They are used to repair [[elytra]] and brew [[Potion of Slow Falling|potions of Slow Falling]].
== Obtaining ==
=== Mob loot ===
[[Phantom]]s drop 0–1 phantom membrane when killed by a [[player]] or tamed [[wolf]]. [[Looting]] increases the maximum drops by 1 per level, for a maximum of 4 with Looting III.
=== Cat gifts ===
{{main|Cat#Gifts}}
Tamed [[cat]]s have a 70% chance to bring the player a gift when they wake up from a [[bed]], and the gift has a 3.22% chance to be a phantom membrane.
== Usage ==
=== Repairing ===
Phantom membranes can be used in an [[anvil]] to repair [[elytra]], restoring 108 durability points (25% of the pair's total durability) per membrane while preserving their [[enchantments]].
{| class="wikitable" data-description="Repairing elytra"
! scope="col" style="width:64px;" | Name
! Ingredients
! [[Anvil]] usage
|-
! scope="row" style="text-align: center;" | '''Elytra'''
| [[Elytra]] +<br>[[Phantom Membrane]]
| style="width: 260px; padding: 1px;" | {{Anvil| title = Elytra|Input1=Damaged Elytra|Input2=Phantom Membrane, 2|Output=Elytra}}
|-
|}
=== Brewing ingredient ===
Phantom membranes are used to [[brewing|brew]] [[Potion of Slow Falling|slow falling potions]] from an [[awkward potion]].
{{Brewing
|Phantom Membrane
|Potion of Slow Falling
|showname=3
}}
== Data values ==
=== ID ===
{{edition|java}}:
{{ID table
|edition=java
|showforms=y
|generatetranslationkeys=y
|displayname=Phantom Membrane
|spritetype=item
|nameid=phantom_membrane
|form=item
|foot=1}}
{{edition|bedrock}}:
{{ID table
|edition=bedrock
|shownumericids=y
|showforms=y
|notshowbeitemforms=y
|generatetranslationkeys=y
|displayname=Phantom Membrane
|spritetype=item
|nameid=phantom_membrane
|id=574
|form=item
|foot=1}}
== History ==
{{History|java}}
{{History||1.13|snap=18w14a|[[File:Phantom Membrane JE1 BE1.png|32px]] Added phantom membranes.}}
{{History||1.14|snap=18w44a|Tamed [[cat]]s now have a chance to give the [[player]] phantom membranes as [[Cat#Gifts|gifts]].}}
{{History|||snap=19w08a|[[File:Phantom Membrane JE2 BE2.png|32px]] The texture of phantom membranes has now been changed.}}
{{History|bedrock}}
{{History||1.6.0|snap=beta 1.6.0.5|[[File:Phantom Membrane JE1 BE1.png|32px]] Added phantom membranes.}}
{{History||1.8.0|snap=beta 1.8.0.8|Tamed [[cat]]s now have a chance to give the [[player]] phantom membranes as gifts.}}
{{History||1.10.0|snap=beta 1.10.0.3|[[File:Phantom Membrane JE2 BE2.png|32px]] The texture of phantom membranes has now been changed.}}
{{History|console}}
{{History||xbox=TU69|ps=1.76|wiiu=Patch 38|[[File:Phantom Membrane JE1 BE1.png|32px]] Added phantom membranes.}}
{{History||xbox=none|xbone=none|ps=1.90|wiiu=none|switch=none|[[File:Phantom Membrane JE2 BE2.png|32px]] The texture of phantom membranes has now been changed.}}
{{History|foot}}
== Issues ==
{{issue list}}
== References ==
{{reflist}}
== External Links ==
*[https://www.minecraft.net/en-us/article/taking-inventory--phantom-membrane Taking Inventory: Phantom Membrane] – Minecraft.net on August 2, 2019
{{items}}
[[de:Phantomhaut]]
[[fr:Membrane de Phantom]]
[[ja:ファントムの皮膜]]
[[ko:팬텀 막]]
[[pl:Błona fantoma]]
[[pt:Membrana de phantom]]
[[ru:Мембрана фантома]]
[[th:เนื้อเยื่อแฟนท่อม]]
[[uk:Перетинка фантома]]
[[zh:幻翼膜]]
[[Category:Renewable resources]]
[[Category:Brewing recipe]]</li></ul> | Dispensers no longer place command blocks.[1] | ||||
1.9{{Extension DPL}}<ul><li>[[Chalkboard|Chalkboard]]<br/>{{Education feature}}
{{unobtainable|edition=be}}{{Block
|image=<gallery>
Chalkboard Slate.png|Slate
Chalkboard Poster.png|Poster
Chalkboard Board.png|Board
</gallery>
|invimage=Slate
|invimage2=Poster
|invimage3=Board
|transparent=Yes
|renewable=No
|light=No
|tool=None
|stackable=Yes (16)
|flammable=No
}}
A '''chalkboard''' is a [[block]] that can display more text than a [[sign]].<ref>https://education.minecraft.net/support/knowledge-base/using-slates-posters-boards/</ref> Three sizes are available: 1×1 (slate), 2×1 (poster), and 3×2 (board).
== Obtaining ==
In ''[[Education Edition]]'', chalkboards can be obtained in the [[Creative inventory]] or through the {{cmd|give}} command.
In ''[[Bedrock Edition]]'', chalkboards cannot be obtained by commands or the creative inventory, and can only be obtained by using glitches or inventory editors.
== Usage ==
A chalkboard can be used similarly to a [[sign]], to display text. Once placed, select the chalkboard and enter the desired text and click the "OK" button. The "×" in the upper right corner of the board closes the edit screen.
=== Placement ===
Chalkboards may be placed on the top or side of other blocks (including non-solid blocks like [[fence]]s, [[glass]], [[rail]]s, and other chalkboards). To place a chalkboard, {{control|use}} a chalkboard item while pointing at the block the chalkboard should be attached to. To place a chalkboard on a block that can be interacted with by the {{control|use}} control (for example, [[chest]]s, [[note block]]s, etc.), {{control|sneak}} while placing the chalkboard.
1×1 slates placed on the top of a block stand on a short post, facing in the direction of the player who placed it, in any of 16 different directions. 2×1 posters and 2×3 boards can be placed in any of 4 different directions. Chalkboards placed on the side of a block simply float there, even if the block doesn't make contact with the chalkboards.
=== Text ===
When entering text, six lines of text are available for the slates and posters, while fifteen lines of text are available for the 2×3 boards. To switch between lines, the player can press Enter or the up/down arrow keys. The location of text currently selected has a flashing cursor.
While editing, typing and backspacing can occur at any point in the line by moving the cursor using the left and right arrow keys. Once the end of the line has been reached, the word is hyphenated and is continued on the next line.
After the editing window is closed, right-clicking on a chalkboard reopens the editing menu. Copy and paste can be performed, and no more than the basic/shifted keyboard characters may be entered.
=== Interaction ===
Chalkboards act as though they have a {{control|use}} action, so {{control|sneaking}} is required to place blocks or use items while the cursor is pointed at them.
Unlike signs, boards block a [[piston]] from moving.
Boards have no collision box (they are completely non-solid), so [[item]]s and [[mob]]s can move through boards blocks. Other blocks (including other boards) can be placed on any edge of a board.
[[Water]] and [[lava]] flow around boards. Lava can create [[fire]] in [[air]] blocks next to boards as if the boards were flammable, but the boards do not burn.
== Sounds ==
{{Sound table/Block/Stone/BE}}
== Data values ==
=== ID ===
{{ID table
|edition=bedrock
|shownumericids=y
|showforms=y
|generatetranslationkeys=y
|displayname=Block
|spritename=chalkboard
|spritetype=block
|nameid=chalkboard
|id=230
|form=block
|translationkey=tile.chalkboard.oneByOne.name, tile.chalkboard.twoByOne.name, tile.chalkboard.threeByTwo.name}}
{{ID table
|displayname=Item
|spritename=board
|spritetype=item
|nameid=board
|translationkey=tile.chalkboard.oneByOne.name, tile.chalkboard.twoByOne.name, tile.chalkboard.threeByTwo.name
|id=454
|form=item
|foot=1}}
=== Metadata ===
{{see also|Data values}}
Chalkboards uses the following data values:
*Slate: 1
*Board: 2
*Poster: 3
<!--{{/DV}}-->
=== Block states ===
{{see also|Block states}}
{{info needed}}
<!--{{/BS}}-->
== History ==
{{History|pocket alpha}}
{{History||v0.16.0|snap=build 1|[[File:Chalkboard Slate.png|32px]] [[File:Chalkboard Poster.png|32px]] [[File:Chalkboard Board.png|32px]]<br>[[File:Chalkboard_Slate_(item)_BE1.png|32px]] [[File:Chalkboard_Poster_(item)_BE1.png|32px]] [[File:Chalkboard_Board_(item)_BE1.png|32px]] Added chalkboards, likely as an accidental addition.
|Chalkboards can be obtained and placed using the {{cmd|give}} and {{cmd|setblock}} [[command]]s respectively. However, they serve no purpose.}}
{{History|||snap=build 2|Chalkboards have now been removed. However, the textures still exist.}}
{{History|bedrock}}
{{History||1.11.0|snap=beta 1.11.0.1|Re-added chalkboards. They still exist as entities, but can't be spawned. The items can't be spawned either.}}
{{h||1.17.30|snap=beta 1.17.30.20|Chalkboards can now be placed consistently.}}
{{History|education}}
{{History||MinecraftEdu|link=MinecraftEdu|[[File:Oak Sign JE1 BE1.png|30px]] [[MinecraftEdu]], Education Edition's predecessor, had "[[Big Sign]]s", 3 block wide signs that served a similar purpose.}}
{{History||1.0|[[File:Chalkboard Slate.png|32px]] [[File:Chalkboard Poster.png|32px]] [[File:Chalkboard Board.png|32px]]<br>[[File:Chalkboard_Slate_(item)_BE1.png|32px]] [[File:Chalkboard_Poster_(item)_BE1.png|32px]] [[File:Chalkboard_Board_(item)_BE1.png|32px]] Added chalkboards.}}
{{History||1.0.2|The UI of chalkboards now has a locked option.
|[[Player|Students]] now can place their own chalkboards even without a worldbuilder ability.}}
{{History|foot}}
== Gallery ==
<gallery>
Education Edition Exclusive Features.png|The chalkboard placed in a world along with other Education Edition features.
Chalkboardsingamepe.png|The chalkboard in [[Pocket Edition v0.16.0 alpha build 1]].
</gallery>
== References ==
{{Reflist}}
{{Blocks|Utility}}
{{Items}}
{{Education Edition}}
[[Category:Utility blocks]]
[[Category:Block entities]]
[[Category:Education Edition blocks]]
[[Category:Education Edition items]]
[[pt:Lousa]]
[[de:Tafel]]
[[fr:Ardoise]]
[[ja:黒板]]
[[pl:Tablica kredowa]]
[[ru:Доска]]
[[uk:Дошка]]
[[zh:黑板]]</li><li>[[Sugar Cane|Sugar Cane]]<br/>{{Block
|image=Sugar Cane.png
|image2=Sugar Cane (item) JE3.png
|extratext = View all [[#Gallery|renders]]
|transparent=Yes
|light=No
|tool=any
|renewable=Yes
|stackable=Yes (64)
|flammable=No
|lavasusceptible=No
}}
'''Sugar cane''' is a block found as 1–4-block-tall. It plants near water in the [[Overworld]]. As an item, it is an important crafting ingredient.
==Obtaining==
Sugar cane can be mined instantly with anything.
When the spot a sugar cane block is placed in becomes unsuitable, such as when the supporting block is removed, the sugar cane block uproots and drops as an item. {{IN|be}}, sugar cane uproots immediately after all adjacent water is removed. {{IN|je}}, sugar cane uproots on the next block update or [[Tick#Random tick|random tick]].
A sugar cane block drops itself as an item if a piston tries to push it (trying to pull it does nothing) or moves a block into its space.
===Natural generation===
[[File:Sugar Canez.png|thumb|250px|Naturally-occurring sugar cane near a river.]]
Sugar cane can generate naturally near [[water]] and [[ice]], as two ({{frac|11|18}} chance), three ({{frac|5|18}} chance), or four ({{frac|2|18}} chance) blocks tall. Rare taller sugar canes can be found if the world generator places two smaller canes on top of each other. It generates in approximately 0.8 sugar cane per chunk seeing as how they only generate near bodies of water.
Sugar canes attempt to generate 10 times in any Overworld biome, which requires water. An extra 10 attempts are made in [[swamp]] biomes, and 50 in [[desert]] biomes, which makes sugar cane twice as frequent in swamps and six times as frequent in desert biomes, making the banks of [[river]]s that cut through deserts lined with sugar canes. Sugar canes do not grow faster in swamps or deserts they only spawn a increased amount.
Sugar cane cannot generate in caves {{in|je}}.<ref>{{bug|MC-214959||Sugar cane generated in cave|Fixed}}</ref>
===Trading===
[[Wandering trader]]s can sell sugar cane for an [[emerald]].
==Usage==
Due to its water-displacing properties, sugar cane can interestingly be used to create underwater paths, allowing [[player]]s to move at normal speed and breathe if it is two blocks in height.{{only|java}}<ref>{{bug|MC-929||Sugar cane can be placed underwater|WAI}}</ref>
Sugar cane takes on a different shade of green depending on the biome in which it is placed.
===Crafting ingredient===
{{crafting usage}}
===Farming===
{{main|Tutorials/Sugar cane farming}}
[[File:Underground Sugar Farm.png|200px|thumb|An underground sugar cane farm.]]
Sugar cane can generate naturally up to any number of blocks tall, but ''grow'' only to a height of three blocks, adding a block of height when the top sugar cane block has received 16 random [[Tick#Block tick|block tick]]s (i.e. on average every 18 minutes on ''Java Edition''<!-- Average 68.27 seconds/tick * 16 ticks/growth = 18.2 minutes --> or 54 minutes on Bedrock Edition, but the actual rate can vary widely).
Sugar cane must be planted on a [[grass block]], [[dirt]], [[coarse dirt]], [[rooted dirt]], [[podzol]], [[mycelium]], [[sand]], [[red sand]], [[suspicious sand]], [[moss block]], or [[mud]] that is directly adjacent to [[water]], [[waterlogged]] block, or [[frosted ice]] (not merely above or diagonal to water), or on top of another sugar cane block. The adjacent water block can be covered with another block, whether [[opacity|opaque or transparent]], and sugar cane can still be placed and grow next to it. Sugar cane grows regardless of light level, even in complete darkness.
[[File:4blockcane.png|thumb|A natural 4-block-high sugar cane plant.]]
{{IN|bedrock}}, [[bone meal]] can be used to instantly grow sugar cane to three blocks. Only one bone meal is consumed. {{IN|java}}, bone meal cannot be used on sugar cane.<ref>{{bug|MC-73963||Can't use bonemeal on cacti or sugar cane|WAI}}</ref>
On average, it takes [[Tutorials/Sugar_cane_farming#Mechanics|18 minutes]] for a single block of sugar cane to grow 3 blocks tall.
=== Composting ===
Placing sugar cane into a [[composter]] has a 50% chance of raising the compost level by 1.
== List of colors ==
{{Missing information|Bedrock Edition colors (see [[Water#Color]]{{verify|it's there?}})}}
=== ''Java Edition'' ===
These values are generated by the biome dyeing algorithm. See [[Color#Biome colors|Biome colors]] for more information.
<div class="mw-collapsible mw-collapsed" style="float: left">
{| class="wikitable sortable" style="text-align:center" data-description="Java edition biome colors"
!Biome !! Category !! Rainfall !! Sugarcane Color !! Temperature Affects !! Render
|-
| {{BiomeLink|Badlands}} || Mesa || No || #90814d || No || [[File:Badlands Sugar Cane.png|32px]]
|-
| {{BiomeLink|Beach}} || Beach || Rain || #91bd59 || || [[File:Plains Sugar Cane.png|32px]]
|-
| {{BiomeLink|Birch Forest}} || Forest || Rain || #88bb67 || || [[File:Birch Forest Sugar Cane.png|32px]]
|-
| {{BiomeLink|Cold Ocean}} || Ocean || Rain || #8eb971 || || [[File:Ocean Sugar Cane.png|32px]]
|-
| {{BiomeLink|Dark Forest}} || Forest || Rain || #507a32 || || [[File:Dark Forest Sugar Cane.png|32px]]
|-
| {{BiomeLink|Deep Cold Ocean}} || Ocean || Rain || #8eb971 || || [[File:Ocean Sugar Cane.png|32px]]
|-
| {{BiomeLink|Deep Frozen Ocean}} || Ocean || Rain || #8eb971 || || [[File:Ocean Sugar Cane.png|32px]]
|-
| {{BiomeLink|Deep Lukewarm Ocean}} || Ocean || Rain || #8eb971 || || [[File:Ocean Sugar Cane.png|32px]]
|-
| {{BiomeLink|Deep Ocean}} || Ocean || Rain || #8eb971 || || [[File:Ocean Sugar Cane.png|32px]]
|-
| {{BiomeLink|Desert}} || Desert || No || #bfb755 || || [[File:Desert Sugar Cane.png|32px]]
|-
| {{BiomeLink|End Barrens}} || The End || No || #8eb971 || || [[File:Ocean Sugar Cane.png|32px]]
|-
| {{BiomeLink|End Highlands}} || The End || No || #8eb971 || || [[File:Ocean Sugar Cane.png|32px]]
|-
| {{BiomeLink|End Midlands}} || The End || No || #8eb971 || || [[File:Ocean Sugar Cane.png|32px]]
|-
| {{BiomeLink|Eroded Badlands}} || Mesa || No || #90814d || No || [[File:Badlands Sugar Cane.png|32px]]
|-
| {{BiomeLink|Flower Forest}} || Forest || Rain || #79c05a || || [[File:Forest Sugar Cane.png|32px]]
|-
| {{BiomeLink|Forest}} || Forest || Rain || #79c05a || || [[File:Forest Sugar Cane.png|32px]]
|-
| {{BiomeLink|Frozen Ocean}} || Ocean || Snow || #80b497 || || [[File:Snowy Plains Sugar Cane.png|32px]]
|-
| {{BiomeLink|Frozen River}} || River || Snow || #80b497 || || [[File:Snowy Plains Sugar Cane.png|32px]]
|-
| {{BiomeLink|Old Growth Spruce Taiga}} || Taiga || Rain || #86b783 || || [[File:Taiga Sugar Cane.png|32px]]
|-
| {{BiomeLink|Old Growth Pine Taiga}} || Taiga || Rain || #86b87f || || [[File:Old Growth Pine Taiga Sugar Cane.png|32px]]
|-
| {{BiomeLink|Ice Spikes}} || Icy || Snow || #80b497 || || [[File:Snowy Plains Sugar Cane.png|32px]]
|-
| {{BiomeLink|Jungle}} || Jungle || Rain || #59c93c || || [[File:Jungle Sugar Cane.png|32px]]
|-
| {{BiomeLink|Sparse Jungle}} || Jungle || Rain || #64c73f || || [[File:Sparse Jungle Sugar Cane.png|32px]]
|-
| {{BiomeLink|Lukewarm Ocean}} || Ocean || Rain || #8eb971 || || [[File:Ocean Sugar Cane.png|32px]]
|-
| {{BiomeLink|Windswept Hills}} || Extreme Hills || Rain || #8ab689 || || [[File:Windswept Hills Sugar Cane.png|32px]]
|-
| {{BiomeLink|Mushroom Fields}} || Mushroom || Rain || #55c93f || || [[File:Mushroom Fields Sugar Cane.png|32px]]
|-
| {{BiomeLink|Nether}} || Nether || No || #bfb755 || || [[File:Desert Sugar Cane.png|32px]]
|-
| {{BiomeLink|Ocean}} || Ocean || Rain || #8eb971 || || [[File:Ocean Sugar Cane.png|32px]]
|-
| {{BiomeLink|Plains}} || Plains || Rain || #91bd59 || || [[File:Plains Sugar Cane.png|32px]]
|-
| {{BiomeLink|River}} || River || Rain || #8eb971 || || [[File:Ocean Sugar Cane.png|32px]]
|-
| {{BiomeLink|Savanna}} || Savanna || No || #bfb755 || || [[File:Desert Sugar Cane.png|32px]]
|-
| {{BiomeLink|Savanna Plateau}} || Savanna || No || #bfb755 || || [[File:Desert Sugar Cane.png|32px]]
|-
| {{BiomeLink|Windswept Savanna}} || Savanna || No || #bfb755 || || [[File:Desert Sugar Cane.png|32px]]
|-
| {{BiomeLink|Small End Islands}} || The End || No || #8eb971 || || [[File:Ocean Sugar Cane.png|32px]]
|-
| {{BiomeLink|Snowy Beach}} || Beach || Snow || #83b593 || || [[File:Snowy Beach Sugar Cane.png|32px]]
|-
| {{BiomeLink|Snowy Taiga}} || Taiga || Snow || #80b497 || || [[File:Snowy Plains Sugar Cane.png|32px]]
|-
| {{BiomeLink|Snowy Plains}} || Icy || Snow || #80b497 || || [[File:Snowy Plains Sugar Cane.png|32px]]
|-
| {{BiomeLink|Stony Shore}} || None || Rain || #8ab689 || || [[File:Windswept Hills Sugar Cane.png|32px]]
|-
| {{BiomeLink|Sunflower Plains}} || Plains || Rain || #91bd59 || || [[File:Plains Sugar Cane.png|32px]]
|-
| {{BiomeLink|Swamp}} || Swamp || Rain || #6A7039 || If temperature below -0.1, used #4C763C. || [[File:Swamp Sugar Cane.png|32px]] / [[File:Swamp Sugar Cane (Cold).png|32px]]
|-
| {{BiomeLink|Taiga}} || Taiga || Rain || #86b783 || || [[File:Taiga Sugar Cane.png|32px]]
|-
| {{BiomeLink|Old Growth Birch Forest}} || Forest || Rain || #88bb67 || || [[File:Birch Forest Sugar Cane.png|32px]]
|-
| {{BiomeLink|The End}} || The End || No || #8eb971 || || [[File:Ocean Sugar Cane.png|32px]]
|-
| {{BiomeLink|The Void}} || None || No || #8eb971 || || [[File:Ocean Sugar Cane.png|32px]]
|-
| {{BiomeLink|Warm Ocean}} || Ocean || Rain || #8eb971 || || [[File:Ocean Sugar Cane.png|32px]]
|-
| {{BiomeLink|Wooded Badlands}} || Mesa || No || #90814d || No || [[File:Badlands Sugar Cane.png|32px]]
|-
| {{BiomeLink|Windswept Forest}} || Extreme Hills || Rain || #8ab689 || || [[File:Windswept Hills Sugar Cane.png|32px]]
|}
</div>
{{clear}}
=== Bedrock Edition ===
{{empty section}}
== Sounds ==
{{Sound table/Block/Grass}}
== Data values ==
=== ID ===
{{edition|java}}:
{{ID table
|edition=java
|showforms=y
|generatetranslationkeys=y
|displayname=Sugar Cane
|spritetype=block
|nameid=sugar_cane
|foot=1}}
{{edition|bedrock}}:
{{ID table
|edition=bedrock
|firstcolumnname=Sugar Cane
|shownumericids=y
|showforms=y
|showaliasids=y
|generatetranslationkeys=y
|displayname=Block
|spritename=sugar-cane
|spritetype=block
|nameid=reeds
|id=83
|form=block
|itemform=item.reeds}}
{{ID table
|displayname=Item
|spritename=sugar-cane
|spritetype=item
|nameid=sugar_cane
|id=385
|form=item
|aliasid=reeds
|translationkey=item.reeds.name
|foot=1}}
=== Block states ===
{{see also|Block states}}
{{/BS}}
== Video ==
{{Video note|This video was made before sugar cane had a different shade of green depending on the biome.|minor}}
<div style="text-align:center">{{yt|zlOnwn3PH5o}}</div>
== History ==
{{more images|Appearance when affected by {{bug|MC-48831}}}}
{{History|java alpha}}
{{History||v1.0.11|[[File:Sugar Cane JE1 BE1.png|32px]] [[File:Sugar Cane (item) JE1 BE1.png|32px]] Added reeds in the [[Seecret Updates|Seecret Friday Update 6]].
|Reeds are informally referred to as "bamboo" or "papyrus" by many [[player]]s.
|Since reeds can be washed away with [[water]] currents or instantly destroyed by removing the water adjacent to them, automated reed farms can be made.
|Reeds can be used to craft [[paper]].}}
{{History|java beta}}
{{History||1.2|[[Notch]] has [[wikipedia:Retroactive continuity|retconned]] reeds into sugar cane so that it can now be [[crafting|crafted]] into [[sugar]], included in the recipe for the [[cake]]s.}}
{{History||1.6|snap=Test Build 3|[[Arrow]]s no longer stick to sugar cane, and instead, they pass through. However, [[snowball]]s still come into contact with any sugar cane blocks, as if they are solid.}}
{{History||1.8|snap=Pre-release|Sugar cane can now grow and be placed onto [[sand]] as long as they are adjacent to [[water]]. This update allows sugar canes to appear next to [[water]] ponds in [[desert]] biomes.
|Sugar cane is now available in the [[creative]] [[inventory]] in both block and item forms.}}
{{History|java}}
{{History||1.0.0|snap=?|The sugar cane block has been removed from the creative inventory.}}
{{History||1.7.2|snap=13w36a|[[File:Sugar Cane JE2 BE2.png|32px]] Sugar cane is now [[tint]]ed depending on the [[biome]] it's in.
|The item texture remained unchanged, however, and still used the color palette from Alpha to 1.6.4.<ref name="Bug">{{bug|MC-216227}}</ref>}}
{{History||1.9|snap=15w43a|Sugar cane no longer breaks if its adjacent [[water]] is turned to [[frosted ice]].}}
{{History||1.13|snap=17w47a|The ID of sugar cane has now been changed from <code>reeds</code> to <code>sugar_cane</code>.
|"Sugar Canes" have now been renamed to "Sugar Cane".
|Prior to [[1.13/Flattening|''The Flattening'']], this [[block]]'s numeral ID was 83, and the [[item]]'s 338.}}
{{History||1.14|snap=18w43a|[[File:Sugar Cane (item) JE2 BE2.png|32px]] The texture of the sugar cane item has been changed.}}
{{History|||snap=19w03a|Placing sugar cane into a [[composter]] has a 20% chance of raising the compost level by 1.}}
{{History|||snap=19w05a|Sugar cane now has a 50% chance of increasing the compost level in a composter by 1.
|Added [[wandering trader]]s, which sell sugar cane.}}
{{History||1.16|snap=20w13a|Sugar cane has been moved from the Miscellaneous tab to the Decoration Blocks tab in the [[Creative inventory]].<ref name="misc decoration">https://bugs.mojang.com/browse/MC-174434</ref>}}
{{History||1.17|snap=21w11a|[[File:Sugar Cane (item) JE3.png|32px]] The texture of the sugar cane item has been changed, so that it actually matches the color it uses when placed again.<ref name="Bug"/>}}
{{History|||snap=Pre-release 1|Sugar cane now generates in mushroom fields.<ref>{{bug|MC-226683}}</ref>}}
{{History||1.19|snap=22w15a|Sugar cane can now be planted on mud.}}
{{History||1.20|snap=23w14a|Sugar cane can now be planted on [[suspicious sand]].}}
{{History|pocket alpha}}
{{History||Pre-release|[[File:Sugar Cane JE1 BE1.png|32px]] [[File:Sugar Cane (item) JE1 BE1.png|32px]] Added sugar cane.}}
{{History||v0.2.0|Despite being visible in the inventory, sugar cane does not drop anything when mined, making it unobtainable in Survival mode.}}
{{History||v0.2.1|Survival players now start with an infinite stack of sugar cane in the inventory.}}
{{History||v0.3.0|Sugar cane now drops its item form when mined.
|Survival players no longer start with an infinite stack of sugar cane in the inventory.}}
{{History||v0.5.0|Sugar cane can now be grown on [[sand]].
|Sugar cane can now be obtained after activating the [[nether reactor]].}}
{{History||v0.8.0|snap=build 5|[[Bone meal]] can now grow sugar cane to maximum height.}}
{{History||v0.9.0|snap=build 1|[[File:Sugar Cane JE2 BE2.png|32px]] The color of sugar cane now changes depending on the [[biome]] they are in.
|Using bone meal on sugar cane is no longer able to break blocks above it.}}
{{History||v0.12.1|snap=build 1|Sugar cane is no longer available from the [[nether reactor]].}}
{{History|pocket}}
{{History||1.0.0|snap=alpha 0.17.0.1|[[File:Sugar Cane JE1 BE1.png|32px]] Due to a bug, sugar canes no longer change color depending on the [[biome]].}}
{{History|bedrock}}
{{History||1.2.13|snap=beta 1.2.13.5|[[File:Sugar Cane JE2 BE2.png|32px]] The color of sugar canes now changes depending on the [[biome]], once again.}}
{{History||1.10.0|snap=beta 1.10.0.3|[[File:Sugar Cane (item) JE2 BE2.png|32px]] The texture of the sugar cane [[item]] has been changed.
|Sugar cane can now be [[trading|bought]] from [[wandering trader]]s.}}
{{History||1.11.0|snap=beta 1.11.0.1|Sugar canes can now be used to fill up [[composter]]s.}}
{{History||1.17.0|snap=beta 1.17.0.50|[[File:Sugar Cane (item) JE3.png|32px]] The texture of the sugar cane item has been changed, so that it actually matches the color it uses when placed again.}}
{{History|console}}
{{History||xbox=TU1|xbone=CU1|ps=1.0|wiiu=Patch 1|switch=1.0.1|[[File:Sugar Cane JE1 BE1.png|32px]] [[File:Sugar Cane (item) JE1 BE1.png|32px]] Added sugar canes.
|Sugar canes are solid, making it useful for growable walls. Unlike on Java Edition, they were never renamed to Sugar Cane.}}
{{History||xbox=TU2|Sugar canes are no longer solid, and arrows pass through them.}}
{{History||xbox=TU31|xbone=CU19|ps=1.22|wiiu=Patch 3|[[File:Sugar Cane JE2 BE2.png|32px]] The color of sugar cane now changes depending on the [[biome]] they're in.}}
{{History||xbox=TU60|xbone=CU51|ps=1.64|wiiu=Patch 30|switch=1.0.11|Sugar cane can now be grown with [[bonemeal]].}}
{{History||xbox=none|xbone=none|ps=1.90|wiiu=none|switch=none|[[File:Sugar Cane (item) JE2 BE2.png|32px]] The texture of the sugar cane [[item]] has been changed.}}
{{History||xbox=none|xbone=none|ps=1.91|wiiu=none|switch=none|Sugar cane can now be [[trading|bought]] from [[wandering trader]]s.
|Sugar canes can now be used to fill up [[composter]]s.}}
{{History|New Nintendo 3DS Edition}}
{{History||0.1.0|[[File:Sugar Cane JE1 BE1.png|32px]] [[File:Sugar Cane (item) JE1 BE1.png|32px]] Added sugar cane.}}
{{History|foot}}
=== Sugar cane "item" ===
{{:Technical blocks/Sugar Cane}}
== Issues ==
{{Issue list}}
== Trivia ==
*When a sugar cane is broken at the second level, the time resets (for example, if a two-block high sugar cane is broken, but is just about to grow to the third stage, it would reset that time).
*By placing more sugar canes on top of a sugar cane plant, it is possible to create tall sugar canes (up to y=319, the maximum height for building), although they do not naturally grow this high.
*Before sugar cane received an official name, they were sometimes referred to as [[bamboo]], a block added 9 years later. Other names were "reeds" and "papyrus".
== Gallery ==
=== Renders ===
<gallery>
Plains Sugar Cane.png|Plains
Taiga Sugar Cane.png|Taiga
Snowy Plains Sugar Cane.png|Snowy plains
Jungle Sugar Cane.png|Jungle
Desert Sugar Cane.png|Desert
Swamp Sugar Cane (Cold).png|Swamp (cold)
Swamp Sugar Cane.png|Swamp
Badlands Sugar Cane.png|Badlands
</gallery>
=== In-game ===
<gallery>
Huge Sugar Farm.png|A large sugar cane farm using 2×2 [[water]] holes.
Sugar Cane Waterfall.png|Water flowing over sugar cane.
UnderwaterSugarCane.png|Naturally generated sugar cane found underwater.
Sugar and Cactus.png|A [[cactus]] and sugar cane stalk generated next to each other.
SugarCaneRavine.png|Sugar cane found in the [[ravine]].
Reeds in Winter mode.png|Reeds generated in the [[winter mode]].
Sugar Cane Naturally Growing.png|Sugar cane growing between [[biome]]s.
Mesa Sugar Cane.jpg|Sugar cane growing on [[red sand]] in a [[badlands]] biome.
Sugarcanenowaterglitch.png|Sugar cane generated without a water source.
SwampCane.png|Sugar cane generated in a [[swamp]] biome.
Sugar cane savanna.png|Sugar cane growing in a [[savanna]] biome.
ForestSugarcane.png|Sugar cane growing in a [[forest]] biome.
Lava cane.png|Sugar cane growing with lava flowing around it.
Before breaking.png|Sugar canes few seconds before breaking because the water is frozen.
Undergroundreed.png|A sugar cane plant that generated in an underground [[water lake]].
Cave Sugar.png|Another example.
</gallery>
=== Heights ===
<gallery>
Tall Sugar Cane.png|Four-block tall sugar cane.
4RiverCane.png|Four-block tall sugar cane.
4-block tall sugar cane.png|Four-block tall sugar cane in a [[plains]] biome.
</gallery>
== References ==
{{Reflist}}
{{Blocks|vegetation}}
{{Items}}
[[Category:Plants]]
[[Category:Natural blocks]]
[[Category:Non-solid blocks]]
[[cs:Cukrová třtina]]
[[de:Zuckerrohr]]
[[es:Caña de azúcar]]
[[fr:Canne à sucre]]
[[hu:Cukornád]]
[[it:Canna da zucchero]]
[[ja:サトウキビ]]
[[ko:사탕수수]]
[[nl:Suikerriet]]
[[pl:Trzcina cukrowa]]
[[pt:Cana-de-açúcar]]
[[ru:Сахарный тростник]]
[[th:อ้อย]]
[[uk:Цукрова тростина]]
[[zh:甘蔗]]</li></ul> | 15w33a | The character limit for command blocks is now 32,500 instead of 32,767. | |||
| 15w34a | |||||
| Added block facing for command blocks. | |||||
| 15w34b | Added Conditional mode within command blocks. | ||||
| Added tab completion support within command blocks. | |||||
| 15w35a | |||||
| Added Always active and needs redstone options for command blocks. | |||||
Added auto NBT tag to control redstone options within command blocks. | |||||
| 15w36a | Players are now unable to use commands, such as /give, within command blocks.
| ||||
| Players, who are unable to use commands, can no longer place command blocks. | |||||
| 15w36d | Each command block type now appears with different colors on maps. | ||||
| 16w02a | Running /help in a command block now randomly uses one of various different humorous phrases as the previous output. | ||||
| 16w04a | Running "Searge" as the command in the command block without a preceding "/" now sets the previous output to "#itzlipofutzli". | ||||
1.11{{Extension DPL}}<ul><li>[[Torchflower Seeds|Torchflower Seeds]]<br/>{{wip}}
{{Block
| image = <gallery>
Torchflower Age 0.png| Age 0
Torchflower Age 1.png| Age 1
Torchflower Age 2.png| Age 2
</gallery>
| image2 = Torchflower Seeds JE1.png
| transparent = Yes
| light = No
| tool = N/A
| renewable = Yes
| stackable = Yes (64)
| rarity = Common
|flammable=No
|lavasusceptible=No
}}
'''Torchflower seeds''' are seeds that have a chance to be dropped by [[Sniffer|sniffers]] when they finish digging.
== Obtaining ==
[[Sniffer]]s will occasionally bury their nose in the ground and start digging. Once the sniffer has finished digging, one torchflower seed will have a chance to be dropped on the floor as an item.
Sniffers can only dig for torchflower seeds in the following blocks:
*{{BlockLink|Dirt}}
*{{BlockLink|Grass Block}}
*{{BlockLink|Podzol}}
*{{BlockLink|Coarse Dirt}}
*{{BlockLink|Rooted Dirt}}
*{{BlockLink|Moss Block}}
*{{BlockLink|Mud}}
*{{BlockLink|Muddy Mangrove Roots}}
They cannot dig for torchflower seeds on [[mycelium]], which is intended.<ref>{{bug|MC-260259||Sniffers cannot dig nor find seeds on mycelium|WAI}}</ref>
== Usage ==
=== Crop ===
{{main|Tutorials/Crop farming|title1=Crop farming}}
Torchflower seeds can be {{control|placed}} on [[farmland]], where they grow through three stages. Breaking the torchflower crop before it matures drops the seed, while breaking the final stage produces one [[torchflower]] and does not yield the seed.
Crops break if pushed by a [[piston]] or if their supporting farmland breaks or turns to dirt (i.e. by being trampled), dropping their usual drops.
Farmer [[villager]]s can plant torchflower seeds, but cannot harvest them after they have fully grown.<ref>{{bug|MC-263382|||WAI}}</ref>
=== Feeding ===
Torchflower seeds can be used to breed [[sniffer]]s and [[chicken]]s and reduce the remaining growth duration of snifflets and chicks by 10%. Also, if some torchflower seeds were fed to an injured sniffer, it will heal it by {{hp|2}} health points.
=== Taming ===
Torchflower seeds can be used to tame [[parrot]]s.
=== Composting ===
Placing torchflower seeds into a [[composter]] has a 30% chance of raising the compost level by 1.
== Sounds ==
{{Sound table/Block/Crop}}
== Data values ==
=== ID ===
{{edition|java}}:
{{ID table
|edition=java
|showblocktags=y
|showitemtags=y
|showforms=y
|generatetranslationkeys=y
|displayname=Torchflower Crop
|spritetype=block
|nameid=torchflower_crop
|form=block
|blocktags=bee_growables, crops}}
{{ID table
|displayname=Torchflower Seeds
|spritetype=item
|nameid=torchflower_seeds
|form=item
|itemtags=villager_plantable_seeds
|foot=1}}
{{edition|bedrock}}:
{{ID table
|edition=bedrock
|shownumericids=y
|showforms=y
|generatetranslationkeys=y
|displayname=Torchflower Crop
|spritetype=block
|nameid=torchflower_crop
|id=-567
|form=block
|translationkey=-}}
{{ID table
|displayname=Torchflower Seeds
|spritetype=item
|nameid=torchflower_seeds
|id=296
|form=item
|foot=1}}
=== Block states ===
{{see also|Block states}}
{{/BS}}
== Achievements ==
{{Load achievements|Planting The Past}}
== Advancements ==
{{load advancements|A Seedy Place;Planting The Past;Little Sniffs}}
== History ==
{{History|java}}
{{History||1.20<br>(Experimental)|link=1.19.4|snap=23w07a|[[File:Torchflower Seeds JE1.png|32px]] Added torchflower seeds behind the [[Java Edition 1.20|Update 1.20 experimental datapack]].}}
{{History|||snap=1.19.4 Pre-release 1|Torchflower seeds can now be used to breed [[chicken]]s and tame [[parrot]]s.<ref>{{bug|MC-260035|||Fixed}}</ref>|Torchflower seeds are now next to other seeds in the [[Creative inventory]].|Placing torchflower seeds in farmland now gives the player the "A Seedy Place" [[advancement]].}}
{{History||1.20|snap=23w12a|[[Sniffer]]s can now be obtained in Survival, making torchflower seeds [[renewable]].|Torchflower seeds are now available without using the "Update 1.20" experimental datapack.}}
{{History|||snap=23w14a|Torchflower seeds can now be picked up by farmer [[villager]]s.|[[Sniffer]]s can now be tempted with torchflower seeds.}}
{{History|||snap=23w16a|[[Villager]]s can now plant torchflower seeds.}}
{{History|||snap=23w17a|The player now get the [[advancement]] "Little sniffs" when they feed a [[snifflet]] using torchflower seeds, "Planting the past" when they plant torchflower seeds on [[farmland]].}}
{{History|bedrock}}
{{History||Sniffer<br>(Experimental)|link=Bedrock Edition 1.19.70|snap=beta 1.19.70.23|[[File:Torchflower Seeds JE1.png|32px]] Added torchflower seeds behind the "[[Bedrock Edition 1.20.0|Sniffer]]" [[experimental]] toggle.}}
{{History||1.20.0|snap=beta 1.20.0.20|Torchflower seeds are now available without using the "Sniffer" experimental toggle.}}
{{History|foot}}
== Issues ==
{{issue list}}
== Trivia ==
* The final growth stage of the torchflower crop uses the same ID as the actual torchflower. This causes some side effects, such as the plant becoming offset and randomly jumping to the side.<ref>{{bug|MC-260472|resolution=wai}}</ref>
== Gallery ==
<gallery>
Torchflower Seeds stages.png|All the growth stages of torchflower seeds.
</gallery>
== Notes ==
{{notelist}}
== References ==
{{reflist}}
{{Blocks|upcoming}}
{{Items}}
[[Category:Plants]]
[[Category:Non-solid blocks]]
[[de:Fackelliliensamen]]
[[es:Semillas de plantorcha]]
[[ja:トーチフラワーの種]]
[[pt:Sementes de plantocha]]
[[zh:火把莲种子]]</li><li>[[:Category:Invalid data value items|Category:Invalid data value items]]<br/>[[Category:Items]]</li></ul> | 16w32a | The block entity ID has been changed from Control to command_block. | |||
1.12{{Extension DPL}}<ul><li>[[Flint and Steel|Flint and Steel]]<br/>{{Item
| image = Flint and Steel.png
| rarity = Common
| renewable = Yes
| durability = 64
| stackable = No
}}
'''Flint and steel''' is a [[tool]] used to create [[fire]] or to ignite certain blocks, structures and mobs.
== Obtaining ==
=== Crafting ===
{{Crafting
|head=1
|showname=0
|showdescription=1
|Iron Ingot
|Flint
|Output=Flint and Steel
|type=Tool
}}
{{crafting
|foot=1
|ignoreusage=1
|Damaged Flint and Steel
|Damaged Flint and Steel
|Output= Flint and Steel
|description= The durability of the two tools is added together, plus an extra 5% durability.
|type= Tool
}}
=== Chest loot ===
{{LootChestItem|flint-and-steel}}
== Usage ==
=== Igniting ===
When {{control|use|text=used}} on the space above any solid top surface, on any side of any flammable block or any side of any [[obsidian]] block within a valid unlit [[nether portal]] frame regardless of if there is a solid top surface available, the flint and steel places a [[fire]] there.
Flint and steel can be used to light unlit [[campfire]]s, [[candle]]s and [[cake|cakes with candles]].
Flint and steel can be used to light [[nether portal]]s, as any fire existing within an appropriate [[obsidian]] frame will instantly be replaced with [[Nether Portal (block)|nether portal blocks]] that occupy the entirety of the frame.
Using flint and steel on [[TNT]] ignites it. The explosion damage dealt by TNT ignited with flint and steel in this specific way counts as the player's attack. If the player is {{Control|sneak|text=sneaking}} a fire is instead placed on the side of the TNT the flint and steel was used on.
A flint and steel can be used on a [[creeper]] to force it to explode. Explosions initiated in this way cannot be cancelled.
When powered, a [[dispenser]] containing flint and steel can place fires or ignite relevant blocks such as TNT or campfires in the space directly in front of it. This reduces the flint and steel's durability. A dispenser containing a flint and steel cannot detonate creepers.
=== Enchantments ===
Flint and steel can receive the following [[enchantment]]s:
{|class="wikitable col-2-center col-3-right"
|+
!Name
!Max Level
![[Enchanting|Method]]
|-
|[[Unbreaking]]
|III
|{{Inventory slot|Anvil}}
|-
|[[Mending]]
|I
|{{Inventory slot|Anvil}}
|-
|[[Curse of Vanishing]]
|I
|{{Inventory slot|Anvil}}
|}
== Sounds ==
{{edition|java}}:
{{Sound table
|rowspan=2
|sound=Flint and steel click.ogg
|subtitle=Flint and Steel click
|source=block
|description=When a flint and steel is used to place fire
|id=item.flintandsteel.use|idnote=<ref name=incorrecteventnames group=sound>{{Cite bug|MC|177457|Fire charge and flint and steel sound event names do not follow item IDs|date=April 5, 2020}}</ref>
|translationkey=subtitles.item.flintandsteel.use|translationkeynote=<ref name=incorrecteventnames group=sound/>
|volume=1.0
|pitch=0.8-1.2
|distance=16}}
{{Sound table
|subtitle=Flint and Steel click
|source=hostile
|description=When a flint and steel is used to light a creeper
|id=item.flintandsteel.use|idnote=<ref name=incorrecteventnames group=sound/>
|translationkey=subtitles.item.flintandsteel.use|translationkeynote=<ref name=incorrecteventnames group=sound/>
|volume=1.0
|pitch=0.8-1.2
|distance=16}}
{{Sound table
|sound=Random break.ogg
|subtitle=Item breaks
|source=player
|description=When a flint and steel's durability is exhausted
|id=entity.item.break
|translationkey=subtitles.entity.item.break
|volume=0.8
|pitch=0.8-1.2
|distance=16
|foot=1}}
{{edition|bedrock}};
{{Sound table
|type=bedrock
|sound=Flint and steel click.ogg
|source=block
|description=When a flint and steel is used to place fire
|id=fire.ignite
|volume=1.0
|pitch=0.8-1.2}}
{{Sound table
|sound=Random break.ogg
|source=player
|description=When a flint and steel's durability is exhausted
|id=random.break
|volume=1.0
|pitch=0.9
|foot=1}}
== Data values ==
=== ID ===
{{edition|java}}:
{{ID table
|edition=java
|showforms=y
|generatetranslationkeys=y
|displayname=Flint and Steel
|spritetype=item
|nameid=flint_and_steel
|form=item
|foot=1}}
{{edition|bedrock}}:
{{ID table
|edition=bedrock
|shownumericids=y
|showforms=y
|notshowbeitemforms=y
|generatetranslationkeys=y
|displayname=Flint and Steel
|spritetype=item
|nameid=flint_and_steel
|id=299
|form=item
|foot=1}}
== Achievements ==
{{Load achievements|Into the Nether}}
== Advancements ==
{{load advancements|We Need To Go Deeper}}
== Video ==
<div style="text-align:center">{{yt|caz8BBG48VU}}</div>
== History ==
{{more sounds|type=old|There is within the possible realm a different use sound from 2015-era Pocket Edition, can this be uploaded?}}
{{History|java indev}}
{{History||0.31|snap=20100110|[[File:Flint and Steel JE1.png|32px]] Added flint and steel.
|Flint and steel can be used to set [[fire]].}}
{{History|||snap=20100129|[[File:Flint and Steel JE2.png|32px]] The steel part of the texture has been brightened.
|Flint and steel can be used alongside [[lava]] to [[smelting|smelt]] [[ores]] and cook [[food]].<ref>http://www.youtube.com/watch?v=OpmK7rDU5bA</ref>}}
{{History|||snap=20100201-2|Flint and steel can now sometimes be dropped as loot from killing [[mobs]].}}
{{History||20100219|[[File:Flint and Steel JE3 BE1.png|32px]] The texture of flint and steel has been changed, due to its new crafting recipe.
|Flint and steel can no longer drop from mobs.
|Flint and steel can now be crafted from an [[iron ingot]] and the newly added [[flint]].
|[[Furnace]]s have been added to replace the cooking and [[smelting]] function of flint and steel.}}
{{History|java beta}}
{{History||1.7|Flint and steel, along with [[fire]] itself, [[explosion]]s and [[Mechanics/Redstone/Circuit|redstone]] are now the only ways to activate [[TNT]].<ref>{{tweet|jeb_|78154891637436416}}</ref>}}
{{History|java}}
{{History||1.3.1|snap=12w21a|The [[player]] can now [[trading|buy]] 1 flint and steel from farmer [[villager]]s for 3 [[emerald]]s, making flint and steel [[renewable]].}}
{{History||1.4.2|snap=12w38a|The [[sound]] when using flint and steel has been changed.}}
{{History||1.5|snap=13w04a|[[Dispenser]]s are now able to use flint and steel on the [[block]] in front of them.}}
{{History||1.6.1|snap=13w18a|Flint and steel can now be found in the new [[chest]]s in [[nether fortress]]es.}}
{{History|||snap=13w25a|Flint and steel now loses [[durability]] when igniting [[TNT]].}}
{{History||1.7.2|snap=13w36a|Flint and steel now has a shapeless crafting recipe.
{{{!}} class{{=}}"collapsible collapsed" data-description{{=}}"Old recipe"
! Old recipe
{{!}}-
{{!}}
{{Crafting
|A1=Iron Ingot
|B2=Flint
|Output=Flint and Steel
|ignoreusage=1
}}
{{!}}}
|Using flint and steel on a [[creeper]] now causes it to [[explosion|explode]].}}
{{History||1.8|snap=14w02a|[[Villager]]s no longer [[trading|sell]] flint and steel, making it no longer renewable. However, if a villager selling flint and steel already exists in the world, it can be continuously traded with to obtain flint and steel renewably.}}
{{History||1.9|snap=15w43a|The average yield of flint and steel in [[nether fortress]] [[chest]]s has been slightly reduced.}}
{{History||1.13|snap=17w47a|Prior to [[1.13/Flattening|''The Flattening'']], this [[item]]'s numeral ID was 259.}}
{{History||1.14|snap=18w43a|[[File:Flint and Steel JE4 BE2.png|32px]] The texture of flint and steel has been changed.}}
{{History||1.16|snap=20w07a|[[Gravel]] now can be given by the [[piglin]]s when [[bartering]], making flint and steel renewable again.}}
{{History|||snap=20w16a|Flint and steel can now be found inside [[ruined portal]] chests.}}
{{History|pocket alpha}}
{{History||v0.4.0|[[File:Flint and Steel JE3 BE1.png|32px]] Added flint and steel.}}
{{History||v0.7.0|Flint and steel can now be used to set [[fire]].}}
{{History||v0.7.4|Using flint and steel on a [[creeper]] now causes it to [[explosion|explode]].}}
{{History||v0.8.0|snap=build 1|Added flint and steel to the [[creative]] [[inventory]].}}
{{History||v0.12.1|snap=build 1|Flint and steel can now be used to activate a [[nether portal]].
|Flint and steel can now be found in [[nether fortress]]es.
|Flint and steel can now be [[enchanted]] in [[anvil]]s.}}
{{History||v0.14.0|snap=build 1|Flint and steel can now be used inside [[dispenser]]s when powered.}}
{{History|bedrock}}
{{History||1.10.0|snap=beta 1.10.0.3|[[File:Flint and Steel JE4 BE2.png|32px]] The texture of flint and steel has been changed.}}
{{History||1.16.0|snap=beta 1.16.0.51|Flint and steel can now be obtained by [[bartering]] with [[piglin]]s.|Flint and steel can now be enchanted with [[Curse of Vanishing]] through an [[anvil]].}}
{{History|||snap=beta 1.16.0.57|Flint and steel are no longer obtainable from [[bartering]].
|Flint and steel can now be found inside [[ruined portal]] chests.}}
{{History|console}}
{{History||xbox=TU1|xbone=CU1|ps=1.0|wiiu=Patch 1|switch=1.0.1|[[File:Flint and Steel JE3 BE1.png|32px]] Added flint and steel.}}
{{History||xbox=TU3|Flint and steel, along with [[fire]] itself, [[explosion]]s and [[redstone (disambiguation)|redstone]] are now the only ways to activate [[TNT]].}}
{{History||xbox=TU31|xbone=CU19|ps=1.22|wiiu=Patch 3|Flint and steel now makes [[sound]]s when igniting [[block]]s.}}
{{History||xbox=none|xbone=none|ps=1.90|wiiu=none|switch=none|[[File:Flint and Steel JE4 BE2.png|32px]] The texture of flint and steel has been changed.}}
{{History|New 3DS}}
{{History||0.1.0|[[File:Flint and Steel JE3 BE1.png|32px]] Added flint and steel.}}
{{History|foot}}
Historical sounds:
{| class="wikitable"
! Sound
! From
! to
! Pitch
|-
| {{sound||Flint and Steel old.ogg}}
| ?
| ?
| ?
|}
== Issues ==
{{issue list}}
== Trivia ==
* In [[Adventure mode]], flint and steel cannot light fires, nor can it ignite nether portals (unless it has the tag {{cd|CanPlaceOn:obsidian}}). However, it can still ignite TNT and creepers.
* The name "Flint and Steel" may be misleading and is inaccurate considering the game doesn’t have and possibly will have [[Java Edition mentioned features#Steel|steel]] in the game and it's crafted with iron instead. This is similar to the [[Old Growth Taiga|Old Growth Pine Taiga]], as there are no pines in the game and they have [[Spruce|Spruce Trees]] instead.
**In real life, Iron can’t be used as a fire striker, so Mojang had to rename it to Flint and Steel so it makes more sense. This explains why it is called Flint and Steel, but there is no steel in the game.
**Steel was mentioned by Mojang, as a “stronger” iron, but shortly rejected, and there are no currently no plans to add it to the game.
* Flint and steel cannot light end portals.
* Flint and Steel is the first item to mention another item that is not in the game.
*In the April Fools Snapshot, [[Java Edition 23w13a or b]], one of the possible voted was “Flint and Steel can ignite any block”.
==References==
{{Reflist}}
{{Items}}
[[Category:Renewable resources]]
[[cs:Křesadlo]]
[[de:Feuerzeug]]
[[es:Mechero]]
[[fr:Briquet]]
[[hu:Kovakő acéllal]]
[[ja:火打石と打ち金]]
[[ko:부싯돌과 부시]]
[[nl:Vuursteen en staal]]
[[pl:Krzesiwo]]
[[pt:Pederneira]]
[[ru:Огниво]]
[[zh:打火石]]</li><li>[[Brewing Stand|Brewing Stand]]<br/>{{Block
| image = <gallery>
Brewing Stand (empty) JE10.png | Empty
Brewing Stand (right) JE10.png | Right
Brewing Stand (left) JE10.png | Left
Brewing Stand (full) JE10.png | Full
</gallery>
| transparent = Yes
| light = Yes (1)
| tool = Wooden Pickaxe
| renewable = Yes
| stackable = Yes (64)
| flammable = No
| lavasusceptible = No
}}
A '''brewing stand''' is a [[block]] used for [[brewing]] [[potion]]s using [[Glass Bottle|bottles]] and suitable ingredients. It also serves as a [[cleric]]'s [[job site block]].
== Obtaining ==
=== Breaking ===
A brewing stand can be obtained using any [[pickaxe]]. If mined without a pickaxe, it drops nothing {{in|JE}}, while it drops itself {{in|BE}}.
{{breaking row|horizontal=1|Brewing Stand|Pickaxe|Wood|foot=1}}
=== Natural generation ===
Brewing stands generate in [[end ship]]s. They have two [[potion of Healing|Instant Health II potions]] in their holders.
A brewing stand also generates in the basement of [[igloo]]s with a [[splash potion of Weakness]] in it.
Brewing stands can generate without potions in [[village]] churches.
=== Crafting ===
{{Crafting
|head=1
|showdescription=1
|B1= Blaze Rod
|A2= Any stone-tier block |B2= Any stone-tier block |C2= Any stone-tier block
|Output= Brewing Stand
|type= Brewing
|description=Can use cobblestone and its other variants interchangeably.
|foot=1
}}
== Usage ==
[[File:Brewing Stand GUI.png|thumb|right|176px|Brewing stand GUI {{in|java}}]]
By default, the interface of a brewing stand is labeled "Brewing Stand", but this name can be customized by naming it in an [[anvil]] before placing it.
Brewing stands cannot be pushed by [[piston]]s {{in|java}}.
=== Brewing ===
{{main|Brewing}}
The main purpose of brewing stands is to allow for the [[brewing]] of [[potion]]s. Its interface can be opened by pressing {{control|use}} on them.
Brewing stands need [[blaze powder]] as fuel. Each piece brews 20 batches of potions, with each stage of brewing counting separately. Unlike [[furnace]]s, there is no time limit; fuel is consumed only when there are [[Glass Bottle|bottles]] and an ingredient to brew into it.
Brewing stands interact with [[hopper]]s as follows:
* They accept brewing ingredients from hoppers pointing down into the top.
* Any valid potion recipe can be preloaded for "hands-free" brewing of a complex recipe, with the [[Nether Wart|nether wart]] falling through into the stand for the first step.
* Bottles and fuel are accepted from hoppers pointing into the side.
* Finished products can be pulled out by hoppers below, but each stage of brewing counts as a batch of "finished" potions.
{{IN|education}}, elements can be combined in the brewing stand to make the [[medicine]] potions: antidote, elixir, eye drops, and tonic.
=== Changing profession ===
If a village has a brewing stand that has not been claimed by a villager, any villager who hasn't already picked a [[job site]] block in the village has a chance to change their profession into cleric.
=== Light source ===
Brewing stands emit a light level of 1.
== Sounds ==
=== Generic ===
{{Sound table/Block/Stone}}
=== Unique ===
{{edition|java}}:
{{Sound table
|rowspan=2
|sound=Brewing Stand brew1.ogg
|sound2=Brewing Stand brew2.ogg
|subtitle=Brewing Stand bubbles
|source=block
|description=When a potion finishes brewing
|id=block.brewing_stand.brew
|translationkey=subtitles.block.brewing_stand.brew
|volume=1.0
|pitch=1.0
|distance=16}}
{{Sound table
|subtitle=Cleric works
|source=neutral
|description=Randomly while a cleric is working
|id=entity.villager.work_cleric
|translationkey=subtitles.entity.villager.work_cleric
|volume=1.0
|pitch=0.8-1.2
|distance=16}}
{{Sound table
|sound=Door close.ogg
|sound2=Door open.ogg
|subtitle=Chest locked<ref group=sound name=lock>{{Bug|MC-98316||Wrong subtitles caused by missing distinction}}</ref>
|source=block
|description=When a player attempts to open a brewing stand locked using the {{nbt|string|Lock}} tag
|id=block.chest.locked|idnote=<ref group=sound name=lock/>
|translationkey=subtitles.block.chest.locked|translationkeynote=<ref group=sound name=lock/>
|volume=1.0
|pitch=1.0
|distance=16
|foot=1}}
{{Edition|Bedrock}}:
{{Sound table
|type=bedrock
|rowspan=2
|sound=Brewing Stand brew1.ogg
|sound2=Brewing Stand brew2.ogg
|source=block
|description=When a potion finishes brewing
|id=random.potion.brewed
|volume=1.0
|pitch=1.0}}
{{Sound table
|source=block
|description=Randomly while a cleric is working
|id=random.potion.brewed
|volume=1.0
|pitch=1.0
|foot=1}}
== Data values ==
=== ID ===
{{edition|java}}:
{{ID table
|edition=java
|showforms=y
|generatetranslationkeys=y
|displayname=Brewing Stand
|spritetype=block
|nameid=brewing_stand
|translationkey=block.minecraft.brewing_stand, item.minecraft.brewing_stand
|foot=1}}
{{ID table
|displayname=Block entity
|spritename=brewing-stand
|spritetype=block
|nameid=brewing_stand
|foot=1}}
{{edition|bedrock}}:
{{ID table
|edition=bedrock
|firstcolumnname=Brewing Stand
|shownumericids=y
|showforms=y
|generatetranslationkeys=y
|displayname=Block
|spritename=brewing-stand
|spritetype=block
|nameid=brewing_stand
|id=117
|form=block
|itemform=item.brewing_stand
|translationkey=-}}
{{ID table
|displayname=Item
|spritename=brewing-stand
|spritetype=item
|nameid=brewing_stand
|id=431
|form=item
|foot=1}}
{{ID table
|notnamespaced=y
|displayname=Block entity
|spritename=brewing-stand
|spritetype=block
|nameid=BrewingStand
|foot=1}}
=== Block states ===
{{see also|Block states}}
{{/BS}}
=== Block data ===
A brewing stand has a block entity associated with it that holds additional data about the block.
{{el|java}}:
{{see also|Block entity format}}
{{/BE}}
{{el|bedrock}}:
: See [[Bedrock Edition level format/Block entity format]].
== Achievements ==
{{load achievements|Local Brewery}}
== Advancements ==
{{Load advancements|Local Brewery}}
== History ==
{{History|java}}
{{History||1.0.0|snap=Beta 1.9 Prerelease 2|[[Cauldron]]s are implemented to be used to brew [[potion]]s, but are not available in-game yet.}}
{{History|||snap=September 30, 2011|slink={{tweet|jeb|119762786619359232}}|[[File:Brewing Stand (pre-release).png|32px]] [[Jens Bergensten|Jeb]] reveals that brewing is done through a brewing stand instead of a [[cauldron]].}}
{{History|||snap=Beta 1.9 Prerelease 3|[[File:Brewing Stand (empty) JE1 BE1.png|32px]] [[File:Brewing Stand (right) JE1.png|32px]] [[File:Brewing Stand (left) JE1.png|32px]] [[File:Brewing Stand (full) JE1.png|32px]] [[File:Brewing Stand (item) JE1 BE1.png|32px]] Added brewing stands.
|Brewing [[potion]]s with brewing stands currently take 30 seconds.
|When the first brewing stand was shown by Jeb, it had an additional 2D sub-stand for [[Glass Bottle|bottles]], but the stands for bottles are now designed in 3D.<ref>{{tweet|jeb|119763532312096769|I'm fully aware the potions are very thin (diet?), but it looks cute. (Always work in progress, of course)|September 30, 2011}}</ref>}}
{{History||1.1|snap=12w01a|Brewing time for brewing stands has been reduced to 20 seconds.}}
{{History||1.3.1|snap=12w15a|{{key|Shift}} + clicking can now be used to put items in brewing stands.}}
{{History||1.8|snap=14w11a|[[File:Brewing Stand (empty) JE2.png|32px]] [[File:Brewing Stand (right) JE2.png|32px]] [[File:Brewing Stand (left) JE2.png|32px]] [[File:Brewing Stand (full) JE2.png|32px]] The [[model]] of brewing stands has been changed. Stands with no bottles appear glitched from some angles, the left and right slots appear identical when filled in (although both distinct appearences still exist as metadata), and the arm angles have changed due to the 22.5º rotation limit.
|Brewing stands' targeting [[hitbox]] is now a full cube - previously it was a cuboid around the base plates.}}
{{History|||snap=14w11b|[[File:Brewing Stand (empty) JE3.png|32px]] [[File:Brewing Stand (right) JE3.png|32px]] [[File:Brewing Stand (left) JE3.png|32px]] [[File:Brewing Stand (full) JE3.png|32px]] Empty brewing stands' model have been fixed, although the other changes still remain.}}
{{History|||snap=14w25a|[[File:Brewing Stand (empty) JE4.png|32px]] [[File:Brewing Stand (right) JE4.png|32px]] [[File:Brewing Stand (left) JE4.png|32px]] [[File:Brewing Stand (full) JE4.png|32px]] Brewing stand models have changed such that bottles in the left and right slots now indeed appear different. However, the leftmost one appears stretched. Arms are also now affected by directional shading.<ref>{{bug|MC-68302|||WAI}}</ref>}}
{{History||1.9|snap=15w31a|Brewing stands now generate in [[End City|end cities]].}}
{{History|||snap=15w33a|Brewing stands can now brew [[Lingering Potion|lingering potion]]s.}}
{{History|||snap=15w33c|A bug where the [[player]] couldn't put in a [[splash potion]] to make a lingering potion has been fixed.}}
{{History|||snap=15w42a|Brewing stands now require [[Blaze Powder|blaze powder]] to operate.}}
{{History|||snap=15w43a|Brewing stands now generate in the basement of [[igloo]]s.
|Each blaze powder now fuels 20 brewing stand operations rather than 30.}}
{{History|||snap=15w44a|[[File:Brewing Stand (empty) JE5.png|32px]] [[File:Brewing Stand (right) JE5.png|32px]] [[File:Brewing Stand (left) JE5.png|32px]] [[File:Brewing Stand (full) JE5.png|32px]] Brewing stand models no longer have a stretched bottle.}}
{{History|||snap=15w47b|[[Sound]]s have been added for brewing stands.}}
{{History||1.11|snap=16w32a|The block entity ID has been changed from <code>Cauldron</code> to <code>brewing_stand</code>.}}
{{History||1.13|snap=17w47a|Prior to [[Java Edition 1.13/Flattening|''The Flattening'']], this [[block]]'s numeral ID was 117, and the [[item]]'s 379.}}
{{History||1.14|snap=18w43a|[[File:Brewing Stand (empty) JE6 BE2.png|32px]] <!-- [[File:Brewing Stand (left) JE6 BE2.png|32px]] [[File:Brewing Stand (right) JE6 BE2.png|32px]] -->[[File:Brewing Stand (Full) JE6 BE2.png|32px]] [[File:Brewing Stand (item) JE2.png|32px]] The textures of brewing stands have been changed.}}
{{History|||snap=18w44a|[[File:Brewing Stand (item) JE3 BE2.png|32px]] The texture of the brewing stand [[item]] has been changed.}}
{{History|||snap=18w48a|Brewing stands now generate in the updated [[plains]] [[village]]s.}}
{{History|||snap=18w49a|Brewing stands now generate in the updated [[savanna]] villages and the new [[Snowy Tundra|snowy]] villages.}}
{{History|||snap=18w50a|Brewing stands now generate in the updated [[desert]] and [[taiga]] villages.}}
{{History|||snap=19w03c|The three plates, but not the rod, of a brewing stand now use correct cullface arguments.}}
{{History|||snap=19w11a|Brewing stands now serve as cleric [[villager]]s' job site block.}}
{{History||1.16.2|snap=20w28a|Brewing stands can now be [[crafting|crafted]] with [[blackstone]].}}
{{History||1.17|snap=21w07a|Brewing stands can now be crafted with [[deepslate|grimstone]] (now deepslate).}}
{{History||1.17|snap=21w08a|Brewing stands can no longer be crafted with deepslate.
|Brewing stands can now be crafted with [[Cobbled Deepslate|cobbled deepslate]].}}
{{History|||snap=21w11a|<!--[[File:Brewing Stand (empty) JE7.png|32px]] [[File:Brewing Stand (right) JE7.png|32px]] [[File:Brewing Stand (left) JE7.png|32px]] [[File:Brewing Stand (Full) JE7.png|32px]] Changed [[lighting]].-->Tweaked the brewing stand GUI texture.}}
{{History||1.18|snap=21w39a|[[File:Brewing Stand (empty) JE8.png|32px]] [[File:Brewing Stand (right) JE8.png|32px]] [[File:Brewing Stand (left) JE8.png|32px]] [[File:Brewing Stand (full) JE8.png|32px]] The default [[brightness]] has been changed from "Moody" to 50.}}
{{History||1.19|snap=22w11a|[[File:Brewing Stand (empty) JE9.png|32px]] [[File:Brewing Stand (right) JE9.png|32px]] [[File:Brewing Stand (left) JE9.png|32px]] [[File:Brewing Stand (full) JE9.png|32px]] Changed texture and model.}}
{{History|||snap=22w17a|[[File:Brewing Stand (empty) JE10.png|32px]] [[File:Brewing Stand (right) JE10.png|32px]] [[File:Brewing Stand (left) JE10.png|32px]] [[File:Brewing Stand (full) JE10.png|32px]] Changed base texture and model.}}
{{History|pocket alpha}}
{{History||v0.12.1|snap=build 1|[[File:Brewing Stand (empty) JE1 BE1.png|32px]] [[File:Brewing Stand (item) JE1 BE1.png|32px]] Added brewing stands.}}
{{History|pocket}}
{{History||1.0.0|snap=alpha 0.17.0.1|Brewing stands now generate in [[igloo]] basements.
|Brewing stands now generate in [[end ship]]s.}}
{{History|bedrock}}
{{History||1.2.0|snap=beta 1.2.0.2|Brewing stands now require [[blaze powder]] to operate.}}
{{History||1.10.0|snap=beta 1.10.0.3|[[File:Brewing Stand (empty) JE6 BE2.png|32px]] [[File:Brewing Stand (item) JE3 BE2.png|32px]] The textures of brewing stands have been changed.|A brewing stand can now generate in [[village]] temples.}}
{{History||1.16.100|snap=beta 1.16.100.52|Brewing stands can now be [[craft]]ed with [[blackstone]].}}
{{History||1.17.0|snap=beta 1.17.0.50|Brewing stands can now be [[craft]]ed with [[cobbled deepslate]].}}
{{History||1.19.0|snap=beta 1.19.0.20|[[File:Brewing Stand (empty) JE10.png|32px]] [[File:Brewing Stand (right) JE10.png|32px]] [[File:Brewing Stand (left) JE10.png|32px]] [[File:Brewing Stand (full) JE10.png|32px]] Slightly changed its texture, to make their arms connect to their bases.}}
{{History|console}}
{{History||xbox=TU7|xbone=CU1|ps=1.0|wiiu=Patch 1|switch=1.0.1|[[File:Brewing Stand (empty) JE1 BE1.png|32px]] [[File:Brewing Stand (item) JE1 BE1.png|32px]] Added brewing stands.}}
{{History||xbox=TU43|xbone=CU33|ps=1.36|wiiu=Patch 13|Brewing stands now appear in [[igloo]]s. The lack of a fuel requirement means that potions can now be made without going to the Nether.}}
{{History||xbox=TU46|xbone=CU36|ps=1.38|wiiu=Patch 15|Brewing stands now require [[blaze powder]] to operate.}}
{{History||xbox=none|xbone=none|ps=1.90|wiiu=none|switch=none|[[File:Brewing Stand.png|32px]] [[File:Brewing Stand (item) JE3 BE2.png|32px]] The textures of brewing stands have been changed.}}
{{History|new 3ds}}
{{History||0.1.0|[[File:Brewing Stand (empty) JE1 BE1.png|32px]] [[File:Brewing Stand (item) JE1 BE1.png|32px]] Added brewing stands.}}
{{History|foot}}
<gallery>
File:Brewingstand Potion.png|The first picture of a brewing stand. A [[giant mushroom]] is also seen in this picture.
</gallery>
=== Brewing stand "item" ===
{{:Technical blocks/Brewing Stand}}
== Issues ==
{{issue list}}
== Trivia ==
* Even when the brewing stand is not in use, there is still smoke coming out of the top of it.
* In ''[[Java Edition]]'', when a brewing stand is broken, particles from a bottle appear, even if no bottle is in the stand.
* No matter what potion (including water bottles) is in the stand it always looks like a full red bottle.
* Brewing stands always face east, no matter what direction they are placed.
* According to [[Michael Stoyke|Searge]], for thematic reasons, a brewing stand was added to the basement of the [[igloo]]. Because of this, blaze powder was required for fuel to preserve game progression. In this way, the player is prevented from using it before going to the Nether.<ref>https://minecraft.net/en-us/article/meet-blaze</ref>
== Gallery ==
<gallery>
File:Brewing stand in action.png|A brewing stand in action.
File:Igloobasement.png|A brewing stand in an igloo basement.
File:1.8 and below brewing stand.png|The GUI of the brewing stand in 1.8.x and below.
</gallery>
== See also ==
*[[Glass Bottle]]
*[[Splash Potion]]
== References ==
{{reflist}}
== External links ==
*[https://www.minecraft.net/en-us/article/taking-inventory--brewing-stand Taking Inventory: Brewing Stand] – Minecraft.net on October 11, 2019
{{Blocks|Utility}}
{{items}}
[[Category:Job blocks]]
[[Category:Utility blocks]]
[[Category:Manufactured blocks]]
[[Category:Generated structure blocks]]
[[Category:Storage]]
[[Category:Block entities]]
[[Category:Light sources]]
[[de:Braustand]]
[[es:Soporte para pociones]]
[[fr:Alambic]]
[[hu:Főzőállvány]]
[[it:Alambicco]]
[[ja:醸造台]]
[[nl:Brouwstandaard]]
[[pl:Statyw alchemiczny]]
[[pt:Suporte de poções]]
[[ru:Варочная стойка]]
[[uk:Варильна стійка]]
[[zh:酿造台]]</li></ul> | 17w16a | Chains of command blocks no longer schedule their commands to be run in the next tick. Instead, they now execute all in the same tick they are read. This allows later blocks in a chain to be modified via earlier blocks, allowing techniques like branching and looping, all in the same tick. | |||
Added maxCommandChainLength game rule to control the max length of such a chain. | |||||
| 17w17a | Added UpdateLastExecution and LastExecution NBT tags, which control the tracking of which tick a chain command block was last executed in. | ||||
| pre6 | Tab-completing command names in command blocks no longer add a / prefix. | ||||
1.13{{Extension DPL}}<ul><li>[[Glowstone Dust|Glowstone Dust]]<br/>{{Item
| image = Glowstone Dust.png
|type=
| renewable = Yes
| stackable = Yes (64)
}}
'''Glowstone dust''' is an [[item]] obtained from mining [[glowstone]], and is mainly used to create [[potion]]s with increased strength and decreased duration.
== Obtaining ==
=== Mining ===
When broken using anything other than a [[Silk Touch]]-enchanted [[tool]], a [[glowstone]] block drops 2-4 glowstone dust. A [[Fortune]] enchantment increases the chances of higher drops, with Fortune III allowing an average yield of 3.5 glowstone dust per block.
=== Mob loot ===
[[Witch]]es have a chance of dropping 0–6 glowstone dust upon death. This is increased by 3 per level of [[Looting]], for a maximum of 0-15 glowstone dust. <!-- Do not add the blaze as it is in violation of MCW:UPTODATE due to the Legacy Console Edition being discontinued. Any edit that adds the blaze to this section will be immediately reverted. -->
=== Trading ===
{{IN|bedrock}}, journeyman-level cleric [[villager]]s sell one glowstone dust for 4 [[emerald]]s as part of their trades.
== Usage ==
=== Crafting ingredient ===
{{crafting usage}}
=== Brewing ingredient ===
{{brewing
|showname=1
|head=1
|Glowstone Dust
|Thick Potion
|base=Water Bottle
}}
{{brewing
|name=Increased Potency
|showbase=1
|Glowstone Dust
|base=[Potion of Healing II]Potion of Healing;[Potion of Regeneration II]Potion of Regeneration;[Potion of Strength II]Potion of Strength;[Potion of Swiftness II]Potion of Swiftness;[Potion of Harming II]Potion of Harming;[Potion of Poison II]Potion of Poison;[Potion of Leaping II]Potion of Leaping
|foot=1
}}
== Data values ==
=== ID ===
{{edition|java}}:
{{ID table
|edition=java
|showforms=y
|generatetranslationkeys=y
|displayname=Glowstone Dust
|spritetype=item
|nameid=glowstone_dust
|form=item
|foot=1}}
{{edition|bedrock}}:
{{ID table
|edition=bedrock
|shownumericids=y
|showforms=y
|notshowbeitemforms=y
|generatetranslationkeys=y
|displayname=Glowstone Dust
|spritetype=item
|nameid=glowstone_dust
|id=394
|form=item
|foot=1}}
== History ==
{{History|java alpha}}
{{History||v1.2.0|snap=preview|[[File:Glowstone Dust JE1 BE1.png|32px]] Added glowstone dust.
|Glowstone dust currently uses nine dust to [[crafting|craft]] 1 [[glowstone]] block.
|Also, each glowstone block drops only one glowstone dust.}}
{{History|java beta}}
{{History||1.6.6|The crafting recipe for glowstone blocks has been changed from 9 glowstone dust to 4.
|Each glowstone block now drops 2-4 glowstone dust when broken.}}
{{History|java}}
{{History||1.0.0|snap=Beta 1.9 Prerelease 3|Glowstone dust can now be [[brewing|brewed]] in a [[water bottle]] to create a [[thick potion]].
|Glowstone dust now strengthens the [[potion]]s of [[Swiftness]], [[Healing]], [[Harming]], [[Poison]], [[Regeneration]] and [[Strength]].}}
{{History|||snap=Beta 1.9 Prerelease 4|Glowstone dust now strengthens the new potion of [[Regeneration]].}}
{{History||1.3.1|snap=12w21a|Glowstone dust has become a renewable resource, as priest [[villager]]s now sell glowstone blocks.}}
{{History||1.4.2|snap=12w38b|[[Witch]]es now have a chance of [[drops|dropping]] glowstone dust.}}
{{History||1.4.6|snap=12w49a|Glowstone dust can now be used to [[crafting|craft]] a [[firework star]] with a twinkle effect.}}
{{History||1.8|snap=14w27a|Glowstone dust now strengthens the new [[potion of Leaping]].}}
{{History||1.9|snap=15w31a|Glowstone dust is now used to craft [[spectral arrow]]s.
|Glowstone dust can no longer be added to extended [[potion]]s.}}
{{History||1.13|snap=17w47a|Prior to [[1.13/Flattening|''The Flattening'']], this [[item]]'s numeral ID was 348.}}
{{History|||snap=18w07a|Glowstone dust now strengthens the new [[potion of the Turtle Master]].}}
{{History||1.14|snap=18w43a|[[File:Glowstone Dust JE2 BE2.png|32px]] The texture of glowstone dust has been changed.}}
{{History||1.16|snap=20w07a|Glowstone dust has a {{frac|2|109}} (~1.83%) chance of being offered by [[piglin]]s when [[bartering]], in a stack size of 2–4.}}
{{History|||snap=20w09a|Glowstone dust now has a {{frac|10|226}} (~4.42%) chance of being offered by piglins when bartering, in a stack size of 1–5.}}
{{History||1.16.2|snap=20w28a|Glowstone dust can no longer be obtained from bartering with piglins.}}
{{History|pocket alpha}}
{{History||v0.2.0|[[File:Glowstone Dust JE1 BE1.png|32px]] Added glowstone dust. It is currently unobtainable and serves no purpose.}}
{{History||v0.5.0|Glowstone dust is now obtainable through the [[nether reactor]].
|Glowstone dust can be used to craft [[glowstone]] blocks.}}
{{History||v0.12.1|snap=build 1|Glowstone dust can now be obtained through [[the Nether]] instead of the nether reactor.
|Glowstone dust is now available in the [[creative]] [[inventory]].|Glowstone dust can now be used to [[brewing|brew]] thick [[potion]]s and to strengthen potions.}}
{{History||v0.14.0|snap=build 1|Added [[witch]]es, which have a chance of [[drops|dropping]] glowstone dust upon [[death]].}}
{{History|bedrock}}
{{History||1.2.0|snap=beta 1.2.0.2|Glowstone dust can now be used to [[crafting|craft]] a [[firework star]] with a twinkle effect.}}
{{History||1.10.0|snap=beta 1.10.0.3|[[File:Glowstone Dust JE2 BE2.png|32px]] The texture of glowstone dust has been changed.}}
{{History||1.11.0|snap=beta 1.11.0.4|Glowstone dust can now be [[trading|bought]] from cleric [[villager]]s.}}
{{History||1.16.0|snap=beta 1.16.0.57|Glowstone dust can now be obtained from [[bartering]] with [[piglin]]s.}}
{{History||1.16.100|snap=beta 1.16.100.54|Glowstone dust can no longer be obtained from [[barter]]ing with [[piglin]]s.}}
{{History|console}}
{{History||xbox=TU1|xbone=CU1|ps=1.0|wiiu=Patch 1|switch=1.0.1|[[File:Glowstone Dust JE1 BE1.png|32px]] Added glowstone dust.}}
{{History||xbox=TU8|0–2 glowstone dust is now [[drops|dropped]] when a [[blaze]] is killed.}}
{{History|Ps4}}
{{History||1.90|[[File:Glowstone Dust JE2 BE2.png|32px]] The texture of glowstone dust has been changed.}}
{{History|New 3DS}}
{{History||0.1.0|[[File:Glowstone Dust JE1 BE1.png|32px]] Added glowstone dust.}}
{{History|foot}}
== Issues ==
{{issue list}}
{{Items}}
[[Category:Renewable resources]]
[[Category:Brewing recipe]]
[[de:Glowstonestaub]]
[[es:Polvo de piedra luminosa]]
[[fr:Poudre lumineuse]]
[[hu:Izzókő-por]]
[[ja:グロウストーンダスト]]
[[ko:발광석 가루]]
[[nl:Gloeisteenstof]]
[[pl:Jasnopył]]
[[pt:Pó de pedra luminosa]]
[[ru:Светокаменная пыль]]
[[tr:Işık Taşı Tozu]]
[[uk:Пил світлокаменю]]
[[zh:荧石粉]]</li><li>[[Rabbit Hide|Rabbit Hide]]<br/>{{Item
| title = Rabbit Hide
| image = Rabbit Hide.png
| renewable = Yes
| stackable = Yes (64)
}}
'''Rabbit hide''' is an [[item]] dropped by [[rabbit]]s.
== Obtaining ==
===Mob loot===
[[Rabbit]]s drop 0–1 rabbit hide upon death. The maximum number of drops can be increased by 1 per level of [[Looting]] used, for a maximum of 0–4 rabbit hides with Looting III.
Some [[foxes]] spawn holding rabbit hides, which always drop upon death. Alternatively, the player can drop a food item, which causes the fox to drop the rabbit hide.
=== Cat gifts ===
{{main|Cat#Gifts}}
Tamed [[cat]]s have a 70% chance of giving the [[player]] a gift when they wake up from a [[bed]], and the gift has a 16.13% chance to be a rabbit hide.
== Usage ==
Rabbit hide can be crafted into leather, or into bundles to store stacks of items.
=== Crafting ingredient ===
{{crafting usage}}
=== Trading ===
Journeyman-level leatherworker [[villager]]s buy 9 rabbit hide for an [[emerald]] as part of their trades.
== Data values ==
=== ID ===
{{edition|java}}:
{{ID table
|edition=java
|showforms=y
|generatetranslationkeys=y
|displayname=Rabbit Hide
|spritetype=item
|nameid=rabbit_hide
|form=item
|foot=1}}
{{edition|bedrock}}:
{{ID table
|edition=bedrock
|shownumericids=y
|showforms=y
|notshowbeitemforms=y
|generatetranslationkeys=y
|displayname=Rabbit Hide
|spritetype=item
|nameid=rabbit_hide
|id=529
|form=item
|foot=1}}
== History ==
{{History|java}}
{{History||1.8|snap=June 30, 2014|slink={{tweet|TheMogMiner|483636993780232192}}|[[Ryan Holtz]] tweeted images of rabbit hide and some other new [[item]]s.}}
{{History|||snap=14w27a|[[File:Rabbit Hide JE1.png|32px]] Added rabbit hide.}}
{{History|||snap=14w33b|[[File:Rabbit Hide JE2 BE1.png|32px]] The texture of rabbit hide has been changed.}}
{{History||1.13|snap=17w47a|Prior to [[1.13/Flattening|''The Flattening'']], this [[item]]'s numeral ID was 415.}}
{{History||1.14|snap=18w43a|[[File:Rabbit Hide JE3 BE2.png|32px]] The texture of rabbit hide has been changed.}}
{{History|||snap=18w44a|Cats now offer rabbit hides as [[Cat#Gifts|gifts]].}}
{{History|||snap=19w07a|Added [[fox]]es, which sometimes spawn with rabbit hides in their mouths.}}
{{History|||snap=19w11a|Leatherworker [[villager]]s now [[trading|buy]] rabbit hides.}}
{{History||1.17|snap=20w45a|Rabbit hide can now be used to craft [[bundle]]s.}}
{{History|||snap=21w18a|Rabbit hide can no longer be used to craft bundles.}}
{{History||1.18|snap=Experimental Snapshot 1|Rabbit hide can now once again be used to craft bundles.}}
{{History|||snap=21w37a|Rabbit hide once again can no longer be used to craft bundles.}}
{{History||1.20<br>(Experimental)|link=1.19.3|snap=22w42a|Rabbit hide can now once again be used to craft bundles.}}
{{History|pocket alpha}}
{{History||v0.13.0|snap=build 1|[[File:Rabbit Hide JE2 BE1.png|32px]] Added rabbit hide.}}
{{History|bedrock}}
{{History||1.8.0|snap=beta 1.8.0.8|Tamed [[cat]]s can now give [[player]]s rabbit hide as a gift.}}
{{History||1.10.0|snap=beta 1.10.0.3|[[File:Rabbit Hide JE3 BE2.png|32px]] The texture of rabbit hide has been changed.}}
{{History||1.11.0|snap=beta 1.11.0.4|Rabbit hide can be [[trading|sold]] to leatherworker [[villager]]s.}}
{{History||1.13.0|snap=beta 1.13.0.1|Added [[fox]]es, which can [[drops|drop]] rabbit hide.}}
{{History|console}}
{{History||xbox=TU31|xbone=CU19|ps=1.22|wiiu=Patch 3|switch=1.0.1|[[File:Rabbit Hide JE2 BE1.png|32px]] Added rabbit hide.}}
{{History||xbox=none|xbone=none|ps=1.90|wiiu=none|switch=none|[[File:Rabbit Hide JE3 BE2.png|32px]] The texture of rabbit hide has been changed.}}
{{History|new 3ds}}
{{History||0.1.0|[[File:Rabbit Hide JE2 BE1.png|32px]] Added rabbit hide.}}
{{History|foot}}
== Issues ==
{{issue list}}
== Gallery ==
<gallery>
File:Rabbit Items 1 Ryan Holtz.png|First image of the item by [[Ryan Holtz]].
</gallery>
{{items}}
[[de:Kaninchenfell]]
[[es:Piel de conejo]]
[[fr:Peau de lapin]]
[[hu:Nyúlbőr]]
[[it:Pelle di coniglio]]
[[ja:ウサギの皮]]
[[ko:토끼 가죽]]
[[nl:Konijnenhuid]]
[[pl:Królicza skóra]]
[[pt:Pele de coelho]]
[[ru:Кроличья шкурка]]
[[zh:兔子皮]]
[[Category:Renewable resources]]</li></ul> | 17w47a | Prior to The Flattening, the numeral IDs for the command block, repeating command block, and chain command block were 137, 210, and 211, respectively. | |||
| pre1 | The player can now tab-complete in command blocks again. | ||||
1.14{{Extension DPL}}<ul><li>[[Green Dye|Green Dye]]<br/>{{redirect|Cactus Green|the plant|Cactus}}{{Item
| title = Green Dye
| renewable = Yes
| stackable = Yes (64)
}}
'''Green dye''' is a [[primary color dye]].
== Obtaining ==
=== Chest loot ===
{{LootChestItem|green-dye}}
=== Smelting ===
{{Smelting
|head=1
|showdescription=1
|Cactus
|Green Dye
|1
|description={{only|Java}}<ref>{{bug|MC-210211||Smelting cactus gives too much experience since 1.13}}</ref>
}}
{{Smelting
|head=0
|showdescription=1
|Cactus
|Green Dye
|0,2
|description={{only|Bedrock}}
|foot=1
}}
=== Trading ===
[[Wandering trader]]s sell 3 green dye for an [[emerald]].
== Usage ==
{{dye usage}}
=== Crafting ingredient ===
{{crafting usage|ignore=Banner|continue=1}}
{{banner crafting usage}}
=== Loom ingredient ===
{{Banner loom usage|Green Dye}}
=== Trading ===
Expert level shepherd villagers have {{frac|1|6}} chance to buy 12 green dye for an emerald.{{only|bedrock}} Expert level shepherds have a {{frac|2|7}} chance to buy 12 green dye for 1 emerald.{{only|java}}
== Data values ==
=== ID ===
{{edition|java}}:
{{ID table
|edition=java
|showforms=y
|generatetranslationkeys=y
|displayname=Green Dye
|spritetype=item
|nameid=green_dye
|form=item
|foot=1}}
{{edition|bedrock}}:
{{ID table
|edition=bedrock
|showaliasids=y
|shownumericids=y
|showforms=y
|notshowbeitemforms=y
|generatetranslationkeys=y
|displayname=Green Dye
|spritetype=item
|nameid=green_dye
|aliasid=dye / 2
|id=397
|form=item
|translationkey=item.dye.green.name
|foot=1}}
== Video ==
<div style="text-align:center">{{yt|O4KVTPI4qIc}}</div>
== History ==
{{History|java beta}}
{{History||1.2|[[File:Green Dye JE1 BE1.png|32px]] Added cactus green, together with all other dyes.}}
{{History|java}}
{{History||1.3.1|snap=1.3|[[File:Green Dye JE2 BE2.png|32px]] The texture of cactus green has been changed.}}
{{History||1.4.2|snap=12w34a|Added the ability to [[Armor#Dyeing|dye]] leather [[armor]] and [[wolf]] collars.}}
{{History||1.4.6|snap=12w49a|Cactus green can be crafted with [[gunpowder]] to create a [[firework star]].}}
{{History||1.6.1|snap=13w19a|[[Stained clay]] can now be [[crafting|crafted]].}}
{{History||1.7.2|snap=13w41a|[[Stained glass]] can now be crafted.}}
{{History||1.8|snap=14w30a|Added [[banner]]s, which can be dyed.}}
{{History||1.11|snap=16w39a|Added the ability to dye [[shulker box]]es.}}
{{History||1.12|snap=17w06a|Cactus green can now be used to craft green [[concrete powder]].}}
{{History||1.12|snap=17w15a|Added the ability to dye [[bed]]s.}}
{{History||1.13|snap=17w47a|The different data values for the <code>dye</code> ID have now been split up into their own IDs.
|Prior to [[1.13/Flattening|''The Flattening'']], this [[item]]'s numeral ID was 351.}}
{{History||1.14|snap=18w43a|"Cactus Green" has been renamed to "Green Dye".
|[[File:Green Dye JE3 BE3.png|32px]] The texture of green dye has been changed.}}
{{History|||snap=18w44a|Green dye can now change the text color on [[sign]]s to green.}}
{{History|||snap=18w50a|Green dye can now be found in [[chest]]s in [[desert]] [[village]] houses.}}
{{History|||snap=19w05a|Added the [[wandering trader]], which sells green dye.}}
{{History|||snap=19w11a|Green dye can now be [[trading|bought]] by shepherd villagers.}}
{{History||1.17|snap=20w45a|Green dye can now be used to craft [[green candle]]s.}}
{{History|||snap=21w19a|Green dye can no longer be used to craft green candles.}}
{{History|||snap=Pre-release 1|Green dye can once again be used to craft green candles.}}
{{History||1.20<br>(Experimental)|link=1.19.3|snap=22w42a|Green dye can now change the text color on [[hanging sign]]s to green.}}
{{History|pocket alpha}}
{{History||v0.3.0|[[File:Green Dye JE1 BE1.png|32px]] Added cactus green. It is currently unobtainable and has no usage.}}
{{History||v0.3.2|Cactus green is now obtainable by [[smelting]] cacti in a [[furnace]]. It still has no usage.}}
{{History||v0.4.0|Cactus green can now be used to craft [[cyan dye]], [[lime dye]], and [[green wool]].}}
{{History||v0.8.0|snap=build 1|[[File:Green Dye JE2 BE2.png|32px]] The texture of cactus green has been changed.}}
{{History||v0.14.0|snap=build 1|Cactus green can now be used to dye [[water]] in [[cauldron]]s.}}
{{History|pocket}}
{{History||1.0.0|snap=alpha 0.17.0.1|Cactus green can now be used to dye [[shulker]]s.}}
{{History||1.1.0|snap=alpha 1.1.0.0|Cactus green can now be used to dye [[bed]]s, [[shulker box]]es, and craft [[concrete powder]].}}
{{History|bedrock}}
{{History||1.2.0|snap=beta 1.2.0.2|Cactus green can now be used to craft [[stained glass]], patterns on [[banner]]s, and [[firework star]]s.}}
{{History||1.4.0|snap=beta 1.2.20.1|Cactus green can now be used to craft [[balloon]]s and [[glow stick]]s.}}
{{History||1.8.0|snap=beta 1.8.0.10|"Cactus Green" has been renamed to "Green Dye".}}
{{History||1.10.0|snap=beta 1.10.0.3|Green dye is now sold by [[wandering trader]]s.
|[[File:Green Dye JE3 BE3.png|32px]] The texture of green dye has been changed.}}
{{History||1.11.0|snap=beta 1.11.0.1|Green dye can now be found in [[desert]] [[village]] house [[chest]]s.}}
{{History|||snap=beta 1.11.0.4|Green dye can now be [[trading|sold]] to shepherd [[villager]]s.}}
{{History||1.16.100|snap=beta 1.16.100.56|The ID of green dye has been changed from <code>dye/2</code> to <code>green_dye</code>.}}
{{History|console}}
{{History||xbox=TU1|xbone=CU1|ps=1.00|wiiu=Patch 1|[[File:Green Dye JE1 BE1.png|32px]] Added cactus green.}}
{{History|PS4}}
{{History||1.83|"Cactus Green" has been renamed to "Green Dye".}}
{{History||1.90|[[File:Green Dye JE3 BE3.png|32px]] The texture of green dye has been changed.}}
{{History|new 3ds}}
{{History||0.1.0|[[File:Green Dye JE1 BE1.png|32px]] Added cactus green.}}
{{History|foot}}
== Issues ==
{{issue list}}
{{Items}}
[[cs:Kaktusová zeleň]]
[[de:Grüner Farbstoff]]
[[es:Tinte verde]]
[[fr:Teinture verte]]
[[hu:Kaktuszzöld]]
[[ja:緑色の染料]]
[[ko:초록색 염료]]
[[nl:Cactusgroen]]
[[pl:Zielony barwnik]]
[[pt:Corante verde]]
[[ru:Зелёный краситель]]
[[Category:Items]]
[[Category:Dyes]]
[[Category:Renewable resources]]</li><li>[[Lapis Lazuli|Lapis Lazuli]]<br/>{{Item
| image = Lapis Lazuli.png
|type=
| renewable = Yes
| stackable = Yes (64)
}}
{{About|the item|the ore|Lapis Lazuli Ore|the mineral block|Lapis Lazuli Block}}
'''Lapis lazuli''' is a mineral required to [[Enchanting|enchant]] items in an [[Enchanting Table|enchanting table]].
== Obtaining ==
=== Mining ===
When mined with a stone [[pickaxe]] or better, [[lapis lazuli ore]] drops 4–9 lapis lazuli. With the [[Fortune]] III enchantment, a single block has a chance of dropping up to 36 items.
=== Crafting ===
{{Crafting
|Block of Lapis Lazuli
|Output=Lapis Lazuli,9
|type=Material
}}
=== Smelting ===
{{Smelting
|showname=1
|Lapis Lazuli Ore; Deepslate Lapis Lazuli Ore
|Lapis Lazuli
|0.2
}}
=== Villager gifts ===
{{IN|java}}, cleric [[villager]]s give [[player]]s lapis lazuli if they have the [[Hero of the Village]] effect.
=== Trading ===
Apprentice-level cleric villagers sell one lapis lazuli for an [[emerald]] as part of their trades.
{{IN|bedrock}}, [[wandering trader]]s may sell 3 lapis lazuli for an emerald.
=== Chest loot ===
{{see also|Lapis Lazuli Ore#Natural generation}}
{{LootChestItem|lapis-lazuli}}
== Usage ==
=== Enchanting ===
1–3 pieces of lapis lazuli are required to use an [[Enchanting Table|enchanting table]] to enchant an [[items|item]]. More specifically, the enchanting table UI shows 3 options (see [[Enchanting mechanics]] for details): the first, second, and third options cost 1, 2, and 3 lapis lazuli, respectively.
=== Crafting ingredient ===
Lapis lazuli can be used to make [[blocks of lapis lazuli]] and [[blue dye]]. {{IN|bedrock}}, it can also be used directly as a substitute for blue dye.
{{crafting usage}}
{{IN|bedrock}}, lapis lazuli can be also used in banner patterns:
{{banner crafting usage}}
=== Loom ingredient ===
{{Banner loom usage|Lapis Lazuli}}
=== Dye ===
{{Dye usage}}
=== Smithing ingredient ===
{{Smithing
|head=1
|ingredients=Any Armor Trim +<br/>Any Armor Piece + <br/>Lapis Lazuli
|Any Armor Trim Smithing Template
|Netherite Chestplate
|Lapis Lazuli
|Lapis Trim Netherite Chestplate
|showdescription=1
|description = All armor types can be used in this recipe,<br/>a netherite chestplate is shown as an example.<br/>
|tail=1
}}
;Trim color palette
The following color palette is shown on the designs on trimmed armor:
*{{TrimPalette|lapis lazuli}}
== Data values ==
=== ID ===
{{edition|java}}:
{{ID table
|edition=java
|showforms=y
|generatetranslationkeys=y
|displayname=Lapis Lazuli
|spritetype=item
|nameid=lapis_lazuli
|form=item
|foot=1}}
{{edition|bedrock}}:
{{ID table
|edition=bedrock
|showaliasids=y
|shownumericids=y
|showforms=y
|notshowbeitemforms=y
|generatetranslationkeys=y
|displayname=Lapis Lazuli
|spritetype=item
|nameid=lapis_lazuli
|aliasid=dye / 4
|id=414
|form=item
|translationkey=item.dye.blue.name
|foot=1}}
== Advancements ==
{{load advancements|Enchanter}}
== History ==
{{History|java beta}}
{{History||1.2|[[File:Lapis Lazuli JE1 BE1.png|32px]] Added lapis lazuli.}}
{{History||1.2_02|[[Lapis lazuli ore]] can now be found at [[bedrock]] level and now drops 4–8 lapis lazuli per block mined (increased from 1) on [[singleplayer]] only. However, servers have not been affected yet.}}
{{History||1.8|snap=Pre-release|Lapis lazuli can now be found in [[mineshaft]] [[chest]]s.}}
{{History|java}}
{{History||1.4.2|snap=12w34a|Lapis lazuli can now be used to [[Armor#Dyeing|dye]] leather [[armor]] and [[wolf]] collars.}}
{{History||1.4.6|snap=12w49a|Lapis lazuli can now be [[crafting|crafted]] with [[gunpowder]] to create a [[firework star]].}}
{{History||1.6.1|snap=13w19a|Lapis lazuli can now be used to craft blue [[stained clay]].}}
{{History||1.7.2|snap=13w41a|Lapis lazuli can now be used to craft blue [[stained glass]].}}
{{History||1.8|snap=14w02a|[[Enchanting]] now requires lapis lazuli. Different enchantments require different amounts of levels and different amounts of levels now require different amounts of lapis lazuli (between 1-3).
|Cleric [[villager]]s now [[trading|sell]] 1–2 lapis lazuli for 1 [[emerald]], making it a [[renewable resource]].}}
{{History|||snap=14w30a|Lapis lazuli can now be used to dye [[banner]]s.}}
{{History||1.9|snap=15w44a|The average yield of lapis lazuli in [[mineshaft]] [[chest]]s has been decreased.}}{{History||1.11|snap=16w39a|Added the ability to dye [[shulker box]]es.}}
{{History||1.12|snap=17w06a|Can now be used to craft blue [[concrete powder]].}}
{{History|||snap=17w15a|Added the ability to dye [[bed]]s.}}
{{History||1.13|snap=17w47a|The different data values for the <code>dye</code> ID have been split up into their own IDs.
|Prior to [[1.13/Flattening|''The Flattening'']], this [[item]]'s numeral ID was 351.}}
{{History|||snap=18w11a|Lapis lazuli now generates in [[shipwreck]] [[chest]]s.}}
{{History||1.14|snap=18w43a|Lapis lazuli can now be used to craft [[blue dye]].
|Lapis lazuli can no longer be used as a [[dye]].
|All of the dye-related functions and crafting recipes of lapis lazuli (except lapis lazuli blocks) have been transferred to blue dye.
|[[File:Lapis Lazuli JE2 BE2.png|32px]] The texture of lapis lazuli has been changed.}}
{{History|||snap=18w50a|Lapis lazuli can now be found in chests in [[village]] temples.}}
{{History|||snap=19w13a|Cleric villagers now give lapis lazuli to players under the [[Hero of the Village]] effect.}}
{{History||1.17|snap=21w08a|Lapis lazuli can now drop and be smelted from [[deepslate lapis lazuli ore]].}}
{{History||1.20<br>(Experimental)|link=1.19.4|snap=23w04a|Lapis lazuli can now be used as an armor trim material.}}
{{History|pocket alpha}}
{{History||v0.3.0|[[File:Lapis Lazuli JE1 BE1.png|32px]] Added lapis lazuli.}}
{{History||v0.3.2|Lapis lazuli can now be crafted into lapis lazuli blocks, and vice versa.}}
{{History||v0.12.1|snap=build 1|Lapis lazuli is now required for [[enchanting]].}}
{{History||v0.14.0|snap=build 1|Lapis lazuli can now be found inside [[minecart with chest]]s in [[mineshaft]]s.
|Lapis lazuli can now be used to dye [[water]] in [[cauldron]]s.}}
{{History|pocket}}
{{History||1.0.4|snap=alpha 1.0.4.0|Cleric [[villager]]s now [[trading|sell]] 1–2 lapis lazuli for 1 [[emerald]].
|Lapis lazuli can now be used to [[dyeing|dye]] [[shulker shell]]s.}}
{{History||1.1.0|snap=alpha 1.1.0.0|Lapis lazuli can now be used to dye [[shulker box]]es and [[bed]]s.
|Lapis lazuli can now be used to [[crafting|craft]] blue [[concrete powder]].}}
{{History|bedrock}}
{{History||1.2.0|snap=beta 1.2.0.2|Lapis lazuli can now be used to dye [[banner]]s, [[firework star]]s and [[glass]].}}
{{History||1.4.0|snap=beta 1.2.14.2|Lapis lazuli can now be found in [[shipwreck]] treasure chests.}}
{{History|||snap=beta 1.2.20.1|Lapis lazuli can now be used to craft [[balloon]]s and [[glow stick]]s.}}
{{History||1.8.0|snap=beta 1.8.0.10|Lapis lazuli can now be used to craft [[blue dye]]s.}}
{{History||1.10.0|snap=beta 1.10.0.3|Lapis lazuli are now [[trading|sold]] by [[wandering trader]]s.
|[[File:Lapis Lazuli JE2 BE2.png|32px]] The texture of lapis lazuli has been changed.}}
{{History||1.11.0|snap=beta 1.11.0.1|Lapis lazuli can now be found in [[desert]] [[village]] temple [[chest]]s.}}
{{History|||snap=beta 1.11.0.4|Cleric [[villager]]s now [[trading|sell]] one lapis lazuli for one [[emerald]].}}
{{History||1.16.100|snap=beta 1.16.100.56|The ID of lapis lazuli has been changed from <code>dye/4</code> to <code>lapis_lazuli</code>.}}
{{History||1.17.0|snap=beta 1.16.230.52|Lapis lazuli can now drop and be smelted from [[deepslate lapis lazuli ore]].}}
{{History||1.19.80|snap=beta 1.19.80.21|Lapis lazuli can now be used as an armor trim material.}}
{{History|console}}
{{History||xbox=TU1|xbone=CU1|ps=1.0|wiiu=Patch 1|switch=1.0.1|[[File:Lapis Lazuli JE1 BE1.png|32px]] Added lapis lazuli.}}
{{History||xbox=TU31|xbone=CU19|ps=1.22|wiiu=Patch 3|switch=1.0.1|Lapis lazuli can now be used in [[enchanting]].}}
{{History|Ps4}}
{{History||1.90|[[File:Lapis Lazuli JE2 BE2.png|32px]] The texture of lapis lazuli has been changed.}}
{{History|foot}}
== Issues ==
{{issue list}}
== Trivia ==
* In real life, lapis lazuli is a blue gem that can be ground and processed into ultramarine pigment. Lapis lazuli pigment has been famously used in the production of illuminated manuscripts, stained glass, and cave paintings. [[Wikipedia:Lapis lazuli|See the Wikipedia article for more information]].
* Lapis lazuli is the only [[ore]] that can be used as a [[dye]]{{only|BE|short=1}} or making a dye.
* It is the only item that can be put in the second slot of an [[enchantment table]].
== References ==
{{reflist}}
{{Items}}
[[Category:Dyes]]
[[cs:Lazurit]]
[[de:Lapislazuli]]
[[es:Lapislázuli]]
[[fr:Lapis-lazuli]]
[[hu:Lazurit]]
[[ja:ラピスラズリ]]
[[ko:청금석]]
[[nl:Lapis lazuli]]
[[pl:Lazuryt]]
[[pt:Lápis-lazúli]]
[[ru:Лазурит]]
[[th:แร่แลพิสแลซูลี]]
[[uk:Лазурит]]
[[zh:青金石]]
[[Category:Renewable resources]]</li></ul> | 18w43a | ||||
| 18w47b | |||||
| Pocket Edition | |||||
1.0.5{{Extension DPL}}<ul><li>[[Portfolio|Portfolio]]<br/>{{exclusive|education}}
{{Item
| image = Portfolio.png
| renewable = No
| stackable = Yes (64)
}}
A '''portfolio''' is an [[item]] that can save [[photo]]s taken with a [[camera]].<ref>https://education.minecraft.net/support/knowledge-base/using-cameras-portfolios/</ref>
== Obtaining ==
Portfolios can be obtained in the [[creative inventory]] or through the {{cmd|give}} command.
== Usage ==
[[File:Portfolio Interface.png|thumb|upright=1.5|The portfolio interface]]
Once a photo has been taken using the [[camera]], it appears in the portfolio. Once equipped, right-clicking brings up a two-page book of photos the [[player]] has taken, in chronological order. Captions can be added below each picture. Pressing the "Export Portfolio" button creates a .zip file with all photos as JPGs in a specified folder. The portfolio is also used to load custom items in [[Minecraft China]].
== Data values ==
=== ID ===
{{ID table
|edition=bedrock
|shownumericids=y
|showforms=y
|notshowbeitemforms=y
|generatetranslationkeys=y
|displayname=Portfolio
|spritetype=item
|nameid=portfolio
|id=456
|form=item
|foot=1}}
== History ==
{{History|pocket alpha}}
{{History||v0.16.0|snap=build 1|[[File:Portfolio BE1.png|32px]] Added portfolios.}}
{{History|||snap=build 2|Portfolios have been removed.}}
{{History|bedrock}}
{{History||1.16.100|Data-driven portfolios, allowing for add-ons to create custom portfolios. Normal Portfolios are still unobtainable.}}
{{History|education}}
{{History||1.0|[[File:Portfolio BE1.png|32px]] Added portfolios.}}
{{History|foot}}
== References ==
{{Reflist}}
{{Items}}
{{Education Edition}}
[[Category:Non-renewable resources]]
[[Category:Education Edition items]]
[[Category:Storage]]
[[de:Fotoalbum]]
[[es:Portafolio]]
[[ja:ポートフォリオ]]
[[ko:포트폴리오]]
[[pl:Portfolio]]
[[pt:Portfólio]]
[[ru:Портфолио]]
[[uk:Портфоліо]]
[[zh:公文包]]</li><li>[[Honeycomb|Honeycomb]]<br/>{{distinguish|Honeycomb Block}}
{{Item
| image = Honeycomb.png
| renewable = Yes
| stackable = Yes (64)
}}
'''Honeycombs''' are [[item]]s obtained from [[bee nest]]s and beehives.
== Obtaining ==
{{See also|Tutorials/Honey farming}}
When a bee nest or beehive at {{cd|honey_level}} 5 is [[shear]]ed, it drops 3 honeycombs and angers any [[bee]]s inside, causing them to attack. Having a lit [[campfire]] or lighting a [[fire]] underneath the nest or hive prevents the bees from becoming hostile.
A [[dispenser]] with [[shears]] inside can be used to shear the nest or hive without angering the bees. A honeycomb item drops out after using the shears.
== Usage ==
=== Signs ===
{{Control|Using}} a honeycomb on a [[sign]] or a hanging sign prevents the sign from being edited.
=== Waxing ===
{{Control|Using}} a honeycomb on a [[block of copper]] changes the block into its waxed variant, preventing oxidation of the copper.
=== Crafting ingredient ===
{{crafting usage}}
== Sounds ==
{{edition|java}}:
{{Sound table
|sound=Beehive shear.ogg
|subtitle=Shears scrape
|source=neutral
|description=When honeycombs are collected from a beehive
|id=block.beehive.shear
|translationkey=subtitles.block.beehive.shear
|volume=0.8
|pitch=1.0/0.9/0.8
|distance=16}}
{{Sound table
|sound=Wax on1.ogg
|sound2=Wax on2.ogg
|sound3=Wax on3.ogg
|subtitle=Wax on
|source=block
|description=When a honeycomb waxes something
|id=item.honeycomb.wax_on
|translationkey=subtitles.item.honeycomb.wax_on
|volume=1.0
|pitch=1.0/0.9/1.1
|distance=16
|foot=1}}
{{edition|bedrock}}:
{{Sound table
|type=bedrock
|sound=Beehive shear.ogg
|source=block
|description=When honeycombs are collected from a beehive
|id=block.beehive.shear
|volume=0.8
|pitch=0.8-1.0}}
{{Sound table
|sound=Wax on1.ogg
|sound2=Wax on2.ogg
|sound3=Wax on3.ogg
|source=neutral
|description=When a honeycomb waxes something
|id=copper.wax.on
|volume=1.0
|pitch=0.8-1.2
|foot=1}}
== Data values ==
=== ID ===
{{edition|java}}:
{{ID table
|edition=java
|showforms=y
|generatetranslationkeys=y
|displayname=Honeycomb
|spritetype=item
|nameid=honeycomb
|form=item
|foot=1}}
{{edition|bedrock}}:
{{ID table
|edition=bedrock
|shownumericids=y
|showforms=y
|notshowbeitemforms=y
|generatetranslationkeys=y
|displayname=Honeycomb
|spritetype=item
|nameid=honeycomb
|id=591
|form=item
|foot=1}}
== Advancements ==
{{load advancements|Wax on;Wax off}}
== History ==
{{History|java}}
{{History||1.15|snap=19w34a|[[File:Honeycomb JE1.png|32px]] Added honeycombs.
|Honeycombs can be used to craft [[beehive]]s.}}
{{History|||snap=19w41a|Honeycombs can now be used to craft [[honeycomb block]]s.}}
{{History|||snap=Pre-release 3|[[File:Honeycomb texture change 1.15pre2 to 1.15pre3.gif|32px]] The texture file of honeycombs has been slightly changed. The color channel of transparent pixels are now filled to black. The in-game texture has not been changed.}}
{{History||1.17|snap=20w45a|Honeycomb can now be used to craft [[candle]]s and [[waxed copper]].}}
{{History|||snap=21w11a|Honeycomb can now be used to wax copper blocks by right clicking or dispensing honeycomb onto the block.}}
{{History|||snap=21w14a|Honeycomb can now be used to wax oxidized copper blocks.}}
{{History|||snap=21w19a|Honeycomb can no longer used to craft candles.}}
{{History|||snap=Pre-release 1|Honeycomb can once again used to craft candles.}}
{{History||1.20|snap=23w12a|[[Sign]]s and hanging signs can now be waxed with honeycomb to prevent them from being edited.}}
{{History|bedrock}}
{{History||1.14.0|snap=beta 1.14.0.1|[[File:Honeycomb BE1.png|32px]] Added honeycombs.}}
{{History|||snap=beta 1.14.0.4|[[File:Honeycomb BE2.png|32px]] The texture of honeycombs has been changed to match {{el|je}}'s.}}
{{History||Caves & Cliffs (experimental)|link=Bedrock Edition 1.17.0|snap=beta 1.16.210.57|Honeycomb can now be used to craft [[waxed copper]].
|Honeycomb can now be used to wax copper blocks by right clicking or dispensing honeycomb onto the block.}}
{{History||1.17.0|snap=beta 1.16.230.52|Honeycomb can now be used to wax oxidized copper blocks.}}
{{History||1.17.10|snap=beta 1.17.10.22|Honeycomb can now be used to craft [[candle]]s.}}
{{History||Next Major Update<br>(Experimental)|link=Bedrock Edition 1.19.80|snap=beta 1.19.80.22|[[Sign]]s and hanging signs can now be waxed with honeycomb to prevent them from being edited.}}
{{History|foot}}
== Issues ==
{{issue list}}
{{items}}
[[cs:Plástev medu]]
[[de:Honigwabe]]
[[es:Panal]]
[[fr:Rayon de miel]]
[[ja:ハニカム]]
[[ko:벌집 조각]]
[[pl:Plaster miodu]]
[[pt:Favo de mel]]
[[ru:Пчелиные соты]]
[[zh:蜜脾]]
[[Category:Renewable resources]]</li></ul> | alpha 1.0.5.0 | ||||
| Bedrock Edition | |||||
1.8.0{{Extension DPL}}<ul><li>[[:Category:Minecraft Earth items|Category:Minecraft Earth items]]<br/>All items in ''[[Minecraft Earth]]''.
[[Category:Items]]
[[Category:Minecraft Earth|Items]]</li><li>[[Elytra|Elytra]]<br/>{{Item
| image = Elytra.png
| rarity = Uncommon
| renewable = No
| durability = 432
| stackable = No
}}
'''Elytra''' ({{Audio|ElytraPronunciation.mp3|/ˈɛl ɪ trə/|link2=''ᴇʟ-i-trə''}}<ref>“Elytron.” ''Merriam-Webster.com Dictionary'', Merriam-Webster, https://www.merriam-webster.com/dictionary/elytron. Accessed 22 May. 2022.</ref>)<!--"Elytra" is the plural of "elytron," a single half of a beetle's protective wing covers. Verbs should agree accordingly (e.g. "Elytra allow flight"). https://www.merriam-webster.com/dictionary/elytron--> are rare wings found in [[end ship]]s that are a source of flight in [[Survival]] mode.
== Obtaining ==
=== Natural generation ===
Elytra are found only in [[end city|end cities]] in [[item frame|item frames]] in the treasure room of the [[end ship]]. A [[shulker]] guards the elytra and the ship's two loot chests.
=== Repairing ===
Elytra can be enchanted with [[Mending]] so that they get [[Item repair|repaired]] as the player collects [[experience]] orbs while wearing/holding them.
Elytra can also be repaired in the player crafting grid, by combining two damaged pairs of elytra together.
{{crafting
|showname=0
|showdescription=1
|ignoreusage=1
|Damaged Elytra
|Damaged Elytra
|Output= Elytra
|description= The durability of the two pairs is added together, plus an extra 5% durability, but removes any enchantments.
|type= Transportation
}}
Similarly, two damaged elytra pairs can be combined on a [[grindstone]].
{{Grinding
|showdescription=1
|ingredients=2x Damaged [[Elytra]]
|Damaged Elytra
|Damaged Elytra
|Elytra
|description=The durability of the two pairs is added together, plus an extra 5% durability, but removes any enchantments.
}}
Elytra can also be repaired at an anvil using [[phantom membrane]]s, which has the advantage that it preserves [[enchantments]] on elytra. Each phantom membrane restores 108 durability points, exactly 25% of the elytra's total durability.
{| class="wikitable" data-description="Repairing elytra"
! scope="col" style="width:64px;" | Name
! Ingredients
! [[Anvil]] usage
|-
! scope="row" style="text-align: center;" | '''Elytra'''
| [[Elytra]] +<br>[[Phantom Membrane]]
| style="width: 260px; padding: 1px;" | {{Anvil| title = Elytra|Input1=Damaged Elytra|Input2=Phantom Membrane, 2|Output=Elytra}}
|-
|}
Each repair on the anvil, however, also increases the [[Anvil mechanics|prior work]] penalty for the Elytra, making every subsequent repair increasingly expensive and eventually reaching an upper limit where repairs are no longer allowed because they are "too expensive" (even if the player has many xp levels to spare). However, the prior work penalty can be reset to 0 for an enchanted elytra pair when it is disenchanted on a grindstone. Unenchanted elytra cannot be used on the grindstone alone.
== Usage ==
[[File:Steve in elytra.png|75px]] [[File:Alex in elytra.png|75px]]
Elytra are equipped in the [[chestplate]] slot, either by placing the item directly in the slot, by pressing {{ctrl|use item}} while [[hotbar|held in hand]], or by firing a point-blank [[dispenser]] at a target. They are gray in color by default, but they adopt the design of any [[cape]] the player is wearing. They maintain their in-world texture design even when they're [[#Repair|broken]] or [[enchanted]].
=== Flying ===
To fly, the player must press the {{ctrl|jump}} key while falling, and the elytra spread apart like a beetle's elytra. The player can aim their view around to turn or adjust their pitch. Losing altitude increases speed, and gaining altitude decreases speed. [[Firework rocket]]s can be used to increase speed. Additionally, speed is quickly lost from sharp changes in direction.
Directly hitting any surface while gliding too fast causes damage to the player and their armor proportional to flight speed (although this may be calculated from another factor). When a player dies in this way, they receive the [[death messages|death message]] "'''<player> experienced kinetic energy'''". The player does not take [[fall damage]] from colliding at a shallow angle or a low enough speed. The critical, damaging angle is about 50° with the collision surface, and the calculation for damage seems to be as if the player had fallen from their maximum potential glide height to the height of the struck surface.
A safe and simple cruise with the highest travel distance can be achieved by aiming directly at the horizon while at the glide's altitude limit. The player's speed is slow enough to allow them time to do other things during a long flight, like sort out their inventory.
In [[Creative]] mode or when the "mayfly" [[ability]] has been given, the player can alternatively hold the {{ctrl|jump}} key to fly up,{{only|bedrock}} or double press the jump key to move around freely.
Flight can be stopped by pressing the [[jump]] key.{{only|bedrock}}
==== Speed and altitude ====
Elytra have a minimum speed of about 7.2 m/s (obtained by gliding at the altitude cap with a strong upward pitch of 30°). If the diver drops to 0 speed, they quickly get accelerated back up to at least this minimum. The diver can increase speed by choosing to descend faster, but afterward, they do not regain nearly as much altitude. In the real world, drag increases with speed, and drag, in turn, slows the aircraft; Minecraft mimics this. To glide from cliff to cliff, a player's best bet is to aim slightly above the horizon.
Sharp turns are a fast way to lose speed. Quicker turns cause greater losses, while gentle movements have small effects. Making a hairpin turn can actually be used for making high-speed landings safe as well as for precise landings on small targets like rooftops. The player aims to glide just above the target, then as they're right over it they immediately reverse directions, then they make readjustments as necessary.
The lowest rate of altitude loss is about 1.5 m/sec, obtained by gliding at the altitude cap with a slight upward pitch (12° or 15°).
To get the best possible glide ratio (and thus the furthest distance out of their altitude), the diver pilot should aim directly at the horizon. This ratio is about 9.47 to 1.
[[Slow Falling]] potions greatly decrease the player's vertical (fall) speed, which also greatly decreases their ''horizontal'' speed (clearly, it depends on the vertical fall rate, as one might expect from flight modeling). The net result is that the player flies extremely slowly - but their Elytra still takes durability damage at the usual rate (1 durability per second without Unbreaking, etc.). Due to this combination, Elytra plus Slow Falling is largely a novelty that most players won't use. The [[Feather Falling]] enchantment does not affect Elytra speed and does not reduce fall damage from hitting things with elytra.
It is possible to calculate the glide range by dividing the altitude by tan of the glide angle (altitude/tan(glide angle)). For example, if the player glides from an altitude of 64 blocks above ground with a glide angle of 15 degrees, they can glide for 237 blocks (assume that they are on superflat), since floor(64 / tan(15)) is 237.
==== Stalling ====
Trying for too high a pitch reduces the player's lift. At a pitch of 30° above the horizon, the player has the lowest possible airspeed of 7.2 m/sec. Above that, the player might be considered to be in a stall. Increasing the pitch gets closer to a free-fall, and stalled flight at 60° is enough to cause fall damage. Stalling at 90° is a true free-fall.
Recovering from a stall is done by readjusting to any safe pitch as quickly as the player likes. This can be just changing to look at the horizon.
==== Powered flight ====
{{fakeImage|{{invSprite|Firework Rocket}}|Firework rockets are used for speed boosts while gliding.}}
[[Firework rocket]]s can be used for propulsion during flight by placing it in either hand and {{ctrl|using}}. Using a firework rocket while gliding quickly maximizes the player's speed for a time similar to the rocket's flight duration.
If the rocket is equipped with [[firework star]]s, it explodes at the end of its flight, inflicting damage based on the number of stars.
It is possible to gain altitude during powered flight. This makes it possible to glide for extreme distances and had been used extensively by [[far lands]]/[[World Border]] challenges.
=== Durability and Repair ===
{{fakeImage|{{invSprite|Broken Elytra}}|A broken pair of elytra.}}
[[Durability]] decreases by one point each second when gliding. A pair of elytra has 432 durability, allowing 7 minutes and 12 seconds of gliding time without enchantments, providing more than 10,000 blocks of transport distance. It is possible to apply the [[Unbreaking]] enchantment using an [[anvil]] and an [[enchanted book]], which affects the elytra, in the same way it does to [[tool]]s. Unbreaking III increases elytra's flight time to about four seconds per durability point, a total of 28 minutes and 44 seconds.
When the durability reaches 1, elytra stop working until they are repaired, adopting a tattered texture in the inventory. The damage ends at durability 1, so they can never fully break. A pair may be repaired by either using the [[Mending]] enchantment, combining two pairs in a [[grindstone]], or combining it in an anvil with [[phantom membrane]]s. In an anvil, each piece of membrane repairs elytra by 108 durability points, requiring 4 pieces to fully repair them.
Each repair on the anvil will also increase the [[Anvil mechanics|prior work]] penalty for the Elytra, making every subsequent repair increasingly expensive, with an upper limit where repairs are no longer allowed because they are "too expensive". However, the prior work penalty can be reset to 0 for an enchanted elytra pair when it is disenchanted on a grindstone (by adding nothing to it). Unenchanted elytra cannot be used on the grindstone alone.
=== Enchantments ===
Elytra can receive the following [[enchantments]] by combining in an anvil:
{| class="wikitable sortable"
|-
! Enchantment
! Max Level
![[Enchanting|Method]]
|-
| [[Unbreaking]]
| III
|{{Inventory slot|Anvil}}
|-
| [[Mending]]
| I
|{{Inventory slot|Anvil}}
|-
| [[Curse of Vanishing]]
| I
|{{Inventory slot|Anvil}}
|-
| [[Curse of Binding]]
| I
|{{Inventory slot|Anvil}}
|}
{{notelist|columns=1}}
== Sounds ==
{{edition|java}}:
{{Sound table
|sound=Equip leather1.ogg
|sound2=Equip leather2.ogg
|sound3=Equip leather3.ogg
|sound4=Equip leather4.ogg
|sound5=Equip leather5.ogg
|sound6=Equip leather6.ogg
|subtitle=Elytra rustles
|source=player
|description=When a pair of elytra is equipped
|id=item.armor.equip_elytra
|translationkey=subtitles.item.armor.equip_elytra
|volume=1.0
|pitch=1.0
|distance=16}}
{{Sound table
|sound=Elytra loop.ogg
|subtitle=MC-177084
|source=player
|description=While flying with a pair of elytra
|id=item.elytra.flying
|translationkey=-
|volume=0.0-1.0 <ref group=sound>Is a quarter of the player's velocity. If flying for less than 1 second, it is 0.0; otherwise, if flying for less than 2 seconds, it is between 0.0 and a quarter of the player's velocity (scaling up with time until 2 seconds)</ref>
|pitch=1.0 <ref group=sound>If the volume is greater than 0.8, 0.8-volume is added to the pitch</ref>
|distance=16}}
{{Sound table
|sound=Random break.ogg
|subtitle=Item breaks
|source=dependent
|description=When a pair of elytra's durability is exhausted
|id=entity.item.break
|translationkey=subtitles.entity.item.break
|volume=0.8
|pitch=0.8-1.2
|distance=16
|foot=1}}
{{edition|bedrock}}:
{{Sound table
|type=bedrock
|sound=Equip leather1.ogg
|sound2=Equip leather2.ogg
|sound3=Equip leather3.ogg
|sound4=Equip leather4.ogg
|sound5=Equip leather5.ogg
|sound6=Equip leather6.ogg
|source=player
|description=When a pair of elytra is equipped
|id=armor.equip_leather
|volume=1.0
|pitch=1.0}}
{{Sound table
|sound=Elytra loop.ogg
|source=player
|description=While flying with a pair of elytra
|id=elytra.loop
|volume=''Depends'' {{checkthecode}}
|pitch=1.0}}
{{Sound table
|sound=Random break.ogg
|source=player
|description=When a pair of elytra's durability is exhausted
|id=random.break
|volume=1.0
|pitch=0.9
|foot=1}}
== Data values ==
=== ID ===
{{edition|java}}:
{{ID table
|edition=java
|showforms=y
|generatetranslationkeys=y
|displayname=Elytra
|spritetype=item
|nameid=elytra
|form=item
|foot=1}}
{{edition|bedrock}}:
{{ID table
|edition=bedrock
|shownumericids=y
|showforms=y
|notshowbeitemforms=y
|generatetranslationkeys=y
|displayname=Elytra
|spritetype=item
|nameid=elytra
|id=564
|form=item
|foot=1}}
== Achievements ==
{{Load achievements|Super Sonic}}
== Advancements ==
{{load advancements|Sky's the Limit}}
== History ==
{{History|java}}
{{History||1.9|snap=October 5, 2015|slink=https://twitter.com/_tomcc/status/651042141397979136|[[Tommaso Checchi]] tweets that [[Jeb]] is working on a secret feature for Minecraft Java Edition, saying "it's like [[W:c:Mario:Super Mario 64|Mario 64]]."}}
{{History|||snap=October 6, 2015|slink=https://twitter.com/jeb_/status/651416814791081984|[[Jeb]] tweets a [https://web.archive.org/web/20230820173231/https://gfycat.com/serpentinehighlevelamurminnow-minecraftsuggestions-ethoslab animated GIF] revealing a [[player]] gliding around an [[end city]]. Elytra have a dragon-wing texture.}}
{{History|||snap=October 6, 2015|slink=https://twitter.com/jeb_/status/651419480187346944|Jeb tweets an [https://web.archive.org/web/20230219045525/https://i.imgur.com/LBgZCyW.png image] of folded wings, which replace the cape the player is wearing.}}
{{History|||snap=October 6, 2015|slink=https://twitter.com/jeb_/status/651423700777074688|Jeb tweets another [https://web.archive.org/web/20230820083025/https://gfycat.com/leadingindolentgangesdolphin animated GIF] of his character with Mojang-themed elytra, gliding along a [[river]] through a [[taiga]] forest.}}
{{History|||snap=15w41a|[[File:Elytra JE1 BE1.png|32px]] <br>[[File:Elytra (item) JE1 BE1.png|32px]] [[File:Broken Elytra (item) JE1 BE1.png|32px]] Added elytra.
|Elytra are currently repaired with [[leather]] when using [[anvil]].}}
{{History|||snap=15w42a|Elytra now spread slightly when the [[player]] crouches.
|The player can now take [[damage]] from gliding into walls, and crashing into a wall now has its own [[Health#Death messages|death message]].
|When flying with elytra, players are only 0.6 blocks tall. They, therefore, can now fit through 1-block gaps while gliding.
|The [[player]] can no longer go higher than the starting point of the glide.}}
{{History|||snap=15w43a|The player's point of view now shifts while gliding.}}
{{History|||snap=16w06a|Elytra now recognize the [[player]]'s [[cape]] and adopt a different elytron design for every official cape (see [[#Gallery|Gallery]]). In addition, Jeb is working on a feature to allow players to change the elytron design like regular player skins.}}
{{History|||snap=16w07a|Elytra are now activated by jumping mid-air. The player no longer glides automatically when falling.
|The cape option in the [[options|options menu]] now also disables custom elytra textures.
|Added the [[game rule]] {{cd|disableElytraMovementCheck}}.}}
{{History||1.9.1|snap=pre1|[[Sound]]s while gliding with elytra have been added.}}
{{History||1.11|snap=16w32a|Elytra can now be placed on [[armor stand]]s, just like any other [[chestplate]].}}
{{History|||snap=16w38a|Elytra are now visible on [[zombie]]s, [[skeleton]]s, and armor stands.}}
{{History|||snap=16w41a|Elytra now have their own [[sound]] when equipped.}}
{{History||1.11.1|snap=16w50a|Elytra can now be propelled through the [[air]] by using [[firework rocket]]s.}}
{{History||1.13|snap=17w47a|Prior to [[1.13/Flattening|''The Flattening'']], this [[item]]'s numeral ID was 443.}}
{{History|||snap=18w14a|Elytra now require [[phantom membrane]] to be repaired, instead of [[leather]].}}
{{History||1.14|snap=18w43a|[[File:Elytra JE2 BE2.png|32px]] <br>[[File:Elytra (item) JE2 BE2.png|32px]] [[File:Broken Elytra (item) JE2 BE2.png|32px]] The textures of the elytra have been changed.}}
{{History||1.15|snap=19w39a|The deployment animation of elytra causes [[player]] blinks when the deployment events has overlapped.}}
{{History|||snap=19w42a|The deployment and folding animations of elytra have been improved and become smoother.
|Elytra can now start to glide immediately after a jump, not only during falls.}}
{{History||1.18|snap=experimental snapshot 7|Elytra no longer use up durability when gliding regularly. Durability is now only consumed when a [[firework rocket]] is used.
|Speed boosts from firework rockets are slightly weaker.
|Now break when the item reaches 0 durability.}}
{{History|||snap=21w37a|The elytra changes in experimental snapshot 7 have been reverted.}}
{{History||1.19|snap=Pre-release 1|Equipping elytra through the inventory now plays a sound.<ref>{{bug|MC-94060||Equipping armor/elytra through inventory or dispenser doesn't play sounds|Fixed}}</ref>}}
{{History||1.19.4|snap=23w05a|Equipping elytra while held with an item already in the chestplate slot now swaps the two items.}}
{{History|pocket}}
{{History||1.0.0|snap=alpha 0.17.0.1|[[File:Elytra JE1 BE1.png|32px]] <br>[[File:Elytra (item) JE1 BE1.png|32px]] [[File:Broken Elytra (item) JE1 BE1.png|32px]] Added elytra. In-game, they are known as ''elytra wings''.}}
{{History|bedrock}}
{{History||1.2.0|snap=beta 1.2.0.2|Elytra can now be propelled through the [[air]] by using [[firework rocket]]s.}}
{{History||1.2.3|snap=beta 1.2.3.3|''Elytra Wings'' have been renamed to ''Elytra''.}}
{{History||1.6.0|snap=beta 1.6.0.5|Elytra can now be repaired in an [[anvil]] using [[phantom membrane]], instead of [[leather]].}}
{{History||1.10.0|snap=beta 1.10.0.3|[[File:Elytra JE2 BE2.png|32px]] <br>[[File:Elytra (item) JE2 BE2.png|32px]] [[File:Broken Elytra (item) JE2 BE2.png|32px]] The textures of elytra have been changed.}}
{{History|console}}
{{History||xbox=TU46|xbone=CU36|ps=1.38|wiiu=Patch 15|switch=1.0.1|[[File:Elytra JE1 BE1.png|32px]] <br>[[File:Elytra (item) JE1 BE1.png|32px]] [[File:Broken Elytra (item) JE1 BE1.png|32px]] Added elytra.}}
{{History||xbox=TU53|xbone=CU43|ps=1.49|wiiu=Patch 23|switch=1.0.3|Elytra can now be propelled through the [[air]] by using [[firework rocket]]s.}}
{{History||xbox=TU69|xbone=none|ps=1.76|wiiu=Patch 38|switch=none|Elytra are now repaired on the [[anvil]] using [[phantom membrane]] instead of [[leather]].}}
{{History||xbox=none|xbone=none|ps=1.90|wiiu=none|switch=none|[[File:Elytra JE2 BE2.png|32px]] <br>[[File:Elytra (item) JE2 BE2.png|32px]] [[File:Broken Elytra (item) JE2 BE2.png|32px]] The textures of elytra have been changed.}}
{{History|new 3ds}}
{{History||1.7.10|[[File:Elytra JE1 BE1.png|32px]] <br>[[File:Elytra (item) JE1 BE1.png|32px]] [[File:Broken Elytra (item) JE1 BE1.png|32px]] Added elytra.}}
{{History|foot}}
== Issues ==
{{issue list}}
== Trivia ==
* The singular form of elytra is an {{w|elytron}}.
* In reality, elytra are not used for flight. They are the tough forewings of beetles and earwigs that cover the wings they actually use for flight. However, like ''Minecraft'' elytra, beetles can use them for gliding.
* A flying player has a shorter hitbox than usual: A 0.6 block cube centered on the player's feet.
* It is possible to glide while on a [[ladder]], by pressing {{key|shift}} followed by {{key|space}}, causing the player to fall with a speed determined by the player's visual angle. This means that the player can descend fast on a ladder, but if the speed is too fast when hitting the ground, they can take fatal fall damage. Using a [[firework rocket]] can also speed up the player's descent.
* {{IN|java}} if the player glides into deep [[water]] with elytra equipped, the animation does not stop, giving it the appearance of a [[swimming]] animation.<ref name="MC-97190">{{bug|MC-97190||While gliding into water or lava, player continues gliding|WAI}}</ref> The animation stops once the player touches the ground. Additionally, [[firework rocket]]s can be used with elytra underwater with a short boost duration.
* Elytra do not deactivate when the player flies into [[lava]].<ref name="MC-97190"/>
* Elytra can be equipped onto some [[mob]]s using [[command]]s. This has no effect unless the mob has the {{cd|FallFlying}} tag set to {{cd|1b}}. Mobs glide forward, unable to control the movement before landing, at which time they regain their AI.
** Exceptions to this are [[squid]]s as the squid's AI causes it to attempt swimming in midair, making it fall straight down because it conflicts with the elytra mechanics.
**Because [[chicken]]s fall slowly, they can move more distance.
** [[Enderman|Endermen]], tamed [[wolf|wolves]] and tamed [[cat]]s that are not sitting cannot teleport until they hit the ground.
** Because mobs do not regain control until they hit the ground, [[vex]]es fall until they die or despawn as they cannot touch the ground.
** Mobs capable of flying, such as [[parrot]]s or vexes can steer in air, though they cannot travel up or down. Dolphins also have this ability.
* [[4J Studios]] created an elytron-centered tutorial map for console edition when elytra were first introduced to this platform, this map is themed as "ruins of an ancient civilization of ''[[Minecraft]]'' worshipers" and showcases the new amplified terrain generation. This map can be seen behind the scenes.<ref>{{Mcnet|learning-fly|Learning To Fly}}</ref> On 28 March 2017, 4J Studios added an elytron-themed [[Mini Games]] for console edition called "Glide;" it consists of Time Attack and Score Attack mode.<ref>{{Mcnet|glide-mini-game-consoles-tomorrow|Glide Mini Game on Consoles Tomorrow|March 23, 2017}}</ref><ref>{{Mcnet|mini-game-masters-glide-console|Mini Game Masters Glide onto Console|March 28, 2017}}</ref>
* A player who jumps with both elytra and the [[Slow Falling]] effect travels slightly upward, which is a cheap but time-consuming alternative to [[fireworks]] and [[Riptide]]-enchanted [[trident]]s.
* On May 5, 2019, [[Mojang]] tweeted '[[The End]] never yields enough adequate resources, sadly,' along with a sad emoji.<ref>{{tweet|Minecraft|1125053038757068802|The End never yields enough adequate resources, sadly. 😔}}</ref> The first letter of each word spells 'T E n y e a r s' (Ten Years). Attached was a picture of [[player|Steve and Alex]] wearing both a [[chestplate]] and elytra. The next day, they tweeted, "Have you noticed something ''suspic10us'' here lately?"<ref>{{tweet|Minecraft|1125415169495064576|Have you noticed something suspic10us here lately?}}</ref>
* Mojang has considered the suggestion of combining elytra with a chestplate, but eventually decided against it, stating that elytra taking up armor is an intentional decision of game balancing.<ref>
{{cite
|url=https://feedback.minecraft.net/hc/en-us/articles/360005029872-Previously-Considered-Suggestions
| title = Part of the tradeoff of having an Elytra is it takes up half your armor.
|website=Minecraft Feedback
|date=July 12, 2018}}
</ref>
== Gallery ==
<gallery>
ElytraFlight.gif|The first image of elytra, tweeted by [[Jeb]]. Click to play.
FoldedWings.png|Folded elytra, which resembles the [[cape]] the user is wearing.
Minecon2015Alternative.png|The minecon 2015 cape elytra.
Dinnerbone Elytra.png|[[Dinnerbone]] flying upside down.
ElytraEnd.png|Elytra in an [[end ship]].
PlayerElytraBack.png|A [[player]] wearing elytra.
PlayerElytraFront.png|A player using elytra.
Broken Elytra.png|Elytra with only 1 [[item durability|durability]].
UpcomingElytras.jpg|Elytra designs fitting to the official capes, posted by Jeb on {{w|Reddit}}.
FlyBlock.png|A player gliding while blocking with a [[shield]].
Suspic10us.jpg|An image of players using elytra.
Steve Gliding with Elytra.png|Steve gliding with elytra.
Alex Gliding with Elytra.png|Alex gliding with elytra.
Enchanted Elytra (item).gif|A pair of enchanted elytra.
</gallery>
=== Console exclusive ===
<gallery>
Glide Score Cavern 2.png|Screenshot of Glide mini-games.
Glide Time Cavern 2.png|Another screenshot of Glide mini-games.
GLIDE Official.jpg|''Glide'' launch poster.
Elytra Tutorial Map.jpg|Official elytra themed tutorial map.
</gallery>(These maps can be found for a price on the Microsoft Store)
=== Designs when wearing capes ===
<blockquote>Designs that are not listed here have default elytron texture or don't have any.</blockquote><gallery>
File:Mojang employees Elytra.png|Old [[Mojang]] cape
File:Mojang employees 2015 Elytra.png|New Mojang cape
File:Mojang Studios employees 2021 Elytra.png|Mojang Studios cape
File:Crowdin Translator Elytra.png|[[Crowdin]] Translator cape
File:DannyBstyle's Elytra.png|dannyBstyle's cape
File:JulianClark's Elyrtra.png|JulianClark's cape
File:Millionth Customer Elytra.png|Millionth Customer cape
File:MINECON 2011 Attendees Elytra.png|[[MINECON 2011]] Attendees cape
File:MINECON 2012 Attendees Elytra.png|[[MINECON 2012]] Attendees cape
File:MINECON 2013 Attendees Elytra.png|[[MINECON 2013]] Attendees cape
File:MINECON 2015 Attendees Elytra.png|[[MINECON 2015]] Attendees cape
File:MINECON 2016 Attendees Elytra.png|[[MINECON 2016]] Attendees cape
File:MINECON LIVE 2019 Founder's Elytra.png|[[MINECON Live 2019]] Founder's cape
File:Mojira Moderator Elytra.png|[[bug tracker|Mojira]] Moderator cape
File:MrMessiah's Elytra.png|MrMessiah's cape
File:Prismarine Elytra.png|[[Prismarine]] cape
File:Realms Mapmaker Elytra.png|[[Realms]] mapmaker's cape
File:Cobalt Elytra.png|[[Cobalt (game)|Cobalt]] cape
File:Scrolls Elytra.png|[[Scrolls]] cape
File:Turtle Elytra.png|[[Turtle]] cape
File:PancapeElyR.png|Pancape cape
File:MSCapeElyR.png|Migrator cape
File:Gr8 Escape's elytra.png|Gr8_Escape's cape
File:Valentine Elytra.png|Valentine cape
File:Vanilla Cape Elytra JE.png|Vanilla cape{{only|java}}
File:Vanilla cape elytra BE.png|Vanilla cape{{only|bedrock}}
</gallery>
== References ==
{{reflist}}
== External Links ==
*[https://www.minecraft.net/en-us/article/taking-inventory--elytra Taking Inventory: Elytra] – Minecraft.net on December 14, 2019
{{Items}}
[[de:Elytren]]
[[es:Élitros]]
[[fr:Élytres]]
[[ja:エリトラ]]
[[ko:겉날개]]
[[nl:Dekschild]]
[[pl:Elytry]]
[[pt:Élitros]]
[[ru:Элитры]]
[[tr:Elitra]]
[[zh:鞘翅]]
[[Category:Non-renewable resources]]</li></ul> | beta 1.8.0.8 | Command blocks now have a default name of ! instead of @. | |||
1.10.0{{Extension DPL}}<ul><li>[[Tool|Tool]]<br/>{{About|the in-game items|program enhancing software|Programs and Editors}}
A '''tool''' is an [[item]] used by the [[player]] while held to perform actions faster and more efficiently, to gather materials not obtainable by hand, to gain information, or to perform completely new actions. With the exception of the [[clock]], [[compass]], empty [[bucket]], and [[lead]], tools do not stack in the inventory. Tools can be repaired; see [[Item repair]].
== Obtaining ==
=== Mob loot ===
{{main|Drops#Mob drops|title1=Drops}}
Some tools can be obtained by killing mobs that carry the equipment.
=== Crafting ===
Most tools can be obtained through crafting.
{{:Crafting/Tools}}
=== Upgrading ===
[[Netherite]] tools can be obtained only through upgrading.
{{Smithing
|head=1
|Netherite Upgrade
|Diamond Pickaxe; Diamond Axe; Diamond Shovel; Diamond Hoe
|Netherite Ingot
|Netherite Pickaxe; Netherite Axe; Netherite Shovel; Netherite Hoe
}}
== Usage ==
=== Best tools ===
{{main|Breaking#Best tools|title1=Breaking}}
Many blocks have a preferred tool to break them. Some blocks can be broken only with certain tools. The tool's material also affects how fast a block is mined. Materials from worst to best in terms of mining speed are wooden, stone, iron, diamond, netherite, gold.
=== Item durability ===
{{main|Durability}}
Different tools have different amounts of durability. Some uses require more durability to be used than others. A tool's durability is also affected by its material. Materials from worst to best in terms of durability are gold, wooden, stone, iron, diamond, netherite.
Some tools are not block-breaking tools: This includes bows, fishing rods, carrots on sticks, flint & steel, and buckets. Such tools are no better than bare fists at breaking blocks, but they do not take damage from doing so—they take damage from being used in their own intended manners.
=== Item enchantability ===
Materials from worst to best in terms of [[enchantability]] are stone, diamond, iron, wooden/netherite, gold.
=== Smelting ===
{{main|Smelting}}
Iron or golden tools can be smelted into [[nugget]]s.
{{Smelting|showname=1|head=1|Any iron tools|Iron Nugget|0,1}}
{{Smelting|showname=1|foot=1|Any golden tools|Gold Nugget|0,1}}
; Fuel
* Wooden tools can be used as a fuel in [[furnace]]s, smelting 1 item per tool.
* A [[fishing rod]] can be used as fuel in [[furnace]]s, smelting 1.5{{only|java|short=1}}/1{{only|bedrock|short=1}} items per fishing rod.
== History ==
{{info needed section|earlier Java Edition history between Indev and 1.3.1|section=10}}
{{History|java indev}}
{{History||0.31|snap=20091231-2|Added iron shovels.}}
{{History|||snap=20100110|Added iron axes and pickaxes.}}
{{History|||snap=20100128|Added wooden, stone, and diamond tools.}}
{{History|||snap=20100129|Added crafting recipes for wooden, stone, iron, and diamond tools.}}
{{History|||snap=20100130|Added golden tools.}}
{{History|||snap=20100131|A [[Tiers|tier system]] for wooden, stone, iron, diamond, and gold tools is added. Each tier has a different mining speed multiplier and durability.}}
{{History|||snap=20100201-2|Tools are now required to break blocks and ores.}}
{{history|java}}
{{History||1.0.0|snap=RC1|Tools now make a breaking sound and have a breaking animation.
|All tools now also have breaking animation.}}
{{History|||snap=RC2|Tools no longer break quickly after loading a world that was saved in RC1.}}
{{History||1.3.1|snap=12w17a|Tools now have infinite [[durability]] in [[Creative]] mode.}}
{{history|||snap=12w18a|Wooden tools became able to be used as [[fuel]] for [[furnace]]s in case players didn't want to repair them or finish using them.}}
{{History|||snap=12w24a|Breaking a block that can be [[instant mining|instantly mined]] by hand ([[tall grass]], [[torch]], etc.) while holding a block-breaking tool no longer reduces the tool's [[durability]].}}
{{history||1.6.1|snap=13w21a|Instead of replacing the barehanded damage ({{hp|1}}), pickaxes, shovels, axes and swords now add their damage onto the barehanded damage.}}
{{History||1.11.1|snap=16w50a|Golden and iron tools now smelt down into one of their respective nuggets.}}
{{History||1.14|snap=18w48a|Tools cannot be repaired by crafting.}}
{{History||1.14.3|snap=Pre-Release 3|Tools can be once again be repaired by crafting.}}
{{History||1.16.2|snap=20w29a|Tools have a new arrange in the Creative inventory.}}
{{History||1.20<br>(Experimental)|link=1.19.4|snap=23w04a|Upgrading diamond tools to netherite tools now requires the netherite upgrade [[smithing template]].}}
{{History|||snap=23w07a|Added brushes.}}
{{History|pocket alpha}}
{{History||v0.2.0|Added stone tools and shears.}}
{{History||v0.3.0|Added wooden tools.}}
{{History||v0.3.2|Added iron, diamond, and golden tools.}}
{{History||v0.3.3|Added bows.}}
{{History||v0.4.0|Added flint and steel and all hoe types.}}
{{History||v0.7.0|Added buckets.}}
{{History||v0.7.4|Flint and steel now ignite creepers.}}
{{History||v0.8.0|snap=build 1|Added flint and steel to the Creative inventory.}}
{{History|||snap=build 3|Added shears to the Creative inventory.}}
{{History||v0.11.0|snap=build 1|Added fishing rod.}}
{{History||v0.15.0|snap=build 1|Added carrot on a stick and leads.}}
{{History|pocket}}
{{History||1.1.0|snap=alpha 1.1.0.0|Golden and iron tools now smelt down into one of their respective nuggets.}}
{{History|console}}
{{History||xbox=TU53|xbone=CU43|ps=1.49|wiiu=Patch 23|switch=1.0.3|Golden and iron tools now smelt down into one of their respective nuggets.}}
{{History|foot}}
== Issues ==
{{issue list}}
== Trivia ==
* Gold tools are actually ranked as superior to diamond tools on the [[Legacy Console Edition]]'s crafting screen.
* Wooden tools can be burned in a furnace regardless of its durability; this means the player can burn a wooden tool that has only 1 use left.
== See also ==
* [[Item Repair]]
* [[Breaking]]
* [[Weapon]]
{{Items}}
[[Category:Tools|*]]
[[cs:Nástroje]]
[[de:Werkzeug]]
[[es:Herramientas]]
[[fr:Outils]]
[[hu:Eszközök]]
[[it:Attrezzi]]
[[ja:道具]]
[[ko:도구]]
[[nl:Gereedschap]]
[[pl:Narzędzia]]
[[pt:Ferramentas]]
[[ru:Инструменты]]
[[tr:Alet]]
[[zh:工具]]</li><li>[[Fermented Spider Eye|Fermented Spider Eye]]<br/>{{Item
| image = Fermented Spider Eye.png
| renewable = Yes
| stackable = Yes (64)
}}
A '''fermented spider eye''' is a [[brewing]] ingredient.
== Obtaining ==
=== Crafting ===
{{Crafting
|Brown Mushroom
|Sugar
|Spider Eye
|Output= Fermented Spider Eye
|type= Brewing
}}
== Usage ==
They can be used to brew [[potion]]s with negative effects, as well as the [[Potion of Invisibility]].
=== Brewing ingredient ===
{{brewing
|showname=1
|head=1
|Fermented Spider Eye
|Potion of Weakness
|base=Water Bottle
}}
{{brewing
|Fermented Spider Eye
|Potion of Harming
|base=Potion of Poison;Potion of Healing
}}
{{brewing
|Fermented Spider Eye
|Potion of Slowness
|base=Potion of Swiftness;Potion of Leaping
}}
{{brewing
|foot=1
|Fermented Spider Eye
|Potion of Invisibility
|base=Potion of Night Vision
}}
== Data values ==
=== ID ===
{{edition|java}}:
{{ID table
|edition=java
|showforms=y
|generatetranslationkeys=y
|displayname=Fermented Spider Eye
|spritetype=item
|nameid=fermented_spider_eye
|form=item
|foot=1}}
{{edition|bedrock}}:
{{ID table
|edition=bedrock
|shownumericids=y
|showforms=y
|notshowbeitemforms=y
|generatetranslationkeys=y
|displayname=Fermented Spider Eye
|spritetype=item
|nameid=fermented_spider_eye
|id=428
|form=item
|foot=1}}
== Video ==
<div style="text-align:center">{{yt|ln8ZQn5MtFI}}</div>
== History ==
{{History|java}}
{{History||1.0.0|snap=Beta 1.9 Prerelease 2|[[File:Fermented Spider Eye JE1 BE1.png|32px]] Added fermented spider eyes.}}
{{History|||snap=Beta 1.9 Prerelease 3|Fermented spider eyes can now be [[brewing|brewed]] in a [[water bottle]] to create a [[potion of Weakness]].
|Fermented spider eyes now corrupt potions of [[Swiftness]] and [[Fire Resistance]] into potions of [[Slowness]], for both normal and extended types.
|Fermented spider eyes now corrupts potions of [[Healing]] and [[Poison]] into potions of [[Harming]], as well as Healing II and extended Poison into extended Harming.}}
{{History||1.4.2|snap=12w34a|Fermented spider eyes now change potions of [[Night Vision]] into the new potions of [[Invisibility]], for both normal and extended types.}}
{{History||1.7.2|snap=13w36a|Fermented spider eyes now corrupt the new [[potion of Water Breathing]] into a potion of Harming.}}
{{History||1.8|snap=14w27a|Fermented spider eyes now corrupt the new [[potion of Leaping]] into a potion of Slowness.}}
{{History||1.9|snap=15w31a|[[Potions of Weakness]] can no longer be made using a [[thick potion]], [[mundane potion]], [[awkward potion]], [[potion of Regeneration]], or [[potion of Strength]].
|[[Potions of Slowness]] can no longer be made using a [[potion of Fire Resistance]].
|[[Potions of Harming]] can no longer be made using a [[potion of Water Breathing]].}}
{{History||1.13|snap=17w47a|Prior to [[1.13/Flattening|''The Flattening'']], this [[item]]'s numeral ID was 376.}}
{{History||1.14|snap=18w50a|[[File:Fermented Spider Eye JE2 BE2.png|32px]] The texture of fermented spider eyes has been changed.}}
{{History|upcoming java}}
{{History||Villager Trade Rebalance<br>(Experimental)|link=Java Edition 1.20.2|snap=23w31a|[[Wandering trader]]s now have a chance to [[trading|buy]] a fermented spider eye from the player.}}
{{History|pocket alpha}}
{{History||v0.12.1|snap=build 1|[[File:Fermented Spider Eye JE1 BE1.png|32px]] Added fermented spider eyes.}}
{{History|bedrock}}
{{History||1.10.0|snap=beta 1.10.0.3|[[File:Fermented Spider Eye JE2 BE2.png|32px]] The texture of fermented spider eyes has been changed.}}
{{History|console}}
{{History||xbox=TU7|xbone=CU1|ps=1.0|wiiu=Patch 1|switch=1.0.1|[[File:Fermented Spider Eye JE1 BE1.png|32px]] Added fermented spider eyes.}}
{{History||xbox=none|xbone=none|ps=1.90|wiiu=none|switch=none|[[File:Fermented Spider Eye JE2 BE2.png|32px]] The texture of fermented spider eyes has been changed.}}
{{History|New 3DS}}
{{History||0.1.0|[[File:Fermented Spider Eye JE1 BE1.png|32px]] Added fermented spider eyes.}}
{{History|foot}}
== Issues ==
{{issue list}}
{{items}}
[[Category:Renewable resources]]
[[cs:Zkvašené pavoučí oko]]
[[de:Fermentiertes Spinnenauge]]
[[es:Ojo de araña fermentado]]
[[fr:Œil d'araignée fermenté]]
[[it:Occhio di ragno fermentato]]
[[ja:発酵したクモの目]]
[[ko:발효된 거미 눈]]
[[nl:Gefermenteerd spinnenoog]]
[[pl:Sfermentowane oko pająka]]
[[pt:Olho de aranha fermentado]]
[[ru:Приготовленный паучий глаз]]
[[th:ตาแมงมุมดอง]]
[[uk:Оброблене павуче око]]
[[zh:发酵蛛眼]]</li></ul> | beta 1.10.0.3 | ||||
1.12.0{{Extension DPL}}<ul><li>[[:Category:Tools|Category:Tools]]<br/>[[Category:Items]]
[[fr:Catégorie:Outil]]
[[it:Categoria:Attrezzi]]</li><li>[[Wheat|Wheat]]<br/>{{About||the artifact in ''Minecraft Dungeons''|Minecraft Dungeons:Wonderful Wheat|the seed|Wheat Seeds}}
{{Item
| image = Wheat.png
| renewable = Yes
| stackable = Yes (64)
}}
'''Wheat''' is an [[item]] primarily obtained by harvesting fully-grown [[Wheat Seeds|wheat crops]]. It is used for [[crafting]] as well as to feed certain animals.
== Obtaining ==
=== Natural generation ===
{{LootChestItem|wheat}}
=== Farming ===
{{main|Tutorials/Crop farming}}
When a fully-grown wheat crop is harvested, it drops 1 wheat and 1 to 4 [[wheat seeds]] ({{frac|2|5|7}} per crop harvested on average). A wheat crop has a total of eight stages (0-7) from the time it is planted until it can be harvested. If a crop is harvested before it is fully grown, it just drops one seed. Wheat needs light to grow; a seed is destroyed if planted without light. Harvesting with a [[Fortune]]-enchanted tool increases the number of seeds dropped but does not increase the yield of wheat.
=== Crafting ===
{{Crafting
|Hay Bale
|Output= Wheat,9
|type= Material
}}
=== Drops ===
A [[fox]] sometimes spawns holding wheat, which it always drops upon death. Alternatively, the player can drop a [[food]] item, causing the fox to drop the wheat.
== Usage ==
=== Food ===
[[File:New Cattle.png|thumb|Using wheat to lead a cow.]]
When wheat is held, it causes nearby [[cow]]s, [[sheep]], [[goat]]s and [[mooshroom]]s to follow the player, until either the player stops holding the wheat or goes too far away from the animal, thus leading them to lose interest.
Wheat may be used to [[breed]] cows, sheep, goats, and mooshrooms by first herding two of them together and then {{control|using}} the wheat on them to begin "Love Mode."
Wheat can heal a [[horse]] {{hp|1}} health or lower its temper by 3% when attempting to tame it. It can also decrease the time it takes for a foal to grow by 20 seconds.
Similarly, wheat can heal a [[llama]] {{hp|2}} health, and it decreases the time it takes a baby llama to grow by 10 seconds.
=== Crafting ingredient ===
{{crafting usage}}
=== Trading ===
Novice-level farmer [[Villager|villagers]] have a 25%{{only|bedrock}} or 40%{{only|java}} chance to buy 20 wheat for one [[emerald]].
=== Composting ===
Placing wheat into a [[composter]] has a 65% chance of raising the compost level by 1. A stack of wheat yields an average of 5.94 [[bone meal]].
== Achievements ==
{{load achievements|Bake Bread;The Lie;Repopulation}}
== Advancements ==
{{load advancements|A Seedy Place}}
== Data values ==
=== ID ===
{{edition|java}}:
{{ID table
|edition=java
|showforms=y
|generatetranslationkeys=y
|displayname=Wheat
|spritetype=item
|nameid=wheat
|form=item
|foot=1}}
{{edition|bedrock}}:
{{ID table
|edition=bedrock
|shownumericids=y
|showforms=y
|notshowbeitemforms=y
|generatetranslationkeys=y
|displayname=Wheat
|spritetype=item
|nameid=wheat
|id=334
|form=item
|foot=1}}
== Video ==
{{Video note|the narrator demonstrates at 0:56 that walking over wheat can destroy the crop and un-till the land. This is outdated: since version {{Version link|JE 1.1}}, wheat can be destroyed only by a player or mob jumping on it or falling on it.}}
<div style="text-align:center">{{yt|JbAURiYQZlA}}</div>
== History ==
{{History|java indev}}
{{History||20100206|[[File:Wheat JE1 BE1.png|32px]] Wheat has been added.
|Wheat can be used to craft [[bread]].}}
{{History||20100223|Bread now requires 3 wheat (1 row of 3) instead of 6 (2 rows of 3) to be crafted.}}
{{History|java infdev}}
{{History||20100625-2|Wheat can now be found in the new [[dungeon]] [[chest]]s.}}
{{History|java beta}}
{{History||1.2|Wheat can now be used to craft [[cake]].}}
{{History||1.4|Wheat can now be used to craft [[cookie]]s.}}
{{History|java}}
{{History||1.0.0|snap=Beta 1.9 Prerelease 2|Wheat can now be used in [[breeding]].}}
{{History||1.3.1|snap=12w21a|Wheat can now be [[trading|sold]] to farmer [[villager]]s, at 18–21 wheat for 1 [[emerald]].}}
{{History||1.4.2|snap=12w36a|[[Chicken]]s and [[pig]]s no longer use wheat to [[breeding|breed]].}}
{{History||1.6.1|snap=13w16a|[[Horse]]s can now be healed by being fed wheat.
|Foals can now have their growth increased by being fed wheat.}}
{{History|||snap=13w17a|[[Horse]]s can now have their tempers lowered with wheat.}}
{{History|||snap=13w18a|Nine wheat can now be crafted to make a [[hay bale]].}}
{{History||1.8|snap=14w02a|Trading has been changed: farmer [[villager]]s now [[trading|buy]] 18–22 wheat for 1 [[emerald]].}}
{{history||1.9|snap=15w43a|Wheat may now be found in [[igloo]] basement chests.}}
{{history|||snap=15w44a|The average yield of wheat in [[dungeon]] chests has been decreased.}}
{{History||1.11|snap=16w39a|Wheat can now be found in the new [[woodland mansion]] chests.}}
{{History||1.13|snap=17w47a|Prior to [[1.13/Flattening|''The Flattening'']], this [[item]]'s numeral ID was 296.}}
{{History|||snap=18w09a|Wheat can now generate in the chests of [[underwater ruins]].}}
{{History|||snap=18w11a|Wheat can now generate in [[shipwreck]] chests.}}
{{History||1.14|snap=18w43a|[[File:Wheat JE2 BE2.png|32px]] The texture of wheat has been changed.}}
{{History|||snap=18w47a|Wheat can now generate inside of loot chests on top of [[pillager outpost]]s.}}
{{History|||snap=18w49a|Wheat can now generate in chests in [[village]] butcher and shepherd houses.}}
{{History|||snap=18w50a|Wheat can now generate in chests in desert [[village]] houses.}}
{{History||1.14|snap=19w03a|Placing wheat into the new [[composter]] has a 50% chance of raising the compost level by 1.}}
{{History|||snap=19w05a|Wheat now has a 65% chance of increasing the compost level in a composter by 1.}}
{{History|||snap=19w07a|Added [[fox]]es, which sometimes spawn with wheat in their mouths.}}
{{History||1.17|snap=21w13a|Wheat can now be used to breed [[goat]]s.}}
{{History||1.19|snap=22w11a|Wheat can now be used to craft [[packed mud]].}}
{{History||1.20|snap=23w12a|Wheat can now be found in [[suspicious gravel]] and [[suspicious sand]] in cold and warm [[ocean ruins]] and in [[trail ruins]].}}
{{History|||snap=23w16a|Wheat no longer generates in [[suspicious sand]] in [[trail ruins]].|Due to the split of the archaeological loot tables for suspicious gravel within [[trail ruins]], wheat is now common loot.}}
{{History|pocket alpha}}
{{History||v0.2.0|[[File:Wheat JE1 BE1.png|32px]] Added wheat. It is currently unobtainable and serves no purpose.}}
{{History||v0.4.0|Wheat is now obtainable via farming and can be used to craft [[bread]].}}
{{History||v0.7.0|Wheat can now be used to craft [[cake]].}}
{{History||v0.8.0|snap=build 1|Wheat can now be used to breed [[cow]]s and [[sheep]].
|Wheat can now be used to craft [[hay bale]]s.}}
{{History||v0.9.0|snap=build 1|Wheat [[crop]]s now naturally spawn in [[village]]s.
|Wheat can now be used to craft [[cookie]]s.}}
{{History||v0.15.0|snap=build 1|Wheat can now be used to grow, increase tame and heal [[horse]]s, [[donkey]]s and [[mule]]s.}}
{{History||v0.16.2|Wheat can now be found in the [[chest]]s inside of large houses in [[ice plains]] and [[cold taiga]] [[village]]s.}}
{{History|pocket}}
{{History||1.0.0|snap=alpha 0.17.0.1|Wheat can now be found in [[igloo]] basement chests.}}
{{History||1.0.4|snap=alpha 1.0.4.0|Farmer [[villager]]s now [[trading|buy]] 18–22 wheat for 1 [[emerald]].}}
{{History||1.1.0|snap=alpha 1.1.0.0|Wheat can now be found in the new [[woodland mansion]] chests.}}
{{History|bedrock}}
{{History||1.4.0|snap=beta 1.2.14.2|Wheat can now be found inside [[shipwreck]] chests.}}
{{History|||snap=beta 1.2.20.1|Wheat can now be found inside [[underwater ruins]] chests.}}
{{History||1.10.0|snap=beta 1.10.0.3|Wheat can now be found in [[pillager outpost]] chests.
|[[File:Wheat JE2 BE2.png|32px]] The texture of wheat has been changed.}}
{{History||1.11.0|snap=beta 1.11.0.1|Wheat can now be found in [[desert]] [[village]] house chests, village shepherd and butcher house chests.
|Wheat can now be used to fill up [[composter]]s.}}
{{History|||snap=beta 1.11.0.4|[[Trading]] has changed, farmer [[villager]]s now have a 25% chance to buy 20 wheat for one [[emerald]] as part of their first tier trade.}}
{{History||1.13.0|snap=beta 1.13.0.1|Added [[fox]]es, which can drop wheat.}}
{{History|console}}
{{History||xbox=TU1|xbone=CU1|ps=1.0|wiiu=Patch 1|switch=1.0.1|[[File:Wheat JE1 BE1.png|32px]] Added wheat.}}
{{History||xbox=none|xbone=none|ps=1.90|wiiu=none|switch=none|[[File:Wheat JE2 BE2.png|32px]] The texture of wheat has been changed.}}
{{History|New 3DS}}
{{History||0.1.0|[[File:Wheat JE1 BE1.png|32px]] Added wheat.}}
{{History|foot}}
== Issues ==
{{issue list}}
== Gallery ==
<gallery>
Wheat SDGP.png|Wheat in the [[Super Duper Graphics Pack]].
File:Field of Wheat.jpg|[[Steve]] and [[Kai]] in a field of wheat crops.<ref>https://www.instagram.com/p/CumuJleg6Ij/</ref>
</gallery>
== External Links ==
*[https://www.minecraft.net/en-us/article/taking-inventory--wheat Taking Inventory: Wheat] – Minecraft.net on April 21, 2022
{{Items}}
[[Category:Plants]]
[[Category:Food]]
[[cs:Pšenice]]
[[de:Weizen]]
[[es:Trigo]]
[[fr:Blé]]
[[hu:Búza]]
[[it:Grano]]
[[ja:小麦]]
[[ko:밀]]
[[nl:Tarwe]]
[[pl:Pszenica]]
[[pt:Trigo]]
[[ru:Пшеница]]
[[th:ข้าวสาลี]]
[[uk:Пшениця]]
[[zh:小麦]]
[[Category:Renewable resources]]</li></ul> | beta 1.12.0.2 | Tab-complete has been added to command blocks. | |||
| Added a delay option to command blocks, which allows a delay to be added to a redstone tick delay field. | |||||
| Legacy Console Edition | |||||
| TU19 | CU7 | 1.12 | Patch 1 | ||
| Command blocks do not have any functionality and can be obtained only with mods. | |||||
Gallery

The command block GUI in Bedrock Edition pre 1.12.0
- JebAdventureModeControlBlockDev1.png
The first image released by Mojang of the command block.
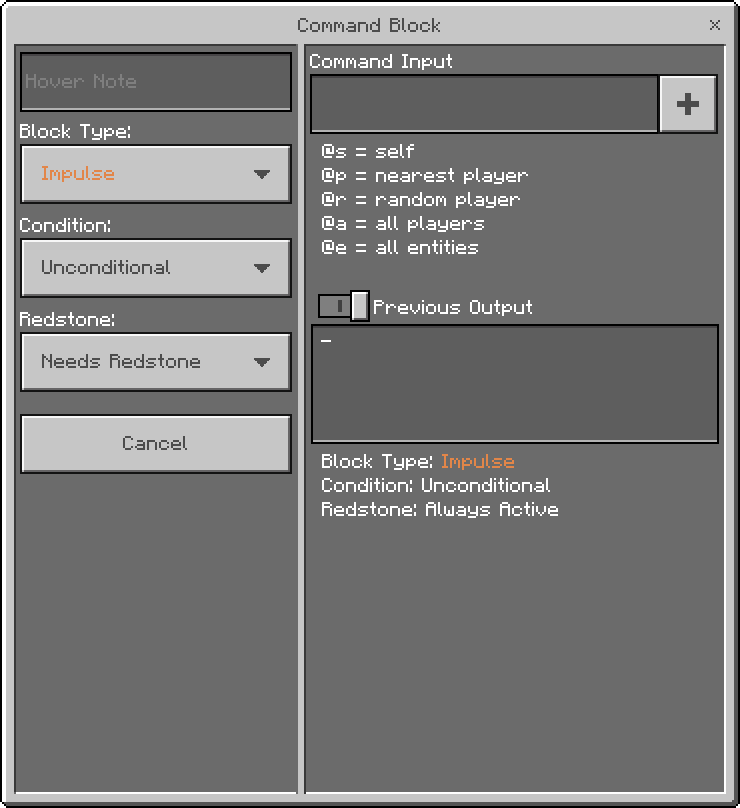
Issues
Issues relating to "Command Block" are maintained on the bug tracker. Report issues there.