m (→History: Removed info needed section template with question "can the addition or removal of every block be added here?". Use the Discussion page for this instead.) |
NutronStar45 (talk | contribs) No edit summary |
||
| (4 intermediate revisions by 4 users not shown) | |||
| Line 1: | Line 1: | ||
{{about|the physical blocks found in ''Minecraft''|the action|Blocking|the charity|Block by Block}} |
{{about|the physical blocks found in ''Minecraft''|the action|Blocking|the charity|Block by Block}} |
||
| + | {{redirect|Blocks|the song by C418|Music Disc}} |
||
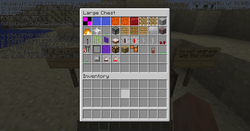
[[File:Block_overview.png|thumb|460px|All of the blocks in [[Java Edition 1.16.3]].|alt=]] |
[[File:Block_overview.png|thumb|460px|All of the blocks in [[Java Edition 1.16.3]].|alt=]] |
||
'''Blocks''' are the basic units of structure in ''[[Minecraft]]'' that can be directly placed in the game world. |
'''Blocks''' are the basic units of structure in ''[[Minecraft]]'' that can be directly placed in the game world. |
||
| Line 73: | Line 74: | ||
* [[File:Azure Bluet.png|30px]] [[Azure Bluet]] |
* [[File:Azure Bluet.png|30px]] [[Azure Bluet]] |
||
* [[File:Leafless Bamboo.png|30px]] [[Bamboo]] |
* [[File:Leafless Bamboo.png|30px]] [[Bamboo]] |
||
| − | * [[File:Bamboo Sapling.png|30px]] ''[[Bamboo |
+ | * [[File:Bamboo Sapling.png|30px]] ''[[Bamboo Shoot]]'' |
* [[File:Barrel.png|30px]] [[Barrel]] |
* [[File:Barrel.png|30px]] [[Barrel]] |
||
* [[File:Barrier.png|30px]] [[Barrier]] |
* [[File:Barrier.png|30px]] [[Barrier]] |
||
| Line 142: | Line 143: | ||
* [[File:Brain Coral Block.png|30px]] [[Brain Coral Block]] |
* [[File:Brain Coral Block.png|30px]] [[Brain Coral Block]] |
||
* [[File:Brain Coral Fan.png|30px]] [[Brain Coral Fan]] |
* [[File:Brain Coral Fan.png|30px]] [[Brain Coral Fan]] |
||
| − | * [[File:Brain Coral Wall Fan.png|30px]] ''[[ |
+ | * [[File:Brain Coral Wall Fan.png|30px]] ''[[Brain Coral Wall Fan]]'' |
* [[File:Brewing Stand.png|30px]] [[Brewing Stand]] |
* [[File:Brewing Stand.png|30px]] [[Brewing Stand]] |
||
* [[File:Brick Slab.png|30px]] [[Brick Slab]] |
* [[File:Brick Slab.png|30px]] [[Brick Slab]] |
||
| Line 166: | Line 167: | ||
* [[File:Bubble Coral Block.png|30px]] [[Bubble Coral Block]] |
* [[File:Bubble Coral Block.png|30px]] [[Bubble Coral Block]] |
||
* [[File:Bubble Coral Fan.png|30px]] [[Bubble Coral Fan]] |
* [[File:Bubble Coral Fan.png|30px]] [[Bubble Coral Fan]] |
||
| − | * [[File:Bubble Coral Wall Fan.png|30px]] ''[[ |
+ | * [[File:Bubble Coral Wall Fan.png|30px]] ''[[Bubble Coral Wall Fan]]'' |
* [[File:Cactus.png|30px]] [[Cactus]] |
* [[File:Cactus.png|30px]] [[Cactus]] |
||
* [[File:Cake.png|30px]] [[Cake]] |
* [[File:Cake.png|30px]] [[Cake]] |
||
| Line 175: | Line 176: | ||
* [[File:Cauldron.png|30px]] [[Cauldron]] |
* [[File:Cauldron.png|30px]] [[Cauldron]] |
||
* [[File:Air.png|30px]] ''[[Cave Air]]''{{only|java}} |
* [[File:Air.png|30px]] ''[[Cave Air]]''{{only|java}} |
||
| ⚫ | |||
* [[File:Chain Command Block.png|30px]] [[Chain Command Block]] |
* [[File:Chain Command Block.png|30px]] [[Chain Command Block]] |
||
* [[File:Chest.png|30px]] [[Chest]] |
* [[File:Chest.png|30px]] [[Chest]] |
||
| Line 187: | Line 189: | ||
* [[File:Chorus Flower.png|30px]] [[Chorus Flower]] |
* [[File:Chorus Flower.png|30px]] [[Chorus Flower]] |
||
* [[File:Chorus Plant.png|30px]] [[Chorus Plant]] |
* [[File:Chorus Plant.png|30px]] [[Chorus Plant]] |
||
| − | * [[File:Clay Block.png|30px]] [[ |
+ | * [[File:Clay Block.png|30px]] [[Clay]] |
* [[File:Coal Ore.png|30px]] [[Coal Ore]] |
* [[File:Coal Ore.png|30px]] [[Coal Ore]] |
||
* [[File:Coarse Dirt.png|30px]] [[Coarse Dirt]] |
* [[File:Coarse Dirt.png|30px]] [[Coarse Dirt]] |
||
| Line 200: | Line 202: | ||
* [[File:Conduit.png|30px]] [[Conduit]] |
* [[File:Conduit.png|30px]] [[Conduit]] |
||
* [[File:Cornflower.png|30px]] [[Cornflower]] |
* [[File:Cornflower.png|30px]] [[Cornflower]] |
||
| ⚫ | |||
* [[File:Cracked Nether Bricks.png|30px]] [[Cracked Nether Bricks]] |
* [[File:Cracked Nether Bricks.png|30px]] [[Cracked Nether Bricks]] |
||
| ⚫ | |||
* [[File:Cracked Stone Bricks.png|30px]] [[Cracked Stone Bricks]] |
* [[File:Cracked Stone Bricks.png|30px]] [[Cracked Stone Bricks]] |
||
* [[File:Crafting Table.png|30px]] [[Crafting Table]] |
* [[File:Crafting Table.png|30px]] [[Crafting Table]] |
||
* [[File:Creeper Head.png|30px]] [[Creeper Head]] |
* [[File:Creeper Head.png|30px]] [[Creeper Head]] |
||
| − | * [[File:Creeper Head.png|30px]] ''[[ |
+ | * [[File:Creeper Head.png|30px]] ''[[Creeper Wall Head]]'' |
* [[File:Crimson Button.png|30px]] [[Crimson Button]] |
* [[File:Crimson Button.png|30px]] [[Crimson Button]] |
||
* [[File:Crimson Door.png|30px]] [[Crimson Door]] |
* [[File:Crimson Door.png|30px]] [[Crimson Door]] |
||
| Line 263: | Line 265: | ||
* [[File:Dead Brain Coral Block.png|30px]] [[Dead Brain Coral Block]] |
* [[File:Dead Brain Coral Block.png|30px]] [[Dead Brain Coral Block]] |
||
* [[File:Dead Brain Coral Fan.png|30px]] [[Dead Brain Coral Fan]] |
* [[File:Dead Brain Coral Fan.png|30px]] [[Dead Brain Coral Fan]] |
||
| − | * [[File:Dead Brain Coral Wall Fan.png|30px]] ''[[ |
+ | * [[File:Dead Brain Coral Wall Fan.png|30px]] ''[[Dead Brain Coral Wall Fan]]'' |
* [[File:Dead Bubble Coral.png|30px]] [[Dead Bubble Coral]] |
* [[File:Dead Bubble Coral.png|30px]] [[Dead Bubble Coral]] |
||
* [[File:Dead Bubble Coral Block.png|30px]] [[Dead Bubble Coral Block]] |
* [[File:Dead Bubble Coral Block.png|30px]] [[Dead Bubble Coral Block]] |
||
* [[File:Dead Bubble Coral Fan.png|30px]] [[Dead Bubble Coral Fan]] |
* [[File:Dead Bubble Coral Fan.png|30px]] [[Dead Bubble Coral Fan]] |
||
| − | * [[File:Dead Bubble Coral Wall Fan.png|30px]] ''[[ |
+ | * [[File:Dead Bubble Coral Wall Fan.png|30px]] ''[[Dead Bubble Coral Wall Fan]]'' |
* [[File:Dead Bush.png|30px]] [[Dead Bush]] |
* [[File:Dead Bush.png|30px]] [[Dead Bush]] |
||
* [[File:Dead Fire Coral.png|30px]] [[Dead Fire Coral]] |
* [[File:Dead Fire Coral.png|30px]] [[Dead Fire Coral]] |
||
* [[File:Dead Fire Coral Block.png|30px]] [[Dead Fire Coral Block]] |
* [[File:Dead Fire Coral Block.png|30px]] [[Dead Fire Coral Block]] |
||
* [[File:Dead Fire Coral Fan.png|30px]] [[Dead Fire Coral Fan]] |
* [[File:Dead Fire Coral Fan.png|30px]] [[Dead Fire Coral Fan]] |
||
| − | * [[File:Dead Fire Coral Wall Fan.png|30px]] ''[[ |
+ | * [[File:Dead Fire Coral Wall Fan.png|30px]] ''[[Dead Fire Coral Wall Fan]]'' |
* [[File:Dead Horn Coral.png|30px]] [[Dead Horn Coral]] |
* [[File:Dead Horn Coral.png|30px]] [[Dead Horn Coral]] |
||
* [[File:Dead Horn Coral Block.png|30px]] [[Dead Horn Coral Block]] |
* [[File:Dead Horn Coral Block.png|30px]] [[Dead Horn Coral Block]] |
||
* [[File:Dead Horn Coral Fan.png|30px]] [[Dead Horn Coral Fan]] |
* [[File:Dead Horn Coral Fan.png|30px]] [[Dead Horn Coral Fan]] |
||
| − | * [[File:Dead Horn Coral Wall Fan.png|30px]] ''[[ |
+ | * [[File:Dead Horn Coral Wall Fan.png|30px]] ''[[Dead Horn Coral Wall Fan]]'' |
* [[File:Dead Tube Coral.png|30px]] [[Dead Tube Coral]] |
* [[File:Dead Tube Coral.png|30px]] [[Dead Tube Coral]] |
||
* [[File:Dead Tube Coral Block.png|30px]] [[Dead Tube Coral Block]] |
* [[File:Dead Tube Coral Block.png|30px]] [[Dead Tube Coral Block]] |
||
* [[File:Dead Tube Coral Fan.png|30px]] [[Dead Tube Coral Fan]] |
* [[File:Dead Tube Coral Fan.png|30px]] [[Dead Tube Coral Fan]] |
||
| − | * [[File:Dead Tube Coral Wall Fan.png|30px]] ''[[ |
+ | * [[File:Dead Tube Coral Wall Fan.png|30px]] ''[[Dead Tube Coral Wall Fan]]'' |
* [[File:Detector Rail.png|30px]] [[Detector Rail]] |
* [[File:Detector Rail.png|30px]] [[Detector Rail]] |
||
* [[File:Diamond Ore.png|30px]] [[Diamond Ore]] |
* [[File:Diamond Ore.png|30px]] [[Diamond Ore]] |
||
| Line 291: | Line 293: | ||
* [[File:Dragon Egg.png|30px]] [[Dragon Egg]] |
* [[File:Dragon Egg.png|30px]] [[Dragon Egg]] |
||
* [[File:Dragon Head.png|30px]] [[Dragon Head]] |
* [[File:Dragon Head.png|30px]] [[Dragon Head]] |
||
| − | * [[File:Dragon Head.png|30px]] ''[[ |
+ | * [[File:Dragon Head.png|30px]] ''[[Dragon Wall Head]]'' |
* [[File:Dried Kelp Block.png|30px]] [[Dried Kelp Block]] |
* [[File:Dried Kelp Block.png|30px]] [[Dried Kelp Block]] |
||
* [[File:Dropper.png|30px]] [[Dropper]] |
* [[File:Dropper.png|30px]] [[Dropper]] |
||
| Line 312: | Line 314: | ||
* [[File:Fire Coral Block.png|30px]] [[Fire Coral Block]] |
* [[File:Fire Coral Block.png|30px]] [[Fire Coral Block]] |
||
* [[File:Fire Coral Fan.png|30px]] [[Fire Coral Fan]] |
* [[File:Fire Coral Fan.png|30px]] [[Fire Coral Fan]] |
||
| − | * [[File:Fire Coral Wall Fan.png|30px]] ''[[ |
+ | * [[File:Fire Coral Wall Fan.png|30px]] ''[[Fire Coral Wall Fan]]'' |
* [[File:Fletching Table.png|30px]] [[Fletching Table]] |
* [[File:Fletching Table.png|30px]] [[Fletching Table]] |
||
* [[File:Flower Pot.png|30px]] [[Flower Pot]] |
* [[File:Flower Pot.png|30px]] [[Flower Pot]] |
||
| Line 364: | Line 366: | ||
* [[File:Horn Coral Block.png|30px]] [[Horn Coral Block]] |
* [[File:Horn Coral Block.png|30px]] [[Horn Coral Block]] |
||
* [[File:Horn Coral Fan.png|30px]] [[Horn Coral Fan]] |
* [[File:Horn Coral Fan.png|30px]] [[Horn Coral Fan]] |
||
| − | * [[File:Horn Coral Wall Fan.png|30px]] ''[[ |
+ | * [[File:Horn Coral Wall Fan.png|30px]] ''[[Horn Coral Wall Fan]]'' |
* [[File:Ice.png|30px]] [[Ice]] |
* [[File:Ice.png|30px]] [[Ice]] |
||
* [[File:Chiseled Stone Bricks.png|30px]] [[Infested Chiseled Stone Bricks]] |
* [[File:Chiseled Stone Bricks.png|30px]] [[Infested Chiseled Stone Bricks]] |
||
| Line 399: | Line 401: | ||
* [[File:Jungle Wood.png|30px]] [[Jungle Wood]] |
* [[File:Jungle Wood.png|30px]] [[Jungle Wood]] |
||
* {{BlockSprite|kelp}} [[Kelp]] |
* {{BlockSprite|kelp}} [[Kelp]] |
||
| − | * {{BlockSprite|kelp-plant}} ''[[ |
+ | * {{BlockSprite|kelp-plant}} ''[[Kelp Plant]]'' |
* [[File:Ladder.png|30px]] [[Ladder]] |
* [[File:Ladder.png|30px]] [[Ladder]] |
||
* [[File:Lantern.png|30px]] [[Lantern]] |
* [[File:Lantern.png|30px]] [[Lantern]] |
||
| Line 434: | Line 436: | ||
* [[File:Light Weighted Pressure Plate.png|30px]] [[Light Weighted Pressure Plate]] |
* [[File:Light Weighted Pressure Plate.png|30px]] [[Light Weighted Pressure Plate]] |
||
* [[File:Lilac.png|15px]] [[Lilac]] |
* [[File:Lilac.png|15px]] [[Lilac]] |
||
| ⚫ | |||
* [[File:Lily of the Valley.png|30px]] [[Lily of the Valley]] |
* [[File:Lily of the Valley.png|30px]] [[Lily of the Valley]] |
||
| ⚫ | |||
* [[File:Lime Banner.png|10px]] [[Lime Banner]] |
* [[File:Lime Banner.png|10px]] [[Lime Banner]] |
||
* [[File:Lime Bed.png|30px]] [[Lime Bed]] |
* [[File:Lime Bed.png|30px]] [[Lime Bed]] |
||
| Line 503: | Line 505: | ||
* [[File:Oak Stairs.png|30px]] [[Oak Stairs]] |
* [[File:Oak Stairs.png|30px]] [[Oak Stairs]] |
||
* [[File:Oak Trapdoor.png|30px]] [[Oak Trapdoor]] |
* [[File:Oak Trapdoor.png|30px]] [[Oak Trapdoor]] |
||
| − | * [[File:Oak Wall Sign.png|30px]] [[Oak Wall Sign]]'' |
+ | * [[File:Oak Wall Sign.png|30px]] ''[[Oak Wall Sign]]'' |
* [[File:Oak Wood.png|30px]] [[Oak Wood]] |
* [[File:Oak Wood.png|30px]] [[Oak Wood]] |
||
* [[File:Observer.png|30px]] [[Observer]] |
* [[File:Observer.png|30px]] [[Observer]] |
||
* [[File:Obsidian.png|30px]] [[Obsidian]] |
* [[File:Obsidian.png|30px]] [[Obsidian]] |
||
| ⚫ | |||
* [[File:Orange Banner.png|10px]] [[Orange Banner]] |
* [[File:Orange Banner.png|10px]] [[Orange Banner]] |
||
* [[File:Orange Bed.png|30px]] [[Orange Bed]] |
* [[File:Orange Bed.png|30px]] [[Orange Bed]] |
||
| Line 540: | Line 543: | ||
* [[File:Piston Head.png|30px]] ''[[Piston Head]]'' |
* [[File:Piston Head.png|30px]] ''[[Piston Head]]'' |
||
* [[File:Player Head.png|30px]] [[Player Head]] |
* [[File:Player Head.png|30px]] [[Player Head]] |
||
| − | * [[File:Player Head.png|30px]] ''[[ |
+ | * [[File:Player Head.png|30px]] ''[[Player Wall Head]]'' |
* [[File:Podzol.png|30px]] [[Podzol]] |
* [[File:Podzol.png|30px]] [[Podzol]] |
||
* [[File:Polished Andesite.png|30px]] [[Polished Andesite]] |
* [[File:Polished Andesite.png|30px]] [[Polished Andesite]] |
||
| Line 653: | Line 656: | ||
* [[File:Redstone Repeater.png|30px]] [[Redstone Repeater]] |
* [[File:Redstone Repeater.png|30px]] [[Redstone Repeater]] |
||
* [[File:Redstone Torch.png|30px]] [[Redstone Torch]] |
* [[File:Redstone Torch.png|30px]] [[Redstone Torch]] |
||
| − | * [[File:Redstone Wall Torch.png|30px]] [[ |
+ | * [[File:Redstone Wall Torch.png|30px]] ''[[Redstone Wall Torch]]'' |
* [[File:Inactive Redstone Wire (unconnected).png|30px]] ''[[Redstone Wire]]'' |
* [[File:Inactive Redstone Wire (unconnected).png|30px]] ''[[Redstone Wire]]'' |
||
* [[File:Repeating Command Block.png|30px]] [[Repeating Command Block]] |
* [[File:Repeating Command Block.png|30px]] [[Repeating Command Block]] |
||
| Line 671: | Line 674: | ||
* [[File:Shulker Box.png|30px]] [[Shulker Box]] |
* [[File:Shulker Box.png|30px]] [[Shulker Box]] |
||
* [[File:Skeleton Skull.png|30px]] [[Skeleton Skull]] |
* [[File:Skeleton Skull.png|30px]] [[Skeleton Skull]] |
||
| − | * [[File:Skeleton Skull.png|30px]] ''[[ |
+ | * [[File:Skeleton Skull.png|30px]] ''[[Skeleton Wall Skull]]'' |
* [[File:Slime Block.png|30px]] [[Slime Block]] |
* [[File:Slime Block.png|30px]] [[Slime Block]] |
||
* [[File:Smithing Table.png|30px]] [[Smithing Table]] |
* [[File:Smithing Table.png|30px]] [[Smithing Table]] |
||
* [[File:Smoker.png|30px]] [[Smoker]] |
* [[File:Smoker.png|30px]] [[Smoker]] |
||
* [[File:Purpur Block.png|30px]] [[Smooth Purpur]]{{only|bedrock}} |
* [[File:Purpur Block.png|30px]] [[Smooth Purpur]]{{only|bedrock}} |
||
| − | * [[File:Smooth Quartz.png|30px]] [[Smooth Quartz]] |
+ | * [[File:Smooth Quartz.png|30px]] [[Smooth Quartz Block]] |
* [[File:Smooth Quartz Slab.png|30px]] [[Smooth Quartz Slab]] |
* [[File:Smooth Quartz Slab.png|30px]] [[Smooth Quartz Slab]] |
||
* [[File:Smooth Quartz Stairs.png|30px]] [[Smooth Quartz Stairs]] |
* [[File:Smooth Quartz Stairs.png|30px]] [[Smooth Quartz Stairs]] |
||
| Line 693: | Line 696: | ||
* [[File:Soul Fire.png|30px]] ''[[Soul Fire]]'' |
* [[File:Soul Fire.png|30px]] ''[[Soul Fire]]'' |
||
* [[File:Soul Lantern.png|30px]] [[Soul Lantern]] |
* [[File:Soul Lantern.png|30px]] [[Soul Lantern]] |
||
| ⚫ | |||
| ⚫ | |||
* [[File:Soul Sand.png|30px]] [[Soul Sand]] |
* [[File:Soul Sand.png|30px]] [[Soul Sand]] |
||
* [[File:Soul Soil.png|30px]] [[Soul Soil]] |
* [[File:Soul Soil.png|30px]] [[Soul Soil]] |
||
| + | * [[File:Soul Torch.png|30px]] [[Soul Torch]] |
||
| ⚫ | |||
* [[File:Spawner.png|30px]] [[Spawner]] |
* [[File:Spawner.png|30px]] [[Spawner]] |
||
* [[File:Sponge.png|30px]] [[Sponge]] |
* [[File:Sponge.png|30px]] [[Sponge]] |
||
| Line 747: | Line 750: | ||
* [[File:Sunflower.png|15px]] [[Sunflower]] |
* [[File:Sunflower.png|15px]] [[Sunflower]] |
||
* [[File:Sweet Berry Bush Age 3.png|30px]] ''[[Sweet Berry Bush]]'' |
* [[File:Sweet Berry Bush Age 3.png|30px]] ''[[Sweet Berry Bush]]'' |
||
| ⚫ | |||
* [[File:Tall Grass.png|15px]] [[Tall Grass]] |
* [[File:Tall Grass.png|15px]] [[Tall Grass]] |
||
* [[File:Tall Seagrass.png|30px]] ''[[Tall Seagrass]]'' |
* [[File:Tall Seagrass.png|30px]] ''[[Tall Seagrass]]'' |
||
* [[File:Target.png|30px]] [[Target]] |
* [[File:Target.png|30px]] [[Target]] |
||
* [[File:Terracotta.png|30px]] [[Terracotta]] |
* [[File:Terracotta.png|30px]] [[Terracotta]] |
||
| ⚫ | |||
* [[File:Torch.png|30px]] [[Torch]] |
* [[File:Torch.png|30px]] [[Torch]] |
||
| ⚫ | |||
* [[File:Trapped Chest.png|30px]] [[Trapped Chest]] |
* [[File:Trapped Chest.png|30px]] [[Trapped Chest]] |
||
* [[File:Tripwire.png|30px]] ''[[Tripwire]]'' |
* [[File:Tripwire.png|30px]] ''[[Tripwire]]'' |
||
| Line 760: | Line 762: | ||
* [[File:Tube Coral Block.png|30px]] [[Tube Coral Block]] |
* [[File:Tube Coral Block.png|30px]] [[Tube Coral Block]] |
||
* [[File:Tube Coral Fan.png|30px]] [[Tube Coral Fan]] |
* [[File:Tube Coral Fan.png|30px]] [[Tube Coral Fan]] |
||
| − | * [[File:Tube Coral Wall Fan.png|30px]] ''[[ |
+ | * [[File:Tube Coral Wall Fan.png|30px]] ''[[Tube Coral Wall Fan]]'' |
* [[File:Turtle Egg 1.png|30px]] [[Turtle Egg]] |
* [[File:Turtle Egg 1.png|30px]] [[Turtle Egg]] |
||
* [[File:Twisting Vines.png|30px]] [[Twisting Vines]] |
* [[File:Twisting Vines.png|30px]] [[Twisting Vines]] |
||
| Line 766: | Line 768: | ||
* [[File:Vines.png|30px]] [[Vines]] |
* [[File:Vines.png|30px]] [[Vines]] |
||
* [[File:Air.png|30px]] ''[[Void Air]]''{{only|java}} |
* [[File:Air.png|30px]] ''[[Void Air]]''{{only|java}} |
||
| + | * [[File:Wall Torch.png|30px]] ''[[Wall Torch]]'' |
||
* [[File:Warped Button.png|30px]] [[Warped Button]] |
* [[File:Warped Button.png|30px]] [[Warped Button]] |
||
* [[File:Warped Door.png|30px]] [[Warped Door]] |
* [[File:Warped Door.png|30px]] [[Warped Door]] |
||
| Line 817: | Line 820: | ||
* [[File:Yellow Wool.png|30px]] [[Yellow Wool]] |
* [[File:Yellow Wool.png|30px]] [[Yellow Wool]] |
||
* [[File:Zombie Head.png|30px]] [[Zombie Head]] |
* [[File:Zombie Head.png|30px]] [[Zombie Head]] |
||
| − | * [[File:Zombie Head.png|30px]] ''[[ |
+ | * [[File:Zombie Head.png|30px]] ''[[Zombie Wall Head]]'' |
}} |
}} |
||
Blocks with ''italicized name'' cannot be obtained in the inventory. |
Blocks with ''italicized name'' cannot be obtained in the inventory. |
||
Revision as of 13:22, 30 October 2020
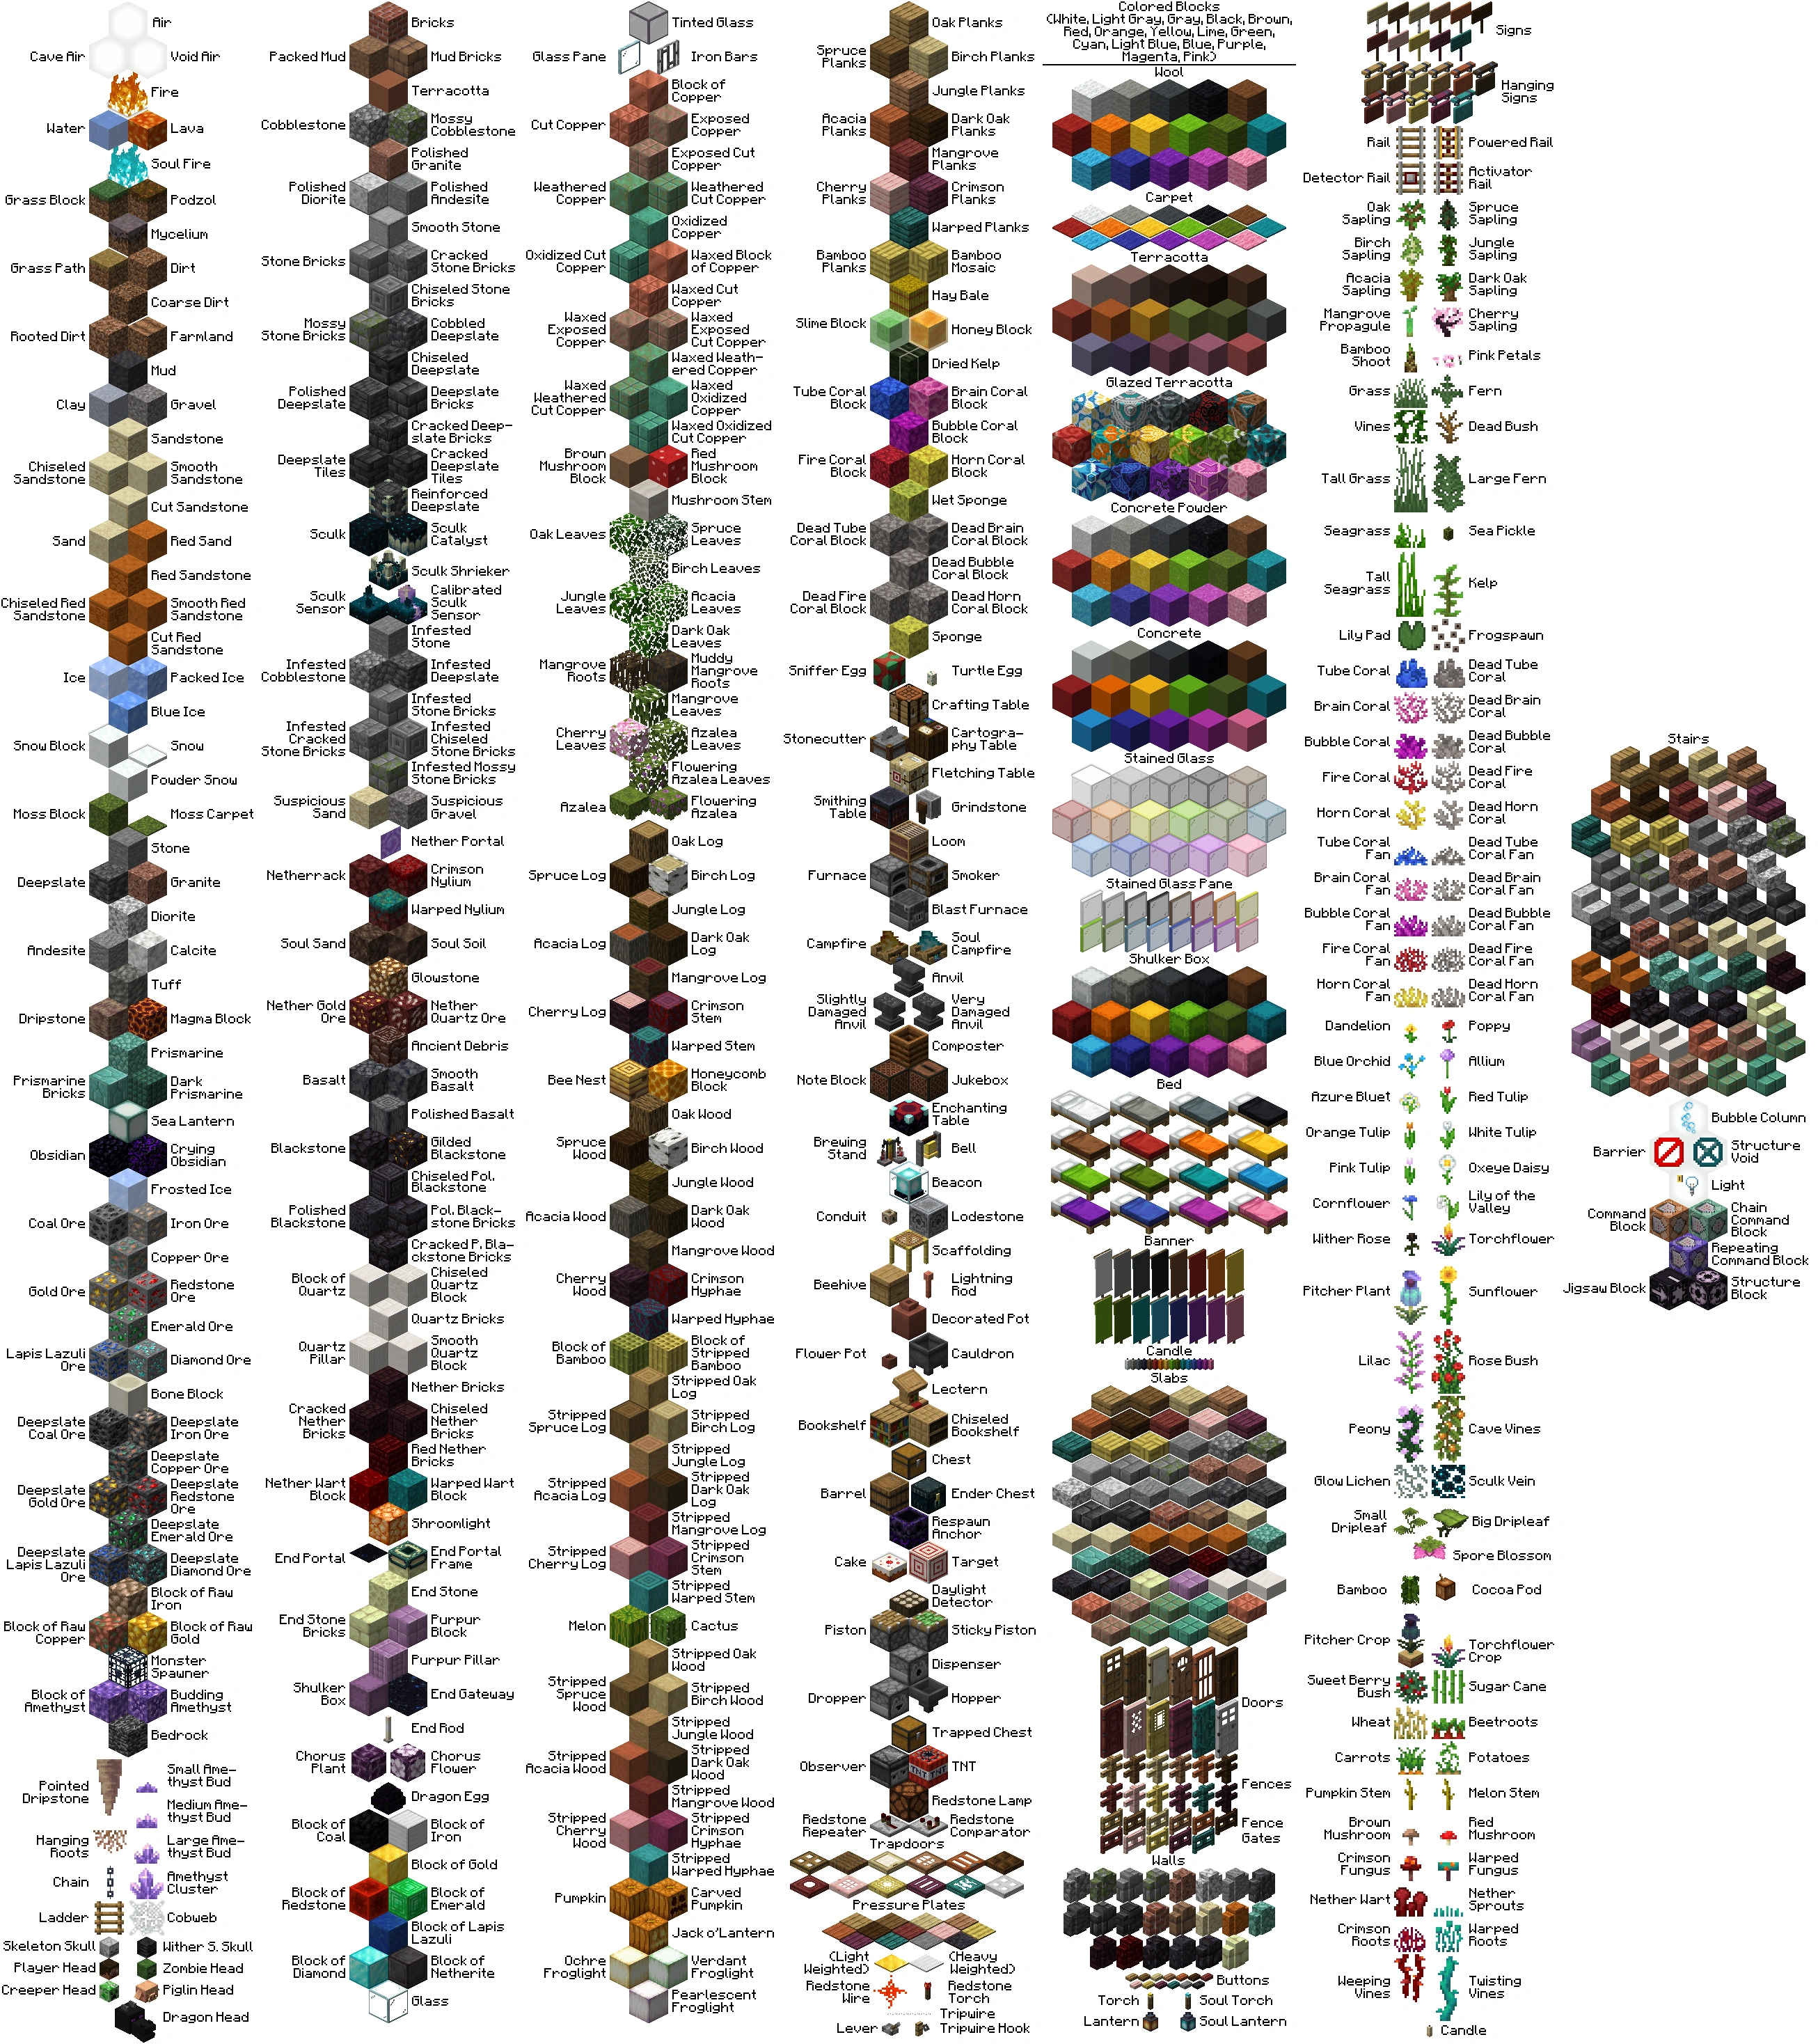
All of the blocks in Java Edition 1.16.3.
Blocks are the basic units of structure in Minecraft that can be directly placed in the game world.
Behavior
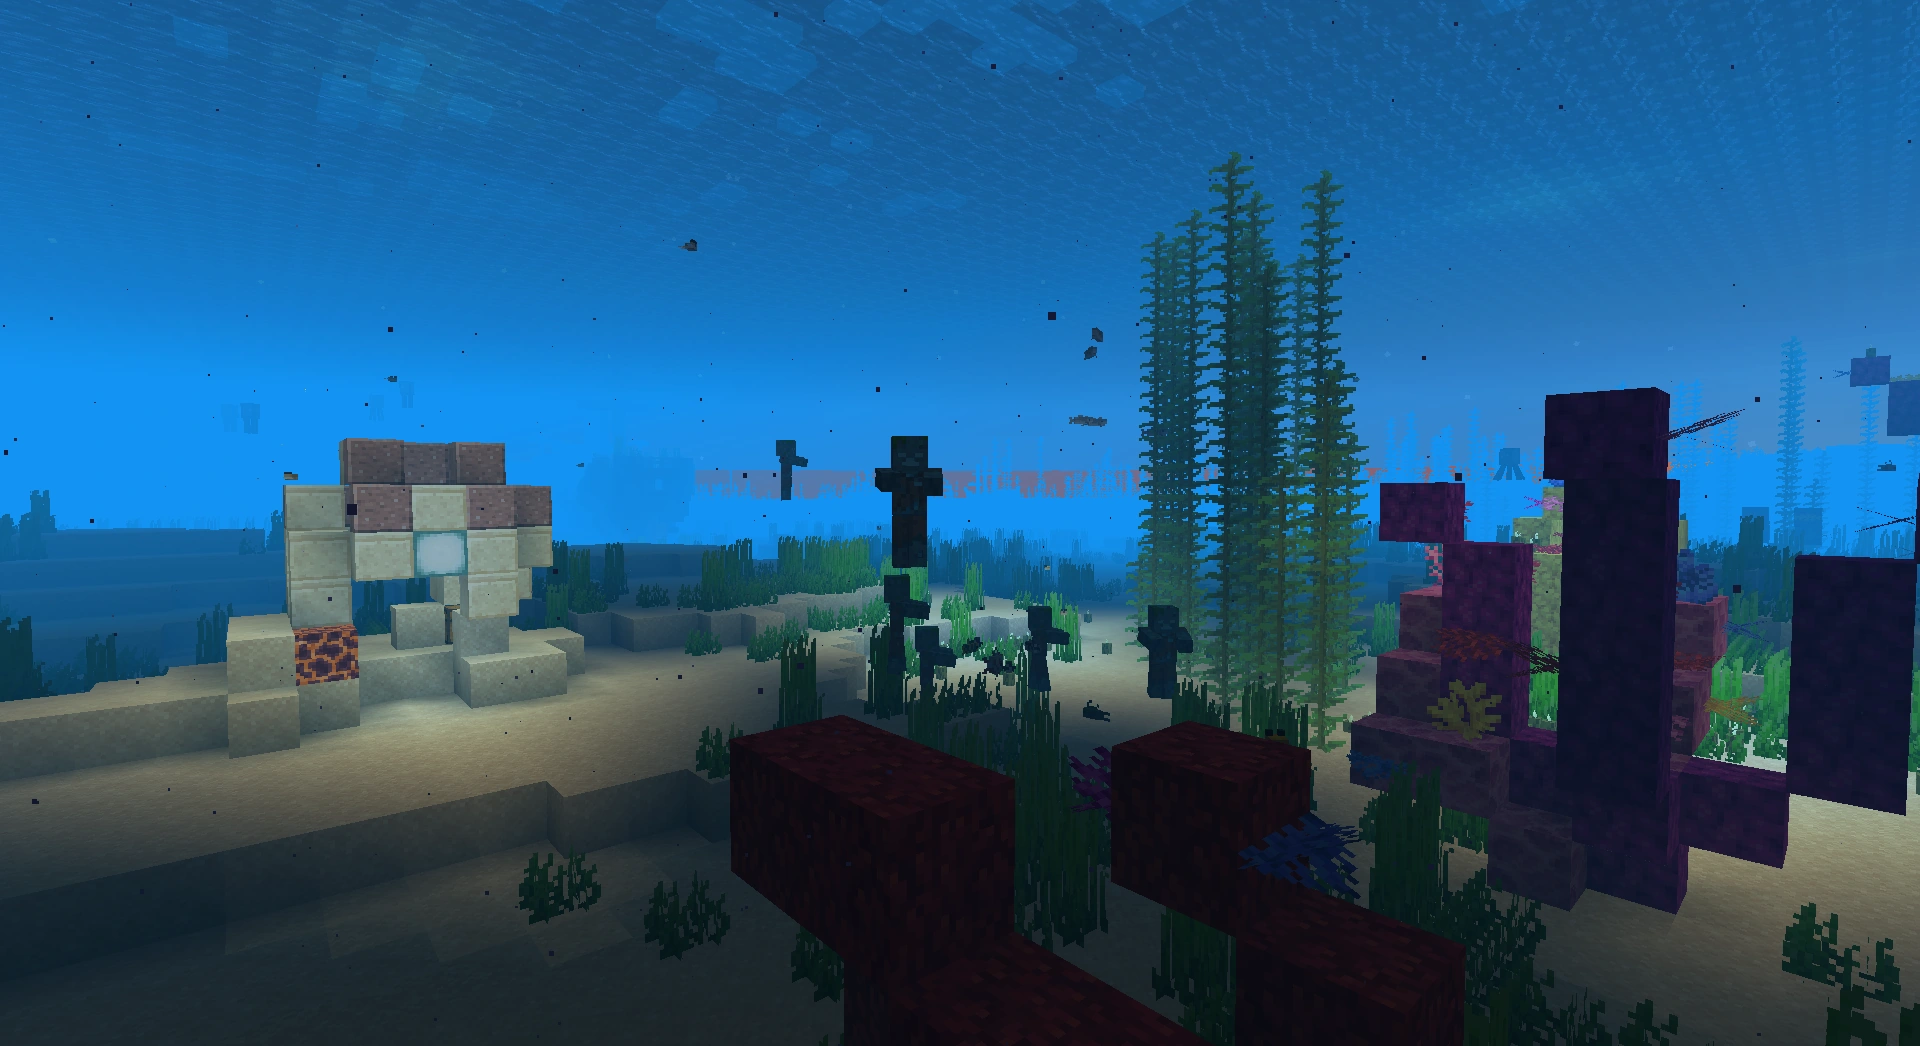
A variety of different blocks occurring in an underwater coral reef; sand can be seen lining the ground, cut sandstone in underwater ruin structures, and various forms of coral.
Blocks are arranged in a 3-dimensional grid of 1-cubic-meter cells. Each cell usually contains exactly one block; exceptions exist in the form of slabs, vines, snow layers, turtle eggs and sea pickles.
Together, blocks and fluids build up the in-game environment, and most can be harvested and utilized in various fashions. Some blocks, such as dirt and sandstone, are opaque and occupy their entire cubic meter, while other blocks, such as glass and flowers, are transparent or non-solid. Explosions destroy some blocks more easily than they destroy others.
Air is a special block. It is an unbreakable transparent block, as a substitute for the absence of blocks. in Java Edition, it has two variants: cave air and void air.
Some blocks, such as torches and glowstone, emit light. The amount of light they emit varies widely; see this table of light values for further information. Opaque blocks completely block light, while transparent blocks can have no effect on light, block the light, or merely weaken it.
Almost all blocks ignore gravity, with the exception of sand, red sand, gravel, anvils, dragon eggs, concrete powder, scaffolding, and snow.[Bedrock Edition only]
When broken, blocks emit sounds and particles associated with themselves, except in the following cases:
- When the block is removed by a piston.[1]
- If the block is affected by gravity and falls into an invalid space.[Java Edition only][2]
- Anvils that are destroyed by running out of durability or falling. Only particles are missing.[3]
- If the block can be washed away and is washed away by a flowing fluid.[4]
- If the block can be replaced by other blocks and is replaced.[5]
- If the block is supported by another block and its supporting block is removed.[6]
- If the block is leaves and decays.[7]
Block height
Most solid blocks are 1 meter high (3.28084 ft), but certain blocks (especially slabs and stairs) have non-standard block heights.
A player can automatically step up from a lower to a higher height if the difference is at most 0.6 (3⁄5) of a block or 1.9685 feet.
Textures
The textures on the faces of blocks are 16×16 pixels. Most blocks are proportionately one cubic meter by default, but their shape can be changed using models.
Most blocks have static textures, but these blocks are animated: water, lava, Nether portal, End portal, End gateway, prismarine (slab; stairs; wall), sea lantern, magma block, seagrass, kelp, fire, lantern, lit campfire and their soul variants, lit blast furnace, heat block[BE & edu only], stems, hyphae, lit smoker, stonecutter and command block.
Using resource packs, the player can change the textures and resolution of blocks, including whether their texture is animated. They can also change the shapes of blocks using models and the size of blocks to any size with equal width and height, though sizes that are a power of two tend to work better.
List of blocks
 Acacia Button
- Acacia Door
- Acacia Fence
- Acacia Fence Gate
- Acacia Leaves
- Acacia Log
- Acacia Planks
- Acacia Pressure Plate
- Acacia Sapling
- Acacia Sign
- Acacia Slab
- Acacia Stairs
- Acacia Trapdoor
- Acacia Wall Sign
- Acacia Wood
- Activator Rail
- Air
- Allium
- Ancient Debris
- Andesite
- Andesite Slab
- Andesite Stairs
- Andesite Wall
- Anvil
- File:Attached Stem.png Attached Melon Stem
- File:Attached Stem.png Attached Pumpkin Stem
- Azure Bluet
- Bamboo
- Bamboo Shoot
- Barrel
- Barrier
- Basalt
- Beacon
- Bedrock
- Beetroots
- Beehive
- Bee Nest
- Bell
- Birch Button
- Birch Door
- Birch Fence
- Birch Fence Gate
- Birch Leaves
- Birch Log
- Birch Planks
- Birch Pressure Plate
- Birch Sapling
- Birch Sign
- Birch Slab
- Birch Stairs
- Birch Trapdoor
- Birch Wall Sign
- Birch Wood
- Black Banner
- Black Bed
- Black Carpet
- Black Concrete
- Black Concrete Powder
- Black Glazed Terracotta
- Black Shulker Box
- Black Stained Glass
- Black Stained Glass Pane
- Black Terracotta
- Black Wall Banner
- Black Wool
- Blackstone
- Blackstone Slab
- Blackstone Stairs
- Blackstone Wall
- Blast Furnace
- Block of Coal
- Block of Diamond
- Block of Emerald
- Block of Gold
- Block of Iron
- Block of Netherite
- Block of Quartz
- Block of Redstone
- Blue Banner
- Blue Bed
- Blue Carpet
- Blue Concrete
- Blue Concrete Powder
- Blue Glazed Terracotta
- Blue Ice
- Blue Orchid
- Blue Shulker Box
- Blue Stained Glass
- Blue Stained Glass Pane
- Blue Terracotta
- Blue Wall Banner
- Blue Wool
- Bone Block
- Bookshelf
- Brain Coral
- Brain Coral Block
- Brain Coral Fan
- Brain Coral Wall Fan
- Brewing Stand
- Brick Slab
- Brick Stairs
- Brick Wall
- Bricks
- Brown Banner
- Brown Bed
- Brown Carpet
- Brown Concrete
- Brown Concrete Powder
- Brown Glazed Terracotta
- Brown Mushroom
- Brown Mushroom Block
- Brown Shulker Box
- Brown Stained Glass
- Brown Stained Glass Pane
- Brown Terracotta
- Brown Wall Banner
- Brown Wool
- Bubble Column
- Bubble Coral
- Bubble Coral Block
- Bubble Coral Fan
- Bubble Coral Wall Fan
- Cactus
- Cake
- Campfire
- Carrots
- Cartography Table
- Carved Pumpkin
- Cauldron
- Cave Air[Java Edition only]
- Chain
- Chain Command Block
- Chest
- Chipped Anvil
- Chiseled Nether Bricks
- Chiseled Polished Blackstone
- Chiseled Purpur[Bedrock Edition only]
- Chiseled Quartz Block
- Chiseled Red Sandstone
- Chiseled Sandstone
- Chiseled Stone Bricks
- Chorus Flower
- Chorus Plant
- Clay
- Coal Ore
- Coarse Dirt
- Cobblestone
- Cobblestone Slab
- Cobblestone Stairs
- Cobblestone Wall
- Cobweb
- Cocoa
- Command Block
- Composter
- Conduit
- Cornflower
- Cracked Nether Bricks
- Cracked Polished Blackstone Bricks
- Cracked Stone Bricks
- Crafting Table
- Creeper Head
- Creeper Wall Head
- Crimson Button
- Crimson Door
- Crimson Fence
- Crimson Fence Gate
- Crimson Fungus
- Crimson Hyphae
- Crimson Nylium
- Crimson Planks
- Crimson Pressure Plate
- Crimson Roots
- Crimson Sign
- Crimson Slab
- Crimson Stairs
- Crimson Stem
- Crimson Trapdoor
- Crimson Wall Sign
- Crying Obsidian
- Cut Red Sandstone
- Cut Red Sandstone Slab
- Cut Sandstone
- Cut Sandstone Slab
- Cyan Banner
- Cyan Bed
- Cyan Carpet
- Cyan Concrete
- Cyan Concrete Powder
- Cyan Glazed Terracotta
- Cyan Shulker Box
- Cyan Stained Glass
- Cyan Stained Glass Pane
- Cyan Terracotta
- Cyan Wall Banner
- Cyan Wool
- Damaged Anvil
- Dandelion
- Dark Oak Button
- Dark Oak Door
- Dark Oak Fence
- Dark Oak Fence Gate
- Dark Oak Leaves
- Dark Oak Log
- Dark Oak Planks
- Dark Oak Pressure Plate
- Dark Oak Sapling
- Dark Oak Sign
- Dark Oak Slab
- Dark Oak Stairs
- Dark Oak Trapdoor
- Dark Oak Wall Sign
- Dark Oak Wood
- Dark Prismarine
- Dark Prismarine Slab
- Dark Prismarine Stairs
- Daylight Detector
- Dead Brain Coral
- Dead Brain Coral Block
- Dead Brain Coral Fan
- Dead Brain Coral Wall Fan
- Dead Bubble Coral
- Dead Bubble Coral Block
- Dead Bubble Coral Fan
- Dead Bubble Coral Wall Fan
- Dead Bush
- Dead Fire Coral
- Dead Fire Coral Block
- Dead Fire Coral Fan
- Dead Fire Coral Wall Fan
- Dead Horn Coral
- Dead Horn Coral Block
- Dead Horn Coral Fan
- Dead Horn Coral Wall Fan
- Dead Tube Coral
- Dead Tube Coral Block
- Dead Tube Coral Fan
- Dead Tube Coral Wall Fan
- Detector Rail
- Diamond Ore
- Diorite
- Diorite Slab
- Diorite Stairs
- Diorite Wall
- Dirt
- Dispenser
- Dragon Egg
- Dragon Head
- Dragon Wall Head
- Dried Kelp Block
- Dropper
- Emerald Ore
- Enchanting Table
- End Gateway
- End Portal
- End Portal Frame
- End Rod
- End Stone
- End Stone Brick Slab
- End Stone Brick Stairs
- End Stone Brick Wall
- End Stone Bricks
- Ender Chest
- Farmland
- Fern
- Fire
- Fire Coral
- Fire Coral Block
- Fire Coral Fan
- Fire Coral Wall Fan
- Fletching Table
- Flower Pot
- Frosted Ice
- Furnace
- Gilded Blackstone
- Glass
- Glass Pane
- Glowing Obsidian[Bedrock Edition only]
- Glowstone
- Gold Ore
- Granite
- Granite Slab
- Granite Stairs
- Granite Wall
- Grass
- Grass Block
- Grass Path
- Gravel
- Gray Banner
- Gray Bed
- Gray Carpet
- Gray Concrete
- Gray Concrete Powder
- Gray Glazed Terracotta
- Gray Shulker Box
- Gray Stained Glass
- Gray Stained Glass Pane
- Gray Terracotta
- Gray Wall Banner
- Gray Wool
- Green Banner
- Green Bed
- Green Carpet
- Green Concrete
- Green Concrete Powder
- Green Glazed Terracotta
- Green Shulker Box
- Green Stained Glass
- Green Stained Glass Pane
- Green Terracotta
- Green Wall Banner
- Green Wool
- Grindstone
- Hay Bale
- Heavy Weighted Pressure Plate
- Honey Block
- Honeycomb Block
- Hopper
- Horn Coral
- Horn Coral Block
- Horn Coral Fan
- Horn Coral Wall Fan
- Ice
- Infested Chiseled Stone Bricks
- Infested Cobblestone
- Infested Cracked Stone Bricks
- Infested Mossy Stone Bricks
- Infested Stone
- Infested Stone Bricks
- info_update[Bedrock Edition only]
- info_update2[Bedrock Edition only]
- Invisible Bedrock[Bedrock Edition only]
- Iron Bars
- Iron Door
- Iron Ore
- Iron Trapdoor
- Item Frame (as a block)[Bedrock Edition only]
- Jack o'Lantern
- Jigsaw Block
- Jukebox
- Jungle Button
- Jungle Door
- Jungle Fence
- Jungle Fence Gate
- Jungle Leaves
- Jungle Log
- Jungle Planks
- Jungle Pressure Plate
- Jungle Sapling
- Jungle Sign
- Jungle Slab
- Jungle Stairs
- Jungle Trapdoor
- Jungle Wall Sign
- Jungle Wood
- Kelp
- Kelp Plant
- Ladder
- Lantern
- Lapis Lazuli Block
- Lapis Lazuli Ore
- Large Fern
- Lava
- Lectern
- Lever
- Light Blue Banner
- Light Blue Bed
- Light Blue Carpet
- Light Blue Concrete
- Light Blue Concrete Powder
- Light Blue Glazed Terracotta
- Light Blue Shulker Box
- Light Blue Stained Glass
- Light Blue Stained Glass Pane
- Light Blue Terracotta
- Light Blue Wall Banner
- Light Blue Wool
- Light Gray Banner
- Light Gray Bed
- Light Gray Carpet
- Light Gray Concrete
- Light Gray Concrete Powder
- Light Gray Glazed Terracotta
- Light Gray Shulker Box
- Light Gray Stained Glass
- Light Gray Stained Glass Pane
- Light Gray Terracotta
- Light Gray Wall Banner
- Light Gray Wool
- Light Weighted Pressure Plate
- Lilac
- Lily of the Valley
- Lily Pad
- Lime Banner
- Lime Bed
- Lime Carpet
- Lime Concrete
- Lime Concrete Powder
- Lime Glazed Terracotta
- Lime Shulker Box
- Lime Stained Glass
- Lime Stained Glass Pane
- Lime Terracotta
- Lime Wall Banner
- Lime Wool
- Lodestone
- Loom
- Magenta Banner
- Magenta Bed
- Magenta Carpet
- Magenta Concrete
- Magenta Concrete Powder
- Magenta Glazed Terracotta
- Magenta Shulker Box
- Magenta Stained Glass
- Magenta Stained Glass Pane
- Magenta Terracotta
- Magenta Wall Banner
- Magenta Wool
- Magma Block
- Melon
- File:Stem.png Melon Stem
- Mossy Cobblestone
- Mossy Cobblestone Slab
- Mossy Cobblestone Stairs
- Mossy Cobblestone Wall
- Mossy Stone Brick Slab
- Mossy Stone Brick Stairs
- Mossy Stone Brick Wall
- Mossy Stone Bricks
- Moving Piston
- Mushroom Stem
- Mycelium
- Nether Brick Fence
- Nether Brick Slab
- Nether Brick Stairs
- Nether Brick Wall
- Nether Bricks
- Nether Gold Ore
- Nether Portal
- Nether Quartz Ore
- Nether Reactor Core[Bedrock Edition only]
- Nether Sprouts
- Nether Wart
- Nether Wart Block
- Netherrack
- Note Block
- Oak Button
- Oak Door
- Oak Fence
- Oak Fence Gate
- Oak Leaves
- Oak Log
- Oak Planks
- Oak Pressure Plate
- Oak Sapling
- Oak Sign
- Oak Slab
- Oak Stairs
- Oak Trapdoor
- Oak Wall Sign
- Oak Wood
- Observer
- Obsidian
- Ominous Banner
- Orange Banner
- Orange Bed
- Orange Carpet
- Orange Concrete
- Orange Concrete Powder
- Orange Glazed Terracotta
- Orange Shulker Box
- Orange Stained Glass
- Orange Stained Glass Pane
- Orange Terracotta
- Orange Tulip
- Orange Wall Banner
- Orange Wool
- Oxeye Daisy
- Packed Ice
- Peony
- Petrified Oak Slab
- Pink Banner
- Pink Bed
- Pink Carpet
- Pink Concrete
- Pink Concrete Powder
- Pink Glazed Terracotta
- Pink Shulker Box
- Pink Stained Glass
- Pink Stained Glass Pane
- Pink Terracotta
- Pink Tulip
- Pink Wall Banner
- Pink Wool
- Piston
- Piston Head
- Player Head
- Player Wall Head
- Podzol
- Polished Andesite
- Polished Andesite Slab
- Polished Andesite Stairs
- Polished Basalt
- Polished Blackstone
- Polished Blackstone Brick Slab
- Polished Blackstone Brick Stairs
- Polished Blackstone Brick Wall
- Polished Blackstone Bricks
- Polished Blackstone Button
- Polished Blackstone Pressure Plate
- Polished Blackstone Slab
- Polished Blackstone Stairs
- Polished Blackstone Wall
- Polished Diorite
- Polished Diorite Slab
- Polished Diorite Stairs
- Polished Granite
- Polished Granite Slab
- Polished Granite Stairs
- Poppy
- Potatoes
- Potted Acacia Sapling
- Potted Allium
- Potted Azure Bluet
- Potted Bamboo
- Potted Birch Sapling
- Potted Blue Orchid
- Potted Brown Mushroom
- Potted Cactus
- Potted Cornflower
- Potted Crimson Fungus
- Potted Crimson Roots
- Potted Dandelion
- Potted Dark Oak Sapling
- Potted Dead Bush
- Potted Fern
- Potted Jungle Sapling
- Potted Lily of the Valley
- Potted Oak Sapling
- Potted Orange Tulip
- Potted Oxeye Daisy
- Potted Pink Tulip
- Potted Poppy
- Potted Red Mushroom
- Potted Red Tulip
- Potted Spruce Sapling
- Potted Warped Fungus
- Potted Warped Roots
- Potted White Tulip
- Potted Wither Rose
- Powered Rail
- Prismarine
- Prismarine Brick Slab
- Prismarine Brick Stairs
- Prismarine Bricks
- Prismarine Slab
- Prismarine Stairs
- Prismarine Wall
- Pumpkin
- File:Stem.png Pumpkin Stem
- Purple Banner
- Purple Bed
- Purple Carpet
- Purple Concrete
- Purple Concrete Powder
- Purple Glazed Terracotta
- Purple Shulker Box
- Purple Stained Glass
- Purple Stained Glass Pane
- Purple Terracotta
- Purple Wall Banner
- Purple Wool
- Purpur Block
- Purpur Pillar
- Purpur Slab
- Purpur Stairs
- Quartz Bricks
- Quartz Pillar
- Quartz Slab
- Quartz Stairs
- Rail
- Red Banner
- Red Bed
- Red Carpet
- Red Concrete
- Red Concrete Powder
- Red Glazed Terracotta
- Red Mushroom
- Red Mushroom Block
- Red Nether Brick Slab
- Red Nether Brick Stairs
- Red Nether Brick Wall
- Red Nether Bricks
- Red Sand
- Red Sandstone
- Red Sandstone Slab
- Red Sandstone Stairs
- Red Sandstone Wall
- Red Shulker Box
- Red Stained Glass
- Red Stained Glass Pane
- Red Terracotta
- Red Tulip
- Red Wall Banner
- Red Wool
- Redstone Comparator
- Redstone Lamp
- Redstone Ore
- Redstone Repeater
- Redstone Torch
- Redstone Wall Torch
- Redstone Wire
- Repeating Command Block
- reserved6[Bedrock Edition only]
- Respawn Anchor
- Rose Bush
- Sand
- Sandstone
- Sandstone Slab
- Sandstone Stairs
- Sandstone Wall
- Scaffolding
- Sea Lantern
- Sea Pickle
- Seagrass
- Shroomlight
- Shulker Box
- Skeleton Skull
- Skeleton Wall Skull
- Slime Block
- Smithing Table
- Smoker
- Smooth Purpur[Bedrock Edition only]
- Smooth Quartz Block
- Smooth Quartz Slab
- Smooth Quartz Stairs
- Smooth Red Sandstone
- Smooth Red Sandstone Slab
- Smooth Red Sandstone Stairs
- Smooth Sandstone
- Smooth Sandstone Slab
- Smooth Sandstone Stairs
- Smooth Stone
- Smooth Stone Bricks[Bedrock Edition only]
- Smooth Stone Slab
- Snow
- Snow Block
- Soul Campfire
- Soul Fire
- Soul Lantern
- Soul Sand
- Soul Soil
- Soul Torch
- Soul Wall Torch
- Spawner
- Sponge
- Spruce Button
- Spruce Door
- Spruce Fence
- Spruce Fence Gate
- Spruce Leaves
- Spruce Log
- Spruce Planks
- Spruce Pressure Plate
- Spruce Sapling
- Spruce Sign
- Spruce Slab
- Spruce Stairs
- Spruce Trapdoor
- Spruce Wall Sign
- Spruce Wood
- Sticky Piston
- Stone
- Stone Brick Slab
- Stone Brick Stairs
- Stone Brick Wall
- Stone Bricks
- Stone Button
- Stone Pressure Plate
- Stone Slab
- Stone Stairs
- Stonecutter
- Stonecutter (legacy)[Bedrock Edition only]
- Stripped Acacia Log
- Stripped Acacia Wood
- Stripped Birch Log
- Stripped Birch Wood
- Stripped Crimson Hyphae
- Stripped Crimson Stem
- Stripped Dark Oak Log
- Stripped Dark Oak Wood
- Stripped Jungle Log
- Stripped Jungle Wood
- Stripped Oak Log
- Stripped Oak Wood
- Stripped Spruce Log
- Stripped Spruce Wood
- Stripped Warped Hyphae
- Stripped Warped Stem
- Structure Block
- Structure Void
- Sugar Cane
- Sunflower
- Sweet Berry Bush
- Tall Grass
- Tall Seagrass
- Target
- Terracotta
- TNT
- Torch
- Trapped Chest
- Tripwire
- Tripwire Hook
- Tube Coral
- Tube Coral Block
- Tube Coral Fan
- Tube Coral Wall Fan
- Turtle Egg
- Twisting Vines
- Twisting Vines Plant
- Vines
- Void Air[Java Edition only]
- Wall Torch
- Warped Button
- Warped Door
- Warped Fence
- Warped Fence Gate
- Warped Fungus
- Warped Hyphae
- Warped Nylium
- Warped Planks
- Warped Pressure Plate
- Warped Roots
- Warped Sign
- Warped Slab
- Warped Stairs
- Warped Stem
- Warped Trapdoor
- Warped Wall Sign
- Warped Wart Block
- Water
- Weeping Vines
- Weeping Vines Plant
- Wet Sponge
- Wheat
- White Banner
- White Bed
- White Carpet
- White Concrete
- White Concrete Powder
- White Glazed Terracotta
- White Shulker Box
- White Stained Glass
- White Stained Glass Pane
- White Terracotta
- White Tulip
- White Wall Banner
- White Wool
- Wither Rose
- Wither Skeleton Skull
- Wither Skeleton Wall Skull
- Yellow Banner
- Yellow Bed
- Yellow Carpet
- Yellow Concrete
- Yellow Concrete Powder
- Yellow Glazed Terracotta
- Yellow Shulker Box
- Yellow Stained Glass
- Yellow Stained Glass Pane
- Yellow Terracotta
- Yellow Wall Banner
- Yellow Wool
- Zombie Head
- Zombie Wall Head
Blocks with italicized name cannot be obtained in the inventory.
Education Edition only
These blocks can be accessed only in Minecraft Education and in Bedrock Edition when education options are enabled. (Elements are not listed here.)
Removed blocks
Removed blocks no longer exist in current versions of the game.
Technical blocks
Technical blocks up to Java Edition 1.6.1. Blocks in this image are no longer available in the current Minecraft version, except farmland and spawner.
Technical blocks are blocks whose main functions are strictly tied to the usage of other blocks. They cannot be acquired through normal gameplay. Most of them cannot be obtained with commands and even external editors,[Java Edition only] but others require commands or mods to obtain. They serve various purposes during events within the game. If acquired, they usually have a missing texture.
Many of these blocks have different representations in the inventory; flint and steel is used to place fire, water and lava can be placed with their respective buckets, and blocks such as beds, doors, cake and flower pots have separate inventory items.
Videos
History
| pre-classic | |||||
|---|---|---|---|---|---|
rd-132211{{Extension DPL}}<ul><li>[[Blaze Powder|Blaze Powder]]<br/>{{Item
| image = Blaze Powder.png
| renewable = Yes
| stackable = Yes (64)
}}
'''Blaze powder''' is an item made from a [[blaze rod]], which is dropped by a [[blaze]] when killed. Its main uses are to fuel [[brewing stand]]s, to brew [[strength]] [[potions]], and to make [[eyes of ender]] to take the player to [[the End]].
== Obtaining ==
=== Crafting ===
{{Crafting
|Blaze Rod
|Output= Blaze Powder,2
|type= Brewing
}}
== Usage ==
=== Crafting Ingredient ===
{{crafting usage}}
=== Brewing stand fuel ===
In addition to being a [[brewing]] ingredient, blaze powder is needed to fuel a [[brewing stand]]. Each piece of blaze powder can brew up to 20 batches of [[Potion|potions]].
=== Brewing ingredient ===
{{brewing
|showname=1
|head=1
|Blaze Powder
|Mundane Potion
|base=Water Bottle
}}
{{brewing
|foot=1
|Blaze Powder
|Potion of Strength
}}
== Data values ==
=== ID ===
{{edition|java}}:
{{ID table
|edition=java
|showforms=y
|generatetranslationkeys=y
|displayname=Blaze Powder
|spritetype=item
|nameid=blaze_powder
|form=item
|foot=1}}
{{edition|bedrock}}:
{{ID table
|edition=bedrock
|shownumericids=y
|showforms=y
|notshowbeitemforms=y
|generatetranslationkeys=y
|displayname=Blaze Powder
|spritetype=item
|nameid=blaze_powder
|id=429
|form=item
|foot=1}}
== Video ==
{{Video note|This video does not mention that blaze powder must be used to fuel [[brewing stand]]s.|minor}}
<div style="text-align:center">{{yt|FSP2qBpe9vI}}</div>
==History==
{{History|java}}
{{History||1.0.0|snap=Beta 1.9 Prerelease 2|[[File:Blaze Powder JE1.png|32px]] Added blaze powder.
|Blaze powder can be used to craft [[eyes of ender]] and [[magma cream]].}}
{{History|||snap=Beta 1.9 Prerelease 3|Blaze powder can now be [[brewing|brewed]] in a [[water bottle]] to create a [[mundane potion]], or in an [[awkward potion]] to create a [[potion of Strength]].}}
{{History||1.2.1|snap=12w04a|Blaze powder can now be used to craft [[fire charge]]s.}}
{{History||1.3.1|snap=1.3|[[File:Blaze Powder JE2 BE1.png|32px]] The texture of blaze powder has been changed.}}
{{History||1.9|snap=15w42a|Blaze powder is now required to operate a [[brewing stand]].}}
{{History|||snap=15w43a|Blaze powder now [[fuel]]s 20 operations rather than 30.}}
{{History||1.13|snap=17w47a|Prior to [[1.13/Flattening|''The Flattening'']], this [[item]]'s numeral ID was 377.}}
{{History|pocket alpha}}
{{History||v0.12.1|snap=build 1|[[File:Blaze Powder JE2 BE1.png|32px]] Added blaze powder.
|Blaze powder can be used to craft [[magma cream]].
|Blaze powder is used as an ingredient to brew [[potion]]s.}}
{{History||v0.15.0|snap=build 1|Blaze powder is now used to craft [[fire charge]]s.}}
{{History|pocket}}
{{History||1.0.0|snap=alpha 0.17.0.1|Blaze powder is now used to craft [[eyes of ender]].}}
{{History|bedrock}}
{{History||1.2.0|snap=beta 1.2.0.2|Blaze powder is now required to operate a [[brewing stand]].}}
{{History|console}}
{{History||xbox=TU7|xbone=CU1|ps=1.00|wiiu=Patch 1|switch=1.0.1|[[File:Blaze Powder JE2 BE1.png|32px]] Added blaze powder.}}
{{History||xbox=TU46|xbone=CU36|ps=1.38|wiiu=Patch 15|Blaze powder is now required to operate a [[brewing stand]].}}
{{History|New 3DS}}
{{History||0.1.0|[[File:Blaze Powder JE2 BE1.png|32px]] Added blaze powder.}}
{{History|foot}}
== Issues ==
{{issue list}}
== See also ==
* [[The Nether]]
* [[Potions]]
== External Links ==
*[https://www.minecraft.net/en-us/article/taking-inventory--blaze-powder Taking Inventory: Blaze Powder] – Minecraft.net on November 25, 2021
{{Items}}
[[Category:Renewable resources]]
[[cs:Ohnivý prach]]
[[de:Lohenstaub]]
[[es:Polvo de blaze]]
[[fr:Poudre de Blaze]]
[[hu:Őrlángpor]]
[[ja:ブレイズパウダー]]
[[ko:블레이즈 가루]]
[[nl:Blazepoeder]]
[[pl:Płomienny proszek]]
[[pt:Pó de blaze]]
[[ru:Огненный порошок]]
[[th:ผงปีศาจไฟ]]
[[zh:烈焰粉]]</li><li>[[Minecart with Chest|Minecart with Chest]]<br/>{{ItemEntity
|image=Minecart with Chest.png
|renewable=Yes
|stackable=No
|size=Height: 0.7 Blocks<br>Width: 0.98 Blocks
|networkid='''[[JE]]''': 10
|drops=1 {{ItemLink|Minecart with Chest}}<br> plus contents
|health={{hp|6}}
}}
A '''minecart with chest''' is a single [[chest]] inside a [[minecart]], and functions as such.
== Natural generation ==
Minecarts with chests containing loot naturally generate in [[mineshaft]]s, each on top of a piece of [[rail]].
== Obtaining ==
=== Crafting ===
{{Crafting|Chest|Minecart|Output=Minecart with Chest|type=Transportation}}
Minecarts with chests can be retrieved by attacking them. By doing so it drops as an [[item]] and any other contents of the chest are dropped as well.
==Usage==
[[File:Minecart with Chest GUI.png|thumb|176px|The GUI of a minecart with chest.]]
Minecarts with chests can be placed by {{control|use item|text=using its item}} on any type of [[rail]].
Chest minecarts' contents can be accessed by pressing {{control|use item}} button on them. The interaction makes no sounds and the chest does not show the opening or closing animation, unlike regular chests.
The boost that minecarts with chests gain from [[powered rail]]s is dependent on their load. For example, from a 1 powered rail starter track, an empty minecart with chest travels 64 blocks, but a full minecart with chest travels only 16 blocks (opposed to 80 blocks for an occupied normal minecart and 8 blocks for an empty normal minecart).
Another physical property of chest minecarts is their ability to be stacked. While three chests can fit in an area three blocks tall, up to four chest minecarts can fit in the same area. Like other minecarts, an unlimited number of minecarts with chests can exist in the same block space.
Minecarts with chests are also able to interact with [[hopper]]s. Hoppers can take items out from the minecart chest if they are below the track as the minecart rolls over it or put them in if the minecart rolls under a downward facing hopper. Hoppers can also input items if they are facing into the side of the minecart.
Opening or destroying a minecart with chest angers [[piglin]]s.
{{See also|Tutorials/Storage minecarts}}
When on top of [[detector rail]]s, nearby [[redstone comparators]] will give out redstone signals based on how full the minecarts with chests are.
== Sounds ==
{{Edition|Java}}:<br>
Minecarts with chests use the Friendly Creatures sound category for entity-dependent sound events.<ref group=sound name=rollsource>{{bug|MC-42132}}</ref>
{{Sound table
|sound=Minecart rolling.ogg
|subtitle=Minecart rolls
|source=Friendly Creatures <ref group=sound name=rollsource/>
|overridesource=1
|description=While a minecart with chest is moving
|id=entity.minecart.riding
|translationkey=subtitles.entity.minecart.riding
|volume=0.0-0.35 <ref group=sound>Relates linearly with horizontal velocity (max 0.5)</ref>
|pitch=0.0-1.0 <ref group=sound>Will increase by 0.0025 per tick if the minecart's horizontal velocity is more than 0.01</ref>
|distance=16
|foot=1}}
{{Edition|Bedrock}}:
{{Sound table
|type=bedrock
|sound=Minecart rolling.ogg
|source=neutral
|description=While a minecart with chest is moving
|id=minecart.base
|foot=1}}
==Data values==
===ID===
{{edition|java}}:
{{ID table
|edition=java
|firstcolumnname=Item
|showforms=y
|generatetranslationkeys=y
|displayname=Minecart with Chest
|spritetype=item
|nameid=chest_minecart
|form=item
|foot=1}}
{{ID table
|edition=java
|firstcolumnname=Entity
|generatetranslationkeys=y
|displayname=Minecart with Chest
|spritetype=entity
|nameid=chest_minecart
|foot=1}}
{{edition|bedrock}}:
{{ID table
|edition=bedrock
|firstcolumnname=Item
|shownumericids=y
|showforms=y
|notshowbeitemforms=y
|generatetranslationkeys=y
|displayname=Minecart with Chest
|spritetype=item
|nameid=chest_minecart
|id=389
|form=item
|foot=1}}
{{ID table
|edition=bedrock
|firstcolumnname=Entity
|shownumericids=y
|generatetranslationkeys=y
|displayname=Minecart with Chest
|spritetype=entity
|nameid=chest_minecart
|id=98
|foot=1}}
===Entity data===
Minecarts with chests have entity data associated with them that contain various properties of the entity.
{{el|java}}:
{{main|Entity format}}
{{/ED}}
{{el|bedrock}}:
: See [[Bedrock Edition level format/Entity format]].
==Achievements==
{{load achievements|Freight Station}}
== Video==
<div style="text-align:center">{{yt|2yVVMiQrCwo}}</div>
==History ==
[[File:Minecart with Chest BE3.png|thumb|The Minecart models in the Bedrock Edition were north or south on the sides. In the latest version, the front and rear sides are north or south. But the absolute orientation of the chest was not changed.]]
{{info needed section|In bedrock edition 1.16.100 it seems that chests in minecarts face sideways instead of forward - when was this changed?}}
{{History|java alpha}}
{{History||v1.0.14|[[File:Minecart with Chest JE1.png|32px]] [[File:Minecart with Chest (item) JE1 BE1.png|32px]] Minecarts with chests have been added.
|At this point, they are either called "chest minecarts" or "storage minecarts" because no in-game name was indicated.}}
{{History|java beta}}
{{History||1.0|"Minecart with Chest" has been first indicated as its name, via the new item tooltips.}}
{{History||1.8|snap=Pre-release|[[File:Minecart with Chest JE2.png|32px]] The [[model]] of the minecart with chest has been changed to match the new [[chest]] model. However, the [[chest]] is incorrectly offset.<ref>[[mcw:Issues/Beta 1.8pre2#Graphical]]</ref>}}
{{History|||snap=release|[[File:Minecart with Chest JE3 BE1.png|32px]] The model of minecarts with chests has been fixed.}}
{{History|java}}
{{History||1.5|snap=13w02a|Minecarts with chests now generate in [[mineshaft]]s in place of normal chests.}}
{{History||1.9|snap=15w43a|[[Loot table]]s have been added; minecarts with chests now use loot tables, and those in generated in [[mineshaft]]s now use loot tables.}}
{{History||1.9.1|snap=pre2|The title of the [[inventory]] has been changed from 'Chest minecart' to 'Minecart with Chest'.}}
{{History||1.11|snap=16w32a|The [[entity]] ID has been changed from <code>MinecartChest</code> to <code>chest_minecart</code>.}}
{{History||1.13|snap=17w47a|Prior to [[1.13/Flattening|''The Flattening'']], this [[item]]'s numeral ID was 342.}}
{{History||1.14|snap=18w43a|[[File:Minecart with Chest JE4 BE2.png|32px]] [[File:Minecart with Chest (item) JE2 BE2.png|32px]] The textures of minecarts with chests have been changed.}}
{{History||1.16.2|snap=Pre-release 1|[[Piglin]]s now become angry with players who open or destroy a chest minecart.}}
{{History||1.19|snap=22w13a|The crafting recipe for a minecart with chest is now shapeless.
|Breaking a minecart with chest will now drop the item instead of the minecart and chest separately, though the contents of the chest are still dropped.<ref>{{bug|MC-249493|||Fixed}}</ref>}}
{{History|pocket alpha}}
{{History||v0.14.0|snap=build 1|[[File:Minecart with Chest JE3 BE1.png|32px]] [[File:Minecart with Chest (item) JE1 BE1.png|32px]] Added minecarts with chests.}}
{{History|||snap=build 3|Minecarts with chests now drop [[item]]s when destroyed in [[Creative]] mode.}}
{{History|pocket}}
{{History||1.1.0|snap=alpha 1.1.0.0|The [[entity]] ID has been changed from <code>minecartchest</code> to <code>chest_minecart</code>.}}
{{History|bedrock}}
{{History||1.10.0|snap=beta 1.10.0.3|[[File:Minecart with Chest JE4 BE2.png|32px]] [[File:Minecart with Chest (item) JE2 BE2.png|32px]] The textures of minecarts with chests have been changed.}}
{{History||1.19.0|snap=beta 1.19.0.30|Breaking a minecart with chest will now drop the item instead of the minecart and chest separately, though the contents of the chest are still dropped.}}
{{History|console}}
{{History||xbox=TU1|xbone=CU1|ps=1.0|wiiu=Patch 1|switch=1.0.1|[[File:Minecart with Chest JE3 BE1.png|32px]] [[File:Minecart with Chest (item) JE1 BE1.png|32px]] Added minecarts with chests.}}
{{History||xbox=none|xbone=none|ps=1.90|wiiu=none|switch=none|[[File:Minecart with Chest JE4 BE2.png|32px]] [[File:Minecart with Chest (item) JE2 BE2.png|32px]] The textures of minecarts with chests have been changed.}}
{{History|new 3ds}}
{{History||0.1.0|[[File:Minecart_with_Chest_JE3_BE1.png|32px]] [[File:Minecart_with_Chest_(item)_JE1_BE1.png|32px]] Added minecarts with chests.
|Minecarts with chests emit smoke [[particles]] when destroyed.}}
{{History|foot}}
==Issues==
{{issue list}}
==Gallery ==
<gallery>
Compact Minecart Storage.png|A compact storage using chest minecarts (left) compared to chest storage in the same volume. Notice how chests cannot be placed next to each other, which is no longer the case after Java Edition 1.13.
GlitchedMinecartChest.png|This minecart with chest is trapped inside a block, due to a [[stronghold]] and a [[mineshaft]] that generated partially overlapping.
Minecartportal.png|A minecart with chest generated on top of an [[end portal frame]], because there is a mineshaft behind the wall.
Chest Minecart Stack.png|A large stack of chest minecarts.
</gallery>
==References==
{{Reflist}}
{{items}}
{{entities}}
[[Category:Mechanics]]
[[Category:Storage]]
[[cs:Nákladní vozík]]
[[de:Güterlore]]
[[es:Vagoneta con cofre]]
[[fr:Wagonnet de stockage]]
[[hu:Tárolócsille]]
[[it:Carrello da miniera]]
[[ja:チェスト付きのトロッコ]]
[[ko:상자가 실린 광산 수레]]
[[nl:Mijnkar met kist]]
[[pl:Wagonik ze skrzynią]]
[[pt:Carrinho de mina com baú]]
[[ru:Вагонетка с сундуком]]
[[uk:Вагонетка зі скринею]]
[[zh:运输矿车]]</li></ul> | Added blocks that can be placed and destroyed. | ||||
| Added air, but internally isn't a block. | |||||
rd-160052{{Extension DPL}}<ul><li>[[White Dye|White Dye]]<br/>{{Item
| image = White Dye.png
| renewable = Yes
| stackable = Yes (64)
}}
'''White dye''' is a [[Dye#Primary|primary color dye]] similar to [[bone meal]].
== Obtaining ==
=== Crafting ===
{{Crafting
|showname=0
|Bone Meal
|Output=White Dye
|type=Material
|head=1
}}
{{Crafting
|Lily of the Valley
|Output=White Dye
|type=Material
|foot=1
}}
=== Loot chest ===
{{#invoke:LootChest|base3|white-dye}}
== Usage ==
{{dye usage}}
=== Crafting ingredient ===
{{crafting usage|ignore=Banner|continue=1}}
{{banner crafting usage}}
=== Loom ingredient ===
{{Banner loom usage|White Dye}}
=== Trading ===
Apprentice-level shepherd villagers have a 20% chance to buy 12 white dye for an emerald.
== Data values ==
=== ID ===
{{edition|java}}:
{{ID table
|edition=java
|showforms=y
|generatetranslationkeys=y
|displayname=White Dye
|spritetype=item
|nameid=white_dye
|form=item
|foot=1}}
{{edition|bedrock}}:
{{ID table
|edition=bedrock
|showaliasids=y
|shownumericids=y
|showforms=y
|notshowbeitemforms=y
|generatetranslationkeys=y
|displayname=White Dye
|spritetype=item
|nameid=white_dye
|aliasid=dye / 19
|id=410
|form=item
|translationkey=item.dye.white_new.name
|foot=1}}
== History ==
{{History|java}}
{{History||1.14|snap=18w43a|[[File:White Dye JE1 BE1.png|32px]] Added white dye.}}
{{History|||snap=18w44a|White dye can now change the text color on [[sign]]s to white.}}
{{History|||snap=19w05a|Added the [[wandering trader]], which sells white dye.}}
{{History|||snap=19w11a|White dye can now be [[trading|bought]] by shepherd villagers.}}
{{History||1.17|snap=20w45a|White dye can now be used to craft [[white candle]]s.}}
{{History|||snap=21w19a|White dyes can no longer be used to craft white candles.}}
{{History|||snap=Pre-release 1|White dye can once again be used to craft white candles.}}
{{History||1.20<br>(Experimental)|link=1.19.3|snap=22w42a|White dye can now change the text color on [[hanging sign]]s to white.}}
{{History||1.20|snap=23w12a|White dye can now be found in [[suspicious gravel]] and [[suspicious sand]] in [[trail ruins]].}}
{{History|||snap=23w16a|White dye no longer generates in [[suspicious sand]] in [[trail ruins]].|Due to the split of the archaeological loot tables for suspicious gravel within the [[trail ruins]]; white dye is now common loot.}}
{{History|bedrock}}
{{History||1.8.0|snap=beta 1.8.0.10|[[File:White Dye JE1 BE1.png|32px]] Added white dye.}}
{{History||1.9.0|snap=beta 1.9.0.0|Added [[flower|lilies of the valley]], which can be used to [[crafting|craft]] white dye.}}
{{History||1.11.0|snap=beta 1.11.0.4|White dye can now be [[trading|sold]] to shepherd [[villager]]s.}}
{{History||1.16.100|snap=beta 1.16.100.56|The ID of white dye has been changed from <code>dye/19</code> to <code>white_dye</code>.}}
{{History|ps4}}
{{History||1.83|[[File:White Dye JE1 BE1.png|32px]] Added white dye.}}
{{History|foot}}
== Issues ==
{{issue list}}
{{Items}}
[[Category:Items]]
[[Category:Dyes]]
[[Category:Renewable resources]]
[[de:Weißer Farbstoff]]
[[es:Tinte blanco]]
[[fr:Teinture blanche]]
[[ja:白色の染料]]
[[ko:하얀색 염료]]
[[pl:Biały barwnik]]
[[pt:Corante branco]]
[[zh:白色染料]]</li><li>[[Hopper|Hopper]]<br/>{{About|the block|the crash utility|Hopper (crash utility)}}
{{Block
|image=<gallery>
Hopper (D).png|Java
Hopper (D) BE.png|Bedrock
</gallery>
|extratext = View [[#Gallery|all renders]]
|transparent=Yes
|light=No
|tool=wooden pickaxe
|renewable=Yes
|stackable=Yes (64)
|flammable=No
|lavasusceptible=No
}}
A '''hopper''' is a low-capacity storage [[block]] that can be used to collect [[item (entity)|item entities]] directly above it, as well as to transfer [[item]]s into and out of other containers. A hopper can be locked with [[Redstone Dust|redstone power]] to stop it from moving items into or out of itself.
== Obtaining ==
=== Breaking ===
To obtain a hopper, {{control|mine}} it with a [[pickaxe]]. Using any other item to mine a hopper drops only its contents.
{{breaking row|horizontal=1|Hopper|Pickaxe|Wood|foot=1}}
===Crafting===
A hopper can be crafted from 5 iron ingots and a chest.
{{Crafting
|A1= Iron Ingot
|C1= Iron Ingot
|A2= Iron Ingot
|B2= Chest
|C2= Iron Ingot
|B3= Iron Ingot
|Output= Hopper
|type= Redstone
}}
==Usage==
{{see also|Tutorials/Hopper}}
[[File:Hopper aligment.png|Hoppers can face down or sideways.|thumb]]
A hopper can be used as a container, as a crafting ingredient, and as a redstone component.
A hopper has an "output" tube at its bottom that can face down or sideways and provides a visual indication of which block the hopper is set up to drop its items into, if that block has an inventory. To place a hopper, use the {{control|Place Block}} control while aiming at the surface to which its output should face (Hoppers ''do not'' orient themselves automatically). To place a hopper directly on the face of an already interactable block, the player can {{control|sneak}} while placing the hopper. Attempting to place a hopper aimed on the bottom face of a block instead faces downward. With some blocks, such as the [[furnace]] and [[brewing stand]], the hopper has multiple uses. A hopper does not change direction after placement, and it is not attached to the container it faces; the container can be removed or replaced, and the hopper remains unchanged.
Hoppers cannot be moved by [[piston]]s.{{only|java}} Despite not being a solid block, attached blocks such as [[rail]]s, [[lever]]s, [[tripwire]] and [[redstone]] dust can be placed on top of hoppers, but not on their sides.
===Container===
[[File:Hopper GUI.png|thumb|176px|Hopper GUI showing the hopper's five slots of inventory at the top and the player's inventory below.]]
A hopper can be used as a container and has 5 slots of inventory space.
To open the hopper GUI, use the {{control|use item|text=Use Item/Place Block}} [[control]]. To move items between the hopper inventory and the player inventory or hotbar while the hopper GUI is open, drag or shift-click the items. To exit the hopper GUI, use the {{key|Esc}} key, B button or circle button, depending on the device.
By default, the GUI of a hopper is labeled "Item Hopper". A hopper's GUI label can be changed by naming the hopper in an [[anvil]] before placing it, or, {{in|java}}, by using the [[Commands#data|data]] command (for example, to label a hopper at (0,64,0) "Steve's Hopper", use <code>/data merge block 0 64 0 {CustomName:'"Steve's Hopper"'}</code>).
{{IN|java}}, a hopper's GUI can be "locked" (or subsequently unlocked) by setting the hopper's <code>Lock</code> tag with the [[Commands#data|data]] command. If a hopper's <code>Lock</code> tag is not blank, the hopper cannot be accessed except by players holding an item with the same name as the <code>Lock</code> tag's text. For example, to lock a hopper at (0,64,0) so that only players holding an item named "Steve's Key" can access the hopper, use <code>/data merge block 0 64 0 {Lock:"Steve's Key"}</code>.
===Crafting ingredient===
A hopper can be used to craft a [[minecart with hopper]].
{{crafting usage}}
===Redstone component===
{{see also|Redstone circuit|Redstone components#Hopper}}
[[File:Hopper logic flowchart.png|thumb|Flowchart of hopper logic]]
While a hopper is ''not'' powered by redstone signals, it operates with three functions:
*'''Collect''' [[Item (entity)|item entities]] (free-floating items in the world) into its inventory from the space above it
*'''Pull''' a single item into its inventory from a container above it
*'''Push''' a single item from its own inventory into a container it faces
A hopper first attempts to push any items inside it. Afterward, it checks if the block above it is a type of container. If so, it attempts to pull from it. Otherwise, the hopper attempts to collect item entities. Notably, hoppers can push to and pull from other hoppers, forming '''hopper pipes''' or '''hopper chains''', which allow transporting items across several blocks and are further discussed below.
====Redstone signals====
When a hopper receives a redstone signal (and is considered to be "activated"), all three functions stop. To avoid confusion over the terms "activated" and "deactivated", powered hoppers are often described as being '''locked''' and unpowered hoppers described as being '''unlocked'''. Hoppers can be powered by [[Redstone_mechanics#Power|soft powered]] blocks, meaning a [[redstone dust]] trail pointing into a block touching the hopper locks it just as effectively as a [[redstone block]] or any other [[Redstone components#Power components|power component]] touching the hopper. When the hopper is unlocked during a redstone tick, it does not push or pull/collect during the same tick, but has a delay of 1 redstone tick instead.
While a locked hopper does not push or pull/collect items, it may still receive items from [[dispenser]]s, [[dropper]]s and other hoppers, and may have its items pulled out by another hopper beneath it. Hence, the item flow in a horizontal hopper pipe may be stopped by locking just one of the hoppers, but stopping a vertical hopper pipe requires locking two adjacent hoppers at the same time, such that both the pushing of the top one and the pulling of the bottom one are stopped.
A hopper does not output any redstone signals by itself, but its fullness can be read using a [[Redstone Comparator|redstone comparator]], which needs to be placed next to it and facing away from it. An empty hopper outputs a signal strength of 0 and a completely full hopper outputs a signal strength of 15. Notably, a single stackable item (16 or 64) outputs a signal strength of 1 and a single non-stackable item outputs a signal strength of 3.
{{IN|Java}}, if the hopper being read is part of a horizontal hopper pipe, the comparator can individually read each item passing through the chain, because items are pushed through the hoppers one by one at a speed that is manageable by the comparator. If there is an uninterrupted stream of items, the comparator does not switch off in between items. On the other hand, in a vertical hopper pipe, some of the hoppers may never produce a reading above 0, even with a continuous stream of items, because pushes and pulls both occur in the same game tick: The hoppers' items get pulled out a single game tick after they're pushed in and this isn't measurable by a comparator, because comparators need measurements lasting at least 1.5 redstone ticks to produce a reading.
====Collecting items====
A hopper collects items dropped on top of it if the space above the hopper not occupied by a storage block. Items are gathered from the entire 1 block space above the hopper, meaning that items sitting on partial blocks such as [[soul sand]] directly above a hopper can be collected.<ref>https://bugs.mojang.com/browse/MCPE-55824</ref> It is also possible for a hopper to collect items from inside a full, solid block, a situation that might come from items rising up through solid blocks or being [[commands/summon|summoned]]. Item entities are not collected when they are outside of the collection area however; for example, items on top of a stone block directly above a hopper are not collected. Collected items are placed in the leftmost empty slot of a hopper's inventory.
{{IN|java}}, if there is no container above the hopper, then the hopper collects dropped items in the order in which they landed on the hopper. This order is remembered even while a hopper is locked. For instance, if a hopper is locked under a carpet while a fully equipped [[armor stand]] is broken above it, then it always collects items in this order when it is unlocked: [[armor stand]], [[boots]], [[leggings]], [[chestplates]], [[helmets]]. This is due to the order in which these items land.{{Verify|Wouldn't this be due to the order in which the game creates the item entities that drop drop from the armor stand?}} {{IN|Bedrock}}, hoppers do not remember the order in which items land on the hopper. Instead, hoppers with multiple dropped items above them collect the items in the order in which they entered the chunk in which the hopper is located. Items that drop from a broken armor stand are collected in a random order.<ref>https://bugs.mojang.com/browse/MCPE-120586</ref>
Hoppers usually check for dropped items every [[game tick]] and they can collect items even before they are picked up by a [[player]]{{Verify|Does this happen always, or sometimes, and in Java only or also in Bedrock?}} or destroyed by [[lava]]. However, {{In|Bedrock}} hoppers have a "collection cooldown" time. After collecting an item (or stack of items), a hopper waits {{tooltip|4 redstone ticks|8 game ticks}} (0.4 seconds, barring lag) before attempting to collect again.
Hoppers collect groups of items all at once rather than collecting them as single items one at a time. As a result, hoppers can collect item entities much faster than they can pull items from a container. Pulling from a moving [[minecart with chest]] or [[minecart with hopper]] is even slower, since the minecart is not always above the hopper.
====Pushing and pulling items====
A hopper with a storage container above it (such as a [[furnace]], [[chest]], [[dropper]], [[composter]], or another hopper) attempts to pull from the container instead of checking for floating items above it, and hence can not collect items. A hopper always tries to push or pull items using the leftmost available slot. When a hopper is removing items from a chest, the items disappear from left to right. Similarly, when filling up a chest, the chest fills up from left to right. Hoppers prioritize pulling from the first slot of a container over pulling into the first hopper slot. If a hopper has stone in its first slot and nothing in its second while the container it is pulling from has chicken in its first slot but stone in the second, the hopper pulls the chicken from the first slot of the container into its empty second slot. However, if the hopper is unable to pull the chicken, such as if all slots are filled with stone, the hopper pulls the stone from the second slot of the container instead. Similarly, hoppers prioritize pushing from their first slot over pushing into the first slot of a container. If a hopper has stone in its first slot and chicken in its second while the container it is pushing to has chicken it its first slot but stone in the second, the hopper pushes stone from its first slot into the second slot of the container.
In [[Java Edition]] the checks done by a hopper while pulling generally require less processing than the checks done by a hopper attempting collection. Therefore, a chain of hoppers topped with storage containers rather than air/solid blocks has better performance (measured as milliseconds of processing per tick) and lower potential for processing lag. <ref name=":0">https://www.youtube.com/watch?v=LC3ZOOI1Rf0</ref> The performance improvement achieved is correlated with the number of storage slots the container has. Placing composters (with no storage slots but still with custom output logic) on top of hoppers provide the greatest efficiency, while double chests actually degrade performance, even when sharing each double chest across two hoppers.<ref name=":0" /> In [[Bedrock Edition]] a chain of hoppers with air or non-container blocks on top has better performance than a chain of hoppers topped by container blocks.<ref>https://cdn.discordapp.com/attachments/715523208530362389/890030941282631741/Redstone_MSPT_measure.xlsx</ref> This may be because, even though hoppers with containers on top do not check for items, they do check for hopper-minecarts and chest-minecarts to pull from, and that involves scanning the chunk entity list.<ref>{{bug|MCPE-109449}}</ref>
{{Schematic|caption='''Push then Pull'''
Chest A is full of items while the hopper and Chest B are empty.
|ch-$+A||-
|ho-$e|ch-$+B
}}
Item pushes and pulls are processed in the same game tick, but pushes are processed before pulls. In the schematic, the empty hopper first pulls an item from chest A as it cannot push anything into chest B. After the cooldown, the hopper first pushes its item into chest B before pulling another item from chest A, both pushing and pulling in the same tick, and the process repeats. The hopper stops pulling when A is empty, and stops pushing when B becomes full.
Hoppers also have a "transfer cooldown" time. After pulling and/or pushing items, a hopper waits {{tooltip|4 redstone ticks|8 game ticks}} (0.4 seconds, barring lag) before pulling or pushing again (a transfer rate of 2.5 items per second, barring lag). A hopper that has an item pushed into it from another hopper also starts a 4 tick cooldown period, regardless of whether it pushed or pulled items itself. Item entities can be collected at any time without affecting the transfer cooldown time. The transfer cooldown and the Bedrock Edition collection cooldown are independent of each other.
====Container interactions====
Some [[container]]s interact with hoppers in specific ways:
:;{{BlockLink|Composter}}
::Hoppers above composters can push compostable items into the composter's top face with a chance of increasing the level of the composter as if the player used the item on the composter. Items that are not compostable cannot be pushed into the composter. Hoppers below the composter can pull [[bone meal]] when the composter is in stage 8, emptying the composter and resetting it to stage 0. Hoppers to the side of a composter do not interact with it.
:;{{BlockLink|Brewing Stand}}
::A working hopper on the top face of a brewing stand deposits only into the ingredient slot and it can push only valid [[brewing]] ingredients. A hopper on side face of a brewing stand can deposit only [[blaze powder]] or filled bottles into the three brew slots. A hopper underneath a brewing stand always extracts from the three brew slots, whether brewing is finished or not—The hopper must be locked to allow potions to finish brewing.
:;{{BlockLink|Chest}}
:;{{BlockLink|Trapped Chest}}
::Large chests and large trapped chests are treated as a single container: A hopper depositing into a large chest fills up the entire chest and a hopper underneath a large chest empties the entire chest. Trapped chests being accessed by a player lock any adjacent hoppers, per the standard behavior of a hopper next to an active power source.
:;{{BlockLink|Furnace}}
:;{{BlockLink|Blast Furnace}}
:;{{BlockLink|Smoker}}
::A working hopper pointing into top of a furnace deposits only into the ingredient slot. It can push any item, including items that can't be smelted by the furnace. A hopper pointing into the side of a furnace deposits into the fuel slot, and only items that are usable as fuel. A hopper below a furnace pulls everything from the output slot and empty [[bucket]]s from the fuel slot left over from using [[lava bucket]]s as fuel. When a hopper removes items from a furnace, the experience points are 'stored' in the furnace until a player removes at least one smelted item, or the furnace block is broken.
:;{{BlockSprite|Hopper}} Hopper
::A sequence of three or more hoppers, each pushing items into the next, is called a '''hopper pipe'''. Working horizontal hopper pipes simply push items into each other at the expected rate of 2.5 items per second, but vertical hopper pipes are more complicated, as the hoppers are trying both to pull and to push. When a vertical pipe pulls from a single container, it simply transfers items at 2.5 items per second because the transfer rate is limited by the first hopper pulling items from the container. If a ''stack of items'' is in a vertical pipe, the items can be transferred twice as fast, because the hopper with the item stack is pushing items down while the hopper below it is also pulling items down.
:;{{EntityLink|Minecart with Chest}}
:;{{EntityLink|Minecart with Hopper}}
::Unlocked hoppers fill chest minecarts and hopper minecarts if any part of the entity's hitbox is within the hopper's target block-space. Hopper minecarts try to pull items from the hopper at high speed. Hoppers can pull items from minecarts above them so rails can be placed directly on the top faces of a hoppers. If a [[detector rail]] is in the right position, it could lock the hopper per standard redstone-hopper behavior.
:;{{BlockLink|Jukebox}}
::Hoppers can insert [[music disc]]s into jukeboxes, and extract the music discs after they finish playing.
:;{{BlockLink|Shulker Box}}
::Hoppers cannot put shulker boxes into other shulker boxes. This allows for the creation of certain [[Tutorials/Hopper#Potions and shulker boxes|item filters]].
::Otherwise, hoppers interact with shulker boxes normally.
:;{{BlockLink|Lectern}}
::Hoppers cannot remove or place books on lecterns. The redstone pulse emitted from a lectern when a page is turned can temporarily lock hoppers.
:;{{BlockLink|Ender Chest}}
::Hoppers cannot interact with ender chests in any way.
:;{{BlockLink|Barrel}}
:;{{BlockLink|Dispenser}}
:;{{BlockLink|Dropper}}
:;{{EntityLink|Boat with Chest}}
::Hoppers interact normally with barrels, dispensers, droppers, and boats with chests.
:;{{BlockLink|Chiseled Bookshelf}}
::Hoppers and minecart with hoppers can insert and remove books from the bookshelf. As with any other container, items are taken from the first slot that has an item that can fit in the hopper and are inserted into the first empty slot.
==Sounds==
===Generic===
{{Sound table/Block/Metal}}
===Unique===
{{Edition|Java}}:
{{Sound table
|sound=Door close.ogg
|sound2=Door open.ogg
|subtitle=Chest locked<ref group=sound name=lock>{{Bug|MC-98316||Wrong subtitles caused by missing distinction}}</ref>
|source=block
|description=When a player attempts to open a hopper locked using the {{nbt|string|Lock}} tag
|id=block.chest.locked|idnote=<ref group=sound name=lock/>
|translationkey=subtitles.block.chest.locked|translationkeynote=<ref group=sound name=lock/>
|volume=1.0
|pitch=1.0
|distance=16
|foot=1}}
{{Edition|Bedrock}}: ''None''
==Data values==
===ID===
{{edition|java}}:
{{ID table
|edition=java
|showforms=y
|generatetranslationkeys=y
|displayname=Hopper
|spritetype=block
|nameid=hopper
|foot=1}}
{{ID table
|displayname=Block entity
|spritename=hopper
|spritetype=block
|nameid=hopper
|foot=1}}
{{edition|bedrock}}:
{{ID table
|edition=bedrock
|firstcolumnname=Hopper
|shownumericids=y
|showforms=y
|generatetranslationkeys=y
|displayname=Block
|spritename=hopper
|spritetype=block
|nameid=hopper
|id=154
|form=block
|itemform=item.hopper}}
{{ID table
|displayname=Item
|spritename=hopper
|spritetype=item
|nameid=hopper
|id=527
|form=item
|translationkey=tile.hopper.name
|foot=1}}
{{ID table
|notnamespaced=y
|displayname=Block entity
|spritename=hopper
|spritetype=block
|nameid=Hopper
|foot=1}}
===Block states===
{{see also|Block states}}
{{/BS}}
===Block data===
A hopper has a block entity associated with it that holds additional data about the block.
{{el|java}}:
{{see also|Block entity format}}
{{/BE}}
{{el|bedrock}}:
:See [[Bedrock Edition level format/Block entity format]].
==Achievements==
{{load achievements|Freight Station;Smelt Everything}}
==Video==
<div style="text-align:center">{{yt|XO0IKUsGiG8}}</div>
==History==
{{History|java}}
{{History||1.5|snap=13w01a|[[File:Hopper (D) JE1.png|32px]] [[File:Hopper (N) JE1.png|32px]] [[File:Hopper (E) JE1.png|32px]] [[File:Hopper (S) JE1.png|32px]] [[File:Hopper (W) JE1.png|32px]] [[File:Hopper (U) JE1.png|32px]] Added hoppers.
|Hoppers with the [[damage]] value of 1, which are obtainable only through world editing, visually point in no direction. They functionally push items upward, however the behavior is inconsistent.
|[[File:Hopper (item) JE1.png|32px]] There is currently a temporary "work in progress" sprite for hoppers in the [[inventory]].
|Hoppers can be [[crafting|crafted]] from a [[chest]] and [[stone]] blocks with the following recipe:
{{{!}} class{{=}}"collapsible collapsed"
! Recipe
{{!}}-
{{!}}
{{Crafting Table
|A1= Stone
|C1= Stone
|A2= Stone
|B2= Chest
|C2= Stone
|B3= Stone
|Output= Hopper
}}
{{!}}}
}}
{{History|||snap=13w01b|[[Rail]]s can now be placed on top of hoppers.
|Hoppers no longer load [[item]]s into [[minecart]]s without [[chest]]s.}}
{{History|||snap=13w02a|[[File:Hopper (item) JE2 BE1.png|32px]] The [[inventory]] sprite of hoppers has been changed.
|[[File:Hopper (item) 13w02a.png|32px]] However, the [[item]] of hoppers appears bugged if [[drops|dropped]] or placed in an [[item frame]].<ref>{{bug|MC-6737}}</ref> This may be due to the game attempting to pull the item sprite from the hopper's equivalent spot in <samp>[[stitched_terrain.png]]</samp> (compare files: [[:File:13w02a stitched terrain.png|terrain]], [[:File:13w02a stitched items.png|items]]), a region which contains parts of the oak planks, end stone and iron bars textures.
|Applying a [[redstone]] signal to a hopper now deactivates the hopper until the signal is removed.
|Hoppers can no longer be used as [[fuel]] in a [[furnace]].
|Hoppers are now [[crafting|crafted]] using 5 [[iron ingot]]s rather than 5 [[stone]] blocks.
{{{!}} class{{=}}"collapsible collapsed"
! Recipe
{{!}}-
{{!}}
{{Crafting
|A1= Iron Ingot
|C1= Iron Ingot
|A2= Iron Ingot
|B2= Chest
|C2= Iron Ingot
|B3= Iron Ingot
|Output= Hopper
}}
{{!}}}
|Hoppers now pull only from the output slot of [[furnace]]s.
|Hoppers now output 1 signal strengh per 1/3 of a stack (21 [[item]]s) when interacting with a [[redstone comparator]].
|[[File:Hopper (D) JE2.png|32px]] [[File:Hopper (N) JE2.png|32px]] [[File:Hopper (E) JE2.png|32px]] [[File:Hopper (S) JE2.png|32px]] [[File:Hopper (W) JE2.png|32px]] [[File:Hopper (U) JE2.png|32px]] The texture of hoppers has been given a unique texture. Hoppers no longer use the [[cauldron]] texture. Note that the top texture does not rotate with facing direction.
|The preferred tool is now a pickaxe, rather than the axe.}}
{{History|||snap=13w02b|Hoppers now treat large [[chest]]s properly, no longer needing two hoppers connected to them to fill up the entire [[inventory]].
|Hoppers no longer take [[item]]s from containers when powered via a [[redstone]] current.
|Hoppers now display correctly as a [[drops|dropped]] or [[item frame|frame]] [[item]].}}
{{History|||snap=13w03a|Hoppers are now used to [[crafting|craft]] a [[minecart with hopper]].
|Hoppers can now empty a [[minecart with hopper]].}}
{{History|||snap=13w04a|The transfer rate of hoppers has been changed from 7 to 8 [[game tick]]s per [[item]] (2.5 items per second).}}
{{History||1.5.1|snap=pre|Hoppers now take empty [[bucket]]s out of furnace fuel slots.}}
{{History||1.7.2|snap=release|[[File:Hopper (D) JE3.png|32px]] [[File:Hopper (N) JE3.png|32px]] [[File:Hopper (E) JE3.png|32px]] [[File:Hopper (S) JE3.png|32px]] [[File:Hopper (W) JE3.png|32px]] [[File:Hopper (U) JE3.png|32px]] The UV of all blocks is broken on certain sides as a result of {{bug|MC-37106}} (few cases are listed on the wiki so far - this is a future project). This includes hoppers.}}
{{History||1.7.4|snap=13w47a|[[File:Hopper (D) JE4.png|32px]] [[File:Hopper (N) JE4.png|32px]] [[File:Hopper (E) JE4.png|32px]] [[File:Hopper (S) JE4.png|32px]] [[File:Hopper (W) JE4.png|32px]] [[File:Hopper (U) JE4.png|32px]] MC-37106 has been fixed, reverting hoppers to their pre-1.7.2 appearences.}}
{{History|||snap=13w48a|This version fixed {{bug|MC-190}}, which hoppers were allegedly subject to since their introduction. However, a comparison of hopper UV in 13w02a and 14w08a failed to reveal any visible differences, even accounting for the example images on the ticket. More research is needed on this matter.}}
{{History||1.8|snap=?|Hoppers no longer generate [[multiplayer]] lag when idle.}}
{{History|||snap=14w10a|[[File:Hopper (D) JE5.png|32px]] [[File:Hopper (N) JE5.png|32px]] [[File:Hopper (E) JE5.png|32px]] [[File:Hopper (S) JE5.png|32px]] [[File:Hopper (W) JE5.png|32px]] [[File:Missing Model JE2.png|32px]] Hoppers now use block models rather than having a hardcoded shape. This brings multiple changes: the inside texture now rotates with the hopper rather than being constant, the inside planes of hoppers are now shaded/have ambient occlusion, and some minor UV changes have occurred, notably on the smallest cuboid. The directionless hopper also [[Missing model|no longer has a model]].}}
{{History|||snap=14w26a|The directionless hopper has been removed.}}
{{History|||snap=14w31a|Hoppers now no longer use wood [[sound]]s.<ref>{{bug|MC-5991}}</ref>}}
{{History||1.9|snap=15w33c|A hopper now generates as a part of the [[end ship]] in the [[end city|end cities]].}}
{{History|||snap=15w41a|End ships no longer contain a hopper.}}
{{History|||snap=15w43a|[[Loot table]]s have been added; hoppers can now use loot tables.}}
{{History|||snap=15w43c|[[File:Hopper (D) JE6.png|32px]] [[File:Hopper (N) JE6.png|32px]] [[File:Hopper (E) JE6.png|32px]] [[File:Hopper (S) JE6.png|32px]] [[File:Hopper (W) JE6.png|32px]] The UV on the hopper model has changed, resulting in minor differences, particularly to the smallest cuboid. This is likely due to the fix for {{bug|MC-73401}}.}}
{{History|||snap=15w44a|[[File:Hopper (D) JE7.png|32px]] [[File:Hopper (N) JE7.png|32px]] [[File:Hopper (E) JE7.png|32px]] [[File:Hopper (S) JE7.png|32px]] [[File:Hopper (W) JE7.png|32px]] A mapping issue introduced in the previous snapshot for the sides of the large funnel region has been fixed. This may be due to the fix for {{bug|MC-50344}}.}}
{{History||1.9.1|snap=pre1|A hopper can now push into and pull [[item]]s from a blocked [[chest]].}}
{{History||1.13|snap=17w47a|Prior to [[1.13/Flattening|''The Flattening'']], this [[block]]'s numeral ID was 154.}}
{{History||1.14|snap=18w43a|[[File:Hopper (D) JE8.png|32px]] [[File:Hopper (N) JE8.png|32px]] [[File:Hopper (E) JE8.png|32px]] [[File:Hopper (S) JE8.png|32px]] [[File:Hopper (W) JE8.png|32px]]<br>[[File:Hopper (item) JE3 BE2.png|32px]] The textures of hoppers have been changed.}}
{{History|||snap=19w03c|Hoppers now use correct cullface arguments, and some redundant faces have also been deleted.}}
{{History||1.19|snap=22w13a|Hoppers no longer drop when breaking a [[minecart with hopper]].}}
{{History||1.19.4|snap=23w07a|Hoppers can now interact with jukeboxes.}}
{{History|pocket alpha}}
{{History||v0.14.0|snap=build 1|[[File:Hopper (D) JE2.png|32px]]{{verify|Is this model correct?}}<br>[[File:Hopper (item) JE2 BE1.png|32px]] Added hoppers. Upward hoppers also exist.}}
{{History||v0.15.0|snap=build 1|Hoppers can now be moved by [[piston]]s.}}
{{History|bedrock}}
{{History||1.10.0|snap=beta 1.10.0.3|[[File:Hopper (D) BE.png|32px]] [[File:Hopper (N) BE.png|32px]] [[File:Hopper (E) BE.png|32px]] [[File:Hopper (S) BE.png|32px]] [[File:Hopper (W) BE.png|32px]] [[File:Hopper (U) BE.png|32px]]<br>[[File:Hopper (item) JE3 BE2.png|32px]] The textures of hoppers have been changed.}}
{{History||1.19.70|snap=beta 1.19.70.20|Hoppers can now collect items through all blocks that have a lower height than a full block.}}
{{History|console}}
{{History||xbox=TU19|xbone=CU7|ps=1.12|wiiu=Patch 1|switch=1.0.1|[[File:Hopper (D) JE2.png|32px]]{{verify|Is this model correct?}}<br>[[File:Hopper (item) JE2 BE1.png|32px]] Added hoppers.}}
{{History||xbox=none|xbone=none|ps=1.90|wiiu=none|switch=none|[[File:Hopper (D) JE8.png|32px]]{{verify|Is this model correct?}}<br>[[File:Hopper (item) JE3 BE2.png|32px]] The textures of hoppers have been changed.}}
{{History||ps=1.91|Hoppers can now fill [[composter]]s.}}
{{History|new 3ds}}
{{History||0.1.0|[[File:Hopper (D) JE2.png|32px]]{{verify|Is this model correct?}}<br>[[File:Hopper (item) JE2 BE1.png|32px]] Added hoppers.}}
{{History|foot}}
==Issues==
{{Issue list}}
==Trivia==
* A [[wikipedia:Hopper (particulate collection container)|real-world hopper]] is a large, pyramidal or cone-shaped container used in industrial processes to hold particulate matter, like dust, gravel, nuts, seeds, etc., and can then dispense them from the bottom.
* A hopper can transfer 9000 items per hour, or 150 items per minute.
==Gallery==
=== Renders ===
<gallery>
Hopper (N).png
Hopper (E).png
Hopper (S).png
Hopper (W).png
</gallery>
<gallery>
Hopper (N) BE.png
Hopper (E) BE.png
Hopper (S) BE.png
Hopper (W) BE.png
</gallery>
=== Screenshots ===
<gallery>
File:Hopper screenshot 1.png|In snapshot 13w01a, the hopper item uses a 'WIP' sprite, though the item still read "Hopper".
File:13w02a Banner.png|The 13w02a Banner includes a [[minecart with TNT]] and a hopper.
</gallery>
==References==
{{Reflist}}
{{Redstone}}
{{Blocks|Utility}}
{{Items}}
[[Category:Mechanisms]]
[[Category:Redstone mechanics]]
[[Category:Mechanics]]
[[Category:Storage]]
[[Category:Utility blocks]]
[[Category:Manufactured blocks]]
[[Category:Block entities]]
[[cs:Násypka]]
[[de:Trichter]]
[[el:Hopper]]
[[es:Tolva]]
[[fr:Entonnoir]]
[[it:tramoggia]]
[[ja:ホッパー]]
[[ko:호퍼]]
[[nl:Trechter]]
[[pl:Lej]]
[[pt:Funil]]
[[ru:Загрузочная воронка]]
[[uk:Лійка]]
[[zh:漏斗]]</li></ul> | There is now support for different block types. | ||||
| New particles are now shown when destroying a block. | |||||
| New support for dynamic blocks. | |||||
| Added pick blocks functionality. | |||||
| classic | |||||
| ? | Added multiple sounds for blocks. | ||||
| August 4, 2009 | Breaking blocks allows picking them up and place them, thus adding and removing them from the inventory. | ||||
| August 14, 2009 | The requirement to have to hold down the mouse button to break blocks, creating a block-breaking animation, was first shown. | ||||
0.27 SURVIVAL TEST{{Extension DPL}}<ul><li>[[Raw Beef|Raw Beef]]<br/>{{Item
| title = Raw Beef
| image = Raw Beef.png
| heals = {{hunger|3}}
| renewable = Yes
| stackable = Yes (64)
}}
'''Raw beef''' is a [[food]] item that can be eaten by the [[player]] or cooked in a [[furnace]], [[smoker]], or [[campfire]] to make [[steak]].
== Obtaining ==
=== Mob loot ===
When adult [[cow]]s and [[mooshroom]]s are killed, they drop 1-3 raw beef. The maximum amount is increased by 1 per level of [[Looting]], for a maximum of 1-6 with Looting III. If killed while on fire, they drop [[steak]] instead.
=== Chest loot ===
{{LootChestItem|raw-beef}}
== Usage ==
=== Food ===
To eat raw beef, press and hold {{control|use}} while it is selected in the hotbar. Eating one restores {{hunger|3}} hunger and 1.8 hunger [[Hunger#Mechanics|saturation]].
=== Smelting ingredient ===
{{Smelting
|showname=1
|Raw Beef
|Steak
|0.35
}}
=== Wolves ===
Raw beef can be used to [[breed]] and heal tamed [[wolves]], lead them around, and make baby tamed wolves grow up faster by 10% of the remaining time.
=== Trading ===
Journeyman-level Butcher villagers have a 50% chance to buy 10 raw beef for an emerald.{{only|bedrock}}
Journeyman-level Butcher villagers always offer buy 10 raw beef for an emerald.{{only|java}}
==Sounds==
{{Sound table/Entity/Food}}
== Advancements ==
{{load advancements|Husbandry;A Balanced Diet}}
== Data values ==
=== ID ===
{{edition|java}}:
{{ID table
|edition=java
|showforms=y
|generatetranslationkeys=y
|displayname=Raw Beef
|spritetype=item
|nameid=beef
|form=item
|foot=1}}
{{edition|bedrock}}:
{{ID table
|edition=bedrock
|shownumericids=y
|showforms=y
|notshowbeitemforms=y
|generatetranslationkeys=y
|displayname=Raw Beef
|spritetype=item
|nameid=beef
|id=273
|form=item
|foot=1}}
== History ==
{{History|java beta}}
{{History||1.8|snap=Pre-release|[[File:Raw Beef JE1 BE1.png|32px]] Added raw beef.|Raw beef is one of the new [[food]] items, [[drops|dropped]] by [[cow]]s in addition to their [[leather]].}}
{{History|java}}
{{History||1.2.1|snap=12w03a|Raw beef can now be used to breed wolves.}}
{{History||1.3.1|snap=12w21a|Raw beef can now be [[trading|sold]] to butcher [[villager]]s, at 14–17 raw beef for 1 [[emerald]].}}
{{History|||snap=1.3|[[File:Raw Beef JE2.png|32px]] The texture of raw beef has been changed.}}
{{History||1.4.2|snap=12w37a|[[File:Raw Beef JE3 BE2.png|32px]] The texture of raw beef has been changed, so that it no longer has a dark outline.}}
{{History||1.8|snap=14w02a|[[Villager]]s no longer [[trading|trade]] for raw beef.}}
{{History||1.13|snap=17w47a|Prior to [[1.13/Flattening|''The Flattening'']], this [[item]]'s numeral ID was 363.}}
{{History||1.14|snap=18w43a|[[File:Raw Beef JE4 BE3.png|32px]] The texture of raw beef has been changed.}}
{{History|||snap=18w49a|Raw beef can now be found in [[chest]]s in [[village]] butcher shops.}}
{{History|||snap=19w11a|Butcher [[villager]]s now [[trading|buy]] raw beef.}}
{{History|pocket alpha}}
{{History||v0.4.0|[[File:Raw Beef JE1 BE1.png|32px]] Added raw beef.}}
{{History||v0.5.0|Raw beef now restores {{hp|3}} instead of {{hp|1}}.}}
{{History||v0.8.0|snap=build 1|[[File:Raw Beef JE3 BE2.png|32px]] The texture of raw beef has been changed, so that it no longer has a dark outline.}}
{{History||v0.9.0|snap=build 1|Raw beef has been added to [[Creative]] mode.}}
{{History||v0.12.1|snap=build 1|Raw beef now restores [[hunger]] instead of [[health]].}}
{{History|bedrock}}
{{History||1.10.0|snap=beta 1.10.0.3|[[File:Raw Beef JE4 BE3.png|32px]] The texture of raw beef has been changed.}}
{{History||1.11.0|snap=beta 1.11.0.1|Raw beef can now be found in [[village]] butcher [[chest]]s.}}
{{History|||snap=beta 1.11.0.4|Raw beef can now be [[trading|sold]] to butcher [[villager]]s.}}
{{History|console}}
{{History||xbox=TU5|xbone=CU1|ps=1.0|wiiu=Patch 1|[[File:Raw Beef JE1 BE1.png|32px]] Added raw beef.}}
{{History||xbox=TU12|[[File:Raw Beef JE3 BE2.png|32px]] The texture of raw beef has been changed, so that it no longer has a dark outline.}}
{{History||xbox=none|xbone=none|ps=1.90|wiiu=none|switch=none|[[File:Raw Beef JE4 BE3.png|32px]] The texture of raw beef has been changed.}}
{{History|New 3DS}}
{{History||0.1.0|[[File:Raw Beef JE3 BE2.png|32px]] Added raw beef.}}
{{History|foot}}
== Issues ==
{{issue list}}
== Gallery ==
<gallery>
File:Jeb steak.png|Raw Beef and [[Steak]] in a preview screenshot.
</gallery>
{{Items}}
[[de:Rohes Rindfleisch]]
[[es:Filete crudo]]
[[fr:Bœuf cru]]
[[hu:Nyers marhahús]]
[[ja:生の牛肉]]
[[ko:익히지 않은 소고기]]
[[nl:Rauwe biefstuk]]
[[pl:Surowa wołowina]]
[[pt:Bife cru]]
[[ru:Сырая говядина]]
[[uk:Сира яловичина]]
[[zh:生牛肉]]
[[Category:Food]]
[[Category:Renewable resources]]</li><li>[[Beetroot Soup|Beetroot Soup]]<br/>{{for|other uses|Soup}}
{{Item
| title = Beetroot Soup
| image = Beetroot Soup.png
| renewable = Yes
| heals = {{hunger|6}}
| stackable = No
}}
'''Beetroot soup''' is an unstackable [[food]] item.
== Obtaining ==
=== Crafting ===
{{Crafting
|Beetroot
|Beetroot
|Beetroot
|Beetroot
|Beetroot
|Beetroot
|Bowl
|Output=Beetroot Soup
|type=Foodstuff
}}
=== Natural generation ===
{{LootChestItem|beetroot-soup}}
== Usage ==
Beetroot soup can be eaten to restore {{hunger|6}} [[hunger]] points and 7.2 [[Hunger#Mechanics|saturation]], the same as [[cooked chicken]] and [[mushroom stew]]. After eating, the empty [[bowl]] remains, similarly to mushroom stew and [[rabbit stew]].
== Sounds ==
{{Sound table/Entity/Food}}
== Data values ==
=== ID ===
{{edition|java}}:
{{ID table
|edition=java
|showforms=y
|generatetranslationkeys=y
|displayname=Beetroot Soup
|spritetype=item
|nameid=beetroot_soup
|form=item
|foot=1}}
{{edition|bedrock}}:
{{ID table
|edition=bedrock
|shownumericids=y
|showforms=y
|notshowbeitemforms=y
|generatetranslationkeys=y
|displayname=Beetroot Soup
|spritetype=item
|nameid=beetroot_soup
|id=286
|form=item
|foot=1}}
== Advancements ==
{{load advancements|Husbandry;A Balanced Diet}}
== History ==
{{History|java}}
{{History||1.9|snap=15w31a|[[File:Beetroot Soup JE1 BE1.png|32px]] Added beetroot soup.}}
{{History||1.13|snap=17w47a|Prior to [[1.13/Flattening|''The Flattening'']], this [[item]]'s numeral ID was 436.}}
{{History||1.14|snap=18w43a|[[File:Beetroot Soup JE2 BE2.png|32px]] The texture of beetroot soup has been changed.
|The recipe for beetroot soup is now shapeless.}}
{{History|||snap=18w49a|Beetroot soup can now be found in [[chest]]s in [[snowy tundra]] [[village]] houses.}}
{{History|pocket alpha}}
{{History||November 14, 2013|link={{tweet|jbernhardsson|400902957782147072}}|[[Johan Bernhardsson]] posts an image of beetroot soup.}}
{{History||v0.8.0|snap=build 2|[[File:Beetroot Soup JE1 BE1.png|32px]] Added beetroot soup. It is not obtainable in the Creative inventory.}}
{{History||v0.9.0|snap=build 1|Beetroot soup now requires 6 [[beetroot]]s instead of 4.}}
{{History||v0.12.1|snap=build 12|Beetroot soup now restores {{hunger|6}} instead of {{health|8}}.}}
{{History||v0.13.0|snap=build 3|Beetroot soup can now be stacked.}}
{{history|pocket}}
{{History||1.0.0|snap=alpha 0.17.0.1|Beetroot soup has been added to the Creative inventory.<ref name="missing beetroot soup">{{Bug|MCPE-13804}}</ref>}}
{{History|bedrock}}
{{History||1.10.0|snap=beta 1.10.0.3|[[File:Beetroot Soup JE2 BE2.png|32px]] The texture of beetroot soup has been changed.
|The recipe for beetroot soup is now shapeless.}}
{{History||1.11.0|snap=beta 1.11.0.1|Beetroot soup can now be found in [[snowy tundra]] [[village]] house [[chest]]s.}}
{{History|console}}
{{History||xbox=TU43|xbone=CU33|ps=1.36|switch=1.0.1|wiiu=Patch 13|[[File:Beetroot Soup JE1 BE1.png|32px]] Added beetroot soup.}}
{{History||xbox=none|xbone=none|ps=1.90|wiiu=none|switch=none|[[File:Beetroot Soup JE2 BE2.png|32px]] The texture of beetroot soup has been changed.
|The recipe for beetroot soup is now shapeless.}}
{{History|new 3ds}}
{{History||0.1.0|[[File:Beetroot Soup JE1 BE1.png|32px]] Added beetroot soup.
|Beetroot soup is not available within the [[Creative inventory]].}}
{{History||?|Added beetroot soup to the Creative inventory.{{info needed|Which update did this occur?}}}}
{{History|foot}}
== Issues ==
{{issue list}}
== References ==
{{reflist}}
{{Items}}
[[Category:Food]]
[[Category:Renewable resources]]
[[de:Borschtsch]]
[[es:Estofado de remolacha]]
[[fr:Soupe de betteraves]]
[[it:Zuppa di barbabietole]]
[[ja:ビートルートスープ]]
[[ko:비트 수프]]
[[nl:Bietensoep]]
[[pl:Barszcz]]
[[pt:Ensopado de beterraba]]
[[ru:Свекольный суп]]
[[th:ซุปบีทรูท]]
[[uk:Борщ]]
[[zh:甜菜汤]]</li></ul> | The player now begins with 10 TNT blocks and can now obtain dirt, cobblestone from stone, wooden planks from wood, gold blocks from gold ore, iron blocks from iron ore, stone slabs from coal ore, and white wool from sheep. | ||||
0.28{{Extension DPL}}<ul><li>[[Explorer Map|Explorer Map]]<br/>{{about|the map used to find rare structures|the craftable map|Map|others|Map (disambiguation)}}{{Needs updating|Add info on the new jungle, swamp, and village maps in Java 1.20.2 Pre-Release 1}}{{Item
| image = <gallery>
Ocean Explorer Map.png | Ocean
Woodland Explorer Map.png | Woodland
Buried Treasure Map.png | Buried Treasure
</gallery>
|image2 = <gallery>
Ocean Explorer Map BE.png | Ocean (BE)
Woodland Explorer Map BE.png | Woodland (BE)
Buried Treasure Map BE.png | Buried in Treasure (BE)
</gallery>
| renewable =
* '''Buried Treasure''': No
* '''Woodland and Ocean''': Yes
| stackable = Yes (64)
}}
An '''explorer map''' is a special [[map]] used to aid in finding rare [[generated structures]], including [[woodland mansion]]s, [[ocean monument]]s, and [[buried treasure]]s.
== Obtaining ==
=== Trading ===
Apprentice-level [[cartographer]] villagers sell ocean explorer maps for 13 emeralds and a compass. Journeyman-level cartographer villagers sell woodland explorer maps for 14 emeralds and a compass.
{{IN|java}}, if the cartographer is in [[the Nether]] or [[the End]], either spawned or transported, the trades for the map do not unlock. However, {{in|bedrock}}, the cartographer trades for the map are unlocked, but the purchased map shows the same layout as in the corresponding dimension and shows no destination structure, but if cartographer trades are unlocked in an old world type (prior-1.11.0), the game stops ticking.
In ''Java Edition'', each cartographer sells its own unique explorer map that points to a different location than other cartographers. Purchasing another explorer map from the same cartographer results in the same explorer map. In Bedrock Edition, a cartographer sells an explorer map that points to the nearest location, regardless of whether it is explored or previously mapped by another cartographer.<!-- start to glitched out-->
=== Chest loot ===
Treasure maps, in contrast to explorer maps, generate in underwater ruins or in shipwrecks.
{{LootChestItem|buried-treasure-map}}
== Usage ==
[[File:Explorer Map Comparison.gif|thumb|217px|Unexplored and partially explored maps.]]
{{See also|Map#Mapping|Map#Map content}}
=== Locating structures ===
There are three types of explorer maps: woodland, [[ocean]], and buried treasure. The maps differ from a normal map, in that it shows the area's land-water outline, with an orange striated (striped) texture for water<ref>Specifically, biomes in the "water_on_map_outlines" [[Tag#Biomes|biome tag]].</ref>, and the blank map texture for land. The maps show a section of land that contains a [[woodland mansion]], [[monument]] or [[buried treasure]] respectively. This may not be the nearest such [[structure]] to the [[player]]. The structures are displayed as a small icon. If the player icon is smaller than it would be on a normal map, that means the player is a great distance away. When the player is less than 1027 blocks away from the map border, the icon returns to the proper size. When the player reaches the map's area of land (512×512), the [[map]] fills in like a normal map.
The basic functions of a buried treasure explorer map are similar to that of the other two. However, instead of showing the structure icon on the map, it shows a red X instead. The [[buried treasure]] structure is located on the same X and Z coordinates as the middle of the X (the player marker may need to be aligned with the bottom of the middle 2×2 pixel square of the X). To locate the [[chest]] spot, hold the treasure map with both hands, not in the offhand slot.
=== Cloning ===
{{Crafting
|showdescription=1
|shapeless=1
|name=[[Explorer Map]]<br>(cloned)
|;;;Empty Map;Empty Map;Empty Map;Empty Map;Empty Map
|;;;;Empty Map;Empty Map;Empty Map;Empty Map
|;;;;;Empty Map;Empty Map;Empty Map
|Ocean Explorer Map; Woodland Explorer Map; Buried Treasure Map; Ocean Explorer Map; Woodland Explorer Map; Buried Treasure Map; Ocean Explorer Map; Woodland Explorer Map
|Empty Map
|;;;;;;Empty Map;Empty Map
|;Empty Map;Empty Map;Empty Map;Empty Map;Empty Map;Empty Map;Empty Map
|;;Empty Map;Empty Map;Empty Map;Empty Map;Empty Map;Empty Map
|;;;;;;;Empty Map
|Output= Ocean Explorer Map,2; Woodland Explorer Map,3; Buried Treasure Map,4; Ocean Explorer Map,5; Woodland Explorer Map,6; Buried Treasure Map,7; Ocean Explorer Map,8; Woodland Explorer Map,9
|type= Miscellaneous
|description=The output has the same map center as the input map, and the same [[monument]], [[woodland mansion]] or [[buried treasure]] marker. Cloned maps are stackable.
}}
The parts of the world that have already been explored and mapped are copied, and newly explored areas appear on both instances. In Creative mode, cloned explorer maps can be obtained by pick blocking on the explorer map displayed on [[item frames]] (the map needs to be out of the [[player]]'s inventory when using pick block, or else that map moves into the active hotbar slot).
== Sounds ==
{{edition|java}}:
{{Sound table
|sound=Drawmap1.ogg
|sound2=Drawmap2.ogg
|sound3=Drawmap3.ogg
|subtitle=Map drawn
|source=block
|description=When an explorer map is edited using a cartography table
|id=ui.cartography_table.take_result
|translationkey=subtitles.ui.cartography_table.take_result
|volume=1.0
|pitch=1.0
|distance=16
|foot=1}}
{{edition|bedrock}}: ''None''
== Data values ==
=== ID ===
{{edition|java}}:
{{ID table
|edition=java
|showforms=y
|generatetranslationkeys=y
|displayname=Map
|spritetype=item
|nameid=filled_map
|form=item
|translationkey=filled_map.mansion,filled_map.ocean,filled_map.buried_treasure
|foot=1}}
{{edition|bedrock}}:
{{ID table
|edition=bedrock
|showaliasids=y
|shownumericids=y
|showforms=y
|notshowbeitemforms=y
|generatetranslationkeys=y
|displayname=Map
|spritetype=item
|nameid=filled_map
|aliasid=map
|id=358
|form=item
|translationkey=item.map.exploration.monument.name,item.map.exploration.mansion.name,item.map.exploration.treasure.name
|foot=1}}
=== Metadata ===
{{see also|Bedrock Edition data values}}
{{IN|bedrock}}, the item [[Data value]] distinguishes explorer maps from one another:
{{:Map/DV}}
=== Item data ===
An explorer map differs from a map in that its <code>display</code> tag is set, which includes a <code>Mapcolor</code> and a <code>LocName</code>; also its <code>Decorations</code> list includes an entry for its target monument, mansion or buried treasure. Its [[Map item format#map_<#>.dat format|map item entry]] is identical to that of a normal map, except that by the time the player sees it, its <code>colors</code> byte array is pre-filled with explorer maps' characteristic land-water boundary lines and water shading.
<div class="treeview">
It should be noted that this additional data is stored in the Cartographer's NBT data and in the inventory item's NBT data, and not in the map file (e.g. <samp>map_0.dat</samp>). If the [[player]] were to use the {{cmd|give}} command to give themselves a map with the same map ID as an existing explorer map, it would still have the Ocean Monument or the Woodland Mansion icon on the map, but it would simply be named "Map" instead of, for example, "Ocean Explorer Map".
* {{nbt|compound}} Item data
** {{nbt|compound|tag}}:
*** {{nbt|compound|display}}: How the map looks in an item slot. See also [[Player.dat_format#Display Properties]].
**** {{nbt|string|Name}}: The name the map is given. In this case, they are localized strings: either <code>{"translate":"filled_map.monument"}</code>,<code>{"translate":"filled_map.mansion"}</code> or <code>{"translate":"filled_map.buried_treasure"}</code>.
**** {{nbt|int|MapColor}}: Color codes are calculated from the Red, Green and Blue components using this formula:<br>'''<span style="color:red">Red</span>[[wikipedia:Logical shift|<<]]16 + <span style="color:green">Green</span><<8 + <span style="color:blue">Blue</span>'''.<ref group=note>For positive values larger than 0x00FFFFFF, the top byte is ignored. All negative values produce white.</ref> Monument maps use 3830373, which is {{color swatch|58|114|101}}. Mansion maps use 5393476, which is {{color swatch|82|76|68}}. Buried treasure explorer maps do not use a color code.
*** {{nbt|list|Decorations}}:
**** {{nbt|compound}}: One of these for each icon on the map. Explorer maps always have at least one representing their target.
***** {{nbt|string|id}}: An arbitrary unique string identifying the decoration. For explorer map target structures, this is "+".
***** {{nbt|double|rot}}: The rotation of the icon. For explorer map target structures, this is always 180.
***** {{nbt|byte|type}}: The ID of the [[Map#Map icons|map icon]]: 8 for a mansion map, 9 for a monument map, 26 for a treasure map.
***** {{nbt|double|x}}: The world x-coordinate of the target structure icon.
***** {{nbt|double|z}}: The world z-coordinate of the target structure icon.
</div>
; Notes
{{notelist}}
== Achievements ==
{{load achievements|Treasure Hunter}}
== History ==
{{History|java}}
{{History||1.11|snap=16w39a|[[File:Woodland Explorer Map JE1 BE1.png|32px]] [[File:Ocean Explorer Map JE1 BE1.png|32px]] Added woodland and ocean explorer maps.}}
{{History|||snap=16w41a|Explorer maps can now no longer be zoomed out.}}
{{History||1.13|snap=18w10a|[[File:Map (item) JE1 BE1.png|32px]] Added buried treasure explorer maps.}}
{{History|||snap=18w11a|Buried treasure explorer maps now generate in the [[chest]]s of [[shipwreck]]s.}}
{{History||1.14|snap=18w43a|[[File:Woodland Explorer Map JE2 BE2.png|32px]] [[File:Ocean Explorer Map JE2 BE2.png|32px]] [[File:Map (item) JE2 BE2.png|32px]] The textures for explorer maps have now been changed.}}
{{History||1.20.2|snap=1.20.2 Pre-release 1|Updated structure icons on explorer maps sold by cartographers.}}
{{History||Villager Trade Rebalance<br>(Experimental)|link=Java Edition 1.20.2|snap=1.20.2 Pre-release 1|Added seven new maps which cartographers can sell.}}
{{History|pocket}}
{{History||1.1.0|snap=alpha 1.1.0.0|[[File:Woodland Explorer Map JE1 BE1.png|32px]] [[File:Ocean Explorer Map JE1 BE1.png|32px]] Added explorer maps.<ref>{{Mcnet|discovery-update-pocket-and-win-10-soon|The Discovery Update: on Pocket and Win 10 soon|March 29, 2017}}</ref>
|Explorer maps are not yet obtainable in [[survival]] mode.}}
{{History|||snap=alpha 1.1.0.3|Explorer maps are now obtainable as [[trading|trades]] from [[cartographer]] [[villager]]s.}}
{{History|bedrock}}
{{History||1.4.0|snap=beta 1.2.14.2|[[File:Map (item) JE1 BE1.png|32px]] Added buried treasure explorer maps.}}
{{History|||snap=beta 1.2.20.1|Treasure maps now generate in [[underwater ruins]] [[chest]]s.}}
{{History||1.10.0|snap=beta 1.10.0.3|[[File:Woodland Explorer Map JE2 BE2.png|32px]] [[File:Ocean Explorer Map JE2 BE2.png|32px]] [[File:Map (item) JE2 BE2.png|32px]] The textures for explorer maps have now been changed.}}
{{History||1.11.0|snap=beta 1.11.0.4|[[Trading]] has now been changed, woodland and ocean explorer maps now cost a [[compass]] and 12 [[emerald]]s.
|Journeyman-level [[cartographer]] [[villager]]s no longer [[trading|sell]] 2 type of explorer map as they now have {{frac|1|3}} chance to sell woodland explorer maps, {{frac|1|3}} chance to sell ocean explorer maps, or {{frac|1|3}} chance to sell other [[item]]s<!-- empty locator map--> as part of their [[trading|trades]].
|Woodland explorer maps can now be [[trading|bought]] from fletcher [[villager]]s.}}
{{History||1.12.0|snap=beta 1.12.0.3|Journeyman-level fletcher villagers no longer [[trading|sell]] woodland explorer maps.}}
{{History||1.13.0|snap=beta 1.13.0.1|[[File:Woodland Explorer Map BE3.png|32px]] [[File:Ocean Explorer Map BE3.png|32px]] [[File:Buried Treasure Map BE3.png|32px]] The textures of explorer maps have now been changed.}}
{{History||1.16.100|snap=beta 1.16.100.56|The ID of maps has been changed from <code>map</code> to <code>filled_map</code>.}}
{{History|console}}
{{History||xbox=TU54|xbone=CU44|ps=1.52|wiiu=Patch 24|switch=1.0.4|[[File:Woodland Explorer Map JE1 BE1.png|32px]] [[File:Ocean Explorer Map JE1 BE1.png|32px]] Added explorer maps.}}
{{History|PS4}}
{{History||1.90|[[File:Woodland Explorer Map JE2 BE2.png|32px]] [[File:Ocean Explorer Map JE2 BE2.png|32px]] The textures for explorer maps have now been changed.}}
{{History|new3ds}}
{{History||1.9.19|[[File:Woodland Explorer Map JE1 BE1.png|32px]] [[File:Ocean Explorer Map JE1 BE1.png|32px]] Added explorer maps.}}
{{History|foot}}
== Issues ==
{{Issue list}}
== Trivia ==
* When a [[cartographer]] generates the trade offers for the explorer maps, it chooses the location of one of the nearest structures of the respective type ([[monument]] or [[woodland mansion]]).
* For the reason above, explorer maps obtained from one cartographer are always the same. Also, if two cartographers unlock the explorer map trades approximately at the same place and at the same time, the map locations are usually identical. This sometimes also happens when finding multiple treasure maps from [[ocean ruins]].
* Explorer maps fill as the [[chunk]]s are generated, rather than when the [[player]] holds them while in the area; leaving an explorer map while exploring the area still fills the map.
* Buried treasure explorer maps are named ''Buried Treasure Map'' {{in|java}} while {{in|bedrock}}, they are named ''Treasure Map''.
* It is possible for a cartographer to give a monument or woodland mansion explorer map for areas where the [[generated structures|structures]] would have spawned in the world, but were unable to as a result of terrain generation. As a result, explorer maps, unfortunately, don't always guarantee that a structure exists at the purported location. This is most common with woodland mansion explorer maps, due to its generation algorithm.
* On [[Bedrock Edition]], inventory editors and add-ons can be used to create Explorer Maps that lead to any structure.
== Gallery ==
<gallery>
File:Explorer Maps.png|An ocean explorer map in the [[off-hand]], a woodland explorer map in the main hand, and a [[cartographer]] [[villager]] in between them.
File:Partial Explorer Map.png|A partially-explored explorer map.
File:ExplorerToNormal Map Comparison.png|Two fully-explored maps of the same place, one of which is a woodland explorer map.
File:Buried Treasure Explorer Map.png|An [[item frame]] holding a buried treasure explorer map. The player can see the red X on the left side of the map.
File:Purchase.png|Purchasing explorer maps from a cartographer.
</gallery>
== See also ==
* [[Map]]
* [[Woodland Mansion]]
* [[Ocean Monument]]
* [[Shipwreck]]
* [[Buried treasure]]
== References ==
{{reflist}}
== External Links ==
*[https://www.minecraft.net/en-us/article/taking-inventory--explorer-map Taking Inventory: Explorer Map] – Minecraft.net on November 13, 2019
{{Items}}
[[de:Schatzkarte]]
[[es:Mapa (localización de estructura)]]
[[fr:Carte d'exploration]]
[[ja:探検家の地図]]
[[ko:탐험 지도]]
[[pl:Mapa eksploracyjna]]
[[pt:Mapa de exploração]]
[[ru:Карта сокровищ]]
[[zh:探险家地图]]</li><li>[[Bread|Bread]]<br/>{{dungeons hatnote|type=item}}
{{Item
| title = Bread
| image = Bread.png
| renewable = Yes
| heals = {{hunger|5}}
| stackable = Yes (64)
}}
'''Bread''' is a [[food]] [[item]] that can be eaten by the [[player]].
== Obtaining ==
=== Crafting ===
{{Crafting
|A2=Wheat
|B2=Wheat
|C2=Wheat
|Output=Bread
|type=Foodstuff
}}
=== Chest loot ===
{{LootChestItem|bread}}
=== Trading ===
Novice-level farmer [[Villager|villagers]] sell 6 bread for one [[emerald]] as part of their [[Trading|trades]]. {{IN|java}} they only have a 40% chance of offering this trade.
=== Villager gifts ===
Farmer villagers may use wheat they have harvested to craft bread, which they can trade with other villagers.
Farmer villagers may throw bread at players under the [[Hero of the Village]] effect.{{only|java}}
== Usage ==
=== Food ===
{{see also|Tutorials/Hunger management|title1= Hunger management}}
Bread can be eaten with the use control while it is selected in the [[hotbar]]. Eating bread restores {{hunger|5}} [[hunger]] and 6.0 [[Hunger#Mechanics|hunger saturation]].
=== Breeding ===
Villagers can pick up bread items to become willing, allowing them to breed. Villagers require 3 bread to become willing.
=== Composting ===
Placing bread into a [[composter]] has an 85% chance of raising the compost level by 1. It is more efficient to compost [[wheat]] than bread made from wheat.
== Sounds ==
{{Sound table/Entity/Food}}
== Data values ==
=== ID ===
{{edition|java}}:
{{ID table
|edition=java
|showforms=y
|generatetranslationkeys=y
|displayname=Bread
|spritetype=item
|nameid=bread
|form=item
|foot=1}}
{{edition|bedrock}}:
{{ID table
|edition=bedrock
|shownumericids=y
|showforms=y
|notshowbeitemforms=y
|generatetranslationkeys=y
|displayname=Bread
|spritetype=item
|nameid=bread
|id=261
|form=item
|foot=1}}
== Achievements ==
{{load achievements|Bake Bread}}
== Advancements ==
{{load advancements|Husbandry;A Balanced Diet}}
== History ==
{{History|java indev}}
{{History||20100206|[[File:Bread JE1 BE1.png|32px]] Bread has been added, which now restores {{hp|5}}.}}
{{History||20100223|Bread now requires 3 [[wheat]] (1 row of 3) instead of 6 (2 rows of 3) to be crafted.}}
{{History|java infdev}}
{{History||?|Bread is no longer stackable.}}
{{History||20100625-2|Bread can now be found in the new [[dungeon]] [[chest]]s.}}
{{History|java beta}}
{{History||1.8|snap=Pre-release|Bread is now stackable to 64.
|Bread now restores {{hunger|5}} instead of {{hp|5}}.
|[[Dungeon]] [[chests]] now contain more bread, now that it stacks.
|Bread can now be found in the new [[stronghold]] storerooms and [[mineshaft]] [[chest]]s.}}
{{History|java}}
{{History||1.0.0|snap=Beta 1.9 Prerelease 3|Bread can now be found in the new [[stronghold]] altar [[chest]]s.}}
{{History||1.1|snap=12w01a|Bread can now be found in the new [[village]] blacksmith chests.}}
{{History||1.3.1|snap=12w16a|Bread can now be found in the new [[bonus chest]]s.}}
{{History|||snap=12w21a|Farmer [[villager]]s now [[trading|sell]] 3–4 loaves of bread for 1 [[emerald]].}}
{{History||1.4.2|snap=12w37a|[[File:Bread JE2 BE2.png|32px]] The dark outline has now been removed from the bread texture.}}
{{History||1.6.1|snap=13w16a|Bread can now be used to feed [[horse]]s.}}
{{History||1.8|snap=14w02a|Farmer [[villager]]s now [[trading|sell]] 2–4 loaves of bread for 1 [[emerald]].}}
{{History|||snap=14w26c|[[Horse]]s no longer can eat bread.}}
{{History||1.9|snap=15w44a|The average yield of bread from [[mineshaft]] and [[dungeon]] [[chest]]s has now been decreased.}}
{{History||1.11|snap=16w39a|Bread can now found in the new [[woodland mansion]] chests.}}
{{History||1.13|snap=17w47a|Prior to [[1.13/Flattening|''The Flattening'']], this [[item]]'s numeral ID was 297.}}
{{History||1.14|snap=18w43a|[[File:Bread JE3 BE3.png|32px]] The texture of bread has now been changed.}}
{{History|||snap=18w48a|Bread can now generate inside chests in cartographer houses, tanneries and plains [[village]] houses.}}
{{History|||snap=18w49a|Bread can now generate inside chests in mason houses, and savanna and snowy [[village]] houses.}}
{{History|||snap=18w50a|Bread can now generate inside chests in village temples, toolsmith, and desert and taiga [[village]] houses.}}
{{History|||snap=19w03a|Placing bread into the new [[composter]] now has an 80% chance of raising the compost level by 1.}}
{{History|||snap=19w05a|Bread now has an 85% chance of increasing the compost level in a composter by 1.}}
{{History|||snap=19w13a|Farmer villagers now give bread to players under the [[Hero of the Village]] effect.}}
{{History|pocket alpha}}
{{History||v0.4.0|[[File:Bread JE1 BE1.png|32px]] Added bread.}}
{{History||v0.5.0|Bread now restores {{hp|5}} instead of {{hp|2}}.}}
{{History||v0.8.0|snap=build 1|[[File:Bread JE2 BE2.png|32px]] The dark outline has now been removed from the bread texture.}}
{{History||v0.12.1|snap=build 1|Bread now restores [[hunger]] instead of [[health]].}}
{{History||v0.14.0|snap=build 1|Bread can now be found inside [[minecart with chest]]s in [[mineshaft]]s.}}
{{History|pocket}}
{{History||1.0.4|snap=alpha 1.0.4.0|[[Villager]]s now require bread to become willing, in order to [[breeding|breed]].
|Farmer [[villager]]s now [[trading|sell]] 2-4 loaves of bread for 1 [[emerald]].}}
{{History||1.1.0|snap=alpha 1.1.0.0|Bread can now be found in [[woodland mansion]] [[chest]]s.}}
{{History|bedrock}}
{{History||1.2.0|snap=beta 1.2.0.2|Bread can now be found inside [[bonus chest]]s.}}
{{History||1.10.0|snap=beta 1.10.0.3|[[File:Bread JE3 BE3.png|32px]] The texture of bread has now been changed.
|Bread can now be found inside [[plains]] [[village]] houses [[chest]]s, plains tannery house chests, village cartographer house chests and plains weaponsmith chests.}}
{{History||1.11.0|snap=beta 1.11.0.1|Bread can now be found in village chests other than plains.
|Bread can now be used to fill up [[composter]]s.}}
{{History|||snap=beta 1.11.0.4|Farmer [[villager]]s now [[trading|sell]] 6 bread for one [[emerald]].}}
{{History|console}}
{{History||xbox=TU1|xbone=CU1|ps=1.0|wiiu=Patch 1|[[File:Bread JE1 BE1.png|32px]] Added bread.}}
{{History||xbox=TU5|Bread is now stackable to 64.
|Bread now restores [[hunger]] instead of [[health]].}}
{{History||xbox=TU12|[[File:Bread JE2 BE2.png|32px]] The dark outline has now been removed from the bread texture.}}
{{History||xbox=none|xbone=none|ps=1.90|wiiu=none|switch=none|[[File:Bread JE3 BE3.png|32px]] The texture of bread has now been changed.}}
{{History|new3DS}}
{{History||0.1.0|[[File:Bread JE2 BE2.png|32px]] Added bread.}}
{{History|foot}}
== Issues ==
{{issue list}}
== External Links ==
*[https://www.minecraft.net/en-us/article/taking-inventory--bread Taking Inventory: Bread] – Minecraft.net on February 25, 2021
{{Items}}
[[Category:Food]]
[[Category:Renewable resources]]
[[cs:Chléb]]
[[de:Brot]]
[[es:Pan]]
[[fr:Pain]]
[[hu:Kenyér]]
[[it:Pane]]
[[ja:パン]]
[[ko:빵]]
[[nl:Brood]]
[[pl:Chleb]]
[[pt:Pão]]
[[ru:Хлеб]]
[[th:ขนมปัง]]
[[uk:Хліб]]
[[zh:面包]]</li></ul> | Right click now adds blocks and left click now removes them. | ||||
| The player can now build with naturally occurring blocks. | |||||
| The player can now use bookshelves, sponges, colored wools, bricks, obsidians and mossy cobblestones. | |||||
| Operators of servers can now also build bedrock. Some custom servers can now give the ability to place grass blocks and fluid blocks, too. | |||||
| All new block types have been added. | |||||
| indev | |||||
0.31{{Extension DPL}}<ul><li>[[Bread|Bread]]<br/>{{dungeons hatnote|type=item}}
{{Item
| title = Bread
| image = Bread.png
| renewable = Yes
| heals = {{hunger|5}}
| stackable = Yes (64)
}}
'''Bread''' is a [[food]] [[item]] that can be eaten by the [[player]].
== Obtaining ==
=== Crafting ===
{{Crafting
|A2=Wheat
|B2=Wheat
|C2=Wheat
|Output=Bread
|type=Foodstuff
}}
=== Chest loot ===
{{LootChestItem|bread}}
=== Trading ===
Novice-level farmer [[Villager|villagers]] sell 6 bread for one [[emerald]] as part of their [[Trading|trades]]. {{IN|java}} they only have a 40% chance of offering this trade.
=== Villager gifts ===
Farmer villagers may use wheat they have harvested to craft bread, which they can trade with other villagers.
Farmer villagers may throw bread at players under the [[Hero of the Village]] effect.{{only|java}}
== Usage ==
=== Food ===
{{see also|Tutorials/Hunger management|title1= Hunger management}}
Bread can be eaten with the use control while it is selected in the [[hotbar]]. Eating bread restores {{hunger|5}} [[hunger]] and 6.0 [[Hunger#Mechanics|hunger saturation]].
=== Breeding ===
Villagers can pick up bread items to become willing, allowing them to breed. Villagers require 3 bread to become willing.
=== Composting ===
Placing bread into a [[composter]] has an 85% chance of raising the compost level by 1. It is more efficient to compost [[wheat]] than bread made from wheat.
== Sounds ==
{{Sound table/Entity/Food}}
== Data values ==
=== ID ===
{{edition|java}}:
{{ID table
|edition=java
|showforms=y
|generatetranslationkeys=y
|displayname=Bread
|spritetype=item
|nameid=bread
|form=item
|foot=1}}
{{edition|bedrock}}:
{{ID table
|edition=bedrock
|shownumericids=y
|showforms=y
|notshowbeitemforms=y
|generatetranslationkeys=y
|displayname=Bread
|spritetype=item
|nameid=bread
|id=261
|form=item
|foot=1}}
== Achievements ==
{{load achievements|Bake Bread}}
== Advancements ==
{{load advancements|Husbandry;A Balanced Diet}}
== History ==
{{History|java indev}}
{{History||20100206|[[File:Bread JE1 BE1.png|32px]] Bread has been added, which now restores {{hp|5}}.}}
{{History||20100223|Bread now requires 3 [[wheat]] (1 row of 3) instead of 6 (2 rows of 3) to be crafted.}}
{{History|java infdev}}
{{History||?|Bread is no longer stackable.}}
{{History||20100625-2|Bread can now be found in the new [[dungeon]] [[chest]]s.}}
{{History|java beta}}
{{History||1.8|snap=Pre-release|Bread is now stackable to 64.
|Bread now restores {{hunger|5}} instead of {{hp|5}}.
|[[Dungeon]] [[chests]] now contain more bread, now that it stacks.
|Bread can now be found in the new [[stronghold]] storerooms and [[mineshaft]] [[chest]]s.}}
{{History|java}}
{{History||1.0.0|snap=Beta 1.9 Prerelease 3|Bread can now be found in the new [[stronghold]] altar [[chest]]s.}}
{{History||1.1|snap=12w01a|Bread can now be found in the new [[village]] blacksmith chests.}}
{{History||1.3.1|snap=12w16a|Bread can now be found in the new [[bonus chest]]s.}}
{{History|||snap=12w21a|Farmer [[villager]]s now [[trading|sell]] 3–4 loaves of bread for 1 [[emerald]].}}
{{History||1.4.2|snap=12w37a|[[File:Bread JE2 BE2.png|32px]] The dark outline has now been removed from the bread texture.}}
{{History||1.6.1|snap=13w16a|Bread can now be used to feed [[horse]]s.}}
{{History||1.8|snap=14w02a|Farmer [[villager]]s now [[trading|sell]] 2–4 loaves of bread for 1 [[emerald]].}}
{{History|||snap=14w26c|[[Horse]]s no longer can eat bread.}}
{{History||1.9|snap=15w44a|The average yield of bread from [[mineshaft]] and [[dungeon]] [[chest]]s has now been decreased.}}
{{History||1.11|snap=16w39a|Bread can now found in the new [[woodland mansion]] chests.}}
{{History||1.13|snap=17w47a|Prior to [[1.13/Flattening|''The Flattening'']], this [[item]]'s numeral ID was 297.}}
{{History||1.14|snap=18w43a|[[File:Bread JE3 BE3.png|32px]] The texture of bread has now been changed.}}
{{History|||snap=18w48a|Bread can now generate inside chests in cartographer houses, tanneries and plains [[village]] houses.}}
{{History|||snap=18w49a|Bread can now generate inside chests in mason houses, and savanna and snowy [[village]] houses.}}
{{History|||snap=18w50a|Bread can now generate inside chests in village temples, toolsmith, and desert and taiga [[village]] houses.}}
{{History|||snap=19w03a|Placing bread into the new [[composter]] now has an 80% chance of raising the compost level by 1.}}
{{History|||snap=19w05a|Bread now has an 85% chance of increasing the compost level in a composter by 1.}}
{{History|||snap=19w13a|Farmer villagers now give bread to players under the [[Hero of the Village]] effect.}}
{{History|pocket alpha}}
{{History||v0.4.0|[[File:Bread JE1 BE1.png|32px]] Added bread.}}
{{History||v0.5.0|Bread now restores {{hp|5}} instead of {{hp|2}}.}}
{{History||v0.8.0|snap=build 1|[[File:Bread JE2 BE2.png|32px]] The dark outline has now been removed from the bread texture.}}
{{History||v0.12.1|snap=build 1|Bread now restores [[hunger]] instead of [[health]].}}
{{History||v0.14.0|snap=build 1|Bread can now be found inside [[minecart with chest]]s in [[mineshaft]]s.}}
{{History|pocket}}
{{History||1.0.4|snap=alpha 1.0.4.0|[[Villager]]s now require bread to become willing, in order to [[breeding|breed]].
|Farmer [[villager]]s now [[trading|sell]] 2-4 loaves of bread for 1 [[emerald]].}}
{{History||1.1.0|snap=alpha 1.1.0.0|Bread can now be found in [[woodland mansion]] [[chest]]s.}}
{{History|bedrock}}
{{History||1.2.0|snap=beta 1.2.0.2|Bread can now be found inside [[bonus chest]]s.}}
{{History||1.10.0|snap=beta 1.10.0.3|[[File:Bread JE3 BE3.png|32px]] The texture of bread has now been changed.
|Bread can now be found inside [[plains]] [[village]] houses [[chest]]s, plains tannery house chests, village cartographer house chests and plains weaponsmith chests.}}
{{History||1.11.0|snap=beta 1.11.0.1|Bread can now be found in village chests other than plains.
|Bread can now be used to fill up [[composter]]s.}}
{{History|||snap=beta 1.11.0.4|Farmer [[villager]]s now [[trading|sell]] 6 bread for one [[emerald]].}}
{{History|console}}
{{History||xbox=TU1|xbone=CU1|ps=1.0|wiiu=Patch 1|[[File:Bread JE1 BE1.png|32px]] Added bread.}}
{{History||xbox=TU5|Bread is now stackable to 64.
|Bread now restores [[hunger]] instead of [[health]].}}
{{History||xbox=TU12|[[File:Bread JE2 BE2.png|32px]] The dark outline has now been removed from the bread texture.}}
{{History||xbox=none|xbone=none|ps=1.90|wiiu=none|switch=none|[[File:Bread JE3 BE3.png|32px]] The texture of bread has now been changed.}}
{{History|new3DS}}
{{History||0.1.0|[[File:Bread JE2 BE2.png|32px]] Added bread.}}
{{History|foot}}
== Issues ==
{{issue list}}
== External Links ==
*[https://www.minecraft.net/en-us/article/taking-inventory--bread Taking Inventory: Bread] – Minecraft.net on February 25, 2021
{{Items}}
[[Category:Food]]
[[Category:Renewable resources]]
[[cs:Chléb]]
[[de:Brot]]
[[es:Pan]]
[[fr:Pain]]
[[hu:Kenyér]]
[[it:Pane]]
[[ja:パン]]
[[ko:빵]]
[[nl:Brood]]
[[pl:Chleb]]
[[pt:Pão]]
[[ru:Хлеб]]
[[th:ขนมปัง]]
[[uk:Хліб]]
[[zh:面包]]</li><li>[[Beetroot Seeds|Beetroot Seeds]]<br/>{{Block
| group = Age 0
| 1-1 = Beetroots Age 0.png
| 1-2 = Beetroots Age 0 BE.png
| group2 = Age 1
| 2-1 = Beetroots Age 1.png
| 2-2 = Beetroots Age 1 BE.png
| group3 = Age 2
| 3-1 = Beetroots Age 2.png
| 3-2 = Beetroots Age 2 BE.png
| group4 = Age 3
| 4-1 = Beetroots Age 3.png
| 4-2 = Beetroots Age 3 BE.png
|image=Beetroot Seeds JE2 BE2.png
|transparent=Yes
|light=No
|tool=Any
|renewable=Yes
|stackable=Yes (64)
|flammable=No
|lavasusceptible=No
}}
'''Beetroot seeds''' are items that can be used to plant beetroot crops.
'''Beetroot crops''' are planted in [[farmland]] and used to grow [[beetroot]] and beetroot seeds.
== Obtaining ==
=== Natural generation ===
[[Village]] farms have a chance of growing beetroot. The exact chance depends on the village:
{| class="wikitable"
! Village style !! Chance
|-
| {{EnvSprite|desert-village}} Desert || 20%
|-
| {{EnvSprite|plains-village}} Plains || 5%
|}
=== Breaking ===
Harvesting fully-grown beetroot yields from 1 to 4 seeds per crop harvested ({{frac|2|5|7}} seeds per crop harvested on average). The [[Fortune]] enchantment can be used to improve the drop rate.
=== Chest loot ===
{{LootChestItem|beetroot-seeds}}
=== Trading ===
Beetroot seeds are sold by [[wandering trader]]s for one [[emerald]].
== Usage ==
=== Farming ===
Beetroot seeds can be placed on [[farmland]]. After being placed, it goes through four stages of growth. When fully grown it can be broken to produce beetroot seeds and beetroots.
<!-- Java Edition only? -->While beetroot crops have only four growth stages compared to eight for [[wheat]], [[carrot]]s, and [[potato]]es, each growth tick has a {{frac|1|3}} chance of not advancing the growth stage and therefore beetroot grows slightly faster than other crops.
Crops grow faster if the farmland they are planted in is [[Farmland#Hydration|hydrated]]. One application of [[bonemeal]] has a 75% chance of advancing growth by one stage. This is less effective than for other crops: an average of {{frac|5|1|3}} are needed to fully grow beetroot compared to {{frac|2|2|7}} for other crops.
=== Breeding ===
Like other [[seeds]], beetroot seeds can be used to [[breed]] [[chicken]]s, lead chickens around, and make baby chickens grow up faster by 10% of the remaining time.
=== Taming ===
Like other seeds, beetroot seeds can be used to tame [[parrot]]s.
=== Composting ===
Placing beetroot seeds into a [[composter]] has a 30% chance of raising the compost level by 1.
=== Trading ===
[[Wandering trader]]s may offer to sell beetroot seeds for one emerald.
== Sounds ==
{{Edition|Java}}:
{{Sound table/Block/Crop/JE}}
{{Edition|Bedrock}}:
{{Sound table/Block/Wood/BE}}
== Data values ==
=== ID ===
{{edition|java}}:
{{ID table
|edition=java
|showblocktags=y
|showforms=y
|generatetranslationkeys=y
|displayname=Beetroots
|spritetype=block
|nameid=beetroots
|blocktags=bee_growables, crops
|form=block}}
{{ID table
|displayname=Beetroot Seeds
|spritetype=item
|nameid=beetroot_seeds
|form=item
|foot=1}}
{{edition|bedrock}}:
{{ID table
|edition=bedrock
|shownumericids=y
|showforms=y
|generatetranslationkeys=y
|displayname=Beetroots
|spritetype=block
|nameid=beetroot
|id=244
|form=block
|itemform=item.beetroot}}
{{ID table
|displayname=Beetroot Seeds
|spritetype=item
|nameid=beetroot_seeds
|id=295
|form=item
|foot=1}}
=== Block states ===
{{see also|Block states}}
{{/BS}}
== Advancements ==
{{load advancements|A Seedy Place}}
== History ==
{{History|java}}
{{History||1.9|snap=15w31a|[[File:Beetroot Seeds JE1 BE1.png|32px]] Added beetroot seeds.
|[[File:Beetroots Age 0 JE1.png|32px]] [[File:Beetroots Age 1 JE1.png|32px]] [[File:Beetroots Age 2 JE1.png|32px]] [[File:Beetroots Age 3 JE1.png|32px]] Added beetroot crops.
|Beetroot seeds can be found in [[end city]] [[chest]]s.
|Beetroot plants naturally generate in [[village]] farms.
|[[Villager]]s are able to harvest beetroot crops, but they are not yet able to pick up the seeds and plant them.}}
{{History|||snap=15w38a|The [[drop]] chances have been greatly improved from the average {{frac|4|5}} per beetroot crop harvested to 2.
|Villagers are now able to pick up and plant beetroot seeds.}}
{{History|||snap=15w44a|Beetroots now generate in [[dungeon]] and [[mineshaft]] chests.}}
{{History||1.11|snap=16w39a|Beetroot seeds are now found in the new [[woodland mansion]] chests.}}
{{History||1.12|snap=17w18b|Placing a beetroot seeds in farmland now gives the player the "A Seedy Place" [[advancement]].{{verify}}}}
{{History||1.13|snap=17w47a|Prior to [[1.13/Flattening|''The Flattening'']], this item's numeral ID was 458 and block's numeral ID was 244.}}
{{History||1.14|snap=18w43a|[[File:Beetroot Seeds JE2 BE2.png|32px]] The texture of beetroot seeds has been changed.
|[[File:Beetroots Age 0 JE2.png|32px]] [[File:Beetroots Age 1 JE2.png|32px]] [[File:Beetroots Age 2 JE2.png|32px]] [[File:Beetroots Age 3 JE2.png|32px]] The textures of beetroot crops have been changed.}}
{{History|||snap=18w49a|Beetroot seeds can now be found in chests in [[snowy tundra]] village houses.}}
{{History|||snap=19w03a|Placing beetroot seeds into the new [[composter]] has a 10% chance of raising the compost level by 1.}}
{{History|||snap=19w05a|Beetroot seeds now have a 30% chance of increasing the compost level in a composter.
|Added [[Wandering Trader|wandering trader]]s, which sell beetroot seeds.}}
{{History||1.15|snap=19w34a|[[Bee]]s can now pollinate beetroot crops.}}
{{History||1.17|snap=21w13a|[[File:Beetroots Age 0 JE3.png|32px]] [[File:Beetroots Age 1 JE3.png|32px]] [[File:Beetroots Age 2 JE3.png|32px]] [[File:Beetroots Age 3 JE3.png|32px]] The "crop" template model has changed such that pixels appear in the same physical positions on opposite sides of texture planes, changing the beetroot crop's appearance in the process.<ref>{{bug|MC-199242|||Fixed}}</ref>}}
{{History||1.18|snap=Pre-release 5|[[File:Beetroot Seeds JE3.png|32px]] The texture of beetroot seeds has been changed.}}
{{History||1.20|snap=23w12a|Beetroot seeds can now be found in [[suspicious gravel]] and [[suspicious sand]] in [[trail ruins]].}}
{{History|||snap=23w16a|Beetroot seeds no longer generates in [[suspicious sand]] in [[trail ruins]].|Due to the split of the archaeological loot tables for the suspicious gravel within the [[trail ruins]]; beetroot seeds now are in the common loot.}}
{{History|pocket alpha}}
{{History||November 14, 2013|link=https://twitter.com/jbernhardsson/status/400902957782147072|[[Johan Bernhardsson]] previewed an image of beetroot seeds.}}
{{History||v0.8.0|snap=build 2|[[File:Beetroot Seeds JE1 BE1.png|32px]] Added Beetroots seeds.
|[[File:Beetroots Age 0 JE1 BE1.png|32px]] [[File:Beetroots Age 1 JE1 BE1.png|32px]] [[File:Beetroots Age 2 JE1 BE1.png|32px]] [[File:Beetroots Age 3 JE1 BE1.png|32px]]{{verify|Correct models?}} Added Beetroots crops.}}
{{History|||snap=build 3|Beetroots seeds now have a chance of dropping when tilling [[grass block]]s.}}
{{History||v0.11.0|snap=build 1|"Beetroots seeds" have been renamed to "Beetroot Seeds" and the capitalization has now also been fixed.<ref>{{bug|MCPE-7953|||Fixed}}</ref>}}
{{History||v0.12.1|snap=build 1|Beetroot seeds no longer have a chance of dropping when tilling [[grass block]]s.}}
{{History||v0.14.0|snap=build 1|Beetroot seeds can now be found in [[minecart with chest]]s inside of [[mineshaft]]s.}}
{{History||v0.16.2|Beetroot seeds can now be found in [[chest]]s inside the large house in [[ice plains]] and [[cold taiga]] [[village]]s.}}
{{History|pocket}}
{{History||1.0.0|snap=alpha 0.17.0.1|Beetroot seeds can now be found in the [[chest]]s of [[dungeon]]s and [[end city|end cities]].}}
{{History||1.1.0|snap=alpha 1.1.0.0|Beetroot seeds can now be found in [[woodland mansion]] chests.}}
{{History|bedrock}}
{{History||1.2.0|snap=beta 1.2.0.2|Beetroot seeds can now be found inside [[bonus chest]]s.
|Beetroot seeds can now be used to tame [[parrot]]s.}}
{{History||1.10.0|snap=beta 1.10.0.3|[[File:Beetroot Seeds JE2 BE2.png|32px]] The texture of beetroot seeds has been changed.
|[[File:Beetroots Age 0 JE2.png|32px]] [[File:Beetroots Age 1 JE2.png|32px]] [[File:Beetroots Age 2 JE2.png|32px]] [[File:Beetroots Age 3 JE2.png|32px]]{{verify|Correct models?}} The textures of beetroot crops have been changed.
|Beetroot seeds are now [[trading|sold]] by the new [[wandering trader]]s.}}
{{History||1.11.0|snap=beta 1.11.0.1|Beetroot seeds can now be used to fill the [[composter]].
|Beetroot seeds can now be found in [[snowy tundra]] [[village]] house [[chest]]s.}}
{{History||1.14.0|snap=beta 1.14.0.1|[[Bee]]s can now pollinate beetroot crops.}}
{{History||?|[[File:Beetroots Age 0 BE.png|32px]] [[File:Beetroots Age 1 BE.png|32px]] [[File:Beetroots Age 2 BE.png|32px]] [[File:Beetroots Age 3 BE.png|32px]] Potato crop planes use a mapping that results in very unnatural mirroring when viewed from certain angles, such as northwest.<ref>{{bug|MCPE-146936}}</ref>}}
{{History|console}}
{{History||xbox=TU43|xbone=CU33|ps=1.36|wiiu=Patch 13|[[File:Beetroot Seeds JE1 BE1.png|32px]] Added beetroot seeds.
|[[File:Beetroots Age 0 JE1 BE1.png|32px]] [[File:Beetroots Age 1 JE1 BE1.png|32px]] [[File:Beetroots Age 2 JE1 BE1.png|32px]] [[File:Beetroots Age 3 JE1 BE1.png|32px]]{{verify|Correct models?}} Added beetroot crops.}}
{{History||xbox=none|xbone=none|ps=1.90|wiiu=none|switch=none|[[File:Beetroot Seeds JE2 BE2.png|32px]] The texture of beetroot seeds has been changed.
|[[File:Beetroots Age 0 JE2.png|32px]] [[File:Beetroots Age 1 JE2.png|32px]] [[File:Beetroots Age 2 JE2.png|32px]] [[File:Beetroots Age 3 JE2.png|32px]]{{verify|Correct models?}} The textures of beetroot crops have been changed.}}
{{History|New 3DS}}
{{History||0.1.0|[[File:Beetroot Seeds JE1 BE1.png|32px]] Added beetroot seeds.
|[[File:Beetroots Age 0 JE1 BE1.png|32px]] [[File:Beetroots Age 1 JE1 BE1.png|32px]] [[File:Beetroots Age 2 JE1 BE1.png|32px]] [[File:Beetroots Age 3 JE1 BE1.png|32px]]{{verify|Correct models?}} Added beetroot crops.}}
{{History|foot}}
== Issues ==
{{issue list}}
== Gallery ==
<gallery>
Beetrootstwitpic.png|The first image released of beetroot seeds.
Village Wheat Beetroot Farm.png|Beetroots generated in a [[village]].
File:Beetroot farm.png|A beetroot garden.
</gallery>
== References ==
<references />
{{Blocks|vegetation}}
{{Items}}
[[Category:Plants]]
[[Category:Food]]
[[Category:Generated structure blocks]]
[[Category:Non-solid blocks]]
[[cs:Semínka červené řepy]]
[[es:Semillas de remolacha]]
[[fr:Graines de betterave]]
[[it:Semi di barbabietola]]
[[ja:ビートルートの種]]
[[ko:비트 씨앗]]
[[nl:Bietenzaden]]
[[pl:Nasiona buraka]]
[[pt:Sementes de beterraba]]
[[ru:Семена свёклы]]
[[th:เมล็ดบีตรูท]]
[[zh:甜菜种子]]</li></ul> | 20091223-2 | Blocks can now be dropped on the ground. | |||
| Blocks that are thrown on the ground can now also be picked up. | |||||
| 20100122 | Blocks can now be placed on resource items. As a result, resource items are now pushed off. | ||||
| 20100125-1 | Added new block particles. | ||||
| infdev | |||||
| Minecraft Infdev | 20100227 | It is now possible to place blocks inside the player. | |||
| 20100413 | It is now impossible to place blocks inside the player. | ||||
| 20100617-2 | Solid blocks now cause suffocation. | ||||
| Java Edition | |||||
1.7.2{{Extension DPL}}<ul><li>[[:Category:Minecraft Dungeons items|Category:Minecraft Dungeons items]]<br/>All items that are in ''[[Minecraft Dungeons]]''.
{{Minecraft Dungeons items}}
[[Category:Minecraft Dungeons]]
[[Category:Items]]
[[ja:カテゴリ:アイテム (Minecraft Dungeons)]]
[[pl:Kategoria:Przedmioty w Minecraft Dungeons]]
[[pt:Categoria:Itens do Minecraft Dungeons]]</li><li>[[Boots|Boots]]<br/>{{Item
| image = <gallery>
Leather Boots.png | Leather
Chainmail Boots.png | Chainmail
Iron Boots.png | Iron
Diamond Boots.png | Diamond
Golden Boots.png | Golden
Netherite Boots.png | Netherite
</gallery>
| durability =
* Leather: 65
* Chainmail: 195
* Iron: 195
* Golden: 91
* Diamond: 429
* Netherite: 481
| renewable =
* '''Netherite''': No
* '''All others''': Yes
| stackable = No
}}
'''Boots''' are a type of [[armor]] that covers the feet of the player. There are six types of boots: '''leather boots''', '''chainmail boots''', '''iron boots''', '''diamond boots''', '''gold boots''', and '''netherite boots'''.
== Obtaining ==
=== Crafting ===
{{crafting
|head=1
|showname=0
|showdescription=1
|name=[[Boots]]
|A2= Leather;Gold Ingot;Iron Ingot;Diamond
|C2= Leather;Gold Ingot;Iron Ingot;Diamond
|A3= Leather;Gold Ingot;Iron Ingot;Diamond
|C3= Leather;Gold Ingot;Iron Ingot;Diamond
|Output= Leather Boots;Golden Boots;Iron Boots;Diamond Boots
|type= Combat
}}
{{crafting
|foot=1
|ignoreusage=1
|name=[[Boots]]
|ingredients=Damaged Matching [[Boots]]
|Damaged Leather Boots; Damaged Golden Boots; Damaged Chainmail Boots; Damaged Iron Boots; Damaged Diamond Boots; Damaged Netherite Boots
|Damaged Leather Boots; Damaged Golden Boots; Damaged Chainmail Boots; Damaged Iron Boots; Damaged Diamond Boots; Damaged Netherite Boots
|Output= Leather Boots; Golden Boots; Chainmail Boots; Iron Boots; Diamond Boots; Netherite Boots
|description= The durability of the two boots is added together, plus an extra 5% durability.
|type= Combat
}}
=== Upgrading ===
{{Smithing
|head=1
|Netherite Upgrade
|Diamond Boots
|Netherite Ingot
|Netherite Boots
|description=
|tail=1
}}
=== Repairing ===
==== Grinding ====
{{Grinding
|showdescription=1
|ingredients=2x Damaged [[Leather Boots]] or<br>2x Damaged [[Chainmail Boots]] or<br>2x Damaged [[Iron Boots]] or<br>2x Damaged [[Golden Boots]] or<br>2x Damaged [[Diamond Boots]] or<br>2x Damaged [[Netherite Boots]]
|Damaged Leather Boots; Damaged Chainmail Boots; Damaged Iron Boots; Damaged Golden Boots; Damaged Diamond Boots; Damaged Netherite Boots
|Damaged Leather Boots; Damaged Chainmail Boots; Damaged Iron Boots; Damaged Golden Boots; Damaged Diamond Boots; Damaged Netherite Boots
|Leather Boots; Chainmail Boots; Iron Boots; Golden Boots; Diamond Boots; Netherite Boots
|description=The durability of the two boots are added together, plus an extra 5% durability.
}}
==== Anvil ====
Boots can be repaired in an [[Anvil mechanics#Unit repair|anvil]] by adding units of the [[armor material]]'s repair material, with each repair material restoring 25% of the boots' maximum durability, rounded down. Chainmail boots may also be repaired in this way using iron ingots.
They can also be [[Anvil mechanics#Combining items|combined]] with other boots. When doing this, the item's enchantments are not lost, and can even be raised.
==== Crafting ====
You can craft two sets of boots together using a crafting table, but enchantments are removed.
=== Mob loot ===
If a [[zombie]], [[husk]], [[stray]], [[piglin]], or [[skeleton]] is wearing armor, there is a 8.5% chance (9.5% with Looting I, 10.5% with Looting II and 11.5% with Looting III) for the mob to drop boots upon death. The boots are usually badly damaged, and may be enchanted.
[[File:Zombie With Boots.png|alt=Zombie is shown wearing boots|thumb|Zombie is shown wearing full iron armor set, including boots.]]
{{IN|bedrock}}, [[vindicator]]s and [[pillager]]s that spawn in [[raid]]s have a chance to drop iron boots, which are usually badly damaged and have a 50% chance to be enchanted.
=== Chest loot ===
{{LootChestItem|leather-boots,random-enchanted-leather-boots,chainmail-boots,iron-boots,level-enchanted-iron-boots,golden-boots,random-enchanted-golden-boots,soul-speed-enchanted-golden-boots,diamond-boots,damaged-diamond-boots,damaged-random-enchanted-diamond-boots,damaged-random-enchanted-diamond-boots-2,level-enchanted-diamond-boots}}
=== Trading ===
{{IN|java}}, novice-level armorer [[villager]]s have 40% chance to sell iron boots for 4 [[emerald]]s. Apprentice-level armorers have a 50% chance to sell chainmail boots for an [[emerald]]. Expert-level armorers always sell enchanted<ref group="note" name="enchantment" /> diamond boots for 11–27 [[emerald]]s. Apprentice-level leatherworker [[villager]]s have {{frac|2|3}} chance to sell leather boots for 4 [[emerald]]s.
Armorer [[villager]]s may give the players with the [[Hero of the Village]] effect chainmail boots.{{only|java}}
{{IN|bedrock}}, novice-level armorer villagers have a 25% chance to sell iron boots for 4 emeralds. Apprentice-level armorers have a {{frac|1|3}} chance to sell chainmail boots for an emerald. Expert-level armorers have a 50% chance to sell enchanted<ref group="note" name="enchantment">When creating an enchantment offer, the game uses a random enchantment level from 5 – 19. The enchantments are never treasure enchantments.</ref> diamond boots for 8 emeralds. Apprentice-level leatherworker villagers have a 50% chance to sell leather boots for 4 emeralds.
{{notelist}}
=== Bartering ===
[[Piglin]]s may [[bartering|barter]] iron boots with [[Soul Speed]] when given a [[gold ingot]].
=== Fishing ===
Leather boots can be caught as a "junk" item when [[fishing]].
== Usage ==
Boots can be placed in the fourth armor slot of a player's [[inventory]] for activation.
=== Defense points ===
Defense points are each signified by half of a chestplate in the armor bar above the health bar. Each defense point reduces any damage dealt to the player that is absorbed by armor by 4%, increasing additively with the number of defense points. Different materials and combinations of armor provide different levels of defense.
The following table shows the amount of defense points added by boots.
{| class="wikitable" data-description="Boots defense points"
|-
!scope="col" | Material
!scope="col" | Defense points
|-
!scope="row" | Leather
| rowspan="3" | {{armor|1}}
|-
!scope="row" | Golden
|-
!scope="row" | Chainmail
|-
!scope="row" | Iron
| {{armor|2}}
|-
!scope="row" | Diamond
| rowspan="2" | {{armor|3}}
|-
!scope="row" | Netherite
|}
=== Knockback resistance ===
Netherite boots provide 10% knockback resistance.
=== Durability ===
The following table shows the amount of damage each piece of armor can absorb before being destroyed.
Any "hit" from a damage source that can be blocked by armor removes one point of durability from each piece of armor worn for every {{hp|4}} of incoming damage (rounded down, but never below 1). Damage taken that armor doesn't protect (such as [[Damage#Fall damage|falling]] or [[Damage#Drowning|drowning]]) does not damage the armor, even if it is enchanted to protect against that type of damage. The following chart displays how many hits boots can endure.
Netherite armor is not damaged by [[lava]] or [[fire]] when worn.
{| class="wikitable" data-description="Boots durability"
|-
! Material
!Durability
|-
!scope="row" | Leather
| 65
|-
!scope="row" | Golden
| 91
|-
!scope="row" | Chainmail/Iron
| 195
|-
!scope="row" | Diamond
| 429
|-
!scope="row" | Netherite
| 481
|}
=== Enchantments ===
Boots can receive the following [[enchantment]]s:
{| class="wikitable"
|-
! Enchantment !! Max Level !! Notes
|-
| [[Fire Protection]] || IV || <ref group=note name=exclusive>Fire Protection, Blast Protection, Projectile Protection and Protection are mutually exclusive.</ref>
|-
| [[Projectile Protection]] || IV || <ref group=note name="exclusive"/>
|-
| [[Blast Protection]] || IV || <ref group=note name="exclusive"/>
|-
| [[Protection]] || IV || <ref group=note name="exclusive"/>
|-
| [[Feather Falling]] || IV ||
|-
| [[Unbreaking]] || III ||
|-
| [[Thorns]] || III || <ref group="note" name="anvil">Only from using an [[anvil]] and [[enchanted book]]s.</ref>
|-
| [[Depth Strider]] || III || <ref group=note name=exclusive2>Frost Walker and Depth Strider are mutually exclusive.</ref>
|-
| [[Soul Speed]] || III || <ref group=note name="anvil">Only from using an [[anvil]] and [[enchanted book]]s.</ref>
|-
| [[Frost Walker]] || II || <ref group=note name=exclusive2 /><ref group="note" name="anvil2">Only from using an [[anvil]] and [[enchanted book]]s, or by finding enchanted boots in an [[End city]] chest.</ref>
|-
| [[Mending]] || I || <ref group=note name="anvil2" />
|-
| [[Curse of Binding]] || I || <ref group="note" name="anvil2"/>
|-
| [[Curse of Vanishing]] || I || <ref group="note" name="anvil2"/>
|}
{{notelist}}
=== Smelting usage ===
{{Smelting|showname=1|Iron Boots;Chainmail Boots;Golden Boots|Iron Nugget;Iron Nugget;Gold Nugget|0,1}}
=== Piglins ===
{{EntityLink|Piglin|Piglins}} are attracted to ''golden'' boots and pick them up, examining them for 6 to 8 seconds. Other boots do not attract piglins but can be worn by them. They prefer stronger boots over weaker boots, with one major exception: They always prefer golden boots over all other boots, throwing out stronger boots to equip them. Enchanted boots are preferred over unenchanted boots.
=== Powder snow===
Leather boots can be used to safely cross [[powder snow]] without sinking in it. The block behaves similar to [[scaffolding]], allowing the player to sink in by pressing {{control|crouch}} and move up by pressing {{control|jump}}. The boots also prevent the wearer from taking freezing damage.
===Decoration===
It is possible to upgrade armor with trims. This requires a [[Smithing Template#Gallery|Smithing Template]], an armor piece, and an ingot or crystal ({{ItemSprite|iron-ingot}}iron ingot/{{ItemSprite|copper-ingot}}copper ingot/{{ItemSprite|gold-ingot}}gold ingot/{{ItemSprite|netherite-ingot}}netherite ingot/{{ItemSprite|emerald}}emerald/{{ItemSprite|redstone-dust}}redstone dust/{{ItemSprite|lapis-lazuli}}lapis lazuli/{{ItemSprite|amethyst-shard}}amethyst shard/{{ItemSprite|nether-quartz}}nether quartz/{{ItemSprite|diamond}}diamond).
These trims have no effect on the gameplay or strength of the armor.
{{Smithing|Any Armor Trim Smithing Template|Netherite Boots|Amethyst Shard; Copper Ingot; Diamond; Emerald; Gold Ingot; Iron Ingot; Lapis Lazuli; Netherite Ingot; Nether Quartz; Redstone Dust|Amethyst Trim Netherite Boots; Copper Trim Netherite Boots; Diamond Trim Netherite Boots; Emerald Trim Netherite Boots; Gold Trim Netherite Boots; Iron Trim Netherite Boots; Lapis Trim Netherite Boots; Netherite Trim Netherite Boots; Quartz Trim Netherite Boots; Redstone Trim Netherite Boots|head=1|tail=1|ingredients=Any Armor Trim +<br>Any Armor Piece +<br>Any Ingot/Crystal|showdescription=1|description=}}
==Sounds==
{{el|je}}:
{{Sound table
|sound=Equip leather1.ogg
|sound2=Equip leather2.ogg
|sound3=Equip leather3.ogg
|sound4=Equip leather4.ogg
|sound5=Equip leather5.ogg
|sound6=Equip leather6.ogg
|subtitle=Leather armor rustles
|source=player
|description=When leather boots are equipped
|id=item.armor.equip_leather
|translationkey=subtitles.item.armor.equip_leather
|volume=1.0
|pitch=1.0
|distance=16}}
{{Sound table
|sound=Equip chain1.ogg
|sound2=Equip chain2.ogg
|sound3=Equip chain3.ogg
|sound4=Equip chain4.ogg
|sound5=Equip chain5.ogg
|sound6=Equip chain6.ogg
|subtitle=Chain armor jingles
|source=player
|description=When chainmail boots are equipped
|id=item.armor.equip_chain
|translationkey=subtitles.item.armor.equip_chain
|volume=1.0
|pitch=1.0
|distance=16}}
{{Sound table
|sound=Equip iron1.ogg
|sound2=Equip iron2.ogg
|sound3=Equip iron3.ogg
|sound4=Equip iron4.ogg
|sound5=Equip iron5.ogg
|sound6=Equip iron6.ogg
|subtitle=Iron armor clanks
|source=player
|description=When iron boots are equipped
|id=item.armor.equip_iron
|translationkey=subtitles.item.armor.equip_iron
|volume=1.0
|pitch=1.0
|distance=16}}
{{Sound table
|sound=Equip gold1.ogg
|sound2=Equip gold2.ogg
|sound3=Equip gold3.ogg
|sound4=Equip gold4.ogg
|sound5=Equip gold5.ogg
|sound6=Equip gold6.ogg
|subtitle=Gold armor clinks
|source=player
|description=When gold boots are equipped
|id=item.armor.equip_gold
|translationkey=subtitles.item.armor.equip_gold
|volume=1.0
|pitch=1.0
|distance=16}}
{{Sound table
|sound=Equip diamond1.ogg
|sound2=Equip diamond2.ogg
|sound3=Equip diamond3.ogg
|sound4=Equip diamond4.ogg
|sound5=Equip diamond5.ogg
|sound6=Equip diamond6.ogg
|subtitle=Diamond armor clangs
|source=player
|description=When diamond boots are equipped
|id=item.armor.equip_diamond
|translationkey=subtitles.item.armor.equip_diamond
|volume=1.0
|pitch=1.0
|distance=16}}
{{Sound table
|sound=Equip netherite1.ogg
|sound2=Equip netherite2.ogg
|sound3=Equip netherite3.ogg
|sound4=Equip netherite4.ogg
|subtitle=Netherite armor clanks
|source=player
|description=When netherite boots are equipped
|id=item.armor.equip_netherite
|translationkey=subtitles.item.armor.equip_netherite
|volume=0.8
|pitch=1.0/0.9
|distance=16}}
{{Sound table
|sound=Random break.ogg
|subtitle=Item breaks
|source=dependent
|description=When a pair of boots' durability is exhausted
|id=entity.item.break
|translationkey=subtitles.entity.item.break
|volume=0.8
|pitch=0.8-1.2
|distance=16
|foot=1}}
{{el|be}}:
{{Sound table
|type=bedrock
|sound=Equip leather1.ogg
|sound2=Equip leather2.ogg
|sound3=Equip leather3.ogg
|sound4=Equip leather4.ogg
|sound5=Equip leather5.ogg
|sound6=Equip leather6.ogg
|source=player
|description=When leather boots are equipped
|id=armor.equip_leather
|volume=1.0
|pitch=1.0}}
{{Sound table
|sound=Equip chain1.ogg
|sound2=Equip chain2.ogg
|sound3=Equip chain3.ogg
|sound4=Equip chain4.ogg
|sound5=Equip chain5.ogg
|sound6=Equip chain6.ogg
|source=player
|description=When chain boots are equipped
|id=armor.equip_chain
|volume=1.0
|pitch=1.0}}
{{Sound table
|sound=Equip iron1.ogg
|sound2=Equip iron2.ogg
|sound3=Equip iron3.ogg
|sound4=Equip iron4.ogg
|sound5=Equip iron5.ogg
|sound6=Equip iron6.ogg
|source=player
|description=When iron boots are equipped
|id=armor.equip_iron
|volume=1.0
|pitch=1.0}}
{{Sound table
|sound=Equip gold1.ogg
|sound2=Equip gold2.ogg
|sound3=Equip gold3.ogg
|sound4=Equip gold4.ogg
|sound5=Equip gold5.ogg
|sound6=Equip gold6.ogg
|source=player
|description=When gold boots are equipped
|id=armor.equip_gold
|volume=1.0
|pitch=1.0}}
{{Sound table
|sound=Equip diamond1.ogg
|sound2=Equip diamond2.ogg
|sound3=Equip diamond3.ogg
|sound4=Equip diamond4.ogg
|sound5=Equip diamond5.ogg
|sound6=Equip diamond6.ogg
|source=player
|description=When diamond boots are equipped
|id=armor.equip_diamond
|volume=1.0
|pitch=1.0}}
{{Sound table
|sound=Equip netherite1.ogg
|sound2=Equip netherite2.ogg
|sound3=Equip netherite3.ogg
|sound4=Equip netherite4.ogg
|source=player
|description=When netherite boots are equipped.
|id=armor.equip_netherite
|volume=1.0
|pitch=1.0}}
{{Sound table
|rowspan=2
|sound=Water Splash Old.ogg
|source=block
|description=When leather boots are dyed using a cauldron
|id=cauldron.dyearmor
|volume=0.1
|pitch=1.0}}
{{Sound table
|source=block
|description=When leather boots' dye is removed using a cauldron
|id=cauldron.cleanarmor
|volume=0.1
|pitch=1.0}}
{{Sound table
|sound=Random break.ogg
|source=player
|description=When a pair of boots' durability is exhausted
|id=random.break
|volume=1.0
|pitch=0.9
|foot=1}}
==Data values==
===ID===
{{edition|java}}:
{{ID table
|edition=java
|showitemtags=y
|showforms=y
|generatetranslationkeys=y
|displayname=Leather Boots
|spritetype=item
|nameid=leather_boots
|itemtags=freeze_immune_wearables
|form=item}}
{{ID table
|displayname=Chainmail Boots
|spritetype=item
|nameid=chainmail_boots
|form=item}}
{{ID table
|displayname=Iron Boots
|spritetype=item
|nameid=iron_boots
|form=item}}
{{ID table
|displayname=Diamond Boots
|spritetype=item
|nameid=diamond_boots
|form=item}}
{{ID table
|displayname=Golden Boots
|spritetype=item
|nameid=golden_boots
|form=item}}
{{ID table
|displayname=Netherite Boots
|spritetype=item
|nameid=netherite_boots
|form=item
|foot=1}}
{{edition|bedrock}}:
{{ID table
|edition=bedrock
|shownumericids=y
|showforms=y
|notshowbeitemforms=y
|generatetranslationkeys=y
|displayname=Leather Boots
|spritetype=item
|nameid=leather_boots
|id=338
|form=item}}
{{ID table
|displayname=Chainmail Boots
|spritetype=item
|nameid=chainmail_boots
|id=342
|form=item}}
{{ID table
|displayname=Iron Boots
|spritetype=item
|nameid=iron_boots
|id=346
|form=item}}
{{ID table
|displayname=Diamond Boots
|spritetype=item
|nameid=diamond_boots
|id=350
|form=item}}
{{ID table
|displayname=Golden Boots
|spritetype=item
|nameid=golden_boots
|id=354
|form=item}}
{{ID table
|displayname=Netherite Boots
|spritetype=item
|nameid=netherite_boots
|id=612
|form=item
|foot=1}}
=== Item data===
When leather boots are dyed, it has the following NBT:
<div class="treeview">
*{{nbt|compound|tag}}: Parent tag.
**{{nbt|compound|display}}: Display properties.
***{{nbt|int|color}}: The color of the leather armor. The tooltip displays "Dyed" if advanced tooltips are disabled, otherwise it displays the hexadecimal color value. Color codes are calculated from the Red, Green and Blue components using this formula:<br>'''<span style="color:red">Red</span>[[wikipedia:Logical shift|<<]]16 + <span style="color:green">Green</span><<8 + <span style="color:blue">Blue</span>'''<ref>For positive values larger than 0x00FFFFFF, the top byte is ignored. All negative values produce white.</ref>
</div>
==Achievements==
{{load achievements|Iron Man;Tie Dye Outfit;Let It Go!;Cover me in debris;Oooh, shiny!}}
==Advancements==
{{load advancements|Suit Up;Cover me With Diamonds;Oh Shiny;Cover Me in Debris;Light as a Rabbit}}
==History==
{{History|java indev}}
{{History||0.31|snap=20091231-2|[[File:Studded Boots (item) JE1.png|32px]] [[History of textures/Unused textures#Studded armor|Studded boots]] are now capable of being seen in the [[inventory]]. This was taken directly from one of [[Notch|Notch's]] game's ''[[Legend of the Chambered 2]]''.{{more info|When were they removed?}}}}
{{History||February 9, 2010|link=wordofnotch:380486636|[[File:Notch revealed armor.png|32px]] [[Notch]] revealed new models for armor, which included boots.}}
{{History||20100218|[[File:Leather Boots JE1.png|32px]] [[File:Chainmail Boots JE1 BE1.png|32px]] [[File:Iron Boots JE1 BE1.png|32px]] [[File:Golden Boots JE1 BE1.png|32px]] [[File:Diamond Boots JE1 BE1.png|32px]]<br>[[File:Leather Boots (item) JE1 BE1.png|32px]] [[File:Chainmail Boots (item) JE1 BE1.png|32px]] [[File:Iron Boots (item) JE1 BE1.png|32px]] [[File:Golden Boots (item) JE1 BE1.png|32px]] [[File:Diamond Boots (item) JE1 BE1.png|32px]] Added cloth, chain, iron, gold, and diamond boots{{verify|edition=java|type=change|Below, it says "wool armor" was renamed to leather, which name is incorrect, wool or cloth? Also, was it "gold" or "golden"?}}
|Boots can now be [[crafting|crafted]] and worn.
|Boots now function, giving {{Armor|3}}. Boots have limited [[item durability|durability]], with lower tier boots less durable than higher tier boots.}}
{{History|java alpha}}
{{History||v1.0.8|"Wool boots" have been renamed to "leather boots", despite item names not existing at this time.
|Leather boots are now [[crafting|crafted]] with [[leather]] instead of [[wool]].}}
{{History|java}}
{{History||1.0.0|snap=Beta 1.9 Prerelease|The armor protection behavior has been changed. Previous to this update, the total armor protection is based in this equation: (((''total equipped armor damage reduction'' − 1) × (''all equipped armor max damage'' − ''total equipped armor damage'')) ÷ (''total equipped armor max damage'' + 1)).}}
{{History|||snap=October 3, 2011|slink={{tweet|notch|120859830339637249}}|The first images of a [[player]] wearing enchanted armor, including boots, are revealed.}}
{{History|||snap=Beta 1.9 Prerelease 3|Iron boots can now be found in the new [[stronghold]] altar [[chest]]s.}}
{{History|||snap=Beta 1.9 Prerelease 4|Boots can now be [[enchanting|enchanted]].}}
{{History||1.1|snap=12w01a|Iron boots can now be found in the new blacksmith [[chest]]s in [[village]]s.}}
{{History||1.2.1|snap=1.2|Changed "Golden boots" to "Golden Boots".}}
{{History||1.3.1|snap=12w15a|{{key|Shift}}+clicking can now be used to equip boots.}}
{{History|||snap=12w21a|Chain boots can now be obtained legitimately in [[survival]] mode through [[trading]].
|Blacksmith [[villager]]s now [[trading|sell]] chain boots for 5–6 [[emerald]]s.
|Blacksmith villagers now sell diamond boots for 7 emeralds.
|Blacksmith villagers now sell iron boots for 4–5 emeralds.
|Butcher villagers now sell leather boots for 2-3 emeralds.}}
{{History||1.4.2|snap=12w32a|[[Mob]] armor has been reintroduced. A partial or full set of any armor is now sometimes worn by [[zombie]]s, [[skeleton]]s and [[zombie pigman|zombie pigmen]], with the likelihood increasing with difficulty.}}
{{History|||snap=August 17, 2012|slink={{tweet|Dinnerbone|236445090929844225}}|[[Jeb]] and [[Dinnerbone]] tweeted pictures of [[dye]]able leather armor, including boots.{{citation needed|Link to Jeb's tweet?}}}}
{{History|||snap=12w34a|Leather boots can now be dyed by [[crafting]] leather boots with [[dye]]s. Dyes can be removed by {{control|use|text=using}} dyed leather boots on a [[cauldron]] with [[water]].
|[[File:Leather Boots JE2 BE1.png|32px]] [[File:Leather Boots (item) JE2.png|32px]] Default leather boots are now slightly darker.}}
{{History|||snap=12w36a|[[Dye]]d leather boots are now more saturated and have a slight tint of tan in respect to the default armor color.
|[[Wither skeleton]]s can now spawn wearing boots.}}
{{History|||snap=12w37a|[[File:Leather Boots (item) JE3 BE2.png|32px]] Leather boots now have non-dyed parts. This has been implemented so that [[player]]s can distinguish between other types of armor and similarly colored leather armor.}}
{{History||1.5|snap=13w04a|Boots in the [[player]]'s hand can now be equipped by right-clicking.
|[[Dispenser]]s can now equip nearby players with boots.}}
{{History||1.7.2|snap=13w36a|Leather boots can now be obtained as one of the "junk" items through [[fishing]].}}
{{History||1.8|snap=14w02a|Armorer [[villager]]s now [[trading|sell]] chain boots for 5–7 [[emerald]]s.
|Armorer villagers no longer sell diamond boots.
|Armorer villagers no longer sell iron boots.
|Leatherworker villagers no longer sell leather boots.}}
{{History|||snap=14w05a|Boots no longer turn red when [[mob]]s and [[player]]s are hurt.}}
{{History|||snap=14w06a|Boots are now visible on [[giant]]s.}}
{{History|||snap=14w25a|Chain boots [[Java Edition removed features#Chain armor|can no longer be crafted anymore]] due to the [[item]] form of [[fire]] being [[Java Edition removed features#Obtainable until 1.8|removed]].}}
{{History||1.9|snap=15w31a|Enchanted iron and diamond boots can now be found in [[end city]] ship [[chest]]s.
|[[Mob]]s now wear armor from the bottom to the top, rather than from the top to the bottom. This means that a mob with three armor pieces, for example, spawn with all armor except a helmet.}}
{{History|||snap=15w34b|Boots' [[item durability|durability]] now affects armor value.}}
{{History|||snap=15w36a|Armor value and[[enchanting|enchantment]] calculations have been changed. For the original values, see [[Armor/Before 1.9|here]].}}
{{History|||snap=15w36d|Boots' durability affecting value has been removed.
|Boots now have an attribute controlling the defense points.}}
{{History|||snap=15w50a|Added {{cd|equip}} [[sound]]s for boots.}}
{{History|||snap=16w02a|Armor value and enchantment calculations have been changed again.}}
{{History|||snap=16w05a|Armor value calculations have been changed, once again.}}
{{History||1.11.1|snap=16w50a|Golden, chain and iron boots can now be [[smelting|smelted]] down into one of their respective [[nugget]]s. Chain boots smelt into iron nuggets.}}
{{History||1.13|snap=17w47a|Prior to [[1.13/Flattening|''The Flattening'']], these [[item]]s' numeral IDs were 298 through 317.{{more info|Specific values for boots}}}}
{{History|||snap=18w11a|Enchanted leather boots can now generate in the chests of [[shipwreck]]s.}}
{{History|||snap=18w20a|Chain armor boots have been renamed to "chainmail".}}
{{History||1.14|snap=18w43a|[[File:Leather Boots JE3 BE2.png|32px]] [[File:Chainmail Boots JE2 BE2.png|32px]] [[File:Iron Boots JE2 BE2.png|32px]] [[File:Golden Boots JE2 BE2.png|32px]] [[File:Diamond Boots JE2 BE2.png|32px]]<br>[[File:Leather Boots (item) JE4 BE3.png|32px]] [[File:Chainmail Boots (item) JE2 BE2.png|32px]] [[File:Iron Boots (item) JE2 BE2.png|32px]] [[File:Golden Boots (item) JE2 BE2.png|32px]] [[File:Diamond Boots (item) JE2 BE2.png|32px]] The textures of leather, chainmail, iron, golden, and diamond boots have been changed.}}
{{History|||snap=18w48a|Leather boots can now be found in [[chest]]s in [[village]] tanneries.}}
{{History|||snap=19w08a|[[File:Golden Boots (item) JE3 BE3.png|32px]] The textures of gold boots [[item]]s have been changed.}}
{{History|||snap=19w11a|Armorer villagers now sell iron and enchanted diamond boots, making diamond boots effectively [[renewable resource|renewable]] again.
|Leatherworker villagers now sell randomly [[dye]]d leather boots.}}
{{History|||snap=19w13a|Armorer villagers now give chainmail boots to players under the [[Hero of the Village]] effect.}}
{{History||1.16|snap=20w06a|[[File:Netherite Boots JE1.png|32px]] [[File:Netherite Boots (item) JE1.png|32px]] Added netherite boots.
|Netherite boots are obtained by combining diamond boots and one netherite ingot in a crafting table.}}
{{History|||snap=20w09a|[[File:Diamond Boots (item) JE3 BE3.png|32px]] The texture of diamond boots [[item]]s has been changed.}}
{{History|||snap=20w10a|[[File:Netherite Boots JE2 BE1.png|32px]] [[File:Netherite Boots (item) JE2.png|32px]] The texture of netherite boots has been changed.
|Netherite boots can no longer be crafted.
|Netherite boots are now obtained by combining diamond boots and one netherite ingot in a smithing table.}}
{{History|||snap=20w16a|Netherite boots now generate randomly enchanted in [[bastion remnants]] chests.
|Golden boots now generate randomly enchanted in [[ruined portal]] chests.}}
{{History|||snap=20w17a|Diamonds boots now generate in place of netherite boots in bastion remnant chests.}}
{{History||1.17|snap=20w46a|Leather boots can now be used to safely walk on [[powder snow]].|Leather armor now protects against [[powder snow]]'s freezing.}}
{{History|||snap=21w13a|Leather Boots now prevent fall damage when landing on [[powder snow]].}}
{{History||1.18.2|snap=22w03a|Netherite boots knockback resistance is no longer random.}}
{{History||1.19|snap=Deep Dark Experimental Snapshot 1|Added the [[Swift Sneak]] enchantment, which can only be applied to boots.}}
{{History|||snap=22w12a|The [[Swift Sneak]] enchantment can no longer applied to boots.}}
{{History||1.20<br>(Experimental)|link=1.19.4|snap=23w04a|Non-leather boots can now be trimmed using a [[smithing table]].
|There are 10 types of material that determine the color of the trim:
*Iron
*Copper
*Gold
*Lapis
*Emerald
*Diamond
*Netherite
*Redstone
*Amethyst
*Quartz
|Upgrading diamond boots to netherite boots now requires the netherite upgrade [[smithing template]].}}
{{History|||snap=23w05a|Leather boots can now be trimmed using a smithing table.|Boots can now have trims of the same material it is made out of.}}
{{History|||snap=23w06a|Swapped {{cd|iron}} and {{cd|iron_darker}} palette, then made {{cd|iron_darker}} darker overall.}}
{{History||1.19.4|snap=23w05a|Boots can now be swapped by {{ctrl|using}} them in the hotbar.<ref>{{bug|MC-216270|||Fixed}}</ref>}}
{{History||?|Boots can now be swapped in [[armor stand]]s by {{ctrl|using}} them in the armor stand's slot.}}
{{History||1.20|snap=23w12a|The pattern textures of dune and sentry armor trims are changed.|
Those previous patterns were left with different names: dune was renamed sentry and sentry was renamed shaper.}}
{{History|pocket alpha}}
{{History||v0.6.0|[[File:Leather Boots JE1 BE1.png|32px]] [[File:Chainmail Boots JE1 BE1.png|32px]] [[File:Iron Boots JE1 BE1.png|32px]] [[File:Golden Boots JE1 BE1.png|32px]] [[File:Diamond Boots JE1 BE1.png|32px]]<br> [[File:Leather Boots (item) JE1 BE1.png|32px]] [[File:Chainmail Boots (item) JE1 BE1.png|32px]] [[File:Iron Boots (item) JE1 BE1.png|32px]] [[File:Golden Boots (item) JE1 BE1.png|32px]] [[File:Diamond Boots (item) JE1 BE1.png|32px]] Added boots.}}
{{History||v0.8.0|snap=build 2|{{InvSprite|Leather Boots}} The leather boots sprites have been changed to that of the [[Java Edition|PC]] version, but its armor [[model]] remains that of older versions.}}
{{History||v0.9.0|snap=build 1|Iron boots now naturally generates in [[village]] [[chest]]s and a [[stronghold]] altar chest.}}
{{History||v0.12.1|snap=build 1|Chainmail boots can now be obtained in [[survival]] mode from a mob wearing it.
|Leather boots can now be obtained from [[fishing]] as a "junk" [[item]].}}
{{History||v0.14.0|snap=build 1|[[File:Leather Boots JE2 BE2.png|32px]] Leather boots can now be dyed and the model has been updated.}}
{{History|pocket}}
{{History||1.0.0|snap=alpha 0.17.0.1|[[Enchanting|Enchanted]] iron boots and enchanted diamond boots can now be found inside [[chest]]s within [[end city]].}}
{{History||1.0.4|snap=alpha 1.0.4.0|Chainmail boots are now [[trading|sold]] by armorer smith [[villager]]s via [[trading]].}}
{{History||1.1.0|snap=alpha 1.1.0.0|Golden, chain and iron boots can now be [[smelting|smelted]] down into one of their respective [[nugget]]s.}}
{{History|bedrock}}
{{History||1.4.0|snap=beta 1.2.14.2|Chainmail boots now generate in [[buried treasure]] chests.
|Enchanted leather boots can now be found inside [[shipwreck]] supply room [[chest]]s.}}
{{History||1.10.0|snap=beta 1.10.0.3|Iron boots now can be found in plains [[village]] weaponsmith [[chest]]s.
|Leather boots can now be found inside plains village tannery chests.
|[[File:Leather Boots JE3 BE2.png|32px]] [[File:Iron Boots JE2 BE2.png|32px]] [[File:Golden Boots JE2 BE2.png|32px]] [[File:Diamond Boots JE2 BE2.png|32px]]<br> [[File:Leather Boots (item) JE4 BE3.png|32px]] [[File:Iron Boots (item) JE2 BE2.png|32px]] [[File:Golden Boots (item) JE2 BE2.png|32px]] [[File:Diamond Boots (item) JE2 BE2.png|32px]] The textures of boots have been changed.{{more info|Did chain boots not change?}}}}
{{History||1.11.0|snap=beta 1.11.0.1|Iron boots now can be found in [[savanna]], [[taiga]], [[desert]], [[snowy taiga]] and [[snowy tundra]] [[village]] weaponsmith [[chest]]s.
|Leather boots can now be found inside savanna, taiga, desert, snowy taiga and snowy tundra village tannery chests.}}
{{History|||snap=beta 1.11.0.4|[[Pillager]]s and [[vindicator]]s that spawn in [[raid]]s can now drop iron boots.
|Iron and diamond boots are now sold by armorer villagers.}}
{{History||1.11.0|snap=beta 1.11.0.5|[[File:Golden Boots (item) JE3 BE3.png|32px]] The textures of golden boots [[item]]s have been changed.}}
{{History||1.12.0|snap=beta 1.12.0.2|[[File:Armor Stand with Leather Armor MCPE-44669.png|32px]] Leather boots no longer show as being [[dye]]d properly when worn by [[armor stand]]s.}}
{{History||1.13.0|snap=beta 1.13.0.1|Leather boots now appear dyed properly when worn by armor stands.}}
{{History||1.16.0|snap=beta 1.16.0.51|[[File:Netherite Boots JE2 BE1.png|32px]] [[File:Netherite Boots (item) BE1.png|32px]] Added netherite boots.|Netherite boots are obtained by combining diamond boots and one netherite ingot in a crafting table.
|[[File:Diamond Boots (item) JE3 BE3.png|32px]] The texture of diamond boots [[item]]s have been changed.}}
{{History|||snap=beta 1.16.0.57|Iron boots with soul speed enchantment can be obtained from bartering with piglin.
|Netherite boots can no longer be crafted.
|Netherite boots are now obtained by combining diamond boots and one netherite ingot in a smithing table.
|Golden boots can now be found in [[ruined portal]] chest.
|Golden and netherite boots can be found in [[bastion remnant]] chest.}}
{{History|||snap=beta 1.16.0.63|Diamonds boots now generate in place of netherite boots in bastion remnant chests.}}
{{History||1.16.200|snap=beta 1.16.200.52|Leather boots can now be used to safely walk on [[powder snow]].}}
{{History||1.17.10|snap=beta 1.17.10.20|[[File:Netherite Boots (item) JE2.png|32px]] The texture of netherite boots item has been changed to match ''Java Edition''.}}
{{History|console}}
{{History||xbox=TU1|xbone=CU1|ps=1.0|wiiu=Patch 1|switch=1.0.1|[[File:Leather Boots JE2 BE1.png|32px]] [[File:Leather Boots (item) JE1 BE1.png|32px]] Added leather boots.
|[[File:Iron Boots JE1 BE1.png|32px]] [[File:Iron Boots (item) JE1 BE1.png|32px]] Added iron boots.
|[[File:Golden Boots JE1 BE1.png|32px]] [[File:Golden Boots (item) JE1 BE1.png|32px]] Added golden boots.
|[[File:Diamond Boots JE1 BE1.png|32px]] [[File:Diamond Boots (item) JE1 BE1.png|32px]] Added diamond boots.}}
{{History||xbox=TU5|[[File:Chainmail Boots JE1 BE1.png|32px]] [[File:Chainmail Boots (item) JE1 BE1.png|32px]] Added chain boots.
|Added a quick equip for boots to the [[inventory]] interface.}}
{{History||xbox=TU12|ps=1.03|[[File:Leather Boots (item) JE3 BE2.png|32px]] The textures for leather boots [[item]]s have been changed.}}
{{History||xbox=TU14|ps=1.05|Leather boots can now be [[dye]]d.
|[[Item repair]] can now repair boots.}}
{{History||xbox=TU25|xbone=CU13|ps=1.16|Boots now have the quick equip functionality.}}
{{History||xbox=TU53|xbone=CU43|ps=1.49|wiiu=Patch 23|switch=1.0.3|Golden, chain and iron boots can now be [[smelting|smelted]] down into one of their respective [[nugget]]s. Chain boots smelt into iron nuggets.}}
{{History|PS4}}
{{History||1.90|[[File:Leather Boots JE3 BE2.png|32px]] [[File:Leather Boots (item) JE4 BE3.png|32px]] The textures of leather boots have been changed.
|[[File:Chainmail Boots JE2 BE2.png|32px]] [[File:Chainmail Boots (item) JE2 BE2.png|32px]] The textures of chainmail boots have been changed.
|[[File:Iron Boots JE2 BE2.png|32px]] [[File:Iron Boots (item) JE2 BE2.png|32px]] The textures of iron boots have been changed.
|[[File:Golden Boots JE2 BE2.png|32px]] [[File:Golden Boots (item) JE3 BE3.png|32px]] The textures of gold boots have been changed.
|[[File:Diamond Boots JE2 BE2.png|32px]] [[File:Diamond Boots (item) JE2 BE2.png|32px]] The textures of diamond boots have been changed.}}
{{History|new 3ds}}
{{History||0.1.0|[[File:Leather Boots JE2 BE1.png|32px]] [[File:Leather Boots (item) JE3 BE2.png|32px]] Added leather boots.
|[[File:Chainmail Boots JE1 BE1.png|32px]] [[File:Chainmail Boots (item) JE1 BE1.png|32px]] Added chain boots.
|[[File:Iron Boots JE1 BE1.png|32px]] [[File:Iron Boots (item) JE1 BE1.png|32px]] Added iron boots.
|[[File:Golden Boots JE1 BE1.png|32px]] [[File:Golden Boots (item) JE1 BE1.png|32px]] Added golden boots.
|[[File:Diamond Boots JE1 BE1.png|32px]] [[File:Diamond Boots (item) JE1 BE1.png|32px]] Added diamond boots.}}
{{History|foot}}
==Issues ==
{{issue list}}
==Trivia==
*Netherite boots are shorter in their item texture but are longer in their texture when being worn
*Leather armor originally used textures from one of [[Notch]]'s previous games, ''[[Legend of the Chambered]]''.
*Leather boots are the only piece of leather armor that has the same name as other armor materials.
*The netherite boots are the only type of boots to have a differently shaped item sprite when compared to the other boot types.
*Chainmail boots are the only boots that have transparent pixels in their texture currently
==Gallery==
===Enchanted Boots===
<gallery>
File:Enchanted Leather Boots (item).gif
File:Enchanted Chainmail Boots (item).gif
File:Enchanted Iron Boots (item).gif
File:Enchanted Golden Boots (item).gif
File:Enchanted Diamond Boots (item).gif
File:Enchanted Netherite Boots (item).gif
</gallery>
<gallery>
File:Enchanted Leather Boots.gif
File:Enchanted Chainmail Boots.gif
File:Enchanted Iron Boots.gif
File:Enchanted Golden Boots.gif
File:Enchanted Diamond Boots.gif
File:Enchanted Netherite Boots.gif
</gallery>
==References==
{{reflist}}
==External Links==
*[https://www.minecraft.net/en-us/article/taking-inventory--boots Taking Inventory: Boots] – Minecraft.net on November 24, 2019
{{Items}}
[[Category:Armor]]
[[ja:ブーツ]]
[[ko:부츠]]
[[pl:Buty]]
[[pt:Botas]]
[[th:รองเท้า]]
[[zh:靴子]]</li></ul> | 13w37a | The ability to obtain the item form of 26 technical blocks has been removed. These were the bed (26), piston head and extension (34 & 36), redstone wire (55), wheat crops (59), standing and wall sign (63 & 68), wooden and iron door (64 & 71), lit redstone ore (74), unlit redstone torch (75), sugar cane (83), cake (92), unpowered and powered repeater (93 & 94), pumpkin and melon stem (104 & 105), nether wart (115), brewing stand (117), cauldron (118), lit redstone lamp (124), tripwire (132), flower pot (140), skull (144), and unpowered and powered comparator (149 & 150). | |||
| 13w38b | Air is now internally a block[8] and can be kept in the inventory. It has a missing texture, | ||||
| 13w38c | Air can no longer be kept in the inventory anymore. | ||||
1.8{{Extension DPL}}<ul><li>[[Blaze Powder|Blaze Powder]]<br/>{{Item
| image = Blaze Powder.png
| renewable = Yes
| stackable = Yes (64)
}}
'''Blaze powder''' is an item made from a [[blaze rod]], which is dropped by a [[blaze]] when killed. Its main uses are to fuel [[brewing stand]]s, to brew [[strength]] [[potions]], and to make [[eyes of ender]] to take the player to [[the End]].
== Obtaining ==
=== Crafting ===
{{Crafting
|Blaze Rod
|Output= Blaze Powder,2
|type= Brewing
}}
== Usage ==
=== Crafting Ingredient ===
{{crafting usage}}
=== Brewing stand fuel ===
In addition to being a [[brewing]] ingredient, blaze powder is needed to fuel a [[brewing stand]]. Each piece of blaze powder can brew up to 20 batches of [[Potion|potions]].
=== Brewing ingredient ===
{{brewing
|showname=1
|head=1
|Blaze Powder
|Mundane Potion
|base=Water Bottle
}}
{{brewing
|foot=1
|Blaze Powder
|Potion of Strength
}}
== Data values ==
=== ID ===
{{edition|java}}:
{{ID table
|edition=java
|showforms=y
|generatetranslationkeys=y
|displayname=Blaze Powder
|spritetype=item
|nameid=blaze_powder
|form=item
|foot=1}}
{{edition|bedrock}}:
{{ID table
|edition=bedrock
|shownumericids=y
|showforms=y
|notshowbeitemforms=y
|generatetranslationkeys=y
|displayname=Blaze Powder
|spritetype=item
|nameid=blaze_powder
|id=429
|form=item
|foot=1}}
== Video ==
{{Video note|This video does not mention that blaze powder must be used to fuel [[brewing stand]]s.|minor}}
<div style="text-align:center">{{yt|FSP2qBpe9vI}}</div>
==History==
{{History|java}}
{{History||1.0.0|snap=Beta 1.9 Prerelease 2|[[File:Blaze Powder JE1.png|32px]] Added blaze powder.
|Blaze powder can be used to craft [[eyes of ender]] and [[magma cream]].}}
{{History|||snap=Beta 1.9 Prerelease 3|Blaze powder can now be [[brewing|brewed]] in a [[water bottle]] to create a [[mundane potion]], or in an [[awkward potion]] to create a [[potion of Strength]].}}
{{History||1.2.1|snap=12w04a|Blaze powder can now be used to craft [[fire charge]]s.}}
{{History||1.3.1|snap=1.3|[[File:Blaze Powder JE2 BE1.png|32px]] The texture of blaze powder has been changed.}}
{{History||1.9|snap=15w42a|Blaze powder is now required to operate a [[brewing stand]].}}
{{History|||snap=15w43a|Blaze powder now [[fuel]]s 20 operations rather than 30.}}
{{History||1.13|snap=17w47a|Prior to [[1.13/Flattening|''The Flattening'']], this [[item]]'s numeral ID was 377.}}
{{History|pocket alpha}}
{{History||v0.12.1|snap=build 1|[[File:Blaze Powder JE2 BE1.png|32px]] Added blaze powder.
|Blaze powder can be used to craft [[magma cream]].
|Blaze powder is used as an ingredient to brew [[potion]]s.}}
{{History||v0.15.0|snap=build 1|Blaze powder is now used to craft [[fire charge]]s.}}
{{History|pocket}}
{{History||1.0.0|snap=alpha 0.17.0.1|Blaze powder is now used to craft [[eyes of ender]].}}
{{History|bedrock}}
{{History||1.2.0|snap=beta 1.2.0.2|Blaze powder is now required to operate a [[brewing stand]].}}
{{History|console}}
{{History||xbox=TU7|xbone=CU1|ps=1.00|wiiu=Patch 1|switch=1.0.1|[[File:Blaze Powder JE2 BE1.png|32px]] Added blaze powder.}}
{{History||xbox=TU46|xbone=CU36|ps=1.38|wiiu=Patch 15|Blaze powder is now required to operate a [[brewing stand]].}}
{{History|New 3DS}}
{{History||0.1.0|[[File:Blaze Powder JE2 BE1.png|32px]] Added blaze powder.}}
{{History|foot}}
== Issues ==
{{issue list}}
== See also ==
* [[The Nether]]
* [[Potions]]
== External Links ==
*[https://www.minecraft.net/en-us/article/taking-inventory--blaze-powder Taking Inventory: Blaze Powder] – Minecraft.net on November 25, 2021
{{Items}}
[[Category:Renewable resources]]
[[cs:Ohnivý prach]]
[[de:Lohenstaub]]
[[es:Polvo de blaze]]
[[fr:Poudre de Blaze]]
[[hu:Őrlángpor]]
[[ja:ブレイズパウダー]]
[[ko:블레이즈 가루]]
[[nl:Blazepoeder]]
[[pl:Płomienny proszek]]
[[pt:Pó de blaze]]
[[ru:Огненный порошок]]
[[th:ผงปีศาจไฟ]]
[[zh:烈焰粉]]</li><li>[[Netherite Scrap|Netherite Scrap]]<br/>{{About|the unrefined material|the refined item|Netherite Ingot|other uses|Netherite}}
{{Item
| title = Netherite Scrap
| image = Netherite Scrap.png
| rarity = Common
| renewable = No
| stackable = Yes (64)
}}
'''Netherite scrap''' is a material [[smelt]]ed from [[ancient debris]], which is found in [[the Nether]]. It is used solely for crafting [[Netherite Ingot|netherite ingots]]. Like all netherite-related items, it is not flammable.
== Obtaining ==
=== Smelting ===
{{Smelting
|Ancient Debris
|Netherite Scrap
|2
}}
=== Chest loot ===
{{LootChestItem|netherite-scrap}}
== Usage ==
=== Crafting ingredient ===
{{Crafting usage}}
== Data values ==
=== ID ===
{{edition|java}}:
{{ID table
|edition=java
|showforms=y
|generatetranslationkeys=y
|displayname=Netherite Scrap
|spritetype=item
|nameid=netherite_scrap
|form=item
|foot=1}}
{{edition|bedrock}}:
{{ID table
|edition=bedrock
|shownumericids=y
|showforms=y
|notshowbeitemforms=y
|generatetranslationkeys=y
|displayname=Netherite Scrap
|spritetype=item
|nameid=netherite_scrap
|id=613
|form=item
|foot=1}}
== History ==
{{History|java}}
{{History||1.16|snap=20w06a|[[File:Netherite Scrap JE1.png|32px]] Added netherite scrap.}}
{{History|||snap=20w10a|[[File:Netherite Scrap JE2 BE1.png|32px]] The texture of netherite scrap has been changed.}}
{{History|||snap=20w16a|Netherite scraps now generate in [[bastion remnant]] chests.}}
{{History||1.16.2|snap=20w30a|The chance of finding netherite scraps in bastion remnant chests has been increased.}}
{{History|bedrock}}
{{History||1.16.0|snap=beta 1.16.0.51|[[File:Netherite Scrap JE2 BE1.png|32px]] Added netherite scrap.}}
{{History|||snap=beta 1.16.0.57|Netherite scraps now generate in [[bastion remnants]] chests.}}
{{History|foot}}
== Issues ==
{{Issue list}}
== External Links ==
*[https://www.minecraft.net/en-us/article/taking-inventory--netherite-scrap Taking Inventory: Netherite Scrap] – Minecraft.net on March 25, 2021
{{Items}}
[[Category:Non-renewable resources]]
[[de:Netheritplatten]]
[[fr:Fragments de Netherite]]
[[it:Frammento di netherite]]
[[ja:ネザライトの欠片]]
[[ko:네더라이트 파편]]
[[pl:Odłamek netherytu]]
[[pt:Fragmentos de netherita]]
[[ru:Незеритовый скрап]]
[[th:เศษเนเธอไรต์]]
[[uk:Незеритовий уламок]]
[[zh:下界合金碎片]]</li></ul> | 14w25a | The ability to obtain the item form of 12 technical blocks has been removed. These blocks were flowing and stationary water and lava blocks (8, 9, 10 & 11), double stone and wooden slabs (43 & 125), fire blocks (51), nether and end portal blocks (90 & 119), cocoa pods (127), and potato and carrot crops (141 & 142). | |||
| Blocks now show the closest item form to themselves as the icon in the superflat settings menu. | |||||
| 14w26b | All technical blocks, except for the monster spawner (52) and farmland (60), now have a missing texture in the inventory, File:Missing Texture Block.png, due to their item models being nonexistent. | ||||
1.9{{Extension DPL}}<ul><li>[[Orange Dye|Orange Dye]]<br/>{{Item
|image = Orange_Dye_JE2_BE2.png
|renewable = Yes
|stackable = Yes (64)
}}
'''Orange dye''' is a [[Dye#Quasi-Primary|quasi-primary dye]] crafted from [[Flower|orange tulips]], or by combining one [[red dye]] with one [[yellow dye]].
== Obtaining ==
=== Crafting ===
{{Crafting
|head = 1
|showname = 0
|Orange Tulip; Torchflower
|Output=Orange Dye
|type=Material
}}
{{Crafting
|Red Dye
|Yellow Dye
|Output = Orange Dye,2
|type = Material
|foot = 1
}}
=== Loot chest ===
{{#invoke:LootChest|base3|orange-dye}}
=== Trading ===
[[Wandering trader|Wandering traders]] sell 3 orange dye for an [[emerald]].
== Usage ==
{{dye usage}}
=== Crafting ingredient ===
{{crafting usage|ignore=Banner|continue=1}}
{{banner crafting usage}}
=== Loom ingredient ===
{{Banner loom usage|Orange Dye}}
=== Trading ===
Apprentice-level shepherd [[villager]]s have a 20% chance to buy 12 orange dye for an [[emerald]] as part of their trades.{{only|bedrock}}
Journeyman-level shepherd [[villager]]s have a {{frac|1|3}} chance to buy 12 orange dye for an [[emerald]].{{only|java}}
== Data values ==
=== ID ===
{{edition|java}}:
{{ID table
|edition=java
|showforms=y
|generatetranslationkeys=y
|displayname=Orange Dye
|spritetype=item
|nameid=orange_dye
|form=item
|foot=1}}
{{edition|bedrock}}:
{{ID table
|edition=bedrock
|showaliasids=y
|shownumericids=y
|showforms=y
|notshowbeitemforms=y
|generatetranslationkeys=y
|displayname=Orange Dye
|spritetype=item
|nameid=orange_dye
|aliasid=dye / 14
|id=409
|form=item
|translationkey=item.dye.orange.name
|foot=1}}
== Video ==
<div style="text-align:center">{{yt|25t7uNMOFS8}}</div>
== History ==
{{History|java beta}}
{{History||1.2|[[File:Orange Dye JE1 BE1.png|32px]] Added orange dye.}}
{{History|java}}
{{History||1.4.2|snap=12w34a|Added the ability to [[Armor#Dyeing|dye]] leather [[armor]] and [[wolf]] collars.}}
{{History||1.4.6|snap=12w49a|Orange dye can now be crafted with [[gunpowder]] to create a [[firework star]].}}
{{History||1.6.1|snap=13w19a|[[Stained clay]] can now be [[crafting|crafted]].}}
{{History||1.7.2|snap=13w36a|With the addition of the new [[flower]]s, many secondary and tertiary [[dye]]s are now primary dyes.}}
{{History|||snap=13w41a|[[Stained glass]] can now be crafted.}}
{{History||1.8|snap=14w30a|Added [[banner]]s, which can be dyed.}}
{{History||1.11|snap=16w39a|Added the ability to dye [[shulker box]]es.}}
{{History||1.12|snap=17w15a|Added the ability to dye [[bed]]s.}}
{{History||1.13|snap=17w47a|The different data values for the <code>dye</code> ID has now been split up into their own IDs.
|Prior to [[1.13/Flattening|''The Flattening'']], this [[item]]'s numeral ID was 351.}}
{{History||1.14|snap=18w43a|[[File:Orange_Dye_JE2_BE2.png|32px]] The texture of orange dye has now been changed.}}
{{History|||snap=18w44a|Orange dye can now change the text color on [[sign]]s to orange.}}
{{History|||snap=19w05a|Added the [[wandering trader]], which sells orange dye.}}
{{History|||snap=19w11a|Orange dye can now be [[trading|bought]] by shepherd villagers.}}
{{History||1.17|snap=20w45a|Orange dye can now be used to craft [[orange candle]]s.}}
{{History|||snap=21w19a|Orange dye can no longer be used to craft orange candles.}}
{{History|||snap=Pre-release 1|Orange dye can now once again be used to craft orange candles.}}
{{History||1.20 (Experimental)|link=1.19.3|snap=22w42a|Orange dye can now change the text color on [[hanging sign]]s to orange.}}
{{History||1.20<br>(Experimental)|link=1.19.4|snap=23w07a|[[Torchflower]]s can now be crafted into orange dye.}}
{{History||1.20|snap=23w12a|Orange dye can now be found in [[suspicious gravel]] and [[suspicious sand]] in [[trail ruins]].}}
{{History|||snap=23w16a|Orange dye no longer generates in [[suspicious sand]] in [[trail ruins]].|Due to the split of the archaeological loot tables for suspicious gravel within [[trail ruins]], orange dye is now common loot.}}
{{History|pocket alpha}}
{{History||v0.3.0|[[File:Orange Dye JE1 BE1.png|32px]] Added orange dye. It is currently unobtainable and serves no purpose.}}
{{History||v0.4.0|Orange dye is now [[craft]]able with rose red and dandelion yellow.
|Orange dye can now be used to craft orange [[wool]].}}
{{History||v0.8.0|snap=build 1|Orange dye is now used to craft [[cocoa bean]]s (version exclusive).}}
{{History||v0.14.0|snap=build 1|Orange dye can now be used to dye [[water]] in [[cauldron]]s.}}
{{History||unknown|The above recipe for orange dye has now been removed.}}
{{History|pocket}}
{{History||1.0.0|snap=alpha 0.17.0.1|Orange dye can now be used to dye [[shulker]]s.}}
{{History||1.1.0|snap=alpha 1.1.0.0|Orange dye can now be used to craft [[concrete powder]] and colored [[bed]]s.}}
{{History|bedrock}}
{{History||1.2.0|snap=beta 1.2.0.2|Orange dye can now be used to craft [[firework star]]s, [[stained glass]], and patterns on [[banner]]s.}}
{{History||1.4.0|snap=beta 1.2.20.1|Orange dye can now be used to craft [[balloon]]s and [[glow stick]]s.}}
{{History||1.8.0|snap=beta 1.8.0.8|Orange dye can now be used to dye [[cat]] collars.}}
{{History||1.10.0|snap=beta 1.10.0.3|Orange dye is now [[trading|sold]] by [[wandering trader]]s.
|Orange dye can now be used to dye white [[carpet]]s.
|[[File:Orange_Dye_JE2_BE2.png|32px]] The texture of orange dye has now been changed.}}
{{History||1.11.0|snap=beta 1.11.0.4|Orange dye can now be [[trading|sold]] to shepherd [[villager]]s.}}
{{History||1.16.100|snap=beta 1.16.100.56|The ID of orange dye has been changed from <code>dye/14</code> to <code>orange_dye</code>.}}
{{History|console}}
{{History||xbox=TU1|xbone=CU1|ps=1.00|switch=1.0.1|wiiu=Patch 1|[[File:Orange Dye JE1 BE1.png|32px]] Added orange dye.}}
{{History|ps4}}
{{History||1.90|[[File:Orange_Dye_JE2_BE2.png|32px]] The texture of orange dye has now been changed.}}
{{History|new 3ds}}
{{History||0.1.0|[[File:Orange_Dye_JE2_BE2.png|32px]] Added orange dye.}}
{{History|foot}}
== Issues ==
{{issue list}}
== References ==
{{Reflist}}
{{Items}}
[[cs:Oranžové barvivo]]
[[de:Oranger Farbstoff]]
[[es:Tinte naranja]]
[[fr:Teinture orange]]
[[hu:Narancssárga festék]]
[[ja:橙色の染料]]
[[ko:주황색 염료]]
[[nl:Oranje kleurstof]]
[[pl:Pomarańczowy barwnik]]
[[pt:Corante laranja]]
[[ru:Оранжевый краситель]]
[[zh:橙色染料]]
[[Category:Items]]
[[Category:Dyes]]
[[Category:Renewable resources]]</li><li>[[Armor Stand|Armor Stand]]<br/>{{ItemEntity
| image = Armor Stand.png
| image2 = Armor Stand BE.png
| extratext = View [[#Gallery|all renders]]
| stackable =
* '''[[JE]]:''' Yes (16)
* '''[[BE]]:''' Yes (64)
| renewable = Yes
| flammable = Yes
| size = '''Normal:'''<br>
Width: 0.5 Blocks<br>
Height: 1.975 Blocks<br>
'''Small:'''<br>
Width: 0.25 Blocks<br>
Height: 0.9875 Blocks<br>
| health = {{hp|20}}
}}
An '''armor stand''' is an inanimate [[entity]] that can wear [[armor]]. It can also hold [[Item|items]] and be posed (but these are not possible in [[Survival]] in [[Java Edition]]).
== Obtaining ==
An armor stand can be broken by quickly {{control|attack|text=attacking}} it twice, dropping itself and any armor placed onto it.
=== Crafting ===
{{Crafting
|A1= Stick
|B1= Stick
|C1= Stick
|B2= Stick
|A3= Stick
|B3= Smooth Stone Slab
|C3= Stick
|Output= Armor Stand
|type=Decoration block
}}
=== Natural generation ===
Two armor stands are found in each taiga [[village]] outdoor armory, one equipped with an [[iron helmet]], the other with an [[iron chestplate]].
== Usage ==
[[Player]]s can use armor stands to hold [[armor]], [[mob head]]s, [[carved pumpkin]]s, and [[elytra]]. [[Commands]] can be used to give them other [[item]]s. The stand does not have a GUI, so players interact with it directly. Armor stands are also able to be placed in different orientations, similar to [[banner]]s or [[sign]]s. Armor stands are [[entity|entities]], allowing them to be pushed by [[piston]]s, moved by flowing [[water]], pulled with [[fishing rod]]s, pushed by players (with knockback), and bounced by [[slime block]]s.
{{Control|use|text=Using}} armor on the stand places the armor if done on a bare spot. Conversely, clicking on armor with a bare hand removes the armor and places it in the highlighted hotbar slot. It is not possible to take or place items from the armor stand's hands unless playing on Bedrock Edition.
Armor, mob heads, or carved pumpkins can be automatically placed on armor stands with a [[dispenser]].
Armor stands can be customized further to have arms, pose, disobey gravity, dual wield and other things by summoning them using {{cmd|summon}} with [[Tutorials/Command NBT tags#Armor Stand|NBT tags]].
In maps heavily using [[command blocks]], armor stands can be used to keep [[scoreboard]] objectives that are 'global' to the map, run [[commands]], etc.
{{IN|bedrock}}, the pose of the armor stand can be changed by interacting with the armor stand (or pressing the {{btn|Pose|be=1}} button on mobile devices) while sneaking, or by using a redstone signal. There are 13 possible poses. Armor stands can also hold items by interacting with the armor stand (or pressing the {{btn|Equip|be=1}} button on mobile devices) while holding an item that cannot be worn.
;<nowiki>Below are the poses:
{| class="wikitable collapsible collapsed"
!No.!!Namespace ID!! Redstone power
!
! !! Image
|-
|0
|{{cd|animation.armor_stand.default_pose}}
|0
|
|
|[[File:Armor Stand Default Pose.png|128px]]
|-
|1
|{{cd|animation.armor_stand.no_pose}}
|1
|
|
|[[File:Armor Stand No Pose.png|128px]]
|-
|2
|{{cd|animation.armor_stand.solemn_pose}}
|2
|
|
|[[File:Armor Stand Solemn Pose.png|128px]]
|-
|3
|{{cd|animation.armor_stand.athena_pose}}
|3
|
|
|[[File:Armor Stand Athena Pose.png|128px]]
|-
|4
|{{cd|animation.armor_stand.brandish_pose}}
|4
|
|
|[[File:Armor Stand Brandish Pose.png|128px]]
|-
|5
|{{cd|animation.armor_stand.honor_pose}}
|5
|
|
|[[File:Armor Stand Honor Pose.png|128px]]
|-
|6
|{{cd|animation.armor_stand.entertain_pose}}
|6
|
|
|[[File:Armor Stand Entertain Pose.png|128px]]
|-
|7
|{{cd|animation.armor_stand.salute_pose}}
|7
|
|
|[[File:Armor Stand Salute Pose.png|128px]]
|-
|8
|{{cd|animation.armor_stand.hero_pose}}
|8, 13 or more
|
|
|[[File:Armor Stand Hero Pose.png|128px]]
|-
|9
|{{cd|animation.armor_stand.riposte_pose}}
|9
|
|
|[[File:Armor Stand Riposte Pose.png|128px]]
|-
|10
|{{cd|animation.armor_stand.zombie_pose}}
|10
|
|
|[[File:Armor Stand Zombie Pose.png|128px]]
|-
|11
|{{cd|animation.armor_stand.cancan_a_pose}}
|11
|
|
|[[File:Armor Stand Cancan A Pose.png|128px]]
|-
|12
|{{cd|animation.armor_stand.cancan_b_pose}}
|12
|
|
|[[File:Armor Stand Cancan B Pose.png|128px]]
|}
==Behavior==
Because armor stands are entities, they obey gravity, allowing them to fall and rest on non-full [[block]]s such as [[enchanting table]]s, [[snow layer]]s and [[slab]]s.
Any [[armor]] on the stand drops when the stand is broken. Armor stands can display [[enchanting|enchanted]] and all forms of [[dye]]d armor. The effects of most enchanted armor have no effect when on an armor stand, with three exceptions:
*[[Frost Walker]] creates [[frosted ice]] blocks on [[water]] as usual if an armor stand is pushed with a [[piston]].
*[[Depth Strider]] slows the movement of the armor stand when being pushed with water.
*A [[player]] may take damage from hitting an armor stand that holds armor enchanted with [[Thorns]].
Armor stands are not damaged by [[cacti]] but can be broken by [[arrow]]s. An armor stand destroyed by an explosion or a firework does not drop as an [[item (entity)|item]]. Armor stands in water and [[lava]] at the same time are not consumed by the lava.
{{IN|be}}, armor stands can be affected by [[status effect]]s. They can be 'killed' by [[Harming]] and [[Decay]] [[splash potion|splash]]/[[lingering potion]]s, lava, [[fire]], and [[campfire]]s, and they play the player death sound and fall to their side and disappear, yielding no armor stand item. If an armor stand is equipped with an item or armor, that item or armor is considered as "naturally-spawned equipment" with an 8.5% chance of dropping when the armor stand "dies" from the [[Instant Damage]] or the [[Wither (status effect)|Wither]] status effect. If the dropped item is any form of [[weapon]], [[tool]] or armor, it drops in a badly damaged state because the game considers it as "naturally-spawned equipment".<ref>{{Bug|MCPE-24341}}</ref>
The stand wobbles slightly when being hit by the player.
{{IN|java}}, it is possible to create an armor stand with arms using the {{cmd|summon}} [[command]]. It is also possible to change an armor stand without arms into a stand with arms by using the {{cmd|data}} command. The commands are as follows:
*<code>/data merge entity @e[type=armor_stand,sort=nearest,limit=1] {ShowArms:1}</code>, which changes the nearest armor stand into an armor stand with arms.
*<code>/summon minecraft:armor_stand ~ ~ ~ {ShowArms:1}</code>, which summons a new armor stand with arms shown.
*<code>/summon armor_stand ~ ~ ~ {Rotation:[0.0f]}</code>, which summons a new armor stand that faces a desired direction (dependent on changing "0.0f" to other numbers like "90.0f" or "180.0f", otherwise it faces the same way as a default armor stand).
==Sounds==
{{edition|java}}:<br>
Armor stands use the Friendly Creatures sound category for entity-dependent sound events.
{{Sound table
|sound=Armor Stand hit1.ogg
|sound2=Armor Stand hit2.ogg
|sound3=Armor Stand hit3.ogg
|sound4=Armor Stand hit4.ogg
|subtitle=Block breaking
|source=Friendly Creatures
|description=When an armor stand is damaged
|id=entity.armor_stand.hit
|translationkey=subtitles.block.generic.hit
|volume=1.0
|pitch=1.0
|distance=16}}
{{Sound table
|sound=Armor Stand break1.ogg
|sound2=Armor Stand break2.ogg
|sound3=Armor Stand break3.ogg
|sound4=Armor Stand break4.ogg
|subtitle=Block broken
|source=Friendly Creatures
|description=When an armor stand is destroyed
|id=entity.armor_stand.break
|translationkey=subtitles.block.generic.break
|volume=1.0
|pitch=1.0
|distance=16}}
{{Sound table
|sound=Stone dig1.ogg
|sound2=Stone dig2.ogg
|sound3=Stone dig3.ogg
|sound4=Stone dig4.ogg
|subtitle=Block placed
|source=Blocks
|description=When an armor stand is placed
|id=entity.armor_stand.place
|translationkey=subtitles.block.generic.place
|volume=1.0
|pitch=1.0
|distance=16}}
{{Sound table
|sound=Wood dig1.ogg
|sound2=Wood dig2.ogg
|sound3=Wood dig3.ogg
|sound4=Wood dig4.ogg
|subtitle=Block placed
|source=Friendly Creatures
|description=When an armor stand falls onto a block at a high speed{{Info needed}}
|id=entity.armor_stand.fall
|translationkey=subtitles.entity.armorstand.fall
|volume=1.0
|pitch=1.0
|distance=16
|foot=1}}
{{edition|bedrock}}:
{{Sound table
|type=bedrock
|sound=Armor Stand hit1.ogg
|sound2=Armor Stand hit2.ogg
|sound3=Armor Stand hit3.ogg
|sound4=Armor Stand hit4.ogg
|source=neutral
|description=When an armor stand is damaged
|id=mob.armor_stand.hit
|volume=1.0
|pitch=1.0}}
{{Sound table
|sound=Armor Stand break1.ogg
|sound2=Armor Stand break2.ogg
|sound3=Armor Stand break3.ogg
|sound4=Armor Stand break4.ogg
|source=neutral
|description=When an armor stand is destroyed
|id=mob.armor_stand.break
|volume=1.0
|pitch=1.0}}
{{Sound table
|sound=Stone dig1.ogg
|sound2=Stone dig2.ogg
|sound3=Stone dig3.ogg
|sound4=Stone dig4.ogg
|source=neutral
|description=When an armor stand is placed
|id=mob.armor_stand.place
|volume=1.0
|pitch=1.0}}
{{Sound table
|sound=Wood dig1.ogg
|sound2=Wood dig2.ogg
|sound3=Wood dig3.ogg
|sound4=Wood dig4.ogg
|source=neutral
|description=When an armor stand falls onto a block at a high speed{{Info needed}}
|id=mob.armor_stand.land
|volume=1.0
|pitch=1.0
|foot=1}}
==Data values==
===ID===
{{edition|java}}:
{{ID table
|edition=java
|firstcolumnname=Armor Stand
|showforms=y
|generatetranslationkeys=y
|displayname=Item
|spritename=armor-stand
|spritetype=item
|nameid=armor_stand
|form=item
|foot=1}}
{{ID table
|edition=java
|firstcolumnname=Armor Stand
|generatetranslationkeys=y
|displayname=Entity
|spritename=armor-stand
|spritetype=entity
|nameid=armor_stand
|foot=1}}
{{edition|bedrock}}:
{{ID table
|edition=bedrock
|firstcolumnname=Armor Stand
|shownumericids=y
|showforms=y
|notshowbeitemforms=y
|generatetranslationkeys=y
|displayname=Item
|spritename=armor-stand
|spritetype=item
|nameid=armor_stand
|id=552
|form=item
|foot=1}}
{{ID table
|edition=bedrock
|firstcolumnname=Armor Stand
|shownumericids=y
|generatetranslationkeys=y
|displayname=Entity
|spritename=armor-stand
|spritetype=entity
|nameid=armor_stand
|id=61
|foot=1}}
===Item data===
{{el|java}}:
{{main|Player.dat format}}
<div class="treeview">
* {{nbt|compound|tag}}: The item's '''tag''' tag.
{{:Player.dat_format/Entity Spawners}}
</div>
{{el|bedrock}}:
:{{IN|bedrock}}, armor stands have no additional item tag.
:See [[Bedrock Edition level format/Item format]].
===Entity data===
Armor stands have entity data associated with them that contain various properties of the [[entity]].
{{el|java}}:
{{main|Entity format}}
{{/ED}}
{{el|bedrock}}:
:See [[Bedrock Edition level format/Entity format]].
== Video==
Note: This video is outdated as Zoglins now attack armor stands
<div style="text-align:center">{{yt|tCFkdTfCleQ}}</div>
==History==
{{History|java}}
{{History||1.8|snap=August 5, 2014|slink={{Tweet|SeargeDP|496666952530538498}}|[[File:Armor Stand (pre-release).png|32px]] [[File:Armor Stand (item) (pre-release).png|32px]] [[Searge]] tweeted a image of an armor stand. The appearance was changed before release.}}
{{History|||snap=August 5, 2014|slink={{Tweet|SeargeDP|496673890148823040}}|Showed crafting recipe and name "[Armor Stand]", both were changed before release.}}
{{History|||snap=14w32a|[[File:Armor Stand JE1.png|32px]] Added armor stands.}}
{{History|||snap=14w32b|[[File:Armor Stand (item) JE1 BE1.png|32px]] The item texture has changed.
|Pick-block can now be used on armor stands.
|Armor stands can now no longer be crafted using [[slabs]] other than stone slabs.}}
{{History|||snap=14w32c|Added a <code>NoBasePlate</code> tag for the armor stand.}}
{{History|||snap=14w33a|Breaking [[particles]] have been added for the armor stand.}}
{{History||1.8.1|snap=pre1|Added <code>Marker</code> tag for armor stands.}}
{{History||1.9|snap=15w31a|Armor stands can now dual wield.
|<code>HandItems</code> and <code>ArmorItems</code> tags added for armor stands, which is intended to replace the <code>Equipment</code> tag.}}
{{History|||snap=15w33a|The <code>Equipment</code> tag has been removed from armor stands.}}
{{History|||snap=15w47a|The armor stand now wobbles when hit by the [[player]].}}
{{History|||snap=16w02a|Marker <code>ArmorStand</code>s now outline their equipment only when glowing.}}
{{History||1.11|snap=16w32a|The entity ID of the armor stand has been changed from <code>ArmorStand</code> to <code>armor_stand</code>.}}
{{History||1.13|snap=17w47a|Prior to [[1.13/Flattening|''The Flattening'']], this [[item]]'s numeral ID was 416.}}
{{History||1.14|snap=18w43a|[[File:Armor Stand JE2.png|32px]] The texture of armor stands has been changed to the new [[planks|oak planks]] texture.
|[[File:Armor Stand (item) JE2 BE2.png|32px]] The texture of armor stand [[item]]s has been slightly changed. (Comparison: [[File:Armor Stand (item) Texture Change 1.13 to 18w43a.gif|32px]])}}
{{History|||snap=18w50a|[[File:Armor Stand JE3.png|32px]] The texture of armor stands has been changed again.
|Armor stands now generate in taiga [[village]]s.}}
{{History||1.15|snap=19w42a|Armor stands can now be placed by [[dispenser]]s.}}
{{History||1.16|snap=20w07a|Armor stands no longer fall through fences and walls when placed.<ref>{{bug|MC-65951}}</ref>}}
{{History|||snap=20w14a|[[Zoglin]]s now attack armor stands.}}
{{History||1.17|snap=20w45a|[[File:Armor Stand 20w45a.png|32px]] The model of the armor stand has been changed.}}
{{History|||snap=20w46a|[[File:Armor Stand JE3.png|32px]] The model of the armor stand has been changed back to how it was in 1.16.}}
{{History||1.18|snap=Pre-release 5|[[File:Armor Stand JE4.png|32px]] Changed smooth stone texture on armor stand.}}
{{History||1.19.4|snap=23w03a|Armor stands now preserve custom names when placed and broken.}}
{{History||1.20<br>(Experimental)|link=1.19.4|snap=23w04a|An armor stand now appears in the smithing table GUI; arms are displayed as in Bedrock Edition.
|When an armor stand is placed, its model now changes in effect of the player's facing direction<ref>{{bug|MC-93533}}</ref>.}}
{{History|||snap=23w06a|The model no longer changes when the armory is placed. Also, the head, which tilted slightly to the lower right in the version from 1.8 up to 1.19.3, now faces forward from [[File:Armor Stand JE4.png|32px]] to [[File:Armor Stand JE5.png|32px]].}}
{{History||?|Armor can now be swapped in [[armor stand]]s by {{ctrl|using}} them in the armor stand's slot.}}
{{History|bedrock}}
{{History||1.2.0|snap=beta 1.2.0.2|[[File:Armor Stand BE1.png|32px]] [[File:Armor Stand (item) JE1 BE1.png|32px]] Added armor stands.}}
{{History||1.10.0|snap=beta 1.10.0.3|[[File:Armor Stand BE2.png|32px]] The texture of armor stands has been changed.
|[[File:Armor Stand (item) JE2 BE2.png|32px]] The texture of armor stand [[item]]s has been slightly changed.}}
{{History||1.12.0|snap=beta 1.12.0.2|[[File:Armor Stand with Leather Armor MCPE-44669.png|32px]] Leather [[armor]] no longer shows as being [[dye]]d properly when worn by armor stands.}}
{{History|||snap=beta 1.12.0.3|[[File:Armor Stand wear Chicken.png|x73px]][[File:Armor Stand wear Rabbit.png|x73px]] [[File:Armor Stand wear Salmon.gif|x73px]] [[File:Armor Stand wear Pufferfish.gif|x73px]] [[File:Armor Stand wear Slime.png|x73px]] When armor stands hold a [[raw chicken]], [[raw rabbit]], [[raw salmon]], [[pufferfish]] or a [[slime block]], they now wear these [[mob]] counterparts.<ref>{{bug|mcpe-48629}}</ref>}}
{{History||1.13.0|snap=beta 1.13.0.1|Leather armor now shows as being dyed properly when worn by armor stands.}}
{{History|||snap=beta 1.13.0.4|Armor stands no longer hold certain [[mob]]s if they are holding a [[item]] related to them.
|Armor stands now have a smoother animation when changing poses.}}
{{History||1.16.0|snap=?|Armor stands are now targeted by zoglins.}}
{{History||1.16.210|snap=beta 1.16.210.51|Armor stands are no longer attacked by [[goat]]s.}}
{{History|console}}
{{History||xbox=TU31|xbone=CU19|ps=1.22|wiiu=Patch 3|switch=1.0.1|[[File:Armor Stand JE1.png|32px]] [[File:Armor Stand (item) JE1 BE1.png|32px]] Added armor stands.}}
{{History||xbox=TU43|xbone=CU33|ps=1.36|wiiu=Patch 13|Added [[sound]]s for armor stands.}}
{{History||xbox=TU60|xbone=CU51|ps=1.64|wiiu=Patch 30|switch=1.0.11|[[File:Armor Stand BE1.png|32px]] Armor stands now have arms and the [[player]] can now change the pose of the armor stand.}}
{{History||xbox=none|xbone=none|ps=1.90|wiiu=none|switch=none|[[File:Armor Stand BE2.png|32px]] The texture of armor stands has been changed.
|[[File:Armor Stand (item) JE2 BE2.png|32px]] The texture of armor stand [[item]]s has been slightly changed.}}
{{History|foot}}
<gallery>
Armour stand 1.png|The first image of the armor stand.
JE 1.8 Dev Armor Stand crafting.png|The first image of armor stand crafting recipe.
The Bountiful Update.png|Armor stands in the [[Java Edition 1.8|1.8]] poster.
Dual Wielding Armor Stand.png|A dual wielding armor stand.
Glowing Armor Stands.png|Armor stands with the [[glowing]] effect.
Armor Stand Chess.jpg|Chess with armor stands.
</gallery>
==Issues==
{{issue list}}
==Trivia ==
*Equipping armor stands with certain [[block]]s and [[item]]s can cause rendering glitches. According to [[Searge]] this is due to transparent rendering on entities not yet being supported.<ref>{{bug|MC-67415||"Armor Stands with Slime Block rendering entities behind them"}} resolved as "Won't Fix"</ref><ref>{{bug|MC-67674||"Armor Stand wearing a Skull and Holding Stained Glass causes Graphical issues"}} resolved as "Won't Fix"</ref>
*Bedrock Edition has a version exclusive armor stand [[model]], which includes posable arms.
*Using [[redstone]] to change the stands reverse the poses, starting with the can-can pose first.
*Placing the stand within three powered [[redstone dust]] always changes its pose to the honor pose. [[Redstone Repeater|Repeaters]] also switch the stand to the honor pose if not set four blocks from one.
*Using external tools, armor stand spawners can be placed.
*Secret signatures for [[Jasper Boerstra|JAPPA]], Chi Wong, and [[Michael Stoyke|Searge]] can be found at the bottom of the armor stand texture.
== Gallery ==
===Renders===
;Armor (Java Edition)
<gallery>
Armor Stand Leather.png
Armor Stand Golden.png
Armor Stand Chainmail.png
Armor Stand Iron.png
Armor Stand Diamond.png
Armor Stand Netherite.png
</gallery>
; Armor (Bedrock Edition)
<gallery>
Armor Stand with Leather Armor BE.png
Armor Stand with Golden Armor BE.png
Armor Stand with Chain Armor BE.png
Armor Stand with Iron Armor BE.png
Armor Stand with Diamond Armor BE.png
Armor Stand with Netherite Armor BE.png
</gallery>
;Poses
<gallery>
Armor Stand Pose 0.png|
Armor Stand Pose 1.png|
Armor Stand Pose 2.png|
Armor Stand Pose 3.png|
Armor Stand Pose 4.png|
Armor Stand Pose 5.png|
Armor Stand Pose 6.png|
Armor Stand Pose 7.png|
Armor Stand Pose 8.png|
Armor Stand Pose 9.png|
Armor Stand Pose 10.png|
Armor Stand Pose 11.png|
Armor Stand Pose 12.png|
</gallery>
===Screenshots===
<gallery>
Armor Stand Demo.png|Armor stands in various positions with various [[armor]].
Armor Stand glass and sword.png|Armor stands can wear [[block]]s on their heads. This is accessible with [[command]]s such as {{cmd|item}}.
Bedrock edition armor stand poses.png|All armor stand poses as seen in {{el|be}}.
Netherite to the rescue!.png|An entire set of netherite [[armor]] on an armor stand.
Armor Stand Garage.png|An armor stand in a garage.
</gallery>
==References ==
{{reflist}}
==External Links==
*[https://www.minecraft.net/en-us/article/taking-inventory--armor-stand Taking Inventory: Armor Stand] – Minecraft.net on March 16, 2023
{{Items}}
{{Entities}}
[[Category:Storage]]
[[de:Rüstungsständer]]
[[es:Soporte para armadura]]
[[fr:Porte-armure]]
[[ja:防具立て]]
[[ko:갑옷 거치대]]
[[pl:Stojak na zbroję]]
[[pt:Suporte de armaduras]]
[[ru:Стойка для брони]]
[[th:แท่นวางชุดเกราะ]]
[[uk:Стійка для обладунків]]
[[zh:盔甲架]]</li></ul></nowiki> | 15w49a | The ability to obtain the item form of lit furnaces (62) has been removed. | |||
| Pocket Edition Alpha | |||||
Pre-release{{Extension DPL}}<ul><li>[[Red Dye|Red Dye]]<br/>{{Item
| title = Red Dye
| renewable = Yes
| stackable = Yes (64)
}}
'''Red dye''' is a [[Dye#Primary|primary color dye]] created primarily from flowers.
== Obtaining ==
=== Crafting ===
{{Crafting
|head=1
|showname=0
|Poppy; Red Tulip; Beetroot
|Output=Red Dye
|type=Material
}}
{{Crafting
|Rose Bush
|Output=Red Dye,2
|type=Material
|foot=1
}}
=== Trading ===
[[Wandering trader]]s sell 3 red dye for an [[emerald]].
== Usage ==
{{dye usage}}
=== Crafting ingredient ===
{{crafting usage|ignore=Banner|continue=1}}
{{banner crafting usage}}
=== Loom ingredient ===
{{Banner loom usage|Red Dye}}
=== Trading ===
Journeyman-level shepherd villagers have a {{frac|1|6}} chance to buy 12 red dye for an emerald.
== Data values ==
=== ID ===
{{edition|java}}:
{{ID table
|edition=java
|showforms=y
|generatetranslationkeys=y
|displayname=Red Dye
|spritetype=item
|nameid=red_dye
|form=item
|foot=1}}
{{edition|bedrock}}:
{{ID table
|edition=bedrock
|showaliasids=y
|shownumericids=y
|showforms=y
|notshowbeitemforms=y
|generatetranslationkeys=y
|displayname=Red Dye
|spritetype=item
|nameid=red_dye
|aliasid=dye / 1
|id=396
|form=item
|translationkey=item.dye.red.name
|foot=1}}
== Video ==
<div style="text-align:center">{{yt|tqTbsbt2irk}}</div>
== History ==
{{History|java beta}}
{{History||January 10, 2011<ref group="n">Supposed time when fragment was filmed. Based on modified date of client.jar/gui/trap.png in [[Beta 1.2]].</ref>|link=https://www.youtube.com/watch?v=cBF2ugTzXqQ&t=181s|[[File:Red Dye (pre-release).png|32px]] Shown rose red in development as part of [[Minecraft: The Story of Mojang]].}}
{{History||1.2|[[File:Red Dye JE1 BE1.png|32px]] Added rose red.}}
{{History||1.6.6|Roses can now be generated using [[Bone Meal|bone meal]], making rose red [[renewable resource|renewable]].}}
{{History|java}}
{{History||1.3.1|snap=1.3|[[File:Red Dye JE2 BE2.png|32px]] The texture of rose red has now been changed.}}
{{History||1.4.2|snap=12w34a|Added the ability to [[Armor#Dyeing|dye]] leather [[armor]] and [[wolf]] collars.}}
{{History||1.4.6|snap=12w49a|Rose red can now be crafted with [[gunpowder]] to create a [[firework star]].}}
{{History||1.6.1|snap=13w19a|Rose red can now be used to craft stained clay.}}
{{History||1.7.2|snap=13w36a|Rose red is now crafted using a poppy instead of a rose, as the latter is removed.
|Rose red can now be crafted using red tulips and rose bushes.}}
{{History|||snap=13w37a|Each poppy now yields only 1 rose red, instead of 2.}}
{{History|||snap=13w41a|Rose red can now be used to craft stained glass.}}
{{History||1.8|snap=14w30a|Added [[banner]]s, which can be dyed.}}
{{History||1.9|snap=15w31a|Rose red can now be crafted using [[beetroot]].}}
{{History||1.11|snap=16w39a|Added the ability to dye [[shulker box]]es.}}
{{History||1.12|snap=17w06a|Rose red can now be used to craft red [[concrete powder]].}}
{{History|||snap=17w15a|Added the ability to dye [[bed]]s.}}
{{History||1.13|snap=17w47a|The different data values for the <code>dye</code> ID have now been split up into their own IDs.
|Prior to [[1.13/Flattening|''The Flattening'']], this [[item]]'s numeral ID was 351.}}
{{History||1.14|snap=18w43a|"Rose Red" has now been renamed to "Red Dye".
|[[File:Red Dye JE3 BE3.png|32px]] The texture of red dye has now been changed.}}
{{History|||snap=18w44a|Red dye can now change the text color on [[sign]]s to red.}}
{{History|||snap=19w05a|Added the [[wandering trader]], which sells red dye.}}
{{History|||snap=19w11a|Red dye can now be [[trading|bought]] by shepherd villagers.}}
{{History||1.17|snap=20w45a|Red dye can now be used to craft [[red candle]]s.}}
{{History|||snap=21w19a|Red dye can no longer be used to craft red candles.}}
{{History|||snap=Pre-release 1|Red dye can once again be used to craft red candles.}}
{{History||1.20<br>(Experimental)|link=1.19.3|snap=22w42a|Red dye can now change the text color on [[hanging sign]]s to red.}}
{{History|pocket alpha}}
{{History||v0.3.0|[[File:Red Dye JE1 BE1.png|32px]] Added rose red. It is currently unobtainable and serves no purpose.}}
{{History||v0.4.0|Rose red is now obtainable by smelting red [[mushroom]]s.
|Rose red can now be used to craft other dyes and red wool.}}
{{History||v0.8.0|snap=build 1|[[File:Red Dye JE2 BE2.png|32px]] The texture of red dye has been changed.
|Rose red is now used to craft [[cocoa beans]].}}
{{History||v0.9.0|snap=build 3|Rose red can now be obtained by putting a poppy, red tulip or rose bush [[flower]]s in the crafting grid.}}
{{History||v0.15.0|snap=build 1|Red mushrooms can no longer be smelted to obtain rose red.}}
{{History||v0.16.0|snap=build 1|Rose red is no longer used to craft cocoa beans.}}
{{History|bedrock}}
{{History||1.8.0|snap=beta 1.8.0.10|"Rose Red" has now been renamed to "Red Dye".}}
{{History||1.10.0|snap=beta 1.10.0.3|Red dye can now be [[trading|bought]] from [[wandering trader]]s.
|[[File:Red Dye JE3 BE3.png|32px]] The texture of red dye has now been changed.}}
{{History||1.11.0|snap=beta 1.11.0.4|Red dye can now be [[trading|sold]] to shepherd [[villager]]s.}}
{{History||1.16.100|snap=beta 1.16.100.56|The ID of red dye has been changed from <code>dye/1</code> to <code>red_dye</code>.}}
{{History|console}}
{{History||xbox=TU1|xbone=CU1|ps=1.00|switch=1.0.1|wiiu=Patch 1|[[File:Red Dye JE1 BE1.png|32px]] Added rose red.}}
{{History||xbox=none|xbone=none|ps=1.83|switch=none|wiiu=none|"Rose Red" has now been renamed to "Red Dye".}}
{{History||ps=1.90|[[File:Red Dye JE3 BE3.png|32px]] The texture of red dye has now been changed.}}
{{History|new 3ds}}
{{History||0.1.0|[[File:Red Dye JE1 BE1.png|32px]] Added rose red.}}
{{History|foot}}
;Notes
{{reflist|group=n}}
== Issues ==
{{issue list}}
{{Items}}
[[cs:Šípková červeň]]
[[de:Roter Farbstoff]]
[[es:Tinte rojo]]
[[fr:Teinture rouge]]
[[hu:Rózsavörös]]
[[ja:赤色の染料]]
[[ko:장밋빛 빨강 염료]]
[[nl:Rozenrood]]
[[pl:Czerwony barwnik]]
[[pt:Corante vermelho]]
[[ru:Красный краситель]]
[[zh:红色染料]]
[[Category:Items]]
[[Category:Dyes]]
[[Category:Renewable resources]]</li><li>[[Sugar Cane|Sugar Cane]]<br/>{{Block
|image=Sugar Cane.png
|image2=Sugar Cane (item) JE3.png
|extratext = View all [[#Gallery|renders]]
|transparent=Yes
|light=No
|tool=any
|renewable=Yes
|stackable=Yes (64)
|flammable=No
|lavasusceptible=No
}}
'''Sugar cane''' is a block found as 1–4-block-tall. It plants near water in the [[Overworld]]. As an item, it is an important crafting ingredient.
==Obtaining==
Sugar cane can be mined instantly with anything.
When the spot a sugar cane block is placed in becomes unsuitable, such as when the supporting block is removed, the sugar cane block uproots and drops as an item. {{IN|be}}, sugar cane uproots immediately after all adjacent water is removed. {{IN|je}}, sugar cane uproots on the next block update or [[Tick#Random tick|random tick]].
A sugar cane block drops itself as an item if a piston tries to push it (trying to pull it does nothing) or moves a block into its space.
===Natural generation===
[[File:Sugar Canez.png|thumb|250px|Naturally-occurring sugar cane near a river.]]
Sugar cane can generate naturally near [[water]] and [[ice]], as two ({{frac|11|18}} chance), three ({{frac|5|18}} chance), or four ({{frac|2|18}} chance) blocks tall. Rare taller sugar canes can be found if the world generator places two smaller canes on top of each other. It generates in approximately 0.8 sugar cane per chunk seeing as how they only generate near bodies of water.
Sugar canes attempt to generate 10 times in any Overworld biome, which requires water. An extra 10 attempts are made in [[swamp]] biomes, and 50 in [[desert]] biomes, which makes sugar cane twice as frequent in swamps and six times as frequent in desert biomes, making the banks of [[river]]s that cut through deserts lined with sugar canes. Sugar canes do not grow faster in swamps or deserts they only spawn a increased amount.
Sugar cane cannot generate in caves {{in|je}}.<ref>{{bug|MC-214959||Sugar cane generated in cave|Fixed}}</ref>
===Trading===
[[Wandering trader]]s can sell sugar cane for an [[emerald]].
==Usage==
Due to its water-displacing properties, sugar cane can interestingly be used to create underwater paths, allowing [[player]]s to move at normal speed and breathe if it is two blocks in height.{{only|java}}<ref>{{bug|MC-929||Sugar cane can be placed underwater|WAI}}</ref>
Sugar cane takes on a different shade of green depending on the biome in which it is placed.
===Crafting ingredient===
{{crafting usage}}
===Farming===
{{main|Tutorials/Sugar cane farming}}
[[File:Underground Sugar Farm.png|200px|thumb|An underground sugar cane farm.]]
Sugar cane can generate naturally up to any number of blocks tall, but ''grow'' only to a height of three blocks, adding a block of height when the top sugar cane block has received 16 random [[Tick#Block tick|block tick]]s (i.e. on average every 18 minutes on ''Java Edition''<!-- Average 68.27 seconds/tick * 16 ticks/growth = 18.2 minutes --> or 54 minutes on Bedrock Edition, but the actual rate can vary widely).
Sugar cane must be planted on a [[grass block]], [[dirt]], [[coarse dirt]], [[rooted dirt]], [[podzol]], [[mycelium]], [[sand]], [[red sand]], [[suspicious sand]], [[moss block]], or [[mud]] that is directly adjacent to [[water]], [[waterlogged]] block, or [[frosted ice]] (not merely above or diagonal to water), or on top of another sugar cane block. The adjacent water block can be covered with another block, whether [[opacity|opaque or transparent]], and sugar cane can still be placed and grow next to it. Sugar cane grows regardless of light level, even in complete darkness.
[[File:4blockcane.png|thumb|A natural 4-block-high sugar cane plant.]]
{{IN|bedrock}}, [[bone meal]] can be used to instantly grow sugar cane to three blocks. Only one bone meal is consumed. {{IN|java}}, bone meal cannot be used on sugar cane.<ref>{{bug|MC-73963||Can't use bonemeal on cacti or sugar cane|WAI}}</ref>
On average, it takes [[Tutorials/Sugar_cane_farming#Mechanics|18 minutes]] for a single block of sugar cane to grow 3 blocks tall.
=== Composting ===
Placing sugar cane into a [[composter]] has a 50% chance of raising the compost level by 1.
== List of colors ==
{{Missing information|Bedrock Edition colors (see [[Water#Color]]{{verify|it's there?}})}}
=== ''Java Edition'' ===
These values are generated by the biome dyeing algorithm. See [[Color#Biome colors|Biome colors]] for more information.
<div class="mw-collapsible mw-collapsed" style="float: left">
{| class="wikitable sortable" style="text-align:center" data-description="Java edition biome colors"
!Biome !! Category !! Rainfall !! Sugarcane Color !! Temperature Affects !! Render
|-
| {{BiomeLink|Badlands}} || Mesa || No || #90814d || No || [[File:Badlands Sugar Cane.png|32px]]
|-
| {{BiomeLink|Beach}} || Beach || Rain || #91bd59 || || [[File:Plains Sugar Cane.png|32px]]
|-
| {{BiomeLink|Birch Forest}} || Forest || Rain || #88bb67 || || [[File:Birch Forest Sugar Cane.png|32px]]
|-
| {{BiomeLink|Cold Ocean}} || Ocean || Rain || #8eb971 || || [[File:Ocean Sugar Cane.png|32px]]
|-
| {{BiomeLink|Dark Forest}} || Forest || Rain || #507a32 || || [[File:Dark Forest Sugar Cane.png|32px]]
|-
| {{BiomeLink|Deep Cold Ocean}} || Ocean || Rain || #8eb971 || || [[File:Ocean Sugar Cane.png|32px]]
|-
| {{BiomeLink|Deep Frozen Ocean}} || Ocean || Rain || #8eb971 || || [[File:Ocean Sugar Cane.png|32px]]
|-
| {{BiomeLink|Deep Lukewarm Ocean}} || Ocean || Rain || #8eb971 || || [[File:Ocean Sugar Cane.png|32px]]
|-
| {{BiomeLink|Deep Ocean}} || Ocean || Rain || #8eb971 || || [[File:Ocean Sugar Cane.png|32px]]
|-
| {{BiomeLink|Desert}} || Desert || No || #bfb755 || || [[File:Desert Sugar Cane.png|32px]]
|-
| {{BiomeLink|End Barrens}} || The End || No || #8eb971 || || [[File:Ocean Sugar Cane.png|32px]]
|-
| {{BiomeLink|End Highlands}} || The End || No || #8eb971 || || [[File:Ocean Sugar Cane.png|32px]]
|-
| {{BiomeLink|End Midlands}} || The End || No || #8eb971 || || [[File:Ocean Sugar Cane.png|32px]]
|-
| {{BiomeLink|Eroded Badlands}} || Mesa || No || #90814d || No || [[File:Badlands Sugar Cane.png|32px]]
|-
| {{BiomeLink|Flower Forest}} || Forest || Rain || #79c05a || || [[File:Forest Sugar Cane.png|32px]]
|-
| {{BiomeLink|Forest}} || Forest || Rain || #79c05a || || [[File:Forest Sugar Cane.png|32px]]
|-
| {{BiomeLink|Frozen Ocean}} || Ocean || Snow || #80b497 || || [[File:Snowy Plains Sugar Cane.png|32px]]
|-
| {{BiomeLink|Frozen River}} || River || Snow || #80b497 || || [[File:Snowy Plains Sugar Cane.png|32px]]
|-
| {{BiomeLink|Old Growth Spruce Taiga}} || Taiga || Rain || #86b783 || || [[File:Taiga Sugar Cane.png|32px]]
|-
| {{BiomeLink|Old Growth Pine Taiga}} || Taiga || Rain || #86b87f || || [[File:Old Growth Pine Taiga Sugar Cane.png|32px]]
|-
| {{BiomeLink|Ice Spikes}} || Icy || Snow || #80b497 || || [[File:Snowy Plains Sugar Cane.png|32px]]
|-
| {{BiomeLink|Jungle}} || Jungle || Rain || #59c93c || || [[File:Jungle Sugar Cane.png|32px]]
|-
| {{BiomeLink|Sparse Jungle}} || Jungle || Rain || #64c73f || || [[File:Sparse Jungle Sugar Cane.png|32px]]
|-
| {{BiomeLink|Lukewarm Ocean}} || Ocean || Rain || #8eb971 || || [[File:Ocean Sugar Cane.png|32px]]
|-
| {{BiomeLink|Windswept Hills}} || Extreme Hills || Rain || #8ab689 || || [[File:Windswept Hills Sugar Cane.png|32px]]
|-
| {{BiomeLink|Mushroom Fields}} || Mushroom || Rain || #55c93f || || [[File:Mushroom Fields Sugar Cane.png|32px]]
|-
| {{BiomeLink|Nether}} || Nether || No || #bfb755 || || [[File:Desert Sugar Cane.png|32px]]
|-
| {{BiomeLink|Ocean}} || Ocean || Rain || #8eb971 || || [[File:Ocean Sugar Cane.png|32px]]
|-
| {{BiomeLink|Plains}} || Plains || Rain || #91bd59 || || [[File:Plains Sugar Cane.png|32px]]
|-
| {{BiomeLink|River}} || River || Rain || #8eb971 || || [[File:Ocean Sugar Cane.png|32px]]
|-
| {{BiomeLink|Savanna}} || Savanna || No || #bfb755 || || [[File:Desert Sugar Cane.png|32px]]
|-
| {{BiomeLink|Savanna Plateau}} || Savanna || No || #bfb755 || || [[File:Desert Sugar Cane.png|32px]]
|-
| {{BiomeLink|Windswept Savanna}} || Savanna || No || #bfb755 || || [[File:Desert Sugar Cane.png|32px]]
|-
| {{BiomeLink|Small End Islands}} || The End || No || #8eb971 || || [[File:Ocean Sugar Cane.png|32px]]
|-
| {{BiomeLink|Snowy Beach}} || Beach || Snow || #83b593 || || [[File:Snowy Beach Sugar Cane.png|32px]]
|-
| {{BiomeLink|Snowy Taiga}} || Taiga || Snow || #80b497 || || [[File:Snowy Plains Sugar Cane.png|32px]]
|-
| {{BiomeLink|Snowy Plains}} || Icy || Snow || #80b497 || || [[File:Snowy Plains Sugar Cane.png|32px]]
|-
| {{BiomeLink|Stony Shore}} || None || Rain || #8ab689 || || [[File:Windswept Hills Sugar Cane.png|32px]]
|-
| {{BiomeLink|Sunflower Plains}} || Plains || Rain || #91bd59 || || [[File:Plains Sugar Cane.png|32px]]
|-
| {{BiomeLink|Swamp}} || Swamp || Rain || #6A7039 || If temperature below -0.1, used #4C763C. || [[File:Swamp Sugar Cane.png|32px]] / [[File:Swamp Sugar Cane (Cold).png|32px]]
|-
| {{BiomeLink|Taiga}} || Taiga || Rain || #86b783 || || [[File:Taiga Sugar Cane.png|32px]]
|-
| {{BiomeLink|Old Growth Birch Forest}} || Forest || Rain || #88bb67 || || [[File:Birch Forest Sugar Cane.png|32px]]
|-
| {{BiomeLink|The End}} || The End || No || #8eb971 || || [[File:Ocean Sugar Cane.png|32px]]
|-
| {{BiomeLink|The Void}} || None || No || #8eb971 || || [[File:Ocean Sugar Cane.png|32px]]
|-
| {{BiomeLink|Warm Ocean}} || Ocean || Rain || #8eb971 || || [[File:Ocean Sugar Cane.png|32px]]
|-
| {{BiomeLink|Wooded Badlands}} || Mesa || No || #90814d || No || [[File:Badlands Sugar Cane.png|32px]]
|-
| {{BiomeLink|Windswept Forest}} || Extreme Hills || Rain || #8ab689 || || [[File:Windswept Hills Sugar Cane.png|32px]]
|}
</div>
{{clear}}
=== Bedrock Edition ===
{{empty section}}
== Sounds ==
{{Sound table/Block/Grass}}
== Data values ==
=== ID ===
{{edition|java}}:
{{ID table
|edition=java
|showforms=y
|generatetranslationkeys=y
|displayname=Sugar Cane
|spritetype=block
|nameid=sugar_cane
|foot=1}}
{{edition|bedrock}}:
{{ID table
|edition=bedrock
|firstcolumnname=Sugar Cane
|shownumericids=y
|showforms=y
|showaliasids=y
|generatetranslationkeys=y
|displayname=Block
|spritename=sugar-cane
|spritetype=block
|nameid=reeds
|id=83
|form=block
|itemform=item.reeds}}
{{ID table
|displayname=Item
|spritename=sugar-cane
|spritetype=item
|nameid=sugar_cane
|id=385
|form=item
|aliasid=reeds
|translationkey=item.reeds.name
|foot=1}}
=== Block states ===
{{see also|Block states}}
{{/BS}}
== Video ==
{{Video note|This video was made before sugar cane had a different shade of green depending on the biome.|minor}}
<div style="text-align:center">{{yt|zlOnwn3PH5o}}</div>
== History ==
{{more images|Appearance when affected by {{bug|MC-48831}}}}
{{History|java alpha}}
{{History||v1.0.11|[[File:Sugar Cane JE1 BE1.png|32px]] [[File:Sugar Cane (item) JE1 BE1.png|32px]] Added reeds in the [[Seecret Updates|Seecret Friday Update 6]].
|Reeds are informally referred to as "bamboo" or "papyrus" by many [[player]]s.
|Since reeds can be washed away with [[water]] currents or instantly destroyed by removing the water adjacent to them, automated reed farms can be made.
|Reeds can be used to craft [[paper]].}}
{{History|java beta}}
{{History||1.2|[[Notch]] has [[wikipedia:Retroactive continuity|retconned]] reeds into sugar cane so that it can now be [[crafting|crafted]] into [[sugar]], included in the recipe for the [[cake]]s.}}
{{History||1.6|snap=Test Build 3|[[Arrow]]s no longer stick to sugar cane, and instead, they pass through. However, [[snowball]]s still come into contact with any sugar cane blocks, as if they are solid.}}
{{History||1.8|snap=Pre-release|Sugar cane can now grow and be placed onto [[sand]] as long as they are adjacent to [[water]]. This update allows sugar canes to appear next to [[water]] ponds in [[desert]] biomes.
|Sugar cane is now available in the [[creative]] [[inventory]] in both block and item forms.}}
{{History|java}}
{{History||1.0.0|snap=?|The sugar cane block has been removed from the creative inventory.}}
{{History||1.7.2|snap=13w36a|[[File:Sugar Cane JE2 BE2.png|32px]] Sugar cane is now [[tint]]ed depending on the [[biome]] it's in.
|The item texture remained unchanged, however, and still used the color palette from Alpha to 1.6.4.<ref name="Bug">{{bug|MC-216227}}</ref>}}
{{History||1.9|snap=15w43a|Sugar cane no longer breaks if its adjacent [[water]] is turned to [[frosted ice]].}}
{{History||1.13|snap=17w47a|The ID of sugar cane has now been changed from <code>reeds</code> to <code>sugar_cane</code>.
|"Sugar Canes" have now been renamed to "Sugar Cane".
|Prior to [[1.13/Flattening|''The Flattening'']], this [[block]]'s numeral ID was 83, and the [[item]]'s 338.}}
{{History||1.14|snap=18w43a|[[File:Sugar Cane (item) JE2 BE2.png|32px]] The texture of the sugar cane item has been changed.}}
{{History|||snap=19w03a|Placing sugar cane into a [[composter]] has a 20% chance of raising the compost level by 1.}}
{{History|||snap=19w05a|Sugar cane now has a 50% chance of increasing the compost level in a composter by 1.
|Added [[wandering trader]]s, which sell sugar cane.}}
{{History||1.16|snap=20w13a|Sugar cane has been moved from the Miscellaneous tab to the Decoration Blocks tab in the [[Creative inventory]].<ref name="misc decoration">https://bugs.mojang.com/browse/MC-174434</ref>}}
{{History||1.17|snap=21w11a|[[File:Sugar Cane (item) JE3.png|32px]] The texture of the sugar cane item has been changed, so that it actually matches the color it uses when placed again.<ref name="Bug"/>}}
{{History|||snap=Pre-release 1|Sugar cane now generates in mushroom fields.<ref>{{bug|MC-226683}}</ref>}}
{{History||1.19|snap=22w15a|Sugar cane can now be planted on mud.}}
{{History||1.20|snap=23w14a|Sugar cane can now be planted on [[suspicious sand]].}}
{{History|pocket alpha}}
{{History||Pre-release|[[File:Sugar Cane JE1 BE1.png|32px]] [[File:Sugar Cane (item) JE1 BE1.png|32px]] Added sugar cane.}}
{{History||v0.2.0|Despite being visible in the inventory, sugar cane does not drop anything when mined, making it unobtainable in Survival mode.}}
{{History||v0.2.1|Survival players now start with an infinite stack of sugar cane in the inventory.}}
{{History||v0.3.0|Sugar cane now drops its item form when mined.
|Survival players no longer start with an infinite stack of sugar cane in the inventory.}}
{{History||v0.5.0|Sugar cane can now be grown on [[sand]].
|Sugar cane can now be obtained after activating the [[nether reactor]].}}
{{History||v0.8.0|snap=build 5|[[Bone meal]] can now grow sugar cane to maximum height.}}
{{History||v0.9.0|snap=build 1|[[File:Sugar Cane JE2 BE2.png|32px]] The color of sugar cane now changes depending on the [[biome]] they are in.
|Using bone meal on sugar cane is no longer able to break blocks above it.}}
{{History||v0.12.1|snap=build 1|Sugar cane is no longer available from the [[nether reactor]].}}
{{History|pocket}}
{{History||1.0.0|snap=alpha 0.17.0.1|[[File:Sugar Cane JE1 BE1.png|32px]] Due to a bug, sugar canes no longer change color depending on the [[biome]].}}
{{History|bedrock}}
{{History||1.2.13|snap=beta 1.2.13.5|[[File:Sugar Cane JE2 BE2.png|32px]] The color of sugar canes now changes depending on the [[biome]], once again.}}
{{History||1.10.0|snap=beta 1.10.0.3|[[File:Sugar Cane (item) JE2 BE2.png|32px]] The texture of the sugar cane [[item]] has been changed.
|Sugar cane can now be [[trading|bought]] from [[wandering trader]]s.}}
{{History||1.11.0|snap=beta 1.11.0.1|Sugar canes can now be used to fill up [[composter]]s.}}
{{History||1.17.0|snap=beta 1.17.0.50|[[File:Sugar Cane (item) JE3.png|32px]] The texture of the sugar cane item has been changed, so that it actually matches the color it uses when placed again.}}
{{History|console}}
{{History||xbox=TU1|xbone=CU1|ps=1.0|wiiu=Patch 1|switch=1.0.1|[[File:Sugar Cane JE1 BE1.png|32px]] [[File:Sugar Cane (item) JE1 BE1.png|32px]] Added sugar canes.
|Sugar canes are solid, making it useful for growable walls. Unlike on Java Edition, they were never renamed to Sugar Cane.}}
{{History||xbox=TU2|Sugar canes are no longer solid, and arrows pass through them.}}
{{History||xbox=TU31|xbone=CU19|ps=1.22|wiiu=Patch 3|[[File:Sugar Cane JE2 BE2.png|32px]] The color of sugar cane now changes depending on the [[biome]] they're in.}}
{{History||xbox=TU60|xbone=CU51|ps=1.64|wiiu=Patch 30|switch=1.0.11|Sugar cane can now be grown with [[bonemeal]].}}
{{History||xbox=none|xbone=none|ps=1.90|wiiu=none|switch=none|[[File:Sugar Cane (item) JE2 BE2.png|32px]] The texture of the sugar cane [[item]] has been changed.}}
{{History||xbox=none|xbone=none|ps=1.91|wiiu=none|switch=none|Sugar cane can now be [[trading|bought]] from [[wandering trader]]s.
|Sugar canes can now be used to fill up [[composter]]s.}}
{{History|New Nintendo 3DS Edition}}
{{History||0.1.0|[[File:Sugar Cane JE1 BE1.png|32px]] [[File:Sugar Cane (item) JE1 BE1.png|32px]] Added sugar cane.}}
{{History|foot}}
=== Sugar cane "item" ===
{{:Technical blocks/Sugar Cane}}
== Issues ==
{{Issue list}}
== Trivia ==
*When a sugar cane is broken at the second level, the time resets (for example, if a two-block high sugar cane is broken, but is just about to grow to the third stage, it would reset that time).
*By placing more sugar canes on top of a sugar cane plant, it is possible to create tall sugar canes (up to y=319, the maximum height for building), although they do not naturally grow this high.
*Before sugar cane received an official name, they were sometimes referred to as [[bamboo]], a block added 9 years later. Other names were "reeds" and "papyrus".
== Gallery ==
=== Renders ===
<gallery>
Plains Sugar Cane.png|Plains
Taiga Sugar Cane.png|Taiga
Snowy Plains Sugar Cane.png|Snowy plains
Jungle Sugar Cane.png|Jungle
Desert Sugar Cane.png|Desert
Swamp Sugar Cane (Cold).png|Swamp (cold)
Swamp Sugar Cane.png|Swamp
Badlands Sugar Cane.png|Badlands
</gallery>
=== In-game ===
<gallery>
Huge Sugar Farm.png|A large sugar cane farm using 2×2 [[water]] holes.
Sugar Cane Waterfall.png|Water flowing over sugar cane.
UnderwaterSugarCane.png|Naturally generated sugar cane found underwater.
Sugar and Cactus.png|A [[cactus]] and sugar cane stalk generated next to each other.
SugarCaneRavine.png|Sugar cane found in the [[ravine]].
Reeds in Winter mode.png|Reeds generated in the [[winter mode]].
Sugar Cane Naturally Growing.png|Sugar cane growing between [[biome]]s.
Mesa Sugar Cane.jpg|Sugar cane growing on [[red sand]] in a [[badlands]] biome.
Sugarcanenowaterglitch.png|Sugar cane generated without a water source.
SwampCane.png|Sugar cane generated in a [[swamp]] biome.
Sugar cane savanna.png|Sugar cane growing in a [[savanna]] biome.
ForestSugarcane.png|Sugar cane growing in a [[forest]] biome.
Lava cane.png|Sugar cane growing with lava flowing around it.
Before breaking.png|Sugar canes few seconds before breaking because the water is frozen.
Undergroundreed.png|A sugar cane plant that generated in an underground [[water lake]].
Cave Sugar.png|Another example.
</gallery>
=== Heights ===
<gallery>
Tall Sugar Cane.png|Four-block tall sugar cane.
4RiverCane.png|Four-block tall sugar cane.
4-block tall sugar cane.png|Four-block tall sugar cane in a [[plains]] biome.
</gallery>
== References ==
{{Reflist}}
{{Blocks|vegetation}}
{{Items}}
[[Category:Plants]]
[[Category:Natural blocks]]
[[Category:Non-solid blocks]]
[[cs:Cukrová třtina]]
[[de:Zuckerrohr]]
[[es:Caña de azúcar]]
[[fr:Canne à sucre]]
[[hu:Cukornád]]
[[it:Canna da zucchero]]
[[ja:サトウキビ]]
[[ko:사탕수수]]
[[nl:Suikerriet]]
[[pl:Trzcina cukrowa]]
[[pt:Cana-de-açúcar]]
[[ru:Сахарный тростник]]
[[th:อ้อย]]
[[uk:Цукрова тростина]]
[[zh:甘蔗]]</li></ul> | Added exclusively textured roses and exclusive invisible bedrock. Blocks were also 2D in the inventory | ||||
v0.2.0{{Extension DPL}}<ul><li>[[Minecart with Chest|Minecart with Chest]]<br/>{{ItemEntity
|image=Minecart with Chest.png
|renewable=Yes
|stackable=No
|size=Height: 0.7 Blocks<br>Width: 0.98 Blocks
|networkid='''[[JE]]''': 10
|drops=1 {{ItemLink|Minecart with Chest}}<br> plus contents
|health={{hp|6}}
}}
A '''minecart with chest''' is a single [[chest]] inside a [[minecart]], and functions as such.
== Natural generation ==
Minecarts with chests containing loot naturally generate in [[mineshaft]]s, each on top of a piece of [[rail]].
== Obtaining ==
=== Crafting ===
{{Crafting|Chest|Minecart|Output=Minecart with Chest|type=Transportation}}
Minecarts with chests can be retrieved by attacking them. By doing so it drops as an [[item]] and any other contents of the chest are dropped as well.
==Usage==
[[File:Minecart with Chest GUI.png|thumb|176px|The GUI of a minecart with chest.]]
Minecarts with chests can be placed by {{control|use item|text=using its item}} on any type of [[rail]].
Chest minecarts' contents can be accessed by pressing {{control|use item}} button on them. The interaction makes no sounds and the chest does not show the opening or closing animation, unlike regular chests.
The boost that minecarts with chests gain from [[powered rail]]s is dependent on their load. For example, from a 1 powered rail starter track, an empty minecart with chest travels 64 blocks, but a full minecart with chest travels only 16 blocks (opposed to 80 blocks for an occupied normal minecart and 8 blocks for an empty normal minecart).
Another physical property of chest minecarts is their ability to be stacked. While three chests can fit in an area three blocks tall, up to four chest minecarts can fit in the same area. Like other minecarts, an unlimited number of minecarts with chests can exist in the same block space.
Minecarts with chests are also able to interact with [[hopper]]s. Hoppers can take items out from the minecart chest if they are below the track as the minecart rolls over it or put them in if the minecart rolls under a downward facing hopper. Hoppers can also input items if they are facing into the side of the minecart.
Opening or destroying a minecart with chest angers [[piglin]]s.
{{See also|Tutorials/Storage minecarts}}
When on top of [[detector rail]]s, nearby [[redstone comparators]] will give out redstone signals based on how full the minecarts with chests are.
== Sounds ==
{{Edition|Java}}:<br>
Minecarts with chests use the Friendly Creatures sound category for entity-dependent sound events.<ref group=sound name=rollsource>{{bug|MC-42132}}</ref>
{{Sound table
|sound=Minecart rolling.ogg
|subtitle=Minecart rolls
|source=Friendly Creatures <ref group=sound name=rollsource/>
|overridesource=1
|description=While a minecart with chest is moving
|id=entity.minecart.riding
|translationkey=subtitles.entity.minecart.riding
|volume=0.0-0.35 <ref group=sound>Relates linearly with horizontal velocity (max 0.5)</ref>
|pitch=0.0-1.0 <ref group=sound>Will increase by 0.0025 per tick if the minecart's horizontal velocity is more than 0.01</ref>
|distance=16
|foot=1}}
{{Edition|Bedrock}}:
{{Sound table
|type=bedrock
|sound=Minecart rolling.ogg
|source=neutral
|description=While a minecart with chest is moving
|id=minecart.base
|foot=1}}
==Data values==
===ID===
{{edition|java}}:
{{ID table
|edition=java
|firstcolumnname=Item
|showforms=y
|generatetranslationkeys=y
|displayname=Minecart with Chest
|spritetype=item
|nameid=chest_minecart
|form=item
|foot=1}}
{{ID table
|edition=java
|firstcolumnname=Entity
|generatetranslationkeys=y
|displayname=Minecart with Chest
|spritetype=entity
|nameid=chest_minecart
|foot=1}}
{{edition|bedrock}}:
{{ID table
|edition=bedrock
|firstcolumnname=Item
|shownumericids=y
|showforms=y
|notshowbeitemforms=y
|generatetranslationkeys=y
|displayname=Minecart with Chest
|spritetype=item
|nameid=chest_minecart
|id=389
|form=item
|foot=1}}
{{ID table
|edition=bedrock
|firstcolumnname=Entity
|shownumericids=y
|generatetranslationkeys=y
|displayname=Minecart with Chest
|spritetype=entity
|nameid=chest_minecart
|id=98
|foot=1}}
===Entity data===
Minecarts with chests have entity data associated with them that contain various properties of the entity.
{{el|java}}:
{{main|Entity format}}
{{/ED}}
{{el|bedrock}}:
: See [[Bedrock Edition level format/Entity format]].
==Achievements==
{{load achievements|Freight Station}}
== Video==
<div style="text-align:center">{{yt|2yVVMiQrCwo}}</div>
==History ==
[[File:Minecart with Chest BE3.png|thumb|The Minecart models in the Bedrock Edition were north or south on the sides. In the latest version, the front and rear sides are north or south. But the absolute orientation of the chest was not changed.]]
{{info needed section|In bedrock edition 1.16.100 it seems that chests in minecarts face sideways instead of forward - when was this changed?}}
{{History|java alpha}}
{{History||v1.0.14|[[File:Minecart with Chest JE1.png|32px]] [[File:Minecart with Chest (item) JE1 BE1.png|32px]] Minecarts with chests have been added.
|At this point, they are either called "chest minecarts" or "storage minecarts" because no in-game name was indicated.}}
{{History|java beta}}
{{History||1.0|"Minecart with Chest" has been first indicated as its name, via the new item tooltips.}}
{{History||1.8|snap=Pre-release|[[File:Minecart with Chest JE2.png|32px]] The [[model]] of the minecart with chest has been changed to match the new [[chest]] model. However, the [[chest]] is incorrectly offset.<ref>[[mcw:Issues/Beta 1.8pre2#Graphical]]</ref>}}
{{History|||snap=release|[[File:Minecart with Chest JE3 BE1.png|32px]] The model of minecarts with chests has been fixed.}}
{{History|java}}
{{History||1.5|snap=13w02a|Minecarts with chests now generate in [[mineshaft]]s in place of normal chests.}}
{{History||1.9|snap=15w43a|[[Loot table]]s have been added; minecarts with chests now use loot tables, and those in generated in [[mineshaft]]s now use loot tables.}}
{{History||1.9.1|snap=pre2|The title of the [[inventory]] has been changed from 'Chest minecart' to 'Minecart with Chest'.}}
{{History||1.11|snap=16w32a|The [[entity]] ID has been changed from <code>MinecartChest</code> to <code>chest_minecart</code>.}}
{{History||1.13|snap=17w47a|Prior to [[1.13/Flattening|''The Flattening'']], this [[item]]'s numeral ID was 342.}}
{{History||1.14|snap=18w43a|[[File:Minecart with Chest JE4 BE2.png|32px]] [[File:Minecart with Chest (item) JE2 BE2.png|32px]] The textures of minecarts with chests have been changed.}}
{{History||1.16.2|snap=Pre-release 1|[[Piglin]]s now become angry with players who open or destroy a chest minecart.}}
{{History||1.19|snap=22w13a|The crafting recipe for a minecart with chest is now shapeless.
|Breaking a minecart with chest will now drop the item instead of the minecart and chest separately, though the contents of the chest are still dropped.<ref>{{bug|MC-249493|||Fixed}}</ref>}}
{{History|pocket alpha}}
{{History||v0.14.0|snap=build 1|[[File:Minecart with Chest JE3 BE1.png|32px]] [[File:Minecart with Chest (item) JE1 BE1.png|32px]] Added minecarts with chests.}}
{{History|||snap=build 3|Minecarts with chests now drop [[item]]s when destroyed in [[Creative]] mode.}}
{{History|pocket}}
{{History||1.1.0|snap=alpha 1.1.0.0|The [[entity]] ID has been changed from <code>minecartchest</code> to <code>chest_minecart</code>.}}
{{History|bedrock}}
{{History||1.10.0|snap=beta 1.10.0.3|[[File:Minecart with Chest JE4 BE2.png|32px]] [[File:Minecart with Chest (item) JE2 BE2.png|32px]] The textures of minecarts with chests have been changed.}}
{{History||1.19.0|snap=beta 1.19.0.30|Breaking a minecart with chest will now drop the item instead of the minecart and chest separately, though the contents of the chest are still dropped.}}
{{History|console}}
{{History||xbox=TU1|xbone=CU1|ps=1.0|wiiu=Patch 1|switch=1.0.1|[[File:Minecart with Chest JE3 BE1.png|32px]] [[File:Minecart with Chest (item) JE1 BE1.png|32px]] Added minecarts with chests.}}
{{History||xbox=none|xbone=none|ps=1.90|wiiu=none|switch=none|[[File:Minecart with Chest JE4 BE2.png|32px]] [[File:Minecart with Chest (item) JE2 BE2.png|32px]] The textures of minecarts with chests have been changed.}}
{{History|new 3ds}}
{{History||0.1.0|[[File:Minecart_with_Chest_JE3_BE1.png|32px]] [[File:Minecart_with_Chest_(item)_JE1_BE1.png|32px]] Added minecarts with chests.
|Minecarts with chests emit smoke [[particles]] when destroyed.}}
{{History|foot}}
==Issues==
{{issue list}}
==Gallery ==
<gallery>
Compact Minecart Storage.png|A compact storage using chest minecarts (left) compared to chest storage in the same volume. Notice how chests cannot be placed next to each other, which is no longer the case after Java Edition 1.13.
GlitchedMinecartChest.png|This minecart with chest is trapped inside a block, due to a [[stronghold]] and a [[mineshaft]] that generated partially overlapping.
Minecartportal.png|A minecart with chest generated on top of an [[end portal frame]], because there is a mineshaft behind the wall.
Chest Minecart Stack.png|A large stack of chest minecarts.
</gallery>
==References==
{{Reflist}}
{{items}}
{{entities}}
[[Category:Mechanics]]
[[Category:Storage]]
[[cs:Nákladní vozík]]
[[de:Güterlore]]
[[es:Vagoneta con cofre]]
[[fr:Wagonnet de stockage]]
[[hu:Tárolócsille]]
[[it:Carrello da miniera]]
[[ja:チェスト付きのトロッコ]]
[[ko:상자가 실린 광산 수레]]
[[nl:Mijnkar met kist]]
[[pl:Wagonik ze skrzynią]]
[[pt:Carrinho de mina com baú]]
[[ru:Вагонетка с сундуком]]
[[uk:Вагонетка зі скринею]]
[[zh:运输矿车]]</li><li>[[Banner|Banner]]<br/>{{for|the image|Banner (image)}}
{{Block
| image = <gallery>
White Banner.gif | Banner
White Wall Banner.png | Wall Banner
</gallery>
| rarity = Common
| transparent = Yes
| light = No
| tool = axe
| renewable = Yes
| stackable = Yes (16)
| flammable = No
| lavasusceptible = Yes
}}
'''Banners''' are tall decorative [[blocks]], featuring a field that is highly customizable using [[dye]]s and [[banner pattern]]s.
== Obtaining ==
=== Breaking ===
Banners can be broken with or without a [[tool]], but an [[axe]] is fastest.
{{breaking row|horizontal=1|Banners|Axe}}
A banner also breaks and drops itself as an [[Item (entity)|item]] if the block the banner is attached to is moved, removed, or destroyed.
=== Natural generation ===
{| class="wikitable collapsible"
! Name !! Location !! Appearance !! Design
|-
! Magenta Banner
| Outside of [[end cities]].
| style="text-align: center" | [[File:End City Banner.png|32px]]
| Magenta Banner
* Black Inverted Chevron
* Black Chevron
|-
! Gray Banner
| In banner room in [[woodland mansion]]s.
| style="text-align: center" | [[File:Gray Banner.png|32px]]
| Gray Banner
|-
! Light Gray Banner
| In master bedroom in [[woodland mansion]]s.
| style="text-align: center" | [[File:Master Bedroom Banner.png|32px]]
| Light Gray Banner
* White Flower Charge
|- id="Ominous Banner"
! Ominous Banner{{only|java|short=1}}
Illager Banner{{only|bedrock|education|short=1}}
| Carried by [[raid captain]]s.<br> Located in [[pillager outpost]]s.
{{IN|java}}, the ominous banner cannot be crafted or copied because the design uses 8 patterns.
{{IN|bedrock}}, the illager banner is a separate type that cannot be placed in a loom.
| style="text-align: center" | [[File:Ominous Banner.png|32px]]<br/>[[File:Ominous Banner BE.png|32px]]
| White Banner{{only|java|short=1}}
* Cyan Lozenge
* Light Gray Base
* Gray Pale
* Light Gray Bordure
* Black Fess
* Light Gray Per Fess
* Light Gray Roundel
* Black Bordure
Separate type entirely{{only|bedrock|short=1}}
|-
! Brown Banner
| Outside of some houses, meeting points, and pillar fountains in savanna [[village]]s.
| style="text-align: center" | [[File:Brown Banner.png|32px]]
| Brown Banner
|-
! Black Banner
| In altar room in [[woodland mansions]].
| style="text-align: center" | [[File:Black Banner.png|32px]]
| Black Banner
|}
=== Crafting ===
Banners can be crafted from six [[wool]] and a [[stick]] in a pattern resembling a [[sign]].
{{Crafting
|head=1
|showdescription=1
|A1=Matching Wool |B1=Matching Wool |C1=Matching Wool
|A2=Matching Wool |B2=Matching Wool |C2=Matching Wool
|B3=Stick
|Output=Matching Banner
|Olink=Banner
|type=Decoration block
|description=Once the banner is crafted, its base color cannot be changed.{{only|java}}
}}
{{Crafting
|showdescription=1
|Any Banner
|Bleach
|Output=White Banner
|type=Decoration block
|description=Bleach can be used to remove the color of a banner, resulting in a white banner. This includes removing patterns from a white banner.{{only|bedrock|education}}
|foot=1
}}
=== Trading ===
Expert-level cartographer [[villager]]s always offer to [[trading|sell]] 1 or 2 blank banners of a random color for 3 [[emeralds]]. Expert-level shepherd villagers have a {{frac|2|7}} chance of offering the same trade.{{only|java}}
{{IN|bedrock}}, expert-level cartographer and shepherd villagers both offer to sell one of 16 blank banners for 3 emeralds as part of their trades.
=== Mob loot ===
[[Illager]]s that spawn carrying an ominous banner{{only|java|short=1}} / illager banner{{only|bedrock|education|short=1}} always drop it upon death.
== Usage ==
[[File:Standing banner with block.png|thumb|upright|Overlapping block on a banner.]]
[[File:Wall banner with block.png|thumb|upright|Overlapping on a wall mounted banner.]]
There are 16 colored blank banners, and numerous patterns each available in each of the 16 colors. A banner can feature up to 6 different patterns. The top layer of a banner (or the last pattern added) can be washed off by {{control|using}} it on a [[cauldron]] containing water.
Banners, much like signs, can be placed both on the ground facing in any direction, or on a wall. They gently sway as if affected by a breeze, regardless of dimension or location.
Banners have no collision mask as they are completely non-solid, so [[entities]] can move through them.
Other blocks (including other banners) can be placed on any edge of a banner's hitbox, which is only one block high despite the banner appearing as two blocks tall. This makes it possible to overlap another solid block on the top half of a banner for floor banners, or the bottom half of wall banners.
When a banner is placed on the side of a block, its position is set by the top block, and it is possible to place it so it appears half buried.
Banners can also be placed in [[item frame]]s, where they simply appear as their item model.
[[Water]] and [[lava]] flow around banners. {{IN|bedrock}}, banners can be [[waterlogged]].
<gallery>
File:Wall banner with water below.png| Water can be placed below wall banners
File:Water flowing around banner.png| Water flows around a banner on the ground
</gallery>
Lava can create [[fire]] in air blocks next to banners as if the banners were flammable, but the banners do not burn (and cannot be burned by other methods). Banners also cannot be moved by [[piston]]s.
If a banner is renamed on an [[anvil]], it retains its name when a pattern is added, but not when a pattern is removed.
=== Helmet ===
{{exclusive|java|section=13}}
While a banner cannot be equipped in the [[Helmet|head slot]] in [[Survival]] mode, equipping it using commands causes it to appear on top of the player. This is how [[raid captain]]s wear banners{{only|java|short=1}}.
=== Chestplate ===
{{exclusive|bedrock|section=13}}
While a banner cannot be equipped in the [[chestplate]] slot in Survival mode, equipping it using NBT editors causes it to appear on top of the player. This is how [[raid captain]]s wear banners{{only|bedrock|education|short=1}}.
<gallery>
Steve wearing White Banner.png|
Alex wearing White Banner.png|
Pillager with Ominous Banner.png|
Vindicator with Ominous Banner.png|
Evoker with Ominous Banner.png|Illusioner with Ominous Banner.png|
</gallery>
=== Crafting ingredient ===
[[Shield]]s can have patterns applied to them using banners. The shield pattern has a smaller resolution than the banner pattern, causing them to look different or offset. Banners that have more than six patterns, such as Ominous Banners or banners obtained through inventory editors, will be reduced to six patterns on the shield.
{{Crafting
|showdescription=1
|Shield
|Matching Banner; Ominous Banner
|Output=Matching Shield; Ominous Shield
|B2link=Banner
|type=Combat
|description=Applies the banner pattern to the shield. The banner is consumed.<br>The shield must have no pre-existing patterns.<br>Does not change existing durability or enchantments on the shield.
}}
=== Copying ===
Banners can be copied with a blank banner to make multiple identical banners. Banners with more than 6 patterns applied using commands cannot be copied in this manner.
{{Crafting
|showdescription=1
|Matching Banner
|Matching Banner
|Output=Matching Banner
|A2link=Banner
|B2link=Banner
|Olink=Banner
|type=Decoration block
|ignoreusage=1
|description=Copies pattern; both banners must have the same base color, and the one having a pattern copied onto it must have no preexisting pattern.
}}
=== Map marker ===
[[File:Banner marked map.png|alt=All banners marked on a map, alongside a named banner.|thumb|right|How every banner appears {{IN|java}} on a map, including named banners.]]
{{exclusive|java|section=13}}
{{IN|java}}, {{control|using}} on a standing banner with a [[map]] selected places a marker of the banner's position on the selected map, and {{control|using}} on the banner again removes the marker. Note that wall banners cannot serve as map markers. The marker has the same color as the banner's base without decorations. The marker is removed if the banner is destroyed unless the map is locked using a [[cartography table]]. If the banner is renamed, the name appears below the marker.
=== Patterns ===
{{see also|Banner/Patterns|title1=List of patterned banners}}
[[File:Spawned-in Banner.png|thumb|100px|Example of a banner with more than 6 patterns, a result of using the {{cmd|give}} command.]]
A banner may have up to six layers of patterns, which are overlaid with the last-crafted on top. A banner can have up to 16 layers of patterns with the use of commands. The total number of unique banners is approximately 2.3x10^16 (or 23 quadrillion).
Any color banner can be used; the pattern overlays the color. {{IN|java}}, a [[loom]] is used to make patterns. However, {{in|bedrock}}, the patterns can be made in a [[loom]] or a [[crafting table]].
A banner can have more than six layers of patterns through the commands <code>/[[Commands/give|give]]</code>, <code>/[[Commands/setblock|setblock]]</code> or <code>/[[Commands/fill|fill]]</code>. This only works in ''Java Edition'', as Bedrock Edition doesn't have any NBT commands. Here is an example of a mining banner with seven different patterns. There is specific codes for the [[Banner#Item data:~:text=white-,Item,-In Java Edition|colors]] and [[Banner/Patterns|patterns]] that you have to input.
<code><nowiki>/give @p white_banner{display:{Name:"\"Mining Industries Banner\""},BlockEntityTag:{Patterns:[{Pattern:"cr",Color:15},{Pattern:"bs",Color:15},{Pattern:"sc",Color:12},{Pattern:"ms",Color:0},{Pattern:"hh",Color:15},{Pattern:"bo",Color:15},{Pattern:"tts",Color:8}]}} 1</code>
{{LoadPage|Template:Banner pattern loom recipes|Loom recipes|h4}}
{{LoadPage|Banner/Banner pattern crafting recipes|Crafting recipes|h4|transcluded=1}}
=== Renaming ===
{{IN|java}}, a banner can be given a custom name that remains as the banner is placed and retrieved. The player can use an [[anvil]] to rename the banner item, or may change the <code>CustomName</code> tag using the {{cmd|data}} command on the banner block.
=== Fuel ===
Banners can be used as a fuel in [[furnace]]s, smelting 1.5 items per banner.
=== Note Blocks ===
Banners can be placed under [[note block]]s to produce "bass" sounds.
== Sounds ==
=== Generic ===
{{Sound table/Block/Wood}}
=== Unique ===
{{edition|java}}: ''None''
{{edition|bedrock}}:
{{Sound table
|type=bedrock
|sound=Water Splash Old.ogg
|source=block
|description=When all patterns are removed from a banner using a cauldron
|id=cauldron.cleanbanner
|volume=0.1
|pitch=1.0
|foot=1}}
== Data values ==
=== ID ===
{{edition|java}}:
{{ID table
|edition=java
|showblocktags=y
|showitemtags=y
|showforms=y
|generatetranslationkeys=y
|displayname=White Banner
|spritetype=block
|nameid=white_banner
|blocktags=banners, wall_post_override
|itemtags=banners
|translationkey=block.minecraft.white_banner,block.minecraft.ominous_banner
}}
{{ID table
|displayname=Orange Banner
|spritetype=block
|nameid=orange_banner
|blocktags=banners, wall_post_override
|itemtags=banners}}
{{ID table
|displayname=Magenta Banner
|spritetype=block
|nameid=magenta_banner
|blocktags=banners, wall_post_override
|itemtags=banners}}
{{ID table
|displayname=Light Blue Banner
|spritetype=block
|nameid=light_blue_banner
|blocktags=banners, wall_post_override
|itemtags=banners}}
{{ID table
|displayname=Yellow Banner
|spritetype=block
|nameid=yellow_banner
|blocktags=banners, wall_post_override
|itemtags=banners}}
{{ID table
|displayname=Lime Banner
|spritetype=block
|nameid=lime_banner
|blocktags=banners, wall_post_override
|itemtags=banners}}
{{ID table
|displayname=Pink Banner
|spritetype=block
|nameid=pink_banner
|blocktags=banners, wall_post_override
|itemtags=banners}}
{{ID table
|displayname=Gray Banner
|spritetype=block
|nameid=gray_banner
|blocktags=banners, wall_post_override
|itemtags=banners}}
{{ID table
|displayname=Light Gray Banner
|spritetype=block
|nameid=light_gray_banner
|blocktags=banners, wall_post_override
|itemtags=banners}}
{{ID table
|displayname=Cyan Banner
|spritetype=block
|nameid=cyan_banner
|blocktags=banners, wall_post_override
|itemtags=banners}}
{{ID table
|displayname=Purple Banner
|spritetype=block
|nameid=purple_banner
|blocktags=banners, wall_post_override
|itemtags=banners}}
{{ID table
|displayname=Blue Banner
|spritetype=block
|nameid=blue_banner
|blocktags=banners, wall_post_override
|itemtags=banners}}
{{ID table
|displayname=Brown Banner
|spritetype=block
|nameid=brown_banner
|blocktags=banners, wall_post_override
|itemtags=banners}}
{{ID table
|displayname=Green Banner
|spritetype=block
|nameid=green_banner
|blocktags=banners, wall_post_override
|itemtags=banners}}
{{ID table
|displayname=Red Banner
|spritetype=block
|nameid=red_banner
|blocktags=banners, wall_post_override
|itemtags=banners}}
{{ID table
|displayname=Black Banner
|spritetype=block
|nameid=black_banner
|blocktags=banners, wall_post_override
|itemtags=banners}}
{{ID table
|displayname=White Wall Banner
|spritetype=block
|nameid=white_wall_banner
|blocktags=banners, wall_post_override
|form=block
|translationkey=block.minecraft.white_banner,block.minecraft.ominous_banner}}
{{ID table
|displayname=Orange Wall Banner
|spritetype=block
|nameid=orange_wall_banner
|blocktags=banners, wall_post_override
|form=block
|translationkey=block.minecraft.orange_banner}}
{{ID table
|displayname=Magenta Wall Banner
|spritetype=block
|nameid=magenta_wall_banner
|blocktags=banners, wall_post_override
|form=block
|translationkey=block.minecraft.magenta_banner}}
{{ID table
|displayname=Light Blue Wall Banner
|spritetype=block
|nameid=light_blue_wall_banner
|blocktags=banners, wall_post_override
|form=block
|translationkey=block.minecraft.light_blue_banner}}
{{ID table
|displayname=Yellow Wall Banner
|spritetype=block
|nameid=yellow_wall_banner
|blocktags=banners, wall_post_override
|form=block
|translationkey=block.minecraft.yellow_banner}}
{{ID table
|displayname=Lime Wall Banner
|spritetype=block
|nameid=lime_wall_banner
|blocktags=banners, wall_post_override
|form=block
|translationkey=block.minecraft.lime_banner}}
{{ID table
|displayname=Pink Wall Banner
|spritetype=block
|nameid=pink_wall_banner
|blocktags=banners, wall_post_override
|form=block
|translationkey=block.minecraft.pink_banner}}
{{ID table
|displayname=Gray Wall Banner
|spritetype=block
|nameid=gray_wall_banner
|blocktags=banners, wall_post_override
|form=block
|translationkey=block.minecraft.gray_banner}}
{{ID table
|displayname=Light Gray Wall Banner
|spritetype=block
|nameid=light_gray_wall_banner
|blocktags=banners, wall_post_override
|form=block
|translationkey=block.minecraft.light_gray_banner}}
{{ID table
|displayname=Cyan Wall Banner
|spritetype=block
|nameid=cyan_wall_banner
|blocktags=banners, wall_post_override
|form=block
|translationkey=block.minecraft.cyan_banner}}
{{ID table
|displayname=Purple Wall Banner
|spritetype=block
|nameid=purple_wall_banner
|blocktags=banners, wall_post_override
|form=block
|translationkey=block.minecraft.purple_banner}}
{{ID table
|displayname=Blue Wall Banner
|spritetype=block
|nameid=blue_wall_banner
|blocktags=banners, wall_post_override
|form=block
|translationkey=block.minecraft.blue_banner}}
{{ID table
|displayname=Brown Wall Banner
|spritetype=block
|nameid=brown_wall_banner
|blocktags=banners, wall_post_override
|form=block
|translationkey=block.minecraft.brown_banner}}
{{ID table
|displayname=Green Wall Banner
|spritetype=block
|nameid=green_wall_banner
|blocktags=banners, wall_post_override
|form=block
|translationkey=block.minecraft.green_banner}}
{{ID table
|displayname=Red Wall Banner
|spritetype=block
|nameid=red_wall_banner
|blocktags=banners, wall_post_override
|form=block
|translationkey=block.minecraft.red_banner}}
{{ID table
|displayname=Black Wall Banner
|spritetype=block
|nameid=black_wall_banner
|blocktags=banners, wall_post_override
|form=block
|translationkey=block.minecraft.black_banner
|foot=1}}
{{ID table
|displayname=Block entity
|spritename=Banners
|spritetype=block
|nameid=banner
|foot=1}}
{{edition|bedrock}}:
{{ID table
|edition=bedrock
|firstcolumnname=Banner
|shownumericids=y
|showforms=y
|generatetranslationkeys=y
|displayname=Standing
|spritename=Banners
|spritetype=block
|nameid=standing_banner
|translationkey=tile.standing_banner.black.name, tile.standing_banner.red.name, tile.standing_banner.green.name, tile.standing_banner.brown.name, tile.standing_banner.blue.name, tile.standing_banner.purple.name, tile.standing_banner.cyan.name, tile.standing_banner.silver.name, tile.standing_banner.gray.name, tile.standing_banner.pink.name, tile.standing_banner.lime.name, tile.standing_banner.yellow.name, tile.standing_banner.lightBlue.name, tile.standing_banner.magenta.name, tile.standing_banner.orange.name, tile.standing_banner.white.name
|id=176
|form=block}}
{{ID table
|displayname=Wall
|spritename=Banners
|spritetype=block
|nameid=wall_banner
|id=177
|form=block
|translationkey=-}}
{{ID table
|displayname=Item
|spritename=Banners
|spritetype=item
|nameid=banner
|translationkey=item.banner.black.name, item.banner.red.name, item.banner.green.name, item.banner.brown.name, item.banner.blue.name, item.banner.purple.name, item.banner.cyan.name, item.banner.silver.name, item.banner.gray.name, item.banner.pink.name, item.banner.lime.name, item.banner.yellow.name, item.banner.lightBlue.name, item.banner.magenta.name, item.banner.orange.name, item.banner.white.name
|id=567
|form=item
|foot=1}}
{{ID table
|notnamespaced=y
|displayname=Block entity
|spritename=Banners
|spritetype=block
|nameid=Banner
|foot=1}}
=== Metadata ===
==== Item ====
{{IN|Bedrock}}, banner items use the following data values:
{| class="wikitable"
! DV !! Banner color
|-
|| 0 || black
|-
|| 1 || red
|-
|| 2 || green
|-
|| 3 || brown
|-
|| 4 || blue
|-
|| 5 || purple
|-
|| 6 || cyan
|-
|| 7 || light gray
|-
|| 8 || gray
|-
|| 9 || pink
|-
|| 10 || lime
|-
|| 11 || yellow
|-
|| 12 || light blue
|-
|| 13 || magenta
|-
|| 14 || orange
|-
|| 15 || white
|}
=== Item ===
{{IN|Java}}, banner items use the following data values:
{| class="wikitable"
! DV !! Banner color
|-
|| 15 || black
|-
|| 14 || red
|-
|| 13 || green
|-
|| 12 || brown
|-
|| 11 || blue
|-
|| 10 || purple
|-
|| 9 || cyan
|-
|| 8 || light gray
|-
|| 7 || gray
|-
|| 6 || pink
|-
|| 5 || lime
|-
|| 4 || yellow
|-
|| 3 || light blue
|-
|| 2 || magenta
|-
|| 1 || orange
|-
|| 0 || white
|}
=== Block states ===
{{see also|Block states}}
{{/BS}}
=== Block data ===
A banner has a block entity associated with it that holds additional data about the block.
{{el|bedrock}}:
: See [[Bedrock Edition level format/Block entity format]].
{{el|java}}:
{{see also|Block entity format}}
{{/BE}}
=== Item data ===
{{el|java}}:
{{main|Player.dat format}}
Banners, as items, use an NBT tag <code>BlockEntityTag</code> to indicate the patterns and details when it is placed.
<div class="treeview" style="margin-top: 0;">
* {{nbt|compound|Item}}: The item
** {{nbt|compound|tag}}: Additional information about the item. This tag is optional for most items.
*** {{nbt|compound|BlockEntityTag}}: The details of the shulker box.
**** All block data, except tags common to all block entities.
</div>
{{el|bedrock}}:
: See [[Bedrock Edition level format/Item format]].
== Achievements ==
{{load achievements|Fruit on the Loom}}
== Advancements ==
{{load advancements|Voluntary Exile}}
== History ==
{{info needed section|The Nether Update}}
{{History|java}}
{{History||1.8|snap=July 21, 2014|slink=https://twitter.com/jeb_/status/491238882789572608|[[Jeb]] posted a picture of banners, and stated that he is working on them.}}
{{History|||snap=14w30a|[[File:White Banner Revision 1.png|22px]][[File:Light Gray Banner Revision 1.png|22px]][[File:Gray Banner Revision 1.png|22px]][[File:Black Banner Revision 1.png|22px]][[File:Brown Banner Revision 1.png|22px]][[File:Red Banner Revision 1.png|22px]][[File:Orange Banner Revision 1.png|22px]][[File:Yellow Banner Revision 1.png|22px]][[File:Lime Banner Revision 1.png|22px]][[File:Green Banner Revision 1.png|22px]][[File:Cyan Banner Revision 1.png|22px]][[File:Light Blue Banner Revision 1.png|22px]][[File:Blue Banner Revision 1.png|22px]][[File:Purple Banner Revision 1.png|22px]][[File:Magenta Banner Revision 1.png|22px]][[File:Pink Banner Revision 1.png|22px]] Added banners.}}
{{History|||snap=14w30c|Added four additional patterns: Cross (+), Border, Curly Border and Thing (Mojang logo).}}
{{History|||snap=14w31a|Added two additional patterns: Inverted Halves and Base Gradient.
|The banner pattern terminology has been changed based on vexillology advice [[Jeb]] received from [http://www.reddit.com/r/Minecraft/comments/2bkxej/i_made_a_huge_mistake_banners/ his Reddit post].
|Banners can now be used as a [[fuel]] in [[furnace]]s.}}
{{History||1.8.8|snap=pre|The number of layers attainable by using [[commands]] is now limited to 16 per banner.}}
{{History||1.9|snap=15w31a|[[File:End City Banner.png|17px]] Magenta banners with a black chevron and inverted chevron are now naturally generated on the outside walls of [[end city|end cities]].}}
{{History|||snap=15w33c|Banners can be used to apply patterns to [[shield]]s.}}
{{History||1.11|snap=16w33a|Banners now require a [[dye]] when applying a pattern that uses a non-dye [[item]], such as a [[mob head|creeper head]] or [[golden apple|enchanted golden apple]]. Previously, the lack of a dye would have applied the black variant of the pattern.}}
{{History|||snap=16w39a|Black and gray banners, and light gray banners with a white flower charge are now naturally generated in rooms of [[woodland mansion]]s.}}
{{History||1.12|snap=January 24, 2017|slink={{tweet|jeb_|823817090511601664}}|[[Jeb]] tweets a screenshot of the changes to the banner color palette.}}
{{History|||snap=17w06a|[[File:White Banner.png|17px]] [[File:Light Gray Banner.png|17px]] [[File:Gray Banner.png|17px]] [[File:Black Banner.png|17px]] [[File:Brown Banner.png|17px]] [[File:Red Banner.png|17px]] [[File:Orange Banner.png|17px]] [[File:Yellow Banner.png|17px]] [[File:Lime Banner.png|17px]] [[File:Green Banner.png|17px]] [[File:Cyan Banner.png|17px]] [[File:Light Blue Banner.png|17px]] [[File:Blue Banner.png|17px]] [[File:Purple Banner.png|17px]] [[File:Magenta Banner.png|17px]] [[File:Pink Banner.png|17px]] Changed banners' [[tint]]s.}}
{{History|||snap=pre6|"Chief fess" and "base fess" banners are now just "chief" and "base" banners.}}
{{History||1.13|snap=17w47a|The colors for the <code>banner</code>, <code>wall_banner</code> and <code>standing_banner</code> ID have been split up into their own IDs.
|Prior to [[1.13/Flattening|''The Flattening'']], these [[block]]s' numeral IDs were 176 and 177, and the [[item]]'s 425.}}
{{History|||snap=18w10a|{{control|Using}} a [[map]] on a banner now mark the spot of the banner on the map.}}
{{History||1.14|snap=18w43a|[[Loom]]s have been added to help the [[player]] edit banners more easily.
|All recipes for banner patterns have been removed.}}
{{History|||snap=18w45a|[[File:Ominous Banner Revision 1.png|17px]] Added [[illager patrol]]s, where the leader of an illager patrol carries an [[illager]] banner.}}
{{History|||snap=18w46a|[[File:Ominous Banner.png|17px]] The pattern of [[illager]] banner now has a black border.}}
{{History|||snap=19w11a|Cartographer and shepherd [[villager]]s now [[trading|sell]] banners.}}
{{History|||snap=Pre-Release 2|"Illager Banners" have been renamed to "Ominous Banners".}}
{{History||1.17|snap=20w46a|The unused "base" pattern has been renamed to the "field" pattern and given proper translation strings (its ID is still "base").}}
{{History||1.19.3|snap=22w43a|The ominous banner is now available in the Creative inventory.}}
{{History|bedrock}}
{{History||1.2.0|snap=beta 1.2.0.2|[[File:White Banner.png|17px]] [[File:Light Gray Banner.png|17px]] [[File:Gray Banner.png|17px]] [[File:Black Banner.png|17px]] [[File:Brown Banner.png|17px]] [[File:Red Banner.png|17px]] [[File:Orange Banner.png|17px]] [[File:Yellow Banner.png|17px]] [[File:Lime Banner.png|17px]] [[File:Green Banner.png|17px]] [[File:Cyan Banner.png|17px]] [[File:Light Blue Banner.png|17px]] [[File:Blue Banner.png|17px]] [[File:Purple Banner.png|17px]] [[File:Magenta Banner.png|17px]] [[File:Pink Banner.png|17px]] Added banners.
|[[File:End City Banner.png|17px]] Magenta banners with a black chevron and inverted chevron are now naturally generated on the outside walls of [[end city|end cities]].
|Black and gray banners, and light gray banners with a white flower charge are now naturally generated in rooms of [[woodland mansion]]s.}}
{{History||1.4.0|snap=beta 1.2.20.1|The white banner can now be crafted from a colored banner and [[bleach]], which also removes all patterns, if used on a white banner.}}
{{History||1.10.0|snap=beta 1.10.0.3|[[Loom]]s have been added to help the [[player]] edit banners more easily.
|Brown banners now generate in new [[savanna]] [[village]]s.
|Black banners now generate in [[pillager outpost]] watchtowers.}}
{{History||1.11.0|snap=beta 1.11.0.1|Gray banners now generate in pillager outpost watchtowers, instead of black banners.
|[[File:Ominous Banner BE.png|17px]] Added [[illager captain]]s, which drop an [[illager]] banner upon [[death]].}}
{{History|||snap=beta 1.11.0.3|Illager banners now generate in [[pillager outpost]] watchtowers, instead of gray banners.}}
{{History|||snap=beta 1.11.0.4|Banners can now be [[trading|bought]] from cartographer and shepherd [[villager]]s.}}
{{History||1.20.0|snap=beta 1.20.0.20|Banners can now be used to customise [[shield]]s.}}
{{History|console}}
{{History||xbox=TU43|xbone=CU33|ps=1.36|wiiu=Patch 13|switch=1.0.1|[[File:White Banner Revision 1.png|22px]][[File:Light Gray Banner Revision 1.png|22px]][[File:Gray Banner Revision 1.png|22px]][[File:Black Banner Revision 1.png|22px]][[File:Brown Banner Revision 1.png|22px]][[File:Red Banner Revision 1.png|22px]][[File:Orange Banner Revision 1.png|22px]][[File:Yellow Banner Revision 1.png|22px]][[File:Lime Banner Revision 1.png|22px]][[File:Green Banner Revision 1.png|22px]][[File:Cyan Banner Revision 1.png|22px]][[File:Light Blue Banner Revision 1.png|22px]][[File:Blue Banner Revision 1.png|22px]][[File:Purple Banner Revision 1.png|22px]][[File:Magenta Banner Revision 1.png|22px]][[File:Pink Banner Revision 1.png|22px]] Added banners.}}
{{History||xbox=TU46|xbone=CU36|ps=1.38|wiiu=Patch 15|switch=1.0.1|[[File:End City Banner.png|17px]] Magenta banners with a black chevron and inverted chevron are now naturally generated on the outside walls of [[end city|end cities]].}}
{{History||xbox=TU53|xbone=CU43|ps=1.49|wiiu=Patch 23|switch=1.0.3|[[File:White Banner.png|17px]] [[File:Light Gray Banner.png|17px]] [[File:Gray Banner.png|17px]] [[File:Black Banner.png|17px]] [[File:Brown Banner.png|17px]] [[File:Red Banner.png|17px]] [[File:Orange Banner.png|17px]] [[File:Yellow Banner.png|17px]] [[File:Lime Banner.png|17px]] [[File:Green Banner.png|17px]] [[File:Cyan Banner.png|17px]] [[File:Light Blue Banner.png|17px]] [[File:Blue Banner.png|17px]] [[File:Purple Banner.png|17px]] [[File:Magenta Banner.png|17px]] [[File:Pink Banner.png|17px]] Changed banners' [[tint]]s.}}
{{History||xbox=none|xbone=none|ps=1.90|wiiu=none|switch=none|[[Loom]]s have been added to help the [[player]] edit banners more easily.}}
{{History||ps=1.91|[[File:Ominous Banner BE.png|17px]] Added [[illager]] banners, which generate with [[pillager outpost]]s and are [[drops|dropped]] by [[illager captain]]s upon [[death]].}}
{{History|foot}}
== Issues ==
{{issue list}}
== Trivia ==
* With 16 blank banners, 38 patterns of 16 colors each (608 uniquely-colored patterns), and 0 to 6 patterns per banner, the number of uniquely crafted banners is 16 × (608<sup>0</sup> + 608<sup>1</sup> + 608<sup>2</sup> + 608<sup>3</sup> + 608<sup>4</sup> + 608<sup>5</sup> + 608<sup>6</sup>) ≈ 809 quadrillion - 809 with 15 zeros (809,573,616,779,945,488). The number of visually distinct banners is smaller, because one or more patterns may completely cover other patterns, or the entire banner, or be duplicated due to the symmetric set of patterns (e.g. field or (yellow) + per pale azure (blue) = field azure + per pale or inverted).
** Not 38 patterns are available on BE, but 40 patterns of 16 colors each (640 uniquely-colored patterns), so the number is even greater. 16 × (640<sup>0</sup> + 640<sup>1</sup> + 640<sup>2</sup> + 640<sup>3</sup> + 640<sup>4</sup> + 640<sup>5</sup> + 640<sup>6</sup>) ≈ 1 quintillion - 1 with 18 zeros (1,101,232,303,249,827,856). This increases the number by almost 1.4 times, or almost 292 quadrillion, despite the addition of only 2 patterns.
* If a banner has over 6 patterns, only the six bottom-most patterns are displayed when hovered over in the [[inventory]].
* The Mojang logo is called "Thing" in-game, which could be considered an alternate translation for [[wiktionary:mojäng|mojäng]]. If [[wikipedia:Google Translate|Google Translate]] is used, it translates to "thingys" or "contraption".
** In the Swedish translation of the game, this pattern is, in fact, called ''mojäng''.
* [[List of block textures#Banner Textures|Banner textures]] are located in \assets\minecraft\textures\entity\banner.
** There are 40 monochrome textures, each containing all 6 sides of the banner.
** The texture of the back side is the mirrored texture of the front side.
** Compared to the texture files, textures' colors are inverted in-game due to them acting as masks for the re-colored base texture, base.png. That means white is visible, while black is transparent.
* Banners that have the purple NBT+ line in the bottom (obtained by holding Ctrl and middle-clicking the banner, which also copies the NBT [[tag]] of anything that the player points their crosshair to) actually have no difference with the base banner obtained by middle click.
*The Illager Banner in Bedrock Edition is available as a separate item but is just a second variant of the white banner.
**Standard variant of white banner is set to type 0.
**Illager variant is set to type 1.
== Gallery ==
<gallery>
Banners Jeb.png|The first image of banners, as tweeted by Jens Bergensten.
Iceland and Norway Flags.png|Another banner image from Jeb.
Searge Banners.png|Several banners made by Searge.
The Bountiful Update.png|Banners in the official 1.8 poster.
BannersBeforeAndAfter.png|An image, tweeted by Jeb, showcasing the changes he made to the banner color palette in the 1.12 update.
Gradients Overlay.png|The result of using gradient different numbers of times, each time increasing the level of gradient by 1.
All positions and rotations of a banner.png|All positions and rotations of a banner
Item Frame with Banner.png|A banner with the [[Mojang]] logo in an [[item frame]].
EndCityBanners.png|Banners floating outside of an [[End city]] tower.
Woodland mansion 1x2 d1.png|Banners hanging above the doorway of a [[woodland mansion]] master bedroom.
Replaceitembanner.png|Banner put in the helmet slot by using the command {{cmd|replaceitem}}{{Only|BE}} or {{cmd|item replace}}{{Only|JE}}.
Better Together Banners.jpg|Banners in ''Bedrock Edition''.
Better Together Banner Crafting 1.jpg|A banner in the hand.
Better Together Banner Crafting 2.jpg|A banner in the inventory.
Better Together Banner Crafting 3.jpg|A banner in the crafting grid.
Better Together Banner Crafting 4.jpg|A banner being given a pattern.
</gallery>
=== Renders ===
<gallery>
Ominous Banner.gif
White Banner.gif
Light Gray Banner.gif
Gray Banner.gif
Black Banner.gif
Brown Banner.gif
Red Banner.gif
Orange Banner.gif
Yellow Banner.gif
Lime Banner.gif
Green Banner.gif
Cyan Banner.gif
Light Blue Banner.gif
Blue Banner.gif
Purple Banner.gif
Magenta Banner.gif
Pink Banner.gif
Ominous Wall Banner.png|
White Wall Banner.png|
Light Gray Wall Banner.png|
Gray Wall Banner.png|
Black Wall Banner.png|
Brown Wall Banner.png|
Red Wall Banner.png|
Orange Wall Banner.png|
Yellow Wall Banner.png|
Lime Wall Banner.png|
Green Wall Banner.png|
Cyan Wall Banner.png|
Light Blue Wall Banner.png|
Blue Wall Banner.png|
Purple Wall Banner.png|
Magenta Wall Banner.png|
Pink Wall Banner.png
</gallery>
<gallery>
File:Ominous Banner.gif|Ominous banner pattern in Java Edition.
File:Ominous Banner BE.gif|Illager banner pattern in Bedrock Edition.
File:Ominous Banner Revision 1.gif|Old Ominous banner pattern.
File:Ominous Banner washing.gif|Washing with cauldron shows how to apply the ominous banner pattern.
</gallery>
=== [[Lego Minecraft]] Banners ===
<gallery>
File:Lego Red Creeper Banner Collage.jpg|Lego banners from 21127 and 21131
File:Lego Melon Banner.png|Lego banner from 21138
File:Lego Fish Banner.png|Lego banner from 21142
File:Lego Beetroot Banner.png|Lego banner from 21144
File:Lego Wheat Banner.png|Another lego banner from 21144
File:Lego Carrot Banner.png|A third lego banner from 21144
File:Lego Crossbones Banner.png|Lego banner from 21152
File:Lego Green Creeper Banner Collage.jpg|Lego banners from 21155
File:Lego Ominous Banner.png|Lego ominous banner from 21160
</gallery>
== References ==
{{reflist}}
{{Blocks|Utility}}
{{Items}}
[[Category:Generated structure blocks]]
[[Category:Manufactured blocks]]
[[Category:Block entities]]
[[Category:Non-solid blocks]]
[[cs:Prapor]]
[[de:Banner]]
[[es:Estandarte]]
[[fr:Bannière]]
[[ja:旗]]
[[ko:현수막]]
[[nl:Banier]]
[[pl:Sztandar]]
[[pt:Estandarte]]
[[ru:Флаг]]
[[uk:Стяг]]
[[zh:旗帜]]</li></ul></nowiki> | Breaking blocks now allows the player to pick them up and place them, thus adding and removing them from the inventory. Blocks are now 3D in the inventory | ||||
v0.2.1{{Extension DPL}}<ul><li>[[Warped Fungus on a Stick|Warped Fungus on a Stick]]<br/>{{Item
| image = Warped Fungus on a Stick.png
| durability = 100
| renewable = Yes
| stackable = No
}}
A '''warped fungus on a stick''' is an item that can be used to control saddled [[strider]]s.
== Obtaining ==
=== Crafting ===
{{Crafting
|head=1
|showdescription=1
|A1=Fishing Rod; Damaged Fishing Rod
|B2=Warped Fungus
|Output= Warped Fungus on a Stick
|description=Crafting from a damaged fishing rod is available only {{in|bedrock}}. ''Java Edition'' requires a pristine fishing rod. The [[2×2 grid]] can also be used for crafting instead of a crafting table.
|type= Transportation
}}
{{crafting
|foot=1
|ignoreusage=1
|Damaged Warped Fungus on a Stick
|Damaged Warped Fungus on a Stick
|Output= Warped Fungus on a Stick
|description= The durability of the two warped fungi on sticks is added together, plus an extra 5% durability.
|type= Transportation
}}
=== Mobs ===
A [[zombified piglin]] that spawns as a strider jockey holds a warped fungus on a stick instead of a {{ItemLink|golden sword}}, and has an 8.5%{{Only|java|short=y}} or 25%{{Only|bedrock|short=y}} chance to drop it if killed by a player or tamed [[wolf]], or upon death when angry. chance is increased by 1%{{Only|java|short=y}} or 5%{{Only|bedrock|short=y}} per level of Looting, for a maximum of 11.5%{{Only|java|short=y}} or 40%{{Only|bedrock|short=y}} with Looting III.
== Usage ==
[[File:Strider riding.gif|A [[player]] shown using a warped fungus on a stick to ride a [[strider]] (click to see animation).|thumb|350px]]
Similar to how a [[carrot on a stick]] is used to control [[pig]]s, the [[player]]s can use a warped fungus on a stick to control a [[strider]]. To do this, the player simply holds the [[item]] in one hand and any nearby striders within view is attracted toward the player. If mounted on a [[saddle]]d strider, the strider moves in the direction the player is facing while holding the warped fungus on a stick. Right clicking with the item makes the strider go faster, but reduces the item's durability by 1 for every speed boost. If the item durability reaches 0, it turns into a fishing rod.
Due to a strider's ability to walk on [[lava]], this is a beneficial [[tools|tool]] for using striders as a safe transport across [[the Nether]]'s terrain, which is otherwise considered difficult to traverse.
=== Enchantments ===
A warped fungus on a stick can receive the following enchantments, but only through an [[anvil]]:
{|class="wikitable col-2-center col-3-right"
|+
!Name
!Max Level
![[Enchanting|Method]]
|-
|[[Unbreaking]]
|III
|{{Inventory slot|Anvil}}
|-
|[[Mending]]
|I
|{{Inventory slot|Anvil}}
|-
|[[Curse of Vanishing]]
|I
|{{Inventory slot|Anvil}}
|}
== Sounds ==
{{Edition|Java}}:
{{Sound table
|sound=Random break.ogg
|subtitle=Item breaks
|source=player
|description=When a warped fungus on a stick's durability is exhausted
|id=entity.item.break
|translationkey=subtitles.entity.item.break
|volume=0.8
|pitch=0.8-1.2
|distance=16
|foot=1}}
{{Edition|Bedrock}}:
{{Sound table
|type=bedrock
|sound=Random break.ogg
|source=player
|description=When a warped fungus on a stick's durability is exhausted
|id=random.break
|volume=1.0
|pitch=0.9
|foot=1}}
== Data values ==
=== ID ===
{{edition|java}}:
{{ID table
|edition=java
|showforms=y
|generatetranslationkeys=y
|displayname=Warped Fungus on a Stick
|spritetype=item
|nameid=warped_fungus_on_a_stick
|form=item
|foot=1}}
{{edition|bedrock}}:
{{ID table
|edition=bedrock
|shownumericids=y
|showforms=y
|notshowbeitemforms=y
|generatetranslationkeys=y
|displayname=Warped Fungus on a Stick
|spritetype=item
|nameid=warped_fungus_on_a_stick
|id=618
|form=item
|foot=1}}
== Advancements ==
{{load advancements|This Boat Has Legs}}
== History ==
{{History|java}}
{{History||1.16|snap=20w13a|[[File:Warped Fungus on a Stick JE1 BE1.png|32px]] Added warped fungus on a stick.}}
{{History|||snap=20w14a|Now has 100 durability instead of 25.
|Now takes only 1 damage every time the strider is speed boosted.}}
{{History||1.16.2|snap=Pre-release 1|The [[zombified piglin]] riding a [[strider]] now spawns holding a warped fungus on a stick.}}
{{History|bedrock}}
{{History||1.16.0|snap=beta 1.16.0.57|[[File:Warped Fungus on a Stick JE1 BE1.png|32px]] Added warped fungus on a stick.}}
{{History|||snap=beta 1.16.0.63|Warped Fungus on a Stick can now be enchanted.}}
{{History||1.16.100|snap=beta 1.16.100.54|The [[zombified piglin]] riding a [[strider]] now spawns holding a warped fungus on a stick.}}
{{History|foot}}
== Issues ==
{{Issue list}}
== See also ==
* {{ItemLink|Carrot on a Stick}}
* {{ItemLink|Saddle}}
== References ==
{{Items}}
[[Category:Renewable resources]]
[[de:Wirrpilzrute]]
[[es:Caña con hongo distorsionado]]
[[fr:Champignon biscornu sur un bâton]]
[[ja:歪んだキノコ付きの棒]]
[[lzh:譎蕈釣竿]]
[[pl:Spaczony grzyb na patyku]]
[[pt:Vara com fungo distorcido]]
[[ru:Удочка с искажённым грибком]]
[[zh:诡异菌钓竿]]</li><li>[[Wheat Seeds|Wheat Seeds]]<br/>{{Block
| group = Age 0
| 1-1 = Wheat Age 0.png
| 1-2 = Wheat Age 0 BE.png
| group2 = Age 7
| 2-1 = Wheat Age 7.png
| 2-2 = Wheat Age 7 BE.png
| image = Wheat Seeds.png
| extratext = [[#Renders|View all renders]]
| invimage = Wheat Seeds
| transparent = Yes
| light = No
| tool = N/A
| renewable = Yes
| stackable = Yes (64)
| flammable = No
| lavasusceptible = No
}}
'''Wheat seeds''' ({{in|java}}) or '''seeds''' ({{in|bedrock}}) are [[item]]s obtained by breaking [[grass]], or more abundantly harvested from wheat crops, and are used to plant them.
'''Wheat crops''' are planted in [[farmland]] and used to grow [[wheat]] and wheat seeds.
== Obtaining ==
=== Breaking ===
Harvesting fully-grown [[wheat]] [[crops]] yields from 1 to 4 seeds per crop harvested (about {{frac|2|5|7}} seeds/crop harvested on average).
In '''Bedrock edition''' yields are 0-3.[https://bugs.mojang.com/browse/MCPE-169402]<sup><nowiki>https://bugs.mojang.com/browse/MCPE-169402</sup>
Wheat seeds can be obtained from breaking all variants of [[grass]], which yields 0 to 1 seed. If harvested with a [[Fortune]] enchanted tool the drop rate from grass is increased.
The looting is calculated by a binomial distribution: a drop is attempted three times with a success rate of around 57% to yield the 0–3 drops. Each level of Fortune enchantment increases the number of attempts by one.
{| class="wikitable"
! rowspan="3" |[[Resource location]]
! rowspan="3" | Source
! colspan="5" | Drops
|- style="text-align:center"
! rowspan="2" |{{ItemLink|Wheat}}
! colspan="4" |{{ItemText|Wheat Seeds}}
|- style="text-align:center"
! Default tool
! With [[Fortune]] I
! With Fortune II
! With Fortune III
|- style="text-align:center"
| rowspan="2" |<code>blocks/wheat</code>
|{{BlockLink|Wheat}} (age 0–6)
| 0 {{ItemSprite|Wheat}}
| 1 {{ItemSprite|Wheat Seeds}}|| 1 {{ItemSprite|Wheat Seeds}}|| 1 {{ItemSprite|Wheat Seeds}}|| 1 {{ItemSprite|Wheat Seeds}}
|- style="text-align:center"
|{{BlockLink|Wheat}} (age 7)
| 1 {{ItemSprite|Wheat}}
| 1 {{ItemSprite|Wheat Seeds}} (~7.87%) ''or''<br>2 {{ItemSprite|Wheat Seeds}} (~31.49%) ''or''<br>3 {{ItemSprite|Wheat Seeds}} (~41.98%) ''or''<br>4 {{ItemSprite|Wheat Seeds}} (~18.66%)
| 1 {{ItemSprite|Wheat Seeds}} (~3.37%) ''or''<br>2 {{ItemSprite|Wheat Seeds}} (~17.99%) ''or''<br>3 {{ItemSprite|Wheat Seeds}} (~35.98%) ''or''<br>4 {{ItemSprite|Wheat Seeds}} (~31.99%) ''or''<br>5 {{ItemSprite|Wheat Seeds}} (~10.66%)
| 1 {{ItemSprite|Wheat Seeds}} (~1.44%) ''or''<br>2 {{ItemSprite|Wheat Seeds}} (~9.64%) ''or''<br>3 {{ItemSprite|Wheat Seeds}} (~25.70%) ''or''<br>4 {{ItemSprite|Wheat Seeds}} (~34.27%) ''or''<br>5 {{ItemSprite|Wheat Seeds}} (~22.85%) ''or''<br>6 {{ItemSprite|Wheat Seeds}} (~6.09%)
| 1 {{ItemSprite|Wheat Seeds}} (~0.62%) ''or''<br>2 {{ItemSprite|Wheat Seeds}} (~4.96%) ''or''<br>3 {{ItemSprite|Wheat Seeds}} (~16.52%) ''or''<br>4 {{ItemSprite|Wheat Seeds}} (~29.38%) ''or''<br>5 {{ItemSprite|Wheat Seeds}} (~29.38%) ''or''<br>6 {{ItemSprite|Wheat Seeds}} (~15.67%) ''or''<br>7 {{ItemSprite|Wheat Seeds}} (~3.48%)
|}
=== Natural generation ===
[[Village]] farm plots have a chance of being wheat crops. The exact chance depends on the style of the village:
{| class="wikitable"
! Village style !! Chance
|-
| {{EnvSprite|savanna-village}} Savanna || 80%
|-
| {{EnvSprite|desert-village}} Desert || 70%
|-
| {{EnvSprite|taiga-village}} Taiga || 60%
|-
| {{EnvSprite|plains-village}} Plains || 50%
|-
| {{EnvSprite|snowy-village}} Snowy || 20%
|}
=== Chest loot ===
{{LootChestItem|wheat-seeds}}
=== Trading ===
[[Wandering trader]]s sell wheat seeds for an [[emerald]].
=== Villager gifts ===
{{exclusive|java|section=1}}
Nitwit and unemployed [[villager]]s throw wheat seeds at players under the [[Hero of the Village]] effect.
== Usage ==
=== Crop ===
{{main|Tutorials/Crop farming|title1=Crop Farming}}
[[File:Crop states.png|thumb|Different stages of crop growth.]]
Wheat seeds can be placed on [[farmland]] by right-clicking, where they grow through eight stages. When left alone, wheat seeds planted on farmland grow to become wheat crops, which can be harvested by the player. Planted seeds require a light level of 9 or greater to continue growing. If the light level is 7 or below, the crops instantly un-plant themselves ("pop off"). It is not possible to plant seeds if the light level is too low.
Crops grow faster if the farmland they are planted in is [[Farmland#Hydration|hydrated]]. Using [[bone meal]] on crops also increases the speed of growth by randomly increasing their growth stage by 2 to 5.
Breaking the final stage produces 1 to 4 wheat seeds (or more with Fortune) and 1 [[wheat]]. If they are harvested early, they drop 1 seed without any wheat. Crops break if pushed by a [[piston]] or if their supporting farmland breaks or turns to dirt (i.e. by being trampled), dropping their usual drops.
=== Breeding ===
Like other seeds, wheat seeds can be used to breed [[chicken]]s and reduce the remaining growth duration of baby chickens by 10%. Chickens also follow a player holding wheat seeds.
=== Taming ===
Like other seeds, wheat seeds can be used to tame [[parrot]]s.
=== Composting ===
Placing wheat seeds into a [[composter]] has a 30% chance of raising the compost level by 1. A stack of wheat seeds yields an average of 2.74 [[bonemeal]].
== Sounds ==
{{Sound table/Block/Crop}}
== Data values ==
=== ID ===
{{edition|java}}:
{{ID table
|edition=java
|showblocktags=y
|showforms=y
|generatetranslationkeys=y
|displayname=Wheat Crops
|spritetype=block
|nameid=wheat
|blocktags=bee_growables, crops
|form=block}}
{{ID table
|displayname=Wheat Seeds
|spritetype=item
|nameid=wheat_seeds
|form=item
|foot=1}}
{{edition|bedrock}}:
{{ID table
|edition=bedrock
|shownumericids=y
|showforms=y
|generatetranslationkeys=y
|displayname=Wheat
|spritetype=block
|nameid=wheat
|id=59
|form=block
|itemform=item.wheat}}
{{ID table
|displayname=Seeds
|spritetype=item
|nameid=wheat_seeds
|id=291
|form=item
|foot=1}}
=== Block states ===
{{see also|Block states}}
{{/BS}}
== Advancements ==
{{load advancements|A Seedy Place}}
== History ==
''For a more in-depth breakdown of changes to wheat textures and models, including a set of renders for each state, see [[/Asset history]]''
{{History|java classic}}
{{History||May 21, 2009|link=wordofnotch:110762705|[[Notch]] shows interest in adding [[crops]] on [[farmland]].}}
{{History|java indev}}
{{History||Minecraft Indev|snap=20100206|link=Minecraft Indev|slink=Java Edition Indev 20100206|[[File:Wheat Seeds JE1 BE1.png|32px]] Added seeds.
|[[File:Wheat Age 0 JE1.png|32px]] [[File:Wheat Age 1 JE1.png|32px]] [[File:Wheat Age 2 JE1.png|32px]] [[File:Wheat Age 3 JE1.png|32px]] [[File:Wheat Age 4 JE1.png|32px]] [[File:Wheat Age 5 JE1.png|32px]] [[File:Wheat Age 6 JE1.png|32px]] [[File:Wheat Age 7 JE1.png|32px]] Added crops.
|Seeds can be planted on farmland.
|Seeds have a chance of [[drop]]ping while using a [[hoe]] on a [[grass block]].}}
{{History|java beta}}
{{History||1.5|Crops destroyed by [[water]] now drop both seeds and wheat. Prior to this update, they dropped only wheat when destroyed by water.}}
{{History||1.6|snap=Test Build 3|Seeds can no longer be tilled from a grass block.
|Seeds are now found by destroying [[tall grass]] or by harvesting fully-grown crops.}}
{{History||1.8|snap=Pre-release|Crops can now be found in [[village]] farms.}}
{{History|java}}
{{History||1.4.2|snap=12w36a|[[Chicken]]s now use seeds instead of wheat to [[breeding|breed]].}}
{{History||1.8|snap=14w02a|[[Villager]]s can now harvest and plant seeds to grow crops.}}
{{History|||snap=14w06a|[[File:Wheat Age 0 JE2.png|32px]] [[File:Wheat Age 1 JE2.png|32px]] [[File:Wheat Age 2 JE2.png|32px]] [[File:Wheat Age 3 JE2.png|32px]] [[File:Wheat Age 4 JE2.png|32px]] [[File:Wheat Age 5 JE2.png|32px]] [[File:Wheat Age 6 JE2.png|32px]] [[File:Wheat Age 7 JE2.png|32px]] Crops are now a pixel higher - previously they were offset one pixel down as to match farmland. This is likely an accidental result of model conversion.}}
{{History|||snap=14w10a|[[File:Missing Model JE2.png|32px]] [[File:Missing Model JE2.png|32px]] [[File:Missing Model JE2.png|32px]] [[File:Missing Model JE2.png|32px]] [[File:Missing Model JE2.png|32px]] [[File:Missing Model JE2.png|32px]] [[File:Missing Model JE2.png|32px]] [[File:Missing Model JE2.png|32px]] Crops of all stages [[Missing model|no longer have a model]].}}
{{History|||snap=14w10b|[[File:Wheat Age 0 JE4.png|32px]] [[File:Wheat Age 1 JE4.png|32px]] [[File:Wheat Age 2 JE4.png|32px]] [[File:Wheat Age 3 JE4.png|32px]] [[File:Wheat Age 4 JE4.png|32px]] [[File:Wheat Age 5 JE4.png|32px]] [[File:Wheat Age 6 JE4.png|32px]] [[File:Wheat Age 7 JE4.png|32px]] Crops now have models again.<ref>{{bug|MC-50232|||Fixed}}</ref> In addition, they are now offset downwards by one pixel once more.<ref>{{bug|MC-50155|||Fixed}}</ref>}}
{{History|||snap=14w25a|[[File:Wheat Age 0 JE5.png|32px]] [[File:Wheat Age 1 JE5.png|32px]] [[File:Wheat Age 2 JE5.png|32px]] [[File:Wheat Age 3 JE5.png|32px]] [[File:Wheat Age 4 JE5.png|32px]] [[File:Wheat Age 5 JE5.png|32px]] [[File:Wheat Age 6 JE5.png|32px]] [[File:Wheat Age 7 JE5.png|32px]] Crops model are now shaded.}}
{{History|||snap=14w27a|[[File:Wheat Age 0 JE6.png|32px]] [[File:Wheat Age 1 JE6.png|32px]] [[File:Wheat Age 2 JE6.png|32px]] [[File:Wheat Age 3 JE6.png|32px]] [[File:Wheat Age 4 JE6.png|32px]] [[File:Wheat Age 5 JE6.png|32px]] [[File:Wheat Age 6 JE6.png|32px]] [[File:Wheat Age 7 JE6.png|32px]] Crops are no longer shaded.}}
{{History||1.9|snap=15w38a|The drop chances of crops has been slightly improved from an average of {{frac|1|3|5}} per [[crop]] harvested to {{frac|1|5|7}}.}}
{{History||1.11|snap=16w39a|Crops now generate inside [[woodland mansion]]s.}}
{{History||1.12|snap=17w18b|Placing a wheat seeds in farmland now gives the player the "A Seedy Place" [[advancement]].}}
{{History|||snap=pre3|Seeds are now used to tame [[parrot]]s.}}
{{History||1.13|snap=17w47a|Prior to [[1.13/Flattening|''The Flattening'']], this block's numeral ID was 59, and the item's was 295.}}
{{History|||snap=18w14a|Seeds no longer become destroyed when an [[entity]] jumps on them if they have the [[Slow Falling]] status effect.}}
{{History|||snap=18w20a|"Seeds" have been renamed to "Wheat Seeds".
|"Crops" have been renamed to "Wheat Crops".}}
{{History||1.14|snap=18w43a|[[File:Wheat Age 0 JE7.png|32px]] [[File:Wheat Age 1 JE7.png|32px]] [[File:Wheat Age 2 JE7.png|32px]] [[File:Wheat Age 3 JE7.png|32px]] [[File:Wheat Age 4 JE7.png|32px]] [[File:Wheat Age 5 JE7.png|32px]] [[File:Wheat Age 6 JE7.png|32px]] [[File:Wheat Age 7 JE7.png|32px]] The textures of wheat crops have been changed.
|The drop rate of fully grown wheat seeds has been changed from 0-3 to 1-4.}}
{{History|||snap=18w44a|[[File:Wheat Age 6 JE8.png|32px]] [[File:Wheat Age 7 JE8.png|32px]] The textures of wheat crops of age 6 and 7 have been changed again.}}
{{History|||snap=18w47a|[[File:Wheat Age 0 JE8.png|32px]] [[File:Wheat Age 1 JE8.png|32px]] [[File:Wheat Age 2 JE8.png|32px]] [[File:Wheat Age 3 JE8.png|32px]] [[File:Wheat Age 4 JE8.png|32px]] [[File:Wheat Age 5 JE8.png|32px]] [[File:Wheat Age 6 JE9.png|32px]] [[File:Wheat Age 7 JE9.png|32px]] The textures of wheat crops have been changed, once again.}}
{{History|||snap=18w48a|Wheat seeds can now be found in [[chest]]s in [[village]] fisher cottages.}}
{{History|||snap=18w49a|Wheat seeds can now be found in chests in [[savanna]] village houses.}}
{{History|||snap=19w03a|Placement and breaking [[sound]]s have been added to wheat crops.
|Placing wheat seeds into the new [[composter]] has a 10% chance of raising the compost level by 1.}}
{{History|||snap=19w05a|Wheat seeds now have a 30% chance of increasing the compost level in a composter by 1.
|Added [[Wandering Trader|wandering trader]]s, which sell wheat seeds.}}
{{History|||snap=19w13a|Nitwit and unemployed villagers now give wheat seeds to players under the [[Hero of the Village]] effect.}}
{{History||1.15|snap=19w34a|[[Bee]]s can now pollinate wheat crops.}}
{{History||1.17|snap=21w13a|[[File:Wheat Age 0.png|32px]] [[File:Wheat Age 1.png|32px]] [[File:Wheat Age 2.png|32px]] [[File:Wheat Age 3.png|32px]] [[File:Wheat Age 4.png|32px]] [[File:Wheat Age 5.png|32px]] [[File:Wheat Age 6.png|32px]] [[File:Wheat Age 7.png|32px]] The "crop" template model has changed such that pixels appear in the same physical positions on opposite sides of texture planes.<ref>{{bug|MC-199242|||Fixed}}</ref>}}
{{History||1.20|snap=23w12a|Wheat seeds can now be found in [[suspicious gravel]] and [[suspicious sand]] in [[trail ruins]].}}
{{History|||snap=23w16a|Wheat seeds no longer generates in [[suspicious sand]] in [[trail ruins]].|Due to the split of the archaeological loot tables for suspicious gravel within [[trail ruins]], wheat seeds are now common loot.}}
{{History|pocket alpha}}
{{History||v0.4.0|[[File:Wheat Seeds JE1 BE1.png|32px]] Added seeds.
|[[File:Wheat Age 0 JE6 BE1.png|32px]] [[File:Wheat Age 1 JE6 BE1.png|32px]] [[File:Wheat Age 2 JE6 BE1.png|32px]] [[File:Wheat Age 3 JE6 BE1.png|32px]] [[File:Wheat Age 4 JE6 BE1.png|32px]] [[File:Wheat Age 5 JE6 BE1.png|32px]] [[File:Wheat Age 6 JE6 BE1.png|32px]] [[File:Wheat Age 7 JE6 BE1.png|32px]] Added crops.
|Seeds can be obtained by tilling [[grass block]]s.}}
{{History||v0.9.0|snap=build 1|[[File:Wheat Age 0 BE2.png|32px]] [[File:Wheat Age 1 BE2.png|32px]] [[File:Wheat Age 2 BE2.png|32px]] [[File:Wheat Age 3 BE2.png|32px]] [[File:Wheat Age 4 BE2.png|32px]] [[File:Wheat Age 5 BE2.png|32px]] [[File:Wheat Age 6 BE2.png|32px]] [[File:Wheat Age 7 BE2.png|32px]] Faces now renders from both sides, resulting in z-fighting.
|Seeds can now be used to [[breeding|breed]] [[chicken]].
|Crops can now be found in [[village]] farms.}}
{{History|||snap=build 2|[[File:Wheat Age 0 BE3.png|32px]] [[File:Wheat Age 1 BE3.png|32px]] [[File:Wheat Age 2 BE3.png|32px]] [[File:Wheat Age 3 BE3.png|32px]] [[File:Wheat Age 4 BE3.png|32px]] [[File:Wheat Age 5 BE3.png|32px]] [[File:Wheat Age 6 BE3.png|32px]] [[File:Wheat Age 7 BE3.png|32px]] Removed some faces to fix z-fighting.}}
{{History||v0.12.1|snap=build 1|Farmer [[villager]]s can now pick up, harvest and plant seeds to grow [[wheat]].}}
{{History|||snap=build 2|Crops now always drop seeds when mined, regardless of growth stage.}}
{{History|||snap=build 8|Seeds can no longer be obtained by tilling [[grass block]]s.}}
{{History||v0.16.2|Seeds can now be found in [[chest]]s inside the large house of [[snowy tundra]] and [[snowy taiga]] [[village]]s.}}
{{History|pocket}}
{{History||1.1.0|snap=alpha 1.1.0.0|Crops now generate inside [[woodland mansion]]s.}}
{{History|bedrock}}
{{History||1.2.0|snap=beta 1.2.0.2|Seeds are now used to tame [[parrot]]s.}}
{{History||1.6.0|snap=beta 1.6.0.1|Seeds no longer become destroyed when an [[entity]] jumps on them if they have the [[Slow Falling]] status effect.}}
{{History||1.10.0|snap=beta 1.10.0.3|Seeds can now be bought from [[wandering trader]]s.
|Placement and breaking [[sound]]s have been added to crops.
|[[File:Wheat Age 0 BE.png|32px]] [[File:Wheat Age 1 BE.png|32px]] [[File:Wheat Age 2 BE.png|32px]] [[File:Wheat Age 3 BE.png|32px]] [[File:Wheat Age 4 BE.png|32px]] [[File:Wheat Age 5 BE.png|32px]] [[File:Wheat Age 6 BE.png|32px]] [[File:Wheat Age 7 BE.png|32px]] The textures of crops have been changed.}}
{{History||1.11.0|snap=beta 1.11.0.1|Seeds can now be found in [[savanna]] [[village]] house [[chest]]s.
|Seeds can now be used to fill up [[composter]]s.}}
{{History||1.14.0|snap=beta 1.14.0.1|[[Bee]]s can now pollinate crops.}}
{{History|console}}
{{History||xbox=TU1|xbone=CU1|ps=1.0|wiiu=Patch 1|switch=1.0.1|[[File:Wheat Seeds JE1 BE1.png|32px]] Added seeds.
|[[File:Wheat Age 0 JE6 BE1.png|32px]] [[File:Wheat Age 1 JE6 BE1.png|32px]] [[File:Wheat Age 2 JE6 BE1.png|32px]] [[File:Wheat Age 3 JE6 BE1.png|32px]] [[File:Wheat Age 4 JE6 BE1.png|32px]] [[File:Wheat Age 5 JE6 BE1.png|32px]] [[File:Wheat Age 6 JE6 BE1.png|32px]] [[File:Wheat Age 7 JE6 BE1.png|32px]] Added crops.}}
{{History||xbox=none|xbone=none|ps=1.90|wiiu=none|switch=none|[[File:Wheat Age 0 JE8.png|32px]] [[File:Wheat Age 1 JE8.png|32px]] [[File:Wheat Age 2 JE8.png|32px]] [[File:Wheat Age 3 JE8.png|32px]] [[File:Wheat Age 4 JE8.png|32px]] [[File:Wheat Age 5 JE8.png|32px]] [[File:Wheat Age 6 JE9.png|32px]] [[File:Wheat Age 7 JE9.png|32px]] The textures of crops have been changed.}}
{{History|New 3DS}}
{{History||0.1.0|[[File:Wheat Seeds JE1 BE1.png|32px]] Added seeds.
|[[File:Wheat Age 0 JE6 BE1.png|32px]] [[File:Wheat Age 1 JE6 BE1.png|32px]] [[File:Wheat Age 2 JE6 BE1.png|32px]] [[File:Wheat Age 3 JE6 BE1.png|32px]] [[File:Wheat Age 4 JE6 BE1.png|32px]] [[File:Wheat Age 5 JE6 BE1.png|32px]] [[File:Wheat Age 6 JE6 BE1.png|32px]] [[File:Wheat Age 7 JE6 BE1.png|32px]] Added crops.}}
{{History|foot}}
=== Wheat "item" ===
{{:Technical blocks/Crops}}
== Issues ==
{{issue list}}
== Gallery ==
===Renders===
;Java Edition
<gallery>
Wheat Age 0.png|
Wheat Age 1.png|
Wheat Age 2.png|
Wheat Age 3.png|
Wheat Age 4.png|
Wheat Age 5.png|
Wheat Age 6.png|
Wheat Age 7.png|
</gallery>
;Bedrock Edition
<gallery>
Wheat Age 0 BE.png|
Wheat Age 1 BE.png|
Wheat Age 2 BE.png|
Wheat Age 3 BE.png|
Wheat Age 4 BE.png|
Wheat Age 5 BE.png|
Wheat Age 6 BE.png|
Wheat Age 7 BE.png|
</gallery>
===Screenshots===
<gallery>
AllSeeds.png|All the seeds that exist.
Wheat.jpg|Wheat crops in Pocket Edition.
Village Wheat Beetroot Farm.png| Wheat generated in a village.
</gallery>
== References ==
{{reflist}}
{{Blocks|vegetation}}
{{Items}}
[[Category:Plants]]
[[Category:Food]]
[[Category:Non-solid blocks]]
[[Category:Generated structure blocks]]
[[de:Weizensamen]]
[[es:Semillas de trigo]]
[[fr:Graines de blé]]
[[hu:Búzamagok]]
[[it:Semi di grano]]
[[ja:小麦の種]]
[[ko:밀 씨앗]]
[[nl:Zaden]]
[[pl:Nasiona zboża]]
[[pt:Sementes de trigo]]
[[ru:Семена пшеницы]]
[[zh:小麦种子]]</li></ul></nowiki> | Added block breaking animation. | ||||
v0.5.0{{Extension DPL}}<ul><li>[[Charcoal|Charcoal]]<br/>{{Item
| image = Charcoal.png
|type=
| renewable = Yes
| stackable = Yes (64)
}}
'''Charcoal''' is an [[item]] obtained by smelting [[log]]s or [[wood]]. It is used as fuel, or for crafting [[torch]]es and [[campfire]]s. Unlike [[coal]], charcoal cannot be traded with [[villager]]s, nor can it be crafted into a [[block of coal]]. Coal and charcoal cannot stack together either. It can be used as a substitute for coal, as both charcoal and coal have an equivalent duration when smelted.
== Obtaining ==
=== Breaking ===
A [[campfire]] broken without the [[Silk Touch]] enchantment drops 2 charcoal.
=== Smelting ===
{{Smelting
|Any Log; Any Stripped Log; Any Wood; Any Stripped Wood
|Charcoal
|foot=1
|0,15
}}
=== Compound creation ===
Charcoal can be created from its base [[element]]s, using the [[compound creator]].{{only|bedrock|education}}
{| class="wikitable"
!Name
!Elements
!Example recipe
|- <!-- Temporarily using crafting grid as substitute for compound creator (template not yet available), since the layout is the same, even if the appearance is different -->
!Charcoal
|7 Carbon<br>4 Hydrogen<br>1 Oxygen
|{{Crafting Table
|shapeless= 1
|A2=Carbon,7 |B2=Hydrogen,4 |C2=Oxygen
|Output=Charcoal}}
|}
== Usage ==
=== Crafting ingredient ===
{{crafting usage|Charcoal}}
{{Crafting
|B1= Stick
|A2= Stick
|B2= Coal; Charcoal
|C2= Stick
|A3= Any Log or Stem; Any Stripped Log or Stem; Any Wood or Hyphae; Any Stripped Wood or Hyphae
|B3= Any Log or Stem; Any Stripped Log or Stem; Any Wood or Hyphae; Any Stripped Wood or Hyphae
|C3= Any Log or Stem; Any Stripped Log or Stem; Any Wood or Hyphae; Any Stripped Wood or Hyphae
|Output= Campfire
}}
=== Lab table ingredient ===
Charcoal is one of the [[lab table]] ingredients needed to produce the [[heat block]].{{only|education}}
{| class="wikitable"
! Result
! Materials Needed
|-
!rowspan=2|{{slot|Heat Block.gif}}<br>[[Heat Block]]
|{{slot}}{{slot|Iron|link=Element}}{{slot|Water (compound)|link=Compound}}{{slot|Charcoal}}{{slot|Salt|link=Compound}}{{slot}}
|-
|<center>[[Element|Iron]], [[Water (compound)|Water]], Charcoal, [[Compound|Salt]]</center>
|}
=== Fuel ===
When used in a [[furnace]] as a fuel, a piece of charcoal lasts 80 seconds (smelting up to 8 items), the same as coal. Charcoal used as fuel lasts more than 5 times longer than [[wood planks]] or [[wood]] logs used as fuel, being more efficient than any other use of wood for smelting in ''[[Java Edition]]'', but outstripped by [[wooden slabs]] in Bedrock.
Coal and charcoal are also the only fuels accepted by [[Minecart with Furnace|furnace minecarts]]. They provide approximately four minutes of transit each.
== Data values ==
=== ID ===
{{edition|java}}:
{{ID table
|edition=java
|showforms=y
|generatetranslationkeys=y
|displayname=Charcoal
|spritetype=item
|nameid=charcoal
|itemtags=coals
|form=item
|foot=1}}
{{edition|bedrock}}:
{{ID table
|edition=bedrock
|showitemtags=y
|showaliasids=y
|shownumericids=y
|showforms=y
|notshowbeitemforms=y
|generatetranslationkeys=y
|displayname=Charcoal
|spritetype=item
|nameid=charcoal
|aliasid=coal / 1
|id=303
|itemtags=minecraft:coals
|form=item
|foot=1}}
== Achievements ==
{{load achievements|Renewable Energy}}
== History ==
{{History|java beta}}
{{History||December 25, 2010|link=http://www.minecraftforum.net/topic/131047-lantern-update-incoming/page__st__20#entry1986964| In 0.3.2, charcoal was suggested to [[Markus Persson|Notch]] by [https://twitter.com/Moleculor @Moleculor] on [[wikipedia:Twitter|Twitter]] as a writing implement.}}
{{History||1.2|[[File:Charcoal JE1 BE1.png|32px]] Added charcoal, with the same texture as coal.
|Charcoal is not used as a writing implement.}}
{{History|java}}
{{History||1.2.1|snap=12w04a|Charcoal can now be used to craft [[fire charge]]s.}}
{{History||1.3.1|snap=?|Charcoal is now directly available in the creative inventory.}}
{{History|||snap=1.3|[[File:Charcoal JE2 BE2.png|32px]] The texture of charcoal has been changed.}}
{{History||1.6.1|snap=13w19a|[[File:Charcoal JE3 BE3.png|32px]] The texture of charcoal has been changed.}}
{{History||1.8|snap=14w02a|Charcoal can no longer be [[trading|traded]] from [[villager]]s.}}
{{History||1.13|snap=17w47a|The different data values for the {{code|coal}} ID have been split up into their own IDs.
|Prior to [[1.13/Flattening|''The Flattening'']], this [[item]]'s numeral ID was 263.}}
{{History||1.14|snap=18w43a|[[File:Charcoal JE4 BE4.png|32px]] The texture of charcoal has been changed.}}
{{History|||snap=19w02a|Charcoal can now be used to craft [[campfire]]s. Destroying a campfire returns 2 charcoal.}}
{{History|pocket alpha}}
{{History||v0.3.0|[[File:Charcoal JE1 BE1.png|32px]] Added charcoal, with the same texture as coal. It is not yet obtainable.}}
{{History||v0.3.2|Charcoal is now obtainable by smelting [[log|wood]] in a furnace.}}
{{History||v0.8.0|snap=build 1|[[File:Charcoal JE2 BE2.png|32px]] The texture of charcoal has been changed.}}
{{History||v0.8.1|[[File:Charcoal JE3 BE3.png|32px]] The texture of charcoal has been changed.}}
{{History|bedrock}}
{{History||1.4.0|snap=beta 1.2.13.8|Added [[stripped log]] variants, which can be [[smelting|smelted]] to obtain charcoal.}}
{{History|||snap=beta 1.2.20.1|Charcoal now can be crafted using 7 Carbon, 4 Hydrogen, and an Oxygen in a [[compound creator]].
|Charcoal can now be used in the [[lab table]] to create a [[heat block]].}}
{{History||1.10.0|snap=beta 1.10.0.3|Charcoal can now be used to craft [[campfire]]s. Destroying a campfire returns 2 charcoal.
|[[File:Charcoal JE4 BE4.png|32px]] The textures of charcoal has been changed.}}
{{History||1.16.0|snap=beta 1.16.0.51|Charcoal are now used to craft [[soul fire torch]]es.}}
{{History||1.16.100|snap=beta 1.16.100.56|The ID of charcoal has been changed from {{code|coal/1}} to {{code|charcoal}}.}}
{{History|console}}
{{History||xbox=TU1|xbone=CU1|ps=1.0|wiiu=Patch 1|switch=1.0.1|[[File:Charcoal JE1 BE1.png|32px]] Added charcoal.}}
{{History||?|[[File:Charcoal JE3 BE3.png|32px]] The texture of charcoal has been changed.}}
{{History||xbox=none|xbone=none|ps=1.90|wiiu=none|switch=none|[[File:Charcoal JE4 BE4.png|32px]] The texture of charcoal has been changed.}}
{{History|New 3DS}}
{{History||0.1.0|[[File:Charcoal JE3 BE3.png|32px]] Added charcoal.}}
{{History|foot}}
== Issues ==
{{issue list|Charcoal}}
== How it's renewable ==
Charcoal comes from smelting log. Logs are renewable and charcoal can be used as fuel to smelt logs{{Items}}
[[Category:Renewable resources]]
[[de:Holzkohle]]
[[fr:Charbon (objet)#Charbon de bois]]
[[hu:Faszén]]
[[it:Carbonella]]
[[ko:목탄]]
[[pt:Carvão#Carvão vegetal]]
[[nl:Steenkool#Houtskool]]
[[ru:Уголь#Древесный уголь]]
[[zh:木炭]]</li><li>[[Lime Dye|Lime Dye]]<br/>{{Item
| image = Lime_Dye_JE2_BE2.png
| renewable = Yes
| stackable = Yes (64)
}}
'''Lime dye''' is a [[Dye#Quasi-Primary|quasi-primary dye]] obtained by combining one [[green dye]] and one [[white dye]] in a crafting square, or by smelting a [[sea pickle]].
== Obtaining ==
=== Crafting ===
{{Crafting
|head=1
|showname=0
|showdescription=1
|Green Dye
|White Dye
|Output=Lime Dye,2
|type=Material
}}
{{Crafting
|foot=1
|Green Dye
|Bone Meal
|Output=Lime Dye,2
|description={{only|bedrock|education}}
|type=Material
}}
=== Smelting ===
{{Smelting
|head=1
|foot=1
|Sea Pickle
|Lime Dye
|0,2
}}
=== Trading ===
[[Wandering trader]]s sell 3 lime [[dye]] for 1 [[emerald]].
== Usage ==
{{dye usage}}
=== Crafting ingredient ===
{{crafting usage|continue=1}}
{{banner crafting usage}}
=== Loom ingredient ===
{{Banner loom usage|Lime Dye}}
=== Trading ===
Journeyman-level shepherd villagers have a 20% chance to buy 12 lime dye for an emerald as part of their trades.
== Data values ==
=== ID ===
{{edition|java}}:
{{ID table
|edition=java
|showforms=y
|generatetranslationkeys=y
|displayname=Lime Dye
|spritetype=item
|nameid=lime_dye
|form=item
|foot=1}}
{{edition|bedrock}}:
{{ID table
|edition=bedrock
|showaliasids=y
|shownumericids=y
|showforms=y
|notshowbeitemforms=y
|generatetranslationkeys=y
|displayname=Lime Dye
|spritetype=item
|nameid=lime_dye
|aliasid=dye / 10
|id=405
|form=item
|translationkey=item.dye.lime.name
|foot=1}}
== Video ==
<div style="text-align:center">{{yt|5oPGO6jL1zQ}}</div>
== History ==
{{History|java beta}}
{{History||1.2|[[File:Lime Dye JE1 BE1.png|32px]] Added lime dye.}}
{{History|java}}
{{History||1.4.2|snap=12w34a|Added the ability to [[Armor#Dyeing|dye]] leather [[armor]] and [[wolf]] collars.}}
{{History||1.4.6|snap=12w49a|Lime dye can now be [[crafting|crafted]] with [[gunpowder]] to create a [[firework star]].}}
{{History||1.6.1|snap=13w19a|[[Stained clay]] can now be crafted.}}
{{history||1.7.2|snap=13w41a|[[Stained glass]] can now be crafted.}}
{{History||1.8|snap=14w30a|Added [[banner]]s, which can be dyed.}}
{{History||1.11|snap=16w39a|Added the ability to dye [[shulker box]]es.}}
{{History||1.12|snap=17w15a|Added the ability to dye [[bed]]s.}}
{{History||1.13|snap=17w47a|The different data values for the <code>dye</code> ID have now been split up into their own IDs.
|Prior to [[1.13/Flattening|''The Flattening'']], this [[item]]'s numeral ID was 351.}}
{{History|||snap=18w14b|Lime dye can now be smelted from [[sea pickle]]s.}}
{{History||1.14|snap=18w43a|Lime dye is now crafted using [[white dye]], instead of [[bone meal]].
|[[File:Lime_Dye_JE2_BE2.png|32px]] The texture of lime dye has now been changed.}}
{{History|||snap=18w44a|Lime dye can now change the text color on [[sign]]s to lime.}}
{{History|||snap=19w05a|Added the [[wandering trader]], which sells lime dye.}}
{{History|||snap=19w11a|Lime dye can now be [[trading|bought]] by shepherd villagers.}}
{{History||1.17|snap=20w45a|Lime dye can now be used to craft [[lime candle]]s.}}
{{History|||snap=21w19a|Lime dye can no longer be used to craft lime candles.}}
{{History|||snap=Pre-release 1|Lime dye can now once again be used to craft lime candles.}}
{{History||1.20<br>(Experimental)|link=1.19.3|snap=22w42a|Lime dye can now change the text color on [[hanging sign]]s to lime.}}
{{History|pocket alpha}}
{{History||v0.3.0|[[File:Lime Dye JE1 BE1.png|32px]] Added lime dye. It is currently unobtainable and serves no purpose.}}
{{History||v0.4.0|Lime dye is now craftable with [[cactus green]] and [[bone meal]].
|Lime dye can now be used to craft lime wool.}}
{{History||v0.6.0|Lime dye can now be used to dye [[sheep]].}}
{{History||v0.9.0|snap=build 11|Lime dye can now be used to craft colored [[terracotta]].}}
{{History||v0.11.0|snap=build 1|Lime dye can now be used to dye tamed [[wolf]] collars.}}
{{History||v0.14.0|snap=build 1|Lime dye can now be used to dye [[water]] in [[cauldron]]s.}}
{{History|pocket}}
{{History||1.0.0|snap=alpha 0.17.0.1|Lime dye can now be used to dye [[shulker]]s.}}
{{History||1.1.0|snap=alpha 1.1.0.0|Lime dye can now be used to craft [[concrete powder]], colored [[bed]]s and dyed [[shulker box]]es.}}
{{History|bedrock}}
{{History||1.2.0|snap=beta 1.2.0.2|Lime dye can now be used to craft [[firework star]]s, [[stained glass]] and patterns on [[banner]]s.}}
{{History||1.4.0|snap=beta 1.2.20.1|Lime dye can now be used to craft [[balloon]]s and [[glow stick]]s.
|Lime dye can now be obtained from smelting [[sea pickle]]s.}}
{{History||1.8.0|snap=beta 1.8.0.8|Lime dye can now be used to dye tamed [[cat]] collars.}}
{{History||1.10.0|snap=beta 1.10.0.3|Lime dye is now [[trading|sold]] by [[wandering trader]]s.
|Lime dye can now be used to dye white [[carpet]]s and undyed [[glass pane]]s.
|[[File:Lime_Dye_JE2_BE2.png|32px]] The texture of lime dye has now been changed.}}
{{History||1.11.0|snap=beta 1.11.0.4|Lime dye can now be [[trading|sold]] to shepherd [[villager]]s.}}
{{History||1.16.100|snap=beta 1.16.100.56|The ID of lime dye has been changed from <code>dye/10</code> to <code>lime_dye</code>.}}
{{History|console}}
{{History||xbox=TU1|xbone=CU1|ps=1.00|switch=1.0.1|wiiu=Patch 1|[[File:Lime Dye JE1 BE1.png|32px]] Added lime dye.}}
{{History|PS4}}
{{History||1.90|[[File:Lime_Dye_JE2_BE2.png|32px]] The texture of lime dye has now been changed.}}
{{History|new 3ds}}
{{History||0.1.0|[[File:Lime Dye JE1 BE1.png|32px]] Added lime dye.}}
{{History|foot}}
== Issues ==
{{issue list}}
== References ==
{{Reflist}}
{{Items}}
[[Category:Dyes]]
[[Category:Renewable resources]]
[[cs:Světle zelené barvivo]]
[[de:Hellgrüner Farbstoff]]
[[es:Tinte verde lima]]
[[fr:Teinture vert clair]]
[[hu:Neonzöld festék]]
[[ja:黄緑色の染料]]
[[ko:연두색 염료]]
[[nl:Lichtgroene kleurstof]]
[[pl:Jasnozielony barwnik]]
[[pt:Corante verde-limão]]
[[ru:Лаймовый краситель]]
[[zh:黄绿色染料]]</li></ul> | Added exclusive nether reactor core and glowing obsidian. | ||||
v0.6.0{{Extension DPL}}<ul><li>[[Glistering Melon Slice|Glistering Melon Slice]]<br/>{{Item
| image = Glistering Melon Slice.png
| renewable = Yes
| stackable = Yes (64)
}}
A '''glistering melon slice'''{{fn|Known as '''Glistering Melon Slice''' {{in|java}} and '''Glistering Melon''' {{in|bedrock}}.}} is an inedible [[item]] used for brewing [[potion]]s of [[Healing]]. It is also one of the many potion ingredients that can be used to make mundane potions.
== Obtaining ==
=== Chest loot ===
{{LootChestItem|glistering-melon-slice}}
=== Crafting ===
{{Crafting
|A1= Gold Nugget
|B1= Gold Nugget
|C1= Gold Nugget
|A2= Gold Nugget
|B2= Melon Slice
|C2= Gold Nugget
|A3= Gold Nugget
|B3= Gold Nugget
|C3= Gold Nugget
|Output= Glistering Melon Slice
|type= Brewing
}}
=== Trading ===
Master-level farmer [[villager]]s sell 3 glistering melon for 4 [[emerald]]s.
== Usage ==
Despite being crafted with a [[melon slice]], a glistering melon slice cannot be eaten, unlike a [[golden apple]] or [[golden carrot]].
=== Brewing ingredient ===
{{Brewing
|head=1
|Glistering Melon Slice
|Mundane Potion
|base=Water Bottle
}}
{{Brewing
|Glistering Melon Slice
|Potion of Healing
|foot=1}}
===Piglins===
[[Piglin]]s are attracted to glistering melon slices. They run toward any glistering melon slice on the ground, and inspect it for 6 to 8 seconds before putting it in their inventory.
== Achievements ==
{{load achievements|Oooh, shiny!}}
== Advancements ==
{{load advancements|Oh Shiny}}
== Data values ==
=== ID ===
{{edition|java}}:
{{ID table
|edition=java
|showforms=y
|generatetranslationkeys=y
|displayname=Glistering Melon Slice
|spritetype=item
|nameid=glistering_melon_slice
|form=item
|foot=1}}
{{edition|bedrock}}:
{{ID table
|edition=bedrock
|showaliasids=y
|shownumericids=y
|showforms=y
|notshowbeitemforms=y
|generatetranslationkeys=y
|displayname=Glistering Melon
|spritetype=item
|nameid=glistering_melon_slice
|aliasid=speckled_melon
|id=434
|form=item
|translationkey=item.speckled_melon.name
|foot=1}}
== History ==
{{History|java}}
{{History||1.0.0|snap=Beta 1.9 Prerelease 4|[[File:Glistering Melon Slice JE1 BE1.png|32px]] Added glistering melons.
|The [[crafting]] recipe of glistering melons is one [[melon slice]] and one [[gold nugget]].
|Glistering melons have replaced [[ghast tear]]s as the ingredient to produce [[potions of Healing]] due to the difficulty in getting tears.<ref>{{tweet|jeb_|123671273904680960}}</ref> They also now brew with [[water bottle]]s to create [[mundane potion]]s.}}
{{History||1.6.1|snap=13w23a|The [[crafting]] recipe of glistering melons is changed from one [[gold nugget]] to eight.}}
{{History||1.9|snap=15w49a|[[File:Glistering Melon Slice JE2.png|32px]] The rotation of glistering melon [[item]]s has been changed to be consistent with [[melon slice]]s.<ref>{{bug|MC-85963}}</ref>}}
{{History|||snap=15w49b|[[File:Glistering Melon Slice JE1 BE1.png|32px]] The rotation of glistering melons has been reverted and is no longer consistent with melon slices.}}
{{History||1.13|snap=17w47a|Prior to [[1.13/Flattening|''The Flattening'']], this [[item]]'s numeral ID was 382.}}
{{History|||snap=18w20b|"Glistering Melon" has been renamed to "Glistering Melon Slice".
|The ID of glistering melon slices has been changed from <code>speckled_melon</code> to <code>glistering_melon_slice</code>.}}
{{History||1.14|snap=18w43a|[[File:Glistering Melon Slice JE3 BE2.png|32px]] The texture of glistering melon slices has been changed.}}
{{History|||snap=19w11a|Farmer [[villager]]s now [[trading|sell]] glistering melon slices.}}
{{History||1.16|snap=20w09a|Glistering melon slices are now admired by [[piglin]]s.<ref>{{bug|MC-172363}}</ref>}}
{{History|||snap=20w16a|Glistering melon slices now generate in [[ruined portal]] chests.}}
{{History|pocket alpha}}
{{History||v0.12.1|snap=build 1|[[File:Glistering Melon Slice JE1 BE1.png|32px]] Added glistering melons.}}
{{History|bedrock}}
{{History||1.10.0|snap=beta 1.10.0.3|[[File:Glistering Melon Slice JE3 BE2.png|32px]] The texture of glistering melons has been changed.}}
{{History||1.11.0|snap=beta 1.11.0.4|Glistering melons can now be [[trading|bought]] from farmer [[villager]]s.}}
{{History||1.13.0|snap=beta 1.13.0.9|[[Trading]] has been changed. Master-level farmer villagers now have a {{frac|1|3}} chance to [[trading|sell]] glistering melon slices.}}
{{History||1.16.0|snap=beta 1.16.0.57|Glistering melons are [[trading|sold]] from farmer villagers under a 50% chance, once again.
|Glistering melons now generate in [[ruined portal]] chests.}}
{{History||1.16.100|snap=beta 1.16.100.54|[[Ruined Portal]]s can now generate with 4–12 glistering melons instead of only one.}}
{{History|||snap=beta 1.16.100.56|The ID of glistering melon slices has been changed from <code>speckled_melon</code> to <code>glistering_melon_slice</code>.}}
{{History|console}}
{{History||xbox=TU7|xbone=CU1|ps=1.0|wiiu=Patch 1|[[File:Glistering Melon Slice JE1 BE1.png|32px]] Added glistering melons.}}
{{History||xbox=none|xbone=none|ps=1.90|wiiu=none|switch=none|[[File:Glistering Melon Slice JE3 BE2.png|32px]] The texture of glistering melons has been changed.}}
{{History|New 3DS}}
{{History||0.1.0|[[File:Glistering Melon Slice JE1 BE1.png|32px]] Added glistering melons.}}
{{History|foot}}
== Issues ==
{{issue list}}
== See also ==
* [[Melon Slice]]
* [[Melon]]
== Notes ==
{{fnlist}}
== References ==
{{reflist}}
{{Items}}
[[Category:Renewable resources]]
[[cs:Zlatavý kousek melounu]]
[[de:Glitzernde Melonenscheibe]]
[[es:Rodaja de sandía reluciente]]
[[fr:Tranche de pastèque scintillante]]
[[hu:Ragyogó dinnye]]
[[ja:きらめくスイカの薄切り]]
[[ko:반짝이는 수박 조각]]
[[nl:Glinsterende meloenschijf]]
[[pl:Błyszczący arbuz]]
[[pt:Fatia de melancia reluzente]]
[[ru:Сверкающий ломтик арбуза]]
[[uk:Блискуча скибка кавуна]]
[[zh:闪烁的西瓜片]]</li><li>[[Saddle|Saddle]]<br/>{{about|normal saddles|the removed horse saddle|Horse Saddle}}
{{item
| image = <gallery>
Saddle (Pig).png | Pig
Saddle (Horse).png | Horse
Saddle (Strider).png | Strider
</gallery>
| invimage = Saddle
| renewable = Yes
| stackable = No
}}
A '''saddle''' is an [[item]] required to ride [[Pig|pigs]] and [[Strider|striders]] or control ridden [[camel]]s, [[Horse|horses]], [[Donkey|donkeys]] and [[Mule|mules]].
== Obtaining ==
=== Chest loot ===
{{LootChestItem|saddle}}
=== Fishing ===
Saddles can be obtained as a "treasure" item from [[fishing]] with a base chance (without fishing rod enchantments) of 0.8%.
=== Trading ===
Master-level [[Trading#Leatherworker|leatherworker]] [[villager]]s have a 50% chance to sell a saddle for 6 [[Emerald|emeralds]] as their trade.{{only|bedrock}} This trade is always offered in ''Java Edition''.
=== Mob loot ===
Any mob that the player equips with a saddle drops the saddle upon death.
A [[strider]] may spawn being ridden by a [[zombified piglin]], which causes it to spawn wearing a saddle. This saddle always drops when the strider is killed.
A [[ravager]] always spawns with a saddle and always drops the saddle upon death. Looting does not affect the drop.
== Usage ==
[[File:SaddledHorse.png|thumb|right|A [[horse]] equipped with a saddle.]]
While [[camel]]s, [[horse]]s, [[donkey]]s, [[mule]]s and [[Skeleton Horse|skeleton horse]]s{{Only|Java}} can always be ridden, a saddle is required to control them. These mobs (only after being tamed, in the case of equine mobs) can be equipped with a saddle by placing it in their inventory, which can be opened by pressing {{control|use}} while holding a saddle or {{control|sneaking}}. The saddle can be unequipped by removing it from {{SlotSprite|Saddle}} the specific inventory slot.
Saddles are required to ride [[Pig|pigs]] and [[Strider|striders]], but even with a saddle their movement cannot be controlled like other mobs. A [[Carrot on a Stick|carrot on a stick]] (for pigs) or a [[Warped Fungus on a Stick|warped fungus on a stick]] (for striders) is required to direct these mobs. {{control|Using}} a saddle on one of these mobs equips them with the saddle, and, since they have no inventory, there is no way to retrieve the saddle without killing the mob.
Animals can also be equipped with saddles by a [[dispenser]].
Although [[ravager]]s are equipped with saddles and sometimes ridden by other mobs, the [[player]] is unable to ride ravagers.
== Sounds ==
{{edition|java}}:
{{Sound table
|rowspan=4
|sound=Saddle equip.ogg
|source=neutral
|subtitle=Saddle equips
|description=When a saddle is equipped to a camel
|id=entity.camel.saddle
|translationkey=subtitles.entity.horse.saddle
|volume=0.5
|pitch=0.8
|distance=16}}
{{Sound table
|subtitle=MC-184399
|source=neutral
|description=When a saddle is equipped to a strider
|id=entity.strider.saddle
|translationkey=-
|volume=0.5
|pitch=1.0
|distance=16}}
{{Sound table
|subtitle=Saddle equips
|source=neutral
|description=When a saddle is equipped to a horse, donkey, mule, skeleton horse, or zombie horse
|id=entity.horse.saddle
|translationkey=subtitles.entity.horse.saddle
|volume=0.5
|pitch=1.0
|distance=16}}
{{Sound table
|subtitle=Saddle equips
|source=neutral
|description=When a saddle is equipped to a pig
|id=entity.pig.saddle
|translationkey=subtitles.entity.pig.saddle
|volume=0.5
|pitch=1.0
|distance=16
|foot=1}}
{{edition|bedrock}}:
{{Sound table
|type=bedrock
|rowspan=3
|sound=Saddle equip.ogg
|source=neutral
|description=When a saddle is equipped to a camel
|id=mob.horse.leather
|volume=1.0
|pitch=1.0}}
{{Sound table
|source=neutral
|description=When a saddle is equipped to a horse, mule, skeleton horse, or zombie horse
|id=mob.horse.leather
|volume=0.6
|pitch=1.0}}
{{Sound table
|source=neutral
|description=When a saddle is equipped to a donkey
|id=mob.horse.leather
|volume=0.5
|pitch=1.0
|foot=1}}
== Data values ==
=== ID ===
{{edition|java}}:
{{ID table
|edition=java
|showforms=y
|generatetranslationkeys=y
|displayname=Saddle
|spritetype=item
|nameid=saddle
|form=item
|foot=1}}
{{edition|bedrock}}:
{{ID table
|edition=bedrock
|shownumericids=y
|showforms=y
|notshowbeitemforms=y
|generatetranslationkeys=y
|displayname=Saddle
|spritetype=item
|nameid=saddle
|id=371
|form=item
|foot=1}}
== Achievements ==
{{load achievements|When Pigs Fly}}
== Advancements ==
{{load advancements|This Boat Has Legs}}
== History ==
{{needs render|type=old|isolated saddles in 1.13 dev|section=11}}
{{History|java infdev}}
{{History||20100625-2|[[File:Saddle (Pig) JE1 BE1.png|32px]] [[File:Saddle JE1 BE1.png|32px]] Added saddles.
|Saddles do not [[drops|drop]] from saddled [[pig]]s.
|Saddles can be found in the new [[dungeon]] [[chest]]s.}}
{{History|java}}
{{History||1.2.4|snap=release|When baby animals were introduced, baby [[pig]]s could be ridden just like adult pigs. After this version, baby pigs can no longer be saddled.}}
{{History||1.3.1|snap=12w21a|Saddles can now be [[trading|bought]] from butcher [[villager]]s for 6–7 [[emerald]]s each, and thus have become [[renewable resource|renewable]].}}
{{History||1.4.2|snap=12w36a|Saddles now [[drops|drop]] from killing saddled [[pig]]s.
|Added [[Carrot on a Stick|carrot on a stick]] to direct saddled pigs, effectively controlling them.}}
{{History|||snap=12w37a|Pigs can now jump when being ridden.}}
{{History||1.6.1|snap=13w18a|Regular saddles can now be used to ride [[horse]]s, while previously they required [[Horse Saddle|horse saddle]]s.
|Added saddles to the loot tables of [[mineshaft]] minecarts, [[stronghold]] altar chests, [[village]] blacksmith chests, as well as [[Desert pyramid|desert]] and [[jungle pyramid]]s.
|Added chests to [[Nether Fortress|nether fortresses]], where saddles can be found.}}
{{History||1.7.2|snap=13w36a|Saddles can now be [[fishing|fished]] with [[Fishing Rod|fishing rod]]s and are described as treasure.}}
{{History||1.8|snap=14w02a|[[Trading]] has been changed: leatherworker [[villager]]s now [[trading|sell]] saddles for 8–10 [[emerald]]s each, and butchers no longer [[trading|trade]] saddles.}}
{{History||1.9|snap=15w31a|Saddles can now be found in [[End City|end city]] [[chest]]s.}}
{{History|||snap=15w43a|The average yield of saddles in [[Nether Fortress|nether fortress]] chests has been slightly decreased.}}
{{History|||snap=15w44a|Saddles have been removed from [[mineshaft]] chests.
|The average yield of saddles in [[dungeon]] chests has been decreased.
|The average yield of saddles in [[desert pyramid|desert temple]] chests has been increased.}}
{{History||1.13|snap=17w45a|[[File:White Horse (Saddle) 17w45a.png|50px]] The models of the horse's saddle has been changed.}}
{{History|||snap=17w46a|[[File:White Horse (Saddle) 17w46a.png|50px]] The models of the horse's saddle has been changed once again.}}
{{History|||snap=17w47a|Prior to [[Java Edition 1.13/Flattening|''The Flattening'']], this [[item]]'s numeral ID was 329.}}
{{History|||snap=18w03a|[[File:White Horse (Saddle) 18w03a.png|50px]] The models of the horse's saddle has been changed once again.}}
{{History|||snap=pre2|[[File:White Horse (Saddle) 1.13pre2.png|50px]] The models of the horse's saddle has been changed once again. The reins bit has now been rendered. Also, the lines of the reins are no longer rendered except when riding.}}
{{History||1.14|snap=18w43a|Added [[ravager|illager beast]]s, which [[drops|drop]] saddles.
|[[File:Saddle (Pig) JE2 BE2.png|32px]] [[File:Saddle (Horse) JE2 BE2.png|32px]] <br>[[File:Saddle JE2 BE2.png|32px]] The textures of saddles have been changed.}}
{{History|||snap=18w48a|Saddles can now be found in [[chest]]s in [[village]] tanneries.}}
{{History|||snap=18w49a|Saddles can now be found in chests in [[savanna]] village houses.}}
{{History||1.16|snap=20w13a|[[File:Saddle (Strider) JE1 BE1.png|32px]] Added [[strider]]s, which can be ridden with saddles.}}
{{History|||snap=20w15a|Saddles placed in a [[dispenser]] can now saddle pigs, striders, and tamed horses, donkeys and mules.}}
{{History|||snap=20w16a|Saddles now generate in [[Bastion Remnant|bastion remnant]] chests.}}
{{History|||snap=20w17a|[[File:Saddle (Strider) JE2.png|32px]] The texture of the strider saddles has been changed. The front and back orientation of the saddle has been corrected.<ref>{{bug|MC-176116}}</ref>}}
{{History||1.19|snap=22w13a|Saddles may now be found in [[ancient city]] [[chest]]s.}}
{{History||1.20<br>(Experimental)|link=1.19.3|snap=22w42a|Saddles can be used to ride [[camel]]s with the use of a built-in experimental data pack.}}
{{History|pocket alpha}}
{{History||v0.7.0|[[File:Saddle JE1 BE1.png|32px]] Added saddles. They are currently unobtainable and have no practical usage since they cannot be equipped on any mobs.}}
{{History||v0.9.0|snap=build 1|Saddles can now be obtained from [[village]] blacksmith [[chest]]s.}}
{{History||v0.11.0|snap=build 1|Saddles can now be [[fishing|fished]] with [[fishing rod]]s and are described as treasure.}}
{{History||v0.12.1|snap=build 1|Saddles can now be found in [[nether fortress]]es.}}
{{History||v0.13.0|snap=build 1|Saddles can now be found in [[desert temple]]s.}}
{{History||v0.15.0|snap=build 1|[[File:Saddle (Pig) JE1 BE1.png|32px]] [[File:Saddle (Horse) JE1 BE1.png|32px]] Saddles can now be used for riding [[horse]]s and [[pig]]s.|Saddles can now be found inside [[jungle temple]]s.}}
{{History||snap=?||Added saddles to the [[Creative inventory]].{{info needed}}}}
{{History|pocket}}
{{History||1.0.0|snap=alpha 0.17.0.1|Saddles can now be found in [[end cities]].}}
{{History||1.0.4|snap=alpha 1.0.4.0|Saddles are now [[trading|sold]] by leatherworker [[villager]]s for 8-10 [[emerald]]s as their only third tiers [[trading|trades]].}}
{{History|bedrock}}
{{History||1.10.0|snap=beta 1.10.0.3|Saddles can now be found in [[plains]] [[village]] tannery and weaponsmith [[chest]]s.
|Added [[ravager]]s, which [[drops|drop]] a saddle upon death.
|[[File:Saddle (Pig) JE2 BE2.png|32px]] [[File:Saddle (Horse) JE2 BE2.png|32px]] <br>[[File:Saddle JE2 BE2.png|32px]] The textures of saddles have been changed.}}
{{History||1.11.0|snap=beta 1.11.0.1|Saddles can now be found in [[savanna]], [[snowy taiga]], [[taiga]] and [[snowy tundra]] village tannery [[chest]]s.
|Saddles can now be found in savanna, taiga, snowy taiga, and [[desert]] village weaponsmith chests.
|Saddles can now be found in savanna [[village]] house chests.}}
{{History|||snap=beta 1.11.0.4|[[Trading]] has been changed. Leatherworker [[villager]]s now have 50% chance to [[trading|sell]] saddles for 10 [[emerald]]s as part of their last tier [[trading|trade]].}}
{{History||1.12.0|snap=beta 1.12.0.3|The trading price of saddles has been lowered to 6 emeralds.}}
{{History||1.16.0|snap=beta 1.16.0.57|[[File:Saddle (Strider) JE1 BE1.png|32px]] Added [[strider]]s, which can be ridden with saddles.|Saddles now generate in [[Bastion Remnant|bastion remnant]] chests.}}
{{History||1.20.0<br>(Experimental)|link=Bedrock Edition 1.19.50|snap=beta 1.19.50.21|Saddles can now be used to ride [[camel]]s with the use of the "[[Bedrock Edition 1.20|Next Major Update]]" [[experimental]] toggle.}}
{{History|console}}
{{History||xbox=TU1|xbone=CU1|ps=1.0|wiiu=Patch 1|switch=1.0.1|[[File:Saddle (Pig) JE1 BE1.png|32px]] <br>[[File:Saddle JE1 BE1.png|32px]] Added saddles.}}
{{History||xbox=none|xbone=none|ps=1.90|wiiu=none|switch=none|[[File:Saddle (Pig) JE2 BE2.png|32px]] [[File:Saddle (Horse) JE2 BE2.png|32px]] <br>[[File:Saddle JE2 BE2.png|32px]] The textures of saddles have been changed.}}
{{History|3ds}}
{{History||0.1.0|[[File:Saddle (Pig) JE1 BE1.png|32px]] <br>[[File:Saddle JE1 BE1.png|32px]] Added saddles.}}
{{History|foot}}
== Issues ==
{{issue list}}
== Trivia ==
* A saddle is considered "armor" by the game, but the value of protection to the animal is zero.
* A saddle on a pig can still be seen if the pig is afflicted with [[Invisibility]].
* When riding a saddled mob, the hunger bar is replaced by hearts (representing the mounted mob's health) resembling the look of the saddle.
== Gallery ==
<gallery>
File:Pig saddle.png|A [[player]] riding a [[pig]] (before [[Java Edition Beta 1.8|Beta 1.8]]).
File:Horse saddle.png|A player riding a [[horse]].
File:13w21a-new-HorseUI-inventory.png|The horse interface implemented in [[Java Edition 13w21a|13w21a]] that allows for the removal of saddles, but only on horses, [[donkey]]s or [[mule]]s.
File:Saddled Mule (picture).png|Mule equipped with both a saddle and a [[chest]].
File:GodSpawner.png|A saddle found in a monster room chest, which coincidentally contains an [[enchanted golden apple]].
</gallery>
== See also ==
* [[Transportation]]
== References ==
{{reflist}}
{{items}}
[[cs:Sedlo]]
[[de:Sattel]]
[[es:Montura]]
[[fr:Selle]]
[[hu:Nyereg]]
[[it:Sella]]
[[ja:鞍]]
[[ko:안장]]
[[nl:Zadel]]
[[pl:Siodło]]
[[pt:Sela]]
[[ru:Седло]]
[[zh:鞍]]
[[Category:Renewable resources]]
[[uk:Сідло]]</li></ul> | Added exclusive stonecutter. | ||||
v0.9.0{{Extension DPL}}<ul><li>[[Water Bucket|Water Bucket]]<br/>{{Item
| title = Water Bucket
| renewable = Yes
| image = Water Bucket.png
| stackable = No
}}
A '''water bucket''' is a [[bucket]] filled with [[water]].
== Obtaining ==
=== Interacting ===
To fill an empty [[bucket]] with water, {{control|use}} it on a [[water]] source block. The water is consumed in the process. Flowing water does not fill a bucket.
{{control|Using}} an empty bucket on a [[cauldron]] filled with water (water level 3) empties the cauldron and fills the bucket.
Water buckets can also be filled by placing an empty one in the fuel slot of a [[furnace]], and a wet [[sponge]] into the oven slot. The bucket is filled when the [[smelting]] process completes, which also leaves the sponge dry and ready to be reused.
=== Chest Loot ===
{{LootChestItem|water-bucket}}
== Usage ==
{{Control|Using}} a water bucket on a solid block places a water source block against that block, emptying the bucket; using a water bucket on a [[waterlogging|waterloggable]] block waterlogs the block. In [[the Nether]], however, the water evaporates, making a fire extinguishing sound and displays smoke particles while nothing gets placed.
=== Dispensers ===
A [[dispenser]] can be loaded with a water bucket, and when activated it places a water block directly before it, emptying the bucket. A dispenser loaded with an empty bucket and a water source right in front of it draws the source into the bucket when activated.
=== Cauldrons ===
A single water bucket can fill a [[cauldron]], and using an empty bucket on a water-filled cauldron fills the bucket. Empty buckets cannot be filled from partly-filled cauldrons.
=== Filling bucket with mobs ===
Water buckets can be used on a [[fish]], [[axolotl]] or [[tadpole]] to create a [[bucket of aquatic mob]].
=== Transportation ===
{{main|Tutorials/Elevators#Water elevators}}
Water buckets can be used as a means of quickly descending great heights in the [[Overworld]] and [[the End]], either by creating a waterfall or using the water bucket while falling to create a safe water landing.
Water buckets can also be used to climb vertical surfaces anywhere but [[the Nether]] by repeatedly creating higher waterfalls from the bottom and swimming up them.
== Sounds ==
{{el|je}}:
{{Sound table
|sound=Fill water bucket1.ogg
|sound2=Fill water bucket2.ogg
|sound3=Fill water bucket3.ogg
|subtitle=Bucket fills
|source=player
|description=When a bucket is filled with water
|id=item.bucket.fill
|translationkey=subtitles.item.bucket.fill
|volume=1.0
|pitch=1.0
|distance=16}}
{{Sound table
|sound=Empty water bucket1.ogg
|sound2=Empty water bucket2.ogg
|sound3=Empty water bucket3.ogg
|subtitle=Bucket empties
|source=block
|description=When the bucket is placed
|id=item.bucket.empty
|translationkey=subtitles.item.bucket.empty
|volume=1.0 <ref group=sound>Except for the second copy of {{cd|empty1}}, which is 0.9</ref>
|pitch=1.0
|distance=16
|foot=1}}
{{el|je}}:
{{Sound table
|type=bedrock
|sound=Fill water bucket1.ogg
|sound2=Fill water bucket2.ogg
|sound3=Fill water bucket3.ogg
|source=block
|description=When a bucket is filled with water
|id=bucket.fill_water
|volume=1.0
|pitch=1.0}}
{{Sound table
|sound=Empty water bucket1.ogg
|sound2=Empty water bucket2.ogg
|sound3=Empty water bucket3.ogg
|source=block
|description=When a water bucket is emptied
|id=bucket.empty_water
|volume=1.0
|pitch=1.0}}
{{Sound table
|rowspan=2
|sound=Water Splash Old.ogg
|source=block
|description=When a water bucket is placed in a cauldron<wbr><ref group=sound name=bucketsplash>{{Bug|MCPE-135919}}</ref>
|id=cauldron.fillwater
|volume=0.1
|pitch=1.0}}
{{Sound table
|source=block
|description=When a water bucket is removed from a cauldron<wbr><ref group=sound name=bucketsplash/>
|id=cauldron.takewater
|volume=0.1
|pitch=1.0
|foot=1}}
==Data values==
=== ID ===
{{edition|java}}:
{{ID table
|edition=java
|showforms=y
|generatetranslationkeys=y
|displayname=Water Bucket
|spritetype=item
|nameid=water_bucket
|form=item
|foot=1}}
{{edition|bedrock}}:
{{ID table
|edition=bedrock
|showaliasids=y
|shownumericids=y
|showforms=y
|notshowbeitemforms=y
|generatetranslationkeys=y
|displayname=Water Bucket
|spritetype=item
|nameid=water_bucket
|aliasid=bucket / 8
|id=362
|form=item
|translationkey=item.bucketWater.name
|foot=1}}
== Advancements ==
{{load advancements|Tactical fishing;The Cutest Predator;Bukkit bukkit}}
==History==
{{History|java infdev}}
{{History||20100615|[[File:Water Bucket JE1 BE1.png|32px]] Added water buckets.}}
{{History|java alpha}}
{{History||v1.2.6|{{control|use|text=Using}} a water bucket on [[block]]s with GUIs ([[chest]]s, [[furnace]]s, etc.) no longer places the water.}}
{{History|java}}
{{History||1.0.0|snap=Beta 1.9 Prerelease 2|Water buckets can now be used to fill [[cauldron]]s.}}
{{History||1.3.1|snap=12w15a|[[Dispenser]]s have now been given the ability to dispense water buckets. They can also collect if activated again.}}
{{History||1.8|snap=14w25a|A water bucket is now shown as the icon when [[water]] is used as a layer in [[Superflat]].}}
{{History|||snap=14w25b|[[Smelting]] a wet [[sponge]] while an empty bucket is in the fuel slot fills the bucket with water.}}
{{History||1.9|snap=15w44a|A full [[cauldron]] can now be emptied with a bucket, yielding a water bucket.}}
{{History|||snap=15w50a|Added sounds for collecting and pouring water using a bucket.}}
{{History||1.13|snap=17w47a|Prior to the ''[[Flattening]]'' this item's numerical ID was 326.}}
{{History|||snap=18w08b|Water buckets can now be used to pick up [[fish]] mobs.}}
{{History||1.14|snap=18w43a|[[File:Water Bucket JE2 BE2.png|32px]] The texture of water buckets has now been changed.
|Water buckets can now suck up liquids directly adjacent to the side they are facing. How this works is unknown, given the water bucket clearly already contains a liquid.}}
{{History|||snap=18w48a|Water buckets can now be found in [[chest]]s in [[village]] fishing cottages.}}
{{History|||snap=19w02a|Water buckets can now be used to put out [[campfire]]s.}}
{{History||1.17|snap=20w51a|Water buckets can now be used to collect [[axolotl]]s.}}
{{History||1.19|snap=22w11a|Water buckets can now be used to collect [[tadpole]]s.}}
{{History||1.19.3|snap=22w45a|Water buckets can now be emptied into [[waterlogging|waterlogged]] blocks, instead of placing water against them.<ref>{{bug|MC-127110|||Fixed}}</ref>}}
{{History|upcoming java}}
{{History||Villager Trade Rebalance<br>(Experimental)|link=Java Edition 1.20.2|snap=23w31a|[[Wandering trader]]s now have a chance to [[trading|buy]] a water bucket from the player.}}
{{History|pocket alpha}}
{{History||v0.7.0|[[File:Water Bucket JE1 BE1.png|32px]] Added water buckets.
|Water buckets were simply called "Bucket".}}
{{History||v0.7.4|Water buckets no longer stack to 64.}}
{{History||v0.14.0|snap=build 1|Dispensers can now shoot out water from water buckets.}}
{{History|bedrock}}
{{History||1.4.0|snap=beta 1.2.14.2|Water buckets can now be used to pick up [[fish mob]]s.
|Moved all bucket items, including water buckets, from the Equipment tab to the Items tab in the [[Creative inventory]].{{verify|type=update}}{{info needed}}<!---please check snapshots, only 1 major release version was checked each--->}}
{{History||1.10.0|snap=beta 1.10.0.3|[[File:Water Bucket JE2 BE2.png|32px]] The texture of water buckets has now been changed.}}
{{History||1.16.100|snap=beta 1.16.100.56|The ID of water buckets has been changed from <code>bucket/8</code> to <code>water_bucket</code>.}}
{{History||1.17.0|snap=beta 1.16.230.52|Water buckets can now be used to collect [[axolotl]]s.}}
{{History||1.18.10|snap=beta 1.18.10.24|Water buckets can now be used to collect [[tadpole]]s behind the "Wild Update" experimental toggle.}}
{{History|console}}
{{History||xbox=TU1|xbone=CU1|ps=1.0|wiiu=Patch 1|switch=1.0.1|[[File:Water Bucket JE1 BE1.png|32px]] Added water buckets.}}
{{History||xbox=TU9|[[Dispenser]]s have now been given the ability to shoot out the [[liquids]] inside water buckets. They can also suck up the liquids if activated again, but a bug prevents the empty [[bucket]] from being filled. Whether this was ever fixed is unknown.}}
{{History||xbox=none|xbone=none|ps=1.90|wiiu=none|switch=none|[[File:Water Bucket JE2 BE2.png|32px]] The texture of water buckets has now been changed.}}
{{History|New Nintendo 3DS Edition}}
{{History||0.1.0|[[File:Water Bucket JE1 BE1.png|32px]] Added water buckets.}}
{{History|foot}}
==Issues==
{{issue list}}
==Gallery==
<gallery>
Water Bucket SDGP.png|Water bucket in the [[Super Duper Graphics Pack]].
</gallery>
==References==
{{Reflist}}
{{Items}}
[[Category:Renewable resources]]
[[Category:Tools]]
[[de:Wassereimer]]
[[ja:水入りバケツ]]
[[pt:Balde de água]]
[[th:ถังน้ำ]]
[[uk:Відро води]]
[[zh:水桶]]</li><li>[[Dye|Dye]]<br/>{{Item
| title = Dyes
| image = White Dye.png
| extratext = View [[#Gallery|all renders]]
| renewable = Yes
| stackable = Yes (64)
}}
'''Dyes''' are a set of sixteen items used to change the color of [[wool]], [[carpet]]s, [[terracotta]], [[concrete powder]], [[glass]], [[shulker box]]es, [[bed]]s, [[candle]]s, the patterns on [[banner]]s, [[firework star]]s, certain mobs, and text on [[sign]]s and [[hanging sign]]s. {{IN|bedrock}} they can also be used to dye water in a [[cauldron]] (which is thereafter used to dye leather [[armor]]); {{in|java}} leather armor can be dyed directly. {{IN|education}} dyes can also be used to dye [[balloon]]s and [[glow stick]]s.
{{IN|bedrock|education}}, [[bone meal]], [[ink sac]]s, [[lapis lazuli]], and [[cocoa bean]]s can generally substitute for [[white dye]], [[black dye]], [[blue dye]], and [[brown dye]], respectively, in crafting recipes and for use in dyeing items or mobs. However, they have other important uses that aren't related to color, and are therefore not considered true dyes. They are mentioned in this article only in regard to their use as dyeing agents; see their individual articles for complete information about them.
[[File:Dye Recipes.png|400px|thumb|A guide for creating all the dyes]]
== Obtaining ==
<!--[[File:Dye Chart.png|350px|thumb|A guide to crafting all the dyes.{{until|java 1.14}}]]-->
Dyes can be produced by crafting them from plants (mainly flowers), by crafting dyes of different colors together, by smelting plants, or by trading with a [[wandering trader]].
{{loadPage|Crafting/Dye|Crafting|h3}}
=== Smelting ===
{{smelting|head=1|Sea Pickle|Lime Dye|0,2}}
{{smelting|foot=1|Cactus|Green Dye|1||b=Lapis Lazuli|c=Any fuel|d=1}}
=== Trading ===
[[Wandering trader]]s can sell 3 dyes for an [[emerald]]. {{IN|bedrock}}, they can also sell 3 lapis lazuli, bone meal, cocoa beans, or ink sacs for one emerald.
Apprentice-level cleric [[villager]]s sell one lapis lazuli per emerald.
=== Chest loot ===
{{#invoke:LootChest|base3|blue-dye,green-dye,orange-dye,light-blue-dye,yellow-dye,white-dye}}
=== Other ===
Ink sacs can also be created using 1 iron, 1 sulfur, and 4 oxygen in the [[compound creator]]. {{only|bedrock|education}}
== Usage ==
Similar to their use in crafting, [[bone meal]], [[ink sac]]s, [[lapis lazuli]], and [[cocoa beans]] can be substituted for the corresponding dye in any of the following usages unless otherwise specified.{{only|bedrock}} <!--- sections are ordered by craftable dyeable blocks, dyeable items, version exclusive sections, and non-crafting miscellaneous uses--->
=== Dyeing wool and mobs ===
Players can dye wool by placing [[wool]] and any dye in a crafting grid.
{{Crafting
|nocat=1
|Any Wool
|Matching Dye
|Output=Any Wool
}}
Dyes can be {{control|use|text=used}} on sheep to change the color of the wool. Shearing a colored sheep drops the corresponding color of the wool, and the sheep retains the color when the wool regenerates. [[Breeding]] colored sheep produces a lamb colored as one of the parent sheep, or a color resulting from the combination of both parents' color. The color combining follows the same rules that dyes use – red and yellow sheep produce an orange lamb, but a blue and yellow sheep cannot create a green lamb. The unlimited reproduction of colored sheep makes dyeing and shearing sheep infinitely more efficient than just dyeing wool directly.
Dye can also be used on a tamed [[wolf]] or [[cat]] to change the color of its collar from the default red to the color of the dye.
=== Dyeing carpets ===
Carpets can be dyed.
{{Crafting
|Any Carpet
|Matching Dye
|Output= Matching Carpet
|type= Building block
}}
=== Dyeing terracotta ===
[[Terracotta]] can be dyed by placing 8 blocks around a dye on a crafting table.
{{Crafting
|nocat=1
|A1=Terracotta |B1=Terracotta |C1=Terracotta
|A2=Terracotta |B2=Matching Dye |C2=Terracotta
|A3=Terracotta |B3=Terracotta |C3=Terracotta
|Output=Matching Dyed Terracotta,8
}}
=== Creating concrete powder ===
Dyes can also be used to craft [[concrete powder]], which can then be set into their respective [[concrete]] blocks (they cannot be dyed directly).
{{Crafting
|nocat=1
|Sand |Gravel |Sand
|Gravel |Matching Dye |Gravel
|Sand |Gravel |Sand
|Output=Matching Concrete Powder,8
}}
=== Staining glass ===
[[Stained glass]] can be stained by placing 8 blocks of glass around a dye on a [[crafting table]]. Just like regular glass, stained glass can be crafted into stained glass panes. The recipe for this is the same as with regular glass.
{{Crafting
|nocat=1
|A1=Glass |B1=Glass |C1=Glass
|A2=Glass |B2=Matching Dye |C2=Glass
|A3=Glass |B3=Glass |C3=Glass
|Output=Matching Stained Glass,8
|head=1
}}
{{Crafting
|nocat=1
|A1= Glass Pane
|B1= Glass Pane
|C1= Glass Pane
|A2= Glass Pane
|B2= Matching Dye
|C2= Glass Pane
|A3= Glass Pane
|B3= Glass Pane
|C3= Glass Pane
|Output= Matching Stained Glass Pane,8
|type= Decoration block
|foot=1
}}
=== Dyeing shulker boxes ===
[[Shulker box]]es are generated in a light shade of purple (like the [[purpur block]]), but can be dyed any color. They can also be re-dyed as often as desired.
{{Crafting
|ignoreusage=1
|showname=1
|Any Shulker Box
|Matching Dye
|Output=Matching Shulker Box
}}
=== Dyeing beds ===
Players can dye beds by placing a [[bed]] and any color dye in a crafting grid.
{{Crafting
|nocat=1
|Any Bed
|Matching Dye
|Output=Matching Bed
}}
=== Dyeing candles ===
Players can dye [[candles]] by placing an undyed candle and any color dye in a crafting grid.
{{Crafting
|ignoreusage=1
|Candle
|Matching Dye
|Output=Matching Dyed Candle
}}
=== Banner patterns ===
{{main|Banner#Patterns}}
Dyes are used in most banner patterns to determine the pattern and color displayed.
=== Dyeing armor ===
[[File:DyeGraph2.png|200px|thumb|A graph showing all combinations of two dyes on a [[tunic]].]]
Leather [[armor]] can be dyed by:
* Crafting dyes with a piece of leather armor or leather [[horse armor]].{{Only|java}}
* Dousing the leather armor or leather [[horse armor]] in a [[cauldron]] to which dyes have been added.{{Only|bedrock}}
There are 5,713,438<ref>https://anrar4.github.io/DyeLeatherArmor/</ref> (34.1% of sRGB) colors leather armor can be, as it is possible to put more than one dye on the crafting bench alongside the leather armor. Armor can be dyed multiple times with previous colors affecting the final outcome. Colored armor can be reverted to their original color using a [[cauldron]] with undyed water.
The game has a specific formula for calculating the color of dyed armor: each color, in the RGB color model, has a red value, green value, and blue value. For each dye in the crafting grid, and the armor itself (if it is already dyed), the red, green, and blue values are added to running totals. In addition, a running total of the highest value (be it red, green, or blue) is also kept. After this, each total is divided by the number of colors used. This effectively produces the average red, green, blue, and maximum values. The maximum value of the average RGB values is also calculated. Finally, each average RGB value is multiplied by the average maximum value and divided by the maximum of the average RGB values. The modified average RGB values are then used as the final color. This procedure can be summed up with the following equations:
for each color (all "total" variables start at 0 before counting):
totalRed = totalRed + redValue
totalGreen = totalGreen + greenValue
totalBlue = totalBlue + blueValue
totalMaximum = totalMaximum + max(redValue, greenValue, blueValue)
numberOfColors = numberOfColors + 1
averageRed = totalRed / numberOfColors
averageGreen = totalGreen / numberOfColors
averageBlue = totalBlue / numberOfColors
averageMaximum = totalMaximum / numberOfColors
maximumOfAverage = max(averageRed, averageGreen, averageBlue)
gainFactor = averageMaximum / maximumOfAverage
resultRed = averageRed * gainFactor
resultGreen = averageGreen * gainFactor
resultBlue = averageBlue * gainFactor
Due to the way this formula works, the resulting color can never be darker than the average of the input colors and is often lighter and more saturated. Of course, the resulting color can never be lighter or more saturated than the lightest or most saturated input color. In addition, this formula never creates an RGB value higher than 255 (which would be invalid in the 8-bit RGB color model).
If leather armor is renamed on an [[anvil]], it retains its name when dyed or undyed.
;Mixing Samples
: {{ItemSprite|Yellow Dye}} + {{ItemSprite|Yellow Dye}} = {{Tint|leather-chestplate| #{{CalcDye| yellow=2 }} | code=1}}
: {{ItemSprite|Red Dye}} + {{ItemSprite|Blue Dye}} + {{ItemSprite|White Dye}} = {{Tint|leather-chestplate| #{{CalcDye| red=1 | blue=1 | white=1}} | code=1}}
: {{ItemSprite|Green Dye}} + {{ItemSprite|Red Dye}} + {{ItemSprite|Pink Dye}} = {{Tint|leather-chestplate| #{{CalcDye| green=1 | red=1 | pink=1}} | code=1}}
=== Dyeing firework stars ===
A [[firework star]] can have a single color or a combination of up to eight colors when crafted with dyes. Adding one or more dyes to a crafted firework star adds a "fade to color" effect to it, overwriting any existing fade colors.
{{Crafting
|head=1
|ignoreusage=1
|ingredients=[[Gunpowder]] +<br>Any Dye (1–8) +<br>Extra ingredient (optional)
|Gunpowder
|Matching Dye
|Diamond;Glowstone Dust;Head;Gold Nugget;Feather;Fire Charge;
|Output=Matching Firework Star
}}
{{Crafting
|ignoreusage=1
|Matching Firework Star
|Any Dye
|Output=Matching Firework Star
|foot=1
}}
=== Creating balloons ===
Dye can be used to craft balloons.{{only|education}}
{{Crafting
|nocat=1
|A1= Latex
|B1= Matching Dye
|C1= Latex
|A2= Latex
|B2= Helium
|C2= Latex
|A3= Latex
|B3= Lead
|C3= Latex
|Output= Matching Balloon
}}
=== Creating glow sticks ===
Dye can also be used to craft glow sticks.{{only|education}}
{{Crafting
|nocat=1
|A1= Polyethylene
|B1= Hydrogen Peroxide
|C1= Polyethylene
|A2= Polyethylene
|B2= Matching Dye
|C2= Polyethylene
|A3= Polyethylene
|B3= Luminol
|C3= Polyethylene
|Output= Matching Glow Stick
}}
=== Dyeing water inside cauldrons ===
Water can be dyed in a cauldron by holding any dye in the hand and pressing {{Ctrl|use}} on a cauldron filled with water.{{only|bedrock}}
=== Signs ===
Dye can be {{control|used}} on a [[sign]] or a [[hanging sign]] to change the text color. {{IN|bedrock}}, [[ink sac]]s cannot be used for this purpose; black dye must be used to change the text to black.
=== Trading ===
Apprentice, journeyman and expert-level shepherd [[villager]]s buy any of the 12 dyes for an [[emerald]].
== Color values ==
The "color codes" are used to determine the color imparted on sheep, wolf and cat collars, firework stars, [[beacon]] beams, and dyed leather armor. The hex value is shown in the extended tooltips of dyed leather armor; however, to set the color using an NBT data tag in a [[command]], the decimal value must be used instead. The color values for firework stars are slightly different from the ones listed below, and use [[Item colors#Firework stars|these values]] instead.
{| class="wikitable" style="margin:2px; border: 1px solid silver; text-align: left;" data-description="Data values"
! rowspan=2 | Description
! colspan=2 style="text-align:center" | Color Code
|-
! Dec
! <abbr title="Hexadecimal color code">Hex</abbr>
|-
| style="text-align:center" | White || 16383998 || {{color|#F9FFFE}}
|-
| style="text-align:center" | Light gray || 10329495 || {{color|#9D9D97}}
|-
| style="text-align:center" | Gray || 4673362 || {{color|#474F52}}
|-
| style="text-align:center" | Black || 1908001|| {{color|#1D1D21}}
|-
| style="text-align:center" | Brown || 8606770 || {{color|#835432}}
|-
| style="text-align:center" | Red || 11546150 || {{color|#B02E26}}
|-
| style="text-align:center" | Orange || 16351261 || {{color|#F9801D}}
|-
| style="text-align:center" | Yellow || 16701501 || {{color|#FED83D}}
|-
| style="text-align:center" | Lime || 8439583 || {{color|#80C71F}}
|-
| style="text-align:center" | Green || 6192150 || {{color|#5E7C16}}
|-
| style="text-align:center" | Cyan || 1481884|| {{color|#169C9C}}
|-
| style="text-align:center" | Light blue || 3847130 || {{color|#3AB3DA}}
|-
| style="text-align:center" | Blue || 3949738 || {{color|#3C44AA}}
|-
| style="text-align:center" | Purple || 8991416 || {{color|#8932B8}}
|-
| style="text-align:center" | Magenta || 13061821 || {{color|#C74EBD}}
|-
| style="text-align:center" | Pink || 15961002 || {{color|#F38BAA}}
|}
== Sounds ==
{{edition|java}}:
{{Sound table
|rowspan=2
|sound=Dye.ogg
|subtitle=Dye stains
|source=block
|description=When dye is used on a [[sign]]
|id=item.dye.use
|translationkey=subtitles.item.dye.use
|volume=1.0
|pitch=1.0/0.9/0.95/1.1
|distance=16}}
{{Sound table
|subtitle=Dye stains
|source=player
|description=When dye is used on a [[sheep]]
|id=item.dye.use
|translationkey=subtitles.item.dye.use
|volume=1.0
|pitch=1.0/0.9/0.95/1.1
|distance=16
|foot=1}}
{{edition|bedrock}}:
{{Sound table
|type=bedrock
|sound=Dye.ogg
|source=sound
|description=When dye is used on a sign
|id=sign.dye.use
|volume=1.0
|pitch=1.0}}
{{Sound table
|rowspan=3
|sound=Water Splash Old.ogg
|source=block
|description=When dye is added to a cauldron
|id=cauldron.adddye
|volume=0.1
|pitch=1.0}}
{{Sound table
|source=block
|description=When armor is dyed using a cauldron
|id=cauldron.dyearmor
|volume=0.1
|pitch=1.0}}
{{Sound table
|source=block
|description=When dye is removed from armor using a cauldron
|id=cauldron.cleanarmor
|volume=0.1
|pitch=1.0
|foot=1}}
== Achievements ==
{{load achievements|Rainbow Collection;Tie dye outfit}}
== Video ==
{{Video note|These videos are outdated, as it does not include details of the [[Java Edition 1.7.2|1.7.2]] update's changes to the dyeing system/production chain.}}
<div style="text-align:center">
<span style="display:inline-block">{{yt|8YD7oauNZHE}}</span>
<span style="display:inline-block">{{yt|7tETaRt7STM}}</span>
</div>
== History ==
{{History|java beta}}
{{History||January 3, 2011|link=https://web.archive.org/web/0/http://notch.tumblr.com/post/2582321901/2011-here-we-go|Notch mentions adding a "paint" feature if he can figure out how.}}
{{History||January 10, 2011<ref group="n">Supposed time when fragment was filmed. Based on modified date of client.jar/gui/trap.png in [[Beta 1.2]].</ref>|link=https://www.youtube.com/watch?v=cBF2ugTzXqQ&t=181s|[[File:Red Dye (pre-release).png|32px]] Shown rose red in development as part of [[Minecraft: The Story of Mojang]].}}
{{History||1.2|[[File:Ink Sac JE1 BE1.png|32px]] [[File:Red Dye JE1 BE1.png|32px]] [[File:Green Dye JE1 BE1.png|32px]] [[File:Cocoa Beans JE1 BE1.png|32px]] [[File:Lapis Lazuli JE1 BE1.png|32px]] [[File:Purple Dye JE1 BE1.png|32px]] [[File:Cyan Dye JE1 BE1.png|32px]] [[File:Light Gray Dye JE1 BE1.png|32px]] [[File:Gray Dye JE1 BE1.png|32px]] [[File:Pink Dye JE1 BE1.png|32px]] [[File:Lime Dye JE1 BE1.png|32px]] [[File:Yellow Dye JE1 BE1.png|32px]] [[File:Light Blue Dye JE1 BE1.png|32px]] [[File:Magenta Dye JE1 BE1.png|32px]] [[File:Orange Dye JE1 BE1.png|32px]] [[File:Bone Meal JE1 BE1.png|32px]] Added dyes.
|[[File:Black Dye (Recreated).png|32px]] [[File:Red Dye (pre-release).png|32px]] [[File:Green Dye (Recreated).png|32px]] [[File:Brown Dye (Recreated).png|32px]] [[File:Blue Dye (Recreated).png|32px]] [[File:Purple Dye (Recreated).png|32px]] [[File:Cyan Dye (Recreated).png|32px]] [[File:Light Gray Dye (Recreated).png|32px]] [[File:Gray Dye (Recreated).png|32px]] [[File:Pink Dye (Recreated).png|32px]] [[File:Lime Dye (Recreated).png|32px]] [[File:Yellow Dye (Recreated).png|32px]] [[File:Light Blue Dye (Recreated).png|32px]] [[File:Magenta Dye (Recreated).png|32px]] [[File:Orange Dye (Recreated).png|32px]] [[File:White Dye (Recreated).png|32px]] Leftovers of old textures can be seen in [[items.png]] with 100% opacity. The white dye texture was reused for [[Sugar]].
| The colors were as follows:{{verify|Did the color codes remain the same between Beta 1.2 and Java 1.11.2?}}
{{:Color/Java Edition dye colors before 17w06a}}
}}
{{History|java}}
{{History||1.1|snap=11w49a|[[Sheep]] can now regrow their [[wool]] by eating [[grass block|grass]]. Dyed sheep regrow wool in their new color.}}
{{History||1.3.1|snap=12w19a|[[File:Cocoa Beans JE2.png|32px]] The texture of [[cocoa beans]] has been changed.}}
{{History|||snap=1.3|[[File:bone meal changes.gif|32px]] The textures of [[bone meal]], [[cactus green]], cocoa beans and [[rose red]] have been changed. The textures have been lowered one pixel.}}
{{History||1.4.2|snap=12w34a|Added the ability to dye leather [[armor]] and [[wolf]] collars.}}
{{History||1.4.4|snap=1.4.3|Color codes have been changed. The colors of red, brown, blue, purple, cyan, pink, light blue, magenta and orange were adjusted a little vividly.}}
{{History||1.6.1|snap=13w19a|[[Stained clay]] can now be crafted using dyes.}}
{{history||1.7.2|snap=13w36a|With the addition of new [[flower]]s, many secondary and tertiary dyes are now primary dyes.}}
{{History|||snap=13w41a|[[Stained glass]] can now be crafted using dyes.}}
{{History||1.8|snap=14w02a|As cleric [[villager]]s now sell lapis lazuli, all dyes have become fully renewable.}}
{{History|||snap=14w30a|Added [[banner]]s, which can be dyed.}}
{{History||1.9|snap=15w34a|Added [[shield]]s, which can be dyed indirectly by applying a matching [[banner]].}}
{{History||1.11|snap=16w39b|Dyes are now used to change the color of [[shulker box]]es.}}
{{History||1.12|snap=17w06a|Dyes are now used to craft [[concrete powder]].
|Color codes have been changed. All colors are adjusted more vividly. The changes were as follows:
{{:Color/Java Edition dye color changes in 17w06a}}
|Light blue dye, stained glass, and stained glass panes, did not change colors in this update. This means that they still use old colors.<ref name="unchanged dyes">{{Bug|MC-214643}}<br>{{Bug|MC-214641}}</ref>
}}
{{History|||snap=17w15a|Dyes can now apply color to white [[bed]]s.}}
{{History||1.13|snap=17w47a|The different data values for the <code>dye</code> ID have been split up into their own IDs.}}
{{History||1.14|snap=18w43a|[[Bone meal]], [[ink sac]]s, [[cocoa beans]] and [[lapis lazuli]] are no longer considered dyes.
|[[File:White Dye JE1 BE1.png|32px]] [[File:Black Dye JE1 BE1.png|32px]] [[File:Brown Dye JE1 BE1.png|32px]] [[File:Blue Dye JE1 BE1.png|32px]] Added [[white dye|white]], [[black dye|black]], [[brown dye|brown]] and [[blue dye]]s.
|"Rose Red", "Dandelion Yellow" and "Cactus Green" have been renamed to "Red Dye", "Yellow Dye" and "Green Dye", respectively.
|[[Glass pane]]s and [[carpet]]s can now be dyed.
|[[File:Light Gray Dye JE2 BE2.png|32px]] [[File:Gray Dye JE2 BE2.png|32px]] [[File:Red Dye JE2 BE2.png|32px]] [[File:Orange Dye JE2 BE2.png|32px]] [[File:Yellow Dye JE2 BE2.png|32px]] [[File:Lime Dye JE2 BE2.png|32px]] [[File:Green Dye JE2 BE2.png|32px]] [[File:Cyan Dye.png|32px]] [[File:Light Blue Dye JE2 BE2.png|32px]] [[File:Purple Dye JE2 BE2.png|32px]] [[File:Magenta Dye JE2 BE2.png|32px]] [[File:Pink Dye JE2 BE2.png|32px]] The textures of light gray, gray, red, orange, yellow, lime, green, cyan, light blue, purple, magenta, and pink dyes, have been changed. The color texture for light blue dye was not changed to reflect the updated colors from 1.12.<ref name="unchanged dyes"></ref>}}
{{History|||snap=18w44a|The color of the text on [[sign]]s can now be changed with dye.}}
{{History|||snap=18w49a|Yellow dyes can now be found in [[chest]]s in [[village]] mason houses.}}
{{History|||snap=18w50a|Green dyes can now be found in [[chest]]s in [[desert]] [[village]] houses.}}
{{History|||snap=19w05a|Added the [[wandering trader]], which can sell any type of dye.}}
{{History|||snap=19w11a|All 16 types of dyes can now be [[trading|bought]] by shepherd villagers.}}
{{History||1.16.2|snap=Pre-release 2|Reversed the order of dyes to match other colored items in the [[Creative inventory]].<ref name="reverse dye">{{Bug|MC-136553}}</ref>
|Regrouped dyes in the Creative inventory such that white, blue, brown, and black dyes are within and not [[cocoa beans]], [[ink sacs]], [[lapis lazuli]], and [[bone meal]].<ref name="regroup dye">{{Bug|MC-177684}}</ref>}}
{{History||1.17|snap=20w45a|Added [[candle]]s, which can be dyed.}}
{{History|||snap=21w03a|Added a sound for applying dyes.}}
{{History|||snap=21w19a|Candles can no longer be dyed.}}
{{History|||snap=Pre-release 1|Candles can now once again be dyed.}}
{{History||1.20<br>(Experimental)|link=1.19.3|snap=22w42a|The color of the text on [[hanging sign]]s can now be changed with dye.}}
{{History||1.20<br>(Experimental)|link=1.19.4|snap=23w07a|[[Torchflower]]s can now be crafted into orange dye.|[[Pink petals]] can now be crafted into pink dye.}}
{{History||1.20|snap=23w12a|[[Pitcher plant]]s can now be crafted into cyan dye.|Blue, light blue, orange, white, and yellow dye can now be found in [[suspicious gravel]] and [[suspicious sand]] in [[trail ruins]].}}
{{History|||snap=23w14a|Pitcher plants can now craft two [[cyan dye]] instead of one.}}
{{History|||snap=23w16a|Blue, light blue, orange, white, and yellow dye no longer generates in [[suspicious sand]] in [[trail ruins]].|Due to the split of the archaeological loot tables for the suspicious gravel within the [[trail ruins]]; blue, light blue, orange, white, and yellow dye now are in the common loot.}}
{{History|pocket alpha}}
{{History||v0.3.0|[[File:Bone Meal JE1 BE1.png|32px]] [[File:Light Gray Dye JE1 BE1.png|32px]] [[File:Gray Dye JE1 BE1.png|32px]] [[File:Ink Sac JE1 BE1.png|32px]] [[File:Cocoa Beans JE1 BE1.png|32px]] [[File:Red Dye JE1 BE1.png|32px]] [[File:Orange Dye JE1 BE1.png|32px]] [[File:Yellow Dye JE1 BE1.png|32px]] [[File:Lime Dye JE1 BE1.png|32px]] [[File:Green Dye JE1 BE1.png|32px]] [[File:Cyan Dye JE1 BE1.png|32px]] [[File:Light Blue Dye JE1 BE1.png|32px]] [[File:Lapis Lazuli JE1 BE1.png|32px]] [[File:Purple Dye JE1 BE1.png|32px]] [[File:Magenta Dye JE1 BE1.png|32px]] [[File:Pink Dye JE1 BE1.png|32px]] Added dyes. Only [[dandelion yellow]] and [[lapis lazuli]] are currently obtainable and have functionality.}}
{{History||v0.3.2|[[Cactus green]] is now obtainable by smelting [[cacti]].}}
{{History||v0.3.3|[[Bone meal]] is now obtainable via [[crafting]].}}
{{History||v0.4.0|[[Cyan dye]], [[light blue dye]], [[lime dye]], [[magenta dye]], [[orange dye]], [[pink dye]], and [[purple dye]] are now obtainable via crafting.
|[[Rose red]] is now obtainable by smelting red [[mushroom]]s.
|All available dyes, excluding bone meal, can now be used to craft their respective [[wool]] color.}}
{{History||v0.8.0|snap=build 1|[[File:Cocoa Beans JE3 BE2.png|32px]] The texture of cocoa beans has been changed.}}
{{History|||snap=build 3|[[Ink sac]]s, [[cocoa bean]]s, [[gray dye]], and [[light gray dye]] are now available in the [[creative]] [[inventory]].
|Rose red can now be obtained from [[beetroot]]s.}}
{{History||v0.9.0|snap=build 1|Cocoa beans can now be obtained from [[cocoa pod]]s.
|The [[rose]] has been removed and replaced with a new poppy [[flower]] that can be crafted into rose red.}}
{{History|||snap=build 3|All new [[flower]]s can now be [[crafting|crafted]] into dyes. Because of this, many secondary and tertiary dyes are now primary dyes.
|[[Gray dye]] and [[light gray dye]] can now be obtained in [[survival]].}}
{{History|||snap=build 11|[[Terracotta|Stained clay]] can now be crafted using dyes.}}
{{History||v0.11.0|snap=build 1|[[Ink sac]]s can now be obtained from [[squid]].
|Added the ability to dye [[wolf]] collars.}}
{{History||v0.12.1|snap=build 1|Red [[mushroom]]s can no longer be smelted to obtain [[rose red]].}}
{{History||v0.14.0|snap=build 1|[[Cauldron]]s now used for leather dyeing, by applying a dye to a [[water]]-filled cauldron.}}
{{History||v0.16.0|snap=build 1|[[Cocoa bean]]s can no longer be crafted.}}
{{History|pocket}}
{{History||1.0.0|snap=alpha 0.17.0.1|Added a ''Dye'' button for [[sheep]].
|Added [[shulker]]s, which can be dyed.
|Added [[stained glass]]. Stain glass cannot be [[crafting|crafted]], but purple glass generates in [[end city|end cities]].}}
{{History||1.1.0|snap=alpha 1.1.0.0|Dyes can now apply color to a white [[bed]]s.
|Dyes are now used to craft [[concrete powder]].
|The color palette has been changed.}}
{{History|bedrock}}
{{History||1.2.0|snap=beta 1.2.0.2|Dyes can now be used for [[banner]] crafting.
|Dyes can now be used to craft [[firework star]]s.
|[[Stained glass]] is now [[crafting|craftable]], using dyes.}}
{{History||1.4.0|snap=beta 1.2.20.1|[[Lime dye]] can now be obtained from smelting [[sea pickle]]s.
|Dyes can now used to craft [[glow stick]]s and [[balloon]]s.}}
{{History||1.8.0|snap=beta 1.8.0.8|Dyes can now be used to dye [[cat]] collars.}}
{{History|||snap=beta 1.8.0.10|[[File:White Dye JE1 BE1.png|32px]] [[File:Black Dye JE1 BE1.png|32px]] [[File:Brown Dye JE1 BE1.png|32px]] [[File:Blue Dye JE1 BE1.png|32px]] Added [[white dye|white]], [[brown dye|brown]], [[black dye|black]] and [[blue dye]]s, which can be crafted from [[lapis lazuli]], [[bone meal]], [[cocoa beans]] and [[ink sac]]s. This, however, the later four still use as dyes.<ref>{{Bug|MCPE-42473}}</ref>
|"Rose Red", "Dandelion Yellow" and "Cactus Green" have been renamed to "Red Dye", "Yellow Dye" and "Green Dye", respectively.}}
{{History||1.9.0|snap=beta 1.9.0.0|Blue and white dye can now be obtained from [[cornflower]]s and [[lily of the valley]]s.}}
{{History||1.10.0|snap=beta 1.10.0.3|[[Glass pane]]s and [[carpet]]s can now be dyed.
|Only a single dye is now required to apply a banner pattern in a [[loom]].
|Various dyes except black dye, white dye, brown dye and blue dye are now [[trading|sold]] by [[wandering trader]]s.
|[[File:Bone Meal JE2 BE2.png|32px]] [[File:Light Gray Dye JE2 BE2.png|32px]] [[File:Gray Dye JE2 BE2.png|32px]] [[File:Ink Sac JE2 BE2.png|32px]] [[File:Cocoa Beans JE4 BE3.png|32px]] [[File:Red Dye JE3 BE3.png|32px]] [[File:Orange Dye JE2 BE2.png|32px]] [[File:Yellow Dye JE2 BE2.png|32px]] [[File:Lime Dye JE2 BE2.png|32px]] [[File:Green Dye JE2 BE2.png|32px]] [[File:Cyan Dye.png|32px]] [[File:Light Blue Dye JE2 BE2.png|32px]] [[File:Lapis Lazuli JE2 BE2.png|32px]] [[File:Purple Dye JE2 BE2.png|32px]] [[File:Magenta Dye JE2 BE2.png|32px]] [[File:Pink Dye JE2 BE2.png|32px]] The textures of bone meal, light gray, gray, ink sac, cocoa beans, red, orange, yellow, lime, green, cyan, light blue, lapis lazuli, purple, magenta, and pink dyes have been changed.}}
{{History||1.11.0|snap=beta 1.11.0.4|Dye can now be [[trading|sold]] to shepherd [[villager]]s.}}
{{History||1.16.210|snap=beta 1.16.210.59|The color of the text on [[sign]]s can now be changed with dye.}}
{{History|||snap=beta 1.16.210.60|The ability to dye the color of the text on [[sign]]s was temporarily removed.}}
{{History||1.16.220|snap=beta 1.16.220.50|The color of the text on [[sign]]s can now be changed with dye again.}}
{{History||1.17.10|snap=beta 1.17.10.22|Added [[candles]], which can be dyed.}}
{{History|console}}
{{History||xbox=TU1|xbone=CU1|ps=1.0|wiiu=Patch 1|switch=1.0.1|[[File:Bone Meal JE1 BE1.png|32px]] [[File:Light Gray Dye JE1 BE1.png|32px]] [[File:Gray Dye JE1 BE1.png|32px]] [[File:Ink Sac JE1 BE1.png|32px]] [[File:Cocoa Beans JE1 BE1.png|32px]] [[File:Red Dye JE1 BE1.png|32px]] [[File:Orange Dye JE1 BE1.png|32px]] [[File:Yellow Dye JE1 BE1.png|32px]] [[File:Lime Dye JE1 BE1.png|32px]] [[File:Green Dye JE1 BE1.png|32px]] [[File:Cyan Dye JE1 BE1.png|32px]] [[File:Light Blue Dye JE1 BE1.png|32px]] [[File:Lapis Lazuli JE1 BE1.png|32px]] [[File:Purple Dye JE1 BE1.png|32px]] [[File:Magenta Dye JE1 BE1.png|32px]] [[File:Pink Dye JE1 BE1.png|32px]] Added dyes.}}
{{History||xbox=TU9|[[File:Cocoa Beans JE3 BE2.png|32px]] The texture of cocoa beans has been changed.}}
{{History||xbox=none|xbone=none|ps=1.83|wiiu=none|switch=none|[[File:White Dye JE1 BE1.png|32px]] [[File:Black Dye JE1 BE1.png|32px]] [[File:Brown Dye JE1 BE1.png|32px]] [[File:Blue Dye JE1 BE1.png|32px]] Added [[white dye|white]], [[black dye|black]], [[brown dye|brown]], and [[blue dye|blue]] dyes, which can crafted from [[bone meal]], [[ink sac]], [[cocoa beans]], and [[lapis lazuli]].
|"Rose Red", "Dandelion Yellow" and "Cactus Green" have been renamed to "Red Dye", "Yellow Dye" and "Green Dye", respectively.}}
{{History||ps=1.90|[[File:Bone Meal JE2 BE2.png|32px]] [[File:Light Gray Dye JE2 BE2.png|32px]] [[File:Gray Dye JE2 BE2.png|32px]] [[File:Ink Sac JE2 BE2.png|32px]] [[File:Cocoa Beans JE4 BE3.png|32px]] [[File:Red Dye JE2 BE2.png|32px]] [[File:Orange Dye JE2 BE2.png|32px]] [[File:Yellow Dye JE2 BE2.png|32px]] [[File:Lime Dye JE2 BE2.png|32px]] [[File:Green Dye JE2 BE2.png|32px]] [[File:Cyan Dye.png|32px]] [[File:Light Blue Dye JE2 BE2.png|32px]] [[File:Lapis Lazuli JE2 BE2.png|32px]] [[File:Purple Dye JE2 BE2.png|32px]] [[File:Magenta Dye JE2 BE2.png|32px]] [[File:Pink Dye JE2 BE2.png|32px]] The textures of bone meal, light gray, gray, ink sac, cocoa beans, red, orange, yellow, lime, green, cyan, light blue, lapis lazuli, purple, magenta, and pink dyes have been changed.}}
{{History|3ds}}
{{History||0.1.0|[[File:Bone Meal JE1 BE1.png|32px]] [[File:Light Gray Dye JE1 BE1.png|32px]] [[File:Gray Dye JE1 BE1.png|32px]] [[File:Ink Sac JE1 BE1.png|32px]] [[File:Cocoa Beans JE3 BE2.png|32px]] [[File:Red Dye JE1 BE1.png|32px]] [[File:Orange Dye JE1 BE1.png|32px]] [[File:Yellow Dye JE1 BE1.png|32px]] [[File:Lime Dye JE1 BE1.png|32px]] [[File:Green Dye JE1 BE1.png|32px]] [[File:Cyan Dye JE1 BE1.png|32px]] [[File:Light Blue Dye JE1 BE1.png|32px]] [[File:Lapis Lazuli JE1 BE1.png|32px]] [[File:Purple Dye JE1 BE1.png|32px]] [[File:Magenta Dye JE1 BE1.png|32px]] [[File:Pink Dye JE1 BE1.png|32px]] Added dyes from [[Pocket Edition v0.15.4 alpha]].}}
{{History|foot}}
<gallery>
Pre-release dyes.png|Pre-release dye textures hidden within [[Items.png]].
</gallery>
;Notes
{{reflist|group=n}}
== Gallery ==
<gallery>
White Dye.png|White Dye
Light Gray Dye.png|Light Gray Dye
Gray Dye.png|Gray Dye
Black Dye.png|Black Dye
Brown Dye.png|Brown Dye
Red Dye.png|Red Dye
Orange Dye.png|Orange Dye
Yellow Dye.png|Yellow Dye
Lime Dye.png|Lime Dye
Green Dye.png|Green Dye
Cyan Dye.png|Cyan Dye
Light Blue Dye.png|Light Blue Dye
Blue Dye.png|Blue Dye
Purple Dye.png|Purple Dye
Magenta Dye.png|Magenta Dye
Pink Dye.png|Pink Dye
</gallery>
==Issues==
{{issue list}}
== Trivia ==
* Players can obtain each one of every color with 1 cocoa bean, 2 yellow dye, 2 ink sac, 3 green dye, 4 lapis lazuli, 4 red dye, and 6 bone meal (2 bones).
* The dyed sheep breeding behavior mirrors [[wikipedia:Lamarckism|Lamarck's theory]], in which the organisms evolve inheriting the external changes and adaptations of the previous generation, transmitting them to their offspring.
* In ''Bedrock Edition'', tertiary colors, along with their regular crafting recipes, can be crafted with primary colors. E.g.: Magenta can be crafted with one rose red and two bone meals.
* The colors of the dyes match the chat colors in [[color codes]] except for brown (dye only), light aqua, and gold (color codes only).
* The texture for light blue dye still uses the color from prior to the 1.12 World of Color update.<ref name="unchanged dyes"></ref>
== References ==
{{reflist}}
== External Links ==
* Tools for calculating leather dye combination: [https://minecraft.tools/en/armor.php minecraft.tools] (webapp); [https://github.com/pudquick/pyMCdyes/ pyMCDyes] (open-source Python script, outdated); [https://anrar4.github.io/DyeLeatherArmor/ DyeLeatherArmor]: a tool for calculating an exact crafting recipe for any sRGB color
{{Items}}
[[Category:Dyes]]
[[Category:Renewable resources]]
[[cs:Barvivo]]
[[de:Farbstoff]]
[[es:Tinte]]
[[fr:Teinture]]
[[hu:Színezés]]
[[it:Colorante]]
[[ja:染料]]
[[ko:염료]]
[[nl:Kleurstof]]
[[pl:Barwniki]]
[[pt:Corante]]
[[ru:Красители]]
[[th:สีย้อม]]
[[uk:Барвники]]
[[zh:染料]]</li></ul> | ? | Removed rose. | |||
v0.12.1{{Extension DPL}}<ul><li>[[Minecart with Chest|Minecart with Chest]]<br/>{{ItemEntity
|image=Minecart with Chest.png
|renewable=Yes
|stackable=No
|size=Height: 0.7 Blocks<br>Width: 0.98 Blocks
|networkid='''[[JE]]''': 10
|drops=1 {{ItemLink|Minecart with Chest}}<br> plus contents
|health={{hp|6}}
}}
A '''minecart with chest''' is a single [[chest]] inside a [[minecart]], and functions as such.
== Natural generation ==
Minecarts with chests containing loot naturally generate in [[mineshaft]]s, each on top of a piece of [[rail]].
== Obtaining ==
=== Crafting ===
{{Crafting|Chest|Minecart|Output=Minecart with Chest|type=Transportation}}
Minecarts with chests can be retrieved by attacking them. By doing so it drops as an [[item]] and any other contents of the chest are dropped as well.
==Usage==
[[File:Minecart with Chest GUI.png|thumb|176px|The GUI of a minecart with chest.]]
Minecarts with chests can be placed by {{control|use item|text=using its item}} on any type of [[rail]].
Chest minecarts' contents can be accessed by pressing {{control|use item}} button on them. The interaction makes no sounds and the chest does not show the opening or closing animation, unlike regular chests.
The boost that minecarts with chests gain from [[powered rail]]s is dependent on their load. For example, from a 1 powered rail starter track, an empty minecart with chest travels 64 blocks, but a full minecart with chest travels only 16 blocks (opposed to 80 blocks for an occupied normal minecart and 8 blocks for an empty normal minecart).
Another physical property of chest minecarts is their ability to be stacked. While three chests can fit in an area three blocks tall, up to four chest minecarts can fit in the same area. Like other minecarts, an unlimited number of minecarts with chests can exist in the same block space.
Minecarts with chests are also able to interact with [[hopper]]s. Hoppers can take items out from the minecart chest if they are below the track as the minecart rolls over it or put them in if the minecart rolls under a downward facing hopper. Hoppers can also input items if they are facing into the side of the minecart.
Opening or destroying a minecart with chest angers [[piglin]]s.
{{See also|Tutorials/Storage minecarts}}
When on top of [[detector rail]]s, nearby [[redstone comparators]] will give out redstone signals based on how full the minecarts with chests are.
== Sounds ==
{{Edition|Java}}:<br>
Minecarts with chests use the Friendly Creatures sound category for entity-dependent sound events.<ref group=sound name=rollsource>{{bug|MC-42132}}</ref>
{{Sound table
|sound=Minecart rolling.ogg
|subtitle=Minecart rolls
|source=Friendly Creatures <ref group=sound name=rollsource/>
|overridesource=1
|description=While a minecart with chest is moving
|id=entity.minecart.riding
|translationkey=subtitles.entity.minecart.riding
|volume=0.0-0.35 <ref group=sound>Relates linearly with horizontal velocity (max 0.5)</ref>
|pitch=0.0-1.0 <ref group=sound>Will increase by 0.0025 per tick if the minecart's horizontal velocity is more than 0.01</ref>
|distance=16
|foot=1}}
{{Edition|Bedrock}}:
{{Sound table
|type=bedrock
|sound=Minecart rolling.ogg
|source=neutral
|description=While a minecart with chest is moving
|id=minecart.base
|foot=1}}
==Data values==
===ID===
{{edition|java}}:
{{ID table
|edition=java
|firstcolumnname=Item
|showforms=y
|generatetranslationkeys=y
|displayname=Minecart with Chest
|spritetype=item
|nameid=chest_minecart
|form=item
|foot=1}}
{{ID table
|edition=java
|firstcolumnname=Entity
|generatetranslationkeys=y
|displayname=Minecart with Chest
|spritetype=entity
|nameid=chest_minecart
|foot=1}}
{{edition|bedrock}}:
{{ID table
|edition=bedrock
|firstcolumnname=Item
|shownumericids=y
|showforms=y
|notshowbeitemforms=y
|generatetranslationkeys=y
|displayname=Minecart with Chest
|spritetype=item
|nameid=chest_minecart
|id=389
|form=item
|foot=1}}
{{ID table
|edition=bedrock
|firstcolumnname=Entity
|shownumericids=y
|generatetranslationkeys=y
|displayname=Minecart with Chest
|spritetype=entity
|nameid=chest_minecart
|id=98
|foot=1}}
===Entity data===
Minecarts with chests have entity data associated with them that contain various properties of the entity.
{{el|java}}:
{{main|Entity format}}
{{/ED}}
{{el|bedrock}}:
: See [[Bedrock Edition level format/Entity format]].
==Achievements==
{{load achievements|Freight Station}}
== Video==
<div style="text-align:center">{{yt|2yVVMiQrCwo}}</div>
==History ==
[[File:Minecart with Chest BE3.png|thumb|The Minecart models in the Bedrock Edition were north or south on the sides. In the latest version, the front and rear sides are north or south. But the absolute orientation of the chest was not changed.]]
{{info needed section|In bedrock edition 1.16.100 it seems that chests in minecarts face sideways instead of forward - when was this changed?}}
{{History|java alpha}}
{{History||v1.0.14|[[File:Minecart with Chest JE1.png|32px]] [[File:Minecart with Chest (item) JE1 BE1.png|32px]] Minecarts with chests have been added.
|At this point, they are either called "chest minecarts" or "storage minecarts" because no in-game name was indicated.}}
{{History|java beta}}
{{History||1.0|"Minecart with Chest" has been first indicated as its name, via the new item tooltips.}}
{{History||1.8|snap=Pre-release|[[File:Minecart with Chest JE2.png|32px]] The [[model]] of the minecart with chest has been changed to match the new [[chest]] model. However, the [[chest]] is incorrectly offset.<ref>[[mcw:Issues/Beta 1.8pre2#Graphical]]</ref>}}
{{History|||snap=release|[[File:Minecart with Chest JE3 BE1.png|32px]] The model of minecarts with chests has been fixed.}}
{{History|java}}
{{History||1.5|snap=13w02a|Minecarts with chests now generate in [[mineshaft]]s in place of normal chests.}}
{{History||1.9|snap=15w43a|[[Loot table]]s have been added; minecarts with chests now use loot tables, and those in generated in [[mineshaft]]s now use loot tables.}}
{{History||1.9.1|snap=pre2|The title of the [[inventory]] has been changed from 'Chest minecart' to 'Minecart with Chest'.}}
{{History||1.11|snap=16w32a|The [[entity]] ID has been changed from <code>MinecartChest</code> to <code>chest_minecart</code>.}}
{{History||1.13|snap=17w47a|Prior to [[1.13/Flattening|''The Flattening'']], this [[item]]'s numeral ID was 342.}}
{{History||1.14|snap=18w43a|[[File:Minecart with Chest JE4 BE2.png|32px]] [[File:Minecart with Chest (item) JE2 BE2.png|32px]] The textures of minecarts with chests have been changed.}}
{{History||1.16.2|snap=Pre-release 1|[[Piglin]]s now become angry with players who open or destroy a chest minecart.}}
{{History||1.19|snap=22w13a|The crafting recipe for a minecart with chest is now shapeless.
|Breaking a minecart with chest will now drop the item instead of the minecart and chest separately, though the contents of the chest are still dropped.<ref>{{bug|MC-249493|||Fixed}}</ref>}}
{{History|pocket alpha}}
{{History||v0.14.0|snap=build 1|[[File:Minecart with Chest JE3 BE1.png|32px]] [[File:Minecart with Chest (item) JE1 BE1.png|32px]] Added minecarts with chests.}}
{{History|||snap=build 3|Minecarts with chests now drop [[item]]s when destroyed in [[Creative]] mode.}}
{{History|pocket}}
{{History||1.1.0|snap=alpha 1.1.0.0|The [[entity]] ID has been changed from <code>minecartchest</code> to <code>chest_minecart</code>.}}
{{History|bedrock}}
{{History||1.10.0|snap=beta 1.10.0.3|[[File:Minecart with Chest JE4 BE2.png|32px]] [[File:Minecart with Chest (item) JE2 BE2.png|32px]] The textures of minecarts with chests have been changed.}}
{{History||1.19.0|snap=beta 1.19.0.30|Breaking a minecart with chest will now drop the item instead of the minecart and chest separately, though the contents of the chest are still dropped.}}
{{History|console}}
{{History||xbox=TU1|xbone=CU1|ps=1.0|wiiu=Patch 1|switch=1.0.1|[[File:Minecart with Chest JE3 BE1.png|32px]] [[File:Minecart with Chest (item) JE1 BE1.png|32px]] Added minecarts with chests.}}
{{History||xbox=none|xbone=none|ps=1.90|wiiu=none|switch=none|[[File:Minecart with Chest JE4 BE2.png|32px]] [[File:Minecart with Chest (item) JE2 BE2.png|32px]] The textures of minecarts with chests have been changed.}}
{{History|new 3ds}}
{{History||0.1.0|[[File:Minecart_with_Chest_JE3_BE1.png|32px]] [[File:Minecart_with_Chest_(item)_JE1_BE1.png|32px]] Added minecarts with chests.
|Minecarts with chests emit smoke [[particles]] when destroyed.}}
{{History|foot}}
==Issues==
{{issue list}}
==Gallery ==
<gallery>
Compact Minecart Storage.png|A compact storage using chest minecarts (left) compared to chest storage in the same volume. Notice how chests cannot be placed next to each other, which is no longer the case after Java Edition 1.13.
GlitchedMinecartChest.png|This minecart with chest is trapped inside a block, due to a [[stronghold]] and a [[mineshaft]] that generated partially overlapping.
Minecartportal.png|A minecart with chest generated on top of an [[end portal frame]], because there is a mineshaft behind the wall.
Chest Minecart Stack.png|A large stack of chest minecarts.
</gallery>
==References==
{{Reflist}}
{{items}}
{{entities}}
[[Category:Mechanics]]
[[Category:Storage]]
[[cs:Nákladní vozík]]
[[de:Güterlore]]
[[es:Vagoneta con cofre]]
[[fr:Wagonnet de stockage]]
[[hu:Tárolócsille]]
[[it:Carrello da miniera]]
[[ja:チェスト付きのトロッコ]]
[[ko:상자가 실린 광산 수레]]
[[nl:Mijnkar met kist]]
[[pl:Wagonik ze skrzynią]]
[[pt:Carrinho de mina com baú]]
[[ru:Вагонетка с сундуком]]
[[uk:Вагонетка зі скринею]]
[[zh:运输矿车]]</li><li>[[:Category:Minecraft: Story Mode items|Category:Minecraft: Story Mode items]]<br/>[[Category:Minecraft: Story Mode]]
[[Category:Items]]</li></ul> | build 1 | Nether Reactor Core is no longer obtainable in survival or creative. | |||
v0.13.0{{Extension DPL}}<ul><li>[[:Category:Joke items|Category:Joke items]]<br/>[[Category:Joke features|Items]]
[[Category:Items]]</li><li>[[Shield|Shield]]<br/>{{Item
| image = Shield.png
| image2 = White Shield.png
| extratext = View [[#Gallery|all renders]]
| durability = 336
| renewable = Yes
| stackable = No
}}
A '''shield''' is a tool used for protecting the [[player]] against attacks.
== Obtaining ==
=== Crafting ===
{{Crafting
|head=1
|showname=0
|A1=Any Planks <!-- the recipe changed in 15w37a, do not change it to the old recipe without reason -->
|B1=Iron Ingot
|C1=Any Planks
|A2=Any Planks
|B2=Any Planks
|C2=Any Planks
|B3=Any Planks
|Output=Shield
|type=Combat
}}
{{Crafting
|ignoreusage=1
|Shield
|Matching Banner
|A2=Shield
|B2=Banner
|Output=Matching Shield
|type=combat
|foot=1
}}
=== Repairing ===
{{Crafting
|ignoreusage=1
|showdescription=1
|Damaged Shield
|Damaged Shield
|Output=Shield
|description= The durability of the two shields is added together, plus an extra 5% durability. The repaired shield has no pattern.
|type= Combat
}}
Shields may also be repaired on an [[anvil]] by using [[planks]] or another shield. Shields repaired on anvils retain their pattern.
=== Trading ===
Journeyman-level armorer [[villager]]s have {{frac|1|3}}{{only|Bedrock|short=1}}/{{frac|2|5}}{{only|Java|short=1}} chance of selling a shield for 5 [[emerald]]s as their sixth trade.
== Usage ==
Despite using iron in its crafting recipe, it cannot be smelted into [[iron nugget]]s.<ref>{{bug|MC-111738}}</ref>
=== Defense ===
Shields are used for [[blocking]] incoming attacks. {{control|Using}}{{Only|Java|short=1}} or {{Control|sneaking}}{{Only|Bedrock|short=1}} causes a player to slow to a [[sneaking]] pace, and after {{convert|5|ticks|seconds}}<ref>{{bug|MC-100949||Shield blocking is delayed}}</ref>, attacks coming from in front of the player are blocked, dealing no damage. When the shield blocks an attack of {{hp|3}} or stronger, it takes durability damage equal to the strength of the attack rounded up.
Most blocked projectiles that carry status effects (such as [[Shulker#Shulker bullet|shulker bullets]]{{only|java|short=1}}, flaming [[arrow]]s, or tipped arrows) do not affect the blocker. [[Trident]]s & arrows can be deflected into other targets. Knockback from melee attacks and projectiles is prevented, while knockback from [[explosion]]s, [[hoglin]], and [[ravager]] attacks are significantly reduced.
The shield directionally blocks all attacks coming from within the FOV of the direction the wielder is facing, providing a full hemisphere of coverage to them. If the wielder faces straight up, they are likely to miss their blocks.<ref>{{bug|MC-109101||Shields do not block damage while the player faces straight up}}</ref><!--straight down fix: MC-92019-->
Mobs that deal continuous contact damage such as the slime, magma cube, and blaze rapidly drain the shield's durability for as long as the shielded player remains within the mob's hitbox.<ref>{{bug|MC-169167}}</ref><ref>{{bug|MCPE-119451}}</ref>
Blockable attacks include:
*Melee attacks, except by a warden, axe-wielding mobs or by a sprinting player wielding an axe, however even without sprinting an axe still greatly decreases the durability
** Status effects do not carry through to the blocker{{only|java|short=1}}.
*Normal, tipped, and spectral [[arrow]]s
** Arrows other than [[Piercing]] are totally deflected and can hit other targets.
** Status effects do not carry through to the blocker{{only|java|short=1}}.
***This can be used to damage the attacker or another mob down there.
*[[Flame|Flaming arrows]]
** Burning does not carry through to the blocker{{only|java|short=1}}.
*[[Trident]]s
*[[Snowball]]s and [[egg]]s
*Spines from [[pufferfish]]
*Bullets from [[shulker]]s
** The levitation effect does not carry through to the blocker{{only|java|short=1}}.
*Spit from [[llama]]s
*[[Fireball]]s, such as from [[blaze]]s and [[fire charge]]s
** Burning does not carry through to the blocker.
*Direct hits from [[ghast]] [[fireball]]s
** These still cause environmental damage.
*All explosions{{only|JE|short=1}}
*Explosion damage from [[creeper]]s
*[[TNT]] that another player lit
*[[Ravager]] headbutts
** These still knock the blocker back by about 3 blocks.
** Blocking these strikes can stun the ravager for a moment, and it roars afterward.
*Ravager roars are blocked but still knock back the blocker.
*[[Bee]] stings are blocked, but bees continuously attack until the player stops blocking and the player is stung.
*Beam attacks from [[guardian]]s or [[elder guardian]]s (only reduces damage by 50%).
*Damage reflected from [[Thorns]] enchantment / [[Guardian|guardians]].
They cannot block:
*Arrows from a [[crossbow]] enchanted with [[Piercing]]
** This does not reduce the shield's durability.
*[[Status effect]]s from tipped arrows or shulker bullets {{only|bedrock|short=1}} <ref>{{bug|MCPE-52904}}</ref>
** Direct projectile damage is blocked, but the effect still carries through.
*Status effects from splash/lingering [[potion]]s, [[evoker]]s' fangs, or breath from the [[ender dragon]]
*Beam attacks from [[guardian]]s or [[elder guardian]]s, or the [[warden]]'s sonic boom attack
*TNT that the blocking player lit themselves{{only|BE|short=1}}
*TNT that a [[Redstone (disambiguation)|redstone mechanism]] lit{{only|BE|short=1}}
*[[Fall damage]], including that from [[ender pearl]]s
** This also includes when the player rides an [[entity]] that died due to fall damage.
*Strikes from a warden or any [[axe]]-wielding mob (e.g., [[vindicator]]s, [[piglin brute]]s, [[zombie]]s after disabling players shield they attack another time immediately)
** Such strikes disable being able to use shields for 5 seconds.
=== Applying patterns ===
[[File:Cyan Shield Screenshot.png|250px|thumb|A custom shield.]]
Shields can be decorated by applying a [[banner]].
{{Crafting
|showdescription=1
|Shield
|Matching Banner
|Output=Matching Shield; Ominous Shield
|B2link=Banner
|Olink=Shield
|type=Combat
|description=Applies the banner pattern to the shield. The banner is consumed.<br>The shield must have no preexisting patterns.<br>Does not change existing durability or enchantments on the shield.
}}
Unlike with [[banner]]s, shields cannot be repainted or washed in a [[cauldron]]. Shields have only half the resolution of banners, making patterns look slightly different. In the game files, the pattern textures can be found in a separate directory called entity/shield.
{{IN|java}}, shields with patterns can also be obtained using the same commands as banners, except <code>banner</code> has to be replaced with <code>shield</code>.
=== Enchantments ===
A shield can receive the following [[enchantments]], but only through an [[anvil]]:
{| class="wikitable col-2-center"
|+
!Name
!Max Level
![[Enchanting|Method]]
|-
|[[Unbreaking]]
|III
|{{Inventory slot|Anvil}}
|-
|[[Mending]]
|I
|{{Inventory slot|Anvil}}
|-
|[[Curse of Vanishing]]
|I
|{{Inventory slot|Anvil}}
|-
|}
== Sounds ==
{{edition|java}}:
{{Sound table
|sound=Shield block1.ogg
|sound2=Shield block2.ogg
|sound3=Shield block3.ogg
|sound4=Shield block4.ogg
|sound5=Shield block5.ogg
|subtitle=Shield blocks
|source=player
|description=When an attack is blocked using a shield
|id=item.shield.block
|translationkey=subtitles.item.shield.block
|volume=1.0
|pitch=0.8-1.2
|distance=16}}
{{Sound table
|sound=Equip generic1.ogg
|sound2=Equip generic2.ogg
|sound3=Equip generic3.ogg
|sound4=Equip generic4.ogg
|sound5=Equip generic5.ogg
|sound6=Equip generic6.ogg
|subtitle=Gear equips
|source=player
|description=When a shield is placed in the offhand slot
|id=item.armor.equip_generic
|translationkey=subtitles.item.armor.equip
|volume=1.0
|pitch=1.0
|distance=16}}
{{Sound table
|sound=Random break.ogg
|subtitle=Item breaks
|source=player
|description=When a shield's durability is exhausted
|id=item.shield.break
|translationkey=subtitles.entity.item.break
|volume=0.8
|pitch=0.8-1.2
|distance=16
|foot=1}}
{{edition|bedrock}}:
{{Sound table
|type=bedrock
|sound=Shield block1.ogg
|sound2=Shield block2.ogg
|sound3=Shield block3.ogg
|sound4=Shield block4.ogg
|sound5=Shield block5.ogg
|source=player
|description=When an attack is blocked using a shield
|id=item.shield.block
|volume=0.7
|pitch=1.0}}
{{Sound table
|sound=Equip generic1.ogg
|sound2=Equip generic2.ogg
|sound3=Equip generic3.ogg
|sound4=Equip generic4.ogg
|sound5=Equip generic5.ogg
|sound6=Equip generic6.ogg
|source=player
|description=When a shield is placed in the offhand slot<wbr>{{Upcoming|BE 1.20.30}}<wbr><ref group=sound>{{Bug|MCPE-168039}}</ref>
|id=armor.equip_generic
|volume=1.0
|pitch=1.0}}
{{Sound table
|sound=Random break.ogg
|source=player
|description=When a shield's durability is exhausted
|id=random.break
|volume=1.0
|pitch=0.9
|foot=1}}
== Data values ==
=== ID ===
{{edition|java}}:
{{ID table
|edition=java
|showforms=y
|generatetranslationkeys=y
|displayname=Shield
|spritetype=item
|nameid=shield
|form=item
|translationkey=item.minecraft.shield, item.minecraft.shield.white, item.minecraft.shield.orange, item.minecraft.shield.magenta, item.minecraft.shield.light_blue, item.minecraft.shield.yellow, item.minecraft.shield.lime, item.minecraft.shield.pink, item.minecraft.shield.gray, item.minecraft.shield.light_gray, item.minecraft.shield.cyan, item.minecraft.shield.purple, item.minecraft.shield.blue, item.minecraft.shield.brown, item.minecraft.shield.green, item.minecraft.shield.red, item.minecraft.shield.black
|foot=1}}
{{edition|bedrock}}:
{{ID table
|edition=bedrock
|shownumericids=y
|showforms=y
|notshowbeitemforms=y
|generatetranslationkeys=y
|displayname=Shield
|spritetype=item
|nameid=shield
|id=355
|form=item
|translationkey=item.shield.name, item.shield.white.name, item.shield.orange.name, item.shield.magenta.name, item.shield.lightBlue.name, item.shield.yellow.name, item.shield.lime.name, item.shield.pink.name, item.shield.gray.name, item.shield.silver.name, item.shield.cyan.name, item.shield.purple.name, item.shield.blue.name, item.shield.brown.name, item.shield.green.name, item.shield.red.name, item.shield.black.name
|foot=1}}
== Advancements ==
{{load advancements|Not Today}}
== History ==
{{History||July 10, 2011|link=http://minetimes.wordpress.com/2011/07/10/interview-mit-jeb-ihr-konntet-die-fragen-stellen/|During an interview, [[Jeb]] says that "shields for the left arm" might be added.}}
{{History|java}}
{{History||1.9|snap=15w33c|[[File:White Shield.png|22px]] [[File:Light Gray Shield.png|22px]] [[File:Gray Shield.png|22px]] [[File:Black Shield.png|22px]] [[File:Brown Shield.png|22px]] [[File:Red Shield.png|22px]] [[File:Orange Shield.png|22px]] [[File:Yellow Shield.png|22px]] [[File:Lime Shield.png|22px]] [[File:Green Shield.png|22px]] [[File:Cyan Shield.png|22px]] [[File:Light Blue Shield.png|22px]] [[File:Blue Shield.png|22px]] [[File:Purple Shield.png|22px]] [[File:Magenta Shield.png|22px]] [[File:Pink Shield.png|22px]] Added shields.
|Shields replace the [[blocking]] functionality of [[sword]]s, although blocking more [[damage]].
|The current [[crafting]] recipe of shields includes [[wool]], producing 16 possible colored shields. There currently isn't a blank, uncolored shield.
{{{!}} class{{=}}"collapsible collapsed" data-description{{=}}"Recipe"
! Recipe
{{!}}-
{{!}}
{{Crafting
|A1=Matching Wool |B1=Any Planks
|A2=Matching Wool |B2=Any Planks |C2=Iron Ingot
|A3=Matching Wool |B3=Any Planks
|Output=Matching Shield
|ignoreusage=1
}}
{{!}}}
|Any of the colored base shields can be [[crafting|crafted]] with a [[banner]] of the same base color, to produce a patterned shield.
}}
{{History|||snap=15w34c|When an attack is blocked by a shield, the attacker now may be knocked back.
|Being attacked with an [[axe]] now may disable shield use for 5 seconds.}}
{{History|||snap=15w37a|The [[crafting]] recipe of shields has been changed to 6 [[planks]] and 1 [[iron ingot]].
{{{!}} class{{=}}"collapsible collapsed" data-description{{=}}"Recipe"
! Recipe
{{!}}-
{{!}}
{{Crafting
|A1=Any Planks |B1=Iron Ingot |C1=Any Planks
|A2=Any Planks |B2=Any Planks |C2=Any Planks
|B3=Any Planks
|Output=Shield
|ignoreusage=1
}}
{{!}}}
|[[File:Shield JE1.png|22px]] Crafting a shield now produces a base wooden shield that can be crafted together with any [[banner]].
|The cooldown of shields has been reduced from 0.5s to 0.25s.
|Blocking with shields now prevents some side effects.{{verify}}
|[[Arrow]]s now ricochet off shields.}}
{{History|||snap=15w44a|Shields can now be repaired by combining with other shields. This removes any [[banner]] that had been applied.}}
{{History|||snap=15w45a|Crafting a banner onto a shield now consumes the banner.}}
{{History|||snap=15w47b|Added shield blocking [[sound]]s.}}
{{History|||snap=16w07a|Added more variation of shield blocking sounds.}}
{{History|||snap=pre1|The [[durability]] of shields has been increased from 181 to 337.}}
{{History||1.10|snap=16w21a|Shields can now be equipped by [[dispenser]]s.}}
{{History||1.11|snap=16w33a|[[Crafting]] a shield with a banner no longer changes the durability, nor does it remove [[enchanting|enchantments]] from it.}}
{{History|||snap=16w35a|Shields now block 100% of [[damage]]/[[knockback]]/debuffs dealt in melee combat.}}
{{History||1.13|snap=17w47a|Prior to [[1.13/Flattening|''The Flattening'']], this [[item]]'s numeral ID was 442.}}
{{History||1.13.2|snap=release|Shields now properly block attacks when the player is facing down.<ref>{{bug|MC-92019|||Fixed}}</ref>}}
{{History||1.14|snap=18w43a|[[File:Shield JE2 BE1.png|22px]] The texture of shields has been changed.
|Shields no longer knockback attackers when they block due to a bug with rework of the blocking mechanic with the introduction of the ravager.<ref>{{bug|MC-147694}}</ref>}}
{{History|||snap=19w11a|Shields can now be [[trading|bought]] from armorer [[villager]]s.}}
{{History||1.14.3|snap=Pre-Release 3|Shields blocking flaming [[arrow]]s no longer put the [[player]] on [[fire]].}}
{{History||1.16|snap=20w06a|[[Crimson planks]] and [[warped planks]] can now be used to craft shields.}}
{{History||1.19|snap=22w11a|[[Mangrove planks]] can now be used to craft shields.}}
{{History||1.19.3|snap=22w43a|Shields can now properly block all explosions.}}
{{History||1.19.4|snap=23w06a|A sound is now played when a shield is placed into the offhand slot.}}
{{History|upcoming java}}
{{History||Combat Tests|snap=1.14.3 - Combat Test|Critical hits now bypass shields.
|The warm-up delay has been removed from shields.
|When in the off-hand, shields now activate when [[sneaking]].}}
{{History|||snap=Combat Test 2|Shields now protect against critical attacks again.
|Shields can only be activated when the weapon is charged to 200%.}}
{{History|||snap=Combat Test 3|A "Shield Indicator" option that displays when the shield is active, similar to the attack indicator, has been added.
|An option to hide shields when active has been added.
|The arc of available protection of shields has been decreased to 100 degrees instead of 180 degrees.}}
{{History|||snap=Combat Test 4|An option to disable shields being activated by pressing {{ctrl|crouch}} has been added.
|The option to hide the shield has been removed.}}
{{History|||snap=Combat Test 6|Shields now protect up to 5 [[damage]] for melee attacks (still 100% against projectiles).
|Shields activate instantly regardless if the weapon is charged, similar to Combat test 1.
|Shields now recover faster after an attack.}}
{{History|||snap=Combat Test 7c|Shields now add a 50% knockback resistance when active.
|Shields now protect against 100% [[explosions|explosion]] damage.}}
{{History|||snap=Combat Test 8c|The knockback calculations for shields have been fixed.{{Info needed}}
|Crouch-shielding while jumping has been disabled.
|Shields with [[banner]]s are now temporarily stronger than normal shields (10 absorption instead of 5, and better knockback resistance) to test different shield types.}}
{{History|bedrock}}
{{History||1.10.0|snap=beta 1.10.0.3|[[File:Shield JE2 BE1.png|22px]] Added shields.
|Shields cannot be customized with [[banner]]s.
|Shields are activated by [[sneaking|crouching]] or mounting [[mob]]s.}}
{{History||1.11.0|snap=beta 1.11.0.4|Shields can now be [[trading|bought]] from armorer [[villager]]s.}}
{{History||1.16.210|snap=beta 1.16.210.51|Now grants partial knockback protection from the [[goat]] ram attack.}}
{{History||1.16.220|snap=beta 1.16.220.50|[[Mob]]s that pick up shields now place them to their off-hand.}}
{{History||1.18.30|snap=beta 1.18.30.26|Being attacked with an [[axe]] now may disable shield use. This was not mentioned in the official changelog.<ref>{{tweet|kingbdogz|1504505321884196872|We missed a change in recent changelogs for the Bedrock beta that you may like - we have now made a parity fix that makes shields get disabled for 5 seconds when attacked by an Axe-wielding mob or player. We will make sure to list this properly in the next beta :)|March 17, 2022}}</ref>}}
{{History||1.20.0|snap=beta 1.20.0.20|[[File:White Shield.png|22px]] [[File:Light Gray Shield.png|22px]] [[File:Gray Shield.png|22px]] [[File:Black Shield.png|22px]] [[File:Brown Shield.png|22px]] [[File:Red Shield.png|22px]] [[File:Orange Shield.png|22px]] [[File:Yellow Shield.png|22px]] [[File:Lime Shield.png|22px]] [[File:Green Shield.png|22px]] [[File:Cyan Shield.png|22px]] [[File:Light Blue Shield.png|22px]] [[File:Blue Shield.png|22px]] [[File:Purple Shield.png|22px]] [[File:Magenta Shield.png|22px]] [[File:Pink Shield.png|22px]] Shields can now be customized using a banner.}}
{{History|PS4}}
{{History||1.90|[[File:Shield JE1.png|22px]] Added shields.
|Shields do not have [[banner]] application features.}}
{{History|foot}}
== Issues ==
{{issue list|-wither}}
== Gallery ==
<gallery>
Shield.png|Shield
White Shield.png|White Shield
Light Gray Shield.png|Light Gray Shield
Gray Shield.png|Gray Shield
Black Shield.png|Black Shield
Brown Shield.png|Brown Shield
Red Shield.png|Red Shield
Orange Shield.png|Orange Shield
Yellow Shield.png|Yellow Shield
Lime Shield.png|Lime Shield
Green Shield.png|Green Shield
Cyan Shield.png|Cyan Shield
Light Blue Shield.png|Light Blue Shield
Blue Shield.png|Blue Shield
Purple Shield.png|Purple Shield
Magenta Shield.png|Magenta Shield
Pink Shield.png|Pink Shield
</gallery>
=== Screenshots ===
<gallery>
JebShield.png|One of the first images of shields. [[Jeb]] wearing diamond armor while holding a creeper-emblazoned shield during [[MineCon]] 2015.
Jeb Crafting Shield.png|Jeb crafting a shield.
Player with Shield.png|Player holding the default shield.
Shield Block.png|A player blocking with a shield.
ShieldFirstPerson.png|Blocking with a shield as seen in first person.
Enchanted Shield (item).gif|An enchanted shield as seen in the [[inventory]].
-ominous- shield.png|A shield with the [[ominous banner]] on it as seen in the inventory.
Kai-Shield.jpg|An image of [[Kai]] wielding a banner with a shield, used to announce the feature on [[Bedrock Edition]].
Bedrock-Shields.jpg
</gallery>
== References ==
{{reflist}}
== External Links ==
* [https://www.minecraft.net/en-us/article/taking-inventory--shield Taking Inventory: Shield] – Minecraft.net on July 25, 2019
{{Items}}
[[Category:Combat]]
[[Category:Renewable resources]]
[[de:Schild (Kampf)]]
[[fr:Bouclier]]
[[it:Scudo]]
[[ja:盾]]
[[ko:방패]]
[[nl:Schild]]
[[pl:Tarcza]]
[[pt:Escudo]]
[[ru:Щит]]
[[th:โล่]]
[[zh:盾牌]]</li></ul> | build 1 | Removed crafting recipe and functionality of the stonecutter. It can still be found in the creative inventory. | |||
Issues
Issues relating to "Block" are maintained on the bug tracker. Report issues there.
Gallery
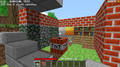
All blocks in Classic 0.26 SURVIVAL TEST.
All blocks in Classic 0.0.21a.

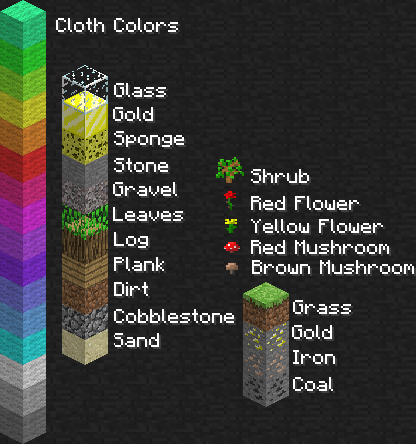
Trivia
- Certain blocks may interpret positions they cannot be placed in by normal means as a valid position. For example, a sign placed in midair via
/setblockor through bugs remains in midair even when updated, until either it is broken, or a block is placed below it and broken.