World Type is an option to change how worlds generate in Minecraft.
World types
Computer and Pocket Editions
| Type | Description | Image |
|---|---|---|
| Default (PC) Infinite (PE) |
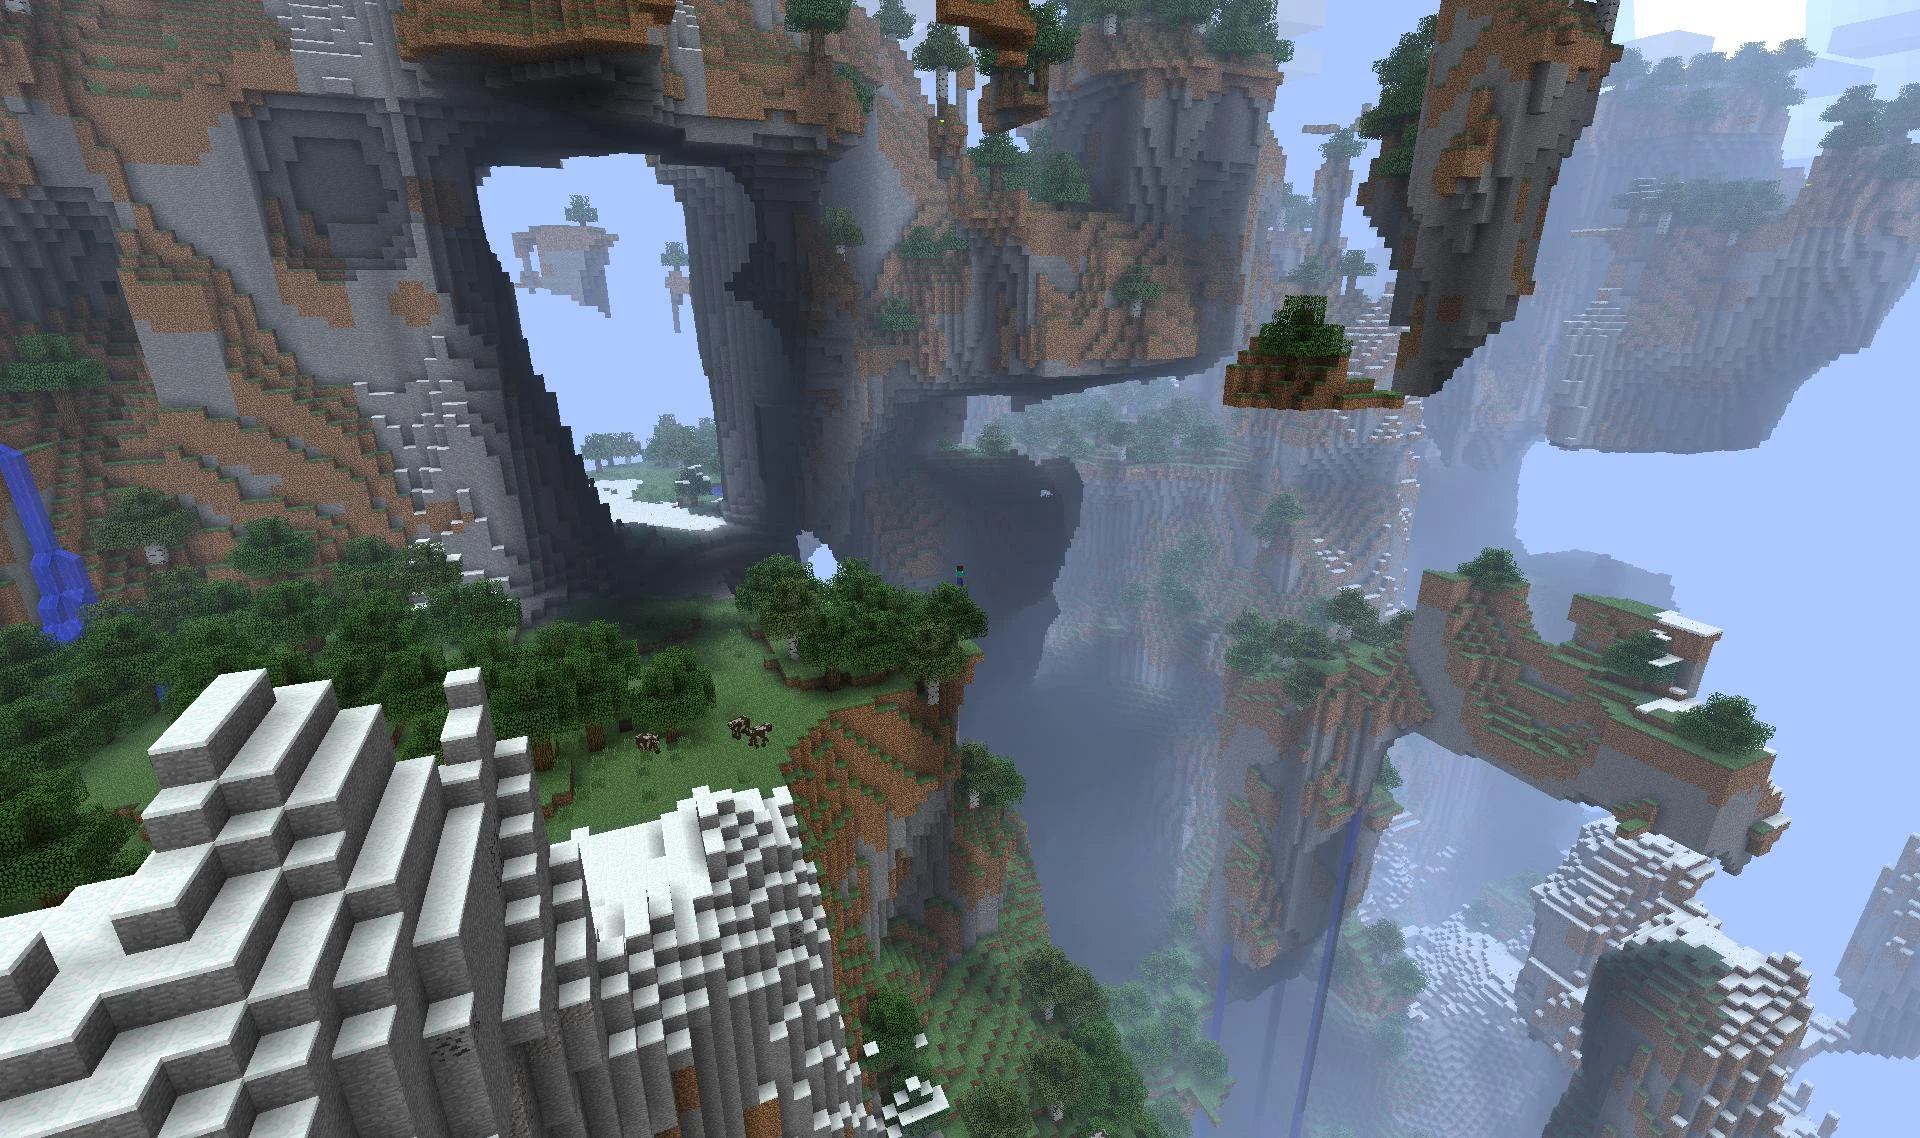
This is the default type of generation. Various landscapes generate utilizing Biomes.
level.dat generatorName: |
File:Minecraft 2.jpg |
| Superflat (PC) Flat (PE) |
This type of generation creates a world that is completely flat, at an altitude of y=4, by default. On a classic (default) superflat world, the terrain consists of one layer of bedrock, two layers of dirt, and one layer of grass. Mobs spawn normally; slimes are prevalent. In the computer edition, villages will also generate, and superflat worlds can be further customized through the use of presets, which allows you to change the layers of the terrain, spawn trees, larger villages, strongholds, etc.
level.dat generatorName: |
|
Computer and Console Editions
| Type | Description | Image |
|---|---|---|
| AMPLIFIED (PC) Amplified Worlds (CE) |
Generates many large mountains which dwarf even the extreme hills seen in default world types, and will more often than not reach the world height limit. Due to extremely steep cliffs and unforgiving terrain, careless players will find it quite difficult to survive in this world type. Certain biomes (i.e. swamplands, oceans and rivers) may see no obvious change in height. Villages will still spawn in this world type regardless of how flat the ground is, causing the buildings to generate in bizarre ways.
In Console Edition, this is available for Xbox One and PS4 only. It can be selected together with any of the world sizes described in the section below. level.dat generatorName: |
|
Computer Edition exclusive
| Type | Description | Image |
|---|---|---|
| Large Biomes | Generates a default world type, but with each geographic feature 4x larger along the X and Z axis, which results in biomes with 16 times as much area. Because of this, villages, desert temples, jungle temples, and other generated structures are all more likely to be found.
level.dat generatorName: |
|
| Customized | A customizable world type, with four pages of settings. The first page contains customization options which affect how structures and biomes will generate. The second page contains settings for ore generation. The third and fourth page contain advanced terrain customization options. In addition to these options, there are several pre-made presets.
level.dat generatorName: |
|
| Debug Mode | A world type containing all of the block states laid out in a grid at layer y=70 for convenient viewing. It can be accessed by holding down the ⇧ Shift key while cycling through the world types. In this world type there is a floor on y=60 made of barriers, and you cannot place or destroy blocks. level.dat generatorName: |
|
Pocket Edition exclusive
| Type | Description | Image |
|---|---|---|
| Old | This world type has a finite area of 256×256 blocks with an invisible bedrock barrier surrounding it. | 
|
Console Edition exclusive
| Type | Description | Image |
|---|---|---|
| Classic (360, PS3, One, PS4, Vita, Wii U, Switch) |
This world size has a finite area of 864×864 blocks (less than 1 Map) with a barrier surrounding it. | File:Minecraft 2.jpg |
| Small (One, PS4, Switch) |
This world size has a finite area of 1024x1024 blocks (1 Map) with a barrier surrounding it. | File:Minecraft 2.jpg |
| Medium (One, PS4, Switch) |
This world size has a finite area of 3072×3072 blocks (9 Maps) with a barrier surrounding it. | File:Minecraft 2.jpg |
| Large (One, PS4) |
This world size has a finite area of 5120×5120 blocks (25 Maps) with a barrier surrounding it. | File:Minecraft 2.jpg |
History
| indev | |||||
|---|---|---|---|---|---|
0.31{{Extension DPL}}<ul><li>[[Fermented Spider Eye|Fermented Spider Eye]]<br/>{{Item
| image = Fermented Spider Eye.png
| renewable = Yes
| stackable = Yes (64)
}}
A '''fermented spider eye''' is a [[brewing]] ingredient.
== Obtaining ==
=== Crafting ===
{{Crafting
|Brown Mushroom
|Sugar
|Spider Eye
|Output= Fermented Spider Eye
|type= Brewing
}}
== Usage ==
They can be used to brew [[potion]]s with negative effects, as well as the [[Potion of Invisibility]].
=== Brewing ingredient ===
{{brewing
|showname=1
|head=1
|Fermented Spider Eye
|Potion of Weakness
|base=Water Bottle
}}
{{brewing
|Fermented Spider Eye
|Potion of Harming
|base=Potion of Poison;Potion of Healing
}}
{{brewing
|Fermented Spider Eye
|Potion of Slowness
|base=Potion of Swiftness;Potion of Leaping
}}
{{brewing
|foot=1
|Fermented Spider Eye
|Potion of Invisibility
|base=Potion of Night Vision
}}
== Data values ==
=== ID ===
{{edition|java}}:
{{ID table
|edition=java
|showforms=y
|generatetranslationkeys=y
|displayname=Fermented Spider Eye
|spritetype=item
|nameid=fermented_spider_eye
|form=item
|foot=1}}
{{edition|bedrock}}:
{{ID table
|edition=bedrock
|shownumericids=y
|showforms=y
|notshowbeitemforms=y
|generatetranslationkeys=y
|displayname=Fermented Spider Eye
|spritetype=item
|nameid=fermented_spider_eye
|id=428
|form=item
|foot=1}}
== Video ==
<div style="text-align:center">{{yt|ln8ZQn5MtFI}}</div>
== History ==
{{History|java}}
{{History||1.0.0|snap=Beta 1.9 Prerelease 2|[[File:Fermented Spider Eye JE1 BE1.png|32px]] Added fermented spider eyes.}}
{{History|||snap=Beta 1.9 Prerelease 3|Fermented spider eyes can now be [[brewing|brewed]] in a [[water bottle]] to create a [[potion of Weakness]].
|Fermented spider eyes now corrupt potions of [[Swiftness]] and [[Fire Resistance]] into potions of [[Slowness]], for both normal and extended types.
|Fermented spider eyes now corrupts potions of [[Healing]] and [[Poison]] into potions of [[Harming]], as well as Healing II and extended Poison into extended Harming.}}
{{History||1.4.2|snap=12w34a|Fermented spider eyes now change potions of [[Night Vision]] into the new potions of [[Invisibility]], for both normal and extended types.}}
{{History||1.7.2|snap=13w36a|Fermented spider eyes now corrupt the new [[potion of Water Breathing]] into a potion of Harming.}}
{{History||1.8|snap=14w27a|Fermented spider eyes now corrupt the new [[potion of Leaping]] into a potion of Slowness.}}
{{History||1.9|snap=15w31a|[[Potions of Weakness]] can no longer be made using a [[thick potion]], [[mundane potion]], [[awkward potion]], [[potion of Regeneration]], or [[potion of Strength]].
|[[Potions of Slowness]] can no longer be made using a [[potion of Fire Resistance]].
|[[Potions of Harming]] can no longer be made using a [[potion of Water Breathing]].}}
{{History||1.13|snap=17w47a|Prior to [[1.13/Flattening|''The Flattening'']], this [[item]]'s numeral ID was 376.}}
{{History||1.14|snap=18w50a|[[File:Fermented Spider Eye JE2 BE2.png|32px]] The texture of fermented spider eyes has been changed.}}
{{History|upcoming java}}
{{History||Villager Trade Rebalance<br>(Experimental)|link=Java Edition 1.20.2|snap=23w31a|[[Wandering trader]]s now have a chance to [[trading|buy]] a fermented spider eye from the player.}}
{{History|pocket alpha}}
{{History||v0.12.1|snap=build 1|[[File:Fermented Spider Eye JE1 BE1.png|32px]] Added fermented spider eyes.}}
{{History|bedrock}}
{{History||1.10.0|snap=beta 1.10.0.3|[[File:Fermented Spider Eye JE2 BE2.png|32px]] The texture of fermented spider eyes has been changed.}}
{{History|console}}
{{History||xbox=TU7|xbone=CU1|ps=1.0|wiiu=Patch 1|switch=1.0.1|[[File:Fermented Spider Eye JE1 BE1.png|32px]] Added fermented spider eyes.}}
{{History||xbox=none|xbone=none|ps=1.90|wiiu=none|switch=none|[[File:Fermented Spider Eye JE2 BE2.png|32px]] The texture of fermented spider eyes has been changed.}}
{{History|New 3DS}}
{{History||0.1.0|[[File:Fermented Spider Eye JE1 BE1.png|32px]] Added fermented spider eyes.}}
{{History|foot}}
== Issues ==
{{issue list}}
{{items}}
[[Category:Renewable resources]]
[[cs:Zkvašené pavoučí oko]]
[[de:Fermentiertes Spinnenauge]]
[[es:Ojo de araña fermentado]]
[[fr:Œil d'araignée fermenté]]
[[it:Occhio di ragno fermentato]]
[[ja:発酵したクモの目]]
[[ko:발효된 거미 눈]]
[[nl:Gefermenteerd spinnenoog]]
[[pl:Sfermentowane oko pająka]]
[[pt:Olho de aranha fermentado]]
[[ru:Приготовленный паучий глаз]]
[[th:ตาแมงมุมดอง]]
[[uk:Оброблене павуче око]]
[[zh:发酵蛛眼]]</li><li>[[Bread|Bread]]<br/>{{dungeons hatnote|type=item}}
{{Item
| title = Bread
| image = Bread.png
| renewable = Yes
| heals = {{hunger|5}}
| stackable = Yes (64)
}}
'''Bread''' is a [[food]] [[item]] that can be eaten by the [[player]].
== Obtaining ==
=== Crafting ===
{{Crafting
|A2=Wheat
|B2=Wheat
|C2=Wheat
|Output=Bread
|type=Foodstuff
}}
=== Chest loot ===
{{LootChestItem|bread}}
=== Trading ===
Novice-level farmer [[Villager|villagers]] sell 6 bread for one [[emerald]] as part of their [[Trading|trades]]. {{IN|java}} they only have a 40% chance of offering this trade.
=== Villager gifts ===
Farmer villagers may use wheat they have harvested to craft bread, which they can trade with other villagers.
Farmer villagers may throw bread at players under the [[Hero of the Village]] effect.{{only|java}}
== Usage ==
=== Food ===
{{see also|Tutorials/Hunger management|title1= Hunger management}}
Bread can be eaten with the use control while it is selected in the [[hotbar]]. Eating bread restores {{hunger|5}} [[hunger]] and 6.0 [[Hunger#Mechanics|hunger saturation]].
=== Breeding ===
Villagers can pick up bread items to become willing, allowing them to breed. Villagers require 3 bread to become willing.
=== Composting ===
Placing bread into a [[composter]] has an 85% chance of raising the compost level by 1. It is more efficient to compost [[wheat]] than bread made from wheat.
== Sounds ==
{{Sound table/Entity/Food}}
== Data values ==
=== ID ===
{{edition|java}}:
{{ID table
|edition=java
|showforms=y
|generatetranslationkeys=y
|displayname=Bread
|spritetype=item
|nameid=bread
|form=item
|foot=1}}
{{edition|bedrock}}:
{{ID table
|edition=bedrock
|shownumericids=y
|showforms=y
|notshowbeitemforms=y
|generatetranslationkeys=y
|displayname=Bread
|spritetype=item
|nameid=bread
|id=261
|form=item
|foot=1}}
== Achievements ==
{{load achievements|Bake Bread}}
== Advancements ==
{{load advancements|Husbandry;A Balanced Diet}}
== History ==
{{History|java indev}}
{{History||20100206|[[File:Bread JE1 BE1.png|32px]] Bread has been added, which now restores {{hp|5}}.}}
{{History||20100223|Bread now requires 3 [[wheat]] (1 row of 3) instead of 6 (2 rows of 3) to be crafted.}}
{{History|java infdev}}
{{History||?|Bread is no longer stackable.}}
{{History||20100625-2|Bread can now be found in the new [[dungeon]] [[chest]]s.}}
{{History|java beta}}
{{History||1.8|snap=Pre-release|Bread is now stackable to 64.
|Bread now restores {{hunger|5}} instead of {{hp|5}}.
|[[Dungeon]] [[chests]] now contain more bread, now that it stacks.
|Bread can now be found in the new [[stronghold]] storerooms and [[mineshaft]] [[chest]]s.}}
{{History|java}}
{{History||1.0.0|snap=Beta 1.9 Prerelease 3|Bread can now be found in the new [[stronghold]] altar [[chest]]s.}}
{{History||1.1|snap=12w01a|Bread can now be found in the new [[village]] blacksmith chests.}}
{{History||1.3.1|snap=12w16a|Bread can now be found in the new [[bonus chest]]s.}}
{{History|||snap=12w21a|Farmer [[villager]]s now [[trading|sell]] 3–4 loaves of bread for 1 [[emerald]].}}
{{History||1.4.2|snap=12w37a|[[File:Bread JE2 BE2.png|32px]] The dark outline has now been removed from the bread texture.}}
{{History||1.6.1|snap=13w16a|Bread can now be used to feed [[horse]]s.}}
{{History||1.8|snap=14w02a|Farmer [[villager]]s now [[trading|sell]] 2–4 loaves of bread for 1 [[emerald]].}}
{{History|||snap=14w26c|[[Horse]]s no longer can eat bread.}}
{{History||1.9|snap=15w44a|The average yield of bread from [[mineshaft]] and [[dungeon]] [[chest]]s has now been decreased.}}
{{History||1.11|snap=16w39a|Bread can now found in the new [[woodland mansion]] chests.}}
{{History||1.13|snap=17w47a|Prior to [[1.13/Flattening|''The Flattening'']], this [[item]]'s numeral ID was 297.}}
{{History||1.14|snap=18w43a|[[File:Bread JE3 BE3.png|32px]] The texture of bread has now been changed.}}
{{History|||snap=18w48a|Bread can now generate inside chests in cartographer houses, tanneries and plains [[village]] houses.}}
{{History|||snap=18w49a|Bread can now generate inside chests in mason houses, and savanna and snowy [[village]] houses.}}
{{History|||snap=18w50a|Bread can now generate inside chests in village temples, toolsmith, and desert and taiga [[village]] houses.}}
{{History|||snap=19w03a|Placing bread into the new [[composter]] now has an 80% chance of raising the compost level by 1.}}
{{History|||snap=19w05a|Bread now has an 85% chance of increasing the compost level in a composter by 1.}}
{{History|||snap=19w13a|Farmer villagers now give bread to players under the [[Hero of the Village]] effect.}}
{{History|pocket alpha}}
{{History||v0.4.0|[[File:Bread JE1 BE1.png|32px]] Added bread.}}
{{History||v0.5.0|Bread now restores {{hp|5}} instead of {{hp|2}}.}}
{{History||v0.8.0|snap=build 1|[[File:Bread JE2 BE2.png|32px]] The dark outline has now been removed from the bread texture.}}
{{History||v0.12.1|snap=build 1|Bread now restores [[hunger]] instead of [[health]].}}
{{History||v0.14.0|snap=build 1|Bread can now be found inside [[minecart with chest]]s in [[mineshaft]]s.}}
{{History|pocket}}
{{History||1.0.4|snap=alpha 1.0.4.0|[[Villager]]s now require bread to become willing, in order to [[breeding|breed]].
|Farmer [[villager]]s now [[trading|sell]] 2-4 loaves of bread for 1 [[emerald]].}}
{{History||1.1.0|snap=alpha 1.1.0.0|Bread can now be found in [[woodland mansion]] [[chest]]s.}}
{{History|bedrock}}
{{History||1.2.0|snap=beta 1.2.0.2|Bread can now be found inside [[bonus chest]]s.}}
{{History||1.10.0|snap=beta 1.10.0.3|[[File:Bread JE3 BE3.png|32px]] The texture of bread has now been changed.
|Bread can now be found inside [[plains]] [[village]] houses [[chest]]s, plains tannery house chests, village cartographer house chests and plains weaponsmith chests.}}
{{History||1.11.0|snap=beta 1.11.0.1|Bread can now be found in village chests other than plains.
|Bread can now be used to fill up [[composter]]s.}}
{{History|||snap=beta 1.11.0.4|Farmer [[villager]]s now [[trading|sell]] 6 bread for one [[emerald]].}}
{{History|console}}
{{History||xbox=TU1|xbone=CU1|ps=1.0|wiiu=Patch 1|[[File:Bread JE1 BE1.png|32px]] Added bread.}}
{{History||xbox=TU5|Bread is now stackable to 64.
|Bread now restores [[hunger]] instead of [[health]].}}
{{History||xbox=TU12|[[File:Bread JE2 BE2.png|32px]] The dark outline has now been removed from the bread texture.}}
{{History||xbox=none|xbone=none|ps=1.90|wiiu=none|switch=none|[[File:Bread JE3 BE3.png|32px]] The texture of bread has now been changed.}}
{{History|new3DS}}
{{History||0.1.0|[[File:Bread JE2 BE2.png|32px]] Added bread.}}
{{History|foot}}
== Issues ==
{{issue list}}
== External Links ==
*[https://www.minecraft.net/en-us/article/taking-inventory--bread Taking Inventory: Bread] – Minecraft.net on February 25, 2021
{{Items}}
[[Category:Food]]
[[Category:Renewable resources]]
[[cs:Chléb]]
[[de:Brot]]
[[es:Pan]]
[[fr:Pain]]
[[hu:Kenyér]]
[[it:Pane]]
[[ja:パン]]
[[ko:빵]]
[[nl:Brood]]
[[pl:Chleb]]
[[pt:Pão]]
[[ru:Хлеб]]
[[th:ขนมปัง]]
[[uk:Хліб]]
[[zh:面包]]</li></ul> | Map types, map shapes, and map themes were added, all of which allowed the user to customize how a world would generate. | ||||
| infdev | |||||
| ? | Map types, shapes, and themes were removed. | ||||
| release | |||||
1.1{{Extension DPL}}<ul><li>[[Boots|Boots]]<br/>{{Item
| image = <gallery>
Leather Boots.png | Leather
Chainmail Boots.png | Chainmail
Iron Boots.png | Iron
Diamond Boots.png | Diamond
Golden Boots.png | Golden
Netherite Boots.png | Netherite
</gallery>
| durability =
* Leather: 65
* Chainmail: 195
* Iron: 195
* Golden: 91
* Diamond: 429
* Netherite: 481
| renewable =
* '''Netherite''': No
* '''All others''': Yes
| stackable = No
}}
'''Boots''' are a type of [[armor]] that covers the feet of the player. There are six types of boots: '''leather boots''', '''chainmail boots''', '''iron boots''', '''diamond boots''', '''gold boots''', and '''netherite boots'''.
== Obtaining ==
=== Crafting ===
{{crafting
|head=1
|showname=0
|showdescription=1
|name=[[Boots]]
|A2= Leather;Gold Ingot;Iron Ingot;Diamond
|C2= Leather;Gold Ingot;Iron Ingot;Diamond
|A3= Leather;Gold Ingot;Iron Ingot;Diamond
|C3= Leather;Gold Ingot;Iron Ingot;Diamond
|Output= Leather Boots;Golden Boots;Iron Boots;Diamond Boots
|type= Combat
}}
{{crafting
|foot=1
|ignoreusage=1
|name=[[Boots]]
|ingredients=Damaged Matching [[Boots]]
|Damaged Leather Boots; Damaged Golden Boots; Damaged Chainmail Boots; Damaged Iron Boots; Damaged Diamond Boots; Damaged Netherite Boots
|Damaged Leather Boots; Damaged Golden Boots; Damaged Chainmail Boots; Damaged Iron Boots; Damaged Diamond Boots; Damaged Netherite Boots
|Output= Leather Boots; Golden Boots; Chainmail Boots; Iron Boots; Diamond Boots; Netherite Boots
|description= The durability of the two boots is added together, plus an extra 5% durability.
|type= Combat
}}
=== Upgrading ===
{{Smithing
|head=1
|Netherite Upgrade
|Diamond Boots
|Netherite Ingot
|Netherite Boots
|description=
|tail=1
}}
=== Repairing ===
==== Grinding ====
{{Grinding
|showdescription=1
|ingredients=2x Damaged [[Leather Boots]] or<br>2x Damaged [[Chainmail Boots]] or<br>2x Damaged [[Iron Boots]] or<br>2x Damaged [[Golden Boots]] or<br>2x Damaged [[Diamond Boots]] or<br>2x Damaged [[Netherite Boots]]
|Damaged Leather Boots; Damaged Chainmail Boots; Damaged Iron Boots; Damaged Golden Boots; Damaged Diamond Boots; Damaged Netherite Boots
|Damaged Leather Boots; Damaged Chainmail Boots; Damaged Iron Boots; Damaged Golden Boots; Damaged Diamond Boots; Damaged Netherite Boots
|Leather Boots; Chainmail Boots; Iron Boots; Golden Boots; Diamond Boots; Netherite Boots
|description=The durability of the two boots are added together, plus an extra 5% durability.
}}
==== Anvil ====
Boots can be repaired in an [[Anvil mechanics#Unit repair|anvil]] by adding units of the [[armor material]]'s repair material, with each repair material restoring 25% of the boots' maximum durability, rounded down. Chainmail boots may also be repaired in this way using iron ingots.
They can also be [[Anvil mechanics#Combining items|combined]] with other boots. When doing this, the item's enchantments are not lost, and can even be raised.
==== Crafting ====
You can craft two sets of boots together using a crafting table, but enchantments are removed.
=== Mob loot ===
If a [[zombie]], [[husk]], [[stray]], [[piglin]], or [[skeleton]] is wearing armor, there is a 8.5% chance (9.5% with Looting I, 10.5% with Looting II and 11.5% with Looting III) for the mob to drop boots upon death. The boots are usually badly damaged, and may be enchanted.
[[File:Zombie With Boots.png|alt=Zombie is shown wearing boots|thumb|Zombie is shown wearing full iron armor set, including boots.]]
{{IN|bedrock}}, [[vindicator]]s and [[pillager]]s that spawn in [[raid]]s have a chance to drop iron boots, which are usually badly damaged and have a 50% chance to be enchanted.
=== Chest loot ===
{{LootChestItem|leather-boots,random-enchanted-leather-boots,chainmail-boots,iron-boots,level-enchanted-iron-boots,golden-boots,random-enchanted-golden-boots,soul-speed-enchanted-golden-boots,diamond-boots,damaged-diamond-boots,damaged-random-enchanted-diamond-boots,damaged-random-enchanted-diamond-boots-2,level-enchanted-diamond-boots}}
=== Trading ===
{{IN|java}}, novice-level armorer [[villager]]s have 40% chance to sell iron boots for 4 [[emerald]]s. Apprentice-level armorers have a 50% chance to sell chainmail boots for an [[emerald]]. Expert-level armorers always sell enchanted<ref group="note" name="enchantment" /> diamond boots for 11–27 [[emerald]]s. Apprentice-level leatherworker [[villager]]s have {{frac|2|3}} chance to sell leather boots for 4 [[emerald]]s.
Armorer [[villager]]s may give the players with the [[Hero of the Village]] effect chainmail boots.{{only|java}}
{{IN|bedrock}}, novice-level armorer villagers have a 25% chance to sell iron boots for 4 emeralds. Apprentice-level armorers have a {{frac|1|3}} chance to sell chainmail boots for an emerald. Expert-level armorers have a 50% chance to sell enchanted<ref group="note" name="enchantment">When creating an enchantment offer, the game uses a random enchantment level from 5 – 19. The enchantments are never treasure enchantments.</ref> diamond boots for 8 emeralds. Apprentice-level leatherworker villagers have a 50% chance to sell leather boots for 4 emeralds.
{{notelist}}
=== Bartering ===
[[Piglin]]s may [[bartering|barter]] iron boots with [[Soul Speed]] when given a [[gold ingot]].
=== Fishing ===
Leather boots can be caught as a "junk" item when [[fishing]].
== Usage ==
Boots can be placed in the fourth armor slot of a player's [[inventory]] for activation.
=== Defense points ===
Defense points are each signified by half of a chestplate in the armor bar above the health bar. Each defense point reduces any damage dealt to the player that is absorbed by armor by 4%, increasing additively with the number of defense points. Different materials and combinations of armor provide different levels of defense.
The following table shows the amount of defense points added by boots.
{| class="wikitable" data-description="Boots defense points"
|-
!scope="col" | Material
!scope="col" | Defense points
|-
!scope="row" | Leather
| rowspan="3" | {{armor|1}}
|-
!scope="row" | Golden
|-
!scope="row" | Chainmail
|-
!scope="row" | Iron
| {{armor|2}}
|-
!scope="row" | Diamond
| rowspan="2" | {{armor|3}}
|-
!scope="row" | Netherite
|}
=== Knockback resistance ===
Netherite boots provide 10% knockback resistance.
=== Durability ===
The following table shows the amount of damage each piece of armor can absorb before being destroyed.
Any "hit" from a damage source that can be blocked by armor removes one point of durability from each piece of armor worn for every {{hp|4}} of incoming damage (rounded down, but never below 1). Damage taken that armor doesn't protect (such as [[Damage#Fall damage|falling]] or [[Damage#Drowning|drowning]]) does not damage the armor, even if it is enchanted to protect against that type of damage. The following chart displays how many hits boots can endure.
Netherite armor is not damaged by [[lava]] or [[fire]] when worn.
{| class="wikitable" data-description="Boots durability"
|-
! Material
!Durability
|-
!scope="row" | Leather
| 65
|-
!scope="row" | Golden
| 91
|-
!scope="row" | Chainmail/Iron
| 195
|-
!scope="row" | Diamond
| 429
|-
!scope="row" | Netherite
| 481
|}
=== Enchantments ===
Boots can receive the following [[enchantment]]s:
{| class="wikitable"
|-
! Enchantment !! Max Level !! Notes
|-
| [[Fire Protection]] || IV || <ref group=note name=exclusive>Fire Protection, Blast Protection, Projectile Protection and Protection are mutually exclusive.</ref>
|-
| [[Projectile Protection]] || IV || <ref group=note name="exclusive"/>
|-
| [[Blast Protection]] || IV || <ref group=note name="exclusive"/>
|-
| [[Protection]] || IV || <ref group=note name="exclusive"/>
|-
| [[Feather Falling]] || IV ||
|-
| [[Unbreaking]] || III ||
|-
| [[Thorns]] || III || <ref group="note" name="anvil">Only from using an [[anvil]] and [[enchanted book]]s.</ref>
|-
| [[Depth Strider]] || III || <ref group=note name=exclusive2>Frost Walker and Depth Strider are mutually exclusive.</ref>
|-
| [[Soul Speed]] || III || <ref group=note name="anvil">Only from using an [[anvil]] and [[enchanted book]]s.</ref>
|-
| [[Frost Walker]] || II || <ref group=note name=exclusive2 /><ref group="note" name="anvil2">Only from using an [[anvil]] and [[enchanted book]]s, or by finding enchanted boots in an [[End city]] chest.</ref>
|-
| [[Mending]] || I || <ref group=note name="anvil2" />
|-
| [[Curse of Binding]] || I || <ref group="note" name="anvil2"/>
|-
| [[Curse of Vanishing]] || I || <ref group="note" name="anvil2"/>
|}
{{notelist}}
=== Smelting usage ===
{{Smelting|showname=1|Iron Boots;Chainmail Boots;Golden Boots|Iron Nugget;Iron Nugget;Gold Nugget|0,1}}
=== Piglins ===
{{EntityLink|Piglin|Piglins}} are attracted to ''golden'' boots and pick them up, examining them for 6 to 8 seconds. Other boots do not attract piglins but can be worn by them. They prefer stronger boots over weaker boots, with one major exception: They always prefer golden boots over all other boots, throwing out stronger boots to equip them. Enchanted boots are preferred over unenchanted boots.
=== Powder snow===
Leather boots can be used to safely cross [[powder snow]] without sinking in it. The block behaves similar to [[scaffolding]], allowing the player to sink in by pressing {{control|crouch}} and move up by pressing {{control|jump}}. The boots also prevent the wearer from taking freezing damage.
===Decoration===
It is possible to upgrade armor with trims. This requires a [[Smithing Template#Gallery|Smithing Template]], an armor piece, and an ingot or crystal ({{ItemSprite|iron-ingot}}iron ingot/{{ItemSprite|copper-ingot}}copper ingot/{{ItemSprite|gold-ingot}}gold ingot/{{ItemSprite|netherite-ingot}}netherite ingot/{{ItemSprite|emerald}}emerald/{{ItemSprite|redstone-dust}}redstone dust/{{ItemSprite|lapis-lazuli}}lapis lazuli/{{ItemSprite|amethyst-shard}}amethyst shard/{{ItemSprite|nether-quartz}}nether quartz/{{ItemSprite|diamond}}diamond).
These trims have no effect on the gameplay or strength of the armor.
{{Smithing|Any Armor Trim Smithing Template|Netherite Boots|Amethyst Shard; Copper Ingot; Diamond; Emerald; Gold Ingot; Iron Ingot; Lapis Lazuli; Netherite Ingot; Nether Quartz; Redstone Dust|Amethyst Trim Netherite Boots; Copper Trim Netherite Boots; Diamond Trim Netherite Boots; Emerald Trim Netherite Boots; Gold Trim Netherite Boots; Iron Trim Netherite Boots; Lapis Trim Netherite Boots; Netherite Trim Netherite Boots; Quartz Trim Netherite Boots; Redstone Trim Netherite Boots|head=1|tail=1|ingredients=Any Armor Trim +<br>Any Armor Piece +<br>Any Ingot/Crystal|showdescription=1|description=}}
==Sounds==
{{el|je}}:
{{Sound table
|sound=Equip leather1.ogg
|sound2=Equip leather2.ogg
|sound3=Equip leather3.ogg
|sound4=Equip leather4.ogg
|sound5=Equip leather5.ogg
|sound6=Equip leather6.ogg
|subtitle=Leather armor rustles
|source=player
|description=When leather boots are equipped
|id=item.armor.equip_leather
|translationkey=subtitles.item.armor.equip_leather
|volume=1.0
|pitch=1.0
|distance=16}}
{{Sound table
|sound=Equip chain1.ogg
|sound2=Equip chain2.ogg
|sound3=Equip chain3.ogg
|sound4=Equip chain4.ogg
|sound5=Equip chain5.ogg
|sound6=Equip chain6.ogg
|subtitle=Chain armor jingles
|source=player
|description=When chainmail boots are equipped
|id=item.armor.equip_chain
|translationkey=subtitles.item.armor.equip_chain
|volume=1.0
|pitch=1.0
|distance=16}}
{{Sound table
|sound=Equip iron1.ogg
|sound2=Equip iron2.ogg
|sound3=Equip iron3.ogg
|sound4=Equip iron4.ogg
|sound5=Equip iron5.ogg
|sound6=Equip iron6.ogg
|subtitle=Iron armor clanks
|source=player
|description=When iron boots are equipped
|id=item.armor.equip_iron
|translationkey=subtitles.item.armor.equip_iron
|volume=1.0
|pitch=1.0
|distance=16}}
{{Sound table
|sound=Equip gold1.ogg
|sound2=Equip gold2.ogg
|sound3=Equip gold3.ogg
|sound4=Equip gold4.ogg
|sound5=Equip gold5.ogg
|sound6=Equip gold6.ogg
|subtitle=Gold armor clinks
|source=player
|description=When gold boots are equipped
|id=item.armor.equip_gold
|translationkey=subtitles.item.armor.equip_gold
|volume=1.0
|pitch=1.0
|distance=16}}
{{Sound table
|sound=Equip diamond1.ogg
|sound2=Equip diamond2.ogg
|sound3=Equip diamond3.ogg
|sound4=Equip diamond4.ogg
|sound5=Equip diamond5.ogg
|sound6=Equip diamond6.ogg
|subtitle=Diamond armor clangs
|source=player
|description=When diamond boots are equipped
|id=item.armor.equip_diamond
|translationkey=subtitles.item.armor.equip_diamond
|volume=1.0
|pitch=1.0
|distance=16}}
{{Sound table
|sound=Equip netherite1.ogg
|sound2=Equip netherite2.ogg
|sound3=Equip netherite3.ogg
|sound4=Equip netherite4.ogg
|subtitle=Netherite armor clanks
|source=player
|description=When netherite boots are equipped
|id=item.armor.equip_netherite
|translationkey=subtitles.item.armor.equip_netherite
|volume=0.8
|pitch=1.0/0.9
|distance=16}}
{{Sound table
|sound=Random break.ogg
|subtitle=Item breaks
|source=dependent
|description=When a pair of boots' durability is exhausted
|id=entity.item.break
|translationkey=subtitles.entity.item.break
|volume=0.8
|pitch=0.8-1.2
|distance=16
|foot=1}}
{{el|be}}:
{{Sound table
|type=bedrock
|sound=Equip leather1.ogg
|sound2=Equip leather2.ogg
|sound3=Equip leather3.ogg
|sound4=Equip leather4.ogg
|sound5=Equip leather5.ogg
|sound6=Equip leather6.ogg
|source=player
|description=When leather boots are equipped
|id=armor.equip_leather
|volume=1.0
|pitch=1.0}}
{{Sound table
|sound=Equip chain1.ogg
|sound2=Equip chain2.ogg
|sound3=Equip chain3.ogg
|sound4=Equip chain4.ogg
|sound5=Equip chain5.ogg
|sound6=Equip chain6.ogg
|source=player
|description=When chain boots are equipped
|id=armor.equip_chain
|volume=1.0
|pitch=1.0}}
{{Sound table
|sound=Equip iron1.ogg
|sound2=Equip iron2.ogg
|sound3=Equip iron3.ogg
|sound4=Equip iron4.ogg
|sound5=Equip iron5.ogg
|sound6=Equip iron6.ogg
|source=player
|description=When iron boots are equipped
|id=armor.equip_iron
|volume=1.0
|pitch=1.0}}
{{Sound table
|sound=Equip gold1.ogg
|sound2=Equip gold2.ogg
|sound3=Equip gold3.ogg
|sound4=Equip gold4.ogg
|sound5=Equip gold5.ogg
|sound6=Equip gold6.ogg
|source=player
|description=When gold boots are equipped
|id=armor.equip_gold
|volume=1.0
|pitch=1.0}}
{{Sound table
|sound=Equip diamond1.ogg
|sound2=Equip diamond2.ogg
|sound3=Equip diamond3.ogg
|sound4=Equip diamond4.ogg
|sound5=Equip diamond5.ogg
|sound6=Equip diamond6.ogg
|source=player
|description=When diamond boots are equipped
|id=armor.equip_diamond
|volume=1.0
|pitch=1.0}}
{{Sound table
|sound=Equip netherite1.ogg
|sound2=Equip netherite2.ogg
|sound3=Equip netherite3.ogg
|sound4=Equip netherite4.ogg
|source=player
|description=When netherite boots are equipped.
|id=armor.equip_netherite
|volume=1.0
|pitch=1.0}}
{{Sound table
|rowspan=2
|sound=Water Splash Old.ogg
|source=block
|description=When leather boots are dyed using a cauldron
|id=cauldron.dyearmor
|volume=0.1
|pitch=1.0}}
{{Sound table
|source=block
|description=When leather boots' dye is removed using a cauldron
|id=cauldron.cleanarmor
|volume=0.1
|pitch=1.0}}
{{Sound table
|sound=Random break.ogg
|source=player
|description=When a pair of boots' durability is exhausted
|id=random.break
|volume=1.0
|pitch=0.9
|foot=1}}
==Data values==
===ID===
{{edition|java}}:
{{ID table
|edition=java
|showitemtags=y
|showforms=y
|generatetranslationkeys=y
|displayname=Leather Boots
|spritetype=item
|nameid=leather_boots
|itemtags=freeze_immune_wearables
|form=item}}
{{ID table
|displayname=Chainmail Boots
|spritetype=item
|nameid=chainmail_boots
|form=item}}
{{ID table
|displayname=Iron Boots
|spritetype=item
|nameid=iron_boots
|form=item}}
{{ID table
|displayname=Diamond Boots
|spritetype=item
|nameid=diamond_boots
|form=item}}
{{ID table
|displayname=Golden Boots
|spritetype=item
|nameid=golden_boots
|form=item}}
{{ID table
|displayname=Netherite Boots
|spritetype=item
|nameid=netherite_boots
|form=item
|foot=1}}
{{edition|bedrock}}:
{{ID table
|edition=bedrock
|shownumericids=y
|showforms=y
|notshowbeitemforms=y
|generatetranslationkeys=y
|displayname=Leather Boots
|spritetype=item
|nameid=leather_boots
|id=338
|form=item}}
{{ID table
|displayname=Chainmail Boots
|spritetype=item
|nameid=chainmail_boots
|id=342
|form=item}}
{{ID table
|displayname=Iron Boots
|spritetype=item
|nameid=iron_boots
|id=346
|form=item}}
{{ID table
|displayname=Diamond Boots
|spritetype=item
|nameid=diamond_boots
|id=350
|form=item}}
{{ID table
|displayname=Golden Boots
|spritetype=item
|nameid=golden_boots
|id=354
|form=item}}
{{ID table
|displayname=Netherite Boots
|spritetype=item
|nameid=netherite_boots
|id=612
|form=item
|foot=1}}
=== Item data===
When leather boots are dyed, it has the following NBT:
<div class="treeview">
*{{nbt|compound|tag}}: Parent tag.
**{{nbt|compound|display}}: Display properties.
***{{nbt|int|color}}: The color of the leather armor. The tooltip displays "Dyed" if advanced tooltips are disabled, otherwise it displays the hexadecimal color value. Color codes are calculated from the Red, Green and Blue components using this formula:<br>'''<span style="color:red">Red</span>[[wikipedia:Logical shift|<<]]16 + <span style="color:green">Green</span><<8 + <span style="color:blue">Blue</span>'''<ref>For positive values larger than 0x00FFFFFF, the top byte is ignored. All negative values produce white.</ref>
</div>
==Achievements==
{{load achievements|Iron Man;Tie Dye Outfit;Let It Go!;Cover me in debris;Oooh, shiny!}}
==Advancements==
{{load advancements|Suit Up;Cover me With Diamonds;Oh Shiny;Cover Me in Debris;Light as a Rabbit}}
==History==
{{History|java indev}}
{{History||0.31|snap=20091231-2|[[File:Studded Boots (item) JE1.png|32px]] [[History of textures/Unused textures#Studded armor|Studded boots]] are now capable of being seen in the [[inventory]]. This was taken directly from one of [[Notch|Notch's]] game's ''[[Legend of the Chambered 2]]''.{{more info|When were they removed?}}}}
{{History||February 9, 2010|link=wordofnotch:380486636|[[File:Notch revealed armor.png|32px]] [[Notch]] revealed new models for armor, which included boots.}}
{{History||20100218|[[File:Leather Boots JE1.png|32px]] [[File:Chainmail Boots JE1 BE1.png|32px]] [[File:Iron Boots JE1 BE1.png|32px]] [[File:Golden Boots JE1 BE1.png|32px]] [[File:Diamond Boots JE1 BE1.png|32px]]<br>[[File:Leather Boots (item) JE1 BE1.png|32px]] [[File:Chainmail Boots (item) JE1 BE1.png|32px]] [[File:Iron Boots (item) JE1 BE1.png|32px]] [[File:Golden Boots (item) JE1 BE1.png|32px]] [[File:Diamond Boots (item) JE1 BE1.png|32px]] Added cloth, chain, iron, gold, and diamond boots{{verify|edition=java|type=change|Below, it says "wool armor" was renamed to leather, which name is incorrect, wool or cloth? Also, was it "gold" or "golden"?}}
|Boots can now be [[crafting|crafted]] and worn.
|Boots now function, giving {{Armor|3}}. Boots have limited [[item durability|durability]], with lower tier boots less durable than higher tier boots.}}
{{History|java alpha}}
{{History||v1.0.8|"Wool boots" have been renamed to "leather boots", despite item names not existing at this time.
|Leather boots are now [[crafting|crafted]] with [[leather]] instead of [[wool]].}}
{{History|java}}
{{History||1.0.0|snap=Beta 1.9 Prerelease|The armor protection behavior has been changed. Previous to this update, the total armor protection is based in this equation: (((''total equipped armor damage reduction'' − 1) × (''all equipped armor max damage'' − ''total equipped armor damage'')) ÷ (''total equipped armor max damage'' + 1)).}}
{{History|||snap=October 3, 2011|slink={{tweet|notch|120859830339637249}}|The first images of a [[player]] wearing enchanted armor, including boots, are revealed.}}
{{History|||snap=Beta 1.9 Prerelease 3|Iron boots can now be found in the new [[stronghold]] altar [[chest]]s.}}
{{History|||snap=Beta 1.9 Prerelease 4|Boots can now be [[enchanting|enchanted]].}}
{{History||1.1|snap=12w01a|Iron boots can now be found in the new blacksmith [[chest]]s in [[village]]s.}}
{{History||1.2.1|snap=1.2|Changed "Golden boots" to "Golden Boots".}}
{{History||1.3.1|snap=12w15a|{{key|Shift}}+clicking can now be used to equip boots.}}
{{History|||snap=12w21a|Chain boots can now be obtained legitimately in [[survival]] mode through [[trading]].
|Blacksmith [[villager]]s now [[trading|sell]] chain boots for 5–6 [[emerald]]s.
|Blacksmith villagers now sell diamond boots for 7 emeralds.
|Blacksmith villagers now sell iron boots for 4–5 emeralds.
|Butcher villagers now sell leather boots for 2-3 emeralds.}}
{{History||1.4.2|snap=12w32a|[[Mob]] armor has been reintroduced. A partial or full set of any armor is now sometimes worn by [[zombie]]s, [[skeleton]]s and [[zombie pigman|zombie pigmen]], with the likelihood increasing with difficulty.}}
{{History|||snap=August 17, 2012|slink={{tweet|Dinnerbone|236445090929844225}}|[[Jeb]] and [[Dinnerbone]] tweeted pictures of [[dye]]able leather armor, including boots.{{citation needed|Link to Jeb's tweet?}}}}
{{History|||snap=12w34a|Leather boots can now be dyed by [[crafting]] leather boots with [[dye]]s. Dyes can be removed by {{control|use|text=using}} dyed leather boots on a [[cauldron]] with [[water]].
|[[File:Leather Boots JE2 BE1.png|32px]] [[File:Leather Boots (item) JE2.png|32px]] Default leather boots are now slightly darker.}}
{{History|||snap=12w36a|[[Dye]]d leather boots are now more saturated and have a slight tint of tan in respect to the default armor color.
|[[Wither skeleton]]s can now spawn wearing boots.}}
{{History|||snap=12w37a|[[File:Leather Boots (item) JE3 BE2.png|32px]] Leather boots now have non-dyed parts. This has been implemented so that [[player]]s can distinguish between other types of armor and similarly colored leather armor.}}
{{History||1.5|snap=13w04a|Boots in the [[player]]'s hand can now be equipped by right-clicking.
|[[Dispenser]]s can now equip nearby players with boots.}}
{{History||1.7.2|snap=13w36a|Leather boots can now be obtained as one of the "junk" items through [[fishing]].}}
{{History||1.8|snap=14w02a|Armorer [[villager]]s now [[trading|sell]] chain boots for 5–7 [[emerald]]s.
|Armorer villagers no longer sell diamond boots.
|Armorer villagers no longer sell iron boots.
|Leatherworker villagers no longer sell leather boots.}}
{{History|||snap=14w05a|Boots no longer turn red when [[mob]]s and [[player]]s are hurt.}}
{{History|||snap=14w06a|Boots are now visible on [[giant]]s.}}
{{History|||snap=14w25a|Chain boots [[Java Edition removed features#Chain armor|can no longer be crafted anymore]] due to the [[item]] form of [[fire]] being [[Java Edition removed features#Obtainable until 1.8|removed]].}}
{{History||1.9|snap=15w31a|Enchanted iron and diamond boots can now be found in [[end city]] ship [[chest]]s.
|[[Mob]]s now wear armor from the bottom to the top, rather than from the top to the bottom. This means that a mob with three armor pieces, for example, spawn with all armor except a helmet.}}
{{History|||snap=15w34b|Boots' [[item durability|durability]] now affects armor value.}}
{{History|||snap=15w36a|Armor value and[[enchanting|enchantment]] calculations have been changed. For the original values, see [[Armor/Before 1.9|here]].}}
{{History|||snap=15w36d|Boots' durability affecting value has been removed.
|Boots now have an attribute controlling the defense points.}}
{{History|||snap=15w50a|Added {{cd|equip}} [[sound]]s for boots.}}
{{History|||snap=16w02a|Armor value and enchantment calculations have been changed again.}}
{{History|||snap=16w05a|Armor value calculations have been changed, once again.}}
{{History||1.11.1|snap=16w50a|Golden, chain and iron boots can now be [[smelting|smelted]] down into one of their respective [[nugget]]s. Chain boots smelt into iron nuggets.}}
{{History||1.13|snap=17w47a|Prior to [[1.13/Flattening|''The Flattening'']], these [[item]]s' numeral IDs were 298 through 317.{{more info|Specific values for boots}}}}
{{History|||snap=18w11a|Enchanted leather boots can now generate in the chests of [[shipwreck]]s.}}
{{History|||snap=18w20a|Chain armor boots have been renamed to "chainmail".}}
{{History||1.14|snap=18w43a|[[File:Leather Boots JE3 BE2.png|32px]] [[File:Chainmail Boots JE2 BE2.png|32px]] [[File:Iron Boots JE2 BE2.png|32px]] [[File:Golden Boots JE2 BE2.png|32px]] [[File:Diamond Boots JE2 BE2.png|32px]]<br>[[File:Leather Boots (item) JE4 BE3.png|32px]] [[File:Chainmail Boots (item) JE2 BE2.png|32px]] [[File:Iron Boots (item) JE2 BE2.png|32px]] [[File:Golden Boots (item) JE2 BE2.png|32px]] [[File:Diamond Boots (item) JE2 BE2.png|32px]] The textures of leather, chainmail, iron, golden, and diamond boots have been changed.}}
{{History|||snap=18w48a|Leather boots can now be found in [[chest]]s in [[village]] tanneries.}}
{{History|||snap=19w08a|[[File:Golden Boots (item) JE3 BE3.png|32px]] The textures of gold boots [[item]]s have been changed.}}
{{History|||snap=19w11a|Armorer villagers now sell iron and enchanted diamond boots, making diamond boots effectively [[renewable resource|renewable]] again.
|Leatherworker villagers now sell randomly [[dye]]d leather boots.}}
{{History|||snap=19w13a|Armorer villagers now give chainmail boots to players under the [[Hero of the Village]] effect.}}
{{History||1.16|snap=20w06a|[[File:Netherite Boots JE1.png|32px]] [[File:Netherite Boots (item) JE1.png|32px]] Added netherite boots.
|Netherite boots are obtained by combining diamond boots and one netherite ingot in a crafting table.}}
{{History|||snap=20w09a|[[File:Diamond Boots (item) JE3 BE3.png|32px]] The texture of diamond boots [[item]]s has been changed.}}
{{History|||snap=20w10a|[[File:Netherite Boots JE2 BE1.png|32px]] [[File:Netherite Boots (item) JE2.png|32px]] The texture of netherite boots has been changed.
|Netherite boots can no longer be crafted.
|Netherite boots are now obtained by combining diamond boots and one netherite ingot in a smithing table.}}
{{History|||snap=20w16a|Netherite boots now generate randomly enchanted in [[bastion remnants]] chests.
|Golden boots now generate randomly enchanted in [[ruined portal]] chests.}}
{{History|||snap=20w17a|Diamonds boots now generate in place of netherite boots in bastion remnant chests.}}
{{History||1.17|snap=20w46a|Leather boots can now be used to safely walk on [[powder snow]].|Leather armor now protects against [[powder snow]]'s freezing.}}
{{History|||snap=21w13a|Leather Boots now prevent fall damage when landing on [[powder snow]].}}
{{History||1.18.2|snap=22w03a|Netherite boots knockback resistance is no longer random.}}
{{History||1.19|snap=Deep Dark Experimental Snapshot 1|Added the [[Swift Sneak]] enchantment, which can only be applied to boots.}}
{{History|||snap=22w12a|The [[Swift Sneak]] enchantment can no longer applied to boots.}}
{{History||1.20<br>(Experimental)|link=1.19.4|snap=23w04a|Non-leather boots can now be trimmed using a [[smithing table]].
|There are 10 types of material that determine the color of the trim:
*Iron
*Copper
*Gold
*Lapis
*Emerald
*Diamond
*Netherite
*Redstone
*Amethyst
*Quartz
|Upgrading diamond boots to netherite boots now requires the netherite upgrade [[smithing template]].}}
{{History|||snap=23w05a|Leather boots can now be trimmed using a smithing table.|Boots can now have trims of the same material it is made out of.}}
{{History|||snap=23w06a|Swapped {{cd|iron}} and {{cd|iron_darker}} palette, then made {{cd|iron_darker}} darker overall.}}
{{History||1.19.4|snap=23w05a|Boots can now be swapped by {{ctrl|using}} them in the hotbar.<ref>{{bug|MC-216270|||Fixed}}</ref>}}
{{History||?|Boots can now be swapped in [[armor stand]]s by {{ctrl|using}} them in the armor stand's slot.}}
{{History||1.20|snap=23w12a|The pattern textures of dune and sentry armor trims are changed.|
Those previous patterns were left with different names: dune was renamed sentry and sentry was renamed shaper.}}
{{History|pocket alpha}}
{{History||v0.6.0|[[File:Leather Boots JE1 BE1.png|32px]] [[File:Chainmail Boots JE1 BE1.png|32px]] [[File:Iron Boots JE1 BE1.png|32px]] [[File:Golden Boots JE1 BE1.png|32px]] [[File:Diamond Boots JE1 BE1.png|32px]]<br> [[File:Leather Boots (item) JE1 BE1.png|32px]] [[File:Chainmail Boots (item) JE1 BE1.png|32px]] [[File:Iron Boots (item) JE1 BE1.png|32px]] [[File:Golden Boots (item) JE1 BE1.png|32px]] [[File:Diamond Boots (item) JE1 BE1.png|32px]] Added boots.}}
{{History||v0.8.0|snap=build 2|{{InvSprite|Leather Boots}} The leather boots sprites have been changed to that of the [[Java Edition|PC]] version, but its armor [[model]] remains that of older versions.}}
{{History||v0.9.0|snap=build 1|Iron boots now naturally generates in [[village]] [[chest]]s and a [[stronghold]] altar chest.}}
{{History||v0.12.1|snap=build 1|Chainmail boots can now be obtained in [[survival]] mode from a mob wearing it.
|Leather boots can now be obtained from [[fishing]] as a "junk" [[item]].}}
{{History||v0.14.0|snap=build 1|[[File:Leather Boots JE2 BE2.png|32px]] Leather boots can now be dyed and the model has been updated.}}
{{History|pocket}}
{{History||1.0.0|snap=alpha 0.17.0.1|[[Enchanting|Enchanted]] iron boots and enchanted diamond boots can now be found inside [[chest]]s within [[end city]].}}
{{History||1.0.4|snap=alpha 1.0.4.0|Chainmail boots are now [[trading|sold]] by armorer smith [[villager]]s via [[trading]].}}
{{History||1.1.0|snap=alpha 1.1.0.0|Golden, chain and iron boots can now be [[smelting|smelted]] down into one of their respective [[nugget]]s.}}
{{History|bedrock}}
{{History||1.4.0|snap=beta 1.2.14.2|Chainmail boots now generate in [[buried treasure]] chests.
|Enchanted leather boots can now be found inside [[shipwreck]] supply room [[chest]]s.}}
{{History||1.10.0|snap=beta 1.10.0.3|Iron boots now can be found in plains [[village]] weaponsmith [[chest]]s.
|Leather boots can now be found inside plains village tannery chests.
|[[File:Leather Boots JE3 BE2.png|32px]] [[File:Iron Boots JE2 BE2.png|32px]] [[File:Golden Boots JE2 BE2.png|32px]] [[File:Diamond Boots JE2 BE2.png|32px]]<br> [[File:Leather Boots (item) JE4 BE3.png|32px]] [[File:Iron Boots (item) JE2 BE2.png|32px]] [[File:Golden Boots (item) JE2 BE2.png|32px]] [[File:Diamond Boots (item) JE2 BE2.png|32px]] The textures of boots have been changed.{{more info|Did chain boots not change?}}}}
{{History||1.11.0|snap=beta 1.11.0.1|Iron boots now can be found in [[savanna]], [[taiga]], [[desert]], [[snowy taiga]] and [[snowy tundra]] [[village]] weaponsmith [[chest]]s.
|Leather boots can now be found inside savanna, taiga, desert, snowy taiga and snowy tundra village tannery chests.}}
{{History|||snap=beta 1.11.0.4|[[Pillager]]s and [[vindicator]]s that spawn in [[raid]]s can now drop iron boots.
|Iron and diamond boots are now sold by armorer villagers.}}
{{History||1.11.0|snap=beta 1.11.0.5|[[File:Golden Boots (item) JE3 BE3.png|32px]] The textures of golden boots [[item]]s have been changed.}}
{{History||1.12.0|snap=beta 1.12.0.2|[[File:Armor Stand with Leather Armor MCPE-44669.png|32px]] Leather boots no longer show as being [[dye]]d properly when worn by [[armor stand]]s.}}
{{History||1.13.0|snap=beta 1.13.0.1|Leather boots now appear dyed properly when worn by armor stands.}}
{{History||1.16.0|snap=beta 1.16.0.51|[[File:Netherite Boots JE2 BE1.png|32px]] [[File:Netherite Boots (item) BE1.png|32px]] Added netherite boots.|Netherite boots are obtained by combining diamond boots and one netherite ingot in a crafting table.
|[[File:Diamond Boots (item) JE3 BE3.png|32px]] The texture of diamond boots [[item]]s have been changed.}}
{{History|||snap=beta 1.16.0.57|Iron boots with soul speed enchantment can be obtained from bartering with piglin.
|Netherite boots can no longer be crafted.
|Netherite boots are now obtained by combining diamond boots and one netherite ingot in a smithing table.
|Golden boots can now be found in [[ruined portal]] chest.
|Golden and netherite boots can be found in [[bastion remnant]] chest.}}
{{History|||snap=beta 1.16.0.63|Diamonds boots now generate in place of netherite boots in bastion remnant chests.}}
{{History||1.16.200|snap=beta 1.16.200.52|Leather boots can now be used to safely walk on [[powder snow]].}}
{{History||1.17.10|snap=beta 1.17.10.20|[[File:Netherite Boots (item) JE2.png|32px]] The texture of netherite boots item has been changed to match ''Java Edition''.}}
{{History|console}}
{{History||xbox=TU1|xbone=CU1|ps=1.0|wiiu=Patch 1|switch=1.0.1|[[File:Leather Boots JE2 BE1.png|32px]] [[File:Leather Boots (item) JE1 BE1.png|32px]] Added leather boots.
|[[File:Iron Boots JE1 BE1.png|32px]] [[File:Iron Boots (item) JE1 BE1.png|32px]] Added iron boots.
|[[File:Golden Boots JE1 BE1.png|32px]] [[File:Golden Boots (item) JE1 BE1.png|32px]] Added golden boots.
|[[File:Diamond Boots JE1 BE1.png|32px]] [[File:Diamond Boots (item) JE1 BE1.png|32px]] Added diamond boots.}}
{{History||xbox=TU5|[[File:Chainmail Boots JE1 BE1.png|32px]] [[File:Chainmail Boots (item) JE1 BE1.png|32px]] Added chain boots.
|Added a quick equip for boots to the [[inventory]] interface.}}
{{History||xbox=TU12|ps=1.03|[[File:Leather Boots (item) JE3 BE2.png|32px]] The textures for leather boots [[item]]s have been changed.}}
{{History||xbox=TU14|ps=1.05|Leather boots can now be [[dye]]d.
|[[Item repair]] can now repair boots.}}
{{History||xbox=TU25|xbone=CU13|ps=1.16|Boots now have the quick equip functionality.}}
{{History||xbox=TU53|xbone=CU43|ps=1.49|wiiu=Patch 23|switch=1.0.3|Golden, chain and iron boots can now be [[smelting|smelted]] down into one of their respective [[nugget]]s. Chain boots smelt into iron nuggets.}}
{{History|PS4}}
{{History||1.90|[[File:Leather Boots JE3 BE2.png|32px]] [[File:Leather Boots (item) JE4 BE3.png|32px]] The textures of leather boots have been changed.
|[[File:Chainmail Boots JE2 BE2.png|32px]] [[File:Chainmail Boots (item) JE2 BE2.png|32px]] The textures of chainmail boots have been changed.
|[[File:Iron Boots JE2 BE2.png|32px]] [[File:Iron Boots (item) JE2 BE2.png|32px]] The textures of iron boots have been changed.
|[[File:Golden Boots JE2 BE2.png|32px]] [[File:Golden Boots (item) JE3 BE3.png|32px]] The textures of gold boots have been changed.
|[[File:Diamond Boots JE2 BE2.png|32px]] [[File:Diamond Boots (item) JE2 BE2.png|32px]] The textures of diamond boots have been changed.}}
{{History|new 3ds}}
{{History||0.1.0|[[File:Leather Boots JE2 BE1.png|32px]] [[File:Leather Boots (item) JE3 BE2.png|32px]] Added leather boots.
|[[File:Chainmail Boots JE1 BE1.png|32px]] [[File:Chainmail Boots (item) JE1 BE1.png|32px]] Added chain boots.
|[[File:Iron Boots JE1 BE1.png|32px]] [[File:Iron Boots (item) JE1 BE1.png|32px]] Added iron boots.
|[[File:Golden Boots JE1 BE1.png|32px]] [[File:Golden Boots (item) JE1 BE1.png|32px]] Added golden boots.
|[[File:Diamond Boots JE1 BE1.png|32px]] [[File:Diamond Boots (item) JE1 BE1.png|32px]] Added diamond boots.}}
{{History|foot}}
==Issues ==
{{issue list}}
==Trivia==
*Netherite boots are shorter in their item texture but are longer in their texture when being worn
*Leather armor originally used textures from one of [[Notch]]'s previous games, ''[[Legend of the Chambered]]''.
*Leather boots are the only piece of leather armor that has the same name as other armor materials.
*The netherite boots are the only type of boots to have a differently shaped item sprite when compared to the other boot types.
*Chainmail boots are the only boots that have transparent pixels in their texture currently
==Gallery==
===Enchanted Boots===
<gallery>
File:Enchanted Leather Boots (item).gif
File:Enchanted Chainmail Boots (item).gif
File:Enchanted Iron Boots (item).gif
File:Enchanted Golden Boots (item).gif
File:Enchanted Diamond Boots (item).gif
File:Enchanted Netherite Boots (item).gif
</gallery>
<gallery>
File:Enchanted Leather Boots.gif
File:Enchanted Chainmail Boots.gif
File:Enchanted Iron Boots.gif
File:Enchanted Golden Boots.gif
File:Enchanted Diamond Boots.gif
File:Enchanted Netherite Boots.gif
</gallery>
==References==
{{reflist}}
==External Links==
*[https://www.minecraft.net/en-us/article/taking-inventory--boots Taking Inventory: Boots] – Minecraft.net on November 24, 2019
{{Items}}
[[Category:Armor]]
[[ja:ブーツ]]
[[ko:부츠]]
[[pl:Buty]]
[[pt:Botas]]
[[th:รองเท้า]]
[[zh:靴子]]</li><li>[[Bowl|Bowl]]<br/>{{Item
| image = Bowl.png
| renewable = Yes
| stackable = Yes (64)
}}
'''Bowls''' are containers that can hold certain [[food]]s.
== Obtaining ==
=== Crafting ===
{{Crafting
|A2= Any Planks
|C2= Any Planks
|B3= Any Planks
|Output= Bowl,4
|type= Material
}}
=== Fishing ===
Bowls can be obtained as a "junk" item while [[fishing]].
=== Eating ===
A bowl containing food becomes an empty bowl when the food is eaten.
=== Mob loot ===
When a [[turtle]] is killed by a [[Thunderstorm#Lightning|lightning bolt]], it drops 1 bowl.<ref name=BowlReport>{{Cite bug|MC|125562|Turtles drop bowls when killed by lightning|date=February 16, 2018}}</ref><ref>{{Cite bug|MCPE|57038| Turtles killed by lightning drop Bowls.|date=November 17, 2019}}</ref>
== Usage ==
=== Crafting ingredient ===
{{crafting usage}}
=== Mooshrooms ===
{{control|use|text=Using}} a bowl on a [[mooshroom]] turns the bowl into [[mushroom stew]] or [[suspicious stew]]. The stew can then be consumed immediately and the process repeated, making this an excellent way to quickly restore depleted [[hunger]] and [[saturation]] with almost no cost or effort.
=== Fuel ===
Bowls can be used as a fuel in [[furnace]]s, smelting 0.5 items per bowl {{in|je}}, and 1 item per bowl {{in|be}}.
== Data values ==
=== ID ===
{{edition|java}}:
{{ID table
|edition=java
|showforms=y
|generatetranslationkeys=y
|displayname=Bowl
|spritetype=item
|nameid=bowl
|form=item
|foot=1}}
{{edition|bedrock}}:
{{ID table
|edition=bedrock
|shownumericids=y
|showforms=y
|notshowbeitemforms=y
|generatetranslationkeys=y
|displayname=Bowl
|spritetype=item
|nameid=bowl
|id=321
|form=item
|foot=1}}
== History ==
{{History|java indev}}
{{History||0.31|snap=20100130|[[File:Bowl JE1 BE1.png|32px]] Added bowls.
|Bowls are used to craft [[mushroom soup]].}}
{{History|java}}
{{History||1.0.0|snap=Beta 1.9 Prerelease|Added [[mooshroom]]s, which can be {{control|use|text=milked}} with a bowl.}}
{{History||1.2.4|snap=release|[[Spruce planks]], [[birch planks]], and [[jungle planks]] can now be used to craft bowls.}}
{{History||1.7.2|snap=13w36a|Bowls can now be obtained as one of the "junk" [[item]]s by [[fishing]].}}
{{History|||snap=1.7.1|[[Acacia planks]] and [[dark oak planks]] can now be used to craft bowls.}}
{{History||1.8|snap=14w27a|Bowls are now used to craft [[rabbit stew]].}}
{{History||1.9|snap=15w31a|Bowls are now used to craft [[beetroot soup]].}}
{{History||1.11|snap=16w33a|Bowls can now be used to fuel [[furnace]]s.}}
{{History||1.13|snap=17w47a|Prior to [[1.13/Flattening|''The Flattening'']], this [[item]]'s numeral ID was 281.}}
{{History|||snap=18w07a|[[Turtles]] drop 0 to 1 bowls if killed by [[lightning]].<ref name=BowlReport/>}}
{{History||1.14|snap=18w43a|[[File:Bowl JE2 BE2.png|32px]] The texture of bowls has now been changed.
|Bowls are now used to craft [[suspicious stew]].}}
{{History||1.16|snap=20w06a|[[Crimson planks]] and [[warped planks]] can now be used to craft bowls.}}
{{History||1.19|snap=22w11a|[[Mangrove planks]] can now be used to craft bowls.}}
{{History|pocket alpha}}
{{History||v0.2.0|[[File:Bowl JE1 BE1.png|32px]] Added bowls. They are currently unobtainable and serve no purpose.}}
{{History||v0.3.0|Bowls are now [[craft]]able. They still serve no purpose.}}
{{History||v0.4.0|Bowls are now used to craft [[mushroom stew]].}}
{{History||v0.5.0|Bowls now appear in the [[nether reactor]].}}
{{History||v0.8.0|snap=build 2|Bowls are now used to craft [[beetroot soup]].}}
{{History|||snap=build 7|Bowls can now be used as fuel in a [[furnace]].}}
{{History||v0.9.0|snap=build 1|Added bowls to [[creative]] mode.
|[[Mooshroom]]s can now be "milked" to obtain [[mushroom stew]].}}
{{History||v0.12.1|snap=build 1|Bowls are no longer available from the [[nether reactor]].}}
{{History||v0.13.0|snap=build 1|Bowls are now used to craft [[rabbit stew]].}}
{{History|bedrock}}
{{History||1.10.0|snap=beta 1.10.0.3|[[File:Bowl JE2 BE2.png|32px]] The texture of bowls has now been changed.}}
{{History||1.13.0|snap=beta 1.13.0.9|Bowls can now be used to craft [[suspicious stew]].}}
{{History|console}}
{{History||xbox=TU1|xbone=CU1|ps=1.0|wiiu=Patch 1|switch=1.0.1|[[File:Bowl JE1 BE1.png|32px]] Added bowls.}}
{{History||xbox=TU9|Bowls now stack to 64.}}
{{History||xbox=none|xbone=none|ps=1.90|wiiu=none|switch=none|[[File:Bowl JE2 BE2.png|32px]] The texture of bowls has now been changed.}}
{{History|new 3ds}}
{{History||0.1.0|[[File:Bowl JE1 BE1.png|32px]] Added bowls.}}
{{History|foot}}
== Issues ==
{{issue list}}
== Trivia ==
* {{in|be}}, bowls are actually more fuel efficient than [[stick]]s. If 6 wood planks are crafted into 8 bowls, 8 items can be [[smelt]]ed; but if those are crafted into 12 sticks, only 6 items can be smelted. This can be useful when the player only has access to Nether wood types, which cannot be used as fuel.
== See also ==
* [[Mushrooms]]
== References ==
{{reflist}}
== External Links ==
* {{Mcnet|taking-inventory--bowl|Taking Inventory: Bowl|April 25, 2019}}
{{Items}}
[[Category:Renewable resources]]
[[cs:Miska]]
[[de:Schüssel]]
[[es:Cuenco]]
[[fr:Bol]]
[[hu:Tál]]
[[it:Ciotola]]
[[ja:ボウル]]
[[ko:그릇]]
[[nl:Kom]]
[[pl:Miska]]
[[pt:Tigela]]
[[ru:Миска]]
[[th:ชาม]]
[[uk:Миска]]
[[zh:碗]]</li></ul> | 12w01a | Added World Type options, currently Default and Superflat. | |||
1.3.1{{Extension DPL}}<ul><li>[[Disc Fragment|Disc Fragment]]<br/>{{Item
| image = Disc Fragment.png
| renewable = No
| stackable = Yes (64)
}}
A '''disc fragment''' is a [[music disc]] fragment obtained from [[ancient city]] loot chests. Nine fragments can be combined in a [[Crafting Table|crafting table]] to make a music disc named "5".
== Obtaining ==
=== Chest loot ===
{{LootChestItem|disc-fragment-5}}
== Usage ==
=== Crafting ingredient ===
{{crafting usage|Disc Fragment 5}}
== Data values ==
=== ID ===
{{ID table
|edition=java<!--
|showitemtags=y-->
|showforms=y
|firstcolumnname=Track
|generatetranslationkeys=y
|displayname=Samuel Åberg - 5
|spritename=disc-fragment-5
|spritetype=item
|nameid=disc_fragment_5<!--
|itemtags=-->
|form=item
|foot=y}}
== History ==
{{History|java}}
{{History||1.19|snap=22w16a|[[File:Disc Fragment.png|32px]] Added disc fragments.}}
{{History|bedrock}}
{{History||1.19.0|snap=beta 1.19.0.28|[[File:Disc Fragment.png|32px]] Added disc fragments.}}
{{History|foot}}
== Issues ==
{{Issue list}}
==Gallery==
<gallery>
9 to 5.jpg|9 fragments of the 5 music disc.
</gallery>
==See also==
* {{EnvLink|Music}}
* {{ItemLink|Music Disc}}
{{Items}}
[[de:Plattenbruchstück]]
[[es:Fragmento de disco]]
[[fr:Fragment de disque]]
[[ja:レコードの破片]]
[[pl:Fragment płyty]]
[[pt:Fragmento de disco]]
[[ru:Фрагмент пластинки 5]]
[[uk:Фрагмент платівки]]
[[zh:唱片残片]]
[[Category:Non-renewable resources]]</li><li>[[Redstone Repeater|Redstone Repeater]]<br/>{{Block
| image = <gallery>
Redstone Repeater.png|Redstone Repeater
Redstone Repeater BE.png|Redstone Repeater (BE)
</gallery>
| extratext = View [[#Renders|all renders]]
| transparent = Yes
| light = No
| tool = any
| stackable = Yes (64)
| flammable = No
| lavasusceptible = No
| renewable = Yes
}}
{{about|the block|repeater circuits|Transmission circuit#Repeater|other topics related to redstone|Redstone (disambiguation)}}
A '''redstone repeater''' is a [[block]] that produces a full-strength [[Redstone Dust|output signal]] from its front when its back is powered, with four configurable delay settings. It can also be locked into a power state by its side being directly powered by a repeater or a [[Redstone Comparator|comparator]].
== Obtaining ==
=== Breaking ===
A redstone repeater can be broken instantly using any [[tool]], or without a tool, and drops itself as an item. To remove a redstone repeater, {{control|mine}} it.
A redstone repeater is removed and drops as an item if:
* its attachment block is moved, removed, or destroyed;
* [[water]] or [[lava]] flows into its space;{{only|java}}
* a [[piston]] tries to push it or moves a block into its space.
=== Natural generation ===
[[File:Redstone Repeater naturally generated.png|thumb|A redstone repeater generated in the jungle temple's hidden room.]]
A single redstone repeater is generated naturally in each [[jungle temple]].
They also generate in [[Ancient City|ancient cities]].
=== Crafting ===
{{Crafting
|A2= Redstone Torch
|B2= Redstone Dust
|C2= Redstone Torch
|B3= Stone
|C3= Stone
|A3= Stone
|Output= Redstone Repeater
|type= Redstone
}}
== Usage ==
{{see also|Redstone circuit}}
A redstone repeater can be used in four different ways: to "repeat" redstone signals back to full strength, delay signals, prevent signals moving backwards, or to "lock" signals in one state.
A repeater can be placed only on top of [[opaque]] blocks (dirt, stone, etc.), on top of upside-down [[slab]]s, upside-down [[stairs]], furnaces, and glass. {{IN|be}}, a repeater can also be placed on fences and stone walls. They can also be placed on some transparent blocks. See [[Opacity/Placement]] for more information. To place a repeater, use the {{control|Place Block}} [[control]].
A redstone repeater has a front and back – the arrow on the top points to the repeater's front. A repeater also has two small redstone torches on its top – the color of the torches indicates whether its output is on (dark red when off, bright red when on) and the distance between them indicates the delay the repeater adds to the signal transmission.
A repeater is 0.125 ({{frac|1|8}}) blocks high.
=== Signal transmission ===
A repeater transmits signals only from its back to its front, but its behavior can be modified from the side (see [[#Signal locking|signal locking]], below).
[[File:Redstone Torch Power.png|Different ways to power a repeater|thumb]]
A redstone repeater can be powered by any of the following components at its back:
* an active [[power component]] (redstone torch, lever, block of redstone, etc.)
* powered [[redstone dust]]
* a powered [[redstone comparator]] or another powered redstone repeater facing the repeater
* a powered opaque block (including any opaque [[mechanism component]]s, such as [[dispenser]]s, [[redstone lamp]]s, etc.)
A redstone repeater can power any of the following components at its front:
* redstone dust
* a redstone comparator or another redstone repeater facing away from the repeater
* any opaque block (including any opaque [[mechanism component]]s)
A redstone repeater can activate any [[mechanism component]] it is facing.
An opaque block powered by a redstone repeater is called "strongly-powered" (as opposed to an opaque block "weakly-powered" by redstone dust). A strongly-powered opaque block can power adjacent redstone dust, as well as other redstone components.
=== Signal repeating ===
{{see also|Transmission circuit#Repeater}}
A redstone repeater can "repeat" a [[Redstone Dust|redstone]] signal, boosting it back up to power level 15.
Redstone signals have a maximum power level of 15 and that level drops by 1 for every block of [[redstone dust]] the signal travels through. If a signal must travel through more than 15 [[block]]s of redstone dust, a redstone repeater can be used to boost the signal back up to full strength. An extra two blocks of distance can be achieved by placing solid opaque blocks before and after the repeater.
While redstone repeaters can allow signals to travel great distances, each always adds some delay to the transmission since the minimum amount of delay is 1 redstone tick (0.1 seconds, barring lag).
=== Signal delay ===
When initially placed, a redstone repeater has a delay of one [[redstone tick]] (equivalent to two game ticks, or 0.1 seconds barring lag).
A repeater's delay can be modified by using the {{control|Use Item}} control. Each use increases the repeater's delay by one redstone tick, to a maximum of four redstone ticks, then back to one redstone tick. Longer delays can be made with multiple repeaters – for example, a repeater set to 'four' and another to 'one' provides a half-second delay (0.4s + 0.1s = 0.5s).
A repeater set to a delay of two to four redstone ticks increases the length of any shorter [[Pulse circuit#Pulses|on-pulse]] to match the length of the repeater's delay, and suppress any shorter off-pulse. For example, a repeater set to a 4-tick delay changes a 1-tick, 2-tick, or 3-tick on-pulse into a 4-tick on-pulse, and does not allow through any off-pulse shorter than 4 ticks.
Although a repeater cannot be set to have a delay of zero, [[Transmission circuit#Instant repeater|instant repeater circuits]] are possible (circuits that repeat a signal with no delay).
In Bedrock Edition, the first repeater have a delay of zero but the repeater is still showing 1-tick{{info needed}}
=== {{anchor|diode}} Signal direction ===
{{see also| Mechanics/Redstone/Transmission circuit#Diode}}
A redstone repeater acts as a diode – it allows redstone signals through in one direction (unlike [[redstone dust]] or opaque blocks that can transmit redstone signals in any direction).
A diode can be used to protect a [[redstone circuit]] from redstone signals feeding back into the circuit from its output, or can be used to isolate one part of a circuit from another.
=== {{anchor|lock}} Signal locking ===
{{see also| Mechanics/Redstone/Memory circuit}}
[[File:Latch.png|thumb|The left repeater has been locked in an unpowered output state by the right repeater.]]
A redstone repeater can be "locked" by another powered redstone repeater facing its side. When locked, the repeater does not change its output (whether powered or unpowered), no matter what the input does. When the side repeater turns back off, the repeater returns to its normal behavior.
A repeater can also be locked by a powered [[redstone comparator]] facing its side. This offers additional possibilities for locking signals because a comparator's output can be affected from 3 sides as well as by containers.
If a repeater is locked again too quickly after unlocking (e.g. the lock is controlled by a fast clock circuit), or the lock and the input are changed only on the same tick (e.g. because they're fed by the same clock and both repeaters have the same delay), the repeater does not switch states.
== Sounds ==
{{Edition|java}}:
{{Sound table/Block/Stone/JE}}
{{Edition|bedrock}}:
{{Sound table/Block/Wood/BE}}
== Data values ==
=== ID ===
{{edition|java}}:
{{ID table
|edition=java
|showforms=y
|generatetranslationkeys=y
|displayname=Redstone Repeater
|spritetype=block
|nameid=repeater
|foot=1}}
{{edition|bedrock}}:
{{ID table
|edition=bedrock
|firstcolumnname=Redstone Repeater
|shownumericids=y
|showforms=y
|generatetranslationkeys=y
|displayname=Unpowered block
|spritename=unpowered-repeater
|spritetype=block
|nameid=unpowered_repeater
|id=93
|form=block
|translationkey=-}}
{{ID table
|displayname=Powered block
|spritename=powered-repeater
|spritetype=block
|nameid=powered_repeater
|id=94
|form=block
|translationkey=-}}
{{ID table
|displayname=Item
|spritename=redstone-repeater
|spritetype=item
|nameid=repeater
|id=419
|form=item
|foot=1}}
=== Block states ===
{{see also|Block states}}
{{/BS}}
== Video ==
<div style="text-align:center">{{yt|0Ij_qMLiRzE}}</div>
== History ==
''For a more in-depth breakdown of changes to repeater textures and models, including a set of renders for each state combination, see [[/Asset history]]''
{{History|java beta}}
{{History||1.3|[[File:Redstone Repeater (S) JE1.png|32px]] [[File:Redstone Repeater (item) JE1.png|32px]] Added redstone repeaters.
|Originally, the four possible settings were "1, 2, 5 and 7",<ref>http://twitter.com/jeb_/status/33888465502339073</ref> but [[Jeb]] decided to change the settings to "1, 2, 3, and 4".<ref>http://www.reddit.com/r/Minecraft/comments/fmdtp/teammojang_redstone_repeater_video/c1gzrn6</ref>
|The particles when [[breaking]] redstone repeaters erroneously use the [[pumpkin]] top texture.}}
{{History||unknown|The breaking particles of redstone repeaters now use the smooth stone [[slab]] top texture, even though none of the elements on the [[model]] use it.}}
{{History||1.7|[[File:Redstone Repeater (S) JE2.png|32px]] The side texture of redstone repeaters has been changed to the previous bottom part of the texture.
|[[Redstone dust]] now automatically connects to the input of a redstone repeater. Previously, it needed to be specifically pointed towards the repeater like with other blocks.}}
{{History||unknown|Redstone dust now visually connects to the output of redstone repeaters, though this does not change its behavior.}}
{{History|java}}
{{History||unknown|The breaking particles of redstone repeaters have been changed to an unlit [[redstone torch]] when unpowered and a lit redstone torch when powered.}}
{{History||1.3.1|snap=12w22a|Redstone repeaters now naturally generate inside [[jungle temple]]s.}}
{{History|||snap=1.3|[[File:Redstone Repeater (item) JE2 BE1.png|32px]] The texture of redstone repeater [[item]]s have been changed.}}
{{History||1.4.2|snap=12w42a|[[File:Redstone Repeater (S) JE3.png|32px]] The top texture of redstone repeaters has now been changed.
|[[File:Locked Redstone Repeater (S) JE1.png|32px]] Added repeater locking to redstone repeaters. Interestingly, the smallest face of the bedrock cuboid's texture changes depending on the delay, but the other two faces remain the same. When/if this changed is unknown.}}
{{History||1.5|snap=13w02a|[[File:Redstone Repeater (S) JE4.png|32px]] The side textures of redstone repeaters have been changed to use the top texture of stone [[slab]]s.}}
{{History||unknown|The breaking [[particles|particle]] of redstone repeaters has been changed once again and now matches the top texture of redstone repeaters.}}
{{History||1.8|snap=14w06a|Repeaters no longer produce block [[light]] when powered.}}
{{History|||snap=14w10a|[[File:Powered Redstone Repeater (S) JE5.png|32px]] Torches on repeaters now no longer have protruding features.
|The torches underneath redstone repeaters have now been shortened, which has changed the underside textures from [[File:Redstone Repeater JE2 BE1 (facing NWU).png|32px]] [[File: Redstone Repeater Delay 2 JE2 BE1 (facing NWU).png|32px]] [[File: Redstone Repeater Delay 3 JE2 BE1 (facing NWU).png|32px]] [[File: Redstone Repeater Delay 4 JE2 BE1 (facing NWU).png|32px]] [[File: Active Redstone Repeater JE2 BE1 (facing NWU).png|32px]] [[File: Active Redstone Repeater Delay 2 JE2 BE1 (facing NWU).png|32px]] [[File: Active Redstone Repeater Delay 3 JE2 BE1 (facing NWU).png|32px]] [[File: Active Redstone Repeater Delay 4 JE2 BE1 (facing NWU).png|32px]] [[File: Locked Redstone Repeater JE2 BE1 (facing NWU).png|32px]] [[File: Locked Redstone Repeater Delay 2 JE2 BE1 (facing NWU).png|32px]] [[File: Locked Redstone Repeater Delay 3 JE2 BE1 (facing NWU).png|32px]] [[File: Locked Redstone Repeater Delay 4 JE2 BE1 (facing NWU).png|32px]] [[File: Active Locked Redstone Repeater JE2 BE1 (facing NWU).png|32px]] [[File: Active Locked Redstone Repeater Delay 2 JE2 BE1 (facing NWU).png|32px]] [[File: Active Locked Redstone Repeater Delay 3 JE2 BE1 (facing NWU).png|32px]] [[File: Active Locked Redstone Repeater Delay 4 JE2 BE1 (facing NWU).png|32px]] to [[File:Redstone Repeater JE3 (facing NWU).png|32px]] [[File: Redstone Repeater Delay 2 JE3 (facing NWU).png|32px]] [[File: Redstone Repeater Delay 3 JE3 (facing NWU).png|32px]] [[File: Redstone Repeater Delay 4 JE3 (facing NWU).png|32px]] [[File: Active Redstone Repeater JE3 (facing NWU).png|32px]] [[File: Active Redstone Repeater Delay 2 JE3 (facing NWU).png|32px]] [[File: Active Redstone Repeater Delay 3 JE3 (facing NWU).png|32px]] [[File: Active Redstone Repeater Delay 4 JE3 (facing NWU).png|32px]] [[File: Locked Redstone Repeater JE3 (facing NWU).png|32px]] [[File: Locked Redstone Repeater Delay 2 JE3 (facing NWU).png|32px]] [[File: Locked Redstone Repeater Delay 3 JE3 (facing NWU).png|32px]] [[File: Locked Redstone Repeater Delay 4 JE3 (facing NWU).png|32px]] [[File: Locked Active Redstone Repeater JE3 (facing NWU).png|32px]] [[File: Locked Active Redstone Repeater Delay 2 JE3 (facing NWU).png|32px]] [[File: Locked Active Redstone Repeater Delay 3 JE3 (facing NWU).png|32px]] [[File: Locked Active Redstone Repeater Delay 4 JE3 (facing NWU).png|32px]].}}
{{History|||snap=14w10b|[[File:Powered Redstone Repeater (S) JE4.png|32px]] Repeater torches now have protruding features again.<ref>{{bug|MC-50242}}</ref>}}
{{History|||snap=?|[[File:Powered Redstone Repeater (S) JE7.png|32px]] The torches on redstone repeaters are now affected by directional shading.}}
{{History||1.13|snap=17w47a|All 3 IDs for the redstone repeater have now been merged into 1 ID: <code>repeater</code>.
|Added powered block state to redstone repeaters.
|Redstone repeaters now render their underside, which has changed their undersides from [[File:Redstone Repeater JE3 (facing NWU).png|32px]] [[File: Redstone Repeater Delay 2 JE3 (facing NWU).png|32px]] [[File: Redstone Repeater Delay 3 JE3 (facing NWU).png|32px]] [[File: Redstone Repeater Delay 4 JE3 (facing NWU).png|32px]] [[File: Active Redstone Repeater JE3 (facing NWU).png|32px]] [[File: Active Redstone Repeater Delay 2 JE3 (facing NWU).png|32px]] [[File: Active Redstone Repeater Delay 3 JE3 (facing NWU).png|32px]] [[File: Active Redstone Repeater Delay 4 JE3 (facing NWU).png|32px]] [[File: Locked Redstone Repeater JE3 (facing NWU).png|32px]] [[File: Locked Redstone Repeater Delay 2 JE3 (facing NWU).png|32px]] [[File: Locked Redstone Repeater Delay 3 JE3 (facing NWU).png|32px]] [[File: Locked Redstone Repeater Delay 4 JE3 (facing NWU).png|32px]] [[File: Locked Active Redstone Repeater JE3 (facing NWU).png|32px]] [[File: Locked Active Redstone Repeater Delay 2 JE3 (facing NWU).png|32px]] [[File: Locked Active Redstone Repeater Delay 3 JE3 (facing NWU).png|32px]] [[File: Locked Active Redstone Repeater Delay 4 JE3 (facing NWU).png|32px]] to [[File:Redstone Repeater JE4 BE2 (facing NWU).png|32px]] [[File: Redstone Repeater Delay 2 JE4 BE2 (facing NWU).png|32px]] [[File: Redstone Repeater Delay 3 JE4 BE2 (facing NWU).png|32px]] [[File: Redstone Repeater Delay 4 JE4 BE2 (facing NWU).png|32px]] [[File: Active Redstone Repeater JE4 BE2 (facing NWU).png|32px]] [[File: Active Redstone Repeater Delay 2 JE4 BE2 (facing NWU).png|32px]] [[File: Active Redstone Repeater Delay 3 JE4 BE2 (facing NWU).png|32px]] [[File: Active Redstone Repeater Delay 4 JE4 BE2 (facing NWU).png|32px]] [[File: Locked Redstone Repeater JE4 BE2 (facing NWU).png|32px]] [[File: Locked Redstone Repeater Delay 2 JE4 BE2 (facing NWU).png|32px]] [[File: Locked Redstone Repeater Delay 3 JE4 BE2 (facing NWU).png|32px]] [[File: Locked Redstone Repeater Delay 4 JE4 BE2 (facing NWU).png|32px]] [[File: Locked Active Redstone Repeater JE4 BE2 (facing NWU).png|32px]] [[File: Locked Active Redstone Repeater Delay 2 JE4 BE2 (facing NWU).png|32px]] [[File: Locked Active Redstone Repeater Delay 3 JE4 BE2 (facing NWU).png|32px]] [[File: Locked Active Redstone Repeater Delay 4 JE4 BE2 (facing NWU).png|32px]].
|Prior to [[1.13/Flattening|''The Flattening'']], these [[block]]s' numeral IDs were 93 and 94, and the [[item]]'s 356.}}
{{History||1.14|snap=18w43a|[[File:Redstone Repeater (S) JE5.png|32px]] [[File:Powered Redstone Repeater (S) JE9.png|32px]] [[File:Locked Redstone Repeater (S) JE5.png|32px]] [[File:Powered Locked Redstone Repeater (S) JE6.png|32px]] [[File:Redstone Repeater (item) JE3 BE2.png|32px]] The textures of redstone repeaters have now been changed.}}
{{History|||snap=18w50a|[[File:Locked Redstone Repeater (S) JE6.png|32px]] [[File:Powered Locked Redstone Repeater (S) JE7.png|32px]] As the texture of [[bedrock]] has been changed, the textures of locked redstone repeaters have also now been changed.}}
{{History|||snap=19w12b|Redstone repeaters can now be placed on [[glass]], [[ice]], [[glowstone]] and [[sea lantern]]s.}}
{{History||1.19|snap=22w13a|Redstone repeaters now generate in [[Ancient City|ancient cities]].}}
{{History||1.20.2|snap=23w33a|Redstone repeaters now use stone sounds instead of wood sounds.<ref>{{bug|MC-182820|||Fixed}}</ref>}}
{{History|pocket alpha}}
{{History||v0.14.0|snap=build 1|[[File:Redstone Repeater (S) JE3.png|32px]] [[File:Redstone Repeater (item) JE2 BE1.png|32px]] Added redstone repeaters.}}
{{History|bedrock}}
{{History||1.2.0|snap=beta 1.2.0.2|Redstone repeaters now render their underside, which has changed their undersides from [[File:Redstone Repeater JE2 BE1 (facing NWU).png|32px]] [[File: Redstone Repeater Delay 2 JE2 BE1 (facing NWU).png|32px]] [[File: Redstone Repeater Delay 3 JE2 BE1 (facing NWU).png|32px]] [[File: Redstone Repeater Delay 4 JE2 BE1 (facing NWU).png|32px]] [[File: Active Redstone Repeater JE2 BE1 (facing NWU).png|32px]] [[File: Active Redstone Repeater Delay 2 JE2 BE1 (facing NWU).png|32px]] [[File: Active Redstone Repeater Delay 3 JE2 BE1 (facing NWU).png|32px]] [[File: Active Redstone Repeater Delay 4 JE2 BE1 (facing NWU).png|32px]] [[File: Locked Redstone Repeater JE2 BE1 (facing NWU).png|32px]] [[File: Locked Redstone Repeater Delay 2 JE2 BE1 (facing NWU).png|32px]] [[File: Locked Redstone Repeater Delay 3 JE2 BE1 (facing NWU).png|32px]] [[File: Locked Redstone Repeater Delay 4 JE2 BE1 (facing NWU).png|32px]] [[File: Active Locked Redstone Repeater JE2 BE1 (facing NWU).png|32px]] [[File: Active Locked Redstone Repeater Delay 2 JE2 BE1 (facing NWU).png|32px]] [[File: Active Locked Redstone Repeater Delay 3 JE2 BE1 (facing NWU).png|32px]] [[File: Active Locked Redstone Repeater Delay 4 JE2 BE1 (facing NWU).png|32px]] to [[File:Redstone Repeater JE4 BE2 (facing NWU).png|32px]] [[File: Redstone Repeater Delay 2 JE4 BE2 (facing NWU).png|32px]] [[File: Redstone Repeater Delay 3 JE4 BE2 (facing NWU).png|32px]] [[File: Redstone Repeater Delay 4 JE4 BE2 (facing NWU).png|32px]] [[File: Active Redstone Repeater JE4 BE2 (facing NWU).png|32px]] [[File: Active Redstone Repeater Delay 2 JE4 BE2 (facing NWU).png|32px]] [[File: Active Redstone Repeater Delay 3 JE4 BE2 (facing NWU).png|32px]] [[File: Active Redstone Repeater Delay 4 JE4 BE2 (facing NWU).png|32px]] [[File: Locked Redstone Repeater JE4 BE2 (facing NWU).png|32px]] [[File: Locked Redstone Repeater Delay 2 JE4 BE2 (facing NWU).png|32px]] [[File: Locked Redstone Repeater Delay 3 JE4 BE2 (facing NWU).png|32px]] [[File: Locked Redstone Repeater Delay 4 JE4 BE2 (facing NWU).png|32px]] [[File: Locked Active Redstone Repeater JE4 BE2 (facing NWU).png|32px]] [[File: Locked Active Redstone Repeater Delay 2 JE4 BE2 (facing NWU).png|32px]] [[File: Locked Active Redstone Repeater Delay 3 JE4 BE2 (facing NWU).png|32px]] [[File: Locked Active Redstone Repeater Delay 4 JE4 BE2 (facing NWU).png|32px]].}}
{{History||1.10.0|snap=beta 1.10.0.3|[[File:Redstone Repeater (S) BE2.png|32px]] [[File:Powered Redstone Repeater (S) BE2.png|32px]] [[File:Redstone Repeater (item) JE3 BE2.png|32px]] The textures of redstone repeaters have now been changed.}}
{{History||1.20.30|snap=beta 1.20.30.20|Redstone Repeaters now use the <code>minecraft:cardinal_direction</code> [[block state]] instead of <code>direction</code>.}}
{{History|console}}
{{History||xbox=TU1|xbone=CU1|ps=1.0|wiiu=Patch 1|switch=1.0.1|[[File:Redstone Repeater (S) JE3.png|32px]]{{verify|Was this model actually used here?}} [[File:Redstone Repeater (item) JE2 BE1.png|32px]] Added redstone repeaters.}}
{{History||xbox=TU19|xbone=CU7|ps=1.12|wiiu=Patch 1|switch=1.0.1|[[File:Locked Redstone Repeater (S) JE1.png|32px]]{{verify|Was this model actually used here?}} Added repeater locking to redstone repeaters.}}
{{History||xbox=none|xbone=none|ps=1.90|wiiu=none|switch=none|[[File:Redstone Repeater (S) JE4.png|32px]]{{verify|Was this model actually used here?}} [[File:Redstone Repeater (item) JE3 BE2.png|32px]] The textures of redstone repeaters have now been changed.}}
{{History|new 3ds}}
{{History||0.1.0|[[File:Redstone Repeater (S) JE3.png|32px]]{{verify|Was this model actually used here?}} [[File:Redstone Repeater (item) JE2 BE1.png|32px]] Added redstone repeaters and repeater locking.}}
{{History|foot}}
=== Redstone repeater "items" ===
{{:Technical blocks/Redstone Repeater}}
== Issues ==
{{Issue list}}
== Trivia ==
* The recipe and appearance of redstone repeaters are a likely reference to the old method of repeating signals, which would also use two torches at a time, inverting each other
== Gallery ==
<gallery>
Repeater clock.gif|A redstone clock formed from a redstone torch and a repeater.
Repeater feedback.gif|A redstone clock formed from two repeaters.
Two way repeater.gif|MCRedstoneSim diagram of a two-way repeater.
Repeater bridge.png|Crossing redstone wires using repeaters.
Jeb Repeaters 1.png|
Jeb Repeaters 2.png|
Jeb Repeaters 3.png|
</gallery>
=== Renders ===
<gallery>
Redstone Repeater.png
Redstone Repeater Delay 2.png
Redstone Repeater Delay 3.png
Redstone Repeater Delay 4.png
Powered Redstone Repeater.png
Powered Redstone Repeater Delay 2.png
Powered Redstone Repeater Delay 3.png
Powered Redstone Repeater Delay 4.png
Locked Redstone Repeater.png
Locked Redstone Repeater Delay 2.png
Locked Redstone Repeater Delay 3.png
Locked Redstone Repeater Delay 4.png
Powered Locked Redstone Repeater.png
Powered Locked Redstone Repeater Delay 2.png
Powered Locked Redstone Repeater Delay 3.png
Powered Locked Redstone Repeater Delay 4.png
Redstone Repeater BE.png
Redstone Repeater Delay 2 BE.png
Redstone Repeater Delay 3 BE.png
Redstone Repeater Delay 4 BE.png
Powered Redstone Repeater BE.png
Powered Redstone Repeater Delay 2 BE.png
Powered Redstone Repeater Delay 3 BE.png
Powered Redstone Repeater Delay 4 BE.png
Locked Redstone Repeater BE.png
Locked Redstone Repeater Delay 2 BE.png
Locked Redstone Repeater Delay 3 BE.png
Locked Redstone Repeater Delay 4 BE.png
Powered Locked Redstone Repeater BE.png
Powered Locked Redstone Repeater Delay 2 BE.png
Powered Locked Redstone Repeater Delay 3 BE.png
Powered Locked Redstone Repeater Delay 4 BE.png
</gallery>
== References ==
{{Reflist}}
{{Redstone}}
{{Blocks|Utility}}
{{Items}}
[[Category:Mechanics]]
[[Category:Redstone mechanics]]
[[Category:Redstone]]
[[Category:Mechanisms]]
[[Category:Manufactured blocks]]
[[Category:Generated structure blocks]]
[[Category:Non-solid blocks]]
[[de:Redstone-Verstärker]]
[[es:Repetidor de redstone]]
[[fr:Répéteur de redstone]]
[[hu:Redstone-jelismétlő]]
[[it:Ripetitore di redstone]]
[[ja:レッドストーンリピーター]]
[[ko:레드스톤 중계기]]
[[nl:Redstoneversterker]]
[[pl:Przekaźnik]]
[[pt:Repetidor de redstone]]
[[ru:Красный повторитель]]
[[tr:Kızıltaş tekrarlayıcı]]
[[zh:红石中继器]]</li></ul> | 12w19a | New world type 'Large biomes' is added. | |||
1.4.2{{Extension DPL}}<ul><li>[[:Category:Storage|Category:Storage]]<br/>Blocks and items used to '''store''' other blocks or items.
[[Category:Blocks]][[Category:Items]]
[[ja:カテゴリ:ストレージ]]
[[zh:Category:储物]]</li><li>[[Dye|Dye]]<br/>{{Item
| title = Dyes
| image = White Dye.png
| extratext = View [[#Gallery|all renders]]
| renewable = Yes
| stackable = Yes (64)
}}
'''Dyes''' are a set of sixteen items used to change the color of [[wool]], [[carpet]]s, [[terracotta]], [[concrete powder]], [[glass]], [[shulker box]]es, [[bed]]s, [[candle]]s, the patterns on [[banner]]s, [[firework star]]s, certain mobs, and text on [[sign]]s and [[hanging sign]]s. {{IN|bedrock}} they can also be used to dye water in a [[cauldron]] (which is thereafter used to dye leather [[armor]]); {{in|java}} leather armor can be dyed directly. {{IN|education}} dyes can also be used to dye [[balloon]]s and [[glow stick]]s.
{{IN|bedrock|education}}, [[bone meal]], [[ink sac]]s, [[lapis lazuli]], and [[cocoa bean]]s can generally substitute for [[white dye]], [[black dye]], [[blue dye]], and [[brown dye]], respectively, in crafting recipes and for use in dyeing items or mobs. However, they have other important uses that aren't related to color, and are therefore not considered true dyes. They are mentioned in this article only in regard to their use as dyeing agents; see their individual articles for complete information about them.
[[File:Dye Recipes.png|400px|thumb|A guide for creating all the dyes]]
== Obtaining ==
<!--[[File:Dye Chart.png|350px|thumb|A guide to crafting all the dyes.{{until|java 1.14}}]]-->
Dyes can be produced by crafting them from plants (mainly flowers), by crafting dyes of different colors together, by smelting plants, or by trading with a [[wandering trader]].
{{loadPage|Crafting/Dye|Crafting|h3}}
=== Smelting ===
{{smelting|head=1|Sea Pickle|Lime Dye|0,2}}
{{smelting|foot=1|Cactus|Green Dye|1||b=Lapis Lazuli|c=Any fuel|d=1}}
=== Trading ===
[[Wandering trader]]s can sell 3 dyes for an [[emerald]]. {{IN|bedrock}}, they can also sell 3 lapis lazuli, bone meal, cocoa beans, or ink sacs for one emerald.
Apprentice-level cleric [[villager]]s sell one lapis lazuli per emerald.
=== Chest loot ===
{{#invoke:LootChest|base3|blue-dye,green-dye,orange-dye,light-blue-dye,yellow-dye,white-dye}}
=== Other ===
Ink sacs can also be created using 1 iron, 1 sulfur, and 4 oxygen in the [[compound creator]]. {{only|bedrock|education}}
== Usage ==
Similar to their use in crafting, [[bone meal]], [[ink sac]]s, [[lapis lazuli]], and [[cocoa beans]] can be substituted for the corresponding dye in any of the following usages unless otherwise specified.{{only|bedrock}} <!--- sections are ordered by craftable dyeable blocks, dyeable items, version exclusive sections, and non-crafting miscellaneous uses--->
=== Dyeing wool and mobs ===
Players can dye wool by placing [[wool]] and any dye in a crafting grid.
{{Crafting
|nocat=1
|Any Wool
|Matching Dye
|Output=Any Wool
}}
Dyes can be {{control|use|text=used}} on sheep to change the color of the wool. Shearing a colored sheep drops the corresponding color of the wool, and the sheep retains the color when the wool regenerates. [[Breeding]] colored sheep produces a lamb colored as one of the parent sheep, or a color resulting from the combination of both parents' color. The color combining follows the same rules that dyes use – red and yellow sheep produce an orange lamb, but a blue and yellow sheep cannot create a green lamb. The unlimited reproduction of colored sheep makes dyeing and shearing sheep infinitely more efficient than just dyeing wool directly.
Dye can also be used on a tamed [[wolf]] or [[cat]] to change the color of its collar from the default red to the color of the dye.
=== Dyeing carpets ===
Carpets can be dyed.
{{Crafting
|Any Carpet
|Matching Dye
|Output= Matching Carpet
|type= Building block
}}
=== Dyeing terracotta ===
[[Terracotta]] can be dyed by placing 8 blocks around a dye on a crafting table.
{{Crafting
|nocat=1
|A1=Terracotta |B1=Terracotta |C1=Terracotta
|A2=Terracotta |B2=Matching Dye |C2=Terracotta
|A3=Terracotta |B3=Terracotta |C3=Terracotta
|Output=Matching Dyed Terracotta,8
}}
=== Creating concrete powder ===
Dyes can also be used to craft [[concrete powder]], which can then be set into their respective [[concrete]] blocks (they cannot be dyed directly).
{{Crafting
|nocat=1
|Sand |Gravel |Sand
|Gravel |Matching Dye |Gravel
|Sand |Gravel |Sand
|Output=Matching Concrete Powder,8
}}
=== Staining glass ===
[[Stained glass]] can be stained by placing 8 blocks of glass around a dye on a [[crafting table]]. Just like regular glass, stained glass can be crafted into stained glass panes. The recipe for this is the same as with regular glass.
{{Crafting
|nocat=1
|A1=Glass |B1=Glass |C1=Glass
|A2=Glass |B2=Matching Dye |C2=Glass
|A3=Glass |B3=Glass |C3=Glass
|Output=Matching Stained Glass,8
|head=1
}}
{{Crafting
|nocat=1
|A1= Glass Pane
|B1= Glass Pane
|C1= Glass Pane
|A2= Glass Pane
|B2= Matching Dye
|C2= Glass Pane
|A3= Glass Pane
|B3= Glass Pane
|C3= Glass Pane
|Output= Matching Stained Glass Pane,8
|type= Decoration block
|foot=1
}}
=== Dyeing shulker boxes ===
[[Shulker box]]es are generated in a light shade of purple (like the [[purpur block]]), but can be dyed any color. They can also be re-dyed as often as desired.
{{Crafting
|ignoreusage=1
|showname=1
|Any Shulker Box
|Matching Dye
|Output=Matching Shulker Box
}}
=== Dyeing beds ===
Players can dye beds by placing a [[bed]] and any color dye in a crafting grid.
{{Crafting
|nocat=1
|Any Bed
|Matching Dye
|Output=Matching Bed
}}
=== Dyeing candles ===
Players can dye [[candles]] by placing an undyed candle and any color dye in a crafting grid.
{{Crafting
|ignoreusage=1
|Candle
|Matching Dye
|Output=Matching Dyed Candle
}}
=== Banner patterns ===
{{main|Banner#Patterns}}
Dyes are used in most banner patterns to determine the pattern and color displayed.
=== Dyeing armor ===
[[File:DyeGraph2.png|200px|thumb|A graph showing all combinations of two dyes on a [[tunic]].]]
Leather [[armor]] can be dyed by:
* Crafting dyes with a piece of leather armor or leather [[horse armor]].{{Only|java}}
* Dousing the leather armor or leather [[horse armor]] in a [[cauldron]] to which dyes have been added.{{Only|bedrock}}
There are 5,713,438<ref>https://anrar4.github.io/DyeLeatherArmor/</ref> (34.1% of sRGB) colors leather armor can be, as it is possible to put more than one dye on the crafting bench alongside the leather armor. Armor can be dyed multiple times with previous colors affecting the final outcome. Colored armor can be reverted to their original color using a [[cauldron]] with undyed water.
The game has a specific formula for calculating the color of dyed armor: each color, in the RGB color model, has a red value, green value, and blue value. For each dye in the crafting grid, and the armor itself (if it is already dyed), the red, green, and blue values are added to running totals. In addition, a running total of the highest value (be it red, green, or blue) is also kept. After this, each total is divided by the number of colors used. This effectively produces the average red, green, blue, and maximum values. The maximum value of the average RGB values is also calculated. Finally, each average RGB value is multiplied by the average maximum value and divided by the maximum of the average RGB values. The modified average RGB values are then used as the final color. This procedure can be summed up with the following equations:
for each color (all "total" variables start at 0 before counting):
totalRed = totalRed + redValue
totalGreen = totalGreen + greenValue
totalBlue = totalBlue + blueValue
totalMaximum = totalMaximum + max(redValue, greenValue, blueValue)
numberOfColors = numberOfColors + 1
averageRed = totalRed / numberOfColors
averageGreen = totalGreen / numberOfColors
averageBlue = totalBlue / numberOfColors
averageMaximum = totalMaximum / numberOfColors
maximumOfAverage = max(averageRed, averageGreen, averageBlue)
gainFactor = averageMaximum / maximumOfAverage
resultRed = averageRed * gainFactor
resultGreen = averageGreen * gainFactor
resultBlue = averageBlue * gainFactor
Due to the way this formula works, the resulting color can never be darker than the average of the input colors and is often lighter and more saturated. Of course, the resulting color can never be lighter or more saturated than the lightest or most saturated input color. In addition, this formula never creates an RGB value higher than 255 (which would be invalid in the 8-bit RGB color model).
If leather armor is renamed on an [[anvil]], it retains its name when dyed or undyed.
;Mixing Samples
: {{ItemSprite|Yellow Dye}} + {{ItemSprite|Yellow Dye}} = {{Tint|leather-chestplate| #{{CalcDye| yellow=2 }} | code=1}}
: {{ItemSprite|Red Dye}} + {{ItemSprite|Blue Dye}} + {{ItemSprite|White Dye}} = {{Tint|leather-chestplate| #{{CalcDye| red=1 | blue=1 | white=1}} | code=1}}
: {{ItemSprite|Green Dye}} + {{ItemSprite|Red Dye}} + {{ItemSprite|Pink Dye}} = {{Tint|leather-chestplate| #{{CalcDye| green=1 | red=1 | pink=1}} | code=1}}
=== Dyeing firework stars ===
A [[firework star]] can have a single color or a combination of up to eight colors when crafted with dyes. Adding one or more dyes to a crafted firework star adds a "fade to color" effect to it, overwriting any existing fade colors.
{{Crafting
|head=1
|ignoreusage=1
|ingredients=[[Gunpowder]] +<br>Any Dye (1–8) +<br>Extra ingredient (optional)
|Gunpowder
|Matching Dye
|Diamond;Glowstone Dust;Head;Gold Nugget;Feather;Fire Charge;
|Output=Matching Firework Star
}}
{{Crafting
|ignoreusage=1
|Matching Firework Star
|Any Dye
|Output=Matching Firework Star
|foot=1
}}
=== Creating balloons ===
Dye can be used to craft balloons.{{only|education}}
{{Crafting
|nocat=1
|A1= Latex
|B1= Matching Dye
|C1= Latex
|A2= Latex
|B2= Helium
|C2= Latex
|A3= Latex
|B3= Lead
|C3= Latex
|Output= Matching Balloon
}}
=== Creating glow sticks ===
Dye can also be used to craft glow sticks.{{only|education}}
{{Crafting
|nocat=1
|A1= Polyethylene
|B1= Hydrogen Peroxide
|C1= Polyethylene
|A2= Polyethylene
|B2= Matching Dye
|C2= Polyethylene
|A3= Polyethylene
|B3= Luminol
|C3= Polyethylene
|Output= Matching Glow Stick
}}
=== Dyeing water inside cauldrons ===
Water can be dyed in a cauldron by holding any dye in the hand and pressing {{Ctrl|use}} on a cauldron filled with water.{{only|bedrock}}
=== Signs ===
Dye can be {{control|used}} on a [[sign]] or a [[hanging sign]] to change the text color. {{IN|bedrock}}, [[ink sac]]s cannot be used for this purpose; black dye must be used to change the text to black.
=== Trading ===
Apprentice, journeyman and expert-level shepherd [[villager]]s buy any of the 12 dyes for an [[emerald]].
== Color values ==
The "color codes" are used to determine the color imparted on sheep, wolf and cat collars, firework stars, [[beacon]] beams, and dyed leather armor. The hex value is shown in the extended tooltips of dyed leather armor; however, to set the color using an NBT data tag in a [[command]], the decimal value must be used instead. The color values for firework stars are slightly different from the ones listed below, and use [[Item colors#Firework stars|these values]] instead.
{| class="wikitable" style="margin:2px; border: 1px solid silver; text-align: left;" data-description="Data values"
! rowspan=2 | Description
! colspan=2 style="text-align:center" | Color Code
|-
! Dec
! <abbr title="Hexadecimal color code">Hex</abbr>
|-
| style="text-align:center" | White || 16383998 || {{color|#F9FFFE}}
|-
| style="text-align:center" | Light gray || 10329495 || {{color|#9D9D97}}
|-
| style="text-align:center" | Gray || 4673362 || {{color|#474F52}}
|-
| style="text-align:center" | Black || 1908001|| {{color|#1D1D21}}
|-
| style="text-align:center" | Brown || 8606770 || {{color|#835432}}
|-
| style="text-align:center" | Red || 11546150 || {{color|#B02E26}}
|-
| style="text-align:center" | Orange || 16351261 || {{color|#F9801D}}
|-
| style="text-align:center" | Yellow || 16701501 || {{color|#FED83D}}
|-
| style="text-align:center" | Lime || 8439583 || {{color|#80C71F}}
|-
| style="text-align:center" | Green || 6192150 || {{color|#5E7C16}}
|-
| style="text-align:center" | Cyan || 1481884|| {{color|#169C9C}}
|-
| style="text-align:center" | Light blue || 3847130 || {{color|#3AB3DA}}
|-
| style="text-align:center" | Blue || 3949738 || {{color|#3C44AA}}
|-
| style="text-align:center" | Purple || 8991416 || {{color|#8932B8}}
|-
| style="text-align:center" | Magenta || 13061821 || {{color|#C74EBD}}
|-
| style="text-align:center" | Pink || 15961002 || {{color|#F38BAA}}
|}
== Sounds ==
{{edition|java}}:
{{Sound table
|rowspan=2
|sound=Dye.ogg
|subtitle=Dye stains
|source=block
|description=When dye is used on a [[sign]]
|id=item.dye.use
|translationkey=subtitles.item.dye.use
|volume=1.0
|pitch=1.0/0.9/0.95/1.1
|distance=16}}
{{Sound table
|subtitle=Dye stains
|source=player
|description=When dye is used on a [[sheep]]
|id=item.dye.use
|translationkey=subtitles.item.dye.use
|volume=1.0
|pitch=1.0/0.9/0.95/1.1
|distance=16
|foot=1}}
{{edition|bedrock}}:
{{Sound table
|type=bedrock
|sound=Dye.ogg
|source=sound
|description=When dye is used on a sign
|id=sign.dye.use
|volume=1.0
|pitch=1.0}}
{{Sound table
|rowspan=3
|sound=Water Splash Old.ogg
|source=block
|description=When dye is added to a cauldron
|id=cauldron.adddye
|volume=0.1
|pitch=1.0}}
{{Sound table
|source=block
|description=When armor is dyed using a cauldron
|id=cauldron.dyearmor
|volume=0.1
|pitch=1.0}}
{{Sound table
|source=block
|description=When dye is removed from armor using a cauldron
|id=cauldron.cleanarmor
|volume=0.1
|pitch=1.0
|foot=1}}
== Achievements ==
{{load achievements|Rainbow Collection;Tie dye outfit}}
== Video ==
{{Video note|These videos are outdated, as it does not include details of the [[Java Edition 1.7.2|1.7.2]] update's changes to the dyeing system/production chain.}}
<div style="text-align:center">
<span style="display:inline-block">{{yt|8YD7oauNZHE}}</span>
<span style="display:inline-block">{{yt|7tETaRt7STM}}</span>
</div>
== History ==
{{History|java beta}}
{{History||January 3, 2011|link=https://web.archive.org/web/0/http://notch.tumblr.com/post/2582321901/2011-here-we-go|Notch mentions adding a "paint" feature if he can figure out how.}}
{{History||January 10, 2011<ref group="n">Supposed time when fragment was filmed. Based on modified date of client.jar/gui/trap.png in [[Beta 1.2]].</ref>|link=https://www.youtube.com/watch?v=cBF2ugTzXqQ&t=181s|[[File:Red Dye (pre-release).png|32px]] Shown rose red in development as part of [[Minecraft: The Story of Mojang]].}}
{{History||1.2|[[File:Ink Sac JE1 BE1.png|32px]] [[File:Red Dye JE1 BE1.png|32px]] [[File:Green Dye JE1 BE1.png|32px]] [[File:Cocoa Beans JE1 BE1.png|32px]] [[File:Lapis Lazuli JE1 BE1.png|32px]] [[File:Purple Dye JE1 BE1.png|32px]] [[File:Cyan Dye JE1 BE1.png|32px]] [[File:Light Gray Dye JE1 BE1.png|32px]] [[File:Gray Dye JE1 BE1.png|32px]] [[File:Pink Dye JE1 BE1.png|32px]] [[File:Lime Dye JE1 BE1.png|32px]] [[File:Yellow Dye JE1 BE1.png|32px]] [[File:Light Blue Dye JE1 BE1.png|32px]] [[File:Magenta Dye JE1 BE1.png|32px]] [[File:Orange Dye JE1 BE1.png|32px]] [[File:Bone Meal JE1 BE1.png|32px]] Added dyes.
|[[File:Black Dye (Recreated).png|32px]] [[File:Red Dye (pre-release).png|32px]] [[File:Green Dye (Recreated).png|32px]] [[File:Brown Dye (Recreated).png|32px]] [[File:Blue Dye (Recreated).png|32px]] [[File:Purple Dye (Recreated).png|32px]] [[File:Cyan Dye (Recreated).png|32px]] [[File:Light Gray Dye (Recreated).png|32px]] [[File:Gray Dye (Recreated).png|32px]] [[File:Pink Dye (Recreated).png|32px]] [[File:Lime Dye (Recreated).png|32px]] [[File:Yellow Dye (Recreated).png|32px]] [[File:Light Blue Dye (Recreated).png|32px]] [[File:Magenta Dye (Recreated).png|32px]] [[File:Orange Dye (Recreated).png|32px]] [[File:White Dye (Recreated).png|32px]] Leftovers of old textures can be seen in [[items.png]] with 100% opacity. The white dye texture was reused for [[Sugar]].
| The colors were as follows:{{verify|Did the color codes remain the same between Beta 1.2 and Java 1.11.2?}}
{{:Color/Java Edition dye colors before 17w06a}}
}}
{{History|java}}
{{History||1.1|snap=11w49a|[[Sheep]] can now regrow their [[wool]] by eating [[grass block|grass]]. Dyed sheep regrow wool in their new color.}}
{{History||1.3.1|snap=12w19a|[[File:Cocoa Beans JE2.png|32px]] The texture of [[cocoa beans]] has been changed.}}
{{History|||snap=1.3|[[File:bone meal changes.gif|32px]] The textures of [[bone meal]], [[cactus green]], cocoa beans and [[rose red]] have been changed. The textures have been lowered one pixel.}}
{{History||1.4.2|snap=12w34a|Added the ability to dye leather [[armor]] and [[wolf]] collars.}}
{{History||1.4.4|snap=1.4.3|Color codes have been changed. The colors of red, brown, blue, purple, cyan, pink, light blue, magenta and orange were adjusted a little vividly.}}
{{History||1.6.1|snap=13w19a|[[Stained clay]] can now be crafted using dyes.}}
{{history||1.7.2|snap=13w36a|With the addition of new [[flower]]s, many secondary and tertiary dyes are now primary dyes.}}
{{History|||snap=13w41a|[[Stained glass]] can now be crafted using dyes.}}
{{History||1.8|snap=14w02a|As cleric [[villager]]s now sell lapis lazuli, all dyes have become fully renewable.}}
{{History|||snap=14w30a|Added [[banner]]s, which can be dyed.}}
{{History||1.9|snap=15w34a|Added [[shield]]s, which can be dyed indirectly by applying a matching [[banner]].}}
{{History||1.11|snap=16w39b|Dyes are now used to change the color of [[shulker box]]es.}}
{{History||1.12|snap=17w06a|Dyes are now used to craft [[concrete powder]].
|Color codes have been changed. All colors are adjusted more vividly. The changes were as follows:
{{:Color/Java Edition dye color changes in 17w06a}}
|Light blue dye, stained glass, and stained glass panes, did not change colors in this update. This means that they still use old colors.<ref name="unchanged dyes">{{Bug|MC-214643}}<br>{{Bug|MC-214641}}</ref>
}}
{{History|||snap=17w15a|Dyes can now apply color to white [[bed]]s.}}
{{History||1.13|snap=17w47a|The different data values for the <code>dye</code> ID have been split up into their own IDs.}}
{{History||1.14|snap=18w43a|[[Bone meal]], [[ink sac]]s, [[cocoa beans]] and [[lapis lazuli]] are no longer considered dyes.
|[[File:White Dye JE1 BE1.png|32px]] [[File:Black Dye JE1 BE1.png|32px]] [[File:Brown Dye JE1 BE1.png|32px]] [[File:Blue Dye JE1 BE1.png|32px]] Added [[white dye|white]], [[black dye|black]], [[brown dye|brown]] and [[blue dye]]s.
|"Rose Red", "Dandelion Yellow" and "Cactus Green" have been renamed to "Red Dye", "Yellow Dye" and "Green Dye", respectively.
|[[Glass pane]]s and [[carpet]]s can now be dyed.
|[[File:Light Gray Dye JE2 BE2.png|32px]] [[File:Gray Dye JE2 BE2.png|32px]] [[File:Red Dye JE2 BE2.png|32px]] [[File:Orange Dye JE2 BE2.png|32px]] [[File:Yellow Dye JE2 BE2.png|32px]] [[File:Lime Dye JE2 BE2.png|32px]] [[File:Green Dye JE2 BE2.png|32px]] [[File:Cyan Dye.png|32px]] [[File:Light Blue Dye JE2 BE2.png|32px]] [[File:Purple Dye JE2 BE2.png|32px]] [[File:Magenta Dye JE2 BE2.png|32px]] [[File:Pink Dye JE2 BE2.png|32px]] The textures of light gray, gray, red, orange, yellow, lime, green, cyan, light blue, purple, magenta, and pink dyes, have been changed. The color texture for light blue dye was not changed to reflect the updated colors from 1.12.<ref name="unchanged dyes"></ref>}}
{{History|||snap=18w44a|The color of the text on [[sign]]s can now be changed with dye.}}
{{History|||snap=18w49a|Yellow dyes can now be found in [[chest]]s in [[village]] mason houses.}}
{{History|||snap=18w50a|Green dyes can now be found in [[chest]]s in [[desert]] [[village]] houses.}}
{{History|||snap=19w05a|Added the [[wandering trader]], which can sell any type of dye.}}
{{History|||snap=19w11a|All 16 types of dyes can now be [[trading|bought]] by shepherd villagers.}}
{{History||1.16.2|snap=Pre-release 2|Reversed the order of dyes to match other colored items in the [[Creative inventory]].<ref name="reverse dye">{{Bug|MC-136553}}</ref>
|Regrouped dyes in the Creative inventory such that white, blue, brown, and black dyes are within and not [[cocoa beans]], [[ink sacs]], [[lapis lazuli]], and [[bone meal]].<ref name="regroup dye">{{Bug|MC-177684}}</ref>}}
{{History||1.17|snap=20w45a|Added [[candle]]s, which can be dyed.}}
{{History|||snap=21w03a|Added a sound for applying dyes.}}
{{History|||snap=21w19a|Candles can no longer be dyed.}}
{{History|||snap=Pre-release 1|Candles can now once again be dyed.}}
{{History||1.20<br>(Experimental)|link=1.19.3|snap=22w42a|The color of the text on [[hanging sign]]s can now be changed with dye.}}
{{History||1.20<br>(Experimental)|link=1.19.4|snap=23w07a|[[Torchflower]]s can now be crafted into orange dye.|[[Pink petals]] can now be crafted into pink dye.}}
{{History||1.20|snap=23w12a|[[Pitcher plant]]s can now be crafted into cyan dye.|Blue, light blue, orange, white, and yellow dye can now be found in [[suspicious gravel]] and [[suspicious sand]] in [[trail ruins]].}}
{{History|||snap=23w14a|Pitcher plants can now craft two [[cyan dye]] instead of one.}}
{{History|||snap=23w16a|Blue, light blue, orange, white, and yellow dye no longer generates in [[suspicious sand]] in [[trail ruins]].|Due to the split of the archaeological loot tables for the suspicious gravel within the [[trail ruins]]; blue, light blue, orange, white, and yellow dye now are in the common loot.}}
{{History|pocket alpha}}
{{History||v0.3.0|[[File:Bone Meal JE1 BE1.png|32px]] [[File:Light Gray Dye JE1 BE1.png|32px]] [[File:Gray Dye JE1 BE1.png|32px]] [[File:Ink Sac JE1 BE1.png|32px]] [[File:Cocoa Beans JE1 BE1.png|32px]] [[File:Red Dye JE1 BE1.png|32px]] [[File:Orange Dye JE1 BE1.png|32px]] [[File:Yellow Dye JE1 BE1.png|32px]] [[File:Lime Dye JE1 BE1.png|32px]] [[File:Green Dye JE1 BE1.png|32px]] [[File:Cyan Dye JE1 BE1.png|32px]] [[File:Light Blue Dye JE1 BE1.png|32px]] [[File:Lapis Lazuli JE1 BE1.png|32px]] [[File:Purple Dye JE1 BE1.png|32px]] [[File:Magenta Dye JE1 BE1.png|32px]] [[File:Pink Dye JE1 BE1.png|32px]] Added dyes. Only [[dandelion yellow]] and [[lapis lazuli]] are currently obtainable and have functionality.}}
{{History||v0.3.2|[[Cactus green]] is now obtainable by smelting [[cacti]].}}
{{History||v0.3.3|[[Bone meal]] is now obtainable via [[crafting]].}}
{{History||v0.4.0|[[Cyan dye]], [[light blue dye]], [[lime dye]], [[magenta dye]], [[orange dye]], [[pink dye]], and [[purple dye]] are now obtainable via crafting.
|[[Rose red]] is now obtainable by smelting red [[mushroom]]s.
|All available dyes, excluding bone meal, can now be used to craft their respective [[wool]] color.}}
{{History||v0.8.0|snap=build 1|[[File:Cocoa Beans JE3 BE2.png|32px]] The texture of cocoa beans has been changed.}}
{{History|||snap=build 3|[[Ink sac]]s, [[cocoa bean]]s, [[gray dye]], and [[light gray dye]] are now available in the [[creative]] [[inventory]].
|Rose red can now be obtained from [[beetroot]]s.}}
{{History||v0.9.0|snap=build 1|Cocoa beans can now be obtained from [[cocoa pod]]s.
|The [[rose]] has been removed and replaced with a new poppy [[flower]] that can be crafted into rose red.}}
{{History|||snap=build 3|All new [[flower]]s can now be [[crafting|crafted]] into dyes. Because of this, many secondary and tertiary dyes are now primary dyes.
|[[Gray dye]] and [[light gray dye]] can now be obtained in [[survival]].}}
{{History|||snap=build 11|[[Terracotta|Stained clay]] can now be crafted using dyes.}}
{{History||v0.11.0|snap=build 1|[[Ink sac]]s can now be obtained from [[squid]].
|Added the ability to dye [[wolf]] collars.}}
{{History||v0.12.1|snap=build 1|Red [[mushroom]]s can no longer be smelted to obtain [[rose red]].}}
{{History||v0.14.0|snap=build 1|[[Cauldron]]s now used for leather dyeing, by applying a dye to a [[water]]-filled cauldron.}}
{{History||v0.16.0|snap=build 1|[[Cocoa bean]]s can no longer be crafted.}}
{{History|pocket}}
{{History||1.0.0|snap=alpha 0.17.0.1|Added a ''Dye'' button for [[sheep]].
|Added [[shulker]]s, which can be dyed.
|Added [[stained glass]]. Stain glass cannot be [[crafting|crafted]], but purple glass generates in [[end city|end cities]].}}
{{History||1.1.0|snap=alpha 1.1.0.0|Dyes can now apply color to a white [[bed]]s.
|Dyes are now used to craft [[concrete powder]].
|The color palette has been changed.}}
{{History|bedrock}}
{{History||1.2.0|snap=beta 1.2.0.2|Dyes can now be used for [[banner]] crafting.
|Dyes can now be used to craft [[firework star]]s.
|[[Stained glass]] is now [[crafting|craftable]], using dyes.}}
{{History||1.4.0|snap=beta 1.2.20.1|[[Lime dye]] can now be obtained from smelting [[sea pickle]]s.
|Dyes can now used to craft [[glow stick]]s and [[balloon]]s.}}
{{History||1.8.0|snap=beta 1.8.0.8|Dyes can now be used to dye [[cat]] collars.}}
{{History|||snap=beta 1.8.0.10|[[File:White Dye JE1 BE1.png|32px]] [[File:Black Dye JE1 BE1.png|32px]] [[File:Brown Dye JE1 BE1.png|32px]] [[File:Blue Dye JE1 BE1.png|32px]] Added [[white dye|white]], [[brown dye|brown]], [[black dye|black]] and [[blue dye]]s, which can be crafted from [[lapis lazuli]], [[bone meal]], [[cocoa beans]] and [[ink sac]]s. This, however, the later four still use as dyes.<ref>{{Bug|MCPE-42473}}</ref>
|"Rose Red", "Dandelion Yellow" and "Cactus Green" have been renamed to "Red Dye", "Yellow Dye" and "Green Dye", respectively.}}
{{History||1.9.0|snap=beta 1.9.0.0|Blue and white dye can now be obtained from [[cornflower]]s and [[lily of the valley]]s.}}
{{History||1.10.0|snap=beta 1.10.0.3|[[Glass pane]]s and [[carpet]]s can now be dyed.
|Only a single dye is now required to apply a banner pattern in a [[loom]].
|Various dyes except black dye, white dye, brown dye and blue dye are now [[trading|sold]] by [[wandering trader]]s.
|[[File:Bone Meal JE2 BE2.png|32px]] [[File:Light Gray Dye JE2 BE2.png|32px]] [[File:Gray Dye JE2 BE2.png|32px]] [[File:Ink Sac JE2 BE2.png|32px]] [[File:Cocoa Beans JE4 BE3.png|32px]] [[File:Red Dye JE3 BE3.png|32px]] [[File:Orange Dye JE2 BE2.png|32px]] [[File:Yellow Dye JE2 BE2.png|32px]] [[File:Lime Dye JE2 BE2.png|32px]] [[File:Green Dye JE2 BE2.png|32px]] [[File:Cyan Dye.png|32px]] [[File:Light Blue Dye JE2 BE2.png|32px]] [[File:Lapis Lazuli JE2 BE2.png|32px]] [[File:Purple Dye JE2 BE2.png|32px]] [[File:Magenta Dye JE2 BE2.png|32px]] [[File:Pink Dye JE2 BE2.png|32px]] The textures of bone meal, light gray, gray, ink sac, cocoa beans, red, orange, yellow, lime, green, cyan, light blue, lapis lazuli, purple, magenta, and pink dyes have been changed.}}
{{History||1.11.0|snap=beta 1.11.0.4|Dye can now be [[trading|sold]] to shepherd [[villager]]s.}}
{{History||1.16.210|snap=beta 1.16.210.59|The color of the text on [[sign]]s can now be changed with dye.}}
{{History|||snap=beta 1.16.210.60|The ability to dye the color of the text on [[sign]]s was temporarily removed.}}
{{History||1.16.220|snap=beta 1.16.220.50|The color of the text on [[sign]]s can now be changed with dye again.}}
{{History||1.17.10|snap=beta 1.17.10.22|Added [[candles]], which can be dyed.}}
{{History|console}}
{{History||xbox=TU1|xbone=CU1|ps=1.0|wiiu=Patch 1|switch=1.0.1|[[File:Bone Meal JE1 BE1.png|32px]] [[File:Light Gray Dye JE1 BE1.png|32px]] [[File:Gray Dye JE1 BE1.png|32px]] [[File:Ink Sac JE1 BE1.png|32px]] [[File:Cocoa Beans JE1 BE1.png|32px]] [[File:Red Dye JE1 BE1.png|32px]] [[File:Orange Dye JE1 BE1.png|32px]] [[File:Yellow Dye JE1 BE1.png|32px]] [[File:Lime Dye JE1 BE1.png|32px]] [[File:Green Dye JE1 BE1.png|32px]] [[File:Cyan Dye JE1 BE1.png|32px]] [[File:Light Blue Dye JE1 BE1.png|32px]] [[File:Lapis Lazuli JE1 BE1.png|32px]] [[File:Purple Dye JE1 BE1.png|32px]] [[File:Magenta Dye JE1 BE1.png|32px]] [[File:Pink Dye JE1 BE1.png|32px]] Added dyes.}}
{{History||xbox=TU9|[[File:Cocoa Beans JE3 BE2.png|32px]] The texture of cocoa beans has been changed.}}
{{History||xbox=none|xbone=none|ps=1.83|wiiu=none|switch=none|[[File:White Dye JE1 BE1.png|32px]] [[File:Black Dye JE1 BE1.png|32px]] [[File:Brown Dye JE1 BE1.png|32px]] [[File:Blue Dye JE1 BE1.png|32px]] Added [[white dye|white]], [[black dye|black]], [[brown dye|brown]], and [[blue dye|blue]] dyes, which can crafted from [[bone meal]], [[ink sac]], [[cocoa beans]], and [[lapis lazuli]].
|"Rose Red", "Dandelion Yellow" and "Cactus Green" have been renamed to "Red Dye", "Yellow Dye" and "Green Dye", respectively.}}
{{History||ps=1.90|[[File:Bone Meal JE2 BE2.png|32px]] [[File:Light Gray Dye JE2 BE2.png|32px]] [[File:Gray Dye JE2 BE2.png|32px]] [[File:Ink Sac JE2 BE2.png|32px]] [[File:Cocoa Beans JE4 BE3.png|32px]] [[File:Red Dye JE2 BE2.png|32px]] [[File:Orange Dye JE2 BE2.png|32px]] [[File:Yellow Dye JE2 BE2.png|32px]] [[File:Lime Dye JE2 BE2.png|32px]] [[File:Green Dye JE2 BE2.png|32px]] [[File:Cyan Dye.png|32px]] [[File:Light Blue Dye JE2 BE2.png|32px]] [[File:Lapis Lazuli JE2 BE2.png|32px]] [[File:Purple Dye JE2 BE2.png|32px]] [[File:Magenta Dye JE2 BE2.png|32px]] [[File:Pink Dye JE2 BE2.png|32px]] The textures of bone meal, light gray, gray, ink sac, cocoa beans, red, orange, yellow, lime, green, cyan, light blue, lapis lazuli, purple, magenta, and pink dyes have been changed.}}
{{History|3ds}}
{{History||0.1.0|[[File:Bone Meal JE1 BE1.png|32px]] [[File:Light Gray Dye JE1 BE1.png|32px]] [[File:Gray Dye JE1 BE1.png|32px]] [[File:Ink Sac JE1 BE1.png|32px]] [[File:Cocoa Beans JE3 BE2.png|32px]] [[File:Red Dye JE1 BE1.png|32px]] [[File:Orange Dye JE1 BE1.png|32px]] [[File:Yellow Dye JE1 BE1.png|32px]] [[File:Lime Dye JE1 BE1.png|32px]] [[File:Green Dye JE1 BE1.png|32px]] [[File:Cyan Dye JE1 BE1.png|32px]] [[File:Light Blue Dye JE1 BE1.png|32px]] [[File:Lapis Lazuli JE1 BE1.png|32px]] [[File:Purple Dye JE1 BE1.png|32px]] [[File:Magenta Dye JE1 BE1.png|32px]] [[File:Pink Dye JE1 BE1.png|32px]] Added dyes from [[Pocket Edition v0.15.4 alpha]].}}
{{History|foot}}
<gallery>
Pre-release dyes.png|Pre-release dye textures hidden within [[Items.png]].
</gallery>
;Notes
{{reflist|group=n}}
== Gallery ==
<gallery>
White Dye.png|White Dye
Light Gray Dye.png|Light Gray Dye
Gray Dye.png|Gray Dye
Black Dye.png|Black Dye
Brown Dye.png|Brown Dye
Red Dye.png|Red Dye
Orange Dye.png|Orange Dye
Yellow Dye.png|Yellow Dye
Lime Dye.png|Lime Dye
Green Dye.png|Green Dye
Cyan Dye.png|Cyan Dye
Light Blue Dye.png|Light Blue Dye
Blue Dye.png|Blue Dye
Purple Dye.png|Purple Dye
Magenta Dye.png|Magenta Dye
Pink Dye.png|Pink Dye
</gallery>
==Issues==
{{issue list}}
== Trivia ==
* Players can obtain each one of every color with 1 cocoa bean, 2 yellow dye, 2 ink sac, 3 green dye, 4 lapis lazuli, 4 red dye, and 6 bone meal (2 bones).
* The dyed sheep breeding behavior mirrors [[wikipedia:Lamarckism|Lamarck's theory]], in which the organisms evolve inheriting the external changes and adaptations of the previous generation, transmitting them to their offspring.
* In ''Bedrock Edition'', tertiary colors, along with their regular crafting recipes, can be crafted with primary colors. E.g.: Magenta can be crafted with one rose red and two bone meals.
* The colors of the dyes match the chat colors in [[color codes]] except for brown (dye only), light aqua, and gold (color codes only).
* The texture for light blue dye still uses the color from prior to the 1.12 World of Color update.<ref name="unchanged dyes"></ref>
== References ==
{{reflist}}
== External Links ==
* Tools for calculating leather dye combination: [https://minecraft.tools/en/armor.php minecraft.tools] (webapp); [https://github.com/pudquick/pyMCdyes/ pyMCDyes] (open-source Python script, outdated); [https://anrar4.github.io/DyeLeatherArmor/ DyeLeatherArmor]: a tool for calculating an exact crafting recipe for any sRGB color
{{Items}}
[[Category:Dyes]]
[[Category:Renewable resources]]
[[cs:Barvivo]]
[[de:Farbstoff]]
[[es:Tinte]]
[[fr:Teinture]]
[[hu:Színezés]]
[[it:Colorante]]
[[ja:染料]]
[[ko:염료]]
[[nl:Kleurstof]]
[[pl:Barwniki]]
[[pt:Corante]]
[[ru:Красители]]
[[th:สีย้อม]]
[[uk:Барвники]]
[[zh:染料]]</li></ul> | 12w37a | Added ability to customize super flat world. | |||
1.7.2{{Extension DPL}}<ul><li>[[Banner Pattern|Banner Pattern]]<br/>{{Item
| image = Banner Pattern.png
| rarity =
* '''Flower Charge, Field Masoned, Bordure Indented, Globe, Snout'''
* Common
* '''Creeper Charge, Skull Charge'''
* Uncommon
* '''Thing'''
* Epic
| renewable =
* '''Snout, Thing''': No
* '''All others''': Yes
| stackable = No
}}
'''Banner patterns''' are [[item]]s used to customize [[banner]]s inside [[loom]]s.
There are six patterns {{in|java}} and eight {{in|bedrock}}.
== Obtaining ==
[[File:Banner Patterns 20w15a.png|thumb|All six banner patterns {{in|java}} with their various sources.]]
=== Crafting ===
{{see also|Banner/Patterns|title1=List of patterned banners}}
4 out of 6 banner patterns {{only|JE}} and 2 more {{only|BE}} can be obtained by crafting. They are crafted by combining one [[paper]] along with a certain material.
{{Crafting
|head=1
|Paper
|Creeper Head
|Output=Banner Pattern Creeper
|type=Miscellaneous
|description=Creeper face
}}
{{Crafting
|Paper
|Wither Skeleton Skull
|Output=Banner Pattern Skull
|type=Miscellaneous
|description=Skeleton skull and crossbones
}}
{{Crafting
|Paper
|Oxeye Daisy
|Output=Banner Pattern Flower
|type=Miscellaneous
|description=Daisy
}}
{{Crafting
|Paper
|Enchanted Golden Apple
|Output=Banner Pattern Thing
|type=Miscellaneous
|showdescription=true
|description=Former [[Mojang Studios]] logo
}}
{{Crafting
|Paper
|Bricks
|Output=Banner Pattern Field Masoned
|type=Miscellaneous
|description={{only|bedrock}}
}}
{{Crafting
|Paper
|Vines
|Output=Banner Pattern Bordure Indented
|type=Miscellaneous
|description={{only|bedrock}}
|foot=1
}}
=== Trading ===
'''Globe banner pattern''' is obtained by trading with a master-level [[Trading#Cartographer|cartographer villager]] for a price of 8 emeralds.
=== Chest loot ===
'''Snout banner pattern''' is obtained in the [[Bastion Remnant]] as loot.
{{LootChestItem|snout-banner-pattern}}
== Usage ==
=== Loom ingredient ===
Banner patterns are used in [[loom]]s to add customization to [[banner]]s. The pattern must be combined with 1 banner and 1 [[dye]]. Upon usage in the loom, the banner pattern is not consumed.
{{Looming
|head=1
|showdescription=1
|name=[[Banner|Flower Charge Banner]]
|ingredients={{:Banner/recipe|ingredients}}
|{{:Banner/recipe|banner}}
|Matching Dye
|Banner Pattern Flower Charge
|Flower Charge
|{{:Banner/recipe|output|Flower Charge}}
|Blink=Banner
|Olink=Banner
|description=Emblazons a flower charge (flower icon)
}}
{{Looming
|name=[[Banner|Creeper Charge Banner]]
|ingredients={{:Banner/recipe|ingredients}}
|{{:Banner/recipe|banner}}
|Matching Dye
|Banner Pattern Creeper Charge
|Creeper Charge
|{{:Banner/recipe|output|Creeper Charge}}
|Blink=Banner
|Olink=Banner
|description=Emblazons a creeper charge (creeper face)
}}
{{Looming
|name=[[Banner|Skull Charge Banner]]
|ingredients={{:Banner/recipe|ingredients}}
|{{:Banner/recipe|banner}}
|Matching Dye
|Banner Pattern Skull Charge
|Skull Charge
|{{:Banner/recipe|output|Skull Charge}}
|Blink=Banner
|Olink=Banner
|description=Emblazons a skull charge (skull and crossbones)
}}
{{Looming
|name=[[Banner|Thing Banner]]
|ingredients={{:Banner/recipe|ingredients}}
|{{:Banner/recipe|banner}}
|Matching Dye
|Banner Pattern Thing
|Thing
|{{:Banner/recipe|output|Thing}}
|Blink=Banner
|Olink=Banner
|description=Emblazons a thing (old Mojang logo)}}
{{Looming
|name=[[Banner|Snout Banner]]
|ingredients={{:Banner/recipe|ingredients}}
|{{:Banner/recipe|banner}}
|Matching Dye
|Banner Pattern Snout
|Snout
|{{:Banner/recipe|output|Snout}}
|Blink=Banner
|Olink=Banner
|description=Emblazons a piglin snout
}}
{{Looming
|name=[[Banner|Globe Banner]]
|ingredients={{:Banner/recipe|ingredients}}
|{{:Banner/recipe|banner}}
|Matching Dye
|Banner Pattern Globe
|Globe
|{{:Banner/recipe|output|Globe}}
|Blink=Banner
|Olink=Banner
|description=Emblazons a globe (cube shaped earth)
}}
{{Looming
|name=[[Banner|Bordure Indented Banner]]
|ingredients={{:Banner/recipe|ingredients}}
|{{:Banner/recipe|banner}}
|Matching Dye
|Banner Pattern Bordure Indented
|Bordure Indented
|{{:Banner/recipe|output|Bordure Indented}}
|Blink=Banner
|Olink=Banner
|description=Emblazons a bordure indented (fancy border){{only|bedrock}}
}}
{{Looming
|name=[[Banner|Field Masoned Banner]]
|ingredients={{:Banner/recipe|ingredients}}
|{{:Banner/recipe|banner}}
|Matching Dye
|Banner Pattern Field Masoned
|Field Masoned
|{{:Banner/recipe|output|Field Masoned}}
|Blink=Banner
|Olink=Banner
|description=Emblazons a field masoned (brick pattern){{only|bedrock}}
|foot=1
}}
== Data values ==
=== ID ===
{{edition|java}}:
{{ID table
|edition=java
|firstcolumnname=Banner Pattern
|showforms=y
|generatetranslationkeys=y
|displayname=Flower Charge
|spritename=banner-pattern
|spritetype=item
|nameid=flower_banner_pattern
|form=item}}
{{ID table
|displayname=Creeper Charge
|spritename=banner-pattern
|spritetype=item
|nameid=creeper_banner_pattern
|form=item}}
{{ID table
|displayname=Skull Charge
|spritename=banner-pattern
|spritetype=item
|nameid=skull_banner_pattern
|form=item}}
{{ID table
|displayname=Thing
|spritename=banner-pattern
|spritetype=item
|nameid=mojang_banner_pattern
|form=item}}
{{ID table
|displayname=Globe
|spritename=banner-pattern
|spritetype=item
|nameid=globe_banner_pattern
|form=item}}
{{ID table
|displayname=Snout
|spritename=banner-pattern
|spritetype=item
|nameid=piglin_banner_pattern
|form=item
|foot=1}}
{{edition|bedrock}}:
{{ID table
|edition=bedrock
|firstcolumnname=Banner Pattern
|showaliasids=y
|shownumericids=y
|showforms=y
|notshowbeitemforms=y
|generatetranslationkeys=y
|displayname=Creeper Charge
|spritename=banner-pattern
|spritetype=item
|nameid=creeper_banner_pattern
|aliasid=banner_pattern / 0
|id=582
|form=item
|translationkey=item.banner_pattern.name, item.banner_pattern.creeper}}
{{ID table
|displayname=Skull Charge
|spritename=banner-pattern
|spritetype=item
|nameid=skull_banner_pattern
|aliasid=banner_pattern / 1
|id=583
|form=item
|translationkey=item.banner_pattern.name, item.banner_pattern.skull}}
{{ID table
|displayname=Flower Charge
|spritename=banner-pattern
|spritetype=item
|nameid=flower_banner_pattern
|aliasid=banner_pattern / 2
|id=581
|form=item
|translationkey=item.banner_pattern.name, item.banner_pattern.flower}}
{{ID table
|displayname=Thing
|spritename=banner-pattern
|spritetype=item
|nameid=mojang_banner_pattern
|aliasid=banner_pattern / 3
|id=584
|form=item
|translationkey=item.banner_pattern.name, item.banner_pattern.thing}}
{{ID table
|displayname=Field Masoned
|spritename=banner-pattern
|spritetype=item
|nameid=field_masoned_banner_pattern
|aliasid=banner_pattern / 4
|id=585
|form=item
|translationkey=item.banner_pattern.name, item.banner_pattern.bricks}}
{{ID table
|displayname=Bordure Indented
|spritename=banner-pattern
|spritetype=item
|nameid=bordure_indented_banner_pattern
|aliasid=banner_pattern / 5
|id=586
|form=item
|translationkey=item.banner_pattern.name, item.banner_pattern.vines}}
{{ID table
|displayname=Snout
|spritename=banner-pattern
|spritetype=item
|nameid=piglin_banner_pattern
|aliasid=banner_pattern / 6
|id=587
|form=item
|translationkey=item.banner_pattern.name, item.banner_pattern.piglin}}
{{ID table
|displayname=Globe
|spritename=banner-pattern
|spritetype=item
|nameid=globe_banner_pattern
|aliasid=banner_pattern / 7
|id=588
|form=item
|translationkey=item.banner_pattern.name, item.banner_pattern.globe
|foot=1}}
== Achievements ==
{{load achievements|Fruit on the Loom}}
== History ==
{{History|java}}
{{History||1.14|snap=18w43a|[[File:Banner Pattern JE1 BE1.png|32px]] [[File:Banner Pattern JE1 BE1.png|32px]] [[File:Banner Pattern JE1 BE1.png|32px]] [[File:Banner Pattern JE1 BE1.png|32px]] Added banner patterns for flower charge, creeper charge, skull charge and thing patterns.}}
{{History|||snap=19w11a|[[File:Banner Pattern JE1 BE1.png|32px]] Added banner pattern for globe.
|The banner pattern for globe can be [[trading|bought]] from master-level cartographer [[villager]]s for 8 [[emerald]]s.}}
{{History||1.16|snap=20w15a|[[File:Banner Pattern JE1 BE1.png|32px]] Added the piglin banner pattern.}}
{{History|||snap=20w16a|The piglin banner pattern can now be found in [[chest]]s in [[bastion remnants]].}}
{{History|||snap=20w18a|The piglin pattern has now been renamed to "Snout".}}
{{History||1.16.2|snap=20w30a|The chance of finding the "Snout" banner pattern in bastion remnant chests has been increased from 5.5% to 10.1%.}}
{{History|bedrock}}
{{History||1.10.0|snap=beta 1.10.0.3|[[File:Banner Pattern JE1 BE1.png|32px]] [[File:Banner Pattern JE1 BE1.png|32px]] [[File:Banner Pattern JE1 BE1.png|32px]] [[File:Banner Pattern JE1 BE1.png|32px]] [[File:Banner Pattern JE1 BE1.png|32px]] [[File:Banner Pattern JE1 BE1.png|32px]] Added banner patterns for creeper charge, skull charge, flower charge, thing, field masoned and bordure indented patterns.}}
{{History||1.11.0|snap=beta 1.11.0.4|The banner patterns flower charge, field masoned and bordure indented can now be [[trading|bought]] from cartographer [[villager]]s.}}
{{History||1.16.0|snap=beta 1.16.0.57|[[File:Banner Pattern JE1 BE1.png|32px]] Added the piglin banner pattern.}}
{{History|||snap=beta 1.16.0.59|The piglin pattern has now been renamed to "Snout".}}
{{History||1.16.100|snap=beta 1.16.100.55|The "Thing" banner pattern can now be crafted at the [[loom]].}}
{{History||1.16.100|snap=beta 1.16.100.56|The ID of banner patterns have been changed from <code>banner_pattern</code> to <code><type>_banner_pattern</code>.}}
{{History||1.18.10|snap=beta 1.18.10.24|[[File:Banner Pattern JE1 BE1.png|32px]] Added banner pattern for globe. It is currently unobtainable in survival.}}
{{History|||snap=beta 1.18.10.26|The banner pattern for globe are now obtainable in survival and can be [[trading|bought]] from master-level cartographer [[villager]]s for 8 [[emerald]]s.
|Removed flower charge, field masoned and bordure indented banner pattern from villager trading.}}
{{History|PS4}}
{{History||1.90|[[File:Banner Pattern JE1 BE1.png|32px]] [[File:Banner Pattern JE1 BE1.png|32px]] [[File:Banner Pattern JE1 BE1.png|32px]] [[File:Banner Pattern JE1 BE1.png|32px]] [[File:Banner Pattern JE1 BE1.png|32px]] [[File:Banner Pattern JE1 BE1.png|32px]] Added banner patterns for creeper charge, skull charge, flower charge, thing, field masoned and bordure indented patterns.}}
{{History|foot}}
== Issues ==
{{issue list}}
{{Items}}
[[de:Bannervorlage]]
[[es:Diseño de estandarte]]
[[fr:Motif de bannière]]
[[ja:旗の模様]]
[[ko:현수막 무늬]]
[[pl:Wzór sztandaru]]
[[pt:Desenho para estandarte]]
[[ru:Узор флага]]
[[th:ลวดลายธง]]
[[zh:旗帜图案]]</li><li>[[Compound|Compound]]<br/>{{About|a feature in the Education Edition|the NBT tag|NBT}}
{{education feature}}
{{exclusive|bedrock|education}}
{{Item
| image = Water (compound).png
| image2 = Garbage.png
| renewable = No
| stackable = Yes (64)
}}
'''Compounds''' are a type of [[item]] from [[Education Edition]] used in chemistry, which are created from combinations of various [[element]]s.
== Obtaining ==
Compounds cannot be obtained in the [[Creative inventory]]. They are only obtained from creating them in the [[compound creator]]. This is done by inserting a certain number of [[element]]s corresponding to the compound's chemical formula.
== List of compounds ==
{| class="wikitable" data-description="Compounds"
!Icon
!Compound Name
!Compound Recipe
!Description
!Uses
|-
|{{slot|Aluminum Oxide|link=none}}
|{{text anchor|Aluminium Oxide}}
|{{slot|Aluminum,2}}{{slot|Oxygen,3}}
|Is only brown when dug up from the Earth and contaminated; actually white when pure. Can be electrolyzed to make aluminum metal. Also the main chemical in rubies and sapphires.
|Used to craft [[hardened glass]].
|-
|{{slot|Ammonia|link=none}}
|{{text anchor|Ammonia}}
|{{slot|Nitrogen}}{{slot|Hydrogen,3}}
|
|Used to create [[super fertilizer]].
|-
|{{slot|Barium Sulfate|link=none}}
|{{text anchor|Barium Sulfate}}
|{{slot|Barium}}{{slot|Sulfur}}{{slot|Oxygen,4}}
|
|
|-
|{{slot|Benzene|link=none}}
|{{text anchor|Benzene}}
|{{slot|Carbon,6}}{{slot|Hydrogen,6}}
|
|
|-
|{{slot|Boron Trioxide|link=none}}
|{{text anchor|Boron Trioxide}}
|{{slot|Boron,2}}{{slot|Oxygen,3}}
|
|Used to craft [[hardened glass]].
|-
|{{slot|Calcium Bromide|link=none}}
|{{text anchor|Calcium Bromide}}
|{{slot|Calcium}}{{slot|Bromine,2}}
|
|
|-
|{{slot|Crude Oil|link=none}}
|{{text anchor|Crude Oil}}
|{{slot|Carbon,9}}{{slot|Hydrogen,20}}
|C<sub>9</sub>H<sub>20</sub> is the chemical formula for nonane.
|
|-
|{{slot|Glue|link=none}}
|{{text anchor|Glue}} (Cyanoacrylate)
|{{slot|Carbon,5}}{{slot|Hydrogen,5}}{{slot|Nitrogen}}{{slot|Oxygen,2}}
|C<sub>5</sub>H<sub>5</sub>NO<sub>2</sub> is the chemical formula for methyl cyanoacrylate, one of the cyanoacrylate glues ("superglue"); its condensed formula is CH<sub>2</sub>=C(CN)COOCH<sub>3</sub>.
|
|-
|{{slot|Hydrogen Peroxide|link=none}}
|{{text anchor|Hydrogen Peroxide}}
|{{slot|Hydrogen,2}}{{slot|Oxygen,2}}
|
|Used to craft [[glow stick]].
|-
|{{slot|Iron Sulfide|link=none}}
|{{text anchor|Iron Sulfide}}
|{{slot|Iron}}{{slot|Sulfur}}
|
|
|-
|{{slot|Latex|link=none}}
|{{text anchor|Latex}}
|{{slot|Carbon,5}}{{slot|Hydrogen,8}}
|C<sub>5</sub>H<sub>8</sub> is the chemical formula for isoprene, which polymers are the main components of natural rubber; its condensed formula is CH<sub>2</sub>=C(CH<sub>3</sub>)−CH=CH<sub>2</sub>.
|Used to craft [[balloon]]s.
|-
|{{slot|Lithium Hydride|link=none}}
|{{text anchor|Lithium Hydride}}
|{{slot|Lithium}}{{slot|Hydrogen}}
|
|
|-
|{{slot|Luminol|link=none}}
|{{text anchor|Luminol}}
| class="nowrap" |{{slot|Carbon,8}}{{slot|Hydrogen,7}}{{slot|Nitrogen,3}}{{slot|Oxygen,2}}
|Luminol is a chemical that glows blue when oxidized. It can detect blood.
|Used to craft [[glow stick]].
|-
|{{slot|Lye|link=none}}
|{{text anchor|Lye}}
|{{slot|Sodium}}{{slot|Oxygen}}{{slot|Hydrogen}}
|
|
|-
|{{slot|Magnesium Nitrate|link=none}}
|{{text anchor|Magnesium Nitrate}}
|{{slot|Magnesium}}{{slot|Nitrogen,2}}{{slot|Oxygen,6}}
|Condensed formula: Mg(NO<sub>3</sub>)<sub>2</sub>
|
|-
|{{slot|Magnesium Oxide|link=none}}
|{{text anchor|Magnesium Oxide}}
|{{slot|Magnesium}}{{slot|Oxygen}}
|
|
|-
|{{slot|Polyethylene|link=none}}
|{{text anchor|Polyethylene}}
|{{slot|Carbon,10}}{{slot|Hydrogen,20}}
|Polyethlene (PE), (CH<sub>2</sub>)<sub>''n''</sub>, is ''the'' most commonly produced plastic.
|Used to craft [[glow stick]].
|-
|{{slot|Potassium Iodide|link=none}}
|{{text anchor|Potassium Iodide}}
|{{slot|Potassium}}{{slot|Iodine}}
|Used for making iodized salt and other things.
|
|-
|{{slot|Soap|link=none}}
|{{text anchor|Soap}}
|{{slot|Carbon,18}}{{slot|Hydrogen,35}}{{slot|Sodium}}{{slot|Oxygen,2}}
|C<sub>18</sub>H<sub>35</sub>NaO<sub>2</sub> is the chemical formula of sodium stearate, the most common soap.
|
|-
|{{slot|Sodium Acetate|link=none}}
|{{text anchor|Sodium Acetate}}
|{{slot|Carbon,2}}{{slot|Hydrogen,3}}{{slot|Sodium}}{{slot|Oxygen,2}}
|Used to make hand warmers because it heats up when it "freezes".
|Used to create [[Ice Bomb]].
|-
|{{slot|Sodium Fluoride|link=none}}
|{{text anchor|Sodium Fluoride}}
|{{slot|Sodium}}{{slot|Fluorine}}
|Commonly used in toothpaste to prevent cavity, among other uses.
|
|-
|{{slot|Sodium Hydride|link=none}}
|{{text anchor|Sodium Hydride}}
|{{slot|Sodium}}{{slot|Hydrogen}}
|
|
|-
|{{slot|Sodium Hypochlorite|link=none}}
|{{text anchor|Sodium Hypochlorite}}
|{{slot|Sodium}}{{slot|Chlorine}}{{slot|Oxygen}}
|Main ingredient of real-life bleach.
|Used to create [[Bleach]].
|-
|{{slot|Sodium Oxide|link=none}}
|{{text anchor|Sodium Oxide}}
|{{slot|Sodium,2}}{{slot|Oxygen}}
|
|
|-
|{{slot|Sulfate|link=none}}
|{{text anchor|Sulfate}}
|{{slot|Sulfur}}{{slot|Oxygen,4}}
|Cannot actually exist on its own, as it should have a <sup>2-</sup> charge.
|
|}
=== Chlorides ===
{| class="wikitable" data-description="Chlorides"
!Icon
!Compound
!Recipe
!Uses
|-
|{{slot|Salt|link=none}}
|{{text anchor|Salt}}
|{{slot|Sodium}}{{slot|Chlorine}}
|Used to create [[heat block]].
|-
|{{slot|Calcium Chloride|link=none}}
|{{text anchor|Calcium Chloride}}
|{{slot|Calcium}}{{slot|Chlorine,2}}
|Used to craft [[sparkler|orange sparkler]].
|-
|{{slot|Cerium Chloride|link=none}}
|{{text anchor|Cerium Chloride}}
|{{slot|Cerium}}{{slot|Chlorine,3}}
|Used to craft [[colored torch|blue torch]] and [[sparkler|blue sparkler]].
|-
|{{slot|Mercuric Chloride|link=none}}
|{{text anchor|Mercuric Chloride}}
|{{slot|Mercury}}{{slot|Chlorine,2}}
|Used to craft [[colored torch|red torch]] and [[sparkler|red sparkler]].
|-
|{{slot|Potassium Chloride|link=none}}
|{{text anchor|Potassium Chloride}}
|{{slot|Potassium}}{{slot|Chlorine}}
|Used to craft [[colored torch|purple torch]] and [[sparkler|purple sparkler]].
|-
|{{slot|Tungsten Chloride|link=none}}
|{{text anchor|Tungsten Chloride}}
|{{slot|Tungsten}}{{slot|Chlorine,6}}
|Used to craft [[colored torch|green torch]] and [[sparkler|green sparkler]].
|}
=== Natural compounds ===
Natural compounds are compounds which can be obtained naturally in ''Minecraft''.
{| class="wikitable" data-description="Chlorides"
!Icon
!Compound
! class="nowrap" |Chemical formula
!Natural source
!Method
!Notes
|-
|{{slot|Charcoal}}
|[[Charcoal]]
|{{slot|Carbon,7}}{{slot|Hydrogen,4}}{{slot|Oxygen}}
|[[Log]] or [[Wood]]
|[[Smelting]]
|The chemical formula C<sub>7</sub>H<sub>4</sub>O is sometimes used to describe the approximate composition of charcoal.
|-
|{{slot|Glow Ink Sac}} {{slot|Ink Sac}}
|[[Glow Ink Sac]], [[Ink Sac]]
|{{slot|Iron}}{{slot|Sulfur}}{{slot|Oxygen,4}}
|[[Glow Squid]], [[Squid]]
|Killing Glow Squid, Squid
|FeSO<sub>4</sub> is the chemical formula of iron(II) sulfate or ferrous sulfate, normally found complexed with water as a salt with the formula FeSO<sub>4</sub>·''x''H<sub>2</sub>O, and has been used in the manufacture of iron gall ink and other inks for centuries. In contrast, squid ink (and other cephalopod inks) is composed mainly of melanin and mucus, with an assortment of other compounds in a variety of concentrations dependent on the species.
|-
|{{slot|Sugar}}
|[[Sugar]]
|{{slot|Carbon,6}}{{slot|Hydrogen,12}}{{slot|Oxygen,6}}
|[[Sugar Cane]]s or [[Honey Bottle]]s
|Harvesting and [[crafting]]
|C<sub>6</sub>H<sub>12</sub>O<sub>6</sub> is the chemical formula of glucose and fructose, as well as a number of other simple sugars (common table sugar is instead sucrose, a complex sugar made of glucose and fructose with the chemical formula C<sub>12</sub>H<sub>22</sub>O<sub>11</sub>).
|-
|{{slot|Water (compound)|link=water}}
|{{text anchor|Water}}
|{{slot|Hydrogen,2}}{{slot|Oxygen}}
|[[Water]]
|Picking up in a [[bucket]] or [[glass bottle]] from a [[Cauldron]] or a water source block
|One of the easiest to obtain.
|}
=== Garbage ===
Garbage is considered a "compound", but the only way to produce it is to activate the [[Lab Table]] when its inputs are an invalid recipe. It has no uses.
== Usage ==
Certain compounds are used as ingredients in [[crafting]] or [[lab table]] experiments. Natural compounds have uses outside of chemistry, detailed in their respective articles.
=== Crafting ingredient ===
{{Crafting usage|description=0|Latex, Polyethylene, Hydrogen Peroxide, Luminol, Boron Trioxide, Aluminum Oxide}}
==== Chloride coloring ====
{{Crafting usage|Chloride,Cerium Chloride|match=end}}
=== Lab table ingredient ===
{| class="wikitable"
!Result
!Materials needed
|-
! rowspan="2" |{{slot|Bleach}}<br>[[Bleach]]
|{{slot|Water (compound)|link=Compound}}{{slot|Water (compound)|link=Compound}}{{slot|Water (compound)|link=Compound}}{{slot|Sodium Hypochlorite|link=Compound}}{{slot|Sodium Hypochlorite|link=Compound}}{{slot|Sodium Hypochlorite|link=Compound}}
|-
|<center>Water ×3, Sodium Hypochlorite ×3</center>
|-
! rowspan="2" |{{slot|Heat Block.gif}}<br>[[Heat Block]]
|{{slot}}{{slot|Iron|link=Element#Iron}}{{slot|Water (compound)|link=Compound}}{{slot|Charcoal}}{{slot|Salt|link=Compound}}{{slot}}
|-
|<center>[[Iron (element)|Iron]], Water, [[Charcoal]], Salt</center>
|-
! rowspan="2" |{{slot|Ice Bomb}}<br>[[Ice Bomb]]
|{{slot}}{{slot|Sodium Acetate|link=Compound}}{{slot|Sodium Acetate|link=Compound}}{{slot|Sodium Acetate|link=Compound}}{{slot|Sodium Acetate|link=Compound}}{{slot}}
|-
|<center>Sodium Acetate ×4</center>
|-
! rowspan="2" |{{slot|Super Fertilizer}}<br>[[Super Fertilizer]]
|{{slot}}{{slot}}{{slot|Ammonia|link=Compound}}{{slot|Phosphorus|link=Element#Phosphorus}}{{slot}}{{slot}}
|-
|<center>Ammonia, [[Phosphorus]]</center>
|}
== Sounds ==
Sounds are produced when a [[lab table]] creates garbage.
{{Sound table
|type=bedrock
|sound=Fizz.ogg
|source=block
|description=When a lab table creates garbage{{verify}}
|id=random.fizz
|volume=1.0
|pitch=0.5/0.7}}
{{Sound table
|sound=Ghast fireball4.ogg
|source=hostile
|description=When a lab table creates garbage{{verify}}
|id=mob.blaze.shoot
|volume=1.0
|pitch=0.8/1.0}}
{{Sound table
|sound=Explosion1.ogg
|sound2=Explosion2.ogg
|sound3=Explosion3.ogg
|sound4=Explosion4.ogg
|source=block
|description=When a lab table creates garbage
|id=random.explode
|volume=1.0
|pitch=0.4/0.6}}
{{Sound table
|sound=Fire.ogg
|source=sound
|description=When a lab table creates garbage
|id=lt.reaction.fire
|volume=2.0
|pitch=0.4/0.6}}
{{Sound table
|sound=Explosion1.ogg
|sound2=Explosion2.ogg
|sound3=Explosion3.ogg
|sound4=Explosion4.ogg
|source=weather
|description=When a lab table creates garbage
|id=ambient.weather.lightning.impact
|volume=1.0
|pitch=0.6/0.8
|foot=1}}
== Data values ==
=== ID ===
{{ID table
|edition=bedrock
|shownumericids=y
|showforms=y
|notshowbeitemforms=y
|generatetranslationkeys=y
|displayname=Compound
|spritetype=item
|nameid=compound
|id=594
|form=item
|translationkey=item.compound.salt.name,item.compound.sodiumoxide.name,item.compound.sodiumhydroxide.name,item.compound.magnesiumnitrate.name,item.compound.ironsulfide.name,item.compound.lithiumhydride.name,item.compound.sodiumhydride.name,item.compound.calciumbromide.name,item.compound.magnesiumoxide.name,item.compound.sodiumacetate.name,item.compound.luminol.name,item.compound.charcoal.name,item.compound.sugar.name,item.compound.aluminumoxide.name,item.compound.borontrioxide.name,item.compound.soap.name,item.compound.polyethylene.name,item.compound.garbage.name,item.compound.magnesiumsalts.name,item.compound.sulfate.name,item.compound.bariumsulfate.name,item.compound.potassiumchloride.name,item.compound.mercuricchloride.name,item.compound.ceriumchloride.name,item.compound.tungstenchloride.name,item.compound.calciumchloride.name,item.compound.water.name,item.compound.glue.name,item.compound.hypochlorite.name,item.compound.crudeoil.name,item.compound.latex.name,item.compound.potassiumiodide.name,item.compound.sodiumfluoride.name,item.compound.benzene.name,item.compound.ink.name,item.compound.hydrogenperoxide.name,item.compound.ammonia.name,item.compound.sodiumhypochlorite.name
|foot=1}}
===Item data===
{{see also|Data values}}Compounds uses the following data values:{{/DV}}
== History ==
{{History|bedrock}}
{{History||1.4.0|snap=beta 1.2.20.1|[[File:Aluminum Oxide BE1.png|32px]] [[File:Ammonia BE1.png|32px]] [[File:Barium Sulfate BE1.png|32px]] [[File:Benzene BE1.png|32px]] [[File:Boron Trioxide BE1.png|32px]] [[File:Calcium Bromide BE1.png|32px]] [[File:Crude Oil BE1.png|32px]] [[File:Glue BE1.png|32px]] [[File:Hydrogen Peroxide BE1.png|32px]] [[File:Iron Sulfide BE1.png|32px]] [[File:Latex BE1.png|32px]] [[File:Lithium Hydride BE1.png|32px]] [[File:Luminol BE1.png|32px]] [[File:Lye BE1.png|32px]] [[File:Magnesium Nitrate BE1.png|32px]] [[File:Magnesium Oxide BE1.png|32px]] [[File:Polyethylene BE1.png|32px]] [[File:Potassium Iodide BE1.png|32px]] [[File:Salt BE1.png|32px]] [[File:Soap BE1.png|32px]] [[File:Sodium Acetate BE1.png|32px]] [[File:Sodium Fluoride.png|32px]] [[File:Sodium Hydride BE1.png|32px]] [[File:Sodium Hypochlorite BE1.png|32px]] [[File:Sodium Oxide BE1.png|32px]] [[File:Sulfate BE1.png|32px]] [[File:Calcium Chloride BE1.png|32px]] [[File:Cerium Chloride BE1.png|32px]] [[File:Mercuric Chloride BE1.png|32px]] [[File:Potassium Chloride BE1.png|32px]] [[File:Tungsten Chloride BE1.png|32px]] [[File:Charcoal JE3 BE3.png|32px]] [[File:Ink Sac JE1 BE1.png|32px]] [[File:Sugar JE1 BE1.png|32px]] [[File:Water (compound) BE1.png|32px]] [[File:Garbage BE1.png|32px]] Added compounds.}}
{{History||1.10.0|snap=beta 1.10.0.3|[[File:Charcoal JE4 BE4.png|32px]][[File:Ink Sac JE2 BE2.png|32px]][[File:Sugar JE2 BE2.png|32px]] The textures of Charcoal, Ink Sacs and Sugar have been changed.}}
{{History||1.16|All compounds have been made unobtainable. It is unknown whether it is a glitch or intended. {{bug|MCPE-113776}}}}
{{History| |1.17.0|All compounds are obtainable once again.}}{{History|education}}
{{History||1.0.27|[[File:Aluminum Oxide BE1.png|32px]] [[File:Ammonia BE1.png|32px]] [[File:Barium Sulfate BE1.png|32px]] [[File:Benzene BE1.png|32px]] [[File:Boron Trioxide BE1.png|32px]] [[File:Calcium Bromide BE1.png|32px]] [[File:Crude Oil BE1.png|32px]] [[File:Glue BE1.png|32px]] [[File:Hydrogen Peroxide BE1.png|32px]] [[File:Iron Sulfide BE1.png|32px]] [[File:Latex BE1.png|32px]] [[File:Lithium Hydride BE1.png|32px]] [[File:Luminol BE1.png|32px]] [[File:Lye BE1.png|32px]] [[File:Magnesium Nitrate BE1.png|32px]] [[File:Magnesium Oxide BE1.png|32px]] [[File:Polyethylene BE1.png|32px]] [[File:Potassium Iodide BE1.png|32px]] [[File:Salt BE1.png|32px]] [[File:Soap BE1.png|32px]] [[File:Sodium Acetate BE1.png|32px]] [[File:Sodium Fluoride BE1.png|32px]] [[File:Sodium Hydride BE1.png|32px]] [[File:Sodium Hypochlorite BE1.png|32px]] [[File:Sodium Oxide BE1.png|32px]] [[File:Sulfate BE1.png|32px]] [[File:Calcium Chloride BE1.png|32px]] [[File:Cerium Chloride BE1.png|32px]] [[File:Mercuric Chloride BE1.png|32px]] [[File:Potassium Chloride BE1.png|32px]] [[File:Tungsten Chloride BE1.png|32px]] [[File:Charcoal JE3 BE3.png|32px]] [[File:Ink Sac JE1 BE1.png|32px]] [[File:Sugar JE1 BE1.png|32px]] [[File:Water (compound) BE1.png|32px]] [[File:Garbage BE1.png|32px]] Added compounds.}}
{{History||1.12.0|[[File:Charcoal JE4 BE4.png|32px]][[File:Ink Sac JE2 BE2.png|32px]][[File:Sugar JE2 BE2.png|32px]] The textures of Charcoal, Ink Sacs and Sugar have been changed.}}
{{History|foot}}
== Unused compound textures ==
In the chemistry resource pack folder, there are numerous [[History of textures/Unused textures#Unused compounds|compound textures which are not used]] in the game. Note: a <code>compound</code> item with a data value of <code>38</code> will have the <code>Blue Flask</code> texture and will be called <code>item.compound..name</code>. If you use an NBT Editor to get a compound item with no assigned data value (by deleting the data tag) and then transfer that item to another world / realm using structure blocks (by exporting to a <code>.mcstructure</code> file, then importing it on another world or realm) then it will be renamed to <code>Ivory Tusk</code>.
<gallery widths="48" heights="48" perrow="30" class="center">
Flask EE1.png|Flask
Black Flask EE1.png|Black Flask
Blue Flask EE1.png|Blue Flask
Brown Beaker EE1.png|Brown Beaker
Brown Flask EE1.png|Brown Flask
Dark Gray Beaker EE1.png|Dark Gray Beaker
Dark Gray Flask EE1.png|Dark Gray Flask
Dark Gray Jar EE1.png|Dark Gray Jar
Green Beaker EE1.png|Green Beaker
Green Flask EE1.png|Green Flask
Green Jar EE1.png|Green Jar
Indigo Beaker EE1.png|Indigo Beaker
Indigo Flask EE1.png|Indigo Flask
Indigo Jar EE1.png|Indigo Jar
Light Gray Beaker EE1.png|Light Gray Beaker
Light Gray Flask EE1.png|Light Gray Flask
Orange Beaker EE1.png|Orange Beaker
Orange Flask EE1.png|Orange Flask
Orange Jar EE1.png|Orange Jar
Purple Beaker EE1.png|Purple Beaker
Purple Flask EE1.png|Purple Flask
Purple Jar EE1.png|Purple Jar
Red Beaker EE1.png|Red Beaker
Red Flask EE1.png|Red Flask
Red Jar EE1.png|Red Jar
White Flask EE1.png|White Flask
Yellow Flask EE1.png|Yellow Flask
Bleach (compound).png|Bleach
</gallery>
== Gallery ==
<gallery>
Screen Shot 2021-08-19 at 12.22.50 PM.png|A compound creator in using 5 carbon and 8 hydrogen to create latex.
</gallery>
== See also ==
*[[Compound Creator]]
*[[Crafting]]
*[[Element Constructor]]
*[[Lab Table]]
*[[Brewing Stand]]
*[[Brewing]]
*[[Crafting Table]]
== References ==
{{reflist}}
{{Items}}
{{Education Edition}}
[[Category:Non-renewable resources]]
[[Category:Education Edition items]]
[[de:Verbindung]]
[[it:Composto]]
[[ja:化合物]]
[[pl:Związki chemiczne]]
[[pt:Composto]]
[[ru:Соединение]]
[[th:สารประกอบ]]
[[uk:Сполуки]]
[[zh:化合物]]</li></ul> | 13w36a | New world type 'AMPLIFIED' is added. | |||
1.8{{Extension DPL}}<ul><li>[[Goat Horn|Goat Horn]]<br/>{{redirect|Horn}}
{{Item
| image = Goat Horn JE1 BE1.png
| renewable = Yes
| stackable = No
}}
A '''goat horn''' is an [[item]] dropped by [[goat]]s. It has eight variants, and each plays a unique sound when {{Control|used}} which can be heard by [[Player|players]] in a large radius.
== Obtaining ==
=== Mob loot ===
A horn is dropped when an adult [[goat]] rams a tree or any other hard block that occurs naturally where goats spawn. These include [[stone]], [[coal ore]], [[copper ore]], [[iron ore]], [[emerald ore]], [[log]], or [[packed ice]]. Goats do not ram other solid blocks. {{IN|java}}, these blocks are listed under the {{cd|snaps_goat_horn}} [[tag]], and can be modified by [[data pack]]s.
Up to two horns can be dropped from an adult goat. Regular goats may drop the Ponder, Sing, Seek, and Feel horns, while screaming goats drop the Admire, Call, Yearn, and Dream horns. A specific goat drops only one type of horn; that is, if a goat drops a Sing horn, its other horn is also a Sing horn.
=== Natural generation ===
{{LootChestItem|goat-horn}}
Only the four variants from regular goats can be found here.
== Usage ==
When {{control|used}}, they play a loud sound that can be heard from up to 256 blocks, but are also limited by the server view distance. Each horn variant plays a unique sound. There are eight variants, four of which are exclusive to [[Goat#Spawning|screaming goats]].
There is a cooldown of seven seconds between each use of the horn. All goat horns are affected by this cooldown.
== Sounds ==
=== Generic ===
{{edition|java}}:
{{Sound table
|sound=Goat horn break1.ogg
|sound2=Goat horn break2.ogg
|sound3=Goat horn break3.ogg
|sound4=Goat horn break4.ogg
|subtitle=Goat Horn breaks off
|source=neutral
|description=When a goat's horn breaks off
|id=entity.goat.horn_break
|translationkey=subtitles.entity.goat.horn_break
|volume=0.9
|pitch=1.0
|distance=16
|foot=1}}
{{edition|bedrock}}:
{{Sound table
|type=bedrock
|sound=Goat horn break1.ogg
|sound2=Goat horn break2.ogg
|sound3=Goat horn break3.ogg
|sound4=Goat horn break4.ogg
|description=When a goat's horn breaks off
|source=hostile
|id=mob.goat.horn_break
|volume=1.0
|pitch=1.0
|foot=1}}
=== Playing ===
{{edition|java}}:
{{Sound table
|sound=Goat Horn Call0.ogg
|description="Ponder"
|subtitle=Goat horn plays
|source=Jukebox/Note Blocks
|id=item.goat_horn.sound.0
|translationkey=subtitles.item.goat_horn.play
|volume=16.0
|pitch=1.0
|distance=256}}
{{Sound table
|sound=Goat Horn Call1.ogg
|description="Sing"
|subtitle=Goat horn plays
|source=Jukebox/Note Blocks
|id=item.goat_horn.sound.1
|translationkey=subtitles.item.goat_horn.play
|volume=16.0
|pitch=1.0
|distance=256}}
{{Sound table
|sound=Goat Horn Call2.ogg
|description="Seek"
|subtitle=Goat horn plays
|source=Jukebox/Note Blocks
|id=item.goat_horn.sound.2
|translationkey=subtitles.item.goat_horn.play
|volume=16.0
|pitch=1.0
|distance=256}}
{{Sound table
|sound=Goat Horn Call3.ogg
|description="Feel"
|subtitle=Goat horn plays
|source=Jukebox/Note Blocks
|id=item.goat_horn.sound.3
|translationkey=subtitles.item.goat_horn.play
|volume=16.0
|pitch=1.0
|distance=256}}
{{Sound table
|sound=Goat Horn Call4.ogg
|description="Admire"<ref group=note name=screaming>These are dropped by screaming goats.</ref>
|subtitle=Goat horn plays
|source=Jukebox/Note Blocks
|id=item.goat_horn.sound.4
|translationkey=subtitles.item.goat_horn.play
|volume=16.0
|pitch=1.0
|distance=256}}
{{Sound table
|sound=Goat Horn Call5.ogg
|description="Call"<ref group=note name=screaming/>
|subtitle=Goat horn plays
|source=Jukebox/Note Blocks
|id=item.goat_horn.sound.5
|translationkey=subtitles.item.goat_horn.play
|volume=16.0
|pitch=1.0
|distance=256}}
{{Sound table
|sound=Goat Horn Call6.ogg
|description="Yearn"<ref group=note name=screaming/>
|subtitle=Goat horn plays
|source=Jukebox/Note Blocks
|id=item.goat_horn.sound.6
|translationkey=subtitles.item.goat_horn.play
|volume=16.0
|pitch=1.0
|distance=256}}
{{Sound table
|sound=Goat Horn Call7.ogg
|description="Dream"<ref group=note name=screaming/>
|subtitle=Goat horn plays
|source=Jukebox/Note Blocks
|id=item.goat_horn.sound.7
|translationkey=subtitles.item.goat_horn.play
|volume=16.0
|pitch=1.0
|distance=256
|foot=1}}
{{edition|bedrock}}:
{{Sound table
|type=bedrock
|sound=Goat Horn Call0.ogg
|source=Jukebox/Note Blocks<wbr>{{Until|BE 1.20.40}}<br>Hostile Creatures<wbr>{{Upcoming|BE 1.20.40}}|overridesource=1
|description="Ponder"
|id=horn.call.0
|volume=1.0<wbr><ref group=sound name=nodistance>{{Bug|MCPE-153254}}</ref><wbr>{{Until|BE 1.20.40}}<br>16.0<wbr>{{Upcoming|BE 1.20.40}}
|pitch=1.0}}
{{Sound table
|sound=Goat Horn Call1.ogg
|source=Jukebox/Note Blocks<wbr>{{Until|BE 1.20.40}}<br>Hostile Creatures<wbr>{{Upcoming|BE 1.20.40}}|overridesource=1
|description="Sing"
|id=horn.call.1
|volume=1.0<wbr><ref group=sound name=nodistance/><wbr>{{Until|BE 1.20.40}}<br>16.0<wbr>{{Upcoming|BE 1.20.40}}
|pitch=1.0}}
{{Sound table
|sound=Goat Horn Call2.ogg
|source=Jukebox/Note Blocks<wbr>{{Until|BE 1.20.40}}<br>Hostile Creatures<wbr>{{Upcoming|BE 1.20.40}}|overridesource=1
|description="Seek"
|id=horn.call.2
|volume=1.0<wbr><ref group=sound name=nodistance/><wbr>{{Until|BE 1.20.40}}<br>16.0<wbr>{{Upcoming|BE 1.20.40}}
|pitch=1.0}}
{{Sound table
|sound=Goat Horn Call3.ogg
|source=Jukebox/Note Blocks<wbr>{{Until|BE 1.20.40}}<br>Hostile Creatures<wbr>{{Upcoming|BE 1.20.40}}|overridesource=1
|description="Feel"
|id=horn.call.3
|volume=1.0<wbr><ref group=sound name=nodistance/><wbr>{{Until|BE 1.20.40}}<br>16.0<wbr>{{Upcoming|BE 1.20.40}}
|pitch=1.0}}
{{Sound table
|sound=Goat Horn Call4.ogg
|source=Jukebox/Note Blocks<wbr>{{Until|BE 1.20.40}}<br>Hostile Creatures<wbr>{{Upcoming|BE 1.20.40}}|overridesource=1
|description="Admire"<ref group=note name=screaming/>
|id=horn.call.4
|volume=1.0<wbr><ref group=sound name=nodistance/><wbr>{{Until|BE 1.20.40}}<br>16.0<wbr>{{Upcoming|BE 1.20.40}}
|pitch=1.0}}
{{Sound table
|sound=Goat Horn Call5.ogg
|source=Jukebox/Note Blocks<wbr>{{Until|BE 1.20.40}}<br>Hostile Creatures<wbr>{{Upcoming|BE 1.20.40}}|overridesource=1
|description="Call"<ref group=note name=screaming/>
|id=horn.call.5
|volume=1.0<wbr><ref group=sound name=nodistance/><wbr>{{Until|BE 1.20.40}}<br>16.0<wbr>{{Upcoming|BE 1.20.40}}
|pitch=1.0}}
{{Sound table
|sound=Goat Horn Call6.ogg
|source=Jukebox/Note Blocks<wbr>{{Until|BE 1.20.40}}<br>Hostile Creatures<wbr>{{Upcoming|BE 1.20.40}}|overridesource=1
|description="Yearn"<ref group=note name=screaming/>
|id=horn.call.6
|volume=1.0<wbr><ref group=sound name=nodistance/><wbr>{{Until|BE 1.20.40}}<br>16.0<wbr>{{Upcoming|BE 1.20.40}}
|pitch=1.0}}
{{Sound table
|sound=Goat Horn Call7.ogg
|source=Jukebox/Note Blocks<wbr>{{Until|BE 1.20.40}}<br>Hostile Creatures<wbr>{{Upcoming|BE 1.20.40}}|overridesource=1
|description="Dream"<ref group=note name=screaming/>
|id=horn.call.7
|volume=1.0<wbr><ref group=sound name=nodistance/><wbr>{{Until|BE 1.20.40}}<br>16.0<wbr>{{Upcoming|BE 1.20.40}}
|pitch=1.0
|foot=1}}
== Data values ==
=== ID ===
{{el|je}}:
{{ID table
|edition=java
|showforms=y
|generatetranslationkeys=y
|displayname=Goat Horn
|spritetype=item
|nameid=goat_horn
|form=item
|foot=1}}
{{el|be}}:
{{ID table
|edition=bedrock
|shownumericids=y
|showforms=y
|notshowbeitemforms=y
|generatetranslationkeys=y
|displayname=Goat Horn
|spritetype=item
|nameid=goat_horn
|form=item
|id=624
|translationkey=item.goat_horn.name, item.minecraft.goat_horn.sound.0, item.minecraft.goat_horn.sound.1, item.minecraft.goat_horn.sound.2, item.minecraft.goat_horn.sound.3, item.minecraft.goat_horn.sound.4, item.minecraft.goat_horn.sound.5, item.minecraft.goat_horn.sound.6, item.minecraft.goat_horn.sound.7
|foot=1}}
=== Item data ===
==== ''Java Edition'' ====
<div class="treeview">
*{{nbt|compound|tag}}: The item's '''tag''' tag.
{{:Player.dat_format/Goat Horn}}
</div>
Goat horns use the "instrument" tag to control which sound can be played when using a goat horn. The values of the tag (to be prefixed with <code>minecraft:</code>) are:
{| class="wikitable sortable" style="text-align: center;"
!Sound type !![[Resource location|Identifier]]
|-
|Ponder||<code>ponder_goat_horn</code>
|-
|Sing ||<code>sing_goat_horn</code>
|-
|Seek ||<code>seek_goat_horn</code>
|-
|Feel ||<code>feel_goat_horn</code>
|-
|Admire||<code>admire_goat_horn</code>
|-
|Call ||<code>call_goat_horn</code>
|-
|Yearn||<code>yearn_goat_horn</code>
|-
|Dream||<code>dream_goat_horn</code>
|}
== History ==
{{History||October 16, 2021|link=https://www.twitch.tv/videos/1178420217?t=02h46m05s|Ulraf, a game developer on ''Minecraft'', states that goat horns are not included in [[Java Edition 1.18]].}}
{{History||November 17, 2021|link=https://www.minecraft.net/en-us/article/caves---cliffs-update-part-ii-coming|Goat horns are initially announced to be added after "The Wild Update".}}
{{History|java}}
{{History||1.19|snap=22w17a|[[File:Goat Horn JE1 BE1.png|32px]]Added goat horns.}}
{{History||1.19|snap=Pre-release 2|Goat Horns now snap when a goat rams into [[copper ore]].<ref>{{bug|MC-250941|||Fixed }}</ref>}}
{{History|Bedrock}}
{{History||Caves & Cliffs<br>(experimental)|link=Caves & Cliffs|snap=beta 1.16.200.52|[[File:Goat Horn JE1 BE1.png|32px]]Added goat horns behind the "Caves and Cliffs" experimental toggle.}}
{{History|||snap=beta 1.16.210.51|Goats now drop 2 horns each.}}
{{History|||snap=beta 1.17.20.20|Baby goats no longer drop horns.}}
{{History||1.18.0|snap=beta 1.18.0.20|Goat horns are now available outside of experimental gameplay.}}
{{History|||snap=beta 1.18.0.22|Goat horns have been moved behind the "Vanilla Experiments" [[experimental gameplay|experiments]] toggle.}}
{{History||Vanilla Experiments (experimental)|link=Experimental Gameplay|snap=beta 1.18.20.23|Goat horns now have a cooldown after being used.}}
{{History|||snap=beta 1.18.20.25|Goat horns now have an animation when being used in first person.
|Goats now make a sound when they drop goat horns.}}
{{History|||snap=beta 1.18.30.26|Goat horns are now used to craft [[copper horn]]s.|Changed goat horn sounds.}}
{{History||Vanilla Experiments (experimental)|link=Experimental Gameplay|snap=beta 1.19.0.24|Goat horns are no longer used to craft copper horns, as copper horns have been removed.|Changed goat horn sounds.{{verify}}|Removed "Fly" and "Dream" goat horns.}}
{{History||1.19.0|snap=beta 1.19.0.28|Goat horns are now available without enabling experimental gameplay.}}
{{History||1.19.10|snap=beta 1.19.10.22|Renamed the "Resist" goat horn to the "Dream" goat horn to match ''Java Edition''.|The "Feel" goat horn now plays the same sound as ''Java Edition''.}}
{{History|upcoming bedrock}}
{{History||1.20.40|snap=beta 1.20.40.22|Goat horns now have a range of 256 blocks.<ref name=nodistance>{{Bug|MCPE-153254}}</ref>}}
{{History|foot}}
== Issues ==
{{issue list}}
== Trivia ==
* The "seek" horn sounds similar to the "ominous horn" that announces a [[raid]].
== Gallery ==
<gallery>
File:Screenshot (17).png|Steve using a goat horn.
File:Alex uses a goat horn.png|Alex using a goat horn.
File:Screenshot (18).png|The goat horn animation in first person.
File:Screenshot (19).png|The goat horn animation with "Left Hand" option enabled.
</gallery>
== Notes ==
<references group="note" />
== References ==
{{reflist}}
== External Links ==
* [https://www.minecraft.net/en-us/article/taking-inventory--goat-horn Taking Inventory: Goat Horn] - Minecraft.net on February 16, 2023
{{Items}}
[[Category:Renewable resources]]
[[Category:Tools]]
[[de:Ziegenhorn]]
[[es:Cuerno de cabra]]
[[fr:Corne de chèvre]]
[[it:Corno di capra]]
[[ja:ヤギの角笛]]
[[pl:Kozi róg]]
[[pt:Chifre de cabra]]
[[ru:Козий рог]]
[[zh:山羊角]]</li><li>[[Lapis Lazuli|Lapis Lazuli]]<br/>{{Item
| image = Lapis Lazuli.png
|type=
| renewable = Yes
| stackable = Yes (64)
}}
{{About|the item|the ore|Lapis Lazuli Ore|the mineral block|Lapis Lazuli Block}}
'''Lapis lazuli''' is a mineral required to [[Enchanting|enchant]] items in an [[Enchanting Table|enchanting table]].
== Obtaining ==
=== Mining ===
When mined with a stone [[pickaxe]] or better, [[lapis lazuli ore]] drops 4–9 lapis lazuli. With the [[Fortune]] III enchantment, a single block has a chance of dropping up to 36 items.
=== Crafting ===
{{Crafting
|Block of Lapis Lazuli
|Output=Lapis Lazuli,9
|type=Material
}}
=== Smelting ===
{{Smelting
|showname=1
|Lapis Lazuli Ore; Deepslate Lapis Lazuli Ore
|Lapis Lazuli
|0.2
}}
=== Villager gifts ===
{{IN|java}}, cleric [[villager]]s give [[player]]s lapis lazuli if they have the [[Hero of the Village]] effect.
=== Trading ===
Apprentice-level cleric villagers sell one lapis lazuli for an [[emerald]] as part of their trades.
{{IN|bedrock}}, [[wandering trader]]s may sell 3 lapis lazuli for an emerald.
=== Chest loot ===
{{see also|Lapis Lazuli Ore#Natural generation}}
{{LootChestItem|lapis-lazuli}}
== Usage ==
=== Enchanting ===
1–3 pieces of lapis lazuli are required to use an [[Enchanting Table|enchanting table]] to enchant an [[items|item]]. More specifically, the enchanting table UI shows 3 options (see [[Enchanting mechanics]] for details): the first, second, and third options cost 1, 2, and 3 lapis lazuli, respectively.
=== Crafting ingredient ===
Lapis lazuli can be used to make [[blocks of lapis lazuli]] and [[blue dye]]. {{IN|bedrock}}, it can also be used directly as a substitute for blue dye.
{{crafting usage}}
{{IN|bedrock}}, lapis lazuli can be also used in banner patterns:
{{banner crafting usage}}
=== Loom ingredient ===
{{Banner loom usage|Lapis Lazuli}}
=== Dye ===
{{Dye usage}}
=== Smithing ingredient ===
{{Smithing
|head=1
|ingredients=Any Armor Trim +<br/>Any Armor Piece + <br/>Lapis Lazuli
|Any Armor Trim Smithing Template
|Netherite Chestplate
|Lapis Lazuli
|Lapis Trim Netherite Chestplate
|showdescription=1
|description = All armor types can be used in this recipe,<br/>a netherite chestplate is shown as an example.<br/>
|tail=1
}}
;Trim color palette
The following color palette is shown on the designs on trimmed armor:
*{{TrimPalette|lapis lazuli}}
== Data values ==
=== ID ===
{{edition|java}}:
{{ID table
|edition=java
|showforms=y
|generatetranslationkeys=y
|displayname=Lapis Lazuli
|spritetype=item
|nameid=lapis_lazuli
|form=item
|foot=1}}
{{edition|bedrock}}:
{{ID table
|edition=bedrock
|showaliasids=y
|shownumericids=y
|showforms=y
|notshowbeitemforms=y
|generatetranslationkeys=y
|displayname=Lapis Lazuli
|spritetype=item
|nameid=lapis_lazuli
|aliasid=dye / 4
|id=414
|form=item
|translationkey=item.dye.blue.name
|foot=1}}
== Advancements ==
{{load advancements|Enchanter}}
== History ==
{{History|java beta}}
{{History||1.2|[[File:Lapis Lazuli JE1 BE1.png|32px]] Added lapis lazuli.}}
{{History||1.2_02|[[Lapis lazuli ore]] can now be found at [[bedrock]] level and now drops 4–8 lapis lazuli per block mined (increased from 1) on [[singleplayer]] only. However, servers have not been affected yet.}}
{{History||1.8|snap=Pre-release|Lapis lazuli can now be found in [[mineshaft]] [[chest]]s.}}
{{History|java}}
{{History||1.4.2|snap=12w34a|Lapis lazuli can now be used to [[Armor#Dyeing|dye]] leather [[armor]] and [[wolf]] collars.}}
{{History||1.4.6|snap=12w49a|Lapis lazuli can now be [[crafting|crafted]] with [[gunpowder]] to create a [[firework star]].}}
{{History||1.6.1|snap=13w19a|Lapis lazuli can now be used to craft blue [[stained clay]].}}
{{History||1.7.2|snap=13w41a|Lapis lazuli can now be used to craft blue [[stained glass]].}}
{{History||1.8|snap=14w02a|[[Enchanting]] now requires lapis lazuli. Different enchantments require different amounts of levels and different amounts of levels now require different amounts of lapis lazuli (between 1-3).
|Cleric [[villager]]s now [[trading|sell]] 1–2 lapis lazuli for 1 [[emerald]], making it a [[renewable resource]].}}
{{History|||snap=14w30a|Lapis lazuli can now be used to dye [[banner]]s.}}
{{History||1.9|snap=15w44a|The average yield of lapis lazuli in [[mineshaft]] [[chest]]s has been decreased.}}{{History||1.11|snap=16w39a|Added the ability to dye [[shulker box]]es.}}
{{History||1.12|snap=17w06a|Can now be used to craft blue [[concrete powder]].}}
{{History|||snap=17w15a|Added the ability to dye [[bed]]s.}}
{{History||1.13|snap=17w47a|The different data values for the <code>dye</code> ID have been split up into their own IDs.
|Prior to [[1.13/Flattening|''The Flattening'']], this [[item]]'s numeral ID was 351.}}
{{History|||snap=18w11a|Lapis lazuli now generates in [[shipwreck]] [[chest]]s.}}
{{History||1.14|snap=18w43a|Lapis lazuli can now be used to craft [[blue dye]].
|Lapis lazuli can no longer be used as a [[dye]].
|All of the dye-related functions and crafting recipes of lapis lazuli (except lapis lazuli blocks) have been transferred to blue dye.
|[[File:Lapis Lazuli JE2 BE2.png|32px]] The texture of lapis lazuli has been changed.}}
{{History|||snap=18w50a|Lapis lazuli can now be found in chests in [[village]] temples.}}
{{History|||snap=19w13a|Cleric villagers now give lapis lazuli to players under the [[Hero of the Village]] effect.}}
{{History||1.17|snap=21w08a|Lapis lazuli can now drop and be smelted from [[deepslate lapis lazuli ore]].}}
{{History||1.20<br>(Experimental)|link=1.19.4|snap=23w04a|Lapis lazuli can now be used as an armor trim material.}}
{{History|pocket alpha}}
{{History||v0.3.0|[[File:Lapis Lazuli JE1 BE1.png|32px]] Added lapis lazuli.}}
{{History||v0.3.2|Lapis lazuli can now be crafted into lapis lazuli blocks, and vice versa.}}
{{History||v0.12.1|snap=build 1|Lapis lazuli is now required for [[enchanting]].}}
{{History||v0.14.0|snap=build 1|Lapis lazuli can now be found inside [[minecart with chest]]s in [[mineshaft]]s.
|Lapis lazuli can now be used to dye [[water]] in [[cauldron]]s.}}
{{History|pocket}}
{{History||1.0.4|snap=alpha 1.0.4.0|Cleric [[villager]]s now [[trading|sell]] 1–2 lapis lazuli for 1 [[emerald]].
|Lapis lazuli can now be used to [[dyeing|dye]] [[shulker shell]]s.}}
{{History||1.1.0|snap=alpha 1.1.0.0|Lapis lazuli can now be used to dye [[shulker box]]es and [[bed]]s.
|Lapis lazuli can now be used to [[crafting|craft]] blue [[concrete powder]].}}
{{History|bedrock}}
{{History||1.2.0|snap=beta 1.2.0.2|Lapis lazuli can now be used to dye [[banner]]s, [[firework star]]s and [[glass]].}}
{{History||1.4.0|snap=beta 1.2.14.2|Lapis lazuli can now be found in [[shipwreck]] treasure chests.}}
{{History|||snap=beta 1.2.20.1|Lapis lazuli can now be used to craft [[balloon]]s and [[glow stick]]s.}}
{{History||1.8.0|snap=beta 1.8.0.10|Lapis lazuli can now be used to craft [[blue dye]]s.}}
{{History||1.10.0|snap=beta 1.10.0.3|Lapis lazuli are now [[trading|sold]] by [[wandering trader]]s.
|[[File:Lapis Lazuli JE2 BE2.png|32px]] The texture of lapis lazuli has been changed.}}
{{History||1.11.0|snap=beta 1.11.0.1|Lapis lazuli can now be found in [[desert]] [[village]] temple [[chest]]s.}}
{{History|||snap=beta 1.11.0.4|Cleric [[villager]]s now [[trading|sell]] one lapis lazuli for one [[emerald]].}}
{{History||1.16.100|snap=beta 1.16.100.56|The ID of lapis lazuli has been changed from <code>dye/4</code> to <code>lapis_lazuli</code>.}}
{{History||1.17.0|snap=beta 1.16.230.52|Lapis lazuli can now drop and be smelted from [[deepslate lapis lazuli ore]].}}
{{History||1.19.80|snap=beta 1.19.80.21|Lapis lazuli can now be used as an armor trim material.}}
{{History|console}}
{{History||xbox=TU1|xbone=CU1|ps=1.0|wiiu=Patch 1|switch=1.0.1|[[File:Lapis Lazuli JE1 BE1.png|32px]] Added lapis lazuli.}}
{{History||xbox=TU31|xbone=CU19|ps=1.22|wiiu=Patch 3|switch=1.0.1|Lapis lazuli can now be used in [[enchanting]].}}
{{History|Ps4}}
{{History||1.90|[[File:Lapis Lazuli JE2 BE2.png|32px]] The texture of lapis lazuli has been changed.}}
{{History|foot}}
== Issues ==
{{issue list}}
== Trivia ==
* In real life, lapis lazuli is a blue gem that can be ground and processed into ultramarine pigment. Lapis lazuli pigment has been famously used in the production of illuminated manuscripts, stained glass, and cave paintings. [[Wikipedia:Lapis lazuli|See the Wikipedia article for more information]].
* Lapis lazuli is the only [[ore]] that can be used as a [[dye]]{{only|BE|short=1}} or making a dye.
* It is the only item that can be put in the second slot of an [[enchantment table]].
== References ==
{{reflist}}
{{Items}}
[[Category:Dyes]]
[[cs:Lazurit]]
[[de:Lapislazuli]]
[[es:Lapislázuli]]
[[fr:Lapis-lazuli]]
[[hu:Lazurit]]
[[ja:ラピスラズリ]]
[[ko:청금석]]
[[nl:Lapis lazuli]]
[[pl:Lazuryt]]
[[pt:Lápis-lazúli]]
[[ru:Лазурит]]
[[th:แร่แลพิสแลซูลี]]
[[uk:Лазурит]]
[[zh:青金石]]
[[Category:Renewable resources]]</li></ul> | 14w17a | New world type 'Customized' is added. | |||
| 14w26a | New world type 'Debug Mode' is added. | ||||
| Pocket Edition Alpha | |||||
0.9.0{{Extension DPL}}<ul><li>[[Baked Potato|Baked Potato]]<br/>{{Item
| title = Baked Potato
| renewable = Yes
| heals = {{hunger|5}}
| stackable = Yes (64)}}
A '''baked potato''' is a [[food]] [[item]] that can be eaten by the [[player]].
== Obtaining ==
Baked potatoes can be obtained by cooking [[potato]]es in a [[furnace]], [[smoker]], or [[campfire]].
{{Smelting
|Potato
|Baked Potato
|0,35
}}
{{IN|JE}}, baked potatoes can also be obtained by killing a zombie or one of its variants while it is on fire. The drop chance is still affected by [[Looting]].
=== Chest loot ===
{{LootChestItem|baked-potato}}
== Usage ==
To eat a baked potato, press and hold {{control|use}} while it is selected in the [[hotbar]]. Eating one restores {{hunger|5}} hunger and 6.0 hunger [[Hunger#Mechanics|saturation]].
=== Crafting ingredient ===
{{crafting usage}}
=== Composting ===
Placing a baked potato into a [[composter]] has an 85% chance of raising the compost level by 1. This is more efficient than composting with raw potatoes.
== Sounds ==
{{Sound table/Entity/Food}}
== Data values ==
=== ID ===
{{edition|java}}:
{{ID table
|edition=java
|showforms=y
|generatetranslationkeys=y
|displayname=Baked Potato
|spritetype=item
|nameid=baked_potato
|form=item
|foot=1}}
{{edition|bedrock}}:
{{ID table
|edition=bedrock
|shownumericids=y
|showforms=y
|notshowbeitemforms=y
|generatetranslationkeys=y
|displayname=Baked Potato
|spritetype=item
|nameid=baked_potato
|id=281
|form=item
|foot=1}}
== Advancements ==
{{load advancements|Husbandry;A Balanced Diet}}
== History ==
{{History|java}}
{{History||1.4.2|snap=12w34a|[[File:Baked Potato JE1.png|32px]] Added baked potatoes.}}
{{History|||snap=12w37a|[[File:Baked Potato JE2 BE1.png|32px]] The texture of baked potatoes has been slightly changed.}}
{{History||1.8|snap=14w02a|Baked potatoes now restore {{Hunger|5}} hunger points instead of 6.}}
{{History|||snap=14w27a|Baked potatoes are now used to craft [[rabbit stew]].}}
{{History||1.13|snap=17w47a|Prior to [[1.13/Flattening|''The Flattening'']], this [[item]]'s numeral ID was 393.}}
{{History||1.14|snap=18w43a|[[File:Baked Potato JE3.png|32px]] The texture of baked potatoes has been changed.}}
{{History|||snap=18w50a|[[File:Baked Potato JE4 BE2.png|32px]] The texture of baked potatoes has been changed, once again.}}
{{History|||snap=19w03a|Placing a baked potato into the new [[composter]] has an 80% chance of raising the compost level by 1.}}
{{History|||snap=19w05a|Baked potatoes now have an 85% chance of increasing the compost level in a composter by 1.}}
{{History||1.17|snap=21w13a|Baked potatoes can now be dropped by flaming [[zombie]]s.<ref>{{bug|MC-199065}}</ref>}}
{{History||1.19|snap=22w13a|Baked potatoes can now be found in [[ancient city]] ice box [[chest]]s.}}
{{History|upcoming java}}
{{History||Villager Trade Rebalance<br>(Experimental)|link=Java Edition 1.20.2|snap=23w31a|[[Wandering trader]]s now have a chance to [[trading|buy]] baked potatoes from the player.}}
{{History|pocket alpha}}
{{History||v0.8.0|snap=build 1|[[File:Baked Potato JE2 BE1.png|32px]] Added baked potatoes.}}
{{History||v0.12.1|snap=build 1|Baked potatoes now restore [[hunger]] instead of [[health]].}}
{{History||v0.13.0|snap=build 1|Baked potatoes are now used to craft [[rabbit stew]].}}
{{History|bedrock}}
{{History||1.10.0|snap=beta 1.10.0.3|[[File:Baked Potato JE4 BE2.png|32px]] The texture of baked potatoes has been changed.}}
{{History||1.11.0|snap=beta 1.11.0.1|Baked potatoes can now be used to fill up [[composter]]s.}}
{{History|console}}
{{History||xbox=TU14|xbone=CU1|ps=1.04|wiiu=Patch 1|switch=1.0.1|[[File:Baked Potato JE2 BE1.png|32px]] Added baked potatoes.}}
{{History||ps=1.00|[[File:Baked Potato JE2 BE1.png|32px]] Added baked potatoes to the [[PlayStation 4 Edition|PS4]] and [[PlayStation Vita Edition|PSVita]].}}
{{History||xbox=none|xbone=none|ps=1.90|wiiu=none|switch=none|[[File:Baked Potato JE4 BE2.png|32px]] The texture of baked potatoes has been changed.}}
{{History|new3DS}}
{{History||0.1.0|[[File:Baked Potato JE2 BE1.png|32px]] Added baked potatoes.}}
{{History|foot}}
== Issues ==
{{issue list}}
== See also ==
* {{ItemLink|Poisonous Potato}}
{{Items}}
[[Category:Food]]
[[Category:Renewable resources]]
[[cs:Pečená brambora]]
[[de:Ofenkartoffel]]
[[es:Patata cocida]]
[[fr:Pomme de terre cuite]]
[[hu:Sült burgonya]]
[[it:Patata al forno]]
[[ja:ベイクドポテト]]
[[ko:구운 감자]]
[[nl:Gebakken aardappel]]
[[pl:Pieczony ziemniak]]
[[pt:Batata assada]]
[[ru:Печёный картофель]]
[[th:มันฝรั่งอบ]]
[[zh:烤马铃薯]]</li><li>[[Copper Ingot|Copper Ingot]]<br/>{{About|the ingot|the ore|Copper Ore|the mineral block|Block of Copper}}
{{Item
| image = Copper Ingot.png
| renewable = Yes
| stackable = Yes (64)
}}
'''Copper ingots''' are [[metal]] ingots obtained from smelting [[raw copper]] or killing [[drowned]].
== Obtaining ==
=== Crafting ===
{{Crafting
|Block of Copper;Waxed Block of Copper|Output=Copper Ingot,9
|type=Miscellaneous
}}
=== Smelting ===
Copper ingots can be obtained by smelting [[raw copper]] in a [[furnace]] or [[blast furnace]], as well as the ore itself if mined using [[Silk Touch]].
{{Smelting
|head=1
|Raw Copper
|Copper Ingot
|0.7
}}
{{Smelting
|foot=1
|Copper Ore; Deepslate Copper Ore
|Copper Ingot
|0.7
}}
=== Mob loot ===
==== Drowned ====
When killed by a [[player]] or a tamed [[wolf]], a [[drowned]] has a 11% ({{frac|11|100}}) chance of dropping a copper ingot. With the [[Looting]] enchantment, the chance can be increased to 13% ({{frac|13|100}}) with Looting I, 15% ({{frac|3|20}}) with Looting II, and 17% ({{frac|17|100}}) with Looting III.
== Usage ==
=== Crafting ingredient ===
{{crafting usage}}
=== Smithing ingredient ===
{{Smithing
|head=1
|ingredients=Any Armor Trim +<br/>Any Armor Piece + <br/>Copper Ingot
|Any Armor Trim Smithing Template
|Netherite Chestplate
|Copper Ingot
|Copper Trim Netherite Chestplate
|showdescription=1
|description = All armor types can be used in this recipe,<br/>a netherite chestplate is shown as an example.<br/>
|tail=1
}}
;Trim color palette
The following color palette is shown on the designs on trimmed armor:
*{{TrimPalette|copper ingot}}
== Data values ==
=== ID ===
{{edition|java}}:
{{ID table
|edition=java
|showforms=y
|generatetranslationkeys=y
|displayname=Copper Ingot
|spritetype=item
|nameid=copper_ingot
|form=item
|foot=1}}
{{edition|bedrock}}:
{{ID table
|edition=bedrock
|shownumericids=y
|showforms=y
|notshowbeitemforms=y
|generatetranslationkeys=y
|displayname=Copper Ingot
|spritetype=item
|nameid=copper_ingot
|form=item
|id=504
|foot=1}}
== History ==
{{History|java}}
{{History||1.17|snap=20w45a|[[File:Copper Ingot JE1.png|32px]] Added copper ingots.}}
{{History|||snap=20w46a|[[File:Copper Ingot JE2 BE1.png|32px]] The texture of copper ingots has been changed.|Crafting copper ingots from and into copper blocks now outputs/requires only 4 ingots.}}
{{History|||snap=21w05a|[[Drowned]] can now drop copper ingots when killed instead of [[gold ingots]], making copper ingots renewable.}}
{{History|||snap=21w10a|Copper ingots can now be smelted from [[deepslate copper ore]].}}
{{History|||snap=21w14a|Copper ingots can now be smelted from [[raw copper]].}}
{{History|||snap=21w17a|The amount of copper ingots required to make a [[block of copper]] has been changed back to 9.}}
{{History||1.17.1|snap=Pre-release 1|Increased the chance of [[drowned]] dropping a copper ingot from 5% to 11% and the increase of this chance for each level of [[Looting]] enchantment from 1% to 2% to match {{el|be}}.}}
{{History||1.20<br>(Experimental)|link=1.19.4|snap=23w04a|Copper ingots can now be used as an armor trim material.}}
{{History|||snap=1.19.4 Pre-release 1|Copper ingots can now be used to craft [[brush]]es.}}
{{History|bedrock}}
{{History||Caves & Cliffs (experimental)|link=Bedrock Edition 1.17.0|snap=beta 1.16.210.57|[[File:Copper Ingot JE2 BE1.png|32px]] Added copper ingots.}}
{{History||1.17.0|snap=beta 1.17.0.50|Copper ingots can now be used to craft [[spyglass|spyglasses]].}}
{{History|||snap=beta 1.17.0.52|Copper ingots are now available without enabling [[experimental gameplay]].}}
{{History|||snap=beta 1.17.0.54|The amount of copper ingots required to make a [[block of copper]] has been changed to 9.}}
{{History||Vanilla Experiments (experimental)|link=1.18.30|snap=beta 1.18.30.26|Copper ingots can now be used to craft copper horns.}}
{{History||1.19.0|snap=beta 1.19.0.24|Copper ingots can no longer be used to craft copper horns, as copper horns have been removed.}}
{{History||1.20.0<br>(Experimental)|link=Bedrock Edition 1.19.80|snap=beta 1.19.80.20|Copper ingots can now be used to craft [[brush]]es.}}
{{History|||snap=beta 1.19.80.21|Copper ingots can now be used as an armor trim material.}}
{{History|foot}}
== Issues ==
{{Issue list}}
== External Links ==
*[https://www.minecraft.net/en-us/article/taking-inventory--copper-ingot Taking Inventory:Copper Ingot] – Minecraft.net on December 22, 2022
{{Items}}
[[Category:Renewable resources]]
[[de:Kupferbarren]]
[[es:Lingote de cobre]]
[[fr:Lingot de cuivre]]
[[it:Lingotto di rame]]
[[ja:Copper Ingot]]
[[ko:구리괴]]
[[pl:Sztabka miedzi]]
[[pt:Barra de cobre]]
[[ru:Медный слиток]]
[[uk:Мідний злиток]]
[[zh:铜锭]]</li></ul> | Added Flat world type. | ||||
| Added Infinite world type. | |||||
| Added Old option. | |||||
0.16.0{{Extension DPL}}<ul><li>[[Bottle of Entity|Bottle of Entity]]<br/>{{joke feature}}
{{exclusive|java}}
{{WIP}}
{{see also|Potion|Splash Potion}}
{{Item
|image=Bottle of Entity.png
|image2=Splash Bottle of Entity.png
|image3=Bottle of Void.png
|stackable= No
}}
'''Bottles of entity''' are items that transform players into the respective mobs when drunk.
'''Splash bottle of entity''' are a variation of bottles of mob that can be thrown.
'''Bottle of void''' is a special bottle to transform back to the original player. Right clicking with it on a transformed player will remove the transformation and convert the bottle into a bottle of entity of that transformation.
A transformation into an entity will sometimes lead to special effects. For example, transforming into a chicken will allow the player to glide slowly to the ground. The chicken will however take fall damage upon landing, killing it and transforming the player back to themselves.
Transforming into an enderman will cause the player to be teleported randomly when a projectile it aimed at it or when they're being looked at by other players. Transforming into any mob capable of flight (for example, a bat) will allow the player to fly in survival mode as if they were in creative mode.
== Sounds ==<!--No sounds when thrown from a player or dispenser-->
Splash bottles of entities use the Friendly Creatures sound category for entity-dependent sound events.
{{Sound table
|sound=Bottle fill water1.ogg
|sound2=Bottle fill water2.ogg
|sound3=Bottle fill water3.ogg
|sound4=Bottle fill water4.ogg
|subtitle=Bottle fills
|source=neutral
|description=When an entity is collected using a bottle of void
|id=item.bottle.fill
|translationkey=subtitles.item.bottle.fill
|volume=1.0
|pitch=1.0
|distance=16}}
{{Sound table
|sound=Drink.ogg
|subtitle=Sipping
|source=player
|description=While a player is drinking a bottle of entity
|id=entity.generic.drink
|translationkey=subtitles.entity.generic.drink
|volume=0.5
|pitch=0.9-1.0
|distance=16}}
{{Sound table
|sound=Glass dig1.ogg
|sound2=Glass dig2.ogg
|sound3=Glass dig3.ogg
|subtitle=Bottle smashes
|source=neutral
|description=When a splash bottle of entity impacts something <ref group=sound>This sound is played six times simultaneously</ref>
|id=entity.splash_potion.break
|translationkey=subtitles.entity.potion.splash
|volume=1.0
|pitch=0.9-1.0
|distance=16
|foot=1}}
== Data values ==
=== ID ===
{{ID table
|edition=java
|showforms=y
|generatetranslationkeys=y
|displayname=Bottle of Entity
|spritetype=item
|nameid=bottle_of_entity
|form=item
|translationkey=item.minecraft.bottle_of_entity,item.minecraft.bottle_of_entity.specific}}
{{ID table
|showforms=y
|generatetranslationkeys=y
|displayname=Splash Bottle of Entity
|spritetype=item
|nameid=splash_bottle_of_entity
|form=item
|translationkey=item.minecraft.splash_bottle_of_entity,item.minecraft.splash_bottle_of_entity.specific}}
{{ID table
|showforms=y
|generatetranslationkeys=y
|displayname=Bottle of Void
|spritetype=item
|nameid=bottle_of_void
|form=item
|translationkey=item.minecraft.bottle_of_void
|foot=1}}
== History ==
{{History|java}}
{{History||23w13a_or_b|[[File:Bottle of Entity.png|32px]] [[File:Splash Bottle of Entity.png|32px]] [[File:Bottle of Void.png|32px]] Added bottle of entity, splash bottle of entity, and bottle of void.}}
{{History|foot}}
{{items}}
{{Jokes}}
[[ja:Bottle of Entity]]
[[pt:Frasco de entidade]]
[[Category:Joke items]]</li><li>[[Chestplate|Chestplate]]<br/>{{Update|Include information about armor trims and updated netherite upgrade information.}}
{{Item
| image = <gallery>
Leather Tunic.png | Leather
Chainmail Chestplate.png | Chainmail
Iron Chestplate.png | Iron
Diamond Chestplate.png | Diamond
Golden Chestplate.png | Golden
Netherite Chestplate.png | Netherite
</gallery>
| durability =
* Leather: 80
* Chainmail: 240
* Iron: 240
* Golden: 112
* Diamond: 528
* Netherite: 592
| renewable =
* '''Netherite''': No
* '''All Other''': Yes
| stackable = No
}}
'''Chestplates''' are a type of [[armor]] that covers the upper body of the player. There are six types of chestplates: '''leather''', '''chainmail''', '''iron''', '''diamond''', '''gold''' and '''netherite'''.
== Obtaining ==
=== Crafting ===
{{crafting
|head=1
|showname=0
|showdescription=1
|name=[[Chestplate]]
|A1= Leather;Gold Ingot;Iron Ingot;Diamond
|C1= Leather;Gold Ingot;Iron Ingot;Diamond
|A2= Leather;Gold Ingot;Iron Ingot;Diamond
|B2= Leather;Gold Ingot;Iron Ingot;Diamond
|C2= Leather;Gold Ingot;Iron Ingot;Diamond
|A3= Leather;Gold Ingot;Iron Ingot;Diamond
|B3= Leather;Gold Ingot;Iron Ingot;Diamond
|C3= Leather;Gold Ingot;Iron Ingot;Diamond
|Output= Leather Tunic;Golden Chestplate;Iron Chestplate;Diamond Chestplate
|type= Combat
}}
{{crafting
|foot=1
|ignoreusage=1
|name=[[Chestplate]]
|ingredients=Damaged Matching [[Chestplate]]
|Damaged Leather Tunic; Damaged Golden Chestplate; Damaged Chainmail Chestplate; Damaged Iron Chestplate; Damaged Diamond Chestplate; Damaged Netherite Chestplate
|Damaged Leather Tunic; Damaged Golden Chestplate; Damaged Chainmail Chestplate; Damaged Iron Chestplate; Damaged Diamond Chestplate; Damaged Netherite Chestplate
|Output= Leather Tunic; Golden Chestplate; Chainmail Chestplate; Iron Chestplate; Diamond Chestplate; Netherite Chestplate
|description= The durability of the two chestplates is added together, making a fully healed chestplate. You can get 5% more durability while using a grindstone to fix.
|type= Combat
}}
=== Upgrading ===
{{Smithing
|Netherite Upgrade
|Diamond Chestplate
|Netherite Ingot
|Netherite Chestplate
|description=
|tail=1
}}
=== Repairing ===
==== Grinding ====
{{Grinding
|showdescription=1
|ingredients=Damaged Matching Chestplates
|Damaged Leather Tunic; Damaged Chainmail Chestplate; Damaged Iron Chestplate; Damaged Golden Chestplate; Damaged Diamond Chestplate; Damaged Netherite Chestplate
|Damaged Leather Tunic; Damaged Chainmail Chestplate; Damaged Iron Chestplate; Damaged Golden Chestplate; Damaged Diamond Chestplate; Damaged Netherite Chestplate
|Leather Tunic; Chainmail Chestplate; Iron Chestplate; Golden Chestplate; Diamond Chestplate; Netherite Chestplate
|description=The durability of the two chestplates are added together, plus an extra 5% durability.
}}
==== [[Anvil mechanics#Unit repair|Unit repair]] ====
Chestplates can be repaired in an [[anvil]] by adding units of the [[armor material]]'s repair material, with each repair material restoring 25% of the chestplate's maximum durability, rounded down.
=== Mob loot ===
[[Zombie]]s and [[skeleton]]s have a small chance to spawn wearing any armor. There is an 8.5% chance (9.5% with [[Looting]] I, 10.5% with Looting II and 11.5% with Looting III) for the mob to drop a chestplate upon death. The chestplate the mob drops is usually badly damaged, and rarely enchanted.
[[Vindicator]]s and [[Pillager]]s spawning in [[raid]]s have a 4.1% chance (5.12% on hard difficulty) to drop iron chestplate, which is almost always badly damaged and rarely enchanted.
=== Natural generation ===
Two [[armor stand]]s are found in each taiga [[village]] outdoor armory, one of them equipped with an [[iron chestplate]].
=== Chest loot ===
{{IN|BE}}, a sealed room in [[woodland mansion]]s can appear that has a chest sometimes containing an [[Efficiency]] I leather tunic.<ref>{{bug|MCPE-109048}}</ref>
{{LootChestItem|leather-tunic,random-enchanted-leather-tunic,chainmail-chestplate,iron-chestplate,level-enchanted-iron-chestplate,golden-chestplate,random-enchanted-golden-chestplate,diamond-chestplate,damaged-diamond-chestplate,level-enchanted-diamond-chestplate,damaged-random-enchanted-diamond-chestplate,damaged-random-enchanted-diamond-chestplate-2}}
=== Trading ===
{{IN|java}}, novice-level armorer villagers have a 40% chance to sell an iron chestplate for 9 emeralds. Journeyman-level armorers have a 40% chance to sell a chainmail chestplate for 4 emeralds. Master-level armorers always sell an enchanted<ref group="note" name="enchantment" /> diamond chestplate for 18-35 emeralds. Novice-level leatherworker villagers have a {{frac|2|3}} chance to sell a leather tunic<ref group="note" name="dye note">The leather armor has a random color created by two dyes (possibly the same dye twice).</ref> for 7 emeralds. Journeyman-level Leatherworker villagers always offer the same trade.
Armorer villagers may give the players with the [[Hero of the Village]] effect a chainmail chestplate.
{{IN|bedrock}}, novice-level armorer villagers have a 25% chance to sell an iron chestplate for 9 emeralds. Journeyman-level armorers have a {{frac|1|3}} chance to sell a chainmail chestplate for 4 emeralds. Master-level armorers have a 50% chance to sell an enchanted<ref group="note" name="enchantment">When creating an enchantment offer, the game uses a random enchantment level from 5 – 19. The enchantments are never treasure enchantments.</ref> diamond chestplate for 16 emeralds. Novice-level leatherworker villagers have a 50% chance to sell leather tunic for 7 emeralds. Master-level leatherworkers always sell an enchanted<ref group="note" name="enchantment" /> leather tunic for 7 emeralds.
{{notelist|columns=1}}
== Usage ==
Chestplates can be placed in the 2nd armor slot of a player's [[inventory]] for activation.
=== Defense points ===
Defense points are each signified by chestplates in the armor bar above the [[health]] bar. 1 defense point is half of a chestplate in the armor bar. Each defense point reduces any damage dealt to the player, which is absorbed by armor by 4%, increasing additively with the number of defense points. Different materials and combinations of armor provide different levels of defense.
The following table shows the amount of defense points added by chestplates.
{| class="wikitable" data-description="Chestplate defense points"
|-
!scope="col" | Material
!scope="col" | Defense points
|-
!scope="row" | Leather
| {{armor|3}}
|-
!scope="row" | Golden
| rowspan="2" | {{armor|5}}
|-
!scope="row" | Chainmail
|-
!scope="row" | Iron
| {{armor|6}}
|-
!scope="row" | Diamond
| rowspan="2" | {{armor|8}}
|-
!scope="row" | Netherite
|}
===Knockback Resistance ===
A netherite chestplate provides 10% knockback resistance.
=== Durability ===
The following table shows the amount of damage each piece of armor can absorb before being destroyed.
Any "hit" from a damage source that can be blocked by armor removes one point of durability from each piece of armor worn for every {{hp|4}} of incoming damage (rounded down, but never below 1). Damage taken that unenchanted armor does not protect against (such as [[Damage#Fall damage|falling]] or [[Damage#Drowning|drowning]]) does not damage the armor, even if it is enchanted to protect against that type of damage. The following chart displays how many hits chest plates can endure.
Netherite armor is not damaged by [[lava]] or [[fire]] when worn.
{| class="wikitable" data-description="Chestplate durability"
|-
! Material
! Durability
|-
!scope="row" | Leather
| 80
|-
!scope="row" | Golden
| 112
|-
!scope="row" | Chainmail
| rowspan="2" | 240
|-
!Iron
|-
!scope="row" | Diamond
| 528
|-
!scope="row" | Netherite
| 592
|}
==== Repair ====
Chestplates may be [[item repair|repaired]] by using them along with some of their crafting material ([[leather]], [[gold ingot]]s, [[iron ingot]]s, [[diamond]]s, or [[netherite ingot]]s) in an [[anvil]]. Chainmail chestplates may be repaired in this way with iron ingots. They may also be repaired by crafting them together with another chestplate of the same material.
=== Enchantments ===
A chestplate can receive the following [[enchantment]]s:
{| class="wikitable"
|-
! Enchantment !! Max Level !! Notes
|-
| [[Fire Protection]] || IV || <ref group=note name=exclusive>Fire Protection, Blast Protection, Projectile Protection and Protection are mutually exclusive</ref>
|-
| [[Projectile Protection]] || IV || <ref group=note name="exclusive"/>
|-
| [[Blast Protection]] || IV || <ref group=note name="exclusive"/>
|-
| [[Protection]] || IV || <ref group=note name="exclusive"/>
|-
| [[Unbreaking]] || III ||
|-
| [[Thorns]] || III || <ref group="note" name="maxlvl">The max level obtainable in the enchanting table is 2</ref>
|-
| [[Mending]] || I || <ref group=note name="anvil2">Only from chest loot, fishing, or an anvil and enchanted books.</ref>
|-
| [[Curse of Binding]] || I || <ref group="note" name="anvil2"/>
|-
| [[Curse of Vanishing]] || I || <ref group="note" name="anvil2"/>
|}
{{notelist}}
=== Smelting usage ===
{{Smelting|showname=1|Iron Chestplate;Chainmail Chestplate;Golden Chestplate|Iron Nugget;Iron Nugget;Gold Nugget|0,1}}
=== Piglins ===
{{EntityLink|Piglin|Piglins}} are attracted to ''golden'' chestplates and pick them up, examining them for 6 to 8 seconds. Piglins can wear other chestplates but are not attracted to them. They prefer stronger chestplates over weaker chestplates, with one exception: They always prefer golden chestplates over all other chestplates, throwing out stronger chestplates to equip them. Enchanted chestplates are preferred over unenchanted chestplates.
== Sounds ==
{{el|je}}:
{{Sound table
|sound=Equip leather1.ogg
|sound2=Equip leather2.ogg
|sound3=Equip leather3.ogg
|sound4=Equip leather4.ogg
|sound5=Equip leather5.ogg
|sound6=Equip leather6.ogg
|subtitle=Leather armor rustles
|source=player
|description=When a leather chestplate is equipped
|id=item.armor.equip_leather
|translationkey=subtitles.item.armor.equip_leather
|volume=1.0
|pitch=1.0
|distance=16}}
{{Sound table
|sound=Equip chain1.ogg
|sound2=Equip chain2.ogg
|sound3=Equip chain3.ogg
|sound4=Equip chain4.ogg
|sound5=Equip chain5.ogg
|sound6=Equip chain6.ogg
|subtitle=Chain armor jingles
|source=player
|description=When a chainmail chestplate is equipped
|id=item.armor.equip_chain
|translationkey=subtitles.item.armor.equip_chain
|volume=1.0
|pitch=1.0
|distance=16}}
{{Sound table
|sound=Equip iron1.ogg
|sound2=Equip iron2.ogg
|sound3=Equip iron3.ogg
|sound4=Equip iron4.ogg
|sound5=Equip iron5.ogg
|sound6=Equip iron6.ogg
|subtitle=Iron armor clanks
|source=player
|description=When an iron chestplate is equipped
|id=item.armor.equip_iron
|translationkey=subtitles.item.armor.equip_iron
|volume=1.0
|pitch=1.0
|distance=16}}
{{Sound table
|sound=Equip gold1.ogg
|sound2=Equip gold2.ogg
|sound3=Equip gold3.ogg
|sound4=Equip gold4.ogg
|sound5=Equip gold5.ogg
|sound6=Equip gold6.ogg
|subtitle=Gold armor clinks
|source=player
|description=When a gold chestplate is equipped
|id=item.armor.equip_gold
|translationkey=subtitles.item.armor.equip_gold
|volume=1.0
|pitch=1.0
|distance=16}}
{{Sound table
|sound=Equip diamond1.ogg
|sound2=Equip diamond2.ogg
|sound3=Equip diamond3.ogg
|sound4=Equip diamond4.ogg
|sound5=Equip diamond5.ogg
|sound6=Equip diamond6.ogg
|subtitle=Diamond armor clangs
|source=player
|description=When a diamond chestplate is equipped
|id=item.armor.equip_diamond
|translationkey=subtitles.item.armor.equip_diamond
|volume=1.0
|pitch=1.0
|distance=16}}
{{Sound table
|sound=Equip netherite1.ogg
|sound2=Equip netherite2.ogg
|sound3=Equip netherite3.ogg
|sound4=Equip netherite4.ogg
|subtitle=Netherite armor clanks
|source=player
|description=When a netherite chestplate is equipped
|id=item.armor.equip_netherite
|translationkey=subtitles.item.armor.equip_netherite
|volume=0.8
|pitch=1.0/0.9
|distance=16}}
{{Sound table
|sound=Random break.ogg
|subtitle=Item breaks
|source=dependent
|description=When a chestplate's durability is exhausted
|id=entity.item.break
|translationkey=subtitles.entity.item.break
|volume=0.8
|pitch=0.8-1.2
|distance=16
|foot=1}}
{{el|be}}:
{{Sound table
|type=bedrock
|sound=Equip leather1.ogg
|sound2=Equip leather2.ogg
|sound3=Equip leather3.ogg
|sound4=Equip leather4.ogg
|sound5=Equip leather5.ogg
|sound6=Equip leather6.ogg
|source=player
|description=When a leather chestplate is equipped
|id=armor.equip_leather
|volume=1.0
|pitch=1.0}}
{{Sound table
|sound=Equip chain1.ogg
|sound2=Equip chain2.ogg
|sound3=Equip chain3.ogg
|sound4=Equip chain4.ogg
|sound5=Equip chain5.ogg
|sound6=Equip chain6.ogg
|source=player
|description=When a chain chestplate is equipped
|id=armor.equip_chain
|volume=1.0
|pitch=1.0}}
{{Sound table
|sound=Equip iron1.ogg
|sound2=Equip iron2.ogg
|sound3=Equip iron3.ogg
|sound4=Equip iron4.ogg
|sound5=Equip iron5.ogg
|sound6=Equip iron6.ogg
|source=player
|description=When an iron chestplate is equipped
|id=armor.equip_iron
|volume=1.0
|pitch=1.0}}
{{Sound table
|sound=Equip gold1.ogg
|sound2=Equip gold2.ogg
|sound3=Equip gold3.ogg
|sound4=Equip gold4.ogg
|sound5=Equip gold5.ogg
|sound6=Equip gold6.ogg
|source=player
|description=When a gold chestplate is equipped
|id=armor.equip_gold
|volume=1.0
|pitch=1.0}}
{{Sound table
|sound=Equip diamond1.ogg
|sound2=Equip diamond2.ogg
|sound3=Equip diamond3.ogg
|sound4=Equip diamond4.ogg
|sound5=Equip diamond5.ogg
|sound6=Equip diamond6.ogg
|source=player
|description=When a diamond chestplate is equipped
|id=armor.equip_diamond
|volume=1.0
|pitch=1.0}}
{{Sound table
|sound=Equip netherite1.ogg
|sound2=Equip netherite2.ogg
|sound3=Equip netherite3.ogg
|sound4=Equip netherite4.ogg
|source=player
|description=When a netherite chestplate is equipped.
|id=armor.equip_netherite
|volume=1.0
|pitch=1.0}}
{{Sound table
|rowspan=2
|sound=Water Splash Old.ogg
|source=block
|description=When a leather chestplate is dyed using a cauldron
|id=cauldron.dyearmor
|volume=0.1
|pitch=1.0}}
{{Sound table
|source=block
|description=When a leather chestplate's dye is removed using a cauldron
|id=cauldron.cleanarmor
|volume=0.1
|pitch=1.0}}
{{Sound table
|sound=Random break.ogg
|source=player
|description=When a chestplate's durability is exhausted
|id=random.break
|volume=1.0
|pitch=0.9
|foot=1}}
== Data values ==
=== ID ===
{{edition|java}}:
{{ID table
|edition=java
|showitemtags=y
|showforms=y
|generatetranslationkeys=y
|displayname=Leather Tunic
|spritetype=item
|nameid=leather_chestplate
|itemtags=freeze_immune_wearables
|form=item}}
{{ID table
|displayname=Chainmail Chestplate
|spritetype=item
|nameid=chainmail_chestplate
|form=item}}
{{ID table
|displayname=Iron Chestplate
|spritetype=item
|nameid=iron_chestplate
|form=item}}
{{ID table
|displayname=Diamond Chestplate
|spritetype=item
|nameid=diamond_chestplate
|form=item}}
{{ID table
|displayname=Golden Chestplate
|spritetype=item
|nameid=golden_chestplate
|form=item}}
{{ID table
|displayname=Netherite Chestplate
|spritetype=item
|nameid=netherite_chestplate
|form=item
|foot=1}}
{{edition|bedrock}}:
{{ID table
|edition=bedrock
|shownumericids=y
|showforms=y
|notshowbeitemforms=y
|generatetranslationkeys=y
|displayname=Leather Tunic
|spritetype=item
|nameid=leather_chestplate
|id=336
|form=item}}
{{ID table
|displayname=Chainmail Chestplate
|spritetype=item
|nameid=chainmail_chestplate
|id=340
|form=item}}
{{ID table
|displayname=Iron Chestplate
|spritetype=item
|nameid=iron_chestplate
|id=344
|form=item}}
{{ID table
|displayname=Diamond Chestplate
|spritetype=item
|nameid=diamond_chestplate
|id=348
|form=item}}
{{ID table
|displayname=Golden Chestplate
|spritetype=item
|nameid=golden_chestplate
|id=352
|form=item}}
{{ID table
|displayname=Netherite Chestplate
|spritetype=item
|nameid=netherite_chestplate
|id=610
|form=item
|foot=1}}
=== Item data ===
When leather tunics are dyed, it has the following NBT:
<div class="treeview">
* {{nbt|compound|tag}}: Parent tag.
** {{nbt|compound|display}}: Display properties.
*** {{nbt|int|color}}: The color of the leather armor. The tooltip displays "Dyed" if advanced tooltips are disabled, otherwise it displays the hexadecimal color value. Color codes are calculated from the Red, Green and Blue components using this formula:<br>'''<span style="color:red">Red</span>[[wikipedia:Logical shift|<<]]16 + <span style="color:green">Green</span><<8 + <span style="color:blue">Blue</span>'''<ref>For positive values larger than 0x00FFFFFF, the top byte is ignored. All negative values produce white.</ref>
</div>
== Achievements ==
{{load achievements|Iron Man;Tie Dye Outfit;Cover me in debris;Oooh, shiny!}}
== Advancements ==
{{load advancements|Suit Up;Cover me With Diamonds;Oh Shiny;Cover Me in Debris}}
== History ==
{{History|java classic}}
{{History||June 14, 2009|link=wordofnotch:123343045|[[Notch]] discussed how armor would work in [[Survival]] mode: "Two types of swords, two types of armor, two types of helmets. The basic versions require iron. The advanced versions require steel, which you make by combining iron and coal. Carrying swords, armor or helmets take up inventory slots, but otherwise have no penalty and work pretty much as you expect (prevent some damage, or cause more damage)".}}
{{History||August 13, 2009|link=wordofnotch:162091556|Notch tested chestplates on the [[human]]. They were merely aesthetic at the time and had no effect on gameplay.}}
{{History||0.24_SURVIVAL_TEST|[[File:Plate Chestplate.png|32px]] Added the [[Java_Edition_removed_features#Armor_in_Survival_Test|plate chestplate]].
|[[File:Chainmail Chestplate JE1.png|32px]] Added the model and the texture for the unused [[Java_Edition_removed_features#Armor_in_Survival Test|chain chestplate]].
|[[File:Zombie full set.png|32px]] [[File:Skeleton helmet.png|26px]] The plate chestplate has been tested on [[zombie]]s and [[skeleton]]s. It had no effect on gameplay.}}
{{History|java indev}}
{{History||0.31|snap=20091223-1|Plate and chain armor chestplates are no longer used.}}
{{History|||snap=20091231-2|[[File:Leather Tunic (item) JE1 BE1.png|32px]] [[File:Studded Chestplate (item) JE1.png|32px]] [[File:Chainmail Chestplate (item) JE1 BE1.png|32px]] [[File:Iron Chestplate (item) JE1 BE1.png|32px]] Added the single item form of relation to leather, [[History of textures/Unused textures#Studded armor|studded]], chainmail, and plate (iron) chestplates.
|The textures of the cloth chestplate are taken from one of [[Notch]]'s previous games, ''[[Legend of the Chambered]]''. The rest are from ''[[Legend of the Chambered 2]]''.}}
{{History||20100206|[[File:Golden Chestplate (item) JE1 BE1.png|32px]] [[File:Diamond Chestplate (item) JE1 BE1.png|32px]] Added the item form of golden and diamond chestplates.
|Removed the leather-chain chestplate.}}
{{History||February 9, 2010|link=wordofnotch:380486636|[[File:Notch revealed armor.png|32px]] [[Notch]] revealed new models for armor - including chestplates.}}
{{History||20100212-1|Added armor models.
|[[File:Indev 20100212 armor.png|50px]] Armor models are now displayed on the [[player]] in the [[inventory]].}}
{{History||20100218|[[File:Leather Tunic JE1 BE1.png|32px]] [[File:Chainmail Chestplate JE2 BE1.png|32px]] [[File:Iron Chestplate JE1 BE1.png|32px]] [[File:Golden Chestplate JE1 BE1.png|32px]] [[File:Diamond Chestplate JE1 BE1.png|32px]] Added models of cloth, chainmail, iron, gold, and diamond chestplates.
|Chestplates can now be [[crafting|crafted]] and worn.
|Chestplates now functions. All chestplates give {{Armor|8}}. Chestplates have limited [[item durability|durability]], with lower tier chestplates less durable than higher tier chestplates.}}
{{History|java alpha}}
{{History||v1.0.8|With the introduction of [[leather]], "Cloth Chestplate" has been renamed to "Leather Tunic".
|Leather tunics is now [[crafting|crafted]] with leather instead of [[wool|cloth]].}}
{{History|java}}
{{History||1.0.0|snap=Beta 1.9 Prerelease|The armor protection behavior has been changed. Previous to this update, the total armor protection is based in this equation: ((''total equipped armor damage reduction'' − 1) × (''all equipped armor max damage'' − ''total equipped armor damage'')) ÷ (''total equipped armor max damage'' + 1)). Armor no longer reduces certain damage types to be covered by enchantments.}}
{{History|||snap=October 3, 2011|slink={{tweet|notch|120859830339637249}}|The first images of a [[player]] wearing enchanted chestplates are revealed.}}
{{History|||snap=Beta 1.9 Prerelease 3|Iron chestplates can now be found in the new [[stronghold]] altar [[chest]]s.}}
{{History|||snap=Beta 1.9 Prerelease 4|Chestplates can now be [[enchanting|enchanted]].}}
{{History||1.1|snap=12w01a|Iron chestplates can now be found in the new blacksmith [[chest]]s in [[village]]s.}}
{{History||1.3.1|snap=12w15a|{{key|Shift}}+clicking can now be used to wear chestplates.}}
{{History|||snap=12w21a|Chainmail chestplates can now be obtained legitimately in [[survival]] mode through [[trading]].
|Blacksmith [[villager]]s now [[trading|sell]] chainmail chestplates for 11–14 emeralds.
|Blacksmith villagers now sell diamond chestplates for 16–18 emeralds.
|Blacksmith villagers now sell iron chestplates for 10–13 emeralds.
|Butchers now sell leather tunics for 4 emeralds.}}
{{History||1.4.2|snap=12w32a|[[Mob]] armor has been reintroduced. A partial or full set of any armor is now sometimes worn by [[zombie]]s, [[skeleton]]s and [[zombified piglins|zombie pigmen]], with the likelihood increasing with difficulty.}}
{{History|||snap=August 17, 2012|slink={{tweet|Dinnerbone|236445090929844225}}|[[Jeb]] and [[Dinnerbone]] tweeted pictures of [[dye]]able leather chestplates.}}
{{History|||snap=12w34a|Leather tunics can now be dyed by [[crafting]] a leather tunic piece with [[dye]]s. Dyes can be removed by {{control|use|text=using}} dyed leather tunics on a [[cauldron]] with [[water]].
|[[File:Leather Tunic JE2.png|32px]] [[File:Leather Tunic (item) JE2.png|32px]] Default leather tunic textures are now slightly darker and have buttons.}}
{{History|||snap=12w34b|[[File:Leather Tunic JE3 BE2.png|32px]] [[File:Leather Tunic (item) JE3 BE2.png|32px]] [[File:Diamond Chestplate JE2.png|32px]] The texture of leather and diamond chestplates has been changed. Leather tunics now have longer sleeves. Diamond chestplates now have notches under the shoulders.}}
{{History|||snap=12w36a|[[Dye]]d leather tunics are now more saturated and have a slight tint of tan in respect to the default armor color.}}
{{History|||snap=12w37a|[[File:Leather Cap JE3 BE2.png|32px]] [[File:Leather Boots JE2 BE2.png|32px]] [[File:Leather Cap (item) JE3 BE2.png|32px]] [[File:Leather Boots (item) JE3 BE2.png|32px]] Leather armor now have non-dyed parts on cap, pants and boots. This has been implemented so that [[player]]s can distinguish between other types of armor and similarly colored leather armor.}}
{{History||1.4.6|snap=12w50a|The [[Thorns]] enchantment can now be [[enchanting|enchanted]] on chestplates.}}
{{History||1.5|snap=13w04a|Armor in the [[player]]'s hand can now be equipped by right-clicking.
|[[Dispenser]]s can now equip nearby players with armor.}}
{{History||1.6.1|snap=13w18a|Golden chestplates are now found in the new [[chest]]s in [[nether fortress]]es.}}
{{History||1.7.2|snap=13w36a|Leather [[boots]] can now be obtained as one of the "junk" items by [[fishing]].}}
{{History||1.8|snap=14w02a|[[Trading|Trades]] changed: armorer [[villager]]s now [[trading|sell]] chain boots for 5–7 [[emerald]]s, chain [[leggings]] for 9–11 emeralds, chain chestplates for 11–15 emeralds and chain helmets for 5–7 emeralds.
|Armorer villagers now sell enchanted diamond chestplates for 16–19 emeralds, and no longer sell other diamond armor.
|Armorer villagers now sell iron chestplates for 10–14 emeralds and iron helmets for 4–6 emeralds, and no longer sell other iron armor.
|Leatherworkers now sell enchanted leather tunics for 7–12 emeralds, and no longer sell other leather armor.}}
{{History|||snap=14w05a|Armor no longer turns red when [[mob]]s and [[player]]s are hurt.}}
{{History|||snap=14w06a|Armor is now visible on [[giant]]s.}}
{{History|||snap=14w25a|Chain armor [[Java Edition removed features#Chainmail armor|cannot be crafted anymore]] due to the [[item]] form of [[fire]] being [[Java Edition removed features#Obtainable until 1.8|removed]].}}
{{History||1.9|snap=15w31a|Enchanted iron and diamond armor can now be found in [[end city]] ship [[chest]]s.
|[[Mob]]s now wear armor from the bottom to the top, rather than from the top to the bottom. This means that a mob with three armor pieces, for example, spawn with all armor except a helmet.}}
{{History|||snap=15w34b|Armor [[item durability|durability]] now affects armor value.}}
{{History|||snap=15w36a|Armor and armor [[enchanting|enchantment]] calculations have been changed. For the original values, see [[Armor/Before 1.9|here]].}}
{{History|||snap=15w36d|Armor durability affecting value has been removed.
|Armor now has an attribute controlling the defense points.}}
{{History|||snap=15w43a|The average yield of gold chestplates in [[nether fortress]] [[chest]]s has been decreased.}}
{{History|||snap=15w50a|Added <code>equip</code> [[sound]]s for all types of armor.}}
{{History|||snap=16w02a|Armor and armor enchantment calculations have been changed again.}}
{{History|||snap=16w05a|Armor calculations have been changed, once again.}}
{{History||1.11|snap=16w39a|Diamond and chainmail chestplates are now found in the new [[woodland mansion]] chests.}}
{{History||1.11.1|snap=16w50a|Golden, chain and iron armor can now be [[smelting|smelted]] down into one of their respective [[nugget]]s.}}
{{History||1.13|snap=17w47a|Prior to [[1.13/Flattening|''The Flattening'']], these [[item]]s' numeral IDs were 298 through 317.}}
{{History|||snap=18w09a|Leather tunics now have a chance of generating in [[underwater ruins]].}}
{{History|||snap=18w10a|Leather tunics can now generate in [[buried treasure]] [[chest]]s.}}
{{History|||snap=18w11a|Enchanted leather tunics can now generate in the chests of [[shipwreck]]s.}}
{{History|||snap=18w20a|Chain armor pieces have been renamed to "chainmail".}}
{{History||1.14|snap=18w43a|[[File:Leather Tunic JE4 BE2.png|32px]] [[File:Chainmail Chestplate JE3 BE2.png|32px]] [[File:Iron Chestplate JE2 BE2.png|32px]] [[File:Golden Chestplate JE2 BE2.png|32px]] [[File:Diamond Chestplate JE3 BE2.png|32px]] [[File:Leather Tunic (item) JE4 BE3.png|32px]] [[File:Chainmail Chestplate (item) JE2 BE2.png|32px]] [[File:Iron Chestplate (item) JE2 BE2.png|32px]] [[File:Golden Chestplate (item) JE2 BE2.png|32px]] [[File:Diamond Chestplate (item) JE2 BE2.png|32px]] The textures of all types of armor have been changed.}}
{{History|||snap=18w48a|Leather tunics can now be found in [[chest]]s in [[village]] tanneries.}}
{{History|||snap=18w50a|Iron chestplates can now be found on [[armor stand]]s in [[taiga]] villages.}}
{{History|||snap=19w08a|[[File:Golden Chestplate (item) JE3 BE3.png|32px]] The textures of gold chestplate [[item]] have been changed.}}
{{History|||snap=19w11a|Leatherworker villagers now sell randomly [[dye]]d leather tunics, instead of enchanted leather tunics.}}
{{History|||snap=19w13a|Armorer villagers now give chainmail chestplates to players under the [[Hero of the Village]] effect.}}
{{History||1.16|snap=20w06a|[[File:Netherite Chestplate JE1.png|32px]] [[File:Netherite Chestplate (item) JE1.png|32px]] Added netherite chestplate.}}
{{History|||snap=20w10a|[[File:Netherite Chestplate JE2 BE1.png|32px]] [[File:Netherite Chestplate (item) JE2 BE1.png|32px]] The texture of netherite chestplate have been changed.
|Netherite chestplate can no longer be [[crafting|crafted]].
|Netherite chestplate is now obtained by combining one diamond armor piece and one netherite ingot in a [[smithing table]].}}
{{History|||snap=20w16a|All parts of golden and netherite chestplates now generate randomly [[enchanting|enchanted]], and sometimes [[damage]]d, in [[bastion remnant]] and [[ruined portal]] chests.}}
{{History|||snap=20w17a|Diamonds chestplates now generates in place of netherite armor in bastion remnant [[chest]]s.}}
{{History||1.17|snap=20w48a|Wearing any piece of leather armor now prevents [[Powder Snow#Freezing|freezing]] entirely.}}
{{History||1.18.2|snap=22w03a|Netherite chestplate knockback resistance is no longer random.}}
{{History||1.20<br>(Experimental)|link=1.19.4|snap=23w04a|Non-leather chestplates can now be trimmed using a [[smithing table]].
|There are 10 types of material that determine the color of the trim:
*Iron
*Copper
*Gold
*Lapis
*Emerald
*Diamond
*Netherite
*Redstone
*Amethyst
*Quartz
|Upgrading diamond chestplate to netherite chestplate now requires the netherite upgrade [[smithing template]].}}
{{History|||snap=23w05a|Leather tunics can now be trimmed using a smithing table.|Chestplates can now have trims of the same material it is made out of.|The texture of the dune armor trim has been tweaked, so that the symbol on the chestplate is moved up a few pixels.}}
{{History|||snap=23w06a|Swapped {{cd|iron}} and {{cd|iron_darker}} palette, then made {{cd|iron_darker}} darker overall.|Added a darkest pixel to {{cd|chestplate_trim}} trim item texture.}}
{{History||1.19.4|snap=23w05a|Chestplates can now be swapped by {{ctrl|using}} them/elytra in the hotbar.<ref>{{bug|MC-216270|||Fixed}}</ref>}}
{{History||?|Chestplates can now be swapped in [[armor stand]]s by {{ctrl|using}} them/elytra in the armor stand's slot.}}
{{History||1.20|snap=23w12a|The pattern textures of dune and sentry armor trims are changed.|
Those previous patterns were left with different names: dune was renamed sentry and sentry was renamed shaper.}}
{{History|pocket alpha}}
{{History||v0.6.0|[[File:Leather Tunic JE1 BE1.png|32px]] [[File:Chainmail Chestplate JE2 BE1.png|32px]] [[File:Iron Chestplate JE1 BE1.png|32px]] [[File:Golden Chestplate JE1 BE1.png|32px]] [[File:Diamond Chestplate JE1 BE1.png|32px]] [[File:Leather Tunic (item) JE1 BE1.png|32px]] [[File:Chainmail Chestplate (item) JE1 BE1.png|32px]] [[File:Iron Chestplate (item) JE1 BE1.png|32px]] [[File:Golden Chestplate (item) JE1 BE1.png|32px]] [[File:Diamond Chestplate (item) JE1 BE1.png|32px]] Added chestplates.}}
{{History||v0.8.0|snap=build 2|[[File:Leather Tunic (item) JE3 BE2.png|32px]] The leather armor sprites have been changed to that of {{el|je}}, but its armor [[model]] remains that of older versions.}}
{{History||v0.9.0|snap=build 1|Iron armor now naturally generates in [[village]] [[chest]]s and a [[stronghold]] altar chest.}}
{{History||v0.11.0|snap=build 11|Armor now protects against [[damage]] from [[mob]]s only.}}
{{History||v0.12.1|snap=build 1|Armor can now be worn by mobs.
|Golden chestplates can now be found in [[nether fortress]] [[chest]]s.
|Chainmail armor can now be obtained in [[survival]] mode from a mob wearing it.}}
{{History||?|Armor no longer turns red when [[mob]]s and [[player]]s are hurt.}}
{{History||v0.14.0|snap=build 1|[[File:Leather Tunic JE3 BE2.png|32px]] The textures of leather chestplate have been changed.
|Leather armor can now be dyed.}}
{{History||v0.15.0|snap=build 1|Armor can now be obtained from [[stray]]s and [[husk]]s that naturally spawn with armor.}}
{{History||v0.15.10|[[Cape]]s no longer clip through armor.}}
{{History|pocket}}
{{History||1.0.0|snap=alpha 0.17.0.1|[[Enchanting|Enchanted]] iron armor and enchanted diamond armor can now be found inside [[chest]]s within [[end city]].}}
{{History||1.0.4|snap=alpha 1.0.4.0|Iron [[helmet]]s, iron chestplates, enchanted diamond chestplates and chainmail armor are now [[trading|sold]] by armorer smith [[villager]]s via [[trading]].}}
{{History||1.1.0|snap=alpha 1.1.0.0|Golden, chain and iron armor can now be [[smelting|smelted]] down into one of their respective [[nugget]]s.
|Diamond chestplates and chainmail chestplates can now be found inside [[woodland mansion]] chests.}}
{{History|bedrock}}
{{History||1.4.0|snap=beta 1.2.14.2|Chainmail chestplates now generate in [[buried treasure]] chests.
|Enchanted leather armor can now be found inside [[shipwreck]] supply room [[chest]]s.}}
{{History|||snap=beta 1.2.20.1|Leather chestplates can now be found inside [[underwater ruins]] chests.}}
{{History||1.10.0|snap=beta 1.10.0.3|[[File:Leather Tunic JE4 BE2.png|32px]] [[File:Chainmail Chestplate JE3 BE2.png|32px]] [[File:Iron Chestplate JE2 BE2.png|32px]] [[File:Golden Chestplate JE2 BE2.png|32px]] [[File:Diamond Chestplate JE3 BE2.png|32px]] [[File:Leather Tunic (item) JE4 BE3.png|32px]] [[File:Chainmail Chestplate (item) JE2 BE2.png|32px]] [[File:Iron Chestplate (item) JE2 BE2.png|32px]] [[File:Golden Chestplate (item) JE2 BE2.png|32px]] [[File:Diamond Chestplate (item) JE2 BE2.png|32px]] The textures of all types of chestplates have been changed.
|Iron armor now can be found in plains [[village]] weaponsmith [[chest]]s.
|Leather armor can now be found inside plains village tannery chests.}}
{{History||1.11.0|snap=beta 1.11.0.1|Iron armor now can be found in [[savanna]], [[taiga]], [[desert]], [[snowy taiga]] and [[snowy tundra]] [[village]] weaponsmith [[chest]]s.
|Leather armor can now be found inside savanna, taiga, desert, snowy taiga and snowy tundra village tannery chests.}}
{{History|||snap=beta 1.11.0.4|[[Pillager]]s and [[vindicator]]s that spawn in [[raid]]s can now drop iron armor.}}
{{History||1.11.0|snap=beta 1.11.0.5|[[File:Golden Chestplate (item) JE3 BE3.png|32px]] The textures of gold chestplate [[item]] have been changed.}}
{{History||1.12.0|snap=beta 1.12.0.2|[[File:Armor Stand with Leather Armor MCPE-44669.png|32px]] Leather armor no longer show as being [[dye]]d properly when worn by [[armor stand]]s.}}
{{History||1.13.0|snap=beta 1.13.0.1|Leather armor now appears dyed properly when worn by armor stands.}}
{{History||1.16.0|snap=beta 1.16.0.51|[[File:Netherite Chestplate JE2 BE1.png|32px]] [[File:Netherite Chestplate (item) JE2 BE1.png|32px]] Added netherite chestplate.
|Armor can now be obtained from [[piglin]]s that naturally spawn with golden armor.}}
{{History|||snap=beta 1.16.0.57|All parts of golden and netherite armor now generate randomly [[enchanting|enchanted]], and sometimes [[damage]]d, in [[bastion remnant]] chests.
|Netherite armor can no longer be [[crafting|crafted]].
|Netherite armor is now obtained by combining one diamond armor piece and one netherite ingot in a [[smithing table]].}}
{{History|||snap=beta 1.16.0.63|Diamonds armor now generates in place of netherite armor in bastion remnant [[chest]]s.}}
{{History|||snap=beta 1.16.200.53|Netherite Armor now gives a 90% reduction in Knockback.}}
{{History||1.16.210|snap=beta 1.16.210.53|Wearing any piece of leather armor now prevents [[Powder Snow#Freezing|freezing]] entirely.}}
{{History|console}}
{{History||xbox=TU1|xbone=CU1|ps=1.0|wiiu=Patch 1|switch=1.0.1|[[File:Leather Tunic JE1 BE1.png|32px]] [[File:Chainmail Chestplate JE2 BE1.png|32px]] [[File:Iron Chestplate JE1 BE1.png|32px]] [[File:Golden Chestplate JE1 BE1.png|32px]] [[File:Diamond Chestplate JE1 BE1.png|32px]] [[File:Leather Tunic (item) JE1 BE1.png|32px]] [[File:Chainmail Chestplate (item) JE1 BE1.png|32px]] [[File:Iron Chestplate (item) JE1 BE1.png|32px]] [[File:Golden Chestplate (item) JE1 BE1.png|32px]] [[File:Diamond Chestplate (item) JE1 BE1.png|32px]] Added chestplates.
|Added a quick equip for armor to the [[inventory]] interface.}}
{{History||xbox=TU12|ps=1.03|[[File:Leather Tunic JE3 BE2.png|32px]] [[File:Leather Tunic (item) JE3 BE2.png|32px]] The textures for leather chestplate have been changed.}}
{{History||xbox=TU14|ps=1.05|Leather armor can now be [[dye]]d.
|[[Item repair]] can now repair armor.}}
{{History||xbox=TU25|xbone=CU13|ps=1.16|Armor now have the quick equip functionality.}}
{{History||xbox=TU53|xbone=CU43|ps=1.49|wiiu=Patch 23|switch=1.0.3|Golden, chain and iron armor can now be [[smelting|smelted]] down into one of their respective [[nugget]]s.}}
{{History|PS4}}
{{History||1.90|[[File:Chainmail Chestplate (item) JE2 BE2.png|32px]] [[File:Iron Chestplate (item) JE2 BE2.png|32px]] [[File:Golden Chestplate (item) JE2 BE2.png|32px]] [[File:Diamond Chestplate (item) JE2 BE2.png|32px]] The textures of all types of chestplate items have been changed (except for the leather one).}}
{{History|new 3ds}}
{{History||0.1.0|[[File:Leather Tunic JE1 BE1.png|32px]] [[File:Chainmail Chestplate JE2 BE1.png|32px]] [[File:Iron Chestplate JE1 BE1.png|32px]] [[File:Golden Chestplate JE1 BE1.png|32px]] [[File:Diamond Chestplate JE1 BE1.png|32px]] [[File:Leather Tunic (item) JE3 BE2.png|32px]] [[File:Chainmail Chestplate (item) JE1 BE1.png|32px]] [[File:Iron Chestplate (item) JE1 BE1.png|32px]] [[File:Golden Chestplate (item) JE1 BE1.png|32px]] [[File:Diamond Chestplate (item) JE1 BE1.png|32px]] Added chestplates.}}
{{History|foot}}
; Armor durability from Indev until late Beta
{| class="wikitable" data-description="Armor Durability during Indev until late Beta" style="text-align:center;"
|-
!scope="col" | Material
!scope="col" | Helmet
!scope="col" | Chestplate
!scope="col" | Leggings
!scope="col" | Boots
|-
|scope="row" | '''Leather'''
| 33
| 48
| 45
| 39
|-
|scope="row" | '''Golden'''
| 66
| 96
| 90
| 78
|-
|scope="row" | '''Chainmail'''
| 66
| 96
| 90
| 78
|-
|scope="row" | '''Iron'''
| 132
| 192
| 180
| 156
|-
|scope="row" | '''Diamond'''
| 264
| 384
| 360
| 312
|}
== Issues ==
{{issue list}}
== Trivia ==
* Chestplates do not render on the player's arm in first person view.<ref>{{bug|MC-25512}}</ref><ref>{{bug|MCPE-30000}}</ref>
== Gallery ==
=== Enchanted Chestplates ===
<gallery>
File:Enchanted Leather Tunic (item).gif
File:Enchanted Chainmail Chestplate (item).gif
File:Enchanted Iron Chestplate (item).gif
File:Enchanted Golden Chestplate (item).gif
File:Enchanted Diamond Chestplate (item).gif
File:Enchanted Netherite Chestplate (item).gif
</gallery>
<gallery>
File:Enchanted Leather Chestplate.gif
File:Enchanted Chainmail Chestplate.gif
File:Enchanted Iron Chestplate.gif
File:Enchanted Golden Chestplate.gif
File:Enchanted Diamond Chestplate.gif
File:Enchanted Netherite Chestplate.gif
</gallery>
== References ==
{{reflist}}
== External Links ==
*[https://www.minecraft.net/en-us/article/taking-inventory--chestplate Taking Inventory: Chestplate] – Minecraft.net on August 4, 2021
{{Items}}
[[Category:Armor]]
[[ja:チェストプレート]]
[[ko:흉갑]]
[[pt:Peitoral]]
[[pl:Napierśnik]]
[[th:เสื้อเกราะ]]
[[zh:胸甲]]</li></ul> | build 1 | Removed old world type. | |||
| build 5 | Added back old world type. | ||||
| Legacy Console Edition | |||||
| TU5 | CU1 | 1.0 | Patch 1 | Added Superflat world type. The Nether is also flat in this world type. | |
| Added Small, Medium, and Large world types. | |||||
| CU36 | 1.38 | Added Amplified Terrain option (Xbox One and PS4 only). | |||
Issues
Issues relating to "World type" are maintained on the bug tracker. Report issues there.
See also
- Options, for further customizing your Minecraft experience.