No edit summary |
(Undo revision 756555 by Kooledud (talk) Already mentioned below) |
||
| Line 15: | Line 15: | ||
{{cleanup}} |
{{cleanup}} |
||
'''Wolves''' are [[mob]]s that can be allied with the player. They can be tamed by being fed [[bone]]s with the "use" key. Wolves are 1 block in height, 2 in length, and 1 in width (1 × 2 × 1). |
'''Wolves''' are [[mob]]s that can be allied with the player. They can be tamed by being fed [[bone]]s with the "use" key. Wolves are 1 block in height, 2 in length, and 1 in width (1 × 2 × 1). |
||
| − | |||
| − | == Collars == |
||
| − | |||
| − | You can die the wolf's collars. Just get some die and click on the wolf (not the button that makes you attack/destroy) |
||
== Spawning == |
== Spawning == |
||
| Line 33: | Line 29: | ||
All wolves will attack and chase skeletons, causing them to run away. When a wolf attacks a skeleton that is hidden from sunlight, the skeleton will shoot at the wolf. |
All wolves will attack and chase skeletons, causing them to run away. When a wolf attacks a skeleton that is hidden from sunlight, the skeleton will shoot at the wolf. |
||
| − | Wolves attack [[rabbit]]s, which will run away, with the exception of [[Rabbit#The Killer Bunny|killer |
+ | Wolves attack [[rabbit]]s, which will run away, with the exception of [[Rabbit#The Killer Bunny|killer rabbits]], which will not run away and will try to attack them. |
Wolves will retailiate if they are hit with a stray projectile from a mob or player. When this happens, all wolves within the vicinity of 32 blocks from the assaulted wolf will become hostile to the offender, and stay hostile until their target is killed. They have a search radius of 16 blocks. |
Wolves will retailiate if they are hit with a stray projectile from a mob or player. When this happens, all wolves within the vicinity of 32 blocks from the assaulted wolf will become hostile to the offender, and stay hostile until their target is killed. They have a search radius of 16 blocks. |
||
Revision as of 18:15, 23 November 2014
Wolves are mobs that can be allied with the player. They can be tamed by being fed bones with the "use" key. Wolves are 1 block in height, 2 in length, and 1 in width (1 × 2 × 1).
Spawning
Wolves spawn only in Forest, Taiga, Mega Taiga, Cold Taiga, and Cold Taiga M biomes. Wolves can also be spawned in Creative mode with a wolf spawn egg. Adult wolves spawn untamed and baby wolves spawn tamed. However, if baby wolves are spawned in creative by using the spawn egg on an adult wolf, they will spawn wild, and furthermore, can become hostile if attacked by the player. In Pocket Edition, however, wolves can spawn naturally as babies.
Behavior and appearance

A tamed wolf "begging" the player
Wolves can exhibit three different states depending on how the user interacts with them: 1. wild (untamed), 2. hostile, and 3. tamed. Tamed wolves can be bred to create a baby wolf using raw porkchop, cooked porkchop, raw beef, steak, raw chicken, cooked chicken, raw mutton, cooked mutton, raw rabbit, cooked rabbit, and rotten flesh.
All wolves will attack and chase skeletons, causing them to run away. When a wolf attacks a skeleton that is hidden from sunlight, the skeleton will shoot at the wolf.
Wolves attack rabbits, which will run away, with the exception of killer rabbits, which will not run away and will try to attack them.
Wolves will retailiate if they are hit with a stray projectile from a mob or player. When this happens, all wolves within the vicinity of 32 blocks from the assaulted wolf will become hostile to the offender, and stay hostile until their target is killed. They have a search radius of 16 blocks.
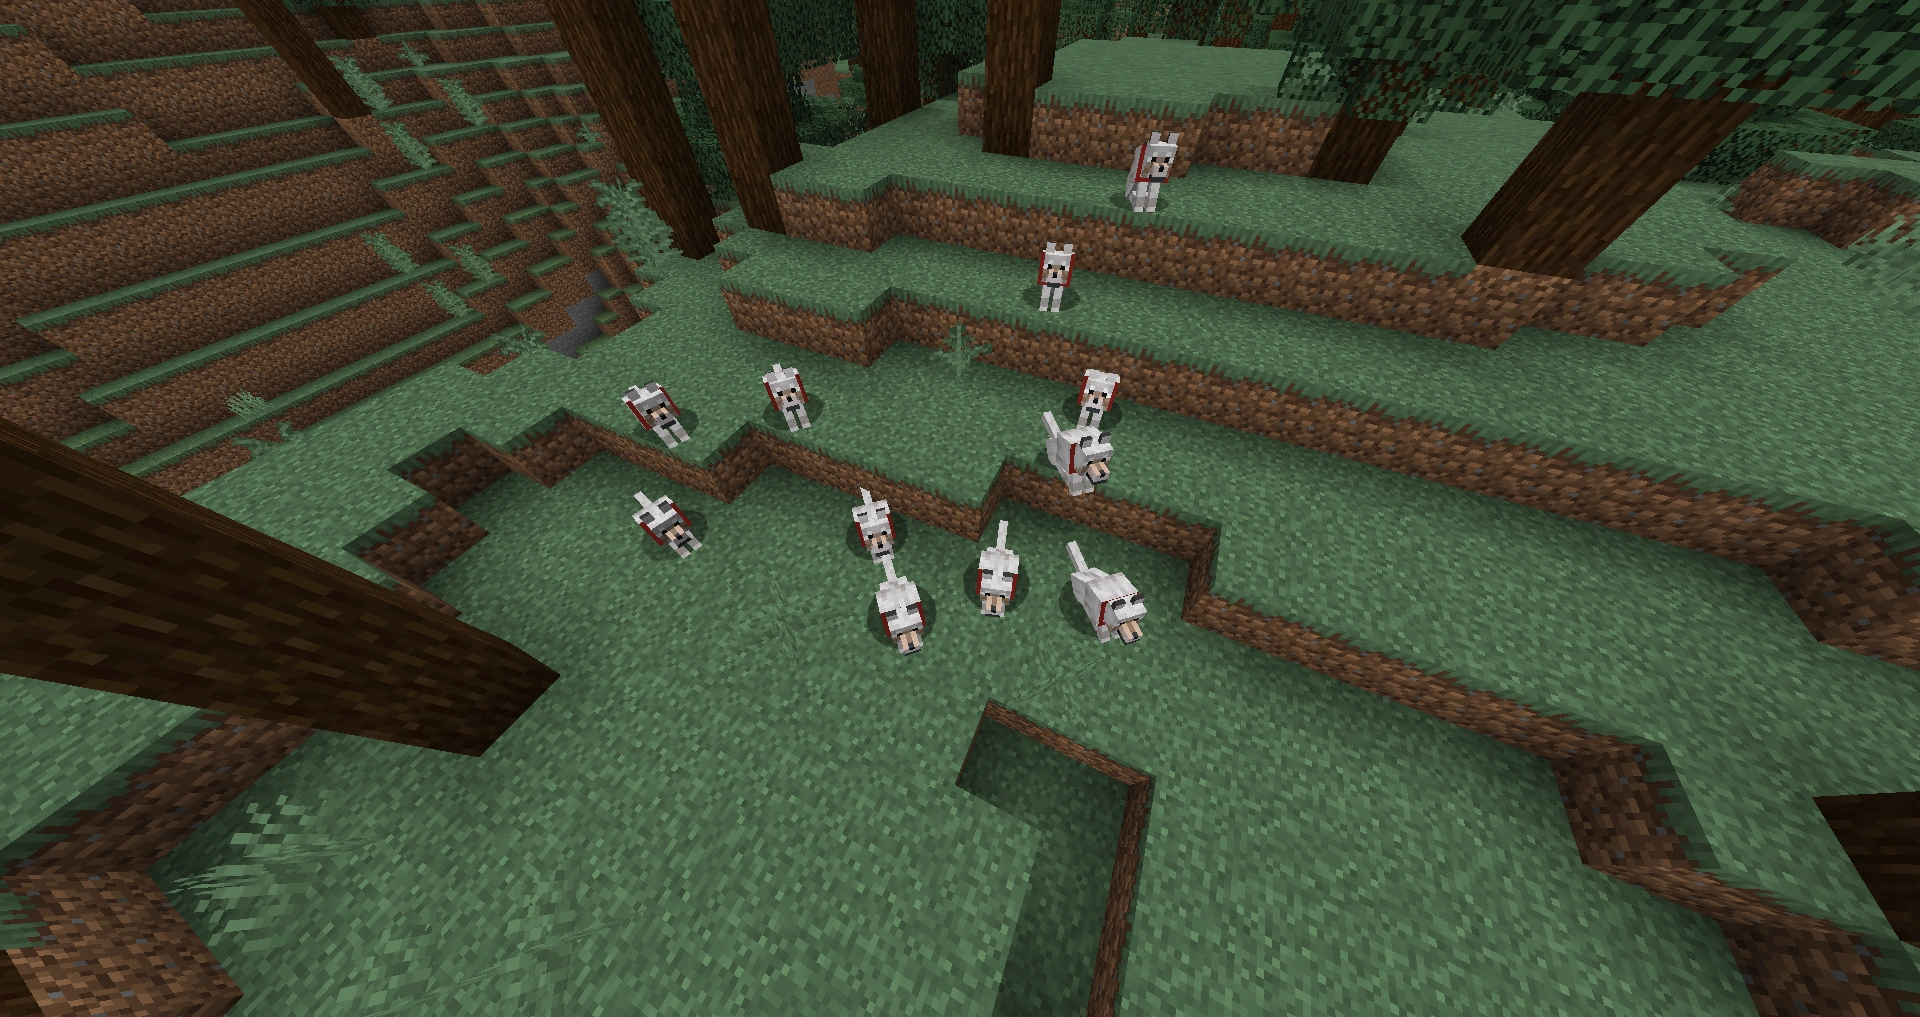
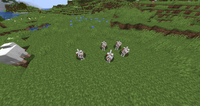
- Wild wolves have white fur, a drooping tail, and their eyes consist of two white pixels and two black pupils. They are neutral towards the player and spawn untamed in packs of 4. Occasionally, they will coordinate attacks on nearby sheep, rabbits or skeletons while roaming around. When a wild wolf attacks a mob, they will appear to become hostile, but will not attack the player. When the sheep dies, they will look like normal wild wolves again. Randomly dropped blocks of wool can be reliable indications of their presence. Untamed wolves will tilt their head to the side to indicate their interest in a bone or meat held by a nearby player. Untamed wolves will also become hostile toward the player if the player attacks them.
- Hostile wolves can be distinguished by their constant growling and appearance. Their tail becomes straight, their eyes become red and the contrast level of the fur increases, revealing dark patches of bristling hair and a mouth line raised in a slight snarl. They coordinate attacks on players that have injured a wild wolf in the pack, and will not revert from this state once aggravated unless the player dies and respawns. Tamed wolves cannot become aggravated by their owner, but they can be by other players and mobs. Aggravated wolves will attack any and all players in range. They also use this appearance when attacking sheep, skeletons or rabbits, but once their target is killed or out of their range, they will change back into their wild appearance.
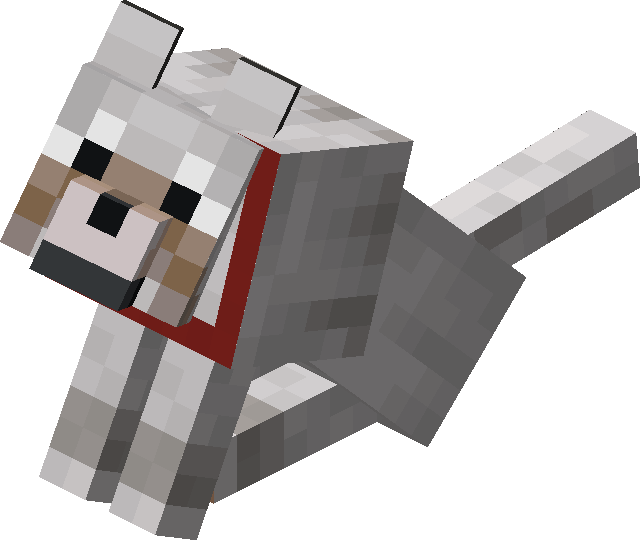
- Tamed wolves, or dogs, can be distinguished from wild or hostile wolves from their eyes since they change to look less aggressive (two white pixels and one black pixel). They also appear to have a red collar around their neck. The collar can be dyed using any color of dye on the wolf. Right clicking on the wolf makes it sit and remain in place while the player is free to move around. Sitting wolves will never despawn,[1] regardless of whether the player leaves the game, or goes to sleep. Wolves will teleport to the player when they are not in sitting position and far enough from the player, which allows the player to walk at normal pace without worrying about losing it. They also will resume following the player when he/she returns and right-clicks on them, causing them to stand up again. Friendly wolves will also bark occasionally at any nearby players. When standing, these wolves will engage any mob (regardless of the type of mob, unless a creeper) the player attacks or attacks the player (the notable exceptions being creepers and wolves owned by the same player). They will also not attack tamed horses if the horse is struck by the player. However, they will attack untamed horses if the horse is struck by the player. Tamed dogs are considered passive mobs and will not attack the player for any reason (with the exception of the player inadvertently attacking himself). If a player attacks wild wolves, tamed wolves will attack the wild wolves.
Movement
By default, tamed wolves follow the player quickly in a wandering manner (as opposed to walking directly towards him/her) to avoid falling, but will continue to jump and move around even if the player stands still. However, if you move far enough away from your wolf, and it is not in sit mode (see below) it will move towards you, and if you get far enough away it will teleport to you. Besides making travel easier (no need to wait for them), this can be used to rescue them from lava, water, or pits. Note that they will not teleport to you if you are in water more than one block deep.
- Wolves can be told to "sit" by pressing use on them, and made to stand again with another press of use.
- When originally tamed, they will start off sitting, you will need to stand them up to take them with you.
- While sitting, they will not follow the player. However, if their owner fights a mob near them, they are still likely to join the fight. When the fight is over, they will go back to sitting (if in water, they won't sit until they are on dry land). They will sit at their new location instead of returning to wherever they were previously.
- Wolves will stand up and follow the player (teleporting if necessary) if pushed into water or injured while sitting.
- A significant bug: Sitting wolves can occasionally teleport to you from unloaded chunks, most often when reloading a single-player game world and when the wolves grow from a puppy to an adult wolf. This is especially problematic when in a boat (see below).
- Wolves can find paths to their targets if attacking, even in craters. They will also navigate along the edges of cliffs, but will occasionally take drops long enough to damage them.
- Wolves attack their targets by leaping at them in the exact same manner Spiders, but cause no damage while in midair.
- Wolves can navigate and turn around in 1 × 1 horizontal tunnels.
Hazards
- Like other pets, they can activate pressure plates, perhaps letting monsters in or animals out of a pressure-plate door or gate, or even setting off a trap.
- They can trample crops by jumping on them.
- Tamed wolves will attack an animal the player starts to attack, so be careful not to hit your animals (or hit sheep with the shears) if you do not want it killed. If a tamed wolf's owner attacks a villager, the wolf will attack it as well. It is strongly advised to not hit a villager by accident with your wolf standing up, as it will attack the villager until it is dead. Not to mention that any iron golems in the area will kill the wolf swiftly.
- They can still block the player's attempt to click on something or place a block, or even intercept (and block) a player's attack against some other mob. They can also walk in front of your pick while mining.
- They can teleport in front of your boat whenever you are in shallow water (1 block deep). This can be unexpectedly lethal (to you), due to a long-standing bug with boats running into mobs.
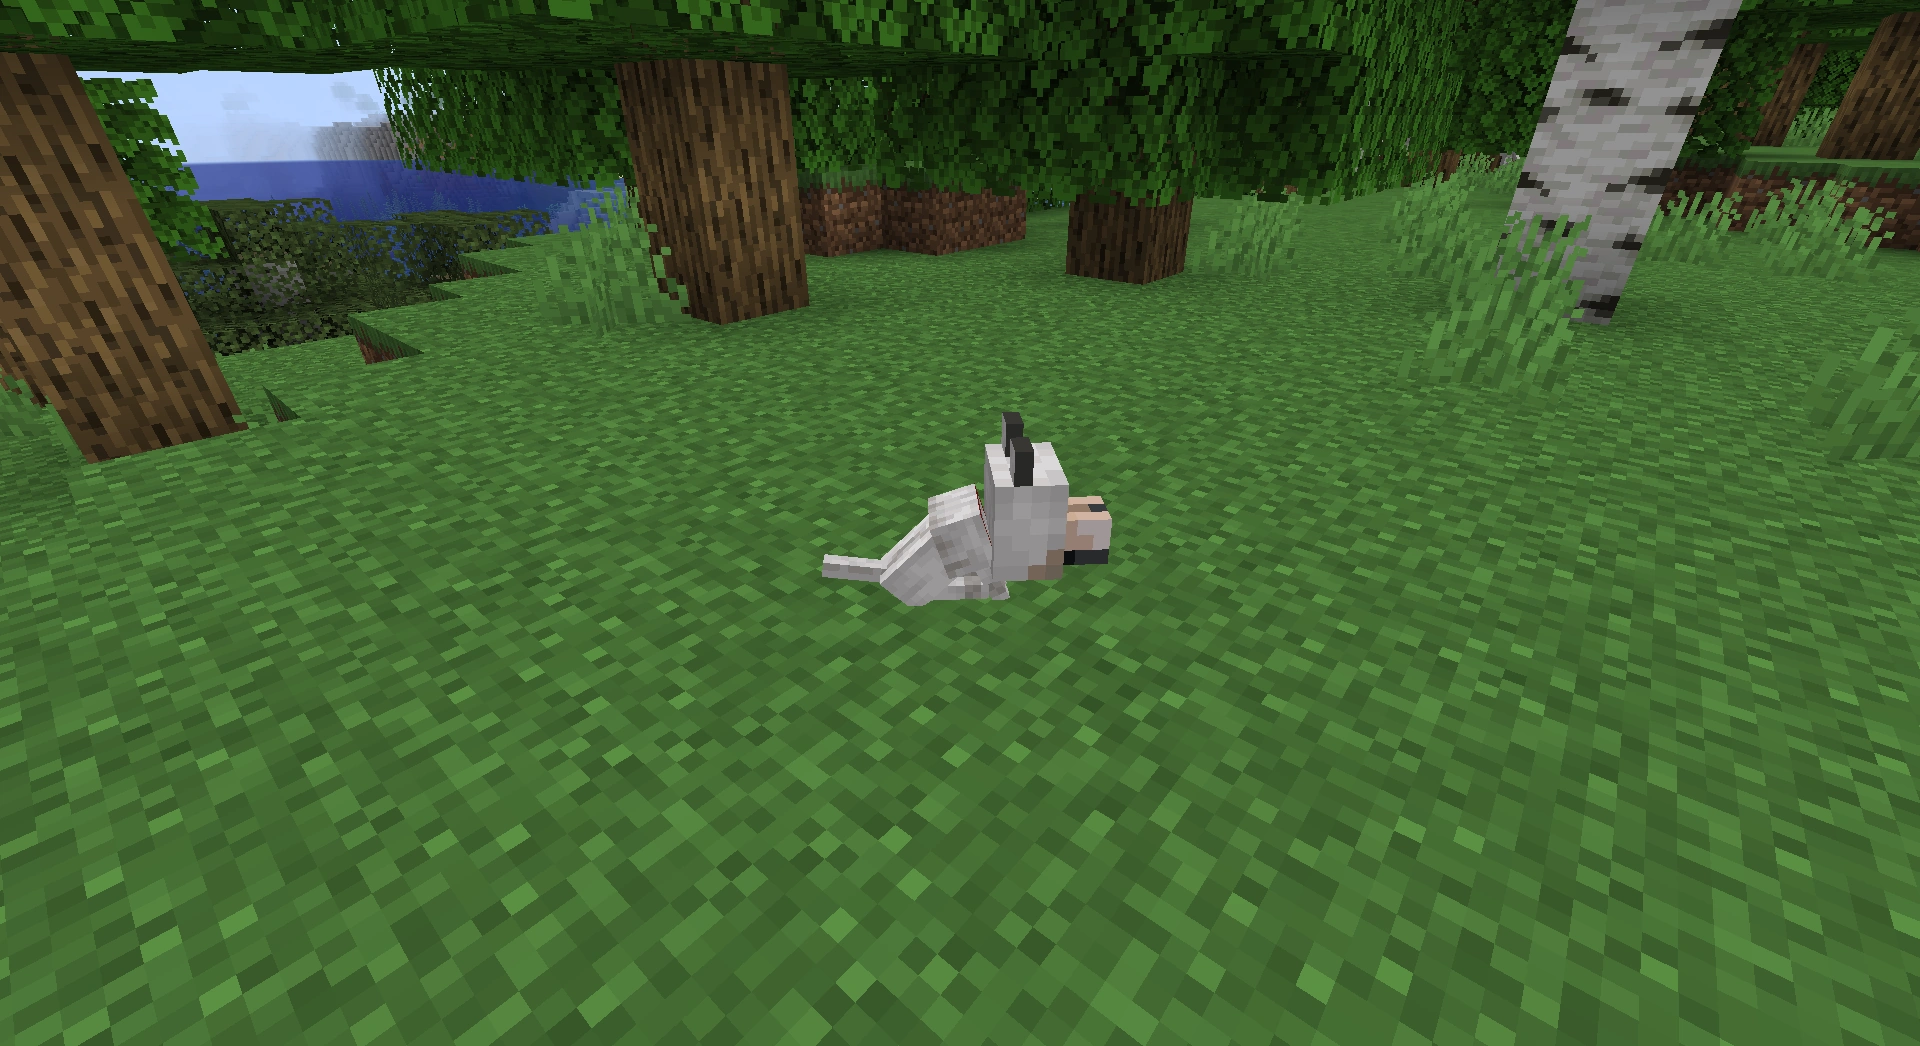
- They can get caught in water currents. Even when not outright sucked under by a current, they can drown in a waterfall by trying to swim towards you, even if that means staying underwater.
Teleportation
Tamed wolves will teleport to the player if they are more than 12 blocks from the player, with a few exceptions.
- Teleporting resets the focus of a tamed wolf, so if a wolf is attacking a mob and teleports beside a player, it will resume following the player.
- It is possible for tamed wolves to teleport to an inaccessible location (e.g. under ice) and be injured or die of suffocation as a result.
A wolf will not teleport:
- If the wolf has been ordered to sit.[2]
- Exception: The wolf is likely to teleport if it is injured while sitting (it will no longer be sitting after it teleports). A dramatic example is if a wolf sitting outside is struck by lightning, in which case it will be on fire when it appears.
- If the wolf is in a minecart.
- If the wolf has been attached to a fence post with a lead.
- If the wolf is in an unloaded chunk.
- If none of the blocks on the edge of a 5×5×1 region centered on the player are transparent blocks with a solid block below and another transparent block above.
- If the player is in another dimension; a wolf will remain in its current dimension until the player returns. However, wolves can be transported to another dimension by pushing them into the portal first.
Combat
Tamed wolves (when standing) always follow the player around the Overworld, teleporting to him/her if they become too distant. They will attack any non-environmental entities that injure the player - even idle sitting wolves will stand up and descend upon an attacker to defend the player when he/she is hit by someone else or a hostile mob. If the player orders a wolf to attack an untamed member of its own pack, it will kill it. When the player hits a mob or another player with melee attacks (non-arrow),[3] tamed wolves will engage in combat with it, focusing on one target at a time and switching to another only when the first has been killed.
Huge armies of wolves may be strong; however, due to unit collision between a wolf and another wolf, they are limited in how many can attack a mob at once. It is not recommended to have greater than 8 wolves out at once, due to creepers being able to kill or injure most of them. Wolves are best at attacking hostile mobs that struggle to fight back, due to a bug, such as Spiders and Zombies. When fighting Endermen, they are likely to need player assistance, including feeding them in melee. When attacking Skeletons, they can be quite a nuisance; when a skeleton is in the vicinity, it will flee from the wolves, which in turn attack the skeleton. They will continue to chase the skeleton everywhere it goes until it is dead or despawns, often leaving the player to fend for themselves. Note that tamed wolves will never attack Creepers. It is not recommended to let your wolf alone with a Witch, as the witch constantly uses healing potions on itself, and if it doesn't kill the wolf, it is likely to get its poison potion in, leaving the wolf with half a heart. Because of the splash damage, the witch is a dangerous foe to leave with any amount of wolves. They will attack Slimes and Magma cubes, but only the ones you actually hit or are hit by—when the mobs split, they won't continue attacking the new smaller mobs.
Combining an army of wolves with a horse in a plains or desert is one of the easiest ways to kill mobs. When fighting mobs, the player can hit the mob, run away, and collect the drops and exp afterwards. One of the biggest advantages is you can run away from creepers and other mobs when you need to. Zombies, Skeletons, Spiders, and even Endermen will at most only attack you once or twice, and Creepers can be easily avoided on horseback. However, this method is ineffective against Witches, as their poison attacks are likely to leave you, your horse and most of your wolf pack down to half a heart.
On a PvP server, wolves are sometimes used in battles. The difficulty of killing the wolves or evading them depends on the situation.
If a tamed wolf kills a mob, it will drop experience orbs for the player to take, as any mob killed by the player. If the player is hurt by any mob, all tamed wolves in the radius will stand up and attack the mob.
Taming, health and feeding
Many tamed wolves sitting
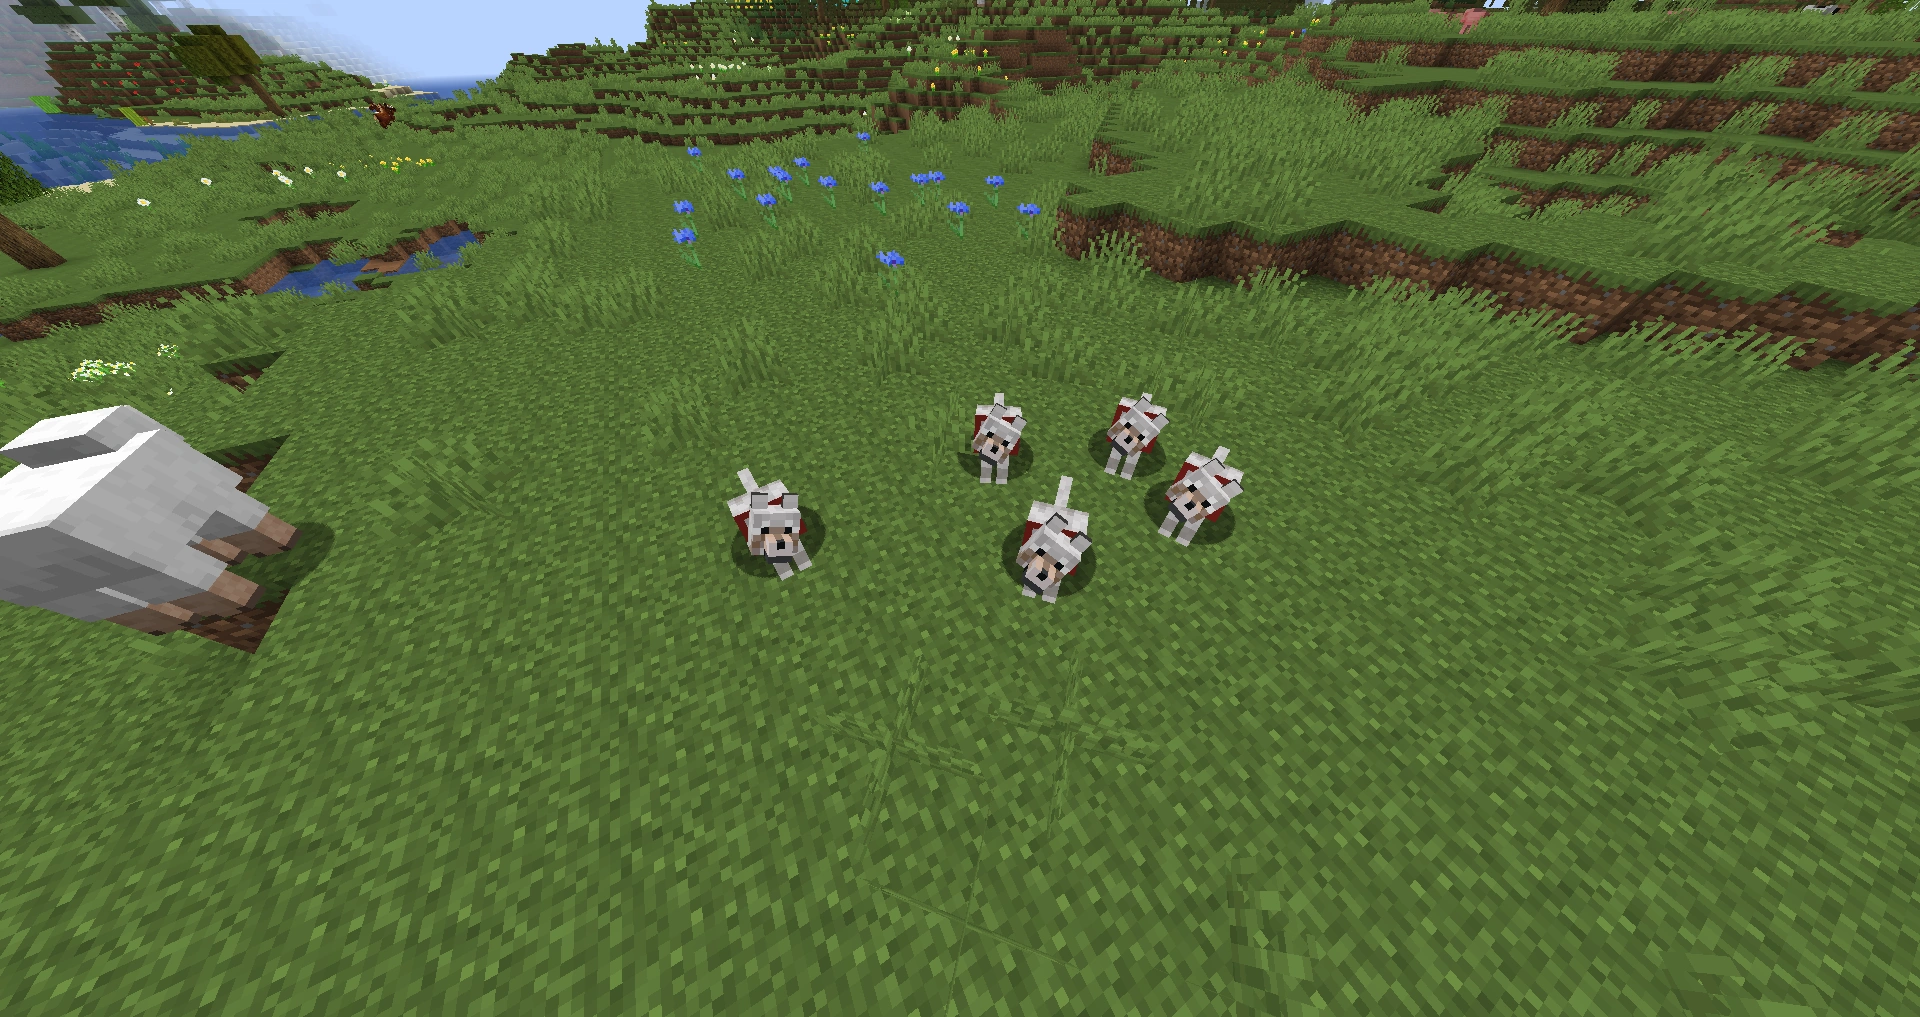
A group of begging wolves
First, find an untamed wolf or wolf pack. Tamed wolves are 5 times stronger than wild ones, with 2.5 times the health and double the attack power, and can kill 4 at a time, possibly without dying. Each individual wolf can be tamed by feeding (right-clicking) it bones. Once tamed, a wolf will not accept any more bones. Note that the number of bones required is random - each bone has a 1 in 3 chance of taming the wolf, and up to 12 bones need to be used to ensure that the wolf is successfully tamed.[4] If the wolf is also tamed, it will get a red collar and (if not swimming) the wolf will sit down. Currently, there is no limit[5] to the number of wolves the player can tame.
A wolf's tail will rise and lower depending on its health. The exact health of an individual wolf can be determined by measuring the angle between its hind legs and tail. The angle indicates the percentage of health that the wolf has (100 degrees for 100%, or 10 hearts; 90 degrees for 90%, etc.). Wild wolves have a maximum health of 4 hearts, so their tails will always remain significantly lower than those of tamed wolves. Tamed wolves can be healed by feeding them any sort of meat other than fish; this will restore as much of the wolf's health as the same food would restore hunger points when eaten by the player.
Puppies will not gain 100% health when born, but their maximum health is the same as an adult's, and they can be raised to full health by feeding them. (splash potions of healing or regeneration can also be used.) Note that wolves do not get food poisoning, so they can freely eat Rotten Flesh (often referred to as "dog food"), or raw chicken. For a perfectly healthy puppy, 6 raw chicken, 4 raw pork or beef, 3 rotten flesh, or 2 of any cooked meat is required. Feeding a tamed wolf which is already at full health will usually start the "love mode" animation. (However, if it's a puppy or has recently bred, it will not eat food unless it needs healing.)
You can change a tamed wolf's collar color by right clicking with a dye. The collars are a different layer, so the collar will still be visible when affected by the Invisibility potion effect.
Breeding

A puppy sitting
Wolves can be bred, if tamed and at full health, through the use of any type of meat (raw or cooked chicken, raw or cooked porkchop, raw or cooked beef, raw or cooked rabbit, raw or cooked mutton and rotten flesh). Once you have two or more wolves, breeding them is a much better way to increase your wolf pack's population than taming more wolves, but keep in mind that wolves are born at low health and should be fed when they're born. It's best to feed wolves rotten flesh, because there are not many other uses for it, and wolves will not receive damage from food poisoning (hunger).
The growth of baby wolves can be slowly accelerated using any type of meat. Each use takes 10% off the remaining time to grow up.
The behavior of puppies is the same as tamed wolves, with few exceptions. They do not attack as well as wolves, and will drown after a short while of swimming due to their size and inexperience. The appearance of the pups also varies. They have large heads, similar to the offspring of pigs, cows, sheep and so on.
Breeding two wolves that recognize someone else as an owner will cause the puppy to also be owned by the owner of the original two wolves. In order to breed a puppy that recognizes you as its owner, one or both of the wolves must be tamed by you, and both must be tamed. In order to breed two wolves belonging to two separate people, the wolf owner who does not wish to have the puppy tamed to them must click the wolf belonging to the other person first, followed by his/her own wolf.
Achievements
| Icon | Achievement | In-game description | Actual requirements (if different) | Gamerscore earned | Trophy type (PS4) | |
|---|---|---|---|---|---|---|
| PS4 | Other | |||||
| Leader of the Pack | Befriend five wolves. | This does not have to be in a single game, so multiple games or reloading old saves does count toward this achievement. | 20G | Bronze | ||
Video
Wolf/video
History
| b | |||||
|---|---|---|---|---|---|
| ? | Notch confirmed their addition after having breakfast with an idol of his (likely Peter Molyneux).[6] Jeb posted a video preview of the wolves he was working on on March 18th, 2011.[7] | ||||
| A glitch was encountered where if the player's wolf was not sitting when the player logged off, it would become wild and the player would have to tame it again. This problem was fixed a couple of updates after wolves were first introduced. | |||||
1.4{{Extension DPL}}<ul><li>[[Red Dye|Red Dye]]<br/>{{Item
| title = Red Dye
| renewable = Yes
| stackable = Yes (64)
}}
'''Red dye''' is a [[Dye#Primary|primary color dye]] created primarily from flowers.
== Obtaining ==
=== Crafting ===
{{Crafting
|head=1
|showname=0
|Poppy; Red Tulip; Beetroot
|Output=Red Dye
|type=Material
}}
{{Crafting
|Rose Bush
|Output=Red Dye,2
|type=Material
|foot=1
}}
=== Trading ===
[[Wandering trader]]s sell 3 red dye for an [[emerald]].
== Usage ==
{{dye usage}}
=== Crafting ingredient ===
{{crafting usage|ignore=Banner|continue=1}}
{{banner crafting usage}}
=== Loom ingredient ===
{{Banner loom usage|Red Dye}}
=== Trading ===
Journeyman-level shepherd villagers have a {{frac|1|6}} chance to buy 12 red dye for an emerald.
== Data values ==
=== ID ===
{{edition|java}}:
{{ID table
|edition=java
|showforms=y
|generatetranslationkeys=y
|displayname=Red Dye
|spritetype=item
|nameid=red_dye
|form=item
|foot=1}}
{{edition|bedrock}}:
{{ID table
|edition=bedrock
|showaliasids=y
|shownumericids=y
|showforms=y
|notshowbeitemforms=y
|generatetranslationkeys=y
|displayname=Red Dye
|spritetype=item
|nameid=red_dye
|aliasid=dye / 1
|id=396
|form=item
|translationkey=item.dye.red.name
|foot=1}}
== Video ==
<div style="text-align:center">{{yt|tqTbsbt2irk}}</div>
== History ==
{{History|java beta}}
{{History||January 10, 2011<ref group="n">Supposed time when fragment was filmed. Based on modified date of client.jar/gui/trap.png in [[Beta 1.2]].</ref>|link=https://www.youtube.com/watch?v=cBF2ugTzXqQ&t=181s|[[File:Red Dye (pre-release).png|32px]] Shown rose red in development as part of [[Minecraft: The Story of Mojang]].}}
{{History||1.2|[[File:Red Dye JE1 BE1.png|32px]] Added rose red.}}
{{History||1.6.6|Roses can now be generated using [[Bone Meal|bone meal]], making rose red [[renewable resource|renewable]].}}
{{History|java}}
{{History||1.3.1|snap=1.3|[[File:Red Dye JE2 BE2.png|32px]] The texture of rose red has now been changed.}}
{{History||1.4.2|snap=12w34a|Added the ability to [[Armor#Dyeing|dye]] leather [[armor]] and [[wolf]] collars.}}
{{History||1.4.6|snap=12w49a|Rose red can now be crafted with [[gunpowder]] to create a [[firework star]].}}
{{History||1.6.1|snap=13w19a|Rose red can now be used to craft stained clay.}}
{{History||1.7.2|snap=13w36a|Rose red is now crafted using a poppy instead of a rose, as the latter is removed.
|Rose red can now be crafted using red tulips and rose bushes.}}
{{History|||snap=13w37a|Each poppy now yields only 1 rose red, instead of 2.}}
{{History|||snap=13w41a|Rose red can now be used to craft stained glass.}}
{{History||1.8|snap=14w30a|Added [[banner]]s, which can be dyed.}}
{{History||1.9|snap=15w31a|Rose red can now be crafted using [[beetroot]].}}
{{History||1.11|snap=16w39a|Added the ability to dye [[shulker box]]es.}}
{{History||1.12|snap=17w06a|Rose red can now be used to craft red [[concrete powder]].}}
{{History|||snap=17w15a|Added the ability to dye [[bed]]s.}}
{{History||1.13|snap=17w47a|The different data values for the <code>dye</code> ID have now been split up into their own IDs.
|Prior to [[1.13/Flattening|''The Flattening'']], this [[item]]'s numeral ID was 351.}}
{{History||1.14|snap=18w43a|"Rose Red" has now been renamed to "Red Dye".
|[[File:Red Dye JE3 BE3.png|32px]] The texture of red dye has now been changed.}}
{{History|||snap=18w44a|Red dye can now change the text color on [[sign]]s to red.}}
{{History|||snap=19w05a|Added the [[wandering trader]], which sells red dye.}}
{{History|||snap=19w11a|Red dye can now be [[trading|bought]] by shepherd villagers.}}
{{History||1.17|snap=20w45a|Red dye can now be used to craft [[red candle]]s.}}
{{History|||snap=21w19a|Red dye can no longer be used to craft red candles.}}
{{History|||snap=Pre-release 1|Red dye can once again be used to craft red candles.}}
{{History||1.20<br>(Experimental)|link=1.19.3|snap=22w42a|Red dye can now change the text color on [[hanging sign]]s to red.}}
{{History|pocket alpha}}
{{History||v0.3.0|[[File:Red Dye JE1 BE1.png|32px]] Added rose red. It is currently unobtainable and serves no purpose.}}
{{History||v0.4.0|Rose red is now obtainable by smelting red [[mushroom]]s.
|Rose red can now be used to craft other dyes and red wool.}}
{{History||v0.8.0|snap=build 1|[[File:Red Dye JE2 BE2.png|32px]] The texture of red dye has been changed.
|Rose red is now used to craft [[cocoa beans]].}}
{{History||v0.9.0|snap=build 3|Rose red can now be obtained by putting a poppy, red tulip or rose bush [[flower]]s in the crafting grid.}}
{{History||v0.15.0|snap=build 1|Red mushrooms can no longer be smelted to obtain rose red.}}
{{History||v0.16.0|snap=build 1|Rose red is no longer used to craft cocoa beans.}}
{{History|bedrock}}
{{History||1.8.0|snap=beta 1.8.0.10|"Rose Red" has now been renamed to "Red Dye".}}
{{History||1.10.0|snap=beta 1.10.0.3|Red dye can now be [[trading|bought]] from [[wandering trader]]s.
|[[File:Red Dye JE3 BE3.png|32px]] The texture of red dye has now been changed.}}
{{History||1.11.0|snap=beta 1.11.0.4|Red dye can now be [[trading|sold]] to shepherd [[villager]]s.}}
{{History||1.16.100|snap=beta 1.16.100.56|The ID of red dye has been changed from <code>dye/1</code> to <code>red_dye</code>.}}
{{History|console}}
{{History||xbox=TU1|xbone=CU1|ps=1.00|switch=1.0.1|wiiu=Patch 1|[[File:Red Dye JE1 BE1.png|32px]] Added rose red.}}
{{History||xbox=none|xbone=none|ps=1.83|switch=none|wiiu=none|"Rose Red" has now been renamed to "Red Dye".}}
{{History||ps=1.90|[[File:Red Dye JE3 BE3.png|32px]] The texture of red dye has now been changed.}}
{{History|new 3ds}}
{{History||0.1.0|[[File:Red Dye JE1 BE1.png|32px]] Added rose red.}}
{{History|foot}}
;Notes
{{reflist|group=n}}
== Issues ==
{{issue list}}
{{Items}}
[[cs:Šípková červeň]]
[[de:Roter Farbstoff]]
[[es:Tinte rojo]]
[[fr:Teinture rouge]]
[[hu:Rózsavörös]]
[[ja:赤色の染料]]
[[ko:장밋빛 빨강 염료]]
[[nl:Rozenrood]]
[[pl:Czerwony barwnik]]
[[pt:Corante vermelho]]
[[ru:Красный краситель]]
[[zh:红色染料]]
[[Category:Items]]
[[Category:Dyes]]
[[Category:Renewable resources]]</li><li>[[Bone|Bone]]<br/>{{about|the item|the block|Bone Block|other uses|Bone (disambiguation)}}
{{Item
| image = Bone.png
| renewable = Yes
| stackable = Yes (64)
}}
A '''bone''' is an [[item]] primarily obtained from [[skeleton]]s and similar mobs. It can be crafted into [[Bone Meal|bone meal]] or used to tame wild [[Wolf|wolves]].
== Obtaining ==
=== Chest loot ===
{{LootChestItem|bone}}
=== Mob loot ===
Skeletons, [[wither skeleton]]s, [[skeleton horse]]s, and [[stray]]s may drop 0–2 bones upon death. The maximum drop is increased by 1 per level of Looting, for a maximum of 0-5 bones with Looting III.
{{IN|bedrock}}, [[salmon]], [[cod]], [[pufferfish]], and [[tropical fish]] have 25% chance to drop 1-2 bones upon death. The maximum drop is increased by 1 to 2 per level of Looting, for a maximum of 2-8 bones with Looting III.
Salmon (small and medium size) have 25% chance to drop 1 bone upon death, The maximum drop is increased by 1 to 2 per level of [[Looting]], for a maximum of 2-7 bones with Looting III. The chance of dropping bones increases by 1% per looting level, so with Looting III there is up to a 28% chance of bones dropping.
=== Fishing ===
Bones can also be obtained by [[fishing]] as part of the junk category. The best chance of catching a bone is achieved without the [[Luck of the Sea]] enchantment, yielding a 1.1% chance.
== Usage ==
=== Helmet ===
[[File:Steve wearing Bone.png|thumb|right|75px]]
[[File:Alex wearing Bone.png|thumb|right|75px]]
While a bone cannot be equipped in the head slot in Survival mode, equipping it using commands causes it to appear in the player's mouth.
=== Taming ===
Using a bone on a wild [[wolf]] has a {{frac|1|3}} chance of [[taming]] it. Bones cannot tame a hostile wolf or a wolf that has already been tamed. However, bones can be used to attract the attention of the tamed ones.
=== Crafting ingredient ===
A bone can be crafted into 3 bone meal.
{{crafting usage}}
== Achievements ==
{{load achievements|Leader of the pack}}
== Advancements ==
{{load advancements|Best Friends Forever}}
== Data values ==
=== ID ===
{{edition|java}}:
{{ID table
|edition=java
|showforms=y
|generatetranslationkeys=y
|displayname=Bone
|spritetype=item
|nameid=bone
|form=item
|foot=1}}
{{edition|bedrock}}:
{{ID table
|edition=bedrock
|shownumericids=y
|showforms=y
|notshowbeitemforms=y
|generatetranslationkeys=y
|displayname=Bone
|spritetype=item
|nameid=bone
|id=415
|form=item
|foot=1}}
== History ==
{{History|java beta}}
{{History||1.2|[[File:Bone JE1 BE1.png|32px]] Added bones.
|Bones can be [[crafting|crafted]] into [[bone meal]].}}
{{History||1.4|Bones can now be used to tame [[wolves]].}}
{{History|java}}
{{History||1.3.1|snap=12w21a|Bones can now be found within [[desert temple]]s, allowing bones to be obtainable on Peaceful difficulty.}}
{{History||1.4.2|snap=12w36a|Added [[wither skeleton]]s, which has a chance to [[drops|drop]] bones when killed.}}
{{History||1.6.1|snap=13w16a|Added [[skeleton horse]]s, which drop bones when killed.}}
{{History||1.7.2|snap=13w36a|Bones can now be more easily obtained in Peaceful difficulty by [[fishing]]. Although, they are considered a "junk" [[item]].}}
{{History||1.9|snap=15w44a|The average yield of bones in [[desert temple]]s has been slightly decreased.
|Bones can now be found in [[dungeon]] [[chest]]s.}}
{{History||1.10|snap=16w20a|Added [[stray]]s, which [[drops|drop]] bones when killed.}}
{{History||1.11|snap=16w39a|Bones can now found in the new [[woodland mansion]] chests.}}
{{History||1.13|snap=17w47a|Prior to [[1.13/Flattening|''The Flattening'']], this [[item]]'s numeral ID was 352.}}
{{History||1.14|snap=18w43a|[[File:Bone JE2.png|32px]] The texture of bones has now been changed.}}
{{History|||snap=18w44a|[[File:Bone JE3 BE2.png|32px]] The texture of bones has now been slightly changed.}}
{{History||1.19|snap=Deep Dark Experimental Snapshot 1|Bones now generate in [[ancient city]] chests.}}
{{History|pocket alpha}}
{{History||v0.2.0|[[File:Bone JE1 BE1.png|32px]] Added bones. They are currently unobtainable and serve no purpose.}}
{{History||v0.3.3|Added skeletons, which drop bones when they die.
|Bones can now be used to craft [[bone meal]].}}
{{History||v0.5.0|Bones can now be obtained after activating the [[nether reactor]].}}
{{History||v0.9.0|snap=build 1|Added bones to [[Creative]] mode.}}
{{History||v0.11.0|snap=build 1|Bones can now be more easily obtained in Peaceful difficulty by [[fishing]]. Although, they are considered a "junk" [[item]].}}
{{History||v0.12.1|snap=build 1|Added [[wither skeleton]]s, which have a chance to [[drops|drop]] bones when killed.
|Bones are no longer available from the [[nether reactor]].}}
{{History||v0.13.0|snap=build 1|Bones can now be found inside of the [[desert temple]] hidden [[chest]] room.}}
{{History||v0.15.0|snap=build 1|Added [[stray]]s and [[skeleton horse]]s, which drop bones when killed.
|Bones can now be found in [[jungle temple]] [[chest]]s.}}
{{History|pocket}}
{{History||1.1.0|snap=alpha 1.1.0.0|Bone can now be found inside [[woodland mansion]] chests.}}
{{History|bedrock}}
{{History||1.4.0|snap=beta 1.2.14.2|Bones now [[drops|drop]] from [[fish]] mobs.}}
{{History||1.10.0|snap=beta 1.10.0.3|[[File:Bone JE3 BE2.png|32px]] The texture of bones has now been changed.}}
{{History|console}}
{{History||xbox=TU1|xbone=CU1|ps=1.00|wiiu=Patch 1|[[File:Bone JE1 BE1.png|32px]] Added bones.}}
{{History||xbox=TU5|Bones can be found in the Miscellaneous tab in the [[Creative inventory]].}}
{{History||xbox=TU12|Moved bones to the Materials tab in the Creative inventory.}}
{{History||xbox=TU19|xbone=CU7|ps=1.12|wiiu=Patch 1|Added [[wither skeleton]]s, which have a chance to [[drops|drop]] bones when killed.}}
{{History||xbox=TU31|xbone=CU19|ps=1.22|wiiu=Patch 3|Bones can now be obtained from [[fishing]].}}
{{History||xbox=TU46|xbone=CU36|ps=1.38|wiiu=Patch 15|Added [[stray]]s and [[skeleton horse]]s, which drop bones when killed.}}
{{History||xbox=none|xbone=none|ps=1.90|wiiu=none|switch=none|[[File:Bone JE3 BE2.png|32px]] The texture of bones has now been changed.}}
{{History|new 3ds}}
{{History||0.1.0|[[File:Bone JE1 BE1.png|32px]] Added bones.}}
{{History|foot}}
== Issues ==
{{issue list}}
== See also ==
* [[Bone meal]]
* [[Wolf]]
* [[Dyeing]]
{{Items}}
[[Category:Renewable resources]]
[[de:Knochen]]
[[es:Hueso]]
[[fr:Os]]
[[hu:Csont]]
[[it:Osso]]
[[ja:骨]]
[[ko:뼈]]
[[nl:Bot]]
[[pl:Kość]]
[[pt:Osso]]
[[ru:Кость]]
[[th:กระดูก]]
[[tr:Kemik]]
[[uk:Кістка]]
[[zh:骨头]]</li></ul> | Added wolves on March 31, 2011. | ||||
1.5{{Extension DPL}}<ul><li>[[Dragon's Breath|Dragon's Breath]]<br/>{{Item
| image = Dragon's Breath.png
| renewable = Yes
| stackable = Yes (64)
| rarity = Uncommon
}}
The '''dragon's breath''' is a [[brewing]] item that is used solely to make [[lingering potion]]s.
== Obtaining ==
The dragon's breath can be obtained by scooping up the [[ender dragon]]'s breath attack or the purple [[area effect cloud|effect clouds]] caused by [[dragon fireball]]s in an empty [[glass bottle]].
== Usage ==
=== Brewing ingredient ===
Dragon's breath may be added to any splash potion to upgrade it to a lingering potion, which can be used to create a lasting [[Lingering Potion#Area Effect Cloud|area effect cloud]], or to craft [[Arrow#Tipped arrows|tipped arrows]].
{{brewing
|name=[[Lingering Potion]]
|showname=1
|Dragon's Breath
|Any Lingering Potion
|base=Any Splash Potion}}
When put 2 or more dragon's breath in the brewing stand, after the brewing process, a glass bottle will drop as an [[Item (entity)|entity]]. However, if put only 1 dragon's breath in the brewing stand, after the brewing process, the glass bottle is consumed and cannot be retrieved.<ref>{{bug|MC-259583}}</ref>
== Sounds ==
{{Edition|Java}}:
{{Sound table
|sound=Bottle fill dragon breath1.ogg
|sound2=Bottle fill dragon breath2.ogg
|subtitle=Bottle fills
|source=neutral
|description=Filling a glass bottle with dragon's breath
|id=item.bottle.fill_dragonbreath
|translationkey=subtitles.item.bottle.fill
|volume=1.0
|pitch=1.0
|distance=16
|foot=1}}
{{Edition|Bedrock}}:
{{Sound table
|type=bedrock
|sound=Bottle fill dragon breath1.ogg
|sound2=Bottle fill dragon breath2.ogg
|source=sound
|description=When a bottle is filled with dragon's breath
|id=bottle.dragonbreath
|volume=0.7<wbr>{{Until|BE 1.20.40}}<br>1.0<wbr>{{Upcoming|BE 1.20.40}}
|pitch=1.0
|foot=1}}
== Achievements ==
{{Load achievements|You Need a Mint}}
== Advancements ==
{{load advancements|You Need a Mint}}
== Data values ==
=== ID ===
{{edition|java}}:
{{ID table
|edition=java
|showforms=y
|generatetranslationkeys=y
|displayname=Dragon's Breath
|spritetype=item
|nameid=dragon_breath
|form=item
|foot=1}}
{{edition|bedrock}}:
{{ID table
|edition=bedrock
|shownumericids=y
|showforms=y
|notshowbeitemforms=y
|generatetranslationkeys=y
|displayname=Dragon's Breath
|spritetype=item
|nameid=dragon_breath
|id=560
|form=item
|foot=1}}
== History ==
{{History|java}}
{{History||1.9|snap=15w33a|[[File:Dragon's Breath JE1 BE1.png|32px]] Added dragon's breath.}}
{{History||1.13|snap=17w47a|Prior to [[1.13/Flattening|''The Flattening'']], this [[item]]'s numeral ID was 437.}}
{{History||1.14|snap=18w43a|[[File:Dragon's Breath JE2 BE2.png|32px]] The texture of dragon's breath has been changed.}}
{{History|pocket}}
{{History||1.0.0|snap=alpha 0.17.0.1|[[File:Dragon's Breath JE1 BE1.png|32px]] Added dragon's breath.}}
{{History|bedrock}}
{{History||1.10.0|snap=beta 1.10.0.3|[[File:Dragon's Breath JE2 BE2.png|32px]] The texture of dragon's breath has been changed.}}
{{History|console}}
{{History||xbox=TU46|xbone=CU36|ps=1.38|wiiu=Patch 15|switch=1.0.1|[[File:Dragon's Breath JE1 BE1.png|32px]] Added dragon's breath.}}
{{History||xbox=none|xbone=none|ps=1.90|wiiu=none|switch=none|[[File:Dragon's Breath JE2 BE2.png|32px]] The texture of dragon's breath has been changed.}}
{{History|3ds}}
{{History||1.7.10|[[File:Dragon's Breath JE1 BE1.png|32px]] Added dragon's breath.}}
{{History|foot}}
== Issues ==
{{issue list}}
== Trivia ==
* If the dragon's breath is used in a [[crafting]] recipe (using a [[mod]] or a [[data pack]]), it becomes an empty bottle instead of being entirely consumed.
== References ==
{{reflist}}
==External Links==
*[https://www.minecraft.net/en-us/article/dragon-s-breath Taking Inventory: Dragon's Breath] – Minecraft.net on June 9, 2023
{{Items}}
[[Category:Renewable resources]]
[[de:Drachenatem]]
[[fr:Souffle de dragon]]
[[it:Soffio di drago]]
[[ja:ドラゴンブレス]]
[[ko:드래곤의 숨결]]
[[nl:Drakenadem]]
[[pl:Oddech smoka]]
[[pt:Bafo do dragão]]
[[ru:Драконье дыхание]]
[[zh:龙息]]
[[Category:Brewing recipe]]</li><li>[[Shovel|Shovel]]<br/>{{Item
| image = <gallery>
Wooden Shovel.png | Wooden
Stone Shovel.png | Stone
Iron Shovel.png | Iron
Golden Shovel.png | Golden
Diamond Shovel.png | Diamond
Netherite Shovel.png | Netherite
</gallery>
| rarity = Common
| renewable = '''Netherite''': No<br>'''All others''': Yes
| durability =
* Wood: 59
* Stone: 131
* Iron: 250
* Golden: 32
* Diamond: 1561
* Netherite: 2031
| stackable = No
}}
'''Shovels''' are [[tool]]s used to hasten the process of breaking [[dirt]], [[sand]], [[gravel]] and other soil blocks, as well as to convert [[Dirt (disambiguation)|dirt]] blocks into [[Dirt Path|dirt paths]].
== Obtaining ==
=== Crafting ===
{{Crafting
|head=1
|showname=0
|showdescription=1
|name=[[Shovel]]s
|B1= {Any Planks}; Iron Ingot; Gold Ingot; Diamond
|B2= Stick
|B3= Stick
|Output= Wooden Shovel; Iron Shovel; Golden Shovel; Diamond Shovel
|type= Tool
}}
{{Crafting
|name=[[Stone Shovel]]
|B1=Any stone-tier block
|B2=Stick
|B3=Stick
|Output=Stone Shovel
|description=Can use any variant of cobblestone
|type=Tool
}}
{{Crafting
|foot=1
|ignoreusage=1
|name=[[Shovel]]
|ingredients=Damaged Matching [[Shovel]]
|Damaged Wooden Shovel; Damaged Stone Shovel; Damaged Iron Shovel; Damaged Golden Shovel; Damaged Diamond Shovel; Damaged Netherite Shovel
|Damaged Wooden Shovel; Damaged Stone Shovel; Damaged Iron Shovel; Damaged Golden Shovel; Damaged Diamond Shovel; Damaged Netherite Shovel
|Output=Wooden Shovel; Stone Shovel; Iron Shovel; Golden Shovel; Diamond Shovel; Netherite Shovel
|description= The durability of the two shovels is added together, plus an extra 5% durability.
|type= Tool
}}
=== Upgrading ===
Like other diamond tools, a diamond shovel can be upgraded to a netherite shovel, although increased durability and resistance to fire/lava in item form are the only benefits. The shovel's performance as a digging tool or a weapon is unchanged by the upgrade.
{{Smithing
|Netherite Upgrade
|Diamond Shovel
|Netherite Ingot
|Netherite Shovel
|description=
|tail=1
}}
=== Repairing ===
==== Grinding ====
{{Grinding
|showdescription=1
|ingredients=2x Damaged [[Wooden Shovel]] or<br>2x Damaged [[Stone Shovel]] or<br>2x Damaged [[Iron Shovel]] or<br>2x Damaged [[Golden Shovel]] or<br>2x Damaged [[Diamond Shovel]] or<br>2x Damaged [[Netherite Shovel]]
|Damaged Wooden Shovel; Damaged Stone Shovel; Damaged Iron Shovel; Damaged Golden Shovel; Damaged Diamond Shovel; Damaged Netherite Shovel
|Damaged Wooden Shovel; Damaged Stone Shovel; Damaged Iron Shovel; Damaged Golden Shovel; Damaged Diamond Shovel; Damaged Netherite Shovel
|Wooden Shovel; Stone Shovel; Iron Shovel; Golden Shovel; Diamond Shovel; Netherite Shovel
|description=The durability of the two shovels is added together, plus an extra 5% durability.
}}
==== [[Anvil mechanics#Unit repair|Unit repair]] ====
{{/Repairing with Anvils}}
A shovel can be repaired in an [[anvil]] by adding units of the [[tiers]]' repair material, with each repair material restoring 25% the shovel's maximum durability, rounded down. It also keeps the shovel's [[Enchanting|enchantments]].
=== Chest loot ===
On <code>ancient_city/city_center/city_center_2</code>, they generate a furnace with a wooden shovel inside of it.
{{LootChestItem|iron-shovel,level-enchanted-iron-shovel,random-enchanted-golden-shovel,diamond-shovel,level-enchanted-diamond-shovel,damaged-random-enchanted-diamond-shovel,damaged-random-enchanted-diamond-shovel-2}}
=== Mob loot ===
==== Equipment ====
{{Main|Drops#Equipped items}}
[[Zombie]]s and [[husk]]s have a 0.67% (3.33% in Hard [[difficulty]]) chance of spawning with an iron shovel. They have an 8.5% (9.5% with [[Looting]] I, 10.5% with Looting II and 11.5% with Looting III) chance of dropping that shovel if they are killed by the player. The dropped shovel is usually badly damaged, and may be enchanted: 0%–25% on Normal difficulty and 3.125%–25% on Hard difficulty, varying with [[regional difficulty]], and enchanted as if on an enchanting table at level 5–22.
==== Raids ====
Vindicators and pillagers that spawn from raids have a 4.1% chance(5.12% on hard) to drop a badly-damaged iron shovel that is sometimes enchanted with a random enchantment.{{only|bedrock}}
=== Trading ===
Novice-level toolsmith villagers have a 25% chance to sell stone shovels for one emerald, journeyman-level toolsmith villagers have a 25% chance to sell enchanted iron shovels for 2 emeralds, and expert-level toolsmith villagers have a 50% chance to sell enchanted diamond shovels for 5 emeralds as part of their trades.{{only|bedrock}}
Novice-level toolsmith villagers have a 40% chance to sell stone shovels for one emerald, journeyman-level tool smiths have a 40% chance to sell an enchanted iron shovel for 7-22 emeralds, and expert-level tool smiths have a {{frac|2|3}} chance to sell an enchanted diamond shovel for 11-27 emeralds.{{only|java}}
The enchantments are the same as the ones obtained from an [[enchanting table]] at levels 5–19.
=== Villager gifts ===
{{in|java}}, toolsmith [[villager]]s occasionally throw stone shovels at players with the [[Hero of the Village]] effect.
== Usage ==
=== Digging ===
A shovel can be used to break some materials faster. When breaking a block, it uses 1 durability. For blocks that break instantly, it uses 0 durability.
==== Durability ====
Each different tier of shovel has a different durability:
{| class="wikitable sortable"
! Material
! [[Durability]]
|-
| {{itemLink|Wooden Shovel|Wood|link=Shovel}}
| 59
|-
| {{itemLink|Stone Shovel|Stone|link=Shovel}}
| 131
|-
| {{itemLink|Iron Shovel|Iron|link=Shovel}}
| 250
|-
| {{itemLink|Diamond Shovel|Diamond|link=Shovel}}
| 1561
|-
| {{itemLink|Golden Shovel|Golden|link=Shovel}}
| 32
|-
| {{itemLink|Netherite Shovel|Netherite|link=Shovel}}
| 2031
|}
==== Speed ====
The following table summarizes the speed at which different quality shovels perform on different block types. Values with a red background indicate that no resource is dropped when the block is destroyed without a shovel.
{{breaking row|Clay|simple=1}}
{{breaking row|Coarse Dirt}}
{{Breaking row|Concrete Powder}}
{{breaking row|Dirt}}
{{breaking row|Dirt Path}}
{{breaking row|Farmland}}
{{breaking row|Grass Block}}
{{breaking row|Gravel}}
{{breaking row|Mud}}
{{breaking row|Muddy Mangrove Roots}}
{{breaking row|Mycelium}}
{{breaking row|Podzol}}
{{breaking row|Red Sand}}
{{breaking row|Rooted Dirt}}
{{breaking row|Sand}}
{{breaking row|Snow|Wooden}}
{{breaking row|Snow Block|Wooden}}
{{breaking row|Soul Sand}}
{{breaking row|Soul Soil}}
{{breaking row|Suspicious Gravel}}
{{breaking row|Suspicious Sand|foot=1}}
=== Dirt paths ===
A shovel can be used to create a [[dirt path]] by {{control|using}} (not digging) the shovel on any one of the following blocks, losing one durability point:
* {{BlockLink|Grass Block}}
* {{BlockLink|Dirt}}
* {{BlockLink|Coarse Dirt}}
* {{BlockLink|Rooted Dirt}}
* {{BlockLink|Podzol}}
* {{BlockLink|Mycelium}}
=== Campfire ===
A shovel can be used to extinguish a [[campfire]].
===Weapon===
Hitting a mob while holding a shovel is a stronger attack than barehanded. Shovels take 2 damage when used as a weapon.
====Java Edition====
[[Category:Java Edition specific information]]
Shovels have an attack speed modifier of -3, meaning they take 1 second to [[Damage#Attack cooldown|recover]]. Shovels deal different damage based on the type:
{| class="wikitable" style="text-align:center" data-description="Attack damage"
!Shovel type
! Attack damage
! Attack speed
!Damage per<br>second (DPS)
|-
|{{ItemLink|Wooden Shovel}}<br>{{ItemLink|Golden Shovel}}||{{hp|2.5}}|| rowspan="4" |1||2.5
|-
|{{ItemLink|Stone Shovel}}||{{hp|3.5}}||3.5
|-
|{{ItemLink|Iron Shovel}}||{{hp|4.5}}||4.5
|-
|{{ItemLink|Diamond Shovel}}||{{hp|5.5}}||5.5
|-
|{{ItemLink|Netherite Shovel}}||{{hp|6.5}}
|1.6||10.4
|}
====Bedrock Edition====
{{IN|bedrock}}, shovels always attack instantly and do the following damage:
{| class="wikitable" style="text-align:center" data-description="Attack damage"
! colspan="5" |Attack damage
|-
|{{ItemSprite|Wooden Shovel}}{{ItemSprite|Golden Shovel}} {{hp|2}}
|{{ItemSprite|Stone Shovel}} {{hp|3}}
|{{ItemSprite|Iron Shovel}} {{hp|4}}
|{{ItemSprite|Diamond Shovel}} {{hp|5}}
|{{ItemSprite|Netherite Shovel}} {{hp|6}}
|}
===Enchantments===
A shovel can receive, or be found in an [[End City]] with the following [[enchantment]]s:
{| class="wikitable col-2-center col-3-right"
|+
!Name
!Max Level
![[Enchanting|Method]]
|-
|[[Fortune]]<ref group="note" name="exc">Silk Touch and Fortune are mutually exclusive</ref>
|III
|{{Inventory slot|Enchanting Table}}{{Inventory slot|Anvil}}
|-
|[[Silk Touch]]<ref group="note" name="exc" />
|I
|{{Inventory slot|Enchanting Table}}{{Inventory slot|Anvil}}
|-
|[[Efficiency]]
|V
|{{Inventory slot|Enchanting Table}}{{Inventory slot|Anvil}}
|-
|[[Unbreaking]]
|III
|{{Inventory slot|Enchanting Table}}{{Inventory slot|Anvil}}
|-
|[[Mending]]
|I
|{{Inventory slot|Anvil}}
|-
|[[Curse of Vanishing]]
|I
|{{Inventory slot|Anvil}}
|}
{{notelist}}
=== Fuel===
Wooden shovels can be used as a fuel in [[furnace]]s, smelting 1 item per shovel.
===Smelting ingredient===
{{Smelting|showname=1|Iron Shovel;Golden Shovel|Iron Nugget;Gold Nugget|0,1}}
===Piglins ===
{{EntityLink|Piglin|Piglins}} are attracted to golden shovels and run toward any golden shovels on the ground, and inspect it for 6 to 8 seconds before putting it in their inventory.
== Sounds ==
{{edition|java}}:
{{Sound table
|sound=Shovel flatten1.ogg
|sound2=Shovel flatten2.ogg
|sound3=Shovel flatten3.ogg
|sound4=Shovel flatten4.ogg
|subtitle=Shovel flattens
|source=block
|description=When a shovel creates a [[dirt path]]
|id=item.shovel.flatten
|translationkey=subtitles.item.shovel.flatten
|volume=1.0
|pitch=1.0
|distance=16}}
{{Sound table
|sound=Random break.ogg
|subtitle=Item breaks
|source=player
|description=When a shovel's durability is exhausted
|id=entity.item.break
|translationkey=subtitles.entity.item.break
|volume=0.8
|pitch=0.8-1.2
|distance=16
|foot=1}}
{{edition|bedrock}}:
{{Sound table
|type=bedrock
|sound=Grass hit1.ogg
|sound2=Grass hit2.ogg
|sound3=Grass hit3.ogg
|sound4=Grass hit4.ogg
|sound5=Grass hit5.ogg
|sound6=Grass hit6.ogg
|source=block
|description=When a shovel creates a dirt path <ref group=sound>{{Bug|MCPE-114390}}</ref>
|id=use.grass
|volume=1.0
|pitch=0.8}}
{{Sound table
|sound=Random break.ogg
|source=player
|description=When a shovel's durability is exhausted
|id=random.break
|volume=1.0
|pitch=0.9
|foot=1}}
==Data values==
===ID===
{{edition|java}}:
{{ID table
|edition=java
|showforms=y
|generatetranslationkeys=y
|displayname=Wooden Shovel
|spritetype=item
|nameid=wooden_shovel
|form=item}}
{{ID table
|displayname=Stone Shovel
|spritetype=item
|nameid=stone_shovel
|form=item}}
{{ID table
|displayname=Iron Shovel
|spritetype=item
|nameid=iron_shovel
|form=item}}
{{ID table
|displayname=Diamond Shovel
|spritetype=item
|nameid=diamond_shovel
|form=item}}
{{ID table
|displayname=Golden Shovel
|spritetype=item
|nameid=golden_shovel
|form=item}}
{{ID table
|displayname=Netherite Shovel
|spritetype=item
|nameid=netherite_shovel
|form=item
|foot=1}}
{{edition|bedrock}}:
{{ID table
|edition=bedrock
|shownumericids=y
|showforms=y
|notshowbeitemforms=y
|generatetranslationkeys=y
|displayname=Wooden Shovel
|spritetype=item
|nameid=wooden_shovel
|id=309
|form=item}}
{{ID table
|displayname=Stone Shovel
|spritetype=item
|nameid=stone_shovel
|id=313
|form=item}}
{{ID table
|displayname=Iron Shovel
|spritetype=item
|nameid=iron_shovel
|id=296
|form=item}}
{{ID table
|displayname=Diamond Shovel
|spritetype=item
|nameid=diamond_shovel
|id=317
|form=item}}
{{ID table
|displayname=Golden Shovel
|spritetype=item
|nameid=golden_shovel
|id=323
|form=item}}
{{ID table
|displayname=Netherite Shovel
|spritetype=item
|nameid=netherite_shovel
|id=605
|form=item
|foot=1}}
==Achievements==
{{load achievements|MOAR Tools ;Oooh, shiny!}}
==Advancements==
{{load advancements|Oh Shiny}}
== Video==
<div style="text-align:center">{{yt|U4X-4S4neYM}}</div>
==History==
{{Missing information|there are so many missing blocks that need shovel to break}}
{{History|java indev}}
{{History||0.31|snap=20091231-2|[[File:Iron Shovel JE1.png|32px]] Added iron shovels which are located in the player's [[inventory]].
|Shovels cannot be crafted yet and are not functional in this version.}}
{{History|||snap=20100110|Shovels are now functional and can now be used to gather [[material]]s like [[dirt]], [[sand]] and [[gravel]] 400% faster than by hand.}}
{{History|||snap=20100124|A complete [[tool]] set is no longer given to the [[player]] on starting a new world. Instead, there are multiple [[chest]]s in the later called "[[Indev House]]" containing a stack of most accessible [[blocks]]/[[items]] including [[tools]].}}
{{History|||snap=20100128|[[File:Wooden Shovel JE1 BE1.png|32px]] [[File:Stone Shovel JE1 BE1.png|32px]] [[File:Diamond Shovel JE1 BE1.png|32px]] [[Tools]] now have tiers. Shovels made from wood, stone, and diamond have been added.
|[[File:Iron Shovel JE2 BE1.png|32px]] The texture of iron shovels has been changed.
|A shovel held by the player is now rendered to appear more 3D.|They cannot be crafted yet, but have been added to the item chest in the Indev house.}}
{{History|||snap=20100129|Wood, stone, iron, and diamond shovels can now be [[craft]]ed.}}
{{History|||snap=20100130|[[File:Golden Shovel JE1.png|32px]] Shovels can now be made out of gold.}}
{{History|||snap=20100201-1|[[Tools]], including shovels, now take [[damage]] when being used.
|Better tools, including shovels, now last longer.}}
{{History||20100206|[[File:Golden Shovel JE2 BE1.png|32px]] The texture of golden shovels has been changed.}}
{{History|java alpha}}
{{History||1.0.5_01|Shovels are now used to get snowballs out of snow layers.}}
{{History|java beta}}
{{History||April 9, 2011|link=https://www.youtube.com/watch?v=qy882ILYJMM&t=154s|[[File:Iron Shovel (pre-release).png|32px]] Alternate iron shovel texture was shown in [[Mojang]] test video.}}
{{History|java}}
{{History||1.2.4|snap=release|[[Spruce planks]], [[birch planks]], and [[jungle planks]] can now be used to craft wooden shovels.}}
{{History||1.3.1|snap=12w18a|Wooden shovels can now be used as [[fuel]] in a [[furnace]].}}
{{History|||snap=12w21a|Blacksmith [[villager]]s now [[trading|sell]] diamond shovels for 7 [[emerald]]s, and iron shovels for 4–5 emeralds.}}
{{History||1.6.1|snap=13w21a|Instead of replacing the barehanded [[damage]] ({{hp|1}}), shovels now add their damage onto the barehanded damage, which results in all shovels doing {{hp|1}} more damage than before.}}
{{History||1.7.2|snap=1.7.1|[[Acacia planks]] and [[dark oak planks]] can now be used to craft wooden shovels.}}
{{History||1.8|snap=14w02a|Tool smith villagers now [[trading|sell]] enchanted iron shovels for 5–7 emeralds. The previous trades are now unavailable, making diamond shovels [[non-renewable resource|non-renewable]].}}
{{History||1.9|snap=15w31a|A shovel can now be used on a [[grass block]] to create [[grass path]] blocks.
|[[Enchanting|Enchanted]] iron or diamond shovels can now be found in [[end city]] chests.}}
{{History|||snap=15w34a|Shovels now use the "attack strength" combat mechanic meter. The time it takes for the meter to fill up for a shovel is 0.8 seconds.}}
{{History|||snap=15w34c|Shovels now do more [[damage]] and take longer to recover.}}
{{History|||snap=15w35a|The damage of shovels has been reduced.}}
{{History|||snap=15w41a|Wooden shovels are now used to craft [[boat]]s.}}
{{History|||snap=15w50a|The [[sound]] <code>item.shovel.flatten</code> has been added to shovels.}}
{{History|||snap=16w04a|Wooden shovels are no longer used to [[crafting|craft]] boats.}}
{{History||1.11.1|snap=16w50a|Golden and iron shovels now [[smelting|smelt]] down into one of their respective [[nugget]]s.}}
{{History||1.13|snap=17w47a|Prior to [[1.13/Flattening|''The Flattening'']], these [[item]]s' numeral IDs were 269, 273, 256, 277 and 284.}}
{{History||1.14|snap=18w43a|[[File:Wooden Shovel JE2 BE2.png|32px]] [[File:Stone Shovel JE2 BE2.png|32px]] [[File:Iron Shovel JE3 BE2.png|32px]] [[File:Golden Shovel JE3 BE2.png|32px]] [[File:Diamond Shovel JE2 BE2.png|32px]] The textures of all shovels have been changed.}}
{{History|||snap=18w50a|Iron shovels can now be found in chests in [[village]] toolsmith houses.}}
{{History|||snap=19w11a|Toolsmith [[villager]]s now [[trading|sell]] stone shovels and enchanted diamond shovels, making diamond shovels [[renewable resource|renewable]] again.}}
{{History|||snap=19w13a|Toolsmith villagers now give stone shovels to players under the [[Hero of the Village]] effect.}}
{{History||1.15|snap=19w37a|Shovels can now be used to extinguish [[campfire]]s.}}
{{History||1.16|snap=20w06a|[[File:Netherite Shovel JE1.png|32px]] Added netherite shovels.
|Netherite shovels are obtained by combining one diamond shovel and one netherite ingot in a crafting table.
|[[Crimson planks]] and [[warped planks]] can now be used to craft wooden shovels.}}
{{History|||snap=20w09a|[[File:Diamond Shovel JE3 BE3.png|32px]] The texture of diamond shovels has been changed.
|Shovels can now break soul soil quickly.}}
{{History|||snap=20w10a|[[File:Netherite Shovel JE2 BE1.png|32px]] The texture of netherite shovels has been changed.
|Netherite shovels can no longer be crafted.
|Netherite shovels are now obtained by combining one diamond shovel and one netherite ingot in a smithing table.}}
{{History|||snap=20w15a|Stone shovels can now be crafted using [[blackstone]].}}
{{History|||snap=20w16a|Netherite shovels now generate randomly enchanted in [[bastion remnants]] chests.
|Golden shovels now generate randomly enchanted in [[ruined portal]] chests.}}
{{History|||snap=20w17a|Diamonds shovels now generate in place of netherite shovels in bastion remnant chests.}}
{{History||1.16.2|snap=20w30a|Increases the chance of finding randomly enchanted diamond shovels in bastion remnant chests.
|Unenchanted, undamaged diamond shovels can also be found in bastion remnant chests.}}
{{History||1.17|snap=21w08a|Stone shovels can now be crafted using [[cobbled deepslate]].}}
{{History||1.19|snap=22w11a|[[Mangrove planks]] can now be used to craft wooden shovels.}}
{{History|||snap=22w13a|Wooden shovels may now be found in [[ancient city]] [[furnace]]s.}}
{{History||1.20<br>(Experimental)|link=1.19.4|snap=23w04a|Upgrading diamond shovels to netherite shovels now requires the netherite upgrade [[smithing template]].}}
{{History||1.20|snap=23w14a|Shovel now breaks [[suspicious sand]] and [[suspicious gravel]] quickly.}}
{{History|upcoming java}}
{{History||Combat Tests|snap=1.14.3 - Combat Test|The attack speed for all shovels has been increased to 2.|The [[damage]] for all shovels has been decreased by {{hp|1}}.}}
{{History|pocket alpha}}
{{History||v0.2.0|[[File:Stone Shovel JE1 BE1.png|32px]] Added stone shovels.}}
{{History||v0.3.0|[[File:Wooden Shovel JE1 BE1.png|32px]] Added wooden shovels.
|Survival players no longer start out with an infinite durability stone shovel in the inventory.}}
{{History||v0.3.2|[[File:Iron Shovel JE2 BE1.png|32px]] [[File:Golden Shovel JE2 BE1.png|32px]] [[File:Diamond Shovel JE1 BE1.png|32px]] Added iron, gold, and diamond shovels.}}
{{History||v0.4.0|Removed stone shovels from the creative inventory.}}
{{History||v0.11.0|snap=build 1|Wooden shovels are now used to craft [[boat]]s.
|Iron shovels are now available in the [[creative]] [[inventory]].
|A shovel can now be used on a [[grass block]] to create [[grass path]] blocks.}}
{{History|||snap=build 11|Wooden, stone, golden, and diamond shovels are now available in the [[creative]] inventory.}}
{{History|||snap=build 12|All shovels have been removed from creative.}}
{{History|||snap=build 13|Shovel have been re-added to creative mode.}}
{{History||v0.12.1|snap=build 1|Shovels can now be [[enchanting|enchanted]].
|[[Zombie]]s now have a small chance to spawn holding an iron shovel.}}
{{History||v0.15.0|snap=build 1|Added [[husk]]s, which have a small chance to spawn holding an iron shovel.}}
{{History|pocket}}
{{History||1.0.0|snap=alpha 0.17.0.1|[[Enchanting|Enchanted]] iron and diamond shovels can now be found inside [[end city]] chests.}}
{{History||1.0.4|snap=alpha 1.0.4.0|Enchanted iron shovels are now [[trading|sold]] by toolsmith [[villager]]s for 4-5 [[emerald]]s.}}
{{History||1.1.0|snap=alpha 1.1.0.0|Iron and golden shovels are now [[smelting|smeltable]].}}
{{History|bedrock}}
{{History||1.10.0|snap=beta 1.10.0.3|[[File:Wooden Shovel JE2 BE2.png|32px]] [[File:Stone Shovel JE2 BE2.png|32px]] [[File:Iron Shovel JE3 BE2.png|32px]] [[File:Golden Shovel JE3 BE2.png|32px]] [[File:Diamond Shovel JE2 BE2.png|32px]] The textures of all shovels have been changed.}}
{{History||1.11.0|snap=beta 1.11.0.1|Iron shovels can now be found in [[village]] toolsmith houses.}}
{{History|||snap=beta 1.11.0.4|[[Vindicator]]s and [[pillager]]s that spawn in [[raid]]s can now drop iron shovels upon [[death]].
|[[Trading]] has been changed, toolsmith [[villager]]s now have a 25% chance to [[trading|sell]] enchanted iron shovels for 2 [[emerald]]s as part of their third tier trades.
|Stone shovels and [[enchanting|enchanted]] diamond shovels can now be [[trading|bought]] from toolsmith villagers.}}
{{History||1.16.0|snap=beta 1.16.0.51|[[File:Netherite Shovel JE2 BE1.png|32px]] Added netherite shovels.|Netherite shovels are obtained by combining one diamond shovel and one netherite ingot in a crafting table.
|[[File:Diamond Shovel JE3 BE3.png|32px]] The texture of diamond shovels has been changed.}}
{{History|||snap=beta 1.16.0.57|Netherite shovels can no longer be crafted.
|Netherite shovels are now obtained by combining one diamond shovel and one netherite ingot in a smithing table.
|Stone shovels can now be crafted using [[blackstone]].
|Netherite shovels now generate randomly enchanted in [[bastion remnants]] chests.
|Golden shovels now generate randomly enchanted in [[ruined portal]] chests.}}
{{History|||snap=beta 1.16.0.63|Diamonds shovels now generate in place of netherite shovels in bastion remnant chests.}}
{{History||1.20.10|snap=beta 1.20.10.20|The [[wooden shovel]] in the crafting recipe has been removed for all boat types except the bamboo raft.}}
{{History|||snap=beta 1.20.10.21|The bamboo raft recipe no longer needs a wooden shovel.}}
{{History|console}}
{{History||xbox=TU1|xbone=CU1|ps=1.0|wiiu=Patch 1|switch=1.0.1|[[File:Wooden Shovel JE1 BE1.png|32px]] [[File:Stone Shovel JE1 BE1.png|32px]] [[File:Iron Shovel JE2 BE1.png|32px]] [[File:Golden Shovel JE2 BE1.png|32px]] [[File:Diamond Shovel JE1 BE1.png|32px]] Added shovels (all five types).}}
{{History||xbox=TU53|xbone=CU43|ps=1.49|wiiu=Patch 23|switch=1.0.3|Iron and golden shovels are now [[smelting|smeltable]].}}
{{History||xbox=none|xbone=none|ps=1.90|wiiu=none|switch=none|[[File:Wooden Shovel JE2 BE2.png|32px]] [[File:Stone Shovel JE2 BE2.png|32px]] [[File:Iron Shovel JE3 BE2.png|32px]] [[File:Golden Shovel JE3 BE2.png|32px]] [[File:Diamond Shovel JE2 BE2.png|32px]] The textures of all shovels have been changed.}}
{{History|New Nintendo 3DS Edition}}
{{History||0.1.0|[[File:Wooden Shovel JE1 BE1.png|32px]] [[File:Stone Shovel JE1 BE1.png|32px]] [[File:Iron Shovel JE2 BE1.png|32px]] [[File:Golden Shovel JE2 BE1.png|32px]] [[File:Diamond Shovel JE1 BE1.png|32px]] Added shovels.}}
{{History|foot}}
==Issues==
{{issue list}}
==Gallery==
<gallery>
Shovel JINX.jpg|Official shovel T-shirt made by JINX.
Stone Shovel SDGP.png|Stone shovel in the [[Super Duper Graphics Pack]].
Adventure Shovel.png|An "adventure shovel" that can break blocks in [[adventure mode]].
</gallery>
===Enchanted shovels===
<gallery>
Enchanted_Wooden_Shovel.gif
Enchanted_Stone_Shovel.gif
Enchanted_Iron_Shovel.gif
Enchanted_Golden_Shovel.gif
Enchanted_Diamond_Shovel.gif
Enchanted_Netherite_Shovel.gif
</gallery>
==References==
{{reflist}}
== External Links ==
*[https://www.minecraft.net/en-us/article/taking-inventory-shovel Taking Inventory: Shovel] – Minecraft.net on November 16, 2018
{{items}}
[[Category:Combat]]
[[cs:Lopata]]
[[de:Schaufel]]
[[es:Pala]]
[[fr:Pelle]]
[[hu:Ásó]]
[[ja:シャベル]]
[[ko:삽]]
[[nl:Schep]]
[[pl:Łopata]]
[[pt:Pá]]
[[ru:Лопата]]
[[uk:Лопата]]
[[zh:锹]]</li></ul> | Prior to this update, wolves continuously made whimpering noises even when they were at full health in SMP because Jeb accidentally used client-side health instead of synced health.[8] | ||||
1.6{{Extension DPL}}<ul><li>[[:Category:Joke items|Category:Joke items]]<br/>[[Category:Joke features|Items]]
[[Category:Items]]</li><li>[[:Category:Dyes|Category:Dyes]]<br/>These are items that can be used to dye sheep, wool blocks, or combined to make other dyes.
[[Category:Items]]
[[es:Categoría:Tintes]]
[[fr:Catégorie:Teinture]]
[[hu:Kategória:Festékek]]
[[zh:Category:染料]]</li></ul> | Prior to this update, players hurting themselves with arrows would cause all of their tamed wolves to attack the player. | ||||
1.8{{Extension DPL}}<ul><li>[[Balloon|Balloon]]<br/>{{exclusive|bedrock|education}}
{{education feature}}
{{ItemEntity
|image=White Balloon.png
|extratext = View [[#Gallery|all renders]]
|invimage=White Balloon
|invimage2=Orange Balloon
|invimage3=Magenta Balloon
|invimage4=Light Blue Balloon
|invimage5=Yellow Balloon
|invimage6=Lime Balloon
|invimage7=Pink Balloon
|invimage8=Gray Balloon
|invimage9=Light Gray Balloon
|invimage10=Cyan Balloon
|invimage11=Purple Balloon
|invimage12=Blue Balloon
|invimage13=Brown Balloon
|invimage14=Green Balloon
|invimage15=Red Balloon
|invimage16=Black Balloon
|renewable=No
|stackable=Yes
|size=Height: 0.4 Blocks<br>Width: 0.4 Blocks
}}
'''Balloons''' are [[entities]] that float upward when placed.
== Obtaining ==
Balloons are not available in the [[Creative]] inventory or [[commands]].
=== Crafting ===
{{Crafting
|A1= Latex
|B1= Matching Dye
|C1= Latex
|A2= Latex
|B2= Helium
|C2= Latex
|A3= Latex
|B3= Lead
|C3= Latex
|Output= Matching Balloon
|description={{only|bedrock|education}}
|type= Miscellaneous
|head=1
}}
{{Crafting
|A1= Latex
|B1= Bone Meal; Lapis Lazuli; Cocoa Beans; Ink Sac
|C1= Latex
|A2= Latex
|B2= Helium
|C2= Latex
|A3= Latex
|B3= Lead
|C3= Latex
|Output= White Balloon; Blue Balloon; Brown Balloon; Black Balloon
|description={{only|bedrock|education}}
|type= Miscellaneous
|foot=1
}}
== Usage ==
When {{control|used}} on a [[mob]], a [[fence]], or a [[wall]], balloons attach to the mob or block, similarly to a [[lead]]. Balloons float into the air faster than the speed the [[player]] flies up, but remain grounded if tied to a fence. If tied to a mob, the balloon floats away and carries the mob into the air, before both eventually [[despawn]] or disappear.
{| class="wikitable sortable" style="text-align: left;"
|+ Balloon-attachable mobs
! Mob
! Mass
|-
| {{EntityLink|Chicken}}
| 0.6
|-
| {{EntityLink|Cow}}
| 1.0
|-
| {{EntityLink|Donkey}}
| 1.0
|-
| {{EntityLink|Horse}}
| 1.0
|-
| {{EntityLink|Iron Golem}}
| 2.0
|-
| {{EntityLink|Llama}}
| 1.0
|-
| {{EntityLink|Mule}}
| 1.0
|-
| {{EntityLink|Mooshroom}}
| 1.0
|-
| {{EntityLink|Panda}}
| 1.5
|-
| {{EntityLink|Pig}}
| 0.75
|-
| {{EntityLink|Sheep}}
| 0.75
|-
| {{EntityLink|Snow Golem}}
| 1.0
|-
| {{EntityLink|Fox}}
| 0.6
|}
When a balloon is shot by an [[arrow]] or a [[trident]], or floats into a solid block, it pops, summons [[particles]], and is destroyed. It drops nothing. A balloon tied to a fence post bursts when a player strikes it in any direction.
== Sounds ==
{{Sound table
|type=bedrock
|sound=Balloon pop1.ogg
|sound2=Balloon pop2.ogg
|source=neutral
|description=When a balloon collides with a block from above
|id=balloon.pop
|volume=10.0
|pitch=1.75/2.0
|foot=1}}
== Data values ==
=== ID ===
{{ID table
|edition=bedrock
|firstcolumnname=Balloon
|shownumericids=y
|showforms=y
|notshowbeitemforms=y
|generatetranslationkeys=y
|displayname=Item
|spritename=balloons
|spritetype=item
|nameid=balloon
|id=598
|form=item
|translationkey=item.balloon.black.name,item.balloon.red.name,item.balloon.green.name,item.balloon.brown.name,item.balloon.blue.name,item.balloon.purple.name,item.balloon.cyan.name,item.balloon.silver.name,item.balloon.gray.name,item.balloon.pink.name,item.balloon.lime.name,item.balloon.yellow.name,item.balloon.lightBlue.name,item.balloon.magenta.name,item.balloon.orange.name,item.balloon.white.name
|foot=1}}
{{ID table
|edition=bedrock
|firstcolumnname=Balloon
|shownumericids=y
|generatetranslationkeys=y
|displayname=Entity
|spritename=balloons
|spritetype=entity
|nameid=balloon
|id=107
|foot=1}}
=== Metadata ===
In ''Bedrock Edition'', balloon items use the following data values:
{{/DV}}
== History ==
{{History|bedrock}}
{{History||1.4.0|snap=beta 1.2.20.1|[[File:White Balloon BE1.png|32px]] [[File:Orange Balloon BE1.png|32px]] [[File:Magenta Balloon BE1.png|32px]] [[File:Light Blue Balloon BE1.png|32px]] [[File:Yellow Balloon BE1.png|32px]] [[File:Lime Balloon BE1.png|32px]] [[File:Pink Balloon BE1.png|32px]] [[File:Gray Balloon BE1.png|32px]] [[File:Silver Balloon BE1.png|32px]] [[File:Cyan Balloon BE1.png|32px]] [[File:Purple Balloon BE1.png|32px]] [[File:Blue Balloon BE1.png|32px]] [[File:Brown Balloon BE1.png|32px]] [[File:Green Balloon BE1.png|32px]] [[File:Red Balloon BE1.png|32px]] [[File:Black Balloon BE1.png|32px]] <br> [[File:White Balloon (item) BE1.png|32px]] [[File:Orange Balloon (item) BE1.png|32px]] [[File:Magenta Balloon (item) BE1.png|32px]] [[File:Light Blue Balloon (item) BE1.png|32px]] [[File:Yellow Balloon (item) BE1.png|32px]] [[File:Lime Balloon (item) BE1.png|32px]] [[File:Pink Balloon (item) BE1.png|32px]] [[File:Gray Balloon (item) BE1.png|32px]] [[File:Silver Balloon (item) BE1.png|32px]] [[File:Cyan Balloon (item) BE1.png|32px]] [[File:Purple Balloon (item) BE1.png|32px]] [[File:Blue Balloon (item) BE1.png|32px]] [[File:Brown Balloon (item) BE1.png|32px]] [[File:Green Balloon (item) BE1.png|32px]] [[File:Red Balloon (item) BE1.png|32px]] [[File:Black Balloon (item) BE1.png|32px]] Added balloons.}}
{{History||1.18.10|snap=beta 1.18.10.24|[[Bee]]s, [[boat]]s, tamed [[cat]]s, [[dolphin]]s, [[glow squid]]s, [[goat]]s, [[hoglin]]s, [[ocelot]]s, [[panda]]s, [[parrot]]s, [[polar bear]]s, [[squid]]s, [[strider]]s, tamed [[wolves]] and [[zoglin]]s can now be leashed.}}
{{History||1.18.30|snap=beta 1.18.30.28|Added the [[boat with chest]], which can be leashed.}}
{{History|education}}
{{History||1.0.27|[[File:White Balloon BE1.png|32px]] [[File:Orange Balloon BE1.png|32px]] [[File:Magenta Balloon BE1.png|32px]] [[File:Light Blue Balloon BE1.png|32px]] [[File:Yellow Balloon BE1.png|32px]] [[File:Lime Balloon.png|32px]] [[File:Pink Balloon BE1.png|32px]] [[File:Gray Balloon BE1.png|32px]] [[File:Silver Balloon BE1.png|32px]] [[File:Cyan Balloon BE1.png|32px]] [[File:Purple Balloon BE1.png|32px]] [[File:Blue Balloon.png|32px]] [[File:Brown Balloon BE1.png|32px]] [[File:Green Balloon BE1.png|32px]] [[File:Red Balloon BE1.png|32px]] [[File:Black Balloon BE1.png|32px]] <br> [[File:White Balloon (item) BE1.png|32px]] [[File:Orange Balloon (item) BE1.png|32px]] [[File:Magenta Balloon (item) BE1.png|32px]] [[File:Light Blue Balloon (item) BE1.png|32px]] [[File:Yellow Balloon (item) BE1.png|32px]] [[File:Lime Balloon (item) BE1.png|32px]] [[File:Pink Balloon (item) BE1.png|32px]] [[File:Gray Balloon (item) BE1.png|32px]] [[File:Silver Balloon (item) BE1.png|32px]] [[File:Cyan Balloon (item) BE1.png|32px]] [[File:Purple Balloon (item) BE1.png|32px]] [[File:Blue Balloon (item) BE1.png|32px]] [[File:Brown Balloon (item) BE1.png|32px]] [[File:Green Balloon (item) BE1.png|32px]] [[File:Red Balloon (item) BE1.png|32px]] [[File:Black Balloon (item) BE1.png|32px]] Added balloons.}}
{{History||1.18.32|snap=1.18.10.04|[[Bee]]s, [[boat]]s, tamed [[cat]]s, [[dolphin]]s, [[glow squid]]s, [[goat]]s, [[hoglin]]s, [[ocelot]]s, [[panda]]s, [[parrot]]s, [[polar bear]]s, [[squid]]s, [[strider]]s, tamed [[wolves]] and [[zoglin]]s can now be leashed.}}
{{History|foot}}
==Gallery==
=== Colors ===
<gallery>
Orange Balloon.png
Magenta Balloon.png
Light Blue Balloon.png
Yellow Balloon.png
Lime Balloon.png
Pink Balloon.png
Gray Balloon.png
Light Gray Balloon.png
Cyan Balloon.png
Purple Balloon.png
Blue Balloon.png
Brown Balloon.png
Green Balloon.png
Red Balloon.png
Black Balloon.png
</gallery>
=== [[Event servers]] ===
<gallery>
File:Legends Balloon.png|Differently designed balloons featured in the ''[[Minecraft Legends Live Event]]''.
File:Sniffer Balloon (Trails and Tales Summer Event) Render.png|A [[Sniffer]] balloon, featured in the [[Trails & Tales Event]].
File:Camel Balloon (Trails and Tales Summer Event) Render.png|A balloon of a [[Camel]], featured in the Trails & Tales Event.
File:Balloon Bundle (Trails and Tales Summer Event) Render.png|Bundle of balloons from the Trails & Tales Event.
</gallery>{{Items}}
{{Entities}}
{{Education Edition}}
[[Category:Education Edition entities]]
[[Category:Education Edition items]]
[[de:Ballon]]
[[it:Palloncino]]
[[ja:風船]]
[[ko:풍선]]
[[pl:Balon]]
[[pt:Balão]]
[[ru:Воздушный шар]]
[[zh:气球]]</li><li>[[Lava|Lava]]<br/>{{About|the fluid|the [[bucket]]|Lava Bucket}}
{{Fluid
| image = Lava.gif
| image2 = Lava BE.gif
| invimage = Lava Bucket
| invimage2 = Lava
| renewable = Yes
| transparent = Yes
| light = Yes (15)
| tool = Bucket
| infinite = No
| flowrate = 30 [[tick]]s/block (Overworld, End)<br> 10 [[tick]]s/block (Nether)
| flowdistance = 4 blocks (Overworld, End)<br>8 blocks (Nether)
}}
'''Lava''' is a light-emitting [[fluid]] that causes fire [[damage]], mostly found in the [[altitude|lower reaches]] of the [[Overworld]] and [[the Nether]].
== Obtaining ==
Lava blocks do not exist as items (at least {{in|java}}), but can be retrieved with a [[Lava Bucket|bucket]]. {{IN|bedrock}}, they may be obtained as an item via glitches (in old versions), add-ons or inventory editing.
Lava may be obtained [[renewable resource|renewably]] from [[cauldron]]s, as [[pointed dripstone]] with a lava source above it can slowly fill a cauldron with lava.
=== Natural generation ===
During world generation, lava replaces [[air]] blocks generated in [[cave]]s and [[canyon]]s between Y=-55 and Y=-63. [[Aquifer]]s are sometimes filled with lava below Y=0. Lava does not replace air blocks inside [[mineshaft]]s, [[monster room]]s, [[amethyst geode]]s, or [[stronghold]]s.
Lava can also occur as lava flows from a single [[spring]] block, pouring down walls into pools. The spring block can be on the side of a cave, ravine, mineshaft, or stone cliff above ground.
Lava also generates as small [[lava lake]]s, which can be found above Y=0 within any [[biome]].
Two blocks of lava can also be found in plains, snowy plains, and desert [[village]] weaponsmith buildings, or one source in savanna village weaponsmith buildings.
Fifteen blocks of lava can be found in the [[end portal]] room of a [[stronghold]]: 3 along each side wall, and 9 below the portal frame.
Lava also generates in [[woodland mansion]]s: two blocks of lava generate in the "blacksmith room", and 25 blocks of lava generate in a secret "lava room".
In [[the Nether]], lava is more common than [[water]] in the [[Overworld]]. [[Terrain features#Lava sea|Seas of lava]] occur, with sea level at y-level 32, about a quarter of the total height of the Nether (as the usable space in the Nether is 128 blocks tall). They can extend down to about y-level 19-22. Lava also randomly appears [[Spring#Hidden lava|in single blocks]] inside [[netherrack]] formations. Lava is also generated as a single source in well rooms in [[nether fortress]]es. There are also large pockets of lava generated under y-19 and can reach all the way down to bedrock level. These pockets are generally over 12 blocks in height and often connect to a large lava lake on y-32; the size of these pockets in 1.18 can range from the size of a singular pre-1.18 ravine to multiple ravines combined.
Lava generates as [[delta]] shapes, which can be found commonly in the [[basalt deltas]] biome. Lava also generates in [[ruined portal]]s and [[bastion remnant]]s.
=== Post-generation ===
Unlike [[Water#Source blocks|water source blocks]], new lava source blocks cannot be created in a space by two or more adjacent source blocks. However {{in|Java}}, if the [[game rule]] {{cd|lavaSourceConversion}} is set to {{cd|true}}, new lava source blocks can form in a similar way to water source blocks.
== Usage ==
=== Fuel ===
When used in a [[furnace]], a bucket of lava lasts 1000 seconds (100 items).
=== Burning ===
[[File:Inside Lava.png|thumb|What it looks like inside lava.]]
[[File:Under lava fire resistance.png|thumb|What it looks like inside lava using Fire Resistance {{in|java}}.]]
Most [[entity|entities]] take {{hp|4}} damage every half-second while in contact with lava, and are set on [[fire]]. An entity/player in lava will also have its {{code|remainingFireTicks}} set to 300, setting it on fire for 15 seconds. This timer is reset to 300 every tick that the victim spends in lava, so it will only start counting down once the victim leaves the lava. Once the victim does exit the lava source, it will burn for just under 15 seconds, taking fire damage 14 times. This is due to the fact that for the first tick outside of lava, its {{code|remainingFireTicks}} decrease to 299, and entities take fire damage when {{code|remainingFireTicks}} is a multiple of 20 and greater than 0. If the victim touches water or [[rain]] falls on it, the fire is extinguished, but the lava continues to damage them directly.
In addition, a dense [[fog]] effect will be applied for players under lava to obscure vision. This can be slightly mitigated via the [[Fire Resistance]] effect.
An entity/player moving in lava has their horizontal movement speed reduced by 50% and their vertical movement speed reduced by 20%.
{{IN|bedrock}}, a player with the Fire Resistance effect or a total [[Fire Protection]] of 7 or higher does not catch fire.
[[Vex]]es, [[zoglin]]s, Nether [[mob]]s (excluding [[piglin]]s and [[hoglin]]s), [[Wither|withers]], [[Warden|wardens]], and players or mobs affected by the [[Fire Resistance]] effect are not damaged when touching lava.
The embers or fireballs that fly out of lava are purely decorative and do not cause fires or damage to entities. When rain falls on lava, the black ember particles appear more frequently.
A player in lava lasts a few seconds before dying:
==== ''Java Edition'' ====
* 2.5 seconds with no armor
* 3.5 seconds with full leather armor, no enchantments
* 4 seconds with full gold armor, no enchantments
* 4.5 seconds with full chain armor, no enchantments
* 5.5 seconds with full iron armor, no enchantments
* 10.5 seconds with full diamond armor, no enchantments
* 11 seconds with full netherite armor, no enchantments
==== Bedrock Edition====
* 2.5 seconds with no armor
* 3.5 seconds with full leather armor, no enchantments
* 4.5 seconds with full gold armor, no enchantments
* 5 seconds with full chain armor, no enchantments
* 6.5 seconds with full iron armor, no enchantments
* 12.5 seconds with full diamond armor, no enchantments
* 12.5 seconds with full netherite armor, no enchantments
If the player is wearing armor enchanted with [[Fire Protection]], they can last even longer. With the maximum bonus, the damage is small enough that the natural healing from a full hunger bar can outpace it {{only|JE|short=1}}, so a player could survive indefinitely as long as they have food and their armor holds up (non-netherite armor is damaged by lava). This maximum bonus can be obtained by wearing 2 pieces of armor with [[Fire Protection|Fire Protection IV]] and 1 with [[Protection|Protection IV]], or 1 piece of armor with [[Fire Protection|Fire Protection IV]] and 3 with [[Protection|Protection IV]].
==== Fire spread ====
Lava can cause fires by turning air blocks to fire blocks.
In order for air above lava to turn to fire, a block adjacent to the air has to be [[Fire#Burning blocks|flammable]], or one of the wood-constructed [[Fire#Non-flammable blocks|non-flammable]] blocks. Since catching fire depends on air blocks, even torches or lava itself can prevent a flammable block from catching fire. Additionally, not all flammable or wood-constructed blocks can be ignited by lava.
The lava of any depth can start fires this way, whether or not it appears to have a current.
Additional conditions must be met, depending on the edition of Minecraft.
===== Java Edition =====
{{FakeImage|align=right|{{BlockGrid|scale=2|L=lava|w=Oak Planks|p=Orange Stained Glass|s=Light Gray Stained Glass|wwwwwwwww|wwsssssww|wspppppsw|wwspppsww|wwwsLswww|wwwwwwwww}}|Example for JE. The orange area represents areas<br>where air could catch flame if the<br>gray and orange areas contain<br>flammable blocks. The wood<br>is all at a safe distance.
}}
Air block must be in a 3×1×3 area right above the lava or in a 5×1×5 2 blocks above the lava.
Note that an air block in the 5x1x5 area will not catch on fire if the 3x1x3 area is completely filled, even if the latter is filled with flammable blocks.
===== Bedrock Edition =====
The block to be set on fire must be in a 3×3×3 cube centered on a lava block, above which there must be either air or an ignitable block.
=== Flow ===
{{See also|Fluid}}
Lava flows from "source blocks". Most streams or "lava-falls" come from a single source block, but lava lakes (including the "flood lava" in the bottom 10 layers) are composed entirely of source blocks. A source block can be captured only with a [[lava bucket|bucket]].
In the [[Overworld]] and [[the End]], lava travels 3 blocks in any horizontal direction from a source block. Lava flows far more slowly than water (1 block every 30 game ticks, or 1.5 seconds), and sourceless lava flows linger for a short time more. In [[the Nether]], lava travels 7 blocks horizontally and spreads 1 block every 10 game ticks, or 2 blocks per second, which is half the speed as water in the Overworld. In all dimensions, lava spreading uses the same mechanic as water: for every adjacent block it can flow into it tries to find a way down that is reachable in four or fewer blocks from the block it wants to flow to. When found, the flow weight for that direction is set to the shortest path distance to the way down. (This can result in lava flows turning toward dropoffs that they cannot reach in the Overworld and the End.)
Flowing lava destroys the following in its path: [[sapling]]s, [[cobweb]], [[tall grass]], [[dead bush]], [[wheat]], [[flower]]s, [[mushroom]]s, [[snow]] on ground (but snow blocks are immune), [[lily pad]]s, [[vines]], [[lever]]s, [[button]]s, all three types of [[torch]]es, [[redstone]], [[redstone repeater|repeaters]], [[end rod]]s, and [[rail]]s. [[Sugar cane]]s hold back lava, but disappear if the sugar cane's water source is destroyed by the lava. Lava also slows down entities, including those that are normally immune to lava damage.
Using redstone wire, a one-block lava flow can be redirected by supplying power to the source block, which causes it to reset the flow toward the now-nearest terrain depression. It cannot, however, be reversed. This re-calculation is made because of the redstone wire when toggled changes the block from redstone (on) to redstone (off). Whenever a block updates on any side of the lava, the lava re-calculates where to flow, but does not cut off its current direction of flow. In Bedrock Edition using the /setblock command can be used to create stationary lava without the use of barriers.
Flowing lava can push entities.
==== Flow arrangement tables ====
===== Overworld and the End =====
{| class="wikitable"
|+
|
|
|
!4
|
|
|
|-
|
|
!4
!3
!4
|
|
|-
|
!4
!3
!2
!3
!4
|
|-
!4
!3
!2
!1
!2
!3
!4
|-
|
!4
!3
!2
!3
!4
|
|-
|
|
!4
!3
!4
|
|
|-
|
|
|
!4
|
|
|
|}
{| class="wikitable"
|+
! colspan="2" |Range
!Height in blocks
|-
!1
|block
|1
|-
!2
|blocks
|0.75-1
|-
!3
|blocks
|0.5-0.75
|-
!4
|blocks
|0.25-0.5
|}
===== The Nether =====
{| class="wikitable"
|+
|
|
|
|
|
|
!7
|
|
|
|
|
|
|-
|
|
|
|
|
!7
!6
!7
|
|
|
|
|
|-
|
|
|
|
!7
!6
!5
!6
!7
|
|
|
|
|-
|
|
|
!7
!6
!5
!4
!5
!6
!7
|
|
|
|-
|
|
!7
!6
!5
!4
!3
!4
!5
!6
!7
|
|
|-
|
!7
!6
!5
!4
!3
!2
!3
!4
!5
!6
!7
|
|-
!7
!6
!5
!4
!3
!2
!1
!2
!3
!4
!5
!6
!7
|-
|
!7
!6
!5
!4
!3
!2
!3
!4
!5
!6
!7
|
|-
|
|
!7
!6
!5
!4
!3
!4
!5
!6
!7
|
|
|-
|
|
|
!7
!6
!5
!4
!5
!6
!7
|
|
|
|-
|
|
|
|
!7
!6
!5
!6
!7
|
|
|
|
|-
|
|
|
|
|
!7
!6
!7
|
|
|
|
|
|-
|
|
|
|
|
|
!7
|
|
|
|
|
|
|}
{| class="wikitable"
! colspan="2" |Range
!Height in blocks
|-
!1
|block
|1
|-
!2
|blocks
|0.75-1
|-
!3
|blocks
|0.625-0.75
|-
!4
|blocks
|0.5-0.625
|-
!5
|blocks
|0.375-0.5
|-
!6
|blocks
|0.25-0.375
|-
!7
|blocks
|0.125-0.25
|}
=== Lava and water ===
{{Main|Fluid#Mixing}}
Water and lava can produce [[stone]], [[cobblestone]], or [[obsidian]] based on how they interact. Lava can also generate basalt when above soul soil and touching blue ice.
=== Light source ===
Lava blocks emit a [[light]] level of 15.
=== Other ===
[[File:LavaDropletsExample.png|thumb|If there is lava flowing above a [[block]], the lava seeps through.]]
Lava above a non-transparent block (does ''not'' include stairs, fences, and slabs) produces dripping particles on the underside of that block. These droplets do not do anything other than warn the player that a deluge of lava lies above that block. The particles function identically to their water counterparts, except that they drip slower.
Flowing lava can set off tripwires because it breaks placed string. Lava triggers a tripwire only once.
Any [[item (entity)|item]] dropped into lava is immediately destroyed, except for [[netherite]]-related items. [[Lodestone|Lodestones]], however, can be destroyed by lava despite containing netherite.<ref>{{bug|MC-176618|||WAI}}</ref>
Lava can be placed in an empty [[cauldron]].
If lava is above a non-transparent block supporting [[pointed dripstone]], dripping particles are created on the end. These can fill cauldrons with lava.
== Farming ==
{{main|Tutorials/Lava farming}}
Lava farms can be created by placing a lava source block on top of a solid block and a [[pointed dripstone]] and a [[cauldron]] underneath.
== Sounds ==
{{edition|java}}:
{{Sound table
|sound=Lava.ogg
|subtitle=Lava pops
|source=block
|description=Randomly
|id=block.lava.ambient
|translationkey=subtitles.block.lava.ambient
|volume=0.2-0.4
|pitch=0.9-1.05
|distance=16}}
{{Sound table
|sound=Fizz.ogg
|subtitle=Lava hisses
|source=block
|description=When lava mixes with water, making a block
|id=block.lava.extinguish
|translationkey=subtitles.block.lava.extinguish
|volume=0.5
|pitch=1.8-3.4
|distance=16}}
{{Sound table
|sound=Lava pop.ogg
|subtitle=Lava pops
|source=block
|description=When a lava bubble particle spawns
|id=block.lava.pop
|translationkey=subtitles.block.lava.ambient
|volume=0.2-0.4
|pitch=0.9-1.05
|distance=16}}
{{Sound table
|sound=Empty lava bucket1.ogg
|sound2=Empty lava bucket2.ogg
|sound3=Empty lava bucket3.ogg
|subtitle=Bucket empties
|source=block
|description=When lava is placed with a bucket
|id=item.bucket.empty_lava
|translationkey=subtitles.item.bucket.empty
|volume=1.0
|pitch=1.0
|distance=16}}
{{Sound table
|sound=Fill lava bucket1.ogg
|sound2=Fill lava bucket2.ogg
|sound3=Fill lava bucket3.ogg
|subtitle=Bucket fills
|source=player
|description=When lava is collected with a bucket
|id=item.bucket.fill_lava
|translationkey=subtitles.item.bucket.fill
|volume=1.0
|pitch=1.0
|distance=16}}
{{Sound table
|sound=Fizz.ogg
|subtitle=Fire extinguishes
|description=When something [[freezing]] is dunked into lava
|source=block
|id=entity.generic.extinguish_fire
|translationkey=subtitles.entity.generic.extinguish_fire
|volume=0.7
|pitch=1.2-2.0
|distance=16
|foot=1}}
{{edition|bedrock}}:
{{Sound table
|type=bedrock
|sound=Lava.ogg
|source=block
|description=Randomly
|id=liquid.lava
|volume=0.4-0.6
|pitch=0.9-1.05}}
{{Sound table
|sound=Fizz.ogg
|source=block
|description=When lava mixes with water, making a block
|id=random.fizz
|volume=0.5
|pitch=1.8-2.4}}
{{Sound table
|sound=Lava pop.ogg
|source=block
|description=When a lava bubble particle spawns
|id=liquid.lavapop
|volume=0.4-0.6
|pitch=0.9-1.05}}
{{Sound table
|sound=Empty lava bucket1.ogg
|sound2=Empty lava bucket2.ogg
|sound3=Empty lava bucket3.ogg
|source=block
|description=When lava is placed with a bucket
|id=bucket.empty_lava
|volume=1.0
|pitch=1.0}}
{{Sound table
|sound=Fill lava bucket1.ogg
|sound2=Fill lava bucket2.ogg
|sound3=Fill lava bucket3.ogg
|source=block
|description=When lava is collected with a bucket
|id=bucket.fill_lava
|volume=1.0
|pitch=1.0}}
{{Sound table
|sound=Fizz.ogg
|source=block
|description=When something freezing is dunked into lava
|id=random.fizz
|foot=1}}
== Data values ==
=== ID ===
{{edition|java}}:
{{ID table
|edition=java
|firstcolumnname=Lava
|showblocktags=y
|showforms=y
|generatetranslationkeys=y
|displayname=Block
|spritename=lava
|spritetype=block
|nameid=lava
|blocktags=strider_warm_blocks
|form=block
|foot=1}}
{{ID table
|firstcolumnname=Lava
|showfluidtags=y
|displayname=Fluid
|spritename=lava
|spritetype=block
|nameid=lava
|fluidtags=lava}}
{{ID table
|displayname=Flowing Fluid
|spritetype=block
|spritename=lava
|nameid=flowing_lava
|fluidtags=lava
|foot=1}}
{{edition|bedrock}}:
{{ID table
|edition=bedrock
|firstcolumnname=Lava
|shownumericids=y
|showforms=y
|generatetranslationkeys=y
|displayname=Flowing
|spritename=lava
|spritetype=block
|nameid=flowing_lava
|id=10
|form=block}}
{{ID table
|displayname=Stationary
|spritename=lava
|spritetype=block
|nameid=lava
|id=11
|form=block
|foot=1}}
Lava spends most of its time as stationary, rather than 'flowing' – regardless of its level, or whether it contains a current downward or to the side. When specifically triggered by a block update, lava changes to 'flowing', update its level, then change back to stationary. Lava springs are generated as flowing, and lava lakes are generated as stationary.
=== Block states ===
{{see also|Block states}}
{{/BS}}
=== Fluid states ===
{{see also|Block states}}
{{/FS}}
== Achievements ==
{{load achievements|Stayin' Frosty;Super Fuel;Feels Like Home}}
== Advancements ==
{{Load advancements|Hot Stuff;Feels Like Home}}
== History ==
{{main|/History}}
{{History|java classic}}
{{History||0.0.12a|snap=May 19, 2009|slink=Java Edition Classic 0.0.12a/Development#Lava test (May 19, 2009)|Lava is shown.}}
{{History|||snap=release|slink=Java Edition Classic 0.0.12a|[[File:Lava JE1.png|32px]] Added lava.
|The texture is transparent.
|Lava spreads by duplicating itself to open horizontal and downward squares.
|Lava is slower than [[water]] and can be easily outrun.
|Model has z-fighting with blocks below lava.}}
{{History||0.0.13a|[[File:Lava JE2.png|32px]] The texture has changed to be opaque.}}
{{History||0.0.13a_03|Lava lakes no longer generate.}}
{{History||0.0.15a|link=Java Edition Classic 0.0.15a (Multiplayer Test 1)|[[File:Lava JE3.png|32px]] The model is no longer shaded.}}
{{History||0.0.19a|[[File:Lava JE4.png|32px]] Added a [[Procedural animated texture generation|procedural animated texture]] to lava. Old texture is still retained for use as a [[animation placeholder texture|placeholder]].|Upscaled model 2% to fix z-fighting with blocks below lava. It's created lava or water models overlapping and z-fighting with each other.|Added lava layer to the bottom of the map.<!--as it traps the [[player]] and prevents the player from leaving unless [[water]] is let in and collides with it or if the player places a [[sand]] or [[gravel]] block, letting it [[drops|drop]] into the lava. If water is let into the area where the lava is, the lava becomes [[stone]], allowing the stone block to be removed to expose bedrock underneath.-->}}
{{History||0.0.20a_02|[[File:Lava JE5.png|32px]] Changed model scale back to normal with 1% offset on all coordinates.}}
{{History||0.0.22a|[[File:Lava JE6.png|32px]] Lava's generated texture has changed - it now appears brighter overall.}}
{{History||August 25, 2009|link=https://notch.tumblr.com/post/170887079/survival-mode-status-update-video-with-plenty-of|Lava has been shown to deal [[damage]].}}
{{History||0.24_SURVIVAL_TEST|Lava now deals damage.}}
{{History||0.26 SURVIVAL TEST|[[File:Lava JE7.png|32px]] UV mapping on side faces now has 11% v offset up.}}
{{History||0.28|[[File:Lava JE6.png|32px]] Fixed UV mapping.}}
{{History|java indev}}
{{History||0.31|snap=20091223-2|Lava is now luminous.}}
{{History|||snap=20100110|Lava now sets [[fire]] to flammable materials.}}
{{History|||snap=20100122|Added [[lava spawner]]s that spawn lava on sides and bottom.|It appears in the player's inventory in a stack of 5.
|Lava now flows, but more slowly than water.<ref>[[wordofnotch:347976621]]</ref>
|Dropped [[item]]s now burn in lava.
|Shot [[arrow]]s catch [[fire]] and not burn in lava.}}
{{History|||snap=20100124|Lava spawner can no longer be found in the player's inventory. Instead, a full stack (99) can be found inside the [[Indev house]] chests.}}
{{History|||snap=20100125-1|Lava now has [[particles|particle]] effects.}}
{{History|||snap=20100130|Re-added the infinite lava sea to the bottom of the map.}}
{{History||20100219|[[File:Lava JE8.png|32px]] The model is shaded again.}}
{{History|java infdev}}
{{History||20100227-1|Lava no longer flows due to changes in chunk handling for infinite worlds.}}
{{History||20100607|[[File:Lava JE9.png|32px]] UV mapping now has 1% uv offset on top and bottom faces and 1% u, 11% v offset on side faces.}}
{{History||20100608|[[File:Lava JE8.png|32px]] Fixed UV mapping, once again.}}
{{History||20100615|[[File:Lava JE10.png|32px]] The model has been changed.
|Added flowing lava.
|Lava now creates flowing lava for a total distance of 7 blocks "away" from the source block.
|Flowing lava flows in a single line toward the nearest terrain depression within four blocks.}}
{{History||20100616-1|[[File:Lava JE11.png|32px]] Added flowing lava texture for sides and vertex offset.
|Lava and flowing lava now have visual connection to blocks.|A large lava flow is now visible in the dark from a long distance.}}
{{History||20100617-2|[[File:Lava JE12.png|32px]] Removed vertex offset.
|Lava now flows 3 blocks horizontally instead of 7.
|Lava and flowing lava touching water, flowing water, water spawner, or lava spawner now replaces with [[obsidian]].
|Removed the infinite lava sea at the bottom of the map.}}
{{History|java alpha}}
{{History||v1.0.2_02|Flowing of lava has been tweaked.}}
{{History||v1.0.4|Added [[ice]] and [[snow]], which lava can melt.}}
{{History||v1.0.15|Lava now sets nearby [[block]]s on [[fire]].}}
{{History||v1.2.0|snap=preview|Added [[the Nether]], which contains lava.}}
{{History||v1.2.2|Lava now flows further in the Nether.}}
{{History||v1.2.6|Added [[lava lake]]s, which can generate at any [[altitude]].}}
{{History|java beta}}
{{History||1.8|snap=Pre-release|[[File:Lava JE13.png|32px]] Changed [[lighting]].
|When lava is touched by [[rain]], it emits smoke [[particles]].
|Lava now generates in the blacksmiths of the newly added [[village]]s.}}
{{History|java}}
{{History||1.0.0|snap=Beta 1.9 Prerelease|Added lava dripping.
|Lava blocks now form [[stone]] when falling directly onto [[water]] source blocks.}}
{{History|||snap=Beta 1.9 Prerelease 3|Lava now generates in the newly added [[end portal]] rooms of [[stronghold]]s.}}
{{History|||snap=Beta 1.9 Prerelease 5|Only in this version, it is possible to create an infinite lava source using a plus-sign shaped arrangement of [[block]]s with four lava source blocks flowing into a central empty block.}}
{{History|||snap=RC1|[[File:Lava JE14.png|32px]] Faces on model now 0.1% moved to center to fix z-fighting on inner faces.}}
{{History||1.2.1|snap=12w05a|Lava (as well as the embers that pop out of it) now makes [[sound]]s. These sounds were in the game files for a long time, but they had not played in-game.}}
{{History||1.3.1|snap=12w21a|Lava can now be collected and dispensed by [[dispenser]]s containing buckets.}}
{{History||1.4.2|snap=12w38a|Flowing lava now has a constant [[sound]].}}
{{History||1.5|snap=13w02a|[[File:Lava JE15.png|32px]] The model of lava now uses animated texture files.
|There is now "hidden lava" in [[the Nether]].
|Lava now flows much more quickly in the Nether.}}
{{History||1.6.1|snap=13w18a|Lava no longer lingers after the source is removed.}}
{{History||1.7.2|snap=13w37a|Flowing lava, which previously could be destroyed by a few [[block]]s of [[TNT]], can no longer be destroyed by [[explosion]]s.}}
{{History||1.10|snap=16w21a|[[File:Lava JE16.png|32px]] [[File:Lava (bottom view) 16w21a.png|32px]] Lava is now [[color]]ed red ({{color|#ff0000}}) except for the bottom face.<ref>{{bug|MC-102511}}</ref>}}
{{History|||snap=16w21b|[[File:Lava JE15.png|32px]] Lava is no longer colored.
|Added 2 [[splash]]es referencing colored lava: "Rule #1: it's never my fault", "Replaced molten cheese with blood?".}}
{{History||1.11|snap=16w39a|Lava can now generate in [[woodland mansion]]s.}}
{{History||1.13|snap=18w15a|[[File:Lava JE17.png|32px]] [[File:Swamp Lava 18w15a.png|32px]] [[File:Swamp Hills Lava 18w15a.png|32px]] [[File:Warm Ocean Lava 18w15a.png|32px]] [[File:Lukewarm Ocean Lava 18w15a.png|32px]] [[File:Cold Ocean Lava 18w15a.png|32px]] [[File:Frozen Ocean Lava 18w15a.png|32px]] Lava is now biome colored except for the bottom face. This is linked to new biome coloring for water.<ref>{{bug|MC-128233}}</ref>}}
{{History|||snap=18w16a|[[File:Lava JE15.png|32px]] Lava is no longer biome colored.}}
{{History||1.16|snap=20w09a|Lava now pushes [[Entity|entities]].}}
{{History|||snap=20w13a|Added [[strider]]s, which can be [[saddle]]d and ridden across lava.
|When lava flows over [[soul soil]] next to [[blue ice]], it now turns into [[basalt]].}}
{{History|||snap=20w16a|Lava now generates as part of [[bastion remnants]] and [[ruined portal]]s.}}
{{History|||snap=Pre-release 3|Visibility under lava is now slightly better when under the effect of [[Fire Resistance]].}}
{{History||1.17|snap=20w45a|[[Cauldron]]s can now be filled with lava.}}
{{History|||snap=20w48a|Added a [[renewable]] way of obtaining lava through cauldrons and [[pointed dripstone]].}}
{{History|||snap=21w06a|Lava no longer replaces air below Y{{=}}11.}}
{{History|||snap=21w08a|Lava now replaces air below Y{{=}}-53.
|Lava [[spring]]s are able to generate below Y{{=}}0.}}
{{History|||snap=21w11a|[[Spectator]] mode players can now see through lava.<ref>{{bug|MC-71530|||Fixed}}</ref>}}
{{History|||snap=21w13a|Lava is now fully renewable, as pointed dripstone can be obtained in Survival without custom generation.}}
{{History|||snap=21w15a|The changes to lava generation in 21w06a and 21w08a have been reverted.}}
{{History||1.18|snap=Experimental Snapshot 1|The changes to lava generation in the 1.17 snapshots have been reintroduced.
|[[Aquifer]]s below Y{{=}}0 sometimes generate with lava instead of water.}}
{{History||1.19.3|snap=22w44a|Added [[game rule]] {{cd|lavaSourceConversion}}, which allows the formation of new lava source blocks when set to {{cd|true}}.}}
{{History|pocket alpha}}
{{History||v0.1.0|[[File:Lava BE1.png|32px]] Added lava.}}
{{History||v0.3.3|Lava no longer creates [[fire]], due to a game breaking spreading bug.}}
{{History||v0.7.0|Lava now lights flammable [[block]]s around it on fire.
|[[File:Lava BE2.png|32px]] [[File:Lava BE2.gif|32px]] Lava now has a flowing animation.}}
{{History||v0.8.0|snap=build 5|Lava flowing directly into [[water]] now actually spreads out over it.}}
{{History||v0.9.0|snap=build 1|Underground ponds of lava can now be found, making lava much more easy to obtain.
|Lava dripping [[particles]] have been added.
|Lava now generates in [[village]] blacksmiths and [[stronghold]] end portal rooms.}}
{{History||v0.12.1|snap=build 1|[[Player]]s are now able to [[swimming|swim]] in lava.
|Lava now generates in [[the Nether]].}}
{{History|||snap=build 6|[[File:Lava BE3.png|32px]] [[File:Lava BE3.gif|32px]] Lava is now brighter shaded.}}
{{History|||snap=build 8|Lava now cancels all fall [[damage]].}}
{{History|pocket}}
{{History||1.1.0|snap=alpha 1.1.0.0|Lava now generates in [[woodland mansion]]s.}}
{{History|bedrock}}
{{History||1.11.0|snap=beta 1.11.0.5|[[File:Lava BE4.png|32px]] The texture for lava has been changed to match ''Java Edition''.}}
{{History||1.16.0|snap=beta 1.16.0.51|Lava can now push entities.}}
{{History|||snap=beta 1.16.0.57|Lava now generates as a [[delta]] that can be found in [[basalt deltas]].
|Lava now generates as part of [[bastion remnants]] and [[ruined portal]]s.
|When lava flows over [[soul soil]] next to [[blue ice]], it now turns into [[basalt]].}}
{{History|||snap=beta 1.16.0.59|Lava can no longer push entities.}}
{{History||1.17.30|snap=beta 1.17.20.22|Lava can now push entities, once again.<ref>{{bug|MCPE-75124}}</ref>}}
{{History|console}}
{{History||xbox=TU1|xbone=CU1|ps=1.00|wiiu=Patch 1|switch=1.0.1|[[File:Lava JE12.png|32px]] Added lava.}}
{{History||xbox=TU12|[[File:Lava JE15.png|32px]] The texture for lava has been changed.
|Lava (as well as the embers that pop out of it) now makes [[sound]]s.}}
{{History||xbox=TU25|xbone=CU14|ps=1.17|Lava can be used in custom superflats. It appears as a 3D block in the block selection screen of the custom superflat interface.}}
{{History|new 3ds}}
{{History||0.1.0|[[File:Lava BE3.png|32px]] Added lava.}}
{{History|foot}}
=== Data history ===
{{History|java}}
{{History||1.13|snap=17w47a|Prior to [[1.13/Flattening|''The Flattening'']], these blocks' numeral IDs were 10 and 11.}}
{{History|foot}}
== Issues ==
{{Issue list}}
== Trivia ==
* A player with [[Fire Resistance]] can swim in lava without taking damage, although the swimming speed does not become faster.
* A player cannot sprint-swim in lava.
* An arrow catches fire when shot into flowing lava, but not still lava.
* [[Water]] flows into lava-occupied blocks as though it were empty space, and vice versa.
* Although lava is a fluid, it is not possible to drown in lava. This applies to all mobs. However, it is still possible to suffocate in lava. This applies to almost every mob.{{only|bedrock}}<ref>{{bug|MCPE-17073}}</ref>
* A player sleeping in a bed cannot be damaged by lava.
* If the lava is changed to be transparent via a [[resource pack]], it does not become transparent.
* {{IN|bedrock}}, lava does not deactivate [[elytra]] like [[water]] does.
* Despite flowing identically to water while in [[the Nether]], it was not possible to create an infinite spring of lava before [[Java Edition 1.19.3|1.19.3]].
** Before Lava source conversion was implemented, the ''Minecraft: Combat Handbook'' (2014) stated the possibility to create infinite sources of lava by simply creating a cross shape with 4 nether bricks and placing lava in the middle. As expected, this turned out to be false, as confirmed by [[Nathan Adams|Dinnerbone]].<ref>[[bugtracker:MC-71088|MC-71088]]</ref>
* Geologically, lava in the Overworld is consistent with [[wikipedia:Felsic lava|felsic lava]], and lava in the Nether is consistent with [[wikipedia:mafic lava|mafic lava]]. Felsic lava is slow, sticky, and does not run as far as mafic lava, which is relatively thin and runny.
* When lava source conversion was implemented, any text where lava was supposed to be said "lave" instead.
** A splash text now says "Made with 'lave'".
== Gallery ==
<gallery>
Lavameltpattern1.png|Lava's melting pattern for snow and ice.
Water and lava springs.png|A natural lava spring near a waterfall.
Cave Lava.png|The lava "ocean" layer of [[cave]]s.
Lavastreamwithores.png|A naturally-occurring stream of lava next to diamond and iron ore.
Spawn Point Lava Warning.png|The warning in [[Legacy Console Edition]] when trying to place lava near the spawn point.
Lave found close under the dessert.png|A running lava source (origin not seen) uncovered six blocks below the surface of desert terrain.
Lava with Night vision potion.png|The inside view of lava with the night vision effect.
Ladders Blocking Lava.png|Ladders can stop lava from flowing.
Lava flowing off cliff.png|A lava [[spring]].
Minecraft Surface LavaFall.png|Lava spreading into dirt.
Exposed Cavern Lava.png|Lava in a ravine.
Lava in Ravine.png|Lava found in a snowy [[ravine]].
BedrockLava.png|Lava generates on bedrock.
BedrockPostLavaRemoval.png| Lava being extinguished near bedrock.
LavaRiver.png| Lava pool and water pool meeting each other naturally.
Lavafall.png| Two lava springs meeting water in a savannah plateau.
Lava spring.png| Lava spreading in the Overworld.
Minecraft lavalake.png| A lava spring spreading into a lava lake.
Lava cane.png|Sugar cane growing with lava flowing around it.
TallLavafall.png|Tall lavafall flowing into ravine.
RavineandStornghold.png|Ravine with multiple ores, water and lava falls, and stronghold bridge over it.
Underground Lava Lake.png|Another example of underground lava lake.
Lwava.png|Lava pouring from a cliff.
Extreme Hills Falls.png|Lava and water pouring from a cliff.
Lavalake.png|Lava and ores in a cave underground.
Cavern2.png|Lava texture in Classic [[0.0.21a_01]].
Lavaspring.png|Lava setting fire to [[grass]].
File:Mobbo Destroyed Village.jpeg|A [[village]] ravaged by lava.
File:Lava Moodlight.jpg|An officially licensed lava block moodlight.
</gallery>
== References ==
{{Reflist}}
== External links ==
*[https://www.minecraft.net/en-us/article/block-week-lava Block of the Week: Lava] – Minecraft.net on September 29, 2017
*[[wikipedia:Lava|Real-life lava on Wikipedia]]
*[[wikipedia:Magma|Real-life magma on Wikipedia]]
{{Blocks|natural}}
{{Items}}
[[Category:Fluids]]
[[Category:Natural blocks]]
[[Category:Non-solid blocks]]
[[Category:Generated structure blocks]]
[[Category:Light sources]]
[[cs:Láva]]
[[de:Lava]]
[[es:Lava]]
[[fr:Lave]]
[[hu:Láva]]
[[it:Lava]]
[[ja:溶岩]]
[[ko:용암]]
[[nl:Lava]]
[[pl:Lawa]]
[[pt:Lava]]
[[ru:Лава]]
[[th:ลาวา]]
[[tr:Lav]]
[[uk:Лава]]
[[zh:熔岩]]</li></ul> | Just like farm animals, wolves don't despawn, and they spawn rarely. Most generate with the world. | ||||
| r | |||||
1.1{{Extension DPL}}<ul><li>[[Steak|Steak]]<br/>{{Item
| title = Steak
| image = Steak.png
| renewable = Yes
| heals = {{hunger|8}}
| stackable = Yes (64)
}}
'''Steak''' ({{in|java}}) or '''cooked beef''' ({{in|bedrock}}) is a [[food]] [[item]] obtained from [[cow]]s, [[mooshroom]]s, or from cooking [[raw beef]].
== Obtaining ==
=== Mob loot ===
==== Cows ====
When a [[cow]] or [[mooshroom]] is killed, it drops [[raw beef]]. If a cow dies while on fire, it drops steak instead. If the cow is killed using a weapon with the [[Looting]] enchantment, the maximum number of steak drops increases by 1 per level.
=== Cooking ===
Raw beef can be cooked in a [[furnace]], [[smoker]], or [[campfire]]. Each steak removed from a furnace output slot gives 0.35 [[experience]] (22.4 experience per stack).
{{Smelting
|Raw Beef
|Steak
|0,35
}}
=== Villager gifts ===
{{IN|java}}, butcher [[Villager|villagers]] may give players steak if they have the [[Hero of the Village]] status effect.
== Usage ==
=== Food ===
To eat steak, press and hold {{control|use}} while it is selected in the hotbar. Eating one restores {{hunger|8}} [[hunger]] and 12.8 hunger
[[saturation]].
=== Wolves ===
Steak can be used to [[breed]] and heal tamed [[wolves]], lead them around, and make baby tamed wolves grow up faster by 10% of the remaining time.
==Sounds==
{{Sound table/Entity/Food}}
== Data values ==
=== ID ===
{{edition|java}}:
{{ID table
|edition=java
|showforms=y
|generatetranslationkeys=y
|displayname=Steak
|spritetype=item
|nameid=cooked_beef
|form=item
|foot=1}}
{{edition|bedrock}}:
{{ID table
|edition=bedrock
|shownumericids=y
|showforms=y
|notshowbeitemforms=y
|generatetranslationkeys=y
|displayname=Cooked Beef
|spritetype=item
|nameid=cooked_beef
|id=274
|form=item
|foot=1}}
== Advancements ==
{{load advancements|Husbandry;A Balanced Diet}}
== History ==
{{History|java beta}}
{{History||1.8|snap=Pre-release|[[File:Steak JE1 BE1.png|32px]] Added steak.
|Steak has been introduced as the cooked result of [[raw beef]].
|Steak is a new [[food]] [[item]] dropped by [[cow]]s in addition to their [[leather]].
|The icon for steak is used as the image for the [[cooked porkchop]] before [[Java Edition Beta 1.8|Beta 1.8]], as the cooked porkchop's icon was updated to a lighter colored piece of meat.}}
{{History|java}}
{{History||1.2.1|snap=12w03a|Steak can now be used to [[breed]] [[wolves]].}}
{{History||1.3.1|snap=12w21a|Steak can now be [[trading|bought]] from butcher [[villager]]s, at 6–7 steak for 1 [[emerald]].}}
{{History|||snap=1.3|[[File:Steak JE2.png|32px]] The texture of steak has been changed.}}
{{History||1.4.2|snap=12w37a|[[File:Steak JE3 BE2.png|32px]] The texture of steak has been changed, so that it no longer has a dark outline.}}
{{History||1.8|snap=14w02a|[[Villager]]s no longer [[trade]] steak.}}
{{History||1.13|snap=17w47a|Prior to [[1.13/Flattening|''The Flattening'']], this [[item]]'s numeral ID was 364.}}
{{History||1.14|snap=18w43a|[[File:Steak JE4 BE3.png|32px]] The texture of steak has been changed.}}
{{History|||snap=19w13a|Butcher villagers now give steak to players under the [[Hero of the Village]] effect.}}
{{History|pocket alpha}}
{{History||v0.4.0|[[File:Steak JE1 BE1.png|32px]] Added steak.}}
{{History||v0.5.0|Steak now restores {{hp|8}} instead of {{hp|4}}.}}
{{History||v0.8.0|snap=build 1|[[File:Steak JE3 BE2.png|32px]] The texture of steak has been changed, so that it no longer has a dark outline.}}
{{History||v0.12.1|snap=build 1|Steak now restores [[hunger]] instead of [[health]].}}
{{History||v0.16.0|snap=build 4|"Steak" has been renamed to "Cooked Beef."}}
{{History|bedrock}}
{{History||1.10.0|snap=beta 1.10.0.3|[[File:Steak JE4 BE3.png|32px]] The texture of cooked beef has been changed.}}
{{History||1.11.0|snap=beta 1.11.0.4|Cooked beef can now be [[trading|bought]] from butcher [[villager]]s.}}
{{History|console}}
{{History||xbox=TU5|xbone=CU1|ps=1.0|wiiu=Patch 1|switch=1.0.1|[[File:Steak JE1 BE1.png|32px]] Added steak.}}
{{History||xbox=TU12|[[File:Steak JE3 BE2.png|32px]] The steak's texture has been changed, so that it no longer has a dark outline.}}
{{History||xbox=none|xbone=none|ps=1.90|wiiu=none|switch=none|[[File:Steak JE4 BE3.png|32px]] The texture of steak has been changed.}}
{{History|new3DS}}
{{History||0.1.0|[[File:Steak JE3 BE2.png|32px]] Added steak.}}
{{History|foot}}
== Issues ==
{{issue list}}
== Gallery ==
<gallery>
Jeb steak.png|Raw beef and steak shown in the [[inventory]] from a preview screenshot.
Eating Steak.png|A still frame of the player eating a steak.
Steak SDGP.png|Steak in the [[Super Duper Graphics Pack]].
</gallery>
== Notes ==
{{fnlist}}
{{Items}}
[[cs:Propečený steak]]
[[de:Steak]]
[[es:Filete asado]]
[[fr:Steak]]
[[hu:Steak]]
[[it:Bistecca]]
[[ja:ステーキ]]
[[ko:스테이크]]
[[nl:Biefstuk]]
[[pl:Befsztyk]]
[[pt:Filé]]
[[ru:Жареная говядина]]
[[tr:Biftek]]
[[uk:Стейк]]
[[zh:牛排]]
[[Category:Food]]
[[Category:Renewable resources]]</li><li>[[Eye of Ender|Eye of Ender]]<br/>{{redirect|Ender Eye|the boss|Ender Dragon|item that teleports the player to where it lands|Ender Pearl}}
{{ItemEntity
|image=Eye of Ender.png
|stackable=Yes (64)
|renewable=Yes
|size=Height: 0.25 Blocks<br>Width: 0.25 Blocks
|networkid='''[[JE]]''': 72
}}
An '''eye of ender''' is a craftable item used to locate [[stronghold]]s and activate the [[end portal]]s within them.
== Obtaining ==
=== Crafting ===
{{Crafting
|Blaze Powder
|Ender Pearl
|Output=Eye of Ender
|type=Miscellaneous
}}
== Usage ==
=== Locating strongholds ===
[[File:Eye of Ender (break).gif|thumb|right|An animation of an eye of ender shattering.]]
To locate [[stronghold]]s (and the [[end portal]]s they house):
* Pressing {{control|use}} while holding an eye of ender causes it to fly approximately 12 blocks in the direction of the nearest stronghold, traveling through any blocks necessary, and leave a trail of purple particles, the same particle effect used for [[endermen]] and [[ender chests]].
** The eye leads to the [[chunk]] where a spiral staircase, the first room generated in the stronghold, is located.
** The center of this entrance staircase is always exactly at the chunk coordinates 4, ~, 4, although the eye of ender leads to chunk coordinates 0, ~, 0 (the northwest corner of the chunk).
* While over 12 blocks away from the northwest corner of the staircase chunk, the eye will travel upward to offer an easily-visible indication of the horizontal direction the player must travel.
* When closer than 12 blocks to the northwest corner of the staircase chunk, the eye will travel downward, to indicate the player is above a stronghold and must mine downward.
* After two or three seconds of travel, the eye floats in the air briefly, then either falls (becoming collectable again) or shatters in mid-air. The eye has a 20% chance of shattering (80% chance of surviving) per throw, therefore throwing it three times has approximately 50% overall chance to shatter the eye (0.8<sup>3</sup>=51.2%).
* The eye of ender's flying function works only in the [[Overworld]]. It does nothing in [[the Nether]], [[the End]], [[custom dimension]]s{{verify|type=current}}, or in worlds with no strongholds.
Note that the eyes may point to an incorrect location if the target chunks were generated with a different biomes map in an older version or through different generation settings.<ref>See also {{bug|MC-135996}}</ref>
=== Activating end portals ===
[[File:Active End Portal.png|thumb|right|An end portal activated with eyes of ender.]]
Once an end portal is found, the eyes of ender are required to activate it. End portals require a total of 12 eyes of ender in order to activate, though each individual frame-block has a 10% chance of containing an eye of ender when generated. Eyes can be placed in empty [[End portal frame]]s by pressing {{control|use}} on them until the entire ring of 12 is filled, thereby activating the portal. Due to the fact that there is a 10% chance of each individual end portal frame having an eye in it, there is a one out of one trillion chance of every frame having an eye in it thereby activating the portal even if the player doesn't have any eyes of ender.
{| class="wikitable sortable mw-collapsible"
|+End Portal Pre-Filled Eyes
!Eyes
!0
!1
!2
!3
!4
!5-12
|-
|Exactly
|28%
|38%
|23%
|9%
|2%
|<1%
|-
|Or More
|100%
|72%
|34%
|11%
|3%
|<1%
|}
=== Crafting ingredient ===
{{crafting usage}}
== Sounds ==
{{Edition|Java}}:<br>
Eyes of ender use the Friendly Creatures sound category for entity-dependent sound events.
{{Sound table
|sound=Ender Eye death1.ogg
|sound2=Ender Eye death2.ogg
|subtitle=Eye of Ender falls <ref group=sound name=LousyEvents>{{Bug|MC-98316||Wrong subtitles caused by missing distinction}}</ref>
|source=neutral
|description=When an eye of ender drops or breaks
|id=entity.ender_eye.death|idnote=<ref group=sound name=LousyEvents/>
|translationkey=subtitles.entity.ender_eye.death|translationkeynote=<ref group=sound name=LousyEvents/>
|volume=1.3
|pitch=1.0
|distance=16}}
{{Sound table
|sound=Ender Eye launch1.ogg
|sound2=Ender Eye launch2.ogg
|subtitle=Eye of Ender shoots
|source=neutral
|description=When an eye of ender is thrown
|id=entity.ender_eye.launch
|translationkey=subtitles.entity.ender_eye.launch
|volume=0.5
|pitch={{frac|1|3}}-0.5
|distance=16}}
{{Sound table
|sound=End portal eye place1.ogg
|sound2=End portal eye place2.ogg
|sound3=End portal eye place3.ogg
|subtitle=Eye of Ender attaches
|source=block
|description=When an eye of ender is placed in an end portal frame
|id=block.end_portal_frame.fill
|translationkey=subtitles.block.end_portal_frame.fill
|volume=1.0
|pitch=1.0
|distance=16
|foot=1}}
{{Edition|Bedrock}}:
{{Sound table
|type=bedrock
|sound=Item Frame break1.ogg
|sound2=Item Frame break2.ogg
|sound3=Item Frame break3.ogg
|source=block
|description=When an eye of ender breaks <ref group=sound>{{Bug|MCPE-115646}}</ref>
|id=block.itemframe.break}}
{{Sound table
|sound=Bow shoot.ogg
|source=player
|description=When an eye of ender is thrown
|id=random.bow
|volume=0.5
|pitch=0.33-0.5}}
{{Sound table
|sound=End portal eye place1.ogg
|sound2=End portal eye place2.ogg
|sound3=End portal eye place3.ogg
|source=block
|description=When an eye of ender is placed in an end portal frame
|id=block.end_portal_frame.fill
|volume=0.3
|pitch=0.9/1.0/1.1
|foot=1}}
==Data values==
===ID===
{{edition|java}}:
{{ID table
|edition=java
|firstcolumnname=Item
|showforms=y
|generatetranslationkeys=y
|displayname=Eye of Ender
|spritetype=item
|nameid=ender_eye
|form=item
|foot=1}}
{{ID table
|edition=java
|firstcolumnname=Entity
|generatetranslationkeys=y
|displayname=Eye of Ender
|spritetype=entity
|nameid=eye_of_ender
|foot=1}}
{{edition|bedrock}}:
{{ID table
|edition=bedrock
|firstcolumnname=Item
|shownumericids=y
|showforms=y
|notshowbeitemforms=y
|generatetranslationkeys=y
|displayname=Eye of Ender
|spritetype=item
|nameid=ender_eye
|id=433
|form=item
|foot=1}}
{{ID table
|edition=bedrock
|firstcolumnname=Entity
|shownumericids=y
|generatetranslationkeys=y
|displayname=Eye of Ender
|spritetype=entity
|nameid=eye_of_ender_signal
|id=70
|foot=1}}
===Entity data===
The purple particles left by eyes of ender have entity data that define various properties of the entity.
{{el|java}}:
{{main|Entity format}}
{{/ED}}
{{el|bedrock}}:
:See [[Bedrock Edition level format/Entity format]].
==Advancements==
{{load advancements|Eye Spy}}
==Video ==
{{Video note|This video does not mention that eyes of ender can be used to craft [[ender chest]]s or [[end crystal]]s.}}
<div style="text-align:center">{{yt|E0AhoxYLomc}}</div>
==History==
{{History|java}}
{{History||1.0.0|snap=Beta 1.9 Prerelease 3|[[File:Eye of Ender JE1 BE1.png|32px]] Added eyes of ender.
|Eyes of ender can be used on a [[end portal frame|portal block]] to repair them, but repairing them does nothing.}}
{{History|||snap=Beta 1.9 Prerelease 4|Each eye can now be placed in a [[end portal frame|portal block]] or used to hone in on a [[stronghold]]. [[Jens Bergensten|Jeb]] demonstrated the new uses for an eye in his livestream.<ref>http://www.twitch.tv/jebox/b/297000418</ref> An [[end portal]] within a stronghold could be seen in the stream with two eyes inserted into blocks.
|In older worlds with chunks generated before [[Java Edition Beta 1.9 Prerelease 3|Beta 1.9 Prerelease 3]], the eyes may mislead the [[player]] to a place where there isn't a [[stronghold]] at all. This happens because the eyes lead to where a stronghold should be based on the world seed in the current version, but before Beta 1.9 Prerelease 3 strongholds generated differently based on the seed. Therefore, if the player saved the coordinates the eye traveled to in an old world and generated a new world with the same seed, the player could travel to those same coordinates and find a stronghold.}}
{{History|||snap=Beta 1.9 Prerelease 6|Eyes of ender no longer render like a tool in third person.}}
{{History|||snap=RC1|The throwing sound of eyes of ender has been changed.}}
{{History||1.3.1|snap=12w21a|Eyes of ender can now be used to craft [[ender chest]]s.
|Priest [[villager]]s would [[trading|buy]] 2–3 eyes of ender for one [[emerald]].}}
{{History|||snap=12w22a|Priest villagers no longer buy eyes of ender, instead selling them for 7–10 emeralds.}}
{{History||1.6.4|snap=1.6.3-pre|Eyes of ender now lead to [[stronghold]]s based on the structure data saved in the world file instead of calculating their approximate location via the [[seed (level generation)|world seed]]. Therefore, strongholds generated in old versions can still be found even if the distribution of strongholds is changed.}}
{{History||1.7.2|snap=13w41a|Eyes of Ender now lead to the entrance of a stronghold instead of the portal room.}}
{{History||1.8|snap=14w02a|With changes that have been made to villagers and the [[trading]] system, cleric villagers now sell eyes of ender for 7–11 [[emerald]]s, as one of their tier III trades.}}
{{History||1.9|snap=15w41a|Eyes of ender are no longer [[trading|sold]] by cleric [[villager]]s.}}
{{History|||snap=15w44b|An eye of ender is now used to craft an [[end crystal]].}}
{{History|||snap=pre3|Eyes of ender now point to the 125 new strongholds.<ref>{{bug|MC-91173}} resolved as "Fixed"</ref>}}
{{History||1.11|snap=16w32a|The [[entity]] ID has been changed from <code>EyeOfEnderSignal</code> to <code>eye_of_ender_signal</code>.}}
{{History||1.12|snap=17w17a|A new ''pop'' [[sound]] has been added when a thrown eye of ender bursts.}}
{{History||1.13|snap=17w47a|Prior to [[1.13/Flattening|''The Flattening'']], this [[item]]'s numeral ID was 381.}}
{{History|||snap=pre5|The [[entity]] ID has been changed to <code>eye_of_ender</code>.}}
{{History||1.14|snap=18w43a|[[File:Eye of Ender JE2 BE2.png|32px]] The texture of eyes of ender has been changed.}}
{{History||1.19|snap=22w11a|Eyes of Ender now lead to the corner of the chunk (0, ~, 0) instead of the center (8-9, ~, 8-9).<ref>{{bug|MC-253394}}</ref>}}
{{History|pocket}}
{{History||1.0.0|snap=alpha 0.17.0.1|[[File:Eye of Ender JE1 BE1.png|32px]] Added eyes of ender.}}
{{History|bedrock}}
{{History||1.10.0|snap=beta 1.10.0.3|[[File:Eye of Ender JE2 BE2.png|32px]] The texture of eyes of ender has been changed.}}
{{History||1.16.0|snap=beta 1.15.0.51|The [[particles]] of eyes of ender have been changed to match {{el|je}}.}}
{{History|console}}
{{History||xbox=TU7|xbone=CU1|ps=1.0|wiiu=Patch 1|[[File:Eye of Ender JE1 BE1.png|32px]] Added eyes of ender.}}
{{History||xbox=none|xbone=none|ps=1.90|wiiu=none|switch=none|[[File:Eye of Ender JE2 BE2.png|32px]] The texture of eyes of ender has been changed.}}
{{History|new 3ds}}
{{History||1.7.10|[[File:Eye of Ender JE1 BE1.png|32px]] Added eyes of ender.}}
{{History|foot}}
=== Historical images ===
<gallery>
File:Held_Eye_of_Ender.png|The eye of ender used to appear large in third-person view.
</gallery>
==Issues==
{{issue list}}
==Trivia ==
*When thrown in third-person view, the eyes of ender fly out from the player's feet instead of their hand.
*Before [[Java Edition 1.9]], eyes of ender can be purchased from cleric villagers, which means players can find a [[stronghold]] and go to [[the End]] without accessing [[the Nether]] at all.
*{{IN|bedrock}} if the player travels beyond a certain radius (roughly 740,000 blocks), eyes of ender always point to a stronghold near spawn, even though strongholds continue to generate past this limit. If one travels to this limit, they can see eyes of ender suddenly switching direction. A similar phenomenon occurs with the {{cmd|locate}} command.
==Gallery==
===Screenshots===
<gallery>
Stronghold Portal Room.png|An end portal frame containing a few eyes of ender.
EnderChestexample.png|An [[ender chest]] depicting an eye of ender on the front.
</gallery>
===In other media===
<gallery>
File:Eye of Ender JINX.jpg|Official T-shirt artwork "Eye of Ender" sold by JINX.
File:Happy Halloween Eye.jpg|A Halloween T-Shirt design featuring an eye of ender.
</gallery>
==External links==
*[http://www.strongholdfinder.com/ A super-easy stronghold triangulation tool]
*[http://jsfiddle.net/42EDX/40/ JSFiddle Eye of Ender triangulator - can guess the location of other 2 strongholds in the first ring]
*[https://ens-gijs.github.io/minecraft-stronghold-locator/ Minecraft Stronghold Locator Eye of Ender throw plotting visualizer - zoomable to show all possible stronghold rings]
*[https://github.com/winny-/stronghold Python Eye of Ender throw plotting tool]
*[http://www.purplefrog.com/~thoth/MinecraftStronghold/stronghold.html HTML Eye of Ender throw plotting visualizer (not updated after 1.9 stronghold placement changes)]
*[http://chunkbase.com/apps/stronghold-finder Chunk Base Stronghold Finder (seed-based)]
*[https://github.com/toolbox4minecraft/amidst/releases Amidst - File-based world visualizer]
*[http://minecraft.tournier.org/StrongholdLocator/ Find strongholds by analyzing stronghold.dat file]
== References==
{{reflist}}
{{Items}}
{{entities}}
[[cs:Endové oko]]
[[de:Enderauge]]
[[es:Ojo de ender]]
[[fr:Œil de l'Ender]]
[[hu:Végzet szeme]]
[[ja:エンダーアイ]]
[[ko:엔더의 눈]]
[[nl:Enderoog]]
[[pl:Oko Endera]]
[[pt:Olho de ender]]
[[ru:Око Края]]
[[th:ดวงตาแห่งเอนเดอร์]]
[[uk:Око Краю]]
[[zh:末影之眼]]</li></ul> | Wolves only despawn when aggressive; passive and tamed wolves will not. | ||||
1.2.1{{Extension DPL}}<ul><li>[[Shears|Shears]]<br/>{{Item
| image = Shears.png
| rarity = Common
| renewable = Yes
| durability = 238
| stackable = No
}}
'''Shears''' are tools required to obtain some organic blocks or otherwise mine them faster as well as to shear certain entities and blocks.
==Obtaining==
===Crafting===
{{Crafting
|head=1
|showdescription=1
|B2= Iron Ingot
|A3= Iron Ingot
|Output= Shears
|type= Tool
}}
{{crafting
|foot=1
|ignoreusage=1
|Damaged Shears
|Damaged Shears
|Output= Shears
|description= The durability of the two shears is added together, plus an extra 5% durability.
|type= Tool
}}
Despite using [[Iron Ingot|iron]] in its crafting recipe, shears cannot be smelted into [[iron nugget]]s.<ref>{{bug|MC-111738}}</ref>
===Trading===
Novice-level Shepherd [[villager]]s have a 40% chance to sell shears for 2 [[emerald]]s in Java Edition. This trade is always offered in Bedrock Edition.
===Chest loot===
{{LootChestItem|shears}}
==Usage==
===Shearing===
Shears lose 1 [[durability]] when used to shear something.
Shears can be {{Control|use|text=used}} on a [[sheep]] to remove its coat and drop 1–3 [[wool]] of the corresponding color. The same sheep can be sheared again after it eats from a [[grass block]] to regenerate its coat.
Shearing a [[mooshroom]] drops 5 [[mushroom]]s of the corresponding color and irreversibly turns it into a normal [[cow]].
Shearing a [[snow golem]] irreversibly removes its pumpkin, dropping it and revealing its face.
Shearing either a [[beehive]] or [[bee nest]] that is full of honey makes it drop 3 [[honeycomb]]s and resets it to honey level 0. The same beehive or bee nest can be sheared again if it is able to reach full honey again. If sheared by hand without a [[campfire]] below the hive or nest all bees within will exit and all nearby bees will attack the offending player.
[[Dispenser]]s can use shears in any of the above listed ways, interacting with any valid block or entity in front of the dispenser's face. This decreases the shears' [[durability]]. A dispenser shearing a beehive or bee nest will not anger bees or cause them to leave even if there is not a campfire below it.
Shearing a [[pumpkin]] turns it into a [[carved pumpkin]], dropping 4 [[pumpkin seeds]].
{{IN|java}}, shearing the tip of [[cave vines]], [[kelp]], [[weeping vines]], or [[twisting vines]] sets its age value to 25 and stops further growth.
===Breaking blocks===
Shears use 1 [[durability]] when is used to break any block, even if it [[instant mining|breaks instantly]] by hand.
Shears can be used to harvest [[cobweb|cobwebs]], [[leaves]], [[grass|grass, tall grass]], [[seagrass|seagrass, tall seagrass]], [[fern|ferns, large fern]]s, [[dead bush]]es, [[nether sprouts]], [[vines]], [[glow lichen]] or [[hanging roots]] and obtain them in item form. They can also be used to break [[tripwire]] connected to a [[tripwire hook]] without activating it.
When shears are used to break [[Weeping Vines|weeping vines]] or [[Twisting Vines|twisting vines]] they are guaranteed to drop in item form instead of the usual 33% chance. This only applies to vines directly broken by shears and not vines that are broken due to the destruction of their supporting vines.
The following table shows information about blocks that can be broken with shears. Colors indicate what gets dropped when the block is broken:
*White: The original block.
*Blue: The block's normal drop (i.e. string, sticks, seeds, saplings, apples).
*Red: Nothing.
{| class="wikitable" style="text-align:center" data-description="Blocks broken with shears"
!
!No shears breaking time
!Shears breaking time
|-
! style="text-align:left" |{{BlockLink|Cobweb}}
| {{tc|no|20 s}}<ref group="note">Breaking cobwebs with a sword is as fast as breaking with shears, and yields string. This costs double durability.</ref>
|0.4 s
|-
! style="text-align:left" |{{BlockLink|Dead Bush}}
| {{tc|planned|0 s}}
|0 s
|-
! style="text-align:left" |{{BlockLink|id=fern|Grass|Fern}}
| {{tc|planned|0 s}}
|0 s
|-
! style="text-align:left" |{{BlockLink|Grass}}
| {{tc|planned|0 s}}
| 0 s
|-
! style="text-align:left" |{{BlockLink|Nether Sprouts}}
| {{tc|no|0 s}}<ref group="note">{{IN|bedrock}}, the item drops when breaking it with fists.</ref>
|0 s
|-
! style="text-align:left" |{{BlockLink|Leaves}}
| {{tc|planned|0.35 s}}
|0.05 s
|-
! style="text-align:left" |{{BlockLink|id=tripwire|String#Tripwire|Tripwire}}
|0 s
|0 s<ref group="note">Using shears does not trigger a redstone pulse.</ref>
|-
! style="text-align:left" |{{BlockLink|Vines}}
| {{tc|no|0.35 s}}
|0.35 s
|-
! style="text-align:left" |{{BlockLink|Wool}}
|1.25 s
|0.25 s
|-
! style="text-align:left" |{{BlockLink|Seagrass}}
| {{tc|no|0 s}}
|0 s
|-
! style="text-align:left" | {{BlockLink|Glow Lichen}}
| {{tc|no|0.3 s}}
|0.3 s
|-
! style="text-align:left" |{{BlockLink|Hanging Roots}}
| {{tc|no|0 s}}
|0 s
|-
! style="text-align:left" |{{BlockSprite|Twisting Vines Plant}}{{BlockLink|Twisting Vines}}<br> {{BlockSprite|Weeping Vines Plant}}{{BlockLink|Weeping Vines}}
|0 s
|0 s<ref group="note">Using shears will increase the chance of dropping from 33% to 100%.</ref>
|}
{{notelist}}
===Enchantments===
Shears can receive the following [[Enchanting|enchantments]]:
{| class="wikitable col-2-center col-3-right"
|+
!Name
! Max Level
![[Enchanting|Method]]
|-
|[[Efficiency]]
|V
|{{Inventory slot|Anvil}}
|-
|[[Unbreaking]]
| III
|{{Inventory slot|Anvil}}
|-
|[[Mending]]
|I
|{{Inventory slot|Anvil}}
|-
|[[Curse of Vanishing]]
|I
|{{Inventory slot|Anvil}}
|-
|[[Silk Touch]]{{only|be|short=1}}
|I
|{{Inventory slot|Anvil}}
|}
{{notelist}}
== Sounds ==
{{edition|java}}:
{{Sound table
|rowspan=4
|sound=Shear.ogg
|subtitle=Shears click
|source=player
|description=When a mooshroom is sheared
|id=entity.mooshroom.shear
|translationkey=subtitles.item.shears.shear
|volume=1.0
|pitch=1.0
|distance=16}}
{{Sound table
|subtitle=Shears click
|source=player
|description=When a sheep is sheared
|id=entity.sheep.shear
|translationkey=subtitles.item.shears.shear
|volume=1.0
|pitch=1.0
|distance=16}}
{{Sound table
|subtitle=Shears click
|source=player
|description=When a snow golem is sheared
|id=entity.snow_golem.shear
|translationkey=subtitles.item.shears.shear
|volume=1.0
|pitch=1.0
|distance=16}}
{{Sound table
|subtitle=Plant cropped
|source=block
|description=When a growing plant is cropped
|id=block.growing_plant.crop
|translationkey=subtitles.block.growing_plant.crop
|volume=1.0
|pitch=1.0
|distance=16}}
{{Sound table
|sound=Beehive shear.ogg
|source=block
|subtitle=Shears scrape
|description=When honeycombs are harvested from a beehive
|id=block.beehive.shear
|translationkey=subtitles.block.beehive.shear
|volume=0.8
|pitch=1.0/0.8/0.9
|distance=16}}
{{Sound table
|sound=Pumpkin carve1.ogg
|sound2=Pumpkin carve2.ogg
|source=block
|subtitle=Shears carve
|description=When a pumpkin is carved
|id=block.pumpkin.carve
|translationkey=subtitles.block.pumpkin.carve
|volume=1.0
|pitch=1.0
|distance=16}}
{{Sound table
|sound=Random break.ogg
|subtitle=Item breaks
|source=player
|description=When a pair of shears' durability is exhausted
|id=entity.item.break
|translationkey=subtitles.entity.item.break
|volume=0.8
|pitch=0.8-1.2
|distance=16
|foot=1}}
{{edition|bedrock}}:<br>
Pumpkins do not have carve sounds.
{{Sound table
|type=bedrock
|sound=Shear.ogg
|source=player
|description=When something is sheared
|id=mob.sheep.shear
|volume=1.0
|pitch=1.0}}
{{Sound table
|sound=Beehive shear.ogg
|source=block
|description=When honeycombs are harvested from a beehive
|id=block.beehive.shear
|volume=0.8
|pitch=0.8-1.0}}
{{Sound table
|sound=Random break.ogg
|source=player
|description=When a pair of shears' durability is exhausted
|id=random.break
|volume=1.0
|pitch=0.9
|foot=1}}
==Data values==
===ID===
{{edition|java}}:
{{ID table
|edition=java
|showforms=y
|generatetranslationkeys=y
|displayname=Shears
|spritetype=item
|nameid=shears
|form=item
|foot=1}}
{{edition|bedrock}}:
{{ID table
|edition=bedrock
|shownumericids=y
|showforms=y
|notshowbeitemforms=y
|generatetranslationkeys=y
|displayname=Shears
|spritetype=item
|nameid=shears
|id=421
|form=item
|foot=1}}
==Achievements==
{{load achievements|Have a Shearful Day}}<div style="text-align:center"></div>
==History==
{{History||June 3, 2011|link=https://twitter.com/jeb_/status/76570646074765312|Shears were first mentioned by [[Jeb]] on [[wikipedia:Twitter|Twitter]]. The tweet revealing Jeb's work on shears was written in Swedish (''Jag jobbar på shears nu''), which translates to "I'm working on shears now".}}
{{History||June 7, 2011|link=https://twitter.com/jeb_/status/78154891637436416|Jeb tweets about how shears were originally planned as a way to defuse [[TNT]], but he dropped this shortly after deciding TNT would detonate only with [[redstone]] or [[fire]].}}
{{History|java beta}}
{{History||1.7|[[File:Shears JE1 BE1.png|32px]] Added shears.
|Before [[Beta 1.7]], [[sheep]] would drop 1-3 [[wool]] blocks at most when hit, but shears can harvest up to 4 wool blocks per sheep.}}
{{History||1.8|snap=Pre-release|Shears can now be used to harvest a [[fern]], [[vines]] and [[grass]].}}
{{History|java}}
{{History||1.0.0|snap=Beta 1.9 Prerelease|Shears now harvest [[red mushroom]]s from a [[mooshroom]] and turn it back into a normal [[cow]].}}
{{History||1.1|snap=11w49a|[[Sheep]] now drop only 1-3 wool blocks when sheared, but they can also regrow their wool by eating [[grass block|grass]], which is part of a plan to have [[animal]]s stay in the game longer.<ref>{{Tweet|jeb|76647002317930496}}</ref>}}
{{History||1.2.1|snap=12w05a|Shears can now be used to harvest [[dead bush]]es.}}
{{History|||snap=12w06a|Shears are now [[renewable]], due to [[zombie]]s occassionally dropping iron ingots.}}
{{History||1.3.1|snap=12w21a|Shears can now be [[trading|bought]] from farmer [[villager]]s for 3 [[emerald]]s each.}}
{{History|||snap=12w22a|Shears can now be used to break [[tripwire]] string and not set it off.}}
{{History||1.4.2|snap=12w38a|Added a [[sound]] when using shears on [[sheep]].}}
{{History||1.4.6|snap=12w50a|Shears can now be [[enchanting|enchanted]].}}
{{History||1.8|snap=14w02a|[[Trading]] has been changed: Shepherd [[villager]]s now [[trading|sell]] shears for 3–4 [[emerald]]s each.
|Farmers no longer trade shears.}}
{{History|||snap=pre1|Shears now lose [[item durability|durability]] when breaking [[wool]] blocks. In previous versions, shears would take [[item durability|durability]] [[damage]] only when destroyed or when breaking [[tall grass]] or [[leaves]], the damage remaining the same for all other [[block]]s.<ref>{{bug|MC-5313}}</ref>}}
{{History||1.9|snap=15w34a|Shears may now be used in a crafting grid to zoom in [[map]]s.}}
{{History|||snap=15w45a|Shears no longer zoom in maps.}}
{{History|||snap=15w47b|Shears can no longer be enchanted with [[Silk Touch]].
|Shears now lose durability when used to break any block (formerly lost durability only from [[leaves]], [[web]], [[grass]], [[vines]], [[tripwire]] and [[wool]]).}}
{{History|||snap=15w47c|Shears now harvest [[cobweb]] without requiring [[Silk Touch]].}}
{{History|||snap=15w49a|[[Snow golem]]'s [[pumpkin]] can now be removed with shears.}}
{{History||1.13|snap=17w47a|When shears are {{control|used}} on an un-carved [[pumpkin]], it now turns into a carved pumpkin and drops 4 [[pumpkin seeds]].
|Prior to [[1.13/Flattening|''The Flattening'']], this [[item]]'s numeral ID was 359.}}
{{History||1.14|snap=18w43a|Shears placed in a [[dispenser]] can now shear [[sheep]].
|[[File:Shears JE2 BE2.png|32px]] The texture of shears has been changed.}}
{{History|||snap=18w49a|Shears can now be found in [[chest]]s in [[village]] shepherd houses.}}
{{History||1.15|snap=19w34a|Shears can now be used on [[bee nest]]s and [[beehive]]s to harvest [[honeycomb]].}}
{{History||1.16|snap=20w15a|Shears placed in a dispenser can now shear [[mooshrooms]] and [[snow golem]]s.}}
{{History||1.16.2|snap=pre1|Shears are now required in order to pick up [[roots]].}}
{{History||1.16.2|snap=pre2|Shears are no longer required to pick up [[roots]].}}
{{History||1.17|snap=?|Shears are now required in order to pick up [[hanging roots]].}}
{{History||1.18|snap=21w37a|Shears can now stop [[cave vines]], [[kelp]], [[weeping vines]], and [[twisting vines]] from aging.}}
{{History||1.19|snap=22w11a|Shears are now required in order to pick up [[mangrove leaves]].}}
{{History|pocket alpha}}
{{History||v0.2.0|[[File:Shears JE1 BE1.png|32px]] Added shears.}}
{{History||v0.3.2|Survival [[player]]s no longer start out with infinite durability shears in the [[inventory]].}}
{{History||v0.4.0|Removed shears from the creative inventory.}}
{{History||v0.8.0|snap=build 3|Re-added shears to [[creative]] mode.}}
{{History||v0.9.0|snap=build 1|Shears can now be used to transform [[mooshroom]]s into [[cow]]s.}}
{{History||v0.12.1|snap=build 3|Shearing a [[snow golem]] now removes its [[pumpkin]].
|Shears can now be [[enchanting|enchanted]] in an [[anvil]].}}
{{History||v0.13.0|snap=build 1|Shears can now be used to break [[tripwire]] string without triggering it.}}
{{History||v0.15.0|snap=build 1|Shears now lose durability when used to break any [[block]].}}
{{History|pocket}}
{{History||1.0.4|snap=alpha 1.0.4.0|Shears can now be [[trading|bought]] from shepherd [[villager]]s.}}
{{History||1.1.0|snap=alpha 1.1.0.0|Breaking a [[melon|melon block]] with shears now always drop 9 [[melon slice|melons]].}}
{{History|bedrock}}
{{History||1.4.0|snap=beta 1.2.13.8|Shears can now be used to turn un-carved [[pumpkin]]s into [[carved pumpkin]] and spit out 4 [[pumpkin seeds]].}}
{{History||?|Shears now harvest [[cobweb]] without requiring [[Silk Touch]].}}
{{History||1.10.0|snap=beta 1.10.0.3|Shears placed in a [[dispenser]] can now shear [[sheep]].
|[[File:Shears JE2 BE2.png|32px]] The texture of shears has been changed.}}
{{History||1.11.0|snap=beta 1.11.0.1|Shears can now be found in [[village]] shepherd houses.}}
{{History|||snap=beta 1.11.0.4|Shears [[trading|sold]] by shepherd [[villager]]s now cost only 2 [[emerald]]s.}}
{{History||1.14.0|snap=beta 1.14.0.1|Shears can now be used on [[bee nest]]s and [[beehive]]s to harvest [[honeycomb]].}}
{{History|console}}
{{History||xbox=TU3|xbone=CU1|ps=1.0|wiiu=Patch 1|switch=1.0.1|[[File:Shears JE1 BE1.png|32px]] Added shears.}}
{{History||xbox=TU69|xbone=none|ps=1.76|wiiu=Patch 38|switch=none|Shears can now be used to turn regular [[pumpkin]]s into [[carved pumpkin]]s.}}
{{History||xbox=none|xbone=none|ps=1.90|wiiu=none|switch=none|[[File:Shears JE2 BE2.png|32px]] The texture of shears has been changed.
|Shears placed in a [[dispenser]] can now shear [[sheep]].}}
{{History|New 3DS}}
{{History||0.1.0|[[File:Shears JE1 BE1.png|32px]] Added shears.}}
{{History|foot}}
==Issues==
{{issue list}}
==Gallery==
<gallery>
File:Enchanted Shears.gif|An enchanted pair of shears.
</gallery>
==References==
{{reflist}}
==External links==
*[https://www.minecraft.net/en-us/article/taking-inventory--shears Taking Inventory: Shears] – Minecraft.net on November 20, 2019
{{Items}}
[[cs:Nůžky]]
[[de:Schere]]
[[es:Tijeras]]
[[fr:Cisailles]]
[[hu:Metszőolló]]
[[it:Cesoie]]
[[ja:ハサミ]]
[[ko:가위]]
[[nl:Schaar]]
[[pl:Nożyce]]
[[pt:Tesoura]]
[[ru:Ножницы]]
[[zh:剪刀]]
[[Category:Renewable resources]]</li><li>[[Enchanted Book|Enchanted Book]]<br/>{{About|the book that can give items enchantments when used on an anvil|the artifact that can enchant allied mobs in Minecraft Dungeons|Enchanter's Tome}}
{{Item
| image = Enchanted Book.gif
|imagesize=160px
| stackable = No
| renewable = '''Swift Sneak''': No<br>'''All others''': Yes
| rarity = Uncommon
}}
An '''enchanted book''' is an [[item]] that lets players add [[enchantments]] to certain items using an [[anvil]].
== Obtaining ==
=== Chest loot ===
==== Level-30 books ====
{{LootChestItem|enchanted-book}}
==== Random enchantment books ====
{{LootChestItem|enchanted-book-rnd}}
==== Soul Speed books ====
{{LootChestItem|enchanted-book-rnd-soul-speed}}
==== Swift Sneak books ====
{{LootChestItem|enchanted-book-rnd-swift-sneak}}
===Fishing===
Enchanted books can be obtained as a "treasure" item from [[fishing]] with a [[fishing rod]] as part of the "treasure" category. The book has the equivalent of a level 30 enchantment from an enchantment table, but treasure enchantments are available and the chance of multiple enchantments is not reduced.
=== Trading ===
{{IN|bedrock}}, librarian [[villager]]s have a 50% chance to sell enchanted books as part of their trades at novice, apprentice, and journeyman-level, and have {{frac|1|3}} chance to sell enchanted books at expert-level as part of their trades, meaning each librarian villager can sell up to four books. The price ranges between 5-64 [[emerald]]s per book. Based on the level of the enchantment and whether it is classified as a "[[Enchanting mechanics|treasure enchantment]]" (meaning they are not obtainable by enchanting, e.g. [[Mending]]), which doubles the cost, or not a price is determined.
{{IN|java}}, librarian villagers have a {{frac|2|3}} chance to sell an enchanted book as part of their trades at the novice, apprentice, and journeyman level, and have a 50% chance to sell an enchanted book at the expert level, meaning each librarian can sell up to four books. The price ranges from 5-64 [[emerald]]s per book, depending on the enchantment's level as well as whether or not it is a [[Enchanting mechanics|treasure enchantment]].
{| class="fandom-table"
|+Cost of Enchanted Books based on their level
!Level
!Lowest Price
!Highest Price
|-
|I (1)
|5
|19
|-
|II (2)
|8
|32
|-
|III (3)
|11
|45
|-
|IV (4)
|14
|58
|-
|V (5)
|17
|71 (capped at 64)
|}
They may contain any available enchantment (except Soul Speed and Swift Sneak) at any available level. See [[Trading#cite_note-enchanted-book-10|trading notes]] for more information on enchantments and prices.
===Drops ===
Vindicators and pillagers that spawn from raids have a small chance to drop an enchanted book with a level 30 enchantment, which may be a treasure enchantment.{{only|bedrock}}
===Enchanting===
[[File:Enchanted Book 4x.png|thumb|An enchanted book with multiple high level enchantments.]]
[[File:Similar enchantments.png|thumb|An enchanted book with multiple enchantments that can be applied to the same item.]]
Players can create an enchanted book by enchanting a [[book]] on an [[enchantment table]]. Books have a decreased chance of getting multiple enchantments (specifically, if multiple enchantments would be added, then one is removed at random), and have a lower "enchantability level" than most other items. Treasure enchantments such as Mending cannot be obtained from an enchantment table.
=== Bartering ===
Players can barter with [[piglin]]s by using or throwing [[gold ingot]]s, and doing so has a {{frac|5|459}} chance for piglins to give the player an enchanted book with any level of [[Soul Speed]]. Soul Speed enchanted books are only obtainable through [[bartering]], [[chest]] loot inside a bastion remnant, and [[fishing]]. They cannot be obtained through [[enchanting]] or [[trading]].
== Usage ==
{{see also|Anvil mechanics}}
In Survival, enchanted books are the only method to obtain certain enchantments on certain tools, such as Unbreaking on [[shield]]s. Enchanted books have a shine effect on their sprite.
To use an enchanted book, the player must place an item in the first slot in an [[anvil]], and a book in the next. In order to complete the enchantment, the player must have the required amount of [[experience]]. Note that using an enchanted book gets significant discounts at the anvil. Enchanted books themselves can be combined to create a single book with increased or multiple enchantments, similar to combining tools or weapons.
When combining items, the compatible enchantments from the book in the second slot are transferred to the item from the first slot, keeping the highest level of any type. If two enchantments have the same level and a higher level is available, they combine into the next level. If a book is applied to an item that can't take all of its spells, the appropriate spells are transferred, while the unusable ones are lost. Enchanted books are single-use.
Enchanted books do not exhibit their enchantment. For example, a book with Sharpness IV as an enchantment does no more damage than an un-enchanted book, or any non-weapon item, would when used as a weapon. An exception is the Fire Aspect book which can ignite TNT and light campfires and the Mending book if the block mined can be broken by fist.{{only|bedrock}}
=== Available items ===
{{See also|Enchantments}}
Enchanted books can enchant the usual items that can be enchanted at an [[enchanting table]], but ''unlike an enchanting table'', they are able to boost enchantments such as Sharpness or Thorns to their maximum power, and may apply the following enchantments to items (the table displays only netherite tools and armor, but any type can be enchanted):
<!-- do not change the items listed in this table. It is supposed to show the items that can receive these enchantments from an enchanted book, but are NOT possible through an enchanting table. -->
{| class="wikitable" style="text-align: center;" data-description="Secondary enchantments"
|-
!Enchantment
!Items not enchantable<br>at an enchanting table
!Note
|-
|[[Efficiency]]
|{{simpleGrid|Shears}}{{simpleGrid|Netherite Pickaxe}}{{simpleGrid|Netherite Shovel}}{{simpleGrid|Netherite Axe}}{{simpleGrid|Netherite Hoe}}
|Increases mining speed
|-
|[[Thorns]]||{{simpleGrid|Netherite Helmet}}{{simpleGrid|Netherite Chestplate}}{{simpleGrid|Netherite Leggings}}{{simpleGrid|Netherite Boots}}
|Inflicts damage on attacker
|-
|[[Unbreaking]]
|{{simpleGrid|Shears}}{{simpleGrid|Flint and Steel}}{{simpleGrid|Fishing Rod}}{{simpleGrid|Carrot on a Stick}}{{simpleGrid|Warped Fungus on a Stick}}{{simpleGrid|Trident}}{{simpleGrid|Shield}}{{simpleGrid|Elytra}}<br>
{{simpleGrid|Netherite Pickaxe}}{{simpleGrid|Netherite Shovel}}{{simpleGrid|Netherite Axe}}{{simpleGrid|Netherite Hoe}}{{simpleGrid|Netherite Sword}}{{simpleGrid|Bow}}{{simpleGrid|Crossbow}}<br>
{{simpleGrid|Netherite Helmet}}{{simpleGrid|Netherite Chestplate}}{{simpleGrid|Netherite Leggings}}{{simpleGrid|Netherite Boots}}
|Increasing durability on enchanted tools/armors
|-
|[[Frost Walker]]
|{{simpleGrid|Netherite Boots}}
|Creates walkable ice layer over water
|-
|[[Mending]]
|{{simpleGrid|Netherite Helmet}}{{simpleGrid|Netherite Chestplate}}{{simpleGrid|Netherite Leggings}}{{simpleGrid|Netherite Boots}}<br>
{{simpleGrid|Netherite Pickaxe}}{{simpleGrid|Netherite Shovel}}{{simpleGrid|Netherite Axe}}{{simpleGrid|Netherite Hoe}}{{simpleGrid|Netherite Sword}}{{simpleGrid|Bow}}{{simpleGrid|Crossbow}}<br>
{{simpleGrid|Shears}}{{simpleGrid|Flint and Steel}}{{simpleGrid|Fishing Rod}}{{simpleGrid|Carrot on a Stick}}{{simpleGrid|Warped Fungus on a Stick}}{{simpleGrid|Trident}}{{simpleGrid|Shield}}{{simpleGrid|Elytra}}
|Uses XP Orbs to repair damaged tools/weapons/armors
|-
|[[Curse of Binding]]
|{{simpleGrid|Netherite Helmet}}{{simpleGrid|Netherite Chestplate}}{{simpleGrid|Netherite Leggings}}{{simpleGrid|Netherite Boots}}<br>{{simpleGrid|Elytra}}{{simpleGrid|Carved Pumpkin}}{{simpleGrid|Head}}
|Prevents removal of cursed item
|-
|[[Curse of Vanishing]]
|{{simpleGrid|Netherite Helmet}}{{simpleGrid|Netherite Chestplate}}{{simpleGrid|Netherite Leggings}}{{simpleGrid|Netherite Boots}}<br>
{{simpleGrid|Netherite Pickaxe}}{{simpleGrid|Netherite Shovel}}{{simpleGrid|Netherite Axe}}{{simpleGrid|Netherite Hoe}}{{simpleGrid|Netherite Sword}}{{simpleGrid|Bow}}{{simpleGrid|Crossbow}}<br>
{{simpleGrid|Shears}}{{simpleGrid|Flint and Steel}}{{simpleGrid|Fishing Rod}}{{simpleGrid|Carrot on a Stick}}{{simpleGrid|Warped Fungus on a Stick}}{{simpleGrid|Trident}}{{simpleGrid|Shield}}<br>{{simpleGrid|Elytra}}{{simpleGrid|Carved Pumpkin}}{{simpleGrid|Head}}<br>{{simpleGrid|Compass}}{{simpleGrid|Recovery Compass}}
|Cursed item is destroyed upon death
|-
|[[Soul Speed]]
|{{simpleGrid|Netherite Boots}}
|The wearer's speed is increased when walking on [[soul sand]] or [[soul soil]].
|-
|[[Swift Sneak]]
|{{simpleGrid|Netherite Leggings}}
|The wearer's sneaking speed is increased.
|}
=== Creative mode ===
The player can enchant any item with any enchantment in [[Creative]] mode, allowing any applied effects to exhibit themselves.{{only|java}} For example, a [[stick]] can be enchanted with [[Silk Touch]] to allow the player to successfully dig [[grass block]]s. The enchanted item can still be used in Survival mode without any loss of enchantments.
Enchantments that are normally incompatible are still incompatible; for example, Piercing and Multishot cannot be both applied to the same item, even in Creative mode.
If a block is enchanted, it loses the enchantment upon being placed in the world.
=== Disenchanting ===
Disenchanting an enchanted book at a [[grindstone]] yields a normal [[book]] and some experience depending on the quality of the book.
=== Chiseled bookshelf ===
{{control|Use|text=Using}} the [[chiseled bookshelf]] while having an enchanted book in the main hand will put the book inside the chiseled bookshelf.
== Sounds ==
{{edition|java}}:
{{Sound table
|sound=Chiseled bookshelf insert enchanted1.ogg
|sound2=Chiseled bookshelf insert enchanted2.ogg
|sound3=Chiseled bookshelf insert enchanted3.ogg
|sound4=Chiseled bookshelf insert enchanted4.ogg
|subtitle=Enchanted Book placed
|source=block
|description=When an enchanted book is placed in a chiseled bookshelf
|id=block.chiseled_bookshelf.insert.enchanted
|translationkey=subtitles.chiseled_bookshelf.insert_enchanted
|volume=0.8
|pitch=''varies'' <ref group=sound name=insertvaries>Can be 1.0, 0.85, or 1.1 for each sound</ref>
|distance=16}}
{{Sound table
|sound=Chiseled bookshelf pickup enchanted1.ogg
|sound2=Chiseled bookshelf pickup enchanted2.ogg
|sound3=Chiseled bookshelf pickup enchanted3.ogg
|subtitle=Enchanted Book taken
|source=block
|description=When an enchanted book is removed from a chiseled bookshelf
|id=block.chiseled_bookshelf.pickup.enchanted
|translationkey=subtitles.chiseled_bookshelf.take_enchanted
|volume=0.8
|pitch=''varies'' <ref group=sound name=pickupvaries>Can be 1.0, 0.8, or 1.1 for each sound</ref>
|distance=16
|foot=1}}
{{edition|bedrock}}:
{{Sound table
|type=bedrock
|sound=Chiseled bookshelf insert enchanted1.ogg
|sound2=Chiseled bookshelf insert enchanted2.ogg
|sound3=Chiseled bookshelf insert enchanted3.ogg
|sound4=Chiseled bookshelf insert enchanted4.ogg
|source=block
|description=When an enchanted book is placed in a chiseled bookshelf
|id=insert_enchanted.chiseled_bookshelf
|volume=0.8
|pitch=''varies'' <ref group=sound name=insertvaries>Can be 1.0, 0.85, or 1.1 for each sound</ref>}}
{{Sound table
|sound=Chiseled bookshelf pickup enchanted1.ogg
|sound2=Chiseled bookshelf pickup enchanted2.ogg
|sound3=Chiseled bookshelf pickup enchanted3.ogg
|source=block
|description=When an enchanted book is removed from a chiseled bookshelf
|id=pickup_enchanted.chiseled_bookshelf
|volume=0.8
|pitch=''varies'' <ref group=sound name=pickupvaries>Can be 1.0, 0.8, or 1.1 for each sound</ref>
|foot=1}}
== Data values ==
=== ID ===
{{edition|java}}:
{{ID table
|edition=java
|showforms=y
|generatetranslationkeys=y
|displayname=Enchanted Book
|spritetype=item
|nameid=enchanted_book
|form=item
|foot=1}}
{{edition|bedrock}}:
{{ID table
|edition=bedrock
|showitemtags=y
|shownumericids=y
|showforms=y
|notshowbeitemforms=y
|generatetranslationkeys=y
|displayname=Enchanted Book
|spritetype=item
|nameid=enchanted_book
|id=521
|itemtags=minecraft:bookshelf_books</code>
|form=item
|foot=1}}
=== Item data ===
{{el|java}}:
{{main|Player.dat format}}
Enchanted books use an NBT tag <code>StoredEnchantments</code> to indicate the enchantment.
The allowed sub-tags are <code>id</code> and <code>lvl</code>, equivalent to the format of the <code>Enchantments</code> tag that is used for enchantments applied to items.
''The following NBT structure is provided to show how the <code>StoredEnchantments</code> tag is organized, and is not comprehensive above the <code>tag</code> tag. The full NBT for an item can be found [[Chunk format#Items_and_XP_Orbs|here]].''
<div class="treeview" style="margin-top: 0;">
*{{nbt|compound|tag}}: The tag tag.
**{{nbt|list|StoredEnchantments}}: The list of enchantments on this book.
***{{nbt|compound}} An enchantment
****{{nbt|string|id}}: The enchantment name ID
****{{nbt|short|lvl}}: The enchantment level
</div>
{{el|bedrock}}:
:See [[Bedrock Edition level format/Item format]].
==Advancements==
{{load advancements|Enchanter}}
==History==
{{History|java}}
{{History||November 24, 2012|link=none|[[Dinnerbone]] stated that he wanted to add a way to [[enchanting|enchant]] items in an [[anvil]] using [[paper]] at [[MINECON 2012]].}}
{{History||December 6, 2012|link={{tweet|Dinnerbone|276777823996366848}}|Dinnerbone released the first image of enchanting a diamond [[sword]] using an enchanted book that has [[Looting]] II for 6 levels. He also stated that "this is the reason I originally added the anvil."}}
{{History||1.4.6|snap=12w49a|[[File:Enchanted Book JE1 BE1.png|32px]] Added enchanted books.
|The enchantments of enchanted books can be applied to any [[item]].}}
{{History|||snap=12w50a|In [[Survival]] mode, enchanted books can now be used with limited kind of items. In [[Creative]] mode, they can still be used with any item. It was stated that the remaining functionality in Creative mode is intentional.<ref>{{Tweet|Dinnerbone|277084371146665984|Also enchanted books + items they're not intended for are a little broken and I kindly ask you to not exploit it too badly thanks.|December 7, 2012}}</ref><ref>{{bug|MC-4203}}</ref>
|Librarian [[villager]]s now [[trading|sell]] enchanted books at a cost of 1 [[book]] at 5–64 [[emerald]]s. The cost depends on the [[enchanting|enchantment]] level, and the cost can occasionally go above 64 emeralds; see [[Trading/Before 1.8]] for more details.
|Enchanted books now spawn in [[dungeon]], [[mineshaft]], [[desert temple|desert]] and [[jungle temple|jungle]] temple, [[stronghold]] and [[village]] blacksmith [[chest]]s.}}
{{History|||snap=pre|Enchanted books have been added to the [[Creative inventory]]. All levels for each enchanted book can be found in the search tab, and only the maximum level in the ''Tools'' and ''Combat'' tabs.}}
{{History||1.5.1|snap=13w11a|The [[player]] can now combine enchanted books of the same level to create a higher level variation.}}
{{History||1.7.2|snap=13w36a|Enchanted books can now be obtained by [[fishing]] as a "treasure" [[item]]. It is possible for the book to have multiple enchantments.}}
{{History|||snap=13w39a|When [[enchanting]] books, [[book]]s can now gain multiple enchantments.}}
{{History||1.8|snap=14w02a|[[Trading]] for enchanted books has been changed: the [[emerald]] cost has been doubled for [[treasure enchantment]]s, and cost has been capped at 64.}}
{{History|||snap=14w25a|Enchanted book [[Depth Strider]] added, which can go up to Level III and allows for faster underwater moving.}}
{{History||1.9|snap=15w42a|Enchanted book [[Frost Walker]] added, which can go up to Level II and turns water into [[frosted ice]].
|Enchanted book [[Mending]] added, which repairs [[tools]]/[[armor]] upon receiving [[experience]].}}
{{History|||snap=15w43a|The average yield of enchanted books found in [[stronghold]] library [[chest]]s has now more than tripled.}}
{{History|||snap=15w44a|The average yield from [[desert temple]], [[mineshaft]] and [[dungeon]] chests has been substantially increased. The enchantments on these books are now fully random, rather than enchanted only at level 30.}}
{{History||1.11|snap=16w39a|Enchanted books are now found in the new [[woodland mansion]] chests, with fully random enchantments.
|Enchanted book [[Curse of Binding]] added, which prevents removal of cursed [[armor]].
|Enchanted book [[Curse of Vanishing]] added, which destroys cursed items upon [[death]].}}
{{History||1.13|snap=17w47a|Prior to [[1.13/Flattening|''The Flattening'']], this [[item]]'s numeral ID was 403.}}
{{History|||snap=18w09a|Enchanted books now have a chance of generating in [[underwater ruins]] chests.}}
{{History||1.14|snap=18w43a|[[File:Enchanted Book JE2 BE2.png|32px]] The texture of enchanted books has been changed.}}
{{History|||snap=18w47a|Enchanted books now have a chance of generating in [[pillager outpost]] chests.}}
{{History||1.16|snap=20w11a|Added [[Soul Speed]] enchanted book, which increases player's speed on [[soul sand]] and [[soul soil]]. It can be obtained only via the [[bartering]].}}
{{History|||snap=20w16a|Soul Speed enchanted books now generate in [[bastion remnants]] chests.}}
{{History||1.19|snap=Deep Dark Experimental Snapshot 1|Added [[Swift Sneak]] enchanted book, which increases player's speed while sneaking. It can be obtained only in [[ancient city]] chests.
|Enchanted books now generate in [[ancient city]] chests.}}
{{History||1.20<br>(Experimental)|link=1.19.3|snap=22w42a|Enchanted books can now interact with [[chiseled bookshelves]].}}
{{History|pocket alpha}}
{{History||v0.12.1|snap=build 1|[[File:Enchanted Book JE1 BE1.png|32px]] Added enchanted books.
|All levels of each enchanted book can be obtained in the Creative inventory.}}
{{History||v0.13.0|snap=build 1|Enchanted books now generate in [[desert temple]]s.}}
{{History||v0.14.0|snap=build 1|Enchanted books now generate in [[mineshaft]]s.}}
{{History||v0.15.0|snap=build 1|Enchanted books now generate in [[jungle pyramid]]s.}}
{{History|pocket}}
{{History||1.0.0|snap=alpha 0.17.0.1|Enchanted books now generate in [[end city|end cities]].}}
{{History||1.0.4|snap=alpha 1.0.4.0|Enchanted books can now be [[trading|bought]] from librarian villagers for 5-64 emeralds as part of their tier 1, 4 and 5 trades.}}
{{History||1.1.0|snap=alpha 1.1.0.0|Enchanted books now generate in [[woodland mansion]]s.
|Enchanted books [[Mending]] and [[Frost Walker]] added.}}
{{History|bedrock}}
{{History||1.2.13|snap=beta 1.2.13.5|Added Curse of Binding and Curse of Vanishing [[enchanting|enchantments]], but they are obtainable only via [[trading]] with librarian [[villager]]s.}}
{{History||1.4.0|snap=beta 1.2.20.1|Enchanted books can now be found in [[underwater ruins]].}}
{{History||1.4.0|snap=beta 1.2.20.2|Curse enchantments are no longer obtainable via trading.}}
{{History||1.10.0|snap=beta 1.10.0.3|[[File:Enchanted Book JE2 BE2.png|32px]] The texture of enchanted books has been changed.
|Enchanted books can now be found in [[pillager outpost]]s.}}
{{History||1.11.0|snap=beta 1.11.0.4|[[Vindicator]]s and [[pillager]]s that spawn in [[raid]]s can now [[drops|drop]] enchanted books.
|[[Trading]] has been changed, enchanted books [[trading|bought]] from librarian [[villager]]s now cost 15-64 [[emerald]]s.
|Librarian villagers now have a 50% chance to [[trading|sell]] enchanted books as part of their first, second, and third tier trade, and {{frac|1|3}} chance to sell enchanted books as part of their fourth tier trades.}}
{{History||1.16.0|snap=beta 1.16.0.57|Added [[Soul Speed]] enchanted book, which can be obtained only via [[bartering]] and at [[bastion remnants]] chests.}}
{{History||1.20.0<br>(Experimental)|link=Bedrock Edition 1.19.50|snap=beta 1.19.50.21|Enchanted books can now interact with [[chiseled bookshelves]].}}
{{History|console}}
{{History||xbox=TU14|xbone=CU1|ps=1.04|wiiu=Patch 1|[[File:Enchanted Book JE1 BE1.png|32px]] Added enchanted books.
|Only the maximum level of each enchanted book can be obtained within the Creative inventory.}}
{{History|PS4}}
{{History||1.90|[[File:Enchanted Book JE2 BE2.png|32px]] The texture of enchanted books has been changed.}}
{{History|new 3ds}}
{{History||0.1.0|[[File:Enchanted Book JE1 BE1.png|32px]] Added enchanted books.
|All levels of each enchanted book can be obtained in the Creative inventory.}}
{{History|foot}}
== Issues ==
{{Issue list}}
==Trivia==
*When obtained through the {{cmd|give}} command with no stored enchantments, the enchanted book has no attached enchantments, but still shines as if it is enchanted.
*A book enchanted with [[Unbreaking]] III appears in both the tools tab and combat tab of the [[Creative]] [[inventory]].
==Gallery==
<gallery>
File:Dinnerbones_enchanted_Books.png|First image of an enchanted book, released by Dinnerbone.
File:DungeonBook.png|An enchanted book found in a dungeon chest.
File:Enchanted_Book.gif|An animation of an enchanted book.
</gallery>
==References ==
{{reflist}}
{{Items}}
[[Category:Renewable resources]]
[[de:Verzaubertes Buch]]
[[es:Libro encantado]]
[[fr:Livre enchanté]]
[[hu:Varázskönyv]]
[[ja:エンチャントの本]]
[[ko:마법이 부여된 책]]
[[nl:Betoverd boek]]
[[pl:Zaklęta książka]]
[[pt:Livro encantado]]
[[ru:Зачарованная книга]]
[[th:หนังสือร่ายมนตร์]]
[[uk:Зачарована книга]]
[[zh:附魔书]]</li></ul> | 12w03a | Prior to this update, breeding wolves with wheat caused a bug which made them sit forever. | |||
| Wolves can be bred through the use of any type of meat such as chicken (raw or cooked), pork (raw or cooked), beef (raw or cooked), and rotten flesh if tamed and at full health. | |||||
1.4.2{{Extension DPL}}<ul><li>[[Poisonous Potato|Poisonous Potato]]<br/>{{Item
| title = Poisonous Potato
| image = Poisonous Potato.png
| heals = {{hunger|2}}
|effects={{EffectLink|Poison}} (0:05) (60% chance)
| stackable = Yes (64)
| renewable = Yes
}}
A '''poisonous potato''' is a type of [[potato]] that can [[poison]] the [[player]].
== Obtaining ==
The poisonous potato is a rare [[drop]] when harvesting (destroying) [[potato|potato crops]]; a fully grown plant has a 2% chance of dropping one in addition to the 2-5 regular potatoes.
=== Chest loot ===
{{LootChestItem|poisonous-potato}}
== Usage ==
Poisonous potatoes cannot be planted on [[farmland]] or [[Baked Potato|baked]]. They also have no use with the [[composter]].<ref>{{bug|MC-142373|resolution=WAI}}</ref>
=== Food ===
{{see also|Tutorials/Hunger management|title1=Hunger management}}
To eat a poisonous potato, press and hold {{control|use}} while it is selected in the hotbar. Eating one restores {{hunger|2}} [[hunger]] and 1.2 hunger [[Hunger#Mechanics|saturation]] and has a 60% chance of applying 5 seconds of [[Poison]] II, draining {{hp|4|poisoned=1}} points of [[health]].
Interestingly, a poisonous potato actually restores double the hunger and saturation than a normal, unpoisoned potato. (A normal potato gives {{hunger|1}} hunger and 0.6 saturation points.)
==Sounds==
{{Sound table/Entity/Food}}
== Advancements ==
{{load advancements|Husbandry;A Balanced Diet}}
== Data values ==
=== ID ===
{{edition|java}}:
{{ID table
|edition=java
|showforms=y
|generatetranslationkeys=y
|displayname=Poisonous Potato
|spritetype=item
|nameid=poisonous_potato
|form=item
|foot=1}}
{{edition|bedrock}}:
{{ID table
|edition=bedrock
|shownumericids=y
|showforms=y
|notshowbeitemforms=y
|generatetranslationkeys=y
|displayname=Poisonous Potato
|spritetype=item
|nameid=poisonous_potato
|id=282
|form=item
|foot=1}}
== History ==
{{History|java}}
{{History||1.4.2|snap=12w34a|[[File:Poisonous Potato JE1 BE1.png|32px]] Added poisonous potatoes.}}
{{History||1.13|snap=17w47a|Prior to [[Java_Edition_1.13/Flattening|''The Flattening'']], this [[item]]'s numeral ID was 394.}}
{{History|||snap=18w11a|Poisonous potatoes now generate in the [[chest]]s of [[shipwreck]]s.}}
{{History||1.14|snap=18w43a|[[File:Poisonous Potato JE2.png|32px]] The texture of poisonous potatoes has been changed.}}
{{History|||snap=18w50a|[[File:Poisonous Potato JE3 BE2.png|32px]] The texture of poisonous potatoes has been changed, once again.}}
{{History|pocket alpha}}
{{History||v0.12.1|snap=build 1|[[File:Poisonous Potato JE1 BE1.png|32px]] Added poisonous potatoes.}}
{{History|bedrock}}
{{History||1.4.0|snap=beta 1.2.14.2|Poisonous potatoes can now be found inside of [[shipwreck]] [[chest]]s.}}
{{History||1.10.0|snap=beta 1.10.0.3|[[File:Poisonous Potato JE3 BE2.png|32px]] The texture of poisonous potatoes has been changed.}}
{{History|console}}
{{History||xbox=TU14|xbone=CU1|ps=1.04|wiiu=Patch 1|switch=1.0.1|[[File:Poisonous Potato JE1 BE1.png|32px]] Added poisonous potatoes.}}
{{History||xbox=none|xbone=none|ps=1.90|wiiu=none|switch=none|[[File:Poisonous Potato JE3 BE2.png|32px]] The texture of poisonous potatoes has been changed.}}
{{History|New 3DS}}
{{History||0.1.0|[[File:Poisonous Potato JE1 BE1.png|32px]] Added poisonous potatoes.}}
{{History|foot}}
== Issues ==
{{issue list}}
== References ==
{{reflist}}
{{Items}}
[[Category:Plants]]
[[cs:Jedovatá brambora]]
[[de:Giftige Kartoffel]]
[[es:Patata envenenada]]
[[fr:Pomme de terre empoisonnée]]
[[hu:Mérgező burgonya]]
[[it:Patata velenosa]]
[[ja:青くなったジャガイモ]]
[[ko:독이 있는 감자]]
[[nl:Giftige aardappel]]
[[pl:Trujący ziemniak]]
[[pt:Batata venenosa]]
[[ru:Ядовитый картофель]]
[[th:มันฝรั่งพิษ]]
[[uk:Отруйна картопля]]
[[zh:毒马铃薯]]
[[Category:Food]]
[[Category:Renewable resources]]</li><li>[[Dye|Dye]]<br/>{{Item
| title = Dyes
| image = White Dye.png
| extratext = View [[#Gallery|all renders]]
| renewable = Yes
| stackable = Yes (64)
}}
'''Dyes''' are a set of sixteen items used to change the color of [[wool]], [[carpet]]s, [[terracotta]], [[concrete powder]], [[glass]], [[shulker box]]es, [[bed]]s, [[candle]]s, the patterns on [[banner]]s, [[firework star]]s, certain mobs, and text on [[sign]]s and [[hanging sign]]s. {{IN|bedrock}} they can also be used to dye water in a [[cauldron]] (which is thereafter used to dye leather [[armor]]); {{in|java}} leather armor can be dyed directly. {{IN|education}} dyes can also be used to dye [[balloon]]s and [[glow stick]]s.
{{IN|bedrock|education}}, [[bone meal]], [[ink sac]]s, [[lapis lazuli]], and [[cocoa bean]]s can generally substitute for [[white dye]], [[black dye]], [[blue dye]], and [[brown dye]], respectively, in crafting recipes and for use in dyeing items or mobs. However, they have other important uses that aren't related to color, and are therefore not considered true dyes. They are mentioned in this article only in regard to their use as dyeing agents; see their individual articles for complete information about them.
[[File:Dye Recipes.png|400px|thumb|A guide for creating all the dyes]]
== Obtaining ==
<!--[[File:Dye Chart.png|350px|thumb|A guide to crafting all the dyes.{{until|java 1.14}}]]-->
Dyes can be produced by crafting them from plants (mainly flowers), by crafting dyes of different colors together, by smelting plants, or by trading with a [[wandering trader]].
{{loadPage|Crafting/Dye|Crafting|h3}}
=== Smelting ===
{{smelting|head=1|Sea Pickle|Lime Dye|0,2}}
{{smelting|foot=1|Cactus|Green Dye|1||b=Lapis Lazuli|c=Any fuel|d=1}}
=== Trading ===
[[Wandering trader]]s can sell 3 dyes for an [[emerald]]. {{IN|bedrock}}, they can also sell 3 lapis lazuli, bone meal, cocoa beans, or ink sacs for one emerald.
Apprentice-level cleric [[villager]]s sell one lapis lazuli per emerald.
=== Chest loot ===
{{#invoke:LootChest|base3|blue-dye,green-dye,orange-dye,light-blue-dye,yellow-dye,white-dye}}
=== Other ===
Ink sacs can also be created using 1 iron, 1 sulfur, and 4 oxygen in the [[compound creator]]. {{only|bedrock|education}}
== Usage ==
Similar to their use in crafting, [[bone meal]], [[ink sac]]s, [[lapis lazuli]], and [[cocoa beans]] can be substituted for the corresponding dye in any of the following usages unless otherwise specified.{{only|bedrock}} <!--- sections are ordered by craftable dyeable blocks, dyeable items, version exclusive sections, and non-crafting miscellaneous uses--->
=== Dyeing wool and mobs ===
Players can dye wool by placing [[wool]] and any dye in a crafting grid.
{{Crafting
|nocat=1
|Any Wool
|Matching Dye
|Output=Any Wool
}}
Dyes can be {{control|use|text=used}} on sheep to change the color of the wool. Shearing a colored sheep drops the corresponding color of the wool, and the sheep retains the color when the wool regenerates. [[Breeding]] colored sheep produces a lamb colored as one of the parent sheep, or a color resulting from the combination of both parents' color. The color combining follows the same rules that dyes use – red and yellow sheep produce an orange lamb, but a blue and yellow sheep cannot create a green lamb. The unlimited reproduction of colored sheep makes dyeing and shearing sheep infinitely more efficient than just dyeing wool directly.
Dye can also be used on a tamed [[wolf]] or [[cat]] to change the color of its collar from the default red to the color of the dye.
=== Dyeing carpets ===
Carpets can be dyed.
{{Crafting
|Any Carpet
|Matching Dye
|Output= Matching Carpet
|type= Building block
}}
=== Dyeing terracotta ===
[[Terracotta]] can be dyed by placing 8 blocks around a dye on a crafting table.
{{Crafting
|nocat=1
|A1=Terracotta |B1=Terracotta |C1=Terracotta
|A2=Terracotta |B2=Matching Dye |C2=Terracotta
|A3=Terracotta |B3=Terracotta |C3=Terracotta
|Output=Matching Dyed Terracotta,8
}}
=== Creating concrete powder ===
Dyes can also be used to craft [[concrete powder]], which can then be set into their respective [[concrete]] blocks (they cannot be dyed directly).
{{Crafting
|nocat=1
|Sand |Gravel |Sand
|Gravel |Matching Dye |Gravel
|Sand |Gravel |Sand
|Output=Matching Concrete Powder,8
}}
=== Staining glass ===
[[Stained glass]] can be stained by placing 8 blocks of glass around a dye on a [[crafting table]]. Just like regular glass, stained glass can be crafted into stained glass panes. The recipe for this is the same as with regular glass.
{{Crafting
|nocat=1
|A1=Glass |B1=Glass |C1=Glass
|A2=Glass |B2=Matching Dye |C2=Glass
|A3=Glass |B3=Glass |C3=Glass
|Output=Matching Stained Glass,8
|head=1
}}
{{Crafting
|nocat=1
|A1= Glass Pane
|B1= Glass Pane
|C1= Glass Pane
|A2= Glass Pane
|B2= Matching Dye
|C2= Glass Pane
|A3= Glass Pane
|B3= Glass Pane
|C3= Glass Pane
|Output= Matching Stained Glass Pane,8
|type= Decoration block
|foot=1
}}
=== Dyeing shulker boxes ===
[[Shulker box]]es are generated in a light shade of purple (like the [[purpur block]]), but can be dyed any color. They can also be re-dyed as often as desired.
{{Crafting
|ignoreusage=1
|showname=1
|Any Shulker Box
|Matching Dye
|Output=Matching Shulker Box
}}
=== Dyeing beds ===
Players can dye beds by placing a [[bed]] and any color dye in a crafting grid.
{{Crafting
|nocat=1
|Any Bed
|Matching Dye
|Output=Matching Bed
}}
=== Dyeing candles ===
Players can dye [[candles]] by placing an undyed candle and any color dye in a crafting grid.
{{Crafting
|ignoreusage=1
|Candle
|Matching Dye
|Output=Matching Dyed Candle
}}
=== Banner patterns ===
{{main|Banner#Patterns}}
Dyes are used in most banner patterns to determine the pattern and color displayed.
=== Dyeing armor ===
[[File:DyeGraph2.png|200px|thumb|A graph showing all combinations of two dyes on a [[tunic]].]]
Leather [[armor]] can be dyed by:
* Crafting dyes with a piece of leather armor or leather [[horse armor]].{{Only|java}}
* Dousing the leather armor or leather [[horse armor]] in a [[cauldron]] to which dyes have been added.{{Only|bedrock}}
There are 5,713,438<ref>https://anrar4.github.io/DyeLeatherArmor/</ref> (34.1% of sRGB) colors leather armor can be, as it is possible to put more than one dye on the crafting bench alongside the leather armor. Armor can be dyed multiple times with previous colors affecting the final outcome. Colored armor can be reverted to their original color using a [[cauldron]] with undyed water.
The game has a specific formula for calculating the color of dyed armor: each color, in the RGB color model, has a red value, green value, and blue value. For each dye in the crafting grid, and the armor itself (if it is already dyed), the red, green, and blue values are added to running totals. In addition, a running total of the highest value (be it red, green, or blue) is also kept. After this, each total is divided by the number of colors used. This effectively produces the average red, green, blue, and maximum values. The maximum value of the average RGB values is also calculated. Finally, each average RGB value is multiplied by the average maximum value and divided by the maximum of the average RGB values. The modified average RGB values are then used as the final color. This procedure can be summed up with the following equations:
for each color (all "total" variables start at 0 before counting):
totalRed = totalRed + redValue
totalGreen = totalGreen + greenValue
totalBlue = totalBlue + blueValue
totalMaximum = totalMaximum + max(redValue, greenValue, blueValue)
numberOfColors = numberOfColors + 1
averageRed = totalRed / numberOfColors
averageGreen = totalGreen / numberOfColors
averageBlue = totalBlue / numberOfColors
averageMaximum = totalMaximum / numberOfColors
maximumOfAverage = max(averageRed, averageGreen, averageBlue)
gainFactor = averageMaximum / maximumOfAverage
resultRed = averageRed * gainFactor
resultGreen = averageGreen * gainFactor
resultBlue = averageBlue * gainFactor
Due to the way this formula works, the resulting color can never be darker than the average of the input colors and is often lighter and more saturated. Of course, the resulting color can never be lighter or more saturated than the lightest or most saturated input color. In addition, this formula never creates an RGB value higher than 255 (which would be invalid in the 8-bit RGB color model).
If leather armor is renamed on an [[anvil]], it retains its name when dyed or undyed.
;Mixing Samples
: {{ItemSprite|Yellow Dye}} + {{ItemSprite|Yellow Dye}} = {{Tint|leather-chestplate| #{{CalcDye| yellow=2 }} | code=1}}
: {{ItemSprite|Red Dye}} + {{ItemSprite|Blue Dye}} + {{ItemSprite|White Dye}} = {{Tint|leather-chestplate| #{{CalcDye| red=1 | blue=1 | white=1}} | code=1}}
: {{ItemSprite|Green Dye}} + {{ItemSprite|Red Dye}} + {{ItemSprite|Pink Dye}} = {{Tint|leather-chestplate| #{{CalcDye| green=1 | red=1 | pink=1}} | code=1}}
=== Dyeing firework stars ===
A [[firework star]] can have a single color or a combination of up to eight colors when crafted with dyes. Adding one or more dyes to a crafted firework star adds a "fade to color" effect to it, overwriting any existing fade colors.
{{Crafting
|head=1
|ignoreusage=1
|ingredients=[[Gunpowder]] +<br>Any Dye (1–8) +<br>Extra ingredient (optional)
|Gunpowder
|Matching Dye
|Diamond;Glowstone Dust;Head;Gold Nugget;Feather;Fire Charge;
|Output=Matching Firework Star
}}
{{Crafting
|ignoreusage=1
|Matching Firework Star
|Any Dye
|Output=Matching Firework Star
|foot=1
}}
=== Creating balloons ===
Dye can be used to craft balloons.{{only|education}}
{{Crafting
|nocat=1
|A1= Latex
|B1= Matching Dye
|C1= Latex
|A2= Latex
|B2= Helium
|C2= Latex
|A3= Latex
|B3= Lead
|C3= Latex
|Output= Matching Balloon
}}
=== Creating glow sticks ===
Dye can also be used to craft glow sticks.{{only|education}}
{{Crafting
|nocat=1
|A1= Polyethylene
|B1= Hydrogen Peroxide
|C1= Polyethylene
|A2= Polyethylene
|B2= Matching Dye
|C2= Polyethylene
|A3= Polyethylene
|B3= Luminol
|C3= Polyethylene
|Output= Matching Glow Stick
}}
=== Dyeing water inside cauldrons ===
Water can be dyed in a cauldron by holding any dye in the hand and pressing {{Ctrl|use}} on a cauldron filled with water.{{only|bedrock}}
=== Signs ===
Dye can be {{control|used}} on a [[sign]] or a [[hanging sign]] to change the text color. {{IN|bedrock}}, [[ink sac]]s cannot be used for this purpose; black dye must be used to change the text to black.
=== Trading ===
Apprentice, journeyman and expert-level shepherd [[villager]]s buy any of the 12 dyes for an [[emerald]].
== Color values ==
The "color codes" are used to determine the color imparted on sheep, wolf and cat collars, firework stars, [[beacon]] beams, and dyed leather armor. The hex value is shown in the extended tooltips of dyed leather armor; however, to set the color using an NBT data tag in a [[command]], the decimal value must be used instead. The color values for firework stars are slightly different from the ones listed below, and use [[Item colors#Firework stars|these values]] instead.
{| class="wikitable" style="margin:2px; border: 1px solid silver; text-align: left;" data-description="Data values"
! rowspan=2 | Description
! colspan=2 style="text-align:center" | Color Code
|-
! Dec
! <abbr title="Hexadecimal color code">Hex</abbr>
|-
| style="text-align:center" | White || 16383998 || {{color|#F9FFFE}}
|-
| style="text-align:center" | Light gray || 10329495 || {{color|#9D9D97}}
|-
| style="text-align:center" | Gray || 4673362 || {{color|#474F52}}
|-
| style="text-align:center" | Black || 1908001|| {{color|#1D1D21}}
|-
| style="text-align:center" | Brown || 8606770 || {{color|#835432}}
|-
| style="text-align:center" | Red || 11546150 || {{color|#B02E26}}
|-
| style="text-align:center" | Orange || 16351261 || {{color|#F9801D}}
|-
| style="text-align:center" | Yellow || 16701501 || {{color|#FED83D}}
|-
| style="text-align:center" | Lime || 8439583 || {{color|#80C71F}}
|-
| style="text-align:center" | Green || 6192150 || {{color|#5E7C16}}
|-
| style="text-align:center" | Cyan || 1481884|| {{color|#169C9C}}
|-
| style="text-align:center" | Light blue || 3847130 || {{color|#3AB3DA}}
|-
| style="text-align:center" | Blue || 3949738 || {{color|#3C44AA}}
|-
| style="text-align:center" | Purple || 8991416 || {{color|#8932B8}}
|-
| style="text-align:center" | Magenta || 13061821 || {{color|#C74EBD}}
|-
| style="text-align:center" | Pink || 15961002 || {{color|#F38BAA}}
|}
== Sounds ==
{{edition|java}}:
{{Sound table
|rowspan=2
|sound=Dye.ogg
|subtitle=Dye stains
|source=block
|description=When dye is used on a [[sign]]
|id=item.dye.use
|translationkey=subtitles.item.dye.use
|volume=1.0
|pitch=1.0/0.9/0.95/1.1
|distance=16}}
{{Sound table
|subtitle=Dye stains
|source=player
|description=When dye is used on a [[sheep]]
|id=item.dye.use
|translationkey=subtitles.item.dye.use
|volume=1.0
|pitch=1.0/0.9/0.95/1.1
|distance=16
|foot=1}}
{{edition|bedrock}}:
{{Sound table
|type=bedrock
|sound=Dye.ogg
|source=sound
|description=When dye is used on a sign
|id=sign.dye.use
|volume=1.0
|pitch=1.0}}
{{Sound table
|rowspan=3
|sound=Water Splash Old.ogg
|source=block
|description=When dye is added to a cauldron
|id=cauldron.adddye
|volume=0.1
|pitch=1.0}}
{{Sound table
|source=block
|description=When armor is dyed using a cauldron
|id=cauldron.dyearmor
|volume=0.1
|pitch=1.0}}
{{Sound table
|source=block
|description=When dye is removed from armor using a cauldron
|id=cauldron.cleanarmor
|volume=0.1
|pitch=1.0
|foot=1}}
== Achievements ==
{{load achievements|Rainbow Collection;Tie dye outfit}}
== Video ==
{{Video note|These videos are outdated, as it does not include details of the [[Java Edition 1.7.2|1.7.2]] update's changes to the dyeing system/production chain.}}
<div style="text-align:center">
<span style="display:inline-block">{{yt|8YD7oauNZHE}}</span>
<span style="display:inline-block">{{yt|7tETaRt7STM}}</span>
</div>
== History ==
{{History|java beta}}
{{History||January 3, 2011|link=https://web.archive.org/web/0/http://notch.tumblr.com/post/2582321901/2011-here-we-go|Notch mentions adding a "paint" feature if he can figure out how.}}
{{History||January 10, 2011<ref group="n">Supposed time when fragment was filmed. Based on modified date of client.jar/gui/trap.png in [[Beta 1.2]].</ref>|link=https://www.youtube.com/watch?v=cBF2ugTzXqQ&t=181s|[[File:Red Dye (pre-release).png|32px]] Shown rose red in development as part of [[Minecraft: The Story of Mojang]].}}
{{History||1.2|[[File:Ink Sac JE1 BE1.png|32px]] [[File:Red Dye JE1 BE1.png|32px]] [[File:Green Dye JE1 BE1.png|32px]] [[File:Cocoa Beans JE1 BE1.png|32px]] [[File:Lapis Lazuli JE1 BE1.png|32px]] [[File:Purple Dye JE1 BE1.png|32px]] [[File:Cyan Dye JE1 BE1.png|32px]] [[File:Light Gray Dye JE1 BE1.png|32px]] [[File:Gray Dye JE1 BE1.png|32px]] [[File:Pink Dye JE1 BE1.png|32px]] [[File:Lime Dye JE1 BE1.png|32px]] [[File:Yellow Dye JE1 BE1.png|32px]] [[File:Light Blue Dye JE1 BE1.png|32px]] [[File:Magenta Dye JE1 BE1.png|32px]] [[File:Orange Dye JE1 BE1.png|32px]] [[File:Bone Meal JE1 BE1.png|32px]] Added dyes.
|[[File:Black Dye (Recreated).png|32px]] [[File:Red Dye (pre-release).png|32px]] [[File:Green Dye (Recreated).png|32px]] [[File:Brown Dye (Recreated).png|32px]] [[File:Blue Dye (Recreated).png|32px]] [[File:Purple Dye (Recreated).png|32px]] [[File:Cyan Dye (Recreated).png|32px]] [[File:Light Gray Dye (Recreated).png|32px]] [[File:Gray Dye (Recreated).png|32px]] [[File:Pink Dye (Recreated).png|32px]] [[File:Lime Dye (Recreated).png|32px]] [[File:Yellow Dye (Recreated).png|32px]] [[File:Light Blue Dye (Recreated).png|32px]] [[File:Magenta Dye (Recreated).png|32px]] [[File:Orange Dye (Recreated).png|32px]] [[File:White Dye (Recreated).png|32px]] Leftovers of old textures can be seen in [[items.png]] with 100% opacity. The white dye texture was reused for [[Sugar]].
| The colors were as follows:{{verify|Did the color codes remain the same between Beta 1.2 and Java 1.11.2?}}
{{:Color/Java Edition dye colors before 17w06a}}
}}
{{History|java}}
{{History||1.1|snap=11w49a|[[Sheep]] can now regrow their [[wool]] by eating [[grass block|grass]]. Dyed sheep regrow wool in their new color.}}
{{History||1.3.1|snap=12w19a|[[File:Cocoa Beans JE2.png|32px]] The texture of [[cocoa beans]] has been changed.}}
{{History|||snap=1.3|[[File:bone meal changes.gif|32px]] The textures of [[bone meal]], [[cactus green]], cocoa beans and [[rose red]] have been changed. The textures have been lowered one pixel.}}
{{History||1.4.2|snap=12w34a|Added the ability to dye leather [[armor]] and [[wolf]] collars.}}
{{History||1.4.4|snap=1.4.3|Color codes have been changed. The colors of red, brown, blue, purple, cyan, pink, light blue, magenta and orange were adjusted a little vividly.}}
{{History||1.6.1|snap=13w19a|[[Stained clay]] can now be crafted using dyes.}}
{{history||1.7.2|snap=13w36a|With the addition of new [[flower]]s, many secondary and tertiary dyes are now primary dyes.}}
{{History|||snap=13w41a|[[Stained glass]] can now be crafted using dyes.}}
{{History||1.8|snap=14w02a|As cleric [[villager]]s now sell lapis lazuli, all dyes have become fully renewable.}}
{{History|||snap=14w30a|Added [[banner]]s, which can be dyed.}}
{{History||1.9|snap=15w34a|Added [[shield]]s, which can be dyed indirectly by applying a matching [[banner]].}}
{{History||1.11|snap=16w39b|Dyes are now used to change the color of [[shulker box]]es.}}
{{History||1.12|snap=17w06a|Dyes are now used to craft [[concrete powder]].
|Color codes have been changed. All colors are adjusted more vividly. The changes were as follows:
{{:Color/Java Edition dye color changes in 17w06a}}
|Light blue dye, stained glass, and stained glass panes, did not change colors in this update. This means that they still use old colors.<ref name="unchanged dyes">{{Bug|MC-214643}}<br>{{Bug|MC-214641}}</ref>
}}
{{History|||snap=17w15a|Dyes can now apply color to white [[bed]]s.}}
{{History||1.13|snap=17w47a|The different data values for the <code>dye</code> ID have been split up into their own IDs.}}
{{History||1.14|snap=18w43a|[[Bone meal]], [[ink sac]]s, [[cocoa beans]] and [[lapis lazuli]] are no longer considered dyes.
|[[File:White Dye JE1 BE1.png|32px]] [[File:Black Dye JE1 BE1.png|32px]] [[File:Brown Dye JE1 BE1.png|32px]] [[File:Blue Dye JE1 BE1.png|32px]] Added [[white dye|white]], [[black dye|black]], [[brown dye|brown]] and [[blue dye]]s.
|"Rose Red", "Dandelion Yellow" and "Cactus Green" have been renamed to "Red Dye", "Yellow Dye" and "Green Dye", respectively.
|[[Glass pane]]s and [[carpet]]s can now be dyed.
|[[File:Light Gray Dye JE2 BE2.png|32px]] [[File:Gray Dye JE2 BE2.png|32px]] [[File:Red Dye JE2 BE2.png|32px]] [[File:Orange Dye JE2 BE2.png|32px]] [[File:Yellow Dye JE2 BE2.png|32px]] [[File:Lime Dye JE2 BE2.png|32px]] [[File:Green Dye JE2 BE2.png|32px]] [[File:Cyan Dye.png|32px]] [[File:Light Blue Dye JE2 BE2.png|32px]] [[File:Purple Dye JE2 BE2.png|32px]] [[File:Magenta Dye JE2 BE2.png|32px]] [[File:Pink Dye JE2 BE2.png|32px]] The textures of light gray, gray, red, orange, yellow, lime, green, cyan, light blue, purple, magenta, and pink dyes, have been changed. The color texture for light blue dye was not changed to reflect the updated colors from 1.12.<ref name="unchanged dyes"></ref>}}
{{History|||snap=18w44a|The color of the text on [[sign]]s can now be changed with dye.}}
{{History|||snap=18w49a|Yellow dyes can now be found in [[chest]]s in [[village]] mason houses.}}
{{History|||snap=18w50a|Green dyes can now be found in [[chest]]s in [[desert]] [[village]] houses.}}
{{History|||snap=19w05a|Added the [[wandering trader]], which can sell any type of dye.}}
{{History|||snap=19w11a|All 16 types of dyes can now be [[trading|bought]] by shepherd villagers.}}
{{History||1.16.2|snap=Pre-release 2|Reversed the order of dyes to match other colored items in the [[Creative inventory]].<ref name="reverse dye">{{Bug|MC-136553}}</ref>
|Regrouped dyes in the Creative inventory such that white, blue, brown, and black dyes are within and not [[cocoa beans]], [[ink sacs]], [[lapis lazuli]], and [[bone meal]].<ref name="regroup dye">{{Bug|MC-177684}}</ref>}}
{{History||1.17|snap=20w45a|Added [[candle]]s, which can be dyed.}}
{{History|||snap=21w03a|Added a sound for applying dyes.}}
{{History|||snap=21w19a|Candles can no longer be dyed.}}
{{History|||snap=Pre-release 1|Candles can now once again be dyed.}}
{{History||1.20<br>(Experimental)|link=1.19.3|snap=22w42a|The color of the text on [[hanging sign]]s can now be changed with dye.}}
{{History||1.20<br>(Experimental)|link=1.19.4|snap=23w07a|[[Torchflower]]s can now be crafted into orange dye.|[[Pink petals]] can now be crafted into pink dye.}}
{{History||1.20|snap=23w12a|[[Pitcher plant]]s can now be crafted into cyan dye.|Blue, light blue, orange, white, and yellow dye can now be found in [[suspicious gravel]] and [[suspicious sand]] in [[trail ruins]].}}
{{History|||snap=23w14a|Pitcher plants can now craft two [[cyan dye]] instead of one.}}
{{History|||snap=23w16a|Blue, light blue, orange, white, and yellow dye no longer generates in [[suspicious sand]] in [[trail ruins]].|Due to the split of the archaeological loot tables for the suspicious gravel within the [[trail ruins]]; blue, light blue, orange, white, and yellow dye now are in the common loot.}}
{{History|pocket alpha}}
{{History||v0.3.0|[[File:Bone Meal JE1 BE1.png|32px]] [[File:Light Gray Dye JE1 BE1.png|32px]] [[File:Gray Dye JE1 BE1.png|32px]] [[File:Ink Sac JE1 BE1.png|32px]] [[File:Cocoa Beans JE1 BE1.png|32px]] [[File:Red Dye JE1 BE1.png|32px]] [[File:Orange Dye JE1 BE1.png|32px]] [[File:Yellow Dye JE1 BE1.png|32px]] [[File:Lime Dye JE1 BE1.png|32px]] [[File:Green Dye JE1 BE1.png|32px]] [[File:Cyan Dye JE1 BE1.png|32px]] [[File:Light Blue Dye JE1 BE1.png|32px]] [[File:Lapis Lazuli JE1 BE1.png|32px]] [[File:Purple Dye JE1 BE1.png|32px]] [[File:Magenta Dye JE1 BE1.png|32px]] [[File:Pink Dye JE1 BE1.png|32px]] Added dyes. Only [[dandelion yellow]] and [[lapis lazuli]] are currently obtainable and have functionality.}}
{{History||v0.3.2|[[Cactus green]] is now obtainable by smelting [[cacti]].}}
{{History||v0.3.3|[[Bone meal]] is now obtainable via [[crafting]].}}
{{History||v0.4.0|[[Cyan dye]], [[light blue dye]], [[lime dye]], [[magenta dye]], [[orange dye]], [[pink dye]], and [[purple dye]] are now obtainable via crafting.
|[[Rose red]] is now obtainable by smelting red [[mushroom]]s.
|All available dyes, excluding bone meal, can now be used to craft their respective [[wool]] color.}}
{{History||v0.8.0|snap=build 1|[[File:Cocoa Beans JE3 BE2.png|32px]] The texture of cocoa beans has been changed.}}
{{History|||snap=build 3|[[Ink sac]]s, [[cocoa bean]]s, [[gray dye]], and [[light gray dye]] are now available in the [[creative]] [[inventory]].
|Rose red can now be obtained from [[beetroot]]s.}}
{{History||v0.9.0|snap=build 1|Cocoa beans can now be obtained from [[cocoa pod]]s.
|The [[rose]] has been removed and replaced with a new poppy [[flower]] that can be crafted into rose red.}}
{{History|||snap=build 3|All new [[flower]]s can now be [[crafting|crafted]] into dyes. Because of this, many secondary and tertiary dyes are now primary dyes.
|[[Gray dye]] and [[light gray dye]] can now be obtained in [[survival]].}}
{{History|||snap=build 11|[[Terracotta|Stained clay]] can now be crafted using dyes.}}
{{History||v0.11.0|snap=build 1|[[Ink sac]]s can now be obtained from [[squid]].
|Added the ability to dye [[wolf]] collars.}}
{{History||v0.12.1|snap=build 1|Red [[mushroom]]s can no longer be smelted to obtain [[rose red]].}}
{{History||v0.14.0|snap=build 1|[[Cauldron]]s now used for leather dyeing, by applying a dye to a [[water]]-filled cauldron.}}
{{History||v0.16.0|snap=build 1|[[Cocoa bean]]s can no longer be crafted.}}
{{History|pocket}}
{{History||1.0.0|snap=alpha 0.17.0.1|Added a ''Dye'' button for [[sheep]].
|Added [[shulker]]s, which can be dyed.
|Added [[stained glass]]. Stain glass cannot be [[crafting|crafted]], but purple glass generates in [[end city|end cities]].}}
{{History||1.1.0|snap=alpha 1.1.0.0|Dyes can now apply color to a white [[bed]]s.
|Dyes are now used to craft [[concrete powder]].
|The color palette has been changed.}}
{{History|bedrock}}
{{History||1.2.0|snap=beta 1.2.0.2|Dyes can now be used for [[banner]] crafting.
|Dyes can now be used to craft [[firework star]]s.
|[[Stained glass]] is now [[crafting|craftable]], using dyes.}}
{{History||1.4.0|snap=beta 1.2.20.1|[[Lime dye]] can now be obtained from smelting [[sea pickle]]s.
|Dyes can now used to craft [[glow stick]]s and [[balloon]]s.}}
{{History||1.8.0|snap=beta 1.8.0.8|Dyes can now be used to dye [[cat]] collars.}}
{{History|||snap=beta 1.8.0.10|[[File:White Dye JE1 BE1.png|32px]] [[File:Black Dye JE1 BE1.png|32px]] [[File:Brown Dye JE1 BE1.png|32px]] [[File:Blue Dye JE1 BE1.png|32px]] Added [[white dye|white]], [[brown dye|brown]], [[black dye|black]] and [[blue dye]]s, which can be crafted from [[lapis lazuli]], [[bone meal]], [[cocoa beans]] and [[ink sac]]s. This, however, the later four still use as dyes.<ref>{{Bug|MCPE-42473}}</ref>
|"Rose Red", "Dandelion Yellow" and "Cactus Green" have been renamed to "Red Dye", "Yellow Dye" and "Green Dye", respectively.}}
{{History||1.9.0|snap=beta 1.9.0.0|Blue and white dye can now be obtained from [[cornflower]]s and [[lily of the valley]]s.}}
{{History||1.10.0|snap=beta 1.10.0.3|[[Glass pane]]s and [[carpet]]s can now be dyed.
|Only a single dye is now required to apply a banner pattern in a [[loom]].
|Various dyes except black dye, white dye, brown dye and blue dye are now [[trading|sold]] by [[wandering trader]]s.
|[[File:Bone Meal JE2 BE2.png|32px]] [[File:Light Gray Dye JE2 BE2.png|32px]] [[File:Gray Dye JE2 BE2.png|32px]] [[File:Ink Sac JE2 BE2.png|32px]] [[File:Cocoa Beans JE4 BE3.png|32px]] [[File:Red Dye JE3 BE3.png|32px]] [[File:Orange Dye JE2 BE2.png|32px]] [[File:Yellow Dye JE2 BE2.png|32px]] [[File:Lime Dye JE2 BE2.png|32px]] [[File:Green Dye JE2 BE2.png|32px]] [[File:Cyan Dye.png|32px]] [[File:Light Blue Dye JE2 BE2.png|32px]] [[File:Lapis Lazuli JE2 BE2.png|32px]] [[File:Purple Dye JE2 BE2.png|32px]] [[File:Magenta Dye JE2 BE2.png|32px]] [[File:Pink Dye JE2 BE2.png|32px]] The textures of bone meal, light gray, gray, ink sac, cocoa beans, red, orange, yellow, lime, green, cyan, light blue, lapis lazuli, purple, magenta, and pink dyes have been changed.}}
{{History||1.11.0|snap=beta 1.11.0.4|Dye can now be [[trading|sold]] to shepherd [[villager]]s.}}
{{History||1.16.210|snap=beta 1.16.210.59|The color of the text on [[sign]]s can now be changed with dye.}}
{{History|||snap=beta 1.16.210.60|The ability to dye the color of the text on [[sign]]s was temporarily removed.}}
{{History||1.16.220|snap=beta 1.16.220.50|The color of the text on [[sign]]s can now be changed with dye again.}}
{{History||1.17.10|snap=beta 1.17.10.22|Added [[candles]], which can be dyed.}}
{{History|console}}
{{History||xbox=TU1|xbone=CU1|ps=1.0|wiiu=Patch 1|switch=1.0.1|[[File:Bone Meal JE1 BE1.png|32px]] [[File:Light Gray Dye JE1 BE1.png|32px]] [[File:Gray Dye JE1 BE1.png|32px]] [[File:Ink Sac JE1 BE1.png|32px]] [[File:Cocoa Beans JE1 BE1.png|32px]] [[File:Red Dye JE1 BE1.png|32px]] [[File:Orange Dye JE1 BE1.png|32px]] [[File:Yellow Dye JE1 BE1.png|32px]] [[File:Lime Dye JE1 BE1.png|32px]] [[File:Green Dye JE1 BE1.png|32px]] [[File:Cyan Dye JE1 BE1.png|32px]] [[File:Light Blue Dye JE1 BE1.png|32px]] [[File:Lapis Lazuli JE1 BE1.png|32px]] [[File:Purple Dye JE1 BE1.png|32px]] [[File:Magenta Dye JE1 BE1.png|32px]] [[File:Pink Dye JE1 BE1.png|32px]] Added dyes.}}
{{History||xbox=TU9|[[File:Cocoa Beans JE3 BE2.png|32px]] The texture of cocoa beans has been changed.}}
{{History||xbox=none|xbone=none|ps=1.83|wiiu=none|switch=none|[[File:White Dye JE1 BE1.png|32px]] [[File:Black Dye JE1 BE1.png|32px]] [[File:Brown Dye JE1 BE1.png|32px]] [[File:Blue Dye JE1 BE1.png|32px]] Added [[white dye|white]], [[black dye|black]], [[brown dye|brown]], and [[blue dye|blue]] dyes, which can crafted from [[bone meal]], [[ink sac]], [[cocoa beans]], and [[lapis lazuli]].
|"Rose Red", "Dandelion Yellow" and "Cactus Green" have been renamed to "Red Dye", "Yellow Dye" and "Green Dye", respectively.}}
{{History||ps=1.90|[[File:Bone Meal JE2 BE2.png|32px]] [[File:Light Gray Dye JE2 BE2.png|32px]] [[File:Gray Dye JE2 BE2.png|32px]] [[File:Ink Sac JE2 BE2.png|32px]] [[File:Cocoa Beans JE4 BE3.png|32px]] [[File:Red Dye JE2 BE2.png|32px]] [[File:Orange Dye JE2 BE2.png|32px]] [[File:Yellow Dye JE2 BE2.png|32px]] [[File:Lime Dye JE2 BE2.png|32px]] [[File:Green Dye JE2 BE2.png|32px]] [[File:Cyan Dye.png|32px]] [[File:Light Blue Dye JE2 BE2.png|32px]] [[File:Lapis Lazuli JE2 BE2.png|32px]] [[File:Purple Dye JE2 BE2.png|32px]] [[File:Magenta Dye JE2 BE2.png|32px]] [[File:Pink Dye JE2 BE2.png|32px]] The textures of bone meal, light gray, gray, ink sac, cocoa beans, red, orange, yellow, lime, green, cyan, light blue, lapis lazuli, purple, magenta, and pink dyes have been changed.}}
{{History|3ds}}
{{History||0.1.0|[[File:Bone Meal JE1 BE1.png|32px]] [[File:Light Gray Dye JE1 BE1.png|32px]] [[File:Gray Dye JE1 BE1.png|32px]] [[File:Ink Sac JE1 BE1.png|32px]] [[File:Cocoa Beans JE3 BE2.png|32px]] [[File:Red Dye JE1 BE1.png|32px]] [[File:Orange Dye JE1 BE1.png|32px]] [[File:Yellow Dye JE1 BE1.png|32px]] [[File:Lime Dye JE1 BE1.png|32px]] [[File:Green Dye JE1 BE1.png|32px]] [[File:Cyan Dye JE1 BE1.png|32px]] [[File:Light Blue Dye JE1 BE1.png|32px]] [[File:Lapis Lazuli JE1 BE1.png|32px]] [[File:Purple Dye JE1 BE1.png|32px]] [[File:Magenta Dye JE1 BE1.png|32px]] [[File:Pink Dye JE1 BE1.png|32px]] Added dyes from [[Pocket Edition v0.15.4 alpha]].}}
{{History|foot}}
<gallery>
Pre-release dyes.png|Pre-release dye textures hidden within [[Items.png]].
</gallery>
;Notes
{{reflist|group=n}}
== Gallery ==
<gallery>
White Dye.png|White Dye
Light Gray Dye.png|Light Gray Dye
Gray Dye.png|Gray Dye
Black Dye.png|Black Dye
Brown Dye.png|Brown Dye
Red Dye.png|Red Dye
Orange Dye.png|Orange Dye
Yellow Dye.png|Yellow Dye
Lime Dye.png|Lime Dye
Green Dye.png|Green Dye
Cyan Dye.png|Cyan Dye
Light Blue Dye.png|Light Blue Dye
Blue Dye.png|Blue Dye
Purple Dye.png|Purple Dye
Magenta Dye.png|Magenta Dye
Pink Dye.png|Pink Dye
</gallery>
==Issues==
{{issue list}}
== Trivia ==
* Players can obtain each one of every color with 1 cocoa bean, 2 yellow dye, 2 ink sac, 3 green dye, 4 lapis lazuli, 4 red dye, and 6 bone meal (2 bones).
* The dyed sheep breeding behavior mirrors [[wikipedia:Lamarckism|Lamarck's theory]], in which the organisms evolve inheriting the external changes and adaptations of the previous generation, transmitting them to their offspring.
* In ''Bedrock Edition'', tertiary colors, along with their regular crafting recipes, can be crafted with primary colors. E.g.: Magenta can be crafted with one rose red and two bone meals.
* The colors of the dyes match the chat colors in [[color codes]] except for brown (dye only), light aqua, and gold (color codes only).
* The texture for light blue dye still uses the color from prior to the 1.12 World of Color update.<ref name="unchanged dyes"></ref>
== References ==
{{reflist}}
== External Links ==
* Tools for calculating leather dye combination: [https://minecraft.tools/en/armor.php minecraft.tools] (webapp); [https://github.com/pudquick/pyMCdyes/ pyMCDyes] (open-source Python script, outdated); [https://anrar4.github.io/DyeLeatherArmor/ DyeLeatherArmor]: a tool for calculating an exact crafting recipe for any sRGB color
{{Items}}
[[Category:Dyes]]
[[Category:Renewable resources]]
[[cs:Barvivo]]
[[de:Farbstoff]]
[[es:Tinte]]
[[fr:Teinture]]
[[hu:Színezés]]
[[it:Colorante]]
[[ja:染料]]
[[ko:염료]]
[[nl:Kleurstof]]
[[pl:Barwniki]]
[[pt:Corante]]
[[ru:Красители]]
[[th:สีย้อม]]
[[uk:Барвники]]
[[zh:染料]]</li></ul> | 12w34a | Tamed wolves have dye-able collars.[9] | |||
1.4.5{{Extension DPL}}<ul><li>[[Shield|Shield]]<br/>{{Item
| image = Shield.png
| image2 = White Shield.png
| extratext = View [[#Gallery|all renders]]
| durability = 336
| renewable = Yes
| stackable = No
}}
A '''shield''' is a tool used for protecting the [[player]] against attacks.
== Obtaining ==
=== Crafting ===
{{Crafting
|head=1
|showname=0
|A1=Any Planks <!-- the recipe changed in 15w37a, do not change it to the old recipe without reason -->
|B1=Iron Ingot
|C1=Any Planks
|A2=Any Planks
|B2=Any Planks
|C2=Any Planks
|B3=Any Planks
|Output=Shield
|type=Combat
}}
{{Crafting
|ignoreusage=1
|Shield
|Matching Banner
|A2=Shield
|B2=Banner
|Output=Matching Shield
|type=combat
|foot=1
}}
=== Repairing ===
{{Crafting
|ignoreusage=1
|showdescription=1
|Damaged Shield
|Damaged Shield
|Output=Shield
|description= The durability of the two shields is added together, plus an extra 5% durability. The repaired shield has no pattern.
|type= Combat
}}
Shields may also be repaired on an [[anvil]] by using [[planks]] or another shield. Shields repaired on anvils retain their pattern.
=== Trading ===
Journeyman-level armorer [[villager]]s have {{frac|1|3}}{{only|Bedrock|short=1}}/{{frac|2|5}}{{only|Java|short=1}} chance of selling a shield for 5 [[emerald]]s as their sixth trade.
== Usage ==
Despite using iron in its crafting recipe, it cannot be smelted into [[iron nugget]]s.<ref>{{bug|MC-111738}}</ref>
=== Defense ===
Shields are used for [[blocking]] incoming attacks. {{control|Using}}{{Only|Java|short=1}} or {{Control|sneaking}}{{Only|Bedrock|short=1}} causes a player to slow to a [[sneaking]] pace, and after {{convert|5|ticks|seconds}}<ref>{{bug|MC-100949||Shield blocking is delayed}}</ref>, attacks coming from in front of the player are blocked, dealing no damage. When the shield blocks an attack of {{hp|3}} or stronger, it takes durability damage equal to the strength of the attack rounded up.
Most blocked projectiles that carry status effects (such as [[Shulker#Shulker bullet|shulker bullets]]{{only|java|short=1}}, flaming [[arrow]]s, or tipped arrows) do not affect the blocker. [[Trident]]s & arrows can be deflected into other targets. Knockback from melee attacks and projectiles is prevented, while knockback from [[explosion]]s, [[hoglin]], and [[ravager]] attacks are significantly reduced.
The shield directionally blocks all attacks coming from within the FOV of the direction the wielder is facing, providing a full hemisphere of coverage to them. If the wielder faces straight up, they are likely to miss their blocks.<ref>{{bug|MC-109101||Shields do not block damage while the player faces straight up}}</ref><!--straight down fix: MC-92019-->
Mobs that deal continuous contact damage such as the slime, magma cube, and blaze rapidly drain the shield's durability for as long as the shielded player remains within the mob's hitbox.<ref>{{bug|MC-169167}}</ref><ref>{{bug|MCPE-119451}}</ref>
Blockable attacks include:
*Melee attacks, except by a warden, axe-wielding mobs or by a sprinting player wielding an axe, however even without sprinting an axe still greatly decreases the durability
** Status effects do not carry through to the blocker{{only|java|short=1}}.
*Normal, tipped, and spectral [[arrow]]s
** Arrows other than [[Piercing]] are totally deflected and can hit other targets.
** Status effects do not carry through to the blocker{{only|java|short=1}}.
***This can be used to damage the attacker or another mob down there.
*[[Flame|Flaming arrows]]
** Burning does not carry through to the blocker{{only|java|short=1}}.
*[[Trident]]s
*[[Snowball]]s and [[egg]]s
*Spines from [[pufferfish]]
*Bullets from [[shulker]]s
** The levitation effect does not carry through to the blocker{{only|java|short=1}}.
*Spit from [[llama]]s
*[[Fireball]]s, such as from [[blaze]]s and [[fire charge]]s
** Burning does not carry through to the blocker.
*Direct hits from [[ghast]] [[fireball]]s
** These still cause environmental damage.
*All explosions{{only|JE|short=1}}
*Explosion damage from [[creeper]]s
*[[TNT]] that another player lit
*[[Ravager]] headbutts
** These still knock the blocker back by about 3 blocks.
** Blocking these strikes can stun the ravager for a moment, and it roars afterward.
*Ravager roars are blocked but still knock back the blocker.
*[[Bee]] stings are blocked, but bees continuously attack until the player stops blocking and the player is stung.
*Beam attacks from [[guardian]]s or [[elder guardian]]s (only reduces damage by 50%).
*Damage reflected from [[Thorns]] enchantment / [[Guardian|guardians]].
They cannot block:
*Arrows from a [[crossbow]] enchanted with [[Piercing]]
** This does not reduce the shield's durability.
*[[Status effect]]s from tipped arrows or shulker bullets {{only|bedrock|short=1}} <ref>{{bug|MCPE-52904}}</ref>
** Direct projectile damage is blocked, but the effect still carries through.
*Status effects from splash/lingering [[potion]]s, [[evoker]]s' fangs, or breath from the [[ender dragon]]
*Beam attacks from [[guardian]]s or [[elder guardian]]s, or the [[warden]]'s sonic boom attack
*TNT that the blocking player lit themselves{{only|BE|short=1}}
*TNT that a [[Redstone (disambiguation)|redstone mechanism]] lit{{only|BE|short=1}}
*[[Fall damage]], including that from [[ender pearl]]s
** This also includes when the player rides an [[entity]] that died due to fall damage.
*Strikes from a warden or any [[axe]]-wielding mob (e.g., [[vindicator]]s, [[piglin brute]]s, [[zombie]]s after disabling players shield they attack another time immediately)
** Such strikes disable being able to use shields for 5 seconds.
=== Applying patterns ===
[[File:Cyan Shield Screenshot.png|250px|thumb|A custom shield.]]
Shields can be decorated by applying a [[banner]].
{{Crafting
|showdescription=1
|Shield
|Matching Banner
|Output=Matching Shield; Ominous Shield
|B2link=Banner
|Olink=Shield
|type=Combat
|description=Applies the banner pattern to the shield. The banner is consumed.<br>The shield must have no preexisting patterns.<br>Does not change existing durability or enchantments on the shield.
}}
Unlike with [[banner]]s, shields cannot be repainted or washed in a [[cauldron]]. Shields have only half the resolution of banners, making patterns look slightly different. In the game files, the pattern textures can be found in a separate directory called entity/shield.
{{IN|java}}, shields with patterns can also be obtained using the same commands as banners, except <code>banner</code> has to be replaced with <code>shield</code>.
=== Enchantments ===
A shield can receive the following [[enchantments]], but only through an [[anvil]]:
{| class="wikitable col-2-center"
|+
!Name
!Max Level
![[Enchanting|Method]]
|-
|[[Unbreaking]]
|III
|{{Inventory slot|Anvil}}
|-
|[[Mending]]
|I
|{{Inventory slot|Anvil}}
|-
|[[Curse of Vanishing]]
|I
|{{Inventory slot|Anvil}}
|-
|}
== Sounds ==
{{edition|java}}:
{{Sound table
|sound=Shield block1.ogg
|sound2=Shield block2.ogg
|sound3=Shield block3.ogg
|sound4=Shield block4.ogg
|sound5=Shield block5.ogg
|subtitle=Shield blocks
|source=player
|description=When an attack is blocked using a shield
|id=item.shield.block
|translationkey=subtitles.item.shield.block
|volume=1.0
|pitch=0.8-1.2
|distance=16}}
{{Sound table
|sound=Equip generic1.ogg
|sound2=Equip generic2.ogg
|sound3=Equip generic3.ogg
|sound4=Equip generic4.ogg
|sound5=Equip generic5.ogg
|sound6=Equip generic6.ogg
|subtitle=Gear equips
|source=player
|description=When a shield is placed in the offhand slot
|id=item.armor.equip_generic
|translationkey=subtitles.item.armor.equip
|volume=1.0
|pitch=1.0
|distance=16}}
{{Sound table
|sound=Random break.ogg
|subtitle=Item breaks
|source=player
|description=When a shield's durability is exhausted
|id=item.shield.break
|translationkey=subtitles.entity.item.break
|volume=0.8
|pitch=0.8-1.2
|distance=16
|foot=1}}
{{edition|bedrock}}:
{{Sound table
|type=bedrock
|sound=Shield block1.ogg
|sound2=Shield block2.ogg
|sound3=Shield block3.ogg
|sound4=Shield block4.ogg
|sound5=Shield block5.ogg
|source=player
|description=When an attack is blocked using a shield
|id=item.shield.block
|volume=0.7
|pitch=1.0}}
{{Sound table
|sound=Equip generic1.ogg
|sound2=Equip generic2.ogg
|sound3=Equip generic3.ogg
|sound4=Equip generic4.ogg
|sound5=Equip generic5.ogg
|sound6=Equip generic6.ogg
|source=player
|description=When a shield is placed in the offhand slot<wbr>{{Upcoming|BE 1.20.30}}<wbr><ref group=sound>{{Bug|MCPE-168039}}</ref>
|id=armor.equip_generic
|volume=1.0
|pitch=1.0}}
{{Sound table
|sound=Random break.ogg
|source=player
|description=When a shield's durability is exhausted
|id=random.break
|volume=1.0
|pitch=0.9
|foot=1}}
== Data values ==
=== ID ===
{{edition|java}}:
{{ID table
|edition=java
|showforms=y
|generatetranslationkeys=y
|displayname=Shield
|spritetype=item
|nameid=shield
|form=item
|translationkey=item.minecraft.shield, item.minecraft.shield.white, item.minecraft.shield.orange, item.minecraft.shield.magenta, item.minecraft.shield.light_blue, item.minecraft.shield.yellow, item.minecraft.shield.lime, item.minecraft.shield.pink, item.minecraft.shield.gray, item.minecraft.shield.light_gray, item.minecraft.shield.cyan, item.minecraft.shield.purple, item.minecraft.shield.blue, item.minecraft.shield.brown, item.minecraft.shield.green, item.minecraft.shield.red, item.minecraft.shield.black
|foot=1}}
{{edition|bedrock}}:
{{ID table
|edition=bedrock
|shownumericids=y
|showforms=y
|notshowbeitemforms=y
|generatetranslationkeys=y
|displayname=Shield
|spritetype=item
|nameid=shield
|id=355
|form=item
|translationkey=item.shield.name, item.shield.white.name, item.shield.orange.name, item.shield.magenta.name, item.shield.lightBlue.name, item.shield.yellow.name, item.shield.lime.name, item.shield.pink.name, item.shield.gray.name, item.shield.silver.name, item.shield.cyan.name, item.shield.purple.name, item.shield.blue.name, item.shield.brown.name, item.shield.green.name, item.shield.red.name, item.shield.black.name
|foot=1}}
== Advancements ==
{{load advancements|Not Today}}
== History ==
{{History||July 10, 2011|link=http://minetimes.wordpress.com/2011/07/10/interview-mit-jeb-ihr-konntet-die-fragen-stellen/|During an interview, [[Jeb]] says that "shields for the left arm" might be added.}}
{{History|java}}
{{History||1.9|snap=15w33c|[[File:White Shield.png|22px]] [[File:Light Gray Shield.png|22px]] [[File:Gray Shield.png|22px]] [[File:Black Shield.png|22px]] [[File:Brown Shield.png|22px]] [[File:Red Shield.png|22px]] [[File:Orange Shield.png|22px]] [[File:Yellow Shield.png|22px]] [[File:Lime Shield.png|22px]] [[File:Green Shield.png|22px]] [[File:Cyan Shield.png|22px]] [[File:Light Blue Shield.png|22px]] [[File:Blue Shield.png|22px]] [[File:Purple Shield.png|22px]] [[File:Magenta Shield.png|22px]] [[File:Pink Shield.png|22px]] Added shields.
|Shields replace the [[blocking]] functionality of [[sword]]s, although blocking more [[damage]].
|The current [[crafting]] recipe of shields includes [[wool]], producing 16 possible colored shields. There currently isn't a blank, uncolored shield.
{{{!}} class{{=}}"collapsible collapsed" data-description{{=}}"Recipe"
! Recipe
{{!}}-
{{!}}
{{Crafting
|A1=Matching Wool |B1=Any Planks
|A2=Matching Wool |B2=Any Planks |C2=Iron Ingot
|A3=Matching Wool |B3=Any Planks
|Output=Matching Shield
|ignoreusage=1
}}
{{!}}}
|Any of the colored base shields can be [[crafting|crafted]] with a [[banner]] of the same base color, to produce a patterned shield.
}}
{{History|||snap=15w34c|When an attack is blocked by a shield, the attacker now may be knocked back.
|Being attacked with an [[axe]] now may disable shield use for 5 seconds.}}
{{History|||snap=15w37a|The [[crafting]] recipe of shields has been changed to 6 [[planks]] and 1 [[iron ingot]].
{{{!}} class{{=}}"collapsible collapsed" data-description{{=}}"Recipe"
! Recipe
{{!}}-
{{!}}
{{Crafting
|A1=Any Planks |B1=Iron Ingot |C1=Any Planks
|A2=Any Planks |B2=Any Planks |C2=Any Planks
|B3=Any Planks
|Output=Shield
|ignoreusage=1
}}
{{!}}}
|[[File:Shield JE1.png|22px]] Crafting a shield now produces a base wooden shield that can be crafted together with any [[banner]].
|The cooldown of shields has been reduced from 0.5s to 0.25s.
|Blocking with shields now prevents some side effects.{{verify}}
|[[Arrow]]s now ricochet off shields.}}
{{History|||snap=15w44a|Shields can now be repaired by combining with other shields. This removes any [[banner]] that had been applied.}}
{{History|||snap=15w45a|Crafting a banner onto a shield now consumes the banner.}}
{{History|||snap=15w47b|Added shield blocking [[sound]]s.}}
{{History|||snap=16w07a|Added more variation of shield blocking sounds.}}
{{History|||snap=pre1|The [[durability]] of shields has been increased from 181 to 337.}}
{{History||1.10|snap=16w21a|Shields can now be equipped by [[dispenser]]s.}}
{{History||1.11|snap=16w33a|[[Crafting]] a shield with a banner no longer changes the durability, nor does it remove [[enchanting|enchantments]] from it.}}
{{History|||snap=16w35a|Shields now block 100% of [[damage]]/[[knockback]]/debuffs dealt in melee combat.}}
{{History||1.13|snap=17w47a|Prior to [[1.13/Flattening|''The Flattening'']], this [[item]]'s numeral ID was 442.}}
{{History||1.13.2|snap=release|Shields now properly block attacks when the player is facing down.<ref>{{bug|MC-92019|||Fixed}}</ref>}}
{{History||1.14|snap=18w43a|[[File:Shield JE2 BE1.png|22px]] The texture of shields has been changed.
|Shields no longer knockback attackers when they block due to a bug with rework of the blocking mechanic with the introduction of the ravager.<ref>{{bug|MC-147694}}</ref>}}
{{History|||snap=19w11a|Shields can now be [[trading|bought]] from armorer [[villager]]s.}}
{{History||1.14.3|snap=Pre-Release 3|Shields blocking flaming [[arrow]]s no longer put the [[player]] on [[fire]].}}
{{History||1.16|snap=20w06a|[[Crimson planks]] and [[warped planks]] can now be used to craft shields.}}
{{History||1.19|snap=22w11a|[[Mangrove planks]] can now be used to craft shields.}}
{{History||1.19.3|snap=22w43a|Shields can now properly block all explosions.}}
{{History||1.19.4|snap=23w06a|A sound is now played when a shield is placed into the offhand slot.}}
{{History|upcoming java}}
{{History||Combat Tests|snap=1.14.3 - Combat Test|Critical hits now bypass shields.
|The warm-up delay has been removed from shields.
|When in the off-hand, shields now activate when [[sneaking]].}}
{{History|||snap=Combat Test 2|Shields now protect against critical attacks again.
|Shields can only be activated when the weapon is charged to 200%.}}
{{History|||snap=Combat Test 3|A "Shield Indicator" option that displays when the shield is active, similar to the attack indicator, has been added.
|An option to hide shields when active has been added.
|The arc of available protection of shields has been decreased to 100 degrees instead of 180 degrees.}}
{{History|||snap=Combat Test 4|An option to disable shields being activated by pressing {{ctrl|crouch}} has been added.
|The option to hide the shield has been removed.}}
{{History|||snap=Combat Test 6|Shields now protect up to 5 [[damage]] for melee attacks (still 100% against projectiles).
|Shields activate instantly regardless if the weapon is charged, similar to Combat test 1.
|Shields now recover faster after an attack.}}
{{History|||snap=Combat Test 7c|Shields now add a 50% knockback resistance when active.
|Shields now protect against 100% [[explosions|explosion]] damage.}}
{{History|||snap=Combat Test 8c|The knockback calculations for shields have been fixed.{{Info needed}}
|Crouch-shielding while jumping has been disabled.
|Shields with [[banner]]s are now temporarily stronger than normal shields (10 absorption instead of 5, and better knockback resistance) to test different shield types.}}
{{History|bedrock}}
{{History||1.10.0|snap=beta 1.10.0.3|[[File:Shield JE2 BE1.png|22px]] Added shields.
|Shields cannot be customized with [[banner]]s.
|Shields are activated by [[sneaking|crouching]] or mounting [[mob]]s.}}
{{History||1.11.0|snap=beta 1.11.0.4|Shields can now be [[trading|bought]] from armorer [[villager]]s.}}
{{History||1.16.210|snap=beta 1.16.210.51|Now grants partial knockback protection from the [[goat]] ram attack.}}
{{History||1.16.220|snap=beta 1.16.220.50|[[Mob]]s that pick up shields now place them to their off-hand.}}
{{History||1.18.30|snap=beta 1.18.30.26|Being attacked with an [[axe]] now may disable shield use. This was not mentioned in the official changelog.<ref>{{tweet|kingbdogz|1504505321884196872|We missed a change in recent changelogs for the Bedrock beta that you may like - we have now made a parity fix that makes shields get disabled for 5 seconds when attacked by an Axe-wielding mob or player. We will make sure to list this properly in the next beta :)|March 17, 2022}}</ref>}}
{{History||1.20.0|snap=beta 1.20.0.20|[[File:White Shield.png|22px]] [[File:Light Gray Shield.png|22px]] [[File:Gray Shield.png|22px]] [[File:Black Shield.png|22px]] [[File:Brown Shield.png|22px]] [[File:Red Shield.png|22px]] [[File:Orange Shield.png|22px]] [[File:Yellow Shield.png|22px]] [[File:Lime Shield.png|22px]] [[File:Green Shield.png|22px]] [[File:Cyan Shield.png|22px]] [[File:Light Blue Shield.png|22px]] [[File:Blue Shield.png|22px]] [[File:Purple Shield.png|22px]] [[File:Magenta Shield.png|22px]] [[File:Pink Shield.png|22px]] Shields can now be customized using a banner.}}
{{History|PS4}}
{{History||1.90|[[File:Shield JE1.png|22px]] Added shields.
|Shields do not have [[banner]] application features.}}
{{History|foot}}
== Issues ==
{{issue list|-wither}}
== Gallery ==
<gallery>
Shield.png|Shield
White Shield.png|White Shield
Light Gray Shield.png|Light Gray Shield
Gray Shield.png|Gray Shield
Black Shield.png|Black Shield
Brown Shield.png|Brown Shield
Red Shield.png|Red Shield
Orange Shield.png|Orange Shield
Yellow Shield.png|Yellow Shield
Lime Shield.png|Lime Shield
Green Shield.png|Green Shield
Cyan Shield.png|Cyan Shield
Light Blue Shield.png|Light Blue Shield
Blue Shield.png|Blue Shield
Purple Shield.png|Purple Shield
Magenta Shield.png|Magenta Shield
Pink Shield.png|Pink Shield
</gallery>
=== Screenshots ===
<gallery>
JebShield.png|One of the first images of shields. [[Jeb]] wearing diamond armor while holding a creeper-emblazoned shield during [[MineCon]] 2015.
Jeb Crafting Shield.png|Jeb crafting a shield.
Player with Shield.png|Player holding the default shield.
Shield Block.png|A player blocking with a shield.
ShieldFirstPerson.png|Blocking with a shield as seen in first person.
Enchanted Shield (item).gif|An enchanted shield as seen in the [[inventory]].
-ominous- shield.png|A shield with the [[ominous banner]] on it as seen in the inventory.
Kai-Shield.jpg|An image of [[Kai]] wielding a banner with a shield, used to announce the feature on [[Bedrock Edition]].
Bedrock-Shields.jpg
</gallery>
== References ==
{{reflist}}
== External Links ==
* [https://www.minecraft.net/en-us/article/taking-inventory--shield Taking Inventory: Shield] – Minecraft.net on July 25, 2019
{{Items}}
[[Category:Combat]]
[[Category:Renewable resources]]
[[de:Schild (Kampf)]]
[[fr:Bouclier]]
[[it:Scudo]]
[[ja:盾]]
[[ko:방패]]
[[nl:Schild]]
[[pl:Tarcza]]
[[pt:Escudo]]
[[ru:Щит]]
[[th:โล่]]
[[zh:盾牌]]</li><li>[[Map|Map]]<br/>{{about|the craftable map|maps showing the locations of certain structures|Explorer Map|other uses|Map (disambiguation)}}
{{distinguish|World}}
{{Item
| image = Map Zoom 4.png
| renewable = Yes
| stackable = Yes (64)
}}
A '''map''' is an [[item]] used to view explored [[Chunk|terrain]] and mark landmarks.
==Obtaining==
===Crafting===
{{crafting
|head=1
|showname=0
|showdescription=1
|A1= Paper
|B1= Paper
|C1= Paper
|A2= Paper
|B2= Compass
|C2= Paper
|A3= Paper
|B3= Paper
|C3= Paper
|Output= Empty Map
|type= Miscellaneous
|description=This variation is called an "empty locator map" {{in|bedrock}}, or an "empty map" {{in|java}}.
When the player first creates a map, it is blank. It needs to be activated by holding it and pressing ''{{Control|use item}}''. after which it records terrain and location markers as the player travels within (or close to) the area it maps.
}}
{{crafting
|A1= Paper
|B1= Paper
|C1= Paper
|A2= Paper
|B2= Paper
|C2= Paper
|A3= Paper
|B3= Paper
|C3= Paper
|Output= Empty Map
|type= Miscellaneous
|description={{only|bedrock}}
This variation is called an "empty map". It does not show location markers. It is intended for cloning and zooming locator maps without having to consume an additional [[compass]] (thereby saving [[iron ingot]]s and [[redstone dust]]), but it can also be {{Control|use|text=activated}} and later converted to a locator map by combining it with a compass on an [[anvil]], [[crafting table]], or [[cartography table]].
|foot=1
}}
=== Natural generation ===
==== Chest loot ====
{{LootChestItem|empty-map,map
}}
=== Cartography table ===
A map can also be created using a single paper on a [[cartography table]] to create an empty map, or a paper with a compass for an empty locator map.{{only|bedrock}}
=== Starting map ===
{{exclusive|bedrock|section=1}}
When creating a new world {{in|bedrock}}, the player can enable the "Starting Map" option to spawn with an empty locator map in the hotbar. The map's zoom scale is 1:8. The map is updated only while the player holds it.
=== Trading ===
Novice-level cartographer [[Villager|villagers]] sell a single empty map for 7 [[Emerald|emeralds]] as their trades.
{{IN|java}}, cartographer villagers may give players with the [[Hero of the Village]] effect an empty map.
== Usage ==
{{See also|Tutorials/Mapping}}
=== Mapping ===
Crafting a map creates an empty map. The map is drawn for the first time when it is held and used (with ''{{control|use item}}''). This map can then be adjusted to different zoom levels. After conversion to a drawn map item, it starts to draw a top-down view of the player's surroundings, with North pointing to the top of the map. A pointed oval pointer indicates the player's position on the map, and moves in real-time as the player moves across the terrain shown on the map. The map does ''not'' center on the player when created, rather, the world is broken up into large invisible grid squares, and the map displays the area of whichever grid square it is in when it is first used. For example, if a player uses a new map in a certain grid square, and then moves a distance away and uses another fresh map but is still within the same grid square, both maps appear identical. To make a map that is not identical to the first one, the player would have to move outside of the edges of the first map (because then they would be in a new grid square). This way, no two maps of the same size can ever partially overlap and every map can display only a fixed area.
To record the world on a map, that specific map must be held in the player's hands while the player moves around the world. The world is recorded as-is during exploration, meaning that if the world is modified, a player must revisit the area while holding the map to update the map's view. Maps can also be [[Map#Cloning|cloned]]. If a player holds a map whose one or more clones are on display in item frames, updates are made on all clone-connected maps.
Other players are displayed on the map only if they have a map in their inventory cloned from the one being looked at. When placing a map into an [[item frame]], the map displays with a green pointer shown at the location of the item frame. This is to help the player see where they are in relation to the area that the map is showing. If the player leaves a map in an item frame and views a clone of it, the green pointer remains in the spot of the framed copy. This can be used to set up waypoints. Unexplored areas are transparent, making the item frame visible.
When the player leaves the area shown on a specific map, the player pointer transforms into a white dot that moves on that map. The marker shrinks to a smaller white dot if the player is far from the map's center: the area is 320 by 320 blocks per scale factor. The dot moves along the edge of the map to show the relative location of the player. However {{in|bedrock}}, the pointer remains as an arrow but shrinks until the player is near the area shown on the map.
While maps in [[the Nether]] work, they show only the red-and-gray pattern, regardless of the blocks placed. The only useful function is finding where the player is in relation to placed framed maps, which show as green pointers. Additionally, the player pointer rapidly spins and is not a good indicator of direction. Placing a [[banner]] in [[the Nether]] still shows it on the map as usual. Having a smaller map image while riding a [[strider]] in the Nether can help one to see one's footing while traveling over [[lava]].
{{IN|java}}, when using a map from another dimension, the map shows the player's position and direction when they were last in the dimension of the map. {{IN|bedrock}}, however, the player can use maps from one dimension while in another dimension. For locator maps, the place marker changes color depending on the dimension that the player is currently in (white for the Overworld, red for [[the Nether]], and magenta for [[the End]]). An Overworld map in the Nether shows the player's corresponding location and direction in the Overworld.<ref name=multiverse>{{ytl|EpP1diZdEdI}}</ref> Similarly, a Nether Map in the Overworld shows the player's corresponding location in the Overworld, but the place marker spins, just like a Nether map in the Nether. An Overworld map in the End shows the world spawn.<ref name=multiverse/> A Nether map cannot be used in the End — the map appears, but the place marker is not shown anywhere — and similarly, an End map cannot be used in the Overworld or the Nether.
A player can make a large piece of pixel art (128×128) facing upward, center a map on it, and place that map in an [[item frame]] to create a custom picture. Locking is recommended. See [[Map item format#Map Pixel Art]] for details on the techniques.
Maps display as a mini-map when held in the off-hand, or if the off-hand slot is occupied; the map is full-sized only when held in the dominant hand with both hands free.
A map always positions itself facing towards North when placed horizontally within an item frame regardless of how the map is placed.
=== Map content ===
{{Main|Map item format}}
Maps consist of square pixels arranged like pixels in a 128×128 square pattern, with each pixel representing a square portion of land. {{IN|java}}, the [[Map item format#Color table|color of a map pixel]] generally matches the color of the most common [[opaque]] block in the corresponding area, as seen from the sky. 'Minority blocks' in the target area have no effect on the color of the pixel, thus small features tend to be undetectable on zoomed-out maps.
{{IN|bedrock}}, the [[Map item format#Color table|color of a map pixel]] instead matches the single top-most opaque block in a grid sized by the map magnification pixel size (see the table in the "Player marker and pointer" section below). For example, a 3/4 magnification map has a pixel size of 8x8 blocks; this means the map will read only the top-most opaque blocks at the 0,0 coordinate, the 8,0 coordinate, the 0,8 coordinate, etcetera, ignoring all other blocks in the area. This means that {{in|bedrock}}, map pixel art requires only one block per pixel regardless of map magnification.
{{IN|bedrock}}, grass, foliage and water colors that are biome-dependent are represented accurately on a map.
{| class="wikitable"
|-
! style="width: 300px;" | {{el|je}}
! style="width: 300px;" | {{el|be}}
|-
| style="text-align: center;" | [[File:Map Zoom 4.png|alt=All banners marked on a map, alongside a named banner.|216px]]
| style="text-align: center;" | [[File:Map item BE.png|216px]]
|-
| Biome colors on ''Java Edition''.
| Biome colors on ''Bedrock Edition''.
|-
|}
Maps also show ground up to about 15 blocks below the surface of the water in oceans as slightly lighter blue, to show where the ground rises. This is not true with land above water. Higher elevations in the world mean lighter colors on the map. The map records the surface even as the player moves below the surface.
A standard map represents 128x128 blocks (1 block per pixel, 8x8 [[chunks]]) but maps can be zoomed-out to represent up to 2048x2048 blocks (16 square blocks per pixel, 128x128 [[chunks]]).
Some relevant distances: 64 blocks (4 chunks) is the update radius from a player in the Overworld and the End. However, it is half this (32 blocks) in the Nether. Also, 1024 blocks is the minimum Overworld distance from a [[nether portal]], at which players can build another portal and expect to reach a new location in the Nether. This is the distance across a 1:8 map, and also from a 1:16 map's center to its edge.
=== Player marker and pointer ===
{{IN|java}}, every map contains a marker that marks the position of the player, and points in the same direction as the player. When a player moves out of a map, a big white dot appears and moves relative to the player's position. The pointer either disappears when the player moves away a certain distance from the border of the map or, in case of [[explorer map]]s, the big white dot changes to a smaller white dot. The distance required for the small white dot to appear(explorer maps) or for the big dot to vanish (normal maps) changes with the scaling of the map.
* '''Level 0/4 :''' 128×128 blocks (each map pixel represents 1 block)
* '''Level 1/4 :''' 256×256 blocks (2×2 blocks per map pixel)
* '''Level 2/4 :''' 512×512 blocks (4×4 blocks per map pixel)
* '''Level 3/4 :''' 1024×1024 blocks (8×8 blocks per map pixel)
* '''Level 4/4 :''' 2048×2048 blocks (16×16 blocks per map pixel)
{{IN|bedrock}}, a map can be crafted with or without this marker, and a map without a position marker can add one later by adding a compass to the map. When a map is crafted without a compass, it's simply called an "empty map", but when crafted with a compass, it's called an "empty locator map". The marker also turns red if the player enters the Nether with an Overworld map and shows the player's Overworld location relative to the Nether location. A map created in the End has a purple marker showing the player's location. If an Overworld map is used in the End, a magenta dot appears on the player's spawn point.{{/BE|position}}
{{crafting
|name=Map<br>(with marker)
|ingredients=[[Map]] or Empty Map +<br>[[Compass]]
|showdescription=1
|Map (no markers);Empty Map
|Compass
|Output= Locator Map;Empty Locator Map
|type= Miscellaneous
|description={{el|be}} only.
Maps crafted from only paper do not show the location marker; to add it, a compass must be added to the map.
|foot=1
}}
{{IN|bedrock}}, a cartography table can also be used to add a pointer to create a locator map or empty locator map. This can be done by adding a compass to paper, or to an empty map or map.
=== Zooming out ===
[[File:Cartography table UI zoom.png|thumb|300px|{{IN|java}}, cartography table's UI, showing the map is being zoomed out.]]
A [[cartography table]] can also be used to zoom out, taking only one piece of paper per zoom level.
A blank map can not be zoomed out. A map has to have something already marked on it for the zooming to be possible.
{{Crafting
|A1= Paper |B1= Paper |C1= Paper
|A2= Paper |B2= Map;Locator Map |C2= Paper
|A3= Paper |B3= Paper |C3= Paper
|Output= Map;Locator Map
|showdescription=1
|description=Locator Map {{el|be}} only.
}}
{{/BE|zoom}}
==== Zoom details ====
The zooming function starts from when the map is created (zoom level 0) up to its fourth zoom step (zoom level 4).
{| class="wikitable" style="text-align: center" data-description="Zoom levels"
! colspan="2" |
! Zoom step 0
! Zoom step 1
! Zoom step 2
! Zoom step 3
! Zoom step 4
|-
! colspan="2" |
| [[File:Map Zoom 0.png|116px|Zoom step 0, 1:1]]
| [[File:Map Zoom 1.png|116px|Zoom step 1, 1:2]]
| [[File:Map Zoom 2.png|116px|Zoom step 2, 1:4]]
| [[File:Map Zoom 3.png|116px|Zoom step 3, 1:8]]
| [[File:Map Zoom 4.png|116px|Zoom step 4, 1:16]]
|-
! colspan="2" | Zoom level
| 0/4
| 1/4
| 2/4
| 3/4
| 4/4
|-
! colspan="2" | 1 map pixel represents
| 1 block
| 2×2 blocks
| 4×4 blocks
| 8×8 blocks
| 16×16 blocks<br>(1×1 chunk)
|-
! colspan="2" | Scaling ratio
| 1:1
| 1:2
| 1:4
| 1:8
| 1:16
|-
! rowspan="2" colspan="2" | Map covers an area of
| 128×128 blocks
| 256×256 blocks
| 512×512 blocks
| 1024×1024 blocks
| 2048×2048 blocks
|-
| 8×8 chunks
| 16×16 chunks
| 32×32 chunks
| 64×64 chunks
| 128×128 chunks
|-
! colspan="2" | Smallest discernible features
| Blocks
| Trees, Paths
| Lakes, Buildings
| Mountains, Rivers
| Biomes, Mountain Ranges
|-
! colspan="2" | Use cases
| Pixel art, Base plans
| Base surroundings
| Structure mapping
| Landscape mapping
| Biome mapping
|-
! rowspan="2" | Total paper needed to zoom out from Level 0
! in anvil{{only|bedrock|short=1}} or crafting table
| -
| {{ItemSprite|Paper}} 8
| {{ItemSprite|Paper}} 16
| {{ItemSprite|Paper}} 24
| {{ItemSprite|Paper}} 32
|-
! in cartography table
| -
| {{ItemSprite|Paper}} 1
| {{ItemSprite|Paper}} 2
| {{ItemSprite|Paper}} 3
| {{ItemSprite|Paper}} 4
|}
Maps are always aligned to a grid at all zoom levels. That means zooming out any different map in a specific area covered by that map always has the same center. As such, maps are aligned by map width (1024 blocks for a level 3 maps) minus 64. A level 3 map generated at spawn covers X and Z coordinates from -64 to 959. All maps generated in this area zoom out to the same coordinates, guaranteeing that they are always 'aligned' on a map wall. For a zoomed-out map to cover a new area, it must start with a base (level 0) map that is in that area.
At zoom level 0, a map created on the point (0,0) has (0,0) at the center of the map. At higher zoom levels of the same map, the coordinate (0,0) is in the top left square of the map.
{{IN|java}}, zoom level can be seen on a map by turning on Advanced Tooltips (a [[Debug screen#More debug keys|debug screen]] option that can be toggled by using the key combination {{key|F3+H}}). The tooltip of the map then shows the zoom level, scaling factors, and map ID.
=== Cloning ===
[[File:Cartography table UI clone.png|thumb|300px|{{IN|Java}}, cartography table's UI, showing the map is being cloned.]]
A mix of empty maps and empty locator maps may be used. Whether the cloned maps show position markers is dependent only on the input map.
A [[cartography table]] can also be used to clone a map.
The parts of the world that have already been explored and mapped are copied, and newly explored areas appear on both instances. If one of the maps is later zoomed out, then the maps lose their connection to each other and function as completely separate maps that have to be individually filled by exploring.
In Creative mode, a map in an item frame may be cloned by using {{control|pick block}} on it, as long as that map is not also in the player's inventory.
It doesn't matter if the map to be cloned is at a higher zoom level (made of more paper) than the blank map. Upon copying the map, both resulting maps have the same magnification as the starting map.
{{/BE|clone}}
=== Crafting ingredient ===
{{crafting usage|Map, Empty Map}}
=== Marking points ===
{{IN|java}} the player has the ability to mark spots on a map. To do this, {{control|use}} a map on a placed-down [[banner]], and the spot of the banner gets marked on the map. The mark takes the color of whatever the base color is for the banner, and if the banner has a name, the mark shows that name. Banner marks on a map are always oriented with their top facing north, regardless of the banner's actual orientation. If the banner is destroyed, the mark of the banner remains at first, but if the player gets closer to where the banner previously was, it disappears as the area is updated on the map.
If a map is mounted on an item frame and is within the area it depicts, the mounted map displays its current location with a green indicator rotated to match its orientation.
[[File:Map Marker Bedrock on Item frame.png|thumb|181x181px|{{IN|bedrock}} this is what a map lying on an item frame looks like, while showing markers.]]
{{IN|bedrock}} the player can place copies of locator maps in [[item frame]]s in order to create a land mark. The marker is a green dot that resembles the shape of the player's marker, but in green color. The position the marker points at depends on the direction the item frame is facing. It is worth noting that the markers work only on copies of the same map. Other maps of the same area do not show the existing markers that the player(s) had placed.
If a player has a cloned map in their inventory, their pointer appears white when viewed on the same map held by another player. Hence, if all players have the same cloned map in their inventory, all markers would appear white when the clone map is viewed.
{| class="wikitable"
|-
! style="width: 300px;" | {{el|je}}
! style="width: 300px;" | {{el|be}}
|-
| style="text-align: center;" | [[File:Banner marked map.png|alt=All banners marked on a map, alongside a named banner.|216px]]
| style="text-align: center;" | [[File:Tracking map with markers bedrock.png|216px]]
|-
| How every banner appears {{IN|java}} on a map, including named banners.
| {{IN|bedrock}} this is how a locator map shows map markers while held by a player.
|-
|}
===Locking===
[[File:Cartography table UI lock.png|thumb|300px|{{IN|Java}}, cartography table's UI, showing the map is being locked.]]
Maps can be locked when using a [[glass pane]] in a [[cartography table]]. This creates a new map containing the same data and locks it. All copies of this new map are also locked. A locked map never changes, even when the depicted terrain changes. {{IN|Be}}, locked maps have a unique texture.
{| class="wikitable" style="text-align: center;"
|-
! Condition
! style="width: 200px;" | Newly created map
! style="width: 200px;" | Map after terrain alteration
|-
! Unlocked map
| [[File:Map Zoom 0.png|174px]] || [[File:Unlocked Map.png|174px]]
|-
! Locked map
| [[File:Map Zoom 0.png|174px]] || [[File:Map Zoom 0.png|174px]]
|-
|}
{{-}}
== Sounds ==
{{Edition|Java}}:
{{Sound table
|rowspan=2
|sound=Drawmap1.ogg
|sound2=Drawmap2.ogg
|sound3=Drawmap3.ogg
|subtitle=Map drawn
|source=player
|description=When a map is drawn
|id=ui.cartography_table.take_result
|translationkey=subtitles.ui.cartography_table.take_result
|volume=1.0
|pitch=1.0
|distance=16}}
{{Sound table
|subtitle=Map drawn
|source=block
|description=When a map is edited using a cartography table
|id=ui.cartography_table.take_result
|translationkey=subtitles.ui.cartography_table.take_result
|volume=1.0
|pitch=1.0
|distance=16
|foot=1}}
{{Edition|Bedrock}}:
{{Sound table
|type=bedrock
|rowspan=2
|sound=Drawmap1.ogg
|sound2=Drawmap2.ogg
|sound3=Drawmap3.ogg
|source=block
|description=When a map is drawn<wbr>{{Upcoming|BE 1.20.20.20}}
|id=ui.cartography_table.take_result|idnote={{Verify|Could be block.cartography_table.use}}
|volume=0.8
|pitch=1.0}}
{{Sound table
|type=bedrock
|source=block
|description=When a map is edited using a cartography table
|id=ui.cartography_table.take_result
|volume=0.8
|pitch=1.0
|foot=1}}
== Data values ==
=== ID ===
{{edition|java}}:
{{ID table
|edition=java
|showforms=y
|generatetranslationkeys=y
|displayname=Empty Map
|spritetype=item
|nameid=map
|form=item}}
{{ID table
|displayname=Map
|spritetype=item
|nameid=filled_map
|form=item
|translationkey=item.minecraft.filled_map, filled_map.buried_treasure, filled_map.explorer_jungle{{upcoming|java 1.20.2}}, filled_map.explorer_swamp{{upcoming|java 1.20.2}}, filled_map.mansion, filled_map.monument, filled_map.unknown, filled_map.village_desert{{upcoming|java 1.20.2}}, filled_map.village_plains{{upcoming|java 1.20.2}}, filled_map.village_savanna{{upcoming|java 1.20.2}}, filled_map.village_snowy{{upcoming|java 1.20.2}}, filled_map.village_taiga{{upcoming|java 1.20.2}}
|foot=1}}
{{edition|bedrock}}:
{{ID table
|edition=bedrock
|showaliasids=y
|shownumericids=y
|showforms=y
|notshowbeitemforms=y
|generatetranslationkeys=y
|displayname=Empty Map
|spritetype=item
|nameid=empty_map
|aliasid=emptymap
|id=515
|form=item
|translationkey=item.emptyMap.name, item.emptyLocatorMap.name}}
{{ID table
|displayname=Map
|spritetype=item
|spritename=map-be
|nameid=filled_map
|aliasid=map
|id=420
|form=item
|translationkey=item.map.name, item.map.exploration.mansion.name, item.map.exploration.monument.name, item.map.exploration.treasure.name
|foot=1}}
=== Metadata ===
{{see also|Bedrock Edition data values}}
{{IN|bedrock}}, maps use the following data values:
{{/DV}}
=== Item data ===
{{el|java}}:
{{main|Player.dat format}}
<div class="treeview">
* {{nbt|compound|tag}}: The item's '''tag''' tag.
{{:Player.dat_format/Maps}}
</div>
{{el|bedrock}}:
: See [[Bedrock Edition level format/Item format]].
=== Map icons ===
{{see also|Player.dat format|Map item format|map_icons.png}}
Map icons are 8×8 in ''Java Edition'', but 16×16 in Bedrock Edition. As such, there are minor misalignment issues in ''Java Edition''.<ref>{{bug|MC-214649|||WF}}</ref>
[[File:Map icons.png|thumb|128px|Map icons texture {{in|Java}}]]
[[File:Map icons BE.png|thumb|128px|Map icons texture {{in|Bedrock}}]]
{| class="wikitable"
|-
! Java ID !! Bedrock ID !! Text ID !! Appearance !! Purpose !! Shown in item frames?
|-
| 0 || ||<code>player</code> || [[File:Player (texture) JE1 BE1.png|16px]] [[File:Player (texture) BE2.png|16px]] White marker || Players (on map) || No
|-
| 1 || 1 ||<code>frame</code> || [[File:Green Marker (texture) JE1 BE1.png|16px]] [[File:Green Marker (texture) BE2.png|16px]] Green marker || The current map in an item frame || Yes
|-
| 2 || ||<code>red_marker</code> || [[File:Red Marker (texture) JE1 BE1.png|16px]] [[File:Red Marker (texture) BE2.png|16px]] Red marker || Position converted to Overworld when opening Overworld map in the Nether{{Only|bedrock}} || No
|-
| 3 || ||<code>blue_marker</code> || [[File:Blue Marker (texture) JE1 BE1.png|16px]] [[File:Blue Marker (texture) BE2.png|16px]] Blue marker || Other players || No
|-
| 4 || ||<code>target_x</code> || [[File:Target X (texture) JE1 BE1.png|16px]] White X || Unused || Yes
|-
| 5 ||5
|<code>target_point</code> || [[File:Target Point (texture) JE1 BE1.png|16px]] [[File:Target Point (texture) BE2.png|16px]] Red triangle || Unused || Yes
|-
| 6 || 6 ||<code>player_off_map</code> || [[File:Player Off Map (texture) JE1 BE1.png|16px]] Large white dot || Players off map, nearby{{only|java}} || No
|-
| 7 || 13 ||<code>player_off_limits</code> || [[File:Player Off Limits (texture) JE1.png|16px]] [[File:Player Off Limits (texture) BE.png|16px]] Small white dot || Players off map, far away{{only|java}} || No
|-
| 8 ||14
|<code>mansion</code> || [[File:Mansion (texture) JE1.png|16px]] [[File:Mansion (Texture) BE2.png|frameless|16x16px]] Woodland mansion || Woodland mansion || Yes
|-
| 9 || 15 ||<code>monument</code> || [[File:Monument (texture) JE1.png|16px]] [[File:Monument Texture BE2.png|frameless|16x16px]] Ocean monument || Ocean monument || Yes
|-
| 10 - 25 || ||<code>{{tooltip|banner_*|banner_white, banner_orange, banner_magenta, banner_light_blue, banner_yellow, banner_lime, banner_pink, banner_gray, banner_light_gray, banner_cyan, banner_purple, banner_blue, banner_brown, banner_green, banner_red, banner_black}}</code> || [[File:Banner White (texture) JE1.png|16px]] [[File:Banner Light Gray (texture) JE1.png|16px]] [[File:Banner Gray (texture) JE1.png|16px]] [[File:Banner Black (texture) JE1.png|16px]] [[File:Banner Brown (texture) JE1.png|16px]] [[File:Banner Red (texture) JE1.png|16px]] [[File:Banner Orange (texture) JE1.png|16px]] [[File:Banner Yellow (texture) JE1.png|16px]] [[File:Banner Lime (texture) JE1.png|16px]] [[File:Banner Green (texture) JE1.png|16px]] [[File:Banner Cyan (texture) JE1.png|16px]] [[File:Banner Light Blue (texture) JE1.png|16px]] [[File:Banner Blue (texture) JE1.png|16px]] [[File:Banner Magenta (texture) JE1.png|16px]] [[File:Banner Purple (texture) JE1.png|16px]] [[File:Banner Pink (texture) JE1.png|16px]]<br>Banners in all 16 wool colors{{only|java}}|| Banner markers || Yes
|-
| 26 ||4
|<code>red_x</code> || [[File:Red X (texture) JE1.png|16px]] [[File:Target X (texture) BE2.png|16px]] Red X || Buried treasure || Yes
|-
| || 8 || || [[File:Magenta Marker (texture) BE1.png|16px]] Magenta marker
| Position converted to Overworld when opening Overworld map in the End{{Only|bedrock}} || No
|-
| || 9 || || [[File:Orange Marker (texture) BE1.png|16px]] Orange marker{{more info}}
|Other players
|Yes
|-
| || 10 || || [[File:Yellow Marker (texture) BE1.png|16px]] Yellow marker
| Other players || No
|-
| || 11 || || [[File:Cyan Marker (texture) BE1.png|16px]] Cyan marker
| Other players || No
|-
| -
|12
| || [[File:Green Point (texture) BE1.png|16px]] Green Triangle
| Other structure such as stronghold, fortress, end city, etc. when used as explorer map destination{{Only|bedrock}} || Yes
|}
It should be noted that even if the player used a NBT editor to add an additional icon on the map, ''Minecraft'' shows only the first one listed when the player loads up their world.
== Achievements ==
{{load achievements|Map Room}}
== History ==
{{see also|section=24|map_icons.png|Java Edition history of textures#Map icons}}
{{more images|section=24|{{bug|MC-72962}}}}
{{History||April 27, 2011|link=https://web.archive.org/web/0/http://notch.tumblr.com/post/4988431144/the-maps|[[Notch]] unveiled screenshots of the map.}}
{{History||April 28, 2011|link={{tweet|notch|63500114005721088}}|[[Notch]] said that he would try to make maps place-able on [[wall]]s.}}
{{History|java beta}}
{{History||1.6|snap=Test Build 3|[[File:Map (item) JE1 BE1.png|32px]] Added maps.}}
{{History||1.6.6|The ability to auto-craft maps using shift-click has been disabled.}}
{{History||1.8|snap=Pre-release|Maps can now be found in library chests in the brand-new [[stronghold]]s.
|Auto crafting maps has been restored. Map cloning, therefore, is unavailable for a period of time.}}
{{History||1.8.1|Maps now work both while walking and flying.}}
{{History|java}}
{{History||1.0.0|snap=Beta 1.9 Prerelease 5|Prior to this update, the [[sun]] in ''[[Minecraft]]'' rose in the North, which threw off many [[player]]s and led to a common misconception that ''Minecraft'' maps/[[world]]s were oriented with East at the top. The sun now rises in the east and sets in the west, making navigation much more intuitive.
|Before the change in sun position, it was commonly said that ''Minecraft'' maps/worlds are oriented with East at the top; sunrise, by definition, occurs at the East, which means it is certainly true that the maps were oriented "East" since the Sun rose from the top (North). However, [[Jeb]] asserted (and [[Notch]] agreed) that the sun rose in the north.<ref>{{Tweet|jeb|87815841160237056}}</ref><ref>{{Tweet|notch|88155424880201728}}</ref> Most mods and map-making tools, however, used the terms East and North consistent with their actual definitions (e.g. a [[Programs and editors/Cartograph|Cartograph]]-generated map with North at the top is rotated 90 degrees from the in-game map).}}
{{History||1.4.2|snap=12w34a|[[File:Empty Map JE1 BE1.png|32px]] [[Crafting]] a map now creates an empty map. The map is drawn for the first time when it is held and right clicked, and is centered near the location of the [[player]] when clicked (not as before where it was centered on the location it was crafted.)
|Previously, in order to map a new area, the map had to be ''crafted'' in that area (rather than carrying a previously-crafted map to the new area). The point where a map is crafted becomes its permanent center, and could never be changed.
|The pointer no longer disappears when leaving the map, but transforms into a white dot, indicating on what side of the map the player is located.
|Maps now align to a grid, making it easier to create adjacent maps.
|Maps can now be zoomed out (but not zoomed in).
|Maps can now be cloned and scaled.}}
{{History||1.4.2|snap=12w34b|Maps now have a ''zoom level'', which was fixed at 1:8 prior to snapshot [[Java Edition 12w34a|12w34a]],<ref name="mapinfo">https://web.archive.org/web/0/http://notch.tumblr.com/post/4988431144/the-maps</ref> but now starts at 1:1 and can be increased up to 1:16 by re-crafting an existing map.
|Maps are no longer numbered on the top-left corner and is labeled through the tooltip.}}
{{History|||snap=12w36a|New maps are now crafted at a scale factor of 1:1. A zoomed in map can be zoomed out by re-crafting it with another 8 sheets of [[paper]] on a [[crafting table]]. Each time this is done, the scale increases - 1:1, 1:2, 1:4, 1:8, 1:16 with a map scale of 1:16 being the current maximum.}}
{{History||1.7.2|snap=13w38a|The map size has been increased when placed on a [[wall]] using the [[item frame]].
|More colors have been added to maps for different [[block]]s.<ref name="infodump2">https://web.archive.org/web/0/https://www.mojang.com/2013/10/minecraft-1-7-the-update-that-changed-the-world</ref>}}
{{History||1.8|snap=14w31a|Zoomed maps now conform to an expanded grid based on their zoom level. Previously, careful considerations would need to be taken to creating a wall of adjoining maps.}}
{{History||1.8.1|snap=pre1|Some colors have been changed on maps to more accurately represent their respective [[block]].}}
{{History||1.9|snap=15w31a|Maps now display as a mini-map when held in the off-hand, or if the off-hand slot is occupied; the (old) large version is visible only when held in the dominant hand with the secondary hand free.}}
{{History|||snap=15w34a|New maps can now be [[crafting|crafted]] at a scale factor of 1:4.
|A crafting recipe has been added for zooming in maps.}}
{{History|||snap=15w43a|The average yield of empty maps from [[stronghold]] library [[chest]]s has been doubled.}}
{{History|||snap=15w45a|New maps are once again [[crafting|crafted]] at a scale factor of 1:1, as they had been before snapshot [[15w34a]].
|The [[crafting]] recipe, that was introduced in 15w34a, for zooming in maps has been removed.}}
{{History|||snap=15w49a|Map making now uses armor equipping sounds.}}
{{History||1.11|snap=16w39a|Maps now work in [[the End]].
|Empty maps are now [[trading|sold]] by cartographer [[villager]]s as their tier 3 [[trading|trade]].
|Added [[explorer map]]s, sold by cartographers as their tier 4 trades.}}
{{History||1.12|snap=17w17a|Maps now have separate colors for colored [[terracotta]] blocks from other colored blocks.}}
{{History||1.13|snap=17w47a|Prior to [[1.13/Flattening|''The Flattening'']], these [[item]]s' numeral IDs were 358 and 395.
|Maps now use additional NBT to specify which map they contain. Prior to this version, they used the [[damage]] value instead.
|Map IDs are no longer limited to 32,768.}}
{{History|||snap=17w50a|Maps can now be placed on floor and ceiling [[item frame]]s.}}
{{History|||snap=18w10a|Spots on maps can now be marked using [[banner]]s.}}
{{History|||snap=18w11a|Empty maps can now generate in [[shipwreck]] [[chest]]s.}}
{{History|||snap=pre7|Maps have been changed slightly, in regard to which [[block]]s are shown and which blocks are not.}}
{{History||1.14|snap=18w43a|[[File:Empty Map JE2 BE2.png|32px]] [[File:Map (item) JE2 BE2.png|32px]] The textures of maps have been changed.}}
{{History|||snap=18w48a|Empty maps can now be found in chests in [[village]] cartographer houses.}}
{{History|||snap=19w02a|Maps can now be cloned and zoomed out (extended) by using a [[cartography table]].
|Maps can now be locked by using a [[glass pane]] with a cartography table.
|The recipes for cloning and zooming out maps have been removed.}}
{{History|||snap=19w06a|Map making is now silent again.}}
{{History|||snap=19w13a|Cartographer villagers now give empty maps to players under the [[Hero of the Village]] effect.}}
{{History||1.16|snap=20w21a|Map making sounds are now the same as when using a cartography table.}}
{{History|pocket alpha}}
{{History||v0.14.0|snap=build 1|[[File:Empty Map JE1 BE1.png|32px]] [[File:Map (item) JE1 BE1.png|32px]] Added maps.
|Maps are crafted using nine [[paper]], one for every slot of the [[crafting]] grid.
|Maps must be combined with a [[compass]] using an [[anvil]] in order to show the [[player]]'s position.
|Maps can be zoomed using an anvil.}}
{{History|||snap=build 3|New maps are now [[crafting|crafted]] at full zoom.
|Empty maps now have a "Create Map" button to initialize them.}}
{{History|||snap=build 7|New maps are now crafted at a scale factor of 1:1.}}
{{History||v0.15.0|snap=unknown|Maps can now be crafted either with 8 pieces of [[paper]] and a [[compass]] ''or'' 9 pieces of paper, to get a map with or without a position marker.}}
{{History||v0.16.0|snap=build 1|Different colors have been added to maps for different [[biome]]s.}}
{{History|pocket}}
{{History||1.0.0|snap=?|[[Windows 10 Edition]] can now use the [[anvil]] as well as the [[crafting table]] to clone, zoom and apply markers, just as [[Pocket Edition]] in general could.
|Maps can now be found inside [[stronghold]] library [[chest]]s.}}
{{History||1.1.0|snap=alpha 1.1.0.0|Empty maps with direction markers built-in are now called "locator maps".}}
{{History|||snap=alpha 1.1.0.3|"Locator maps" are now called "empty locator maps".
|Empty maps are now [[trading|sold]] by cartographer [[villager]]s for 7-11 [[emerald]]s as their tier 3 [[trading|trade]].}}
{{History|bedrock}}
{{History||1.4.0|snap=beta 1.2.14.2|Maps can now be found inside map room [[chest]]s in [[shipwreck]]s.}}
{{History||?|The texture of the filled map overlay has been changed.}}
{{History||?|Maps now function in dimensions other than the dimension in which they were created.}}
{{History||1.10.0|snap=beta 1.10.0.3|Maps can now be found in cartographer house [[chest]]s in [[village]]s.
|[[File:Empty Map JE2 BE2.png|32px]] The texture of empty maps has been changed.}}
{{History||1.11.0|snap=beta 1.11.0.1|Empty maps can now be created from 1 [[paper]] in [[cartography table]]s.
|Maps can now be zoomed, cloned, renamed, and have pointers added in cartography tables.}}
{{History|||snap=beta 1.11.0.4|Cartographer [[villager]]s now [[trading|sell]] empty map for an [[emerald]] as their first tier [[trading|trades]].
|Empty locator maps can now be [[trading|bought]] from cartographer villagers.}}
{{History||1.13.0|snap=beta 1.13.0.1|[[File:Map (item) BE3.png|32px]] [[File:Locked Map (item) BE2.png|32px]] Filled maps and locked maps now have unique inventory icons.}}
{{History||1.16.0|snap=beta 1.16.0.57|Trading has been changed, novice-level cartographer now sell an empty map for 7 emeralds. Cartographer villager no longer sell empty locator map.}}
{{History||1.16.100|snap=beta 1.16.100.56|The ID of maps have been changed from <code>emptymap</code> to <code>empty_map</code> and <code>map</code> to <code>filled_map</code>.}}
{{History|console}}
{{History||xbox=TU1|xbone=CU1|ps=1.00|wiiu=Patch 1|switch=1.0.1|[[File:Map (item) JE1 BE1.png|32px]] Added maps.
|The [[player]] spawns with a free map.
|Maps are available only as zoom step 3 maps centered at coordinates 0,0. Biome colors do not appear on maps.}}
{{History||xbox=none|xbone=CU1|ps=1.0|wiiu=none|Larger sized worlds on Xbox One, Playstation 4, and Nintendo Switch have zoom step 3 maps aligned to a grid with maps centered at 0, 1024, or 2048 on the X or Z coordinates.}}
{{History||xbox=TU21|xbone=CU9|ps=1.14|wiiu=Patch 1|[[File:Empty Map JE1 BE1.png|32px]] [[Crafting]] a map now produces an empty map.}}
{{History||xbox=TU46|xbone=CU36|ps=1.38|wiiu=Patch 15|The outer end islands appear on different maps; even on Xbox 360, Playstation 3, Vita, and Wii U editions.}}
{{History||xbox=none|xbone=none|ps=1.90|wiiu=none|switch=none|[[File:Empty Map JE2 BE2.png|32px]] [[File:Map (item) JE2 BE2.png|32px]] The textures of maps have been changed.}}
{{History||ps=1.91|Maps can now be created and used in [[cartography table]]s.}}
{{History|foot}}
== Issues ==
{{issue list}}
== Trivia ==
* Use of the {{key|F1}} key can allow the player to hold a map without blocking their view at all.
* In ''Java Edition'', a map created using {{cmd|give}} can be any map by using the Map parameter to specify the map number desired. E.g. {{cmd|give [player] minecraft:filled_map{map:5<nowiki>}}} gives the specified player map_5. If no data value is supplied it defaults to map_0. If map_0 has not ever been crafted, it is centered on x=0, z=0.
* The maps are stored separately as their own data (<code>.dat</code>) file as <code>map_x.dat</code> with (x) being the map number, see [[map item format]] for more info. By manipulating this number, players can organize their maps to suit them, or if they accidentally create a map in the same location, they can delete their extra map so as to save the number they make.
* Certain programs can be used to make customized maps with images or text on them instead of actual maps, many people use these in adventure maps to show pictures or to tell a story.
* Since all copies of a map are links to the same file, copying an unfinished map keeps it synchronized with the copy as the player fills it in. Thus, a copy stored in a chest can act as a remote backup.
* A map that is in an item frame does not update itself until a player picks it up, lets it reload, and places it back again. However, if a player holds a clone of the map, both maps update.
* Filled maps are the only items that make 90 degree rotations in item frames, and also the only items that can expand the item frame into full block wide.
* On [[Legacy Console Edition]], the player always spawns with a map in their inventory after creating a world. This was later added to Bedrock Edition as an optional feature in the world creation menu.
* Maps on Legacy Console Edition always show the player's current coordinates, as a substitute for the optional [[Coordinates|coordinate display]] in other editions.
* A map cannot be created on [[New Nintendo 3DS Edition]]. Instead, the map is always displayed on the bottom screen along with the coordinates. Biome colors do not appear on maps.
== Gallery ==
<gallery>
MapItem1.png|A fully zoomed map.
MapRotation.png|Having a map in hand does not stop the ability to see ahead.
MapItem3.png|A world being recorded onto a map.
Mcmap4.png|Nearly fully explored map.
Zoomed Map.png|A map edited to the scale of 1.
Sky Map.png|A map mapping the [[Sky Dimension]].
MapOfVillage.png|A village and how it is represented on a map.
Pumpkin map.png|A map containing a custom image made by placing a large number of blocks.
Complete Map.png|A completely explored map.
MapZooms.png|A diagram showing how maps zoomed out before [[Java Edition 1.8]]. Notice how the larger maps have borders made of half and quarter small maps.
Map18zooms.png|From 1.8, zoomed maps are aligned to this grid exactly.
Large Biome Map.png|A map of a [[Large Biomes]] world.
Map0140-0160.png|A comparison of maps between versions in Pocket Edition Alpha [[Pocket Edition Alpha 0.14.0|0.14.0]] and [[Pocket Edition Alpha 0.16.0|0.16.0]].
Mycelium Map.png|A map view of a mushroom biome, showing that mycelium appears purple on a map.
MiniMap.png|Maps held in the off-hand or in either hand while [[dual wielding]] appear as mini-maps.
Partly filled treasure map.png|Partly filled treasure map with an odd area at the bottom left. Normally a partly filled map would look striped (as in the top left), but this map seems to be bugged and is possibly showing caves, or something, in the bottom left.
Partly filled ocean explorer map.png|Partly filled ocean explorer map. Updating the game from an older version (in this case the area was first generated before 1.18) and buying a map after updating (in this case in 1.19.4) can result in the map displaying rivers and terrain where there is really a frozen sea.
Map Stained Glass 1.png|Stained glasses' appearances on maps before and after 1.13.
Map Stained Glass 2.png|Stained glasses' appearances on maps before and after 1.13.
Map Various Blocks 1.png|Various blocks' appearances on maps before and after 1.13.
Map Various Blocks 2.png|Various blocks' appearances on maps before and after 1.13.
Better Together Map.jpg|Holding a map in the offhand in ''Bedrock Edition''.
Better Together Map Icon.jpg|Holding a map in both hands in ''Bedrock Edition''.
File:MapFailedtoFill.png|A map that has not yet filled. A rare bug in Java.
</gallery>
=== The Nether ===
<gallery>
Nethermap.png|A map in [[the Nether]].
Maponnether.png|A map in the Nether; the arrow turns around itself, like in [[compass]].
</gallery>
=== The End ===
<gallery>
Jeb End Map.png|The first image of a map in [[the End]].
Endmap.png|A map in the End.
</gallery>
=== Maps in item frames ===
<gallery>
FramedMap.png|A map displayed on an item frame, as it looked before [[Java Edition 1.7.2]].
Structure Map Collection.png|Multiple maps in item frames. Notice a [[village]], two [[desert temple]]s and a lava lake.
Minecraft maps 3by3.png|A collection of 9 connected full maps.
Full Map.png|A combination of 25 maps pasted together as one map.
Map wall BE.png|A map wall on ''Bedrock Edition'', showing large areas of biome colors for each biome.
Map's in item frames.png|Maps can be placed into [[item frame]]s so they can be viewed together.
Comparing Maps.png|The comparison between 3 zooms of maps.
SuperflatMap.png|A map in a [[Superflat]] world, with some [[village]]s.
MapWallWithMarkers.png|A 3x3 map wall with banner markers.
HEYYEYAAEYAAAEYAEYAA.png|He-Man map art.
Map Player Icons 1.png|First image of player icons on maps.
Map Player Icons 2.png|Second image of player icons on maps.
</gallery>
== See also ==
* [[Explorer Map]]
* [[Clock]]
* [[Tutorials/Navigation|Navigation]]
== References ==
{{Reflist}}
{{Items}}
[[cs:Mapa]]
[[de:Karte]]
[[es:Mapa]]
[[fr:Carte (objet)]]
[[hu:Térkép (tárgy)]]
[[ja:地図]]
[[ko:지도]]
[[nl:Kaart]]
[[pl:Mapa]]
[[pt:Mapa]]
[[ru:Карта]]
[[tr:Harita]]
[[th:แผนที่]]
[[uk:Мапа]]
[[zh:地图]]
[[Category:Renewable resources]]</li></ul></nowiki> | Added baby untamed wolves. Only spawn in creative via mob egg | ||||
1.6.2{{Extension DPL}}<ul><li>[[Slimeball|Slimeball]]<br/>{{about|the item|the mob|Slime|the block constructed with slimeballs|Slime Block|other uses|Slime (disambiguation)}}
{{Item
| image = Slimeball.png
| renewable = Yes
| stackable = Yes (64)
}}
A '''slimeball''' is a [[crafting]] ingredient commonly dropped by [[slime]]s, and can be sneezed out by [[panda]]s.
== Obtaining ==
=== Mob loot ===
==== Slimes ====
{{see also|Tutorials/Slime farming}}
If a [[slime]]'s size is 1, it drops 0–2 slimeballs when killed. The maximum number of slimeballs is increased by 1 per level of [[Looting]], for a maximum of 5 slimeballs with Looting III.
==== Pandas ====
Baby [[panda]]s have a {{frac|1|700}} chance of [[drop]]ping one slimeball when sneezing.
=== Crafting ===
{{Crafting
|Slime Block
|Output= Slimeball,9
|type= Miscellaneous
}}
=== Trading ===
[[Wandering trader]]s sometimes offer to sell a slimeball for 4 [[emerald]]s.
== Usage ==
=== Crafting ingredient ===
{{crafting usage}}
=== Breeding ===
Slimeballs can be used to breed [[frog]]s and reduce the remaining growth duration of [[tadpole]]s by 10%. Both also follow a player holding a slimeball.
==Video==
{{Video note|This video is outdated, as slimeballs can now also be used to craft [[lead]]s and [[slime block]]s, breed [[frog]]s, and can now be obtained from baby [[panda]]s and [[wandering trader]]s.}}
{{yt|J6oR3fdbbjY}}
== Data values ==
===ID===
{{edition|java}}:
{{ID table
|edition=java
|showforms=y
|generatetranslationkeys=y
|displayname=Slimeball
|spritetype=item
|nameid=slime_ball
|form=item
|foot=1}}
{{edition|bedrock}}:
{{ID table
|edition=bedrock
|shownumericids=y
|showforms=y
|notshowbeitemforms=y
|generatetranslationkeys=y
|displayname=Slimeball
|spritetype=item
|nameid=slime_ball
|id=388
|form=item
|foot=1}}
==History==
{{History|java alpha}}
{{History||v1.0.11|[[File:Slimeball JE1 BE1.png|32px]] Added slimeballs, which are dropped from [[slime]]s. At the moment, they serve no purpose.}}
{{History|java beta}}
{{History||1.7|Slimeballs are now used to craft [[sticky piston]]s.}}
{{History|java}}
{{History||1.0.0|snap=Beta 1.9 Prerelease 2|Slimeballs are used to craft [[magma cream]].}}
{{History||1.6.1|snap=13w18a|[[Lead]]s, which were originally implemented in the [[13w16a]] snapshot, now have a [[crafting]] recipe that includes slimeballs.}}
{{History||1.8|snap=14w02a|Nine slimeballs are now used to [[crafting|craft]] a [[slime block]]. Slime blocks also act as storage [[block]]s, being able to craft back into 9 slimeballs.}}
{{History||1.13|snap=17w47a|Prior to [[1.13/Flattening|''The Flattening'']], this [[item]]'s numeral ID was 341.}}
{{History||1.14|snap=18w43a|[[File:Slimeball JE2 BE2.png|32px]] The texture of slimeballs has been changed.
|Slimeballs can now be obtained when a [[panda|baby panda]] sneezes.}}
{{History|||snap=19w05a|Slimeballs can now be bought from [[wandering trader]]s.}}
{{History||1.19|snap=22w11a|Slimeballs can now be used to breed [[frog]]s.}}
{{History|pocket alpha}}
{{History||v0.9.0|snap=build 1|[[File:Slimeball JE1 BE1.png|32px]] Added slimeballs. They are currently unobtainable and serve no purpose.}}
{{History||v0.12.1|snap=build 1|Added slimeballs to the [[creative]] [[inventory]].
|Slimeballs can now be obtained by killing [[slime]]s.
|Slimeballs are now used to craft [[magma cream]].}}
{{History||v0.14.0|snap=build 1|Slimeballs are now used to craft [[slime block]]s.}}
{{History||v0.15.0|snap=build 1|Slimeballs are now used to craft [[sticky piston]]s and [[lead]]s.}}
{{History|bedrock}}
{{History||1.8.0|snap=beta 1.8.0.8|Slimeballs can now be obtained when a [[panda|baby panda]] sneezes.}}
{{History||1.10.0|snap=beta 1.10.0.3|[[File:Slimeball JE2 BE2.png|32px]] The texture of slimeballs has been changed.
|Slimeballs can now be obtained via [[trading]] with [[wandering trader]]s.}}
{{History|console}}
{{History||xbox=TU1|xbone=CU1|ps=1.0|wiiu=Patch 1|switch=1.0.1|[[File:Slimeball JE1 BE1.png|32px]] Added slimeballs.}}
{{History||xbox=TU3|Slimeballs are now used to craft [[sticky piston]]s.}}
{{History||xbox=TU5|Slimeballs are found in the Miscellaneous tab in the [[Creative inventory]].}}
{{History||xbox=TU9|Moved slimeballs to the Materials tab in the Creative inventory.}}
{{History||xbox=none|xbone=none|ps=1.83|wiiu=none|switch=none|Slimeballs can now be obtained when a [[panda|baby panda]] sneezes.}}
{{History||xbox=none|xbone=none|ps=1.90|wiiu=none|switch=none|[[File:Slimeball JE2 BE2.png|32px]] The texture of slimeballs has been changed.}}
{{History|New 3DS}}
{{History||0.1.0|[[File:Slimeball JE1 BE1.png|32px]] Added slimeballs.}}
{{History|foot}}
==Issues ==
{{issue list}}
== External Links ==
*[https://www.minecraft.net/en-us/article/taking-inventory--slimeball Taking Inventory: Slimeball] – Minecraft.net on June 24, 2021
{{Items}}
[[Category:Renewable resources]]
[[cs:Sliz]]
[[de:Schleimball]]
[[es:Bola de slime]]
[[fr:Boule de Slime]]
[[hu:Nyálkagolyó]]
[[it:Palla di slime]]
[[ja:スライムボール]]
[[ko:슬라임볼]]
[[nl:Slijmbal]]
[[pl:Kula szlamu]]
[[pt:Bola de slime]]
[[ru:Слизь]]
[[th:ลูกเมือก]]
[[uk:Слизова кулька]]
[[zh:黏液球]]</li><li>[[Shears|Shears]]<br/>{{Item
| image = Shears.png
| rarity = Common
| renewable = Yes
| durability = 238
| stackable = No
}}
'''Shears''' are tools required to obtain some organic blocks or otherwise mine them faster as well as to shear certain entities and blocks.
==Obtaining==
===Crafting===
{{Crafting
|head=1
|showdescription=1
|B2= Iron Ingot
|A3= Iron Ingot
|Output= Shears
|type= Tool
}}
{{crafting
|foot=1
|ignoreusage=1
|Damaged Shears
|Damaged Shears
|Output= Shears
|description= The durability of the two shears is added together, plus an extra 5% durability.
|type= Tool
}}
Despite using [[Iron Ingot|iron]] in its crafting recipe, shears cannot be smelted into [[iron nugget]]s.<ref>{{bug|MC-111738}}</ref>
===Trading===
Novice-level Shepherd [[villager]]s have a 40% chance to sell shears for 2 [[emerald]]s in Java Edition. This trade is always offered in Bedrock Edition.
===Chest loot===
{{LootChestItem|shears}}
==Usage==
===Shearing===
Shears lose 1 [[durability]] when used to shear something.
Shears can be {{Control|use|text=used}} on a [[sheep]] to remove its coat and drop 1–3 [[wool]] of the corresponding color. The same sheep can be sheared again after it eats from a [[grass block]] to regenerate its coat.
Shearing a [[mooshroom]] drops 5 [[mushroom]]s of the corresponding color and irreversibly turns it into a normal [[cow]].
Shearing a [[snow golem]] irreversibly removes its pumpkin, dropping it and revealing its face.
Shearing either a [[beehive]] or [[bee nest]] that is full of honey makes it drop 3 [[honeycomb]]s and resets it to honey level 0. The same beehive or bee nest can be sheared again if it is able to reach full honey again. If sheared by hand without a [[campfire]] below the hive or nest all bees within will exit and all nearby bees will attack the offending player.
[[Dispenser]]s can use shears in any of the above listed ways, interacting with any valid block or entity in front of the dispenser's face. This decreases the shears' [[durability]]. A dispenser shearing a beehive or bee nest will not anger bees or cause them to leave even if there is not a campfire below it.
Shearing a [[pumpkin]] turns it into a [[carved pumpkin]], dropping 4 [[pumpkin seeds]].
{{IN|java}}, shearing the tip of [[cave vines]], [[kelp]], [[weeping vines]], or [[twisting vines]] sets its age value to 25 and stops further growth.
===Breaking blocks===
Shears use 1 [[durability]] when is used to break any block, even if it [[instant mining|breaks instantly]] by hand.
Shears can be used to harvest [[cobweb|cobwebs]], [[leaves]], [[grass|grass, tall grass]], [[seagrass|seagrass, tall seagrass]], [[fern|ferns, large fern]]s, [[dead bush]]es, [[nether sprouts]], [[vines]], [[glow lichen]] or [[hanging roots]] and obtain them in item form. They can also be used to break [[tripwire]] connected to a [[tripwire hook]] without activating it.
When shears are used to break [[Weeping Vines|weeping vines]] or [[Twisting Vines|twisting vines]] they are guaranteed to drop in item form instead of the usual 33% chance. This only applies to vines directly broken by shears and not vines that are broken due to the destruction of their supporting vines.
The following table shows information about blocks that can be broken with shears. Colors indicate what gets dropped when the block is broken:
*White: The original block.
*Blue: The block's normal drop (i.e. string, sticks, seeds, saplings, apples).
*Red: Nothing.
{| class="wikitable" style="text-align:center" data-description="Blocks broken with shears"
!
!No shears breaking time
!Shears breaking time
|-
! style="text-align:left" |{{BlockLink|Cobweb}}
| {{tc|no|20 s}}<ref group="note">Breaking cobwebs with a sword is as fast as breaking with shears, and yields string. This costs double durability.</ref>
|0.4 s
|-
! style="text-align:left" |{{BlockLink|Dead Bush}}
| {{tc|planned|0 s}}
|0 s
|-
! style="text-align:left" |{{BlockLink|id=fern|Grass|Fern}}
| {{tc|planned|0 s}}
|0 s
|-
! style="text-align:left" |{{BlockLink|Grass}}
| {{tc|planned|0 s}}
| 0 s
|-
! style="text-align:left" |{{BlockLink|Nether Sprouts}}
| {{tc|no|0 s}}<ref group="note">{{IN|bedrock}}, the item drops when breaking it with fists.</ref>
|0 s
|-
! style="text-align:left" |{{BlockLink|Leaves}}
| {{tc|planned|0.35 s}}
|0.05 s
|-
! style="text-align:left" |{{BlockLink|id=tripwire|String#Tripwire|Tripwire}}
|0 s
|0 s<ref group="note">Using shears does not trigger a redstone pulse.</ref>
|-
! style="text-align:left" |{{BlockLink|Vines}}
| {{tc|no|0.35 s}}
|0.35 s
|-
! style="text-align:left" |{{BlockLink|Wool}}
|1.25 s
|0.25 s
|-
! style="text-align:left" |{{BlockLink|Seagrass}}
| {{tc|no|0 s}}
|0 s
|-
! style="text-align:left" | {{BlockLink|Glow Lichen}}
| {{tc|no|0.3 s}}
|0.3 s
|-
! style="text-align:left" |{{BlockLink|Hanging Roots}}
| {{tc|no|0 s}}
|0 s
|-
! style="text-align:left" |{{BlockSprite|Twisting Vines Plant}}{{BlockLink|Twisting Vines}}<br> {{BlockSprite|Weeping Vines Plant}}{{BlockLink|Weeping Vines}}
|0 s
|0 s<ref group="note">Using shears will increase the chance of dropping from 33% to 100%.</ref>
|}
{{notelist}}
===Enchantments===
Shears can receive the following [[Enchanting|enchantments]]:
{| class="wikitable col-2-center col-3-right"
|+
!Name
! Max Level
![[Enchanting|Method]]
|-
|[[Efficiency]]
|V
|{{Inventory slot|Anvil}}
|-
|[[Unbreaking]]
| III
|{{Inventory slot|Anvil}}
|-
|[[Mending]]
|I
|{{Inventory slot|Anvil}}
|-
|[[Curse of Vanishing]]
|I
|{{Inventory slot|Anvil}}
|-
|[[Silk Touch]]{{only|be|short=1}}
|I
|{{Inventory slot|Anvil}}
|}
{{notelist}}
== Sounds ==
{{edition|java}}:
{{Sound table
|rowspan=4
|sound=Shear.ogg
|subtitle=Shears click
|source=player
|description=When a mooshroom is sheared
|id=entity.mooshroom.shear
|translationkey=subtitles.item.shears.shear
|volume=1.0
|pitch=1.0
|distance=16}}
{{Sound table
|subtitle=Shears click
|source=player
|description=When a sheep is sheared
|id=entity.sheep.shear
|translationkey=subtitles.item.shears.shear
|volume=1.0
|pitch=1.0
|distance=16}}
{{Sound table
|subtitle=Shears click
|source=player
|description=When a snow golem is sheared
|id=entity.snow_golem.shear
|translationkey=subtitles.item.shears.shear
|volume=1.0
|pitch=1.0
|distance=16}}
{{Sound table
|subtitle=Plant cropped
|source=block
|description=When a growing plant is cropped
|id=block.growing_plant.crop
|translationkey=subtitles.block.growing_plant.crop
|volume=1.0
|pitch=1.0
|distance=16}}
{{Sound table
|sound=Beehive shear.ogg
|source=block
|subtitle=Shears scrape
|description=When honeycombs are harvested from a beehive
|id=block.beehive.shear
|translationkey=subtitles.block.beehive.shear
|volume=0.8
|pitch=1.0/0.8/0.9
|distance=16}}
{{Sound table
|sound=Pumpkin carve1.ogg
|sound2=Pumpkin carve2.ogg
|source=block
|subtitle=Shears carve
|description=When a pumpkin is carved
|id=block.pumpkin.carve
|translationkey=subtitles.block.pumpkin.carve
|volume=1.0
|pitch=1.0
|distance=16}}
{{Sound table
|sound=Random break.ogg
|subtitle=Item breaks
|source=player
|description=When a pair of shears' durability is exhausted
|id=entity.item.break
|translationkey=subtitles.entity.item.break
|volume=0.8
|pitch=0.8-1.2
|distance=16
|foot=1}}
{{edition|bedrock}}:<br>
Pumpkins do not have carve sounds.
{{Sound table
|type=bedrock
|sound=Shear.ogg
|source=player
|description=When something is sheared
|id=mob.sheep.shear
|volume=1.0
|pitch=1.0}}
{{Sound table
|sound=Beehive shear.ogg
|source=block
|description=When honeycombs are harvested from a beehive
|id=block.beehive.shear
|volume=0.8
|pitch=0.8-1.0}}
{{Sound table
|sound=Random break.ogg
|source=player
|description=When a pair of shears' durability is exhausted
|id=random.break
|volume=1.0
|pitch=0.9
|foot=1}}
==Data values==
===ID===
{{edition|java}}:
{{ID table
|edition=java
|showforms=y
|generatetranslationkeys=y
|displayname=Shears
|spritetype=item
|nameid=shears
|form=item
|foot=1}}
{{edition|bedrock}}:
{{ID table
|edition=bedrock
|shownumericids=y
|showforms=y
|notshowbeitemforms=y
|generatetranslationkeys=y
|displayname=Shears
|spritetype=item
|nameid=shears
|id=421
|form=item
|foot=1}}
==Achievements==
{{load achievements|Have a Shearful Day}}<div style="text-align:center"></div>
==History==
{{History||June 3, 2011|link=https://twitter.com/jeb_/status/76570646074765312|Shears were first mentioned by [[Jeb]] on [[wikipedia:Twitter|Twitter]]. The tweet revealing Jeb's work on shears was written in Swedish (''Jag jobbar på shears nu''), which translates to "I'm working on shears now".}}
{{History||June 7, 2011|link=https://twitter.com/jeb_/status/78154891637436416|Jeb tweets about how shears were originally planned as a way to defuse [[TNT]], but he dropped this shortly after deciding TNT would detonate only with [[redstone]] or [[fire]].}}
{{History|java beta}}
{{History||1.7|[[File:Shears JE1 BE1.png|32px]] Added shears.
|Before [[Beta 1.7]], [[sheep]] would drop 1-3 [[wool]] blocks at most when hit, but shears can harvest up to 4 wool blocks per sheep.}}
{{History||1.8|snap=Pre-release|Shears can now be used to harvest a [[fern]], [[vines]] and [[grass]].}}
{{History|java}}
{{History||1.0.0|snap=Beta 1.9 Prerelease|Shears now harvest [[red mushroom]]s from a [[mooshroom]] and turn it back into a normal [[cow]].}}
{{History||1.1|snap=11w49a|[[Sheep]] now drop only 1-3 wool blocks when sheared, but they can also regrow their wool by eating [[grass block|grass]], which is part of a plan to have [[animal]]s stay in the game longer.<ref>{{Tweet|jeb|76647002317930496}}</ref>}}
{{History||1.2.1|snap=12w05a|Shears can now be used to harvest [[dead bush]]es.}}
{{History|||snap=12w06a|Shears are now [[renewable]], due to [[zombie]]s occassionally dropping iron ingots.}}
{{History||1.3.1|snap=12w21a|Shears can now be [[trading|bought]] from farmer [[villager]]s for 3 [[emerald]]s each.}}
{{History|||snap=12w22a|Shears can now be used to break [[tripwire]] string and not set it off.}}
{{History||1.4.2|snap=12w38a|Added a [[sound]] when using shears on [[sheep]].}}
{{History||1.4.6|snap=12w50a|Shears can now be [[enchanting|enchanted]].}}
{{History||1.8|snap=14w02a|[[Trading]] has been changed: Shepherd [[villager]]s now [[trading|sell]] shears for 3–4 [[emerald]]s each.
|Farmers no longer trade shears.}}
{{History|||snap=pre1|Shears now lose [[item durability|durability]] when breaking [[wool]] blocks. In previous versions, shears would take [[item durability|durability]] [[damage]] only when destroyed or when breaking [[tall grass]] or [[leaves]], the damage remaining the same for all other [[block]]s.<ref>{{bug|MC-5313}}</ref>}}
{{History||1.9|snap=15w34a|Shears may now be used in a crafting grid to zoom in [[map]]s.}}
{{History|||snap=15w45a|Shears no longer zoom in maps.}}
{{History|||snap=15w47b|Shears can no longer be enchanted with [[Silk Touch]].
|Shears now lose durability when used to break any block (formerly lost durability only from [[leaves]], [[web]], [[grass]], [[vines]], [[tripwire]] and [[wool]]).}}
{{History|||snap=15w47c|Shears now harvest [[cobweb]] without requiring [[Silk Touch]].}}
{{History|||snap=15w49a|[[Snow golem]]'s [[pumpkin]] can now be removed with shears.}}
{{History||1.13|snap=17w47a|When shears are {{control|used}} on an un-carved [[pumpkin]], it now turns into a carved pumpkin and drops 4 [[pumpkin seeds]].
|Prior to [[1.13/Flattening|''The Flattening'']], this [[item]]'s numeral ID was 359.}}
{{History||1.14|snap=18w43a|Shears placed in a [[dispenser]] can now shear [[sheep]].
|[[File:Shears JE2 BE2.png|32px]] The texture of shears has been changed.}}
{{History|||snap=18w49a|Shears can now be found in [[chest]]s in [[village]] shepherd houses.}}
{{History||1.15|snap=19w34a|Shears can now be used on [[bee nest]]s and [[beehive]]s to harvest [[honeycomb]].}}
{{History||1.16|snap=20w15a|Shears placed in a dispenser can now shear [[mooshrooms]] and [[snow golem]]s.}}
{{History||1.16.2|snap=pre1|Shears are now required in order to pick up [[roots]].}}
{{History||1.16.2|snap=pre2|Shears are no longer required to pick up [[roots]].}}
{{History||1.17|snap=?|Shears are now required in order to pick up [[hanging roots]].}}
{{History||1.18|snap=21w37a|Shears can now stop [[cave vines]], [[kelp]], [[weeping vines]], and [[twisting vines]] from aging.}}
{{History||1.19|snap=22w11a|Shears are now required in order to pick up [[mangrove leaves]].}}
{{History|pocket alpha}}
{{History||v0.2.0|[[File:Shears JE1 BE1.png|32px]] Added shears.}}
{{History||v0.3.2|Survival [[player]]s no longer start out with infinite durability shears in the [[inventory]].}}
{{History||v0.4.0|Removed shears from the creative inventory.}}
{{History||v0.8.0|snap=build 3|Re-added shears to [[creative]] mode.}}
{{History||v0.9.0|snap=build 1|Shears can now be used to transform [[mooshroom]]s into [[cow]]s.}}
{{History||v0.12.1|snap=build 3|Shearing a [[snow golem]] now removes its [[pumpkin]].
|Shears can now be [[enchanting|enchanted]] in an [[anvil]].}}
{{History||v0.13.0|snap=build 1|Shears can now be used to break [[tripwire]] string without triggering it.}}
{{History||v0.15.0|snap=build 1|Shears now lose durability when used to break any [[block]].}}
{{History|pocket}}
{{History||1.0.4|snap=alpha 1.0.4.0|Shears can now be [[trading|bought]] from shepherd [[villager]]s.}}
{{History||1.1.0|snap=alpha 1.1.0.0|Breaking a [[melon|melon block]] with shears now always drop 9 [[melon slice|melons]].}}
{{History|bedrock}}
{{History||1.4.0|snap=beta 1.2.13.8|Shears can now be used to turn un-carved [[pumpkin]]s into [[carved pumpkin]] and spit out 4 [[pumpkin seeds]].}}
{{History||?|Shears now harvest [[cobweb]] without requiring [[Silk Touch]].}}
{{History||1.10.0|snap=beta 1.10.0.3|Shears placed in a [[dispenser]] can now shear [[sheep]].
|[[File:Shears JE2 BE2.png|32px]] The texture of shears has been changed.}}
{{History||1.11.0|snap=beta 1.11.0.1|Shears can now be found in [[village]] shepherd houses.}}
{{History|||snap=beta 1.11.0.4|Shears [[trading|sold]] by shepherd [[villager]]s now cost only 2 [[emerald]]s.}}
{{History||1.14.0|snap=beta 1.14.0.1|Shears can now be used on [[bee nest]]s and [[beehive]]s to harvest [[honeycomb]].}}
{{History|console}}
{{History||xbox=TU3|xbone=CU1|ps=1.0|wiiu=Patch 1|switch=1.0.1|[[File:Shears JE1 BE1.png|32px]] Added shears.}}
{{History||xbox=TU69|xbone=none|ps=1.76|wiiu=Patch 38|switch=none|Shears can now be used to turn regular [[pumpkin]]s into [[carved pumpkin]]s.}}
{{History||xbox=none|xbone=none|ps=1.90|wiiu=none|switch=none|[[File:Shears JE2 BE2.png|32px]] The texture of shears has been changed.
|Shears placed in a [[dispenser]] can now shear [[sheep]].}}
{{History|New 3DS}}
{{History||0.1.0|[[File:Shears JE1 BE1.png|32px]] Added shears.}}
{{History|foot}}
==Issues==
{{issue list}}
==Gallery==
<gallery>
File:Enchanted Shears.gif|An enchanted pair of shears.
</gallery>
==References==
{{reflist}}
==External links==
*[https://www.minecraft.net/en-us/article/taking-inventory--shears Taking Inventory: Shears] – Minecraft.net on November 20, 2019
{{Items}}
[[cs:Nůžky]]
[[de:Schere]]
[[es:Tijeras]]
[[fr:Cisailles]]
[[hu:Metszőolló]]
[[it:Cesoie]]
[[ja:ハサミ]]
[[ko:가위]]
[[nl:Schaar]]
[[pl:Nożyce]]
[[pt:Tesoura]]
[[ru:Ножницы]]
[[zh:剪刀]]
[[Category:Renewable resources]]</li></ul> | Wolves, along with Zombies, Creepers and Skeletons, no longer turn hostile by the the player when attacked in Creative mode. | ||||
1.8{{Extension DPL}}<ul><li>[[Orange Dye|Orange Dye]]<br/>{{Item
|image = Orange_Dye_JE2_BE2.png
|renewable = Yes
|stackable = Yes (64)
}}
'''Orange dye''' is a [[Dye#Quasi-Primary|quasi-primary dye]] crafted from [[Flower|orange tulips]], or by combining one [[red dye]] with one [[yellow dye]].
== Obtaining ==
=== Crafting ===
{{Crafting
|head = 1
|showname = 0
|Orange Tulip; Torchflower
|Output=Orange Dye
|type=Material
}}
{{Crafting
|Red Dye
|Yellow Dye
|Output = Orange Dye,2
|type = Material
|foot = 1
}}
=== Loot chest ===
{{#invoke:LootChest|base3|orange-dye}}
=== Trading ===
[[Wandering trader|Wandering traders]] sell 3 orange dye for an [[emerald]].
== Usage ==
{{dye usage}}
=== Crafting ingredient ===
{{crafting usage|ignore=Banner|continue=1}}
{{banner crafting usage}}
=== Loom ingredient ===
{{Banner loom usage|Orange Dye}}
=== Trading ===
Apprentice-level shepherd [[villager]]s have a 20% chance to buy 12 orange dye for an [[emerald]] as part of their trades.{{only|bedrock}}
Journeyman-level shepherd [[villager]]s have a {{frac|1|3}} chance to buy 12 orange dye for an [[emerald]].{{only|java}}
== Data values ==
=== ID ===
{{edition|java}}:
{{ID table
|edition=java
|showforms=y
|generatetranslationkeys=y
|displayname=Orange Dye
|spritetype=item
|nameid=orange_dye
|form=item
|foot=1}}
{{edition|bedrock}}:
{{ID table
|edition=bedrock
|showaliasids=y
|shownumericids=y
|showforms=y
|notshowbeitemforms=y
|generatetranslationkeys=y
|displayname=Orange Dye
|spritetype=item
|nameid=orange_dye
|aliasid=dye / 14
|id=409
|form=item
|translationkey=item.dye.orange.name
|foot=1}}
== Video ==
<div style="text-align:center">{{yt|25t7uNMOFS8}}</div>
== History ==
{{History|java beta}}
{{History||1.2|[[File:Orange Dye JE1 BE1.png|32px]] Added orange dye.}}
{{History|java}}
{{History||1.4.2|snap=12w34a|Added the ability to [[Armor#Dyeing|dye]] leather [[armor]] and [[wolf]] collars.}}
{{History||1.4.6|snap=12w49a|Orange dye can now be crafted with [[gunpowder]] to create a [[firework star]].}}
{{History||1.6.1|snap=13w19a|[[Stained clay]] can now be [[crafting|crafted]].}}
{{History||1.7.2|snap=13w36a|With the addition of the new [[flower]]s, many secondary and tertiary [[dye]]s are now primary dyes.}}
{{History|||snap=13w41a|[[Stained glass]] can now be crafted.}}
{{History||1.8|snap=14w30a|Added [[banner]]s, which can be dyed.}}
{{History||1.11|snap=16w39a|Added the ability to dye [[shulker box]]es.}}
{{History||1.12|snap=17w15a|Added the ability to dye [[bed]]s.}}
{{History||1.13|snap=17w47a|The different data values for the <code>dye</code> ID has now been split up into their own IDs.
|Prior to [[1.13/Flattening|''The Flattening'']], this [[item]]'s numeral ID was 351.}}
{{History||1.14|snap=18w43a|[[File:Orange_Dye_JE2_BE2.png|32px]] The texture of orange dye has now been changed.}}
{{History|||snap=18w44a|Orange dye can now change the text color on [[sign]]s to orange.}}
{{History|||snap=19w05a|Added the [[wandering trader]], which sells orange dye.}}
{{History|||snap=19w11a|Orange dye can now be [[trading|bought]] by shepherd villagers.}}
{{History||1.17|snap=20w45a|Orange dye can now be used to craft [[orange candle]]s.}}
{{History|||snap=21w19a|Orange dye can no longer be used to craft orange candles.}}
{{History|||snap=Pre-release 1|Orange dye can now once again be used to craft orange candles.}}
{{History||1.20 (Experimental)|link=1.19.3|snap=22w42a|Orange dye can now change the text color on [[hanging sign]]s to orange.}}
{{History||1.20<br>(Experimental)|link=1.19.4|snap=23w07a|[[Torchflower]]s can now be crafted into orange dye.}}
{{History||1.20|snap=23w12a|Orange dye can now be found in [[suspicious gravel]] and [[suspicious sand]] in [[trail ruins]].}}
{{History|||snap=23w16a|Orange dye no longer generates in [[suspicious sand]] in [[trail ruins]].|Due to the split of the archaeological loot tables for suspicious gravel within [[trail ruins]], orange dye is now common loot.}}
{{History|pocket alpha}}
{{History||v0.3.0|[[File:Orange Dye JE1 BE1.png|32px]] Added orange dye. It is currently unobtainable and serves no purpose.}}
{{History||v0.4.0|Orange dye is now [[craft]]able with rose red and dandelion yellow.
|Orange dye can now be used to craft orange [[wool]].}}
{{History||v0.8.0|snap=build 1|Orange dye is now used to craft [[cocoa bean]]s (version exclusive).}}
{{History||v0.14.0|snap=build 1|Orange dye can now be used to dye [[water]] in [[cauldron]]s.}}
{{History||unknown|The above recipe for orange dye has now been removed.}}
{{History|pocket}}
{{History||1.0.0|snap=alpha 0.17.0.1|Orange dye can now be used to dye [[shulker]]s.}}
{{History||1.1.0|snap=alpha 1.1.0.0|Orange dye can now be used to craft [[concrete powder]] and colored [[bed]]s.}}
{{History|bedrock}}
{{History||1.2.0|snap=beta 1.2.0.2|Orange dye can now be used to craft [[firework star]]s, [[stained glass]], and patterns on [[banner]]s.}}
{{History||1.4.0|snap=beta 1.2.20.1|Orange dye can now be used to craft [[balloon]]s and [[glow stick]]s.}}
{{History||1.8.0|snap=beta 1.8.0.8|Orange dye can now be used to dye [[cat]] collars.}}
{{History||1.10.0|snap=beta 1.10.0.3|Orange dye is now [[trading|sold]] by [[wandering trader]]s.
|Orange dye can now be used to dye white [[carpet]]s.
|[[File:Orange_Dye_JE2_BE2.png|32px]] The texture of orange dye has now been changed.}}
{{History||1.11.0|snap=beta 1.11.0.4|Orange dye can now be [[trading|sold]] to shepherd [[villager]]s.}}
{{History||1.16.100|snap=beta 1.16.100.56|The ID of orange dye has been changed from <code>dye/14</code> to <code>orange_dye</code>.}}
{{History|console}}
{{History||xbox=TU1|xbone=CU1|ps=1.00|switch=1.0.1|wiiu=Patch 1|[[File:Orange Dye JE1 BE1.png|32px]] Added orange dye.}}
{{History|ps4}}
{{History||1.90|[[File:Orange_Dye_JE2_BE2.png|32px]] The texture of orange dye has now been changed.}}
{{History|new 3ds}}
{{History||0.1.0|[[File:Orange_Dye_JE2_BE2.png|32px]] Added orange dye.}}
{{History|foot}}
== Issues ==
{{issue list}}
== References ==
{{Reflist}}
{{Items}}
[[cs:Oranžové barvivo]]
[[de:Oranger Farbstoff]]
[[es:Tinte naranja]]
[[fr:Teinture orange]]
[[hu:Narancssárga festék]]
[[ja:橙色の染料]]
[[ko:주황색 염료]]
[[nl:Oranje kleurstof]]
[[pl:Pomarańczowy barwnik]]
[[pt:Corante laranja]]
[[ru:Оранжевый краситель]]
[[zh:橙色染料]]
[[Category:Items]]
[[Category:Dyes]]
[[Category:Renewable resources]]</li><li>[[Cocoa Beans|Cocoa Beans]]<br/>{{Block
|image=<gallery>
Cocoa Age 0.png|Age 0 JE
Cocoa Age 1.png|Age 1 JE
Cocoa Age 2.png|Age 2 JE
</gallery>
|image2=<gallery>
Cocoa Age 0 BE.png|Age 0 BE
Cocoa Age 1 BE.png|Age 1 BE
Cocoa Age 2 BE.png|Age 2 BE
</gallery>
|transparent=Yes
|light=No
|tool=axe
|renewable=Yes
|stackable=Yes (64)
|flammable=No
|lavasusceptible=No
}} '''Cocoa beans''' are items obtained from cocoa pods and are used to plant them, as well as to craft [[dye|brown dye]] and [[cookie|cookies]].
'''Cocoa pods''' are [[Bone Meal|bonemealable]] [[plant]]s placed on [[Log|jungle log]] sides that grow cocoa beans, and can be found naturally in [[Jungle|jungles]].
==Obtaining==
In ''Java Edition'', cocoa beans are only obtained through the natural generation of cocoa pods, while in ''Bedrock Edition'', they can also be gotten in bonus chests, from [[fishing]] inside the jungle, bamboo jungle and sparse jungle biomes and during a [[trading]] with a wandering trader.
Cocoa beans come from cocoa pods, which are found on the trunks of normal-sized naturally-generated [[jungle tree]]s in [[jungle]], [[bamboo jungle]]s and [[sparse jungle]] temperate [[biome]]s.
Cocoa pods can be mined with any item, but [[axe]]s are the quickest. Fully grown cocoa pods drop 3 cocoa beans. Using a tool enchanted with Fortune does not increase the amount of cocoa beans dropped.
{{breaking row|horizontal=1|Cocoa|Axe|sword=1|link=none}}
The block itself can be obtained by inventory editing or [[add-on]]s {{in|bedrock}}.
From one to two cocoa beans can be found in 40% of bonus [[chest]]s {{in|bedrock}}.
{{LootChestItem|cocoa-beans}}
Cocoa beans can be obtained from [[fishing]] in a jungle {{in|bedrock}}.
[[Wandering trader]]s may sell 3 cocoa beans for an [[emerald]] during a [[trading]] {{in|bedrock}}.
==Usage==
===Farming===
{{main|Tutorials/Cocoa bean farming}}
Placing cocoa beans on the side of a jungle [[log]] plants a new cocoa pod. The log does not need to be attached to a tree. A cocoa pod can be placed on jungle logs, jungle [[wood]], stripped jungle logs and stripped jungle wood.
[[File:Cocoaplant farm.png|thumb|left|A somewhat efficient cocoa pod farm, minimizing space and wood use.]]
Cocoa has three stages of growth. During its first stage, the pod is small and green. In the second stage, the plant is bigger and colored tan. In its last stage, the pod is even larger and orange. The cocoa block has a 20% chance to grow a stage when receiving a [[Tick#Random tick|random tick]], giving it an average time of 5 minutes and 41 seconds per stage. When destroyed in the first two stages, the pod yields only one cocoa bean. When destroyed in the third stage, it gives 3 cocoa beans. [[Bone meal]] can be used to force the cocoa pod forward by one growth stage. Cocoa pods burst and drop their beans when struck by flowing water, pushed by a piston or if their [[log]] or wood are removed by any means.
===Composting===
Placing cocoa beans into a [[composter]] has a 65% chance of raising the compost level by 1. {{IN|bedrock}}, cocoa beans are accepted as a direct substitute of brown dye in many recipes.
===Crafting ingredient===
{{crafting usage}}
{{Dye usage}}
{{IN|bedrock}}, cocoa beans can be also used in banner patterns:
{{banner crafting usage}}
{{Banner loom usage|Cocoa Beans}}
==Sounds==
{{Sound table/Block/Wood}}
==Data values==
===ID===
{{edition|java}}:
{{ID table
|edition=java
|showforms=y
|generatetranslationkeys=y
|displayname=Cocoa
|spritetype=block
|nameid=cocoa
|form=block}}
{{ID table
|displayname=Cocoa Beans
|spritetype=item
|nameid=cocoa_beans
|form=item
|foot=1}}
{{edition|bedrock}}:
{{ID table
|edition=bedrock
|showforms=y
|showaliasids=y
|shownumericids=y
|generatetranslationkeys=y
|displayname=Cocoa
|spritetype=block
|nameid=cocoa
|id=127
|form=block}}
{{ID table
|displayname=Cocoa Beans
|spritetype=item
|nameid=cocoa_beans
|aliasid=dye / 3
|id=412
|form=item
|translationkey=item.dye.brown.name
|foot=1}}
===Block states===
{{see also|Block states}}
{{/BS}}
==History==
''For a more in-depth breakdown of changes to textures and models, including a set of renders for each state combination, see [[/Asset history]]''
{{History|java beta}}
{{History||1.2|[[File:Cocoa Beans JE1 BE1.png|32px]] Added cocoa beans.
|Cocoa beans are currently obtainable only through an inventory editor.}}
{{History||1.2_02|Prior to this, Cocoa Beans were misspelled as 'Coco Beans'.}}
{{History||1.4|Cocoa beans have been formally brought into the game as a reward found in [[dungeon]] chests.<ref>{{tweet|notch|53161729990987776}}</ref> (53% chance) Also, brown [[sheep]] now naturally spawn, making brown [[wool]] obtainable without hacking the game.
|Cocoa beans can now be used to craft [[cookie]]s.}}
{{History|java}}
{{History||May 8, 2012|link={{tweet|jeb|199867730927697920}}|[[Jeb]] revealed cocoa with a screenshot.}}
{{History||1.3.1|snap=12w18a|For only this snapshot, cocoa beans have been given a small (0.5%) chance of dropping from destroyed [[jungle tree]] [[leaves]] in a similar fashion to [[apple]]s from oak leaves, which makes cocoa beans [[renewable resource|renewable]] for the first time.}}
{{History|||snap=12w19a|[[File:Cocoa Age 0 (S) JE1.png|32px]] [[File:Cocoa Age 1 (S) JE1.png|32px]] [[File:Cocoa Age 2 (S) JE1.png|32px]] Added cocoa. The top textures of cocoa always keep a completely constant rotation, regardless of what direction they face. They also not shaded.
|[[File:Cocoa Beans JE2.png|32px]] The texture of cocoa beans has been changed.
|Cocoa has replaced jungle [[leaves]] as the main method of finding cocoa beans.
|[[File:Cocoa Age 3 (S) JE1.png|32px]] Cocoa with values 12–15 is inaccessible normally, and use the texture of the [[dragon egg]]. This is due to the dragon egg texture being to the left of the ripe cocoa texture in <samp>[[terrain.png]]</samp>, as cocoa textures are arranged with the oldest on the left and the youngest on the right, resulting in the unusually ripe cocoa reading the dragon egg texture.}}
{{History|||snap=1.3|[[File:Cocoa Beans JE3 BE2.png|32px]] The texture of cocoa beans has been changed.}}
{{History||1.4.2|snap=12w34a|Cocoa beans have been given the ability to [[Armor#Dyeing|dye]] leather [[armor]] and [[wolf]] collars.}}
{{History||1.4.6|snap=12w49a|Cocoa beans can now be [[crafting|crafted]] with [[gunpowder]] to create a [[firework star]].}}
{{History||1.5|snap=13w02a|Due to textures being stored in individual files, cocoa beans with data 12–15 no longer have a texture to use, and now crash the game if a [[chunk]] containing one is loaded.}}
{{History|||snap=13w03a|Cocoa with data values 12–15 now only crash the game if one is directly in the field of view.}}
{{History|||snap=13w04a|[[Bone meal]] now grows cocoa by only one stage.}}
{{History|||snap=13w10a|[[File:Cocoa Age 3 (S) JE2.png|32px]] Cocoa with data 12–15 now use the age 2 texture, resulting in a broken appearance, preventing previously mentioned crashes.}}
{{History||1.6.1|snap=13w18a|Cocoa beans have been removed from [[dungeon]] [[chest]]s.}}
{{History|||snap=13w19a|Brown [[Terracotta|stained clay]] can now be [[crafting|crafted]] using cocoa beans.}}
{{History||1.7.2|snap=13w41a|Brown [[stained glass]] can now be crafted using cocoa beans.}}
{{History||1.8|snap=14w07a|[[File:Cocoa Age 0 (S) JE2.png|32px]] [[File:Cocoa Age 1 (S) JE2.png|32px]] [[File:Cocoa Age 2 (S) JE2.png|32px]] [[File:Missing Model JE1.png|32px]] The top textures of cocoa now rotate with the blocks themselves (cocoa facing north remaining visually unaffected), and cocoa of age 3 has [[Missing model|no model]].}}
{{History|||snap=14w10a|[[File:Cocoa Age 0 (S) JE3.png|32px]] [[File:Cocoa Age 1 (S) JE3.png|32px]] [[File:Cocoa Age 2 (S) JE3.png|32px]] [[File:Missing Model JE2.png|32px]] The large section of cocoa is shaded, and the missing model (which age 3 cocoa uses) has changed.}}
{{History|||snap=14w25a|[[File:Cocoa Age 0 (S) JE4.png|32px]] [[File:Cocoa Age 1 (S) JE4.png|32px]] [[File:Cocoa Age 2 (S) JE4.png|32px]] The connecting region of cocoa is now shaded.}}
{{History|||snap=14w26a|Cocoa with data 12–15 has been effectively removed from the game, as such blocks now convert to a proper value with {{cmd|setblock}}. Loading worlds with existing out of range cocoa crash the game.}}
{{History|||snap=14w30a|Cocoa beans can now be used to dye [[banner]]s.}}
{{History||1.13|snap=17w47a|The different data values for the <code>dye</code> ID have been split up into their own IDs.
|Prior to [[1.13/Flattening|''The Flattening'']], this block's and item's numeral ID were respectively 127 and 351.}}
{{History||1.14|snap=18w43a|Cocoa beans can now be used to craft [[brown dye]].
|Cocoa beans can no longer be used as a [[dye]].
|All of the dye-related functions and crafting recipes of cocoa beans (except cookies) have been transferred to brown dye.
|"Cocoa Beans" item has been renamed to "Cocoa".
|[[File:Cocoa Beans JE4 BE3.png|32px]] The texture of cocoa has been changed.
|[[File:Cocoa Age 0 (S) JE5.png|32px]] [[File:Cocoa Age 1 (S) JE5.png|32px]] [[File:Cocoa Age 2 (S) JE5.png|32px]] The textures of cocoa have been changed.
|[[File:Cocoa Age 0 (texture) JE2 BE2.png|32px]] [[File:Cocoa Age 1 (texture) JE2 BE2.png|32px]] Textures for cocoa age 0 and 1 has palette left, visible only on particles.
|Cocoa now has a placement [[sound]].}}
{{History|||snap=19w03a|Placing cocoa into the new [[composter]] has a 50% chance of raising the compost level by 1.}}
{{History|||snap=19w05a|Cocoa now has a 65% chance of increasing the compost level in a composter by 1.}}
{{History|||snap=19w11b|"Cocoa" item has been renamed back to "Cocoa Beans".{{verify|was this not just one bug that affected other crops as well? if so cite the ticket and add to all other affected pages}}}}
{{History||1.18|snap=Pre-release 5|[[File:Cocoa Age 0 (texture) JE3 BE3.png|32px]] [[File:Cocoa Age 1 (texture) JE3 BE3.png|32px]] Textures for cocoa age 0 and 1 were changed. This visually changes only particles.}}
{{History||1.19|snap=22w11a|[[File:Cocoa Age 2 (S) JE6.png|32px]] The texture and model of cocoa age 2 have been changed.}}
{{History|pocket alpha}}
{{History||v0.3.0|[[File:Cocoa Beans JE1 BE1.png|32px]] Added cocoa beans. They are currently unobtainable and serve no purpose.}}
{{History||v0.8.0|snap=build 1|[[File:Cocoa Beans JE3 BE2.png|32px]] The texture of cocoa beans has been changed.
|Cocoa beans can be [[crafted]] from an [[orange dye]] and an [[ink sac]], or from [[dandelion yellow]], [[rose red]], and an ink sac, despite there being no way of obtaining ink sacs at the time.}}
{{History|||snap=build 3|Cocoa beans are now available in [[creative]].}}
{{History||v0.9.0|snap=build 1|[[File:Cocoa Age 0 (S) JE1.png|32px]] [[File:Cocoa Age 1 (S) JE1.png|32px]] [[File:Cocoa Age 2 (S) JE1.png|32px]] {{info needed|How did 12-16 appear?}} Added cocoa.
|Cocoa provides an additional way of obtaining cocoa beans.
|Cocoa beans are now used to craft [[cookie]]s.}}
{{History||v0.11.0|snap=build 14|Cocoa now grows over time.<ref>{{bug|MCPE-7887}}</ref>}}
{{History||?|[[File:Cocoa Age 0 (S) BE4.png|32px]] [[File:Cocoa Age 1 (S) BE4.png|32px]] [[File:Cocoa Age 2 (S) BE2.png|32px]] Cocoa no longer has a stem connecting it to the log.}}
{{History||v0.15.0|snap=Realms build 4|[[File:Cocoa Age 0 (S) JE1.png|32px]] [[File:Cocoa Age 1 (S) JE1.png|32px]] [[File:Cocoa Age 2 (S) JE1.png|32px]] Cocoa stems now render again.<ref>{{bug|MCPE-13579}}</ref>}}
{{History||v0.16.0|snap=build 1|Cocoa beans can no longer be crafted from [[orange dye]] and an ink sac.
|Cocoa beans can no longer be crafted from rose red, dandelion yellow and ink sacs.}}
{{History|pocket}}
{{History||1.0.0|snap=alpha 0.17.0.1|Cocoa beans can now be used to dye [[shulker]]s.}}
{{History||1.1.0|snap=alpha 1.1.0.0|Cocoa beans can now be used to dye [[shulker box]]es and [[bed]]s.
|Cocoa beans can now be used to craft [[concrete powder]].}}
{{History|bedrock}}
{{History||1.2.0|snap=beta 1.2.0.2|Cocoa beans can now be used to dye [[banner]]s, [[firework star]]s, and [[glass]].
|Cocoa beans can now be found in [[bonus chest]]s.}}
{{History||1.4.0|snap=beta 1.2.20.1|Cocoa beans can now be used to craft brown [[balloon]]s and [[glow stick]]s.}}
{{History||1.8.0|snap=beta 1.8.0.10|Cocoa beans can now be used to craft [[brown dye]].}}
{{History||1.10.0|snap=beta 1.10.0.3|Cocoa beans are now [[trading|sold]] by [[wandering trader]]s.
|[[File:Cocoa Beans JE4 BE3.png|32px]] The texture of cocoa beans has been changed.
|[[File:Cocoa Age 0 (S) BE4.png|32px]] [[File:Cocoa Age 1 (S) BE4.png|32px]] [[File:Cocoa Age 2 (S) BE4.png|32px]] The textures of cocoa have been changed.}}
{{History||1.11.0|snap=beta 1.11.0.1|Cocoa beans can now be used to fill up [[composter]]s.}}
{{History||1.16.100|snap=beta 1.16.100.56|The ID of cocoa beans has been changed from <code>dye/3</code> to <code>cocoa_beans</code>.}}
{{History||1.18.10|snap=beta 1.18.10.22|[[File:Cocoa Age 0 (texture) JE3 BE3.png|32px]] [[File:Cocoa Age 1 (texture) JE3 BE3.png|32px]] Textures for cocoa age 0 and 1 were changed. This visually changes only particles.}}
{{History|console}}
{{History||xbox=TU1|xbone=CU1|ps=1.0|wiiu=Patch 1|switch=1.0.1|[[File:Cocoa Beans JE1 BE1.png|32px]] Added cocoa beans.}}
{{History||xbox=TU9|[[File:Cocoa Beans JE3 BE2.png|32px]] The texture of cocoa beans has been changed.}}
{{History||xbox=TU12|[[File:Cocoa Age 0 (S) JE3.png|32px]] [[File:Cocoa Age 1 (S) JE3.png|32px]] [[File:Cocoa Age 2 (S) JE3.png|32px]]{{verify|Were these the models used?}} Added cocoa.}}
{{History||xbox=none|xbone=none|ps=1.90|wiiu=none|switch=none|[[File:Cocoa Beans JE4 BE3.png|32px]] The texture of cocoa beans has been changed once again.
|[[File:Cocoa Age 0 (S) JE5.png|32px]] [[File:Cocoa Age 1 (S) JE5.png|32px]] [[File:Cocoa Age 2 (S) JE5.png|32px]]{{verify|Were these the models used?}} The textures of cocoa have been changed.}}
{{History|new 3ds}}
{{History||0.1.0|[[File:Cocoa Beans JE3 BE2.png|32px]] Added cocoa beans.
|[[File:Cocoa Age 0 (S) JE3.png|32px]] [[File:Cocoa Age 1 (S) JE3.png|32px]] [[File:Cocoa Age 2 (S) JE3.png|32px]]{{verify|Were these the models used?}} Added cocoa.}}
{{History|foot}}
=== Cocoa "item" ===
{{:Technical blocks/Cocoa}}
== Issues ==
{{issue list|Cocoa Beans|Cocoa Pod}}
== Trivia ==
*Cocoa pods have a different hitbox for each size; however, the top is always 0.25 blocks below the top of the [[log]] it is on.
*If a cocoa pod grows while the player is standing next to it, the player is forced into the appropriate form of [[suffocation prevention]] depending on available space.
*{{IN|be}}, the pixels on top of the fully grown pod are 8/7 the size of those on the side.<ref>{{bug|MC-109055||Fixed}}</ref><ref>{{bug|MCPE-152862}}</ref>
== Gallery ==
<gallery>
CocoaReveal.png|The first screenshot of cocoa pods tweeted by [[Jens Bergensten]], which revealed the plants.
CocoaPlant.png|A screenshot tweeted by Jens Bergensten, showing the pod.
Cocoa Plants in a Jungle Biome (12w19a).png|Naturally generated cocoa pods.
CPlantsJWood.png|A cocoa pod farm.
Cocoa2.jpg|A cocoa farm.
Cocoa beans phases.png|Three growing phases of the cocoa pod.
AreaOptimizedBeanPods.gif|A log and pod layout for optimizing an example area of 14×14 (including walls).
File:CocoaBean15.png|Cocoa beans with values greater than 12 appeared this way
</gallery>
==Literature==
===References===
{{reflist}}
===External Links===
*[https://www.minecraft.net/en-us/article/taking-inventory--cocoa-beans Taking Inventory: Cocoa Beans] – Minecraft.net on December 5, 2019
{{Items}}
{{Blocks|vegetation}}
[[Category:Dyes]]
[[Category:Food]]
[[Category:Plants]]
[[Category:Renewable resources]]
[[Category:Non-solid blocks]]
[[Category:Natural blocks]]
[[cs:Kakaové boby]]
[[de:Kakaobohnen]]
[[es:Semillas de cacao]]
[[fr:Fèves de cacao]]
[[hu:Kakaóbab]]
[[ja:カカオ豆]]
[[ko:코코아 콩]]
[[nl:Cacaobonen]]
[[pl:Ziarna kakaowe]]
[[pt:Sementes de cacau]]
[[ru:Какао-бобы]]
[[uk:Какао-боби]]
[[zh:可可豆]]</li></ul> | 14w02a | Baby wolves growth can be accelerated using raw or cooked chicken, raw or cooked porkchop, raw or cooked beef and rotten flesh. | |||
| 14w10a | Wolves (both wild and tamed) now chase and attack both regular and Wither skeletons. | ||||
| Tamed Wolves named using a name tag now display death messages to the owner. | |||||
| pocketa | |||||
0.9.0{{Extension DPL}}<ul><li>[[:Category:Combat|Category:Combat]]<br/>[[Category:Items]]
[[fr:Catégorie:Combat]]
[[zh:Category:武器]]</li><li>[[Item Frame|Item Frame]]<br/>{{redirect|Frame}}
{{ItemEntity
| group = Item Frame
| 1-1 = Item Frame.png
| 1-2 = Item Frame (item).png
| group2 = Glow Item Frame
| 2-1 = Glow Item Frame.png
| 2-2 = Glow Item Frame (item).png
| extratext = [[#Renders|View all renders]]
| renewable = Yes
| stackable = Yes (64)
| drops = {{ItemLink|Item Frame}} (1)<br>
or
{{ItemLink|Glow Item Frame}} (1)<br>{{EnvSprite|items}} The item it contains.
}}
An '''item frame''' is an [[entity]]{{only|java|short=y}} or [[block entity]]{{only|bedrock|short=y}} that displays the item or block that is inside it.
A '''glow item frame''' keeps itself and the item inside it illuminated, even in the dark.
== Obtaining ==
=== Breaking ===
{{IN|je}}, an empty item frame can be broken simply by punching it. If the item frame contains an item, punching it drops the item, leaving the frame on the wall.
Because item frames are [[entities]] {{in|java}}, they can be broken in [[Adventure]] mode. They will also be targeted by commands using the @e selector.{{only|java}}
=== Natural generation ===
An item frame containing a pair of [[elytra]] generates in each [[end ship]].
[[File:BoatElytra.png|thumb|An item frame naturally generating in an end ship.]]
=== Crafting ===
{{Crafting
|head=1
|A1= Stick |B1= Stick |C1= Stick
|A2= Stick |B2= Leather |C2= Stick
|A3= Stick |B3= Stick |C3= Stick
|Output= Item Frame
|type= Decoration block
}}
{{Crafting
|foot=1
|Glow Ink Sac
|Item Frame
|Output= Glow Item Frame
|type= Decoration block
}}
=== Trading ===
Expert-level [[Trading#Cartographer|cartographer]] [[villager]]s have a chance to sell an item frame for 7 [[emerald]]s.
== Usage ==
=== Item display ===
[[File:Item Frame (map filled partial).png|thumb|150px|Item frame with partially filled map]]
Item frames can be placed on the sides of [[cactus]] blocks, [[pressure plate]]s, [[fence]]s, [[tree]]s, [[slab]]s, [[cobblestone wall]]s, [[chest]]s, [[door]]s, and all [[solid block]]s. They can also be placed on the top and bottom of these blocks. To place on chests and doors, the player needs to be [[sneaking]]. As item frames are an entity, multiple item frames can occupy the same block, although on different faces. It also allows non-solid blocks to occupy the same space.{{only|java}}
Players can place items in the frame by {{control|using}} the item. If a [[map]] is placed in an item frame, it enlarges to show the map in the size of a full block, with the item frame's location displayed as a green pointer on the map, pointing in the direction the item frame is facing. If this is done in the Nether, the green cursor spins around similar to the white cursor (players). If an item in an item frame has been renamed using an [[anvil]], it displays its custom name when the cursor is over the item frame. If the player places a block inside the frame, it is displayed in miniature half in, half out of the block. This can be most notably seen on stairs or slabs.
{{control|Pick block}} may be used on item frames by players in creative mode only, the control has no effect for players in Survival or Adventure mode. When the item frame is displaying an item, {{control|pick block}} picks the displayed item instead of the item frame.
Item frames can be placed on the lid of a [[shulker box]] that is positioned horizontally, but pop off when the lid is opened.{{only|java}}
=== Rotation ===
The displayed item can then be rotated by right-clicking the frame. Items displayed in the item frame can turn 45° diagonally, with a total of 8 possibilities (90° and 4 possibilities if it is a map), and the frame outputs a [[Mechanics/Redstone/Circuit#Power level|redstone signal]] depending on the rotation phase that can be interpreted by a [[redstone comparator]] (note that this rotation value is separate from the clock or compass rotation). As long as the frame remains placed, it remembers the orientation of the last item it held, and uses it for the next item it holds.{{only|java}}
=== Glow item frames ===
[[File:Item Frames Comparison.png|thumb|260px|Comparison between ordinary item frame and glow item frame in the dark.]]
When an item is placed inside a glow item frame, it appears to glow, even though it does not emit any [[light level]].
== Sounds ==
Item frames and glow item frames share the same sounds.
=== Generic ===
{{Edition|Bedrock}}:<!--Item frames are blocks in BE, so they get the generic section.-->
{{Sound table/Block/Item frame/BE}}
=== Unique ===
{{Edition|Java}}:
{{Sound table
|rowspan=2
|sound=Item Frame add item1.ogg
|sound2=Item Frame add item2.ogg
|soumd3=Item Frame add item3.ogg
|sound4=Item Frame add item4.ogg
|subtitle=Item Frame fills
|source=neutral
|description=When an item is placed in an item frame
|id=entity.item_frame.add_item
|translationkey=subtitles.entity.item_frame.add_item
|volume=1.0
|pitch=1.0
|distance=16}}
{{Sound table
|subtitle=Glow Item Frame fills
|source=neutral
|description=When an item is placed in a glow item frame
|id=entity.glow_item_frame.add_item
|translationkey=subtitles.entity.glow_item_frame.add_item
|volume=1.0
|pitch=1.0
|distance=16}}
{{Sound table
|rowspan=2
|sound=Item Frame break1.ogg
|sound2=Item Frame break2.ogg
|sound3=Item Frame break3.ogg
|subtitle=Item Frame breaks<ref group=sound name=breaks>{{bug|MC-194948}}</ref>
|source=neutral
|description=When an item frame is broken or pops off
|id=entity.item_frame.break
|translationkey=subtitles.entity.item_frame.break
|volume=1.0
|pitch=1.0
|distance=16}}
{{Sound table
|subtitle=Glow Item Frame breaks<ref group=sound name=breaks/>
|source=neutral
|description=When a glow item frame is broken or pops off
|id=entity.glow_item_frame.break
|translationkey=subtitles.entity.glow_item_frame.break
|volume=1.0
|pitch=1.0
|distance=16}}
{{Sound table
|rowspan=2
|sound=Item Frame place1.ogg
|sound2=Item Frame place2.ogg
|sound3=Item Frame place3.ogg
|sound4=Item Frame place4.ogg
|subtitle=Item Frame placed
|source=neutral
|description=When an item frame is placed
|id=entity.item_frame.place
|translationkey=subtitles.entity.item_frame.place
|volume=1.0
|pitch=1.0
|distance=16}}
{{Sound table
|subtitle=Glow Item Frame placed
|source=neutral
|description=When a glow item frame is placed
|id=entity.glow_item_frame.place
|translationkey=subtitles.entity.glow_item_frame.place
|volume=1.0
|pitch=1.0
|distance=16}}
{{Sound table
|rowspan=2
|sound=Item Frame remove item1.ogg
|sound2=Item Frame remove item2.ogg
|sound3=Item Frame remove item3.ogg
|sound4=Item Frame remove item4.ogg
|subtitle=Item Frame empties
|source=neutral
|description=When an item is removed from an item frame
|id=entity.item_frame.remove_item
|translationkey=subtitles.entity.item_frame.remove_item
|volume=1.0
|pitch=1.0
|distance=16}}
{{Sound table
|subtitle=Glow Item Frame empties
|source=neutral
|description=When an item is removed from a glow item frame
|id=entity.glow_item_frame.remove_item
|translationkey=subtitles.entity.glow_item_frame.remove_item
|volume=1.0
|pitch=1.0
|distance=16}}
{{Sound table
|rowspan=2
|sound=Item Frame rotate item1.ogg
|sound2=Item Frame rotate item2.ogg
|sound3=Item Frame rotate item3.ogg
|sound4=Item Frame rotate item4.ogg
|subtitle=Item Frame clicks
|source=neutral
|description=When an item is rotated in an item frame
|id=entity.item_frame.rotate_item
|translationkey=subtitles.entity.item_frame.rotate_item
|volume=1.0
|pitch=1.0
|distance=16}}
{{Sound table
|subtitle=Glow Item Frame clicks
|source=neutral
|description=When an item is rotated in an item frame
|id=entity.glow_item_frame.rotate_item
|translationkey=subtitles.entity.glow_item_frame.rotate_item
|volume=1.0
|pitch=1.0
|distance=16
|foot=1}}
{{Edition|Bedrock}}:
{{Sound table
|type=bedrock
|sound=Item Frame add item1.ogg
|sound2=Item Frame add item2.ogg
|soumd3=Item Frame add item3.ogg
|sound4=Item Frame add item4.ogg
|source=block
|description=When an item is placed in an item frame
|id=block.itemframe.add_item
|volume=1.0
|pitch=1.0}}
{{Sound table
|sound=Item Frame remove item1.ogg
|sound2=Item Frame remove item2.ogg
|sound3=Item Frame remove item3.ogg
|sound4=Item Frame remove item4.ogg
|source=block
|description=When an item is removed from an item frame
|id=block.itemframe.remove_item
|volume=1.0
|pitch=1.0}}
{{Sound table
|sound=Item Frame rotate item1.ogg
|sound2=Item Frame rotate item2.ogg
|sound3=Item Frame rotate item3.ogg
|sound4=Item Frame rotate item4.ogg
|source=block
|description=When an item is rotated in an item frame
|id=block.itemframe.rotate_item
|volume=1.0
|pitch=1.0
|foot=1}}
== Achievements ==
{{load achievements|Map room}}
== Data values ==
=== ID ===
{{edition|java}}:
{{ID table
|edition=java
|firstcolumnname=Item
|showforms=y
|generatetranslationkeys=y
|displayname=Item Frame
|spritetype=item
|nameid=item_frame
|form=item}}
{{ID table
|displayname=Glow Item Frame
|spritetype=item
|nameid=glow_item_frame
|form=item
|foot=1}}
{{ID table
|edition=java
|firstcolumnname=Entity
|generatetranslationkeys=y
|displayname=Item Frame
|spritetype=entity
|nameid=item_frame}}
{{ID table
|displayname=Glow Item Frame
|spritetype=entity
|nameid=glow_item_frame
|foot=1}}
{{edition|bedrock}}:
{{ID table
|edition=bedrock
|firstcolumnname=Item Frame
|shownumericids=y
|showforms=y
|generatetranslationkeys=y
|displayname=Item
|spritename=item-frame
|spritetype=item
|nameid=frame
|id=513
|form=item}}
{{ID table
|displayname=Block
|spritename=item-frame
|spritetype=block
|nameid=frame
|id=199
|form=block
|translationkey=-
|itemform=item.frame}}
{{ID table
|displayname=Item
|spritename=glow-item-frame
|spritetype=item
|nameid=glow_frame
|id=623
|form=item}}
{{ID table
|displayname=Block
|spritename=glow-item-frame
|spritetype=block
|nameid=glow_frame
|form=block
|id=594
|itemform=item.glow_frame
|translationkey=-
|foot=1}}
{{ID table
|notnamespaced=y
|displayname=Block entity
|spritename=item-frame
|spritetype=block
|nameid=ItemFrame}}
{{ID table
|displayname=Block entity
|spritename=glow-item-frame
|spritetype=block
|nameid=GlowItemFrame
|foot=1}}
=== Block states===
{{see also|Block states}}
{{/BS}}<br />
===Item data===
{{el|java}}:{{main|Player.dat format}}<div class="treeview">
*{{nbt|compound|tag}}'''<span data-ve-ignore="true" class="nowrap"> tag</span>''': The item's '''tag''' tag.
{{:Player.dat_format/Entity Spawners}}Unlike spawn eggs, cannot change the type of entity created using the <code>id</code> tag. Data that item frames do not normally use (see below) has no effect.
</div>
===Entity data===
{{main|Entity format}}
{{IN|java}}, item frames have entity data that define various properties of the entity.
{{/ED}}
===Block data===
{{IN|bedrock}}, an item frame has a block entity associated with it that holds additional data about the block.
See [[Bedrock Edition level format/Block entity format]].
== Video==
<div style="text-align:center">{{yt|rJLj95DBb-w}}</div>
==History==
{{History|java}}
{{History||August 15, 2012|link={{tweet|Dinnerbone|235724805196877824}}|[[File:Item Frame (pre-release).png|32px]] [[Dinnerbone]] showed the first image of item frames.}}
{{History||August 15, 2012|link={{tweet|Dinnerbone|235742974271700993}}|[[File:Item Frame (item) (pre-release).png|32px]] Dinnerbone showed item frame in item form.}}
{{History||August 15, 2012|link={{tweet|jeb_|235746335368814592}}|[[File:Item Frame (pre-release 2).png|32px]] [[Jeb]] showed the item frames with new model.}}
{{History||August 16, 2012|link={{tweet|Dinnerbone|236062188555624448}}|[[File:Item Frame (item) JE1 BE1.png|32px]] Dinnerbone showed the item frame in item form with new texture.}}
{{History||1.4.2|snap=12w34a|[[File:Item Frame JE1 BE1.png|32px]] [[File:Item Frame (item) JE1 BE1.png|32px]] Added item frames.
|There is currently a bug where attempting to place an item frame in [[multiplayer]] causes an internal server error, as well as other bugs.}}
{{History|||snap=12w34b|The multiplayer item frame bug has been fixed.}}
{{History|||snap=12w38a|Item frames no longer despawn when the [[player]] moves 20 [[block]]s away.}}
{{History||1.7.2|snap=13w36a|Items renamed using an [[anvil]] now display their name when looked at up close.}}
{{History|||snap=13w38a|[[Map]]s placed in an item frame now cover the whole block face, allowing seamless tiling of adjacent maps. This makes undiscovered areas of maps invisible.}}
{{History|||snap=13w43a|[[File:Item Frame (map) JE1 BE1.png|32px]] Incomplete maps placed in item frames now display the item frame texture underneath.}}
{{History||1.8|snap=14w04a|[[Item]]s and [[block]]s displayed in the item frame now rotate 45 degrees when rotated instead of 90 degrees, and a [[comparator]] outputs a [[redstone]] signal depending on the rotation phase.}}
{{History|||snap=14w10a|Multiple item frames can no longer be placed on the same block face.}}
{{History||1.9|snap=15w41a|An item frame now generates in the treasure room of [[end ship]]s, above the [[shulker]] that guards the treasure. It holds [[elytra]].}}
{{History|||snap=15w49a|Item frames are no longer destroyed by [[lightning]] bolts.}}
{{History|||snap=15w50a|Added [[sound]]s to item frames: <code>entity.itemframe.add_item</code>, <code>entity.itemframe.break</code>, <code>entity.itemframe.place</code>, <code>entity.itemframe.remove_item</code>, and <code>entity.itemframe.rotate_item</code>.}}
{{History||1.11|snap=16w32a|The [[entity]] ID of item frames has been changed from <code>ItemFrame</code> to <code>item_frame</code>.}}
{{History||1.13|snap=17w47a|Prior to [[1.13/Flattening|''The Flattening'']], this [[item]]'s numeral ID was 389.}}
{{History|||snap=17w50a|Item frames can now be put on floors and ceilings.}}
{{History||1.14|snap=18w43a|[[File:Item Frame JE2 BE2.png|32px]] [[File:Item Frame (map) JE2 BE2.png|32px]] [[File:Item Frame (item) JE2 BE2.png|32px]] The textures of item frames have been changed.}}
{{History|||snap=19w11a|Item frames are now [[trading|sold]] by cartographer [[villager]]s.}}
{{History||1.15|snap=19w38a|[[File:Item Frame 19w38a.png|32px]] [[File:Item Frame Map 19w38a.png|32px]] Item frames now appear dark, same as suffocating [[mob]]s.<ref>{{bug|mc-161283|||Fixed}}</ref>}}
{{History|||snap=19w39a|Item frames are now colored correctly.}}
{{History||1.16|snap=20w10a|The NBT <code>Invisible</code> and <code>Fixed</code> have been added to item frames.}}
{{History||1.17|snap=21w03a|[[File:Glow Item Frame JE1 BE3.png|32px]] [[File:Glow Item Frame (map) JE1 BE3.png|32px]] [[File:Glow Item Frame (item) JE1 BE1.png|32px]] Added glow item frames.}}
{{History|||snap=21w10a|Added new [[subtitles]] for glow item frames.}}
{{History||1.18|snap=21w41a|[[File:Item Frame (item) JE3.png|32px]] [[File:Glow Item Frame (item) JE2.png|32px]] The textures of item frames and glow item frames as item have been changed.}}
{{History||1.19|snap=22w15a|Item frames now adjusts its hitbox to account for the larger size of a framed [[map]].}}
{{History|||snap=Pre-release 3|Reverted the change in 22w15a.}}
{{History|pocket alpha}}
{{History||v0.14.0|snap=build 1|[[File:Item Frame JE1 BE1.png|32px]] [[File:Item Frame (map) JE1 BE1.png|32px]] [[File:Item Frame (item) JE1 BE1.png|32px]] Added item frames.
|Item frames are considered as a [[block entity]] instead of an [[entity]].<ref>{{tweet|_tomcc|690127591525728257|Let's create some drama: ItemFrames in MCPE will behave like signs and won't be placeable in blocks, and can't put many in the same block.|21 Jan 2016}}</ref>}}
{{History|pocket}}
{{History||1.0.0|snap=alpha 0.17.0.1|An item frame containing [[elytra]] now generates in [[end city]] ships.}}
{{History|bedrock}}
{{History||1.10.0|snap=beta 1.10.0.3|[[File:Item Frame JE2 BE2.png|32px]] [[File:Item Frame (map) JE2 BE2.png|32px]] [[File:Item Frame (item) JE2 BE2.png|32px]] The textures of item frames have been changed.}}
{{History||1.11.0|snap=beta 1.11.0.4|Item frames can now be [[trading|bought]] from cartographer [[villager]]s.}}
{{History||1.13.0|snap=beta 1.13.0.9|Item frames can now be placed on the top and bottom of [[block]]s.}}
{{History||1.16.0|snap=beta 1.16.0.57|Trading has been changed, item frames are now offered by expert-level cartographer villager.}}
{{History||Caves & Cliffs (experimental)|link=Bedrock Edition 1.17.0|snap=beta 1.16.210.59|[[File:Item Frame.png|32px]] [[File:Item Frame (map) JE2 BE2.png|32px]] [[File:Glow Item Frame (item) JE1 BE1.png|32px]] Added glow item frames.
|Has the default item frame block texture.}}
{{History|||snap=beta 1.16.210.60|Temporarily removed glow item frames due to a crash.}}
{{History|||snap=beta 1.16.220.50|[[File:Item Frame JE2 BE2.png|32px]] [[File:Item Frame (map) JE2 BE2.png|32px]] [[File:Glow Item Frame (item) JE1 BE1.png|32px]] Re-added glow item frames.}}
{{History|||snap=beta 1.16.220.52|[[File:Glow Item Frame BE2.png|32px]] [[File:Glow Item Frame (map) BE2.png|32px]] Glow Item Frame block texture uses update block texture due to a bug.}}
{{History||1.17.0|snap=beta 1.16.230.52|[[File:Item Frame.png|32px]] [[File:Item Frame (map) JE2 BE2.png|32px]] The glow item frame block textures have been reverted back to the previous one.}}
{{History|||snap=beta 1.17.0.50|[[File:Glow Item Frame JE1 BE3.png|32px]] [[File:Glow Item Frame (map) JE1 BE3.png|32px]] The textures of glow item frames have been changed to match Java Edition.
|Now produces [[redstone]] signals.}}
{{History|||snap=beta 1.17.0.52|Maps now glow in glow item frames.
|Glow Item Frames are no longer available only through [[Experimental Gameplay]].}}
{{History||1.18.10|snap=beta 1.18.10.20|[[File:Item Frame (item) JE3.png|32px]] [[File:Glow Item Frame (item) JE2.png|32px]] The textures of item frames and glow item frames as item have been changed.}}
{{History|console}}
{{History||xbox=TU9|xbone=CU1|ps=1.0|wiiu=Patch 1|switch=1.0.1|[[File:Item Frame LCE1.png|32px]] [[File:Item Frame (item) JE1 BE1.png|32px]] Added item frames.}}
{{History||xbox=TU11|The limit for item frames in a world has been increased. A message is now displayed when the maximum number of item frames are reached.}}
{{History||xbox=TU12|[[File:Item Frame JE1 BE1.png|32px]] The entity texture of item frames has been changed.}}
{{History||xbox=TU31|xbone=CU19|ps=1.22|wiiu=Patch 3|[[Item]]s and [[block]]s displayed in the item frame now rotate 45 degrees when rotated instead of 90 degrees, and a [[redstone comparator|comparator]] now outputs a [[redstone]] signal depending on the rotation phase.}}
{{History||xbox=TU43|xbone=CU33|ps=1.36|wiiu=Patch 13|Added [[sound]]s for item frames.}}
{{History||xbox=TU56|xbone=CU47|ps=1.55|wiiu=Patch 26|switch=1.0.6|If the [[item]] in the item frame has a name (from an [[anvil]]) it now shows as if there is a name tag on the item frame.}}
{{History||xbox=none|xbone=none|ps=1.90|wiiu=none|switch=none|[[File:Item Frame JE2 BE2.png|32px]] [[File:Item Frame (map) JE2 BE2.png|32px]] [[File:Item Frame (item) JE2 BE2.png|32px]] The textures of item frames have been changed.}}
{{History|new 3ds}}
{{History||0.1.0|[[File:Item Frame JE1 BE1.png|32px]] [[File:Item Frame (map) JE1 BE1.png|32px]] [[File:Item Frame (item) JE1 BE1.png|32px]] Added item frames.}}
{{History|foot}}
== Issues==
{{issue list}}
== Trivia==
*The item frame is based upon a suggestion on [[wikipedia:Reddit|Reddit]], like the [[ender chest]] and [[flower pot]].<ref>{{Tweet|dinnerbone|235747041286975488}}</ref>
*The item frame is the only entity to reference a block [[model]].{{only|java|short=1}} Because of this, the texture of the frame border is the same as the birch planks texture.
*Item frame is the '''only''' placeable item that can interfere with other non-full block entities.
*Due to the way layer textures are displayed in Minecraft, maps float on item frames, similar to how icons float on the map itself.
== Gallery ==
=== Renders ===
<gallery>
Item Frame.png | Item Frame
Item Frame (map).png | Map Item Frame
Glow Item Frame.png | Glow Item Frame
Glow Item Frame (map).png | Map Glow Item Frame
Item Frame with Item.png | With item
Item Frame with rotated Item.png | With rotated item
Item Frame with Block.png | With block
Item Frame with rotated Block.png | With rotated block
</gallery>
=== Screenshots ===
<gallery>
Slab Frame.png|An item frame on the side of a slab.
ItemFrameBoxed.png|Four item frames in a one-block space.{{only|java}}
Item Frames Woodbase.png|The frame itself uses the texture of birch planks.
Item Frame rotation.gif|The rotation of an item in an item frame.
Front-back-itemframe.png|The front and back of an item frame are the same.
Big skills right there.png|A glow item frame inside a glow item frame.
Frame fireplace.png|An image of a fireplace retweeted by Dinnerbone.
11 Framed.png|[[11]] in an item frame.
</gallery>
=== Development images ===
<gallery>
Suggestion for itemframes.png|Original Reddit image suggesting item frames and flower pots.
Item frame2.png|Dinnerbone's first screenshot showing armor and weapons.
Item frame3.png|Dinnerbone's second screenshot showing a map, a compass, and two diamond swords.
Item frame4.png|Dinnerbone's third screenshot showing a golden sword in all directions, the item frame item itself, and a working clock.
Item frame1.png|Jeb's screenshot of the item frame.
FlowerPot.png|Snapshot showing plant pots and item frames.
Item frame5.png|Snapshot image of an ender pearl in an item frame.
SOATPC.png|An image tweeted by Dinnerbone showing how hovering over an item frame containing a renamed item shows a name tag.
Pocket Edition Item Frames.jpg|First image of item frames in ''Bedrock Edition''.
</gallery>
== See also ==
*{{ItemLink|Painting}}
== References ==
{{Reflist}}
{{Blocks|Utility}}
{{items}}
{{entities}}
[[Category:Block entities]]
[[Category:Utility blocks]]
[[Category:Manufactured blocks]]
[[Category:Generated structure blocks]]
[[Category:Storage]]
[[cs:Rámeček]]
[[de:Rahmen]]
[[es:Marco]]
[[fr:Cadre]]
[[hu:Eszköz keret]]
[[it:Cornice]]
[[ja:額縁]]
[[ko:아이템 액자]]
[[nl:Voorwerplijst]]
[[pl:Ramka na przedmiot]]
[[pt:Moldura]]
[[ru:Рамка]]
[[th:กรอบโชว์สิ่งของ]]
[[zh:物品展示框]]</li></ul> | build 1 | Added wolves. | |||
| build 2 | Wolves now have sounds. | ||||
| build 9 | Wolves now have interact buttons at the bottom of the screen to tame and sit them. | ||||
| Legacy Console Edition | |||||
TU1{{Extension DPL}}<ul><li>[[:Category:Storage|Category:Storage]]<br/>Blocks and items used to '''store''' other blocks or items.
[[Category:Blocks]][[Category:Items]]
[[ja:カテゴリ:ストレージ]]
[[zh:Category:储物]]</li><li>[[Recovery Compass|Recovery Compass]]<br/>{{About|the item used to point to the location of the player's last death|the item used to point to the world spawn or to a lodestone|Compass}}
{{Item
| image = Recovery Compass.gif
| renewable = No
| stackable = Yes (64)
}}
A '''recovery compass''' is an item used to point to the location of the [[Player|player's]] last death.
== Obtaining ==
=== Crafting ===
{{Crafting
|A1= Echo Shard |B1= Echo Shard |C1= Echo Shard
|A2= Echo Shard |B2= Compass |C2= Echo Shard
|A3= Echo Shard |B3= Echo Shard |C3= Echo Shard
|Output= Recovery Compass
|type= Tool
}}
== Usage ==
When held by a player, the recovery compass will point towards the spot where they previously died.
The recovery compass will only work when it is held by a player who has previously died and is in the same dimension as their last death. Otherwise, it will spin around randomly.
Like other items, the recovery compass itself will still drop when a player dies and the <code>keepInventory</code> [[game rule]] is not enabled.
This item is useless on Hardcore mode, as once the player dies, the player cannot respawn.
=== Enchantments ===
A recovery compass can receive the following [[enchantment]]s:
{| class="wikitable col-2-center col-3-right"
|+
!Name
!Max Level
![[Enchanting|Method]]
|-
|[[Curse of Vanishing]]{{only|bedrock|short=1}}
|I
|{{Inventory slot|Anvil}}
|-
|}
== Data values ==
{{Missing information|section|data values for Bedrock Edition|type=data}}
=== ID ===
[[Java Edition|''Java Edition'']]:
{{ID table|edition=java|displayname=Recovery Compass|nameid=recovery_compass|translationkey=item.minecraft.recovery_compass|generatetranslationkeys=y|showforms=y|spritetype=item|form=item|foot=1}}
==History==
{{History|java}}
{{History||1.19|snap=22w14a|[[File:Recovery Compass JE1 BE1.gif|32px]] Added recovery compasses.}}
{{History|||snap=22w15a|Recovery compasses can no longer be used on [[lodestone]]s and can no longer be enchanted with [[Curse of Vanishing]].}}
{{History|bedrock}}
{{History||1.19.0|snap=beta 1.19.0.24|[[File:Recovery Compass JE1 BE1.gif|32px]] Added recovery compasses.}}
{{History|foot}}
==Issues==
{{issue list}}
==Gallery==
<gallery>
File:Recovery Compass In An Item Frame.jpg|Recovery Compass.<ref>{{tweet|kingbdogz|1511751971673419782|Tell us what you think of the new Recovery Compass! We're hoping it improves how rewarding it feels to obtain Ancient City loot. Despite that, how do you feel about it? Will you use it? If so, how? What situations would you use it instead of just trying to remember?|April 6, 2022}}</ref>
</gallery>
==References==
{{reflist}}
== External Links ==
*[https://www.minecraft.net/en-us/article/taking-inventory--recovery-compass Taking Inventory:Recovery Compass] – Minecraft.net on January 19, 2023
{{Items}}
[[Category:Tools]]
[[Category:Non-renewable resources]]
[[de:Bergungskompass]]
[[es:Brújula de recuperación]]
[[fr:Boussole de récupération]]
[[ja:リカバリーコンパス]]
[[pl:Kompas powrotny]]
[[pt:Bússola de retomada]]
[[ru:Компас восстановления]]
[[th:เข็มทิศกู้คืน]]
[[uk:Компас відновлення]]
[[zh:追溯指针]]</li></ul> | Added wolves. | ||||
TU14{{Extension DPL}}<ul><li>[[Pickaxe|Pickaxe]]<br/>{{Dungeons hatnote|type=weapon}}
{{Redirect|Diamond Pickaxe|the ''Minecraft Dungeons'' weapon|MCD:Diamond Pickaxe}}
{{Redirect|Pick|the block|Sea Pickle|the control|Controls#Pick Block|the joke block|Pickaxe Block}}
{{Item
| image = <gallery>
Wooden Pickaxe.png | Wooden
Stone Pickaxe.png | Stone
Iron Pickaxe.png | Iron
Golden Pickaxe.png | Golden
Diamond Pickaxe.png | Diamond
Netherite Pickaxe.png | Netherite
</gallery>
|rarity = Common
|renewable =
* '''Netherite''': No
* '''Others''': Yes
|durability =
Java Edition:
* Wood: 59
* Stone: 131
* Iron: 250
* Golden: 32
* Diamond: 1,561
* Netherite: 2,031
Bedrock Edition:
* Wood: 60
* Stone: 132
* Iron: 251
* Golden: 33
* Diamond: 1,562
* Netherite: 2,032
| stackable = No
}}
A '''pickaxe''' is a [[tools|tool]] required to mine [[ore]]s, [[rock|rocks]], rock-based blocks and metal-based [[block]]s quickly and obtain them as items. A pickaxe mines faster and can obtain more block types as items depending on the material it is made from.
== Obtaining ==
=== Crafting ===
Pickaxes are crafted using 2 [[stick]]s and 3 identical units of tool material.
{{crafting |showdescription=1 |showname=0 |head=1
|name=[[Pickaxe]]
|A1={Any Planks}; Iron Ingot; Gold Ingot; Diamond
|B1={Any Planks}; Iron Ingot; Gold Ingot; Diamond
|C1={Any Planks}; Iron Ingot; Gold Ingot; Diamond
|B2=Stick
|B3=Stick
|Output=Wooden Pickaxe; Iron Pickaxe; Golden Pickaxe; Diamond Pickaxe
|type=Tool
}}
{{Crafting
|name=[[Stone Pickaxe]]
|A1=Any stone-tier block |B1=Any stone-tier block |C1=Any stone-tier block
|B2=Stick
|B3=Stick
|Output=Stone Pickaxe
|description=Can use cobblestone and its other variants interchangeably.
|type=Tool
}}
{{crafting |foot=1 |ignoreusage=1
|name=[[Pickaxe]]
|ingredients=Matching Damaged [[Pickaxe]]s
|Damaged Wooden Pickaxe; Damaged Stone Pickaxe; Damaged Iron Pickaxe; Damaged Golden Pickaxe; Damaged Diamond Pickaxe; Damaged Netherite Pickaxe
|Damaged Wooden Pickaxe; Damaged Stone Pickaxe; Damaged Iron Pickaxe; Damaged Golden Pickaxe; Damaged Diamond Pickaxe; Damaged Netherite Pickaxe
|Output=Wooden Pickaxe; Stone Pickaxe; Iron Pickaxe; Golden Pickaxe; Diamond Pickaxe; Netherite Pickaxe
|description=The durability of the two pickaxes is added together, plus an extra 5% of the tool type's total durability.
|type=Tool
}}
=== Upgrading ===
{{Smithing
|head=1
|Netherite Upgrade
|Diamond Pickaxe
|Netherite Ingot
|Netherite Pickaxe
|tail=1
}}
=== Repairing ===
==== Grinding ====
{{grinding
|showdescription=1
|ingredients=Matching Damaged [[Pickaxe]]s
|Damaged Wooden Pickaxe; Damaged Stone Pickaxe; Damaged Iron Pickaxe; Damaged Golden Pickaxe; Damaged Diamond Pickaxe; Damaged Netherite Pickaxe
|Damaged Wooden Pickaxe; Damaged Stone Pickaxe; Damaged Iron Pickaxe; Damaged Golden Pickaxe; Damaged Diamond Pickaxe; Damaged Netherite Pickaxe
|Wooden Pickaxe; Stone Pickaxe; Iron Pickaxe; Golden Pickaxe; Diamond Pickaxe; Netherite Pickaxe
|description=The durability of the two pickaxes is added together, plus an extra 5% durability.
}}
==== Unit repair ====
{{main|Anvil mechanics#Unit repair}}
Pickaxes can be repaired in an [[anvil]] by adding units of the [[tiers|tier's]] repair material, with each repair material restoring 25% of the pickaxe's maximum durability, rounded down.
=== Natural generation ===
{{LootChestItem|wooden-pickaxe,stone-pickaxe,iron-pickaxe,level-enchanted-iron-pickaxe,random-enchanted-golden-pickaxe,level-enchanted-diamond-pickaxe,random-enchanted-diamond-pickaxe,damaged-random-enchanted-diamond-pickaxe}}
=== Trading ===
{{IN|bedrock}}, novice-level toolsmith [[Villager|villagers]] have a 25% chance to sell stone pickaxes for one [[emerald]], Journeyman-level toolsmith villagers have a 25% chance to sell enchanted iron pickaxes for 3 emeralds, and master-level toolsmith villagers always sell enchanted diamond pickaxes for 13 emeralds.
{{IN|java}}, novice-level toolsmith villagers have a 40% chance to sell a stone pickaxe for one emerald, journeyman-level toolsmith villagers have a 40% chance to sell an enchanted iron pickaxe for 7–22 emeralds, and a master-level toolsmith always sells an enchanted diamond pickaxe for 18–35 emeralds.
The enchantments are the same as the ones obtained from an [[enchantment table]] at levels 5–19.
=== Villager gifts ===
{{IN|JE}}, toolsmith [[villager]]s throw stone pickaxes at players under the [[Hero of the Village]] effect.
=== Mob loot ===
{{IN|BE}}, [[pillager]]s and [[vindicator]]s have a chance of dropping a damaged iron pickaxe when killed during a [[raid]]. The pickaxe has a 50% chance of being enchanted with random enchantment(s).
== Usage ==
=== Mining ===
A pickaxe is used to break stone and metal-based materials faster. Breaking a block with a pickaxe consumes one use (one durability point). No durability is consumed for blocks that break instantly. Pickaxes have different amounts of uses based on the type:
* Wooden: 60
* Stone: 132
* Iron: 251
* Golden: 33
* Diamond: 1562
* Netherite: 2032
Different qualities of pickaxe are required to successfully harvest certain ores and blocks. For example, while [[stone]] can be mined with any pickaxe, [[gold ore]] must be mined with an [[iron]], [[diamond]], or [[netherite]] pickaxe, or else the player harvests no ore. Different pickaxes also mine many materials at different speeds:
==== Speed ====
The following table shows the time it takes to break each type of block.
* A <span style="background-color:#FFC7CE;color:#9C0006;">red</span> background indicates that the block cannot be harvested with that type of pickaxe.
* A <span style="background-color:#FFFFDD;color:#8A7600;">yellow</span> background indicates that the block cannot be harvested with that type of pickaxe, but still drops something.
* A <span style="background-color:#C6EFCE;color:#006100;">green</span> background indicates that the block can be harvested with that type of pickaxe.
<!-- Table is sorted by hardness (mining time with diamond shows well), then by name -->
{|class="wikitable collapsible collapsed" data-description="Mining time by block" style="background-color: transparent;"
! Times to break blocks by pickaxe
|-
|
{{breaking row|sort=1|simple=1|Obsidian|Diamond}}
{{breaking row|Crying Obsidian|Diamond}}
{{breaking row|Respawn Anchor|Diamond}}
{{breaking row|Block of Netherite|Diamond}}
{{breaking row|Ancient Debris|Diamond}}
{{breaking row|Ender Chest|Wood}}
{{breaking row|Anvil|Wood}}
{{breaking row|Bell|Wood}}
{{breaking row|Block of Coal|Wood}}
{{breaking row|Block of Diamond|Iron}}
{{breaking row|Block of Emerald|Iron}}
{{breaking row|Block of Iron|Stone}}
{{breaking row|Block of Raw Copper|Stone}}
{{breaking row|Block of Raw Gold|Iron}}
{{breaking row|Block of Raw Iron|Stone}}
{{breaking row|Block of Redstone|Wood}}
{{breaking row|Chain|Wood}}
{{breaking row|Enchantment Table|Wood}}
{{breaking row|Iron Bars|Wood}}
{{breaking row|Iron Door|Wood|item=1|link=Door}}
{{breaking row|Iron Trapdoor|Wood|link=Trapdoor}}
{{breaking row|Monster Spawner|Wood}}
{{breaking row|Deepslate Coal Ore|Wood}}
{{breaking row|Deepslate Copper Ore|Wood}}
{{breaking row|Deepslate Diamond Ore|Wood}}
{{breaking row|Deepslate Emerald Ore|Wood}}
{{breaking row|Deepslate Gold Ore|Wood}}
{{breaking row|Deepslate Iron Ore|Wood}}
{{breaking row|Deepslate Lapis Lazuli Ore|Wood}}
{{breaking row|Deepslate Redstone Ore|Wood}}
{{breaking row|Blast furnace|Wood}}
{{breaking row|Cobbled Deepslate|Wood}}
{{breaking row|Chiseled Deepslate|Wood}}
{{breaking row|Deepslate Bricks|Wood}}
{{breaking row|Deepslate Tiles|Wood}}
{{breaking row|Polished Deepslate|Wood}}
{{breaking row|Dispenser|Wood}}
{{breaking row|Dropper|Wood}}
{{breaking row|Furnace|Wood}}
{{breaking row|Lantern|wood}}
{{breaking row|Lodestone|Wood}}
{{breaking row|Smoker|Wood}}
{{breaking row|Stonecutter|Wood}}
{{breaking row|Conduit}}
{{breaking row|Block of Gold|Iron}}
{{breaking row|Block of Lapis Lazuli|Stone}}
{{breaking row|Coal Ore|Wood}}
{{breaking row|Copper Ore|Wood}}
{{breaking row|Copper Blocks|Wood}}
{{breaking row|Cut Copper|Wood}}
{{breaking row|Cut Copper Slab|Wood}}
{{breaking row|Cut Copper Stairs|Wood}}
{{breaking row|Deepslate|Wood}}
{{breaking row|Dragon Egg
|note=<ref group="note">The dragon egg can be mined directly only when there aren't any air blocks available for it to teleport to. However, the dragon egg can be collected by other means.</ref>}}
{{breaking row|Diamond Ore|Iron}}
{{breaking row|Emerald Ore|Iron}}
{{breaking row|End Stone|Wood}}
{{breaking row|Gold Ore|Iron}}
{{breaking row|Hopper|Wood}}
{{breaking row|Iron Ore|Stone}}
{{breaking row|Lightning Rod|Wood}}
{{breaking row|Lapis Lazuli Ore|Stone}}
{{breaking row|Nether Quartz Ore|Wood}}
{{breaking row|Nether Gold Ore|Wood}}
{{breaking row|Observer|Wood}}
{{breaking row|Redstone Ore|Iron}}
{{breaking row|Blue Ice|drop=0}}
{{breaking row|Compound Creator|Wood|drop=1|note=<ref group="note" name="Chemtable">Chemistry tables are slow to break by hand, similar to blocks that require a pickaxe to mine. However, they still drop as items.</ref>}}
{{breaking row|Heat Block|Wood}}
{{breaking row|Grindstone|Wood}}
{{breaking row|Bone Block|Wood}}
{{breaking row|Brick Stairs|Wood|link=Stairs}}
{{breaking row|Bricks|Wood}}
{{breaking row|Cauldron|Wood}}
{{breaking row|Cobblestone|Wood}}
{{breaking row|link=Stairs|Cobblestone Stairs|Wood}}
{{breaking row|Cobblestone Wall|Wood}}
{{breaking row|Mossy Cobblestone|Wood}}
{{breaking row|Nether Bricks|Wood}}
{{breaking row|Nether Brick Fence|Wood}}
{{breaking row|link=Stairs|Nether Brick Stairs|Wood}}
{{breaking row|Red Nether Bricks|Wood}}
{{breaking row|Polished Blackstone|Wood}}
{{breaking row|link=Slab|Stone Slabs|sprite=all-slabs|Wood}}
{{breaking row|Smooth Stone|Wood}}
{{breaking row|Shulker Box}}
{{breaking row|Concrete|Wood}}
{{breaking row|Andesite|Wood}}
{{breaking row|Dark Prismarine|Wood}}
{{breaking row|Diorite|Wood}}
{{breaking row|Dripstone Block|Wood}}
{{breaking row|Granite|Wood}}
{{breaking row|Mud Bricks|Wood}}
{{breaking row|Pointed Dripstone}}
{{breaking row|Prismarine|Wood}}
{{breaking row|Prismarine Bricks|Wood}}
{{breaking row|Purpur block|Wood}}
{{breaking row|Purpur pillar|Wood}}
{{breaking row|Stone|Wood}}
{{breaking row|Stone Bricks|Wood}}
{{breaking row|Tuff|Wood}}
{{breaking row|link=Stairs|Stone Brick Stairs|Wood}}
{{breaking row|Amethyst Bud|drop=0}}
{{breaking row|Amethyst Cluster|drop=0}}
{{breaking row|Blackstone|Wood}}
{{breaking row|Block of Amethyst|Wood}}
{{breaking row|Budding Amethyst|drop=0}}
{{breaking row|Chiseled Polished Blackstone|Wood}}
{{breaking row|Polished Blackstone Bricks|Wood}}
{{breaking row|Gilded Blackstone|Wood}}
{{breaking row|Glazed Terracotta|Wood}}
{{breaking row|Terracotta|Wood}}
{{breaking row|Basalt|Wood}}
{{breaking row|Smooth Basalt|Wood}}
{{breaking row|Polished Basalt|Wood}}
{{breaking row|Packed Mud}}
{{breaking row|Block of Quartz|Wood}}
{{breaking row|Quartz Stairs|Wood|link=Stairs}}
{{breaking row|Red Sandstone|Wood}}
{{breaking row|Red Sandstone Stairs|Wood|link=stairs}}
{{breaking row|Sandstone|Wood}}
{{breaking row|Sandstone Stairs|Wood|link=stairs}}
{{breaking row|Calcite|Wood}}
{{breaking row|Rail}}
{{breaking row|Brewing Stand|Wood}}
{{breaking row|Stone Button|any}}
{{breaking row|Ice|drop=0}}
{{breaking row|Magma Block|Wood}}
{{breaking row|Packed Ice|drop=0}}
{{breaking row|Frosted Ice|drop=0}}
{{breaking row|Stone Pressure Plate|Wood}}
{{breaking row|Netherrack|Wood}}
{{breaking row|sprite=crimson-nylium|Nylium|Wood|foot=1}}
|}
=== Weapon ===
Hitting a mob with a pickaxe is a stronger attack than using fists. Pickaxes lose 2 durability when used as a weapon.
==== Java Edition ====
Pickaxes have an attack speed modifier of −2.8, meaning they take about 0.83 seconds to [[Damage#Attack cooldown|recover]]. All pickaxes have an attack speed of 1.2 hits per second. They deal different damage based on the type:
{|class="wikitable" style="text-align:center" data-description="Attack damage"
! Pickaxe type
! Attack damage
! Damage per<br> second (DPS)
|-
|{{ItemLink|Wooden Pickaxe}} ||rowspan=2 |{{hp|2}} ||rowspan=2 |2.4
|-
|{{ItemLink|Golden Pickaxe}}
|-
|{{ItemLink|Stone Pickaxe}} ||{{hp|3}} ||3.6
|-
|{{ItemLink|Iron Pickaxe}} ||{{hp|4}} ||4.8
|-
|{{ItemLink|Diamond Pickaxe}} ||{{hp|5}} ||6
|-
|{{ItemLink|Netherite Pickaxe}} ||{{hp|6}} ||7.2
|}
==== Bedrock Edition ====
{{IN|bedrock}}, pickaxes always attack instantly and do the following damage:
{|class="wikitable" style="text-align:center" data-description="Attack damage"
! Pickaxe type
! Attack damage
|-
|{{ItemLink|Wooden Pickaxe}}<br />{{ItemLink|Golden Pickaxe}} ||{{hp|3}}
|-
|{{ItemLink|Stone Pickaxe}} ||{{hp|4}}
|-
|{{ItemLink|Iron Pickaxe}} ||{{hp|5}}
|-
|{{ItemLink|Diamond Pickaxe}} ||{{hp|6}}
|-
|{{ItemLink|Netherite Pickaxe}} ||{{hp|7}}
|}
=== Enchantments ===
A pickaxe can receive the following [[enchantment]]s:
{|class="wikitable col-2-center col-3-right"
|+
!Name
!Max Level
![[Enchanting|Method]]
|-
|[[Efficiency]]
|V
|{{Inventory slot|Enchanting Table}}{{Inventory slot|Anvil}}
|-
|[[Fortune]]<ref group=note name=note1>Fortune and Silk Touch are mutually exclusive.</ref>
|III
|{{Inventory slot|Enchanting Table}}{{Inventory slot|Anvil}}
|-
|[[Silk Touch]]<ref group=note name=note1/>
|I
|{{Inventory slot|Enchanting Table}}{{Inventory slot|Anvil}}
|-
|[[Unbreaking]]
|III
|{{Inventory slot|Enchanting Table}}{{Inventory slot|Anvil}}
|-
|[[Mending]]
|I
|{{Inventory slot|Anvil}}
|-
|[[Curse of Vanishing]]
|I
|{{Inventory slot|Anvil}}
|}
{{Notelist}}
=== Fuel ===
Wooden pickaxes can be used as a fuel in [[furnace]]s, smelting 1 item per wooden pickaxe.
=== Smelting ingredient ===
{{Smelting|showname=1|Iron Pickaxe;Golden Pickaxe|Iron Nugget;Gold Nugget|0,1}}
===Piglins===
{{EntityLink|Piglin|Piglins}} are attracted to golden pickaxes and run toward any golden pickaxes on the ground, and inspect it for 6 to 8 seconds before putting it in their inventory.
== Sounds ==
{{edition|java}}:
{{Sound table
|sound=Random break.ogg
|subtitle=Item breaks
|source=player
|description=When a pickaxe's durability is exhausted
|id=entity.item.break
|translationkey=subtitles.entity.item.break
|volume=0.8
|pitch=0.8-1.2
|distance=16
|foot=1}}
{{edition|bedrock}}:
{{Sound table
|type=bedrock
|sound=Random break.ogg
|source=player
|description=When a shovel's durability is exhausted
|id=random.break
|volume=1.0
|pitch=0.9
|foot=1}}
== Data values ==
=== ID ===
{{edition|java}}:
{{ID table
|edition=java
|showforms=y
|generatetranslationkeys=y
|displayname=Wooden Pickaxe
|spritetype=item
|nameid=wooden_pickaxe
|form=item}}
{{ID table
|displayname=Stone Pickaxe
|spritetype=item
|nameid=stone_pickaxe
|form=item}}
{{ID table
|displayname=Iron Pickaxe
|spritetype=item
|nameid=iron_pickaxe
|form=item}}
{{ID table
|displayname=Diamond Pickaxe
|spritetype=item
|nameid=diamond_pickaxe
|form=item}}
{{ID table
|displayname=Golden Pickaxe
|spritetype=item
|nameid=golden_pickaxe
|form=item}}
{{ID table
|displayname=Netherite Pickaxe
|spritetype=item
|nameid=netherite_pickaxe
|form=item
|foot=1}}
{{edition|bedrock}}:
{{ID table
|edition=bedrock
|shownumericids=y
|showforms=y
|notshowbeitemforms=y
|generatetranslationkeys=y
|displayname=Wooden Pickaxe
|spritetype=item
|nameid=wooden_pickaxe
|id=310
|form=item}}
{{ID table
|displayname=Stone Pickaxe
|spritetype=item
|nameid=stone_pickaxe
|id=314
|form=item}}
{{ID table
|displayname=Iron Pickaxe
|spritetype=item
|nameid=iron_pickaxe
|id=297
|form=item}}
{{ID table
|displayname=Diamond Pickaxe
|spritetype=item
|nameid=diamond_pickaxe
|id=318
|form=item}}
{{ID table
|displayname=Golden Pickaxe
|spritetype=item
|nameid=golden_pickaxe
|id=324
|form=item}}
{{ID table
|displayname=Netherite Pickaxe
|spritetype=item
|nameid=netherite_pickaxe
|id=606
|form=item
|foot=1}}
== Achievements ==
{{Load achievements|Time to mine!;Getting an Upgrade;MOAR Tools ;Oooh, shiny!}}
== Advancements ==
{{load advancements|Getting an Upgrade;Isn't It Iron Pick;Stone Age;Oh Shiny}}
== Video ==
{{yt|G_HTViy2JTo}}
== History ==
{{History|java indev}}
{{History||0.31|snap=20100110|[[File:Iron Pickaxe JE1.png|32px]] Added iron pickaxes.
|A pickaxe is used to gather [[stone]] materials 400% faster than by hand.
|When starting in a new world, the [[player]] is given one of each [[tool]].}}
{{History|||snap=20100124|A complete tool set is no longer given to the player on starting a new world. Instead, there are multiple [[chest]]s in the later called "[[Indev House]]" containing a stack of most accessible [[blocks]]/[[items]] including [[tools]].}}
{{History|||snap=20100128|[[File:Wooden Pickaxe JE1 BE1.png|32px]] [[File:Stone Pickaxe JE1 BE1.png|32px]] [[File:Diamond Pickaxe JE1 BE1.png|32px]] Tools now have tiers. Wooden, stone, and diamond pickaxes have been added.|[[File:Iron Pickaxe JE2 BE1.png|32px]] The texture of iron pickaxes has been changed.
|A pickaxe held by the [[player]] is now rendered to appear more 3D.|They cannot be crafted yet, but have been added to the item chest in the Indev house.}}
{{History|||snap=20100129|Wood, stone, iron, and diamond pickaxes can now be [[craft]]ed.}}
{{History|||snap=20100130|[[File:Golden Pickaxe JE1.png|32px]] Pickaxes can now be made out of [[gold]].}}
{{History|||snap=20100201-1|Tools, including pickaxes, now take [[damage]] when being used. |Better tools, including pickaxes, now last longer.}}
{{History|||snap=20100201-2|Better pickaxes are now required to mine harder materials.}}
{{History||20100206|[[File:Golden Pickaxe JE2 BE1.png|32px]] The texture of golden pickaxes has been changed.}}
{{History|java beta}}
{{History||1.2|Before, the pickaxe had much less [[item durability|durability]] (usually half as much).
|Gold pickaxes now [[breaking|mine]] certain materials much faster.}}
{{History||1.8|snap=Pre-release|Iron pickaxes are now found in the new [[stronghold]] storeroom [[chest]]s, and in the new [[mineshaft]] chests.}}
{{History|java}}
{{History||1.0.0|snap=Beta 1.9 Prerelease 3|Iron pickaxes can now be found in the new [[stronghold]] altar [[chest]]s.}}
{{History|||snap=RC1|Pickaxes and other [[tool]]s now make a [[sound]] when they break.}}
{{History||1.1|snap=12w01a|Iron pickaxes are now found in the new [[village]] blacksmith chests.}}
{{History||1.2.4|snap=release|[[Spruce planks]], [[birch planks]], and [[jungle planks]] can now be used to craft wooden pickaxes.}}
{{History||1.3.1|snap=12w16a|Wooden and stone pickaxes are now found in the new [[bonus chest]]s.}}
{{History|||snap=12w18a|Wooden pickaxes can now be used as fuel in a [[furnace]].}}
{{History|||snap=12w21a|Blacksmith [[villager]]s now [[trading|sell]] 1 diamond pickaxe for 10–11 [[emerald]]s, and 1 iron pickaxe for 7–8 emeralds.}}
{{History||1.6.1|snap=13w21a|Instead of replacing the barehanded [[damage]] ({{hp|1}}), pickaxes now add their damage onto the barehanded damage, which results in all pickaxes doing {{hp|1}} more damage than before.}}
{{History||1.7.2|snap=1.7.1|[[Acacia planks]] and [[dark oak planks]] can now be used to craft wooden pickaxes.}}
{{History||1.8|snap=14w02a|Tool smith villagers now [[trading|sell]] 1 [[enchanting|enchanted]] diamond pickaxe for 12–15 emeralds, and 1 enchanted iron pickaxe for 9–11 emeralds.
|Unenchanted pickaxes are no longer sold by [[villager]]s.}}
{{History||1.9|snap=15w31a|Enchanted iron and diamond pickaxes can now be found in the [[end ship]] [[chest]]s in [[end city|end cities]].}}
{{History|||snap=15w34a|Pickaxes now use the "attack strength" combat mechanic meter. The time it takes for the meter to fill up for a pickaxe is 0.8 seconds.}}
{{History|||snap=15w34c|Pickaxes now do less [[damage]], but recover quicker.}}
{{History|||snap=15w35a|Pickaxes now recover more slowly.}}
{{History|||snap=15w44a|The average yield of wood and stone pickaxes in [[bonus chest]]s has been decreased.
|The average yield of iron pickaxes in [[mineshaft]] [[chest]]s has been increased.}}
{{History||1.11.1|snap=16w50a|Golden and iron pickaxes can now be [[smelting|smelted]] down into one of their respective [[nugget]]s.}}
{{History||1.13|snap=17w47a|Prior to [[1.13/Flattening|''The Flattening'']], these [[item]]s' numeral IDs were 270, 274, 257, 278 and 285.}}
{{History||1.14|snap=18w43a|[[File:Wooden Pickaxe JE2 BE2.png|32px]] [[File:Stone Pickaxe JE2 BE2.png|32px]] [[File:Iron Pickaxe JE3 BE2.png|32px]] [[File:Golden Pickaxe JE3 BE2.png|32px]] [[File:Diamond Pickaxe JE2 BE2.png|32px]] The textures of all pickaxes have been changed.}}
{{History|||snap=18w50a|Iron pickaxes can now be found in chests in [[village]] toolsmith houses.}}
{{History|||snap=19w11a|Toolsmith [[villager]]s now [[trading|sell]] stone pickaxes.}}
{{History|||snap=19w13a|Toolsmith villagers now give stone pickaxes to players under the [[Hero of the Village]] effect.}}
{{History||1.16|snap=20w06a|[[File:Netherite Pickaxe JE1.png|32px]] Added netherite pickaxes.
|Netherite pickaxes are obtained by combining one diamond pickaxe and one netherite ingot in a crafting table.
|[[Crimson planks]] and [[warped planks]] can now be used to craft wooden pickaxes.}}
{{History|||snap=20w09a|[[File:Wooden Pickaxe JE3 BE3.png|32px]] [[File:Golden Pickaxe JE4 BE3.png|32px]] [[File:Diamond Pickaxe JE3 BE3.png|32px]] [[File:Netherite Pickaxe JE2 BE1.png|32px]] The textures of wooden, golden, diamond, and netherite pickaxes have been changed.}}
{{History|||snap=20w10a|[[File:Netherite Pickaxe JE3.png|32px]] Changed a pixel of the texture of netherite pickaxes.
|Netherite pickaxes can no longer be crafted.
|Netherite pickaxes are now obtained by combining one diamond pickaxe and one netherite ingot in a smithing table.}}
{{History|||snap=20w15a|Stone pickaxes can now be crafted using [[blackstone]].}}
{{History|||snap=20w16a|Golden pickaxes now generate randomly enchanted in [[ruined portal]] chests.}}
{{History||1.16.2|snap=20w30a|Randomly enchanted diamond pickaxes can now be found in [[bastion remnant]] chests.}}
{{History||1.17|snap=21w08a|Stone pickaxe can now be crafted using [[cobbled deepslate]].}}
{{History||1.19|snap=22w11a|[[Mangrove planks]] can now be used to craft wooden pickaxes.}}
{{History||1.20<br>(Experimental)|link=1.19.4|snap=23w04a|Upgrading diamond pickaxes to netherite pickaxes now requires the netherite upgrade [[smithing template]].}}
{{History|upcoming java}}
{{History||Villager Trade Rebalance<br>(Experimental)|link=Java Edition 1.20.2|snap=23w31a|[[Wandering trader]]s now have a chance to sell an enchanted iron pickaxe.}}
{{History||Combat Tests|snap=1.14.3 - Combat Test|The attack speed for all pickaxes has been increased to 2.5.
|The [[damage]] for all pickaxes has been increased by {{hp|1}}.}}
{{History|pocket alpha}}
{{History||v0.2.0|[[File:Stone Pickaxe JE1 BE1.png|32px]] Added stone pickaxes.}}
{{History||v0.3.0|[[File:Wooden Pickaxe JE1 BE1.png|32px]] Added wooden pickaxes.
|Survival players no longer start out with an infinite durability stone pickaxe in the inventory.}}
{{History||v0.3.2|[[File:Iron Pickaxe JE2 BE1.png|32px]] [[File:Golden Pickaxe JE2 BE1.png|32px]] [[File:Diamond Pickaxe JE1 BE1.png|32px]] Added iron, gold, and diamond pickaxes.}}
{{History||v0.4.0|Removed stone pickaxes from the creative inventory.}}
{{History||v0.11.0|snap=build 11|All pickaxes are now available in the [[creative]] inventory.}}
{{History|||snap=build 12|All pickaxes have been removed from creative.}}
{{History|||snap=build 13|Pickaxes have been re-added to creative mode.}}
{{History||v0.14.0|snap=build 1|Iron pickaxes can now be found inside [[minecart with chest]]s in [[mineshaft]]s.}}
{{History|pocket}}
{{History||1.0.0|snap=alpha 0.17.0.1|[[Enchanting|Enchanted]] iron pickaxes and enchanted diamond pickaxes can now be found in [[end city|end cities]].}}
{{History||1.0.4|snap=alpha 1.0.4.0|Toolsmith [[villager]]s now [[trading|sell]] enchanted diamond pickaxes for 12-15 emeralds as their last tier trades and enchanted iron pickaxes for 9-11 [[emerald]]s as their second tier trades.}}
{{History||1.1.0|snap=alpha 1.1.0.0|Iron and golden pickaxes are now [[smelting|smeltable]].}}
{{History|bedrock}}
{{History||1.2.0|snap=beta 1.2.0.2|Wooden and stone pickaxes can now be found inside [[bonus chest]]s.}}
{{History||1.10.0|snap=beta 1.10.0.3|Iron pickaxes can now be found in [[plains]] [[village]] weaponsmith houses.
|[[File:Wooden Pickaxe JE2 BE2.png|32px]] [[File:Stone Pickaxe JE2 BE2.png|32px]] [[File:Iron Pickaxe JE3 BE2.png|32px]] [[File:Golden Pickaxe JE3 BE2.png|32px]] [[File:Diamond Pickaxe JE2 BE2.png|32px]] The textures of all pickaxes have been changed.}}
{{History||1.11.0|snap=beta 1.11.0.1|Iron pickaxes can now be found in [[village]] toolsmiths [[chest]]s and in [[savanna]], [[taiga]], [[snowy taiga]] and [[desert]] village weaponsmith chests.}}
{{History|||snap=beta 1.11.0.4|[[Trading]] has been changed, toolsmith [[villager]]s now have a 25% chance to [[trading|sell]] an [[enchanting|enchanted]] iron pickaxe for 3 [[emerald]]s as part of their third tier trades, and an enchanted diamond pickaxe now costs 13 emeralds.
|Stone pickaxes can now be bought from toolsmith villagers.}}
{{History||1.16.0|snap=beta 1.16.0.51|[[File:Netherite Pickaxe JE2 BE1.png|32px]] Added netherite pickaxes.|Netherite pickaxes are obtained by combining one diamond pickaxe and one netherite ingot in a crafting table.
|[[File:Wooden Pickaxe JE3 BE3.png|32px]] [[File:Golden Pickaxe JE4 BE3.png|32px]] [[File:Diamond Pickaxe JE3 BE3.png|32px]] The textures of wooden, golden, and diamond pickaxes have been changed.}}
{{History|||snap=beta 1.16.0.57|Netherite pickaxes can no longer be crafted.
|Netherite pickaxes are now obtained by combining one diamond pickaxe and one netherite ingot in a smithing table.
|Stone pickaxes can now be crafted using [[blackstone]].
|Golden pickaxes now generate randomly enchanted in [[ruined portal]] chests.
|Netherite pickaxe now generate randomly enchanted in [[bastion remnant]] chest.}}
{{History||1.17.10|snap=beta 1.17.10.20|[[File:Netherite Pickaxe JE3.png|32px]] Changed a pixel of the texture of netherite pickaxes to match ''Java Edition''.}}
{{History|console}}
{{History||xbox=TU1|xbone=CU1|ps=1.0|wiiu=Patch 1|[[File:Wooden Pickaxe JE1 BE1.png|32px]] [[File:Stone Pickaxe JE1 BE1.png|32px]] [[File:Iron Pickaxe JE2 BE1.png|32px]] [[File:Golden Pickaxe JE2 BE1.png|32px]] [[File:Diamond Pickaxe JE1 BE1.png|32px]] Added pickaxes (all five types).}}
{{History||xbox=TU53|xbone=CU43|ps=1.49|wiiu=Patch 23|switch=1.0.3|Iron and golden pickaxes are now [[smelting|smeltable]].}}
{{History|Ps4}}
{{History||1.90|[[File:Wooden Pickaxe JE2 BE2.png|32px]] [[File:Stone Pickaxe JE2 BE2.png|32px]] [[File:Iron Pickaxe JE3 BE2.png|32px]] [[File:Golden Pickaxe JE3 BE2.png|32px]] [[File:Diamond Pickaxe JE2 BE2.png|32px]] The textures of all pickaxes have been changed.}}
{{History|New Nintendo 3DS Edition}}
{{History||0.1.0|[[File:Wooden Pickaxe JE1 BE1.png|32px]] [[File:Stone Pickaxe JE1 BE1.png|32px]] [[File:Iron Pickaxe JE2 BE1.png|32px]] [[File:Golden Pickaxe JE2 BE1.png|32px]] [[File:Diamond Pickaxe JE1 BE1.png|32px]] Added pickaxes.}}
{{History|foot}}
== Issues ==
{{issue list}}
== Trivia ==
*The golden pickaxe is the only pickaxe that is unable to harvest the material it is made from.
*The pickaxe is the only block-breaking tool without a {{control|use}} (right-click) function.
=== Publicity ===
*Plastic diamond pickaxes are official ''[[Minecraft]]'' merchandise.<ref>https://shop.minecraft.net/products/minecraft-pickaxe?_pos=3&_psq=pickaxe&_ss=e&_v=1.0</ref>
*In the game [[wikipedia:Naughty Bear: Panic in Paradise|''Naughty Bear: Panic in Paradise'']], the player can buy a diamond pickaxe which, according to the game, is made by "Kick it up a Notch Pickaxes", referring to [[Notch]].
*In mobile game ''[https://play.google.com/store/apps/details?id=br.com.tapps.vloggergoviral Vlogger Go Viral]'' clicker game, after buying the figurine shelf, there is a model of a diamond pickaxe stuck to a [[grass block]].
*In the game [[wikipedia:The Elder Scrolls V: Skyrim|''The Elder Scrolls V: Skyrim'']], the player can find a pickaxe called the "Notched Pickaxe", evidently an [[easter egg]].
*In the game [[wikipedia:Offensive Combat|''Offensive Combat'']], a stone pickaxe can be used as a melee weapon with the name of "The Notch Carver".
*In the game [[wikipedia:The Binding of Isaac (video game)|''The Binding of Isaac'']], an obtainable item named "Notched Axe", also with a drawn 8-bit look, can be used to destroy rocks. The Notched Axe also makes a return in the game's remake, [[wikipedia:The Binding of Isaac: Rebirth|''The Binding of Isaac: Rebirth'']].
*In the game [[wikipedia:Borderlands 2|''Borderlands 2'']], the player can find a secret area hidden away by blocks resembling Minecraft [[dirt]], also once inside the player can fight Creeper and the Mother Creeper to get rare Minecraft-related skins.
*In the game [[wikipedia:Octodad: Dadliest Catch|''Octodad: Dadliest Catch'']], the supermarket level has a "Mintcraft" display, an obvious parody of Minecraft, even including toy pickaxes and a creeper head.
*In the game [[wikipedia:Transformice|''Transformice'']], a diamond pickaxe can be found in the shop.
== Gallery ==
<gallery>
File:Pickaxe in Mineshaft Chest.png|A naturally generated pickaxe.
Live in Your World JINX.jpg|Official T-shirt artwork "Live in Your World" featuring an iron pickaxe made by [https://www.jinx.com JINX].
Pickaxe JINX.jpg|Official T-shirt artwork of a pickaxe made by JINX.
Stone Pickaxe SDGP.png|Stone pickaxe in the [[Super Duper Graphics Pack]].
Iron Pickaxe SDGP.png|Iron pickaxe in the [[Super Duper Graphics Pack]].
</gallery>
=== Enchanted pickaxes ===
<gallery>
Enchanted Wooden Pickaxe.gif
Enchanted Stone Pickaxe.gif
Enchanted Iron Pickaxe.gif
Enchanted Golden Pickaxe.gif
Enchanted Diamond Pickaxe.gif
Enchanted Netherite Pickaxe.gif
</gallery>
== References ==
{{reflist}}
== External Links ==
*[https://www.minecraft.net/en-us/article/taking-inventory-pickaxe Taking Inventory: Pickaxe] – Minecraft.net on May 10, 2018
{{items}}
[[Category:Combat]]
[[cs:Krumpáč]]
[[de:Spitzhacke]]
[[es:Pico]]
[[fr:Pioche]]
[[hu:Csákány]]
[[it:Piccone]]
[[ja:ツルハシ]]
[[ko:곡괭이]]
[[nl:Houweel]]
[[pl:Kilof]]
[[pt:Picareta]]
[[ru:Кирка]]
[[th:อีเต้อ]]
[[uk:Кайло]]
[[zh:镐]]</li><li>[[Door|Door]]<br/>{{About|the block|the music track|Minecraft - Volume Alpha}}
{{See also|Trapdoor}}
{{Block
| image = <gallery>
Iron Door.png|Java Edition
Iron Door BE.png|Bedrock Edition
</gallery>
| extratext = View [[#Gallery|all renders]]
| transparent = Partial
| light = No
| tntres = {{Blast resistance values|Wooden Door}} <small>(Wood)</small><br>{{Blast resistance values|Iron Door|Copper Door}}<small> (Iron)</small>
| hardness = {{Hardness values|Wooden Door}} <small>(Wood)</small><br>{{Hardness values|Iron Door|Copper Door}}<small> (Iron)</small>
| tool = axe
| tool2 = wooden pickaxe
| renewable = Yes
| stackable = Yes (64)
| flammable = No
| lavasusceptible = '''Overworld wood''': Yes<br>'''Nether wood''','''iron''','''copper''': No
}}
A '''door''' is a block that can be used as a barrier that can be opened by hand or with [[redstone]].
== Obtaining ==
Doors can be found in any Overworld biome, and can also be crafted from any type of [[wood]] as well as materials found in [[the Nether]]. Some have built-in openings that are useful for determining the time of day.
=== Breaking ===
Wooden doors can be broken with anything, but [[axe]]s are fastest. An iron door can be broken with anything if the top half of the door is broken.<ref>{{bug|MC-189739}}</ref><ref>{{bug|MCPE-126620}}</ref> All doors drop themselves if they no longer have a block beneath them that can support them.
{{breaking row
|Oak Door, Spruce Door, Birch Door, Jungle Door, Acacia Door, Dark Oak Door, Mangrove Door, Cherry Door, Bamboo Door, Crimson Door, Warped Door; Iron Door
|textTrim=Door
|Axe;Pickaxe
|;
|item=1;1
|link=none;none
}}
A door is removed and drops itself as an item:
* if the block beneath the door is moved, removed, or destroyed
* if a [[piston]] tries to push the door (trying to pull a door does nothing) or moves a block into its space
=== Natural generation ===
Doors generate in some generated structures, forming the entrances to the majority of buildings. Doors do not generate in [[zombie village]]s.
;{{BlockSprite|Oak Door|text=Oak}}
Oak doors generate as part of:
* Plains [[village]]s
* [[Stronghold]]s
* Right-side-up [[shipwreck]]s
;{{BlockSprite|Spruce Door|text=Spruce}}
Spruce doors generate as part of:
* Taiga, snowy tundra and snowy taiga [[village]]s
* Right-side-up [[shipwreck]]s
;{{BlockSprite|Jungle Door|text=Jungle}}
Jungle doors generate as part of:
* Desert [[village]]s
* Right-side-up [[shipwreck]]s
;{{BlockSprite|Acacia Door|text=Acacia}}
Acacia doors generate as part of:
* Savanna [[village]]s
<!-- * Right-side-up [[shipwreck]]s{{only|BE}}{{need testing}} -->
;{{BlockSprite|Dark Oak Door|text=Dark oak}}
Dark oak doors generate as part of:
* Master bedroom closets in [[woodland mansion]]s
* Right-side-up [[shipwreck]]s
;{{BlockSprite|Iron Door|text=Iron}}
Iron doors generate as part of:
* Prison rooms in [[woodland mansion]]s
* [[Stronghold]]s with a stone [[button]] to open{{only|JE}}
=== Crafting ===
{{Crafting
|head=1
|name=[[Wood Door]]
|A1= Matching Planks
|B1= Matching Planks
|A2= Matching Planks
|B2= Matching Planks
|A3= Matching Planks
|B3= Matching Planks
|Output= Matching wood Door,3
|type= Redstone
}}
{{Crafting
|A1= Iron Ingot
|B1= Iron Ingot
|A2= Iron Ingot
|B2= Iron Ingot
|A3= Iron Ingot
|B3= Iron Ingot
|Output= Iron Door,3
|type= Redstone
|foot=1
}}
== Usage ==
Wooden doors can be opened and closed by players, [[villager]]s, [[wandering trader]]s{{only|bedrock|short=1}}<!--Wandering traders cannot open doors in java edition. -->, [[vindicator]]s{{only|java|short=1}}, and [[piglin]]s. Wooden doors can be broken by all variants of [[zombie]]s (except [[drowned]]) and [[vindicator]]s in Hard difficulty.
Iron doors can be opened only with redstone power.
=== Placement ===
Doors must be "attached" to a block beneath them. To place a door, {{control|use}} a door item while pointing at the top of the block it should be attached to. A door can be attached to:
* the '''top''' of any full solid [[opaque]] block ([[stone]], [[dirt]], [[blocks of gold]], etc.)
* the '''top''' of an upside-down [[slab]] or upside-down [[stairs]]
* the '''top''' of a [[slime block]] or downward-facing [[piston]]
More information about placement on transparent blocks can be found at [[Opacity/Placement]].
When placed, a door occupies the side of the block facing the player, or behind a player if placed in the player's own space.
By default, a door's "hinge" appears on the side of the half of the block that the player pointed at when placing and its "handle" on the opposite side{{only|java}}, but the hinge is forced to other side by:
* Placing a door besides another door (creating a double door where both doors open away from each other)
* Placing a door between a full solid and any opaque block (top or bottom), making the hinge appear to attach to the solid block.
=== Behavior ===
[[Water]] and [[lava]] flow around doors. Lava can create [[fire]] in air blocks next to wooden doors as if the wooden doors were flammable, but the doors do not burn (and cannot be burned by other methods either, except throwing them into lava).
[[Mob]]s can spawn in a space occupied by a door.
The sound of opening and closing of a door can be heard up to 16 blocks away, like most mob sounds.
When placed using the {{cmd|setblock}} command, only one half of a door is placed, because doors are actually two separate blocks. The lower half still works, but with graphical bugs, and the upper half does not. Redstone cannot be used because it updates the half, breaking it. The upper half does not drop anything when broken, the lower half drops a normal door. This implies that the upper half is dependent on the lower.
=== Barrier ===
A door can be used as a switchable barrier to entity movement. Although primarily used to block movement by mobs and players, a door can also be used to control the movement of boats (for example, a door placed in a two-wide water flow stops a boat when perpendicular to the flow, but allow it to move again when parallel), items and minecarts (a door can stop a falling item or minecart, then allow it to drop again when the door moves), etc.
{{IN|Java}}, doors provide a breathable space if placed underwater. {{IN|bedrock}}, doors in water source blocks are [[waterlogging|waterlogged]] and do not displace water source blocks.
Doors are 0.1875 ({{frac|3|16}}) blocks thick (0.1825 {{in|bedrock}}). The rest of a door's space can be moved through freely. A door occupies two block spaces and both halves normally act as a single barrier, although doors can be opened or closed with a player or mob occupying the bottom block of the door,<ref>{{bug|MC-54255}} – "You can stand on the bottom block of a door, allowing you to climb it like a ladder" resolved as "Won't Fix"</ref> in which case the player can jump up to land on the bottom half of the door and then again to land on top of the door.
To open or close a wooden door, use the {{control|use|text=Use Item/Place Block}} [[control]]. When a door opens or closes, it immediately changes its orientation without affecting anything in the space it "swings through". Moving doors do not push entities the way that pistons do.
[[Villager]]s, [[wandering trader]]s,{{only|bedrock|short=1}} [[vindicator]]s{{only|java|short=1}}, [[piglin]]s and [[piglin brute]]s can open and close wooden doors when pathfinding.
Some [[zombie]]s can break wooden doors in [[Hard]] [[difficulty]]. Zombies have a 5% chance to spawn with the ability to break doors. Vindicators spawned from a [[raid]] in [[Normal]] and Hard difficulty can also break wooden doors, but they do so only to reach targeted players, villagers, or wandering traders. Some vindicators may sometimes open a wooden door instead of breaking it.{{only|java}} Both zombies and vindicators attempt to break wooden doors only when in their "closed" state, even if a door is placed so that its "open" state blocks access (for example, by facing sideways when placing a door so that it allows passage when closed and blocks passage when open).
Iron doors can be opened only with redstone power (a [[button]], a [[redstone circuit]], etc.). Any mob can activate an iron door by stepping on a pressure plate or by triggering a tripwire.
=== Redstone component ===
{{see also|Redstone circuit}}
Both wood and iron doors can be controlled with redstone power.
A door is a redstone [[mechanism component]] and can be activated by:
* an adjacent active '''[[power component]]''', including above or below: for example, a [[redstone torch]], a [[block of redstone]], a [[daylight sensor]], etc.
* an adjacent '''powered block''' (for example, a block with an active redstone torch under it), including above or below
* a powered '''[[redstone comparator]]''' or '''[[redstone repeater]]''' facing the door
* powered '''[[redstone dust]]''' configured to point at the door or a directionless "dot" next to it; a door is ''not'' activated by adjacent powered redstone dust that is configured to point in another direction.
All methods of activating a door can be applied to either the top or bottom parts of a door.
When activated, a door immediately rotates around its hinge side to its open state. When deactivated, a door immediately returns to its closed state.
An activated wood door can still be closed by a player or villager and does not re-open until it receives a new activation signal (if a door has been closed "by hand", it still needs to be deactivated and then reactivated to open by redstone).
=== Fuel ===
Overworld wooden doors can be used as a [[Smelting#Fuel|fuel]] in [[furnace]]s, smelting 1 item per door.
=== Note blocks ===
Wooden doors can be placed under [[note block]]s to produce "bass" sound.
== Sounds ==
=== Generic ===
==== Iron ====
{{Sound table/Block/Metal}}
==== Normal wood ====
{{Sound table/Block/Wood}}
==== Cherry wood ====
{{Sound table/Block/Cherry wood}}
==== Bamboo wood ====
{{Sound table/Block/Bamboo wood}}
==== Nether wood ====
{{Sound table/Block/Nether wood}}
=== Unique ===
{{el|java}}:
{{Sound table
|sound=Iron Door open1.ogg
|sound2=Iron Door open2.ogg
|sound3=Iron Door open3.ogg
|sound4=Iron Door open4.ogg
|subtitle=Door creaks
|source=block
|description=When an iron door opens
|id=block.iron_door.open
|translationkey=subtitles.block.door.toggle
|volume=0.9
|pitch=0.9-1.0
|distance=16}}
{{Sound table
|sound=Iron Door close1.ogg
|sound2=Iron Door close2.ogg
|sound3=Iron Door close3.ogg
|sound4=Iron Door close4.ogg
|subtitle=Door creaks
|source=block
|description=When an iron door closes
|id=block.iron_door.close
|translationkey=subtitles.block.door.toggle
|volume=0.9
|pitch=0.9-1.0
|distance=16}}
{{Sound table
|sound=Wooden Door open3.ogg
|sound2=Wooden Door open4.ogg
|subtitle=Door creaks
|source=block
|description=When a wooden door opens
|id=block.wooden_door.open
|translationkey=subtitles.block.door.toggle
|volume=0.9
|pitch=0.9-1.0
|distance=16}}
{{Sound table
|sound=Wooden Door close2.ogg
|sound2=Wooden Door close5.ogg
|sound3=Wooden Door close6.ogg
|subtitle=Door creaks
|source=block
|description=When a wooden door closes
|id=block.wooden_door.close
|translationkey=subtitles.block.door.toggle
|volume=0.9
|pitch=0.9-1.0
|distance=16}}
{{Sound table
|rowspan=2
|sound=Cherry door toggle1.ogg
|sound2=Cherry door toggle2.ogg
|sound3=Cherry door toggle3.ogg
|sound4=Cherry door toggle4.ogg
|subtitle=Door creaks
|source=block
|description=When a cherry wood door opens
|id=block.cherry_wood_door.open
|translationkey=subtitles.block.door.toggle
|volume=0.9
|pitch=0.9-1.0
|distance=16}}
{{Sound table
|subtitle=Door creaks
|source=block
|description=When a cherry wood door closes
|id=block.cherry_wood_door.close
|translationkey=subtitles.block.door.toggle
|volume=0.9
|pitch=0.9-1.0
|distance=16}}
{{Sound table
|rowspan=2
|sound=Bamboo Door toggle1.ogg
|sound2=Bamboo Door toggle2.ogg
|sound3=Bamboo Door toggle3.ogg
|sound4=Bamboo Door toggle4.ogg
|subtitle=Door creaks
|source=block
|description=When a bamboo wood door opens
|id=block.bamboo_wood_door.open
|translationkey=subtitles.block.door.toggle
|volume=0.9
|pitch=0.9-1.0
|distance=16}}
{{Sound table
|subtitle=Door creaks
|source=block
|description=When a bamboo wood door closes
|id=block.bamboo_wood_door.close
|translationkey=subtitles.block.door.toggle
|volume=0.9
|pitch=0.9-1.0
|distance=16}}
{{Sound table
|rowspan=2
|sound=Nether Door toggle1.ogg
|sound2=Nether Door toggle2.ogg
|sound3=Nether Door toggle3.ogg
|sound4=Nether Door toggle4.ogg
|subtitle=Door creaks
|source=block
|description=When a Nether wood door opens
|id=block.nether_wood_door.open
|translationkey=subtitles.block.door.toggle
|volume=1.0
|pitch=0.9-1.0
|distance=16}}
{{Sound table
|subtitle=Door creaks
|source=block
|description=When a Nether wood door closes
|id=block.nether_wood_door.close
|translationkey=subtitles.block.door.toggle
|volume=1.0
|pitch=0.9-1.0
|distance=16}}
{{Sound table
|sound=Zombie hit wood1.ogg
|sound2=Zombie hit wood2.ogg
|sound3=Zombie hit wood3.ogg
|sound4=Zombie hit wood4.ogg
|subtitle=Door shakes
|source=hostile
|description=When a [[zombie]] attacks a door
|id=entity.zombie.attack_wooden_door
|translationkey=subtitles.entity.zombie.attack_wooden_door
|volume=2.0
|pitch=0.8-1.2
|distance=16}}
{{Sound table
|sound=Zombie hit metal1.ogg
|sound2=Zombie hit metal2.ogg
|sound3=Zombie hit metal3.ogg
|subtitle=Block broken <ref group=sound name=ironsubtitle>{{Bug|MC-226770}}</ref>
|source=None
|description=''Unused sound event''<ref group=sound>{{bug|MC-218122}}</ref>
|id=entity.zombie.attack_iron_door
|translationkey=subtitles.block.generic.break|translationkeynote=<ref group=sound name=ironsubtitle/>
|volume=''None''
|pitch=''None''
|distance=''None''}}
{{Sound table
|sound=Zombie breaks door.ogg
|subtitle=Door breaks
|source=hostile
|description=When a zombie breaks a door
|id=entity.zombie.break_wooden_door
|translationkey=subtitles.entity.zombie.break_wooden_door
|volume=2.0
|pitch=0.8-1.2
|distance=16
|foot=1}}
{{el|bedrock}}:
{{Sound table
|type=bedrock
|sound=Iron Door open1.ogg
|sound2=Iron Door open2.ogg
|sound3=Iron Door open3.ogg
|sound4=Iron Door open4.ogg
|source=block
|description=When an iron door opens
|id=open.iron_door
|volume=0.9
|pitch=0.9-1.0}}
{{Sound table
|sound=Iron Door close1.ogg
|sound2=Iron Door close2.ogg
|sound3=Iron Door close3.ogg
|sound4=Iron Door close4.ogg
|source=block
|description=When an iron door closes
|id=close.iron_door
|volume=0.9
|pitch=0.9-1.0}}
{{Sound table
|sound=Wooden Door open3.ogg
|sound2=Wooden Door open4.ogg
|source=block
|description=When a wooden door opens
|id=open.wooden_door
|volume=0.9
|pitch=0.9-1.0}}
{{Sound table
|sound=Wooden Door close2.ogg
|sound2=Wooden Door close5.ogg
|sound3=Wooden Door close6.ogg
|source=block
|description=When a wooden door closes
|id=close.wooden_door
|volume=0.9
|pitch=0.9-1.0}}
{{Sound table
|rowspan=2
|sound=Cherry door toggle1.ogg
|sound2=Cherry door toggle2.ogg
|sound3=Cherry door toggle3.ogg
|sound4=Cherry door toggle4.ogg
|source=block
|description=When a cherry wood door opens
|id=open.cherry_wood_door
|volume=1.0
|pitch=0.9-1.0}}
{{Sound table
|source=block
|description=When a cherry wood door closes
|id=close.cherry_wood_door
|volume=1.0
|pitch=0.9-1.0}}
{{Sound table
|rowspan=2
|sound=Bamboo Door toggle1.ogg
|sound2=Bamboo Door toggle2.ogg
|sound3=Bamboo Door toggle3.ogg
|sound4=Bamboo Door toggle4.ogg
|source=block
|description=When a bamboo wood door opens
|id=open.bamboo_wood_door
|volume=0.9
|pitch=0.9-1.0}}
{{Sound table
|source=block
|description=When a bamboo wood door closes
|id=close.bamboo_wood_door
|volume=0.9
|pitch=0.9-1.0}}
{{Sound table
|rowspan=2
|sound=Nether Door toggle1.ogg
|sound2=Nether Door toggle2.ogg
|sound3=Nether Door toggle3.ogg
|sound4=Nether Door toggle4.ogg
|source=block
|description=When a Nether wood door opens
|id=open.nether_wood_door
|volume=1.0
|pitch=0.9-1.0}}
{{Sound table
|source=block
|description=When a Nether wood door closes
|id=close.nether_wood_door
|volume=1.0
|pitch=0.9-1.0}}
{{Sound table
|sound=Zombie hit wood1.ogg
|sound2=Zombie hit wood2.ogg
|sound3=Zombie hit wood3.ogg
|sound4=Zombie hit wood4.ogg
|source=hostile
|description=While a zombie is breaking a wooden door
|id=mob.zombie.wood
|volume=1.0
|pitch=1.0}}
{{Sound table
|sound=Zombie breaks door.ogg
|source=hostile
|description=When a zombie breaks a wooden door
|id=mob.zombie.woodbreak
|volume=1.0
|pitch=1.0
|foot=1}}
== Data values ==
=== ID ===
{{edition|java}}:
{{ID table
|edition=java
|showblocktags=y
|showitemtags=y
|showforms=y
|generatetranslationkeys=y
|displayname=Iron Door
|spritetype=block
|nameid=iron_door
|blocktags=doors
|itemtags=doors}}
{{ID table
|displayname=Oak Door
|spritetype=block
|nameid=oak_door
|blocktags=doors, wooden_doors
|itemtags=doors, wooden_doors}}
{{ID table
|displayname=Spruce Door
|spritetype=block
|nameid=spruce_door
|blocktags=doors, wooden_doors
|itemtags=doors, wooden_doors}}
{{ID table
|displayname=Birch Door
|spritetype=block
|nameid=birch_door
|blocktags=doors, wooden_doors
|itemtags=doors, wooden_doors}}
{{ID table
|displayname=Jungle Door
|spritetype=block
|nameid=jungle_door
|blocktags=doors, wooden_doors
|itemtags=doors, wooden_doors}}
{{ID table
|displayname=Acacia Door
|spritetype=block
|nameid=acacia_door
|blocktags=doors, wooden_doors
|itemtags=doors, wooden_doors}}
{{ID table
|displayname=Dark Oak Door
|spritetype=block
|nameid=dark_oak_door
|blocktags=doors, wooden_doors
|itemtags=doors, wooden_doors}}
{{ID table
|displayname=Mangrove Door
|spritetype=block
|nameid=mangrove_door
|blocktags=doors, wooden_doors
|itemtags=doors, wooden_doors}}
{{ID table
|displayname=Cherry Door
|spritetype=block
|nameid=cherry_door
|blocktags=doors, wooden_doors
|itemtags=doors, wooden_doors}}
{{ID table
|displayname=Bamboo Door
|spritetype=block
|nameid=bamboo_door
|blocktags=doors, wooden_doors
|itemtags=doors, wooden_doors}}
{{ID table
|displayname=Crimson Door
|spritetype=block
|nameid=crimson_door
|blocktags=doors, non_flammable_wood, wooden_doors
|itemtags=doors, non_flammable_wood, wooden_doors}}
{{ID table
|displayname=Warped Door
|spritetype=block
|nameid=warped_door
|blocktags=doors, non_flammable_wood, wooden_doors
|itemtags=doors, non_flammable_wood, wooden_doors
|foot=1}}
{{edition|bedrock}}:
{{ID table
|edition=bedrock
|showitemtags=y
|firstcolumnname=Door
|shownumericids=y
|showforms=y
|generatetranslationkeys=y
|spritename=iron-door
|displayname=Iron block
|spritetype=block
|nameid=iron_door
|id=71
|form=block
|itemform=item.iron_door}}
{{ID table
|spritename=oak-door
|displayname=Oak block
|spritetype=block
|nameid=wooden_door
|id=64
|form=block
|itemform=item.wooden_door
|translationkey=-}}
{{ID table
|spritename=spruce-door
|displayname=Spruce block
|spritetype=block
|nameid=spruce_door
|id=193
|form=block
|itemform=item.spruce_door
|translationkey=-}}
{{ID table
|spritename=birch-door
|displayname=Birch block
|spritetype=block
|nameid=birch_door
|id=194
|form=block
|itemform=item.birch_door
|translationkey=-}}
{{ID table
|spritename=jungle-door
|displayname=Jungle block
|spritetype=block
|nameid=jungle_door
|id=195
|form=block
|itemform=item.jungle_door
|translationkey=-}}
{{ID table
|spritename=acacia-door
|displayname=Acacia block
|spritetype=block
|nameid=acacia_door
|id=196
|form=block
|itemform=item.acacia_door
|translationkey=-}}
{{ID table
|spritename=dark-oak-door
|displayname=Dark Oak block
|spritetype=block
|nameid=dark_oak_door
|id=197
|form=block
|itemform=item.dark_oak_door
|translationkey=-}}
{{ID table
|spritename=mangrove-door
|displayname=Mangrove block
|spritetype=block
|nameid=mangrove_door
|id=-493
|form=block
|itemform=item.mangrove_door
|translationkey=-}}
{{ID table
|displayname=Cherry Door
|spritetype=block
|nameid=cherry_door
|id=-531
|itemtags=minecraft:door
|translationkey=item.cherry_door.name}}
{{ID table
|displayname=Bamboo Door
|spritetype=block
|nameid=bamboo_door
|id=-517
|itemtags=minecraft:door
|translationkey=item.bamboo_door.name}}
{{ID table
|spritename=crimson-door
|displayname=Crimson block
|spritetype=block
|nameid=crimson_door
|id=499
|form=block
|itemform=item.crimson_door}}
{{ID table
|spritename=warped-door
|displayname=Warped block
|spritetype=block
|nameid=warped_door
|id=500
|form=block
|itemform=item.warped_door}}
{{ID table
|spritename=iron-door
|displayname=Iron item
|spritetype=item
|nameid=iron_door
|id=372
|form=item
|itemtags=minecraft:door}}
{{ID table
|spritename=oak-door
|displayname=Oak item
|spritetype=item
|nameid=wooden_door
|id=359
|form=item
|itemtags=minecraft:door}}
{{ID table
|spritename=spruce-door
|displayname=Spruce item
|spritetype=item
|nameid=spruce_door
|id=553
|form=item
|itemtags=minecraft:door}}
{{ID table
|spritename=birch-door
|displayname=Birch item
|spritetype=item
|nameid=birch_door
|id=554
|form=item
|itemtags=minecraft:door}}
{{ID table
|spritename=jungle-door
|displayname=Jungle item
|spritetype=item
|nameid=jungle_door
|id=555
|form=item
|itemtags=minecraft:door}}
{{ID table
|spritename=acacia-door
|displayname=Acacia item
|spritetype=item
|nameid=acacia_door
|id=556
|form=item
|itemtags=minecraft:door}}
{{ID table
|spritename=dark-oak-door
|displayname=Dark Oak item
|spritetype=item
|nameid=dark_oak_door
|id=557
|form=item
|itemtags=minecraft:door}}
{{ID table
|spritename=mangrove-door
|displayname=Mangrove item
|spritetype=item
|nameid=mangrove_door
|id=641
|form=item
|itemtags=minecraft:door}}
{{ID table
|spritename=crimson-door
|displayname=Crimson item
|spritetype=item
|nameid=crimson_door
|id=616
|form=item
|itemtags=minecraft:door}}
{{ID table
|spritename=warped-door
|displayname=Warped item
|spritetype=item
|nameid=warped_door
|id=617
|form=item
|itemtags=minecraft:door
|foot=1}}
=== Block states ===
{{see also|Block states}}
{{/BS}}
== Video ==
Note: The videos do not mention or state Crimson, Warped, Bamboo, or Cherry doors, since the videos were uploaded before 1.16.
<div style="text-align:center">
<span style="display:inline-block">{{yt|7jlIQcbHFts}}</span>
<span style="display:inline-block">{{yt|CC6ujEdvzQY}}</span>
</div>
== History ==
''For a history of changes to textures and models for each block state, see [[/Asset history]]''
{{History||3 June 2010|link=https://notch.tumblr.com/post/659506746/asynchronous-saving-and-loading-and-slightly-more|Notch states plans to implement doors.}}
{{History|java infdev}}{{History||20100607|[[File:Oak Door JE1.png|32px]] [[File:Oak Door (Right) JE1.png|32px]] [[File:Oak Door (item) JE1.png|32px]] Added wooden doors.}}
{{History||20100608|Doors have been given smarter rotation logic.}}
{{History||20100611|[[File:Oak Door JE2.png|32px]] [[File:Oak Door (Right) JE2.png|32px]] The models of doors have been changed to use door bottom half texture on sides instead of the wooden [[planks]] texture.}}
{{History||20100618|[[File:Oak Door JE3 BE1.png|32px]] [[File:Oak Door (Right) JE3.png|32px]] The textures of doors have been changed.}}
{{History||20100624|[[File:Oak Door (Right) JE4 BE1.png|32px]] The model of door with right hinge has been changed to mirror and use textures of door with left hinge.}}
{{History|java alpha}}
{{History||v1.0.1|[[File:Iron Door JE1 BE1.png|32px]] [[File:Iron Door (Right) JE1 BE1.png|32px]] [[File:Iron Door (item) JE1 BE1.png|32px]] Added iron doors.
|[[File:Oak Door (item) JE2 BE1.png|32px]] The texture of wooden doors in [[item]] form has been changed.
|Doors can now be controlled by redstone power.}}
{{History|java beta}}
{{History||1.7|Punching the back face of a left-hinge oak or iron door or the front face of a right-hinge door, as well as destroying a door, would [[Java Edition placeholder texture uses|create]] particles using the [[Placeholder texture#Texture atlas blank spaces|block placeholder texture]].}}
{{History||1.7.3|Doors no longer produce placeholder texture particles.}}
{{History||1.8|snap=Pre-release|Doors now occur naturally in [[village]]s and [[stronghold]]s.}}
{{History|java}}
{{History||1.0.0|snap=Beta 1.9 Prerelease 6|Wooden doors are now broken faster using an [[axe]].
|Iron doors are broken much faster using a [[pickaxe]], and the [[mining]] speed is now [[tier]] dependent.}}
{{History|||snap=RC1|The opening and closing [[sound]]s for doors have been changed.}}
{{History||1.1|snap=11w47a|Double doors now open correctly.}}
{{History||1.2.1|snap=12w05b|[[Villager]]s can now open and close doors.}}
{{History|||snap=12w06a|[[File:Oak Door JE4 BE3.png|32px]] [[File:Iron Door JE2 BE5.png|32px]] Changed top model of door.
|[[Zombie]]s can now break wooden doors.
|Doors have been changed to properly detect if they are open or closed. Placing two [[pressure plate]]s directly in front of doors and stepping on them now opens them correctly.}}
{{History|||snap=12w07a|Zombies can no longer break iron doors.}}
{{History||1.4.2|snap=12w40a|Wooden doors can no longer be opened by attacking (left-click).}}
{{History||1.8|snap=December 13, 2013|slink=https://twitter.com/jeb_/status/411425952338808832|[[Jens Bergensten|Jeb]] tweeted an image showing that the crafting recipes for doors are changed so that 3 doors are crafted at once. Doors are also stackable to 64.}}
{{History|||snap=14w02a|Doors are now stackable to 64.
|The [[crafting]] recipes of doors now yield 3 doors instead of 1.}}
{{History|||snap=14w10a|[[File:Oak Door JE5.png|32px]] [[File:Iron Door JE3.png|32px]] The models of doors have been changed.}}
{{History|||snap=August 8, 2014|slink=https://twitter.com/TheMogMiner/status/497751889102905344|[[Ryan Holtz|TheMogMiner]] tweeted an image showing new types of [[wood]] doors.}}
{{History|||snap=14w32d|[[File:Spruce Door JE1 BE1.png|32px]] [[File:Birch Door JE1 BE1.png|32px]] [[File:Jungle Door JE1.png|32px]] [[File:Acacia Door JE1.png|32px]] [[File:Dark Oak Door JE1 BE1.png|32px]] [[File:Spruce Door (item) JE1.png|32px]] [[File:Birch Door (item) JE1.png|32px]] [[File:Jungle Door (item) JE1.png|32px]] [[File:Acacia Door (item) JE1.png|32px]] [[File:Dark Oak Door (item) JE1.png|32px]] New types of wood doors have been added: spruce, birch, jungle, acacia and dark oak.}}
{{History|||snap=14w33a|[[File:Jungle Door JE2 BE1.png|32px]] [[File:Acacia Door JE2 BE1.png|32px]] The models of jungle and acacia doors no longer have inner faces in the holes in their models.
|[[File:Spruce Door (item) JE2.png|32px]] [[File:Birch Door (item) JE2.png|32px]] [[File:Jungle Door (item) JE2.png|32px]] [[File:Acacia Door (item) JE2.png|32px]] [[File:Dark Oak Door (item) JE2.png|32px]] [[Item]] textures of new doors have been changed to match the dimensions of oak and iron doors.
|The wooden door (''Door'') has been renamed to ''Oak Door''.}}
{{History|||snap=14w33b|[[File:Oak Door (item) JE3 BE2.png|32px]] [[File:Spruce Door (item) JE3 BE1.png|32px]] [[File:Birch Door (item) JE3 BE1.png|32px]] [[File:Jungle Door (item) JE3 BE1.png|32px]] [[File:Acacia Door (item) JE3 BE1.png|32px]] [[File:Dark Oak Door (item) JE3 BE1.png|32px]][[File:Iron Door (item) JE2 BE2.png|32px]] All [[item]] textures for all doors have been changed. Doors now have hinges on the left and handles on the right, existing wooden doors & iron doors have a slight item textures change as well.}}
{{History||1.9|snap=15w31a|[[File:Birch Door JE2.png|32px]] [[File:Jungle Door JE3.png|32px]] [[File:Acacia Door JE3.png|32px]] [[File:Dark Oak Door JE2.png|32px]] Shading on the [[block]] textures of birch, jungle, acacia, and dark oak doors have been changed, so that the shadow is in the upper left and the highlight is in the lower right.}}
{{History|||snap=15w43a|Iron doors now have different [[sound]]s than wooden doors.
|Doors now have [[sound]]s for placing and different sounds for opening and closing - see sounds section.}}
{{History|||snap=15w47a|Doors now make [[sound]]s when placed,<ref>{{bug|MC-2844}} – "Doors have no placement sound." resolved as "Fixed"</ref> despite these apparently already being added in 15w43a.}}
{{History|||snap=15w49a|Doors are now placed facing left/right depending on which half of the [[block]] the [[player]] clicks on, unless neighboring doors or solid/opaque blocks cause them to place a certain way.}}
{{History||1.10|snap=16w20a|Acacia and spruce doors now generate in [[savanna]] and [[taiga]] [[villages]].}}
{{History||1.11|snap=16w33a|Wooden doors can now be used to fuel [[furnace]]s.|Iron doors no longer have a right-click action - previously they would result in the hand swinging, and would override other valid right click actions such as snowball throwing.}}
{{History|||snap=16w39a|Dark oak doors and iron doors now generate in [[woodland mansion]]s.}}
{{History||July 19, 2017|link=https://twitter.com/jeb_/status/887599625045250048|[[Jeb]] tweets image of a new jungle [[wood planks]], jungle doors, [[cauldron]], and [[dandelion]] textures.}}
{{History||1.13|snap=17w47a|The oak door ID has been changed from <code>wooden_door</code> to <code>oak_door</code>.
|Prior to [[1.13/Flattening|''The Flattening'']], these [[block]]s' numeral IDs were 64, 71, 193, 194, 195, 196 and 197, and the [[item]]s' 324, 330, 427, 428, 429, 430 and 431.}}
{{History|||snap=18w11a|Doors now generate as part of the newly added [[shipwreck]]s.}}
{{History||1.14|snap=18w43a|[[File:Oak Door JE6.png|32px]] [[File:Spruce Door JE2.png|32px]] [[File:Birch Door JE3.png|32px]] [[File:Jungle Door JE4.png|32px]] [[File:Acacia Door JE4.png|32px]] [[File:Dark Oak Door JE3.png|32px]] [[File:Iron Door JE4.png|32px]] The textures of all doors have been changed.
|[[Vindicator]]s can now break doors.}}
{{History|||snap=18w47b|[[File:Spruce Door JE3.png|32px]] The textures of spruce doors have been changed.}}
{{History|||snap=18w49a|Added [[snowy tundra]] villages, which generate with spruce doors.}}
{{History|||snap=18w50a|The updated [[desert]] villages now generate with jungle doors instead of oak doors.}}
{{History|||snap=19w08a|[[File:Oak Door JE7.png|32px]] The texture of oak doors has been changed.}}
{{History|||snap=19w12b|Doors can now be placed on glass, ice, glowstone and sea lanterns.}}
{{History|||snap=19w13a|[[Evoker]]s and [[pillager]]s can now open doors during [[raid]]s.}}
{{History|||snap=19w14a|Pillagers can no longer open doors.}}
{{History||1.15|snap=19w39a|Iron doors must now be mined with a [[pickaxe]] for it to be dropped as an [[item]].}}
{{History||1.16|snap=20w06a|[[File:Crimson Door JE1.png|32px]] [[File:Warped Door JE1.png|32px]] [[File:Crimson Door (item) JE1 BE1.png|32px]] [[File:Warped Door (item) JE1 BE1.png|32px]] Added crimson and warped doors.}}
{{History|||snap=20w07a|Added [[piglin]]s, which can open and close doors.}}
{{History|||snap=20w19a|[[File:Crimson Door JE2.png|32px]] [[File:Warped Door JE2.png|32px]] [[File:Crimson Door (item) JE2 BE2.png|32px]] [[File:Warped Door (item) JE2 BE2.png|32px]] The textures of crimson and warped doors have been changed.}}
{{History||1.17|snap=21w11a|[[File:Jungle Door (item) JE4 BE2.png|32px]] Changed the texture of the jungle door item.}}
{{History||1.18|snap=21w41a|[[File:Oak Door (item) JE4 BE3.png|32px]] [[File:Spruce Door (item) JE4 BE2.png|32px]] [[File:Birch Door (item) JE4 BE2.png|32px]] [[File:Jungle Door (item) JE5 BE3.png|32px]] [[File:Acacia Door (item) JE4 BE2.png|32px]] [[File:Dark Oak Door (item) JE4 BE2.png|32px]][[File:Iron Door (item) JE3 BE3.png|32px]] All [[item]] textures for all doors except crimson and warped have been changed.}}
{{History|||snap=Pre-release 5|[[File:Oak Door JE8.png|32px]] [[File:Spruce Door JE4.png|32px]] [[File:Birch Door JE4.png|32px]] [[File:Jungle Door JE5.png|32px]] [[File:Acacia Door JE5.png|32px]] [[File:Dark Oak Door JE4.png|32px]] [[File:Crimson Door JE3.png|32px]] [[File:Warped Door JE3.png|32px]] [[File:Iron Door JE5.png|32px]] Changed top and bottom models of door. Changed oak and iron doors textures.}}
{{History||1.19|snap=22w11a|[[File:Mangrove Door JE1.png|32px]][[File:Mangrove Door (item) JE1 BE1.png|32px]] Added mangrove door.}}
{{History|||snap=22w14a|Due to the addition of the [[mangrove tree]] and [[mangrove swamp]], mangrove doors are now obtainable and renewable.}}
{{History||October 15, 2022|link={{ytl|https://youtu.be/iM9KtHaDcUg?t=5659}}|[[File:Bamboo Door JE1.png|32px]] Bamboo doors were shown on [[Minecraft Live 2022]].}}
{{History||1.20<br>(Experimental)|link=1.19.3|snap=22w42a|[[File:Bamboo Door JE1.png|32px]] [[File:Bamboo Door (item) JE1 BE1.png|32px]] Added bamboo doors behind the [[Java Edition 1.20|Update 1.20 experimental datapack]].}}
{{History||1.20<br>(Experimental)|link=1.19.4|snap=23w07a|[[File:Cherry Door JE1.png|32px]] [[File:Cherry Door (item) JE1.png|32px]] Added cherry doors behind the [[Java Edition 1.20|Update 1.20 experimental datapack]].}}
{{History|||snap=1.19.4-pre2|[[File:Cherry Door JE2.png|32px]] [[File:Cherry Door (item) JE2.png|32px]] Changed the texture of cherry doors.}}
{{History||1.20|snap=23w12a|Bamboo and cherry doors are now available without using the "Update 1.20" experimental datapack.}}
{{History|pocket alpha}}
{{History||v0.1.0|[[File:Oak Door JE3 BE1.png|32px]] [[File:Iron Door JE1 BE1.png|32px]] Added doors.
[[File:Oak Door (bottom texture) JE2 BE1.png|32px]] [[File:Iron Door (bottom texture) JE1 BE1.png|32px]] These are the textures defined for the door blocks in <samp>[[gui_blocks.png]]</samp>. The door items exist, but due to a bug in the code that renders items in the hotbar, they cannot be used.}}
{{History||v0.1.3|[[File:Oak Door BE2.png|32px]] [[File:Iron Door BE2.png|32px]] The models of doors have been changed to not display transparency on upper half.}}
{{History||v0.2.0|[[File:Oak Door (item) JE2 BE1.png|32px]] [[File:Iron Door (item) JE1 BE1.png|32px]] Added door inventory icons.
|[[File:Oak Door JE3 BE1.png|32px]] [[File:Iron Door JE1 BE1.png|32px]] The models of doors have been changed to display transparency on upper half.
|Wooden doors are now available in the inventory, including in [[Creative]].}}
{{History||v0.2.1 alpha2|link=Pocket Edition v0.2.1 alpha2|[[File:Iron Door BE3.png|32px]] The textures of iron doors have been changed.}}
{{History||v0.3.0|A crafting recipe for wooden doors has been added.
|Survival players no longer start out with an infinite stack of wooden doors in the inventory.}}
{{History||v0.3.2|Wooden doors now drop their item form when broken.}}
{{History||v0.5.0|[[File:Oak Door JE4 BE3.png|32px]] [[File:Iron Door BE4.png|32px]] The models of doors have been changed.
|Wooden doors can now be obtained after activating the [[nether reactor]].}}
{{History||v0.8.0|snap=build 2|[[File:Iron Door JE2 BE5.png|32px]] The textures of iron doors have been changed to before v0.2.1 alpha2.}}
{{History||v0.11.0|snap=build 1|''Door'' has been now renamed to ''Oak Door''.}}
{{History||v0.12.1|snap=build 1|Doors are now stackable to 64.
|The [[crafting]] recipes of doors now yield 3 doors instead of 1.
|[[Zombie]]s can now break down wooden doors.
|Oak doors can now be opened by [[villager]]s.
|Oak doors are no longer available from the [[nether reactor]].}}
{{History||v0.13.0|snap=build 1|[[File:Spruce Door JE1 BE1.png|32px]] [[File:Birch Door JE1 BE1.png|32px]] [[File:Jungle Door JE2 BE1.png|32px]] [[File:Acacia Door JE2 BE1.png|32px]] [[File:Dark Oak Door JE1 BE1.png|32px]] [[File:Spruce Door (item) JE3 BE1.png|32px]] [[File:Birch Door (item) JE3 BE1.png|32px]] [[File:Jungle Door (item) JE3 BE1.png|32px]] [[File:Acacia Door (item) JE3 BE1.png|32px]] [[File:Dark Oak Door (item) JE3 BE1.png|32px]] Added spruce, birch, jungle, acacia and dark oak doors.
|Iron doors are now available in the [[Creative]] [[inventory]].
|A [[crafting]] recipe for iron doors has been added.
|Redstone mechanics added, making iron doors able to function normally.}}
{{History|||snap=build 2|Spruce, birch, jungle, acacia, and dark oak doors can now be opened by [[villager]]s.}}
{{History|||snap=build 4|[[File:Oak Door (item) JE3 BE2.png|32px]] [[File:Iron Door (item) JE2 BE2.png|32px]] The [[item]] textures of oak and iron door has been changed.}}
{{History||v0.15.0|snap=build 1|Acacia doors now generate in [[savanna]] [[village]]s.
|Spruce doors now generate in [[taiga]] and [[snowy tundra]] villages.}}
{{History|pocket}}
{{History||1.1.0|snap=alpha 1.1.0.0|Dark oak doors and iron doors now generate in [[woodland mansion]]s.
|Doors now have [[sound]]s when placed.<ref>{{bug|MCPE-10079}} – "Doors don't have a placement sound" resolved as "Fixed"</ref>}}
{{History|bedrock}}
{{History||1.4.0|snap=beta 1.2.14.2|Various wooden doors now generate in [[shipwreck]]s.}}
{{History||1.10.0|snap=beta 1.10.0.3|[[File:Oak Door BE4.png|32px]] [[File:Spruce Door BE2.png|32px]] [[File:Birch Door BE2.png|32px]] [[File:Jungle Door BE2.png|32px]] [[File:Acacia Door BE2.png|32px]] [[File:Dark Oak Door BE2.png|32px]] [[File:Iron Door BE6.png|32px]] The textures of all doors have been changed.
|Jungle doors now generate in the new [[desert]] [[village]]s.
|Added [[wandering trader]]s, which can open and close wooden doors.}}
{{History||1.11.0|snap=beta 1.11.0.7|[[Vindicator]]s can now break doors during [[raid]]s.}}
{{History||1.16.0|snap=beta 1.15.0.51|Zombies can no longer break iron doors.<ref>{{bug|MCPE-43725}}</ref>}}
{{History|||snap=beta 1.16.0.51|[[File:Crimson Door BE1.png|32px]] [[File:Warped Door BE1.png|32px]] [[File:Crimson Door (item) JE1 BE1.png|32px]] [[File:Warped Door (item) JE1 BE1.png|32px]] Added crimson and warped doors.
|Added [[piglin]]s, which can open and close doors.}}
{{History|||snap=beta 1.16.0.63|[[File:Crimson Door BE2.png|32px]] [[File:Warped Door BE2.png|32px]] [[File:Crimson Door (item) JE2 BE2.png|32px]] [[File:Warped Door (item) JE2 BE2.png|32px]] The textures of crimson and warped doors have been changed.}}
{{History||1.17.0|snap=beta 1.17.0.50|[[File:Jungle Door (item) JE4 BE2.png|32px]] Changed the texture of the jungle door item.}}
{{History||1.18.10|snap=beta 1.18.10.20|[[File:Oak Door (item) JE4 BE3.png|32px]] [[File:Spruce Door (item) JE4 BE2.png|32px]] [[File:Birch Door (item) JE4 BE2.png|32px]] [[File:Jungle Door (item) JE5 BE3.png|32px]] [[File:Acacia Door (item) JE4 BE2.png|32px]] [[File:Dark Oak Door (item) JE4 BE2.png|32px]][[File:Iron Door (item) JE3 BE3.png|32px]] All [[item]] textures for all doors except crimson and warped have been changed.}}
{{History||1.19.0|snap=beta 1.19.0.20|[[File:Mangrove Door BE1.png|32px]] [[File:Mangrove Door (item) JE1 BE1.png|32px]] Added mangrove doors.}}
{{History||Next Major Update<br>(Experimental)|link=Bedrock Edition 1.19.50|snap=beta 1.19.50.21|[[File:Bamboo Door BE1.png|32px]] [[File:Bamboo Door (item) JE1 BE1.png|32px]] Added bamboo doors behind the "[[Bedrock Edition 1.20|Next Major Update]]" [[experimental]] toggle.
|The doors now use the same opening and closing [[sound]] effects as ''[[Java Edition]]''.}}
{{History||Next Major Update<br>(Experimental)|link=Bedrock Edition 1.19.80|snap=beta 1.19.80.20|[[File:Cherry Door JE2.png|32px]] [[File:Cherry Door (item) JE2.png|32px]] Added cherry doors behind the "[[Bedrock Edition 1.20|Next Major Update]]" [[experimental]] toggle.}}
{{History||1.20.0|snap=beta 1.20.0.21|Bamboo and cherry doors are now available without using the "Next Major Update" experimental toggle.}}
{{History|console}}
{{History||xbox=TU1|xbone=CU1|ps=1.0|wiiu=Patch 1|switch=1.0.1|[[File:Oak Door JE3 BE1.png|32px]] [[File:Iron Door JE1 BE1.png|32px]] [[File:Oak Door (item) JE2 BE1.png|32px]] [[File:Iron Door (item) JE1 BE1.png|32px]] Added doors.}}
{{History||xbox=TU5|Doors can be found in the Redstone & Transportation tab in the [[Creative inventory]].}}
{{History||xbox=TU14|ps=1.04|Doors being broken by [[zombie]]s now show [[damage]].
|Moved doors to the Building Blocks tab in the Creative inventory.}}
{{History||xbox=TU25|xbone=CU14|ps=1.17|[[File:Spruce Door JE1 BE1.png|32px]] [[File:Birch Door JE1 BE1.png|32px]] [[File:Jungle Door JE2 BE1.png|32px]] [[File:Spruce Door (item) JE3 BE1.png|32px]] [[File:Birch Door (item) JE3 BE1.png|32px]] [[File:Jungle Door (item) JE3 BE1.png|32px]] Added spruce, birch, and jungle door variants.
|The [[crafting]] recipes of doors now yield 3 doors instead of 1.
|The original wooden door (''Door'') has been renamed to ''Oak Door''.}}
{{History||xbox=TU27|xbone=CU15|ps=1.18|[[File:Acacia Door JE2 BE1.png|32px]] [[File:Dark Oak Door JE1 BE1.png|32px]] [[File:Acacia Door (item) JE3 BE1.png|32px]] [[File:Dark Oak Door (item) JE3 BE1.png|32px]] Acacia and dark oak doors have been added to the [[Creative]] [[inventory]].}}
{{History||xbox=TU31|xbone=CU19|ps=1.22|wiiu=Patch 3|Acacia doors and dark oak doors are now obtainable in [[survival]] mode.}}
{{History||?| [[File:Oak Door (item) JE3 BE2.png|32px]] [[File:Iron Door (item) JE2 BE2.png|32px]] Oak and iron door's inventory textures have been changed to match Java Edition}}
{{History||xbox=none|xbone=none|ps=1.90|wiiu=none|switch=none|[[File:Oak Door BE4.png|32px]] [[File:Spruce Door BE2.png|32px]] [[File:Birch Door BE2.png|32px]] [[File:Jungle Door BE2.png|32px]] [[File:Acacia Door BE2.png|32px]] [[File:Dark Oak Door BE2.png|32px]] [[File:Iron Door BE6.png|32px]] The textures of all doors have been changed.}}
{{History|new 3ds}}
{{History||0.1.0|[[File:Oak Door JE2.png|32px]] [[File:Spruce Door JE1 BE1.png|32px]] [[File:Birch Door JE1 BE1.png|32px]] [[File:Jungle Door JE2 BE1.png|32px]] [[File:Acacia Door JE2 BE1.png|32px]] [[File:Dark Oak Door JE1 BE1.png|32px]] [[File:Iron Door JE2 BE5.png|32px]] [[File:Oak Door (item) JE3 BE2.png|32px]] [[File:Spruce Door (item) JE3 BE1.png|32px]] [[File:Birch Door (item) JE3 BE1.png|32px]] [[File:Jungle Door (item) JE3 BE1.png|32px]] [[File:Acacia Door (item) JE3 BE1.png|32px]] [[File:Dark Oak Door (item) JE3 BE1.png|32px]] [[File:Iron Door (item) JE1 BE1.png|32px]] Added doors.}}
{{History|foot}}
<gallery>
Beta 1.7 punching oak door.png|From [[Java Edition Beta 1.7]] to Beta 1.7.2, doors produced [[placeholder texture]] particles when broken or punched on some sides.
</gallery>
Historical sounds:
{| class="wikitable"
! Sound
! From
! to
! Pitch
|-
| {{sound||Door closing old.ogg|Door opening old.ogg}}
| ?
| Sound Update
| ?
|-
| {{sound||Door open.ogg|Door close.ogg}}
| Sound Update
| 15w43a
| ?
|}
=== Door "items" ===
{{:Technical blocks/Doors}}
== Issues ==
{{Issue list}}
== Trivia ==
* Door models have an extra hinge on the opposite side of the actual functional hinge.<ref>{{bug|MC-106697|||WAI}}</ref>
== Gallery ==
<gallery>
Oak Door.png|Oak Door
Spruce Door.png|Spruce Door
Birch Door.png|Birch Door
Jungle Door.png|Jungle Door
Acacia Door.png|Acacia Door
Dark Oak Door.png|Dark Oak Door
Mangrove Door.png|Mangrove Door
Cherry Door.png|Cherry Door
Bamboo Door.png|Bamboo Door
Crimson Door.png|Crimson Door
Warped Door.png|Warped Door
Iron Door.png|Iron Door
Oak Door (item) JE4 BE3.png|Oak Door (item)
Spruce Door (item) JE4 BE2.png|Spruce Door (item)
Birch Door (item) JE4 BE2.png|Birch Door (item)
Jungle Door (item) JE5 BE3.png|Jungle Door (item)
Acacia Door (item) JE4 BE2.png|Acacia Door (item)
Dark Oak Door (item) JE4 BE2.png|Dark Oak Door (item)
Mangrove Door (item) JE1 BE1.png|Mangrove Door (item)
Cherry Door (item) JE2.png|Cherry Door (item)
Bamboo Door (item) JE1 BE1.png|Bamboo Door (item)
Crimson Door (item) JE2 BE2.png|Crimson Door (item)
Warped Door (item) JE2 BE2.png|Warped Door (item)
Iron Door (item) JE3 BE3.png|Iron Door (item)
</gallery>
=== Screenshots ===
<gallery>
Iron Door in Stronghold.png|Naturally occurring iron door in a [[stronghold]].
Wooden Doors 1.8.png|First picture of brand-new 1.8 variants of doors.
Door Creeper.png|A creeper behind some dark oak doors.
Doortypes.png|All types of doors with their respective trapdoors.
FloatingDoorArrows.jpg|Arrows shot into a door that was opened, causing a floating bug.
Jeb Crafting Doors.png|First image of three doors being crafted at once.
Jappa Closet.jpg|A closet made from oak doors.
</gallery>
=== Concept Art ===
<gallery>
Bamboo Wood and Door Concept Art.png|Bamboo door concept art.
Bamboo Door Prototype Textures.png|Bamboo door prototype textures.
</gallery>
== References ==
{{Reflist}}
== External Links ==
*[https://www.minecraft.net/en-us/article/taking-inventory--door Taking Inventory: Door] – Minecraft.net on September 29, 2022
{{Redstone}}
{{Blocks|Utility}}
{{Items}}
[[Category:Manufactured blocks]]
[[Category:Generated structure blocks]]
[[Category:Utility blocks]]
[[Category:Mechanics]]
[[Category:Redstone mechanics]]
[[Category:Mechanisms]]
[[cs:Dveře]]
[[de:Tür]]
[[el:Door]]
[[es:Puerta]]
[[fr:Porte]]
[[hu:Ajtók]]
[[it:Porta]]
[[ja:ドア]]
[[ko:문]]
[[nl:Deur]]
[[pl:Drzwi]]
[[pt:Porta]]
[[ru:Дверь]]
[[th:ประตู]]
[[uk:Двері]]
[[zh:门]]</li></ul> | Tamed wolves have dye-able collars. | ||||
Issues
Issues relating to "Wolf", "Wolves", or "Dog" are maintained on the bug tracker. Report issues there.
Trivia
- Wolves were added by Jens Bergensten.
- Angry wolves can be distracted with sheep, skeletons or rabbits.
- Wolves are the first official tameable mob in Minecraft.
- Wolves do not trample crops[10] (but they can destroy them by jumping on them.).
- Wolves make step sounds.[11]
- If the player attacks another player on SMP, even if PvP is off, a tamed wolf will attack the opposing player. They will continue to attack even if made to sit by the wolf's owner. Similarly, if a player attacks a tamed wolf that isn't their own, then the wolf will attack. In addition to this, the wolves will never stop growling unless they are killed.
- If a wolf is in a downward water current, they will not float and, if not removed, will drown.
- Wolves, Iron Golems, Killer rabbits and the Ender Dragon are the only mobs that can be hostile to the player on peaceful mode.
- Wolves can teleport into transparent blocks. Therefore, it is not recommended to bring a wolf underground or near lava/fire.
- If the player creates a new world and tames a wolf, then logs in under a different username, the wolf will not obey the player.
- If the player attacks another player or mob while the wolf is in follow mode, even if it is enclosed then freed after, it will attack that mob or player. Whereas if it is sitting and the player attacks a mob or player, it won’t attack them, even if the player let them start walking again.
- Wolves have two unused sound files called "howl1" and "howl2". They seem to be a sort of wolf/werewolf howling loudly. It is unknown if they will ever be used.
- If you attack a wolf and then give the aggressive wolf food that it can eat (like Rotten Flesh), hearts will appear as animals do when entering breeding mode. The wolf will not breed and continue attacking the player.
- Aggressive wolves can see you even if you are invisible. This may be on purpose, since dogs have a keen sense of smell, and it could be using it to detect the player. Zombie Pigmen also display this behavior when provoked.
- In Pocket Edition, wolves will attack Creepers if you attack one.
- If you throw a Potion of Invisibility on a tamed wolf the collar will still appear, as the collar is considered "armor", just like wool on a sheep.
- Wolves are the first mob added that can teleport.
- In singleplayer, if you punch a wild wolf and leave its field of vision, it will stare at you and not move at all. Going back into its range will make it continue pursuing you.
- Aggressive wolves have the path-finding of most mobs, such as going around pits, but may sometimes try to jump to get a player that's separated by a 1-2 block gap. In two block gaps, they won't make the jump and fall, but may manage to damage the player.
- In the Xbox 360 edition of minecraft, Wolves cannot enter the Nether.
- Killing your own tamed wolves will still make them drop experience.
- In Xbox 360 edition you can only have 1-8 wolves at a time
- Untamed Wolves use their hostile appearance when they are attacking sheep, skeletons, or rabbits. They will change back once the targeted mob dies or gets out of their range.
- If a tamed wolf is sitting and then pushed into water, they will stand up and swim. As soon as they get out of the water, they will sit. This only works if the player is in range or the wolf is tied to a fence with a lead, otherwise they will teleport to the player.
- Also happens with cats.
- If a wolf is in water or rain, it will turn into its untamed appearance.
- If you manage to attack a wild wolf from 128 or more blocks away, it will instantly despawn, sometimes leaving behind the projectile, implying it got hostile before impact.
- Attacking a wild wolf on peaceful won't damage you, however they get the hostile appearance and try to push you like a baby slime.
- A wild baby wolf grows significantly when attacked.
Gallery
![The first screenshot of wolves[12]](https://static.wikia.nocookie.net/minecraft_gamepedia/images/a/aa/Wolves_in_working.png/revision/latest/scale-to-width-down/120?cb=20110315135735)
The first screenshot of wolves[12]
![The second screenshot of wolves. Here, Jeb implemented sitting.[13]](https://static.wikia.nocookie.net/minecraft_gamepedia/images/c/c6/Wolf_sitting.png/revision/latest/scale-to-width-down/120?cb=20110316150652)
The second screenshot of wolves. Here, Jeb implemented sitting.[13]
- Shakeyshakey.PNG
A wolf shaking off water droplets after a swim.

A pack of wolves hunting a cow on command.
- Wolfstuck.jpg
A wolf stuck inside a tree after teleporting.
- 2011-10-10 20.23.10.png
Even aggressive wolves will shake off water droplets after a swim.

Wolves have a darker texture when they are swimming or when it's raining.
A pack of wolves locking a sheep under a tree (bug).
Wolves with dyed collars.
A wild baby wolf that can only be spawned by a wolf spawn egg. Since wild wolves cannot breed, wild baby wolves are considered rare. However, they are still tameable and can become tamed baby wolves.
A wild baby wolf will become angry if attacked, like their adult variant.
![The first screenshot of wolves[12]](https://static.wikia.nocookie.net/minecraft_gamepedia/images/a/aa/Wolves_in_working.png/revision/latest?cb=20110315135735)
![The second screenshot of wolves. Here, Jeb implemented sitting.[13]](https://static.wikia.nocookie.net/minecraft_gamepedia/images/c/c6/Wolf_sitting.png/revision/latest?cb=20110316150652)

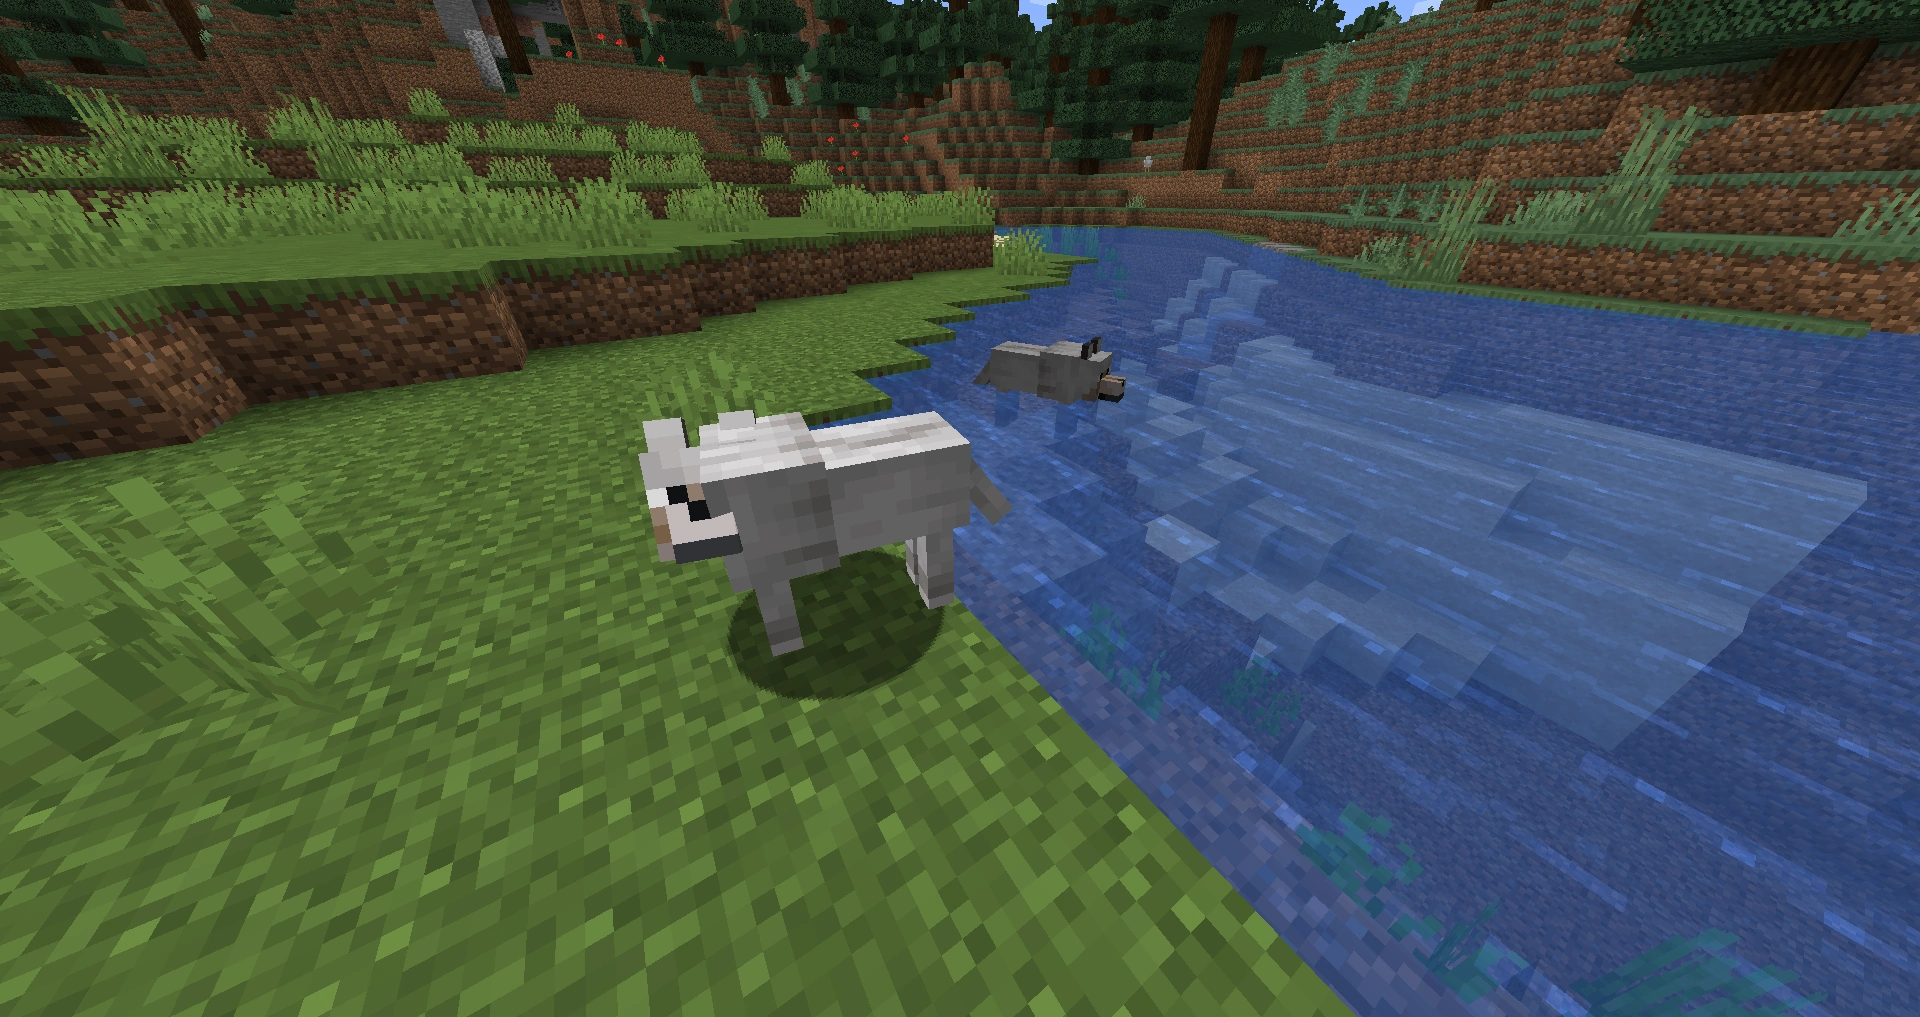

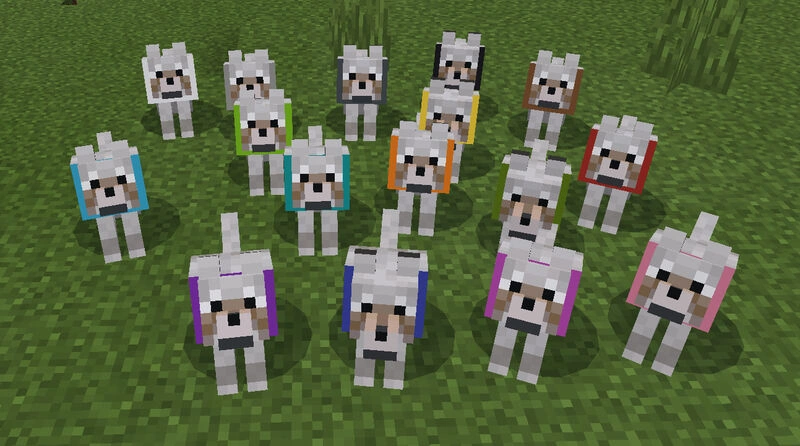
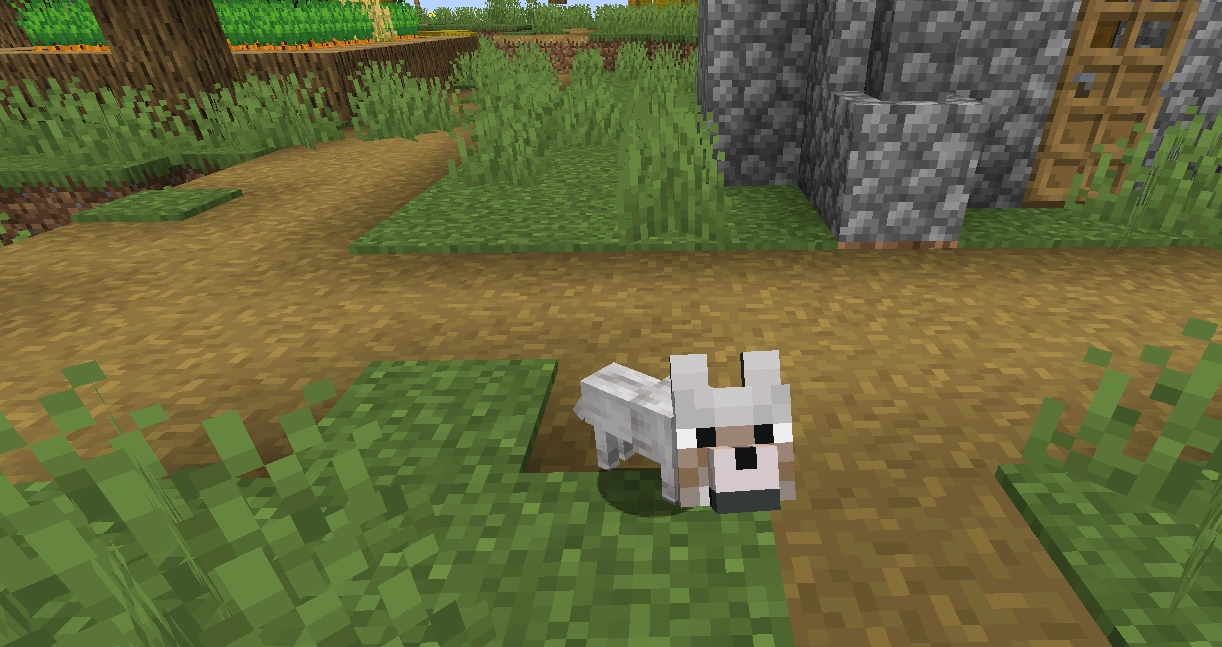
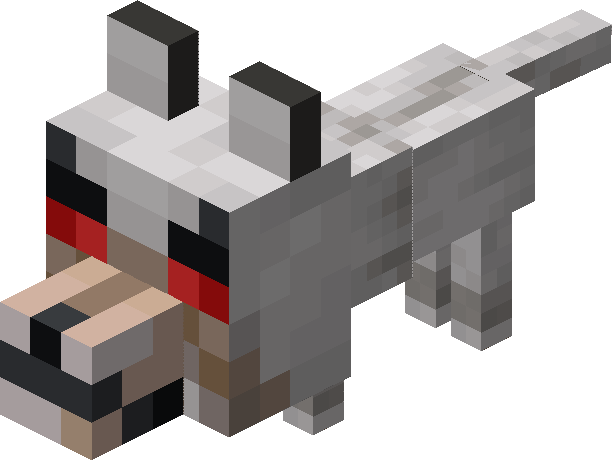
References
- ↑ http://www.reddit.com/r/Minecraft/comments/g6fur/wolves_in_action/c1l8tf0
- ↑ https://twitter.com/jeb_/status/52996089921548288
- ↑ https://twitter.com/jeb_/status/48762461930790912
- ↑ https://twitter.com/jeb_/status/48752041044090880
- ↑ https://twitter.com/jeb_/status/48752134958747649
- ↑ wordofnotch:3597265965
- ↑ http://www.youtube.com/watch?v=c9Lp9p5yjuo
- ↑ https://twitter.com/jeb_/status/53757304130113536
- ↑ https://twitter.com/Dinnerbone/status/236530180737335296
- ↑ https://twitter.com/jeb_/status/53002130386202624
- ↑ https://twitter.com/jeb_/status/53003154291306496
- ↑ https://twitter.com/jeb_/status/47650984125665280
- ↑ https://twitter.com/jeb_/status/48037113270251520