(Undo revision 800736 by Jethrostoltzfus (talk) why?) |
(Fixing typos and updating download link. Removing red link as the correct link leads to out of date information. http://minecraft.gamepedia.com/User:Asuandrew/Server) |
||
| (29 intermediate revisions by 23 users not shown) | |||
| Line 1: | Line 1: | ||
{{msgbox |
{{msgbox |
||
| title = Warning |
| title = Warning |
||
| − | Before following these instructions please note that running server software on your computer without a clear understanding of what you are doing may seriously harm your system and lead to vulnerabilities.<ref> |
+ | Before following these instructions please note that running server software on your computer without a clear understanding of what you are doing may seriously harm your system and lead to vulnerabilities.<ref>[[#Warning]]</ref> |
| bgcol = #FFCCCC |
| bgcol = #FFCCCC |
||
| linecol = #FFAAAA |
| linecol = #FFAAAA |
||
}} |
}} |
||
{{TOC|right}} |
{{TOC|right}} |
||
| − | This tutorial takes you through the steps of '''setting up your own server''' using the default [[server]] software that [[Mojang AB|Mojang]] distributes free of charge. The software may be installed on most operating systems, including Windows, Mac and Linux. |
+ | # This tutorial takes you through the steps of '''setting up your own server''' using the default [[server]] software that [[Mojang AB|Mojang]] distributes free of charge. The software may be installed on most operating systems, including Windows, Mac and Linux. |
| − | Regardless of your operating system, you must begin by downloading the server software from the minecraft [ |
+ | Regardless of your operating system, you must begin by downloading the server software from the minecraft [https://minecraft.net/download download page]. The server is available as either a Java .jar file or a Windows .exe file. The .exe version may seem easier to use, but in case of problems the .jar version gives better error messages and it is more configurable. |
| + | |||
| + | Notes: |
||
| + | * Setting up a server takes some time, and some technical knowledge. Don't try to set up a server unless you have some basic computer and networking abilities. Probably, your best bet can be to look on the Internet for a guide on how to set up a server. |
||
| + | * Hosting and playing on the same machine does not usually matter, unless you have a slow computer. |
||
| + | * Netbooks and Notebooks don't usually make for good server machines. They typically have lower-end hardware and bad I/O performance in comparison to desktops and servers. |
||
| + | * Hosting a server with many players in a wireless network (WLAN and especially WWAN) is not recommended. Use a wired network instead, such as Ethernet. |
||
| + | * If you decide you don't want to host, but still want to play online, check out the public server options in the [http://www.minecraftforum.net/viewforum.php?f=1025 Minecraft servers area] of the Minecraft forum. |
||
| + | * If you still want to manage a server, but not from home, check out the [http://www.minecraftforum.net/forum/131-minecraft-server-hosting/ Minecraft server hosting area] of the Minecraft forum or other websites. Expect to pay monthly for this type of server since finding free hosting is a rarity. Though your computer that is hosting the server does not need to be on for her users to join. |
||
''Note: There is also [[Custom server list|custom server software]] available, which most large servers use, but these applications are not supported by Mojang.'' |
''Note: There is also [[Custom server list|custom server software]] available, which most large servers use, but these applications are not supported by Mojang.'' |
||
| Line 29: | Line 37: | ||
* Open Windows Control Panel, find Java (it may be inside the Programs category), and click on Update Now. |
* Open Windows Control Panel, find Java (it may be inside the Programs category), and click on Update Now. |
||
* If Java has been enabled in your browser, you can also visit http://java.com/en/download/installed.jsp. This will perform an automatic version check. |
* If Java has been enabled in your browser, you can also visit http://java.com/en/download/installed.jsp. This will perform an automatic version check. |
||
| − | * The following method will only work if the Java folder has been added to the system path. Open a command window. ( |
+ | * The following method will only work if the Java folder has been added to the system path. Open a command window. (While holding the Windows key down, press R to open the Run dialog. Type <code>cmd</code> and press enter or click OK.) Once the command prompt has opened, enter the command <code>java -version</code>, followed by the enter key. If a version number is reported, then check the Java website at http://www.java.com/download/ to see what the most recent version number is. |
| − | If you don't have Java, or your version is outdated, then download it at http://www.java.com/download/. If you also want to be able to use Java in your |
+ | If you don't have Java, or your version is outdated, then download it at http://www.java.com/download/. If you also want to be able to use Java in your web browser, you will probably have to install the 32-bit version, even if you are running 64-bit Windows, because most web browsers are still 32-bit. (Read more about this at http://java.com/en/download/faq/java_win64bit.xml) If you are using a 64-bit web browser, or don't need to use it with your web browser, you can install the 64-bit version. It is possible to install both the 32-bit and the 64-bit versions, but then you need to remember to upgrade both versions when they are outdated. |
=== Start the Minecraft server === |
=== Start the Minecraft server === |
||
| Line 115: | Line 123: | ||
java -Xms1024M -Xmx2048M -jar minecraft_server.jar nogui |
java -Xms1024M -Xmx2048M -jar minecraft_server.jar nogui |
||
pause |
pause |
||
| + | |||
| + | |||
| + | The following is an exact copy of a working launcher .bat file to run a .exe Minecraft_server in windows. |
||
| + | Note: Running minecraft_server.1.8.8.exe in a Command Window ONLY. This is because the server GUI (for some reason) causes the server to spike ALL THE TIME. |
||
| + | '''COPY''' the following example and '''replace the file path''' with the file path to '''YOUR''' .exe server. |
||
| + | |||
| + | |||
| + | @echo off |
||
| + | java -Xms1024M -Xmx1024M -jar "C:\Users\owner\Desktop\Minecraft Server\minecraft_server.1.8.8.exe" nogui |
||
| + | Pause |
||
| + | |||
| + | Save as >> select file type as "All Files" >> name your new file '''Startserver.bat''' |
||
| + | |||
| + | Double click the files to start your server. You may get a "Class_Not_Found" and ServerGuiConcole error, just ignore these errors |
||
| + | and you should see your "Server Thread/INFO" dialog start the server. |
||
| + | |||
| + | Have Fun! :) |
||
| + | |||
| + | Footnote: You are most likely here to increase the memory allocation size in order to reduce lag. The .bat file above |
||
| + | will help in two ways; one is allocating more buffer memory to have less real time processing on the server. And two is |
||
| + | removing the GUI (Server Game User Interface). As stated above, the GUI causes a redundant visual process that chews up |
||
| + | CPU time for some reason. Additionally, you can help the server by lowering and turning off the "eye candy" features. |
||
| + | The following are the basic Minecraft setting set to run a balanced user experience and server load. |
||
| + | |||
| + | Graphics: Fast Render Distance: 6 Chunks |
||
| + | Smooth Lighting: Minimum Max Framerate: Unlimited |
||
| + | 3D Anaglyph: Off View Bobbing: ON |
||
| + | GUI Scale: (your choice) Brightness: Bright |
||
| + | Clouds: Fast Particles: All |
||
| + | Fullscreen: (your choice) Use VSync: Off |
||
| + | Mipmap Levels: Off Alternate Blocks: Off |
||
| + | Use VBOs: Off Entity Shadows: Off |
||
| + | |||
| + | The overall settings are for you to play with, but these settings help a lot for multi player |
||
| + | gameplay over LAN and the WEB. |
||
=== Further configuration === |
=== Further configuration === |
||
| Line 120: | Line 163: | ||
Read the sections [[#Port_forwarding|Port forwarding]] and further for more information about configuring your server. |
Read the sections [[#Port_forwarding|Port forwarding]] and further for more information about configuring your server. |
||
| − | == |
+ | == OS X Yosemite instructions == |
How to make a Minecraft Server on OS Yosemite: |
How to make a Minecraft Server on OS Yosemite: |
||
| − | This short tutorial will teach you how to make a vanilla Minecraft server for |
+ | This short tutorial will teach you how to make a vanilla Minecraft server for a Mac running OS X Yosemite! |
| + | |||
1) First figure out whether or not you have a Dynamic IP or a Static IP. This can be crucial because with a dynamic IP your IP will always change, so you will have to give your friends a different IP every time while with a static IP it will just be one IP that never changes unless you restart your modem. |
1) First figure out whether or not you have a Dynamic IP or a Static IP. This can be crucial because with a dynamic IP your IP will always change, so you will have to give your friends a different IP every time while with a static IP it will just be one IP that never changes unless you restart your modem. |
||
| + | |||
2) After you have figured that out, download a Minecraft server.jar I have placed a link below for the versions. https://mcversions.net/ |
2) After you have figured that out, download a Minecraft server.jar I have placed a link below for the versions. https://mcversions.net/ |
||
| + | |||
| − | 3) Select your version of the Minecraft.jar and download it. Your |
+ | 3) Select your version of the Minecraft.jar and download it. Your Mac will probably ask you if this file is okay, click yes and your download will begin. |
| + | |||
4) Make a folder on your desktop and name it what ever you want, then drag the new Minecraft Server.jar and double click. |
4) Make a folder on your desktop and name it what ever you want, then drag the new Minecraft Server.jar and double click. |
||
| + | |||
| − | 5) The server console will start but then abruptly freeze and quit. It created three new things in the folder where the minecraft.jar is located. Go |
+ | 5) The server console will start but then abruptly freeze and quit. It created three new things in the folder where the minecraft.jar is located. Go to the EULA.txt and read it then change the “false” to a “true”. |
| + | |||
6) Then let your servers run and boom, it will create more files and start the server. |
6) Then let your servers run and boom, it will create more files and start the server. |
||
| + | |||
7) If you have noticed, on top of the console it says “Running server on port:*25565” |
7) If you have noticed, on top of the console it says “Running server on port:*25565” |
||
| + | |||
| − | 8) |
+ | 8) For your friends to join you need to port forward. Figure out what kind of modem you have and then ask you parents for the credentials to get on the modem’s configuration |
| + | |||
9) To access this you will have to go to spotlight and find an app called “Terminal”, after you have opened it, type in “ifconfig” a bunch of numbers will pop up, scroll to the top and search for “en1” and below it find “inet X.X.X.X and take that number and put a one at the end and paste it in your browser. |
9) To access this you will have to go to spotlight and find an app called “Terminal”, after you have opened it, type in “ifconfig” a bunch of numbers will pop up, scroll to the top and search for “en1” and below it find “inet X.X.X.X and take that number and put a one at the end and paste it in your browser. |
||
| ⚫ | |||
| ⚫ | |||
| ⚫ | |||
| + | |||
| ⚫ | Setting a server up in |
||
| ⚫ | |||
| ⚫ | Setting a server up in OS X is [http://minecraft.net/download.jsp "more involved"] than in Windows because an executable file has not been made available. A three step in-depth video tutorial of the process can be seen [http://www.youtube.com/watch?v=fqbd3emxrcg&list=PL8NCkvVGHD21XnJ14rBQ4u7JEWvEpTOot&index=1 here]. Keep in mind that the server won't run correctly on OS X 10.4 and may crash your machine. |
||
=== Downloading === |
=== Downloading === |
||
| Line 141: | Line 194: | ||
=== Installing Java === |
=== Installing Java === |
||
| − | + | OS X already has Java downloaded onto your machine. Java is updated through Java's website |
|
| − | If you are running OS X 10.8.* (Mountain Lion) or OS X 10.9.* (Mavericks) You need to download Java here, as Mavericks will fail when looking for it. [http://support.apple.com/kb/dl1572 Java Download] |
+ | If you are running OS X 10.8.* (Mountain Lion) or OS X 10.9.* (Mavericks) You need to download Java here, as Mavericks will fail when looking for it. [http://support.apple.com/kb/dl1572 no Java Download] |
=== Setting up the Minecraft server === |
=== Setting up the Minecraft server === |
||
| Line 159: | Line 212: | ||
*Double-click the start.command file to start the server. |
*Double-click the start.command file to start the server. |
||
*A new Terminal window will open and, the first time you run the script, several error messages about missing files/directories will appear. This is normal. You're now ready to [[Setting up a server#Configuring the Minecraft server|configure your server]]. |
*A new Terminal window will open and, the first time you run the script, several error messages about missing files/directories will appear. This is normal. You're now ready to [[Setting up a server#Configuring the Minecraft server|configure your server]]. |
||
| − | |||
| − | === Pre-Made Server Configuration === |
||
| − | *Vanilla: |
||
| − | **[https://skydrive.live.com/redir?resid=F9E6AC3C0BC0ACBF!1166 Download Here] |
||
| − | *CraftBukkit: |
||
| − | **[http://files.gettfs.info/WohK/Pre-made%20Minecraft%20Server%20Files%20%5BCraftBukkit,%20OSX%5D.zip Download Here] |
||
| − | |||
| − | |||
| − | '''Please keep in mind that these are NOT self updating. Download the newest server software here:''' |
||
| − | *CraftBukkit: |
||
| − | **[http://dl.bukkit.org/latest-rb/craftbukkit.jar Latest Recommended Build] |
||
| − | **[http://dl.bukkit.org/latest-beta/craftbukkit.jar Latest Beta Build] (Please remember that this file needs to be renamed to <code>craftbukkit.jar</code>) |
||
| − | **[http://dl.bukkit.org/latest-dev/craftbukkit.jar Latest Development Build] |
||
| − | *Vanilla: |
||
| − | **Find all of the minecraft server downloads [http://minecraft.net/download here] Click on the "minecraft_server.[minecraft version].jar" to download. (Please remember that this file needs to be renamed to <code>minecraft_server.jar</code>.) |
||
| − | |||
| − | === Spigot/Bukkit downloads === |
||
| − | '''Spigot and bukkit got shut down so you cant download the files from there website so download them here.''' |
||
| − | |||
| − | *Spigot |
||
| − | **[https://drive.google.com/file/d/0B-NRAW-koo3KOHNkVlpOQ3pWTG8/view?usp=sharing Click Here] |
||
| − | *Bukkit |
||
| − | **[https://drive.google.com/file/d/0B-NRAW-koo3KaGVrdW5XQVFYS0U/view?usp=sharing Click Here] |
||
=== Using Time Capsule === |
=== Using Time Capsule === |
||
| Line 203: | Line 233: | ||
=== Run as a daemon === |
=== Run as a daemon === |
||
| ⚫ | |||
Alternatively you can automate the startup of the Minecraft server. |
Alternatively you can automate the startup of the Minecraft server. |
||
| − | |||
| ⚫ | |||
== Linux instructions == |
== Linux instructions == |
||
This tutorial for how to set up a Minecraft server on Linux was designed for people who don't have a lot of experience with Linux. There is a [http://www.minecraftforum.net/viewtopic.php?t=628 more advanced tutorial in the forums.] |
This tutorial for how to set up a Minecraft server on Linux was designed for people who don't have a lot of experience with Linux. There is a [http://www.minecraftforum.net/viewtopic.php?t=628 more advanced tutorial in the forums.] |
||
| − | This tutorial was tested on Ubuntu 9.10 32-bit but should work with the descendants of Debian. |
+ | This tutorial was tested on Ubuntu 9.10 32-bit but should work with the 32-bit and 64-bit descendants of Debian. (Note that a 64-bit version of Linux will probably perform better on a 64-bit CPU, and that a 32-bit version will only use the first 4 GiB of RAM if more than that is installed.) |
=== Downloading === |
=== Downloading === |
||
| Line 256: | Line 285: | ||
==== openSUSE ==== |
==== openSUSE ==== |
||
| − | On older versions, you can |
+ | On older versions, you can simply type <code>zypper in java-1_6_0-sun</code> into a terminal. |
On newer versions, there is a tutorial [https://sites.google.com/site/easylinuxtipsproject/java-for-opensuse#TOC-Get-JRE here] describing how to install Java. |
On newer versions, there is a tutorial [https://sites.google.com/site/easylinuxtipsproject/java-for-opensuse#TOC-Get-JRE here] describing how to install Java. |
||
| Line 262: | Line 291: | ||
==== Arch Linux ==== |
==== Arch Linux ==== |
||
Open a terminal and run <code>pacman -S jre7-openjdk</code> as root. |
Open a terminal and run <code>pacman -S jre7-openjdk</code> as root. |
||
| + | ==== Arch Linux ARMv7 ==== |
||
| + | On ARMv7 it could better to use java from oracle http://www.oracle.com/technetwork/java/javase/downloads/jdk7-arm-downloads-2187468.html Accept license agreement and download jdk-7u60-linux-arm-vfp-hflt.tar.gz |
||
| + | Extract file in <code>/usr/lib/jvm/</code> |
||
| + | |||
| + | and change java default with |
||
| + | |||
| + | <code> archlinux-java set jdk1.7.0_60 </code> |
||
| + | |||
| + | Than |
||
| + | |||
| + | <code>java -version</code> |
||
| + | |||
| + | should give something like that: |
||
| + | |||
| + | <code>java version "1.7.0_60" |
||
| + | Java(TM) SE Runtime Environment (build 1.7.0_60-b19) |
||
| + | Java HotSpot(TM) Client VM (build 24.60-b09, mixed mode)</code> |
||
| + | |||
| + | (tested on Raspberry Pi 2) |
||
==== Gentoo ==== |
==== Gentoo ==== |
||
| Line 333: | Line 381: | ||
* [[Tutorials/Ubuntu startup script|Ubuntu startup script]] |
* [[Tutorials/Ubuntu startup script|Ubuntu startup script]] |
||
* [https://github.com/Thue/rfwadmin rfwadmin] startup script with web interface (for Linux servers). Nice web interface for quickly saving and loading maps. |
* [https://github.com/Thue/rfwadmin rfwadmin] startup script with web interface (for Linux servers). Nice web interface for quickly saving and loading maps. |
||
| + | * [https://teilgedanken.de/Blog/post/8/ Minecraft Systemd Service] A fully systemd-integrated minecraft service: |
||
| + | ** Working on CentOS and Fedora |
||
| + | ** Protecting the server with various readonly and inaccessible jails |
||
| + | ** Safe restart and stop operations using rcon |
||
| + | ** Can be combined with a [https://teilgedanken.de/Blog/post/9/ Minecraft Command Center Script] for ease of administration |
||
| + | * [https://wiki.archlinux.org/index.php/Minecraft#Minecraft_Server Arch Linux systemd wrapper] |
||
=== A simple installer script (also installs Java) === |
=== A simple installer script (also installs Java) === |
||
| Line 406: | Line 460: | ||
:'''Mac''' |
:'''Mac''' |
||
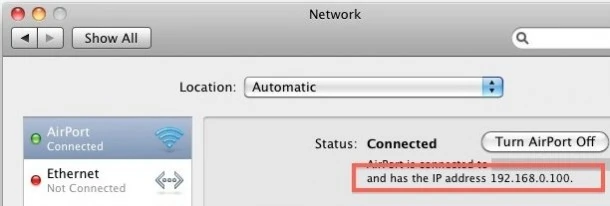
| − | [[File:Ip-address-mac-610x206.jpg|thumb|The IP location on |
+ | [[File:Ip-address-mac-610x206.jpg|thumb|The IP location on OS X]] |
: Locate your way to your desktop. Pull up the apple menu under the logo and scroll down to ''System Preferences''; then select "''Network''" your IP should be on the lower right as "IP address (xxx.xxx.xxx.xxx)". Once you have your IP, copy it down. |
: Locate your way to your desktop. Pull up the apple menu under the logo and scroll down to ''System Preferences''; then select "''Network''" your IP should be on the lower right as "IP address (xxx.xxx.xxx.xxx)". Once you have your IP, copy it down. |
||
| Line 452: | Line 506: | ||
== Configuring the Minecraft server == |
== Configuring the Minecraft server == |
||
# Configure the server by editing the [[server.properties]] file, the format for which is [[server.properties|explained here]]. Be certain to edit the file with a text editor that does not add formatting (e.g., for italics), such as Windows 7's Notepad. Additional configuration may not be necessary as many servers run fine from the default values. |
# Configure the server by editing the [[server.properties]] file, the format for which is [[server.properties|explained here]]. Be certain to edit the file with a text editor that does not add formatting (e.g., for italics), such as Windows 7's Notepad. Additional configuration may not be necessary as many servers run fine from the default values. |
||
| + | # To become or add an operator ("[[op]]"), type "/op <username>" into the server console or gui. This adds the specified user's username and UUID to the ops.json file. Operator status will not be changed if you chnage your username due to the use of UUID. |
||
| − | # Add your username to the admin.txt and/or ops.txt to become an [[administrator]] or [[operator]]. (Newer Minecraft versions may not have an admin.txt file). Each username must be on a separate line. |
||
#* Administrators and operators may execute [[commands]]. In other words, operator ("[[op]]") privileges allow you to control certain aspects of the game (e.g., teleporting players). |
#* Administrators and operators may execute [[commands]]. In other words, operator ("[[op]]") privileges allow you to control certain aspects of the game (e.g., teleporting players). |
||
| + | #If your [[server.properties]] is configured to enable whitelist, you can add a user to the whitelist.json by typing "/whitelist add <username>" into the server console or gui. Due to the transition to the UUID system, it is not recommended to directly edit whitelist.json. |
||
| − | #* Operator privileges may also be granted from the server GUI: type "op <username>" and it will automatically add <username> to the ops.txt file. |
||
== Connect to the Minecraft server == |
== Connect to the Minecraft server == |
||
| Line 465: | Line 519: | ||
* Unless you set a static IP for the computer that is hosting the game, the internal IP address can change. This affects port forwarding rules, and can make them invalid. Each modem or router has a different way of setting a static IP address. You should refer to the manual for your device(s) or online documentation for further instruction. |
* Unless you set a static IP for the computer that is hosting the game, the internal IP address can change. This affects port forwarding rules, and can make them invalid. Each modem or router has a different way of setting a static IP address. You should refer to the manual for your device(s) or online documentation for further instruction. |
||
* If you are having players connect to your external IP, your external IP can change if you do not have a static IP from your internet service provider. Use a tool such as [http://mywanip.com/ MyWANIP] to periodically check on the external IP address. You may also search "my ip address" on Google and it will show your IP address. Alternatively, you can look into a DNS service that will allow you to have a name, rather than an IP address, that will remain the same. The name will point to your external IP address, regardless of whether or not it changes (the DNS is updated when changes occur). |
* If you are having players connect to your external IP, your external IP can change if you do not have a static IP from your internet service provider. Use a tool such as [http://mywanip.com/ MyWANIP] to periodically check on the external IP address. You may also search "my ip address" on Google and it will show your IP address. Alternatively, you can look into a DNS service that will allow you to have a name, rather than an IP address, that will remain the same. The name will point to your external IP address, regardless of whether or not it changes (the DNS is updated when changes occur). |
||
| + | * For troubleshooting purposes you can try to connect to your own server on the same machine. You can connect trough either your localhost, your home network (192.168.x.x) or your public IP. If for some reason you have trouble with connecting publicly over your IPv4, try connecting over IPv6. This should only be done for testing whether your server is online, external players should still use IPv4. |
||
=== Firewalling, NATs and external IP addresses === |
=== Firewalling, NATs and external IP addresses === |
||
| Line 646: | Line 701: | ||
** [http://www.youtube.com/watch?v=ye_BnHAEJGU How to Port Forward any Minecraft Server (1.6.2)] |
** [http://www.youtube.com/watch?v=ye_BnHAEJGU How to Port Forward any Minecraft Server (1.6.2)] |
||
** [http://www.minecraftforum.net/viewtopic.php?t=836 Alternative port forwarding tutorial for Windows (with pictures)] |
** [http://www.minecraftforum.net/viewtopic.php?t=836 Alternative port forwarding tutorial for Windows (with pictures)] |
||
| − | ** [[User:ASUandrew/Server|Guide to setting up a server using Virtualbox]]. |
||
* Full course |
* Full course |
||
**[http://www.youtube.com/playlist?list=PL5aiq8Z-dwu2OlNWkSZ5RYBfHUwTKGGHA Course: How to Make a Server] |
**[http://www.youtube.com/playlist?list=PL5aiq8Z-dwu2OlNWkSZ5RYBfHUwTKGGHA Course: How to Make a Server] |
||
Revision as of 05:06, 21 November 2015
Before following these instructions please note that running server software on your computer without a clear understanding of what you are doing may seriously harm your system and lead to vulnerabilities.[1]
- This tutorial takes you through the steps of setting up your own server using the default server software that Mojang distributes free of charge. The software may be installed on most operating systems, including Windows, Mac and Linux.
Regardless of your operating system, you must begin by downloading the server software from the minecraft download page. The server is available as either a Java .jar file or a Windows .exe file. The .exe version may seem easier to use, but in case of problems the .jar version gives better error messages and it is more configurable.
Notes:
- Setting up a server takes some time, and some technical knowledge. Don't try to set up a server unless you have some basic computer and networking abilities. Probably, your best bet can be to look on the Internet for a guide on how to set up a server.
- Hosting and playing on the same machine does not usually matter, unless you have a slow computer.
- Netbooks and Notebooks don't usually make for good server machines. They typically have lower-end hardware and bad I/O performance in comparison to desktops and servers.
- Hosting a server with many players in a wireless network (WLAN and especially WWAN) is not recommended. Use a wired network instead, such as Ethernet.
- If you decide you don't want to host, but still want to play online, check out the public server options in the Minecraft servers area of the Minecraft forum.
- If you still want to manage a server, but not from home, check out the Minecraft server hosting area of the Minecraft forum or other websites. Expect to pay monthly for this type of server since finding free hosting is a rarity. Though your computer that is hosting the server does not need to be on for her users to join.
Note: There is also custom server software available, which most large servers use, but these applications are not supported by Mojang.
Warning
Since you're about to run your own server, you should be aware of the possible dangers. Although we can not prevent people from running their server and putting themselves at risk, we may at least appeal that you don't do it when having no idea what you actually do. Running by the instructions below should not put you at any risk, but since this is a wiki which everybody is allowed to edit, and we don't know about your system configuration, we cannot guarantee you'll be out of danger. In order to run your server and stay out of trouble, we strongly recommend you should at least know about the following:
- Networking in general (IP, DHCP, ports etc.)
- Your system configuration
- Your network configuration
- Your router configuration (if you want other people to connect over Internet)
Alternatively, if you decide that you don't wish to create a server, you are welcome to join other servers, which can be found here.
Windows instructions
Verify that the latest version of Java is installed
The Minecraft server (also the Windows .exe) requires Java (also called the Java Runtime Environment or JRE). For your security, you should only use the most recent version of Java. To verify that you have the latest version, do one of the following:
- Open Windows Control Panel, find Java (it may be inside the Programs category), and click on Update Now.
- If Java has been enabled in your browser, you can also visit http://java.com/en/download/installed.jsp. This will perform an automatic version check.
- The following method will only work if the Java folder has been added to the system path. Open a command window. (While holding the Windows key down, press R to open the Run dialog. Type
cmdand press enter or click OK.) Once the command prompt has opened, enter the commandjava -version, followed by the enter key. If a version number is reported, then check the Java website at http://www.java.com/download/ to see what the most recent version number is.
If you don't have Java, or your version is outdated, then download it at http://www.java.com/download/. If you also want to be able to use Java in your web browser, you will probably have to install the 32-bit version, even if you are running 64-bit Windows, because most web browsers are still 32-bit. (Read more about this at http://java.com/en/download/faq/java_win64bit.xml) If you are using a 64-bit web browser, or don't need to use it with your web browser, you can install the 64-bit version. It is possible to install both the 32-bit and the 64-bit versions, but then you need to remember to upgrade both versions when they are outdated.
Start the Minecraft server
Before starting the server, be aware that where ever (Your desktop, a folder, etc.) you run the server (.exe or .jar) from, it will create several configuration files in that location. It may be easier to create a dedicated folder for your server, and run it from inside the folder, as this will make it easier to locate/organize all the files.
Double click the file and the server should start. It will put configuration files in the folder, and quit immediately.
The first, and required, configuration you have to do is accepting the EULA. A text file call eula.txt is created in the application folder. Open this file in a text editor (Notepad, Gedit, TextEdit, etc. Do not use a rich text editor like Wordpad.) and change the line eula=false to eula=true. It signifies that you have read and understood the end user license agreement that you'll follow when using the software. If you don't do this, the server will shut down immediately when you try to start it.
If you get an error such as "Can't save server.properties" and your screen fills with useless, gibberish text, then run the Minecraft Server as administrator by right-mouse clicking on it and choosing 'Run as administrator'. (You may need the administrator password to do this.)
After the first start, you'll probably want to shut it down and then edit some configuration files, as is explained below.
Starting from the command line
Both the Java and the executable version can be run from the command line with extra parameters to configure, for example, memory usage.
Running from the command line requires that the Java folder is included in the system path, or that it is specified on the command line. The Java installer does not do this for you (anymore), so you will have to do this yourself. You can either modify the system path permanently, or make a temporary modification every time you start the server.
Either method requires that you know the location of the Java folder. Unless you made changes while installing Java, this folder should be:
- if you are using 32-bit Windows:
c:\Program Files\Java\jre7\bin\ - if you are using 32-bit Java on 64-bit Windows:
c:\Program Files (x86)\Java\jre7\bin\ - if you are using 64-bit Java on 64-bit Windows:
c:\Program Files\Java\jre7\bin\
Permanently modifying the system path
- Right click Computer (either on your desktop, in the Start menu, or in the Windows Explorer).
- Click properties.
- Click "Advanced system settings".
- Click "Environment Variables".
- Under system variables, find the Path variable.
- Click edit, and append to the end of the current value a semicolon (
;) and the location of your Java folder, for examplec:\Program Files (x86)\Java\jre7\bin\. (See above.) - Close any command windows that are open. (A reboot is not required.)
- Now (re)open the command prompt and enter the command
java -version. Java should now report the installed version.
Specifying the path on the command line
The system path can also be modified from the command line. This way, the modification is forgotten as soon as you close the command window.
To modify the system path, enter the following command:
set path=%path%;c:\Program Files\Java\jre7\bin\ (if "c:\Program Files\Java\jre7\bin\" is your Java folder, see above).
Instead of modifying the system path, the Java folder can also be entered as part of the Java command:
"c:\Program Files\Java\jre7\bin\java" -version (again, if "c:\Program Files\Java\jre7\bin\" is your Java folder).
Please note: when entering the path together with the Java command you need to enclose the command inside quotes, because of the space character in the path (between Program and Files). When modifying the path, the quotes are not required.
Starting the server
To start the server, change to the Minecraft server folder using the cd command, and enter the following command:
java -jar minecraft_server.jar
(Replace minecraft_server.jar with the .jar file name if it is different, for example minecraft_server.1.7.10.jar. Use minecraft_server.exe if you're using the executable server.)
If you prefer not to use the server's Graphical User Interface (GUI) to enter administration commands, simply add the option nogui to the end of the command, so that it reads: ... minecraft_server.jar nogui
You can also replace the java command with javaw. Javaw.exe is identical to Java.exe but there is no associated console window. This may be preferable when using a .bat file. (See the next section.) Note however that Javaw also doesn't show any error messages in the command window if anything is wrong.
Using the Xms and Xmx parameters, the initial and maximum memory size for Java can be specified. By default, your server runs with about 100 MB of RAM, which is very little. Most people will change their server to run on, for example:
java -Xms512M -Xmx1G ...
java -Xms1024M -Xmx1024M ...
java -Xms1G -Xmx2G ...
Add in -d64 if your server is on a 64-bit computer using 64-bit Java.
Add -o true to tell the server to run in online mode so only authenticated users can join.
Creating a .bat file to store the commands
To start the Minecraft server from the command line, without having to enter all commands every time, you need to create a "batch" (.bat) file.
- To do this open a text editor, for example Notepad.
- On the very first line add the command
@echo off
so that a command window isn't opened to show the output from our start file. - On the next line, enter the
set pathcommand if required. Usually, this is not required and if this is required, it is better off to reinstall Java and the reinstallation process will fix it. - After that you have the command that starts the Minecraft server itself. See the previous paragraphs for the possible commands to do this.
- Optionally, on the next line enter the command
pauseto tell the window to stay open after the /stop command is issued. Useful if you want to read what happened as it shut down. - Save the file, for example as "start-server.bat", where ever you are running your server from. Note: when using Notepad, use quotes around the filename "start-server.bat" when saving, because otherwise Notepad will add a ".txt" extension to the file.
- Now the server can be started just by double-clicking the .bat file.
Here is an example of a bat file that starts the Minecraft server on Windows. Put it in the same directory the Minecraft server is.
title run-minecraft
java -Xms1024M -Xmx2048M -jar minecraft_server.jar nogui
pause
The following is an exact copy of a working launcher .bat file to run a .exe Minecraft_server in windows.
Note: Running minecraft_server.1.8.8.exe in a Command Window ONLY. This is because the server GUI (for some reason) causes the server to spike ALL THE TIME.
COPY the following example and replace the file path with the file path to YOUR .exe server.
@echo off
java -Xms1024M -Xmx1024M -jar "C:\Users\owner\Desktop\Minecraft Server\minecraft_server.1.8.8.exe" nogui
Pause
Save as >> select file type as "All Files" >> name your new file Startserver.bat
Double click the files to start your server. You may get a "Class_Not_Found" and ServerGuiConcole error, just ignore these errors and you should see your "Server Thread/INFO" dialog start the server.
Have Fun! :)
Footnote: You are most likely here to increase the memory allocation size in order to reduce lag. The .bat file above will help in two ways; one is allocating more buffer memory to have less real time processing on the server. And two is removing the GUI (Server Game User Interface). As stated above, the GUI causes a redundant visual process that chews up CPU time for some reason. Additionally, you can help the server by lowering and turning off the "eye candy" features. The following are the basic Minecraft setting set to run a balanced user experience and server load.
Graphics: Fast               Render Distance: 6 Chunks
Smooth Lighting: Minimum     Max Framerate: Unlimited
3D Anaglyph: Off             View Bobbing: ON
GUI Scale: (your choice)     Brightness: Bright
Clouds: Fast                 Particles: All
Fullscreen: (your choice)    Use VSync: Off
Mipmap Levels: Off           Alternate Blocks: Off
Use VBOs: Off                Entity Shadows: Off
The overall settings are for you to play with, but these settings help a lot for multi player gameplay over LAN and the WEB.
Further configuration
Read the sections Port forwarding and further for more information about configuring your server.
OS X Yosemite instructions
How to make a Minecraft Server on OS Yosemite: This short tutorial will teach you how to make a vanilla Minecraft server for a Mac running OS X Yosemite!
1) First figure out whether or not you have a Dynamic IP or a Static IP. This can be crucial because with a dynamic IP your IP will always change, so you will have to give your friends a different IP every time while with a static IP it will just be one IP that never changes unless you restart your modem.
2) After you have figured that out, download a Minecraft server.jar I have placed a link below for the versions. https://mcversions.net/
3) Select your version of the Minecraft.jar and download it. Your Mac will probably ask you if this file is okay, click yes and your download will begin.
4) Make a folder on your desktop and name it what ever you want, then drag the new Minecraft Server.jar and double click.
5) The server console will start but then abruptly freeze and quit. It created three new things in the folder where the minecraft.jar is located. Go to the EULA.txt and read it then change the “false” to a “true”.
6) Then let your servers run and boom, it will create more files and start the server.
7) If you have noticed, on top of the console it says “Running server on port:*25565”
8) For your friends to join you need to port forward. Figure out what kind of modem you have and then ask you parents for the credentials to get on the modem’s configuration
9) To access this you will have to go to spotlight and find an app called “Terminal”, after you have opened it, type in “ifconfig” a bunch of numbers will pop up, scroll to the top and search for “en1” and below it find “inet X.X.X.X and take that number and put a one at the end and paste it in your browser.
10) Now, login and go to forwarding. I do not know what type of modem you have so, look up tutorials on YouTube I hope this tutorial helps.
OS X instructions
Setting a server up in OS X is "more involved" than in Windows because an executable file has not been made available. A three step in-depth video tutorial of the process can be seen here. Keep in mind that the server won't run correctly on OS X 10.4 and may crash your machine.
Downloading
Ensure you have the latest server application software. Look above for instructions.
Installing Java
OS X already has Java downloaded onto your machine. Java is updated through Java's website If you are running OS X 10.8.* (Mountain Lion) or OS X 10.9.* (Mavericks) You need to download Java here, as Mavericks will fail when looking for it. no Java Download
Setting up the Minecraft server
Ensure you have followed the download step before proceeding.
- Create a folder, if you haven't already, and put minecraft_server.jar into it. For example, create a folder on the Desktop named minecraft_server and drag the jar file into it.
- Open TextEdit, set the format to plain text (Format > Make Plain Text), copy and paste in the following:
#!/bin/bash
cd "$(dirname "$0")"
exec java -Xms1G -Xmx1G -jar minecraft_server.jar nogui
- Save the file as "start.command" in the same folder as minecraft_server.jar.
- This will give the server enough RAM to run. The amount of RAM can be changed by editing the
1Gto something else, such as2Gfor 2 GB.
- This will give the server enough RAM to run. The amount of RAM can be changed by editing the
- Open Terminal (in /Applications/Utilities/Terminal).
- Grant execute permissions on file start.command to Owner, Group. and Public. To do so, type in
chmod a+x, with a space after it; drag and drop the start.command file into the terminal window; and then press enter. (This gives run permission to the start.command script.) - Double-click the start.command file to start the server.
- A new Terminal window will open and, the first time you run the script, several error messages about missing files/directories will appear. This is normal. You're now ready to configure your server.
Using Time Capsule
Some homes use AirPort Time Capsule as a wireless router instead of other brands. This section will teach you how to set one up without messing up your file server.
NOTE: Make sure you have your admin username and password.
- Open System Preferences > Network.
- Click the Advanced button and go under TCP/IP.
- Where it says Configure IPv4, change that option to Using DHCP with manual address.
- Change the IP address to 10.0.1.x, where x can be any number from 1 to 100.
- Now go to the Sharing section and make sure that Internet Sharing is on.
- Now, open up AirPort Utility and edit your Time Capsule settings.
- Go under Network and make sure the option Router Mode is set to DHCP and NAT. Now, click the + button under the Port Settings.
- Type in the following:
- Description: Minecraft Server (or whatever you want to call it)
- Private IP Address: The address you chose for the 4th step.
- Change everything with the word port in it to 25565.
- Now hit Save and update the Time Capsule.
That's it! You're now ready to configure your server.
Run as a daemon
Alternatively you can automate the startup of the Minecraft server.
Linux instructions
This tutorial for how to set up a Minecraft server on Linux was designed for people who don't have a lot of experience with Linux. There is a more advanced tutorial in the forums. This tutorial was tested on Ubuntu 9.10 32-bit but should work with the 32-bit and 64-bit descendants of Debian. (Note that a 64-bit version of Linux will probably perform better on a 64-bit CPU, and that a 32-bit version will only use the first 4 GiB of RAM if more than that is installed.)
Downloading
Ensure you have the latest server application software. Look above for instructions.
Installing Java
If you get java: command not found (which may be followed by more text) or if you do have another Java version than 1.6 then you need to install or update java.
The official Oracle Java is recommended. A few individuals have experienced issues with OpenJDK. Others report that running on OpenJDK is completely fine.
Debian
Ensure that the non-free repository is being scanned by apt. You do this by adding non-free to your /etc/apt/sources.list file. e.g.:
deb http://ftp.uk.debian.org/debian/ squeeze main contrib non-free
Update your sources list (as root):
apt-get update
Then to install Java, simply type this in terminal and press enter (as root):
apt-get install sun-java6-jre
Ubuntu
Unfortunately, some licensing issues have prevented Canonical from allowing repositories to have Sun Java, so you must either download it directly from Oracle, package it, and install it or you could use the PPA provided by webupd8 by following the instructions below.
This guide has been tested on Ubuntu Server 12.10.
Note: You might need to install the package "software-properties-common" by running apt-get install software-properties-common and/or "python-software-properties" by running apt-get install python-software-properties to use the apt-add-repository command.
Run the following commands in this order to add the PPA, update the source list and then install java:
sudo apt-add-repository ppa:webupd8team/java

sudo apt-get update

sudo apt-get install oracle-java7-installer
Then run this to check what version you have installed:
java -version
The output should be similar to:
java version "1.7.0_10"

Java(TM) SE Runtime Environment (build 1.7.0_10-b18)

Java HotSpot(TM) 64-Bit Server VM (build 23.6-b04, mixed mode)
For more information or troubleshooting see this link at webupd8s site
openSUSE
On older versions, you can simply type zypper in java-1_6_0-sun into a terminal.
On newer versions, there is a tutorial here describing how to install Java.
Arch Linux
Open a terminal and run pacman -S jre7-openjdk as root.
Arch Linux ARMv7
On ARMv7 it could better to use java from oracle http://www.oracle.com/technetwork/java/javase/downloads/jdk7-arm-downloads-2187468.html Accept license agreement and download jdk-7u60-linux-arm-vfp-hflt.tar.gz
Extract file in /usr/lib/jvm/
and change java default with
archlinux-java set jdk1.7.0_60
Than
java -version
should give something like that:
java version "1.7.0_60"
Java(TM) SE Runtime Environment (build 1.7.0_60-b19)
Java HotSpot(TM) Client VM (build 24.60-b09, mixed mode)
(tested on Raspberry Pi 2)
Gentoo
Use:
emerge virtual/jre
Other distros
Alternatively, you can visit Java's website directly to download the Java package for Linux. Most distros work with this (either 32 or 64-bit). Instructions for the installation of those different packages are given on the site.
If during installation, it asks for a password, enter your password. If you get asked "Is this OK [Y/N]" Enter Y and press enter if required. Java should now be installed.
Start the Minecraft server
Open the terminal again Applications > Accessories > Terminal Enter the following commands, substituting 'minecraft_server' with the name of the folder you extracted the server to:
cd minecraft_server

			java -Xms1G -Xmx1G -jar minecraft_server.jar nogui
Less than 1GB free RAM
If you have less than 1024MB RAM, the above line may cause problems with swapping and out of memory conditions, which makes the game hard to play.
cd minecraft_server
It may look like this:
java -Xms1G -Xmx1G -jar minecraft_server.jar nogui
free -m
You are interested in the last number in the third line, 2163 in this case. Subtract some RAM as safety. On this computer, the server may use up to 1536 MB RAM. Now, replace the 1024 in the above example with the calculated number:
java -Xms1536M -Xmx1536M -jar minecraft_server.jar nogui
Voila, it should run smoothly now
Tip: If you want to spare more memory, you may set the -Xms parameter even lower, say:
java -Xms32M -Xmx512M -jar minecraft_server.jar nogui
The parameter controls how much memory is reserved on startup Your server will start with 32MB RAM and whenever it needs more memory it will allocate some until it reaches the maximum of 512 MB. However, this will result in a little slowdown whenever the allocation is done.
Startup and maintenance script
Alternatively you can manage/automate the startup and shutdown of the Minecraft server using a script such as the ones listed below:
- Minecraft Server Manager A comprehensive start up script for Minecraft and Bukkit servers (support Debian, such as Ubuntu).
- MSM can also periodically create World Edit compatible backups.
- Keeps players informed with configurable in-game messages, such as "Shutting down in 10 seconds!"
- Expose in-game commands (such as "say", "op" and "whitelist") to the terminal.
- Tab completion on all commands makes learning easy.
- Visit Minecraft Server Manager's GitHub page for the full list of features.
- Server startup script
- M3tal Warrior' Server Startup Script
- For Debian (and should work on Ubuntu too); Bukkit and Vanilla compatible
- Full backup and rollback routines
- All ingame commands can be invocated
- Supports using the RAM as server root file system
- Multiple cron invocations to ease administration
- Easy autoupdater
- Easy installer for first timers
- FreeBSD startup script
- OpenBSD startup script
- Ubuntu startup script
- rfwadmin startup script with web interface (for Linux servers). Nice web interface for quickly saving and loading maps.
- Minecraft Systemd Service A fully systemd-integrated minecraft service:
- Working on CentOS and Fedora
- Protecting the server with various readonly and inaccessible jails
- Safe restart and stop operations using rcon
- Can be combined with a Minecraft Command Center Script for ease of administration
- Arch Linux systemd wrapper
A simple installer script (also installs Java)
https://github.com/silvertriclops/MCSLI
Note: this is a very early project, designed with offline installation in mind, and will be updated periodically to make it more user friendly.
FreeBSD instructions
This part was tested with FreeBSD 10.0 amd64 and 'jre-7u65-linux-i586.tar.gz'
Installing Java
Due to performance and crash issue with OpenJDK and Minecraft server, we will install Sun/Oracle JRE made for linux.
Before installing this JRE, you have to install the linux binary compatibility on FreeBSD, you can follow this documentation.
Jave requires some information about the proc. You have to mount linprocfs, type:
 kldload linprocfs
 mount -t linprocfs linprocfs /compat/linux/proc
and add this line to /etc/fstab:
linprocfs /compat/linux/proc linprocfs rw 0 0
The Sun/Oracle JRE has a dependency marked as forbidden and the installation will fail. Go to /usr/ports/textproc/linux-f10-expat2.0.1/ and in the Makefile remove the line which starts with FORBIDDEN=.
Next you have to manually get the linux tarball due to licence issue (like `jre-7u65-linux-i586.tar.gz') from java official web site and copy the file to /usr/ports/distfiles.
Then to install the JRE, go to /usr/ports/java/linux-sun-jre17/ and run:
make install distclean
Note: The previous version of this part, tested on FreeBSD 9.2 amd64, was explained like this: You may have to set JRE_UPDATE_VERSION variable in your Makefile to the actual number (e.g. 45 like in this example) and run 'make install NO_CHECKSUM=1'.
Try running java -version. You may end up with a message that it can not find libjli.so. One way to fix it is to add your java paths to the search explicitly.
Make a symlink:
ln -s /usr/local/linux-sun-jre1.7.0/lib/i386 /compat/linux/usr/lib/java
And in /compat/linux/etc/ld.so.conf.d/java.conf add:
 /usr/lib/java
 /usr/lib/java/jli
Run /compat/linux/sbin/ldconfig.
Now java -version should work.
Launching Minecraft Server
Create a folder and copy the minecraft server jar in it.
In the actual version you will get this exception syscall epoll_create not implemented if you run the server in the usual way, so we add this line to the command to fix that -Djava.nio.channels.spi.SelectorProvider=sun.nio.ch.PollSelectorProvider.
The command to launch is like
java -Xmx1024M -Xms1024M -Djava.nio.channels.spi.SelectorProvider=sun.nio.ch.PollSelectorProvider -jar minecraft_server.1.7.10.jar nogui
Plan 9
Use:
alien-convert <path-to-your-jre->.deb
chmod ~/~ rwx for <current user>
Then snarf java -jar <path to your .jar> xvmf in acme
Port forwarding
Port forwarding is used when you have a router and you wish to let users connect to your server through it. If you wish to host your server for local reasons, it is not required that you do so. Keep in mind that port forwarding might cause security risks.
When port forwarding, it varies on how your router will ask you for the information. If you don't understand on how your router wants you to input the information, try visiting PortForward.com for a tutorial. If you still need help, please visit the Minecraft Forums and create a thread asking for help (You need to register).
Once you have managed to locate your router's admin page, and find the Port Forwarding page; hit add new service (may not work) (if you use Belkin, this can be very difficult to perform) or custom service. When you get a page asking to setup the new rule, it should prompt you on what you want to call it. You may name it as you wish but for simplicity, name it "minecraft". Then you want to look for "type". Select TCP. For the ports (internal and external), enter 25565. If it asks for anything else other than output IP (or internal IP, server IP), leave it alone and continue.
To find your computer's IP address, use the following steps:
- Windows
- Hold the Windows key and press "R"; this should being up the "Run" dialog box. Type cmd (without the quotes) and hit Enter. This should open a command window with a black background. From there, type "ipconfig" and press Enter. You should be given a list of text. Scroll up to "Wireless LAN" (if using wireless) or "Ethernet" (if using a wired connection), and look at "IPv4 address". To the right of this should be a string of numbers (of the form xxx.xxx.xxx.xxx). Copy this down by right clicking the window and selecting "Mark", then highlight the area and hit Enter. Don't copy any parenthesis or letters.
- Mac
The IP location on OS X
- Locate your way to your desktop. Pull up the apple menu under the logo and scroll down to System Preferences; then select "Network" your IP should be on the lower right as "IP address (xxx.xxx.xxx.xxx)". Once you have your IP, copy it down.
- Linux
- Either you use the network diagnose center (depending on distribution), or the terminal with ifconfig. The output should return all your interfaces. Search for inet addr:xxx.xxx.xxx.xxx, copy the xxx.xxx.xxx.xxx numbers down.
Once you have this IP, enter it in the "Output IP / Server IP" or whatever way it asks for where the service points to.
Once you have completed it, find where it says to save/continue/apply. And you have successfully port forwarded. When you run your Minecraft server, you have to leave the Server IP field empty in the server properties.
For people to connect to your server, they must use your external IP, which you can find at websites such as IP Chicken. If you don't want to use such IPs, use DynDNS services such as NoIP DynDNS
Configure and connect
Now it is time to configure and connect.
Setting up a VPN
An alternate way to set up a server between you and your friends is to set up a VPN (virtual private network). This method may be deemed unrecommended, and an inconvenience for many users due to the fact that all users whom wish to connect to the server must download external software in order to join or create server. An alternative to this method is to port forward. Free software utilities that can be used to set up a VPN are Hamachi by LogMeIn and Evolve by Echobit (Hamachi supports Windows, Mac OS X, and Linux, but Evolve currently only supports Windows). OpenVPN is another (free, open source) alternative that supports most OSes, but is a bit more difficult to configure. The free version of Hamachi allows up to 5 connections (i.e. players), while the free version of Evolve allows an unlimited number of connections.
Setting up Hamachi
- Install Hamachi on each computer that wishes to participate in the server, including the host.
Windows / Mac
Linux (32-bit and 64-bit .deb and .rpm packages are available, you can install it on Gentoo by emerging "net-misc/logmein-hamachi") - The host server signs up for admin via the Logmein website.
- On the host machine, a new Hamachi network is created.
- The host installs and configures the Minecraft server software:
The server IP field in server.properties is left blank (as default). - The host passes the newly created Hamachi network credentials to each of the players.
- The players connect to the host's Hamachi network.
- Now that all the machines are connected within the same Hamachi network, the host gives their machine's Hamachi IPv4 address to the players.
- Each player connects using this IP as per the usual Minecraft multiplayer screen.
Setting up Evolve
- Install Evolve on each computer that wishes to participate in the server, including the host.
Windows - Each computer participating must create an account on Evolve's website, whether they host the server or not.
- On the host machine, a new Evolve party is created. This can be done after logging in by opening the Friends window, clicking the red "Friends" tab, and clicking "Create Party..."
- The host installs and configures the Minecraft server software:
The server IP field in server.properties is left blank (as default). - The host adds each participating computer as a friend (Friends window > "Add Friend..." > enter the nickname of each computer, which was created in step 2) and then adds them in the party (double-click the party > "Send Party Invite" > enter the nickname of each friended computer. You must add them as a friend first, or they will not be added).
- The players connect to the host's Evolve party.
- Now that all the machines are connected within the same Evolve party, each player connects using the host's Evolve IP address (10.xxx.xxx.2, shown next to their name on the sidebar of the party) as per the usual Minecraft multiplayer screen.
- Evolve also doubles as a LAN bridger, so any singleplayer worlds opened to LAN can be accessed just as any other LAN server: at the bottom of the Multiplayer screen.
- The only advantage of being the party creator is that you can kick and ban players from your party. Any player in the party can host a Minecraft server.
- You can get help with setting up a party from the Evolve group chat room.
Configuring the Minecraft server
- Configure the server by editing the server.properties file, the format for which is explained here. Be certain to edit the file with a text editor that does not add formatting (e.g., for italics), such as Windows 7's Notepad. Additional configuration may not be necessary as many servers run fine from the default values.
- To become or add an operator ("op"), type "/op <username>" into the server console or gui. This adds the specified user's username and UUID to the ops.json file. Operator status will not be changed if you chnage your username due to the use of UUID.
- If your server.properties is configured to enable whitelist, you can add a user to the whitelist.json by typing "/whitelist add <username>" into the server console or gui. Due to the transition to the UUID system, it is not recommended to directly edit whitelist.json.
Connect to the Minecraft server
- If you are playing on the same machine on which the server is running, select the "Multiplayer" option in the game client, click direct connect, and then type in "localhost" instead of an IP address.
- Both hosting and playing on the same machine is not a recommended practice unless you have a powerful computer (e.g. more than 6 gigabytes of ram (5 for the server, 1 for the client, and remainder for system).
- Users within your local network (i.e. that are accessing the same router) can connect using your internal IP address - port forwarding is not required for such local connections. The internal IP address of a specific network adapter can be found by typing "ipconfig" into command prompt and looking for the ipv4 address.
- People connecting from the Internet (i.e., outside of your local network) must connect using your external IP address. You must port forward for someone outside your network to connect to the server.
IP address notes
- Unless you set a static IP for the computer that is hosting the game, the internal IP address can change. This affects port forwarding rules, and can make them invalid. Each modem or router has a different way of setting a static IP address. You should refer to the manual for your device(s) or online documentation for further instruction.
- If you are having players connect to your external IP, your external IP can change if you do not have a static IP from your internet service provider. Use a tool such as MyWANIP to periodically check on the external IP address. You may also search "my ip address" on Google and it will show your IP address. Alternatively, you can look into a DNS service that will allow you to have a name, rather than an IP address, that will remain the same. The name will point to your external IP address, regardless of whether or not it changes (the DNS is updated when changes occur).
- For troubleshooting purposes you can try to connect to your own server on the same machine. You can connect trough either your localhost, your home network (192.168.x.x) or your public IP. If for some reason you have trouble with connecting publicly over your IPv4, try connecting over IPv6. This should only be done for testing whether your server is online, external players should still use IPv4.
Firewalling, NATs and external IP addresses
- You must open the TCP port (default is 25565) on the firewall.
- If the server in question is not reachable via a globally routable IP address, you will need to add appropriate address and/or port number translation rules to the gateway — usually your router has the global IP address.
- For help with address translation, opening the firewall and routing (these three make up what people call port mapping/forwarding), portforward.com is a good source. Select your router from that list, skip the ad that comes after selecting the device, and you will see instructions for setting up port forwarding. Alternatively, you can read the documentation supplied with your router, modem, or other ISP related hardware.
- Verify the port is open, and note your external IP by using a port checker tool, such as You Get Signal. The default port you should test is 25565, unless you specified something else. Have the Minecraft server running when you test the port.
- You can obtain your external IP address from YouGetSignal.
Local network dedicated servers
This only applies to Classic (v0.30) servers.
A common problem for server administrators is the inability to connect to your own server via another machine on your local network. A typical scenario for this is that you have a Classic server running on a dedicated machine, and you have your own machine which you play on. They're both connected to the same router/switch, and have internal IP's with the octets '192.168.x.x'. Normally, connecting via the URL generated for your server will result in an error message claiming that the server is offline.
To correct this, you must add a function to the end of your URL, bookmarks, or whatever else you connect by. The function is: ?override=true
Example: http://www.minecraft.net/classic/play/4c3bebb1a01816acbe31c5ece1570da5?override=true
Previously, (before the 1.8 beta and website update) this was &override=true. This caused much confusion since the change was not announced by Mojang, and wasn't announced on the website applet pages either. Before the update, connecting to your own URL via the website resulted in red text under the applet window saying "If you can't connect, try this link instead." The link returned the same thing, with the &override=true affixed to the end.
Note: This situation does not effect Beta servers, and you should be able to connect via an internal or external IP.
FAQ (frequently asked questions)
Q: I have a problem which is not answered in here! What should I do to?
A: Go to the Minecraft Forums and post your problem there. To help you, they need the following information:
- Operating system
- Version of Java
- One machine or multiple computers
- Exact description of the problem
- Steps you have taken to solve the problem
- Any errors you encountered
- Screenshots of the problem (if possible)
- Anything else that might help us to solve your problem - there almost never is too much information (passwords would be too much information!)
And please, if we were able to help you, post where the problem was exactly and what the fix was for that. Other people will appreciate that (and we will be able to get a grip on the common problems)!
Q: On a Windows computer, when I double click the batch file it opens a command prompt window, but quickly disappears and the server does not start.
A: Right-click your .bat program and hit edit; add a new line and type pause save and run the file. If it says invalid path, it is probably due to an incorrect path for javaw.exe or your server software. You may just need to change /jre7/ to /jre6/ . Or search your system for javaw.exe and adjust the path accordingly. (It's probably under c:\program files or c:\program files (x86).) Also, you must have the offline version of Java installed—not just the Java plug-in for your browser.
You can also try replacing the contents of the .bat file with: START "minecraft" "C:\Program Files (x86)\Java\jre7\bin\javaw.exe" -Xms1024m -Xmx1024m -jar "Minecraft_Server.exe" amending name values/locations as required
Q: Whenever I try to get the server up, it says "Failed to bind to port!".
A: This usually means that you have tried to use a port that is already in use or that you do not have permission to use (ports < 1024 are privileged and require root to bind to). You can try a different port by changing it in your server.properties file in this line: server-port=25565.
Note: You should avoid using the following ports for your server as some ISPs may block these ports for security reasons and you shouldn't be running the Minecraft server as root (in the case of a Linux type OS and ports < 1024):
- 21 (Used by most FTP Servers)
- 22 (Used by Secure Shell daemon)
- 25 (Used by Mail Servers for SMTP)
- 53 (Used by DNS Servers)
- 80 (Used by most Web Servers)
- 110 (Used by most Mail Servers for POP3)
- 115 (Used by Simple File Transfer Protocol)
- 143 (Used by Mail Servers for IMAP)
- 443 (SSL port for Web Servers)
- 3306 (Used by most MySQL Servers)
Generally avoid any port below number 1024, since those ports are generally referred as well-known ports and are registered with the IANA for important services.
Q: I tried to run the server with Solaris/OpenSolaris and got the following error:
java.io.InterruptedIOException: Operation interrupted
at java.net.SocketInputStream.socketRead0(Native Method)
at java.net.SocketInputStream.read(SocketInputStream.java:129)
at java.net.SocketInputStream.read(SocketInputStream.java:182)
at java.io.FilterInputStream.read(FilterInputStream.java:66)
at gq.a(SourceFile:131)
at ji.g(SourceFile:197)
at ji.c(SourceFile:17)
at oq.run(SourceFile:84)
2011-05-31 16:57:26 [INFO] /:44673 lost connection
A: For whatever reason, out of all of the operating systems, only Solaris throws that exception when a thread interrupts a connection. A workaround is to change the default behavior on the command line:
java -Xmx1G -Xms32M -XX:-UseVMInterruptibleIO -XX:+UseConcMarkSweepGC \
 -XX:+CMSIncrementalPacing -XX:ParallelGCThreads=$CPU_COUNT -XX:+AggressiveOpts\
 -jar minecraft.jar nogui
This instructs Java to use an interruptible IO stack instead of the default IO that is sensitive to interrupted threads.
Q: When I try to connect to my server this is what it says:
               Connection lost

The server responded with an invalid server key
A: This error is usually caused when the server sends an unrecognized function to the client, which may be caused by using unrecognized server software, unbalanced client / server versions or modifications to the client.
Q: I cannot break/place any blocks!?
A: This is most usually caused by interacting with blocks in a protected area. If you are trying to interact near spawn, most likely it has been protected, by the minecraft server software; either build away from it or get operator status.
Q: My server runs fine but I cannot connect to it!
A: This could be caused by a series of issues. Please post a thread using the template provided above.
Q: How do you give a .jar server more ram?
A: Change the numbers in the server launch command "-Xmx1G -Xms1G". The -Xms part specifies how much memory the server starts with, and the -Xmx part is the maximum amount of memory the server can use.
-Xmx1G -Xms2G = 1GB
-Xmx2G -Xms1G = 2GB
And so on.
Q: Help! How do you find out your server's IP address?
A: Read #Connect to the Minecraft server
Video/Alternative Tutorials
Here are some other tutorials on how to set up a Minecraft server:
- Windows
- Mac OS X
- Linux
- Others
- Full course