(Undo revision 829445 by 23.29.47.172 (talk) - False) |
|||
| (One intermediate revision by one other user not shown) | |||
Revision as of 11:21, 29 April 2015
For other types of farming see Farming
Growth mechanics
Melons and pumpkins use essentially the same mechanics for growth, and can be easily farmed with the same techniques. Once the plants are mature, they will provide a steady supply of fruit for your needs.
- To begin farming, seeds must first be found:
- Pumpkin and melon seeds can both be found in minecarts with chests inside abandoned mine shafts
- Pumpkins can be found growing "wild" in any biome with grass.[note 1]
- Melons can be found growing "wild" in jungles.[note 2]
- In Pocket Edition, both seeds can also be manufactured with the help of a nether reactor.
- The growth rate of melon and pumpkin stems and the spawning of melon and pumpkin fruit is determined by the same growth rate algorithm as for wheat, carrots, and potatoes. The stem itself has 8 phases of growth until maturity. Bone meal may be used to accelerate growth.
- The attempt to grow a fruit happens when the mature stem would grow again (to "phase 9") and is not already adjacent to an instance of its fruit. First one of the four sides is chosen, and if this space is suitable (empty with dirt, grass, podzol, or farmland beneath) the fruit is created. Bone meal will not force fruit production.
- Thus, hydrated farmland adjacent increases growth rates of stems and production rate of fruit, having the same stem type adjacent to the stem (unless in rows) reduces growth rates and fruit production, light level 9 in the block above the stem is required for any growth, etc.
- The maximum probability of fruit production from a single stem would therefore require a stem in hydrated farmland with hydrated farmland on all eight sides, with four of those farmland blocks remaining unplanted (the corners may be planted with some other crop). Practical farms will often accept reduced per-plant production rates (⅔, ⅓, or even ⅙ of the maximum) for greater space efficiency and ease of harvest.
- Both sorts of fruit will revert farmland below them to dirt when they grow. Pumpkins can most easily be harvested with an axe, and will drop whole as items. Melons can be broken quickest using an axe. They will also break faster using a sword, but at the cost of double durability. While melons grow as blocks, the melons are broken into 3–7 slices by harvesting (unless a Silk Touch tool is used). In both cases, the harvested fruit can be crafted back into seeds. Harvesting mature stems will also produce seed (1–4 per stem), but it is faster to wait for the already-mature stem to grow a fruit than to regrow a mature stem from seed.
- ↑ Each chunk has a 1/32 chance of attempting to spawn pumpkins when the chunk is generated; a random point is chosen and 64 attempts are made to find a random air block with grass beneath in a 15×15×7 region around the point in which to place a pumpkin. Note the random point could be far in the air or far underground, greatly reducing the chances of pumpkins being able to be placed.
- ↑ For each jungle chunk generated a random point is chosen and 64 attempts are made to find a random replaceable block (e.g. air, long grass, or vines) with grass beneath in a 15×15×7 region around the point in which to place a melon. Note the random point could be far in the air or far underground, greatly reducing the chances of melons being able to be placed.
Manual farms
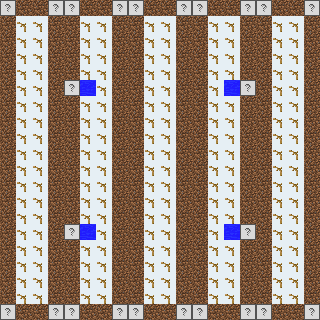
Here are some suitable layouts. The percentages given are space efficiencies. Parenthesized values are theoretical maximums, which assume that there are free blocks surrounding the farm for the border plants to place melons. The maximum possible efficiency for any melon or pumpkin farm is 50% (one fruit per stem). Spaces where a fruit can occupy two or more stems will reduce the efficiency and yield. Question-mark blocks indicate that anything could be put in that spot—perhaps lighting, or other crops such as wheat, carrots, or potatoes. You will probably want to cover the water with a slab, a lily pad, or a carpet.
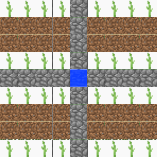
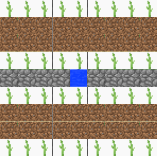
If you just want a quick, compact farm, use design D below. C and D have slightly lower efficiency, but both fit on a "standard farm plot", and are easy to harvest. Of those two, D likely has a faster growth rate due to the separated rows of stalks, but the middle row should not be open dirt/grass or farmland (or more stalks), because any fruit spawned there can tie up two stems. For C, the middle row can be anything except more stalks, for the same reason.
Design A is slightly larger and maximizes space efficiency. It can be tiled for larger farms, but alternate rows should be mirrored top-to-bottom to keep the efficiency. Design B is least efficient, but fits in a slightly smaller plot.
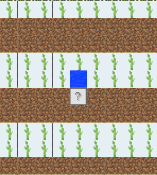 Farm Plan A, 9×10, 48.88% |
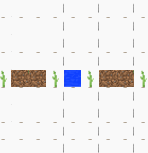
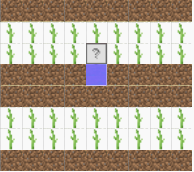 Farm Plan B, 9×8, 43.21% |
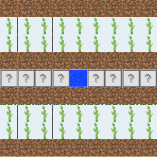 Farm Plan C, 9×9, 44.44% |
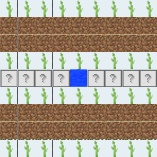 Farm Plan D, 9×9, 44.44% |
Very large farms
Most of the above farms can be tiled to make larger farms, though in some cases, alternate rows or columns of the plots should be flipped for best results. This farm represents an expansion of design A (turned sideways), with the left column of plots reversed. (It also shows the farmland border for the whole farm.) The basic plots could be repeated further, expanding the farm in units of 9×9. Note that this design aims to make sure that each fruit only occupies one stem - as it increases in size, the efficiency approaches 49%
Multi-level farms
While the above designs all use one layer, the most efficient (49.38%) 9×9 farm can be created by using two layers. Design is based on design D, and cobblestone indicates spaces that will be covered (with dirt) by the layer above.
When replicated over a larger area, design G has spots where you will need to jump. Design H avoids that but keeps the same efficiency. For design H, the water source must be placed with care so that it won't spread into the "corridors". However, if there is the usual pit in the bottom layer (and matching hole above), the source block can be placed against one of the upper blocks, or 2 blocks above that layer. The position of the melon stems and dirt/grass/farmland blocks in the two farming layers can be swapped without losing efficiency.
 Farm Plan G bottom layer, 9×9, 29.62% (44.44%) |
 Farm Plan G upper layer, 9×9 |
 Farm Plan H bottom layer, 9×9, 29.62% (44.44%) |
 Farm Plan H top layer, 9×9 |
An example of plan D
Rapid-harvest farms
The above layouts are optimized for high efficiency, at the cost of speed. They work best for infrequent harvests, with plenty of time for the field to regrow in between. For frequent harvests, the first following layout may be better suited; if harvested once per day-and-night cycle, it yields about 17 fruits per harvest (as opposed to about 13 fruits for the above designs). The second layout goes even further in that direction—it does not use space efficiently, but instead gives each stem 2–4 potential places to spawn a pumpkin or melon, encouraging quicker initial growth at the cost of a clumsier design and reduced long-term yield.
 Rapid-harvest Farm 1 |
 Rapid-Harvest Farm 2 |
Semi-automatic farms
Melons and pumpkins are both "dropped" when a Piston of any kind pushes them, leading the possibility for auto-harvesting Melon farms. A simple Auto-Harvester would be made by placing an upward-facing sticky piston under each farmland block reserved for melons. When the sticky pistons are powered, they destroy all of the melons for pickup by the player. Using this technique, one can make a semi automatic farm as shown here, but it will take up extra space for the mechanisms. A farm can be made fully automatic by using a timer to harvest the melons and using hoppers to pick up the drops.
Design 1
Design 2
| A semi-automatic harvesting melon/pumpkin farm. (view on YouTube) |
|---|
Design 3
| A semi-automatic harvesting pumpkin farm. (view on YouTube) |
|---|
Design 4
| A semi-automatic harvesting melon farm. (view on YouTube) |
|---|
Design 5
The following melon/pumpkin farm uses a pressure plate to rapidly pulse a sticky piston.
| Pressure plate activated farm. (view on YouTube) |
|---|
Design 6
A compact semi automatic pumpkin and/or melon slice generator, with notification noise:
- Pumpkin generator 1.png
Layer 1
- Pumpkin generator 2.png
Layer 2
- Pumpkin generator 3.png
Layer 3
This design uses 2 stems with 2 spawn places and a notification note block for each. Wooden planks in layer 1 define note block's tone and can be replaced with other blocks according to your preferences. Any opaque block can be used instead of cobblestone. Jack-o-lantern can be replaced with glowstone. Maximum delay is recommended for the redstone repeaters.
Design 7 - Stackable
The following design sacrifices space efficiency in order to fully automate harvesting and allow massive expansion: The tower can be expanded up to the build limit and/or down to bedrock, potentially yielding nearly a thousand growing spaces per tower.
The total area of the farm is 13 blocks by 7 blocks, with alternating piston and farm layers. Its height is 2 blocks, plus 2 more for each "crop layer" of 8 growing spaces. It will use 16 dirt, 8 jack-o-lanterns, or glowstone, 8 iron, 28 redstone, and at least 50 generic blocks per crop layer, plus 10-13 extra redstone and 43 blocks for the build as a whole.
The farmland is hydrated by water flowing down from above. A pressure plate at the end of the collection area on the bottom activates a redstone torch tower, which in turn activates each piston layer. The harvest falls down the empty middle area into flowing water at the bottom layer, and is channelled to the player standing on the pressure plate. Notes:
- To speed up collection, place ice blocks under the watercourse.
- The farm can be lit from within by glowstone as shown, or much more cheaply by jack-o-lanterns. Unfortunately, you can't place a jack-o-lantern directly onto a piston, so if you will need to put temporary blocks in place of the pistons, put the jack-o-lanterns on top of those, and then replace the temporary blocks with the pistons.
- The pressure plate can be replaced with a hopper or two, leading to a chest or two south of it. Then the redstone can be triggered with a switch anywhere along its length. However, a sufficiently tall farm may produce enough goods to overwhelm the hopper. (750 items—call it a dozen stacks—will take 5 minutes to absorb, so additional stacks may expire. Twenty or so levels of melons could do that, or most of a hundred levels of pumpkins.)
To build the farm:
- Start with the base layer, which is a modified farm layer. The farmland squares should be planted with your seeds, while the dirt is where pumpkins or melons will grow.
- If you are using jack-o-lanterns for light, remember the temporary blocks as noted above.
- Place a piston layer on top of that. This completes your first crop layer, and for the bare-minimum "tower", you could go on to the cap and water layers from here. More likely, continue to:
- Alternate farm and piston layers, as many as you want. Each pair is a crop layer. This is the expandable section, and you are limited only by resources.
- After the last piston layer, build the cap layer instead of another farm layer. The black wool indicates temporary blocks (any solid, non-falling, block will do) which you will remove after placing the water on the top level.
- Last of all, build the top layer, place the water, and mine out those temporary blocks. For the top-most layer, all the water blocks are sources. (The Art of the Bucket will assist in filling them quickly.)
Schematics:
[Schematic Help]
Base Layer
Piston and Farm Layers
Cap and Water Layers
This design is based on the following video:
| Design by Panda4994 (view on YouTube) |
|---|
Fully automatic farms
These farms require no player interaction for the harvesting and collection of pumpkins or melons after being built. Fully automatic farms require pistons and redstone to function, and are generally more expensive to build than manual or semi-automatic pumpkin and melon farms.
Farms are triggered automatically in one of three ways.
- A system based on time. Either a redstone/hopper clock or a daylight sensor.
- Bud switches that detect when an adjacent block updates.
- A simple redstone circuit that completes when a pumpkin or melon grow
Pumpkins and melons are collected in a combination of the following.
- Water streams.
- Hoppers.
- Hopper Minecarts.
Design 1
This design requires only 1 piston per pumpkin stem, and doesn't require a bud switch. This pumpkin farm fits within a 5x5 area and is simple to build.
| Jioge's fully automatic farm (view on YouTube) |
|---|
Design 2
The following melon/pumpkin farm is completely modular and uses a dropper/hopper combo to detect melon growth. Believed to have the highest efficiency of the fully automatic farms.
| Fully automatic modular melon/pumpkin farm. (view on YouTube) |
|---|
Design 3
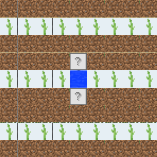
To make the Auto slicing Melon and Pumpkin farm, you need to first find a small, flat area to build in. Start by placing a water source with a bucket, and tilling the grass nearby it.
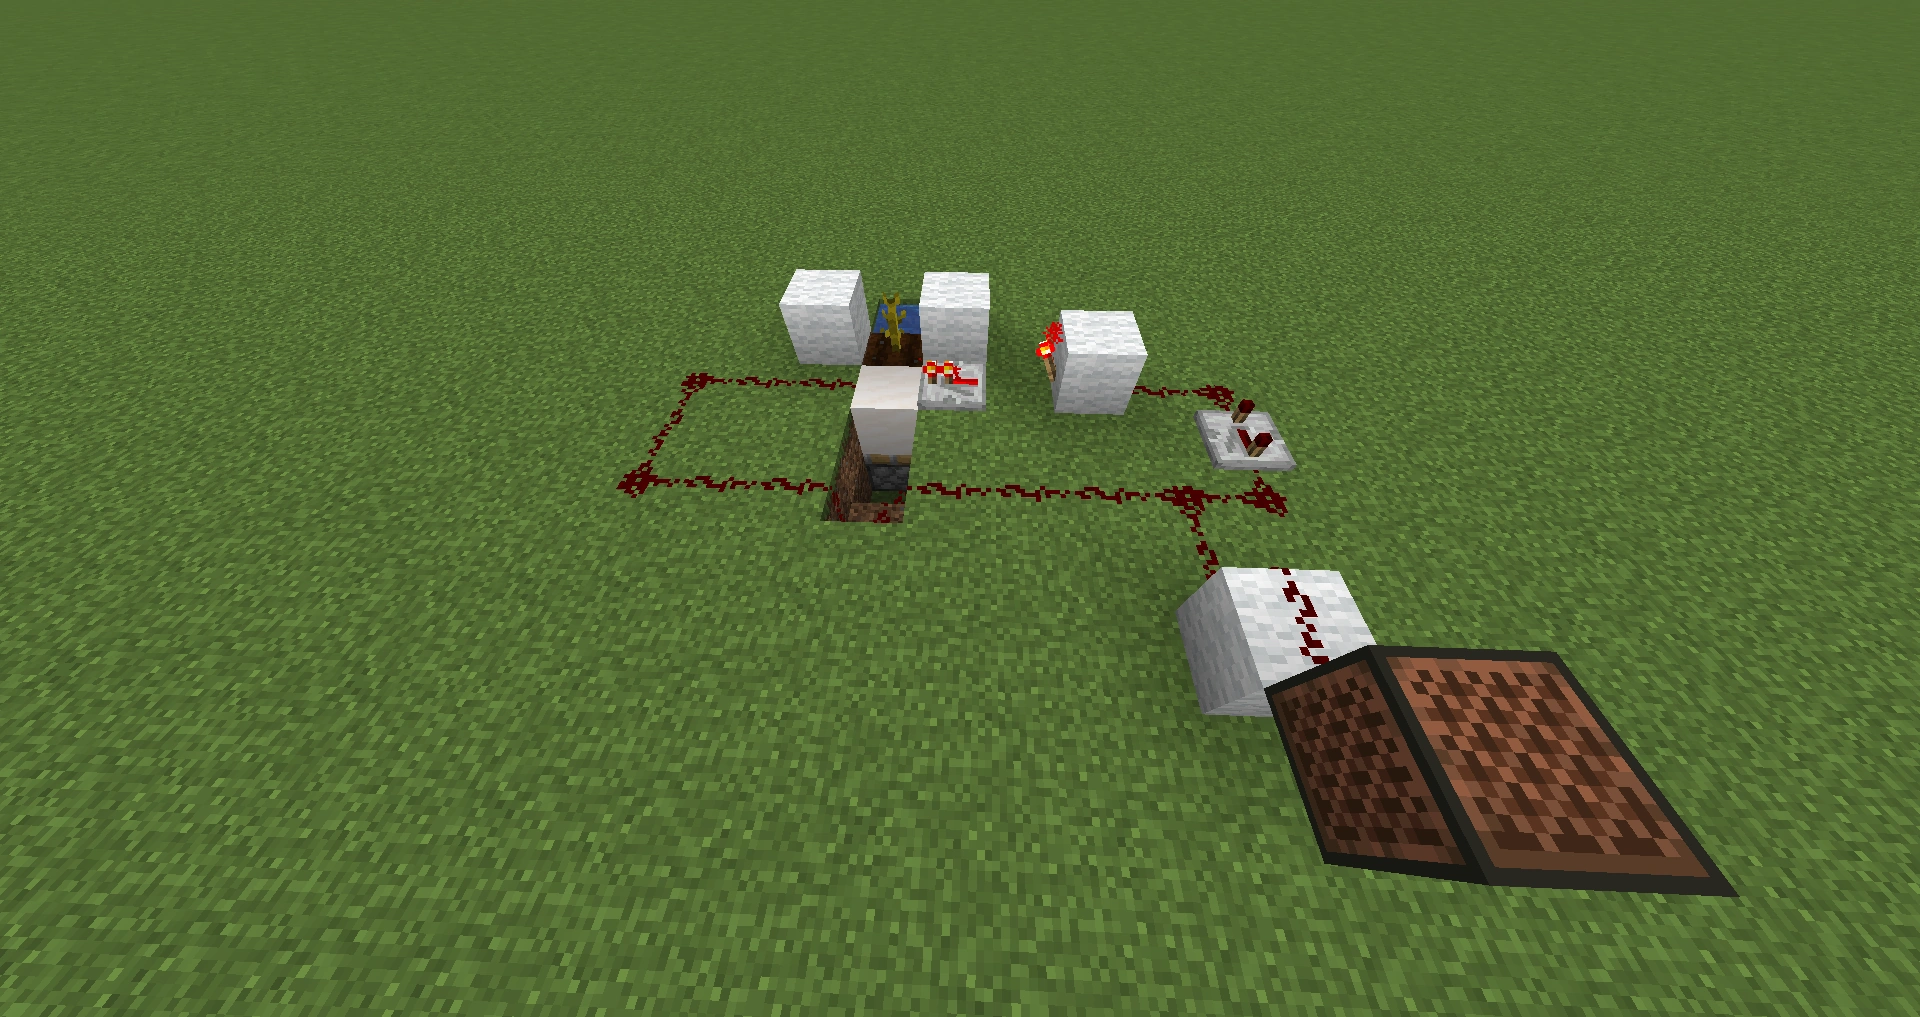
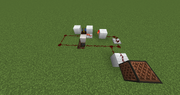
Design of auto melon and pumpkin farm
Then, block all but one sides with any block, where the stone bricks are in the image to the right. After that is done, place a sticky piston two blocks below the area you did not cover. Place any solid block where the grass block is shown, and connect it to a redstone torch, make sure it is facing the same direction as the picture is.
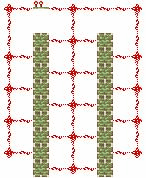
After that, place a redstone repeater facing away from the redstone torch and pointing towards where your melon/pumpkin will grow. Make a loop around the perimeter with redstone, and the occasional repeater may be necessary, depending how large you are making the structure. The note block seen in the bottom right of the image is optional, it just makes sound so you notice the plant being harvested.
An additional feature for ease of collecting is to push the pumpkin item or melon slices into a canal. To do this, wire the underground piston's power to power another sticky piston one block above the plant and a block away opposite the water and put a block on its arm (using just the piston arm to push could cause the item(s) to not be pushed). A delay may be necessary for this piston to avoid bugs involving pushed blocks becoming unstuck. Make sure to put a longer delay on the reparator going into the pumpkin or melon. Additionally, several blocks must be placed to ensure each item has nowhere to go but into the water.
After you finish, plant the melon or pumpkin seeds (If you already haven't), and wait for your first harvest.
Design 4
This farm is very small, no sticky pistons and resource friendly. Using only a space of 3x5, it uses a BUD switch to determine if a pumpkin/melon has matured and then activates a piston to break it and send it into a hopper.
| Small, simple, sticky piston free melon/pumpkin farm. (view on YouTube) |
|---|