This article describes different pieces of furniture you can construct in Minecraft. Note that the majority of these are just for decoration, with the exception of beds and bookshelf blocks (Bookshelves enhance Enchanting Tables in the vicinity). This tutorial being merely decorative will enhance your house and make it more functional. For example, a fridge could hold food in a way so the block holding the food is hidden but still accessible. Or, a fireplace can be used as an item incinerator. Try coming up with ways to incorporate uses into furniture.
There are also some mods to the game that can make some furniture more functional.
Curse Video
Tutorials/Furniture/video
Bedroom Furniture
The most essential piece to a bedroom is the bed. You can make a 'fake' bed using wool, But this article isn't about that kind of thing. This is about decorative furniture (for the most part). Let's start with some basics: Dressers, desks, and bookshelves.
To make a barricaded door or window, use signs and put them against doors or windows as pieces of wood then type dashes on.
Dressers
A dresser is a stack of double chests. An idea for a more interesting home is to have themed chests with only certain things (e.x. Only store armor in the dresser). A good idea is to place Item Frames next to the dressers to show the items inside. However, most people would only store say, armour inside the dresser so as an alternative method, place a few Armor Stands down to show off your newly crafted Armor.
Dresser #1- Put two wood planks next to each other on the floor, then double it. Then put trapdoors on all of them.
Dresser #2- Put two wood planks next to each other on the floor, then double it. Then put buttons on all of them.
Dresser #3- Put two wood planks next to each other on the floor, then double it. Then put signs with the letter O on the second line to represent drawers.
Closets
Here is how to make a simple but cool and interactive closet. You will need: 4 Stairs 2 door 2 trapdoors Place the blocks like this:
Side View
Then place the doors over it so they look like the double doors, with the handles closest to each other, you could also add trapdoors either side of the stairs.
Cabinets
Here is how to make a simple cabinet. 1-4 of any type of block (bookshelves are preferable, because it gives the illusion of food or dinnerware within.) 2-8 trapdoors
Place the block against a wall, and place the trapdoors. One on top and one on the front side.
Bunk Bed
For the bunk bed, you need a wall that has a width of 4 and a height of 4. Get fence pieces and place them each on the outer rim of the wall, then place planks in the wall spaces on the bottom only. Place a bed on top of the two blocks. Next, get rid of the blocks under the bed and then place a bed where those blocks were. Note: The top bed will not change your spawn point unless there is a solid block with two empty blocks above it one block below the bed and directly adjacent and you will wake up on top of the bed, so there needs to be more than one block of space above the bed.
You can also make a bunk bed with two doors and two beds. Put two (any block) blocks in a row then place a bed on top. Break the two blocks. Then place a bed under the top bed. Put the two doors on the side.
for a bunk bed, you will need a wall that is 3x3.all you need is 6 fences and 2 beds. first put fences (3 high) 2 blocks away from each other. then place the first bed on the floor, and the second on the 3rd fence, up and there you go! your very own bunk bed!
Bookshelves
To make a bookshelf, stack as many bookshelf blocks as you desire. It's also a good idea to add a crafting table to your bedroom, and possibly a jukebox. As well as bookshelves, you can use slabs and stairs stacked on top of each other to simulate normal shelves.
Shelves
To make a shelf, place a row of 4 wooden planks on the ground, and add a stack of 3 wooden planks at each end. Close off the space at the top with 2 more planks, and add slabs for shelves.
Potted Plant
Note: As of 1.4.2 PC version, there are now Flower Pots made out of three bricks crafted the same way as a Bucket.
To make a potted plant, you can either use Flower pots or use the following method.
Place a grass block. You may also get a long grass, a rose, a yellow flower, or any of the other new 1-block-high plants.
Next, dig out the blocks around it on the floor.
Above each hole, place a trapdoor. Then make them all in the closed position, with its flat side against the side of the dirt block.
After that, fill in the holes. Then put a dirt or a stone block, tall grass piece, or fern on top of the dirt block and you're done!
Another way to make potted plants is to put signs around a block of dirt as the pot and then put a plant on top of it.
Desks
To make a desk, take your choice of support, (Fence or fence gate are best) and place 2 of them for a freestanding desk, 1 for a desk attached to the wall. Then make a surface (wooden slabs work well). But, with the beta 1.8 update, pressure plates can be placed on fences, creating a much flatter surface. Additionally, if three fence blocks are placed in a row, two could be covered in pressure plates, and one with glowstone or a redstone lamp on top, making a "lamp".
Another neat way of making easy and simple desks is to have a set of pistons lined up in patterns in rectangular shapes or lines. Simply place redstone blocks in the shape of your desk one block beneath your floor. Then place pistons atop the blocks for a permanent desk/table. Another way to make a desk is after the pistons are placed, put a single redstone torch under each one of them, causing the pistons to activate, and thus making a quick and simple table. An adaptation of this is to put a piston in the ground facing up and put pressure plates around it. When you walk up to it, the table/desk pops up.
A different way of making desks is to make a huge table out of blocks. There should be four "leg" blocks, acting as the "legs" of your table. On top of the "legs" you can put slabs or blocks, making a simple table. This form of table is one of the easiest to make.
The last type of table is the "Block-by-block" table. It consists of a simple arrangement of multiple blocks. By putting many blocks in a rectangular, square, or straight pattern, you can make a very simple table useful for keeping things on. This form of table is mostly built with white, plain wool, because it causes the table to look like the table is covered with a clean, white tablecloth. [Credit to Minecraftfurniture.net]
Another way to make a good looking desk is to place two upside down stairs on the ends with slabs between them, the stairs act as the legs. And if you want to have a top table cloth but still a wood table then put white carpet on top of the wood blocks.
Computers
Place an iron block, a painting on the side, and a "keyboard" in front of it. Some people use a powered minecart rail, mostly because it looks like there's buttons on it in the original resource pack. Best use with a desk. You can use 3×2×1 logs and put the "computer" in the middle. Alternatively there are several mods that can provide you with computers. A good example is ComputerCraft or the Mr. Crayfish's furniture mod.
Basic Computer on a desk with a chair.
Another way is to place a painting on the wall in front of a block of wood and place a minecart rail or another object that looks like a computer keyboard and you can use that as a computer. When you want to 'change the display' just put a new picture in place.
Another way to make a computer is by placing a wooden, or stone pressure plate. From the outside (or rear of the 'desk'), place a sign on the edge of the pressure plate (check for the black outline showing the plate as selected). This sign can be decorated with common logos, like real monitors. Now move to the front of the 'desk' (or back of the sign, which is now floating) and place a picture. An optional button can be placed on the left or right as a mouse. Two of these screens can be setup (the pressure plate is required to hold the sign) for dual monitor configurations.
Alternatively you can use the item frame method to set up a computer. Place an oak wood block next to the wall. Above it on the wall put an item frame. On the wood block put a stone pressure plate and there you have it! You can put a map or an item (Heads are a good ones) inside to make it look like you are running a program. You can also expand by putting another block of wood on one side of the first one and placing a flower pot on one and a button on the other. You now have a laptop with some coffee and a mouse!
To make a disk drive, place a jukebox close to a wall and place a stone or wooden pressure plate on the jukebox. Add a picture on the wall and then place any block beside the jukebox and place a lever on it. Now you have a computer that can play music!
Griefer's trick: Add a TNT trap with a dropper and a wooden pressure plate hidden and a trapdoor to open the computer system and add a book to the dropper. You can use them as 'viruses' to wreck their computer. Add a button next to the dropper to turn 'on' it. Add a command block next to the pressure plate HIDDEN and set the command to: /me ERROR! VIRUS ERROR!. When a player has turned 'on' his computer, the ERROR! alert will make the player think there is a virus and then the computer will explode!
One way is to put a block of any kind with a painting on. Underneath put a pressureplate as a keyboard and use stairs as a desk chair. There are many other ways that you can make them please comment below to help other players! :)
Lamps/Light sources
Using a Redstone Lamp is the easiest way to create a toggle-able light source. Alternatively you can use one of the following methods:
To make a lamp, place a fence block and put a torch (or some glowstone) on top.
Or, to make a different kind of lamp, build up three blocks from your original ceiling, place glass blocks where the original ceiling was and leave one block open for an escape hatch and start placing lava. This would be best used in creative mode in a netherack/nether brick structure (creative mode because depending on how big your house is it might take a lot of lava to cover the ceiling!)
Mood lighting can be made by placing a glowstone block and shield it on all sides but one. Next, place a slab in the remaining spot. The result is a small patch of slightly whiter light. This will not create a radius of light however, so its solely for the effect.
A modern/futuristic style light can be made by placing down any block and then a stone slab (or any half-step) on top. Then remove the bottom block and put another half step in its place. Put a glowstone block on top of all of it. It should look like the glowstone hovers above the stone slabs.
Another modern way is to have a wall with stairs on all of the bottom row of blocks but the corners, and place glowstone in the corners. Then place one more stair piece next to the glowstone to make an 8×8 pixel square of glowstone. Lastly, place a half slab of the same type of the stair (wooden plank, cobblestone, stone brick, sandstone) on the glowstone. There you have a modern 'glowing' couch piece. I recommend either stone brick (modern) or sandstone (blends in with glowstone).
Using lava as lighting can create a cool effect. Place a non-flammable block on the ground. Place a block next to that, and place glass on there, before removing the second block you placed. Do this on all sides, before placing any amount of layers of glass on top of the glass. Pour lava down the resulting tube, and place a non-flammable block on the top. Note: This is dangerous if anything with four blocks of your lava lamp is flammable. Not recommended for houses with lots of wood/wool.
Curtains
Need some privacy for that boudoir d'amour? Attach a row of blocks under your ceiling, and then attach vines to the sides. The vines will grow hanging down, and create curtains for you.
Another alternative is to use wool. Just make a small wall of wool in front of your window or open space, and privacy is perfect!
Also, as of version 1.8, you can use banners as curtains. First, make a banner. The color and design are up to you, but a plain white banner is good with many homes. Next, you must put up the banner. For one block high windows, place the banner on the block above it. If the window is two blocks high, place the banner on the higher glass block of the two. For three or more, place banners on every row except the bottom one. This design makes a nice hanging curtain that lets light in and can easily be removed.
Ladders and or trapdoors could also be used as open window shutters.
Closets
To make a closet, first dig two blocks tall and one block wide into a wall. If you want to make it wider, dig in deeper and start to dig spreading out. Then, go out side of the little "room" you've made and put a door at the entrance. You can make a four by four entrance but you will have to put double doors. Since you cannot really "place" armor in the game (except in 1.8, if you use an armor stand), you must use a chest and put the chest into the closet, or if you still want to be able to see the armor put up a row of item frames with the armor inside.
Living Room Furniture
The living room is your house's heart, where you can gather with friends (if you're on a server) and spend your time, if you want to.
Tables
Tables are an essential furniture item in every living room. Read on to find out how to make many different table designs!
Coffee Tables
To create a coffee table, use any type of slab and place them near your sofas, chairs, etc.
Corner Tables
Build a fence and add a wooden pressure plate, carpet/rug or trapdoor on top for a good looking table. Another option is to place a piston in the ground with a redstone torch or block below it. The piston will activate, and will create a nice, one block table.
Dining Room Tables
- Place two stair blocks facing each other. Next, place two slab blocks of your taste on top of them. Some crafters believe that slab floors will make the table more aesthetically pleasing.
- Another method utilizing stair blocks: Place stairs upside-down, and back-to-back. This table can be as small as 2 back-to-back stairs or as large as you like! Slabs and stairs can be used as chairs.
- Place four blocks (e.g., wooden planks) for the legs of your table. Then place some upside down slabs in the center of the four legs you just created. Next, place four upside down slabs between the legs to make an awesome table.
- Place a dark block (e.g., such as Nether Brick blocks) in a 3×2 hole in your floor. On top of your dark blocks, place glass blocks.
- For larger tables, you can place stone pressure plates or white carpet to serve as dishware. You can use empty flowerpots for cups and/or a chest with prepared food in the middle of the table, too!
- For a simple table, with an actual use, simply use fence posts against your wall, then put wooden pressure plates on top. Once that is done, simply replace the blocks on the wall right above the table (on the same level as the pressure plates) with droppers (dispensers work too, but require a bow to make, unlike droppers). Now, fill the droppers with food, and then all you have to do is walk up to the table, and voila! you have food.
- In later versions you can have fence posts over the whole area of the table and cover them with carpets.
Modern Table
Place two glowstone blocks where you want the center of your table to be, then surround the glowstone blocks with glass panes for a cake and coffee table that will light up your living room!
You can also make some more rings of glowstone around the middle glowstone block.
Piston table
Extended pistons are usually more aesthetically pleasing than fences with pressure plates, as they form a solid top, rather than one with gaps. You need 6 pistons and 6 redstone torches. Dig the floor 3×2×2 and then fill ONE layer of the hole with redstone torches.
Side view
Overhead view
Then just cover the hole with pistons (Or you could place a sticky piston at random to make it look as though someone spilled!) facing UPWARDS. There you have it! A piston table!
Simple Table
Place 2 blocks above where you want your table, now create a 2 block deep hole below the blocks above your table (3 if you include the gap for the table which should already be there), get into the hole, look up and place 2 stairs facing each other on the bottom of them, get out the hole and fill it in, now remove the 2 blocks above the table, you now have a nice simple table.
Tablecloths
Using carpet blocks, you can replace the pressure plates on tables with carpet, or perhaps top your piston arms with the aforementioned block. This will create a nice-looking tablecloth. Use it anywhere, from fancy restaurants to cave homes!
T.V.
There are two main designs for televisions in Minecraft. You can make a decorative TV that is really just coal blocks, black wool or obsidian decoratively in or on the wall or floor. You could also just use a 2×1 painting starting from left to right to imitate a flat screen TV. You can also put two blocks of any material, two fence uptop and a 2×1 painting on the fence.
If you have space then there is another method. Build a frame 4×4 out of black or gray wool. Next carve out a small room within the frame. Put a row of glass along the lowest row that isn't the frame. You can then lure an animal or monster into the frame or if you're on creative mode use a spawn egg to get a villager, animal or monster. Just put in another layer of glass and you have a TV!
-
Using this method, you could also put item frames behind the glass, with things such as heads, food, or tools in them.
A more expensive method is a redstone lamp in the wall with a lever next to it and a painting over the lamp. When the lever is pulled, light will shine through the painting.
Another modern design is to place two furnaces at the bottom, two obsidian on top, and a 2×1 painting in front where you want the screen, then place two iron blocks vertically across the sides and place a button on each one.
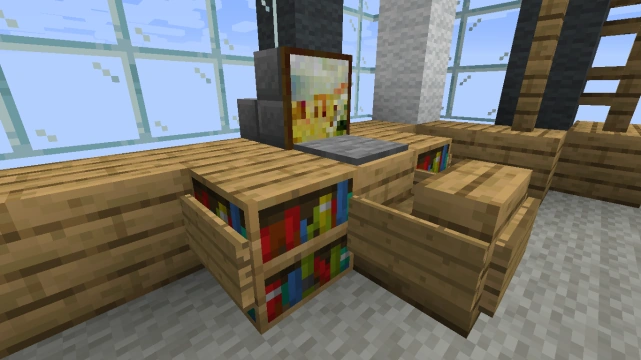
Another design is more like a real TV in cost. It looks like a flat screen TV with loud speakers and a cabinet of videos and CDs.
First, you want to pick a 1 by 2 painting to be the video playing. To build this design, you will need a four by 3 area. AT LEAST.
Next, you place the painting down (You may have to redo the step until you find the painting you want.) flanked by two jukeboxes. Underneath place four bookshelves with a trap doer (closed) on each. This is what it should look like before to add the trap doors (Blue wool is for the painting):
This is what it will look like with the trapdoors:
Video game
Put a painting of Donkey Kong on a wall, preferably on a TV. Place a cobblestone wall and then place at least 2 redstone (so it looks straight) connecting the cobblestone wall to the TV. You now have a video game on a screen. Instead of a cobblestone wall, you could also put a weighted pressure plate. Drop something on the pressure plate, and it will "turn it on." Or for the game system you can just use a cake ("What? Don't you like my Cake-box?) [the cobble wall is a cobble fence!]
Sofas and Chairs
A sofa can be made using 2-4 stair blocks, with a sign attached to either side as "arms". Also, as of 1.4.2, one could use stairs facing inwards to crate "arms". An alternate type of sofa can be made by placing 2 or more slabs in a row and surround the sides and back with blank signs. To make a 'leather' sofa, use slabs surrounded by wool blocks.
Another way to make a nice couch is to place four wood planks in a row, with wood slabs on top. Then, put two wood planks on the ends and two rails in the middle. Place minecarts on the rails, and there! You have a couch you can actually sit on!
Chairs can be made similarly to sofas, but the 'sitting' area is only 1 block wide. There are many variations of the chair listed below. You could just place 1 stair block for a simple chair. You could also put 1 stair block down, and put blank signs on the side for an armchair. You could also put down 1 slab, with blank signs on the sides and the back for a cool-looking armchair.
If you have a dog (tamed wolf), you may also want a dog bed in your house for it to sit on. You can make one using 2 wood slabs in a row, with signs attached on the sides, front and back. Also, since the 1.6.1 update, place 2 carpet color of choice on the ground.
A throne can be made by placing a minecart track on the ground with a block (stone, cobblestone, or iron blocks are best) on one end and a staircase on the other end. placing another block on top of the first and one on either side of it. Then, four stairs are placed to the sides of the minecart track and the original staircase. Then place two stairs on the two side blocks. Put a minecart on the track and enjoy your throne you can sit on.
A step up into the modern world of interior design is the "lounge bench". Make an extra long "sofa" with a 90 degree angle in it somewhere, no sign "arms", and possibly using slabs and blocks, instead of stair pieces. If in a corner, a bookshelf looks appealing in the corner, and blends in with the wood's texture. You can also place any type of stairs (oak wood stairs are recommended) and place block on the sides.
Another model looks like a sofa from a TV show. You are required to have 3 height, 2 length and 6 width. You can use spruce wood or brown wool to make it look like that TV show sofa, but you have to have 26 blocks of that material. Any material is okay, but otherwise it will not look like the prototype. First, lay 12 blocks of your material in a 2×6 rectangle. Then add your material to ½ of your sofa (width). Then, on the ends of where there is 1 layer of material, add 1 block to each end. Now just add 6 blocks on top of the 2 block height area (other than the ends and add 1 block on each. Never set near fires, as the sofa will burn up.
Fireplaces
Fireplaces give your living room a more "homey" feel. A fireplace can literally be a little hole in the wall with netherrack in it. Or it can be a sleek, ultra-modern piece of contemporary minecraft art. A nice design is a brick outline in the wall and floor (slabs can make the area around it on the floor elevated). Then make a 1×2×1 hole in the wall inside the brick outline and put in netherrack. Light the netherrack, and add a chimney for all the smoke to go out through (and it's also an outside decoration!) A more contemporary and "sleek" design is to make the same brick outline, but then, add lava instead of netherrack, and put glass in front of the lava, making for an ultra-modern, "artificial fireplace" feel. Iron bars can be added around the fire to look like a fire guard for a more realistic look.
For an alternate fireplace design, pick a spot away from any flammable material. Next, dig a 2 block deep hole and put netherrack in it, then light the netherrack with flint and steel. Next you should place a glass block on top of the fire, not the netherrack, so you won't burn yourself (you will have to put a block adjacent to the hole to place the glass block then later remove it). Put chairs and/or couches surrounding this and you have yourself a fire pit and lounge.
An example of a Traditional Fireplace. The wooden blocks seen behind the chimney are double wood-slabs, as they are within the fire spread-zone, as well as some of the ceiling blocks (Note that wooden slabs are no longer immune to fire). Credit to EndoMatrix
To build an old style brick built fireplace, you will want this next to a wall. First dig a 3 block deep hole. After that, add netherrack at the bottom and light it up. Third, place netherrack on the top of the hole. Next, place a brick on both sides of the fire and put another brick on top of those and in the middle of the ones in the top. Repeat in front of the bricks so you cannot throw things in the fire. This part is optional. If you want to add a chimney, add bricks on the top to the sides and the front of the fire. Keep adding until you reach your roof and then break the area where the fire is. Add 2 - 3 more levels of the chimney on the roof. Finally, add netherrack on your roof level and light it up!
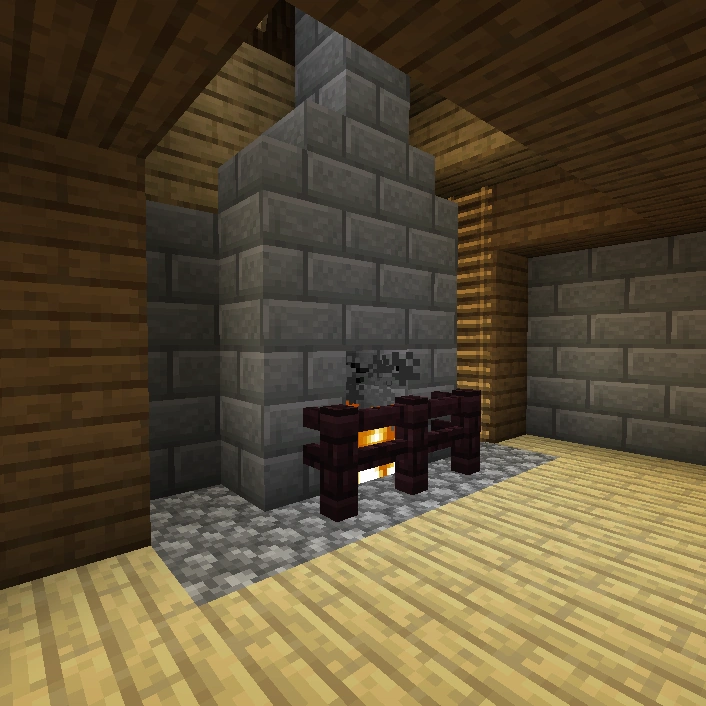
Alternatively you can build a Traditional Style fireplace, which is similar to the Old Style fireplace, but more elaborate. Simply make a 5×2 floorspace from cobblestone, and replace the center-back block with netherrack. Next, place a 3-high column of stone bricks on each side of the netherrack, and place stone brick stairs on each side (place them so that the steps go towards the center). Add a stone brick between the two stairs, and attach an additional stone brick below. Build up a column of stone bricks upwards from the center brick, until it exits the house, placing a torch on top to imitate a chimney stoke. Finally, ignite the netherrack and add nether-brick fences around the opening. You could also add stone stairs to the underside of the opening. See the image for reference. IMPORTANT: Wood blocks and stairs will ignite if they are less than 4 blocks above the fire or any adjacent blocks.You can turn off fire spreading with the command:/gamerule doFireTick false BUT if fire is ignited (by player, lighting etc.) on a flammable object, it will burn forever unless you stop it. However the rest of your house will be fine.
Make a huge fireplace 3×3 with netherrack so it never burns down, and then add a nether brick fence at the side (not normal fences, they will burn!) and progress it to the center. It should be 3 blocks from the ground. Now, descend it to almost the fire level (2 blocks away) and add a cauldron to the nether fence. Add water in and it's done! Very fun if making witch houses.
Automatic fireplaces activate at the push of a button or the pull of a lever. There is a glitch that lets fire charges go through a 1 meter wide wall when shot out of a dispenser. Make a wall out of non-flammable material. Leave a 3 space gap. Then make another wall. In the gap, put a single block located right beside where you want the dispenser. Place a dispenser so it is facing the inside wall and there is no space between the dispenser and the wall. Place redstone on the block that leads to the dispenser [you have to use a repeater]. Start building the inside. You need to surround a piece of netherrack with iron bars. Make sure the floor is not made out of any wooden materials, wool or carpets as they will burn. You may decorate this any other way but place a button where the redstone signal would receive the input. Then, place multiple fire charges in the dispenser [they don't have any other important use]. You will have to kill blazes and creepers/ghasts and mine coal or kill wither skeletons to make them so they are hard to make but are worth the trouble.
For a more effective fireplace, place a sticky piston that is activated by a NOT gate. Replace the button with the lever. You may need to use repeaters to delay the dispenser. When you switch the fireplace off, a piston pops out and burns out the fire. You may want to make a fake chimney to hide the piston.
For a unique look to your fireplace, use a dispenser to dispense burning arrows to make the fire look better. You will have to have some redstone skill to make this.
D=Dispenser
L=Lava
F=Fence Gate (closed)
R=Redstone clock and AND gate
B=Any Block
E=Repeater
/=Air
@=Button
Top View
///@//
//BBBB
RDLF/B
//BBBB
This shoots flaming arrows to give a multilayered experience.
Shelves
Building a shelf is simple. all you need to do is place a trap door where you want your shelf to go, and you're finished!
You could also place slabs on a wall. That way you can put things on them, such as a cake.
Placing stairs upside down allows functional stair shelves. Blocks are split into two halves (thus two slabs of the same material make 1 block) so point your cursor at the TOP HALF of the block you want your shelf against and place your stair; if you aim lower it will be right-side up and you have to replace it. If you aimed for the top half of the placement block it will become upside-down and you can make non-floating cake holders. This way you can skip the trouble of placing a block and your stair and removing the reference block. Place them outside under a window for a windowsill, or maybe even use several with crafting tables mixed in for a cat tree.
Ceiling fans
Place any block on the ceiling, then put 4 trapdoors on each side of the block to give it the look of a ceiling fan.
Piano
Need some music in your house? Here's how to make a piano that plays music or just notes.
All you need is:
- 2 Nether Brick Stairs
- 1 Note Block
- 1 Jukebox
- Several Music Discs
Now to the building:
- Dig a 2x1 hole in the ground.
- Put a note block and a jukebox in the hole.
- Put two upside-down nether brick stairs the note block and on the jukebox.(or put black and white carpets on 2 quartz stairs)
- Now you have your fully fuctional piano!
==== The Concert Piano ====
- Put down a fence and black wool.
- Behind the first piece, put another and one to the right of it. On the right piece, put another fence.
- Do that one more time but do three wool pieces.
- Put quartz stairs facing you. (3 of them)
- Put down two of any block as a bench.
or
- Put down two blocks of black wool next to each other.
- Then on the left of these blocks place three blocks of black wool one in front of the other.
- Next on top of the first two blocks you placed, place two more blocks.
- After that on the top of all of your black wool place black carpet.
- On the second three blocks you placed, place another layer of carpet one those three blocks.
- In front of the first two blocks of black wool you placed, place two blocks of note blocks next two each other.
- Then do the same on top of it
- In front of those blocks place two blocks of nether brick stairs
or The Grand Piano (By Sky_Ninja99)
- Note: all the blocks used in this are netherbrick
- Symbols: n: netherbrick, s: stair(| means north to south[the stair part; [ means south to north), l: slab, u: upside down slab, f: fence, t: track, p: stone slab, 0: air, c: chest with jukebox under it
- Design:
  North
  0f00    0n00    0|00    0000
  uuu0    npn0    0ul0    l000
  uuuu    nppn    00ul    ul00
  uuuu    n||n    f0ul    nl00
  fuuf    [tt[    0000    0000
  c000
  0ll0
- And that's how it's made!
Cool Fences
To make a "cool" fence, place a stair where you want your fence to go, then place a slab block on top of each stair. Glass panes, iron bars and cobblestone walls with slabs on top will also work.
Kitchen
A kitchen may consist of a small chest with food products, such as meats, bread, or raw ingredients. You may wish to add a Crafting Table as well as a few furnaces, to simulate a working area and an oven. Counters are made by placing Stone, Stone Brick or Wooden Plank blocks in any manner a real-world kitchen would be placed in. Also, the kitchen should be placed on Cobblestone or Stone Brick floors, rather than Wooden Plank floors. You may also make a fridge by placing a dispenser on the floor, an iron block on top, and an iron door in front. Then just place a button next to the dispenser, and when you press it, the iron door will open, and the dispenser will dispense your food! If you have a slanted roof put a 2×1 hole in the ceiling near the wall and over the counter and put two stair blocks there and make it look like there is just two solid blocks there the put a large chest underneath it and you got yourself a cabinet!
Sink
A sink allows you to have a water supply right in your kitchen. Many sinks use a 2×2 square. You could also create a 1×1 block sink just for show, or a flowing sink. You can use a cauldron filled with water then a lever above it representing the tap. Putting Iron Blocks below or surrounding your sink would look cool, or Gold or Diamond Blocks if you have the resources.
Materials Needed:
- 1 cauldron
- 1 tripwire hook
- 1 bucket of water (optional)
1. Place the cauldron against the wall.
2. Place the tripwire hook above the cauldron.
(Optional) Last, fill the cauldron with water from your bucket .
Alternate sink
Materials:
- 1 Red Wool
- 1 Blue Wool
- 2 Water Bucket
- 2 Button
- 8 Iron Block or other solid blocks (see Wooden Plank)
1. Place the Iron Blocks on the floor against a wall like the diagram below. Fill the empty space between the Iron Blocks and the wall with water. (Place the water diagonally for the sink to automatically fill the rest.)The wood it the wall
2. Above the water blocks closest to the wall, place a red wool on the left and a blue wool on the right. On the front of those wool blocks, place buttons. And you are finished! Now you have a functional sink that looks nice.
Cleaning sink
Now you might be wondering "What is the world is a cleaning sink?" Well, this design used to be completely useless before the 1.4.2 update where they received the game mechanic where one could use the water filled cauldron to remove any kind of dye from any kind of dyed leather armor. Right after the 1.8 update, in which banners were added, cauldrons got another use of removing the last pattern on a banner. Thus, this design is now useful.
Fridge
You can make a refrigerator for a nice finish, and to make your kitchen more distinguished. Many fridge designs allow you to store food inside them, making them functional as well as decorative.
Design 1
Materials:
- 1 Chest
- 1 Iron Block (Quartz or Snow for alternate texture packs)
- 1 Iron Door
- 1 Lever
This fridge will look fancy and you will have the ability to store items. Firstly dig a block where you want to put your fridge, then put in there a chest, leave the above block blank. Put above the blank space an Iron/Quartz/Snow Block, then put an iron door and a lever above or next to it.
Design 2
Materials:
- 1 Dispenser
- 1 Iron Block
- 1 Iron Door
- 1 Button
This fridge will give you food when you need some. Place a dispenser on the ground with an iron block on it. (You could also place the dispenser on top of the iron block. See fireglo450's fridge.) Place an iron door in front of those and place a button on the iron block. When you press the button, the door will open and the dispenser will drop the food you stored.
Design 3
Materials:
- 2 Iron Blocks
- 1 Button
- 1 Dispenser
This fridge needs to be built on a wall. To build it, dig one block into the wall. Place a dispenser in the wall, and from inside fill it with food. Place two iron blocks in a stack in front of it. Place a button on either side the bottom block. When you press the button, instant food! Perfect if you need some food in a hurry.
Design 4
Materials:
- 1 Dispenser
- 1 Iron Block
- 1 Iron Door
- 1 Button/Lever
Place a dispenser and on top, put an iron block. Then place an iron door in front of it, and put A button or lever on the iron block. Then just fill the dispenser.
Design 5
Materials:
- 7 Iron Blocks
- 3 Sticky Pistons
- 2 Redstone Torches
- 1 Lever
- 8 (?) Redstone Dust
- 1 Block (any kind) to place some of the redstone dust on
- 1 Ice Block (Obtained in survival with silk touch or pushed into place with pistons)
- 1 Chest
- 3 Stone Slabs
To set up this fridge, make a 2 wide and 3 tall rectangle out of the iron. Make sure it is against a wall and in a corner. On the side facing into the corner, cut out the walls and place the sticky pistons, setting up redstone torches appropriately as inverters to the pistons. Then, attach the lever to the 2nd block up on the non-piston-attached side. Wire this lever into the piston inverters, and voila, a working fridge. inside the fridge, place an iron block in the middle, a stone slab as the roof, and put a chest in the top space. At the bottom, put a block of ice in as a sort of "freezer."
Design 6
Materials:
- 4 of any Solid Block
- 1 rail
- 1 Storage Minecart/Minecart With Chest
- 1 Piston (not sticky)
- 6-8 Blocks of the material you want your fridge to be made of (I.E- Iron or Quartz)
- 1 Redstone Torch or Redstone Block
This is a good fridge that has the ability to store items. Make a tower, three blocks high, of any solid block. Now add another solid block in front of the three high stack. Add a rail to it. Put a storage minecart on top of the rail. Destroy the block with the rail on it so that the minecart falls down. Add a normal piston on the top of the 'tower', facing down. Now, put the block underneath the piston that you want your fridge to be made out of (I.E- I want an iron fridge, so the block underneath the piston will be iron). Now put a redstone torch/block on top of the tower. This will force the piston down. Destroy the piston, the tower and the redstone torch/block. You should be left with a block with a shading error. Add blocks around it so that you can't see the black… stuff. You now have a fridge!
Design 7
by -metalmanII-
Materials:
- 2 dispensers
- Iron door
- 2 buttons
- 2 blocks of any kind (preferably iron blocks, you can use the blocks of your wall material if you are building this fridge into a wall)
Instructions: place 2 dispensers one on top of the other, then fill with food.
Jump on top and place an iron door so it is touching the dispensers.
On either side place your 2 blocks, one on top of the other.
Add buttons to these blocks.
Result: a nice compact fridge! When you press one of the buttons, the door opens and one of the dispensers launches food out, then the door closes.
Design 8
Materials:
- 6 Iron Blocks
- 1 Iron Door
- 1 Pressure Plate (not weighted) or 1 lever
- 1 Chest
- 1 Quartz Stair (optional)
Once you pick a spot along a wall where the fridge is going to go, dig a two-block deep hole and place one iron block at the bottom of it. Next put the chest inside that hole, then destroy the three blocks behind, left, and right of the chest. replace those blocks with iron blocks. Next, place an iron block two spaces up. (If you place a solid block directly on top of the chest it won't open, therefore, make one space between the chest and the iron block.) Optional: At this point, you can place an upside-down quartz stair on the iron block. Since the quartz stair is not a solid block, the chest can still be accessed. However, the quartz stair will not match the iron blocks, so they may need to be replaced by quartz blocks, but they will still not match the iron door. If you do not plan to use the quartz stair, place an iron block on top of the iron block behind the chest. Next jump on top of the iron block (which should only be two spaces above ground) and place the iron door in front of the iron block, making the door and the block touch. Jump down and place the pressure plate in front of the door, or place the lever on the side of the iron block. You will notice that on each side of the fridge there are holes, just places things next to it (i.e. walls, wooden planks, crafting tables, etc.). Now you are done, you can put perishable foods in the chest like milk or eggs.
Design 9
Materials:
- 2 Iron Blocks
- 1 Stone Button
Place the iron into a 1×2 rectangle, then put the button on the top block. There you have it. A simple and pretty decorative fridge. It looks chunky, but it's still pretty cool.
Design 10
Materials:
- 2/3 Iron Doors
- 1 Stone Slab
- 1 Chest
- 1 Stone Button
Depending on where you want your fridge, place the first iron door on the inner side of a block to the left or right of where you want your fridge. Then place the other iron door on the other side, leaving one blank block in between. Third, place your chest, and the last door in front of the chest. On top, place the stone slab. Finally place the button so you can open one of the 3 doors, whichever works for your room layout. To make a corner fridge with this method, you will only need 2 iron doors, with the layout like so:
 * S *
 * C D
 B D *
Design 11
Materials:
- 1 Iron Door
- 8 Iron blocks (you can use snow too)
- 1 Lever
- 1 Daylight Sensor
Find a place in your wall where you would like to put your fridge [NOTE: this MUST be at least 2 blocks away from anything you don't want to dig into]. Dig into your wall 3 at eye level and 2 deep on bottom. Dig behind your wall 2 wide.
After following these instructions, your wall should look like this from overhead:
Next you will start placing your blocks.
Place two-high iron blocks in all of your empty spaces minus the two in the middle.
It should look like this now.
Now, place a block in the middle of all of your iron blocks (note that the one in the middle is on lower than the others).
Finally, put a daylight sensor on top of that block, a door in front and a lever on the wall next to that.
Tip: The daylight sensor can be clicked once to make it look like a freezer pack. Or, if you want to leave your fridge door open and click it again, it will look like your letting the cold air out and you need to refreeze your freezer packs.
Design 12, made by pickake Materials:
- 1 iron door
- 1iron block
- 1 rail
- 1 mine-cart with chest
- 1 lever
First place the iron block on the wall 2 Blocks above the floor place the rail Under the iron block then put the Mine-cart on the rail back in to the Fridge look down place the door then Place the lever on the side now you Have a nice looking fridge that's all So functional due to mine-carts with Chests not needing a free space to Open it
Note: this looks best with counters on The sides
Design 13 Materials
- 1 Hopper.
- 1 Button
- 2 Blocks of Iron
- 1 Dispenser/Dropper
Wherever you want a fridge, dig a 2-block-across hole (1 block down). On the far end of the hole, put a dispenser/dropper facing you. On the inside of the hole, put a hopper that goes into the dispenser/dropper. Next, put 2 blocks of iron on top of the dispenser/dropper and put a button on the lower block of iron. The finished fridge should look like this:
File:Minecraft Refrigerator.png
To get some food from the fridge, press the button and the dispenser/dropper will drop food at your feet. To put food in your fridge, put the food in the hopper using whatever method Design 14, made by Logan5123
- 1 Redstone
- 2 of any block, I prefer Quartz
- 1 button
- 1 Iron Door
- 2 dispensers
First, place your two dispensers on top of each other. Fill the dispensers with food, Then, to the exact left/right block depending where you are placing it, put the Redstone. Then, in front of the redstone, stack the blocks and put a button on the bottom block. Place the iron door in front of the dispensers. If you click the button, food comes out and the door closes.
Cupboards
All you need is a bookshelf and trapdoor. Place down a bookshelf (preferably next to a fridge or furnace) and on the side of the bookshelf facing you place a trapdoor and close it. Now it looks like a bunch of boxes of food or colored cups in a cupboard when you open the trapdoor.
You can also do it this way: YOU NEED: 2 stairs 2 trap doors Place the 2 stairs in wards so it looks like a U. Then place a trapdoor in front of each of the stairs. Now you have a simple but cute looking cabinet.
Bathroom
Most nicely built bathrooms have some kind of tiles for the floor. Slabs can help you save time and resources if you're in survival. Quartz looks very nice in bathrooms as they add a clean, polished feel and can be chiselled into different styles. You can make bathrooms with even running water, but these would mainly serve as decorations since you (hopefully) can't actually take a bath or use the toilet. Technically, any small room with an infinite water source and a door, qualifies as a "water closet". However, here are some ways to build fixtures that can be used for disposal and/or decoration.
Toilet
A toilet is basically a single-block hole with stuff arranged on top for looks (the "throne") and leading down to a disposal for items. Generally, there's a trapdoor atop the hole, by way of a "toilet lid". What you put in that hole will depend on how quickly or thoroughly you want to destroy items... or players who fall in! The options for the hole are fairly simple:
- a block of water, or full cauldron. Items will stay until they despawn or are retrieved. The cauldron will hide the items.
- a hopper with a chest beneath it. Items will disappear, but be saved in the chest.
- A block of water flowing downward into a deep hole, or sideways under the floor. No real threat to most players, but carries items out of easy reach. This can be combined with the next item.
- An oubliette—basically, any hole too deep to jump out of, up to and including a drop-shaft into the depths. Note that if there's a waterfall, players can swim back up.
- Lava. With attention, water currents can be used to carry items to the lava. Items will be destroyed. Having lava at the top of the "bowl" may be hazardous to your health or your base.
Alternately if your town has a sewer system you can build a sticky piston based secret door under the toilet (hooked up to the flush lever). An drop shaft leads to the sewer and the waterfall created by having the "secret" door open allows you to safely swim either direction. If you're worried about drowning simply have the shaft move forward 1 block for every 7 it goes down. Lighting can be added at these points at head level. A sewer allows you to connect all the houses in a village/city with semi-secret passages. Building it out of Mossy Stone Brick makes it look appropriately slimy. Don't forget to make the center of the floor a stream.
Toilet Tops
Levers generally represent the flush lever, and can even be functional with a bit of redstone work. All you need is a trapdoor, and a bucket of water. Dig your hole, place the water, put the trapdoor on top, finally put the lever next to the trapdoor.
A slightly prettier version uses 9 or 11 blocks—wool works fine if there's no lava below it, but iron adds a more modern look. Arrange the blocks in a ring shape around the hole, place your trapdoor within. Place three more blocks at the back of the toilet (or just one in the middle), and put a button on the middle of those.
To make a slab toilet, you need the following: Materials:
- 1 trapdoor
- 5 half slabs
- 4-6 whole blocks (optional)
Surround your hole on 3 sides with half blocks, then place 3 of the 4-6 blocks on the ground as a back wall (of course), then place the 1-3 blocks you have left on the 3 wall blocks, then place the trap door above the hole.
To make a nice toilet that you can sit on and do your business, all you need is:
- 3 Solid blocks (you get one of these back)
- 1 Rail (you get this back too)
- 1 Minecart
- 1 Trapdoor
- 1 Lever
You may need to dig down a couple of spaces in front of the hole, if you want the cart under ground level, instead of sitting on the floor. 1) Place the 3 blocks in an L shape with two blocks stacked on top of each other and one block placed in front of the stack. 2) On the block in front of the double stack of blocks, place the rail and then the minecart on top of the rail. 3) Now destroy the block that is under the minecart; this will cause the rail to break and let the minecart fall onto a block without a rail making it unable to move (easily). 4) Place the trapdoor in the space above the minecart connected to the top of the 2 stack of blocks. 5) Place the lever on either side of the same block as the trapdoor.
Shower
You can place slabs on the ground to mark off the edges of the shower. This should usually be built in a corner. Then place a piston in the ceiling or wall and place water behind it. You can use a lever to turn the shower on and off.
Another version is that if you make a wall around 3×3 blocks and put holes in the roof and cover them with glass or trapdoors and then everytime it rains if you open them you can have a nice shower.
Another option is to do what it says in the paragraph above this one but don't make holes in the ceiling. This is the easiest and quickest option but you won't have a functional, water-spewing shower. The reason for this option is purely for decoration and you would not be able to use it.
However, placing a water source above the ceiling (with particles on) will solve the above problem, because the water will make little blue drops (purely for decoration) that fall from the ceiling, making the shower actually "work" in all weathers and without one huge torrent of water that looks pretty unrealistic (have you ever seen a shower that looks like a waterfall?).
Bath
Design 1 Use a fence, wall or block and surround a 2×1 area near a wall. Get a dispenser and place it in the wall near a button (or lever if you want it to look more like a tap) and place a water bucket into the dispenser, when you hit the button/lever the water will come out and if you hit again it will clear the water out.
Design 2 Repeat the 1st sentence of Design 1, then fill the space with water, add lever or tripwire hook for a tap. Feel free to change the size of the space where the water is but this size is suitable for an average sized bathroom.
Design 3 You can simply place a minecart down and sit in it to save time.
Design 4 Dig a 2×2 hole and fill it with water. Surround the water with iron blocks, quartz block or white wool.
Sink and Mirror
For the sink proper, you can use a hopper, a cauldron (full or empty), or a minecart (try the rail removal trick from above).
You can make a very acceptable looking sink and mirror combo by making a section at least 3 blocks wide of your floor material. In the middle "2nd" block place your chosen sink. Surround the left and right sides of the sink with your wall material as well as the back at least 2 blocks high. Replace the block that is behind and above the sink with your "mirror". If you have it, you can use ice, otherwise use a glass pane and completely surround it with wall blocks to make it a full pane. You might put a water block behind the glass, just for "atmosphere".
A lever or trip-wire hook can be added above the cauldron sink, as a faucet. Also, for an extra touch, you can put up a banner next to your sink to create a towel! (Plain white banners work best, though patterned ones look nice, too.)
An alternate mirror is an item frame with the Steve mob head in it, or you can mine a 2 block deep hole in the wall, place a Steve mob head, then place a glass block at the front. (This is only an accurate reflection if you're using the default Steve skin, but if you use the command /give @p skull 1 3 {SkullOwner:PlayerName}, you can get a head with your skin to use.)
Games Room
Chess/Checker Board
To make a Chess/Checker Board, place a noteblock anywhere to form the table and board. You can build any type of chairs you like for the table. Notice how the noteblock looks a lot like a chess/checker board. You can cover up the sides with trapdoors for a table effect.
Note: This may not work with alternate texture packs.
Pool Table
Put down 3×6 dark green wool blocks, with closed trapdoors for sides.Or,you can put down wooden planks and cover them with green or lime carpet (introduced in the 1.6 update). Use fence posts to 'suspend' three jack o'lanterns in a row a single space above the table (will require temporary blocks to sit them on, then destroy them after the pumpkins are placed). Ideally have faces turned in against each other. Then use string to draw a baulking line across the second row of green blocks. Nearby you can have a chest with sticks, eggs and the oblong dyes (e.g.: lime, pink and purple).
Ping Pong Table
Lay down 5×3 wooden slabs. At the two long ends, make a 3×1 fence. Cover the whole lot in green carpet/rug. In the middle of the long sides and at the side, place 3 high wooden blocks, with tripwire hooks on the inside of the top blocks, connected by string for the net. Cobwebs might work here as well. But you may not be able to get the green carpet in that case just use green wool.
Pac-Man arcade cabinet
A simple way is to place two stairs, one on the ground, and one on top of it, upside down. Another way is to put 2 yellow wool (gold blocks work as well), one on the ground, put glass on top of it, and the other wool block on top. Put a painting on the glass, and you're done! You can also put two gold blocks on the ground, next to each other, put a black wool on one of the blocks, put another gold block on top of it, and put white wool in front of it. Put a lever on the gold block on the ground to act as a joystick (Rails and crafting /tic-tac-toe tables work too) and you have a decent looking Pac-Man machine!
Miscellaneous
This section is for pieces of furniture that really don't fit in any categories listed above.
Water Spigot
Use this if you're making an outside enclosure for your farm animals. It looks nice and is refillable with rain water.
First put a 3×3 base of cobblestone. Then place a cobblestone wall on top of the middle cobblestone. Then place a lever and Tripwire Hook on opposite sides of a chiseled stone block. Add a Cauldron under the Tripwire Hook, and there you go a sort of working water spigot!
Pet Door
A pet door is actually quite simple to create and will save you the trouble of having to keep the door open for your pets. To make a pet door make a 1×1 hole in the wall then put pressure plates on both sides of the hole. Inside the hole, put in a fence gate. Now your pets can come in with ease and most monsters won't be able to get in (except for Cave Spiders, Silverfish, and the small Slimes)!
Radio
Basically, all you need are 2 note blocks and an Iron block. First, place the note blocks. Make sure you have a 1 block gap between them. Then, place the iron block in the gap. You could even place buttons or redstone torches on the blocks to give the feel of having knobs and an antenna or replace one block with a jukebox to play music.
Fancy Jukebox
For this you will need 4 stair blocks, a jukebox, and a redstone lamp. Optional items are a chest, 2 more stair blocks, a slab, and maybe a few buttons for decoration. First, place the redstone lamp on the floor with the jukebox on top. Then, place two stairs next to the redstone lamp, then place the other two stairs on top of the stairs so it makes a [ shape. If you have buttons, add them where you would like, then place the music disk inside the jukebox! If you are using the chest, place the chest on top of it and add on the other two stair blocks next to the chest on top of the previously placed stairs. Then put the slab right above the chest (Don't worry! the chest will still open!)
Redstone
Try using Redstone to "deploy" furniture. You can even try to make a barren room with everything hidden, with a lever that reveals or creates furniture. This may sound weird, however it has a cool effect when you actually use it. To do this, you use pistons along the walls, and pull them back with the flick of a lever to reveal your furniture!
Put furniture where the wood slabs are.
Maps
Maps can be useful, or merely decorative.
Wall Map
- Materials
- 1 Item Frame
- 1 Map
- To create the map, place the Item Frame on the wall, and place the Map in the Item Frame.
- To cover a larger area, place more Item Frames and Maps in a grid-like structure.
Floor/Table Map
- Materials
- 1 Sticky Piston
- 1 Redstone Torch OR 4 Pressure Plates
- To create the map, dig two (one, if using pressure plates) blocks down, then place the redstone torch on the bottom, (unless using pressure plates) and on top, place the sticky piston. Now you have a map that, if using the torch, is on a table, and, if using the pressure plates, will pop up when you walk up to it! The green parts simulate land, and the rest simulates ocean.
- Once again, to cover a larger area, place more torches and sticky pistons in a grid-like structure. (can't use pressure plates for this) You can also use normal pistons to simulate large tracts of ocean.
- You can actually put this on the wall, however if you do, you shouldn't power the pistons.
- Notes
- Only for decoration; serves no other purpose.
- May not work in some Resource packs
Wall Clock
All you really have to do is place a clock into an item frame and hang it up. Now you can have a wall clock in your house or anywhere you'd like to place it!
Grandfather Clock
Take two of any block you want (must be able to put an item frame on it!) and place them on top of each other on the floor. Add an item frame with clock on the top block and you're done! Optional, add an item frame on the bottom block with a spade / shovel in it, rotated to be the pendulum.
Barbeque (BBQ)
To make a barbeque on the patio or outside of your house you can craft anvil and place it where you want on your outdoor space.