(→Cactus) |
|||
| Line 474: | Line 474: | ||
Fire charge: The Fire charge is a dangerous weapon that can light mobs from a distance. Try to use the Fire charge in deserts more often than forests, taigas, and jungles, unless it is raining. Usage in forests, taigas and jungles can create forest fires, which can kill large amounts of mobs but can short out your wood supply. |
Fire charge: The Fire charge is a dangerous weapon that can light mobs from a distance. Try to use the Fire charge in deserts more often than forests, taigas, and jungles, unless it is raining. Usage in forests, taigas and jungles can create forest fires, which can kill large amounts of mobs but can short out your wood supply. |
||
| − | Splash Potion: (If you want know the different types of potions, look at [[Potions]]) You can damage, heal, poison your target. Those can be effective when using instant damage, where can deal a good amount of damage, however due to difficulty to make potions it's likely this will not be worth (if you can use the Arrow Dispenser). Make sure you know your potions! Using a potion of instant damage or poison on Undead (Zombie, Skeleton, Zombie pigman) will heal them, so use splash potions of instant healing or regeneration on them. |
+ | Splash Potion: (If you want know the different types of potions, look at [[Potions]]) You can damage, heal, and poison your target. Those can be effective when using instant damage, where can deal a good amount of damage, however due to difficulty to make potions it's likely this will not be worth (if you can use the Arrow Dispenser). Make sure you know your potions! Using a potion of instant damage or poison on Undead (Zombie, Skeleton, Zombie pigman) will heal them, so use splash potions of instant healing or regeneration on them. |
Dispense Water: Dispensing water on your target or near your target is not very efficient: it is much simpler to get close and place the water yourself. Dispense water only when your target is far away from where you are standing, yet you want to slow them down. |
Dispense Water: Dispensing water on your target or near your target is not very efficient: it is much simpler to get close and place the water yourself. Dispense water only when your target is far away from where you are standing, yet you want to slow them down. |
||
Revision as of 01:24, 31 May 2015
A mob is any creature in the game, whether Hostile, Passive, Allied or Neutral. Mobs come in various shapes and sizes, and all have different health, damage, strength and weaknesses. Each mob will require a different tactic to defeat.
Hostile mobs and bosses
As of 12w38a, there are 14 hostile mobs and 2 bosses (the Ender Dragon and the Wither) in the game. This list is sorted by chance of encounter. If caught in a difficult place without a weapon, the player can run away if he or she is outdoors or tunnel downwards and wait for the mob to despawn before surfacing. A failsafe is to set the difficulty to peaceful, which removes all hostile mobs, save the Ender Dragon.
Zombie
Zombies are often considered the easiest mobs to kill, as they use only weak melee attacks and burn in sunlight unless they are wearing helmets/pumpkins on their heads or are in water. However, they have an extended reach and a small amount of natural armor (8% damage negation), and it is easy to land a hit on them in melee combat without taking damage. Also, they often spawn in large numbers and when they do so, they can quickly overcome you. Zombies aren't that fast, merely a nuisance, especially when mining underground. When surrounded by multiple mobs, cut down the zombies first to escape. The player can also use a bow to shoot the zombies, but as mentioned, they spawn in large numbers, so it will be difficult to kill all of them. If possible, lure them out into sunlight so that they burn. They drop rotten flesh, which is only useful if you (or a wolf) are low on food or far from a permanent food source. It should also be noted that as of the 12w06a snapshot, zombies can break down wooden doors in hard difficulty and hardcore mode, so take caution when trying to defend yourself by placing blocks. If you play on Hard/Hardcore mode, protect your house with an iron door. They also attack villagers and can be seen trying to open doors. They can spawn with armor, pumpkins on their heads, and iron tools such as swords and shovels. Zombies are also extremely weak when trapped. A way to lure them is use the villager trap. Zombies can, as of 1.6.1 spawn other zombies when you hit them.
Skeleton
Skeletons can be quite difficult to slay in melee combat, unless you have the correct tactics. They fire arrows as you approach, making them hard to kill; although if you get close enough, it is possible to hit them, block, and repeat until you kill them. Another way you can attack is by circling them, and while doing so, approach and hit them and keep on circling and hitting it until it dies. They burn in sunlight like zombies unless they are wearing any type of armor or pumpkins on their heads. When attacking them in melee combat, strafe while approaching, and spiral around them. Never use sprint hits on skeletons unless they are near a hazard, as knocking them back will give them a free shot at you before you can approach. Skeletons can hide behind corners in caverns and ambush you, so ensure to light the entire tunnel before exploring further when underground. One can make short work of a skeleton by shooting it while outside its search range. On equal ground with a skeleton, charge your bow shortly after dodging a skeleton's arrow to prevent being shot while under the slowing effects of a charging bow. If you are low on health and ammo, wait until day so that they burn up. However, if inside a cave, wait for your health to regenerate completely and try again. In Nether Fortresses, they spawn 20% of the time in place of a Wither Skeleton. They can wear armor and pumpkins like zombies, but cannot pick up items or blocks. When fighting skeletons and you run behind a wall, don't try to rush out and attack them (unless you don't mind taking some damage). What you should do is wait behind the corner with your sword on block and when the skeleton hits you, retaliate before it can launch another attack. Skeletons are very accurate and running out will almost always result in a hit. So does trying to wait around the corner and attacking the edge of the skeleton. By blocking with a sword you reduce damage taken. Don't try to slay a skeleton in melee combat in water (use only a ranged attack), they can fire arrows at you preventing you of getting out of the water and possibly killing you. If you do decide to attack a skeleton in water with melee tactics, get under the skeleton or jump off a ledge into the water. A good plan in the Swampland biome is to try and drown the skeleton under lily pads.
Creeper
Not only one of the most notorious and infamous mobs in the game, but also one of the most deadly.
Explosion Mechanics
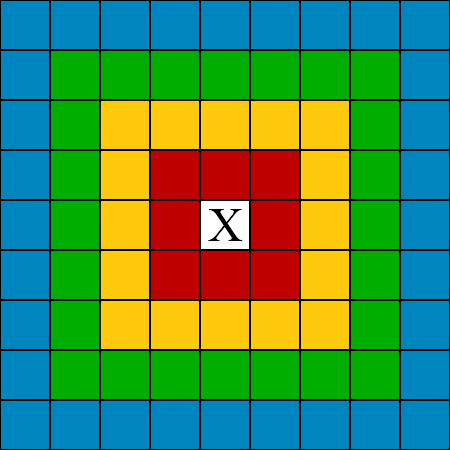
If there is 1 block or less between you and the creeper and it knows you're there, it will start its 1.5 second countdown before it explodes. Hitting it and moving back or sprint-hitting it will move it far enough away that it stops its countdown, and starts its cooldown. The length of the cooldown is equivalent to how long it was counting down. So, if it had been counting down for 0.75 seconds when it moved out of range, then the cooldown will last 0.75 seconds as well. If there are 2 blocks between you and the creeper, you're safe unless it has already started its countdown. Creepers will also run away if close to a cat or ocelot, preventing an explosion.
Below is an image showing the likelihood of a creeper exploding. The white square in the center with an 'X' is the creepers location. This grid uses the block system for distance and it is used by 'placing' your player on the relative colored square. Please note that you may think that you are two blocks away in the game, but actually you may be closer, depending on your graphics or perspective (e.g. looking up vs. looking straight ahead).
A grid showing the likeliness of a creeper exploding.
| Color | Chance of Explosion | Predicted Damage |
|---|---|---|
| Red | Definite | Extreme |
| Yellow | High | Moderate |
| Green | Minimal/None | None |
| Blue | None | None |
Combat Methods
The safest way to engage a creeper is from a distance by shooting three fully charged arrows at it with a bow so it cannot explode near the player. Also, the player can finish off the Creeper with a sword after shooting the Creeper once or twice to save arrows (unless you have the infinity enchantment on your bow).
Swimming Creepers can be easily dealt with using melee attacks while the player is underwater. Players can also take advantage of the Creeper's countdown system by hitting it, retreating a few squares away, and repeating this until it dies. Alternatively, the player can find sufficiently high ground to strike a Creeper from above with a melee weapon without the detonation sequence being activated. However, the player should keep in mind that Creepers move forwards and to the right (your left) when in pursuit.
A Creeper can be hit and knocked out of reach with the sprint hit ability (also with an Knockback enchantment to the player's sword). This allows a player to slowly work down a Creeper's health while remaining out of the explosion radius. Jumping and hitting a Creeper while falling during a sprint will kill the Creeper quickly while still keeping it out of reach.
If a Creeper is below the player, the player can suffocate it (and many other mobs) by placing a block of sand or gravel above the Creeper as long as the block they are placing is on a wall or a block in front of the player and above the target mob. It will usually take one to two blocks to cover the Creeper and when it is covered, it will slowly suffocate to death. This is a slow way of eliminating a Creeper but it will keep the player out of harm's way and preserve the durability of their weapon.
Before 1.7.9, it was possible to kill a creeper with flint and steel. As of now, however, setting a creeper on fire will cause it to explode.
Another method to kill a Creeper is by using the pillar method. This method is not the most effective, but chances of explosions are minimal. By making a 3-4 block pillar of dirt/sand by pillar-jumping, and waiting until the creeper comes next to your pillar, you can attack it without exploding.
Another method to kill a Creeper (especially if there are multiple creepers), is to fight them with an open door between you. As soon as you attack, the creepers might start their countdowns. Close the door quickly, and it will shield you from their sight, forcing them to abort the countdown. Re-open the door and strike again, then quickly re-close the door. The creepers will not be quick enough to go through, and the door will shield you from their view. The only drawbacks to this method are if you react too slowly, they can detonate; and that zombies could break the door if they see you. This method is very effective, especially if you have low resources and time. This method can also be used to block a possible skeleton arrow.
They may be hit by lightning during a storm, making it a charged Creeper. These are one of the most dangerous mobs in the game as its explosion is stronger than TNT. However, the lightning also damages the Creeper, making it a faster kill. One fact you should know about the lightning Creeper is that they approach straight on, instead of from the right (your left.)
But remember, keep your distance when fighting hostile mobs, especially Creepers.
(Note: Attacking a Creeper with a sword enchanted with fire aspect (not flame) can result in the Creeper exploding upon death, so not always a good solution.)
Spider
Spiders can be a nuisance if handled incorrectly. They are one of the three monsters that are 1 block high, and as such they will be able to sneak into your house if a hole is sufficiently large for them. However, spiders are also 2 blocks wide, so a 1x1 hole will not let them pass. Spiders have a special feature in which they can climb blocks. If you hear spider noises but can't see one, usually they are on top of your house. In the daytime, spiders will become neutral — they will only attack you if you attack them (but don't think they will forgive you if they were chasing you in the night!). However, they can ambush you in the daytime if you exit your house when one is on your roof, attacking your back as you walk away from your house. Spiders have a jump attack, and so it is best to swing a sword while walking backwards to avoid most damage. During the day, they can be killed by lava or flint and steel without becoming hostile to you. On Survival a Spider becomes neutral towards you if the light level around you and it is around 12 - 14. One can also kill spiders by pillar jumping, creating a ledge around the pillar, bombing the spiders with snowballs, and watching them climb and fall. (See Spider Masher.) Spiders drop 0 - 2 string, and have a chance to drop a spider eye as of 1.9 pre 3. String is useful stuff, and precious in the beginning game as it is needed for bows, fishing rods, and leads. It can also be crafted into wool (12 string makes enough for a bed), and it can be placed in the environment as tripwire.
Spider Jockey
These are rare, they have 1/100 chance to spawn in place of a regular spider and from a Spider Spawn Egg in Creative Mode. It is also highly fatal if confronted head-on, as the spider will attack you, while the skeleton shoots you with arrows, On Hard Mode, a Spider Jockey deals a total of 5.5 Hearts of Damage if attacked head on (also the Spider Jockey can still climb walls). If the spider climbs into an area that is only one block high, the skeleton will suffocate.
If the spider is killed the skeleton will revert to a normal skeleton and continue to attack normally and vice versa.
Wolves are a messy way to combat them because the wolf will attack the mob who last attacked it, so it may alternate from attacking the spider to attacking the skeleton, etc.
One can attack Spider Jockeys with a bow outside of the mobs' search range. Be sure you do not hit the spider until you have killed the skeleton.
Cave Spider
Cave Spiders only appear in Abandoned Mineshafts underground, but are a pain to deal with. Not only are they smaller than a regular Spider, meaning they can fit through 1x1 holes, but also their bite will poison you (except on Easy and obviously Peaceful difficulty). On Normal difficulty, the poison effect lasts for 6 seconds if not countered by drinking a bucket of milk. On Hard, the poison effects will last for a deadly 15 seconds. Keep in mind that the poison effect on Hard can deal 10 (5 Hearts) of damage if not treated with said milk, and will eventually be the ultimate cause of player deaths in the abandoned mineshafts from the poison leaving only 1 health left on the player. Cave Spider spawners are often difficult to take out, due to their location being surrounded by cobwebs. If you run across a Cave Spider spawner, make sure you have shears or a sword to cut the cobwebs quickly (a sword will be used up quickly by this). Another great option would be a bucket of water. You can also tunnel under the floor to reach them, then mine upwards and break the spawner. Neither type of spider is affected by the cobweb slowing effect, so be aware that they cannot get stuck like other mobs and entities can.
Ender Dragon
Ender Dragons are the first official boss mob in Minecraft as of the Official Release. They spawn only once per world, and have extremely high health (100 hearts). They can only be found legitimately in The End. Always craft armor and bring an iron sword or better. Instead of bringing a helmet, bring a pumpkin instead, as there are lots of Endermen and the pumpkin will stop them from becoming hostile when looked at. A tactic to fight one is to stock up on ladders, as there are obsidian pillars with Ender Crystals on top. However, when the Ender Crystals are destroyed they blow up, and the diameter of the explosion is larger than the pillar, so you will fall off. It would be a better idea to mine lots and lots of Obsidian or End Stone, so that you can make your own pillars and shoot the Ender Crystals from a distance. That way, you won't fall off and die. Coming unprepared will most likely result in your death (if you die in the End you would spawn like normal in your Default spawn point.) In the console editions, the Ender Dragon will approach the player when he/she is at the exit portal frame when the dragon is alive, allowing successful melee attacks, as in the console editions the Ender Dragon fires acid at the player. When the Ender Dragon is killed, it plays a unique death animation and drops an Exit portal. When you jump in, you have completely finished the game. The portal also has a Dragon Egg on the top, which is useless, but it can be collected if you put a piston on one side of the egg and any block on the other. Then, activate the piston and the dragon egg drops. It's a great way to prove to your friends that you killed the Ender Dragon. If you go through the portal, the credits appear, and you spawn back in the Overworld earning the achievement "The End.".
Wither
Withers are boss mobs that can be summoned by making a "T" shape with Soul Sand and placing 3 Wither Skeleton heads on top. They have 150 hearts of health (50 more than the Ender Dragon) and shoot black explosives that give the Wither effect and do as much damage as a Ghast fireball, and blue ones that can destroy any block except bedrock and end portal frames. So when spawning the Wither make sure you are in a confined space (made with obsidian if being done in survival) with lots of effective potions drank to kill the Wither quicker. Upon summoning one, drink a potion of strength, a potion of regeneration, and a potion of swiftness, and maybe eat an enchanted Golden Apple. When the Wither has gotten up to max HP in a few seconds the Wither will gain Health and cause a massive explosion. A good thing to do is to shoot it with arrows until down to 75 hearts of health and then kill it quickly with a sword to end the battle. The Wither drops 1 Nether Star which can be used to make a beacon.
Slime
Slimes are found only below altitude level 40 in certain chunks and in swamp biomes at night, but often occur in large numbers. They are the only way to get slimeballs for sticky pistons, and drop large amounts of experience, but they are often a major pest in mines. A solution is to dig the mine only one block wide so that only the harmless tiny Slimes can fit in it, but in natural caves and larger mines, they can become a nuisance as they will spawn in any light level. Since the larger Slimes are slightly over 1 block wide, you can trap them behind walls and hit them easily. They are also easily killed by attacking from above. When a Slime is killed, it will split into one to four smaller Slimes, and a single huge Slime can produce up to 16 small Slimes, which can easily overrun the player in large numbers, but is mainly just a nuisance. Attacking from above or backpedaling will prevent too many from attacking at once. Water is also effective at slowing them down and it is common on the surface, while lava will kill large numbers, so it is a good last resort. Note that a tiny slime can be killed with a one punch(saving sword durability).
Prior to pre-release 1.9 the only way for a large Slime to split into a smaller one was to have exactly the amount of damage needed to kill it, no more. Therefore, if you wanted to maximize your slimeball output, the best way to kill slimes was to punch them near their base. Since pre-release 1.9, Slimes will split even if they are hit with more than necessary damage.
Witch
Witches are hostile mobs with an appearance similar to villagers that spawn in swamp huts. They throw negative splash potions at you and will drink Water Breathing, Fire Resistance and Instant Health potions to protect themselves; so drowning them or killing them with lava or fire isn't a good thing to do. They have 13 hearts of health. If you find one, shoot it with a bow or attack it with a sword in the way that you would attack skeletons. If you are holding an iron sword or better, another strategy would be charging towards it and hitting it 3-4 times before the witch is finished drinking their potion of Instant Health. However, don't use splash potions on them as they are almost completely immune to them. Fire attacks are also useless. Before 1.7, Witches were found only spawned in swampland biomes in their wood huts which are counted as Generated Structures. However, in versions 1.7 or higher, they can spawn anywhere it is dark, excluding the Nether and The End. The Witch itself tends to drop Spider Eye, Sugar, Glowstone Dust, Redstone Dust, Sticks and empty Glass Bottles, making them a great monster to farm.
Guardians
The Guardian has two methods of attack, engaging a laser-like beam and a thorn-like attack. The beam takes several seconds to charge, doing no damage while doing so, and changes from purple initially to bright yellow when fully charged. Once charged, the beam abruptly disappears and deals damage. The Guardian will swim around for a few seconds before firing again. If the target comes near the Guardian while it is firing its beam, it will stop firing and swim away until it is at a comfortable range, at which point it will continue attacking. The Guardian, unlike other hostile mobs, will not follow the player if they move out of sight. Instead, it will simply continue swimming until the player becomes visible again, and will then start to charge its attack. The beam cannot be dodged, as it follows the player, but can be obstructed by solid blocks, and has a range of approximately 15 blocks.
Guardians also have spikes on their bodies. Although these spikes don't do any direct damage upon contact or as a melee attack, they act similar to the Thorns enchantment. The Guardians can extend and retract their spikes. If a player attacks the Guardian when its spikes are extended, the player takes a small amount of damage.
Guardians are very resistant to melee attacks when under water, as the player will not be able to quickly approach the Guardian due to the slowing effect of the water. Guardians will swim away when approached by a player it is targeting. The Guardian will deal 1 heart of damage every time it is hit when its spikes are extended. If cornered, the Guardian will usually extend its spikes and fire its laser at the player, even at point-blank range.
If brought to land they may take fall damage from their swift movement.
If the player must melee a Guardian, they should try to corner it and hope for the best; or else try to trick it into swimming within melee range repeatedly.
The Guardian cannot shoot as fast as a player with a bow can, so a skilled player will be able to shoot the Guardian, and then hide to break the beam's lock, repeating until the Guardian is dead. Note that the new arrow mechanics introduced in 14w25a will cause arrows to slow down and eventually fall when in water, so the player may be forced to shoot at very close range. If the Guardian is in shallow water the player(s) can use a fishing rod to pull it out of the water where the player(s) can then kill it using melee attacks without being shot at or hurt by the spikes. (The Guardian can still shoot while out of water, but unless it's held still, it flops around too much to keep the target in range.)
Fighting Guardians is incredibly dangerous without armor. Armor is essential to combating Guardians, especially within an ocean monument. Entering their territory without armor will almost always lead to a swift death, even if armed with a sword or bow and arrows.
Using the combined effects of Depth Strider III, Speed II and sprinting, the player can actually swim faster than the Guardians, allowing him/her to sneak up on them or to escape their beams.
Elder Guardians
The Elder Guardian has a very large amount of HP (80), making melee attacks even harder. Elder Guardians do more damage than regular Guardians. Diamond equipment enchanted with Respiration and Depth Strider, swords and bows are recommended. Fighting Elder Guardians is incredibly dangerous without armor, if not impossible. Entering their territory without armor will almost always lead to a swift death, even if armed with a sword or bow and arrow. Also, they may give you the Mining Fatigue effect, making it nearly impossible to tunnel out in case of emergency, or mine the gold in the center.
Nether mobs
As of 1.4.2, only 5 mobs spawn naturally in the Nether other than Skeletons. This list is sorted by chance of encounter. Currently, all Nether mobs are hostile, with the exception of the Zombie Pigman, which is neutral. All can be very dangerous without sufficient weapons, but all can be outrun fairly easily while sprinting, and all excepting the magma cube despawn on peaceful.
Zombie Pigman
Zombie Pigmen are neutral mobs. This means that they are not naturally hostile, but will retaliate if attacked, just like wolves. These mobs will attack in medium-large groups and unprepared players should be cautious of their strength in numbers.
To an unprepared or careless player, a charging group of Zombie Pigmen can mean a swift death, but the fight becomes easier after you can recognize how they behave and attack. Zombie Pigmen attack with a mob mentality. If you attack one of them they will all join in and attempt to kill you. As soon as one Pigman is attacked, all of the others within a 32 block radius become hostile and will charge the player if he is in sight range (16 blocks). Zombie Pigmen will notice attacks from behind walls and at different heights. It is a misconception that their hostile status lasts between 20–40 seconds since the last attack by the player, so taking cover and waiting is useless, but you can still attempt to bunker down (in a narrow cave/choke point, for example) and dispatch them safely. The hostility radius is centered around each Zombie Pigman that is attacked, not the player. This means that you can attack a far-away Zombie Pigman with a bow without nearby Pigmen becoming hostile (although this is not suggested). Note also any Pigmen between 17 and 32 blocks will continue to wander as normal unless you come within 16 blocks of them (or vice versa), upon which they will rush you (assuming they haven't calmed down by then). But, when you defend yourself, any Pigmen within a new 32-block radius will be angered.
They carry a golden sword, and so they do quite a bit more damage than a zombie. On hard difficulty they will do 13 hp(6.5 hearts) of damage. Compared to the Zombies 4 hp(2 hearts) damage on hard difficulty, there is a considerable difference. They do, however, share zombies' natural armor (8% damage negation). Zombie Pigmen always spawn with a golden sword. They will never spawn with armor pieces on them (chestplates, helmets, etc.) , but their sword may be enchanted. If items are dropped near them, they will pick up the items. Armor and swords will be automatically equipped.
The easist way to kill Zombie Pigman is in one hit, as they will not be agrooed if another pigman is killed in one hit. This can be achieved with Strength II and a Diamond sword, or a Diamond sword with Sharpness III and Strength I.
Ghast
Ghasts are often considered the most difficult mob to kill in the Nether because of their extreme attack range, explosive attack power, mobility and flight. They are also quite common; players in any exposed area will have to deal with them sooner or later and possibly from the moment they step out of a portal. Ghast fireballs have a profound effect on Nether architecture, making a compelling case to use only materials resistant to their explosions for outer walls and exterior fittings in places where their fire may be drawn. As a result of their large size and the extreme unpleasantness of an indoor Ghast spawn, the primary defense mechanism for buildings in the Nether becomes enclosure rather than lighting. A Ghast's firepower is highly inaccurate at most ranges if one is moving. Players are most vulnerable when they are building in the Nether, when they may well not be moving and possibly standing above a long fall. Ghasts can also break blocks from under the player, often dropping them into lava or causing death through falling damage.
The player can reflect fireballs by hitting them with anything before they impact, even bare hands. Because of their low speed, spamming mouse clicks is often enough to deflect any given attack. It is possible to kill Ghasts by reflecting their attacks back at them, but it can be difficult since they are agile. You can easily make a fireball reflect in the direction you want by shooting an arrow, fishing rod, or snowball at the fireball. The fishing rod, when released, slightly affects the fireball's trajectory. This relationship goes both ways and a Ghast's constant stream of fireballs may well interfere with the firing arc of your bow.
Most Ghast kills are made with a bow and arrows or a ghast fireball for obvious reasons but a Ghast can be killed with melee weapons if the player can get close enough before it draws away. Ghasts are highly vulnerable when caught on the ground since their attacks can be deflected and their health is quite low - 2 blows from a diamond sword will destroy one. It is possible to use a fishing rod to draw Ghasts near enough to hit them with a sword. A close Ghast is also much easier to hit with a bow, though reaction time against its fireballs is likewise lessened. When aiming your bow, be sure to lead your shots as Ghasts can quickly change trajectory and move quite quickly. Depending on the Ghast's range and relative altitude, it is usually necessary to also aim at a high trajectory to gain extra range. Where possible, having the advantage in altitude (such as shooting from the topmost layer of the Nether) is of enormous help. Also, Ghasts move much slower when caught in a lava fall or pool, so waiting for the perfect opportunity can help your accuracy. If ammunition is not a concern, it is advisable to shoot many arrows at differing trajectories in order to find the range to the Ghast. The Ghast's hitbox is mainly its tentacles, and aiming too high may cause a shot to go through the Ghast's body, dealing no damage. However, it is perfectly practical to shoot the hitbox through the ephemeral body from above using plunging fire.
Much like using neutral or enemy mobs as shields against arrows fired by skeletons in the regular world, it is feasible to use Zombie Pigmen as shields against Ghasts in the Nether. It is possible to injure or kill Zombie Pigmen in this fashion without ever making them hostile to the player. If a ghast hits a zombie pigman, other zombie pigmen will try to kill the ghast and will if it is close to the ground.
An effective method of fighting Ghasts in the Nether is to make a shelter, preferably out of brick, cobblestone, obsidian, or other explosion-resistant materials. Nether brick is ideal because it is completely immune to their fireballs, and is commonly found in the fortresses and as smelted netherrack. Make a 1x1 hole in the roof and add ladders leading up to it, in such a way that you can poke the upper half of your body through the roof. When a Ghast is near, climb the ladder, shoot an arrow at the Ghast and quickly descend again into your explosion-proof shelter. This should mean that you can kill Ghasts easily with minimal health loss. To improve this even further, add a small 3x3 roof 1 block above the hole in the main roof. Most of the Ghasts' fireballs will now hit this roof rather than you, meaning that you should be safe against most Ghast attacks.
Since the Beta 1.9 pre-release 3, Ghasts do full 10 hearts damage when a direct hit from a Fireball is taken. Inversely, this means that deflecting a Ghast's fireball against itself will kill it instantly, although the game code states that direct contact with a fireball does 1,000 damage (500 hearts).
Overall, though, an enchanted bow and good skill are the most effective ways to deal with a Ghast. A bow with Power IV can down a Ghast in a single shot, and a player skilled at archery can make a sport of them.
Magma Cube
Magma Cubes drop magma cream, and they are common in the Nether and give the player large amounts of experience, so being able to fight them is a necessity for anyone who explores the Nether a lot, and is a good source of experience and useful potion ingredients. The smaller two kinds of cube are both easily killed with a stone sword or better even in large numbers, as they have low health and a slow attack rate, but big cubes can be deadly. Due to their jumping attack, they are very hard to hit and dodge, and while they have less health than the player at 8 hearts, they have natural armor that negates 48% of damage dealt to them, making their practical health much higher than the player's base. Preferably trap them on a ledge above you and use a hit and run tactic, but if you must fight them in the open, hit them immediately after their jump so you have time to escape the next one. However, you will likely take damage due to their glitched hitbox. Once the big cube is defeated, fighting its smaller counterparts should be much easier. It should be noted that a large Magma Cube is almost impossible to hit with a sword, as its hitbox is glitched in both SMP and in SSP. In this case, one should instead use a bow to fight large Magma Cubes until they are reduced down to a smaller size. However, the glitched hitbox has one known weak spot where you can hit them without them hitting you: the belly, which makes trapping them above you very effective. When fighting one in a flat area, a trapdoor-like technique is often a safe way to kill them while avoiding taking damage. Stand just out of reach of the Magma Cube, and start walking toward them just before they jump. As they jump over you, look up and hit them, but keep on moving. If done properly, the Magma Cube should be knocked over you and you should be safe. If they are knocked sideways or backwards when you hit them, move to avoid them respectively. A sword enchanted with Knockback will also help. Sprint-hitting a cube also gives increased knockback; however it is much more difficult to hit them when moving faster. This technique requires practice, but may be the most reliable way to kill them without a bow.
Blaze
Blazes are rare and spawn from spawners in Nether Fortress. They are essential to get Blaze Rods, which have many uses, such as in making brewing stands. They can occasionally spawn elsewhere in a Nether Fortress, so it is best be prepared, even if you do not plan to go near a spawner. Blazes are one of the most difficult mobs to fight, due to their ranged, unblockable attacks and rapid rate of fire. Their ability to fly usually leaves the player's sword useless, while a player's bow's charging time and move speed leaves the player highly vulnerable to attack. On the other hand, Blazes have a much shorter attack range, which makes it more feasible to snipe them from afar. Blazes can only spawn in light level 11 or lower (at the lower half of their body). Much like Ghasts, the Blaze's ability to fly can make it difficult to recover their loot after killing them. However, a viable tactic of combat is to fight them at close range by reeling them in with a fishing rod first. The use of a potion of fire resistance is extremely helpful when fighting Blazes.
Blaze spawners occur in Nether Fortresses, and will start spawning Blazes once the player gets within 16 blocks. The spawners have a chance of spawning 1-4 Blazes at once. 'Camping' at a Blaze spawner is an effective way to gather Blaze Rods, as they will always appear close enough to attack with a sword, and there is a delay in their attack after they spawn because they have to charge first. This is best done in combination with the fire resistance potion in effect, which makes the player immune to the Blaze's attacks and can be brewed by adding Magma Cream to awkward potions. You can also build a doorway, 2 blocks tall and 1 block wide, where you can camp and kill the blazes as they come down. This strategy is extremely effective if you cover up the roof of the spawner room and camp in the doorway with a diamond sword. But be careful, as the blaze also has a melee attack that damages the player if they get too close.
A Blaze suffers damage from snowballs, and would be damaged by water if there was any in the Nether. Alas, Snow Golems do not survive in the Nether unless immediately provided with a potion of fire resistance or possibly a regeneration potion.
Wither Skeleton
Wither Skeletons are the Nether equivalent of skeletons. They use stone swords and will give you the Wither effect if you are damaged by one. They spawn in Nether Fortresses. If you see one, shoot it with a bow or trap it in a 2 block high space. Wither skeletons are 2 and a half blocks high, but their hitbox is only 2 blocks high; however they will be unable to move. If you are too close and can't place a block in front of it fast enough, use an attack strategy similar to Zombie Pigmen. They will rarely drop Wither Skeleton Skulls used to make the Wither. They can spawn with armor and pumpkins, and can pick up armor and weapons, but they cannot pick up blocks or items.An efficient way of kiling them will be making a wither skeleton farm by filling in fortress intersections.
Neutral mobs
Iron Golem
Iron Golems spawn in NPC villages containing 10 villagers and at least 21 houses (counted as doors). They do massive damage and have high health (100![]() × 50 hitpoints), so it is advised to use a diamond sword to engage it. You can also use cactus to kill it, if you can get the Iron Golem to walk into the cactus either by provoking it or placing the cactus in its path. If you can figure out which area of the village spawns Iron Golems, an iron/poppy farm can be created.
× 50 hitpoints), so it is advised to use a diamond sword to engage it. You can also use cactus to kill it, if you can get the Iron Golem to walk into the cactus either by provoking it or placing the cactus in its path. If you can figure out which area of the village spawns Iron Golems, an iron/poppy farm can be created.
Enderman
Although they are technically neutral, you are sure to end up fighting an Enderman sooner or later, either by unintentionally looking at one or trying to get Ender Pearls.
Despite their somewhat unsettling appearance, Endermen are damaged by fire, lava, water, rain and attacks. An Enderman cannot see you when you have a pumpkin on your head (place in the spot where you would put a helmet). Alternatively, if you see it before it sees you, you can build a 2-block high ceiling, at least 3 by 3. Then look at it to anger it, and quickly retreat under your shelter as it (hopefully) teleports to you. Since endermen are three blocks tall, you can then attack it without fear of reprisal.
Emptying a bucket of water on the ground will hurt the Enderman without it becoming hostile to you, though it will teleport away. All types of swords are effective against one, though wood, stone, and gold swords may not deal enough damage to kill the Enderman before it kills you. Cacti will also damage Endermen, so a wall of cacti also help you against Endermen.
As of the Beta 1.9 pre-release 4, if you use water to kill an Enderman in The End, it will simply just disappear.
Hostile Endermen will teleport away when the player closes in on them to strike. When this happens in a small underground space, the Enderman may teleport into inaccessible caves or to the surface. They will not teleport back to the player unless he/she moves to an area that has enough space for the Enderman to teleport back. On the surface, an Enderman's tendency to teleport away when the player is close enough to attack can be used to keep an attacking Enderman at bay. The player can also change to 3rd person view by pressing F5 and Fn (Mac) to make sure he or she can't be attacked from behind because of the Enderman tendency of teleporting behind them.
When killed, regardless of the method of death, any blocks held by the Enderman disappear. They do not drop or get placed.
Endermen teleport to avoid being hit by arrows and splash potions and teleport to a new location when hit with one. They are no longer damaged by sunlight in this version, and when they touch water they immediately teleport away.
A less exciting but effective way of killing an Enderman is by staring below their torso, preferably attacking the 'feet' of its legs constantly with a sword or an axe. However, due to their tendency to teleport when the player closes in on them, you should either stand still while attacking their legs or move backwards keeping your distance (should multiple Endermen be in pursuit of you). This can also be done by simply punching them (providing this strategy is done correctly) without taking a single point of damage, but could be considered tedious to some.
You can wear a pumpkin as the head armor piece in order to stop Endermen from turning hostile when you look at them. If you hit an Enderman with any kind of sword while doing this, the Enderman will not teleport away from you, allowing you to kill it safely.
Pre Beta 1.9 pre-release Endermen were very easily killed with the use of a bow; however, from beta 1.9 pre-release 2 onwards, when an arrow or splash potion is shot/thrown at them they will instantly teleport away without taking any damage.
However, interestingly, if shot with a bow with a Flame enchantment the Enderman will immediately teleport as per usual but will get set on fire, receiving damage. This can be an effective way of hunting them. But this was fixed at later versions.
The enderman is based on the Slenderman creepypasta.
Tamable mobs
Wolf
Wolves are neutral mobs that will become hostile should you attack them directly. If you accidentally hit a wolf, they and any other wolves nearby will become hostile. They will remain hostile until you die. Try and escape them by tunneling away from them, sealing the entrance (and bring torches so you will be able to see) or combat them with a stone sword or higher while sprinting backwards.
Wolves can be tamed using bones. Once tamed, they will follow you around and attack mobs that you attack via melee or that hit you, except for Creepers. However, wolves will attack skeletons automatically, even if you have not attacked or been attacked by a skeleton. This is true for both tamed and wild wolves. They can be commanded to "stay" or "follow". A wolf can regain health by being fed any meat including raw meat/fish or rotten flesh.
Wolves can also be bred by feeding them meat.
Ocelot
Ocelots are a type of tamable passive mob that spawns in jungle biomes. It is the only mob thus far that can sprint, making it one of the fastest mobs in the game, second only to the Wither. To tame one, hold raw fish and stand still or move slowly until it orients on you. Then slowly move the cursor to its head and right-click the ocelot until it changes color, becoming a cat. The main benefit cats offer is their ability to scare away Creepers. To simply fight an ocelot, be stealthy about your approach and simply attack. Like the wolf, it drops nothing as a reward, not even experience, so killing them is a waste of energy and sword or bow durability.
Ocelots can either be left near your house to keep Creepers away, or bring them with you to keep you safe. They are particularly useful when you lack a bow and arrows, or you are relying on wolves and golems, neither of which attack Creepers. As Creepers are very damaging on Hard mode, ocelots are very useful.
Horse
A horse is a very good use for transportation. They can move faster than you can walk and can jump up to three blocks. To tame a horse, right click on it with an empty hand until hearts appear. When this happens you have tamed the horse. To ride it right click on it and open it's GUI then, drag a saddle into the saddle slot. You can also add armor to protect the horse by dragging armor, found in dungeons or villager chests, into the armor slot.
Utility mobs
Snow Golem
Despite dealing no damage, the Snow Golem's use in combat is not to be underestimated. Defensively, they can either knock enemies away from your base, or lure them into a trap. They are very cheap to make, and offensively, they can distract mobs, making them much easier for you to kill, as after being hit by a snowball, they will ignore the player to attack the Golem. This allows you to make easy kills on most mobs. They also alert you if a mob approaches from behind, as well as slowing it. If you need to retreat, place a Snow Golem or two to occupy incoming mobs, buying you plenty of time to escape or let your health regenerate. Unfortunately, they no longer attack Creepers, so you may want to take a cat with you if possible.
Iron Golem
After Boss Mobs, the Iron Golem is the most powerful mob in the game (he has 100![]() × 50 hitpoints), and can kill most mobs in one or two hits. However, it is also extremely expensive to build, requiring 36 iron ingots, and apart from creating it, the player has no control over it. It also takes longer to build than a Snow Golem, making it less useful as a last resort. In general, it's a better idea to use wolves instead, as they are much easier to acquire. However, an Iron Golem has the advantage that it can attack where you are far away or inattentive, making them useful in mob traps and base defending. It may also be useful when you are in the Nether and fighting a Blaze and Wither Skeleton.
× 50 hitpoints), and can kill most mobs in one or two hits. However, it is also extremely expensive to build, requiring 36 iron ingots, and apart from creating it, the player has no control over it. It also takes longer to build than a Snow Golem, making it less useful as a last resort. In general, it's a better idea to use wolves instead, as they are much easier to acquire. However, an Iron Golem has the advantage that it can attack where you are far away or inattentive, making them useful in mob traps and base defending. It may also be useful when you are in the Nether and fighting a Blaze and Wither Skeleton.
Passive mobs
Most passive mobs are easy to kill, as they do not fight back. However, as they will run when they take damage from any source, this can often be a nuisance. Flint and steel or fire-enchanted weapons can also be used to make the animal drop the cooked version of its meat (although it will run away, it will probably die from the burning). The classic "farm animals" can be drawn toward you by holding wheat, seeds, or carrots for their respective mobs.
Avoid attacking a passive mob without a tool or weapon. This will not only lead to frustration, but also wastes daylight due to the time taken, although it could save the amount of uses on your tool. Two successive strikes from a diamond, stone or iron sword will finish them off easily. For a one hit kill, critical hit them with a stone sword or better so they won't run away. Note that baby animals generally don't drop anything, including experience.
Chickens
Chickens can be quite difficult to hit because of their small hitbox, but they have the least health (4![]()
![]() HP). A single strike from any sword or from most tools will finish them off. They drop 1 raw chicken and 0-2 feathers.
HP). A single strike from any sword or from most tools will finish them off. They drop 1 raw chicken and 0-2 feathers.
Cows
Cows drop 1-3 raw beef and 0-2 leather, and have 10![]()
![]()
![]()
![]()
![]() HP. Mooshrooms drop the same as cows, with the exception of when it is being sheared, it drops at most 5 red mushrooms. Either can also be milked. If you have a bowl, "milk" the mooshrooms to get some mushroom soup. Cows can be milked with a bucket to get a bucket of milk.
HP. Mooshrooms drop the same as cows, with the exception of when it is being sheared, it drops at most 5 red mushrooms. Either can also be milked. If you have a bowl, "milk" the mooshrooms to get some mushroom soup. Cows can be milked with a bucket to get a bucket of milk.
Pigs
Pigs only drop raw porkchops. They have 10![]()
![]()
![]()
![]()
![]() HP. As of version 1.3, they will drop 1-3 pieces of meat, where before they dropped 0-2.
HP. As of version 1.3, they will drop 1-3 pieces of meat, where before they dropped 0-2.
You can also ride pigs by right-clicking a saddle on them, which are found in dungeon chests. After the saddle is put on the pig it can be right-clicked to ride. Before the 1.4 update, saddled pigs could not be controlled, so they would go in any direction they wanted to. This could only be useful in multiplayer by having one person ride the pig and the other holding wheat (now carrots) but even this is not practical unless the rider is AFK. Now, you can use the Carrot on a Stick to move the pig wherever you want it to go by holding it while riding and boost it by right-clicking it, providing effective mounts.
Sheep
Sheep have 8![]()
![]()
![]()
![]() HP (until 1.9 pre-release 3, they had 10 HP like cows and pigs). They drop one block of wool and raw mutton when killed (Since much more wool can be obtained by shearing, and the wool will regenerate as of version 1.1, it is advisable to use shears on sheep if the player's goal is to obtain wool).
HP (until 1.9 pre-release 3, they had 10 HP like cows and pigs). They drop one block of wool and raw mutton when killed (Since much more wool can be obtained by shearing, and the wool will regenerate as of version 1.1, it is advisable to use shears on sheep if the player's goal is to obtain wool).
Villager
Villagers are NPC mobs that spawn in villages. They have 20![]() × 10 HP and are easy to kill, although they drop nothing when killed. Villagers will not run away when attacked, but Iron Golems will turn hostile to the player, and this will also mean that you won't have any villagers to trade with, so don't kill villagers. If you accidentally hit one, use a splash potion of healing/regeneration to heal him, or trade with him in large quantities, because each trade has 20% chance to let a villager gain regeneration II for 10 seconds, healing him 8
× 10 HP and are easy to kill, although they drop nothing when killed. Villagers will not run away when attacked, but Iron Golems will turn hostile to the player, and this will also mean that you won't have any villagers to trade with, so don't kill villagers. If you accidentally hit one, use a splash potion of healing/regeneration to heal him, or trade with him in large quantities, because each trade has 20% chance to let a villager gain regeneration II for 10 seconds, healing him 8![]()
![]()
![]()
![]() .
.
Bat
Bats are passive mobs that spawn in any 1x1x1 space with a light level of 10 or less. They have 6![]()
![]()
![]() HP of health and drop nothing when killed. Bats have the second smallest hitbox (the first being baby chickens), so it is difficult for an un-skilled player to defeat them. As of 1.4.2 they will spawn anywhere in superflat.
HP of health and drop nothing when killed. Bats have the second smallest hitbox (the first being baby chickens), so it is difficult for an un-skilled player to defeat them. As of 1.4.2 they will spawn anywhere in superflat.
Other Players
All other players have 20![]() × 10 HP. If you are engaged in a duel, be sure to be prepared with armor and weapons as your opponent will make quick work of you if you are unprepared. It will be great if you could get some help. Engaging other players may possibly be the most challenging fights in Minecraft, depending on you and the other's skill. Observe battle tactics and use them to your advantage. Use splash potions and flint-and-steel if allowed. When the opponent attempts to spam you with sword hits, block at first, then backpedal and fire several arrows. Then sprint/critical hit them to finish them off. A failsafe is to drop an anvil on them from 24 blocks high, which will kill them.
× 10 HP. If you are engaged in a duel, be sure to be prepared with armor and weapons as your opponent will make quick work of you if you are unprepared. It will be great if you could get some help. Engaging other players may possibly be the most challenging fights in Minecraft, depending on you and the other's skill. Observe battle tactics and use them to your advantage. Use splash potions and flint-and-steel if allowed. When the opponent attempts to spam you with sword hits, block at first, then backpedal and fire several arrows. Then sprint/critical hit them to finish them off. A failsafe is to drop an anvil on them from 24 blocks high, which will kill them.
The Equipment
Cobwebs
Cobwebs can be used to greatly impair enemy movement and makes the helpless target a very easy one. You can acquire cobwebs from abandoned mineshafts. If you are running away or an enemy is approaching you place cobwebs in his/her path. Even if they don't run into it they will still have to waste precious time going around.
Sword
- Style: Offensive, direct
- Range: Melee
- Damage: Varies with material
The primary weapon which is the most versatile, effective and cheapest to use. A sword's damage varies on material and a rule of thumb is the rarer the material, the stronger the sword (with the exception of gold). A sword deals far more damage than by hand, and will greatly increase a player's chance of survival upon being faced with hostile mobs. Even the wooden sword, the lowest tier of sword, deals four times as much damage as the fist (and each further increase in material increases the damage of the sword by half a heart). The sword is the only tool that has the ability to block, which reduces melee and ranged damage dealt by mobs by half. A sword, like many of the weapons mentioned here, has a limited amount of uses, and disappears when its uses reach zero. Again, the higher tier the sword is, the more uses it has, and each tier approximately doubles the uses that a sword possesses, apart from the diamond, which has more than 5 times the number of uses as iron. Enchanting your sword can also greatly increase its power.
Tools
- Style: Offensive, direct
- Range: Melee
- Damage: Varies with type and material
When a player is out performing tasks in the world, they may forget to bring a sword or set a sword onto the hotbar. Tools that have a shaft (more specifically, the Shovel, Pickaxe and Axe) can be used to deal mediocre damage when a sword cannot be drawn. The same rules apply to a tool that apply to the sword, except the tool cannot be used to block. Players should note that the wooden and golden shovels deal no more damage than the fist, and therefore the player should avoid using these in combat to prevent consuming their uses. The Axe deals half a heart more than a Pickaxe of the same material, and the Pickaxe deals half a heart more than the Shovel by the same criteria. Again, each tier of tool deals half a heart more than the previous tier (for example, a Diamond Axe deals the same damage as an Iron Sword, and a Diamond Pickaxe deals the same damage as a Stone Sword). When used as a weapon, tools will also incur double durability damage. As a result of this, it would behoove the player to only use tools as a last resort, i.e., if their sword breaks mid-battle.
Bow
Style: Offensive, direct
Range: Ranged
Damage: no charge: .5, med. charge: 3, high charge: 4.5 - 5
The bow is the longest, easiest to use, and most widely employed ranged weapon in the game. However, it requires arrows as ammunition. As of 1.1, Bows can also be enchanted, which greatly enhances their usefulness. Enchantments include making all arrows fired from the bow be lit and cause fire damage on impact, similar to the sword's Fire Aspect enchant, and Infinite Arrows, for those who have trouble making enough ammunition, or have bad aim. There is also a Power enchantment that increases the damage done by your arrows,along with Punch,which behaves just like the Sword's knockback enchantment.
Bucket
Style: Varies with contents
Range: Varies with contents
Damage: Varies with contents
The bucket can be filled with either Water,Lava,or Milk to become arguably one of the most powerful weapons in the game. It also does not have a use limit, and therefore can be used infinite times. A bucket is primarily used as a defensive weapon against approaching mobs, as the player must place the contents of it between the mob and themselves for it to be effective. A bucket can also be filled with milk which removes all potion effects.
Water bucket
Style: Defensive, hindering
Range: 7 from source
Damage: None (Except for Endermen and Blaze)
A water bucket can be used to reduce approaching mob speed, leaving them highly vulnerable to arrow fire and sword damage. Combining this with height, a player can hold off hordes of mobs with little effort. A water bucket provides advantages over the lava bucket in the fact that it is safe to use, is easily removable, and also doubles as a fire extinguisher should the player be set alight. However, it cannot be used in the nether. Also, by using traps it is possible to drown an opponent. For drowning players it is best to encase the trap in obsidian. It also helps that blocks are harder to break underwater.
A water bucket also has the added benefit of being a guaranteed protection from Endermen, provided the player is standing in the water.
Lava bucket
Style: Contact, flame, lasting
Range: 3 from source
Damage: Contact (Except for all Nether mobs)
A lava bucket can be used to cause immense amounts of damage to multiple mobs. It will provide light and will greatly slow mob movement, even more so than water. A player can dump it on the ground for quick use, however this will prove difficult for cleanup and the player may end up burning themselves or trapping their escape. A strategic player can quickly dig a 7x1 trench and fill the middle block with lava to hinder mob advances, inflicting enough damage on them to allow for an easy kill. However, this method is ineffective against spiders unless the trench was 7x2. However due to current Mob AI updates, the aforementioned method is no longer applicable as most enemy mobs will navigate around the trench. It is suggested swords and bows are used in accordance to knock the hostile Mobs into the trenches. Lava buckets are almost completely ineffective against all Nether mobs — their only use is to slow down land based mobs such as the Zombie Pigman or the Magma Cube in the same way that a Water Bucket is used. Also, the player should note that lava destroys any drops that the mobs would otherwise give, so lava should only be used for an outright kill.
Furthermore, with the bow enchantment update which gives flaming arrows the ability to do burn damage, the lava bucket can be used to place a block of lava and fire arrows through it. The best method is to create a two block high stack of cheap blocks (wool or wood is recommended), which you place the block of lava upon at the top, thereafter you remove the two blocks under the lava source block creating a lava wall/pile of sorts. You can now shoot arrows through the wall against enemies which will set them alight. This method is slow, and suited for long range combat, but is useful for players who do not have access to an enchantment table. This method is also able to ignite enemy TNT at a distance when not equipped with a flame bow.
Pros
- Infinite uses, no durability.
- Large area of effect, depending on terrain.
- Slows down the mobs.
- Also acts as lighting.
- Can be used as a trap.
- Fast, almost certain kill.
- Can help players keep a distance from hostile mobs.
- It won't make Endermen hostile (unless you look directly at them).
- Use in accordance with a bow or power bow for devastating long range attack.
Cons
- Just as dangerous to the player, usually deadly if water is not near. To avoid this downside drink a potion of fire resistance.
- Takes long time to flow.
- Usually destroys the loot.
- Can take a long time to disappear, potentially blocking your escape route.
- Does not yield Experience.
- Since Nether Mobs are fire-resistant, lava will not harm them.
TNT
| Style | Offensive, Explosive |
| Range | ~10 blocks in diameter |
| Damage | Up to 15 hearts to all enemies in range |
As an explosive, TNT is an incredibly powerful weapon, doing damage to many enemies at once and making the area difficult to navigate for future mobs. Because TNT can be activated with Redstone, either directly or through a Dispensed Fire Charge, it is most effective as a trap, allowing you to dispatch an enemy indirectly. But because TNT does just as much damage to you, it is ineffective as a weapon in direct combat unless you can get away from the primed TNT faster than your foes can. In addition, TNT is expensive to make and nonrenewable, so using an alternative explosive method in this situation, such as a primed or lit Creeper or a Bed while in The Nether, is preferred.
Flint & steel (Held Fire charge)
Style: Contact, Lasting
Range: Damage on contact
Damage: ½ heart per second, while lit
Flint and steel is a unique weapon, as you can set a block of fire, and while it burns, any contact with it sets a mob on fire, doing damage over time. This can be very useful when being chased by multiple mobs, as it will weaken all or most of them down to the point where a sword hit or two will be enough to kill them. However, there are several downsides to this method. First of all, mobs may elude the fire by pure luck, requiring another light. Second of all, if you are in a confined space, circling to avoid mobs, you could light yourself on fire accidentally. Lastly, it can take a long time for the mob to die, enough time for more mobs to join the party! A fast player could make a short 1-block netherrack wall and light the top. Mobs would have to jump and they would take damage instantly/over time. Particularly effective with a sword with the knockback enchantment.
Sand or Gravel
Style: Ambush, Lasting
Range: Unlimited
Damage: From suffocating
Sand or Gravel aren't weapons in true sense, but they can be used to kill mobs. Best use is in caves — when you're on a high place and you have a mob directly below, you can place that block on a wall near where you're standing; the block will fall, and with right aim, it will fall on the mob, and thus suffocate it. However, killing with this weapon doesn't yield any experience, but that block will make the mob stuck, and you can finish him with the sword.
Cactus
Style: Offensive, Trap
Range: 1 block
Damage: Contact (0.5 heart)
Cacti can be used to make effective traps against mobs. When in contact with the block, any mob (including the player) will lose mid heart (0,5) life. Those are effective against Creeper, however due to the new 1.2 update they might avoid it. But if you want make a trap, you can place three cacti plants, two blocks high, in a V format. You might want to lure them nearby (around 10 blocks far from the trap) and hide in the opposite side, where they will try pursue you but will not be able to reach.
Snowballs
Style: Assistive, Hindering
Range: Ranged, up to approx. 50 blocks depending on aim.
Damage: 0 (Except for blazes and the enderdragon)
Snowballs may seem a useless weapon at first, as they deal no damage against mobs other than the blaze and the enderdragon. They have their use however because of their two important traits. Firstly, they push a mob backwards just as any hit does even despite the lack of damage. Secondly, unlike arrows snowballs can be fired as quickly as the player can right-click. This allows them to be used to keep even large amounts of approaching mobs at bay with relative ease, or to quickly interrupt a mob's attack when necessary. This speed combined with the fact that snow is abundant in certain biomes, renewable and easily gathered make it a cheaply obtained and useful long or short-range option, even after a bow has been located. Armor also takes damage from Snowballs, making it much easier to disarm a Juggernaut.
Dispensers
Style: Offensive/Defensive/Trap
Range: 10 - 30 blocks
Damage: Varied
They fire automatically when triggered by redstone. You need to put in what you want them to shoot, such as arrows, Snowball and eggs or splash potions.
Arrows: You can use those to damage mobs or use them as trap. Simply right-click the dispenser, and deposit your arrows inside the nine grid squares. The quantity of arrows inside is the number of times it'll shoot them. You can put up to nine stacks of arrows, making a powerful dispenser. Arrow dispensers will damage the target with arrow damage.
Snowballs/Eggs: Can be used to knockback mobs, for defense or offense (where the mobs will be knocked towards is a hole). Snowballs will do nothing but throw them back (but will damage Blazes), but Eggs may spawn Chicks. If you're in a tundra biome, those surely will be the easier to make, as you can take snowballs.
Fire charge: The Fire charge is a dangerous weapon that can light mobs from a distance. Try to use the Fire charge in deserts more often than forests, taigas, and jungles, unless it is raining. Usage in forests, taigas and jungles can create forest fires, which can kill large amounts of mobs but can short out your wood supply.
Splash Potion: (If you want know the different types of potions, look at Potions) You can damage, heal, and poison your target. Those can be effective when using instant damage, where can deal a good amount of damage, however due to difficulty to make potions it's likely this will not be worth (if you can use the Arrow Dispenser). Make sure you know your potions! Using a potion of instant damage or poison on Undead (Zombie, Skeleton, Zombie pigman) will heal them, so use splash potions of instant healing or regeneration on them.
Dispense Water: Dispensing water on your target or near your target is not very efficient: it is much simpler to get close and place the water yourself. Dispense water only when your target is far away from where you are standing, yet you want to slow them down.
Dispense Lava: Dispensing lava to attack your foes is slightly more efficient than placing it. Thinking strategically, you can dispense the lava whilst far away from it, meaning that you are much safer from the threat it possesses. The Dispenser can also vacuum up the lava, meaning that you do not need to take the Lava by hand, and in the process, making Lava Dispensers much safer than placing lava by hand.
Splash potion
Style: Offensive, Hindering, Lasting(Varies)
Range: Varied
Damage: Varied
Splash potions can be a lot of help to hinder your foe or dealing damage, but use them sparingly! Remember that there is a big difference between throwing a splash potion of damage at one mob than at a group of mobs. Another good strategy is to know your potions. Splash potions of Healing or Regeneration can let you get closer to Zombies or Zombie Pigmen and receive the Healing/Regeneration boost while damaging your target. Splash potions that have increased time make for hit and run tactics, a good strategy if you are low on health. If you are being chased by a group of hostile mobs and you have a splash potion of Instant damage, remember that you still take damage from splash potions. Use the knockback from the potion to take shortcuts or get over walls two blocks high.
Fishing rod
Style: Assistive
Damage: none
Fishing rods are not a weapon, but useful nonetheless. Their ability to grab and draw in mobs is useful to keep passive mobs from running away when hit, or to draw hostile mobs into traps or hazards. To maximize effectiveness for combat, keep a sword in the item slot next to the fishing rod, so that drawing in an enemy, then striking them with a sword becomes faster.
Anvil
Anvils deal as much damage when falling on an entity as that entity would take with no armor or potion effects falling from the same height. This means to kill a player, Zombie, Spider, Skeleton, Creeper, Zombie Pigman, or Horses with 20 health, it has to fall 24 blocks. This will damage the anvil.
Fighting styles
Melee Combat
Requirements: diamond sword with sharpness enchantment, armor (preferably diamond) with protection enchantment, a few splash potions of regeneration/instant health II, cooked steak or porkchops
Pre-combat:
Be sure not to consume any of the following items before battle.
-melons
-rotten flesh
-any uncooked foods
-cookies
-apples
-carrots
These items have a very low effective quality and will make your hunger go down very quickly, especially while in combat. In combat, you will be sprinting, jumping, attacking, and taking damage. These all effect your hunger saturation, or the amount of time each hunger point will last, so you are going to want as much saturation as possible. The following foods are the best choice for pre-combat preparation and are recommended to have while in combat.
-golden apple
-cooked steak
-cooked porkchops
-golden carrots
-cake (unless you can't place blocks due to plugins)
All of these foods, except for cake, have an effective quality score above 20. Cake, with a score of 14.4, is useful because you can place and eat it without being forced into the speed of crouching. If you are on a server with plugins that keep you from placing blocks in certain areas, then cake might not be the best choice. Always be sure to keep your sword as set as your most easily accessible item in your hot bar, depending on how your controls are set up. If you are using the default controls, it is recommended that you set your sword as the leftmost item on your hot bar. Also, be sure to keep other important items such as food or potions to the left of your hot bar.
Engaging in combat:
When engaging your opponent, sprint jump towards them with your sword equipped and start your swing as you approach your opponent. Try to be in mid air when you attack to get a critical hit, which will increase the amount of damage you deal. If successful, it will leave a star-like particle effect. If you make contact, your opponent will be knocked back.
If you are the one that gets hit, and the damage is too much for you to re-engage combat, the best option is to use a splash potion. Don't immediately use the potion, because you might also heal your opponent. Instead, run out of your opponents range, and, while running, look down briefly and throw the potion. If it is an instant health potion, turn around and surprise your opponent with a quick attack. If it is a regeneration potion, wait for your health to regenerate to full and turn around and lay as many hits on them as you can, blocking between hits. The regeneration effect will be a huge advantage, allowing you to attack without fear of losing health too quickly.
If you are at a distance from your opponent and your opponent attacks with a bow, start to move towards them, sprint jumping and moving from side to side. If possible, block with your sword to protect against incoming arrows. Blocking with your sword will make you only take half the damage you would have taken.
Tips:
-When attacking with multiple hits at once, only attack when your opponent is not under the "red" damage effect. Your sword will take damage, but your opponent will not. Instead, block with your sword to protect against attacks until your opponent can be damaged again.
-Eating food, besides cake, can be tricky because of being forced into crouching speed. When being attacked with arrows, watch your opponent to see when they fire an arrow. As soon as the arrow is in the air, move some distance away from your current location, eat, and move out of the way quickly.
-Know when you are beaten. If you're in protection I iron armor with a sharpness III diamond sword, and your opponent is in protection IV diamond armor with a sharpness V diamond sword, then you are highly unlikely to win the fight.
Fire Spirit Throw
Required Items:
- Invisibility Potion
- Ender Pearls
- Knockback Sword (II is recommended)
- Lava Bucket
Steps:
- Step 1. Go Invisible.
- Step 2. Place the lava down in front of the enemy, but keep it around 5-15 blocks away depending on your knockback.
- Step 3. Throw an Ender Pearl behind the enemy.
- Step 4. Smack them from behind, pushing them into the lava.
Pros: Quick, and very effective on zombies.
Cons: Expensive requirements, won't work on endermen, you take damage from the ender pearl, unworthy use for invisibility, you might land in the lava.
Finn Fu
Required: sword, bow(or other convenient ranged weapon), TNT, and a flint & steel.
- Step 1: From a range of 50-25 blocks open up with your bow
- Step 2: At 25 blocks use the F&S to make a "firewall"
- Step 3: Set down the TNT, light it and kite your foe into the blast radius(being careful not to blow yourself up!)
- Step 4:By now they should be dead!
Pros: Effective use of all weapons Cons: Expensive, not very useful if you want to kill creepers to get TNT, high risk of death, possibility to blow up drops (assuming you kill the mob prior to the explosion), it will create a crater. (Feel free to add any cons you can find!)
The Sato technique
- Place wooden planks all around an area, then mine two blocks down and place 1 TNT, place back the wood and place a wooden pressure plate above it.
- Shoot them once with a bow in the open to get their attention
- Then run forward and hit them with a sword 2-3 times.
- Then run back and lure them to the trap you have set.
- If they don't die finish it with your bow
Pros: Inflicts high damage, surprising. Cons: Doesn't work on endermen or flying mobs.
Battle archery
- The player uses a Bow often, sometimes even in close combat, since a fully charged arrow is stronger than an unenchanted diamond sword. Note that a sword can hit much faster, however, and deals more damage per second.
- It is good to bring a sword anyway, especially if the foe is carrying an iron sword or better, as they deal significantly more damage over time.
- Punch and Knockback enchantments are especially useful, as the Knockback from such weapons increases the players chances of escape. This can backfire in PvP, allowing the player being knocked back to escape after being hit only once.
Hunger Circle
- You will need a lot of food for this technique. You will want to eat before attacking each enemy.
- Try to get as close to the enemy as you can without them noticing you, then once close enough, sprint toward them, but slightly to one side.
- If they flee, sprint-jump (sprinting while holding down the space bar) to stay as close to them as you can continuously hitting them. If they pull ahead of you enough to be out of reach of your sword, continue on. Remember, you just ate, so your hunger will last longer than theirs.
- If they stay and fight, circle around them, hitting them continuously. Once they have lost 1.5 hunger points, they will no longer be able to regenerate health, and you will most likely win.
Sniping
- Hides in a high or concealed spot and strikes foes with a bow from considerable distances.
- Not as effective in Multiplayer as it is in Singleplayer - critical arrows leave behind a trail, and make the sniper easier to track, while shots that are uncharged cannot deal as much damage and will not hit far targets.
- Works wonders against Creepers, Zombies, Silverfish, or any mob that can only deal damage at close range.
- Recommended for experts with the bow, and if the battlefield has good hiding spots or high up places.
- Very vulnerable to surprise attacks — the sniper is often focusing more on far targets rather than close ones. To mitigate this, make sure your sniper's nest is secure from all sides, including below.
- It can be easy to counter-snipe you. Use multiple sniping windows and crouch while not aiming.
Circle strafing
- Circle strafe around your target to avoid damage.
- Can only be done if you are using a Bow - Using a sword means you will be within attacking range of the foes blade, and making this technique less useful.
- Because the only handheld ranged weapons are bows, circle strafing lets you dodge the arrows if the target is aiming directly at you when firing.
Knockback striking
- Put Knockback enchantments on all your weapons.(unless you have a weaker enemy that could use the knockback enchantment to their advantage and get away with the extra distance)
- If your foe does not have any ability to strike you at range (Foes that can strike you at range are Skeletons, Ghasts, Blazes, and other players with the bow) then knocking them back a considerable distance should greatly reduce damage taken by that foe.
- It is advisable to sprint while hitting a mob as this will knock it back even more.
Enderpearl striking
- Take a bow and at least a stack of enderpearls (it's also a good idea to have feather falling boots, as you will be using a lot of enderpearls).
- Hit an enemy to gain their attention.
- As they charge at you, use an enderpearl to teleport away from them (preferably to a high place where they can't reach you).
- From there you can simply shoot them with your bow until they give up and run away or try to get to you. If they run away you can use your enderpearls to teleport to them and harass them until they die, or if they try to get you, you can just teleport away and keep shooting them.
- If your opponent gets to you and is about to kill you, simply teleport away and run, he/she most likely won't be able to catch up to you.
Berserker Method
Be prepared with:
- A Diamond Sword with a sharpness level better than two
- Any tier of armor (even gold should do)
- Potions of Strength or Speed (Optional)
What to do:
- Run up to your target, while jumping.
- Keep smashing it with your sword, strafing or amplifying your attacks.
It is quite simple!
Philosophy and Notes: This comes from the saying "The best defense is a good offense." Basically, you are supposed to deal a lot of damage to your target, The more damage you do to the target, the faster you can kill it. The faster you can kill it, the less time it has to deal damage to you, making armor unnecessary. Also, if fighting a horde of hostile mobs, try not to advance toward the horde, as you can get surrounded by them and thus dooming you. This can kill an experienced player with full diamond armor.
Pros:
- Not too costly, as armor is more expensive to craft than a sword.
- Can be modified with potions or better armor.
- Good for mob hunting.
Cons:
- Not too good for player hunting.
- You need an enchantment table and experience levels. The former is somewhat expensive.
Clear the way
- This fighting technique is efficient with Six or more people.
- You need the following-a full set of Diamond Armor with Protection enchanted on all the pieces, multiple bows and an Enchanted Bow (Preferably with Punch or Power), an Enchanted Sword (preferably with Knockback and Sharpness), Splash potions of Fire resistance Extended, Strength II, Regeneration II and lots of Splash potions of Harming II and Weakness II.
- First, Team one ambushes the large group of enemies, using the Splash Potions of Harming to clear a path, and the Splash potions of Weakness II to reduce damage taken. Next, Team two charges into the path made by Team one, One player with the Diamond armor, Enchanted Sword and Bow, While another throwing Potions of Fire resistance Extended, Strength II, and Regeneration II at the player with the Diamond armor. Meanwhile, Team three fires arrows and Splash potions into the fray, weakening the already weak group of enemies even further.
- This technique is relatively costly, but can cut through large groups of enemies considerably.
"Flaming" sword
- Bring a Flint and Steel and a sword (preferably iron or diamond) and a full set of armor.
- Approach the mob and set fire to the area around it, causing him to burn. To speed up the process, attack with your sword. If melee is not your style, then use a bow (advantage being that not as many arrows are needed). This is very effective while being attacked by large groups.
- If the mob is near the fire, then while it is burning, put the fire out, therefore not burning the loot.
The Invisible Man
- Required to use: potions of invisibility, no armor,Sharpness 3 diamond sword or better, bow(optional).
This method is rather self-explanatory. You use potion to go invisible, and slaughter any nearby mobs while your stealth lasts. Only draw the weapon immediately before attacking then put it away at once so that your stealth isn't compromised. When the invisibility runs out drink another potion and run in circles to make the enemy lost your trail.
- Pros: you probably won't take a single hit if you do it right, easy get away.
- Cons: expensive, no armor, when potion effects wear off you are left entirely visible and vulnerable.
The Villager Way
Use villagers to kill zombies! Isn't that fun? You still get experience and tons of items from villagers. All you need to do is lure a zombie villager to a place, cure him (use a splash potion of weakness, feed him a golden apple, then wait), and then trap him in a glass dome. (Make sure the roof has a trapdoor so you can trade with him.) Surround the area with lava. The zombies will try to turn the villager into a zombie villager, but they won't be able to.
To collect the loot, make the top some block and make lava flowing down. Keep an open trapdoor there so that the zombie's head is stuck inside. When the zombie runs to the villager, he will die, giving you his loot. Punch the zombie at least 5 times to get experience (sometimes this does not work).
Another way to get experience and loot is to make several villager cages, and build dispensers firing arrows activated pressure plates. Once the zombie gets shot by 10 arrows, use a fishing rod to raise it up to your floating platform (a house is OK, too but a floating platform is best), and finish it off with your fist or a sword.
Don't let a horde get too big though. You will be swarmed and killed.
From the Shadows
- You will need a good sword for this, no enchantments are needed ( sharpness and fire aspect are most helpful for this method). You might want some armor but it's not required ( feather falling boots are good). A regeneration potion is also helpful but not needed.*
First, find a good hiding spot; not on the ground and away from sight. Drink a regeneration potion if you want. When your target comes, jump down to them and start swinging your sword. You will take some fall damage but you should finish the quickly enough to not take a lot of damage. It they aren't down by 3 hits, circle around them. Then, you can jump in and out, dodging and hitting. Now, you took down your target.
Trololol Man
Required: Troll skin, enchanted golden apples, invisibility potions, splash potions of harming/poison, sword, armor
Say insults to a person in chat (Or /msg them). They will challenge you to a PVP fight or just attack you. Use your OP stuff to troll your enemy until you kill them.
Frosty the Snowman
Required: Snowballs, armor, and a knockback sword
- You should be near either a 24+ block drop or lava for this.
Use snowballs and your sword to knock your enemy off a cliff, into a ravine, or into lava. If you want, you can do this in the nether except instead anger nearby Zombie Pigmen with your snowballs.
Finn-The-Almighty-Style
Required: Bow, Snowballs, Sword.
Clear out a 3x3 area. Place two dirt block in the middle on top of each other. Build up 3, and mine the 2 second to top and the third to top blocks, so that there are 3 blocks, two floating, and one on the ground. Stand underneath the floating one(on top of the other one) and build a plus sign around eye level, which uses four blocks. You are now stationary. Wait till night,and mobs will crowd around you. They will not be able to hit you, and you can wreak havoc on them without being knocked off.
- Note: This does not prevent attacks from Enderman. To do that, build one additional block to stand on.
Haunted House
You will need: Sneaking skills, Invisibility (Extended) and Speed potions, Ender Pearls, a decent Sword, (Iron or Diamond should do, strong swords recommended.) and a target with a house.
Steps:
- Find a target (any target without Juggernaut equipment will do) from a tall place.
- Drink your Invisibility potion.
- Use your Ender Pearls to teleport down to him.
- Stalk them back to their house while sneaking. If you are running low on invisibility, use Ender Pearls to teleport away, drink your Invisibility potion, teleport back to him, and resume chase.
- Once he gets to his house, find the bedroom and break their bed. Make sure to break it with your fists, and make sure not to have the bed in your hand when you pick it up if you decide to.
- Once your target is vulnerable, pull out your sword and murder them.
- Find their Storage Hold and get all their loots.
- Break a window.
- Use the Ender Pearls to teleport out of their house.
- You are safe. Get the heck out of there and run to avoid getting caught.
- You are Finished!
- Pros: Good chest loot, your target would be pretty freaked out, your target has no idea who did it.
- Cons: Expensive, somewhat time-consuming, not 100% guaranteed to work as the bubbly effect may give you away, obviously doesn't work in single player.
Spider Masher
Make a tall pillar, tall enough to kill a mob with fall damage. Make a ledge around the pillar. While standing on top of said pillar, throw snowballs at spiders to make them climb up the pillar to try and kill you. Any spiders will fall off and die, and provide you with free drops. Pros: Hilarious, somewhat safe Cons: fall damage when dismounting to pillars, cannot be done until the player has found snow, some drops might despawn before day.
Ninjitsu Style
Required: Good sword, invisibility potion, fire charges
Cheaper Method: Sword, black-dyed leather armor, flint and steel
Optional: Ninja-themed, all black skin, feather falling black-dyed leather boots, bow, flaming sword
To use the Ninjitsu technique, equip your sword, put fire charges next to it, and drink an invisibility potion. When an unsuspecting mob/player passes by, ring them with fire charges and chop them apart. Do not hold ANYTHING until a target shows, and put it away immediately after they are terminated. Once the invisibility runs out, get your butt home ASAP and make more invisibility potions.
To use the cheaper Ninjitsu method, equip your black leather armor. Hide in the shadows, in a ditch, or in/on a tree. When your opponent passes by, if it's a mob then just hit them. The cheap method works better with players. If it's a player, light fire in their path and chop them up. Make sure it's night! Try hooking up an ambush station by going up in a tree, putting a trapdoor under you, and using fancy graphics to see the enemy (Note that if your enemy has fancy graphics as well, you have a chance of being spotted(although not many people check trees)so hiding in a tree is not 100% reliable). Open the trapdoor while standing on it to fall out of the tree and bash your foes. Make sure you sneak while in the tree.
To make use of the optional stuff, then use the ninja skin to hide if your potion runs out. The bow can be used to take out people without getting up close and personal. The feather falling boots can be used to jump off cliffs to ambush people.
The Ninjitsu method is based upon the arts of the ninja. It makes use of suddenly freaking the opponent out and possibly burning them, and during the confusion, annihilate them before they can figure out what's going on.
Home Advantage
Requirements:Previously set up traps;Bait;Good Boots(optional)
As the name suggests you use the terrain to your advantage. It is highly recommended that traps are set specifically for the purpose.
Execution: The player is lured to lower grounds when chasing a player with the "bait" afterwards falls in the trap: mines, holes, anvils, etc.
Water Pitfall
Note: This technique is useless against Endermen and Witches and not recommended to kill mobs larger than 1 block wide or long, such as Spiders or animals other than Chickens.
Materials: a hole, a Water Bucket, and two blocks that aren't sand or gravel
Setup: Dig a pit deep enough to house the mob you want to kill PLUS ONE BLOCK, as insurance. The hole actually can be as deep as you want, but don't dig it too deep, as you will have to enter it yourself later. Then place one of the two blocks next to the hole.
Wait for the mob you want to kill to spawn. Then herd it into the pit by your preferred method. If the mob doesn't have pathfinding, it's all the easier for you. Pour your Water Bucket into your hole. Then, BEFORE the mob can float to the surface, place your other block on top of the hole, but not into it, i.e. adjacent to the block next the hole that you placed earlier. This prevents the mob's head from breaking the water's surface, while not getting rid of the water source. If you mess up, the mob's still trapped anyway.
Wait for the mob to drown. Then just open up the hole, dive in to collect the drops, then remove the water with your now empty bucket to reset the trap.
Variation on the Water Pitfall: Simple Water Pitfall
Did you just start playing the game? Survived your first night? Don't have a bucket? Then just build the simple version!
Supplies: A natural water source (like a lake), a hole, and two blocks that aren't Sand or Gravel
Setup: Dig a pit as instructed previously, located next to a water source, with one block separating the pit and the water. Then place one of your two blocks as instructed, but DO NOT put it between the pit and water!
Wait for whatever mob you want to kill to show up, and herd it into the pit by however you like. Then, break the block between the pit and water, which will allow the water to flow over the mob. Then put the block over the pit without cutting off the water. Don't worry about the one block space unless you're trying to drown a Chicken, which makes no sense since Chickens are incredibly easy to kill.
Pros: Easy to set up, and works wonders on Creepers! Just don't get too close to the trap. Also skeletons can not shoot you
Cons: No experience or rare drops, useless in the Nether, and impractical for killing more than one mob at a time. Plus you have to find a water source, which is not easy if you spawn in, say, a desert.
See any benefits or flaws that I missed? Add them yourself!
Creeper Taunting
Note: This is a dangerous technique and may not work on skeletons if mob-to-mob interactions are on since skeletons attack creepers. Flying mobs or high health mobs may need multiple uses of this. Ocelots cannot be around. Don't do this if you're fighting in your house.
Requirements: You'll need armor on to resist damage. You'll need to know the landscape. You'll need to move fast. You need an area that doesn't experience thunderstorms. You need to be able to find creepers. Finally, you'll need a lot of guts. If you have a sword, guarding helps a lot.
Setup: No setup needed!
Find a couple of creepers and lead them to the mob you're trying to fight. Then let them explode on the mobs!
Pros: Widespread damage to take out a group of mobs, and deals with the creepers by itself! Also doesn't need any weapons. Can be extremely handy if ambushed by large groups of mobs early game/when you forgot your combat gear. The creeper-crater somewhat helps stop more mobs/mobs that survived
Cons: No drops from the creepers or XP. You'll take damage and might die in Hardcore. Time-consuming. Also, the creepers might not explode when they reach the mobs, or explode before they reach them.
Creepersmash
Turn a dangerous foe into a deadly weapon!
Equipment: Flint and Steel, Sword with Knockback (preferably Knockback II) side by side in the hotbar.
Ideally practiced on level surfaces, away from valuable architecture, lure a creeper near a cluster of mobs. Position the creeper between yourself and your targets and use the Flint and Steel on it to induce it into an unstoppable detonation. As fast as you can, switch to your Knockback sword and slug the creeper for all your worth into the mobs. Don't try to sprint/jump for extra knockback there is generally not enough time before the creeper explodes. Once the creeper has done its damage clean up any stragglers with your preferred combat method.
Note: You may want to practice this technique few times on easy or creative mode to get the timing down. Also armor enchanted with Blast Resistance will help soften damage from misfires or premature detonations.
Defensive measures
Turtling
- This technique is a defensive measure loosely based off the fighting game strategy of the same name.
- Carry a stack of Dirt or other common block with you and equip it to a slot next to your main weapon.
- If you are stuck out in the open with low health you can look straight down and hold space and right click to "turtle", that is, to create a tower on which you can temporarily stand while there are mobs around.
- This will work on all mobs which cannot climb/fly, and with Spiders provided they haven't seen you. If a spider has seen you, place eight blocks around the topmost block and stand on top, and if they climb up they cannot get to you and they will fall off and die.
Parrying
- Holding the right mouse button while holding a sword will allow you block with it and reduce the damage a mob does to you by 50%, but causes you to move more slowly.
The Golden Apple
- A Golden Apple no longer restores full health, but heals two hunger units and grants quick health regeneration for four seconds, regardless of hunger level. The new Enchanted Golden Apple last much longer, and grants more potion effects such as resistance I, fire resistance I, absorption I, and regeneration V, but its much harder or more expensive to obtain.
- This is particularly useful when you have to deal with many Skeletons or Zombie Pigmen and the Enchanted Golden Apple is useful for fighting Blazes.
Debuff
- If one has Sugar, Gunpowder, Spider Eye, Brown Mushrooms, and some Redstone Dust that they don't need, they can create an efficient battle strategy.
- Make a Splash Potion of Slowness (Awkward potion + Sugar, + Fermented Spider Eye, + Gunpowder), and a Splash Potion of Weakness (Mundane potion + Fermented Spider Eye, + Gunpowder).
- First, come up close with your foe. When right outside the Splash Potion radius, throw both potions at him/her.
- The slowness affecting your foe makes escape near impossible, while the Weakness makes it near impossible to win in a Sword duel, unless enchantments are used.
The enchantments
Sword enchantments
- Knockback is effective when near Damaging terrain like large holes or Cacti, and it is very useful for fighting multiple creepers. However, as much as possible, avoid using it on foes that have ranged attacks, like Blazes or Skeletons.
- Fire Aspect is one of the most valuable enchantments in game, as considered by most players. However, if you spend a lot of time in the Nether then this enchantment is virtually useless, since most Nether mobs are Fire-Resistant.
- Bane of Arthropods is very resourceful for exploring Abandoned Mineshafts. The sword itself can cut through Cobwebs quickly, while the enchantment itself (Bane of Arthropods II) can Instantly kill Cave spiders and spiders if the sword is Diamond. A Bane of Arthropods IV diamond sword can make you sure you kill a regular spider in one hit.
- Sharpness is the most versatile enchantment for the sword-it does not have any disadvantages against certain mobs, but does not have good advantages against certain mobs.
- Smite is a good enchantment for surviving the night without a shelter-Skeletons and Zombies spawn in hordes. It is also useful for killing the Wither boss.
Bow enchantments
- Punch is more effective for Battle archers than for Snipers-The increased Knockback on mobs lets the user use Fully Charged shots more before retaliating with Sword strikes.
- Power is more effective for Snipers than for Battle archers, as the enchantment is used less in direct combat.
- Flame, like its Sword counterpart Fire Aspect, is very ineffective against Nether mobs. It is also better for Snipers, as they can focus on more than one target at once, while a Battle Archer rarely has time to think in Close Combat.
- Infinity is very good for Snipers and Battle Archers alike - A Sniper will usually be in an isolated spot, where he will likely run out of arrows in one point. The slightest bit of movement may alert the enemies, and not having to return to base to pick up more arrows can help. Battle Archers will need to worry about attacking and their own health, so they can be as trigger happy as they want.
Armor enchantments
- Fire Protection is very effective in the Nether, since you have many fire-related things to worry about; Blaze Fireballs, Ghast explosions, fire everywhere, and lava pouring from the ceiling. It can also be considered as an Anti-Fire Aspect(Flame) Enchantment, since if the foe relies on fire to deal damage, Fire protection can give you a great advantage.
- Protection in its raw form gives you protection from may kinds of damage. It is recommended to use this enchantment with Diamond armor, since Diamond armor combined with a high Protection level can make you an unstoppable Juggernaut, plus damage taken from Protection-Enchanted armor instantly goes to your armor durability. Diamond armor has relatively high durability, making it the best choice for a Protection enchantment.
- Projectile protection is recommended if your bow is low on durability. This means that you will need to go into close combat to strike, and foes will often take advantage of this by striking you from afar.
- Blast protection is very good against Creepers and Ghasts, as their only form of attack is an explosion, which Blast protection is effective against. It is also efficient for a non-combat related topic-TNT mining.
- Feather falling is good if you are in a high place, which feather falling protects against. It can successfully protect against the form of combat known as Knockback striking if the only environmental damage is fall damage.
- Respiration is not very combat related, as you will rarely be fighting underwater. However, should someone drop sand above you then it can increase your survivability of the attack.
- Depth strider is good if you are raiding an ocean monument because, it allows you to move faster under water and avoid guardians.