Molassascookieman (talk | contribs) mNo edit summary |
KnightMiner (talk | contribs) m (→Generation: implement usage of {{id table}} (also decided the table is redundant here because of the tooltips...) |
||
| (28 intermediate revisions by 19 users not shown) | |||
| Line 1: | Line 1: | ||
| − | [[File:Minecraft 2.jpg|thumb|300px|The Overworld, as seen in an [[ |
+ | [[File:Minecraft 2.jpg|thumb|300px|The Overworld, as seen in an [[extreme hills]] biome]] |
| − | '''The Overworld''' is the starting [[:Category:Dimensions|dimension]] in ''Minecraft''. As with all dimensions in the game, the Overworld can generate infinitely. The Overworld is limited to 862 by 862 blocks on the ''[[Xbox 360 Edition]]'', and 256 by 256 blocks on [[Old]] ''[[Pocket Edition]]'' worlds. At the edge of the Overworld, there is an animated world border. |
+ | '''The Overworld''' is the starting [[:Category:Dimensions|dimension]] in ''Minecraft''. As with all dimensions in the game, the Overworld can generate infinitely. The Overworld is limited to 862 by 862 blocks on the ''[[Xbox 360]]'' and ''[[PlayStation 3 Edition]]'', and 256 by 256 blocks on [[Old]] ''[[Pocket Edition]]'' worlds. At the edge of the Overworld, there is an animated world border. Nether portals in the Overworld can be used to teleport to [[the Nether]]. |
| − | The Overworld encompasses the level ceiling down to [[bedrock]] and extending in every direction on the horizontal plane. It is generated through a secret process which creates multiple noise maps to create differing [[Altitude|elevations]], general [[ |
+ | The Overworld encompasses the level ceiling down to [[bedrock]] and extending in every direction on the horizontal plane. It is generated through a secret process which creates multiple noise maps to create differing [[Altitude|elevations]], general [[chunk]] shapes, and complex [[mountain]] and [[cave]] systems. |
| − | Most [[mobs]] in the game can appear in the Overworld: [[ |
+ | Most [[mobs]] in the game can appear in the Overworld: [[wolves]], [[bat]]s, [[pig]]s, [[sheep]], [[cow]]s, [[horse]]s, [[mooshroom]]s, [[chicken]]s, [[chicken jockey]]s, [[squid]], [[zombie]]s, [[ocelot]]s, [[skeleton]]s, [[spider]]s, [[villager]]s, [[spider jockey]]s, [[witch]]es, [[endermen]], [[creeper]]s and [[slime]]s all spawn normally. [[Zombie pigmen]] can also spawn near nether portals. |
| − | Mobs from [[the Nether]] may also pass through [[ |
+ | Mobs from [[the Nether]] may also pass through [[nether portal]]s and enter the Overworld: [[zombie pigmen]], [[magma cube]]s, [[wither skeleton]]s, [[ghast]]s, and [[blaze]]s (mobs from the Overworld can also enter the Nether through a nether portal). The [[ender dragon]] however can't enter the Overworld because there is no return portal from [[the End]] unless the dragon is defeated. |
| + | |||
| + | While less dangerous than the Nether, the Overworld is still, nonetheless, a relatively hostile dimension, mostly due to monsters that roam the darkness of [[caves]] and outside at night, and the common hazards ranging from falling from great heights to the near-lethal [[lava]] found underground or in lava lakes on the surface. Also, living humans are a very rare sight, these "humans" can refer to the [[player]]s that are trying to survive day by day, and [[villager]]s, who live in [[village]]s. |
||
== Seeds == |
== Seeds == |
||
| + | |||
{{Main|Seed (level generation)|title1=Seed}} |
{{Main|Seed (level generation)|title1=Seed}} |
||
| Line 15: | Line 18: | ||
Using a specific seed generates exactly the same world each time, and thus interesting ''Minecraft'' worlds could be shared between players. The [[spawn]] is not on ''exactly'' the same spot, though, so it is wise to give [[coordinates]] instead of directions. The seed input is converted into an integer, so, for instance, the word 'Glacier' corresponds to a value of 1772835215, which generates exactly the same world when entered as a seed value. |
Using a specific seed generates exactly the same world each time, and thus interesting ''Minecraft'' worlds could be shared between players. The [[spawn]] is not on ''exactly'' the same spot, though, so it is wise to give [[coordinates]] instead of directions. The seed input is converted into an integer, so, for instance, the word 'Glacier' corresponds to a value of 1772835215, which generates exactly the same world when entered as a seed value. |
||
| − | Many seeds are chosen simply because they spawn the player near desirable resources, a stronghold or some certain special structure, such as a dungeon. Players often like to find seeds with other very important generated structures such as [[abandoned mine shaft]]s (possibly for the melon seeds and cobwebs) and [[village]]s (perhaps for a surplus of wheat, potatoes, and/or carrots, and for the open possibility of trading with villagers.). While [[ |
+ | Many seeds are chosen simply because they spawn the player near desirable resources, a stronghold or some certain special structure, such as a dungeon. Players often like to find seeds with other very important generated structures such as [[abandoned mine shaft]]s (possibly for the melon seeds and cobwebs) and [[village]]s (perhaps for a surplus of wheat, potatoes, and/or carrots, and for the open possibility of trading with villagers.). While [[stronghold]]s have a minimum distance from the origin, a seed could also be chosen for a relatively close one. |
| − | Seeds can also be chosen for useful [[biome]]s near the spawn point; notably, a Mushroom Island biome provides a large sanctuary from monsters, even underground. Other particularly useful biomes |
+ | Seeds can also be chosen for useful [[biome]]s near the spawn point; notably, a Mushroom Island biome provides a large sanctuary from monsters, even underground. Other particularly useful biomes includes jungle ([[wood]], [[cat]]s), desert ([[village]]s, [[sand]], open line-of-sight), Mesa ([[stained clay]]), taiga ([[wolves]], [[snow]]), Swampland (aboveground [[slime]]s), and extreme hills ([[emerald ore]]s). |
| − | Players can find the current map seed by entering the /seed [[ |
+ | Players can find the current map seed by entering the /seed [[command]]. |
== Sizes == |
== Sizes == |
||
| Line 23: | Line 26: | ||
In [[Classic]] and [[Indev]], maps can be generated in "small" (128×128×64), "normal" (256×256×64), and "huge" (512×512×64) sizes. |
In [[Classic]] and [[Indev]], maps can be generated in "small" (128×128×64), "normal" (256×256×64), and "huge" (512×512×64) sizes. |
||
| − | In [[Infdev]], [[Alpha]] and [[Beta]], maps are somewhat infinitely big |
+ | In [[Infdev]], [[Alpha]] and [[Beta]], maps are somewhat infinitely big − They are made up of [[chunks]]; this means that as the player explores the map distant chunks are generated automatically, leading to theoretically infinite maps. In practice, technical reasons (the limits of 32-bit math<ref name="notch_blog">[[wordofnotch:3746989361]]</ref>) force the maximum map size, including the [[Far Lands]], to be around 9.3 million times the surface area of Earth [[wordofnotch:443693773|[1]]], which comes out to about 4.7 quadrillion km<sup>2</sup> (The hard limit where chunks are overwritten is at X/Z of ±34,359,738,368, making the world at most 68,719,476,736 meters wide and long, which is about 4,722,366,482,869,645 km<sup>2</sup>. When compared to Earth's total surface area, 510,072,000 km<sup>2</sup>, this works out to be about 9,258,235 times that). Whilst the horizontal planes of the maps are vast in size, the vertical plane remains at a fixed (soft limit) 256-block height [[wordofnotch:697022652|[2]]]. |
=== Map limitation === |
=== Map limitation === |
||
| − | [[File:mc cutoff.png|thumb|200px|Visual cutoff point of a ''Minecraft'' map (Left is normal minecraft generation, the right is after limitation.)]] |
||
| + | [[File:mc cutoff.png|thumb|200px|Visual cutoff point of a ''Minecraft'' map (Left is normal ''Minecraft'' generation, the right is after limitation.)]] |
||
| − | While the map is infinite, the number of blocks the player may walk on is limited. The map, counting air as a block, and not counting blocks beyond and at where block physics fail (32,000,000 from the center) from top to bottom, and all in between, is essentially always 2.62144 × 10<sup>17</sup> blocks big. The last point a person may still play normally, which in layman terms the very edge of the map is X/Z: 30,000,000. The player can't move past those coordinates, though in older versions of the game, the player will just fall through the blocks into [[The Void]], but could keep exploring if flying in [[Creative Mode]]. There is also a height limit of 255. |
||
| + | While the map is infinite, the number of blocks the player may walk on is limited. The map contains a world border at +/- 30,000,000 x/z. The world border is an animated wall of blue stripes. As you get near it, the edges of your screen turn red, and you can not go past it. There is nothing past 16 blocks after the wall, just emptiness. |
||
| − | Beyond this edge, world generation is significantly simpler. Any chunk after the edge consists of just dirt, stone, sand, gravel and water with absolutely no vegetation. Caves ''do'' generate here, but no ores or structures appear inside, and the lighting in some of these caves may appear to make them look brighter with more contrast. Another point to note is that if a person stands on the very border of the edge, the ocean will look empty and 'seemingly' be able to see as though there was no water. |
||
| − | Because of these limitations the maximum blocks that can be generated in a world is approximately 921,600,000,000,000,000. This means that a filled world with no entities or tile entities would be |
+ | Because of these limitations the maximum blocks that can be generated in a world is approximately 921,600,000,000,000,000. This means that a filled world with no entities or tile entities would be 3,686,400,000,000,000,000 bits (409.27261579781770706 Petabytes) in block data alone due to the fact that each standard block is assigned 4 bits of information. |
| − | EDIT: At just under 30,000,000 there is an animated wall of blue stripes. As you get near it, the edges of your screen turn red, and you can not go past it. There is nothing past 4 blocks after the wall, just emptiness. This occurs even if there is no ocean to speak of where you are. |
||
== Generation == |
== Generation == |
||
=== Generated blocks === |
=== Generated blocks === |
||
| − | Entries marked with a <sup>D</sup> require additional data to fully define the block in a Beta world. Entries marked with an <sup>I</sup> have a different ID as an inventory item. Entries marked with a <sup>B</sup> require additional inventory data to fully define the inventory item. Entries marked with a <sup>[[Tile entity|T]]</sup> have tile entities associated with them to store additional data. Blocks with IDs in red cannot be legitimately obtained in the player's inventory in the game; they can only be obtained by "hacking" (such as the use of Inventory editors) or, in multiplayer using the /give server command. Blocks available only in Creative mode are in blue, and blocks available in Survival mode only with the use of a Silk Touch-enchanted tool are in green. |
||
==== Naturally generated ==== |
==== Naturally generated ==== |
||
Naturally Generated includes blocks that are created through the world seed. |
Naturally Generated includes blocks that are created through the world seed. |
||
| + | {{id table|dv=0|Air|obtain=none|icon=none|namecolumn=0}} |
||
| − | |||
| + | {{id table|dv=1|Stone}} |
||
| − | {| align="left" style="margin:2px; border: 1px solid silver; text-align: center;" |
||
| + | {{id table|dv=2|Grass Block|icon=Grass.png|obtain=enchantments}} |
||
| − | ! Icon !! Dec !! Hex !! Block type |
||
| + | {{id table|dv=3|Dirt|SB}} |
||
| − | |- |
||
| + | {{id table|dv=4|Cobblestone}} |
||
| − | | height="27px" | || <span style='color:red'>00</span> || <span style='color:red'>00</span> || [[Air]] |
||
| + | {{id table|dv=7|Bedrock|obtain=creative}} |
||
| − | |- |
||
| + | {{id table|dv=9|Water (stationary)|S|section=Water and Lava|obtain=none}} |
||
| − | | height="27px" | [[File:Stone.png|25px]] || 01 || 01 || [[Stone]] |
||
| + | {{id table|dv=11|Lava (stationary)|S|section=Water and Lava|obtain=none}} |
||
| − | |- |
||
| + | {{id table|dv=12|Sand}} |
||
| − | | height="27px" | [[File:Grass.png|25px]] || <span style='color:green'>02</span> || <span style='color:green'>02</span> || [[Grass Block]] |
||
| + | {{id table|dv=13|Gravel}} |
||
| − | |- |
||
| + | {{id table|dv=14|Gold Ore}} |
||
| − | | height="27px" | [[File:Dirt.png|25px]] || 03 || 03 || [[Dirt]] <sup>[[Data Values#Dirt|D]] [[Data Values#Dirt|B]] |
||
| + | {{id table|dv=15|Iron Ore}} |
||
| − | |- |
||
| + | {{id table|dv=16|Coal Ore|obtain=enchantments}} |
||
| − | | height="27px" | [[File:Cobblestone.png|25px]] || 04 || 04 || [[Cobblestone]] |
||
| + | {{id table|dv=17|Wood|SB}} |
||
| − | |- |
||
| + | {{id table|dv=18|Leaves|SB}} |
||
| − | | height="27px" | [[File:Bedrock.png|25px]] || <span style='color:blue'>07</span> || <span style='color:blue'>07</span> || [[Bedrock]] |
||
| + | {{id table|dv=21|Lapis Lazuli Ore|obtain=enchantments}} |
||
| − | |- |
||
| + | {{id table|dv=24|Sandstone}} |
||
| − | | height="27px" | [[File:Water.png|25px]] || <span style='color:red'>09</span> || <span style='color:red'>09</span> || [[Water]] (Stationary) <sup>[[Data Values#Water and Lava|D]]</sup> |
||
| + | {{id table|dv=31|Grass|SB|icon=Tall Grass.png}} |
||
| − | |- |
||
| + | {{id table|dv=32|Dead Bush}} |
||
| − | | height="27px" | [[File:Lava.png|25px]] || <span style='color:red'>11</span> || <span style='color:red'>0B</span> || [[Lava]] (Stationary) <sup>[[Data Values#Water and Lava|D]]</sup> |
||
| + | {{id table|dv=37|Dandelion|link=Flower}} |
||
| − | |- |
||
| + | {{id table|dv=38|Flower|SB|icon=Poppy.png}} |
||
| − | | height="27px" | [[File:Sand.png|25px]] || 12 || 0C || [[Sand]] |
||
| + | {{id table|dv=39|Brown Mushroom|link=Mushroom|foot=1}} |
||
| − | |- |
||
| + | {{id table|dv=40|Red Mushroom|link=Mushroom}} |
||
| − | | height="27px" | [[File:Gravel.png|25px]] || 13 || 0D || [[Gravel]] |
||
| + | {{id table|dv=48|Moss Stone}} |
||
| − | |- |
||
| + | {{id table|dv=52|Monster Spawner|T|obtain=give}} |
||
| − | | height="27px" | [[File:Gold (Ore).png|25px]] || 14 || 0E || [[Gold Ore]] |
||
| + | {{id table|dv=56|Diamond Ore|obtain=enchantments}} |
||
| − | |- |
||
| + | {{id table|dv=73|Redstone Ore|obtain=enchantments}} |
||
| − | | height="27px" | [[File:Iron (Ore).png|25px]] || 15 || 0F || [[Iron Ore]] |
||
| + | {{id table|dv=78|Snow|S|link=Snow (layer)}} |
||
| − | |- |
||
| + | {{id table|dv=79|Ice|obtain=enchantments}} |
||
| − | | height="27px" | [[File:Coal (Ore).png|25px]] || <span style='color:green'>16</span> || <span style='color:green'>10</span> || [[Coal Ore]] |
||
| + | {{id table|dv=81|Cactus|S}} |
||
| − | |- |
||
| + | {{id table|dv=82|Clay|link=Clay (block)|icon=Clay Block.png}} |
||
| − | | height="27px" | [[File:Wood.png|25px]] || 17 || 11 || [[Wood]] <sup>[[Data Values#Wood|D]] [[Data Values#Wood|B]] |
||
| + | {{id table|dv=83|Sugar Canes|SI|icon=Sugar Cane.png|obtain=none}} |
||
| − | |- |
||
| + | {{id table|dv=86|Pumpkin|S|section=Pumpkins and Jack o'Lanterns}} |
||
| − | | height="27px" | [[File:Leaves.png|25px]] || 18 || 12 || [[Leaves]] <sup>[[Data Values#Leaves|D]] [[Data Values#Leaves|B]]</sup> |
||
| + | {{id table|dv=99|Brown Mushroom|D|icon=BrownMushroomCap.png|obtain=enchantments|link=Mushroom (block)}} |
||
| − | |- |
||
| + | {{id table|dv=100|Red Mushroom|D|icon=RedMushroomCap.png|obtain=enchantments|link=Mushroom (block)}} |
||
| − | | height="27px" | [[File:Lapis Lazuli (Ore).png|25px]] || <span style='color:green'>21</span> || <span style='color:green'>15</span> || [[Lapis Lazuli Ore]] |
||
| + | {{id table|dv=103|Melon|link=Melon (block)|icon=Melon (Block).png|obtain=enchantments}} |
||
| − | |- |
||
| + | {{id table|dv=106|Vines|S|icon=Vine.png}} |
||
| − | | height="27px" | [[File:Sandstone.png|25px]] || 24 || 18 || [[Sandstone]] |
||
| + | {{id table|dv=110|Mycelium|obtain=enchantments}} |
||
| − | |- |
||
| + | {{id table|dv=111|Lily Pad}} |
||
| − | | height="27px" | [[File:Tall Grass.png|25px]] || 31 || 1F || [[Grass]] <sup>[[Data Values#Tall Grass|D]] [[Data Values#Tall Grass|B]]</sup> |
||
| + | {{id table|dv=120|End Portal|link=End Portal (block)|icon=End Portal Frame.png|obtain=creative}} |
||
| − | |- |
||
| + | {{id table|dv=127|Cocoa|icon=Cocoa Plant.png|obtain=none}} |
||
| − | | height="27px" | [[File:Grid Dead Bush.png|25px]] || 32 || 20 || [[Dead Bush]] |
||
| + | {{id table|dv=129|Emerald Ore|obtain=enchantments}} |
||
| − | |- |
||
| + | {{id table|dv=175|Flower|SB|section=Large Flowers|Large|icon=Grid Sunflower.png}} |
||
| − | | height="27px" | [[File:Dandelion.png|25px]] || 37 || 25 || [[Flowers#Dandelion|Dandelion]] |
||
| + | {{id table|dv=179|Red Sandstone|foot=1}} |
||
| − | |} |
||
| − | {| align="left" style="margin:2px; border: 1px solid silver; text-align: center;" |
||
| − | ! Icon !! Dec !! Hex !! Block type |
||
| − | |- |
||
| − | | height="27px" | [[File:Poppy.png|25px]] || 38 || 26 || [[Flowers]] <sup>[[Data Values#Flowers|D]] [[Data Values#Flowers|B]] |
||
| − | |- |
||
| − | | height="27px" | [[File:Brown Mushroom.png|25px]] || 39 || 27 || [[Mushrooms#Brown Mushroom|Brown Mushroom]] |
||
| − | |- |
||
| − | | height="27px" | [[File:Red Mushroom.png|25px]] || 40 || 28 || [[Mushrooms#Red Mushroom|Red Mushroom]] |
||
| − | |- |
||
| − | | height="27px" | [[File:Moss Stone.png|25px]] || 48 || 30 || [[Moss Stone]] |
||
| − | |- |
||
| − | | height="27px" | [[File:Monster Spawner.png|25px]] || <span style='color:red'>52</span> || <span style='color:red'>34</span> || [[Monster Spawner]] <sup>[[Tile entity|T]]</sup> |
||
| − | |- |
||
| − | | height="27px" | [[File:Diamond (Ore).png|25px]] || <span style='color:green'>56</span> || <span style='color:green'>38</span> || [[Diamond Ore]] |
||
| − | |- |
||
| − | | height="27px" | [[File:Redstone (Ore).png|25px]] || <span style='color:green'>73</span> || <span style='color:green'>49</span> || [[Redstone Ore]] |
||
| − | |- |
||
| − | | height="27px" | [[File:Snow.png|25px]] || <span style='color:black'>78</span> || <span style='color:black'>4E</span> || [[Snow (cover)|Snow]] |
||
| − | |- |
||
| − | | height="27px" | [[File:Ice.png|25px]] || <span style='color:green'>79</span> || <span style='color:green'>4F</span> || [[Ice]] |
||
| − | |- |
||
| − | | height="27px" | [[File:Cactus.png|25px]] || 81 || 51 || [[Cactus]] <sup>[[Data Values#Cactus|D]]</sup> |
||
| − | |- |
||
| − | | height="27px" | [[File:Clay (Block).png|25px]] || 82 || 52 || [[Clay (block)|Clay Block]] |
||
| − | |- |
||
| − | | height="27px" | [[File:Sugar Cane.png|25px]] || <span style='color:red'>83</span> || <span style='color:red'>53</span> || [[Sugar Cane]] <sup>[[Data Values#Sugar Canes|D]] [[Data Values#Item IDs|I]]</sup> |
||
| − | |- |
||
| − | | height="27px" | [[File:Pumpkin.png|25px]] || 86 || 56 || [[Pumpkin]] <sup>[[Data Values#Pumpkins and Jack-o-Lanterns|D]]</sup> |
||
| − | |- |
||
| − | | height="27px" | [[File:BrownMushroomCap.png|25px]] || <span style='color:green'>99</span> || <span style='color:green'>63</span> || [[Huge Mushroom|Huge Brown Mushroom]] <sup>[[Data Values#Huge brown and red mushroom|D]]</sup> |
||
| − | |- |
||
| − | | height="27px" | [[File:RedMushroomCap.png|25px]] || <span style='color:green'>100</span> || <span style='color:green'>64</span> || [[Huge Mushroom|Huge Red Mushroom]] <sup>[[Data Values#Huge brown and red mushroom|D]]</sup> |
||
| − | |- |
||
| − | | height="27px" | [[File:Melon (Block).png|25px]] || <span style='color:green'>103</span> || <span style='color:green'>67</span> || [[Melon (block)|Melon]] |
||
| − | |- |
||
| − | | height="27px" | [[File:Vine.png|25px]] || 106 || 6A || [[Vines]] <sup>[[Data Values#Vines|D]]</sup> |
||
| − | |- |
||
| − | | height="27px" | [[File:Mycelium.png|25px]] || <span style='color:green'>110</span> || <span style='color:green'>6E</span> || [[Mycelium]] |
||
| − | |- |
||
| − | | height="27px" | [[File:Lily Pad.png|25px]] || 111 || 6F || [[Lily Pad]] |
||
| − | |- |
||
| − | | height="27px" | [[File:End Portal Frame.png|25px]] || <span style='color:blue'>120</span> || <span style='color:blue'>78</span> || [[End Portal (block)|End Portal]] |
||
| − | |- |
||
| − | | height="27px" | [[File:Cocoa Plant.png|25px]] || <span style='color:red'>127</span> || <span style='color:red'>7F</span> || [[Cocoa]] |
||
| − | |- |
||
| − | | height="27px" | [[File:Emerald Ore2.png|25px]] || <span style='color:green'>129</span> || <span style='color:green'>81</span> || [[Emerald Ore]] |
||
| − | |- |
||
| − | | height="27px" | [[File:Grid Sunflower.png|25px]] || 175 || AF || [[Flowers|Large Flowers]] <sup>[[Data Values#Large Flowers|D]] [[Data Values#Large Flowers|B]] |
||
| − | |- |
||
| − | | height="27px" | [[File:Red Sandstone.png|25px]] || 179 || B3 || [[Red Sandstone]] |
||
| − | |} |
||
{{-}} |
{{-}} |
||
| Line 143: | Line 92: | ||
Naturally created means a combination of events that cause a new block to be placed by natural causes, not the player. Some of these blocks may also be created as part of world generation. |
Naturally created means a combination of events that cause a new block to be placed by natural causes, not the player. Some of these blocks may also be created as part of world generation. |
||
| + | {{id table|dv=0|Air|obtain=none|icon=none}} |
||
| − | |||
| + | {{id table|dv=02|Grass Block|icon=Grass.png|obtain=enchantments}} |
||
| − | {| align="left" style="margin:2px; border: 1px solid silver; text-align: center;" |
||
| + | {{id table|dv=03|Dirt}} |
||
| − | ! Icon !! Dec !! Hex !! Block type |
||
| + | {{id table|dv=04|Cobblestone}} |
||
| − | |- |
||
| + | {{id table|dv=08|Water (flowing)|S|section=Water and Lava|obtain=none}} |
||
| − | | height="27px" | || <span style='color:red'>00</span> || <span style='color:red'>00</span> || [[Air]] |
||
| + | {{id table|dv=10|Lava (flowing)|S|section=Water and Lava|obtain=none}} |
||
| − | |- |
||
| + | {{id table|dv=39|Brown Mushroom}} |
||
| − | | height="27px" | [[File:Grass.png|25px]] || <span style='color:green'>02</span> || <span style='color:green'>02</span> || [[Grass Block]] |
||
| + | {{id table|dv=40|Red Mushroom|foot=1}} |
||
| − | |- |
||
| + | {{id table|dv=49|Obsidian}} |
||
| − | | height="27px" | [[File:Dirt.png|25px]] || 03 || 03 || [[Dirt]] |
||
| + | {{id table|dv=51|Fire|S|obtain=none}} |
||
| − | |- |
||
| + | {{id table|dv=78|Snow|S|link=Snow (layer)}} |
||
| − | | height="27px" | [[File:Cobblestone.png|25px]] || 04 || 04 || [[Cobblestone]] |
||
| + | {{id table|dv=79|Ice|obtain=creative}} |
||
| − | |- |
||
| + | {{id table|dv=81|Cactus|S}} |
||
| − | | height="27px" | [[File:Water.png|25px]] || <span style='color:red'>08</span> || <span style='color:red'>08</span> || [[Water]] (Flowing) <sup>[[Data Values#Water and Lava|D]]</sup> |
||
| + | {{id table|dv=83|Sugar Canes|SI|icon=Sugar Cane.png|obtain=none}} |
||
| − | |- |
||
| + | {{id table|dv=106|Vines|S|icon=Vine.png}} |
||
| − | | height="27px" | [[File:Lava.png|25px]] || <span style='color:red'>10</span> || <span style='color:red'>0A</span> || [[Lava]] (Flowing) <sup>[[Data Values#Water and Lava|D]]</sup> |
||
| + | {{id table|dv=110|Mycelium|obtain=enchantments|foot=1}} |
||
| − | |- |
||
| − | | height="27px" | [[File:Brown Mushroom.png|25px]] || 39 || 27 || [[Mushrooms#Brown Mushroom|Brown Mushroom]] |
||
| − | |- |
||
| − | | height="27px" | [[File:Red Mushroom.png|25px]] || 40 || 28 || [[Mushrooms#Red Mushroom|Red Mushroom]] |
||
| − | |} |
||
| − | {| align="left" style="margin:2px; border: 1px solid silver; text-align: center;" |
||
| − | ! Icon !! Dec !! Hex !! Block type |
||
| − | |- |
||
| − | | height="27px" | [[File:Obsidian.png|25px]] || 49 || 31 || [[Obsidian]] |
||
| − | |- |
||
| − | | height="27px" | [[File:Fire.png|25px]] || <span style='color:red'>51</span> || <span style='color:red'>33</span> || [[Fire]] <sup>[[Data Values#Fire|D]]</sup> |
||
| − | |- |
||
| − | | height="27px" | [[File:Snow.png|25px]] || <span style='color:black'>78</span> || <span style='color:black'>4E</span> || [[Snow (cover)|Snow]] |
||
| − | |- |
||
| − | | height="27px" | [[File:Ice.png|25px]] || <span style='color:blue'>79</span> || <span style='color:blue'>4F</span> || [[Ice]] |
||
| − | |- |
||
| − | | height="27px" | [[File:Cactus.png|25px]] || 81 || 51 || [[Cactus]] <sup>[[Data Values#Cactus|D]]</sup> |
||
| − | |- |
||
| − | | height="27px" | [[File:Sugar Cane.png|25px]] || <span style='color:red'>83</span> || <span style='color:red'>53</span> || [[Sugar Cane]] <sup>[[Data Values#Sugar Canes|D]] [[Data Values#Item IDs|I]]</sup> |
||
| − | |- |
||
| − | | height="27px" | [[File:Vine.png|25px]] || 106 || 6A || [[Vines]] <sup>[[Data Values#Vines|D]]</sup> |
||
| − | |- |
||
| − | | height="27px" | [[File:Mycelium.png|25px]] || <span style='color:green'>110</span> || <span style='color:green'>6E</span> || [[Mycelium]] |
||
| − | |} |
||
{{-}} |
{{-}} |
||
| Line 187: | Line 113: | ||
Same as naturally generated, but these blocks are only created with the "Generate Structures" option enabled. |
Same as naturally generated, but these blocks are only created with the "Generate Structures" option enabled. |
||
| + | {{id table|dv=0|Air|obtain=none|icon=none}} |
||
| − | |||
| + | {{id table|dv=4|Cobblestone}} |
||
| − | {| align="left" style="margin:2px; border: 1px solid silver; text-align: center;" |
||
| + | {{id table|dv=5|Wood Planks|icon=Oak Wood Planks.png}} |
||
| − | ! Icon !! Dec !! Hex !! Block type |
||
| + | {{id table|dv=9|Water (stationary)|S|section=Water and Lava|obtain=none}} |
||
| − | |- |
||
| + | {{id table|dv=23|Dispenser}} |
||
| − | | height="27px" | || <span style='color:red'>00</span> || <span style='color:red'>00</span> || [[Air]] |
||
| + | {{id table|dv=30|Cobweb|obtain=enchantments|icon=WebBlock.png}} |
||
| − | |- |
||
| + | {{id table|dv=24|Sandstone}} |
||
| − | | height="27px" | [[File:Cobblestone.png|25px]] || 04 || 04 || [[Cobblestone]] |
||
| + | {{id table|dv=29|Sticky Piston}} |
||
| − | |- |
||
| + | {{id table|dv=33|Piston}} |
||
| − | | height="27px" | [[File:Wooden Plank.png|25px]] || 05 || 05 || [[Wooden Plank]] |
||
| + | {{id table|dv=39|Brown Mushroom}} |
||
| − | |- |
||
| + | {{id table|dv=40|Red Mushroom}} |
||
| − | | height="27px" | [[File:Grid Cobweb.png|25px]] || <span style='color:green'>30</span> || <span style='color:green'>1E</span> || [[Cobweb]] |
||
| + | {{id table|dv=35|Wool|SB|icon=White Wool.png}} |
||
| − | |- |
||
| + | {{id table|dv=44|Slab|SB|icon=Stone Slab.png}} |
||
| − | | height="27px" | [[File:Sandstone.png|25px]] || 24 || 18 || [[Sandstone]] |
||
| + | {{id table|dv=47|Bookshelf|foot=1}} |
||
| − | |- |
||
| + | {{id table|dv=50|Torch|S|section=Torches and Redstone Torches}} |
||
| − | | height="27px" | [[File:Sticky Piston.png|25px]] || 29 || 1D || [[Sticky Piston]] |
||
| + | {{id table|dv=53|Wood Stairs|S|section=Stairs|link=Stairs|icon=Wooden Stairs.png}} |
||
| − | |- |
||
| + | {{id table|dv=54|Chest|ST|section=Ladders, Furnaces, Chests}} |
||
| − | | height="27px" | [[File:Piston.png|25px]] || 33 || 21 || [[Piston]] |
||
| + | {{id table|dv=58|Crafting Table}} |
||
| − | |- |
||
| + | {{id table|dv=59|Wheat|SI|icon=Crops.png|obtain=none}} |
||
| − | | height="27px" | [[File:Brown Mushroom.png|25px]] || 39 || 27 || [[Mushrooms#Brown Mushroom|Brown Mushroom]] |
||
| + | {{id table|dv=60|Farmland|S|obtain=give}} |
||
| − | |- |
||
| + | {{id table|dv=61|Furnace|ST|section=Ladders, Furnaces, Chests}} |
||
| − | | height="27px" | [[File:Red Mushroom.png|25px]] || 40 || 28 || [[Mushrooms#Red Mushroom|Red Mushroom]] |
||
| + | {{id table|dv=64|Wooden Door|SI|obtain=none}} |
||
| − | |- |
||
| + | {{id table|dv=65|Ladder|S|section=Ladders, Furnaces, Chests}} |
||
| − | | height="27px" | [[File:Grid Black Wool.png|25px]] || 35 || 23 || [[Wool]] <sup>[[Data Values#Wool|D]] [[Data Values#Wool|B]]</sup> |
||
| + | {{id table|dv=66|Rails|S}} |
||
| − | |- |
||
| + | {{id table|dv=67|Cobblestone Stairs}} |
||
| − | | height="27px" | [[File:Stone Slab.png|25px]] || 44 || 2C || [[Slabs]] <sup>[[Data Values#Slab and Double Slab material|D]] [[Data Values#Slab and Double Slab material|B]] |
||
| + | {{id table|dv=69|Lever}} |
||
| − | |- |
||
| + | {{id table|dv=71|Iron Door|SI|section=Door|obtain=none}} |
||
| − | | height="27px" | [[File:Bookshelf.png|25px]] || 47 || 2F || [[Bookshelf]] |
||
| + | {{id table|dv=72|Wooden Pressure Plate|S|section=Pressure Plates|foot=1}} |
||
| − | |- |
||
| + | {{id table|dv=77|Button|S|icon=Stone Button.png}} |
||
| − | | height="27px" | [[File:Torch.png|25px]] || 50 || 32 || [[Torch]] <sup>[[Data Values#Torches and Redstone Torches|D]]</sup> |
||
| + | {{id table|dv=85|Fence}} |
||
| − | |- |
||
| − | + | {{id table|dv=97|Monster Egg|icon=Stone.png|obtain=creative}} <sup>[[Data values#Monster Egg|D]]</sup> |
|
| + | {{id table|dv=98|Stone Bricks|SB|section=Stone Brick|icon=Stone Brick.png}} |
||
| − | |- |
||
| + | {{id table|dv=101|Iron Bars}} |
||
| − | | height="27px" | [[File:Chest.png|25px]] || 54 || 36 || [[Chest]] <sup>[[#Furnaces, Dispensers and Chests|D]]</sup> <sup>[[Tile entity|T]]</sup> |
||
| + | {{id table|dv=102|Glass Pane}} |
||
| − | |- |
||
| + | {{id table|dv=48|Moss Stone}} |
||
| − | | height="27px" | [[File:Crafting Table.png|25px]] || 58 || 3A || [[Crafting Table]] |
||
| + | {{id table|dv=118|Cauldron|SI|obtain=none}}<sup>[[Data values#Item IDs|I]]<sup> |
||
| − | |- |
||
| + | {{id table|dv=120|End Portal|link=End Portal (block)|icon=End Portal Frame.png|obtain=creative}} |
||
| − | | height="27px" | [[File:Crops.png|25px]] || <span style='color:red'>59</span> || <span style='color:red'>3B</span> || [[Seeds (Item)|Seeds]] <sup>[[Data Values#Crops|D]]</sup> |
||
| + | {{id table|dv=132|Tripwire|SI|obtain=none}} |
||
| − | |- |
||
| + | {{id table|dv=140|Flower Pot|SIT|obtain=none}} |
||
| − | | height="27px" | [[File:Farmland.png|25px]] || <span style='color:red'>60</span> || <span style='color:red'>3C</span> || [[Farmland]] <sup>[[Data Values#Farmland|D]]</sup> |
||
| + | {{id table|dv=141|Carrot|SI|icon=Carrot Crop.png|obtain=none}} |
||
| − | |- |
||
| + | {{id table|dv=142|Potato|SI|icon=Potato Crop.png|obtain=none|foot=1}} |
||
| − | | height="27px" | [[File:Furnace.png|25px]] || 61 || 3D || [[Furnace]] <sup>[[Data Values#Furnaces, Dispensers and Chests|D]]</sup> <sup>[[Tile entity|T]]</sup> |
||
| − | |} |
||
| − | {| align="left" style="margin:2px; border: 1px solid silver; text-align: center;" |
||
| − | ! Icon !! Dec !! Hex !! Block type |
||
| − | |- |
||
| − | | height="27px" | [[File:Wooden Door.png|25px]] || 64 || 40 || Wooden [[Door]] <sup>[[Data Values#Door|D]] [[Data Values#Item IDs|I]]</sup> |
||
| − | |- |
||
| − | | height="27px" | [[File:Ladders.png|25px]] || 65 || 41 || [[Ladders]] <sup>[[Data Values#Ladders|D]]</sup> |
||
| − | |- |
||
| − | | height="27px" | [[File:Rails.png|25px]] || 66 || 42 || [[Rail]]s <sup>[[Data Values#Rails|D]]</sup> |
||
| − | |- |
||
| − | | height="27px" | [[File:Cobblestone Stairs.png|25px]] || 67 || 43 || Stone [[Stairs]] |
||
| − | |- |
||
| − | | height="27px" | [[File:Lever.png|25px]] || 69 || 45 || [[Lever]] |
||
| − | |- |
||
| − | | height="27px" | [[File:Iron Door.png|25px]] || 71 || 47 || Iron [[Door]] <sup>[[Data Values#Door|D]] [[Data Values#Item IDs|I]]</sup> |
||
| − | |- |
||
| − | | height="27px" | [[File:Wooden Pressure Plate.png|25px]] || 72 || 48 || Wooden [[Pressure Plates|Pressure Plate]] <sup>[[Data Values#Pressure Plates|D]]</sup> |
||
| − | |- |
||
| − | | height="27px" | [[File:Stone Button.png|25px]] || 77 || 4D || [[Button]] <sup>[[Data Values#Button|D]] </sup> |
||
| − | |- |
||
| − | | height="27px" | [[File:Fence.png|25px]] || 85 || 55 || [[Fence]] |
||
| − | |- |
||
| − | | height="27px" | [[File:Stone.png|25px]] || <span style='color:red'>97</span> || <span style='color:red'>61</span> || [[Monster Egg]] <sup>[[Data Values#Monster Egg|D]]</sup> |
||
| − | |- |
||
| − | | height="27px" | [[File:Stone Brick.png|25px]] || 98 || 62 || [[Stone Brick]]s <sup>[[Data Values#Stone Brick|D]]</sup> <sup>[[Data Values#Stone Brick|B]]</sup> (2) |
||
| − | |- |
||
| − | | height="27px" | [[File:Iron Bars.png|25px]] || 101 || 65 || [[Iron Bars]] |
||
| − | |- |
||
| − | | height="27px" | [[File:Glass Pane.png|25px]] || 102 || 66 || [[Glass Pane]] |
||
| − | |} |
||
| − | {| align="left" style="margin:2px; border: 1px solid silver; text-align: center;" |
||
| − | ! Icon !! Dec !! Hex !! Block type |
||
| − | |- |
||
| − | | height="27px" | [[File:Moss Stone.png|25px]] || 48 || 30 || [[Moss Stone]] |
||
| − | |- |
||
| − | | height="27px" | [[File:Cauldron.png|25px]] || 118 || 76 || [[Cauldron]] |
||
| − | |- |
||
| − | | height="27px" | [[File:End Portal Frame.png|25px]] || 120 || 78 || [[End Portal (block)|End Portal block]] |
||
| − | |- |
||
| − | | height="27px" | [[File:Tripwire.png|25px]] || 132 || 84 || [[String]] |
||
| − | |- |
||
| − | | height="27px" | [[File:Flower Pot.png|25px]] || 140 || 8C || [[Flower Pot]] |
||
| − | |- |
||
| − | | height="27px" | [[File:Carrot Crop.png|25px]] || 141 || 8D || [[Carrots]] |
||
| − | |- |
||
| − | | height="27px" | [[File:Potato Crop.png|25px]] || 142 || 8E || [[Potatoes]] |
||
| − | |} |
||
| − | |||
{{-}} |
{{-}} |
||
=== Chunks === |
=== Chunks === |
||
| + | |||
{{Main|Chunks}} |
{{Main|Chunks}} |
||
| − | Chunks are the method used by [[Notch]] to divide maps into manageable pieces. They are 16 blocks wide, 16 blocks long, and 256 blocks high, each containing 65,536 [[blocks]]. By adjusting the [[render distance]], differing numbers of chunks will be loaded into memory, ranging from 25 to 1089. Only chunks which have been loaded may experience activity such as [[spawn]]ing, [[ |
+ | Chunks are the method used by [[Notch]] to divide maps into manageable pieces. They are 16 blocks wide, 16 blocks long, and 256 blocks high, each containing 65,536 [[blocks]]. By adjusting the [[render distance]], differing numbers of chunks will be loaded into memory, ranging from 25 to 1089. Only chunks which have been loaded may experience activity such as [[spawn]]ing, [[despawning]], [[farming|growth]], [[fluid]] movement, or player interaction. Upon reaching the required distance away from a chunk, it will be unloaded from the memory, however not deleted. Thus, upon re-entering that area, ''Minecraft'' will reload the chunk(s). |
=== Biomes === |
=== Biomes === |
||
| − | {{Main|Biomes}} |
||
| + | {{Main|Biome}} |
||
| − | The Overworld is also subdivided into [[biomes]]. What biome you are in determines the physical aspects of the land above ground and can entirely change its appearance. It also influences which mobs may spawn and affects the behavior of the weather. |
||
| + | |||
| − | Biomes may have varying sizes, and each has its own features. For example, a forest biome will have large quantities of [[tree]]s, and a snow biome will have much [[Snow (cover)|snow]] and [[ice]]. |
||
| + | The Overworld is also subdivided into [[biome]]s. What biome you are in determines the physical aspects of the land above ground and can entirely change its appearance. It also influences which mobs may spawn and affects the behavior of the weather. |
||
| + | Biomes may have varying sizes, and each has its own features. For example, a forest biome will have large quantities of [[tree]]s, and a snow biome will have much [[Snow (layer)|snow]] and [[ice]]. |
||
=== Natural structures === |
=== Natural structures === |
||
| + | |||
{{Main|Generated structures}} |
{{Main|Generated structures}} |
||
| Line 296: | Line 177: | ||
== Navigating the Overworld == |
== Navigating the Overworld == |
||
| + | |||
{{Main|Tutorials/Navigation}} |
{{Main|Tutorials/Navigation}} |
||
The Overworld can be navigated by use of the position of the [[sun]] and the [[moon]], and the movement of the [[clouds]] and the stars. All of these rise in the east and go west. |
The Overworld can be navigated by use of the position of the [[sun]] and the [[moon]], and the movement of the [[clouds]] and the stars. All of these rise in the east and go west. |
||
| − | Tools used for navigating the Overworld include the [[ |
+ | Tools used for navigating the Overworld include the [[compass]] and [[map]]. The compass points to the world [[spawn]] point (sleeping in a [[bed]] does not change the compass operation), and the map displays an area around where it was made, and shows an overview at various scales depending on its zoom factor. In [[the Nether]] and [[the End]], maps are much less useful. |
The {{key|F3}} key toggles a debug console which shows the player their absolute [[coordinates]], where the X and Z [[coordinates]] show longitude and latitude, and the Y coordinate shows height, where Y=63 corresponds to sea level. The 'f' value indicates the direction the player is facing. |
The {{key|F3}} key toggles a debug console which shows the player their absolute [[coordinates]], where the X and Z [[coordinates]] show longitude and latitude, and the Y coordinate shows height, where Y=63 corresponds to sea level. The 'f' value indicates the direction the player is facing. |
||
== Day and night == |
== Day and night == |
||
| + | |||
{{Main|Day-night cycle}} |
{{Main|Day-night cycle}} |
||
| − | The Overworld is the only [[:Category:Dimensions|dimension]] with a day/night cycle. During the daytime, the [[sun]] acts as a [[light]] source. This light is strong enough to kill [[ |
+ | The Overworld is the only [[:Category:Dimensions|dimension]] with a day/night cycle. During the daytime, the [[sun]] acts as a [[light]] source. This light is strong enough to kill [[zombie]]s, and [[skeleton]]s, make [[endermen]] teleport away from the player and also makes [[spider]]s neutral. The only mobs that survive and stay hostile in the daylight are [[creeper]]s and [[slime]]s. |
At night time the [[moon]] is the only natural [[light]] source. However, it provides little light, allowing hostile [[mobs]] to spawn. |
At night time the [[moon]] is the only natural [[light]] source. However, it provides little light, allowing hostile [[mobs]] to spawn. |
||
== Far Lands == |
== Far Lands == |
||
| + | |||
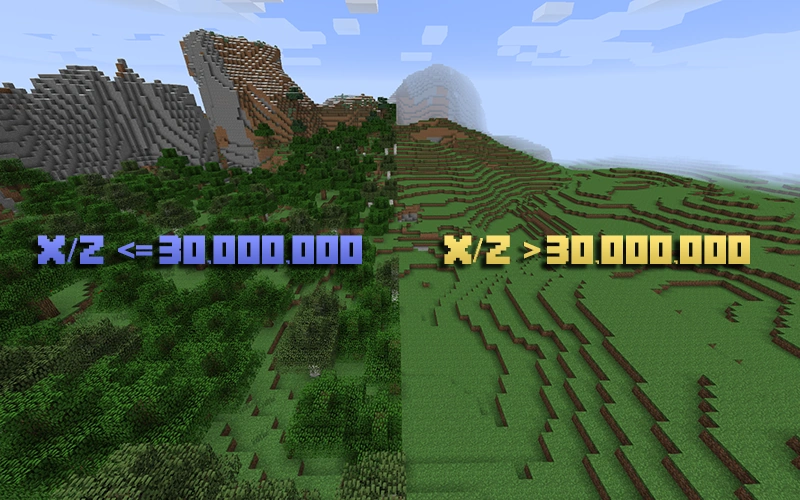
[[File:Edge of the World.jpg|thumb|200px|Difference between >30,000,000 and <30,000,000.]] |
[[File:Edge of the World.jpg|thumb|200px|Difference between >30,000,000 and <30,000,000.]] |
||
{{Main|Far Lands}} |
{{Main|Far Lands}} |
||
| Line 320: | Line 204: | ||
In Beta 1.8, instead of a distorted land, there is a seemingly endless ocean. Normal terrain only starts to generate beyond the actual edges of the world. |
In Beta 1.8, instead of a distorted land, there is a seemingly endless ocean. Normal terrain only starts to generate beyond the actual edges of the world. |
||
| − | As of 1.7.2, the player can not go past 30,000,000 in any direction. This was added by placing an [[ |
+ | As of 1.7.2, the player can not go past 30,000,000 in any direction. This was added by placing an [[invisible bedrock]]-like wall at 30,000,000 blocks from the center of the map in each direction. |
| + | |||
| + | In 1.8, a visible, animated wall can be seen, stopping all entities from passing through. |
||
== History == |
== History == |
||
| Line 332: | Line 218: | ||
{{History||1.2.0|Biomes added. This changes world generation a lot.}} |
{{History||1.2.0|Biomes added. This changes world generation a lot.}} |
||
{{History||1.2.3|The {{key|F3}} key toggles a debug console which shows the player their exact [[coordinates]].}} |
{{History||1.2.3|The {{key|F3}} key toggles a debug console which shows the player their exact [[coordinates]].}} |
||
| − | {{History| |
+ | {{History|b}} |
{{History||1.3|The option was added for the player to specify the world seed.}} |
{{History||1.3|The option was added for the player to specify the world seed.}} |
||
{{History||1.5|Rain was added.}} |
{{History||1.5|Rain was added.}} |
||
| Line 338: | Line 224: | ||
{{History||1.8|Players can find the current map seed by pressing {{key|F3}}.|Some biomes were changed, added, or removed.|Animals spawn on world generation, and don't spawn randomly as much.|The Far Lands were "accidentally" fixed.<ref name="notch_blog"/>}} |
{{History||1.8|Players can find the current map seed by pressing {{key|F3}}.|Some biomes were changed, added, or removed.|Animals spawn on world generation, and don't spawn randomly as much.|The Far Lands were "accidentally" fixed.<ref name="notch_blog"/>}} |
||
{{History|r}} |
{{History|r}} |
||
| − | {{History||1.0.0|snap=Beta 1.9-pre4|The |
+ | {{History||1.0.0|snap=Beta 1.9-pre4|The compass needle and the clock will spin randomly within [[the End]] and [[the Nether]].}} |
{{History||1.2.1|snap=12w07a|New maps have a height of 256 thanks to the new Anvil level format.}} |
{{History||1.2.1|snap=12w07a|New maps have a height of 256 thanks to the new Anvil level format.}} |
||
{{History||1.6.1|snap=13w17a|[[Desert]] biomes do not generate large pools of water anymore}} |
{{History||1.6.1|snap=13w17a|[[Desert]] biomes do not generate large pools of water anymore}} |
||
| − | {{History||1.7.2 |
+ | {{History||1.7.2|snap=13w36a|Cave Generation was tweaked, making caves less dense and interconnected.<ref>http://www.minecraftforum.net/topic/1981051-it-seems-that-the-underground-is-no-longer-swiss-cheese-anymore/page__hl__cave%20generation%20swiss%20cheese</ref> |
|New biomes were added and some old biomes were changed.}} |
|New biomes were added and some old biomes were changed.}} |
||
{{History|||snap=13w37a|An invisible barrier at 30,000,000 blocks was added. This removed the last remnants of the [[Far Lands]].}} |
{{History|||snap=13w37a|An invisible barrier at 30,000,000 blocks was added. This removed the last remnants of the [[Far Lands]].}} |
||
| Line 347: | Line 233: | ||
== Trivia == |
== Trivia == |
||
| + | |||
| − | * If someone made a 1:1 (1 block = 1 meter) scale version of the Earth, its area would be 510,000,000,000,000 blocks. Assuming the map is only one block deep and takes 1 byte/block, we get approximately 475,000GB, or 464TB. |
||
| + | * If someone made a 1:1 (1 block = 1 meter) scale version of the Earth, its area would be 510,900,000,000,000 blocks. Assuming the map is only one block deep and takes 1 byte/block, we get approximately 475,800 GB, or 464.7 TB. A Moon-sized map would be made of 37,950,000,000,000 blocks and would take 35,340 GB, or 34.52 TB. |
||
| − | * 461 quadrillion (4.608x10<sup>17</sup>) blocks would fit in a Minecraft world assuming that it spreads from 30,000,000 to -30,000,000. |
||
| + | * 921.6 quadrillion (9.216x10<sup>17</sup>) blocks would fit in a ''Minecraft'' world assuming that it spreads from 30,000,000 to -30,000,000. |
||
| − | * A Minecraft world is theoretically bigger than the earth, but in practice, an Earth-sized map would be large enough to overwhelm almost any consumer-grade computer. Indeed, nearly all structures ''within'' Minecraft, such as strongholds, villages, and mountains, are much smaller than a realistic version would be. The same applies even on larger scales such as biomes, landmasses, oceans, and the vertical space between bedrock and the "sky" (approximated by the build limit) . |
||
| + | * A ''Minecraft'' world is theoretically bigger than the earth, but in practice, an Earth-sized map would be large enough to overwhelm almost any consumer-grade computer. Indeed, nearly all structures within ''Minecraft'', such as strongholds, villages, and mountains, are much smaller than a realistic version would be. The same applies even on larger scales such as biomes, landmasses, oceans, and the vertical space between bedrock and the "sky" (approximated by the build limit). However, some small items, such as [[anvil]]s, are bigger than in real life. |
||
== See also == |
== See also == |
||
| + | |||
| − | *[[The Nether]] |
||
| − | *[[ |
+ | * [[Sky Dimension]] |
| − | *[[ |
+ | * [[The Void]] |
| − | *[[The Void]] |
||
| − | *[[Far Lands]] |
||
== References == |
== References == |
||
| + | |||
{{Reflist}} |
{{Reflist}} |
||
| + | |||
{{Environment}} |
{{Environment}} |
||
[[Category:Dimensions]] |
[[Category:Dimensions]] |
||
| − | [[Category:Environment]] |
||
| − | [[de:Oberwelt]] |
+ | [[de:Die Oberwelt]] |
| − | [[es:Mundo |
+ | [[es:Mundo real]] |
[[fr:La Surface]] |
[[fr:La Surface]] |
||
[[hu:Térkép]] |
[[hu:Térkép]] |
||
[[it:Mondo principale]] |
[[it:Mondo principale]] |
||
| − | [[ |
+ | [[ko:오버월드]] |
| + | [[nl:De Bovenwereld]] |
||
[[pl:Świat (wymiar)]] |
[[pl:Świat (wymiar)]] |
||
[[ru:Игровой мир]] |
[[ru:Игровой мир]] |
||
Revision as of 22:16, 6 February 2015
The Overworld, as seen in an extreme hills biome
The Overworld is the starting dimension in Minecraft. As with all dimensions in the game, the Overworld can generate infinitely. The Overworld is limited to 862 by 862 blocks on the Xbox 360 and PlayStation 3 Edition, and 256 by 256 blocks on Old Pocket Edition worlds. At the edge of the Overworld, there is an animated world border. Nether portals in the Overworld can be used to teleport to the Nether.
The Overworld encompasses the level ceiling down to bedrock and extending in every direction on the horizontal plane. It is generated through a secret process which creates multiple noise maps to create differing elevations, general chunk shapes, and complex mountain and cave systems.
Most mobs in the game can appear in the Overworld: wolves, bats, pigs, sheep, cows, horses, mooshrooms, chickens, chicken jockeys, squid, zombies, ocelots, skeletons, spiders, villagers, spider jockeys, witches, endermen, creepers and slimes all spawn normally. Zombie pigmen can also spawn near nether portals.
Mobs from the Nether may also pass through nether portals and enter the Overworld: zombie pigmen, magma cubes, wither skeletons, ghasts, and blazes (mobs from the Overworld can also enter the Nether through a nether portal). The ender dragon however can't enter the Overworld because there is no return portal from the End unless the dragon is defeated.
While less dangerous than the Nether, the Overworld is still, nonetheless, a relatively hostile dimension, mostly due to monsters that roam the darkness of caves and outside at night, and the common hazards ranging from falling from great heights to the near-lethal lava found underground or in lava lakes on the surface. Also, living humans are a very rare sight, these "humans" can refer to the players that are trying to survive day by day, and villagers, who live in villages.
Seeds
Worlds in Minecraft are generated through a procedural formula that takes a random number as a starting point - a seed, and it will be used to generate all the terrain.
Using a specific seed generates exactly the same world each time, and thus interesting Minecraft worlds could be shared between players. The spawn is not on exactly the same spot, though, so it is wise to give coordinates instead of directions. The seed input is converted into an integer, so, for instance, the word 'Glacier' corresponds to a value of 1772835215, which generates exactly the same world when entered as a seed value.
Many seeds are chosen simply because they spawn the player near desirable resources, a stronghold or some certain special structure, such as a dungeon. Players often like to find seeds with other very important generated structures such as abandoned mine shafts (possibly for the melon seeds and cobwebs) and villages (perhaps for a surplus of wheat, potatoes, and/or carrots, and for the open possibility of trading with villagers.). While strongholds have a minimum distance from the origin, a seed could also be chosen for a relatively close one. Seeds can also be chosen for useful biomes near the spawn point; notably, a Mushroom Island biome provides a large sanctuary from monsters, even underground. Other particularly useful biomes includes jungle (wood, cats), desert (villages, sand, open line-of-sight), Mesa (stained clay), taiga (wolves, snow), Swampland (aboveground slimes), and extreme hills (emerald ores). Players can find the current map seed by entering the /seed command.
Sizes
In Classic and Indev, maps can be generated in "small" (128×128×64), "normal" (256×256×64), and "huge" (512×512×64) sizes.
In Infdev, Alpha and Beta, maps are somewhat infinitely big − They are made up of chunks; this means that as the player explores the map distant chunks are generated automatically, leading to theoretically infinite maps. In practice, technical reasons (the limits of 32-bit math[1]) force the maximum map size, including the Far Lands, to be around 9.3 million times the surface area of Earth [1], which comes out to about 4.7 quadrillion km2 (The hard limit where chunks are overwritten is at X/Z of ±34,359,738,368, making the world at most 68,719,476,736 meters wide and long, which is about 4,722,366,482,869,645 km2. When compared to Earth's total surface area, 510,072,000 km2, this works out to be about 9,258,235 times that). Whilst the horizontal planes of the maps are vast in size, the vertical plane remains at a fixed (soft limit) 256-block height [2].
Map limitation
Visual cutoff point of a Minecraft map (Left is normal Minecraft generation, the right is after limitation.)
While the map is infinite, the number of blocks the player may walk on is limited. The map contains a world border at +/- 30,000,000 x/z. The world border is an animated wall of blue stripes. As you get near it, the edges of your screen turn red, and you can not go past it. There is nothing past 16 blocks after the wall, just emptiness.
Because of these limitations the maximum blocks that can be generated in a world is approximately 921,600,000,000,000,000. This means that a filled world with no entities or tile entities would be 3,686,400,000,000,000,000 bits (409.27261579781770706 Petabytes) in block data alone due to the fact that each standard block is assigned 4 bits of information.
Generation
Generated blocks
Naturally generated
Naturally Generated includes blocks that are created through the world seed.
| Name | Identifier |
|---|---|
| ? | ? |
| ? | ? |
| ? | ? |
| ? | ? |
| ? | ? |
| ? | ? |
| ? | ? |
| ? | ? |
| ? | ? |
| ? | ? |
| ? | ? |
| ? | ? |
| ? | ? |
| ? | ? |
| ? | ? |
| ? | ? |
| ? | ? |
| ? | ? |
| ? | ? |
| ? | ? |
| ? | ? |
| ? | ? |
| Name | Identifier |
|---|---|
| ? | ? |
| ? | ? |
| ? | ? |
| ? | ? |
| ? | ? |
| ? | ? |
| ? | ? |
| ? | ? |
| ? | ? |
| ? | ? |
| ? | ? |
| ? | ? |
| ? | ? |
| ? | ? |
| ? | ? |
| ? | ? |
| ? | ? |
| ? | ? |
| ? | ? |
| ? | ? |
| ? | ? |
| ? | ? |
Naturally created
Naturally created means a combination of events that cause a new block to be placed by natural causes, not the player. Some of these blocks may also be created as part of world generation.
| Name | Identifier |
|---|---|
| ? | ? |
| ? | ? |
| ? | ? |
| ? | ? |
| ? | ? |
| ? | ? |
| ? | ? |
| ? | ? |
| Name | Identifier |
|---|---|
| ? | ? |
| ? | ? |
| ? | ? |
| ? | ? |
| ? | ? |
| ? | ? |
| ? | ? |
| ? | ? |
Structures
Same as naturally generated, but these blocks are only created with the "Generate Structures" option enabled.
| Name | Identifier |
|---|---|
| ? | ? |
| ? | ? |
| ? | ? |
| ? | ? |
| ? | ? |
| ? | ? |
| ? | ? |
| ? | ? |
| ? | ? |
| ? | ? |
| ? | ? |
| ? | ? |
| ? | ? |
| ? | ? |
| Name | Identifier |
|---|---|
| ? | ? |
| ? | ? |
| ? | ? |
| ? | ? |
| ? | ? |
| ? | ? |
| ? | ? |
| ? | ? |
| ? | ? |
| ? | ? |
| ? | ? |
| ? | ? |
| ? | ? |
| ? | ? |
| Name | Identifier |
|---|---|
| ? | ? |
| ? | ? |
| ? | ? |
| ? | ? |
| ? | ? |
| ? | ? |
| ? | ? |
| ? | ? |
| ? | ? |
| ? | ? |
| ? | ? |
| ? | ? |
| ? | ? |
Chunks
Chunks are the method used by Notch to divide maps into manageable pieces. They are 16 blocks wide, 16 blocks long, and 256 blocks high, each containing 65,536 blocks. By adjusting the render distance, differing numbers of chunks will be loaded into memory, ranging from 25 to 1089. Only chunks which have been loaded may experience activity such as spawning, despawning, growth, fluid movement, or player interaction. Upon reaching the required distance away from a chunk, it will be unloaded from the memory, however not deleted. Thus, upon re-entering that area, Minecraft will reload the chunk(s).
Biomes
The Overworld is also subdivided into biomes. What biome you are in determines the physical aspects of the land above ground and can entirely change its appearance. It also influences which mobs may spawn and affects the behavior of the weather. Biomes may have varying sizes, and each has its own features. For example, a forest biome will have large quantities of trees, and a snow biome will have much snow and ice.
Natural structures
The Overworld is able to seamlessly create new areas by using patterns found in the surrounding chunks and extend those into the newly created chunk. These patterns, while unique to each world, can be categorized easily by comparing them to a real-world equivalent, such as cliffs or oceans. While Minecraft is based on landforms found on earth, impossible formations, such as floating islands, can be found throughout the Overworld.
The Overworld can be navigated by use of the position of the sun and the moon, and the movement of the clouds and the stars. All of these rise in the east and go west.
Tools used for navigating the Overworld include the compass and map. The compass points to the world spawn point (sleeping in a bed does not change the compass operation), and the map displays an area around where it was made, and shows an overview at various scales depending on its zoom factor. In the Nether and the End, maps are much less useful.
The F3 key toggles a debug console which shows the player their absolute coordinates, where the X and Z coordinates show longitude and latitude, and the Y coordinate shows height, where Y=63 corresponds to sea level. The 'f' value indicates the direction the player is facing.
Day and night
The Overworld is the only dimension with a day/night cycle. During the daytime, the sun acts as a light source. This light is strong enough to kill zombies, and skeletons, make endermen teleport away from the player and also makes spiders neutral. The only mobs that survive and stay hostile in the daylight are creepers and slimes. At night time the moon is the only natural light source. However, it provides little light, allowing hostile mobs to spawn.
Far Lands
Difference between >30,000,000 and <30,000,000.
The Far Lands used to be an area that formed the "edge" of the "infinite" map, but was later removed from a patch on Beta 1.8 due to the change in the terrain generation code. When players made it to the Far Lands, they experienced an excessive amount of lag and the world became severely distorted.
According to Notch, this distortion could be fixed, but since no one was likely to make it to the Far Lands without some form of cheating, he says that he was likely not going to fix it.
In Beta 1.8, instead of a distorted land, there is a seemingly endless ocean. Normal terrain only starts to generate beyond the actual edges of the world.
As of 1.7.2, the player can not go past 30,000,000 in any direction. This was added by placing an invisible bedrock-like wall at 30,000,000 blocks from the center of the map in each direction.
In 1.8, a visible, animated wall can be seen, stopping all entities from passing through.
History
In addition to this, as new features get added, they will change Overworld generation.
| inf | ||||||||||||||||||||||||||||||||||||||||||||||||||||||||||||||||||||||||||||||||||||||||||||||||||||||||||||||
|---|---|---|---|---|---|---|---|---|---|---|---|---|---|---|---|---|---|---|---|---|---|---|---|---|---|---|---|---|---|---|---|---|---|---|---|---|---|---|---|---|---|---|---|---|---|---|---|---|---|---|---|---|---|---|---|---|---|---|---|---|---|---|---|---|---|---|---|---|---|---|---|---|---|---|---|---|---|---|---|---|---|---|---|---|---|---|---|---|---|---|---|---|---|---|---|---|---|---|---|---|---|---|---|---|---|---|---|---|---|---|
February 27, 2010{{Extension DPL}}<ul><li>[[Melon Slice|Melon Slice]]<br/>{{Dungeons hatnote|type=consumable|Melon}}
{{Item
| title = Melon Slice
|typeimage=Melon Slice.png
| renewable = Yes
| heals = {{hunger|2}}
| stackable = Yes (64)
}}
A '''melon slice'''{{efn|Known as '''Melon Slice''' {{in|java}} and '''Melon''' {{in|bedrock}}.}} is a [[food]] item that can be eaten by the [[player]].
== Obtaining ==
=== Block loot ===
{{see also|Tutorials/Pumpkin and melon farming|title1 = Pumpkin and melon farming}}
Melon slices can be obtained by breaking (harvesting) [[melon]]s using any [[tool]] or by hand. [[Axe]]s, followed by [[sword]]s, are the fastest tools for harvesting melons. A melon drops 3–7 melon slices, when broken; by hand, using a [[tool]], or after being broken by the movement of a [[piston]], with an average of 4.64 slices per melon.
Breaking a melon with a tool enchanted with [[Fortune]] increases the potential number of drops by 1 slice per level, up to a maximum of 9 slices.
== Usage ==
=== Food ===
{{see also|Tutorials/Hunger management|title1=Hunger management}}
To eat a melon slice, press and hold {{control|use}} while it is selected in the hotbar. Eating one restores {{hunger|2}} [[hunger]] and 1.2 hunger
[[Hunger#Mechanics|saturation]].
=== Crafting ingredient ===
{{crafting usage}}
=== Composting ===
Placing a melon slice into a [[composter]] has a 50% chance of raising the compost level by 1.
==Sounds==
{{Sound table/Entity/Food}}
== Data values ==
=== ID ===
{{edition|java}}:
{{ID table
|edition=java
|showforms=y
|generatetranslationkeys=y
|displayname=Melon Slice
|spritetype=item
|nameid=melon_slice
|form=item
|foot=1}}
{{edition|bedrock}}:
{{ID table
|edition=bedrock
|showaliasids=y
|shownumericids=y
|showforms=y
|notshowbeitemforms=y
|generatetranslationkeys=y
|spritename=melon-slice
|displayname=Melon
|spritetype=item
|nameid=melon_slice
|aliasid=melon
|id=272
|form=item
|translationkey=item.melon.name
|foot=1}}
== Advancements ==
{{load advancements|Husbandry;A Balanced Diet}}
== History ==
{{History|java beta}}
{{History||1.8|snap=Pre-release|[[File:Melon Slice JE1 BE1.png|32px]] Added melons.}}
{{History|java}}
{{History||1.0.0|snap=Beta 1.9 Prerelease 4|Melons are now used in the [[crafting]] recipe of [[glistering melon]]s.}}
{{History|||snap=Beta 1.9 Prerelease 5|Melons once again drop the correct number of slices.}}
{{History||1.3.1|snap=12w21a|Melons can now be [[trading|bought]] from farmer [[villager]]s, at 5–8 melon slices for 1 [[emerald]].}}
{{History||1.7.2|snap=13w37a|Block ID 105, [[melon stem]], has been removed from the {{cmd|give}} [[commands|command]].}}
{{History||1.8|snap=14w02a|[[Villager]]s no longer [[trading|sell]] melons. They now buy [[melon]]s instead.}}
{{History||1.13|snap=17w47a|Prior to [[1.13/Flattening|''The Flattening'']], this [[item]]'s numeral ID was 360.}}
{{History|||snap=18w20b|"Melon" has been renamed to "Melon Slice."
|The ID of melon slices has been changed from <code>melon</code> to <code>melon_slice</code>.}}
{{History||1.14|snap=18w43a|[[File:Melon Slice JE2 BE2.png|32px]] The texture of melon slices has been changed.}}
{{History|||snap=19w03a|Placing a melon slice into the new [[composter]] has a 20% chance of raising the compost level by 1.}}
{{History|||snap=19w05a|Melon slices now have a 50% chance of increasing the compost level in a composter by 1.}}
{{History|pocket alpha}}
{{History||v0.5.0|[[File:Melon Slice JE1 BE1.png|32px]] Added melons.
|Melons restore {{health|2}} each, rather than {{hunger|2}}.}}
{{History||v0.12.1|snap=?|Added Melon slice to the Creative inventory.}}
{{History|||snap=build 1|Melons now restores [[hunger]] instead of [[health]].
|Melons can no longer be obtained from [[nether reactor]]s.}}
{{History|pocket}}
{{History||1.1.0|snap=alpha 1.1.0.3|[[Breaking]] a [[melon]] with [[shears]] now always yields 9 melons.}}
{{History|bedrock}}
{{History||1.10.0|snap=beta 1.10.0.3|[[File:Melon Slice JE2 BE2.png|32px]] The texture of melons has been changed.}}
{{History||1.11.0|snap=beta 1.11.0.1|Melons can now be used to fill up [[composter]]s.}}
{{History|||snap=beta 1.11.0.4|Melons can now be [[trading|sold]] to farmer [[villager]]s.}}
{{History||1.16.0|snap=beta 1.16.0.57|[[Trading]] has been changed, melon slices can no longer be sold to farmer villagers.}}
{{History||1.16.100|snap=beta 1.16.100.56|The ID of melon slices has been changed from <code>melon</code> to <code>melon_slice</code>.}}
{{History|console}}
{{History||xbox=TU5|xbone=CU1|ps=1.0|wiiu=Patch 1|[[File:Melon Slice JE1 BE1.png|32px]] Added melons.}}
{{History||xbox=none|xbone=none|ps=1.90|wiiu=none|switch=none|[[File:Melon Slice JE2 BE2.png|32px]] The texture of melons has been changed.}}
{{History|new 3ds}}
{{History||0.1.0|[[File:Melon Slice JE1 BE1.png|32px]] Added melons.}}
{{History|foot}}
== Issues ==
{{issue list}}
== See also ==
* [[Pumpkin]]
* [[Glistering Melon Slice]]
== Notes ==
{{fnlist}}
{{Items}}
[[Category:Plants]]
[[cs:Meloun]]
[[de:Melone]]
[[es:Rodaja de sandía]]
[[fr:Tranche de pastèque]]
[[hu:Dinnye Szelet]]
[[ko:수박]]
[[nl:Meloenschijf]]
[[pl:Arbuz]]
[[pt:Fatia de melancia]]
[[ru:Ломтик арбуза]]
[[zh:西瓜片]]
[[Category:Food]]
[[Category:Renewable resources]]</li><li>[[Camera|Camera]]<br/>{{about|the entity|the command|commands/camera}}
{{exclusive|edu}}
{{unobtainable|edition=be}}
{{ItemEntity
|imagesize=80px
|renewable=No
|stackable=Yes (64)
|health={{hp|4}}
|image=Camera.png}}
{{Block
| title = Camera Block
| image = Camera (block).png
| invimage = none
| transparent = No
| light = 0
| tool = any
| stackable = Yes (64)
| flammable = No
| lavasusceptible = No
| renewable = No
}}
The '''camera''' is an [[entity]] that is capable of capturing and storing images. {{IN|edu}}, it works together with the [[portfolio]] item to create collections of [[photo]]s.<ref>https://education.minecraft.net/support/knowledge-base/using-cameras-portfolios/</ref>
== Obtaining ==
The camera can be obtained in the [[Creative inventory]] in ''Minecraft Education''. It can be obtained either by NBT editors, inventory editors, or glitches in Bedrock Edition.
To get the block form of the camera in Bedrock Edition using an NBT editor, you need to set the item name of the block in the inventory slot (<code>name:</code> ) to <code>item.camera</code>, then you need to add a compound tag called <code>Block</code> and inside of that put the int tag <code>version: 18040335</code> and the text tag <code>name: minecraft:camera</code> into the block compound tag. For the usable "[[spawn egg]]" form of the camera, you only need to set the item name of the block in the inventory slot (<code>name:</code> ) to <code>camera</code>; you do not need to add the block compound for this form of the camera.
== Usage ==
Using a camera from the [[inventory]] captures a first-person screenshot. It can also be placed, creating a camera [[entity]] that can track the user, and take pictures from the camera's perspective. Photos that are taken using the camera appear in the [[portfolio]].
Close-up snapshots of an [[item]] on the ground can be taken by holding the Shift key while right-clicking.
Photos that are taken with the camera block are stored in <code>%localappdata%\Packages\MinecraftUWP_8wekyb3d8bbwe\LocalState\screenshots</code>.
== Sounds ==
=== Generic ===
{{Sound table/Block/Normal/BE}}
=== Unique ===
{{Sound table
|sound=Camera1.ogg
|sound2=Camera2.ogg
|sound3=Camera3.ogg
|type=bedrock
|description=When a picture is taken with a camera
|source=Players
|id=camera.take_picture
|volume=1.0
|pitch=1.0
|foot=1}}
== Data values ==
=== ID ===
{{ID table
|edition=bedrock
|firstcolumnname=Camera
|shownumericids=y
|showforms=y
|generatetranslationkeys=y
|displayname=Block
|spritename=camera
|spritetype=block
|nameid=camera
|id=242
|form=block
|itemform=item.camera}}
{{ID table
|displayname=Item
|spritename=camera
|spritetype=item
|translationtype=item
|nameid=camera
|id=593
|form=item
|foot=1}}
{{ID table
|edition=bedrock
|firstcolumnname=Camera
|shownumericids=y
|generatetranslationkeys=y
|displayname=Entity
|spritename=camera
|spritetype=entity
|nameid=tripod_camera
|id=62
|foot=1}}
=== Entity data ===
See [[Bedrock Edition level format/Entity format]].
== Video ==
{{yt|1XLRGFibFNQ}}
== History ==
{{History|pocket alpha}}
{{History||v0.1.0|[[File:Camera BE1.png|50px]] [[File:Camera (item texture) BE1.png|32px]] The textures and model of the camera can be found in the game apk file.<ref name="found">[{{Reddit|jkkmr/found_image_file_for_camera_in_minecraft_portable}} Reddit - Found image file for camera in Minecraft Portable Edition Demo APK file.]</ref><ref>https://web.archive.org/web/20160604161800/https://twitter.com/Kappische/status/103548954368679936</ref>}}
{{History||v0.2.0|[[File:Camera BE2.png|50px]] [[File:Music Disc Blocks JE1 BE1.png|32px]] Added cameras
|Changed item and tripod textures.
|To use a camera, equip it in the [[player]]'s hand, then look in the direction the player wants the picture to be taken. Long-press the screen, and a camera [[drops]] to the ground where the player are standing. Step back, then press on the camera until it starts emitting smoke [[particles]]. The smoke means a picture has been taken, and the camera may disappear immediately afterward.
|Cameras have infinite uses.
|Entity id 62 and item id 456.<ref>https://www.minecraftforum.net/topic/1233138-i-found-the-camera-id/</ref>}}
{{History||v0.5.0|The camera is now invisible and makes the standard player [[damage]] [[sound]].}}
{{History||v0.7.0|Added the "F1" feature (Hide GUI), which has now made the camera obsolete.}}
{{History||v0.8.0|snap=build 2|[[File:Egg JE1 BE1.png|32px]] Item form now uses [[egg]] texture.}}
{{History||v0.9.0|snap=build 1|The camera [[entity]] has been removed. [[Tommaso]] also stated: ''"It doesn't mean that it's dead forever, in fact I have a lot of ideas for it! I think it will be back when have [[shader]]s, sharing and [[redstone]]."''<ref>{{Reddit|sub=MCPE|281sep/camera|ci6znr8}}</ref>}}
{{History||v0.14.0|snap=build 1|[[File:Camera BE3.png|32px]] [[File:Camera (item) BE2.png|32px]] Re-added the camera. It is accessible only with [[inventory]] editors.
|In this version, if the player spawns a camera, leaves the [[world]] and joins back, it summons [[lightning]].}}
{{History||v0.14.2|The camera [[item]] ID has been changed to 498, but it cannot be used at the moment. The [[entity]] can now be spawned with a [[spawn egg]] with a [[damage]] value of 62.
|According to the language files of the game, the empty label that shows up whenever hovering a finger to a camera would now say "Take Picture". However, the button doesn't do anything.}}
{{History||v0.15.0|snap=build 1|The previous empty label on the camera mentioned above now displays the words "Take Picture".
|The [[health]] of the camera [[entity]] is now {{hp|2}} instead {{hp|4}}.
|The camera no longer summons [[lightning]].}}
{{History||v0.16.0|snap=build 1|The camera now has a [[block]] form in [[inventory]], but still spawns the entity. However, the block can be placed only with [[commands]] and editing.
|"Take picture" button on the camera works now, but no image files are created.
|The oldest ID for camera (456) now refers to [[portfolio]].}}
{{History|||snap=build 2|[[File:Camera Block.png|32px]] The camera now has an [[item]] form and the [[block]] has been removed. However, it is still obtainable in servers.
|[[Portfolio]], which works together with the camera to create collections of pictures, has been removed.}}
{{History|||snap=build 4|Camera item form has been removed, and the camera can no longer be obtained or placed using any [[commands|command]].}}
{{History|bedrock}}
{{History||1.8.0|snap=beta 1.8.0.8|[[File:Camera BE3.png|32px]] [[File:Camera Block.png|32px]] The camera has been reimplemented.
|The camera [[entity]] can now be spawned with a [[spawn egg]] with [[damage]] value 258.}}
{{History||1.12.0|snap=beta 1.12.0.2|The camera can now be obtained with the {{cmd|give}} [[commands|command]].}}
{{History||1.13.0|snap=beta 1.13.0.1|The camera can no longer be obtained with the {{cmd|give}} command.
|Functionality has been added to the camera. Screenshots that are taken by the camera can now be saved into the {{cd|screenshots}} folder.
|Cameras are now a part of the {{el|ee}} toggle as a hidden feature.
|Cameras no longer have a [[death]] animation when killed by the [[player]] and instead, instantly emit smoke [[particles]].}}
{{History||1.16.100|snap=beta 1.16.100.50|The camera can now be obtained with the {{cmd|give}} [[commands|command]] once again.}}
{{History|||snap=beta 1.16.100.55|The camera can no longer be obtained with the {{cmd|give}} command.}}
{{History|education}}
{{History||1.0|[[File:Camera BE3.png|32px]] [[File:Camera Block.png|32px]] Added cameras.}}
{{History||1.4.0|Cameras no longer have a [[death]] animation when killed by the [[player]] and instead instantly emit smoke [[particles]].}}
{{History|foot}}
=== Future ===
At the Minecraft [[Pocket Edition]] panel at [[MineCon 2012]], as well as one of [[Johan Bernhardsson|Jbernhardsson]]'s livestreams, it was stated that future plans include trying to have a proper use for cameras, perhaps an easier way to take screenshots and share them with others.<ref>{{ytl|YMhyX_lKWV4}}</ref> In the BlockTalk Q&A, the camera was briefly mentioned as part of a broader "sharing" theme planned for {{el|be}} in the future.<ref>{{ytl|Ruf6tvqsD84}}</ref>
It later got implemented into {{el|ee}}, using the camera to make screenshots and share them in a special book.
== Issues ==
{{Issue list}}
== Trivia ==
* A camera prevents a [[Book and Quill]] from working. Attempting to craft it or obtain it by commands gives a regular book instead, due to non-implementation of photo attaching to written books.
* The camera can take a screenshot, which appears a bit smaller with a thick paper outline having cuts on its edges, making it look like an old photograph.
* This feature is hidden from the Creative inventory and from the /give command item menu.
== Gallery ==
<gallery>
PEcameras030.jpg|A row of cameras, as seen in [[Pocket Edition v0.3.0 alpha|v0.3.0]].
PEcameraphoto.jpg|Example image taken by the camera [[entity]].
CameraUse-1.png|The first method of using cameras.
CameraUse-2.png|The second method of using cameras.
Dinnerbone Camera.png|A camera spawned using a [[spawn egg]] named "[[Dinnerbone]]" in the v0.15.0 beta.
Cam2.png|A camera falling from a [[tree]]. This shows that cameras are entities.
Education Edition Exclusive Features.png|The camera and camera block placed in a world along with other Education Edition features.
Screenshot by camera.jpg|An example of the screenshot taken by a camera in [[Bedrock Edition beta 1.13.0.1|beta 1.13.0.1]].
File:Say Cheese.jpeg|[[Steve]], [[Alex]], [[Jesse]], and an [[Agent]] getting their picture taken.
</gallery>
== See also ==
* [[Portfolio]]
* [[Screenshot]]
== References ==
{{Reflist}}
{{Items}}
{{Entities}}
{{Education Edition}}
[[Category:Education Edition entities]]
[[Category:Education Edition items]]
[[Category:Tools]]
[[cs:Kamera]]
[[de:Kamera]]
[[el:Camera]]
[[es:Cámara]]
[[fr:Appareil photo]]
[[hu:Kamera]]
[[ja:カメラ]]
[[ko:카메라]]
[[nl:Camera]]
[[pl:Kamera]]
[[pt:Câmera]]
[[ru:Камера]]
[[uk:Камера]]
[[zh:相机]]</li></ul> | The world is infinite. Before this, it wasn't. | |||||||||||||||||||||||||||||||||||||||||||||||||||||||||||||||||||||||||||||||||||||||||||||||||||||||||||||
| a | ||||||||||||||||||||||||||||||||||||||||||||||||||||||||||||||||||||||||||||||||||||||||||||||||||||||||||||||
1.0.0{{Extension DPL}}<ul><li>[[Goat Horn|Goat Horn]]<br/>{{redirect|Horn}}
{{Item
| image = Goat Horn JE1 BE1.png
| renewable = Yes
| stackable = No
}}
A '''goat horn''' is an [[item]] dropped by [[goat]]s. It has eight variants, and each plays a unique sound when {{Control|used}} which can be heard by [[Player|players]] in a large radius.
== Obtaining ==
=== Mob loot ===
A horn is dropped when an adult [[goat]] rams a tree or any other hard block that occurs naturally where goats spawn. These include [[stone]], [[coal ore]], [[copper ore]], [[iron ore]], [[emerald ore]], [[log]], or [[packed ice]]. Goats do not ram other solid blocks. {{IN|java}}, these blocks are listed under the {{cd|snaps_goat_horn}} [[tag]], and can be modified by [[data pack]]s.
Up to two horns can be dropped from an adult goat. Regular goats may drop the Ponder, Sing, Seek, and Feel horns, while screaming goats drop the Admire, Call, Yearn, and Dream horns. A specific goat drops only one type of horn; that is, if a goat drops a Sing horn, its other horn is also a Sing horn.
=== Natural generation ===
{{LootChestItem|goat-horn}}
Only the four variants from regular goats can be found here.
== Usage ==
When {{control|used}}, they play a loud sound that can be heard from up to 256 blocks, but are also limited by the server view distance. Each horn variant plays a unique sound. There are eight variants, four of which are exclusive to [[Goat#Spawning|screaming goats]].
There is a cooldown of seven seconds between each use of the horn. All goat horns are affected by this cooldown.
== Sounds ==
=== Generic ===
{{edition|java}}:
{{Sound table
|sound=Goat horn break1.ogg
|sound2=Goat horn break2.ogg
|sound3=Goat horn break3.ogg
|sound4=Goat horn break4.ogg
|subtitle=Goat Horn breaks off
|source=neutral
|description=When a goat's horn breaks off
|id=entity.goat.horn_break
|translationkey=subtitles.entity.goat.horn_break
|volume=0.9
|pitch=1.0
|distance=16
|foot=1}}
{{edition|bedrock}}:
{{Sound table
|type=bedrock
|sound=Goat horn break1.ogg
|sound2=Goat horn break2.ogg
|sound3=Goat horn break3.ogg
|sound4=Goat horn break4.ogg
|description=When a goat's horn breaks off
|source=hostile
|id=mob.goat.horn_break
|volume=1.0
|pitch=1.0
|foot=1}}
=== Playing ===
{{edition|java}}:
{{Sound table
|sound=Goat Horn Call0.ogg
|description="Ponder"
|subtitle=Goat horn plays
|source=Jukebox/Note Blocks
|id=item.goat_horn.sound.0
|translationkey=subtitles.item.goat_horn.play
|volume=16.0
|pitch=1.0
|distance=256}}
{{Sound table
|sound=Goat Horn Call1.ogg
|description="Sing"
|subtitle=Goat horn plays
|source=Jukebox/Note Blocks
|id=item.goat_horn.sound.1
|translationkey=subtitles.item.goat_horn.play
|volume=16.0
|pitch=1.0
|distance=256}}
{{Sound table
|sound=Goat Horn Call2.ogg
|description="Seek"
|subtitle=Goat horn plays
|source=Jukebox/Note Blocks
|id=item.goat_horn.sound.2
|translationkey=subtitles.item.goat_horn.play
|volume=16.0
|pitch=1.0
|distance=256}}
{{Sound table
|sound=Goat Horn Call3.ogg
|description="Feel"
|subtitle=Goat horn plays
|source=Jukebox/Note Blocks
|id=item.goat_horn.sound.3
|translationkey=subtitles.item.goat_horn.play
|volume=16.0
|pitch=1.0
|distance=256}}
{{Sound table
|sound=Goat Horn Call4.ogg
|description="Admire"<ref group=note name=screaming>These are dropped by screaming goats.</ref>
|subtitle=Goat horn plays
|source=Jukebox/Note Blocks
|id=item.goat_horn.sound.4
|translationkey=subtitles.item.goat_horn.play
|volume=16.0
|pitch=1.0
|distance=256}}
{{Sound table
|sound=Goat Horn Call5.ogg
|description="Call"<ref group=note name=screaming/>
|subtitle=Goat horn plays
|source=Jukebox/Note Blocks
|id=item.goat_horn.sound.5
|translationkey=subtitles.item.goat_horn.play
|volume=16.0
|pitch=1.0
|distance=256}}
{{Sound table
|sound=Goat Horn Call6.ogg
|description="Yearn"<ref group=note name=screaming/>
|subtitle=Goat horn plays
|source=Jukebox/Note Blocks
|id=item.goat_horn.sound.6
|translationkey=subtitles.item.goat_horn.play
|volume=16.0
|pitch=1.0
|distance=256}}
{{Sound table
|sound=Goat Horn Call7.ogg
|description="Dream"<ref group=note name=screaming/>
|subtitle=Goat horn plays
|source=Jukebox/Note Blocks
|id=item.goat_horn.sound.7
|translationkey=subtitles.item.goat_horn.play
|volume=16.0
|pitch=1.0
|distance=256
|foot=1}}
{{edition|bedrock}}:
{{Sound table
|type=bedrock
|sound=Goat Horn Call0.ogg
|source=Jukebox/Note Blocks<wbr>{{Until|BE 1.20.40}}<br>Hostile Creatures<wbr>{{Upcoming|BE 1.20.40}}|overridesource=1
|description="Ponder"
|id=horn.call.0
|volume=1.0<wbr><ref group=sound name=nodistance>{{Bug|MCPE-153254}}</ref><wbr>{{Until|BE 1.20.40}}<br>16.0<wbr>{{Upcoming|BE 1.20.40}}
|pitch=1.0}}
{{Sound table
|sound=Goat Horn Call1.ogg
|source=Jukebox/Note Blocks<wbr>{{Until|BE 1.20.40}}<br>Hostile Creatures<wbr>{{Upcoming|BE 1.20.40}}|overridesource=1
|description="Sing"
|id=horn.call.1
|volume=1.0<wbr><ref group=sound name=nodistance/><wbr>{{Until|BE 1.20.40}}<br>16.0<wbr>{{Upcoming|BE 1.20.40}}
|pitch=1.0}}
{{Sound table
|sound=Goat Horn Call2.ogg
|source=Jukebox/Note Blocks<wbr>{{Until|BE 1.20.40}}<br>Hostile Creatures<wbr>{{Upcoming|BE 1.20.40}}|overridesource=1
|description="Seek"
|id=horn.call.2
|volume=1.0<wbr><ref group=sound name=nodistance/><wbr>{{Until|BE 1.20.40}}<br>16.0<wbr>{{Upcoming|BE 1.20.40}}
|pitch=1.0}}
{{Sound table
|sound=Goat Horn Call3.ogg
|source=Jukebox/Note Blocks<wbr>{{Until|BE 1.20.40}}<br>Hostile Creatures<wbr>{{Upcoming|BE 1.20.40}}|overridesource=1
|description="Feel"
|id=horn.call.3
|volume=1.0<wbr><ref group=sound name=nodistance/><wbr>{{Until|BE 1.20.40}}<br>16.0<wbr>{{Upcoming|BE 1.20.40}}
|pitch=1.0}}
{{Sound table
|sound=Goat Horn Call4.ogg
|source=Jukebox/Note Blocks<wbr>{{Until|BE 1.20.40}}<br>Hostile Creatures<wbr>{{Upcoming|BE 1.20.40}}|overridesource=1
|description="Admire"<ref group=note name=screaming/>
|id=horn.call.4
|volume=1.0<wbr><ref group=sound name=nodistance/><wbr>{{Until|BE 1.20.40}}<br>16.0<wbr>{{Upcoming|BE 1.20.40}}
|pitch=1.0}}
{{Sound table
|sound=Goat Horn Call5.ogg
|source=Jukebox/Note Blocks<wbr>{{Until|BE 1.20.40}}<br>Hostile Creatures<wbr>{{Upcoming|BE 1.20.40}}|overridesource=1
|description="Call"<ref group=note name=screaming/>
|id=horn.call.5
|volume=1.0<wbr><ref group=sound name=nodistance/><wbr>{{Until|BE 1.20.40}}<br>16.0<wbr>{{Upcoming|BE 1.20.40}}
|pitch=1.0}}
{{Sound table
|sound=Goat Horn Call6.ogg
|source=Jukebox/Note Blocks<wbr>{{Until|BE 1.20.40}}<br>Hostile Creatures<wbr>{{Upcoming|BE 1.20.40}}|overridesource=1
|description="Yearn"<ref group=note name=screaming/>
|id=horn.call.6
|volume=1.0<wbr><ref group=sound name=nodistance/><wbr>{{Until|BE 1.20.40}}<br>16.0<wbr>{{Upcoming|BE 1.20.40}}
|pitch=1.0}}
{{Sound table
|sound=Goat Horn Call7.ogg
|source=Jukebox/Note Blocks<wbr>{{Until|BE 1.20.40}}<br>Hostile Creatures<wbr>{{Upcoming|BE 1.20.40}}|overridesource=1
|description="Dream"<ref group=note name=screaming/>
|id=horn.call.7
|volume=1.0<wbr><ref group=sound name=nodistance/><wbr>{{Until|BE 1.20.40}}<br>16.0<wbr>{{Upcoming|BE 1.20.40}}
|pitch=1.0
|foot=1}}
== Data values ==
=== ID ===
{{el|je}}:
{{ID table
|edition=java
|showforms=y
|generatetranslationkeys=y
|displayname=Goat Horn
|spritetype=item
|nameid=goat_horn
|form=item
|foot=1}}
{{el|be}}:
{{ID table
|edition=bedrock
|shownumericids=y
|showforms=y
|notshowbeitemforms=y
|generatetranslationkeys=y
|displayname=Goat Horn
|spritetype=item
|nameid=goat_horn
|form=item
|id=624
|translationkey=item.goat_horn.name, item.minecraft.goat_horn.sound.0, item.minecraft.goat_horn.sound.1, item.minecraft.goat_horn.sound.2, item.minecraft.goat_horn.sound.3, item.minecraft.goat_horn.sound.4, item.minecraft.goat_horn.sound.5, item.minecraft.goat_horn.sound.6, item.minecraft.goat_horn.sound.7
|foot=1}}
=== Item data ===
==== ''Java Edition'' ====
<div class="treeview">
*{{nbt|compound|tag}}: The item's '''tag''' tag.
{{:Player.dat_format/Goat Horn}}
</div>
Goat horns use the "instrument" tag to control which sound can be played when using a goat horn. The values of the tag (to be prefixed with <code>minecraft:</code>) are:
{| class="wikitable sortable" style="text-align: center;"
!Sound type !![[Resource location|Identifier]]
|-
|Ponder||<code>ponder_goat_horn</code>
|-
|Sing ||<code>sing_goat_horn</code>
|-
|Seek ||<code>seek_goat_horn</code>
|-
|Feel ||<code>feel_goat_horn</code>
|-
|Admire||<code>admire_goat_horn</code>
|-
|Call ||<code>call_goat_horn</code>
|-
|Yearn||<code>yearn_goat_horn</code>
|-
|Dream||<code>dream_goat_horn</code>
|}
== History ==
{{History||October 16, 2021|link=https://www.twitch.tv/videos/1178420217?t=02h46m05s|Ulraf, a game developer on ''Minecraft'', states that goat horns are not included in [[Java Edition 1.18]].}}
{{History||November 17, 2021|link=https://www.minecraft.net/en-us/article/caves---cliffs-update-part-ii-coming|Goat horns are initially announced to be added after "The Wild Update".}}
{{History|java}}
{{History||1.19|snap=22w17a|[[File:Goat Horn JE1 BE1.png|32px]]Added goat horns.}}
{{History||1.19|snap=Pre-release 2|Goat Horns now snap when a goat rams into [[copper ore]].<ref>{{bug|MC-250941|||Fixed }}</ref>}}
{{History|Bedrock}}
{{History||Caves & Cliffs<br>(experimental)|link=Caves & Cliffs|snap=beta 1.16.200.52|[[File:Goat Horn JE1 BE1.png|32px]]Added goat horns behind the "Caves and Cliffs" experimental toggle.}}
{{History|||snap=beta 1.16.210.51|Goats now drop 2 horns each.}}
{{History|||snap=beta 1.17.20.20|Baby goats no longer drop horns.}}
{{History||1.18.0|snap=beta 1.18.0.20|Goat horns are now available outside of experimental gameplay.}}
{{History|||snap=beta 1.18.0.22|Goat horns have been moved behind the "Vanilla Experiments" [[experimental gameplay|experiments]] toggle.}}
{{History||Vanilla Experiments (experimental)|link=Experimental Gameplay|snap=beta 1.18.20.23|Goat horns now have a cooldown after being used.}}
{{History|||snap=beta 1.18.20.25|Goat horns now have an animation when being used in first person.
|Goats now make a sound when they drop goat horns.}}
{{History|||snap=beta 1.18.30.26|Goat horns are now used to craft [[copper horn]]s.|Changed goat horn sounds.}}
{{History||Vanilla Experiments (experimental)|link=Experimental Gameplay|snap=beta 1.19.0.24|Goat horns are no longer used to craft copper horns, as copper horns have been removed.|Changed goat horn sounds.{{verify}}|Removed "Fly" and "Dream" goat horns.}}
{{History||1.19.0|snap=beta 1.19.0.28|Goat horns are now available without enabling experimental gameplay.}}
{{History||1.19.10|snap=beta 1.19.10.22|Renamed the "Resist" goat horn to the "Dream" goat horn to match ''Java Edition''.|The "Feel" goat horn now plays the same sound as ''Java Edition''.}}
{{History|upcoming bedrock}}
{{History||1.20.40|snap=beta 1.20.40.22|Goat horns now have a range of 256 blocks.<ref name=nodistance>{{Bug|MCPE-153254}}</ref>}}
{{History|foot}}
== Issues ==
{{issue list}}
== Trivia ==
* The "seek" horn sounds similar to the "ominous horn" that announces a [[raid]].
== Gallery ==
<gallery>
File:Screenshot (17).png|Steve using a goat horn.
File:Alex uses a goat horn.png|Alex using a goat horn.
File:Screenshot (18).png|The goat horn animation in first person.
File:Screenshot (19).png|The goat horn animation with "Left Hand" option enabled.
</gallery>
== Notes ==
<references group="note" />
== References ==
{{reflist}}
== External Links ==
* [https://www.minecraft.net/en-us/article/taking-inventory--goat-horn Taking Inventory: Goat Horn] - Minecraft.net on February 16, 2023
{{Items}}
[[Category:Renewable resources]]
[[Category:Tools]]
[[de:Ziegenhorn]]
[[es:Cuerno de cabra]]
[[fr:Corne de chèvre]]
[[it:Corno di capra]]
[[ja:ヤギの角笛]]
[[pl:Kozi róg]]
[[pt:Chifre de cabra]]
[[ru:Козий рог]]
[[zh:山羊角]]</li><li>[[Shield|Shield]]<br/>{{Item
| image = Shield.png
| image2 = White Shield.png
| extratext = View [[#Gallery|all renders]]
| durability = 336
| renewable = Yes
| stackable = No
}}
A '''shield''' is a tool used for protecting the [[player]] against attacks.
== Obtaining ==
=== Crafting ===
{{Crafting
|head=1
|showname=0
|A1=Any Planks <!-- the recipe changed in 15w37a, do not change it to the old recipe without reason -->
|B1=Iron Ingot
|C1=Any Planks
|A2=Any Planks
|B2=Any Planks
|C2=Any Planks
|B3=Any Planks
|Output=Shield
|type=Combat
}}
{{Crafting
|ignoreusage=1
|Shield
|Matching Banner
|A2=Shield
|B2=Banner
|Output=Matching Shield
|type=combat
|foot=1
}}
=== Repairing ===
{{Crafting
|ignoreusage=1
|showdescription=1
|Damaged Shield
|Damaged Shield
|Output=Shield
|description= The durability of the two shields is added together, plus an extra 5% durability. The repaired shield has no pattern.
|type= Combat
}}
Shields may also be repaired on an [[anvil]] by using [[planks]] or another shield. Shields repaired on anvils retain their pattern.
=== Trading ===
Journeyman-level armorer [[villager]]s have {{frac|1|3}}{{only|Bedrock|short=1}}/{{frac|2|5}}{{only|Java|short=1}} chance of selling a shield for 5 [[emerald]]s as their sixth trade.
== Usage ==
Despite using iron in its crafting recipe, it cannot be smelted into [[iron nugget]]s.<ref>{{bug|MC-111738}}</ref>
=== Defense ===
Shields are used for [[blocking]] incoming attacks. {{control|Using}}{{Only|Java|short=1}} or {{Control|sneaking}}{{Only|Bedrock|short=1}} causes a player to slow to a [[sneaking]] pace, and after {{convert|5|ticks|seconds}}<ref>{{bug|MC-100949||Shield blocking is delayed}}</ref>, attacks coming from in front of the player are blocked, dealing no damage. When the shield blocks an attack of {{hp|3}} or stronger, it takes durability damage equal to the strength of the attack rounded up.
Most blocked projectiles that carry status effects (such as [[Shulker#Shulker bullet|shulker bullets]]{{only|java|short=1}}, flaming [[arrow]]s, or tipped arrows) do not affect the blocker. [[Trident]]s & arrows can be deflected into other targets. Knockback from melee attacks and projectiles is prevented, while knockback from [[explosion]]s, [[hoglin]], and [[ravager]] attacks are significantly reduced.
The shield directionally blocks all attacks coming from within the FOV of the direction the wielder is facing, providing a full hemisphere of coverage to them. If the wielder faces straight up, they are likely to miss their blocks.<ref>{{bug|MC-109101||Shields do not block damage while the player faces straight up}}</ref><!--straight down fix: MC-92019-->
Mobs that deal continuous contact damage such as the slime, magma cube, and blaze rapidly drain the shield's durability for as long as the shielded player remains within the mob's hitbox.<ref>{{bug|MC-169167}}</ref><ref>{{bug|MCPE-119451}}</ref>
Blockable attacks include:
*Melee attacks, except by a warden, axe-wielding mobs or by a sprinting player wielding an axe, however even without sprinting an axe still greatly decreases the durability
** Status effects do not carry through to the blocker{{only|java|short=1}}.
*Normal, tipped, and spectral [[arrow]]s
** Arrows other than [[Piercing]] are totally deflected and can hit other targets.
** Status effects do not carry through to the blocker{{only|java|short=1}}.
***This can be used to damage the attacker or another mob down there.
*[[Flame|Flaming arrows]]
** Burning does not carry through to the blocker{{only|java|short=1}}.
*[[Trident]]s
*[[Snowball]]s and [[egg]]s
*Spines from [[pufferfish]]
*Bullets from [[shulker]]s
** The levitation effect does not carry through to the blocker{{only|java|short=1}}.
*Spit from [[llama]]s
*[[Fireball]]s, such as from [[blaze]]s and [[fire charge]]s
** Burning does not carry through to the blocker.
*Direct hits from [[ghast]] [[fireball]]s
** These still cause environmental damage.
*All explosions{{only|JE|short=1}}
*Explosion damage from [[creeper]]s
*[[TNT]] that another player lit
*[[Ravager]] headbutts
** These still knock the blocker back by about 3 blocks.
** Blocking these strikes can stun the ravager for a moment, and it roars afterward.
*Ravager roars are blocked but still knock back the blocker.
*[[Bee]] stings are blocked, but bees continuously attack until the player stops blocking and the player is stung.
*Beam attacks from [[guardian]]s or [[elder guardian]]s (only reduces damage by 50%).
*Damage reflected from [[Thorns]] enchantment / [[Guardian|guardians]].
They cannot block:
*Arrows from a [[crossbow]] enchanted with [[Piercing]]
** This does not reduce the shield's durability.
*[[Status effect]]s from tipped arrows or shulker bullets {{only|bedrock|short=1}} <ref>{{bug|MCPE-52904}}</ref>
** Direct projectile damage is blocked, but the effect still carries through.
*Status effects from splash/lingering [[potion]]s, [[evoker]]s' fangs, or breath from the [[ender dragon]]
*Beam attacks from [[guardian]]s or [[elder guardian]]s, or the [[warden]]'s sonic boom attack
*TNT that the blocking player lit themselves{{only|BE|short=1}}
*TNT that a [[Redstone (disambiguation)|redstone mechanism]] lit{{only|BE|short=1}}
*[[Fall damage]], including that from [[ender pearl]]s
** This also includes when the player rides an [[entity]] that died due to fall damage.
*Strikes from a warden or any [[axe]]-wielding mob (e.g., [[vindicator]]s, [[piglin brute]]s, [[zombie]]s after disabling players shield they attack another time immediately)
** Such strikes disable being able to use shields for 5 seconds.
=== Applying patterns ===
[[File:Cyan Shield Screenshot.png|250px|thumb|A custom shield.]]
Shields can be decorated by applying a [[banner]].
{{Crafting
|showdescription=1
|Shield
|Matching Banner
|Output=Matching Shield; Ominous Shield
|B2link=Banner
|Olink=Shield
|type=Combat
|description=Applies the banner pattern to the shield. The banner is consumed.<br>The shield must have no preexisting patterns.<br>Does not change existing durability or enchantments on the shield.
}}
Unlike with [[banner]]s, shields cannot be repainted or washed in a [[cauldron]]. Shields have only half the resolution of banners, making patterns look slightly different. In the game files, the pattern textures can be found in a separate directory called entity/shield.
{{IN|java}}, shields with patterns can also be obtained using the same commands as banners, except <code>banner</code> has to be replaced with <code>shield</code>.
=== Enchantments ===
A shield can receive the following [[enchantments]], but only through an [[anvil]]:
{| class="wikitable col-2-center"
|+
!Name
!Max Level
![[Enchanting|Method]]
|-
|[[Unbreaking]]
|III
|{{Inventory slot|Anvil}}
|-
|[[Mending]]
|I
|{{Inventory slot|Anvil}}
|-
|[[Curse of Vanishing]]
|I
|{{Inventory slot|Anvil}}
|-
|}
== Sounds ==
{{edition|java}}:
{{Sound table
|sound=Shield block1.ogg
|sound2=Shield block2.ogg
|sound3=Shield block3.ogg
|sound4=Shield block4.ogg
|sound5=Shield block5.ogg
|subtitle=Shield blocks
|source=player
|description=When an attack is blocked using a shield
|id=item.shield.block
|translationkey=subtitles.item.shield.block
|volume=1.0
|pitch=0.8-1.2
|distance=16}}
{{Sound table
|sound=Equip generic1.ogg
|sound2=Equip generic2.ogg
|sound3=Equip generic3.ogg
|sound4=Equip generic4.ogg
|sound5=Equip generic5.ogg
|sound6=Equip generic6.ogg
|subtitle=Gear equips
|source=player
|description=When a shield is placed in the offhand slot
|id=item.armor.equip_generic
|translationkey=subtitles.item.armor.equip
|volume=1.0
|pitch=1.0
|distance=16}}
{{Sound table
|sound=Random break.ogg
|subtitle=Item breaks
|source=player
|description=When a shield's durability is exhausted
|id=item.shield.break
|translationkey=subtitles.entity.item.break
|volume=0.8
|pitch=0.8-1.2
|distance=16
|foot=1}}
{{edition|bedrock}}:
{{Sound table
|type=bedrock
|sound=Shield block1.ogg
|sound2=Shield block2.ogg
|sound3=Shield block3.ogg
|sound4=Shield block4.ogg
|sound5=Shield block5.ogg
|source=player
|description=When an attack is blocked using a shield
|id=item.shield.block
|volume=0.7
|pitch=1.0}}
{{Sound table
|sound=Equip generic1.ogg
|sound2=Equip generic2.ogg
|sound3=Equip generic3.ogg
|sound4=Equip generic4.ogg
|sound5=Equip generic5.ogg
|sound6=Equip generic6.ogg
|source=player
|description=When a shield is placed in the offhand slot<wbr>{{Upcoming|BE 1.20.30}}<wbr><ref group=sound>{{Bug|MCPE-168039}}</ref>
|id=armor.equip_generic
|volume=1.0
|pitch=1.0}}
{{Sound table
|sound=Random break.ogg
|source=player
|description=When a shield's durability is exhausted
|id=random.break
|volume=1.0
|pitch=0.9
|foot=1}}
== Data values ==
=== ID ===
{{edition|java}}:
{{ID table
|edition=java
|showforms=y
|generatetranslationkeys=y
|displayname=Shield
|spritetype=item
|nameid=shield
|form=item
|translationkey=item.minecraft.shield, item.minecraft.shield.white, item.minecraft.shield.orange, item.minecraft.shield.magenta, item.minecraft.shield.light_blue, item.minecraft.shield.yellow, item.minecraft.shield.lime, item.minecraft.shield.pink, item.minecraft.shield.gray, item.minecraft.shield.light_gray, item.minecraft.shield.cyan, item.minecraft.shield.purple, item.minecraft.shield.blue, item.minecraft.shield.brown, item.minecraft.shield.green, item.minecraft.shield.red, item.minecraft.shield.black
|foot=1}}
{{edition|bedrock}}:
{{ID table
|edition=bedrock
|shownumericids=y
|showforms=y
|notshowbeitemforms=y
|generatetranslationkeys=y
|displayname=Shield
|spritetype=item
|nameid=shield
|id=355
|form=item
|translationkey=item.shield.name, item.shield.white.name, item.shield.orange.name, item.shield.magenta.name, item.shield.lightBlue.name, item.shield.yellow.name, item.shield.lime.name, item.shield.pink.name, item.shield.gray.name, item.shield.silver.name, item.shield.cyan.name, item.shield.purple.name, item.shield.blue.name, item.shield.brown.name, item.shield.green.name, item.shield.red.name, item.shield.black.name
|foot=1}}
== Advancements ==
{{load advancements|Not Today}}
== History ==
{{History||July 10, 2011|link=http://minetimes.wordpress.com/2011/07/10/interview-mit-jeb-ihr-konntet-die-fragen-stellen/|During an interview, [[Jeb]] says that "shields for the left arm" might be added.}}
{{History|java}}
{{History||1.9|snap=15w33c|[[File:White Shield.png|22px]] [[File:Light Gray Shield.png|22px]] [[File:Gray Shield.png|22px]] [[File:Black Shield.png|22px]] [[File:Brown Shield.png|22px]] [[File:Red Shield.png|22px]] [[File:Orange Shield.png|22px]] [[File:Yellow Shield.png|22px]] [[File:Lime Shield.png|22px]] [[File:Green Shield.png|22px]] [[File:Cyan Shield.png|22px]] [[File:Light Blue Shield.png|22px]] [[File:Blue Shield.png|22px]] [[File:Purple Shield.png|22px]] [[File:Magenta Shield.png|22px]] [[File:Pink Shield.png|22px]] Added shields.
|Shields replace the [[blocking]] functionality of [[sword]]s, although blocking more [[damage]].
|The current [[crafting]] recipe of shields includes [[wool]], producing 16 possible colored shields. There currently isn't a blank, uncolored shield.
{{{!}} class{{=}}"collapsible collapsed" data-description{{=}}"Recipe"
! Recipe
{{!}}-
{{!}}
{{Crafting
|A1=Matching Wool |B1=Any Planks
|A2=Matching Wool |B2=Any Planks |C2=Iron Ingot
|A3=Matching Wool |B3=Any Planks
|Output=Matching Shield
|ignoreusage=1
}}
{{!}}}
|Any of the colored base shields can be [[crafting|crafted]] with a [[banner]] of the same base color, to produce a patterned shield.
}}
{{History|||snap=15w34c|When an attack is blocked by a shield, the attacker now may be knocked back.
|Being attacked with an [[axe]] now may disable shield use for 5 seconds.}}
{{History|||snap=15w37a|The [[crafting]] recipe of shields has been changed to 6 [[planks]] and 1 [[iron ingot]].
{{{!}} class{{=}}"collapsible collapsed" data-description{{=}}"Recipe"
! Recipe
{{!}}-
{{!}}
{{Crafting
|A1=Any Planks |B1=Iron Ingot |C1=Any Planks
|A2=Any Planks |B2=Any Planks |C2=Any Planks
|B3=Any Planks
|Output=Shield
|ignoreusage=1
}}
{{!}}}
|[[File:Shield JE1.png|22px]] Crafting a shield now produces a base wooden shield that can be crafted together with any [[banner]].
|The cooldown of shields has been reduced from 0.5s to 0.25s.
|Blocking with shields now prevents some side effects.{{verify}}
|[[Arrow]]s now ricochet off shields.}}
{{History|||snap=15w44a|Shields can now be repaired by combining with other shields. This removes any [[banner]] that had been applied.}}
{{History|||snap=15w45a|Crafting a banner onto a shield now consumes the banner.}}
{{History|||snap=15w47b|Added shield blocking [[sound]]s.}}
{{History|||snap=16w07a|Added more variation of shield blocking sounds.}}
{{History|||snap=pre1|The [[durability]] of shields has been increased from 181 to 337.}}
{{History||1.10|snap=16w21a|Shields can now be equipped by [[dispenser]]s.}}
{{History||1.11|snap=16w33a|[[Crafting]] a shield with a banner no longer changes the durability, nor does it remove [[enchanting|enchantments]] from it.}}
{{History|||snap=16w35a|Shields now block 100% of [[damage]]/[[knockback]]/debuffs dealt in melee combat.}}
{{History||1.13|snap=17w47a|Prior to [[1.13/Flattening|''The Flattening'']], this [[item]]'s numeral ID was 442.}}
{{History||1.13.2|snap=release|Shields now properly block attacks when the player is facing down.<ref>{{bug|MC-92019|||Fixed}}</ref>}}
{{History||1.14|snap=18w43a|[[File:Shield JE2 BE1.png|22px]] The texture of shields has been changed.
|Shields no longer knockback attackers when they block due to a bug with rework of the blocking mechanic with the introduction of the ravager.<ref>{{bug|MC-147694}}</ref>}}
{{History|||snap=19w11a|Shields can now be [[trading|bought]] from armorer [[villager]]s.}}
{{History||1.14.3|snap=Pre-Release 3|Shields blocking flaming [[arrow]]s no longer put the [[player]] on [[fire]].}}
{{History||1.16|snap=20w06a|[[Crimson planks]] and [[warped planks]] can now be used to craft shields.}}
{{History||1.19|snap=22w11a|[[Mangrove planks]] can now be used to craft shields.}}
{{History||1.19.3|snap=22w43a|Shields can now properly block all explosions.}}
{{History||1.19.4|snap=23w06a|A sound is now played when a shield is placed into the offhand slot.}}
{{History|upcoming java}}
{{History||Combat Tests|snap=1.14.3 - Combat Test|Critical hits now bypass shields.
|The warm-up delay has been removed from shields.
|When in the off-hand, shields now activate when [[sneaking]].}}
{{History|||snap=Combat Test 2|Shields now protect against critical attacks again.
|Shields can only be activated when the weapon is charged to 200%.}}
{{History|||snap=Combat Test 3|A "Shield Indicator" option that displays when the shield is active, similar to the attack indicator, has been added.
|An option to hide shields when active has been added.
|The arc of available protection of shields has been decreased to 100 degrees instead of 180 degrees.}}
{{History|||snap=Combat Test 4|An option to disable shields being activated by pressing {{ctrl|crouch}} has been added.
|The option to hide the shield has been removed.}}
{{History|||snap=Combat Test 6|Shields now protect up to 5 [[damage]] for melee attacks (still 100% against projectiles).
|Shields activate instantly regardless if the weapon is charged, similar to Combat test 1.
|Shields now recover faster after an attack.}}
{{History|||snap=Combat Test 7c|Shields now add a 50% knockback resistance when active.
|Shields now protect against 100% [[explosions|explosion]] damage.}}
{{History|||snap=Combat Test 8c|The knockback calculations for shields have been fixed.{{Info needed}}
|Crouch-shielding while jumping has been disabled.
|Shields with [[banner]]s are now temporarily stronger than normal shields (10 absorption instead of 5, and better knockback resistance) to test different shield types.}}
{{History|bedrock}}
{{History||1.10.0|snap=beta 1.10.0.3|[[File:Shield JE2 BE1.png|22px]] Added shields.
|Shields cannot be customized with [[banner]]s.
|Shields are activated by [[sneaking|crouching]] or mounting [[mob]]s.}}
{{History||1.11.0|snap=beta 1.11.0.4|Shields can now be [[trading|bought]] from armorer [[villager]]s.}}
{{History||1.16.210|snap=beta 1.16.210.51|Now grants partial knockback protection from the [[goat]] ram attack.}}
{{History||1.16.220|snap=beta 1.16.220.50|[[Mob]]s that pick up shields now place them to their off-hand.}}
{{History||1.18.30|snap=beta 1.18.30.26|Being attacked with an [[axe]] now may disable shield use. This was not mentioned in the official changelog.<ref>{{tweet|kingbdogz|1504505321884196872|We missed a change in recent changelogs for the Bedrock beta that you may like - we have now made a parity fix that makes shields get disabled for 5 seconds when attacked by an Axe-wielding mob or player. We will make sure to list this properly in the next beta :)|March 17, 2022}}</ref>}}
{{History||1.20.0|snap=beta 1.20.0.20|[[File:White Shield.png|22px]] [[File:Light Gray Shield.png|22px]] [[File:Gray Shield.png|22px]] [[File:Black Shield.png|22px]] [[File:Brown Shield.png|22px]] [[File:Red Shield.png|22px]] [[File:Orange Shield.png|22px]] [[File:Yellow Shield.png|22px]] [[File:Lime Shield.png|22px]] [[File:Green Shield.png|22px]] [[File:Cyan Shield.png|22px]] [[File:Light Blue Shield.png|22px]] [[File:Blue Shield.png|22px]] [[File:Purple Shield.png|22px]] [[File:Magenta Shield.png|22px]] [[File:Pink Shield.png|22px]] Shields can now be customized using a banner.}}
{{History|PS4}}
{{History||1.90|[[File:Shield JE1.png|22px]] Added shields.
|Shields do not have [[banner]] application features.}}
{{History|foot}}
== Issues ==
{{issue list|-wither}}
== Gallery ==
<gallery>
Shield.png|Shield
White Shield.png|White Shield
Light Gray Shield.png|Light Gray Shield
Gray Shield.png|Gray Shield
Black Shield.png|Black Shield
Brown Shield.png|Brown Shield
Red Shield.png|Red Shield
Orange Shield.png|Orange Shield
Yellow Shield.png|Yellow Shield
Lime Shield.png|Lime Shield
Green Shield.png|Green Shield
Cyan Shield.png|Cyan Shield
Light Blue Shield.png|Light Blue Shield
Blue Shield.png|Blue Shield
Purple Shield.png|Purple Shield
Magenta Shield.png|Magenta Shield
Pink Shield.png|Pink Shield
</gallery>
=== Screenshots ===
<gallery>
JebShield.png|One of the first images of shields. [[Jeb]] wearing diamond armor while holding a creeper-emblazoned shield during [[MineCon]] 2015.
Jeb Crafting Shield.png|Jeb crafting a shield.
Player with Shield.png|Player holding the default shield.
Shield Block.png|A player blocking with a shield.
ShieldFirstPerson.png|Blocking with a shield as seen in first person.
Enchanted Shield (item).gif|An enchanted shield as seen in the [[inventory]].
-ominous- shield.png|A shield with the [[ominous banner]] on it as seen in the inventory.
Kai-Shield.jpg|An image of [[Kai]] wielding a banner with a shield, used to announce the feature on [[Bedrock Edition]].
Bedrock-Shields.jpg
</gallery>
== References ==
{{reflist}}
== External Links ==
* [https://www.minecraft.net/en-us/article/taking-inventory--shield Taking Inventory: Shield] – Minecraft.net on July 25, 2019
{{Items}}
[[Category:Combat]]
[[Category:Renewable resources]]
[[de:Schild (Kampf)]]
[[fr:Bouclier]]
[[it:Scudo]]
[[ja:盾]]
[[ko:방패]]
[[nl:Schild]]
[[pl:Tarcza]]
[[pt:Escudo]]
[[ru:Щит]]
[[th:โล่]]
[[zh:盾牌]]</li></ul> | Build limit increased to 128. Previously the build limit was 64 (32 blocks up from sea level and 32 down). | |||||||||||||||||||||||||||||||||||||||||||||||||||||||||||||||||||||||||||||||||||||||||||||||||||||||||||||
1.2.0{{Extension DPL}}<ul><li>[[:Category:Minecraft Earth items|Category:Minecraft Earth items]]<br/>All items in ''[[Minecraft Earth]]''.
[[Category:Items]]
[[Category:Minecraft Earth|Items]]</li><li>[[Horse Armor|Horse Armor]]<br/>{{Item
| image = <gallery>
Leather Horse Armor.png | Leather
Iron Horse Armor.png | Iron
Golden Horse Armor.png | Golden
Diamond Horse Armor.png | Diamond
</gallery>
| image2 = <gallery>
Leather Horse Armor (item).png|Leather
Iron Horse Armor (item).png|Iron
Golden Horse Armor (item).png|Golden
Diamond Horse Armor (item).png|Diamond
</gallery>
| extratext = View [[#Gallery|all renders]]
| renewable =
* '''Leather''': Yes
* '''All others''': No
| stackable = No
}}
'''Horse armor''' is a special type of [[armor]] that can be given to a [[horse]] to wear.
== Obtaining ==
===Chest loot===
{{LootChestItem|iron-horse-armor}}
{{LootChestItem|golden-horse-armor}}
{{LootChestItem|diamond-horse-armor}}
===Crafting===
{{crafting
|A1= Leather
|C1= Leather
|A2= Leather
|B2= Leather
|C2= Leather
|A3= Leather
|C3= Leather
|Output= Leather Horse Armor
|type=Miscellaneous
}}
Only leather horse armor can be crafted; other horse armor can be obtained only from chest loot from some generated structures.
===Trading===
Expert-level [[leatherworker]] villagers [[trading|sell]] leather horse armor for 6 [[emerald]]s as part of their trade.
==Usage==
Only normal adult horses can wear armor; foals, [[donkey]]s, [[mule]]s, and undead variants such as [[skeleton horse]]s and [[zombie horse]]s cannot be equipped with armor.
=== Types ===
Horse armor has leather, iron, gold, and diamond variants. However, horse armor does not have netherite or chainmail variants.
=== Armor Stands ===
Horse armor cannot be placed or displayed on [[armor stand]]s.
===Protection===
Horse armor can be equipped to horses either by manually placing it in its respective slot by pressing E while riding the horse ({{SlotSprite|Horse Armor}}), or by right-clicking the horse with it.
There is a gradual increase in the defense given from a horse wearing the different types of armor. Note that golden horse armor provides more protection than iron horse armor, whereas the opposite is true for [[armor|player armor]].
{| class="wikitable" data-description="Armor defense"
|-
! Material !! [[Armor]]
|-
! [[Leather]]
| {{armor|3}}
|-
! [[Iron]]
| {{armor|5}}
|-
! [[Gold]]
| {{armor|7}}
|-
! [[Diamond]]
| {{armor|11}}
|}
When a horse dies while equipped with any horse armor, it drops its normal loot, saddle (if it had one), and the horse armor.
Leather horse armor protects horses from freezing in [[powder snow]], but it does not negate other powder snow effects (e.g., falling through, inability to jump).
===Durability===
Unlike [[armor|player armor]], horse armor does not have durability. This means a single horse armor can be used infinitely unless destroyed.
=== Enchanting ===
Unlike [[armor|player armor]], horse armor cannot be enchanted in survival mode. However, {{in|java}} Creative mode, horse armor can be used with an [[anvil]] to enchant with [[Depth Strider]], [[Thorns]], [[Respiration]], [[Feather Falling]], and [[Curse of vanishing]]. Other enchantments can be applied, but they have no effect.
=== Dyeing ===
Leather horse armor can be dyed 12,326,391 different colors (using lone dyes or dye combinations) and put onto a horse to display that color. These changes can be reverted by {{control|using}} a filled [[cauldron]] with dyed leather horse armor.
===Smelting usage===
{{Smelting|showname=1|Iron Horse Armor;Golden Horse Armor|Iron Nugget;Gold Nugget|0,1}}
===Piglins===
{{EntityLink|Piglin|Piglins}} are attracted to golden horse armor and run toward any golden horse armor on the ground, inspecting it for 6 to 8 seconds before putting it in their inventory.
== Sounds ==
{{Edition|Java}}:
{{Sound table
|sound=Horse armor.ogg
|subtitle=Horse armor equips
|source=neutral
|description=When armor is equipped to a horse
|id=entity.horse.armor
|translationkey=subtitles.entity.horse.armor
|volume=0.5
|pitch=1.0
|distance=16
|foot=1}}
{{Edition|Bedrock}}:
{{Sound table
|type=bedrock
|sound=Horse armor.ogg
|source=neutral
|description=When armor is equipped to a horse
|id=mob.horse.armor
|volume=0.6
|pitch=1.0
|foot=1}}
== Data values ==
=== ID ===
{{edition|java}}:
{{ID table
|edition=java
|showforms=y
|generatetranslationkeys=y
|displayname=Leather Horse Armor
|spritetype=item
|nameid=leather_horse_armor
|form=item}}
{{ID table
|displayname=Iron Horse Armor
|spritetype=item
|nameid=iron_horse_armor
|form=item}}
{{ID table
|displayname=Diamond Horse Armor
|spritetype=item
|nameid=diamond_horse_armor
|form=item}}
{{ID table
|displayname=Golden Horse Armor
|spritetype=item
|nameid=golden_horse_armor
|form=item
|foot=1}}
{{edition|bedrock}}:
{{ID table
|edition=bedrock
|shownumericids=y
|showforms=y
|showaliasids=y
|notshowbeitemforms=y
|generatetranslationkeys=y
|displayname=Leather Horse Armor
|spritetype=item
|nameid=leather_horse_armor
|aliasid=horsearmorleather
|id=530
|form=item
|translationkey=item.horsearmorleather.name}}
{{ID table
|displayname=Iron Horse Armor
|spritetype=item
|nameid=iron_horse_armor
|aliasid=horsearmoriron
|id=531
|form=item
|translationkey=item.horsearmoriron.name}}
{{ID table
|displayname=Diamond Horse Armor
|spritetype=item
|nameid=diamond_horse_armor
|aliasid=horsearmordiamond
|id=533
|form=item
|translationkey=item.horsearmordiamond.name}}
{{ID table
|displayname=Golden Horse Armor
|spritetype=item
|nameid=golden_horse_armor
|aliasid=horsearmorgold
|id=532
|form=item
|translationkey=item.horsearmorgold.name
|foot=1}}
=== Item data ===
When leather horse armor is dyed, it has the following NBT:
{{el|java}}:
{{main|Player.dat format}}
<div class="treeview">
* {{nbt|compound|tag}}: Parent tag.
** {{nbt|compound|display}}: Display properties.
*** {{nbt|int|color}}: The color of the leather armor. The tooltip displays "Dyed" if advanced tooltips are disabled, otherwise it displays the hexadecimal color value. Color codes are calculated from the Red, Green and Blue components using this formula:<br>'''<span style="color:red">Red</span>[[wikipedia:Logical shift|<<]]16 + <span style="color:green">Green</span><<8 + <span style="color:blue">Blue</span>'''<ref>For positive values larger than 0x00FFFFFF, the top byte is ignored. All negative values produce white.</ref>
</div>
{{el|bedrock}}:
: See [[Bedrock Edition level format/Item format]].
== History ==
{{History|java}}
{{History||1.6.1|snap=13w16a|[[File:Iron Horse Armor JE1 BE1.png|32px]] [[File:Golden Horse Armor JE1 BE1.png|32px]] [[File:Diamond Horse Armor JE1 BE1.png|32px]]<br>[[File:Iron Horse Armor (item) JE1 BE1.png|32px]] [[File:Golden Horse Armor (item) JE1 BE1.png|32px]] [[File:Diamond Horse Armor (item) JE1 BE1.png|32px]] Added horse armor.
|Horse armor can be [[crafting|crafted]] using the following recipe.
{{{!}} class{{=}}"collapsible collapsed"
! Recipe
{{!}}-
{{!}}
{{Crafting Table
|C1=Iron Ingot; Gold Ingot; Diamond
|A2=Iron Ingot; Gold Ingot; Diamond
|B2=Any Wool
|C2=Iron Ingot; Gold Ingot; Diamond
|A3=Iron Ingot; Gold Ingot; Diamond
|B3=Iron Ingot; Gold Ingot; Diamond
|C3=Iron Ingot; Gold Ingot; Diamond
|Output=Iron Horse Armor; Golden Horse Armor; Diamond Horse Armor
}}
{{!}}}
}}
{{History|||snap=13w18a|The crafting recipe for horse armor has been removed.
|Horse armor can now be found in [[chest]]s in [[jungle temple|jungle]] & [[desert temple]]s, [[dungeon]]s, [[nether fortress]]es, [[stronghold]] altar rooms and [[village]] blacksmith buildings.
|Iron horse armor can now additionally be found in [[mineshaft]] chests.}}
{{History|||snap=13w21a|Horse armor is no longer stackable, to be consistent with other types of [[armor]].}}
{{History||1.9|snap=15w31a|Horse armor has been added to [[end city]] [[chest]]s.}}
{{History|||snap=15w43a|The average yield of horse armor in [[nether fortress]] chests has slightly decreased.}}
{{History|||snap=15w44a|The average yield of horse armor in [[desert temple]] chests has increased.
|The average yield of iron horse armor from [[dungeon]] chests has slightly decreased.
|Iron horse armor has been removed from [[mineshaft]] [[chest]]s.}}
{{History||1.11.1|snap=16w50a|Golden and iron horse armor can now be [[smelting|smelted]] down into one of their respective [[nugget]]s.}}
{{History||1.13|snap=17w45a|[[File:Iron Horse Armor JE2.png|32px]] [[File:Golden Horse Armor JE2.png|32px]] [[File:Diamond Horse Armor JE2.png|32px]] The textures of horse armor have been changed, as the [[model]] of [[horse]]s has changed.}}
{{History|||snap=17w46a|[[File:Iron Horse Armor 17w46a.png|32px]] [[File:Golden Horse Armor 17w46a.png|32px]] [[File:Diamond Horse Armor 17w46a.png|32px]] The model of horse armor has been changed, but the textures of horse armor have remained unaltered.}}
{{History|||snap=17w47a|Prior to [[1.13/Flattening|''The Flattening'']], these [[item]]s' numeral IDs were 417, 418 and 419.}}
{{History|||snap=18w03a|[[File:Iron Horse Armor JE3.png|32px]] [[File:Golden Horse Armor JE3 BE2.png|32px]] [[File:Diamond Horse Armor JE3 BE2.png|32px]] The textures of horse armor have been changed, as the [[model]] of [[horse]]s has changed.}}
{{History|||snap=18w22a|[[File:Iron Horse Armor JE4 BE2.png|32px]] The texture of iron horse armor when equipped has been changed.<ref>{{bug|MC-124357}}</ref>}}
{{History|||snap=pre2|A bug with the [[horse]] skin and horse armor textures not applying correctly has been fixed.<ref>{{bug|MC-124364}}</ref>}}
{{History||1.14|snap=18w50a|[[File:Iron Horse Armor (item) JE2 BE2.png|32px]] [[File:Golden Horse Armor (item) JE2 BE2.png|32px]] [[File:Diamond Horse Armor (item) JE2 BE2.png|32px]] The textures of horse armor [[item]]s have been changed.}}
{{History|||snap=February 20, 2019|slink=https://twitter.com/_LadyAgnes/status/1098134917299531776?s=19|Leather horse armor announced for {{el|je}}.}}
{{History|||snap=19w08a|[[File:Iron Horse Armor JE5 BE3.png|32px]] [[File:Golden Horse Armor JE4 BE3.png|32px]] [[File:Diamond Horse Armor JE4 BE3.png|32px]]<br>[[File:Iron Horse Armor (item) JE3.png|32px]] [[File:Golden Horse Armor (item) JE3 BE3.png|32px]] [[File:Diamond Horse Armor (item) JE3 BE3.png|32px]] The textures of iron, gold and diamond horse armor have been changed.
|[[File:Leather Horse Armor JE1 BE3.png|32px]] [[File:Leather Horse Armor (item) JE1.png|32px]] Added leather horse armor, which can be [[dyeing|dyed]] 12,326,391 different colors, similar to leather [[armor]].}}
{{History|||snap=19w11a|Leatherworker [[villager]]s now [[trading|sell]] leather horse armor.}}
{{History||1.14.1|snap=Pre-Release 1|[[File:Leather Horse Armor (item) JE2.png|32px]] The texture of leather horse armor [[item]] has been changed to be more consistent with the other types of horse armor.
|[[File:Iron Horse Armor (item) JE4 BE3.png|32px]] The texture of iron horse armor item has been changed.}}
{{History||1.16|snap=20w15a|Horse armor placed in a dispenser can now be put on tamed horses.}}
{{History|||snap=20w16a|Golden horse armor now generates in [[ruined portal]] chests.}}
{{History||1.17|snap=21w13a|Leather horse armor now protects [[horse]]s from [[freezing]].}}
{{History||1.19|snap=22w13a|Diamond horse armor may now be found in [[ancient city]] [[chest]]s.}}
{{History|pocket alpha}}
{{History||v0.15.0|snap=build 1|[[File:Leather Horse Armor BE1.png|32px]] [[File:Iron Horse Armor JE1 BE1.png|32px]] [[File:Golden Horse Armor JE1 BE1.png|32px]] [[File:Diamond Horse Armor JE1 BE1.png|32px]]<br>[[File:Leather Horse Armor (item) BE1.png|32px]] [[File:Iron Horse Armor (item) JE1 BE1.png|32px]] [[File:Golden Horse Armor (item) JE1 BE1.png|32px]] [[File:Diamond Horse Armor (item) JE1 BE1.png|32px]] Added horse armor and [[dyeing|dyeable]] leather horse armor as a version exclusive.}}
{{History|pocket}}
{{History||1.0.0|snap=alpha 0.17.0.1|Horse armor can now be found inside [[end city]] [[chest]]s.}}
{{History||1.1.0|snap=alpha 1.1.0.0|Iron and golden horse armor are now [[smelting|smeltable]].}}
{{History|bedrock}}
{{History||1.2.6|snap=beta 1.2.6.2|[[File:Leather Horse Armor BE2.png|32px]] [[File:Iron Horse Armor JE4 BE2.png|32px]] [[File:Golden Horse Armor JE3 BE2.png|32px]] [[File:Diamond Horse Armor JE3 BE2.png|32px]] The textures of horse armor have been changed, as the [[model]] of [[horse]]s has been changed.}}
{{History||1.10.0|snap=beta 1.10.0.3|Horse armor can now be found in [[plains]] [[village]] weaponsmith [[chest]]s.
|[[File:Leather Horse Armor JE1 BE3.png|32px]] [[File:Iron Horse Armor JE5 BE3.png|32px]] [[File:Golden Horse Armor JE4 BE3.png|32px]] [[File:Diamond Horse Armor JE4 BE3.png|32px]]<br>[[File:Leather Horse Armor (item) BE2.png|32px]] [[File:Iron Horse Armor (item) JE2 BE2.png|32px]] [[File:Golden Horse Armor (item) JE2 BE2.png|32px]] [[File:Diamond Horse Armor (item) JE2 BE2.png|32px]] The textures of all horse armor have been changed.}}
{{History||1.11.0|snap=beta 1.11.0.1|Horse armor can now be found in [[savanna]], [[desert]], [[taiga]], [[snowy taiga]] and [[snowy tundra]] [[village]] weaponsmith [[chest]]s.}}
{{History|||snap=beta 1.11.0.4|Leather horse armor can now be [[trading|bought]] from leatherworker [[villager]]s.}}
{{History|||snap=beta 1.11.0.5|[[File:Leather Horse Armor (item) BE3.png|32px]] [[File:Iron Horse Armor (item) JE4 BE3.png|32px]] [[File:Golden Horse Armor (item) JE3 BE3.png|32px]] [[File:Diamond Horse Armor (item) JE3 BE3.png|32px]] The textures of all horse armor [[item]]s have been changed.}}
{{History||1.17.0|snap=beta 1.16.230.54|Leather horse armor now protects [[horse]]s from [[freezing]].}}
{{History|console}}
{{History||xbox=TU19|xbone=CU7|ps=1.12|wiiu=Patch 1|switch=1.0.1|[[File:Iron Horse Armor JE1 BE1.png|32px]] [[File:Golden Horse Armor JE1 BE1.png|32px]] [[File:Diamond Horse Armor JE1 BE1.png|32px]]<br>[[File:Iron Horse Armor (item) JE1 BE1.png|32px]] [[File:Golden Horse Armor (item) JE1 BE1.png|32px]] [[File:Diamond Horse Armor (item) JE1 BE1.png|32px]] Added horse armor.}}
{{History||xbox=TU53|xbone=CU43|ps=1.49|wiiu=Patch 23|switch=1.0.3|Iron and golden horse armor are now [[smelting|smeltable]].}}
{{History||xbox=TU60|xbone=CU51|ps=1.64|wiiu=Patch 30|switch=1.0.11|[[File:Leather Horse Armor BE1.png|32px]]<br>[[File:Leather Horse Armor (item) BE1.png|32px]] Added leather horse armor.}}
{{History||xbox=none|xbone=none|ps=1.90|wiiu=none|switch=none|[[File:Leather Horse Armor JE1 BE3.png|32px]] [[File:Iron Horse Armor JE5 BE3.png|32px]] [[File:Golden Horse Armor JE4 BE3.png|32px]] [[File:Diamond Horse Armor JE4 BE3.png|32px]]<br>[[File:Leather Horse Armor (item) BE3.png|32px]] [[File:Iron Horse Armor (item) JE3.png|32px]] [[File:Golden Horse Armor (item) JE3 BE3.png|32px]] [[File:Diamond Horse Armor (item) JE3 BE3.png|32px]] The textures of leather, iron, gold and diamond horse armor have been changed.}}
{{History|3ds}}
{{History||0.1.0|[[File:Leather Horse Armor BE1.png|32px]] [[File:Iron Horse Armor JE1 BE1.png|32px]] [[File:Golden Horse Armor JE1 BE1.png|32px]] [[File:Diamond Horse Armor JE1 BE1.png|32px]]<br>[[File:Leather Horse Armor (item) BE1.png|32px]] [[File:Iron Horse Armor (item) JE1 BE1.png|32px]] [[File:Golden Horse Armor (item) JE1 BE1.png|32px]] [[File:Diamond Horse Armor (item) JE1 BE1.png|32px]] Added horse armor.}}
{{History|foot}}
== Issues ==
{{issue list}}
== Gallery ==
<gallery>
Leather Horse Armor.png | Undyed Leather armor
White Leather Horse Armor.png | White Leather armor
Light Gray Leather Horse Armor.png | Light Gray Leather armor
Gray Leather Horse Armor.png | Gray Leather armor
Black Leather Horse Armor.png | Black Leather armor
Brown Leather Horse Armor.png | Brown Leather armor
Red Leather Horse Armor.png | Red Leather armor
Orange Leather Horse Armor.png | Orange Leather armor
Yellow Leather Horse Armor.png | Yellow Leather armor
Lime Leather Horse Armor.png | Lime Leather armor
Green Leather Horse Armor.png | Green Leather armor
Cyan Leather Horse Armor.png | Cyan Leather armor
Light Blue Leather Horse Armor.png | Light Blue Leather armor
Blue Leather Horse Armor.png | Blue Leather armor
Purple Leather Horse Armor.png | Purple Leather armor
Magenta Leather Horse Armor.png | Magenta Leather armor
Pink Leather Horse Armor.png | Pink Leather armor
</gallery>
=== Screenshots ===
<gallery>
Armored Horse.png|A [[horse]] equipped with iron horse armor and bound to a fence post by a [[lead]].
13w21a-new-HorseUI-inventory.png|The GUI for horses implemented in [[Java Edition 13w21a|13w21a]], which allows the removal and switching of armor.
GodSpawner.png|A golden horse armor found in a [[dungeon]] chest, which coincidentally contains an [[enchanted golden apple]].
Horses with armor.png|4 [[horse]]s equipped with [[leather]], [[iron]], [[gold]], and [[diamond]] armor.
Leather Horse Armor 1.jpg|First image of leather horse armor.
Leather Horse Armor 2.jpg|Second image of leather horse armor.
Leather Horse Armor 3.jpg|Third image of leather horse armor.
Leather Horse Armor 4.jpg|Fourth image of leather horse armor.
Leather Horse Armor 5.jpg|Fifth image of leather horse armor.
</gallery>
== Notes ==
{{Notelist}}
== References ==
{{Reflist}}
{{items}}
[[Category:Armor]]
[[de:Rossharnisch]]
[[es:Armadura para caballo]]
[[fr:Armure pour cheval]]
[[it:Bardatura]]
[[ja:馬鎧]]
[[ko:말 갑옷]]
[[nl:Paardenharnas]]
[[pl:Zbroja końska]]
[[pt:Armadura para cavalo]]
[[ru:Конская броня]]
[[uk:Кінські обладунки]]
[[zh:马铠]]</li></ul> | Biomes added. This changes world generation a lot. | |||||||||||||||||||||||||||||||||||||||||||||||||||||||||||||||||||||||||||||||||||||||||||||||||||||||||||||
1.2.3{{Extension DPL}}<ul><li>[[:Category:Armor|Category:Armor]]<br/>[[Category:Items]]</li><li>[[Rabbit Hide|Rabbit Hide]]<br/>{{Item
| title = Rabbit Hide
| image = Rabbit Hide.png
| renewable = Yes
| stackable = Yes (64)
}}
'''Rabbit hide''' is an [[item]] dropped by [[rabbit]]s.
== Obtaining ==
===Mob loot===
[[Rabbit]]s drop 0–1 rabbit hide upon death. The maximum number of drops can be increased by 1 per level of [[Looting]] used, for a maximum of 0–4 rabbit hides with Looting III.
Some [[foxes]] spawn holding rabbit hides, which always drop upon death. Alternatively, the player can drop a food item, which causes the fox to drop the rabbit hide.
=== Cat gifts ===
{{main|Cat#Gifts}}
Tamed [[cat]]s have a 70% chance of giving the [[player]] a gift when they wake up from a [[bed]], and the gift has a 16.13% chance to be a rabbit hide.
== Usage ==
Rabbit hide can be crafted into leather, or into bundles to store stacks of items.
=== Crafting ingredient ===
{{crafting usage}}
=== Trading ===
Journeyman-level leatherworker [[villager]]s buy 9 rabbit hide for an [[emerald]] as part of their trades.
== Data values ==
=== ID ===
{{edition|java}}:
{{ID table
|edition=java
|showforms=y
|generatetranslationkeys=y
|displayname=Rabbit Hide
|spritetype=item
|nameid=rabbit_hide
|form=item
|foot=1}}
{{edition|bedrock}}:
{{ID table
|edition=bedrock
|shownumericids=y
|showforms=y
|notshowbeitemforms=y
|generatetranslationkeys=y
|displayname=Rabbit Hide
|spritetype=item
|nameid=rabbit_hide
|id=529
|form=item
|foot=1}}
== History ==
{{History|java}}
{{History||1.8|snap=June 30, 2014|slink={{tweet|TheMogMiner|483636993780232192}}|[[Ryan Holtz]] tweeted images of rabbit hide and some other new [[item]]s.}}
{{History|||snap=14w27a|[[File:Rabbit Hide JE1.png|32px]] Added rabbit hide.}}
{{History|||snap=14w33b|[[File:Rabbit Hide JE2 BE1.png|32px]] The texture of rabbit hide has been changed.}}
{{History||1.13|snap=17w47a|Prior to [[1.13/Flattening|''The Flattening'']], this [[item]]'s numeral ID was 415.}}
{{History||1.14|snap=18w43a|[[File:Rabbit Hide JE3 BE2.png|32px]] The texture of rabbit hide has been changed.}}
{{History|||snap=18w44a|Cats now offer rabbit hides as [[Cat#Gifts|gifts]].}}
{{History|||snap=19w07a|Added [[fox]]es, which sometimes spawn with rabbit hides in their mouths.}}
{{History|||snap=19w11a|Leatherworker [[villager]]s now [[trading|buy]] rabbit hides.}}
{{History||1.17|snap=20w45a|Rabbit hide can now be used to craft [[bundle]]s.}}
{{History|||snap=21w18a|Rabbit hide can no longer be used to craft bundles.}}
{{History||1.18|snap=Experimental Snapshot 1|Rabbit hide can now once again be used to craft bundles.}}
{{History|||snap=21w37a|Rabbit hide once again can no longer be used to craft bundles.}}
{{History||1.20<br>(Experimental)|link=1.19.3|snap=22w42a|Rabbit hide can now once again be used to craft bundles.}}
{{History|pocket alpha}}
{{History||v0.13.0|snap=build 1|[[File:Rabbit Hide JE2 BE1.png|32px]] Added rabbit hide.}}
{{History|bedrock}}
{{History||1.8.0|snap=beta 1.8.0.8|Tamed [[cat]]s can now give [[player]]s rabbit hide as a gift.}}
{{History||1.10.0|snap=beta 1.10.0.3|[[File:Rabbit Hide JE3 BE2.png|32px]] The texture of rabbit hide has been changed.}}
{{History||1.11.0|snap=beta 1.11.0.4|Rabbit hide can be [[trading|sold]] to leatherworker [[villager]]s.}}
{{History||1.13.0|snap=beta 1.13.0.1|Added [[fox]]es, which can [[drops|drop]] rabbit hide.}}
{{History|console}}
{{History||xbox=TU31|xbone=CU19|ps=1.22|wiiu=Patch 3|switch=1.0.1|[[File:Rabbit Hide JE2 BE1.png|32px]] Added rabbit hide.}}
{{History||xbox=none|xbone=none|ps=1.90|wiiu=none|switch=none|[[File:Rabbit Hide JE3 BE2.png|32px]] The texture of rabbit hide has been changed.}}
{{History|new 3ds}}
{{History||0.1.0|[[File:Rabbit Hide JE2 BE1.png|32px]] Added rabbit hide.}}
{{History|foot}}
== Issues ==
{{issue list}}
== Gallery ==
<gallery>
File:Rabbit Items 1 Ryan Holtz.png|First image of the item by [[Ryan Holtz]].
</gallery>
{{items}}
[[de:Kaninchenfell]]
[[es:Piel de conejo]]
[[fr:Peau de lapin]]
[[hu:Nyúlbőr]]
[[it:Pelle di coniglio]]
[[ja:ウサギの皮]]
[[ko:토끼 가죽]]
[[nl:Konijnenhuid]]
[[pl:Królicza skóra]]
[[pt:Pele de coelho]]
[[ru:Кроличья шкурка]]
[[zh:兔子皮]]
[[Category:Renewable resources]]</li></ul> | The F3 key toggles a debug console which shows the player their exact coordinates. | |||||||||||||||||||||||||||||||||||||||||||||||||||||||||||||||||||||||||||||||||||||||||||||||||||||||||||||
| b | ||||||||||||||||||||||||||||||||||||||||||||||||||||||||||||||||||||||||||||||||||||||||||||||||||||||||||||||
1.3{{Extension DPL}}<ul><li>[[:Category:Joke items|Category:Joke items]]<br/>[[Category:Joke features|Items]]
[[Category:Items]]</li><li>[[Helmet|Helmet]]<br/>{{Update|Include information about armor trims and updated netherite upgrade information.}}
{{redirect|Cap|mob spawning caps|Spawn}}
{{redirect|Turtle Shell|the item dropped by maturing turtles|Scute}}
{{Item
| image = <gallery>
Leather Cap.png| Leather
Chainmail Helmet.png| Chainmail
Iron Helmet.png| Iron
Diamond Helmet.png| Diamond
Golden Helmet.png| Golden
Netherite Helmet.png| Netherite
Turtle Shell.png| Turtle Shell
</gallery>
| durability =
* Leather: 55
* Chainmail: 165
* Iron: 165
* Golden: 77
* Diamond: 363
* Netherite: 407
* Turtle Shell: 275
| renewable =
* '''Netherite''': No
* '''All others''': Yes
| stackable = No
}}
'''Helmets''' are a type of [[armor]] that covers the head of the player. There are seven types of helmets: '''leather cap''', '''chainmail helmet''', '''iron helmet''', '''diamond helmet''', '''gold helmet''', '''netherite helmet''', and '''turtle shell'''.
==Obtaining ==
===Crafting===
{{crafting
|head=1
|showname=0
|showdescription=1
|name=Helmet
|A2= Leather;Gold Ingot;Iron Ingot;Diamond;Scute
|B2= Leather;Gold Ingot;Iron Ingot;Diamond;Scute
|C2= Leather;Gold Ingot;Iron Ingot;Diamond;Scute
|A3= Leather;Gold Ingot;Iron Ingot;Diamond;Scute
|C3= Leather;Gold Ingot;Iron Ingot;Diamond;Scute
|description=
|Output= Leather Cap;Golden Helmet;Iron Helmet;Diamond Helmet;Turtle Shell
|type= Combat
}}
{{crafting
|ignoreusage=1
|name=[[Helmet]]
|ingredients=Damaged matching helmet
|Damaged Leather Cap; Damaged Golden Helmet; Damaged Chainmail Helmet; Damaged Iron Helmet; Damaged Diamond Helmet; Damaged Turtle Shell; Damaged Netherite Helmet
|Damaged Leather Cap; Damaged Golden Helmet; Damaged Chainmail Helmet; Damaged Iron Helmet; Damaged Diamond Helmet; Damaged Turtle Shell; Damaged Netherite Helmet
|Output= Leather Cap; Golden Helmet; Chainmail Helmet; Iron Helmet; Diamond Helmet; Turtle Shell; Netherite Helmet
|description= The durability of the two helmets is added together, plus an extra 5% durability.
|type= Combat
|foot=1
}}
===Upgrading===
{{Smithing
|head=1
|Netherite Upgrade
|Diamond Helmet
|Netherite Ingot
|Netherite Helmet
|tail=1
}}
===Repairing===
====Grinding====
{{Grinding
|showdescription=1
|ingredients=2x Damaged [[Leather Cap]] or<br>2x Damaged [[Chainmail Helmet]] or<br>2x Damaged [[Iron Helmet]] or<br>2x Damaged [[Golden Helmet]] or<br>2x Damaged [[Diamond Helmet]] or<br>2x Damaged [[Netherite Helmet]] or<br>2x Damaged [[Turtle Shell]]
|Damaged Leather Cap; Damaged Chainmail Helmet; Damaged Iron Helmet; Damaged Golden Helmet; Damaged Diamond Helmet; Damaged Netherite Helmet; Damaged Turtle Shell
|Damaged Leather Cap; Damaged Chainmail Helmet; Damaged Iron Helmet; Damaged Golden Helmet; Damaged Diamond Helmet; Damaged Netherite Helmet; Damaged Turtle Shell
|Leather Cap; Chainmail Helmet; Iron Helmet; Golden Helmet; Diamond Helmet; Netherite Helmet; Turtle Shell
|description=The durability of the two helmets are added together, plus an extra 5% durability.
}}
====[[Anvil mechanics#Unit repair|Unit repair]]====
Helmets can be repaired in an [[anvil]] by adding units of the [[armor material]]'s repair material, with each repair material restoring 25% of the helmet's maximum durability, rounded down.
===Mob loot===
If a [[zombie]], [[husk]], [[stray]] or [[skeleton]] is wearing armor, there is a 8.5% chance (9.5% with [[Looting]] I, 10.5% with Looting II and 11.5% with Looting III) for the mob to drop a helmet upon death. The dropped helmet is usually badly damaged, and may be [[enchanted]] with enchantment levels 5-19.
{{IN|bedrock}}, [[vindicator]]s and [[pillager]]s spawned in [[raid]]s have a 8.3525% chance (10.28% on hard) to drop [[iron]] helmets. The dropped helmets are usually badly damaged, and have a 50% chance of being [[enchanted]] with a random [[enchantment]].
===Natural generation===
Two [[armor stand]]s are found in each taiga [[village]] outdoor armory, one of them equipped with an [[iron helmet]].
===Chest loot===
{{IN|BE}}, a sealed room in [[woodland mansion]]s can appear that has a chest sometimes containing an [[Efficiency]] I leather cap.<ref>{{bug|MCPE-109048}}</ref>
{{LootChestItem|leather-cap,random-enchanted-leather-cap,chainmail-helmet,iron-helmet,level-enchanted-iron-helmet,golden-helmet,random-enchanted-golden-helmet,diamond-helmet,damaged-diamond-helmet,level-enchanted-diamond-helmet,damaged-random-enchanted-diamond-helmet,damaged-random-enchanted-diamond-helmet-2}}
===Trading===
{{IN|java}}, novice-level armorer villagers have a 40% chance to sell an iron helmet for 4 emeralds. Journeyman-level armorers have a 40% chance to sell a chainmail helmet for 1 emerald. Master-level armorers always sell an enchanted diamond helmet for 11-27 emeralds. Apprentice-level leatherworker villagers have a {{frac|2|3}} chance to sell a leather cap<ref group="note" name="dye note">The leather armor has a random color created by two dyes (possibly the same dye twice.)</ref> for 5 emeralds. Master-level leatherworker villagers offer the same trade.
Armorer villagers may give the players with the [[Hero of the Village]] effect a chainmail helmet.
{{IN|bedrock}}, novice-level armorer villagers have a 25% chance to sell iron helmet for 5 emeralds, {{frac|1|3}} chance to sell chainmail helmet at journeyman-level for an emerald, and 50% chance to sell enchanted diamond helmet for 8 emeralds at master-level. Apprentice-level leatherworker villagers have a 50% chance to sell leather cap for 5 emeralds as part of their trades, and 50% chance to sell an enchanted leather cap for 5 emeralds at the master level.
{{notelist|columns=1}}
==Usage ==
Helmets can be placed in the top armor slot of a player's [[inventory]] for activation.
===Defense points===
Defense points are each signified by half of a shirt of mail in the armor bar above the health bar. Each defense point reduces any damage dealt to the player that is absorbed by armor by 4%, increasing additively with the number of defense points. Different materials and combinations of armor provide different levels of defense.
The following table shows the number of defense points added by helmets.
{| class="wikitable" data-description="Helmet defense points"
|-
! scope="col" |Material
! scope="col" |
|-
! scope="row" |Leather
|{{armor|1}}
|-
! scope="row" |Golden
| rowspan="4" |{{armor|2}}
|-
! scope="row" |Chainmail
|-
! scope="row" |Iron
|-
! scope="row" |Turtle Shell
|-
! scope="row" |Diamond
| rowspan="2" |{{armor|3}}
|-
! scope="row" |Netherite
|}
===Knockback resistance===
A netherite helmet provides 10% knockback resistance.
===Durability===
The following table shows the amount of damage each piece of armor can absorb before being destroyed.
Any "hit" from a damage source that can be blocked by armor removes one point of durability from each piece of armor worn for every {{hp|4}} of incoming damage (rounded down, but never below 1). Damage taken that armor doesn't protect (such as [[Damage#Fall damage|falling]] or [[Damage#Drowning|drowning]]) does not damage the armor, even if it is enchanted to protect against that type of damage. The following chart displays how many hits helmets can endure.
Netherite armor is not damaged by [[lava]] or [[fire]] when worn.
{| class="wikitable" data-description="Helmet durability"
|-
!Material
!Durability
|-
! scope="row" |Leather
|55
|-
! scope="row" |Golden
|77
|-
! scope="row" |Chainmail
| rowspan="2" |165
|-
! scope="row" |Iron
|-
! scope="row" |Turtle Shell
|275
|-
! scope="row" |Diamond
|363
|-
! scope="row" |Netherite
|407
|}
====Repair====
Helmets may be [[item repair|repaired]] by using them along with some of their crafting material (leather, gold ingots, iron ingots, diamonds or netherite) in an [[anvil]]. Chainmail helmets may be repaired in this way with iron ingots. They may also be repaired by crafting them together with another helmet of like material.
===Enchantments===
A helmet can receive the following [[enchantment]]s. Note that while iron and chainmail have the same durability, chainmail has a higher [[Tutorials/Enchanting mechanics#Enchantability|enchantability]] than iron or diamond.
{| class="wikitable"
|-
!Enchantment !!Max Level !!Notes
|-
|[[Fire Protection]]|| IV ||<ref group="note" name="exclusive">Fire Protection, Blast Protection, Projectile Protection and Protection are mutually exclusive</ref>
|-
|[[Projectile Protection]]|| IV ||<ref group="note" name="exclusive" />
|-
|[[Blast Protection]]|| IV ||<ref group="note" name="exclusive" />
|-
|[[Protection]]|| IV ||<ref group="note" name="exclusive" />
|-
|[[Unbreaking]]||III
|
|-
|[[Respiration]]||III
|
|-
|[[Aqua Affinity]]||I
|
|-
|[[Thorns]]||III ||<ref group="note" name="anvil">Only from using an [[anvil]] and [[enchanted book]]s.</ref>
|-
|[[Mending]]||I ||<ref group="note" name="anvil2">Only from chest loot, fishing, or an anvil and enchanted books.</ref>
|-
|[[Curse of Binding]]||I ||<ref group="note" name="anvil2" />
|-
|[[Curse of Vanishing]]||I ||<ref group="note" name="anvil2" />
|}
{{notelist}}
===Turtle shell effect===
Equipping a {{ItemSprite|Turtle Shell}} turtle shell provides the {{EffectLink|Water Breathing}} status effect, allowing the player to remain underwater for an additional 10 seconds. The time that this effect lasts does not begin to count down until the player dives underwater, then the 10 seconds are counted down. The effect immediately recharges after exposure to air.
===Brewing ingredient===
A turtle shell can also be used as a potion brewing ingredient.
{{Brewing
|Turtle Shell
|Potion of the Turtle Master
|Potion of the Turtle Master
|Potion of the Turtle Master
|showname=1
}}
===Smelting usage===
{{Smelting|showname=1|Iron Helmet;Chainmail Helmet;Golden Helmet|Iron Nugget;Iron Nugget;Gold Nugget|0,1}}
===Piglins===
{{EntityLink|Piglin|Piglins}} are attracted to ''golden'' helmets and pick them up, examining them for 6 to 8 seconds. Piglins can wear other helmets but are not attracted to them. They prefer stronger helmets over weaker helmets, with one exception: They always prefer golden helmets, throwing out stronger helmets in favor of gold helmets. Enchanted helmets are preferred over unenchanted helmets.
==Sounds ==
{{el|je}}:
{{Sound table
|sound=Equip leather1.ogg
|sound2=Equip leather2.ogg
|sound3=Equip leather3.ogg
|sound4=Equip leather4.ogg
|sound5=Equip leather5.ogg
|sound6=Equip leather6.ogg
|subtitle=Leather armor rustles
|source=player
|description=When a leather helmet is equipped
|id=item.armor.equip_leather
|translationkey=subtitles.item.armor.equip_leather
|volume=1.0
|pitch=1.0
|distance=16}}
{{Sound table
|sound=Equip chain1.ogg
|sound2=Equip chain2.ogg
|sound3=Equip chain3.ogg
|sound4=Equip chain4.ogg
|sound5=Equip chain5.ogg
|sound6=Equip chain6.ogg
|subtitle=Chain armor jingles
|source=player
|description=When a chainmail helmet is equipped
|id=item.armor.equip_chain
|translationkey=subtitles.item.armor.equip_chain
|volume=1.0
|pitch=1.0
|distance=16}}
{{Sound table
|sound=Equip iron1.ogg
|sound2=Equip iron2.ogg
|sound3=Equip iron3.ogg
|sound4=Equip iron4.ogg
|sound5=Equip iron5.ogg
|sound6=Equip iron6.ogg
|subtitle=Iron armor clanks
|source=player
|description=When an iron helmet is equipped
|id=item.armor.equip_iron
|translationkey=subtitles.item.armor.equip_iron
|volume=1.0
|pitch=1.0
|distance=16}}
{{Sound table
|sound=Equip gold1.ogg
|sound2=Equip gold2.ogg
|sound3=Equip gold3.ogg
|sound4=Equip gold4.ogg
|sound5=Equip gold5.ogg
|sound6=Equip gold6.ogg
|subtitle=Gold armor clinks
|source=player
|description=When a gold helmet is equipped
|id=item.armor.equip_gold
|translationkey=subtitles.item.armor.equip_gold
|volume=1.0
|pitch=1.0
|distance=16}}
{{Sound table
|sound=Equip diamond1.ogg
|sound2=Equip diamond2.ogg
|sound3=Equip diamond3.ogg
|sound4=Equip diamond4.ogg
|sound5=Equip diamond5.ogg
|sound6=Equip diamond6.ogg
|subtitle=Diamond armor clangs
|source=player
|description=When a diamond helmet is equipped
|id=item.armor.equip_diamond
|translationkey=subtitles.item.armor.equip_diamond
|volume=1.0
|pitch=1.0
|distance=16}}
{{Sound table
|sound=Equip netherite1.ogg
|sound2=Equip netherite2.ogg
|sound3=Equip netherite3.ogg
|sound4=Equip netherite4.ogg
|subtitle=Netherite armor clanks
|source=player
|description=When a netherite helmet is equipped
|id=item.armor.equip_netherite
|translationkey=subtitles.item.armor.equip_netherite
|volume=0.8
|pitch=1.0/0.9
|distance=16}}
{{Sound table
|sound=Equip turtle shell.ogg
|subtitle=Turtle Shell thunks
|source=player
|description=When a turtle shell is equipped
|id=item.armor.equip_turtle
|translationkey=subtitles.item.armor.equip_turtle
|volume=1.0
|pitch=1.0/0.85/1.1
|distance=16}}
{{Sound table
|sound=Random break.ogg
|subtitle=Item breaks
|source=dependent
|description=When a helmet's durability is exhausted
|id=entity.item.break
|translationkey=subtitles.entity.item.break
|volume=0.8
|pitch=0.8-1.2
|distance=16
|foot=1}}
{{el|be}}:
{{Sound table
|type=bedrock
|sound=Equip leather1.ogg
|sound2=Equip leather2.ogg
|sound3=Equip leather3.ogg
|sound4=Equip leather4.ogg
|sound5=Equip leather5.ogg
|sound6=Equip leather6.ogg
|source=player
|description=When a leather helmet or a turtle shell is equipped
|id=armor.equip_leather
|volume=1.0
|pitch=1.0}}
{{Sound table
|sound=Equip chain1.ogg
|sound2=Equip chain2.ogg
|sound3=Equip chain3.ogg
|sound4=Equip chain4.ogg
|sound5=Equip chain5.ogg
|sound6=Equip chain6.ogg
|source=player
|description=When a chain helmet is equipped
|id=armor.equip_chain
|volume=1.0
|pitch=1.0}}
{{Sound table
|sound=Equip iron1.ogg
|sound2=Equip iron2.ogg
|sound3=Equip iron3.ogg
|sound4=Equip iron4.ogg
|sound5=Equip iron5.ogg
|sound6=Equip iron6.ogg
|source=player
|description=When an iron helmet is equipped
|id=armor.equip_iron
|volume=1.0
|pitch=1.0}}
{{Sound table
|sound=Equip gold1.ogg
|sound2=Equip gold2.ogg
|sound3=Equip gold3.ogg
|sound4=Equip gold4.ogg
|sound5=Equip gold5.ogg
|sound6=Equip gold6.ogg
|source=player
|description=When a gold helmet is equipped
|id=armor.equip_gold
|volume=1.0
|pitch=1.0}}
{{Sound table
|sound=Equip diamond1.ogg
|sound2=Equip diamond2.ogg
|sound3=Equip diamond3.ogg
|sound4=Equip diamond4.ogg
|sound5=Equip diamond5.ogg
|sound6=Equip diamond6.ogg
|source=player
|description=When a diamond helmet is equipped
|id=armor.equip_diamond
|volume=1.0
|pitch=1.0}}
{{Sound table
|sound=Equip netherite1.ogg
|sound2=Equip netherite2.ogg
|sound3=Equip netherite3.ogg
|sound4=Equip netherite4.ogg
|source=player
|description=When a netherite helmet is equipped.
|id=armor.equip_netherite
|volume=1.0
|pitch=1.0}}
{{Sound table
|rowspan=2
|sound=Water Splash Old.ogg
|source=block
|description=When a leather helmet is dyed using a cauldron
|id=cauldron.dyearmor
|volume=0.1
|pitch=1.0}}
{{Sound table
|source=block
|description=When a leather helmet's dye is removed using a cauldron
|id=cauldron.cleanarmor
|volume=0.1
|pitch=1.0}}
{{Sound table
|sound=Random break.ogg
|source=player
|description=When a helmet's durability is exhausted
|id=random.break
|volume=1.0
|pitch=0.9
|foot=1}}
==Data values ==
=== ID===
{{edition|java}}:
{{ID table
|edition=java
|showitemtags=y
|showforms=y
|generatetranslationkeys=y
|displayname=Leather Cap
|spritetype=item
|nameid=leather_helmet
|itemtags=freeze_immune_wearables
|form=item}}
{{ID table
|displayname=Chainmail Helmet
|spritetype=item
|nameid=chainmail_helmet
|form=item}}
{{ID table
|displayname=Iron Helmet
|spritetype=item
|nameid=iron_helmet
|form=item}}
{{ID table
|displayname=Diamond Helmet
|spritetype=item
|nameid=diamond_helmet
|form=item}}
{{ID table
|displayname=Golden Helmet
|spritetype=item
|nameid=golden_helmet
|form=item}}
{{ID table
|displayname=Netherite Helmet
|spritetype=item
|nameid=netherite_helmet
|form=item}}
{{ID table
|displayname=Turtle Shell
|spritetype=item
|nameid=turtle_helmet
|form=item
|foot=1}}
{{edition|bedrock}}:
{{ID table
|edition=bedrock
|shownumericids=y
|showforms=y
|notshowbeitemforms=y
|generatetranslationkeys=y
|displayname=Leather Cap
|spritetype=item
|nameid=leather_helmet
|id=335
|form=item}}
{{ID table
|displayname=Chainmail Helmet
|spritetype=item
|nameid=chainmail_helmet
|id=339
|form=item}}
{{ID table
|displayname=Iron Helmet
|spritetype=item
|nameid=iron_helmet
|id=343
|form=item}}
{{ID table
|displayname=Diamond Helmet
|spritetype=item
|nameid=diamond_helmet
|id=347
|form=item}}
{{ID table
|displayname=Golden Helmet
|spritetype=item
|nameid=golden_helmet
|id=351
|form=item}}
{{ID table
|displayname=Netherite Helmet
|spritetype=item
|nameid=netherite_helmet
|id=609
|form=item}}
{{ID table
|displayname=Turtle Shell
|spritetype=item
|nameid=turtle_helmet
|id=573
|form=item
|foot=1}}
===Item data===
When leather caps are dyed, it has the following NBT:
<div class="treeview">
*{{nbt|compound|tag}}: Parent tag.
**{{nbt|compound|display}}: Display properties.
***{{nbt|int|color}}: The color of the leather armor. The tooltip displays "Dyed" if advanced tooltips are disabled, otherwise it displays the hexadecimal color value. Color codes are calculated from the Red, Green and Blue components using this formula:<br>'''<span style="color:red">Red</span>[[wikipedia:Logical shift|<<]]16 + <span style="color:green">Green</span><<8 + <span style="color:blue">Blue</span>'''<ref>For positive values larger than 0x00FFFFFF, the top byte is ignored. All negative values produce white.</ref>
</div>
==Achievements ==
{{load achievements|Iron Man;Tie Dye Outfit;Cover me in debris;Oooh, shiny!}}
==Advancements ==
{{load advancements|Suit Up;Cover me With Diamonds;Oh Shiny;Cover Me in Debris;A Furious Cocktail;How Did We Get Here}}
==History ==
{{History|java classic}}
{{History||August 13, 2009|link=wordofnotch:162091556|Notch tested armor models on [[mob (entity)|mob]]. Only [[chestplate]]s and helmets were available. They were merely aesthetic at the time and had no effect on gameplay.}}
{{History||0.24_SURVIVAL_TEST|[[File:Plate Helmet.png|32px]] Added [[Java_Edition_removed_features#Armor_in_Survival_Test|plate helmet]]s.
|[[File:Chainmail Helmet JE1.png|32px]] Added the model and the texture for unused [[Java_Edition_removed_features#Armor_in_Survival_Test|chain helmet]]s.
|[[File:Zombie full set.png|32px]] [[File:Skeleton helmet.png|26px]] Plate armor models have been tested on [[zombie]]s and [[skeleton]]s. It had no effect on gameplay.}}
{{History|java indev}}
{{History||0.31|snap=20091223-1|Plate and chain armor [[model]]s are no longer used.}}
{{History|||snap=20091231-2|[[File:Leather Cap (item) JE1 BE1.png|32px]] [[File:Studded Helmet (item) JE1.png|32px]] [[File:Chainmail Helmet (item) JE1 BE1.png|32px]] [[File:Iron Helmet (item) JE1 BE1.png|32px]] Added [[item]]s of relation to leather, [[History of textures/Unused textures#Studded armor|studded]], chainmail and plate (iron) helmets.
|The textures of leather helmets are taken from one of [[Notch]]'s previous games, ''[[Legend of the Chambered]]''. The rest are from ''[[Legend of the Chambered 2]]''.}}
{{History||20100206|[[File:Golden Helmet (item) JE1 BE1.png|32px]] [[File:Diamond Helmet (item) JE1 BE1.png|32px]] Added items of golden and diamond helmets.
|Removed leather-chain helmets.}}
{{History||20100212-1|Added armor models.
|[[File:Indev 20100212 armor.png|50px]] Armor models are now displayed on the [[player]] in the [[inventory]].}}
{{History||20100218|[[File:Leather Cap JE1 BE1.png|32px]] [[File:Chainmail Helmet JE2 BE1.png|32px]] [[File:Iron Helmet JE1 BE1.png|32px]] [[File:Golden Helmet JE1 BE1.png|32px]] [[File:Diamond Helmet JE1 BE1.png|32px]] Added models of leather, chainmail, iron, gold, and diamond helmets.
|Helmets can now be [[crafting|crafted]] and worn.
|Helmets now function. All helmets give {{Armor|3}}. Helmets have limited [[item durability|durability]], with lower tier helmets less durable than higher tier helmets.}}
{{History|java alpha}}
{{History||v1.0.8|With the introduction of [[leather]], "Cloth Cap" has been renamed to "Leather Cap".
|Leather cap is now [[crafting|crafted]] with leather instead of [[wool|cloth]].}}
{{History|java}}
{{History||1.0.0|snap=Beta 1.9 Prerelease|The armor protection behavior has been changed. Prior to this update, the total armor protection is based in this equation: (((''total equipped armor damage reduction'' − 1) × (''all equipped armor max damage'' − ''total equipped armor damage'')) ÷ (''total equipped armor max damage'' + 1)). Armor no longer reduces certain damage types to be covered by enchantments.}}
{{History|||snap=October 3, 2011|slink={{tweet|notch|120859830339637249}}|The first images of a [[player]] wearing enchanted armor are revealed.}}
{{History|||snap=Beta 1.9 Prerelease 3|Iron helmets can now be found in the new [[stronghold]] altar [[chest]]s.}}
{{History|||snap=Beta 1.9 Prerelease 4|Helmets can now be [[enchanting|enchanted]].}}
{{History||1.1|snap=12w01a|Iron helmets can now be found in the new blacksmith [[chest]]s in [[village]]s.}}
{{History||1.2.1|snap=12w06a|[[Zombie]]s now drop iron helmets on rare occasions and [[zombie pigman|zombie pigmen]] now drop golden helmets.}}
{{History||1.3.1|snap=12w15a|{{key|Shift}}+clicking can now be used to wear helmets.}}
{{History|||snap=12w21a|Chain helmets can now be obtained legitimately in [[survival]] mode through [[trading]].
|Blacksmith [[villager]]s now [[trading|sell]] chain helmets for 5–6 emeralds.
|Blacksmith villagers now sell diamond helmets for 7 emeralds.
|Blacksmith villagers now sell iron helmets for 4–5 emeralds.
|Butchers now sell leather caps for 2–3 emeralds.}}
{{History||1.4.2|snap=12w32a|[[Mob]] armor has been reintroduced. A partial or full set of any armor is now sometimes worn by [[zombie]]s, [[skeleton]]s and [[zombified piglins|zombie pigmen]], with the likelihood increasing with difficulty.}}
{{History|||snap=August 17, 2012|slink={{tweet|Dinnerbone|236445090929844225}}|[[Jeb]] and [[Dinnerbone]] tweeted pictures of [[dye]]able leather armor.}}
{{History|||snap=12w34a|Leather helmets can now be dyed by [[crafting]] a leather armor piece with [[dye]]s. Dyes can be removed by {{control|use|text=using}} dyed leather armor on a [[cauldron]] with [[water]].
|[[File:Leather Cap JE2.png|32px]] [[File:Leather Cap (item) JE2.png|32px]] Default leather caps textures are now slightly darker.}}
{{History|||snap=12w36a|[[Dye]]d leather caps are now more saturated and have a slight tint of tan in respect to the default armor color.}}
{{History|||snap=12w37a|[[File:Leather Cap JE3 BE2.png|32px]] [[File:Leather Cap (item) JE3 BE2.png|32px]] Leather armor now has non-dyed parts on the cap. This has been implemented so that [[player]]s can distinguish between other types of helmets and similarly colored leather caps.}}
{{History||1.5|snap=13w04a|Helmets in the [[player]]'s hand can now be equipped by right-clicking.
|[[Dispenser]]s can now equip nearby players with helmets.}}
{{History||1.8|snap=14w02a|[[Trading|Trades]] changed: armorer [[villager]]s now [[trading|sell]] chain helmets for 5–7 emeralds.
|Armorer villagers no longer sell diamond helmets.
|Armorer villagers now sell iron helmets for 4–6 emeralds.
|Leatherworkers no longer sell other leather caps.}}
{{History|||snap=14w05a|Helmets no longer turns red when [[mob]]s and [[player]]s are hurt.}}
{{History|||snap=14w06a|Helmets are now visible on [[giant]]s.}}
{{History|||snap=14w25a|Chain helmets [[Java Edition removed features#Chainmail armor|cannot be crafted anymore]] due to the [[item]] form of [[fire]] being [[Java Edition removed features#Obtainable until 1.8|removed]].}}
{{History||1.9|snap=15w31a|Enchanted iron and diamond helmets can now be found in [[end city]] ship [[chest]]s.
|[[Mob]]s now wear armor from the bottom to the top, rather than from the top to the bottom. This means that a mob with three armor pieces, for example, spawn with all armor except a helmet.}}
{{History|||snap=15w34b|Helmet [[item durability|durability]] now affects armor value.}}
{{History|||snap=15w36a|Armor and armor [[enchanting|enchantment]] calculations have been changed. For the original values, see [[Armor/Before 1.9|here]].}}
{{History|||snap=15w36d|Helmet durability affecting value has been removed.
|Helmets now has an attribute controlling the defense points.}}
{{History|||snap=15w50a|Added <code>equip</code> [[sound]]s for leather armor.}}
{{History|||snap=16w02a|Armor and armor enchantment calculations have been changed again.}}
{{History|||snap=16w05a|Armor calculations have been changed, once again.}}
{{History||1.13|snap=17w47a|Prior to [[1.13/Flattening|''The Flattening'']], these [[item]]s' numeral IDs were 298, 302, 306, 310 and 314.}}
{{History|||snap=18w07a|[[File:Turtle Shell.png|32px]] [[File:Turtle Shell (item) JE1 BE1.png|32px]] Added turtle shells.}}
{{History|||snap=18w09a|Golden helmets now have a chance of generating in [[underwater ruins]].}}
{{History|||snap=18w11a|Enchanted leather caps can now generate in the chests of [[shipwreck]]s.}}
{{History|||snap=18w20a|"Chain Helmet" has now been renamed to "Chainmail Helmet".}}
{{History||1.14|snap=18w43a|[[File:Leather Cap JE4 BE2.png|32px]] [[File:Chainmail Helmet JE3 BE2.png|32px]] [[File:Iron Helmet JE2 BE2.png|32px]] [[File:Golden Helmet JE2 BE2.png|32px]] [[File:Diamond Helmet JE2 BE2.png|32px]]<br>[[File:Leather Cap (item) JE4 BE3.png|32px]] [[File:Chainmail Helmet (item) JE2 BE2.png|32px]] [[File:Iron Helmet (item) JE2 BE2.png|32px]] [[File:Golden Helmet (item) JE2 BE2.png|32px]] [[File:Diamond Helmet (item) JE2 BE2.png|32px]] The textures of all types of helmets have been changed.}}
{{History|||snap=18w48a|Leather caps can now be found in [[chest]]s in [[village]] tanneries.}}
{{History|||snap=18w50a|Iron helmets can now be found on [[armor stand]]s in [[taiga]] villages.}}
{{History|||snap=19w08a|[[File:Golden Helmet (item) JE3 BE3.png|32px]] The textures of gold helmet [[item]]s have been changed.}}
{{History|||snap=19w11a|Armorer villagers now sell enchanted diamond helmets, making diamond helmets effectively [[renewable resource|renewable]] again.
|Leatherworker villagers now sell randomly [[dye]]d leather caps.}}
{{History|||snap=19w13a|Armorer villagers now give chainmail helmets to players under the [[Hero of the Village]] effect.}}
{{History||1.16|snap=20w06a|[[File:Netherite Helmet JE1.png|32px]] [[File:Netherite Helmet (item) JE1.png|32px]] Added netherite helmets.}}
{{History|||snap=20w07a|[[File:Leather piglin helmet.png|32px]] [[File:Chainmail piglin helmet.png|32px]] [[File:Iron piglin helmet.png|32px]] [[File:Golden piglin helmet.png|32px]] [[File:Diamond piglin helmet.png|32px]] [[File:Netherite piglin helmet JE1.png|32px]] Added textures and [[model]]s for all helmets when they are used by [[piglin]]s.
|Netherite helmets are now obtained by combining one diamond armor piece and one netherite ingot in a crafting table.
|[[File:Turtle Shell piglin MC-172110.png|32px]] Turtle shells, when used by piglins and [[zombified piglin]]s, result in a [[missing texture]] when being displayed.<ref>{{Cite bug|MC|172110|Texture of turtle shells is missing when worn by a piglin or zombified piglin|date=February 14, 2020}}</ref>}}
{{History|||snap=20w09a|[[File:Diamond Helmet (item) JE3 BE3.png|32px]] The textures of diamond helmet [[item]]s have been changed.}}
{{History|||snap=20w10a|[[File:Netherite Helmet JE2 BE1.png|32px]] [[File:Netherite Helmet (item) JE2 BE1.png|32px]] The texture of netherite helmets has been changed.
|[[File:Netherite piglin helmet.png|32px]] The texture of netherite helmets for [[piglin]]s has been changed.
|Netherite helmets can no longer be [[crafting|crafted]].
|Netherite helmets are now obtained by combining one diamond helmet and one netherite ingot in a [[smithing table]].}}
{{History|||snap=20w16a|Golden and netherite helmets now generate randomly [[enchanting|enchanted]], and sometimes [[damage]]d, in [[bastion remnant]] and [[ruined portal]] chests.}}
{{History|||snap=20w17a|Diamonds helmets now generate in place of netherite helmets in bastion remnant [[chest]]s.}}
{{History|||snap=pre3|The special helmet [[model]]s and textures created for [[piglin]]s have been removed except for leather helmets.}}
{{History||1.17|snap=20w48a|Wearing a leather helmet now prevents [[Powder Snow#Freezing|freezing]] entirely.}}
{{History|||snap=21w13a|The two unused textures of the leather cap for [[piglin]]s<ref><code>/assets/minecraft/textures/models/armor/piglin_leather_layer_1.png</code></ref><ref><code>/assets/minecraft/textures/models/armor/piglin_leather_layer_1_overlay.png</code></ref> have been removed.}}
{{History||1.18.2|snap=22w03a|Netherite helmet knockback resistance is no longer random.}}
{{History||1.19|snap=22w17a|[[File:Leather Cap JE5.png|32px]] The texture of the leather cap item has been changed.|Changed the leather cap texture when worn so the center bar now extends to the bottom of the back face.}}
{{History||1.20<br>(Experimental)|link=1.19.4|snap=23w04a|Non-leather helmets can now be trimmed using a [[smithing table]].
|There are 10 types of material that determine the color of the trim:
*Iron
*Copper
*Gold
*Lapis
*Emerald
*Diamond
*Netherite
*Redstone
*Amethyst
*Quartz
|Upgrading diamond helmets to netherite helmets now requires the netherite upgrade [[smithing template]].}}
{{History|||snap=23w05a|Leather caps can now be trimmed using a smithing table.|Helmets can now have trims of the same material it is made out of.}}
{{History|||snap=23w06a|Swapped {{cd|iron}} and {{cd|iron_darker}} palette, then made {{cd|iron_darker}} darker overall.}}
{{History||1.19.4|snap=23w05a|Helmets can now be swapped by {{ctrl|using}} them in the hotbar.<ref>{{bug|MC-216270|||Fixed}}</ref>}}
{{History||?|Helmets can now be swapped in [[armor stand]]s by {{ctrl|using}} them/[[head]]s/[[carved pumpkin]]s in the armor stand's slot.}}
{{History||1.20|snap=23w12a|The pattern textures of dune and sentry armor trims are changed.|Those previous patterns were left with different names: dune was renamed sentry and sentry was renamed shaper.}}
{{History|pocket alpha}}
{{History||v0.6.0|[[File:Leather Cap JE1 BE1.png|32px]] [[File:Chainmail Helmet JE2 BE1.png|32px]] [[File:Iron Helmet JE1 BE1.png|32px]] [[File:Golden Helmet JE1 BE1.png|32px]] [[File:Diamond Helmet JE1 BE1.png|32px]]<br>[[File:Leather Cap (item) JE1 BE1.png|32px]] [[File:Chainmail Helmet (item) JE1 BE1.png|32px]] [[File:Iron Helmet (item) JE1 BE1.png|32px]] [[File:Golden Helmet (item) JE1 BE1.png|32px]] [[File:Diamond Helmet (item) JE1 BE1.png|32px]] Added helmets.}}
{{History||v0.8.0|snap=build 2|[[File:Leather Cap (item) JE3 BE2.png|32px]] The leather helmet sprite has been changed to that of {{el|je}}, but its armor [[model]] remains that of older versions.}}
{{History||v0.9.0|snap=build 1|Iron helmets now naturally generate in [[village]] [[chest]]s and in [[stronghold]] altar chests.}}
{{History||v0.11.0|snap=build 11|Helmets now protect against [[damage]] from [[mob]]s only.}}
{{History||v0.12.1|snap=build 1|Helmets can now be worn by mobs.
|Chainmail helmets can now be obtained in [[survival]] mode from a mob wearing it.}}
{{History||?|Helmets no longer turn red when [[mob]]s and [[player]]s are hurt.}}
{{History||v0.14.0|snap=build 1|[[File:Leather Cap JE3 BE2.png|32px]] The texture of leather helmets have been changed.
|Leather helmets can now be dyed.}}
{{History||v0.15.0|snap=build 1|Helmets can now be obtained from [[stray]]s and [[husk]]s that naturally spawn with armor.}}
{{History|pocket}}
{{History||1.0.0|snap=alpha 0.17.0.1|[[Enchanting|Enchanted]] iron helmets and enchanted diamond helmets can now be found inside [[chest]]s within [[end city|end cities]].}}
{{History||1.0.4|snap=alpha 1.0.4.0|Iron helmets and chainmail helmets are now [[trading|sold]] by armorer smith [[villager]]s via trading.}}
{{History||1.1.0|snap=alpha 1.1.0.0|Golden, chain and iron helmets can now be [[smelting|smelted]] down into one of their respective [[nugget]]s.}}
{{History|bedrock}}
{{History||1.4.0|snap=beta 1.2.14.2|Chainmail helmets now generate in [[buried treasure]] chests.
|Enchanted leather helmets can now be found inside [[shipwreck]] supply room [[chest]]s.}}
{{History|||snap=beta 1.2.20.1|Golden helmets can now be found inside [[underwater ruins]] chests.}}
{{History||1.5.0|snap=beta 1.5.0.4|[[File:Turtle Shell.png|32px]] [[File:Turtle Shell (item) JE1 BE1.png|32px]] Added turtle shells.}}
{{History||1.10.0|snap=beta 1.10.0.3|[[File:Leather Cap JE4 BE2.png|32px]] [[File:Chainmail Helmet JE3 BE2.png|32px]] [[File:Iron Helmet JE2 BE2.png|32px]] [[File:Golden Helmet JE2 BE2.png|32px]] [[File:Diamond Helmet JE2 BE2.png|32px]]<br>[[File:Leather Cap (item) JE4 BE3.png|32px]] [[File:Chainmail Helmet (item) JE2 BE2.png|32px]] [[File:Iron Helmet (item) JE2 BE2.png|32px]] [[File:Golden Helmet (item) JE2 BE2.png|32px]] [[File:Diamond Helmet (item) JE2 BE2.png|32px]] The textures of all types of helmets have been changed.
|Iron helmets now can be found in plains [[village]] weaponsmith [[chest]]s.
|Leather helmets can now be found inside plains village tannery chests.}}
{{History||1.11.0|snap=beta 1.11.0.1|Iron helmets now can be found in [[savanna]], [[taiga]], [[desert]], [[snowy taiga]] and [[snowy tundra]] [[village]] weaponsmith [[chest]]s.
|Leather helmets can now be found inside savanna, taiga, desert, snowy taiga and snowy tundra village tannery chests.
|Iron helmets can now be found in [[village]] armorer chests.}}
{{History|||snap=beta 1.11.0.4|[[Pillager]]s and [[vindicator]]s that spawn in [[raid]]s can now drop iron helmets.
|Diamond helmets are now sold by armorer villagers.}}
{{History||1.11.0|snap=beta 1.11.0.5|[[File:Golden Helmet (item) JE3 BE3.png|32px]] The textures of gold helmet [[item]]s have been changed.}}
{{History||1.12.0|snap=beta 1.12.0.2|[[File:Armor Stand with Leather Armor MCPE-44669.png|32px]] Leather armor no longer shows as being [[dye]]d properly when worn by [[armor stand]]s.}}
{{History||1.13.0|snap=beta 1.13.0.1|Leather armor now appears properly dyed when worn by armor stands.}}
{{History||1.16.0|snap=beta 1.16.0.51|[[File:Netherite Helmet JE2 BE1.png|32px]] [[File:Netherite Helmet (item) JE2 BE1.png|32px]] Added netherite helmets.
|[[File:Diamond Helmet (item) JE3 BE3.png|32px]] The textures of diamond helmet [[item]]s have been changed.
|Helmets can now be obtained from [[piglin]]s that naturally spawn with golden helmets.}}
{{History|||snap=beta 1.16.0.57|Golden and netherite helmets now generate randomly [[enchanting|enchanted]], and sometimes [[damage]]d, in [[bastion remnant]] chests.
|Netherite helmets can no longer be [[crafting|crafted]].
|Netherite helmets are now obtained by combining one diamond helmet and one netherite ingot in a [[smithing table]].}}
{{History|||snap=beta 1.16.0.63|Diamonds helmets now generate in place of netherite helmets in bastion remnant [[chest]]s.}}
{{History|||snap=beta 1.16.200.53|Netherite helmets now gives a 90% reduction in knockback.}}
{{History||1.16.210|snap=beta 1.16.210.53|Wearing leather helmets now prevents [[Powder Snow#Freezing|freezing]] entirely.}}
{{History|console}}
{{History||xbox=TU1|xbone=CU1|ps=1.0|wiiu=Patch 1|switch=1.0.1|[[File:Leather Cap JE1 BE1.png|32px]] [[File:Chainmail Helmet JE2 BE1.png|32px]] [[File:Iron Helmet JE1 BE1.png|32px]] [[File:Golden Helmet JE1 BE1.png|32px]] [[File:Diamond Helmet JE1 BE1.png|32px]]<br>[[File:Leather Cap (item) JE1 BE1.png|32px]] [[File:Chainmail Helmet (item) JE1 BE1.png|32px]] [[File:Iron Helmet (item) JE1 BE1.png|32px]] [[File:Golden Helmet (item) JE1 BE1.png|32px]] [[File:Diamond Helmet (item) JE1 BE1.png|32px]] Added helmets.
|Added a quick equip for armor to the [[inventory]] interface.}}
{{History||xbox=TU12|ps=1.03|[[File:Leather Cap JE3 BE2.png|32px]] [[File:Leather Cap (item) JE3 BE2.png|32px]] The textures for leather helmets have been changed.}}
{{History||xbox=TU14|ps=1.05|Leather helmets can now be [[dye]]d.
|[[Item repair]] can now repair helmets.}}
{{History||xbox=TU25|xbone=CU13|ps=1.16|Helmets now have the quick equip functionality.}}
{{History||xbox=TU53|xbone=CU43|ps=1.49|wiiu=Patch 23|switch=1.0.3|Golden, chain and iron helmets can now be [[smelting|smelted]] down into one of their respective [[nugget]]s.}}
{{History|PS4}}
{{History||1.90|[[File:Chainmail Helmet (item) JE2 BE2.png|32px]] [[File:Iron Helmet (item) JE2 BE2.png|32px]] [[File:Golden Helmet (item) JE2 BE2.png|32px]] [[File:Diamond Helmet (item) JE2 BE2.png|32px]] The textures of all types of helmet items have been changed (except for the leather helmets).}}
{{History|new 3ds}}
{{History||0.1.0|[[File:Leather Cap JE1 BE1.png|32px]] [[File:Chainmail Helmet JE2 BE1.png|32px]] [[File:Iron Helmet JE1 BE1.png|32px]] [[File:Golden Helmet JE1 BE1.png|32px]] [[File:Diamond Helmet JE1 BE1.png|32px]]<br>[[File:Leather Cap (item) JE3 BE2.png|32px]] [[File:Chainmail Helmet (item) JE1 BE1.png|32px]] [[File:Iron Helmet (item) JE1 BE1.png|32px]] [[File:Golden Helmet (item) JE1 BE1.png|32px]] [[File:Diamond Helmet (item) JE1 BE1.png|32px]] Added helmets.}}
{{History|foot}}
<gallery>
File:ArmorModel Aug 13 2009.jpg|First image of armor.
File:DinnerboneArmor.png|[[Dinnerbone]]'s first screenshot of dyed armor.
File:ArmorPE.png
</gallery>
;Armor durability from Indev until late Beta
{| class="wikitable" data-description="Armor Durability during Indev until late Beta" style="text-align:center;"
|-
!Leather
!Golden
!Chainmail
!Iron
!Diamond
|-
|33
|66
|66
|132
|264
|}
==Issues ==
{{issue list}}
==Trivia ==
*Unlike the other helmets, the netherite helmet covers most of the player's face, due to a nose guard and cheek plates.
*The turtle shell is the only helmet that is not part of a complete set.
* In Bedrock Edition, there exists a bug<ref>{{Cite bug|MCPE|109048|Efficiency 1 Leather Cap in Woodland Mansions|date=December 1, 2020}}</ref> that makes it possible to obtain a Leather Cap enchanted with Efficiency I from [[Woodland Mansion]] chests with a chance of 1.45%. The enchantment has no effect on the cap, however.
==Gallery ==
<gallery>
File:Zombie helmet.png|A zombie wearing a helmet in [[Survival Test]].
</gallery>
===Enchanted Helmets===
<gallery>
File:Enchanted Leather Cap (item).gif
File:Enchanted Chainmail Helmet (item).gif
File:Enchanted Iron Helmet (item).gif
File:Enchanted Golden Helmet (item).gif
File:Enchanted Diamond Helmet (item).gif
File:Enchanted Netherite Helmet (item).gif
File:Enchanted Turtle Shell (item).gif
</gallery>
<gallery>
File:Enchanted Leather Helmet.gif
File:Enchanted Chainmail Helmet.gif
File:Enchanted Iron Helmet.gif
File:Enchanted Golden Helmet.gif
File:Enchanted Diamond Helmet.gif
File:Enchanted Netherite Helmet.gif
File:Enchanted Turtle Shell.gif
</gallery>
==References ==
{{reflist}}
==External Links ==
*[https://www.minecraft.net/en-us/article/taking-inventory--helmet Taking Inventory: Helmet] – Minecraft.net on February 20, 2020
{{Items}}
[[Category:Armor]]
[[es:Casco]]
[[ja:ヘルメット]]
[[ko:투구]]
[[pt:Capacete]]
[[pl:Hełm]]
[[zh:头盔]]</li></ul> | The option was added for the player to specify the world seed. | |||||||||||||||||||||||||||||||||||||||||||||||||||||||||||||||||||||||||||||||||||||||||||||||||||||||||||||
1.5
Template loop detected: Template:History Template loop detected: Template:History Template loop detected: Template:History Template loop detected: Template:History Template loop detected: Template:History Template loop detected: Template:History Template loop detected: Template:History Template loop detected: Template:History Template loop detected: Template:History Template loop detected: Template:History Template loop detected: Template:History Template loop detected: Template:History Template loop detected: Template:History Template loop detected: Template:History Template loop detected: Template:History Template loop detected: Template:History Template loop detected: Template:History Template loop detected: Template:History Template loop detected: Template:History Template loop detected: Template:History Template loop detected: Template:History Template loop detected: Template:History Template loop detected: Template:History Template loop detected: Template:History Template loop detected: Template:History Template loop detected: Template:History Template loop detected: Template:History Template loop detected: Template:History Template loop detected: Template:History Template loop detected: Template:History Template loop detected: Template:History Template loop detected: Template:History Template loop detected: Template:History Template loop detected: Template:History Template loop detected: Template:History Template loop detected: Template:History Template loop detected: Template:History Template loop detected: Template:History Template loop detected: Template:History Template loop detected: Template:History Template loop detected: Template:History Template loop detected: Template:History
| Rain was added. | |||||||||||||||||||||||||||||||||||||||||||||||||||||||||||||||||||||||||||||||||||||||||||||||||||||||||||||
1.7{{Extension DPL}}<ul><li>[[End Crystal|End Crystal]]<br/>{{ItemEntity
|image=End Crystal.gif
|imagesize=150px
|invimage=End Crystal
|renewable=Yes
|stackable=Yes (64)
|rarity=Rare
|drops=None
|size=
Height: 2 Blocks<br>Width: 2 Blocks
}}
An '''end crystal''' is an [[entity]] that can be [[Crafting|crafted]] or found on [[the End]]'s main island, where it heals the [[Ender Dragon|ender dragon]]. It can only be placed on [[obsidian]] or [[bedrock]] and [[Explosion|explodes]] instantly when attacked or damaged in most ways.
== Spawning ==
=== Natural generation ===
An end crystal is found atop each [[obsidian pillar]] on the central island of the End, each on top of a piece of [[bedrock]]. There are 10 end crystals in total, of which two are protected in "cages" of [[iron bars]]. All end crystals respawn one after another as the respawning process of the [[ender dragon]] starts.
== Obtaining ==
=== Crafting ===
{{Crafting
|A1=Glass
|B1=Glass
|C1=Glass
|A2=Glass
|B2=Eye of Ender
|C2=Glass
|A3=Glass
|B3=Ghast Tear
|C3=Glass
|Output= End Crystal
|type= Decoration block
}}
== Usage ==
=== Healing the ender dragon ===
Their primary purpose is to recharge the health of the ender dragon, who gains a charge from the nearest crystal within a cuboid extending 32 blocks from the dragon in all directions. The dragon is healed {{hp|1}} each half-second. If multiple ender dragons are spawned, an end crystal can affect multiple dragons at the same time. The healing beam is neither obstructed nor is its power diminished by entities or blocks.
=== Respawning the ender dragon ===
[[File:End Crystals on the Exit portal.png|right|thumb|How to arrange end crystals on the exit portal to respawn the ender dragon.]]
As items, end crystals may be placed on bedrock and [[obsidian]], if the two blocks above the bedrock or obsidian block are air or replaceable blocks and no other entities intersect the area. When an end crystal is placed in [[the End]], a [[fire]] block is created at the end crystal location. If four are placed on the end [[exit portal]], one on each of the flat sides, the crystals respawn the original end crystals on the obsidian pillars, as well as resurrect the dragon itself, before exploding. The top of each pillar also explodes, destroying any player-placed blocks. This happens even if TNT explosions are turned off in settings.
If the exit portal is ever broken for any reason, end crystals can still be placed on obsidian blocks with the same location as the exit portal.
=== Explosions ===
End crystals explode when attacked or damaged in most ways, even by attacks that normally do zero damage. They are not affected by exploding fireworks, and if damaged by an explosion, they disappear instead of exploding.{{Only|Java}}<ref>{{bug|MC-118429||End crystals don't explode when destroyed by nearby explosions}}</ref> The end crystal's [[explosion]] has an [[Explosion#Explosion strength|explosion strength]] of 6, the same as a [[charged creeper]]. The end crystal's fire often remains after the crystal explodes. Any ender dragon charging from the crystal when it is destroyed takes {{hp|10}} damage.
{{IN|java}}, an end crystal's explosion can be [[blocking|blocked]] by a [[shield]].
Although an ender dragon damages most blocks and entities in its path, it cannot destroy end crystals simply by going near them.
Placing [[water]] on the end crystal will neutralize the blast effect, but not the [[damage]] or knockback.
End crystals with obsidian or bedrock below them will not damage blocks below them when they explode.
{{IN|bedrock}}, having the game rule {{cd|mobGriefing}} to {{cd|false}} will prevent the End Crystal from destroying any blocks. While {{in|java}} the same game rule will not prevent the End Crystal from destroying any blocks.
=== Beams ===
The end crystal naturally shoots a beam at the ender dragon and heals it when the dragon is within range. This beam can be manually created using the command {{cmd|data merge entity @e[type{{=}}end_crystal,limit{{=}}1] {BeamTarget:{X:0, Y:0, Z:0<nowiki>}}}}. The beam can be pointed in any direction, allowing it to mark locations or objects.
=== Properties ===
[[File:End Crystal (Slateless).gif|thumb|A base-less end crystal.]]
End crystals are of two kinds: the ones with a base beneath them are created either by game mechanism or by the {{cmd|summon}} command; while the base-less ones are created by players by manually placing the crystal items on top of [[obsidian]] or [[bedrock]].
The base appears to be made of bedrock, with a crystal hovering over it. While in the End, a crystal continually generates fire at its current position, one block above the base (directly on top of the block the base is embedded in), replacing any other block at that location. This fire is capable of spreading.
The end crystal entity is not solid and can be walked through freely. End crystals can be pushed by [[piston]]s, but they explode if moved while on fire. Because fire is checked only when an entity moves, end crystals do not normally take damage from their own fire unless moved.
== Sounds ==
{{edition|java}}:
{{Sound table
|sound=Explosion1.ogg
|sound2=Explosion2.ogg
|sound3=Explosion3.ogg
|sound4=Explosion4.ogg
|subtitle=Explosion
|source=block
|description=When an end crystal explodes
|id=entity.generic.explode
|translationkey=subtitles.entity.generic.explode
|volume=4.0
|pitch=0.56-0.84
|distance=16
|foot=1}}
{{edition|bedrock}}:
{{Sound table
|type=bedrock
|sound=Explosion1.ogg
|sound2=Explosion2.ogg
|sound3=Explosion3.ogg
|sound4=Explosion4.ogg
|source=block
|description=When an end crystal explodes
|id=random.explode
|volume=4.0
|pitch=1.0
|foot=1}}
== Data values ==
=== ID ===
{{edition|java}}:
{{ID table
|edition=java
|firstcolumnname=Item
|showforms=y
|generatetranslationkeys=y
|displayname=End Crystal
|spritetype=item
|nameid=end_crystal
|form=item
|foot=1}}
{{ID table
|edition=java
|firstcolumnname=Entity
|generatetranslationkeys=y
|displayname=End Crystal
|spritetype=entity
|nameid=end_crystal
|foot=1}}
{{edition|bedrock}}:
{{ID table
|edition=bedrock
|firstcolumnname=Item
|shownumericids=y
|showforms=y
|notshowbeitemforms=y
|generatetranslationkeys=y
|displayname=End Crystal
|spritetype=item
|nameid=end_crystal
|id=637
|form=item
|foot=1}}
{{ID table
|edition=bedrock
|firstcolumnname=Entity
|shownumericids=y
|generatetranslationkeys=y
|displayname=End Crystal
|spritetype=entity
|nameid=ender_crystal
|id=71
|foot=1}}
=== Entity data ===
End crystals have entity data that define various properties of the entity.
{{el|java}}:
{{main|Entity format}}
{{/ED}}
{{el|bedrock}}:
: See [[Bedrock Edition level format/Entity format]].
== Achievements ==
{{load achievements|The End... Again...}}
== Advancements ==
{{load advancements|The End... Again...}}
== History ==
[[File:End Crystal 19w38a.gif|thumb|Java Edition 19w38a]]
{{History|java}}
{{History||1.0.0|snap=Beta 1.9 Prerelease 6|[[File:End Crystal JE1 BE1.png|32px]] Added ender crystals.}}
{{History||1.2.1|snap=12w04a|Previously, ender crystals could be spawned using [[spawn egg]]s with ID 200 (in a [[server]], these were created using {{cmd|give 383 1 200}}). The spawned crystal would be positioned where a natural crystal would be if there was a bedrock block at the location. It was still possible until 1.9 to obtain an end crystal spawn egg, but it would not spawn anything.}}
{{History||1.7.2|snap=13w36a|Ender crystals can now be spawned with the {{cmd|summon}} command.}}
{{History||1.8|snap=14w06a|Ender crystals now generate one [[block]] lower. The fire they generate destroys the [[bedrock]] block that is supposed to be underneath (see {{bug|MC-47526}}).}}
{{History||1.9|snap=15w31a|Ender crystals generate at the correct Y-level again.}}
{{History|||snap=15w33c|Respawning the ender dragon now also respawns the ender crystals on the obsidian pillars.
|Ender crystals now have a compound BeamTarget tag that hold the X, Y, Z block location the beam points to.}}
{{History|||snap=15w44a|"Ender crystals" have been renamed to "end crystals".
|[[File:End Crystal (item) JE1 BE1.png|32px]] End crystals can now be obtained as an item.
|End crystals now drop from [[skeleton trap]] horses and can be placed only on [[obsidian]] or bedrock. Placing several of them atop the end exit portal respawns the ender dragon.}}
{{History|||snap=15w44b|End crystals are no longer dropped by [[skeleton horse]]s.
|Added crafting recipe for end crystals, making end crystals [[renewable]].}}
{{History|||snap=15w49a|End crystals now require [[air]]/replaceable [[block]]s and lack of [[entity|entities]] for placement.}}
{{History|||snap=15w51a|End crystals can no longer be placed in [[Adventure mode]].}}
{{History||1.11|snap=16w32a|The entity ID has been changed from <code>EnderCrystal</code> to <code>ender_crystal</code>.}}
{{History||1.13|snap=17w47a|Prior to [[1.13/Flattening|''The Flattening'']], this [[item]]'s numeral ID was 426.}}
{{History|||snap=18w20b|Renamed to "End Crystal".}}
{{History|||snap=pre5|Entity ID has been changed to <code>end_crystal</code>.}}
{{History||1.14|snap=18w43a|[[File:End Crystal JE2.png|32px]][[File:End Crystal (item) JE2 BE2.png|32px]] The textures of end crystals and the end crystal [[item]] have been changed.}}
{{History||1.19.3|snap=22w43a|End crystal explosions can now be [[blocking|blocked]] by [[shield]]s.<ref>{{bug|MC-188247|||Fixed}}</ref>}}
{{History|pocket}}
{{History||1.0.0|snap=alpha 0.17.0.1|[[File:End Crystal JE1 BE1.png|32px]][[File:End Crystal (item) JE1 BE1.png|32px]] Added end crystals.}}
{{History|bedrock}}
{{History||1.6.0|snap=?|[[File:End Crystal BE2.png|32px]] [[File:End Crystal BE2.gif|32px]] The model of the end crystals has been changed. It has now two cubes instead of three.}}
{{History||1.10.0|snap=beta 1.10.0.3|[[File:End Crystal BE3.png|32px]][[File:End Crystal (item) JE2 BE2.png|32px]] The textures of end crystals and the end crystal item have been changed.}}
{{History||1.17.10|snap=beta 1.17.10.20|[[File:End Crystal JE2.png|32px]] The model of the end crystals has been changed to have three cubes again, and to match ''Java Edition''.}}
{{History||1.19.70|snap=beta 1.19.70.20|Increased end crystal collision box size to match ''Java Edition''.|End crystals with obsidian or bedrock below them now will not damage blocks below them when they explode.}}
{{History|console}}
{{History||xbox=TU9|xbone=CU1|ps=1.0|wiiu=Patch 1|[[File:End Crystal JE1 BE1.png|32px]] Added ender crystals.}}
{{History||xbox=TU31|xbone=CU19|ps=1.22|wiiu=Patch 3|Ender crystals now generate one block lower. The fire they generate destroys the [[bedrock]] block that is supposed to be underneath.}}
{{History||xbox=TU46|xbone=CU36|ps=1.38|wiiu=Patch 15|"Ender crystals" have been renamed to "end crystals".
|[[File:End Crystal (item) JE1 BE1.png|32px]] End crystals can now be obtained as an [[item]].
|End crystals now drop from [[skeleton trap]] horses and can be placed only on [[obsidian]] or bedrock. Placing several of them atop the [[end portal|end exit portal]] respawns the ender dragon.
|Added a crafting recipe for end crystals.}}
{{History||xbox=none|xbone=none|ps=1.90|wiiu=none|switch=none|[[File:End Crystal JE2.png|32px]][[File:End Crystal (item) JE2 BE2.png|32px]] The textures of end crystals and the end crystal item have been changed.}}
{{History|new 3ds}}
{{History||1.7.10|[[File:End Crystal JE1 BE1.png|32px]][[File:End Crystal (item) JE1 BE1.png|32px]] Added end crystals.}}
{{History|foot}}
== Issues ==
{{issue list}}
== Trivia ==
* According to [[Jens Bergensten|Jeb]], the reason behind the current crafting recipe using glass as opposed to [[Chorus Fruit|chorus fruit]] or any materials introduced in [[Java Edition 1.9|1.9]] is as a means for players to craft end crystals in older worlds that the dragon has already been killed in.<ref>{{tweet|jeb_|667000226524372992|The problem is that you need to be able to craft the crystals on worlds in which the dragon has been destroyed already|November 18, 2015}}</ref>
* A historical rendition of the [[beacon]] block featured an animated entity within it, which resembled a yellow miniaturized end crystal. The bedrock platform of the end crystal entity would also render below the beacon, though this would normally be hidden within the block below.
* Using a [[piston]] to push an end crystal's fire into an end portal block deletes the end portal block. However, natural portal blocks regenerate if the end crystal is moved.
== Gallery ==
<gallery>
End Crystal Usage.png|Using end crystals to respawn the ender dragon.
Crystal Link.png|An ender dragon being hit with the "healing beam" of an end crystal.
Ender Crystal.png|An end crystal.
EnderCrystalOverworld.png|An end crystal in the Overworld spawned using {{cmd|summon}} {{code|end_crystal}}.
Ender Dragon Revival.png|End crystals respawning the ender dragon.
CagedEnderCrystal.png|A caged end crystal.
Respawn ender dragon.png|A [[player]] trying to respawn the ender dragon.
End Crystal (item).gif|An animation of the item of the end crystal.
</gallery>
== References ==
{{reflist}}
{{Entities}}
{{Items}}
[[de:Enderkristall]]
[[el:Κρύσταλλος του Ender]]
[[es:Cristal del End]]
[[fr:Cristal de l'End]]
[[ja:エンドクリスタル]]
[[ko:엔드 수정]]
[[nl:Endkristal]]
[[pl:Kryształ Endu]]
[[pt:Cristal do End]]
[[ru:Кристалл Края]]
[[th:คริสตัลเอนด์]]
[[uk:Кристал Енду]]
[[zh:末影水晶]]</li><li>[[Chalkboard|Chalkboard]]<br/>{{Education feature}}
{{unobtainable|edition=be}}{{Block
|image=<gallery>
Chalkboard Slate.png|Slate
Chalkboard Poster.png|Poster
Chalkboard Board.png|Board
</gallery>
|invimage=Slate
|invimage2=Poster
|invimage3=Board
|transparent=Yes
|renewable=No
|light=No
|tool=None
|stackable=Yes (16)
|flammable=No
}}
A '''chalkboard''' is a [[block]] that can display more text than a [[sign]].<ref>https://education.minecraft.net/support/knowledge-base/using-slates-posters-boards/</ref> Three sizes are available: 1×1 (slate), 2×1 (poster), and 3×2 (board).
== Obtaining ==
In ''[[Education Edition]]'', chalkboards can be obtained in the [[Creative inventory]] or through the {{cmd|give}} command.
In ''[[Bedrock Edition]]'', chalkboards cannot be obtained by commands or the creative inventory, and can only be obtained by using glitches or inventory editors.
== Usage ==
A chalkboard can be used similarly to a [[sign]], to display text. Once placed, select the chalkboard and enter the desired text and click the "OK" button. The "×" in the upper right corner of the board closes the edit screen.
=== Placement ===
Chalkboards may be placed on the top or side of other blocks (including non-solid blocks like [[fence]]s, [[glass]], [[rail]]s, and other chalkboards). To place a chalkboard, {{control|use}} a chalkboard item while pointing at the block the chalkboard should be attached to. To place a chalkboard on a block that can be interacted with by the {{control|use}} control (for example, [[chest]]s, [[note block]]s, etc.), {{control|sneak}} while placing the chalkboard.
1×1 slates placed on the top of a block stand on a short post, facing in the direction of the player who placed it, in any of 16 different directions. 2×1 posters and 2×3 boards can be placed in any of 4 different directions. Chalkboards placed on the side of a block simply float there, even if the block doesn't make contact with the chalkboards.
=== Text ===
When entering text, six lines of text are available for the slates and posters, while fifteen lines of text are available for the 2×3 boards. To switch between lines, the player can press Enter or the up/down arrow keys. The location of text currently selected has a flashing cursor.
While editing, typing and backspacing can occur at any point in the line by moving the cursor using the left and right arrow keys. Once the end of the line has been reached, the word is hyphenated and is continued on the next line.
After the editing window is closed, right-clicking on a chalkboard reopens the editing menu. Copy and paste can be performed, and no more than the basic/shifted keyboard characters may be entered.
=== Interaction ===
Chalkboards act as though they have a {{control|use}} action, so {{control|sneaking}} is required to place blocks or use items while the cursor is pointed at them.
Unlike signs, boards block a [[piston]] from moving.
Boards have no collision box (they are completely non-solid), so [[item]]s and [[mob]]s can move through boards blocks. Other blocks (including other boards) can be placed on any edge of a board.
[[Water]] and [[lava]] flow around boards. Lava can create [[fire]] in [[air]] blocks next to boards as if the boards were flammable, but the boards do not burn.
== Sounds ==
{{Sound table/Block/Stone/BE}}
== Data values ==
=== ID ===
{{ID table
|edition=bedrock
|shownumericids=y
|showforms=y
|generatetranslationkeys=y
|displayname=Block
|spritename=chalkboard
|spritetype=block
|nameid=chalkboard
|id=230
|form=block
|translationkey=tile.chalkboard.oneByOne.name, tile.chalkboard.twoByOne.name, tile.chalkboard.threeByTwo.name}}
{{ID table
|displayname=Item
|spritename=board
|spritetype=item
|nameid=board
|translationkey=tile.chalkboard.oneByOne.name, tile.chalkboard.twoByOne.name, tile.chalkboard.threeByTwo.name
|id=454
|form=item
|foot=1}}
=== Metadata ===
{{see also|Data values}}
Chalkboards uses the following data values:
*Slate: 1
*Board: 2
*Poster: 3
<!--{{/DV}}-->
=== Block states ===
{{see also|Block states}}
{{info needed}}
<!--{{/BS}}-->
== History ==
{{History|pocket alpha}}
{{History||v0.16.0|snap=build 1|[[File:Chalkboard Slate.png|32px]] [[File:Chalkboard Poster.png|32px]] [[File:Chalkboard Board.png|32px]]<br>[[File:Chalkboard_Slate_(item)_BE1.png|32px]] [[File:Chalkboard_Poster_(item)_BE1.png|32px]] [[File:Chalkboard_Board_(item)_BE1.png|32px]] Added chalkboards, likely as an accidental addition.
|Chalkboards can be obtained and placed using the {{cmd|give}} and {{cmd|setblock}} [[command]]s respectively. However, they serve no purpose.}}
{{History|||snap=build 2|Chalkboards have now been removed. However, the textures still exist.}}
{{History|bedrock}}
{{History||1.11.0|snap=beta 1.11.0.1|Re-added chalkboards. They still exist as entities, but can't be spawned. The items can't be spawned either.}}
{{h||1.17.30|snap=beta 1.17.30.20|Chalkboards can now be placed consistently.}}
{{History|education}}
{{History||MinecraftEdu|link=MinecraftEdu|[[File:Oak Sign JE1 BE1.png|30px]] [[MinecraftEdu]], Education Edition's predecessor, had "[[Big Sign]]s", 3 block wide signs that served a similar purpose.}}
{{History||1.0|[[File:Chalkboard Slate.png|32px]] [[File:Chalkboard Poster.png|32px]] [[File:Chalkboard Board.png|32px]]<br>[[File:Chalkboard_Slate_(item)_BE1.png|32px]] [[File:Chalkboard_Poster_(item)_BE1.png|32px]] [[File:Chalkboard_Board_(item)_BE1.png|32px]] Added chalkboards.}}
{{History||1.0.2|The UI of chalkboards now has a locked option.
|[[Player|Students]] now can place their own chalkboards even without a worldbuilder ability.}}
{{History|foot}}
== Gallery ==
<gallery>
Education Edition Exclusive Features.png|The chalkboard placed in a world along with other Education Edition features.
Chalkboardsingamepe.png|The chalkboard in [[Pocket Edition v0.16.0 alpha build 1]].
</gallery>
== References ==
{{Reflist}}
{{Blocks|Utility}}
{{Items}}
{{Education Edition}}
[[Category:Utility blocks]]
[[Category:Block entities]]
[[Category:Education Edition blocks]]
[[Category:Education Edition items]]
[[pt:Lousa]]
[[de:Tafel]]
[[fr:Ardoise]]
[[ja:黒板]]
[[pl:Tablica kredowa]]
[[ru:Доска]]
[[uk:Дошка]]
[[zh:黑板]]</li></ul></nowiki> | An 'f' value was added to the performance screen, indicating the direction the player is facing. | |||||||||||||||||||||||||||||||||||||||||||||||||||||||||||||||||||||||||||||||||||||||||||||||||||||||||||||
1.8{{Extension DPL}}<ul><li>[[Black Dye|Black Dye]]<br/>{{Item
| image = Black Dye.png
| renewable = Yes
| stackable = Yes (64)
}}
'''Black dye''' is a [[Dye#Primary|primary color dye]] similar to an [[ink sac]].
== Obtaining ==
=== Trading ===
[[Wandering trader]]s have a chance to [[trading|trade]] 3 black dyes for 1 [[emerald]].{{only|java}}
=== Crafting ===
{{Crafting
|head=1
|showname=0
|Ink Sac
|Output=Black Dye
|type=Material
}}
{{Crafting
|Wither Rose
|Output=Black Dye
|type=Material
|foot=1
}}
== Usage ==
{{dye usage}}
=== Crafting ingredient ===
{{crafting usage|ignore=Banner|continue=1}}
{{banner crafting usage}}
=== Loom ingredient ===
{{Banner loom usage|Black Dye}}
=== Trading ===
Apprentice-level Shepherd villagers have a 20%{{only|bedrock}} or {{frac|2|7}}{{only|java}} chance to buy 12 black dye for an emerald.
== Data values ==
=== ID ===
{{edition|java}}:
{{ID table
|edition=java
|showforms=y
|generatetranslationkeys=y
|displayname=Black Dye
|spritetype=item
|nameid=black_dye
|form=item
|foot=1}}
{{edition|bedrock}}:
{{ID table
|edition=bedrock
|showaliasids=y
|shownumericids=y
|showforms=y
|notshowbeitemforms=y
|generatetranslationkeys=y
|displayname=Black Dye
|spritetype=item
|nameid=black_dye
|aliasid=dye / 16
|id=395
|form=item
|translationkey=item.dye.black_new.name
|foot=1}}
== History ==
{{History|java}}
{{History||1.14|snap=18w43a|[[File:Black Dye JE1 BE1.png|32px]] Added black dye.}}
{{History|||snap=18w44a|Black dyes now can changed the text color on the [[sign]]s to black.}}
{{History|||snap=19w05a|Added the [[wandering trader]], which sell black dyes.}}
{{History|||snap=19w11a|Black dyes can now be [[trading|bought]] by shepherd villagers.}}
{{History||1.15|snap=Pre-release 1|Black dye can now be used to craft [[prismarine|dark prismarine]], just like [[Bedrock Edition]].}}
{{History||1.17|snap=20w45a|Black dyes can now used to craft newly added [[black candle]]s.}}
{{History|||snap=21w19a|Black dyes can no longer used to craft black candles.}}
{{History|||snap=Pre-release 1|Black dyes can once again used to craft black candles.}}
{{History||1.20<br>(Experimental)|link=1.19.3|snap=22w42a|Black dyes now can change the text color on [[hanging sign]]s to black.}}
{{History|bedrock}}
{{History||1.8.0|snap=beta 1.8.0.10|[[File:Black Dye JE1 BE1.png|32px]] Added black dye.}}
{{History||1.11.0|snap=beta 1.11.0.4|Black dye can now be [[trading|sold]] to shepherd [[villager]]s.}}
{{history||1.13.0|snap=beta 1.13.0.9|Black dye can now be [[crafting|crafted]] from [[flower|wither roses]].}}
{{History||1.16.100|snap=beta 1.16.100.56|The ID of black dye has been changed from <code>dye/16</code> to <code>black_dye</code>.}}
{{History|ps4}}
{{History||1.83|[[File:Black Dye JE1 BE1.png|32px]] Added black dye.}}
{{History|foot}}
== Issues ==
{{issue list}}
{{Items}}
[[Category:Dyes]]
[[Category:Renewable resources]]
[[de:Schwarzer Farbstoff]]
[[es:Tinte negro]]
[[fr:Teinture noire]]
[[ja:黒色の染料]]
[[ko:검은색 염료]]
[[pl:Czarny barwnik]]
[[pt:Corante preto]]
[[th:สีย้อมสีดำ]]
[[zh:黑色染料]]</li><li>[[Glow Berries|Glow Berries]]<br/>{{Block
|image=<gallery>
Cave Vines (head).png|Without Berries
Cave Vines (berries).png|With Berries
</gallery>
|image2 = Glow Berries JE1 BE1.png
|extratext=[[#Gallery|View all renders]]
|rarity=Common
|renewable=Yes
|stackable=Yes (64)
|tool=Any
|light=Yes
|transparent=Yes
|heals={{hunger|2}}
|flammable=Yes
|lavasusceptible=No
}}
'''Glow berries''' are a [[food]] [[item]] obtained from cave vines and can be used to plant them.
'''Cave vines''' are a climbable, [[Bone Meal|bonemealable]] plant that hangs off ceilings and grows glow berries. Cave vines with glow berries produce [[light]] and drop glow berries when broken or harvested. Cave vines with no glow berries will not drop anything.
== Obtaining ==
=== Natural generation ===
Cave vines can be found in [[lush caves]], hanging from cave ceilings.
=== Chest loot ===
{{LootChestItem|glow-berries}}
=== Post-generation ===
Glow berries can be collected from a cave vine by {{control|using}} or {{control|breaking}} the vine. This yields one glow berry when the vine is bearing them and nothing when it is not. A cave vine also breaks if [[water]] runs over its location or if a [[piston]] extends or pushes a block into its location.
{{IN|bedrock}}, using a tool with [[Silk Touch]] on cave vines always yields a glow berry, even if the vine appears empty.
[[Fortune]] has no effect on the number of glow berries dropped.
== Usage ==
=== Placement ===
Glow berries can be placed on and grown from the bottom of most blocks. They have no specific lighting requirements. When placed, they can be of any length.
=== Growth ===
Placing glow berries on the bottom of a block creates a cave vine that grows downward one block at a time as long as [[air]] is beneath it and its maximum height (2 to 26 blocks) has not been reached. Each newly-grown cave vine block has a 1 in 9 chance of bearing glow berries. Only this tip can ever naturally grow them.{{only|JE}}{{More info|exact growth rate and chance to bear glow berries}}
{{control|Using}} [[bone meal]] on a cave vine produces glow berries if the vine was not bearing any.
{{IN|Java}}, cave vines stop growing if [[shears]] are {{control|used}} on the tip.
{{IN|bedrock}}, if placing glow berries in the Nether, cave vines are able to grow and produces glow berries.
=== Food ===
To eat glow berries, press and hold {{control|use}} while it is selected in the hotbar. Eating one restores {{hunger|2}} [[hunger]] and 0.4 hunger [[Hunger#Mechanics|saturation]] points, like [[sweet berries]].
=== Light ===
When bearing glow berries, cave vines give off a [[light]] level of 14.
=== Composting ===
Placing glow berries into a [[composter]] by {{control|using}} them on it has a 30% chance of raising the compost level by 1.
=== Breeding ===
Glow berries can be fed to [[fox]]es to [[breeding|breed]] them. Foxes are similar to cats when being fed as a wild animal; a sudden movement by the player may cause the fox to flee even if the player holds glow berries. The resulting baby fox trusts the [[player]] and does not flee.
Glow berries can be {{control|used}} on baby foxes to reduce the time until they grow by 10%.
==Sounds==
===Glow berries===
{{Sound table/Entity/Food}}
===Cave vines===
====Generic====
{{Sound table/Block/Cave vines}}
==== Unique ====
{{edition|java}}:
{{Sound table
|sound=Berries pick1.ogg
|sound2=Berries pick2.ogg
|subtitle=Berries pop
|source=block
|description=When glow berries are picked
|id=block.cave_vines.pick_berries
|translationkey=subtitles.item.berries.pick
|volume=1.0
|pitch=0.8-1.2
|distance=16}}
{{Sound table
|sound=Shear.ogg
|subtitle=Plant cropped
|source=block
|description=When the tip of cave vines are cropped with [[Shears#Cropping growing plants|shears]]
|id=block.growing_plant.crop
|translationkey=subtitles.block.growing_plant.crop
|volume=1.0
|pitch=1.0
|distance=16
|foot=1}}
{{edition|bedrock}}:
{{Sound table
|type=bedrock
|sound=Berries pick1.ogg
|sound2=Berries pick2.ogg
|source=block
|description=When glow berries are picked
|id=pick_berries.cave_vines
|volume=1.0
|pitch=0.8-1.2
|foot=1}}
==Data values==
===ID===
{{edition|java}}:
{{ID table
|edition=java
|showblocktags=y
|showitemtags=y
|showforms=y
|generatetranslationkeys=y
|displayname=Cave Vines
|spritetype=block
|nameid=cave_vines
|blocktags=cave_vines,lush_plants_replaceable
|form=block
}}
{{ID table
|displayname=Cave Vines Plant
|spritetype=block
|nameid=cave_vines_plant
|blocktags=cave_vines,lush_plants_replaceable
|form=block
}}
{{ID table
|displayname=Glow Berries
|spritetype=item
|nameid=glow_berries
|itemtags=fox_food
|form=item
|foot=1}}
{{el|be}}:
{{ID table
|edition=bedrock
|shownumericids=y
|showforms=y
|generatetranslationkeys=y
|displayname=Cave Vines
|nameid=cave_vines
|spritetype=block
|id=577}}
{{ID table
|displayname=Cave Vines Body With Berries
|nameid=cave_vines_body_with_berries
|spritename=lit-cave-vines-plant
|spritetype=block
|id=630}}
{{ID table
|displayname=Cave Vines Head With Berries
|spritename=lit-cave-vines
|nameid=cave_vines_head_with_berries
|spritetype=block
|id=631}}
{{ID table
|displayname=Glow Berries
|spritetype=item
|nameid=glow_berries
|form=item
|id=638
|foot=1}}
=== Block states===
{{See also|Block states}}
{{/BS}}
==Advancements==
{{load advancements|Husbandry;A Balanced Diet}}
==History==
{{History||October 3, 2020|link={{ytl|DWZIfsaIgtE|t=1781}}|[[File:Cave Vines Plant JE1 BE1.png|32px]] [[File:Cave Vines Plant (berries) JE1 BE1.png|32px]] [[File:Cave Vines (head) JE1 BE1.png|32px]] [[File:Cave Vines (berries) JE1 BE1.png|32px]] Cave vines (named as glow berries) are shown as part of lush caves at [[Minecraft Live 2020]].}}
{{History|java}}
{{History||1.17|snap=21w05a|[[File:Glow Berries JE1 BE1.png|32px]] Added glow berries.
|[[File:Cave Vines Plant JE1 BE1.png|32px]] [[File:Cave Vines Plant (berries) JE1 BE1.png|32px]] [[File:Cave Vines (head) JE1 BE1.png|32px]] [[File:Cave Vines (berries) JE1 BE1.png|32px]] Added cave vines.}}
{{History|||snap=21w11a|Renamed from "cave vines head" and "cave vines body" to "cave vines" and "cave vines plant", respectively.
|The IDs have also changed.
|Cave vines now always give 14 light, regardless of the type of part.
|Now slow down the player.
|Can now be climbed.}}
{{History|||snap=21w13a|Glow berries now generate as loot in [[mineshaft]] [[Minecart with Chest|chest minecarts]].}}
{{History||1.18|snap=Experimental Snapshot 1|With the implementation of cave biomes including lush caves, caves vines can now generate in normal worlds.}}
{{History|||snap=21w37a|Cave vines stop growing if [[shears]] are used on the tip.}}
{{History|||snap=21w41a|[[File:Cave Vines Plant JE2.png|32px]] [[File:Cave Vines Plant (berries) JE2.png|32px]] Changed cave vines plant texture.}}
{{History||1.19|snap=22w13a|Glow Berries may now be found in [[ancient city]] [[chest]]s.}}
{{History|bedrock}}
{{History||Caves & Cliffs (experimental)|link=Bedrock Edition 1.17.0|snap=beta 1.16.220.52|[[File:Glow Berries JE1 BE1.png|32px]] Added glow berries.
|[[File:Cave Vines Plant JE1 BE1.png|32px]] [[File:Cave Vines Plant (berries) JE1 BE1.png|32px]] [[File:Cave Vines (head) JE1 BE1.png|32px]] [[File:Cave Vines (berries) JE1 BE1.png|32px]] Added cave vines.}}
{{History||1.17.0|snap=beta 1.16.230.54|Glow Berries now generate as loot in [[mineshaft]] [[Minecart with Chest|chest minecarts]].}}
{{History|||snap=beta 1.17.0.52|Glow Berries are now available without enabling [[experimental gameplay]].}}
{{History||1.17.20|snap=beta 1.17.20.20|Cave Vines can now be pollinated by [[bee]]s.}}
{{History||1.18.10|snap=beta 1.18.10.20|[[File:Cave Vines Plant JE2.png|32px]] [[File:Cave Vines Plant (berries) JE2.png|32px]] Changed cave vines plant texture.}}
{{History||1.19.20|snap=beta 1.19.20.20|Cave vines can now be destroyed by [[ravagers]].}}
{{History|foot}}
<gallery>
Lush_caves_overview_concept_art.jpg|Concept art for the lush caves and vegetation including Glow Berries.
JE_1.17_Development_Lush_Caves.jpg|A view of the lush caves with glow berries from Minecraft Live 2020.
Lushcaves_minecon.png|Lush cave in MINECON.
Cavesworkinprogress.jpg|A view of the lush caves with glow berries, tweeted by LadyAgnes.
Livestream_lush_cave.jpg|Another view of the lush caves with glow berries, in an interview with LadyAgnes.
Glow Berry Fox.jpg|A fox under a glow berry vine.
</gallery>
===Cave vines "item"===
{{:Technical blocks/Cave Vines}}
==Issues==
{{Issue list}}
==Trivia==
*They are the first item to be usable as both a food and a light source.
==Gallery==
<gallery>
Cave Vines (plant).png
Cave Vines (berries, plant).png
Cave Vines (head).png
Cave Vines (berries).png
Cave_Vines_Age2_(Possibility_pattern_1)_JE1.png|A possible pattern of the cave vines at Age 2.
Cave_Vines_Age2_(Possibility_pattern_2)_JE1.png|And another pattern.
</gallery>
{{Blocks|vegetation}}
{{Items}}
[[Category:Food]]
[[Category:Plants]]
[[Category:Natural blocks]]
[[Category:Non-solid blocks]]
[[Category:Light sources]]
[[Category:Flammable blocks]]
[[Category:Climbable blocks]]
[[de:Leuchtbeeren]]
[[es:Bayas luminosas]]
[[fr:Baies lumineuses]]
[[it:Bacche luminose]]
[[ja:グロウベリー]]
[[pt:Bagas brilhantes]]
[[ru:Светящиеся ягоды]]
[[zh:发光浆果]]</li></ul> | Players can find the current map seed by pressing F3. | |||||||||||||||||||||||||||||||||||||||||||||||||||||||||||||||||||||||||||||||||||||||||||||||||||||||||||||
| Some biomes were changed, added, or removed. | ||||||||||||||||||||||||||||||||||||||||||||||||||||||||||||||||||||||||||||||||||||||||||||||||||||||||||||||
| Animals spawn on world generation, and don't spawn randomly as much. | ||||||||||||||||||||||||||||||||||||||||||||||||||||||||||||||||||||||||||||||||||||||||||||||||||||||||||||||
| The Far Lands were "accidentally" fixed.[1] | ||||||||||||||||||||||||||||||||||||||||||||||||||||||||||||||||||||||||||||||||||||||||||||||||||||||||||||||
| r | ||||||||||||||||||||||||||||||||||||||||||||||||||||||||||||||||||||||||||||||||||||||||||||||||||||||||||||||
1.0.0{{Extension DPL}}<ul><li>[[Nether Quartz|Nether Quartz]]<br/>{{About|the item|the ore|Nether Quartz Ore|the mineral block|Block of Quartz|other uses|Quartz}}
{{Item
| image = Nether Quartz.png
|type=
| renewable = Yes
| stackable = Yes (64)
}}
'''Nether quartz''' is a white mineral found in [[the Nether]].
== Obtaining ==
{{see also|Nether Quartz Ore#Natural generation}}
=== Mining ===
[[Nether quartz ore]] mined using a [[pickaxe]] drops one unit of Nether quartz. If the pickaxe is enchanted with [[Fortune]], it may drop an extra unit per level of Fortune, up to a maximum of four with Fortune III. If the pickaxe is enchanted with [[Silk Touch]], the ore drops itself.
=== Chest loot ===
{{LootChestItem|nether-quartz}}
=== Smelting ===
{{Smelting
|Nether Quartz Ore
|Nether Quartz
|0,2
}}
=== Bartering ===
[[Piglin]]s may [[barter]] 5–12 nether quartz when given a [[gold ingot]].
== Usage ==
=== Crafting ingredient ===
{{crafting usage}}
=== Trading ===
Expert-level stone mason [[villagers]] have a {{frac|1|33}} chance to trade one [[emerald]] for 12 Nether quartz {{in|java}}. This trade is always offered {{in|bedrock}}.
=== Smithing ingredient ===
{{Smithing
|head=1
|ingredients=Any Armor Trim +<br/>Any Armor Piece + <br/>Nether Quartz
|Any Armor Trim Smithing Template
|Netherite Chestplate
|Nether Quartz
|Quartz Trim Netherite Chestplate
|showdescription=1
|description = All armor types can be used in this recipe,<br/>a netherite chestplate is shown as an example.<br/>
|tail=1
}}
;Trim color palette
The following color palette is shown on the designs on trimmed armor:
*{{TrimPalette|nether quartz}}
== Data values ==
=== ID ===
{{edition|java}}:
{{ID table
|edition=java
|showforms=y
|generatetranslationkeys=y
|displayname=Nether Quartz
|spritetype=item
|nameid=quartz
|form=item
|foot=1}}
{{edition|bedrock}}:
{{ID table
|edition=bedrock
|shownumericids=y
|showforms=y
|notshowbeitemforms=y
|generatetranslationkeys=y
|displayname=Nether Quartz
|spritetype=item
|nameid=quartz
|id=524
|form=item
|foot=1}}
== History ==
{{History|java}}
{{History||1.5|snap=13w01a|[[File:Nether Quartz JE1 BE1.png|32px]] Added Nether quartz.
|Nether quartz is used to craft [[daylight sensor]]s and [[redstone comparator]]s.}}
{{History|||snap=January 4, 2013|slink=http://twitter.com/jeb_/status/287481098760499201|[[Jeb]] tweeted that Nether quartz would be used for more decorative uses as well.}}
{{History|||snap=January 7, 2013|slink=http://twitter.com/jeb_/status/288311932304371712|Jeb tweeted a picture of some [[block of quartz]] tests potentially being replacements for the lack of limestone/marble in the game.}}
{{History|||snap=13w02a|Added [[block of quartz]], which is [[crafting|crafted]] with Nether quartz.}}
{{History||1.8|snap=14w02a|Nether quartz can now be used to craft [[granite]] and [[diorite]].}}
{{History||1.11|snap=16w39a|Nether quartz is now used to craft [[observer]]s.}}
{{History||1.13|snap=17w47a|Prior to [[1.13/Flattening|''The Flattening'']], this [[item]]'s numeric ID was 406.}}
{{History||1.14|snap=18w43a|[[File:Nether Quartz JE2 BE2.png|32px]] The texture of Nether quartz has now been changed.}}
{{History|||snap=19w11a|Nether quartz is now [[trading|bought]] by [[villager]]s of the new mason profession.}}
{{History||1.16|snap=20w07a|Nether quartz now has a {{frac|1|109}} (~0.92%) chance of being offered by [[piglin]]s when [[bartering]], in a stack size of 1–4, making it [[renewable resource|renewable]].}}
{{History|||snap=20w09a|Nether quartz now has a {{frac|10|226}} (~4.42%) chance of being offered by piglins when bartering, in a stack size of 1–5.}}
{{History|||snap=20w10a|Nether quartz now has a {{frac|20|411}} (~4.87%) chance of being offered by piglins when bartering, in a stack size of 8-16.}}
{{History|||snap=20w11a|Nether quartz now has a {{frac|20|417}} (~4.80%) chance of being offered by piglins when bartering.}}
{{History|||snap=20w13a|Nether quartz now has a {{frac|20|424}} (~4.72%) chance of being offered by piglins when bartering.}}
{{History|||snap=20w16a|Nether quartz can now be found in [[bastion remnant]] chests.}}
{{History|||snap=20w20a|Nether quartz now has a {{frac|20|423}} (~4.73%) chance of being offered by piglins when bartering.}}
{{History||1.16.2|snap=20w28a|Nether quartz now has a {{frac|20|459}} (~4.36%) chance of being offered by piglins when bartering, in a stack size of 5-12.}}
{{History||1.20<br>(Experimental)|link=1.19.4|snap=23w04a|Nether quartz can now be used as an armor trim material.}}
{{History|pocket alpha}}
{{History||v0.6.0|[[File:Nether Quartz JE1 BE1.png|32px]] Added Nether quartz.}}
{{History||v0.12.1|snap=build 1|Nether quartz is no longer available from the [[Nether reactor]] and is now available from [[the Nether]].}}
{{History||v0.13.0|snap=build 1|Nether quartz is now used to craft [[daylight sensor]]s.}}
{{History||v0.14.0|snap=build 1|Nether quartz can now be used to craft [[redstone comparator]]s.}}
{{History||v0.15.0|snap=build 1|Nether quartz is now used to craft [[observer]]s.}}
{{History|bedrock}}
{{History||1.10.0|snap=beta 1.10.0.3|[[File:Nether Quartz JE2 BE2.png|32px]] The texture of Nether quartz has now been changed.
|Between 20 and 26 nether quartz can now be [[trading|sold]] to stone mason [[villager]]s.}}
{{History||1.11.0|snap=beta 1.11.0.4|[[Trading]] has now been changed, 12 Nether quartz can now be sold to stone mason villagers.}}
{{History||1.16.0|snap=beta 1.16.0.57|Nether Quartz can now be obtained from bartering with piglin.}}
{{History||1.19.80|snap=beta 1.19.80.21|Nether quartz can now be used as an armor trim material.}}
{{History|console}}
{{History||xbox=TU14|xbone=CU1|ps=1.04|wiiu=Patch 1|switch=1.0.1|[[File:Nether Quartz JE1 BE1.png|32px]] Added Nether quartz.}}
{{History||xbox=none|xbone=none|ps=1.90|wiiu=none|switch=none|[[File:Nether Quartz JE2 BE2.png|32px]] The texture of Nether quartz has now been changed.}}
{{History|New 3DS}}
{{History||0.1.0|[[File:Nether Quartz JE1 BE1.png|32px]] Added Nether quartz.}}
{{History|foot}}
== Issues ==
{{issue list}}
== Trivia ==
* All of the sensor related items that are craftable (comparator, daylight sensor, observer) are crafted with some Nether quartz involved.
== References ==
{{reflist}}
{{items}}
[[Category:Renewable resources]]
[[cs:Netheritový křemen]]
[[de:Netherquarz]]
[[es:Cuarzo del Nether]]
[[fr:Quartz du Nether]]
[[hu:Alvilági kvarc]]
[[ja:ネザークォーツ]]
[[ko:네더 석영]]
[[nl:Netherkwarts]]
[[pl:Kwarc]]
[[pt:Quartzo do Nether]]
[[ru:Кварц Нижнего мира]]
[[uk:Пекельний кварц]]
[[zh:下界石英]]</li><li>[[Cake|Cake]]<br/>{{Distinguish|Pumpkin Pie}}
{{Block
| title = Cake
| image = <gallery>
Cake.png|0 bites
Cake (1 bite).png|1 bite
Cake (2 bites).png|2 bites
Cake (3 bites).png|3 bites
Cake (4 bites).png|4 bites
Cake (5 bites).png|5 bites
Cake (6 bites).png|6 bites
</gallery>
|image2 = <gallery>
Cake with Candle.png|Unlit
Candle Cake (lit).png|Lit
</gallery>
| extratext = [[#Gallery|View all renders]]
| transparent = Yes
| light = '''Candle Cake''': Yes (3) when lit<br>'''Cake''': No
| tool = any
| renewable = Yes
| stackable = Yes (64){{only|bedrock|short=1}}<br>No{{only|java|short=1}}
| flammable = No
| lavasusceptible = No
}}
'''Cake''' is a [[food]] and a block that can be eaten by the player.
A '''cake with candle''' is a light-producing variation created when a [[candle]] is used on an uneaten cake.
== Obtaining ==
=== Breaking ===
Once the cake is placed, it cannot be recollected even with the use of [[Silk Touch]]. Candle cakes always drop their respective [[candle]] when broken.
{{breaking row|horizontal=1|Cake|drop=0}}
=== Chest loot ===
{{LootChestItem|cake}}
=== Crafting ===
{{Crafting
|A1=Milk Bucket
|B1=Milk Bucket
|C1=Milk Bucket
|A2=Sugar
|B2=Egg
|C2=Sugar
|A3=Wheat
|B3=Wheat
|C3=Wheat
|Output=Cake
|type=Foodstuff
|showdescription=1
|description= Empty [[bucket]]s remain in the crafting grid after crafting the cake.
}}
=== Trading ===
Expert-level farmer [[villager]]s can [[trading|sell]] cake for a single [[emerald]] each. The chance is {{frac|2|7}} {{in|je}}.
== Usage ==
{{see also|Tutorials/Hunger management}}
Unlike most [[food]], the cake cannot be eaten as an [[item]] in the hotbar. Before being eaten, it must first be placed on top of a solid [[block]]. Placing the cake on a slab also works, as the slab acts like a solid block. The cake instead floats half a block on top of the slab.
Each cake has seven "slices"; each use consumes one slice progressing inward from the west. A single slice restores {{hunger|2}} hunger and 0.4 hunger [[Hunger#Mechanics|saturation]]. Eating all seven slices of a cake restores {{hunger|14}} hunger and 2.8 hunger saturation.
Since eating a cake comes with no animation, the cake can be eaten at a rate of one slice per [[tick]]. Multiple [[player]]s can eat from the same cake at the same time. {{IN|java}}, eating cake makes no [[sound]], unlike other foods.
As a [[redstone]] component, when connected to a [[comparator]], a whole cake emits a signal strength of 14. The signal strength decreases two units with each slice.
Cake destroys [[Entity#Falling Blocks|falling blocks]] if placed under them, similar to a [[torch]].
=== Pandas ===
Some [[panda]]s move toward a dropped cake to pick up and eat it. Some may not, depending on the cake's location.
=== Composting ===
Placing a cake into a [[composter]] raises the compost level by 1.
=== Piston interactivity ===
A cake is broken when pushed by a [[piston]], and it drops nothing.
=== Cakes with candles ===
[[File:Cake with Candle.png|thumb|upright|A cake with candle created by placing a candle on an uneaten cake.]]
{{control|Using}} a [[candle]] on an uneaten cake creates a candle cake of that color (including uncolored). Eating the cake causes the candle to drop.
{{control|Using}} [[flint and steel]], [[fire charge]], or any flaming projectile on an unlit candle cake lights its candle. Lit candle cakes emit light level of 3. Clicking on the lit candle (but not the cake) extinguishes it.
== Sounds ==
=== Generic ===
{{Sound table/Block/Wool}}
=== Unique ===
{{edition|java}}:
{{Sound table
|sound=Cake add_candle1.ogg
|sound2=Cake add_candle2.ogg
|sound3=Cake add_candle3.ogg
|subtitle=Cake squishes
|source=Blocks
|description=When a [[candle]] is placed on a cake
|id=block.cake.add_candle
|translationkey=subtitles.block.cake.add_candle
|volume=1.0
|pitch=1.0
|distance=16
|foot=1}}
{{edition|bedrock}}:
{{Sound table
|type=bedrock
|sound=Cake add_candle1.ogg
|sound2=Cake add_candle2.ogg
|sound3=Cake add_candle3.ogg
|source=block
|description=When a candle is placed on a cake
|id=cake.add_candle
|volume=1.0
|pitch=1.0}}
{{Sound table
|sound=Burp.ogg
|source=player
|description=After a player eats a cake
|id=random.burp
|volume=0.5
|pitch=0.9-1.0
|foot=1}}
== Data values ==
=== ID ===
{{edition|java}}:
{{ID table
|edition=java
|showblocktags=y
|showforms=y
|generatetranslationkeys=y
|displayname=Cake
|spritetype=block
|nameid=cake}}
{{ID table
|displayname=Cake with Candle
|spritename=candle-cake
|spritetype=block
|nameid=candle_cake
|blocktags=candle_cakes
|form=block}}
{{ID table
|displayname=Cake with White Candle
|spritename=white-candle-cake
|spritetype=block
|nameid=white_candle_cake
|blocktags=candle_cakes
|form=block}}
{{ID table
|displayname=Cake with Orange Candle
|spritename=orange-candle-cake
|spritetype=block
|nameid=orange_candle_cake
|blocktags=candle_cakes
|form=block}}
{{ID table
|displayname=Cake with Magenta Candle
|spritename=magenta-candle-cake
|spritetype=block
|nameid=magenta_candle_cake
|blocktags=candle_cakes
|form=block}}
{{ID table
|displayname=Cake with Light Blue Candle
|spritename=light-blue-candle-cake
|spritetype=block
|nameid=light_blue_candle_cake
|blocktags=candle_cakes
|form=block}}
{{ID table
|displayname=Cake with Yellow Candle
|spritename=yellow-candle-cake
|spritetype=block
|nameid=yellow_candle_cake
|blocktags=candle_cakes
|form=block}}
{{ID table
|displayname=Cake with Lime Candle
|spritename=lime-candle-cake
|spritetype=block
|nameid=lime_candle_cake
|blocktags=candle_cakes
|form=block}}
{{ID table
|displayname=Cake with Pink Candle
|spritename=pink-candle-cake
|spritetype=block
|nameid=pink_candle_cake
|blocktags=candle_cakes
|form=block}}
{{ID table
|displayname=Cake with Gray Candle
|spritename=gray-candle-cake
|spritetype=block
|nameid=gray_candle_cake
|blocktags=candle_cakes
|form=block}}
{{ID table
|displayname=Cake with Light Gray Candle
|spritename=light-gray-candle-cake
|spritetype=block
|nameid=light_gray_candle_cake
|blocktags=candle_cakes
|form=block}}
{{ID table
|displayname=Cake with Cyan Candle
|spritename=cyan-candle-cake
|spritetype=block
|nameid=cyan_candle_cake
|blocktags=candle_cakes
|form=block}}
{{ID table
|displayname=Cake with Purple Candle
|spritename=purple-candle-cake
|spritetype=block
|nameid=purple_candle_cake
|blocktags=candle_cakes
|form=block}}
{{ID table
|displayname=Cake with Blue Candle
|spritename=blue-candle-cake
|spritetype=block
|nameid=blue_candle_cake
|blocktags=candle_cakes
|form=block}}
{{ID table
|displayname=Cake with Brown Candle
|spritename=brown-candle-cake
|spritetype=block
|nameid=brown_candle_cake
|blocktags=candle_cakes
|form=block}}
{{ID table
|displayname=Cake with Green Candle
|spritename=green-candle-cake
|spritetype=block
|nameid=green_candle_cake
|blocktags=candle_cakes
|form=block}}
{{ID table
|displayname=Cake with Red Candle
|spritename=red-candle-cake
|spritetype=block
|nameid=red_candle_cake
|blocktags=candle_cakes
|form=block}}
{{ID table
|displayname=Cake with Black Candle
|spritename=black-candle-cake
|spritetype=block
|nameid=black_candle_cake
|blocktags=candle_cakes
|form=block
|foot=1}}
{{edition|bedrock}}:
{{ID table
|edition=bedrock
|firstcolumnname=Cake
|shownumericids=y
|showforms=y
|generatetranslationkeys=y
|displayname=Block
|spritename=cake
|spritetype=block
|nameid=cake
|id=92
|form=block
|itemform=item.cake}}
{{ID table
|displayname=Item
|spritename=cake
|spritetype=item
|nameid=cake
|id=417
|form=item}}
{{ID table
|displayname=Cake with Candle
|spritename=candle-cake
|spritetype=block
|nameid=candle_cake
|blocktags=candle_cakes
|form=block
|id=684}}
{{ID table
|displayname=Cake with White Candle
|spritename=white-candle-cake
|spritetype=block
|nameid=white_candle_cake
|blocktags=candle_cakes
|form=block
|id=685}}
{{ID table
|displayname=Cake with Orange Candle
|spritename=orange-candle-cake
|spritetype=block
|nameid=orange_candle_cake
|blocktags=candle_cakes
|form=block
|id=686}}
{{ID table
|displayname=Cake with Magenta Candle
|spritename=magenta-candle-cake
|spritetype=block
|nameid=magenta_candle_cake
|blocktags=candle_cakes
|form=block
|id=687}}
{{ID table
|displayname=Cake with Light Blue Candle
|spritename=light-blue-candle-cake
|spritetype=block
|nameid=light_blue_candle_cake
|blocktags=candle_cakes
|form=block
|id=688}}
{{ID table
|displayname=Cake with Yellow Candle
|spritename=yellow-candle-cake
|spritetype=block
|nameid=yellow_candle_cake
|blocktags=candle_cakes
|form=block
|id=689}}
{{ID table
|displayname=Cake with Lime Candle
|spritename=lime-candle-cake
|spritetype=block
|nameid=lime_candle_cake
|blocktags=candle_cakes
|form=block
|id=690}}
{{ID table
|displayname=Cake with Pink Candle
|spritename=pink-candle-cake
|spritetype=block
|nameid=pink_candle_cake
|blocktags=candle_cakes
|form=block
|id=691}}
{{ID table
|displayname=Cake with Gray Candle
|spritename=gray-candle-cake
|spritetype=block
|nameid=gray_candle_cake
|blocktags=candle_cakes
|form=block
|id=692}}
{{ID table
|displayname=Cake with Light Gray Candle
|spritename=light-gray-candle-cake
|spritetype=block
|nameid=light_gray_candle_cake
|blocktags=candle_cakes
|form=block
|id=693}}
{{ID table
|displayname=Cake with Cyan Candle
|spritename=cyan-candle-cake
|spritetype=block
|nameid=cyan_candle_cake
|blocktags=candle_cakes
|form=block
|id=694}}
{{ID table
|displayname=Cake with Purple Candle
|spritename=purple-candle-cake
|spritetype=block
|nameid=purple_candle_cake
|blocktags=candle_cakes
|form=block
|id=695}}
{{ID table
|displayname=Cake with Blue Candle
|spritename=blue-candle-cake
|spritetype=block
|nameid=blue_candle_cake
|blocktags=candle_cakes
|form=block
|id=696}}
{{ID table
|displayname=Cake with Brown Candle
|spritename=brown-candle-cake
|spritetype=block
|nameid=brown_candle_cake
|blocktags=candle_cakes
|form=block
|id=697}}
{{ID table
|displayname=Cake with Green Candle
|spritename=green-candle-cake
|spritetype=block
|nameid=green_candle_cake
|blocktags=candle_cakes
|form=block
|id=698}}
{{ID table
|displayname=Cake with Red Candle
|spritename=red-candle-cake
|spritetype=block
|nameid=red_candle_cake
|blocktags=candle_cakes
|form=block
|id=699}}
{{ID table
|displayname=Cake with Black Candle
|spritename=black-candle-cake
|spritetype=block
|nameid=black_candle_cake
|blocktags=candle_cakes
|form=block
|id=700
|foot=1}}
=== Block states ===
{{see also|Block states}}
{{/BS}}
== Achievements ==
{{load achievements|The Lie;Birthday Song}}
== Advancements ==
{{load advancements|Birthday Song}}
== History ==
{{info needed section|{{bug|MC-45375}}}}
{{History|java beta}}
{{History||November 23, 2010|link={{tweet|notch|7118994444124160}}|[[Notch]] stated if ''Minecraft'' won the [[2010 Indie of the Year Awards]], he would add cake to ''Minecraft''.}}
{{History||1.2|[[File:Cake JE1.png|32px]] [[File:Cake (1 bite) JE1.png|32px]] [[File:Cake (2 bites) JE1.png|32px]] [[File:Cake (3 bites) JE1.png|32px]] [[File:Cake (4 bites) JE1.png|32px]] [[File:Cake (5 bites) JE1.png|32px]]<br>[[File:Cake (item) JE1 BE1.png|32px]] Since ''Minecraft'' won the title, cake has been added.
|Cake heals {{hp|18}}.
|[[File:Cake (6 bites) JE1.png|32px]] [[File:Cake (7 bites) JE1.png|32px]] Cakes with six and seven bites exist, but are not accessible.
|[[File:Cake (8 bites) JE1.png|32px]] [[File:Cake (9 bites) JE1.png|32px]] [[File:Cake (10 bites) JE1.png|32px]] [[File:Cake (11 bites) JE1.png|32px]] [[File:Cake (12 bites) JE1.png|32px]] [[File:Cake (13 bites) JE1.png|32px]] [[File:Cake (14 bites) JE1.png|32px]] [[File:Cake (15 bites) JE1.png|32px]]<br>[[File:Cake (8 bites) JE1 (facing NWU).png|32px]] [[File:Cake (9 bites) JE1 (facing NWU).png|32px]] [[File:Cake (10 bites) JE1 (facing NWU).png|32px]] [[File:Cake (11 bites) JE1 (facing NWU).png|32px]] [[File:Cake (12 bites) JE1 (facing NWU).png|32px]] [[File:Cake (13 bites) JE1 (facing NWU).png|32px]] [[File:Cake (14 bites) JE1 (facing NWU).png|32px]] [[File:Cake (15 bites) JE1 (facing NWU).png|32px]]<br>Cakes with eight through fifteen bites also exist. These have a glitched appearance, with misaligned cake textures as well as the block [[placeholder texture]] on the bottom (as the texture next to the bottom of the cake on [[terrain.png]], which it overflows to, is itself a placeholder).}}
{{History||1.5|[[Achievements/Java Edition|Achievements]] have been added, including "The Lie", which is rewarded when the [[player]] crafts a cake.}}
{{History||1.7|[[File:Cake (8 bites) JE2 (facing NWU).png|32px]] [[File:Cake (9 bites) JE2 (facing NWU).png|32px]] [[File:Cake (10 bites) JE2 (facing NWU).png|32px]] [[File:Cake (11 bites) JE2 (facing NWU).png|32px]] [[File:Cake (12 bites) JE2 (facing NWU).png|32px]] [[File:Cake (13 bites) JE2 (facing NWU).png|32px]] [[File:Cake (14 bites) JE2 (facing NWU).png|32px]] [[File:Cake (15 bites) JE2 (facing NWU).png|32px]]<br>The cake side texture shown from underneath has flipped to the other side.}}
{{History||1.8|snap=Pre-release|Cake now restores {{hunger|12}}.
|[[File:Cake (8 bites) JE3.png|32px]] [[File:Cake (9 bites) JE3.png|32px]] [[File:Cake (10 bites) JE3.png|32px]] [[File:Cake (11 bites) JE3.png|32px]] [[File:Cake (12 bites) JE3.png|32px]] [[File:Cake (13 bites) JE3.png|32px]] [[File:Cake (14 bites) JE3.png|32px]] [[File:Cake (15 bites) JE3.png|32px]]<br>Cakes with data 8 through 15 now use the red mushroom block texture with the addition of the red [[mushroom block]].
|Dropped cake items{{info needed|the proper item form, or the unobtainable one?}} no longer appear larger than normal blocks.}}
{{History|||snap=?|Cake is available both in item and block forms in the creative inventory.}}
{{History|java}}
{{History||1.0.0|snap=?|Cake blocks have been removed from creative.}}
{{History||1.2.1|snap=?|When cake is crafted, the empty [[bucket]]s are now moved to the [[player]]'s [[inventory]], rather than staying in the [[crafting]] grid.}}
{{History||1.5|snap=13w02a|[[File:Cake JE2.png|32px]] [[File:Cake (1 bite) JE2.png|32px]] [[File:Cake (2 bites) JE2.png|32px]] [[File:Cake (3 bites) JE2.png|32px]] [[File:Cake (4 bites) JE2.png|32px]] [[File:Cake (5 bites) JE2.png|32px]] [[File:Cake (6 bites) JE2.png|32px]] Cakes now use the inside texture for all orthogonal faces.
|[[File:Cake (8 bites) JE4.png|32px]] [[File:Cake (9 bites) JE4.png|32px]] [[File:Cake (10 bites) JE4.png|32px]] [[File:Cake (11 bites) JE4.png|32px]] [[File:Cake (12 bites) JE4.png|32px]] [[File:Cake (13 bites) JE4.png|32px]] [[File:Cake (14 bites) JE4.png|32px]] [[File:Cake (15 bites) JE4.png|32px]]<br>[[File:Cake (8 bites) JE4 (facing NWU).png|32px]] [[File:Cake (9 bites) JE4 (facing NWU).png|32px]] [[File:Cake (10 bites) JE4 (facing NWU).png|32px]] [[File:Cake (11 bites) JE4 (facing NWU).png|32px]] [[File:Cake (12 bites) JE4 (facing NWU).png|32px]] [[File:Cake (13 bites) JE4 (facing NWU).png|32px]] [[File:Cake (14 bites) JE4 (facing NWU).png|32px]] [[File:Cake (15 bites) JE4 (facing NWU).png|32px]]<br>With the advent of major changes in texture storage and architecture, overeaten cakes now display other parts of cakes as well as part of a crop texture.
|From this version up until 14w08a, overeaten cakes start to draw from the textures next to them on the [[texture atlas]], in much the same way they previously did with terrain.png. However, as texture atlases are unstable and textures tend to change positions as new blocks and textures are added, overeaten cakes change the texture they draw from every time new textures are added, which includes when textures added by [[mods]].}}
{{History|||snap=13w03a|[[File:Cake JE3 BE1.png|32px]] [[File:Cake (1 bite) JE3 BE1.png|32px]] [[File:Cake (2 bites) JE3 BE1.png|32px]] [[File:Cake (3 bites) JE3 BE1.png|32px]] [[File:Cake (4 bites) JE3 BE1.png|32px]] [[File:Cake (5 bites) JE3 BE1.png|32px]] Cakes now use the outside side texture for the sides again.<ref>{{bug|MC-7119}}</ref>
|[[File:Cake (8 bites) JE5.png|32px]] [[File:Cake (9 bites) JE5.png|32px]] [[File:Cake (10 bites) JE5.png|32px]] [[File:Cake (11 bites) JE5.png|32px]] [[File:Cake (12 bites) JE5.png|32px]] [[File:Cake (13 bites) JE5.png|32px]] [[File:Cake (14 bites) JE5.png|32px]] [[File:Cake (15 bites) JE5.png|32px]]<br>[[File:Cake (8 bites) JE5 (facing NWU).png|32px]] [[File:Cake (9 bites) JE5 (facing NWU).png|32px]] [[File:Cake (10 bites) JE5 (facing NWU).png|32px]] [[File:Cake (11 bites) JE5 (facing NWU).png|32px]] [[File:Cake (12 bites) JE5 (facing NWU).png|32px]] [[File:Cake (13 bites) JE5 (facing NWU).png|32px]] [[File:Cake (14 bites) JE5 (facing NWU).png|32px]] [[File:Cake (15 bites) JE5 (facing NWU).png|32px]]<br>Overeaten cakes now display a different part of the cake texture than before.}}
{{History|||snap=13w09a|[[File:Cake (8 bites) JE6.png|32px]] [[File:Cake (9 bites) JE6.png|32px]] [[File:Cake (10 bites) JE6.png|32px]] [[File:Cake (11 bites) JE6.png|32px]] [[File:Cake (12 bites) JE6.png|32px]] [[File:Cake (13 bites) JE6.png|32px]] [[File:Cake (14 bites) JE6.png|32px]] [[File:Cake (15 bites) JE6.png|32px]]<br>[[File:Cake (8 bites) JE6 (facing NWU).png|32px]] [[File:Cake (9 bites) JE6 (facing NWU).png|32px]] [[File:Cake (10 bites) JE6 (facing NWU).png|32px]] [[File:Cake (11 bites) JE6 (facing NWU).png|32px]] [[File:Cake (12 bites) JE6 (facing NWU).png|32px]] [[File:Cake (13 bites) JE6 (facing NWU).png|32px]] [[File:Cake (14 bites) JE6 (facing NWU).png|32px]] [[File:Cake (15 bites) JE6 (facing NWU).png|32px]]<br>Overeaten cakes now display a crop texture on the side.}}
{{History||1.6.1|snap=13w17a|[[File:Cake (8 bites) JE7.png|32px]] [[File:Cake (9 bites) JE7.png|32px]] [[File:Cake (10 bites) JE7.png|32px]] [[File:Cake (11 bites) JE7.png|32px]] [[File:Cake (12 bites) JE7.png|32px]] [[File:Cake (13 bites) JE7.png|32px]] [[File:Cake (14 bites) JE7.png|32px]] [[File:Cake (15 bites) JE7.png|32px]]<br>[[File:Cake (8 bites) JE7 (facing NWU).png|32px]] [[File:Cake (9 bites) JE7 (facing NWU).png|32px]] [[File:Cake (10 bites) JE7 (facing NWU).png|32px]] [[File:Cake (11 bites) JE7 (facing NWU).png|32px]] [[File:Cake (12 bites) JE7 (facing NWU).png|32px]] [[File:Cake (13 bites) JE7 (facing NWU).png|32px]] [[File:Cake (14 bites) JE7 (facing NWU).png|32px]] [[File:Cake (15 bites) JE7 (facing NWU).png|32px]]<br>Overeaten cakes now display a part of the powered [[redstone comparator]] texture.}}
{{History|||snap=13w18a|[[File:Cake (8 bites) JE8.png|32px]] [[File:Cake (9 bites) JE8.png|32px]] [[File:Cake (10 bites) JE8.png|32px]] [[File:Cake (11 bites) JE8.png|32px]] [[File:Cake (12 bites) JE8.png|32px]] [[File:Cake (13 bites) JE8.png|32px]] [[File:Cake (14 bites) JE8.png|32px]] [[File:Cake (15 bites) JE8.png|32px]]<br>[[File:Cake (8 bites) JE8 (facing NWU).png|32px]] [[File:Cake (9 bites) JE8 (facing NWU).png|32px]] [[File:Cake (10 bites) JE8 (facing NWU).png|32px]] [[File:Cake (11 bites) JE8 (facing NWU).png|32px]] [[File:Cake (12 bites) JE8 (facing NWU).png|32px]] [[File:Cake (13 bites) JE8 (facing NWU).png|32px]] [[File:Cake (14 bites) JE8 (facing NWU).png|32px]] [[File:Cake (15 bites) JE8 (facing NWU).png|32px]]<br>Overeaten cakes now display the [[carrots]] texture. The inside underside also uses the feet of the [[cauldron]].}}
{{History||1.7.2|snap=13w41a|[[File:Cake (8 bites) JE9.png|32px]] [[File:Cake (9 bites) JE9.png|32px]] [[File:Cake (10 bites) JE9.png|32px]] [[File:Cake (11 bites) JE9.png|32px]] [[File:Cake (12 bites) JE9.png|32px]] [[File:Cake (13 bites) JE9.png|32px]] [[File:Cake (14 bites) JE9.png|32px]] [[File:Cake (15 bites) JE9.png|32px]]<br>[[File:Cake (8 bites) JE9 (facing NWU).png|32px]] [[File:Cake (9 bites) JE9 (facing NWU).png|32px]] [[File:Cake (10 bites) JE9 (facing NWU).png|32px]] [[File:Cake (11 bites) JE9 (facing NWU).png|32px]] [[File:Cake (12 bites) JE9 (facing NWU).png|32px]] [[File:Cake (13 bites) JE9 (facing NWU).png|32px]] [[File:Cake (14 bites) JE9 (facing NWU).png|32px]] [[File:Cake (15 bites) JE9 (facing NWU).png|32px]]<br>Overeaten cakes now display a part of the block breaking texture, and the texture of the [[block of diamond]] inside.}}
{{History||1.8|snap=14w02a|Farmer [[villager]]s now [[trading|sell]] 1 cake for 1 [[emerald]].}}
{{History|||snap=14w10a|[[File:Missing Model JE2.png|32px]] Cakes with data values 7 and above now [[Missing model|have no model]].}}
{{History|||snap=14w28a|Cake slices available when eating cakes have been increased from 6 to 7, allowing the 6-bites cake to be obtained legitimately.
|Cake now emits a [[redstone comparator|comparator]] signal.
|When cake is crafted, empty [[bucket]]s now stay in the [[crafting table]].}}
{{History||1.9|snap=15w37a|Cake can no longer be eaten in survival with the primary attack (left-click).}}
{{History||1.13|snap=17w47a|Prior to [[1.13/Flattening|''The Flattening'']], this block's numeral ID was 92, and the item's 354.}}
{{History||1.14|snap=18w43a|[[File:Cake JE4.png|32px]] [[File:Cake (1 bite) JE4.png|32px]] [[File:Cake (2 bites) JE4.png|32px]] [[File:Cake (3 bites) JE4.png|32px]] [[File:Cake (4 bites) JE4.png|32px]] [[File:Cake (5 bites) JE4.png|32px]] [[File:Cake (6 bites) JE4.png|32px]]<br>[[File:Cake (item) JE2 BE2.png|32px]] The texture of cake has been changed.
|Cakes can now be eaten by [[panda]]s when they are thrown to them.}}
{{History|||snap=19w03a|Placing a cake into the new [[composter]] now raises the compost level by 1.}}
{{History|||snap=19w08a|[[File:Cake (item) JE3 BE3.png|32px]] The texture of cake [[item]]s have been changed, this time to have a large cherry in the middle to match its block counterpart.}}
{{History||May 17–20, 2019|link=none|[[File:10 years cake render.png|32px]] Cakes now display a "10" above them, textured with [[white concrete]], to celebrate the 10 year anniversary of the first public version of ''Minecraft'' ([[0.0.11a]]) being released.}}
{{History||1.17|snap=20w45a|[[File:Cake with Candle JE1.png|32px]] [[File:Cake with White Candle JE1.png|32px]] [[File:Cake with Light Gray Candle JE1.png|32px]] [[File:Cake with Gray Candle JE1.png|32px]] [[File:Cake with Black Candle JE1.png|32px]] [[File:Cake with Brown Candle JE1.png|32px]] [[File:Cake with Red Candle JE1.png|32px]] [[File:Cake with Orange Candle JE1.png|32px]] [[File:Cake with Yellow Candle JE1.png|32px]] [[File:Cake with Lime Candle JE1.png|32px]] [[File:Cake with Green Candle JE1.png|32px]] [[File:Cake with Cyan Candle JE1.png|32px]] [[File:Cake with Light Blue Candle JE1.png|32px]] [[File:Cake with Blue Candle JE1.png|32px]] [[File:Cake with Purple Candle JE1.png|32px]] [[File:Cake with Magenta Candle JE1.png|32px]] [[File:Cake with Pink Candle JE1.png|32px]] [[File:Candle Cake (lit) JE1.png|32px]] [[File:White Candle Cake (lit) JE1.png|32px]] [[File:Light Gray Candle Cake (lit) JE1.png|32px]] [[File:Gray Candle Cake (lit) JE1.png|32px]] [[File:Black Candle Cake (lit) JE1.png|32px]] [[File:Brown Candle Cake (lit) JE1.png|32px]] [[File:Red Candle Cake (lit) JE1.png|32px]] [[File:Orange Candle Cake (lit) JE1.png|32px]] [[File:Yellow Candle Cake (lit) JE1.png|32px]] [[File:Lime Candle Cake (lit) JE1.png|32px]] [[File:Green Candle Cake (lit) JE1.png|32px]] [[File:Cyan Candle Cake (lit) JE1.png|32px]] [[File:Light Blue Candle Cake (lit) JE1.png|32px]] [[File:Blue Candle Cake (lit) JE1.png|32px]] [[File:Purple Candle Cake (lit) JE1.png|32px]] [[File:Magenta Candle Cake (lit) JE1.png|32px]] [[File:Pink Candle Cake (lit) JE1.png|32px]] Added candle cakes.}}
{{History||1.17|snap=21w19a|The name of "Candle Cake" has been changed to "Cake with Candle".}}
{{History||1.17|snap=Pre-release 3|[[File:Candle Cake (lit) JE2.png|32px]] [[File:White Candle Cake (lit) JE2.png|32px]] [[File:Light Gray Candle Cake (lit) JE2.png|32px]] [[File:Gray Candle Cake (lit) JE2.png|32px]] [[File:Black Candle Cake (lit) JE2.png|32px]] [[File:Brown Candle Cake (lit) JE2.png|32px]] [[File:Red Candle Cake (lit) JE2.png|32px]] [[File:Orange Candle Cake (lit) JE2.png|32px]][[File:Yellow Candle Cake (lit) JE2.png|32px]] [[File:Lime Candle Cake (lit) JE2.png|32px]] [[File:Green Candle Cake (lit) JE2.png|32px]] [[File:Cyan Candle Cake (lit) JE2.png|32px]] [[File:Light Blue Candle Cake (lit) JE2.png|32px]] [[File:Blue Candle Cake (lit) JE2.png|32px]] [[File:Purple Candle Cake (lit) JE2.png|32px]] [[File:Magenta Candle Cake (lit) JE2.png|32px]] [[File:Pink Candle Cake (lit) JE2.png|32px]] Changed lit cake with candle textures.}}
{{History|pocket alpha}}
{{History||v0.7.0|[[File:Cake JE3 BE1.png|32px]] [[File:Cake (1 bite) JE3 BE1.png|32px]] [[File:Cake (2 bites) JE3 BE1.png|32px]] [[File:Cake (3 bites) JE3 BE1.png|32px]] [[File:Cake (4 bites) JE3 BE1.png|32px]] [[File:Cake (5 bites) JE3 BE1.png|32px]] [[File:Cake (6 bites) JE3 BE1.png|32px]]<br>[[File:Cake (item) JE1 BE1.png|32px]] Added cake.
|Cake restores {{hp|18}}.}}
{{History||v0.12.1|snap=build 1|Cake now restore {{hunger|12}}.}}
{{History||v0.14.0|snap=build 1|Cake can now be used to emit a [[redstone comparator|comparator]] signal.}}
{{History||v0.15.0|snap=?|Cake currently does not show its inside texture on two or more bites.}}
{{History|pocket}}
{{History||1.0.4|snap=alpha 1.0.4.0|Farmer villagers now [[trading|sell]] cake for one [[emerald]].}}
{{History|bedrock}}
{{History||unknown|Cake is now stackable.}}
{{History||1.4.0|snap=beta 1.2.14.2|Cake can now be found inside [[buried treasure]] [[chest]]s.}}
{{History||1.8.0|snap=beta 1.8.0.8|Cake, as a dropped [[item]], can now be eaten by [[panda]]s.}}
{{History||1.10.0|snap=beta 1.10.0.3|[[File:Cake BE2.png|32px]] [[File:Cake (1 bite) BE2.png|32px]] [[File:Cake (2 bites) BE2.png|32px]] [[File:Cake (3 bites) BE2.png|32px]] [[File:Cake (4 bites) BE2.png|32px]] [[File:Cake (5 bites) BE2.png|32px]] [[File:Cake (6 bites) BE2.png|32px]] <br>[[File:Cake (item) JE2 BE2.png|32px]] The texture of cake has been changed.}}
{{History||1.11.0|snap=beta 1.11.0.1|Cake can now be used to fill up [[composter]]s.}}
{{History|||snap=beta 1.11.0.4|Cake [[trading|sold]] by farmers now has a 50% chance to cost 8 [[emerald]]s.}}
{{History|||snap=beta 1.11.0.5|[[File:Cake (item) JE3 BE3.png|32px]] The texture of cake [[item]]s has been changed, once again.}}
{{History|||snap=beta 1.11.0.7|Cake [[trading|trades]] from farmer [[villager]]s have been reverted.}}
{{History||1.16.0|snap=beta 1.15.0.53|Cake now shows its inside texture on two or more bites.}}
{{History||1.17.10|snap=beta 1.17.10.22|[[File:Cake with Candle JE1.png|32px]] [[File:Cake with White Candle JE1.png|32px]] [[File:Cake with Light Gray Candle JE1.png|32px]] [[File:Cake with Gray Candle JE1.png|32px]] [[File:Cake with Black Candle JE1.png|32px]] [[File:Cake with Brown Candle JE1.png|32px]] [[File:Cake with Red Candle JE1.png|32px]] [[File:Cake with Orange Candle JE1.png|32px]] [[File:Cake with Yellow Candle JE1.png|32px]] [[File:Cake with Lime Candle JE1.png|32px]] [[File:Cake with Green Candle JE1.png|32px]] [[File:Cake with Cyan Candle JE1.png|32px]] [[File:Cake with Light Blue Candle JE1.png|32px]] [[File:Cake with Blue Candle JE1.png|32px]] [[File:Cake with Purple Candle JE1.png|32px]] [[File:Cake with Magenta Candle JE1.png|32px]] [[File:Cake with Pink Candle JE1.png|32px]] [[File:Candle Cake (lit) JE2.png|32px]] [[File: White Candle Cake (lit) JE2.png|32px]] [[File:Light Gray Candle Cake (lit) JE2.png|32px]] [[File:Gray Candle Cake (lit) JE2.png|32px]] [[File:Black Candle Cake (lit) JE2.png|32px]] [[File:Brown Candle Cake (lit) JE2.png|32px]] [[File:Red Candle Cake (lit) JE2.png|32px]] [[File:Orange Candle Cake (lit) JE2.png|32px]] [[File:Yellow Candle Cake (lit) JE2.png|32px]] [[File:Lime Candle Cake (lit) JE2.png|32px]] [[File:Green Candle Cake (lit) JE2.png|32px]] [[File:Cyan Candle Cake (lit) JE2.png|32px]] [[File:Light Blue Candle Cake (lit) JE2.png|32px]] [[File:Blue Candle Cake (lit) JE2.png|32px]] [[File:Purple Candle Cake (lit) JE2.png|32px]] [[File:Magenta Candle Cake (lit) JE2.png|32px]] [[File:Pink Candle Cake (lit) JE2.png|32px]] Added candle cakes.}}
{{History|console}}
{{History||xbox=TU1|xbone=CU1|ps=1.0|wiiu=Patch 1|switch=1.0.1|[[File:Cake JE3 BE1.png|32px]] [[File:Cake (1 bite) JE3 BE1.png|32px]] [[File:Cake (2 bites) JE3 BE1.png|32px]] [[File:Cake (3 bites) JE3 BE1.png|32px]] [[File:Cake (4 bites) JE3 BE1.png|32px]] [[File:Cake (5 bites) JE3 BE1.png|32px]] [[File:Cake (6 bites) JE3 BE1.png|32px]]<br>[[File:Cake (item) JE1 BE1.png|32px]] Added cake.}}
{{History||xbox=TU6|Cake has been made stackable, as a then-version exclusive.}}
{{History||xbox=none|xbone=none|ps=1.90|wiiu=none|switch=none|[[File:Cake JE4.png|32px]] [[File:Cake (1 bite) JE4.png|32px]] [[File:Cake (2 bites) JE4.png|32px]] [[File:Cake (3 bites) JE4.png|32px]] [[File:Cake (4 bites) JE4.png|32px]] [[File:Cake (5 bites) JE4.png|32px]] [[File:Cake (6 bites) JE4.png|32px]]{{verify|Are these the textures/models used?}}<br>[[File:Cake (item) JE2 BE2.png|32px]] The single, lone texture of cake has been changed.}}
{{History|new 3ds}}
{{History||0.1.0|[[File:Cake JE3 BE1.png|32px]] [[File:Cake (1 bite) JE3 BE1.png|32px]] [[File:Cake (2 bites) JE3 BE1.png|32px]] [[File:Cake (3 bites) JE3 BE1.png|32px]] [[File:Cake (4 bites) JE3 BE1.png|32px]] [[File:Cake (5 bites) JE3 BE1.png|32px]] [[File:Cake (6 bites) JE3 BE1.png|32px]]<br>[[File:Cake (item) JE1 BE1.png|32px]] Added cake.}}
{{History|foot}}
=== Cake "item" ===
{{:Technical blocks/Cake}}
== Issues ==
{{issue list}}
== Trivia ==
=== Interaction ===
* Because cake is only {{frac|7|8}} blocks wide, it is possible to stand on the edge of a [[block]] beneath a cake.
* It is possible to place cake on top of another cake by placing a cake on the ground, then placing another cake on the side of a block above and to the side of the first cake, similar to placing [[torch]]es on a [[chest]]. Eating the lower cake causes the upper cake to disappear, as does mining out the block of cake it is sitting on.
* It is also possible to place any block on top of cakes (including another cake) by [[sneaking]] and placing the block on top of a cake.
* [[Mob]]s on top of cakes rotate while attempting to move, a pathfinding oversight shared with [[fence]]s.
* If cake is placed in a hole one block deep, players can get across the hole without jumping, although a player standing on the cake must jump to get out of the hole.
* Cake can be used to create a functioning staircase, by placing a cake on each level of a 1 block by 1 block incline. This would be one of the most labor-intensive staircases available, given the requirements to craft a cake, compared to any other method of creating a staircase. This staircase is also extremely overpowered when combined with a horse being one of the fastest forms of travel.
*At some point, it was possible to push cakes into the void using pistons.<ref>https://www.youtube.com/watch?v=GxniEMGBXC4&t=340s</ref>
=== Miscellaneous ===
[[File:IOTY.png|thumb|100px|The 2010 Indie of the Year Awards logo.]]
* Cake was added to ''[[Minecraft]]'' following the ModDB [[2010 Indie of the Year Awards]]. [[Notch]] agreed to add cake to ''Minecraft'' if it won, which led to a campaign called "The Quest For Cake". ''Minecraft'' won 3 of the 7 awards, including the "Indie of the Year" award.
* Placing a cake makes the same sound as placing [[wool]].
* The player can place cake on top of a [[bed]], and while [[sleeping]], the cake shows on the player's screen as if it were on top of their head.
* The name of the achievement for crafting a cake is a reference to the internet meme "The Cake is a Lie", which originated from [[wikipedia:Valve Corporation|Valve Software's]] game, ''[[wikipedia:Portal (video game)#Plot|Portal]]''.
* On May 17, 2019, for the [https://www.minecraft.net/en-us/10th-anniversary 10th anniversary] of ''Minecraft'', the cake [[model]] was changed to display a "10" above it, made of [[white concrete]].
* Unlike most foods, cakes don't count towards the advancement "[[A Balanced Diet]]" {{in|java}}.<ref>{{bug|MC-117561}}</ref>
== Gallery ==
=== Renders ===
{{hidden begin}}
<div style="clear: both"></div>
<gallery>
Cake.png
Cake (1 bite).png
Cake (2 bites).png
Cake (3 bites).png
Cake (4 bites).png
Cake (5 bites).png
Cake (6 bites).png
</gallery>
<gallery>
Cake with Candle.png
Cake with White Candle.png
Cake with Light Gray Candle.png
Cake with Gray Candle.png
Cake with Black Candle.png
Cake with Brown Candle.png
Cake with Red Candle.png
Cake with Orange Candle.png
Cake with Yellow Candle.png
Cake with Lime Candle.png
Cake with Green Candle.png
Cake with Cyan Candle.png
Cake with Light Blue Candle.png
Cake with Blue Candle.png
Cake with Purple Candle.png
Cake with Magenta Candle.png
Cake with Pink Candle.png
</gallery>
<gallery>
Candle Cake (lit).png
White Candle Cake (lit).png
Light Gray Candle Cake (lit).png
Gray Candle Cake (lit).png
Black Candle Cake (lit).png
Brown Candle Cake (lit).png
Red Candle Cake (lit).png
Orange Candle Cake (lit).png
Yellow Candle Cake (lit).png
Lime Candle Cake (lit).png
Green Candle Cake (lit).png
Cyan Candle Cake (lit).png
Light Blue Candle Cake (lit).png
Blue Candle Cake (lit).png
Purple Candle Cake (lit).png
Magenta Candle Cake (lit).png
Pink Candle Cake (lit).png
</gallery>
{{hidden end}}
=== In-game ===
<gallery>
Cakes stacked.png|A cake placed on top of another.
Cakeeating.png|The sizes of cake when eaten.
10 Years Cake.jpg|The 10-years cake [[model]] placed in the world.
</gallery>
== References ==
{{Reflist}}
{{Blocks|Utility}}
{{Items}}
[[Category:Food]]
[[Category:Utility blocks]]
[[Category:Manufactured blocks]]
[[cs:Dort]]
[[de:Kuchen]]
[[es:Tarta]]
[[fr:Gâteau]]
[[hu:Torta]]
[[it:Torta]]
[[ja:ケーキ]]
[[ko:케이크]]
[[nl:Taart]]
[[pl:Ciasto]]
[[pt:Bolo]]
[[ru:Торт]]
[[th:เค้ก]]
[[tr:Pasta]]
[[uk:Торт]]
[[zh:蛋糕]]</li></ul> | Beta 1.9-pre4 | The compass needle and the clock will spin randomly within the End and the Nether. | ||||||||||||||||||||||||||||||||||||||||||||||||||||||||||||||||||||||||||||||||||||||||||||||||||||||||||||
1.2.1{{Extension DPL}}<ul><li>[[Horse Armor|Horse Armor]]<br/>{{Item
| image = <gallery>
Leather Horse Armor.png | Leather
Iron Horse Armor.png | Iron
Golden Horse Armor.png | Golden
Diamond Horse Armor.png | Diamond
</gallery>
| image2 = <gallery>
Leather Horse Armor (item).png|Leather
Iron Horse Armor (item).png|Iron
Golden Horse Armor (item).png|Golden
Diamond Horse Armor (item).png|Diamond
</gallery>
| extratext = View [[#Gallery|all renders]]
| renewable =
* '''Leather''': Yes
* '''All others''': No
| stackable = No
}}
'''Horse armor''' is a special type of [[armor]] that can be given to a [[horse]] to wear.
== Obtaining ==
===Chest loot===
{{LootChestItem|iron-horse-armor}}
{{LootChestItem|golden-horse-armor}}
{{LootChestItem|diamond-horse-armor}}
===Crafting===
{{crafting
|A1= Leather
|C1= Leather
|A2= Leather
|B2= Leather
|C2= Leather
|A3= Leather
|C3= Leather
|Output= Leather Horse Armor
|type=Miscellaneous
}}
Only leather horse armor can be crafted; other horse armor can be obtained only from chest loot from some generated structures.
===Trading===
Expert-level [[leatherworker]] villagers [[trading|sell]] leather horse armor for 6 [[emerald]]s as part of their trade.
==Usage==
Only normal adult horses can wear armor; foals, [[donkey]]s, [[mule]]s, and undead variants such as [[skeleton horse]]s and [[zombie horse]]s cannot be equipped with armor.
=== Types ===
Horse armor has leather, iron, gold, and diamond variants. However, horse armor does not have netherite or chainmail variants.
=== Armor Stands ===
Horse armor cannot be placed or displayed on [[armor stand]]s.
===Protection===
Horse armor can be equipped to horses either by manually placing it in its respective slot by pressing E while riding the horse ({{SlotSprite|Horse Armor}}), or by right-clicking the horse with it.
There is a gradual increase in the defense given from a horse wearing the different types of armor. Note that golden horse armor provides more protection than iron horse armor, whereas the opposite is true for [[armor|player armor]].
{| class="wikitable" data-description="Armor defense"
|-
! Material !! [[Armor]]
|-
! [[Leather]]
| {{armor|3}}
|-
! [[Iron]]
| {{armor|5}}
|-
! [[Gold]]
| {{armor|7}}
|-
! [[Diamond]]
| {{armor|11}}
|}
When a horse dies while equipped with any horse armor, it drops its normal loot, saddle (if it had one), and the horse armor.
Leather horse armor protects horses from freezing in [[powder snow]], but it does not negate other powder snow effects (e.g., falling through, inability to jump).
===Durability===
Unlike [[armor|player armor]], horse armor does not have durability. This means a single horse armor can be used infinitely unless destroyed.
=== Enchanting ===
Unlike [[armor|player armor]], horse armor cannot be enchanted in survival mode. However, {{in|java}} Creative mode, horse armor can be used with an [[anvil]] to enchant with [[Depth Strider]], [[Thorns]], [[Respiration]], [[Feather Falling]], and [[Curse of vanishing]]. Other enchantments can be applied, but they have no effect.
=== Dyeing ===
Leather horse armor can be dyed 12,326,391 different colors (using lone dyes or dye combinations) and put onto a horse to display that color. These changes can be reverted by {{control|using}} a filled [[cauldron]] with dyed leather horse armor.
===Smelting usage===
{{Smelting|showname=1|Iron Horse Armor;Golden Horse Armor|Iron Nugget;Gold Nugget|0,1}}
===Piglins===
{{EntityLink|Piglin|Piglins}} are attracted to golden horse armor and run toward any golden horse armor on the ground, inspecting it for 6 to 8 seconds before putting it in their inventory.
== Sounds ==
{{Edition|Java}}:
{{Sound table
|sound=Horse armor.ogg
|subtitle=Horse armor equips
|source=neutral
|description=When armor is equipped to a horse
|id=entity.horse.armor
|translationkey=subtitles.entity.horse.armor
|volume=0.5
|pitch=1.0
|distance=16
|foot=1}}
{{Edition|Bedrock}}:
{{Sound table
|type=bedrock
|sound=Horse armor.ogg
|source=neutral
|description=When armor is equipped to a horse
|id=mob.horse.armor
|volume=0.6
|pitch=1.0
|foot=1}}
== Data values ==
=== ID ===
{{edition|java}}:
{{ID table
|edition=java
|showforms=y
|generatetranslationkeys=y
|displayname=Leather Horse Armor
|spritetype=item
|nameid=leather_horse_armor
|form=item}}
{{ID table
|displayname=Iron Horse Armor
|spritetype=item
|nameid=iron_horse_armor
|form=item}}
{{ID table
|displayname=Diamond Horse Armor
|spritetype=item
|nameid=diamond_horse_armor
|form=item}}
{{ID table
|displayname=Golden Horse Armor
|spritetype=item
|nameid=golden_horse_armor
|form=item
|foot=1}}
{{edition|bedrock}}:
{{ID table
|edition=bedrock
|shownumericids=y
|showforms=y
|showaliasids=y
|notshowbeitemforms=y
|generatetranslationkeys=y
|displayname=Leather Horse Armor
|spritetype=item
|nameid=leather_horse_armor
|aliasid=horsearmorleather
|id=530
|form=item
|translationkey=item.horsearmorleather.name}}
{{ID table
|displayname=Iron Horse Armor
|spritetype=item
|nameid=iron_horse_armor
|aliasid=horsearmoriron
|id=531
|form=item
|translationkey=item.horsearmoriron.name}}
{{ID table
|displayname=Diamond Horse Armor
|spritetype=item
|nameid=diamond_horse_armor
|aliasid=horsearmordiamond
|id=533
|form=item
|translationkey=item.horsearmordiamond.name}}
{{ID table
|displayname=Golden Horse Armor
|spritetype=item
|nameid=golden_horse_armor
|aliasid=horsearmorgold
|id=532
|form=item
|translationkey=item.horsearmorgold.name
|foot=1}}
=== Item data ===
When leather horse armor is dyed, it has the following NBT:
{{el|java}}:
{{main|Player.dat format}}
<div class="treeview">
* {{nbt|compound|tag}}: Parent tag.
** {{nbt|compound|display}}: Display properties.
*** {{nbt|int|color}}: The color of the leather armor. The tooltip displays "Dyed" if advanced tooltips are disabled, otherwise it displays the hexadecimal color value. Color codes are calculated from the Red, Green and Blue components using this formula:<br>'''<span style="color:red">Red</span>[[wikipedia:Logical shift|<<]]16 + <span style="color:green">Green</span><<8 + <span style="color:blue">Blue</span>'''<ref>For positive values larger than 0x00FFFFFF, the top byte is ignored. All negative values produce white.</ref>
</div>
{{el|bedrock}}:
: See [[Bedrock Edition level format/Item format]].
== History ==
{{History|java}}
{{History||1.6.1|snap=13w16a|[[File:Iron Horse Armor JE1 BE1.png|32px]] [[File:Golden Horse Armor JE1 BE1.png|32px]] [[File:Diamond Horse Armor JE1 BE1.png|32px]]<br>[[File:Iron Horse Armor (item) JE1 BE1.png|32px]] [[File:Golden Horse Armor (item) JE1 BE1.png|32px]] [[File:Diamond Horse Armor (item) JE1 BE1.png|32px]] Added horse armor.
|Horse armor can be [[crafting|crafted]] using the following recipe.
{{{!}} class{{=}}"collapsible collapsed"
! Recipe
{{!}}-
{{!}}
{{Crafting Table
|C1=Iron Ingot; Gold Ingot; Diamond
|A2=Iron Ingot; Gold Ingot; Diamond
|B2=Any Wool
|C2=Iron Ingot; Gold Ingot; Diamond
|A3=Iron Ingot; Gold Ingot; Diamond
|B3=Iron Ingot; Gold Ingot; Diamond
|C3=Iron Ingot; Gold Ingot; Diamond
|Output=Iron Horse Armor; Golden Horse Armor; Diamond Horse Armor
}}
{{!}}}
}}
{{History|||snap=13w18a|The crafting recipe for horse armor has been removed.
|Horse armor can now be found in [[chest]]s in [[jungle temple|jungle]] & [[desert temple]]s, [[dungeon]]s, [[nether fortress]]es, [[stronghold]] altar rooms and [[village]] blacksmith buildings.
|Iron horse armor can now additionally be found in [[mineshaft]] chests.}}
{{History|||snap=13w21a|Horse armor is no longer stackable, to be consistent with other types of [[armor]].}}
{{History||1.9|snap=15w31a|Horse armor has been added to [[end city]] [[chest]]s.}}
{{History|||snap=15w43a|The average yield of horse armor in [[nether fortress]] chests has slightly decreased.}}
{{History|||snap=15w44a|The average yield of horse armor in [[desert temple]] chests has increased.
|The average yield of iron horse armor from [[dungeon]] chests has slightly decreased.
|Iron horse armor has been removed from [[mineshaft]] [[chest]]s.}}
{{History||1.11.1|snap=16w50a|Golden and iron horse armor can now be [[smelting|smelted]] down into one of their respective [[nugget]]s.}}
{{History||1.13|snap=17w45a|[[File:Iron Horse Armor JE2.png|32px]] [[File:Golden Horse Armor JE2.png|32px]] [[File:Diamond Horse Armor JE2.png|32px]] The textures of horse armor have been changed, as the [[model]] of [[horse]]s has changed.}}
{{History|||snap=17w46a|[[File:Iron Horse Armor 17w46a.png|32px]] [[File:Golden Horse Armor 17w46a.png|32px]] [[File:Diamond Horse Armor 17w46a.png|32px]] The model of horse armor has been changed, but the textures of horse armor have remained unaltered.}}
{{History|||snap=17w47a|Prior to [[1.13/Flattening|''The Flattening'']], these [[item]]s' numeral IDs were 417, 418 and 419.}}
{{History|||snap=18w03a|[[File:Iron Horse Armor JE3.png|32px]] [[File:Golden Horse Armor JE3 BE2.png|32px]] [[File:Diamond Horse Armor JE3 BE2.png|32px]] The textures of horse armor have been changed, as the [[model]] of [[horse]]s has changed.}}
{{History|||snap=18w22a|[[File:Iron Horse Armor JE4 BE2.png|32px]] The texture of iron horse armor when equipped has been changed.<ref>{{bug|MC-124357}}</ref>}}
{{History|||snap=pre2|A bug with the [[horse]] skin and horse armor textures not applying correctly has been fixed.<ref>{{bug|MC-124364}}</ref>}}
{{History||1.14|snap=18w50a|[[File:Iron Horse Armor (item) JE2 BE2.png|32px]] [[File:Golden Horse Armor (item) JE2 BE2.png|32px]] [[File:Diamond Horse Armor (item) JE2 BE2.png|32px]] The textures of horse armor [[item]]s have been changed.}}
{{History|||snap=February 20, 2019|slink=https://twitter.com/_LadyAgnes/status/1098134917299531776?s=19|Leather horse armor announced for {{el|je}}.}}
{{History|||snap=19w08a|[[File:Iron Horse Armor JE5 BE3.png|32px]] [[File:Golden Horse Armor JE4 BE3.png|32px]] [[File:Diamond Horse Armor JE4 BE3.png|32px]]<br>[[File:Iron Horse Armor (item) JE3.png|32px]] [[File:Golden Horse Armor (item) JE3 BE3.png|32px]] [[File:Diamond Horse Armor (item) JE3 BE3.png|32px]] The textures of iron, gold and diamond horse armor have been changed.
|[[File:Leather Horse Armor JE1 BE3.png|32px]] [[File:Leather Horse Armor (item) JE1.png|32px]] Added leather horse armor, which can be [[dyeing|dyed]] 12,326,391 different colors, similar to leather [[armor]].}}
{{History|||snap=19w11a|Leatherworker [[villager]]s now [[trading|sell]] leather horse armor.}}
{{History||1.14.1|snap=Pre-Release 1|[[File:Leather Horse Armor (item) JE2.png|32px]] The texture of leather horse armor [[item]] has been changed to be more consistent with the other types of horse armor.
|[[File:Iron Horse Armor (item) JE4 BE3.png|32px]] The texture of iron horse armor item has been changed.}}
{{History||1.16|snap=20w15a|Horse armor placed in a dispenser can now be put on tamed horses.}}
{{History|||snap=20w16a|Golden horse armor now generates in [[ruined portal]] chests.}}
{{History||1.17|snap=21w13a|Leather horse armor now protects [[horse]]s from [[freezing]].}}
{{History||1.19|snap=22w13a|Diamond horse armor may now be found in [[ancient city]] [[chest]]s.}}
{{History|pocket alpha}}
{{History||v0.15.0|snap=build 1|[[File:Leather Horse Armor BE1.png|32px]] [[File:Iron Horse Armor JE1 BE1.png|32px]] [[File:Golden Horse Armor JE1 BE1.png|32px]] [[File:Diamond Horse Armor JE1 BE1.png|32px]]<br>[[File:Leather Horse Armor (item) BE1.png|32px]] [[File:Iron Horse Armor (item) JE1 BE1.png|32px]] [[File:Golden Horse Armor (item) JE1 BE1.png|32px]] [[File:Diamond Horse Armor (item) JE1 BE1.png|32px]] Added horse armor and [[dyeing|dyeable]] leather horse armor as a version exclusive.}}
{{History|pocket}}
{{History||1.0.0|snap=alpha 0.17.0.1|Horse armor can now be found inside [[end city]] [[chest]]s.}}
{{History||1.1.0|snap=alpha 1.1.0.0|Iron and golden horse armor are now [[smelting|smeltable]].}}
{{History|bedrock}}
{{History||1.2.6|snap=beta 1.2.6.2|[[File:Leather Horse Armor BE2.png|32px]] [[File:Iron Horse Armor JE4 BE2.png|32px]] [[File:Golden Horse Armor JE3 BE2.png|32px]] [[File:Diamond Horse Armor JE3 BE2.png|32px]] The textures of horse armor have been changed, as the [[model]] of [[horse]]s has been changed.}}
{{History||1.10.0|snap=beta 1.10.0.3|Horse armor can now be found in [[plains]] [[village]] weaponsmith [[chest]]s.
|[[File:Leather Horse Armor JE1 BE3.png|32px]] [[File:Iron Horse Armor JE5 BE3.png|32px]] [[File:Golden Horse Armor JE4 BE3.png|32px]] [[File:Diamond Horse Armor JE4 BE3.png|32px]]<br>[[File:Leather Horse Armor (item) BE2.png|32px]] [[File:Iron Horse Armor (item) JE2 BE2.png|32px]] [[File:Golden Horse Armor (item) JE2 BE2.png|32px]] [[File:Diamond Horse Armor (item) JE2 BE2.png|32px]] The textures of all horse armor have been changed.}}
{{History||1.11.0|snap=beta 1.11.0.1|Horse armor can now be found in [[savanna]], [[desert]], [[taiga]], [[snowy taiga]] and [[snowy tundra]] [[village]] weaponsmith [[chest]]s.}}
{{History|||snap=beta 1.11.0.4|Leather horse armor can now be [[trading|bought]] from leatherworker [[villager]]s.}}
{{History|||snap=beta 1.11.0.5|[[File:Leather Horse Armor (item) BE3.png|32px]] [[File:Iron Horse Armor (item) JE4 BE3.png|32px]] [[File:Golden Horse Armor (item) JE3 BE3.png|32px]] [[File:Diamond Horse Armor (item) JE3 BE3.png|32px]] The textures of all horse armor [[item]]s have been changed.}}
{{History||1.17.0|snap=beta 1.16.230.54|Leather horse armor now protects [[horse]]s from [[freezing]].}}
{{History|console}}
{{History||xbox=TU19|xbone=CU7|ps=1.12|wiiu=Patch 1|switch=1.0.1|[[File:Iron Horse Armor JE1 BE1.png|32px]] [[File:Golden Horse Armor JE1 BE1.png|32px]] [[File:Diamond Horse Armor JE1 BE1.png|32px]]<br>[[File:Iron Horse Armor (item) JE1 BE1.png|32px]] [[File:Golden Horse Armor (item) JE1 BE1.png|32px]] [[File:Diamond Horse Armor (item) JE1 BE1.png|32px]] Added horse armor.}}
{{History||xbox=TU53|xbone=CU43|ps=1.49|wiiu=Patch 23|switch=1.0.3|Iron and golden horse armor are now [[smelting|smeltable]].}}
{{History||xbox=TU60|xbone=CU51|ps=1.64|wiiu=Patch 30|switch=1.0.11|[[File:Leather Horse Armor BE1.png|32px]]<br>[[File:Leather Horse Armor (item) BE1.png|32px]] Added leather horse armor.}}
{{History||xbox=none|xbone=none|ps=1.90|wiiu=none|switch=none|[[File:Leather Horse Armor JE1 BE3.png|32px]] [[File:Iron Horse Armor JE5 BE3.png|32px]] [[File:Golden Horse Armor JE4 BE3.png|32px]] [[File:Diamond Horse Armor JE4 BE3.png|32px]]<br>[[File:Leather Horse Armor (item) BE3.png|32px]] [[File:Iron Horse Armor (item) JE3.png|32px]] [[File:Golden Horse Armor (item) JE3 BE3.png|32px]] [[File:Diamond Horse Armor (item) JE3 BE3.png|32px]] The textures of leather, iron, gold and diamond horse armor have been changed.}}
{{History|3ds}}
{{History||0.1.0|[[File:Leather Horse Armor BE1.png|32px]] [[File:Iron Horse Armor JE1 BE1.png|32px]] [[File:Golden Horse Armor JE1 BE1.png|32px]] [[File:Diamond Horse Armor JE1 BE1.png|32px]]<br>[[File:Leather Horse Armor (item) BE1.png|32px]] [[File:Iron Horse Armor (item) JE1 BE1.png|32px]] [[File:Golden Horse Armor (item) JE1 BE1.png|32px]] [[File:Diamond Horse Armor (item) JE1 BE1.png|32px]] Added horse armor.}}
{{History|foot}}
== Issues ==
{{issue list}}
== Gallery ==
<gallery>
Leather Horse Armor.png | Undyed Leather armor
White Leather Horse Armor.png | White Leather armor
Light Gray Leather Horse Armor.png | Light Gray Leather armor
Gray Leather Horse Armor.png | Gray Leather armor
Black Leather Horse Armor.png | Black Leather armor
Brown Leather Horse Armor.png | Brown Leather armor
Red Leather Horse Armor.png | Red Leather armor
Orange Leather Horse Armor.png | Orange Leather armor
Yellow Leather Horse Armor.png | Yellow Leather armor
Lime Leather Horse Armor.png | Lime Leather armor
Green Leather Horse Armor.png | Green Leather armor
Cyan Leather Horse Armor.png | Cyan Leather armor
Light Blue Leather Horse Armor.png | Light Blue Leather armor
Blue Leather Horse Armor.png | Blue Leather armor
Purple Leather Horse Armor.png | Purple Leather armor
Magenta Leather Horse Armor.png | Magenta Leather armor
Pink Leather Horse Armor.png | Pink Leather armor
</gallery>
=== Screenshots ===
<gallery>
Armored Horse.png|A [[horse]] equipped with iron horse armor and bound to a fence post by a [[lead]].
13w21a-new-HorseUI-inventory.png|The GUI for horses implemented in [[Java Edition 13w21a|13w21a]], which allows the removal and switching of armor.
GodSpawner.png|A golden horse armor found in a [[dungeon]] chest, which coincidentally contains an [[enchanted golden apple]].
Horses with armor.png|4 [[horse]]s equipped with [[leather]], [[iron]], [[gold]], and [[diamond]] armor.
Leather Horse Armor 1.jpg|First image of leather horse armor.
Leather Horse Armor 2.jpg|Second image of leather horse armor.
Leather Horse Armor 3.jpg|Third image of leather horse armor.
Leather Horse Armor 4.jpg|Fourth image of leather horse armor.
Leather Horse Armor 5.jpg|Fifth image of leather horse armor.
</gallery>
== Notes ==
{{Notelist}}
== References ==
{{Reflist}}
{{items}}
[[Category:Armor]]
[[de:Rossharnisch]]
[[es:Armadura para caballo]]
[[fr:Armure pour cheval]]
[[it:Bardatura]]
[[ja:馬鎧]]
[[ko:말 갑옷]]
[[nl:Paardenharnas]]
[[pl:Zbroja końska]]
[[pt:Armadura para cavalo]]
[[ru:Конская броня]]
[[uk:Кінські обладунки]]
[[zh:马铠]]</li><li>[[Cocoa Beans|Cocoa Beans]]<br/>{{Block
|image=<gallery>
Cocoa Age 0.png|Age 0 JE
Cocoa Age 1.png|Age 1 JE
Cocoa Age 2.png|Age 2 JE
</gallery>
|image2=<gallery>
Cocoa Age 0 BE.png|Age 0 BE
Cocoa Age 1 BE.png|Age 1 BE
Cocoa Age 2 BE.png|Age 2 BE
</gallery>
|transparent=Yes
|light=No
|tool=axe
|renewable=Yes
|stackable=Yes (64)
|flammable=No
|lavasusceptible=No
}} '''Cocoa beans''' are items obtained from cocoa pods and are used to plant them, as well as to craft [[dye|brown dye]] and [[cookie|cookies]].
'''Cocoa pods''' are [[Bone Meal|bonemealable]] [[plant]]s placed on [[Log|jungle log]] sides that grow cocoa beans, and can be found naturally in [[Jungle|jungles]].
==Obtaining==
In ''Java Edition'', cocoa beans are only obtained through the natural generation of cocoa pods, while in ''Bedrock Edition'', they can also be gotten in bonus chests, from [[fishing]] inside the jungle, bamboo jungle and sparse jungle biomes and during a [[trading]] with a wandering trader.
Cocoa beans come from cocoa pods, which are found on the trunks of normal-sized naturally-generated [[jungle tree]]s in [[jungle]], [[bamboo jungle]]s and [[sparse jungle]] temperate [[biome]]s.
Cocoa pods can be mined with any item, but [[axe]]s are the quickest. Fully grown cocoa pods drop 3 cocoa beans. Using a tool enchanted with Fortune does not increase the amount of cocoa beans dropped.
{{breaking row|horizontal=1|Cocoa|Axe|sword=1|link=none}}
The block itself can be obtained by inventory editing or [[add-on]]s {{in|bedrock}}.
From one to two cocoa beans can be found in 40% of bonus [[chest]]s {{in|bedrock}}.
{{LootChestItem|cocoa-beans}}
Cocoa beans can be obtained from [[fishing]] in a jungle {{in|bedrock}}.
[[Wandering trader]]s may sell 3 cocoa beans for an [[emerald]] during a [[trading]] {{in|bedrock}}.
==Usage==
===Farming===
{{main|Tutorials/Cocoa bean farming}}
Placing cocoa beans on the side of a jungle [[log]] plants a new cocoa pod. The log does not need to be attached to a tree. A cocoa pod can be placed on jungle logs, jungle [[wood]], stripped jungle logs and stripped jungle wood.
[[File:Cocoaplant farm.png|thumb|left|A somewhat efficient cocoa pod farm, minimizing space and wood use.]]
Cocoa has three stages of growth. During its first stage, the pod is small and green. In the second stage, the plant is bigger and colored tan. In its last stage, the pod is even larger and orange. The cocoa block has a 20% chance to grow a stage when receiving a [[Tick#Random tick|random tick]], giving it an average time of 5 minutes and 41 seconds per stage. When destroyed in the first two stages, the pod yields only one cocoa bean. When destroyed in the third stage, it gives 3 cocoa beans. [[Bone meal]] can be used to force the cocoa pod forward by one growth stage. Cocoa pods burst and drop their beans when struck by flowing water, pushed by a piston or if their [[log]] or wood are removed by any means.
===Composting===
Placing cocoa beans into a [[composter]] has a 65% chance of raising the compost level by 1. {{IN|bedrock}}, cocoa beans are accepted as a direct substitute of brown dye in many recipes.
===Crafting ingredient===
{{crafting usage}}
{{Dye usage}}
{{IN|bedrock}}, cocoa beans can be also used in banner patterns:
{{banner crafting usage}}
{{Banner loom usage|Cocoa Beans}}
==Sounds==
{{Sound table/Block/Wood}}
==Data values==
===ID===
{{edition|java}}:
{{ID table
|edition=java
|showforms=y
|generatetranslationkeys=y
|displayname=Cocoa
|spritetype=block
|nameid=cocoa
|form=block}}
{{ID table
|displayname=Cocoa Beans
|spritetype=item
|nameid=cocoa_beans
|form=item
|foot=1}}
{{edition|bedrock}}:
{{ID table
|edition=bedrock
|showforms=y
|showaliasids=y
|shownumericids=y
|generatetranslationkeys=y
|displayname=Cocoa
|spritetype=block
|nameid=cocoa
|id=127
|form=block}}
{{ID table
|displayname=Cocoa Beans
|spritetype=item
|nameid=cocoa_beans
|aliasid=dye / 3
|id=412
|form=item
|translationkey=item.dye.brown.name
|foot=1}}
===Block states===
{{see also|Block states}}
{{/BS}}
==History==
''For a more in-depth breakdown of changes to textures and models, including a set of renders for each state combination, see [[/Asset history]]''
{{History|java beta}}
{{History||1.2|[[File:Cocoa Beans JE1 BE1.png|32px]] Added cocoa beans.
|Cocoa beans are currently obtainable only through an inventory editor.}}
{{History||1.2_02|Prior to this, Cocoa Beans were misspelled as 'Coco Beans'.}}
{{History||1.4|Cocoa beans have been formally brought into the game as a reward found in [[dungeon]] chests.<ref>{{tweet|notch|53161729990987776}}</ref> (53% chance) Also, brown [[sheep]] now naturally spawn, making brown [[wool]] obtainable without hacking the game.
|Cocoa beans can now be used to craft [[cookie]]s.}}
{{History|java}}
{{History||May 8, 2012|link={{tweet|jeb|199867730927697920}}|[[Jeb]] revealed cocoa with a screenshot.}}
{{History||1.3.1|snap=12w18a|For only this snapshot, cocoa beans have been given a small (0.5%) chance of dropping from destroyed [[jungle tree]] [[leaves]] in a similar fashion to [[apple]]s from oak leaves, which makes cocoa beans [[renewable resource|renewable]] for the first time.}}
{{History|||snap=12w19a|[[File:Cocoa Age 0 (S) JE1.png|32px]] [[File:Cocoa Age 1 (S) JE1.png|32px]] [[File:Cocoa Age 2 (S) JE1.png|32px]] Added cocoa. The top textures of cocoa always keep a completely constant rotation, regardless of what direction they face. They also not shaded.
|[[File:Cocoa Beans JE2.png|32px]] The texture of cocoa beans has been changed.
|Cocoa has replaced jungle [[leaves]] as the main method of finding cocoa beans.
|[[File:Cocoa Age 3 (S) JE1.png|32px]] Cocoa with values 12–15 is inaccessible normally, and use the texture of the [[dragon egg]]. This is due to the dragon egg texture being to the left of the ripe cocoa texture in <samp>[[terrain.png]]</samp>, as cocoa textures are arranged with the oldest on the left and the youngest on the right, resulting in the unusually ripe cocoa reading the dragon egg texture.}}
{{History|||snap=1.3|[[File:Cocoa Beans JE3 BE2.png|32px]] The texture of cocoa beans has been changed.}}
{{History||1.4.2|snap=12w34a|Cocoa beans have been given the ability to [[Armor#Dyeing|dye]] leather [[armor]] and [[wolf]] collars.}}
{{History||1.4.6|snap=12w49a|Cocoa beans can now be [[crafting|crafted]] with [[gunpowder]] to create a [[firework star]].}}
{{History||1.5|snap=13w02a|Due to textures being stored in individual files, cocoa beans with data 12–15 no longer have a texture to use, and now crash the game if a [[chunk]] containing one is loaded.}}
{{History|||snap=13w03a|Cocoa with data values 12–15 now only crash the game if one is directly in the field of view.}}
{{History|||snap=13w04a|[[Bone meal]] now grows cocoa by only one stage.}}
{{History|||snap=13w10a|[[File:Cocoa Age 3 (S) JE2.png|32px]] Cocoa with data 12–15 now use the age 2 texture, resulting in a broken appearance, preventing previously mentioned crashes.}}
{{History||1.6.1|snap=13w18a|Cocoa beans have been removed from [[dungeon]] [[chest]]s.}}
{{History|||snap=13w19a|Brown [[Terracotta|stained clay]] can now be [[crafting|crafted]] using cocoa beans.}}
{{History||1.7.2|snap=13w41a|Brown [[stained glass]] can now be crafted using cocoa beans.}}
{{History||1.8|snap=14w07a|[[File:Cocoa Age 0 (S) JE2.png|32px]] [[File:Cocoa Age 1 (S) JE2.png|32px]] [[File:Cocoa Age 2 (S) JE2.png|32px]] [[File:Missing Model JE1.png|32px]] The top textures of cocoa now rotate with the blocks themselves (cocoa facing north remaining visually unaffected), and cocoa of age 3 has [[Missing model|no model]].}}
{{History|||snap=14w10a|[[File:Cocoa Age 0 (S) JE3.png|32px]] [[File:Cocoa Age 1 (S) JE3.png|32px]] [[File:Cocoa Age 2 (S) JE3.png|32px]] [[File:Missing Model JE2.png|32px]] The large section of cocoa is shaded, and the missing model (which age 3 cocoa uses) has changed.}}
{{History|||snap=14w25a|[[File:Cocoa Age 0 (S) JE4.png|32px]] [[File:Cocoa Age 1 (S) JE4.png|32px]] [[File:Cocoa Age 2 (S) JE4.png|32px]] The connecting region of cocoa is now shaded.}}
{{History|||snap=14w26a|Cocoa with data 12–15 has been effectively removed from the game, as such blocks now convert to a proper value with {{cmd|setblock}}. Loading worlds with existing out of range cocoa crash the game.}}
{{History|||snap=14w30a|Cocoa beans can now be used to dye [[banner]]s.}}
{{History||1.13|snap=17w47a|The different data values for the <code>dye</code> ID have been split up into their own IDs.
|Prior to [[1.13/Flattening|''The Flattening'']], this block's and item's numeral ID were respectively 127 and 351.}}
{{History||1.14|snap=18w43a|Cocoa beans can now be used to craft [[brown dye]].
|Cocoa beans can no longer be used as a [[dye]].
|All of the dye-related functions and crafting recipes of cocoa beans (except cookies) have been transferred to brown dye.
|"Cocoa Beans" item has been renamed to "Cocoa".
|[[File:Cocoa Beans JE4 BE3.png|32px]] The texture of cocoa has been changed.
|[[File:Cocoa Age 0 (S) JE5.png|32px]] [[File:Cocoa Age 1 (S) JE5.png|32px]] [[File:Cocoa Age 2 (S) JE5.png|32px]] The textures of cocoa have been changed.
|[[File:Cocoa Age 0 (texture) JE2 BE2.png|32px]] [[File:Cocoa Age 1 (texture) JE2 BE2.png|32px]] Textures for cocoa age 0 and 1 has palette left, visible only on particles.
|Cocoa now has a placement [[sound]].}}
{{History|||snap=19w03a|Placing cocoa into the new [[composter]] has a 50% chance of raising the compost level by 1.}}
{{History|||snap=19w05a|Cocoa now has a 65% chance of increasing the compost level in a composter by 1.}}
{{History|||snap=19w11b|"Cocoa" item has been renamed back to "Cocoa Beans".{{verify|was this not just one bug that affected other crops as well? if so cite the ticket and add to all other affected pages}}}}
{{History||1.18|snap=Pre-release 5|[[File:Cocoa Age 0 (texture) JE3 BE3.png|32px]] [[File:Cocoa Age 1 (texture) JE3 BE3.png|32px]] Textures for cocoa age 0 and 1 were changed. This visually changes only particles.}}
{{History||1.19|snap=22w11a|[[File:Cocoa Age 2 (S) JE6.png|32px]] The texture and model of cocoa age 2 have been changed.}}
{{History|pocket alpha}}
{{History||v0.3.0|[[File:Cocoa Beans JE1 BE1.png|32px]] Added cocoa beans. They are currently unobtainable and serve no purpose.}}
{{History||v0.8.0|snap=build 1|[[File:Cocoa Beans JE3 BE2.png|32px]] The texture of cocoa beans has been changed.
|Cocoa beans can be [[crafted]] from an [[orange dye]] and an [[ink sac]], or from [[dandelion yellow]], [[rose red]], and an ink sac, despite there being no way of obtaining ink sacs at the time.}}
{{History|||snap=build 3|Cocoa beans are now available in [[creative]].}}
{{History||v0.9.0|snap=build 1|[[File:Cocoa Age 0 (S) JE1.png|32px]] [[File:Cocoa Age 1 (S) JE1.png|32px]] [[File:Cocoa Age 2 (S) JE1.png|32px]] {{info needed|How did 12-16 appear?}} Added cocoa.
|Cocoa provides an additional way of obtaining cocoa beans.
|Cocoa beans are now used to craft [[cookie]]s.}}
{{History||v0.11.0|snap=build 14|Cocoa now grows over time.<ref>{{bug|MCPE-7887}}</ref>}}
{{History||?|[[File:Cocoa Age 0 (S) BE4.png|32px]] [[File:Cocoa Age 1 (S) BE4.png|32px]] [[File:Cocoa Age 2 (S) BE2.png|32px]] Cocoa no longer has a stem connecting it to the log.}}
{{History||v0.15.0|snap=Realms build 4|[[File:Cocoa Age 0 (S) JE1.png|32px]] [[File:Cocoa Age 1 (S) JE1.png|32px]] [[File:Cocoa Age 2 (S) JE1.png|32px]] Cocoa stems now render again.<ref>{{bug|MCPE-13579}}</ref>}}
{{History||v0.16.0|snap=build 1|Cocoa beans can no longer be crafted from [[orange dye]] and an ink sac.
|Cocoa beans can no longer be crafted from rose red, dandelion yellow and ink sacs.}}
{{History|pocket}}
{{History||1.0.0|snap=alpha 0.17.0.1|Cocoa beans can now be used to dye [[shulker]]s.}}
{{History||1.1.0|snap=alpha 1.1.0.0|Cocoa beans can now be used to dye [[shulker box]]es and [[bed]]s.
|Cocoa beans can now be used to craft [[concrete powder]].}}
{{History|bedrock}}
{{History||1.2.0|snap=beta 1.2.0.2|Cocoa beans can now be used to dye [[banner]]s, [[firework star]]s, and [[glass]].
|Cocoa beans can now be found in [[bonus chest]]s.}}
{{History||1.4.0|snap=beta 1.2.20.1|Cocoa beans can now be used to craft brown [[balloon]]s and [[glow stick]]s.}}
{{History||1.8.0|snap=beta 1.8.0.10|Cocoa beans can now be used to craft [[brown dye]].}}
{{History||1.10.0|snap=beta 1.10.0.3|Cocoa beans are now [[trading|sold]] by [[wandering trader]]s.
|[[File:Cocoa Beans JE4 BE3.png|32px]] The texture of cocoa beans has been changed.
|[[File:Cocoa Age 0 (S) BE4.png|32px]] [[File:Cocoa Age 1 (S) BE4.png|32px]] [[File:Cocoa Age 2 (S) BE4.png|32px]] The textures of cocoa have been changed.}}
{{History||1.11.0|snap=beta 1.11.0.1|Cocoa beans can now be used to fill up [[composter]]s.}}
{{History||1.16.100|snap=beta 1.16.100.56|The ID of cocoa beans has been changed from <code>dye/3</code> to <code>cocoa_beans</code>.}}
{{History||1.18.10|snap=beta 1.18.10.22|[[File:Cocoa Age 0 (texture) JE3 BE3.png|32px]] [[File:Cocoa Age 1 (texture) JE3 BE3.png|32px]] Textures for cocoa age 0 and 1 were changed. This visually changes only particles.}}
{{History|console}}
{{History||xbox=TU1|xbone=CU1|ps=1.0|wiiu=Patch 1|switch=1.0.1|[[File:Cocoa Beans JE1 BE1.png|32px]] Added cocoa beans.}}
{{History||xbox=TU9|[[File:Cocoa Beans JE3 BE2.png|32px]] The texture of cocoa beans has been changed.}}
{{History||xbox=TU12|[[File:Cocoa Age 0 (S) JE3.png|32px]] [[File:Cocoa Age 1 (S) JE3.png|32px]] [[File:Cocoa Age 2 (S) JE3.png|32px]]{{verify|Were these the models used?}} Added cocoa.}}
{{History||xbox=none|xbone=none|ps=1.90|wiiu=none|switch=none|[[File:Cocoa Beans JE4 BE3.png|32px]] The texture of cocoa beans has been changed once again.
|[[File:Cocoa Age 0 (S) JE5.png|32px]] [[File:Cocoa Age 1 (S) JE5.png|32px]] [[File:Cocoa Age 2 (S) JE5.png|32px]]{{verify|Were these the models used?}} The textures of cocoa have been changed.}}
{{History|new 3ds}}
{{History||0.1.0|[[File:Cocoa Beans JE3 BE2.png|32px]] Added cocoa beans.
|[[File:Cocoa Age 0 (S) JE3.png|32px]] [[File:Cocoa Age 1 (S) JE3.png|32px]] [[File:Cocoa Age 2 (S) JE3.png|32px]]{{verify|Were these the models used?}} Added cocoa.}}
{{History|foot}}
=== Cocoa "item" ===
{{:Technical blocks/Cocoa}}
== Issues ==
{{issue list|Cocoa Beans|Cocoa Pod}}
== Trivia ==
*Cocoa pods have a different hitbox for each size; however, the top is always 0.25 blocks below the top of the [[log]] it is on.
*If a cocoa pod grows while the player is standing next to it, the player is forced into the appropriate form of [[suffocation prevention]] depending on available space.
*{{IN|be}}, the pixels on top of the fully grown pod are 8/7 the size of those on the side.<ref>{{bug|MC-109055||Fixed}}</ref><ref>{{bug|MCPE-152862}}</ref>
== Gallery ==
<gallery>
CocoaReveal.png|The first screenshot of cocoa pods tweeted by [[Jens Bergensten]], which revealed the plants.
CocoaPlant.png|A screenshot tweeted by Jens Bergensten, showing the pod.
Cocoa Plants in a Jungle Biome (12w19a).png|Naturally generated cocoa pods.
CPlantsJWood.png|A cocoa pod farm.
Cocoa2.jpg|A cocoa farm.
Cocoa beans phases.png|Three growing phases of the cocoa pod.
AreaOptimizedBeanPods.gif|A log and pod layout for optimizing an example area of 14×14 (including walls).
File:CocoaBean15.png|Cocoa beans with values greater than 12 appeared this way
</gallery>
==Literature==
===References===
{{reflist}}
===External Links===
*[https://www.minecraft.net/en-us/article/taking-inventory--cocoa-beans Taking Inventory: Cocoa Beans] – Minecraft.net on December 5, 2019
{{Items}}
{{Blocks|vegetation}}
[[Category:Dyes]]
[[Category:Food]]
[[Category:Plants]]
[[Category:Renewable resources]]
[[Category:Non-solid blocks]]
[[Category:Natural blocks]]
[[cs:Kakaové boby]]
[[de:Kakaobohnen]]
[[es:Semillas de cacao]]
[[fr:Fèves de cacao]]
[[hu:Kakaóbab]]
[[ja:カカオ豆]]
[[ko:코코아 콩]]
[[nl:Cacaobonen]]
[[pl:Ziarna kakaowe]]
[[pt:Sementes de cacau]]
[[ru:Какао-бобы]]
[[uk:Какао-боби]]
[[zh:可可豆]]</li></ul> | 12w07a | New maps have a height of 256 thanks to the new Anvil level format. | ||||||||||||||||||||||||||||||||||||||||||||||||||||||||||||||||||||||||||||||||||||||||||||||||||||||||||||
1.6.1Tropical fish also have assigned names that can be seen after capture. In Java Edition, the smaller text under the item name is displayed showing the fish name, similar to the text that displays enchantments under enchanted items. In Bedrock Edition, the item name is displayed showing "Bucket of <fish name>". Their colors are mostly named according to the colored block names, though with a few exceptions:
The base color comes first, and if the pattern color is different, it comes after that. Lastly, the fish bucket is given a name according to the shape and pattern of the fish:
Some tropical fish don't follow the normal naming system, and instead, reference real-life fish species. Apart from these names, these types of fish aren't different from regular tropical fish in terms of design or behavior. These varieties are:
| 13w17a | Desert biomes do not generate large pools of water anymore | ||||||||||||||||||||||||||||||||||||||||||||||||||||||||||||||||||||||||||||||||||||||||||||||||||||||||||||
1.7.2{{Extension DPL}}<ul><li>[[Raw Salmon|Raw Salmon]]<br/>{{about|the item|the mob|Salmon}}
{{Item
| title = Raw Salmon
| image = Raw Salmon.png
| renewable = Yes
| heals = {{hunger|2}}
| stackable = Yes (64)
}}
'''Raw salmon''' is a food item that can be eaten by the [[player]] or cooked to make [[cooked salmon]].
== Obtaining ==
=== Mob loot ===
====Salmon====
[[Salmon]] always drops 1 raw salmon when killed, unaffected by Looting.<ref>{{bug|MC-212795||Salmon & Fish mobs are not affected by Looting}}</ref> If it is killed while on [[fire]], it drops 1 [[Cooked Salmon|cooked salmon]] instead.
====Guardians and elder guardians ====
[[Guardian|Guardians]] and [[Elder Guardian|elder guardians]] have a 2.5% chance to drop a random fish, with 25% of them being raw salmon, which drops as cooked if the guardian was on fire. The chance of getting the fish drop is increased by 1% per level with [[Looting]] (for a maximum of 5.5% with Looting III), but the type of fish is not affected.
====Polar bears====
[[Polar bear]]s have a 25% chance of dropping 0–2 raw salmon when killed. The maximum amount can be increased by 1 per level of Looting, for a maximum of 0-5 with Looting III. If killed while on fire, they drop cooked salmon instead.
=== Fishing ===
{{main|Fishing}}Raw salmon can be obtained from [[fishing]]. The wait time of one being caught is decreased with the [[Lure]] enchantment and the chance of one being caught is slightly decreased with the [[Luck of the Sea]] enchantment (named as such because it increases treasure, not fish).
Catching salmon awards 1-6 experience.
=== Chest loot ===
{{LootChestItem|raw-salmon}}
=== Villager gifts ===
{{in|java}}, Fisherman villagers throw raw salmon at [[player]]s under the [[Hero of the Village]] effect.
== Usage ==
=== Smelting ingredient ===
{{smelting
|Raw Salmon
|Cooked Salmon
|0.35
}}
=== Food ===
Raw salmon restores {{hunger|2}} [[hunger]] and 0.2 [[Hunger#Mechanics|saturation]].
=== Cats ===
Raw salmon can be used to tame [[cat]]s with {{frac|1|3}} chance of success, get cats off of [[chest]]s, and [[bed]]s, [[breed]] cats, and make baby cats grow up faster by 10% of the remaining time. Additionally, raw salmon can be used to heal cats by {{hp|2|mob=1}}.
Raw salmon can be used to gain [[ocelot]] trust, breed ocelots, and make baby ocelots grow up by 10%.
=== Dolphins ===
A [[dolphin]] can be fed raw salmon to increase its trust of the player and cause it to interact with the player more often. However, unlike most other animal mobs, this does not cause them to breed.
Additionally, dolphins swim to the nearest chest in a [[shipwreck]] or [[underwater ruin]] after they are fed raw salmon. If the chest in the nearest structure is broken, they swim to another structure with a chest.
=== Trading ===
Apprentice-level Fisherman [[villager]]s have 50%{{only|bedrock}} or {{frac|2|3}}{{only|java}} chance to buy 6 raw salmon and one [[emerald]] for 6 cooked salmon.
Journeyman-level Fisherman villagers offer to buy 13 raw salmon for an emerald.
=== Wolves ===
{{IN|bedrock}}, raw salmon can be fed only to [[wolves]] not at full health, healing them by {{hp|2|mob=1}}. Unlike other wolf food, raw salmon cannot be used to breed wolves or to accelerate the growth of baby wolves.
==Sounds==
{{Sound table/Entity/Food}}
== Data values ==
=== ID ===
{{edition|java}}:
{{ID table
|edition=java
|showitemtags=y
|showforms=y
|generatetranslationkeys=y
|displayname=Raw Salmon
|spritetype=item
|nameid=salmon
|itemtags=fishes
|form=item
|foot=1}}
{{edition|bedrock}}:
{{ID table
|edition=bedrock
|shownumericids=y
|showforms=y
|notshowbeitemforms=y
|generatetranslationkeys=y
|displayname=Raw Salmon
|spritetype=item
|nameid=salmon
|id=265
|form=item
|foot=1}}
== Achievements ==
{{load achievements|Lion Hunter}}
== Advancements ==
{{load advancements|Husbandry;A Balanced Diet;Fishy Business;A Complete Catalogue}}
== Video ==
<span style="display:inline-block">{{yt|s_GcAFeoREk}}</span>
== History ==
{{History|java}}
{{History||1.7.2|snap=13w36a|[[File:Raw Salmon JE1 BE1.png|32px]] Added raw salmon.}}
{{History||1.8|snap=14w25a|Raw salmon is now obtainable rare drops from [[guardian]]s and [[elder guardians]].}}
{{History||1.9|snap=15w44a|Raw salmon can now be found in [[bonus chest]]s.}}
{{History||1.10|snap=16w20a|Raw salmon is now dropped from [[polar bear]]s.}}
{{History||1.13|snap=17w47a|The different data values for the <code>fish</code> and <code>cooked_fish</code> IDs have been split up into their own IDs.
|Prior to [[1.13/Flattening|''The Flattening'']], these [[item]]s' numeral IDs were 349 and 250.}}
{{History|||snap=18w08b|Salmon has been added as a [[mob]], which drops raw salmon when killed (cooked while on [[fire]]).
|[[File:Raw Salmon JE2 BE2.png|32px]] The texture for raw salmon has been changed.}}
{{History||1.14|snap=18w48a|Raw salmon can now be found in chests in [[village]] fisher cottages.}}
{{History|||snap=19w11a|Fisherman [[villager]]s now [[trading|buy]] raw salmon.}}
{{History|||snap=19w13a|Fisherman villagers now give raw salmon to players under the [[Hero of the Village]] effect.}}
{{History|pocket alpha}}
{{History||v0.11.0|snap=build 1|[[File:Raw Salmon JE1 BE1.png|32px]] Added raw salmon.}}
{{History||v0.12.1|snap=build 1|Salmon now restores [[hunger]] instead of [[health]].
|Raw salmon can now be used to tame [[ocelot]]s.}}
{{History||v0.16.0|snap=build 1|Salmon is now [[drops|dropped]] by [[guardian]]s and [[elder guardian]]s.}}
{{History|pocket}}
{{History||1.0.0|snap=alpha 0.17.0.1|Added [[polar bear]]s, which drop raw salmon.}}
{{History|bedrock}}
{{History||1.2.0|snap=beta 1.2.0.2|Raw salmon is now found inside [[bonus chest]]s.}}
{{History||1.4.0|snap=beta 1.2.14.2|Salmon has been added as a [[mob]], which drops raw salmon when killed (cooked while on [[fire]]).
|[[File:Raw Salmon JE2 BE2.png|32px]] The texture for raw salmon has been changed.}}
{{History|||snap=beta 1.2.20.1|Added [[dolphin]]s, which can be [[breeding|bred]] with raw salmon.}}
{{History||1.5.0|snap=beta 1.5.0.0|Raw salmon can no longer be used to breed dolphins.
|Giving raw salmon to dolphins now leads the [[player]] to nearest [[underwater ruins]] or [[shipwreck]].}}
{{History||1.8.0|snap=beta 1.8.0.8|Raw salmon can no longer be used to tame [[ocelot]]s.
|Raw salmon can now be used to [[breeding|breed]] ocelots.
|Added stray [[cat]]s, which can be tamed by being fed raw salmon.}}
{{History||1.11.0|snap=beta 1.11.0.4|Raw salmon can now be [[trading|sold]] to fisherman [[villager]]s.}}
{{History||1.16.100|snap=beta 1.16.100.52|If [[salmon]] is [[death|killed]] while on [[fire]], then they now drop [[cooked salmon]] instead of a raw salmon.}}
{{History|console}}
{{History||xbox=TU31|xbone=CU19|ps=1.22|wiiu=Patch 3|[[File:Raw Salmon JE1 BE1.png|32px]] Added raw salmon.}}
{{History||xbox=TU69|ps=1.76|wiiu=Patch 38|[[File:Raw Salmon JE2 BE2.png|32px]] The texture for raw salmon have been changed.}}
{{History|new 3ds}}
{{History||0.1.0|[[File:Raw Salmon JE1 BE1.png|32px]] Added raw salmon.}}
{{History|foot}}
== Issues ==
{{issue list}}
== See also ==
* [[Fishing]]
== References ==
{{reflist}}
{{items}}
[[de:Roher Lachs]]
[[es:Salmón crudo]]
[[ja:生鮭]]
[[ko:생연어]]
[[pt:Salmão cru]]
[[ru:Сырой лосось]]
[[tr:Çiğ Somon]]
[[zh:生鲑鱼]]
[[Category:Renewable resources]]
[[Category:Food]]</li><li>[[Minecart|Minecart]]<br/>{{about|the rideable minecart in Minecraft|other uses|Minecart (disambiguation)|}}
{{distinguish|Minecraft}}
{{ItemEntity
|image=Minecart.png
|renewable=Yes
|stackable=No
|size=Height: 0.7 Blocks<br>Width: 0.98 Blocks
|networkid='''[[JE]]''': 10
|drops={{ItemLink|Minecart}} (1)
|health={{hp|6}}
}}
A '''minecart''' is a train-like vehicle [[entity]] that runs on [[Rail (disambiguation)|rail]]s.
== Obtaining ==
Minecarts can be retrieved by {{control|attack|text=attacking}} them for some time. Minecarts can also be retrieved with one attack from a [[pickaxe]] provided the player's attack cooldown is reset. A minecart is also destroyed if it makes contact with a [[cactus]], or if shot with a [[bow]] and arrow.
=== Crafting ===
{{Crafting
|A2= Iron Ingot
|C2= Iron Ingot
|A3= Iron Ingot
|B3= Iron Ingot
|C3= Iron Ingot
|Output= Minecart
|type= Transportation
}}
=== Entity loot ===
[[Minecart with command block]]s can be given to the player with the {{cmd|/give}} command or through the creative inventory under certain conditions{{only|java}}; [[minecart with spawner]]s{{only|java}} are available only via the {{cmd|/summon}} command. Each drop 1 minecart when broken.
== Usage ==
[[File:RideableMinecart.png|thumb|right|A rideable minecart on rails surrounded by wood slabs]]
A minecart can be placed in the same manner as most blocks but can be placed only on top of a [[rail]]. Once placed, it may be derailed by pushing it off the end of the track. After this, it can be railed again by placing a rail directly below it or pushing it onto a track.
=== Crafting ingredient ===
{{crafting usage}}
=== Transportation ===
[[File:Steve Riding a Minecart.png|thumb|right|upright|[[Steve]] riding a minecart]]
{{see also|Transportation|Riding}}
Minecarts can be ridden by {{control|use|text=pressing the "use" control}} on them. Once inside, an external impulse may be needed to make the minecart start moving. The player can slowly move the minecart forward while riding it, by pressing {{control|forward}}. If a mob walks in front of an empty minecart, it is pulled into the cart.
After rolling off of the end of a track, a minecart can be pushed around on open blocks. If a minecart is pushed onto or falls onto tracks, it "snaps" to those tracks. When riding a minecart, if the minecart lands on a rail, the player does not take any fall damage. <!--Minecarts and arrows don't interact anymore.-->
Unlike with [[bed]]s, there is no message above the hotbar for attempting to enter a fully occupied minecart.<ref>{{Cite bug|MC|161251|Attempting to enter an occupied bed displays a message over the hotbar, but attempting to enter an occupied vehicle does not|date=September 18, 19|resolution=Works as Intended}}</ref>
=== Dismounting ===
Players can exit the minecart by pressing {{control|sneak}}. When a player or mob dismounts a minecart, either by choice, by breaking the minecart, or by passing over an [[activator rail]], the minecart tries to find a safe ejection destination one block away. First it checks the eight horizontally adjacent blocks in the following order of priority relative to direction of travel: right, left, rear right, rear left, front right, front left, rear, front. A valid destination has a block underneath with a solid (not necessarily full) top surface and a space with enough headroom and width for the passenger to fit in when standing at the center. The space can even contain liquid or have open trapdoors if the mob is slim enough, and presence of other mobs doesn't matter. If no valid destination exists on same horizontal level, the minecart then checks the blocks one above, then one below. For a player, the minecart also checks for crawlable destinations. If still none, the minecart chooses its own location. Once the minecart picks a destination, it actually ejects the passenger one block up in the air and the passenger settles down on its own. Under a low ceiling this may cause one tick of suffocation damage. The air drop exists to allow passengers to land on carpet or bottom slabs.
== Behavior ==
=== Speed ===
Minecarts have a predefined speed limit of exactly 8 blocks per second. However, this speed limit does not change the minecart's speed value but instead limits how far a minecart can travel each tick to 0.4 blocks. Therefore, a minecart moving from powered rail to normal rail will move at constant speed for some time until decelerating because its internal speed value is over its speed limit of 8.
[[Powered rail]]s powered by redstone give minecarts a boost of speed. Speed is gradually decreased (due to drag) if there are no powered rails to assist its movement, and an unpowered powered rail slows down a minecart rapidly. The speed decreases at a faster rate when going uphill, compared to when moving horizontally. A minecart does not need powered rails to assist its movement down a hill.
<!-- Is this comparison to real-life physics necessary? - One unit of kinetic energy could be defined as the energy gained by a cart going down a one-block slope and lost by a cart when it goes up a one-block slope. If a 45-degree downward slope is connected directly into an upward slope, an initial height of 60 blocks results in a final height of 40 blocks, a loss of 20 units of potential energy. But if 20 sections of flat track are inserted between the slopes, the final height is 35. This implies that one unit of energy is lost for every 4 sections of horizontal track traveled with an initial stored energy of between 60 and 40. At much lower speeds, much less energy is lost, implying that the energy lost is a percentage of the cart's current energy. The above gives about 0.5% energy loss per section of track. One implication of this is that more energy lost when the cart has more energy, so a gradual slope should allow you to travel much farther distances than a steep slope followed by a long flat section. (This is different from real-life physics, where friction does not increase with velocity. However, it may be an attempt to mirror air resistance, which ''does'' increase with velocity.) -->
Anything in the way of the minecart brings it to a stop. Once a minecart has left the track, it rapidly decelerates within one or two blocks. When mobs touch a minecart, they affect it in the same way a player would, i.e. mobs that move up against a still cart set it in motion.
If a minecart is moving fast enough, it can skip across one block without a track and reattach to track on the other side, at significantly reduced energy and speed. A minecart's hitbox can skip turns if the minecart is boosted using enough powered rails.<ref>{{Cite bug|MC|179971|Minecart skips turns if too fast|date=April 22, 2020}}</ref>
The speed and momentum of a minecart can differ depending on whether or not it is empty, and in the case where a minecart has a container, the speed can differ depending on the quantity and type of items inside.
=== Merged minecarts ===
{{IN|java}}, two or more minecarts can be merged by pushing them into each other so that they overlap. Merged minecarts move as a collective, like a train, and can be useful for long-distance transport because while moving in a straight line, they ''do not need powered rails to keep their speed''.
To summarize:
* Minecarts can also be merged by ''dropping'' a minecart on another minecart.
* Merged minecarts do not lose speed while traveling on straight rails
* ''Corners'' in the rails might cause merged minecarts to unmerge.
* Minecarts with ''chest'' (even fully filled) can also be merged and also do ''not'' require powered rails.
=== Distance traveled by empty carts starting on a downward slope ===
This table shows the distance traveled by an unoccupied minecart on a downward slope, with a boost (or no boost). The most efficient way is to use only 1 boost at the bottom of the incline on the flat surface. Using 2 increases distance by about 20% or 1.5 blocks. All distance trends based on the height seem to be logarithmic.
The carts started from rest, on a slope Height blocks up.
{| class="wikitable" data-description="Distance traveled"
|-
! Height !! No Boost !! Bottom !! Bottom and Top !! All boosts on incline and bottom
|-
| 1 || 2.77m || 8.77 || 10.8 || 10.8
|-
| 2 || 4.59m || 9.59 || 10.83 || 13.37
|-
| 3 || 5.81m || 9.81 || 11.66 || 15.12
|-
| 4 || 7.04m || 10.04 || 12.46 || 16.95
|-
| 5 || 7.87m || 10.87 || 12.29<!--(Yes, it did actually travel less)--> || 17.95
|-
| 10 || 11.65m || 13.38 || 15.12 || 21.68
|-
| 100 || 15.87m || 17.05 || 17.54 || 25.34
|}
=== Collision ===
Minecarts are about the same size as a block (1×1). Because of this, a ladder, door, or trapdoor prevents it from falling down a 1×1 hole. Carts on [[rail]]s also ignore collision in certain situations. A cart traveling uphill, downhill, or on a curve with a block placed in front of it, goes through the block.<ref>{{Cite bug|MC|8004|Minecarts glitch through the stop block of a track that ends with a turn or a downward slope|date=January 20, 2013}}</ref>
A minecart that reaches the end of a rail up against an opaque solid block bounces back, but if the block is transparent then it stops. The minecart can even bounce against an opaque block from a standstill if the rail underneath is powered. A player or mob riding in a minecart does not collide with or suffocate in any transparent blocks but suffocates inside opaque blocks.
Minecarts are completely unaffected by [[ice]], [[packed ice]], and [[blue ice]]<ref>{{Cite bug|MC|8265|Minecarts don't slide on any sort of ice|date=January 25, 2013}}</ref>; they can also be destroyed by coming in contact with [[lava]] or [[fire]].
=== Mobs ===
{{missing information|section|some other mobs that cannot be picked up by minecarts}}
[[File:Minecart shake.gif|thumb|right|Minecart shaking due to being on top of an activator rail.]]
Mobs can ride minecarts, but cannot control them. Mobs cannot exit the minecart unless the minecart is destroyed or moves onto an active [[activator rail]].<ref>{{bug|MC-3866||Endermen, Tamed Wolves and Ocelots cannot teleport when in a Minecart|WAI}}</ref> However, {{in|bedrock}}, [[endermen]] are able to teleport out of minecarts.<ref>{{bug|MCPE-31761||Endermen can still teleport out of the boats and minecarts}}</ref>
A mob can ride a minecart when pushing by a moving minecart on rails {{in|java}} or when colliding with a minecart {{in|bedrock}}. It is easier to pick up a mob when a minecart is turning. {{IN|bedrock}}, [[armor stand]]s can also be picked up.
Most mobs can be picked up by minecarts, except [[ender dragon]]s, [[warden]]s, and [[wither]]s. {{IN|java}}, [[iron golem]]s cannot be picked up either.
A [[jockey]] riding a minecart automatically accelerates the minecart.<ref>{{bug|MC-71998||Minecarts that have passengers within them riding mobs can move automatically when not on rails}}</ref> Mobs in minecarts don't despawn, and don't count towards the mob cap.{{only|java}}<ref>{{bug|MC-182897||Some passenger mobs don't count to the mob cap|WAI}}</ref>
=== Boats ===
{{exclusive|java|section=yes}}
{{UsesBug|section=yes}}
Due to the bug {{bug|MC-113871}}, [[boat]]s can be captured by minecarts. When a boat is placed in a minecart, the minecart travels faster on rails, approximately as fast as on powered rails. The movement in the boat minecart is glitchy and moving forward with the W key moves the cart backward relative to the player, and vice versa for moving backward with the S key. The minecart also moves on the rail-less ground at a crawling speed, but it does not float in the water despite being in a boat.
Using this glitch can be far more resource-efficient since the boat minecart can move at the speed of a powered rail track on flat ground and on slopes. Another physics glitch with the boat minecart is the extreme reduction in friction when the minecart is on rails, which is similar to the lack of friction when a boat is riding on ice. This glitch can be done in Survival without cheats simply by pushing a minecart into a boat on the track. This bug is now patched.
== Sounds ==
{{Edition|Java}}:<br>
Minecarts use the Friendly Creatures sound category for entity-dependent sound events.<ref group="sound" name="oddcats" />
{{Sound table
|sound=Minecart inside.ogg
|subtitle=MC-177078
|source=Friendly Creatures <ref group="sound" name="oddcats">{{Cite bug|MC|42132|The sounds of minecarts aren't controlled by the correct sound slider|date=December 13, 2013}}</ref>
|overridesource=1
|description=While the player is inside of a moving minecart
|id=entity.minecart.inside
|translationkey=-
|volume=0.0-0.75 <ref group=sound name=insidevolume>Based on horizontal speed; it is clamped between 0.0 and 0.75 and will not play if speed is less than 0.01</ref>
|pitch=1.0
|distance=16 (technical) / rider only (effective)}}
{{Sound table
|sound=Minecart inside underwater1.ogg
|sound2=Minecart inside underwater2.ogg
|sound3=Minecart inside underwater3.ogg
|subtitle=MC-204124
|source=Friendly Creatures <ref group="sound" name="oddcats"/>
|overridesource=1
|description=While inside of a moving minecart when the player's eye level is underwater
|id=entity.minecart.inside.underwater
|translationkey=-
|volume=0.0-0.75 <ref group=sound name=insidevolume/>
|pitch=1.0
|distance=16 (technical) / rider only (effective)}}
{{Sound table
|sound=Minecart rolling.ogg
|subtitle=Minecart rolls <ref group="sound">Shows far less often than it should - see {{bug|MC-181831}}</ref>
|source=Friendly Creatures <ref group="sound" name="oddcats"/>
|overridesource=1
|description=While a minecart is moving
|id=entity.minecart.riding
|translationkey=subtitles.entity.minecart.riding
|volume=0.0-0.35 <ref group=sound>Relates linearly with horizontal velocity (max 0.5)</ref>
|pitch=0.0-1.0 <ref group=sound>Will increase by 0.0025 per tick if the minecart's horizontal velocity is more than 0.01</ref>
|distance=16
|foot=1}}
{{Edition|Bedrock}}:
{{Sound table
|type=bedrock
|sound=Minecart inside.ogg
|source=neutral
|description=While the player is inside of a moving minecart
|id=minecart.inside}}
{{Sound table
|sound=Minecart rolling.ogg
|source=neutral
|description=While a minecart is moving
|id=minecart.base
|foot=1}}
== Data values ==
=== ID ===
{{edition|java}}:
{{ID table
|edition=java
|firstcolumnname=Item
|showforms=y
|generatetranslationkeys=y
|displayname=Minecart
|spritetype=item
|nameid=minecart
|form=item
|foot=1}}
{{ID table
|edition=java
|generatetranslationkeys=y
|firstcolumnname=Entity
|displayname=Minecart
|spritetype=entity
|nameid=minecart
|foot=1}}
{{edition|bedrock}}:
{{ID table
|edition=bedrock
|firstcolumnname=Item
|shownumericids=y
|showforms=y
|notshowbeitemforms=y
|generatetranslationkeys=y
|displayname=Minecart
|spritetype=item
|nameid=minecart
|id=370
|form=item
|foot=1}}
{{ID table
|edition=bedrock
|firstcolumnname=Entity
|shownumericids=y
|generatetranslationkeys=y
|displayname=Minecart
|spritetype=entity
|nameid=minecart
|id=84
|foot=1}}
=== Entity data ===
Minecarts have entity data associated with them that contain various properties of the entity.
{{el|java}}:
{{main|Entity format}}
{{/ED}}
{{el|bedrock}}:
: See [[Bedrock Edition level format/Entity format]]
== Achievements ==
{{load achievements|On A Rail}}
== History ==
{{History|java infdev}}
{{History||20100618|[[File:Minecart JE1.png|32px]] [[File:Minecart (item) JE1.png|32px]] Added minecarts.
|Minecarts are not rideable but instead are used to store things in.
|Right-clicking minecarts opens them like a [[chest]] (with the container called "Minecart". Filling them up makes the [[dirt]] layer inside them rise.}}
{{History||20100624|[[File:Minecart JE2.png|32px]] [[File:Minecart (item) JE2 BE1.png|32px]] The entity model and item texture of minecarts have been changed.
|The minecart mechanics have been changed to being rideable, removing their ability to store items.
| Minecarts now render a chest inside for unknown reasons.}}
{{History|java alpha}}
{{History||v1.0.4|[[File:Minecart JE3 BE1.png|32px]] Removed the phantom chest from minecarts.
|A [[sitting]] animation for riding minecarts has been added.}}
{{History||v1.0.14|Minecarts are now used to craft [[minecart with furnace]] and [[minecart with chest]].}}
{{History||v1.2.2|Minecarts now appear to other players and can be ridden in multiplayer.
|Minecarts are no longer fully solid - they no longer block movement, and can no longer be stood on top of.}}
{{History|java beta}}
{{History||1.5|Minecarts now break faster with hands.
|[[Powered rail]]s have been introduced, which enables minecarts to move automatically, although previous methods of boosting no longer works, or does not work as effectively.
|The [[detector rail]]s have been introduced for use in detecting minecarts. Prior to this update, carts were detected by using [[pressure plate]]s in line with cart tracks. This had the often undesirable effect of dramatically slowing or even stopping the minecart, which limited the use of this design mostly to boosters.}}
{{History||1.6|snap=Test Build 3|A minecart now transfers any [[Damage#Fall damage|fall damage]] it suffers onto its rider and is not destroyed upon impact.}}
{{History||1.8|snap=Pre-release|If the [[player]] punches a minecart when descending from a jump, it shows the [[Damage#Critical hit|critical hit]] animation. This also happens if the player punches the cart while still in it.}}
{{History|java}}
{{History||1.0.0|snap=Beta 1.9 Prerelease|[[Daniel Rosenfeld|C418]] posted a [[sound]] showing the sound that minecarts make.}}
{{History|||snap=Beta 1.9 Prerelease 6|The texture of minecarts has changed slightly.}}
{{History||1.3.1|snap=12w15a|Minecarts can now be shot out from [[dispenser]]s.}}
{{History|||snap=12w21b|The [[player]] no longer spawns on top/inside of the minecart after getting out. Instead, the player gets out a few [[block]]s away. Also, the player can nudge a stationary minecart while inside it to move onto a [[Powered Rail|powered rail]], etc.}}
{{History||1.4.2|snap=12w38b|[[Sound]]s for minecarts have been added.}}
{{History||1.5|snap=13w02a|Minecarts can now be edited with a third-party program to show any [[block]] inside of it (it does not take on the characteristics of this block), as well as make it take on the characteristics of any cart.
|Minecart types no longer all share the same [[entity]] ID – <code>Minecart</code> – and are no longer distinguished by a <code>Type</code> field. They have been given separate entity IDs.
|Minecarts are now used to craft [[TNT minecart]]s.}}
{{History|||snap=13w03a|Minecarts are now used to craft [[hopper minecart]]s.}}
{{History|||snap=13w06a|Added [[minecart with spawner]].}}
{{History||1.6.2|snap=release|A [[player]] in a moving minecart no longer turns with the minecart.}}
{{History||1.7.2|snap=13w39a|Added [[minecart with command block]].}}
{{History||1.8|snap=14w11a|Minecart physics have been changed - they now go faster and further, can derail at corners if going too fast and refuse to go uphill and they can also (if going fast enough) go over 1 [[block]].
|The collision and position handling of minecarts have been improved.}}
{{History|||snap=14w17a|All changes to old minecart physics used before 14w11a have been reverted.}}
{{History||1.9.1|snap=pre2|Extreme typos in minecarts with hoppers and chests, reading "''container.minecart'''' have been fixed.}}
{{History||1.11|snap=16w32a|The [[entity]] ID has been changed from <code>MinecartRideable</code> to <code>minecart</code>.
|The player's [[hunger]] bar is now visible when riding in a minecart.}}
{{History||1.13|snap=17w47a|Prior to [[Java Edition 1.13/Flattening|''The Flattening'']], this [[item]]'s numeral ID was 328.}}
{{History||1.14|snap=18w43a|[[File:Minecart JE4 BE2.png|32px]] [[File:Minecart (item) JE3 BE2.png|32px]] The textures of minecarts have been changed.}}
{{History|||snap=19w13a|Minecarts now move much slower when pushed along standard [[rail]]s using the W key, even slower on unpowered golden rails, and cannot be pushed off of unpowered golden rails without the [[player]] looking at a certain angle.}}
{{History||1.16|snap=20w09a|Minecart now checks dismount position height against entity height.}}
{{History|||snap=20w16a<!--cannot confirm due to how assets are handled - assuming this due to MC-91163 fix version-->|Minecarts no longer have subtitles for movement.}}
{{History|||snap=20w18a|Mobs in minecarts no longer [[Spawn#Despawning|despawn]].}}
{{History||1.17|snap=20w45a|Minecarts can now move in [[water]].}}
{{History||1.19|snap=22w13a|Minecarts no longer drop when breaking a [[Minecart with Chest|minecart with chest]], [[Minecart with Hopper|hopper]], [[Minecart with Furnace|furnace]], or [[Minecart with TNT|TNT]].<ref>{{bug|MC-249493|||Fixed}}</ref>}}
{{History||1.20|snap=23w16a|Sniffers can now enter [[minecart]]s.}}
{{History|pocket alpha}}
{{History||v0.8.0|snap=build 2|[[File:Minecart JE3 BE1.png|32px]] [[File:Minecart (item) JE2 BE1.png|32px]] Added minecarts.}}
{{History|||snap=build 3|Minecarts now ride smoother.}}
{{History||v0.13.0|snap=build 1|[[Sound]]s for minecarts have been added.}}
{{History|||snap=build 2|Minecarts now stack on top of each other.}}
{{History||v0.14.0|snap=build 1|Minecarts can now be used to craft [[Minecart with Chest|storage]], [[Minecart with TNT|TNT]], and [[Minecart with Hopper|hopper minecart]]s.}}
{{History|bedrock}}
{{History||1.10.0|snap=beta 1.10.0.3|[[File:Minecart JE4 BE2.png|32px]] [[File:Minecart (item) JE3 BE2.png|32px]] The textures of minecarts have been changed.}}
{{History|console}}
{{History||xbox=TU1|xbone=CU1|ps=1.0|wiiu=Patch 1|switch=1.0.1|[[File:Minecart JE3 BE1.png|32px]] [[File:Minecart (item) JE2 BE1.png|32px]] Added minecarts.}}
{{History||xbox=TU1|xbone=CU1|ps=1.0|wiiu=Patch 1|Minecarts are now twice the speed than in other editions.}}
{{History||xbox=TU12|Minecarts are now slower.}}
{{History||xbox=TU13|ps=1.0|Minecarts are now faster again.}}
{{History||xbox=TU21|xbone=CU9|ps=1.14|The minecart limit has been increased.}}
{{History||xbox=TU31|xbone=CU19|ps=1.22|wiiu=Patch 3|Minecart [[sound]]s have been updated.}}
{{History||xbox=none|xbone=none|ps=1.90|wiiu=none|switch=none|[[File:Minecart JE4 BE2.png|32px]] [[File:Minecart (item) JE3 BE2.png|32px]] The texture of minecarts has been changed.}}
{{History|new 3DS}}
{{History||0.1.0|[[File:Minecart JE3 BE1.png|32px]] [[File:Minecart_(item)_JE2_BE1.png|32px]] Added minecarts.}}
{{History|foot}}
== Issues ==
{{issue list}}
== Trivia ==
* Minecarts appear to float above the track, as their model has no wheels.
* If the player views their inventory while riding in a minecart, they appear sitting down in mid-air.
* The player can teleport to another minecart while sitting in a minecart by right-clicking a minecart in their range. This can be used as an elevator to quickly rise up when minecarts are placed on top of each other.
* If the sound is muted in the options while riding a minecart, and then turned back up, the minecart no longer makes noise in the client until the player exits the minecart.
* If a saddled pig is riding a minecart, the player can ride the pig. Doing so causes the minecart to be able to ride freely at the player's walking speed. It is unknown whether this is a glitch.
* It seems that hunger does not deplete while inactive in a minecart (at least in normal difficulty).
* A minecart (alongside rails and powered rails) are used as Steve's Side-Special in the crossover fighting game Super Smash Bros. Ultimate.
== Gallery ==
<gallery>
Minecart fire pig.png|A pig inside a burning minecart
MinecartInfdev1.png|A Minecart opened in Minecraft Infdev
MinecartInfdev2.png|A Minecart filled in Minecraft Infdev
2ed Spawner Minecart Image and 1st Dispenser cart image.jpg|An image of two [[Minecart with Spawner]]s and unimplemented Minecart with Dispensers.
Minecart with chest and head thing.png|The first image [[Jens Bergensten|Jeb]] released.<ref>{{Tweet|jeb|289000646210904064}}</ref>
Pocket Edition v0.8.0 alpha Development minecarts.png|The first image of minecarts in {{edition|PE}}.
Minecart Booster.png|Minecart booster.
MinecartStack.png|Minecarts being stacked on each other.
Villager minecart.png|Villager in a minecart.
Minecartride.jpg|Player in minecart.
Blocks in Invisible Minecarts.png|Minecarts can be edited to show any block inside, and can also be edited to be invisible.
File:Minecart (Trails and Tales Summer Event) Render.png|A wooden minecart, featured in the [[Trails & Tales Event]].
File:Minecoins 5.png|Two minecarts, as depicted on [[Minecraft Marketplace|Minecoin]] gift cards.
</gallery>
== References ==
{{reflist}}
== External Links ==
*[https://www.minecraft.net/en-us/article/taking-inventory--minecart Taking Inventory: Minecart] – Minecraft.net on September 6, 2019
{{Items}}
{{entities}}
[[Category:Mechanics]]
[[cs:Vozík]]
[[de:Lore]]
[[es:Vagoneta]]
[[fr:Wagonnet]]
[[hu:Csille]]
[[it:Carrello da miniera]]
[[ja:トロッコ]]
[[ko:광산 수레]]
[[nl:Mijnkar]]
[[pl:Wagonik]]
[[pt:Carrinho de mina]]
[[ru:Вагонетка]]
[[th:รถราง]]
[[uk:Вагонетка]]
[[zh:矿车]]</li></ul> | 13w36a | Cave Generation was tweaked, making caves less dense and interconnected.[2] | ||||||||||||||||||||||||||||||||||||||||||||||||||||||||||||||||||||||||||||||||||||||||||||||||||||||||||||
| New biomes were added and some old biomes were changed. | ||||||||||||||||||||||||||||||||||||||||||||||||||||||||||||||||||||||||||||||||||||||||||||||||||||||||||||||
| 13w37a | An invisible barrier at 30,000,000 blocks was added. This removed the last remnants of the Far Lands. | |||||||||||||||||||||||||||||||||||||||||||||||||||||||||||||||||||||||||||||||||||||||||||||||||||||||||||||
Trivia
- If someone made a 1:1 (1 block = 1 meter) scale version of the Earth, its area would be 510,900,000,000,000 blocks. Assuming the map is only one block deep and takes 1 byte/block, we get approximately 475,800 GB, or 464.7 TB. A Moon-sized map would be made of 37,950,000,000,000 blocks and would take 35,340 GB, or 34.52 TB.
- 921.6 quadrillion (9.216x10¹⁷) blocks would fit in a Minecraft world assuming that it spreads from 30,000,000 to -30,000,000.
- A Minecraft world is theoretically bigger than the earth, but in practice, an Earth-sized map would be large enough to overwhelm almost any consumer-grade computer. Indeed, nearly all structures within Minecraft, such as strongholds, villages, and mountains, are much smaller than a realistic version would be. The same applies even on larger scales such as biomes, landmasses, oceans, and the vertical space between bedrock and the "sky" (approximated by the build limit). However, some small items, such as anvils, are bigger than in real life.
See also
References