Spawning refers to players and mobs being created and placed in the game world. Players will respawn at their spawn point, or at the bed they last slept in upon death. Mobs will despawn upon death.
Player spawning
World spawn

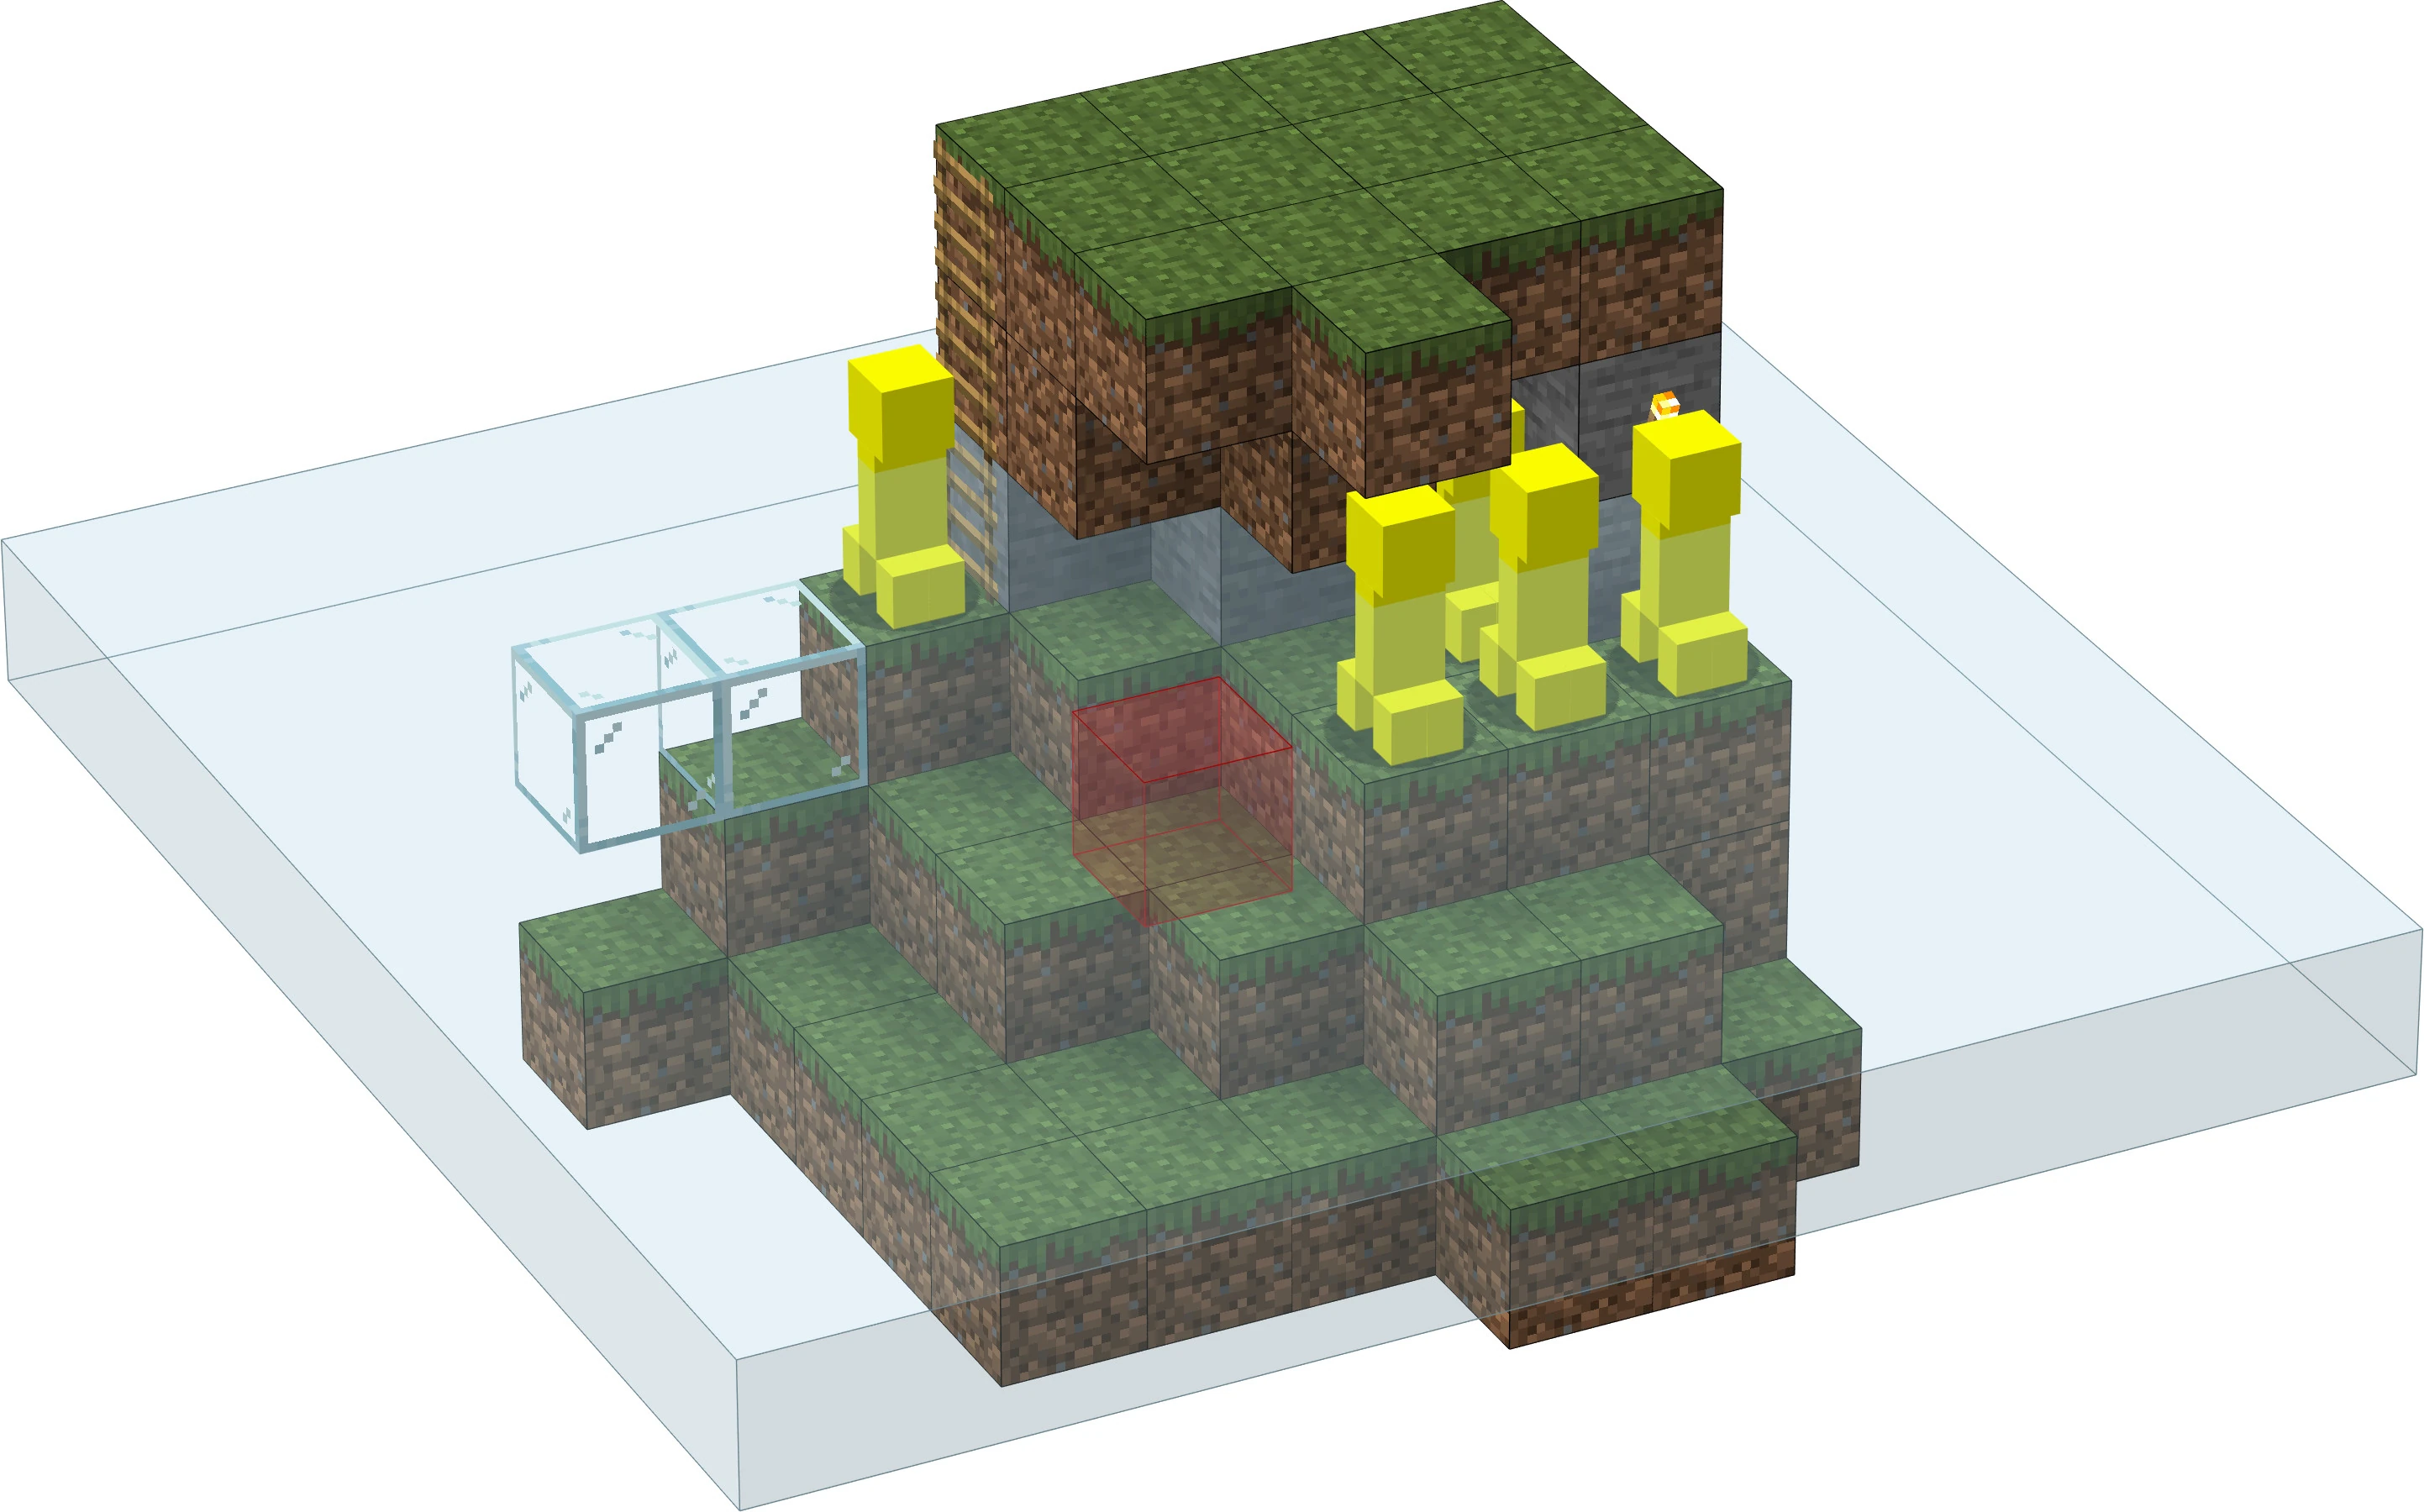
World spawning area. White represents the extent of singleplayer, blue represents multiplayer, and yellow represents the world spawn point.
New players will initially spawn within a small area surrounding the world spawn point when the server is not in adventure mode. This area is 20×20 blocks in singleplayer and reduced to 10×10 blocks in multiplayer, while the area itself is offset in the Northwest direction of the world spawn point. Upon death, the player will then respawn within this area unless they have had their individual spawn point changed.
When spawning, the player will be placed upon the highest block of the matching X and Z location that they have spawned at, even if this would set the player above the maximum build height. This area will not consider the existence of a block to spawn on, which can result in players spawning above the Void if there are no blocks at that X and Z location.
The world spawn point also determines the center of the permanently loaded spawn chunks.
The world spawn point itself can be changed using the /setworldspawn command.
Adventure mode
When the server's settings set the default game mode to adventure mode (using the server.properties), then the normal spawning mechanic is ignored and players are spawned directly on the world spawn. This includes the X, Y and Z coordinates, even if there is no block there and even if there are blocks above it.
If the Y coordinate is not a valid spawning area then the server looks up until it finds one, at most players can spawn at Y=256. If there is space to spawn but it is in the middle of the air, the player will spawn in the middle of the air, even falling into the void if there is a hole.
Individual spawn
The individual spawn point of the player can be changed by lying in a bed or using the /spawnpoint command. If the individual spawning area of the player is obstructed upon their death, they will be forced to respawn at the world spawn.
Lying in a bed will allow for leniency in obstruction, in that the player will attempt to respawn on other blocks near the bed if the original point becomes blocked. If the spawn point set via /spawnpoint becomes obstructed, the player will not be given this leniency in respawning.
Natural generation
Many mobs generate upon initial chunk creation. These spawns will only happen once per chunk.
Animals

A cow that generated with the map inside a tree's leaves and could not escape, a common sight in forested hill areas.
Approximately one in ten newly generated chunks will contain mobs, usually in packs of up to four of the same species. They will always spawn on the highest available block in a column, basically the one that can see the sky. For an animal to spawn on it, this block must be opaque and the two blocks above it must be transparent. The block does not need to be a grass block nor does it need to be illuminated as it does with mob spawning.
Animals do not spawn in desert or ocean biomes, with the exception of squid, and only mooshrooms will spawn in mushroom island biomes.
Randomness for animal spawning is derived from the world seed, which means that worlds with the same seed will generate chunks with the same animals in the same places.
Other mobs
- Villagers generate as part of the village generation.
- A single witch will spawn within a witch hut upon generation.
- Three elder guardians generate as part of a single ocean monument.
- A single ender dragon is created in the End when the dimension is created.
Spawn cycle
Mobs are broadly divided into four categories: hostile, friendly, water (i.e. squid) and ambient (i.e. bat). Hostile mobs have a spawning cycle once every game tick (1/20th of a second). Friendly and water mobs have only one spawning cycle every 400 ticks (20 seconds). Because of this, where conditions permit spawning, hostile mobs spawn frequently, but passive mobs (ie: animals) spawn very rarely. Most animals spawn within chunks when they are generated.
Mobs spawn naturally within a square group of chunks centered on the player, 15×15 chunks (240×240 blocks). When there are multiple players, mobs can spawn within the given distance of any of them. However, hostile mobs (and some others) that move farther than 128 blocks from the nearest player will soon despawn, so the mob spawning area is more-or-less limited to spheres with a radius of 128 blocks, centered at each player. In multiplayer, mob caps are shared by all players, no matter where they are.
Mob cap
Mob caps are directly proportional to the total number of chunks eligible for spawning. To calculate the cap, the spawning area is expanded by one chunk in every direction (so the default gives 17×17 chunks), then the total number of chunks is plugged into the following formula:
cap = constant * chunks / 289
Each mob category has a separate cap and a different constant in the formula:
 Hostile = 70
 Passive = 10
 Ambient (Bats) = 15
 Water (Squids) = 5
In single player mode, there are always 289 chunks in range so the caps above are used. In multiplayer, chunks that are in range of multiple players are only counted once. So the more spread out the players are, the more chunks will be covered and the higher the caps will be.
The amount of mobs is checked once at the beginning of each spawning cycle against the cap. If the number of living mobs in a category is over its cap, the entire spawning cycle for that category is skipped. The area checked for mobs is the same as the area used for calculating the mob cap, which is the spawning area expanded by one chunk in every direction.
Pack spawning
Example of a mob pack spawning. The 41×1×41 spawning area is shaded blue (not to scale). The yellow figures represent the actual positions that mobs could spawn in after checking the environment. Note that the mobs can spawn inside torch and ladder blocks. But they can't spawn on top of glass because it's not opaque. The red cube is the center of the pack, which must be an air block, but the blocks above and below it can be anything.

Requirements for the spawning location of individual mobs
For each spawning cycle, one attempt is made to spawn a pack of mobs in each eligible chunk. A random location in the chunk is chosen to be the center point of the pack. For the pack to spawn at all, the center block must be water for water mobs and air for all other mobs. Note that in the latter case, it must actually be an air block. Any other block, even a non-colliding one, will prevent the entire pack from spawning.
If the pack location is suitable, 12 attempts are made to spawn up to a pack, which is 8 wolves, 1 ghasts, 3 rabbits, or 4 or any other mob. The pack is spawned within a 41×1×41 (that's a 41×41 square that is one block high) area centered at the initial block. Mobs will spawn with the lowest part of their body inside this area. For each spawn attempt, a block location within the pack area is chosen at random. Though the pack area extends 21 blocks out from the center, the random location is heavily skewed toward the center of the pack. Approximately 85% of spawns will be within 5 blocks of the pack center, and 99% within 10 blocks of the center.
All mobs within a pack are the same species. The species for the entire pack is chosen randomly from those eligible to spawn at the location of the first spawn attempt in the pack:
- In the Overworld, this depends on the location:
- Forest, taiga, mega taiga, and cold taiga biomes and their variants can also spawn wolves.
- Plains and savanna biomes can also spawn horses, though savannas spawn horses only 1/5 of the time as plains.
- Jungle biomes can also spawn ocelots, and increase the chance to spawn chickens.
- Desert, beach, stone beach, river, ocean, mesa, and snowy biomes (except cold taiga) cannot spawn animals; only hostile mobs and squid.
- Mushroom island biomes can spawn only mooshrooms.
- Witch huts can only spawn witches.
- Ocean monuments can only spawn guardians.
- The rest of the locations can spawn sheep, pigs, chickens, cows, rabbits, spiders, zombies, skeletons, creepers, endermen, slimes, witches, and squid.
- Slimes will only spawn if they are in any eligible chunk under layer 40, or in a swamp biome at a low light level.
- In the Nether, the locations are less varied,
- Skeletons, wither skeletons, and blazes can spawn within Nether fortresses.
- Zombie pigmen, magma cubes, and ghasts can spawn everywhere else.
- In the End, only endermen will spawn.
Spawn conditions
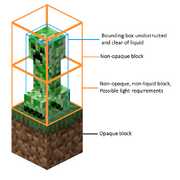
Each individual spawn attempt succeeds only if all of the following conditions are met:
- There must be no players and no player spawn points within a 24 block distance (spherical) of the spawning block
- If it's not a squid or a guardian, then...
- the block directly below it must have a solid top surface (opaque, upside down slabs / stairs and others)
- the block directly below it may not be bedrock
- the spawning block itself must be non-opaque and non-liquid
- the block directly above it must be non-opaque
- the spawning mob hitbox must not be obstructed by solid blocks, other mobs or liquids
- If it's a bat, then...
- the spawning block must be at level 62 or below
- If the real-time day is between October 20 and November 3, then the light level must be 7 or darker. Otherwise the light level must be 4 or darker.
- If it's an animal (other than a mooshroom or ocelot), then...
- the light level of the spawning block must be 9 or brighter
- the block directly below the spawning block must be grass
- the light level of the spawning block must be 9 or brighter
- If it's a mooshroom, then...
- the light level of the spawning block must be 9 or brighter
- the block directly below the spawning block must be mycelium
- the light level of the spawning block must be 9 or brighter
- If it's an ocelot, then...
- If it's a hostile mob (except as noted below), then...
- the difficulty must not be peaceful
- the light level of the spawning block must be 7 or darker (with exception during thunderstorms), and more light increases the chance that the spawn will fail
- sunlight falling on the spawning block further increases the chance that the spawn will fail, by up to 50%
- If it's a slime, then...
- the light checks in the general hostile mob check don't apply
- one of the following must be true:
- option 1:
- the spawning block must be in a chunk eligible to spawn slimes (see the slime page for details)
- the spawning block must be below level 40
- 90% chance of failure
- option 2:
- the spawning block must be in a swamp biome
- the spawning block be on level 51 through 69 inclusive
- chance of failure based on the phase of the moon
- option 1:
- the light level of the spawning block must be 7 or darker, and more light increases the chance that the spawn will fail
- 50% chance of failure
- If it's a ghast, then...
- the light checks in the general hostile mob check don't apply
- there is a 95% chance the spawn will fail, thus ghasts only spawn 1/20th as often as other mobs
- If it's a magma cube, then...
- the light checks in the general hostile mob check don't apply
- If it's a zombie pigman, then...
- the light checks in the general hostile mob check don't apply
- If it's a blaze, then...
- the light checks in the general hostile mob check don't apply
- the light level must be 11 or darker
- If it's a skeleton in the Nether, then...
- there is an 80% chance of spawning a wither skeleton instead
If all of these conditions are met then the mob is spawned. The pack is complete when 4 mobs have spawned (or 8 wolves, or 1 ghast), or 12 attempts have been made, whichever comes first. The exception(s) to these rules is the ender dragon or the wither.
Notes
- Due to the general block checks, all mobs besides squid must spawn on top of an opaque block with at least two blocks of headroom, even ghasts, etc. However, short mobs can spawn in a one block high space if the block above is transparent, like a glass block or piston.
- While individual mobs can spawn inside signs, pressure plates, and other non-opaque blocks, packs cannot. They need a completely empty block in the center. Since a pack spawns all at one level, there needs to be some air blocks right above a flat surface to allow mobs to spawn on it, and more air blocks will always allow more spawning.
- Similarly, buildings surrounded by air will spawn more mobs inside than underground rooms because packs that spawn outside of the building can spawn mobs inside it.
- The mob caps tend to be reached in seconds. Because of this, mobs can be funneled into a spawning room by preventing them from spawning outside of it.
- The caps also mean that the faster mobs are killed, the faster they will spawn.
- Because the caps are only checked at the beginning of a spawn cycle, they can be dramatically exceeded when a large number of mobs spawn in a single cycle. This happens often with squid, which have a fairly low cap (5 in single player) but can spawn in the hundreds in a single cycle, in an area with lots of water.
- If the player's view distance or the server view distance in multiplayer is at 9 or below, mob spawning is severely reduced (or they despawn too quickly), and may result in the player encountering no mobs at all. Set the view distance to 10 or higher to ensure mobs spawn correctly.
Other types of spawning
- Cows, chickens, pigs, sheep, mooshrooms, villagers, ocelots, wolves, horses, donkeys, and rabbits can breed. All of these requires a player to breed them except for villagers.
- A thrown egg has a 1 in 8 chance of spawning a chicken, and an additional 1 in 32 chance of spawning 4 chickens from a single egg, so there is a total of 1 in 256 chance for a single thrown egg to spawn 4 chickens.
- A snow golem, iron golem, or wither can be made to spawn if a player builds the proper structure out of blocks. Iron golems can also spawn in sufficiently populous villages. See their respective pages for full details.
- A monster egg will spawn a silverfish if broken, or if a nearby silverfish is attacked.
- Zombies can spawn in large groups in villages at midnight ignoring most of the usual restrictions, forming a siege. It could even happen in mushroom biomes or if
/gamerule doMobSpawningis false. - Zombie pigmen can spawn from nether portals in the Overworld. Lighting and player proximity don't prevent this.
- Endermites can spawn randomly when a player uses an ender pearl.
- Killing medium and large slimes and magma cubes will spawn more of them, but in a smaller size.
- When a pig gets struck by lightning, it is replaced by a newly spawned zombie pigman.
- When a villager gets struck by lightning, it is replaced by a newly spawned witch.
- A monster spawner causes mobs to spawn constantly in the area around it. Spawners may naturally generate spawning zombies, skeletons, spiders, cave spiders, silverfish, or blazes, but may be made to spawn other mobs using commands. Mobs have the same spawning conditions they would have from a natural spawn, except hostile mobs may spawn without a block below them.
- In Creative, the player can use spawn eggs to spawn most mobs. When mobs are spawned this way, all normal spawning requirements, such as light level and block type, are ignored.
- Any entity can be spawned using the
/summoncommand.
Despawning


Various mob spawning ranges, illustrated
Monsters, squid, ocelots, and hostile wolves, can cease to exist, or "despawn", under certain conditions:
- A mob that has had no player within 32 blocks of it for more than 30 seconds has a 1 in 800 chance of despawning on each game tick (1/20th of a second). Therefore, the half-life of monsters not within 32 blocks of a player is 27.73 seconds (after the initial 30 seconds have elapsed).
- A mob will immediately despawn if there is no player within 128 blocks of it. Note that this is a Euclidean sphere, not a cylinder from map top to bottom and not a taxicab sphere (which is more like an octahedron). Example: A mob at 0/y/0 will remain at least 30 seconds (as above) if the player moves to 65/y/65 (real distance 91.9), but despawns immediately if the player moves to 91/y/91 (real distance 128.7).
- All hostile mobs (including those that are holding items) in a world will despawn if the difficulty is set to peaceful, regardless as to where the player is positioned in the world.
- In multiplayer, despawning does not occur while there are no players in the game.
- A monster which has been named with a name tag will not despawn. However, one created from a renamed spawn egg will despawn as normal.
- If a monster is holding any items or wearing any armor that was given by a player or picked up from the ground, it will not despawn.
- Chickens that originally spawned as chicken jockeys follow zombie despawn rules, rather than chicken despawn rules. In other words, they will despawn.
History
| classic | |||||
|---|---|---|---|---|---|
0.24_06{{Extension DPL}}<ul><li>[[Drinks|Drinks]]<br/>[[File:Drinking Steve.png|150px|right]] [[File:Drinking Alex.png|150px|right]]
'''Drinks''' are a narrow class of consumable [[item]]s that can be ingested by the [[player]] in an extremely similar manner to [[food]]. However, drinks are not encountered quite as commonly as food is, and they are not nearly as integral to Survival gameplay. Drinks can generally be distinguished from food by the sounds they make upon consumption, the lack of [[particles]] they emit, and the fact that they leave an empty container item in the [[inventory]] after consumption. Drinks do not affect [[hunger]] or saturation values upon use (with the exception of [[honey bottle]]s), and do not need those values to be depleted in order to be consumed.
Drinks are drunk by holding {{control|use item}} while having the drink item selected in the hotbar or in the off hand.
== Drinks ==
{{/table}}
== History ==
{{main|Milk#History|Potion#History|Honey Bottle#History}}
{{History|java alpha}}
{{History||v1.0.11|[[File:Milk Bucket JE1 BE1.png|32px]] Added milk.}}
{{History|java}}
{{History||1.0.0|snap=Beta 1.9 Prerelease 3|Added water bottles and potions.}}
{{History||1.15|snap=19w34a|[[File:Honey Bottle JE1.png|32px]] Added honey bottles.}}
{{History|pocket alpha}}
{{History||v0.7.0|[[File:Milk Bucket JE1 BE1.png|32px]] Added milk buckets.}}
{{History||v0.12.1|snap=build 1|Added water bottles and potions.}}
{{History|bedrock}}
{{History||1.14.0|snap=beta 1.14.0.1|[[File:Honey Bottle BE1.png|32px]] Added honey bottles.}}
{{History|foot}}
{{Items}}
[[ja:飲み物]]
[[pt:Bebidas]]
[[Category:Food]]</li><li>[[Pumpkin Seeds|Pumpkin Seeds]]<br/>{{Block
| image = <gallery>
Pumpkin Stem Age 0.png | Age 0
Pumpkin Stem Age 1.png | Age 1
Pumpkin Stem Age 2.png | Age 2
Pumpkin Stem Age 3.png | Age 3
Pumpkin Stem Age 4.png | Age 4
Pumpkin Stem Age 5.png | Age 5
Pumpkin Stem Age 6.png | Age 6
Pumpkin Stem Age 7.png | Age 7
</gallery>
|image2 = <gallery>
Attached Pumpkin Stem (N).png | North
Attached Pumpkin Stem (E).png | East
Attached Pumpkin Stem (S).png | South
Attached Pumpkin Stem (W).png | West
</gallery>
| transparent = Yes
| light = No
| tool = none
| renewable = Yes
| stackable = Yes (64)
| flammable = No
| lavasusceptible = No
}}
'''Pumpkin seeds''' are items obtained from pumpkins that can be used to grow pumpkin stems.
'''Pumpkin stems''' are plants grown on [[farmland]] that, over time, grow [[pumpkin]]s on dirt, mud and moss blocks adjacent to them.
== Obtaining ==
=== Breaking ===
When broken, a pumpkin stem drops 0–3 pumpkin seeds. The chance for pumpkin seeds to drop increases with the stem's age.
{| class="wikitable"
! rowspan="3" |[[Resource location]]
! rowspan="3" | Source
! colspan="4" | Default
|-
| colspan="1" rowspan="2" style="text-align:center" | Nothing || colspan="3" style="text-align:center" |{{ItemLink|Pumpkin Seeds|Pumpkin seeds}}
|-
| style="text-align:center" | 1 || style="text-align:center" | 2 || style="text-align:center" | 3
|-
| rowspan="8" |<code>blocks/pumpkin_stem</code>
|{{BlockLink|Pumpkin Stem|Pumpkin stem}} <code>age = 0</code>
| style="text-align:center" |81.3%|| style="text-align:center" |17.42%|| style="text-align:center" |1.24%|| style="text-align:center" |0.03%
|-
|{{BlockLink|Pumpkin Stem|Pumpkin stem}} <code>age = 1</code>
| style="text-align:center" |65.1%|| style="text-align:center" |30.04%|| style="text-align:center" |4.62%|| style="text-align:center" |0.24%
|-
|{{BlockLink|Pumpkin Stem|Pumpkin stem}} <code>age = 2</code>
| style="text-align:center" |51.2%|| style="text-align:center" |38.4%|| style="text-align:center" |9.6%|| style="text-align:center" |0.8%
|-
|{{BlockLink|Pumpkin Stem|Pumpkin stem}} <code>age = 3</code>
| style="text-align:center" |39.44%|| style="text-align:center" |43.02%|| style="text-align:center" |15.64%|| style="text-align:center" |1.9%
|-
|{{BlockLink|Pumpkin Stem|Pumpkin stem}} <code>age = 4</code>
| style="text-align:center" |29.13%|| style="text-align:center" |44.44%|| style="text-align:center" |22.22%|| style="text-align:center" |3.7%
|-
|{{BlockLink|Pumpkin Stem|Pumpkin stem}} <code>age = 5</code>
| style="text-align:center" |21.6%|| style="text-align:center" |43.2%|| style="text-align:center" |28.8%|| style="text-align:center" |6.4%
|-
|{{BlockLink|Pumpkin Stem|Pumpkin stem}} <code>age = 6</code>
| style="text-align:center" |15.17%|| style="text-align:center" |39.82%|| style="text-align:center" |34.84%|| style="text-align:center" |10.16%
|-
|{{BlockLink|Pumpkin Stem|Pumpkin stem}} <code>age = 7</code>
| style="text-align:center" |10.16%|| style="text-align:center" |34.84%|| style="text-align:center" |39.82%|| style="text-align:center" |15.17%
|-
| rowspan="1" |<code>blocks/attached_pumpkin_stem</code>
|{{BlockLink|Attached Pumpkin Stem|Attached Pumpkin stem}}
| style="text-align:center" |10.16%|| style="text-align:center" |34.84%|| style="text-align:center" |39.82%|| style="text-align:center" |15.17%
|}
=== Natural generation ===
Pumpkin stems generate naturally in stem farm rooms in [[woodland mansion]]s.
Pumpkin stems generate in [[taiga]] and [[snowy taiga]]{{only|be|short=1}} [[village]] farms.
=== Chest loot ===
{{LootChestItem|pumpkin-seeds}}
=== Crafting ===
{{Crafting
|Pumpkin
|Output= Pumpkin Seeds,4
|type= Material
}}
=== Trading ===
[[Wandering trader]]s sell pumpkin seeds for 1 [[emerald]].
=== Post-generation ===
Shearing an uncarved pumpkin yields 4 pumpkin seeds.
== Usage ==
=== Farming ===
{{see also|Tutorials/Pumpkin and melon farming}}
Pumpkin seeds can be planted only on [[farmland]], as stems. Over time, a stem grows through several stages{{Needs testing}} and, at its final growth stage, will produce [[pumpkin]]s on any adjacent [[dirt]], [[Coarse Dirt|coarse dirt]], [[Rooted Dirt|rooted dirt]], [[Grass Block|grass block]], [[farmland]], [[podzol]], [[mycelium]], [[Moss Block|moss block]], [[mud]] or [[Muddy Mangrove Roots|muddy mangrove roots]]. If a pumpkin is already occupying a spot adjacent to a stem it does not grow more pumpkins until the pumpkin is removed. A single stem can grow an unlimited number of pumpkins. Pumpkin stems need a minimum light level of 10 in the block above the stem to grow and give pumpkins. Pumpkin seeds are affected by [[bone meal]] only with respect to stem growth; bone meal does not help produce the actual pumpkins.
=== Breeding ===
Like other seeds, pumpkin seeds can be used to [[breed]] [[chicken]]s, lead chickens around, and make baby chickens grow up faster by 10% of the remaining time.
=== Taming ===
Like other seeds, pumpkin seeds can be used to tame [[parrot]]s.
=== Composting ===
Placing pumpkin seeds into a [[composter]] has a 30% chance of raising the compost level by 1.
== Pumpkin stem ==
A '''pumpkin stem''' is the block that is planted on [[farmland]] when pumpkin seeds are used on it. It starts underground, and rises up as the plant grows. The stem is colored green when young, and then yellow once fully grown.
The stem curves once a pumpkin has grown from it. A fully-grown single stem connects to any [[pumpkin]] in an adjacent square, thus there are 5 possible appearances to a stem. If there are multiple pumpkins it can connect to, it favors the east, then west, north, and south. When the pumpkin is removed, the stem returns to its straight shape.
== Sounds ==
{{Sound table/Block/Hard crop}}
== Data values ==
=== ID ===
{{edition|java}}:
{{ID table
|edition=java
|showblocktags=y
|showforms=y
|generatetranslationkeys=y
|displayname=Pumpkin Stem
|spritetype=block
|nameid=pumpkin_stem
|blocktags=bee_growables, crops
|form=block}}
{{ID table
|displayname=Attached Pumpkin Stem
|spritetype=block
|nameid=attached_pumpkin_stem
|form=block}}
{{ID table
|displayname=Pumpkin Seeds
|spritetype=item
|nameid=pumpkin_seeds
|form=item
|foot=1}}
{{edition|bedrock}}:
{{ID table
|edition=bedrock
|shownumericids=y
|showforms=y
|generatetranslationkeys=y
|displayname=Pumpkin Stem
|spritetype=block
|nameid=pumpkin_stem
|id=104
|form=block}}
{{ID table
|displayname=Pumpkin Seeds
|spritetype=item
|nameid=pumpkin_seeds
|id=292
|form=item
|foot=1}}
=== Block states ===
{{see also|Block states}}
{{/BS}}
== Advancements ==
{{load advancements|A Seedy Place}}
== History ==
{{info needed section|check if stems floated above farmland upon initial implementation}}
{{History|java beta}}
{{History||1.8|snap=Pre-release|[[File:Pumpkin Seeds JE1 BE1.png|32px]] Added pumpkin seeds.
|[[File:Pumpkin Stem Age 0 JE1.png|32px]] [[File:Pumpkin Stem Age 1 JE1.png|32px]] [[File:Pumpkin Stem Age 2 JE1.png|32px]] [[File:Pumpkin Stem Age 3 JE1.png|32px]] [[File:Pumpkin Stem Age 4 JE1.png|32px]] [[File:Pumpkin Stem Age 5 JE1.png|32px]] [[File:Pumpkin Stem Age 6 JE1.png|32px]] [[File:Pumpkin Stem Age 7 JE1.png|32px]] Added the pumpkin stem, with seven stages of growth.
|Pumpkin seeds can be found in the new [[mineshaft]] [[chest]]s.
|[[File:Attached Pumpkin Stem (N) JE1.png|32px]] [[File:Attached Pumpkin Stem (E) JE1.png|32px]] [[File:Attached Pumpkin Stem (S) JE1.png|32px]] [[File:Attached Pumpkin Stem (W) JE1.png|32px]] The pumpkin stem has four slightly visually distinct appearances for each facing direction - the bent part of the stem rotates, but the other two planes do not.
|[[File:Pumpkin Stem Age 8 JE1.png|32px]] [[File:Pumpkin Stem Age 9 JE1.png|32px]] [[File:Pumpkin Stem Age 10 JE1.png|32px]] [[File:Pumpkin Stem Age 11 JE1.png|32px]] [[File:Pumpkin Stem Age 12 JE1.png|32px]] [[File:Pumpkin Stem Age 13 JE1.png|32px]] [[File:Pumpkin Stem Age 14 JE1.png|32px]] [[File:Pumpkin Stem Age 15 JE1.png|32px]] Pumpkin stem data values from 8 through 15 now show a glitched formation, with a floating stem with an attached stem cross eventually emerging below.
|[[File:Attached Stem Age 8 JE1.png|32px]] [[File:Attached Stem Age 9 JE1.png|32px]] [[File:Attached Stem Age 10 JE1.png|32px]] [[File:Attached Stem Age 11 JE1.png|32px]] [[File:Attached Stem Age 12 JE1.png|32px]] [[File:Attached Stem Age 13 JE1.png|32px]] [[File:Attached Stem Age 14 JE1.png|32px]] [[File:Attached Stem Age 15 JE1.png|32px]] Pumpkin stem blocks with data values higher than 7 can attach to adjacent fruits, which results in buggy stem textures with [[vines]] in the mix due to vines being below attached stems in [[terrain.png]].}}
{{History|||snap=Pre-release 2 ;)|Pumpkin stems can now be grown faster using [[bone meal]].}}
{{History|java}}
{{History||1.0.0|snap=Beta 1.9 Prerelease 2|Pumpkins can now be [[crafting|crafted]] into [[pumpkin seeds]].}}
{{History||1.3.1|snap=1.3|The texture of pumpkin stems has been moved one pixel to the left in [[terrain.png]].
|[[File:Pumpkin Stem Age 0 JE2.png|32px]] [[File:Pumpkin Stem Age 1 JE2.png|32px]] [[File:Pumpkin Stem Age 2 JE2.png|32px]] [[File:Pumpkin Stem Age 3 JE2.png|32px]] [[File:Pumpkin Stem Age 4 JE2.png|32px]] [[File:Pumpkin Stem Age 5 JE2.png|32px]] [[File:Pumpkin Stem Age 6 JE2.png|32px]] [[File:Pumpkin Stem Age 7 JE2.png|32px]] Stems now appear slightly different.
|[[File:Pumpkin Stem Age 8 JE2.png|32px]] [[File:Pumpkin Stem Age 9 JE2.png|32px]] [[File:Pumpkin Stem Age 10 JE2.png|32px]] [[File:Pumpkin Stem Age 11 JE2.png|32px]] [[File:Pumpkin Stem Age 12 JE2.png|32px]] [[File:Pumpkin Stem Age 13 JE2.png|32px]] [[File:Pumpkin Stem Age 14 JE2.png|32px]] [[File:Pumpkin Stem Age 15 JE2.png|32px]] Overgrown attached pumpkin stems now appear slightly different.
|[[File:Attached Pumpkin Stem (N) JE2.png|32px]] [[File:Attached Pumpkin Stem (E) JE2.png|32px]] [[File:Attached Pumpkin Stem (S) JE2.png|32px]] [[File:Attached Pumpkin Stem (W) JE2.png|32px]] Attached pumpkin stems now appear slightly different.
|[[File:Attached Stem Age 8 JE2.png|32px]] [[File:Attached Stem Age 9 JE2.png|32px]] [[File:Attached Stem Age 10 JE2.png|32px]] [[File:Attached Stem Age 11 JE2.png|32px]] [[File:Attached Stem Age 12 JE2.png|32px]] [[File:Attached Stem Age 13 JE2.png|32px]] [[File:Attached Stem Age 14 JE2.png|32px]] [[File:Attached Stem Age 15 JE2.png|32px]] Overgrown attached pumpkin stems now appear slightly different.}}
{{History||1.4.2|snap=12w36a|[[Chicken]]s now use [[wheat seeds]], [[melon seeds]] and pumpkin seeds, instead of [[wheat]] to [[breeding|breed]].}}
{{History||1.5|snap=13w02a|[[File:Pumpkin Stem Age 0 JE3.png|32px]] [[File:Pumpkin Stem Age 1 JE3.png|32px]] [[File:Pumpkin Stem Age 2 JE3.png|32px]] [[File:Pumpkin Stem Age 3 JE3.png|32px]] [[File:Pumpkin Stem Age 4 JE3.png|32px]] [[File:Pumpkin Stem Age 5 JE3.png|32px]] [[File:Pumpkin Stem Age 6 JE3.png|32px]] Pumpkin stems now use a squished version of their texture for immature stems, depending on age.
|[[File:Pumpkin Stem Age 8 JE3.png|32px]] [[File:Pumpkin Stem Age 9 JE3.png|32px]] [[File:Pumpkin Stem Age 10 JE3.png|32px]] [[File:Pumpkin Stem Age 11 JE3.png|32px]] [[File:Pumpkin Stem Age 12 JE3.png|32px]] [[File:Pumpkin Stem Age 13 JE3.png|32px]] [[File:Pumpkin Stem Age 14 JE3.png|32px]] [[File:Pumpkin Stem Age 15 JE3.png|32px]] This also affects pumpkin stems of ages 8-15, which are likewise stretched to accommodate its predicted size.
|[[File:Attached Stem Age 8 JE3.png|32px]] [[File:Attached Stem Age 9 JE3.png|32px]] [[File:Attached Stem Age 10 JE3.png|32px]] [[File:Attached Stem Age 11 JE3.png|32px]] [[File:Attached Stem Age 12 JE3.png|32px]] [[File:Attached Stem Age 13 JE3.png|32px]] [[File:Attached Stem Age 14 JE3.png|32px]] [[File:Attached Stem Age 15 JE3.png|32px]] Pumpkin stems of extreme ages, which are attached to adjacent fruits, now show a stretched and tinted stem appearance.}}
{{History|||snap=13w03a|[[File:Pumpkin Stem Age 0 JE4.png|32px]] [[File:Pumpkin Stem Age 1 JE4.png|32px]] [[File:Pumpkin Stem Age 2 JE4.png|32px]] [[File:Pumpkin Stem Age 3 JE4.png|32px]] [[File:Pumpkin Stem Age 4 JE4.png|32px]] [[File:Pumpkin Stem Age 5 JE4.png|32px]] [[File:Pumpkin Stem Age 6 JE4.png|32px]] [[File:Pumpkin Stem Age 7 JE4.png|32px]] Pumpkin stems are no longer squished or stretched to account for age.<ref>{{bug|MC-7111}}</ref>
|[[File:Pumpkin Stem Age 8 JE4.png|32px]] [[File:Pumpkin Stem Age 9 JE4.png|32px]] [[File:Pumpkin Stem Age 10 JE4.png|32px]] [[File:Pumpkin Stem Age 11 JE4.png|32px]] [[File:Pumpkin Stem Age 12 JE4.png|32px]] [[File:Pumpkin Stem Age 13 JE4.png|32px]] [[File:Pumpkin Stem Age 14 JE4.png|32px]] [[File:Pumpkin Stem Age 15 JE4.png|32px]] Pumpkin stems with age values 8 through 15 now show a tinted [[trapdoor]] texture.
|From this version up until 14w08a, overgrown pumpkin stems start to draw from the texture below them on the [[texture atlas]], in much the same way they previously did with terrain.png. However, as texture atlases are unstable and textures tend to change positions as new blocks and textures are added, overgrown stems change the texture they draw from every time new textures are added, which includes when textures added by [[mods]].}}
{{History|||snap=13w09a|[[File:Pumpkin Stem Age 8 JE5.png|32px]] [[File:Pumpkin Stem Age 9 JE5.png|32px]] [[File:Pumpkin Stem Age 10 JE5.png|32px]] [[File:Pumpkin Stem Age 11 JE5.png|32px]] [[File:Pumpkin Stem Age 12 JE5.png|32px]] [[File:Pumpkin Stem Age 13 JE5.png|32px]] [[File:Pumpkin Stem Age 14 JE5.png|32px]] [[File:Pumpkin Stem Age 15 JE5.png|32px]] Pumpkin stems with age values 8 through 15 now show a tinted [[birch wood]] texture.}}
{{History||1.6.1|snap=13w24a|Melon and pumpkin stems have now been assigned separate textures.
|[[File:Pumpkin Stem Age 8 JE6.png|32px]] [[File:Pumpkin Stem Age 9 JE6.png|32px]] [[File:Pumpkin Stem Age 10 JE6.png|32px]] [[File:Pumpkin Stem Age 11 JE6.png|32px]] [[File:Pumpkin Stem Age 12 JE6.png|32px]] [[File:Pumpkin Stem Age 13 JE6.png|32px]] [[File:Pumpkin Stem Age 14 JE6.png|32px]] [[File:Pumpkin Stem Age 15 JE6.png|32px]] Pumpkin stems with age values 8 through 15 now show a tinted curving [[rail]] texture.}}
{{History||1.7.2|snap=13w37a|Added the {{cmd|setblock}} command, allowing for invalid pumpkin stem ages to be placed in the world without using external editors. This also allows them to be obtained in earlier versions via backdating.}}
{{History|||snap=13w41a|[[File:Pumpkin Stem Age 8 JE7.png|32px]] [[File:Pumpkin Stem Age 9 JE7.png|32px]] [[File:Pumpkin Stem Age 10 JE7.png|32px]] [[File:Pumpkin Stem Age 11 JE7.png|32px]] [[File:Pumpkin Stem Age 12 JE7.png|32px]] [[File:Pumpkin Stem Age 13 JE7.png|32px]] [[File:Pumpkin Stem Age 14 JE7.png|32px]] [[File:Pumpkin Stem Age 15 JE7.png|32px]] Pumpkin stems with age values 8 through 15 now show a tinted lit [[furnace]] texture.}}
{{History|||snap=13w43a|[[File:Pumpkin Stem Age 8 JE8.png|32px]] [[File:Pumpkin Stem Age 9 JE8.png|32px]] [[File:Pumpkin Stem Age 10 JE8.png|32px]] [[File:Pumpkin Stem Age 11 JE8.png|32px]] [[File:Pumpkin Stem Age 12 JE8.png|32px]] [[File:Pumpkin Stem Age 13 JE8.png|32px]] [[File:Pumpkin Stem Age 14 JE8.png|32px]] [[File:Pumpkin Stem Age 15 JE8.png|32px]] Pumpkin stems with age values 8 through 15 now show a tinted [[pumpkin]] top texture.}}
{{History||1.8|snap=14w10a|[[File:Pumpkin Stem Age 8 JE9.png|32px]] [[File:Pumpkin Stem Age 9 JE9.png|32px]] [[File:Pumpkin Stem Age 10 JE9.png|32px]] [[File:Pumpkin Stem Age 11 JE9.png|32px]] Pumpkin stems with data values 8-11 now display a tinted attached stem, with 8 facing west, 9 facing east, 10 facing north and 11 facing south.
|Invalid pumpkin stems with data values 12-15 now crash the game.}}
{{History|||snap=14w25a|[[File:Pumpkin Stem Age 0 JE5.png|32px]] [[File:Pumpkin Stem Age 1 JE5.png|32px]] [[File:Pumpkin Stem Age 2 JE5.png|32px]] [[File:Pumpkin Stem Age 3 JE5.png|32px]] [[File:Pumpkin Stem Age 4 JE5.png|32px]] [[File:Pumpkin Stem Age 5 JE5.png|32px]] [[File:Pumpkin Stem Age 6 JE5.png|32px]] [[File:Pumpkin Stem Age 7 JE5.png|32px]] Pumpkin stems now render as a single diagonal plane, or, in the case of attached stems, a diagonal and orthogonal plane.
|[[File:Attached Pumpkin Stem (N) JE3.png|32px]] [[File:Attached Pumpkin Stem (E) JE3.png|32px]] [[File:Attached Pumpkin Stem (S) JE3.png|32px]] [[File:Attached Pumpkin Stem (W) JE3.png|32px]] The attached pumpkin stem [[model]] now fully rotates to the direction the stem points. Prior to this update, the base of the pumpkin stem would stay the same while the long attaching section would differ, resulting in four possible attached stem appearances.
|Invalid overgrown pumpkin stems have now effectively been removed from the game, as attempting to place an out of range stem via {{cmd|setblock}} creates a stem of age 0 and loading a world with existing such stems cause a game crash.}}
{{History|||snap=14w26a|[[File:Pumpkin Stem Age 0 JE6.png|32px]] [[File:Pumpkin Stem Age 1 JE6.png|32px]] [[File:Pumpkin Stem Age 2 JE6.png|32px]] [[File:Pumpkin Stem Age 3 JE6.png|32px]] [[File:Pumpkin Stem Age 4 JE6.png|32px]] [[File:Pumpkin Stem Age 5 JE6.png|32px]] [[File:Pumpkin Stem Age 6 JE6.png|32px]] [[File:Pumpkin Stem Age 7 JE6.png|32px]] [[File:Attached Pumpkin Stem (N) JE4.png|32px]] [[File:Attached Pumpkin Stem (E) JE4.png|32px]] [[File:Attached Pumpkin Stem (S) JE4.png|32px]] [[File:Attached Pumpkin Stem (W) JE4.png|32px]] Pumpkin stems now correctly render as crosses again.<ref>{{bug|MC-58136}}</ref>}}
{{History|||snap=14w27a|[[File:Attached Stem Age 0 14w27a.png|32px]] [[File:Attached Stem Age 1 14w27a.png|32px]] [[File:Attached Stem Age 2 14w27a.png|32px]] [[File:Attached Stem Age 3 14w27a.png|32px]] [[File:Attached Stem Age 4 14w27a.png|32px]] [[File:Attached Stem Age 5 14w27a.png|32px]] [[File:Attached Stem Age 6 14w27a.png|32px]] Due to a bug, all pumpkin stems now appear attached regardless of age or any actual attachment.<ref>{{bug|MC-60208}}</ref>}}
{{History|||snap=14w28a|All pumpkin stems appearing attached regardless of the age of any actual attachment has been fixed. However, pumpkin stems still appear attached to adjacent fruits regardless of age due to a similar bug.<ref>{{bug|MC-61716}}</ref>}}
{{History|||snap=14w34d|Pumpkin seeds no longer can be used to breed [[chicken]]s.}}
{{History||1.9|snap=15w31a|Chickens can now use pumpkin seeds to [[breeding|breed]] again.}}
{{History|||snap=15w44a|Pumpkin seeds have been added to [[dungeon]] [[chest]]s.
|The average yield of pumpkin seeds in [[mineshaft]] chests has been decreased.}}
{{History|||snap=15w45a|Pumpkin stems must now be fully grown again to attach.}}
{{History||1.11|snap=16w39a|Pumpkin seeds are now found in the new [[woodland mansion]] chests.
|Pumpkin stems now generate inside [[woodland mansion]]s.}}
{{History||1.13|snap=17w47a|The different [[block]] states for the <code>pumpkin_stem</code> ID have been split up into their own IDs.
|Pumpkin seeds can now be obtained by [[shear]]ing an uncarved pumpkin.
|Prior to [[1.13/Flattening|''The Flattening'']], this [[block]]'s numeral ID was 104, and the [[item]]'s 361.}}
{{History|||snap=17w48a|Attached pumpkin stems no longer [[drops|drop]] seeds.}}
{{History||1.14|snap=18w43a|[[File:Pumpkin Stem Age 0 JE7.png|32px]] [[File:Pumpkin Stem Age 1 JE7.png|32px]] [[File:Pumpkin Stem Age 2 JE7.png|32px]] [[File:Pumpkin Stem Age 3 JE7.png|32px]] [[File:Pumpkin Stem Age 4 JE7.png|32px]] [[File:Pumpkin Stem Age 5 JE7.png|32px]] [[File:Pumpkin Stem Age 6 JE7.png|32px]] [[File:Pumpkin Stem Age 7 JE7.png|32px]] The stem texture has changed.
|[[File:Attached Pumpkin Stem (N) JE5.png|32px]] [[File:Attached Pumpkin Stem (E) JE5.png|32px]] [[File:Attached Pumpkin Stem (S) JE5.png|32px]] [[File:Attached Pumpkin Stem (W) JE5.png|32px]] The pumpkin stem texture change also affects the base cross on pumpkin stems.}}
{{History|||snap=18w50a|Pumpkin stems now generate in the updated [[taiga]] [[village]] farms.
|Pumpkin seeds can now be found in [[chest]]s in taiga village houses.}}
{{History|||snap=19w03a|Placing pumpkin seeds into the new [[composter]] has a 10% chance of raising the compost level by 1.}}
{{History|||snap=19w05a|Pumpkin seeds now have a 30% chance of increasing the compost level in a composter by 1.
|Added [[Wandering Trader|wandering trader]]s, which sell pumpkin seeds.}}
{{History||1.15|snap=19w34a|[[Bee]]s can now pollinate pumpkin stems.}}
{{History|||snap=19w39a|Attached pumpkin stems now [[drops|drop]] seeds again.<ref>{{bug|MC-136360}}</ref>}}
{{History|pocket alpha}}
{{History||v0.8.0|snap=build 1|[[File:Pumpkin Seeds JE1 BE1.png|32px]] Added pumpkin seeds.
|[[File:Pumpkin Stem Age 0 JE1.png|32px]] [[File:Pumpkin Stem Age 1 JE1.png|32px]] [[File:Pumpkin Stem Age 2 JE1.png|32px]] [[File:Pumpkin Stem Age 3 JE1.png|32px]] [[File:Pumpkin Stem Age 4 JE1.png|32px]] [[File:Pumpkin Stem Age 5 JE1.png|32px]] [[File:Pumpkin Stem Age 6 JE1.png|32px]] [[File:Pumpkin Stem Age 7 JE1.png|32px]] [[File:Attached Pumpkin Stem (N) JE1.png|32px]] [[File:Attached Pumpkin Stem (E) JE1.png|32px]] [[File:Attached Pumpkin Stem (S) JE1.png|32px]] [[File:Attached Pumpkin Stem (W) JE1.png|32px]]{{verify|Were these the models used by this edition?}} Added pumpkin stems.
|Pumpkin seeds are obtainable from the [[Nether reactor]].}}
{{History||v0.12.1|snap=build 1|Pumpkin seeds are no longer available from the Nether reactor.}}
{{History||v0.14.0|snap=build 1|Pumpkin seeds can now be found in [[minecart with chest]]s inside [[mineshaft]]s.}}
{{History|pocket}}
{{History||1.1.0|snap=alpha 1.1.0.0|Pumpkin stems now generate inside [[woodland mansion]]s.}}
{{History|bedrock}}
{{History||1.2.0|snap=beta 1.2.0.2|Pumpkin seeds are now used to tame [[parrot]]s.}}
{{History||1.4.0|snap=beta 1.2.13.8|Pumpkin seeds can now be obtained by [[shear]]ing an uncarved [[pumpkin]].}}
{{History||1.10.0|snap=beta 1.10.0.3|[[File:Attached Pumpkin Stem (W) JE5.png|32px]]{{info needed|More accurate image}} The texture of attached pumpkin stems has been changed.
|Pumpkin seeds can now be [[trading|bought]] from [[wandering trader]]s.
|A single pumpkin crop now generates in the new [[taiga]] and [[snowy taiga]] [[village]]s.}}
{{History||1.11.0|snap=beta 1.11.0.1|A single pumpkin seed can now be used to fill the [[composter]].
|Pumpkin seeds can now be found in [[taiga]] and [[snowy taiga]] [[village]] house [[chest]]s.}}
{{History|console}}
{{History||xbox=TU5|xbone=CU1|ps=1.0|wiiu=Patch 1|[[File:Pumpkin Seeds JE1 BE1.png|32px]] Added pumpkin seeds.
|[[File:Pumpkin Stem Age 0 JE1.png|32px]] [[File:Pumpkin Stem Age 1 JE1.png|32px]] [[File:Pumpkin Stem Age 2 JE1.png|32px]] [[File:Pumpkin Stem Age 3 JE1.png|32px]] [[File:Pumpkin Stem Age 4 JE1.png|32px]] [[File:Pumpkin Stem Age 5 JE1.png|32px]] [[File:Pumpkin Stem Age 6 JE1.png|32px]] [[File:Pumpkin Stem Age 7 JE1.png|32px]] [[File:Attached Pumpkin Stem (N) JE1.png|32px]] [[File:Attached Pumpkin Stem (E) JE1.png|32px]] [[File:Attached Pumpkin Stem (S) JE1.png|32px]] [[File:Attached Pumpkin Stem (W) JE1.png|32px]]{{verify|Were these the models used by this edition?}} Added pumpkin stems.}}
{{History||xbox=TU69|ps=1.76|wiiu=Patch 38|Pumpkin seeds can now be obtained by [[shear]]ing an uncarved [[pumpkin]].}}
{{History||xbox=none|xbone=none|ps=1.90|wiiu=none|switch=none|[[File:Attached Pumpkin Stem (W) JE5.png|32px]]{{info needed|More accurate image}} The texture of attached pumpkin stems has been changed.}}
{{History|New 3DS}}
{{History||0.1.0|[[File:Pumpkin Stem Age 0 JE1.png|32px]] [[File:Pumpkin Stem Age 1 JE1.png|32px]] [[File:Pumpkin Stem Age 2 JE1.png|32px]] [[File:Pumpkin Stem Age 3 JE1.png|32px]] [[File:Pumpkin Stem Age 4 JE1.png|32px]] [[File:Pumpkin Stem Age 5 JE1.png|32px]] [[File:Pumpkin Stem Age 6 JE1.png|32px]] [[File:Pumpkin Stem Age 7 JE1.png|32px]] [[File:Attached Pumpkin Stem (N) JE1.png|32px]] [[File:Attached Pumpkin Stem (E) JE1.png|32px]] [[File:Attached Pumpkin Stem (S) JE1.png|32px]] [[File:Attached Pumpkin Stem (W) JE1.png|32px]]{{verify|Were these the models used by this edition?}} Added pumpkin stems.}}
{{History|foot}}
<gallery>
Pumpkin Stem with data value 15.png|The final version of the pumpkin stem with age 15, as seen in-game.
Pumpkinstems.png|Pumpkin stems of ages 1 to 15 on a modded version of [[Java Edition 1.7.2|1.7.2]], hence the nearby melon stems using the melon top texture.
Stems of 13w02a.png|All 16 stem sizes in [[Java Edition 13w02a|13w02a]], with accompanying data values.
</gallery>
=== Pumpkin stem "item" ===
{{:Technical blocks/Pumpkin Stem}}
== Issues ==
{{issue list}}
== Gallery ==
<gallery>
Stem All Ages.png|All stages of growth.
AllSeeds.png|All the [[seeds]] that exist in the game.
</gallery>
== References ==
{{reflist}}
{{Blocks|vegetation}}
{{Items}}
[[Category:Plants]]
[[Category:Food]]
[[Category:Non-solid blocks]]
[[Category:Generated structure blocks]]
[[cs:Dýňová semínka]]
[[de:Kürbiskerne]]
[[es:Semillas de calabaza]]
[[fr:Graines de citrouille]]
[[hu:Tökmagok]]
[[ja:カボチャの種]]
[[ko:호박씨]]
[[nl:Pompoenpitten]]
[[pl:Nasiona dyni]]
[[pt:Sementes de abóbora]]
[[ru:Семена тыквы]]
[[th:เมล็ดฝักทอง]]
[[zh:南瓜种子]]</li></ul> | Mobs spawn in groups. | ||||
| ? | The spawning area used to be 17x17 chunks rather than 15x15. The area was reduced, but the old size is still used to calculate mob caps. | ||||
| It was not always possible to funnel mobs into a spawning room by preventing them from spawning elsewhere. Some older sources of information about spawning might make reference to this. | |||||
| Large amounts of empty space used to encourage spawning in the general area. This remains true on a smaller scale, and only horizontally, due to pack spawning. | |||||
| alpha | |||||
1.2.0{{Extension DPL}}<ul><li>[[Nether Star|Nether Star]]<br/>{{Distinguish|Firework Star}}
{{Item
| image = Nether Star.gif
| renewable = Yes
| stackable = Yes (64)
| rarity = Uncommon
}}
The '''Nether Star''' is a rare item [[drops|dropped]] by the [[wither]] that is used solely to [[Crafting|craft]] [[Beacon]]s.
== Obtaining ==
=== Mob loot ===
The nether star can be obtained only by defeating the [[Wither]] [[Mob#Boss mobs|boss]], which is created using [[Soul sand]] and [[Head|Wither Skeleton Skulls]]. One nether star is dropped each time; the dropped amount is not affected by the [[Looting]] enchantment. {{IN|java}}, nether stars dropped by withers take 10 minutes to despawn and are immune to explosions. {{IN|bedrock}}, nether star items never despawn, neither by time nor by explosions.
== Usage ==
The nether star has the same animated glint as [[enchanted]] items, [[potion]]s, and [[end crystal]]s.
A dropped nether star item cannot be destroyed by [[explosion]]s. However, it can still be destroyed by a falling [[anvil]],{{only|java}} [[fire]], [[lava]], [[cacti]], or [[the Void]].
It is used to [[Crafting|craft]] a [[beacon]].
=== Crafting ingredient ===
{{crafting usage|match=start}}
== Achievements ==
{{load achievements|The beginning;The beginnig?.}}
== Advancements ==
{{load advancements|Withering Heights}}
== Data values ==
=== ID ===
{{edition|java}}:
{{ID table
|edition=java
|showforms=y
|generatetranslationkeys=y
|displayname=Nether Star
|spritetype=item
|nameid=nether_star
|form=item
|foot=1}}
{{edition|bedrock}}:
{{ID table
|edition=bedrock
|showaliasids=y
|shownumericids=y
|showforms=y
|notshowbeitemforms=y
|generatetranslationkeys=y
|displayname=Nether Star
|spritetype=item
|nameid=nether_star
|aliasid=netherstar
|id=518
|form=item
|translationkey=item.netherStar.name
|foot=1}}
== Video ==
<div style="text-align:center">{{yt|H6k28iUefMo}}</div>
== History ==
{{History|java}}
{{History||1.4.2|snap=12w34a|[[File:Nether Star JE1.png|32px]] The texture of the nether star has been added.}}
{{History|||snap=12w36a|[[File:Nether Star JE1.gif|32px]] Added nether stars.
|Nether stars are [[drops|dropped]] by the [[wither]].}}
{{History|||snap=12w37a|[[File:Nether Star JE2 BE1.gif|32px]] The texture of nether stars has been changed so that they no longer have a dark outline.}}
{{History||1.4.6|snap=12w49a|[[Drops|Dropped]] nether stars can no longer be destroyed by [[explosion]]s.}}
{{History||1.13|snap=17w47a|Prior to [[1.13/Flattening|''The Flattening'']], this [[item]]'s numeral ID was 399.}}
{{History||1.14|snap=18w43a|[[File:Nether Star.gif|32px]] The texture of nether stars has been changed.}}
{{History||1.16|snap=20w07a|Nether star has become a [[renewable resource]], as [[soul sand]], one of the blocks used to construct withers, is now renewable through [[bartering]].}}
{{History|pocket alpha}}
{{History||v0.16.0|snap=build 4|[[File:Nether Star JE2 BE1.gif|32px]] Added nether stars.}}
{{History|bedrock}}
{{History||1.10.0|snap=beta 1.10.0.3|[[File:Nether Star.gif|32px]] The texture of nether stars has been changed.}}
{{History|console}}
{{History||xbox=TU19|xbone=CU7|ps=1.12|wiiu=Patch 1|switch=1.0.1|[[File:Nether Star JE2 BE1.gif|32px]] Added nether stars.}}
{{History||xbox=none|xbone=none|ps=1.90|wiiu=none|switch=none|[[File:Nether Star.gif|32px]] The texture of nether stars has been changed.}}
{{History|New 3DS}}
{{History||1.3.12|[[File:Nether Star JE2 BE1.gif|32px]] Added nether stars.}}
{{History|foot}}
== Issues ==
{{issue list}}
== Gallery ==
<gallery>
File:Nether Star JE3 BE2.png|The nether star without enchanted animated glint.
File:Star Drop.png|The nether star dropped by the wither.
File:Wither, left- Nether Star, right.png|A wither to the left, and a nether star to the right.
</gallery>
== References ==
{{reflist}}
==External Links==
*[https://www.minecraft.net/en-us/article/taking-inventory--nether-star Taking Inventory: Nether Star] – Minecraft.net on May 11, 2023
{{Items}}
[[cs:Netheritová hvězda]]
[[de:Netherstern]]
[[es:Estrella del Inframundo]]
[[fr:Étoile du Nether]]
[[hu:Alvilági csillag]]
[[it:Stella del Nether]]
[[ja:ネザースター]]
[[ko:네더의 별]]
[[nl:Netherster]]
[[pl:Netherowa gwiazda]]
[[pt:Estrela do Nether]]
[[ru:Звезда Нижнего мира]]
[[tr:Nether Yıldızı]]
[[uk:Зірка Незеру]]
[[zh:下界之星]]
[[Category:Renewable resources]]</li><li>[[Raw Gold|Raw Gold]]<br/>{{Item
| image = Raw Gold.png
| renewable = No
| stackable = Yes (64)
}}
'''Raw gold''' is a raw metal resource obtained from mining [[gold ore]].
== Obtaining ==
=== Mining ===
[[Gold ore]] and [[deepslate gold ore]] mined with an [[iron pickaxe]] or higher drops 1 unit of raw gold. If the pickaxe is enchanted with [[Fortune]], it can drop an extra unit per level of Fortune, allowing for a maximum of 4 with Fortune III. If the ore is mined using a pickaxe enchanted with [[Silk Touch]], it drops the ore block instead.
=== Crafting ===
{{Crafting
|showname=1
|Block of Raw Gold
|Output=Raw Gold,9
|type=Material
|foot=1
}}
== Usage ==
The primary usage of raw gold is smelting it into [[gold ingot]]s.
=== Crafting ===
{{crafting usage|Raw Gold}}
=== Smelting ingredient ===
{{Smelting
|showname=2
|Raw Gold
|Gold Ingot
|1.0
}}
=== Piglins ===
{{EntityLink|Piglin|Piglins}} are attracted to raw gold. They run toward any raw gold on the ground, and inspect it for 6 to 8 seconds before putting it in their inventory.
== Advancements ==
{{load advancements|Oh Shiny}}
== Data values ==
=== ID ===
{{edition|java}}:
{{ID table
|edition=java
|showitemtags=y
|showforms=y
|generatetranslationkeys=y
|displayname=Raw Gold
|spritetype=item
|nameid=raw_gold
|itemtags=piglin_loved
|form=item
|foot=1}}
{{edition|bedrock}}:
{{ID table
|edition=bedrock
|shownumericids=y
|showforms=y
|notshowbeitemforms=y
|generatetranslationkeys=y
|displayname=Raw Gold
|spritetype=item
|nameid=raw_gold
|form=item
|id=506
|foot=1}}
== History ==
{{History|java}}
{{History||1.17|snap=21w14a|[[File:Raw Gold JE1.png|32px]] Added raw gold.}}
{{History|||snap=April 13, 2021|slink={{Tweet|JasperBoerstra|1381991999952277513}}|[[File:Raw Gold JE2.png|32px]] [[JAPPA]] shows a new raw gold texture.}}
{{History|||snap=21w15a|[[File:Raw Gold JE2.png|32px]] The texture of raw gold has been changed.
|Raw gold can now be used to craft [[block of raw gold]].}}
{{History|||snap=April 16, 2021|slink={{Tweet|JasperBoerstra|1383047666037325829}}|[[File:Raw Gold (pre-release).png|32px]] [[JAPPA]] shows a new raw gold texture again.}}
{{History|||snap=21w16a|[[File:Raw Gold JE3.png|32px]] The texture of raw gold has been changed.}}
{{History|Bedrock}}
{{History||1.17.0|snap=beta 1.17.0.50|[[File:Raw Gold JE2.png|32px]] Added raw gold.}}
{{History|||snap=beta 1.17.0.52|Raw gold are now available without enabling [[experimental gameplay]].}}
{{History|||snap=beta 1.17.0.54|[[File:Raw Gold JE3.png|32px]] The texture of raw gold has been changed.}}
{{History|foot}}
== Issues ==
{{Issue list}}
==Gallery==
<gallery>
JE 1.17 Dev Raw Metals.jpg|Jappa shows raw ore textures.
Jappa Raw Ores 1.jpg|Jappa shows raw ore textures.
Jappa Raw Ores 2.png|Jappa shows raw ore textures.
Jappa Raw Ores 3.jpg|Jappa shows raw ore textures.
Jappa Raw Ores 4.jpg|Jappa shows raw ore textures.
Jappa Raw Ores 5.jpg|Jappa shows raw ore textures.
</gallery>
{{Items}}
[[Category:Non-renewable resources]]
[[de:Rohgold]]
[[es:Oro en bruto]]
[[fr:Or brut]]
[[ja:金の原石]]
[[pl:Surowe złoto]]
[[pt:Ouro bruto]]
[[ru:Необработанное золото]]
[[uk:Необроблене золото]]
[[zh:粗金]]</li></ul> | The chunk 0,0 (X 0-16 and Z 0-16) is no longer always the first chunk evaluated for mob spawning. If one built a dark room inside that chunk, all mobs would spawn inside that room and nowhere else. | ||||
| beta | |||||
1.8{{Extension DPL}}<ul><li>[[Bottle o' Enchanting|Bottle o' Enchanting]]<br/>{{ItemEntity
|image=Bottle o' Enchanting.gif
|imagesize=160px
|invimage=Bottle o' Enchanting
|stackable=Yes (64)
|renewable=Yes
|size=Height: 0.25 Blocks<br>Width: 0.25 Blocks
|rarity=Uncommon
|networkid='''[[JE]]''': 75
}}
A '''bottle o' enchanting''' is a throwable item that releases [[experience]] orbs on impact.
== Obtaining ==
=== Trading ===
Master-level cleric [[villager]]s sell bottles o' enchanting for 3 emeralds as part of their trade.
=== Natural generation ===
{{LootChestItem|bottle-o'-enchanting}}
== Usage ==
A bottle o' enchanting can be thrown by pressing {{control|use}}. On impact, it drops [[experience]] orbs worth {{xp|3|11}} (average 7.0) and sends out blue particles.
== Sounds ==
{{Edition|Java}}:<br>
Bottles o' enchanting use the Friendly Creatures sound category for entity-dependent sound events.
{{Sound table
|sound=Glass dig1.ogg
|sound2=Glass dig2.ogg
|sound3=Glass dig3.ogg
|subtitle=Bottle smashes
|source=neutral
|description=When a bottle o' enchanting impacts something
|id=entity.splash_potion.break
|translationkey=subtitles.entity.potion.splash
|volume=1.0
|pitch=0.9-1.0
|distance=16}}
{{Sound table
|rowspan=2
|sound=Bow shoot.ogg
|subtitle=Bottle thrown
|source=neutral
|description=When a bottle o' enchanting is thrown by a player
|id=entity.experience_bottle.throw
|translationkey=subtitles.entity.potion.throw
|volume=0.5
|pitch={{frac|1|3}}-0.5
|distance=16}}
{{Sound table
|subtitle=Dispensed item
|source=block
|description=When a bottle o' enchanting is dispensed from a [[dispenser]]
|id=block.dispenser.launch
|translationkey=subtitles.block.dispenser.dispense
|volume=1.0
|pitch=1.2
|distance=16
|foot=1}}
{{Edition|Bedrock}}:
{{Sound table
|type=bedrock
|sound=Glass dig1.ogg
|sound2=Glass dig2.ogg
|sound3=Glass dig3.ogg
|source=block
|description=When a splash potion impacts something
|id=random.glass
|volume=1.0
|pitch=1.0}}
{{Sound table
|rowspan=2
|sound=Bow shoot.ogg
|source=player
|description=When a splash potion is thrown by a player
|id=random.bow
|volume=0.5
|pitch=0.33-0.5}}
{{Sound table
|source=player
|description=When a splash potion is dispensed from a dispenser
|id=random.bow
|volume=1.0
|pitch=0.83-1.25
|foot=1}}
== Data values ==
=== ID ===
{{edition|java}}:
{{ID table
|edition=java
|firstcolumnname=Item
|showforms=y
|generatetranslationkeys=y
|displayname=Bottle o' Enchanting
|spritetype=item
|nameid=experience_bottle
|form=item
|foot=1}}
{{ID table
|edition=java
|firstcolumnname=Entity
|generatetranslationkeys=y
|displayname=Thrown Bottle o' Enchanting
|spritetype=entity
|spritename=Bottle o' Enchanting
|nameid=experience_bottle
|foot=1}}
{{edition|bedrock}}:
{{ID table
|edition=bedrock
|firstcolumnname=Item
|shownumericids=y
|showforms=y
|notshowbeitemforms=y
|generatetranslationkeys=y
|displayname=Bottle o' Enchanting
|spritetype=item
|nameid=experience_bottle
|id=508
|form=item
|foot=1}}
{{ID table
|edition=bedrock
|firstcolumnname=Entity
|shownumericids=y
|generatetranslationkeys=y
|displayname=Bottle o' Enchanting
|spritetype=entity
|nameid=xp_bottle
|id=68
|foot=1}}
=== Entity data ===
{{see also|Chunk format}}
Thrown bottles o' enchanting have entity data that define various properties of the entity.
{{/ED}}
== History ==
<!--When were dispensers made able to fire these? Or was this always a thing?-->
{{History|java}}
{{History||1.2.1|snap=12w04a|[[File:Bottle o' Enchanting JE1 BE1.png|32px]] Added bottles o' enchanting.
|Bottles o' enchanting can currently be obtained only in [[creative]] mode.}}
{{History||1.3.1|snap=12w21a|With the implementation of the [[trading]] system, the [[player]] can now trade with priest [[villager]]s to obtain 2–4 bottles o' enchanting for 1 [[emerald]].}}
{{History||1.8|snap=14w02a|With the trading revamp, villagers no longer [[trading|sell]] bottles o' enchanting, making them again unobtainable in regular [[survival]].}}
{{History|||snap=14w31a|Cleric [[villager]]s now sell bottles o' enchanting for 3–11 [[emerald]]s each, making them [[renewable resource|renewable]] again.}}
{{History||1.9|snap=15w49a|Bottles o' enchanting, like all projectiles, now take thrower's motion into account.}}
{{History||1.11|snap=16w32a|The entity ID has now been changed from <code>ThrownExpBottle</code> to <code>xp_bottle</code>.}}
{{History||1.13|snap=17w47a|Prior to [[1.13/Flattening|''The Flattening'']], this [[item]]'s numeral ID was 384.}}
{{History|||snap=18w11a|Bottles o' enchanting can now generate in [[shipwreck]] chests.}}
{{History|||snap=pre5|The entity ID has now been changed to <code>experience_bottle</code>.}}
{{History||1.14|snap=18w43a|[[File:Bottle o' Enchanting JE2 BE2.png|32px]] The texture of bottles o' enchanting has now been changed.}}
{{History|||snap=18w47a|Bottles o' enchanting can now generate in [[pillager outpost]] chests.}}
{{History||1.19|snap=22w13a|Bottles o' enchanting may now be found in [[ancient city]] [[chest]]s.}}
{{History|pocket alpha}}
{{History||v0.12.1|snap=build 1|[[File:Bottle o' Enchanting JE1 BE1.png|32px]] Added bottles o' enchanting.
|Due to the lack of [[trading]], bottles o' enchanting are currently available only in [[creative]] mode, similar to [[Java Edition 12w04a|12w04a]] when it was first released.}}
{{History|pocket}}
{{History||1.0.4|snap=alpha 1.0.4.0|With [[villager]] [[trading]] added, it is now possible to obtain bottles o' enchanting legitimately.}}
{{History||1.1.0|snap=alpha 1.1.0.0|The entity ID has now been changed from <code>potion.experience</code> to <code>xp_bottle</code>.}}
{{History|bedrock}}
{{History||1.4.0|snap=beta 1.2.14.2|Bottles o' enchanting can now be found inside [[shipwreck]] and [[buried treasure]] [[chest]]s.}}
{{History||1.10.0|snap=beta 1.10.0.3|Bottles o' enchanting can now be found in [[pillager outpost]] chests.
|[[File:Bottle o' Enchanting JE2 BE2.png|32px]] The texture of bottles o' enchanting has now been changed.}}
{{History||1.11.0|snap=beta 1.11.0.4|[[Trading]] has now been changed and bottles o' enchanting are now [[trading|sold]] by cleric [[villager]]s for 3 [[emerald]]s.}}
{{History|console}}
{{History||xbox=TU7|xbone=CU1|ps=1.0|wiiu=Patch 1|[[File:Bottle o' Enchanting JE1 BE1.png|32px]] Added bottles o' enchanting.
|Bottle o' enchanting can be found in the Miscellaneous tab in the [[Creative inventory]].}}
{{History||xbox=TU12|Moved bottle o' enchanting to the Brewing tab in the Creative inventory.}}
{{History|PS4}}
{{History||1.90|[[File:Bottle o' Enchanting JE2 BE2.png|32px]] The texture of bottles o' enchanting has now been changed.}}
{{History|3ds}}
{{History||0.1.0|[[File:Bottle o' Enchanting JE1 BE1.png|32px]] Added bottles o' enchanting.
|Bottles o' enchanting are not available within the [[Creative inventory]].}}
{{History||?|Added bottles o' enchanting to the Creative inventory.{{info needed|Which update did this occur?}}}}
{{History|foot}}
== Issues ==
{{issue list|Bottle o' Enchanting|Experience Bottle}}
== Gallery ==
<gallery>
Bottle O' Enchanting Splash.gif|Bottle o' enchanting splash animation on impact.
Bottle O' Enchanting villager.png|Players may trade with villagers to obtain bottles o' enchanting in survival mode.
</gallery>
{{Items}}
{{Entities}}
[[cs:Lektvar očarování]]
[[de:Erfahrungsfläschchen]]
[[es:Frasco con experiencia]]
[[fr:Fiole d'expérience]]
[[ja:エンチャントの瓶]]
[[ko:경험치 병]]
[[pl:Zaklęta butelka]]
[[pt:Frasco de experiência]]
[[ru:Зелье опыта]]
[[th:ขวดแห่งเวทมนตร์]]
[[zh:附魔之瓶]]</li><li>[[Shears|Shears]]<br/>{{Item
| image = Shears.png
| rarity = Common
| renewable = Yes
| durability = 238
| stackable = No
}}
'''Shears''' are tools required to obtain some organic blocks or otherwise mine them faster as well as to shear certain entities and blocks.
==Obtaining==
===Crafting===
{{Crafting
|head=1
|showdescription=1
|B2= Iron Ingot
|A3= Iron Ingot
|Output= Shears
|type= Tool
}}
{{crafting
|foot=1
|ignoreusage=1
|Damaged Shears
|Damaged Shears
|Output= Shears
|description= The durability of the two shears is added together, plus an extra 5% durability.
|type= Tool
}}
Despite using [[Iron Ingot|iron]] in its crafting recipe, shears cannot be smelted into [[iron nugget]]s.<ref>{{bug|MC-111738}}</ref>
===Trading===
Novice-level Shepherd [[villager]]s have a 40% chance to sell shears for 2 [[emerald]]s in Java Edition. This trade is always offered in Bedrock Edition.
===Chest loot===
{{LootChestItem|shears}}
==Usage==
===Shearing===
Shears lose 1 [[durability]] when used to shear something.
Shears can be {{Control|use|text=used}} on a [[sheep]] to remove its coat and drop 1–3 [[wool]] of the corresponding color. The same sheep can be sheared again after it eats from a [[grass block]] to regenerate its coat.
Shearing a [[mooshroom]] drops 5 [[mushroom]]s of the corresponding color and irreversibly turns it into a normal [[cow]].
Shearing a [[snow golem]] irreversibly removes its pumpkin, dropping it and revealing its face.
Shearing either a [[beehive]] or [[bee nest]] that is full of honey makes it drop 3 [[honeycomb]]s and resets it to honey level 0. The same beehive or bee nest can be sheared again if it is able to reach full honey again. If sheared by hand without a [[campfire]] below the hive or nest all bees within will exit and all nearby bees will attack the offending player.
[[Dispenser]]s can use shears in any of the above listed ways, interacting with any valid block or entity in front of the dispenser's face. This decreases the shears' [[durability]]. A dispenser shearing a beehive or bee nest will not anger bees or cause them to leave even if there is not a campfire below it.
Shearing a [[pumpkin]] turns it into a [[carved pumpkin]], dropping 4 [[pumpkin seeds]].
{{IN|java}}, shearing the tip of [[cave vines]], [[kelp]], [[weeping vines]], or [[twisting vines]] sets its age value to 25 and stops further growth.
===Breaking blocks===
Shears use 1 [[durability]] when is used to break any block, even if it [[instant mining|breaks instantly]] by hand.
Shears can be used to harvest [[cobweb|cobwebs]], [[leaves]], [[grass|grass, tall grass]], [[seagrass|seagrass, tall seagrass]], [[fern|ferns, large fern]]s, [[dead bush]]es, [[nether sprouts]], [[vines]], [[glow lichen]] or [[hanging roots]] and obtain them in item form. They can also be used to break [[tripwire]] connected to a [[tripwire hook]] without activating it.
When shears are used to break [[Weeping Vines|weeping vines]] or [[Twisting Vines|twisting vines]] they are guaranteed to drop in item form instead of the usual 33% chance. This only applies to vines directly broken by shears and not vines that are broken due to the destruction of their supporting vines.
The following table shows information about blocks that can be broken with shears. Colors indicate what gets dropped when the block is broken:
*White: The original block.
*Blue: The block's normal drop (i.e. string, sticks, seeds, saplings, apples).
*Red: Nothing.
{| class="wikitable" style="text-align:center" data-description="Blocks broken with shears"
!
!No shears breaking time
!Shears breaking time
|-
! style="text-align:left" |{{BlockLink|Cobweb}}
| {{tc|no|20 s}}<ref group="note">Breaking cobwebs with a sword is as fast as breaking with shears, and yields string. This costs double durability.</ref>
|0.4 s
|-
! style="text-align:left" |{{BlockLink|Dead Bush}}
| {{tc|planned|0 s}}
|0 s
|-
! style="text-align:left" |{{BlockLink|id=fern|Grass|Fern}}
| {{tc|planned|0 s}}
|0 s
|-
! style="text-align:left" |{{BlockLink|Grass}}
| {{tc|planned|0 s}}
| 0 s
|-
! style="text-align:left" |{{BlockLink|Nether Sprouts}}
| {{tc|no|0 s}}<ref group="note">{{IN|bedrock}}, the item drops when breaking it with fists.</ref>
|0 s
|-
! style="text-align:left" |{{BlockLink|Leaves}}
| {{tc|planned|0.35 s}}
|0.05 s
|-
! style="text-align:left" |{{BlockLink|id=tripwire|String#Tripwire|Tripwire}}
|0 s
|0 s<ref group="note">Using shears does not trigger a redstone pulse.</ref>
|-
! style="text-align:left" |{{BlockLink|Vines}}
| {{tc|no|0.35 s}}
|0.35 s
|-
! style="text-align:left" |{{BlockLink|Wool}}
|1.25 s
|0.25 s
|-
! style="text-align:left" |{{BlockLink|Seagrass}}
| {{tc|no|0 s}}
|0 s
|-
! style="text-align:left" | {{BlockLink|Glow Lichen}}
| {{tc|no|0.3 s}}
|0.3 s
|-
! style="text-align:left" |{{BlockLink|Hanging Roots}}
| {{tc|no|0 s}}
|0 s
|-
! style="text-align:left" |{{BlockSprite|Twisting Vines Plant}}{{BlockLink|Twisting Vines}}<br> {{BlockSprite|Weeping Vines Plant}}{{BlockLink|Weeping Vines}}
|0 s
|0 s<ref group="note">Using shears will increase the chance of dropping from 33% to 100%.</ref>
|}
{{notelist}}
===Enchantments===
Shears can receive the following [[Enchanting|enchantments]]:
{| class="wikitable col-2-center col-3-right"
|+
!Name
! Max Level
![[Enchanting|Method]]
|-
|[[Efficiency]]
|V
|{{Inventory slot|Anvil}}
|-
|[[Unbreaking]]
| III
|{{Inventory slot|Anvil}}
|-
|[[Mending]]
|I
|{{Inventory slot|Anvil}}
|-
|[[Curse of Vanishing]]
|I
|{{Inventory slot|Anvil}}
|-
|[[Silk Touch]]{{only|be|short=1}}
|I
|{{Inventory slot|Anvil}}
|}
{{notelist}}
== Sounds ==
{{edition|java}}:
{{Sound table
|rowspan=4
|sound=Shear.ogg
|subtitle=Shears click
|source=player
|description=When a mooshroom is sheared
|id=entity.mooshroom.shear
|translationkey=subtitles.item.shears.shear
|volume=1.0
|pitch=1.0
|distance=16}}
{{Sound table
|subtitle=Shears click
|source=player
|description=When a sheep is sheared
|id=entity.sheep.shear
|translationkey=subtitles.item.shears.shear
|volume=1.0
|pitch=1.0
|distance=16}}
{{Sound table
|subtitle=Shears click
|source=player
|description=When a snow golem is sheared
|id=entity.snow_golem.shear
|translationkey=subtitles.item.shears.shear
|volume=1.0
|pitch=1.0
|distance=16}}
{{Sound table
|subtitle=Plant cropped
|source=block
|description=When a growing plant is cropped
|id=block.growing_plant.crop
|translationkey=subtitles.block.growing_plant.crop
|volume=1.0
|pitch=1.0
|distance=16}}
{{Sound table
|sound=Beehive shear.ogg
|source=block
|subtitle=Shears scrape
|description=When honeycombs are harvested from a beehive
|id=block.beehive.shear
|translationkey=subtitles.block.beehive.shear
|volume=0.8
|pitch=1.0/0.8/0.9
|distance=16}}
{{Sound table
|sound=Pumpkin carve1.ogg
|sound2=Pumpkin carve2.ogg
|source=block
|subtitle=Shears carve
|description=When a pumpkin is carved
|id=block.pumpkin.carve
|translationkey=subtitles.block.pumpkin.carve
|volume=1.0
|pitch=1.0
|distance=16}}
{{Sound table
|sound=Random break.ogg
|subtitle=Item breaks
|source=player
|description=When a pair of shears' durability is exhausted
|id=entity.item.break
|translationkey=subtitles.entity.item.break
|volume=0.8
|pitch=0.8-1.2
|distance=16
|foot=1}}
{{edition|bedrock}}:<br>
Pumpkins do not have carve sounds.
{{Sound table
|type=bedrock
|sound=Shear.ogg
|source=player
|description=When something is sheared
|id=mob.sheep.shear
|volume=1.0
|pitch=1.0}}
{{Sound table
|sound=Beehive shear.ogg
|source=block
|description=When honeycombs are harvested from a beehive
|id=block.beehive.shear
|volume=0.8
|pitch=0.8-1.0}}
{{Sound table
|sound=Random break.ogg
|source=player
|description=When a pair of shears' durability is exhausted
|id=random.break
|volume=1.0
|pitch=0.9
|foot=1}}
==Data values==
===ID===
{{edition|java}}:
{{ID table
|edition=java
|showforms=y
|generatetranslationkeys=y
|displayname=Shears
|spritetype=item
|nameid=shears
|form=item
|foot=1}}
{{edition|bedrock}}:
{{ID table
|edition=bedrock
|shownumericids=y
|showforms=y
|notshowbeitemforms=y
|generatetranslationkeys=y
|displayname=Shears
|spritetype=item
|nameid=shears
|id=421
|form=item
|foot=1}}
==Achievements==
{{load achievements|Have a Shearful Day}}<div style="text-align:center"></div>
==History==
{{History||June 3, 2011|link=https://twitter.com/jeb_/status/76570646074765312|Shears were first mentioned by [[Jeb]] on [[wikipedia:Twitter|Twitter]]. The tweet revealing Jeb's work on shears was written in Swedish (''Jag jobbar på shears nu''), which translates to "I'm working on shears now".}}
{{History||June 7, 2011|link=https://twitter.com/jeb_/status/78154891637436416|Jeb tweets about how shears were originally planned as a way to defuse [[TNT]], but he dropped this shortly after deciding TNT would detonate only with [[redstone]] or [[fire]].}}
{{History|java beta}}
{{History||1.7|[[File:Shears JE1 BE1.png|32px]] Added shears.
|Before [[Beta 1.7]], [[sheep]] would drop 1-3 [[wool]] blocks at most when hit, but shears can harvest up to 4 wool blocks per sheep.}}
{{History||1.8|snap=Pre-release|Shears can now be used to harvest a [[fern]], [[vines]] and [[grass]].}}
{{History|java}}
{{History||1.0.0|snap=Beta 1.9 Prerelease|Shears now harvest [[red mushroom]]s from a [[mooshroom]] and turn it back into a normal [[cow]].}}
{{History||1.1|snap=11w49a|[[Sheep]] now drop only 1-3 wool blocks when sheared, but they can also regrow their wool by eating [[grass block|grass]], which is part of a plan to have [[animal]]s stay in the game longer.<ref>{{Tweet|jeb|76647002317930496}}</ref>}}
{{History||1.2.1|snap=12w05a|Shears can now be used to harvest [[dead bush]]es.}}
{{History|||snap=12w06a|Shears are now [[renewable]], due to [[zombie]]s occassionally dropping iron ingots.}}
{{History||1.3.1|snap=12w21a|Shears can now be [[trading|bought]] from farmer [[villager]]s for 3 [[emerald]]s each.}}
{{History|||snap=12w22a|Shears can now be used to break [[tripwire]] string and not set it off.}}
{{History||1.4.2|snap=12w38a|Added a [[sound]] when using shears on [[sheep]].}}
{{History||1.4.6|snap=12w50a|Shears can now be [[enchanting|enchanted]].}}
{{History||1.8|snap=14w02a|[[Trading]] has been changed: Shepherd [[villager]]s now [[trading|sell]] shears for 3–4 [[emerald]]s each.
|Farmers no longer trade shears.}}
{{History|||snap=pre1|Shears now lose [[item durability|durability]] when breaking [[wool]] blocks. In previous versions, shears would take [[item durability|durability]] [[damage]] only when destroyed or when breaking [[tall grass]] or [[leaves]], the damage remaining the same for all other [[block]]s.<ref>{{bug|MC-5313}}</ref>}}
{{History||1.9|snap=15w34a|Shears may now be used in a crafting grid to zoom in [[map]]s.}}
{{History|||snap=15w45a|Shears no longer zoom in maps.}}
{{History|||snap=15w47b|Shears can no longer be enchanted with [[Silk Touch]].
|Shears now lose durability when used to break any block (formerly lost durability only from [[leaves]], [[web]], [[grass]], [[vines]], [[tripwire]] and [[wool]]).}}
{{History|||snap=15w47c|Shears now harvest [[cobweb]] without requiring [[Silk Touch]].}}
{{History|||snap=15w49a|[[Snow golem]]'s [[pumpkin]] can now be removed with shears.}}
{{History||1.13|snap=17w47a|When shears are {{control|used}} on an un-carved [[pumpkin]], it now turns into a carved pumpkin and drops 4 [[pumpkin seeds]].
|Prior to [[1.13/Flattening|''The Flattening'']], this [[item]]'s numeral ID was 359.}}
{{History||1.14|snap=18w43a|Shears placed in a [[dispenser]] can now shear [[sheep]].
|[[File:Shears JE2 BE2.png|32px]] The texture of shears has been changed.}}
{{History|||snap=18w49a|Shears can now be found in [[chest]]s in [[village]] shepherd houses.}}
{{History||1.15|snap=19w34a|Shears can now be used on [[bee nest]]s and [[beehive]]s to harvest [[honeycomb]].}}
{{History||1.16|snap=20w15a|Shears placed in a dispenser can now shear [[mooshrooms]] and [[snow golem]]s.}}
{{History||1.16.2|snap=pre1|Shears are now required in order to pick up [[roots]].}}
{{History||1.16.2|snap=pre2|Shears are no longer required to pick up [[roots]].}}
{{History||1.17|snap=?|Shears are now required in order to pick up [[hanging roots]].}}
{{History||1.18|snap=21w37a|Shears can now stop [[cave vines]], [[kelp]], [[weeping vines]], and [[twisting vines]] from aging.}}
{{History||1.19|snap=22w11a|Shears are now required in order to pick up [[mangrove leaves]].}}
{{History|pocket alpha}}
{{History||v0.2.0|[[File:Shears JE1 BE1.png|32px]] Added shears.}}
{{History||v0.3.2|Survival [[player]]s no longer start out with infinite durability shears in the [[inventory]].}}
{{History||v0.4.0|Removed shears from the creative inventory.}}
{{History||v0.8.0|snap=build 3|Re-added shears to [[creative]] mode.}}
{{History||v0.9.0|snap=build 1|Shears can now be used to transform [[mooshroom]]s into [[cow]]s.}}
{{History||v0.12.1|snap=build 3|Shearing a [[snow golem]] now removes its [[pumpkin]].
|Shears can now be [[enchanting|enchanted]] in an [[anvil]].}}
{{History||v0.13.0|snap=build 1|Shears can now be used to break [[tripwire]] string without triggering it.}}
{{History||v0.15.0|snap=build 1|Shears now lose durability when used to break any [[block]].}}
{{History|pocket}}
{{History||1.0.4|snap=alpha 1.0.4.0|Shears can now be [[trading|bought]] from shepherd [[villager]]s.}}
{{History||1.1.0|snap=alpha 1.1.0.0|Breaking a [[melon|melon block]] with shears now always drop 9 [[melon slice|melons]].}}
{{History|bedrock}}
{{History||1.4.0|snap=beta 1.2.13.8|Shears can now be used to turn un-carved [[pumpkin]]s into [[carved pumpkin]] and spit out 4 [[pumpkin seeds]].}}
{{History||?|Shears now harvest [[cobweb]] without requiring [[Silk Touch]].}}
{{History||1.10.0|snap=beta 1.10.0.3|Shears placed in a [[dispenser]] can now shear [[sheep]].
|[[File:Shears JE2 BE2.png|32px]] The texture of shears has been changed.}}
{{History||1.11.0|snap=beta 1.11.0.1|Shears can now be found in [[village]] shepherd houses.}}
{{History|||snap=beta 1.11.0.4|Shears [[trading|sold]] by shepherd [[villager]]s now cost only 2 [[emerald]]s.}}
{{History||1.14.0|snap=beta 1.14.0.1|Shears can now be used on [[bee nest]]s and [[beehive]]s to harvest [[honeycomb]].}}
{{History|console}}
{{History||xbox=TU3|xbone=CU1|ps=1.0|wiiu=Patch 1|switch=1.0.1|[[File:Shears JE1 BE1.png|32px]] Added shears.}}
{{History||xbox=TU69|xbone=none|ps=1.76|wiiu=Patch 38|switch=none|Shears can now be used to turn regular [[pumpkin]]s into [[carved pumpkin]]s.}}
{{History||xbox=none|xbone=none|ps=1.90|wiiu=none|switch=none|[[File:Shears JE2 BE2.png|32px]] The texture of shears has been changed.
|Shears placed in a [[dispenser]] can now shear [[sheep]].}}
{{History|New 3DS}}
{{History||0.1.0|[[File:Shears JE1 BE1.png|32px]] Added shears.}}
{{History|foot}}
==Issues==
{{issue list}}
==Gallery==
<gallery>
File:Enchanted Shears.gif|An enchanted pair of shears.
</gallery>
==References==
{{reflist}}
==External links==
*[https://www.minecraft.net/en-us/article/taking-inventory--shears Taking Inventory: Shears] – Minecraft.net on November 20, 2019
{{Items}}
[[cs:Nůžky]]
[[de:Schere]]
[[es:Tijeras]]
[[fr:Cisailles]]
[[hu:Metszőolló]]
[[it:Cesoie]]
[[ja:ハサミ]]
[[ko:가위]]
[[nl:Schaar]]
[[pl:Nożyce]]
[[pt:Tesoura]]
[[ru:Ножницы]]
[[zh:剪刀]]
[[Category:Renewable resources]]</li></ul> | The spawn location is no longer always on sand or gravel, even if it wasn't on a beach. | ||||
| release | |||||
1.0.0{{Extension DPL}}<ul><li>[[Fish|Fish]]<br/>{{About|the type of mob|the action|Fishing}}
'''Fish''' are aquatic creatures that are found in [[river]] and [[ocean]] biomes.
== Mobs ==
There are four categories of fish mobs in ''Minecraft'':
*{{EntityLink|Cod}}
*{{EntityLink|Salmon}}
*{{EntityLink|Pufferfish}}
*{{EntityLink|Tropical Fish}} - many color and pattern varieties
In addition, there are other fish-like mobs that have different characteristics from fish: {{EntityLink|Axolotl}}, {{EntityLink|Guardian}}, and {{EntityLink|Elder Guardian}}.
==Obtaining and transporting==
A live fish can be captured by using a [[water bucket]] on a fish, to obtain a [[bucket of fish]], which is the only way to obtain the live mob in item form. Using the bucket of fish on a water source block transfers the fish from the bucket to the body of water. A water bucket may also be used on [[axolotl]]s in this manner.
==Items==
Fish exist in several different item forms. Upon death, fish drop their item form equivalent (cooked if on fire), with a chance to drop a [[bone]]{{only|bedrock}} or [[bone meal]].{{only|java}}
;Non-living
*{{ItemLink|Raw Cod}}
*{{ItemLink|Cooked Cod}}
*{{ItemLink|Raw Salmon}}
*{{ItemLink|Cooked Salmon}}
*{{ItemLink|Pufferfish|link=Pufferfish (item)}}
*{{ItemLink|Tropical Fish|link=Tropical Fish (item)}}
;Living
*{{ItemLink|Bucket of Cod}}
*{{ItemLink|Bucket of Salmon}}
*{{ItemLink|Bucket of Pufferfish}}
*{{ItemLink|Bucket of Tropical Fish}}
== Spawning ==
Various fish can be found in different [[ocean]] [[biomes]], but only [[salmon]] appear in rivers. Fish can also spawn in player-created bodies of water, as long as they are within a river or ocean biome.
{| class="wikitable sortable" style="text-align:left" data-description="Fish biomes"
!'''Fish'''
! style="text-align:left" |{{BiomeLink|Warm Ocean}}
! style="text-align:left" |{{BiomeLink|Lukewarm Ocean}}<br>{{BiomeLink|Deep Lukewarm Ocean}}
! style="text-align:left" |{{BiomeLink|Ocean}}<br>{{BiomeLink|Deep Ocean}}
! style="text-align:left" |{{BiomeLink|Cold Ocean}}<br>{{BiomeLink|Deep Cold Ocean}}
! style="text-align:left" |{{BiomeLink|Frozen Ocean}}<br>{{BiomeLink|Deep Frozen Ocean}}
! style="text-align:left" |{{BiomeLink|River}}<br>{{BiomeLink|Frozen River}}
|-
! rowspan=2 style="text-align:left" |{{EntityLink|Cod}}
| rowspan=2 {{tc|no}}
| rowspan=2 {{tc|yes}}
| rowspan=2 {{tc|yes}}
| rowspan=2 {{tc|yes}}
| {{tc|no|No{{only|je|short=1}}}}
| rowspan=2 {{tc|no}}
|-
| {{tc|yes|Yes{{only|be|short=1}}}}
|-
! rowspan=2 style="text-align:left" |{{EntityLink|Salmon}}
| rowspan=2 {{tc|no}}
| {{tc|no|No{{only|je|short=1}}}}
| {{tc|no|No{{only|je|short=1}}}}
| rowspan=2 {{tc|yes}}
| rowspan=2 {{tc|yes}}
| rowspan=2 {{tc|yes}}
|-
| {{tc|yes|Yes{{only|be|short=1}}}}
| {{tc|yes|Yes{{only|be|short=1}}}}
|-
! rowspan=2 style="text-align:left" |{{EntityLink|Pufferfish}}
| rowspan=2 {{tc|yes}}
| {{tc|yes|Yes{{only|je|short=1}}}}
| rowspan=2 {{tc|no}}
| rowspan=2 {{tc|no}}
| rowspan=2 {{tc|no}}
| rowspan=2 {{tc|no}}
|-
| {{tc|no|No{{only|be|short=1}}}}
|-
! style="text-align:left" |{{EntityLink|Tropical Fish}}<ref group="note">Also spawns in {{BiomeLink|Lush Caves}} at any Y-level.</ref>
| {{tc|yes}}
| {{tc|yes}}
| {{tc|no}}
| {{tc|no}}
| {{tc|no}}
| {{tc|no}}
|-
! style="text-align:left" |{{EntityLink|Squid}}
| {{tc|yes}}
| {{tc|yes}}
| {{tc|yes}}
| {{tc|yes}}
| {{tc|yes}}
| {{tc|yes}}
|-
! rowspan=2 style="text-align:left" |{{EntityLink|Dolphin}}
| rowspan=2 {{tc|yes}}
| rowspan=2 {{tc|yes}}
| rowspan=2 {{tc|yes}}
| {{tc|no|No{{only|je|short=1}}}}
| rowspan=2 {{tc|no}}
| rowspan=2 {{tc|no}}
|-
| {{tc|yes|Yes{{only|be|short=1}}}}
|}
{{notelist}}
In ''Java Edition'', fish can spawn inside a water block at Y-level 50 to 63 (from 13 blocks below sea level up to inside the block one above it), that also has water above and below it. The spawn block and the block below can be any kind of water, such as a source block, falling water, bubble column, kelp, or even a waterlogged block (as long as the fish can be placed at the bottom center of the spawn block without colliding with anything solid). The block above must be pure water, such as a source block, falling water, or flowing water of any depth. Particularly, the block above cannot also be a bubble column, so fish no longer spawn inside bubble elevators.<ref>{{cite bug|MC|244683|Tropical fish spawn in bubble columns (fixed in 22w07a)}}</ref>
''Bedrock Edition'' does permit fish to spawn in bubble columns.<ref>{{cite bug|MCPE|73967|Squids, Dolphins, and fish not spawning in bubble columns (fixed in 1.16.20)}}</ref>
Fish can spawn between 24 and 64 block spherical range away from the player.{{only|java}}
=== Despawning ===
As of [[1.16]], fish can despawn at range of 40 blocks or more from the player, and will instantly despawn more than 64 blocks away, except when spawned using a [[bucket of fish]].
{{Items}}
{{Entities}}
[[cs:Ryba]]
[[de:Fisch (Begriffsklärung)]]
[[es:Pez]]
[[fr:Poisson]]
[[it:Pesce]]
[[ja:魚]]
[[ko:물고기]]
[[nl:Vis]]
[[pl:Ryba (ujednoznacznienie)]]
[[pt:Peixe]]
[[ru:Рыба]]
[[th:ปลา (แก้ความกำกวม)]]
[[uk:Риба]]
[[zh:鱼]]</li><li>[[Potato|Potato]]<br/>{{about|the raw potato|the cooked potato|Baked Potato|the potato that can inflict poison|Poisonous Potato}}
{{Item
| group = Age 0-1
| 1-1 = Potatoes Age 0-1.png
| 1-2 = Potatoes Age 0-1 BE.png
| group2 = Age 2-3
| 2-1 = Potatoes Age 4-6.png
| 2-2 = Potatoes Age 2-3 BE.png
| group3 = Age 4-6
| 3-1 = Potatoes Age 4-6.png
| 3-2 = Potatoes Age 4-6 BE.png
| group4 = Age 7
| 4-1 = Potatoes Age 7.png
| 4-2 = Potatoes Age 7 BE.png
| image = Potato JE3 BE2.png
| renewable = Yes
| heals = {{hunger|1}}
| stackable = Yes (64)
}}
A '''potato''' is a [[food]] [[item]] obtained from potato crops that can be used to plant them, consumed raw or [[cook]]ed to make [[baked potato]]es.
'''Potato crops''' are planted in [[farmland]] and used to grow potatoes and, rarely, [[Poisonous Potato|poisonous potatoes]].
== Obtaining ==
=== Natural generation ===
[[Village]] farm plots have a chance of being planted with potatoes. The exact chance depends on the style of the village:
{| class="wikitable"
! Village style !! Chance
|-
| {{EnvSprite|snowy-village}} Snowy || 70%
|-
| {{EnvSprite|plains-village}} Plains || 15%
|-
| {{EnvSprite|taiga-village}} Taiga || 10%
|}
Fully grown potato crops drop 2 to 5 potatoes ({{frac|3|5|7}} per crop harvested on average) and have a 2% chance of dropping an additional [[poisonous potato]]. Potato yield can be increased using a tool enchanted with [[Fortune]], with Fortune III harvesting an average of {{frac|5|3|7}} potatoes. [[Bone meal]] can be used to mature the potato to its last stage of growth.
The first two potatoes always drop, and then three more attempts are made to drop a potato with a success rate of 57.14286% to yield the extra 0–3 drops. Each level of Fortune enchantment increases the number of attempts by one.
=== Mob loot ===
[[Zombie]]s, [[husk]]s, and [[zombie villager]]s have a 2.5% ({{frac|1|40}}) chance of dropping either an [[iron ingot]], [[carrot]], or potato when killed by a player or tamed wolf. This is increased by 1% ({{frac|1|100}}) per level of looting. This gives potatoes the following chances of dropping:
* {{frac|1|120}} (about 0.83%)
* {{frac|7|600}} (about 1.17%) with Looting I
* {{frac|9|600}} (1.50%) with Looting II
* {{frac|11|600}} (about 1.83%) with Looting III
If a zombie, husk, or zombie villager is killed with fire, it drops a baked potato instead.
=== Chest loot ===
{{LootChestItem|potato}}
== Usage ==
=== Farming ===
{{main|Tutorials/Crop farming}}
When farmed, potatoes require 8 [[Block tick|stages]] to grow. However, there are four ''visible'' stages due to having only four distinct textures: every two stages have the same texture, except that growth stage 7 keeps the same appearance as stages 5–6, so that only stage 8 has the final, mature appearance. Planted potatoes require a light level of 9 or greater to continue growing. If the light level is 7 or below, the crops instantly un-plant themselves ("pop off"). It is not possible to plant potatoes if the light level is too low.
Crops grow faster if the farmland they are planted in is [[Farmland#Hydration|hydrated]]. Using [[bone meal]] on crops also increases the speed of growth by randomly increasing their growth stage by 2 to 5.
Crops break if pushed by a [[piston]] or if their supporting farmland breaks or turns to dirt (i.e. by being trampled), dropping their usual drops.
=== Food ===
To eat a potato, press and hold {{control|use}} while it is selected in the [[hotbar]]. Eating a potato restores {{hunger|1}} hunger and 0.6 [[Hunger#Mechanics|saturation]].
=== Breeding ===
[[Pig]]s follow and can be [[bred]] by a player holding a potato.
[[Villager]]s can pick up potato items to become willing, which allow them to breed. Villagers require 12 potatoes to become willing.
=== Smelting ingredient ===
{{Smelting
|showname=1
|Potato
|Baked Potato
|0.35
}}
=== Trading ===
Novice-level farmer villagers have a 25%{{only|bedrock}} or 40%{{only|java}} chance to buy 26 potatoes for an [[emerald]] as part of their trade.
=== Composting ===
Placing a potato into a [[composter]] has a 65% chance of raising the compost level by 1. This is less efficient than composting with [[Baked Potato|baked potatoes]], which has a higher success chance of 85%.
== Sounds ==
=== Block ===
{{Sound table/Block/Crop}}
=== Item ===
{{Sound table/Entity/Food}}
== Data values ==
=== ID ===
{{edition|java}}:
{{ID table
|edition=java
|showblocktags=y
|showforms=y
|generatetranslationkeys=y
|displayname=Potatoes
|spritetype=block
|nameid=potatoes
|blocktags=bee_growables, crops
|form=block}}
{{ID table
|displayname=Potato
|spritetype=item
|nameid=potato
|form=item
|foot=1}}
{{edition|bedrock}}:
{{ID table
|edition=bedrock
|shownumericids=y
|showforms=y
|generatetranslationkeys=y
|displayname=Potatoes
|spritetype=block
|nameid=potatoes
|id=142
|form=block}}
{{ID table
|displayname=Potato
|spritetype=item
|nameid=potato
|id=280
|form=item
|foot=1}}
=== Block states ===
{{see also|Block states}}
{{/BS}}
== Advancements ==
{{load advancements|Husbandry;A Balanced Diet}}
== History ==
{{History|java}}
{{History||1.4.2|snap=12w34a|[[File:Potato JE1 BE1.png|32px]] Added potatoes.
|[[File:Potatoes Age 0-1 JE1.png|32px]] [[File:Potatoes Age 2-3 JE1.png|32px]] [[File:Potatoes Age 4-6 JE1.png|32px]] [[File:Potatoes Age 7 JE1.png|32px]] Added potato crops.}}
{{History|||snap=12w36a|Potatoes can now be found in [[village]]s.}}
{{History||1.5|snap=13w09b|The [[Fortune]] enchantment now works when harvesting potatoes.<ref>{{bug|MC-1680}}</ref>}}
{{History||1.8|snap=14w02a|Potatoes can now be [[trading|sold]] to farmer [[villager]]s, at 15–19 potatoes for 1 [[emerald]].}}
{{History|||snap=14w04a|Farmer villagers now harvest fully grown potatoes.
|Villagers can now be made willing using 12 potatoes.}}
{{History|||snap=14w06a|[[File:Potatoes Age 0-1 JE2.png|32px]] [[File:Potatoes Age 2-3 JE2.png|32px]] [[File:Potatoes Age 4-6 JE2.png|32px]] [[File:Potatoes Age 7 JE2.png|32px]] Potato crops are now a pixel higher - previously they were offset one pixel down as to match farmland's sunken model. This is likely an accidental result of model conversion.}}
{{History|||snap=14w10a|[[File:Missing Model JE2.png|32px]] [[File:Missing Model JE2.png|32px]] [[File:Missing Model JE2.png|32px]] [[File:Missing Model JE2.png|32px]]<br>[[File:Missing Model (anisotropic filtering) JE2.png|32px]] [[File:Missing Model (anisotropic filtering) JE2.png|32px]] [[File:Missing Model (anisotropic filtering) JE2.png|32px]] [[File:Missing Model (anisotropic filtering) JE2.png|32px]]<br>Potato crops of all stages [[Missing model|no longer have a model]].}}
{{History|||snap=14w10b|[[File:Potatoes Age 0-1 JE4.png|32px]] [[File:Potatoes Age 2-3 JE4.png|32px]] [[File:Potatoes Age 4-6 JE4.png|32px]] [[File:Potatoes Age 7 JE4.png|32px]] Potato crops now have models again.<ref>{{bug|MC-50232}}</ref> In addition, they are now offset downwards by one pixel once more.<ref>{{bug|MC-50155}}</ref>}}
{{History|||snap=14w25a|[[File:Potatoes Age 0-1 JE5.png|32px]] [[File:Potatoes Age 2-3 JE5.png|32px]] [[File:Potatoes Age 4-6 JE5.png|32px]] [[File:Potatoes Age 7 JE5.png|32px]] Potato crops are now darker and subject to directional shading.}}
{{History|||snap=14w27a|[[File:Potatoes Age 0-1 JE6.png|32px]] [[File:Potatoes Age 2-3 JE6.png|32px]] [[File:Potatoes Age 4-6 JE6.png|32px]] [[File:Potatoes Age 7 JE6.png|32px]] Potato crops are no longer subject to directional shading.}}
{{History||1.9|snap=15w31a|Potatoes can now be used to lead and breed [[pig]]s.}}
{{History|||snap=15w38a|The [[drop]] chances of potatoes has now been slightly improved from average {{frac|2|3|5}} per potato crop harvested to {{frac|2|5|7}}.}}
{{History||1.13|snap=17w47a|Prior to [[1.13/Flattening|''The Flattening'']], this block's numeral ID was 142, and the item's 392.}}
{{History|||snap=18w11a|Potatoes now have a chance of generating in [[shipwreck]] [[chest]]s.}}
{{History||1.14|snap=18w43a|[[File:Potato JE2.png|32px]] The texture of potatoes has been changed.
|[[File:Potatoes Age 0-1 JE7.png|32px]] [[File:Potatoes Age 2-3 JE7.png|32px]] [[File:Potatoes Age 4-6 JE7.png|32px]] [[File:Potatoes Age 7 JE7.png|32px]] The textures of potato crops have been changed.}}
{{History|||snap=18w47a|Potatoes now generate in [[pillager outpost]] chests.}}
{{History|||snap=18w48a|Potatoes can now be found in chests in [[plains]] village houses.}}
{{History|||snap=18w49a|Potatoes can now be found in chests in [[snowy tundra|snowy]] village houses.}}
{{History|||snap=18w50a|Potatoes can now be found in chests in [[taiga]] village houses.
|[[File:Potato JE3 BE2.png|32px]] The texture of potatoes has been changed, once again.}}
{{History|||snap=19w03a|Added placement and new breaking [[sound]]s to potatoes.
|Placing a potato into the new [[composter]] has a 50% chance of raising the compost level by 1.}}
{{History|||snap=19w05a|Potatoes now have a 65% chance of increasing the compost level in a composter by 1.}}
{{History||1.15|snap=19w34a|[[Bee]]s can now pollinate potato crops.}}
{{History||1.17|snap=21w13a|[[File:Potatoes Age 0-1 JE8.png|32px]] [[File:Potatoes Age 2-3 JE8.png|32px]] [[File:Potatoes Age 4-6 JE8.png|32px]] [[File:Potatoes Age 7 JE8.png|32px]] The "crop" template model has changed such that pixels appear in the same physical positions on opposite sides of texture planes, changing the potato crop's appearance in the process.<ref>{{bug|MC-199242}}</ref>}}
{{History|pocket alpha}}
{{History||v0.8.0|snap=build 1|[[File:Potato JE1 BE1.png|32px]] Added potatoes.
|[[File:Potatoes Age 0-1 JE6 BE1.png|32px]] [[File:Potatoes Age 2-3 JE6 BE1.png|32px]] [[File:Potatoes Age 4-6 JE6 BE1.png|32px]] [[File:Potatoes Age 7 JE6 BE1.png|32px]]{{verify|Correct models?}} Added potato crops.
|Potatoes are a rare [[drops|drop]] from killing [[zombie]]s.}}
{{History|||snap=build 3|Potatoes now have a chance to drop when tilling [[grass block]]s.}}
{{History|||snap=build 4|Potatoes are no longer dropped from tilling grass blocks.}}
{{History||v0.9.0|snap=build 1|Potato crops now naturally spawn in [[village]]s.
|Potatoes can now be used to lead and breed [[pig]]s.}}
{{History||v0.12.1|snap=build 1|Potatoes now restore [[hunger]] instead of [[health]].
|Farmer (profession) [[villager]]s now plant and harvest potatoes.}}
{{History||v0.16.2|Potatoes can now be found in the [[chest]] inside large houses in [[ice plains]] and [[cold taiga]] [[village]]s.}}
{{History|bedrock}}
{{History||1.10.0|snap=beta 1.10.0.3|Potatoes can now be found in [[pillager outpost]]s and [[plains]] [[village]] houses.
|[[File:Potato JE3 BE2.png|32px]] The texture of potatoes has been changed.
|[[File:Potatoes Age 0-1 JE7.png|32px]] [[File:Potatoes Age 2-3 JE7.png|32px]] [[File:Potatoes Age 4-6 JE7.png|32px]] [[File:Potatoes Age 7 JE7.png|32px]]{{verify|Correct models?}} The textures of potato crops have been changed.}}
{{History||1.11.0|snap=beta 1.11.0.1|Potatoes can now be used to fill up [[composter]]s.
|Potatoes can now be found in [[taiga]], [[snowy taiga]] and [[snowy tundra]] village house [[chest]]s.}}
{{History|||snap=beta 1.11.0.4|[[Trading]] has now been changed, farmer [[villager]]s now have a 25% chance to [[trading|buy]] 26 potatoes for an [[emerald]].}}
{{History||1.14.0|snap=beta 1.14.0.1|[[Bee]]s can now pollinate potato crops.}}
{{History||?|[[File:Potatoes Age 0-1 BE.png|32px]] [[File:Potatoes Age 2-3 BE.png|32px]] [[File:Potatoes Age 4-6 BE.png|32px]] [[File:Potatoes Age 7 BE.png|32px]] Potato crop planes use a mapping that results in very unnatural mirroring when viewed from certain angles, such as northwest.<ref>{{bug|MCPE-146936}}</ref>}}
{{History|console}}
{{History||xbox=TU14|xbone=CU1|ps=1.04|wiiu=Patch 1|switch=1.0.1|[[File:Potato JE1 BE1.png|32px]] Added potatoes.
|[[File:Potatoes Age 0-1 JE6 BE1.png|32px]] [[File:Potatoes Age 2-3 JE6 BE1.png|32px]] [[File:Potatoes Age 4-6 JE6 BE1.png|32px]] [[File:Potatoes Age 7 JE6 BE1.png|32px]]{{verify|Correct models?}} Added potato crops.}}
{{History||xbox=none|xbone=none|ps=1.90|wiiu=none|switch=none|[[File:Potato JE3 BE2.png|32px]] The texture of potatoes has been changed.
|[[File:Potatoes Age 0-1 JE7.png|32px]] [[File:Potatoes Age 2-3 JE7.png|32px]] [[File:Potatoes Age 4-6 JE7.png|32px]] [[File:Potatoes Age 7 JE7.png|32px]]{{verify|Correct models?}} The textures of potato crops have been changed.}}
{{History|New 3DS}}
{{History||0.1.0|[[File:Potato JE1 BE1.png|32px]] Added potatoes.
|[[File:Potatoes Age 0-1 JE6 BE1.png|32px]] [[File:Potatoes Age 2-3 JE6 BE1.png|32px]] [[File:Potatoes Age 4-6 JE6 BE1.png|32px]] [[File:Potatoes Age 7 JE6 BE1.png|32px]]{{verify|Correct models?}} Added potato crops.}}
{{History|foot}}
=== Potatoes "item" ===
{{:Technical blocks/Potatoes}}
== Issues ==
{{issue list}}
== Gallery ==
<gallery>
AllSeeds.png|All the seeds that exist in the game (except [[Pitcher Plant|seeds fr]][[Torchflower Seeds|om 1.20,]] [[nether wart]] and [[cocoa beans]]).
VillageGrowingCarrotsAndPotatoes.png|[[Carrot]]s and potatoes found growing naturally in a [[village]].
File:Hot Potato.jpeg|Official render of a potato to celebrate National Potato Day.<ref> https://twitter.com/Minecraft/status/1692969488617029859?s=20| Hot potato! @ a friend to toss it.</ref>
</gallery>
== References ==
{{reflist}}
== External Links ==
*[https://www.minecraft.net/en-us/article/taking-inventory--potato Taking Inventory: Potato] – Minecraft.net on December 16, 2021
{{items}}
{{blocks|vegetation}}
[[Category:Plants]]
[[Category:Food]]
[[Category:Renewable resources]]
[[Category:Non-solid blocks]]
[[Category:Generated structure blocks]]
[[cs:Brambora]]
[[de:Kartoffel]]
[[es:Patata]]
[[fr:Pomme de terre]]
[[hu:Burgonya]]
[[it:Patata]]
[[ja:ジャガイモ]]
[[ko:감자]]
[[nl:Aardappel]]
[[pl:Ziemniak]]
[[pt:Batata]]
<br />
[[ru:Картофель]]
[[th:มันฝรั่ง]]
[[uk:Картопля]]
[[zh:马铃薯]]</li></ul> | Previously, spawn was determined by light level rather than the current chunk properties. This was no longer the case in 1.0.0. In a Beta world, hostile mobs would spawn in light level 7 or lower while friendly mobs would spawn in light levels 9 or higher. Because of this, hostile mobs had a slight chance of spawning even though it was light due to them spawning in the air where there was little light. If you had a lot of torches down, go down to your mine, then return, you would have a tendency to find your house having some cows, pigs, chickens or sheep running about. | ||||
Issues
Issues relating to "Spawn" are maintained on the bug tracker. Report issues there.
Trivia
- Sometimes it is possible for the world spawn in the ocean.
- It is possible for the spawn point of a world to be in a lava lake, in which case starting a game in Survival is nearly impossible unless there is water nearby.