No edit summary |
No edit summary |
||
| Line 1,012: | Line 1,012: | ||
[[ru:Скин]] |
[[ru:Скин]] |
||
[[zh:皮肤]] |
[[zh:皮肤]] |
||
| − | Stampylongnose has a orange cat skin |
||
Revision as of 03:35, 16 October 2014
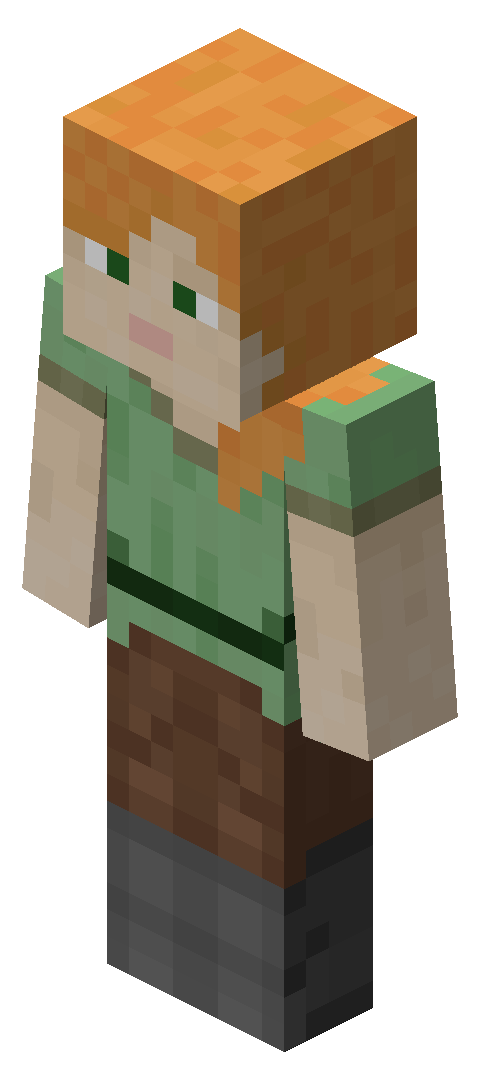
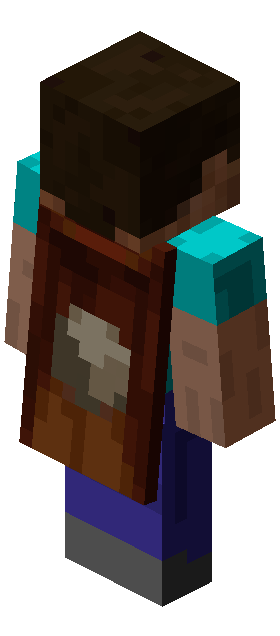
The default player skin, "Steve", as it appears in-game.
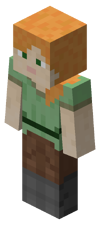
The alternate default player skin, "Alex", as it appears in-game.

The Steve skin when directly opened in an image viewer.

The Alex skin when directly opened in an image viewer.
A skin refers to the texture that is placed onto a player model or mob.
The skin is divided into areas that act as the surface area of the character (For example, there's the front head area, left leg area, etc.). A skin will only allow solid color; transparency is not allowed on the skin file except on the second layer, which is transparent by default; playing offline, pixels can be left free resulting in "holes" in the skin. The second layer can be used to give the character glasses, hats, or other accessories (even a bigger head).
World textures
A skin can also refer to other textures in the game, such as block textures, item sprites, mob skins etc. A list of these can be found here.
It is worth noting that Pigmen, Zombie, and Zombie Pigmen mobs can use typical player skins (and vice-versa). Skeleton mobs can use typical player skins as well, but keep in mind that they have their skinny arms and legs. (If a skeleton mob skin is used as a player's skin, their legs and arms will not be skinny.)
In order to use the player skin for Pigmen, Zombie, and Zombie Pigmen, you must align it to the correct place on the .png or the texture will be broken.
Changing player skins
PC
A player can only change their character's skin if they have purchased Minecraft. This is done on the Profile page by uploading a valid .png image file, which will then replace the default skin.
Skins also have the option of having 3 or 4 pixel wide arms, which can be changed on the profile page as well.[1]
The steve.png and alex.png files in minecraft.jar can also be changed and replaced via a resource pack, but the effects will only be visible to players using the resource pack, and will affect all players with the default skin.
Xbox 360 and PS3
There are currently 8 default skin types (with the exception of the skin packs) all of which appear to have Steve's face, but wearing different outfits and skin colors. The following are available through split screen and online only. The skins are available to be chosen in the 'Change Skin' area of Help & Options. The Xbox and PS3 (Playstation 3) allows transparent skins, because you can't create your own skins on the Xbox or PS3 edition. This prevents issues with completely transparent skin users "haunting" other players.
Default:
| Name | Image | Original | Notes | |
|---|---|---|---|---|
| Default Skin (Steve) | File:Char Snap.png | Player 1's Skin | The classic Steve. | |
| Tennis Steve | File:Char Snap2.png | File:Char2.png | Player 2's Skin | A blond Steve in a tennis outfit and a sweatband. |
| Tuxedo Steve | File:Char Snap3.png | File:Char3.png | Player 3's Skin | Steve in a fancy-looking tuxedo. |
| Athlete Steve | File:Char Snap4.png | File:Char4.png | Player 4's Skin | A darker version of Steve with a sleeveless top, a gold medal necklace, and track pants. |
| Scottish Steve | File:Char Snap5.png | File:Char5.png | Player 5's Skin | Steve in a kilt with fancy hair and clothing. |
| Prisoner Steve | File:Char Snap6.png | File:Char6.png | Player 6's Skin | Steve as an escapee from prison in a bright-colored, prison uniform. It seems as if he resembles an albino, with red eyes and off white hair. |
| Cyclist Steve | File:Char Snap7.png | File:Char7.png | Player 7's Skin | A Steve with bicycling shorts, a jacket, and shoes. |
| Boxer Steve | File:Char Snap8.png | File:Char8.png | Player 8's Skin | A Steve with boxing gloves, a belt with short shorts, no shirt, and fancy boots. |
Skin Packs
Skin Packs are available in the Xbox 360 Edition as downloadable content. Skin Packs add additional skins that players may choose from along with the 8 default skins packaged with the game. They often feature characters from other video games (usually games on Xbox Arcade), alongside original designs. PlayStation 3 Edition currently only has three skin packs.
Main
Skin Pack 1
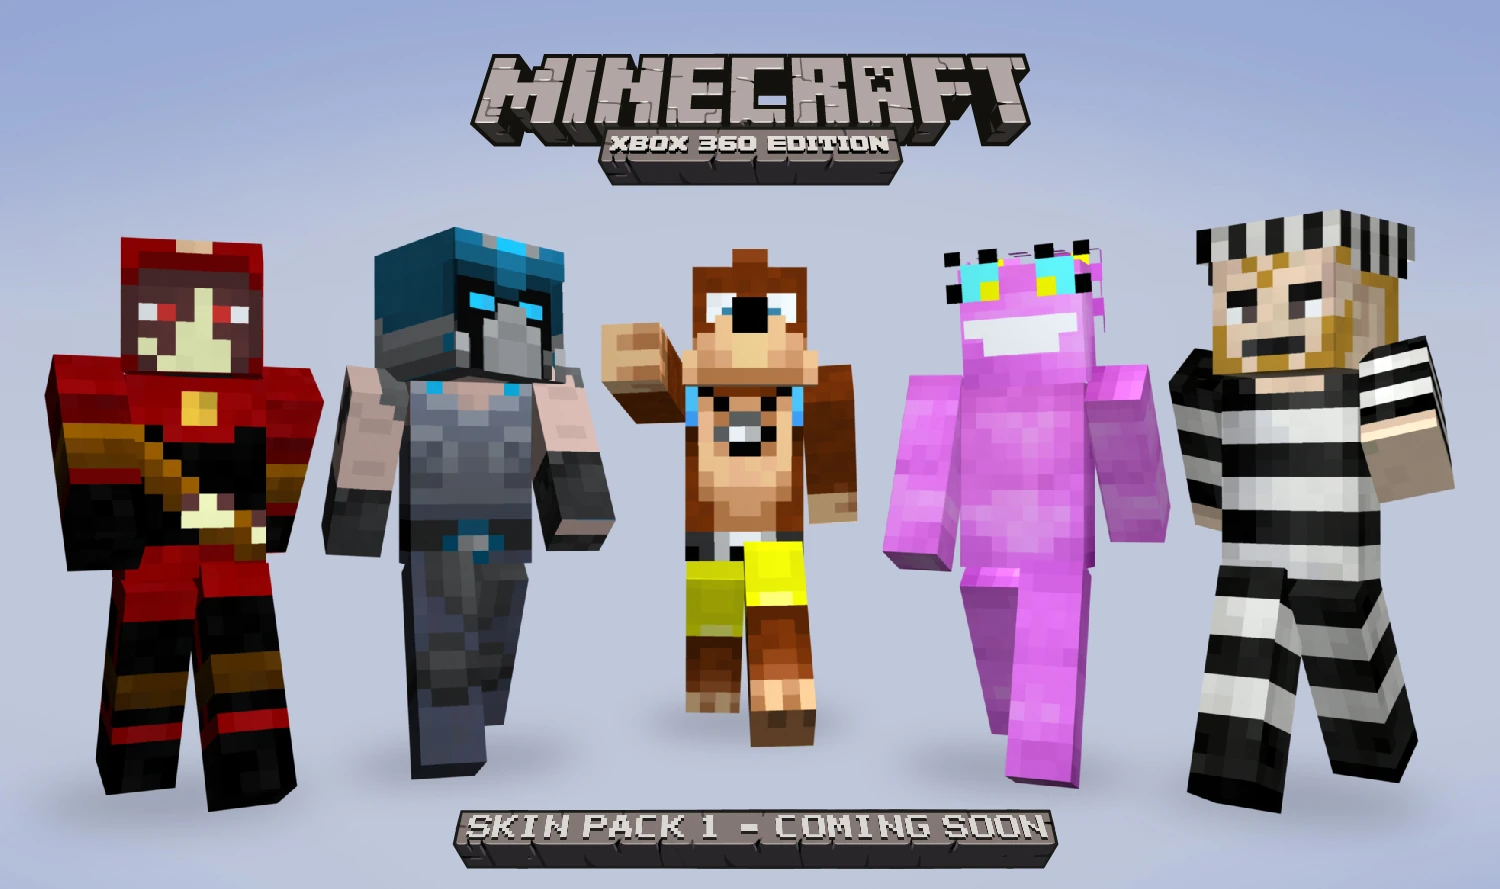

Promotional image for Skin Pack 1. From left to right: Jack of Blades, Clayton Carmine, Banjo, Ms. 'Splosion Man, Prisoner.
Skin Pack 1 was released on July 16, 2012. It contains 45 different skins to choose from.[2] It is purchasable through the Xbox 360 Marketplace or directly in-game through the Downloadable Content section and costs US$1.99. A trial version of Skin Pack 1 is available as a free download, which enables the full use of the original design skins, but not the skins based on copyrighted game characters which include those based on Minecraft's own characters.
| Skins in Skin Pack 1 |
|---|
|
Skin Pack 2
Promotional image for Skin Pack 2. From left to right: Agent Level 5, Joanna Dark - Dress, Damon Baird, Pretztail, Bill.
Skin Pack 2 was released on August 24, 2012. It contains 45 different skins to choose from.[3] It is purchasable through the Xbox 360 Marketplace or directly in-game through the Downloadable Content section and costs US$1.99. A trial version of Skin Pack 2 is available as a free download, which enables the full use of the original design skins and some skins based on certain indie game characters.
| Skins in Skin Pack 2 |
|---|
|
Skin Pack 3

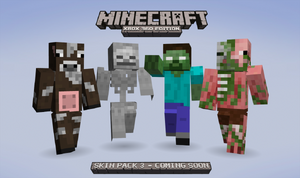
Promotional image for Skin Pack 3. From left to right: Cow, Skeleton, Zombie Herobrine, and Zombie Pigman.
Skin Pack 3 was released on October 17, 2012.[4] It contains 45 different skins to choose from, including figures from Valve's Half Life 2, Portal 2, and Left 4 Dead 2.[5] It is purchasable through the Xbox 360 Marketplace or directly in-game through the Downloadable Content section and costs US$1.99. A trial version of Skin Pack 3 is available as a free download, which enables the full use of the original design skins and skins based on indie game characters.
| Skins in Skin Pack 3 |
|---|
|
Skin Pack 4
Promotional image for Skin Pack 4. From left to right: Ninja, Augustus Cole, Red Spartan, and Barbarian.
Skin Pack 4 was released on March 13, 2013.[6] It contains 45 different skins to choose from. Some of these skins include capes.[7] It is purchasable through the Xbox 360 Marketplace or directly in-game through the Downloadable Content section and costs US$1.99. A trial version of Skin Pack 4 is available as a free download, which enables the full use of some designs.
| Skins in Skin Pack 4 |
|---|
|
Skin Pack 5
Promotional image for Skin Pack 5 (The Walking Dead). From left to right: Lee Everett, Kenny, Female Walker, Molly, Male Walker, Christa, and Omid.
Skin Pack 5 was released on July 31, 2013.[8] It contains 45 different skins to choose from. It is purchasable through the Xbox 360 Marketplace or directly in-game through the Downloadable Content section and costs US$1.99. A trial version of Skin Pack 5 is available as a free download, which enables the full use of some designs.
| Skins in Skin Pack 5 |
|---|
|
Skin Pack 6
Skin Pack 6 was released on June 26, 2014. It contains 40 different skins to choose from. It is purchasable through the Xbox 360 Marketplace or directly in-game through the Downloadable Content section and costs US$1.99. A trial version of Skin Pack 5 is available as a free download, which enables the full use of some designs.
| Skins in Skin Pack 6 |
|---|
|
Other
Summer Of Arcade Promotional Skin Pack
Promotional image for Summer of Arcade Skin Pack. From left to right: Paladin, Randall Wayne, Knight, Dust, Tony Hawk.
The Summer of Arcade Free Promotional Skin Pack was available through July 18 and August 22, 2012.[9] It was available through the Xbox home page, and was free. It contained 15 different skins to choose from, all from popular games in the "Summer of Arcade" XBLA event.
| Skins in Summer of Arcade Promotional Skin Pack |
|---|
|
Halloween Skin Pack
Promotional image for The Halloween Skin Pack.
The Halloween Skin Pack was downloadable from October 26, 2012 to November 26th, 2012. It contained 55 different skins to choose from. 7 skins included capes. It was purchasable through the Xbox 360 Marketplace or directly in-game through the Downloadable Content section of the game and costs US$1.99. All proceeds went to charity.[10]
| Skins in Halloween Skin Pack |
|---|
|
Festive Skin Pack
Promotional image for The Festive Skin Pack.
The Festive Skin Pack was released on December 19, 2012 for Xbox and December 17, 2013 for PS3. It contains 24 different skins to choose from.[11] 13 of the skins added extra pixels not available in the PC Version (ex. Santa's Hat). It is purchasable through the Xbox 360 Marketplace/Playstation Store or directly in-game through the Downloadable Content section of the game and costs US$1. A trial version of The Festive Skin Pack is available as a free download, which enables the full use of 7 of the designs.
| Skins in Festive Skin Pack |
|---|
|
Battle & Beasts Skin Pack

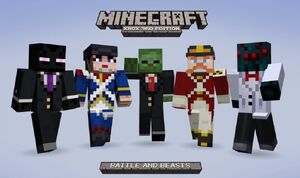
Promotional image for The Battle & Beasts Skin Pack.
The Battle & Beasts Skin Pack was released on May 8, 2013. It contains 45 different skins to choose from.[12] It is purchasable through the Xbox 360 Marketplace or directly in-game through the Downloadable Content section of the game and costs US$1.99. A trial version of The Battle & Beasts Skin Pack is available as a free download, which enables the full use of some of the designs. Each Battle Skin has a Male and Female Variation.
| Skins in Battle and Beasts Skin Pack |
|---|
|
Minecraft 1st Birthday Skin Pack
Promotional image for The Minecraft 1st Birthday Skin Pack.
The Minecraft 1st Birthday Skin Pack was available for a limited time, from May 9 until May 31, 2013.[13][14] It contained 23 different skins to choose from. All the skins were original designs. It was available, for free, through the Xbox 360 Marketplace or directly in-game through the Downloadable Content section of the game. Note Herobrine underneath the "M" in Minecraft.
| Skins in Minecraft 1st Birthday Skin Pack |
|---|
|
Battle & Beasts 2 Skin Pack


Promotional image for The Battle & Beasts 2 Skin Pack.
The Battle & Beasts 2 Skin Pack was released on October 9, 2013.[15] It contains 45 different skins to choose from.
| Skins in Battle & Beasts 2 Skin Pack |
|---|
|
Marvel Avengers Skin Pack
Promotional image for The Minecraft Avengers Skin Pack.
The Marvel Avengers Skin Pack was released on December 23, 2013.[16] It contains 35 different skins to choose from.
| Skins in Marvel Avengers Skin Pack |
|---|
|
Marvel Spider-Man Skin Pack
The Marvel Spider-Man Skin Pack was released on April 30th, 2014.
| Skins in Marvel Spider-Man Skin Pack |
|---|
|
Doctor Who Skin Pack Volume 1
Promotional images have been released for a Doctor Who skin pack. It has also been said that it would come out for the Xbox 360.
More skin packs seem to be planned. Release date unknown.
(Would like some official pictures and information... It has been confirmed by Microsoft though)
|}
Creating a skin
Many players want to have a new look, something which describes them. While you can always search the internet for a previously made skin, many players prefer to create their own.
A custom skin is a great way to personalize your player model and can be done either by using a variety of community-made skin editors, or by editing the "steve.png" file manually with an image editor like Photoshop, GIMP, Paint.net or similar image editors. The "steve.png" file can be downloaded from here. When editing the "steve.png" file manually, be sure to keep the original image dimensions and make the background of the skin (the unused pixels) completely transparent. Otherwise, Minecraft may fail to recognize the skin as intended.
Alternatively, some people find it easier to use a program, either downloadable or in-browser, which will allow them to have a live view of their character on a three dimensional model as they are editing the skin. For example, a program called Skincraft will further assist players by providing them with a wide variety of pre-made selections (such as hats, boots, sweaters, etc.), to give the skin creator exactly what they want, even if the creator has little to no artistic skill.
After making a custom skin, either by using a skin editor or by editing the "steve.png" file directly, one will still need to upload the .png file at the Profile page of www.minecraft.net before the skin is applied. Once completed, start up Minecraft and enjoy your new skin! Other players in multiplayer will also be able to see your skin. Note that you will not be able to see your custom skin if you are not logged in or if playing offline.

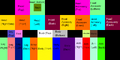
A color-coded skin template on transparent background with all faces labeled.
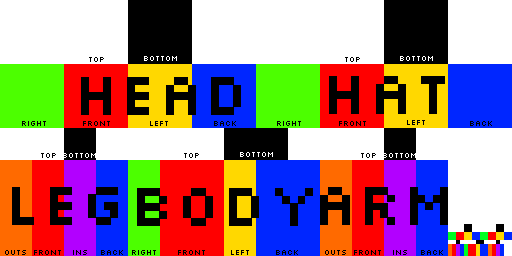
Another skin guide, but on a black background. For the arm and leg sections only, "right" indicates those facing outward, and "left" indicates inward.

The new skin template that will work with Minecraft version 1.8; you can create a second layer on every body part with this template.

An adaptation of the previous template, color-coded to match the appropriate faces of the skin- front, back, left, right, top and bottom. The checked areas represent the secondary layer.
A template for the new model available in the 1.8 version. It features slimmer arms. To select the new model, go to the profile page in the Minecraft website to select it.


Note: the 1.8 templates can be used for pre-1.8 skins on the skin server. Only the top half of the image is used, e.g. not the individual arms and legs on the bottom, and no overlay on any layer except the head. If the skins is in resource pack for 1.7, you must use the old system exactly.
Prior to 1.8, there are approximately 2.29×1011,328 different unique skins. As of 1.8, there can be up to 3.06×1023,581 unique Minecraft skins.
Capes
Capes (previously known as cloaks) are vanity items and are worn in addition to the player's skin. There is currently no way to obtain a cape on one's own, however there are various client mods that allow players to obtain one, only visible client-sided. On the Xbox 360 Edition some skins from various skin packs, such as the Grim Reaper in the Halloween Pack and Ezio Auditore da Firenze in Skin Pack 4 have capes. Players on PC who legitimately have more than one cape can choose between which to wear by going to the mojang website.
| Name | Image | Original | Notes |
|---|---|---|---|
| The Mojang Cape | File:MojangCloak.PNG | File:Mojang cape.png | All Mojang AB employees have Mojang logo capes. |
| The Christmas Cape 2010 | File:ChristmasCape.png | File:Xmas.png | On December 24/25, 2010, all users were shown with this Christmas tree cape. This cape was not added to user accounts. |
| The New Year's Cape | File:Newyearscloak.png | File:2011.png | On New Year's Eve, 2010, all users were shown with this fireworks cape. This cape was not added to user accounts. |
| The Bacon Cape | File:MicleeBaconCape.png | File:BaconCape.png | Miclee was given this cape by Notch,[17] due to his idea of the Pigman.[18] However, later it was removed from him due to other users asking Notch for personal capes.[citation needed] The cape was made by Miclee.[19] |
| One Million Cape | File:1000000.png | File:1MCape.png | This cape was made for akronman1, the lucky buyer of the 1,000,000th copy of Minecraft.[20][21][22] The cape was made by @Kinten.[23] |
| dannyBstyle's Cape | File:Cloak DB.png | File:DBCape.png | This cape was given to dannyBstyle.[24] |
| JulianClark's Cape | File:JulianClark cape.png | File:JulianClark.png | This cape was given to JulianClark in return for bringing Notch the TV presenter and actor Ray Cokes.[25] |
| Crowdin Translator Cape | 
|
File:Capeeeee.png | This cape was given to 29 translators on the Minecraft translation project at Crowdin using a fair dice roll.[26][27] There were plans to give more capes to translators from time to time,[28] but jeb later said that he canceled those plans after seeing abusive behavior from some translators like using auto-translation and down-voting legitimate translations.[29]
Translators that received this cape include 26583571, 77pali, a_mason, ahmetrcagil, aritzh, bogeymanEST, Brownd, ctrl_z, devil188, Dushmursts, FerdErik, Forfal, FumblerX, Gucci_Mane_Burrr, Jokubolakis, JonnnLeee, jvith, Milhooz, moomoohk, MPlaneswalker, rayball36, Remixz, Remora, sa3dany, Space__man and Svajoklis_. |
| MINECON 2011 Attendees Cape | 
|
|
This cape was automatically added to all MINECON 2011 attendees' registered username.[30] |
| MINECON 2011 Xbox Cape | 
|
|
A card was given to all MINECON 2011 attendees and contained a redemption code for Xbox Live. It uses the same design as the in-game cape from the PC version of Minecraft. The cape was then put on Minecraft: XBOX360 Edition as avatar downloadable content. |
| MINECON 2012 Attendees Cape | File:Minecon2012Cape.png | File:Minecon Cape2012.png | A redemption link for this cape was emailed to all registered MINECON 2012 attendees.[30] |
| MINECON 2012 Xbox Cape | 
|
File:Minecon Cape2012.png | A card was given to all MINECON 2012 attendees upon check-in that contained a redemption code for Xbox Live. It uses the same design as the in-game cape from the PC version of Minecraft. |
| 1st Birthday Xbox Cape | File:1st Birthday Xbox Cape.png | From May 9 to May 13, 2013, all players of the Xbox 360 edition were shown with this birthday cake cape (except for players using skins that have their own capes) to celebrate the 1st birthday of the Xbox edition of Minecraft.[31][32] A PC version of the cape currently does not exist. | |
| cheapsh0t's Cape | File:Cheapsh0tcape.png | File:Cheapsh0t.png | In October 2013, the user cheapsh0t received this cape for helping jeb and the Mojang team in Tokyo. The cape is identical to the Crowdin cape except for the Japanese flag on the reverse side of the cape.[33][34] |
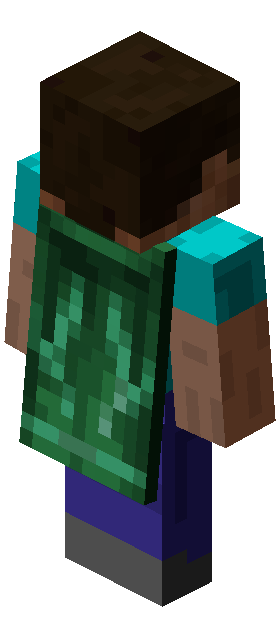
| MINECON 2013 Attendees Cape | File:Wearing MC2013 Cape.png | File:Official MineCon 2013 Cape.png | On October 30, 2013 Tobias Mollstam of the Mojang Team tweeted out an image of the 2013 MINECON cape. The cape shows an extended piston on a green shaded background.[35]
A redemption link for this cape was emailed to all registered MINECON 2013 attendees, similar to MINECON 2012's method.[30] |
Unused MineCon 2011 capes
These capes were featured in a poll where MineCon 2011 attendees could vote for their cape of choice. The red creeper cape won MineCon 2011, and the blue cape with the pickaxe was for MineCon 2012. These following capes are still unused though may appear in the future. The 3rd Minecon cape may have been based off of the green cape below.[36]
History
| c | |||||
|---|---|---|---|---|---|
0.0.17a_02{{Extension DPL}}<ul><li>[[Written Book|Written Book]]<br/>{{Item
| title = Written Book
| image = Written Book.gif
| renewable = Yes
| stackable = Yes (16)
}}
A '''written book''' is an [[item]] created after a [[book and quill]] is signed.
== Obtaining ==
=== Signing a book and quill ===
Written books can be obtained by signing a [[book and quill]]. After it has been signed, it cannot be edited again. The label does not say "Written Book", but whatever the [[player]] titles it. The title appears on the top line of the label, and "by <''player''>" (the player's username) on the bottom. {{IN|bedrock}}, this is customizable without [[commands]].
=== Copying ===
{{crafting
|name=Written Book
|showdescription=1
|;;;Book and Quill;Book and Quill;Book and Quill;Book and Quill;Book and Quill
|;;;;Book and Quill;Book and Quill;Book and Quill;Book and Quill
|;;;;;Book and Quill;Book and Quill;Book and Quill
|Book and Quill
|Written Book
|;;;;;;Book and Quill;Book and Quill
|;Book and Quill;Book and Quill;Book and Quill;Book and Quill;Book and Quill;Book and Quill;Book and Quill
|;;Book and Quill;Book and Quill;Book and Quill;Book and Quill;Book and Quill;Book and Quill
|;;;;;;;Book and Quill
|Output= Written Book; Written Book,2; Written Book,3; Written Book,4; Written Book,5; Written Book,6; Written Book,7; Written Book,8
|description=The input written book is not consumed.<br>The new copies are "Copy of Original" or "Copy of Copy", depending on whether the input written book is "Original" or "Copy of Original".<br>Copies of copies cannot be copied.<br>Copied books of the same generation ("Original", "Copy of Original", "Copy of Copy", or "Tattered") stack.
|type=Miscellaneous
}}
== Usage ==
Written books can be opened by right-clicking (or holding down on the screen {{in|bedrock}}), and display a GUI allowing the [[player]] to read it or turn the page.
The contents of a book are an extra set of data attached to the item. This means that when a book is destroyed, its contents are lost with it.
=== Lecterns ===
One can place a [[written book]] on an empty [[lectern]].
The lectern then emits a redstone signal depending on the displayed page in the book. On the last page, the lectern emits a signal strength of 15.
=== Chiseled bookshelf ===
{{control|Use|text=Using}} the [[chiseled bookshelf]] while having a written book in the main hand will put the book inside the chiseled bookshelf.
== Sounds ==
{{edition|java}}:
{{Sound table
|sound=Page turn1.ogg
|sound2=Page turn2.ogg
|sound3=Page turn3.ogg
|subtitle=Page rustles
|source=master
|description=When the page of a book is turned
|id=item.book.page_turn
|translationkey=subtitles.item.book.page_turn
|volume=2.0
|pitch=1.0
|distance=16}}
{{Sound table
|sound=Page turn1.ogg
|sound2=Page turn2.ogg
|sound3=Page turn3.ogg
|subtitle=Page rustles
|source=block
|description=When the page of a book is turned on a lectern
|id=item.book.page_turn
|translationkey=subtitles.item.book.page_turn
|volume=2.0
|pitch=0.9-1.0
|distance=16}}
{{Sound table
|sound=Book thump1.ogg
|sound2=Book thump2.ogg
|subtitle=Book thumps
|source=block
|description=When a book is placed on a lectern
|id=item.book.put
|translationkey=subtitles.item.book.put
|volume=1.0
|pitch=1.0
|distance=16}}
{{Sound table
|sound=Chiseled bookshelf insert1.ogg
|sound2=Chiseled bookshelf insert2.ogg
|sound3=Chiseled bookshelf insert3.ogg
|sound4=Chiseled bookshelf insert4.ogg
|subtitle=Book placed
|source=block
|description=When a written book is placed in a chiseled bookshelf
|id=block.chiseled_bookshelf.insert
|translationkey=subtitles.chiseled_bookshelf.insert
|volume=0.8
|pitch=''varies'' <ref group=sound>Can be 1.0, 0.85, or 1.1 for each sound</ref>
|distance=16}}
{{Sound table
|sound=Chiseled bookshelf pickup1.ogg
|sound2=Chiseled bookshelf pickup2.ogg
|sound3=Chiseled bookshelf pickup3.ogg
|subtitle=Book taken
|source=block
|description=When a written book is removed from a chiseled bookshelf
|id=block.chiseled_bookshelf.pickup
|translationkey=subtitles.chiseled_bookshelf.take
|volume=0.8
|pitch=''varies'' <ref group=sound>Can be 1.0, 0.8, or 1.1 for each sound</ref>
|distance=16
|foot=1}}
{{edition|bedrock}}:
{{Sound table
|type=bedrock
|sound=Page turn1.ogg
|sound2=Page turn2.ogg
|sound3=Page turn3.ogg
|source=sound
|description=When the page of a book is turned
|id=item.book.page_turn
|volume=2.0
|pitch=1.0}}
{{Sound table
|sound=Book thump1.ogg
|sound2=Book thump2.ogg
|source=block
|description=When a book is placed on a lectern
|id=item.book.put
|volume=4.8
|pitch=1.0}}
{{Sound table
|type=bedrock
|sound=Chiseled bookshelf insert1.ogg
|sound2=Chiseled bookshelf insert2.ogg
|sound3=Chiseled bookshelf insert3.ogg
|sound4=Chiseled bookshelf insert4.ogg
|source=block
|description=When a written book is placed in a chiseled bookshelf
|id=insert.chiseled_bookshelf
|volume=0.8
|pitch=''varies'' <ref group=sound>Can be 1.0, 0.85, or 1.1 for each sound</ref>}}
{{Sound table
|sound=Chiseled bookshelf pickup1.ogg
|sound2=Chiseled bookshelf pickup2.ogg
|sound3=Chiseled bookshelf pickup3.ogg
|source=block
|description=When a written book is removed from a chiseled bookshelf
|id=pickup.chiseled_bookshelf
|volume=0.8
|pitch=''varies'' <ref group=sound>Can be 1.0, 0.8, or 1.1 for each sound</ref>
|foot=1}}
== Data values ==
=== ID ===
{{JE}}:
{{ID table
|edition=java
|showitemtags=y
|showforms=y
|generatetranslationkeys=y
|displayname=Written Book
|spritetype=item
|nameid=written_book
|itemtags=bookshelf_books, lectern_books
|form=item
|foot=1}}
{{BE}}:
{{ID table
|edition=bedrock
|showitemtags=y
|shownumericids=y
|showforms=y
|notshowbeitemforms=y
|generatetranslationkeys=y
|displayname=Written Book
|spritetype=item
|nameid=written_book
|id=511
|itemtags=minecraft:bookshelf_books, minecraft:lectern_books
|form=item
|foot=1}}
=== Item data ===
{{el|java}}:
{{main|Player.dat format}}
<div class="treeview">
* {{nbt|compound|tag}}: The item's '''tag''' tag.
{{:Player.dat_format/Written Books}}
</div>
{{el|bedrock}}:
: See [[Bedrock Edition level format/Item format]].
== History ==
{{History|java}}
{{History||1.3.1|snap=12w17a|[[File:Written Book JE1 BE1.png|32px]] Added written books.}}
{{History|||snap=12w21a|Written books can now be [[trading|sold]] to librarian [[villager]]s, at 1 written book for 1 [[emerald]].}}
{{History||1.7.2|snap=13w36a|Written books can now be cloned the same way [[map]]s can, but by using [[book and quill|books and quills]] instead of Empty Maps. Multiple copies of the same written book can be cloned by putting more book and quills in the crafting grid.
|Written books can now be stacked (up to 16 per stack).}}
{{History||1.8|snap=14w02a|[[Trading]] has been changed: librarian [[villager]]s now [[trading|buy]] 2 written books for 1 [[emerald]].}}
{{History|||snap=14w05a|Copying written books now mark them as "Copy of Original" or "Copy of Copy". The copying status of a book is denoted in a separate line in the tooltip, beneath the author's name. Copies of copies cannot be copied.}}
{{History||1.9|snap=15w33c|A written book titled "Work in Progress" now generates within a [[hopper]] as a part of the [[end ship]] in the [[end cities]]. It reads: "We will have something else here soon..." and is signed by [[Searge]].}}
{{History|||snap=15w41a|End ships no longer contain a written book.}}
{{History||1.13|snap=17w47a|Prior to [[1.13/Flattening|''The Flattening'']], this [[item]]'s numeral ID was 387.}}
{{History||1.14|snap=18w43a|[[File:Written Book JE2 BE2.png|32px]] The texture of written books has been changed.}}
{{History|||snap=19w02a|Written books can now be held on [[lectern]]s.}}
{{History|||snap=19w11a|Librarian [[villager]]s no longer [[trading|buy]] written books.}}
{{History||1.20<br>(Experimental)|link=1.19.3|snap=22w42a|Written books can now interact with [[chiseled bookshelves]].}}
{{History|bedrock}}
{{History||1.2.0|snap=beta 1.2.0.2|[[File:Written Book JE1 BE1.png|32px]] Added written books.}}
{{History||1.10.0|snap=beta 1.10.0.3|[[File:Written Book JE2 BE2.png|32px]] The texture of written books has been changed.
|Written books can now be held on [[lectern]]s.}}
{{History|console}}
{{History||xbox=TU25|xbone=CU14|ps=1.17|wiiu=Patch 1|[[File:Written Book JE1 BE1.png|32px]] Added written books.}}
{{History|PS4}}
{{History||1.90|[[File:Written Book JE2 BE2.png|32px]] The texture of written books has been changed.}}
{{History|foot}}
== Issues ==
{{issue list}}
== Trivia ==
*When written books are obtained with [[commands]] (without the correct [[Player.dat format#Written Books|data tag]]), the label shows "Written Book" and has the text "*Invalid book tag*" when opened. The book is signed and cannot be edited without commands.
*Commands that were added to a written book using serialized JSON objects are executed through the chat system. This means that any command added to a written book can't be longer than 256 characters, which is the maximum chat line limit.
*During the 2020 April Fools Update [[Java Edition 20w14∞]], throwing a written book into a lit [[Nether Portal (block)|nether portal]] would create a portal to one of the 2,147,483,645 new dimensions.
== Gallery ==
<gallery>
Written Book tooltip.png|A signed book.
Test by Dinnerbone.png|Copying a signed book.
BookandQuillOperators12w17a.png|Different types of characters can be used to simulate a different font.
JSON Book.png|First image of a book using JSON text.
No NBT written book GUI.png|A no NBT written book using commands.
Book Background (JE).png|Java Edition book background texture.
Book Background (BE).png|Bedrock Edition book background texture.
Book Arrowleft (JE).png|Java Edition left arrow texture.
Book Arrowright (JE).png|Java Edition right arrow texture.
Book Arrowleft (BE).png|Bedrock Edition left arrow texture.
Book Arrowright (BE).png|Bedrock Edition Right arrow texture.
</gallery>
== See also ==
*[[Book]]
*[[Bookshelf]]
*[[Book and Quill]]
{{Items}}
[[Category:Renewable resources]]
[[cs:Napsaná kniha]]
[[es:Libro escrito]]
[[fr:Livre édité]]
[[hu:Megírt könyv]]
[[it:Libro]]
[[ja:記入済みの本]]
[[ko:글이 쓰인 책]]
[[nl:Geschreven boek]]
[[pl:Zapisana książka]]
[[pt:Livro escrito]]
[[ru:Написанная книга]]
[[uk:Написана книга]]
[[zh:成书]]</li><li>[[Warped Fungus on a Stick|Warped Fungus on a Stick]]<br/>{{Item
| image = Warped Fungus on a Stick.png
| durability = 100
| renewable = Yes
| stackable = No
}}
A '''warped fungus on a stick''' is an item that can be used to control saddled [[strider]]s.
== Obtaining ==
=== Crafting ===
{{Crafting
|head=1
|showdescription=1
|A1=Fishing Rod; Damaged Fishing Rod
|B2=Warped Fungus
|Output= Warped Fungus on a Stick
|description=Crafting from a damaged fishing rod is available only {{in|bedrock}}. ''Java Edition'' requires a pristine fishing rod. The [[2×2 grid]] can also be used for crafting instead of a crafting table.
|type= Transportation
}}
{{crafting
|foot=1
|ignoreusage=1
|Damaged Warped Fungus on a Stick
|Damaged Warped Fungus on a Stick
|Output= Warped Fungus on a Stick
|description= The durability of the two warped fungi on sticks is added together, plus an extra 5% durability.
|type= Transportation
}}
=== Mobs ===
A [[zombified piglin]] that spawns as a strider jockey holds a warped fungus on a stick instead of a {{ItemLink|golden sword}}, and has an 8.5%{{Only|java|short=y}} or 25%{{Only|bedrock|short=y}} chance to drop it if killed by a player or tamed [[wolf]], or upon death when angry. chance is increased by 1%{{Only|java|short=y}} or 5%{{Only|bedrock|short=y}} per level of Looting, for a maximum of 11.5%{{Only|java|short=y}} or 40%{{Only|bedrock|short=y}} with Looting III.
== Usage ==
[[File:Strider riding.gif|A [[player]] shown using a warped fungus on a stick to ride a [[strider]] (click to see animation).|thumb|350px]]
Similar to how a [[carrot on a stick]] is used to control [[pig]]s, the [[player]]s can use a warped fungus on a stick to control a [[strider]]. To do this, the player simply holds the [[item]] in one hand and any nearby striders within view is attracted toward the player. If mounted on a [[saddle]]d strider, the strider moves in the direction the player is facing while holding the warped fungus on a stick. Right clicking with the item makes the strider go faster, but reduces the item's durability by 1 for every speed boost. If the item durability reaches 0, it turns into a fishing rod.
Due to a strider's ability to walk on [[lava]], this is a beneficial [[tools|tool]] for using striders as a safe transport across [[the Nether]]'s terrain, which is otherwise considered difficult to traverse.
=== Enchantments ===
A warped fungus on a stick can receive the following enchantments, but only through an [[anvil]]:
{|class="wikitable col-2-center col-3-right"
|+
!Name
!Max Level
![[Enchanting|Method]]
|-
|[[Unbreaking]]
|III
|{{Inventory slot|Anvil}}
|-
|[[Mending]]
|I
|{{Inventory slot|Anvil}}
|-
|[[Curse of Vanishing]]
|I
|{{Inventory slot|Anvil}}
|}
== Sounds ==
{{Edition|Java}}:
{{Sound table
|sound=Random break.ogg
|subtitle=Item breaks
|source=player
|description=When a warped fungus on a stick's durability is exhausted
|id=entity.item.break
|translationkey=subtitles.entity.item.break
|volume=0.8
|pitch=0.8-1.2
|distance=16
|foot=1}}
{{Edition|Bedrock}}:
{{Sound table
|type=bedrock
|sound=Random break.ogg
|source=player
|description=When a warped fungus on a stick's durability is exhausted
|id=random.break
|volume=1.0
|pitch=0.9
|foot=1}}
== Data values ==
=== ID ===
{{edition|java}}:
{{ID table
|edition=java
|showforms=y
|generatetranslationkeys=y
|displayname=Warped Fungus on a Stick
|spritetype=item
|nameid=warped_fungus_on_a_stick
|form=item
|foot=1}}
{{edition|bedrock}}:
{{ID table
|edition=bedrock
|shownumericids=y
|showforms=y
|notshowbeitemforms=y
|generatetranslationkeys=y
|displayname=Warped Fungus on a Stick
|spritetype=item
|nameid=warped_fungus_on_a_stick
|id=618
|form=item
|foot=1}}
== Advancements ==
{{load advancements|This Boat Has Legs}}
== History ==
{{History|java}}
{{History||1.16|snap=20w13a|[[File:Warped Fungus on a Stick JE1 BE1.png|32px]] Added warped fungus on a stick.}}
{{History|||snap=20w14a|Now has 100 durability instead of 25.
|Now takes only 1 damage every time the strider is speed boosted.}}
{{History||1.16.2|snap=Pre-release 1|The [[zombified piglin]] riding a [[strider]] now spawns holding a warped fungus on a stick.}}
{{History|bedrock}}
{{History||1.16.0|snap=beta 1.16.0.57|[[File:Warped Fungus on a Stick JE1 BE1.png|32px]] Added warped fungus on a stick.}}
{{History|||snap=beta 1.16.0.63|Warped Fungus on a Stick can now be enchanted.}}
{{History||1.16.100|snap=beta 1.16.100.54|The [[zombified piglin]] riding a [[strider]] now spawns holding a warped fungus on a stick.}}
{{History|foot}}
== Issues ==
{{Issue list}}
== See also ==
* {{ItemLink|Carrot on a Stick}}
* {{ItemLink|Saddle}}
== References ==
{{Items}}
[[Category:Renewable resources]]
[[de:Wirrpilzrute]]
[[es:Caña con hongo distorsionado]]
[[fr:Champignon biscornu sur un bâton]]
[[ja:歪んだキノコ付きの棒]]
[[lzh:譎蕈釣竿]]
[[pl:Spaczony grzyb na patyku]]
[[pt:Vara com fungo distorcido]]
[[ru:Удочка с искажённым грибком]]
[[zh:诡异菌钓竿]]</li></ul> | Custom player skin test. | ||||
0.0.18a{{Extension DPL}}<ul><li>[[Feather|Feather]]<br/>{{about|a item|a enchantent|Feather Falling}}
{{Item
| image = Feather.png
| stackable = Yes (64)
| renewable = Yes
}}
'''Feathers''' are items dropped by [[chicken]]s and [[parrot]]s, as well as tamed [[cats]] as morning gifts.
== Obtaining ==
=== Mob loot ===
Adult [[chicken]]s drop 0–2 feathers upon death. The maximum is increased by 1 per level of [[Looting]], for a maximum of 0–5 with Looting III.
[[Parrot]]s drop 1–2 feathers upon death. The maximum is increased by 1 per level of Looting, for a maximum of 1–5 with Looting III.
A [[fox]] sometimes spawns holding a feather, which always drops upon death. Alternatively, the player can drop a [[food]] item, causing the fox to drop the feather in favor of the food.
=== Natural generation ===
{{LootChestItem|feather}}
=== Cat gifts ===
{{main|Cat#Gifts}}
Tamed [[cat]]s have a 70% chance of giving the [[player]] a "morning gift", and the gift has a 16.13% chance to be a feather.
== Usage ==
=== Helmet ===
<div style='float:right'></div>
While a feather cannot be equipped in the head slot in [[Survival]] mode, equipping it using commands causes it to appear completely upright unlike other items.
[[File:Steve wearing Feather.png|75px]]
[[File:Alex wearing Feather.png|75px]]
=== Crafting ingredient ===
{{crafting usage}}
=== Trading ===
Expert-level fletcher [[villager]]s buy 24 feathers for an [[emerald]] as part of their trade.
== Data values ==
=== ID ===
{{edition|java}}:
{{ID table
|edition=java
|showforms=y
|generatetranslationkeys=y
|displayname=Feather
|spritetype=item
|nameid=feather
|form=item
|foot=1}}
{{edition|bedrock}}:
{{ID table
|edition=bedrock
|shownumericids=y
|showforms=y
|notshowbeitemforms=y
|generatetranslationkeys=y
|displayname=Feather
|spritetype=item
|nameid=feather
|id=327
|form=item
|foot=1}}
== History ==
{{History|java indev}}
{{History||0.31|snap=20100130|[[File:Feather JE1.png|32px]] Added feathers.|Feathers can be used to [[craft]] [[arrow]]s.
|Feathers are [[drop]]ped by every [[mob]] in quantities of 0 to 2.}}
{{History||20100206|[[File:Feather JE2 BE1.png|32px]] The feather's texture has been changed; it is now not as straight anymore.}}
{{History||20100219|[[Zombie]]s are now the only [[mob]] that can drop feathers. This was a placeholder as [[Notch]] has stated he currently doesn't know what else they should drop.<ref>{{tweet|notch|21723172931895296}}</ref>}}
{{History|java alpha}}
{{History||v1.0.14|[[Chicken]]s now [[drop]] 0–2 feathers upon death.}}
{{History|java beta}}
{{History||1.8|snap=Pre-release|[[Zombie]]s now drop [[rotten flesh]], instead of feathers.
|[[Chicken]]s are now the only source of feathers.}}
{{History|java}}
{{History||1.3.1|snap=12w17a|Feathers are now used to craft [[book and quill]]s.}}
{{History||1.4.6|snap=12w49a|Feathers are now used to craft a [[firework star]] with a burst effect.}}
{{History||1.12|snap=17w13a|[[Parrot]]s now [[drop]] feathers.}}
{{History||1.13|snap=17w47a|Prior to ''[[The Flattening]]'', this [[item]]'s numeral ID was 288.}}
{{History|||snap=18w11a|Feathers now generate in [[shipwreck]] [[chest]]s.}}
{{History||1.14|snap=18w43a|[[File:Feather JE3 BE2.png|32px]] The texture of feathers has been changed.}}
{{History|||snap=18w44a|[[Cat]]s now offer feathers as [[Cat#Gifts|gift]]s.}}
{{History|||snap=18w48a|Feathers can now be found in chests in plains [[village]] houses.}}
{{History|||snap=18w50a|Feathers can now be found in chests in fletcher houses.}}
{{History|||snap=19w07a|Added [[fox]]es, which sometimes spawn with feather in their mouths.}}
{{History|||snap=19w11a|Fletcher [[villager]]s now [[trading|buy]] feathers.}}
{{History||1.20<br>(Experimental)|link=1.19.4|snap=1.19.4 Pre-release 1|Feathers can now be used to craft [[brush]]es.}}
{{History|pocket alpha}}
{{History||v0.2.0|[[File:Feather JE2 BE1.png|32px]] Added feathers. They are currently unobtainable and serve no purpose.}}
{{History||v0.3.3|Chickens now drop 0–2 feathers upon death.|Feathers can now be used to [[craft]] [[arrow]]s.}}
{{History||v0.5.0|Feathers can now be obtained after activating the [[nether reactor]].}}
{{History||v0.11.0|snap=build 1|[[Zombie]]s now drop [[rotten flesh]], instead of feathers.}}
{{History||v0.12.1|snap=build 1|Feathers are no longer available from the [[nether reactor]].}}
{{History|bedrock}}
{{History||1.2.0|snap=beta 1.2.0.2|Feathers can now be used to craft [[book and quill]]s.|Added [[parrot]]s, which [[drop]] feathers.|Feathers can now be used as an ingredient to craft a [[firework star]].}}
{{History||1.4.0|snap=beta 1.2.14.2|Feathers can now be found in [[shipwreck]] [[chest]]s.}}
{{History||1.8.0|snap=beta 1.8.0.8|Feathers can now be given as a gift to the [[player]] by tamed [[cat]]s.}}
{{History||1.10.0|snap=beta 1.10.0.3|[[File:Feather JE3 BE2.png|32px]] The texture of feathers has been changed.|Feathers can now be found in the new [[plains]] [[village]] house.}}
{{History||1.11.0|snap=beta 1.11.0.1|Feathers can now be found in village fletcher [[chest]]s.}}
{{History|||snap=beta 1.11.0.4|Feathers can now be [[trading|sold]] to fletcher [[villager]]s.}}
{{History||1.13.0|snap=beta 1.13.0.1|Added [[fox]]es, which can [[drops|drop]] feathers.}}
{{History||1.20.0<br>(Experimental)|link=Bedrock Edition 1.19.80|snap=beta 1.19.80.20|Feathers can now be used to craft [[brush]]es.}}
{{History|console}}
{{History||xbox=TU1|xbone=CU1|ps=1.0|wiiu=Patch 1|[[File:Feather JE2 BE1.png|32px]] Added feathers.}}
{{History|Ps4}}
{{History||1.90|[[File:Feather JE3 BE2.png|32px]] The texture of feathers has been changed.}}
{{History|New Nintendo 3DS Edition}}
{{History||0.1.0|[[File:Feather JE2 BE1.png|32px]] Added feathers.}}
{{History|foot}}
== Issues ==
{{issue list}}
== References ==
{{reflist}}
== External Links ==
*[https://www.minecraft.net/en-us/article/taking-inventory--feather Taking Inventory: Feather] – Minecraft.net on March 3, 2019
{{Items}}
[[Category:Renewable resources]]
[[cs:Pírko]]
[[de:Feder]]
[[es:Pluma]]
[[fr:Plume]]
[[hu:Toll]]
[[it:Piuma]]
[[ja:羽根]]
[[ko:깃털]]
[[nl:Veer]]
[[pl:Pióro]]
[[pt:Pena]]
[[ru:Перо]]
[[uk:Перо]]
[[zh:羽毛]]</li><li>[[Rotten Flesh|Rotten Flesh]]<br/>{{Item
| title = Rotten Flesh
| image = Rotten Flesh.png
| renewable = Yes
| heals = {{hunger|4}}
|effects={{EffectLink|link=Hunger (status effect)|Hunger}} (0:30) (80% chance)
| stackable = Yes (64)
}}
'''Rotten flesh''' is a [[food]] item that can be eaten by the [[player]], with high risk of inflicting [[Hunger (status effect)|Hunger]] and low [[Saturation]].
== Obtaining ==
=== Mob loot ===
==== Zombies ====
[[Zombie]]s, [[zombie villager]]s, [[zombie horse]]s, [[husk]]s, and [[drowned]] drop from 0 to 2 units of rotten flesh. [[Looting]] can increase this by one per level, for a maximum of 5 rotten flesh.
==== Zoglins ====
[[Zoglin]]s drop 1-3. Looting III grants a maximum of 6.
==== Zombified piglins ====
[[Zombified Piglin|Zombified piglins]] drop 0-1. Looting III grants a maximum of 4.
=== Fishing ===
Rotten flesh can be obtained as a "junk" item while [[fishing]].
=== Chest loot ===
{{LootChestItem|rotten-flesh}}
=== Cat gifts ===
{{main|Cat#Gifts}}
Tamed [[cat]]s have a 70% chance of giving the [[player]] a gift when they wake up from a [[bed]], and the gift has a 16.13% chance to be a rotten flesh.
== Usage ==
=== Food ===
{{see also|Tutorials/Hunger management}}
To eat rotten flesh, press and hold {{control|use}} while rotten flesh is selected in the hotbar.
Eating rotten flesh restores {{hunger|4}} [[hunger]] and 0.8 hunger [[Hunger#Mechanics|saturation]], but has an 80% chance of inflicting {{EffectLink|Hunger (effect)|id=Hunger}} for 30 seconds. Note that the duration does ''not'' accumulate when eating multiple pieces. However, if more is consumed and the [[Hunger (effect)|Hunger]] status effect is inflicted, the duration resets to 30 seconds.
=== Wolves ===
Rotten flesh can be used to [[breed]] and heal tamed [[wolves]], lead them around, and make baby tamed wolves grow up faster by 10% of the remaining time.
Wolves are immune to the Hunger effect.
=== Trading ===
Novice-level [[Trading#Cleric|cleric villagers]] buy 32 rotten flesh for 1 [[emerald]] as part of their trades.
==Sounds==
{{Sound table/Entity/Food}}
== Data values ==
=== ID ===
{{edition|java}}:
{{ID table
|edition=java
|showforms=y
|generatetranslationkeys=y
|displayname=Rotten Flesh
|spritetype=item
|nameid=rotten_flesh
|form=item
|foot=1}}
{{edition|bedrock}}:
{{ID table
|edition=bedrock
|shownumericids=y
|showforms=y
|notshowbeitemforms=y
|generatetranslationkeys=y
|displayname=Rotten Flesh
|spritetype=item
|nameid=rotten_flesh
|id=277
|form=item
|foot=1}}
== Achievements ==
{{load achievements|Iron Belly}}
== Advancements ==
{{load advancements|Husbandry;A Balanced Diet}}
== Video ==
{{Video note|The video is outdated, as rotten flesh can now be also gained from [[fishing]], [[trading]], or loot chests.}}
<div style="text-align:center">{{yt|xTrUEVoe9Tw}}</div>
== History ==
{{History|java beta}}
{{History||1.8|snap=Pre-release|[[File:Rotten Flesh JE1.png|32px]] Added rotten flesh.
|[[Zombie]]s and [[zombie pigmen]] now drop rotten flesh instead of [[feather]]s and [[cooked porkchop]]s respectively.}}
{{History|java}}
{{History||1.0.0|snap=Beta 1.9 Prerelease 2|Food poisoning can now be stopped by drinking [[milk]].}}
{{History||1.2.1|snap=12w03a|Rotten flesh can now be used to [[Breeding|breed]] wolves. When a wolf eats rotten flesh, it will not receive the [[Hunger (effect)|Hunger]] effect.}}
{{History||1.3.1|snap=12w21a|Rotten flesh can now be found in [[desert temple]] [[chest]]s.
|Priest [[villager]]s now [[trading|buy]] rotten flesh.}}
{{History|||snap=1.3|[[File:Rotten Flesh JE2 BE1.png|32px]] The texture of rotten flesh has been changed.}}
{{History|||snap=12w22a|Rotten flesh now generates in [[jungle temple]] chests.
|Priest [[villager]]s no longer [[trading|buy]] rotten flesh.}}
{{History||1.7.2|snap=13w36a|Rotten flesh can now be obtained as one of the "junk" [[item]]s from [[fishing]].}}
{{History||1.8|snap=14w02a|Cleric [[villager]]s now [[trading|buy]] 36–40 rotten flesh for 1 [[emerald]], as their tier I trade.}}
{{history||1.9|snap=15w43a|Rotten flesh may now be found in [[igloo]] basement [[chest]]s.}}
{{history|||snap=15w44a|Rotten flesh now generates in [[dungeon]] chests.
|The average yield of rotten flesh has been decreased in [[desert temple]] chests.}}
{{History||1.11|snap=16w39a|Rotten flesh can now be found in [[woodland mansion]] [[chest]]s.}}
{{History||1.13|snap=17w47a|Prior to [[1.13/Flattening|''The Flattening'']], this [[item]]'s numeral ID was 367.}}
{{History|||snap=18w09a|Rotten flesh now generates in the loot [[chest]]s of [[underwater ruins]].}}
{{History|||snap=18w11a|[[Drowned]] may now [[drops|drop]] rotten flesh upon death.
|Rotten flesh now sometimes generates in [[shipwreck]] [[chest]]s.}}
{{History||1.14|snap=18w43a|[[File:Rotten Flesh JE3 BE2.png|32px]] The texture of rotten flesh has been changed.}}
{{History|||snap=18w44a|[[Cat]]s now offer rotten flesh as [[Cat#Gifts|gift]]s.}}
{{History|||snap=18w50a|Rotten flesh can now be found in [[village]] temple chests.}}
{{History||1.16|snap=20w06a|Added [[hoglin]]s, which can drop rotten flesh if killed.}}
{{History|||snap=20w07a|Rotten flesh has a {{frac|10|109}} (~9.17%) chance of being given by the new [[piglin]]s when [[bartering]], in a stack size of 4–12.
|[[Hoglin]]s no longer drop rotten flesh.}}
{{History|||snap=20w09a|Rotten flesh can no longer be obtained by bartering with piglins.}}
{{History|||snap=20w14a|Added [[zoglin]]s, which drop rotten flesh when killed.}}
{{History|pocket alpha}}
{{History||v0.11.0|snap=build 1|[[File:Rotten Flesh JE2 BE1.png|32px]] Added rotten flesh.
|As the hunger bar has not yet been added, rotten flesh inflicts [[poison]] rather than [[hunger]].
|[[Zombie]]s and [[zombie pigmen]] now [[drops|drop]] rotten flesh.}}
{{History|||snap=build 11|Rotten flesh can now be used to feed [[wolves]].}}
{{History||v0.12.1|snap=build 1|Eating rotten flesh now gives the [[player]] the [[Hunger]] status effect.
|Rotten flesh now restores [[hunger]] instead of [[health]].
|Added [[zombie villager]]s, which [[drops|drop]] rotten flesh when killed.}}
{{History||v0.13.0|snap=build 1|Rotten flesh can now be found inside [[desert temple]] [[chest]]s.}}
{{History||v0.15.0|snap=build 1|Added [[husk]]s and [[zombie horse]]s, both of which drop rotten flesh when killed.
|Rotten flesh can now be found inside [[jungle temple]] chests.}}
{{History|pocket}}
{{History||1.0.0|snap=alpha 0.17.0.1|Rotten flesh can now be found inside the basement [[chest]]s of [[igloo]]s.}}
{{History||1.0.4|snap=alpha 1.0.4.0|36-40 rotten flesh can now be [[trading|sold]] to cleric [[villager]]s.}}
{{History||1.1.0|snap=alpha 1.1.0.0|Rotten flesh can now be found in [[woodland mansion]] chests.}}
{{History|bedrock}}
{{History||1.4.0|snap=beta 1.2.13.8|Added [[drowned]], which [[drops|drop]] rotten flesh when killed.}}
{{History|||snap=beta 1.2.14.2|Rotten flesh can now be found in some [[shipwreck]] [[chest]]s.}}
{{History|||snap=beta 1.2.20.1|Rotten flesh can now be found inside [[underwater ruins]] chests.}}
{{History||1.8.0|snap=beta 1.8.0.8|Tamed [[cat]]s can now give the [[player]] rotten flesh as a gift.}}
{{History||1.10.0|snap=beta 1.10.0.3|[[File:Rotten Flesh JE3 BE2.png|32px]] The texture of rotten flesh has been changed.}}
{{History||1.11.0|snap=beta 1.11.0.1|Rotten flesh can now be found in [[desert]] [[village]] temple [[chest]]s.}}
{{History|||snap=beta 1.11.0.4|[[Trading]] has been changed, cleric [[villager]]s now [[trading|buy]] 32 rotten flesh for an [[emerald]].}}
{{History|console}}
{{History||xbox=TU5|xbone=CU1|ps=1.0|wiiu=Patch 1|switch=1.0.1|[[File:Rotten Flesh JE2 BE1.png|32px]] Added rotten flesh.}}
{{History||xbox=none|xbone=none|ps=1.90|wiiu=none|switch=none|[[File:Rotten Flesh JE3 BE2.png|32px]] The texture of rotten flesh has been changed.}}
{{History|new3ds}}
{{History||0.1.0|[[File:Rotten Flesh JE2 BE1.png|32px]] Added rotten flesh.}}
{{History|foot}}
== Issues ==
{{issue list}}
== External Links ==
*[https://www.minecraft.net/en-us/article/taking-inventory--rotten-flesh Taking Inventory: Rotten Flesh] – Minecraft.net on June 8, 2020
{{Items}}
[[cs:Shnilé maso]]
[[de:Verrottetes Fleisch]]
[[es:Carne podrida]]
[[fr:Chair putréfiée]]
[[hu:Rohadt hús]]
[[it:Carne marcia]]
[[ja:腐った肉]]
[[ko:썩은 살점]]
[[nl:Bedorven vlees]]
[[pl:Zgniłe mięso]]
[[pt:Carne podre]]
[[ru:Гнилая плоть]]
[[uk:Гнила плоть]]
[[zh:腐肉]]
[[Category:Renewable resources]]
[[Category:Food]]</li></ul> | Custom skins released. | ||||
| alpha | |||||
1.2.2{{Extension DPL}}<ul><li>[[Purple Dye|Purple Dye]]<br/>{{Item
| image = Purple_Dye_JE2_BE2.png
| renewable = Yes
| stackable = Yes (64)
}}
'''Purple dye''' is a [[Dyeing#Secondary colors|secondary dye color]] created by combining [[red dye]] and [[blue dye]] in a crafting grid.
== Obtaining ==
=== Crafting ===
{{Crafting
|head=1
|showname=0
|Blue Dye
|Red Dye
|Output=Purple Dye,2
|type=Material
}}
{{Crafting
|foot=1
|Lapis Lazuli
|Red Dye
|Output=Purple Dye,2
|description={{only|bedrock|education}}
|type=Material
}}
=== Trading ===
[[Wandering trader]]s sometimes sell 3 purple dye for an [[emerald]].
== Usage ==
{{dye usage}}
=== Crafting ingredient ===
{{crafting usage|ignore=Banner|continue=1}}
{{banner crafting usage}}
=== Loom ingredient ===
{{Banner loom usage|Purple Dye}}
=== Trading ===
Apprentice-level Shepherd villagers have a 20% chance to buy 12 purple dye for an emerald as part of their trades.{{only|bedrock}}
Expert-level Shepherd villagers have a {{frac|2|7}} chance to buy 12 purple dye for an emerald.{{only|java}}
== Data values ==
=== ID ===
{{edition|java}}:
{{ID table
|edition=java
|showforms=y
|generatetranslationkeys=y
|displayname=Purple Dye
|spritetype=item
|nameid=purple_dye
|form=item
|foot=1}}
{{edition|bedrock}}:
{{ID table
|edition=bedrock
|showaliasids=y
|shownumericids=y
|showforms=y
|notshowbeitemforms=y
|generatetranslationkeys=y
|displayname=Purple Dye
|spritetype=item
|nameid=purple_dye
|aliasid=dye / 5
|id=400
|form=item
|translationkey=item.dye.purple.name
|foot=1}}
== Video ==
<div style="text-align:center">{{yt|Cx52CGo5QnI}}</div>
== History ==
{{History|java beta}}
{{History||1.2|[[File:Purple Dye JE1 BE1.png|32px]] Added purple dye.}}
{{History|java}}
{{History||1.4.2|snap=12w34a|Added the ability to [[Armor#Dyeing|dye]] leather [[armor]] and [[wolf]] collars.}}
{{History||1.4.6|snap=12w49a|Purple dye can now be [[crafting|crafted]] with [[gunpowder]] to create a [[firework star]].}}
{{History||1.6.1|snap=13w19a|[[Stained clay]] can now be crafted.}}
{{history||1.7.2|snap=13w36a|With the addition of new [[flower]]s, many secondary and tertiary dyes are now primary [[dye]]s.}}
{{History|||snap=13w41a|[[Stained glass]] can now be crafted.}}
{{History||1.8|snap=14w02a|Due to [[lapis lazuli]] being [[renewable resource|renewable]] now, purple dye is also now renewable.}}
{{History|||snap=14w30a|Added [[banner]]s which can be dyed.}}
{{History||1.13|snap=17w47a|The different data values for the <code>dye</code> ID have now been split up into their own IDs.
|Prior to [[1.13/Flattening|''The Flattening'']], this [[item]]'s numeral ID was 351.}}
{{History||1.14|snap=18w43a|Purple dye is now [[crafting|crafted]] using [[blue dye]], instead of [[lapis lazuli]].
|[[File:Purple_Dye_JE2_BE2.png|32px]] The texture of purple dye has now been changed.}}
{{History|||snap=18w44a|Purple dye can now change the text color on [[sign]]s to purple.}}
{{History|||snap=19w05a|Added the [[wandering trader]], which sells purple dye.}}
{{History|||snap=19w11a|Purple dye can now be [[trading|bought]] by shepherd villagers.}}
{{History||1.17|snap=20w45a|Purple dye can now be used to craft [[purple candle]]s.}}
{{History|||snap=21w19a|Purple dye can no longer be used to craft purple candles.}}
{{History|||snap=Pre-release 1|Purple dye can once again be used to craft purple candles.}}
{{History||1.20<br>(Experimental)|link=1.19.3|snap=22w42a|Purple dye can now change the text color on [[hanging sign]]s to purple.}}
{{History|pocket alpha}}
{{History||v0.3.0|[[File:Purple Dye JE1 BE1.png|32px]] Added purple dye. It is currently unobtainable and serves no purpose.}}
{{History||v0.4.0|Purple dye is now [[craft]]able with rose red and lapis lazuli.
|Purple dye can now be used to craft purple [[wool]].}}
{{History||v0.6.0|Purple dye can now be used to dye [[sheep]].}}
{{History||v0.8.0|snap=build 1|Purple dye can now be used to craft [[magenta dye]].}}
{{History||v0.9.0|snap=build 11|Purple dye can now be used to craft colored [[terracotta]].}}
{{History||v0.11.0|snap=build 1|Purple dye can now be used to dye tamed [[wolf]] collars.}}
{{History||v0.14.0|snap=build 1|Purple dye can now be used to dye [[water]] in [[cauldron]]s.}}
{{History|pocket}}
{{History||1.0.0|snap=alpha 0.17.0.1|Purple dye can now be used to dye [[shulker]]s.}}
{{History||1.1.0|snap=alpha 1.1.0.0|Purple dye can now be used to craft [[concrete powder]], colored [[bed]]s and dyed [[shulker box]]es.}}
{{History|bedrock}}
{{History||1.2.0|snap=beta 1.2.0.2|Purple dye can now be used to craft [[firework star]]s, [[stained glass]] and patterns on [[banner]]s.}}
{{History||1.4.0|snap=beta 1.2.20.1|Purple dye can now be used to craft [[balloon]]s and [[glow stick]]s.}}
{{History||1.8.0|snap=beta 1.8.0.8|Purple dye can now be used to dye tamed [[cat]] collars.}}
{{History||1.10.0|snap=beta 1.10.0.3|Purple dye is now [[trading|sold]] by [[wandering trader]]s.
|Purple dye can now be used to dye white [[carpet]]s and undyed [[glass pane]]s.
|[[File:Purple_Dye_JE2_BE2.png|32px]] The texture of purple dye has now been changed.}}
{{History||1.11.0|snap=beta 1.11.0.4|Purple dye can now be [[trading|sold]] to shepherd [[villager]]s.}}
{{History||1.16.100|snap=beta 1.16.100.56|The ID of purple dye has been changed from <code>dye/5</code> to <code>purple_dye</code>.}}
{{History|console}}
{{History||xbox=TU1|xbone=CU1|ps=1.00|switch=1.0.1|wiiu=Patch 1|[[File:Purple Dye JE1 BE1.png|32px]] Added purple dye.}}
{{History|PS4}}
{{History||1.90|[[File:Purple_Dye_JE2_BE2.png|32px]] The texture of purple dye has now been changed.}}
{{History|new 3ds}}
{{History||0.1.0|[[File:Purple Dye JE1 BE1.png|32px]] Added purple dye.}}
{{History|foot}}
== Issues ==
{{issue list}}
{{Items}}
[[Category:Items]]
[[Category:Dyes]]
[[Category:Renewable resources]]
[[cs:Fialové barvivo]]
[[de:Violetter Farbstoff]]
[[es:Tinte morado]]
[[fr:Teinture violette]]
[[hu:Lila festék]]
[[ja:紫色の染料]]
[[ko:보라색 염료]]
[[nl:Paarse kleurstof]]
[[pl:Fioletowy barwnik]]
[[pt:Corante roxo]]
[[ru:Фиолетовый краситель]]
[[zh:紫色染料]]</li><li>[[Melon Seeds|Melon Seeds]]<br/>{{Block
|image = <gallery>
Melon Stem Age 0.png | Age 0
Melon Stem Age 1.png | Age 1
Melon Stem Age 2.png | Age 2
Melon Stem Age 3.png | Age 3
Melon Stem Age 4.png | Age 4
Melon Stem Age 5.png | Age 5
Melon Stem Age 6.png | Age 6
Melon Stem Age 7.png | Age 7
</gallery>
| image2 = <gallery>
Attached Melon Stem (N).png | North
Attached Melon Stem (E).png | East
Attached Melon Stem (S).png | South
Attached Melon Stem (W).png | West
</gallery>
| transparent = Yes
| light = No
| tool = none
| renewable = Yes
| stackable = Yes (64)
| flammable = No
| lavasusceptible = No
}}'''Melon seeds''' are items obtained from [[Melon Slice|melon slices]] that can be used to grow melon stems.
'''Melon stems''' are plants grown on [[farmland]] that, over time, grow [[melon]]s on dirt, mud and moss blocks adjacent to them.
== Obtaining ==
=== Breaking ===
When broken, a melon stem drops 0–3 melon seeds. The chance for melon seeds to drop increases with the stem's age.
{| class="wikitable"
! rowspan="3" |[[Resource location]]
! rowspan="3" | Source
! colspan="4" | Default
|-
| colspan="1" rowspan="2" style="text-align:center" | Nothing || colspan="3" style="text-align:center" |{{ItemLink|Melon Seeds|Melon seeds}}
|-
| style="text-align:center" | 1 || style="text-align:center" | 2 || style="text-align:center" | 3
|-
| rowspan="8" |<code>blocks/melon_stem</code>
|{{BlockLink|Melon Stem|Melon stem}} <code>age = 0</code>
| style="text-align:center" |81.3%|| style="text-align:center" |17.42%|| style="text-align:center" |1.24%|| style="text-align:center" |0.03%
|-
|{{BlockLink|Melon Stem|Melon stem}} <code>age = 1</code>
| style="text-align:center" |65.1%|| style="text-align:center" |30.04%|| style="text-align:center" |4.62%|| style="text-align:center" |0.24%
|-
|{{BlockLink|Melon Stem|Melon stem}} <code>age = 2</code>
| style="text-align:center" |51.2%|| style="text-align:center" |38.4%|| style="text-align:center" |9.6%|| style="text-align:center" |0.8%
|-
|{{BlockLink|Melon Stem|Melon stem}} <code>age = 3</code>
| style="text-align:center" |39.44%|| style="text-align:center" |43.02%|| style="text-align:center" |15.64%|| style="text-align:center" |1.9%
|-
|{{BlockLink|Melon Stem|Melon stem}} <code>age = 4</code>
| style="text-align:center" |29.13%|| style="text-align:center" |44.44%|| style="text-align:center" |22.22%|| style="text-align:center" |3.7%
|-
|{{BlockLink|Melon Stem|Melon stem}} <code>age = 5</code>
| style="text-align:center" |21.6%|| style="text-align:center" |43.2%|| style="text-align:center" |28.8%|| style="text-align:center" |6.4%
|-
|{{BlockLink|Melon Stem|Melon stem}} <code>age = 6</code>
| style="text-align:center" |15.17%|| style="text-align:center" |39.82%|| style="text-align:center" |34.84%|| style="text-align:center" |10.16%
|-
|{{BlockLink|Melon Stem|Melon stem}} <code>age = 7</code>
| style="text-align:center" |10.16%|| style="text-align:center" |34.84%|| style="text-align:center" |39.82%|| style="text-align:center" |15.17%
|-
| rowspan="1" |<code>blocks/attached_melon_stem</code>
|{{BlockLink|Attached Melon Stem|Attached Melon stem}}
| style="text-align:center" |10.16%|| style="text-align:center" |34.84%|| style="text-align:center" |39.82%|| style="text-align:center" |15.17%
|}
=== Natural generation ===
Melon stems generate naturally in stem farm inside [[woodland mansion]]s.
Melon stems generate in 20% of the farm plots in [[savanna]] [[village]]s, and 10% of the farm plots in [[desert]] villages.
=== Chest loot ===
{{LootChestItem|melon-seeds}}
=== Crafting ===
{{Crafting
|Melon Slice
|Output= Melon Seeds
|type= Material
}}
=== Trading ===
[[Wandering trader]]s sell melon seeds for 1 [[emerald]].
== Usage ==
=== Farming ===
{{see also|Tutorials/Pumpkin and melon farming}}
Melon seeds can be planted only on [[farmland]], as stems. Over time, a stem grows through several stages<sup>[''[[Talk:Pumpkin Seeds|needs testing]]'']</sup> and, at its final growth stage, will produce [[melon]]s on any adjacent [[dirt]], [[Coarse Dirt|coarse dirt]], [[Rooted Dirt|rooted dirt]], [[Grass Block|grass block]], [[farmland]], [[podzol]], [[mycelium]], [[Moss Block|moss block]], [[mud]] or [[Muddy Mangrove Roots|muddy mangrove roots]]. If a melon is already occupying a spot adjacent to a stem it does not grow more melons until the melons is removed. A single stem can grow an unlimited number of melons. Melon stems need a minimum light level of 10 in the block above the stem to grow and give melons. Melon seeds are affected by [[bone meal]] only with respect to stem growth; bone meal does not help produce the actual melons.
=== Breeding ===
Like other seeds, melon seeds can be used to [[breed]] [[chicken]]s, lead chickens around, and make baby chickens grow up faster by 10% of the remaining time.
=== Taming ===
Like other seeds, melon seeds can be used to tame [[parrot]]s.
=== Composting ===
Placing melon seeds into a [[composter]] has a 30% chance of raising the compost level by 1.
== Melon Stem ==
A '''melon stem''' is the block that is planted on [[farmland]] when melon seeds are used on it. It starts underground, and rises up as the plant grows. The stem is colored green when young, and then yellow once fully grown.
The stem curves once a melon has grown from it. A fully-grown single stem connects to any [[melon]] in an adjacent square, thus there are 5 possible appearances to a stem. If there are multiple melons it can connect to, it favors the east, then west, north, and south. When the melon is removed, the stem returns to its straight shape.
== Sounds ==
{{Sound table/Block/Hard crop}}
== Data values ==
=== ID ===
{{edition|java}}:
{{ID table
|edition=java
|showblocktags=y
|showforms=y
|generatetranslationkeys=y
|displayname=Melon Stem
|spritetype=block
|nameid=melon_stem
|blocktags=bee_growables, crops
|form=block}}
{{ID table
|displayname=Attached Melon Stem
|spritetype=block
|nameid=attached_melon_stem
|form=block}}
{{ID table
|displayname=Melon Seeds
|spritetype=item
|nameid=melon_seeds
|form=item
|foot=1}}
{{edition|bedrock}}:
{{ID table
|edition=bedrock
|shownumericids=y
|showforms=y
|generatetranslationkeys=y
|displayname=Melon Stem
|spritetype=block
|nameid=melon_stem
|id=105
|form=block
|translationkey=-}}
{{ID table
|displayname=Melon Seeds
|spritetype=item
|nameid=melon_seeds
|id=293
|form=item
|foot=1}}
=== Block states ===
{{see also|Block states}}
{{/BS}}
== Advancements ==
{{load advancements|A Seedy Place}}
== History ==
{{info needed section|check if stems floated above farmland upon initial implementation}}
{{History|java beta}}
{{History||1.8|snap=Pre-release|[[File:Melon Seeds JE1 BE1.png|32px]] Added melon seeds.
|[[File:Melon Stem Age 0 JE1.png|32px]] [[File:Stem Age 1 JE1.png|32px]] [[File:Melon Stem Age 2 JE1.png|32px]] [[File:Melon Stem Age 3 JE1.png|32px]] [[File:Melon Stem Age 4 JE1.png|32px]] [[File:Melon Stem Age 5 JE1.png|32px]] [[File:Melon Stem Age 6 JE1.png|32px]] [[File:Melon Stem Age 7 JE1.png|32px]] Added the melon stem, with seven stages of growth.
|Melon seeds can found in the new [[mineshaft]] [[chest]]s.
|[[File:Attached Melon Stem (N) JE1.png|32px]] [[File:Attached Melon Stem (E) JE1.png|32px]] [[File:Attached Melon Stem (S) JE1.png|32px]] [[File:Attached Melon Stem (W) JE1.png|32px]] Melon stems have four slightly visually distinct appearances for each facing direction - the bent part of the stem rotates, but the other two planes do not.
|[[File:Melon Stem Age 8 JE1.png|32px]] [[File:Melon Stem Age 9 JE1.png|32px]] [[File:Melon Stem Age 10 JE1.png|32px]] [[File:Melon Stem Age 11 JE1.png|32px]] [[File:Melon Stem Age 12 JE1.png|32px]] [[File:Melon Stem Age 13 JE1.png|32px]] [[File:Melon Stem Age 14 JE1.png|32px]] [[File:Melon Stem Age 15 JE1.png|32px]] Melon stem data values 8–15 now show a glitched formation, with a floating stem with an attached stem cross eventually emerging below.
|[[File:Attached Stem Age 8 JE1.png|32px]] [[File:Attached Stem Age 9 JE1.png|32px]] [[File:Attached Stem Age 10 JE1.png|32px]] [[File:Attached Stem Age 11 JE1.png|32px]] [[File:Attached Stem Age 12 JE1.png|32px]] [[File:Attached Stem Age 13 JE1.png|32px]] [[File:Attached Stem Age 14 JE1.png|32px]] [[File:Attached Stem Age 15 JE1.png|32px]] Melon stem blocks with data values higher than 7 can now attach to adjacent fruits, which results in buggy stem textures with [[vines]] in the mix due to vines being below attached stems in [[terrain.png]].}}
{{History|||snap=Pre-release 2 ;)|Melon stems can now be grown faster using [[bone meal]].}}
{{History|java}}
{{History||1.3.1|snap=1.3|The texture of melon stems has been moved one pixel to the left in [[terrain.png]].
|[[File:Melon Stem Age 0 JE2.png|32px]] [[File:Melon Stem Age 1 JE2.png|32px]] [[File:Melon Stem Age 2 JE2.png|32px]] [[File:Melon Stem Age 3 JE2.png|32px]] [[File:Melon Stem Age 4 JE2.png|32px]] [[File:Melon Stem Age 5 JE2.png|32px]] [[File:Melon Stem Age 6 JE2.png|32px]] [[File:Melon Stem Age 7 JE2.png|32px]] Stems now appear slightly different.
|[[File:Melon Stem Age 8 JE2.png|32px]] [[File:Melon Stem Age 9 JE2.png|32px]] [[File:Melon Stem Age 10 JE2.png|32px]] [[File:Melon Stem Age 11 JE2.png|32px]] [[File:Melon Stem Age 12 JE2.png|32px]] [[File:Melon Stem Age 13 JE2.png|32px]] [[File:Melon Stem Age 14 JE2.png|32px]] [[File:Melon Stem Age 15 JE2.png|32px]] Overgrown stems now appear slightly different.
|[[File:Attached Melon Stem (N) JE2.png|32px]] [[File:Attached Melon Stem (E) JE2.png|32px]] [[File:Attached Melon Stem (S) JE2.png|32px]] [[File:Attached Melon Stem (W) JE2.png|32px]] Attached melon stems now appear slightly different.
|[[File:Attached Stem Age 8 JE2.png|32px]] [[File:Attached Stem Age 9 JE2.png|32px]] [[File:Attached Stem Age 10 JE2.png|32px]] [[File:Attached Stem Age 11 JE2.png|32px]] [[File:Attached Stem Age 12 JE2.png|32px]] [[File:Attached Stem Age 13 JE2.png|32px]] [[File:Attached Stem Age 14 JE2.png|32px]] [[File:Attached Stem Age 15 JE2.png|32px]] Overgrown attached melon stems now appear slightly different.}}
{{History||1.4.2|snap=12w36a|[[Chicken]]s now use [[wheat seeds]], melon seeds, and [[pumpkin seeds]], instead of [[wheat]] to breed.}}
{{History||1.5|snap=13w02a|[[File:Melon Stem Age 0 JE3.png|32px]] [[File:Melon Stem Age 1 JE3.png|32px]] [[File:Melon Stem Age 2 JE3.png|32px]] [[File:Melon Stem Age 3 JE3.png|32px]] [[File:Melon Stem Age 4 JE3.png|32px]] [[File:Melon Stem Age 5 JE3.png|32px]] [[File:Melon Stem Age 6 JE3.png|32px]] Melon stems now use a squished version of their texture for immature stems, depending on age.
|[[File:Melon Stem Age 8 JE3.png|32px]] [[File:Melon Stem Age 9 JE3.png|32px]] [[File:Melon Stem Age 10 JE3.png|32px]] [[File:Melon Stem Age 11 JE3.png|32px]] [[File:Melon Stem Age 12 JE3.png|32px]] [[File:Melon Stem Age 13 JE3.png|32px]] [[File:Melon Stem Age 14 JE3.png|32px]] [[File:Melon Stem Age 15 JE3.png|32px]] This also affects melon stems of ages 8–15, which are likewise stretched to accommodate its predicted size.
|[[File:Attached Stem Age 8 JE3.png|32px]] [[File:Attached Stem Age 9 JE3.png|32px]] [[File:Attached Stem Age 10 JE3.png|32px]] [[File:Attached Stem Age 11 JE3.png|32px]] [[File:Attached Stem Age 12 JE3.png|32px]] [[File:Attached Stem Age 13 JE3.png|32px]] [[File:Attached Stem Age 14 JE3.png|32px]] [[File:Attached Stem Age 15 JE3.png|32px]] Melon stems of extreme ages, which are attached to adjacent fruits, now show a stretched and tinted stem appearance.}}
{{History|||snap=13w03a|[[File:Melon Stem Age 0 JE4.png|32px]] [[File:Melon Stem Age 1 JE4.png|32px]] [[File:Melon Stem Age 2 JE4.png|32px]] [[File:Melon Stem Age 3 JE4.png|32px]] [[File:Melon Stem Age 4 JE4.png|32px]] [[File:Melon Stem Age 5 JE4.png|32px]] [[File:Melon Stem Age 6 JE4.png|32px]] [[File:Melon Stem Age 7 JE4.png|32px]] Melon stems are no longer squished or stretched to account for age.<ref>{{bug|MC-7111}}</ref>
|[[File:Melon Stem Age 8 JE4.png|32px]] [[File:Melon Stem Age 9 JE4.png|32px]] [[File:Melon Stem Age 10 JE4.png|32px]] [[File:Melon Stem Age 11 JE4.png|32px]] [[File:Melon Stem Age 12 JE4.png|32px]] [[File:Melon Stem Age 13 JE4.png|32px]] [[File:Melon Stem Age 14 JE4.png|32px]] [[File:Melon Stem Age 15 JE4.png|32px]] Melon stems with age values 8 through 15 now show a tinted [[trapdoor]] texture.
|From this version up until 14w08a, overgrown melon stems start to draw from the texture below them on the [[texture atlas]], in much the same way they previously did with terrain.png. However, as texture atlases are unstable and textures tend to change positions as new blocks and textures are added, overgrown stems change the texture they draw from every time new textures are added, which includes when textures added by [[mods]].}}
{{History|||snap=13w09a|[[File:Melon Stem Age 8 JE5.png|32px]] [[File:Melon Stem Age 9 JE5.png|32px]] [[File:Melon Stem Age 10 JE5.png|32px]] [[File:Melon Stem Age 11 JE5.png|32px]] [[File:Melon Stem Age 12 JE5.png|32px]] [[File:Melon Stem Age 13 JE5.png|32px]] [[File:Melon Stem Age 14 JE5.png|32px]] [[File:Melon Stem Age 15 JE5.png|32px]] Melon stems with age values 8–15 now show a tinted [[birch wood]] texture.}}
{{History||1.6.1|snap=13w24a|Melon and pumpkin stems have now been assigned separate textures.
|[[File:Melon Stem Age 8 JE6.png|32px]] [[File:Melon Stem Age 9 JE6.png|32px]] [[File:Melon Stem Age 10 JE6.png|32px]] [[File:Melon Stem Age 11 JE6.png|32px]] [[File:Melon Stem Age 12 JE6.png|32px]] [[File:Melon Stem Age 13 JE6.png|32px]] [[File:Melon Stem Age 14 JE6.png|32px]] [[File:Melon Stem Age 15 JE6.png|32px]] Melon stems with age values 8–15 now show a tinted [[note block]] texture.}}
{{History||1.7.2|snap=13w37a|Added the {{cmd|setblock}} [[commands|command]], allowing for invalid stem ages to be placed in the world without using external editors. This also allows them to be obtained in earlier versions via backdating.}}
{{History|||snap=13w41a|[[File:Melon Stem Age 8 JE7.png|32px]] [[File:Melon Stem Age 9 JE7.png|32px]] [[File:Melon Stem Age 10 JE7.png|32px]] [[File:Melon Stem Age 11 JE7.png|32px]] [[File:Melon Stem Age 12 JE7.png|32px]] [[File:Melon Stem Age 13 JE7.png|32px]] [[File:Melon Stem Age 14 JE7.png|32px]] [[File:Melon Stem Age 15 JE7.png|32px]] Melon stems with age values 8–15 now show a tinted [[netherrack]] texture.}}
{{History||1.8|snap=14w10a|[[File:Melon Stem Age 8 JE8.png|32px]] [[File:Melon Stem Age 9 JE8.png|32px]] [[File:Melon Stem Age 10 JE8.png|32px]] [[File:Melon Stem Age 11 JE8.png|32px]] Melon stems with data values 8–11 now display a tinted attached stem, with 8 facing west, 9 facing east, 10 facing north and 11 facing south.
|Invalid melon stems with data values 12-15 now crash the game.}}
{{History|||snap=14w25a|[[File:Melon Stem Age 0 JE5.png|32px]] [[File:Melon Stem Age 1 JE5.png|32px]] [[File:Melon Stem Age 2 JE5.png|32px]] [[File:Melon Stem Age 3 JE5.png|32px]] [[File:Melon Stem Age 4 JE5.png|32px]] [[File:Melon Stem Age 5 JE5.png|32px]] [[File:Melon Stem Age 6 JE5.png|32px]] [[File:Melon Stem Age 7 JE5.png|32px]] Melon stems now render as a single diagonal plane, or, in the case of attached stems, a diagonal and orthogonal plane.
|[[File:Attached Melon Stem (N) JE3.png|32px]] [[File:Attached Melon Stem (E) JE3.png|32px]] [[File:Attached Melon Stem (S) JE3.png|32px]] [[File:Attached Melon Stem (W) JE3.png|32px]] The attached melon stem [[model]] now fully rotates to the direction the stem points. Prior to this update, the base of the melon stem would stay the same while the long attaching section would differ, resulting in four possible attached stem appearances.
|Invalid overgrown melon stems have effectively been removed from the game, as attempting to place an out of range stem via {{cmd|setblock}} creates a stem of age 0 and loading a world with such stems existing causes a game crash.}}
{{History|||snap=14w26a|[[File:Melon Stem Age 0 JE6.png|32px]] [[File:Melon Stem Age 1 JE6.png|32px]] [[File:Melon Stem Age 2 JE6.png|32px]] [[File:Melon Stem Age 3 JE6.png|32px]] [[File:Melon Stem Age 4 JE6.png|32px]] [[File:Melon Stem Age 5 JE6.png|32px]] [[File:Melon Stem Age 6 JE6.png|32px]] [[File:Melon Stem Age 7 JE6.png|32px]] [[File:Attached Melon Stem (N) JE4.png|32px]] [[File:Attached Melon Stem (E) JE4.png|32px]] [[File:Attached Melon Stem (S) JE4.png|32px]] [[File:Attached Melon Stem (W) JE4.png|32px]] Melon stems now correctly render as crosses again.<ref>{{bug|MC-58136}}</ref>}}
{{History|||snap=14w27a|[[File:Attached Stem Age 0 14w27a.png|32px]] [[File:Attached Stem Age 1 14w27a.png|32px]] [[File:Attached Stem Age 2 14w27a.png|32px]] [[File:Attached Stem Age 3 14w27a.png|32px]] [[File:Attached Stem Age 4 14w27a.png|32px]] [[File:Attached Stem Age 5 14w27a.png|32px]] [[File:Attached Stem Age 6 14w27a.png|32px]] Due to a bug, all melon stems appear attached regardless of age or any actual attachment.<ref>{{bug|MC-60208}}</ref>}}
{{History|||snap=14w28a|All melon stems appearing attached regardless of age or any actual attachment has been fixed. However, melon stems still appear attached to adjacent fruits regardless of age due to a similar bug.<ref>{{bug|MC-61716}}</ref>}}
{{History|||snap=14w34d|Melon seeds can no longer be used for [[breeding]] [[chicken]]s.}}
{{History||1.9|snap=15w31a|Chickens can now use melon seeds to breed again.}}
{{History|||snap=15w44a|Melon seeds have been added to [[dungeon]] [[chest]]s.
|The average yield of melon seeds from [[mineshaft]] chests has been decreased.}}
{{History|||snap=15w45a|Melon stems must now be fully grown again to attach.}}
{{History||1.11|snap=16w39a|Melon seeds can now be found inside chests in the new [[woodland mansion]]s.
|Melon crops now generate inside woodland mansions.}}
{{History||1.12|snap=17w18b|Placing a melon seeds in farmland now gives the player the "A Seedy Place" [[advancement]].{{verify}}}}
{{History||1.13|snap=17w47a|The different block states for the <code>melon_stem</code> ID have been split up into their own IDs.
|Prior to [[1.13/Flattening|''The Flattening'']], this [[block]]'s numeral ID was 105, and the [[item]]'s 362.}}
{{History|||snap=17w48a|Attached melon stems no longer [[drops|drop]] seeds.}}
{{History||1.14|snap=18w43a|[[File:Attached Melon Stem (N) JE5.png|32px]] [[File:Attached Melon Stem (E) JE5.png|32px]] [[File:Attached Melon Stem (S) JE5.png|32px]] [[File:Attached Melon Stem (W) JE5.png|32px]] The texture of attached melon stems has been changed.}}
{{History|||snap=18w49a|Melon stems now generate in the updated [[savanna]] [[village]]s.}}
{{History|||snap=18w50a|Melon stems now generate in the updated [[desert]] [[village]]s.}}
{{History|||snap=19w03a|Placing melon seeds into the new [[composter]] has a 10% chance of raising the compost level by 1.}}
{{History|||snap=19w05a|Melon seeds now have a 30% chance of increasing the compost level in a composter by 1.
|Added [[Wandering Trader|wandering trader]]s, which sell melon seeds.}}
{{History||1.15|snap=19w34a|[[Bee]]s can now pollinate melon stems.}}
{{History|||snap=19w39a|Attached melon stems now [[drops|drop]] seeds again.<ref>{{bug|MC-136360}}</ref>}}
{{History||1.18|snap=Pre-release 5|[[File:Melon Seeds JE2.png|32px]] The texture of melon seeds has been changed.}}
{{History|pocket alpha}}
{{History||v0.5.0|Added melon seeds.
|[[File:Melon Stem Age 0 JE1.png|32px]] [[File:Stem Age 1 JE1.png|32px]] [[File:Melon Stem Age 2 JE1.png|32px]] [[File:Melon Stem Age 3 JE1.png|32px]] [[File:Melon Stem Age 4 JE1.png|32px]] [[File:Melon Stem Age 5 JE1.png|32px]] [[File:Melon Stem Age 6 JE1.png|32px]] [[File:Melon Stem Age 7 JE1.png|32px]] [[File:Attached Melon Stem (N) JE1.png|32px]] [[File:Attached Melon Stem (E) JE1.png|32px]] [[File:Attached Melon Stem (S) JE1.png|32px]] [[File:Attached Melon Stem (W) JE1.png|32px]]{{verify|Are these models correct?}} Added melon stems.}}
{{History||v0.6.0|[[File:Melon Seeds JE1 BE1.png|32px]] Melon seeds no longer use the pumpkin seeds texture.}}
{{History||v0.9.0|snap=?|Melon seeds can now be found in [[mineshaft]] chests.}}
{{History||v0.12.1|snap=build 1|Melon seeds are no longer available from the [[Nether reactor]].}}
{{History||v0.14.0|snap=build 1|Melon seeds can now be found in [[minecart with chest|minecarts with chests]] in [[mineshaft]]s.}}
{{History|pocket}}
{{History||1.0.0|snap=alpha 0.17.0.1|Melon seeds now generate inside [[dungeon]] [[chest]]s.}}
{{History||1.1.0|snap=alpha 1.1.0.0|Melon crops now generate inside [[woodland mansion]]s.
|Melon seeds can now be found in woodland mansion chests.}}
{{History|bedrock}}
{{History||1.2.0|snap=beta 1.2.0.2|Melon seeds can now be found inside [[bonus chest]]s.
|Melon seeds are now used to tame [[parrot]]s.}}
{{History||1.10.0|snap=beta 1.10.0.3|[[File:Attached Melon Stem (W) JE5.png|32px]]{{info needed|More accurate image}} The texture of attached melon stems has been changed.
|Melon stems now generate in [[savanna]] and [[desert]] [[village]] farms.
|Added [[wandering trader]]s, who [[trading|sell]] melon seeds.}}
{{History||1.11.0|snap=beta 1.11.0.1|Melon seeds can now be used to fill up [[composter]]s.}}
{{History||1.14.0|snap=beta 1.14.0.1|[[Bee]]s can now pollinate melon stems.}}
{{History|console}}
{{History||xbox=TU5|xbone=CU1|ps=1.0|wiiu=Patch 1|[[File:Melon Seeds JE1 BE1.png|32px]] Added melon seeds.
|[[File:Melon Stem Age 0 JE1.png|32px]] [[File:Stem Age 1 JE1.png|32px]] [[File:Melon Stem Age 2 JE1.png|32px]] [[File:Melon Stem Age 3 JE1.png|32px]] [[File:Melon Stem Age 4 JE1.png|32px]] [[File:Melon Stem Age 5 JE1.png|32px]] [[File:Melon Stem Age 6 JE1.png|32px]] [[File:Melon Stem Age 7 JE1.png|32px]] [[File:Attached Melon Stem (N) JE1.png|32px]] [[File:Attached Melon Stem (E) JE1.png|32px]] [[File:Attached Melon Stem (S) JE1.png|32px]] [[File:Attached Melon Stem (W) JE1.png|32px]]{{verify|Are these models correct?}} Added melon stems.}}
{{History||xbox=none|xbone=none|ps=1.90|wiiu=none|switch=none|[[File:Attached Melon Stem (W) JE5.png|32px]]{{info needed|More accurate image}} The texture of attached melon stems has been changed.}}
{{History|New 3DS}}
{{History||0.1.0|[[File:Melon Stem Age 0 JE1.png|32px]] [[File:Stem Age 1 JE1.png|32px]] [[File:Melon Stem Age 2 JE1.png|32px]] [[File:Melon Stem Age 3 JE1.png|32px]] [[File:Melon Stem Age 4 JE1.png|32px]] [[File:Melon Stem Age 5 JE1.png|32px]] [[File:Melon Stem Age 6 JE1.png|32px]] [[File:Melon Stem Age 7 JE1.png|32px]] [[File:Attached Melon Stem (N) JE1.png|32px]] [[File:Attached Melon Stem (E) JE1.png|32px]] [[File:Attached Melon Stem (S) JE1.png|32px]] [[File:Attached Melon Stem (W) JE1.png|32px]]{{verify|Are these models correct?}} Added melon stems.}}
{{History|foot}}
<gallery>
Melon Stem with data value 15.png|The final version of the melon stem with age 15, as seen in-game.
Melonstems.png|Melon stems of ages 1–15 on a modded version of 1.7.2, hence the melon stems using the melon top texture.
Stems of 13w02a.png|All 16 stem sizes in 13w02a, with accompanying data values.
</gallery>
=== Melon stem "item" ===
{{:Technical blocks/Melon Stem}}
== Issues ==
{{issue list}}
== Gallery ==
<gallery>
Stem All Ages.png|All stages of growth.
AllSeeds.png|All the [[seeds]] that exist in the game.
</gallery>
== See also ==
* [[Melon]]
* [[Pumpkin Seeds]]
==References==
{{Reflist}}
{{Blocks|vegetation}}
{{Items}}
[[Category:Plants]]
[[Category:Food]]
[[Category:Non-solid blocks]]
[[Category:Generated structure blocks]]
[[cs:Semínka melounu]]
[[de:Melone]]
[[es:Semillas de sandía]]
[[fr:Graines de pastèque]]
[[hu:Dinnyemagok]]
[[it:Anguria]]
[[ja:スイカの種]]
[[ko:수박씨]]
[[nl:Meloenzaden]]
[[pl:Nasiona arbuza]]
[[pt:Sementes de melancia]]
[[ru:Семена арбуза]]
[[th:เมล็ดแตงโม]]
[[zh:西瓜种子]]</li></ul> | Player skins can be modified. | ||||
| beta | |||||
1.0{{Extension DPL}}<ul><li>[[:Category:Joke items|Category:Joke items]]<br/>[[Category:Joke features|Items]]
[[Category:Items]]</li><li>[[Smithing Template|Smithing Template]]<br/>{{for|the block|Smithing Table}}
{{Item
| title = Smithing Template
| image = <gallery>
Netherite Upgrade Smithing Template.png | Netherite Upgrade
Sentry Armor Trim Smithing Template.png | Armor Trim
</gallery>
| rarity = Rare
| renewable = No<!--Smithing templates are not renewable because diamonds, their only other method of creation, are not renewable.-->
| stackable = Yes (64)
}}
'''Smithing templates''' are items used in [[Smithing Table|smithing tables]] to alter [[Tool|tools]] and [[armor]]. They are consumed when used, but can be [[Crafting|duplicated]] using an existing template, its material and [[Diamond|diamonds]].
The sixteen '''armor trim smithing templates''' are found in a variety of [[Generated structures|structures]], and are used to apply various decorative trims (dependent on the variant) to armor using certain minerals for different colors.
'''Netherite upgrade smithing templates''' are required to upgrade diamond equipment with a [[Netherite Ingot|netherite ingot]]. They are only found in [[Bastion Remnant|bastion remnants]], but are guaranteed only in [[:en:Bastion_Remnant#Treasure_room|treasure rooms]].
== Obtaining ==
Smithing templates can be found in various [[Generated structures|structures]] and can be duplicated by using seven diamonds and a block based on what the template is.
=== Crafting ===
{{Crafting
|A1=Diamond |B1=Matching Smithing Template |C1=Diamond
|A2=Diamond |B2=Netherrack;Cobblestone;Sandstone;End Stone;Terracotta;Terracotta;Netherrack;Cobblestone;Terracotta;Cobbled Deepslate;Blackstone;Purpur Block;Prismarine;Cobblestone;Cobbled Deepslate;Terracotta;Mossy Cobblestone |C2=Diamond
|A3=Diamond |B3=Diamond |C3=Diamond
|Output=Matching Smithing Template,2
}}
{| class="article-table"
|+ Duplication
! Item !! Material
|-
| {{ItemSprite|netherite-upgrade|text=Netherite Upgrade}} || {{BlockSprite|Netherrack|text=Netherrack}}
|-
| {{ItemSprite|sentry-armor-trim|text=Sentry Armor Trim}} || {{BlockSprite|Cobblestone|text=Cobblestone}}
|-
| {{ItemSprite|vex-armor-trim|text=Vex Armor Trim}} || {{BlockSprite|Cobblestone|text=Cobblestone}}
|-
| {{ItemSprite|wild-armor-trim|text=Wild Armor Trim}} || {{BlockSprite|Mossy Cobblestone|text=Mossy Cobblestone}}
|-
| {{ItemSprite|coast-armor-trim|text=Coast Armor Trim}} || {{BlockSprite|Cobblestone|text=Cobblestone}}
|-
| {{ItemSprite|dune-armor-trim|text=Dune Armor Trim}} || {{BlockSprite|Sandstone|text=Sandstone}}
|-
| {{ItemSprite|wayfinder-armor-trim|text=Wayfinder Armor Trim}} || {{BlockSprite|Terracotta|text=Terracotta}}
|-
| {{ItemSprite|raiser-armor-trim|text=Raiser Armor Trim}} || {{BlockSprite|Terracotta|text=Terracotta}}
|-
| {{ItemSprite|shaper-armor-trim|text=Shaper Armor Trim}} || {{BlockSprite|Terracotta|text=Terracotta}}
|-
| {{ItemSprite|host-armor-trim|text=Host Armor Trim}} || {{BlockSprite|Terracotta|text=Terracotta}}
|-
| {{ItemSprite|ward-armor-trim|text=Ward Armor Trim}} || {{BlockSprite|Cobbled Deepslate|text=Cobbled Deepslate}}
|-
| {{ItemSprite|silence-armor-trim|text=Silence Armor Trim}} || {{BlockSprite|Cobbled Deepslate|text=Cobbled Deepslate}}
|-
| {{ItemSprite|tide-armor-trim|text=Tide Armor Trim}} || {{BlockSprite|Prismarine|text=Prismarine}}
|-
| {{ItemSprite|snout-armor-trim|text=Snout Armor Trim}} || {{BlockSprite|Blackstone|text=Blackstone}}
|-
| {{ItemSprite|rib-armor-trim|text=Rib Armor Trim}} || {{BlockSprite|Netherrack|text=Netherrack}}
|-
| {{ItemSprite|eye-armor-trim|text=Eye Armor Trim}} || {{BlockSprite|End Stone|text=End Stone}}
|-
| {{ItemSprite|spire-armor-trim|text=Spire Armor Trim}} || {{BlockSprite|Purpur Block|text=Purpur Block}}
|}
{{IN|bedrock}}, spire, tide, and dune armor trims can be duplicated with more blocks than {{in|java}}. In addition to the normal blocks, Tide armor trims can be duplicated using Prismarine Bricks or Dark Prismarine, dune armor trims can be duplicated with smooth sandstone, cut sandstone, or chiseled sandstone, and spire armor trims can be duplicated with purpur pillars.<ref>{{bug|MCPE-172711||Tide, Spire, and Dune Armor Trims can be crafted from more blocks than in Java Edition}}</ref>
=== Mob loot ===
[[Elder guardian]]s have a 20% chance to drop 1 tide armor trim upon death. [[Looting]] doesn't affect this percentage, and the elder guardian doesn't need to be killed by a player in order for the trim to drop and can be duplicated with [[prismarine]].
=== Chest loot ===
{{#invoke:LootChest|base3|netherite-upgrade-smithing-template,sentry-armor-trim-smithing-template,vex-armor-trim-smithing-template,wild-armor-trim-smithing-template,coast-armor-trim-smithing-template,dune-armor-trim-smithing-template,ward-armor-trim-smithing-template,silence-armor-trim-smithing-template,snout-armor-trim-smithing-template,rib-armor-trim-smithing-template,eye-armor-trim-smithing-template,spire-armor-trim-smithing-template}}
Note: In Woodland Mansions, only chests with random loot have the chance to contain the Vex Smithing Template, chests in the "Allium room", "Sapling farm", "Tree-chopping room" and "Fake End portal room" always generate with the same, room specific, loot.
=== Suspicious block loot ===
Items can only be extracted from [[Suspicious Block|suspicious blocks]] using a [[brush]].{{#invoke:LootChest|base3|wayfinder-armor-trim-smithing-template,raiser-armor-trim-smithing-template,shaper-armor-trim-smithing-template,host-armor-trim-smithing-template}}
== Usage ==
=== Crafting ingredient ===
{{Crafting
|A1=Diamond |B1=Matching Smithing Template |C1=Diamond
|A2=Diamond |B2=Netherrack;Cobblestone;Sandstone;End Stone;Terracotta;Terracotta;Netherrack;Cobblestone;Terracotta;Cobbled Deepslate;Blackstone;Purpur Block;Prismarine;Cobblestone;Cobbled Deepslate;Terracotta;Mossy Cobblestone |C2=Diamond
|A3=Diamond |B3=Diamond |C3=Diamond
|Output=Matching Smithing Template,2
}}
=== Smithing ingredient ===
Smithing templates are used at a [[smithing table]]. Netherite upgrade smithing templates are used to upgrade diamond gear into netherite gear by using a netherite upgrade, a piece of diamond gear, and a [[netherite ingot]].
{{Smithing
|head=1
|ingredients=Netherite Upgrade +<br>Any Diamond Gear +<br>[[Netherite Ingot]]
|Netherite Upgrade
|Diamond Helmet; Diamond Chestplate; Diamond Leggings; Diamond Boots; Diamond Sword; Diamond Pickaxe; Diamond Axe; Diamond Shovel
|Netherite Ingot
|Netherite Helmet; Netherite Chestplate; Netherite Leggings; Netherite Boots; Netherite Sword; Netherite Pickaxe; Netherite Axe; Netherite Shovel
|tail=1
}}
{{FakeImage|{{Animate|Iron_Armor_with_Iron_Shaper_Trim.png; Golden_Armor_with_Golden_Shaper_Trim.png; Diamond_Armor_with_Diamond_Shaper_Trim.png; Netherite_Armor_with_Netherite_Shaper_Trim.png|180px}}|If the armor material and the trimming material are the same, the color palette used for the armor trim is darker.}}
Armor trim smithing templates are used to customize an armor piece's appearance by using a smithing template, an armor piece, and an ingot or crystal ([[emerald]], [[redstone dust]], [[lapis lazuli]], [[amethyst shard]], [[nether quartz]], [[netherite ingot]], [[diamond]], [[gold ingot]], [[iron ingot]], or [[copper ingot]]). Including all dyed leather armor colors and regular armor, there are ≈3.679x10<sup>9</sup> different possible armor pieces<!--5713438 leather colors, plus the 4 other armor materials = 5713442. 5713442 * 161 (the 160 trim combos (16 trims, 10 materials) + untrimmed) = 919864162. 919864162 * 4 (helmet, chestplate, leggings, boots) = 3679456648 ≈ 3.679x10^9-->, and 7.16x10<sup>35</sup> <!--919864162 + 1 (no armor in that slot) = 919864163. 919864163^4 = 715969952015045562662444917041515536 ≈ 7.16x10^35 total possible armor combinations-->total possible armor combinations excluding enchantments and the player not wearing armor.
Already trimmed armor can be trimmed again by applying another template on it; the old trim pattern is overwritten in the process.<ref>{{bug|MC-262538||When combining armor trims the new trim deletes the old one|WAI}}</ref> Therefore, one piece of armor cannot possess multiple trims at the same time.
Most armor trims cover a small portion of the armor piece's surface with the trim material, except for the silence armor trim, which allows the trim material to cover a majority of the armor piece's surface.
All of the trims are purely decorative, and don't impact gameplay or strength(without the use of mods or plugins) of the armor they are applied to in any way. [[Piglin]]s do not pick up any gold-trimmed armor pieces, and they are not pacified by players wearing even a full set of gold-trimmed armor (unless, of course, the armor pieces in question are themselves golden), and netherite-trimmed armor pieces can still be burned by [[fire]].
{{Smithing
|head=1
|ingredients=Any Armor Trim +<br>Any Armor Piece +<br>Any Ingot/Crystal
|Any Armor Trim Smithing Template
|Iron Helmet; Netherite Chestplate;Golden Leggings;Diamond Boots
|Amethyst Shard; Copper Ingot; Diamond; Emerald; Gold Ingot; Iron Ingot; Lapis Lazuli; Nether Quartz; Netherite Ingot; Redstone Dust; Diamond; Emerald
|Amethyst Trim Iron Helmet; Copper Trim Netherite Chestplate; Diamond Trim Golden Leggings; Emerald Trim Diamond Boots; Gold Trim Iron Helmet; Iron Trim Netherite Chestplate; Lapis Trim Golden Leggings; Quartz Trim Diamond Boots; Netherite Trim Iron Helmet; Redstone Trim Netherite Chestplate; Diamond Trim Golden Leggings; Emerald Trim Diamond Boots
|tail=1
}}
;List of color palettes for all materials
*{{ItemSprite|emerald }} - {{TrimPalette| emerald }}
*{{ItemSprite|redstone dust }} - {{TrimPalette| redstone dust }}
*{{ItemSprite|lapis lazuli }} - {{TrimPalette| lapis lazuli }}
*{{ItemSprite|amethyst shard }} - {{TrimPalette| amethyst shard }}
*{{ItemSprite|nether quartz }} - {{TrimPalette| nether quartz }}
*{{ItemSprite|netherite ingot }} - {{TrimPalette| netherite ingot }} (Darker: {{TrimPalette| netherite ingot |darker=1}})
*{{ItemSprite|diamond }} - {{TrimPalette| diamond }} (Darker: {{TrimPalette| diamond |darker=1}})
*{{ItemSprite|gold ingot }} - {{TrimPalette| gold ingot }} (Darker: {{TrimPalette| gold ingot |darker=1}})
*{{ItemSprite|iron ingot }} - {{TrimPalette| iron ingot }} (Darker: {{TrimPalette| iron ingot |darker=1}})
*{{ItemSprite|copper ingot }} - {{TrimPalette| copper ingot }}
== Data values ==
=== ID ===
{{edition|java}}:
{{ID table
|edition=java
|firstcolumnname=Smithing Template
|showforms=y
|generatetranslationkeys=y
|displayname=Netherite Upgrade
|spritename=netherite-upgrade-smithing-template
|spritetype=item
|nameid=netherite_upgrade_smithing_template
|form=item}}
{{ID table
|displayname=Sentry Armor Trim
|spritename=sentry-armor-trim-smithing-template
|spritetype=item
|nameid=sentry_armor_trim_smithing_template
|form=item}}
{{ID table
|displayname=Vex Armor Trim
|spritename=vex-armor-trim-smithing-template
|spritetype=item
|nameid=vex_armor_trim_smithing_template
|form=item}}
{{ID table
|displayname=Wild Armor Trim
|spritename=wild-armor-trim-smithing-template
|spritetype=item
|nameid=wild_armor_trim_smithing_template
|form=item}}
{{ID table
|displayname=Coast Armor Trim
|spritename=coast-armor-trim-smithing-template
|spritetype=item
|nameid=coast_armor_trim_smithing_template
|form=item}}
{{ID table
|displayname=Dune Armor Trim
|spritename=dune-armor-trim-smithing-template
|spritetype=item
|nameid=dune_armor_trim_smithing_template
|form=item}}
{{ID table
|displayname=Wayfinder Armor Trim
|spritename=wayfinder-armor-trim-smithing-template
|spritetype=item
|nameid=wayfinder_armor_trim_smithing_template
|form=item}}
{{ID table
|displayname=Raiser Armor Trim
|spritename=raiser-armor-trim-smithing-template
|spritetype=item
|nameid=raiser_armor_trim_smithing_template
|form=item}}
{{ID table
|displayname=Shaper Armor Trim
|spritename=shaper-armor-trim-smithing-template
|spritetype=item
|nameid=shaper_armor_trim_smithing_template
|form=item}}
{{ID table
|displayname=Host Armor Trim
|spritename=host-armor-trim-smithing-template
|spritetype=item
|nameid=host_armor_trim_smithing_template
|form=item}}
{{ID table
|displayname=Ward Armor Trim
|spritename=ward-armor-trim-smithing-template
|spritetype=item
|nameid=ward_armor_trim_smithing_template
|form=item}}
{{ID table
|displayname=Silence Armor Trim
|spritename=silence-armor-trim-smithing-template
|spritetype=item
|nameid=silence_armor_trim_smithing_template
|form=item}}
{{ID table
|displayname=Tide Armor Trim
|spritename=tide-armor-trim-smithing-template
|spritetype=item
|nameid=tide_armor_trim_smithing_template
|form=item}}
{{ID table
|displayname=Snout Armor Trim
|spritename=snout-armor-trim-smithing-template
|spritetype=item
|nameid=snout_armor_trim_smithing_template
|form=item}}
{{ID table
|displayname=Rib Armor Trim
|spritename=rib-armor-trim-smithing-template
|spritetype=item
|nameid=rib_armor_trim_smithing_template
|form=item}}
{{ID table
|displayname=Eye Armor Trim
|spritename=eye-armor-trim-smithing-template
|spritetype=item
|nameid=eye_armor_trim_smithing_template
|form=item}}
{{ID table
|displayname=Spire Armor Trim
|spritename=spire-armor-trim-smithing-template
|spritetype=item
|nameid=spire_armor_trim_smithing_template
|form=item
|foot=1}}
{{edition|bedrock}}:
{{ID table
|edition=bedrock
|firstcolumnname=Smithing Template
|shownumericids=y
|showforms=y
|notshowbeitemforms=y
|generatetranslationkeys=y
|displayname=Netherite Upgrade
|spritename=netherite-upgrade-smithing-template
|spritetype=item
|nameid=netherite_upgrade_smithing_template
|id=685
|form=item
|translationkey=item.smithing_template.name, upgrade.netherite_upgrade.name}}
{{ID table
|displayname=Sentry Armor Trim
|spritename=sentry-armor-trim-smithing-template
|spritetype=item
|nameid=sentry_armor_trim_smithing_template
|id=686
|form=item
|translationkey=item.smithing_template.name, trim_pattern.sentry.name}}
{{ID table
|displayname=Vex Armor Trim
|spritename=vex-armor-trim-smithing-template
|spritetype=item
|nameid=vex_armor_trim_smithing_template
|id=692
|form=item
|translationkey=item.smithing_template.name, trim_pattern.vex.name}}
{{ID table
|displayname=Wild Armor Trim
|spritename=wild-armor-trim-smithing-template
|spritetype=item
|nameid=wild_armor_trim_smithing_template
|id=689
|form=item
|translationkey=item.smithing_template.name, trim_pattern.wild.name}}
{{ID table
|displayname=Coast Armor Trim
|spritename=coast-armor-trim-smithing-template
|spritetype=item
|nameid=coast_armor_trim_smithing_template
|id=688
|form=item
|translationkey=item.smithing_template.name, trim_pattern.coast.name}}
{{ID table
|displayname=Dune Armor Trim
|spritename=dune-armor-trim-smithing-template
|spritetype=item
|nameid=dune_armor_trim_smithing_template
|id=687
|form=item
|translationkey=item.smithing_template.name, trim_pattern.dune.name}}
{{ID table
|displayname=Wayfinder Armor Trim
|spritename=wayfinder-armor-trim-smithing-template
|spritetype=item
|nameid=wayfinder_armor_trim_smithing_template
|id=698
|form=item
|translationkey=item.smithing_template.name, trim_pattern.wayfinder.name}}
{{ID table
|displayname=Raiser Armor Trim
|spritename=raiser-armor-trim-smithing-template
|spritetype=item
|nameid=raiser_armor_trim_smithing_template
|id=699
|form=item
|translationkey=item.smithing_template.name, trim_pattern.raiser.name}}
{{ID table
|displayname=Shaper Armor Trim
|spritename=shaper-armor-trim-smithing-template
|spritetype=item
|nameid=shaper_armor_trim_smithing_template
|id=700
|form=item
|translationkey=item.smithing_template.name, trim_pattern.shaper.name}}
{{ID table
|displayname=Host Armor Trim
|spritename=host-armor-trim-smithing-template
|spritetype=item
|nameid=host_armor_trim_smithing_template
|id=701
|form=item
|translationkey=item.smithing_template.name, trim_pattern.host.name}}
{{ID table
|displayname=Ward Armor Trim
|spritename=ward-armor-trim-smithing-template
|spritetype=item
|nameid=ward_armor_trim_smithing_template
|id=690
|form=item
|translationkey=item.smithing_template.name, trim_pattern.ward.name}}
{{ID table
|displayname=Silence Armor Trim
|spritename=silence-armor-trim-smithing-template
|spritetype=item
|nameid=silence_armor_trim_smithing_template
|id=697
|form=item
|translationkey=item.smithing_template.name, trim_pattern.silence.name}}
{{ID table
|displayname=Tide Armor Trim
|spritename=tide-armor-trim-smithing-template
|spritetype=item
|nameid=tide_armor_trim_smithing_template
|id=693
|form=item
|translationkey=item.smithing_template.name, trim_pattern.tide.name}}
{{ID table
|displayname=Snout Armor Trim
|spritename=snout-armor-trim-smithing-template
|spritetype=item
|nameid=snout_armor_trim_smithing_template
|id=694
|form=item
|translationkey=item.smithing_template.name, trim_pattern.snout.name}}
{{ID table
|displayname=Rib Armor Trim
|spritename=rib-armor-trim-smithing-template
|spritetype=item
|nameid=rib_armor_trim_smithing_template
|id=695
|form=item
|translationkey=item.smithing_template.name, trim_pattern.rib.name}}
{{ID table
|displayname=Eye Armor Trim
|spritename=eye-armor-trim-smithing-template
|spritetype=item
|nameid=eye_armor_trim_smithing_template
|id=691
|form=item
|translationkey=item.smithing_template.name, trim_pattern.eye.name}}
{{ID table
|displayname=Spire Armor Trim
|spritename=spire-armor-trim-smithing-template
|spritetype=item
|nameid=spire_armor_trim_smithing_template
|id=696
|form=item
|translationkey=item.smithing_template.name, trim_pattern.spire.name
|foot=1}}
== Achievements ==
{{load achievements|Smithing with style}}
== Advancements ==
{{load advancements|Crafting a New Look;Smithing with Style}}
== Video ==
{{yt|klP9SrJFDU8}}
== History ==
{{History|java}}
{{History||1.20<br>(Experimental)|link=1.19.4|snap=23w04a|[[File:Netherite Upgrade Smithing Template JE1 BE1.png|32px]] [[File:Sentry Armor Trim Smithing Template JE1 BE1.png|32px]] [[File:Vex Armor Trim Smithing Template JE1 BE1.png|32px]] [[File:Wild Armor Trim Smithing Template JE1 BE1.png|32px]] [[File:Coast Armor Trim Smithing Template JE1 BE1.png|32px]] [[File:Dune Armor Trim Smithing Template JE1 BE1.png|32px]] [[File:Ward Armor Trim Smithing Template JE1 BE1.png|32px]] [[File:Tide Armor Trim Smithing Template JE1 BE1.png|32px]] [[File:Snout Armor Trim Smithing Template JE1 BE1.png|32px]] [[File:Rib Armor Trim Smithing Template JE1 BE1.png|32px]] [[File:Eye Armor Trim Smithing Template JE1 BE1.png|32px]] [[File:Spire Armor Trim Smithing Template JE1 BE1.png|32px]] Added smithing templates behind the "Update 1.20" experimental datapack.}}
{{History|||snap=23w05a|Smithing templates can be used to trim leather armor.
|Gold, iron, diamond, and netherite armor can be trimmed with their respective material.
|The dune, coast, wild, and sentry armor trims now always generate two templates in a chest when found.
|Increased the chances for all smithing templates that generate in chest loot to spawn:
*Netherite upgrade chance to find increased from 3.2% to 10%.
*Coast chance to find increased from 11.1% to 16.7%.
*Dune chance to find increased from 11.1% to 14.3%.
*Eye chance to find increased from 4.7% to 10% in alter chests, and to 100% in library chests.
*Rib chance to find increased from 4.7% to 6.7%.
*Sentry chance to find increased from 20% to 25%.
*Snout chance to find increased from 4.7% to 8.3%.
*Spire chance to find increased from 4.7% to 6.7%.
*Vex chance to find increased from 4.7% to 50%.
*Ward chance to find increased from 4.7% to 5%.
*Wild chance to find increased from 20% to 33%.}}
{{History||1.20|snap=23w12a|Smithing templates are now available without using the "Update 1.20" experimental datapack.|[[File:Wayfinder Armor Trim Smithing Template JE1 BE1.png|32px]] [[File:Raiser Armor Trim Smithing Template JE1 BE1.png|32px]] [[File:Shaper Armor Trim Smithing Template JE1 BE1.png|32px]] [[File:Host Armor Trim Smithing Template JE1 BE1.png|32px]] [[File:Silence Armor Trim Smithing Template JE1 BE1.png|32px]] Added wayfinder, raiser, shaper, host, and silence armor trim smithing templates.
|[[File:Sentry Armor Trim Smithing Template JE2 BE2.png|32px]] [[File:Dune Armor Trim Smithing Template JE2 BE2.png|32px]] Changed the textures of the sentry and dune armor trim smithing templates.
|The pattern textures of dune and sentry armor trims are changed from [[File:Armor Trim Dune (sample model) JE1 BE1.png|24px]] [[File:Armor Trim Sentry (sample model) JE1 BE1.png|24px]] to [[File:Armor Trim Dune (sample model) JE2 BE2.png|24px]] [[File:Armor Trim Sentry (sample model) JE2 BE2.png|24px]].<br>
Those previous patterns were left with different names: dune was renamed sentry and sentry was renamed shaper.}}
{{History|||snap=23w16a|Wayfinder, raiser, shaper, and host armor trim no longer generates in [[suspicious sand]] in [[trail ruins]].|Due to the split of the archaeological loot tables for the suspicious gravel within the [[trail ruins]]; wayfinder, raiser, shaper, and host armor trim now are in the rare loot.}}
{{History|||snap=23w17a|The probability of the wayfinder, raiser, shaper, and host armor trim to generate in [[suspicious gravel]] in [[trail ruins]] has been changed from 1/11 to 1/12.|The player now get the [[advancement]] "Crafting a new look" when they craft a trimmed armor at a [[smithing table]] using a smithing template, "Smithing with style" when they apply these smithing templates at least once on their armor: Spire, Snout, Rib, Ward, Silence, Vex, Tide, and Wayfinder.}}
{{History|bedrock}}
{{History||Next Major Update<br>(Experimental)|link=Bedrock Edition 1.19.80|snap=beta 1.19.80.21|[[File:Netherite Upgrade Smithing Template JE1 BE1.png|32px]] [[File:Sentry Armor Trim Smithing Template JE1 BE1.png|32px]] [[File:Vex Armor Trim Smithing Template JE1 BE1.png|32px]] [[File:Wild Armor Trim Smithing Template JE1 BE1.png|32px]] [[File:Coast Armor Trim Smithing Template JE1 BE1.png|32px]] [[File:Dune Armor Trim Smithing Template JE1 BE1.png|32px]] [[File:Ward Armor Trim Smithing Template JE1 BE1.png|32px]] [[File:Tide Armor Trim Smithing Template JE1 BE1.png|32px]] [[File:Snout Armor Trim Smithing Template JE1 BE1.png|32px]] [[File:Rib Armor Trim Smithing Template JE1 BE1.png|32px]] [[File:Eye Armor Trim Smithing Template JE1 BE1.png|32px]] [[File:Spire Armor Trim Smithing Template JE1 BE1.png|32px]] Added smithing templates behind the "[[Bedrock Edition 1.20.0|Next Major Update]]" [[experimental]] toggle.}}
{{History|||snap=beta 1.19.80.22|[[File:Wayfinder Armor Trim Smithing Template JE1 BE1.png|32px]] [[File:Raiser Armor Trim Smithing Template JE1 BE1.png|32px]] [[File:Shaper Armor Trim Smithing Template JE1 BE1.png|32px]] [[File:Host Armor Trim Smithing Template JE1 BE1.png|32px]] [[File:Silence Armor Trim Smithing Template JE1 BE1.png|32px]] Added wayfinder, raiser, shaper, host, and silence armor trim smithing templates.
|[[File:Sentry Armor Trim Smithing Template JE2 BE2.png|32px]] [[File:Dune Armor Trim Smithing Template JE2 BE2.png|32px]] Changed the textures of the sentry and dune armor trim smithing templates.
|The pattern textures of dune and sentry armor trims are changed from [[File:Armor Trim Dune (sample model) JE1 BE1.png|24px]] [[File:Armor Trim Sentry (sample model) JE1 BE1.png|24px]] to [[File:Armor Trim Dune (sample model) JE2 BE2.png|24px]] [[File:Armor Trim Sentry (sample model) JE2 BE2.png|24px]].<br>
Those previous patterns were left with different names: dune was renamed sentry and sentry was renamed shaper.}}
{{History||1.20.0|snap=beta 1.20.0.21|Smithing templates are now available without using the "Next Major Update" experimental toggle.}}
{{History|foot}}
== Issues ==
{{Issue list}}
== Trivia ==
* Smithing templates were named "Smithing Blueprints" in the prototype but was changed because the word "blueprint" sounded modern and technical.<ref>{{ytl|klP9SrJFDU8|Minecraft 1.20: Armor Trims - What Do They Mean?|Minecraft|May 4, 2023|t=98}}</ref>
* When Mojang developer Gnembon was working on armor trims, he accidentally messed up their rendering, making them jet through the player's body in a weird fashion, similar to what appears in {{w|Salvador Dalí}}'s paintings where a hand might poke through a forehead.<ref>{{ytl|ghQODkq4ITI|Mojang Dev Comes To Hermitcraft! (Mojang Developer Gnembom Interview)|GoodVodsWithScar|June 23, 2023|t=1980}}</ref>
* Some of the armor trims feature patterns based on a [[mob]] or [[block]] that is found in the same [[Generated structures|structure]] as the corresponding smithing template.<ref name=":0">"Some of the armor trims reflect the place where you found the template, for example bastions contain a piglin-inspired trim."-[[Sofia Dankis]]-{{Mcnet|armor-trims-coming-minecraft-1-20|Armor Trims Coming to Minecraft 1.20|January 24, 2023}}</ref>
** The spire armor trim resembles a [[shulker]].
** The vex armor trim resembles an [[evoker]]. As an item in the [[inventory]], it resembles the wing or the vein texture of a [[vex]].
** The wild armor trim has moss growing on 3 of its corners.
** The coast armor trim appears to have barnacles attached to it.
** The ward armor trim, as an item in the inventory, resembles the faces inside a [[warden]]'s chest.
** The silence armor trim appears to have sculk creeping onto / infecting it.
** The tide armor trim resembles [[Prismarine|prismarine bricks]].
** The snout armor trim resembles a [[piglin]]<ref name=":0" />.
** The rib armor trim resembles a [[wither skeleton]].
** The eye armor trim resembles an [[eye of ender]]. There are also two eyes on the head part of the armor trim that resemble those of an [[enderman]].
* ''Netherite upgrade smithing template'' (35 characters with "_" and 32 characters without "_") and ''sentry armor trim smithing template'' (35 characters with "_" and 31 characters without "_") are the current longest name for item ID, while ''[[polished blackstone pressure plate]]'' and ''[[cracked polished blackstone bricks]]'' have 34 characters with "_" and 31 characters without "_".
* The silence armor trim is the rarest trim, due to being found in ancient cities in the deep dark, and having only a 1.2% chance to be per chest.
* When [[lapis lazuli]] is used as trim material, it is called "Lapis" instead of its full name "Lapis Lazuli"; this is the only instance of the abbreviation "Lapis" being used in-game.<ref>{{bug|MC-262486|||WAI}}</ref>
== Gallery ==
=== Sprites ===
<gallery>
Netherite Upgrade Smithing Template.png|Netherite Upgrade
Sentry Armor Trim Smithing Template.png|Sentry Armor Trim
Vex Armor Trim Smithing Template.png|Vex Armor Trim
Wild Armor Trim Smithing Template.png|Wild Armor Trim
Coast Armor Trim Smithing Template.png|Coast Armor Trim
Dune Armor Trim Smithing Template.png|Dune Armor Trim
Wayfinder Armor Trim Smithing Template.png|Wayfinder Armor Trim
Raiser Armor Trim Smithing Template.png|Raiser Armor Trim
Shaper Armor Trim Smithing Template.png|Shaper Armor Trim
Host Armor Trim Smithing Template.png|Host Armor Trim
Ward Armor Trim Smithing Template.png|Ward Armor Trim
Silence Armor Trim Smithing Template.png|Silence Armor Trim
Tide Armor Trim Smithing Template.png|Tide Armor Trim
Snout Armor Trim Smithing Template.png|Snout Armor Trim
Rib Armor Trim Smithing Template.png|Rib Armor Trim
Eye Armor Trim Smithing Template.png|Eye Armor Trim
Spire Armor Trim Smithing Template.png|Spire Armor Trim
</gallery>
=== Armor trim patterns ===
<gallery>
Armor Trim Sentry (sample model).png|Sentry Armor Trim
Armor Trim Vex (sample model).png|Vex Armor Trim
Armor Trim Wild (sample model).png|Wild Armor Trim
Armor Trim Coast (sample model).png|Coast Armor Trim
Armor Trim Dune (sample model).png|Dune Armor Trim
Armor Trim Wayfinder (sample model).png|Wayfinder Armor Trim
Armor Trim Raiser (sample model).png|Raiser Armor Trim
Armor Trim Shaper (sample model).png|Shaper Armor Trim
Armor Trim Host (sample model).png|Host Armor Trim
Armor Trim Ward (sample model).png|Ward Armor Trim
Armor Trim Silence (sample model).png|Silence Armor Trim
Armor Trim Tide (sample model).png|Tide Armor Trim
Armor Trim Snout (sample model).png|Snout Armor Trim
Armor Trim Rib (sample model).png|Rib Armor Trim
Armor Trim Eye (sample model).png|Eye Armor Trim
Armor Trim Spire (sample model).png|Spire Armor Trim
</gallery>
=== Official Artwork ===
<gallery>
T&T Thumbnail.jpg|[[Sunny]] wearing amethyst armor trims.
Warden Chasing Alex with Silence Trim Pixel Art.png|A [[warden]] chasing Alex holding the silence armor trim.
Alex Trimming Armor in Smithing Table Pixel Art.png|Alex adding the silence armor trim and amethyst on iron armor.
Alex Wearing Iron Armor with Amethyst Pixel Art.jpg|Alex wearing the trimmed iron armor.
File:Live2023-01.jpeg|Noor working on trimmed iron armor.
</gallery>
=== Screenshots ===
<gallery>
Kingbdogz Armor Trim 1.jpg|Redstone trims on diamond armor.
Kingbdogz Armor Trim 2.jpg|Gold trims on netherite armor.
Too Many Trims.jpg|A large amount of armor trims.
Kingbdogz Armor Trim 3.jpg|Gold on netherite.
Kingbdogz Armor Trim 4.jpg|Diamond on diamond.
New Armor Trims in 23W12A.jpg|<ref>{{Tweet|kingbdogz|1638580472962850831|new trims got the drip The new "Silence" armor trim to the left is now the hardest trim to get, with only a 1% chance per chest to spawn in Ancient Cities. Definitely gonna be a challenge to get!|March 22, 2023}}</ref>
Emerald Armor.png|Emerald on gold.
Xilefian Armor Trims 1.png|[[Xilefian]] showing how armor trims work.
Xilefian Armor Trims 2.png|[[Xilefian]] showing how armor trims work.
Xilefian Armor Trims 3.png|[[Xilefian]] showing how armor trims work.
Armor Trims On Netherite Armors.png|A display of all eleven (before [[Java Edition 23w12a]]) armor trims and ten colors on netherite armors.
Armor Trim Showcase.png|A display of all eleven (before [[Java Edition 23w12a]]) armor trims, on netherite armor using emerald as the trim material.
Armor Trim Colors.png|A display of all ten armor trim colors, using the ward trim on a netherite helmet.
Silence Armor Trim on All Armors.png|A display of all ten colors of the silence armor trim on all armors.
Image 2023-06-07 154100087.png|A screenshot of every armor trim in every color(besides quartz) on leather armor.
Armor Trim Friends.jpg|Official screenshot of [[Alex]] and [[Zuri]] wearing armor trims.
LadyAgnes Armor Trims.jpg|Copper trims on netherite armor.
Trim Lineup.jpg
Fancy Delta.jpg|[[Kai]] wearing trimmed armor in a [[Basalt Delta]].
Trims & Pots.jpg
Noor Gold Armor Trim .jpeg
Noor Diamond Armor Trim.jpeg
Noor Netherite Armor Trim.jpeg
Noor Iron Armor Trim.jpeg
</gallery>
== References ==
{{Reflist}}
{{Items}}
[[Category:Bedrock Edition]]
[[Category:Non-renewable resources]]
[[de:Schmiedevorlage]]
[[es:Molde de herrería]]
[[fr:Modèle de forge]]
[[ja:鍛冶型]]
[[pl:Szablon kowalski]]
[[pt:Molde de ferraria]]
[[ru:Кузнечный шаблон]]
[[uk:Ковальський шаблон]]
[[zh:锻造模板]]</li></ul> | Exclusive cloaks (later renamed capes) were added on December 20, 2010. | ||||
1.6.6{{Extension DPL}}<ul><li>[[Firework Star|Firework Star]]<br/>{{Item
| image = Firework Star.png
| renewable =
* '''Trail Effect''': No
* '''All Others''': Yes
| stackable = Yes (64)
}}
'''Firework stars''' are [[items]] used to determine the color, effect, and shape of [[firework rocket]]s.
== Obtaining ==
In [[Survival]] mode, firework stars are obtainable only through crafting. In [[Creative]] mode, they can be found in the creative inventory.
=== Crafting ===
{{Crafting
|head=1
|showname=0
|showdescription=1
|ingredients=[[Gunpowder]] +<br>Matching [[Dye]] +<br>Extra ingredients (optional)
|Gunpowder
|Matching Dye
|Head; Gold Nugget; Feather;Fire Charge;
|Glowstone Dust;
|Diamond;
|Output=Matching Firework Star
|arggroups=1;2,Output;3;4;5
|description=Up to eight dyes can be added.<br>One head, gold nugget, feather, or fire charge can be added.<br>Both the diamond and the glowstone dust can be added with any of the other ingredients.
|type=Miscellaneous
}}
{{Crafting
|ignoreusage=1
|Matching Firework Star
|Any Dye
|Output=Matching Firework Star
|type=Miscellaneous
|description=Adds a "fade to color" effect to the firework star, overwriting any existing fades.<br>Up to eight dyes can be added.
|foot=1
|arggroups=1,Output
}}
<div style="display:none">
<!--
This is so the pre-Village & Pillage dyes can have dye-related crafting recipes show on their respective pages.
They don't need to be displayed on this page because they already intuitively list "Any Matching/Colored Dye".
-->
{{Crafting
|head=1
|showname=0
|showdescription=1
|Gunpowder
|Bone Meal; Lapis Lazuli; Cocoa Beans; Ink Sac
|Head; Gold Nugget; Feather;Fire Charge;
|Glowstone Dust;
|Diamond;
|Output=White Firework Star; Blue Firework Star; Brown Firework Star; Black Firework Star
|arggroups=1;2,Output;3;4;5
|description={{only|bedrock|education}}<br>Up to eight dyes can be added.<br>One head, gold nugget, feather, or fire charge can be added.<br>Both the diamond and the glowstone dust can be added with any of the other ingredients.
|type=Miscellaneous
}}
{{Crafting
|showdescription=1
|White Firework Star; Blue Firework Star; Brown Firework Star; Black Firework Star
|Bone Meal; Lapis Lazuli; Cocoa Beans; Ink Sac
|Output=White Firework Star; Blue Firework Star; Brown Firework Star; Black Firework Star
|type=Decoration block
|description={{only|bedrock|education}}<br>Adds a "fade to color" effect to the firework star, overwriting any existing fades.<br>Up to eight dyes can be added.
|foot=1
}}
</div>
== Usage ==
The only usage of firework stars is to create [[firework rocket]]s.
=== Crafting ingredient ===
{{crafting usage|match=end}}
== Effects ==
=== Shape effects ===
A firework star can have only one shape effect.
{| class="wikitable"
|+ Shape Effects
! <abbr title="Type (Byte tag in NBT structure)">Type</abbr>
! Ingredient
! Effect
! Sample Animation
|-
| 0
| None
| Small Ball explosion (default)
| [[File:Firework Star (Small Sphere).gif|200px]]
|-
| 1
| {{ItemLink|Fire Charge}}
| Large Ball explosion and heavy sound.
| [[File:Firework Star (Large Sphere).gif|200px]]
|-
| 2
| {{ItemLink|Gold Nugget}}
| Star-shaped explosion
| [[File:Firework Star (Star Shape).gif|200px]]
|-
| 3
| {{BlockLink|id=Heads|Head}} (any)
| Creeper-shaped (Creeper Face) explosion
| [[File:Firework Star (Creeper Shape).gif|200px]]
|-
| 4
| {{ItemLink|Feather}}
| Burst explosion
| [[File:Firework Star (Burst).gif|200px]]
|}
=== Additional effects ===
In addition to the shape effects, any combination of these additional effects may be added to a firework star.
{| class="wikitable"
|+ Additional Effects
! Ingredient
! Effect
! Sample Animation
|-
| None
| Default
| [[File:Firework Star (Small Sphere).gif|200px]]
|-
| {{ItemLink|Glowstone Dust}}
| Twinkle (Crackle effect and sounds after the explosion)
| [[File:Firework Star (Twinkle effect).gif|200px]]
|-
| {{ItemLink|Diamond}}
| Trail effect after the explosion
| [[File:Firework Star (Trail effect).gif|200px]]
|-
| {{ItemLink|Glowstone Dust}} <br> {{ItemLink|Diamond}}
| Twinkle + Trail effect after the explosion
| [[File:Firework Star (Twinkle and Trail effect).gif|200px]]
|}
== Sounds ==
{{see also|Firework_Rocket#Sounds}}
== Data values ==
=== ID ===
{{edition|java}}:
{{ID table
|edition=java
|showforms=y
|generatetranslationkeys=y
|displayname=Firework Star
|spritetype=item
|nameid=firework_star
|form=item
|foot=1}}
{{edition|bedrock}}:
{{ID table
|edition=bedrock
|showaliasids=y
|shownumericids=y
|showforms=y
|notshowbeitemforms=y
|generatetranslationkeys=y
|displayname=Firework Star
|spritetype=item
|nameid=firework_star
|aliasid=fireworkscharge
|id=520
|form=item
|translationkey=item.fireworksCharge.name
|foot=1}}
=== Item data ===
{{el|java}}:
{{main|Player.dat format}}
<div class="treeview">
* {{nbt|compound|tag}}: The item's '''tag''' tag.
{{:Player.dat_format/Firework Stars}}
</div>
{{el|bedrock}}:
: See [[Bedrock Edition level format/Item format]].
== Video ==
<div style="text-align:center">{{yt|fYL1W9aW0UU}}</div>
== History ==
{{History|java}}
{{History||1.4.6|snap=12w49a|[[File:Firework Star JE1 BE1.png|32px]] Added firework stars.
|Firework stars in the [[Creative inventory]] come in only one variation; they do not have any color.}}
{{History||1.13|snap=17w47a|The ID of firework stars has now been changed from <code>firework_charge</code> to <code>firework_star</code>.
|Prior to [[Java Edition 1.13/Flattening|''The Flattening'']], this [[item]]'s numeral ID was 402.}}
{{History|bedrock}}
{{History||1.2.0|snap=beta 1.2.0.2|[[File:Firework Star JE1 BE1.png|32px]] Added firework stars.
|Firework stars come in all 16 colors in the [[Creative]] [[inventory]].{{verify|type=update}}{{info needed}}}}
{{History||1.16.100|snap=beta 1.16.100.56|The ID of firework star has been changed from <code>fireworkscharge</code> to <code>firework_star</code>.}}
{{History|console}}
{{History||xbox=TU19|xbone=CU7|ps=1.12|wiiu=Patch 1|switch=1.0.1|[[File:Firework Star JE1 BE1.png|32px]] Added firework stars.
|Firework stars cannot be obtained within the Creative inventory.}}
{{History||xbox=TU46|xbone=CU36|ps=1.38|wiiu=Patch 15|The [[crafting]] interface has now been updated to allow the crafting of firework stars and [[firework rocket]]s.}}
{{History|foot}}
== Issues ==
{{Issue list}}
== Trivia ==
* There are 29,617,272,331,290,537 (29.6 quintillion) unique firework stars.
* Putting firework stars on rockets causes the player to take explosion damage when using them for flying with [[elytra]].
== Gallery ==
<gallery>
File:Firework Star (Tricolor Star shaped with Twinkle and Trail effect).gif|Tricolor (Magenta, Pink, White dye) + Star shaped with Twinkle and Trail effect.
</gallery>
{{Items}}
[[cs:Ohňostrojová hvězda]]
[[de:Feuerwerksstern]]
[[es:Estrella de fuegos artificiales]]
[[fr:Étoile de feu d'artifice]]
[[hu:Tűzijáték csillag]]
[[it:Stella pirotecnica]]
[[ja:花火の星]]
[[ko:폭죽 탄약]]
[[nl:Vuurwerkster]]
[[pl:Gwiazdka pirotechniczna]]
[[pt:Estrela de fogo de artifício]]
[[ru:Пиротехническая звезда]]
[[uk:Зірка феєрверку]]
[[zh:烟火之星]]</li><li>[[Armor Stand|Armor Stand]]<br/>{{ItemEntity
| image = Armor Stand.png
| image2 = Armor Stand BE.png
| extratext = View [[#Gallery|all renders]]
| stackable =
* '''[[JE]]:''' Yes (16)
* '''[[BE]]:''' Yes (64)
| renewable = Yes
| flammable = Yes
| size = '''Normal:'''<br>
Width: 0.5 Blocks<br>
Height: 1.975 Blocks<br>
'''Small:'''<br>
Width: 0.25 Blocks<br>
Height: 0.9875 Blocks<br>
| health = {{hp|20}}
}}
An '''armor stand''' is an inanimate [[entity]] that can wear [[armor]]. It can also hold [[Item|items]] and be posed (but these are not possible in [[Survival]] in [[Java Edition]]).
== Obtaining ==
An armor stand can be broken by quickly {{control|attack|text=attacking}} it twice, dropping itself and any armor placed onto it.
=== Crafting ===
{{Crafting
|A1= Stick
|B1= Stick
|C1= Stick
|B2= Stick
|A3= Stick
|B3= Smooth Stone Slab
|C3= Stick
|Output= Armor Stand
|type=Decoration block
}}
=== Natural generation ===
Two armor stands are found in each taiga [[village]] outdoor armory, one equipped with an [[iron helmet]], the other with an [[iron chestplate]].
== Usage ==
[[Player]]s can use armor stands to hold [[armor]], [[mob head]]s, [[carved pumpkin]]s, and [[elytra]]. [[Commands]] can be used to give them other [[item]]s. The stand does not have a GUI, so players interact with it directly. Armor stands are also able to be placed in different orientations, similar to [[banner]]s or [[sign]]s. Armor stands are [[entity|entities]], allowing them to be pushed by [[piston]]s, moved by flowing [[water]], pulled with [[fishing rod]]s, pushed by players (with knockback), and bounced by [[slime block]]s.
{{Control|use|text=Using}} armor on the stand places the armor if done on a bare spot. Conversely, clicking on armor with a bare hand removes the armor and places it in the highlighted hotbar slot. It is not possible to take or place items from the armor stand's hands unless playing on Bedrock Edition.
Armor, mob heads, or carved pumpkins can be automatically placed on armor stands with a [[dispenser]].
Armor stands can be customized further to have arms, pose, disobey gravity, dual wield and other things by summoning them using {{cmd|summon}} with [[Tutorials/Command NBT tags#Armor Stand|NBT tags]].
In maps heavily using [[command blocks]], armor stands can be used to keep [[scoreboard]] objectives that are 'global' to the map, run [[commands]], etc.
{{IN|bedrock}}, the pose of the armor stand can be changed by interacting with the armor stand (or pressing the {{btn|Pose|be=1}} button on mobile devices) while sneaking, or by using a redstone signal. There are 13 possible poses. Armor stands can also hold items by interacting with the armor stand (or pressing the {{btn|Equip|be=1}} button on mobile devices) while holding an item that cannot be worn.
;<nowiki>Below are the poses:
{| class="wikitable collapsible collapsed"
!No.!!Namespace ID!! Redstone power
!
! !! Image
|-
|0
|{{cd|animation.armor_stand.default_pose}}
|0
|
|
|[[File:Armor Stand Default Pose.png|128px]]
|-
|1
|{{cd|animation.armor_stand.no_pose}}
|1
|
|
|[[File:Armor Stand No Pose.png|128px]]
|-
|2
|{{cd|animation.armor_stand.solemn_pose}}
|2
|
|
|[[File:Armor Stand Solemn Pose.png|128px]]
|-
|3
|{{cd|animation.armor_stand.athena_pose}}
|3
|
|
|[[File:Armor Stand Athena Pose.png|128px]]
|-
|4
|{{cd|animation.armor_stand.brandish_pose}}
|4
|
|
|[[File:Armor Stand Brandish Pose.png|128px]]
|-
|5
|{{cd|animation.armor_stand.honor_pose}}
|5
|
|
|[[File:Armor Stand Honor Pose.png|128px]]
|-
|6
|{{cd|animation.armor_stand.entertain_pose}}
|6
|
|
|[[File:Armor Stand Entertain Pose.png|128px]]
|-
|7
|{{cd|animation.armor_stand.salute_pose}}
|7
|
|
|[[File:Armor Stand Salute Pose.png|128px]]
|-
|8
|{{cd|animation.armor_stand.hero_pose}}
|8, 13 or more
|
|
|[[File:Armor Stand Hero Pose.png|128px]]
|-
|9
|{{cd|animation.armor_stand.riposte_pose}}
|9
|
|
|[[File:Armor Stand Riposte Pose.png|128px]]
|-
|10
|{{cd|animation.armor_stand.zombie_pose}}
|10
|
|
|[[File:Armor Stand Zombie Pose.png|128px]]
|-
|11
|{{cd|animation.armor_stand.cancan_a_pose}}
|11
|
|
|[[File:Armor Stand Cancan A Pose.png|128px]]
|-
|12
|{{cd|animation.armor_stand.cancan_b_pose}}
|12
|
|
|[[File:Armor Stand Cancan B Pose.png|128px]]
|}
==Behavior==
Because armor stands are entities, they obey gravity, allowing them to fall and rest on non-full [[block]]s such as [[enchanting table]]s, [[snow layer]]s and [[slab]]s.
Any [[armor]] on the stand drops when the stand is broken. Armor stands can display [[enchanting|enchanted]] and all forms of [[dye]]d armor. The effects of most enchanted armor have no effect when on an armor stand, with three exceptions:
*[[Frost Walker]] creates [[frosted ice]] blocks on [[water]] as usual if an armor stand is pushed with a [[piston]].
*[[Depth Strider]] slows the movement of the armor stand when being pushed with water.
*A [[player]] may take damage from hitting an armor stand that holds armor enchanted with [[Thorns]].
Armor stands are not damaged by [[cacti]] but can be broken by [[arrow]]s. An armor stand destroyed by an explosion or a firework does not drop as an [[item (entity)|item]]. Armor stands in water and [[lava]] at the same time are not consumed by the lava.
{{IN|be}}, armor stands can be affected by [[status effect]]s. They can be 'killed' by [[Harming]] and [[Decay]] [[splash potion|splash]]/[[lingering potion]]s, lava, [[fire]], and [[campfire]]s, and they play the player death sound and fall to their side and disappear, yielding no armor stand item. If an armor stand is equipped with an item or armor, that item or armor is considered as "naturally-spawned equipment" with an 8.5% chance of dropping when the armor stand "dies" from the [[Instant Damage]] or the [[Wither (status effect)|Wither]] status effect. If the dropped item is any form of [[weapon]], [[tool]] or armor, it drops in a badly damaged state because the game considers it as "naturally-spawned equipment".<ref>{{Bug|MCPE-24341}}</ref>
The stand wobbles slightly when being hit by the player.
{{IN|java}}, it is possible to create an armor stand with arms using the {{cmd|summon}} [[command]]. It is also possible to change an armor stand without arms into a stand with arms by using the {{cmd|data}} command. The commands are as follows:
*<code>/data merge entity @e[type=armor_stand,sort=nearest,limit=1] {ShowArms:1}</code>, which changes the nearest armor stand into an armor stand with arms.
*<code>/summon minecraft:armor_stand ~ ~ ~ {ShowArms:1}</code>, which summons a new armor stand with arms shown.
*<code>/summon armor_stand ~ ~ ~ {Rotation:[0.0f]}</code>, which summons a new armor stand that faces a desired direction (dependent on changing "0.0f" to other numbers like "90.0f" or "180.0f", otherwise it faces the same way as a default armor stand).
==Sounds==
{{edition|java}}:<br>
Armor stands use the Friendly Creatures sound category for entity-dependent sound events.
{{Sound table
|sound=Armor Stand hit1.ogg
|sound2=Armor Stand hit2.ogg
|sound3=Armor Stand hit3.ogg
|sound4=Armor Stand hit4.ogg
|subtitle=Block breaking
|source=Friendly Creatures
|description=When an armor stand is damaged
|id=entity.armor_stand.hit
|translationkey=subtitles.block.generic.hit
|volume=1.0
|pitch=1.0
|distance=16}}
{{Sound table
|sound=Armor Stand break1.ogg
|sound2=Armor Stand break2.ogg
|sound3=Armor Stand break3.ogg
|sound4=Armor Stand break4.ogg
|subtitle=Block broken
|source=Friendly Creatures
|description=When an armor stand is destroyed
|id=entity.armor_stand.break
|translationkey=subtitles.block.generic.break
|volume=1.0
|pitch=1.0
|distance=16}}
{{Sound table
|sound=Stone dig1.ogg
|sound2=Stone dig2.ogg
|sound3=Stone dig3.ogg
|sound4=Stone dig4.ogg
|subtitle=Block placed
|source=Blocks
|description=When an armor stand is placed
|id=entity.armor_stand.place
|translationkey=subtitles.block.generic.place
|volume=1.0
|pitch=1.0
|distance=16}}
{{Sound table
|sound=Wood dig1.ogg
|sound2=Wood dig2.ogg
|sound3=Wood dig3.ogg
|sound4=Wood dig4.ogg
|subtitle=Block placed
|source=Friendly Creatures
|description=When an armor stand falls onto a block at a high speed{{Info needed}}
|id=entity.armor_stand.fall
|translationkey=subtitles.entity.armorstand.fall
|volume=1.0
|pitch=1.0
|distance=16
|foot=1}}
{{edition|bedrock}}:
{{Sound table
|type=bedrock
|sound=Armor Stand hit1.ogg
|sound2=Armor Stand hit2.ogg
|sound3=Armor Stand hit3.ogg
|sound4=Armor Stand hit4.ogg
|source=neutral
|description=When an armor stand is damaged
|id=mob.armor_stand.hit
|volume=1.0
|pitch=1.0}}
{{Sound table
|sound=Armor Stand break1.ogg
|sound2=Armor Stand break2.ogg
|sound3=Armor Stand break3.ogg
|sound4=Armor Stand break4.ogg
|source=neutral
|description=When an armor stand is destroyed
|id=mob.armor_stand.break
|volume=1.0
|pitch=1.0}}
{{Sound table
|sound=Stone dig1.ogg
|sound2=Stone dig2.ogg
|sound3=Stone dig3.ogg
|sound4=Stone dig4.ogg
|source=neutral
|description=When an armor stand is placed
|id=mob.armor_stand.place
|volume=1.0
|pitch=1.0}}
{{Sound table
|sound=Wood dig1.ogg
|sound2=Wood dig2.ogg
|sound3=Wood dig3.ogg
|sound4=Wood dig4.ogg
|source=neutral
|description=When an armor stand falls onto a block at a high speed{{Info needed}}
|id=mob.armor_stand.land
|volume=1.0
|pitch=1.0
|foot=1}}
==Data values==
===ID===
{{edition|java}}:
{{ID table
|edition=java
|firstcolumnname=Armor Stand
|showforms=y
|generatetranslationkeys=y
|displayname=Item
|spritename=armor-stand
|spritetype=item
|nameid=armor_stand
|form=item
|foot=1}}
{{ID table
|edition=java
|firstcolumnname=Armor Stand
|generatetranslationkeys=y
|displayname=Entity
|spritename=armor-stand
|spritetype=entity
|nameid=armor_stand
|foot=1}}
{{edition|bedrock}}:
{{ID table
|edition=bedrock
|firstcolumnname=Armor Stand
|shownumericids=y
|showforms=y
|notshowbeitemforms=y
|generatetranslationkeys=y
|displayname=Item
|spritename=armor-stand
|spritetype=item
|nameid=armor_stand
|id=552
|form=item
|foot=1}}
{{ID table
|edition=bedrock
|firstcolumnname=Armor Stand
|shownumericids=y
|generatetranslationkeys=y
|displayname=Entity
|spritename=armor-stand
|spritetype=entity
|nameid=armor_stand
|id=61
|foot=1}}
===Item data===
{{el|java}}:
{{main|Player.dat format}}
<div class="treeview">
* {{nbt|compound|tag}}: The item's '''tag''' tag.
{{:Player.dat_format/Entity Spawners}}
</div>
{{el|bedrock}}:
:{{IN|bedrock}}, armor stands have no additional item tag.
:See [[Bedrock Edition level format/Item format]].
===Entity data===
Armor stands have entity data associated with them that contain various properties of the [[entity]].
{{el|java}}:
{{main|Entity format}}
{{/ED}}
{{el|bedrock}}:
:See [[Bedrock Edition level format/Entity format]].
== Video==
Note: This video is outdated as Zoglins now attack armor stands
<div style="text-align:center">{{yt|tCFkdTfCleQ}}</div>
==History==
{{History|java}}
{{History||1.8|snap=August 5, 2014|slink={{Tweet|SeargeDP|496666952530538498}}|[[File:Armor Stand (pre-release).png|32px]] [[File:Armor Stand (item) (pre-release).png|32px]] [[Searge]] tweeted a image of an armor stand. The appearance was changed before release.}}
{{History|||snap=August 5, 2014|slink={{Tweet|SeargeDP|496673890148823040}}|Showed crafting recipe and name "[Armor Stand]", both were changed before release.}}
{{History|||snap=14w32a|[[File:Armor Stand JE1.png|32px]] Added armor stands.}}
{{History|||snap=14w32b|[[File:Armor Stand (item) JE1 BE1.png|32px]] The item texture has changed.
|Pick-block can now be used on armor stands.
|Armor stands can now no longer be crafted using [[slabs]] other than stone slabs.}}
{{History|||snap=14w32c|Added a <code>NoBasePlate</code> tag for the armor stand.}}
{{History|||snap=14w33a|Breaking [[particles]] have been added for the armor stand.}}
{{History||1.8.1|snap=pre1|Added <code>Marker</code> tag for armor stands.}}
{{History||1.9|snap=15w31a|Armor stands can now dual wield.
|<code>HandItems</code> and <code>ArmorItems</code> tags added for armor stands, which is intended to replace the <code>Equipment</code> tag.}}
{{History|||snap=15w33a|The <code>Equipment</code> tag has been removed from armor stands.}}
{{History|||snap=15w47a|The armor stand now wobbles when hit by the [[player]].}}
{{History|||snap=16w02a|Marker <code>ArmorStand</code>s now outline their equipment only when glowing.}}
{{History||1.11|snap=16w32a|The entity ID of the armor stand has been changed from <code>ArmorStand</code> to <code>armor_stand</code>.}}
{{History||1.13|snap=17w47a|Prior to [[1.13/Flattening|''The Flattening'']], this [[item]]'s numeral ID was 416.}}
{{History||1.14|snap=18w43a|[[File:Armor Stand JE2.png|32px]] The texture of armor stands has been changed to the new [[planks|oak planks]] texture.
|[[File:Armor Stand (item) JE2 BE2.png|32px]] The texture of armor stand [[item]]s has been slightly changed. (Comparison: [[File:Armor Stand (item) Texture Change 1.13 to 18w43a.gif|32px]])}}
{{History|||snap=18w50a|[[File:Armor Stand JE3.png|32px]] The texture of armor stands has been changed again.
|Armor stands now generate in taiga [[village]]s.}}
{{History||1.15|snap=19w42a|Armor stands can now be placed by [[dispenser]]s.}}
{{History||1.16|snap=20w07a|Armor stands no longer fall through fences and walls when placed.<ref>{{bug|MC-65951}}</ref>}}
{{History|||snap=20w14a|[[Zoglin]]s now attack armor stands.}}
{{History||1.17|snap=20w45a|[[File:Armor Stand 20w45a.png|32px]] The model of the armor stand has been changed.}}
{{History|||snap=20w46a|[[File:Armor Stand JE3.png|32px]] The model of the armor stand has been changed back to how it was in 1.16.}}
{{History||1.18|snap=Pre-release 5|[[File:Armor Stand JE4.png|32px]] Changed smooth stone texture on armor stand.}}
{{History||1.19.4|snap=23w03a|Armor stands now preserve custom names when placed and broken.}}
{{History||1.20<br>(Experimental)|link=1.19.4|snap=23w04a|An armor stand now appears in the smithing table GUI; arms are displayed as in Bedrock Edition.
|When an armor stand is placed, its model now changes in effect of the player's facing direction<ref>{{bug|MC-93533}}</ref>.}}
{{History|||snap=23w06a|The model no longer changes when the armory is placed. Also, the head, which tilted slightly to the lower right in the version from 1.8 up to 1.19.3, now faces forward from [[File:Armor Stand JE4.png|32px]] to [[File:Armor Stand JE5.png|32px]].}}
{{History||?|Armor can now be swapped in [[armor stand]]s by {{ctrl|using}} them in the armor stand's slot.}}
{{History|bedrock}}
{{History||1.2.0|snap=beta 1.2.0.2|[[File:Armor Stand BE1.png|32px]] [[File:Armor Stand (item) JE1 BE1.png|32px]] Added armor stands.}}
{{History||1.10.0|snap=beta 1.10.0.3|[[File:Armor Stand BE2.png|32px]] The texture of armor stands has been changed.
|[[File:Armor Stand (item) JE2 BE2.png|32px]] The texture of armor stand [[item]]s has been slightly changed.}}
{{History||1.12.0|snap=beta 1.12.0.2|[[File:Armor Stand with Leather Armor MCPE-44669.png|32px]] Leather [[armor]] no longer shows as being [[dye]]d properly when worn by armor stands.}}
{{History|||snap=beta 1.12.0.3|[[File:Armor Stand wear Chicken.png|x73px]][[File:Armor Stand wear Rabbit.png|x73px]] [[File:Armor Stand wear Salmon.gif|x73px]] [[File:Armor Stand wear Pufferfish.gif|x73px]] [[File:Armor Stand wear Slime.png|x73px]] When armor stands hold a [[raw chicken]], [[raw rabbit]], [[raw salmon]], [[pufferfish]] or a [[slime block]], they now wear these [[mob]] counterparts.<ref>{{bug|mcpe-48629}}</ref>}}
{{History||1.13.0|snap=beta 1.13.0.1|Leather armor now shows as being dyed properly when worn by armor stands.}}
{{History|||snap=beta 1.13.0.4|Armor stands no longer hold certain [[mob]]s if they are holding a [[item]] related to them.
|Armor stands now have a smoother animation when changing poses.}}
{{History||1.16.0|snap=?|Armor stands are now targeted by zoglins.}}
{{History||1.16.210|snap=beta 1.16.210.51|Armor stands are no longer attacked by [[goat]]s.}}
{{History|console}}
{{History||xbox=TU31|xbone=CU19|ps=1.22|wiiu=Patch 3|switch=1.0.1|[[File:Armor Stand JE1.png|32px]] [[File:Armor Stand (item) JE1 BE1.png|32px]] Added armor stands.}}
{{History||xbox=TU43|xbone=CU33|ps=1.36|wiiu=Patch 13|Added [[sound]]s for armor stands.}}
{{History||xbox=TU60|xbone=CU51|ps=1.64|wiiu=Patch 30|switch=1.0.11|[[File:Armor Stand BE1.png|32px]] Armor stands now have arms and the [[player]] can now change the pose of the armor stand.}}
{{History||xbox=none|xbone=none|ps=1.90|wiiu=none|switch=none|[[File:Armor Stand BE2.png|32px]] The texture of armor stands has been changed.
|[[File:Armor Stand (item) JE2 BE2.png|32px]] The texture of armor stand [[item]]s has been slightly changed.}}
{{History|foot}}
<gallery>
Armour stand 1.png|The first image of the armor stand.
JE 1.8 Dev Armor Stand crafting.png|The first image of armor stand crafting recipe.
The Bountiful Update.png|Armor stands in the [[Java Edition 1.8|1.8]] poster.
Dual Wielding Armor Stand.png|A dual wielding armor stand.
Glowing Armor Stands.png|Armor stands with the [[glowing]] effect.
Armor Stand Chess.jpg|Chess with armor stands.
</gallery>
==Issues==
{{issue list}}
==Trivia ==
*Equipping armor stands with certain [[block]]s and [[item]]s can cause rendering glitches. According to [[Searge]] this is due to transparent rendering on entities not yet being supported.<ref>{{bug|MC-67415||"Armor Stands with Slime Block rendering entities behind them"}} resolved as "Won't Fix"</ref><ref>{{bug|MC-67674||"Armor Stand wearing a Skull and Holding Stained Glass causes Graphical issues"}} resolved as "Won't Fix"</ref>
*Bedrock Edition has a version exclusive armor stand [[model]], which includes posable arms.
*Using [[redstone]] to change the stands reverse the poses, starting with the can-can pose first.
*Placing the stand within three powered [[redstone dust]] always changes its pose to the honor pose. [[Redstone Repeater|Repeaters]] also switch the stand to the honor pose if not set four blocks from one.
*Using external tools, armor stand spawners can be placed.
*Secret signatures for [[Jasper Boerstra|JAPPA]], Chi Wong, and [[Michael Stoyke|Searge]] can be found at the bottom of the armor stand texture.
== Gallery ==
===Renders===
;Armor (Java Edition)
<gallery>
Armor Stand Leather.png
Armor Stand Golden.png
Armor Stand Chainmail.png
Armor Stand Iron.png
Armor Stand Diamond.png
Armor Stand Netherite.png
</gallery>
; Armor (Bedrock Edition)
<gallery>
Armor Stand with Leather Armor BE.png
Armor Stand with Golden Armor BE.png
Armor Stand with Chain Armor BE.png
Armor Stand with Iron Armor BE.png
Armor Stand with Diamond Armor BE.png
Armor Stand with Netherite Armor BE.png
</gallery>
;Poses
<gallery>
Armor Stand Pose 0.png|
Armor Stand Pose 1.png|
Armor Stand Pose 2.png|
Armor Stand Pose 3.png|
Armor Stand Pose 4.png|
Armor Stand Pose 5.png|
Armor Stand Pose 6.png|
Armor Stand Pose 7.png|
Armor Stand Pose 8.png|
Armor Stand Pose 9.png|
Armor Stand Pose 10.png|
Armor Stand Pose 11.png|
Armor Stand Pose 12.png|
</gallery>
===Screenshots===
<gallery>
Armor Stand Demo.png|Armor stands in various positions with various [[armor]].
Armor Stand glass and sword.png|Armor stands can wear [[block]]s on their heads. This is accessible with [[command]]s such as {{cmd|item}}.
Bedrock edition armor stand poses.png|All armor stand poses as seen in {{el|be}}.
Netherite to the rescue!.png|An entire set of netherite [[armor]] on an armor stand.
Armor Stand Garage.png|An armor stand in a garage.
</gallery>
==References ==
{{reflist}}
==External Links==
*[https://www.minecraft.net/en-us/article/taking-inventory--armor-stand Taking Inventory: Armor Stand] – Minecraft.net on March 16, 2023
{{Items}}
{{Entities}}
[[Category:Storage]]
[[de:Rüstungsständer]]
[[es:Soporte para armadura]]
[[fr:Porte-armure]]
[[ja:防具立て]]
[[ko:갑옷 거치대]]
[[pl:Stojak na zbroję]]
[[pt:Suporte de armaduras]]
[[ru:Стойка для брони]]
[[th:แท่นวางชุดเกราะ]]
[[uk:Стійка для обладунків]]
[[zh:盔甲架]]</li></ul></nowiki> | The player skin originally had a beard that was commonly mistaken for a smile. The beard was removed in Beta 1.6.6. | ||||
| October 2011 | Notch renamed the cloak to the cape mentioning that the name was already wrong in the first place.[37] | ||||
| release | |||||
1.0.0{{Extension DPL}}<ul><li>[[Medicine|Medicine]]<br/>{{Redirect|Elixir", "Antidote", "Eye Drops", and "Tonic|s=1|the brewable items|Potion}}
{{Education feature}}
{{Exclusive|bedrock|education}}
{{Item
| image = <gallery>
Antidote.png | Antidote
Elixir.png | Elixir
Eye Drops.png | Eye Drops
Tonic.png | Tonic
</gallery>
| renewable = Yes
| stackable = No
}}
A '''medicine''' is a type of [[potion]] that cures the specified [[effect]] instead of applying it.
== Obtaining ==
=== Brewing ===
Cures are brewed from awkward potions using different [[element]]s.{{only|bedrock|education}} These drinks remove the specified effect when drank, and cannot be modified into splash, lingering, extended or enhanced versions.
{| class="wikitable" style="text-align: center;" data-description="Remedies"
! Potion
! Reagent, base
! Effect
! Notes
|-
! {{Inventory slot|Antidote}}<br>Antidote
| {{Brewing Stand
|Input= Silver
|Output2= Awkward Potion
}}
| Cures [[Poison]]
| Silver detects poison {{w|Silver#Symbolic role|in folklore}}, and possesses anti-microbial properties.
|-
! {{Inventory slot|Elixir}}<br>Elixir
| {{Brewing Stand
|Input= Cobalt
|Output2= Awkward Potion
}}
| Cures [[Weakness]]
|
|-
! {{Inventory slot|Eye Drops}}<br>Eye Drops
| {{Brewing Stand
|Input= Calcium
|Output2= Awkward Potion
}}
| Cures [[Blindness]]
|
|-
! {{Inventory slot|Tonic}}<br>Tonic
| {{Brewing Stand
|Input= Bismuth
|Output2= Awkward Potion
}}
| Cures [[Nausea]]
| In real life, {{w|bismuth subsalicylate}} is used as a nausea treatment.
|}
== Usage ==
Each type of medicine has an associated effect that it can cure (see {{slink||Brewing}} for details). Players can drink the medicine only if they have the corresponding effect. Drinking the medicine eliminates the effect. Although medicine does not resemble [[potion]]s, the player still gets the [[glass bottle]] back.
== Sounds ==
{{Sound table
|type=bedrock
|sound=Drink.ogg
|source=player
|description=When a player drinks medicine
|id=random.drink
|foot=1}}
== Data values ==
=== ID ===
{{ID table
|edition=bedrock
|shownumericids=y
|showforms=y
|generatetranslationkeys=y
|displayname=Medicine
|spritetype=item
|nameid=medicine
|id=599
|form=item
|notshowbeitemforms=y
|translationkey=item.medicine.poison.name,item.medicine.weakness.name,item.medicine.blindness.name,item.medicine.nausea.name
|foot=1}}
== History ==
{{History|bedrock}}
{{History||1.4.0|snap=beta 1.2.20.1|[[File:Antidote BE1.png|32px]] [[File:Elixir BE1.png|32px]] [[File:Eye Drops BE1.png|32px]] [[File:Tonic BE1.png|32px]] Added medicines.}}
{{History|education}}
{{History||1.0.27|[[File:Antidote BE1.png|32px]] [[File:Elixir BE1.png|32px]] [[File:Eye Drops BE1.png|32px]] [[File:Tonic BE1.png|32px]] Added medicines.}}
{{History|foot}}
== Issues ==
{{issue list|Cures|Medicine}}
== See also ==
* [[Potion]]
* [[Splash Potion]]
* [[Lingering Potion]]
{{Items}}
{{Education Edition}}
[[Category:Non-renewable resources]]
[[Category:Education Edition items]]
[[de:Medizin]]
[[it:Medicinale]]
[[ja:治療薬]]
[[lzh:藥]]
[[pl:Leki]]
[[pt:Remédio]]
[[zh:药物]]</li><li>[[Sword|Sword]]<br/>{{For|the item in ''Minecraft Dungeons''|MCD:Sword|MCD:Diamond Sword}}
{{Item
| image = <gallery>
Wooden Sword.png | Wooden
Stone Sword.png | Stone
Iron Sword.png | Iron
Golden Sword.png | Golden
Diamond Sword.png | Diamond
Netherite Sword.png | Netherite
</gallery>
| rarity = Common
| renewable =
* '''Netherite''': No
* '''All others''': Yes
| durability =
'''Java Edition'''<br>
Golden: 32<br>
Wood: 59<br>
Stone: 131<br>
Iron: 250<br>
Diamond: 1561<br>
Netherite: 2031<br>
'''Bedrock Edition'''<br>
Golden: 33<br>
Wood: 60<br>
Stone: 132<br>
Iron: 251<br>
Diamond: 1562<br>
Netherite: 2032
| stackable = No
}}
The '''sword''' is a melee [[weapon]] that is mainly used to deal [[damage]] to [[entity|entities]] or for breaking certain blocks faster than by hand. A sword is made from one of six materials, in order of increasing quality and expense: wood, gold, stone, iron, diamond and netherite.
== Obtaining ==
=== Crafting ===
{{Crafting
|showname=0
|showdescription=1
|head=1
|name=[[Swords]]
|B1={Any Planks}; Iron Ingot; Gold Ingot; Diamond
|B2={Any Planks}; Iron Ingot; Gold Ingot; Diamond
|B3=Stick
|Output=Wooden Sword; Iron Sword; Golden Sword; Diamond Sword
|type=Combat
}}
{{Crafting
|name=Stone Sword
|B1=Any stone-tier block
|B2=Any stone-tier block
|B3=Stick
|Output=Stone Sword
|description=Can use cobblestone and its other variants interchangeably.
|type=Combat
}}
{{Crafting
|foot=1
|ignoreusage=1
|name=[[Swords]]
|ingredients=Damaged Matching [[Swords]]
|Damaged Wooden Sword; Damaged Stone Sword; Damaged Iron Sword; Damaged Golden Sword; Damaged Diamond Sword; Damaged Netherite Sword
|Damaged Wooden Sword; Damaged Stone Sword; Damaged Iron Sword; Damaged Golden Sword; Damaged Diamond Sword; Damaged Netherite Sword
|description= The durability of the two swords is added together, plus an extra 5% of the tool type's total durability. Enchantments are removed unless combined on an [[anvil]].<br>'''Example:''' Two wooden swords, each with remaining durability of 20, combine into a wooden sword having 43 durability (20 + 20 + 5% of 60).
|Output=Wooden Sword; Stone Sword; Iron Sword; Golden Sword; Diamond Sword; Netherite Sword
|type=Combat
}}
=== Upgrading ===
{{Smithing
|Netherite Upgrade
|Diamond Sword
|Netherite Ingot
|Netherite Sword
|description=
|tail=1
}}
=== Repairing ===
==== Grinding ====
{{Grinding
|showdescription=1
|ingredients=2x Damaged Wooden Sword or<br>2x Damaged Stone Sword or<br>2x Damaged Iron Sword or<br>2x Damaged Golden Sword or<br>2x Damaged Diamond Sword or <br>2x Damaged Netherite Sword
|Damaged Wooden Sword; Damaged Stone Sword; Damaged Iron Sword; Damaged Golden Sword; Damaged Diamond Sword; Damaged Netherite Sword
|Damaged Wooden Sword; Damaged Stone Sword; Damaged Iron Sword; Damaged Golden Sword; Damaged Diamond Sword; Damaged Netherite Sword
|Wooden Sword; Stone Sword; Iron Sword; Golden Sword; Diamond Sword; Netherite Sword
|description=The durability of the two swords is added together, plus an extra 5% durability. Any enchantments, besides curses, would be removed.
}}
==== Unit repair ====
{{main|Anvil mechanics#Unit repair}}
{{/Repairing with Anvils}}
A sword can be repaired in an [[anvil]] by adding units of the [[tiers]]' repair material, with each repair material restoring 25% of the sword's maximum durability, rounded down.
=== Mob loot ===
{{Main|Drops#Equipped items}}
Some [[mobs]] can spawn with a sword and have an 8.5% chance of dropping them upon death caused by player. This chance is increased by 1% per level of [[Looting]], up to a maximum of 11.5% with Looting III. [[Zombie]]s and [[husk]]s can drop iron swords, [[zombified piglin]]s and [[piglin]]s can drop golden swords, and [[wither skeleton]]s can drop stone swords. The dropped sword is usually badly damaged and may be enchanted. Stone swords dropped by wither skeletons are never enchanted.
A [[vex]] wields an iron sword that normally has a 0% chance of dropping, because their main hand's <code>HandDropChances</code> is 0. However, this chance increases by 1 percentage point per level of Looting. It is never damaged{{only|java}} and may be enchanted.
{{IN|be}}, [[pillager]]s and [[vindicator]]s that spawn from raids have a 4.1% chance (5.12% chance on hard mode) of dropping a damaged iron sword. This sword has a 50% chance of being enchanted.
=== Trading ===
[[File:Weaponsmith Diamond Sword Trade.png|thumb|right|The diamond sword trade of a weaponsmith.]]
{{IN|bedrock}}, an apprentice-level weaponsmith villagers sells enchanted iron swords for at least 7-21 emeralds, and a master-level weaponsmith sells enchanted diamond swords for at least 13-27 emeralds.
{{IN|java}}, a novice-level weaponsmith villager has a {{frac|2|3}} chance of selling an enchanted iron sword for at least 7-22 emeralds. A master-level weaponsmith offers to sell an enchanted diamond sword for at least 11–27 emeralds.
The enchantments of the swords offered by villagers are the same as the ones obtained from an [[enchantment table]] at levels 5–19.
=== Chest loot ===
{{LootChestItem|iron-sword,level-enchanted-iron-sword,damaged-random-enchanted-iron-sword,golden-sword,random-enchanted-golden-sword,diamond-sword,damaged-diamond-sword,level-enchanted-diamond-sword,damaged-random-enchanted-diamond-sword,damaged-random-enchanted-diamond-sword-2}}
== Usage ==
=== Attacking ===
Pressing {{control|attack}} while holding a sword inflicts damage on both mobs and other players. Upon damaging a mob or player, the sword's [[Item Durability|durability]] decreases by 1.
Attacking a [[boat]] or a [[minecart]] with a sword stone tier or higher instantly destroys it {{only|java}}, without decreasing the sword's durability. Otherwise, it requires 2 hits, with neither decreasing durability.
==== Sweeping ====
{{exclusive|Java|section=1}}
If the attack recharge meter is 84.8% or above and the player is on the ground standing or moving slower than the [[sprinting]] speed in a straight line, the sword performs a sweeping attack indicated by a gale [[particle]] that reaches nearby enemies for {{hp|1}} and knocks them back; the amount of knockback is 80% that of the basal knockback and does not benefit from the [[knockback]] enchantment. As result, the player can perform a sweep attack while they are sprinting diagonally but it is impossible to perform a sweep attack at the same time as a critical hit or while riding some [[entity]]. All enemies within an 1 by 0.25 by 1 block area of any part of the attacked mob and whose feet are 3 or less blocks away from player's feet are affected. The [[sweeping edge]] enchantment increases the damage dealt by 50% of the normal hit damage for level I, 67% for level II and 75% for level III.
=== Damage ===
{{Main|Damage}}
==== Java Edition ====
Swords have an attack speed of 1.6 and take 0.625 seconds to [[Damage#Attack cooldown|recover]].
{| class="wikitable" style="text-align:center" data-description="Sword attack damage by type"
! Material
! {{ItemSprite|Wooden Sword|text=Wooden}}
! {{ItemSprite|Golden Sword|text=Gold}}
! {{ItemSprite|Stone Sword|text=Stone}}
! {{ItemSprite|Iron Sword|text=Iron}}
! {{ItemSprite|Diamond Sword|text=Diamond}}
! {{ItemSprite|Netherite Sword|text=Netherite}}
|-
! Attack Damage
| {{hp|4}}
| {{hp|4}}
| {{hp|5}}
| {{hp|6}}
| {{hp|7}}
| {{hp|8}}
|-
! Attack Speed
| 1.6
| 1.6
| 1.6
| 1.6
| 1.6
| 1.6
|-
! Damage/Second (DPS)
| 6.4
| 6.4
| 8
| 9.6
| 11.2
| 12.8
|-
! Durability
| 59
| 32
| 131
| 250
| 1561
| 2031
|-
! Lifetime damage inflicted<ref group="note">The formula to find the total lifetime damage is ''Lifetime damage minimum = Durability × Damage per hit''. It ignores enchantments and [[Damage#Critical_hit|critical hits]], and assumes the sword is at maximum charge</ref>
| {{hp|236}}
| {{hp|128}}
| {{hp|655}}
| {{hp|1500}}
| {{hp|10927}}
| {{hp|16248}}
|}
{{notelist}}
==== Bedrock Edition ====
{{IN|bedrock}}, swords have no attack cooldown or sweep attack, and deal the following damage:
{| class="wikitable" style="text-align:center" data-description="Sword attack damage by type"
! Material
! {{ItemSprite|Wooden Sword|text=Wooden}}
! {{ItemSprite|Golden Sword|text=Gold}}
! {{ItemSprite|Stone Sword|text=Stone}}
! {{ItemSprite|Iron Sword|text=Iron}}
! {{ItemSprite|Diamond Sword|text=Diamond}}
! {{ItemSprite|Netherite Sword|text=Netherite}}
|-
! Attack Damage
| {{hp|5}} <!-- DO NOT CHANGE THESE! The values are correct, '+4 Attack Damage' means 5 total attack damage. -->
| {{hp|5}}
| {{hp|6}}
| {{hp|7}}
| {{hp|8}}
| {{hp|9}}
|-
! Durability
| 60
| 33
| 132
| 251
| 1562
| 2032
|-
! Lifetime damage inflicted<ref group="note">The formula to find the total lifetime damage is ''Durability × Damage per hit = Lifetime damage minimum''. It excludes enchantments and critical hits</ref>
| {{hp|300}}
| {{hp|165}}
| {{hp|792}}
| {{hp|1757}}
| {{hp|12496}}
| {{hp|18288}}
|}
{{notelist}}
The most amount of damage that a sword enchanted with [[Sharpness]] V can do is 11 {{in|java}} and 15.25 {{in|bedrock}}, without critical hits.
=== Sword breaking times ===
{{main|Breaking}}
A sword can also be used to destroy certain blocks 50% quicker, sometimes much quicker than with fists. Using a sword to destroy any block that doesn't break instantly by hand decreases its durability by 2; this includes bamboo, despite that the sword is the fastest tool for breaking it.<ref>{{bug|MC-195168||Swords consume double durability than they normally would when destroying bamboo saplings, bamboo, or cobwebs}}</ref>
If a sword is enchanted with [[Silk Touch]], either using [[Creative]] or [[commands]], cobwebs the sword destroys will drop the cobwebs themselves instead of the usual string. This is due to the sword being classified as the proper tool for cobwebs.
The following table shows the time it takes to break blocks on which swords have any effect. Colors indicate what gets dropped:
* White: an original block.
* Blue: block's normal drop (e.g. seeds, sapling, apple).
* Red: nothing.
{| class="wikitable" style="text-align:center" data-description="Blocks affected by swords"
! Block
! Fists
! Sword
! colspan="2" | Proper/fastest tool
|-
!style="text-align:left"| {{BlockLink|Bamboo}}
| {{tc|no|{{breaking time|Bamboo}} s }} || 0.05 s (instant) <!-- this doesn't work: {{tc|planned|{{breaking time|Bamboo|Sword}} s}} -->
| {{ItemSprite|sword|link=Sword}}
| 0.05 s (instant) <!-- this doesn't work: {{breaking time|Bamboo|Sword}} s -->
|-
!style="text-align:left"| {{BlockLink|Cobweb}}
| {{tc|no|{{breaking time|Cobweb|drop=None}} s}} || {{tc|planned|{{breaking time|Cobweb|Sword}} s}}
| {{ItemSprite|shears|link=Shears}}
| {{breaking time|Cobweb|Shears}} s
|-
!style="text-align:left"| {{BlockLink|Cocoa}}
| {{tc|planned|{{breaking time|Cocoa}}s}} || {{tc|planned|{{breaking time|Cocoa|Sword}}s}}
| {{ItemSprite|wooden-axe|link=Axe}}
| {{tc|planned|{{breaking time|Cocoa|Golden}} – {{breaking time|Cocoa|Wooden}} s}}
|-
! style="text-align:left"|{{BlockLink|Hay Bale}}
| 1s
| 0.8s{{only|bedrock}}
| {{ItemSprite|wooden-hoe|link=Hoe}}
| {{breaking time|Hay Bale|Golden}} – {{breaking time|Hay Bale|Wooden}} s
|-
!style="text-align:left" rowspan="2"| {{BlockLink|Leaves}}
!rowspan="2" {{tc|planned|{{breaking time|Leaves}} s}}
!rowspan="2" {{tc|planned|{{breaking time|Leaves|Sword}} s}}
| {{ItemSprite|shears|link=Shears}}
| {{breaking time|Leaves|Shears}}s
|-
| {{ItemSprite|wooden-hoe|link=Hoe}}
| {{tc|planned|{{breaking time|Leaves|Golden}} – {{breaking time|Leaves|Wooden}} s}}
|-
!style="text-align:left"| {{BlockLink|Jack o'Lantern}}
| {{breaking time|Jack o'Lantern}} s || {{breaking time|Jack o'Lantern|Sword}} s
| {{ItemSprite|wooden-axe|link=Axe}}
| {{breaking time|Jack o'Lantern|Golden}} – {{breaking time|Jack o'Lantern|Wooden}} s
|-
!style="text-align:left"| {{BlockLink|Melon}}
| {{tc|planned|{{breaking time|Melon}} s}} || {{tc|planned|{{breaking time|Melon|Sword}} s}}
| {{ItemSprite|wooden-axe|link=Axe}}
| {{tc|planned|{{breaking time|Melon|Golden}} – {{breaking time|Melon|Wooden}} s}}
|-
!style="text-align:left"| {{BlockLink|Pumpkin}}
| {{breaking time|Pumpkin}}s || {{breaking time|Pumpkin|Sword}} s
| {{ItemSprite|wooden-axe|link=Axe}}
| {{breaking time|Pumpkin|Golden}} – {{breaking time|Pumpkin|Wooden}} s
|-
!style="text-align:left" rowspan="2"| {{BlockLink|Vines}}
| rowspan="2" {{tc|no|{{breaking time|Vines}} s}} || rowspan="2" {{tc|no|{{breaking time|Vines|Sword}} s}}
| {{ItemSprite|wooden-axe|link=Axe}}
| {{tc|no|{{breaking time|Vines|Golden}} – {{breaking time|Vines|Wooden}} s}}
|-
| {{ItemSprite|shears|link=Shears}}
| {{breaking time|Vines|Shears}} s
|}
==== Safety around constructions ====
In Creative mode, swords are unable to break blocks. However, care must still be taken around [[minecart]]s, [[painting]]s, [[item frame]]s,{{only|java}} and [[armor stand]]s; these are entities, thus can be broken with swords in Creative.<ref>{{bug|MC-27140}}</ref><ref>{{bug|MC-18463}}</ref>
=== Enchantments ===
Swords can receive, gathered from mob drops/villager trades or be found in various loot chests (example: End City, Bastion Remnant)with the following [[enchantment]]s:
{| class="wikitable sortable col-2-center col-3-right"
|+
!Name
!Max Level
![[Enchanting|Method]]
!Weight
|-
|[[Fire Aspect]]
|II
|{{Inventory slot|Enchanting Table}}{{Inventory slot|Anvil}}
|2
|-
|[[Looting]]
|III
|{{Inventory slot|Enchanting Table}}{{Inventory slot|Anvil}}
|2
|-
|[[Unbreaking]]
|III
|{{Inventory slot|Enchanting Table}}{{Inventory slot|Anvil}}
|5
|-
|[[Sharpness]]<ref group=note name=note1>Sharpness, Smite, and Bane of Arthropods are mutually exclusive.</ref>
|V
|{{Inventory slot|Enchanting Table}}{{Inventory slot|Anvil}}
|10
|-
|[[Smite]]<ref group=note name=note1/>
|V
|{{Inventory slot|Enchanting Table}}{{Inventory slot|Anvil}}
|5
|-
|[[Bane of Arthropods]]<ref group="note" name=note1/>
|V
|{{Inventory slot|Enchanting Table}}{{Inventory slot|Anvil}}
|5
|-
|[[Knockback]]
|II
|{{Inventory slot|Enchanting Table}}{{Inventory slot|Anvil}}
|5
|-
|[[Mending]]
|I
|{{Inventory slot|Anvil}}
|2
|-
|[[Curse of Vanishing]]
|I
|{{Inventory slot|Anvil}}
|1
|-
|[[Sweeping Edge]]{{Only|java|short=1}}
|III
|{{Inventory slot|Enchanting Table}}{{Inventory slot|Anvil}}
|2
|}
Golden swords have the highest enchantability, yet the least durability{{Notelist}}
=== Fuel ===
Wooden swords can be used as fuel in [[furnace]]s, smelting 1 item per sword.
=== Smelting ingredient ===
{{Smelting|showname=1|Iron Sword;Golden Sword|Iron Nugget;Gold Nugget|0,1}}
=== Piglins ===
[[Piglin]]s are attracted to golden swords, run toward any golden swords on the ground and inspect it for 6 to 8 seconds before putting it in their [[inventory]] slot.
== Sounds ==
{{Edition|Java}}:
{{Sound table
|sound=Strong attack1.ogg
|sound2=Strong attack2.ogg
|sound3=Strong attack3.ogg
|sound4=Strong attack4.ogg
|sound5=Strong attack5.ogg
|sound6=Strong attack6.ogg
|subtitle=Strong attack
|source=player
|description=When a player deals an attack that does not trigger any other attack sounds
|id=entity.player.attack.strong
|translationkey=subtitles.entity.player.attack.strong
|volume=''varies'' <ref group=sound>0.6 for <code>strong1</code> through <code>strong4</code>, and 0.7 for <code>strong5</code> and <code>strong6</code></ref>
|pitch=1.0
|distance=16}}
{{Sound table
|sound=Critical attack1.ogg
|sound2=Critical attack2.ogg
|sound3=Critical attack3.ogg
|subtitle=Critical attack
|source=player
|description=When a player deals a critical hit
|id=entity.player.attack.crit
|translationkey=subtitles.entity.player.attack.crit
|volume=0.7
|pitch=1.0
|distance=16}}
{{Sound table
|sound=Knockback attack1.ogg
|sound2=Knockback attack2.ogg
|sound3=Knockback attack3.ogg
|sound4=Knockback attack4.ogg
|subtitle=Knockback attack
|source=player
|description=When a player deals a sprinting attack
|id=entity.player.attack.knockback
|translationkey=subtitles.entity.player.attack.knockback
|volume=0.7
|pitch=1.0
|distance=16}}
{{Sound table
|sound=Sweep attack1.ogg
|sound2=Sweep attack2.ogg
|sound3=Sweep attack3.ogg
|sound4=Sweep attack4.ogg
|sound5=Sweep attack5.ogg
|sound6=Sweep attack6.ogg
|sound7=Sweep attack7.ogg
|subtitle=Sweeping attack
|source=player
|description=When a player deals a sweep attack
|id=entity.player.attack.sweep
|translationkey=subtitles.entity.player.attack.sweep
|volume=0.7
|pitch=1.0
|distance=16}}
{{Sound table
|rowspan=2
|sound=Weak attack1.ogg
|sound2=Weak attack2.ogg
|sound3=Weak attack3.ogg
|sound4=Weak attack4.ogg
|subtitle=Weak attack
|source=player
|description=When a player deals an attack with no damage
|id=entity.player.attack.nodamage
|translationkey=subtitles.entity.player.attack.weak
|volume=0.7
|pitch=1.0
|distance=16}}
{{Sound table
|subtitle=Weak attack
|source=player
|description=When a player attempts to attack without sufficient cooldown
|id=entity.player.attack.weak
|translationkey=subtitles.entity.player.attack.weak
|volume=0.7
|pitch=1.0
|distance=16}}
{{Sound table
|sound=Random break.ogg
|subtitle=Item breaks
|source=player
|description=When a sword's durability is exhausted
|id=entity.item.break
|translationkey=subtitles.entity.item.break
|volume=0.8
|pitch=0.8-1.2
|distance=16
|foot=1}}
{{Edition|Bedrock}}:
{{Sound table
|type=bedrock
|sound=Strong attack1.ogg
|sound2=Strong attack2.ogg
|sound3=Strong attack3.ogg
|sound4=Strong attack4.ogg
|sound5=Strong attack5.ogg
|sound6=Strong attack6.ogg
|source=player
|description=When a player deals an attack with damage
|id=game.player.attack.strong
|volume=0.2
|pitch=0.8-1.2}}
{{Sound table
|sound=Weak attack1.ogg
|sound2=Weak attack2.ogg
|sound3=Weak attack3.ogg
|sound4=Weak attack4.ogg
|source=player
|description=When a player deals an attack with no damage
|id=game.player.attack.nodamage
|volume=0.2
|pitch=0.8-1.2}}
{{Sound table
|sound=Random break.ogg
|source=player
|description=When an sword's durability is exhausted
|id=random.break
|volume=1.0
|pitch=0.9
|foot=1}}
== Data values ==
=== ID ===
{{edition|java}}:
{{ID table
|edition=java
|showforms=y
|generatetranslationkeys=y
|displayname=Wooden Sword
|spritetype=item
|nameid=wooden_sword
|form=item}}
{{ID table
|displayname=Stone Sword
|spritetype=item
|nameid=stone_sword
|form=item}}
{{ID table
|displayname=Iron Sword
|spritetype=item
|nameid=iron_sword
|form=item}}
{{ID table
|displayname=Diamond Sword
|spritetype=item
|nameid=diamond_sword
|form=item}}
{{ID table
|displayname=Golden Sword
|spritetype=item
|nameid=golden_sword
|form=item}}
{{ID table
|displayname=Netherite Sword
|spritetype=item
|nameid=netherite_sword
|form=item
|foot=1}}
{{edition|bedrock}}:
{{ID table
|edition=bedrock
|shownumericids=y
|showforms=y
|notshowbeitemforms=y
|generatetranslationkeys=y
|displayname=Wooden Sword
|spritetype=item
|nameid=wooden_sword
|id=308
|form=item}}
{{ID table
|displayname=Stone Sword
|spritetype=item
|nameid=stone_sword
|id=312
|form=item}}
{{ID table
|displayname=Iron Sword
|spritetype=item
|nameid=iron_sword
|id=307
|form=item}}
{{ID table
|displayname=Diamond Sword
|spritetype=item
|nameid=diamond_sword
|id=316
|form=item}}
{{ID table
|displayname=Golden Sword
|spritetype=item
|nameid=golden_sword
|id=322
|form=item}}
{{ID table
|displayname=Netherite Sword
|spritetype=item
|nameid=netherite_sword
|id=604
|form=item
|foot=1}}
== Achievements ==
{{load achievements|Time to Strike!;Overkill;Oooh, shiny!}}
== Advancements ==
{{load advancements|Oh Shiny}}
== History ==
=== Blocking ===
{{main|Blocking}}
[[File:Parrying.png|thumb|right|The blocking animation using a sword before and after [[Java Edition 14w30a]] (from the [[Adventure Update|Adventure]] to the [[Bountiful Update|Bountiful]] updates).]]
Previously, since the [[Adventure Update]], all types of swords could be used to parry to block some forms of damage. If the player is blocking with a sword when attacked, the sword deflects 50% of incoming damage from melee, non-magical projectiles like arrows, and explosions, along with minimizing airborne knockback. The sword is held in front of the player and its durability is not reduced by blocking. The player moves at a slower rate than [[sneaking]] if blocking with a sword. Sword blocks could be engaged and disengaged instantly, with no delay between the input and damage mitigation nor cooldown between lowering a block and raising a new one.
After the [[Combat Update]], the sword blocking functionality was replaced by blocking with [[shield]]s and to accommodate the [[dual wield]] system. Shields negate more damage and knockback than sword blocking from "blockable" attacks (they block 100% damage and knockback after [[Java Edition 1.11]]), but, unlike swords, they lose durability, have a 0.25 second startup period before damage can be mitigated and can be temporarily disabled by attacks with an [[axe]].
=== Knockback ===
The knockback dealt by swords used to be higher than while the players are using another melee [[item]]s, like an axe or with the hands. This feature was removed in [[Java Edition 1.9]] and is also no longer used in ''[[Bedrock Edition]]''.
=== Historical changes per version ===
{{History|java indev}}
{{History||0.31|snap=20091231-2|[[File:Iron Sword JE1 BE1.png|32px]] Added iron swords.
|Iron swords cannot be [[craft]]ed yet, but can be added to the [[player]]'s [[inventory]] during world creation.}}
{{History||0.31|snap=?|The iron sword is no longer added to the player's inventory during world creation.}}
{{History||0.31|snap=20100128|[[File:Wooden Sword JE1 BE1.png|32px]] [[File:Stone Sword JE1 BE1.png|32px]] [[File:Diamond Sword JE1 BE1.png|32px]] Swords made from wood, stone, and diamond have been added.
|Swords cannot be crafted yet, but have been added to the [[item]] [[chest]] in the Indev house.|A sword held by the player is now rendered to appear more 3D.}}
{{History||0.31|snap=20100129|Wood, stone, iron, and diamond swords can now be [[craft]]ed.}}
{{History|||snap=20100130|[[File:Golden Sword JE1.png|32px]] Swords can now be made out of gold.}}
{{History|||snap=20100131|Swords now have [[durability]].
|Better swords now last longer.
|Swords now cost 1 durability per hit, and 2 points per block broken.}}
{{History||20100206|[[File:Golden Sword JE2 BE1.png|32px]] The texture of gold swords has been slightly changed.}}
{{History|java alpha}}
{{History||v1.2.0|snap=release|[[Zombie pigmen]] now hold golden swords.}}
{{History|java beta}}
{{History||1.2|Swords, like all [[tool]]s, now have more [[item durability|durability]].
|Prior, diamond swords had 1024 durability, iron swords had 128, stone swords 64 and wood and gold had 32 durability.}}
{{History||1.5|The damages of all swords have increased by 1, due to the player's barehand damage increasing from {{hp|1}} to {{hp|2}}.
|As a result, wooden and golden swords now dealt {{hp|5}}, stone swords {{hp|7}}, iron swords {{hp|9}}, and diamond swords {{hp|11}}.}}
{{History||1.8|snap=Pre-release|Added the ability to block with a sword, giving the [[player]] more options in combat.
|Swords deflect 50% of incoming melee damage, non-magical projectiles like arrows and explosion damage, and a bit of knockback.
|The sword is held in front of the player and its durability is not reduced by blocking.|The player moves at a slower rate than [[sneaking]] when blocking with a sword.
|As barehand damage has been reduced from {{hp|2}} to {{hp|1}}, the damages of all swords have been reduced to their pre Beta 1.5 values.}}
{{History|java}}
{{History||1.0.0|snap=Beta 1.9 Prerelease 3|Sword [[damage]] has been reduced to make way for [[enchanting]]. A diamond sword's damage has been reduced from {{hp|10}} to {{hp|7}}, iron has been reduced from {{hp|8}} to {{hp|6}} and stone has been reduced from {{hp|6}} to {{hp|5}}. Wooden and golden swords still deal {{hp|4}} damage.|Iron swords are now found in the new [[stronghold]] altar [[chest]]s.}}
{{History|||snap=Beta 1.9 Prerelease 4|Swords can now be enchanted in the [[enchantment table]].}}
{{History||1.1|snap=12w01a|Iron swords are now found in [[village]] blacksmith chests.}}
{{History||1.2.1|snap=12w06a|The [[player]] now has a rare chance of obtaining iron swords by killing [[zombie]]s and golden swords from [[zombie pigmen]] from the addition of [[rare drops]]. These swords have a 20% chance of being enchanted.}}
{{History||1.2.4|snap=release|[[Spruce planks]], [[birch planks]], and [[jungle planks]] can now be used to craft wooden swords.}}
{{History||1.3.1|snap=12w18a|Wooden swords can now be used as [[fuel]] in a [[furnace]].}}
{{History|||snap=12w21a|Blacksmith [[villager]]s now [[trading|sell]] diamond swords for 12–13 [[emerald]]s, and iron swords for 7–10 emeralds.
|With the [[trading]] implementation, renewable [[item]]s such as [[wheat]] can now be [[trading|sold]] to buy a diamond sword. This has now made all swords [[Renewable Resource|renewable]].}}
{{History||1.4.2|snap=12w32a|[[Zombie]]s may sometimes wield iron swords, dealing extra [[damage]].}}
{{History|||snap=12w34a|If a [[player]] has dyed leather armor equipped and selected a sword of any kind, it appears in the color of the dye applied to the armor, when switching to second or third person view.}}
{{History|||snap=12w36a|Added [[wither skeleton]]s, which hold stone swords.}}
{{History||1.4.6|snap=12w49a|[[Unbreaking]] can now be applied to a sword with an [[enchanted book]].}}
{{History||1.6.1|snap=13w18a|Golden swords are now found in the new [[chest]]s in [[nether fortress]]es.}}
{{History|||snap=13w21a|Instead of replacing the barehanded [[damage]] ({{hp|1}}), swords now add their damage onto the barehanded damage, which results in all swords doing {{hp|1}} more damage than before.}}
{{History|||snap=13w25b|In [[Creative]] mode, swords are no longer able to break [[block]]s, and no [[sound]] plays when they're hit with one.}}
{{History||1.7.2|snap=1.7.1|[[Acacia planks]] and [[dark oak planks]] can now be used to craft wooden swords.}}
{{History||1.8|snap=14w02a|Weaponsmith [[villager]]s now [[trading|sell]] enchanted diamond swords for 12–15 [[emerald]]s, and iron swords for 9–10 emeralds. Unenchanted swords are no longer sold.}}
{{History|||snap=14w30a|Sword holding position have been tweaked, and the blocking animation has changed. Blocking while mining was made impossible. Blocking immediately after attacking no longer continues the swing animation.}}
{{History||1.9|snap=15w31a|[[Enchanting|Enchanted]] iron and diamond swords can now be found in [[end city]] ship [[chest]]s.}}
{{History|||snap=15w33c|Swords no longer block attacks. Instead, [[shield]]s are used.}}
{{History|||snap=15w34b|Swords now use the attack speed [[attribute]]. The attack speed of a sword is 1.25 or 0.8 seconds.}}
{{History|||snap=15w34c|Nerfed swords, they now do {{hp|1}} less [[damage]] and have an attack speed of 1.45, or 0.69 seconds.
|Swords can now do a sweep attack when moving at walking speed or slower, which knock back [[mob]]s near the one hit. The attack speed meter must be filled for it to work.}}
{{History|||snap=15w36a|Each [[Sharpness]] level now adds {{hp|1}} damage to the base damage at level I and an additional {{hp|0.5}} for each additional level, down from a flat {{hp|1.25}} per level.}}
{{History|||snap=15w37a|Swords now have an attack speed of 1.6, or 0.63 seconds.}}
{{History|||snap=15w43a|The average yield of golden swords in [[nether fortress]] chests has been decreased.}}
{{History|||snap=15w49a|Sweep attack now does {{hp|1}} damage to affected [[mob]]s and players.}}
{{History||1.11.1|snap=16w50a|Golden and iron swords now [[smelt]] down into one of their respective [[nugget]]s.
|Added [[Sweeping Edge]] enchantment.}}
{{History||1.13|snap=17w47a|Prior to [[1.13/Flattening|''The Flattening'']], these [[item]]s' numeral IDs were 268, 272, 267, 276 and 283.}}
{{History|||snap=18w10a|Swords can now generate in [[buried treasure]] chests.}}
{{History||September 10, 2018|link={{tweet|JasperBoerstra|1039167196801458176}}|[[File:Wooden Sword JE2 BE2.png|32px]] [[File:Stone Sword JE2 BE2.png|32px]] [[File:Iron Sword JE2 BE2.png|32px]] [[File:Golden Sword JE3 BE2.png|32px]] [[File:Diamond Sword JE2 BE2.png|32px]] [[Jasper Boerstra]] tweets an image of updated sword textures.}}
{{History||1.14|snap=18w43a|[[File:Wooden Sword JE2 BE2.png|32px]] [[File:Stone Sword JE2 BE2.png|32px]] [[File:Iron Sword JE2 BE2.png|32px]] [[File:Golden Sword JE3 BE2.png|32px]] [[File:Diamond Sword JE2 BE2.png|32px]] The textures of all swords have been changed.
|Swords now break [[bamboo]] instantly.}}
{{History||1.16|snap=20w06a|[[File:Netherite Sword JE1.png|32px]] Added netherite swords.
|Netherite swords are obtained by combining one diamond sword and one [[netherite ingot]] in a [[crafting table]].
|[[Crimson planks]] and [[warped planks]] can now be used to craft wooden swords.}}
{{History|||snap=20w09a|[[File:Diamond Sword JE3 BE3.png|32px]] The texture of diamond swords has been changed.}}
{{History|||snap=20w10a|[[File:Netherite Sword JE2 BE2.png|32px]] The texture of netherite swords has been changed.
|Netherite swords can no longer be [[crafted]].
|Netherite swords are now obtained by combining one diamond sword and one [[netherite ingot]] in a [[smithing table]].}}
{{History|||snap=20w15a|Stone swords can now be crafted using [[blackstone]].}}
{{History|||snap=20w16a|Golden and netherite swords now generate in [[bastion remnants]] chests.
|Golden swords now generate randomly enchanted in [[ruined portal]] chests.}}
{{History|||snap=20w17a|Diamonds swords now generate in place of netherite swords in bastion remnant [[chest]]s.}}
{{History||1.16.2|snap=20w30a|Damaged enchanted iron swords can now be found in [[bastion remnant]] chests.}}
{{History||1.17|snap=21w08a|Stone swords can now be crafted using [[cobbled deepslate]].}}
{{History||1.19|snap=22w11a|[[Mangrove planks]] can now be used to craft wooden swords.}}
{{History||1.20<br>(Experimental)|link=1.19.4|snap=23w04a|Upgrading diamond swords to netherite swords now requires the netherite upgrade [[smithing template]].}}
{{History|upcoming java}}
{{History||Combat Tests|snap=1.14.3 - Combat Test|The attack speed for all swords has been increased to 3.
|The base [[damage]] is now {{Hp|2}}, meaning that all swords now do {{Hp|1}} more damage than before}.
|The attack reach of swords has been increased to 3.5 [[block]]s.}}
{{History|||snap=Combat Test 2|The attack speed of all swords has been decreased to 2.5.}}
{{History|||snap=Combat Test 3|The attack speed of all swords has been changed from 2.5 back to 3.0.
|The attack key can now again be held down to automatically attack when the attack meter is full.
|Attacks now happen only when the sword is at 120% charge, slower than if attacks were timed.}}
{{History|||snap=Combat Test 4|Sword can now perform critical, knockback ([[sprint]]) hits on 100% charge.
|The attack reach of all weapons was decreased by 0.5 [[block]]. Sword now have a 3 [[block]]s reach.
|The 200% attack now gives a bonus reach of 1 [[block]].}}
{{History|||snap=Combat Test 5|Weapons have been nerfed. All material tiers have been nerfed by {{Hp|1}} except wood and gold, and the sword tier have been nerfed by {{Hp|1}}. This means that the wooden/stone/golden sword now does {{Hp|4}} damage, the iron sword now does {{Hp|5}} damage and the diamond sword now does {{Hp|6}} damage.}}
{{History|||snap=Combat Test 6|All weapons' attack reach have been buffed by 0.5 [[block]].
|200% attacks have been removed.
|Swords now always do sweep attack, even in the air.
|The cooldown for missed hit is a 4-tick cooldown instead of using the attack speed attribute.}}
{{History|||snap=Combat Test 7c|All weapons' attack reach have been nerfed by 0.5 [[block]]. The sword's attack reach is now 3 [[block]]s again.
|200% attacks have been re-added.
|Swords no longer sweep without [[Sweeping Edge]] and 200% charge again.
|Adjusted the netherite tier value to match the weapon nerf in Combat Test 5}}
{{History|||snap=Combat Test 8b|Enchantment bonus attack damage are now included in the base damage when calculating critical hits (they were excluded before). Due to this change, enchanted swords critical attacks are now way more powerful (especially with high enchantments)}}
{{History|pocket alpha}}
{{History||v0.2.0|[[File:Stone Sword JE1 BE1.png|32px]] Added stone swords.}}
{{History||v0.3.0|[[File:Wooden Sword JE1 BE1.png|32px]] Added wooden swords.
|Survival players no longer start out with an infinite durability stone sword in the inventory.}}
{{History||v0.3.2|[[File:Iron Sword JE1 BE1.png|32px]] [[File:Golden Sword JE2 BE1.png|32px]] [[File:Diamond Sword JE1 BE1.png|32px]] Added iron, gold, and diamond swords.}}
{{History||v0.4.0|Iron swords have replaced stone swords in the creative inventory.}}
{{History||v0.9.0|snap=build 1|Iron swords can now be found in [[stronghold]] altar [[chest]]s and inside blacksmith chests.}}
{{History||v0.11.0|snap=build 11|Wooden, stone, golden and diamond swords are now available in the [[creative]] [[inventory]].}}
{{History||v0.11.0|snap=build 12|Wooden, stone, golden and diamond swords have been removed from creative.}}
{{History||v0.11.0|snap=build 13|All swords are available in creative mode again.}}
{{History||v0.12.1|snap=build 1|Instead of replacing the barehanded [[damage]] ({{hp|1}}), swords now add their damage onto the barehanded damage, which results in all swords doing {{hp|1}} more damage than before.|In [[creative]] mode, swords are no longer able to break [[block]]s, and no [[sound]] plays when they're hit with one.|Golden swords can now be found in [[nether fortress]] chests.
|[[Zombie]]s now rarely spawn holding an iron sword that have a chance to [[drops|dropped]].
|Golden swords are now rarely dropped by [[zombie pigmen]].
|Stone swords are now rarely dropped by [[wither skeleton]]s.}}
{{History||v0.15.0|snap=build 1|Iron swords are now sometimes dropped by [[husk]]s that spawn holding an iron sword.}}
{{History|pocket}}
{{History||1.0.0|snap=alpha 0.17.0.1|Enchanted iron and diamond swords can now be found in [[end city]] [[chest]]s.}}
{{History||1.0.4|snap=alpha 1.0.4.0|Iron swords and enchanted diamond swords are now sold by weaponsmith [[villager]]s.}}
{{History||1.1.0|snap=alpha 1.1.0.0|Iron and golden swords are now [[smelting|smeltable]].
|Added [[vex]]es, which rarely drop an iron sword if killed using [[Looting]] enchantment.}}
{{History|bedrock}}
{{History||1.10.0|snap=beta 1.10.0.3|[[File:Wooden Sword JE2 BE2.png|32px]] [[File:Stone Sword JE2 BE2.png|32px]] [[File:Iron Sword JE2 BE2.png|32px]] [[File:Golden Sword JE3 BE2.png|32px]] [[File:Diamond Sword JE2 BE2.png|32px]] The textures of all swords have been changed.
|Iron swords are now found in [[plains]] [[village]] weaponsmiths.}}
{{History||1.11.0|snap=beta 1.11.0.1|Iron swords can now be found in [[savanna]], [[snowy taiga]], [[taiga]] and [[desert]] village weaponsmiths.}}
{{History|||snap=beta 1.11.0.4|[[Pillager]]s and [[vindicator]]s that spawn in [[raid]]s can now drop iron swords upon [[death]].
|[[Trading]] has been changed. Iron swords [[trading|sold]] by weaponsmith [[villager]]s now cost 2 [[emerald]]s while diamond swords cost 8 emeralds as part of their fourth tier trades.}}
{{History||1.16.0|snap=beta 1.16.0.51|[[File:Netherite Sword BE1.png|32px]] Added netherite swords.
|Netherite swords are obtained by combining one diamond sword and one [[netherite ingot]] in a [[crafting table]].
|[[File:Diamond Sword JE3 BE3.png|32px]] The texture of diamond swords has been changed.
|Golden swords are now sometimes [[drops|dropped]] by [[piglin]]s that spawn holding a golden sword.}}
{{History|||snap=beta 1.16.0.57|Netherite swords can no longer be [[crafting|crafted]].
|Netherite swords are now obtained by combining one diamond sword and one [[netherite ingot]] in a [[smithing table]].
|Stone swords can now be crafted using [[blackstone]].
|Golden and netherite swords now generate in [[bastion remnant]] chests.
|Golden swords now generate randomly enchanted in [[ruined portal]] chests.}}
{{History|||snap=beta 1.16.0.63|Diamonds swords now generate in place of netherite swords in bastion remnant [[chest]]s.}}
{{History||1.17.30|snap=beta 1.17.20.20|Swords now break [[bamboo]] instantly.}}
{{History|console}}
{{History||xbox=TU1|xbone=CU1|ps=1.0|wiiu=Patch 1|switch=1.0.1|[[File:Wooden Sword JE1 BE1.png|32px]] [[File:Stone Sword JE1 BE1.png|32px]] [[File:Iron Sword JE1 BE1.png|32px]] [[File:Golden Sword JE2 BE1.png|32px]] [[File:Diamond Sword JE1 BE1.png|32px]] Added swords (all five types).}}
{{History||xbox=TU5|The ability to block with swords has been added, giving the [[player]] more options in combat.}}
{{History||xbox=TU53|xbone=CU43|ps=1.49|wiiu=Patch 23|switch=1.0.3|Iron and golden swords are now [[smelting|smeltable]].}}
{{History||xbox=none|xbone=none|ps=1.90|wiiu=none|switch=none|[[File:Wooden Sword JE2 BE2.png|32px]] [[File:Stone Sword JE2 BE2.png|32px]] [[File:Iron Sword JE2 BE2.png|32px]] [[File:Golden Sword JE3 BE2.png|32px]] [[File:Diamond Sword JE2 BE2.png|32px]] The textures of all swords have been changed.}}
{{History||ps=1.92|The ability to block with swords has been removed.}}
{{History|New Nintendo 3DS Edition}}
{{History||0.1.0|[[File:Wooden Sword JE1 BE1.png|32px]] [[File:Stone Sword JE1 BE1.png|32px]] [[File:Iron Sword JE1 BE1.png|32px]] [[File:Golden Sword JE2 BE1.png|32px]] [[File:Diamond Sword JE1 BE1.png|32px]] Added swords.
|Swords cannot block attacks.}}
{{History|foot}}
== Issues ==
{{issue list}}
== Trivia ==
*The sword's traditional [[texture]] came from [[Notch]]'s abandoned RPG, ''[[Legend of the Chambered]]''. The iron sword's texture was created first, as it was from the game, and the other swords followed.
*In ''Java Edition'', with the introduction of netherite swords, it is possible to one-hit kill undead [[mob]]s in the game (except [[wither]]s and [[zombie]]s/[[skeleton]]s with random armor) using a sword with the [[Smite]] V enchantment, without the need to perform a critical hit (this was previously possible only with a [[Smite]] V stone, iron, or diamond axe).
*Plastic diamond and enchanted swords are official ''[[Minecraft]]'' merchandise.<ref>https://shop.minecraft.net/products/minecraft-sword?_pos=1&_psq=sword&_ss=e&_v=1.0</ref><ref>https://shop.minecraft.net/products/minecraft-enchanted-purple-sword?_pos=4&_psq=sword&_ss=e&_v=1.0</ref>
*In the game [[wikipedia:Transformice|''Transformice'']], a diamond sword can be found in the shop.
== Gallery ==
=== Enchanted swords ===
<gallery>
Enchanted Wooden Sword.gif|Enchanted wooden sword.
Enchanted Stone Sword.gif|Enchanted stone sword.
Enchanted Iron Sword.gif|Enchanted iron sword.
Enchanted Golden Sword.gif|Enchanted golden sword.
Enchanted Diamond Sword.gif|Enchanted diamond sword.
Enchanted Netherite Sword.gif|Enchanted netherite sword.
</gallery>
=== Texture packs ===
<gallery>
File:Wood sword TP.png|Wooden sword in the [[Texture Pack DLC|Plastic Pack]].
Stone Sword SDGP.png|Stone sword in the [[Super Duper Graphics Pack]].
File:Gold sword Natural.png|Gold sword in the [[Texture Pack DLC|Natural Pack]].
</gallery>
=== In other media ===
<gallery>
File:Alex Fighting in Nether.jpeg|Pixel art of [[Alex]] fighting with a diamond sword in the [[Nether]].
File:Alex Retrieving Diamond Sword.jpeg|Alex retrieving another diamond sword from a [[chest]].
File:Sinister Sword Sprite MCD.png|The [[MCD:Sinister Sword|Sinister Sword]], a unique sword featured in ''Minecraft Dungeons''.
File:Sword GUI.png|A nondescript [[MCD:Sword|sword]] as it appears in ''[[Minecraft Dungeons]]''.
File:Sword (item).png|A sword as it appears in ''[[Legend of the Chambered]]''.
File:Sword Shirt.png|Officially licensed T-Shirt of a diamond sword.
File:IronSword replica.jpg|Foam replica of an iron sword.
</gallery>
== References ==
{{reflist}}
{{Items}}
[[Category:Tools]]
[[Category:Combat]]
[[de:Schwert]]
[[es:Espada]]
[[fr:Épée]]
[[hu:Kard]]
[[ja:剣]]
[[ko:검]]
[[nl:Zwaard]]
[[pl:Miecz]]
[[pt:Espada]]
[[ru:Меч]]
[[tr:Kılıç]]
[[uk:Меч]]
[[zh:剑]]</li></ul> | Beta 1.9-pre1 | All "bottom" textures (including hand and foot) have been flipped 180 degrees. It's worth mentioning that the textures were specifically flipped and not rotated because an updated texture with the bottom surface rotated as opposed to flipped may display incorrectly depending on the intended alignment with relation to the rest of the skin. | |||
| ? | On 23 November, 2012, the MineCon 2012 Cape was leaked out when Curse was showing off the MineCon Goodie Bag. The Cape that the Avatar had was the Golden Pickaxe and Blue Background. Then revealed to also be MineCon 2012's Official Cape. | ||||
| April 1, 2014 | On April 1st, all skins applied to players were changed to Villager skins as an April Fool's prank, and trying to edit or change the skin will not work. Capes were still shown, however, if the user had one. | ||||
1.8{{Extension DPL}}<ul><li>[[Paper|Paper]]<br/>{{Item
| image = Paper.png
| renewable = Yes
| stackable = Yes (64)
}}
'''Paper''' is an item crafted from [[sugar cane]].
== Obtaining ==
=== Chest loot ===
{{LootChestItem|paper}}
=== Crafting ===
{{Crafting
|A2= Sugar Cane |B2= Sugar Cane |C2= Sugar Cane
|Output= Paper,3
|type= Miscellaneous
}}
=== Villagers ===
{{IN|java}}, cartographer [[Villager|villagers]] may give paper to players with the [[Hero of the Village]] effect.
== Usage ==
=== Crafting ingredient ===
{{crafting usage}}
=== Anvil usage ===
{{:Map/BE|zoom}}
=== Trading ===
{{IN|bedrock}}, novice-level librarian and cartographer villagers buy 24 paper for an [[emerald]] as part of their trades.
{{IN|java}}, novice-level cartographer villagers always offer to buy 24 paper for an emerald, while novice-level librarians have a {{frac|2|3}} chance of offering the same trade.
== Data values ==
=== ID ===
{{edition|java}}:
{{ID table
|edition=java
|showforms=y
|generatetranslationkeys=y
|displayname=Paper
|spritetype=item
|nameid=paper
|form=item
|foot=1}}
{{edition|bedrock}}:
{{ID table
|edition=bedrock
|shownumericids=y
|showforms=y
|notshowbeitemforms=y
|generatetranslationkeys=y
|displayname=Paper
|spritetype=item
|nameid=paper
|id=386
|form=item
|foot=1}}
==History==
{{History|java alpha}}
{{History||v1.0.11|[[File:Paper JE1 BE1.png|32px]] Added paper, which can be used to craft [[book]]s.}}
{{History|java beta}}
{{History||1.6|snap=Test Build 3|Paper can now be used to craft [[map]]s.}}
{{History||1.8|snap=Pre-release|Paper can now be found in the new [[stronghold]] library [[chest]]s.}}
{{History|java}}
{{History||1.3.1|snap=12w21a|Paper can now be [[trading|sold]] to librarian [[villager]]s, at 24–35 paper for 1 [[emerald]].}}
{{History||1.4.2|snap=12w34a|Paper can now be used to craft an empty [[map]].
|Maps start out at their closest zoom level and can be extended by adding more paper.}}
{{History||1.4.6|snap=12w49a|Paper can now be used to craft [[firework rocket]]s.}}
{{History||1.8|snap=14w02a|[[Trading]] has been changed: librarian [[villager]]s now [[trading|buy]] 24–46 paper for 1 [[emerald]].}}
{{History||1.9|snap=15w43a|The average yield of paper from [[stronghold]] library [[chest]]s has more than doubled.}}
{{History||1.11|snap=16w39a|Added cartographer [[villager]]s, which [[trading|buy]] paper as their tier 1 trade.}}
{{History||1.13|snap=17w47a|Prior to [[1.13/Flattening|''The Flattening'']], this [[item]]'s numeral ID was 339.}}
{{History|||snap=18w11a|Paper now generates in the [[chest]]s of some [[shipwreck]]s.}}
{{History||1.14|snap=18w43a|[[File:Paper JE2 BE2.png|32px]] The texture of paper has now been changed.
|Paper can now be used to craft [[banner pattern]]s.}}
{{History|||snap=18w48a|Paper can now be found in chests in [[village]] cartographer houses.}}
{{History|||snap=19w02a|Paper can now be used to craft a [[cartography table]].}}
{{History|||snap=19w13a|Cartographer villagers now give paper to players under the [[Hero of the Village]] effect.}}
{{History|pocket alpha}}
{{History||v0.2.0|[[File:Paper JE1 BE1.png|32px]] Added paper. It is currently unobtainable and serves no purpose.}}
{{History||v0.3.0|Paper is now [[craft]]able, and can be used to craft [[book]]s.}}
{{History||v0.14.0|snap=build 1|Paper can now be used to craft empty [[map]]s and empty locator maps.
|Paper can now be used to zoom in maps, using [[anvil]]s.}}
{{History|pocket}}
{{History||1.0.0|snap=?|The [[Windows 10 Edition]] can now use the [[anvil]], as well as the [[crafting table]], to zoom in [[map]]s, just as [[Pocket Edition]] in general can.}}
{{History||1.0.4|snap=alpha 1.0.4.0|Librarian [[villager]]s now [[trading|buy]] 24–36 paper for 1 [[emerald]].}}
{{History||1.1.0|snap=alpha 1.1.0.3|Added cartographer villagers, which [[trading|buy]] 24–36 paper as their tier 1 trade.}}
{{History|bedrock}}
{{History||1.2.0|snap=beta 1.2.0.2|Paper can now be used to craft [[firework rocket]]s.}}
{{History||1.4.0|snap=beta 1.2.14.2|Paper can now be found inside [[chest]]s of some [[shipwreck]]s.}}
{{History||1.10.0|snap=beta 1.10.0.3|[[File:Paper JE2 BE2.png|32px]] The texture of paper has now been changed.
|Paper can now be found in cartographer house chests in [[village]]s.
|Paper can now be used to craft [[banner pattern]]s and [[cartography table]]s.}}
{{History||1.11.0|snap=beta 1.11.0.4|Librarian and cartographer villagers now buy 24 paper for an [[emerald]].}}
{{History|console}}
{{History||xbox=TU1|xbone=CU1|ps=1.0|wiiu=Patch 1|[[File:Paper JE1 BE1.png|32px]] Added paper.}}
{{History||xbox=none|xbone=none|ps=1.90|wiiu=none|switch=none|[[File:Paper JE2 BE2.png|32px]] The texture of paper has now been changed.}}
{{History|New 3DS}}
{{History||0.1.0|[[File:Paper JE1 BE1.png|32px]] Added paper.}}
{{History|foot}}
== Issues ==
{{issue list}}
== References ==
{{Reflist}}
==External Links==
*[https://www.minecraft.net/en-us/article/paper Taking Inventory: Paper] – Minecraft.net on August 4, 2023
{{Items}}
[[cs:Papír]]
[[de:Papier]]
[[es:Papel]]
[[fr:Papier]]
[[hu:Papír]]
[[ja:紙]]
[[ko:종이]]
[[nl:Papier]]
[[pl:Papier]]
[[pt:Papel]]
[[ru:Бумага]]
[[th:กระดาษ]]
[[uk:Папір]]
[[zh:纸]]
[[Category:Renewable resources]]</li><li>[[Raw Porkchop|Raw Porkchop]]<br/>{{Item
| title = Raw Porkchop
| image = Raw Porkchop.png
| renewable = Yes
| heals = {{hunger|3}}
| stackable = Yes (64)
}}
A '''raw porkchop''' is a [[food]] item that can be eaten by the [[player]] or cooked to make a [[cooked porkchop]].
== Obtaining ==
=== Mob loot ===
==== Pigs ====
Adult [[pig]]s drop 1–3 raw porkchop when killed. The maximum amount is increased by 1 per level of [[Looting]], for a maximum of 1-6 with Looting III. If killed while on fire, they drop [[cooked porkchop]] instead.
==== Hoglins ====
Adult [[hoglin]]s drop 2–4 raw porkchop when killed. The maximum amount is increased by 1 per level of [[Looting]], for a maximum of 7 with Looting III. If killed while on fire, they drop [[cooked porkchop]] instead.
=== Chest loot ===
{{LootChestItem|raw-porkchop}}
== Usage ==
=== Food ===
To eat raw porkchop, press and hold {{control|use}} while it is selected in the hotbar. Eating one restores {{hunger|3}} [[hunger]] and 0.6 [[Hunger#Mechanics|saturation]].
=== Smelting ingredient ===
{{Smelting
|showname=1
|Raw Porkchop
|Cooked Porkchop
|0.35
}}
=== Trading ===
{{IN|bedrock}}, novice-level butcher [[villager]]s have a {{frac|1|3}} chance to [[trading|buy]] 7 raw porkchop for an [[emerald]] as part of their [[trading|trades]].
{{IN|java}}, novice-level butcher villagers have a 40% chance to buy 7 raw porkchop for an emerald.
=== Wolves ===
Raw porkchops can be used to [[breed]] and heal tamed [[wolves]], lead them around, and make baby tamed wolves grow up faster by 10% of the remaining time.
=== Piglins ===
[[Piglin|Piglins]] instantly pick up raw or [[Cooked Porkchop|cooked porkchops]] that are within 1 block of them, unless they have already picked up one within the last 10 seconds. Porkchops picked up are not dropped upon the piglin's death.
==Sounds==
{{Sound table/Entity/Food}}
== Data values ==
=== ID ===
{{edition|java}}:
{{ID table
|edition=java
|showitemtags=y
|showforms=y
|generatetranslationkeys=y
|displayname=Raw Porkchop
|spritetype=item
|nameid=porkchop
|itemtags=piglin_food
|form=item
|foot=1}}
{{edition|bedrock}}:
{{ID table
|edition=bedrock
|shownumericids=y
|showforms=y
|notshowbeitemforms=y
|generatetranslationkeys=y
|displayname=Raw Porkchop
|spritetype=item
|nameid=porkchop
|id=262
|form=item
|foot=1}}
== Achievements ==
{{load achievements|Pork Chop}}
== Advancements ==
{{load advancements|Husbandry;A Balanced Diet}}
== History ==
{{History|java indev}}
{{History||20100219|[[File:Raw Porkchop JE1 BE1.png|32px]] Added raw porkchops.
|Raw porkchops restore {{hp|3}} and do not stack in the [[inventory]].
|Raw porkchops are [[drops|dropped]] by [[pig]]s.}}
{{History|java beta}}
{{History||1.4|Raw porkchops can now be given to [[wolf|wolves]].}}
{{History||1.8|snap=Pre-release|Raw porkchops can now be stacked to 64.<ref>{{Tweet|jeb|103408168356421632|Some Minecraft food changes...}}</ref>
|Raw porkchops now restore {{hunger|3}} to the [[Hunger|food bar]].}}
{{History|java}}
{{History||1.2.1|snap=12w03a|Raw porkchops can now be used to breed wolves.}}
{{History||1.3.1|snap=12w21a|Raw porkchops can now be [[trading|sold]] to butcher [[villager]]s, at 14–17 pork chops for 1 [[emerald]].}}
{{History|||snap=12w25a|[[Pig]]s now [[drops|drop]] 1–3 porkchops instead of 0–2.}}
{{History||1.4.2|snap=12w37a|[[File:Raw Porkchop JE2 BE2.png|32px]] The texture of raw porkchops has been changed, so that it no longer has a dark outline.}}
{{History||1.8|snap=14w02a|[[Trading]] has been changed; butcher villagers now [[trading|buy]] 14–18 porkchops for 1 emerald.}}
{{History||1.13|snap=17w47a|Prior to [[1.13/Flattening|''The Flattening'']], this [[item]]'s numeral ID was 319.}}
{{History||1.14|snap=18w43a|[[File:Raw Porkchop.png|32px]] The texture of raw porkchops has been changed.}}
{{History|||snap=18w49a|Raw porkchops can now be found in [[chest]]s in [[village]] butcher shops.}}
{{History||1.16|snap=20w07a|Raw porkchops are dropped by the new [[hoglin]]s.
|Raw porkchops have a {{frac|5|109}} (~4.59%) chance of being given by the new [[piglin]]s when [[bartering]], in a stack size of 2–5.}}
{{History|||snap=20w09a|Raw porkchops can no longer be obtained by bartering with piglins.}}
{{History|||snap=20w16a|Raw porkchops now generate in [[bastion remnants]] chests.}}
{{History|pocket alpha}}
{{History||v0.4.0|[[File:Raw Porkchop JE1 BE1.png|32px]] Added raw porkchops.}}
{{History||v0.5.0|Raw porkchops now restore {{hp|3}} instead of {{hp|1}}.}}
{{History||v0.8.0|snap=build 1|[[File:Raw Porkchop JE2 BE2.png|32px]] The texture of raw porkchops has been changed, so that it no longer has that dark outline.}}
{{History||v0.12.1|snap=build 1|Raw porkchops now restore [[hunger]] instead of [[health]].}}
{{History||v0.16.2|[[Pig]]s now [[drops|drop]] 1–3 raw porkchops rather than 0–2.}}
{{History|pocket}}
{{History||1.0.4|snap=alpha 1.0.4.0|14–18 raw porkchops can now be [[trading|sold]] to butcher [[villager]]s for an [[emerald]].}}
{{History|bedrock}}
{{History||1.10.0|snap=beta 1.10.0.3|[[File:Raw Porkchop.png|32px]] The texture of raw porkchops has been changed.}}
{{History||1.11.0|snap=beta 1.11.0.3|Raw porkchops can now be found in [[village]] butcher [[chest]]s.}}
{{History|||snap=beta 1.11.0.4|Butcher [[villager]]s now have {{frac|1|3}} chance to [[trading|buy]] 7 raw porkchops.}}
{{History|console}}
{{History||xbox=TU1|xbone=CU1|ps=1.0|wiiu=Patch 1|switch=1.0.1|[[File:Raw Porkchop JE1 BE1.png|32px]] Added raw porkchops.}}
{{History||xbox=TU5|Raw porkchops are now stackable to 64 and fills [[hunger]] instead of [[health]].}}
{{History||xbox=TU12|[[File:Raw Porkchop JE2 BE2.png|32px]] The texture of raw porkchops has been changed, so that it no longer has a dark outline.}}
{{History||xbox=none|xbone=none|ps=1.90|wiiu=none|switch=none|[[File:Raw Porkchop.png|32px]] The texture of raw porkchops has been changed.}}
{{History|new3DS}}
{{History||0.1.0|[[File:Raw Porkchop JE2 BE2.png|32px]] Added raw porkchops.}}
{{History|foot}}
== Issues ==
{{issue list}}
== Gallery ==
<gallery>
I Porkchop Minecraft JINX.jpg|Official T-shirt artwork "I Porkchop Minecraft" sold by [https://www.jinx.com JINX].
I Brake for Porkchop Bumper Sticker JINX.jpg|An official bumper sticker featuring a raw porkchop sold by JINX.
</gallery>
== References ==
{{reflist}}
== External Links ==
*[https://www.minecraft.net/en-us/article/taking-inventory--porkchop Taking Inventory: Porkchop] – Minecraft.net on February 13, 2020
{{Items}}
[[Category:Food]]
[[cs:Syrová kotleta]]
[[de:Rohes Schweinefleisch]]
[[es:Chuleta de cerdo cruda]]
[[fr:Côtelette de porc crue]]
[[hu:Nyers disznóhús]]
[[ja:生の豚肉]]
[[nl:Rauw varkensvlees]]
[[pl:Surowy schab]]
[[pt:Costeleta de porco crua]]
[[ru:Сырая свинина]]
[[uk:Сира свинина]]
[[zh:生猪排]]
[[Category:Renewable resources]]</li></ul> | 14w03a | Skins have received an overhaul; right and left legs/arms can now be edited independently and the hat layer now counts for the whole body, meaning overlays can now be added on skins. | |||
| 14w04a | Now displays the right arm's second layer in first person view. | ||||
| 1.8-pre1 | Added a new player model with smaller arms, and a new player skin called Alex. | ||||
| Legacy Console Edition | |||||
TU3{{Extension DPL}}<ul><li>[[Cyan Dye|Cyan Dye]]<br/>{{Item
| image = Cyan Dye.png
| renewable = Yes
| stackable = Yes (64)
}}
'''Cyan dye''' is a [[Dyeing#Secondary|secondary dye color]].
== Obtaining ==
=== Crafting ===
{{Crafting
|head=1
|showdescription=1
|showname=0
|Blue Dye
|Green Dye
|Output=Cyan Dye,2
|type=Material
}}
{{Crafting
|Lapis Lazuli
|Green Dye
|Output=Cyan Dye,2
|description={{only|bedrock|education}}
|type=Material
}}
{{Crafting
|Pitcher Plant
|Output=Cyan Dye,2
|description=
|type=Material
|foot=1
}}
=== Trading ===
[[Wandering trader]]s sell 3 cyan dye for an [[emerald]].
== Usage ==
{{dye usage}}
=== Crafting ingredient ===
{{crafting usage|ignore=Banner|continue=1}}
{{banner crafting usage}}
=== Loom ingredient ===
{{Banner loom usage|Cyan Dye}}
=== Trading ===
{{IN|bedrock}}, journeyman-level shepherd villagers have 20% chance to buy 12 cyan dye for an emerald.
{{More info|java=1|Java UI does not use a specific trade slot, which results in a different chance to offer this trade.}}
== Data values ==
=== ID ===
{{edition|java}}:
{{ID table
|edition=java
|showforms=y
|generatetranslationkeys=y
|displayname=Cyan Dye
|spritetype=item
|nameid=cyan_dye
|form=item
|foot=1}}
{{edition|bedrock}}:
{{ID table
|edition=bedrock
|showaliasids=y
|shownumericids=y
|showforms=y
|notshowbeitemforms=y
|generatetranslationkeys=y
|displayname=Cyan Dye
|spritetype=item
|nameid=cyan_dye
|aliasid=dye / 6
|id=401
|form=item
|translationkey=item.dye.cyan.name
|foot=1}}
== History ==
{{History|java beta}}
{{History||1.2|[[File:Cyan Dye JE1 BE1.png|32px]] Added cyan dye.}}
{{History|java}}
{{History||1.4.2|snap=12w34a|Added the ability to [[Armor#Dyeing|dye]] leather [[armor]] and [[wolf]] collars.}}
{{History||1.4.6|snap=12w49a|Cyan dye can now be [[crafting|crafted]] with [[gunpowder]] to create a [[firework star]].}}
{{History||1.6.1|snap=13w19a|[[Stained clay]] can now be crafted.}}
{{history||1.7.2|snap=13w36a|With the addition of new [[flower]]s, many secondary and tertiary dyes are now primary [[dye]]s.}}
{{History|||snap=13w41a|[[Stained glass]] can now be crafted.}}
{{History||1.8|snap=14w02a|Due to [[lapis lazuli]] being [[renewable resource|renewable]], cyan dye is also renewable.}}
{{History|||snap=14w30a|Added [[banner]]s, which can be dyed.}}
{{History||1.13|snap=17w47a|The different data values for the <code>dye</code> ID have now been split up into their own IDs.
|Prior to [[1.13/Flattening|''The Flattening'']], this [[item]]'s numeral ID was 351.}}
{{History||1.14|snap=18w43a|Cyan dye is now [[crafting|crafted]] using [[blue dye]], instead of [[lapis lazuli]].
|[[File:Cyan Dye.png|32px]] The texture of cyan dye has now been changed.}}
{{History|||snap=18w44a|Cyan dye can now change the text color on [[sign]]s to cyan.}}
{{History|||snap=19w05a|Added the [[wandering trader]], which sell cyan dyes.}}
{{History|||snap=19w11a|Cyan dye can now be [[trading|bought]] by shepherd villagers.}}
{{History||1.17|snap=20w45a|Cyan dye can now be used to craft [[cyan candle]]s.}}
{{History|||snap=21w19a|Cyan dye can no longer be used to craft cyan candles.}}
{{History|||snap=Pre-release 1|Cyan dye can once again be used to craft cyan candles.}}
{{History||1.20<br>(Experimental)|link=1.19.3|snap=22w42a|Cyan dye can now change the text color on [[hanging sign]]s to cyan.}}
{{History||1.20|snap=23w12a|Added [[pitcher plant]]s, which can be crafted into cyan dye.}}
{{History|||snap=23w14a|[[Pitcher plant]]s now craft into 2 cyan dye instead of 1.}}
{{History|pocket alpha}}
{{History||v0.3.0|[[File:Cyan Dye JE1 BE1.png|32px]] Added cyan dye. It is currently unobtainable and serves no purpose.}}
{{History||v0.4.0|Cyan dye is now craftable with [[lapis lazuli]] and [[cactus green]].
|Cyan dye can now be used to craft cyan wool.}}
{{History||v0.6.0|Cyan dye can now be used to dye [[sheep]].}}
{{History||v0.9.0|snap=build 11|Cyan dye can now be used to craft colored [[terracotta]].}}
{{History||v0.11.0|snap=build 1|Cyan dye can now be used to dye tamed [[wolf]] collars.}}
{{History||v0.14.0|snap=build 1|Cyan dye can now be used to dye water in [[cauldron]]s.}}
{{History|pocket}}
{{History||1.0.0|snap=alpha 0.17.0.1|Cyan dye can now be used to dye [[shulker]]s.}}
{{History||1.1.0|snap=alpha 1.1.0.0|Cyan dye can now be used to craft [[concrete powder]], colored [[bed]]s and dyed [[shulker box]]es.}}
{{History|bedrock}}
{{History||1.2.0|snap=beta 1.2.0.2|Cyan dye can now be used to craft [[firework star]]s, [[stained glass]] and patterns on [[banner]]s.}}
{{History||1.4.0|snap=beta 1.2.20.1|Cyan dye can now be used to craft [[balloon|ballons]] and [[glow stick|glow sticks]].}}
{{History||1.8.0|snap=beta 1.8.0.8|Cyan dye can now be used to dye tamed [[cat]] collars.}}
{{History||1.10.0|snap=beta 1.10.0.3|Cyan dye are now [[trading|sold]] by [[wandering trader]]s.
|Cyan dye can now be used to dye white [[carpet|carpets]] and undyed [[glass pane]]s.
|[[File:Cyan Dye.png|32px]] The texture of cyan dye has now been changed.}}
{{History||1.11.0|snap=beta 1.11.0.4|Cyan dye can be [[trading|sold]] to shepherd [[villager]]s.}}
{{History||1.16.100|snap=beta 1.16.100.56|The ID of cyan dye has been changed from <code>dye/6</code> to <code>cyan_dye</code>.}}
{{History|console}}
{{History||xbox=TU1|xbone=CU1|ps=1.00|switch=1.0.1|wiiu=Patch 1|[[File:Cyan Dye JE1 BE1.png|32px]] Added cyan dye.}}
{{History|PS4}}
{{History||1.90|[[File:Cyan Dye.png|32px]] The texture of cyan dye has now been changed.}}
{{History|new 3ds}}
{{History||0.1.0|[[File:Cyan Dye JE1 BE1.png|32px]] Added cyan dye.}}
{{History|foot}}
== Issues ==
{{issue list}}
{{Items}}
[[Category:Items]]
[[Category:Dyes]]
[[Category:Renewable resources]]
[[cs:Azurové barvivo]]
[[de:Türkiser Farbstoff]]
[[es:Tinte cian]]
[[fr:Teinture cyan]]
[[hu:Ciánkék festék]]
[[ja:青緑色の染料]]
[[ko:청록색 염료]]
[[nl:Turquoise kleurstof]]
[[pl:Błękitny barwnik]]
[[pt:Corante ciano]]
[[ru:Бирюзовый краситель]]
[[zh:青色染料]]</li><li>[[Medicine|Medicine]]<br/>{{Redirect|Elixir", "Antidote", "Eye Drops", and "Tonic|s=1|the brewable items|Potion}}
{{Education feature}}
{{Exclusive|bedrock|education}}
{{Item
| image = <gallery>
Antidote.png | Antidote
Elixir.png | Elixir
Eye Drops.png | Eye Drops
Tonic.png | Tonic
</gallery>
| renewable = Yes
| stackable = No
}}
A '''medicine''' is a type of [[potion]] that cures the specified [[effect]] instead of applying it.
== Obtaining ==
=== Brewing ===
Cures are brewed from awkward potions using different [[element]]s.{{only|bedrock|education}} These drinks remove the specified effect when drank, and cannot be modified into splash, lingering, extended or enhanced versions.
{| class="wikitable" style="text-align: center;" data-description="Remedies"
! Potion
! Reagent, base
! Effect
! Notes
|-
! {{Inventory slot|Antidote}}<br>Antidote
| {{Brewing Stand
|Input= Silver
|Output2= Awkward Potion
}}
| Cures [[Poison]]
| Silver detects poison {{w|Silver#Symbolic role|in folklore}}, and possesses anti-microbial properties.
|-
! {{Inventory slot|Elixir}}<br>Elixir
| {{Brewing Stand
|Input= Cobalt
|Output2= Awkward Potion
}}
| Cures [[Weakness]]
|
|-
! {{Inventory slot|Eye Drops}}<br>Eye Drops
| {{Brewing Stand
|Input= Calcium
|Output2= Awkward Potion
}}
| Cures [[Blindness]]
|
|-
! {{Inventory slot|Tonic}}<br>Tonic
| {{Brewing Stand
|Input= Bismuth
|Output2= Awkward Potion
}}
| Cures [[Nausea]]
| In real life, {{w|bismuth subsalicylate}} is used as a nausea treatment.
|}
== Usage ==
Each type of medicine has an associated effect that it can cure (see {{slink||Brewing}} for details). Players can drink the medicine only if they have the corresponding effect. Drinking the medicine eliminates the effect. Although medicine does not resemble [[potion]]s, the player still gets the [[glass bottle]] back.
== Sounds ==
{{Sound table
|type=bedrock
|sound=Drink.ogg
|source=player
|description=When a player drinks medicine
|id=random.drink
|foot=1}}
== Data values ==
=== ID ===
{{ID table
|edition=bedrock
|shownumericids=y
|showforms=y
|generatetranslationkeys=y
|displayname=Medicine
|spritetype=item
|nameid=medicine
|id=599
|form=item
|notshowbeitemforms=y
|translationkey=item.medicine.poison.name,item.medicine.weakness.name,item.medicine.blindness.name,item.medicine.nausea.name
|foot=1}}
== History ==
{{History|bedrock}}
{{History||1.4.0|snap=beta 1.2.20.1|[[File:Antidote BE1.png|32px]] [[File:Elixir BE1.png|32px]] [[File:Eye Drops BE1.png|32px]] [[File:Tonic BE1.png|32px]] Added medicines.}}
{{History|education}}
{{History||1.0.27|[[File:Antidote BE1.png|32px]] [[File:Elixir BE1.png|32px]] [[File:Eye Drops BE1.png|32px]] [[File:Tonic BE1.png|32px]] Added medicines.}}
{{History|foot}}
== Issues ==
{{issue list|Cures|Medicine}}
== See also ==
* [[Potion]]
* [[Splash Potion]]
* [[Lingering Potion]]
{{Items}}
{{Education Edition}}
[[Category:Non-renewable resources]]
[[Category:Education Edition items]]
[[de:Medizin]]
[[it:Medicinale]]
[[ja:治療薬]]
[[lzh:藥]]
[[pl:Leki]]
[[pt:Remédio]]
[[zh:药物]]</li></ul> | The first skin pack is available as downloadable content. | ||||
Gallery

Promotional image for Skin Pack 1.
Promotional image for Skin Pack 1.

Promotional image for Skin Pack 1. (Trials Evolution characters)
Promotional image for Skin Pack 1. ('Splosion Man characters)
Promotional image for Skin Pack 1. (Banjo-Kazooie characters)
- Skin Pack Promo 7.jpg
Promotional image for Skin Pack 1. (Fable Heroes characters)
- Xbox Skin Pack Promo 8.jpeg
Promotional image for Skin Pack 2.
Promotional image for Skin Pack 2.
Promotional image for Skin Pack 2. (Castle Crashers characters)
Promotional image for Skin Pack 2. (Perfect Dark characters)
Promotional image for Skin Pack 2. (Gears of War characters)
Promotional image for Skin Pack 2. (Left 4 Dead characters)
Promotional image for Skin Pack 2. (Minecraft characters)
Promotional image for Skin Pack 2.
Promotional image for Skin Pack 2. (Viva Piñata characters)
Promotional image for Skin Pack 3. (Half-Life characters)
Promotional image for Skin Pack 3.
- L4D2.jpg
Promotional image for Skin Pack 3. (Left 4 Dead 2 characters
Promotional image for Skin Pack 3.
- Portal2.jpg
Promotional image for Skin Pack 3. (Portal 2 characters)
- Slamboltscrappers.jpg
Promotional image for Skin Pack 3. (Slam Bolt Scrappers characters)
- SP3.jpg
Promotional image for Skin Pack 3.
- SPIII.jpg
Promotional image for Skin Pack 3.
Promotional image for Skin Pack 4. (Borderlands characters)
- LeakedSkinPack4Screenshot.jpg
Leaked Promotional image for Skin Pack 4.
- SkinPack4CreeperSuit.jpg
Promotional image for Skin Pack 4.
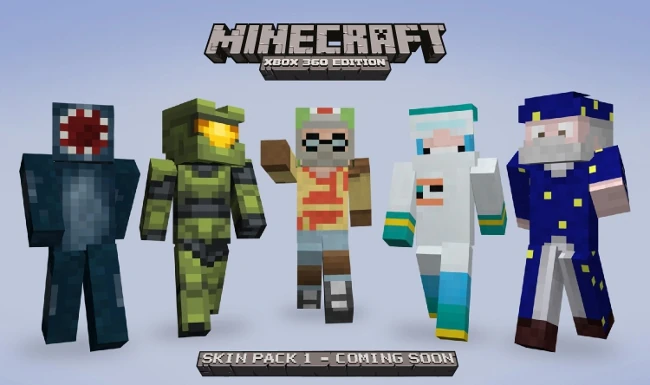
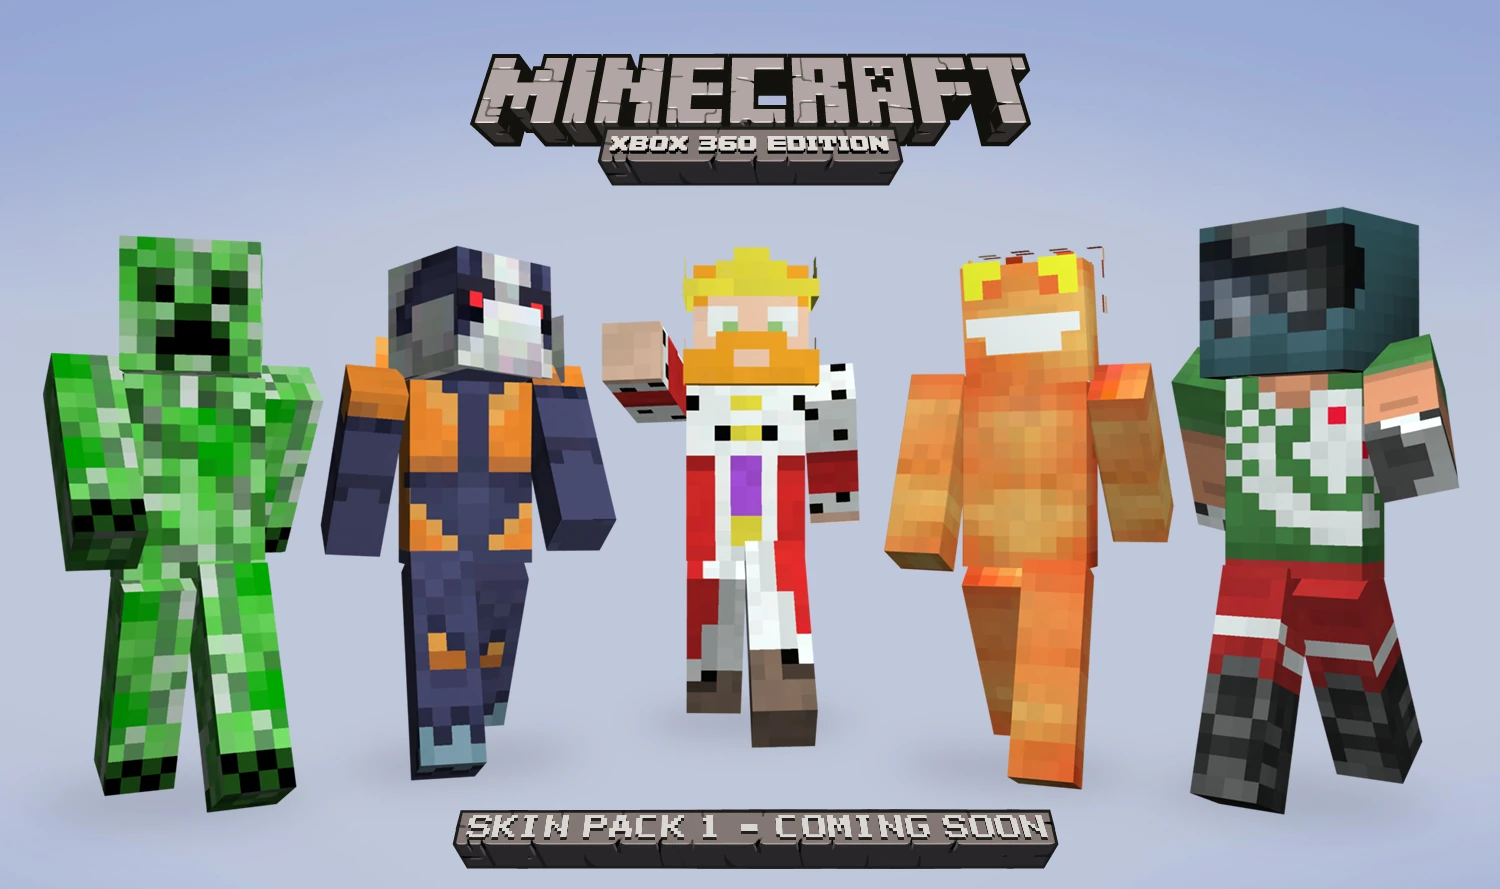
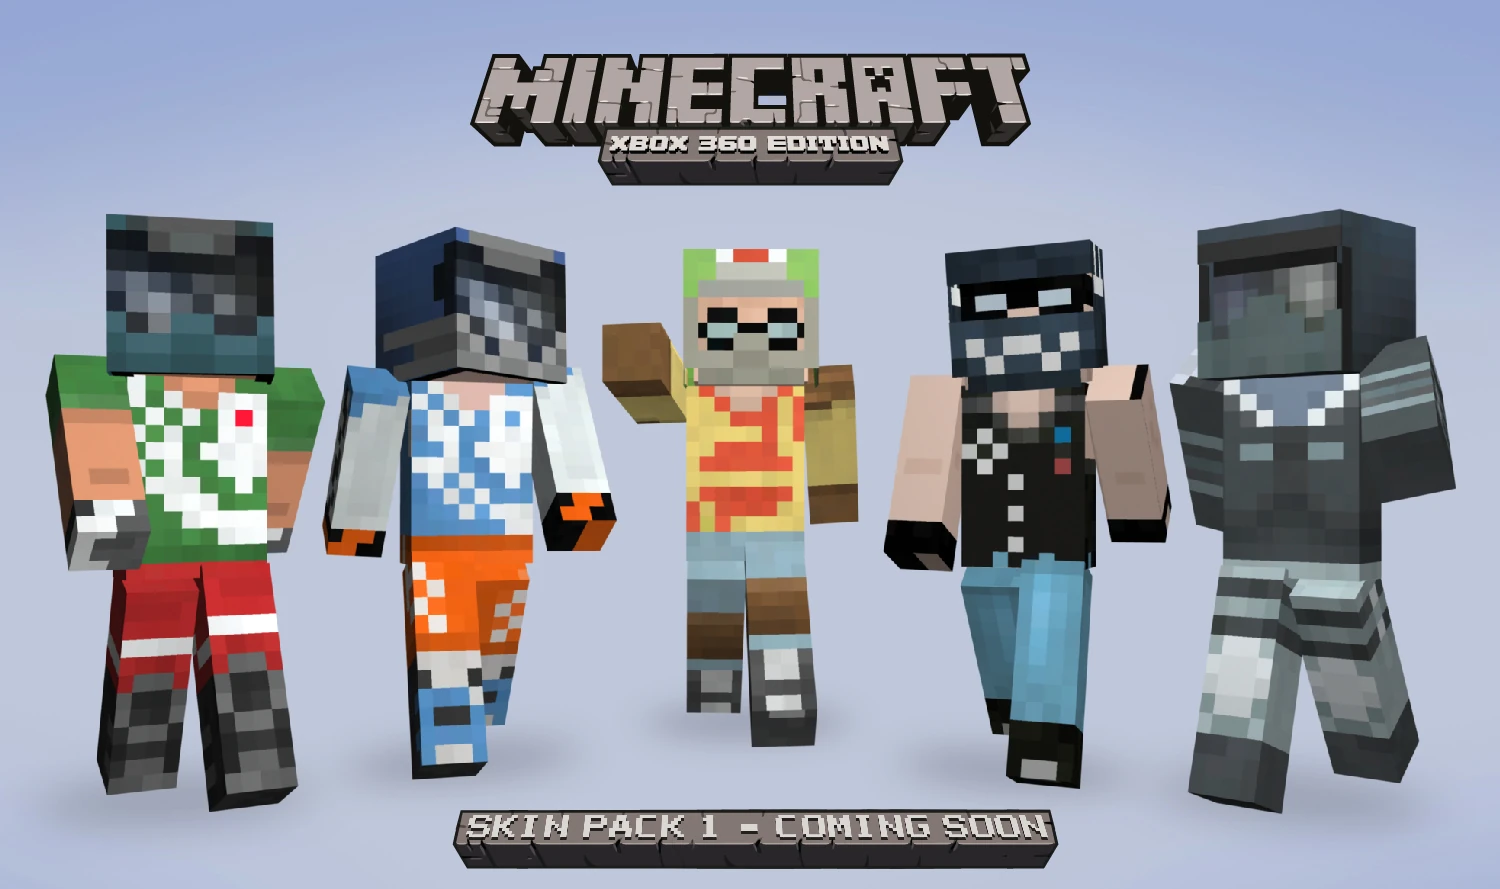
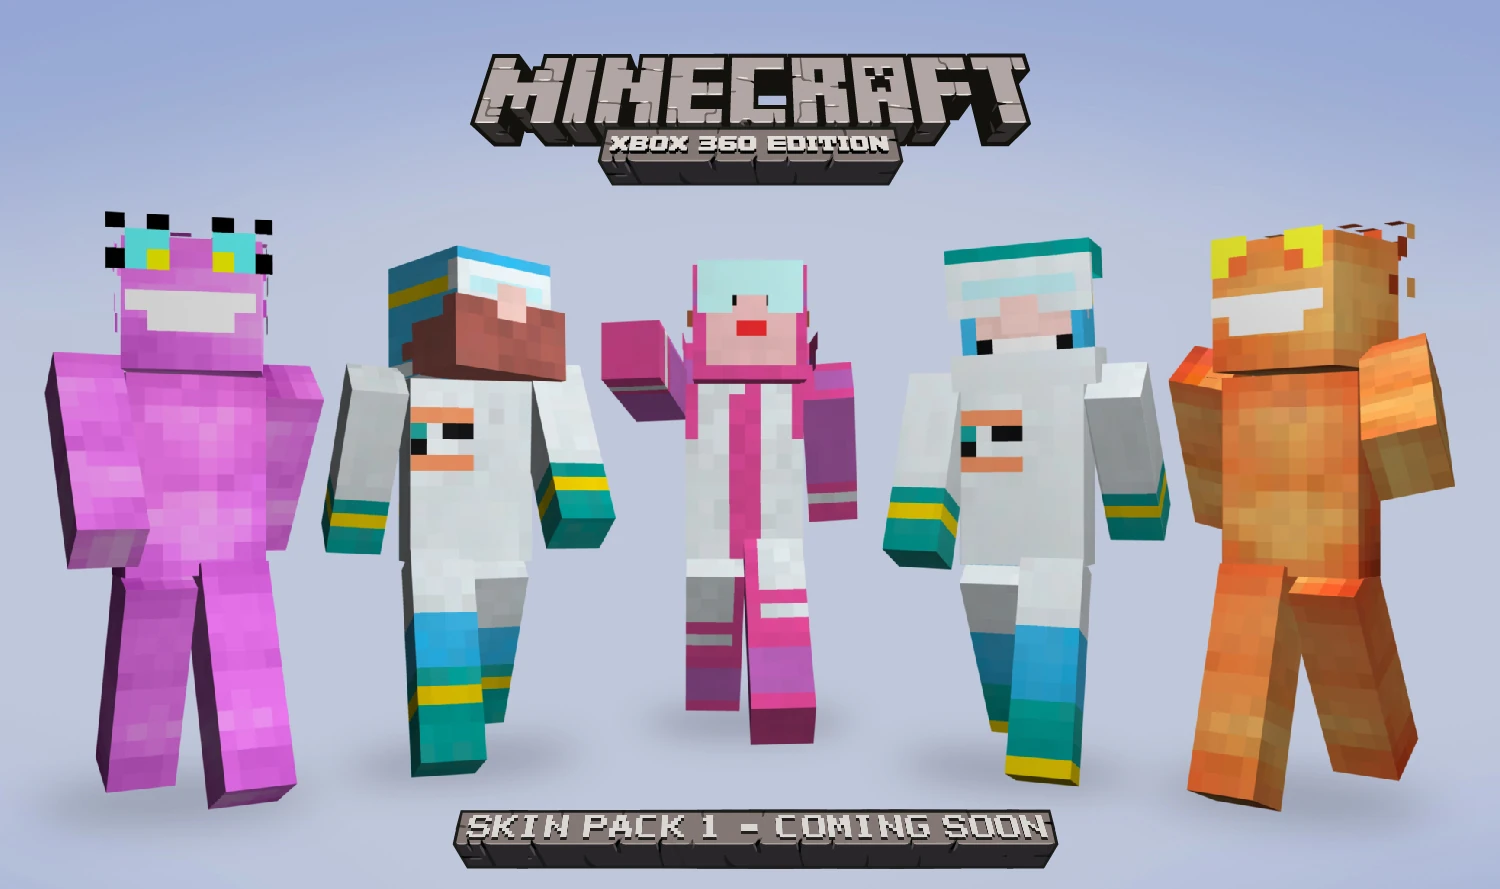
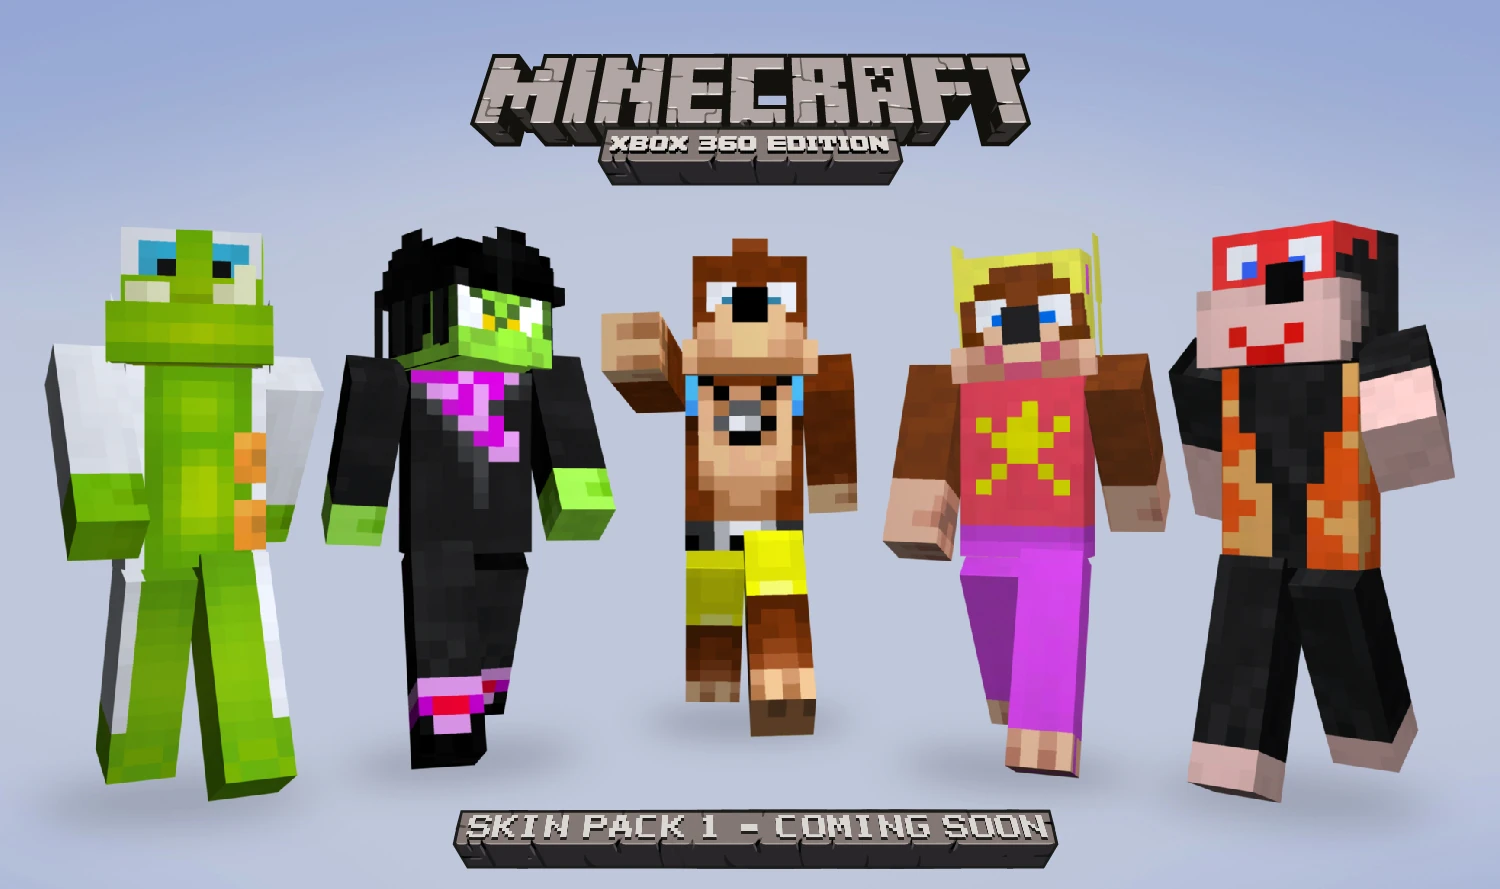
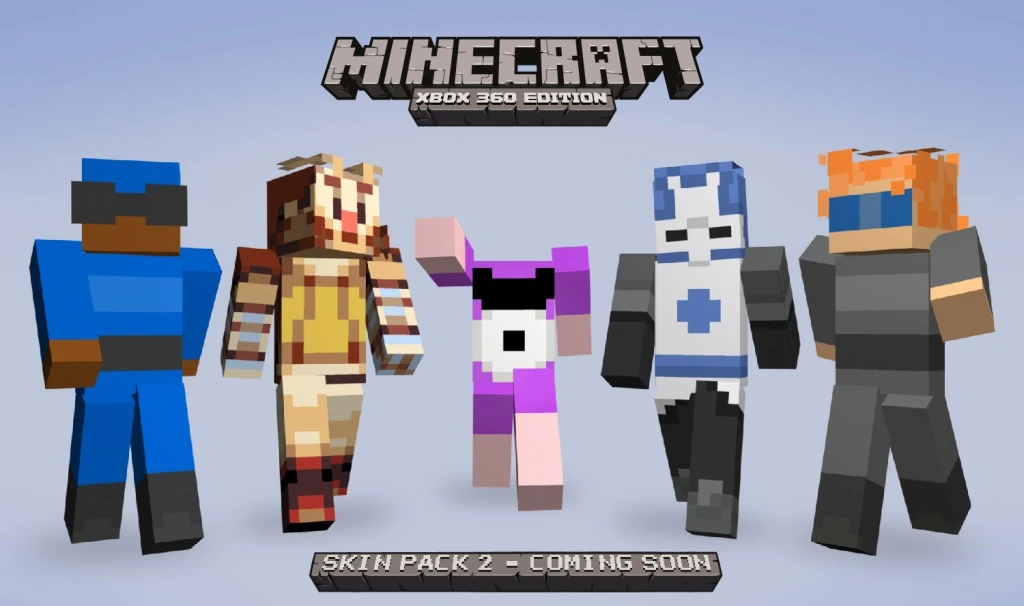


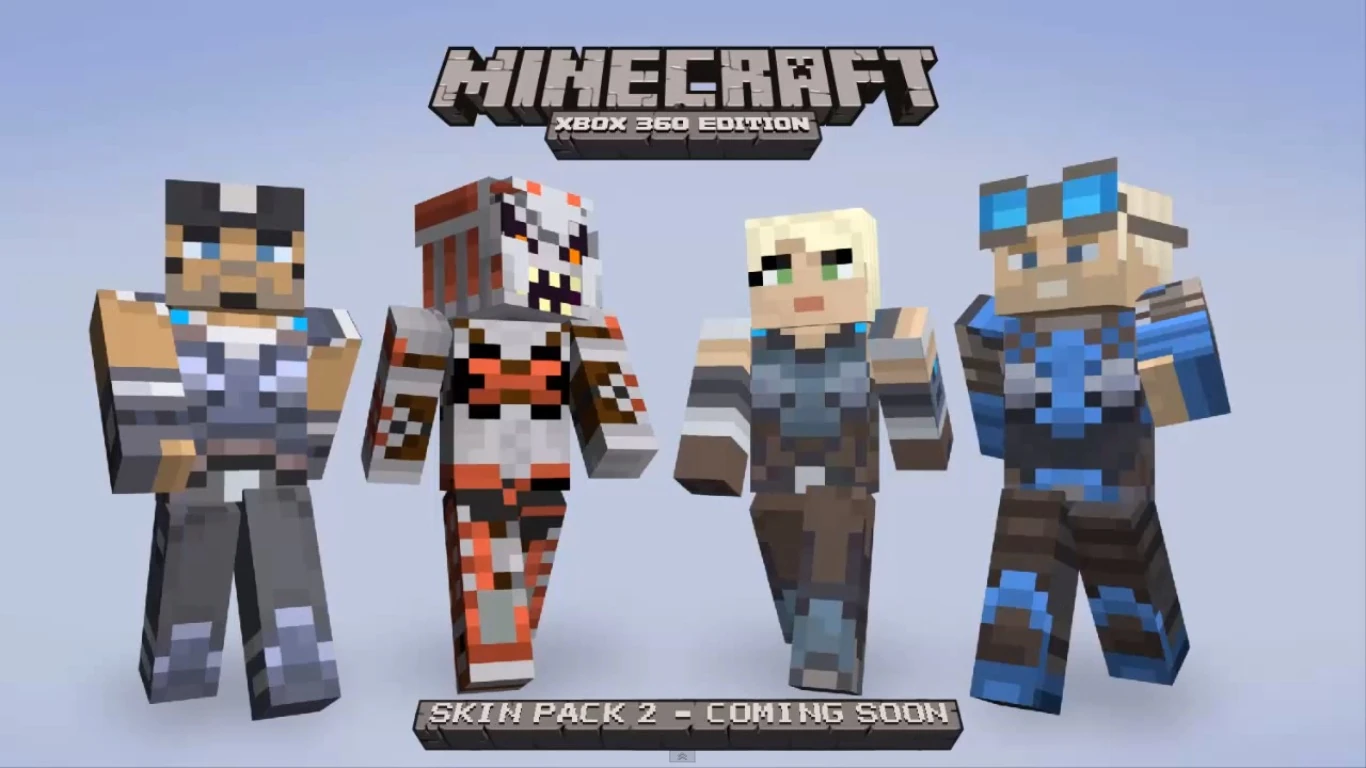
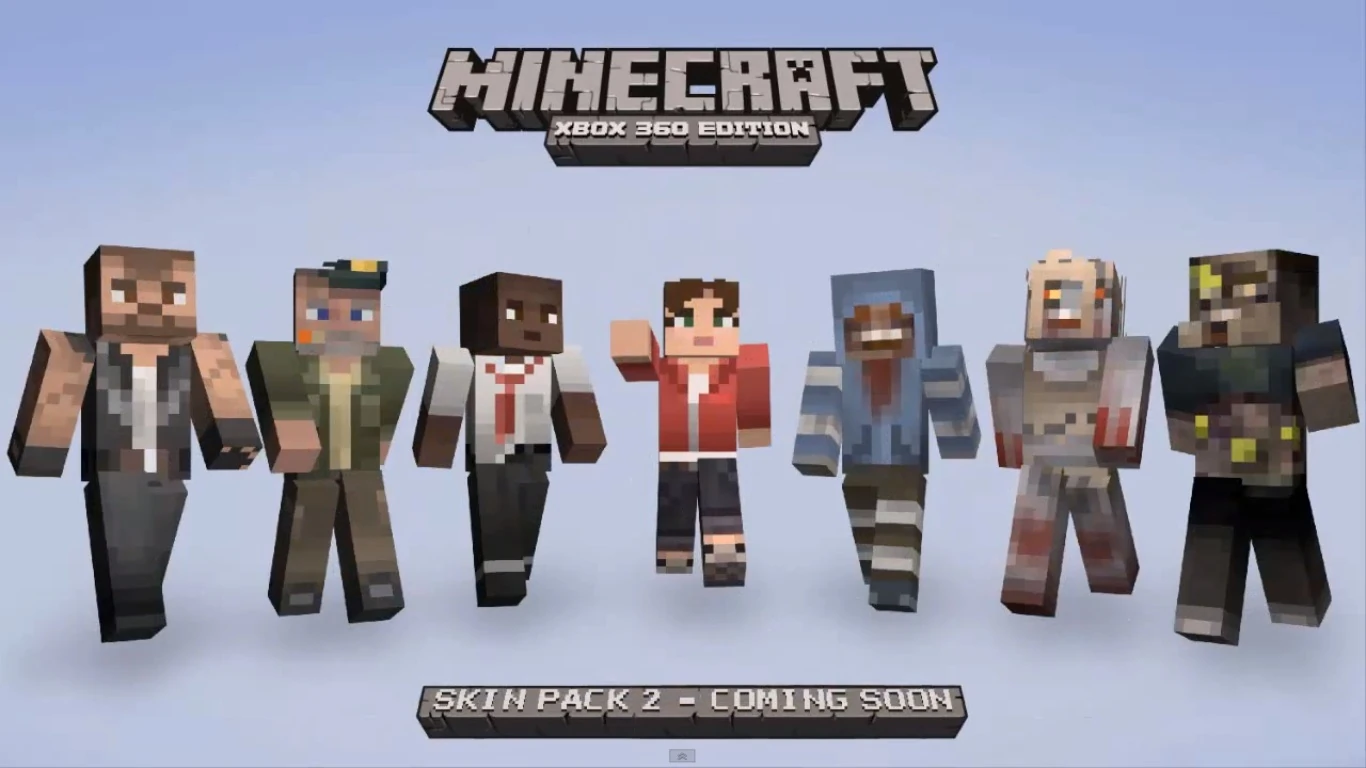
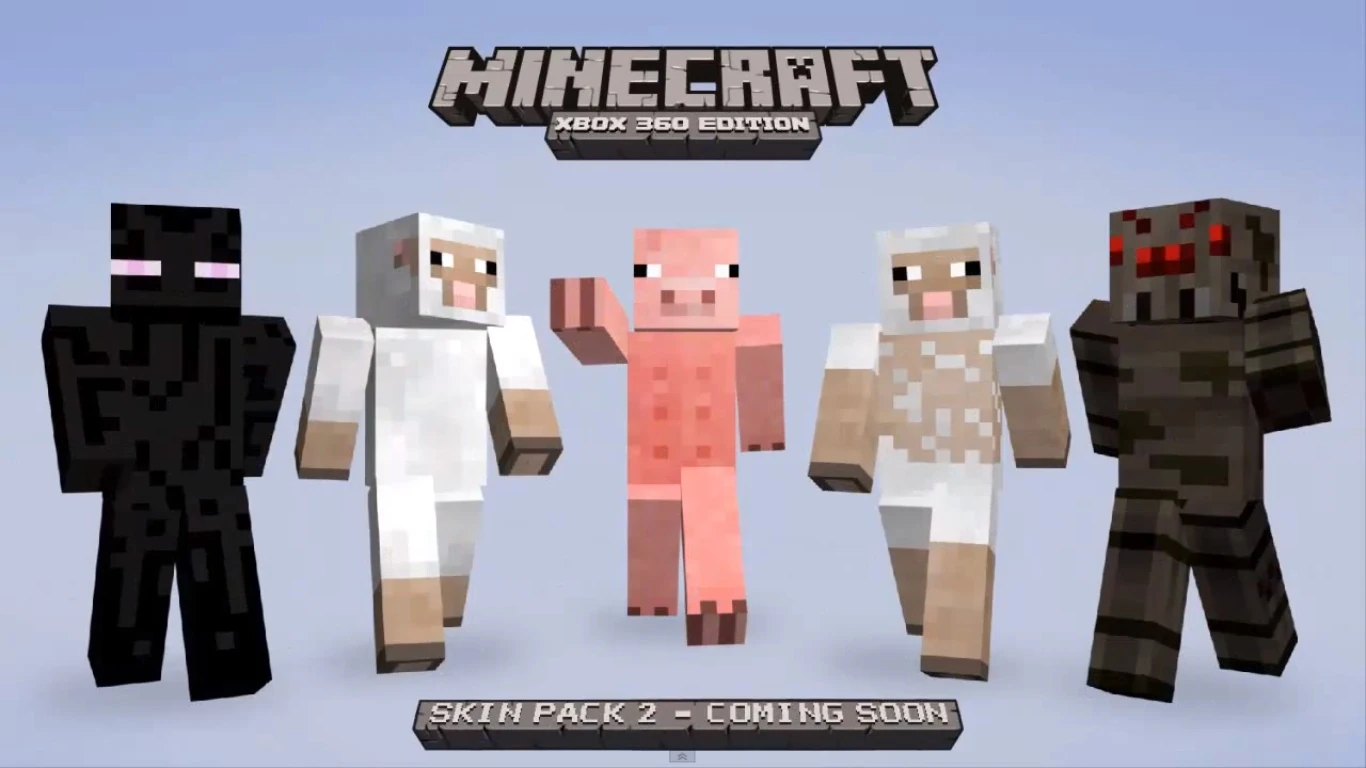
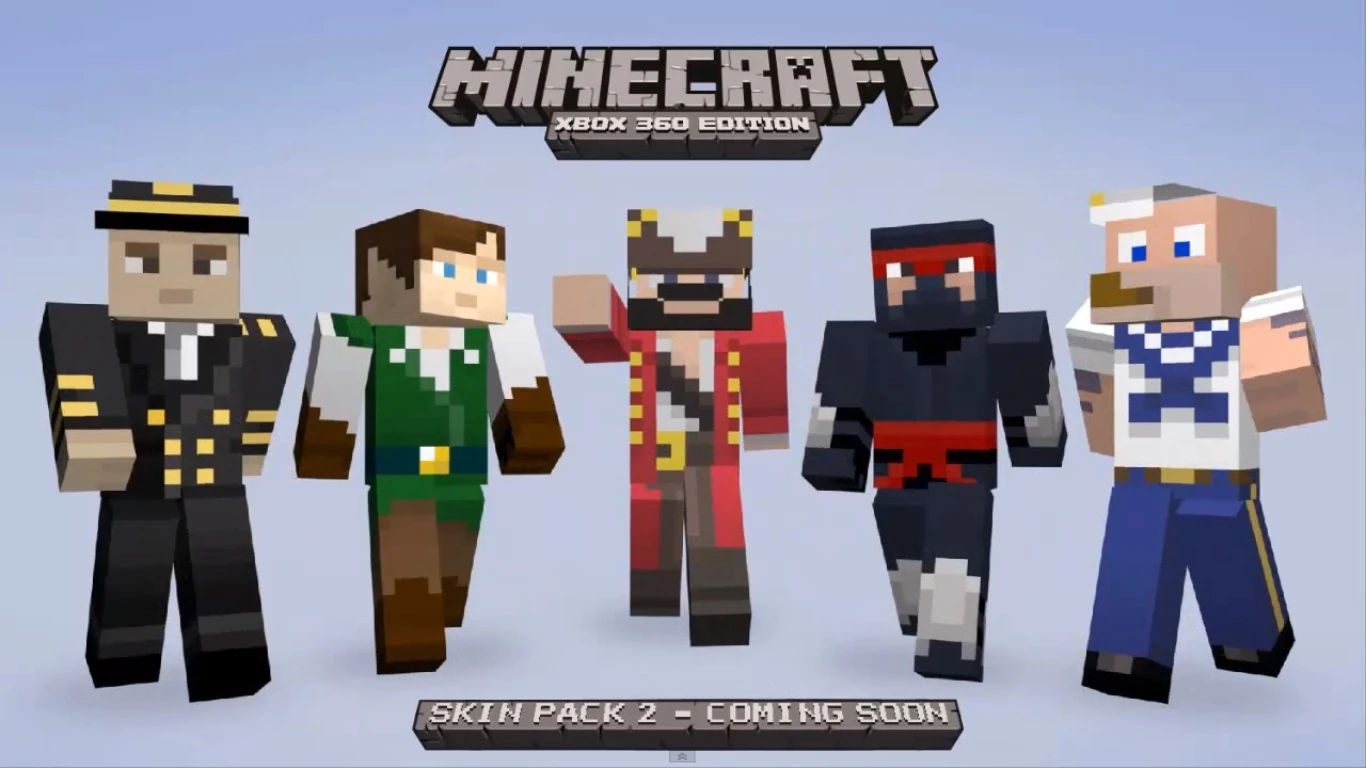

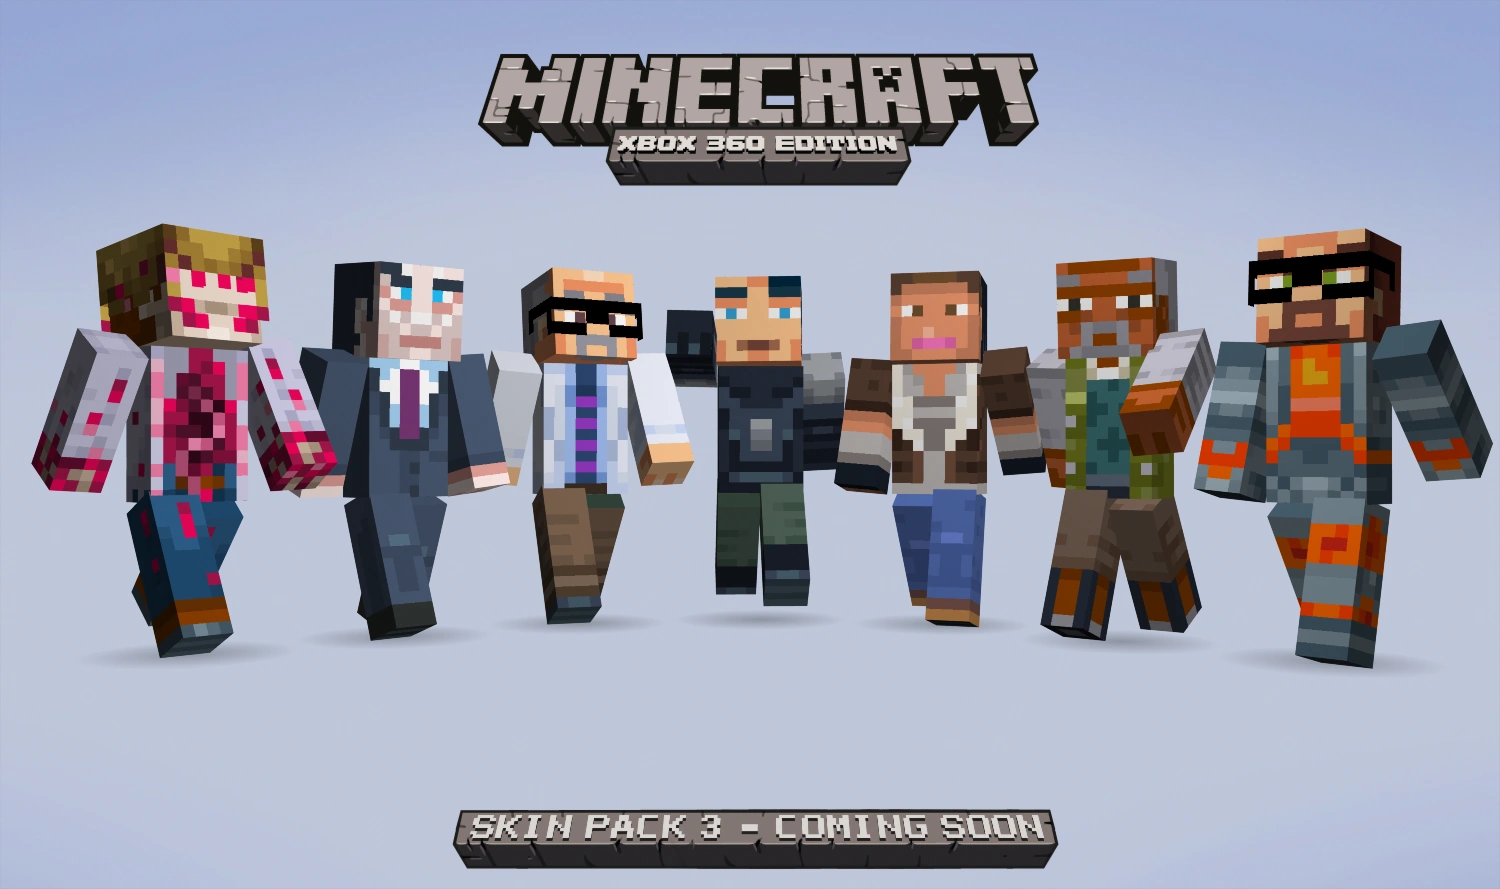
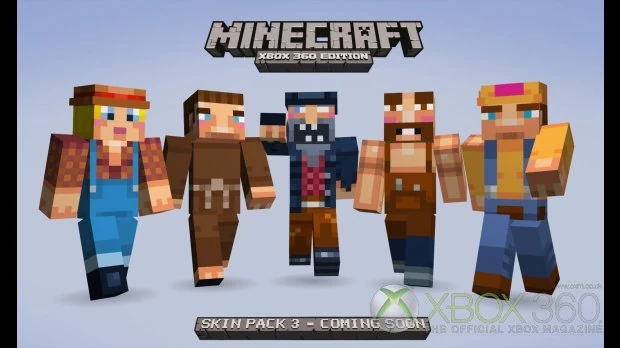
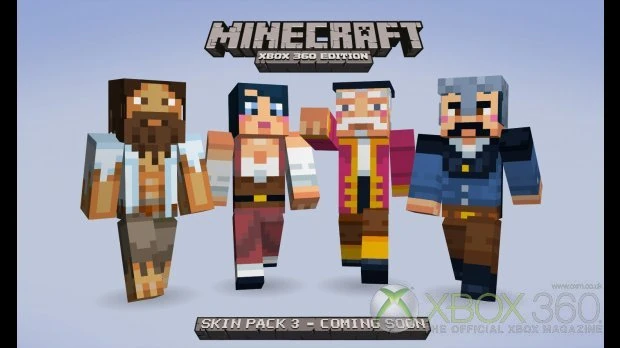

See also
- To share your skin with other users, please do so on the skin gallery page.
References
- ↑ https://twitter.com/MojangSupport/status/511889676227989504
- ↑ http://playxbla.com/minecraft-skins-coming-monday-july-16th
- ↑ http://playxbla.com/complete-list-of-themes-for-minecraft-xbox-360-edition-skin-pack-2-revealed/
- ↑ https://twitter.com/4JStudios/status/258603048392347648
- ↑ http://playxbla.com/minecraft-xbox-360-edition-skin-pack-3-coming-october-19th/
- ↑ http://playxbla.com/minecraft-xbox-360-edition-skin-pack-4-is-coming-wednesday-march-13th/
- ↑ https://twitter.com/4JStudios/status/306267022013108225
- ↑ http://playxbla.com/minecraftskinpack5thewalkingdead/
- ↑ http://playxbla.com/exclusive-summer-of-arcade-content-for-minecraft-and-trials-evolution/
- ↑ http://playxbla.com/minecrafting-for-a-cause/
- ↑ http://playxbla.com/grab-your-minecraft-xbox-360-edition-avatar-items-today-see-the-complete-list-of-festive-skins-and-a-title-update-7-video/
- ↑ http://playxbla.com/the-battle-and-beasts-skin-pack-for-minecraft-xbox-360-edition-is-now-available/
- ↑ http://playxbla.com/were-excited-its-our-birthday-tomorrow/
- ↑ http://playxbla.com/grab-the-minecraft-xbox-360-edition-birthday-skin-pack-before-its-too-late/
- ↑ http://playxbla.com/its-here-battle-beasts-skin-pack-2-for-minecraft-xbox-360-edition-is-now-available/
- ↑ http://playxbla.com/marvels-avengers-skins-for-minecraft-xbox-360-edition-are-now-available/
- ↑ https://twitter.com/notch/status/25340387308601344
- ↑ https://twitter.com/notch/status/28832121068
- ↑ https://twitter.com/micleee/status/24153383925452801
- ↑ https://twitter.com/jeb_/status/25263425357615104
- ↑ https://twitter.com/jeb_/status/25279230933733376
- ↑ http://www.reddit.com/r/Minecraft/comments/f1jdh/i_was_the_person_who_purchased_the_1000000th_copy/
- ↑ https://twitter.com/jeb_/status/25279312726855680
- ↑ https://twitter.com/notch/status/60980770084364288
- ↑ http://www.reddit.com/r/Minecraft/comments/jnc2p/notch_ive_brought_you_ray_cokes_as_requested/
- ↑ https://twitter.com/jeb_/status/202681694132772864
- ↑ https://twitter.com/jeb_/status/202682214692032512
- ↑ http://www.reddit.com/r/Minecraft/comments/tpqpc/this_is_the_cape_29_lucky_people_got_today/c4ot3ox
- ↑ http://www.reddit.com/r/Minecraft/comments/1t1l70/translators_cape_only_29_in_the_world_of/ce3py4b?context=3
- ↑ a b c https://help.mojang.com/customer/portal/articles/872983-minecon-capes
- ↑ https://twitter.com/4JStudios/status/332447319930830849
- ↑ https://twitter.com/4JStudios/status/334029754753757184
- ↑ https://twitter.com/jeb_/status/388193350408757248
- ↑ http://www.reddit.com/r/Minecraft/comments/1ort25/i_received_this_cape_for_helping_jeb_and_the/
- ↑ https://twitter.com/mollstam/status/395505852188487680
- ↑ https://www.mojang.com/2011/09/minecon-swag-cloaks
- ↑ https://twitter.com/notch/status/129820017863819265