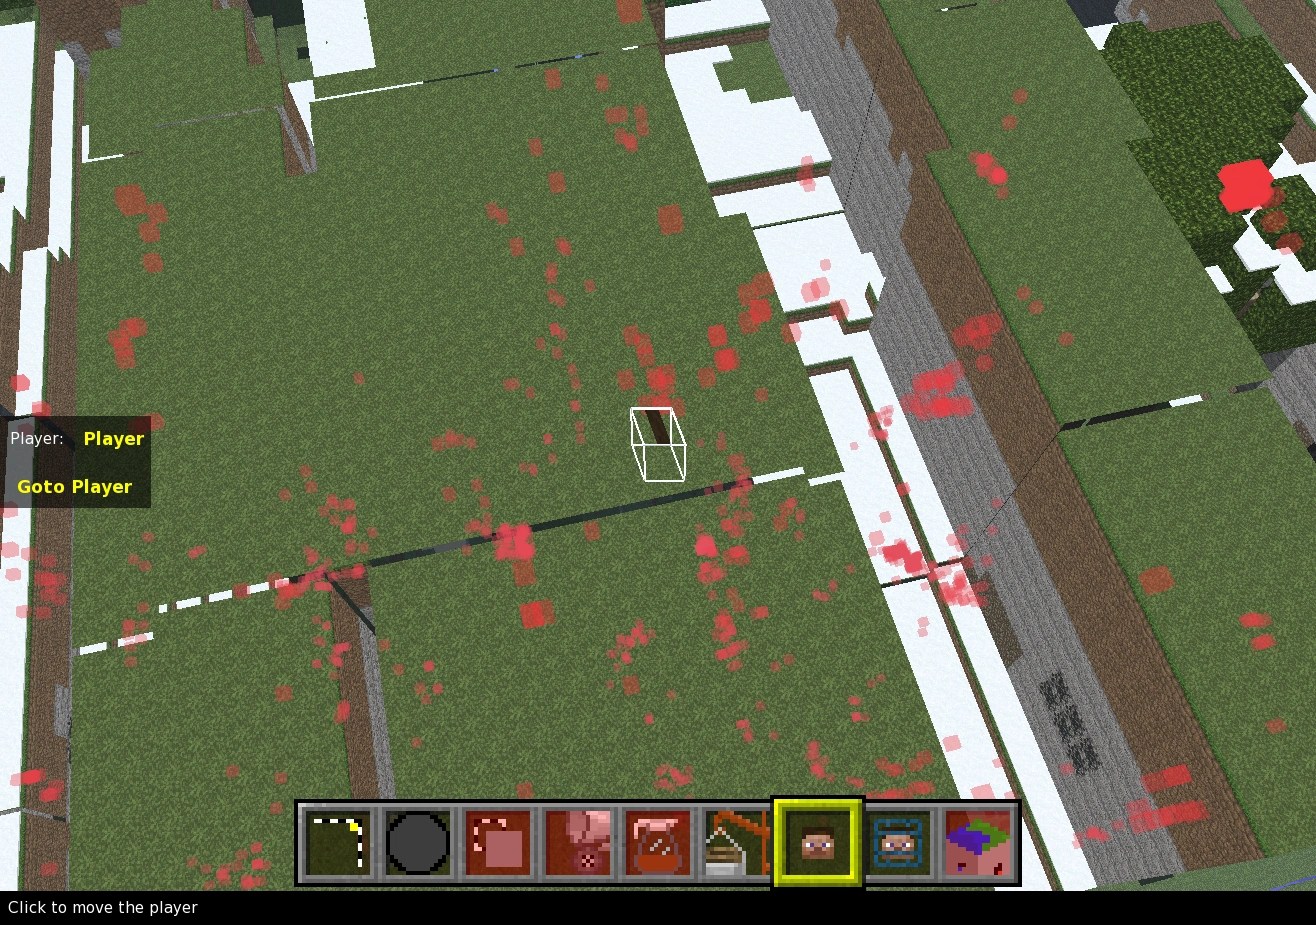
Template:Pocket
Comparison of land before and after X/Z of ±12,550,821.
The “corner" of the Far Lands, at ±12,550,821 on both X and Z axes.
The Far Lands[1] were the area that formed the “edge" of the “infinite" map in PC versions prior to Beta 1.8. They are currently found in Pocket Edition and Windows 10 Edition.
Spawning
The Far Lands start to generate between ±12,550,821 and ±12,550,825 on any horizontal axis.
Structure
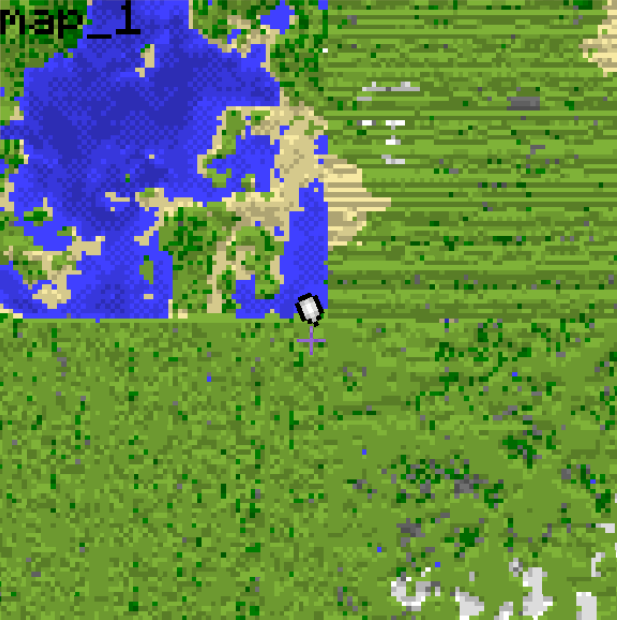

A map created near the Corner Far Lands
A section of the Far Lands shows that all large caves below sea-level are flooded.
A map created near the Far Lands.
Edge map.
A cartograph of the Far Lands.
Both areas of the Far Lands feature extremely strange terrain, although they are significantly different.
In both zones, any area beneath sea level, excluding regular caves, will be flooded with water. The Far Lands will generate biomes but most biomes will be indistinguishable except by the color of grass. Desert biomes will be covered in sand and snow-covered biomes will be covered with snow, excluding the very top of the map (because there's no space for the snow cover up there). Trees will generate somewhat normally, but can only be found in the upper areas of the map due to the need for grass. However, if you open the debug screen, the biome will always claim that the biome is a forest.
Ores can be found up to their respective maximum heights just like in the normal world. Unfortunately, due to the flooding, everything except for coal is difficult, if not impossible, to acquire. In the solid areas of the Far Lands, normal caves will generate but will be limited and small. Along with the caves, dungeons (extremely rare) and lakes can be found in solid areas. Water and lava springs can be found out in the open and in caves.
Much of the open space in both areas is shrouded in darkness and thus hostile mobs run rampant, making the Far Lands as a whole incredibly dangerous. This is especially problematic in the Corner Far Lands due to its layered structure. The flooded zones are filled with squid.
In the Sky Dimension, the Far Lands are not half flooded with water and bedrock does not form at lower levels.
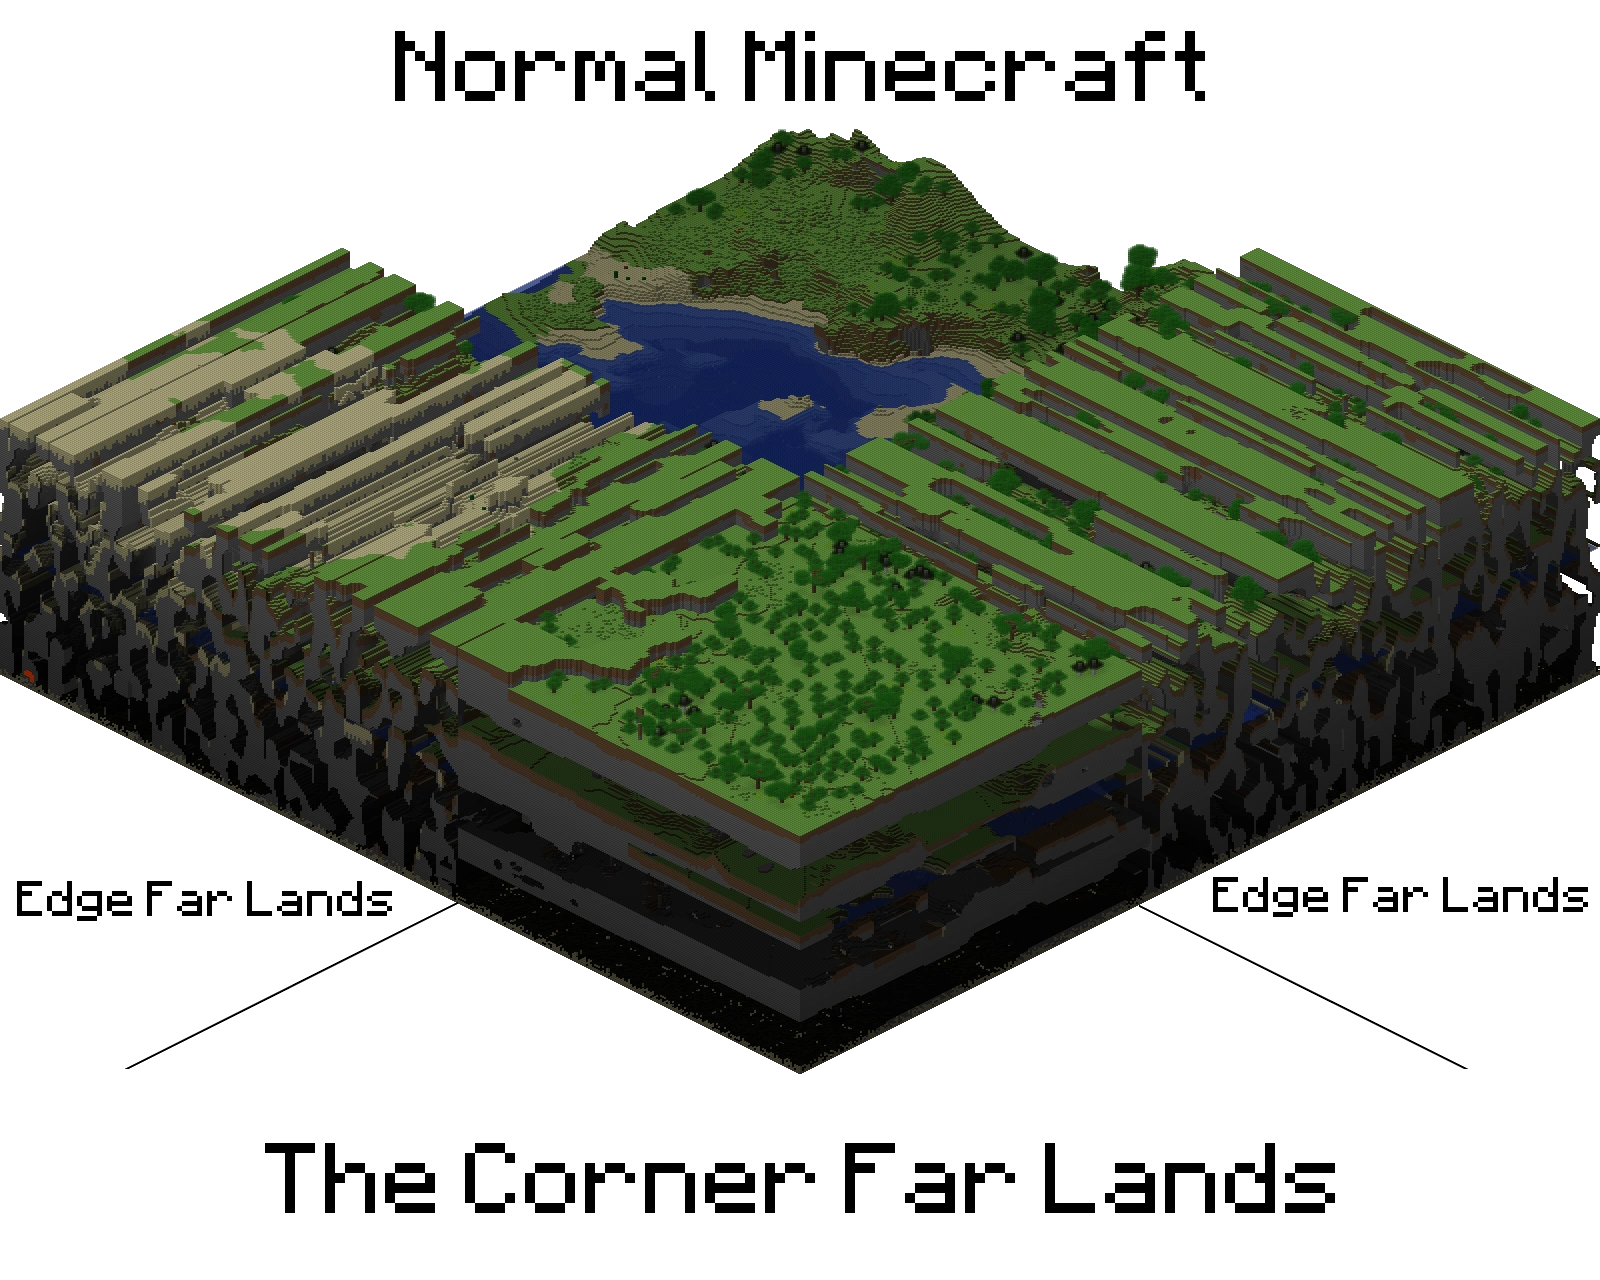
Edge Far Lands
The boundary of the Far Lands' edge (that is, where it meets the regular map) looks like a solid wall, all the way to the top of the map (Y-coordinate 127) that is filled with gaping holes perpendicular to the edge. These holes are extremely long, perhaps infinite, and on the whole seem to change very little no matter how deep the player ventures. They can be blocked, either partially or completely, but such blockages are rare and temporary. This “wall of Swiss cheese" pattern continues beneath ground level, all the way to the bottom of the map, and seems to be partially caused by a large one-dimensional distortion in the map generator's output. This area is sometimes referred to as “the Loop".
The Edge Far Lands' average block composition: 36% stone, 25% air, 23% water, 10% dirt/grass block, 2% bedrock, and 4% others. (Based on a 14×14 chunk selection)
Corner Far Lands
At a corner, when two perpendicular Edge Far Lands sections meet, the Corner Far Lands begin to generate. Unlike the infinite-length holes in the Edge Far Lands, the Corner Far Lands contains more normal terrain. This terrain is "stacked" on top of itself to create a bizarre sandwich with layers of ground and air, which gives it its nickname, “The Stack". Each layer looks like a gigantic floating continent, hovering over the next layer, which is shadowed.
The majority of the generated world is Corner Far Lands, as the “normal" map (before ±12,550,821 mark) only makes the center of the world, and the Edge Far Lands only make its continued sides.
The number of layers isn't always the same, and varies between five to seven. Layers can be grouped into three categories:
- Top layer: This layer exists at the absolute top of the map. Occasionally there can be a lower area that isn't shadowed (this is technically a dry layer). The lower area is where a majority of the trees and passive mobs can be found, as the top layer receives almost all of the sunlight. Due to the lack of space the area at the absolute top can't have trees or mobs.
- The top layer tends to light incorrectly in day-night transitions. This is because the sunlight calculation doesn't work when the entire chunk is blocked at Y-coordinate 128.
- Dry layers: These generate slightly flatter than normal terrain and have grass, despite the darkness. At sea level massive floating beaches can be found, which will collapse if modified. Hostile mobs' spawn rate likely approaches the maximum due to being in the shadow of the top layer. Rarely, there are holes in the top layer that allow sunlight to reach these layers. Caves that have one of these layers as their “surface" can occasionally be carved out of dirt instead of stone. These layers have cave-like ceilings made out of stone, gravel and dirt.
- Flooded layers: Like the dry layers, these generate somewhat flat terrain, but it is comprised primarily of stone. Sand and sandstone will show up down here, even up to 30 meters below sea level. Except for coal, all the ores can only be found in these layers.
Sometimes, there are extremely tall pillars of gravel that stretch from the ground to the ceiling of a layer. Likewise, some of the beaches that collapse will create pillars of sand all the way down to the ground, despite there not being that much sand to begin with. The Corner Far Lands is also prone to having near-perfect diagonal lines being carved into the ceilings or floors of layers. If traced, these lines all intersect at the corner (X/Z ±12,550,821). This seems similar to how the Edge Far Lands have a consistent pattern along lines perpendicular to their edge, but is much less pronounced.
The Corner Far Lands' average block composition: 40% stone, 16% air, 28% water, 10% dirt/grass, 2% bedrock, and 4% others. (Based on a 14×14 chunk selection)
The Nether
The Far Lands as seen inside the Nether.
The Nether Far Lands are similar to Overworld Far Lands, except they generate with Nether features, such as lava ocean at Y=31.
In the Nether, the terrible lag associated with the Overworld Far Lands will not occur. This is because there is considerably less gravel in the Nether.
If a Nether portal is created in the Far Lands of the Overworld, entering will cause a teleportation to normal Nether, as X/Z 32,000,000, the limit at which block physics and lighting cease to function, divided by 8 (as 1 block in the nether corresponds to 8 blocks in the Overworld), is X/Z 4,000,000, within the limits of X/Z 12,550,820, where the distortion starts. Conversely, a Nether Portal built in the nether Far Lands will not function, as even at the limit of 12,550,820 blocks as the beginning of the Far Lands would cause the player to come out at X/Z 100,406,560, far past X/Z 32,000,000.
Pocket Edition
The Pocket Edition Far Lands are different from the PC Far Lands, specifically:
- The content of the Far Lands in Pocket Edition is slightly different in biomes and structure in positive coordinates.
- In negative coordinates, the Far Lands are completely ocean.
- In the Corner Far Lands, an extremely unusual grid pattern of grass blocks will appear instead of the ordinary “stack." Tall grass will spawn on these blocks. This results in a perfect three-dimensional array of grass blocks levitating high above the ocean.[2]
- Flying is the only way to navigate the Far Lands. Walking is impossible as the terrain is made up of ghost chunks.
- Any movement causes chunks to jitter about incredibly.
- One feature of the PE Far Lands is the Stripe Lands, a graphical bug that depicts a one visible-one invisible block pattern.[3][4] The Stripe Lands starts at X/Z ±16,777,216, only generating water, bedrock and ice (frozen oceans), and grass on flat worlds.
- Sand and gravel don't fall from generating in Pocket Edition. This results in relatively stable performance.
Effects
The most noticeable side effect of the Far Lands, where the map takes longer to update according to the player's location.
Pre-Far Lands (X/Z: ±500,000 - ±12,550,820)
There are many effects that will be noticed after traveling millions of blocks away from the center of the map. The very first effect that will be noticed is the jumpy or stuttering movement of the map, which isn't directly related to the Far Lands themselves but instead to floating-point precision errors. This jumpy movement is notable even at an X/Z of ±500,000. The intensity of such glitches doubles every time the player passes a coordinate that is a power of two (e.g 2,097,152 or 4,194,304).
'Early' Far Lands (X/Z: ±12,550,821 - ±32,000,000)
Players will experience extreme framerate drops and very high CPU usage, which will continue until Minecraft freezes completely. The framerate drops do not occur in multiplayer servers, though it will, depending on the server computer's RAM, make the server itself lag. In both singleplayer and multiplayer, the intense lag that is characteristic of the Far Lands is caused by massive numbers of falling sand or gravel entities. This in turn is caused (like most of the rest of the Far Lands' strange effects) by more floating-point precision errors, and will worsen as the player reaches X/Z: ±32,000,000 (Beyond X/Z of ±32,000,000 chunks are treated as permanently nonexistent, and will not generate, even though they may appear to. This value is hardcoded in the source code of Minecraft, meaning that it cannot be changed without editing the source files.) Weather is not affected by the Far Lands directly but is by their terrain. Lightning bolts that hit surfaces at the top of the map (Y-coordinate 127) will be invisible and will not cause fire. The particles created when rain hits these surfaces will be black instead of blue. Snow will not accumulate on these surfaces either (because there's no space).
Fake Chunks (X/Z: >±32,000,000)
Note: feature
As the player journeys even deeper into the Far Lands, the effects worsen to the point where the game is unplayable. At X/Z ±32,000,000,[5] block physics stop functioning correctly. Lighting doesn't work and the blocks, although they appear to be there, aren't solid. If the player tries to walk on these blocks, he or she will fall into the Void. At excessive X/Z positions (depends on the operating system, but usually occurs between X/Z: ±500,000,000 and ±2,000,000,000), world renderer no longer works, or takes incredibly long times and uses most, if not all CPU usage. It then becomes almost impossible to close Minecraft without a task manager. At X/Z: ±2,147,483,647 (the maximum 32-bit integer), surface textures are no longer rendered, giving way to an empty sky. However, chunks are still generated. Note that only 64-bit machines can pass this point.
At X/Z: ±34,359,738,368 (235 meters), new chunks can no longer be generated, causing Minecraft to crash. It may be possible on some machines to surpass this point, however this will lead to a crash shortly after.
At X/Z ±9,223,372,036,854,775,807 (264 meters), the screen will display completely black with no sun and oddly glowing clouds. However, despite this being the limit any machine can go, it may not be possible to reach anywhere near this point, since the vast majority of people experience instant client freeze, followed by the client crashing. In some cases, the side-effects of travelling so far from the center of the world can result in the machine used to play Minecraft becoming completely unresponsive. In these cases, unplugging the machine is the only way to restore it from this state, although this has not been known to cause any damage to the machine.
Vertical effects (Y: <-2,147,483,647)
In Beta 1.7.3, as the player falls below Y -2,147,483,647, the darkness of being in the void disappears. Instead of darkness, the void now looks like an empty world. It has a sky, a sun, and a moon, and they are all visible depending on the time of day. Despite this, the player will still receive damage from the void.
Map editors
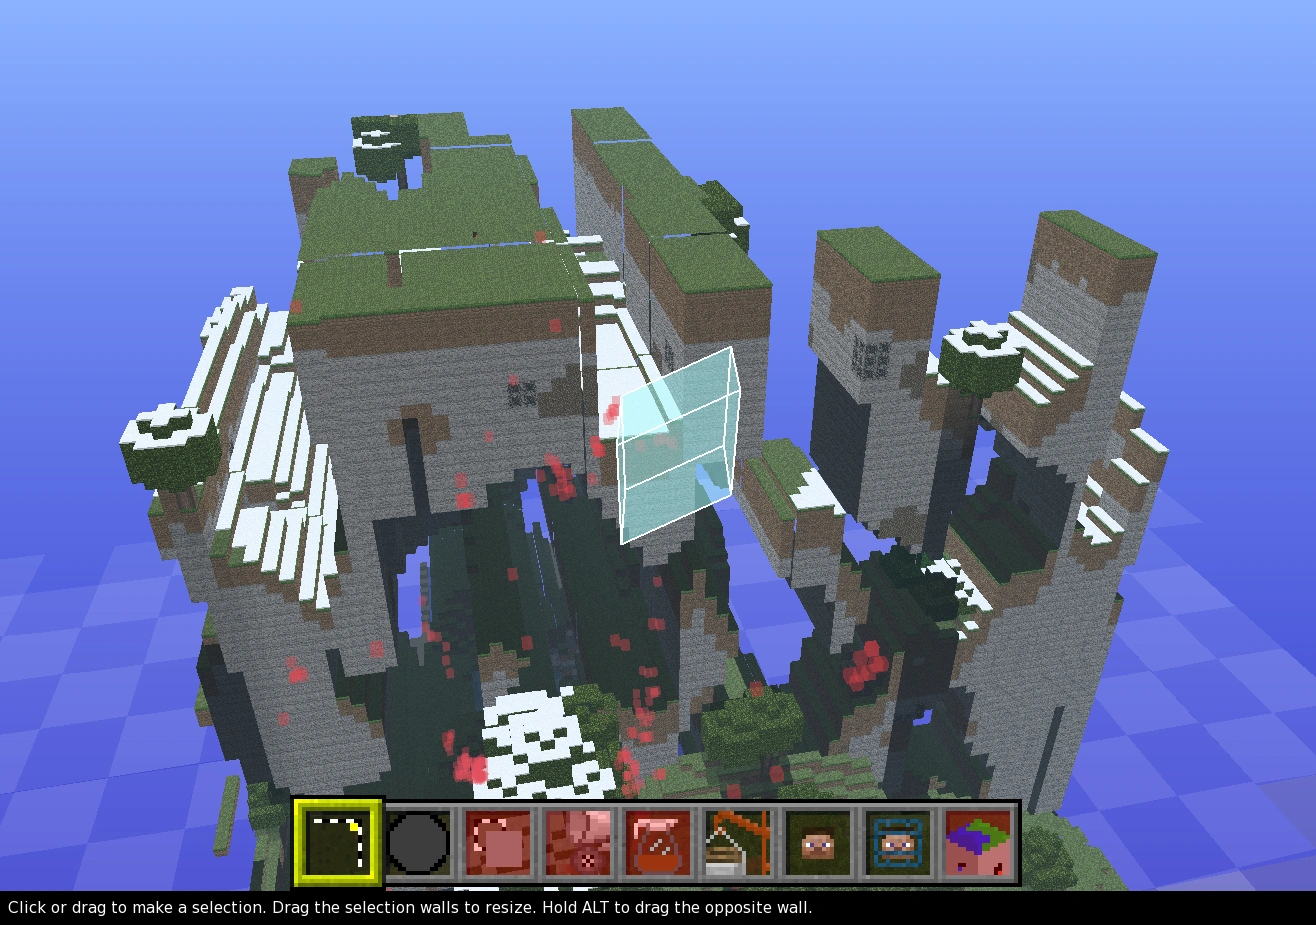
When viewing the Far Lands in a 3D Minecraft map editor, you will encounter errors. In MCEdit, the selection cubes start to distort and the map distorts when viewing. In addition when rotating your view around a selected area, blocks will not be lined up right and will change how poorly lined up they are randomly, making the whole world seem to shake like a machine about to rattle itself to pieces.

The selection box being distorted in MCEdit.

Twisting world and move player tool in MCEdit.
Previous versions
In Infdev, although the Far Lands existed, many of the side effects didn't. However, fire particles and doors would act strange. There was no stuttering movement, and beyond X/Z ±32,000,000, the blocks would simply not render. Walking off the edge would cause the player to become stuck in a glitched position, unable to escape.[6][7]
It has been confirmed that in Alpha v1.1.2, the blocks would not render beyond X/Z ±32,000,000, like older Infdev versions.[5] The fake chunks started appearing in Alpha 1.2.0.
In previous versions of the game, if you teleport as high as you possibly can, you are sent to a Y-Axis of 3.4x1038. In this zone, you float without a purpose, and dropped items will slide with what appears to be no friction before suddenly stopping after about 20 blocks. It has been reported that the X and Z-Axis sometimes flicker randomly in this zone. The memory pie chart also sometimes randomly jumps to 100% undefined memory usage, and then disappears upon re-entering the debug menu.
Pocket Edition effects
In Pocket Edition, the playable range is smaller than that of PC, because of the usage of 32-bit floating-point numbers (as opposed to 64-bit on PC).
- Gaps between chunks first begin to be noticeable at X/Z values above ±100,000. The selection box also experiences a lot more Z-fighting as it contracts (it can still rarely be found in the "normal" world).
- At X/Z: ±524,288 "jitteriness" is experienced and the further the player travels, the world gradually starts to become glitchy and unplayable. Chunks are seen to vibrate rapidly (fixed in 0.10.0).[4]
- Past X/Z: ±900,000, the jitteriness becomes considerably unbearable, and crashes are very frequent at this point on low-end devices.[4]
- At X/Z: ±4,194,304, the blocks' hit detection becomes glitched and can be only hit from behind or in front, as a result; entities less then 1.2 meters wide will fall through. It will occur for the player randomly, however.
- Beyond X/Z: ±8,388,608, the above becomes worse as it affects the entire terrain (except water which still functions), making the chunks from this point onward ghost chunks.
- Between X/Z: ±12,561,029 and X/Z: ±12,758,546 the Far Lands begin to take on a thinner appearance, before fading out. What generates from there to the beginning of the Stripe Lands (X/Z: ±16,777,216) is currently unknown, however it is likely just ocean.
- Beyond X/Z ±33,554,432 water physics break and is no longer rendered. The game also appears 2D
- Generated structures like villages and ice spikes may continue to generate as far up to X/Z: ±100,000,000, however they appear two-dimensional at this distance.
- After about X/Z: ±2,100,000,000, air pockets (the black patches in the Stripe Lands) will fail to render. The map is essentially invisible from this point onwards.
- At X/Z: ±2,147,483,647, the game freezes and crashes. However, not all devices are able to reach this point.
- Blocks that are not full (stairs, fences, etc.) will appear as full blocks, usually stretched out.
- At very large X/Z coordinates, the player can only move horizontally or vertically unless they sprint-fly, and has to hold down directional keys before moving.
Cause
The terrain is generated based on 16 octaves of Perlin noise. Each noise generator takes floating-point inputs and uses those to interpolate between noise values at whole numbers. It does so by:
- casting to a 32-bit integer, where Java rounds toward zero and handles overflow by picking the closest representable value;
- subtracting one if the integer is greater than the original input, to always round down;
- subtracting that integer from the original input to get a remainder in the interval [0, 1) suitable for interpolation.
It covers an interval of [−231, 231) without causing any problems. The problem is that many of the octaves cover a scale much smaller than a block, with up to 171.103 noise units per block. Indeed, 231≈171.103×12,550,824.053. Once this value is exceeded, the integer will always be 231−1, picking the same noise values on that axis every time. This is the reason for those long unchanging tunnels in the Edge Far Lands, and plains in the Corner Far Lands.
At the positive end the remainder starts out relatively small but usually much larger than 1, and grows by 171.103 per block. At the negative end, the remainder starts at −232. This value is then adjusted by ((6x−15)x+10)x3 for quintic interpolation. Even one block in at the positive end, this is already around 1011. The negative end starts all the way around −1049! For the Corner Far Lands, multiply the values of both edges. When interpolation (really extrapolation) is attempted with values as large as these, it produces similarly large output. That output completely dwarfs all other terms that would normally give the terrain its shape, instead effectively only passing the sign of this one noise function through.
It was fixed by taking the remainder of the input divided by 224. Noise repeats every 28 units anyway, so it has no side effects. But it does prevent the overflow. By removing these instructions, the Far Lands can be returned to current versions of the game.[8]
There are several factors making things slightly more complicated:
- Noise is only sampled every four blocks and linearly interpolated in between. This is why when 12,550,824 is affected by the bug, it reaches out three more blocks to 12,550,821.
- Each noise generator picks a random offset in [0, 256) to add to its input. This will usually move the boundary under 12,550,824, starting the Far Lands at 12,550,821. With a few seeds it might not, putting the start at 12,550,825. Very rarely, if the boundary is just barely within 12,550,824, the first couple blocks of the Far Lands might look somewhat normal. The southern and eastern Far Lands do this independently of one another. At the negative end, the Far Lands always start at block coordinate −12,550,825, with the positive edge of those blocks at −12,550,824.
- There are actually two sets of noise generators, which are blended together based on another noise generator. This is responsible for relatively smooth alternation between two sets of tunnels or plains. Occasionally, one of the noise generators starts generating the Far Lands before the other because it uses a different offset, producing an incongruous boundary.
- A second set of the Far Lands starts around ±25,101,648, where another octave overflows. There is no visible change because the original Far Lands dwarf them like everything else.
History
| infdev | |||||
|---|---|---|---|---|---|
March 27, 2010{{Extension DPL}}<ul><li>[[Bookshelf|Bookshelf]]<br/>{{About|the bookshelf used with an enchanting table|the bookshelf that can hold books|Chiseled Bookshelf}}
{{Block
|image=Bookshelf.png
|transparent=No
|light=No
|tool=Axe
|renewable=Yes
|stackable=Yes (64)
|flammable=Yes (30)
|lavasusceptible=Yes
}}
'''Bookshelves''' are [[blocks]] that improve [[enchanting|enchantments]] applied with an [[enchanting table]] when placed around one, up to a maximum of fifteen bookshelves, at the expense of [[Enchanting/Levels|level]] requirement.
== Obtaining ==
=== Natural generation ===
Bookshelves can generate in village libraries and sometimes village houses.
[[Stronghold]]s may contain up to two libraries, each of which may be single-level or have an upper balcony. These feature some bookshelves arranged in pillars, and more bookshelves arranged in pillars in the walls. Single-level libraries contain 161 bookshelves, while libraries with balconies contain 233.
Bookshelves also naturally generate in certain [[woodland mansion]] rooms.
=== Breaking ===
Bookshelves can be broken fairly easily by hand, but can be broken faster by using an [[axe]]. In either case, they drop 3 books when broken, allowing the reconstruction of the bookshelf with the addition of six wood planks. When broken by an item that is [[enchanted]] with [[Silk Touch]], a bookshelf drops itself.
{{breaking row|horizontal=1|Bookshelf|Axe}}
=== Crafting ===
{{Crafting
|A1=Any Planks
|B1=Any Planks
|C1=Any Planks
|A2=Book
|B2=Book
|C2=Book
|A3=Any Planks
|B3=Any Planks
|C3=Any Planks
|Output=Bookshelf
|type=Building block
}}
=== Trading ===
Novice-level librarian [[Villager|villagers]] have a 50% chance to sell 1 bookshelf for 9 [[Emerald|emeralds]] as part of their trades.{{only|bedrock}}
Novice-level librarian villagers have a {{frac|2|3}} chance to sell 1 bookshelf for 9 emeralds.{{only|java}}
== Usage ==
=== Enchanting ===
{{main|Enchantment mechanics#Bookshelf placement}}
If an [[enchanting table]] is placed near a bookshelf, glyph [[particles]] fly from the bookshelf toward the enchanting table. Having bookshelves in the proper position near the table allows the table to apply higher-level enchantments.
=== Crafting ingredient ===
{{crafting usage}}
=== Fuel ===
Bookshelves can be used as a [[fuel]] in [[furnace]]s, smelting 1.5 items per block.
=== Villager ===
Librarian [[villager]]s can interact with bookshelves.
=== Note Blocks ===
Bookshelf can be placed under [[note block]]s to produce "bass" sounds.
== Sounds ==
{{Sound table/Block/Wood}}
== Data values ==
=== ID ===
{{edition|java}}:
{{ID table
|edition=java
|showforms=y
|generatetranslationkeys=y
|displayname=Bookshelf
|spritetype=block
|nameid=bookshelf
|showblocktags=y|blocktags=mineable/axe
|foot=1}}
{{edition|bedrock}}:
{{ID table
|edition=bedrock
|shownumericids=y
|showforms=y
|generatetranslationkeys=y
|displayname=Bookshelf
|spritetype=block
|nameid=bookshelf
|id=47
|foot=1}}
== Achievements ==
{{load achievements|Librarian}}
== History ==
{{History|java classic}}
{{History||October 24, 2009|link=https://notch.tumblr.com/post/221308991/the-new-block-types-and-new-graphics-for-the-gold|Bookshelves were teased by [[Notch]].}}
{{History||0.26 SURVIVAL TEST|[[File:Bookshelf JE1.png|32px]] Added bookshelves.
|Bookshelves are currently impossible to obtain without loading a pre-edited map.
|Bookshelves are currently destroyed in [[explosion]]s.
|When bookshelves are broken, they currently do not drop anything.}}
{{History||0.28|Bookshelves can now be freely placed.}}
{{History|java alpha}}
{{History||v1.0.11|Bookshelves can now be [[crafting|crafted]] from 3 [[book]]s and 6 [[planks]].}}
{{History|java beta}}
{{History||1.8|snap=Pre-release|Bookshelves can now be found generated in libraries in [[village]]s, and libraries in [[stronghold]]s.}}
{{History|java}}
{{History||1.0.0|snap=Beta 1.9 Prerelease 3|Bookshelves now drop 3 [[book]]s when broken by a non-[[Silk Touch]] [[item]].
|They are now necessary to [[enchanting|enchant]] with higher levels for better enchanted items.
|The number of bookshelves required to reach the maximum enchantment level is 30.}}
{{History|||snap=Beta 1.9 Prerelease 5|[[File:Bookshelf JE2 BE1.png|32px]] The top texture of bookshelves have now been updated as a result of the [[planks]] texture update.}}
{{History||1.2.4|snap=release|[[Spruce planks]], [[birch planks]], and [[jungle planks]] can now be used to craft bookshelves.}}
{{History||1.3.1|snap=12w21a|Librarian [[villager]]s now [[trading|sell]] 1 bookshelf for 3 [[emerald]]s.}}
{{History|||snap=12w22a|The number of bookshelves required to reach the maximum enchantment level has been now decreased to 15.}}
{{History||1.7.2|snap=1.7.1|[[Acacia planks]] and [[dark oak planks]] can now be used to craft bookshelves.}}
{{History||1.8|snap=14w02a|Librarian villagers now sell 1 bookshelf for 3–4 [[emerald]]s.}}
{{History||1.11|snap=16w39a|Bookshelves now generate in [[woodland mansion]]s.}}
{{History||1.13|snap=17w47a|Prior to [[1.13/Flattening|''The Flattening'']], this [[block]]'s numeral ID was 47.}}
{{History||1.14|snap=18w43a|[[File:Bookshelf JE3.png|32px]] The texture of bookshelves has now been changed.}}
{{History|||snap=18w47a|[[File:Bookshelf JE4 BE2.png|32px]] The texture of bookshelves has now been changed, once again.}}
{{History|||snap=19w02a|Bookshelves can now be used to craft [[lectern]]s.}}
{{History||1.16|snap=20w06a|[[Crimson planks]] and [[warped planks]] can now be used to craft bookshelves.}}
{{History||1.19|snap=22w11a|[[Mangrove planks]] can now be used to craft bookshelves.}}
{{History|pocket alpha}}
{{History||v0.2.1|[[File:Bookshelf JE2 BE1.png|32px]] Added bookshelves.|Bookshelves are currently obtainable only in [[Creative]] mode.}}
{{History||v0.3.0|Bookshelves are now obtainable in [[Survival]] mode.}}
{{History||v0.9.0|snap=build 1|Bookshelves now naturally spawn in [[stronghold]]s and [[village]]s.}}
{{History||v0.12.1|snap=build 1|Bookshelves can now be used to increase [[enchantment table]] levels.|Bookshelves can now be obtained by using a [[tool]] with the [[Silk Touch]] enchantment.}}
{{History|pocket}}
{{History||1.0.4|snap=alpha 1.0.4.0|Librarian [[villager]]s now [[trading|sell]] 1 bookshelf for 3-4 [[emerald]]s as their second tier trade.}}
{{History||1.1.0|snap=alpha 1.1.0.0|Bookshelves now generate in [[woodland mansion]]s.}}
{{History|bedrock}}
{{History||1.10.0|snap=beta 1.10.0.3|Bookshelves can now be used to craft [[lectern]]s.|Bookshelves now get inspected by librarian [[villager]]s.|[[File:Bookshelf JE4 BE2.png|32px]] The texture of bookshelves has been changed.}}
{{History||1.11.0|snap=beta 1.11.0.4|[[Trading]] has now been changed, librarian villagers now have a 50% chance to sell a bookshelf for 6 [[emerald]]s as part of their first trade.}}
{{History|console}}
{{History||xbox=TU1|xbone=CU1|ps=1.00|wiiu=Patch 1|switch=1.0.1|[[File:Bookshelf JE2 BE1.png|32px]] Added bookshelves. Whether they actually used this texture is unknown.}}
{{History||xbox=none|xbone=none|ps=1.90|wiiu=none|switch=none|[[File:Bookshelf JE4 BE2.png|32px]] The texture of bookshelves has been changed.}}
{{History|new 3ds}}
{{History||0.1.0|[[File:Bookshelf JE2 BE1.png|32px]] Added bookshelves.}}
{{History|foot}}
== Issues ==
{{Issue list}}
== Trivia ==
* Bookshelves' top and bottom textures by default use the same texture as [[oak planks]].
* It takes 90 planks, 45 [[leather]] and 135 [[paper]] to make 15 bookshelves in order to get a level 30 [[enchantment]].
* A bookshelf is the icon for [[Education Edition]].
== Gallery ==
<gallery>
File:Library in Village.png|Naturally occurring bookshelves in a [[village]]. (Before Village & Pillage).
File:Large Stronghold Library.png|Naturally occurring bookshelves in a [[stronghold]].
File:Achievement get! Trading emeralds for bookshelves.png|Bookshelves obtained by [[trading]] with a [[villager]].
File:Enchanting-Table.png|Bookshelves powering an [[enchanting table]].
</gallery>
== References ==
{{Reflist}}
== External Links ==
*[https://www.minecraft.net/en-us/article/block-week-bookshelf Block of the Week: Bookshelf] – Minecraft.net on December 16, 2016
{{Blocks|Building}}
[[Category:Manufactured blocks]]
[[Category:Natural blocks]]
[[Category:Generated structure blocks]]
[[Category:Utility blocks]]
[[Category:Bedrock Edition]]
[[Category:Java Edition]]
[[Category:Items]]
[[Category:Flammable blocks]]
[[cs:Knihovna]]
[[de:Bücherregal]]
[[es:Librería]]
[[fr:Bibliothèque]]
[[hu:Könyvespolc]]
[[it:Libreria]]
[[ja:本棚]]
[[ko:책장]]
[[nl:Boekenkast]]
[[pl:Biblioteczka]]
[[pt:Estante de livros]]
[[ru:Книжные полки]]
[[th:ชั้นหนังสือ]]
[[uk:Книжкова полиця]]
[[zh:书架]]</li><li>[[Banner|Banner]]<br/>{{for|the image|Banner (image)}}
{{Block
| image = <gallery>
White Banner.gif | Banner
White Wall Banner.png | Wall Banner
</gallery>
| rarity = Common
| transparent = Yes
| light = No
| tool = axe
| renewable = Yes
| stackable = Yes (16)
| flammable = No
| lavasusceptible = Yes
}}
'''Banners''' are tall decorative [[blocks]], featuring a field that is highly customizable using [[dye]]s and [[banner pattern]]s.
== Obtaining ==
=== Breaking ===
Banners can be broken with or without a [[tool]], but an [[axe]] is fastest.
{{breaking row|horizontal=1|Banners|Axe}}
A banner also breaks and drops itself as an [[Item (entity)|item]] if the block the banner is attached to is moved, removed, or destroyed.
=== Natural generation ===
{| class="wikitable collapsible"
! Name !! Location !! Appearance !! Design
|-
! Magenta Banner
| Outside of [[end cities]].
| style="text-align: center" | [[File:End City Banner.png|32px]]
| Magenta Banner
* Black Inverted Chevron
* Black Chevron
|-
! Gray Banner
| In banner room in [[woodland mansion]]s.
| style="text-align: center" | [[File:Gray Banner.png|32px]]
| Gray Banner
|-
! Light Gray Banner
| In master bedroom in [[woodland mansion]]s.
| style="text-align: center" | [[File:Master Bedroom Banner.png|32px]]
| Light Gray Banner
* White Flower Charge
|- id="Ominous Banner"
! Ominous Banner{{only|java|short=1}}
Illager Banner{{only|bedrock|education|short=1}}
| Carried by [[raid captain]]s.<br> Located in [[pillager outpost]]s.
{{IN|java}}, the ominous banner cannot be crafted or copied because the design uses 8 patterns.
{{IN|bedrock}}, the illager banner is a separate type that cannot be placed in a loom.
| style="text-align: center" | [[File:Ominous Banner.png|32px]]<br/>[[File:Ominous Banner BE.png|32px]]
| White Banner{{only|java|short=1}}
* Cyan Lozenge
* Light Gray Base
* Gray Pale
* Light Gray Bordure
* Black Fess
* Light Gray Per Fess
* Light Gray Roundel
* Black Bordure
Separate type entirely{{only|bedrock|short=1}}
|-
! Brown Banner
| Outside of some houses, meeting points, and pillar fountains in savanna [[village]]s.
| style="text-align: center" | [[File:Brown Banner.png|32px]]
| Brown Banner
|-
! Black Banner
| In altar room in [[woodland mansions]].
| style="text-align: center" | [[File:Black Banner.png|32px]]
| Black Banner
|}
=== Crafting ===
Banners can be crafted from six [[wool]] and a [[stick]] in a pattern resembling a [[sign]].
{{Crafting
|head=1
|showdescription=1
|A1=Matching Wool |B1=Matching Wool |C1=Matching Wool
|A2=Matching Wool |B2=Matching Wool |C2=Matching Wool
|B3=Stick
|Output=Matching Banner
|Olink=Banner
|type=Decoration block
|description=Once the banner is crafted, its base color cannot be changed.{{only|java}}
}}
{{Crafting
|showdescription=1
|Any Banner
|Bleach
|Output=White Banner
|type=Decoration block
|description=Bleach can be used to remove the color of a banner, resulting in a white banner. This includes removing patterns from a white banner.{{only|bedrock|education}}
|foot=1
}}
=== Trading ===
Expert-level cartographer [[villager]]s always offer to [[trading|sell]] 1 or 2 blank banners of a random color for 3 [[emeralds]]. Expert-level shepherd villagers have a {{frac|2|7}} chance of offering the same trade.{{only|java}}
{{IN|bedrock}}, expert-level cartographer and shepherd villagers both offer to sell one of 16 blank banners for 3 emeralds as part of their trades.
=== Mob loot ===
[[Illager]]s that spawn carrying an ominous banner{{only|java|short=1}} / illager banner{{only|bedrock|education|short=1}} always drop it upon death.
== Usage ==
[[File:Standing banner with block.png|thumb|upright|Overlapping block on a banner.]]
[[File:Wall banner with block.png|thumb|upright|Overlapping on a wall mounted banner.]]
There are 16 colored blank banners, and numerous patterns each available in each of the 16 colors. A banner can feature up to 6 different patterns. The top layer of a banner (or the last pattern added) can be washed off by {{control|using}} it on a [[cauldron]] containing water.
Banners, much like signs, can be placed both on the ground facing in any direction, or on a wall. They gently sway as if affected by a breeze, regardless of dimension or location.
Banners have no collision mask as they are completely non-solid, so [[entities]] can move through them.
Other blocks (including other banners) can be placed on any edge of a banner's hitbox, which is only one block high despite the banner appearing as two blocks tall. This makes it possible to overlap another solid block on the top half of a banner for floor banners, or the bottom half of wall banners.
When a banner is placed on the side of a block, its position is set by the top block, and it is possible to place it so it appears half buried.
Banners can also be placed in [[item frame]]s, where they simply appear as their item model.
[[Water]] and [[lava]] flow around banners. {{IN|bedrock}}, banners can be [[waterlogged]].
<gallery>
File:Wall banner with water below.png| Water can be placed below wall banners
File:Water flowing around banner.png| Water flows around a banner on the ground
</gallery>
Lava can create [[fire]] in air blocks next to banners as if the banners were flammable, but the banners do not burn (and cannot be burned by other methods). Banners also cannot be moved by [[piston]]s.
If a banner is renamed on an [[anvil]], it retains its name when a pattern is added, but not when a pattern is removed.
=== Helmet ===
{{exclusive|java|section=13}}
While a banner cannot be equipped in the [[Helmet|head slot]] in [[Survival]] mode, equipping it using commands causes it to appear on top of the player. This is how [[raid captain]]s wear banners{{only|java|short=1}}.
=== Chestplate ===
{{exclusive|bedrock|section=13}}
While a banner cannot be equipped in the [[chestplate]] slot in Survival mode, equipping it using NBT editors causes it to appear on top of the player. This is how [[raid captain]]s wear banners{{only|bedrock|education|short=1}}.
<gallery>
Steve wearing White Banner.png|
Alex wearing White Banner.png|
Pillager with Ominous Banner.png|
Vindicator with Ominous Banner.png|
Evoker with Ominous Banner.png|Illusioner with Ominous Banner.png|
</gallery>
=== Crafting ingredient ===
[[Shield]]s can have patterns applied to them using banners. The shield pattern has a smaller resolution than the banner pattern, causing them to look different or offset. Banners that have more than six patterns, such as Ominous Banners or banners obtained through inventory editors, will be reduced to six patterns on the shield.
{{Crafting
|showdescription=1
|Shield
|Matching Banner; Ominous Banner
|Output=Matching Shield; Ominous Shield
|B2link=Banner
|type=Combat
|description=Applies the banner pattern to the shield. The banner is consumed.<br>The shield must have no pre-existing patterns.<br>Does not change existing durability or enchantments on the shield.
}}
=== Copying ===
Banners can be copied with a blank banner to make multiple identical banners. Banners with more than 6 patterns applied using commands cannot be copied in this manner.
{{Crafting
|showdescription=1
|Matching Banner
|Matching Banner
|Output=Matching Banner
|A2link=Banner
|B2link=Banner
|Olink=Banner
|type=Decoration block
|ignoreusage=1
|description=Copies pattern; both banners must have the same base color, and the one having a pattern copied onto it must have no preexisting pattern.
}}
=== Map marker ===
[[File:Banner marked map.png|alt=All banners marked on a map, alongside a named banner.|thumb|right|How every banner appears {{IN|java}} on a map, including named banners.]]
{{exclusive|java|section=13}}
{{IN|java}}, {{control|using}} on a standing banner with a [[map]] selected places a marker of the banner's position on the selected map, and {{control|using}} on the banner again removes the marker. Note that wall banners cannot serve as map markers. The marker has the same color as the banner's base without decorations. The marker is removed if the banner is destroyed unless the map is locked using a [[cartography table]]. If the banner is renamed, the name appears below the marker.
=== Patterns ===
{{see also|Banner/Patterns|title1=List of patterned banners}}
[[File:Spawned-in Banner.png|thumb|100px|Example of a banner with more than 6 patterns, a result of using the {{cmd|give}} command.]]
A banner may have up to six layers of patterns, which are overlaid with the last-crafted on top. A banner can have up to 16 layers of patterns with the use of commands. The total number of unique banners is approximately 2.3x10^16 (or 23 quadrillion).
Any color banner can be used; the pattern overlays the color. {{IN|java}}, a [[loom]] is used to make patterns. However, {{in|bedrock}}, the patterns can be made in a [[loom]] or a [[crafting table]].
A banner can have more than six layers of patterns through the commands <code>/[[Commands/give|give]]</code>, <code>/[[Commands/setblock|setblock]]</code> or <code>/[[Commands/fill|fill]]</code>. This only works in ''Java Edition'', as Bedrock Edition doesn't have any NBT commands. Here is an example of a mining banner with seven different patterns. There is specific codes for the [[Banner#Item data:~:text=white-,Item,-In Java Edition|colors]] and [[Banner/Patterns|patterns]] that you have to input.
<code><nowiki>/give @p white_banner{display:{Name:"\"Mining Industries Banner\""},BlockEntityTag:{Patterns:[{Pattern:"cr",Color:15},{Pattern:"bs",Color:15},{Pattern:"sc",Color:12},{Pattern:"ms",Color:0},{Pattern:"hh",Color:15},{Pattern:"bo",Color:15},{Pattern:"tts",Color:8}]}} 1</code>
{{LoadPage|Template:Banner pattern loom recipes|Loom recipes|h4}}
{{LoadPage|Banner/Banner pattern crafting recipes|Crafting recipes|h4|transcluded=1}}
=== Renaming ===
{{IN|java}}, a banner can be given a custom name that remains as the banner is placed and retrieved. The player can use an [[anvil]] to rename the banner item, or may change the <code>CustomName</code> tag using the {{cmd|data}} command on the banner block.
=== Fuel ===
Banners can be used as a fuel in [[furnace]]s, smelting 1.5 items per banner.
=== Note Blocks ===
Banners can be placed under [[note block]]s to produce "bass" sounds.
== Sounds ==
=== Generic ===
{{Sound table/Block/Wood}}
=== Unique ===
{{edition|java}}: ''None''
{{edition|bedrock}}:
{{Sound table
|type=bedrock
|sound=Water Splash Old.ogg
|source=block
|description=When all patterns are removed from a banner using a cauldron
|id=cauldron.cleanbanner
|volume=0.1
|pitch=1.0
|foot=1}}
== Data values ==
=== ID ===
{{edition|java}}:
{{ID table
|edition=java
|showblocktags=y
|showitemtags=y
|showforms=y
|generatetranslationkeys=y
|displayname=White Banner
|spritetype=block
|nameid=white_banner
|blocktags=banners, wall_post_override
|itemtags=banners
|translationkey=block.minecraft.white_banner,block.minecraft.ominous_banner
}}
{{ID table
|displayname=Orange Banner
|spritetype=block
|nameid=orange_banner
|blocktags=banners, wall_post_override
|itemtags=banners}}
{{ID table
|displayname=Magenta Banner
|spritetype=block
|nameid=magenta_banner
|blocktags=banners, wall_post_override
|itemtags=banners}}
{{ID table
|displayname=Light Blue Banner
|spritetype=block
|nameid=light_blue_banner
|blocktags=banners, wall_post_override
|itemtags=banners}}
{{ID table
|displayname=Yellow Banner
|spritetype=block
|nameid=yellow_banner
|blocktags=banners, wall_post_override
|itemtags=banners}}
{{ID table
|displayname=Lime Banner
|spritetype=block
|nameid=lime_banner
|blocktags=banners, wall_post_override
|itemtags=banners}}
{{ID table
|displayname=Pink Banner
|spritetype=block
|nameid=pink_banner
|blocktags=banners, wall_post_override
|itemtags=banners}}
{{ID table
|displayname=Gray Banner
|spritetype=block
|nameid=gray_banner
|blocktags=banners, wall_post_override
|itemtags=banners}}
{{ID table
|displayname=Light Gray Banner
|spritetype=block
|nameid=light_gray_banner
|blocktags=banners, wall_post_override
|itemtags=banners}}
{{ID table
|displayname=Cyan Banner
|spritetype=block
|nameid=cyan_banner
|blocktags=banners, wall_post_override
|itemtags=banners}}
{{ID table
|displayname=Purple Banner
|spritetype=block
|nameid=purple_banner
|blocktags=banners, wall_post_override
|itemtags=banners}}
{{ID table
|displayname=Blue Banner
|spritetype=block
|nameid=blue_banner
|blocktags=banners, wall_post_override
|itemtags=banners}}
{{ID table
|displayname=Brown Banner
|spritetype=block
|nameid=brown_banner
|blocktags=banners, wall_post_override
|itemtags=banners}}
{{ID table
|displayname=Green Banner
|spritetype=block
|nameid=green_banner
|blocktags=banners, wall_post_override
|itemtags=banners}}
{{ID table
|displayname=Red Banner
|spritetype=block
|nameid=red_banner
|blocktags=banners, wall_post_override
|itemtags=banners}}
{{ID table
|displayname=Black Banner
|spritetype=block
|nameid=black_banner
|blocktags=banners, wall_post_override
|itemtags=banners}}
{{ID table
|displayname=White Wall Banner
|spritetype=block
|nameid=white_wall_banner
|blocktags=banners, wall_post_override
|form=block
|translationkey=block.minecraft.white_banner,block.minecraft.ominous_banner}}
{{ID table
|displayname=Orange Wall Banner
|spritetype=block
|nameid=orange_wall_banner
|blocktags=banners, wall_post_override
|form=block
|translationkey=block.minecraft.orange_banner}}
{{ID table
|displayname=Magenta Wall Banner
|spritetype=block
|nameid=magenta_wall_banner
|blocktags=banners, wall_post_override
|form=block
|translationkey=block.minecraft.magenta_banner}}
{{ID table
|displayname=Light Blue Wall Banner
|spritetype=block
|nameid=light_blue_wall_banner
|blocktags=banners, wall_post_override
|form=block
|translationkey=block.minecraft.light_blue_banner}}
{{ID table
|displayname=Yellow Wall Banner
|spritetype=block
|nameid=yellow_wall_banner
|blocktags=banners, wall_post_override
|form=block
|translationkey=block.minecraft.yellow_banner}}
{{ID table
|displayname=Lime Wall Banner
|spritetype=block
|nameid=lime_wall_banner
|blocktags=banners, wall_post_override
|form=block
|translationkey=block.minecraft.lime_banner}}
{{ID table
|displayname=Pink Wall Banner
|spritetype=block
|nameid=pink_wall_banner
|blocktags=banners, wall_post_override
|form=block
|translationkey=block.minecraft.pink_banner}}
{{ID table
|displayname=Gray Wall Banner
|spritetype=block
|nameid=gray_wall_banner
|blocktags=banners, wall_post_override
|form=block
|translationkey=block.minecraft.gray_banner}}
{{ID table
|displayname=Light Gray Wall Banner
|spritetype=block
|nameid=light_gray_wall_banner
|blocktags=banners, wall_post_override
|form=block
|translationkey=block.minecraft.light_gray_banner}}
{{ID table
|displayname=Cyan Wall Banner
|spritetype=block
|nameid=cyan_wall_banner
|blocktags=banners, wall_post_override
|form=block
|translationkey=block.minecraft.cyan_banner}}
{{ID table
|displayname=Purple Wall Banner
|spritetype=block
|nameid=purple_wall_banner
|blocktags=banners, wall_post_override
|form=block
|translationkey=block.minecraft.purple_banner}}
{{ID table
|displayname=Blue Wall Banner
|spritetype=block
|nameid=blue_wall_banner
|blocktags=banners, wall_post_override
|form=block
|translationkey=block.minecraft.blue_banner}}
{{ID table
|displayname=Brown Wall Banner
|spritetype=block
|nameid=brown_wall_banner
|blocktags=banners, wall_post_override
|form=block
|translationkey=block.minecraft.brown_banner}}
{{ID table
|displayname=Green Wall Banner
|spritetype=block
|nameid=green_wall_banner
|blocktags=banners, wall_post_override
|form=block
|translationkey=block.minecraft.green_banner}}
{{ID table
|displayname=Red Wall Banner
|spritetype=block
|nameid=red_wall_banner
|blocktags=banners, wall_post_override
|form=block
|translationkey=block.minecraft.red_banner}}
{{ID table
|displayname=Black Wall Banner
|spritetype=block
|nameid=black_wall_banner
|blocktags=banners, wall_post_override
|form=block
|translationkey=block.minecraft.black_banner
|foot=1}}
{{ID table
|displayname=Block entity
|spritename=Banners
|spritetype=block
|nameid=banner
|foot=1}}
{{edition|bedrock}}:
{{ID table
|edition=bedrock
|firstcolumnname=Banner
|shownumericids=y
|showforms=y
|generatetranslationkeys=y
|displayname=Standing
|spritename=Banners
|spritetype=block
|nameid=standing_banner
|translationkey=tile.standing_banner.black.name, tile.standing_banner.red.name, tile.standing_banner.green.name, tile.standing_banner.brown.name, tile.standing_banner.blue.name, tile.standing_banner.purple.name, tile.standing_banner.cyan.name, tile.standing_banner.silver.name, tile.standing_banner.gray.name, tile.standing_banner.pink.name, tile.standing_banner.lime.name, tile.standing_banner.yellow.name, tile.standing_banner.lightBlue.name, tile.standing_banner.magenta.name, tile.standing_banner.orange.name, tile.standing_banner.white.name
|id=176
|form=block}}
{{ID table
|displayname=Wall
|spritename=Banners
|spritetype=block
|nameid=wall_banner
|id=177
|form=block
|translationkey=-}}
{{ID table
|displayname=Item
|spritename=Banners
|spritetype=item
|nameid=banner
|translationkey=item.banner.black.name, item.banner.red.name, item.banner.green.name, item.banner.brown.name, item.banner.blue.name, item.banner.purple.name, item.banner.cyan.name, item.banner.silver.name, item.banner.gray.name, item.banner.pink.name, item.banner.lime.name, item.banner.yellow.name, item.banner.lightBlue.name, item.banner.magenta.name, item.banner.orange.name, item.banner.white.name
|id=567
|form=item
|foot=1}}
{{ID table
|notnamespaced=y
|displayname=Block entity
|spritename=Banners
|spritetype=block
|nameid=Banner
|foot=1}}
=== Metadata ===
==== Item ====
{{IN|Bedrock}}, banner items use the following data values:
{| class="wikitable"
! DV !! Banner color
|-
|| 0 || black
|-
|| 1 || red
|-
|| 2 || green
|-
|| 3 || brown
|-
|| 4 || blue
|-
|| 5 || purple
|-
|| 6 || cyan
|-
|| 7 || light gray
|-
|| 8 || gray
|-
|| 9 || pink
|-
|| 10 || lime
|-
|| 11 || yellow
|-
|| 12 || light blue
|-
|| 13 || magenta
|-
|| 14 || orange
|-
|| 15 || white
|}
=== Item ===
{{IN|Java}}, banner items use the following data values:
{| class="wikitable"
! DV !! Banner color
|-
|| 15 || black
|-
|| 14 || red
|-
|| 13 || green
|-
|| 12 || brown
|-
|| 11 || blue
|-
|| 10 || purple
|-
|| 9 || cyan
|-
|| 8 || light gray
|-
|| 7 || gray
|-
|| 6 || pink
|-
|| 5 || lime
|-
|| 4 || yellow
|-
|| 3 || light blue
|-
|| 2 || magenta
|-
|| 1 || orange
|-
|| 0 || white
|}
=== Block states ===
{{see also|Block states}}
{{/BS}}
=== Block data ===
A banner has a block entity associated with it that holds additional data about the block.
{{el|bedrock}}:
: See [[Bedrock Edition level format/Block entity format]].
{{el|java}}:
{{see also|Block entity format}}
{{/BE}}
=== Item data ===
{{el|java}}:
{{main|Player.dat format}}
Banners, as items, use an NBT tag <code>BlockEntityTag</code> to indicate the patterns and details when it is placed.
<div class="treeview" style="margin-top: 0;">
* {{nbt|compound|Item}}: The item
** {{nbt|compound|tag}}: Additional information about the item. This tag is optional for most items.
*** {{nbt|compound|BlockEntityTag}}: The details of the shulker box.
**** All block data, except tags common to all block entities.
</div>
{{el|bedrock}}:
: See [[Bedrock Edition level format/Item format]].
== Achievements ==
{{load achievements|Fruit on the Loom}}
== Advancements ==
{{load advancements|Voluntary Exile}}
== History ==
{{info needed section|The Nether Update}}
{{History|java}}
{{History||1.8|snap=July 21, 2014|slink=https://twitter.com/jeb_/status/491238882789572608|[[Jeb]] posted a picture of banners, and stated that he is working on them.}}
{{History|||snap=14w30a|[[File:White Banner Revision 1.png|22px]][[File:Light Gray Banner Revision 1.png|22px]][[File:Gray Banner Revision 1.png|22px]][[File:Black Banner Revision 1.png|22px]][[File:Brown Banner Revision 1.png|22px]][[File:Red Banner Revision 1.png|22px]][[File:Orange Banner Revision 1.png|22px]][[File:Yellow Banner Revision 1.png|22px]][[File:Lime Banner Revision 1.png|22px]][[File:Green Banner Revision 1.png|22px]][[File:Cyan Banner Revision 1.png|22px]][[File:Light Blue Banner Revision 1.png|22px]][[File:Blue Banner Revision 1.png|22px]][[File:Purple Banner Revision 1.png|22px]][[File:Magenta Banner Revision 1.png|22px]][[File:Pink Banner Revision 1.png|22px]] Added banners.}}
{{History|||snap=14w30c|Added four additional patterns: Cross (+), Border, Curly Border and Thing (Mojang logo).}}
{{History|||snap=14w31a|Added two additional patterns: Inverted Halves and Base Gradient.
|The banner pattern terminology has been changed based on vexillology advice [[Jeb]] received from [http://www.reddit.com/r/Minecraft/comments/2bkxej/i_made_a_huge_mistake_banners/ his Reddit post].
|Banners can now be used as a [[fuel]] in [[furnace]]s.}}
{{History||1.8.8|snap=pre|The number of layers attainable by using [[commands]] is now limited to 16 per banner.}}
{{History||1.9|snap=15w31a|[[File:End City Banner.png|17px]] Magenta banners with a black chevron and inverted chevron are now naturally generated on the outside walls of [[end city|end cities]].}}
{{History|||snap=15w33c|Banners can be used to apply patterns to [[shield]]s.}}
{{History||1.11|snap=16w33a|Banners now require a [[dye]] when applying a pattern that uses a non-dye [[item]], such as a [[mob head|creeper head]] or [[golden apple|enchanted golden apple]]. Previously, the lack of a dye would have applied the black variant of the pattern.}}
{{History|||snap=16w39a|Black and gray banners, and light gray banners with a white flower charge are now naturally generated in rooms of [[woodland mansion]]s.}}
{{History||1.12|snap=January 24, 2017|slink={{tweet|jeb_|823817090511601664}}|[[Jeb]] tweets a screenshot of the changes to the banner color palette.}}
{{History|||snap=17w06a|[[File:White Banner.png|17px]] [[File:Light Gray Banner.png|17px]] [[File:Gray Banner.png|17px]] [[File:Black Banner.png|17px]] [[File:Brown Banner.png|17px]] [[File:Red Banner.png|17px]] [[File:Orange Banner.png|17px]] [[File:Yellow Banner.png|17px]] [[File:Lime Banner.png|17px]] [[File:Green Banner.png|17px]] [[File:Cyan Banner.png|17px]] [[File:Light Blue Banner.png|17px]] [[File:Blue Banner.png|17px]] [[File:Purple Banner.png|17px]] [[File:Magenta Banner.png|17px]] [[File:Pink Banner.png|17px]] Changed banners' [[tint]]s.}}
{{History|||snap=pre6|"Chief fess" and "base fess" banners are now just "chief" and "base" banners.}}
{{History||1.13|snap=17w47a|The colors for the <code>banner</code>, <code>wall_banner</code> and <code>standing_banner</code> ID have been split up into their own IDs.
|Prior to [[1.13/Flattening|''The Flattening'']], these [[block]]s' numeral IDs were 176 and 177, and the [[item]]'s 425.}}
{{History|||snap=18w10a|{{control|Using}} a [[map]] on a banner now mark the spot of the banner on the map.}}
{{History||1.14|snap=18w43a|[[Loom]]s have been added to help the [[player]] edit banners more easily.
|All recipes for banner patterns have been removed.}}
{{History|||snap=18w45a|[[File:Ominous Banner Revision 1.png|17px]] Added [[illager patrol]]s, where the leader of an illager patrol carries an [[illager]] banner.}}
{{History|||snap=18w46a|[[File:Ominous Banner.png|17px]] The pattern of [[illager]] banner now has a black border.}}
{{History|||snap=19w11a|Cartographer and shepherd [[villager]]s now [[trading|sell]] banners.}}
{{History|||snap=Pre-Release 2|"Illager Banners" have been renamed to "Ominous Banners".}}
{{History||1.17|snap=20w46a|The unused "base" pattern has been renamed to the "field" pattern and given proper translation strings (its ID is still "base").}}
{{History||1.19.3|snap=22w43a|The ominous banner is now available in the Creative inventory.}}
{{History|bedrock}}
{{History||1.2.0|snap=beta 1.2.0.2|[[File:White Banner.png|17px]] [[File:Light Gray Banner.png|17px]] [[File:Gray Banner.png|17px]] [[File:Black Banner.png|17px]] [[File:Brown Banner.png|17px]] [[File:Red Banner.png|17px]] [[File:Orange Banner.png|17px]] [[File:Yellow Banner.png|17px]] [[File:Lime Banner.png|17px]] [[File:Green Banner.png|17px]] [[File:Cyan Banner.png|17px]] [[File:Light Blue Banner.png|17px]] [[File:Blue Banner.png|17px]] [[File:Purple Banner.png|17px]] [[File:Magenta Banner.png|17px]] [[File:Pink Banner.png|17px]] Added banners.
|[[File:End City Banner.png|17px]] Magenta banners with a black chevron and inverted chevron are now naturally generated on the outside walls of [[end city|end cities]].
|Black and gray banners, and light gray banners with a white flower charge are now naturally generated in rooms of [[woodland mansion]]s.}}
{{History||1.4.0|snap=beta 1.2.20.1|The white banner can now be crafted from a colored banner and [[bleach]], which also removes all patterns, if used on a white banner.}}
{{History||1.10.0|snap=beta 1.10.0.3|[[Loom]]s have been added to help the [[player]] edit banners more easily.
|Brown banners now generate in new [[savanna]] [[village]]s.
|Black banners now generate in [[pillager outpost]] watchtowers.}}
{{History||1.11.0|snap=beta 1.11.0.1|Gray banners now generate in pillager outpost watchtowers, instead of black banners.
|[[File:Ominous Banner BE.png|17px]] Added [[illager captain]]s, which drop an [[illager]] banner upon [[death]].}}
{{History|||snap=beta 1.11.0.3|Illager banners now generate in [[pillager outpost]] watchtowers, instead of gray banners.}}
{{History|||snap=beta 1.11.0.4|Banners can now be [[trading|bought]] from cartographer and shepherd [[villager]]s.}}
{{History||1.20.0|snap=beta 1.20.0.20|Banners can now be used to customise [[shield]]s.}}
{{History|console}}
{{History||xbox=TU43|xbone=CU33|ps=1.36|wiiu=Patch 13|switch=1.0.1|[[File:White Banner Revision 1.png|22px]][[File:Light Gray Banner Revision 1.png|22px]][[File:Gray Banner Revision 1.png|22px]][[File:Black Banner Revision 1.png|22px]][[File:Brown Banner Revision 1.png|22px]][[File:Red Banner Revision 1.png|22px]][[File:Orange Banner Revision 1.png|22px]][[File:Yellow Banner Revision 1.png|22px]][[File:Lime Banner Revision 1.png|22px]][[File:Green Banner Revision 1.png|22px]][[File:Cyan Banner Revision 1.png|22px]][[File:Light Blue Banner Revision 1.png|22px]][[File:Blue Banner Revision 1.png|22px]][[File:Purple Banner Revision 1.png|22px]][[File:Magenta Banner Revision 1.png|22px]][[File:Pink Banner Revision 1.png|22px]] Added banners.}}
{{History||xbox=TU46|xbone=CU36|ps=1.38|wiiu=Patch 15|switch=1.0.1|[[File:End City Banner.png|17px]] Magenta banners with a black chevron and inverted chevron are now naturally generated on the outside walls of [[end city|end cities]].}}
{{History||xbox=TU53|xbone=CU43|ps=1.49|wiiu=Patch 23|switch=1.0.3|[[File:White Banner.png|17px]] [[File:Light Gray Banner.png|17px]] [[File:Gray Banner.png|17px]] [[File:Black Banner.png|17px]] [[File:Brown Banner.png|17px]] [[File:Red Banner.png|17px]] [[File:Orange Banner.png|17px]] [[File:Yellow Banner.png|17px]] [[File:Lime Banner.png|17px]] [[File:Green Banner.png|17px]] [[File:Cyan Banner.png|17px]] [[File:Light Blue Banner.png|17px]] [[File:Blue Banner.png|17px]] [[File:Purple Banner.png|17px]] [[File:Magenta Banner.png|17px]] [[File:Pink Banner.png|17px]] Changed banners' [[tint]]s.}}
{{History||xbox=none|xbone=none|ps=1.90|wiiu=none|switch=none|[[Loom]]s have been added to help the [[player]] edit banners more easily.}}
{{History||ps=1.91|[[File:Ominous Banner BE.png|17px]] Added [[illager]] banners, which generate with [[pillager outpost]]s and are [[drops|dropped]] by [[illager captain]]s upon [[death]].}}
{{History|foot}}
== Issues ==
{{issue list}}
== Trivia ==
* With 16 blank banners, 38 patterns of 16 colors each (608 uniquely-colored patterns), and 0 to 6 patterns per banner, the number of uniquely crafted banners is 16 × (608<sup>0</sup> + 608<sup>1</sup> + 608<sup>2</sup> + 608<sup>3</sup> + 608<sup>4</sup> + 608<sup>5</sup> + 608<sup>6</sup>) ≈ 809 quadrillion - 809 with 15 zeros (809,573,616,779,945,488). The number of visually distinct banners is smaller, because one or more patterns may completely cover other patterns, or the entire banner, or be duplicated due to the symmetric set of patterns (e.g. field or (yellow) + per pale azure (blue) = field azure + per pale or inverted).
** Not 38 patterns are available on BE, but 40 patterns of 16 colors each (640 uniquely-colored patterns), so the number is even greater. 16 × (640<sup>0</sup> + 640<sup>1</sup> + 640<sup>2</sup> + 640<sup>3</sup> + 640<sup>4</sup> + 640<sup>5</sup> + 640<sup>6</sup>) ≈ 1 quintillion - 1 with 18 zeros (1,101,232,303,249,827,856). This increases the number by almost 1.4 times, or almost 292 quadrillion, despite the addition of only 2 patterns.
* If a banner has over 6 patterns, only the six bottom-most patterns are displayed when hovered over in the [[inventory]].
* The Mojang logo is called "Thing" in-game, which could be considered an alternate translation for [[wiktionary:mojäng|mojäng]]. If [[wikipedia:Google Translate|Google Translate]] is used, it translates to "thingys" or "contraption".
** In the Swedish translation of the game, this pattern is, in fact, called ''mojäng''.
* [[List of block textures#Banner Textures|Banner textures]] are located in \assets\minecraft\textures\entity\banner.
** There are 40 monochrome textures, each containing all 6 sides of the banner.
** The texture of the back side is the mirrored texture of the front side.
** Compared to the texture files, textures' colors are inverted in-game due to them acting as masks for the re-colored base texture, base.png. That means white is visible, while black is transparent.
* Banners that have the purple NBT+ line in the bottom (obtained by holding Ctrl and middle-clicking the banner, which also copies the NBT [[tag]] of anything that the player points their crosshair to) actually have no difference with the base banner obtained by middle click.
*The Illager Banner in Bedrock Edition is available as a separate item but is just a second variant of the white banner.
**Standard variant of white banner is set to type 0.
**Illager variant is set to type 1.
== Gallery ==
<gallery>
Banners Jeb.png|The first image of banners, as tweeted by Jens Bergensten.
Iceland and Norway Flags.png|Another banner image from Jeb.
Searge Banners.png|Several banners made by Searge.
The Bountiful Update.png|Banners in the official 1.8 poster.
BannersBeforeAndAfter.png|An image, tweeted by Jeb, showcasing the changes he made to the banner color palette in the 1.12 update.
Gradients Overlay.png|The result of using gradient different numbers of times, each time increasing the level of gradient by 1.
All positions and rotations of a banner.png|All positions and rotations of a banner
Item Frame with Banner.png|A banner with the [[Mojang]] logo in an [[item frame]].
EndCityBanners.png|Banners floating outside of an [[End city]] tower.
Woodland mansion 1x2 d1.png|Banners hanging above the doorway of a [[woodland mansion]] master bedroom.
Replaceitembanner.png|Banner put in the helmet slot by using the command {{cmd|replaceitem}}{{Only|BE}} or {{cmd|item replace}}{{Only|JE}}.
Better Together Banners.jpg|Banners in ''Bedrock Edition''.
Better Together Banner Crafting 1.jpg|A banner in the hand.
Better Together Banner Crafting 2.jpg|A banner in the inventory.
Better Together Banner Crafting 3.jpg|A banner in the crafting grid.
Better Together Banner Crafting 4.jpg|A banner being given a pattern.
</gallery>
=== Renders ===
<gallery>
Ominous Banner.gif
White Banner.gif
Light Gray Banner.gif
Gray Banner.gif
Black Banner.gif
Brown Banner.gif
Red Banner.gif
Orange Banner.gif
Yellow Banner.gif
Lime Banner.gif
Green Banner.gif
Cyan Banner.gif
Light Blue Banner.gif
Blue Banner.gif
Purple Banner.gif
Magenta Banner.gif
Pink Banner.gif
Ominous Wall Banner.png|
White Wall Banner.png|
Light Gray Wall Banner.png|
Gray Wall Banner.png|
Black Wall Banner.png|
Brown Wall Banner.png|
Red Wall Banner.png|
Orange Wall Banner.png|
Yellow Wall Banner.png|
Lime Wall Banner.png|
Green Wall Banner.png|
Cyan Wall Banner.png|
Light Blue Wall Banner.png|
Blue Wall Banner.png|
Purple Wall Banner.png|
Magenta Wall Banner.png|
Pink Wall Banner.png
</gallery>
<gallery>
File:Ominous Banner.gif|Ominous banner pattern in Java Edition.
File:Ominous Banner BE.gif|Illager banner pattern in Bedrock Edition.
File:Ominous Banner Revision 1.gif|Old Ominous banner pattern.
File:Ominous Banner washing.gif|Washing with cauldron shows how to apply the ominous banner pattern.
</gallery>
=== [[Lego Minecraft]] Banners ===
<gallery>
File:Lego Red Creeper Banner Collage.jpg|Lego banners from 21127 and 21131
File:Lego Melon Banner.png|Lego banner from 21138
File:Lego Fish Banner.png|Lego banner from 21142
File:Lego Beetroot Banner.png|Lego banner from 21144
File:Lego Wheat Banner.png|Another lego banner from 21144
File:Lego Carrot Banner.png|A third lego banner from 21144
File:Lego Crossbones Banner.png|Lego banner from 21152
File:Lego Green Creeper Banner Collage.jpg|Lego banners from 21155
File:Lego Ominous Banner.png|Lego ominous banner from 21160
</gallery>
== References ==
{{reflist}}
{{Blocks|Utility}}
{{Items}}
[[Category:Generated structure blocks]]
[[Category:Manufactured blocks]]
[[Category:Block entities]]
[[Category:Non-solid blocks]]
[[cs:Prapor]]
[[de:Banner]]
[[es:Estandarte]]
[[fr:Bannière]]
[[ja:旗]]
[[ko:현수막]]
[[nl:Banier]]
[[pl:Sztandar]]
[[pt:Estandarte]]
[[ru:Флаг]]
[[uk:Стяг]]
[[zh:旗帜]]</li></ul></nowiki> | First confirmed appearance of the Far Lands. | ||||
June 25, 2010{{Extension DPL}}<ul><li>[[Scute|Scute]]<br/>{{about|the item used to craft turtle shell helmets|the helmet|Turtle Shell}}
{{Item
| image = Scute.png
| renewable = Yes
| stackable = Yes (64)
|title=Turtle scute}}
'''Turtle Scutes''' are [[item]]s that baby [[turtle]]s drop when they grow into adults. They can be used to craft [[turtle shell]]s which can be used to brew the [[potion of the Turtle Master]].
== Obtaining ==
=== Mob loot ===
Baby [[turtle]]s drop a single scute when they grow up into adults, which is the only way possible to obtain the [[item]].
== Usage ==
Scutes can be crafted into [[turtle shell]]s.
=== Crafting ingredient ===
{{crafting usage}}
=== Repairing ===
Scutes are the [[repair]] items for the turtle [[armor material]], and thus can be used to repair [[turtle shell]]s in an [[anvil]].
=== Trading ===
Expert-level cleric [[villager]]s have a {{frac|2|3}} chance to buy 4 scutes for an [[emerald]] as part of their [[trading|trades]].{{only|java}}
Expert-level cleric villagers have a 50% chance to buy 4 scutes for an emerald as part of their seventh trades.{{only|bedrock}}
Expert-level leatherworker villagers buy 4 scutes for an emerald as part of their trades.
== Data values ==
=== ID ===
{{edition|java}}:
{{ID table
|edition=java
|showforms=y
|generatetranslationkeys=y
|displayname=Scute
|spritetype=item
|nameid=scute
|form=item
|foot=1}}
{{edition|bedrock}}:
{{ID table
|edition=bedrock
|showaliasids=y
|shownumericids=y
|showforms=y
|notshowbeitemforms=y
|generatetranslationkeys=y
|displayname=Scute
|spritetype=item
|nameid=scute
|aliasid=turtle_shell_piece
|id=572
|form=item
|translationkey=item.turtle_shell_piece.name
|foot=1}}
== History ==
{{History|java}}
{{History||1.13|snap=18w07a|[[File:Scute JE1 BE1.png|32px]] Added turtle shell pieces.}}
{{History|||snap=18w07b|"Turtle Shell Pieces" have now been renamed to "Scutes."}}
{{History||1.14|snap=19w11a|Cleric and leatherworker [[villager]]s now [[trading|buy]] scutes.}}
{{History|bedrock}}
{{History||1.5.0|snap=beta 1.5.0.4|[[File:Scute JE1 BE1.png|32px]] Added scutes.}}
{{History||1.11.0|snap=beta 1.11.0.4|Scutes can be [[trading|sold]] to cleric and leatherworker [[villager]]s.}}
{{History|console}}
{{History||xbox=TU69|ps=1.76|wiiu=Patch 38|[[File:Scute JE1 BE1.png|32px]] Added scutes.}}
{{history|foot}}
== Issues ==
{{issue list}}
== Trivia ==
* Scutes used to be called "Turtle Shell Pieces", they were renamed after it was pointed out that "Scute" was a more technical term.<ref>https://www.reddit.com/r/minecraftsuggestions/comments/7xnp2o/rename_turtle_shell_pieces_to_scutes/</ref>
== References ==
{{reflist}}
{{Items}}
[[Category:Renewable resources]]
[[de:Hornschild]]
[[es:Escama de tortuga]]
[[fr:Écaille de tortue]]
[[ja:カメのウロコ]]
[[ko:인갑]]
[[lzh:鱗]]
[[pl:Tarczka]]
[[pt:Escama de tartaruga]]
[[ru:Щиток]]
[[th:เกล็ดเต่า]]
[[uk:Черепок]]
[[zh:鳞甲]]</li><li>[[Gold Ingot|Gold Ingot]]<br/>{{About|the item|the ore|Gold Ore|the mineral block|Block of Gold|the nugget|Gold Nugget}}
{{Item
| image = Gold Ingot.png
| renewable = Yes
| stackable = Yes (64)
}}
A '''gold ingot''' is a [[metal]] ingot used to craft various [[item]]s, and also used as currency for [[bartering]] with [[piglin]]s.
== Obtaining ==
Gold ingots are mainly obtained by smelting [[raw gold]], [[gold ore]] and [[nether gold ore]], or just mining nether gold ore, dropping gold nuggets. Gold generates more frequently in [[badlands]] biomes.
=== Crafting ===
{{Crafting
|head=1
|showname=0
|Block of Gold
|Output=Gold Ingot,9
|type=Material
}}
{{Crafting
|A1= Gold Nugget
|B1= Gold Nugget
|C1= Gold Nugget
|A2= Gold Nugget
|B2= Gold Nugget
|C2= Gold Nugget
|A3= Gold Nugget
|B3= Gold Nugget
|C3= Gold Nugget
|Output= Gold Ingot
|type= Material
|foot=1
}}
=== Smelting ===
{{see also|Gold Ore#Natural generation}}
{{Smelting
|head=1
|Gold Ore;Nether Gold Ore;Deepslate Gold Ore
|Gold Ingot
|1
}}
{{Smelting
|foot=1
|Raw Gold
|Gold Ingot
|1
}}
=== Mob loot ===
[[Zombified piglin]]s have a 2.5% ({{frac|1|40}}) chance of dropping a gold ingot if killed by a player or tamed wolf. The chance is increased by 1% per level of [[Looting]], for a maximum of 5.5% with Looting III.
=== Chest loot ===
{{LootChestItem|gold-ingot}}
== Usage ==
=== Crafting ingredient===
As a material for weapons, tools, and armor, gold is not a straight upgrade from iron (except in the case of [[Horse Armor|horse armor]]). Gold has a higher mining speed and enchantability than any other material, but attack power and durability is less.
{{crafting usage}}
=== Trading ===
Apprentice-level cleric [[Villager|villagers]] buy 3 gold ingots for an [[emerald]] as part of their trade.
=== Repairing ===
Golden [[helmet]]s, [[chestplate]]s, [[leggings]], [[boots]], [[sword]]s, [[pickaxe]]s, [[axe]]s, [[hoe]]s and [[shovel]]s can be [[item repair|repaired]] with gold ingots in an [[anvil]].
=== Bartering ===
{{main|Bartering}}
[[Piglin]]s throw the player [[Bartering#Mechanics|item(s)]] if the player throws or {{ctrl|uses}} a gold ingot on them.
=== Beacons ===
Gold ingots can be used to select powers from a [[beacon]]. The player must select one of the available powers, and then insert an ingot in the item slot.
A gold ingot can be substituted for an [[iron ingot]] or [[netherite ingot]], an [[emerald]], or a [[diamond]].
=== Smithing ingredient ===
{{Smithing
|head=1
|ingredients=Any Armor Trim +<br/>Any Armor Piece + <br/>Gold Ingot
|Any Armor Trim Smithing Template
|Netherite Chestplate
|Gold Ingot
|Gold Trim Netherite Chestplate
|showdescription=1
|description = All armor types can be used in this recipe,<br/>a netherite chestplate is shown as an example.<br/>
|tail=1
}}
;Trim color palette
The following color palettes are shown on the designs on trimmed armor:
*{{TrimPalette|gold ingot}}
*{{TrimPalette|gold ingot|darker=1}} (a darker color palette is used when a golden armor piece is trimmed using a gold ingot).
== Achievements ==
{{load achievements|Oooh, shiny!}}
== Advancements ==
{{load advancements|Oh Shiny}}
== Data values ==
=== ID ===
{{edition|java}}:
{{ID table
|edition=java
|showitemtags=y
|showforms=y
|generatetranslationkeys=y
|displayname=Gold Ingot
|spritetype=item
|nameid=gold_ingot
|itemtags=beacon_payment_items, piglin_loved
|form=item
|foot=1}}
{{edition|bedrock}}:
{{ID table
|edition=bedrock
|shownumericids=y
|showforms=y
|notshowbeitemforms=y
|generatetranslationkeys=y
|displayname=Gold Ingot
|spritetype=item
|nameid=gold_ingot
|id=306
|form=item
|foot=1}}
== History ==
{{History|java indev}}
{{History||0.31|snap=20100128|[[File:Gold Ingot JE1.png|32px]] Added gold ingots.}}
{{History|||snap=20100129|[[File:Gold Ingot JE2 BE1.png|32px]] The texture of gold ingots has been changed.
|Gold ingots can be [[smelting|smelted]] from [[gold ore]] with [[flint and steel]] and [[drops|drop]] 3-5 gold ingots.
|Gold ingots can be used to craft [[gold block]]s.
|[[Gold block]]s now require 9 gold ingots (3×3) instead of 4 (2×2) to be [[crafting|crafted]], making them much more expensive.}}
{{History|||snap=20100130|Gold ingots can now be used to craft gold [[sword]]s, [[shovel]]s, [[pickaxe]]s and [[axe]]s.}}
{{History||20100206|Gold ingots are now used to [[crafting|craft]] gold [[hoe]]s.}}
{{History||?|Smelting gold ore now drops 1 gold ingot (down from 3-5).}}
{{History||20100218|Gold ingots are now used to craft gold [[helmet]]s, [[chestplate]]s, [[leggings]] and [[boots]].}}
{{history|java alpha}}
{{History||v1.2.0|snap=<nowiki>?|slink=:Category:Information needed requiring unarchived version|Gold ingots are now used to craft [[clock]]s.}}
{{History|java beta}}
{{History||1.5|Gold ingots are now used to craft [[powered rail]]s.}}
{{History||1.8|snap=Pre-release|Gold ingots can now be found in the new [[stronghold]] storerooms and [[mineshaft]] [[chest]]s.}}
{{History|java}}
{{History||1.0.0|snap=Beta 1.9 Prerelease|Gold ingots can be crafted from [[gold nuggets]], which are dropped by [[Zombified Piglin|zombie pigmen]], making gold a [[renewable resource]].}}
{{History|||snap=Beta 1.9 Prerelease 3|Gold ingots can now be found in the new [[stronghold]] altar [[chest]]s.}}
{{History|||snap=Beta 1.9 Prerelease 4|Gold ingots are now used to craft [[gold nugget]]s.}}
{{History||1.1|snap=12w01a|Gold ingots can now be found in [[village]] blacksmith chests.}}
{{History||1.2.1|snap=12w06a|Zombie pigmen now rarely drop gold ingots.}}
{{History||1.3.1|snap=12w21a|Added [[desert temple]]s, with a hidden [[chest]] room and loot containing gold ingots.
|All types of [[villager]]s now [[trading|buy]] 8–9 gold ingots for 1 [[emerald]], as a fallback trade in case no trades were generated for that villager.}}
{{History|||snap=12w22a|Added [[jungle temple]]s, which contain loot chests with gold ingots.}}
{{History||1.5|snap=13w01a|Gold ingots are now used to craft light [[weighted pressure plate]]s.}}
{{History||1.6.1|snap=13w16a|Gold ingot is now used to craft golden [[horse armor]].}}
{{History|||snap=13w18a|Gold ingot is no longer used to craft golden [[horse armor]].|Gold ingots are now found in [[nether fortress]] [[chest]]s.}}
{{History|||snap=13w23a|Gold ingots are now used to craft normal [[golden apple]]s.}}
{{History||1.8|snap=14w02a|[[Trading]] has been changed: only cleric [[villager]]s now [[trading|buy]] 8–10 gold ingots for 1 [[emerald]], as a legitimate trade.}}
{{History||1.9|snap=15w31a|Gold ingots can now be found in [[end city]] [[chest]]s.}}
{{History|||snap=15w43a|The average yield of gold ingots in [[nether fortress]] chest has been decreased.}}
{{History|||snap=15w44a|The average yield of gold ingots in [[mineshaft]] and [[desert temple]] chests has been decreased.
|Gold ingots have been added to [[dungeon]] [[chest]]s.}}
{{History||1.11|snap=16w39a|Gold ingots are now found in the new [[woodland mansion]] chests.}}
{{History||1.13|snap=17w47a|Prior to [[1.13/Flattening|''The Flattening'']], this [[item]]'s numeral ID was 266.}}
{{History|||snap=18w10a|Gold ingots now generate in [[buried treasure]] chests.}}
{{History|||snap=18w11a|Gold ingots can now be obtained as a [[drops|drop]] from [[drowned]].
|Gold ingots now generate in [[shipwreck]] chests.}}
{{History||1.14|snap=18w43a|[[File:Gold Ingot JE3.png|32px]] The texture of gold ingots has been changed.}}
{{History|||snap=18w44a|[[File:Gold Ingot JE4 BE2.png|32px]] The texture of gold ingots has been changed, once again.}}
{{History|||snap=18w50a|Gold ingots now generate in chests in [[village]] toolsmith houses and temples.}}
{{History||1.16|snap=20w06a|Gold ingots are now used to craft [[netherite ingot]]s.}}
{{History|||snap=20w07a|Gold ingots can now be used to [[bartering|barter]] with [[piglin]]s.}}
{{History|||snap=20w11a|Gold ingots can now be [[smelting|smelted]] from [[nether gold ore]].}}
{{History|||snap=20w16a|Gold ingots now generate in [[bastion remnants]] and [[ruined portal]] chests.}}
{{History||1.16.2|snap=20w30a|The average yield of gold ingots from bastion remnant chests has been slightly increased.}}
{{History||1.17|snap=21w05a|Drowneds no longer drop gold ingots, and instead drop [[copper ingot]]s.}}
{{History|||snap=21w08a|Gold ingots can now be smelted from [[deepslate gold ore]].}}
{{History|||snap=21w14a|Gold ingots can now be smelted from [[raw gold]].}}
{{History||1.20<br>(Experimental)|link=1.19.4|snap=23w04a|Gold ingots can now be used as an armor trim material.}}
{{History|||snap=23w05a|Gold ingots can now be trimmed with gold [[armor]].}}
{{History|pocket alpha}}
{{History||v0.2.0|[[File:Gold Ingot JE2 BE1.png|32px]] Added gold ingots. They are currently unobtainable and serve no purpose.}}
{{History||v0.3.2|Gold ingots are now obtainable by [[smelting]] gold ore in a [[furnace]].
|Gold ingots can be used to craft [[blocks of gold]], gold [[pickaxe]]s, [[axe]]s, [[sword]]s and [[shovel]]s.}}
{{History||v0.4.0|Gold ingots are now used to [[crafting|craft]] gold [[hoe]]s.}}
{{History||v0.6.0|Gold ingots are now used to craft gold [[armor]].}}
{{History||v0.8.0|snap=build 1|Gold ingots are now used to craft [[clock]]s.}}
{{History|||snap=build 2|Gold ingots are now used to craft [[powered rail]]s.}}
{{History||v0.9.0|snap=build 1|Gold ingots can now be found in blacksmith [[chest]]s in [[village]]s, [[stronghold]] altar chests and [[dungeon]] chests.}}
{{History||v0.12.1|snap=build 1|Gold ingots are now used to craft [[gold nugget]]s and [[golden apple]]s.
|Gold ingots are now found in [[nether fortress]] chests.}}
{{History||v0.13.0|snap=build 1|Gold ingots are now used to [[crafting|craft]] light [[weighted pressure plate]]s.
|Gold ingots now generate inside of hidden chest rooms in [[desert temple]]s.}}
{{History||v0.14.0|snap=build 1|Gold ingots are now found in [[minecart with chest]]s that generate in [[mineshaft]]s.}}
{{History||v0.15.0|snap=build 1|Gold ingots can now be found in [[jungle temple]] [[chest]]s.}}
{{History||v0.16.0|snap=build 4|Gold ingots can now be used to power [[beacon]]s.}}
{{History|pocket edition}}
{{History||1.0.0|snap=alpha 0.17.0.1|Gold ingots can now be found in [[end city]] ship chests and [[stronghold]] storerooms.}}
{{History||1.0.4|snap=alpha 1.0.4.0|Added [[trading]], cleric [[villager]]s now [[trading|buy]] 8–10 gold ingots for 1 [[emerald]].}}
{{History||1.1.0|snap=alpha 1.1.0.0|Gold ingots are now found in [[woodland mansion]] [[chest]]s.}}
{{history|bedrock}}
{{History||1.4.0|snap=beta 1.2.13.8|Added [[drowned]], which rarely [[drops|drop]] gold ingots.}}
{{History|||snap=beta 1.2.14.2|Gold ingots can now be found inside [[buried treasure]] [[chest]]s and [[shipwreck]]s.}}
{{History||1.10.0|snap=beta 1.10.0.3|Gold ingots can now be found in [[plains]] [[village]] weaponsmith chests.
|[[File:Gold Ingot JE4 BE2.png|32px]] The texture of gold ingots has been changed.}}
{{History||1.11.0|snap=beta 1.11.0.1|Gold ingots can now be found in [[desert]] village temple [[chest]]s and village toolsmith chests.
|Gold ingots can now be found in [[savanna]], [[taiga]], [[snowy taiga]], [[snowy tundra]] and desert village weaponsmith chests.}}
{{History|||snap=beta 1.11.0.4|Cleric [[villager]]s now [[trading|buy]] 3 gold ingots for one [[emerald]].}}
{{History||1.16.0|snap=beta 1.16.0.51|Gold ingots are now used to craft [[netherite ingot]]s.
|Gold ingots can now be used to [[bartering|barter]] with [[piglin]]s.}}
{{History|||snap=beta 1.16.0.57|Gold ingots can now be [[smelting|smelted]] from [[nether gold ore]].
|Gold ingots now be found in [[ruined portal]] and [[bastion remnants]] chests.}}
{{History||1.16.210|snap=beta 1.16.210.57|Gold ingots can no longer be obtained as a [[drops|drop]] from [[drowned]].}}
{{History||1.17.0|snap=beta 1.16.230.52|Gold ingots can now be smelted from [[deepslate gold ore]].}}
{{History|||snap=beta 1.17.0.50|Gold ingots can now be smelted from [[raw gold]].}}
{{History||1.19.80|snap=beta 1.19.80.21|Gold ingots can now be used as an armor trim material.}}
{{History|console}}
{{History||xbox=TU1|xbone=CU1|ps=1.0|wiiu=Patch 1|switch=1.0.1|[[File:Gold Ingot JE2 BE1.png|32px]] Added gold ingots.}}
{{History||xbox=none|xbone=none|ps=1.90|wiiu=none|switch=none|[[File:Gold Ingot JE4 BE2.png|32px]] The texture of gold ingots has been changed.}}
{{History|new3DS}}
{{History||0.1.0|[[File:Gold Ingot JE2 BE1.png|32px]] Added gold ingots.}}
{{History|foot}}
== Issues ==
{{issue list}}
== Trivia ==
*Gold ingots are the only ingots in the game used alongside another [[item]] to [[crafting|craft]] another type of ingot; in this case, it is used with [[netherite scrap]] to craft a [[netherite ingot]].
== See also ==
*{{BlockLink|Block of Gold}}
*{{ItemSprite|Golden Chestplate}} [[Golden Armor]]
*{{ItemLink|Gold Nugget}}
*{{BlockLink|Gold Ore}}
*[[Ore]]s
{{Items}}
[[cs:Zlatý ingot]]
[[de:Goldbarren]]
[[es:Lingote de oro]]
[[fr:Lingot d'or]]
[[hu:Aranyrúd]]
[[ja:金インゴット]]
[[ko:금괴]]
[[nl:Goudstaaf]]
[[pl:Sztabka złota]]
[[pt:Barra de ouro]]
[[ru:Золотой слиток]]
[[uk:Золотий зливок]]
[[zh:金锭]]
[[Category:Renewable resources]]</li></ul></nowiki> | Farlands now get bad chunks and positioning errors. | ||||
| alpha | |||||
1.2.0{{Extension DPL}}<ul><li>[[Ghast Tear|Ghast Tear]]<br/>{{Item
| image = Ghast Tear.png
| renewable = Yes
| stackable = Yes (64)
}}
'''Ghast tears''' are items [[Drops|dropped]] by [[ghast]]s. They can be used to make potions of [[Regeneration]] and [[end crystal]]s.
== Obtaining ==
=== Mob loot ===
[[Ghast]]s drop 0–1 ghast tears. [[Looting]] increases the maximum ghast tears dropped by one per level, for a maximum of 4 ghast tears with Looting III. Looting also works when knocking back a [[fireball]] with an enchanted item.
== Usage ==
=== Brewing ingredient ===
{{brewing
|showname=1
|head=1
|Ghast Tear
|Mundane Potion
|base=Water Bottle
}}
{{brewing
|foot=1
|Ghast Tear
|Potion of Regeneration
}}
=== Crafting ingredient ===
{{crafting usage}}
== Data values ==
=== ID ===
{{edition|java}}:
{{ID table
|edition=java
|showforms=y
|generatetranslationkeys=y
|displayname=Ghast Tear
|spritetype=item
|nameid=ghast_tear
|form=item
|foot=1}}
{{edition|bedrock}}:
{{ID table
|edition=bedrock
|shownumericids=y
|showforms=y
|notshowbeitemforms=y
|generatetranslationkeys=y
|displayname=Ghast Tear
|spritetype=item
|nameid=ghast_tear
|id=424
|form=item
|foot=1}}
== History ==
{{History|java}}
{{History||1.0.0|snap=Beta 1.9 Prerelease|[[File:Ghast Tear JE1 BE1.png|32px]] Added ghast tears.}}
{{History|||snap=Beta 1.9 Prerelease 3|Ghast tears can now be brewed in a [[water bottle]] to create a [[mundane potion]], or in an [[awkward potion]] to create a [[potion of Healing]].}}
{{History|||snap=Beta 1.9 Prerelease 4|Ghast tears now create [[potion of regeneration|potions of Regeneration]]. This was due to the sheer difficulty in obtaining them.<ref>{{tweet|jeb|123671273904680960|Since Ghast Tears are so hard to get, I've decided to replace the "Instant Health" with "Regeneration" for them|October 11, 2011}}</ref> [[Glistering melon]]s have been added to create potions of Healing, instead.}}
{{History||1.9|snap=15w44b|A ghast tear is now used to [[crafting|craft]] an [[end crystal]].}}
{{History||1.13|snap=17w47a|Prior to [[1.13/Flattening|''The Flattening'']], this [[item]]'s numeral ID was 370.}}
{{History||1.14|snap=18w43a|[[File:Ghast Tear JE2 BE2.png|32px]] The texture of ghast tears has been changed.}}
{{History|pocket alpha}}
{{History||v0.12.1|snap=build 1|[[File:Ghast Tear JE1 BE1.png|32px]] Added ghast tears.|Ghast tears are currently unobtainable as [[ghast]]s don’t [[drops|drop]] them.}}
{{History|||snap=build 7|Ghasts now drop ghast tears.<ref>{{bug|MCPE-9338}}</ref>}}
{{History|pocket}}
{{History||1.0.0|snap=alpha 0.17.0.1|A ghast tear is now used to [[crafting|craft]] an [[end crystal]].}}
{{History|bedrock}}
{{History||1.10.0|snap=beta 1.10.0.3|[[File:Ghast Tear JE2 BE2.png|32px]] The texture of ghast tears has been changed.}}
{{History|console}}
{{History||xbox=TU7|xbone=CU1|ps=1.0|wiiu=Patch 1|switch=1.0.1|[[File:Ghast Tear JE1 BE1.png|32px]] Added ghast tears.}}
{{History||xbox=none|xbone=none|ps=1.90|wiiu=none|switch=none|[[File:Ghast Tear JE2 BE2.png|32px]] The texture of ghast tears has been changed.}}
{{History|New 3DS}}
{{History||0.1.0|[[File:Ghast Tear JE1 BE1.png|32px]] Added ghast tears.}}
{{History|foot}}
== Issues ==
{{issue list}}
== References ==
{{reflist}}
{{items}}
[[Category:Renewable resources]]
[[Category:Brewing recipe]]
[[cs:Ďasova slza]]
[[de:Ghast-Träne]]
[[es:Lágrima de ghast]]
[[fr:Larme de Ghast]]
[[hu:Kísértetkönny]]
[[it:Lacrima di ghast]]
[[ja:ガストの涙]]
[[ko:가스트 눈물]]
[[nl:Ghasttraan]]
[[pl:Łza ghasta]]
[[pt:Lágrima de ghast]]
[[ru:Слеза гаста]]
[[uk:Сльоза ґаста]]
[[zh:恶魂之泪]]</li><li>[[Amethyst Shard|Amethyst Shard]]<br/>{{Item
| title = Amethyst Shard
| image = Amethyst Shard.png
| renewable = Yes
| stackable = Yes (64)
}}
An '''amethyst shard''' is a crystal ore obtained from mining a fully grown [[amethyst cluster]] or can be obtained from chests in [[Ancient City|ancient cities]].
== Obtaining ==
=== Mining ===
An [[amethyst cluster]] mined using a non-[[Silk Touch]], non-[[Fortune]] [[pickaxe]] drops 4 amethyst shards. When mined using any other tool, [[item]] or mechanism (such as [[explosion]]s or [[piston]]s) it drops 2 shards. The maximum amount of amethyst shards dropped can be increased with Fortune. Fortune I gives a {{frac|1|3}} chance for eight shards, averaging 5.33 shards; Fortune II gives a 25% chance (each) to give eight or 12 shards, averaging 7 shards, and Fortune III gives a 20% chance (each) to give 8, 12, or 16 shards, averaging 8.8 shards.
If the amethyst cluster in any of its growth stages is mined using a pickaxe enchanted with [[Silk Touch]], it drops itself rather than amethyst shards.
=== Chest loot ===
{{LootChestItem|amethyst-shard}}
== Usage ==
=== Crafting ingredient ===
{{Crafting usage}}
=== Smithing ingredient ===
{{Smithing
|head=1
|ingredients=Any Armor Trim +<br/>Any Armor Piece + <br/>Amethyst Shard
|Any Armor Trim Smithing Template
|Netherite Chestplate
|Amethyst Shard
|Amethyst Trim Netherite Chestplate
|showdescription=1
|description = All armor types can be used in this recipe;<br/>a netherite chestplate is shown as an example.<br/>
|tail=1
}}
;Trim color palette
The following color palette is shown on the designs on trimmed armor:
*{{TrimPalette|amethyst shard}}
=== Allay duplication ===
If an amethyst shard is given to an [[allay]] that is currently dancing to an active [[jukebox]], the allay emits heart particles, consumes the amethyst shard and duplicates into another allay. After this, there is a 5 minute cool down until both allays can be duplicated like this again.
== Sounds ==
{{Edition|Java}}:
{{Sound table
|sound=Amethyst shimmer.ogg
|subtitle=Amethyst chimes
|source=neutral
|description=When an amethyst shard duplicates an allay
|id=block.amethyst_block.chime
|translationkey=subtitles.block.amethyst_block.chime
|volume=0.4
|pitch=1.0
|distance=16
|foot=1}}
{{Edition|Bedrock}}:
{{Sound table
|type=bedrock
|sound=Amethyst shimmer.ogg
|source=block
|description=When an amethyst shard duplicates an allay
|id=chime.amethyst_block
|volume=1.0
|pitch=0.5-1.7
|foot=1}}
== Data values ==
=== ID ===
{{edition|java}}:
{{ID table
|edition=java
|showforms=y
|generatetranslationkeys=y
|displayname=Amethyst Shard
|spritetype=item
|nameid=amethyst_shard
|form=item
|foot=1}}
{{edition|bedrock}}:
{{ID table
|edition=bedrock
|shownumericids=y
|showforms=y
|notshowbeitemforms=y
|generatetranslationkeys=y
|displayname=Amethyst Shard
|spritetype=item
|nameid=amethyst_shard
|form=item
|id=625
|foot=1}}
==History==
{{History||October 3, 2020|link={{ytl|DBvZ2Iqmm3M|t=23m14s}}|Amethyst shards are mentioned, but not shown at [[Minecraft Live 2020]].}}
{{History|java}}
{{History||1.17|snap=20w45a|[[File:Amethyst Shard JE1.png|32px]] Added amethyst shards.}}
{{History|||snap=20w46a|[[File:Amethyst Shard JE2 BE1.png|32px]] The texture for amethyst shards has changed.}}
{{History||1.19|snap=22w13a|Amethyst shards can now be found in [[ancient city]] [[chest]]s.}}
{{History||1.19.1|snap=22w24a|Amethyst shards can now be used to duplicate [[allay]]s.}}
{{History||1.20<br>(Experimental)|link=1.19.4|snap=23w04a|Amethyst shards can now be used as an armor trim material.}}
{{History||1.20|snap=23w12a|Amethyst shards can now be used to craft [[calibrated sculk sensor]]s.}}
{{History|bedrock}}
{{History||1.17.0|snap=beta 1.17.0.50|[[File:Amethyst Shard JE2 BE1.png|32px]] Added amethyst shards.}}
{{History|||snap=beta 1.17.0.52|Amethyst shards are now available without enabling [[Experimental Gameplay]].}}
{{History||1.19.0|snap=beta 1.19.0.26|Amethyst shards can now be found in [[ancient city]] [[chest]]s.}}
{{History||1.19.10|snap=beta 1.19.10.22|Amethyst shards can now be used to duplicate allays.}}
{{History||1.20.0<br>(Experimental)|link=Bedrock Edition 1.19.80|snap=beta 1.19.80.21|Amethyst shards can now be used as an armor trim material.}}
{{History|||snap=beta 1.19.80.22|Amethyst shards can now be used to craft calibrated sculk sensors.}}
{{History|foot}}
==Issues==
{{issue list}}
==Trivia==
* Although in real life {{w|amethyst}} is a variety of {{w|quartz}} like [[Nether Quartz|nether quartz]], the two resources are not interchangeable.
* besides netherite, amethyst is the only or to be attempted not from an ore in caves
== External Links ==
*[https://www.minecraft.net/en-us/article/taking-inventory--amethyst-shard Taking Inventory: Amethyst Shard] – Minecraft.net on May 20, 2021
{{Items}}
[[Category:Renewable resources]]
[[de:Amethystscherbe]]
[[es:Fragmento de amatista]]
[[fr:Éclat d'améthyste]]
[[it:Scheggia di ametista]]
[[ja:アメジストの欠片]]
[[lzh:紫水玉片]]
[[pl:Odłamek ametystu]]
[[pt:Fragmento de ametista]]
[[ru:Осколок аметиста]]
[[uk:Уламок аметисту]]
[[zh:紫水晶碎片]]
[[Category:Ore]]</li></ul> | Beyond X/Z of ±32,000,000, phantom chunks generate that can be fallen through. Previously, no blocks were rendered beyond this point, and players were stuck there. | ||||
| beta | |||||
1.6{{Extension DPL}}<ul><li>[[Prismarine Shard|Prismarine Shard]]<br/>{{Item
| renewable = Yes
| stackable = Yes (64)
| type =
}}
A '''prismarine shard''' is an item obtained by defeating [[guardian]]s or [[elder guardian]]s. It can be used to craft various [[prismarine]] blocks as well as [[sea lantern]]s.
== Obtaining ==
Prismarine shards are dropped upon the death of [[guardian]]s and [[elder guardian]]s. From these mobs, 0–2 shards are dropped each time. This can be increased to a maximum of 5 with the [[Looting]] enchantment.
== Usage ==
=== Crafting ingredient ===
{{crafting usage}}
== Data values ==
=== ID ===
{{edition|java}}:
{{ID table
|edition=java
|showforms=y
|generatetranslationkeys=y
|displayname=Prismarine Shard
|spritetype=item
|nameid=prismarine_shard
|form=item
|foot=1}}
{{edition|bedrock}}:
{{ID table
|edition=bedrock
|showaliasids=y
|shownumericids=y
|showforms=y
|notshowbeitemforms=y
|generatetranslationkeys=y
|displayname=Prismarine Shard
|spritetype=item
|nameid=prismarine_shard
|aliasid=prismarineshard
|id=565
|form=item
|foot=1}}
== History ==
{{History|java}}
{{history||1.8|snap=14w25a|[[File:Prismarine Shard JE1 BE1.png|32px]] Added prismarine shards.}}
{{History||1.13|snap=17w47a|Prior to [[1.13/Flattening|''The Flattening'']], this [[item]]'s numeral ID was 409.}}
{{History||1.14|snap=18w43a|[[File:Prismarine Shard JE2 BE2.png|32px]] The texture of prismarine shards has now been changed.}}
{{History|pocket alpha}}
{{History||v0.16.0|snap=build 1|[[File:Prismarine Shard JE1 BE1.png|32px]] Added prismarine shards.}}
{{History|bedrock}}
{{History||1.10.0|snap=beta 1.10.0.3|[[File:Prismarine Shard JE2 BE2.png|32px]] The texture of prismarine shards has now been changed.}}
{{History|console}}
{{History||xbox=TU31|xbone=CU19|ps=1.22|wiiu=Patch 3|[[File:Prismarine Shard JE1 BE1.png|32px]] Added prismarine shards.}}
{{History||xbox=none|xbone=none|ps=1.90|wiiu=none|switch=none|[[File:Prismarine Shard JE2 BE2.png|32px]] The texture of prismarine shards has now been changed.}}
{{History|New 3DS}}
{{History||1.3.12|[[File:Prismarine Shard JE1 BE1.png|32px]] Added prismarine shards.}}
{{History|foot}}
== Issues ==
{{issue list}}
{{items}}
[[de:Prismarinscherbe]]
[[es:Fragmento de prismarina]]
[[fr:Éclat de prismarine]]
[[ja:プリズマリンの欠片]]
[[ko:프리즈머린 조각]]
[[nl:Prismarienscherf]]
[[pl:Odłamek pryzmarynu]]
[[pt:Pedaço de prismarinho]]
[[ru:Призмариновый осколок]]
[[uk:Призмариновий уламок]]
[[zh:海晶碎片]]
[[Category:Renewable resources]]</li><li>[[Bone|Bone]]<br/>{{about|the item|the block|Bone Block|other uses|Bone (disambiguation)}}
{{Item
| image = Bone.png
| renewable = Yes
| stackable = Yes (64)
}}
A '''bone''' is an [[item]] primarily obtained from [[skeleton]]s and similar mobs. It can be crafted into [[Bone Meal|bone meal]] or used to tame wild [[Wolf|wolves]].
== Obtaining ==
=== Chest loot ===
{{LootChestItem|bone}}
=== Mob loot ===
Skeletons, [[wither skeleton]]s, [[skeleton horse]]s, and [[stray]]s may drop 0–2 bones upon death. The maximum drop is increased by 1 per level of Looting, for a maximum of 0-5 bones with Looting III.
{{IN|bedrock}}, [[salmon]], [[cod]], [[pufferfish]], and [[tropical fish]] have 25% chance to drop 1-2 bones upon death. The maximum drop is increased by 1 to 2 per level of Looting, for a maximum of 2-8 bones with Looting III.
Salmon (small and medium size) have 25% chance to drop 1 bone upon death, The maximum drop is increased by 1 to 2 per level of [[Looting]], for a maximum of 2-7 bones with Looting III. The chance of dropping bones increases by 1% per looting level, so with Looting III there is up to a 28% chance of bones dropping.
=== Fishing ===
Bones can also be obtained by [[fishing]] as part of the junk category. The best chance of catching a bone is achieved without the [[Luck of the Sea]] enchantment, yielding a 1.1% chance.
== Usage ==
=== Helmet ===
[[File:Steve wearing Bone.png|thumb|right|75px]]
[[File:Alex wearing Bone.png|thumb|right|75px]]
While a bone cannot be equipped in the head slot in Survival mode, equipping it using commands causes it to appear in the player's mouth.
=== Taming ===
Using a bone on a wild [[wolf]] has a {{frac|1|3}} chance of [[taming]] it. Bones cannot tame a hostile wolf or a wolf that has already been tamed. However, bones can be used to attract the attention of the tamed ones.
=== Crafting ingredient ===
A bone can be crafted into 3 bone meal.
{{crafting usage}}
== Achievements ==
{{load achievements|Leader of the pack}}
== Advancements ==
{{load advancements|Best Friends Forever}}
== Data values ==
=== ID ===
{{edition|java}}:
{{ID table
|edition=java
|showforms=y
|generatetranslationkeys=y
|displayname=Bone
|spritetype=item
|nameid=bone
|form=item
|foot=1}}
{{edition|bedrock}}:
{{ID table
|edition=bedrock
|shownumericids=y
|showforms=y
|notshowbeitemforms=y
|generatetranslationkeys=y
|displayname=Bone
|spritetype=item
|nameid=bone
|id=415
|form=item
|foot=1}}
== History ==
{{History|java beta}}
{{History||1.2|[[File:Bone JE1 BE1.png|32px]] Added bones.
|Bones can be [[crafting|crafted]] into [[bone meal]].}}
{{History||1.4|Bones can now be used to tame [[wolves]].}}
{{History|java}}
{{History||1.3.1|snap=12w21a|Bones can now be found within [[desert temple]]s, allowing bones to be obtainable on Peaceful difficulty.}}
{{History||1.4.2|snap=12w36a|Added [[wither skeleton]]s, which has a chance to [[drops|drop]] bones when killed.}}
{{History||1.6.1|snap=13w16a|Added [[skeleton horse]]s, which drop bones when killed.}}
{{History||1.7.2|snap=13w36a|Bones can now be more easily obtained in Peaceful difficulty by [[fishing]]. Although, they are considered a "junk" [[item]].}}
{{History||1.9|snap=15w44a|The average yield of bones in [[desert temple]]s has been slightly decreased.
|Bones can now be found in [[dungeon]] [[chest]]s.}}
{{History||1.10|snap=16w20a|Added [[stray]]s, which [[drops|drop]] bones when killed.}}
{{History||1.11|snap=16w39a|Bones can now found in the new [[woodland mansion]] chests.}}
{{History||1.13|snap=17w47a|Prior to [[1.13/Flattening|''The Flattening'']], this [[item]]'s numeral ID was 352.}}
{{History||1.14|snap=18w43a|[[File:Bone JE2.png|32px]] The texture of bones has now been changed.}}
{{History|||snap=18w44a|[[File:Bone JE3 BE2.png|32px]] The texture of bones has now been slightly changed.}}
{{History||1.19|snap=Deep Dark Experimental Snapshot 1|Bones now generate in [[ancient city]] chests.}}
{{History|pocket alpha}}
{{History||v0.2.0|[[File:Bone JE1 BE1.png|32px]] Added bones. They are currently unobtainable and serve no purpose.}}
{{History||v0.3.3|Added skeletons, which drop bones when they die.
|Bones can now be used to craft [[bone meal]].}}
{{History||v0.5.0|Bones can now be obtained after activating the [[nether reactor]].}}
{{History||v0.9.0|snap=build 1|Added bones to [[Creative]] mode.}}
{{History||v0.11.0|snap=build 1|Bones can now be more easily obtained in Peaceful difficulty by [[fishing]]. Although, they are considered a "junk" [[item]].}}
{{History||v0.12.1|snap=build 1|Added [[wither skeleton]]s, which have a chance to [[drops|drop]] bones when killed.
|Bones are no longer available from the [[nether reactor]].}}
{{History||v0.13.0|snap=build 1|Bones can now be found inside of the [[desert temple]] hidden [[chest]] room.}}
{{History||v0.15.0|snap=build 1|Added [[stray]]s and [[skeleton horse]]s, which drop bones when killed.
|Bones can now be found in [[jungle temple]] [[chest]]s.}}
{{History|pocket}}
{{History||1.1.0|snap=alpha 1.1.0.0|Bone can now be found inside [[woodland mansion]] chests.}}
{{History|bedrock}}
{{History||1.4.0|snap=beta 1.2.14.2|Bones now [[drops|drop]] from [[fish]] mobs.}}
{{History||1.10.0|snap=beta 1.10.0.3|[[File:Bone JE3 BE2.png|32px]] The texture of bones has now been changed.}}
{{History|console}}
{{History||xbox=TU1|xbone=CU1|ps=1.00|wiiu=Patch 1|[[File:Bone JE1 BE1.png|32px]] Added bones.}}
{{History||xbox=TU5|Bones can be found in the Miscellaneous tab in the [[Creative inventory]].}}
{{History||xbox=TU12|Moved bones to the Materials tab in the Creative inventory.}}
{{History||xbox=TU19|xbone=CU7|ps=1.12|wiiu=Patch 1|Added [[wither skeleton]]s, which have a chance to [[drops|drop]] bones when killed.}}
{{History||xbox=TU31|xbone=CU19|ps=1.22|wiiu=Patch 3|Bones can now be obtained from [[fishing]].}}
{{History||xbox=TU46|xbone=CU36|ps=1.38|wiiu=Patch 15|Added [[stray]]s and [[skeleton horse]]s, which drop bones when killed.}}
{{History||xbox=none|xbone=none|ps=1.90|wiiu=none|switch=none|[[File:Bone JE3 BE2.png|32px]] The texture of bones has now been changed.}}
{{History|new 3ds}}
{{History||0.1.0|[[File:Bone JE1 BE1.png|32px]] Added bones.}}
{{History|foot}}
== Issues ==
{{issue list}}
== See also ==
* [[Bone meal]]
* [[Wolf]]
* [[Dyeing]]
{{Items}}
[[Category:Renewable resources]]
[[de:Knochen]]
[[es:Hueso]]
[[fr:Os]]
[[hu:Csont]]
[[it:Osso]]
[[ja:骨]]
[[ko:뼈]]
[[nl:Bot]]
[[pl:Kość]]
[[pt:Osso]]
[[ru:Кость]]
[[th:กระดูก]]
[[tr:Kemik]]
[[uk:Кістка]]
[[zh:骨头]]</li></ul> | The Far Lands ceiling is unchanged as Beta 1.6 eliminates ability to normally place blocks at Y of 127. | ||||
1.8{{Extension DPL}}<ul><li>[[Copper Ingot|Copper Ingot]]<br/>{{About|the ingot|the ore|Copper Ore|the mineral block|Block of Copper}}
{{Item
| image = Copper Ingot.png
| renewable = Yes
| stackable = Yes (64)
}}
'''Copper ingots''' are [[metal]] ingots obtained from smelting [[raw copper]] or killing [[drowned]].
== Obtaining ==
=== Crafting ===
{{Crafting
|Block of Copper;Waxed Block of Copper|Output=Copper Ingot,9
|type=Miscellaneous
}}
=== Smelting ===
Copper ingots can be obtained by smelting [[raw copper]] in a [[furnace]] or [[blast furnace]], as well as the ore itself if mined using [[Silk Touch]].
{{Smelting
|head=1
|Raw Copper
|Copper Ingot
|0.7
}}
{{Smelting
|foot=1
|Copper Ore; Deepslate Copper Ore
|Copper Ingot
|0.7
}}
=== Mob loot ===
==== Drowned ====
When killed by a [[player]] or a tamed [[wolf]], a [[drowned]] has a 11% ({{frac|11|100}}) chance of dropping a copper ingot. With the [[Looting]] enchantment, the chance can be increased to 13% ({{frac|13|100}}) with Looting I, 15% ({{frac|3|20}}) with Looting II, and 17% ({{frac|17|100}}) with Looting III.
== Usage ==
=== Crafting ingredient ===
{{crafting usage}}
=== Smithing ingredient ===
{{Smithing
|head=1
|ingredients=Any Armor Trim +<br/>Any Armor Piece + <br/>Copper Ingot
|Any Armor Trim Smithing Template
|Netherite Chestplate
|Copper Ingot
|Copper Trim Netherite Chestplate
|showdescription=1
|description = All armor types can be used in this recipe,<br/>a netherite chestplate is shown as an example.<br/>
|tail=1
}}
;Trim color palette
The following color palette is shown on the designs on trimmed armor:
*{{TrimPalette|copper ingot}}
== Data values ==
=== ID ===
{{edition|java}}:
{{ID table
|edition=java
|showforms=y
|generatetranslationkeys=y
|displayname=Copper Ingot
|spritetype=item
|nameid=copper_ingot
|form=item
|foot=1}}
{{edition|bedrock}}:
{{ID table
|edition=bedrock
|shownumericids=y
|showforms=y
|notshowbeitemforms=y
|generatetranslationkeys=y
|displayname=Copper Ingot
|spritetype=item
|nameid=copper_ingot
|form=item
|id=504
|foot=1}}
== History ==
{{History|java}}
{{History||1.17|snap=20w45a|[[File:Copper Ingot JE1.png|32px]] Added copper ingots.}}
{{History|||snap=20w46a|[[File:Copper Ingot JE2 BE1.png|32px]] The texture of copper ingots has been changed.|Crafting copper ingots from and into copper blocks now outputs/requires only 4 ingots.}}
{{History|||snap=21w05a|[[Drowned]] can now drop copper ingots when killed instead of [[gold ingots]], making copper ingots renewable.}}
{{History|||snap=21w10a|Copper ingots can now be smelted from [[deepslate copper ore]].}}
{{History|||snap=21w14a|Copper ingots can now be smelted from [[raw copper]].}}
{{History|||snap=21w17a|The amount of copper ingots required to make a [[block of copper]] has been changed back to 9.}}
{{History||1.17.1|snap=Pre-release 1|Increased the chance of [[drowned]] dropping a copper ingot from 5% to 11% and the increase of this chance for each level of [[Looting]] enchantment from 1% to 2% to match {{el|be}}.}}
{{History||1.20<br>(Experimental)|link=1.19.4|snap=23w04a|Copper ingots can now be used as an armor trim material.}}
{{History|||snap=1.19.4 Pre-release 1|Copper ingots can now be used to craft [[brush]]es.}}
{{History|bedrock}}
{{History||Caves & Cliffs (experimental)|link=Bedrock Edition 1.17.0|snap=beta 1.16.210.57|[[File:Copper Ingot JE2 BE1.png|32px]] Added copper ingots.}}
{{History||1.17.0|snap=beta 1.17.0.50|Copper ingots can now be used to craft [[spyglass|spyglasses]].}}
{{History|||snap=beta 1.17.0.52|Copper ingots are now available without enabling [[experimental gameplay]].}}
{{History|||snap=beta 1.17.0.54|The amount of copper ingots required to make a [[block of copper]] has been changed to 9.}}
{{History||Vanilla Experiments (experimental)|link=1.18.30|snap=beta 1.18.30.26|Copper ingots can now be used to craft copper horns.}}
{{History||1.19.0|snap=beta 1.19.0.24|Copper ingots can no longer be used to craft copper horns, as copper horns have been removed.}}
{{History||1.20.0<br>(Experimental)|link=Bedrock Edition 1.19.80|snap=beta 1.19.80.20|Copper ingots can now be used to craft [[brush]]es.}}
{{History|||snap=beta 1.19.80.21|Copper ingots can now be used as an armor trim material.}}
{{History|foot}}
== Issues ==
{{Issue list}}
== External Links ==
*[https://www.minecraft.net/en-us/article/taking-inventory--copper-ingot Taking Inventory:Copper Ingot] – Minecraft.net on December 22, 2022
{{Items}}
[[Category:Renewable resources]]
[[de:Kupferbarren]]
[[es:Lingote de cobre]]
[[fr:Lingot de cuivre]]
[[it:Lingotto di rame]]
[[ja:Copper Ingot]]
[[ko:구리괴]]
[[pl:Sztabka miedzi]]
[[pt:Barra de cobre]]
[[ru:Медный слиток]]
[[uk:Мідний злиток]]
[[zh:铜锭]]</li><li>[[Map|Map]]<br/>{{about|the craftable map|maps showing the locations of certain structures|Explorer Map|other uses|Map (disambiguation)}}
{{distinguish|World}}
{{Item
| image = Map Zoom 4.png
| renewable = Yes
| stackable = Yes (64)
}}
A '''map''' is an [[item]] used to view explored [[Chunk|terrain]] and mark landmarks.
==Obtaining==
===Crafting===
{{crafting
|head=1
|showname=0
|showdescription=1
|A1= Paper
|B1= Paper
|C1= Paper
|A2= Paper
|B2= Compass
|C2= Paper
|A3= Paper
|B3= Paper
|C3= Paper
|Output= Empty Map
|type= Miscellaneous
|description=This variation is called an "empty locator map" {{in|bedrock}}, or an "empty map" {{in|java}}.
When the player first creates a map, it is blank. It needs to be activated by holding it and pressing ''{{Control|use item}}''. after which it records terrain and location markers as the player travels within (or close to) the area it maps.
}}
{{crafting
|A1= Paper
|B1= Paper
|C1= Paper
|A2= Paper
|B2= Paper
|C2= Paper
|A3= Paper
|B3= Paper
|C3= Paper
|Output= Empty Map
|type= Miscellaneous
|description={{only|bedrock}}
This variation is called an "empty map". It does not show location markers. It is intended for cloning and zooming locator maps without having to consume an additional [[compass]] (thereby saving [[iron ingot]]s and [[redstone dust]]), but it can also be {{Control|use|text=activated}} and later converted to a locator map by combining it with a compass on an [[anvil]], [[crafting table]], or [[cartography table]].
|foot=1
}}
=== Natural generation ===
==== Chest loot ====
{{LootChestItem|empty-map,map
}}
=== Cartography table ===
A map can also be created using a single paper on a [[cartography table]] to create an empty map, or a paper with a compass for an empty locator map.{{only|bedrock}}
=== Starting map ===
{{exclusive|bedrock|section=1}}
When creating a new world {{in|bedrock}}, the player can enable the "Starting Map" option to spawn with an empty locator map in the hotbar. The map's zoom scale is 1:8. The map is updated only while the player holds it.
=== Trading ===
Novice-level cartographer [[Villager|villagers]] sell a single empty map for 7 [[Emerald|emeralds]] as their trades.
{{IN|java}}, cartographer villagers may give players with the [[Hero of the Village]] effect an empty map.
== Usage ==
{{See also|Tutorials/Mapping}}
=== Mapping ===
Crafting a map creates an empty map. The map is drawn for the first time when it is held and used (with ''{{control|use item}}''). This map can then be adjusted to different zoom levels. After conversion to a drawn map item, it starts to draw a top-down view of the player's surroundings, with North pointing to the top of the map. A pointed oval pointer indicates the player's position on the map, and moves in real-time as the player moves across the terrain shown on the map. The map does ''not'' center on the player when created, rather, the world is broken up into large invisible grid squares, and the map displays the area of whichever grid square it is in when it is first used. For example, if a player uses a new map in a certain grid square, and then moves a distance away and uses another fresh map but is still within the same grid square, both maps appear identical. To make a map that is not identical to the first one, the player would have to move outside of the edges of the first map (because then they would be in a new grid square). This way, no two maps of the same size can ever partially overlap and every map can display only a fixed area.
To record the world on a map, that specific map must be held in the player's hands while the player moves around the world. The world is recorded as-is during exploration, meaning that if the world is modified, a player must revisit the area while holding the map to update the map's view. Maps can also be [[Map#Cloning|cloned]]. If a player holds a map whose one or more clones are on display in item frames, updates are made on all clone-connected maps.
Other players are displayed on the map only if they have a map in their inventory cloned from the one being looked at. When placing a map into an [[item frame]], the map displays with a green pointer shown at the location of the item frame. This is to help the player see where they are in relation to the area that the map is showing. If the player leaves a map in an item frame and views a clone of it, the green pointer remains in the spot of the framed copy. This can be used to set up waypoints. Unexplored areas are transparent, making the item frame visible.
When the player leaves the area shown on a specific map, the player pointer transforms into a white dot that moves on that map. The marker shrinks to a smaller white dot if the player is far from the map's center: the area is 320 by 320 blocks per scale factor. The dot moves along the edge of the map to show the relative location of the player. However {{in|bedrock}}, the pointer remains as an arrow but shrinks until the player is near the area shown on the map.
While maps in [[the Nether]] work, they show only the red-and-gray pattern, regardless of the blocks placed. The only useful function is finding where the player is in relation to placed framed maps, which show as green pointers. Additionally, the player pointer rapidly spins and is not a good indicator of direction. Placing a [[banner]] in [[the Nether]] still shows it on the map as usual. Having a smaller map image while riding a [[strider]] in the Nether can help one to see one's footing while traveling over [[lava]].
{{IN|java}}, when using a map from another dimension, the map shows the player's position and direction when they were last in the dimension of the map. {{IN|bedrock}}, however, the player can use maps from one dimension while in another dimension. For locator maps, the place marker changes color depending on the dimension that the player is currently in (white for the Overworld, red for [[the Nether]], and magenta for [[the End]]). An Overworld map in the Nether shows the player's corresponding location and direction in the Overworld.<ref name=multiverse>{{ytl|EpP1diZdEdI}}</ref> Similarly, a Nether Map in the Overworld shows the player's corresponding location in the Overworld, but the place marker spins, just like a Nether map in the Nether. An Overworld map in the End shows the world spawn.<ref name=multiverse/> A Nether map cannot be used in the End — the map appears, but the place marker is not shown anywhere — and similarly, an End map cannot be used in the Overworld or the Nether.
A player can make a large piece of pixel art (128×128) facing upward, center a map on it, and place that map in an [[item frame]] to create a custom picture. Locking is recommended. See [[Map item format#Map Pixel Art]] for details on the techniques.
Maps display as a mini-map when held in the off-hand, or if the off-hand slot is occupied; the map is full-sized only when held in the dominant hand with both hands free.
A map always positions itself facing towards North when placed horizontally within an item frame regardless of how the map is placed.
=== Map content ===
{{Main|Map item format}}
Maps consist of square pixels arranged like pixels in a 128×128 square pattern, with each pixel representing a square portion of land. {{IN|java}}, the [[Map item format#Color table|color of a map pixel]] generally matches the color of the most common [[opaque]] block in the corresponding area, as seen from the sky. 'Minority blocks' in the target area have no effect on the color of the pixel, thus small features tend to be undetectable on zoomed-out maps.
{{IN|bedrock}}, the [[Map item format#Color table|color of a map pixel]] instead matches the single top-most opaque block in a grid sized by the map magnification pixel size (see the table in the "Player marker and pointer" section below). For example, a 3/4 magnification map has a pixel size of 8x8 blocks; this means the map will read only the top-most opaque blocks at the 0,0 coordinate, the 8,0 coordinate, the 0,8 coordinate, etcetera, ignoring all other blocks in the area. This means that {{in|bedrock}}, map pixel art requires only one block per pixel regardless of map magnification.
{{IN|bedrock}}, grass, foliage and water colors that are biome-dependent are represented accurately on a map.
{| class="wikitable"
|-
! style="width: 300px;" | {{el|je}}
! style="width: 300px;" | {{el|be}}
|-
| style="text-align: center;" | [[File:Map Zoom 4.png|alt=All banners marked on a map, alongside a named banner.|216px]]
| style="text-align: center;" | [[File:Map item BE.png|216px]]
|-
| Biome colors on ''Java Edition''.
| Biome colors on ''Bedrock Edition''.
|-
|}
Maps also show ground up to about 15 blocks below the surface of the water in oceans as slightly lighter blue, to show where the ground rises. This is not true with land above water. Higher elevations in the world mean lighter colors on the map. The map records the surface even as the player moves below the surface.
A standard map represents 128x128 blocks (1 block per pixel, 8x8 [[chunks]]) but maps can be zoomed-out to represent up to 2048x2048 blocks (16 square blocks per pixel, 128x128 [[chunks]]).
Some relevant distances: 64 blocks (4 chunks) is the update radius from a player in the Overworld and the End. However, it is half this (32 blocks) in the Nether. Also, 1024 blocks is the minimum Overworld distance from a [[nether portal]], at which players can build another portal and expect to reach a new location in the Nether. This is the distance across a 1:8 map, and also from a 1:16 map's center to its edge.
=== Player marker and pointer ===
{{IN|java}}, every map contains a marker that marks the position of the player, and points in the same direction as the player. When a player moves out of a map, a big white dot appears and moves relative to the player's position. The pointer either disappears when the player moves away a certain distance from the border of the map or, in case of [[explorer map]]s, the big white dot changes to a smaller white dot. The distance required for the small white dot to appear(explorer maps) or for the big dot to vanish (normal maps) changes with the scaling of the map.
* '''Level 0/4 :''' 128×128 blocks (each map pixel represents 1 block)
* '''Level 1/4 :''' 256×256 blocks (2×2 blocks per map pixel)
* '''Level 2/4 :''' 512×512 blocks (4×4 blocks per map pixel)
* '''Level 3/4 :''' 1024×1024 blocks (8×8 blocks per map pixel)
* '''Level 4/4 :''' 2048×2048 blocks (16×16 blocks per map pixel)
{{IN|bedrock}}, a map can be crafted with or without this marker, and a map without a position marker can add one later by adding a compass to the map. When a map is crafted without a compass, it's simply called an "empty map", but when crafted with a compass, it's called an "empty locator map". The marker also turns red if the player enters the Nether with an Overworld map and shows the player's Overworld location relative to the Nether location. A map created in the End has a purple marker showing the player's location. If an Overworld map is used in the End, a magenta dot appears on the player's spawn point.{{/BE|position}}
{{crafting
|name=Map<br>(with marker)
|ingredients=[[Map]] or Empty Map +<br>[[Compass]]
|showdescription=1
|Map (no markers);Empty Map
|Compass
|Output= Locator Map;Empty Locator Map
|type= Miscellaneous
|description={{el|be}} only.
Maps crafted from only paper do not show the location marker; to add it, a compass must be added to the map.
|foot=1
}}
{{IN|bedrock}}, a cartography table can also be used to add a pointer to create a locator map or empty locator map. This can be done by adding a compass to paper, or to an empty map or map.
=== Zooming out ===
[[File:Cartography table UI zoom.png|thumb|300px|{{IN|java}}, cartography table's UI, showing the map is being zoomed out.]]
A [[cartography table]] can also be used to zoom out, taking only one piece of paper per zoom level.
A blank map can not be zoomed out. A map has to have something already marked on it for the zooming to be possible.
{{Crafting
|A1= Paper |B1= Paper |C1= Paper
|A2= Paper |B2= Map;Locator Map |C2= Paper
|A3= Paper |B3= Paper |C3= Paper
|Output= Map;Locator Map
|showdescription=1
|description=Locator Map {{el|be}} only.
}}
{{/BE|zoom}}
==== Zoom details ====
The zooming function starts from when the map is created (zoom level 0) up to its fourth zoom step (zoom level 4).
{| class="wikitable" style="text-align: center" data-description="Zoom levels"
! colspan="2" |
! Zoom step 0
! Zoom step 1
! Zoom step 2
! Zoom step 3
! Zoom step 4
|-
! colspan="2" |
| [[File:Map Zoom 0.png|116px|Zoom step 0, 1:1]]
| [[File:Map Zoom 1.png|116px|Zoom step 1, 1:2]]
| [[File:Map Zoom 2.png|116px|Zoom step 2, 1:4]]
| [[File:Map Zoom 3.png|116px|Zoom step 3, 1:8]]
| [[File:Map Zoom 4.png|116px|Zoom step 4, 1:16]]
|-
! colspan="2" | Zoom level
| 0/4
| 1/4
| 2/4
| 3/4
| 4/4
|-
! colspan="2" | 1 map pixel represents
| 1 block
| 2×2 blocks
| 4×4 blocks
| 8×8 blocks
| 16×16 blocks<br>(1×1 chunk)
|-
! colspan="2" | Scaling ratio
| 1:1
| 1:2
| 1:4
| 1:8
| 1:16
|-
! rowspan="2" colspan="2" | Map covers an area of
| 128×128 blocks
| 256×256 blocks
| 512×512 blocks
| 1024×1024 blocks
| 2048×2048 blocks
|-
| 8×8 chunks
| 16×16 chunks
| 32×32 chunks
| 64×64 chunks
| 128×128 chunks
|-
! colspan="2" | Smallest discernible features
| Blocks
| Trees, Paths
| Lakes, Buildings
| Mountains, Rivers
| Biomes, Mountain Ranges
|-
! colspan="2" | Use cases
| Pixel art, Base plans
| Base surroundings
| Structure mapping
| Landscape mapping
| Biome mapping
|-
! rowspan="2" | Total paper needed to zoom out from Level 0
! in anvil{{only|bedrock|short=1}} or crafting table
| -
| {{ItemSprite|Paper}} 8
| {{ItemSprite|Paper}} 16
| {{ItemSprite|Paper}} 24
| {{ItemSprite|Paper}} 32
|-
! in cartography table
| -
| {{ItemSprite|Paper}} 1
| {{ItemSprite|Paper}} 2
| {{ItemSprite|Paper}} 3
| {{ItemSprite|Paper}} 4
|}
Maps are always aligned to a grid at all zoom levels. That means zooming out any different map in a specific area covered by that map always has the same center. As such, maps are aligned by map width (1024 blocks for a level 3 maps) minus 64. A level 3 map generated at spawn covers X and Z coordinates from -64 to 959. All maps generated in this area zoom out to the same coordinates, guaranteeing that they are always 'aligned' on a map wall. For a zoomed-out map to cover a new area, it must start with a base (level 0) map that is in that area.
At zoom level 0, a map created on the point (0,0) has (0,0) at the center of the map. At higher zoom levels of the same map, the coordinate (0,0) is in the top left square of the map.
{{IN|java}}, zoom level can be seen on a map by turning on Advanced Tooltips (a [[Debug screen#More debug keys|debug screen]] option that can be toggled by using the key combination {{key|F3+H}}). The tooltip of the map then shows the zoom level, scaling factors, and map ID.
=== Cloning ===
[[File:Cartography table UI clone.png|thumb|300px|{{IN|Java}}, cartography table's UI, showing the map is being cloned.]]
A mix of empty maps and empty locator maps may be used. Whether the cloned maps show position markers is dependent only on the input map.
A [[cartography table]] can also be used to clone a map.
The parts of the world that have already been explored and mapped are copied, and newly explored areas appear on both instances. If one of the maps is later zoomed out, then the maps lose their connection to each other and function as completely separate maps that have to be individually filled by exploring.
In Creative mode, a map in an item frame may be cloned by using {{control|pick block}} on it, as long as that map is not also in the player's inventory.
It doesn't matter if the map to be cloned is at a higher zoom level (made of more paper) than the blank map. Upon copying the map, both resulting maps have the same magnification as the starting map.
{{/BE|clone}}
=== Crafting ingredient ===
{{crafting usage|Map, Empty Map}}
=== Marking points ===
{{IN|java}} the player has the ability to mark spots on a map. To do this, {{control|use}} a map on a placed-down [[banner]], and the spot of the banner gets marked on the map. The mark takes the color of whatever the base color is for the banner, and if the banner has a name, the mark shows that name. Banner marks on a map are always oriented with their top facing north, regardless of the banner's actual orientation. If the banner is destroyed, the mark of the banner remains at first, but if the player gets closer to where the banner previously was, it disappears as the area is updated on the map.
If a map is mounted on an item frame and is within the area it depicts, the mounted map displays its current location with a green indicator rotated to match its orientation.
[[File:Map Marker Bedrock on Item frame.png|thumb|181x181px|{{IN|bedrock}} this is what a map lying on an item frame looks like, while showing markers.]]
{{IN|bedrock}} the player can place copies of locator maps in [[item frame]]s in order to create a land mark. The marker is a green dot that resembles the shape of the player's marker, but in green color. The position the marker points at depends on the direction the item frame is facing. It is worth noting that the markers work only on copies of the same map. Other maps of the same area do not show the existing markers that the player(s) had placed.
If a player has a cloned map in their inventory, their pointer appears white when viewed on the same map held by another player. Hence, if all players have the same cloned map in their inventory, all markers would appear white when the clone map is viewed.
{| class="wikitable"
|-
! style="width: 300px;" | {{el|je}}
! style="width: 300px;" | {{el|be}}
|-
| style="text-align: center;" | [[File:Banner marked map.png|alt=All banners marked on a map, alongside a named banner.|216px]]
| style="text-align: center;" | [[File:Tracking map with markers bedrock.png|216px]]
|-
| How every banner appears {{IN|java}} on a map, including named banners.
| {{IN|bedrock}} this is how a locator map shows map markers while held by a player.
|-
|}
===Locking===
[[File:Cartography table UI lock.png|thumb|300px|{{IN|Java}}, cartography table's UI, showing the map is being locked.]]
Maps can be locked when using a [[glass pane]] in a [[cartography table]]. This creates a new map containing the same data and locks it. All copies of this new map are also locked. A locked map never changes, even when the depicted terrain changes. {{IN|Be}}, locked maps have a unique texture.
{| class="wikitable" style="text-align: center;"
|-
! Condition
! style="width: 200px;" | Newly created map
! style="width: 200px;" | Map after terrain alteration
|-
! Unlocked map
| [[File:Map Zoom 0.png|174px]] || [[File:Unlocked Map.png|174px]]
|-
! Locked map
| [[File:Map Zoom 0.png|174px]] || [[File:Map Zoom 0.png|174px]]
|-
|}
{{-}}
== Sounds ==
{{Edition|Java}}:
{{Sound table
|rowspan=2
|sound=Drawmap1.ogg
|sound2=Drawmap2.ogg
|sound3=Drawmap3.ogg
|subtitle=Map drawn
|source=player
|description=When a map is drawn
|id=ui.cartography_table.take_result
|translationkey=subtitles.ui.cartography_table.take_result
|volume=1.0
|pitch=1.0
|distance=16}}
{{Sound table
|subtitle=Map drawn
|source=block
|description=When a map is edited using a cartography table
|id=ui.cartography_table.take_result
|translationkey=subtitles.ui.cartography_table.take_result
|volume=1.0
|pitch=1.0
|distance=16
|foot=1}}
{{Edition|Bedrock}}:
{{Sound table
|type=bedrock
|rowspan=2
|sound=Drawmap1.ogg
|sound2=Drawmap2.ogg
|sound3=Drawmap3.ogg
|source=block
|description=When a map is drawn<wbr>{{Upcoming|BE 1.20.20.20}}
|id=ui.cartography_table.take_result|idnote={{Verify|Could be block.cartography_table.use}}
|volume=0.8
|pitch=1.0}}
{{Sound table
|type=bedrock
|source=block
|description=When a map is edited using a cartography table
|id=ui.cartography_table.take_result
|volume=0.8
|pitch=1.0
|foot=1}}
== Data values ==
=== ID ===
{{edition|java}}:
{{ID table
|edition=java
|showforms=y
|generatetranslationkeys=y
|displayname=Empty Map
|spritetype=item
|nameid=map
|form=item}}
{{ID table
|displayname=Map
|spritetype=item
|nameid=filled_map
|form=item
|translationkey=item.minecraft.filled_map, filled_map.buried_treasure, filled_map.explorer_jungle{{upcoming|java 1.20.2}}, filled_map.explorer_swamp{{upcoming|java 1.20.2}}, filled_map.mansion, filled_map.monument, filled_map.unknown, filled_map.village_desert{{upcoming|java 1.20.2}}, filled_map.village_plains{{upcoming|java 1.20.2}}, filled_map.village_savanna{{upcoming|java 1.20.2}}, filled_map.village_snowy{{upcoming|java 1.20.2}}, filled_map.village_taiga{{upcoming|java 1.20.2}}
|foot=1}}
{{edition|bedrock}}:
{{ID table
|edition=bedrock
|showaliasids=y
|shownumericids=y
|showforms=y
|notshowbeitemforms=y
|generatetranslationkeys=y
|displayname=Empty Map
|spritetype=item
|nameid=empty_map
|aliasid=emptymap
|id=515
|form=item
|translationkey=item.emptyMap.name, item.emptyLocatorMap.name}}
{{ID table
|displayname=Map
|spritetype=item
|spritename=map-be
|nameid=filled_map
|aliasid=map
|id=420
|form=item
|translationkey=item.map.name, item.map.exploration.mansion.name, item.map.exploration.monument.name, item.map.exploration.treasure.name
|foot=1}}
=== Metadata ===
{{see also|Bedrock Edition data values}}
{{IN|bedrock}}, maps use the following data values:
{{/DV}}
=== Item data ===
{{el|java}}:
{{main|Player.dat format}}
<div class="treeview">
* {{nbt|compound|tag}}: The item's '''tag''' tag.
{{:Player.dat_format/Maps}}
</div>
{{el|bedrock}}:
: See [[Bedrock Edition level format/Item format]].
=== Map icons ===
{{see also|Player.dat format|Map item format|map_icons.png}}
Map icons are 8×8 in ''Java Edition'', but 16×16 in Bedrock Edition. As such, there are minor misalignment issues in ''Java Edition''.<ref>{{bug|MC-214649|||WF}}</ref>
[[File:Map icons.png|thumb|128px|Map icons texture {{in|Java}}]]
[[File:Map icons BE.png|thumb|128px|Map icons texture {{in|Bedrock}}]]
{| class="wikitable"
|-
! Java ID !! Bedrock ID !! Text ID !! Appearance !! Purpose !! Shown in item frames?
|-
| 0 || ||<code>player</code> || [[File:Player (texture) JE1 BE1.png|16px]] [[File:Player (texture) BE2.png|16px]] White marker || Players (on map) || No
|-
| 1 || 1 ||<code>frame</code> || [[File:Green Marker (texture) JE1 BE1.png|16px]] [[File:Green Marker (texture) BE2.png|16px]] Green marker || The current map in an item frame || Yes
|-
| 2 || ||<code>red_marker</code> || [[File:Red Marker (texture) JE1 BE1.png|16px]] [[File:Red Marker (texture) BE2.png|16px]] Red marker || Position converted to Overworld when opening Overworld map in the Nether{{Only|bedrock}} || No
|-
| 3 || ||<code>blue_marker</code> || [[File:Blue Marker (texture) JE1 BE1.png|16px]] [[File:Blue Marker (texture) BE2.png|16px]] Blue marker || Other players || No
|-
| 4 || ||<code>target_x</code> || [[File:Target X (texture) JE1 BE1.png|16px]] White X || Unused || Yes
|-
| 5 ||5
|<code>target_point</code> || [[File:Target Point (texture) JE1 BE1.png|16px]] [[File:Target Point (texture) BE2.png|16px]] Red triangle || Unused || Yes
|-
| 6 || 6 ||<code>player_off_map</code> || [[File:Player Off Map (texture) JE1 BE1.png|16px]] Large white dot || Players off map, nearby{{only|java}} || No
|-
| 7 || 13 ||<code>player_off_limits</code> || [[File:Player Off Limits (texture) JE1.png|16px]] [[File:Player Off Limits (texture) BE.png|16px]] Small white dot || Players off map, far away{{only|java}} || No
|-
| 8 ||14
|<code>mansion</code> || [[File:Mansion (texture) JE1.png|16px]] [[File:Mansion (Texture) BE2.png|frameless|16x16px]] Woodland mansion || Woodland mansion || Yes
|-
| 9 || 15 ||<code>monument</code> || [[File:Monument (texture) JE1.png|16px]] [[File:Monument Texture BE2.png|frameless|16x16px]] Ocean monument || Ocean monument || Yes
|-
| 10 - 25 || ||<code>{{tooltip|banner_*|banner_white, banner_orange, banner_magenta, banner_light_blue, banner_yellow, banner_lime, banner_pink, banner_gray, banner_light_gray, banner_cyan, banner_purple, banner_blue, banner_brown, banner_green, banner_red, banner_black}}</code> || [[File:Banner White (texture) JE1.png|16px]] [[File:Banner Light Gray (texture) JE1.png|16px]] [[File:Banner Gray (texture) JE1.png|16px]] [[File:Banner Black (texture) JE1.png|16px]] [[File:Banner Brown (texture) JE1.png|16px]] [[File:Banner Red (texture) JE1.png|16px]] [[File:Banner Orange (texture) JE1.png|16px]] [[File:Banner Yellow (texture) JE1.png|16px]] [[File:Banner Lime (texture) JE1.png|16px]] [[File:Banner Green (texture) JE1.png|16px]] [[File:Banner Cyan (texture) JE1.png|16px]] [[File:Banner Light Blue (texture) JE1.png|16px]] [[File:Banner Blue (texture) JE1.png|16px]] [[File:Banner Magenta (texture) JE1.png|16px]] [[File:Banner Purple (texture) JE1.png|16px]] [[File:Banner Pink (texture) JE1.png|16px]]<br>Banners in all 16 wool colors{{only|java}}|| Banner markers || Yes
|-
| 26 ||4
|<code>red_x</code> || [[File:Red X (texture) JE1.png|16px]] [[File:Target X (texture) BE2.png|16px]] Red X || Buried treasure || Yes
|-
| || 8 || || [[File:Magenta Marker (texture) BE1.png|16px]] Magenta marker
| Position converted to Overworld when opening Overworld map in the End{{Only|bedrock}} || No
|-
| || 9 || || [[File:Orange Marker (texture) BE1.png|16px]] Orange marker{{more info}}
|Other players
|Yes
|-
| || 10 || || [[File:Yellow Marker (texture) BE1.png|16px]] Yellow marker
| Other players || No
|-
| || 11 || || [[File:Cyan Marker (texture) BE1.png|16px]] Cyan marker
| Other players || No
|-
| -
|12
| || [[File:Green Point (texture) BE1.png|16px]] Green Triangle
| Other structure such as stronghold, fortress, end city, etc. when used as explorer map destination{{Only|bedrock}} || Yes
|}
It should be noted that even if the player used a NBT editor to add an additional icon on the map, ''Minecraft'' shows only the first one listed when the player loads up their world.
== Achievements ==
{{load achievements|Map Room}}
== History ==
{{see also|section=24|map_icons.png|Java Edition history of textures#Map icons}}
{{more images|section=24|{{bug|MC-72962}}}}
{{History||April 27, 2011|link=https://web.archive.org/web/0/http://notch.tumblr.com/post/4988431144/the-maps|[[Notch]] unveiled screenshots of the map.}}
{{History||April 28, 2011|link={{tweet|notch|63500114005721088}}|[[Notch]] said that he would try to make maps place-able on [[wall]]s.}}
{{History|java beta}}
{{History||1.6|snap=Test Build 3|[[File:Map (item) JE1 BE1.png|32px]] Added maps.}}
{{History||1.6.6|The ability to auto-craft maps using shift-click has been disabled.}}
{{History||1.8|snap=Pre-release|Maps can now be found in library chests in the brand-new [[stronghold]]s.
|Auto crafting maps has been restored. Map cloning, therefore, is unavailable for a period of time.}}
{{History||1.8.1|Maps now work both while walking and flying.}}
{{History|java}}
{{History||1.0.0|snap=Beta 1.9 Prerelease 5|Prior to this update, the [[sun]] in ''[[Minecraft]]'' rose in the North, which threw off many [[player]]s and led to a common misconception that ''Minecraft'' maps/[[world]]s were oriented with East at the top. The sun now rises in the east and sets in the west, making navigation much more intuitive.
|Before the change in sun position, it was commonly said that ''Minecraft'' maps/worlds are oriented with East at the top; sunrise, by definition, occurs at the East, which means it is certainly true that the maps were oriented "East" since the Sun rose from the top (North). However, [[Jeb]] asserted (and [[Notch]] agreed) that the sun rose in the north.<ref>{{Tweet|jeb|87815841160237056}}</ref><ref>{{Tweet|notch|88155424880201728}}</ref> Most mods and map-making tools, however, used the terms East and North consistent with their actual definitions (e.g. a [[Programs and editors/Cartograph|Cartograph]]-generated map with North at the top is rotated 90 degrees from the in-game map).}}
{{History||1.4.2|snap=12w34a|[[File:Empty Map JE1 BE1.png|32px]] [[Crafting]] a map now creates an empty map. The map is drawn for the first time when it is held and right clicked, and is centered near the location of the [[player]] when clicked (not as before where it was centered on the location it was crafted.)
|Previously, in order to map a new area, the map had to be ''crafted'' in that area (rather than carrying a previously-crafted map to the new area). The point where a map is crafted becomes its permanent center, and could never be changed.
|The pointer no longer disappears when leaving the map, but transforms into a white dot, indicating on what side of the map the player is located.
|Maps now align to a grid, making it easier to create adjacent maps.
|Maps can now be zoomed out (but not zoomed in).
|Maps can now be cloned and scaled.}}
{{History||1.4.2|snap=12w34b|Maps now have a ''zoom level'', which was fixed at 1:8 prior to snapshot [[Java Edition 12w34a|12w34a]],<ref name="mapinfo">https://web.archive.org/web/0/http://notch.tumblr.com/post/4988431144/the-maps</ref> but now starts at 1:1 and can be increased up to 1:16 by re-crafting an existing map.
|Maps are no longer numbered on the top-left corner and is labeled through the tooltip.}}
{{History|||snap=12w36a|New maps are now crafted at a scale factor of 1:1. A zoomed in map can be zoomed out by re-crafting it with another 8 sheets of [[paper]] on a [[crafting table]]. Each time this is done, the scale increases - 1:1, 1:2, 1:4, 1:8, 1:16 with a map scale of 1:16 being the current maximum.}}
{{History||1.7.2|snap=13w38a|The map size has been increased when placed on a [[wall]] using the [[item frame]].
|More colors have been added to maps for different [[block]]s.<ref name="infodump2">https://web.archive.org/web/0/https://www.mojang.com/2013/10/minecraft-1-7-the-update-that-changed-the-world</ref>}}
{{History||1.8|snap=14w31a|Zoomed maps now conform to an expanded grid based on their zoom level. Previously, careful considerations would need to be taken to creating a wall of adjoining maps.}}
{{History||1.8.1|snap=pre1|Some colors have been changed on maps to more accurately represent their respective [[block]].}}
{{History||1.9|snap=15w31a|Maps now display as a mini-map when held in the off-hand, or if the off-hand slot is occupied; the (old) large version is visible only when held in the dominant hand with the secondary hand free.}}
{{History|||snap=15w34a|New maps can now be [[crafting|crafted]] at a scale factor of 1:4.
|A crafting recipe has been added for zooming in maps.}}
{{History|||snap=15w43a|The average yield of empty maps from [[stronghold]] library [[chest]]s has been doubled.}}
{{History|||snap=15w45a|New maps are once again [[crafting|crafted]] at a scale factor of 1:1, as they had been before snapshot [[15w34a]].
|The [[crafting]] recipe, that was introduced in 15w34a, for zooming in maps has been removed.}}
{{History|||snap=15w49a|Map making now uses armor equipping sounds.}}
{{History||1.11|snap=16w39a|Maps now work in [[the End]].
|Empty maps are now [[trading|sold]] by cartographer [[villager]]s as their tier 3 [[trading|trade]].
|Added [[explorer map]]s, sold by cartographers as their tier 4 trades.}}
{{History||1.12|snap=17w17a|Maps now have separate colors for colored [[terracotta]] blocks from other colored blocks.}}
{{History||1.13|snap=17w47a|Prior to [[1.13/Flattening|''The Flattening'']], these [[item]]s' numeral IDs were 358 and 395.
|Maps now use additional NBT to specify which map they contain. Prior to this version, they used the [[damage]] value instead.
|Map IDs are no longer limited to 32,768.}}
{{History|||snap=17w50a|Maps can now be placed on floor and ceiling [[item frame]]s.}}
{{History|||snap=18w10a|Spots on maps can now be marked using [[banner]]s.}}
{{History|||snap=18w11a|Empty maps can now generate in [[shipwreck]] [[chest]]s.}}
{{History|||snap=pre7|Maps have been changed slightly, in regard to which [[block]]s are shown and which blocks are not.}}
{{History||1.14|snap=18w43a|[[File:Empty Map JE2 BE2.png|32px]] [[File:Map (item) JE2 BE2.png|32px]] The textures of maps have been changed.}}
{{History|||snap=18w48a|Empty maps can now be found in chests in [[village]] cartographer houses.}}
{{History|||snap=19w02a|Maps can now be cloned and zoomed out (extended) by using a [[cartography table]].
|Maps can now be locked by using a [[glass pane]] with a cartography table.
|The recipes for cloning and zooming out maps have been removed.}}
{{History|||snap=19w06a|Map making is now silent again.}}
{{History|||snap=19w13a|Cartographer villagers now give empty maps to players under the [[Hero of the Village]] effect.}}
{{History||1.16|snap=20w21a|Map making sounds are now the same as when using a cartography table.}}
{{History|pocket alpha}}
{{History||v0.14.0|snap=build 1|[[File:Empty Map JE1 BE1.png|32px]] [[File:Map (item) JE1 BE1.png|32px]] Added maps.
|Maps are crafted using nine [[paper]], one for every slot of the [[crafting]] grid.
|Maps must be combined with a [[compass]] using an [[anvil]] in order to show the [[player]]'s position.
|Maps can be zoomed using an anvil.}}
{{History|||snap=build 3|New maps are now [[crafting|crafted]] at full zoom.
|Empty maps now have a "Create Map" button to initialize them.}}
{{History|||snap=build 7|New maps are now crafted at a scale factor of 1:1.}}
{{History||v0.15.0|snap=unknown|Maps can now be crafted either with 8 pieces of [[paper]] and a [[compass]] ''or'' 9 pieces of paper, to get a map with or without a position marker.}}
{{History||v0.16.0|snap=build 1|Different colors have been added to maps for different [[biome]]s.}}
{{History|pocket}}
{{History||1.0.0|snap=?|[[Windows 10 Edition]] can now use the [[anvil]] as well as the [[crafting table]] to clone, zoom and apply markers, just as [[Pocket Edition]] in general could.
|Maps can now be found inside [[stronghold]] library [[chest]]s.}}
{{History||1.1.0|snap=alpha 1.1.0.0|Empty maps with direction markers built-in are now called "locator maps".}}
{{History|||snap=alpha 1.1.0.3|"Locator maps" are now called "empty locator maps".
|Empty maps are now [[trading|sold]] by cartographer [[villager]]s for 7-11 [[emerald]]s as their tier 3 [[trading|trade]].}}
{{History|bedrock}}
{{History||1.4.0|snap=beta 1.2.14.2|Maps can now be found inside map room [[chest]]s in [[shipwreck]]s.}}
{{History||?|The texture of the filled map overlay has been changed.}}
{{History||?|Maps now function in dimensions other than the dimension in which they were created.}}
{{History||1.10.0|snap=beta 1.10.0.3|Maps can now be found in cartographer house [[chest]]s in [[village]]s.
|[[File:Empty Map JE2 BE2.png|32px]] The texture of empty maps has been changed.}}
{{History||1.11.0|snap=beta 1.11.0.1|Empty maps can now be created from 1 [[paper]] in [[cartography table]]s.
|Maps can now be zoomed, cloned, renamed, and have pointers added in cartography tables.}}
{{History|||snap=beta 1.11.0.4|Cartographer [[villager]]s now [[trading|sell]] empty map for an [[emerald]] as their first tier [[trading|trades]].
|Empty locator maps can now be [[trading|bought]] from cartographer villagers.}}
{{History||1.13.0|snap=beta 1.13.0.1|[[File:Map (item) BE3.png|32px]] [[File:Locked Map (item) BE2.png|32px]] Filled maps and locked maps now have unique inventory icons.}}
{{History||1.16.0|snap=beta 1.16.0.57|Trading has been changed, novice-level cartographer now sell an empty map for 7 emeralds. Cartographer villager no longer sell empty locator map.}}
{{History||1.16.100|snap=beta 1.16.100.56|The ID of maps have been changed from <code>emptymap</code> to <code>empty_map</code> and <code>map</code> to <code>filled_map</code>.}}
{{History|console}}
{{History||xbox=TU1|xbone=CU1|ps=1.00|wiiu=Patch 1|switch=1.0.1|[[File:Map (item) JE1 BE1.png|32px]] Added maps.
|The [[player]] spawns with a free map.
|Maps are available only as zoom step 3 maps centered at coordinates 0,0. Biome colors do not appear on maps.}}
{{History||xbox=none|xbone=CU1|ps=1.0|wiiu=none|Larger sized worlds on Xbox One, Playstation 4, and Nintendo Switch have zoom step 3 maps aligned to a grid with maps centered at 0, 1024, or 2048 on the X or Z coordinates.}}
{{History||xbox=TU21|xbone=CU9|ps=1.14|wiiu=Patch 1|[[File:Empty Map JE1 BE1.png|32px]] [[Crafting]] a map now produces an empty map.}}
{{History||xbox=TU46|xbone=CU36|ps=1.38|wiiu=Patch 15|The outer end islands appear on different maps; even on Xbox 360, Playstation 3, Vita, and Wii U editions.}}
{{History||xbox=none|xbone=none|ps=1.90|wiiu=none|switch=none|[[File:Empty Map JE2 BE2.png|32px]] [[File:Map (item) JE2 BE2.png|32px]] The textures of maps have been changed.}}
{{History||ps=1.91|Maps can now be created and used in [[cartography table]]s.}}
{{History|foot}}
== Issues ==
{{issue list}}
== Trivia ==
* Use of the {{key|F1}} key can allow the player to hold a map without blocking their view at all.
* In ''Java Edition'', a map created using {{cmd|give}} can be any map by using the Map parameter to specify the map number desired. E.g. {{cmd|give [player] minecraft:filled_map{map:5<nowiki>}}} gives the specified player map_5. If no data value is supplied it defaults to map_0. If map_0 has not ever been crafted, it is centered on x=0, z=0.
* The maps are stored separately as their own data (<code>.dat</code>) file as <code>map_x.dat</code> with (x) being the map number, see [[map item format]] for more info. By manipulating this number, players can organize their maps to suit them, or if they accidentally create a map in the same location, they can delete their extra map so as to save the number they make.
* Certain programs can be used to make customized maps with images or text on them instead of actual maps, many people use these in adventure maps to show pictures or to tell a story.
* Since all copies of a map are links to the same file, copying an unfinished map keeps it synchronized with the copy as the player fills it in. Thus, a copy stored in a chest can act as a remote backup.
* A map that is in an item frame does not update itself until a player picks it up, lets it reload, and places it back again. However, if a player holds a clone of the map, both maps update.
* Filled maps are the only items that make 90 degree rotations in item frames, and also the only items that can expand the item frame into full block wide.
* On [[Legacy Console Edition]], the player always spawns with a map in their inventory after creating a world. This was later added to Bedrock Edition as an optional feature in the world creation menu.
* Maps on Legacy Console Edition always show the player's current coordinates, as a substitute for the optional [[Coordinates|coordinate display]] in other editions.
* A map cannot be created on [[New Nintendo 3DS Edition]]. Instead, the map is always displayed on the bottom screen along with the coordinates. Biome colors do not appear on maps.
== Gallery ==
<gallery>
MapItem1.png|A fully zoomed map.
MapRotation.png|Having a map in hand does not stop the ability to see ahead.
MapItem3.png|A world being recorded onto a map.
Mcmap4.png|Nearly fully explored map.
Zoomed Map.png|A map edited to the scale of 1.
Sky Map.png|A map mapping the [[Sky Dimension]].
MapOfVillage.png|A village and how it is represented on a map.
Pumpkin map.png|A map containing a custom image made by placing a large number of blocks.
Complete Map.png|A completely explored map.
MapZooms.png|A diagram showing how maps zoomed out before [[Java Edition 1.8]]. Notice how the larger maps have borders made of half and quarter small maps.
Map18zooms.png|From 1.8, zoomed maps are aligned to this grid exactly.
Large Biome Map.png|A map of a [[Large Biomes]] world.
Map0140-0160.png|A comparison of maps between versions in Pocket Edition Alpha [[Pocket Edition Alpha 0.14.0|0.14.0]] and [[Pocket Edition Alpha 0.16.0|0.16.0]].
Mycelium Map.png|A map view of a mushroom biome, showing that mycelium appears purple on a map.
MiniMap.png|Maps held in the off-hand or in either hand while [[dual wielding]] appear as mini-maps.
Partly filled treasure map.png|Partly filled treasure map with an odd area at the bottom left. Normally a partly filled map would look striped (as in the top left), but this map seems to be bugged and is possibly showing caves, or something, in the bottom left.
Partly filled ocean explorer map.png|Partly filled ocean explorer map. Updating the game from an older version (in this case the area was first generated before 1.18) and buying a map after updating (in this case in 1.19.4) can result in the map displaying rivers and terrain where there is really a frozen sea.
Map Stained Glass 1.png|Stained glasses' appearances on maps before and after 1.13.
Map Stained Glass 2.png|Stained glasses' appearances on maps before and after 1.13.
Map Various Blocks 1.png|Various blocks' appearances on maps before and after 1.13.
Map Various Blocks 2.png|Various blocks' appearances on maps before and after 1.13.
Better Together Map.jpg|Holding a map in the offhand in ''Bedrock Edition''.
Better Together Map Icon.jpg|Holding a map in both hands in ''Bedrock Edition''.
File:MapFailedtoFill.png|A map that has not yet filled. A rare bug in Java.
</gallery>
=== The Nether ===
<gallery>
Nethermap.png|A map in [[the Nether]].
Maponnether.png|A map in the Nether; the arrow turns around itself, like in [[compass]].
</gallery>
=== The End ===
<gallery>
Jeb End Map.png|The first image of a map in [[the End]].
Endmap.png|A map in the End.
</gallery>
=== Maps in item frames ===
<gallery>
FramedMap.png|A map displayed on an item frame, as it looked before [[Java Edition 1.7.2]].
Structure Map Collection.png|Multiple maps in item frames. Notice a [[village]], two [[desert temple]]s and a lava lake.
Minecraft maps 3by3.png|A collection of 9 connected full maps.
Full Map.png|A combination of 25 maps pasted together as one map.
Map wall BE.png|A map wall on ''Bedrock Edition'', showing large areas of biome colors for each biome.
Map's in item frames.png|Maps can be placed into [[item frame]]s so they can be viewed together.
Comparing Maps.png|The comparison between 3 zooms of maps.
SuperflatMap.png|A map in a [[Superflat]] world, with some [[village]]s.
MapWallWithMarkers.png|A 3x3 map wall with banner markers.
HEYYEYAAEYAAAEYAEYAA.png|He-Man map art.
Map Player Icons 1.png|First image of player icons on maps.
Map Player Icons 2.png|Second image of player icons on maps.
</gallery>
== See also ==
* [[Explorer Map]]
* [[Clock]]
* [[Tutorials/Navigation|Navigation]]
== References ==
{{Reflist}}
{{Items}}
[[cs:Mapa]]
[[de:Karte]]
[[es:Mapa]]
[[fr:Carte (objet)]]
[[hu:Térkép (tárgy)]]
[[ja:地図]]
[[ko:지도]]
[[nl:Kaart]]
[[pl:Mapa]]
[[pt:Mapa]]
[[ru:Карта]]
[[tr:Harita]]
[[th:แผนที่]]
[[uk:Мапа]]
[[zh:地图]]
[[Category:Renewable resources]]</li></ul></nowiki> | The Far Lands were removed and were replaced by the Void. | ||||
| Pocket Edition Alpha | |||||
0.9.0{{Extension DPL}}<ul><li>[[Rabbit's Foot|Rabbit's Foot]]<br/>{{Item
| image = Rabbit's Foot.png
|type=
| renewable = Yes
| stackable = Yes (64)
}}
A '''rabbit's foot''' is a [[brewing]] item obtained from [[rabbit]]s.
== Obtaining ==
=== Mob loot ===
Each [[rabbit]] has a 10% chance to drop a rabbit's foot when killed by the [[player]]. This chance can be increased by 3% per level using a sword enchanted with [[Looting]].
A [[fox]] sometimes spawns with a rabbit's foot in its mouth, which always drops upon death. Alternatively, the player can drop a [[food]] item, which causes the fox to drop the rabbit's foot.
=== Cat gifts ===
{{main|Cat#Gifts}}
A tamed [[cat]] has a 70% chance of giving the player a gift when the player wakes up from a [[bed]], and the gift has a 16.13% chance to be a rabbit's foot.
== Usage ==
=== Brewing ingredient ===
{{Brewing
|head=1
|Rabbit's Foot
|Mundane Potion
|base=Water Bottle
}}
{{brewing
|foot=1
|showname=1
|Rabbit's Foot
|Potion of Leaping
}}
=== Trading ===
Journeyman-level cleric [[villager]]s buy rabbit's feet for an [[emerald]] as part of their trade: {{in|java}} they buy 2, and {{in|bedrock}} they buy 4.
== Video ==
<div style="text-align:center">{{yt|Ba3QN3uCniU}}</div>
== Data values ==
=== ID ===
{{edition|java}}:
{{ID table
|edition=java
|showforms=y
|generatetranslationkeys=y
|displayname=Rabbit's Foot
|spritetype=item
|nameid=rabbit_foot
|form=item
|foot=1}}
{{edition|bedrock}}:
{{ID table
|edition=bedrock
|shownumericids=y
|showforms=y
|notshowbeitemforms=y
|generatetranslationkeys=y
|displayname=Rabbit's Foot
|spritetype=item
|nameid=rabbit_foot
|id=528
|form=item
|foot=1}}
== History ==
{{History|java}}
{{History||1.8|snap=June 30, 2014|slink=https://twitter.com/TheMogMiner/status/483636993780232192|[[Ryan Holtz]] tweeted images of a rabbit's foot with some other new [[item]]s.}}
{{History|||snap=14w27a|[[File:Rabbit's Foot JE1.png|32px]] Added rabbit's foot.
|Added the [[potion of Leaping]]; it is [[brewing|brewed]] by adding a rabbit's foot to an [[awkward potion]]. The rabbit's foot also creates the [[mundane potion]] when brewed into a [[water bottle]].}}
{{History|||snap=14w33b|[[File:Rabbit's Foot JE2 BE1.png|32px]] The texture of the rabbit's foot has been changed. The new texture was created by [[wikipedia:Reddit|Reddit]] user [http://www.reddit.com/u/zeldahuman zeldahuman].<ref>{{reddit|2bjzes/a_reminder_of_the_blocks_and_items_added_in_18_so|cj69zie|context=3}}</ref><ref>{{reddit|2c5f35/minecraft_snapshot_14w31a_has_been_released|cjct7gb}}</ref>}}
{{History||1.8.1|snap=pre1|Potions of Leaping, which use rabbit's foot, can now be extended using [[redstone]].}}
{{History||1.9|snap=15w46a|The drop rate of rabbit's foot has been quadrupled.{{more info|Before/After rates}}}}
{{History||1.13|snap=17w47a|Prior to [[1.13/Flattening|''The Flattening'']], this [[item]]'s numeral ID was 414.}}
{{History||1.14|snap=18w43a|[[File:Rabbit's Foot JE3 BE2.png|32px]] The texture of rabbit's foot has been changed.}}
{{History|||snap=18w44a|[[Cat]]s now offer rabbit's feet as [[Cat#Gifts|gifts]].}}
{{History|||snap=19w07a|Added [[fox]]es, which sometimes spawn with rabbit's feet in their mouths.}}
{{History|||snap=19w11a|Cleric [[villager]]s now [[trading|buy]] rabbit's feet.}}
{{History|pocket alpha}}
{{History||v0.12.1|snap=build 1|[[File:Rabbit's Foot JE2 BE1.png|32px]] Added rabbit's foot to the [[Creative]] mode [[inventory]].}}
{{History||v0.13.0|snap=build 1|Rabbit's foot can now be obtained as a rare [[drops|drop]] upon killing [[rabbit]]s.
|Rabbit's foot can now be [[brewing|brewed]] to make [[potions of Leaping]].}}
{{History|bedrock}}
{{History||1.8.0|snap=beta 1.8.0.8|Tamed [[cat]]s can now give the [[player]] rabbit's foot as a gift.}}
{{History||1.10.0|snap=beta 1.10.0.3|[[File:Rabbit's Foot JE3 BE2.png|32px]] The texture of rabbit's foot has been changed.}}
{{History||1.11.0|snap=beta 1.11.0.4|Rabbit's foot can now be [[trading|sold]] to cleric [[villager]]s.}}
{{History||1.13.0|snap=beta 1.13.0.1|Added [[fox]]es, which can [[drops|drop]] rabbit's foot.}}
{{History|console}}
{{History||xbox=TU31|xbone=CU19|ps=1.22|wiiu=Patch 3|switch=1.0.1|[[File:Rabbit's Foot JE2 BE1.png|32px]] Added rabbit's foot.}}
{{History||xbox=none|xbone=none|ps=1.90|wiiu=none|switch=none|[[File:Rabbit's Foot JE3 BE2.png|32px]] The texture of rabbit's foot has been changed.}}
{{History|New 3DS}}
{{History||0.1.0|[[File:Rabbit's Foot JE2 BE1.png|32px]] Added rabbit's foot.}}
{{History|foot}}
== Issues ==
{{issue list}}
== Trivia ==
* The superstition that [[wikipedia:Rabbit's_foot|a rabbit's foot is a lucky charm]] applies equally to Minecraft as it does in the real world: it does not actually increase luck.
== Gallery ==
<gallery>
Rabbit Items 4 Ryan Holtz.png|First image of the item by [[Ryan Holtz]].
Rabbit Items 5 Ryan Holtz.png|Ryan Holtz brewing the item into a potion.
Rabbit Items 6 Ryan Holtz.png|Ryan Holtz enhancing the potion.
</gallery>
== References ==
{{reflist}}
== External Links ==
*[https://www.minecraft.net/en-us/article/taking-inventory--rabbit-s-foot Taking Inventory: Rabbit's Foot] – Minecraft.net on May 3, 2019
{{items}}
[[de:Hasenpfote]]
[[es:Pata de conejo]]
[[fr:Patte de lapin]]
[[it:Zampa di coniglio]]
[[ja:ウサギの足]]
[[ko:토끼발]]
[[nl:Konijnenpootje]]
[[pl:Królicza łapka]]
[[pt:Pé de coelho]]
[[ru:Кроличья лапка]]
[[uk:Кроляча лапка]]
[[zh:兔子脚]]
[[Category:Renewable resources]]
[[Category:Brewing recipe]]</li><li>[[Sugar Cane|Sugar Cane]]<br/>{{Block
|image=Sugar Cane.png
|image2=Sugar Cane (item) JE3.png
|extratext = View all [[#Gallery|renders]]
|transparent=Yes
|light=No
|tool=any
|renewable=Yes
|stackable=Yes (64)
|flammable=No
|lavasusceptible=No
}}
'''Sugar cane''' is a block found as 1–4-block-tall. It plants near water in the [[Overworld]]. As an item, it is an important crafting ingredient.
==Obtaining==
Sugar cane can be mined instantly with anything.
When the spot a sugar cane block is placed in becomes unsuitable, such as when the supporting block is removed, the sugar cane block uproots and drops as an item. {{IN|be}}, sugar cane uproots immediately after all adjacent water is removed. {{IN|je}}, sugar cane uproots on the next block update or [[Tick#Random tick|random tick]].
A sugar cane block drops itself as an item if a piston tries to push it (trying to pull it does nothing) or moves a block into its space.
===Natural generation===
[[File:Sugar Canez.png|thumb|250px|Naturally-occurring sugar cane near a river.]]
Sugar cane can generate naturally near [[water]] and [[ice]], as two ({{frac|11|18}} chance), three ({{frac|5|18}} chance), or four ({{frac|2|18}} chance) blocks tall. Rare taller sugar canes can be found if the world generator places two smaller canes on top of each other. It generates in approximately 0.8 sugar cane per chunk seeing as how they only generate near bodies of water.
Sugar canes attempt to generate 10 times in any Overworld biome, which requires water. An extra 10 attempts are made in [[swamp]] biomes, and 50 in [[desert]] biomes, which makes sugar cane twice as frequent in swamps and six times as frequent in desert biomes, making the banks of [[river]]s that cut through deserts lined with sugar canes. Sugar canes do not grow faster in swamps or deserts they only spawn a increased amount.
Sugar cane cannot generate in caves {{in|je}}.<ref>{{bug|MC-214959||Sugar cane generated in cave|Fixed}}</ref>
===Trading===
[[Wandering trader]]s can sell sugar cane for an [[emerald]].
==Usage==
Due to its water-displacing properties, sugar cane can interestingly be used to create underwater paths, allowing [[player]]s to move at normal speed and breathe if it is two blocks in height.{{only|java}}<ref>{{bug|MC-929||Sugar cane can be placed underwater|WAI}}</ref>
Sugar cane takes on a different shade of green depending on the biome in which it is placed.
===Crafting ingredient===
{{crafting usage}}
===Farming===
{{main|Tutorials/Sugar cane farming}}
[[File:Underground Sugar Farm.png|200px|thumb|An underground sugar cane farm.]]
Sugar cane can generate naturally up to any number of blocks tall, but ''grow'' only to a height of three blocks, adding a block of height when the top sugar cane block has received 16 random [[Tick#Block tick|block tick]]s (i.e. on average every 18 minutes on ''Java Edition''<!-- Average 68.27 seconds/tick * 16 ticks/growth = 18.2 minutes --> or 54 minutes on Bedrock Edition, but the actual rate can vary widely).
Sugar cane must be planted on a [[grass block]], [[dirt]], [[coarse dirt]], [[rooted dirt]], [[podzol]], [[mycelium]], [[sand]], [[red sand]], [[suspicious sand]], [[moss block]], or [[mud]] that is directly adjacent to [[water]], [[waterlogged]] block, or [[frosted ice]] (not merely above or diagonal to water), or on top of another sugar cane block. The adjacent water block can be covered with another block, whether [[opacity|opaque or transparent]], and sugar cane can still be placed and grow next to it. Sugar cane grows regardless of light level, even in complete darkness.
[[File:4blockcane.png|thumb|A natural 4-block-high sugar cane plant.]]
{{IN|bedrock}}, [[bone meal]] can be used to instantly grow sugar cane to three blocks. Only one bone meal is consumed. {{IN|java}}, bone meal cannot be used on sugar cane.<ref>{{bug|MC-73963||Can't use bonemeal on cacti or sugar cane|WAI}}</ref>
On average, it takes [[Tutorials/Sugar_cane_farming#Mechanics|18 minutes]] for a single block of sugar cane to grow 3 blocks tall.
=== Composting ===
Placing sugar cane into a [[composter]] has a 50% chance of raising the compost level by 1.
== List of colors ==
{{Missing information|Bedrock Edition colors (see [[Water#Color]]{{verify|it's there?}})}}
=== ''Java Edition'' ===
These values are generated by the biome dyeing algorithm. See [[Color#Biome colors|Biome colors]] for more information.
<div class="mw-collapsible mw-collapsed" style="float: left">
{| class="wikitable sortable" style="text-align:center" data-description="Java edition biome colors"
!Biome !! Category !! Rainfall !! Sugarcane Color !! Temperature Affects !! Render
|-
| {{BiomeLink|Badlands}} || Mesa || No || #90814d || No || [[File:Badlands Sugar Cane.png|32px]]
|-
| {{BiomeLink|Beach}} || Beach || Rain || #91bd59 || || [[File:Plains Sugar Cane.png|32px]]
|-
| {{BiomeLink|Birch Forest}} || Forest || Rain || #88bb67 || || [[File:Birch Forest Sugar Cane.png|32px]]
|-
| {{BiomeLink|Cold Ocean}} || Ocean || Rain || #8eb971 || || [[File:Ocean Sugar Cane.png|32px]]
|-
| {{BiomeLink|Dark Forest}} || Forest || Rain || #507a32 || || [[File:Dark Forest Sugar Cane.png|32px]]
|-
| {{BiomeLink|Deep Cold Ocean}} || Ocean || Rain || #8eb971 || || [[File:Ocean Sugar Cane.png|32px]]
|-
| {{BiomeLink|Deep Frozen Ocean}} || Ocean || Rain || #8eb971 || || [[File:Ocean Sugar Cane.png|32px]]
|-
| {{BiomeLink|Deep Lukewarm Ocean}} || Ocean || Rain || #8eb971 || || [[File:Ocean Sugar Cane.png|32px]]
|-
| {{BiomeLink|Deep Ocean}} || Ocean || Rain || #8eb971 || || [[File:Ocean Sugar Cane.png|32px]]
|-
| {{BiomeLink|Desert}} || Desert || No || #bfb755 || || [[File:Desert Sugar Cane.png|32px]]
|-
| {{BiomeLink|End Barrens}} || The End || No || #8eb971 || || [[File:Ocean Sugar Cane.png|32px]]
|-
| {{BiomeLink|End Highlands}} || The End || No || #8eb971 || || [[File:Ocean Sugar Cane.png|32px]]
|-
| {{BiomeLink|End Midlands}} || The End || No || #8eb971 || || [[File:Ocean Sugar Cane.png|32px]]
|-
| {{BiomeLink|Eroded Badlands}} || Mesa || No || #90814d || No || [[File:Badlands Sugar Cane.png|32px]]
|-
| {{BiomeLink|Flower Forest}} || Forest || Rain || #79c05a || || [[File:Forest Sugar Cane.png|32px]]
|-
| {{BiomeLink|Forest}} || Forest || Rain || #79c05a || || [[File:Forest Sugar Cane.png|32px]]
|-
| {{BiomeLink|Frozen Ocean}} || Ocean || Snow || #80b497 || || [[File:Snowy Plains Sugar Cane.png|32px]]
|-
| {{BiomeLink|Frozen River}} || River || Snow || #80b497 || || [[File:Snowy Plains Sugar Cane.png|32px]]
|-
| {{BiomeLink|Old Growth Spruce Taiga}} || Taiga || Rain || #86b783 || || [[File:Taiga Sugar Cane.png|32px]]
|-
| {{BiomeLink|Old Growth Pine Taiga}} || Taiga || Rain || #86b87f || || [[File:Old Growth Pine Taiga Sugar Cane.png|32px]]
|-
| {{BiomeLink|Ice Spikes}} || Icy || Snow || #80b497 || || [[File:Snowy Plains Sugar Cane.png|32px]]
|-
| {{BiomeLink|Jungle}} || Jungle || Rain || #59c93c || || [[File:Jungle Sugar Cane.png|32px]]
|-
| {{BiomeLink|Sparse Jungle}} || Jungle || Rain || #64c73f || || [[File:Sparse Jungle Sugar Cane.png|32px]]
|-
| {{BiomeLink|Lukewarm Ocean}} || Ocean || Rain || #8eb971 || || [[File:Ocean Sugar Cane.png|32px]]
|-
| {{BiomeLink|Windswept Hills}} || Extreme Hills || Rain || #8ab689 || || [[File:Windswept Hills Sugar Cane.png|32px]]
|-
| {{BiomeLink|Mushroom Fields}} || Mushroom || Rain || #55c93f || || [[File:Mushroom Fields Sugar Cane.png|32px]]
|-
| {{BiomeLink|Nether}} || Nether || No || #bfb755 || || [[File:Desert Sugar Cane.png|32px]]
|-
| {{BiomeLink|Ocean}} || Ocean || Rain || #8eb971 || || [[File:Ocean Sugar Cane.png|32px]]
|-
| {{BiomeLink|Plains}} || Plains || Rain || #91bd59 || || [[File:Plains Sugar Cane.png|32px]]
|-
| {{BiomeLink|River}} || River || Rain || #8eb971 || || [[File:Ocean Sugar Cane.png|32px]]
|-
| {{BiomeLink|Savanna}} || Savanna || No || #bfb755 || || [[File:Desert Sugar Cane.png|32px]]
|-
| {{BiomeLink|Savanna Plateau}} || Savanna || No || #bfb755 || || [[File:Desert Sugar Cane.png|32px]]
|-
| {{BiomeLink|Windswept Savanna}} || Savanna || No || #bfb755 || || [[File:Desert Sugar Cane.png|32px]]
|-
| {{BiomeLink|Small End Islands}} || The End || No || #8eb971 || || [[File:Ocean Sugar Cane.png|32px]]
|-
| {{BiomeLink|Snowy Beach}} || Beach || Snow || #83b593 || || [[File:Snowy Beach Sugar Cane.png|32px]]
|-
| {{BiomeLink|Snowy Taiga}} || Taiga || Snow || #80b497 || || [[File:Snowy Plains Sugar Cane.png|32px]]
|-
| {{BiomeLink|Snowy Plains}} || Icy || Snow || #80b497 || || [[File:Snowy Plains Sugar Cane.png|32px]]
|-
| {{BiomeLink|Stony Shore}} || None || Rain || #8ab689 || || [[File:Windswept Hills Sugar Cane.png|32px]]
|-
| {{BiomeLink|Sunflower Plains}} || Plains || Rain || #91bd59 || || [[File:Plains Sugar Cane.png|32px]]
|-
| {{BiomeLink|Swamp}} || Swamp || Rain || #6A7039 || If temperature below -0.1, used #4C763C. || [[File:Swamp Sugar Cane.png|32px]] / [[File:Swamp Sugar Cane (Cold).png|32px]]
|-
| {{BiomeLink|Taiga}} || Taiga || Rain || #86b783 || || [[File:Taiga Sugar Cane.png|32px]]
|-
| {{BiomeLink|Old Growth Birch Forest}} || Forest || Rain || #88bb67 || || [[File:Birch Forest Sugar Cane.png|32px]]
|-
| {{BiomeLink|The End}} || The End || No || #8eb971 || || [[File:Ocean Sugar Cane.png|32px]]
|-
| {{BiomeLink|The Void}} || None || No || #8eb971 || || [[File:Ocean Sugar Cane.png|32px]]
|-
| {{BiomeLink|Warm Ocean}} || Ocean || Rain || #8eb971 || || [[File:Ocean Sugar Cane.png|32px]]
|-
| {{BiomeLink|Wooded Badlands}} || Mesa || No || #90814d || No || [[File:Badlands Sugar Cane.png|32px]]
|-
| {{BiomeLink|Windswept Forest}} || Extreme Hills || Rain || #8ab689 || || [[File:Windswept Hills Sugar Cane.png|32px]]
|}
</div>
{{clear}}
=== Bedrock Edition ===
{{empty section}}
== Sounds ==
{{Sound table/Block/Grass}}
== Data values ==
=== ID ===
{{edition|java}}:
{{ID table
|edition=java
|showforms=y
|generatetranslationkeys=y
|displayname=Sugar Cane
|spritetype=block
|nameid=sugar_cane
|foot=1}}
{{edition|bedrock}}:
{{ID table
|edition=bedrock
|firstcolumnname=Sugar Cane
|shownumericids=y
|showforms=y
|showaliasids=y
|generatetranslationkeys=y
|displayname=Block
|spritename=sugar-cane
|spritetype=block
|nameid=reeds
|id=83
|form=block
|itemform=item.reeds}}
{{ID table
|displayname=Item
|spritename=sugar-cane
|spritetype=item
|nameid=sugar_cane
|id=385
|form=item
|aliasid=reeds
|translationkey=item.reeds.name
|foot=1}}
=== Block states ===
{{see also|Block states}}
{{/BS}}
== Video ==
{{Video note|This video was made before sugar cane had a different shade of green depending on the biome.|minor}}
<div style="text-align:center">{{yt|zlOnwn3PH5o}}</div>
== History ==
{{more images|Appearance when affected by {{bug|MC-48831}}}}
{{History|java alpha}}
{{History||v1.0.11|[[File:Sugar Cane JE1 BE1.png|32px]] [[File:Sugar Cane (item) JE1 BE1.png|32px]] Added reeds in the [[Seecret Updates|Seecret Friday Update 6]].
|Reeds are informally referred to as "bamboo" or "papyrus" by many [[player]]s.
|Since reeds can be washed away with [[water]] currents or instantly destroyed by removing the water adjacent to them, automated reed farms can be made.
|Reeds can be used to craft [[paper]].}}
{{History|java beta}}
{{History||1.2|[[Notch]] has [[wikipedia:Retroactive continuity|retconned]] reeds into sugar cane so that it can now be [[crafting|crafted]] into [[sugar]], included in the recipe for the [[cake]]s.}}
{{History||1.6|snap=Test Build 3|[[Arrow]]s no longer stick to sugar cane, and instead, they pass through. However, [[snowball]]s still come into contact with any sugar cane blocks, as if they are solid.}}
{{History||1.8|snap=Pre-release|Sugar cane can now grow and be placed onto [[sand]] as long as they are adjacent to [[water]]. This update allows sugar canes to appear next to [[water]] ponds in [[desert]] biomes.
|Sugar cane is now available in the [[creative]] [[inventory]] in both block and item forms.}}
{{History|java}}
{{History||1.0.0|snap=?|The sugar cane block has been removed from the creative inventory.}}
{{History||1.7.2|snap=13w36a|[[File:Sugar Cane JE2 BE2.png|32px]] Sugar cane is now [[tint]]ed depending on the [[biome]] it's in.
|The item texture remained unchanged, however, and still used the color palette from Alpha to 1.6.4.<ref name="Bug">{{bug|MC-216227}}</ref>}}
{{History||1.9|snap=15w43a|Sugar cane no longer breaks if its adjacent [[water]] is turned to [[frosted ice]].}}
{{History||1.13|snap=17w47a|The ID of sugar cane has now been changed from <code>reeds</code> to <code>sugar_cane</code>.
|"Sugar Canes" have now been renamed to "Sugar Cane".
|Prior to [[1.13/Flattening|''The Flattening'']], this [[block]]'s numeral ID was 83, and the [[item]]'s 338.}}
{{History||1.14|snap=18w43a|[[File:Sugar Cane (item) JE2 BE2.png|32px]] The texture of the sugar cane item has been changed.}}
{{History|||snap=19w03a|Placing sugar cane into a [[composter]] has a 20% chance of raising the compost level by 1.}}
{{History|||snap=19w05a|Sugar cane now has a 50% chance of increasing the compost level in a composter by 1.
|Added [[wandering trader]]s, which sell sugar cane.}}
{{History||1.16|snap=20w13a|Sugar cane has been moved from the Miscellaneous tab to the Decoration Blocks tab in the [[Creative inventory]].<ref name="misc decoration">https://bugs.mojang.com/browse/MC-174434</ref>}}
{{History||1.17|snap=21w11a|[[File:Sugar Cane (item) JE3.png|32px]] The texture of the sugar cane item has been changed, so that it actually matches the color it uses when placed again.<ref name="Bug"/>}}
{{History|||snap=Pre-release 1|Sugar cane now generates in mushroom fields.<ref>{{bug|MC-226683}}</ref>}}
{{History||1.19|snap=22w15a|Sugar cane can now be planted on mud.}}
{{History||1.20|snap=23w14a|Sugar cane can now be planted on [[suspicious sand]].}}
{{History|pocket alpha}}
{{History||Pre-release|[[File:Sugar Cane JE1 BE1.png|32px]] [[File:Sugar Cane (item) JE1 BE1.png|32px]] Added sugar cane.}}
{{History||v0.2.0|Despite being visible in the inventory, sugar cane does not drop anything when mined, making it unobtainable in Survival mode.}}
{{History||v0.2.1|Survival players now start with an infinite stack of sugar cane in the inventory.}}
{{History||v0.3.0|Sugar cane now drops its item form when mined.
|Survival players no longer start with an infinite stack of sugar cane in the inventory.}}
{{History||v0.5.0|Sugar cane can now be grown on [[sand]].
|Sugar cane can now be obtained after activating the [[nether reactor]].}}
{{History||v0.8.0|snap=build 5|[[Bone meal]] can now grow sugar cane to maximum height.}}
{{History||v0.9.0|snap=build 1|[[File:Sugar Cane JE2 BE2.png|32px]] The color of sugar cane now changes depending on the [[biome]] they are in.
|Using bone meal on sugar cane is no longer able to break blocks above it.}}
{{History||v0.12.1|snap=build 1|Sugar cane is no longer available from the [[nether reactor]].}}
{{History|pocket}}
{{History||1.0.0|snap=alpha 0.17.0.1|[[File:Sugar Cane JE1 BE1.png|32px]] Due to a bug, sugar canes no longer change color depending on the [[biome]].}}
{{History|bedrock}}
{{History||1.2.13|snap=beta 1.2.13.5|[[File:Sugar Cane JE2 BE2.png|32px]] The color of sugar canes now changes depending on the [[biome]], once again.}}
{{History||1.10.0|snap=beta 1.10.0.3|[[File:Sugar Cane (item) JE2 BE2.png|32px]] The texture of the sugar cane [[item]] has been changed.
|Sugar cane can now be [[trading|bought]] from [[wandering trader]]s.}}
{{History||1.11.0|snap=beta 1.11.0.1|Sugar canes can now be used to fill up [[composter]]s.}}
{{History||1.17.0|snap=beta 1.17.0.50|[[File:Sugar Cane (item) JE3.png|32px]] The texture of the sugar cane item has been changed, so that it actually matches the color it uses when placed again.}}
{{History|console}}
{{History||xbox=TU1|xbone=CU1|ps=1.0|wiiu=Patch 1|switch=1.0.1|[[File:Sugar Cane JE1 BE1.png|32px]] [[File:Sugar Cane (item) JE1 BE1.png|32px]] Added sugar canes.
|Sugar canes are solid, making it useful for growable walls. Unlike on Java Edition, they were never renamed to Sugar Cane.}}
{{History||xbox=TU2|Sugar canes are no longer solid, and arrows pass through them.}}
{{History||xbox=TU31|xbone=CU19|ps=1.22|wiiu=Patch 3|[[File:Sugar Cane JE2 BE2.png|32px]] The color of sugar cane now changes depending on the [[biome]] they're in.}}
{{History||xbox=TU60|xbone=CU51|ps=1.64|wiiu=Patch 30|switch=1.0.11|Sugar cane can now be grown with [[bonemeal]].}}
{{History||xbox=none|xbone=none|ps=1.90|wiiu=none|switch=none|[[File:Sugar Cane (item) JE2 BE2.png|32px]] The texture of the sugar cane [[item]] has been changed.}}
{{History||xbox=none|xbone=none|ps=1.91|wiiu=none|switch=none|Sugar cane can now be [[trading|bought]] from [[wandering trader]]s.
|Sugar canes can now be used to fill up [[composter]]s.}}
{{History|New Nintendo 3DS Edition}}
{{History||0.1.0|[[File:Sugar Cane JE1 BE1.png|32px]] [[File:Sugar Cane (item) JE1 BE1.png|32px]] Added sugar cane.}}
{{History|foot}}
=== Sugar cane "item" ===
{{:Technical blocks/Sugar Cane}}
== Issues ==
{{Issue list}}
== Trivia ==
*When a sugar cane is broken at the second level, the time resets (for example, if a two-block high sugar cane is broken, but is just about to grow to the third stage, it would reset that time).
*By placing more sugar canes on top of a sugar cane plant, it is possible to create tall sugar canes (up to y=319, the maximum height for building), although they do not naturally grow this high.
*Before sugar cane received an official name, they were sometimes referred to as [[bamboo]], a block added 9 years later. Other names were "reeds" and "papyrus".
== Gallery ==
=== Renders ===
<gallery>
Plains Sugar Cane.png|Plains
Taiga Sugar Cane.png|Taiga
Snowy Plains Sugar Cane.png|Snowy plains
Jungle Sugar Cane.png|Jungle
Desert Sugar Cane.png|Desert
Swamp Sugar Cane (Cold).png|Swamp (cold)
Swamp Sugar Cane.png|Swamp
Badlands Sugar Cane.png|Badlands
</gallery>
=== In-game ===
<gallery>
Huge Sugar Farm.png|A large sugar cane farm using 2×2 [[water]] holes.
Sugar Cane Waterfall.png|Water flowing over sugar cane.
UnderwaterSugarCane.png|Naturally generated sugar cane found underwater.
Sugar and Cactus.png|A [[cactus]] and sugar cane stalk generated next to each other.
SugarCaneRavine.png|Sugar cane found in the [[ravine]].
Reeds in Winter mode.png|Reeds generated in the [[winter mode]].
Sugar Cane Naturally Growing.png|Sugar cane growing between [[biome]]s.
Mesa Sugar Cane.jpg|Sugar cane growing on [[red sand]] in a [[badlands]] biome.
Sugarcanenowaterglitch.png|Sugar cane generated without a water source.
SwampCane.png|Sugar cane generated in a [[swamp]] biome.
Sugar cane savanna.png|Sugar cane growing in a [[savanna]] biome.
ForestSugarcane.png|Sugar cane growing in a [[forest]] biome.
Lava cane.png|Sugar cane growing with lava flowing around it.
Before breaking.png|Sugar canes few seconds before breaking because the water is frozen.
Undergroundreed.png|A sugar cane plant that generated in an underground [[water lake]].
Cave Sugar.png|Another example.
</gallery>
=== Heights ===
<gallery>
Tall Sugar Cane.png|Four-block tall sugar cane.
4RiverCane.png|Four-block tall sugar cane.
4-block tall sugar cane.png|Four-block tall sugar cane in a [[plains]] biome.
</gallery>
== References ==
{{Reflist}}
{{Blocks|vegetation}}
{{Items}}
[[Category:Plants]]
[[Category:Natural blocks]]
[[Category:Non-solid blocks]]
[[cs:Cukrová třtina]]
[[de:Zuckerrohr]]
[[es:Caña de azúcar]]
[[fr:Canne à sucre]]
[[hu:Cukornád]]
[[it:Canna da zucchero]]
[[ja:サトウキビ]]
[[ko:사탕수수]]
[[nl:Suikerriet]]
[[pl:Trzcina cukrowa]]
[[pt:Cana-de-açúcar]]
[[ru:Сахарный тростник]]
[[th:อ้อย]]
[[uk:Цукрова тростина]]
[[zh:甘蔗]]</li></ul> | First appearance of the Far Lands. | ||||
Trivia
- There is a chance of walking into a “bad chunk" that has such corrupt and unreadable data that it will cause huge lag spikes and possibly crash the game.
- The Far Lands are referenced in Minecraft: Story Mode, when the group travels there.
- When at the Far Lands, fences either have a thin wall collision box on one side, or no collision with mobs or the player.
- Even though Beta 1.6 made it impossible to place solid blocks at layer 128, the Far Lands' flat “ceiling" still gets generated there.
- Because of the debates over renaming endermen to "Far Landers," Notch jokingly suggested to rename the Far Lands to The End instead. This then became the name for the dimension where the Ender Dragon resides.[9]
- Minecarts with chests will sometimes appear in phantom chunks, but as entities, they fall into the void shortly after they are generated.
- One of the random splashes read: "Check out the far lands!". Ironically, the splash was added to the game after the Far Lands were fixed.
- In Beta 1.7.3 and below:
- At excessive X/Z values, the corner lands are all flat.
- At every power of two after 225, a terrain glitch causes the area around the spawn to generate for a few chunks before generating distorted terrain again. This is the only occurrence where trees generate beyond X/Z: ±32,000,000, the limit at which block physics fail to function correctly and lighting ceases to work. This will continue until X/Z: ±2,147,483,647 (the point where world renderer stops working and surface textures fail to generate).
- At X/Z: ±2,147,483,647, which is the highest point reachable by 32-bit machines, world renderer stops working completely, ending terrain generation in Minecraft. Things using 32-bit integers will overflow at this distance, causing the game to crash. Chunks will still generate, but there will be nothing inside them other than air. The map will stop generating surface textures past this point.
- At around and after X/Z: ±2,147,483,648, clouds become severely stretched out in one direction (Fast graphics only, Fancy graphics clouds are not affected by the Far Lands).
- It is very dangerous to reach X/Z ±4,000,000,000 or higher, as the chances of crashing (assuming you have 64-bit Java) are extremely high, and get higher the further you go.
- Between X/Z: ±25,769,803,000 and X/Z: ±25,769,804,000 clouds stop rendering (Varies between maps, but they disappear somewhere in between these distances. Does not apply for fast graphics clouds).
- If one makes it to X/Z ±34,359,738,368 (235; chunk offset limit), chunks will start getting overwritten. As a result, this is the end of chunk generation in Minecraft. As soon as this limit is approached, the game will freeze and crash, resulting in a Out of memory screen. However in some cases the player may be able to move past this limit for a few seconds before Minecraft crashes.
- The highest signed value for 64-bit machines is X/Z ±9,223,372,036,854,775,807. However, despite this being the limit any machine can go, it may not be possible to reach anywhere near this point, since the vast majority of people experience instant client freeze, followed by the client crashing. One user that has teleported there reported that the screen will display completely black with no sun and oddly glowing clouds, however no other proof of this phenomena exists.
Gallery
Features

A view within the Far Lands.
“The Stack" at X/Z ±32,000,000. Above lies the top layer.
A bird's eye view of the top layer of the Corner Far Lands, or “The Stack".

The middle layer of the Corner Far Lands, or “The Stack", using mods for visibility.
The bottom layer of the Corner Far Lands, or “The Stack", using mods for visibility.
An overhead view of the Edge Far Lands, or "The Loop".
Inside the Edge Far Lands beyond X/Z 32,000,000, where there are no trees, mobs, or lighting.
“The ocean" within the Edge Far Lands.
A bisection of the Corner Far Lands, showing the 3 different layers.
A bird's eye view of the Far Lands' corner.
- 20110608124514.png
The "end of the world" as seen from the third person mode.
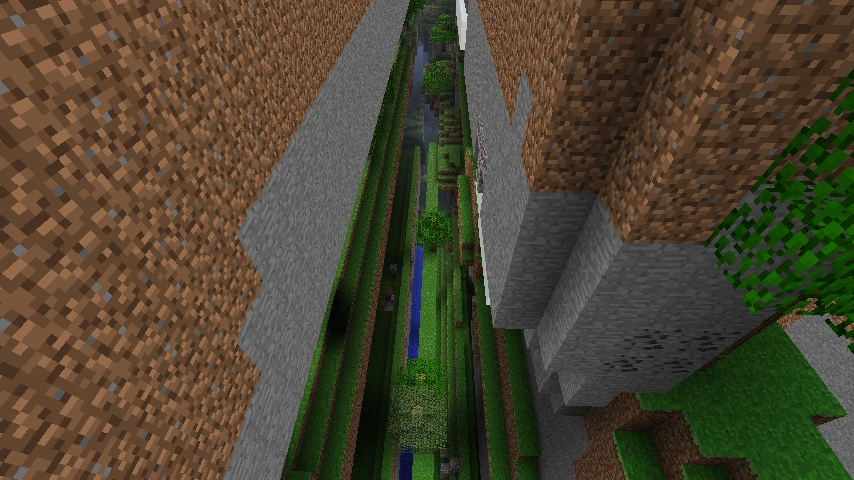


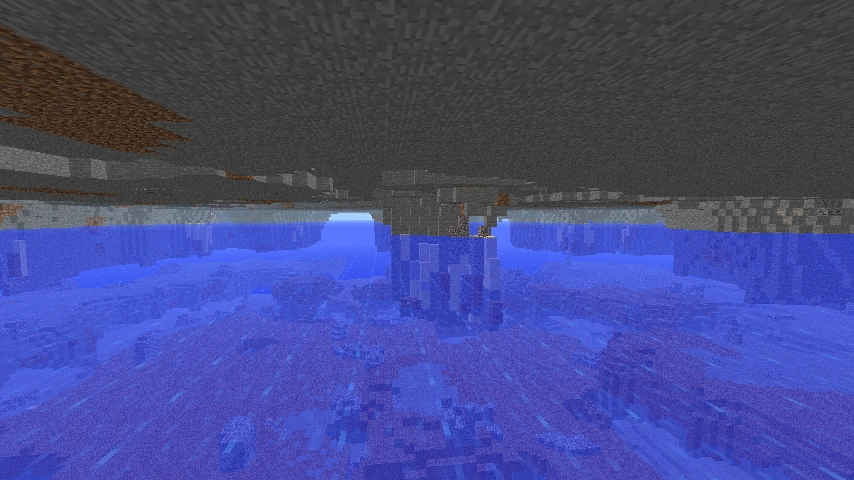
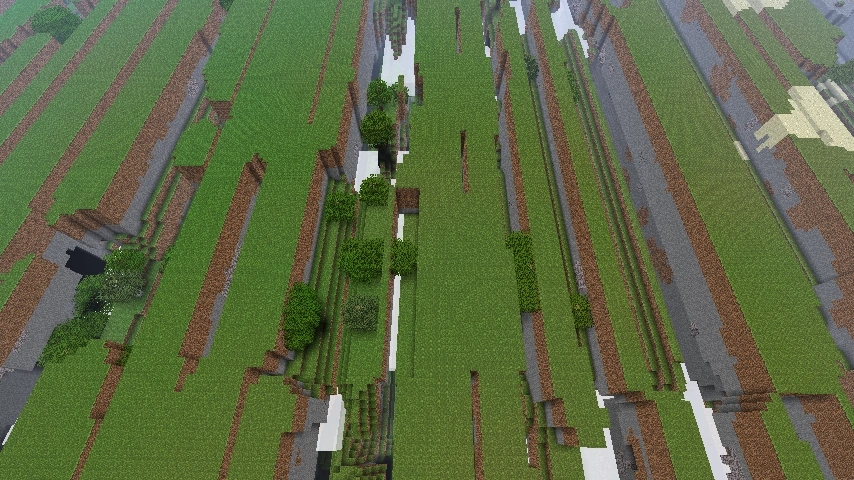
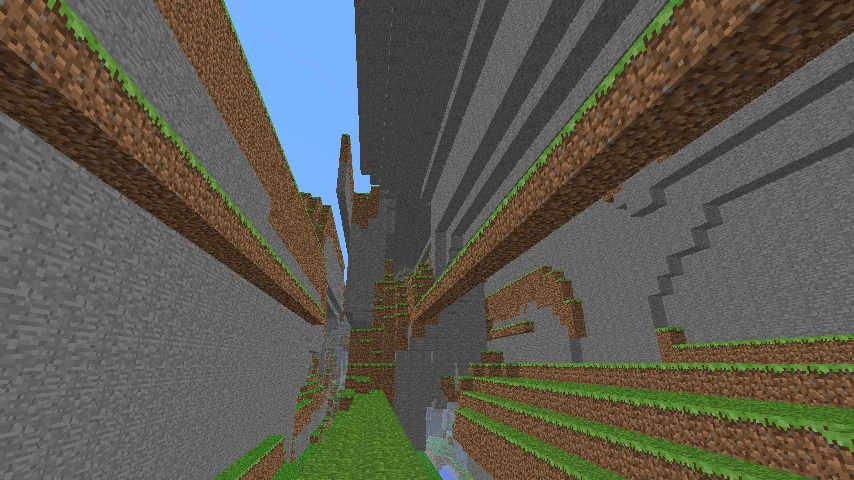
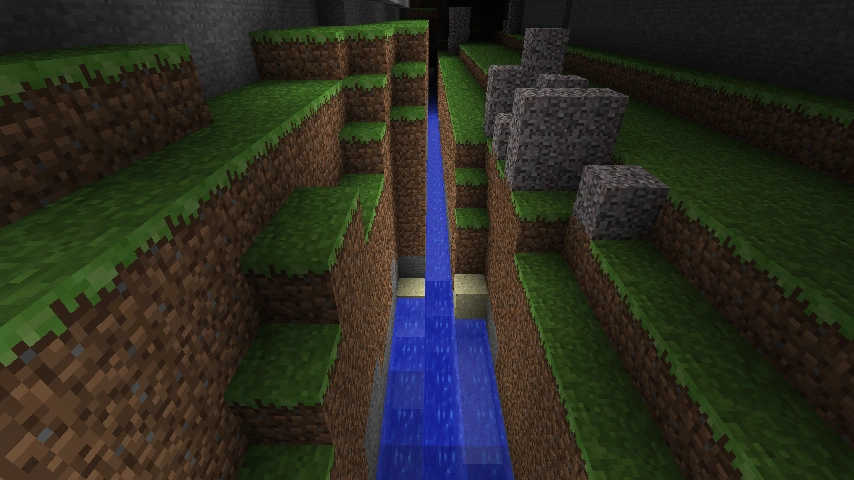
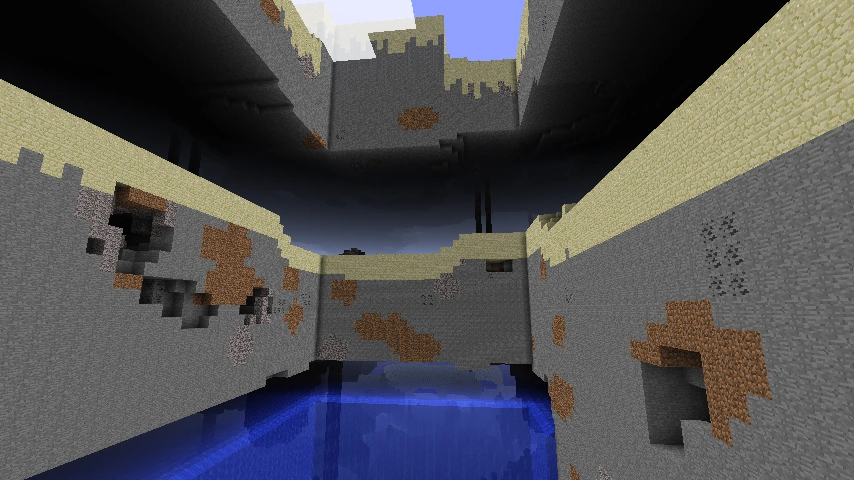
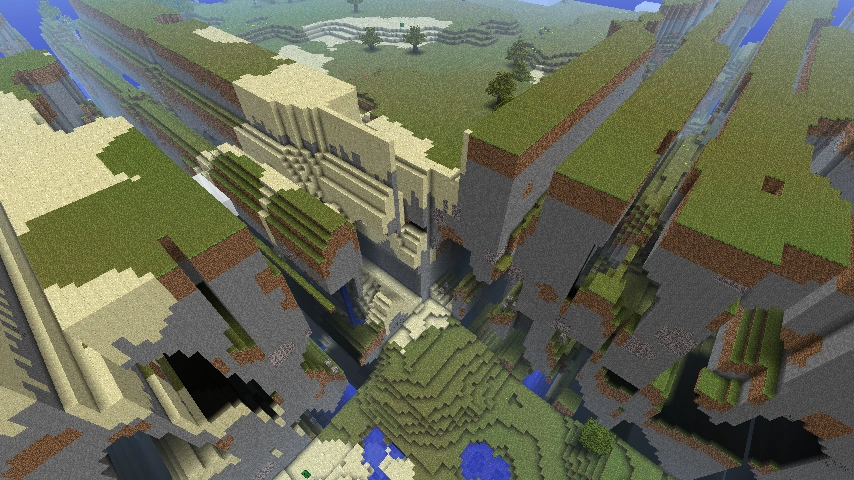
Offset bugs
- Farlandswaterfall.png
A stretched waterfall.
- Farlandslavafall.png
A stretched lava fall.
- Far lands redstone.png
Redstone placed near the Far lands.
- FarlandParticles.png
Particles are offset. String and redstone appear to be stretched out.
- Farlandpistonside.png
Piston powered on the side. The arm is stretched out, nonetheless the hit box is still the same.
- Farlandpistonup.png
Piston powered up. Note the arm is now a full block.
Generation
A desert biome in the Far Lands.
The Nether Far Lands at X/Z of 500,000,000 with severely stretched lava.
Trees spawning past 32,000,000 at X = 268,435,456 along with normal terrain stretching only a few chunks.
The Edge Far Lands meeting with the Corner Far Lands in the Nether at X value of 2,000,000,000 and Z of 12,550,820.
The end of Minecraft terrain generation at X: 2,147,483,794, about 147 blocks short of the 32-bit limit. World renderer stops working at this point.
The end of Minecraft terrain generation in the Nether at X: 2,147,483,644.
- FarLandsChunkEndOverwrite.png
The Far Lands at X: 34,359,738,079, where chunks start to become overwritten (notice the high CPU usage).
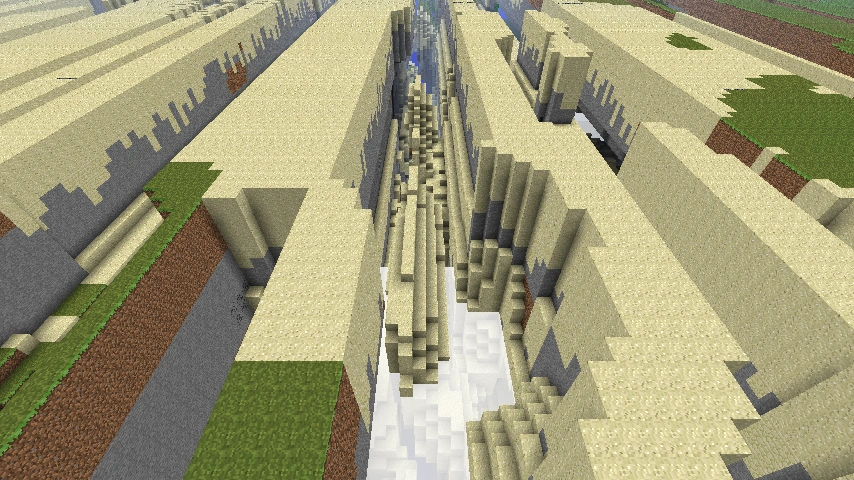
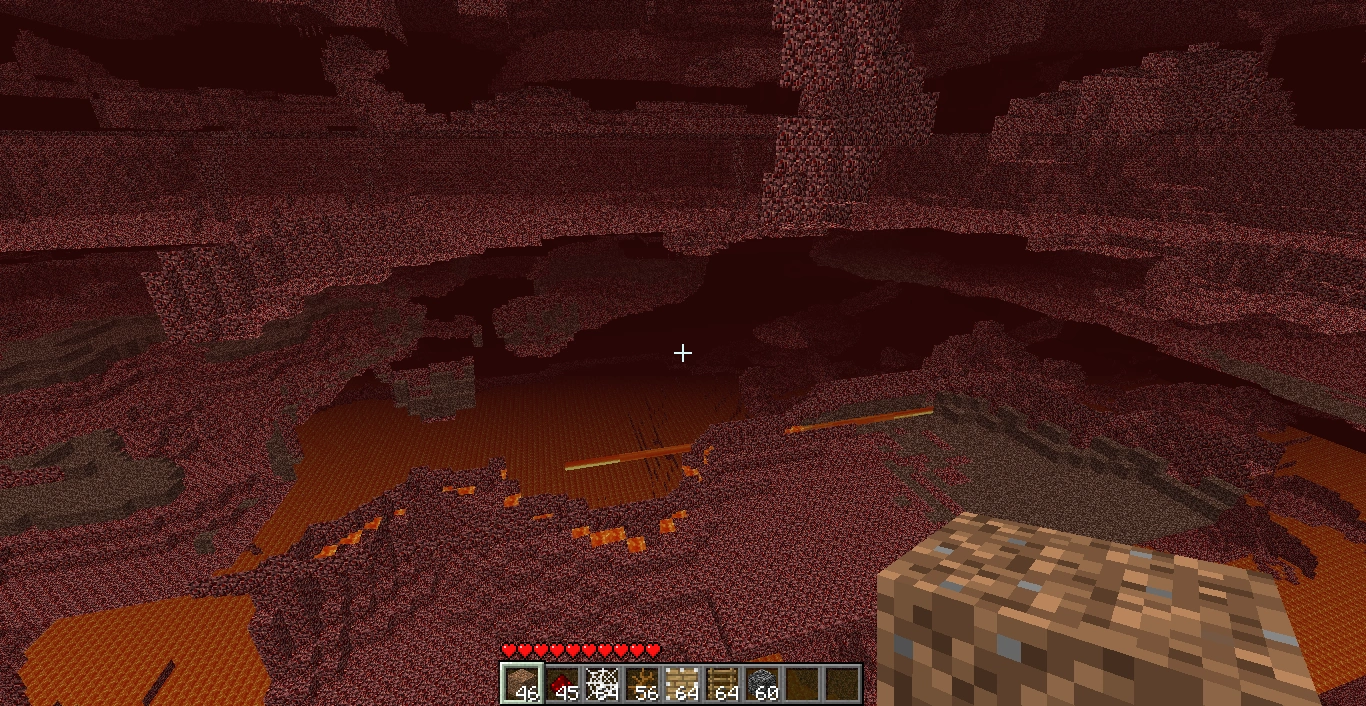

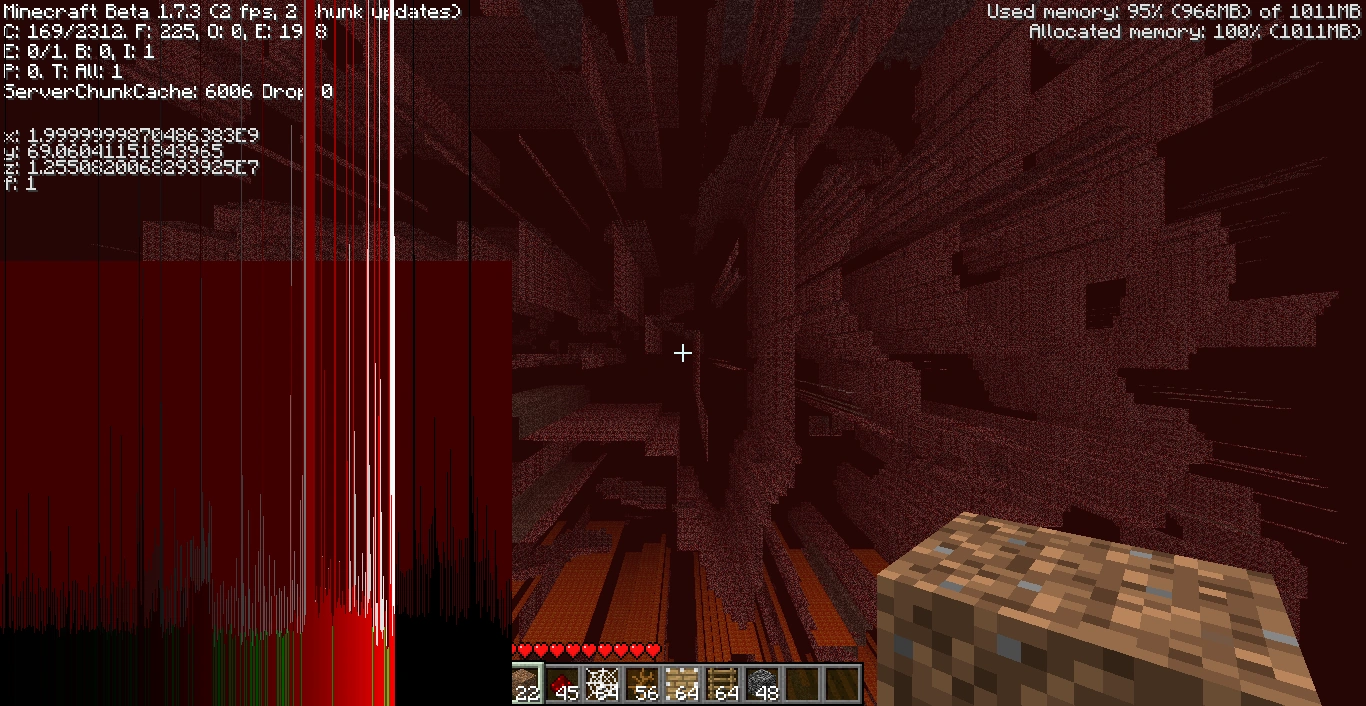
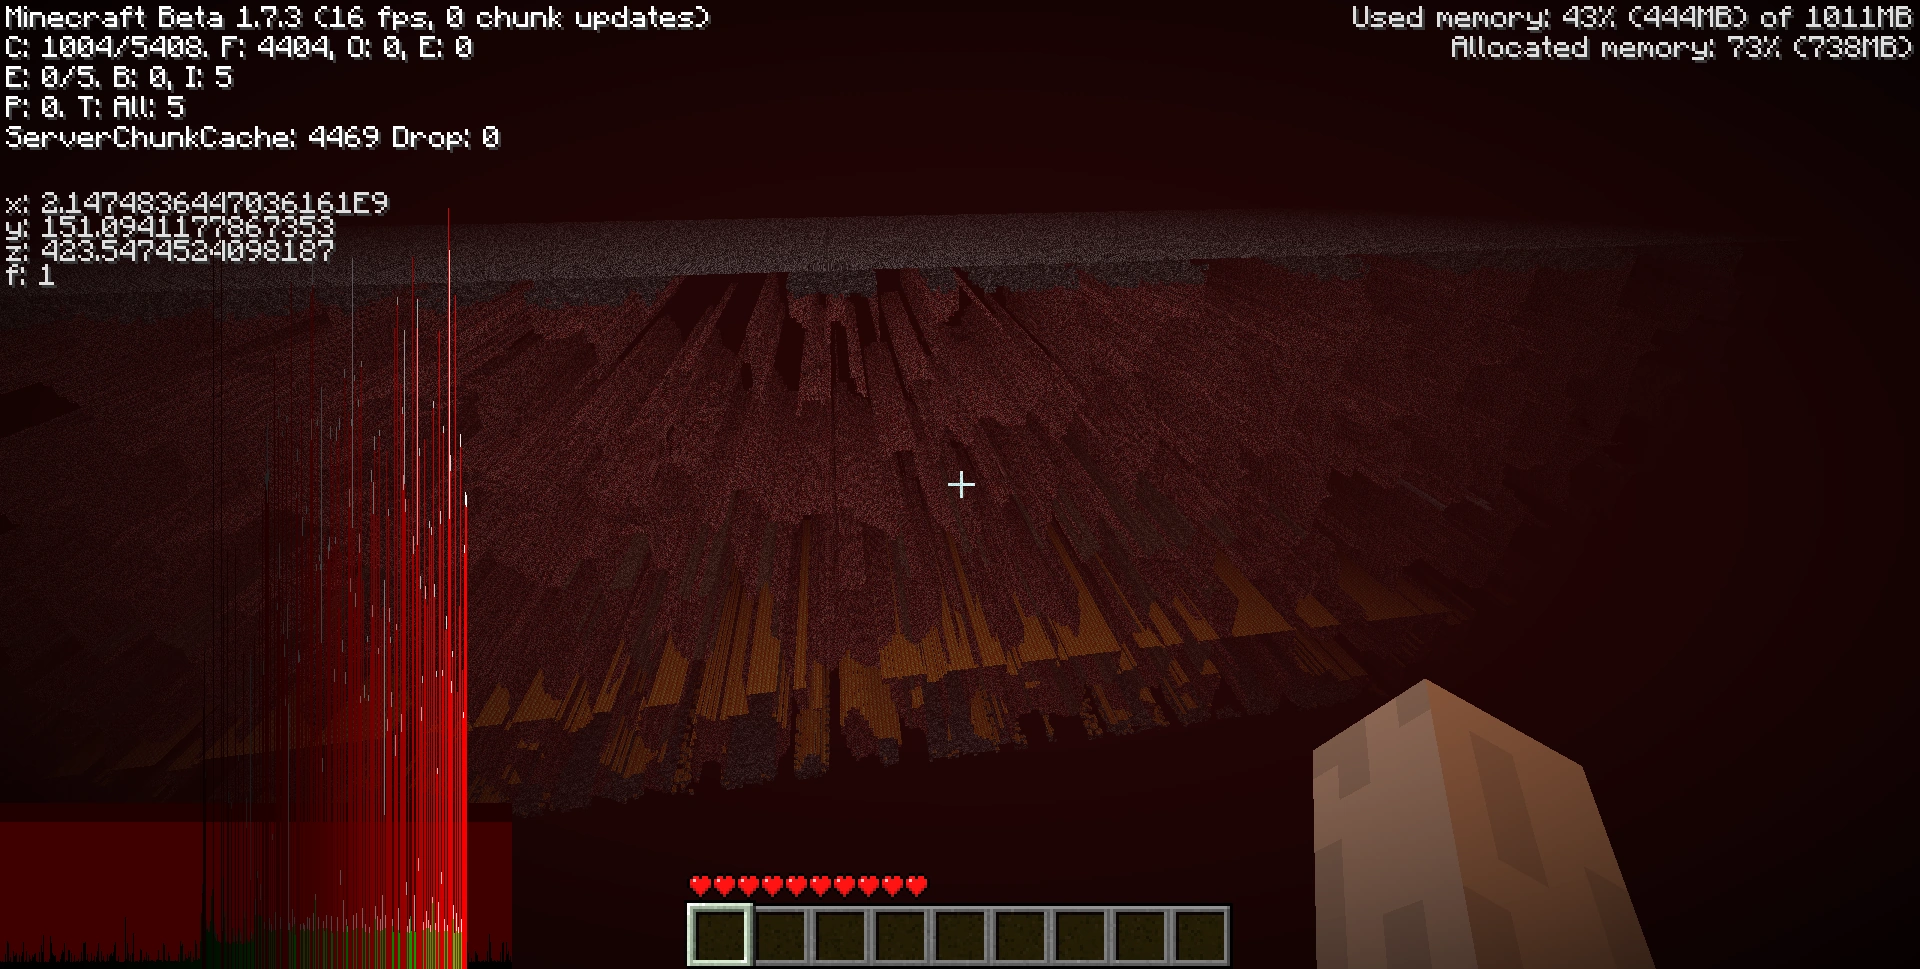
Pocket Edition
- FarlandsMCPE.jpg
The terrain at X=152,556,832 in Minecraft Pocket Edition. It is impossible to move forward or backward. There is water but it is invisible.
Edge of the Far Lands in Pocket Edition.
Mesa section of the Far Lands in Pocket Edition.
Swamp section of the Far Lands in Pocket Edition, with surprisingly normal structure in the middle..
A view inside of the Corner Far Lands in Pocket Edition, it generates terrain in a grid, unlike in PC where the terrain looks similar to normal terrain.
"The Stack" in Pocket Edition, with surprisingly normal structure in the middle.
The Far Lands in negative coordinates, being completely ocean.
The previous screenshot from the opposite angle.
The first screenshot posted of the Stripe Lands, by Tommaso Checchi, at X/Z 32,000,000.
The start of the Stripe Lands at X/Z ±16,777,216
The Corner Stripe Lands
A frozen ocean biome in the Stripe Lands
A swamp biome in the Stripe Lands
The Stripe Lands in a flat world
Far Lands at X/Z: ±2,145,624,024, close to the physical limit of the game. Nothing generates this far out.[10]
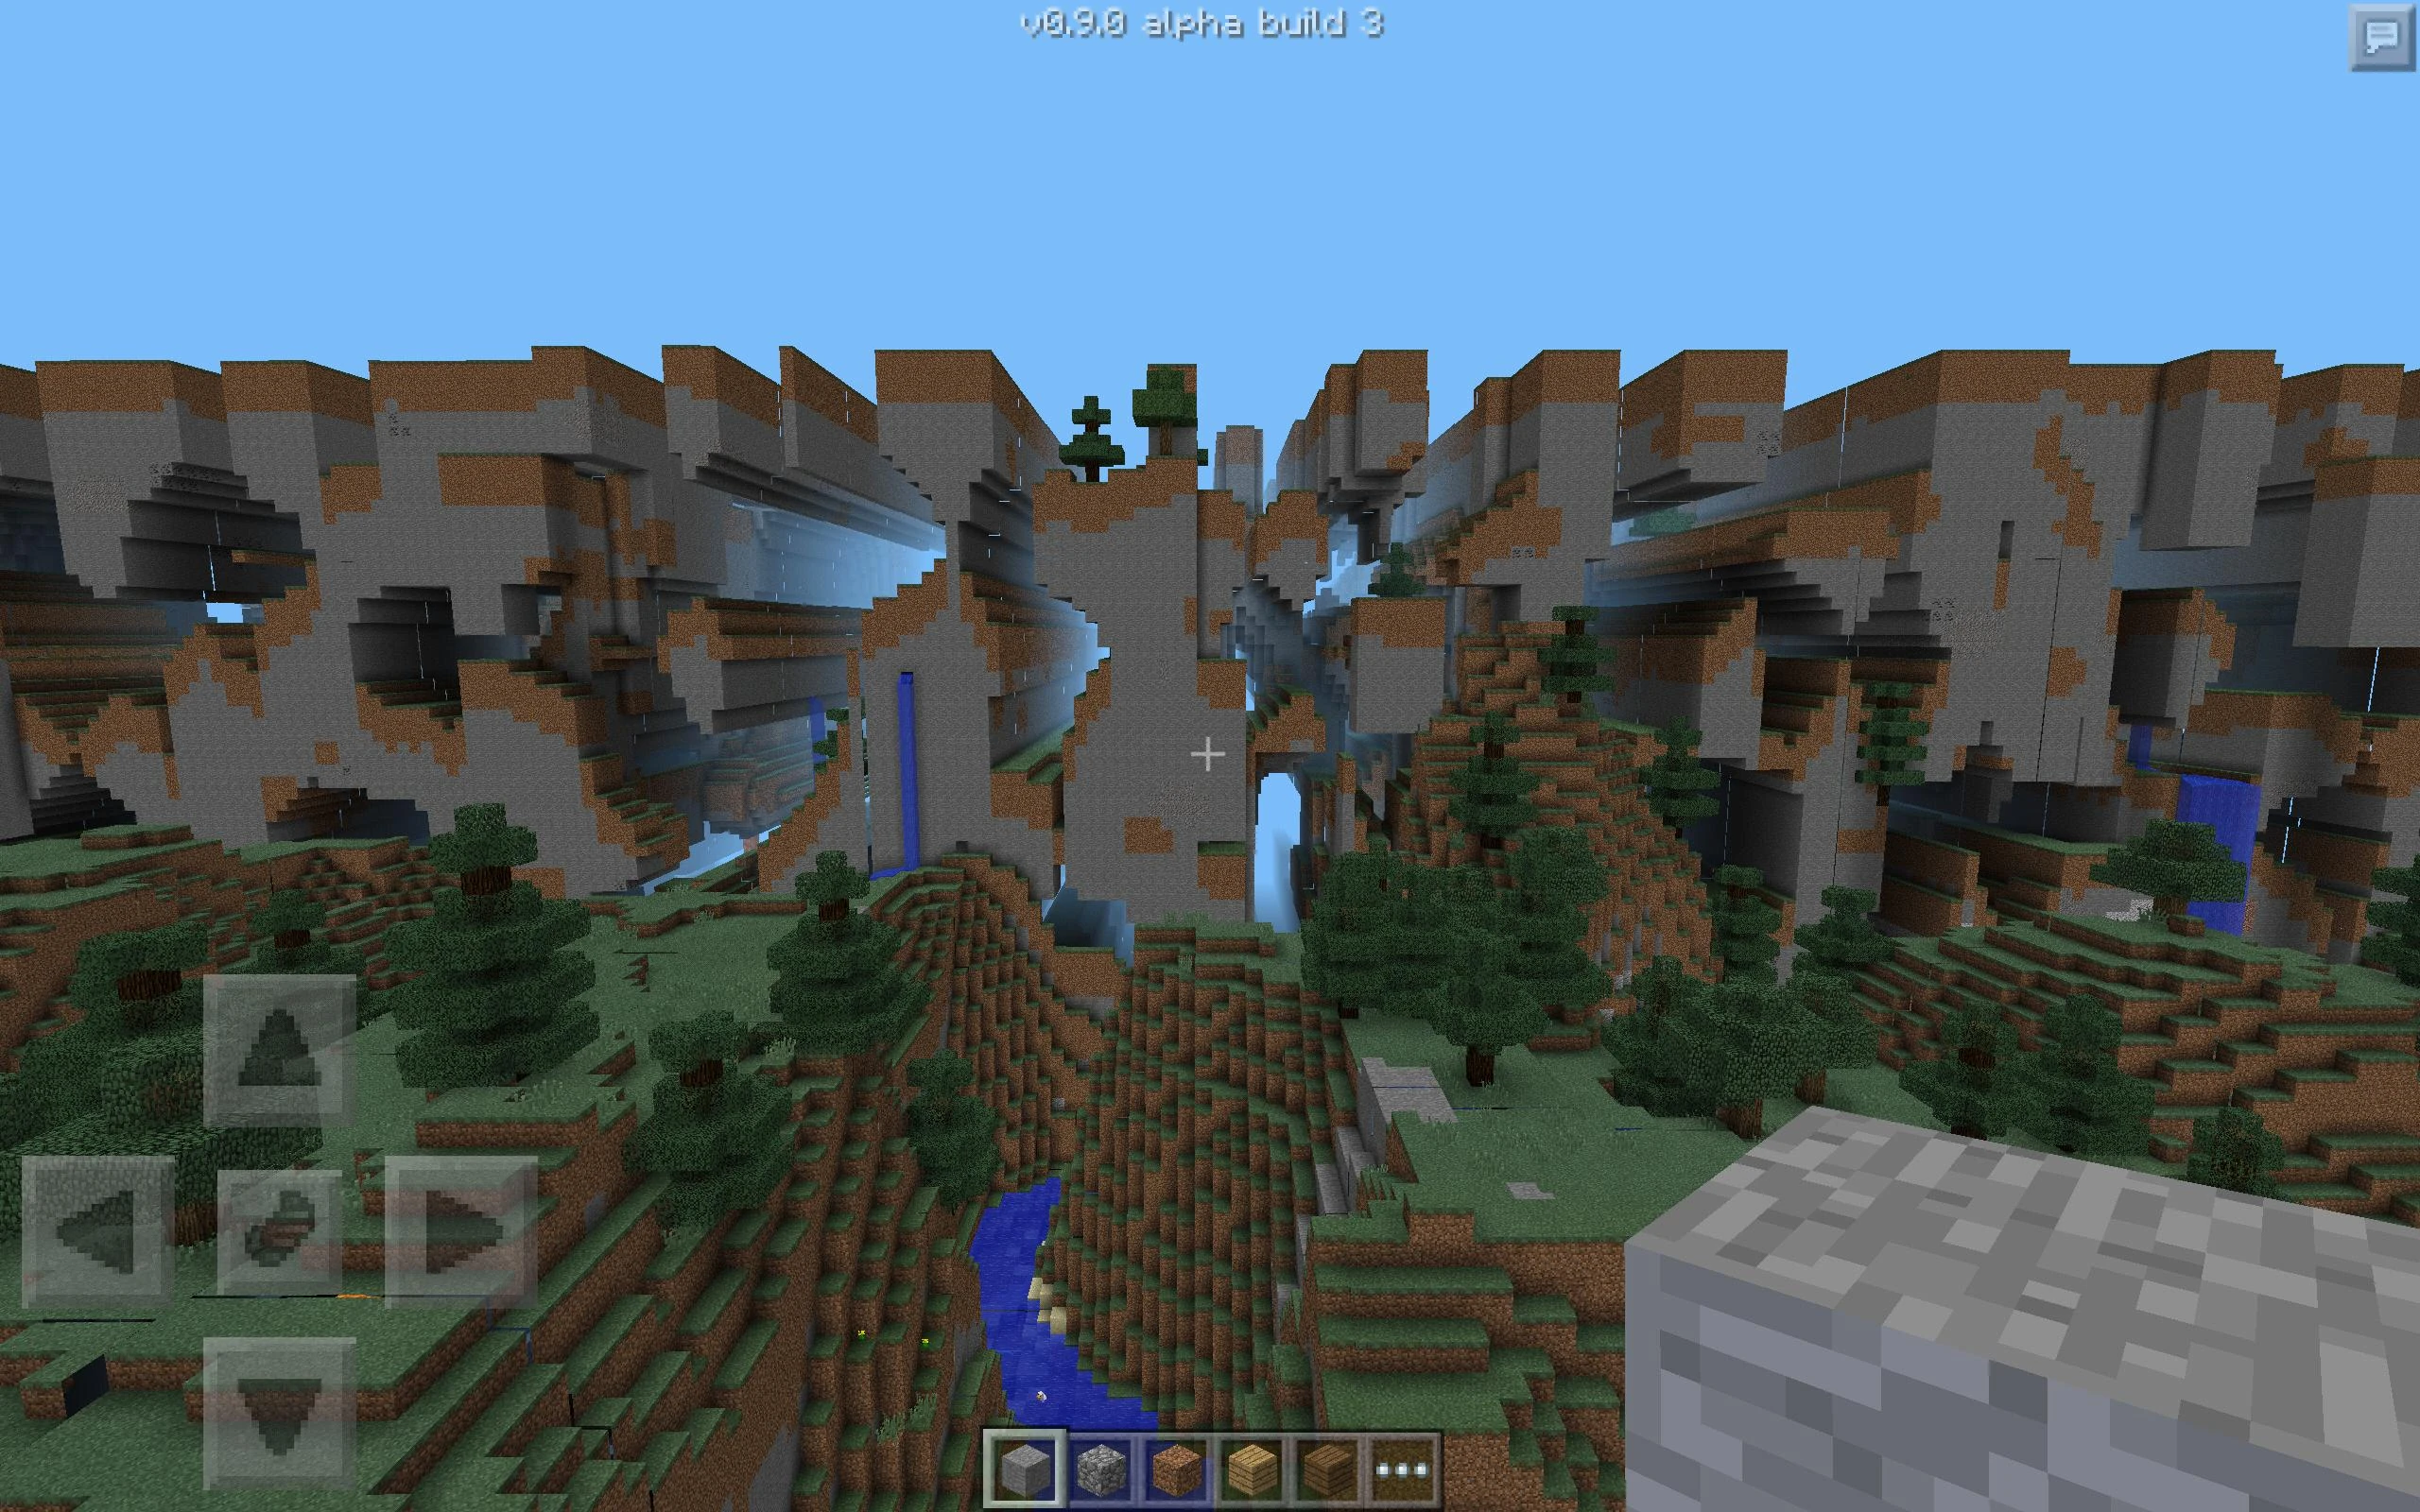
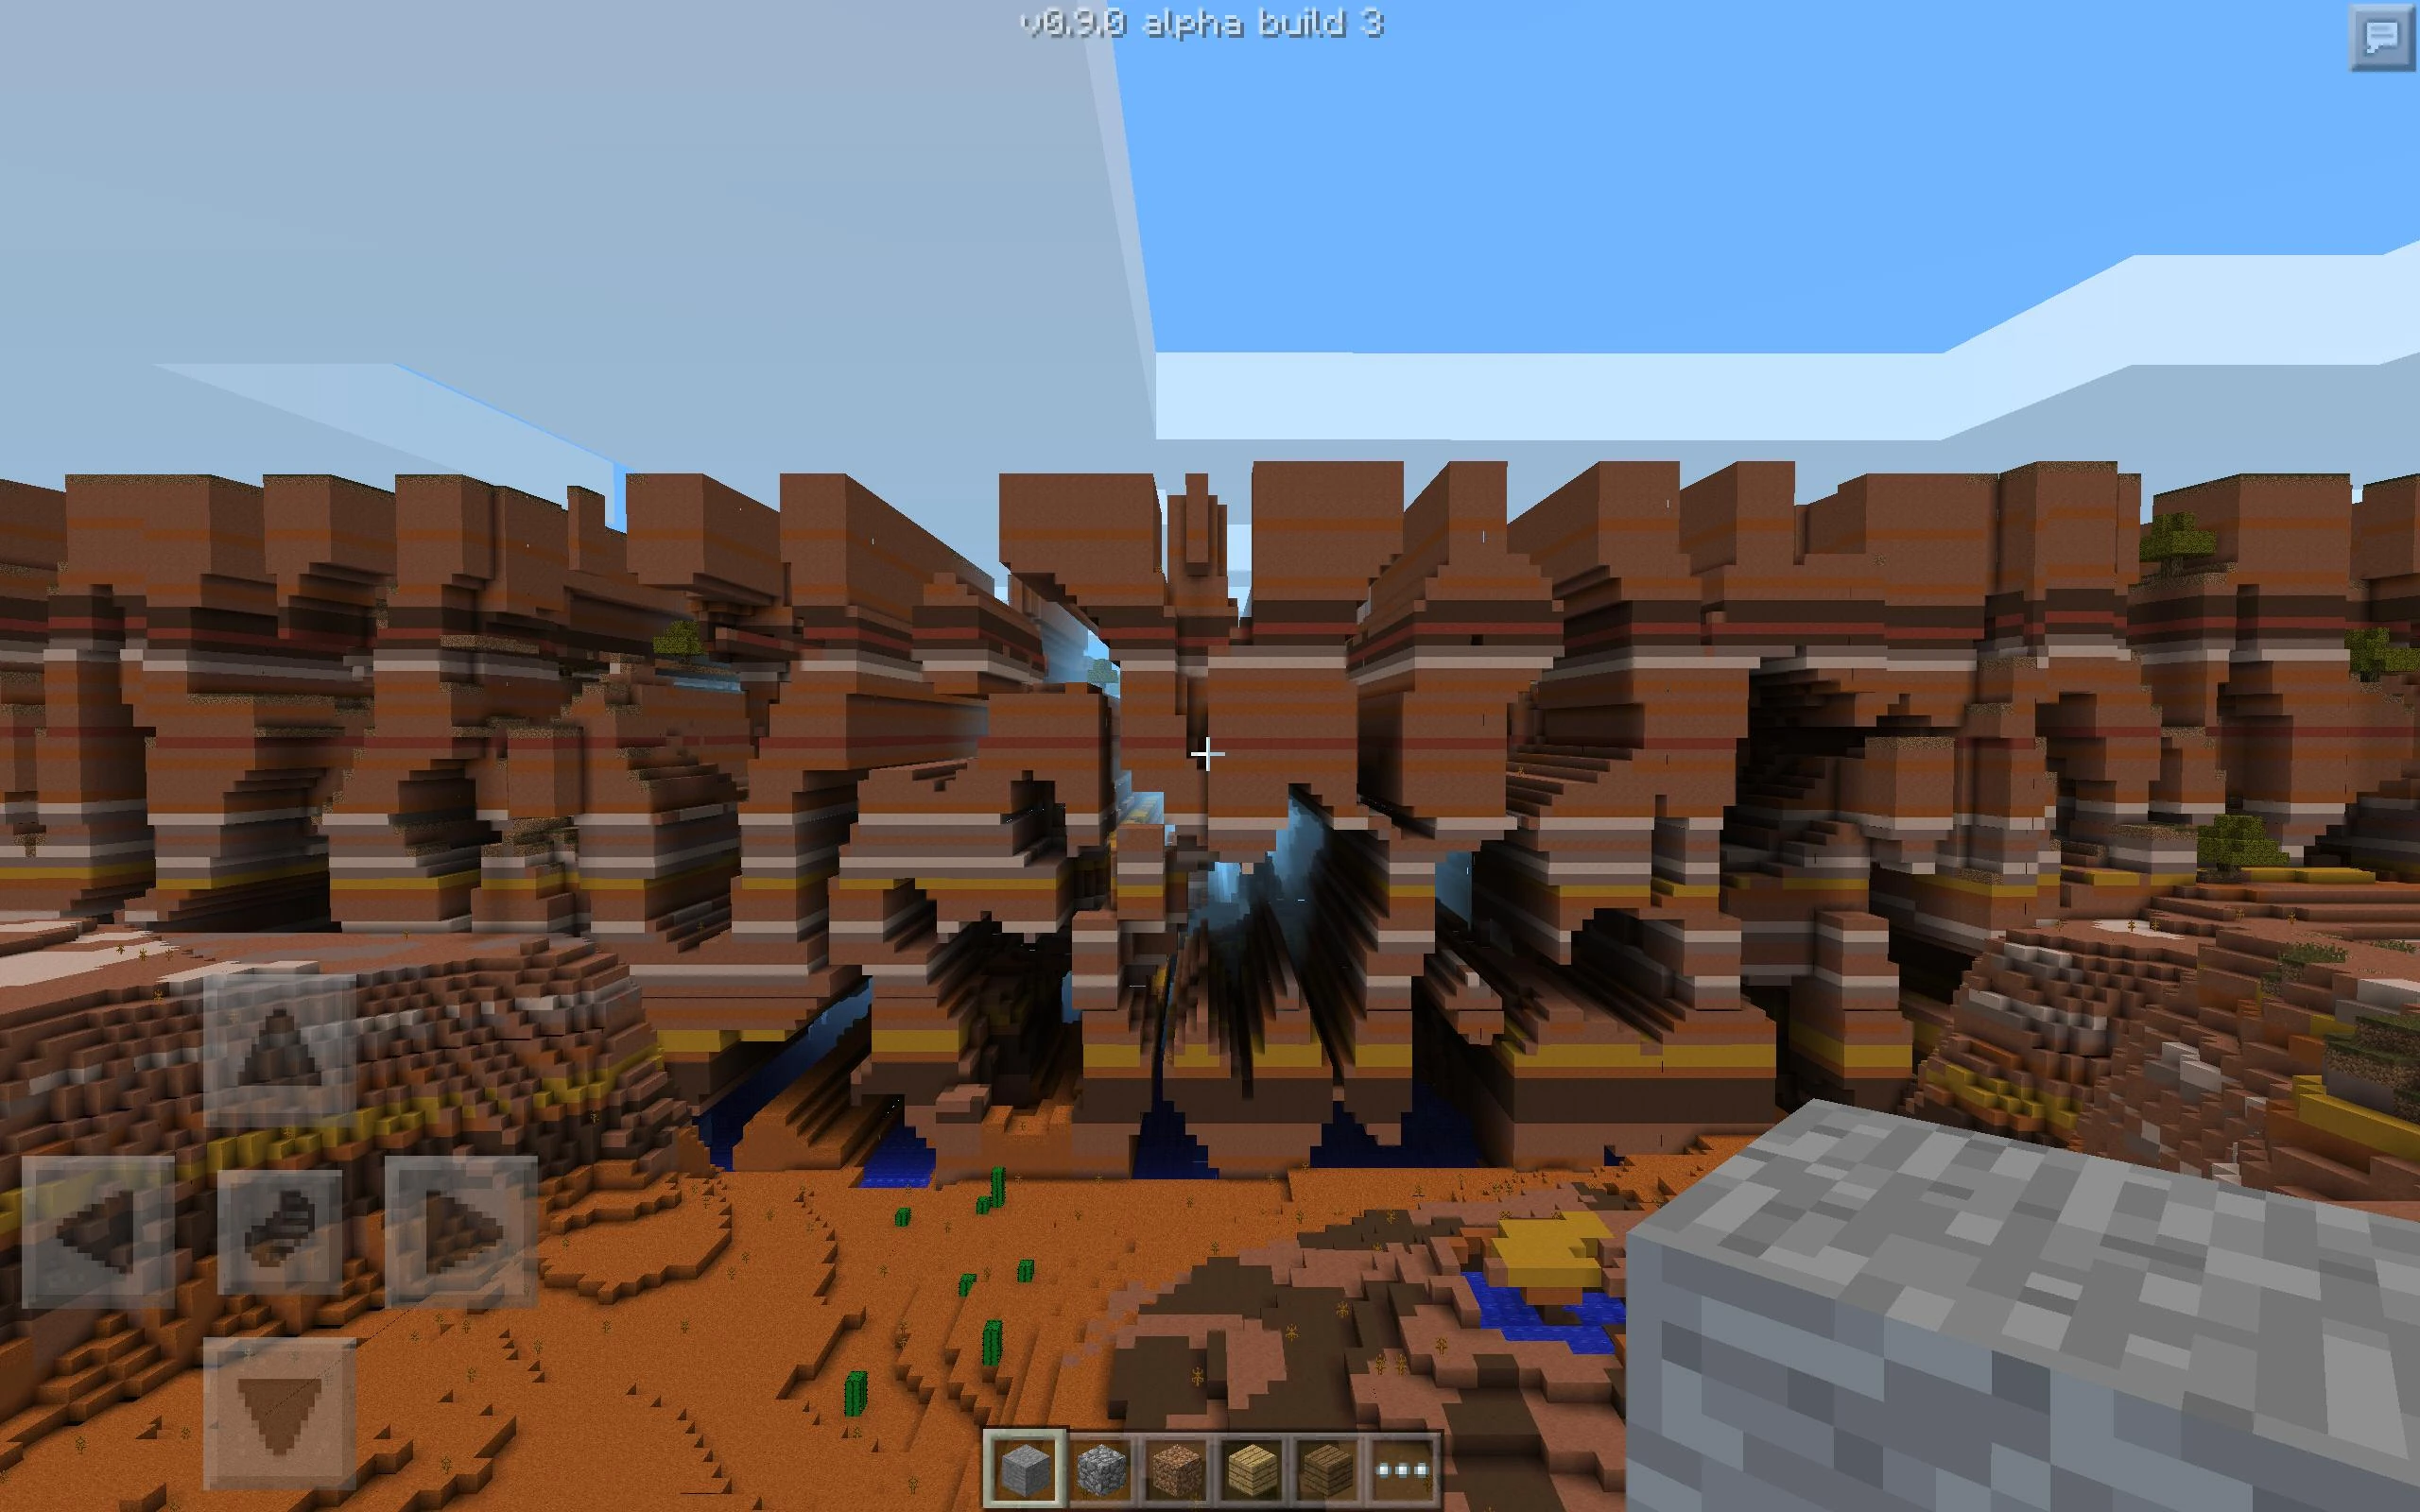

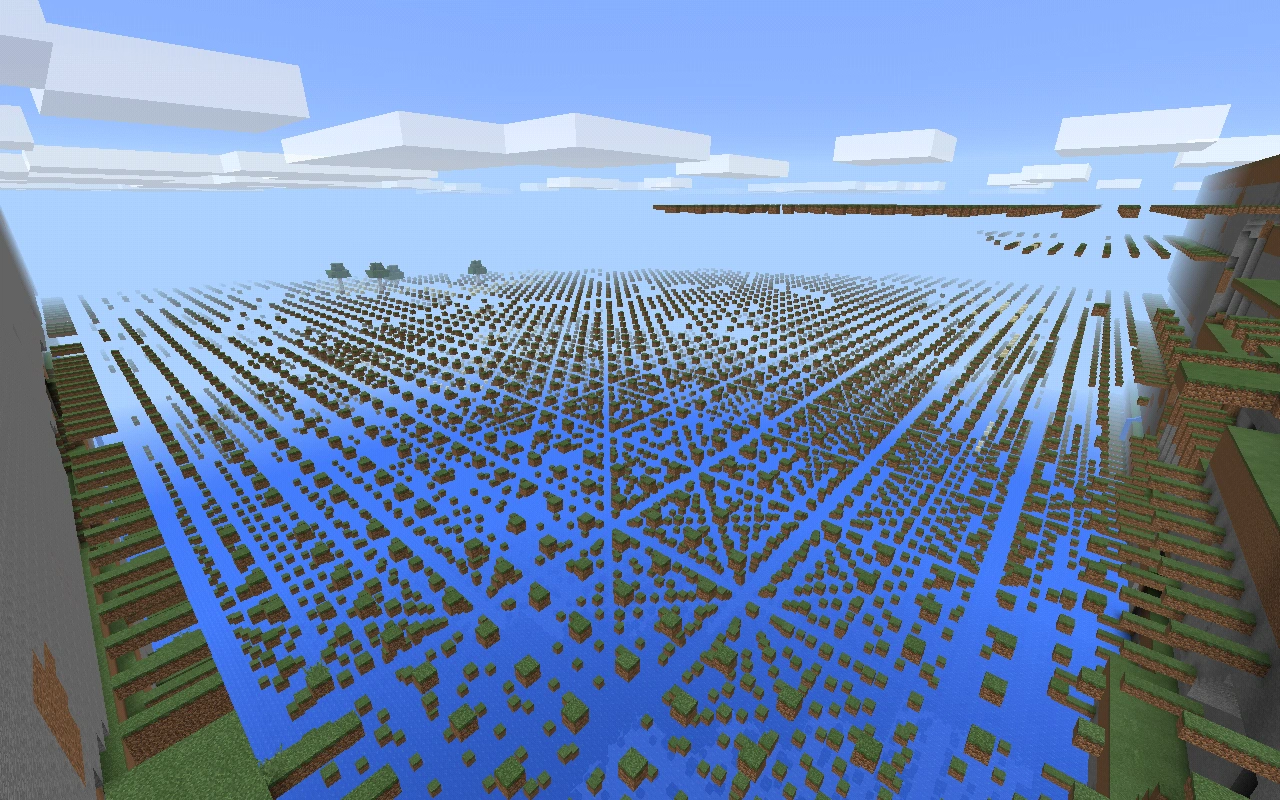
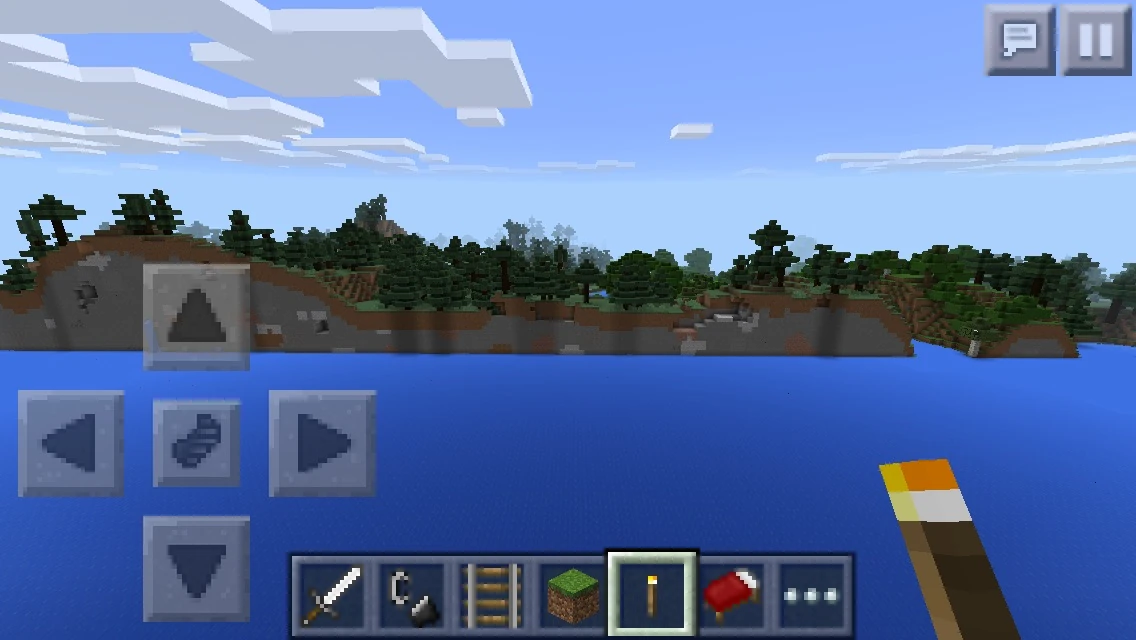
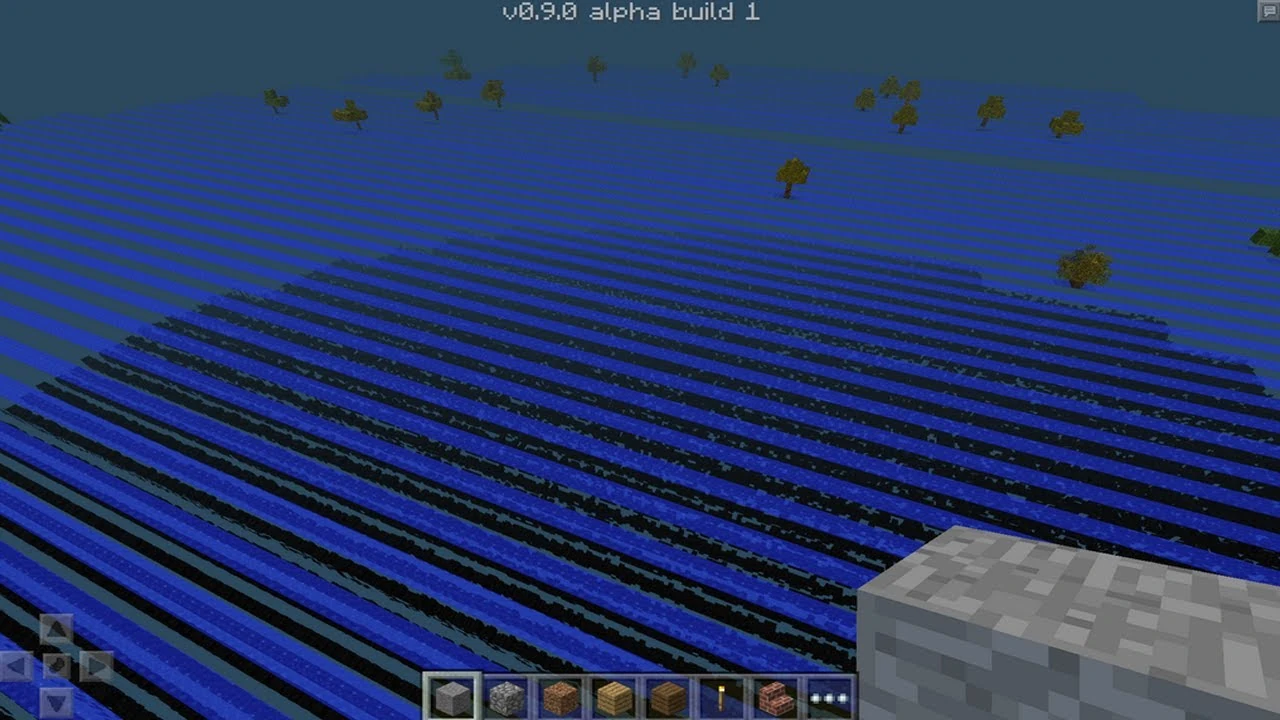
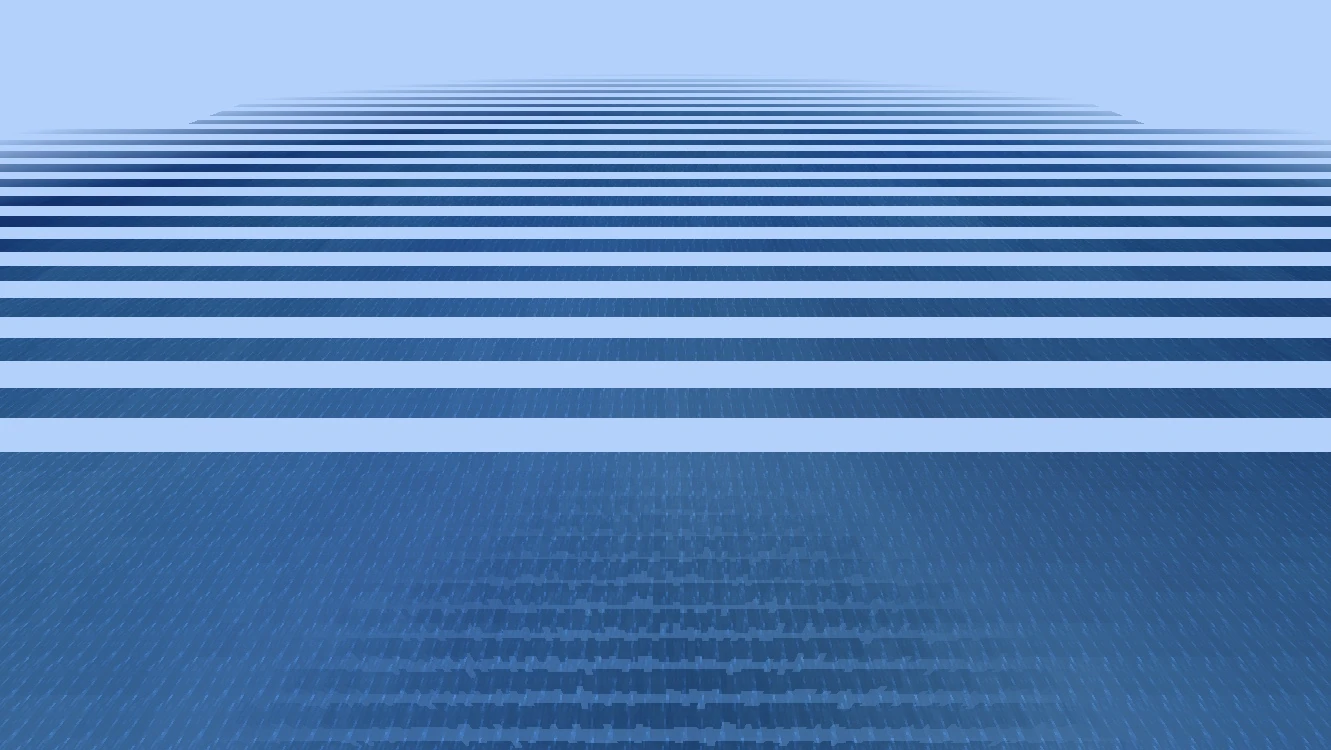
![Far Lands at X/Z: ±2,145,624,024, close to the physical limit of the game. Nothing generates this far out.[10]](https://static.wikia.nocookie.net/minecraft_gamepedia/images/9/9b/MCPEFarLandsEnd.png/revision/latest?cb=20210615033147)
Old versions
- InfdevFar.png
The Far Lands in Infdev.
“The Stack" in Infdev.
A bird's eye view of “The Stack" in Infdev.
The end of the world in Infdev.
The end of the world at night in Infdev from a third person's view.
- INFDEVOLD.png
Far lands in Infdev (April 15, 2010).
The Far Lands in 1.5 from a Beta 1.7 world.
The Edge Far Lands at X-coordinate of 2,147,483,420 (notice the low FPS).
- Infdev corner.JPG
The North-West corner of the end of the world in Infdev from third person view.

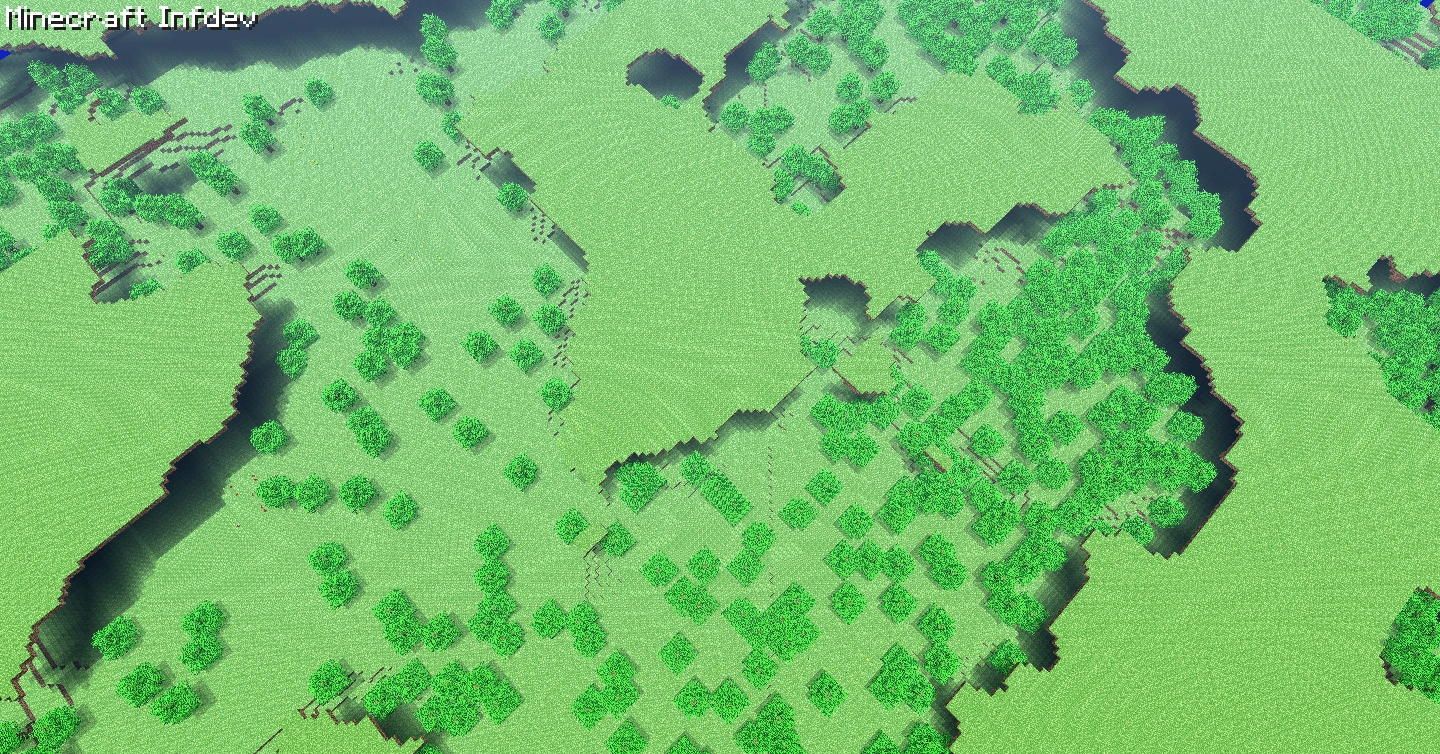
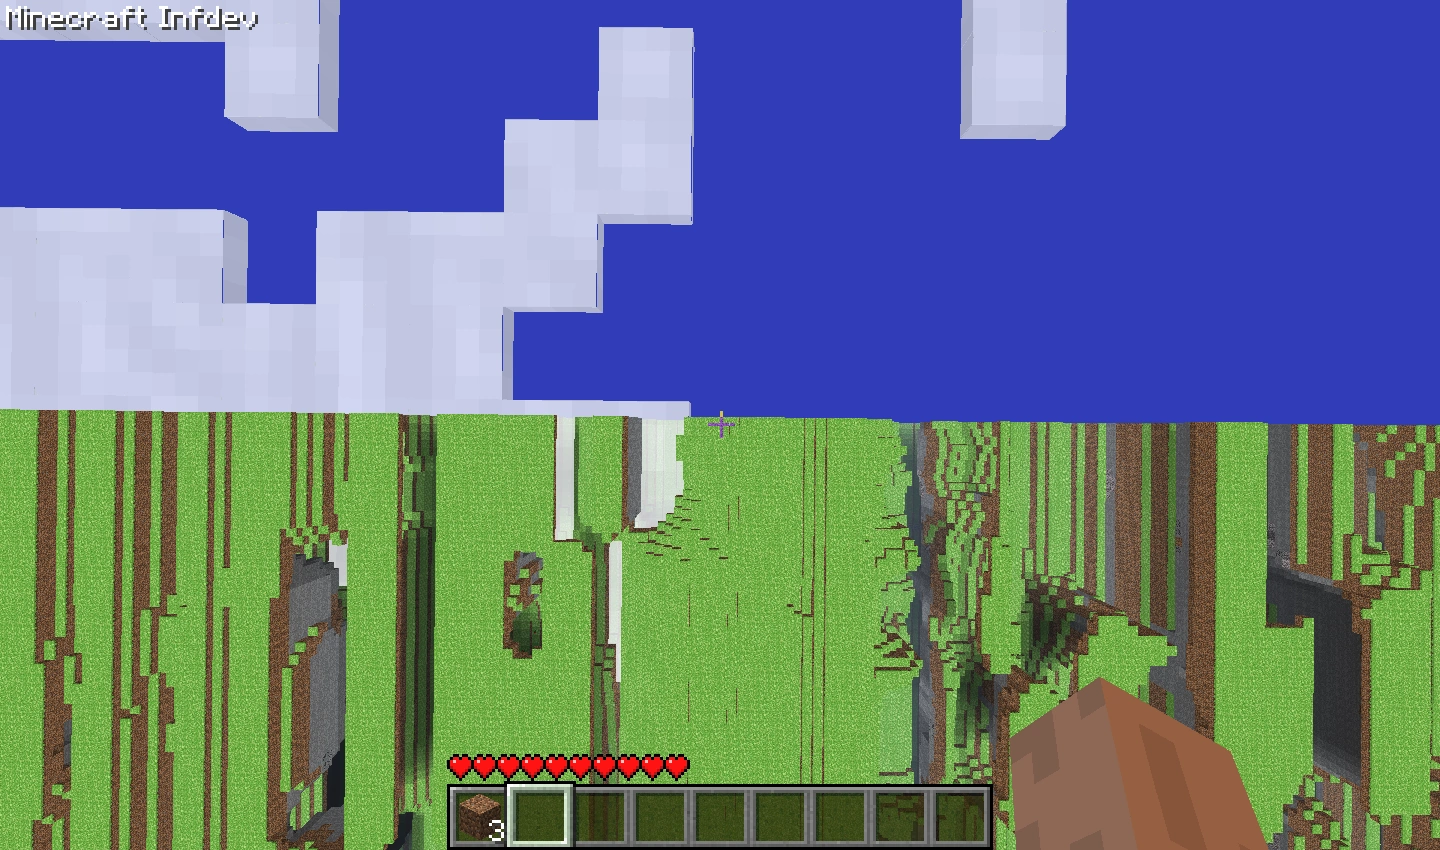
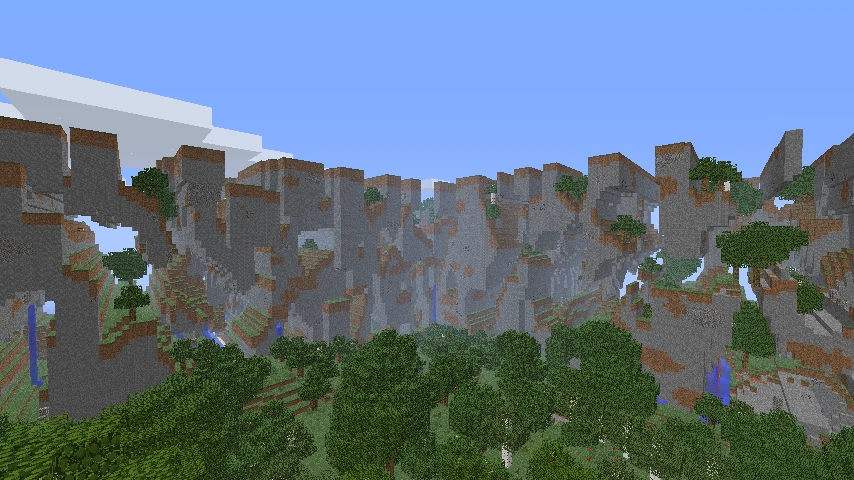
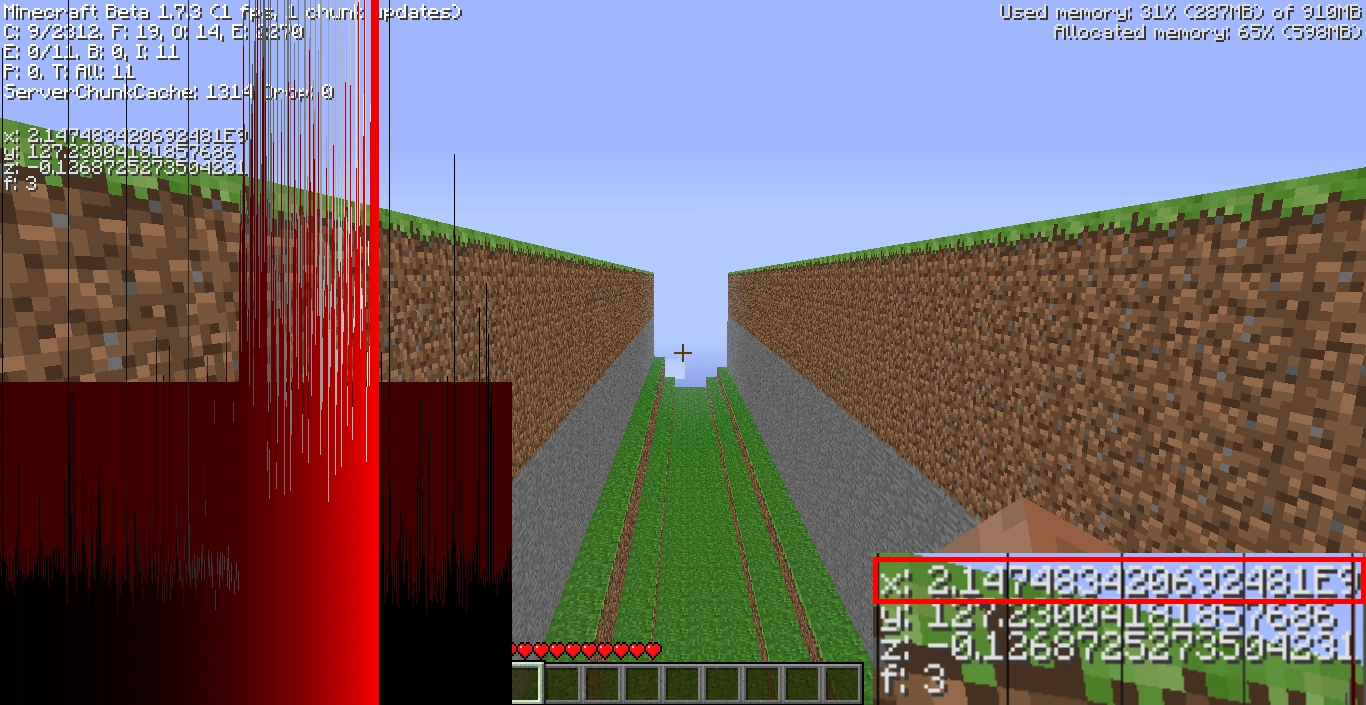
See also
- Tutorials/Far Lands - how to get to the Far Lands and avoid lag
References
- ↑ http://notch.tumblr.com/post/3746989361/terrain-generation-part-1
- ↑ https://www.reddit.com/r/MCPE/comments/280337/i_found_the_edge_far_lands_in_mcpe/
- ↑ https://twitter.com/_tomcc/status/463398793723928576
- ↑ a b c https://www.reddit.com/r/MCPE/comments/24sshy/no_far_lands_how_about_the_stripe_lands/chah6ah?context=1
- ↑ a b https://youtu.be/5bGm2-YpzXE
- ↑ https://youtu.be/7Yj6qV3xTtE
- ↑ https://youtu.be/M1JtvFNr4vg
- ↑ I resurrected the Far Lands in 1.8.1
- ↑ https://twitter.com/notch/status/97216060708753408
- ↑ http://www.reddit.com/r/MCPE/comments/2cma2w/minecraft_pe_limits_minecraft_farlands_at_125/cjgwb4x
| Editions |
| ||||||
|---|---|---|---|---|---|---|---|
| Development |
| ||||||
| Technical | |||||||
| Multiplayer | |||||||
| Exclusive features |
| ||||||
| Removed | |||||||