Endermen are black, neutral mobs from the End that have the ability to teleport.
Spawning
Endermen spawn on solid blocks at light level 7 or less. They spawn commonly in the End in packs (or "hauntings") of 4. However, in the Overworld they spawn in groups of 1-4 and are rarer than most other mobs.
Drops
Endermen may drop 0–1 ender pearls (or up to 4 with the Looting enchantment), and 5 experience orbs when killed by a player or a tamed wolf.
Endermen holding a block will drop that block.[Computer and Pocket editions only]
Behavior
Endermen do not attack unless provoked by a player attacking them or looking at their bodies or upper legs from up to 64 blocks away. When provoked, endermen will open their mouths and shake with rage; when provoked by being stared at, they will also make a lengthy, loud, threatening sound and will run towards the player to attack. If an aggravated enderman is hit by another mob, it will cease attacking the player.[1]
They can also step up one full block without having to jump.
Endermen are damaged by water and rain and will teleport away when they take damage from either of these. However, endermen do not take damage while standing in a filled cauldron. They will also teleport if they take suffocation, fire or lava damage, as well as damage from poison or the wither effect.
Endermen will continue chasing a player until they are either killed, sustain several hits, or become distracted by exterior elements like rain, fire, or sun; they are likely to teleport away to underground locations, such as caves and mineshafts, at day break. If the player sleeps in a bed, it is possible for an enderman to teleport on it and knock them off, however the player will continue sleeping.
Endermen cannot be provoked by players looking through transparent blocks or wearing a pumpkin on their head. However, they can become aggravated by a player in a minecart from some angles.
Endermen will attempt to kill endermites, provided they were spawned from ender pearls and there is no nearby player in Survival or Adventure mode. If the player is close enough to an endermite, endermen focus on the player instead of the endermite.
If you throw a splash potion of Invisibility at an enderman, the enderman will be invisible, but you can still see its eyes. In the End, an invisible enderman at a distance will become visible as a pale purple figure.
Teleportation
When teleporting, for each attempt a random destination is chosen within 32 blocks along each axis (i.e. a 64×64×64 cuboid centered on the current position). It then seeks downwards (regardless of distance) from the chosen destination until the block below is made of a movement-blocking material. The teleportation attempt will succeed to that location as long as no liquid or solid blocks prevent them from standing there. Thus endermen typically need at least three non-solid blocks above the destination to successfully teleport. Exceptions are carpet that is not above a block made of a movement-blocking material and snow layers stacked 10 deep or more, as their materials are not flagged as blocking movement even though the blocks themselves do so.
Endermen always attempt to teleport upon taking damage, such as from water. Most ordinary melee attacks are successful, but are usually followed by an immediate teleport to a few blocks behind the attacking player. When directly attacked by the player, enderman have a chance not to open their mouths. Endermen cannot normally be attacked with projectiles in the PC version (including splash potions of harming), as they will always teleport away just before being hit. If all available blocks within teleport distance are removed or unable to be transported to, it is possible to hit endermen in the PC version with a projectile, arrows tend to bounce off dealing no damage on occasion. However, in the Console Editions, it is possible to hit an enderman with a projectile by arcing a shot onto the enderman without placing the crosshairs on them directly. When teleporting due to damage, an enderman will make up to 64 attempts to teleport.
An enderman cannot teleport while it is in a minecart, though in rain and water it will attempt to do so, always teleporting back into the minecart repeatedly until death.
Endermen will not teleport in the daytime while on soul sand unless they are damaged. They will also not teleport if attacked on their legs or by wolves, as wolves attack at the legs. Endermen also hardly teleport when combating other mobs like Iron Golems.
It is possible for an enderman to teleport at death. In PC edition, the ender pearl should drop as soon as the enderman dies, but the xp only appears as the enderman's body disappears. Because of this, it's possible to slay an enderman, pick up the pearl at the point where the enderman received the killing blow, and find the experience in the location the enderman teleported to.
Moving blocks
Endermen have a unique ability to pick up certain block types and move them around. They will pick up blocks in a 4×4×3 region horizontally centered on the enderman and vertically at the same level as the enderman itself. Endermen drop the block they are holding on death.[Computer and Pocket editions only]
Endermen can only pick up the following blocks:
When carrying a block, the enderman may randomly place it, in a 2×2×2 region horizontally centered on the enderman and vertically at the same level as the enderman itself, if the target location is air with a non-air block beneath and the block is allowed to be placed at the target location.
While endermen may breach walls, bridge fences, break redstone circuitry, and even construct golems by removing or placing blocks, such actions are entirely random and not purposeful.
One can summon an enderman holding any block using the {carried:Block ID} NBT tag.
Data values
Endermen have entity data associated with them that contain various properties of the mob. Their entity ID is Enderman.
- Entity data
- Additional fields for mobs that can become angry
- Tags common to all entities
- Tags common to all mobs
- carriedBlockState: Optional. The block carried by the enderman.
- Name: The resource location of the block.
- Properties: Optional. The block states of the block.
- Name: The block state name and its value.
Video
Enderman/video
History
| b | |||||
|---|---|---|---|---|---|
| ? | At first, when Notch was still designing the endermen, he thought they were not “creepy” enough, coming with the idea that having a situation which the player would want to avoid could make the enderman significantly more scary. This gave Notch the idea to implement the staring feature, where aiming the crosshair at the enderman’s face would cause a suspenseful moment in which breaking eye contact would trigger an attack, as well as the enderman having the ability to teleport so that when the player has stared at the enderman, he or she would have to face a consequence for that action.[2] | ||||
| According to Burnie Burns of Rooster Teeth Productions, the endermen’s weakness to water was suggested by Burnie’s son when Notch mentioned that he needed to come up with a way to kill a group of endermen.[3] | |||||
| ? | In the Beta 1.8 demo at PAX, endermen dropped diamonds as a placeholder for ender pearls. | ||||
1.8{{Extension DPL}}<ul><li>[[Milk Bucket|Milk Bucket]]<br/>{{Item
| title=Milk Bucket
| image = Milk Bucket.png
| renewable = Yes
| effects = Clears all
| stackable = No
}}
A '''milk bucket'''{{fn|Known as '''Milk Bucket''' {{in|java}} and '''Milk''' {{in|bedrock}}.}} is a [[drink]] obtained from {{Control|use|text=using}} a [[bucket]] on [[cow]]s, [[mooshroom]]s and [[goat]]s that can be consumed to clear all [[Effect|effects]].
== Obtaining ==
=== Harvesting ===
Milk buckets can be obtained from [[cow]]s, [[mooshroom]]s, and [[goat]]s by pressing {{control|use}} while looking at them with an empty [[bucket]].
=== Mob loot ===
A milk bucket has a chance of dropping from a [[wandering trader]], if the trader is killed while holding it.{{only|java}}
== Usage ==
Holding {{control|use}} with a milk bucket starts the drinking sound and animation. {{IN|java}}, the animation is shown only in first-person camera mode.
When consumed, milk immediately removes all status [[effect]]s from the [[player]]. [[Fire]] is not a status effect; therefore, drinking milk doesn't extinguish a burning player.
The benefits of area status effects granted by [[beacon]]s and [[Conduit Power|conduit power]] are restored almost immediately in Bedrock Edition and after a few seconds in ''Java Edition''.
=== Crafting ingredient ===
{{crafting usage|Milk Bucket}}
== Sounds ==
{{el|je}}:
{{Sound table
|sound=Drink.ogg
|subtitle=Sipping
|source=player
|description=While a player is drinking milk
|id=entity.generic.drink
|translationkey=subtitles.entity.generic.drink
|volume=0.5
|pitch=0.9-1.0
|distance=16}}
{{Sound table
|sound=Cow milk1.ogg
|sound2=Cow milk2.ogg
|sound3=Cow milk3.ogg
|source=player
|subtitle=Cow gets milked
|description=When a cow is milked
|id=entity.cow.milk
|translationkey=subtitles.entity.cow.milk
|volume=1.0
|pitch=1.0
|distance=16}}
{{Sound table
|sound=Mooshroom milk1.ogg
|sound2=Mooshroom milk2.ogg
|sound3=Mooshroom milk3.ogg
|subtitle=Goat gets milked
|description=When a regular goat is milked
|source=neutral
|id=entity.goat.milk
|translationkey=subtitles.entity.goat.milk
|volume=1.0
|pitch=1.0
|distance=16}}
{{Sound table
|sound=Goat screaming milk1.ogg
|sound2=Goat screaming milk2.ogg
|sound3=Goat screaming milk3.ogg
|sound4=Goat screaming milk4.ogg
|sound5=Goat screaming milk5.ogg
|subtitle=Goat gets milked
|description=When a screaming goat is milked
|source=neutral
|id=entity.goat.screaming.milk
|translationkey=subtitles.entity.goat.milk
|volume=1.0
|pitch=1.0
|distance=16}}
{{Sound table
|sound=Wandering trader drink milk1.ogg
|sound2=Wandering trader drink milk2.ogg
|sound3=Wandering trader drink milk3.ogg
|sound4=Wandering trader drink milk4.ogg
|sound5=Wandering trader drink milk5.ogg
|subtitle=Wandering Trader drinks milk
|source=neutral
|description=While a wandering trader is drinking milk to become visible during daytime
|id=entity.wandering_trader.drink_milk
|translationkey=subtitles.entity.wandering_trader.drink_milk
|volume=0.5
|pitch=0.9-1.0
|distance=16
|foot=1}}
{{el|be}}:
{{Sound table
|type=bedrock
|sound=Drink.ogg
|source=player
|description=While a player is drinking milk
|id=random.drink
|volume=0.35
|pitch=0.9-1.1}}
{{Sound table
|sound=Cow milk1.ogg
|sound2=Cow milk2.ogg
|sound3=Cow milk3.ogg
|source=neutral
|description=When a cow is milked
|id=mob.cow.milk
|volume=1.0
|pitch=1.0}}
{{Sound table
|sound=Mooshroom milk1.ogg
|sound2=Mooshroom milk2.ogg
|sound3=Mooshroom milk3.ogg
|description=When a regular goat is milked
|source=neutral
|id=mob.mooshroom.suspicious_milk
|volume=1.0
|pitch=1.0/0.9/1.1}}
{{Sound table
|sound=Goat screaming milk1.ogg
|sound2=Goat screaming milk2.ogg
|sound3=Goat screaming milk3.ogg
|sound4=Goat screaming milk4.ogg
|sound5=Goat screaming milk5.ogg
|description=When a screaming goat is milked
|source=neutral
|id=mob.goat.milk.screamer
|volume=1.0
|pitch=1.0}}
{{Sound table
|sound=Wandering trader drink milk1.ogg
|sound2=Wandering trader drink milk2.ogg
|sound3=Wandering trader drink milk3.ogg
|sound4=Wandering trader drink milk4.ogg
|sound5=Wandering trader drink milk5.ogg
|source=neutral
|description=While a wandering trader is drinking milk to become visible during daytime
|id=mob.wanderingtrader.drink_milk
|volume=1.0
|pitch=0.8-1.2
|foot=1}}
== Data values ==
=== ID ===
{{edition|java}}:
{{ID table
|edition=java
|showforms=y
|generatetranslationkeys=y
|displayname=Milk Bucket
|spritetype=item
|nameid=milk_bucket
|form=item
|foot=1}}
{{edition|bedrock}}:
{{ID table
|edition=bedrock
|showaliasids=y
|shownumericids=y
|showforms=y
|notshowbeitemforms=y
|generatetranslationkeys=y
|displayname=Milk
|spritetype=item
|nameid=milk_bucket
|aliasid=bucket / 1
|id=361
|form=item
|translationkey=item.milk.name
|foot=1}}
== Achievements ==
{{load achievements|The Lie}}
== Advancements ==
{{Load advancements|Husbandry}}
== Video ==
<div style="text-align:center">{{yt|eyxea_d0b3s}}</div>
== History ==
{{History|java alpha}}
{{History||v1.0.8|[[File:Milk Bucket JE1 BE1.png|32px]] Milk has been introduced, but it has no purpose and is obtainable only through inventory editing.}}
{{History||v1.0.11|Milk can now be obtained by {{control|use|text=milking}} a [[cow]] with a [[bucket]]. However, it is not yet drinkable.}}
{{History||v1.0.17|Milk buckets can now be emptied.}}
{{History|java beta}}
{{History||1.2|Milk has been incorporated into the [[crafting]] recipe of [[cake]].}}
{{History||1.2_01|[[Squid]] can now be milked by right-clicking on their mouth if part of their body was exposed to [[air]] or if they were not touching another [[block]]. An easy way to accomplish this is to pull a squid with a [[fishing rod]] away from other blocks and then milk it.}}
{{History||1.3_01|Squid milking has been removed.}}
{{History|java}}
{{History||1.0.0|snap=Beta 1.9 Prerelease|Milk can now be obtained by milking [[mooshroom]]s.}}
{{History|||snap=Beta 1.9 Prerelease 2|Milk has been made drinkable.
|According to a tweet by [[Jeb]] on September 30th 2011, milk was made a cure for all status effects.<ref>{{tweet|jeb_|119842906528944129|@Nexusdog_UK I haven't! In beta 1.9 pre2 milk works like a clear-everything drink|September 30, 2011}}</ref>
|Milk is no longer emptiable.}}
{{History||1.13|snap=17w47a|Prior to [[1.13/Flattening|''The Flattening'']], this [[item]]'s numeral ID was 335.}}
{{History|||snap=18w20a|"Milk" has been renamed to "Milk Bucket".}}
{{History||1.14|snap=18w43a|[[File:Milk Bucket JE2 BE2.png|32px]] The texture of milk buckets has been changed.}}
{{History||1.14|snap=19w06a|[[Wandering trader]]s now drink from milk buckets at dawn, and have a change to drop them.}}
{{History||1.17|snap=21w13a|Milk can now be obtained by milking [[goat]]s.}}
{{History|upcoming java}}
{{History||Villager Trade Rebalance<br>(Experimental)|link=Java Edition 1.20.2|snap=23w31a|Wander traders now have a chance to [[trading|buy]] a milk bucket from the player.}}
{{History|pocket alpha}}
{{History||v0.7.0|[[File:Milk Bucket JE1 BE1.png|32px]] Added milk buckets.
|Milk buckets are not yet drinkable.}}
{{History||v0.11.0|snap=build 4|Drinking milk now removes [[status effects]].
|Added milk buckets to the Creative inventory.{{verify|type=update}}{{info needed}}<!---same update?--->}}
{{History|bedrock}}
{{History||1.4.0|snap=beta 1.2.14.2|Moved all bucket items, including milk, from the Equipment tab to the Items tab in the [[Creative inventory]].{{verify|type=update}}{{info needed}}<!---please check snapshots, only 1 major release version was checked each--->}}
{{History||1.10.0|snap=beta 1.10.0.3|[[File:Milk Bucket JE2 BE2.png|32px]] The texture of milk buckets has been changed.}}
{{History||1.16.100|snap=beta 1.16.100.56|The ID of milk has been changed from <code>bucket/1</code> to <code>milk_bucket</code>.}}
{{History||1.16.200|snap=beta 1.16.200.52|Milk can now be obtained by milking [[goat]]s.}}
{{History|console}}
{{History||xbox=TU1|xbone=CU1|ps=1.0|wiiu=Patch 1|switch=1.0.1|[[File:Milk Bucket JE1 BE1.png|32px]] Added milk buckets.}}
{{History|Ps4}}
{{History||1.90|[[File:Milk Bucket JE2 BE2.png|32px]] The texture of milk buckets has been changed.}}
{{History|New 3DS}}
{{History||0.1.0|[[File:Milk Bucket JE1 BE1.png|32px]] Added milk buckets.}}
{{History|foot}}
== Issues ==
{{issue list}}
== See also ==
*[[Water Bucket]]
*[[Lava]]
*[[Food]]
*[[Cake]]
*[[Honey Bottle]] (alternative to remove poison effect)
*[[Medicine]]
== Notes ==
{{fnlist}}
== References ==
{{reflist}}
== External Links ==
*[https://www.minecraft.net/en-us/article/taking-inventory--milk-bucket Taking Inventory: Milk Bucket] – Minecraft.net on October 8, 2019
{{Items}}
[[Category:Food]]
[[Category:Renewable resources]]
[[Category:Tools]]
[[cs:Mléko]]
[[de:Milcheimer]]
[[es:Cubo con leche]]
[[fr:Seau de lait]]
[[hu:Tej]]
[[it:Secchio di latte]]
[[ja:ミルク入りバケツ]]
[[ko:우유 양동이]]
[[nl:Emmer melk]]
[[pl:Wiadro mleka]]
[[pt:Balde de leite]]
[[ru:Ведро с молоком]]
[[th:ถังนม]]
[[uk:Відро молока]]
[[zh:奶桶]]</li><li>[[Rabbit's Foot|Rabbit's Foot]]<br/>{{Item
| image = Rabbit's Foot.png
|type=
| renewable = Yes
| stackable = Yes (64)
}}
A '''rabbit's foot''' is a [[brewing]] item obtained from [[rabbit]]s.
== Obtaining ==
=== Mob loot ===
Each [[rabbit]] has a 10% chance to drop a rabbit's foot when killed by the [[player]]. This chance can be increased by 3% per level using a sword enchanted with [[Looting]].
A [[fox]] sometimes spawns with a rabbit's foot in its mouth, which always drops upon death. Alternatively, the player can drop a [[food]] item, which causes the fox to drop the rabbit's foot.
=== Cat gifts ===
{{main|Cat#Gifts}}
A tamed [[cat]] has a 70% chance of giving the player a gift when the player wakes up from a [[bed]], and the gift has a 16.13% chance to be a rabbit's foot.
== Usage ==
=== Brewing ingredient ===
{{Brewing
|head=1
|Rabbit's Foot
|Mundane Potion
|base=Water Bottle
}}
{{brewing
|foot=1
|showname=1
|Rabbit's Foot
|Potion of Leaping
}}
=== Trading ===
Journeyman-level cleric [[villager]]s buy rabbit's feet for an [[emerald]] as part of their trade: {{in|java}} they buy 2, and {{in|bedrock}} they buy 4.
== Video ==
<div style="text-align:center">{{yt|Ba3QN3uCniU}}</div>
== Data values ==
=== ID ===
{{edition|java}}:
{{ID table
|edition=java
|showforms=y
|generatetranslationkeys=y
|displayname=Rabbit's Foot
|spritetype=item
|nameid=rabbit_foot
|form=item
|foot=1}}
{{edition|bedrock}}:
{{ID table
|edition=bedrock
|shownumericids=y
|showforms=y
|notshowbeitemforms=y
|generatetranslationkeys=y
|displayname=Rabbit's Foot
|spritetype=item
|nameid=rabbit_foot
|id=528
|form=item
|foot=1}}
== History ==
{{History|java}}
{{History||1.8|snap=June 30, 2014|slink=https://twitter.com/TheMogMiner/status/483636993780232192|[[Ryan Holtz]] tweeted images of a rabbit's foot with some other new [[item]]s.}}
{{History|||snap=14w27a|[[File:Rabbit's Foot JE1.png|32px]] Added rabbit's foot.
|Added the [[potion of Leaping]]; it is [[brewing|brewed]] by adding a rabbit's foot to an [[awkward potion]]. The rabbit's foot also creates the [[mundane potion]] when brewed into a [[water bottle]].}}
{{History|||snap=14w33b|[[File:Rabbit's Foot JE2 BE1.png|32px]] The texture of the rabbit's foot has been changed. The new texture was created by [[wikipedia:Reddit|Reddit]] user [http://www.reddit.com/u/zeldahuman zeldahuman].<ref>{{reddit|2bjzes/a_reminder_of_the_blocks_and_items_added_in_18_so|cj69zie|context=3}}</ref><ref>{{reddit|2c5f35/minecraft_snapshot_14w31a_has_been_released|cjct7gb}}</ref>}}
{{History||1.8.1|snap=pre1|Potions of Leaping, which use rabbit's foot, can now be extended using [[redstone]].}}
{{History||1.9|snap=15w46a|The drop rate of rabbit's foot has been quadrupled.{{more info|Before/After rates}}}}
{{History||1.13|snap=17w47a|Prior to [[1.13/Flattening|''The Flattening'']], this [[item]]'s numeral ID was 414.}}
{{History||1.14|snap=18w43a|[[File:Rabbit's Foot JE3 BE2.png|32px]] The texture of rabbit's foot has been changed.}}
{{History|||snap=18w44a|[[Cat]]s now offer rabbit's feet as [[Cat#Gifts|gifts]].}}
{{History|||snap=19w07a|Added [[fox]]es, which sometimes spawn with rabbit's feet in their mouths.}}
{{History|||snap=19w11a|Cleric [[villager]]s now [[trading|buy]] rabbit's feet.}}
{{History|pocket alpha}}
{{History||v0.12.1|snap=build 1|[[File:Rabbit's Foot JE2 BE1.png|32px]] Added rabbit's foot to the [[Creative]] mode [[inventory]].}}
{{History||v0.13.0|snap=build 1|Rabbit's foot can now be obtained as a rare [[drops|drop]] upon killing [[rabbit]]s.
|Rabbit's foot can now be [[brewing|brewed]] to make [[potions of Leaping]].}}
{{History|bedrock}}
{{History||1.8.0|snap=beta 1.8.0.8|Tamed [[cat]]s can now give the [[player]] rabbit's foot as a gift.}}
{{History||1.10.0|snap=beta 1.10.0.3|[[File:Rabbit's Foot JE3 BE2.png|32px]] The texture of rabbit's foot has been changed.}}
{{History||1.11.0|snap=beta 1.11.0.4|Rabbit's foot can now be [[trading|sold]] to cleric [[villager]]s.}}
{{History||1.13.0|snap=beta 1.13.0.1|Added [[fox]]es, which can [[drops|drop]] rabbit's foot.}}
{{History|console}}
{{History||xbox=TU31|xbone=CU19|ps=1.22|wiiu=Patch 3|switch=1.0.1|[[File:Rabbit's Foot JE2 BE1.png|32px]] Added rabbit's foot.}}
{{History||xbox=none|xbone=none|ps=1.90|wiiu=none|switch=none|[[File:Rabbit's Foot JE3 BE2.png|32px]] The texture of rabbit's foot has been changed.}}
{{History|New 3DS}}
{{History||0.1.0|[[File:Rabbit's Foot JE2 BE1.png|32px]] Added rabbit's foot.}}
{{History|foot}}
== Issues ==
{{issue list}}
== Trivia ==
* The superstition that [[wikipedia:Rabbit's_foot|a rabbit's foot is a lucky charm]] applies equally to Minecraft as it does in the real world: it does not actually increase luck.
== Gallery ==
<gallery>
Rabbit Items 4 Ryan Holtz.png|First image of the item by [[Ryan Holtz]].
Rabbit Items 5 Ryan Holtz.png|Ryan Holtz brewing the item into a potion.
Rabbit Items 6 Ryan Holtz.png|Ryan Holtz enhancing the potion.
</gallery>
== References ==
{{reflist}}
== External Links ==
*[https://www.minecraft.net/en-us/article/taking-inventory--rabbit-s-foot Taking Inventory: Rabbit's Foot] – Minecraft.net on May 3, 2019
{{items}}
[[de:Hasenpfote]]
[[es:Pata de conejo]]
[[fr:Patte de lapin]]
[[it:Zampa di coniglio]]
[[ja:ウサギの足]]
[[ko:토끼발]]
[[nl:Konijnenpootje]]
[[pl:Królicza łapka]]
[[pt:Pé de coelho]]
[[ru:Кроличья лапка]]
[[uk:Кроляча лапка]]
[[zh:兔子脚]]
[[Category:Renewable resources]]
[[Category:Brewing recipe]]</li></ul> | pre1 | The enderman was officially introduced in Beta 1.8. Endermen were able to pick up any block, including bedrock. They had green eyes and emitted black smoke. | |||
1.8{{Extension DPL}}<ul><li>[[Lime Dye|Lime Dye]]<br/>{{Item
| image = Lime_Dye_JE2_BE2.png
| renewable = Yes
| stackable = Yes (64)
}}
'''Lime dye''' is a [[Dye#Quasi-Primary|quasi-primary dye]] obtained by combining one [[green dye]] and one [[white dye]] in a crafting square, or by smelting a [[sea pickle]].
== Obtaining ==
=== Crafting ===
{{Crafting
|head=1
|showname=0
|showdescription=1
|Green Dye
|White Dye
|Output=Lime Dye,2
|type=Material
}}
{{Crafting
|foot=1
|Green Dye
|Bone Meal
|Output=Lime Dye,2
|description={{only|bedrock|education}}
|type=Material
}}
=== Smelting ===
{{Smelting
|head=1
|foot=1
|Sea Pickle
|Lime Dye
|0,2
}}
=== Trading ===
[[Wandering trader]]s sell 3 lime [[dye]] for 1 [[emerald]].
== Usage ==
{{dye usage}}
=== Crafting ingredient ===
{{crafting usage|continue=1}}
{{banner crafting usage}}
=== Loom ingredient ===
{{Banner loom usage|Lime Dye}}
=== Trading ===
Journeyman-level shepherd villagers have a 20% chance to buy 12 lime dye for an emerald as part of their trades.
== Data values ==
=== ID ===
{{edition|java}}:
{{ID table
|edition=java
|showforms=y
|generatetranslationkeys=y
|displayname=Lime Dye
|spritetype=item
|nameid=lime_dye
|form=item
|foot=1}}
{{edition|bedrock}}:
{{ID table
|edition=bedrock
|showaliasids=y
|shownumericids=y
|showforms=y
|notshowbeitemforms=y
|generatetranslationkeys=y
|displayname=Lime Dye
|spritetype=item
|nameid=lime_dye
|aliasid=dye / 10
|id=405
|form=item
|translationkey=item.dye.lime.name
|foot=1}}
== Video ==
<div style="text-align:center">{{yt|5oPGO6jL1zQ}}</div>
== History ==
{{History|java beta}}
{{History||1.2|[[File:Lime Dye JE1 BE1.png|32px]] Added lime dye.}}
{{History|java}}
{{History||1.4.2|snap=12w34a|Added the ability to [[Armor#Dyeing|dye]] leather [[armor]] and [[wolf]] collars.}}
{{History||1.4.6|snap=12w49a|Lime dye can now be [[crafting|crafted]] with [[gunpowder]] to create a [[firework star]].}}
{{History||1.6.1|snap=13w19a|[[Stained clay]] can now be crafted.}}
{{history||1.7.2|snap=13w41a|[[Stained glass]] can now be crafted.}}
{{History||1.8|snap=14w30a|Added [[banner]]s, which can be dyed.}}
{{History||1.11|snap=16w39a|Added the ability to dye [[shulker box]]es.}}
{{History||1.12|snap=17w15a|Added the ability to dye [[bed]]s.}}
{{History||1.13|snap=17w47a|The different data values for the <code>dye</code> ID have now been split up into their own IDs.
|Prior to [[1.13/Flattening|''The Flattening'']], this [[item]]'s numeral ID was 351.}}
{{History|||snap=18w14b|Lime dye can now be smelted from [[sea pickle]]s.}}
{{History||1.14|snap=18w43a|Lime dye is now crafted using [[white dye]], instead of [[bone meal]].
|[[File:Lime_Dye_JE2_BE2.png|32px]] The texture of lime dye has now been changed.}}
{{History|||snap=18w44a|Lime dye can now change the text color on [[sign]]s to lime.}}
{{History|||snap=19w05a|Added the [[wandering trader]], which sells lime dye.}}
{{History|||snap=19w11a|Lime dye can now be [[trading|bought]] by shepherd villagers.}}
{{History||1.17|snap=20w45a|Lime dye can now be used to craft [[lime candle]]s.}}
{{History|||snap=21w19a|Lime dye can no longer be used to craft lime candles.}}
{{History|||snap=Pre-release 1|Lime dye can now once again be used to craft lime candles.}}
{{History||1.20<br>(Experimental)|link=1.19.3|snap=22w42a|Lime dye can now change the text color on [[hanging sign]]s to lime.}}
{{History|pocket alpha}}
{{History||v0.3.0|[[File:Lime Dye JE1 BE1.png|32px]] Added lime dye. It is currently unobtainable and serves no purpose.}}
{{History||v0.4.0|Lime dye is now craftable with [[cactus green]] and [[bone meal]].
|Lime dye can now be used to craft lime wool.}}
{{History||v0.6.0|Lime dye can now be used to dye [[sheep]].}}
{{History||v0.9.0|snap=build 11|Lime dye can now be used to craft colored [[terracotta]].}}
{{History||v0.11.0|snap=build 1|Lime dye can now be used to dye tamed [[wolf]] collars.}}
{{History||v0.14.0|snap=build 1|Lime dye can now be used to dye [[water]] in [[cauldron]]s.}}
{{History|pocket}}
{{History||1.0.0|snap=alpha 0.17.0.1|Lime dye can now be used to dye [[shulker]]s.}}
{{History||1.1.0|snap=alpha 1.1.0.0|Lime dye can now be used to craft [[concrete powder]], colored [[bed]]s and dyed [[shulker box]]es.}}
{{History|bedrock}}
{{History||1.2.0|snap=beta 1.2.0.2|Lime dye can now be used to craft [[firework star]]s, [[stained glass]] and patterns on [[banner]]s.}}
{{History||1.4.0|snap=beta 1.2.20.1|Lime dye can now be used to craft [[balloon]]s and [[glow stick]]s.
|Lime dye can now be obtained from smelting [[sea pickle]]s.}}
{{History||1.8.0|snap=beta 1.8.0.8|Lime dye can now be used to dye tamed [[cat]] collars.}}
{{History||1.10.0|snap=beta 1.10.0.3|Lime dye is now [[trading|sold]] by [[wandering trader]]s.
|Lime dye can now be used to dye white [[carpet]]s and undyed [[glass pane]]s.
|[[File:Lime_Dye_JE2_BE2.png|32px]] The texture of lime dye has now been changed.}}
{{History||1.11.0|snap=beta 1.11.0.4|Lime dye can now be [[trading|sold]] to shepherd [[villager]]s.}}
{{History||1.16.100|snap=beta 1.16.100.56|The ID of lime dye has been changed from <code>dye/10</code> to <code>lime_dye</code>.}}
{{History|console}}
{{History||xbox=TU1|xbone=CU1|ps=1.00|switch=1.0.1|wiiu=Patch 1|[[File:Lime Dye JE1 BE1.png|32px]] Added lime dye.}}
{{History|PS4}}
{{History||1.90|[[File:Lime_Dye_JE2_BE2.png|32px]] The texture of lime dye has now been changed.}}
{{History|new 3ds}}
{{History||0.1.0|[[File:Lime Dye JE1 BE1.png|32px]] Added lime dye.}}
{{History|foot}}
== Issues ==
{{issue list}}
== References ==
{{Reflist}}
{{Items}}
[[Category:Dyes]]
[[Category:Renewable resources]]
[[cs:Světle zelené barvivo]]
[[de:Hellgrüner Farbstoff]]
[[es:Tinte verde lima]]
[[fr:Teinture vert clair]]
[[hu:Neonzöld festék]]
[[ja:黄緑色の染料]]
[[ko:연두색 염료]]
[[nl:Lichtgroene kleurstof]]
[[pl:Jasnozielony barwnik]]
[[pt:Corante verde-limão]]
[[ru:Лаймовый краситель]]
[[zh:黄绿色染料]]</li><li>[[Wheat Seeds|Wheat Seeds]]<br/>{{Block
| group = Age 0
| 1-1 = Wheat Age 0.png
| 1-2 = Wheat Age 0 BE.png
| group2 = Age 7
| 2-1 = Wheat Age 7.png
| 2-2 = Wheat Age 7 BE.png
| image = Wheat Seeds.png
| extratext = [[#Renders|View all renders]]
| invimage = Wheat Seeds
| transparent = Yes
| light = No
| tool = N/A
| renewable = Yes
| stackable = Yes (64)
| flammable = No
| lavasusceptible = No
}}
'''Wheat seeds''' ({{in|java}}) or '''seeds''' ({{in|bedrock}}) are [[item]]s obtained by breaking [[grass]], or more abundantly harvested from wheat crops, and are used to plant them.
'''Wheat crops''' are planted in [[farmland]] and used to grow [[wheat]] and wheat seeds.
== Obtaining ==
=== Breaking ===
Harvesting fully-grown [[wheat]] [[crops]] yields from 1 to 4 seeds per crop harvested (about {{frac|2|5|7}} seeds/crop harvested on average).
In '''Bedrock edition''' yields are 0-3.[https://bugs.mojang.com/browse/MCPE-169402]<sup><nowiki>https://bugs.mojang.com/browse/MCPE-169402</sup>
Wheat seeds can be obtained from breaking all variants of [[grass]], which yields 0 to 1 seed. If harvested with a [[Fortune]] enchanted tool the drop rate from grass is increased.
The looting is calculated by a binomial distribution: a drop is attempted three times with a success rate of around 57% to yield the 0–3 drops. Each level of Fortune enchantment increases the number of attempts by one.
{| class="wikitable"
! rowspan="3" |[[Resource location]]
! rowspan="3" | Source
! colspan="5" | Drops
|- style="text-align:center"
! rowspan="2" |{{ItemLink|Wheat}}
! colspan="4" |{{ItemText|Wheat Seeds}}
|- style="text-align:center"
! Default tool
! With [[Fortune]] I
! With Fortune II
! With Fortune III
|- style="text-align:center"
| rowspan="2" |<code>blocks/wheat</code>
|{{BlockLink|Wheat}} (age 0–6)
| 0 {{ItemSprite|Wheat}}
| 1 {{ItemSprite|Wheat Seeds}}|| 1 {{ItemSprite|Wheat Seeds}}|| 1 {{ItemSprite|Wheat Seeds}}|| 1 {{ItemSprite|Wheat Seeds}}
|- style="text-align:center"
|{{BlockLink|Wheat}} (age 7)
| 1 {{ItemSprite|Wheat}}
| 1 {{ItemSprite|Wheat Seeds}} (~7.87%) ''or''<br>2 {{ItemSprite|Wheat Seeds}} (~31.49%) ''or''<br>3 {{ItemSprite|Wheat Seeds}} (~41.98%) ''or''<br>4 {{ItemSprite|Wheat Seeds}} (~18.66%)
| 1 {{ItemSprite|Wheat Seeds}} (~3.37%) ''or''<br>2 {{ItemSprite|Wheat Seeds}} (~17.99%) ''or''<br>3 {{ItemSprite|Wheat Seeds}} (~35.98%) ''or''<br>4 {{ItemSprite|Wheat Seeds}} (~31.99%) ''or''<br>5 {{ItemSprite|Wheat Seeds}} (~10.66%)
| 1 {{ItemSprite|Wheat Seeds}} (~1.44%) ''or''<br>2 {{ItemSprite|Wheat Seeds}} (~9.64%) ''or''<br>3 {{ItemSprite|Wheat Seeds}} (~25.70%) ''or''<br>4 {{ItemSprite|Wheat Seeds}} (~34.27%) ''or''<br>5 {{ItemSprite|Wheat Seeds}} (~22.85%) ''or''<br>6 {{ItemSprite|Wheat Seeds}} (~6.09%)
| 1 {{ItemSprite|Wheat Seeds}} (~0.62%) ''or''<br>2 {{ItemSprite|Wheat Seeds}} (~4.96%) ''or''<br>3 {{ItemSprite|Wheat Seeds}} (~16.52%) ''or''<br>4 {{ItemSprite|Wheat Seeds}} (~29.38%) ''or''<br>5 {{ItemSprite|Wheat Seeds}} (~29.38%) ''or''<br>6 {{ItemSprite|Wheat Seeds}} (~15.67%) ''or''<br>7 {{ItemSprite|Wheat Seeds}} (~3.48%)
|}
=== Natural generation ===
[[Village]] farm plots have a chance of being wheat crops. The exact chance depends on the style of the village:
{| class="wikitable"
! Village style !! Chance
|-
| {{EnvSprite|savanna-village}} Savanna || 80%
|-
| {{EnvSprite|desert-village}} Desert || 70%
|-
| {{EnvSprite|taiga-village}} Taiga || 60%
|-
| {{EnvSprite|plains-village}} Plains || 50%
|-
| {{EnvSprite|snowy-village}} Snowy || 20%
|}
=== Chest loot ===
{{LootChestItem|wheat-seeds}}
=== Trading ===
[[Wandering trader]]s sell wheat seeds for an [[emerald]].
=== Villager gifts ===
{{exclusive|java|section=1}}
Nitwit and unemployed [[villager]]s throw wheat seeds at players under the [[Hero of the Village]] effect.
== Usage ==
=== Crop ===
{{main|Tutorials/Crop farming|title1=Crop Farming}}
[[File:Crop states.png|thumb|Different stages of crop growth.]]
Wheat seeds can be placed on [[farmland]] by right-clicking, where they grow through eight stages. When left alone, wheat seeds planted on farmland grow to become wheat crops, which can be harvested by the player. Planted seeds require a light level of 9 or greater to continue growing. If the light level is 7 or below, the crops instantly un-plant themselves ("pop off"). It is not possible to plant seeds if the light level is too low.
Crops grow faster if the farmland they are planted in is [[Farmland#Hydration|hydrated]]. Using [[bone meal]] on crops also increases the speed of growth by randomly increasing their growth stage by 2 to 5.
Breaking the final stage produces 1 to 4 wheat seeds (or more with Fortune) and 1 [[wheat]]. If they are harvested early, they drop 1 seed without any wheat. Crops break if pushed by a [[piston]] or if their supporting farmland breaks or turns to dirt (i.e. by being trampled), dropping their usual drops.
=== Breeding ===
Like other seeds, wheat seeds can be used to breed [[chicken]]s and reduce the remaining growth duration of baby chickens by 10%. Chickens also follow a player holding wheat seeds.
=== Taming ===
Like other seeds, wheat seeds can be used to tame [[parrot]]s.
=== Composting ===
Placing wheat seeds into a [[composter]] has a 30% chance of raising the compost level by 1. A stack of wheat seeds yields an average of 2.74 [[bonemeal]].
== Sounds ==
{{Sound table/Block/Crop}}
== Data values ==
=== ID ===
{{edition|java}}:
{{ID table
|edition=java
|showblocktags=y
|showforms=y
|generatetranslationkeys=y
|displayname=Wheat Crops
|spritetype=block
|nameid=wheat
|blocktags=bee_growables, crops
|form=block}}
{{ID table
|displayname=Wheat Seeds
|spritetype=item
|nameid=wheat_seeds
|form=item
|foot=1}}
{{edition|bedrock}}:
{{ID table
|edition=bedrock
|shownumericids=y
|showforms=y
|generatetranslationkeys=y
|displayname=Wheat
|spritetype=block
|nameid=wheat
|id=59
|form=block
|itemform=item.wheat}}
{{ID table
|displayname=Seeds
|spritetype=item
|nameid=wheat_seeds
|id=291
|form=item
|foot=1}}
=== Block states ===
{{see also|Block states}}
{{/BS}}
== Advancements ==
{{load advancements|A Seedy Place}}
== History ==
''For a more in-depth breakdown of changes to wheat textures and models, including a set of renders for each state, see [[/Asset history]]''
{{History|java classic}}
{{History||May 21, 2009|link=wordofnotch:110762705|[[Notch]] shows interest in adding [[crops]] on [[farmland]].}}
{{History|java indev}}
{{History||Minecraft Indev|snap=20100206|link=Minecraft Indev|slink=Java Edition Indev 20100206|[[File:Wheat Seeds JE1 BE1.png|32px]] Added seeds.
|[[File:Wheat Age 0 JE1.png|32px]] [[File:Wheat Age 1 JE1.png|32px]] [[File:Wheat Age 2 JE1.png|32px]] [[File:Wheat Age 3 JE1.png|32px]] [[File:Wheat Age 4 JE1.png|32px]] [[File:Wheat Age 5 JE1.png|32px]] [[File:Wheat Age 6 JE1.png|32px]] [[File:Wheat Age 7 JE1.png|32px]] Added crops.
|Seeds can be planted on farmland.
|Seeds have a chance of [[drop]]ping while using a [[hoe]] on a [[grass block]].}}
{{History|java beta}}
{{History||1.5|Crops destroyed by [[water]] now drop both seeds and wheat. Prior to this update, they dropped only wheat when destroyed by water.}}
{{History||1.6|snap=Test Build 3|Seeds can no longer be tilled from a grass block.
|Seeds are now found by destroying [[tall grass]] or by harvesting fully-grown crops.}}
{{History||1.8|snap=Pre-release|Crops can now be found in [[village]] farms.}}
{{History|java}}
{{History||1.4.2|snap=12w36a|[[Chicken]]s now use seeds instead of wheat to [[breeding|breed]].}}
{{History||1.8|snap=14w02a|[[Villager]]s can now harvest and plant seeds to grow crops.}}
{{History|||snap=14w06a|[[File:Wheat Age 0 JE2.png|32px]] [[File:Wheat Age 1 JE2.png|32px]] [[File:Wheat Age 2 JE2.png|32px]] [[File:Wheat Age 3 JE2.png|32px]] [[File:Wheat Age 4 JE2.png|32px]] [[File:Wheat Age 5 JE2.png|32px]] [[File:Wheat Age 6 JE2.png|32px]] [[File:Wheat Age 7 JE2.png|32px]] Crops are now a pixel higher - previously they were offset one pixel down as to match farmland. This is likely an accidental result of model conversion.}}
{{History|||snap=14w10a|[[File:Missing Model JE2.png|32px]] [[File:Missing Model JE2.png|32px]] [[File:Missing Model JE2.png|32px]] [[File:Missing Model JE2.png|32px]] [[File:Missing Model JE2.png|32px]] [[File:Missing Model JE2.png|32px]] [[File:Missing Model JE2.png|32px]] [[File:Missing Model JE2.png|32px]] Crops of all stages [[Missing model|no longer have a model]].}}
{{History|||snap=14w10b|[[File:Wheat Age 0 JE4.png|32px]] [[File:Wheat Age 1 JE4.png|32px]] [[File:Wheat Age 2 JE4.png|32px]] [[File:Wheat Age 3 JE4.png|32px]] [[File:Wheat Age 4 JE4.png|32px]] [[File:Wheat Age 5 JE4.png|32px]] [[File:Wheat Age 6 JE4.png|32px]] [[File:Wheat Age 7 JE4.png|32px]] Crops now have models again.<ref>{{bug|MC-50232|||Fixed}}</ref> In addition, they are now offset downwards by one pixel once more.<ref>{{bug|MC-50155|||Fixed}}</ref>}}
{{History|||snap=14w25a|[[File:Wheat Age 0 JE5.png|32px]] [[File:Wheat Age 1 JE5.png|32px]] [[File:Wheat Age 2 JE5.png|32px]] [[File:Wheat Age 3 JE5.png|32px]] [[File:Wheat Age 4 JE5.png|32px]] [[File:Wheat Age 5 JE5.png|32px]] [[File:Wheat Age 6 JE5.png|32px]] [[File:Wheat Age 7 JE5.png|32px]] Crops model are now shaded.}}
{{History|||snap=14w27a|[[File:Wheat Age 0 JE6.png|32px]] [[File:Wheat Age 1 JE6.png|32px]] [[File:Wheat Age 2 JE6.png|32px]] [[File:Wheat Age 3 JE6.png|32px]] [[File:Wheat Age 4 JE6.png|32px]] [[File:Wheat Age 5 JE6.png|32px]] [[File:Wheat Age 6 JE6.png|32px]] [[File:Wheat Age 7 JE6.png|32px]] Crops are no longer shaded.}}
{{History||1.9|snap=15w38a|The drop chances of crops has been slightly improved from an average of {{frac|1|3|5}} per [[crop]] harvested to {{frac|1|5|7}}.}}
{{History||1.11|snap=16w39a|Crops now generate inside [[woodland mansion]]s.}}
{{History||1.12|snap=17w18b|Placing a wheat seeds in farmland now gives the player the "A Seedy Place" [[advancement]].}}
{{History|||snap=pre3|Seeds are now used to tame [[parrot]]s.}}
{{History||1.13|snap=17w47a|Prior to [[1.13/Flattening|''The Flattening'']], this block's numeral ID was 59, and the item's was 295.}}
{{History|||snap=18w14a|Seeds no longer become destroyed when an [[entity]] jumps on them if they have the [[Slow Falling]] status effect.}}
{{History|||snap=18w20a|"Seeds" have been renamed to "Wheat Seeds".
|"Crops" have been renamed to "Wheat Crops".}}
{{History||1.14|snap=18w43a|[[File:Wheat Age 0 JE7.png|32px]] [[File:Wheat Age 1 JE7.png|32px]] [[File:Wheat Age 2 JE7.png|32px]] [[File:Wheat Age 3 JE7.png|32px]] [[File:Wheat Age 4 JE7.png|32px]] [[File:Wheat Age 5 JE7.png|32px]] [[File:Wheat Age 6 JE7.png|32px]] [[File:Wheat Age 7 JE7.png|32px]] The textures of wheat crops have been changed.
|The drop rate of fully grown wheat seeds has been changed from 0-3 to 1-4.}}
{{History|||snap=18w44a|[[File:Wheat Age 6 JE8.png|32px]] [[File:Wheat Age 7 JE8.png|32px]] The textures of wheat crops of age 6 and 7 have been changed again.}}
{{History|||snap=18w47a|[[File:Wheat Age 0 JE8.png|32px]] [[File:Wheat Age 1 JE8.png|32px]] [[File:Wheat Age 2 JE8.png|32px]] [[File:Wheat Age 3 JE8.png|32px]] [[File:Wheat Age 4 JE8.png|32px]] [[File:Wheat Age 5 JE8.png|32px]] [[File:Wheat Age 6 JE9.png|32px]] [[File:Wheat Age 7 JE9.png|32px]] The textures of wheat crops have been changed, once again.}}
{{History|||snap=18w48a|Wheat seeds can now be found in [[chest]]s in [[village]] fisher cottages.}}
{{History|||snap=18w49a|Wheat seeds can now be found in chests in [[savanna]] village houses.}}
{{History|||snap=19w03a|Placement and breaking [[sound]]s have been added to wheat crops.
|Placing wheat seeds into the new [[composter]] has a 10% chance of raising the compost level by 1.}}
{{History|||snap=19w05a|Wheat seeds now have a 30% chance of increasing the compost level in a composter by 1.
|Added [[Wandering Trader|wandering trader]]s, which sell wheat seeds.}}
{{History|||snap=19w13a|Nitwit and unemployed villagers now give wheat seeds to players under the [[Hero of the Village]] effect.}}
{{History||1.15|snap=19w34a|[[Bee]]s can now pollinate wheat crops.}}
{{History||1.17|snap=21w13a|[[File:Wheat Age 0.png|32px]] [[File:Wheat Age 1.png|32px]] [[File:Wheat Age 2.png|32px]] [[File:Wheat Age 3.png|32px]] [[File:Wheat Age 4.png|32px]] [[File:Wheat Age 5.png|32px]] [[File:Wheat Age 6.png|32px]] [[File:Wheat Age 7.png|32px]] The "crop" template model has changed such that pixels appear in the same physical positions on opposite sides of texture planes.<ref>{{bug|MC-199242|||Fixed}}</ref>}}
{{History||1.20|snap=23w12a|Wheat seeds can now be found in [[suspicious gravel]] and [[suspicious sand]] in [[trail ruins]].}}
{{History|||snap=23w16a|Wheat seeds no longer generates in [[suspicious sand]] in [[trail ruins]].|Due to the split of the archaeological loot tables for suspicious gravel within [[trail ruins]], wheat seeds are now common loot.}}
{{History|pocket alpha}}
{{History||v0.4.0|[[File:Wheat Seeds JE1 BE1.png|32px]] Added seeds.
|[[File:Wheat Age 0 JE6 BE1.png|32px]] [[File:Wheat Age 1 JE6 BE1.png|32px]] [[File:Wheat Age 2 JE6 BE1.png|32px]] [[File:Wheat Age 3 JE6 BE1.png|32px]] [[File:Wheat Age 4 JE6 BE1.png|32px]] [[File:Wheat Age 5 JE6 BE1.png|32px]] [[File:Wheat Age 6 JE6 BE1.png|32px]] [[File:Wheat Age 7 JE6 BE1.png|32px]] Added crops.
|Seeds can be obtained by tilling [[grass block]]s.}}
{{History||v0.9.0|snap=build 1|[[File:Wheat Age 0 BE2.png|32px]] [[File:Wheat Age 1 BE2.png|32px]] [[File:Wheat Age 2 BE2.png|32px]] [[File:Wheat Age 3 BE2.png|32px]] [[File:Wheat Age 4 BE2.png|32px]] [[File:Wheat Age 5 BE2.png|32px]] [[File:Wheat Age 6 BE2.png|32px]] [[File:Wheat Age 7 BE2.png|32px]] Faces now renders from both sides, resulting in z-fighting.
|Seeds can now be used to [[breeding|breed]] [[chicken]].
|Crops can now be found in [[village]] farms.}}
{{History|||snap=build 2|[[File:Wheat Age 0 BE3.png|32px]] [[File:Wheat Age 1 BE3.png|32px]] [[File:Wheat Age 2 BE3.png|32px]] [[File:Wheat Age 3 BE3.png|32px]] [[File:Wheat Age 4 BE3.png|32px]] [[File:Wheat Age 5 BE3.png|32px]] [[File:Wheat Age 6 BE3.png|32px]] [[File:Wheat Age 7 BE3.png|32px]] Removed some faces to fix z-fighting.}}
{{History||v0.12.1|snap=build 1|Farmer [[villager]]s can now pick up, harvest and plant seeds to grow [[wheat]].}}
{{History|||snap=build 2|Crops now always drop seeds when mined, regardless of growth stage.}}
{{History|||snap=build 8|Seeds can no longer be obtained by tilling [[grass block]]s.}}
{{History||v0.16.2|Seeds can now be found in [[chest]]s inside the large house of [[snowy tundra]] and [[snowy taiga]] [[village]]s.}}
{{History|pocket}}
{{History||1.1.0|snap=alpha 1.1.0.0|Crops now generate inside [[woodland mansion]]s.}}
{{History|bedrock}}
{{History||1.2.0|snap=beta 1.2.0.2|Seeds are now used to tame [[parrot]]s.}}
{{History||1.6.0|snap=beta 1.6.0.1|Seeds no longer become destroyed when an [[entity]] jumps on them if they have the [[Slow Falling]] status effect.}}
{{History||1.10.0|snap=beta 1.10.0.3|Seeds can now be bought from [[wandering trader]]s.
|Placement and breaking [[sound]]s have been added to crops.
|[[File:Wheat Age 0 BE.png|32px]] [[File:Wheat Age 1 BE.png|32px]] [[File:Wheat Age 2 BE.png|32px]] [[File:Wheat Age 3 BE.png|32px]] [[File:Wheat Age 4 BE.png|32px]] [[File:Wheat Age 5 BE.png|32px]] [[File:Wheat Age 6 BE.png|32px]] [[File:Wheat Age 7 BE.png|32px]] The textures of crops have been changed.}}
{{History||1.11.0|snap=beta 1.11.0.1|Seeds can now be found in [[savanna]] [[village]] house [[chest]]s.
|Seeds can now be used to fill up [[composter]]s.}}
{{History||1.14.0|snap=beta 1.14.0.1|[[Bee]]s can now pollinate crops.}}
{{History|console}}
{{History||xbox=TU1|xbone=CU1|ps=1.0|wiiu=Patch 1|switch=1.0.1|[[File:Wheat Seeds JE1 BE1.png|32px]] Added seeds.
|[[File:Wheat Age 0 JE6 BE1.png|32px]] [[File:Wheat Age 1 JE6 BE1.png|32px]] [[File:Wheat Age 2 JE6 BE1.png|32px]] [[File:Wheat Age 3 JE6 BE1.png|32px]] [[File:Wheat Age 4 JE6 BE1.png|32px]] [[File:Wheat Age 5 JE6 BE1.png|32px]] [[File:Wheat Age 6 JE6 BE1.png|32px]] [[File:Wheat Age 7 JE6 BE1.png|32px]] Added crops.}}
{{History||xbox=none|xbone=none|ps=1.90|wiiu=none|switch=none|[[File:Wheat Age 0 JE8.png|32px]] [[File:Wheat Age 1 JE8.png|32px]] [[File:Wheat Age 2 JE8.png|32px]] [[File:Wheat Age 3 JE8.png|32px]] [[File:Wheat Age 4 JE8.png|32px]] [[File:Wheat Age 5 JE8.png|32px]] [[File:Wheat Age 6 JE9.png|32px]] [[File:Wheat Age 7 JE9.png|32px]] The textures of crops have been changed.}}
{{History|New 3DS}}
{{History||0.1.0|[[File:Wheat Seeds JE1 BE1.png|32px]] Added seeds.
|[[File:Wheat Age 0 JE6 BE1.png|32px]] [[File:Wheat Age 1 JE6 BE1.png|32px]] [[File:Wheat Age 2 JE6 BE1.png|32px]] [[File:Wheat Age 3 JE6 BE1.png|32px]] [[File:Wheat Age 4 JE6 BE1.png|32px]] [[File:Wheat Age 5 JE6 BE1.png|32px]] [[File:Wheat Age 6 JE6 BE1.png|32px]] [[File:Wheat Age 7 JE6 BE1.png|32px]] Added crops.}}
{{History|foot}}
=== Wheat "item" ===
{{:Technical blocks/Crops}}
== Issues ==
{{issue list}}
== Gallery ==
===Renders===
;Java Edition
<gallery>
Wheat Age 0.png|
Wheat Age 1.png|
Wheat Age 2.png|
Wheat Age 3.png|
Wheat Age 4.png|
Wheat Age 5.png|
Wheat Age 6.png|
Wheat Age 7.png|
</gallery>
;Bedrock Edition
<gallery>
Wheat Age 0 BE.png|
Wheat Age 1 BE.png|
Wheat Age 2 BE.png|
Wheat Age 3 BE.png|
Wheat Age 4 BE.png|
Wheat Age 5 BE.png|
Wheat Age 6 BE.png|
Wheat Age 7 BE.png|
</gallery>
===Screenshots===
<gallery>
AllSeeds.png|All the seeds that exist.
Wheat.jpg|Wheat crops in Pocket Edition.
Village Wheat Beetroot Farm.png| Wheat generated in a village.
</gallery>
== References ==
{{reflist}}
{{Blocks|vegetation}}
{{Items}}
[[Category:Plants]]
[[Category:Food]]
[[Category:Non-solid blocks]]
[[Category:Generated structure blocks]]
[[de:Weizensamen]]
[[es:Semillas de trigo]]
[[fr:Graines de blé]]
[[hu:Búzamagok]]
[[it:Semi di grano]]
[[ja:小麦の種]]
[[ko:밀 씨앗]]
[[nl:Zaden]]
[[pl:Nasiona zboża]]
[[pt:Sementes de trigo]]
[[ru:Семена пшеницы]]
[[zh:小麦种子]]</li></ul></nowiki> | The enderman eye color is changed to purple. | ||||
| Endermen now emit portal particles, rather than smoke. | |||||
| release | |||||
1.0.0{{Extension DPL}}<ul><li>[[Clay Ball|Clay Ball]]<br/>{{Item
| image = Clay Ball.png
| stackable = Yes (64)
| renewable = Yes
}}
{{about|the item|the block|Clay|other uses|Clay (disambiguation)}}
A '''clay ball''' is the item obtained from [[clay]] used for [[crafting]] or making [[brick]]s.
== Obtaining ==
=== Block loot ===
Clay balls are obtained when a [[clay]] block is broken with a non-[[Silk Touch]] tool. Each block yields four clay balls regardless of [[Fortune]].
=== Chest loot ===
{{LootChestItem|clay-ball}}
=== Villager gifts ===
If a [[player]] has the [[Hero of the Village]] status effect, a Mason [[villager]] might throw that player a [[clay block]] as a gift. {{Only|java}} This can be placed and [[breaking|broken]] to harvest clay balls.
== Usage ==
Clay balls can be [[crafting|crafted]] back together to form [[clay]] blocks or baked in a [[furnace]] to create [[brick]]s.
=== Crafting ingredient ===
{{crafting usage}}
=== Smelting ingredient ===
{{Smelting
|showname=1
|Clay Ball
|Brick
|0.3
}}
=== Trading ===
Novice-level [[Villager|mason villagers]] buy 10 clay balls for 1 [[emerald]] as part of their [[trades]].
== Data values ==
=== ID ===
{{edition|java}}:
{{ID table
|edition=java
|showforms=y
|generatetranslationkeys=y
|displayname=Clay Ball
|spritetype=item
|nameid=clay_ball
|form=item
|foot=1}}
{{edition|bedrock}}:
{{ID table
|edition=bedrock
|shownumericids=y
|showforms=y
|notshowbeitemforms=y
|generatetranslationkeys=y
|displayname=Clay
|spritetype=item
|nameid=clay_ball
|id=384
|form=item
|foot=1}}
== History ==
{{History|java alpha}}
{{History||v1.0.11|[[File:Clay Ball JE1 BE1.png|32px]] Added clay.}}
{{History|java}}
{{History||1.13|snap=17w47a|Prior to [[1.13/Flattening|''The Flattening'']], this [[item]]'s numeral ID was 337.}}
{{History||1.14|snap=18w43a|[[File:Clay Ball JE2 BE2.png|32px]] The texture of clay has been changed.}}
{{History|||snap=18w49a|Clay can now be found in [[chest]]s in [[village]] mason houses.}}
{{History|||snap=18w50a|Clay can now be found in [[chest]]s in [[desert]] [[village]] houses.}}
{{History|||snap=19w11a|Clay is now [[trading|bought]] by [[villager]]s of the new mason profession.}}
{{History||1.16|snap=20w06a|"Clay" has been renamed to "Clay Ball."}}
{{History|pocket alpha}}
{{History||v0.2.0|[[File:Clay Ball JE1 BE1.png|32px]] Added clay. It is currently unobtainable and serves no purpose.}}
{{History||v0.3.2|4 clay items are now dropped from clay blocks when broken.
|Clay can now be crafted into clay blocks.
|Clay can now be smelted into bricks.}}
{{History|bedrock}}
{{History||1.10.0|snap=beta 1.10.0.3|[[File:Clay Ball JE2 BE2.png|32px]] The texture of clay has been changed.|10–13 clay can now be [[trading|sold]] to stone mason [[villager]]s for an [[emerald]].}}
{{History||1.11.0|snap=beta 1.11.0.1|Clay can now be found in [[village]] mason [[chest]]s and [[desert]] village house chests.}}
{{History|||snap=beta 1.11.0.4|[[Trading]] has been changed, stone mason villagers now [[trading|buy]] 10 clay for an emerald<!-- previously 10-13 -->.}}
{{History||1.19.0|snap=beta 1.19.0.24|Clay ball now [[renewable]] by placing [[mud]] above a block which has [[pointed dripstone]] underneath.}}
{{History|console}}
{{History||xbox=TU1|xbone=CU1|ps=1.0|wiiu=Patch 1|[[File:Clay Ball JE1 BE1.png|32px]] Added clay.}}
{{History||xbox=none|xbone=none|ps=1.90|wiiu=none|switch=none|[[File:Clay Ball JE2 BE2.png|32px]] The texture of clay has been changed.}}
{{History|3ds}}
{{History||0.1.0|[[File:Clay Ball JE1 BE1.png|32px]] Added clay.}}
{{History|foot}}
== Issues ==
{{issue list}}
== Gallery ==
<gallery>
File:ClayInNumerousForms.png
</gallery>
== Notes ==
{{fnlist}}
{{Items}}
[[cs:Jíl]]
[[de:Tonklumpen]]
[[es:Bola de arcilla]]
[[fr:Motte d'argile]]
[[hu:Agyag (Tárgy)]]
[[it:Zolla di argilla]]
[[ja:粘土玉]]
[[ko:점토 덩이]]
[[nl:Klei (voorwerp)]]
[[pl:Glina]]
[[pt:Bola de argila]]
[[ru:Глина]]
[[uk:Глиняна кулька]]
[[zh:黏土球]]</li><li>[[Glowstone Dust|Glowstone Dust]]<br/>{{Item
| image = Glowstone Dust.png
|type=
| renewable = Yes
| stackable = Yes (64)
}}
'''Glowstone dust''' is an [[item]] obtained from mining [[glowstone]], and is mainly used to create [[potion]]s with increased strength and decreased duration.
== Obtaining ==
=== Mining ===
When broken using anything other than a [[Silk Touch]]-enchanted [[tool]], a [[glowstone]] block drops 2-4 glowstone dust. A [[Fortune]] enchantment increases the chances of higher drops, with Fortune III allowing an average yield of 3.5 glowstone dust per block.
=== Mob loot ===
[[Witch]]es have a chance of dropping 0–6 glowstone dust upon death. This is increased by 3 per level of [[Looting]], for a maximum of 0-15 glowstone dust. <!-- Do not add the blaze as it is in violation of MCW:UPTODATE due to the Legacy Console Edition being discontinued. Any edit that adds the blaze to this section will be immediately reverted. -->
=== Trading ===
{{IN|bedrock}}, journeyman-level cleric [[villager]]s sell one glowstone dust for 4 [[emerald]]s as part of their trades.
== Usage ==
=== Crafting ingredient ===
{{crafting usage}}
=== Brewing ingredient ===
{{brewing
|showname=1
|head=1
|Glowstone Dust
|Thick Potion
|base=Water Bottle
}}
{{brewing
|name=Increased Potency
|showbase=1
|Glowstone Dust
|base=[Potion of Healing II]Potion of Healing;[Potion of Regeneration II]Potion of Regeneration;[Potion of Strength II]Potion of Strength;[Potion of Swiftness II]Potion of Swiftness;[Potion of Harming II]Potion of Harming;[Potion of Poison II]Potion of Poison;[Potion of Leaping II]Potion of Leaping
|foot=1
}}
== Data values ==
=== ID ===
{{edition|java}}:
{{ID table
|edition=java
|showforms=y
|generatetranslationkeys=y
|displayname=Glowstone Dust
|spritetype=item
|nameid=glowstone_dust
|form=item
|foot=1}}
{{edition|bedrock}}:
{{ID table
|edition=bedrock
|shownumericids=y
|showforms=y
|notshowbeitemforms=y
|generatetranslationkeys=y
|displayname=Glowstone Dust
|spritetype=item
|nameid=glowstone_dust
|id=394
|form=item
|foot=1}}
== History ==
{{History|java alpha}}
{{History||v1.2.0|snap=preview|[[File:Glowstone Dust JE1 BE1.png|32px]] Added glowstone dust.
|Glowstone dust currently uses nine dust to [[crafting|craft]] 1 [[glowstone]] block.
|Also, each glowstone block drops only one glowstone dust.}}
{{History|java beta}}
{{History||1.6.6|The crafting recipe for glowstone blocks has been changed from 9 glowstone dust to 4.
|Each glowstone block now drops 2-4 glowstone dust when broken.}}
{{History|java}}
{{History||1.0.0|snap=Beta 1.9 Prerelease 3|Glowstone dust can now be [[brewing|brewed]] in a [[water bottle]] to create a [[thick potion]].
|Glowstone dust now strengthens the [[potion]]s of [[Swiftness]], [[Healing]], [[Harming]], [[Poison]], [[Regeneration]] and [[Strength]].}}
{{History|||snap=Beta 1.9 Prerelease 4|Glowstone dust now strengthens the new potion of [[Regeneration]].}}
{{History||1.3.1|snap=12w21a|Glowstone dust has become a renewable resource, as priest [[villager]]s now sell glowstone blocks.}}
{{History||1.4.2|snap=12w38b|[[Witch]]es now have a chance of [[drops|dropping]] glowstone dust.}}
{{History||1.4.6|snap=12w49a|Glowstone dust can now be used to [[crafting|craft]] a [[firework star]] with a twinkle effect.}}
{{History||1.8|snap=14w27a|Glowstone dust now strengthens the new [[potion of Leaping]].}}
{{History||1.9|snap=15w31a|Glowstone dust is now used to craft [[spectral arrow]]s.
|Glowstone dust can no longer be added to extended [[potion]]s.}}
{{History||1.13|snap=17w47a|Prior to [[1.13/Flattening|''The Flattening'']], this [[item]]'s numeral ID was 348.}}
{{History|||snap=18w07a|Glowstone dust now strengthens the new [[potion of the Turtle Master]].}}
{{History||1.14|snap=18w43a|[[File:Glowstone Dust JE2 BE2.png|32px]] The texture of glowstone dust has been changed.}}
{{History||1.16|snap=20w07a|Glowstone dust has a {{frac|2|109}} (~1.83%) chance of being offered by [[piglin]]s when [[bartering]], in a stack size of 2–4.}}
{{History|||snap=20w09a|Glowstone dust now has a {{frac|10|226}} (~4.42%) chance of being offered by piglins when bartering, in a stack size of 1–5.}}
{{History||1.16.2|snap=20w28a|Glowstone dust can no longer be obtained from bartering with piglins.}}
{{History|pocket alpha}}
{{History||v0.2.0|[[File:Glowstone Dust JE1 BE1.png|32px]] Added glowstone dust. It is currently unobtainable and serves no purpose.}}
{{History||v0.5.0|Glowstone dust is now obtainable through the [[nether reactor]].
|Glowstone dust can be used to craft [[glowstone]] blocks.}}
{{History||v0.12.1|snap=build 1|Glowstone dust can now be obtained through [[the Nether]] instead of the nether reactor.
|Glowstone dust is now available in the [[creative]] [[inventory]].|Glowstone dust can now be used to [[brewing|brew]] thick [[potion]]s and to strengthen potions.}}
{{History||v0.14.0|snap=build 1|Added [[witch]]es, which have a chance of [[drops|dropping]] glowstone dust upon [[death]].}}
{{History|bedrock}}
{{History||1.2.0|snap=beta 1.2.0.2|Glowstone dust can now be used to [[crafting|craft]] a [[firework star]] with a twinkle effect.}}
{{History||1.10.0|snap=beta 1.10.0.3|[[File:Glowstone Dust JE2 BE2.png|32px]] The texture of glowstone dust has been changed.}}
{{History||1.11.0|snap=beta 1.11.0.4|Glowstone dust can now be [[trading|bought]] from cleric [[villager]]s.}}
{{History||1.16.0|snap=beta 1.16.0.57|Glowstone dust can now be obtained from [[bartering]] with [[piglin]]s.}}
{{History||1.16.100|snap=beta 1.16.100.54|Glowstone dust can no longer be obtained from [[barter]]ing with [[piglin]]s.}}
{{History|console}}
{{History||xbox=TU1|xbone=CU1|ps=1.0|wiiu=Patch 1|switch=1.0.1|[[File:Glowstone Dust JE1 BE1.png|32px]] Added glowstone dust.}}
{{History||xbox=TU8|0–2 glowstone dust is now [[drops|dropped]] when a [[blaze]] is killed.}}
{{History|Ps4}}
{{History||1.90|[[File:Glowstone Dust JE2 BE2.png|32px]] The texture of glowstone dust has been changed.}}
{{History|New 3DS}}
{{History||0.1.0|[[File:Glowstone Dust JE1 BE1.png|32px]] Added glowstone dust.}}
{{History|foot}}
== Issues ==
{{issue list}}
{{Items}}
[[Category:Renewable resources]]
[[Category:Brewing recipe]]
[[de:Glowstonestaub]]
[[es:Polvo de piedra luminosa]]
[[fr:Poudre lumineuse]]
[[hu:Izzókő-por]]
[[ja:グロウストーンダスト]]
[[ko:발광석 가루]]
[[nl:Gloeisteenstof]]
[[pl:Jasnopył]]
[[pt:Pó de pedra luminosa]]
[[ru:Светокаменная пыль]]
[[tr:Işık Taşı Tozu]]
[[uk:Пил світлокаменю]]
[[zh:荧石粉]]</li></ul> | Beta 1.9-pre1 | Before this update, endermen could be killed with the use of a bow. Afterwards, arrows, snowballs, eggs, and negative splash potions will not hit them due to the fact that they teleport away before impact. | |||
| Enderman will teleport away and become neutral if they are in water. | |||||
| Beta 1.9-pre3 | Notch stated “Endermen suck because they're annoying, and because I nerfed them and made them too easy. I shall fix this.”[4] Because of this, endermen were modified in this update to have 20 hearts instead of 10. | ||||
| Beta 1.9-pre4 | Endermen now have a realm of their own: the End, where they spawn frequently. | ||||
| Endermen used to burn in sunlight, but as of this update, they will instead teleport away when the player walks up to them in the daytime, making it extremely hard to get close enough to kill them. | |||||
| RC1 | Before the Sound Update, endermen used the sound effects of zombies as a place holder. Then in Beta 1.9, the zombie sounds for the enderman were removed. On November 13th, 2011 endermen received their own audio scheme, most notably a long moan overlaid with static for when they are triggered hostile by the player. The noises are actually a person saying “Hi” and “What’s Up” backwards and distorted.[5][6] | ||||
1.3.1{{Extension DPL}}<ul><li>[[Pitcher Pod|Pitcher Pod]]<br/>{{wip}}
{{Block
| image = <gallery>
Pitcher Crop Age 0 JE1.png| Age 0
Pitcher Crop Age 1 JE1.png| Age 1
Pitcher Crop Age 2 JE1.png| Age 2
Pitcher Crop Age 3 JE1.png| Age 3
Pitcher Crop Age 4 JE1.png| Age 4
</gallery>
| image2 = Pitcher Pod.png
| transparent = Yes
| light = Yes
| tool = N/A
| renewable = Yes
| stackable = Yes (64)
| rarity = Common
| flammable = No
| lavasusceptible = No
}}
A '''pitcher pod''' is an ancient bulbous seed that has a chance to be dropped by [[Sniffer|sniffers]] when they finish digging. It is the seed for [[Pitcher Plant]]s.
== Obtaining ==
[[Sniffer]]s occasionally bury their nose in the ground and start digging. Once the sniffer has finished digging, one pitcher pod has a chance to be dropped on the floor as an item.
Sniffers can only dig for pitcher pods in the following blocks:
*{{BlockLink|Dirt}}
*{{BlockLink|Grass Block}}
*{{BlockLink|Podzol}}
*{{BlockLink|Coarse Dirt}}
*{{BlockLink|Rooted Dirt}}
*{{BlockLink|Moss Block}}
*{{BlockLink|Mud}}
*{{BlockLink|Muddy Mangrove Roots}}
They cannot dig for pitcher pods on [[mycelium]].<ref>{{bug|MC-260259||Sniffers cannot dig nor find seeds on mycelium|WAI}}</ref>
== Usage ==
=== Pitcher Crop ===
{{main|Tutorials/Crop farming|title1=Pitcher Crop Farming}}
Pitcher pods can be placed on [[farmland]] by {{ctrl|using}}, where they grow through three stages as a '''pitcher crop'''.
Breaking the crop before it matures drops the pitcher pod, while breaking the final stage produces a [[pitcher plant]] and does ''not'' yield the pod. Pitcher crops break if pushed by a [[piston]] or if their supporting farmland breaks or turns to dirt (i.e. by being trampled), dropping their usual drops.
Farmer [[villager]]s can plant pitcher pods, but cannot harvest them once they have fully grown.<ref>{{bug|MC-263382|||WAI}}</ref>
=== Feeding ===
Pitcher pods can be used to breed [[chicken]]s and reduce the remaining growth duration of chicks by 10%.
=== Taming ===
Pitcher pods can be used to tame [[parrot]]s.
== Sounds ==
{{Sound table/Block/Crop}}
== Data values ==
=== ID ===
{{edition|java}}:
{{ID table
|edition=java
|showblocktags=y
|showitemtags=y
|showforms=y
|generatetranslationkeys=y
|displayname=Pitcher Crop
|spritetype=block
|nameid=pitcher_crop
|form=block
|blocktags=bee_growables, crops}}
{{ID table
|displayname=Pitcher Pod
|spritetype=item
|nameid=pitcher_pod
|form=item
|itemtags=villager_plantable_seeds
|foot=1}}
{{edition|bedrock}}:
{{ID table
|edition=bedrock
|shownumericids=y
|showforms=y
|generatetranslationkeys=y
|displayname=Pitcher Crop
|spritetype=block
|nameid=pitcher_crop
|id=-574
|form=block
|translationkey=-}}
{{ID table
|displayname=Pitcher Pod
|spritetype=item
|nameid=pitcher_pod
|id=297
|form=item
|foot=1}}
=== Block states ===
{{see also|Block states}}
{{/BS}}
== Achievements ==
{{Load achievements|Planting The Past}}
== Advancements ==
{{load advancements|A Seedy Place;Planting The Past}}
== History ==
{{History|java}}
{{History||1.20|snap=23w12a|[[File:Pitcher Crop Age 0 JE1.png|32px]] [[File:Pitcher Crop Age 1 JE1.png|32px]] [[File:Pitcher Crop Age 2 JE1.png|32px]] [[File:Pitcher Crop Age 3 JE1.png|32px]] [[File:Pitcher Crop Age 4 JE1.png|32px]] [[File:Pitcher Pod JE1.png|32px]] Added pitcher crops and pods.
|[[File:Pitcher Crop Age 0 (bottom) JE1.png|32px]] [[File:Pitcher Crop Age 1 (bottom) JE1.png|32px]] [[File:Pitcher Crop Age 2 (bottom) JE1.png|32px]] [[File:Pitcher Crop Age 3 (bottom) JE1.png|32px]] [[File:Pitcher Crop Age 4 (bottom) JE1.png|32px]] The bottom face on all pitcher crop models is missing.<ref>{{bug|MC-261208}}</ref>}}
{{History|||snap=23w13a|Placing a pitcher pod in farmland now gives the player the "A Seedy Place" [[advancement]].
|Fully grown pitcher crops are now destroyed when the farmland they are placed in is destroyed.}}
{{History|||snap=23w14a|Pitcher crops can now be destroyed by [[ravagers]].|Pitcher crops' hitboxes now change according to their age.|[[File:Pitcher Crop Age 0 (bottom) JE2.png|32px]] [[File:Pitcher Crop Age 1 (bottom) JE2.png|32px]] [[File:Pitcher Crop Age 2 (bottom) JE2.png|32px]] [[File:Pitcher Crop Age 3 (bottom) JE2.png|32px]] [[File:Pitcher Crop Age 4 (bottom) JE2.png|32px]] Pitcher crops now have their bottom texture.}}
{{History|||snap=23w16a|Hitbox shape of pitcher crop has been changed for each stage of its growth.|[[Villager]]s can now plant pitcher pods.}}
{{History|||snap=23w17a|The player now get the [[advancement]] "Planting the past" when they plant pitcher pods on [[farmland]].}}
{{History|bedrock}}
{{History||1.20.0|snap=beta 1.20.0.20|[[File:Pitcher Crop Age 0 JE1.png|32px]] [[File:Pitcher Crop Age 1 JE1.png|32px]] [[File:Pitcher Crop Age 2 JE1.png|32px]] [[File:Pitcher Crop Age 3 JE1.png|32px]] [[File:Pitcher Crop Age 4 JE1.png|32px]] [[File:Pitcher Pod JE1.png|32px]] Added pitcher crops and pods.
|Unlike in Java Edition, pitcher pods can be used to feed chickens and parrots.}}
{{history|foot}}
== Notelist ==
{{notelist}}
== References ==
{{reflist}}
{{Blocks|upcoming}}
{{Items}}
[[Category:Plants]]
[[Category:Non-solid blocks]]
[[de:kannenpflanzentrieb]]
[[es:Vaina de planta odre]]
[[ja:ウツボカズラのさや]]
[[pt:Muda de planta-jarro]]</li><li>[[Spyglass|Spyglass]]<br/>{{Item
| title = Spyglass
| image = Spyglass.png
| durability =
| rarity = Common
| renewable = Yes
| stackable = No
}}
A '''spyglass''' is a [[tool]] used to zoom in on distant objects.
== Obtaining ==
=== Crafting ===
{{Crafting
|B1=Amethyst Shard
|B2=Copper Ingot
|B3=Copper Ingot
|Output=Spyglass
|type=Tool
}}
== Usage ==
[[File:Steve scoping Spyglass.png|right|100px]] [[File:Alex scoping Spyglass.png|right|100px]]
To use a spyglass, the player selects it from the hotbar and clicks {{control|use}} while looking in the desired direction.
Spyglasses are used to zoom in on a specific location in the player's field of view (FOV). The spyglass changes the FOV to {{frac|1|10}} of the FOV set in [[options]]. By default, the FOV is set to 70° in ''Java Edition'' and 60° in Bedrock Edition, resulting in an FOV of 7° in ''Java Edition'' and 6° in Bedrock Edition through the spyglass. The player's FOV can be set from 30° to 110°, so the spyglass FOV can range from 3° to 11°. Regardless of the situation, or status effects the player has, using the Spyglass always shows a FOV {{frac|1|10}} of the FOV set in [[options]].
A square vignette is applied when in use, similar to the effect when wearing a [[carved pumpkin]]. Pressing {{key|F1}} removes the vignette,{{only|java}}<ref>{{bug|MC-203575||The spyglass overlay goes away when pressing F1|WAI}}</ref><ref>{{bug|MCPE-125869||Spyglass's overlay don't go away even if the player toggles Hide GUI on/ Pressing F1|}}</ref> similar to a carved pumpkin.
Hazy distant objects remain hazy when viewed in the spyglass. Mobs too distant to render also do not render in the spyglass. The spyglass shows a magnified view of what the player already sees.
The player is slowed down while watching through the spyglass. When the player uses the spyglass continuously for {{convert|1|minute|game tick}}, the interface is automatically closed.
If the player has a certain effect on their screen like [[fire]], the spyglass does not remove that effect on the player's screen.
[[File:Spyglass Zooming.gif|thumb|center|A spyglass being used to zoom in on a [[block of gold]] starting from normal FOV (70°).]]
== Sounds ==
{{edition|java}}:
{{Sound table
|sound=Spyglass use.ogg
|subtitle=Spyglass expands
|source=player
|description=When a player uses a spyglass
|id=item.spyglass.use
|translationkey=subtitles.item.spyglass.use
|volume=0.5
|pitch=''varies'' <ref group=sound>Can be 1.15, 1.33, 1.4, or 1.55</ref>
|distance=16}}
{{Sound table
|sound=Spyglass stop.ogg
|subtitle=Spyglass retracts
|source=player
|description=When a player stops using a spyglass
|id=item.spyglass.stop_using
|translationkey=subtitles.item.spyglass.stop_using
|volume=0.5
|pitch=''varies'' <ref group=sound>Can be 1.0, 0.8, or 0.9</ref>
|distance=16
|foot=1}}
{{edition|bedrock}}:
{{Sound table
|type=bedrock
|sound=Spyglass use.ogg
|source=player
|description=When a player uses a spyglass
|id=item.spyglass.use
|volume=0.5
|pitch=1.15-1.55}}
{{Sound table
|sound=Spyglass stop.ogg
|source=player
|description=When a player stops using a spyglass
|id=item.spyglass.stop_using
|volume=0.5
|pitch=0.8-1.0
|foot=1}}
== Data values ==
=== ID ===
{{edition|java}}:
{{ID table
|edition=java
|showforms=y
|generatetranslationkeys=y
|displayname=Spyglass
|spritetype=item
|nameid=spyglass
|form=item
|foot=1}}
{{edition|bedrock}}:
{{ID table
|edition=bedrock
|shownumericids=y
|showforms=y
|notshowbeitemforms=y
|generatetranslationkeys=y
|displayname=Spyglass
|spritetype=item
|nameid=spyglass
|form=item
|foot=1|id=626}}
== Advancements ==
{{load advancements|Is it a Bird?;Is it a Balloon?;Is it a Plane?}}
== History ==
{{History||October 3, 2020|link={{ytl|DBvZ2Iqmm3M|t=25m21s}}|[[File:Spyglass JE1.png|32px]]<!-- [[File:Spyglass scope (pre-release).png|32px]]--> Spyglasses are revealed at [[Minecraft Live 2020]]. They were originally named "telescopes" and had an oval vignette.}}
{{History|java}}
{{History||1.17|snap=20w45a|[[File:Spyglass JE1.png|32px]] Added spyglasses.
|[[File:Spyglass scope JE1.png|32px]] The scope texture is currently a circle with glare spots.}}
{{History|||snap=20w46a|[[File:Spyglass scope JE2.png|32px]] The scope texture is now a [[glass]] square with a [[copper]] border.}}
{{History|||snap=20w48a|[[File:Spyglass JE2 BE1.png|32px]] The spyglass is now a 3D model instead of a flat sprite.
|[[File:Spyglass (texture) JE2.png|32px]] The texture of the spyglass has changed.
|A spyglass in use is anchored better to the player's "eye" when viewed in 3rd person.}}
{{History|||snap=21w05a|Copper ingots are now renewable via [[drowned]], making spyglasses renewable.}}
{{History|||snap=21w10a|[[File:Spyglass (item) JE3 BE1.png|32px]] Spyglasses have a new texture in the inventory. The 3D model is still used in the hand, similar to [[tridents]].}}
{{History||1.17.1|snap=Pre-release 1|[[File:Spyglass (texture) JE3.png|32px]] The texture of the spyglass model has changed.}}
{{History|bedrock}}
{{History||1.17.0|snap=beta 1.17.0.50|[[File:Spyglass JE2 BE1.png|32px]] [[File:Spyglass (item) JE3 BE1.png|32px]] Added spyglasses.}}
{{History|||snap=beta 1.17.0.52|Spyglasses are now available without enabling [[experimental gameplay]].}}
{{History|foot}}
== Issues ==
{{Issue list}}
== Trivia ==
*If {{command|item replace}} is used to place a spyglass on a player's head, the item appears stuck to the center of the player's face.
== Gallery ==
<gallery>
Villager Spyglass.png|Spying on [[villager]]s through a spyglass.
After using the spyglass at FOV 30 F1.png|Hiding the HUD removes the spyglass overlay.
Panda eating a spyglass.png|When eaten by a [[panda]], spyglasses cause [[missing texture]] particles to be produced.<ref>{{bug|MC-206684}}</ref>
JE 1.17 Development Telescope.jpg|The spyglass was originally called the telescope.
JE 1.17 Development Telescope 2.jpg|The telescope's overlay was originally round instead of square.
File:Ari Spyglass.jpg|How the spyglass looks in the third person.
Steve scoping Spyglass JE1.png|Steve using a spyglass before its 3D model was added.
Alex scoping Spyglass JE1.png|Alex using a spyglass before its 3D model was added.
File:Mangrove Portal.jpg|An [[allay]] peeking into view of [[Noor]]’s spyglass.
</gallery>
== References ==
{{Reflist}}
== External Links ==
*[https://www.minecraft.net/en-us/article/taking-inventory--spyglass Taking Inventory: Spyglass] – Minecraft.net on February 17, 2022
{{Items}}
[[Category:Renewable resources]]
[[de:Fernrohr]]
[[es:Catalejo]]
[[fr:Longue-vue]]
[[it:Cannocchiale]]
[[ja:望遠鏡]]
[[pl:Luneta]]
[[pt:Luneta]]
[[ru:Подзорная труба]]
[[zh:望远镜]]</li></ul> | 12w22a | The enderman’s behavior was modified slightly. Now, it stops in front of the player. When the player swings his/her sword, it teleports behind the player. | |||
1.4.2{{Extension DPL}}<ul><li>[[Lingering Potion|Lingering Potion]]<br/>{{about|throwable potions that leave a lingering area of effect|the throwable potions without a lingering effect|Splash Potion|the drinkable potions|Potion}}
{{Item
| image = <gallery>
Lingering Water Bottle.png | Water Bottle
Uncraftable Lingering Potion.png | Uncraftable
</gallery>
| extratext = View [[#Gallery|all renders]]
| renewable = Uncraftable, Luck{{only|java|short=1}}, Decay{{only|bedrock|short=1}}: No<br>
All others: Yes
| stackable = No
}}
'''Lingering potions''' are variants of [[splash potion]]s that can be thrown to leave clouds with [[status effect]]s that linger on the ground in an area.
== Obtaining ==
=== Brewing ===
{{main|Brewing}}
{{brewing
|Dragon's Breath
|Any Lingering Potion
|ingredients=[[Dragon's Breath]] + <br>Any [[Splash Potion]]
}}
== Usage ==
=== Creating area effect clouds ===
Lingering potions are thrown, like [[splash potion]]s, by {{control|using}} them. On impact they explode, creating a cloud. The cloud is made of the potion particles corresponding to the potion that was thrown.
The cloud starts with a radius of 3 blocks, decreasing to 0 over the course of 30 seconds. During the cloud's existence, any player or mob that walks into it after the first second gets the corresponding status effect; this decreases the radius by a {{frac|1|2}} block immediately, reducing the cloud's lifespan by 5 seconds.
For effects with duration, the duration applied by the cloud is {{frac|1|4}} that of the corresponding [[potion]]. For effects without duration such as healing or harming, the potency of the effect is {{frac|1|2}} that of the corresponding potion.
The effect may be applied consecutively if the player or mob remains in the cloud. For example, a player throwing the Lingering Potion of Healing II straight down consumes the cloud within a few seconds while being healed 5 times for a total of {{hp|20}} health. As far as healing is concerned, this makes the lingering potion much more powerful than the regular or splash potion, provided that the player is away from other mobs or players.
Lingering potions can also be thrown out of [[dispenser]]s like splash potions.
=== Lingering water bottle ===
Like the [[Splash potion#Splash water bottles|splash water bottle]], a lingering water bottle puts out fire and damages endermen and blazes by {{hp|1}}. It creates no effect cloud.
==== Mud ====
Lingering water bottles can be {{control|used}} on [[dirt]], [[coarse dirt]], or [[rooted dirt]] to turn it into [[mud]].
=== Crafting ingredient ===
{{crafting usage|Lingering Potion, Lingering Water Bottle|match=any}}
=== Filling cauldrons ===
{{IN|bedrock}}, using a lingering potion on a cauldron adds one level of that potion to the cauldron. Attempting to add a lingering potion to a cauldron with water, dyed water or a non-matching potion empties the cauldron and creates an explosion sound (but no actual explosion).
=== Uncraftable lingering potion ===
{{IN|java}}, the uncraftable potion is a splash potion with no effect that is unobtainable in regular gameplay. It is also available in potion and splash potion forms, as well as for tipped arrows.
It can be obtained using the following command: {{cmd|give @s minecraft:lingering_potion{Potion:"minecraft:empty"} }}. It is also obtained any time a potion has invalid or missing potion effect tags, and thus serves as a placeholder.
{| class="wikitable" style="text-align: center;" data-description="Unused potions"
! Icon
! Name
|-
| {{Slot|Uncraftable Lingering Potion|link=none}}
! Uncraftable Lingering Potion
|}
== Custom effects ==
{{IN|java}}, lingering potions can be obtained with any status effect using {{cmd|give}} and the tag {{code|CustomPotionEffects}}, which is an array of effects for the potion. See [[Item format#Potion Effects]] for more information, and [[status effect]] for a list of effects and IDs.
== Sounds ==
{{edition|java}}:<br>
Lingering potions use the Friendly Creatures sound category for entity-dependent sound events.
{{Sound table
|sound=Glass dig1.ogg
|sound2=Glass dig2.ogg
|sound3=Glass dig3.ogg
|subtitle=Bottle smashes
|source=neutral
|description=When a lingering potion impacts something
|id=entity.splash_potion.break
|translationkey=subtitles.entity.potion.splash
|volume=1.0
|pitch=0.9-1.0
|distance=16}}
{{Sound table
|rowspan=2
|sound=Bow shoot.ogg
|subtitle=Bottle thrown
|source=neutral
|description=When a lingering potion is thrown by a player
|id=entity.lingering_potion.throw
|translationkey=subtitles.entity.potion.throw
|volume=0.5
|pitch={{frac|1|3}}-0.5
|distance=16}}
{{Sound table
|subtitle=Dispensed item
|source=block
|description=When a lingering potion is dispensed by a [[dispenser]]
|id=block.dispenser.launch
|translationkey=subtitles.block.dispenser.dispense
|volume=1.0
|pitch=1.2
|distance=16
|foot=1}}
{{edition|bedrock}}:
{{Sound table
|type=bedrock
|sound=Glass dig1.ogg
|sound2=Glass dig2.ogg
|sound3=Glass dig3.ogg
|source=block
|description=When a splash potion impacts something
|id=random.glass
|volume=1.0
|pitch=1.0}}
{{Sound table
|rowspan=2
|sound=Bow shoot.ogg
|source=player
|description=When a splash potion is thrown by a player
|id=random.bow
|volume=0.5
|pitch=0.33-0.5}}
{{Sound table
|source=player
|description=When a splash potion is dispensed from a dispenser
|id=random.bow
|volume=1.0
|pitch=0.83-1.25
|foot=1}}
== Data values ==
=== ID ===
{{edition|java}}:
{{ID table
|edition=java
|showforms=y
|generatetranslationkeys=y
|displayname=Lingering Potion
|spritetype=item
|nameid=lingering_potion
|form=item
|translationkey=item.minecraft.lingering_potion,item.minecraft.lingering_potion.effect.empty,item.minecraft.lingering_potion.effect.water,item.minecraft.lingering_potion.effect.mundane,item.minecraft.lingering_potion.effect.thick,item.minecraft.lingering_potion.effect.awkward,item.minecraft.lingering_potion.effect.night_vision,item.minecraft.lingering_potion.effect.invisibility,item.minecraft.lingering_potion.effect.leaping,item.minecraft.lingering_potion.effect.fire_resistance,item.minecraft.lingering_potion.effect.swiftness,item.minecraft.lingering_potion.effect.slowness,item.minecraft.lingering_potion.effect.water_breathing,item.minecraft.lingering_potion.effect.healing,item.minecraft.lingering_potion.effect.harming,item.minecraft.lingering_potion.effect.poison,item.minecraft.lingering_potion.effect.regeneration,item.minecraft.lingering_potion.effect.strength,item.minecraft.lingering_potion.effect.weakness,item.minecraft.lingering_potion.effect.levitation,item.minecraft.lingering_potion.effect.luck,item.minecraft.lingering_potion.effect.turtle_master,item.minecraft.lingering_potion.effect.slow_falling
|foot=1}}
{{edition|bedrock}}:
{{ID table
|edition=bedrock
|shownumericids=y
|showforms=y
|notshowbeitemforms=y
|generatetranslationkeys=y
|displayname=Lingering Potion
|spritetype=item
|nameid=lingering_potion
|id=562
|form=item
|translationkey=potion.emptyPotion.linger.name,potion.mundane.linger.name,potion.mundane.extended.linger.name,potion.thick.linger.name,potion.awkward.linger.name,potion.nightVision.linger.name,potion.invisibility.linger.name,potion.jump.linger.name,potion.fireResistance.linger.name,potion.moveSpeed.linger.name,potion.moveSlowdown.linger.name,potion.heal.linger.name,potion.harm.linger.name,potion.poison.linger.name,potion.regeneration.linger.name,potion.damageBoost.linger.name,potion.weakness.linger.name,potion.wither.linger.name,potion.turtleMaster.linger.name,potion.slowFalling.linger.name
|foot=1}}
=== Item data ===
<div class="treeview">
* {{nbt|compound|tag}}: The item's '''tag''' tag.
{{:Player.dat_format/Potion}}
</div>
=== Thrown potion ===
{{Entity
| title = Thrown lingering potion
| networkid = '''[[JE]]''': 73
}}
==== ID ====
{{edition|java}}:
{{ID table
|generatetranslationkeys=java
|displayname=Lingering Potion
|spritetype=entity
|nameid=potion
|foot=1}}
{{edition|bedrock}}:
{{ID table
|shownumericids=y
|generatetranslationkeys=bedrock
|displayname=Lingering Potion
|spritetype=entity
|nameid=lingering_potion
|id=101
|foot=1}}
==== Entity Data ====
{{see also|Chunk format|Potions#Data values|title2=Potion data values}}
Lingering potions when thrown have entity data that define various properties of the entity.
{{:Splash Potion/ED}}
=== Area Effect Cloud ===
{{Entity
| title = Area Effect Cloud
| image = Area Effect Cloud.png
|imagesize=290px
}}
==== ID ====
{{edition|java}}:
{{ID table
|generatetranslationkeys=java
|displayname=Area Effect Cloud
|spritetype=entity
|nameid=area_effect_cloud
|foot=1}}
{{edition|bedrock}}:
{{ID table
|shownumericids=y
|generatetranslationkeys=bedrock
|displayname=Area Effect Cloud
|spritetype=entity
|nameid=area_effect_cloud
|id=95
|foot=1}}
==== Entity data ====
{{see also|Chunk format}}
The cloud that is created when: lingering potions are thrown; [[creeper]]s with potion effects explode; [[Ender Dragon#Dragon_Fireball|dragon fireballs]] hit the ground, is an entity, which has entity data that defines the properties of the entity.
{{/ED}}
==Advancements==
{{Load advancements|Zombie Doctor;A Furious Cocktail;How Did We Get Here?;Bullseye}}
== History ==
{{Info needed section|Lingering Potion of Decay; Lingering Potion of Weakness; Uncraftable Lingering Potion}}
{{History|java}}
{{History||1.9|snap=15w33a|[[File:Lingering Potion of Night Vision JE1 BE1.png|32px]] [[File:Lingering Potion of Invisibility JE1 BE1.png|32px]] [[File:Lingering Potion of Leaping JE1 BE1.png|32px]] [[File:Lingering Potion of Fire Resistance JE1 BE1.png|32px]] [[File:Lingering Potion of Swiftness JE1 BE1.png|32px]] [[File:Lingering Potion of Slowness JE1 BE1.png|32px]] [[File:Lingering Potion of Water Breathing JE1 BE1.png|32px]] [[File:Lingering Potion of Healing JE1 BE1.png|32px]] [[File:Lingering Potion of Harming JE1 BE1.png|32px]] [[File:Lingering Potion of Poison JE1 BE1.png|32px]] [[File:Lingering Potion of Regeneration JE1 BE1.png|32px]] [[File:Lingering Potion of Strength JE1 BE1.png|32px]] [[File:Lingering Potion of Weakness JE1 BE1.png|32px]] [[File:Lingering Potion of Luck JE1.png|32px]] Added lingering potions.
|[[File:Lingering Water Bottle JE1 BE1.png|32px]] [[File:Lingering Water Bottle JE1 BE1.png|32px]] [[File:Lingering Water Bottle JE1 BE1.png|32px]] [[File:Lingering Water Bottle JE1 BE1.png|32px]] Added lingering water bottle, and Mundane, Thick, and Awkward lingering potions.}}
{{History|||snap=15w33c|The bug where the [[player]] could not place [[splash potion]]s in the [[brewing stand]] has been fixed. This now allows for easier creation of lingering potions.}}
{{History|||snap=16w06a|Lingering potions can now be used to craft [[tipped arrow]]s.}}
{{History||1.11|snap=16w32a|The [[entity]] ID has been changed from {{code|AreaEffectCloud}} to {{code|area_effect_cloud}}.}}
{{History||1.13|snap=17w47a|Prior to [[1.13/Flattening|''The Flattening'']], this [[item]]'s numeral ID was 441.}}
{{History|||snap=18w07a|[[File:Lingering Potion of the Turtle Master JE1 BE1.png|32px]] Added the lingering potions of the Turtle Master.}}
{{History|||snap=18w14a|[[File:Lingering Potion of Slow Falling JE1 BE1.png|32px]] Added lingering potions of [[Slow Falling]].}}
{{History||1.14|snap=18w43a|[[File:Lingering Water Bottle JE2 BE2.png|32px]] [[File:Lingering Potion of Night Vision JE2 BE2.png|32px]] [[File:Lingering Potion of Invisibility JE2 BE2.png|32px]] [[File:Lingering Potion of Leaping JE2 BE2.png|32px]] [[File:Lingering Potion of Fire Resistance JE2 BE2.png|32px]] [[File:Lingering Potion of Swiftness JE2 BE2.png|32px]] [[File:Lingering Potion of Slowness JE2 BE2.png|32px]] [[File:Lingering Potion of the Turtle Master JE2 BE2.png|32px]] [[File:Lingering Potion of Water Breathing JE2 BE2.png|32px]] [[File:Lingering Potion of Healing JE2 BE2.png|32px]] [[File:Lingering Potion of Harming JE2 BE2.png|32px]] [[File:Lingering Potion of Poison JE2 BE2.png|32px]] [[File:Lingering Potion of Regeneration JE2 BE2.png|32px]] [[File:Lingering Potion of Strength JE2 BE2.png|32px]] [[File:Lingering Potion of Weakness JE2 BE2.png|32px]] [[File:Lingering Potion of Luck JE2.png|32px]] [[File:Lingering Potion of Slow Falling JE2 BE2.png|32px]] The textures of lingering potions have been changed.}}
{{History||1.19|snap=22w11a|Lingering water bottles can be {{control|used}} on [[dirt]], [[coarse dirt]], or [[rooted dirt]] to turn it into [[mud]].}}
{{History||1.19.3|snap=22w43a|Lingering water bottles can now extinguish burning entities.<ref>{{bug|MC-189911|||Fixed}}</ref>}}
{{History||1.19.4|snap=Pre-release 1|Lingering potions no longer have an enchantment glint.}}
{{History|||snap=Pre-release 3|[[File:Lingering Potion of Night Vision JE3.png|32px]] [[File:Lingering Potion of Invisibility JE3.png|32px]] [[File:Lingering Potion of Leaping JE3.png|32px]] [[File:Lingering Potion of Fire Resistance JE3.png|32px]] [[File:Lingering Potion of Swiftness JE3.png|32px]] [[File:Lingering Potion of Slowness JE3.png|32px]] [[File:Lingering Potion of the Turtle Master JE3.png|32px]] [[File:Lingering Potion of Water Breathing JE3.png|32px]] [[File:Lingering Potion of Harming JE3.png|32px]] [[File:Lingering Potion of Poison JE3.png|32px]] [[File:Lingering Potion of Strength JE3.png|32px]] Changed colors of the following lingering potions: Night Vision, Invisibility, Leaping, Fire Resistance, Swiftness, Slowness, Turtle Master, Water Breathing, Harming, Poison, Strength, Resistance.}}
{{History||1.20|snap=23w12a|Wither [[effect]] particle colors have been adjusted to make them more distinguishable.
|The lingering potion of [[Slow Falling]] has had its color tweaked to make it more distinguishable from the lingering potion of [[Invisibility]].}}
{{History|pocket}}
{{History||1.0.0|snap=alpha 0.17.0.1|[[File:Lingering Water Bottle JE1 BE1.png|32px]] [[File:Lingering Potion of Night Vision JE1 BE1.png|32px]] [[File:Lingering Potion of Invisibility JE1 BE1.png|32px]] [[File:Lingering Potion of Leaping JE1 BE1.png|32px]] [[File:Lingering Potion of Fire Resistance JE1 BE1.png|32px]] [[File:Lingering Potion of Swiftness JE1 BE1.png|32px]] [[File:Lingering Potion of Slowness JE1 BE1.png|32px]] [[File:Lingering Potion of Water Breathing JE1 BE1.png|32px]] [[File:Lingering Potion of Healing JE1 BE1.png|32px]] [[File:Lingering Potion of Harming JE1 BE1.png|32px]] [[File:Lingering Potion of Poison JE1 BE1.png|32px]] [[File:Lingering Potion of Regeneration JE1 BE1.png|32px]] [[File:Lingering Potion of Strength JE1 BE1.png|32px]] [[File:Lingering Potion of Weakness JE1 BE1.png|32px]] [[File:Lingering Potion of Decay BE1.png|32px]] Added lingering potions.
|Lingering water bottles, mundane, long mundane, thick, and awkward lingering potions are all available in the Creative inventory.}}
{{History|bedrock}}
{{History||1.5.0|snap=beta 1.5.0.4|[[File:Lingering Potion of the Turtle Master JE1 BE1.png|32px]] Added lingering potions of the Turtle Master.}}
{{History||1.6.0|snap=beta 1.6.0.5|[[File:Lingering Potion of Slow Falling JE1 BE1.png|32px]] Added lingering potions of [[Slow Falling]].}}
{{History||1.10.0|snap=beta 1.10.0.3|[[File:Lingering Water Bottle JE2 BE2.png|32px]] [[File:Lingering Potion of Night Vision JE2 BE2.png|32px]] [[File:Lingering Potion of Invisibility JE2 BE2.png|32px]] [[File:Lingering Potion of Leaping JE2 BE2.png|32px]] [[File:Lingering Potion of Fire Resistance JE2 BE2.png|32px]] [[File:Lingering Potion of Swiftness JE2 BE2.png|32px]] [[File:Lingering Potion of Slowness JE2 BE2.png|32px]] [[File:Lingering Potion of Water Breathing JE2 BE2.png|32px]] [[File:Lingering Potion of Healing JE2 BE2.png|32px]] [[File:Lingering Potion of Harming JE2 BE2.png|32px]] [[File:Lingering Potion of Poison JE2 BE2.png|32px]] [[File:Lingering Potion of Regeneration JE2 BE2.png|32px]] [[File:Lingering Potion of Strength JE2 BE2.png|32px]] [[File:Lingering Potion of Weakness JE2 BE2.png|32px]] [[File:Lingering Potion of Decay BE2.png|32px]] [[File:Lingering Potion of the Turtle Master JE2 BE2.png|32px]] [[File:Lingering Potion of Slow Falling JE2 BE2.png|32px]] The textures of lingering potions have been changed.}}
{{History||1.19.80|snap=beta 1.19.80.21|Changed potion colors for the following lingering potions: Fire Resistance, Harming, Invisibility, Leaping, Night Vision, Poison, Slowness, Strength, Swiftness, Turtle Master, and Water Breathing.
|Removed enchantment glint from lingering potions.}}
{{History|console}}
{{History||xbox=TU46|xbone=CU36|ps=1.38|wiiu=Patch 15|switch=1.0.1|[[File:Lingering Water Bottle JE1 BE1.png|32px]] [[File:Lingering Potion of Night Vision JE1 BE1.png|32px]] [[File:Lingering Potion of Invisibility JE1 BE1.png|32px]] [[File:Lingering Potion of Leaping JE1 BE1.png|32px]] [[File:Lingering Potion of Fire Resistance JE1 BE1.png|32px]] [[File:Lingering Potion of Swiftness JE1 BE1.png|32px]] [[File:Lingering Potion of Slowness JE1 BE1.png|32px]] [[File:Lingering Potion of Water Breathing JE1 BE1.png|32px]] [[File:Lingering Potion of Healing JE1 BE1.png|32px]] [[File:Lingering Potion of Harming JE1 BE1.png|32px]] [[File:Lingering Potion of Poison JE1 BE1.png|32px]] [[File:Lingering Potion of Regeneration JE1 BE1.png|32px]] [[File:Lingering Potion of Strength JE1 BE1.png|32px]] [[File:Lingering Potion of Weakness JE1 BE1.png|32px]] [[File:Lingering Potion of Luck JE1.png|32px]] Added lingering potions.}}
{{History||xbox=TU69|xbone=none|ps=1.76|wiiu=Patch 38|switch=none|[[File:Lingering Potion of Decay BE1.png|32px]] [[File:Lingering Potion of the Turtle Master JE1 BE1.png|32px]] [[File:Lingering Potion of Slow Falling JE1 BE1.png|32px]] Added lingering potions of the [[Wither (effect)|Decay]], [[Slow Falling]], and Turtle Master.}}
{{History||xbox=none|xbone=none|ps=1.90|wiiu=none|switch=none|[[File:Lingering Water Bottle JE2 BE2.png|32px]] [[File:Lingering Potion of Night Vision JE2 BE2.png|32px]] [[File:Lingering Potion of Invisibility JE2 BE2.png|32px]] [[File:Lingering Potion of Leaping JE2 BE2.png|32px]] [[File:Lingering Potion of Fire Resistance JE2 BE2.png|32px]] [[File:Lingering Potion of Swiftness JE2 BE2.png|32px]] [[File:Lingering Potion of Slowness JE2 BE2.png|32px]] [[File:Lingering Potion of Water Breathing JE2 BE2.png|32px]] [[File:Lingering Potion of Healing JE2 BE2.png|32px]] [[File:Lingering Potion of Harming JE2 BE2.png|32px]] [[File:Lingering Potion of Poison JE2 BE2.png|32px]] [[File:Lingering Potion of Regeneration JE2 BE2.png|32px]] [[File:Lingering Potion of Strength JE2 BE2.png|32px]] [[File:Lingering Potion of Weakness JE2 BE2.png|32px]] [[File:Lingering Potion of Luck JE2.png|32px]] [[File:Lingering Potion of Decay BE2.png|32px]] [[File:Lingering Potion of the Turtle Master JE2 BE2.png|32px]] [[File:Lingering Potion of Slow Falling JE2 BE2.png|32px]] The textures of lingering potions have been changed.}}
{{History|new 3ds}}
{{History||1.7.10|[[File:Lingering Water Bottle JE1 BE1.png|32px]] [[File:Lingering Potion of Night Vision JE1 BE1.png|32px]] [[File:Lingering Potion of Invisibility JE1 BE1.png|32px]] [[File:Lingering Potion of Leaping JE1 BE1.png|32px]] [[File:Lingering Potion of Fire Resistance JE1 BE1.png|32px]] [[File:Lingering Potion of Swiftness JE1 BE1.png|32px]] [[File:Lingering Potion of Slowness JE1 BE1.png|32px]] [[File:Lingering Potion of Water Breathing JE1 BE1.png|32px]] [[File:Lingering Potion of Healing JE1 BE1.png|32px]] [[File:Lingering Potion of Harming JE1 BE1.png|32px]] [[File:Lingering Potion of Poison JE1 BE1.png|32px]] [[File:Lingering Potion of Regeneration JE1 BE1.png|32px]] [[File:Lingering Potion of Strength JE1 BE1.png|32px]] [[File:Lingering Potion of Weakness JE1 BE1.png|32px]] [[File:Lingering Potion of Decay BE1.png|32px]] Added lingering potions.
|Lingering water bottles, mundane, long mundane, thick, and awkward lingering potions are all available in the Creative inventory.}}
{{History|foot}}
== Issues ==
{{issue list}}
== Trivia ==
* A thrown lingering potion faces toward the [[player]] in first-person view while it appears rotated horizontally in third-person view. This is the case for all throwable [[item]]s ([[ender pearl]]s, [[eggs]], [[snowball]]s, and all throwable potions).
== Gallery ==
<gallery>
Lingering Water Bottle.png|Water Bottle
Lingering Potion of Night Vision.png|Night Vision
Lingering Potion of Invisibility.png|Invisibility
Lingering Potion of Leaping.png|Leaping
Lingering Potion of Fire Resistance.png|Fire Resistance
Lingering Potion of Swiftness.png|Swiftness
Lingering Potion of Slowness.png|Slowness
Lingering Potion of the Turtle Master.png|Turtle Master
Lingering Potion of Water Breathing.png|Water Breathing
Lingering Potion of Healing.png|Healing
Lingering Potion of Harming.png|Harming
Lingering Potion of Poison.png|Poison
Lingering Potion of Regeneration.png|Regeneration
Lingering Potion of Strength.png|Strength
Lingering Potion of Weakness.png|Weakness
Lingering Potion of Slow Falling.png|Slow Falling
Lingering Potion of Luck.png|Luck
Lingering Potion of Decay.png|Decay
Uncraftable Lingering Potion.png|Uncraftable
</gallery>
=== Screenshots ===
<gallery>
Transparent Area Effect Cloud Image.png|Just area affect cloud particles
</gallery>
== See also ==
* {{ItemLink|Glass Bottle}}
* {{ItemLink|Potion}}
* {{ItemLink|Splash Potion}}
{{Items}}
{{Entities}}
[[Category:Combat]]
[[de:Verweiltrank]]
[[fr:Potion persistante]]
[[ko:잔류형 물약]]
[[ja:残留ポーション]]
[[pl:Trwałe miotane mikstury]]
[[pt:Poção prolongada]]
[[ru:Оседающие зелья]]
[[uk:Осідаючі зілля]]
[[zh:滞留药水]]</li><li>[[Shield|Shield]]<br/>{{Item
| image = Shield.png
| image2 = White Shield.png
| extratext = View [[#Gallery|all renders]]
| durability = 336
| renewable = Yes
| stackable = No
}}
A '''shield''' is a tool used for protecting the [[player]] against attacks.
== Obtaining ==
=== Crafting ===
{{Crafting
|head=1
|showname=0
|A1=Any Planks <!-- the recipe changed in 15w37a, do not change it to the old recipe without reason -->
|B1=Iron Ingot
|C1=Any Planks
|A2=Any Planks
|B2=Any Planks
|C2=Any Planks
|B3=Any Planks
|Output=Shield
|type=Combat
}}
{{Crafting
|ignoreusage=1
|Shield
|Matching Banner
|A2=Shield
|B2=Banner
|Output=Matching Shield
|type=combat
|foot=1
}}
=== Repairing ===
{{Crafting
|ignoreusage=1
|showdescription=1
|Damaged Shield
|Damaged Shield
|Output=Shield
|description= The durability of the two shields is added together, plus an extra 5% durability. The repaired shield has no pattern.
|type= Combat
}}
Shields may also be repaired on an [[anvil]] by using [[planks]] or another shield. Shields repaired on anvils retain their pattern.
=== Trading ===
Journeyman-level armorer [[villager]]s have {{frac|1|3}}{{only|Bedrock|short=1}}/{{frac|2|5}}{{only|Java|short=1}} chance of selling a shield for 5 [[emerald]]s as their sixth trade.
== Usage ==
Despite using iron in its crafting recipe, it cannot be smelted into [[iron nugget]]s.<ref>{{bug|MC-111738}}</ref>
=== Defense ===
Shields are used for [[blocking]] incoming attacks. {{control|Using}}{{Only|Java|short=1}} or {{Control|sneaking}}{{Only|Bedrock|short=1}} causes a player to slow to a [[sneaking]] pace, and after {{convert|5|ticks|seconds}}<ref>{{bug|MC-100949||Shield blocking is delayed}}</ref>, attacks coming from in front of the player are blocked, dealing no damage. When the shield blocks an attack of {{hp|3}} or stronger, it takes durability damage equal to the strength of the attack rounded up.
Most blocked projectiles that carry status effects (such as [[Shulker#Shulker bullet|shulker bullets]]{{only|java|short=1}}, flaming [[arrow]]s, or tipped arrows) do not affect the blocker. [[Trident]]s & arrows can be deflected into other targets. Knockback from melee attacks and projectiles is prevented, while knockback from [[explosion]]s, [[hoglin]], and [[ravager]] attacks are significantly reduced.
The shield directionally blocks all attacks coming from within the FOV of the direction the wielder is facing, providing a full hemisphere of coverage to them. If the wielder faces straight up, they are likely to miss their blocks.<ref>{{bug|MC-109101||Shields do not block damage while the player faces straight up}}</ref><!--straight down fix: MC-92019-->
Mobs that deal continuous contact damage such as the slime, magma cube, and blaze rapidly drain the shield's durability for as long as the shielded player remains within the mob's hitbox.<ref>{{bug|MC-169167}}</ref><ref>{{bug|MCPE-119451}}</ref>
Blockable attacks include:
*Melee attacks, except by a warden, axe-wielding mobs or by a sprinting player wielding an axe, however even without sprinting an axe still greatly decreases the durability
** Status effects do not carry through to the blocker{{only|java|short=1}}.
*Normal, tipped, and spectral [[arrow]]s
** Arrows other than [[Piercing]] are totally deflected and can hit other targets.
** Status effects do not carry through to the blocker{{only|java|short=1}}.
***This can be used to damage the attacker or another mob down there.
*[[Flame|Flaming arrows]]
** Burning does not carry through to the blocker{{only|java|short=1}}.
*[[Trident]]s
*[[Snowball]]s and [[egg]]s
*Spines from [[pufferfish]]
*Bullets from [[shulker]]s
** The levitation effect does not carry through to the blocker{{only|java|short=1}}.
*Spit from [[llama]]s
*[[Fireball]]s, such as from [[blaze]]s and [[fire charge]]s
** Burning does not carry through to the blocker.
*Direct hits from [[ghast]] [[fireball]]s
** These still cause environmental damage.
*All explosions{{only|JE|short=1}}
*Explosion damage from [[creeper]]s
*[[TNT]] that another player lit
*[[Ravager]] headbutts
** These still knock the blocker back by about 3 blocks.
** Blocking these strikes can stun the ravager for a moment, and it roars afterward.
*Ravager roars are blocked but still knock back the blocker.
*[[Bee]] stings are blocked, but bees continuously attack until the player stops blocking and the player is stung.
*Beam attacks from [[guardian]]s or [[elder guardian]]s (only reduces damage by 50%).
*Damage reflected from [[Thorns]] enchantment / [[Guardian|guardians]].
They cannot block:
*Arrows from a [[crossbow]] enchanted with [[Piercing]]
** This does not reduce the shield's durability.
*[[Status effect]]s from tipped arrows or shulker bullets {{only|bedrock|short=1}} <ref>{{bug|MCPE-52904}}</ref>
** Direct projectile damage is blocked, but the effect still carries through.
*Status effects from splash/lingering [[potion]]s, [[evoker]]s' fangs, or breath from the [[ender dragon]]
*Beam attacks from [[guardian]]s or [[elder guardian]]s, or the [[warden]]'s sonic boom attack
*TNT that the blocking player lit themselves{{only|BE|short=1}}
*TNT that a [[Redstone (disambiguation)|redstone mechanism]] lit{{only|BE|short=1}}
*[[Fall damage]], including that from [[ender pearl]]s
** This also includes when the player rides an [[entity]] that died due to fall damage.
*Strikes from a warden or any [[axe]]-wielding mob (e.g., [[vindicator]]s, [[piglin brute]]s, [[zombie]]s after disabling players shield they attack another time immediately)
** Such strikes disable being able to use shields for 5 seconds.
=== Applying patterns ===
[[File:Cyan Shield Screenshot.png|250px|thumb|A custom shield.]]
Shields can be decorated by applying a [[banner]].
{{Crafting
|showdescription=1
|Shield
|Matching Banner
|Output=Matching Shield; Ominous Shield
|B2link=Banner
|Olink=Shield
|type=Combat
|description=Applies the banner pattern to the shield. The banner is consumed.<br>The shield must have no preexisting patterns.<br>Does not change existing durability or enchantments on the shield.
}}
Unlike with [[banner]]s, shields cannot be repainted or washed in a [[cauldron]]. Shields have only half the resolution of banners, making patterns look slightly different. In the game files, the pattern textures can be found in a separate directory called entity/shield.
{{IN|java}}, shields with patterns can also be obtained using the same commands as banners, except <code>banner</code> has to be replaced with <code>shield</code>.
=== Enchantments ===
A shield can receive the following [[enchantments]], but only through an [[anvil]]:
{| class="wikitable col-2-center"
|+
!Name
!Max Level
![[Enchanting|Method]]
|-
|[[Unbreaking]]
|III
|{{Inventory slot|Anvil}}
|-
|[[Mending]]
|I
|{{Inventory slot|Anvil}}
|-
|[[Curse of Vanishing]]
|I
|{{Inventory slot|Anvil}}
|-
|}
== Sounds ==
{{edition|java}}:
{{Sound table
|sound=Shield block1.ogg
|sound2=Shield block2.ogg
|sound3=Shield block3.ogg
|sound4=Shield block4.ogg
|sound5=Shield block5.ogg
|subtitle=Shield blocks
|source=player
|description=When an attack is blocked using a shield
|id=item.shield.block
|translationkey=subtitles.item.shield.block
|volume=1.0
|pitch=0.8-1.2
|distance=16}}
{{Sound table
|sound=Equip generic1.ogg
|sound2=Equip generic2.ogg
|sound3=Equip generic3.ogg
|sound4=Equip generic4.ogg
|sound5=Equip generic5.ogg
|sound6=Equip generic6.ogg
|subtitle=Gear equips
|source=player
|description=When a shield is placed in the offhand slot
|id=item.armor.equip_generic
|translationkey=subtitles.item.armor.equip
|volume=1.0
|pitch=1.0
|distance=16}}
{{Sound table
|sound=Random break.ogg
|subtitle=Item breaks
|source=player
|description=When a shield's durability is exhausted
|id=item.shield.break
|translationkey=subtitles.entity.item.break
|volume=0.8
|pitch=0.8-1.2
|distance=16
|foot=1}}
{{edition|bedrock}}:
{{Sound table
|type=bedrock
|sound=Shield block1.ogg
|sound2=Shield block2.ogg
|sound3=Shield block3.ogg
|sound4=Shield block4.ogg
|sound5=Shield block5.ogg
|source=player
|description=When an attack is blocked using a shield
|id=item.shield.block
|volume=0.7
|pitch=1.0}}
{{Sound table
|sound=Equip generic1.ogg
|sound2=Equip generic2.ogg
|sound3=Equip generic3.ogg
|sound4=Equip generic4.ogg
|sound5=Equip generic5.ogg
|sound6=Equip generic6.ogg
|source=player
|description=When a shield is placed in the offhand slot<wbr>{{Upcoming|BE 1.20.30}}<wbr><ref group=sound>{{Bug|MCPE-168039}}</ref>
|id=armor.equip_generic
|volume=1.0
|pitch=1.0}}
{{Sound table
|sound=Random break.ogg
|source=player
|description=When a shield's durability is exhausted
|id=random.break
|volume=1.0
|pitch=0.9
|foot=1}}
== Data values ==
=== ID ===
{{edition|java}}:
{{ID table
|edition=java
|showforms=y
|generatetranslationkeys=y
|displayname=Shield
|spritetype=item
|nameid=shield
|form=item
|translationkey=item.minecraft.shield, item.minecraft.shield.white, item.minecraft.shield.orange, item.minecraft.shield.magenta, item.minecraft.shield.light_blue, item.minecraft.shield.yellow, item.minecraft.shield.lime, item.minecraft.shield.pink, item.minecraft.shield.gray, item.minecraft.shield.light_gray, item.minecraft.shield.cyan, item.minecraft.shield.purple, item.minecraft.shield.blue, item.minecraft.shield.brown, item.minecraft.shield.green, item.minecraft.shield.red, item.minecraft.shield.black
|foot=1}}
{{edition|bedrock}}:
{{ID table
|edition=bedrock
|shownumericids=y
|showforms=y
|notshowbeitemforms=y
|generatetranslationkeys=y
|displayname=Shield
|spritetype=item
|nameid=shield
|id=355
|form=item
|translationkey=item.shield.name, item.shield.white.name, item.shield.orange.name, item.shield.magenta.name, item.shield.lightBlue.name, item.shield.yellow.name, item.shield.lime.name, item.shield.pink.name, item.shield.gray.name, item.shield.silver.name, item.shield.cyan.name, item.shield.purple.name, item.shield.blue.name, item.shield.brown.name, item.shield.green.name, item.shield.red.name, item.shield.black.name
|foot=1}}
== Advancements ==
{{load advancements|Not Today}}
== History ==
{{History||July 10, 2011|link=http://minetimes.wordpress.com/2011/07/10/interview-mit-jeb-ihr-konntet-die-fragen-stellen/|During an interview, [[Jeb]] says that "shields for the left arm" might be added.}}
{{History|java}}
{{History||1.9|snap=15w33c|[[File:White Shield.png|22px]] [[File:Light Gray Shield.png|22px]] [[File:Gray Shield.png|22px]] [[File:Black Shield.png|22px]] [[File:Brown Shield.png|22px]] [[File:Red Shield.png|22px]] [[File:Orange Shield.png|22px]] [[File:Yellow Shield.png|22px]] [[File:Lime Shield.png|22px]] [[File:Green Shield.png|22px]] [[File:Cyan Shield.png|22px]] [[File:Light Blue Shield.png|22px]] [[File:Blue Shield.png|22px]] [[File:Purple Shield.png|22px]] [[File:Magenta Shield.png|22px]] [[File:Pink Shield.png|22px]] Added shields.
|Shields replace the [[blocking]] functionality of [[sword]]s, although blocking more [[damage]].
|The current [[crafting]] recipe of shields includes [[wool]], producing 16 possible colored shields. There currently isn't a blank, uncolored shield.
{{{!}} class{{=}}"collapsible collapsed" data-description{{=}}"Recipe"
! Recipe
{{!}}-
{{!}}
{{Crafting
|A1=Matching Wool |B1=Any Planks
|A2=Matching Wool |B2=Any Planks |C2=Iron Ingot
|A3=Matching Wool |B3=Any Planks
|Output=Matching Shield
|ignoreusage=1
}}
{{!}}}
|Any of the colored base shields can be [[crafting|crafted]] with a [[banner]] of the same base color, to produce a patterned shield.
}}
{{History|||snap=15w34c|When an attack is blocked by a shield, the attacker now may be knocked back.
|Being attacked with an [[axe]] now may disable shield use for 5 seconds.}}
{{History|||snap=15w37a|The [[crafting]] recipe of shields has been changed to 6 [[planks]] and 1 [[iron ingot]].
{{{!}} class{{=}}"collapsible collapsed" data-description{{=}}"Recipe"
! Recipe
{{!}}-
{{!}}
{{Crafting
|A1=Any Planks |B1=Iron Ingot |C1=Any Planks
|A2=Any Planks |B2=Any Planks |C2=Any Planks
|B3=Any Planks
|Output=Shield
|ignoreusage=1
}}
{{!}}}
|[[File:Shield JE1.png|22px]] Crafting a shield now produces a base wooden shield that can be crafted together with any [[banner]].
|The cooldown of shields has been reduced from 0.5s to 0.25s.
|Blocking with shields now prevents some side effects.{{verify}}
|[[Arrow]]s now ricochet off shields.}}
{{History|||snap=15w44a|Shields can now be repaired by combining with other shields. This removes any [[banner]] that had been applied.}}
{{History|||snap=15w45a|Crafting a banner onto a shield now consumes the banner.}}
{{History|||snap=15w47b|Added shield blocking [[sound]]s.}}
{{History|||snap=16w07a|Added more variation of shield blocking sounds.}}
{{History|||snap=pre1|The [[durability]] of shields has been increased from 181 to 337.}}
{{History||1.10|snap=16w21a|Shields can now be equipped by [[dispenser]]s.}}
{{History||1.11|snap=16w33a|[[Crafting]] a shield with a banner no longer changes the durability, nor does it remove [[enchanting|enchantments]] from it.}}
{{History|||snap=16w35a|Shields now block 100% of [[damage]]/[[knockback]]/debuffs dealt in melee combat.}}
{{History||1.13|snap=17w47a|Prior to [[1.13/Flattening|''The Flattening'']], this [[item]]'s numeral ID was 442.}}
{{History||1.13.2|snap=release|Shields now properly block attacks when the player is facing down.<ref>{{bug|MC-92019|||Fixed}}</ref>}}
{{History||1.14|snap=18w43a|[[File:Shield JE2 BE1.png|22px]] The texture of shields has been changed.
|Shields no longer knockback attackers when they block due to a bug with rework of the blocking mechanic with the introduction of the ravager.<ref>{{bug|MC-147694}}</ref>}}
{{History|||snap=19w11a|Shields can now be [[trading|bought]] from armorer [[villager]]s.}}
{{History||1.14.3|snap=Pre-Release 3|Shields blocking flaming [[arrow]]s no longer put the [[player]] on [[fire]].}}
{{History||1.16|snap=20w06a|[[Crimson planks]] and [[warped planks]] can now be used to craft shields.}}
{{History||1.19|snap=22w11a|[[Mangrove planks]] can now be used to craft shields.}}
{{History||1.19.3|snap=22w43a|Shields can now properly block all explosions.}}
{{History||1.19.4|snap=23w06a|A sound is now played when a shield is placed into the offhand slot.}}
{{History|upcoming java}}
{{History||Combat Tests|snap=1.14.3 - Combat Test|Critical hits now bypass shields.
|The warm-up delay has been removed from shields.
|When in the off-hand, shields now activate when [[sneaking]].}}
{{History|||snap=Combat Test 2|Shields now protect against critical attacks again.
|Shields can only be activated when the weapon is charged to 200%.}}
{{History|||snap=Combat Test 3|A "Shield Indicator" option that displays when the shield is active, similar to the attack indicator, has been added.
|An option to hide shields when active has been added.
|The arc of available protection of shields has been decreased to 100 degrees instead of 180 degrees.}}
{{History|||snap=Combat Test 4|An option to disable shields being activated by pressing {{ctrl|crouch}} has been added.
|The option to hide the shield has been removed.}}
{{History|||snap=Combat Test 6|Shields now protect up to 5 [[damage]] for melee attacks (still 100% against projectiles).
|Shields activate instantly regardless if the weapon is charged, similar to Combat test 1.
|Shields now recover faster after an attack.}}
{{History|||snap=Combat Test 7c|Shields now add a 50% knockback resistance when active.
|Shields now protect against 100% [[explosions|explosion]] damage.}}
{{History|||snap=Combat Test 8c|The knockback calculations for shields have been fixed.{{Info needed}}
|Crouch-shielding while jumping has been disabled.
|Shields with [[banner]]s are now temporarily stronger than normal shields (10 absorption instead of 5, and better knockback resistance) to test different shield types.}}
{{History|bedrock}}
{{History||1.10.0|snap=beta 1.10.0.3|[[File:Shield JE2 BE1.png|22px]] Added shields.
|Shields cannot be customized with [[banner]]s.
|Shields are activated by [[sneaking|crouching]] or mounting [[mob]]s.}}
{{History||1.11.0|snap=beta 1.11.0.4|Shields can now be [[trading|bought]] from armorer [[villager]]s.}}
{{History||1.16.210|snap=beta 1.16.210.51|Now grants partial knockback protection from the [[goat]] ram attack.}}
{{History||1.16.220|snap=beta 1.16.220.50|[[Mob]]s that pick up shields now place them to their off-hand.}}
{{History||1.18.30|snap=beta 1.18.30.26|Being attacked with an [[axe]] now may disable shield use. This was not mentioned in the official changelog.<ref>{{tweet|kingbdogz|1504505321884196872|We missed a change in recent changelogs for the Bedrock beta that you may like - we have now made a parity fix that makes shields get disabled for 5 seconds when attacked by an Axe-wielding mob or player. We will make sure to list this properly in the next beta :)|March 17, 2022}}</ref>}}
{{History||1.20.0|snap=beta 1.20.0.20|[[File:White Shield.png|22px]] [[File:Light Gray Shield.png|22px]] [[File:Gray Shield.png|22px]] [[File:Black Shield.png|22px]] [[File:Brown Shield.png|22px]] [[File:Red Shield.png|22px]] [[File:Orange Shield.png|22px]] [[File:Yellow Shield.png|22px]] [[File:Lime Shield.png|22px]] [[File:Green Shield.png|22px]] [[File:Cyan Shield.png|22px]] [[File:Light Blue Shield.png|22px]] [[File:Blue Shield.png|22px]] [[File:Purple Shield.png|22px]] [[File:Magenta Shield.png|22px]] [[File:Pink Shield.png|22px]] Shields can now be customized using a banner.}}
{{History|PS4}}
{{History||1.90|[[File:Shield JE1.png|22px]] Added shields.
|Shields do not have [[banner]] application features.}}
{{History|foot}}
== Issues ==
{{issue list|-wither}}
== Gallery ==
<gallery>
Shield.png|Shield
White Shield.png|White Shield
Light Gray Shield.png|Light Gray Shield
Gray Shield.png|Gray Shield
Black Shield.png|Black Shield
Brown Shield.png|Brown Shield
Red Shield.png|Red Shield
Orange Shield.png|Orange Shield
Yellow Shield.png|Yellow Shield
Lime Shield.png|Lime Shield
Green Shield.png|Green Shield
Cyan Shield.png|Cyan Shield
Light Blue Shield.png|Light Blue Shield
Blue Shield.png|Blue Shield
Purple Shield.png|Purple Shield
Magenta Shield.png|Magenta Shield
Pink Shield.png|Pink Shield
</gallery>
=== Screenshots ===
<gallery>
JebShield.png|One of the first images of shields. [[Jeb]] wearing diamond armor while holding a creeper-emblazoned shield during [[MineCon]] 2015.
Jeb Crafting Shield.png|Jeb crafting a shield.
Player with Shield.png|Player holding the default shield.
Shield Block.png|A player blocking with a shield.
ShieldFirstPerson.png|Blocking with a shield as seen in first person.
Enchanted Shield (item).gif|An enchanted shield as seen in the [[inventory]].
-ominous- shield.png|A shield with the [[ominous banner]] on it as seen in the inventory.
Kai-Shield.jpg|An image of [[Kai]] wielding a banner with a shield, used to announce the feature on [[Bedrock Edition]].
Bedrock-Shields.jpg
</gallery>
== References ==
{{reflist}}
== External Links ==
* [https://www.minecraft.net/en-us/article/taking-inventory--shield Taking Inventory: Shield] – Minecraft.net on July 25, 2019
{{Items}}
[[Category:Combat]]
[[Category:Renewable resources]]
[[de:Schild (Kampf)]]
[[fr:Bouclier]]
[[it:Scudo]]
[[ja:盾]]
[[ko:방패]]
[[nl:Schild]]
[[pl:Tarcza]]
[[pt:Escudo]]
[[ru:Щит]]
[[th:โล่]]
[[zh:盾牌]]</li></ul> | 12w38a | The enderman’s sound now plays the full length sounds instead of shortened, now if you look at them (or they open the jaw), a static sound will play, similar to Slenderman. | |||
1.7.2{{Extension DPL}}<ul><li>[[Explorer Map|Explorer Map]]<br/>{{about|the map used to find rare structures|the craftable map|Map|others|Map (disambiguation)}}{{Needs updating|Add info on the new jungle, swamp, and village maps in Java 1.20.2 Pre-Release 1}}{{Item
| image = <gallery>
Ocean Explorer Map.png | Ocean
Woodland Explorer Map.png | Woodland
Buried Treasure Map.png | Buried Treasure
</gallery>
|image2 = <gallery>
Ocean Explorer Map BE.png | Ocean (BE)
Woodland Explorer Map BE.png | Woodland (BE)
Buried Treasure Map BE.png | Buried in Treasure (BE)
</gallery>
| renewable =
* '''Buried Treasure''': No
* '''Woodland and Ocean''': Yes
| stackable = Yes (64)
}}
An '''explorer map''' is a special [[map]] used to aid in finding rare [[generated structures]], including [[woodland mansion]]s, [[ocean monument]]s, and [[buried treasure]]s.
== Obtaining ==
=== Trading ===
Apprentice-level [[cartographer]] villagers sell ocean explorer maps for 13 emeralds and a compass. Journeyman-level cartographer villagers sell woodland explorer maps for 14 emeralds and a compass.
{{IN|java}}, if the cartographer is in [[the Nether]] or [[the End]], either spawned or transported, the trades for the map do not unlock. However, {{in|bedrock}}, the cartographer trades for the map are unlocked, but the purchased map shows the same layout as in the corresponding dimension and shows no destination structure, but if cartographer trades are unlocked in an old world type (prior-1.11.0), the game stops ticking.
In ''Java Edition'', each cartographer sells its own unique explorer map that points to a different location than other cartographers. Purchasing another explorer map from the same cartographer results in the same explorer map. In Bedrock Edition, a cartographer sells an explorer map that points to the nearest location, regardless of whether it is explored or previously mapped by another cartographer.<!-- start to glitched out-->
=== Chest loot ===
Treasure maps, in contrast to explorer maps, generate in underwater ruins or in shipwrecks.
{{LootChestItem|buried-treasure-map}}
== Usage ==
[[File:Explorer Map Comparison.gif|thumb|217px|Unexplored and partially explored maps.]]
{{See also|Map#Mapping|Map#Map content}}
=== Locating structures ===
There are three types of explorer maps: woodland, [[ocean]], and buried treasure. The maps differ from a normal map, in that it shows the area's land-water outline, with an orange striated (striped) texture for water<ref>Specifically, biomes in the "water_on_map_outlines" [[Tag#Biomes|biome tag]].</ref>, and the blank map texture for land. The maps show a section of land that contains a [[woodland mansion]], [[monument]] or [[buried treasure]] respectively. This may not be the nearest such [[structure]] to the [[player]]. The structures are displayed as a small icon. If the player icon is smaller than it would be on a normal map, that means the player is a great distance away. When the player is less than 1027 blocks away from the map border, the icon returns to the proper size. When the player reaches the map's area of land (512×512), the [[map]] fills in like a normal map.
The basic functions of a buried treasure explorer map are similar to that of the other two. However, instead of showing the structure icon on the map, it shows a red X instead. The [[buried treasure]] structure is located on the same X and Z coordinates as the middle of the X (the player marker may need to be aligned with the bottom of the middle 2×2 pixel square of the X). To locate the [[chest]] spot, hold the treasure map with both hands, not in the offhand slot.
=== Cloning ===
{{Crafting
|showdescription=1
|shapeless=1
|name=[[Explorer Map]]<br>(cloned)
|;;;Empty Map;Empty Map;Empty Map;Empty Map;Empty Map
|;;;;Empty Map;Empty Map;Empty Map;Empty Map
|;;;;;Empty Map;Empty Map;Empty Map
|Ocean Explorer Map; Woodland Explorer Map; Buried Treasure Map; Ocean Explorer Map; Woodland Explorer Map; Buried Treasure Map; Ocean Explorer Map; Woodland Explorer Map
|Empty Map
|;;;;;;Empty Map;Empty Map
|;Empty Map;Empty Map;Empty Map;Empty Map;Empty Map;Empty Map;Empty Map
|;;Empty Map;Empty Map;Empty Map;Empty Map;Empty Map;Empty Map
|;;;;;;;Empty Map
|Output= Ocean Explorer Map,2; Woodland Explorer Map,3; Buried Treasure Map,4; Ocean Explorer Map,5; Woodland Explorer Map,6; Buried Treasure Map,7; Ocean Explorer Map,8; Woodland Explorer Map,9
|type= Miscellaneous
|description=The output has the same map center as the input map, and the same [[monument]], [[woodland mansion]] or [[buried treasure]] marker. Cloned maps are stackable.
}}
The parts of the world that have already been explored and mapped are copied, and newly explored areas appear on both instances. In Creative mode, cloned explorer maps can be obtained by pick blocking on the explorer map displayed on [[item frames]] (the map needs to be out of the [[player]]'s inventory when using pick block, or else that map moves into the active hotbar slot).
== Sounds ==
{{edition|java}}:
{{Sound table
|sound=Drawmap1.ogg
|sound2=Drawmap2.ogg
|sound3=Drawmap3.ogg
|subtitle=Map drawn
|source=block
|description=When an explorer map is edited using a cartography table
|id=ui.cartography_table.take_result
|translationkey=subtitles.ui.cartography_table.take_result
|volume=1.0
|pitch=1.0
|distance=16
|foot=1}}
{{edition|bedrock}}: ''None''
== Data values ==
=== ID ===
{{edition|java}}:
{{ID table
|edition=java
|showforms=y
|generatetranslationkeys=y
|displayname=Map
|spritetype=item
|nameid=filled_map
|form=item
|translationkey=filled_map.mansion,filled_map.ocean,filled_map.buried_treasure
|foot=1}}
{{edition|bedrock}}:
{{ID table
|edition=bedrock
|showaliasids=y
|shownumericids=y
|showforms=y
|notshowbeitemforms=y
|generatetranslationkeys=y
|displayname=Map
|spritetype=item
|nameid=filled_map
|aliasid=map
|id=358
|form=item
|translationkey=item.map.exploration.monument.name,item.map.exploration.mansion.name,item.map.exploration.treasure.name
|foot=1}}
=== Metadata ===
{{see also|Bedrock Edition data values}}
{{IN|bedrock}}, the item [[Data value]] distinguishes explorer maps from one another:
{{:Map/DV}}
=== Item data ===
An explorer map differs from a map in that its <code>display</code> tag is set, which includes a <code>Mapcolor</code> and a <code>LocName</code>; also its <code>Decorations</code> list includes an entry for its target monument, mansion or buried treasure. Its [[Map item format#map_<#>.dat format|map item entry]] is identical to that of a normal map, except that by the time the player sees it, its <code>colors</code> byte array is pre-filled with explorer maps' characteristic land-water boundary lines and water shading.
<div class="treeview">
It should be noted that this additional data is stored in the Cartographer's NBT data and in the inventory item's NBT data, and not in the map file (e.g. <samp>map_0.dat</samp>). If the [[player]] were to use the {{cmd|give}} command to give themselves a map with the same map ID as an existing explorer map, it would still have the Ocean Monument or the Woodland Mansion icon on the map, but it would simply be named "Map" instead of, for example, "Ocean Explorer Map".
* {{nbt|compound}} Item data
** {{nbt|compound|tag}}:
*** {{nbt|compound|display}}: How the map looks in an item slot. See also [[Player.dat_format#Display Properties]].
**** {{nbt|string|Name}}: The name the map is given. In this case, they are localized strings: either <code>{"translate":"filled_map.monument"}</code>,<code>{"translate":"filled_map.mansion"}</code> or <code>{"translate":"filled_map.buried_treasure"}</code>.
**** {{nbt|int|MapColor}}: Color codes are calculated from the Red, Green and Blue components using this formula:<br>'''<span style="color:red">Red</span>[[wikipedia:Logical shift|<<]]16 + <span style="color:green">Green</span><<8 + <span style="color:blue">Blue</span>'''.<ref group=note>For positive values larger than 0x00FFFFFF, the top byte is ignored. All negative values produce white.</ref> Monument maps use 3830373, which is {{color swatch|58|114|101}}. Mansion maps use 5393476, which is {{color swatch|82|76|68}}. Buried treasure explorer maps do not use a color code.
*** {{nbt|list|Decorations}}:
**** {{nbt|compound}}: One of these for each icon on the map. Explorer maps always have at least one representing their target.
***** {{nbt|string|id}}: An arbitrary unique string identifying the decoration. For explorer map target structures, this is "+".
***** {{nbt|double|rot}}: The rotation of the icon. For explorer map target structures, this is always 180.
***** {{nbt|byte|type}}: The ID of the [[Map#Map icons|map icon]]: 8 for a mansion map, 9 for a monument map, 26 for a treasure map.
***** {{nbt|double|x}}: The world x-coordinate of the target structure icon.
***** {{nbt|double|z}}: The world z-coordinate of the target structure icon.
</div>
; Notes
{{notelist}}
== Achievements ==
{{load achievements|Treasure Hunter}}
== History ==
{{History|java}}
{{History||1.11|snap=16w39a|[[File:Woodland Explorer Map JE1 BE1.png|32px]] [[File:Ocean Explorer Map JE1 BE1.png|32px]] Added woodland and ocean explorer maps.}}
{{History|||snap=16w41a|Explorer maps can now no longer be zoomed out.}}
{{History||1.13|snap=18w10a|[[File:Map (item) JE1 BE1.png|32px]] Added buried treasure explorer maps.}}
{{History|||snap=18w11a|Buried treasure explorer maps now generate in the [[chest]]s of [[shipwreck]]s.}}
{{History||1.14|snap=18w43a|[[File:Woodland Explorer Map JE2 BE2.png|32px]] [[File:Ocean Explorer Map JE2 BE2.png|32px]] [[File:Map (item) JE2 BE2.png|32px]] The textures for explorer maps have now been changed.}}
{{History||1.20.2|snap=1.20.2 Pre-release 1|Updated structure icons on explorer maps sold by cartographers.}}
{{History||Villager Trade Rebalance<br>(Experimental)|link=Java Edition 1.20.2|snap=1.20.2 Pre-release 1|Added seven new maps which cartographers can sell.}}
{{History|pocket}}
{{History||1.1.0|snap=alpha 1.1.0.0|[[File:Woodland Explorer Map JE1 BE1.png|32px]] [[File:Ocean Explorer Map JE1 BE1.png|32px]] Added explorer maps.<ref>{{Mcnet|discovery-update-pocket-and-win-10-soon|The Discovery Update: on Pocket and Win 10 soon|March 29, 2017}}</ref>
|Explorer maps are not yet obtainable in [[survival]] mode.}}
{{History|||snap=alpha 1.1.0.3|Explorer maps are now obtainable as [[trading|trades]] from [[cartographer]] [[villager]]s.}}
{{History|bedrock}}
{{History||1.4.0|snap=beta 1.2.14.2|[[File:Map (item) JE1 BE1.png|32px]] Added buried treasure explorer maps.}}
{{History|||snap=beta 1.2.20.1|Treasure maps now generate in [[underwater ruins]] [[chest]]s.}}
{{History||1.10.0|snap=beta 1.10.0.3|[[File:Woodland Explorer Map JE2 BE2.png|32px]] [[File:Ocean Explorer Map JE2 BE2.png|32px]] [[File:Map (item) JE2 BE2.png|32px]] The textures for explorer maps have now been changed.}}
{{History||1.11.0|snap=beta 1.11.0.4|[[Trading]] has now been changed, woodland and ocean explorer maps now cost a [[compass]] and 12 [[emerald]]s.
|Journeyman-level [[cartographer]] [[villager]]s no longer [[trading|sell]] 2 type of explorer map as they now have {{frac|1|3}} chance to sell woodland explorer maps, {{frac|1|3}} chance to sell ocean explorer maps, or {{frac|1|3}} chance to sell other [[item]]s<!-- empty locator map--> as part of their [[trading|trades]].
|Woodland explorer maps can now be [[trading|bought]] from fletcher [[villager]]s.}}
{{History||1.12.0|snap=beta 1.12.0.3|Journeyman-level fletcher villagers no longer [[trading|sell]] woodland explorer maps.}}
{{History||1.13.0|snap=beta 1.13.0.1|[[File:Woodland Explorer Map BE3.png|32px]] [[File:Ocean Explorer Map BE3.png|32px]] [[File:Buried Treasure Map BE3.png|32px]] The textures of explorer maps have now been changed.}}
{{History||1.16.100|snap=beta 1.16.100.56|The ID of maps has been changed from <code>map</code> to <code>filled_map</code>.}}
{{History|console}}
{{History||xbox=TU54|xbone=CU44|ps=1.52|wiiu=Patch 24|switch=1.0.4|[[File:Woodland Explorer Map JE1 BE1.png|32px]] [[File:Ocean Explorer Map JE1 BE1.png|32px]] Added explorer maps.}}
{{History|PS4}}
{{History||1.90|[[File:Woodland Explorer Map JE2 BE2.png|32px]] [[File:Ocean Explorer Map JE2 BE2.png|32px]] The textures for explorer maps have now been changed.}}
{{History|new3ds}}
{{History||1.9.19|[[File:Woodland Explorer Map JE1 BE1.png|32px]] [[File:Ocean Explorer Map JE1 BE1.png|32px]] Added explorer maps.}}
{{History|foot}}
== Issues ==
{{Issue list}}
== Trivia ==
* When a [[cartographer]] generates the trade offers for the explorer maps, it chooses the location of one of the nearest structures of the respective type ([[monument]] or [[woodland mansion]]).
* For the reason above, explorer maps obtained from one cartographer are always the same. Also, if two cartographers unlock the explorer map trades approximately at the same place and at the same time, the map locations are usually identical. This sometimes also happens when finding multiple treasure maps from [[ocean ruins]].
* Explorer maps fill as the [[chunk]]s are generated, rather than when the [[player]] holds them while in the area; leaving an explorer map while exploring the area still fills the map.
* Buried treasure explorer maps are named ''Buried Treasure Map'' {{in|java}} while {{in|bedrock}}, they are named ''Treasure Map''.
* It is possible for a cartographer to give a monument or woodland mansion explorer map for areas where the [[generated structures|structures]] would have spawned in the world, but were unable to as a result of terrain generation. As a result, explorer maps, unfortunately, don't always guarantee that a structure exists at the purported location. This is most common with woodland mansion explorer maps, due to its generation algorithm.
* On [[Bedrock Edition]], inventory editors and add-ons can be used to create Explorer Maps that lead to any structure.
== Gallery ==
<gallery>
File:Explorer Maps.png|An ocean explorer map in the [[off-hand]], a woodland explorer map in the main hand, and a [[cartographer]] [[villager]] in between them.
File:Partial Explorer Map.png|A partially-explored explorer map.
File:ExplorerToNormal Map Comparison.png|Two fully-explored maps of the same place, one of which is a woodland explorer map.
File:Buried Treasure Explorer Map.png|An [[item frame]] holding a buried treasure explorer map. The player can see the red X on the left side of the map.
File:Purchase.png|Purchasing explorer maps from a cartographer.
</gallery>
== See also ==
* [[Map]]
* [[Woodland Mansion]]
* [[Ocean Monument]]
* [[Shipwreck]]
* [[Buried treasure]]
== References ==
{{reflist}}
== External Links ==
*[https://www.minecraft.net/en-us/article/taking-inventory--explorer-map Taking Inventory: Explorer Map] – Minecraft.net on November 13, 2019
{{Items}}
[[de:Schatzkarte]]
[[es:Mapa (localización de estructura)]]
[[fr:Carte d'exploration]]
[[ja:探検家の地図]]
[[ko:탐험 지도]]
[[pl:Mapa eksploracyjna]]
[[pt:Mapa de exploração]]
[[ru:Карта сокровищ]]
[[zh:探险家地图]]</li><li>[[Magma Cream|Magma Cream]]<br/>{{Item
| title = Magma Cream
| image = Magma Cream.png
| renewable = Yes
| stackable = Yes (64)
}}
'''Magma cream''' is an [[item]] used in [[brewing]] to create [[potion]]s of [[Fire Resistance]], and to manually craft [[magma block]]s.
== Obtaining ==
=== Mob loot ===
==== Magma cubes ====
All but tiny-sized [[magma cube]]s drop 0–1 magma cream. The maximum amount of magma cream is increased by 1 per level of [[Looting]], for a maximum of 4 with Looting III.
=== Crafting ===
{{Crafting
|Blaze Powder
|Slimeball
|Output= Magma Cream
|type= Brewing
}}
=== Chest Loot ===
{{LootChestItem|magma-cream}}
== Usage ==
=== Brewing ingredient ===
{{brewing
|showname=1
|head=1
|Magma Cream|Mundane Potion|base=Water Bottle
}}
{{brewing
|foot=1
|Magma Cream
|Potion of Fire Resistance
}}
=== Crafting ingredient ===
{{crafting usage}}
== Data values ==
=== ID ===
{{edition|java}}:
{{ID table
|edition=java
|showforms=y
|generatetranslationkeys=y
|displayname=Magma Cream
|spritetype=item
|nameid=magma_cream
|form=item
|foot=1}}
{{edition|bedrock}}:
{{ID table
|edition=bedrock
|shownumericids=y
|showforms=y
|notshowbeitemforms=y
|generatetranslationkeys=y
|displayname=Magma Cream
|spritetype=item
|nameid=magma_cream
|id=430
|form=item
|foot=1}}
== History ==
{{History|java}}
{{History||1.0.0|snap=Beta 1.9 Prerelease 2|[[File:Magma Cream JE1.png|32px]] Added magma cream.}}
{{History|||snap=Beta 1.9 Prerelease 3|Magma cream can now be [[brewing|brewed]] in a [[water bottle]] to create a mundane [[potion]], or in an awkward potion to create a potion of [[Fire Resistance]].}}
{{History||1.1|snap=release|[[Magma cube]]s now [[drops|drop]] magma cream.}}
{{History||1.3.1|snap=1.3|[[File:Magma Cream JE2 BE1.png|32px]] The texture of magma cream has been changed.}}
{{History||1.10|snap=16w20a|Magma cream can now be [[crafting|crafted]] into [[magma block]]s.}}
{{History||1.13|snap=17w47a|Prior to [[1.13/Flattening|''The Flattening'']], this [[item]]'s numeral ID was 378.}}
{{History||1.14|snap=18w43a|[[File:Magma Cream JE3 BE2.png|32px]] The texture of magma cream has been changed.}}
{{History||1.16|snap=20w07a|Magma cream has a {{frac|2|109}} (~1.83%) chance of being offered by [[piglin]]s when [[bartering]], in a stack size of 1–3.}}
{{History|||snap=20w09a|Magma cream now has a {{frac|10|226}} (~4.42%) chance of being offered by piglins when bartering, in a stack size of 1–5.}}
{{History|||snap=20w16a|Magma cream now generates in [[bastion remnant]]s chests.}}
{{History||1.16.2|snap=20w28a|Magma cream can no longer be obtained from bartering with piglins.}}
{{History|||snap=20w30a|The average yield of magma cream from bastion remnant chests has been slightly increased.}}
{{History|pocket edition alpha}}
{{History||v0.11.0|snap=build 1|[[File:Magma Cream JE2 BE1.png|32px]] Added magma cream.
|Magma cream is currently unobtainable.}}
{{History||v0.11.0|snap=build 8|[[Magma cube]]s now [[drops|drop]] magma cream.}}
{{History||v0.12.1|snap=build 1|Added magma cream to the [[Creative]] mode [[inventory]].
|Magma cream can now be [[crafting|crafted]].}}
{{History|pocket}}
{{History||1.1.3|snap=alpha 1.1.3.0|Magma cream can now be crafted into [[magma block]]s.}}
{{History|bedrock}}
{{History||1.10.0|snap=beta 1.10.0.3|[[File:Magma Cream JE3 BE2.png|32px]] The texture of magma cream has been changed.}}
{{History||1.16.0|snap=beta 1.16.0.57|Magma cream can be obtained from bartering with piglins.
|Magma cream can now be found in [[bastion remnants]] chests.}}
{{History||1.16.100|snap=beta 1.16.100.54|Magma cream can no longer be obtained from [[barter]]ing with [[piglin]]s.}}
{{History|console}}
{{History||xbox=TU7|xbone=CU1|ps=1.0|wiiu=Patch 1|switch=1.0.1|[[File:Magma Cream JE2 BE1.png|32px]] Added magma cream.}}
{{History||xbox=none|xbone=none|ps=1.90|wiiu=none|switch=none|[[File:Magma Cream JE3 BE2.png|32px]] The texture of magma cream has been changed.}}
{{History|New 3DS}}
{{History||0.1.0|[[File:Magma Cream JE2 BE1.png|32px]] Added magma cream.}}
{{history|foot}}
== Issues ==
{{issue list}}
{{items}}
[[Category:Renewable resources]]
[[cs:Lávová pěna]]
[[de:Magmacreme]]
[[es:Crema de magma]]
[[fr:Crème de magma]]
[[hu:Magmakrém]]
[[ja:マグマクリーム]]
[[ko:마그마 크림]]
[[lzh:火漿膏]]
[[nl:Magmacrème]]
[[pl:Magmowy krem]]
[[pt:Creme de magma]]
[[ru:Лавовый крем]]
[[th:ครีมแมกม่า]]
[[uk:Магмовий крем]]
[[zh:岩浆膏]]</li></ul> | 1.7-pre | Endermen are no longer provoked when attacked by the player in creative mode | |||
1.8{{Extension DPL}}<ul><li>[[Light Blue Dye|Light Blue Dye]]<br/>{{Item
| image = Light_Blue_Dye_JE2_BE2.png
| renewable = Yes
| stackable = Yes (64)
}}
'''Light blue dye''' is a [[Dyeing#Quasi-Primary|quasi-primary dye]].
== Obtaining ==
=== Crafting ===
{{Crafting
|showname=0
|showdescription=1
|Blue Orchid
|Output=Light Blue Dye
|type=Material
|head=1
}}
{{Crafting
|Blue Dye
|White Dye
|Output=Light Blue Dye,2
|type=Material
}}
{{Crafting
|Lapis Lazuli;Blue Dye;Lapis Lazuli
|Bone Meal;Bone Meal;White Dye
|Output=Light Blue Dye,2
|type=Material
|description={{only|bedrock|education}}
|foot=1
}}
=== Loot chest ===
{{#invoke:LootChest|base3|light-blue-dye}}
=== Trading ===
[[Wandering trader]]s sell 3 light blue dye for an [[emerald]].
== Usage ==
{{dye usage}}
=== Crafting ingredient ===
{{crafting usage|ignore=Banner|continue=1}}
{{banner crafting usage}}
=== Loom ingredient ===
{{Banner loom usage|Light Blue Dye}}
=== Trading ===
Apprentice-level shepherd villagers have a 20%{{only|bedrock}} or {{frac|2|7}}{{only|java}} chance to buy 12 light blue dye for an emerald as part of their trades.
== Data values ==
=== ID ===
{{edition|java}}:
{{ID table
|edition=java
|showforms=y
|generatetranslationkeys=y
|displayname=Light Blue Dye
|spritetype=item
|nameid=light_blue_dye
|form=item
|foot=1}}
{{edition|bedrock}}:
{{ID table
|edition=bedrock
|showaliasids=y
|shownumericids=y
|showforms=y
|notshowbeitemforms=y
|generatetranslationkeys=y
|displayname=Light Blue Dye
|spritetype=item
|nameid=light_blue_dye
|aliasid=dye / 12
|id=407
|form=item
|translationkey=item.dye.lightBlue.name
|foot=1}}
== Video ==
{{yt|IPQzg-zPJgk}}
== History ==
{{History|java beta}}
{{History||1.2|[[File:Light Blue Dye JE1 BE1.png|32px]] Added light blue dye.}}
{{History|java}}
{{History||1.4.2|snap=12w34a|Added the ability to [[Armor#Dyeing|dye]] leather [[armor]] and [[wolf]] collars.}}
{{History||1.4.6|snap=12w49a|Light blue dye can be [[crafting|crafted]] with gunpowder to create a [[firework star]].}}
{{History||1.6.1|snap=13w19a|[[Stained clay]] can now be crafted.}}
{{history||1.7.2|snap=13w36a|With the addition of new [[flower]]s, many secondary and tertiary dyes are now primary [[dye]]s.}}
{{History|||snap=13w41a|[[Stained glass]] can now be crafted.}}
{{History||1.8|snap=14w30a|Added [[banner]]s, which can be dyed.}}
{{History||1.13|snap=17w47a|The different data values for the <code>dye</code> ID have now been split up into their own IDs.
|Prior to [[1.13/Flattening|''The Flattening'']], this [[item]]'s numeral ID was 351.}}
{{History||1.14|snap=18w43a|Light blue dye is now crafted using [[white dye|white]] and [[blue dye]]s, instead of [[bone meal]] and [[lapis lazuli]].
|[[File:Light_Blue_Dye_JE2_BE2.png|32px]] The texture of light blue dye has now been changed.}}
{{History|||snap=18w44a|Light blue dye can now change the text color on [[sign]]s to light blue.}}
{{History|||snap=19w05a|Added the [[wandering trader]], which sells light blue dye.}}
{{History|||snap=19w11a|Light blue dye can now be [[trading|bought]] by shepherd villagers.}}
{{History||1.17|snap=20w45a|Light blue dye can now be used to craft [[light blue candle]]s.}}
{{History|||snap=21w19a|Light blue dye can no longer be used to craft light blue candles.}}
{{History|||snap=Pre-release 1|Light blue dye can now once again be used to craft light blue candles.}}
{{History||1.20<br>(Experimental)|link=1.19.3|snap=22w42a|Light blue dye can now change the text color on [[hanging sign]]s to light blue.}}
{{History||1.20|snap=23w12a|Light blue dye can now be found in [[suspicious gravel]] and [[suspicious sand]] in [[trail ruins]].}}
{{History|||snap=23w16a|Light blue dye no longer generates in [[suspicious sand]] in [[trail ruins]].|Due to the split of the archaeological loot tables for the suspicious gravel within the [[trail ruins]]; light blue dye now is in the common loot.}}
{{History|pocket alpha}}
{{History||v0.3.0|[[File:Light Blue Dye JE1 BE1.png|32px]] Added light blue dye. It is currently unobtainable and serves no purpose.}}
{{History||v0.4.0|Light blue dye is now craftable with [[lapis lazuli]] and [[bone meal]].
|Light blue dye can now be used to craft light blue wool.}}
{{History||v0.14.0|snap=build 1|Light blue dye can now be used to dye [[water]] in [[cauldron]]s.}}
{{History|pocket}}
{{History||1.0.0|snap=alpha 0.17.0.1|Light blue dye can now be used to dye [[shulker]]s.}}
{{History||1.1.0|snap=alpha 1.1.0.0|Light dye can now be used to craft [[concrete powder]] and dye [[shulker box]]es and [[bed]]s.}}
{{History|bedrock}}
{{History||1.2.0|snap=beta 1.2.0.2|Light blue dye can now be used to craft [[firework star]]s, [[stained glass]], and patterns on [[banner]]s.}}
{{History||1.4.0|snap=beta 1.2.20.1|Light blue dye can now be used to craft [[balloon]]s and [[glow stick]]s.}}
{{History||1.8.0|snap=beta 1.8.0.8|Light blue dye can now be used to dye [[cat]] collars.}}
{{History||1.10.0|snap=beta 1.10.0.3|Light blue dye is now [[trading|sold]] by [[wandering trader]]s.
|Light blue dye can now be used to dye white [[carpet]]s.
|[[File:Light_Blue_Dye_JE2_BE2.png|32px]] The texture of light blue dye has now been changed.}}
{{History||1.11.0|snap=beta 1.11.0.4|Light blue dye can now be [[trading|sold]] to shepherd [[villager]]s.}}
{{History||1.16.100|snap=beta 1.16.100.56|The ID of light blue dye has been changed from <code>dye/12</code> to <code>light_blue_dye</code>.}}
{{History|console}}
{{History||xbox=TU1|xbone=CU1|ps=1.00|switch=1.0.1|wiiu=Patch 1|[[File:Light Blue Dye JE1 BE1.png|32px]] Added light blue dye.}}
{{History|PS4}}
{{History||1.90|[[File:Light_Blue_Dye_JE2_BE2.png|32px]] The texture of light blue dye has now been changed.}}
{{History|new 3ds}}
{{History||0.1.0|[[File:Light Blue Dye JE1 BE1.png|32px]] Added light blue dye.}}
{{History|foot}}
== Issues ==
{{issue list}}
{{Items}}
[[Category:Dyes]]
[[cs:Světle modré barvivo]]
[[de:Hellblauer Farbstoff]]
[[es:Tinte azul claro]]
[[fr:Teinture bleu clair]]
[[hu:Világoskék festék]]
[[ja:空色の染料]]
[[ko:하늘색 염료]]
[[nl:Lichtblauwe kleurstof]]
[[pl:Jasnoniebieski barwnik]]
[[pt:Corante azul-claro]]
[[ru:Светло-синий краситель]]
[[zh:淡蓝色染料]]
[[Category:Renewable resources]]</li><li>[[Water|Water]]<br/>{{About|the fluid|the bucket|Water Bucket|other forms of water}}
{{Fluid
| image = <gallery>
Water.png|Java Edition
Water BE.png|Bedrock Edition
</gallery>
| invimage = Water Bucket
| invimage2 = Water
| renewable = Yes
| transparent = Partial <small>(-1 to light)</small>
| light = No
| tool = bucket
| infinite = Yes
| flowrate = 5 [[tick]]s/block
| flowdistance = 8 blocks
}}
'''Water''' is a [[fluid]] that naturally generates abundantly in the [[Overworld]].
== Obtaining ==
Water blocks do not exist as items,{{only|java}} but water can be collected by using a [[bucket]] on a water source block or a full water [[cauldron]], creating a [[water bucket]].
{{IN|BE}}, it may be obtained as an item via inventory editing or add-ons.
=== Natural generation ===
Water naturally generates in the [[Overworld]] to form [[ocean]]s, [[river]]s and [[spring]]s. The water level is at [[altitude|layer 63]] near oceans and rivers, but changes depending on location due to the [[aquifer]] system, filling some carvers, noise caves and canyons with water at different levels. Water also generates as small puddles on the floor next to [[dripstone cluster]]s, and as clay pools on the floor of [[lush caves]].
Water also generates in [[village]]s, [[desert well]]s, [[stronghold]]s, [[woodland mansion]]s, [[ancient city|ancient cities]] and [[ocean monument]]s.
Water never generates in [[the Nether]] and instantly disappears if placed there with a water bucket. However, water can exist in the Nether in a [[cauldron]]. Water can also be placed in the Nether using [[commands]] such as {{cmd|setblock}} and {{cmd|fill}}. Although it does not naturally generate there, water can be placed and function normally in [[the End]].
{{IN|be}}, water also generates as part of [[ocean ruins]] with loot [[chest]]s, but only two water blocks generate:
* One water block generates inside the loot chest, making it a [[Waterlogging|waterlogged]] loot chest.
* The other water block generates on top of the loot chest.
These water blocks generate even if the ruin is located on the surface.<ref>{{bug|MCPE-36793}}</ref> This is not the case in {{el|je}}; if an underwater ruin generates on the surface, no water generates.<ref>{{bug|MC-136156}}</ref> This also happens with [[shipwreck]]s.
Water spends most of its time as stationary, rather than flowing – regardless of its level, or whether it contains a current downward or to the side. When specifically triggered by a block update, water changes to 'flowing', updates its level, then changes back to stationary. Water springs are generated as flowing, and oceans, and rivers are generated as stationary. This happens before most types of generated structure are created, and the main cause of water "glitches" is that generated structures do not trigger a block update to let water flow into them.
== Usage ==
=== Appearance ===
Water uses a translucent animated texture that is tinted differently in different biomes. {{IN|Java}}, water in cauldrons is completely opaque.<ref>{{bug|MC-13187}}</ref>
Unlike other translucent blocks such as [[ice]], [[stained glass]] and [[tinted glass]], water shows the opposite sides of its external planes when viewed from within and from outside.<ref>{{bug|MC-202578|||WAI}}</ref> However, it applies only to the top plane and four side planes; the bottom face is always unseen from above.<ref>{{bug|MC-190053}}</ref>
=== Swimming ===
{{main|Swimming}}
The button for {{control|swim|text=swimming}} is the same as the button for jumping; non-swimming players and mobs sink slowly in water. Holding the swim button raises the player through the water, and when the surface is reached, the player bobs up and down. The {{control|crouch}} button can be used to sink faster. The {{control|sprint}} button can be used to put the player in "swim mode" when the player is completely submerged in water. When in swim mode, the player is horizontal and one block high. The player has an arm-waving animation when viewed in third person or by other players.
Swimming in water is considerably slower against currents (see [[#Current|Current]] below), but faster when going with the current.
Most mobs that can stand can also swim any time they are in water, except for [[iron golem]]s, [[piglin]]s, [[hoglin]]s, [[strider]]s, [[piglin brute]]s and undead mobs. This can lead to drowning if the water is falling from above.
Water of any depth prevents any entity, including the player, from sustaining falling damage if they fall into it, regardless of the distance fallen.
Being inside of water also imparts a [[fog]] effect, tinted accordingly.
=== Spreading ===
{{Main|Fluid#Spread}}
[[File:Water spread v1-13.png|300px|right|An image showing water's spreading distance]]
Water spreads horizontally and downward into nearby [[air]] blocks. Water can spread downward infinitely until stopped by a block, and 7 blocks horizontally from a source block on a flat surface. Water spreads at a rate of 1 block every 5 game ticks, or 4 blocks per second.
When spreading horizontally, a weight is assigned to every direction water can flow. For each direction, this weight is initially set to 1000. Then, for every adjacent block it can flow into it tries to find a way down that is reachable in four or fewer blocks from the block it wants to flow to. When found, the flow weight for that direction is set to the shortest path distance to the way down. Finally, water spreads in the directions with the lowest flow weight.
Spreading water extinguishes [[fire]] and washes away certain types of items or placed blocks, causing them to drop as items and then carrying them along in the flow until the edge of the spread. Affected items include [[plant]]s (except trees), [[snow]], [[torch]]es, [[carpet]]s, [[redstone dust]] and some other redstone components, [[cobweb]], [[end rod]]s, [[head]]s, and [[flower pot]]s.
==== Flow arrangement tables ====
{| class="wikitable"
|+
|
|
|
|
|
|
|
!7
|
|
|
|
|
|
|
|-
|
|
|
|
|
|
! 7
!6
! 7
|
|
|
|
|
|
|-
|
|
|
|
|
! 7
!6
!5
!6
! 7
|
|
|
|
|
|-
|
|
|
|
! 7
!6
!5
!4
!5
!6
! 7
|
|
|
|
|-
|
|
|
! 7
!6
!5
!4
!3
!4
!5
!6
! 7
|
|
|
|-
|
|
! 7
!6
!5
!4
!3
!2
!3
!4
!5
!6
! 7
|
|
|-
|
! 7
!6
!5
!4
!3
!2
!1
!2
!3
!4
!5
!6
! 7
|
|-
!7
!6
!5
!4
!3
!2
!1
!0
!1
!2
!3
!4
!5
!6
!7
|-
|
! 7
!6
!5
!4
!3
!2
!1
!2
!3
!4
!5
!6
! 7
|
|-
|
|
! 7
!6
!5
!4
!3
!2
!3
!4
!5
!6
! 7
|
|
|-
|
|
|
! 7
!6
!5
!4
!3
!4
!5
!6
! 7
|
|
|
|-
|
|
|
|
! 7
!6
!5
!4
!5
!6
! 7
|
|
|
|
|-
|
|
|
|
|
! 7
!6
!5
!6
! 7
|
|
|
|
|
|-
|
|
|
|
|
|
! 7
!6
! 7
|
|
|
|
|
|
|-
|
|
|
|
|
|
|
!7
|
|
|
|
|
|
|
|}
{| class="wikitable"
! colspan="2" |Range
!Height in blocks
|-
!1
|block
|1
|-
!2
|blocks
|0.75-1
|-
!3
|blocks
|0.625-0.75
|-
!4
|blocks
|0.5-0.625
|-
!5
|blocks
|0.375-0.5
|-
!6
|blocks
|0.25-0.375
|-
!7
|blocks
|0.125-0.25
|}
=== Source blocks ===
{{anchor|Water Spawner}} <!-- Compatibility anchor -->
{{about|the behavior and creation of source units of water|the removed block that created water sources|Water Spawner|section=1}}
A water source block is created from a flowing block that is horizontally adjacent to two or more other source blocks, and sitting on top of a solid block or another water source block. This allows water spawners to exist, in which a new source block immediately forms in the space left by removing a source block with a [[bucket]]. Pools of still water can be created by placing water source blocks in a confined area.
Water spawners can be constructed by arranging for two source blocks to flow into a third block. Each of the examples below require two source blocks, each on opposite ends of the hole, to create a renewable water source block in between.
While water source blocks only generate adjacent to solid blocks, they do not require a solid block to support them. Removing all adjacent blocks to a water source block only causes it to remain floating in the air.
{{IN|java}}, the formation of new water sources blocks can be disabled when the [[game rule]] {{cd|waterSourceConversion}} is set to {{cd|false}}.
<gallery>
2x2 water source.png|2x2 water spawner (every corner is renewable)
3x1 water source.png|3x1 water spawner (middle water block is renewable)
L-shaped water source.png|L-shaped water spawner (corner water block is renewable)
</gallery>
A [[dispenser]] loaded with a filled [[bucket]] places a water source block in an empty block in front of it when activated. A dispenser loaded with an empty bucket and a water source right in front of it sucks the source into the bucket when activated.
In snowy [[biome]]s, water source blocks have a chance to turn into [[ice]] if directly under the sky. Ice blocks under brighter light levels melt back into water source blocks (except in [[the Nether]]). Ice reverts to water when broken, but only if there is a solid block under it.
=== Current ===
The current in a water block determines both the direction it appears to flow and the direction an [[entity]] such as a player or [[boat]] is pushed from that block.
Water with a current pushes players and [[mob]]s at a speed of about 1.39 meters per second, or 25 blocks every 18 seconds. Players that are in creative flying mode don’t get pushed.{{only|je}}<ref>{{bug|MCPE-84592}}</ref>
The horizontal current in a water block is based on a vector sum of the flows to and from that block from its four horizontal neighbors. For example, if a block receives water from the north and sends it both south and east, but borders a solid block on its west edge, then a south-southeast current exits from that block, because 2 southward flows (in and out) are combined with 1 eastward flow (out). Thus, 16 horizontal directions are possible. If a branch in a channel is 2 blocks wide at its entrance, then entities float into it rather than continuing in a straight line.
Water blocks can create a downward current. A downward current in a water block is caused by the block below it. Most blocks that do not have a solid upper face cause downward current on above water blocks. Also, ice and falling water blocks (blocks created by spreading downward) cause downward current on the water block above. Falling water blocks have a downward current by default.
=== Light ===
{{IN|bedrock}}, every block of water reduces [[light]] by 1 extra level (in addition to the normal fading-out of light). {{IN|java}}, water does not cause any additional decrease for block light, but diffuses sky light, causing the light to fade with depth. Underwater visibility changes depending on the biome the player is in. The [[Night Vision]] and [[Conduit Power]] effects increase underwater visibility.
=== Color ===
Water has several colors, depending on the biome.
==== Java Edition ====
{| class="wikitable sortable mw-collapsible mw-collapsed" data-description="Water Color in Java Edition"
|-
!Biome!!Water color!!Water fog color!!Block
|-
|{{BiomeSprite|Plains|text=Default (biomes not listed below)}}||{{color|#3F76E4}}||{{color|#050533}}||[[File:Plains Water JE.png|32px]]
|-
|{{BiomeLink|Swamp}}||{{color|#617B64}}||{{color|#232317}}||[[File:Swamp Water.png|32px]]
|-
|{{BiomeLink|Lukewarm Ocean}}<br>{{BiomeLink|Deep Lukewarm Ocean}}||{{color|#45ADF2}}||{{color|#041633}}||[[File:Lukewarm Ocean Water JE.png|32px]]
|-
|{{BiomeLink|Warm Ocean}}||{{color|#43D5EE}}||{{color|#041F33}}||[[File:Warm Ocean Water JE.png|32px]]
|-
|{{BiomeLink|Cold Ocean}}<br>{{BiomeLink|Deep Cold Ocean}}<br>{{BiomeLink|Snowy Taiga}}<br>{{BiomeLink|Snowy Beach}}||{{color|#3D57D6}}||{{color|#050533}}||[[File:Cold Ocean Water JE.png|32px]]
|-
|{{BiomeLink|Frozen River}}<br>{{BiomeLink|Frozen Ocean}}<br>{{BiomeLink|Deep Frozen Ocean}}||{{color|#3938C9}}||{{color|#050533}}||[[File:Frozen Ocean Water JE.png|32px]]
|-
|{{BiomeLink|Meadow}}||{{color|#0E4ECF}}||{{color|#050533}}||[[File:Meadow Water.png|32px]]
|-
|{{BiomeLink|Mangrove Swamp}}||{{color|#3A7A6A}}||{{color|#4D7A60}}|||[[File:Mangrove Swamp Water.png|32px]]
|-
|{{BiomeLink|Cherry Grove}}||{{color|#5DB7EF}}||{{color|#5DB7EF}}||[[File:Cherry Grove Water.png|32px]]
|}
==== Bedrock Edition====
Biome tints
<!--[[File:Water color.png|500px|thumb|center|From left to right - Badlands Plateau, Birch Forest and Snowy Taiga]]-->
{| class="wikitable sortable mw-collapsible mw-collapsed" data-description="Water Color in Bedrock Edition"
! Biome
!Water Surface Color
! Water Fog Color
!Water Fog Distance
!Water Surface Transparency
!Block
|-
|Default<br>(biomes not listed below)
|{{color|#44aff5}}||{{color|#44aff5}}||15||65%||[[File:Water BE.png|32px]]
|-
|{{BiomeLink|Sunflower Plains}}<br>{{BiomeLink|Plains}}
|{{color|#44aff5}}||{{color|#44aff5}}||60||-||[[File:Water BE.png|32px]]
|-
|{{BiomeLink|Desert}}
|{{color|#32a598}}||{{color|#32a598}}||60||-||[[File:Desert Water.png|32px]]
|-
|{{BiomeLink|Mountains}}
|{{color|#007BF7}}||{{color|#007BF7}}||-||-||[[File:Mountains Water.png|32px]]
|-
|{{BiomeLink|Forest}}
|{{color|#1e97f2}}||{{color|#1e97f2}}||60||-||[[File:Forest Water.png|32px]]
|-
|{{BiomeLink|Flower Forest}}
|{{color|#20a3CC}}||{{color|#20a3CC}}||60||-||[[File:Flower Forest Water.png|32px]]
|-
| {{BiomeLink|Taiga}}
| {{color|#287082}}||{{color|#287082}}||60||-||[[File:Taiga Water.png|32px]]
|-
|{{BiomeLink|Taiga Mountains}}
|{{color|#1e6B82}}||{{color|#1e6B82}}||-||-||[[File:Taiga Mountains Water.png|32px]]
|-
|{{BiomeLink|Swamp}}
|{{color|#4c6559}}||{{color|#4c6559||30||100%||[[File:Swamp Water BE.png|32px]]
|-
| {{BiomeLink|River}}
|{{color|#0084ff}}||{{color|#0084ff}}||60||-||[[File:River Water.png|32px]]
|-
|{{BiomeLink|Nether Wastes}}<br>{{BiomeLink|Warped Forest}}<br>{{BiomeLink|Crimson Forest}}<br>{{BiomeLink|Soul Sand Valley}}
|{{color|#905957}}||{{color|#905957}}||15||-||[[File:Nether Water.png|32px]]
|-
|{{BiomeLink|Basalt Deltas}}
|{{color|#3f76e4}}||{{color|#423e42}}||15||-||[[File:Basalt Deltas Water.png|32px]]
|-
|{{BiomeLink|The End}}
| {{color|#62529e}}||{{color|#62529e}}||-||-||[[File:The End Water.png|32px]]
|-
|{{BiomeLink|Frozen River}}
|{{color|#185390}}||{{color|#185390}}||60||-||[[File:Frozen River Water.png|32px]]
|-
|{{BiomeLink|Snowy Tundra}}<br>{{BiomeLink|Ice Spikes}}
|{{color|#14559b}}||{{color|#14559b}}||-||-||[[File:Ice Spikes Water.png|32px]]
|-
| {{BiomeLink|Mushroom Fields}}
|{{color|#8a8997}}||{{color|#8a8997}}||-||-||[[File:Mushroom Fields Water.png|32px]]
|-
|{{BiomeLink|Beach}}
| {{color|#157cab}}||{{color|#157cab}}||60||-||[[File:Beach Water.png|32px]]
|-
|{{BiomeLink|Mountain Edge}}
|{{color|#045cd5}}||{{color|#045cd5}}||-||-||[[File:Mountain Edge Water.png|32px]]
|-
|{{BiomeLink|Jungle}}<br>{{BiomeLink|Bamboo Jungle}}
|{{color|#14a2c5}}||{{color|#14a2c5||60<br>15||-||[[File:Jungle Water.png|32px]]
|-
|{{BiomeLink|Jungle Edge}}
| {{color|#0D8AE3}}||{{color|#0D8AE3}}||-||-||[[File:Jungle Edge Water.png|32px]]
|-
|{{BiomeLink|Stone Shore}}
|{{color|#0d67bb}}||{{color|#0d67bb}}||60||-||[[File:Stone Shore Water.png|32px]]
|-
|{{BiomeLink|Snowy Beach}}
|{{color|#1463a5}}||{{color|#1463a5}}||60||-||[[File:Snowy Beach Water.png|32px]]
|-
|{{BiomeLink|Birch Forest}}
|{{color|#0677ce}}||{{color|#0677ce}}||60||-||[[File:Birch Forest Water.png|32px]]
|-
|{{BiomeLink|Dark Forest}}
|{{color|#3B6CD1}}||{{color|#3B6CD1}}||60||-||[[File:Dark Forest Water.png|32px]]
|-
|{{BiomeLink|Snowy Taiga}}
|{{color|#205e83}}||{{color|#205e83}}||60||-||[[File:Snowy Taiga Water.png|32px]]
|-
|{{BiomeLink|Giant Tree Taiga}}<br>{{BiomeLink|Giant Spruce Taiga}}
|{{color|#2d6d77}}||{{color|#2d6d77}}||60||-||[[File:Giant Tree Taiga Water.png|32px]]
|-
|{{BiomeLink|Windswept Forest}}<br>{{BiomeLink|Windswept Gravelly Hills}}
|{{color|#0E63AB}}||{{color|#0E63AB}}||-||-||[[File:Wooded Mountains Water.png|32px]]
|-
|{{BiomeLink|Savanna}}
|{{color|#2C8B9C}}||{{color|#2C8B9C}}||60||-||[[File:Savanna Water.png|32px]]
|-
|{{BiomeLink|Savanna Plateau}}<br>{{BiomeLink|Shattered Savanna}}
|{{color|#2590a8}}||{{color|#2590a8}}||-||-||[[File:Savanna Plateau Water.png|32px]]
|-
|{{BiomeLink|Badlands}}
|{{color|#4E7f81}}||{{color|#4E7f81||60
|<nowiki>-||[[File:Badlands Water.png|32px]]
|-
|{{BiomeLink|Eroded Badlands}}<br>{{BiomeLink|Wooded Badlands}}
|{{color|#497f99}}||{{color|#497f99}}||-||-||[[File:Eroded Badlands Water.png|32px]]
|-
|{{BiomeLink|Ocean}}
|{{color|#1787D4}}||{{color|#1165b0}}||60||-||[[File:Ocean Water.png|32px]]
|-
|{{BiomeLink|Deep Ocean}}
|{{color|#1787D4}}||{{color|#1463a5}}||60||-||[[File:Ocean Water.png|32px]]
|-
|{{BiomeLink|Warm Ocean}}
|{{color|#02B0E5}}||{{color|#0289d5}}||60||55%||[[File:Warm Ocean Water.png|32px]]
|-
| {{BiomeLink|Lukewarm Ocean}}
|{{color|#0D96DB}}||{{color|#0a74c4}}||60||-||[[File:Lukewarm Ocean Water.png|32px]]
|-
|{{BiomeLink|Deep Lukewarm Ocean|Lukewarm Deep Ocean}}
|{{color|#0D96DB}}||{{color|#0e72b9}}||60||-||[[File:Lukewarm Ocean Water.png|32px]]
|-
|{{BiomeLink|Cold Ocean}}
|{{color|#2080C9}}||{{color|#14559b}}||60||-||[[File:Cold Ocean Water.png|32px]]
|-
|{{BiomeLink|Deep Cold Ocean|Cold Deep Ocean}}
|{{color|#2080C9}}||{{color|#185390}}||60||-||[[File:Cold Ocean Water.png|32px]]
|-
|{{BiomeLink|Frozen Ocean}}
|{{color|#2570B5}}||{{color|#174985}}||60||-||[[File:Frozen Ocean Water.png|32px]]
|-
|{{BiomeLink|Deep Frozen Ocean|Frozen Deep Ocean}}
|{{color|#2570B5}}||{{color|#1a4879}}||60||-||[[File:Frozen Ocean Water.png|32px]]
|-
|{{BiomeLink|Mangrove Swamp}}
|{{color|#3a7a6a}}||{{color|#4d7a60}}||30||-||[[File:Mangrove Swamp Water BE.png|32px]]
|}
Biome tints from [[Biome/Before 1.18|unused biomes]]
{| class="wikitable sortable mw-collapsible mw-collapsed" data-description="Water Color in Bedrock Edition"
! Biome
!Water Surface Color
!Water Fog Color
!Water Fog Distance
!Water Surface Transparency
!Block
|-
|{{BiomeLink|Legacy Frozen Ocean}}
|{{color|#44aff5}}||{{color|#44aff5}}||-||-||[[File:Water BE.png|32px]]
|-
|{{BiomeLink|Mountains}}
|{{color|#007BF7}}||{{color|#007bf7}}||-||-||[[File:Mountains Water.png|32px]]
|-
|{{BiomeLink|Taiga Mountains}}
|{{color|#1e6B82}}||{{color|#1e6b82}}||-||-||[[File:Taiga Mountains Water.png|32px]]
|-
|{{BiomeLink|Swamp Hills}}
| {{color|#4c6156}}||{{color|#4c6156||30||100%||[[File:Swamp Hills Water.png|32px]]
|-
| {{BiomeLink|Snowy Mountains}}
|{{color|#1156a7}}||{{color|#1156a7}}||-||-||[[File:Snowy Mountains Water.png|32px]]
|-
|{{BiomeLink|Mushroom Field Shore}}
|{{color|#818193}}||{{color|#818193}}||-||-||[[File:Mushroom Field Shore Water.png|32px]]
|-
|{{BiomeLink|Desert Hills}}
|{{color|#1a7aa1}}||{{color|#1a7aa1}}||-||-||[[File:Desert Hills Water.png|32px]]
|-
|{{BiomeLink|Wooded Hills}}
|{{color|#056bd1}}||{{color|#056bd1}}||-||-||[[File:Wooded Hills Water.png|32px]]
|-
|{{BiomeLink|Taiga Hills}}
|{{color|#236583}}||{{color|#236583}}||-||-||[[File:Taiga Hills Water.png|32px]]
|-
|{{BiomeLink|Mountain Edge}}
|{{color|#045cd5}}||{{color|#045cd5}}||-||-||[[File:Mountain Edge Water.png|32px]]
|-
|{{BiomeLink|Jungle Hills}}<br>{{BiomeLink|Modified Jungle}}<br>{{BiomeLink|Bamboo Jungle Hills}}
|{{color|#1B9ED8}}||{{color|#1B9ED8}}||-||-||[[File:Jungle Hills Water.png|32px]]
|-
|{{BiomeLink|Modified Jungle Edge}}
|{{color|#0D8AE3}}||{{color|#0D8AE3}}||-||-||[[File:Jungle Edge Water.png|32px]]
|-
|{{BiomeLink|Birch Forest Hills}}
|{{color|#0a74c4}}||{{color|#0a74c4}}||-||-||[[File:Birch Forest Hills Water.png|32px]]
|-
|{{BiomeLink|Snowy Taiga Mountains}}
|{{color|#205e83}}||{{color|#205e83}}||60||-||[[File:Snowy Taiga Water.png|32px]]
|-
|{{BiomeLink|Snowy Taiga Hills}}
|{{color|#245b78}}||{{color|#245b78}}||-||-||[[File:Snowy Taiga Hills Water.png|32px]]
|-
|{{BiomeLink|Giant Tree Taiga Hills}}
|{{color|#286378}}||{{color|#286378}}||-||-||[[File:Giant Tree Taiga Hills Water.png|32px]]
|-
|{{BiomeLink|id=modified-gravelly-mountains|Gravelly Mountains+}}
|{{color|#0E63AB}}||{{color|#0e63ab}}||-||-||[[File:Wooded Mountains Water.png|32px]]
|-
|{{BiomeLink|Shattered Savanna Plateau}}
|{{color|#2590a8}}||{{color|#2590a8}}||-||-||[[File:Savanna Plateau Water.png|32px]]
|-
|{{BiomeLink|Badlands Plateau}}<br>{{BiomeLink|Modified Badlands Plateau}}
|{{color|#55809E}}||{{color|#55809e}}||-||-||[[File:Badlands Plateau Water.png|32px]]
|-
|{{BiomeLink|Deep Warm Ocean|Warm Deep Ocean}}
|{{color|#02B0E5}}||{{color|#0686ca}}||60||-||[[File:Warm Ocean Water.png|32px]]
|}
===Water and lava===
{{Main|Fluid#Mixing}}
Water and lava can produce [[stone]], [[cobblestone]], or [[obsidian]] based on how they interact. If water touches a lava source, the lava source turns to obsidian. If both touch each other while flowing, cobblestone is made and no sources are removed, and if lava flows downward onto water, the water turns to stone.
===Interactions with mobs===
====Direct contact====
Water damages [[endermen]], [[snow golem]]s, [[Strider|striders]] and [[blaze]]s, at a rate of {{hp|1}} per half second. If water comes into contact with a [[shulker]] or an [[enderman]], the mob teleports away.
====Suffocation====
{{Main|Damage#Suffocation in water}}
Players and mobs (except [[aquatic mob]]s, [[undead mob]]s and [[iron golem]]s) have a breath meter that lasts 15 seconds. After they run out of breath, they take {{hp|2}} suffocation damage every second until they die, surface, or enter [[bubble column]]s.
[[Dolphin]]s are a special case in drowning: they take suffocation damage when underwater for about 4 minutes, but also take suffocation damage when in air for about 2 minutes.
Each level of the [[Respiration]] enchantment adds 15 seconds to the breath meter and grants an x/(x+1) chance (where x is the Respiration level) of not taking damage after that time: 30 seconds and an average {{hp|1}}/second with Respiration I, 45 seconds and an average of {{frac|2|3}} damage/second with Respiration II, and 60 seconds and an average of {{frac|1|2}} damage/second with Respiration III.
If a [[husk]] suffocates underwater, it starts to shake and eventually becomes a [[zombie]]. If a [[zombie]] suffocates underwater, it starts to shake and eventually transforms into a [[drowned]].
=== Slower mining speed===
Players with their head underwater require 5 times the normal amount of time to mine blocks while standing on the ground, or 25 times while not on the ground. If a player wears a helmet with the [[Aqua Affinity]] enchantment, then underwater mining speed while standing on the ground is the same as on land, and 5 times slower if not standing on the ground.
===Explosions===
Water does not prevent explosions from activating. Water has a high blast resistance, causing it to absorb any normal blasts, with the exception of explosions from [[underwater TNT]].
===Hardening concrete powder ===
When water comes into contact with [[concrete powder]], the powder hardens into solid [[concrete]].
===Sponges===
When a dry [[sponge]] comes into contact with a water source or flowing block, it becomes a wet [[sponge]], absorbing all water within 3 to 5 blocks in all directions. [[Kelp]] and [[lily pad]]s within the absorbed water blocks are destroyed and drop as items, and [[seagrass]] is destroyed without dropping anything. Mobs that take damage out of water are affected as a side-effect.
Sponges do not absorb water from [[Waterlogging|waterlogged]] blocks, nor water that comes into contact by flowing back in from outside the area of absorption. For instance, placing a sponge 4 or more blocks from a single water source removes the flowing water in the area of effect, but as the flow from the source resumes it is not affected by the wet sponge.
A sponge instantly absorbs nearby water when it is placed next to water or when water comes into contact with it (by being placed next to the sponge, or by flowing toward it). A sponge absorbs [[water]] around itself (water source blocks or flowing water) out to a [[taxicab distance]] of 7 in all directions (including up and down), but won't absorb more than 65 blocks of water (water closest to the sponge is absorbed first). The absorption propagates only from water to water and does not "jump over" non-water blocks (including air).
===Dripping===
[[File:WaterDropletsExample.png|thumb|Dripping water.]]
Water above a non-transparent block (except for stairs, fences, or slabs) produces dripping particles on the underside of that block. If a block of [[Pointed Dripstone|pointed dripstone]] hangs under any block directly beneath a water source, the drips can slowly fill up a [[cauldron]] placed underneath. Without the dripstone, a cauldron does not fill.
===Vertical transport===
[[Bubble column]]s are created by placing magma blocks or [[soul sand]] under water. These can be used to transport [[mobs]] or items quickly vertically.
==Sounds==
{{el|je}}:
{{Sound table
|sound=Entering water1.ogg
|sound2=Entering water2.ogg
|sound3=Entering water3.ogg
|subtitle=MC-177092
|source=ambient
|description=When the player's eye level goes underwater
|id=ambient.underwater.enter
|translationkey=-
|volume=0.8<wbr>{{Until|JE 1.20.2}}<br>0.5<wbr>{{Upcoming|JE 1.20.2}}
|pitch=1.0
|distance=16}}
{{Sound table
|sound=Exiting water1.ogg
|sound2=Exiting water2.ogg
|sound3=Exiting water3.ogg
|subtitle=MC-177092
|source=ambient
|description=When the player's eye level goes above water
|id=ambient.underwater.exit
|translationkey=-
|volume=0.5<wbr>{{Until|JE 1.20.2}}<br>0.3<wbr>{{Upcoming|JE 1.20.2}}
|pitch=1.0
|distance=16}}
{{Sound table
|sound=Underwater Ambience.ogg
|subtitle=MC-196825
|source=ambient
|description=Randomly when underwater
|id=ambient.underwater.loop
|translationkey=-
|volume=0.65
|pitch=1.0
|distance=16}}
{{Sound table
|sound=Bubbles1.ogg
|sound2=Bubbles2.ogg
|sound3=Bubbles3.ogg
|sound4=Bubbles4.ogg
|sound5=Bubbles5.ogg
|sound6=Bubbles6.ogg
|sound7=Water1.ogg
|sound8=Water2.ogg
|subtitle=MC-196825
|source=ambient
|description=Randomly when underwater
|id=ambient.underwater.loop.additions
|translationkey=-
|volume=1.0
|pitch=1.0
|distance=16}}
{{Sound table
|sound=Animal1.ogg
|sound2=Bass Whale1.ogg
|sound3=Bass Whale2.ogg
|sound4=Crackles1.ogg
|sound5=Crackles2.ogg
|sound6=Driplets1.ogg
|sound7=Driplets2.ogg
|sound8=Earth Crack.ogg
|subtitle=MC-196825
|source=ambient
|description=Randomly when underwater
|id=ambient.underwater.loop.additions.rare
|translationkey=-
|volume=''varies'' <ref group=sound>The first, fifth, and eighth sounds are 1.0; the second sound is 0.45; the third, sixth, and seventh sounds are 0.5; the fourth sound is 0.7</ref>
|pitch=1.0
|distance=16}}
{{Sound table
|sound=Animal2.ogg
|sound2=Dark1.ogg
|sound3=Dark2.ogg
|sound4=Dark3.ogg
|sound5=Dark4.ogg
|subtitle=MC-196825
|source=ambient
|description=Randomly when underwater
|id=ambient.underwater.loop.additions.ultra_rare
|translationkey=-
|volume=1.0 <ref group=sound>Except the third sound, which is 0.7</ref>
|pitch=1.0
|distance=16}}
{{Sound table
|sound=Water1.ogg
|sound2=Water2.ogg
|subtitle=Water flows
|source=block
|description=Randomly from flowing water
|id=block.water.ambient
|translationkey=subtitles.block.water.ambient
|volume=0.75-1.0
|pitch=0.5-1.5
|distance=16}}
{{Sound table
|sound=Water splash1.ogg
|sound2=Water splash2.ogg
|subtitle=Splashing
|source=dependent
|description=When something enters water
|id=entity.generic.splash
|translationkey=subtitles.entity.generic.splash
|volume=0.0-1.0 <ref group=sound name=speedvolume>The mob's momentum, with the horizontal axes' velocities multiplied by 0.2 (capped at 1.0)</ref>
|pitch=0.6-1.4
|distance=16}}
{{Sound table
|sound=Swim1.ogg
|sound2=Swim2.ogg
|sound3=Swim3.ogg
|sound4=Swim4.ogg
|subtitle=Swimming
|source=dependent
|description=While something is moving through water
|id=entity.generic.swim
|translationkey=subtitles.entity.generic.swim
|volume=0.0-1.0 <ref group=sound name=speedvolume/>
|pitch=0.6-1.4
|distance=16}}
{{Sound table
|sound=Empty water bucket1.ogg
|sound2=Empty water bucket1.ogg
|sound3=Empty water bucket2.ogg
|sound4=Empty water bucket3.ogg
|subtitle=Bucket empties
|source=block
|description=When water is placed with a bucket
|id=item.bucket.empty
|translationkey=subtitles.item.bucket.empty
|volume=1.0 <ref group=sound>Except for the second copy of {{cd|empty1}}, which is 0.9</ref>
|pitch=1.0
|distance=16}}
{{Sound table
|sound=Fill water bucket1.ogg
|sound2=Fill water bucket2.ogg
|sound3=Fill water bucket3.ogg
|subtitle=Bucket fills
|source=player
|description=When water is collected with a bucket
|id=item.bucket.fill
|translationkey=subtitles.item.bucket.fill
|volume=1.0
|pitch=1.0
|distance=16}}
{{Sound table
|sound=Axolotl.ogg
|sound2=Dragon fish.ogg
|sound3=Shuniji.ogg
|subtitle=-
|source=music
|description=Randomly when underwater
|id=music.under_water
|translationkey=-
|volume=0.4
|pitch=1.0
|distance=16
|foot=1}}
{{el|be}}:
{{Sound table
|type=bedrock
|sound=Water2.ogg
|source=block
|description=Randomly from flowing water
|id=liquid.water
|volume=0.75-1.0
|pitch=0.5-1.5}}
{{Sound table
|sound=Water Splash Old.ogg
|source=player
|description=When something enters water<wbr><ref group=sound>{{Bug|MCPE-44120}}</ref>
|id=random.splash
|pitch=0.6-1.4}}
{{Sound table
|sound=Water splash1.ogg
|sound2=Water splash2.ogg
|source=ambient
|description=?[[Category:Pages missing sound description]]<wbr>{{Upcoming|BE 1.20.40}}
|id=entity.generic.splash
|pitch=0.6-1.4}}
{{Sound table
|sound=Entering water1.ogg
|sound2=Entering water2.ogg
|sound3=Entering water3.ogg
|source=player
|description=When the player's eye level goes underwater<wbr>{{Upcoming|BE 1.20.40}}
|id=ambient.underwater.enter
|volume=<!--0.8 (other multipliers)-->
|pitch=1.0}}
{{Sound table
|sound=Exiting water1.ogg
|sound2=Exiting water2.ogg
|sound3=Exiting water3.ogg
|source=player
|description=When the player's eye level goes above water<wbr>{{Upcoming|BE 1.20.40}}
|id=ambient.underwater.exit
|volume=<!--1.0 (other multipliers)-->
|pitch=1.0}}
{{Sound table
|sound=Swim1.ogg
|sound2=Swim2.ogg
|sound3=Swim3.ogg
|sound4=Swim4.ogg
|source=player
|description=While something is moving through water
|id=random.swim
|pitch=0.6-1.4}}
{{Sound table
|sound=Empty water bucket1.ogg
|sound2=Empty water bucket2.ogg
|sound3=Empty water bucket3.ogg
|source=block
|description=When water is placed with a bucket
|id=bucket.empty_water
|volume=1.0
|pitch=1.0}}
{{Sound table
|sound=Fill water bucket1.ogg
|sound2=Fill water bucket2.ogg
|sound3=Fill water bucket3.ogg
|source=block
|description=When water is collected with a bucket
|id=bucket.fill_water
|volume=1.0
|pitch=1.0}}
{{Sound table
|sound=Axolotl.ogg
|sound2=Dragon fish.ogg
|sound3=Shuniji.ogg
|source=music
|description=Randomly when underwater
|id=music.game.water
|volume=0.2
|pitch=1.0
|foot=1}}
==Data values==
===ID===
{{edition|java}}:
{{ID table
|edition=java
|firstcolumnname=Water
|showforms=y
|generatetranslationkeys=y
|displayname=Block
|spritename=water
|spritetype=block
|nameid=water
|form=block
|foot=1}}
{{ID table
|edition=java
|firstcolumnname=Water
|showfluidtags=y
|displayname=Fluid
|spritename=water
|spritetype=block
|nameid=water
|fluidtags=water}}
{{ID table
|displayname=Flowing Fluid
|spritetype=block
|spritename=water
|nameid=flowing_water
|fluidtags=water
|foot=1}}
{{edition|bedrock}}:
{{ID table
|edition=bedrock
|firstcolumnname=Water
|shownumericids=y
|showforms=y
|generatetranslationkeys=y
|displayname=Flowing
|spritename=water
|spritetype=block
|nameid=flowing_water
|id=8
|form=block}}
{{ID table
|displayname=Stationary
|spritename=water
|spritetype=block
|nameid=water
|id=9
|form=block
|foot=1}}
===Block states===
{{see also|Block states}}
{{/BS}}
=== Fluid states===
{{see also|Block states}}
{{/FS}}
==Achievements==
{{load achievements|Free Diver;Sleep with the Fishes}}
==Advancements==
{{load advancements|Tactical fishing;The Cutest Predator}}
==History==
{{Main|/History}}
{{History|java classic}}
{{History||May 17, 2009|link=https://archive.org/download/Minecraft_IRC_Logs_2009/history/files/May-15-to-June-03-2009/2009-05-17.140618-0400EDT.txt.~1~|Notch mentions developing water.{{q|a very very first version of the water is somewhat working now, heh [/] the level starts out without any water and is surrounded a by a huge ocean [/] it quickly fills, leaving islands}}}}
{{History||0.0.12a|snap=May 18, 2009|slink=Java Edition Classic 0.0.12a/Development#Water test (May 18, 2009)|[[File:Water (pre-release).png|32px]] Water is shown.}}
{{History|||snap=release|slink=Java Edition Classic 0.0.12a|[[File:Water JE1.png|32px]] Added water.
|Water flows to any available space below or beside it and creates a new source [[block]], making it easy to flood a whole world just with one source.}}
{{History||May 22, 2009|link=wordofnotch:111386404|[[Notch]] pointed out that when a [[plant]] or non-cube block is placed in water, it produces a box of [[air]] around it. He asked how it could be fixed, and whether he even had to.}}
{{History||0.0.13a|[[File:Water JE2.png|32px]] The model of water has been changed.}}
{{History||May 24, 2009|link=wordofnotch:112481256|A new water system is mentioned.}}
{{History||May 24, 2009|link=wordofnotch:112481370|A new water system is shown.}}
{{History||May 24, 2009|link=wordofnotch:112487511| Another test of water is shown.}}
{{History||May 26, 2009|link=wordofnotch:113350683|While sharing feedback on experiments with random vertex and color offsets, and deciding to scrap it, Notch said he would investigate salvaging the technique to add animation to water tiles.}}
{{History||0.0.19a|[[File:Water JE3.png|32px]] Added [[Procedural animated texture generation|procedural animated texture]] to water. The old texture is retained for use as a [[animation placeholder texture|placeholder]].
|Upscaled model 2% to fix z-fighting with blocks below water. It's created water or lava models overlapping and z-fighting with each other.
|Added [[sponge]]s, which remove water.
|Water part of the [[world boundary]] still uses the old water texture.}}
{{History||0.0.20a_02|[[File:Water JE4.png|32px]] Changed model scale back to normal with 1% offset on all coordinates.}}
{{History||0.26 SURVIVAL TEST|[[File:Water JE5.png|32px]] UV mapping on side faces now has 11% v offset up.}}
{{History||0.28|[[File:Water JE4.png|32px]] Fixed UV mapping.}}
{{History|java indev}}
{{History||0.31|snap=20091223-1|[[File:Water JE6.png|32px]] Added the flowing water texture, which is now used on the sides of water.}}
{{History|||snap=20100106|Water part of the [[world boundary]] now uses the animated water texture.}}
{{History|||snap=20100113|Water is now finite.|[[Ocean]]s now have infinite water.
|Water now always drains from its highest remove location.
|Water no longer moves on the surface on its own.
|Water now has a {{frac|2|3}} probability to evaporate and a {{frac|1|3}} probability to copy.}}
{{History|||snap=20100122|Water now spawns in level generation as [[spring]]s and lakes.}}
{{History|||snap=20100131|The texture of water is now seen when underwater.}}
{{History|java infdev}}
{{History||20100227-1|Water no longer flows due to changes in chunk handling for infinite worlds.{{verify|type=change}}}}
{{History||20100607|[[File:Water JE7.png|32px]] UV mapping now has 1% uv offset on top and bottom faces and 1% u, 11% v offset on side faces.}}
{{History||20100608|[[File:Water JE6.png|32px]] Fixed UV mapping, once again.}}
{{History||20100615|[[File:Water JE8.png|32px]] The model has been changed.
|Added flowing water.
|Sources placed in isolation flow exclusively downward, rather than spreading out one block in each direction as well.
|Water and lava do not produce any solid blocks when combined.
|Water does not replace plants.
|Water is now infinite again.
|Added [[water bucket]]s, which can be filled with water.}}
{{History||20100616-1|[[File:Water JE9.png|32px]] Added vertex offset.
|Water and flowing water now has visual connection to blocks.
|Downward flowing water now pushes the [[player]] out.{{info needed|and other entities?}}}}
{{History||20100617-2|[[File:Water JE10.png|32px]] Removed vertex offset.
|Water sources placed in the air now flow outward.
|Lava and flowing lava touching water, flowing water now replaces with [[obsidian]].
|Downward flowing water no longer pushes the player out.
|Water now can replace [[plants]]. However no items are dropped.}}
{{History||20100618|Water can now replace [[rail]]s.}}
{{History||20100624|Water now destroys plants, dropping as items.}}
{{History|java alpha}}
{{History||v1.0.2_02|[[Fluids]], including water, have been slightly tweaked.}}
{{History||v1.0.5_01|Water can now freeze into [[ice]].}}
{{History||v1.2.6|[[Lake]]s, which contain water, have been added.}}
{{History|java beta}}
<!--{{History||1.5|Dropped [[item]]s in flowing water now move faster.{{check version|Taken from trivia, may not be beta}}}}-->
{{History||1.6|snap=Test Build 3|[[Rain]] and [[snow]] no longer fall through water.
|Water sources now form over [[glass]].}}
{{History||1.8|snap=Pre-release|[[File:Water JE11.png|32px]] Changed [[lighting]].
|Underwater [[particles]] have been added.
|Because of the change in how land is generated, if a [[player]] is in a world that was made pre-1.8 and travels into new [[chunk]]s, there's a chance that a large [[ocean]] may be formed as the ocean [[biome]]. There is also a one-[[block]]-high drop in sea level along the discontinuity between the old and new chunks with the old chunks being higher.
|Water can now be found in the farms and wells of [[village]]s, and the fountain rooms of [[stronghold]]s.
|Two [[biome]]s have been added that are almost all water: [[ocean]]s and [[river]]s.}}
{{History|java}}
{{History||1.0.0|snap=Beta 1.9 Prerelease|[[File:Swamp Water JE1.png|32px]] {{color|#E0FF70}} Added water color in swampland.
|Added dripping water.}}
{{History|||snap=Beta 1.9 Prerelease 4|Added [[Respiration]] and [[Aqua Affinity]] enchantments, which allow more breathing time in water and normal digging speed in water.}}
{{History|||snap=Beta 1.9 Prerelease 5|Now flowing downward creates source blocks}}
{{History|||snap=RC1|[[File:Water JE12.png|32px]] [[File:Swamp Water JE2.png|32px]] Faces on model now 0.1% moved to center to fix z-fighting on inner faces.}}
{{History||1.1|snap=12w01a|[[File:Swamp Water JE3.png|32px]] {{color|#E0FFAE}} The water color in swampland is now less intense.}}
{{History||1.2.1|snap=12w04a|Added [[desert well]]s, which contain water.}}
{{History||1.3.1|snap=12w17a|The ability to bring water using [[ice]] into [[the Nether]] has been removed.}}
{{History|||snap=12w21a|[[Dispenser]]s have been given the ability to shoot out [[fluids]], including water, inside [[water bucket]]s. They can also collect the fluids if activated again.}}
{{History||1.4.2|snap=12w38a|The [[sound]] when jumping and swimming in water has been changed.
|The sound of flowing water is now continuous.
|The water overlay is a more saturated blue.}}
{{History||1.4.4|snap=1.4.3|Water of any depth now negates all [[Damage#Fall damage|fall damage]]. [[Player]]s and [[mob]]s no longer die from great heights in shallow water.<ref>{{bug|MC-1644}} resolved as Works As Intended</ref>}}
{{History||1.5|snap=13w02a|[[File:Water JE13.png|32px]] [[File:Swamp Water JE4.png|32px]] The texture of water has been changed to use an animated texture file. Prior to this version, the texture was procedurally generated by the game (see dedicated section below).}}
{{History|||snap=13w03a|A water source [[block]] now forms if there is another water source block below it.}}
{{History|||snap=13w04a|Flowing water in [[Creative]] mode no longer slows the [[player]] down when flying.}}
{{History||1.6.1|snap=13w17a|Water [[lake]]s no longer generate in [[desert]]s.}}
{{History||1.7.2|snap=13w36a|[[File:Swamp Water JE4.png|32px]] {{color|#E0FFAE}} Added water color in swampland M, which is the same as in swampland.}}
{{History||1.7.2|snap=13w36a|Water pools now generate in the new desert M [[biome]].
|[[Ocean]]s are much smaller.}}
{{History|||snap=13w41a|[[File:Water JE14.png|32px]] [[File:Swamp Water JE5.png|32px]] Water's six internal faces are now visible from the outside.
|Water, [[ice]] and [[portal]]s are now visible through each other. This also now allows water's inside faces to be visible from outside.}}
{{History|||snap=13w42a|[[File:Water JE13.png|32px]] [[File:Swamp Water JE6.png|32px]] Water's internal faces have been removed. This visually reverts water to its pre-13w41a appearance when seen from the outside.}}
{{History||1.7.4|snap=13w47a|Water's internal top face has been readded.<ref>{{bug|MC-35658}}</ref>}}
{{History|||snap=13w48a|[[File:Water JE15.png|32px]] [[File:Swamp Water JE7.png|32px]] Water's internal side faces except the bottom face, have been readded.<ref>{{bug|MC-40621}}</ref><ref>{{bug|MC-190053}}</ref>}}
{{History||1.9|snap=15w43b|When viewed through [[glass]], water now appears as a solid blue color, as opposed to a downward flowing water texture.<ref name="badwatergraphicsJE">{{bug|MC-35790}}</ref>}}
{{History||1.11|snap=16w39a|Water now generates in [[woodland mansion]]s.}}
{{History||1.12|snap=17w06a|Water now hardens [[concrete powder]] into [[concrete]], on contact.}}
{{History||1.13|snap=18w07a|[[Item]]s now float in water.
|The [[player]]'s underwater visibility has been changed - the longer a player stays underwater, the better they can see.}}
{{History|||snap=18w10a|Underwater visibility now depends on the [[biome]] the player is in.}}
{{History|||snap=18w10c|Water can now be placed in the same block as [[chest]]s, [[trapped chest]]s, [[stairs]], [[slab]]s, [[fence]]s, [[wall]]s, [[iron bars]] and [[glass pane]]s.}}
{{History|||snap=18w10d|Water can now be placed in [[ender chest]]s, [[trapdoor]]s, [[ladder]]s, and [[sign]]s.}}
{{History|||snap=18w15a|[[File:Water JE16.png|32px]] {{color|#3F76E4}} Added default water color. The textures of water have been changed from blue to grayscale.<ref>{{bug|MC-200838}}</ref>
|[[File:Warm Ocean Water JE.png|32px]] [[File:Lukewarm Ocean Water JE.png|32px]] [[File:Frozen Ocean Water JE.png|32px]] [[File:Cold Ocean Water JE.png|32px]] Added water colors for [[warm ocean]], [[lukewarm ocean]], [[frozen ocean]] and [[cold ocean]].
|[[File:Swamp Water.png|32px]] {{color|#617B64}} Water color in swampland has been changed.
|[[File:Swamp Hills Water 18w15a.png|32px]] {{color|#E0FFAE}} Water color in swampland M is unchanged.<ref>{{bug|MC-128558}}</ref>
|Water now blocks 1 [[light]] level per [[block]] instead of 3.
|[[Player]]s no longer receive the [[Night Vision]] effect while underwater.{{verify|type=change|Did this ever happen, or is it just being used as an analogy?}}}}
{{History|||snap=18w16a|When water spreads and would later turn into a source [[block]], it now immediately places a source block.}}
{{History|||snap=18w19a|[[Experience orb]]s now float in water.}}
{{History|||snap=pre3|[[File:Swamp Water.png|32px]] {{color|#617B64}} water color in swamp hills now the same as in [[swamp]].}}
{{History|||snap=pre7|Pressing the {{control|jump}} button in flowing water at <code>level=1</code>, <code>level=2</code> and <code>level=3</code> now do normal jumps instead of {{control|swimming}} up.}}
{{History||1.15|snap=19w34a|Added [[bee]]s, which get damaged while in water.}}
{{History|||snap=19w35a|Bees now try to avoid water.}}
{{History||1.17|snap=20w45a|Flowing water no longer breaks rails.}}
{{History|||snap=21w06a|[[Aquifer]]s, large bodies of water in caves, have been added.}}
{{History|||snap=21w07a|Aquifers generate less often.}}
{{History|||snap=21w08a|Water [[spring]]s are now able to generate below Y{{=}}0.}}
{{History|||snap=21w10a|The FOV shrinking effect now respects the "FOV Effects" accessibility slider.<ref>{{bug|MC-214629}}</ref>}}
{{History|||snap=21w15a|All changes to water generation from 21w06a to 21w08a have been reverted.}}
{{History|||snap=Pre-release 2|[[Smooth lighting]] now works properly underwater.<ref>{{bug|MC-68129}} resolved as "Fixed"</ref>}}
{{History||1.18|snap=Experimental Snapshot 1|[[File:Meadow Water.png|32px]] Added water color in [[meadow]].
|All changes to water generation in the 1.17 snapshots have been reintroduced.}}
{{History||1.18|snap=21w40a|[[Water lake]]s no longer generate.}}
{{History||1.19|snap=Deep Dark Experimental Snapshot 1|Water can now generate as part of [[Ancient City|ancient cities]].}}
{{History||1.19|snap=22w14a|[[File:Mangrove Swamp Water.png|32px]] Added water color in [[mangrove swamp]].}}
{{History||1.19.3|snap=22w44a|Added the [[game rule]] {{cd|waterSourceConversion}}, which disables the formation of new water source blocks when set to {{cd|false}}.}}
{{History||1.20<br>(experimental)|link=1.19.4|snap=23w07a|[[File:Cherry Grove Water JE1.png|32px]] Added water color in [[cherry grove]].}}
{{History|pocket alpha}}
{{History||v0.1.0|[[File:Water JE11.png|32px]]{{verify|type=change|Is this accurate to how it appeared in this edition at this time?}} Added water.
|[[File:Water JE2.png|32px]] On older or much newer devices, the old [[Java Edition|Java]] water texture is used, whereas the newer animated texture is used on intermediately modern devices.}}
{{History||v0.7.0|[[File:Water JE11.png|32px]]{{verify|type=change|Is this accurate to how it appeared in this edition at this time?}} The texture of water has been changed to the new texture for all devices.}}
{{History||v0.9.0|snap=build 1|[[File:Swamp Water BE1.png|32px]] Water now uses a dark blue coloration in [[swamp]]s.
|Water dripping [[particles]] have been changed.
|[[Water lake]]s have been added.
|Water can now be found in the farms and wells of [[village]]s.
|Two [[biome]]s have been added that are almost all water: [[ocean]]s and [[river]]s.
|Oasis now generate in the new [[desert]] M [[biome]].}}
{{History||v0.10.0|snap=build 1|Smooth lighting for water has been added.
|A gradient effect has been added to water that increases its opacity with distance.
|[[File:Old bedrock swamp water.png|32px]] Water color in swampland has been changed.
|Flowing water can now push [[entities]].}}
{{History|||snap=build 7|Running water now has [[sound]]s.}}
{{History|||snap=?|Water now destroys [[block]]s.{{info needed|if this is referring to washing away plants and torches and stuff, it's been able to do that since 0.1.0}}}}
{{History||v0.14.0|snap=build 1|[[Dispenser]]s can now shoot out water from [[water bucket]]s. They can also suck up [[fluids]], including water, directly adjacent to the side they are facing.}}
{{History||v0.14.2|[[File:Old bedrock water.png|32px]] Water now uses animated texture files.}}
{{History|pocket}}
{{History||1.0.0|snap=alpha 1.0.0.0|When viewed through [[glass]], water now appears as a solid blue color, as opposed to a downward flowing water texture.<ref name="badwatergraphicsBE">{{bug|MCPE-11140}}</ref>}}
{{History||1.1.0|snap=alpha 1.1.0.0|Water now generates in [[woodland mansion]]s.
|Water now hardens [[concrete powder]] into [[concrete]], on contact.}}
{{History|bedrock}}
{{History||?|The rendering change for water in 1.0.0 has been reverted for an unknown reason.}}
{{History||1.2.13|snap=beta 1.2.13.5|Water can now be placed in the same [[block]]s as [[slab]]s and [[stairs]].}}
{{History||1.4.0|snap=beta 1.2.14.2|Water can now be placed in the same block as most transparent blocks, instead of slabs and stairs only.}}
{{History|||snap=beta 1.2.20.1|[[File:Plains Water.png|32px]] Water now has a completely new look for every [[biome]] and it is now much easier to see above and underwater (see [[Water#Bedrock Edition]] for all biome colors).
|[[Item]]s now float to the top of water.
|Underwater visibility now depends on the [[biome]] the [[player]] is in.
|[[Respiration]] enchantment and [[Water Breathing]] effect no longer grants enhanced underwater visibility.}}
{{History|||snap=?|When viewed through [[glass]], water now appears as its own top texture, as opposed to a downward flowing water texture.<ref name="badwatergraphicsBE"/>}}
{{History||1.14.0|snap=beta 1.14.0.1|Added [[bee]]s, which get damaged when touching water and try to avoid it.}}
{{History|console}}
{{History||xbox=TU1|xbone=CU1|ps=1.0|wiiu=Patch 1|switch=1.0.1|[[File:Water JE11.png|32px]]{{verify|type=change|Is this accurate to how it appeared in this edition at this time?}} [[File:Swamp Water JE2.png|32px]] Added water.}}
{{History||xbox=TU9|[[Dispenser]]s have been given the ability to shoot out [[fluids]], including water, inside [[water bucket]]s. They can also suck up the fluids if activated again, but a bug prevents the empty [[bucket]] from being filled.}}
{{History||xbox=TU12|[[File:Water JE15.png|32px]] Water now uses animated texture files.}}
{{History||xbox=TU25|xbone=CU14|ps=1.17|Water can be used in custom superflats. It appears as a 3D block in the block selection screen of the custom superflat interface.}}
{{History||xbox=TU31|xbone=CU19|ps=1.22|wiiu=Patch 3|Water splash [[sound]]s have been updated.
|Most [[mob]]s can now [[swimming|swim]] in water.}}
{{History||xbox=TU69|xbone=none|ps=1.76|wiiu=Patch 38|switch=none|[[File:Warm Ocean Water.png|32px]] [[File:Lukewarm Ocean Water.png|32px]] [[File:Frozen Ocean Water.png|32px]] [[File:Cold Ocean Water.png|32px]] Added [[warm ocean]], [[lukewarm ocean]], [[frozen ocean]] and [[cold ocean]] texture colors for water in those [[biome]]s.}}
{{History||ps=1.78|The animation of water is now less smooth.}}
{{History|New 3DS}}
{{History||0.1.0|[[File:Water JE15.png|32px]]{{verify|type=change|Is this accurate to how it appeared in this edition at this time?}} [[File:Old bedrock swamp water.png|32px]] Added water.}}
{{History|foot}}
<!-- Still need to add in the right version: Drowning added, Water can turn into ice -->
<!--- Still need to add "1.16 pre-release 5 - Water overlay texture turned slightly darker" -->
{{More sounds|Old and older water splash sounds.|type=historical}}
===Data history===
{{History|java}}
{{History||1.13|snap=17w47a|Prior to [[1.13/Flattening|''The Flattening'']], these blocks' numeral IDs were 8 and 9. Both blocks have been merged into a single one.}}
{{History|||snap=18w10c|Removed <code>flowing_water</code>.}}
{{History|foot}}
<gallery>
EarlyFlowingWater.png|The water and flowing water in [[Infdev 20100615]].
</gallery>
==Issues==
{{Issue list}}
==Trivia==
*The texture subtly overlaid on the screen when underwater is that of the original water texture from 0.0.12a.
**The outdatedness of this texture is not considered a bug or oversight, unlike many other outdated textures.<ref>{{bug|MC-241000|||Invalid}}</ref>
**This texture is particularly difficult to notice due to its extreme transparency,<ref>{{bug|MC-128337}}</ref> as well as the fact that other blocks likely make the scene visually noisy enough to further obscure it under most conditions.
* While underwater, the player's FOV (field of vision) is lowered by 10 to simulate light {{w|refraction}}. This can be disabled via the "FOV Effects" [[option]].
*If a player or mob with the [[Levitation]] effect touches water, the effect is completely negated.<ref>{{bug|MC-83369}}</ref>
==Gallery==
<gallery>
1.8underwater.png|Underwater particles, or "bubbles".
Underground water mix.png|Water that is underground, but is still part of 2 different biomes. The color is split.
InvisibleWater.png|A glitch where water is invisible below its surface level.
Water Cave Filling.png|Water flowing into a [[cave]].
Under water.png|A view underwater.
Mac os water texture V1.13-920.gif|Animated view of the Java edition water texture.
Bubbles.gif|These bubbles appear above the [[hunger]] bar when the player's head is in water, and when all the bubbles pop, a heart of damage is dealt every second until the player is no longer entirely under water.
Waterfall.png|A naturally occurring waterfall.
Water (texture) JE1 BE1.png|This texture is subtly overlaid on the screen when underwater.
Land ruin.png|An underwater ruin {{in|bedrock}} that generated on land with a water block on top of it.
Land ruin Java.png|An underwater ruin {{in|java}} that generated on land with a visible loot chest that is not waterlogged and doesn't have water on top of it.
Largelake.png|A large lake, during a [[thunderstorm]].
Coral reef at night.png|A [[coral reef]] at night, in a [[warm ocean]] biome.
WaterRavine.jpg|A bug that causes the water to not flow into the pit.
Obsidian Spring.png|A water flowing on lava lake, creating obsidian. The water was placed by a player.
Two flowing streams.png|Waterfalls made by a player.
Watercave.png|Water flowing into the cave from nearby lake.
RavineandStornghold.png|Ravine with multiple ores, water and lava falls, and stronghold bridge over it.
Water shade.png|Different water colors in swamp biome.
File:Nonflowingwater.png|A block of water, which is not flowing because of a glitch, besides a village farm.
</gallery>
==See also==
*[[Waterlogging]]
==References ==
{{Reflist}}
==External Links ==
*[https://www.minecraft.net/en-us/article/block-week-water Block of the Week: Water] – Minecraft.net on July 14, 2017
{{Blocks|natural}}
{{Items}}
[[Category:Fluids]]
[[Category:Natural blocks]]
[[Category:Non-solid blocks]]
[[Category:Generated structure blocks]]
[[cs:Voda]]
[[de:Wasser]]
[[es:Agua]]
[[fr:Eau]]
[[hu:Víz]]
[[it:Acqua]]
[[ja:水]]
[[ko:물]]
[[nl:Water]]
[[pl:Woda]]
[[pt:Água]]
[[ru:Вода]]
[[th:น้ำ]]
[[tr:Su]]
[[uk:Вода]]
[[zh:水]]</li></ul></nowiki> | 14w06a | Endermen can now pathfind as a result of their update to the new AI system. | |||
| Endermen now teleport after being damaged by any damage source, including suffocation damage | |||||
| 14w11a | Now walk slightly faster. | ||||
| Endermen can now spawn endermites when they teleport. The chance of producing one is 15%, minus 1% for each endermite already spawned. | |||||
| Endermen are naturally aggressive towards endermites. | |||||
| 14w17a | Endermen are no longer hostile to non-pearl spawned endermites. | ||||
| 14w28a | Endermites no longer spawn from endermen. | ||||
1.9{{Extension DPL}}<ul><li>[[Cooked Salmon|Cooked Salmon]]<br/>{{Dungeons hatnote|type=consumable}}
{{Item
| title = Cooked Salmon
| image = Cooked Salmon.png
| renewable = Yes
| heals = {{hunger|6}}
| stackable = Yes (64)
}}
'''Cooked salmon''' is a [[food]] item obtained by cooking [[raw salmon]].
== Obtaining ==
=== Mob loot ===
====Salmon====
[[Salmon]] always drops 1 raw salmon when killed, unaffected by Looting.<ref>{{bug|MC-212795||Salmon & Fish mobs are not affected by Looting}}</ref> If it is killed while on [[fire]], it drops 1 [[Cooked Salmon|cooked salmon]] instead.
====Guardians and elder guardians====
[[Guardian|Guardians]] and [[Elder Guardian|elder guardians]] have a 2.5% chance to drop a random fish, with 25% of them being raw salmon, which drops as cooked if the guardian was on fire. The chance of getting the fish drop is increased by 1% per level with [[Looting]] (for a maximum of 5.5% with Looting III), but the type of fish is not affected.
====Polar bears ====
[[Polar bear]]s have a 25% chance of dropping 0–2 raw salmon when killed. The maximum amount can be increased by 1 per level of Looting, for a maximum of 0-5 with Looting III. If killed while on fire, they drop cooked salmon instead.
=== Cooking ===
Cooked salmon can be obtained by cooking raw salmon in a [[furnace]], [[smoker]], or on a [[campfire]]. Each piece of cooked salmon removed from a furnace output slot gives 0.35 [[experience]] (22.4 experience per stack).
{{smelting|Raw Salmon|Cooked Salmon|0,35}}
=== Chest loot ===
{{LootChestItem|cooked-salmon}}
=== Trading ===
Apprentice-level fishermen villagers have a 50%{{only|bedrock}} or {{frac|2|3}}{{only|java}} chance to sell 6 cooked salmon for 6 raw salmon and an [[emerald]].
== Usage ==
=== Food ===
To eat cooked salmon, press and hold {{control|use}} while it is selected in the hotbar. Eating one restores {{hunger|6}} and 9.6 [[Hunger#Mechanics|saturation]], the same as [[cooked mutton]].
=== Wolves ===
{{IN|Bedrock}}, cooked salmon can be fed to [[wolves]] only if they are not at full health, healing them by {{hp|6|mob=1}}. Cooked salmon does not accelerate the growth of baby wolves and cannot be used to [[breed]] them.
==Sounds==
{{Sound table/Entity/Food}}
== Data values ==
=== ID ===
{{edition|java}}:
{{ID table
|edition=java
|showitemtags=y
|showforms=y
|generatetranslationkeys=y
|displayname=Cooked Salmon
|spritetype=item
|nameid=cooked_salmon
|itemtags=fishes
|form=item
|foot=1}}
{{edition|bedrock}}:
{{ID table
|edition=bedrock
|shownumericids=y
|showforms=y
|notshowbeitemforms=y
|generatetranslationkeys=y
|displayname=Cooked Salmon
|spritetype=item
|nameid=cooked_salmon
|id=269
|form=item
|foot=1}}
== Achievements ==
{{load achievements|Lion Hunter}}
== Advancements ==
{{load advancements|Husbandry;A Balanced Diet;Fishy Business}}
== Video ==
<div style="text-align:center">{{yt|s_GcAFeoREk}}</div>
== History ==
{{History|java}}
{{History||1.7.2|snap=13w36a|[[File:Cooked Salmon JE1 BE1.png|32px]] Added cooked salmon.}}
{{History||1.8|snap=14w02a|Cooked salmon can no longer be [[trading|traded]] by [[villager]]s.}}
{{History||1.13|snap=17w47a|The different data values for the <code>cooked_fish</code> IDs have been split up into their own IDs.
|Prior to [[1.13/Flattening|''The Flattening'']], these [[item]]s' numeral IDs were 349 and 250.}}
{{History|||snap=18w08b|Salmon has been added as a [[mob]], which drops raw salmon when killed (cooked while on [[fire]]).
|[[File:Cooked Salmon JE2 BE2.png|32px]] The texture of cooked salmon has been changed.}}
{{History|||snap=18w10a|Cooked salmon now generates in [[buried treasure]] [[chest]]s.}}
{{History|||snap=19w11a|Fisherman [[villager]]s can now convert raw salmon to cooked salmon, if [[trading|paid]] with emeralds.}}
{{History|pocket alpha}}
{{History||v0.11.0|snap=build 1|[[File:Cooked Salmon JE1 BE1.png|32px]] Added cooked salmon.}}
{{History||v0.12.1|snap=build 1|Salmon now restores [[hunger]] instead of [[health]].}}
{{History||v0.16.0|snap=build 1|Salmon is now dropped by [[guardian]]s and [[elder guardian]]s.}}
{{History|bedrock}}
{{History||1.4.0|snap=beta 1.2.14.2|Salmon has been added as a [[mob]], which drops raw salmon when killed (cooked while on [[fire]]).
|[[File:Cooked Salmon JE2 BE2.png|32px]] The texture of cooked salmon has been changed.}}
{{History||1.11.0|snap=beta 1.11.0.4|Cooked salmon can now be obtained from [[trading]] with fishermen [[villager]]s.}}
{{History||1.16.100|snap=beta 1.16.100.52|Salmon now drops cooked salmon when killed on [[fire]].}}
{{History|console}}
{{History||xbox=TU31|xbone=CU19|ps=1.22|wiiu=Patch 3|[[File:Cooked Salmon JE1 BE1.png|32px]] Added cooked salmon.}}
{{History||xbox=TU69|ps=1.76|wiiu=Patch 38|[[File:Cooked Salmon JE2 BE2.png|32px]] The texture of cooked salmon has been changed.}}
{{History|new 3ds}}
{{History||0.1.0|[[File:Cooked Salmon JE1 BE1.png|32px]] Added cooked salmon.}}
{{History|foot}}
== Issues ==
{{issue list}}
== See also ==
* [[Fishing]]
* [[Cooked Cod]]
{{items}}
[[Category:Food]]
[[Category:Renewable resources]]
[[de:Gebratener Lachs]]
[[es:Salmón ahumado]]
[[pt:Salmão assado]]
[[ko:익힌 연어]]
[[zh:熟鲑鱼]]
[[ru:Жареный лосось]]</li><li>[[Wheat|Wheat]]<br/>{{About||the artifact in ''Minecraft Dungeons''|Minecraft Dungeons:Wonderful Wheat|the seed|Wheat Seeds}}
{{Item
| image = Wheat.png
| renewable = Yes
| stackable = Yes (64)
}}
'''Wheat''' is an [[item]] primarily obtained by harvesting fully-grown [[Wheat Seeds|wheat crops]]. It is used for [[crafting]] as well as to feed certain animals.
== Obtaining ==
=== Natural generation ===
{{LootChestItem|wheat}}
=== Farming ===
{{main|Tutorials/Crop farming}}
When a fully-grown wheat crop is harvested, it drops 1 wheat and 1 to 4 [[wheat seeds]] ({{frac|2|5|7}} per crop harvested on average). A wheat crop has a total of eight stages (0-7) from the time it is planted until it can be harvested. If a crop is harvested before it is fully grown, it just drops one seed. Wheat needs light to grow; a seed is destroyed if planted without light. Harvesting with a [[Fortune]]-enchanted tool increases the number of seeds dropped but does not increase the yield of wheat.
=== Crafting ===
{{Crafting
|Hay Bale
|Output= Wheat,9
|type= Material
}}
=== Drops ===
A [[fox]] sometimes spawns holding wheat, which it always drops upon death. Alternatively, the player can drop a [[food]] item, causing the fox to drop the wheat.
== Usage ==
=== Food ===
[[File:New Cattle.png|thumb|Using wheat to lead a cow.]]
When wheat is held, it causes nearby [[cow]]s, [[sheep]], [[goat]]s and [[mooshroom]]s to follow the player, until either the player stops holding the wheat or goes too far away from the animal, thus leading them to lose interest.
Wheat may be used to [[breed]] cows, sheep, goats, and mooshrooms by first herding two of them together and then {{control|using}} the wheat on them to begin "Love Mode."
Wheat can heal a [[horse]] {{hp|1}} health or lower its temper by 3% when attempting to tame it. It can also decrease the time it takes for a foal to grow by 20 seconds.
Similarly, wheat can heal a [[llama]] {{hp|2}} health, and it decreases the time it takes a baby llama to grow by 10 seconds.
=== Crafting ingredient ===
{{crafting usage}}
=== Trading ===
Novice-level farmer [[Villager|villagers]] have a 25%{{only|bedrock}} or 40%{{only|java}} chance to buy 20 wheat for one [[emerald]].
=== Composting ===
Placing wheat into a [[composter]] has a 65% chance of raising the compost level by 1. A stack of wheat yields an average of 5.94 [[bone meal]].
== Achievements ==
{{load achievements|Bake Bread;The Lie;Repopulation}}
== Advancements ==
{{load advancements|A Seedy Place}}
== Data values ==
=== ID ===
{{edition|java}}:
{{ID table
|edition=java
|showforms=y
|generatetranslationkeys=y
|displayname=Wheat
|spritetype=item
|nameid=wheat
|form=item
|foot=1}}
{{edition|bedrock}}:
{{ID table
|edition=bedrock
|shownumericids=y
|showforms=y
|notshowbeitemforms=y
|generatetranslationkeys=y
|displayname=Wheat
|spritetype=item
|nameid=wheat
|id=334
|form=item
|foot=1}}
== Video ==
{{Video note|the narrator demonstrates at 0:56 that walking over wheat can destroy the crop and un-till the land. This is outdated: since version {{Version link|JE 1.1}}, wheat can be destroyed only by a player or mob jumping on it or falling on it.}}
<div style="text-align:center">{{yt|JbAURiYQZlA}}</div>
== History ==
{{History|java indev}}
{{History||20100206|[[File:Wheat JE1 BE1.png|32px]] Wheat has been added.
|Wheat can be used to craft [[bread]].}}
{{History||20100223|Bread now requires 3 wheat (1 row of 3) instead of 6 (2 rows of 3) to be crafted.}}
{{History|java infdev}}
{{History||20100625-2|Wheat can now be found in the new [[dungeon]] [[chest]]s.}}
{{History|java beta}}
{{History||1.2|Wheat can now be used to craft [[cake]].}}
{{History||1.4|Wheat can now be used to craft [[cookie]]s.}}
{{History|java}}
{{History||1.0.0|snap=Beta 1.9 Prerelease 2|Wheat can now be used in [[breeding]].}}
{{History||1.3.1|snap=12w21a|Wheat can now be [[trading|sold]] to farmer [[villager]]s, at 18–21 wheat for 1 [[emerald]].}}
{{History||1.4.2|snap=12w36a|[[Chicken]]s and [[pig]]s no longer use wheat to [[breeding|breed]].}}
{{History||1.6.1|snap=13w16a|[[Horse]]s can now be healed by being fed wheat.
|Foals can now have their growth increased by being fed wheat.}}
{{History|||snap=13w17a|[[Horse]]s can now have their tempers lowered with wheat.}}
{{History|||snap=13w18a|Nine wheat can now be crafted to make a [[hay bale]].}}
{{History||1.8|snap=14w02a|Trading has been changed: farmer [[villager]]s now [[trading|buy]] 18–22 wheat for 1 [[emerald]].}}
{{history||1.9|snap=15w43a|Wheat may now be found in [[igloo]] basement chests.}}
{{history|||snap=15w44a|The average yield of wheat in [[dungeon]] chests has been decreased.}}
{{History||1.11|snap=16w39a|Wheat can now be found in the new [[woodland mansion]] chests.}}
{{History||1.13|snap=17w47a|Prior to [[1.13/Flattening|''The Flattening'']], this [[item]]'s numeral ID was 296.}}
{{History|||snap=18w09a|Wheat can now generate in the chests of [[underwater ruins]].}}
{{History|||snap=18w11a|Wheat can now generate in [[shipwreck]] chests.}}
{{History||1.14|snap=18w43a|[[File:Wheat JE2 BE2.png|32px]] The texture of wheat has been changed.}}
{{History|||snap=18w47a|Wheat can now generate inside of loot chests on top of [[pillager outpost]]s.}}
{{History|||snap=18w49a|Wheat can now generate in chests in [[village]] butcher and shepherd houses.}}
{{History|||snap=18w50a|Wheat can now generate in chests in desert [[village]] houses.}}
{{History||1.14|snap=19w03a|Placing wheat into the new [[composter]] has a 50% chance of raising the compost level by 1.}}
{{History|||snap=19w05a|Wheat now has a 65% chance of increasing the compost level in a composter by 1.}}
{{History|||snap=19w07a|Added [[fox]]es, which sometimes spawn with wheat in their mouths.}}
{{History||1.17|snap=21w13a|Wheat can now be used to breed [[goat]]s.}}
{{History||1.19|snap=22w11a|Wheat can now be used to craft [[packed mud]].}}
{{History||1.20|snap=23w12a|Wheat can now be found in [[suspicious gravel]] and [[suspicious sand]] in cold and warm [[ocean ruins]] and in [[trail ruins]].}}
{{History|||snap=23w16a|Wheat no longer generates in [[suspicious sand]] in [[trail ruins]].|Due to the split of the archaeological loot tables for suspicious gravel within [[trail ruins]], wheat is now common loot.}}
{{History|pocket alpha}}
{{History||v0.2.0|[[File:Wheat JE1 BE1.png|32px]] Added wheat. It is currently unobtainable and serves no purpose.}}
{{History||v0.4.0|Wheat is now obtainable via farming and can be used to craft [[bread]].}}
{{History||v0.7.0|Wheat can now be used to craft [[cake]].}}
{{History||v0.8.0|snap=build 1|Wheat can now be used to breed [[cow]]s and [[sheep]].
|Wheat can now be used to craft [[hay bale]]s.}}
{{History||v0.9.0|snap=build 1|Wheat [[crop]]s now naturally spawn in [[village]]s.
|Wheat can now be used to craft [[cookie]]s.}}
{{History||v0.15.0|snap=build 1|Wheat can now be used to grow, increase tame and heal [[horse]]s, [[donkey]]s and [[mule]]s.}}
{{History||v0.16.2|Wheat can now be found in the [[chest]]s inside of large houses in [[ice plains]] and [[cold taiga]] [[village]]s.}}
{{History|pocket}}
{{History||1.0.0|snap=alpha 0.17.0.1|Wheat can now be found in [[igloo]] basement chests.}}
{{History||1.0.4|snap=alpha 1.0.4.0|Farmer [[villager]]s now [[trading|buy]] 18–22 wheat for 1 [[emerald]].}}
{{History||1.1.0|snap=alpha 1.1.0.0|Wheat can now be found in the new [[woodland mansion]] chests.}}
{{History|bedrock}}
{{History||1.4.0|snap=beta 1.2.14.2|Wheat can now be found inside [[shipwreck]] chests.}}
{{History|||snap=beta 1.2.20.1|Wheat can now be found inside [[underwater ruins]] chests.}}
{{History||1.10.0|snap=beta 1.10.0.3|Wheat can now be found in [[pillager outpost]] chests.
|[[File:Wheat JE2 BE2.png|32px]] The texture of wheat has been changed.}}
{{History||1.11.0|snap=beta 1.11.0.1|Wheat can now be found in [[desert]] [[village]] house chests, village shepherd and butcher house chests.
|Wheat can now be used to fill up [[composter]]s.}}
{{History|||snap=beta 1.11.0.4|[[Trading]] has changed, farmer [[villager]]s now have a 25% chance to buy 20 wheat for one [[emerald]] as part of their first tier trade.}}
{{History||1.13.0|snap=beta 1.13.0.1|Added [[fox]]es, which can drop wheat.}}
{{History|console}}
{{History||xbox=TU1|xbone=CU1|ps=1.0|wiiu=Patch 1|switch=1.0.1|[[File:Wheat JE1 BE1.png|32px]] Added wheat.}}
{{History||xbox=none|xbone=none|ps=1.90|wiiu=none|switch=none|[[File:Wheat JE2 BE2.png|32px]] The texture of wheat has been changed.}}
{{History|New 3DS}}
{{History||0.1.0|[[File:Wheat JE1 BE1.png|32px]] Added wheat.}}
{{History|foot}}
== Issues ==
{{issue list}}
== Gallery ==
<gallery>
Wheat SDGP.png|Wheat in the [[Super Duper Graphics Pack]].
File:Field of Wheat.jpg|[[Steve]] and [[Kai]] in a field of wheat crops.<ref>https://www.instagram.com/p/CumuJleg6Ij/</ref>
</gallery>
== External Links ==
*[https://www.minecraft.net/en-us/article/taking-inventory--wheat Taking Inventory: Wheat] – Minecraft.net on April 21, 2022
{{Items}}
[[Category:Plants]]
[[Category:Food]]
[[cs:Pšenice]]
[[de:Weizen]]
[[es:Trigo]]
[[fr:Blé]]
[[hu:Búza]]
[[it:Grano]]
[[ja:小麦]]
[[ko:밀]]
[[nl:Tarwe]]
[[pl:Pszenica]]
[[pt:Trigo]]
[[ru:Пшеница]]
[[th:ข้าวสาลี]]
[[uk:Пшениця]]
[[zh:小麦]]
[[Category:Renewable resources]]</li></ul> | 15w31a | Endermen will now remain aggravated towards the player despite being in contact with water. | |||
| Endermen will now drop the block they are holding when killed | |||||
| Have an animation when attacking. | |||||
| Pocket Edition Alpha | |||||
0.9.0{{Extension DPL}}<ul><li>[[End Crystal|End Crystal]]<br/>{{ItemEntity
|image=End Crystal.gif
|imagesize=150px
|invimage=End Crystal
|renewable=Yes
|stackable=Yes (64)
|rarity=Rare
|drops=None
|size=
Height: 2 Blocks<br>Width: 2 Blocks
}}
An '''end crystal''' is an [[entity]] that can be [[Crafting|crafted]] or found on [[the End]]'s main island, where it heals the [[Ender Dragon|ender dragon]]. It can only be placed on [[obsidian]] or [[bedrock]] and [[Explosion|explodes]] instantly when attacked or damaged in most ways.
== Spawning ==
=== Natural generation ===
An end crystal is found atop each [[obsidian pillar]] on the central island of the End, each on top of a piece of [[bedrock]]. There are 10 end crystals in total, of which two are protected in "cages" of [[iron bars]]. All end crystals respawn one after another as the respawning process of the [[ender dragon]] starts.
== Obtaining ==
=== Crafting ===
{{Crafting
|A1=Glass
|B1=Glass
|C1=Glass
|A2=Glass
|B2=Eye of Ender
|C2=Glass
|A3=Glass
|B3=Ghast Tear
|C3=Glass
|Output= End Crystal
|type= Decoration block
}}
== Usage ==
=== Healing the ender dragon ===
Their primary purpose is to recharge the health of the ender dragon, who gains a charge from the nearest crystal within a cuboid extending 32 blocks from the dragon in all directions. The dragon is healed {{hp|1}} each half-second. If multiple ender dragons are spawned, an end crystal can affect multiple dragons at the same time. The healing beam is neither obstructed nor is its power diminished by entities or blocks.
=== Respawning the ender dragon ===
[[File:End Crystals on the Exit portal.png|right|thumb|How to arrange end crystals on the exit portal to respawn the ender dragon.]]
As items, end crystals may be placed on bedrock and [[obsidian]], if the two blocks above the bedrock or obsidian block are air or replaceable blocks and no other entities intersect the area. When an end crystal is placed in [[the End]], a [[fire]] block is created at the end crystal location. If four are placed on the end [[exit portal]], one on each of the flat sides, the crystals respawn the original end crystals on the obsidian pillars, as well as resurrect the dragon itself, before exploding. The top of each pillar also explodes, destroying any player-placed blocks. This happens even if TNT explosions are turned off in settings.
If the exit portal is ever broken for any reason, end crystals can still be placed on obsidian blocks with the same location as the exit portal.
=== Explosions ===
End crystals explode when attacked or damaged in most ways, even by attacks that normally do zero damage. They are not affected by exploding fireworks, and if damaged by an explosion, they disappear instead of exploding.{{Only|Java}}<ref>{{bug|MC-118429||End crystals don't explode when destroyed by nearby explosions}}</ref> The end crystal's [[explosion]] has an [[Explosion#Explosion strength|explosion strength]] of 6, the same as a [[charged creeper]]. The end crystal's fire often remains after the crystal explodes. Any ender dragon charging from the crystal when it is destroyed takes {{hp|10}} damage.
{{IN|java}}, an end crystal's explosion can be [[blocking|blocked]] by a [[shield]].
Although an ender dragon damages most blocks and entities in its path, it cannot destroy end crystals simply by going near them.
Placing [[water]] on the end crystal will neutralize the blast effect, but not the [[damage]] or knockback.
End crystals with obsidian or bedrock below them will not damage blocks below them when they explode.
{{IN|bedrock}}, having the game rule {{cd|mobGriefing}} to {{cd|false}} will prevent the End Crystal from destroying any blocks. While {{in|java}} the same game rule will not prevent the End Crystal from destroying any blocks.
=== Beams ===
The end crystal naturally shoots a beam at the ender dragon and heals it when the dragon is within range. This beam can be manually created using the command {{cmd|data merge entity @e[type{{=}}end_crystal,limit{{=}}1] {BeamTarget:{X:0, Y:0, Z:0<nowiki>}}}}. The beam can be pointed in any direction, allowing it to mark locations or objects.
=== Properties ===
[[File:End Crystal (Slateless).gif|thumb|A base-less end crystal.]]
End crystals are of two kinds: the ones with a base beneath them are created either by game mechanism or by the {{cmd|summon}} command; while the base-less ones are created by players by manually placing the crystal items on top of [[obsidian]] or [[bedrock]].
The base appears to be made of bedrock, with a crystal hovering over it. While in the End, a crystal continually generates fire at its current position, one block above the base (directly on top of the block the base is embedded in), replacing any other block at that location. This fire is capable of spreading.
The end crystal entity is not solid and can be walked through freely. End crystals can be pushed by [[piston]]s, but they explode if moved while on fire. Because fire is checked only when an entity moves, end crystals do not normally take damage from their own fire unless moved.
== Sounds ==
{{edition|java}}:
{{Sound table
|sound=Explosion1.ogg
|sound2=Explosion2.ogg
|sound3=Explosion3.ogg
|sound4=Explosion4.ogg
|subtitle=Explosion
|source=block
|description=When an end crystal explodes
|id=entity.generic.explode
|translationkey=subtitles.entity.generic.explode
|volume=4.0
|pitch=0.56-0.84
|distance=16
|foot=1}}
{{edition|bedrock}}:
{{Sound table
|type=bedrock
|sound=Explosion1.ogg
|sound2=Explosion2.ogg
|sound3=Explosion3.ogg
|sound4=Explosion4.ogg
|source=block
|description=When an end crystal explodes
|id=random.explode
|volume=4.0
|pitch=1.0
|foot=1}}
== Data values ==
=== ID ===
{{edition|java}}:
{{ID table
|edition=java
|firstcolumnname=Item
|showforms=y
|generatetranslationkeys=y
|displayname=End Crystal
|spritetype=item
|nameid=end_crystal
|form=item
|foot=1}}
{{ID table
|edition=java
|firstcolumnname=Entity
|generatetranslationkeys=y
|displayname=End Crystal
|spritetype=entity
|nameid=end_crystal
|foot=1}}
{{edition|bedrock}}:
{{ID table
|edition=bedrock
|firstcolumnname=Item
|shownumericids=y
|showforms=y
|notshowbeitemforms=y
|generatetranslationkeys=y
|displayname=End Crystal
|spritetype=item
|nameid=end_crystal
|id=637
|form=item
|foot=1}}
{{ID table
|edition=bedrock
|firstcolumnname=Entity
|shownumericids=y
|generatetranslationkeys=y
|displayname=End Crystal
|spritetype=entity
|nameid=ender_crystal
|id=71
|foot=1}}
=== Entity data ===
End crystals have entity data that define various properties of the entity.
{{el|java}}:
{{main|Entity format}}
{{/ED}}
{{el|bedrock}}:
: See [[Bedrock Edition level format/Entity format]].
== Achievements ==
{{load achievements|The End... Again...}}
== Advancements ==
{{load advancements|The End... Again...}}
== History ==
[[File:End Crystal 19w38a.gif|thumb|Java Edition 19w38a]]
{{History|java}}
{{History||1.0.0|snap=Beta 1.9 Prerelease 6|[[File:End Crystal JE1 BE1.png|32px]] Added ender crystals.}}
{{History||1.2.1|snap=12w04a|Previously, ender crystals could be spawned using [[spawn egg]]s with ID 200 (in a [[server]], these were created using {{cmd|give 383 1 200}}). The spawned crystal would be positioned where a natural crystal would be if there was a bedrock block at the location. It was still possible until 1.9 to obtain an end crystal spawn egg, but it would not spawn anything.}}
{{History||1.7.2|snap=13w36a|Ender crystals can now be spawned with the {{cmd|summon}} command.}}
{{History||1.8|snap=14w06a|Ender crystals now generate one [[block]] lower. The fire they generate destroys the [[bedrock]] block that is supposed to be underneath (see {{bug|MC-47526}}).}}
{{History||1.9|snap=15w31a|Ender crystals generate at the correct Y-level again.}}
{{History|||snap=15w33c|Respawning the ender dragon now also respawns the ender crystals on the obsidian pillars.
|Ender crystals now have a compound BeamTarget tag that hold the X, Y, Z block location the beam points to.}}
{{History|||snap=15w44a|"Ender crystals" have been renamed to "end crystals".
|[[File:End Crystal (item) JE1 BE1.png|32px]] End crystals can now be obtained as an item.
|End crystals now drop from [[skeleton trap]] horses and can be placed only on [[obsidian]] or bedrock. Placing several of them atop the end exit portal respawns the ender dragon.}}
{{History|||snap=15w44b|End crystals are no longer dropped by [[skeleton horse]]s.
|Added crafting recipe for end crystals, making end crystals [[renewable]].}}
{{History|||snap=15w49a|End crystals now require [[air]]/replaceable [[block]]s and lack of [[entity|entities]] for placement.}}
{{History|||snap=15w51a|End crystals can no longer be placed in [[Adventure mode]].}}
{{History||1.11|snap=16w32a|The entity ID has been changed from <code>EnderCrystal</code> to <code>ender_crystal</code>.}}
{{History||1.13|snap=17w47a|Prior to [[1.13/Flattening|''The Flattening'']], this [[item]]'s numeral ID was 426.}}
{{History|||snap=18w20b|Renamed to "End Crystal".}}
{{History|||snap=pre5|Entity ID has been changed to <code>end_crystal</code>.}}
{{History||1.14|snap=18w43a|[[File:End Crystal JE2.png|32px]][[File:End Crystal (item) JE2 BE2.png|32px]] The textures of end crystals and the end crystal [[item]] have been changed.}}
{{History||1.19.3|snap=22w43a|End crystal explosions can now be [[blocking|blocked]] by [[shield]]s.<ref>{{bug|MC-188247|||Fixed}}</ref>}}
{{History|pocket}}
{{History||1.0.0|snap=alpha 0.17.0.1|[[File:End Crystal JE1 BE1.png|32px]][[File:End Crystal (item) JE1 BE1.png|32px]] Added end crystals.}}
{{History|bedrock}}
{{History||1.6.0|snap=?|[[File:End Crystal BE2.png|32px]] [[File:End Crystal BE2.gif|32px]] The model of the end crystals has been changed. It has now two cubes instead of three.}}
{{History||1.10.0|snap=beta 1.10.0.3|[[File:End Crystal BE3.png|32px]][[File:End Crystal (item) JE2 BE2.png|32px]] The textures of end crystals and the end crystal item have been changed.}}
{{History||1.17.10|snap=beta 1.17.10.20|[[File:End Crystal JE2.png|32px]] The model of the end crystals has been changed to have three cubes again, and to match ''Java Edition''.}}
{{History||1.19.70|snap=beta 1.19.70.20|Increased end crystal collision box size to match ''Java Edition''.|End crystals with obsidian or bedrock below them now will not damage blocks below them when they explode.}}
{{History|console}}
{{History||xbox=TU9|xbone=CU1|ps=1.0|wiiu=Patch 1|[[File:End Crystal JE1 BE1.png|32px]] Added ender crystals.}}
{{History||xbox=TU31|xbone=CU19|ps=1.22|wiiu=Patch 3|Ender crystals now generate one block lower. The fire they generate destroys the [[bedrock]] block that is supposed to be underneath.}}
{{History||xbox=TU46|xbone=CU36|ps=1.38|wiiu=Patch 15|"Ender crystals" have been renamed to "end crystals".
|[[File:End Crystal (item) JE1 BE1.png|32px]] End crystals can now be obtained as an [[item]].
|End crystals now drop from [[skeleton trap]] horses and can be placed only on [[obsidian]] or bedrock. Placing several of them atop the [[end portal|end exit portal]] respawns the ender dragon.
|Added a crafting recipe for end crystals.}}
{{History||xbox=none|xbone=none|ps=1.90|wiiu=none|switch=none|[[File:End Crystal JE2.png|32px]][[File:End Crystal (item) JE2 BE2.png|32px]] The textures of end crystals and the end crystal item have been changed.}}
{{History|new 3ds}}
{{History||1.7.10|[[File:End Crystal JE1 BE1.png|32px]][[File:End Crystal (item) JE1 BE1.png|32px]] Added end crystals.}}
{{History|foot}}
== Issues ==
{{issue list}}
== Trivia ==
* According to [[Jens Bergensten|Jeb]], the reason behind the current crafting recipe using glass as opposed to [[Chorus Fruit|chorus fruit]] or any materials introduced in [[Java Edition 1.9|1.9]] is as a means for players to craft end crystals in older worlds that the dragon has already been killed in.<ref>{{tweet|jeb_|667000226524372992|The problem is that you need to be able to craft the crystals on worlds in which the dragon has been destroyed already|November 18, 2015}}</ref>
* A historical rendition of the [[beacon]] block featured an animated entity within it, which resembled a yellow miniaturized end crystal. The bedrock platform of the end crystal entity would also render below the beacon, though this would normally be hidden within the block below.
* Using a [[piston]] to push an end crystal's fire into an end portal block deletes the end portal block. However, natural portal blocks regenerate if the end crystal is moved.
== Gallery ==
<gallery>
End Crystal Usage.png|Using end crystals to respawn the ender dragon.
Crystal Link.png|An ender dragon being hit with the "healing beam" of an end crystal.
Ender Crystal.png|An end crystal.
EnderCrystalOverworld.png|An end crystal in the Overworld spawned using {{cmd|summon}} {{code|end_crystal}}.
Ender Dragon Revival.png|End crystals respawning the ender dragon.
CagedEnderCrystal.png|A caged end crystal.
Respawn ender dragon.png|A [[player]] trying to respawn the ender dragon.
End Crystal (item).gif|An animation of the item of the end crystal.
</gallery>
== References ==
{{reflist}}
{{Entities}}
{{Items}}
[[de:Enderkristall]]
[[el:Κρύσταλλος του Ender]]
[[es:Cristal del End]]
[[fr:Cristal de l'End]]
[[ja:エンドクリスタル]]
[[ko:엔드 수정]]
[[nl:Endkristal]]
[[pl:Kryształ Endu]]
[[pt:Cristal do End]]
[[ru:Кристалл Края]]
[[th:คริสตัลเอนด์]]
[[uk:Кристал Енду]]
[[zh:末影水晶]]</li><li>[[Melon Seeds|Melon Seeds]]<br/>{{Block
|image = <gallery>
Melon Stem Age 0.png | Age 0
Melon Stem Age 1.png | Age 1
Melon Stem Age 2.png | Age 2
Melon Stem Age 3.png | Age 3
Melon Stem Age 4.png | Age 4
Melon Stem Age 5.png | Age 5
Melon Stem Age 6.png | Age 6
Melon Stem Age 7.png | Age 7
</gallery>
| image2 = <gallery>
Attached Melon Stem (N).png | North
Attached Melon Stem (E).png | East
Attached Melon Stem (S).png | South
Attached Melon Stem (W).png | West
</gallery>
| transparent = Yes
| light = No
| tool = none
| renewable = Yes
| stackable = Yes (64)
| flammable = No
| lavasusceptible = No
}}'''Melon seeds''' are items obtained from [[Melon Slice|melon slices]] that can be used to grow melon stems.
'''Melon stems''' are plants grown on [[farmland]] that, over time, grow [[melon]]s on dirt, mud and moss blocks adjacent to them.
== Obtaining ==
=== Breaking ===
When broken, a melon stem drops 0–3 melon seeds. The chance for melon seeds to drop increases with the stem's age.
{| class="wikitable"
! rowspan="3" |[[Resource location]]
! rowspan="3" | Source
! colspan="4" | Default
|-
| colspan="1" rowspan="2" style="text-align:center" | Nothing || colspan="3" style="text-align:center" |{{ItemLink|Melon Seeds|Melon seeds}}
|-
| style="text-align:center" | 1 || style="text-align:center" | 2 || style="text-align:center" | 3
|-
| rowspan="8" |<code>blocks/melon_stem</code>
|{{BlockLink|Melon Stem|Melon stem}} <code>age = 0</code>
| style="text-align:center" |81.3%|| style="text-align:center" |17.42%|| style="text-align:center" |1.24%|| style="text-align:center" |0.03%
|-
|{{BlockLink|Melon Stem|Melon stem}} <code>age = 1</code>
| style="text-align:center" |65.1%|| style="text-align:center" |30.04%|| style="text-align:center" |4.62%|| style="text-align:center" |0.24%
|-
|{{BlockLink|Melon Stem|Melon stem}} <code>age = 2</code>
| style="text-align:center" |51.2%|| style="text-align:center" |38.4%|| style="text-align:center" |9.6%|| style="text-align:center" |0.8%
|-
|{{BlockLink|Melon Stem|Melon stem}} <code>age = 3</code>
| style="text-align:center" |39.44%|| style="text-align:center" |43.02%|| style="text-align:center" |15.64%|| style="text-align:center" |1.9%
|-
|{{BlockLink|Melon Stem|Melon stem}} <code>age = 4</code>
| style="text-align:center" |29.13%|| style="text-align:center" |44.44%|| style="text-align:center" |22.22%|| style="text-align:center" |3.7%
|-
|{{BlockLink|Melon Stem|Melon stem}} <code>age = 5</code>
| style="text-align:center" |21.6%|| style="text-align:center" |43.2%|| style="text-align:center" |28.8%|| style="text-align:center" |6.4%
|-
|{{BlockLink|Melon Stem|Melon stem}} <code>age = 6</code>
| style="text-align:center" |15.17%|| style="text-align:center" |39.82%|| style="text-align:center" |34.84%|| style="text-align:center" |10.16%
|-
|{{BlockLink|Melon Stem|Melon stem}} <code>age = 7</code>
| style="text-align:center" |10.16%|| style="text-align:center" |34.84%|| style="text-align:center" |39.82%|| style="text-align:center" |15.17%
|-
| rowspan="1" |<code>blocks/attached_melon_stem</code>
|{{BlockLink|Attached Melon Stem|Attached Melon stem}}
| style="text-align:center" |10.16%|| style="text-align:center" |34.84%|| style="text-align:center" |39.82%|| style="text-align:center" |15.17%
|}
=== Natural generation ===
Melon stems generate naturally in stem farm inside [[woodland mansion]]s.
Melon stems generate in 20% of the farm plots in [[savanna]] [[village]]s, and 10% of the farm plots in [[desert]] villages.
=== Chest loot ===
{{LootChestItem|melon-seeds}}
=== Crafting ===
{{Crafting
|Melon Slice
|Output= Melon Seeds
|type= Material
}}
=== Trading ===
[[Wandering trader]]s sell melon seeds for 1 [[emerald]].
== Usage ==
=== Farming ===
{{see also|Tutorials/Pumpkin and melon farming}}
Melon seeds can be planted only on [[farmland]], as stems. Over time, a stem grows through several stages<sup>[''[[Talk:Pumpkin Seeds|needs testing]]'']</sup> and, at its final growth stage, will produce [[melon]]s on any adjacent [[dirt]], [[Coarse Dirt|coarse dirt]], [[Rooted Dirt|rooted dirt]], [[Grass Block|grass block]], [[farmland]], [[podzol]], [[mycelium]], [[Moss Block|moss block]], [[mud]] or [[Muddy Mangrove Roots|muddy mangrove roots]]. If a melon is already occupying a spot adjacent to a stem it does not grow more melons until the melons is removed. A single stem can grow an unlimited number of melons. Melon stems need a minimum light level of 10 in the block above the stem to grow and give melons. Melon seeds are affected by [[bone meal]] only with respect to stem growth; bone meal does not help produce the actual melons.
=== Breeding ===
Like other seeds, melon seeds can be used to [[breed]] [[chicken]]s, lead chickens around, and make baby chickens grow up faster by 10% of the remaining time.
=== Taming ===
Like other seeds, melon seeds can be used to tame [[parrot]]s.
=== Composting ===
Placing melon seeds into a [[composter]] has a 30% chance of raising the compost level by 1.
== Melon Stem ==
A '''melon stem''' is the block that is planted on [[farmland]] when melon seeds are used on it. It starts underground, and rises up as the plant grows. The stem is colored green when young, and then yellow once fully grown.
The stem curves once a melon has grown from it. A fully-grown single stem connects to any [[melon]] in an adjacent square, thus there are 5 possible appearances to a stem. If there are multiple melons it can connect to, it favors the east, then west, north, and south. When the melon is removed, the stem returns to its straight shape.
== Sounds ==
{{Sound table/Block/Hard crop}}
== Data values ==
=== ID ===
{{edition|java}}:
{{ID table
|edition=java
|showblocktags=y
|showforms=y
|generatetranslationkeys=y
|displayname=Melon Stem
|spritetype=block
|nameid=melon_stem
|blocktags=bee_growables, crops
|form=block}}
{{ID table
|displayname=Attached Melon Stem
|spritetype=block
|nameid=attached_melon_stem
|form=block}}
{{ID table
|displayname=Melon Seeds
|spritetype=item
|nameid=melon_seeds
|form=item
|foot=1}}
{{edition|bedrock}}:
{{ID table
|edition=bedrock
|shownumericids=y
|showforms=y
|generatetranslationkeys=y
|displayname=Melon Stem
|spritetype=block
|nameid=melon_stem
|id=105
|form=block
|translationkey=-}}
{{ID table
|displayname=Melon Seeds
|spritetype=item
|nameid=melon_seeds
|id=293
|form=item
|foot=1}}
=== Block states ===
{{see also|Block states}}
{{/BS}}
== Advancements ==
{{load advancements|A Seedy Place}}
== History ==
{{info needed section|check if stems floated above farmland upon initial implementation}}
{{History|java beta}}
{{History||1.8|snap=Pre-release|[[File:Melon Seeds JE1 BE1.png|32px]] Added melon seeds.
|[[File:Melon Stem Age 0 JE1.png|32px]] [[File:Stem Age 1 JE1.png|32px]] [[File:Melon Stem Age 2 JE1.png|32px]] [[File:Melon Stem Age 3 JE1.png|32px]] [[File:Melon Stem Age 4 JE1.png|32px]] [[File:Melon Stem Age 5 JE1.png|32px]] [[File:Melon Stem Age 6 JE1.png|32px]] [[File:Melon Stem Age 7 JE1.png|32px]] Added the melon stem, with seven stages of growth.
|Melon seeds can found in the new [[mineshaft]] [[chest]]s.
|[[File:Attached Melon Stem (N) JE1.png|32px]] [[File:Attached Melon Stem (E) JE1.png|32px]] [[File:Attached Melon Stem (S) JE1.png|32px]] [[File:Attached Melon Stem (W) JE1.png|32px]] Melon stems have four slightly visually distinct appearances for each facing direction - the bent part of the stem rotates, but the other two planes do not.
|[[File:Melon Stem Age 8 JE1.png|32px]] [[File:Melon Stem Age 9 JE1.png|32px]] [[File:Melon Stem Age 10 JE1.png|32px]] [[File:Melon Stem Age 11 JE1.png|32px]] [[File:Melon Stem Age 12 JE1.png|32px]] [[File:Melon Stem Age 13 JE1.png|32px]] [[File:Melon Stem Age 14 JE1.png|32px]] [[File:Melon Stem Age 15 JE1.png|32px]] Melon stem data values 8–15 now show a glitched formation, with a floating stem with an attached stem cross eventually emerging below.
|[[File:Attached Stem Age 8 JE1.png|32px]] [[File:Attached Stem Age 9 JE1.png|32px]] [[File:Attached Stem Age 10 JE1.png|32px]] [[File:Attached Stem Age 11 JE1.png|32px]] [[File:Attached Stem Age 12 JE1.png|32px]] [[File:Attached Stem Age 13 JE1.png|32px]] [[File:Attached Stem Age 14 JE1.png|32px]] [[File:Attached Stem Age 15 JE1.png|32px]] Melon stem blocks with data values higher than 7 can now attach to adjacent fruits, which results in buggy stem textures with [[vines]] in the mix due to vines being below attached stems in [[terrain.png]].}}
{{History|||snap=Pre-release 2 ;)|Melon stems can now be grown faster using [[bone meal]].}}
{{History|java}}
{{History||1.3.1|snap=1.3|The texture of melon stems has been moved one pixel to the left in [[terrain.png]].
|[[File:Melon Stem Age 0 JE2.png|32px]] [[File:Melon Stem Age 1 JE2.png|32px]] [[File:Melon Stem Age 2 JE2.png|32px]] [[File:Melon Stem Age 3 JE2.png|32px]] [[File:Melon Stem Age 4 JE2.png|32px]] [[File:Melon Stem Age 5 JE2.png|32px]] [[File:Melon Stem Age 6 JE2.png|32px]] [[File:Melon Stem Age 7 JE2.png|32px]] Stems now appear slightly different.
|[[File:Melon Stem Age 8 JE2.png|32px]] [[File:Melon Stem Age 9 JE2.png|32px]] [[File:Melon Stem Age 10 JE2.png|32px]] [[File:Melon Stem Age 11 JE2.png|32px]] [[File:Melon Stem Age 12 JE2.png|32px]] [[File:Melon Stem Age 13 JE2.png|32px]] [[File:Melon Stem Age 14 JE2.png|32px]] [[File:Melon Stem Age 15 JE2.png|32px]] Overgrown stems now appear slightly different.
|[[File:Attached Melon Stem (N) JE2.png|32px]] [[File:Attached Melon Stem (E) JE2.png|32px]] [[File:Attached Melon Stem (S) JE2.png|32px]] [[File:Attached Melon Stem (W) JE2.png|32px]] Attached melon stems now appear slightly different.
|[[File:Attached Stem Age 8 JE2.png|32px]] [[File:Attached Stem Age 9 JE2.png|32px]] [[File:Attached Stem Age 10 JE2.png|32px]] [[File:Attached Stem Age 11 JE2.png|32px]] [[File:Attached Stem Age 12 JE2.png|32px]] [[File:Attached Stem Age 13 JE2.png|32px]] [[File:Attached Stem Age 14 JE2.png|32px]] [[File:Attached Stem Age 15 JE2.png|32px]] Overgrown attached melon stems now appear slightly different.}}
{{History||1.4.2|snap=12w36a|[[Chicken]]s now use [[wheat seeds]], melon seeds, and [[pumpkin seeds]], instead of [[wheat]] to breed.}}
{{History||1.5|snap=13w02a|[[File:Melon Stem Age 0 JE3.png|32px]] [[File:Melon Stem Age 1 JE3.png|32px]] [[File:Melon Stem Age 2 JE3.png|32px]] [[File:Melon Stem Age 3 JE3.png|32px]] [[File:Melon Stem Age 4 JE3.png|32px]] [[File:Melon Stem Age 5 JE3.png|32px]] [[File:Melon Stem Age 6 JE3.png|32px]] Melon stems now use a squished version of their texture for immature stems, depending on age.
|[[File:Melon Stem Age 8 JE3.png|32px]] [[File:Melon Stem Age 9 JE3.png|32px]] [[File:Melon Stem Age 10 JE3.png|32px]] [[File:Melon Stem Age 11 JE3.png|32px]] [[File:Melon Stem Age 12 JE3.png|32px]] [[File:Melon Stem Age 13 JE3.png|32px]] [[File:Melon Stem Age 14 JE3.png|32px]] [[File:Melon Stem Age 15 JE3.png|32px]] This also affects melon stems of ages 8–15, which are likewise stretched to accommodate its predicted size.
|[[File:Attached Stem Age 8 JE3.png|32px]] [[File:Attached Stem Age 9 JE3.png|32px]] [[File:Attached Stem Age 10 JE3.png|32px]] [[File:Attached Stem Age 11 JE3.png|32px]] [[File:Attached Stem Age 12 JE3.png|32px]] [[File:Attached Stem Age 13 JE3.png|32px]] [[File:Attached Stem Age 14 JE3.png|32px]] [[File:Attached Stem Age 15 JE3.png|32px]] Melon stems of extreme ages, which are attached to adjacent fruits, now show a stretched and tinted stem appearance.}}
{{History|||snap=13w03a|[[File:Melon Stem Age 0 JE4.png|32px]] [[File:Melon Stem Age 1 JE4.png|32px]] [[File:Melon Stem Age 2 JE4.png|32px]] [[File:Melon Stem Age 3 JE4.png|32px]] [[File:Melon Stem Age 4 JE4.png|32px]] [[File:Melon Stem Age 5 JE4.png|32px]] [[File:Melon Stem Age 6 JE4.png|32px]] [[File:Melon Stem Age 7 JE4.png|32px]] Melon stems are no longer squished or stretched to account for age.<ref>{{bug|MC-7111}}</ref>
|[[File:Melon Stem Age 8 JE4.png|32px]] [[File:Melon Stem Age 9 JE4.png|32px]] [[File:Melon Stem Age 10 JE4.png|32px]] [[File:Melon Stem Age 11 JE4.png|32px]] [[File:Melon Stem Age 12 JE4.png|32px]] [[File:Melon Stem Age 13 JE4.png|32px]] [[File:Melon Stem Age 14 JE4.png|32px]] [[File:Melon Stem Age 15 JE4.png|32px]] Melon stems with age values 8 through 15 now show a tinted [[trapdoor]] texture.
|From this version up until 14w08a, overgrown melon stems start to draw from the texture below them on the [[texture atlas]], in much the same way they previously did with terrain.png. However, as texture atlases are unstable and textures tend to change positions as new blocks and textures are added, overgrown stems change the texture they draw from every time new textures are added, which includes when textures added by [[mods]].}}
{{History|||snap=13w09a|[[File:Melon Stem Age 8 JE5.png|32px]] [[File:Melon Stem Age 9 JE5.png|32px]] [[File:Melon Stem Age 10 JE5.png|32px]] [[File:Melon Stem Age 11 JE5.png|32px]] [[File:Melon Stem Age 12 JE5.png|32px]] [[File:Melon Stem Age 13 JE5.png|32px]] [[File:Melon Stem Age 14 JE5.png|32px]] [[File:Melon Stem Age 15 JE5.png|32px]] Melon stems with age values 8–15 now show a tinted [[birch wood]] texture.}}
{{History||1.6.1|snap=13w24a|Melon and pumpkin stems have now been assigned separate textures.
|[[File:Melon Stem Age 8 JE6.png|32px]] [[File:Melon Stem Age 9 JE6.png|32px]] [[File:Melon Stem Age 10 JE6.png|32px]] [[File:Melon Stem Age 11 JE6.png|32px]] [[File:Melon Stem Age 12 JE6.png|32px]] [[File:Melon Stem Age 13 JE6.png|32px]] [[File:Melon Stem Age 14 JE6.png|32px]] [[File:Melon Stem Age 15 JE6.png|32px]] Melon stems with age values 8–15 now show a tinted [[note block]] texture.}}
{{History||1.7.2|snap=13w37a|Added the {{cmd|setblock}} [[commands|command]], allowing for invalid stem ages to be placed in the world without using external editors. This also allows them to be obtained in earlier versions via backdating.}}
{{History|||snap=13w41a|[[File:Melon Stem Age 8 JE7.png|32px]] [[File:Melon Stem Age 9 JE7.png|32px]] [[File:Melon Stem Age 10 JE7.png|32px]] [[File:Melon Stem Age 11 JE7.png|32px]] [[File:Melon Stem Age 12 JE7.png|32px]] [[File:Melon Stem Age 13 JE7.png|32px]] [[File:Melon Stem Age 14 JE7.png|32px]] [[File:Melon Stem Age 15 JE7.png|32px]] Melon stems with age values 8–15 now show a tinted [[netherrack]] texture.}}
{{History||1.8|snap=14w10a|[[File:Melon Stem Age 8 JE8.png|32px]] [[File:Melon Stem Age 9 JE8.png|32px]] [[File:Melon Stem Age 10 JE8.png|32px]] [[File:Melon Stem Age 11 JE8.png|32px]] Melon stems with data values 8–11 now display a tinted attached stem, with 8 facing west, 9 facing east, 10 facing north and 11 facing south.
|Invalid melon stems with data values 12-15 now crash the game.}}
{{History|||snap=14w25a|[[File:Melon Stem Age 0 JE5.png|32px]] [[File:Melon Stem Age 1 JE5.png|32px]] [[File:Melon Stem Age 2 JE5.png|32px]] [[File:Melon Stem Age 3 JE5.png|32px]] [[File:Melon Stem Age 4 JE5.png|32px]] [[File:Melon Stem Age 5 JE5.png|32px]] [[File:Melon Stem Age 6 JE5.png|32px]] [[File:Melon Stem Age 7 JE5.png|32px]] Melon stems now render as a single diagonal plane, or, in the case of attached stems, a diagonal and orthogonal plane.
|[[File:Attached Melon Stem (N) JE3.png|32px]] [[File:Attached Melon Stem (E) JE3.png|32px]] [[File:Attached Melon Stem (S) JE3.png|32px]] [[File:Attached Melon Stem (W) JE3.png|32px]] The attached melon stem [[model]] now fully rotates to the direction the stem points. Prior to this update, the base of the melon stem would stay the same while the long attaching section would differ, resulting in four possible attached stem appearances.
|Invalid overgrown melon stems have effectively been removed from the game, as attempting to place an out of range stem via {{cmd|setblock}} creates a stem of age 0 and loading a world with such stems existing causes a game crash.}}
{{History|||snap=14w26a|[[File:Melon Stem Age 0 JE6.png|32px]] [[File:Melon Stem Age 1 JE6.png|32px]] [[File:Melon Stem Age 2 JE6.png|32px]] [[File:Melon Stem Age 3 JE6.png|32px]] [[File:Melon Stem Age 4 JE6.png|32px]] [[File:Melon Stem Age 5 JE6.png|32px]] [[File:Melon Stem Age 6 JE6.png|32px]] [[File:Melon Stem Age 7 JE6.png|32px]] [[File:Attached Melon Stem (N) JE4.png|32px]] [[File:Attached Melon Stem (E) JE4.png|32px]] [[File:Attached Melon Stem (S) JE4.png|32px]] [[File:Attached Melon Stem (W) JE4.png|32px]] Melon stems now correctly render as crosses again.<ref>{{bug|MC-58136}}</ref>}}
{{History|||snap=14w27a|[[File:Attached Stem Age 0 14w27a.png|32px]] [[File:Attached Stem Age 1 14w27a.png|32px]] [[File:Attached Stem Age 2 14w27a.png|32px]] [[File:Attached Stem Age 3 14w27a.png|32px]] [[File:Attached Stem Age 4 14w27a.png|32px]] [[File:Attached Stem Age 5 14w27a.png|32px]] [[File:Attached Stem Age 6 14w27a.png|32px]] Due to a bug, all melon stems appear attached regardless of age or any actual attachment.<ref>{{bug|MC-60208}}</ref>}}
{{History|||snap=14w28a|All melon stems appearing attached regardless of age or any actual attachment has been fixed. However, melon stems still appear attached to adjacent fruits regardless of age due to a similar bug.<ref>{{bug|MC-61716}}</ref>}}
{{History|||snap=14w34d|Melon seeds can no longer be used for [[breeding]] [[chicken]]s.}}
{{History||1.9|snap=15w31a|Chickens can now use melon seeds to breed again.}}
{{History|||snap=15w44a|Melon seeds have been added to [[dungeon]] [[chest]]s.
|The average yield of melon seeds from [[mineshaft]] chests has been decreased.}}
{{History|||snap=15w45a|Melon stems must now be fully grown again to attach.}}
{{History||1.11|snap=16w39a|Melon seeds can now be found inside chests in the new [[woodland mansion]]s.
|Melon crops now generate inside woodland mansions.}}
{{History||1.12|snap=17w18b|Placing a melon seeds in farmland now gives the player the "A Seedy Place" [[advancement]].{{verify}}}}
{{History||1.13|snap=17w47a|The different block states for the <code>melon_stem</code> ID have been split up into their own IDs.
|Prior to [[1.13/Flattening|''The Flattening'']], this [[block]]'s numeral ID was 105, and the [[item]]'s 362.}}
{{History|||snap=17w48a|Attached melon stems no longer [[drops|drop]] seeds.}}
{{History||1.14|snap=18w43a|[[File:Attached Melon Stem (N) JE5.png|32px]] [[File:Attached Melon Stem (E) JE5.png|32px]] [[File:Attached Melon Stem (S) JE5.png|32px]] [[File:Attached Melon Stem (W) JE5.png|32px]] The texture of attached melon stems has been changed.}}
{{History|||snap=18w49a|Melon stems now generate in the updated [[savanna]] [[village]]s.}}
{{History|||snap=18w50a|Melon stems now generate in the updated [[desert]] [[village]]s.}}
{{History|||snap=19w03a|Placing melon seeds into the new [[composter]] has a 10% chance of raising the compost level by 1.}}
{{History|||snap=19w05a|Melon seeds now have a 30% chance of increasing the compost level in a composter by 1.
|Added [[Wandering Trader|wandering trader]]s, which sell melon seeds.}}
{{History||1.15|snap=19w34a|[[Bee]]s can now pollinate melon stems.}}
{{History|||snap=19w39a|Attached melon stems now [[drops|drop]] seeds again.<ref>{{bug|MC-136360}}</ref>}}
{{History||1.18|snap=Pre-release 5|[[File:Melon Seeds JE2.png|32px]] The texture of melon seeds has been changed.}}
{{History|pocket alpha}}
{{History||v0.5.0|Added melon seeds.
|[[File:Melon Stem Age 0 JE1.png|32px]] [[File:Stem Age 1 JE1.png|32px]] [[File:Melon Stem Age 2 JE1.png|32px]] [[File:Melon Stem Age 3 JE1.png|32px]] [[File:Melon Stem Age 4 JE1.png|32px]] [[File:Melon Stem Age 5 JE1.png|32px]] [[File:Melon Stem Age 6 JE1.png|32px]] [[File:Melon Stem Age 7 JE1.png|32px]] [[File:Attached Melon Stem (N) JE1.png|32px]] [[File:Attached Melon Stem (E) JE1.png|32px]] [[File:Attached Melon Stem (S) JE1.png|32px]] [[File:Attached Melon Stem (W) JE1.png|32px]]{{verify|Are these models correct?}} Added melon stems.}}
{{History||v0.6.0|[[File:Melon Seeds JE1 BE1.png|32px]] Melon seeds no longer use the pumpkin seeds texture.}}
{{History||v0.9.0|snap=?|Melon seeds can now be found in [[mineshaft]] chests.}}
{{History||v0.12.1|snap=build 1|Melon seeds are no longer available from the [[Nether reactor]].}}
{{History||v0.14.0|snap=build 1|Melon seeds can now be found in [[minecart with chest|minecarts with chests]] in [[mineshaft]]s.}}
{{History|pocket}}
{{History||1.0.0|snap=alpha 0.17.0.1|Melon seeds now generate inside [[dungeon]] [[chest]]s.}}
{{History||1.1.0|snap=alpha 1.1.0.0|Melon crops now generate inside [[woodland mansion]]s.
|Melon seeds can now be found in woodland mansion chests.}}
{{History|bedrock}}
{{History||1.2.0|snap=beta 1.2.0.2|Melon seeds can now be found inside [[bonus chest]]s.
|Melon seeds are now used to tame [[parrot]]s.}}
{{History||1.10.0|snap=beta 1.10.0.3|[[File:Attached Melon Stem (W) JE5.png|32px]]{{info needed|More accurate image}} The texture of attached melon stems has been changed.
|Melon stems now generate in [[savanna]] and [[desert]] [[village]] farms.
|Added [[wandering trader]]s, who [[trading|sell]] melon seeds.}}
{{History||1.11.0|snap=beta 1.11.0.1|Melon seeds can now be used to fill up [[composter]]s.}}
{{History||1.14.0|snap=beta 1.14.0.1|[[Bee]]s can now pollinate melon stems.}}
{{History|console}}
{{History||xbox=TU5|xbone=CU1|ps=1.0|wiiu=Patch 1|[[File:Melon Seeds JE1 BE1.png|32px]] Added melon seeds.
|[[File:Melon Stem Age 0 JE1.png|32px]] [[File:Stem Age 1 JE1.png|32px]] [[File:Melon Stem Age 2 JE1.png|32px]] [[File:Melon Stem Age 3 JE1.png|32px]] [[File:Melon Stem Age 4 JE1.png|32px]] [[File:Melon Stem Age 5 JE1.png|32px]] [[File:Melon Stem Age 6 JE1.png|32px]] [[File:Melon Stem Age 7 JE1.png|32px]] [[File:Attached Melon Stem (N) JE1.png|32px]] [[File:Attached Melon Stem (E) JE1.png|32px]] [[File:Attached Melon Stem (S) JE1.png|32px]] [[File:Attached Melon Stem (W) JE1.png|32px]]{{verify|Are these models correct?}} Added melon stems.}}
{{History||xbox=none|xbone=none|ps=1.90|wiiu=none|switch=none|[[File:Attached Melon Stem (W) JE5.png|32px]]{{info needed|More accurate image}} The texture of attached melon stems has been changed.}}
{{History|New 3DS}}
{{History||0.1.0|[[File:Melon Stem Age 0 JE1.png|32px]] [[File:Stem Age 1 JE1.png|32px]] [[File:Melon Stem Age 2 JE1.png|32px]] [[File:Melon Stem Age 3 JE1.png|32px]] [[File:Melon Stem Age 4 JE1.png|32px]] [[File:Melon Stem Age 5 JE1.png|32px]] [[File:Melon Stem Age 6 JE1.png|32px]] [[File:Melon Stem Age 7 JE1.png|32px]] [[File:Attached Melon Stem (N) JE1.png|32px]] [[File:Attached Melon Stem (E) JE1.png|32px]] [[File:Attached Melon Stem (S) JE1.png|32px]] [[File:Attached Melon Stem (W) JE1.png|32px]]{{verify|Are these models correct?}} Added melon stems.}}
{{History|foot}}
<gallery>
Melon Stem with data value 15.png|The final version of the melon stem with age 15, as seen in-game.
Melonstems.png|Melon stems of ages 1–15 on a modded version of 1.7.2, hence the melon stems using the melon top texture.
Stems of 13w02a.png|All 16 stem sizes in 13w02a, with accompanying data values.
</gallery>
=== Melon stem "item" ===
{{:Technical blocks/Melon Stem}}
== Issues ==
{{issue list}}
== Gallery ==
<gallery>
Stem All Ages.png|All stages of growth.
AllSeeds.png|All the [[seeds]] that exist in the game.
</gallery>
== See also ==
* [[Melon]]
* [[Pumpkin Seeds]]
==References==
{{Reflist}}
{{Blocks|vegetation}}
{{Items}}
[[Category:Plants]]
[[Category:Food]]
[[Category:Non-solid blocks]]
[[Category:Generated structure blocks]]
[[cs:Semínka melounu]]
[[de:Melone]]
[[es:Semillas de sandía]]
[[fr:Graines de pastèque]]
[[hu:Dinnyemagok]]
[[it:Anguria]]
[[ja:スイカの種]]
[[ko:수박씨]]
[[nl:Meloenzaden]]
[[pl:Nasiona arbuza]]
[[pt:Sementes de melancia]]
[[ru:Семена арбуза]]
[[th:เมล็ดแตงโม]]
[[zh:西瓜种子]]</li></ul></nowiki> | build 1 | Added endermen. | |||
| build 2 | Endermen now have sounds. | ||||
| Endermen now teleport out of the way of projectiles. | |||||
| build 8 | Attack strength is now the same as the PC edition. | ||||
0.12.1{{Extension DPL}}<ul><li>[[Bed|Bed]]<br/>{{Block
| image = White Bed (N).png
| extratext = View [[#Gallery|all renders]]
| transparent = Yes
| tntres = 25
| hardness = 4
| light = No
| tool = any
| renewable = Yes
| stackable = No
| flammable = No
| lavasusceptible = {{jebe|Yes|No}}
}}
A '''bed''' is a [[Dye|dyeable]] [[block]] that allows a player to sleep and to reset their [[spawn]] point to within a few blocks of the bed in the [[Overworld]]. If the bed is obstructed or removed, the player spawns at the default world spawning location.
== Obtaining ==
=== Natural generation ===
;Igloo
A red bed naturally generates in each [[igloo]].
;Village
Beds of various colors generate in [[village]] houses, depending on the specific structure and [[biome]]:
* [[Desert]] village houses have cyan, green, or lime beds.
* [[Plains]] village houses have white or yellow beds.
* [[Savanna]] village houses have orange, red, or yellow beds.
* [[Snowy taiga]]{{only|bedrock|short=1}} and [[taiga]] village houses have blue or purple beds.
* [[Snowy tundra]] village houses have blue, red, or white beds.
=== Breaking ===
Beds can be mined with any [[tool]], or without a tool.<ref>{{bug|MC-192722||Beds have no assigned tool}}</ref>
{{breaking row|horizontal=1|Bed|sprite=red-bed|any}}
A bed also drops itself as an item when pushed by a [[piston]].
=== Crafting ===
{{Crafting
|head=1
|showname=0
|showdescription=1
|A2=Matching Wool
|B2=Matching Wool
|C2=Matching Wool
|A3=Any Planks
|B3=Any Planks
|C3=Any Planks
|Output= Matching Bed
|type=Decoration block
|description=The wool color must match. The planks can be different.
}}
<!--recipe removed
{{Crafting
|showdescription=1
|White Bed
|Matching Colored Dye
|Output= Matching Dyed Bed
|type=Decoration block
|description=White beds can be re-dyed using dyes.{{only|java}}{{until|JE 1.20}}
}}-->
{{Crafting
|showdescription=1
|Any Bed
|Matching Dye
|Output= Matching Bed
|type=Decoration block
|description=A bed of any color can be re-dyed using dyes.
}}
{{Crafting
|showdescription=1
|Any Dyed Bed
|Bleach
|Output=White Bed
|type=Decoration block
|description=This removes the color from the bed.{{only|bedrock|education}}
|foot=1
}}
<div style="display:none">
<!--
This is so the pre-Village & Pillage dyes can have dye-related crafting recipes show on their respective pages.
They don't need to be displayed on this page because they already intuitively list "Any Matching Dye".
-->
{{Crafting
|showdescription=1
|Any Bed
|Bone Meal; Lapis Lazuli; Cocoa Beans; Ink Sac
|Output=White Bed; Blue Bed; Brown Bed; Black Bed
|type=Decoration block
|description={{only|bedrock|education}}
}}
</div>
=== Trading ===
Journeyman-level shepherd villagers sell 1 of 16 beds for 3 [[emerald]]s as part of their trades.
== Usage ==
=== Sleeping ===
[[File:Sleep Animation.gif|240px|thumb|Player falling asleep.]]
Beds are used by pressing the {{control|use item}} button while looking at the bed.
A player sleeps by {{control|using|using}} a bed during a [[thunderstorm]], or at [[night]] (between 12542 and 23459 ticks in clear weather, when stars appear in the sky, or between 12010 and 23991 ticks in rainy weather). Players can sleep during a thunderstorm even if they are in a biome where it does not rain (i.e. Desert). Attempting to use a bed at any other time results in the message "You can only sleep at night or during thunderstorms". A player sleeps in a bed for 101 in-game [[tick]]s, or 5.05 seconds before the time skips to the next day. Sleeping in a bed with the {{cmd|gamerule doDaylightCycle}} set to <code>false</code> results in the player being kicked out of the bed after the 101 ticks, but does not change time of the world to day.
Sleeping in a bed is possible only in the [[Overworld]]. Attempting to sleep in a bed in [[the Nether]], [[the End]], and [[custom dimension]]s in which they are disabled causes it to [[explosion|explode]] and set [[fire]] to surrounding blocks; unless {{cmd|gamerule respawnBlocksExplode}}{{only|bedrock}} is set to {{cd|false}}.<ref>{{bug|mcpe-28723}} – "Exploding bed in the Nether" resolved as "Works As Intended". This is referenced {{in|je}} when a player is killed by "Intentional Game Design". </ref> The explosion has power 5, which is stronger than [[TNT]] (4), but not as strong as a charged [[creeper]] or [[End Crystal|end crystal]] (6). The explosion centers on the head part of the bed. [[Villager]]s can sleep normally in any dimension without the bed being blown up.<ref>{{bug|MC-146515|||WAI}}</ref> Upon death from a bed explosion, the [[death messages|message]] "'''(Player) was killed by [Intentional Game Design]'''" appears.
The player must be close to the bed to sleep. If the player is close enough to click on the bed, but not close enough to sleep in it, the message "You may not rest now, the bed is too far away"{{only|java|short=1}}/"Bed is too far away"{{only|bedrock|short=1}} appears. A player must be within 2 blocks of the bed {{in|JE}} or 3 blocks {{in|BE}} to use the bed.
If a "monster" is within 8 blocks of the bed horizontally (in the X- and Z-axis), and 5 blocks vertically (in the Y-axis), the message "You may not rest now, there are monsters nearby" appears and the player is prevented from sleeping until the monsters leave or are killed. Most hostile mobs, as well as some neutral mobs prevent players from sleeping, as shown in the table below.
{| class="wikitable mw-collapsible"
!Mob
!Prevent the player from sleeping
|-
|{{EntityLink|Blaze}}
|{{Tc|yes}}
|-
|{{EntityLink|Chicken Jockey}}
|{{Tc|partial|when hostile{{Only|Java|short=1}}/Yes{{Only|Bedrock|short=1}}}}
|-
|{{EntityLink|Creeper}}
|{{Tc|yes}}
|-
|{{EntityLink|Drowned}}
|{{Tc|yes}}
|-
|{{EntityLink|Endermite}}
|{{Tc|yes}}
|-
|{{EntityLink|Enderman}}
|{{Tc|partial|when hostile}}
|-
|{{EntityLink|Ender Dragon}}
|{{Tc|no}}
|-
|{{EntityLink|Evoker}}
|{{Tc|yes}}
|-
|{{EntityLink|Ghast}}
|{{Tc|no}}
|-
|{{EntityLink|Giant}}
|{{Tc|yes}}
|-
|{{EntityLink|Guardian}}, {{EntityLink|Elder Guardian}}
|{{Tc|yes}}
|-
|{{EntityLink|Hoglin}}
|{{Tc|no}}
|-
|{{EntityLink|Illusioner}}
|{{Tc|yes}}
|-
|{{EntityLink|Killer Bunny}}
|{{Tc|no}}
|-
|{{EntityLink|Magma Cube}}
|{{Tc|partial|no{{Only|Java|short=1}}/Yes{{Only|Bedrock|short=1}}}}
|-
|{{EntityLink|Piglin}}
|{{Tc|no}}
|-
|{{EntityLink|Piglin Brute}}
|{{Tc|yes}}
|-
|{{EntityLink|Pillager}}
|{{Tc|yes}}
|-
|{{EntityLink|Phantom}}
|{{Tc|yes}}
|-
|{{EntityLink|Ravager}}
|{{Tc|yes}}
|-
|{{EntityLink|Shulker}}
|{{Tc|no}}
|-
|{{EntityLink|Silverfish}}
|{{Tc|yes}}
|-
|{{EntityLink|Skeleton}}, {{EntityLink|Skeleton Horseman}}, {{EntityLink|Stray}}, {{EntityLink|Wither Skeleton}}
|{{Tc|yes}}
|-
|{{EntityLink|Spider}}, {{EntityLink|Cave Spider}}, {{EntityLink|Spider Jockey}}
|{{Tc|yes}}
|-
|{{EntityLink|Slime}}
|{{Tc|partial|no{{Only|Java|short=1}}/Yes{{Only|Bedrock|short=1}}}}
|-
|{{EntityLink|Vex}}
|{{Tc|yes}}
|-
|{{EntityLink|Vindicator}}
|{{Tc|yes}}
|-
|{{EntityLink|Warden}}
|{{Tc|yes}}
|-
|{{EntityLink|Witch}}
|{{Tc|yes}}
|-
|{{EntityLink|Wither}}
|{{Tc|yes}}
|-
|{{EntityLink|Zoglin}}
|{{Tc|yes}}
|-
|{{EntityLink|Zombie}}, {{EntityLink|Zombie Villager}}, {{EntityLink|Husk}}
|{{Tc|yes}}
|-
|{{EntityLink|Zombified Piglin}}
|{{Tc|partial|when hostile{{Only|Java|short=1}}/Yes{{Only|Bedrock|short=1}}}}
|-
|}
{{notelist}}
If the player has not entered a bed and didn't die for 3 in-game days, [[phantom]]s can spawn unless {{cmd|gamerule doInsomnia}} is set to {{cd|false}}. {{in|java}}, this can be verified by checking if the "Time Since Last Rest" [[statistic]] is greater than 1.00 h.
A hostile mob can wake a player that is sleeping.
The player also cannot sleep in a bed occupied by another player, resulting in the message, "This bed is occupied".
A player can, however, sleep in a bed being used by a villager. The player may first wake the villager (pressing {{control|use}} on the villager) and then quickly enter the bed before the villager can lie down again. The villager reclaims the bed after the player wakes. The villager is kicked out of its bed when a player attempts to sleep there.
A player also cannot sleep while on fire, while poisoned, or while starving.
If all sleeping requirements are met and the player enters a bed, the player is positioned in the bed. The player falls asleep as the screen fades to black. {{IN|bedrock}}, the sleeping animation slowly lowers the player into bed.
Once all players in a world are asleep, after 5 seconds (100 ticks) the time of day changes to sunrise. (time 0)
During this time, the chat window is focused, and the player can leave the bed by clicking the {{btn|Leave Bed}} button.
[[Waterlogging|Waterlogged]] beds{{only|bedrock}} cannot be slept in unless the player or villager has the {{EffectLink|Water Breathing}} or {{EffectLink|Conduit Power}} status effects. Attempting to use a waterlogged bed otherwise does not display any message.<ref>{{bug|MCPE-35802}}</ref>
Beds displaying an error above the hotbar is a feature exclusive to beds; other blocks that cannot be used do not display such a message.<ref>{{bug|MC-160479}} resolved as "Works As Intended"</ref>
If there are two or more blocks of space above the bed, then the player can wake up on the bed. If there is less than two blocks above the bed and there is room on the side, then the player wakes up on the side of the bed. If there is no space on the side of the bed and there is less than two blocks above the bed, then the player still wakes up on top of the bed, but suffocates if it's a solid block.
Villagers always wake up on top of the bed, meaning they can suffocate if there isn't enough room above the bed.
====Passing the night====
Sleeping changes the [[daylight cycle|time of day]] to sunrise and resets the [[weather]] cycle, changing the weather to clear conditions. {{IN|JE}}, the weather cycle is only reset if it is currently raining or snowing. The player wakes up next to the bed, facing the bed.
Sleeping does not accelerate processes that take place over time such as the growth of [[crops]] or [[smelting]]. If {{cmd|gamerule doDaylightCycle}} is <code>false</code>, the player instead wakes up in the night.
To skip the night in multiplayer, all players in the [[Overworld]] must be in bed at the same time. Pressing the {{btn|Leave Bed}} button is not necessary in this case. The percentage of players that need to sleep to skip the night can be customized with the game rule {{cd|playersSleepingPercentage}}.
Villagers are unable to skip the night by sleeping in beds, unlike players.
If the bed is destroyed while the player is in it, due to for example an explosion or by another player, the player wakes prematurely and the night does not pass.
====Setting the spawn point====
Once a player has entered a bed (or right clicked the bed during daytime), their spawn point is set to the location of that bed. {{IN|java}}, multiple players can set their spawn point on a single bed. {{IN|bedrock}}, the last player to use a specific bed is the only player who can respawn there, and players who had previously slept there respawn at the world spawn.
{{ctrl|Using}} a bed in the daytime likewise sets the spawn point, without actually entering the bed.
When a bed explodes, it does not set the spawn point.
The message "Respawn point set" is displayed in chat when the respawn point is successfully changed.
The check for a bed is made only when the player respawns. This means that the bed can be destroyed and replaced or even reoriented, but as long as there is a bed present in the same location, the player can respawn there. If a player's bed is absent, or if the area around the bed is made unsuitable for respawning (see below), a message is displayed saying ''You have no home bed or charged respawn anchor, or it was obstructed''{{only|je}}/''Your home bed was missing or obstructed''{{only|be}}, and the player respawns at the [[Spawn#World spawn|world spawn]] point.
When choosing where to respawn the player, the northwesternmost (lowest X- and Z-coordinates) location of the seven blocks adjacent to the head of the bed is chosen first. If this location is obstructed, the next choice is to its south (+Z), rather than the east (+X). Only when all seven locations around the head are obstructed are the three remaining ones adjacent to the foot then to be considered.
For a location to be unobstructed, the block at the level of the bed must be air or non-solid (e.g. torches, but not glass) and there must be a space with a solid block below it and two non-colliding blocks for the player to stand in 0-2 blocks below the bed. It does not matter if the bed itself has blocks above it. Putting a slab one block above a bed can act as a two block tall space, as the bed is half a block tall. The bed never spawns the player on or directly below itself even if all other locations are obstructed. If a bed is obstructed, the player's spawn point is cleared after they respawn. That is, even if the bed is subsequently made usable again, the player continues to respawn at the world spawn until interacting with the bed again.
Specifically, when interacting with it, the location of the ''head'' of the bed is saved as the spawn point, and if a bed is in that space (whether it is the foot or the head) then the respawn works. This can be observed by reorienting the bed with its head in the same location. Interacting with it does not produce a "Respawn point set" message as the game doesn't change the saved spawn point. If a bed is reoriented so that its foot is in this space, it still functions on the next respawn, but it can also be interacted with to update the spawn point to the new head of the bed and cause a "Respawn point set" message. Attempting the reverse, reorienting the bed so that it overlaps the original location of the foot, results in a respawn at world spawn. However, the location of the foot of the bed is also saved. If the bed is moved so that part of it overlaps the original location of the head, it can be observed that the same locations need to be obstructed to stop spawning. It is possible to respawn 2 blocks away from the bed this way.
=== Bouncing===
Falling onto a bed bounces the player with 66% strength – the bouncing-up velocity is 66% of the impact velocity. The player also takes 50% of normal fall damage.
Baby villagers bounce on beds during the day.
If the player is falling while sleeping requirements are met, and presses {{control|use}} on a bed within reach before hitting the ground, the fall damage is delayed until the player wakes.
A player can bounce on a bed while another player or villager is sleeping on it without waking the player or the villager up.
Villagers can be pushed onto beds, as the bed is half a block tall.
=== Curing===
Each bed in the vicinity of a zombie villager has a chance to speed up the [[Zombie_Villager#Curing|process of curing the zombie villager]]. Iron bars (such as in a prison cell) also have this effect.
=== Placement===
Beds require two blocks of floor space. Placement requires at least 2 blocks from the player's facing direction. When placed, the foot of the bed is placed on the block selected and the head of the bed on the block farther away from the player. {{IN|bedrock}}, beds require solid blocks below them when placed. However, the bed remains in place if its supporting blocks are later removed. {{IN|java}}, beds do not require supporting blocks and can be placed anywhere, provided there is enough room.
==Sounds ==
===Generic===
{{Sound table/Block/Wood}}
===Unique===
{{edition|java}}:
{{Sound table
|sound=Explosion1.ogg
|sound2=Explosion2.ogg
|sound3=Explosion3.ogg
|sound4=Explosion4.ogg
|subtitle=Explosion
|source=block
|description=When a player attempts to sleep while not in the Overworld
|id=entity.generic.explode
|translationkey=subtitles.entity.generic.explode
|volume=4.0
|pitch=0.56-0.84
|distance=16
|foot=1}}
{{edition|bedrock}}:
{{Sound table
|type=bedrock
|sound=Explosion1.ogg
|sound2=Explosion2.ogg
|sound3=Explosion3.ogg
|sound4=Explosion4.ogg
|source=block
|description=When a player attempts to sleep while not in the Overworld
|id=random.explode
|volume=4.0
|pitch=1.0
|foot=1}}
==Data values==
===ID===
{{edition|java}}:
{{ID table|
|edition=java
|showblocktags=y
|showitemtags=y
|showforms=y
|generatetranslationkeys=y
|displayname=White Bed
|spritetype=block
|nameid=white_bed
|blocktags=beds
|itemtags=beds}}
{{ID table
|displayname=Orange Bed
|spritetype=block
|nameid=orange_bed
|blocktags=beds
|itemtags=beds}}
{{ID table
|displayname=Magenta Bed
|spritetype=block
|nameid=magenta_bed
|blocktags=beds
|itemtags=beds}}
{{ID table
|displayname=Light Blue Bed
|spritetype=block
|nameid=light_blue_bed
|blocktags=beds
|itemtags=beds}}
{{ID table
|displayname=Yellow Bed
|spritetype=block
|nameid=yellow_bed
|blocktags=beds
|itemtags=beds}}
{{ID table
|displayname=Lime Bed
|spritetype=block
|nameid=lime_bed
|blocktags=beds
|itemtags=beds}}
{{ID table
|displayname=Pink Bed
|spritetype=block
|nameid=pink_bed
|blocktags=beds
|itemtags=beds}}
{{ID table
|displayname=Gray Bed
|spritetype=block
|nameid=gray_bed
|blocktags=beds
|itemtags=beds}}
{{ID table
|displayname=Light Gray Bed
|spritetype=block
|nameid=light_gray_bed
|blocktags=beds
|itemtags=beds}}
{{ID table
|displayname=Cyan Bed
|spritetype=block
|nameid=cyan_bed
|blocktags=beds
|itemtags=beds}}
{{ID table
|displayname=Purple Bed
|spritetype=block
|nameid=purple_bed
|blocktags=beds
|itemtags=beds}}
{{ID table
|displayname=Blue Bed
|spritetype=block
|nameid=blue_bed
|blocktags=beds
|itemtags=beds}}
{{ID table
|displayname=Brown Bed
|spritetype=block
|nameid=brown_bed
|blocktags=beds
|itemtags=beds}}
{{ID table
|displayname=Green Bed
|spritetype=block
|nameid=green_bed
|blocktags=beds
|itemtags=beds}}
{{ID table
|displayname=Red Bed
|spritetype=block
|nameid=red_bed
|blocktags=beds
|itemtags=beds}}
{{ID table
|displayname=Black Bed
|spritetype=block
|nameid=black_bed
|blocktags=beds
|itemtags=beds
|foot=1}}
{{ID table
|displayname=Block entity
|spritename=beds
|spritetype=block
|nameid=bed
|foot=1}}
{{edition|bedrock}}:
{{ID table
|edition=bedrock
|firstcolumnname=Bed
|shownumericids=y
|showforms=y
|generatetranslationkeys=y
|displayname=Block
|spritename=Beds
|spritetype=block
|nameid=bed
|id=26
|form=block
|itemform=item.bed}}
{{ID table
|displayname=Item
|spritename=bed
|spritetype=item
|nameid=bed
|id=418
|form=item
|translationkey=item.bed.black.name,item.bed.red.name,item.bed.green.name,item.bed.brown.name,item.bed.blue.name,item.bed.cyan.name,item.bed.silver.name,item.bed.gray.name,item.bed.pink.name,item.bed.lime.name,item.bed.yellow.name,item.bed.lightBlue.name,item.bed.magenta.name,item.bed.orange.name,item.bed.white.name
|foot=1}}
{{ID table
|notnamespaced=y
|displayname=Block entity
|spritename=beds
|spritetype=block
|nameid=Bed
|foot=1}}
===Metadata===
{{see also|Data values}}
{{IN|be}}, bed items use the following data values:
{{/DV}}
===Block states===
{{see also|Block states}}
{{/BS}}
===Block data===
A bed has a block entity associated with it that holds additional data about the block.
{{el|java}}:
{{see also|Block entity format}}
{{/BE}}
{{el|bedrock}}:
: See [[Bedrock Edition level format/Block entity format]].
==Advancements==
{{load advancements|Sweet Dreams}}
==History==
''For a more in-depth breakdown of changes to textures and models, including a set of renders for each state combination, see [[/Asset history]]''
{{History|java beta}}
{{History||November 26, 2011|link={{tweet|jeb|140410431394160640}}|Originally, [[crying obsidian]] was intended to act as a block to reset spawn points, until beds were introduced.}}
{{History||1.3|[[File:Red Bed JE1 BE1.png|32px]] [[File:Red Bed (item) JE1 BE1.png|32px]] Added beds.
|The only color for beds is red.
|Beds can currently be crafted using any color combination of wool.
|Sleeping in an area potentially exposed to monsters can cause [[player]]s to wake up early, with a [[skeleton]] or [[zombie]] spawned next to them.
|Trying to sleep in a bed in [[the Nether]] does nothing.}}
{{History||1.4|Sleeping in a bed now resets the player's spawn position, though it does not work for most users. The spawn point unintentionally changes only if ''Leave Bed'' is clicked and the function is limited to [[multiplayer]].}}
{{History||1.4_01|Beds now act as a respawn point as intended.}}
{{History||1.6|snap=Test Build 3|Trying to sleep in a bed in the Nether now causes the bed to [[explosion|explode]].}}
{{History||1.7|As blocks now pull textures from the expected places for model application, this has resulted in the bed texture shifting downward in <samp>[[terrain.png]]</samp>. No visual difference has resulted for the actual bed.}}
{{History|java}}
{{History||1.0.0|snap=Beta 1.9 Prerelease 4|Bed explosions in the Nether now light nearby blocks on fire.}}
{{History|||snap=Beta 1.9 Prerelease 5|The bottom textures of beds have been changed to the texture of the new [[oak]] planks from [[File:Red Bed JE1 (facing NWU).png|32px]] to [[File:Red Bed JE2 BE1 (facing NWU).png|32px]].}}
{{History|||snap=Beta 1.9 Prerelease 6|Beds no longer spawn monsters. Instead, trying to sleep when monsters are around displays a message saying ''You may not rest now, there are monsters nearby''.}}
{{History||1.2.4|snap=release|[[Cat]]s while in standing position now purposely go and sit on beds.
|[[Spruce]], [[birch]], and [[jungle tree|jungle]] planks can now be used to craft beds.}}
{{History||1.5|snap=?|Beds now check their [[biome]] for detonation rather than just their dimension.}}
{{History||1.7.2|snap=1.7.1|[[Acacia]] planks and [[dark oak]] planks can now be used to craft beds.}}
{{History||1.8|snap=14w29a|Beds now display the cracking animation on top and bottom.}}
{{History|||snap=14w33a|Beds now make [[sound]]s when placed, and play logical sounds when stepped on and [[breaking|broken]].<ref>{{bug|MC-66347||Beds make incorrect sounds|Fixed}}</ref>}}
{{History||1.9|snap=15w43a|Bed now generates inside [[igloo]]s.}}
{{History||1.11|snap=16w32a|The messages "You can only sleep at night", "You may not rest now, there are monsters nearby", and "This bed is occupied" now appear on top of the hotbar, the place that the message "Press <whatever your sneak key is> to dismount" also appears when the player is riding a [[mob]].}}
{{History|||snap=16w33a|If the player is close enough to click on the bed, but not close enough to sleep in it, the message "You may not rest now, the bed is too far away" is now displayed.}}
{{History||1.12|snap=17w06a|Neutral [[zombie pigmen]] no longer prevent the player from sleeping in a bed.}}
{{History|||snap=March 13, 2017|slink={{tweet|jeb_|841311279784591361}}|[[Jeb]] mentions colored beds for [[Java Edition 1.12|1.12]].}}
{{History|||snap=17w15a|[[File:White Bed JE1.png|32px]] [[File:Light Gray Bed JE1.png|32px]] [[File:Gray Bed JE1.png|32px]] [[File:Black Bed JE1.png|32px]] [[File:Brown Bed JE1.png|32px]] [[File:Orange Bed JE1.png|32px]] [[File:Yellow Bed JE1.png|32px]] [[File:Lime Bed JE1.png|32px]] [[File:Green Bed JE1.png|32px]] [[File:Cyan Bed JE1.png|32px]] [[File:Light Blue Bed JE1.png|32px]] [[File:Blue Bed JE1.png|32px]] [[File:Purple Bed JE1.png|32px]] [[File:Magenta Bed JE1.png|32px]] [[File:Pink Bed JE1.png|32px]] [[Dye]]d beds have been added.
|The "Bed" has been renamed to "Red Bed".
|Beds can now only be crafted using wool of the same color.
|[[File:Red Bed JE2.png|32px]] The texture of red beds has been changed. The top of the beds are no longer mirrored. <!--- the numbers appear out of order but it is correct since it orders all beds in the current order in the Java Creative inventory --->
|{{Sprite|pos=1|image=Bed Icons 1.12.png|size=32|sheetsize=512}} {{Sprite|pos=9|image=Bed Icons 1.12.png|size=32|sheetsize=512}} {{Sprite|pos=8|image=Bed Icons 1.12.png|size=32|sheetsize=512}} {{Sprite|pos=16|image=Bed Icons 1.12.png|size=32|sheetsize=512}} {{Sprite|pos=13|image=Bed Icons 1.12.png|size=32|sheetsize=512}} {{Sprite|pos=15|image=Bed Icons 1.12.png|size=32|sheetsize=512}} {{Sprite|pos=2|image=Bed Icons 1.12.png|size=32|sheetsize=512}} {{Sprite|pos=5|image=Bed Icons 1.12.png|size=32|sheetsize=512}} {{Sprite|pos=6|image=Bed Icons 1.12.png|size=32|sheetsize=512}} {{Sprite|pos=14|image=Bed Icons 1.12.png|size=32|sheetsize=512}} {{Sprite|pos=10|image=Bed Icons 1.12.png|size=32|sheetsize=512}} {{Sprite|pos=4|image=Bed Icons 1.12.png|size=32|sheetsize=512}} {{Sprite|pos=12|image=Bed Icons 1.12.png|size=32|sheetsize=512}} {{Sprite|pos=11|image=Bed Icons 1.12.png|size=32|sheetsize=512}} {{Sprite|pos=3|image=Bed Icons 1.12.png|size=32|sheetsize=512}} {{Sprite|pos=7|image=Bed Icons 1.12.png|size=32|sheetsize=512}} Beds now appear 3D in the [[inventory]].
|[[File:Red Bed JE3 (facing NWU).png|32px]] Beds now have 3D legs.<ref>{{bug|MC-11963||bed hind legs not rendered|Fixed}}</ref>
|Beds have been made bouncy, though they do not completely reduce all [[fall damage]].
|Beds are now a [[block entity]].}}
{{History|||snap=17w17a|[[File:Red Bed JE4 BE2 (facing NWU).png|32px]] The four legs of a bed are now each textured separately, and their [[model]] is different.
|[[File:White Bed JE2 BE2.png|32px]] [[File:Light Gray Bed JE2 BE2.png|32px]] [[File:Gray Bed JE2 BE2.png|32px]] [[File:Black Bed JE2 BE2.png|32px]] [[File:Brown Bed JE2 BE2.png|32px]] [[File:Red Bed JE3 BE2.png|32px]] [[File:Orange Bed JE2 BE2.png|32px]] [[File:Yellow Bed JE2 BE2.png|32px]] [[File:Lime Bed JE2 BE2.png|32px]] [[File:Green Bed JE2 BE2.png|32px]] [[File:Cyan Bed JE2 BE2.png|32px]] [[File:Light Blue Bed JE2 BE2.png|32px]] [[File:Blue Bed JE2 BE2.png|32px]] [[File:Purple Bed JE2 BE2.png|32px]] [[File:Magenta Bed JE2 BE2.png|32px]] [[File:Pink Bed JE2 BE2.png|32px]]<br> <!--- the numbers appear out of order but it is correct since it orders all beds in the current order in the Java Creative inventory --->
{{Sprite|pos=17|image=Bed Icons 1.12.png|size=32|sheetsize=512}} {{Sprite|pos=25|image=Bed Icons 1.12.png|size=32|sheetsize=512}} {{Sprite|pos=24|image=Bed Icons 1.12.png|size=32|sheetsize=512}} {{Sprite|pos=32|image=Bed Icons 1.12.png|size=32|sheetsize=512}} {{Sprite|pos=29|image=Bed Icons 1.12.png|size=32|sheetsize=512}} {{Sprite|pos=31|image=Bed Icons 1.12.png|size=32|sheetsize=512}} {{Sprite|pos=18|image=Bed Icons 1.12.png|size=32|sheetsize=512}} {{Sprite|pos=21|image=Bed Icons 1.12.png|size=32|sheetsize=512}} {{Sprite|pos=22|image=Bed Icons 1.12.png|size=32|sheetsize=512}} {{Sprite|pos=30|image=Bed Icons 1.12.png|size=32|sheetsize=512}} {{Sprite|pos=26|image=Bed Icons 1.12.png|size=32|sheetsize=512}} {{Sprite|pos=20|image=Bed Icons 1.12.png|size=32|sheetsize=512}} {{Sprite|pos=28|image=Bed Icons 1.12.png|size=32|sheetsize=512}} {{Sprite|pos=27|image=Bed Icons 1.12.png|size=32|sheetsize=512}} {{Sprite|pos=19|image=Bed Icons 1.12.png|size=32|sheetsize=512}} {{Sprite|pos=23|image=Bed Icons 1.12.png|size=32|sheetsize=512}} The textures of beds have now also been changed.}}
{{History||1.13|snap=17w47a|Beds now require solid blocks below them, or they break into an item. Previously, a bed needed to be placed on solid blocks, but the blocks could later be removed.}}
{{History|||snap=18w07a|Sleeping in a bed is now important to keep [[phantom]]s from spawning.}}
{{History|||snap=18w20a|Players in [[Creative]] mode can now sleep even if monsters are nearby.}}
{{History|||snap=18w22a|Beds no longer require supporting blocks below them; they do not break into an [[item (entity)|item]] if said blocks are removed, and can be directly placed on top of non-solid blocks.}}
{{History|||snap=pre2|The "You can only sleep at night" message when using a bed has been changed to "You can sleep only at night and during [[thunderstorm]]s."}}
{{History||1.14|snap=18w43a|[[File:White Bed JE3 BE3.png|32px]] [[File:Light Gray Bed JE3 BE3.png|32px]] [[File:Gray Bed JE3 BE3.png|32px]] [[File:Black Bed JE3 BE3.png|32px]] [[File:Brown Bed JE3 BE3.png|32px]] [[File:Red Bed JE4 BE3.png|32px]] [[File:Orange Bed JE3 BE3.png|32px]] [[File:Yellow Bed JE3 BE3.png|32px]] [[File:Lime Bed JE3 BE3.png|32px]] [[File:Green Bed JE3 BE3.png|32px]] [[File:Cyan Bed JE3 BE3.png|32px]] [[File:Light Blue Bed JE3 BE3.png|32px]] [[File:Blue Bed JE3 BE3.png|32px]] [[File:Purple Bed JE3 BE3.png|32px]] [[File:Magenta Bed JE3 BE3.png|32px]] [[File:Pink Bed JE3 BE3.png|32px]]<br>{{InvSprite|White Bed}} {{InvSprite|Light Gray Bed}} {{InvSprite|Gray Bed}} {{InvSprite|Black Bed}} {{InvSprite|Brown Bed}} {{InvSprite|Red Bed}} {{InvSprite|Orange Bed}} {{InvSprite|Yellow Bed}} {{InvSprite|Lime Bed}} {{InvSprite|Green Bed}} {{InvSprite|Cyan Bed}} {{InvSprite|Light Blue Bed}} {{InvSprite|Blue Bed}} {{InvSprite|Purple Bed}} {{InvSprite|Magenta Bed}} {{InvSprite|Pink Bed}} The textures of all beds have been changed.
|[[File:Red Bed JE5 (facing NWU).png|32px]] The bottom textures of beds have been changed to new oak planks texture.}}
{{History|||snap=18w44a|Cats can now sleep in empty beds or sit on their owner when their owner is sleeping.}}
{{History|||snap=18w47a|[[File:Red Bed JE6 BE3 (facing NWU).png|32px]] The bottom textures of beds have been changed to the new oak planks to texture, once again.}}
{{History|||snap=18w48a|Beds now generate in the updated [[plains]] [[village]]s.}}
{{History|||snap=18w49a|Beds now generate in the updated [[savanna]] villages and the new [[snowy tundra]] villages.}}
{{History|||snap=18w50a|Beds now generate in the updated [[desert]] and [[taiga]] villages.}}
{{History|||snap=19w08a|All mobs can now sleep in beds using [[command]]s.}}
{{History|||snap=19w11a|[[Villager]]s now claim beds and sleep in them during the night.
|Shepherd villagers now [[trading|sell]] beds.}}
{{History||1.15|snap=19w35a|If a player tries to sleep in a bed that is occupied by a villager, that villager is now kicked out of the bed.}}
{{History|||snap=19w36a|Trying to sleep in a bed during the daytime now sets the player's spawn location to that bed.}}
{{History|||snap=pre2|Successfully changing a spawn point using a bed now displays a message in [[chat]].}}
{{History||1.16|snap=20w06a|Crimson and warped planks can now be used to craft beds.}}
{{History|||snap=20w12a|The message "Your home bed was missing or obstructed" has been changed to "You have no home bed or respawn anchor, or it was obstructed" due to the addition of the [[respawn anchor]], used to set the player's spawn in [[the Nether]].}}
{{History||1.16.2|snap=20w30a|Beds now prioritize the side of the bed the player or villager entered from and then spaces circling around the foot of the bed up to the head of the bed.}}
{{History||1.17|snap=20w51a|Added gamerules for sleeping in multiplayer.}}
{{History||1.18|snap=21w44a|Sleeping now only resets the weather cycle if it is currently raining or snowing.<ref>{{bug|MC-63340||Sleeping always resets time until rain|Fixed}}</ref>}}
{{History||1.19|snap=22w11a|[[Mangrove]] planks can now be used to craft beds.}}
{{History||1.19.3|snap=22w43a|Bed explosions can now be properly [[blocking|blocked]] by [[shield]]s.<ref>{{bug|MC-200006|||Fixed}}</ref>}}
{{History||1.20|snap=Pre-release 1|Beds of any color can now be dyed into any other color.}}
{{History|pocket alpha}}
{{History||v0.4.0|[[File:Red Bed JE1 BE1.png|32px]] [[File:Red Bed (item) JE1 BE1.png|32px]] Added beds.}}
{{History||v0.5.0|Beds can now be obtained after activating the [[nether reactor]].}}
{{History||v0.9.0|snap=build 1|Beds no longer restore [[health]] in normal difficulty, making [[food]] a more required [[Survival]]-needed resource.
|Added smooth lighting to beds.}}
{{History||v0.11.0|snap=build 8|The lighting on beds has been improved.}}
{{History||v0.12.1|snap=build 1|Tamed [[cat|ocelots]] while standing now purposely go and sit on beds.
|Beds are no longer available from the [[nether reactor]].}}
{{History||v0.16.0|snap=build 1|Beds now make a [[sound]] when placed, identical to [[block]]s like [[stone]].<ref name="lazilycodedsounds">{{bug|MCPE-10077}} – "Incorrect sounds on beds" resolved as "Fixed".</ref>}}
{{History|pocket}}
{{History||1.0.0|snap=alpha 0.17.0.1|Beds are now generated in [[igloo]]s.}}
{{History|||snap=alpha 0.17.0.2|[[File:Leave Bed 1.0.jpg|36px]] The ''Leave Bed'' button now has a new texture.}}
{{History|||snap=alpha 1.0.0.0|Sleeping now ends [[weather]].}}
{{History||1.1.0|snap=alpha 1.1.0.0|[[File:White Bed JE2 BE2.png|32px]] [[File:Light Gray Bed JE2 BE2.png|32px]] [[File:Gray Bed JE2 BE2.png|32px]] [[File:Black Bed JE2 BE2.png|32px]] [[File:Brown Bed JE2 BE2.png|32px]] [[File:Orange Bed JE2 BE2.png|32px]] [[File:Yellow Bed JE2 BE2.png|32px]] [[File:Lime Bed JE2 BE2.png|32px]] [[File:Green Bed JE2 BE2.png|32px]] [[File:Cyan Bed JE2 BE2.png|32px]] [[File:Light Blue Bed JE2 BE2.png|32px]] [[File:Blue Bed JE2 BE2.png|32px]] [[File:Purple Bed JE2 BE2.png|32px]] [[File:Magenta Bed JE2 BE2.png|32px]] [[File:Pink Bed JE2 BE2.png|32px]]<br>[[File:White Bed (item) BE1.png|32px]] [[File:Light Gray Bed (item) BE1.png|32px]] [[File:Gray Bed (item) BE1.png|32px]] [[File:Black Bed (item) BE1.png|32px]] [[File:Brown Bed (item) BE1.png|32px]] [[File:Orange Bed (item) BE1.png|32px]] [[File:Yellow Bed (item) BE1.png|32px]] [[File:Lime Bed (item) BE1.png|32px]] [[File:Green Bed (item) BE1.png|32px]] [[File:Cyan Bed (item) BE1.png|32px]] [[File:Light Blue Bed (item) BE1.png|32px]] [[File:Blue Bed (item) BE1.png|32px]] [[File:Purple Bed (item) BE1.png|32px]] [[File:Magenta Bed (item) BE1.png|32px]] [[File:Pink Bed (item) BE1.png|32px]] Added the other 15 colors of beds.
|The "Bed" has been renamed to "Red Bed".
|[[File:Red Bed JE3 BE2.png|32px]] The texture of red beds has been changed.
|A new animation when sleeping has been added to beds.
|Beds in [[igloo]]s are now white in [[ice plains]] and brown in [[cold taiga]]s.
|Beds now bounce the [[player]] two [[block]]s up, and have 3D legs.
|Placement, stepping and breaking [[sound]]s for beds are now correctly wooden.<ref name="lazilycodedsounds"/>}}
{{History|bedrock}}
{{History||1.4.0|snap=beta 1.2.14.2|Beds can now be [[waterlogging|waterlogged]] and require [[Water Breathing]] to sleep in.}}
{{History|||snap=beta 1.2.20.1|Colored beds can now be turned into white beds by adding [[bleach]]. This works only if {{el|ee}} features are turned on.}}
{{History||1.6.0|snap=beta 1.6.0.1|Sleeping in a bed is now important to keep [[phantom]]s from spawning.}}
{{History||1.8.0|snap=beta 1.8.0.8|[[Cat]]s can now sleep in empty beds or sit on their [[player|owner]] when their owner is sleeping.}}
{{History||1.10.0|snap=beta 1.10.0.3|Various beds now generate in the new [[village]]s.
|[[Villager]]s can now sleep by occupying a bed, which prevent [[player]]s from using it.
|[[Igloo]]s now generate with red beds.
|Beds are now used to count the number of available houses in [[village]]s.
|[[File:White Bed JE3 BE3.png|32px]] [[File:Light Gray Bed JE3 BE3.png|32px]] [[File:Gray Bed JE3 BE3.png|32px]] [[File:Black Bed JE3 BE3.png|32px]] [[File:Brown Bed JE3 BE3.png|32px]] [[File:Red Bed JE4 BE3.png|32px]] [[File:Orange Bed JE3 BE3.png|32px]] [[File:Yellow Bed JE3 BE3.png|32px]] [[File:Lime Bed JE3 BE3.png|32px]] [[File:Green Bed JE3 BE3.png|32px]] [[File:Cyan Bed JE3 BE3.png|32px]] [[File:Light Blue Bed JE3 BE3.png|32px]] [[File:Blue Bed JE3 BE3.png|32px]] [[File:Purple Bed JE3 BE3.png|32px]] [[File:Magenta Bed JE3 BE3.png|32px]] [[File:Pink Bed JE3 BE3.png|32px]] The textures of all beds have been changed.}}
{{History||1.11.0|snap=beta 1.11.0.4|Beds can now be [[trading|bought]] from shepherd [[villager]]s.}}
{{History||1.13.0|snap=?|[[Player]]s now succeed in attempting to sleep on villager-occupied beds, kicking the villager off.}}
{{History|console}}
{{History||xbox=TU1|xbone=CU1|ps=1.00|wiiu=Patch 1|switch=1.0.1|[[File:Red Bed JE1 BE1.png|32px]] [[File:Red Bed (item) JE1 BE1.png|32px]] Added beds.}}
{{History||xbox=TU12|xbone=CU1|ps=1.00|wiiu= Patch 1|[[Cat]]s in standing position now purposely go and sit on beds, preventing [[player]]s from using them.}}
{{History||xbox=TU43|xbone=CU33|ps=1.36|wiiu=Patch 13|The sleeping animation while in beds has been changed.}}
{{History||xbox=TU54|xbone=CU44|ps=1.52|wiiu=Patch 24|switch=1.0.4|[[File:White Bed JE2 BE2.png|32px]] [[File:Light Gray Bed JE2 BE2.png|32px]] [[File:Gray Bed JE2 BE2.png|32px]] [[File:Black Bed JE2 BE2.png|32px]] [[File:Brown Bed JE2 BE2.png|32px]] [[File:Orange Bed JE2 BE2.png|32px]] [[File:Yellow Bed JE2 BE2.png|32px]] [[File:Lime Bed JE2 BE2.png|32px]] [[File:Green Bed JE2 BE2.png|32px]] [[File:Cyan Bed JE2 BE2.png|32px]] [[File:Light Blue Bed JE2 BE2.png|32px]] [[File:Blue Bed JE2 BE2.png|32px]] [[File:Purple Bed JE2 BE2.png|32px]] [[File:Magenta Bed JE2 BE2.png|32px]] [[File:Pink Bed JE2 BE2.png|32px]]<br>[[File:White Bed (item) LCE.png|32px]] [[File:Light Gray Bed (item) LCE.png|32px]] [[File:Gray Bed (item) LCE.png|32px]] [[File:Black Bed (item) LCE.png|32px]] [[File:Brown Bed (item) LCE.png|32px]] [[File:Orange Bed (item) LCE.png|32px]] [[File:Yellow Bed (item) LCE.png|32px]] [[File:Lime Bed (item) LCE.png|32px]] [[File:Green Bed (item) LCE.png|32px]] [[File:Cyan Bed (item) LCE.png|32px]] [[File:Light Blue Bed (item) LCE.png|32px]] [[File:Blue Bed (item) LCE.png|32px]] [[File:Purple Bed (item) LCE.png|32px]] [[File:Magenta Bed (item) LCE.png|32px]] [[File:Pink Bed (item) LCE.png|32px]] Added the other 15 colors of beds.
|The "Bed" has been now renamed to "Red Bed".
|[[File:Red Bed JE3 BE2.png|32px]] [[File:Red Bed (item) LCE.png|32px]] The textures of red beds has been changed.
|Beds are now [[dye]]able and bounce the [[player]] two [[block]]s up, and have a single 3D legs.}}
{{History||xbox=TU60|xbone=CU51|ps=1.64|wiiu=Patch 30|switch=1.0.11|The sleeping animation in beds has been changed again.}}
{{History||xbox=TU69|xbone=none|ps=1.76|wiiu=Patch 38|switch=none|Sleeping in a bed is now important to keep [[phantom]]s from spawning.
|Beds can now be [[waterlogging|waterlogged]] and require {{EffectLink|Water Breathing}} to sleep in.}}
{{History||xbox=none|xbone=none|ps=1.83|wiiu=none|switch=none|The sleeping animation for beds has been reverted to how it was before [[Legacy Console Edition version history#ps-1.64|1.64]].}}
{{History||xbox=none|xbone=none|ps=1.91|wiiu=none|switch=none|Various beds now generate in the new [[village]]s.
|[[Villager]]s can now sleep by occupying a bed, which prevents [[player]]s from using it.
|Beds are now used to count the number of available houses in villages.
|Beds can now be [[trading|bought]] from shepherd [[villager]]s.}}
{{History|New 3DS}}
{{History||0.1.0|[[File:Red Bed JE1 BE1.png|32px]] [[File:Red Bed (item) JE1 BE1.png|32px]] Added beds.}}
{{History||1.9.19|[[File:White Bed JE2 BE2.png|32px]] [[File:Light Gray Bed JE2 BE2.png|32px]] [[File:Gray Bed JE2 BE2.png|32px]] [[File:Black Bed JE2 BE2.png|32px]] [[File:Brown Bed JE2 BE2.png|32px]] [[File:Orange Bed JE2 BE2.png|32px]] [[File:Yellow Bed JE2 BE2.png|32px]] [[File:Lime Bed JE2 BE2.png|32px]] [[File:Green Bed JE2 BE2.png|32px]] [[File:Cyan Bed JE2 BE2.png|32px]] [[File:Light Blue Bed JE2 BE2.png|32px]] [[File:Blue Bed JE2 BE2.png|32px]] [[File:Purple Bed JE2 BE2.png|32px]] [[File:Magenta Bed JE2 BE2.png|32px]] [[File:Pink Bed JE2 BE2.png|32px]]<br>[[File:White Bed (item) BE1.png|32px]] [[File:Light Gray Bed (item) BE1.png|32px]] [[File:Gray Bed (item) BE1.png|32px]] [[File:Black Bed (item) BE1.png|32px]] [[File:Brown Bed (item) BE1.png|32px]] [[File:Orange Bed (item) BE1.png|32px]] [[File:Yellow Bed (item) BE1.png|32px]] [[File:Lime Bed (item) BE1.png|32px]] [[File:Green Bed (item) BE1.png|32px]] [[File:Cyan Bed (item) BE1.png|32px]] [[File:Light Blue Bed (item) BE1.png|32px]] [[File:Blue Bed (item) BE1.png|32px]] [[File:Purple Bed (item) BE1.png|32px]] [[File:Magenta Bed (item) BE1.png|32px]] [[File:Pink Bed (item) BE1.png|32px]] Added the other 15 colors of beds.
|The "Bed" has been renamed to "Red Bed".
|[[File:Red Bed JE3 BE2.png|32px]] The texture of red beds has been changed.
|Beds now bounce the [[player]] two [[block]]s up and have 3D legs.}}
{{History|Education}}
{{History||1.0|[[File:Red Bed JE1 BE1.png|32px]] [[File:Red Bed (item) JE1 BE1.png|32px]] Added beds.}}
{{History||1.0.1|[[File:White Bed JE2 BE2.png|32px]] [[File:Light Gray Bed JE2 BE2.png|32px]] [[File:Gray Bed JE2 BE2.png|32px]] [[File:Black Bed JE2 BE2.png|32px]] [[File:Brown Bed JE2 BE2.png|32px]] [[File:Orange Bed JE2 BE2.png|32px]] [[File:Yellow Bed JE2 BE2.png|32px]] [[File:Lime Bed JE2 BE2.png|32px]] [[File:Green Bed JE2 BE2.png|32px]] [[File:Cyan Bed JE2 BE2.png|32px]] [[File:Light Blue Bed JE2 BE2.png|32px]] [[File:Blue Bed JE2 BE2.png|32px]] [[File:Purple Bed JE2 BE2.png|32px]] [[File:Magenta Bed JE2 BE2.png|32px]] [[File:Pink Bed JE2 BE2.png|32px]]<br>[[File:White Bed (item) BE1.png|32px]] [[File:Light Gray Bed (item) BE1.png|32px]] [[File:Gray Bed (item) BE1.png|32px]] [[File:Black Bed (item) BE1.png|32px]] [[File:Brown Bed (item) BE1.png|32px]] [[File:Orange Bed (item) BE1.png|32px]] [[File:Yellow Bed (item) BE1.png|32px]] [[File:Lime Bed (item) BE1.png|32px]] [[File:Green Bed (item) BE1.png|32px]] [[File:Cyan Bed (item) BE1.png|32px]] [[File:Light Blue Bed (item) BE1.png|32px]] [[File:Blue Bed (item) BE1.png|32px]] [[File:Purple Bed (item) BE1.png|32px]] [[File:Magenta Bed (item) BE1.png|32px]] [[File:Pink Bed (item) BE1.png|32px]] Added the other 15 colors of beds.
|The "Bed" has been renamed to "Red Bed".
|[[File:Red Bed JE3 BE2.png|32px]] The texture of red beds has been changed.
|Beds now bounce the [[player]] two [[block]]s up, and have 3D legs.}}
{{History||1.0.27|Colored beds can now be turned into white beds by adding [[bleach]].}}
{{History||1.12|[[File:White Bed JE3 BE3.png|32px]] [[File:Light Gray Bed JE3 BE3.png|32px]] [[File:Gray Bed JE3 BE3.png|32px]] [[File:Black Bed JE3 BE3.png|32px]] [[File:Brown Bed JE3 BE3.png|32px]] [[File:Red Bed JE4 BE3.png|32px]] [[File:Orange Bed JE3 BE3.png|32px]] [[File:Yellow Bed JE3 BE3.png|32px]] [[File:Lime Bed JE3 BE3.png|32px]] [[File:Green Bed JE3 BE3.png|32px]] [[File:Cyan Bed JE3 BE3.png|32px]] [[File:Light Blue Bed JE3 BE3.png|32px]] [[File:Blue Bed JE3 BE3.png|32px]] [[File:Purple Bed JE3 BE3.png|32px]] [[File:Magenta Bed JE3 BE3.png|32px]] [[File:Pink Bed JE3 BE3.png|32px]] The textures of all beds have been changed.}}
{{History|foot}}
=== Data history ===
{{History|java}}
{{History||1.13|snap=17w47a|The different block states for the <code>bed</code> ID have been split up into their own IDs.
|Prior to [[1.13/Flattening|''The Flattening'']], this block's numeral ID was 26, and the item's 355.}}
{{History|foot}}
=== Bed "item"===
{{:Technical blocks/Bed}}
==Issues==
{{Issue list}}
== Trivia==
* The reason beds explode in the Nether and the End is because Notch found it was the easiest solution to dimension-unique respawning.<ref>{{tweet|Notch|1259681657793077250|duh|11 May 2020}}, in response to {{tweet|NoahBandito|1259681319392550912|So you're telling me the "Inteded Game Design" should actually be "Sorry, I was too lazy to code"?|11 May 2020}}</ref>
** Dimension-unique respawning was eventually implemented via the [[respawn anchor]], and gained command support at the same time. Despite this, beds and respawn anchors still explode in invalid dimensions.
* If the player quits the game while sleeping, upon return the player wakes up beside the bed.
* Using the {{cmd|teleport}} command while another player is sleeping still teleports the sleeping player, but the player wakes immediately.{{only|java}}
* If the player places a bed on [[ice]], running over the bed acts like running over ice, similar to slabs.
* When placed using the {{cmd|setblock}} command, only one half of a bed is placed, because beds are two blocks long. A single half can be slept in like a whole bed.
* Villagers can sleep in the Nether and the End without causing the bed to explode.<ref>{{bug|MC-146515}} Resolved as Works As Intended</ref>
* While the block state used to determine the half of a two-block block such as [[door]]s and double-tall [[flower]]s is called ''half'', in the case of beds this is called ''part''.
* Players and villagers do not drown or take damage from lava while in a bed, even if the bed is covered in lava.
*The red bed was the original default bed color. In [[Java Edition 1.12]] and [[Pocket Edition 1.1.0]] version of the game, the default color was changed to white.
== Gallery ==
=== All renders ===
<gallery>
White Bed.png|White
Light Gray Bed.png|Light gray
Gray Bed.png|Gray
Black Bed.png|Black
Brown Bed.png|Brown
Red Bed.png|Red
Orange Bed.png|Orange
Yellow Bed.png|Yellow
Lime Bed.png|Lime
Green Bed.png|Green
Cyan Bed.png|Cyan
Light Blue Bed.png|Light blue
Blue Bed.png|Blue
Purple Bed.png|Purple
Magenta Bed.png|Magenta
Pink Bed.png|Pink
</gallery>
=== Screenshots ===
<gallery>
Multiplayer Sleeping.png|A sleeping player in multiplayer.
Missing Bed.png|The message that can be seen after a failed attempt to respawn at the spawn point set by a bed.
Nether Bed.png|A crater created by attempting to sleep in the Nether.
Ender Bed.png|A crater created by attempting to sleep in the End.
16 color beds.png|All the different color variants.
Old Village New Village VillagerSleeping MCEE.png|An unemployed [[villager]] and a [[butcher]] villager goes to sleep, unaware of the zombies outside.
Stackedbeds.png|A stack of beds.
Mob wakeup.png|Player being awakened by a [[zombie]].
Day Sleeping.png|The message that can be seen when any players attempt to sleep during daytime.
Sleeping.png|A player going to sleep in a bed on the first day of a ''Minecraft'' world.
CobwebVillage.png|A bed in an abandoned village has its bottom half replaced by wheat crops.
</gallery>
=== In other media ===
<gallery>
File:Rainbow Bed.png|The [[MCE:Rainbow Bed|rainbow bed]], a unique coloration featured in [[Minecraft Earth]].
File:The Sham.jpg|The Sham, a villainous, sentient bed featured in the [[skin pack|Campfire Tales]] skin pack.
</gallery>
==References==
{{Reflist}}
{{Blocks|Utility}}
{{Items}}
[[Category:Utility blocks]]
[[Category:Manufactured blocks]]
[[Category:Generated structure blocks]]
[[Category:Block entities]]
[[cs:Postel]]
[[de:Bett]]
[[es:Cama]]
[[fr:Lit]]
[[hu:Ágy]]
[[it:Letto]]
[[ja:ベッド]]
[[ko:침대]]
[[nl:Bed]]
[[pl:Łóżko]]
[[pt:Cama]]
[[ru:Кровать]]
[[th:เตียง]]
[[uk:Ліжко]]
[[zh:床]]</li><li>[[Eye of Ender|Eye of Ender]]<br/>{{redirect|Ender Eye|the boss|Ender Dragon|item that teleports the player to where it lands|Ender Pearl}}
{{ItemEntity
|image=Eye of Ender.png
|stackable=Yes (64)
|renewable=Yes
|size=Height: 0.25 Blocks<br>Width: 0.25 Blocks
|networkid='''[[JE]]''': 72
}}
An '''eye of ender''' is a craftable item used to locate [[stronghold]]s and activate the [[end portal]]s within them.
== Obtaining ==
=== Crafting ===
{{Crafting
|Blaze Powder
|Ender Pearl
|Output=Eye of Ender
|type=Miscellaneous
}}
== Usage ==
=== Locating strongholds ===
[[File:Eye of Ender (break).gif|thumb|right|An animation of an eye of ender shattering.]]
To locate [[stronghold]]s (and the [[end portal]]s they house):
* Pressing {{control|use}} while holding an eye of ender causes it to fly approximately 12 blocks in the direction of the nearest stronghold, traveling through any blocks necessary, and leave a trail of purple particles, the same particle effect used for [[endermen]] and [[ender chests]].
** The eye leads to the [[chunk]] where a spiral staircase, the first room generated in the stronghold, is located.
** The center of this entrance staircase is always exactly at the chunk coordinates 4, ~, 4, although the eye of ender leads to chunk coordinates 0, ~, 0 (the northwest corner of the chunk).
* While over 12 blocks away from the northwest corner of the staircase chunk, the eye will travel upward to offer an easily-visible indication of the horizontal direction the player must travel.
* When closer than 12 blocks to the northwest corner of the staircase chunk, the eye will travel downward, to indicate the player is above a stronghold and must mine downward.
* After two or three seconds of travel, the eye floats in the air briefly, then either falls (becoming collectable again) or shatters in mid-air. The eye has a 20% chance of shattering (80% chance of surviving) per throw, therefore throwing it three times has approximately 50% overall chance to shatter the eye (0.8<sup>3</sup>=51.2%).
* The eye of ender's flying function works only in the [[Overworld]]. It does nothing in [[the Nether]], [[the End]], [[custom dimension]]s{{verify|type=current}}, or in worlds with no strongholds.
Note that the eyes may point to an incorrect location if the target chunks were generated with a different biomes map in an older version or through different generation settings.<ref>See also {{bug|MC-135996}}</ref>
=== Activating end portals ===
[[File:Active End Portal.png|thumb|right|An end portal activated with eyes of ender.]]
Once an end portal is found, the eyes of ender are required to activate it. End portals require a total of 12 eyes of ender in order to activate, though each individual frame-block has a 10% chance of containing an eye of ender when generated. Eyes can be placed in empty [[End portal frame]]s by pressing {{control|use}} on them until the entire ring of 12 is filled, thereby activating the portal. Due to the fact that there is a 10% chance of each individual end portal frame having an eye in it, there is a one out of one trillion chance of every frame having an eye in it thereby activating the portal even if the player doesn't have any eyes of ender.
{| class="wikitable sortable mw-collapsible"
|+End Portal Pre-Filled Eyes
!Eyes
!0
!1
!2
!3
!4
!5-12
|-
|Exactly
|28%
|38%
|23%
|9%
|2%
|<1%
|-
|Or More
|100%
|72%
|34%
|11%
|3%
|<1%
|}
=== Crafting ingredient ===
{{crafting usage}}
== Sounds ==
{{Edition|Java}}:<br>
Eyes of ender use the Friendly Creatures sound category for entity-dependent sound events.
{{Sound table
|sound=Ender Eye death1.ogg
|sound2=Ender Eye death2.ogg
|subtitle=Eye of Ender falls <ref group=sound name=LousyEvents>{{Bug|MC-98316||Wrong subtitles caused by missing distinction}}</ref>
|source=neutral
|description=When an eye of ender drops or breaks
|id=entity.ender_eye.death|idnote=<ref group=sound name=LousyEvents/>
|translationkey=subtitles.entity.ender_eye.death|translationkeynote=<ref group=sound name=LousyEvents/>
|volume=1.3
|pitch=1.0
|distance=16}}
{{Sound table
|sound=Ender Eye launch1.ogg
|sound2=Ender Eye launch2.ogg
|subtitle=Eye of Ender shoots
|source=neutral
|description=When an eye of ender is thrown
|id=entity.ender_eye.launch
|translationkey=subtitles.entity.ender_eye.launch
|volume=0.5
|pitch={{frac|1|3}}-0.5
|distance=16}}
{{Sound table
|sound=End portal eye place1.ogg
|sound2=End portal eye place2.ogg
|sound3=End portal eye place3.ogg
|subtitle=Eye of Ender attaches
|source=block
|description=When an eye of ender is placed in an end portal frame
|id=block.end_portal_frame.fill
|translationkey=subtitles.block.end_portal_frame.fill
|volume=1.0
|pitch=1.0
|distance=16
|foot=1}}
{{Edition|Bedrock}}:
{{Sound table
|type=bedrock
|sound=Item Frame break1.ogg
|sound2=Item Frame break2.ogg
|sound3=Item Frame break3.ogg
|source=block
|description=When an eye of ender breaks <ref group=sound>{{Bug|MCPE-115646}}</ref>
|id=block.itemframe.break}}
{{Sound table
|sound=Bow shoot.ogg
|source=player
|description=When an eye of ender is thrown
|id=random.bow
|volume=0.5
|pitch=0.33-0.5}}
{{Sound table
|sound=End portal eye place1.ogg
|sound2=End portal eye place2.ogg
|sound3=End portal eye place3.ogg
|source=block
|description=When an eye of ender is placed in an end portal frame
|id=block.end_portal_frame.fill
|volume=0.3
|pitch=0.9/1.0/1.1
|foot=1}}
==Data values==
===ID===
{{edition|java}}:
{{ID table
|edition=java
|firstcolumnname=Item
|showforms=y
|generatetranslationkeys=y
|displayname=Eye of Ender
|spritetype=item
|nameid=ender_eye
|form=item
|foot=1}}
{{ID table
|edition=java
|firstcolumnname=Entity
|generatetranslationkeys=y
|displayname=Eye of Ender
|spritetype=entity
|nameid=eye_of_ender
|foot=1}}
{{edition|bedrock}}:
{{ID table
|edition=bedrock
|firstcolumnname=Item
|shownumericids=y
|showforms=y
|notshowbeitemforms=y
|generatetranslationkeys=y
|displayname=Eye of Ender
|spritetype=item
|nameid=ender_eye
|id=433
|form=item
|foot=1}}
{{ID table
|edition=bedrock
|firstcolumnname=Entity
|shownumericids=y
|generatetranslationkeys=y
|displayname=Eye of Ender
|spritetype=entity
|nameid=eye_of_ender_signal
|id=70
|foot=1}}
===Entity data===
The purple particles left by eyes of ender have entity data that define various properties of the entity.
{{el|java}}:
{{main|Entity format}}
{{/ED}}
{{el|bedrock}}:
:See [[Bedrock Edition level format/Entity format]].
==Advancements==
{{load advancements|Eye Spy}}
==Video ==
{{Video note|This video does not mention that eyes of ender can be used to craft [[ender chest]]s or [[end crystal]]s.}}
<div style="text-align:center">{{yt|E0AhoxYLomc}}</div>
==History==
{{History|java}}
{{History||1.0.0|snap=Beta 1.9 Prerelease 3|[[File:Eye of Ender JE1 BE1.png|32px]] Added eyes of ender.
|Eyes of ender can be used on a [[end portal frame|portal block]] to repair them, but repairing them does nothing.}}
{{History|||snap=Beta 1.9 Prerelease 4|Each eye can now be placed in a [[end portal frame|portal block]] or used to hone in on a [[stronghold]]. [[Jens Bergensten|Jeb]] demonstrated the new uses for an eye in his livestream.<ref>http://www.twitch.tv/jebox/b/297000418</ref> An [[end portal]] within a stronghold could be seen in the stream with two eyes inserted into blocks.
|In older worlds with chunks generated before [[Java Edition Beta 1.9 Prerelease 3|Beta 1.9 Prerelease 3]], the eyes may mislead the [[player]] to a place where there isn't a [[stronghold]] at all. This happens because the eyes lead to where a stronghold should be based on the world seed in the current version, but before Beta 1.9 Prerelease 3 strongholds generated differently based on the seed. Therefore, if the player saved the coordinates the eye traveled to in an old world and generated a new world with the same seed, the player could travel to those same coordinates and find a stronghold.}}
{{History|||snap=Beta 1.9 Prerelease 6|Eyes of ender no longer render like a tool in third person.}}
{{History|||snap=RC1|The throwing sound of eyes of ender has been changed.}}
{{History||1.3.1|snap=12w21a|Eyes of ender can now be used to craft [[ender chest]]s.
|Priest [[villager]]s would [[trading|buy]] 2–3 eyes of ender for one [[emerald]].}}
{{History|||snap=12w22a|Priest villagers no longer buy eyes of ender, instead selling them for 7–10 emeralds.}}
{{History||1.6.4|snap=1.6.3-pre|Eyes of ender now lead to [[stronghold]]s based on the structure data saved in the world file instead of calculating their approximate location via the [[seed (level generation)|world seed]]. Therefore, strongholds generated in old versions can still be found even if the distribution of strongholds is changed.}}
{{History||1.7.2|snap=13w41a|Eyes of Ender now lead to the entrance of a stronghold instead of the portal room.}}
{{History||1.8|snap=14w02a|With changes that have been made to villagers and the [[trading]] system, cleric villagers now sell eyes of ender for 7–11 [[emerald]]s, as one of their tier III trades.}}
{{History||1.9|snap=15w41a|Eyes of ender are no longer [[trading|sold]] by cleric [[villager]]s.}}
{{History|||snap=15w44b|An eye of ender is now used to craft an [[end crystal]].}}
{{History|||snap=pre3|Eyes of ender now point to the 125 new strongholds.<ref>{{bug|MC-91173}} resolved as "Fixed"</ref>}}
{{History||1.11|snap=16w32a|The [[entity]] ID has been changed from <code>EyeOfEnderSignal</code> to <code>eye_of_ender_signal</code>.}}
{{History||1.12|snap=17w17a|A new ''pop'' [[sound]] has been added when a thrown eye of ender bursts.}}
{{History||1.13|snap=17w47a|Prior to [[1.13/Flattening|''The Flattening'']], this [[item]]'s numeral ID was 381.}}
{{History|||snap=pre5|The [[entity]] ID has been changed to <code>eye_of_ender</code>.}}
{{History||1.14|snap=18w43a|[[File:Eye of Ender JE2 BE2.png|32px]] The texture of eyes of ender has been changed.}}
{{History||1.19|snap=22w11a|Eyes of Ender now lead to the corner of the chunk (0, ~, 0) instead of the center (8-9, ~, 8-9).<ref>{{bug|MC-253394}}</ref>}}
{{History|pocket}}
{{History||1.0.0|snap=alpha 0.17.0.1|[[File:Eye of Ender JE1 BE1.png|32px]] Added eyes of ender.}}
{{History|bedrock}}
{{History||1.10.0|snap=beta 1.10.0.3|[[File:Eye of Ender JE2 BE2.png|32px]] The texture of eyes of ender has been changed.}}
{{History||1.16.0|snap=beta 1.15.0.51|The [[particles]] of eyes of ender have been changed to match {{el|je}}.}}
{{History|console}}
{{History||xbox=TU7|xbone=CU1|ps=1.0|wiiu=Patch 1|[[File:Eye of Ender JE1 BE1.png|32px]] Added eyes of ender.}}
{{History||xbox=none|xbone=none|ps=1.90|wiiu=none|switch=none|[[File:Eye of Ender JE2 BE2.png|32px]] The texture of eyes of ender has been changed.}}
{{History|new 3ds}}
{{History||1.7.10|[[File:Eye of Ender JE1 BE1.png|32px]] Added eyes of ender.}}
{{History|foot}}
=== Historical images ===
<gallery>
File:Held_Eye_of_Ender.png|The eye of ender used to appear large in third-person view.
</gallery>
==Issues==
{{issue list}}
==Trivia ==
*When thrown in third-person view, the eyes of ender fly out from the player's feet instead of their hand.
*Before [[Java Edition 1.9]], eyes of ender can be purchased from cleric villagers, which means players can find a [[stronghold]] and go to [[the End]] without accessing [[the Nether]] at all.
*{{IN|bedrock}} if the player travels beyond a certain radius (roughly 740,000 blocks), eyes of ender always point to a stronghold near spawn, even though strongholds continue to generate past this limit. If one travels to this limit, they can see eyes of ender suddenly switching direction. A similar phenomenon occurs with the {{cmd|locate}} command.
==Gallery==
===Screenshots===
<gallery>
Stronghold Portal Room.png|An end portal frame containing a few eyes of ender.
EnderChestexample.png|An [[ender chest]] depicting an eye of ender on the front.
</gallery>
===In other media===
<gallery>
File:Eye of Ender JINX.jpg|Official T-shirt artwork "Eye of Ender" sold by JINX.
File:Happy Halloween Eye.jpg|A Halloween T-Shirt design featuring an eye of ender.
</gallery>
==External links==
*[http://www.strongholdfinder.com/ A super-easy stronghold triangulation tool]
*[http://jsfiddle.net/42EDX/40/ JSFiddle Eye of Ender triangulator - can guess the location of other 2 strongholds in the first ring]
*[https://ens-gijs.github.io/minecraft-stronghold-locator/ Minecraft Stronghold Locator Eye of Ender throw plotting visualizer - zoomable to show all possible stronghold rings]
*[https://github.com/winny-/stronghold Python Eye of Ender throw plotting tool]
*[http://www.purplefrog.com/~thoth/MinecraftStronghold/stronghold.html HTML Eye of Ender throw plotting visualizer (not updated after 1.9 stronghold placement changes)]
*[http://chunkbase.com/apps/stronghold-finder Chunk Base Stronghold Finder (seed-based)]
*[https://github.com/toolbox4minecraft/amidst/releases Amidst - File-based world visualizer]
*[http://minecraft.tournier.org/StrongholdLocator/ Find strongholds by analyzing stronghold.dat file]
== References==
{{reflist}}
{{Items}}
{{entities}}
[[cs:Endové oko]]
[[de:Enderauge]]
[[es:Ojo de ender]]
[[fr:Œil de l'Ender]]
[[hu:Végzet szeme]]
[[ja:エンダーアイ]]
[[ko:엔더의 눈]]
[[nl:Enderoog]]
[[pl:Oko Endera]]
[[pt:Olho de ender]]
[[ru:Око Края]]
[[th:ดวงตาแห่งเอนเดอร์]]
[[uk:Око Краю]]
[[zh:末影之眼]]</li></ul> | build 10 | Endermen will now avoid water. | |||
0.14.0{{Extension DPL}}<ul><li>[[Copper Horn|Copper Horn]]<br/>{{About|the removed item|the current item|Goat Horn}}
{{outdated feature|edition=bedrock}}
{{Item
| renewable = Yes
| stackable = No
}}
A '''copper horn''' was an [[item]] crafted from a [[goat horn]] and [[copper ingots]].
== Obtaining ==
=== Crafting ===
{{Crafting
|ignoreusage=1
|A2=Copper Ingot
|B2=Goat Horn
|B3=Copper Ingot
|C2=Copper Ingot
|Output=Copper Horn
}}
=== Natural generation ===
Copper horns were found in pillager outpost chests.
== Usage ==
Copper horns were used to play sounds. They took one second to use and had a four second cooldown. There were ten variations of copper horns, and each of them played three different sounds: when looking up, crouching, or neither of those. In total, there were thirty different sounds that could be played using copper horns. The sound a copper horn plays based on multiple conditions, which are in order as follows:
* If crouching, the bass tune was played.
* Else, if looking up (by 45 degrees), the harmony tune was played.
* Else, the melody tune was played.
== Sounds ==
Sound names in the item tooltip are created using the harmony, melody, and bass sounds in that order.
=== Harmony ===
{{Sound table
|type=bedrock
|sound=harmony0.ogg
|description="Great" ("Great Sky Falling")
|source=hostile
|id=horn.call.0
|volume=1.0
|pitch=1.0}}
{{Sound table
|sound=harmony1.ogg
|description="Old" ("Old Hymn Resting")
|source=hostile
|id=horn.call.1
|volume=1.0
|pitch=1.0}}
{{Sound table
|sound=harmony2.ogg
|description="Pure" ("Pure Water Desire")
|source=hostile
|id=horn.call.2
|volume=1.0
|pitch=1.0}}
{{Sound table
|sound=harmony3.ogg
|description="Humble" ("Humble Fire Memory")
|source=hostile
|id=horn.call.3
|volume=1.0
|pitch=1.0}}
{{Sound table
|sound=harmony4.ogg
|description="Dry" ("Dry Urge Anger")
|source=hostile
|id=horn.call.4
|volume=1.0
|pitch=1.0}}
{{Sound table
|sound=harmony5.ogg
|description="Clear" ("Clear Temper Journey")
|source=hostile
|id=horn.call.5
|volume=1.0
|pitch=1.0}}
{{Sound table
|sound=harmony6.ogg
|description="Fresh" ("Fresh Nest Thought")
|source=hostile
|id=horn.call.6
|volume=1.0
|pitch=1.0}}
{{Sound table
|sound=harmony7.ogg
|description="Secret" ("Secret Lake Tear")
|source=hostile
|id=horn.call.7
|volume=1.0
|pitch=1.0}}
{{Sound table
|sound=harmony8.ogg
|description="Fearless" ("Fearless River Gift")
|source=hostile
|id=horn.call.8
|volume=1.0
|pitch=1.0}}
{{Sound table
|sound=harmony9.ogg
|description="Sweet" ("Sweet Moon Love")
|source=hostile
|id=horn.call.9
|volume=1.0
|pitch=1.0
|foot=1}}
=== Melody ===
{{Sound table
|type=bedrock
|sound=melody0.ogg
|description="Sky" ("Great Sky Falling")
|source=hostile
|id=horn.melody.0
|volume=1.0
|pitch=1.0}}
{{Sound table
|sound=melody1.ogg
|description="Hymn" ("Old Hymn Resting")
|source=hostile
|id=horn.melody.1
|volume=1.0
|pitch=1.0}}
{{Sound table
|sound=melody2.ogg
|description="Water" ("Pure Water Desire")
|source=hostile
|id=horn.melody.2
|volume=1.0
|pitch=1.0}}
{{Sound table
|sound=melody3.ogg
|description="Fire" ("Humble Fire Memory")
|source=hostile
|id=horn.melody.3
|volume=1.0
|pitch=1.0}}
{{Sound table
|sound=melody4.ogg
|description="Urge" ("Dry Urge Anger")
|source=hostile
|id=horn.melody.4
|volume=1.0
|pitch=1.0}}
{{Sound table
|sound=melody5.ogg
|description="Temper" ("Clear Temper Journey")
|source=hostile
|id=horn.melody.5
|volume=1.0
|pitch=1.0}}
{{Sound table
|sound=melody6.ogg
|description="Nest" ("Fresh Nest Thought")
|source=hostile
|id=horn.melody.6
|volume=1.0
|pitch=1.0}}
{{Sound table
|sound=melody7.ogg
|description="Lake" ("Secret Lake Tear")
|source=hostile
|id=horn.melody.7
|volume=1.0
|pitch=1.0}}
{{Sound table
|sound=melody8.ogg
|description="River" ("Fearless River Gift")
|source=hostile
|id=horn.melody.8
|volume=1.0
|pitch=1.0}}
{{Sound table
|sound=melody9.ogg
|description="Moon" ("Sweet Moon Love")
|source=hostile
|id=horn.melody.9
|volume=1.0
|pitch=1.0
|foot=1}}
=== Bass ===
{{Sound table
|type=bedrock
|sound=bass0.ogg
|description="Falling" ("Great Sky Falling")
|source=hostile
|id=horn.bass.0
|volume=1.0
|pitch=1.0}}
{{Sound table
|sound=bass1.ogg
|description="Resting" ("Old Hymn Resting")
|source=hostile
|id=horn.bass.1
|volume=1.0
|pitch=1.0}}
{{Sound table
|sound=bass2.ogg
|description="Desire" ("Pure Water Desire")
|source=hostile
|id=horn.bass.2
|volume=1.0
|pitch=1.0}}
{{Sound table
|sound=bass3.ogg
|description="Memory" ("Humble Fire Memory")
|source=hostile
|id=horn.bass.3
|volume=1.0
|pitch=1.0}}
{{Sound table
|sound=bass4.ogg
|description="Anger" ("Dry Urge Anger")
|source=hostile
|id=horn.bass.4
|volume=1.0
|pitch=1.0}}
{{Sound table
|sound=bass5.ogg
|description="Journey" ("Clear Temper Journey")
|source=hostile
|id=horn.bass.5
|volume=1.0
|pitch=1.0}}
{{Sound table
|sound=bass6.ogg
|description="Thought" ("Fresh Nest Thought")
|source=hostile
|id=horn.bass.6
|volume=1.0
|pitch=1.0}}
{{Sound table
|sound=bass7.ogg
|description="Tear" ("Secret Lake Tear")
|source=hostile
|id=horn.bass.7
|volume=1.0
|pitch=1.0}}
{{Sound table
|sound=bass8.ogg
|description="Gift" ("Fearless River Gift")
|source=hostile
|id=horn.bass.8
|volume=1.0
|pitch=1.0}}
{{Sound table
|sound=bass9.ogg
|description="Love" ("Sweet Moon Love")
|source=hostile
|id=horn.bass.9
|volume=1.0
|pitch=1.0
|foot=1}}
==Data Values==
===ID===
{{ID table
|edition=bedrock
|shownumericids=y
|showforms=y
|notshowbeitemforms=y
|generatetranslationkeys=y
|displayname=Copper Horn
|spritetype=item
|nameid=copper_horn
|form=item
|foot=1}}
== History ==
{{h|bedrock}}
{{h||Vanilla Experiments<br>(experimental)|link=1.18.30|snap=beta 1.18.30.26|[[File:Copper Horn BE1.png|32px]]Added copper horns.}}
{{h|||snap=beta 1.18.30.28|[[File:Copper Horn BE2.png|32px]]Changed the texture of copper horns.}}
{{h||1.19.0|snap=beta 1.19.0.24|Removed copper horns.}}
{{h|foot}}
== Trivia ==
* Copper horns were removed from the game as they didn't live up to the developers' design goals, and as such are no longer supported.<ref>{{cite|url=https://feedback.minecraft.net/hc/en-us/articles/5540500564365| title = Minecraft Beta & Preview - 1.19.0.24/25|website=feedback.minecraft.net|date=April 14, 2022}}</ref>
* This is the first item in {{el|be}} to have been completely removed instead of just made unobtainable. This is likely due to the fact it never made it out of [[experimental gameplay]].
** If a world that contained this item is loaded into a newer version, the horn will disappear upon loading.
== References ==
{{reflist}}
{{Items}}
{{Removed features}}
[[Category:Renewable resources]]
[[de:Ziegenhorn]]
[[es:Cuerno de cobre]]
[[fr:Corne de chèvre]]
[[it:Corno di capra]]
[[lzh:銅號]]
[[pl:Kozi róg]]
[[pt:Chifre de cobre]]
[[ru:Козий рог]]
[[zh:铜制号角]]</li><li>[[Firework Star|Firework Star]]<br/>{{Item
| image = Firework Star.png
| renewable =
* '''Trail Effect''': No
* '''All Others''': Yes
| stackable = Yes (64)
}}
'''Firework stars''' are [[items]] used to determine the color, effect, and shape of [[firework rocket]]s.
== Obtaining ==
In [[Survival]] mode, firework stars are obtainable only through crafting. In [[Creative]] mode, they can be found in the creative inventory.
=== Crafting ===
{{Crafting
|head=1
|showname=0
|showdescription=1
|ingredients=[[Gunpowder]] +<br>Matching [[Dye]] +<br>Extra ingredients (optional)
|Gunpowder
|Matching Dye
|Head; Gold Nugget; Feather;Fire Charge;
|Glowstone Dust;
|Diamond;
|Output=Matching Firework Star
|arggroups=1;2,Output;3;4;5
|description=Up to eight dyes can be added.<br>One head, gold nugget, feather, or fire charge can be added.<br>Both the diamond and the glowstone dust can be added with any of the other ingredients.
|type=Miscellaneous
}}
{{Crafting
|ignoreusage=1
|Matching Firework Star
|Any Dye
|Output=Matching Firework Star
|type=Miscellaneous
|description=Adds a "fade to color" effect to the firework star, overwriting any existing fades.<br>Up to eight dyes can be added.
|foot=1
|arggroups=1,Output
}}
<div style="display:none">
<!--
This is so the pre-Village & Pillage dyes can have dye-related crafting recipes show on their respective pages.
They don't need to be displayed on this page because they already intuitively list "Any Matching/Colored Dye".
-->
{{Crafting
|head=1
|showname=0
|showdescription=1
|Gunpowder
|Bone Meal; Lapis Lazuli; Cocoa Beans; Ink Sac
|Head; Gold Nugget; Feather;Fire Charge;
|Glowstone Dust;
|Diamond;
|Output=White Firework Star; Blue Firework Star; Brown Firework Star; Black Firework Star
|arggroups=1;2,Output;3;4;5
|description={{only|bedrock|education}}<br>Up to eight dyes can be added.<br>One head, gold nugget, feather, or fire charge can be added.<br>Both the diamond and the glowstone dust can be added with any of the other ingredients.
|type=Miscellaneous
}}
{{Crafting
|showdescription=1
|White Firework Star; Blue Firework Star; Brown Firework Star; Black Firework Star
|Bone Meal; Lapis Lazuli; Cocoa Beans; Ink Sac
|Output=White Firework Star; Blue Firework Star; Brown Firework Star; Black Firework Star
|type=Decoration block
|description={{only|bedrock|education}}<br>Adds a "fade to color" effect to the firework star, overwriting any existing fades.<br>Up to eight dyes can be added.
|foot=1
}}
</div>
== Usage ==
The only usage of firework stars is to create [[firework rocket]]s.
=== Crafting ingredient ===
{{crafting usage|match=end}}
== Effects ==
=== Shape effects ===
A firework star can have only one shape effect.
{| class="wikitable"
|+ Shape Effects
! <abbr title="Type (Byte tag in NBT structure)">Type</abbr>
! Ingredient
! Effect
! Sample Animation
|-
| 0
| None
| Small Ball explosion (default)
| [[File:Firework Star (Small Sphere).gif|200px]]
|-
| 1
| {{ItemLink|Fire Charge}}
| Large Ball explosion and heavy sound.
| [[File:Firework Star (Large Sphere).gif|200px]]
|-
| 2
| {{ItemLink|Gold Nugget}}
| Star-shaped explosion
| [[File:Firework Star (Star Shape).gif|200px]]
|-
| 3
| {{BlockLink|id=Heads|Head}} (any)
| Creeper-shaped (Creeper Face) explosion
| [[File:Firework Star (Creeper Shape).gif|200px]]
|-
| 4
| {{ItemLink|Feather}}
| Burst explosion
| [[File:Firework Star (Burst).gif|200px]]
|}
=== Additional effects ===
In addition to the shape effects, any combination of these additional effects may be added to a firework star.
{| class="wikitable"
|+ Additional Effects
! Ingredient
! Effect
! Sample Animation
|-
| None
| Default
| [[File:Firework Star (Small Sphere).gif|200px]]
|-
| {{ItemLink|Glowstone Dust}}
| Twinkle (Crackle effect and sounds after the explosion)
| [[File:Firework Star (Twinkle effect).gif|200px]]
|-
| {{ItemLink|Diamond}}
| Trail effect after the explosion
| [[File:Firework Star (Trail effect).gif|200px]]
|-
| {{ItemLink|Glowstone Dust}} <br> {{ItemLink|Diamond}}
| Twinkle + Trail effect after the explosion
| [[File:Firework Star (Twinkle and Trail effect).gif|200px]]
|}
== Sounds ==
{{see also|Firework_Rocket#Sounds}}
== Data values ==
=== ID ===
{{edition|java}}:
{{ID table
|edition=java
|showforms=y
|generatetranslationkeys=y
|displayname=Firework Star
|spritetype=item
|nameid=firework_star
|form=item
|foot=1}}
{{edition|bedrock}}:
{{ID table
|edition=bedrock
|showaliasids=y
|shownumericids=y
|showforms=y
|notshowbeitemforms=y
|generatetranslationkeys=y
|displayname=Firework Star
|spritetype=item
|nameid=firework_star
|aliasid=fireworkscharge
|id=520
|form=item
|translationkey=item.fireworksCharge.name
|foot=1}}
=== Item data ===
{{el|java}}:
{{main|Player.dat format}}
<div class="treeview">
* {{nbt|compound|tag}}: The item's '''tag''' tag.
{{:Player.dat_format/Firework Stars}}
</div>
{{el|bedrock}}:
: See [[Bedrock Edition level format/Item format]].
== Video ==
<div style="text-align:center">{{yt|fYL1W9aW0UU}}</div>
== History ==
{{History|java}}
{{History||1.4.6|snap=12w49a|[[File:Firework Star JE1 BE1.png|32px]] Added firework stars.
|Firework stars in the [[Creative inventory]] come in only one variation; they do not have any color.}}
{{History||1.13|snap=17w47a|The ID of firework stars has now been changed from <code>firework_charge</code> to <code>firework_star</code>.
|Prior to [[Java Edition 1.13/Flattening|''The Flattening'']], this [[item]]'s numeral ID was 402.}}
{{History|bedrock}}
{{History||1.2.0|snap=beta 1.2.0.2|[[File:Firework Star JE1 BE1.png|32px]] Added firework stars.
|Firework stars come in all 16 colors in the [[Creative]] [[inventory]].{{verify|type=update}}{{info needed}}}}
{{History||1.16.100|snap=beta 1.16.100.56|The ID of firework star has been changed from <code>fireworkscharge</code> to <code>firework_star</code>.}}
{{History|console}}
{{History||xbox=TU19|xbone=CU7|ps=1.12|wiiu=Patch 1|switch=1.0.1|[[File:Firework Star JE1 BE1.png|32px]] Added firework stars.
|Firework stars cannot be obtained within the Creative inventory.}}
{{History||xbox=TU46|xbone=CU36|ps=1.38|wiiu=Patch 15|The [[crafting]] interface has now been updated to allow the crafting of firework stars and [[firework rocket]]s.}}
{{History|foot}}
== Issues ==
{{Issue list}}
== Trivia ==
* There are 29,617,272,331,290,537 (29.6 quintillion) unique firework stars.
* Putting firework stars on rockets causes the player to take explosion damage when using them for flying with [[elytra]].
== Gallery ==
<gallery>
File:Firework Star (Tricolor Star shaped with Twinkle and Trail effect).gif|Tricolor (Magenta, Pink, White dye) + Star shaped with Twinkle and Trail effect.
</gallery>
{{Items}}
[[cs:Ohňostrojová hvězda]]
[[de:Feuerwerksstern]]
[[es:Estrella de fuegos artificiales]]
[[fr:Étoile de feu d'artifice]]
[[hu:Tűzijáték csillag]]
[[it:Stella pirotecnica]]
[[ja:花火の星]]
[[ko:폭죽 탄약]]
[[nl:Vuurwerkster]]
[[pl:Gwiazdka pirotechniczna]]
[[pt:Estrela de fogo de artifício]]
[[ru:Пиротехническая звезда]]
[[uk:Зірка феєрверку]]
[[zh:烟火之星]]</li></ul> | build 1 | Endermen now drop the block they are holding when killed. | |||
| Legacy Console Edition | |||||
| TU5 | CU1 | 1.0 | Patch 1 | Added endermen. | |
| TU14 | 1.04 | Endermen now open their mouths and shake when provoked. | |||
| Endermen now stop in front of the player. When the player swings their sword, it teleports behind the player. | |||||
Issues
Issues relating to "Enderman" are maintained on the bug tracker. Report issues there.
Trivia
- Notch claimed in public that the enderman is a “subtle” reference to “the Slenderman”, a similar looking monster with a similar name. Given the later development of the End, it is possible he already had the name in mind, and did not choose it because of the Reddit thread in which their name was revealed.[7]
- In the Halloween texture pack for the Console Edition, the enderman is re-skinned to look like the Slenderman.
- Enderman sounds seem to be reverse audios:
- The "idle1" sound is a reversed “here”
- The "idle2" sound is a reversed “hiya”
- The "idle3" sound is a down-pitched “what’s up?” or “this way!”
- The "idle4" sound is a down-pitched reversed “forever!”
- The "idle5" sound is a reversed “uh oh!”
- The collective noun for a group of endermen is “a haunting of Endermen”, as stated by Dinnerbone.[8]
- Switching to spectator mode and taking an enderman’s camera adds the invert shader, suggesting that they see the End as an island of blue cobblestone (because end stone is a yellowish inversion of cobblestone) in a white sky, with white pillars, white endermen with green eyes and a white ender dragon.
- An enderman's eyes and body are located in two different texture files.
- If directly attacked by a player (one hit only), Endermen have a chance not to open their mouths.
Gallery
Beta 1.8 pre-release
An enderman striking in Beta 1.8.

The glowing eyes of an enderman in Beta 1.8. Note that the eye color was green instead of white.

An official image of endermen. (Auto-leveled for clarity)

Notch’s release of the endermen texture file.
The enderman attacking the camera in the Beta 1.8 official trailer.
An enderman’s height compared to the player’s height.

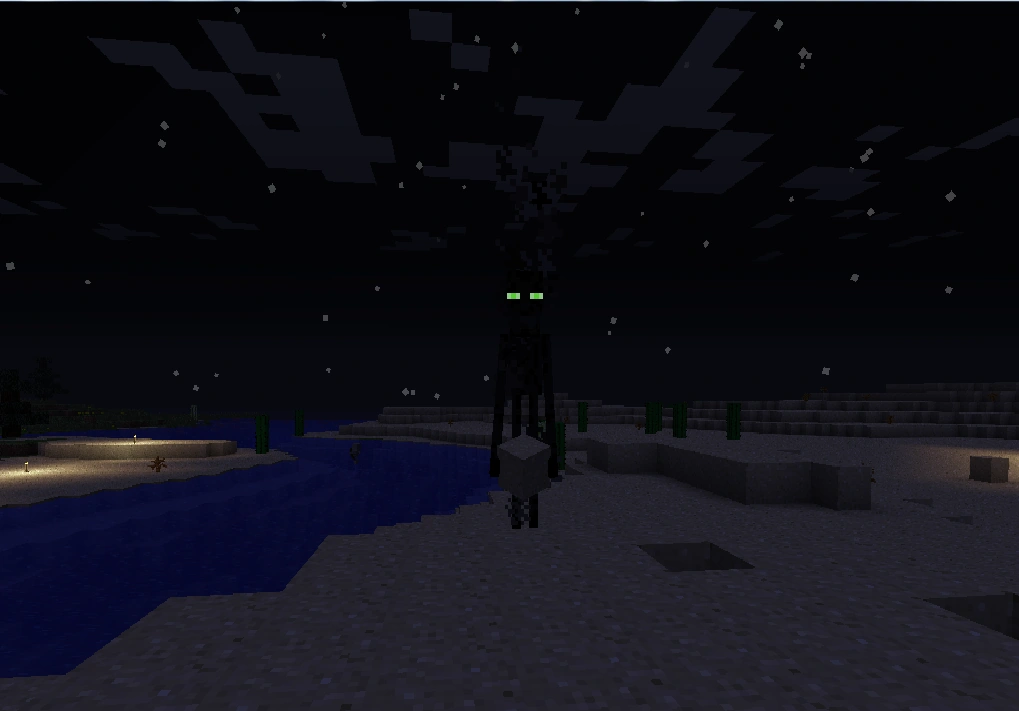
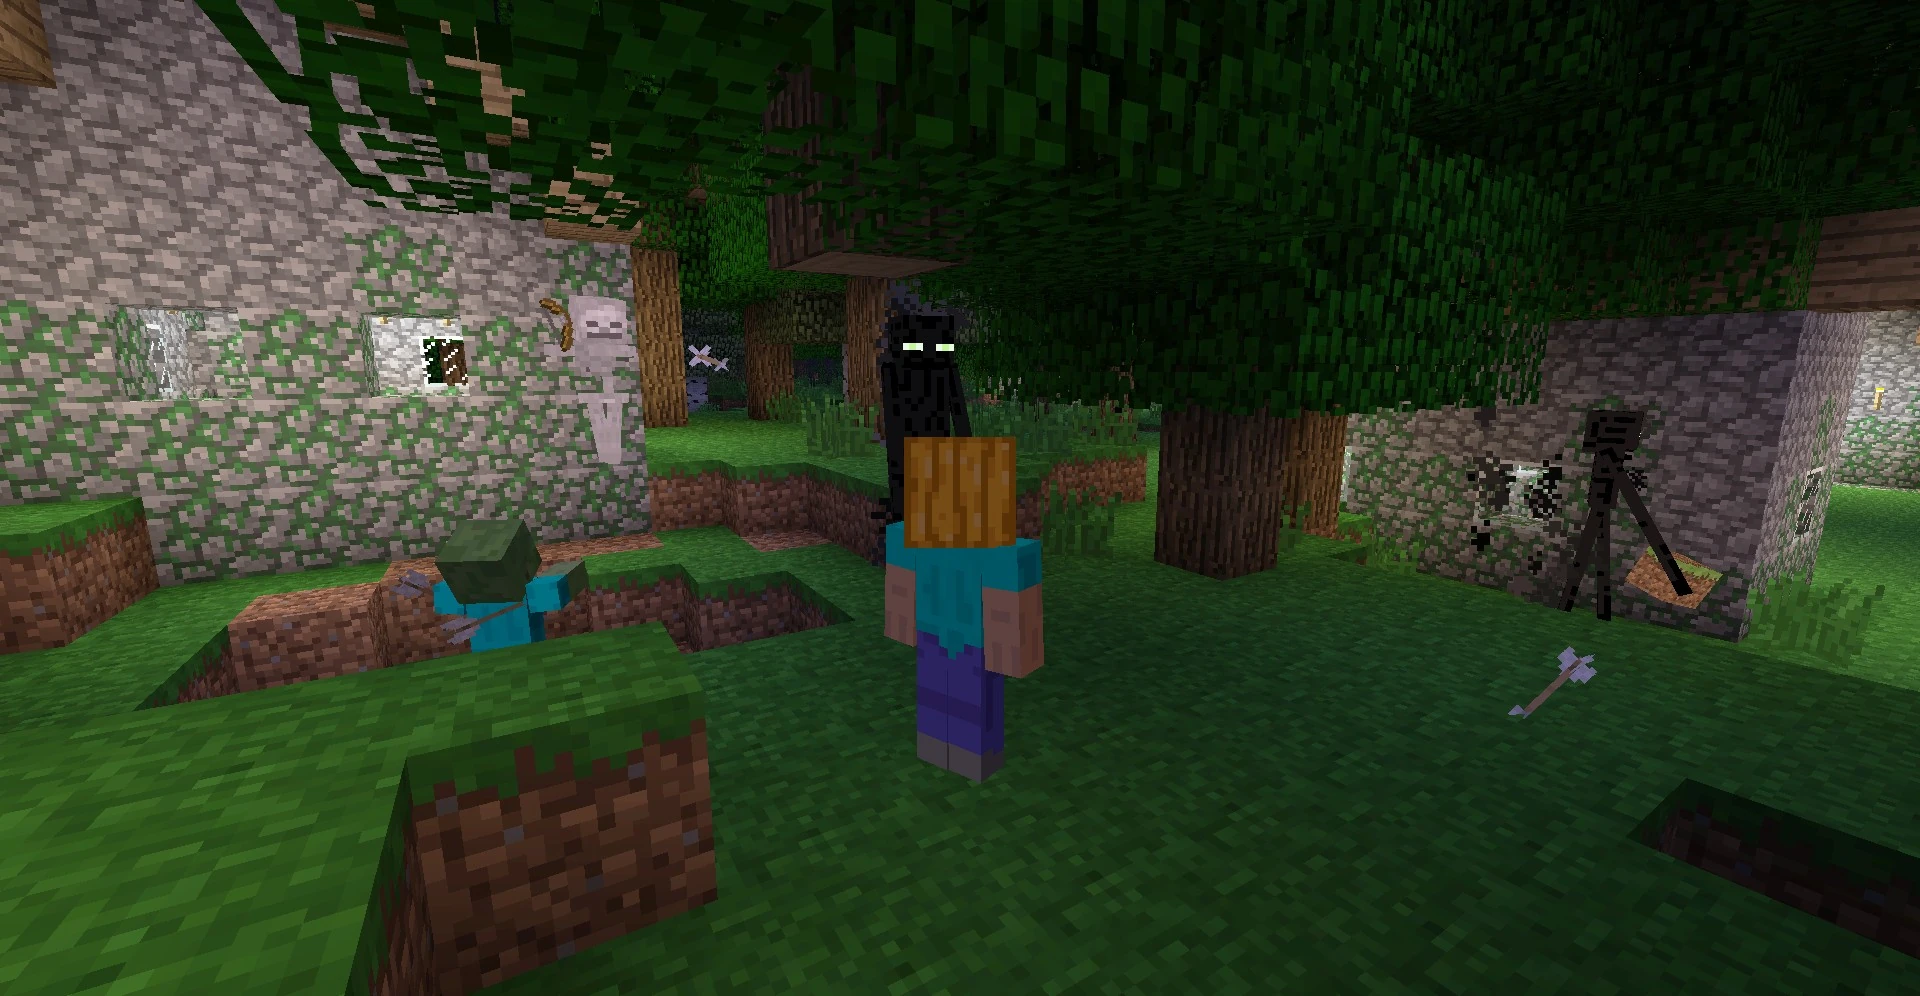

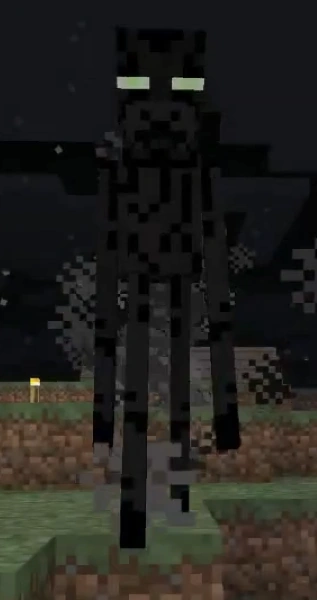
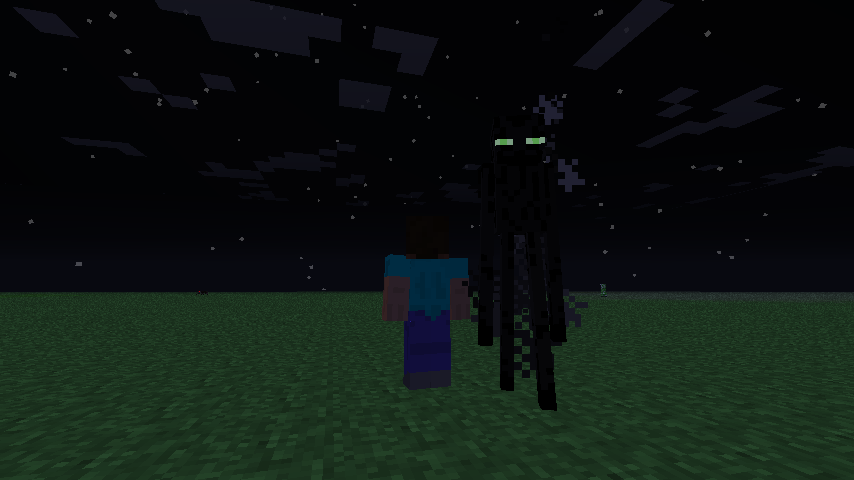
Beta 1.8+
- He be stealing my TNT.png
An enderman holding TNT. Note that the block of TNT is inverted.
A haunting of endermen in a desert biome.
Three endermen in a village.
- Endermans Attack.png
A haunting of endermen attacking a player.
- Front view of Enderman.png
Front view of an enderman.
- 2013-06-06 11.15.53.png
Endermen in the End.
- Dandelion Enderman.png
An enderman holding a dandelion. Note that it is reduced to half its normal size.
- Endermen Glitch.jpg
A bug where when an enderman looks up at you, it has white eyes.
- InvisibleEndermen.jpg
Endermen under the effects of an invisibility splash potion.
Through the eyes of the enderman. Note that the “invert” shader is being used.
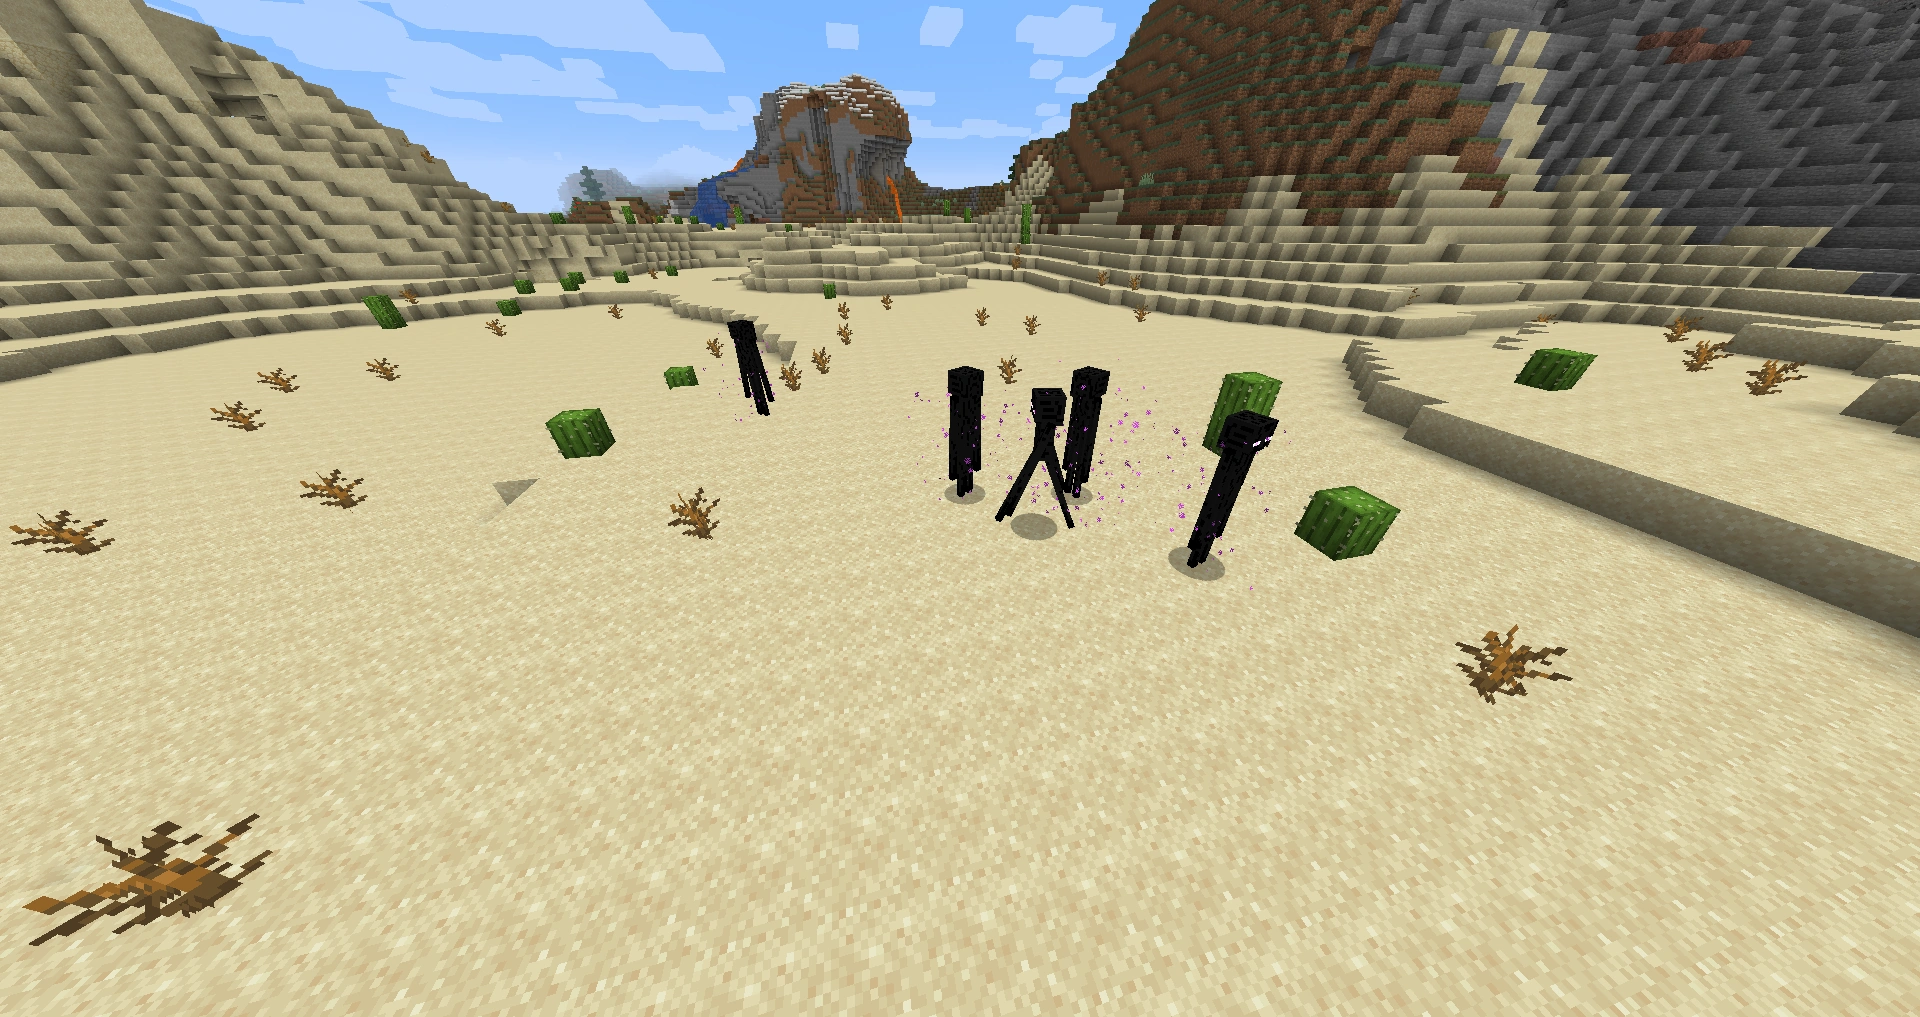
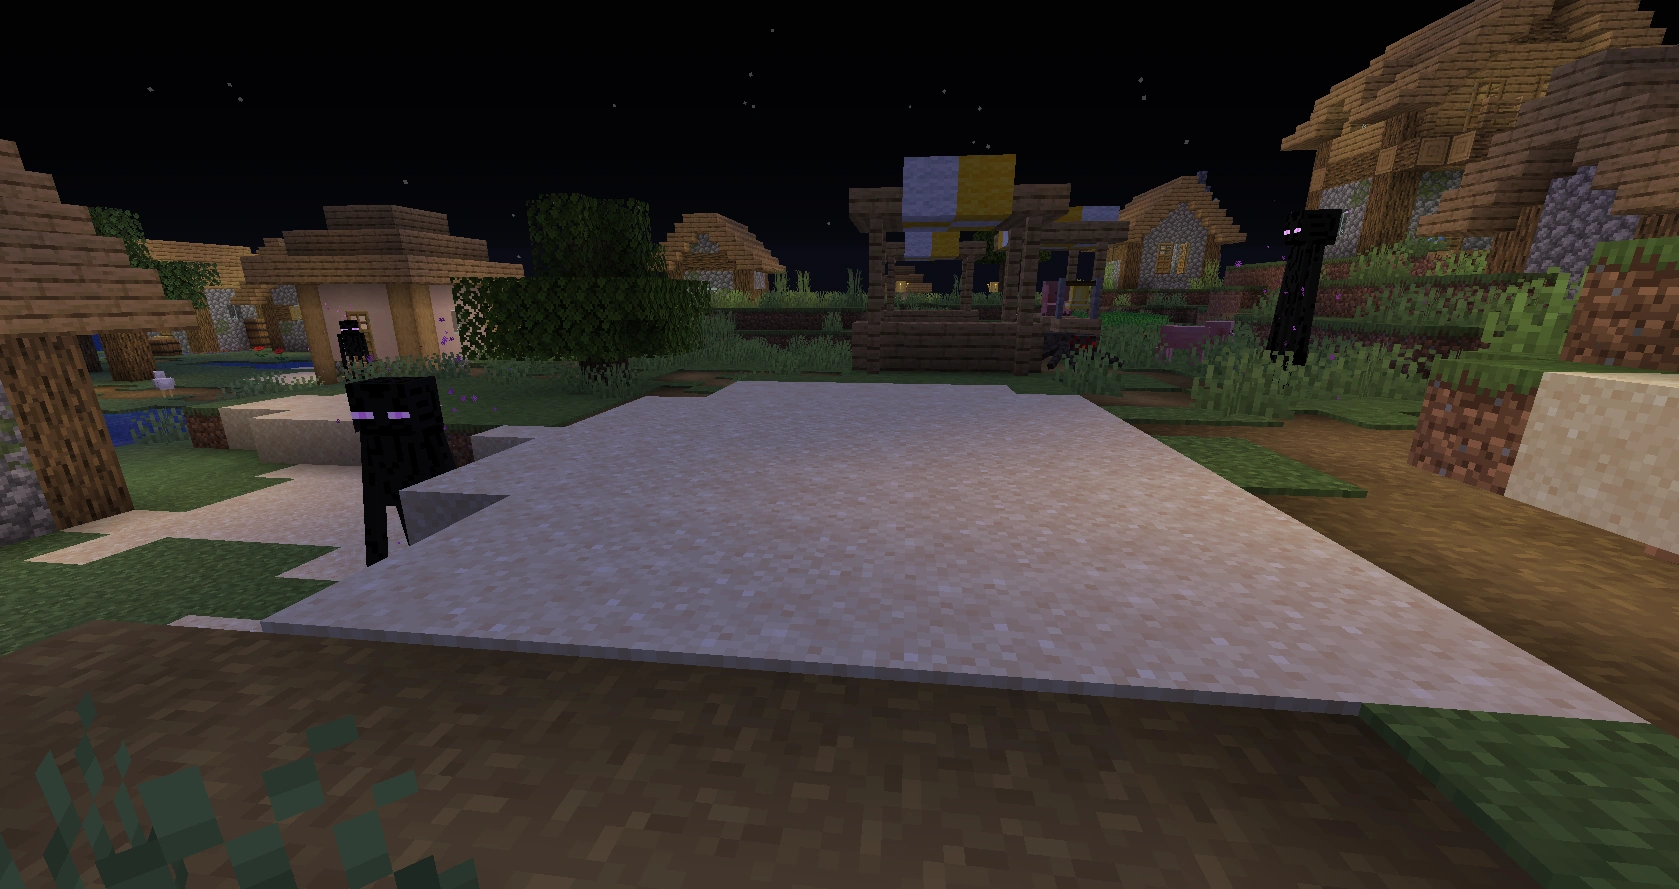
.
References
- ↑ https://twitter.com/notch/status/113639625364480001
- ↑ wordofnotch:8208212863
- ↑ http://roosterteeth.com/podcast/episode.php?id=132
- ↑ https://twitter.com/notch/status/118903247212773376
- ↑ https://www.reddit.com/r/Minecraft/comments/l3jgm/enderdragons_decrypt_w_rot13_via_notch/c2ph1f1?context=1
- ↑ https://www.reddit.com/r/Minecraft/comments/l3jgm/enderdragons_decrypt_w_rot13_via_notch/c2ph3nd?context=1
- ↑ https://www.reddit.com/r/Minecraft/comments/j09ma/notch_posts_images_of_new_mob/c282dzr?context=1
- ↑ https://twitter.com/Dinnerbone/status/443348580058021888