(Undo revision 679002 by 69.245.152.38 (talk)) |
|||
| Line 751: | Line 751: | ||
; Leaping II {{upcoming}} |
; Leaping II {{upcoming}} |
||
: {{ItemLink|Nether Wart}} → {{ItemLink|Rabbit's Foot}} → {{ItemLink|Redstone}} |
: {{ItemLink|Nether Wart}} → {{ItemLink|Rabbit's Foot}} → {{ItemLink|Redstone}} |
||
| + | ; Absorption |
||
| + | : {{ItemLink|Nether Wart}} → {{ItemLink|Nether Quartz}} → {{ItemLink|Redstone}} |
||
== History == |
== History == |
||
Revision as of 05:39, 29 July 2014
Potion brewing chart (most efficient recipes, excludes splash potions).
Brewing (or Alchemy) is the process of creating potions and splash potions by adding various ingredients to water bottles in a brewing stand.
Brewing Potions
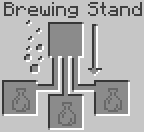
Brewing "grid" (Ingredients are placed at the top. Bottles placed underneath)
Brewing Guide
By placing bottles in the lower three slots of the brewing interface and an ingredient in the upper slot, you can distill the ingredient into the bottles and brew potions which may be consumed to grant an effect to the player.
Every potion starts with a water bottle, made by filling a glass bottle at a water source or filled cauldron. The next step is to add a primary ingredient to create a base potion, which is usually Nether Wart, which itself has no effect on the potion. By brewing a second ingredient into a base potion in the same manner, you can create a potion with a working effect. A third ingredient may be added to make the effect more intense or last longer, or turn the effect harmful. Finally, gunpowder can be added to a potion at any stage to convert it to a splash potion, which can be thrown to disperse its effect in a radius. Each brewing step takes 20 seconds.
Brewing can create very useful and lifesaving items. A good number of them are useful in combat by aiding the player or weakening enemies while others can save the player's life if used quickly, like Fire Resistance or Healing. Gathering the Blaze Rods and Nether Wart necessary for brewing can prove challenging, but once they are set up, most potion ingredients are fairly plentiful and brewing will be a rewarding task.
Tips
- Start by gathering Nether Wart. As seen in the chart above, Awkward Potions can be brewed into every possible potion, while all other base potions can only be used to make a Potion of Weakness. Thus you should always start with an Awkward Potion unless you intend to make a Potion of Weakness, in which case it's more efficient to brew Fermented Spider Eye into a water bottle right off the bat and save yourself some Nether Wart.
- As a rule of thumb, there are four modifier ingredients: Redstone Dust makes it last longer, Glowstone Dust makes it stronger (but shorter-lasting), Fermented Spider Eye reverses or "corrupts" the effect, and gunpowder converts it to a splash potion.
- Brewing stands have three slots for three bottles and can brew three potions at once. A single ingredient is enough to brew into all three bottles, so an efficient potion-maker should always brew in batches of three. For even more efficiency, keep in mind this works even if the potions are of different types; you can brew an ingredient into three different types of potions, and each will result just as if you had brewed them individually.
- Always use a water source for refilling your bottles, as the cauldron only has 3 uses while a water source block is infinite. You won't need to always refill the cauldron using buckets. Using a water source can save you 7 iron ingots (to make the cauldron) and even more iron if you decided to store water in buckets.
Video
Brewing/video
Brewing Equipment
| Name | Icon | Use |
|---|---|---|
| Brewing Stand | Template:Grid | Used to add ingredients into water bottles. |
| Cauldron | Template:Grid | Each one can hold a bucket of water (after placement). Will fill 3 glass bottles. |
| Glass Bottle | Template:Grid | Container for all kinds of potions. |
| Water Bottle | Template:Grid | The starting base for all potions. Made by filling a glass bottle from a cauldron or water source. |
Ingredients
Base Ingredients
Base ingredients are the starting point of all potions. Nether Wart is the primary ingredient added to water bottles at this stage, as it is required to make most of the potions. All other base ingredients will only allow the creation of variations of "Potion of Weakness".
| Name | Icon | When added makes |
|---|---|---|
| Nether Wart | Template:Grid | Awkward Potion |
| Glowstone Dust | Template:Grid | Thick Potion |
| Redstone | Template:Grid | Mundane Potion (extended) |
| Fermented Spider Eye | Template:Grid | Potion of Weakness |
Secondary Ingredients
Secondary ingredients imbue an Awkward Potion with a particular effect but do not alter potion duration or intensity. When added directly to a water bottle, any of these ingredients will produce a Mundane Potion (with the exception of fermented spider eye, which results in a potion of weakness and the golden carrot, which can't be brewed into a water bottle to make a potion).
| Name | Icon | Effect |
|---|---|---|
| Magma Cream | Template:Grid | Fire Resistance |
| Sugar | Template:Grid | Speed |
| Glistering Melon | Template:Grid | Instant Health |
| Spider Eye | Template:Grid | Poison |
| Ghast Tear | Template:Grid | Regeneration |
| Blaze Powder | Template:Grid | Strength |
| Fermented Spider Eye | Template:Grid | Weakness |
| Golden Carrot | Template:Grid | Night Vision |
| Pufferfish | Template:Grid | Water Breathing |
| Rabbit's Foot | Template:Grid | Leaping |
Modifiers
Modifiers change the potion's properties. The "longer duration" and "more potent" versions of a potion can be forever interchanged.
| Name | Icon | When added |
|---|---|---|
| Redstone | Template:Grid | Increases duration |
| Glowstone Dust | Template:Grid | Increases potency |
| Gunpowder | Template:Grid | Turns into a splash |
| Fermented Spider Eye |
Template:Grid | Corrupts effect (see below) |
Corrupting Effect: Fermented Spider Eyes will change a potion's base effect, often reversing it or producing a negative potion.
- A "corrupted" potion usually does the opposite of the original potion.
- Potions of Invisibility are considered a "corrupted" version of the Potions of Night Vision.
- Instead of seeing at maximum brightness, you turn invisible.
Potions
Primary
All primary potions are created by brewing a single ingredient with a water bottle. Mundane Potions and Potions of Weakness (along with their variants) can be combined with gunpowder to create their throwable (splash potion) counterparts.
| Potion | Base | Reagent | Effect | Precursor to |
|---|---|---|---|---|
| Template:Grid Awkward Potion |
Template:Grid Water Bottle |
Template:Grid Nether Wart |
None | Potion of Healing Potion of Fire Resistance Potion of Poison Potion of Regeneration Potion of Strength Potion of Swiftness Potion of Night Vision Potion of Water Breathing Potion of Leaping[upcoming] Potion of Weakness |
| Template:Grid Mundane Potion (extended) |
Template:Grid Water Bottle |
Template:Grid Redstone |
None | Potion of Weakness (extended) |
| Template:Grid Mundane Potion |
Template:Grid Water Bottle |
|
None | Potion of Weakness |
| Template:Grid Thick Potion |
Template:Grid Water Bottle |
Template:Grid Glowstone Dust |
None | Potion of Weakness |
| Template:Grid Potion of Weakness |
Template:Grid Water Bottle |
Template:Grid Fermented Spider Eye |
Reduces all melee attacks by 0.5 damage (0.25 heart). | Potion of Weakness (extended) |
Secondary
Secondary potions are created by brewing an ingredient with a primary potion and can be combined with gunpowder to create their throwable splash potion counterparts.
Positive
| Potion | Base | Reagent | Effect | Duration (minutes) |
|---|---|---|---|---|
| Template:Grid Potion of Healing |
Template:Grid Awkward Potion |
Template:Grid Glistering Melon |
Restores |
Instant |
| Template:Grid Potion of Fire Resistance |
Template:Grid Awkward Potion |
Template:Grid Magma Cream |
Gives immunity to damage from fire, lava, and ranged Blaze attacks. | 3:00 |
| Template:Grid Potion of Regeneration |
Template:Grid Awkward Potion |
Template:Grid Ghast Tear |
Restores health over time by approximately |
0:45 |
| Template:Grid Potion of Strength |
Template:Grid Awkward Potion |
Template:Grid Blaze Powder |
Adds 130% damage to all melee attacks, with or without weapons. | 3:00 |
| Template:Grid Potion of Swiftness |
Template:Grid Awkward Potion |
Template:Grid Sugar |
Increases player's movement speed, sprinting speed, and jumping length by approximately 20%. | 3:00 |
| Template:Grid Potion of Night Vision |
Template:Grid Awkward Potion |
Template:Grid Golden Carrot |
Makes everything appear to be at max light level, including underwater areas. | 3:00 |
| Template:Grid Potion of Water Breathing |
Template:Grid Awkward Potion |
Template:Grid Pufferfish |
Does not deplete the oxygen bar when underwater. | 3:00 |
| Template:Grid Potion of Leaping |
Template:Grid Awkward Potion |
Template:Grid Rabbit's Foot |
Allows the player to jump ½ block higher | 3:00 |
Negative
| Potion | Base | Reagent | Effect | Duration (minutes) |
|---|---|---|---|---|
| Template:Grid Potion of Poison |
Template:Grid Awkward Potion |
Template:Grid Spider Eye |
Poisons the player for the given time, reducing the health to |
0:45 |
| Template:Grid Potion of Weakness |
Template:Grid Awkward Potion, Template:Grid Thick Potion, or Template:Grid Mundane Potion |
Template:Grid Fermented Spider Eye |
Reduces all melee attacks by 0.5 damage (0.25 heart). | 1:30 |
| Template:Grid Potion of Weakness (extended) |
Template:Grid Mundane Potion (extended) |
Template:Grid Fermented Spider Eye |
Reduces all melee attacks by 0.5 damage (0.25 heart). | 4:00 |
Tertiary
Tertiary potions are created by brewing an ingredient with a secondary potion or another tertiary potion and can be combined with gunpowder to create their throwable splash potion counterparts.
Positive
| Potion | Base | Reagent | Effect | Duration (minutes) |
|---|---|---|---|---|
| Template:Grid Potion of Fire Resistance (extended) |
Template:Grid Potion of Fire Resistance (base or reverted) |
Template:Grid Redstone |
Gives immunity to damage from fire, lava, and ranged Blaze attacks. | 8:00 |
| Template:Grid Potion of Healing II |
Template:Grid Potion of Healing (base or reverted) |
Template:Grid Glowstone Dust |
Restores |
Instant |
| Template:Grid Potion of Regeneration (extended) |
Template:Grid Potion of Regeneration tier I or II |
Template:Grid Redstone |
Restores health over time by approximately |
2:00 |
| Template:Grid Potion of Regeneration II |
Template:Grid Potion of Regeneration (base or extended) |
Template:Grid Glowstone Dust |
Restores health over time by approximately |
0:16 |
| Template:Grid Potion of Strength (extended) |
Template:Grid Potion of Strength tier I or II |
Template:Grid Redstone |
Adds 130% damage to all melee attacks, with or without weapons. | 8:00 |
| Template:Grid Potion of Strength II |
Template:Grid Potion of Strength (base or extended) |
Template:Grid Glowstone Dust |
Adds 260% damage to all melee attacks, with or without weapons. | 1:30 |
| Template:Grid Potion of Swiftness (extended) |
Template:Grid Potion of Swiftness tier I or II |
Template:Grid Redstone |
Increases player's movement, sprinting speed, and jumping length by approximately 20%. | 8:00 |
| Template:Grid Potion of Swiftness II |
Template:Grid Potion of Swiftness (base or extended) |
Template:Grid Glowstone Dust |
Increases player's movement, sprinting speed, and jumping length by approximately 40%. | 1:30 |
| Template:Grid Potion of Night Vision (extended) |
Template:Grid Potion of Night Vision |
Template:Grid Redstone |
Makes everything appear to be at max light level, including underwater areas. | 8:00 |
| Template:Grid Potion of Invisibility |
Template:Grid Potion of Night Vision |
Template:Grid Fermented Spider Eye |
Renders the player invisible. Equipped/wielded items are still visible. | 3:00 |
| Template:Grid Potion of Invisibility (extended) |
Template:Grid Potion of Night Vision (extended) |
Template:Grid Fermented Spider Eye |
Renders the player invisible. Equipped/wielded items are still visible. | 8:00 |
| Template:Grid Potion of Invisibility (extended) |
Template:Grid Potion of Invisibility |
Template:Grid Redstone |
Renders the player invisible. Equipped/wielded items are still visible. | 8:00 |
| Template:Grid Potion of Water Breathing (extended) |
Template:Grid Potion of Water Breathing (base or reverted) |
Template:Grid Redstone |
Does not deplete the oxygen bar when underwater. | 8:00 |
| Template:Grid Potion of Leaping II |
Template:Grid Potion of Leaping (base or reverted) |
Template:Grid Glowstone Dust |
Allows the player to jump 1 ½ blocks higher | 1:30 |
Negative
| Potion | Base | Reagent | Effect | Duration (minutes) |
|---|---|---|---|---|
| Template:Grid Potion of Harming |
Template:Grid Potion of Healing or Template:Grid Potion of Poison |
Template:Grid Fermented Spider Eye |
Inflicts |
Instant |
| Template:Grid Potion of Harming II |
Template:Grid Potion of Healing II or Template:Grid Potion of Poison II |
Template:Grid Fermented Spider Eye |
Inflicts |
Instant |
| Template:Grid Potion of Harming II |
Template:Grid Potion of Harming (base or reverted) |
Template:Grid Glowstone Dust |
Inflicts |
Instant |
| Template:Grid Potion of Poison (extended) |
Template:Grid Potion of Poison tier I or II |
Template:Grid Redstone |
Poisons the player for the given time, reducing the health to a minimum of |
2:00 |
| Template:Grid Potion of Poison II |
Template:Grid Potion of Poison (base or extended) |
Template:Grid Glowstone Dust |
Poisons the player for the given time, reducing the health to a minimum of |
0:22 |
| Template:Grid Potion of Slowness |
Template:Grid Potion of Fire Resistance Template:Grid Potion of Swiftness or Template:Grid Potion of Leaping [upcoming] |
Template:Grid Fermented Spider Eye |
Player's movement is slowed to a crouch for the given time. | 1:30 |
| Template:Grid Potion of Slowness (extended) |
Template:Grid Potion of Slowness (base or reverted) |
Template:Grid Redstone |
Player's movement is slowed to a crouch for the given time. | 3:00 |
| Template:Grid Potion of Slowness (extended) |
Template:Grid Potion of Fire Resistance (extended) or Template:Grid Potion of Swiftness (extended) |
Template:Grid Fermented Spider Eye |
Player's movement is slowed to a crouch for the given time. | 3:00 |
| Template:Grid Potion of Weakness |
Template:Grid Potion of Strength or Template:Grid Potion of Regeneration |
Template:Grid Fermented Spider Eye |
Reduces all melee attacks by 0.5 damage (0.25 heart). | 1:30 |
| Template:Grid Potion of Weakness (extended) |
Template:Grid Potion of Strength (extended) or Template:Grid Potion of Regeneration (extended) |
Template:Grid Fermented Spider Eye |
Reduces all melee attacks by 0.5 damage (0.25 heart). | 4:00 |
| Template:Grid Potion of Weakness (extended) |
Template:Grid Potion of Weakness (base or reverted) |
Template:Grid Redstone |
Reduces all melee attacks by 0.5 damage (0.25 heart). | 4:00 |
Reverted
There are two general methods to create reverted potions, one of which involve the addition of fermented spider eyes. Reversion, in general, references changing a longer, upgraded potion into a its original weaker potion (for example, changing from a potion of poison (extended) into a potion of harming (reverted) by adding fermented spider eye).
The first method involves adding glowstone (typically) to an already upgraded tertiary potion (seen in Section 5.3.1 or 5.3.2 above). Since these tertiary potions have already been modified with redstone (typically), they can change to their original (revert) unmodified states depending on which modifier was added previously. Not all potions will revert (or react, for that matter) when glowstone powder or redstone dust is added to an upgraded tertiary potion (for example, adding redstone to an already redstone-extended potion will not yield a new potion).
The second method involves the addition of fermented spider eyes, followed by glowstone (usually). Method two works by adding fermented spider eye to an extended positive potion (i.e. an extended tertiary potion). In almost all cases, this will corrupt the potion (corruption is described in Section 4.3 above) and produce a negative potion of equal strength (in this case, extended). Then, glowstone (depending on the recipe) is added to the extended negative potion. Since these negative tertiary potions (regardless of origin) have already been modified with redstone, the addition of glowstone will revert the potion to a potion of lesser duration.
A good example of this process at work is the reversion of the potion of weakness. A potion of weakness can be made two ways. The first method is by adding fermented spider eye to a mundane potion (water bottle + ghast tear/glistering melon/blaze powder/magma cream/sugar/spider eye), then adding redstone to produce potion of weakness (extended). The second method is by adding (again) fermented spider eye to either a potion of strength or a potion of regeneration. Potions of strength and regen, in their base or extended forms, will produce potions of weakness with equal magnitude (for the sake of this example, fermented spider eye is added to potion of strength (extended) to produce potion of weakness (extended)).
Now, there should be two Potions of Weakness (4:00). Glowstone dust is added to the Potion of Weakness (Ext) which reverts the potion into a normal duration (1:30) Potion of Weakness. The act of reducing the duration from 4:00 to 1:30 is reversion. In the inventory, reverted potions will look identical to their base potion, much like mundane and mundane (extended). Their usage is also identical to their base potions, with the exception of turning into reverted potions rather than base potions.
Glowstone
| Potion | Base | Reagent | Effect | Duration (minutes) |
|---|---|---|---|---|
| Template:Grid Potion of Fire Resistance (reverted) |
Template:Grid Potion of Fire Resistance (extended) |
Template:Grid Glowstone Dust |
Gives immunity to damage from fire, lava, and ranged Blaze attacks. | 3:00 |
| Template:Grid Potion of Slowness (reverted) |
Template:Grid Potion of Slowness (extended) |
Template:Grid Glowstone Dust |
Player's movement is slowed to a crouch for the given time. | 1:30 |
| Template:Grid Potion of Weakness (reverted) |
Template:Grid Potion of Weakness (extended) |
Template:Grid Glowstone Dust |
Reduces all melee attacks by 0.5 damage (0.25 heart). | 1:30 |
| Template:Grid Potion of Water Breathing (reverted) |
Template:Grid Potion of Water Breathing (extended) |
Template:Grid Glowstone Dust |
Does not deplete the oxygen bar when underwater. | 3:00 |
Redstone
| Potion | Base | Reagent | Effect | Duration (minutes) |
|---|---|---|---|---|
| Template:Grid Potion of Healing (reverted) |
Template:Grid Potion of Healing II |
Template:Grid Redstone |
Restores |
Instant |
| Template:Grid Potion of Harming (reverted) |
Template:Grid Potion of Harming II |
Template:Grid Redstone |
Inflicts |
Instant |
| Template:Grid Potion of Leaping (reverted) |
Template:Grid Potion of Leaping II |
Template:Grid Redstone |
Allows the player to jump 1/2 block higher | 3:00 |
Fermented Spider Eye
| Potion | Base | Reagent | Effect | Duration (minutes) |
|---|---|---|---|---|
| Template:Grid Potion of Harming (reverted) |
Template:Grid Potion of Healing (reverted) or Template:Grid Potion of Poison (extended) |
Template:Grid Fermented Spider Eye |
Inflicts |
Instant |
| Template:Grid Potion of Slowness (reverted) |
Template:Grid Potion of Fire Resistance (reverted) or Template:Grid Potion of Swiftness II |
Template:Grid Fermented Spider Eye |
Player's movement is slowed to a crouch for the given time. | 1:30 |
| Template:Grid Potion of Weakness (reverted) |
Template:Grid Potion of Strength II or Template:Grid Potion of Regeneration II |
Template:Grid Fermented Spider Eye |
Reduces all melee attacks by 0.5 damage (0.25 heart). | 1:30 |
Recipes
The following are the most efficient recipes to brew each potion. If two ingredients may be brewed in any order relative to each other, they are separated by a double arrow (↔).
- Weakness
- Fermented Spider Eye
- Weakness Ext
- Fermented Spider Eye ↔ Redstone
- Strength
- Nether Wart → Blaze Powder
- Strength Ext
- Nether Wart → Blaze Powder → Redstone
- Strength II
- Nether Wart → Blaze Powder → Glowstone Dust
- Regeneration
- Nether Wart → Ghast Tear
- Regeneration Ext
- Nether Wart → Ghast Tear → Redstone
- Regeneration II
- Nether Wart → Ghast Tear → Glowstone Dust
- Swiftness
- Nether Wart → Sugar
- Swiftness Ext
- Nether Wart → Sugar → Redstone
- Swiftness II
- Nether Wart → Sugar → Glowstone Dust
- Slowness
- Nether Wart → Sugar → Fermented Spider Eye
- Nether Wart → Magma Cream → Fermented Spider Eye
- Nether Wart → Rabbit's Foot → Fermented Spider Eye
- Slowness Ext
- Nether Wart → Sugar → Fermented Spider Eye ↔ Redstone
- Nether Wart → Magma Cream → Fermented Spider Eye ↔ Redstone
- Nether Wart → Rabbit's Foot → Fermented Spider Eye ↔ Redstone
- Healing
- Nether Wart → Glistering Melon
- Healing II
- Nether Wart → Glistering Melon → Glowstone Dust
- Harming
- Nether Wart → Glistering Melon → Fermented Spider Eye
- Nether Wart → Spider Eye → Fermented Spider Eye
- Harming II
- Nether Wart → Glistering Melon → Fermented Spider Eye ↔ Glowstone Dust
- Nether Wart → Spider Eye → Fermented Spider Eye ↔ Glowstone Dust
- Poison
- Nether Wart → Spider Eye
- Poison Ext
- Nether Wart → Spider Eye → Redstone
- Poison II
- Nether Wart → Spider Eye → Glowstone Dust
- Fire Resistance
- Nether Wart → Magma Cream
- Fire Resistance Ext
- Nether Wart → Magma Cream → Redstone
- Night Vision
- Nether Wart → Golden Carrot
- Night Vision ext
- Nether Wart → Golden Carrot → Redstone
- Invisibility
- Nether Wart → Golden Carrot → Fermented Spider Eye
- Invisibility ext
- Nether Wart → Golden Carrot → Fermented Spider Eye ↔ Redstone
- Water Breathing
- Nether Wart → Pufferfish
- Water Breathing ext
- Nether Wart → Pufferfish → Redstone
- Leaping [upcoming]
- Nether Wart → Rabbit's Foot
- Leaping II [upcoming]
- Nether Wart → Rabbit's Foot → Redstone
- Absorption
- Nether Wart → Nether Quartz → Redstone
History
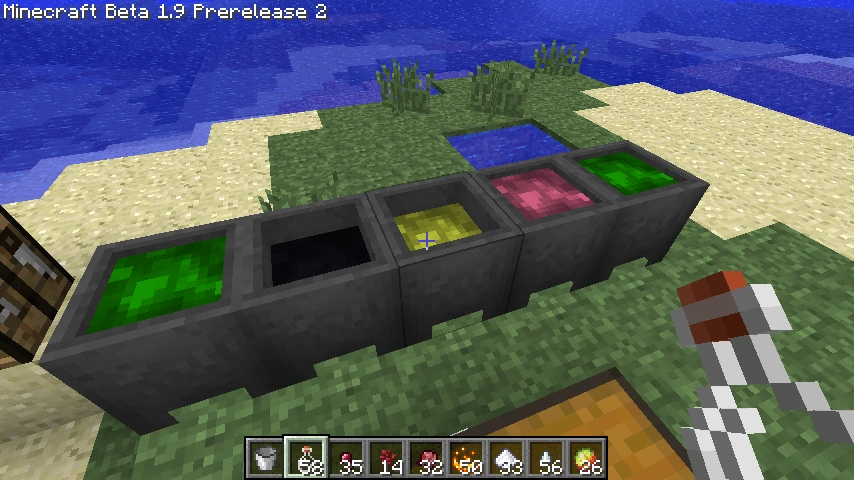

Potions brewing in cauldrons (1.9 pre2).
| r | |||||
|---|---|---|---|---|---|
1.0.0{{Extension DPL}}<ul><li>[[Cooked Rabbit|Cooked Rabbit]]<br/>{{Item
| title = Cooked Rabbit
| image = Cooked Rabbit.png
| heals = {{hunger|5}}
| renewable = Yes
| stackable = Yes (64)
}}
'''Cooked rabbit''' is a [[food]] item that can be eaten by the [[player]].
== Obtaining ==
=== Mob loot ===
{{IN|Bedrock}}, adult [[rabbit]]s drop 0–1 cooked rabbit if killed while on fire. The maximum amount is increased by 1 per level of [[Looting]], for a maximum of 0–4 with Looting III.
{{IN|Java}}, adult [[rabbit]]s drop 1 cooked rabbit if killed while on fire. The maximum amount is increased by 1 per level of [[Looting]], for a maximum of 1–4 with Looting III.
=== Cooking ===
Cooked rabbit can be obtained by cooking [[raw rabbit]] in a [[furnace]], [[smoker]], or [[campfire]].
{{Smelting
|showname=1
|Raw Rabbit
|Cooked Rabbit
|0,35
}}
=== Villagers ===
{{IN|java}}, butcher villagers may give players with the [[Hero of the Village]] effect cooked rabbit.
{{IN|bedrock}}, apprentice-level butcher villagers have 25% chance to sell 5 cooked rabbit for an emerald.
== Usage ==
=== Food ===
To eat a cooked rabbit, press and hold {{control|use}} while it is selected in the [[hotbar]]. Eating one restores {{hunger|5}} [[hunger]] and 6 hunger [[Hunger#Mechanics|saturation]].
=== Crafting ingredient ===
Cooked rabbit can be used to craft rabbit stew.
{{crafting usage}}
=== Wolves ===
Cooked rabbit can be used to [[breed]] and heal tamed [[wolves]], lead them around, and make baby tamed wolves grow up faster by 10% of the remaining time.
==Sounds==
{{Sound table/Entity/Food}}
== Data values ==
=== ID ===
{{edition|java}}:
{{ID table
|edition=java
|showforms=y
|generatetranslationkeys=y
|displayname=Cooked Rabbit
|spritetype=item
|nameid=cooked_rabbit
|form=item
|foot=1}}
{{edition|bedrock}}:
{{ID table
|edition=bedrock
|shownumericids=y
|showforms=y
|notshowbeitemforms=y
|generatetranslationkeys=y
|displayname=Cooked Rabbit
|spritetype=item
|nameid=cooked_rabbit
|id=289
|form=item
|foot=1}}
== Achievements ==
{{load achievements|Rabbit Season}}
== Advancements ==
{{load advancements|Husbandry;A Balanced Diet}}
== History ==
{{History|java}}
{{History||1.8|snap=June 30, 2014|slink=https://twitter.com/TheMogMiner/status/483636993780232192|[[Ryan Holtz]] tweeted images of cooked rabbits and some other new [[item]]s.}}
{{History|||snap=14w27a|[[File:Cooked Rabbit JE1.png|32px]] Added cooked rabbit. It is used to craft [[rabbit stew]].}}
{{History|||snap=14w33b|[[File:Cooked Rabbit JE2 BE1.png|32px]] The texture of cooked rabbit has been changed. The new texture was created by [[wikipedia:Reddit|Reddit]] user [http://www.reddit.com/u/zeldahuman zeldahuman].<ref>{{reddit|2bjzes/a_reminder_of_the_blocks_and_items_added_in_18_so|cj69zie|context=3}}</ref><ref>{{reddit|2c5f35/minecraft_snapshot_14w31a_has_been_released|cjct7gb}}</ref>}}
{{History||1.13|snap=17w47a|Prior to [[1.13/Flattening|''The Flattening'']], this [[item]]'s numeral ID was 412.}}
{{History||1.14|snap=18w43a|[[File:Cooked Rabbit JE3 BE2.png|32px]] The texture of cooked rabbit has been changed.}}
{{History|||snap=19w13a|Butcher [[villager]]s now give cooked rabbit to players under the [[Hero of the Village]] effect.}}
{{History||1.19.3|snap=22w42a|Rabbits now always drop at least 1 coooked rabbit when killed while on fire.}}
{{History|pocket alpha}}
{{History||v0.13.0|snap=build 1|[[File:Cooked Rabbit JE2 BE1.png|32px]] Added cooked rabbit.}}
{{History|bedrock}}
{{History||1.10.0|snap=beta 1.10.0.3|[[File:Cooked Rabbit JE3 BE2.png|32px]] The texture of cooked rabbit has been changed.}}
{{History||1.11.0|snap=beta 1.11.0.4|Cooked rabbit can now be [[trading|bought]] from butcher [[villager]]s.}}
{{History||1.12.0|snap=beta 1.12.0.3|The [[trading]] price of cooked rabbit has been lowered to one [[emerald]].}}
{{History|console}}
{{History||xbox=TU31|xbone=CU19|ps=1.22|wiiu=Patch 3|[[File:Cooked Rabbit JE2 BE1.png|32px]] Added cooked rabbit.}}
{{History|PS4}}
{{History||1.90|[[File:Cooked Rabbit JE3 BE2.png|32px]] The texture of cooked rabbit has been changed.}}
{{History|new 3ds}}
{{History||0.1.0|[[File:Cooked Rabbit JE2 BE1.png|32px]] Added cooked rabbit.}}
{{History|foot}}
== Issues ==
{{issue list}}
== Gallery ==
<gallery>
File:Rabbit Items 2 Ryan Holtz.png|First image of the item by [[Ryan Holtz]].
</gallery>
== References ==
{{reflist}}
{{items}}
[[Category:Food]]
[[Category:Renewable resources]]
[[de:Gebratenes Kaninchen]]
[[es:Conejo asado]]
[[it:Coniglio cotto]]
[[fr:Lapin cuit]]
[[ja:焼き兎肉]]
[[ko:익힌 토끼고기]]
[[nl:Gebraden konijnenvlees]]
[[pl:Pieczony królik]]
[[pt:Coelho assado]]
[[ru:Жареная крольчатина]]
[[zh:熟兔肉]]</li><li>[[Cooked Mutton|Cooked Mutton]]<br/>{{Item
| title = Cooked Mutton
| heals = {{hunger|6}}
| renewable = Yes
| stackable = Yes (64)
| rarity = Common}}
{{redirect|Mutton|the raw version|Raw Mutton}}
'''Cooked mutton''' is a [[food]] item obtained from cooking [[raw mutton]].
== Obtaining ==
=== Mob loot ===
==== Sheep ====
Adult [[sheep]] drop 1–2 cooked mutton if killed while on fire. The maximum amount is increased by 1 per level of [[looting]], for a maximum of 1-5 with Looting III.
=== Cooking ===
Cooked mutton can be obtained by cooking raw mutton in a [[furnace]], [[smoker]], or [[campfire]].
{{Smelting
|showname=1
|Raw Mutton
|Cooked Mutton
|0,35
}}
=== Trading ===
{{IN|bedrock}}, apprentice-level butcher [[villager]]s have a 25% chance to sell 4 cooked mutton for one [[emerald]] as part of their trades.
{{IN|java}}, butcher villagers may give the players with the [[Hero of the Village]] effect cooked mutton.
== Usage ==
=== Food ===
To eat cooked mutton, press and hold {{control|use}} while it is selected in the hotbar. Eating one restores {{hunger|6}} [[hunger]] and 9.6 [[Hunger#Mechanics|saturation]], the same as [[cooked salmon]].
=== Wolves ===
Cooked mutton can be used to [[breed]] and heal tamed [[wolves]], lead them around, and make baby tamed wolves grow up faster by 10% of the remaining time.
==Sounds==
{{Sound table/Entity/Food}}
== Data values ==
=== ID ===
{{edition|java}}:
{{ID table
|edition=java
|showforms=y
|generatetranslationkeys=y
|displayname=Cooked Mutton
|spritetype=item
|nameid=cooked_mutton
|form=item
|foot=1}}
{{edition|bedrock}}:
{{ID table
|edition=bedrock
|showaliasids=y
|shownumericids=y
|showforms=y
|notshowbeitemforms=y
|generatetranslationkeys=y
|displayname=Cooked Mutton
|spritetype=item
|nameid=cooked_mutton
|aliasid=muttoncooked
|id=551
|form=item
|translationkey=item.muttonCooked.name
|foot=1}}
== Advancements ==
{{load advancements|Husbandry;A Balanced Diet}}
== Video ==
<div style="text-align:center">{{yt|PXlW-sZygTs}}</div>
== History ==
{{History|java}}
{{History||1.8|snap=June 30, 2014|slink=https://twitter.com/TheMogMiner/status/483636993780232192|[[Ryan Holtz]] tweeted images of cooked mutton and some other new [[item]]s.}}
{{History|||snap=14w27a|[[File:Cooked Mutton JE1.png|32px]] Added cooked mutton.}}
{{History|||snap=14w33b|[[File:Cooked Mutton JE2 BE1.png|32px]] The texture of raw mutton has been changed. The new texture was created by [[wikipedia:Reddit|Reddit]] user [http://www.reddit.com/u/zeldahuman zeldahuman].<ref>{{reddit|2bjzes/a_reminder_of_the_blocks_and_items_added_in_18_so|cj69zie|context=3}}</ref>}}
{{History||1.13|snap=17w47a|Prior to [[1.13/Flattening|''The Flattening'']], this [[item]]'s numeral ID was 424.}}
{{History||1.14|snap=18w43a|[[File:Cooked Mutton JE3 BE2.png|32px]] The texture of cooked mutton has been changed.}}
{{History|||snap=19w13a|Butcher villagers now give cooked mutton to players under the [[Hero of the Village]] effect.}}
{{History|pocket alpha}}
{{History||v0.15.0|snap=build 1|[[File:Cooked Mutton JE2 BE1.png|32px]] Added cooked mutton.}}
{{History|bedrock}}
{{History||1.10.0|snap=beta 1.10.0.3|[[File:Cooked Mutton JE3 BE2.png|32px]] The texture of cooked mutton has been changed.}}
{{History||1.11.0|snap=beta 1.11.0.4|Cooked mutton can now be [[trading|bought]] from butcher [[villager]]s.}}
{{History||1.16.100|snap=beta 1.16.100.56|The ID of cooked mutton has been changed from <code>muttoncooked</code> to <code>cooked_mutton</code>.}}
{{History|console}}
{{History||xbox=TU31|xbone=CU19|ps=1.22|wiiu=Patch 3|[[File:Cooked Mutton JE2 BE1.png|32px]] Added cooked mutton.}}
{{History|PS4}}
{{History||1.90|[[File:Cooked Mutton JE3 BE2.png|32px]] The texture of cooked mutton has been changed.}}
{{History|3ds}}
{{History||0.1.0|[[File:Cooked Mutton JE2 BE1.png|32px]] Added cooked mutton.}}
{{History|foot}}
== Issues ==
{{issue list}}
== Gallery ==
<gallery>
File:Rabbit Items 3 Ryan Holtz.png|First image of the item by [[Ryan Holtz]].
</gallery>
== References ==
{{reflist}}
{{items}}
[[Category:Food]]
[[Category:Renewable resources]]
[[de:Gebratenes Hammelfleisch]]
[[es:Cordero asado]]
[[fr:Mouton cuit]]
[[it:Carne ovina cotta]]
[[ja:焼き羊肉]]
[[ko:익힌 양고기]]
[[nl:Gebraden schapenvlees]]
[[pl:Pieczona baranina]]
[[pt:Carneiro assado]]
[[ru:Жареная баранина]]
[[zh:熟羊肉]]</li></ul> | 1.9pre2 | Initially, the cauldron was where potions were brewed. Potions were brewed by adding water to the cauldron followed by certain ingredients. Correctly combined ingredients would confer purely beneficial potion effects, and incorrect combinations added negative effects. The system was complicated, lacked a GUI, and formed many duplicate potions (i.e. two potions that were exactly the same could be made in several different ways), so Notch and Jeb came up with a new brewing method using a brewing stand.[1] | |||
| 1.9pre3 | BA brewing GUI was added and most duplicate potions were removed (the total possible potions went down from 150 combinations to only 25 different potions in 31 combinations). Some potion effects available in earlier 1.9 pre-releases inaccessible (e.g. Nausea, Blindness and Invisibility). | ||||
| 1.9pre4 | Throwable splash potions introduced - brewed by placing gunpowder and any potion together in a brewing stand. | ||||
| Glistering Melon as an ingredient to replace the instant health effect conferred by the Ghast Tear, which then added the effect of regeneration instead. | |||||
| Converted certain ingredients into base-secondary ingredients (the Spider Eye, Glistering Melon and Blaze Powder made Mundane Potion when brewed into a water bottle in addition to their previous functions), bringing the potion total to 28 different potions in 35 combinations. | |||||
1.1{{Extension DPL}}<ul><li>[[Bottle o' Enchanting|Bottle o' Enchanting]]<br/>{{ItemEntity
|image=Bottle o' Enchanting.gif
|imagesize=160px
|invimage=Bottle o' Enchanting
|stackable=Yes (64)
|renewable=Yes
|size=Height: 0.25 Blocks<br>Width: 0.25 Blocks
|rarity=Uncommon
|networkid='''[[JE]]''': 75
}}
A '''bottle o' enchanting''' is a throwable item that releases [[experience]] orbs on impact.
== Obtaining ==
=== Trading ===
Master-level cleric [[villager]]s sell bottles o' enchanting for 3 emeralds as part of their trade.
=== Natural generation ===
{{LootChestItem|bottle-o'-enchanting}}
== Usage ==
A bottle o' enchanting can be thrown by pressing {{control|use}}. On impact, it drops [[experience]] orbs worth {{xp|3|11}} (average 7.0) and sends out blue particles.
== Sounds ==
{{Edition|Java}}:<br>
Bottles o' enchanting use the Friendly Creatures sound category for entity-dependent sound events.
{{Sound table
|sound=Glass dig1.ogg
|sound2=Glass dig2.ogg
|sound3=Glass dig3.ogg
|subtitle=Bottle smashes
|source=neutral
|description=When a bottle o' enchanting impacts something
|id=entity.splash_potion.break
|translationkey=subtitles.entity.potion.splash
|volume=1.0
|pitch=0.9-1.0
|distance=16}}
{{Sound table
|rowspan=2
|sound=Bow shoot.ogg
|subtitle=Bottle thrown
|source=neutral
|description=When a bottle o' enchanting is thrown by a player
|id=entity.experience_bottle.throw
|translationkey=subtitles.entity.potion.throw
|volume=0.5
|pitch={{frac|1|3}}-0.5
|distance=16}}
{{Sound table
|subtitle=Dispensed item
|source=block
|description=When a bottle o' enchanting is dispensed from a [[dispenser]]
|id=block.dispenser.launch
|translationkey=subtitles.block.dispenser.dispense
|volume=1.0
|pitch=1.2
|distance=16
|foot=1}}
{{Edition|Bedrock}}:
{{Sound table
|type=bedrock
|sound=Glass dig1.ogg
|sound2=Glass dig2.ogg
|sound3=Glass dig3.ogg
|source=block
|description=When a splash potion impacts something
|id=random.glass
|volume=1.0
|pitch=1.0}}
{{Sound table
|rowspan=2
|sound=Bow shoot.ogg
|source=player
|description=When a splash potion is thrown by a player
|id=random.bow
|volume=0.5
|pitch=0.33-0.5}}
{{Sound table
|source=player
|description=When a splash potion is dispensed from a dispenser
|id=random.bow
|volume=1.0
|pitch=0.83-1.25
|foot=1}}
== Data values ==
=== ID ===
{{edition|java}}:
{{ID table
|edition=java
|firstcolumnname=Item
|showforms=y
|generatetranslationkeys=y
|displayname=Bottle o' Enchanting
|spritetype=item
|nameid=experience_bottle
|form=item
|foot=1}}
{{ID table
|edition=java
|firstcolumnname=Entity
|generatetranslationkeys=y
|displayname=Thrown Bottle o' Enchanting
|spritetype=entity
|spritename=Bottle o' Enchanting
|nameid=experience_bottle
|foot=1}}
{{edition|bedrock}}:
{{ID table
|edition=bedrock
|firstcolumnname=Item
|shownumericids=y
|showforms=y
|notshowbeitemforms=y
|generatetranslationkeys=y
|displayname=Bottle o' Enchanting
|spritetype=item
|nameid=experience_bottle
|id=508
|form=item
|foot=1}}
{{ID table
|edition=bedrock
|firstcolumnname=Entity
|shownumericids=y
|generatetranslationkeys=y
|displayname=Bottle o' Enchanting
|spritetype=entity
|nameid=xp_bottle
|id=68
|foot=1}}
=== Entity data ===
{{see also|Chunk format}}
Thrown bottles o' enchanting have entity data that define various properties of the entity.
{{/ED}}
== History ==
<!--When were dispensers made able to fire these? Or was this always a thing?-->
{{History|java}}
{{History||1.2.1|snap=12w04a|[[File:Bottle o' Enchanting JE1 BE1.png|32px]] Added bottles o' enchanting.
|Bottles o' enchanting can currently be obtained only in [[creative]] mode.}}
{{History||1.3.1|snap=12w21a|With the implementation of the [[trading]] system, the [[player]] can now trade with priest [[villager]]s to obtain 2–4 bottles o' enchanting for 1 [[emerald]].}}
{{History||1.8|snap=14w02a|With the trading revamp, villagers no longer [[trading|sell]] bottles o' enchanting, making them again unobtainable in regular [[survival]].}}
{{History|||snap=14w31a|Cleric [[villager]]s now sell bottles o' enchanting for 3–11 [[emerald]]s each, making them [[renewable resource|renewable]] again.}}
{{History||1.9|snap=15w49a|Bottles o' enchanting, like all projectiles, now take thrower's motion into account.}}
{{History||1.11|snap=16w32a|The entity ID has now been changed from <code>ThrownExpBottle</code> to <code>xp_bottle</code>.}}
{{History||1.13|snap=17w47a|Prior to [[1.13/Flattening|''The Flattening'']], this [[item]]'s numeral ID was 384.}}
{{History|||snap=18w11a|Bottles o' enchanting can now generate in [[shipwreck]] chests.}}
{{History|||snap=pre5|The entity ID has now been changed to <code>experience_bottle</code>.}}
{{History||1.14|snap=18w43a|[[File:Bottle o' Enchanting JE2 BE2.png|32px]] The texture of bottles o' enchanting has now been changed.}}
{{History|||snap=18w47a|Bottles o' enchanting can now generate in [[pillager outpost]] chests.}}
{{History||1.19|snap=22w13a|Bottles o' enchanting may now be found in [[ancient city]] [[chest]]s.}}
{{History|pocket alpha}}
{{History||v0.12.1|snap=build 1|[[File:Bottle o' Enchanting JE1 BE1.png|32px]] Added bottles o' enchanting.
|Due to the lack of [[trading]], bottles o' enchanting are currently available only in [[creative]] mode, similar to [[Java Edition 12w04a|12w04a]] when it was first released.}}
{{History|pocket}}
{{History||1.0.4|snap=alpha 1.0.4.0|With [[villager]] [[trading]] added, it is now possible to obtain bottles o' enchanting legitimately.}}
{{History||1.1.0|snap=alpha 1.1.0.0|The entity ID has now been changed from <code>potion.experience</code> to <code>xp_bottle</code>.}}
{{History|bedrock}}
{{History||1.4.0|snap=beta 1.2.14.2|Bottles o' enchanting can now be found inside [[shipwreck]] and [[buried treasure]] [[chest]]s.}}
{{History||1.10.0|snap=beta 1.10.0.3|Bottles o' enchanting can now be found in [[pillager outpost]] chests.
|[[File:Bottle o' Enchanting JE2 BE2.png|32px]] The texture of bottles o' enchanting has now been changed.}}
{{History||1.11.0|snap=beta 1.11.0.4|[[Trading]] has now been changed and bottles o' enchanting are now [[trading|sold]] by cleric [[villager]]s for 3 [[emerald]]s.}}
{{History|console}}
{{History||xbox=TU7|xbone=CU1|ps=1.0|wiiu=Patch 1|[[File:Bottle o' Enchanting JE1 BE1.png|32px]] Added bottles o' enchanting.
|Bottle o' enchanting can be found in the Miscellaneous tab in the [[Creative inventory]].}}
{{History||xbox=TU12|Moved bottle o' enchanting to the Brewing tab in the Creative inventory.}}
{{History|PS4}}
{{History||1.90|[[File:Bottle o' Enchanting JE2 BE2.png|32px]] The texture of bottles o' enchanting has now been changed.}}
{{History|3ds}}
{{History||0.1.0|[[File:Bottle o' Enchanting JE1 BE1.png|32px]] Added bottles o' enchanting.
|Bottles o' enchanting are not available within the [[Creative inventory]].}}
{{History||?|Added bottles o' enchanting to the Creative inventory.{{info needed|Which update did this occur?}}}}
{{History|foot}}
== Issues ==
{{issue list|Bottle o' Enchanting|Experience Bottle}}
== Gallery ==
<gallery>
Bottle O' Enchanting Splash.gif|Bottle o' enchanting splash animation on impact.
Bottle O' Enchanting villager.png|Players may trade with villagers to obtain bottles o' enchanting in survival mode.
</gallery>
{{Items}}
{{Entities}}
[[cs:Lektvar očarování]]
[[de:Erfahrungsfläschchen]]
[[es:Frasco con experiencia]]
[[fr:Fiole d'expérience]]
[[ja:エンチャントの瓶]]
[[ko:경험치 병]]
[[pl:Zaklęta butelka]]
[[pt:Frasco de experiência]]
[[ru:Зелье опыта]]
[[th:ขวดแห่งเวทมนตร์]]
[[zh:附魔之瓶]]</li><li>[[Brown Dye|Brown Dye]]<br/>{{Item
| image = Brown Dye.png
| renewable = Yes
| stackable = Yes (64)
}}
'''Brown dye''' is a [[Dye#Primary|primary color dye]] derived from [[cocoa beans]].
== Obtaining ==
=== Crafting ===
{{Crafting
|Cocoa Beans
|Output=Brown Dye
|type=Material
|head=
}}
== Usage ==
{{dye usage}}
=== Crafting ingredient ===
{{crafting usage|ignore=Banner|continue=1}}
{{banner crafting usage}}
=== Loom ingredient ===
{{Banner loom usage|Brown Dye}}
=== Trading ===
Apprentice-level Shepherd villagers have a 20% chance to buy 12 brown dye for an emerald.{{only|bedrock}}
Expert-level Shepherd villagers have a {{frac|2|7}} chance to buy 12 brown dye for an emerald.{{only|java}}
== Data values ==
=== ID ===
{{edition|java}}:
{{ID table
|edition=java
|showforms=y
|generatetranslationkeys=y
|displayname=Brown Dye
|spritetype=item
|nameid=brown_dye
|form=item
|foot=1}}
{{edition|bedrock}}:
{{ID table
|edition=bedrock
|showaliasids=y
|shownumericids=y
|showforms=y
|notshowbeitemforms=y
|generatetranslationkeys=y
|displayname=Brown Dye
|spritetype=item
|nameid=brown_dye
|aliasid=dye / 17
|id=398
|form=item
|translationkey=item.dye.brown_new.name
|foot=1}}
== History ==
{{expand section|Item textures and more from a development video on twitter by bartek.}}
{{History|java}}
{{History||1.14|snap=18w43a|[[File:Brown Dye JE1 BE1.png|32px]] Added brown dye.}}
{{History|||snap=18w44a|Brown dye now can change the text color on [[sign]]s to brown.}}
{{History|||snap=19w05a|Added the [[wandering trader]], which sell brown dyes.}}
{{History|||snap=19w11a|Brown dye can now be [[trading|bought]] by shepherd villagers.}}
{{History||1.17|snap=20w45a|Brown dye can now used to craft newly added [[brown candle]]s.}}
{{History|||snap=21w19a|Brown dye can no longer used to craft brown candles.}}
{{History|||snap=Pre-release 1|Brown dye can once again used to craft brown candles.}}
{{History||1.20<br>(Experimental)|link=1.19.3|snap=22w42a|Brown dye now can change the text color on [[hanging sign]]s to brown.}}
{{History|bedrock}}
{{History||1.8.0|snap=beta 1.8.0.10|[[File:Brown Dye JE1 BE1.png|32px]] Added brown dye.}}
{{History||1.11.0|snap=beta 1.11.0.4|Brown dye can now be [[trading|sold]] to shepherd [[villager]]s.}}
{{History||1.16.100|snap=beta 1.16.100.56|The ID of brown dye has been changed from <code>dye/17</code> to <code>brown_dye</code>.}}
{{History|ps4}}
{{History||1.83|[[File:Brown Dye JE1 BE1.png|32px]] Added brown dye.}}
{{History|foot}}
== Issues ==
{{issue list}}
{{Items}}
[[Category:Dyes]]
[[Category:Renewable resources]]
[[de:Brauner Farbstoff]]
[[es:Tinte marrón]]
[[fr:Teinture marron]]
[[ja:茶色の染料]]
[[ko:갈색 염료]]
[[pl:Brązowy barwnik]]
[[pt:Corante marrom]]
[[th:สีย้อมสีน้ำตาล]]
[[zh:棕色染料]]</li></ul> | 12w01 | The time to brew potions was decreased to 20 seconds. | |||
1.4.2{{Extension DPL}}<ul><li>[[Carrot|Carrot]]<br/>{{about|the natural food item|the golden food|Golden Carrot|the item for controlling saddled pigs|Carrot on a Stick}}
{{Item
| group = Age 0-1
| 1-1 = Carrots Age 0-1.png
| 1-2 = Carrots Age 0-1 BE.png
| group2 = Age 2-3
| 2-1 = Carrots Age 2-3.png
| 2-2 = Carrots Age 2-3 BE.png
| group3 = Age 4-6
| 3-1 = Carrots Age 4-6.png
| 3-2 = Carrots Age 4-6 BE.png
| group4 = Age 7
| 4-1 = Carrots Age 7.png
| 4-2 = Carrots Age 7 BE.png
| image2 = Carrot JE3 BE2.png
| renewable = Yes
| heals = {{hunger|3}}
| stackable = Yes (64)
}}
A '''carrot''' is a [[food]] [[item]] obtained from carrot crops that can be used to plant them, eaten or used as a crafting ingredient.
'''Carrot crops''' are planted in [[farmland]] and used to grow carrots.
== Obtaining ==
=== Breaking ===
{{See also|Fortune#Seeds}}
Fully grown carrot crops drop 2 to 5 carrots ({{frac|3|5|7}} per crop harvested on average). Yield can be increased using a tool enchanted with [[Fortune]], with Fortune III harvesting an average of {{frac|5|3|7}} carrots.
The yield is calculated by a binomial distribution: 2 drops are fixed, then a drop is attempted three times with a success rate of 57.14286% to yield the extra 0–3 drops. Each level of Fortune enchantment increases the number of attempts by one.
=== Natural generation ===
[[Village]] farm plots have a chance of having carrots. The exact chance depends on the style of the village:
{| class="wikitable"
! Village style !! Chance
|-
| {{EnvSprite|plains-village}} Plains || 30%
|-
| {{EnvSprite|snowy-village}} Snowy || 10%
|}
=== Mob loot ===
[[Zombie]]s, [[husk]]s, and [[zombie villager]]s have a 2.5% ({{frac|1|40}}) chance of dropping either an [[iron ingot]], carrot, or [[potato]] when killed by a player or tamed wolf. This is increased by 1% ({{frac|1|100}}) per level of looting. This gives carrots the following chances of dropping:
* {{frac|1|120}} (about 0.83%)
* {{frac|7|600}} (about 1.17%) with Looting I
* {{frac|9|600}} (about 1.50%) with Looting II
* {{frac|11|600}} (about 1.83%) with Looting III
=== Chest loot ===
{{LootChestItem|carrot}}
== Usage ==
{{see also|Tutorials/Hunger management|title1=Hunger management}}
To eat a carrot, press and hold {{control|use}} while the carrot is selected in the [[hotbar]]. Eating a carrot restores {{hunger|3}} [[hunger]] and 3.6 hunger [[Hunger#Mechanics|saturation]].
=== Farming ===
{{see also|Tutorials/Crop farming|title1 = Crop farming }}
Carrots can be [[farming|farmed]] and harvested on [[farmland]]. Planted carrots take 8 [[Block tick|stages]] to grow, and go through 4 visually distinct stages. Planted carrots require a light level of 9 or greater to continue growing. If the light level is 7 or below, the crops instantly un-plant themselves ("pop off"). It is not possible to plant carrots if the light level is too low.
Crops grow faster if the farmland they are planted in is [[Farmland#Hydration|hydrated]]. Using [[bone meal]] on crops also increases the speed of growth by randomly increasing their growth stage by 2 to 5.
Crops break if pushed by a [[piston]] or if their supporting farmland breaks or turns to dirt (i.e. by being trampled), dropping their usual drops.
If {{cmd|gamerule mobGriefing}} is <code>true</code>, rabbits will find mature carrot [[crops]]{{only|je}} / carrot crops with growth stage greater than 1{{only|be}}. This reduces the growth stages by one, removing the crop completely when the growth stage reaches 0.
=== Breeding ===
Carrots can also be used to [[breed]] and attract [[pig]]s and [[rabbit]]s.
Villagers can pick up carrot items to become willing, which allow them to breed. Villagers require 12 carrots to become willing.
=== Trading ===
Novice-level Farmer villagers have a 25% ({{frac|1|4}}){{only|bedrock}} or 40% ({{frac|2|5}}){{only|java}} chance to buy 22 carrots for an emerald.
=== Crafting ingredient ===
{{crafting usage}}
=== Composting ===
Placing a carrot into a [[composter]] has a 65% chance of raising the compost level by 1.
== Sounds ==
=== Block ===
{{Sound table/Block/Crop}}
=== Item ===
{{Sound table/Entity/Food}}
== Data values ==
=== ID ===
{{edition|java}}:
{{ID table
|edition=java
|showblocktags=y
|showforms=y
|generatetranslationkeys=y
|displayname=Carrots
|spritetype=block
|nameid=carrots
|blocktags=bee_growables, crops
|form=block}}
{{ID table
|displayname=Carrot
|spritetype=item
|nameid=carrot
|form=item
|foot=1}}
{{edition|bedrock}}:
{{ID table
|edition=bedrock
|showforms=y
|shownumericids=y
|generatetranslationkeys=y
|displayname=Carrots
|spritetype=block
|nameid=carrots
|id=141
|form=block
|translationkey=-}}
{{ID table
|displayname=Carrot
|spritetype=item
|nameid=carrot
|id=279
|form=item
|foot=1}}
=== Block states ===
{{see also|Block states}}
{{/BS}}
== Advancements ==
{{load advancements|Husbandry;A Balanced Diet}}
== History ==
{{History|java}}
{{History||1.4.2|snap=12w34a|[[File:Carrot JE1.png|32px]] Added carrots.
|[[File:Carrots Age 0-1 JE1.png|32px]] [[File:Carrots Age 2-3 JE1.png|32px]] [[File:Carrots Age 4-6 JE1.png|32px]] [[File:Carrots Age 7 JE1.png|32px]] Added carrot crops.
|Carrots can be obtained only as a rare [[drop]] from [[zombie]]s.}}
{{History|||snap=August 28, 2012|slink={{tweet|Dinnerbone|240428477856231424}}|[[Dinnerbone]] released an image of a [[saddle]]d [[pig]] being controlled with a [[carrot on a stick]]. [[Wheat]] was considered as a "fuel" along with carrots,<ref>{{Tweet|Dinnerbone|240188453789257728}}</ref> but Dinnerbone eventually decided on carrots.<ref>{{Tweet|Dinnerbone|240355810650247168}}</ref>}}
{{History|||snap=12w34a|Carrots can now be used to craft [[golden carrot]]s.}}
{{History|||snap=12w36a|Carrots can now be found in [[village]]s.
|Carrots are now used to breed [[pig]]s.
|Carrots are now used to craft [[carrot on a stick]].}}
{{History|||snap=12w37a|[[File:Carrot JE2 BE1.png|32px]] The texture of carrots has now been changed. The texture has been changed to singular carrot, with the tooltip changed to reflect this.}}
{{History||1.5|snap=13w04a|[[Bone meal]] now grows carrots by 1 stage instead of fully growing it. The [[player]] might not see it grow, because some stages look the same.}}
{{History||1.8|snap=14w02a|Carrots now restore {{hunger|3}} points and 3.6 hunger [[saturation]], instead of {{hunger|4}} and 4.8 hunger saturation.
|Farmer [[villager]]s now [[trading|buy]] 15–19 carrots for 1 [[emerald]].}}
{{History|||snap=14w04a|[[Farmer]] (profession) [[villager]]s now harvest fully grown carrots.
|Villagers can now be made willing using 12 carrots.}}
{{History|||snap=14w06a|[[File:Carrots Age 0-1 JE2.png|32px]] [[File:Carrots Age 2-3 JE2.png|32px]] [[File:Carrots Age 4-6 JE2.png|32px]] [[File:Carrots Age 7 JE2.png|32px]] Carrot crops are now a pixel higher - previously they were offset one pixel down as to match farmland's sunken model. This is likely an accidental result of model conversion.}}
{{History|||snap=14w10a|[[File:Missing Model JE2.png|32px]] [[File:Missing Model JE2.png|32px]] [[File:Missing Model JE2.png|32px]] [[File:Missing Model JE2.png|32px]]<br>[[File:Missing Model (anisotropic filtering) JE2.png|32px]] [[File:Missing Model (anisotropic filtering) JE2.png|32px]] [[File:Missing Model (anisotropic filtering) JE2.png|32px]] [[File:Missing Model (anisotropic filtering) JE2.png|32px]]<br>Carrot crops of all stages [[Missing model|no longer have a model]].}}
{{History|||snap=14w10b|[[File:Carrots Age 0-1 JE4.png|32px]] [[File:Carrots Age 2-3 JE4.png|32px]] [[File:Carrots Age 4-6 JE4.png|32px]] [[File:Carrots Age 7 JE4.png|32px]] Carrot crops now have models again.<ref>{{bug|MC-50232}}</ref> In addition, they are now offset downwards by one pixel once more.<ref>{{bug|MC-50155}}</ref>}}
{{History|||snap=14w25a|[[File:Carrots Age 0-1 JE5.png|32px]] [[File:Carrots Age 2-3 JE5.png|32px]] [[File:Carrots Age 4-6 JE5.png|32px]] [[File:Carrots Age 7 JE5.png|32px]] Carrot crops are now darker and subject to directional shading.}}
{{History|||snap=14w27a|[[File:Carrots Age 0-1 JE6.png|32px]] [[File:Carrots Age 2-3 JE6.png|32px]] [[File:Carrots Age 4-6 JE6.png|32px]] [[File:Carrots Age 7 JE6.png|32px]] Carrot crops are no longer subject to directional shading.
|Added [[rabbit]]s, which can be [[breeding|bred]] and/or tamed using carrots. Rabbits also grief carrot crops.
|Carrots are now used to craft [[rabbit stew]].}}
{{History|||snap=14w34a|Rabbits can no longer be tamed.}}
{{History||1.9|snap=15w38a|The [[drops|drop]] chances have now been slightly improved from an average of {{frac|2|3|5}} per [[crops|crop]] harvested to {{frac|2|5|7}}.}}
{{History||1.13|snap=17w47a|Prior to [[1.13/Flattening|''The Flattening'']], this block's numeral ID was 141, and the item's 391.}}
{{History|||snap=18w11a|Carrots can now generate in the chests of [[shipwreck]]s.}}
{{History||1.14|snap=18w43a|[[File:Carrot JE3 BE2.png|32px]] The texture of carrots has now been changed.
|[[File:Carrots Age 0-1 JE7.png|32px]] [[File:Carrots Age 2-3 JE7.png|32px]] [[File:Carrots Age 4-6 JE7.png|32px]] [[File:Carrots Age 7 JE7.png|32px]] The textures of carrot crops have now been changed.}}
{{History|||snap=18w47a|Carrots can now generate in the [[chest]]s of [[pillager outpost]]s.}}
{{History|||snap=19w03a|Placement and breaking [[sound]]s have now been added to carrots.
|Placing a carrot into the new [[composter]] has a 50% chance of raising the compost level by 1.}}
{{History|||snap=19w05a|Carrots now have a 65% chance of increasing the compost level in a composter by 1.}}
{{History||1.15|snap=19w34a|[[Bee]]s can now pollinate carrot crops.}}
{{History||1.17|snap=21w13a|[[File:Carrots Age 0-1 JE8.png|32px]] [[File:Carrots Age 2-3 JE8.png|32px]] [[File:Carrots Age 4-6 JE8.png|32px]] [[File:Carrots Age 7 JE8.png|32px]] The "crop" template model has changed such that pixels appear in the same physical positions on opposite sides of texture planes, changing the carrot crop's appearance in the process.<ref>{{bug|MC-199242}}</ref>}}
{{History||1.18|snap=Pre-release 5|[[File:Carrots Age 7 JE9.png|32px]] A stray dark pixel has been removed from the texture of fully-grown carrots.<ref>{{bug|MC-226711}}</ref>}}
{{History|pocket alpha}}
{{History||v0.8.0|snap=build 1|[[File:Carrot JE2 BE1.png|32px]] Added carrots.
|[[File:Carrots Age 0-1 JE6 BE1.png|32px]] [[File:Carrots Age 2-3 JE6 BE1.png|32px]] [[File:Carrots Age 4-6 JE6 BE1.png|32px]] [[File:Carrots Age 7 JE6 BE1.png|32px]]{{verify|Correct models?}} Added carrot crops.
|Carrots can be obtained by killing [[zombie]]s.}}
{{History|||snap=build 3|Carrots now have a chance to [[drops|drop]] when tilling [[grass block]]s.}}
{{History|||snap=build 4|Carrots are no longer dropped by tilling [[grass block]]s.}}
{{History||v0.9.0|snap=build 1|Carrot crops now naturally spawn in [[village]]s.
|Carrot now used to breed [[pig]]s.}}
{{History||v0.12.1|snap=build 1|Carrots now restore [[hunger]] instead of [[health]].
|Brown robed [[villager]]s can now harvest fully grown carrot crops.
|Carrots can now be used to craft [[golden carrot]]s.}}
{{History||v0.13.0|snap=build 1|Carrots can now be used to breed [[rabbit]]s.
|Carrots can now be used to craft [[rabbit stew]].}}
{{History||v0.15.0|snap=build 1|Carrots are now used to craft [[carrot on a stick]].}}
{{History||v0.16.2|Carrots can now be found in a [[chest]] inside the large house in [[snowy tundra]] and [[snowy taiga]] [[village]]s.}}
{{History|pocket}}
{{History||1.0.4|snap=alpha 1.0.4.0|Farmer [[villager]]s now [[trading|buy]] 15–19 carrots for 1 [[emerald]].
|Carrots can now be picked up by villagers and become willing.}}
{{History|bedrock}}
{{History||1.2.0|snap=beta 1.2.0.2|Carrots can now be found inside of [[bonus chest]]s.}}
{{History||1.4.0|snap=beta 1.2.14.2|Carrots can now be found inside [[shipwreck]] chests.}}
{{History||1.10.0|snap=beta 1.10.0.3|Carrots can be found in the new [[pillager outpost]]s.
|[[File:Carrot JE3 BE2.png|32px]] The texture of carrots has now been changed.
|[[File:Carrots Age 0-1 JE7.png|32px]] [[File:Carrots Age 2-3 JE7.png|32px]] [[File:Carrots Age 4-6 JE7.png|32px]] [[File:Carrots Age 7 JE7.png|32px]]{{verify|Correct models?}} The textures of carrot crops have now been changed.}}
{{History||1.11.0|snap=beta 1.11.0.1|Carrots can now be used to fill up [[composter]]s.}}
{{History|||snap=beta 1.11.0.4|[[Trading]] has now been changed, farmer [[villager]]s now have a 25% chance to [[trading|buy]] 22 carrots for an [[emerald]].}}
{{History||1.14.0|snap=beta 1.14.0.1|[[Bee]]s can now pollinate carrot crops.}}
{{History||?|[[File:Carrots Age 0-1 BE.png|32px]] [[File:Carrots Age 2-3 BE.png|32px]] [[File:Carrots Age 4-6 BE.png|32px]] [[File:Carrots Age 7 BE.png|32px]] Carrot crop planes use a mapping that results in very unnatural mirroring when viewed from certain angles, such as northwest.<ref>{{bug|MCPE-146936}}</ref>}}
{{History|console}}
{{History||xbox=TU14|xbone=CU1|ps=1.04|wiiu=Patch 1|switch=1.0.1|[[File:Carrot JE2 BE1.png|32px]] Added carrots.
|[[File:Carrots Age 0-1 JE6 BE1.png|32px]] [[File:Carrots Age 2-3 JE6 BE1.png|32px]] [[File:Carrots Age 4-6 JE6 BE1.png|32px]] [[File:Carrots Age 7 JE6 BE1.png|32px]]{{verify|Correct models?}} Added carrot crops.}}
{{History||xbox=none|xbone=none|ps=1.90|wiiu=none|switch=none|[[File:Carrot JE3 BE2.png|32px]] The texture of carrots has now been changed.
|[[File:Carrots Age 0-1 JE7.png|32px]] [[File:Carrots Age 2-3 JE7.png|32px]] [[File:Carrots Age 4-6 JE7.png|32px]] [[File:Carrots Age 7 JE7.png|32px]]{{verify|Correct models?}} The textures of carrot crops have now been changed.}}
{{History||xbox=none|xbone=none|ps=1.91|wiiu=none|switch=none|Carrots can now be used to fill up [[composter]]s.}}
{{History|New 3DS}}
{{History||0.1.0|[[File:Carrot JE2 BE1.png|32px]] Added carrots.
|[[File:Carrots Age 0-1 JE6 BE1.png|32px]] [[File:Carrots Age 2-3 JE6 BE1.png|32px]] [[File:Carrots Age 4-6 JE6 BE1.png|32px]] [[File:Carrots Age 7 JE6 BE1.png|32px]]{{verify|Correct models?}} Added carrot crops.}}
{{History|foot}}
=== Carrots "item" ===
{{:Technical blocks/Carrots}}
== Issues ==
{{issue list}}
== Gallery ==
<gallery>
AllSeeds.png|All the seeds that exist in the game (except [[nether wart]] and [[cocoa beans]]).
VillageGrowingCarrotsAndPotatoes.png|Carrots and [[potato]]es found growing naturally in a [[village]].
Carrots Growing.png|Carrots in multiple stages of growth.
Carrot Dungeon.jpg|A carrot that dropped from a zombie, just to the right of the [[spawner]].
Carrot SDGP.png|Carrot in the [[Super Duper Graphics Pack]].
</gallery>
== References ==
{{reflist}}
{{Items}}
{{blocks|vegetation}}
[[Category:Plants]]
[[Category:Food]]
[[Category:Renewable resources]]
[[Category:Non-solid blocks]]
[[Category:Generated structure blocks]]
[[cs:Mrkev]]
[[de:Karotte]]
[[es:Zanahoria]]
[[fr:Carotte]]
[[hu:Sárgarépa]]
[[ja:ニンジン]]
[[ko:당근]]
[[lzh:胡蘿蔔]]
[[nl:Wortel]]
[[pl:Marchewka]]
[[pt:Cenoura]]
[[ru:Морковь]]
[[th:แคร์รอต]]
[[uk:Морква]]
[[zh:胡萝卜]]</li><li>[[Map|Map]]<br/>{{about|the craftable map|maps showing the locations of certain structures|Explorer Map|other uses|Map (disambiguation)}}
{{distinguish|World}}
{{Item
| image = Map Zoom 4.png
| renewable = Yes
| stackable = Yes (64)
}}
A '''map''' is an [[item]] used to view explored [[Chunk|terrain]] and mark landmarks.
==Obtaining==
===Crafting===
{{crafting
|head=1
|showname=0
|showdescription=1
|A1= Paper
|B1= Paper
|C1= Paper
|A2= Paper
|B2= Compass
|C2= Paper
|A3= Paper
|B3= Paper
|C3= Paper
|Output= Empty Map
|type= Miscellaneous
|description=This variation is called an "empty locator map" {{in|bedrock}}, or an "empty map" {{in|java}}.
When the player first creates a map, it is blank. It needs to be activated by holding it and pressing ''{{Control|use item}}''. after which it records terrain and location markers as the player travels within (or close to) the area it maps.
}}
{{crafting
|A1= Paper
|B1= Paper
|C1= Paper
|A2= Paper
|B2= Paper
|C2= Paper
|A3= Paper
|B3= Paper
|C3= Paper
|Output= Empty Map
|type= Miscellaneous
|description={{only|bedrock}}
This variation is called an "empty map". It does not show location markers. It is intended for cloning and zooming locator maps without having to consume an additional [[compass]] (thereby saving [[iron ingot]]s and [[redstone dust]]), but it can also be {{Control|use|text=activated}} and later converted to a locator map by combining it with a compass on an [[anvil]], [[crafting table]], or [[cartography table]].
|foot=1
}}
=== Natural generation ===
==== Chest loot ====
{{LootChestItem|empty-map,map
}}
=== Cartography table ===
A map can also be created using a single paper on a [[cartography table]] to create an empty map, or a paper with a compass for an empty locator map.{{only|bedrock}}
=== Starting map ===
{{exclusive|bedrock|section=1}}
When creating a new world {{in|bedrock}}, the player can enable the "Starting Map" option to spawn with an empty locator map in the hotbar. The map's zoom scale is 1:8. The map is updated only while the player holds it.
=== Trading ===
Novice-level cartographer [[Villager|villagers]] sell a single empty map for 7 [[Emerald|emeralds]] as their trades.
{{IN|java}}, cartographer villagers may give players with the [[Hero of the Village]] effect an empty map.
== Usage ==
{{See also|Tutorials/Mapping}}
=== Mapping ===
Crafting a map creates an empty map. The map is drawn for the first time when it is held and used (with ''{{control|use item}}''). This map can then be adjusted to different zoom levels. After conversion to a drawn map item, it starts to draw a top-down view of the player's surroundings, with North pointing to the top of the map. A pointed oval pointer indicates the player's position on the map, and moves in real-time as the player moves across the terrain shown on the map. The map does ''not'' center on the player when created, rather, the world is broken up into large invisible grid squares, and the map displays the area of whichever grid square it is in when it is first used. For example, if a player uses a new map in a certain grid square, and then moves a distance away and uses another fresh map but is still within the same grid square, both maps appear identical. To make a map that is not identical to the first one, the player would have to move outside of the edges of the first map (because then they would be in a new grid square). This way, no two maps of the same size can ever partially overlap and every map can display only a fixed area.
To record the world on a map, that specific map must be held in the player's hands while the player moves around the world. The world is recorded as-is during exploration, meaning that if the world is modified, a player must revisit the area while holding the map to update the map's view. Maps can also be [[Map#Cloning|cloned]]. If a player holds a map whose one or more clones are on display in item frames, updates are made on all clone-connected maps.
Other players are displayed on the map only if they have a map in their inventory cloned from the one being looked at. When placing a map into an [[item frame]], the map displays with a green pointer shown at the location of the item frame. This is to help the player see where they are in relation to the area that the map is showing. If the player leaves a map in an item frame and views a clone of it, the green pointer remains in the spot of the framed copy. This can be used to set up waypoints. Unexplored areas are transparent, making the item frame visible.
When the player leaves the area shown on a specific map, the player pointer transforms into a white dot that moves on that map. The marker shrinks to a smaller white dot if the player is far from the map's center: the area is 320 by 320 blocks per scale factor. The dot moves along the edge of the map to show the relative location of the player. However {{in|bedrock}}, the pointer remains as an arrow but shrinks until the player is near the area shown on the map.
While maps in [[the Nether]] work, they show only the red-and-gray pattern, regardless of the blocks placed. The only useful function is finding where the player is in relation to placed framed maps, which show as green pointers. Additionally, the player pointer rapidly spins and is not a good indicator of direction. Placing a [[banner]] in [[the Nether]] still shows it on the map as usual. Having a smaller map image while riding a [[strider]] in the Nether can help one to see one's footing while traveling over [[lava]].
{{IN|java}}, when using a map from another dimension, the map shows the player's position and direction when they were last in the dimension of the map. {{IN|bedrock}}, however, the player can use maps from one dimension while in another dimension. For locator maps, the place marker changes color depending on the dimension that the player is currently in (white for the Overworld, red for [[the Nether]], and magenta for [[the End]]). An Overworld map in the Nether shows the player's corresponding location and direction in the Overworld.<ref name=multiverse>{{ytl|EpP1diZdEdI}}</ref> Similarly, a Nether Map in the Overworld shows the player's corresponding location in the Overworld, but the place marker spins, just like a Nether map in the Nether. An Overworld map in the End shows the world spawn.<ref name=multiverse/> A Nether map cannot be used in the End — the map appears, but the place marker is not shown anywhere — and similarly, an End map cannot be used in the Overworld or the Nether.
A player can make a large piece of pixel art (128×128) facing upward, center a map on it, and place that map in an [[item frame]] to create a custom picture. Locking is recommended. See [[Map item format#Map Pixel Art]] for details on the techniques.
Maps display as a mini-map when held in the off-hand, or if the off-hand slot is occupied; the map is full-sized only when held in the dominant hand with both hands free.
A map always positions itself facing towards North when placed horizontally within an item frame regardless of how the map is placed.
=== Map content ===
{{Main|Map item format}}
Maps consist of square pixels arranged like pixels in a 128×128 square pattern, with each pixel representing a square portion of land. {{IN|java}}, the [[Map item format#Color table|color of a map pixel]] generally matches the color of the most common [[opaque]] block in the corresponding area, as seen from the sky. 'Minority blocks' in the target area have no effect on the color of the pixel, thus small features tend to be undetectable on zoomed-out maps.
{{IN|bedrock}}, the [[Map item format#Color table|color of a map pixel]] instead matches the single top-most opaque block in a grid sized by the map magnification pixel size (see the table in the "Player marker and pointer" section below). For example, a 3/4 magnification map has a pixel size of 8x8 blocks; this means the map will read only the top-most opaque blocks at the 0,0 coordinate, the 8,0 coordinate, the 0,8 coordinate, etcetera, ignoring all other blocks in the area. This means that {{in|bedrock}}, map pixel art requires only one block per pixel regardless of map magnification.
{{IN|bedrock}}, grass, foliage and water colors that are biome-dependent are represented accurately on a map.
{| class="wikitable"
|-
! style="width: 300px;" | {{el|je}}
! style="width: 300px;" | {{el|be}}
|-
| style="text-align: center;" | [[File:Map Zoom 4.png|alt=All banners marked on a map, alongside a named banner.|216px]]
| style="text-align: center;" | [[File:Map item BE.png|216px]]
|-
| Biome colors on ''Java Edition''.
| Biome colors on ''Bedrock Edition''.
|-
|}
Maps also show ground up to about 15 blocks below the surface of the water in oceans as slightly lighter blue, to show where the ground rises. This is not true with land above water. Higher elevations in the world mean lighter colors on the map. The map records the surface even as the player moves below the surface.
A standard map represents 128x128 blocks (1 block per pixel, 8x8 [[chunks]]) but maps can be zoomed-out to represent up to 2048x2048 blocks (16 square blocks per pixel, 128x128 [[chunks]]).
Some relevant distances: 64 blocks (4 chunks) is the update radius from a player in the Overworld and the End. However, it is half this (32 blocks) in the Nether. Also, 1024 blocks is the minimum Overworld distance from a [[nether portal]], at which players can build another portal and expect to reach a new location in the Nether. This is the distance across a 1:8 map, and also from a 1:16 map's center to its edge.
=== Player marker and pointer ===
{{IN|java}}, every map contains a marker that marks the position of the player, and points in the same direction as the player. When a player moves out of a map, a big white dot appears and moves relative to the player's position. The pointer either disappears when the player moves away a certain distance from the border of the map or, in case of [[explorer map]]s, the big white dot changes to a smaller white dot. The distance required for the small white dot to appear(explorer maps) or for the big dot to vanish (normal maps) changes with the scaling of the map.
* '''Level 0/4 :''' 128×128 blocks (each map pixel represents 1 block)
* '''Level 1/4 :''' 256×256 blocks (2×2 blocks per map pixel)
* '''Level 2/4 :''' 512×512 blocks (4×4 blocks per map pixel)
* '''Level 3/4 :''' 1024×1024 blocks (8×8 blocks per map pixel)
* '''Level 4/4 :''' 2048×2048 blocks (16×16 blocks per map pixel)
{{IN|bedrock}}, a map can be crafted with or without this marker, and a map without a position marker can add one later by adding a compass to the map. When a map is crafted without a compass, it's simply called an "empty map", but when crafted with a compass, it's called an "empty locator map". The marker also turns red if the player enters the Nether with an Overworld map and shows the player's Overworld location relative to the Nether location. A map created in the End has a purple marker showing the player's location. If an Overworld map is used in the End, a magenta dot appears on the player's spawn point.{{/BE|position}}
{{crafting
|name=Map<br>(with marker)
|ingredients=[[Map]] or Empty Map +<br>[[Compass]]
|showdescription=1
|Map (no markers);Empty Map
|Compass
|Output= Locator Map;Empty Locator Map
|type= Miscellaneous
|description={{el|be}} only.
Maps crafted from only paper do not show the location marker; to add it, a compass must be added to the map.
|foot=1
}}
{{IN|bedrock}}, a cartography table can also be used to add a pointer to create a locator map or empty locator map. This can be done by adding a compass to paper, or to an empty map or map.
=== Zooming out ===
[[File:Cartography table UI zoom.png|thumb|300px|{{IN|java}}, cartography table's UI, showing the map is being zoomed out.]]
A [[cartography table]] can also be used to zoom out, taking only one piece of paper per zoom level.
A blank map can not be zoomed out. A map has to have something already marked on it for the zooming to be possible.
{{Crafting
|A1= Paper |B1= Paper |C1= Paper
|A2= Paper |B2= Map;Locator Map |C2= Paper
|A3= Paper |B3= Paper |C3= Paper
|Output= Map;Locator Map
|showdescription=1
|description=Locator Map {{el|be}} only.
}}
{{/BE|zoom}}
==== Zoom details ====
The zooming function starts from when the map is created (zoom level 0) up to its fourth zoom step (zoom level 4).
{| class="wikitable" style="text-align: center" data-description="Zoom levels"
! colspan="2" |
! Zoom step 0
! Zoom step 1
! Zoom step 2
! Zoom step 3
! Zoom step 4
|-
! colspan="2" |
| [[File:Map Zoom 0.png|116px|Zoom step 0, 1:1]]
| [[File:Map Zoom 1.png|116px|Zoom step 1, 1:2]]
| [[File:Map Zoom 2.png|116px|Zoom step 2, 1:4]]
| [[File:Map Zoom 3.png|116px|Zoom step 3, 1:8]]
| [[File:Map Zoom 4.png|116px|Zoom step 4, 1:16]]
|-
! colspan="2" | Zoom level
| 0/4
| 1/4
| 2/4
| 3/4
| 4/4
|-
! colspan="2" | 1 map pixel represents
| 1 block
| 2×2 blocks
| 4×4 blocks
| 8×8 blocks
| 16×16 blocks<br>(1×1 chunk)
|-
! colspan="2" | Scaling ratio
| 1:1
| 1:2
| 1:4
| 1:8
| 1:16
|-
! rowspan="2" colspan="2" | Map covers an area of
| 128×128 blocks
| 256×256 blocks
| 512×512 blocks
| 1024×1024 blocks
| 2048×2048 blocks
|-
| 8×8 chunks
| 16×16 chunks
| 32×32 chunks
| 64×64 chunks
| 128×128 chunks
|-
! colspan="2" | Smallest discernible features
| Blocks
| Trees, Paths
| Lakes, Buildings
| Mountains, Rivers
| Biomes, Mountain Ranges
|-
! colspan="2" | Use cases
| Pixel art, Base plans
| Base surroundings
| Structure mapping
| Landscape mapping
| Biome mapping
|-
! rowspan="2" | Total paper needed to zoom out from Level 0
! in anvil{{only|bedrock|short=1}} or crafting table
| -
| {{ItemSprite|Paper}} 8
| {{ItemSprite|Paper}} 16
| {{ItemSprite|Paper}} 24
| {{ItemSprite|Paper}} 32
|-
! in cartography table
| -
| {{ItemSprite|Paper}} 1
| {{ItemSprite|Paper}} 2
| {{ItemSprite|Paper}} 3
| {{ItemSprite|Paper}} 4
|}
Maps are always aligned to a grid at all zoom levels. That means zooming out any different map in a specific area covered by that map always has the same center. As such, maps are aligned by map width (1024 blocks for a level 3 maps) minus 64. A level 3 map generated at spawn covers X and Z coordinates from -64 to 959. All maps generated in this area zoom out to the same coordinates, guaranteeing that they are always 'aligned' on a map wall. For a zoomed-out map to cover a new area, it must start with a base (level 0) map that is in that area.
At zoom level 0, a map created on the point (0,0) has (0,0) at the center of the map. At higher zoom levels of the same map, the coordinate (0,0) is in the top left square of the map.
{{IN|java}}, zoom level can be seen on a map by turning on Advanced Tooltips (a [[Debug screen#More debug keys|debug screen]] option that can be toggled by using the key combination {{key|F3+H}}). The tooltip of the map then shows the zoom level, scaling factors, and map ID.
=== Cloning ===
[[File:Cartography table UI clone.png|thumb|300px|{{IN|Java}}, cartography table's UI, showing the map is being cloned.]]
A mix of empty maps and empty locator maps may be used. Whether the cloned maps show position markers is dependent only on the input map.
A [[cartography table]] can also be used to clone a map.
The parts of the world that have already been explored and mapped are copied, and newly explored areas appear on both instances. If one of the maps is later zoomed out, then the maps lose their connection to each other and function as completely separate maps that have to be individually filled by exploring.
In Creative mode, a map in an item frame may be cloned by using {{control|pick block}} on it, as long as that map is not also in the player's inventory.
It doesn't matter if the map to be cloned is at a higher zoom level (made of more paper) than the blank map. Upon copying the map, both resulting maps have the same magnification as the starting map.
{{/BE|clone}}
=== Crafting ingredient ===
{{crafting usage|Map, Empty Map}}
=== Marking points ===
{{IN|java}} the player has the ability to mark spots on a map. To do this, {{control|use}} a map on a placed-down [[banner]], and the spot of the banner gets marked on the map. The mark takes the color of whatever the base color is for the banner, and if the banner has a name, the mark shows that name. Banner marks on a map are always oriented with their top facing north, regardless of the banner's actual orientation. If the banner is destroyed, the mark of the banner remains at first, but if the player gets closer to where the banner previously was, it disappears as the area is updated on the map.
If a map is mounted on an item frame and is within the area it depicts, the mounted map displays its current location with a green indicator rotated to match its orientation.
[[File:Map Marker Bedrock on Item frame.png|thumb|181x181px|{{IN|bedrock}} this is what a map lying on an item frame looks like, while showing markers.]]
{{IN|bedrock}} the player can place copies of locator maps in [[item frame]]s in order to create a land mark. The marker is a green dot that resembles the shape of the player's marker, but in green color. The position the marker points at depends on the direction the item frame is facing. It is worth noting that the markers work only on copies of the same map. Other maps of the same area do not show the existing markers that the player(s) had placed.
If a player has a cloned map in their inventory, their pointer appears white when viewed on the same map held by another player. Hence, if all players have the same cloned map in their inventory, all markers would appear white when the clone map is viewed.
{| class="wikitable"
|-
! style="width: 300px;" | {{el|je}}
! style="width: 300px;" | {{el|be}}
|-
| style="text-align: center;" | [[File:Banner marked map.png|alt=All banners marked on a map, alongside a named banner.|216px]]
| style="text-align: center;" | [[File:Tracking map with markers bedrock.png|216px]]
|-
| How every banner appears {{IN|java}} on a map, including named banners.
| {{IN|bedrock}} this is how a locator map shows map markers while held by a player.
|-
|}
===Locking===
[[File:Cartography table UI lock.png|thumb|300px|{{IN|Java}}, cartography table's UI, showing the map is being locked.]]
Maps can be locked when using a [[glass pane]] in a [[cartography table]]. This creates a new map containing the same data and locks it. All copies of this new map are also locked. A locked map never changes, even when the depicted terrain changes. {{IN|Be}}, locked maps have a unique texture.
{| class="wikitable" style="text-align: center;"
|-
! Condition
! style="width: 200px;" | Newly created map
! style="width: 200px;" | Map after terrain alteration
|-
! Unlocked map
| [[File:Map Zoom 0.png|174px]] || [[File:Unlocked Map.png|174px]]
|-
! Locked map
| [[File:Map Zoom 0.png|174px]] || [[File:Map Zoom 0.png|174px]]
|-
|}
{{-}}
== Sounds ==
{{Edition|Java}}:
{{Sound table
|rowspan=2
|sound=Drawmap1.ogg
|sound2=Drawmap2.ogg
|sound3=Drawmap3.ogg
|subtitle=Map drawn
|source=player
|description=When a map is drawn
|id=ui.cartography_table.take_result
|translationkey=subtitles.ui.cartography_table.take_result
|volume=1.0
|pitch=1.0
|distance=16}}
{{Sound table
|subtitle=Map drawn
|source=block
|description=When a map is edited using a cartography table
|id=ui.cartography_table.take_result
|translationkey=subtitles.ui.cartography_table.take_result
|volume=1.0
|pitch=1.0
|distance=16
|foot=1}}
{{Edition|Bedrock}}:
{{Sound table
|type=bedrock
|rowspan=2
|sound=Drawmap1.ogg
|sound2=Drawmap2.ogg
|sound3=Drawmap3.ogg
|source=block
|description=When a map is drawn<wbr>{{Upcoming|BE 1.20.20.20}}
|id=ui.cartography_table.take_result|idnote={{Verify|Could be block.cartography_table.use}}
|volume=0.8
|pitch=1.0}}
{{Sound table
|type=bedrock
|source=block
|description=When a map is edited using a cartography table
|id=ui.cartography_table.take_result
|volume=0.8
|pitch=1.0
|foot=1}}
== Data values ==
=== ID ===
{{edition|java}}:
{{ID table
|edition=java
|showforms=y
|generatetranslationkeys=y
|displayname=Empty Map
|spritetype=item
|nameid=map
|form=item}}
{{ID table
|displayname=Map
|spritetype=item
|nameid=filled_map
|form=item
|translationkey=item.minecraft.filled_map, filled_map.buried_treasure, filled_map.explorer_jungle{{upcoming|java 1.20.2}}, filled_map.explorer_swamp{{upcoming|java 1.20.2}}, filled_map.mansion, filled_map.monument, filled_map.unknown, filled_map.village_desert{{upcoming|java 1.20.2}}, filled_map.village_plains{{upcoming|java 1.20.2}}, filled_map.village_savanna{{upcoming|java 1.20.2}}, filled_map.village_snowy{{upcoming|java 1.20.2}}, filled_map.village_taiga{{upcoming|java 1.20.2}}
|foot=1}}
{{edition|bedrock}}:
{{ID table
|edition=bedrock
|showaliasids=y
|shownumericids=y
|showforms=y
|notshowbeitemforms=y
|generatetranslationkeys=y
|displayname=Empty Map
|spritetype=item
|nameid=empty_map
|aliasid=emptymap
|id=515
|form=item
|translationkey=item.emptyMap.name, item.emptyLocatorMap.name}}
{{ID table
|displayname=Map
|spritetype=item
|spritename=map-be
|nameid=filled_map
|aliasid=map
|id=420
|form=item
|translationkey=item.map.name, item.map.exploration.mansion.name, item.map.exploration.monument.name, item.map.exploration.treasure.name
|foot=1}}
=== Metadata ===
{{see also|Bedrock Edition data values}}
{{IN|bedrock}}, maps use the following data values:
{{/DV}}
=== Item data ===
{{el|java}}:
{{main|Player.dat format}}
<div class="treeview">
* {{nbt|compound|tag}}: The item's '''tag''' tag.
{{:Player.dat_format/Maps}}
</div>
{{el|bedrock}}:
: See [[Bedrock Edition level format/Item format]].
=== Map icons ===
{{see also|Player.dat format|Map item format|map_icons.png}}
Map icons are 8×8 in ''Java Edition'', but 16×16 in Bedrock Edition. As such, there are minor misalignment issues in ''Java Edition''.<ref>{{bug|MC-214649|||WF}}</ref>
[[File:Map icons.png|thumb|128px|Map icons texture {{in|Java}}]]
[[File:Map icons BE.png|thumb|128px|Map icons texture {{in|Bedrock}}]]
{| class="wikitable"
|-
! Java ID !! Bedrock ID !! Text ID !! Appearance !! Purpose !! Shown in item frames?
|-
| 0 || ||<code>player</code> || [[File:Player (texture) JE1 BE1.png|16px]] [[File:Player (texture) BE2.png|16px]] White marker || Players (on map) || No
|-
| 1 || 1 ||<code>frame</code> || [[File:Green Marker (texture) JE1 BE1.png|16px]] [[File:Green Marker (texture) BE2.png|16px]] Green marker || The current map in an item frame || Yes
|-
| 2 || ||<code>red_marker</code> || [[File:Red Marker (texture) JE1 BE1.png|16px]] [[File:Red Marker (texture) BE2.png|16px]] Red marker || Position converted to Overworld when opening Overworld map in the Nether{{Only|bedrock}} || No
|-
| 3 || ||<code>blue_marker</code> || [[File:Blue Marker (texture) JE1 BE1.png|16px]] [[File:Blue Marker (texture) BE2.png|16px]] Blue marker || Other players || No
|-
| 4 || ||<code>target_x</code> || [[File:Target X (texture) JE1 BE1.png|16px]] White X || Unused || Yes
|-
| 5 ||5
|<code>target_point</code> || [[File:Target Point (texture) JE1 BE1.png|16px]] [[File:Target Point (texture) BE2.png|16px]] Red triangle || Unused || Yes
|-
| 6 || 6 ||<code>player_off_map</code> || [[File:Player Off Map (texture) JE1 BE1.png|16px]] Large white dot || Players off map, nearby{{only|java}} || No
|-
| 7 || 13 ||<code>player_off_limits</code> || [[File:Player Off Limits (texture) JE1.png|16px]] [[File:Player Off Limits (texture) BE.png|16px]] Small white dot || Players off map, far away{{only|java}} || No
|-
| 8 ||14
|<code>mansion</code> || [[File:Mansion (texture) JE1.png|16px]] [[File:Mansion (Texture) BE2.png|frameless|16x16px]] Woodland mansion || Woodland mansion || Yes
|-
| 9 || 15 ||<code>monument</code> || [[File:Monument (texture) JE1.png|16px]] [[File:Monument Texture BE2.png|frameless|16x16px]] Ocean monument || Ocean monument || Yes
|-
| 10 - 25 || ||<code>{{tooltip|banner_*|banner_white, banner_orange, banner_magenta, banner_light_blue, banner_yellow, banner_lime, banner_pink, banner_gray, banner_light_gray, banner_cyan, banner_purple, banner_blue, banner_brown, banner_green, banner_red, banner_black}}</code> || [[File:Banner White (texture) JE1.png|16px]] [[File:Banner Light Gray (texture) JE1.png|16px]] [[File:Banner Gray (texture) JE1.png|16px]] [[File:Banner Black (texture) JE1.png|16px]] [[File:Banner Brown (texture) JE1.png|16px]] [[File:Banner Red (texture) JE1.png|16px]] [[File:Banner Orange (texture) JE1.png|16px]] [[File:Banner Yellow (texture) JE1.png|16px]] [[File:Banner Lime (texture) JE1.png|16px]] [[File:Banner Green (texture) JE1.png|16px]] [[File:Banner Cyan (texture) JE1.png|16px]] [[File:Banner Light Blue (texture) JE1.png|16px]] [[File:Banner Blue (texture) JE1.png|16px]] [[File:Banner Magenta (texture) JE1.png|16px]] [[File:Banner Purple (texture) JE1.png|16px]] [[File:Banner Pink (texture) JE1.png|16px]]<br>Banners in all 16 wool colors{{only|java}}|| Banner markers || Yes
|-
| 26 ||4
|<code>red_x</code> || [[File:Red X (texture) JE1.png|16px]] [[File:Target X (texture) BE2.png|16px]] Red X || Buried treasure || Yes
|-
| || 8 || || [[File:Magenta Marker (texture) BE1.png|16px]] Magenta marker
| Position converted to Overworld when opening Overworld map in the End{{Only|bedrock}} || No
|-
| || 9 || || [[File:Orange Marker (texture) BE1.png|16px]] Orange marker{{more info}}
|Other players
|Yes
|-
| || 10 || || [[File:Yellow Marker (texture) BE1.png|16px]] Yellow marker
| Other players || No
|-
| || 11 || || [[File:Cyan Marker (texture) BE1.png|16px]] Cyan marker
| Other players || No
|-
| -
|12
| || [[File:Green Point (texture) BE1.png|16px]] Green Triangle
| Other structure such as stronghold, fortress, end city, etc. when used as explorer map destination{{Only|bedrock}} || Yes
|}
It should be noted that even if the player used a NBT editor to add an additional icon on the map, ''Minecraft'' shows only the first one listed when the player loads up their world.
== Achievements ==
{{load achievements|Map Room}}
== History ==
{{see also|section=24|map_icons.png|Java Edition history of textures#Map icons}}
{{more images|section=24|{{bug|MC-72962}}}}
{{History||April 27, 2011|link=https://web.archive.org/web/0/http://notch.tumblr.com/post/4988431144/the-maps|[[Notch]] unveiled screenshots of the map.}}
{{History||April 28, 2011|link={{tweet|notch|63500114005721088}}|[[Notch]] said that he would try to make maps place-able on [[wall]]s.}}
{{History|java beta}}
{{History||1.6|snap=Test Build 3|[[File:Map (item) JE1 BE1.png|32px]] Added maps.}}
{{History||1.6.6|The ability to auto-craft maps using shift-click has been disabled.}}
{{History||1.8|snap=Pre-release|Maps can now be found in library chests in the brand-new [[stronghold]]s.
|Auto crafting maps has been restored. Map cloning, therefore, is unavailable for a period of time.}}
{{History||1.8.1|Maps now work both while walking and flying.}}
{{History|java}}
{{History||1.0.0|snap=Beta 1.9 Prerelease 5|Prior to this update, the [[sun]] in ''[[Minecraft]]'' rose in the North, which threw off many [[player]]s and led to a common misconception that ''Minecraft'' maps/[[world]]s were oriented with East at the top. The sun now rises in the east and sets in the west, making navigation much more intuitive.
|Before the change in sun position, it was commonly said that ''Minecraft'' maps/worlds are oriented with East at the top; sunrise, by definition, occurs at the East, which means it is certainly true that the maps were oriented "East" since the Sun rose from the top (North). However, [[Jeb]] asserted (and [[Notch]] agreed) that the sun rose in the north.<ref>{{Tweet|jeb|87815841160237056}}</ref><ref>{{Tweet|notch|88155424880201728}}</ref> Most mods and map-making tools, however, used the terms East and North consistent with their actual definitions (e.g. a [[Programs and editors/Cartograph|Cartograph]]-generated map with North at the top is rotated 90 degrees from the in-game map).}}
{{History||1.4.2|snap=12w34a|[[File:Empty Map JE1 BE1.png|32px]] [[Crafting]] a map now creates an empty map. The map is drawn for the first time when it is held and right clicked, and is centered near the location of the [[player]] when clicked (not as before where it was centered on the location it was crafted.)
|Previously, in order to map a new area, the map had to be ''crafted'' in that area (rather than carrying a previously-crafted map to the new area). The point where a map is crafted becomes its permanent center, and could never be changed.
|The pointer no longer disappears when leaving the map, but transforms into a white dot, indicating on what side of the map the player is located.
|Maps now align to a grid, making it easier to create adjacent maps.
|Maps can now be zoomed out (but not zoomed in).
|Maps can now be cloned and scaled.}}
{{History||1.4.2|snap=12w34b|Maps now have a ''zoom level'', which was fixed at 1:8 prior to snapshot [[Java Edition 12w34a|12w34a]],<ref name="mapinfo">https://web.archive.org/web/0/http://notch.tumblr.com/post/4988431144/the-maps</ref> but now starts at 1:1 and can be increased up to 1:16 by re-crafting an existing map.
|Maps are no longer numbered on the top-left corner and is labeled through the tooltip.}}
{{History|||snap=12w36a|New maps are now crafted at a scale factor of 1:1. A zoomed in map can be zoomed out by re-crafting it with another 8 sheets of [[paper]] on a [[crafting table]]. Each time this is done, the scale increases - 1:1, 1:2, 1:4, 1:8, 1:16 with a map scale of 1:16 being the current maximum.}}
{{History||1.7.2|snap=13w38a|The map size has been increased when placed on a [[wall]] using the [[item frame]].
|More colors have been added to maps for different [[block]]s.<ref name="infodump2">https://web.archive.org/web/0/https://www.mojang.com/2013/10/minecraft-1-7-the-update-that-changed-the-world</ref>}}
{{History||1.8|snap=14w31a|Zoomed maps now conform to an expanded grid based on their zoom level. Previously, careful considerations would need to be taken to creating a wall of adjoining maps.}}
{{History||1.8.1|snap=pre1|Some colors have been changed on maps to more accurately represent their respective [[block]].}}
{{History||1.9|snap=15w31a|Maps now display as a mini-map when held in the off-hand, or if the off-hand slot is occupied; the (old) large version is visible only when held in the dominant hand with the secondary hand free.}}
{{History|||snap=15w34a|New maps can now be [[crafting|crafted]] at a scale factor of 1:4.
|A crafting recipe has been added for zooming in maps.}}
{{History|||snap=15w43a|The average yield of empty maps from [[stronghold]] library [[chest]]s has been doubled.}}
{{History|||snap=15w45a|New maps are once again [[crafting|crafted]] at a scale factor of 1:1, as they had been before snapshot [[15w34a]].
|The [[crafting]] recipe, that was introduced in 15w34a, for zooming in maps has been removed.}}
{{History|||snap=15w49a|Map making now uses armor equipping sounds.}}
{{History||1.11|snap=16w39a|Maps now work in [[the End]].
|Empty maps are now [[trading|sold]] by cartographer [[villager]]s as their tier 3 [[trading|trade]].
|Added [[explorer map]]s, sold by cartographers as their tier 4 trades.}}
{{History||1.12|snap=17w17a|Maps now have separate colors for colored [[terracotta]] blocks from other colored blocks.}}
{{History||1.13|snap=17w47a|Prior to [[1.13/Flattening|''The Flattening'']], these [[item]]s' numeral IDs were 358 and 395.
|Maps now use additional NBT to specify which map they contain. Prior to this version, they used the [[damage]] value instead.
|Map IDs are no longer limited to 32,768.}}
{{History|||snap=17w50a|Maps can now be placed on floor and ceiling [[item frame]]s.}}
{{History|||snap=18w10a|Spots on maps can now be marked using [[banner]]s.}}
{{History|||snap=18w11a|Empty maps can now generate in [[shipwreck]] [[chest]]s.}}
{{History|||snap=pre7|Maps have been changed slightly, in regard to which [[block]]s are shown and which blocks are not.}}
{{History||1.14|snap=18w43a|[[File:Empty Map JE2 BE2.png|32px]] [[File:Map (item) JE2 BE2.png|32px]] The textures of maps have been changed.}}
{{History|||snap=18w48a|Empty maps can now be found in chests in [[village]] cartographer houses.}}
{{History|||snap=19w02a|Maps can now be cloned and zoomed out (extended) by using a [[cartography table]].
|Maps can now be locked by using a [[glass pane]] with a cartography table.
|The recipes for cloning and zooming out maps have been removed.}}
{{History|||snap=19w06a|Map making is now silent again.}}
{{History|||snap=19w13a|Cartographer villagers now give empty maps to players under the [[Hero of the Village]] effect.}}
{{History||1.16|snap=20w21a|Map making sounds are now the same as when using a cartography table.}}
{{History|pocket alpha}}
{{History||v0.14.0|snap=build 1|[[File:Empty Map JE1 BE1.png|32px]] [[File:Map (item) JE1 BE1.png|32px]] Added maps.
|Maps are crafted using nine [[paper]], one for every slot of the [[crafting]] grid.
|Maps must be combined with a [[compass]] using an [[anvil]] in order to show the [[player]]'s position.
|Maps can be zoomed using an anvil.}}
{{History|||snap=build 3|New maps are now [[crafting|crafted]] at full zoom.
|Empty maps now have a "Create Map" button to initialize them.}}
{{History|||snap=build 7|New maps are now crafted at a scale factor of 1:1.}}
{{History||v0.15.0|snap=unknown|Maps can now be crafted either with 8 pieces of [[paper]] and a [[compass]] ''or'' 9 pieces of paper, to get a map with or without a position marker.}}
{{History||v0.16.0|snap=build 1|Different colors have been added to maps for different [[biome]]s.}}
{{History|pocket}}
{{History||1.0.0|snap=?|[[Windows 10 Edition]] can now use the [[anvil]] as well as the [[crafting table]] to clone, zoom and apply markers, just as [[Pocket Edition]] in general could.
|Maps can now be found inside [[stronghold]] library [[chest]]s.}}
{{History||1.1.0|snap=alpha 1.1.0.0|Empty maps with direction markers built-in are now called "locator maps".}}
{{History|||snap=alpha 1.1.0.3|"Locator maps" are now called "empty locator maps".
|Empty maps are now [[trading|sold]] by cartographer [[villager]]s for 7-11 [[emerald]]s as their tier 3 [[trading|trade]].}}
{{History|bedrock}}
{{History||1.4.0|snap=beta 1.2.14.2|Maps can now be found inside map room [[chest]]s in [[shipwreck]]s.}}
{{History||?|The texture of the filled map overlay has been changed.}}
{{History||?|Maps now function in dimensions other than the dimension in which they were created.}}
{{History||1.10.0|snap=beta 1.10.0.3|Maps can now be found in cartographer house [[chest]]s in [[village]]s.
|[[File:Empty Map JE2 BE2.png|32px]] The texture of empty maps has been changed.}}
{{History||1.11.0|snap=beta 1.11.0.1|Empty maps can now be created from 1 [[paper]] in [[cartography table]]s.
|Maps can now be zoomed, cloned, renamed, and have pointers added in cartography tables.}}
{{History|||snap=beta 1.11.0.4|Cartographer [[villager]]s now [[trading|sell]] empty map for an [[emerald]] as their first tier [[trading|trades]].
|Empty locator maps can now be [[trading|bought]] from cartographer villagers.}}
{{History||1.13.0|snap=beta 1.13.0.1|[[File:Map (item) BE3.png|32px]] [[File:Locked Map (item) BE2.png|32px]] Filled maps and locked maps now have unique inventory icons.}}
{{History||1.16.0|snap=beta 1.16.0.57|Trading has been changed, novice-level cartographer now sell an empty map for 7 emeralds. Cartographer villager no longer sell empty locator map.}}
{{History||1.16.100|snap=beta 1.16.100.56|The ID of maps have been changed from <code>emptymap</code> to <code>empty_map</code> and <code>map</code> to <code>filled_map</code>.}}
{{History|console}}
{{History||xbox=TU1|xbone=CU1|ps=1.00|wiiu=Patch 1|switch=1.0.1|[[File:Map (item) JE1 BE1.png|32px]] Added maps.
|The [[player]] spawns with a free map.
|Maps are available only as zoom step 3 maps centered at coordinates 0,0. Biome colors do not appear on maps.}}
{{History||xbox=none|xbone=CU1|ps=1.0|wiiu=none|Larger sized worlds on Xbox One, Playstation 4, and Nintendo Switch have zoom step 3 maps aligned to a grid with maps centered at 0, 1024, or 2048 on the X or Z coordinates.}}
{{History||xbox=TU21|xbone=CU9|ps=1.14|wiiu=Patch 1|[[File:Empty Map JE1 BE1.png|32px]] [[Crafting]] a map now produces an empty map.}}
{{History||xbox=TU46|xbone=CU36|ps=1.38|wiiu=Patch 15|The outer end islands appear on different maps; even on Xbox 360, Playstation 3, Vita, and Wii U editions.}}
{{History||xbox=none|xbone=none|ps=1.90|wiiu=none|switch=none|[[File:Empty Map JE2 BE2.png|32px]] [[File:Map (item) JE2 BE2.png|32px]] The textures of maps have been changed.}}
{{History||ps=1.91|Maps can now be created and used in [[cartography table]]s.}}
{{History|foot}}
== Issues ==
{{issue list}}
== Trivia ==
* Use of the {{key|F1}} key can allow the player to hold a map without blocking their view at all.
* In ''Java Edition'', a map created using {{cmd|give}} can be any map by using the Map parameter to specify the map number desired. E.g. {{cmd|give [player] minecraft:filled_map{map:5<nowiki>}}} gives the specified player map_5. If no data value is supplied it defaults to map_0. If map_0 has not ever been crafted, it is centered on x=0, z=0.
* The maps are stored separately as their own data (<code>.dat</code>) file as <code>map_x.dat</code> with (x) being the map number, see [[map item format]] for more info. By manipulating this number, players can organize their maps to suit them, or if they accidentally create a map in the same location, they can delete their extra map so as to save the number they make.
* Certain programs can be used to make customized maps with images or text on them instead of actual maps, many people use these in adventure maps to show pictures or to tell a story.
* Since all copies of a map are links to the same file, copying an unfinished map keeps it synchronized with the copy as the player fills it in. Thus, a copy stored in a chest can act as a remote backup.
* A map that is in an item frame does not update itself until a player picks it up, lets it reload, and places it back again. However, if a player holds a clone of the map, both maps update.
* Filled maps are the only items that make 90 degree rotations in item frames, and also the only items that can expand the item frame into full block wide.
* On [[Legacy Console Edition]], the player always spawns with a map in their inventory after creating a world. This was later added to Bedrock Edition as an optional feature in the world creation menu.
* Maps on Legacy Console Edition always show the player's current coordinates, as a substitute for the optional [[Coordinates|coordinate display]] in other editions.
* A map cannot be created on [[New Nintendo 3DS Edition]]. Instead, the map is always displayed on the bottom screen along with the coordinates. Biome colors do not appear on maps.
== Gallery ==
<gallery>
MapItem1.png|A fully zoomed map.
MapRotation.png|Having a map in hand does not stop the ability to see ahead.
MapItem3.png|A world being recorded onto a map.
Mcmap4.png|Nearly fully explored map.
Zoomed Map.png|A map edited to the scale of 1.
Sky Map.png|A map mapping the [[Sky Dimension]].
MapOfVillage.png|A village and how it is represented on a map.
Pumpkin map.png|A map containing a custom image made by placing a large number of blocks.
Complete Map.png|A completely explored map.
MapZooms.png|A diagram showing how maps zoomed out before [[Java Edition 1.8]]. Notice how the larger maps have borders made of half and quarter small maps.
Map18zooms.png|From 1.8, zoomed maps are aligned to this grid exactly.
Large Biome Map.png|A map of a [[Large Biomes]] world.
Map0140-0160.png|A comparison of maps between versions in Pocket Edition Alpha [[Pocket Edition Alpha 0.14.0|0.14.0]] and [[Pocket Edition Alpha 0.16.0|0.16.0]].
Mycelium Map.png|A map view of a mushroom biome, showing that mycelium appears purple on a map.
MiniMap.png|Maps held in the off-hand or in either hand while [[dual wielding]] appear as mini-maps.
Partly filled treasure map.png|Partly filled treasure map with an odd area at the bottom left. Normally a partly filled map would look striped (as in the top left), but this map seems to be bugged and is possibly showing caves, or something, in the bottom left.
Partly filled ocean explorer map.png|Partly filled ocean explorer map. Updating the game from an older version (in this case the area was first generated before 1.18) and buying a map after updating (in this case in 1.19.4) can result in the map displaying rivers and terrain where there is really a frozen sea.
Map Stained Glass 1.png|Stained glasses' appearances on maps before and after 1.13.
Map Stained Glass 2.png|Stained glasses' appearances on maps before and after 1.13.
Map Various Blocks 1.png|Various blocks' appearances on maps before and after 1.13.
Map Various Blocks 2.png|Various blocks' appearances on maps before and after 1.13.
Better Together Map.jpg|Holding a map in the offhand in ''Bedrock Edition''.
Better Together Map Icon.jpg|Holding a map in both hands in ''Bedrock Edition''.
File:MapFailedtoFill.png|A map that has not yet filled. A rare bug in Java.
</gallery>
=== The Nether ===
<gallery>
Nethermap.png|A map in [[the Nether]].
Maponnether.png|A map in the Nether; the arrow turns around itself, like in [[compass]].
</gallery>
=== The End ===
<gallery>
Jeb End Map.png|The first image of a map in [[the End]].
Endmap.png|A map in the End.
</gallery>
=== Maps in item frames ===
<gallery>
FramedMap.png|A map displayed on an item frame, as it looked before [[Java Edition 1.7.2]].
Structure Map Collection.png|Multiple maps in item frames. Notice a [[village]], two [[desert temple]]s and a lava lake.
Minecraft maps 3by3.png|A collection of 9 connected full maps.
Full Map.png|A combination of 25 maps pasted together as one map.
Map wall BE.png|A map wall on ''Bedrock Edition'', showing large areas of biome colors for each biome.
Map's in item frames.png|Maps can be placed into [[item frame]]s so they can be viewed together.
Comparing Maps.png|The comparison between 3 zooms of maps.
SuperflatMap.png|A map in a [[Superflat]] world, with some [[village]]s.
MapWallWithMarkers.png|A 3x3 map wall with banner markers.
HEYYEYAAEYAAAEYAEYAA.png|He-Man map art.
Map Player Icons 1.png|First image of player icons on maps.
Map Player Icons 2.png|Second image of player icons on maps.
</gallery>
== See also ==
* [[Explorer Map]]
* [[Clock]]
* [[Tutorials/Navigation|Navigation]]
== References ==
{{Reflist}}
{{Items}}
[[cs:Mapa]]
[[de:Karte]]
[[es:Mapa]]
[[fr:Carte (objet)]]
[[hu:Térkép (tárgy)]]
[[ja:地図]]
[[ko:지도]]
[[nl:Kaart]]
[[pl:Mapa]]
[[pt:Mapa]]
[[ru:Карта]]
[[tr:Harita]]
[[th:แผนที่]]
[[uk:Мапа]]
[[zh:地图]]
[[Category:Renewable resources]]</li></ul></nowiki> | 12w34a | Brewing recipes for Potions of Night Vision and Invisibility added: Potion of Night Vision is brewed by adding a golden carrots to an Awkward Potion. Potion of Invisibility is brewed by adding a Fermented Spider Eye to a Potion of Night Vision. | |||
1.5{{Extension DPL}}<ul><li>[[Charcoal|Charcoal]]<br/>{{Item
| image = Charcoal.png
|type=
| renewable = Yes
| stackable = Yes (64)
}}
'''Charcoal''' is an [[item]] obtained by smelting [[log]]s or [[wood]]. It is used as fuel, or for crafting [[torch]]es and [[campfire]]s. Unlike [[coal]], charcoal cannot be traded with [[villager]]s, nor can it be crafted into a [[block of coal]]. Coal and charcoal cannot stack together either. It can be used as a substitute for coal, as both charcoal and coal have an equivalent duration when smelted.
== Obtaining ==
=== Breaking ===
A [[campfire]] broken without the [[Silk Touch]] enchantment drops 2 charcoal.
=== Smelting ===
{{Smelting
|Any Log; Any Stripped Log; Any Wood; Any Stripped Wood
|Charcoal
|foot=1
|0,15
}}
=== Compound creation ===
Charcoal can be created from its base [[element]]s, using the [[compound creator]].{{only|bedrock|education}}
{| class="wikitable"
!Name
!Elements
!Example recipe
|- <!-- Temporarily using crafting grid as substitute for compound creator (template not yet available), since the layout is the same, even if the appearance is different -->
!Charcoal
|7 Carbon<br>4 Hydrogen<br>1 Oxygen
|{{Crafting Table
|shapeless= 1
|A2=Carbon,7 |B2=Hydrogen,4 |C2=Oxygen
|Output=Charcoal}}
|}
== Usage ==
=== Crafting ingredient ===
{{crafting usage|Charcoal}}
{{Crafting
|B1= Stick
|A2= Stick
|B2= Coal; Charcoal
|C2= Stick
|A3= Any Log or Stem; Any Stripped Log or Stem; Any Wood or Hyphae; Any Stripped Wood or Hyphae
|B3= Any Log or Stem; Any Stripped Log or Stem; Any Wood or Hyphae; Any Stripped Wood or Hyphae
|C3= Any Log or Stem; Any Stripped Log or Stem; Any Wood or Hyphae; Any Stripped Wood or Hyphae
|Output= Campfire
}}
=== Lab table ingredient ===
Charcoal is one of the [[lab table]] ingredients needed to produce the [[heat block]].{{only|education}}
{| class="wikitable"
! Result
! Materials Needed
|-
!rowspan=2|{{slot|Heat Block.gif}}<br>[[Heat Block]]
|{{slot}}{{slot|Iron|link=Element}}{{slot|Water (compound)|link=Compound}}{{slot|Charcoal}}{{slot|Salt|link=Compound}}{{slot}}
|-
|<center>[[Element|Iron]], [[Water (compound)|Water]], Charcoal, [[Compound|Salt]]</center>
|}
=== Fuel ===
When used in a [[furnace]] as a fuel, a piece of charcoal lasts 80 seconds (smelting up to 8 items), the same as coal. Charcoal used as fuel lasts more than 5 times longer than [[wood planks]] or [[wood]] logs used as fuel, being more efficient than any other use of wood for smelting in ''[[Java Edition]]'', but outstripped by [[wooden slabs]] in Bedrock.
Coal and charcoal are also the only fuels accepted by [[Minecart with Furnace|furnace minecarts]]. They provide approximately four minutes of transit each.
== Data values ==
=== ID ===
{{edition|java}}:
{{ID table
|edition=java
|showforms=y
|generatetranslationkeys=y
|displayname=Charcoal
|spritetype=item
|nameid=charcoal
|itemtags=coals
|form=item
|foot=1}}
{{edition|bedrock}}:
{{ID table
|edition=bedrock
|showitemtags=y
|showaliasids=y
|shownumericids=y
|showforms=y
|notshowbeitemforms=y
|generatetranslationkeys=y
|displayname=Charcoal
|spritetype=item
|nameid=charcoal
|aliasid=coal / 1
|id=303
|itemtags=minecraft:coals
|form=item
|foot=1}}
== Achievements ==
{{load achievements|Renewable Energy}}
== History ==
{{History|java beta}}
{{History||December 25, 2010|link=http://www.minecraftforum.net/topic/131047-lantern-update-incoming/page__st__20#entry1986964| In 0.3.2, charcoal was suggested to [[Markus Persson|Notch]] by [https://twitter.com/Moleculor @Moleculor] on [[wikipedia:Twitter|Twitter]] as a writing implement.}}
{{History||1.2|[[File:Charcoal JE1 BE1.png|32px]] Added charcoal, with the same texture as coal.
|Charcoal is not used as a writing implement.}}
{{History|java}}
{{History||1.2.1|snap=12w04a|Charcoal can now be used to craft [[fire charge]]s.}}
{{History||1.3.1|snap=?|Charcoal is now directly available in the creative inventory.}}
{{History|||snap=1.3|[[File:Charcoal JE2 BE2.png|32px]] The texture of charcoal has been changed.}}
{{History||1.6.1|snap=13w19a|[[File:Charcoal JE3 BE3.png|32px]] The texture of charcoal has been changed.}}
{{History||1.8|snap=14w02a|Charcoal can no longer be [[trading|traded]] from [[villager]]s.}}
{{History||1.13|snap=17w47a|The different data values for the {{code|coal}} ID have been split up into their own IDs.
|Prior to [[1.13/Flattening|''The Flattening'']], this [[item]]'s numeral ID was 263.}}
{{History||1.14|snap=18w43a|[[File:Charcoal JE4 BE4.png|32px]] The texture of charcoal has been changed.}}
{{History|||snap=19w02a|Charcoal can now be used to craft [[campfire]]s. Destroying a campfire returns 2 charcoal.}}
{{History|pocket alpha}}
{{History||v0.3.0|[[File:Charcoal JE1 BE1.png|32px]] Added charcoal, with the same texture as coal. It is not yet obtainable.}}
{{History||v0.3.2|Charcoal is now obtainable by smelting [[log|wood]] in a furnace.}}
{{History||v0.8.0|snap=build 1|[[File:Charcoal JE2 BE2.png|32px]] The texture of charcoal has been changed.}}
{{History||v0.8.1|[[File:Charcoal JE3 BE3.png|32px]] The texture of charcoal has been changed.}}
{{History|bedrock}}
{{History||1.4.0|snap=beta 1.2.13.8|Added [[stripped log]] variants, which can be [[smelting|smelted]] to obtain charcoal.}}
{{History|||snap=beta 1.2.20.1|Charcoal now can be crafted using 7 Carbon, 4 Hydrogen, and an Oxygen in a [[compound creator]].
|Charcoal can now be used in the [[lab table]] to create a [[heat block]].}}
{{History||1.10.0|snap=beta 1.10.0.3|Charcoal can now be used to craft [[campfire]]s. Destroying a campfire returns 2 charcoal.
|[[File:Charcoal JE4 BE4.png|32px]] The textures of charcoal has been changed.}}
{{History||1.16.0|snap=beta 1.16.0.51|Charcoal are now used to craft [[soul fire torch]]es.}}
{{History||1.16.100|snap=beta 1.16.100.56|The ID of charcoal has been changed from {{code|coal/1}} to {{code|charcoal}}.}}
{{History|console}}
{{History||xbox=TU1|xbone=CU1|ps=1.0|wiiu=Patch 1|switch=1.0.1|[[File:Charcoal JE1 BE1.png|32px]] Added charcoal.}}
{{History||?|[[File:Charcoal JE3 BE3.png|32px]] The texture of charcoal has been changed.}}
{{History||xbox=none|xbone=none|ps=1.90|wiiu=none|switch=none|[[File:Charcoal JE4 BE4.png|32px]] The texture of charcoal has been changed.}}
{{History|New 3DS}}
{{History||0.1.0|[[File:Charcoal JE3 BE3.png|32px]] Added charcoal.}}
{{History|foot}}
== Issues ==
{{issue list|Charcoal}}
== How it's renewable ==
Charcoal comes from smelting log. Logs are renewable and charcoal can be used as fuel to smelt logs{{Items}}
[[Category:Renewable resources]]
[[de:Holzkohle]]
[[fr:Charbon (objet)#Charbon de bois]]
[[hu:Faszén]]
[[it:Carbonella]]
[[ko:목탄]]
[[pt:Carvão#Carvão vegetal]]
[[nl:Steenkool#Houtskool]]
[[ru:Уголь#Древесный уголь]]
[[zh:木炭]]</li><li>[[Coal|Coal]]<br/>{{About|the fuel item that can be mined|the ore|Coal Ore|the block|Block of Coal|the smelted wood|Charcoal}}
{{Item
| image = Coal.png
|type=
| renewable = Yes
| stackable = Yes (64)
}}
'''Coal''' is a mineral [[item]] mainly obtained from [[Coal Ore|coal ore]]. It is primarily used for crafting [[torches]] and [[Campfire|campfires]], as well as [[fuel]].
== Obtaining ==
=== Chest loot ===
{{see also|Coal Ore#Natural generation}}
{{LootChestItem|coal}}
=== Mining ===
[[Coal ore]] are mined using a [[pickaxe]] and drops 1 piece of coal. If the pickaxe is enchanted with [[Fortune]], it may drop an extra piece per level of Fortune, up to a maximum of 4 with Fortune III.
=== Mob loot ===
[[Wither skeleton]]s have a {{Frac|1|3}} chance of dropping a single coal upon death. The maximum amount of coal is increased by 1 per level of [[Looting]]. The chance of a wither skeleton ''not'' dropping any coal can be found using the formula <code>2 / (Looting Level + 3)</code>. For example, Looting III gives a {{frac|1|3}} chance of not dropping any coal. All other amounts have an equal chance of occurring.
=== Crafting ===
{{Crafting
|showname=1
|Block of Coal
|Output=Coal,9
|type=Material
}}
=== Smelting ===
{{Smelting
|head=1
|Coal Ore
|Coal
|0,1
|foot=1
}}
== Usage ==
=== Crafting ingredient ===
{{crafting usage|Coal}}
=== Fuel ===
When used in a [[furnace]] as a fuel, a piece of coal lasts 80 seconds (smelting up to 8 items), like [[charcoal]]. Coal used as fuel lasts more than 5 times longer than [[wood planks]] or [[wood]] logs used as fuel, being more efficient than any other use of wood for smelting {{in|je}}, but outstripped by [[wooden slabs]] {{in|be}}.
Coal and charcoal are also the only fuels accepted by [[Minecart with Furnace|furnace minecart]]s. They provide approximately four minutes of transit each.
=== Trading ===
Novice-level fisherman [[villager]]s have a 50% chance to buy 10 coal for one [[emerald]].
{{IN|java}}, novice-level armorer and toolsmith villagers have a 40% chance of offering to buy 15 coal for one emerald. Novice-level weaponsmith villagers and apprentice-level butcher villagers have {{frac|2|3}} chance of offering to buy 15 coal for one emerald.
{{IN|bedrock}}, novice-level armorer, toolsmith, and weaponsmith villagers and apprentice-level butcher villagers buy 15 coal for one emerald.
[[trading|Trade]]s that involve coal cannot be substituted by [[charcoal]].
== Data values ==
=== ID ===
{{edition|java}}:
{{ID table
|edition=java
|showitemtags=y
|showforms=y
|generatetranslationkeys=y
|displayname=Coal
|spritetype=item
|nameid=coal
|itemtags=coals
|form=item
|foot=1}}
{{edition|bedrock}}:
{{ID table
|edition=bedrock
|showitemtags=y
|showaliasids=y
|shownumericids=y
|showforms=y
|notshowbeitemforms=y
|generatetranslationkeys=y
|displayname=Coal
|spritetype=item
|nameid=coal
|aliasid=coal / 0
|id=302
|itemtags=minecraft:coals
|form=item
|foot=1}}
== History ==
{{History|java classic}}
{{History||May 21, 2009|link=https://web.archive.org/web/0/http://notch.tumblr.com/post/110762705/my-list-on-tile-types-so-far|[[Notch]] shows interest in adding coal, commenting that it might be combined with [[iron ore]] to make steel.}}
{{History|java indev}}
{{History||0.31|snap=20100128|[[File:Coal JE1.png|32px]] Added coal.
|Mining [[coal ore]] blocks [[drops]] 2-5 pieces of coal.}}
{{History||0.31|snap=20100129|Coal can be used to craft [[torch]]es.}}
{{History||?|Mining [[coal ore]] now drops 1 piece of coal (down from 2-5).}}
{{History||20100219|[[File:Coal JE2 BE1.png|32px]] The texture of coal has been changed. It is now more centered.}}
{{History|java beta}}
{{History||1.8|snap=Pre-release|Coal can now be found in the new [[mineshaft]] [[chest]]s and [[stronghold]] storeroom chests.}}
{{History|java}}
{{History||1.0.0|snap=?|Coal can be now obtained by [[smelting]] [[coal ore]].}}
{{History||1.2.1|snap=12w04a|Coal can now be used to craft [[fire charge]]s.}}
{{History||1.3.1|snap=12w21a|Blacksmith and butcher [[villager]]s now [[trading|buy]] 16–23 of either coal or charcoal for 1 [[emerald]].}}
{{History|||snap=1.3|[[File:Coal JE3 BE2.png|32px]] The texture of coal has been changed.}}
{{History||1.4.2|snap=12w36a|Coal is now dropped by [[wither skeleton]]s, making it [[renewable resource|renewable]].}}
{{History||1.6.1|snap=13w18a|Coal can now be used to craft [[block of coal|coal block]]s.}}
{{History||1.8|snap=14w02a|Fisherman, armorer, tool smith, weapon smith and butcher [[villager]]s now [[trading|buy]] 16–24 coal for 1 [[emerald]].}}
{{History||1.9|snap=15w43a|Coal may now be found in [[igloo]] basement [[chest]]s.}}
{{History|||snap=15w44a|The average yield of coal from [[mineshaft]] chests has been decreased, and added to [[dungeon]] chests.}}
{{History||1.11|snap=16w39a|Coal can now be found in the new [[woodland mansion]] [[chest]]s.}}
{{History||1.13|snap=17w47a|The different data values for the <code>coal</code> ID have been split up into their own IDs.
|Prior to [[1.13/Flattening|''The Flattening'']], this [[item]]'s numeral ID was 263.}}
{{History|||snap=18w09a|Coal can now be found in the loot [[chest]]s of [[underwater ruins]].}}
{{History|||snap=18w11a|Coal now generates in [[shipwreck]] [[chest]]s.}}
{{History||1.14|snap=18w43a|[[File:Coal JE4 BE3.png|32px]] The texture of coal has been changed.}}
{{History|||snap=18w48a|Coal can now be found in [[chest]]s in [[village]] fishing cottages.}}
{{History|||snap=18w49a|Coal can now be found in [[chest]]s in [[village]] butcher shops and [[snowy tundra|snowy]] village houses.}}
{{History|||snap=18w50a|Coal can now be found in [[chest]]s in [[village]] toolsmith houses.}}
{{History|||snap=19w02a|Coal can now be used to craft [[campfire]]s. Destroying a campfire returns 2 charcoal.}}
{{History||1.16|snap=20w06a|Coal can now be used to craft [[torch|soul torches]].}}
{{History||1.19|snap=22w13a|Coal may now be found in [[ancient city]] [[chest]]s.}}
{{History||1.20|snap=23w12a|Coal can now be found in [[suspicious gravel]] and [[suspicious sand]] in cold and warm [[ocean ruins]] and in [[trail ruins]].}}
{{History|||snap=23w16a|Coal no longer generates in [[suspicious sand]] in [[trail ruins]].|Due to the split of the archaeological loot tables for the suspicious gravel within the [[trail ruins]]; coal now is in the common loot.}}
{{History|pocket alpha}}
{{History||v0.3.0|[[File:Coal JE2 BE1.png|32px]] Added coal.
|Coal can be used to craft [[torch]]es.}}
{{History||v0.8.0|snap=build 1|[[File:Coal JE3 BE2.png|32px]] The texture of coal has been changed.
|Coal can now be crafted to make a [[block of coal]].}}
{{History||v0.12.1|snap=build 1|Coal is now [[drops|dropped]] by [[wither skeleton]]s.}}
{{History||v0.14.0|snap=build 1|Coal can now be found inside [[minecart with chest|chest minecarts]] in [[mineshaft]]s.}}
{{History||v0.15.0|snap=build 1|Coal is now used to craft [[fire charge]]s.}}
{{History|pocket}}
{{History||1.0.0|snap=alpha 0.17.0.1|Coal can now be found in the [[stronghold]] storeroom [[chest]]s.
|Coal may now be found in [[igloo]] basement chests.}}
{{History||1.0.4|snap=alpha 1.0.4.0|Fisherman, armorer, toolsmith, weaponsmith and butcher [[villager]]s now [[trading|buy]] 16–24 coal for 1 [[emerald]].}}
{{History||1.1.0|snap=alpha 1.1.0.0|Coal is now found in [[woodland mansion]] [[chest]]s.}}
{{History|bedrock}}
{{History||1.4.0|snap=beta 1.2.14.2|Coal can now be found inside [[shipwreck]] [[chest]]s.}}
{{History|||snap=beta 1.2.20.1|Coal can now be found inside [[underwater ruins]] [[chest]]s.}}
{{History||1.10.0|snap=beta 1.10.0.3|Coal can now be used to craft [[campfire]]s. Destroying a campfire returns 2 charcoal.
|[[File:Coal JE4 BE3.png|32px]] The texture of coal has been changed.}}
{{History||1.11.0|snap=beta 1.11.0.1|Coal can now be found in [[snowy tundra]] [[village]] house [[chest]]s and in village butcher and toolsmith chests.}}
{{History|||snap=beta 1.11.0.4|Armorer, weaponsmith, toolsmith, and butcher [[villager]]s now [[trading|buy]] 15 coal for an [[emerald]].
|Fishermen villagers now have a 50% chance to buy 10 coal for an emerald as part of their first tier [[trading|trade]].}}
{{History||1.16.0|snap=beta 1.16.0.51|Coal can now used to craft [[soul torch]]es.}}
{{History|console}}
{{History||xbox=TU1|xbone=CU1|ps=1.0|wiiu=Patch 1|switch=1.0.1|[[File:Coal JE2 BE1.png|32px]] Added coal.}}
{{History||?|[[File:Coal JE3 BE2.png|32px]] The texture of coal has been changed.}}
{{History||xbox=none|xbone=none|ps=1.90|wiiu=none|switch=none|[[File:Coal JE4 BE3.png|32px]] The texture of coal has been changed.}}
{{History|New 3DS}}
{{History||0.1.0|[[File:Coal JE3 BE2.png|32px]] Added coal.}}
{{History|foot}}
== Issues ==
{{issue list|Coal}}
{{Items}}
[[Category:Renewable resources]]
[[cs:Uhlí]]
[[de:Kohle]]
[[es:Carbón]]
[[fr:Charbon]]
[[hu:Szén]]
[[it:Carbone]]
[[ja:石炭]]
[[ko:석탄]]
[[nl:Steenkool]]
[[pl:Węgiel]]
[[pt:Carvão]]
[[ru:Уголь]]
[[th:ถ่าน]]
[[tr:Kömür]]
[[uk:Вугілля]]
[[zh:煤炭]]</li></ul> | 13w01a | Hoppers added, which can place and take items in and out from brewing stands. | |||
| Legacy Console Edition | |||||
TU7{{Extension DPL}}<ul><li>[[Camera|Camera]]<br/>{{about|the entity|the command|commands/camera}}
{{exclusive|edu}}
{{unobtainable|edition=be}}
{{ItemEntity
|imagesize=80px
|renewable=No
|stackable=Yes (64)
|health={{hp|4}}
|image=Camera.png}}
{{Block
| title = Camera Block
| image = Camera (block).png
| invimage = none
| transparent = No
| light = 0
| tool = any
| stackable = Yes (64)
| flammable = No
| lavasusceptible = No
| renewable = No
}}
The '''camera''' is an [[entity]] that is capable of capturing and storing images. {{IN|edu}}, it works together with the [[portfolio]] item to create collections of [[photo]]s.<ref>https://education.minecraft.net/support/knowledge-base/using-cameras-portfolios/</ref>
== Obtaining ==
The camera can be obtained in the [[Creative inventory]] in ''Minecraft Education''. It can be obtained either by NBT editors, inventory editors, or glitches in Bedrock Edition.
To get the block form of the camera in Bedrock Edition using an NBT editor, you need to set the item name of the block in the inventory slot (<code>name:</code> ) to <code>item.camera</code>, then you need to add a compound tag called <code>Block</code> and inside of that put the int tag <code>version: 18040335</code> and the text tag <code>name: minecraft:camera</code> into the block compound tag. For the usable "[[spawn egg]]" form of the camera, you only need to set the item name of the block in the inventory slot (<code>name:</code> ) to <code>camera</code>; you do not need to add the block compound for this form of the camera.
== Usage ==
Using a camera from the [[inventory]] captures a first-person screenshot. It can also be placed, creating a camera [[entity]] that can track the user, and take pictures from the camera's perspective. Photos that are taken using the camera appear in the [[portfolio]].
Close-up snapshots of an [[item]] on the ground can be taken by holding the Shift key while right-clicking.
Photos that are taken with the camera block are stored in <code>%localappdata%\Packages\MinecraftUWP_8wekyb3d8bbwe\LocalState\screenshots</code>.
== Sounds ==
=== Generic ===
{{Sound table/Block/Normal/BE}}
=== Unique ===
{{Sound table
|sound=Camera1.ogg
|sound2=Camera2.ogg
|sound3=Camera3.ogg
|type=bedrock
|description=When a picture is taken with a camera
|source=Players
|id=camera.take_picture
|volume=1.0
|pitch=1.0
|foot=1}}
== Data values ==
=== ID ===
{{ID table
|edition=bedrock
|firstcolumnname=Camera
|shownumericids=y
|showforms=y
|generatetranslationkeys=y
|displayname=Block
|spritename=camera
|spritetype=block
|nameid=camera
|id=242
|form=block
|itemform=item.camera}}
{{ID table
|displayname=Item
|spritename=camera
|spritetype=item
|translationtype=item
|nameid=camera
|id=593
|form=item
|foot=1}}
{{ID table
|edition=bedrock
|firstcolumnname=Camera
|shownumericids=y
|generatetranslationkeys=y
|displayname=Entity
|spritename=camera
|spritetype=entity
|nameid=tripod_camera
|id=62
|foot=1}}
=== Entity data ===
See [[Bedrock Edition level format/Entity format]].
== Video ==
{{yt|1XLRGFibFNQ}}
== History ==
{{History|pocket alpha}}
{{History||v0.1.0|[[File:Camera BE1.png|50px]] [[File:Camera (item texture) BE1.png|32px]] The textures and model of the camera can be found in the game apk file.<ref name="found">[{{Reddit|jkkmr/found_image_file_for_camera_in_minecraft_portable}} Reddit - Found image file for camera in Minecraft Portable Edition Demo APK file.]</ref><ref>https://web.archive.org/web/20160604161800/https://twitter.com/Kappische/status/103548954368679936</ref>}}
{{History||v0.2.0|[[File:Camera BE2.png|50px]] [[File:Music Disc Blocks JE1 BE1.png|32px]] Added cameras
|Changed item and tripod textures.
|To use a camera, equip it in the [[player]]'s hand, then look in the direction the player wants the picture to be taken. Long-press the screen, and a camera [[drops]] to the ground where the player are standing. Step back, then press on the camera until it starts emitting smoke [[particles]]. The smoke means a picture has been taken, and the camera may disappear immediately afterward.
|Cameras have infinite uses.
|Entity id 62 and item id 456.<ref>https://www.minecraftforum.net/topic/1233138-i-found-the-camera-id/</ref>}}
{{History||v0.5.0|The camera is now invisible and makes the standard player [[damage]] [[sound]].}}
{{History||v0.7.0|Added the "F1" feature (Hide GUI), which has now made the camera obsolete.}}
{{History||v0.8.0|snap=build 2|[[File:Egg JE1 BE1.png|32px]] Item form now uses [[egg]] texture.}}
{{History||v0.9.0|snap=build 1|The camera [[entity]] has been removed. [[Tommaso]] also stated: ''"It doesn't mean that it's dead forever, in fact I have a lot of ideas for it! I think it will be back when have [[shader]]s, sharing and [[redstone]]."''<ref>{{Reddit|sub=MCPE|281sep/camera|ci6znr8}}</ref>}}
{{History||v0.14.0|snap=build 1|[[File:Camera BE3.png|32px]] [[File:Camera (item) BE2.png|32px]] Re-added the camera. It is accessible only with [[inventory]] editors.
|In this version, if the player spawns a camera, leaves the [[world]] and joins back, it summons [[lightning]].}}
{{History||v0.14.2|The camera [[item]] ID has been changed to 498, but it cannot be used at the moment. The [[entity]] can now be spawned with a [[spawn egg]] with a [[damage]] value of 62.
|According to the language files of the game, the empty label that shows up whenever hovering a finger to a camera would now say "Take Picture". However, the button doesn't do anything.}}
{{History||v0.15.0|snap=build 1|The previous empty label on the camera mentioned above now displays the words "Take Picture".
|The [[health]] of the camera [[entity]] is now {{hp|2}} instead {{hp|4}}.
|The camera no longer summons [[lightning]].}}
{{History||v0.16.0|snap=build 1|The camera now has a [[block]] form in [[inventory]], but still spawns the entity. However, the block can be placed only with [[commands]] and editing.
|"Take picture" button on the camera works now, but no image files are created.
|The oldest ID for camera (456) now refers to [[portfolio]].}}
{{History|||snap=build 2|[[File:Camera Block.png|32px]] The camera now has an [[item]] form and the [[block]] has been removed. However, it is still obtainable in servers.
|[[Portfolio]], which works together with the camera to create collections of pictures, has been removed.}}
{{History|||snap=build 4|Camera item form has been removed, and the camera can no longer be obtained or placed using any [[commands|command]].}}
{{History|bedrock}}
{{History||1.8.0|snap=beta 1.8.0.8|[[File:Camera BE3.png|32px]] [[File:Camera Block.png|32px]] The camera has been reimplemented.
|The camera [[entity]] can now be spawned with a [[spawn egg]] with [[damage]] value 258.}}
{{History||1.12.0|snap=beta 1.12.0.2|The camera can now be obtained with the {{cmd|give}} [[commands|command]].}}
{{History||1.13.0|snap=beta 1.13.0.1|The camera can no longer be obtained with the {{cmd|give}} command.
|Functionality has been added to the camera. Screenshots that are taken by the camera can now be saved into the {{cd|screenshots}} folder.
|Cameras are now a part of the {{el|ee}} toggle as a hidden feature.
|Cameras no longer have a [[death]] animation when killed by the [[player]] and instead, instantly emit smoke [[particles]].}}
{{History||1.16.100|snap=beta 1.16.100.50|The camera can now be obtained with the {{cmd|give}} [[commands|command]] once again.}}
{{History|||snap=beta 1.16.100.55|The camera can no longer be obtained with the {{cmd|give}} command.}}
{{History|education}}
{{History||1.0|[[File:Camera BE3.png|32px]] [[File:Camera Block.png|32px]] Added cameras.}}
{{History||1.4.0|Cameras no longer have a [[death]] animation when killed by the [[player]] and instead instantly emit smoke [[particles]].}}
{{History|foot}}
=== Future ===
At the Minecraft [[Pocket Edition]] panel at [[MineCon 2012]], as well as one of [[Johan Bernhardsson|Jbernhardsson]]'s livestreams, it was stated that future plans include trying to have a proper use for cameras, perhaps an easier way to take screenshots and share them with others.<ref>{{ytl|YMhyX_lKWV4}}</ref> In the BlockTalk Q&A, the camera was briefly mentioned as part of a broader "sharing" theme planned for {{el|be}} in the future.<ref>{{ytl|Ruf6tvqsD84}}</ref>
It later got implemented into {{el|ee}}, using the camera to make screenshots and share them in a special book.
== Issues ==
{{Issue list}}
== Trivia ==
* A camera prevents a [[Book and Quill]] from working. Attempting to craft it or obtain it by commands gives a regular book instead, due to non-implementation of photo attaching to written books.
* The camera can take a screenshot, which appears a bit smaller with a thick paper outline having cuts on its edges, making it look like an old photograph.
* This feature is hidden from the Creative inventory and from the /give command item menu.
== Gallery ==
<gallery>
PEcameras030.jpg|A row of cameras, as seen in [[Pocket Edition v0.3.0 alpha|v0.3.0]].
PEcameraphoto.jpg|Example image taken by the camera [[entity]].
CameraUse-1.png|The first method of using cameras.
CameraUse-2.png|The second method of using cameras.
Dinnerbone Camera.png|A camera spawned using a [[spawn egg]] named "[[Dinnerbone]]" in the v0.15.0 beta.
Cam2.png|A camera falling from a [[tree]]. This shows that cameras are entities.
Education Edition Exclusive Features.png|The camera and camera block placed in a world along with other Education Edition features.
Screenshot by camera.jpg|An example of the screenshot taken by a camera in [[Bedrock Edition beta 1.13.0.1|beta 1.13.0.1]].
File:Say Cheese.jpeg|[[Steve]], [[Alex]], [[Jesse]], and an [[Agent]] getting their picture taken.
</gallery>
== See also ==
* [[Portfolio]]
* [[Screenshot]]
== References ==
{{Reflist}}
{{Items}}
{{Entities}}
{{Education Edition}}
[[Category:Education Edition entities]]
[[Category:Education Edition items]]
[[Category:Tools]]
[[cs:Kamera]]
[[de:Kamera]]
[[el:Camera]]
[[es:Cámara]]
[[fr:Appareil photo]]
[[hu:Kamera]]
[[ja:カメラ]]
[[ko:카메라]]
[[nl:Camera]]
[[pl:Kamera]]
[[pt:Câmera]]
[[ru:Камера]]
[[uk:Камера]]
[[zh:相机]]</li><li>[[Water Bucket|Water Bucket]]<br/>{{Item
| title = Water Bucket
| renewable = Yes
| image = Water Bucket.png
| stackable = No
}}
A '''water bucket''' is a [[bucket]] filled with [[water]].
== Obtaining ==
=== Interacting ===
To fill an empty [[bucket]] with water, {{control|use}} it on a [[water]] source block. The water is consumed in the process. Flowing water does not fill a bucket.
{{control|Using}} an empty bucket on a [[cauldron]] filled with water (water level 3) empties the cauldron and fills the bucket.
Water buckets can also be filled by placing an empty one in the fuel slot of a [[furnace]], and a wet [[sponge]] into the oven slot. The bucket is filled when the [[smelting]] process completes, which also leaves the sponge dry and ready to be reused.
=== Chest Loot ===
{{LootChestItem|water-bucket}}
== Usage ==
{{Control|Using}} a water bucket on a solid block places a water source block against that block, emptying the bucket; using a water bucket on a [[waterlogging|waterloggable]] block waterlogs the block. In [[the Nether]], however, the water evaporates, making a fire extinguishing sound and displays smoke particles while nothing gets placed.
=== Dispensers ===
A [[dispenser]] can be loaded with a water bucket, and when activated it places a water block directly before it, emptying the bucket. A dispenser loaded with an empty bucket and a water source right in front of it draws the source into the bucket when activated.
=== Cauldrons ===
A single water bucket can fill a [[cauldron]], and using an empty bucket on a water-filled cauldron fills the bucket. Empty buckets cannot be filled from partly-filled cauldrons.
=== Filling bucket with mobs ===
Water buckets can be used on a [[fish]], [[axolotl]] or [[tadpole]] to create a [[bucket of aquatic mob]].
=== Transportation ===
{{main|Tutorials/Elevators#Water elevators}}
Water buckets can be used as a means of quickly descending great heights in the [[Overworld]] and [[the End]], either by creating a waterfall or using the water bucket while falling to create a safe water landing.
Water buckets can also be used to climb vertical surfaces anywhere but [[the Nether]] by repeatedly creating higher waterfalls from the bottom and swimming up them.
== Sounds ==
{{el|je}}:
{{Sound table
|sound=Fill water bucket1.ogg
|sound2=Fill water bucket2.ogg
|sound3=Fill water bucket3.ogg
|subtitle=Bucket fills
|source=player
|description=When a bucket is filled with water
|id=item.bucket.fill
|translationkey=subtitles.item.bucket.fill
|volume=1.0
|pitch=1.0
|distance=16}}
{{Sound table
|sound=Empty water bucket1.ogg
|sound2=Empty water bucket2.ogg
|sound3=Empty water bucket3.ogg
|subtitle=Bucket empties
|source=block
|description=When the bucket is placed
|id=item.bucket.empty
|translationkey=subtitles.item.bucket.empty
|volume=1.0 <ref group=sound>Except for the second copy of {{cd|empty1}}, which is 0.9</ref>
|pitch=1.0
|distance=16
|foot=1}}
{{el|je}}:
{{Sound table
|type=bedrock
|sound=Fill water bucket1.ogg
|sound2=Fill water bucket2.ogg
|sound3=Fill water bucket3.ogg
|source=block
|description=When a bucket is filled with water
|id=bucket.fill_water
|volume=1.0
|pitch=1.0}}
{{Sound table
|sound=Empty water bucket1.ogg
|sound2=Empty water bucket2.ogg
|sound3=Empty water bucket3.ogg
|source=block
|description=When a water bucket is emptied
|id=bucket.empty_water
|volume=1.0
|pitch=1.0}}
{{Sound table
|rowspan=2
|sound=Water Splash Old.ogg
|source=block
|description=When a water bucket is placed in a cauldron<wbr><ref group=sound name=bucketsplash>{{Bug|MCPE-135919}}</ref>
|id=cauldron.fillwater
|volume=0.1
|pitch=1.0}}
{{Sound table
|source=block
|description=When a water bucket is removed from a cauldron<wbr><ref group=sound name=bucketsplash/>
|id=cauldron.takewater
|volume=0.1
|pitch=1.0
|foot=1}}
==Data values==
=== ID ===
{{edition|java}}:
{{ID table
|edition=java
|showforms=y
|generatetranslationkeys=y
|displayname=Water Bucket
|spritetype=item
|nameid=water_bucket
|form=item
|foot=1}}
{{edition|bedrock}}:
{{ID table
|edition=bedrock
|showaliasids=y
|shownumericids=y
|showforms=y
|notshowbeitemforms=y
|generatetranslationkeys=y
|displayname=Water Bucket
|spritetype=item
|nameid=water_bucket
|aliasid=bucket / 8
|id=362
|form=item
|translationkey=item.bucketWater.name
|foot=1}}
== Advancements ==
{{load advancements|Tactical fishing;The Cutest Predator;Bukkit bukkit}}
==History==
{{History|java infdev}}
{{History||20100615|[[File:Water Bucket JE1 BE1.png|32px]] Added water buckets.}}
{{History|java alpha}}
{{History||v1.2.6|{{control|use|text=Using}} a water bucket on [[block]]s with GUIs ([[chest]]s, [[furnace]]s, etc.) no longer places the water.}}
{{History|java}}
{{History||1.0.0|snap=Beta 1.9 Prerelease 2|Water buckets can now be used to fill [[cauldron]]s.}}
{{History||1.3.1|snap=12w15a|[[Dispenser]]s have now been given the ability to dispense water buckets. They can also collect if activated again.}}
{{History||1.8|snap=14w25a|A water bucket is now shown as the icon when [[water]] is used as a layer in [[Superflat]].}}
{{History|||snap=14w25b|[[Smelting]] a wet [[sponge]] while an empty bucket is in the fuel slot fills the bucket with water.}}
{{History||1.9|snap=15w44a|A full [[cauldron]] can now be emptied with a bucket, yielding a water bucket.}}
{{History|||snap=15w50a|Added sounds for collecting and pouring water using a bucket.}}
{{History||1.13|snap=17w47a|Prior to the ''[[Flattening]]'' this item's numerical ID was 326.}}
{{History|||snap=18w08b|Water buckets can now be used to pick up [[fish]] mobs.}}
{{History||1.14|snap=18w43a|[[File:Water Bucket JE2 BE2.png|32px]] The texture of water buckets has now been changed.
|Water buckets can now suck up liquids directly adjacent to the side they are facing. How this works is unknown, given the water bucket clearly already contains a liquid.}}
{{History|||snap=18w48a|Water buckets can now be found in [[chest]]s in [[village]] fishing cottages.}}
{{History|||snap=19w02a|Water buckets can now be used to put out [[campfire]]s.}}
{{History||1.17|snap=20w51a|Water buckets can now be used to collect [[axolotl]]s.}}
{{History||1.19|snap=22w11a|Water buckets can now be used to collect [[tadpole]]s.}}
{{History||1.19.3|snap=22w45a|Water buckets can now be emptied into [[waterlogging|waterlogged]] blocks, instead of placing water against them.<ref>{{bug|MC-127110|||Fixed}}</ref>}}
{{History|upcoming java}}
{{History||Villager Trade Rebalance<br>(Experimental)|link=Java Edition 1.20.2|snap=23w31a|[[Wandering trader]]s now have a chance to [[trading|buy]] a water bucket from the player.}}
{{History|pocket alpha}}
{{History||v0.7.0|[[File:Water Bucket JE1 BE1.png|32px]] Added water buckets.
|Water buckets were simply called "Bucket".}}
{{History||v0.7.4|Water buckets no longer stack to 64.}}
{{History||v0.14.0|snap=build 1|Dispensers can now shoot out water from water buckets.}}
{{History|bedrock}}
{{History||1.4.0|snap=beta 1.2.14.2|Water buckets can now be used to pick up [[fish mob]]s.
|Moved all bucket items, including water buckets, from the Equipment tab to the Items tab in the [[Creative inventory]].{{verify|type=update}}{{info needed}}<!---please check snapshots, only 1 major release version was checked each--->}}
{{History||1.10.0|snap=beta 1.10.0.3|[[File:Water Bucket JE2 BE2.png|32px]] The texture of water buckets has now been changed.}}
{{History||1.16.100|snap=beta 1.16.100.56|The ID of water buckets has been changed from <code>bucket/8</code> to <code>water_bucket</code>.}}
{{History||1.17.0|snap=beta 1.16.230.52|Water buckets can now be used to collect [[axolotl]]s.}}
{{History||1.18.10|snap=beta 1.18.10.24|Water buckets can now be used to collect [[tadpole]]s behind the "Wild Update" experimental toggle.}}
{{History|console}}
{{History||xbox=TU1|xbone=CU1|ps=1.0|wiiu=Patch 1|switch=1.0.1|[[File:Water Bucket JE1 BE1.png|32px]] Added water buckets.}}
{{History||xbox=TU9|[[Dispenser]]s have now been given the ability to shoot out the [[liquids]] inside water buckets. They can also suck up the liquids if activated again, but a bug prevents the empty [[bucket]] from being filled. Whether this was ever fixed is unknown.}}
{{History||xbox=none|xbone=none|ps=1.90|wiiu=none|switch=none|[[File:Water Bucket JE2 BE2.png|32px]] The texture of water buckets has now been changed.}}
{{History|New Nintendo 3DS Edition}}
{{History||0.1.0|[[File:Water Bucket JE1 BE1.png|32px]] Added water buckets.}}
{{History|foot}}
==Issues==
{{issue list}}
==Gallery==
<gallery>
Water Bucket SDGP.png|Water bucket in the [[Super Duper Graphics Pack]].
</gallery>
==References==
{{Reflist}}
{{Items}}
[[Category:Renewable resources]]
[[Category:Tools]]
[[de:Wassereimer]]
[[ja:水入りバケツ]]
[[pt:Balde de água]]
[[th:ถังน้ำ]]
[[uk:Відро води]]
[[zh:水桶]]</li></ul> | Added potions and brewing. | ||||
Potion type history
Based on information found in minecraft.jar/lang/en_US.lang, the current potion types are listed below:
- Potion of Swiftness
- Potion of Slowness
- Potion of Strength
- Potion of Weakness
- Potion of Healing
- Potion of Harming
- Potion of Regeneration
- Potion of Fire Resistance
- Potion of Water Breathing
- Potion of Poison
- Potion of Night Vision
- Potion of Invisibility
- Potion of Resistance
Due to changes in the brewing system, the following potions are currently not accessible:
- Potion of Haste
- Potion of Dullness
- Potion of Nausea
- Potion of Blindness
- Potion of Hunger
- Potion of Decay
Some potions also do not have a real name in minecraft (i.e. Potion of potion.healthBoost.postFix) and are currently not accessible
- Potion of potion.healthBoost.postFix
- Potion of potion.absorption.postFix
- Potion of potion.saturation.postFix
Trivia

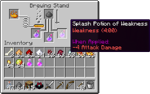
Splash potion brewed using gunpowder.
- As long as at least one of the three bottom spaces is filled, the brewing will continue, and additional bottles of water or potion can be added. However, if the ingredient is removed, or the bottom 3 slots are emptied at any time during the process, the process will stop and nothing will have been brewed.
- The three potions do not necessarily have to be the same.
- Upgrading effect of potion that has no time parameter (i.e. Instant Health, Harming) with glowstone dust has no downsides.
- Upgrading one of the above's level II effect using glowstone will seemingly revert it to the original (metadata-wise, this is not the case).
- Upgrading a potion that has no level II effect (i.e. Fire Resistance, Slowness, Weakness) with redstone has no downsides.
- Upgrading one of the above's extended potion using redstone will seemingly revert it to the original (metadata-wise, this is not the case).
- Although Jeb said that in the 1.9 pre-release 3 there were 161 possible different potion combinations with 2,653 in the future, in the actual third pre-release only 22 different potions could be made without the use of external programs. Of those, 19 potions had one of 8 different effects.
- The Mundane Potion made from redstone has a different metadata (64) than the mundane potion made from any other ingredient (8192). Unlike Mundane 64, Mundane 8192 can be made into a Splash Mundane Potion by adding gunpowder that is, like its base potion, without any effect.
- There are many Potions that were left behind from 1.9 pre-releases that fill up different metadatas that otherwise cannot be brewed or obtained without a SMP server command or inventory editor. These potions include but are not limited to: Bungling Potion, Buttering Potion, Debonair Potion, Refined Potion.
- Splash potions can be fired by dispensers.
- More water can be taken to the Nether in one trip by filling water buckets, carrying a stack of glass bottles, and using a cauldron. This is because stackable glass bottles do not stack once they have been filled with water.
- Undead mobs (zombies, skeletons, zombie pigmen, and Withers) are unaffected by splash potions of poison and regeneration, take damage from instant health splash potions, and gain health from instant damage.
- Mixing Fermented Spider Eye with any base potion (including the ones that were left behind) will either result in a Potion of Weakness, a Potion of Invisibility, or a Potion of Slowness. The Potions of Slowness and Invisibility can only be brewed from the base potions that were left behind.
Gallery
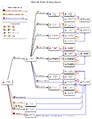
- MinecraftPotionsSimple.png
Simplified view on all potions and different ways to create them
- Updated Potions Craft guide.png
A quicker, but less detailed version of how to make certain potions
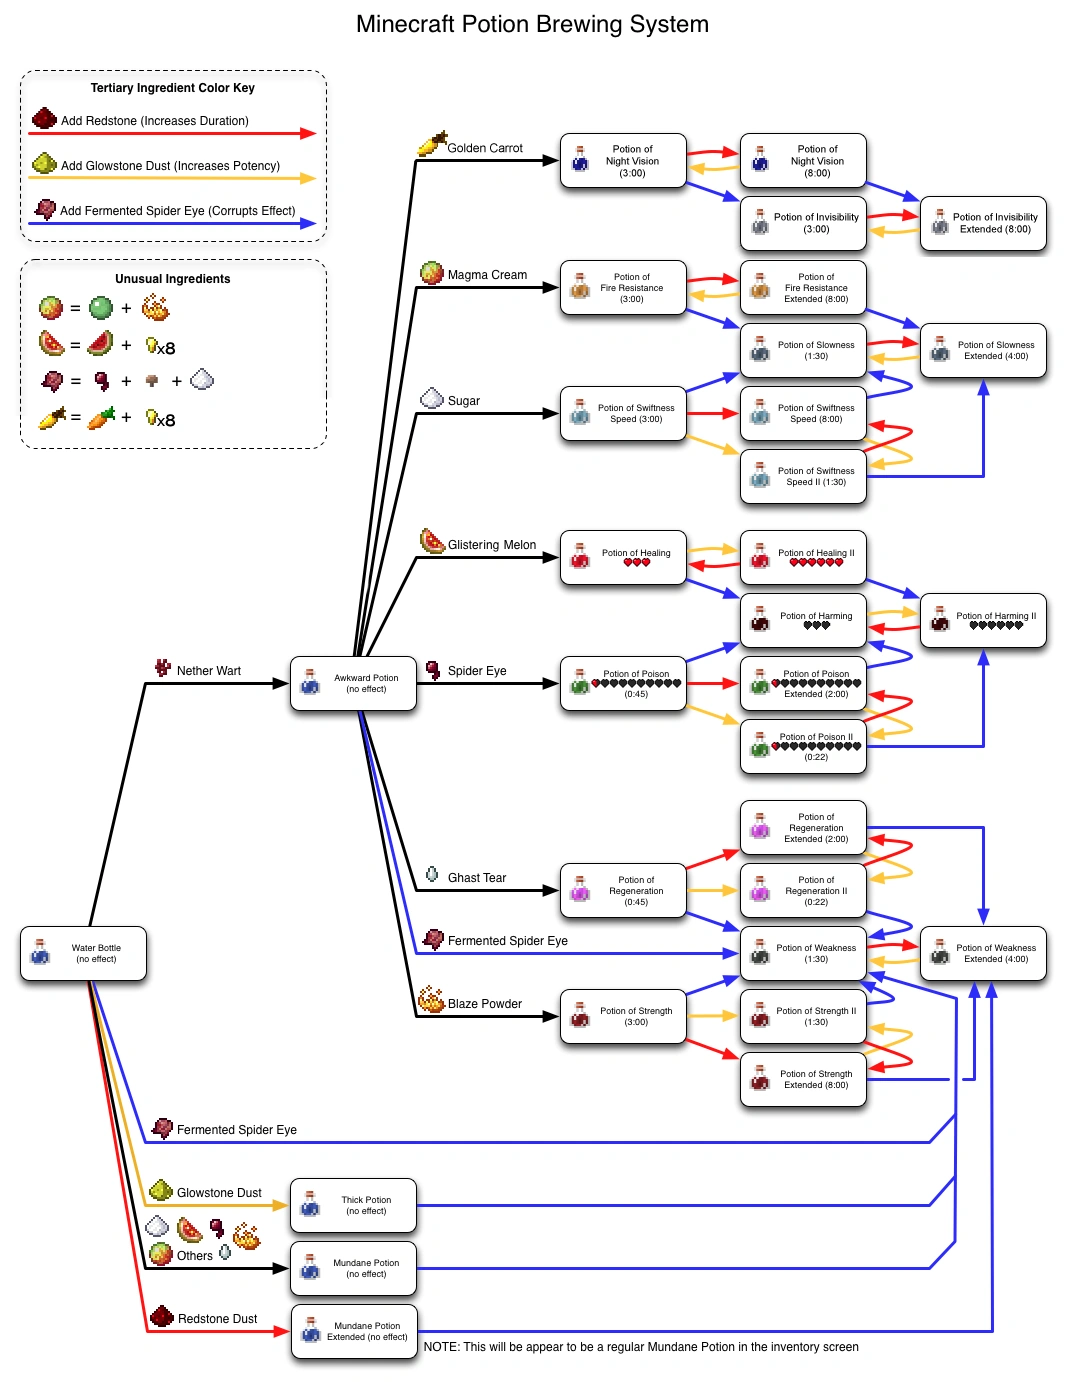